AWS Identity And Access Management User Guide
User Manual:
Open the PDF directly: View PDF ![]() .
.
Page Count: 486 [warning: Documents this large are best viewed by clicking the View PDF Link!]
- AWS Identity and Access Management
- Table of Contents
- What Is IAM?
- Getting Set Up
- Getting Started
- IAM Tutorials
- IAM Best Practices and Use Cases
- IAM Best Practices
- Lock away your AWS account (root) access keys
- Create individual IAM users
- Use groups to assign permissions to IAM users
- Grant least privilege
- Configure a strong password policy for your users
- Enable MFA for privileged users
- Use roles for applications that run on Amazon EC2 instances
- Delegate by using roles instead of by sharing credentials
- Rotate credentials regularly
- Remove unnecessary credentials
- Use policy conditions for extra security
- Monitor activity in your AWS account
- Video presentation about IAM best practices
- Business Use Cases
- IAM Best Practices
- The IAM Console and the Sign-in Page
- Identities (Users, Groups, and Roles)
- IAM Users
- IAM Groups
- IAM Roles
- Temporary Credentials
- The Account "Root" User
- When to create an IAM user
- When to Create an IAM Role
- IAM Users
- How AWS identifies an IAM user
- Users and credentials
- Users and permissions
- Users and accounts
- Users as service accounts
- Creating an IAM User in Your AWS Account
- How IAM Users Sign In to Your AWS Account
- Managing IAM Users
- Managing Passwords
- Managing Access Keys for IAM Users
- Using Multi-Factor Authentication (MFA) in AWS
- Enabling MFA Devices
- Checking MFA Status
- Synchronize MFA devices
- Deactivating MFA devices
- What If an MFA Device Is Lost or Stops Working?
- Configuring MFA-Protected API Access
- Sample Policies with MFA Conditions
- Sample Code: Requesting Credentials with Multi-factor Authentication
- Finding Unused Credentials
- Getting Credential Reports for Your AWS Account
- Using SSH Keys with AWS CodeCommit
- Working with Server Certificates
- IAM Groups
- IAM Roles
- Roles Terms and Concepts
- Common Scenarios for Roles: Users, Applications, and Services
- Identity Providers and Federation
- About Web Identity Federation
- About SAML 2.0-based Federation
- Creating IAM Identity Providers
- Creating OpenID Connect (OIDC) Identity Providers
- Creating SAML Identity Providers
- Creating and Managing a SAML Identity Provider (AWS Management Console)
- Managing a SAML Provider (AWS CLI, Tools for Windows PowerShell and AWS API)
- Configuring your SAML 2.0 IdP with Relying Party Trust and Adding Claims
- Integrating Third-Party SAML Solution Providers with AWS
- Configuring SAML Assertions for the Authentication Response
- Enabling SAML 2.0 Federated Users to Access the AWS Management Console
- Creating a URL that Enables Federated Users to Access the AWS Management Console (Custom Federation Broker)
- Creating IAM Roles
- Creating a Role to Delegate Permissions to an IAM User
- Creating a Role to Delegate Permissions to an AWS Service
- Creating a Role for a Third-Party Identity Provider (Federation)
- Creating a Role for Federated Users (AWS Management Console)
- Creating a Role for Federated Access (AWS Command Line Interface)
- Creating a Role for Federated Access (Tools for Windows PowerShell)
- Creating a Role for Federated Access (IAM API)
- Creating a Role for Web Identity or OpenID Connect Federation (AWS Management Console)
- Creating a Role for SAML 2.0 Federation (AWS Management Console)
- Examples of Policies for Delegating Access
- Using Roles to Delegate Access to Another AWS Account's Resources
- Using a Policy to Delegate Access To Services
- Using a Resource-based Policy to Delegate Access to an Amazon S3 Bucket in Another Account
- Using a Resource-based Policy to Delegate Access to an Amazon SQS Queue in Another Account
- Cannot Delegate Access When the Account is Denied Access
- Using IAM Roles
- Granting a User Permissions to Switch Roles
- Granting a User Permissions to Pass a Role to an AWS Service
- Switching to a Role (AWS Management Console)
- Switching to an IAM Role (AWS Command Line Interface)
- Switching to an IAM Role (Tools for Windows PowerShell)
- Switching to an IAM Role (API)
- Using an IAM Role to Grant Permissions to Applications Running on Amazon EC2 Instances
- Revoking IAM Role Temporary Security Credentials
- Managing IAM Roles
- How IAM Roles Differ from Resource-based Policies
- Temporary Security Credentials
- AWS STS and AWS Regions
- Common Scenarios for Temporary Credentials
- Requesting Temporary Security Credentials
- Using AWS STS with AWS Regions
- AssumeRole—Cross-Account Delegation and Federation Through a Custom Identity Broker
- AssumeRoleWithWebIdentity—Federation Through a Web-based Identity Provider
- AssumeRoleWithSAML—Federation Through an Enterprise Identity Provider Compatible with SAML 2.0
- GetFederationToken—Federation Through a Custom Identity Broker
- GetSessionToken—Temporary Credentials for Users in Untrusted Environments
- Comparing the AWS STS APIs
- Using Temporary Security Credentials to Request Access to AWS Resources
- Controlling Permissions for Temporary Security Credentials
- Permissions for AssumeRole, AssumeRoleWithSAML, and AssumeRoleWithWebIdentity
- Permissions for GetFederationToken
- Permissions for GetSessionToken
- Disabling Permissions for Temporary Security Credentials
- Granting Permissions to Create Temporary Security Credentials
- Activating and Deactivating AWS STS in an AWS Region
- Sample Applications That Use Temporary Credentials
- Additional Resources for Temporary Security Credentials
- The Account Root User
- Access Management
- Overview of AWS IAM Permissions
- Identity-Based (IAM) Permissions and Resource-Based Permissions
- Resource Creators Do Not Automatically Have Permissions
- Granting Permissions Across AWS Accounts
- Permissions For One Service to Access Another
- Delegating Permissions to Administer IAM Users, Groups, and Credentials
- Overview
- Permissions for Working in the AWS Management Console
- Example Policies for Administering IAM Resources
- Allow Users to Manage Their Own Passwords (from the My Password Page)
- Allow Users to Manage Their Own Passwords, Access Keys, and SSH Keys
- Allow a User to List the Account's Groups, Users, Policies, and More for Reporting Purposes
- Allow a User to Manage a Group's Membership
- Allow a User to Manage IAM Users
- Allow Users to Set Account Password Policy
- Allow Users to Generate and Retrieve IAM Credential Reports
- Allow Users to Manage Only Their Own Virtual MFA Devices
- Allow All IAM Actions (Admin Access)
- Overview of IAM Policies
- Managed Policies and Inline Policies
- Versioning for Managed Policies
- Deprecated AWS Managed Policies
- Controlling Access to Managed Policies
- Creating a New Policy
- Working with Policies
- Testing IAM Policies with the IAM Policy Simulator
- Using Policy Validator
- Service Last Accessed Data
- Example Policies for Administering AWS Resources
- Allow Users to Access a Specific Bucket in Amazon S3
- Allow Users to Access a Personal "Home Directory" in Amazon S3
- Allow Users Signed In with Amazon Cognito to Access their Own Amazon S3 Folder
- Allow Users to Access All Actions on a DynamoDB Table Whose Name Matches the User Name
- Allow Users to Manage Amazon EBS Volumes and Amazon EC2 Instances That Have the Specified Tag
- Allow only a specific Amazon EC2 Instance to Run Certain AWS Commands
- Use Conditions to Restrict When Permissions Are Allowed
- Deny All Access Except to a Specific Set of AWS Products and Resources
- Block Requests That Don't Come From an Approved IP Address or Range
- Restrict Access to the Policy Simulator APIs
- Enable Users to Upload Server Certificates and Use them with Elastic Load Balancing
- Resources for Learning About Permissions and Policies
- Overview of AWS IAM Permissions
- Logging IAM Events with AWS CloudTrail
- Troubleshooting IAM
- Troubleshooting General Issues
- Troubleshoot IAM Policies
- Troubleshooting IAM Roles
- Troubleshooting Amazon EC2 and IAM
- When attempting to launch an instance, I don't see the role I expected to see in the Amazon EC2 console IAM role list.
- The credentials on my instance are for the wrong role.
- When I attempt to call the AddRoleToInstanceProfile, I get an AccessDenied error.
- Amazon EC2: When I attempt to launch an instance with a role, I get an AccessDenied error.
- I can't access the temporary security credentials on my EC2 instance.
- What do the errors from the info document in the IAM subtree mean?
- Troubleshooting Amazon S3 and IAM
- Troubleshooting SAML 2.0 Federation with AWS
- How to View a SAML Response in Your Browser for Troubleshooting
- Error: Your request included an invalid SAML response. To logout, click here.
- Error: RoleSessionName is required in AuthnResponse (Service: AWSSecurityTokenService; Status Code: 400; Error Code: InvalidIdentityToken)
- Error: Not authorized to perform sts:AssumeRoleWithSAML (Service: AWSSecurityTokenService; Status Code: 403; Error Code: AccessDenied)
- Error: RoleSessionName in AuthnResponse must match [a-zA-Z_0-9+=,.@-]{2,64} (Service: AWSSecurityTokenService; Status Code: 400; Error Code: InvalidIdentityToken)
- Error: Response signature invalid (Service: AWSSecurityTokenService; Status Code: 400; Error Code: InvalidIdentityToken)
- Error: Failed to assume role: Issuer not present in specified provider (Service: AWSOpenIdDiscoveryService; Status Code: 400; Error Code: AuthSamlInvalidSamlResponseException)
- Reference Information for AWS Identity and Access Management
- IAM Identifiers
- Limitations on IAM Entities and Objects
- AWS Services That Work with IAM
- AWS IAM Policy Reference
- IAM Policy Elements Reference
- IAM Policy Variables Overview
- Creating a Condition That Tests Multiple Key Values (Set Operations)
- IAM Policy Evaluation Logic
- Grammar of the IAM Policy Language
- AWS Service Actions and Condition Context Keys for Use in IAM Policies
- Actions and Condition Context Keys for Amazon API Gateway
- Actions and Condition Context Keys for Application Auto Scaling
- Actions and Condition Context Keys for AWS Application Discovery Service
- Actions and Condition Context Keys for Amazon AppStream
- Actions and Condition Context Keys for Auto Scaling
- Actions and Condition Context Keys for AWS Billing
- Actions and Condition Context Keys for AWS Certificate Manager
- Actions and Condition Context Keys for AWS CloudFormation
- Actions and Condition Context Keys for Amazon CloudFront
- Actions and Condition Context Keys for AWS CloudHSM
- Actions and Condition Context Keys for Amazon CloudSearch
- Actions and Condition Context Keys for AWS CloudTrail
- Actions and Condition Context Keys for Amazon CloudWatch
- Actions and Condition Context Keys for Amazon CloudWatch Events
- Actions and Condition Context Keys for Amazon CloudWatch Logs
- Actions and Condition Context Keys for AWS CodeCommit
- Actions and Condition Context Keys for AWS CodeDeploy
- Actions and Condition Context Keys for AWS CodePipeline
- Actions and Condition Context Keys for Amazon Cognito Identity
- Actions and Condition Context Keys for Amazon Cognito Sync
- Actions and Condition Context Keys for AWS Config
- Actions and Condition Context Keys for Data Pipeline
- Actions and Condition Context Keys for AWS Database Migration Service
- Actions and Condition Context Keys for AWS Device Farm
- Actions and Condition Context Keys for AWS Direct Connect
- Actions and Condition Context Keys for AWS Directory Service
- Actions and Condition Context Keys for Amazon DynamoDB
- Actions and Condition Context Keys for Amazon EC2
- Actions and Condition Context Keys for Amazon EC2 Container Registry
- Actions and Condition Context Keys for Amazon EC2 Container Service
- Actions and Condition Context Keys for AWS Elastic Beanstalk
- Actions and Condition Context Keys for Amazon Elastic File System
- Actions and Condition Context Keys for Elastic Load Balancing
- Actions and Condition Context Keys for Amazon Elastic MapReduce
- Actions and Condition Context Keys for Amazon Elastic Transcoder
- Actions and Condition Context Keys for Amazon ElastiCache
- Actions and Condition Context Keys for Amazon Elasticsearch Service
- Actions and Condition Context Keys for Amazon GameLift
- Actions and Condition Context Keys for Amazon Glacier
- Actions and Condition Context Keys for AWS Identity and Access Management
- Actions and Condition Context Keys for AWS Import Export
- Actions and Condition Context Keys for Amazon Inspector
- Actions and Condition Context Keys for AWS IoT
- Actions and Condition Context Keys for AWS Key Management Service
- Actions and Condition Context Keys for Amazon Kinesis
- Actions and Condition Context Keys for Amazon Kinesis Analytics
- Actions and Condition Context Keys for Amazon Kinesis Firehose
- Actions and Condition Context Keys for AWS Lambda
- Actions and Condition Context Keys for Amazon Machine Learning
- Actions and Condition Context Keys for Manage - Amazon API Gateway
- Actions and Condition Context Keys for AWS Marketplace
- Actions and Condition Context Keys for AWS Marketplace Management Portal
- Actions and Condition Context Keys for Amazon Mechanical Turk
- Actions and Condition Context Keys for Amazon Mobile Analytics
- Actions and Condition Context Keys for AWS Mobile Hub
- Actions and Condition Context Keys for AWS OpsWorks
- Actions and Condition Context Keys for Amazon RDS
- Actions and Condition Context Keys for Amazon Redshift
- Actions and Condition Context Keys for Amazon Route 53
- Actions and Condition Context Keys for Amazon Route53 Domains
- Actions and Condition Context Keys for Amazon S3
- Actions and Condition Context Keys for AWS Security Token Service
- Actions and Condition Context Keys for Amazon SES
- Actions and Condition Context Keys for Amazon Simple Systems Manager
- Actions and Condition Context Keys for Amazon Simple Workflow Service
- Actions and Condition Context Keys for Amazon SimpleDB
- Actions and Condition Context Keys for Amazon SNS
- Actions and Condition Context Keys for Amazon SQS
- Actions and Condition Context Keys for Amazon Storage Gateway
- Actions and Condition Context Keys for AWS Trusted Advisor
- Actions and Condition Context Keys for AWS WAF
- Actions and Condition Context Keys for Amazon WorkDocs
- Actions and Condition Context Keys for Amazon WorkMail
- Actions and Condition Context Keys for Amazon WorkSpaces
- Resources
- Calling the API by Making HTTP Query Requests
- AWS Glossary
- Document History

AWS Identity and
Access Management
User Guide

AWS Identity and Access Management User Guide

AWS Identity and Access Management User Guide
AWS Identity and Access Management: User Guide
Copyright © 2016 Amazon Web Services, Inc. and/or its affiliates. All rights reserved.
Amazon's trademarks and trade dress may not be used in connection with any product or service that is not Amazon's, in any
manner that is likely to cause confusion among customers, or in any manner that disparages or discredits Amazon. All other
trademarks not owned by Amazon are the property of their respective owners, who may or may not be affiliated with, connected to,
or sponsored by Amazon.

AWS Identity and Access Management User Guide
Table of Contents
What Is IAM? ............................................................................................................................... 1
Video Introduction to AWS IAM ............................................................................................... 1
IAM Features ....................................................................................................................... 1
Accessing IAM ..................................................................................................................... 2
Overview: Users ................................................................................................................... 3
First-Time Access Only: Your Root Account Credentials ...................................................... 3
IAM Users ................................................................................................................... 3
Federating Existing Users .............................................................................................. 4
Overview: Permissions and Policies ......................................................................................... 5
Policies and Users ........................................................................................................ 5
Policies and Groups ...................................................................................................... 6
Federated Users and Roles ............................................................................................ 6
User-based and Resource-based Policies ......................................................................... 6
Security Features Outside of IAM ............................................................................................ 7
Quick Links to Common Tasks ............................................................................................... 8
Getting Set Up ............................................................................................................................ 10
Using IAM to Give Users Access to Your AWS Resources ........................................................ 10
Do I Need to Sign Up for IAM? ............................................................................................. 11
Additional Resources ........................................................................................................... 11
Getting Started ........................................................................................................................... 13
Creating an IAM Admin User and Group ................................................................................. 14
AWS Management Console .......................................................................................... 14
AWS Command Line Interface ...................................................................................... 15
How Users Sign In to Your Account ....................................................................................... 17
Tutorials ..................................................................................................................................... 19
Tutorial: Delegate Access to the Billing Console ...................................................................... 19
Prerequisites .............................................................................................................. 20
Step 1: Enable Access to Billing Data on Your AWS Test Account ...................................... 20
Step 2: Create IAM Policies that Grant Permissions to Billing Data ...................................... 21
Step 3: Attach Billing Policies to Your Groups .................................................................. 21
Step 4: Test Access to the Billing Console ...................................................................... 22
Related Resources ...................................................................................................... 23
Summary ................................................................................................................... 23
Tutorial: Delegate Access Across AWS Accounts Using Roles ................................................... 23
Prerequisites .............................................................................................................. 25
Step 1 - Create a Role ................................................................................................ 25
Step 2 - Grant Access to the Role ................................................................................. 27
Step 3 - Test Access by Switching Roles ........................................................................ 29
Related Resources ...................................................................................................... 32
Summary ................................................................................................................... 32
Tutorial: Create a Customer Managed Policy ........................................................................... 33
Prerequisites .............................................................................................................. 33
Step 1: Create the Policy ............................................................................................. 33
Step 2: Attach the Policy .............................................................................................. 34
Step 3: Test User Access ............................................................................................. 34
Related Resources ...................................................................................................... 35
Summary ................................................................................................................... 35
Tutorial: Enable Users to Configure Their Own Credentials and MFA Settings ............................... 35
Prerequisites .............................................................................................................. 36
Step 1: Create a Policy to Enforce MFA Sign-in ............................................................... 36
Step 2: Attach Policies to Your Test Group ..................................................................... 38
Step 3: Test Your User's Access ................................................................................... 38
Related Resources ...................................................................................................... 39
Summary ................................................................................................................... 39
Best Practices and Use Cases ...................................................................................................... 40
iv

AWS Identity and Access Management User Guide
Best Practices .................................................................................................................... 40
Lock away your AWS account (root) access keys ............................................................. 41
Create individual IAM users .......................................................................................... 41
Use groups to assign permissions to IAM users ............................................................... 41
Grant least privilege .................................................................................................... 42
Configure a strong password policy for your users ............................................................ 42
Enable MFA for privileged users .................................................................................... 42
Use roles for applications that run on Amazon EC2 instances ............................................ 43
Delegate by using roles instead of by sharing credentials .................................................. 43
Rotate credentials regularly .......................................................................................... 43
Remove unnecessary credentials ................................................................................... 43
Use policy conditions for extra security ........................................................................... 44
Monitor activity in your AWS account ............................................................................. 44
Video presentation about IAM best practices ................................................................... 44
Business Use Cases ........................................................................................................... 44
Initial Setup of Example Corp ........................................................................................ 45
Use Case for IAM with Amazon EC2 ............................................................................. 45
Use Case for IAM with Amazon S3 ................................................................................ 46
IAM Console and Sign-in Page ..................................................................................................... 48
The User Sign-in Page ........................................................................................................ 48
The Root Account Sign-in Page ............................................................................................ 49
Controlling User Access to the AWS Management Console ....................................................... 49
Your AWS Account ID and Its Alias ....................................................................................... 50
Finding Your AWS Account ID ...................................................................................... 50
About Account Aliases ................................................................................................. 51
Creating, Deleting, and Listing an AWS Account Alias ....................................................... 51
Using MFA Devices With Your IAM Sign-in Page ..................................................................... 52
IAM Console Search ............................................................................................................ 52
Using IAM Console Search ........................................................................................... 53
Icons in the IAM Console Search Results ....................................................................... 53
Sample Search Phrases ............................................................................................... 54
Identities .................................................................................................................................... 55
IAM Users .......................................................................................................................... 55
IAM Groups ........................................................................................................................ 55
IAM Roles .......................................................................................................................... 55
Temporary Credentials ......................................................................................................... 56
The Account "Root" User ..................................................................................................... 56
When to create an IAM user ................................................................................................. 56
When to Create an IAM Role ................................................................................................ 57
Users ................................................................................................................................ 57
How AWS identifies an IAM user ................................................................................... 57
Users and credentials .................................................................................................. 58
Users and permissions ................................................................................................. 58
Users and accounts ..................................................................................................... 58
Users as service accounts ............................................................................................ 59
Adding a User ............................................................................................................ 59
How IAM Users Sign In to Your AWS Account ................................................................ 61
Managing Users .......................................................................................................... 63
Passwords ................................................................................................................. 66
Access Keys .............................................................................................................. 76
Multi-Factor Authentication (MFA) .................................................................................. 80
Finding Unused Credentials ........................................................................................ 104
Getting Credential Reports .......................................................................................... 106
Using SSH Keys with AWS CodeCommit ...................................................................... 110
Working with Server Certificates .................................................................................. 111
Groups ............................................................................................................................. 119
Creating Groups ........................................................................................................ 120
Managing Groups ...................................................................................................... 121
v

AWS Identity and Access Management User Guide
Roles ............................................................................................................................... 124
Terms and Concepts .................................................................................................. 125
Common Scenarios ................................................................................................... 126
Identity Providers and Federation ................................................................................. 132
Creating Roles .......................................................................................................... 167
Using Roles .............................................................................................................. 191
Managing Roles ........................................................................................................ 208
Roles vs. Resource-based Policies ............................................................................... 215
Temporary Security Credentials ........................................................................................... 218
AWS STS and AWS Regions ...................................................................................... 218
Common Scenarios for Temporary Credentials .............................................................. 218
Requesting Temporary Security Credentials ................................................................... 219
Using Temporary Security Credentials to Request Access to AWS Resources ..................... 229
Controlling Permissions for Temporary Security Credentials ............................................. 233
Activating and Deactivating AWS STS in an AWS Region ................................................ 244
Sample Applications That Use Temporary Credentials ..................................................... 245
Additional Resources for Temporary Credentials ............................................................ 246
The Root User .................................................................................................................. 247
Creating Access Keys for the Root User ....................................................................... 247
Deleting Access Keys from the Root User ..................................................................... 248
Activate MFA on the Root User ................................................................................... 248
Changing the Root User's Password ............................................................................ 249
Access Management .................................................................................................................. 250
Permissions ...................................................................................................................... 250
Identity-Based (IAM) Permissions and Resource-Based Permissions ................................. 251
Resource Creators Do Not Automatically Have Permissions ............................................. 253
Granting Permissions Across AWS Accounts ................................................................. 253
Permissions For One Service to Access Another ............................................................ 253
Delegating Permissions to Administer IAM Users, Groups, and Credentials ......................... 253
Policies ............................................................................................................................ 262
Managed Policies and Inline Policies ............................................................................ 266
Versioning for Managed Policies .................................................................................. 270
Deprecated AWS Managed Policies ............................................................................. 272
Controlling Access to Managed Policies ........................................................................ 273
Creating IAM Policies ................................................................................................. 277
Working with Policies ................................................................................................. 280
Testing IAM Policies .................................................................................................. 287
Using Policy Validator ................................................................................................ 293
Service Last Accessed Data ....................................................................................... 295
Example Policies for AWS Access ............................................................................... 299
Additional Resources ......................................................................................................... 308
Logging IAM Events with AWS CloudTrail ..................................................................................... 309
Types of IAM Information Logged in CloudTrail ...................................................................... 309
Examples of Logged Events in CloudTrail Files ...................................................................... 312
IAM API Event in CloudTrail Log File ........................................................................... 312
AWS STS API Event in CloudTrail Log File ................................................................... 313
Sign-in Failure Event in CloudTrail Log File ................................................................... 315
Sign-in Failure Event Caused by Incorrect User Name .................................................... 316
Sign-in Success Event in CloudTrail Log File ................................................................. 316
Preventing Duplicate Log Entries in CloudTrail ....................................................................... 317
Troubleshooting IAM .................................................................................................................. 319
Troubleshooting General Issues ........................................................................................... 319
I lost my access keys. ................................................................................................ 319
I get "access denied" when I make a request to an AWS service. ...................................... 320
I get "access denied" when I make a request with temporary security credentials. ................. 320
Policy variables aren't working. .................................................................................... 320
Changes that I make are not always immediately visible .................................................. 321
Troubleshoot Policies ......................................................................................................... 321
vi

AWS Identity and Access Management User Guide
More than one policy object ........................................................................................ 321
More than one Statement element ............................................................................... 322
More than one Effect, Action, or Resource element in a Statement element ......................... 323
Missing Version Element ............................................................................................ 325
Troubleshooting IAM Roles ................................................................................................. 325
I cannot assume a role. .............................................................................................. 325
Troubleshooting Amazon EC2 and IAM ................................................................................ 326
When attempting to launch an instance, I don't see the role I expected to see in the Amazon
EC2 console IAM role list. .......................................................................................... 326
The credentials on my instance are for the wrong role. .................................................... 327
When I attempt to call the AddRoleToInstanceProfile, I get an AccessDenied error. ..... 327
Amazon EC2: When I attempt to launch an instance with a role, I get an AccessDenied
error. ....................................................................................................................... 327
I can't access the temporary security credentials on my EC2 instance. ............................... 328
What do the errors from the info document in the IAM subtree mean? .............................. 328
Troubleshooting Amazon S3 and IAM ................................................................................... 329
How do I grant anonymous access to an Amazon S3 bucket? .......................................... 329
I'm signed in as a root user, why can't I access an Amazon S3 bucket under my account? ...... 329
Troubleshooting SAML 2.0 Federation with AWS .................................................................... 330
How to View a SAML Response in Your Browser for Troubleshooting ................................ 330
Error: Your request included an invalid SAML response. To logout, click here. .................... 332
Error: RoleSessionName is required in AuthnResponse (Service:
AWSSecurityTokenService; Status Code: 400; Error Code: InvalidIdentityToken) ................. 332
Error: Not authorized to perform sts:AssumeRoleWithSAML (Service:
AWSSecurityTokenService; Status Code: 403; Error Code: AccessDenied) ......................... 332
Error: RoleSessionName in AuthnResponse must match [a-zA-Z_0-9+=,.@-]{2,64} (Service:
AWSSecurityTokenService; Status Code: 400; Error Code: InvalidIdentityToken) ................. 333
Error: Response signature invalid (Service: AWSSecurityTokenService; Status Code: 400;
Error Code: InvalidIdentityToken) ................................................................................. 333
Error: Failed to assume role: Issuer not present in specified provider
(Service: AWSOpenIdDiscoveryService; Status Code: 400; Error Code:
AuthSamlInvalidSamlResponseException) ..................................................................... 333
Reference ................................................................................................................................. 334
IAM Identifiers ................................................................................................................... 334
Friendly Names and Paths .......................................................................................... 334
IAM ARNs ................................................................................................................ 335
Unique IDs ............................................................................................................... 337
Limits ............................................................................................................................... 338
AWS Services That Work with IAM ...................................................................................... 340
Compute Services ..................................................................................................... 341
Storage and Content Delivery Services ......................................................................... 341
Database Services ..................................................................................................... 342
Networking Services .................................................................................................. 342
Administration and Security Services ............................................................................ 342
Deployment and Management Services ........................................................................ 343
Analytics Services ..................................................................................................... 343
Application Services ................................................................................................... 344
Internet of Things ...................................................................................................... 344
Game Development Services ...................................................................................... 344
Mobile Services ......................................................................................................... 345
Enterprise Applications ............................................................................................... 345
Additional Resources ................................................................................................. 345
Policy Reference ............................................................................................................... 345
Element Reference .................................................................................................... 346
Policy Variables ......................................................................................................... 371
Conditions with Multiple Key Values ............................................................................. 377
IAM Policy Evaluation Logic ........................................................................................ 381
Policy Grammar ........................................................................................................ 387
vii

AWS Identity and Access Management User Guide
Actions and Context Keys for IAM Policies .................................................................... 392
Resources ................................................................................................................................ 466
Users and Groups ............................................................................................................. 466
Credentials (Passwords, Access Keys, and MFA devices) ........................................................ 466
Permissions and Policies .................................................................................................... 467
Federation and Delegation .................................................................................................. 467
IAM and Other AWS Products ............................................................................................. 467
Using IAM with Amazon EC2 ...................................................................................... 467
Using IAM with Amazon S3 ........................................................................................ 468
Using IAM with Amazon RDS ...................................................................................... 468
Using IAM with Amazon DynamoDB ............................................................................. 468
General Security Practices .................................................................................................. 468
General Resources ............................................................................................................ 468
Making Query Requests ............................................................................................................. 470
Endpoints ......................................................................................................................... 470
HTTPS Required ............................................................................................................... 471
Signing IAM API Requests .................................................................................................. 471
AWS Glossary .......................................................................................................................... 472
Document History ...................................................................................................................... 473
viii

AWS Identity and Access Management User Guide
Video Introduction to AWS IAM
What Is IAM?
AWS Identity and Access Management (IAM) is a web service that helps you securely control
access to AWS resources for your users. You use IAM to control who can use your AWS resources
(authentication) and what resources they can use and in what ways (authorization).
Topics
•Video Introduction to AWS IAM (p. 1)
•IAM Features (p. 1)
•Accessing IAM (p. 2)
•Overview of Identity Management: Users (p. 3)
•Overview of Access Management: Permissions and Policies (p. 5)
•Security Features Outside of IAM (p. 7)
•Quick Links to Common Tasks (p. 8)
Video Introduction to AWS IAM
This short video (2:15) provides a brief introduction to AWS IAM.
Video Introduction to AWS IAM
IAM Features
IAM gives you the following features:
Shared access to your AWS account
You can grant other people permission to administer and use resources in your AWS account
without having to share your password or access key.
Granular permissions
You can grant different permissions to different people for different resources. For example, you
might allow some users complete access to Amazon Elastic Compute Cloud (Amazon EC2),
1

AWS Identity and Access Management User Guide
Accessing IAM
Amazon Simple Storage Service (Amazon S3), Amazon DynamoDB, Amazon Redshift, and
other AWS services. For other users, you can allow read-only access to just some S3 buckets, or
permission to administer just some EC2 instances, or to access your billing information but nothing
else.
Secure access to AWS resources for applications that run on Amazon EC2
You can use IAM features to securely give applications that run on EC2 instances the credentials
that they need in order to access other AWS resources, like S3 buckets and RDS or DynamoDB
databases.
Identity federation
You can allow users who already have passwords elsewhere—for example, in your corporate
network or with an Internet identity provider—to get temporary access to your AWS account.
Identity information for assurance
If you use AWS CloudTrail, you receive log records that include information about those who made
requests for resources in your account. That information is based on IAM identities.
PCI DSS Compliance
IAM supports the processing, storage, and transmission of credit card data by a merchant or
service provider, and has been validated as being compliant with Payment Card Industry (PCI)
Data Security Standard (DSS). For more information about PCI DSS, including how to request a
copy of the AWS PCI Compliance Package, see PCI DSS Level 1.
Integrated with many AWS services
For a list of AWS services that work with IAM, see AWS Services That Work with IAM (p. 340).
Eventually Consistent
IAM, like many other AWS services, is eventually consistent. IAM achieves high availability by
replicating data across multiple servers within Amazon's data centers around the world. If a
request to change some data is successful, the change is committed and safely stored. However,
the change must be replicated across IAM, which can take some time. For more information, see
Changes that I make are not always immediately visible (p. 321).
Free to use
AWS Identity and Access Management is a feature of your AWS account offered at no additional
charge. You will be charged only for use of other AWS products by your IAM users. For
information about the pricing of other AWS products, see the Amazon Web Services pricing page.
AWS Security Token Service is an included feature of your AWS account offered at no additional
charge. You are charged only for the use of other AWS services that are accessed by your AWS
STS temporary security credentials. For information about the pricing of other AWS services, see
the Amazon Web Services pricing page.
Accessing IAM
You can work with AWS Identity and Access Management in any of the following ways.
AWS Management Console
The console is a browser-based interface to manage IAM and AWS resources. For more
information about accessing IAM through the console, see The IAM Console and the Sign-in
Page (p. 48). For a tutorial that guides you through using the console, see Creating Your First
IAM Admin User and Group (p. 14).
AWS Command Line Tools
You can use the AWS command line tools to issue commands at your system's command line to
perform IAM and AWS tasks; this can be faster and more convenient than using the console. The
command line tools are also useful if you want to build scripts that perform AWS tasks.
AWS provides two sets of command line tools: the AWS Command Line Interface (AWS CLI) and
the AWS Tools for Windows PowerShell. For information about installing and using the AWS CLI,
2

AWS Identity and Access Management User Guide
Overview: Users
see the AWS Command Line Interface User Guide. For information about installing and using the
Tools for Windows PowerShell, see the AWS Tools for Windows PowerShell User Guide.
AWS SDKs
AWS provides SDKs (software development kits) that consist of libraries and sample code for
various programming languages and platforms (Java, Python, Ruby, .NET, iOS, Android, etc.).
The SDKs provide a convenient way to create programmatic access to IAM and AWS. For
example, the SDKs take care of tasks such as cryptographically signing requests, managing
errors, and retrying requests automatically. For information about the AWS SDKs, including how to
download and install them, see the Tools for Amazon Web Services page.
IAM HTTPS API
You can access IAM and AWS programmatically by using the IAM HTTPS API, which lets you
issue HTTPS requests directly to the service. When you use the HTTPS API, you must include
code to digitally sign requests using your credentials. For more information, see Calling the API by
Making HTTP Query Requests (p. 470) and the IAM API Reference.
Overview of Identity Management: Users
For greater security and organization, you can give access to your AWS account to specific users—
identities that you create with custom permissions. You can further simplify access for those users by
federating existing identities into AWS.
Topics
•First-Time Access Only: Your Root Account Credentials (p. 3)
•IAM Users (p. 3)
•Federating Existing Users (p. 4)
First-Time Access Only: Your Root Account
Credentials
When you create an AWS account, you create an account (or "root") identity, which you use to sign in
to AWS. You can sign in to the AWS Management Console using this root identity—that is, the email
address and password that you provided when creating the account. This combination of your email
address and password is also called your root account credentials.
When you use your root account credentials, you have complete, unrestricted access to all resources
in your AWS account, including access to your billing information and the ability to change your
password. This level of access is necessary when you first set up your account. However, we
recommend that you don't use root account credentials for everyday access. We especially
recommend that you do not share your root account credentials with anyone, because doing so gives
them unrestricted access to your account. It is not possible to restrict the permissions that are granted
to the root account.
The following sections explain how you can use IAM to create and manage user identity and
permissions to provide secure, limited access to your AWS resources, both for yourself and for others
who need to work with your AWS resources.
IAM Users
The "identity" aspect of AWS Identity and Access Management (IAM) helps you with the question "Who
is that user?", often referred to as authentication. Instead of sharing your root account credentials
with others, you can create individual IAM users within your account that correspond to users in your
organization. IAM users are not separate accounts; they are users within your account. Each user
3
AWS Identity and Access Management User Guide
Federating Existing Users
can have its own password for access to the AWS Management Console. You can also create an
individual access key for each user so that the user can make programmatic requests to work with
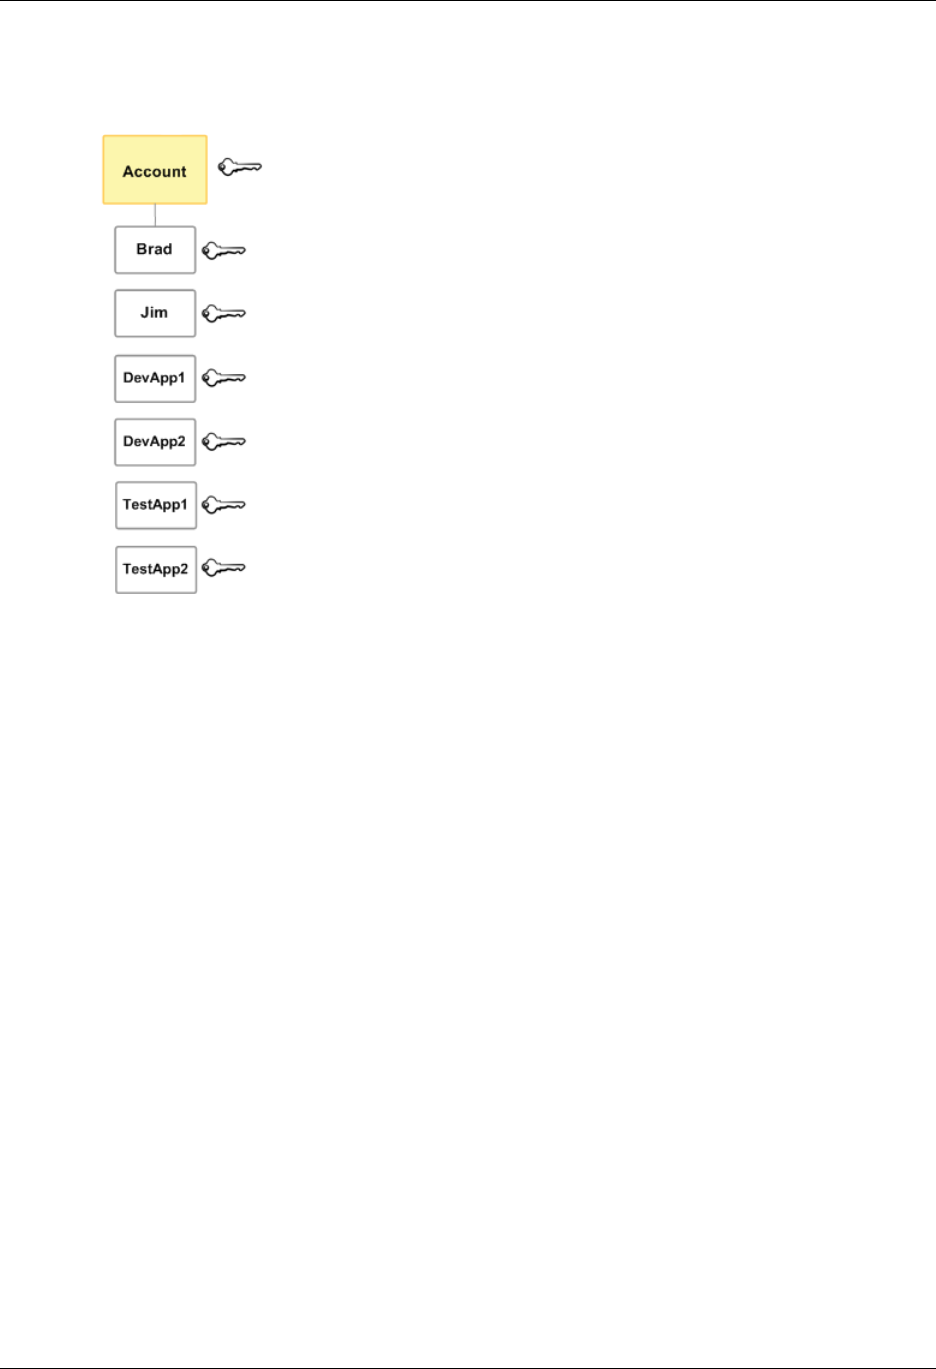
resources in your account. In the following figure, the users Brad, Jim, DevApp1, DevApp2, TestApp1,
and TestApp2 have been added to a single AWS account. Each user has its own credentials.
Notice that some of the users are actually applications (for example, DevApp1). An IAM user doesn't
have to represent an actual person; you can create an IAM user in order to generate an access key for
an application that runs in your corporate network and needs AWS access.
We recommend that you create an IAM user for yourself and then assign yourself administrative
permissions for your account. You can then sign in as that user to add more users as needed.
Federating Existing Users
If your users already have a way to be authenticated—for example, by signing in to your corporate
network—you can federate those user identities into AWS. A user who has already logged in replaces
his or her existing identity with a temporary identity in your AWS account. This user can work in
the AWS Management Console. Similarly, an application that the user is working with can make
programmatic requests using permissions that you define.
Federation is particularly useful in these cases:
•Your users already have identities in a corporate directory.
If your corporate directory is compatible with Security Assertion Markup Language 2.0 (SAML 2.0),
you can configure your corporate directory to provide single-sign on (SSO) access to the AWS
Management Console for your users. For more information, see Common Scenarios for Temporary
Credentials (p. 218).
If your corporate directory is not compatible with SAML 2.0, you can create an identity broker
application to provide single-sign on (SSO) access to the AWS Management Console for your
users. For more information, see Creating a URL that Enables Federated Users to Access the AWS
Management Console (Custom Federation Broker) (p. 159).
If your corporate directory is Microsoft Active Directory, you can use AWS Directory Service to
establish trust between your corporate directory and your AWS account.
•Your users already have Internet identities.
4

AWS Identity and Access Management User Guide
Overview: Permissions and Policies
If you are creating a mobile app or web-based app that can let users identify themselves through an
Internet identity provider like Login with Amazon, Facebook, Google, or any OpenID Connect (OIDC)
compatible identity provider, the app can use federation to access AWS. For more information, see
About Web Identity Federation (p. 133).
Tip
To use identity federation with Internet identity providers, we recommend you use Amazon
Cognito.
The following diagram shows how a user can use IAM to get temporary AWS security credentials to
access resources in your AWS account.
Overview of Access Management:
Permissions and Policies
The "access management" aspect of AWS Identity and Access Management helps you with the
question "What is the user allowed to do in my account?", often referred to as authorization. The basic
tool for granting permissions in IAM is the policy.
Topics
•Policies and Users (p. 5)
•Policies and Groups (p. 6)
•Federated Users and Roles (p. 6)
•User-based and Resource-based Policies (p. 6)
Policies and Users
By default, users can't access anything in your account. You grant permissions to a user by creating
a policy, which is a document that lists the actions that a user can perform and the resources that the
actions can affect. The following example shows a policy.
{
"Version": "2012-10-17",
"Statement": {
"Effect": "Allow",
"Action": "dynamodb:*",
5

AWS Identity and Access Management User Guide
Policies and Groups
"Resource": "arn:aws:dynamodb:us-west-2:123456789012:table/Books"
}
}
This policy grants permission to perform all DynamoDB actions (dynamodb:*) with the Books table in
the account 123456789012. When you attach the policy to a user, that user then has those DynamoDB
permissions. Typically, users in your account have different policies attached to them, policies that
represent permissions that the users need in order to work in your AWS account.
Any actions or resources that are not explicitly allowed are denied by default. For example, if this is
the only policy attached to a user, the user is not allowed to perform DynamoDB actions on a different
table. Similarly, the user is not allowed to perform any actions in Amazon EC2, Amazon S3, or in any
other AWS product, because permissions to work with those products are not included in the policy.
Policies and Groups
You can organize IAM users into IAM groups and attach a policy to a group. In that case, individual
users still have their own credentials, but all the users in a group have the permissions that are
attached to the group. Use groups for easier permissions management, and to follow our IAM Best
Practices (p. 40).
Users or groups can have multiple policies attached to them that grant different permissions. In
that case, the users' permissions are calculated based on the combination of policies. But the basic
principle still applies: If the user has not been granted an explicit permission for an action and a
resource, the user does not have those permissions.
Federated Users and Roles
Federated users don't have permanent identities in your AWS account the way that IAM users do.
To assign permissions to federated users, you can create an entity referred to as a role and define
permissions for the role. When a federated user signs in to AWS, the user is associated with the role
and is granted the permissions that are defined in the role. For more information, see Creating a Role
for a Third-Party Identity Provider (Federation) (p. 180).
User-based and Resource-based Policies
In the previous example, you saw a policy that you can attach to a user or to a group. When you
create a user-based policy like that, you specify the actions that are permitted and the resource (EC2
instance, RDS database, etc.) that the user is allowed to access.
6

AWS Identity and Access Management User Guide
Security Features Outside of IAM
In some cases you can attach a policy to a resource in addition to attaching it to a user or group. For
example, in Amazon S3, you can attach a policy to a bucket. A resource-based policy contains slightly
different information than a user-based policy. In a resource-based policy you specify what actions are
permitted and what resource is affected (just like a user-based policy). However, you also explicitly list
who is allowed access to the resource. (In a user-based policy, the "who" is established by whomever
the policy is attached to.)
The following example shows an S3 bucket policy that allows an IAM user named bob in AWS account
777788889999 to put objects into the bucket called example-bucket.
{
"Version": "2012-10-17",
"Statement": {
"Effect": "Allow",
"Principal": {"AWS": "arn:aws:iam::777788889999:user/bob"},
"Action": [
"s3:PutObject",
"s3:PutObjectAcl"
],
"Resource": "arn:aws:s3:::example-bucket/*"
}
}
Resource-based policies include a Principal element that specifies who is granted the permissions.
In the preceding example, the Principal element is set to the Amazon Resource Name (ARN) of an
IAM user named bob in AWS account 777788889999 to indicate that the resource (in this case, the S3
bucket) is accessible to that IAM user but no one else.
Security Features Outside of IAM
You use IAM to control access to tasks that are performed using the AWS Management Console, the
AWS Command Line Tools, or service APIs using the AWS SDKs. Some AWS products have other
ways to secure their resources as well. The following list provides some examples, though it is not
exhaustive.
Amazon EC2
In Amazon Elastic Compute Cloud you log into an instance with a key pair (for Linux instances) or
using a user name and password (for Microsoft Windows instances).
For more information, see the following documentation:
•Getting Started with Amazon EC2 Linux Instances in the Amazon EC2 User Guide for Linux
Instances
•Getting Started with Amazon EC2 Windows Instances in the Amazon EC2 User Guide for
Windows Instances
Amazon RDS
In Amazon Relational Database Service you log into the database engine with a user name and
password that are tied to that database.
For more information, see Getting Started with Amazon RDS in the Amazon Relational Database
Service User Guide.
Amazon EC2 and Amazon RDS
In Amazon EC2 and Amazon RDS you use security groups to control traffic to an instance or
database.
For more information, see the following documentation:
7

AWS Identity and Access Management User Guide
Quick Links to Common Tasks
•Amazon EC2 Security Groups for Linux Instances in the Amazon EC2 User Guide for Linux
Instances
•Amazon EC2 Security Groups for Windows Instances in the Amazon EC2 User Guide for
Windows Instances
•Amazon RDS Security Groups in the Amazon Relational Database Service User Guide
Amazon WorkSpaces
In Amazon WorkSpaces, users sign in to a desktop with a user name and password.
For more information, see Getting Started with Amazon WorkSpaces in the Amazon WorkSpaces
Administration Guide.
Amazon WorkDocs
In Amazon WorkDocs, users get access to shared documents by signing in with a user name and
password.
For more information, see Getting Started with Amazon WorkDocs in the Amazon WorkDocs
Administration Guide.
These access control methods are not part of IAM. IAM lets you control how these AWS products are
administered—creating or terminating an Amazon EC2 instance, setting up new Amazon WorkSpaces
desktops, and so on. That is, IAM helps you control the tasks that are performed by making requests to
Amazon Web Services, and it helps you control access to the AWS Management Console. However,
IAM does not help you manage security for tasks like signing in to an operating system (Amazon EC2),
database (Amazon RDS), desktop (Amazon WorkSpaces), or collaboration site (Amazon WorkDocs).
When you work with a specific AWS product, be sure to read the documentation to learn the security
options for all the resources that belong to that product.
Quick Links to Common Tasks
Use the following links to get help with common tasks associated with IAM.
Sign in as an IAM user
See How IAM Users Sign In to Your AWS Account (p. 61).
Manage passwords for IAM users
You need a password in order to access the AWS Management Console, including access to
billing information.
For your AWS account, see Changing the AWS Account ("root") Password (p. 66).
For an IAM user, see Managing Passwords for IAM Users (p. 70).
Manage permissions for IAM users
You use policies to grant permissions to the IAM users in your AWS account. IAM users have
no permissions when they are created, so you must add permissions to allow them to use AWS
resources.
For more information, see Working with Policies (p. 280).
List the users in your AWS account and get information about their credentials
See the section called “Getting Credential Reports” (p. 106).
Add multi-factor authentication (MFA)
To add a virtual MFA device for your AWS root account, see Enable a virtual MFA device for your
AWS root account (AWS Management Console) (p. 83).
To add a hardware MFA device for your AWS root account, see Enable a hardware MFA device
for the AWS account root user (AWS Management Console) (p. 86).
8

AWS Identity and Access Management User Guide
Quick Links to Common Tasks
To add a virtual MFA device for an IAM user, see Enable a virtual MFA device for an IAM user
(AWS Management Console) (p. 82).
To add a hardware MFA device for an IAM user, see Enable a hardware MFA device for an IAM
user (AWS Management Console) (p. 85).
To add a hardware MFA device for your AWS account or an IAM user, see Enabling a Hardware
MFA Device (AWS Management Console) (p. 85).
Get an access key
You need an access key if you want to make AWS requests using the AWS SDKs, the AWS
Command Line Tools, Tools for Windows PowerShellor the APIs.
Important
You can view and download your secret access key only when you create the access
key. You cannot view or recover a secret access key later. However, if you lose your
secret access key, you can create a new access key.
For your AWS account, see Managing Access Keys for your AWS Account.
For an IAM user, see Managing Access Keys for IAM Users (p. 76).
9

AWS Identity and Access Management User Guide
Using IAM to Give Users
Access to Your AWS Resources
Getting Set Up
AWS Identity and Access Management (IAM) helps you securely control access to Amazon Web
Services (AWS) and your account resources. IAM can also keep your account credentials private. With
IAM, you can create multiple IAM users under the umbrella of your AWS account or enable temporary
access through identity federation with your corporate directory. In some cases, you can also enable
access to resources across AWS accounts.
Without IAM, however, you must either create multiple AWS accounts—each with its own billing and
subscriptions to AWS products—or your employees must share the security credentials of a single
AWS account. In addition, without IAM, you cannot control the tasks a particular user or system can do
and what AWS resources they might use.
This guide provides a conceptual overview of IAM, describes business use cases, and explains AWS
permissions and policies.
Topics
•Using IAM to Give Users Access to Your AWS Resources (p. 10)
•Do I Need to Sign Up for IAM? (p. 11)
•Additional Resources (p. 11)
Using IAM to Give Users Access to Your AWS
Resources
Here are the ways you can use IAM to control access to your AWS resources.
Type of
access Why would I use it? Where can I get more information?
Access for
users under
your AWS
account
You want to add users under
the umbrella of your AWS
account, and you want to
use IAM to create users and
manage their permissions.
To learn how to use the AWS Management
Console to create users and to manage their
permissions under your AWS account, see
Getting Started (p. 13).
To learn about using the IAM API or AWS
Command Line Interface to create users under
your AWS account, see Creating Your First IAM
Admin User and Group (p. 14).
10

AWS Identity and Access Management User Guide
Do I Need to Sign Up for IAM?
Type of
access Why would I use it? Where can I get more information?
For more information about working with IAM
users, see Identities (Users, Groups, and
Roles) (p. 55).
Non-AWS
user access
via identity
federation
between your
authorization
system and
AWS
You have non-AWS users in
your identity and authorization
system, and they need access
to your AWS resources.
To learn how to use security tokens to give your
users access to your AWS account resources
through federation with your corporate directory,
go to Temporary Security Credentials (p. 218).
For information about the AWS Security Token
Service API, go to the AWS Security Token
Service API Reference.
Cross-
account
access
between AWS
accounts
You want to share access
to certain AWS resources
with users under other AWS
accounts.
To learn how to use IAM to grant permissions
to other AWS accounts, see Roles Terms and
Concepts (p. 125).
Do I Need to Sign Up for IAM?
If you don't already have an AWS account, you need to create one to use IAM. You don't need to
specifically sign up to use IAM. There is no charge to use IAM.
Note
IAM works only with AWS products that are integrated with IAM. For a list of services that
support IAM, see AWS Services That Work with IAM (p. 340).
To sign up for AWS
1. Open http://aws.amazon.com/, and then choose Create an AWS Account.
2. Follow the online instructions.
Part of the sign-up procedure involves receiving a phone call and entering a PIN using the phone
keypad.
Additional Resources
Here are some resources to help you get things done with IAM.
• Manage your AWS account credentials: AWS Security Credentials in the AWS General Reference
• Get started with and learn more about What Is IAM? (p. 1)
• Set up a command line interface (CLI) to use with IAM. For the cross-platform AWS CLI, see the
AWS Command Line Interface Documentation and IAM CLI reference. You can also manage IAM
with Windows PowerShell; see the AWS Tools for Windows PowerShell Documentation and IAM
Windows PowerShell reference.
• Download an AWS SDK for convenient programmatic access to IAM: Tools for Amazon Web
Services
• Get the release notes: Release Notes
• Get the FAQ: AWS Identity and Access Management FAQ
• Get technical support: AWS Support Center
11

AWS Identity and Access Management User Guide
Getting Started
This topic shows you how to give access to your AWS resources by creating users under your AWS
account. First, you'll learn concepts you should understand before you create groups and users, and
then you'll walk through how to perform the necessary tasks using the AWS Management Console.
The first task is to set up an administrators group for your AWS account. Having an administrators
group for your AWS account isn't required, but we strongly recommend it.
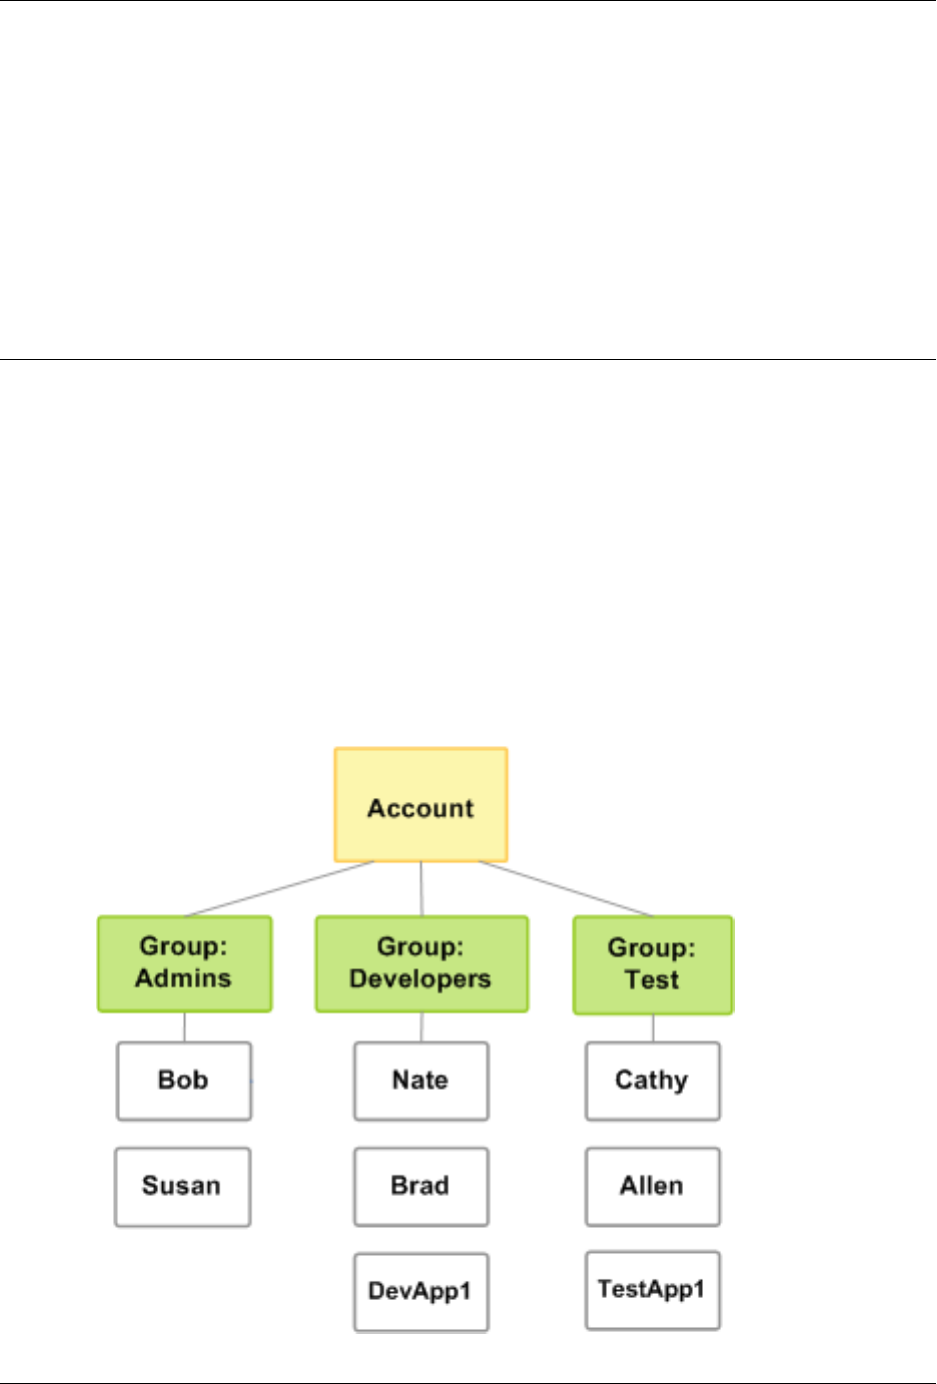
The following figure shows a simple example of an AWS account with three groups. A group is a
collection of users who have similar responsibilities. In this example, one group is for administrators
(it's called Admins). There's also a Developers group and a Test group. Each group has multiple users.
Each user can be in more than one group, although the figure doesn't illustrate that. You can't put
groups inside other groups. You use policies to grant permissions to groups.
13

AWS Identity and Access Management User Guide
Creating an IAM Admin User and Group
In the procedure that follows, you will perform the following tasks:
• Create an Administrators group and give the group permission to access all of your AWS account's
resources.
• Create a user for yourself and add that user to the Administrators group.
• Create a password for your user so you can sign in to the AWS Management Console.
You will grant the Administrators group permission to access all your available AWS account
resources. Available resources are any AWS products you use, or that you are signed up for. Users
in the Administrators group can also access your AWS account information, except for your AWS
account's security credentials.
Topics
•Creating Your First IAM Admin User and Group (p. 14)
•How Users Sign In to Your Account (p. 17)
Creating Your First IAM Admin User and
Group
AWS Management Console
This procedure describes how to create an IAM group named Administrators, grant the group full
permissions for all AWS services, and then create an administrative IAM user for yourself by adding
the user to the Administrators group.
To create the Administrators group
1. Sign in to the Identity and Access Management (IAM) console at https://console.aws.amazon.com/
iam/.
2. In the navigation pane, choose Groups, and then choose Create New Group.
3. In the Group Name box, type Administrators, and then choose Next Step.
4. In the list of policies, select the check box next to the AdministratorAccess policy. You can use
the Filter drop-down menu and Filter box to filter the list or to search for a specific policy.
5. Choose Next Step, review the details of your request, and then choose Create Group.
Your new group is listed under Group Name.
To create an IAM user for yourself, add the user to the Administrators group, and create
a password for the user
1. In the navigation pane, choose Users, and then choose Create New Users.
2. In box 1., type a user name.
3. Clear the check box next to Generate an access key for each user, and then choose Create.
4. In the list of users, choose the name (not the check box) of the user you just created. You can use
the Search box to search for the user name.
5. Choose the Groups tab at the bottom of the User Summary page (not the Groups link in the left-
hand navigation bar), and then choose Add User to Groups.
6. Select the check box next to the Administrators group. Then choose Add to Groups. This
returns you to the Summary page for the user you just created.
14

AWS Identity and Access Management User Guide
AWS Command Line Interface
7. Still on the new user's Summary page, choose the Security Credentials tab. Under Sign-In
Credentials, choose Manage Password.
8. Choose Assign a custom password. Then type a password in the Password and Confirm
Password boxes. When you are finished, chooses Apply.
You created an IAM group named Administrators, granted full permissions for all AWS services
to the group, created an IAM user for yourself, and added the user to the group. You can use the
same process to create more groups and users, and to give your users access to your AWS account
resources. To learn about using policies to restrict users' permissions to specific AWS resources, go to
Access Management (p. 250) and Example Policies for Administering AWS Resources (p. 299).
AWS Command Line Interface
The first thing we recommend you do after creating an AWS account is to set up an administrators
group. It's not required, but is highly recommended. Going forward, the users in the administrators
group should set up the groups, users, and so on, for the AWS account, and all future key-based
interaction should be through the AWS account's users and their own keys.
Tip
If you read through Getting Started (p. 13), you used the AWS Management Console to
set up an administrators group for your AWS account. We've repeated the information here if
you're interested in using a different interface than the one presented in Getting Started.
Process for Setting Up an Administrators Group
1. Create a group and give it a name (for example, Admins). For more information, see Creating a
Group (p. 15).
2. Attach a policy that gives the group administrative permissions—access to all AWS actions and
resources. For more information, see Attaching a Policy to the Group (p. 16).
3. Add at least one user to the group. For more information, see Creating an IAM User in Your AWS
Account (p. 59).
Creating a Group
This section shows how to create a group in the IAM system. For information about the limitations on
the group's name and the maximum number of groups you can have, see Limitations on IAM Entities
and Objects (p. 338).
To create an administrators group
1. Enter the aws iam create-group command with the name you've chosen for the group.
Optionally, you can include a path as part of the group name. For more information about paths,
see Friendly Names and Paths (p. 334).
In this example, you create a group named Admins.
aws iam create-group --group-name Admins
{
"Group": {
"Path": "/",
"CreateDate": "2014-06-05T20:29:53.622Z",
"GroupId":"ABCDEFGHABCDEFGHABCDE",
"Arn": "arn:aws:iam::123456789012:group/Admins",
"GroupName": "Admins"
}
15

AWS Identity and Access Management User Guide
AWS Command Line Interface
}
2. Enter the aws iam list-groups command to list the groups in your AWS account and confirm
the group was created.
aws iam list-groups
{
"Groups": [
{
"Path": "/",
"CreateDate": "2014-06-05T20:29:53.622Z",
"GroupId":"ABCDEFGHABCDEFGHABCDE",
"Arn": "arn:aws:iam::123456789012:group/Admins",
"GroupName": "Admins"
}
]
}
The response includes the Amazon Resource Name (ARN) for your new group. The ARN is a
standard format that AWS uses to identify resources. The 12-digit number in the ARN is your
AWS account ID. The friendly name you assigned to the group (Admins) appears at the end of the
group's ARN.
Attaching a Policy to the Group
This section shows how to attach a policy that lets any user in the group perform any action on
any resource in the AWS account. You do this by attaching the AWS managed policy (p. 266)
called AdministratorAccess to the Admins group. For more information about policies, see Access
Management (p. 250).
To add a policy giving full administrator permissions
1. Enter the aws iam attach-group-policy command to attach the policy called
AdministratorAccess to your Admins group. The command uses the ARN of the AWS managed
policy called AdministratorAccess.
aws iam attach-group-policy --group-name Admins --policy-arn
arn:aws:iam::aws:policy/AdministratorAccess
If the command is successful, there's no response.
2. Enter the aws iam list-attached-group-policies command to confirm the policy is
attached to the Admins group.
aws iam list-attached-group-policies --group-name Admins
The response lists the names of the policies attached to the Admins group. A response like the
following tells you that the policy named AdministratorAccess has been attached to the Admins
group:
{
"AttachedPolicies": [
{
"PolicyName": "AdministratorAccess",
"PolicyArn": "arn:aws:iam::aws:policy/AdministratorAccess"
16
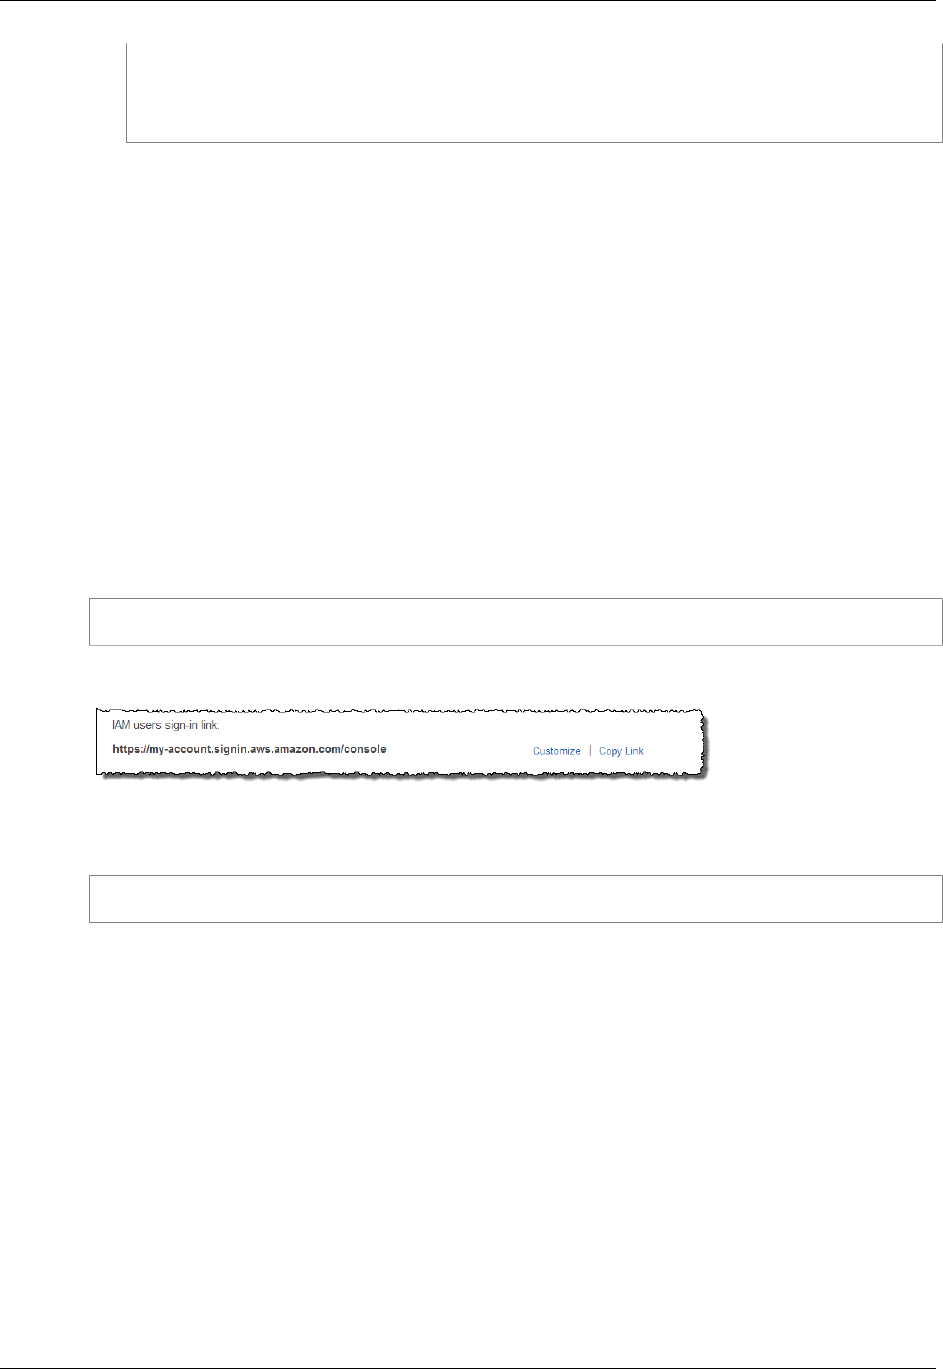
AWS Identity and Access Management User Guide
How Users Sign In to Your Account
}
],
"IsTruncated": false
}
You can confirm the contents of a particular policy with the aws iam get-policy command.
Important
After you have the administrators group set up, you must add at least one user to it. For
more information about adding users to a group, see Creating an IAM User in Your AWS
Account (p. 59).
How Users Sign In to Your Account
After you create IAM users and passwords for each, users can sign in to the AWS Management
Console for your AWS account with a special URL.
By default, the sign-in URL for your account includes your account ID. You can create a unique sign-in
URL for your account so that the URL includes a name instead of an account ID. For more information,
see Your AWS Account ID and Its Alias (p. 50).
The sign-in endpoint follows this pattern:
https://AWS-account-ID-or-alias.signin.aws.amazon.com/console
You can find the sign-in URL for an account on the IAM console dashboard.
You can also sign in at the following endpoint and enter the account ID or alias manually, instead of it
being embedded in the URL:
https://signin.aws.amazon.com/console
Tip
To create a bookmark for your account's unique sign-in page in your web browser, you
should manually enter your account's sign-in URL in the bookmark entry. Don't use your web
browser's "bookmark this page" feature.
IAM users in your account have access only to the AWS resources that you specify in the policy that
is attached to the user or to an IAM group that the user belongs to. To work in the console, users
must have permissions to perform the actions that the console performs, such as listing and creating
AWS resources. For more information, see Access Management (p. 250) and Example Policies for
Administering AWS Resources (p. 299).
Note
If your organization has an existing identity system, you might want to create a single sign-
on (SSO) option that gives users access to the AWS Management Console for your account
without requiring them to have an IAM user identity and without requiring them to sign in
separately to your organization's site and to AWS. For more information, see Creating a URL
that Enables Federated Users to Access the AWS Management Console (Custom Federation
Broker) (p. 159).
17
AWS Identity and Access Management User Guide
How Users Sign In to Your Account
Logging sign-in details in CloudTrail
If you enable CloudTrail to log sign-in events to your logs, you need to be aware of how CloudTrail
chooses where to log the events.
• If your users sign-in directly to a console, they are redirected to either a global or a regional sign-in
endpoint, based on whether the selected service console supports regions. For example, the main
console home page supports regions, so if you sign in to the following URL:
https://alias.signin.aws.amazon.com/console
you are redirected to a regional sign-in endpoint such as https://us-
east-1.signin.aws.amazon.com, resulting in a regional CloudTrail log entry in the user's
region's log:
On the other hand, the Amazon S3 console does not support regions, so if you sign in to the
following URL
https://alias.signin.aws.amazon.com/console/s3
AWS redirects you to the global sign-in endpoint at https://signin.aws.amazon.com, resulting
in a global CloudTrail log entry.
• You can manually request a certain regional sign-in endpoint by signing in to the region-enabled
main console home page using a URL syntax like the following:
https://alias.signin.aws.amazon.com/console?ap-southeast-1
AWS redirects you to the ap-southeast-1 regional sign-in endpoint and results in a regional
CloudTrail log event.
For more information about CloudTrail and IAM, see Logging IAM Events with AWS CloudTrail .
If users need programmatic access to work with your account, you can create an access key pair
(an access key ID and a secret access key) for each user, as described in Creating, Modifying, and
Viewing Access Keys (AWS Management Console) (p. 77).
18
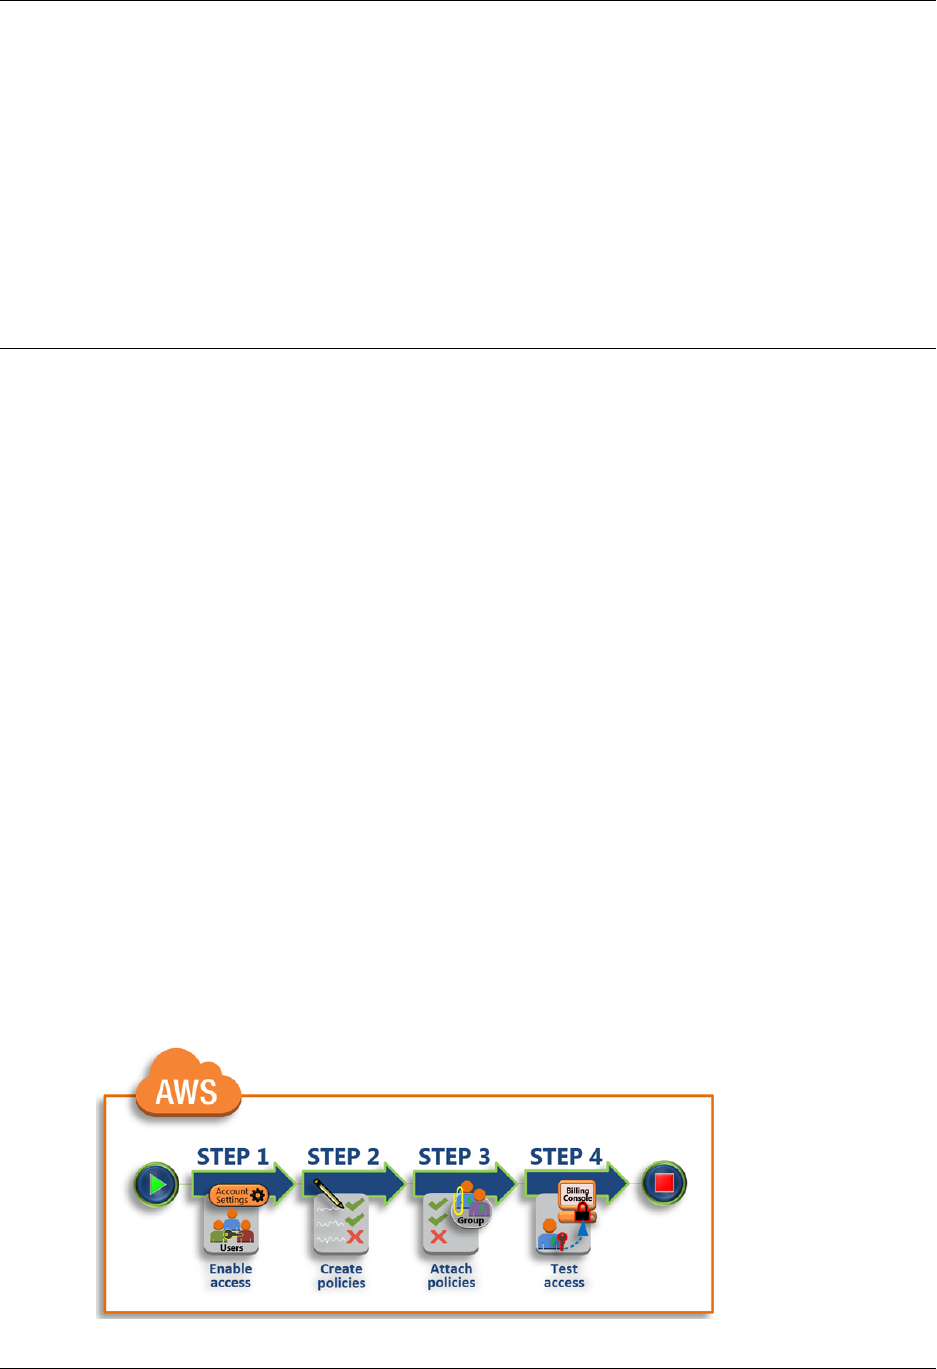
AWS Identity and Access Management User Guide
Tutorial: Delegate Access to the Billing Console
IAM Tutorials
This section contains walkthroughs that present complete end-to-end procedures for common tasks
that you can perform in IAM. They are intended for a lab-type environment, with sample company
names, user names, and so on. Their purpose is to provide general guidance. They are not intended
for direct use in your production environment without careful review and adaptation to the unique
aspects of your organization's environment.
Topics
•Tutorial: Delegate Access to the Billing Console (p. 19)
•Tutorial: Delegate Access Across AWS Accounts Using IAM Roles (p. 23)
•Tutorial: Create and Attach Your First Customer Managed Policy (p. 33)
•Tutorial: Enable Your Users to Configure Their Own Credentials and MFA Settings (p. 35)
Tutorial: Delegate Access to the Billing
Console
AWS account owners can delegate access to specific IAM users who need to view or manage the
AWS Billing and Cost Management data for your AWS account. The instructions that follow will help
you set up a pretested scenario so you can gain hands-on experience configuring billing permissions,
without concern for affecting your main AWS production account.
This workflow has four basic steps.
19

AWS Identity and Access Management User Guide
Prerequisites
Step 1: Enable Access to Billing Data on Your AWS Test Account (p. 20)
By default, only the AWS account owner (root account) has access to view and manage billing
information. Access to this data cannot be delegated to IAM users until the account owner first
enables access to billing data in the account settings.
Step 2: Create IAM Policies that Grant Permissions to Billing Data (p. 21)
After enabling billing access on your account, you must still explicitly grant access to billing data to
specific IAM users or groups. You grant this access with a customer-managed policy.
Step 3: Attach Billing Policies to Your Groups (p. 21)
When you attach a policy to a group, all members of that group receive the complete set of access
permissions that are associated with that policy. In this scenario, you attach the new billing policies
to security groups containing only those users who require the billing access.
Step 4: Test Access to the Billing Console (p. 22)
Once you’ve now completed the core tasks, you’re ready to test the policy. Testing ensures that
the policy works the way you want it to.
Prerequisites
Create a test AWS account to use with this tutorial. In this account create two test users and two test
groups as summarized in the following table. Be sure to assign a password to each user so that you
can sign in later in Step 4.
Create user accounts Create and configure group accounts
FinanceManager FullAccess FinanceManager
FinanceUser ViewAccess FinanceUser
Step 1: Enable Access to Billing Data on Your
AWS Test Account
In this first section, you sign into your test account with root account credentials and go to the account
settings page in the AWS Management Console. There you enable IAM user access to the data in
the Billing and Cost Management console. For more information about how to follow this process
in a production environment, see Activate Access to the AWS Website in the AWS Billing and Cost
Management User Guide.
To enable access to billing data on your AWS test account
1. Sign in to the AWS Management Console with your root account credentials (the email and
password that you used to create your AWS test account).
Note
This requires root account credentials. It cannot be performed by an IAM user.
2. On the navigation bar, choose your account name, and then choose My Account.
3. Next to IAM User Access to Billing Information, choose Edit, and then select the check box to
activate IAM access to the Billing and Cost Management pages.
Important
When you activate IAM user access to the AWS website, you grant full access to the
AWS website to all users who already have full access to the AWS APIs. You can restrict
their access by applying a more constrained set of permissions. See Example 4: Allow full
access to AWS services but deny IAM users access to the Billing and Cost Management
console.
20

AWS Identity and Access Management User Guide
Step 2: Create IAM Policies that
Grant Permissions to Billing Data
4. Sign out of the console, and then proceed to Step 2: Create IAM Policies that Grant Permissions
to Billing Data (p. 21).
Step 2: Create IAM Policies that Grant
Permissions to Billing Data
Next you create custom policies that grant both view and full access permissions to the pages within
the Billing and Cost Management console. For general information about IAM permission policies, see
Managed Policies and Inline Policies (p. 266).
To create IAM polices that grant permissions to billing data
1. Sign in to the AWS Management Console as a user with administrator credentials. To adhere
to IAM best practices, don’t sign in with your root account. For more information, see Create
individual IAM users (p. 41).
2. Open the IAM console at https://console.aws.amazon.com/iam/.
3. In the navigation pane, choose Policies, and then choose Create Policy.
4. Next to Policy Generator, choose Select.
5. On the Edit Permissions page, for Effect choose Allow.
6. For AWS Service, choose AWS Billing.
7. Follow these steps to create two policies:
Full access
a. For Actions, choose All Actions (*).
b. Choose Add Statement, and then choose Next Step.
c. On the Review Policy page, next to Policy Name, type BillingFullAccess, and then
choose Create Policy to save it.
View-only access
a. Repeat steps 3 through 6 (p. 21).
b. For Actions, choose only those permissions that begin with View.
c. Choose Add Statement, and then choose Next Step.
d. On the Review Policy page, next to Policy Name, type BillingViewAccess, and then choose
Create Policy to save it.
To review descriptions for each of the permissions available in IAM policies that grant users
access to the Billing and Cost Management console, see Billing Permissions Descriptions.
Step 3: Attach Billing Policies to Your Groups
Now that you have custom billing policies available, you can attach them to their corresponding groups
that you created earlier. Although you can attach a policy directly to a user or role, we recommend
(in accordance with IAM best practices) that you use groups instead. For more information, see Use
groups to assign permissions to IAM users (p. 41).
To attach billing policies to your groups
1. In the navigation pane, choose Policies to display the full list of policies available to your AWS
account. To attach each policy to its appropriate group, follow these steps:
21

AWS Identity and Access Management User Guide
Step 4: Test Access to the Billing Console
Full access
a. For Filter, type BillingFullAccess, and then select the check box next to the policy name.
b. Choose Policy Actions, and then choose Attach.
c. For Filter, type FullAccess, select the check box next to the name of the group, and then
choose Attach Policy.
View-only access
a. For Filter, type BillingViewAccess, and then select the check box next to the policy name.
b. Choose Policy Actions, and then choose Attach.
c. For Filter, type ViewAccess, select the check box next to the name of the group, and then
choose Attach Policy.
2. Sign out of the console, and then proceed to Step 4: Test Access to the Billing Console (p. 22).
Step 4: Test Access to the Billing Console
You can test user access in a couple of different ways. For this tutorial, we recommend that you test
access by signing in as each of the test users so you can observe the results and see what your users
might experience. Another (optional) way to test user access permissions is to use the IAM policy
simulator. Use the following steps if you want to see another way to view the effective result of these
actions.
Select either of the following procedures based on your preferred testing method. In the first one, you
sign in using both test accounts to see the difference between access rights.
To test billing access by signing in with both test user accounts
1. Go to the sign-in URL for your AWS test account. For example, if your AWS
account name is CompanyXYZ, your sign-in URL would look like https://
companyxyz.signin.aws.amazon.com/console. If you did not assign an
alias like CompanyXYZ, then use your account ID number as in this example:
https://123456789012.signin.aws.amazon.com/console.
2. Sign-in with each account using the steps provided below so you can compare the different user
experiences.
Full access
a. Sign in to your AWS account as the user FinanceManager.
b. On the navigation bar, choose FinanceManager@<account alias or ID number> , and
then choose Billing & Cost Management.
c. Browse through the pages and choose the various buttons to ensure you have full modify
permissions.
View-only access
a. Sign in to your AWS account as the user FinanceUser.
b. On the navigation bar, choose FinanceUser@<account alias or ID number>, and then
choose Billing & Cost Management.
c. Browse through the pages. Notice that you can display costs, reports, and billing data with no
problems. However, if you choose an option to modify a value, you receive an Access Denied
message. For example, on the Preferences page, choose any of the check boxes on the
22

AWS Identity and Access Management User Guide
Related Resources
page, and then choose Save preferences. The console message informs you that you need
ModifyBilling permissions to make changes to that page.
The following optional procedure demonstrates how you could alternatively use the IAM policy
simulator to test your delegated user’s effective permissions to billing pages.
To test billing access by viewing effective permissions in the IAM policy simulator
1. Open the IAM policy simulator at https://policysim.aws.amazon.com. (If you are not already signed
in to AWS, you are prompted to sign in).
2. Under Users, Groups, and Roles, select one of the users that is a member of the group you
recently attached the policy to.
3. Under Policy Simulator, choose Select service, and then choose Billing.
4. Next to Select actions, choose Select All.
5. Choose Run Simulation and compare the user’s listed permissions with all possible billing-related
permission options to make sure that the correct rights have been applied.
Related Resources
For related information found in the AWS Billing and Cost Management User Guide, see the following
resources:
•Activate Access to the AWS Website
•Example 4: Allow full access to AWS services but deny IAM users access to the Billing and Cost
Management console.
•Billing Permissions Descriptions
For related information in the IAM User Guide, see the following resources:
•Managed Policies and Inline Policies (p. 266)
•Controlling User Access to the AWS Management Console (p. 49)
•Attaching a Policy to an IAM Group (p. 122)
Summary
You’ve now successfully completed all of the steps necessary to delegate user access to the Billing
and Cost Management console. As a result, you've seen firsthand what your users billing console
experience will be like and can now proceed to implement this logic in your production environment at
your convenience.
Tutorial: Delegate Access Across AWS
Accounts Using IAM Roles
In this tutorial, you will learn how to use a role to delegate access to resources that are in different
AWS accounts that you own (Production and Development). You'll share resources in one account with
users in a different account. By setting up cross-account access in this way, you don't need to create
individual IAM users in each account, and users don't have to sign out of one account and sign into
another in order to access resources that are in different AWS accounts. After configuring the role,
you'll see how to use the role from the AWS Management Console, the AWS CLI, and the API.
23
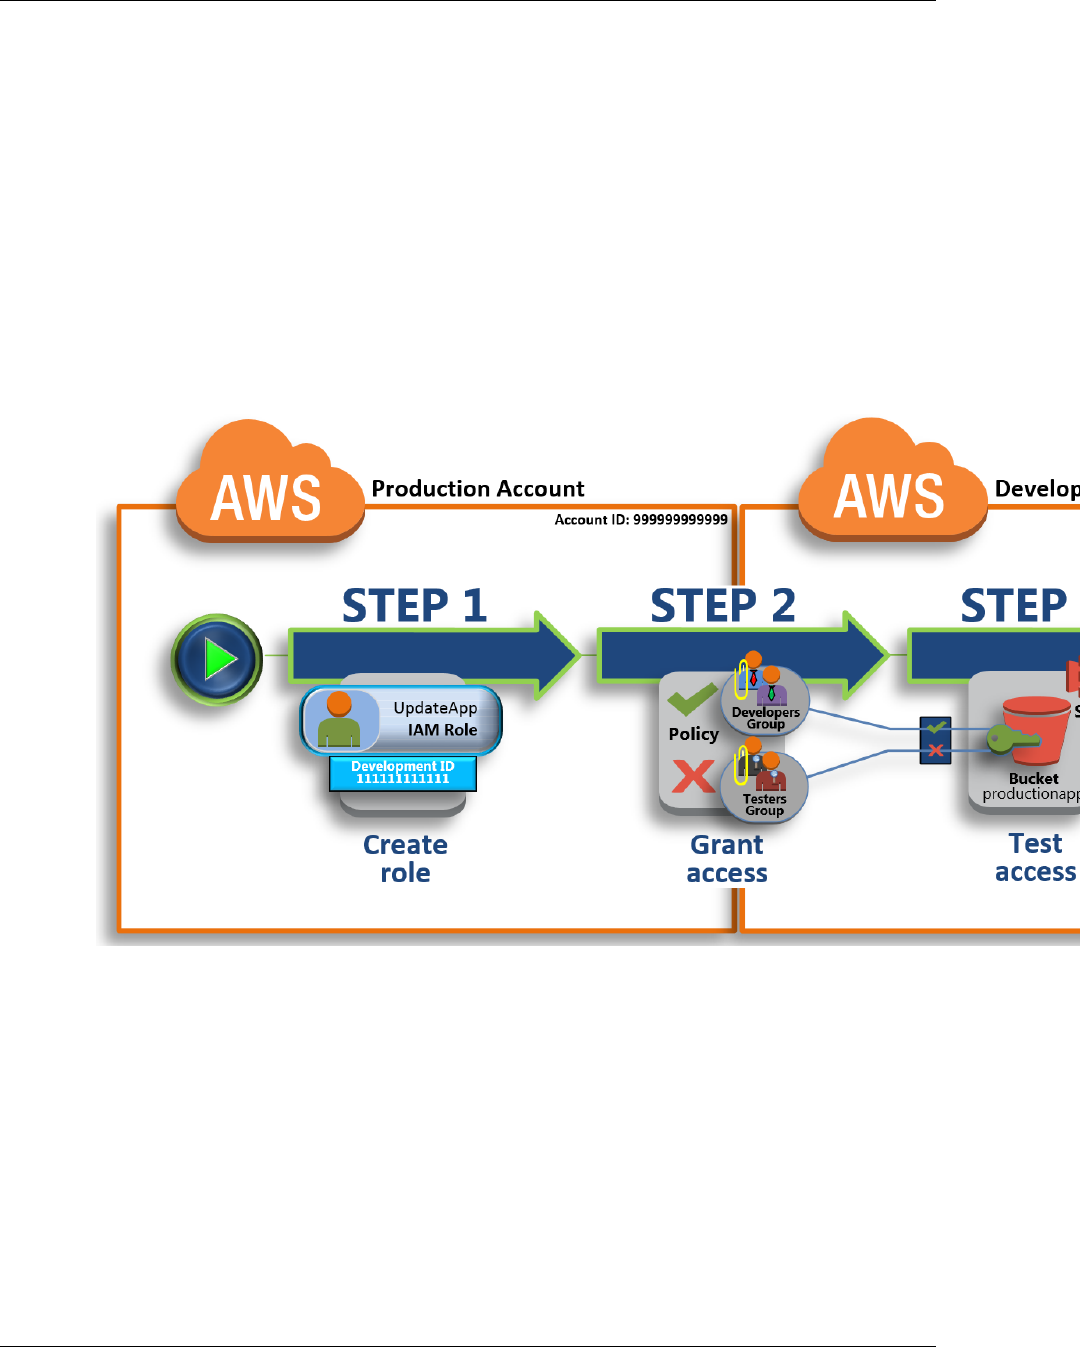
AWS Identity and Access Management User Guide
Tutorial: Delegate Access Across
AWS Accounts Using Roles
In this tutorial, imagine that the Production account is where live applications are managed, and the
Development account is a sandbox where developers and testers can freely test applications. In
each account, application information is stored in Amazon S3 buckets. You manage IAM users in the
Development account, where you have two IAM groups: Developers and Testers. Users in both groups
have permissions to work in the Development account and access resources there. From time to time,
a developer must update the live applications in the Production account. These applications are stored
in an Amazon S3 bucket called productionapp.
At the end of this tutorial, you have a role in the Production account (the trusting account) that allows
users from the Development account (the trusted account) to access the productionapp bucket in
the Production account. Developers can use the role in the AWS Management Console to access the
productionapp bucket in the Production account. They can also access the bucket by using API calls
that are authenticated by temporary credentials provided by the role. Similar attempts by a Tester to
use the role fail.
This workflow has three basic steps.
Step 1 - Create a Role (p. 25)
First, you use the AWS Management Console to establish trust between the Production account
(ID number 999999999999) and the Development account (ID number 111111111111) by
creating an IAM role named UpdateApp. When you create the role, you define the Development
account as a trusted entity and specify a permissions policy that allows trusted users to update the
productionapp bucket.
Step 2 - Grant Access to the Role (p. 27)
In this step of the tutorial, you modify the IAM group policy so that Testers are denied access to
the UpdateAPP role. Because Testers have PowerUser access in this scenario, we must explicitly
deny the ability to use the role.
Step 3 - Test Access by Switching Roles (p. 29)
Finally, as a Developer, you use the UpdateAPP role to update the productionapp bucket in the
Production account. You see how to access the role through the AWS console, the AWS CLI, and
the API.
24

AWS Identity and Access Management User Guide
Prerequisites
Prerequisites
This tutorial assumes that you have the following already in place:
• Two separate AWS accounts that you can use, one to represent the Development account, and one
to represent the Production account.
• Users and groups in the Development account created and configured as follows:
User Group Permissions
David Developers
Theresa Testers
Both users are able to sign-in and use the AWS
Management Console in the Development account.
• You do not need to have any users or groups created in the Production account.
• An Amazon S3 bucket created in the Production account. We call it ProductionApp in this tutorial,
but because S3 bucket names must be globally unique, you'll need to use a bucket with a different
name.
Step 1 - Create a Role
To allow users from one AWS account to access resources in another AWS account, create a role that
defines who can access it and what permissions it grants to users that switch to it.
In this step of the tutorial, you create the role in the Production account and specify the Development
account as a trusted entity. You also limit the role's permissions to only read and write access to the
productionapp bucket. Anyone who is granted permission to use the role can read and write to the
productionapp bucket.
Before you can create a role, you need the account ID of the Development AWS account. The account
ID is a unique identifier assigned to each AWS account.
To obtain the Development AWS account ID
1. Go to the Amazon Web Services website, pause on My Account, choose AWS Management
Console, and then sign in to the AWS Management Console for the Development account.
2. In navigation bar, choose Support, and then Support Center. The Account Number is in the
upper right corner immediately below the Support menu. The account ID is a 12-digit number. For
this scenario, we pretend the Development account ID is 111111111111; however, you should use
a valid account ID if you are reconstructing the scenario in your test environment.
To create a role in the Production account that can be used by the Development
account
1. Sign in to the AWS Management Console as an administrator of the Production account, and open
the IAM console.
2. Before creating the role, prepare the managed policy that defines the permissions that the role
requires. You attach this policy to the role in a later step.
You want to set read and write access to the productionapp bucket. Although AWS provides
some Amazon S3 managed policies, there isn't one that provides read and write access to a single
Amazon S3 bucket, so you can create your own policy instead.
In the navigation pane on the left, choose Policies and then choose Create Policy.
3. Next to Create Your Own Policy, choose Select.
25

AWS Identity and Access Management User Guide
Step 1 - Create a Role
4. Enter read-write-app-bucket for the policy name.
5. Add the following permissions to the policy document. Ensure that you replace the resource ARN
(arn:aws:s3:::productionapp) with the real one appropriate to your S3 bucket.
{
"Version": "2012-10-17",
"Statement": [
{
"Effect": "Allow",
"Action": "s3:ListAllMyBuckets",
"Resource": "arn:aws:s3:::*"
},
{
"Effect": "Allow",
"Action": [
"s3:ListBucket",
"s3:GetBucketLocation"
],
"Resource": "arn:aws:s3:::productionapp"
},
{
"Effect": "Allow",
"Action": [
"s3:GetObject",
"s3:PutObject",
"s3:DeleteObject"
],
"Resource": "arn:aws:s3:::productionapp/*"
}
]
}
The ListBucket permission allows users to view objects in the productionapp bucket. The
GetObject, PutObject, DeleteObject permissions allows users to view, update, and delete
contents in the productionapp bucket.
6. Choose Create Policy.
The new policy appears in the list of managed policies.
7. In the navigation pane on the left, choose Roles and then choose Create New Role.
8. Type UpdateAPP for the role name, and then choose Next Step.
9. Under Select Role Type, choose Role for Cross-Account Access, and then choose Select next
to Provide access between AWS accounts you own.
10. Enter the Development account ID.
For this tutorial, we're using the example account ID 111111111111 for the Development account.
You should use a valid account ID. If you use an invalid account ID, such as 111111111111, IAM
will not let you create the new role.
For now you do not need to require users to have multi-factor authentication (MFA) in order to
assume the role, so leave that option unselected. If you select this option in your environment,
then only users who sign in using a one-time password (OTP) from a multi-factor authentication
program or device can assume the role. Note that the user cannot enter the OTP at when
switching roles; it must be entered when the user initially signs in. For more information, see Using
Multi-Factor Authentication (MFA) in AWS (p. 80)
11. Choose Next Step to set the permissions that will be associated with the role.
12. Select the box next to the policy that you created previously.
26

AWS Identity and Access Management User Guide
Step 2 - Grant Access to the Role
Tip
For Filter, choose Customer Managed Policies to filter the list to include only the
policies that you have created. This hides the AWS created policies and makes it much
easier to find the one you're looking for.
Then choose Next Step.
13. The Review page appears so you can confirm the settings for the role before it's created. One very
important item to note on this page is the link that you can send to your users who need to use
this role. Users who choose the link go straight to the Switch Role page with the Account ID and
Role Name fields already filled in. You can also see this link later on the Role Summary page for
any cross-account role.
Note
For later easy selection, the IAM console caches the last five roles that you use. If your
users need more than five roles, consider the following solutions for easy access:
• If only a small number of users switch roles, recommend that they bookmark the links
that you send them.
• If many users switch roles, consider creating a central location like a web page that
contains all the links that users need to access.
The format of the link is as follows:
https://signin.aws.amazon.com/switchrole?
account=ACCOUNT_NUMBER&roleName=ROLE_NAME&displayName=DISPLAYNAME
14. After reviewing the role, choose Create Role.
The UpdateAPP role appears in the list of roles.
Now you must obtain the role's Amazon Resource Name (ARN), which is a unique identifier for the
role. When you modify the Developers and Testers group's policy, you will specify the role's ARN to
grant or deny permissions.
To obtain the ARN for UpdateAPP
1. In the navigation pane of the IAM console, choose Roles.
2. In the list of roles, choose the UpdateAPP role.
3. In the Summary section of the details pane, copy the Role ARN value.
The Production account has an account ID of 999999999999, so the role ARN is
arn:aws:iam::999999999999:role/UpdateAPP. Ensure that you supply the real AWS
account ID for your 'production' account.
At this point, you have established trust between the Production and Development accounts by
creating a role in the Production account that identifies the Development account as a trusted principal.
You also defined what users who switch to the UpdateApp role can do.
Next, modify the permissions for the groups.
Step 2 - Grant Access to the Role
At this point, both Testers and Developers group members have permissions that allow them to freely
test applications in the Development account. Here are the steps required to add permissions to allow
switching to the role.
27

AWS Identity and Access Management User Guide
Step 2 - Grant Access to the Role
To modify the Developers group to allow them to switch to the UpdateApp role
1. Sign in as an administrator in the Development account, and open the IAM console.
2. Choose Groups, and then choose Developers.
3. Choose the Permissions tab, expand the Inline Policies section, and then choose Create Group
Policy. If no inline policy exists yet, then the button does not appear. Instead, choose the link at
the end of "To create one, click here."
4. Choose Custom Policy and then choose Select button.
5. Type a policy name like allow-assume-S3-role-in-production.
6. Add the following policy statement to allow the AssumeRole action on the UpdateAPP role in
the Production account. Be sure that you change PRODUCTION-ACCOUNT-ID in the Resource
element to the actual AWS account ID of the Production account.
{
"Version": "2012-10-17",
"Statement": {
"Effect": "Allow",
"Action": "sts:AssumeRole",
"Resource": "arn:aws:iam::PRODUCTION-ACCOUNT-ID:role/UpdateAPP"
}
}
The Allow effect explicitly allows the Developers group access to the UpdateAPP role in the
Production account. Any developer who tries to access the role will succeed.
7. Choose Apply Policy to add the policy to the Developer group.
In most environments, the following procedure is likely not needed. If, however, you use Power User
permissions, then some groups might already have the ability to switch roles. The following procedures
shows how to add a "Deny" permission to the Testers group to ensure that they cannot assume
the role. If this procedure is not needed in your environment, then we recommend that you do not
add it; "Deny" permissions make the overall permissions picture more complicated to manage and
understand. Use "Deny" permissions only when there is not a better option.
To modify the Testers group to deny permission to assume the UpdateApp role
1. Choose Groups, and then choose Testers.
2. Choose the Permissions tab, expand the Inline Policies section, and then choose Create Group
Policy.
3. Choose Custom Policy and then choose the Select button.
4. Type a policy name like deny-assume-S3-role-in-production.
5. Add the following policy statement to deny the AssumeRole action on the UpdateAPP role. Be
sure that you change PRODUCTION-ACCOUNT-ID in the Resource element to the actual AWS
account ID of the Production account.
{
"Version": "2012-10-17",
"Statement": {
"Effect": "Deny",
"Action": "sts:AssumeRole",
"Resource": "arn:aws:iam::PRODUCTION-ACCOUNT-ID:role/UpdateAPP"
}
}
28

AWS Identity and Access Management User Guide
Step 3 - Test Access by Switching Roles
The Deny effect explicitly denies the Testers group access to the UpdateAPP role in the
Production account. Any tester who tries to access the role will get an access denied message.
6. Choose Apply Policy to add the policy to the Tester group.
The Developers group now has permissions to use the UpdateAPP role in the Production account. The
Testers group is prevented from using the UpdateAPP role.
Next, you'll learn how David, a developer, can access the productionapp bucket in the Production
account by using the AWS Management Console, the AWS CLI commands, and the AssumeRole API
call.
Step 3 - Test Access by Switching Roles
After completing the first two steps of this tutorial, you have a role that grants access to a resource in
the Production account, and one group in the Development account whose users are allowed to use
that role. The role is now ready to use, and this step discusses how to test switching to that role from
the AWS Management Console, the AWS CLI and the AWS API.
Important
You can switch to a role only when you are signed in as an IAM user, as an externally
authenticated user (p. 132) (SAML (p. 138) or OIDC (p. 133)) already using a role, or
when run from within an Amazon EC2 instance that is attached to a role through its instance
profile. You cannot switch to a role when you are signed in as the AWS account root user.
Switch Roles Using the AWS Management Console
If David needs to work with in the Production environment in the AWS Management Console, he
can do so by using Switch Role. He specifies the account ID or alias and the role name, and his
permissions immediately switch to those permitted by the role. He can then use the console to work
with the productionapp bucket, but cannot work with any other resources in Production. While David
is using the role, he also cannot make use of his power-user privileges in the Development account
because only one set of permissions can be in effect at a time.
Important
Switching roles using the AWS Management Console works only with accounts that do not
require an ExternalID. If you grant access to your account to a third party and require an
ExternalID in a Condition element in your permission policy, the third party can access
your account only by using the AWS API or a command-line tool. The third-party cannot use
the console because it cannot supply a value for ExternalID. For more information about
this scenario, see How to Use an External ID When Granting Access to Your AWS Resources
to a Third Party (p. 172), and How to enable cross-account access to the AWS Management
Console in the AWS Security Blog.
There are two ways that David can use to enter the Switch Role page:
• David receives a link from his administrator that points to a pre-defined Switch Role configuration.
The link is provided to the administrator on the final page of the Create Role wizard or on the Role
Summary page for a cross-account role. Choosing this link takes David to the Switch Role page
with the Account ID and Role Name fields already filled in. All David needs to do is choose Switch
Role and he's done.
• The administrator does not send the link in email, but instead sends the Account ID number and
Role Name values. David must manually enter them to switch roles. This is illustrated in the following
procedure.
29

AWS Identity and Access Management User Guide
Step 3 - Test Access by Switching Roles
To use a role in the AWS Management Console
1. David logs into the AWS console using his normal user that is in the Development group.
2. He chooses the link that his administrator sent to him in email. This takes him to the Switch Role
page with the Account ID or alias and the role name information already filled in.
—or—
He chooses his name (the Identity menu) in the navigation bar, and then chooses Switch Role.
If this is the first time David tries to access the Switch Role page this way, he will first land on a
first-run Switch Role page. This page provides additional information on how switching roles can
enable users to manage resources across AWS accounts. David must choose the Switch Role
button on this page to complete the rest of this procedure.
3. Next, in order to access the role, David must manually enter the Production account ID number
(999999999999) and the role name (UpdateApp).
Also, to help him stay aware of which role (and associated permissions) are currently active, he
types PRODUCTION in the Display Name text box, selects the red color option, and then chooses
Switch Role.
4. David can now use the Amazon S3 console to work with the Amazon S3 bucket, or any other
resource to which the UpdateApp role has permissions.
5. When he is done with the work he needs to do, David can return to his original permissions by
choosing the PRODUCTION role display name in the navigation bar, and then choosing Back to
David @ 111111111111.
6. The next time David wants to switch roles and chooses the Identity menu in the navigation bar, he
sees the PRODUCTION entry still there from last time. He can simply choose that entry to switch
roles immediately without having to reenter the account ID and role name.
Switch Roles Using the AWS CLI
If David needs to work with in the Production environment at the command line, he can do so by
using the AWS CLI. He runs the aws sts assume-role command and passes the role ARN to
get temporary security credentials for that role. He then configures those credentials in environment
variables so subsequent AWS CLI commands work using the role's permissions. While David is using
the role, he cannot make use of his power-user privileges in the Development account because only
one set of permissions can be in effect at a time.
Note that all access keys and tokens are examples only and cannot be used as shown. Replace with
the appropriate values from your live environment.
To use a role in the AWS CLI
1. David opens a command prompt window, and confirms that the AWS CLI client is working by
running the command:
aws help
Note
David's default environment uses the David user credentials from his default profile that
he created with the aws configure command. For more information, see Configuring
the AWS Command Line Interface in the AWS Command Line Interface User Guide.
2. He begins the switch role process by running the following command to switch to the UpdateApp
role in the Production account. He got the role ARN from the administrator that created the role.
The command requires that you provide a session name as well, you can choose any text you like
for that.
30

AWS Identity and Access Management User Guide
Step 3 - Test Access by Switching Roles
aws sts assume-role --role-arn "arn:aws:iam::999999999999:role/UpdateApp"
--role-session-name "David-ProdUpdate"
David then sees the following in the output:
{
"Credentials": {
"SecretAccessKey": "wJalrXUtnFEMI/K7MDENG/bPxRfiCYEXAMPLEKEY",
"SessionToken": "AQoDYXdzEGcaEXAMPLE2gsYULo
+Im5ZEXAMPLEeYjs1M2FUIgIJx9tQqNMBEXAMPLE
CvSRyh0FW7jEXAMPLEW+vE/7s1HRpXviG7b+qYf4nD00EXAMPLEmj4wxS04L/
uZEXAMPLECihzFB5lTYLto9dyBgSDy
EXAMPLE9/
g7QRUhZp4bqbEXAMPLENwGPyOj59pFA4lNKCIkVgkREXAMPLEjlzxQ7y52gekeVEXAMPLEDiB9ST3Uuysg
sKdEXAMPLE1TVastU1A0SKFEXAMPLEiywCC/Cs8EXAMPLEpZgOs+6hz4AP4KEXAMPLERbASP
+4eZScEXAMPLEsnf87e
NhyDHq6ikBQ==",
"Expiration": "2014-12-11T23:08:07Z",
"AccessKeyId": "AKIAIOSFODNN7EXAMPLE"
}
}
3. David sees the three pieces he needs in the Credentials section of the output.
• AccessKeyId
• SecretAccessKey
• SessionToken
David needs to configure the AWS CLI environment to use these parameters in subsequent calls.
For information about the various ways to configure your credentials, see Configuring the AWS
Command Line Interface. You cannot use the aws configure command because it does not
support capturing the session token. However, you can manually enter the information into a
configuration file. Because these are temporary credentials with a relatively short expiration time, it
is easiest to add them to the environment of your current command line session.
4. To add the three values to the environment, David cuts and pastes the output of the previous step
into the following commands. Note that you might want to cut and paste into a simple text editor
to address line wrap issues in the output of the session token. It must be entered as a single long
string, even though it is shown line wrapped here for clarity.
set AWS_ACCESS_KEY_ID=AKIAIOSFODNN7EXAMPLE
set AWS_SECRET_ACCESS_KEY=wJalrXUtnFEMI/K7MDENG/bPxRfiCYEXAMPLEKEY
set AWS_SESSION_TOKEN=AQoDYXdzEGcaEXAMPLE2gsYULo
+Im5ZEXAMPLEeYjs1M2FUIgIJx9tQqNMBEXAMPLECvS
Ryh0FW7jEXAMPLEW+vE/7s1HRpXviG7b+qYf4nD00EXAMPLEmj4wxS04L/
uZEXAMPLECihzFB5lTYLto9dyBgSDyEXA
MPLEKEY9/
g7QRUhZp4bqbEXAMPLENwGPyOj59pFA4lNKCIkVgkREXAMPLEjlzxQ7y52gekeVEXAMPLEDiB9ST3UusKd
EXAMPLE1TVastU1A0SKFEXAMPLEiywCC/Cs8EXAMPLEpZgOs+6hz4AP4KEXAMPLERbASP
+4eZScEXAMPLENhykxiHen
DHq6ikBQ==
At this point, any following commands will run under the permissions of the role identified by those
credentials. In David's case, the UpdateApp role.
31

AWS Identity and Access Management User Guide
Related Resources
5. Run the command to access the resources in the Production account. In this example, David
simply lists the contents of his S3 bucket with the following command.
aws s3 ls s3://productionapp
Because Amazon S3 bucket names are universally unique, there is no need to specify the account
ID that owns the bucket. To access resources for other AWS services, refer to the AWS CLI
documentation for that service for the commands and syntax required to reference its resources.
Using AssumeRole From the API
When David needs to make an update to the Production account from code, he makes an
AssumeRole call to assume the UpdateAPP role. The call returns temporary credentials that he
can use to access the productionapp bucket in the Production account. With those credentials,
David can make API calls to update the productionapp bucket but cannot make API calls to access
any other resources in the Production account, even though he has power-user privileges in the
Development account.
To use a role by making API calls
1. David calls AssumeRole as part of an application. He must specify the UpdateAPP ARN:
arn:aws:iam::999999999999:role/UpdateAPP.
The response from the AssumeRole call includes the temporary credentials with an
AccessKeyId, a SecretAccessKey, and an Expiration time that indicates when the
credentials expire and you must request new ones.
2. With the temporary credentials, David makes an s3:PutObject call to update the
productionapp bucket. He would pass the credentials to the API call as the AuthParams
parameter. Because the temporary role credentials have only read and write access to the
productionapp bucket, any other actions in the Production account are denied.
For a code sample (using Python), see Switching to an IAM Role (API) (p. 200).
Related Resources
• For more information about IAM users and groups, see Identities (Users, Groups, and
Roles) (p. 55) .
• For more information about Amazon S3 buckets, see Create a Bucket with Amazon Simple Storage
Service in the Amazon Simple Storage Service Getting Started Guide.
Summary
You have completed the cross-account API access tutorial. You created a role to establish trust with
another account and defined what actions trusted entities can take. Then, you modified a group policy
to control which IAM users can access the role. As a result, developers from the Development account
can make updates to the productionapp bucket in the Production account by using temporary
credentials.
32
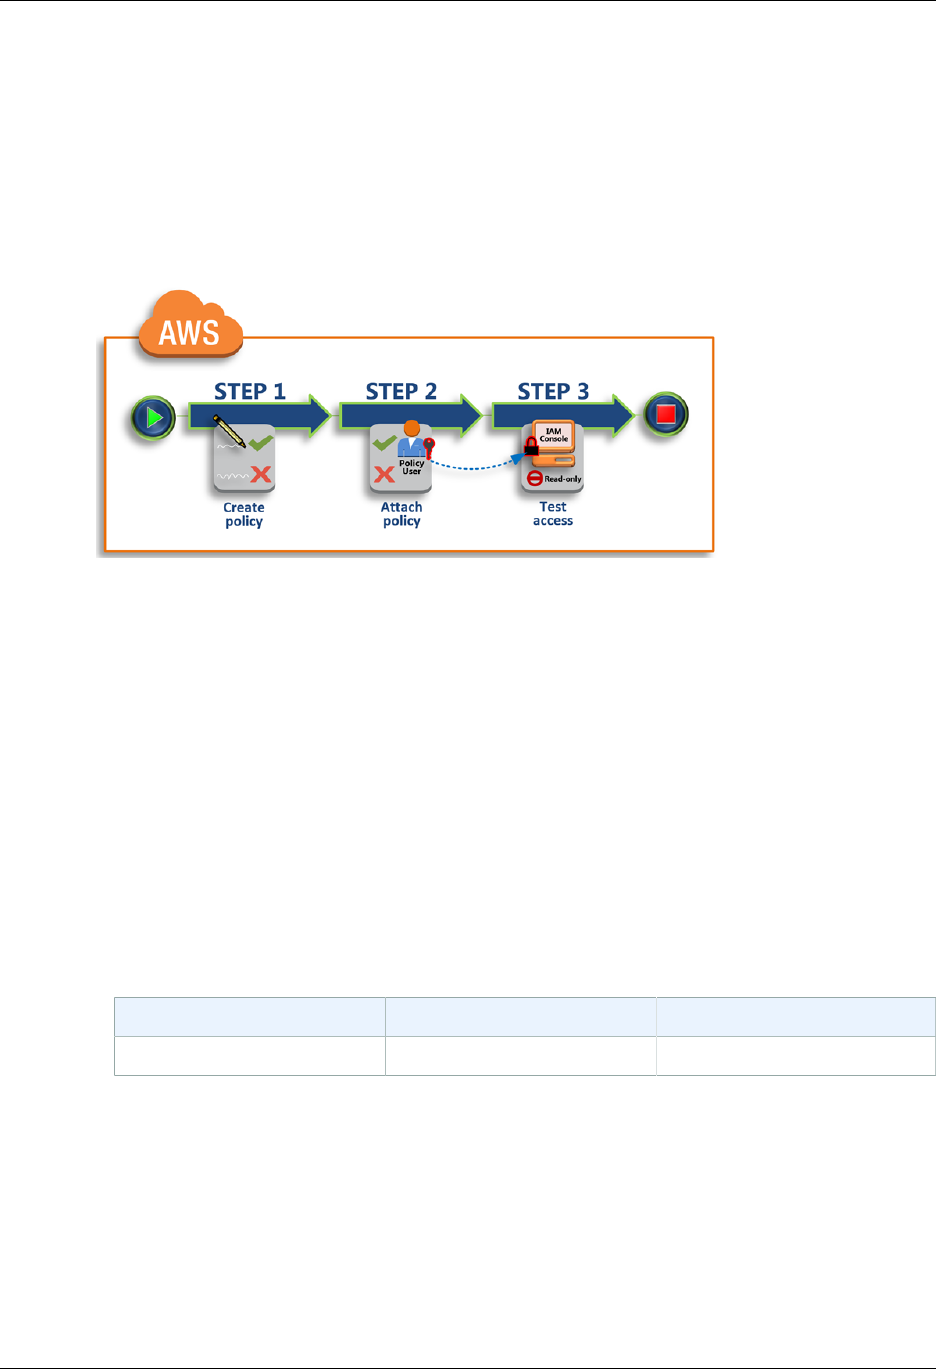
AWS Identity and Access Management User Guide
Tutorial: Create a Customer Managed Policy
Tutorial: Create and Attach Your First
Customer Managed Policy
In this tutorial, you use the AWS Management Console to create a customer-managed policy (p. 267)
and then attach that policy to an IAM user in your AWS account. The policy you create allows an IAM
test user to sign in directly to the AWS Management Console with read only permissions.
This workflow has three basic steps:
Step 1: Create the Policy (p. 33)
By default, IAM users do not have permissions to do anything. They cannot access the AWS
Management Console or manage the data within unless you allow it. In this step, you create a
customer-managed policy that allows any attached user to sign-in to the console.
Step 2: Attach the Policy (p. 34)
When you attach a policy to a user, the user inherits all of the access permissions that are
associated with that policy. In this step, you attach the new policy to a test user account.
Step 3: Test User Access (p. 34)
Once the policy is attached, you can sign in as the user and test the policy.
Prerequisites
To perform the steps in this tutorial, you need to already have the following:
• An AWS account that you can sign in to as an IAM user with administrative permissions.
• A test IAM user that has no permissions assigned or group memberships as follows:
User Name Group Permissions
PolicyUser <none> <none>
Step 1: Create the Policy
In this step, you create a customer managed policy that allows any attached user to sign in to the AWS
Management Console with read-only access to IAM data.
To create the policy for your test user
1. Sign in to the IAM console at https://console.aws.amazon.com/iam/ with your user that has
administrator permissions.
33

AWS Identity and Access Management User Guide
Step 2: Attach the Policy
2. In the navigation pane, choose Policies.
3. In the content pane, choose Create Policy.
4. Next to Create Your Own Policy, choose Select.
5. For Policy Name, type UsersReadOnlyAccessToIAMConsole.
6. For Policy Document, paste the following policy.
{
"Version": "2012-10-17",
"Statement": [ {
"Effect": "Allow",
"Action": [
"iam:GenerateCredentialReport",
"iam:Get*",
"iam:List*"
],
"Resource": "*"
} ]
}
7. Choose Validate Policy and ensure that no errors display in a red box at the top of the screen.
Correct any that are reported.
Note
If Use autoformatting is selected, the policy is reformatted whenever you open a policy
or choose Validate Policy.
8. Choose Create Policy.
You now have a policy ready to attach.
Step 2: Attach the Policy
Next you attach the policy you just created to your test IAM user.
To attach the policy to your test user
1. In the IAM console, in the navigation pane, choose Policies.
2. At the top of the policy list, in the search box, start typing UsersReadOnlyAccesstoIAMConsole
until you can see your policy, and then check the box next to
UsersReadOnlyAccessToIAMConsole in the list.
3. Choose the Policy Actions button, and then chose Attach.
4. Choose All Types to display the filter menu, and then choose Users.
5. In the search box, start typing PolicyUser until that user is visible on the list, and then check the
box next to that user in the list.
6. Choose Attach Policy.
You have attached the policy to your IAM test user, which means that user now has read-only access
to the IAM console.
Step 3: Test User Access
For this tutorial, we recommend that you test access by signing in as the test user so you can observe
the results and see what your users might experience.
34

AWS Identity and Access Management User Guide
Related Resources
To test access by signing in with your test user account
1. Sign in to the IAM console at https://console.aws.amazon.com/iam/ with your PolicyUser test
user.
2. Browse through the pages of the console and try to create a new user or group. Notice that
PolicyUser can display data but cannot create or modify existing IAM data.
Related Resources
For related information in the IAM User Guide, see the following resources:
•Managed Policies and Inline Policies (p. 266)
•Controlling User Access to the AWS Management Console (p. 49)
•Create individual IAM users (p. 41)
Summary
You’ve now successfully completed all of the steps necessary to create and attach a customer-
managed policy. As a result, you are able to sign in to the IAM console with your test account and have
seen firsthand what the experience would be like for your users.
Tutorial: Enable Your Users to Configure Their
Own Credentials and MFA Settings
You can enable your users to self-manage their own multi-factor authentication (MFA) devices and
credentials. You can use the AWS Management Console to configure credentials (access keys and
passwords) and MFA devices for your users in small numbers, but that is a task that could very quickly
become time consuming as the number of users grows. Security best practice specifies that users
should regularly change their passwords and rotate their access keys, and that they should use MFA,
at the very least for sensitive operations. Showing you how to enable these best practices without
burdening your administrators is the goal of this tutorial.
This tutorial shows how to grant users access to AWS services, but only when they sign in with MFA. If
they are not signed in with MFA, then they are denied all permissions except those required to change
their password or manage their MFA devices, including provisioning a new one.
This workflow has three basic steps.
35

AWS Identity and Access Management User Guide
Prerequisites
Step 1: Create a Policy to Enforce MFA Sign-in (p. 36)
Create a customer-managed policy that prohibits all actions except the few IAM APIs that enable
changing credentials and managing MFA devices.
Step 2: Attach Policies to Your Test Group (p. 38)
Create a group whose members have full access to all Amazon EC2 actions if they sign-in
with MFA by attaching both the AWS-managed policy called AmazonEC2FullAccess and the
customer-managed policy you created in the first step.
Step 3: Test Your User's Access (p. 38)
Sign in as the test user to verify that access to Amazon EC2 is blocked until the user creates an
MFA device and then signs in using that device.
Prerequisites
To perform the steps in this tutorial, you need to already have the following:
• An AWS account that you can sign in to as an IAM user with administrative permissions.
• Your account ID number which you'll type into the policy in Step 1.
To find your account ID number, in the navigation bar at the top of the page, choose Support and
then choose Support Center. You can find your account ID under this page's Support menu.
• A test IAM user with group membership as follows:
Create user account Create and configure group account
MFAUser Clear the check box for
Generate an access
key for each user EC2MFA MFAUser
Step 1: Create a Policy to Enforce MFA Sign-in
You begin by creating an IAM customer-managed policy that denies all permissions except those
required for IAM users to manage their own credentials and MFA devices.
1. Sign in to the AWS Management Console as a user with administrator credentials. To adhere
to IAM best practices, don’t sign in with your root account. For more information, see Create
individual IAM users.
2. Open the IAM console at https://console.aws.amazon.com/iam/.
3. In the navigation pane, choose Policies, and then choose Create Policy.
4. On the Create Policy page, choose Select next to Create Your Own Policy.
5. On the Review Policy page, for Policy Name type Force_MFA, and for Description type
something like This policy allows users to manage their own passwords and MFA
devices but nothing else unless they authenticate with MFA.
6. In the Policy Document editor window, paste the following policy text, replacing the six
occurrences of accountid with your actual account ID number.
{
"Version": "2012-10-17",
"Statement":[
{
"Sid": "AllowAllUsersToListAccounts",
"Effect": "Allow",
36

AWS Identity and Access Management User Guide
Step 1: Create a Policy to Enforce MFA Sign-in
"Action":[
"iam:ListAccountAliases",
"iam:ListUsers",
"iam:GetAccountSummary"
],
"Resource": "*"
},
{
"Sid":
"AllowIndividualUserToSeeAndManageTheirOwnAccountInformation",
"Effect": "Allow",
"Action":[
"iam:ChangePassword",
"iam:CreateAccessKey",
"iam:CreateLoginProfile",
"iam:DeleteAccessKey",
"iam:DeleteLoginProfile",
"iam:GetAccountPasswordPolicy",
"iam:GetLoginProfile",
"iam:ListAccessKeys",
"iam:UpdateAccessKey",
"iam:UpdateLoginProfile"
],
"Resource": "arn:aws:iam::accountid:user/${aws:username}"
},
{
"Sid": "AllowIndividualUserToListTheirOwnMFA",
"Effect": "Allow",
"Action":[
"iam:ListVirtualMFADevices",
"iam:ListMFADevices"
],
"Resource":[
"arn:aws:iam::accountid:mfa/*",
"arn:aws:iam::accountid:user/${aws:username}"
]
},
{
"Sid": "AllowIndividualUserToManageTheirOwnMFA",
"Effect": "Allow",
"Action":[
"iam:CreateVirtualMFADevice",
"iam:DeactivateMFADevice",
"iam:DeleteVirtualMFADevice",
"iam:RequestSmsMfaRegistration",
"iam:FinalizeSmsMfaRegistration",
"iam:EnableMFADevice",
"iam:ResyncMFADevice"
],
"Resource":[
"arn:aws:iam::accountid:mfa/${aws:username}",
"arn:aws:iam::accountid:user/${aws:username}"
]
},
{
"Sid": "BlockAnyAccessOtherThanAboveUnlessSignedInWithMFA",
"Effect": "Deny",
"NotAction": "iam:*",
"Resource": "*",
37

AWS Identity and Access Management User Guide
Step 2: Attach Policies to Your Test Group
"Condition":{ "Bool":{ "aws:MultiFactorAuthPresent": "false"}}
}
]
}
What does this policy do?
• The first statement enables the user to see basic information about the account and its users
in the IAM console. These three permissions need to be in their own statement because
they do not support or do not need to specify a specific resource ARN, and instead specify
"Resource" : "*".
• The second statement enables the user to manage his or her own user, password, access keys,
and MFA information in the IAM console, including creating and changing them. The resource
ARN limits the use of these permissions to only the user's own IAM user entity.
• The third statement enables the user to see information about MFA devices, and which are
associated with his or her IAM user entity.
• The fourth statement allows the user to provision or manage his or her own MFA device. Notice
that the resource ARNs in the fourth statement allow access to only an MFA device or user that
has the exact same name as the currently signed-in user. Users can't create or alter any MFA
device other than their own.
• The final statement uses a combination of "Deny" and "NotAction" to explictly deny any
non-IAM actions if the user is not signed-in with MFA. If the user is signed-in with MFA, then
the "Condition" test fails and the final "deny" statement has no effect and other permissions
granted to the user can take effect. This last statement ensures that when the user is not
signed-in with MFA that they can only perform only the IAM actions allowed in the first four
statements.
7. Choose Validate Policy to ensure it is correct. Remember to replace your account ID for the
placeholder above. After it passes validation, choose Create Policy.
Step 2: Attach Policies to Your Test Group
Next you attach two policies to the test IAM group which will be used to grant the MFA-protected
permissions.
1. In the navigation pane, choose Groups.
2. For Filter, type EC2MFA, and then select the group in the list.
3. Choose the Group Actions button, and then chose Attach.
4. Choose the Permissions tab, and then click Attach Policy.
5. On the Attach Policy page, in the Filter box type EC2Full and then select the check box next to
AmazonEC2FullAccess in the list. Don't save your changes yet.
6. In the Filter box type Force, and then select the check box next to Force_MFA in the list.
7. Choose Attach Policy.
Step 3: Test Your User's Access
In this part of the tutorial you sign in as the test user and verify that the policy works as intended.
1. Sign in to your AWS account as MFAUser with the password you assigned in the previous section.
Use the URL: https://<alias or account ID number>.signin.aws.amazon.com/
console
2. Choose EC2 to open the Amazon EC2 console and verify that the user has no permissions to do
anything.
38

AWS Identity and Access Management User Guide
Related Resources
3. In the navigation bar, choose Services, and then choose IAM to open the IAM console.
4. In the navigation pane, choose Users, and then choose the user (not the check box) MFAUser. If
the Groups tab appears by default, note that it says you are not a member of any group. This is
because you don't (in this scenario) have permissions to see your group memberships.
5. Now add an MFA device. Choose the Security Credentials tab, and then choose Manage MFA
Device.
6. For this tutorial, we'll use text messaging-based SMS MFA. Choose An SMS MFA device, and
then click Next Step.
7. Enter your cell phone number and then choose Next Step. When you get the confirmation code as
a text message on your phone, type the code into the box, choose Activate SMS MFA, and then
choose Finish. You can now use MFA to sign in as this user.
8. Sign out of the console and then sign in as MFAUser again. This time AWS prompts you for an
MFA code from your phone. When you get it, type the code in the box and then choose Submit.
9. Choose EC2 to open the Amazon EC2 console again, and note that this time you can see all the
information and perform any actions you wish. If you go to any other console as this user, you will
see "access denied" messages because the policies in this tutorial grant access only to Amazon
EC2.
Related Resources
For related information found in the IAM User Guide, see the following resources:
•Using Multi-Factor Authentication (MFA) in AWS (p. 80)
•Enabling MFA Devices (p. 81)
•Using MFA Devices With Your IAM Sign-in Page (p. 52)
Summary
In this tutorial, you learned how you can create an IAM policy that enables you to restrict access to
any actions to only users who sign in using an MFA device. The policy enables self-provisioning of
passwords, access keys, and MFA devices so that a user can create their own MFA device if they don't
already have one. This helps you improve the overall security posture of your AWS account but doesn't
increase the burden on your administrative staff by requiring them to provision MFA devices for your
users.
39

AWS Identity and Access Management User Guide
Best Practices
IAM Best Practices and Use
Cases
To get the greatest benefits from IAM, take time to learn the recommended best practices. One way to
do this is to see how IAM is used in real-world scenarios to work with other AWS services.
Topics
•IAM Best Practices (p. 40)
•Business Use Cases (p. 44)
IAM Best Practices
To help secure your AWS resources, follow these recommendations for the AWS Identity and Access
Management (IAM) service.
Topics
•Lock away your AWS account (root) access keys (p. 41)
•Create individual IAM users (p. 41)
•Use groups to assign permissions to IAM users (p. 41)
•Grant least privilege (p. 42)
•Configure a strong password policy for your users (p. 42)
•Enable MFA for privileged users (p. 42)
•Use roles for applications that run on Amazon EC2 instances (p. 43)
•Delegate by using roles instead of by sharing credentials (p. 43)
•Rotate credentials regularly (p. 43)
•Remove unnecessary credentials (p. 43)
•Use policy conditions for extra security (p. 44)
•Monitor activity in your AWS account (p. 44)
•Video presentation about IAM best practices (p. 44)
40

AWS Identity and Access Management User Guide
Lock away your AWS account (root) access keys
Lock away your AWS account (root) access keys
You use an access key (an access key ID and secret access key) to make programmatic requests
to AWS. However, do not use your AWS account (root) access key. The access key for your AWS
account gives full access to all your resources for all AWS services, including your billing information.
You cannot restrict the permissions associated with your AWS account access key.
Therefore, protect your AWS account access key like you would your credit card numbers or any other
sensitive secret. Here are some ways to do that:
• If you don't already have an access key for your AWS account, don't create one unless you
absolutely need to. Instead, use your account email address and password to sign in to the AWS
Management Console and create an IAM user for yourself that has administrative privileges, as
explained in the next section.
• If you do have an access key for your AWS account, delete it. If you must keep it, rotate (change)
the access key regularly. To delete or rotate your AWS account access keys, go to the Security
Credentials page in the AWS Management Console and sign in with your account's email address
and password. You can manage your access keys in the Access Keys section.
• Never share your AWS account password or access keys with anyone. The remaining sections of
this document discuss various ways to avoid having to share your account credentials with other
users and to avoid having to embed them in an application.
• Use a strong password to help protect account-level access to the AWS Management Console. For
information about managing your AWS account password, see Changing the AWS Account ("root")
Password (p. 66).
• Enable AWS multifactor authentication (MFA) on your AWS account. For more information, see
Using Multi-Factor Authentication (MFA) in AWS (p. 80).
Create individual IAM users
Don't use your AWS root account credentials to access AWS, and don't give your credentials to
anyone else. Instead, create individual users for anyone who needs access to your AWS account.
Create an IAM user for yourself as well, give that user administrative privileges, and use that IAM user
for all your work. For information about how to do this, see Creating Your First IAM Admin User and
Group (p. 14).
By creating individual IAM users for people accessing your account, you can give each IAM user
a unique set of security credentials. You can also grant different permissions to each IAM user. If
necessary, you can change or revoke an IAM user's permissions any time. (If you give out your AWS
root credentials, it can be difficult to revoke them, and it is impossible to restrict their permissions.)
Note
Before you set permissions for individual IAM users, though, see the next point about groups.
Use groups to assign permissions to IAM users
Instead of defining permissions for individual IAM users, it's usually more convenient to create
groups that relate to job functions (administrators, developers, accounting, etc.), define the relevant
permissions for each group, and then assign IAM users to those groups. All the users in an IAM group
inherit the permissions assigned to the group. That way, you can make changes for everyone in a
group in just one place. As people move around in your company, you can simply change what IAM
group their IAM user belongs to.
For more information, see the following:
•Creating Your First IAM Admin User and Group (p. 14)
41

AWS Identity and Access Management User Guide
Grant least privilege
•Managing IAM Groups (p. 121)
Grant least privilege
When you create IAM policies, follow the standard security advice of granting least privilege—that is,
granting only the permissions required to perform a task. Determine what users need to do and then
craft policies for them that let the users perform only those tasks.
It's more secure to start with a minimum set of permissions and grant additional permissions as
necessary, rather than starting with permissions that are too lenient and then trying to tighten them
later.
Defining the right set of permissions requires some research to determine what is required for the
specific task, what actions a particular service supports, and what permissions are required in order to
perform those actions.
One feature that can help with this is the Access Advisor tab, which is available on the IAM console
Summary page whenever you inspect a user, group, role, or policy. This tab includes information
about which services are actually used by a user, group, role, or by anyone using a policy. You can
use this information to identify unnecessary permissions so that you can refine your IAM policies to
better adhere to the principle of least privilege. For more information, see Service Last Accessed
Data (p. 295).
For more information, see the following:
•Access Management (p. 250)
• Policy topics for individual services, which provide examples of how to write policies for service-
specific resources. Examples:
•Using IAM to Control Access to DynamoDB Resources in the Amazon DynamoDB Developer
Guide
•Using Bucket Policies and User Policies in the Amazon Simple Storage Service Developer Guide
•Access Control List (ACL) Overview in the Amazon Simple Storage Service Developer Guide
Configure a strong password policy for your
users
If you allow users to change their own passwords, require that they create strong passwords and
that they rotate their passwords periodically. On the Account Settings page of the IAM console, you
can create a password policy for your account. You can use the password policy to define password
requirements, such as minimum length, whether it requires non-alphabetic characters, how frequently it
must be rotated, and so on.
For more information, see Setting an Account Password Policy for IAM Users (p. 67).
Enable MFA for privileged users
For extra security, enable multifactor authentication (MFA) for privileged IAM users (users who are
allowed access to sensitive resources or APIs). With MFA, users have a device that generates a
unique authentication code (a one-time password, or OTP) and users must provide both their normal
credentials (like their user name and password) and the OTP. The MFA device can either be a special
piece of hardware, or it can be a virtual device (for example, it can run in an app on a smartphone).
For more information, see Using Multi-Factor Authentication (MFA) in AWS (p. 80).
42

AWS Identity and Access Management User Guide
Use roles for applications that
run on Amazon EC2 instances
Use roles for applications that run on Amazon
EC2 instances
Applications that run on an Amazon EC2 instance need credentials in order to access other AWS
services. To provide credentials to the application in a secure way, use IAM roles. A role is an entity
that has its own set of permissions, but that isn't a user or group. Roles also don't have their own
permanent set of credentials the way IAM users do. In the case of Amazon EC2, IAM dynamically
provides temporary credentials to the EC2 instance, and these credentials are automatically rotated for
you.
When you launch an EC2 instance, you can specify a role for the instance as a launch parameter.
Applications that run on the EC2 instance can use the role's credentials when they access AWS
resources. The role's permissions determine what the application is allowed to do.
For more information, see Using an IAM Role to Grant Permissions to Applications Running on
Amazon EC2 Instances (p. 202).
Delegate by using roles instead of by sharing
credentials
You might need to allow users from another AWS account to access resources in your AWS account.
If so, don't share security credentials, such as access keys, between accounts. Instead, use IAM roles.
You can define a role that specifies what permissions the IAM users in the other account are allowed,
and from which AWS accounts the IAM users are allowed to assume the role.
For more information, see Roles Terms and Concepts (p. 125).
Rotate credentials regularly
Change your own passwords and access keys regularly, and make sure that all IAM users in your
account do as well. That way, if a password or access key is compromised without your knowledge,
you limit how long the credentials can be used to access your resources. You can apply a password
policy to your account to require all your IAM users to rotate their passwords, and you can choose how
often they must do so.
For more information about setting a password policy in your account, see Setting an Account
Password Policy for IAM Users (p. 67).
For more information about rotating access keys for IAM users, see Rotating Access Keys (AWS CLI,
Tools for Windows PowerShell, and AWS API) (p. 79).
Remove unnecessary credentials
Remove IAM user credentials (that is, passwords and access keys) that are not needed. For example,
an IAM user that is used for an application does not need a password (passwords are necessary only
to sign in to AWS websites). Similarly, if a user does not and will never use access keys, there's no
reason for the user to have them.
You can generate and download a credential report that lists all IAM users in your account and the
status of their various credentials, including passwords, access keys, and MFA devices. For passwords
and access keys, the credential report shows how recently the credentials have been used. Passwords
and access keys that have not been used recently might be good candidates for removal.
For more information about IAM credential reports, see the section called “Getting Credential
Reports” (p. 106).
43

AWS Identity and Access Management User Guide
Use policy conditions for extra security
In addition to using credential reports, you can also determine when a password or access key was last
used by using these IAM APIs:
•ListUsers (AWS CLI command: aws iam list-users)
•GetUser (AWS CLI command: aws iam get-user)
•GetAccessKeyLastUsed (AWS CLI command: aws iam get-access-key-last-used)
Use policy conditions for extra security
To the extent that it's practical, define the conditions under which your IAM policies allow access to
a resource. For example, you can write conditions to specify a range of allowable IP addresses that
a request must come from, or you can specify that a request is allowed only within a specified date
range or time range. You can also set conditions that require the use of SSL or MFA (multifactor
authentication). For example, you can require that a user has authenticated with an MFA device in
order to be allowed to terminate an Amazon EC2 instance.
For more information, see Condition (p. 356) in the IAM Policy Elements Reference.
Monitor activity in your AWS account
You can use logging features in AWS to determine the actions users have taken in your account and
the resources that were used. The log files show the time and date of actions, the source IP for an
action, which actions failed due to inadequate permissions, and more.
Logging features are available in the following AWS services:
•Amazon CloudFront – Logs user requests that CloudFront receives. For more information, see
Access Logs in the Amazon CloudFront Developer Guide.
•AWS CloudTrail – Logs AWS API calls and related events made by or on behalf of an AWS account.
For more information, see the AWS CloudTrail User Guide.
•Amazon CloudWatch – Monitors your AWS cloud resources and the applications you run on AWS.
You can set alarms in CloudWatch based on metrics that you define. For more information, see the
Amazon CloudWatch Developer Guide.
•AWS Config – Provides detailed historical information about the configuration of your AWS
resources, including your IAM users, groups, roles, and policies. For example, you can use AWS
Config to determine the permissions that belonged to a user or group at a specific time. For more
information, see the AWS Config Developer Guide.
•Amazon Simple Storage Service (Amazon S3) – Logs access requests to your Amazon S3 buckets.
For more information, see Server Access Logging in the Amazon Simple Storage Service Developer
Guide.
Video presentation about IAM best practices
The following video includes a conference presentation that covers these best practices and shows
additional details about how to work with the features discussed here.
AWS re:Invent 2015 - IAM Best Practices
Business Use Cases
A simple business use case for IAM can help you understand basic ways you might implement the
service to control the AWS access your users have. The use case is described in general terms,
without the mechanics of how you'd use the IAM API to achieve the results you want.
44

AWS Identity and Access Management User Guide
Initial Setup of Example Corp
This use case looks at two typical ways a fictional company called Example Corp might use IAM—first,
with Amazon Elastic Compute Cloud (Amazon EC2), and then with Amazon Simple Storage Service
(Amazon S3).
For more information about using IAM with other services from AWS, see AWS Services That Work
with IAM (p. 340).
Topics
•Initial Setup of Example Corp (p. 45)
•Use Case for IAM with Amazon EC2 (p. 45)
•Use Case for IAM with Amazon S3 (p. 46)
Initial Setup of Example Corp
Joe is the founder of Example Corp. Upon starting the company, he creates his own AWS account
and uses AWS products by himself. Then he hires employees to work as developers, admins, testers,
managers, and system administrators.
Joe uses the AWS Management Console with the AWS account's security credentials to create a user
for himself called Joe, and a group called Admins. He gives the Admins group permissions to perform
all actions on all the AWS account's resources (that is, root privileges), and then he adds the Joe user
to the Admins group. For a step-by-step guide to creating an Administrators group and an IAM user for
yourself, then adding your user to the Administrators group, see Creating Your First IAM Admin User
and Group (p. 14).
At this point, Joe can stop using the AWS account's credentials to interact with AWS, and instead he
begins using only his user credentials.
Joe also creates a group called AllUsers so he can easily apply any account-wide permissions to all
users in the AWS account. He adds himself to the group. He then creates a group called Developers,
a group called Testers, a group called Managers, and a group called SysAdmins. He creates users
for each of his employees, and puts the users in their respective groups. He also adds them all to
the AllUsers group. For information about creating groups, see Creating IAM Groups (p. 120). For
information about creating users, see Creating an IAM User in Your AWS Account (p. 59). For
information about adding users to groups, see Managing IAM Groups (p. 121).
Use Case for IAM with Amazon EC2
A company like Example Corp typically uses IAM to interact with services like Amazon EC2. To
understand this part of the use case, you need to have a basic understanding of Amazon EC2. For
more information about Amazon EC2, go to the Amazon EC2 User Guide for Linux Instances.
Amazon EC2 Permissions for the Groups
To provide "perimeter" control, Joe attaches a policy to the AllUsers group that denies any AWS
request from a user if the originating IP address is outside Example Corp's corporate network.
At Example Corp, different groups require different permissions:
•System Administrators – Need permission to create and manage AMIs, instances, snapshots,
volumes, security groups, and so on. Joe attaches a policy to the SysAdmins group that gives
members of the group permission to use all the Amazon EC2 actions.
•Developers – Need the ability to work with instances only. Joe therefore attaches a policy to
the Developers group that allows developers to call DescribeInstances, RunInstances,
StopInstances, StartInstances, and TerminateInstances.
45

AWS Identity and Access Management User Guide
Use Case for IAM with Amazon S3
Note
Amazon EC2 uses SSH keys, Windows passwords, and security groups to control who has
access to the operating system of specific Amazon EC2 instances. There's no method in
the IAM system to allow or deny access to the operating system of a specific instance.
•Managers – Should not be able to perform any Amazon EC2 actions except listing the Amazon EC2
resources currently available. Therefore, Joe attaches a policy to the Managers group that only lets
them call Amazon EC2 "Describe" APIs.
For examples of what these policies might look like, see Example Policies for Administering AWS
Resources (p. 299) and Using AWS Identity and Access Management in the Amazon EC2 User
Guide for Linux Instances.
User's Role Change
At some point, one of the developers, Don, changes roles and becomes a manager. Joe moves Don
from the Developers group to the Managers group. Now that he's in the Managers group, Don's ability
to interact with Amazon EC2 instances is limited. He can't launch or start instances. He also can't stop
or terminate existing instances, even if he was the user who launched or started the instance. He can
list only the instances that Example Corp users have launched.
Use Case for IAM with Amazon S3
Companies like Example Corp would also typically use IAM with Amazon S3. Joe has created an
Amazon S3 bucket for the company called example_bucket.
Creation of Other Users and Groups
As employees, Don and Mary each need to be able to create their own data in the company's bucket,
as well as read and write shared data that all developers will work on. To enable this, Joe logically
arranges the data in example_bucket using an Amazon S3 key prefix scheme as shown in the
following figure.
/example_bucket
/home
/don
/mary
/share
/developers
/managers
Joe divides the master /example_bucket into a set of home directories for each employee, and a
shared area for groups of developers and managers.
Now Joe creates a set of policies to assign permissions to the users and groups:
•Home directory access for Don – Joe attaches a policy to Don that lets him read, write, and list
any objects with the Amazon S3 key prefix /example_bucket/home/don/
•Home directory access for Mary – Joe attaches a policy to Mary that lets her read, write, and list
any objects with the Amazon S3 key prefix /example_bucket/home/mary/
•Shared directory access for the Developers group – Joe attaches a policy to the group that lets
developers read, write, and list any objects in /example_bucket/share/developers/
•Shared directory access for the Managers group – Joe attaches a policy to the group that lets
managers read, write, and list objects in /example_bucket/share/managers/
46

AWS Identity and Access Management User Guide
Use Case for IAM with Amazon S3
Note
Amazon S3 doesn't automatically give a user who creates a bucket or object permission
to perform other actions on that bucket or object. Therefore, in your IAM policies, you must
explicitly give users permission to use the Amazon S3 resources they create.
For examples of what these policies might look like, see Access Control in the Amazon Simple Storage
Service Developer Guide. For information on how policies are evaluated at run time, see IAM Policy
Evaluation Logic (p. 381).
User's Role Change
At some point, one of the developers, Don, changes roles and becomes a manager. We'll assume
he no longer needs access to the documents in the share/developers directory. Joe, as an
admin, moves Don to the Managers group and out of the Developers group. With just that simple
reassignment, Don automatically gets all permissions granted to the Managers group, but can no
longer access data in the share/developers directory.
Integration with a Third-Party Business
Organizations often work with partner companies, consultants, and contractors. Example Corp has
a partner called the Widget Company, and a Widget Company employee named Natalie needs to
put data into a bucket for Example Corp's use. Joe creates a group called WidgetCo and a user
named Natalie and adds Natalie to the WidgetCo group. Joe also creates a special bucket called
example_partner_bucket for Natalie to use.
Joe updates existing policies or adds new ones to accommodate the partner Widget Company. For
example, Joe can create a new policy that denies members of the WidgetCo group the ability to use
any actions other than write. This policy would be necessary only if there's a broad policy that gives all
users access to a wide set of Amazon S3 actions.
47

AWS Identity and Access Management User Guide
The User Sign-in Page
The IAM Console and the Sign-in
Page
The AWS Management Console provides a web-based way to administer AWS services. You can
sign in to the console and create, list, and perform other tasks with AWS services for your account,
such as starting and stopping Amazon EC2 instances and Amazon RDS databases, creating Amazon
DynamoDB tables, creating IAM users, and so on.
If you're the account owner, you can sign in to the console directly. If you've created IAM users in your
account, assigned passwords to those users, and given the users permissions, they can sign in to the
console using a URL that's specific to your account.
This section provides information about the IAM-enabled AWS Management Console sign-in page
and explains how to create a unique sign-in URL for your account. For information about creating user
passwords, see Managing Passwords (p. 66).
Note
If your organization has an existing identity system, you might want to create a single sign-
on (SSO) option that gives users access to the AWS Management Console for your account
without requiring them to have an IAM user identity and without requiring them to sign in
separately to your organization's site and to AWS. For more information, see Creating a URL
that Enables Federated Users to Access the AWS Management Console (Custom Federation
Broker) (p. 159).
Topics
•The User Sign-in Page (p. 48)
•The Root Account Sign-in Page (p. 49)
•Controlling User Access to the AWS Management Console (p. 49)
•Your AWS Account ID and Its Alias (p. 50)
•Using MFA Devices With Your IAM Sign-in Page (p. 52)
•IAM Console Search (p. 52)
The User Sign-in Page
Users who want to use the AWS Management Console must sign in to your AWS account through a
sign-in page that's specific to your account. You provide your users with the URL they need to access
the sign-in page. You can find the URL for your account sign-in on the dashboard of the IAM console.
48
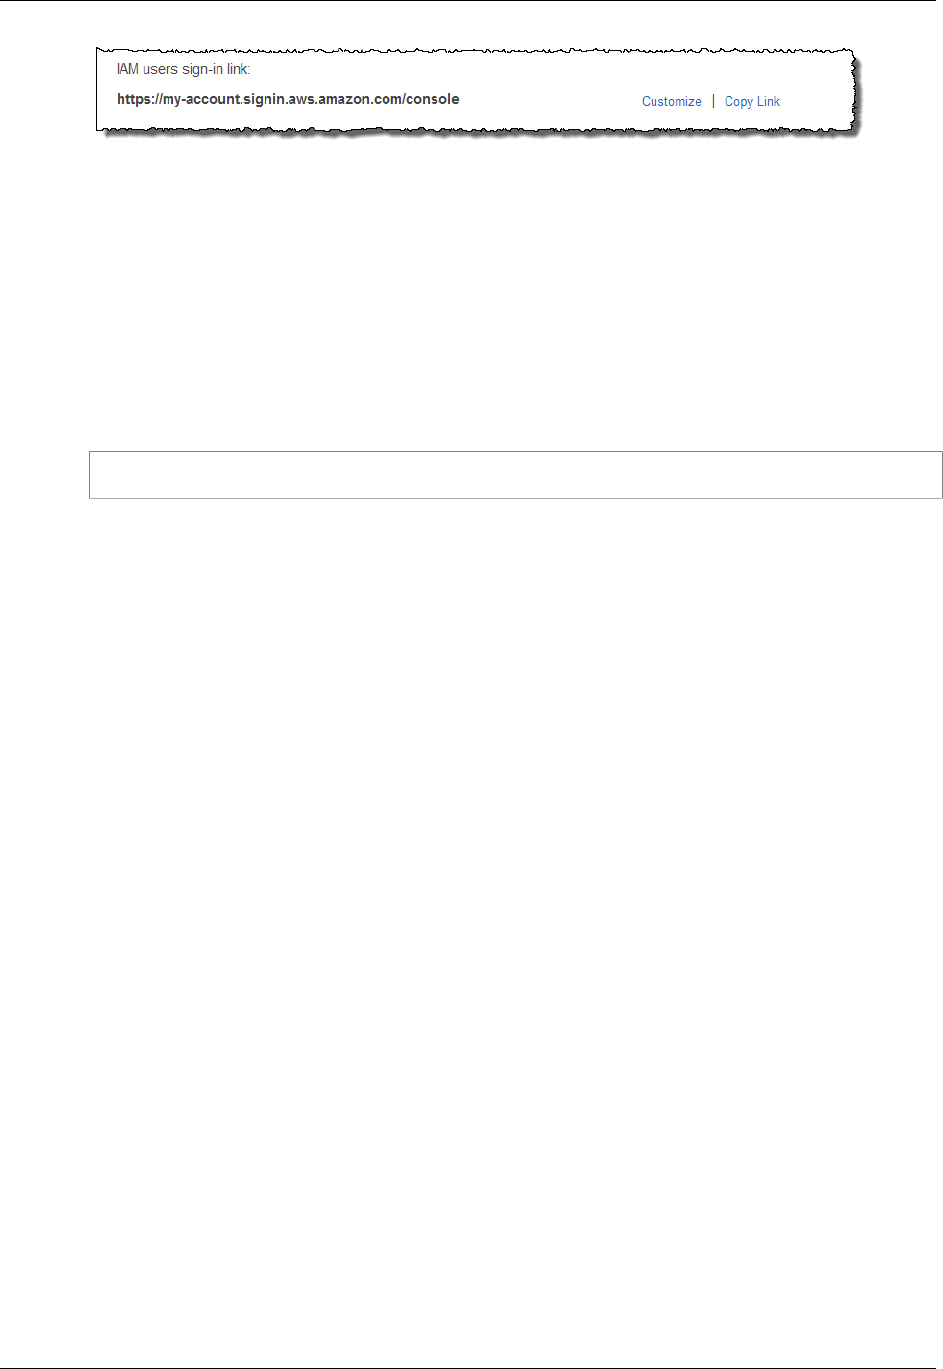
AWS Identity and Access Management User Guide
The Root Account Sign-in Page
Important
In addition to providing users with a URL to your account sign-in page, before users can
sign in to your page, you must provide each user with a password and, if appropriate, an
MFA device. For detailed information about passwords and MFA devices, see Managing
Passwords (p. 66) and Using Multi-Factor Authentication (MFA) in AWS (p. 80).
Tip
To locate your AWS account ID, go to the AWS AWS Security Credentials page. Your account
ID is in the Account Identifiers section.
The account sign-in page URL is created automatically when you begin using IAM. You don't have to
do anything to use this sign-in web page.
https://My_AWS_Account_ID.signin.aws.amazon.com/console/
You can also customize the account sign-in URL for your account if you want the URL to contain
your company name (or other friendly identifier) instead of your AWS account ID number. For
more information about customizing the account sign-in URL, see Your AWS Account ID and Its
Alias (p. 50).
Tip
To create a bookmark for your account sign-in page in your web browser, you should
manually enter your account's sign-in URL in the bookmark entry. Don't use your web
browser's "bookmark this page" feature because of redirects that obscure the sign-in URL.
The Root Account Sign-in Page
When users sign in to your AWS account, they sign in via the account sign-in page. For their
convenience, this sign-in page uses a cookie to remember user status so that the next time a user
goes to the AWS Management Console, the console uses the account sign-in page by default.
If you want to sign in to the console using your AWS root account credentials instead of IAM user
credentials, go to the account sign-in page and then click Sign in using root account credentials.
The Amazon Web Services sign-in page appears that you can use to sign in with your AWS root
account credentials.
Controlling User Access to the AWS
Management Console
Users who sign in to your AWS account through the sign-in page can access your AWS resources
through the AWS Management Console to the extent that you grant them permission. The following
list shows the ways you can grant users access to your AWS account resources through the AWS
Management Console. It also shows how users can access other AWS account features through the
AWS website.
Note
There is no charge to use IAM.
49

AWS Identity and Access Management User Guide
Your AWS Account ID and Its Alias
The AWS Management Console
You create a password for each user who needs access to the AWS Management Console.
Users access the console via your IAM-enabled AWS account sign-in page. For information about
accessing the sign-in page, see The IAM Console and the Sign-in Page (p. 48). For information
about creating passwords, see Managing Passwords (p. 66).
Your AWS resources, such as Amazon EC2 instances, Amazon S3 buckets, and so on
Even if your users have passwords, they still need permission to access your AWS resources.
When you create a user, that user has no permissions by default. To give your users the
permissions they need, you attach policies to them. If you have many users who will be performing
the same tasks with the same resources, you can assign those users to a group, then assign the
permissions to that group. For information about creating users and groups, see Identities (Users,
Groups, and Roles) (p. 55). For information about using policies to set permissions, see Access
Management (p. 250).
AWS Discussion Forums
Anyone can read the posts on the AWS Discussion Forums. Users who want to post questions or
comments to the AWS Discussion Forum can do so using their user name. The first time a user
posts to the AWS Discussion Forum, the user is prompted to enter a nickname and email address
for use only by that user in the AWS Discussion Forums.
Your AWS account billing and usage information
You can grant users access your AWS account billing and usage information. For more
information, see Controlling Access to Your Billing Information in the AWS Billing and Cost
Management User Guide.
Your AWS account profile information
Users cannot access your AWS account profile information.
Your AWS account security credentials
Users cannot access your AWS account security credentials.
Note
IAM policies control access regardless of the interface. For example, you could provide a user
with a password to access the AWS Management Console, and the policies for that user (or
any groups the user belongs to) would control what the user can do in the AWS Management
Console. Or, you could provide the user with AWS access keys for making API calls to AWS,
and the policies would control which actions the user could call through a library or client that
uses those access keys for authentication.
Your AWS Account ID and Its Alias
Finding Your AWS Account ID
To find your AWS account ID number in the AWS Management Console, click on
Support in the navigation bar in the upper-right, and then click Support Center. Your
currently signed in account ID appears in the upper-right corner below the Support menu.
50

AWS Identity and Access Management User Guide
About Account Aliases
About Account Aliases
If you want the URL for your sign-in page to contain your company name (or other friendly identifier)
instead of your AWS account ID, you can create an alias for your AWS account ID. This section
provides information about AWS account aliases and lists the API actions you use to create an alias.
Your sign-in page URL has the following format, by default.
https://Your_AWS_Account_ID.signin.aws.amazon.com/console/
If you create an AWS account alias for your AWS account ID, your sign-in page URL will look like the
following example.
https://Your_Alias.signin.aws.amazon.com/console/
Note
The original URL containing your AWS account ID remains active and can be used after you
create your AWS account alias.
Tip
To create a bookmark for your account sign-in page in your web browser, you should
manually type the sign-in URL in the bookmark entry. Don't use your web browser's
"bookmark this page" feature.
Creating, Deleting, and Listing an AWS Account
Alias
You can use the AWS Management Console, the IAM API, or the command line interface to create or
delete your AWS account alias.
Important
Your AWS account can have only one alias. If you create a new alias for your AWS account,
the new alias overwrites the old alias, and the URL containing the old alias stops working.
AWS Management Console
To create or remove an account alias
1. Sign in to the Identity and Access Management (IAM) console at https://console.aws.amazon.com/
iam/.
2. On the navigation pane, select Dashboard.
3. Find the IAM users sign-in link, and click Customize to the right of the link.
4. Type the name you want to use for your alias, then click Yes, Create.
5. To remove the alias, click Customize, and then click Yes, Delete. The sign-in URL reverts to
using your AWS account ID.
API or CLI
To create an alias for your AWS Management Console sign-in page URL
• AWS CLI: aws iam create-account-alias
• Tools for Windows PowerShell: New-IAMAccountAlias
51

AWS Identity and Access Management User Guide
Using MFA Devices With Your IAM Sign-in Page
• AWS API: CreateAccountAlias
To delete an AWS account ID alias
• AWS CLI:aws iam delete-account-alias
• Tools for Windows PowerShell: Remove-IAMAccountAlias
• AWS API: DeleteAccountAlias
To display your AWS account ID alias
• AWS CLI: aws iam list-account-aliases
• Tools for Windows PowerShell: Get-IAMAccountAlias.html
• AWS API: ListAccountAliases
Note
The account alias must be unique across all Amazon Web Services products. It must contain
only digits, lowercase letters, and hyphens. For more information on limitations on AWS
account entities, see Limitations on IAM Entities and Objects (p. 338).
Using MFA Devices With Your IAM Sign-in
Page
IAM users who are configured with multi-factor authentication (MFA) devices must use their MFA
devices to sign in to the AWS Management Console. After the user types the user name and
password, AWS checks the user's account to see if MFA is required for that user. If so, a second sign-
in page appears with an MFA code box to enter the numeric code provided by an MFA token device
or sent to the user's mobile device as an SMS text message, depending on the type of MFA configured
for the user.
If the MFA code is correct, then the user can access the AWS Management Console. If the code is
incorrect, the user can try again with another code from a token device or by requesting that AWS send
another SMS text message code. This is helpful if the first code was not received or does not work.
It's possible for an MFA token device to get out of synchronization. If after several unsuccessful tries a
user cannot sign in to the AWS Management Console, the user is prompted to synchronize the MFA
token device. The user can follow the on-screen prompts to synchronize the MFA token device. For
information about how you can synchronize a device on behalf of a user in your AWS account, see
Synchronize MFA devices (p. 90).
IAM Console Search
As you navigate through the IAM Management Console to manage various IAM resources, you often
need to locate access keys or browse to the deeply nested IAM resources to find items you need to
work with. A faster option is to use the IAM console search page to locate access keys related to your
account, IAM entities (such as users, groups, roles, identity providers), policies by name, and more.
The IAM console search feature can locate any of the following:
• IAM entity names that match your search keywords (for users, groups, roles, identity providers, and
policies)
52

AWS Identity and Access Management User Guide
Using IAM Console Search
• AWS documentation topic names that match your search keywords
• Tasks that match your search keywords
Every line in the search result is an active link. For example, you can choose the user name in the
search result, which takes you to that user's detail page. Or you can choose an action link, for example
Create user, to go to the Create User page.
Note
Access key search requires you to type the full access key ID in the search box. The search
result shows the user associated with that key. From there you can navigate directly to that
user's page, where you can manage their access key.
Using IAM Console Search
Use the Search page in the IAM console to find items related to that account.
To search for items in the IAM console
1. Sign in to the Identity and Access Management (IAM) console at https://console.aws.amazon.com/
iam/.
2. In the navigation pane, choose Search.
3. In the Search box, type your search keyword(s).
4. Choose a link in the search results list to navigate to the corresponding part of the console or
documentation. .
Icons in the IAM Console Search Results
The following icons identify the types of items that are found by a search:
Icon Description
IAM users
IAM groups
IAM roles
IAM policies
Tasks such as "create user" or "attach policy"
Results from the keyword delete
IAM documentation
53

AWS Identity and Access Management User Guide
Sample Search Phrases
Sample Search Phrases
You can use the following phrases in the IAM search. Replace terms in italics with the names of actual
IAM users, groups, roles, access keys, policies, or identity providers respectively that you want to
locate.
•user_name or group_name or role_name or policy_name or identity_provider_name
•access_key
•add user user_name to groups or add users to group group_name
•remove user user_name from groups
•delete user_name or delete group_name or delete role_name, or delete
policy_name, or delete identity_provider_name
•manage access keys user_name
•manage signing certificates user_name
•users
•manage MFA for user_name
•manage password for user_name
•create role
•password policy
•edit trust policy for role role_name
•show policy document for role role_name
•attach policy to role_name
•create managed policy
•create user
•create group
•attach policy to group_name
•attach entities to policy_name
•detach entities to policy_name
•what is IAM
•how do I create an IAM user
•how do I use IAM console
•what is a user or what is a group, or what is a policy, or what is a role, or what
is an identity provider
54

AWS Identity and Access Management User Guide
IAM Users
Identities (Users, Groups, and
Roles)
This section describes IAM identities, which you create to provide authentication for people and
processes in your AWS account. This section also describes IAM groups, which are collections of
IAM users that you can manage as a unit. Identities represent the user, and can be authenticated
and then authorized to perform actions in AWS. Each of these can be associated with one or more
policies (p. 250) to determine what actions a user, role, or member of a group can do with which
AWS resources and under what conditions.
IAM Users (p. 57)
An IAM user (p. 57) is an entity that you create in AWS. The IAM user represents the person or
service who uses the IAM user to interact with AWS. A primary use for IAM users is to give people
the ability to sign in to the AWS Management Console for interactive tasks and to make programmatic
requests to AWS services using the API or CLI. A user in AWS consists of a name, a password to sign
into the AWS Management Console, and up to two access keys that can be used with the API or CLI.
IAM Groups (p. 119)
An IAM group (p. 119) is a collection of IAM users. You can use groups to specify permissions for a
collection of users, which can make those permissions easier to manage for those users. For example,
you could have a group called Admins and give that group the types of permissions that administrators
typically need. Any user in that group automatically has the permissions that are assigned to the group.
If a new user joins your organization and should have administrator privileges, you can assign the
appropriate permissions by adding the user to that group. Similarly, if a person changes jobs in your
organization, instead of editing that user's permissions, you can remove him or her from the old groups
and add him or her to the appropriate new groups. Note that a group is not truly an identity because it
cannot be identified as a Principal in an access policy. It is only a way to attach policies to multiple
users at one time.
IAM Roles (p. 124)
An IAM role (p. 124) is very similar to a user, in that it is an identity with permission policies that
determine what the identity can and cannot do in AWS. However, a role does not have any credentials
55

AWS Identity and Access Management User Guide
Temporary Credentials
(password or access keys) associated with it. Instead of being uniquely associated with one person,
a role is intended to be assumable by anyone who needs it. An IAM user can assume a role to
temporarily take on different permissions for a specific task. A role can be assigned to a federated
user (p. 132) who signs in by using an external identity provider instead of IAM. AWS uses details
passed by the identity provider to determine which role is mapped to the federated user.
Temporary Credentials (p. 218)
Temporary credentials are primarily used with IAM roles, but there are also other uses. You can
request temporary credentials that have a more restricted set of permissions than your standard IAM
user. This prevents you from accidentally performing tasks that are not permitted by the more restricted
credentials. A benefit of temporary credentials is that they expire automatically after a set period of
time. You have control over the duration that the credentials are valid.
The Account "Root" User (p. 247)
When you first create an AWS account, you create an account (or "root") identity, which you use to
sign in to AWS. You can sign in to the AWS Management Console as the root user—that is, the email
address and password that you provide when you create the account. This combination of your email
address and password is called your root account credentials.
When you sign in as the root user, you have complete, unrestricted access to all resources in your
AWSaccount, including access to your billing information and the ability to change your password. This
level of access is necessary when you initially set up the account. However, we recommend that you
don't use root account credentials for everyday access. We especially recommend that you do not
share your root account credentials with anyone, because doing so gives them unrestricted access to
your account. It is not possible to restrict the permissions that are granted to the root account. Instead,
we strongly recommend that you adhere to the best practice of using the root user only to create your
first IAM user (p. 41) and then securely locking away the root user credentials.
When to create an IAM user
Because an IAM user is just an identity with specific permissions in your account, you might not need
to create an IAM user for every occasion on which you need credentials. In many cases, you can
take advantage of IAM roles and their temporary security credentials instead of using the long-term
credentials associated with an IAM user.
•You created an AWS account and you're the only person who works in your account.
It's possible to work with AWS using the credentials for your root account, but we don't recommend
it. Instead, we strongly recommend that you create an IAM user for yourself and use the credentials
for that user when you work with AWS. For more information, see IAM Best Practices (p. 40).
•Other people in your group need to work in your AWS account, and your group is using no
other identity mechanism.
Create IAM users for the individuals who need access to your AWS resources, assign appropriate
permissions to each user, and give each user his or her own credentials. We strongly recommend
that you never share credentials among multiple users.
•You want to use the command-line interface (CLI) to work with AWS.
The CLI needs credentials that it can use to make calls to AWS. Create an IAM user and give that
user permissions to run the CLI commands you need. Then configure the CLI on your computer to
use the access key credentials associated with that IAM user.
56

AWS Identity and Access Management User Guide
When to Create an IAM Role
When to Create an IAM Role
Create an IAM role in the following situations:
You're creating an application that runs on an Amazon Elastic Compute Cloud (Amazon EC2)
instance and that application makes requests to AWS.
Don't create an IAM user and pass the user's credentials to the application or embed the
credentials in the application. Instead, create an IAM role that you attach to the EC2 instance to
give applications running on the instance temporary security credentials. The credentials have the
permissions specified in the policies attached to the role. For details, see Using an IAM Role to
Grant Permissions to Applications Running on Amazon EC2 Instances (p. 202).
You're creating an app that runs on a mobile phone and that makes requests to AWS.
Don't create an IAM user and distribute the user's access key with the app. Instead, use an identity
provider like Login with Amazon, Amazon Cognito, Facebook, or Google to authenticate users and
map the users to an IAM role. The app can use the role to get temporary security credentials that
have the permissions specified by the policies attached to the role. For more information, see the
following:
•Amazon Cognito Overview in the AWS Mobile SDK for Android Developer Guide
•Amazon Cognito Overview in the AWS Mobile SDK for iOS Developer Guide
•About Web Identity Federation (p. 133)
Users in your company are authenticated in your corporate network and want to be able to use
AWS without having to sign in again—that is, you want to allow users to federate into AWS.
Don't create IAM users. Configure a federation relationship between your enterprise identity
system and AWS. You can do this in two ways:
• If your company's identity system is compatible with SAML 2.0, you can establish trust between
your company's identity system and AWS. For more information, see About SAML 2.0-based
Federation (p. 138).
• Create and use a custom proxy server that translates user identities from the enterprise into
IAM roles that provide temporary AWS security credentials. For more information, see Creating
a URL that Enables Federated Users to Access the AWS Management Console (Custom
Federation Broker) (p. 159).
IAM Users
An IAM user is an entity that you create in AWS to represent the person or service that uses it to
interact with AWS. A user in AWS consists of a name and credentials.
How AWS identifies an IAM user
When you create a user, IAM creates these ways to identify that user:
• A "friendly name" for the user, which is the name that you specified when you created the user, such
as Bob or Alice. These are the names you see in the AWS Management Console.
• An Amazon Resource Name (ARN) for the user. You use the ARN when you need to uniquely
identify the user across all of AWS, such as when you specify the user as a Principal in an IAM
policy for an Amazon S3 bucket. An ARN for an IAM user might look like the following:
arn:aws:iam::account-ID-without-hyphens:user/Bob
• A unique identifier for the user. This ID is returned only when you use the API, Tools for Windows
PowerShell, or AWS CLI to create the user; you do not see this ID in the console.
For more information about these identifiers, see IAM Identifiers (p. 334).
57

AWS Identity and Access Management User Guide
Users and credentials
Users and credentials
User credentials can consist of the following:
• A password that the user can type to sign in to interactive sessions such as the AWS Management
Console.
• One or two access keys than can be used to make programmatic calls to AWS when using the API
in program code or at a command prompt when using the AWS CLI or the AWS PowerShell tools.
A brand new IAM user has no password and no access key (neither an access key ID nor a secret
access key)—no credentials of any kind. You create the type of credentials for an IAM user based on
what the user will be doing.
Take advantage of the following options to administer passwords, access keys, and MFA devices:
•Manage passwords for your IAMusers (p. 66). Create and change the passwords that permit
access to the AWS Management Console. Set a password policy to enforce a minimum password
complexity. Allow users to change their own passwords.
•Manage access keys for your IAM users (p. 76). Create and update access keys for
programmatic access to the resources in your account.
• You can enhance the security of the user's credentials by enabling multi-factor authentication
(MFA) (p. 80) for the user. With MFA, users have to provide both the credentials that are part
of their user identity (a password or access key) and a temporary numeric code that's generated
on a hardware device or by an application on a smartphone or tablet, or sent by AWS to an SMS-
compatible mobile device.
•Find unused passwords and access keys (p. 104). Anyone who has a password or access keys
for your account or an IAM user in your account has access to your AWS resources. The security
best practice is to remove passwords and access keys when users no longer need them.
•Download a credential report for your account (p. 106). You can generate and download a
credential report that lists all IAM users in your account and the status of their various credentials,
including passwords, access keys, and MFA devices. For passwords and access keys, the credential
report shows how recently the password or access key has been used.
Users and permissions
A brand new IAM user has no permissions (p. 250) to do anything. By default, the user is not
authorized to perform any AWS actions or to access any AWS resources. An advantage of having
individual IAM users is that you can assign permissions individually to each user. You might assign
administrative permissions to a few users, who then can administer your AWS resources and can even
create and manage other IAM users. In most cases, however, you want to limit a user's permissions
to just the tasks (AWS actions) and resources that the user needs for his or her job. Imagine a user
named Dave. When you create the IAM user Dave, you create a password for that user and attach
permissions to the IAM user that let him launch a specific Amazon EC2 instance and read (GET)
information from a table in an Amazon RDS database.
Users and accounts
Each IAM user is associated with one and only one AWS account. Because users are defined within
your AWS account, they don't need to have a payment method on file with AWS. Any AWS activity
performed by users in your account is billed to your account.
There's a limit to the number of IAM users you can have in an AWS account. For more information, see
Limitations on IAM Entities and Objects (p. 338).
58

AWS Identity and Access Management User Guide
Users as service accounts
Users as service accounts
An IAM user doesn't necessarily have to represent an actual person. An IAM user is really just an
identity with associated credentials and permissions. You might create an IAM user to represent an
application that needs credentials in order to make requests to AWS. This is typically referred to as
a "service account." An application might have its own service account in your AWS account, and its
own set of permissions, the same way that processes have their own service accounts defined in an
operating system like Windows or Linux.
Creating an IAM User in Your AWS Account
You can create one or more IAM users in your AWS account. You might create an IAM user when
someone joins your organization, or when you have a new application that needs to make API calls to
AWS.
Topics
•Creating IAM Users (AWS Management Console) (p. 59)
•Creating IAM Users (AWS CLI, Tools for Windows PowerShell, or IAM HTTP API) (p. 60)
In outline, the process of creating a user consists of these steps:
1. Create the user in the AWS Management Console or from an AWS CLI, Tools for Windows
PowerShell, or IAM API command.
2. (Optional) Add the user to one or more groups. We recommend that you put your users in groups
and manage their policies and permissions through those groups rather than directly on the users.
3. If the user needs to access AWS resources from the AWS Management Console, create a
password for the user (p. 70) and attach a policy to the user or group (p. 281) that grants
permissions to perform the actions that you want to allow.
4. If the user needs to make API calls or use the AWS CLI or the Tools for Windows PowerShell,
create an access key (an access key ID and a secret access key) for that user. This is the only time
the secret key is available.
5. (Optional) Configure multi-factor authentication (MFA) (p. 80) for the user, which requires the
user to provide a one-time-use code each time he or she signs into the AWS Management Console.
6. Provide the user with the information needed to sign-in. This includes the credentials and the URL
for the account sign-in web page where the user enters those credentials. For more information, see
How IAM Users Sign In to Your AWS Account (p. 61).
7. (Optional) Give users permissions to manage their own security credentials. (By default, users do
not have permissions to manage their own credentials.) For more information, see Permitting IAM
Users to Change Their Own Passwords (p. 74).
For information about the permissions that you need in order to create a user, see Delegating
Permissions to Administer IAM Users, Groups, and Credentials (p. 253).
Creating IAM Users (AWS Management Console)
To create one or more IAM users with the AWS Management Console
1. Sign in to the Identity and Access Management (IAM) console at https://console.aws.amazon.com/
iam/.
2. In the navigation pane, choose Users and then choose Create New Users.
3. Type the user names for the users to create. You can create up to five users at one time.
59

AWS Identity and Access Management User Guide
Adding a User
Note
User names can use only a combination of alphanumeric characters and these
characters: plus (+), equal (=), comma (,), period (.), at (@), and hyphen (-). Names
must be unique within an account. They are not distinguished by case, for example, you
cannot create users named both "TESTUSER" and "testuser". For more information
about limitations on IAM entities, see Limitations on IAM Entities and Objects (p. 338).
4. If the users require access to the API, AWS CLI, or Tools for Windows PowerShell, then they must
have access keys. To generate access key for new users at this time, select Generate an access
key for each user.
5. Choose Create.
6. (Optional) To view the users' access keys (access key IDs and secret access keys), choose Show
User Security Credentials. To save the access keys, choose Download Credentials and then
save the file to a safe location on your computer.
Important
This is your only opportunity to view or download the secret access keys, and you must
provide this information to your users before they can use the AWS API. If you don't
download and save them now, you will need to create new access keys for the users
later. Save the user's new access key ID and secret access key in a safe and secure
place. You will not have access to the secret access keys again after this step.
7. (Optional) Give the user(s) permission to manage their own security credentials. For more
information, see Allow Users to Manage Their Own Passwords, Access Keys, and SSH
Keys (p. 256).
8. (Optional) To enable the user(s) to access the AWS Management Console, create a password
for each user. For more information, see Creating, Changing, or Deleting an IAM User Password
(AWS Management Console) (p. 71).
9. (Optional) Make the user a member of a group that has policies attached that provide the
appropriate permissions for this user to access AWS resources. We recommend using groups
rather than attaching policies directly to users. For more information, see Attaching Managed
Policies (p. 281).
10. Provide each user with his or her credentials:
• User name
• Password and/or access keys
• URL to the account sign-in web page. Use the following example, substituting the correct
account ID number or account alias:
https://AWS-account-ID or alias.signin.aws.amazon.com/console
For more information, see How IAM Users Sign In to Your AWS Account (p. 61).
Creating IAM Users (AWS CLI, Tools for Windows
PowerShell, or IAM HTTP API)
To create an IAM user from the AWS CLI, Tools for Windows PowerShell, or IAM HTTP
API
1. Create a user.
• AWS CLI: aws iam create-user
• Tools for Windows PowerShell: New-IAMUser
• IAM API: CreateUser
60

AWS Identity and Access Management User Guide
How IAM Users Sign In to Your AWS Account
2. (Optional) Give the user a password. This is required if the user needs to use the AWS
Management Console. You will also need to give the user theURL of your account's sign-in
page. (p. 61)
• AWS CLI: aws iam create-login-profile
• Tools for Windows PowerShell: New-IAMLoginProfile
• IAM API: CreateLoginProfile
3. (Optional) Create an access key for the user. This is required if the user needs to
programmatically access AWS resources.
• AWS CLI: aws iam create-access-key
• Tools for Windows PowerShell: New-IAMAccessKey
• IAM API: CreateAccessKey
Important
This is your only opportunity to view or download the secret access keys, and you must
provide this information to your users before they can use the AWS API. If you don't
download and save them now, you will need to create new access keys for the users
later. Save the user's new access key ID and secret access key in a safe and secure
place. You will not have access to the secret access keys again after this step.
4. Add the user to one or more groups. The groups that you specify should have policies attached
that grant the appropriate permissions for the user.
• AWS CLI: aws iam add-user-to-group
• Tools for Windows PowerShell: Add-IAMUserToGroup
• IAM API: AddUserToGroup
5. (Optional) Attach a policy to the user that defines the user's permissions. Note: We recommend
that you manage user permissions by adding the user to a group and attaching a policy to the
group instead of attaching directly to a user.
• AWS CLI: aws iam attach-user-policy
• Tools for Windows PowerShell: Register-IAMUserPolicy
• IAM API: AttachUserPolicy
6. (Optional) Give the user permission to manage his or her own security credentials. For
more information, see Allow Users to Manage Their Own Passwords, Access Keys, and SSH
Keys (p. 256).
How IAM Users Sign In to Your AWS Account
After you create IAM users and passwords for each, users can sign in to the AWS Management
Console for your AWS account with a special URL.
By default, the sign-in URL for your account includes your account ID. You can create a unique sign-in
URL for your account so that the URL includes a name instead of an account ID. For more information,
see Your AWS Account ID and Its Alias (p. 50).
The sign-in endpoint follows this pattern:
https://AWS-account-ID-or-alias.signin.aws.amazon.com/console
You can find the sign-in URL for an account on the IAM console dashboard.
61
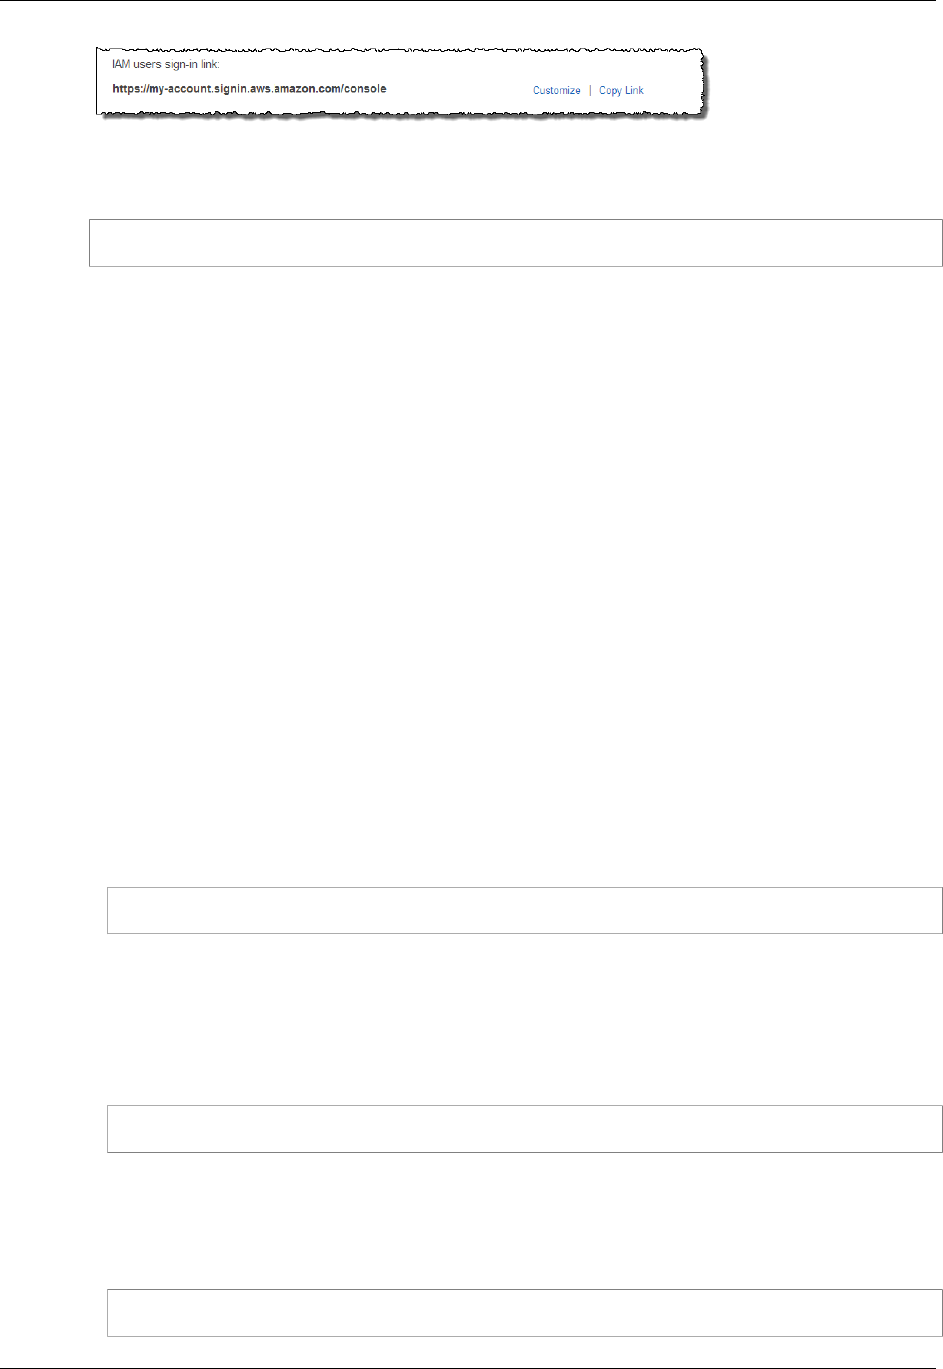
AWS Identity and Access Management User Guide
How IAM Users Sign In to Your AWS Account
You can also sign in at the following endpoint and enter the account ID or alias manually, instead of it
being embedded in the URL:
https://signin.aws.amazon.com/console
Tip
To create a bookmark for your account's unique sign-in page in your web browser, you
should manually enter your account's sign-in URL in the bookmark entry. Don't use your web
browser's "bookmark this page" feature.
IAM users in your account have access only to the AWS resources that you specify in the policy that
is attached to the user or to an IAM group that the user belongs to. To work in the console, users
must have permissions to perform the actions that the console performs, such as listing and creating
AWS resources. For more information, see Access Management (p. 250) and Example Policies for
Administering AWS Resources (p. 299).
Note
If your organization has an existing identity system, you might want to create a single sign-
on (SSO) option that gives users access to the AWS Management Console for your account
without requiring them to have an IAM user identity and without requiring them to sign in
separately to your organization's site and to AWS. For more information, see Creating a URL
that Enables Federated Users to Access the AWS Management Console (Custom Federation
Broker) (p. 159).
Logging sign-in details in CloudTrail
If you enable CloudTrail to log sign-in events to your logs, you need to be aware of how CloudTrail
chooses where to log the events.
• If your users sign-in directly to a console, they are redirected to either a global or a regional sign-in
endpoint, based on whether the selected service console supports regions. For example, the main
console home page supports regions, so if you sign in to the following URL:
https://alias.signin.aws.amazon.com/console
you are redirected to a regional sign-in endpoint such as https://us-
east-1.signin.aws.amazon.com, resulting in a regional CloudTrail log entry in the user's
region's log:
On the other hand, the Amazon S3 console does not support regions, so if you sign in to the
following URL
https://alias.signin.aws.amazon.com/console/s3
AWS redirects you to the global sign-in endpoint at https://signin.aws.amazon.com, resulting
in a global CloudTrail log entry.
• You can manually request a certain regional sign-in endpoint by signing in to the region-enabled
main console home page using a URL syntax like the following:
https://alias.signin.aws.amazon.com/console?ap-southeast-1
62

AWS Identity and Access Management User Guide
Managing Users
AWS redirects you to the ap-southeast-1 regional sign-in endpoint and results in a regional
CloudTrail log event.
For more information about CloudTrail and IAM, see Logging IAM Events with AWS CloudTrail .
If users need programmatic access to work with your account, you can create an access key pair
(an access key ID and a secret access key) for each user, as described in Creating, Modifying, and
Viewing Access Keys (AWS Management Console) (p. 77).
Managing IAM Users
Amazon Web Services offers multiple tools for managing the IAM users in your AWS account.
Topics
•Listing IAM Users (p. 63)
•Renaming an IAM User (p. 64)
•Deleting an IAM User (p. 64)
Listing IAM Users
You can list the IAM users in your AWS account or in a specific IAM group, and list all the groups that
a user is in. For information about the permissions that you need in order to list users, see Delegating
Permissions to Administer IAM Users, Groups, and Credentials (p. 253).
To list all the users in the account
•AWS Management Console: In the navigation pane, choose Users. The console displays the users
in your AWS account.
• AWS CLI: aws iam list-users
• Tools for Windows PowerShell: Get-IAMUsers
• AWS API: ListUsers
To list the users in a specific group
•AWS Management Console: In the navigation pane, choose Groups, choose the name of the group,
and then choose the Users tab.
• AWS CLI: aws iam get-group
• Tools for Windows PowerShell: Get-IAMGroup
• AWS API: GetGroup
To list all the groups that a user is in
•AWS Management Console: In the navigation pane, choose Users, choose the user name, and then
choose the Groups tab.
• AWS CLI: aws iam list-groups-for-user
• Tools for Windows PowerShell: Get-IAMGroupForUser
• AWS API: ListGroupsForUser
63
AWS Identity and Access Management User Guide
Managing Users
Renaming an IAM User
To change a user's name or path, you must use the AWS CLI, Tools for Windows PowerShell, or AWS
API. There is no option in the console to rename a user. For information about the permissions that you
need in order to rename a user, see Delegating Permissions to Administer IAM Users, Groups, and
Credentials (p. 253).
When you change a user's name or path, the following happens:
• Any policies attached to the user stay with the user under the new name.
• The user stays in the same groups under the new name.
• The unique ID for the user remains the same. For more information about unique IDs, see Unique
IDs (p. 337).
• Any resource or role policies that refer to the user as a principal (the user is being granted access)
are automatically updated to use the new name or path. For example, any queue-based policies in
Amazon SQS or resource-based policies in Amazon S3 are automatically updated to use the new
name and path.
IAM does not automatically update policies that refer to the user as a resource to use the new name or
path; you must manually do that. For example, imagine that user Bob has a policy attached to him that
lets him manage his security credentials. If an administrator renames Bob to Robert, the administrator
also needs to update that policy to change the resource from this:
arn:aws:iam::account-ID-without-hyphens:user/division_abc/subdivision_xyz/Bob
to this:
arn:aws:iam::account-ID-without-hyphens:user/division_abc/subdivision_xyz/
Robert
This is true also if an administrator changes the path; the administrator needs to update the policy to
reflect the new path for the user.
To rename a user
• AWS CLI: aws iam update-user
• Tools for Windows PowerShell: Update-IAMUser
• AWS API: UpdateUser
Deleting an IAM User
You might delete an IAM user from your account if someone quits your company. If the user is only
temporarily away from your company, you can disable the user's credentials instead of deleting the
user entirely from the AWS account. That way, you can prevent the user from accessing the AWS
account's resources during the absence but you can re-enable the user later.
For more information about disabling credentials, see Managing Access Keys for IAM Users (p. 76).
For information about the permissions that you need in order to delete a user, see Delegating
Permissions to Administer IAM Users, Groups, and Credentials (p. 253).
Topics
•Deleting an IAM User (AWS Management Console) (p. 65)
•Deleting an IAM User (AWS CLI and Tools for Windows PowerShell) (p. 65)
64

AWS Identity and Access Management User Guide
Managing Users
Deleting an IAM User (AWS Management Console)
When you use the AWS Management Console to delete an IAM user, IAM automatically deletes the
following information for you:
• The user
• Any group memberships—that is, the user is removed from any IAM groups that the user was a
member of
• Any password associated with the user
• Any access keys belonging to the user
• All inline policies embedded in the user (policies that are applied to a user via group permissions are
not affected)
Note
Any managed policies attached to the user are detached from the user when the user is
deleted. Managed policies are not deleted when you delete a user.
• Any associated MFA device
To use the AWS Management Console to delete an IAM user
1. Sign in to the Identity and Access Management (IAM) console at https://console.aws.amazon.com/
iam/.
2. In the navigation pane, choose Users, and then select the check box next to the user name that
you want to delete, not the name or row itself.
3. For User Actions at the top of the page, choose Delete User.
4. In the confirmation dialog box, review the service last accessed data, which shows when each of
the selected users last accessed an AWS service. This helps you to confirm whether the user is
currently active. If you want to proceed, choose Yes, Delete. If you are sure, you can proceed with
the deletion even if the service last accessed data is still loading.
Deleting an IAM User (AWS CLI and Tools for Windows PowerShell)
Unlike the AWS Management Console, when you delete a user with the AWS CLI or Tools for
Windows PowerShell you have to delete the items attached to the user manually. This procedure
illustrates the process. For a complete PowerShell code snippet, see the example in Remove-IAMUser.
To use the AWS CLI to delete a user from your account
1. Delete the user's keys and certificates. This helps ensure that the user can't access your AWS
account's resources anymore. Note that when you delete a security credential, it's gone forever
and can't be retrieved.
aws iam delete-access-key and aws iam delete-signing-certificate
2. Delete the user's password, if the user has one.
aws iam delete-login-profile
3. Deactivate the user's MFA device, if the user has one.
aws iam deactivate-mfa-device
4. Detach any policies that are attached to the user.
aws iam list-attached-user-policies (to list the policies attached to the user) and aws iam
detach-user-policy (to detach the policies)
5. Get a list of any groups the user was in, and remove the user from those groups.
65

AWS Identity and Access Management User Guide
Passwords
aws iam list-groups-for-user and aws iam remove-user-from-group
6. Delete the user.
aws iam delete-user
To use the Tools for Windows PowerShell to delete a user from your account
1. Delete the user's keys and certificates. This helps ensure that the user can't access your AWS
account's resources anymore. Note that when you delete a security credential, it's gone forever
and can't be retrieved.
Remove-IAMAccessKey and Remove-IAMSigningCertificate
2. Delete the user's password, if the user has one.
Remove-IAMLoginProfile
3. Deactivate the user's MFA device, if the user has one.
Disable-IAMMFADevice
4. Detach any policies that are attached to the user.
Get-IAMAttachedUserPolicies (to list the policies attached to the user) and Remove-
IAMUserPolicy (to detach the policies).
5. Get a list of any groups the user was in, and remove the user from those groups.
Get-IAMGroupForUser and Remove-IAMUserFromGroup.
6. Delete the user.
Remove-IAMUser
Managing Passwords
You can manage passwords for your AWS account and for IAM users in your account. IAM users need
passwords in order to access the AWS Management Console. Users do not need passwords to access
AWS resources programmatically by using the AWS CLI, Tools for Windows PowerShell, the AWS
SDKs or APIs. For those environments, users need access keys (p. 76) instead.
Topics
•Changing the AWS Account ("root") Password (p. 66)
•Setting an Account Password Policy for IAM Users (p. 67)
•Managing Passwords for IAM Users (p. 70)
•Permitting IAM Users to Change Their Own Passwords (p. 74)
•How IAM Users Change Their Own Password (p. 75)
Changing the AWS Account ("root") Password
You can change the password for the AWS account (the "root" user). You must be signed in as the root
user in order to change the root password.
To change the password for the AWS root account
1. Use your AWS account email address and password to sign in to the AWS Management Console.
66
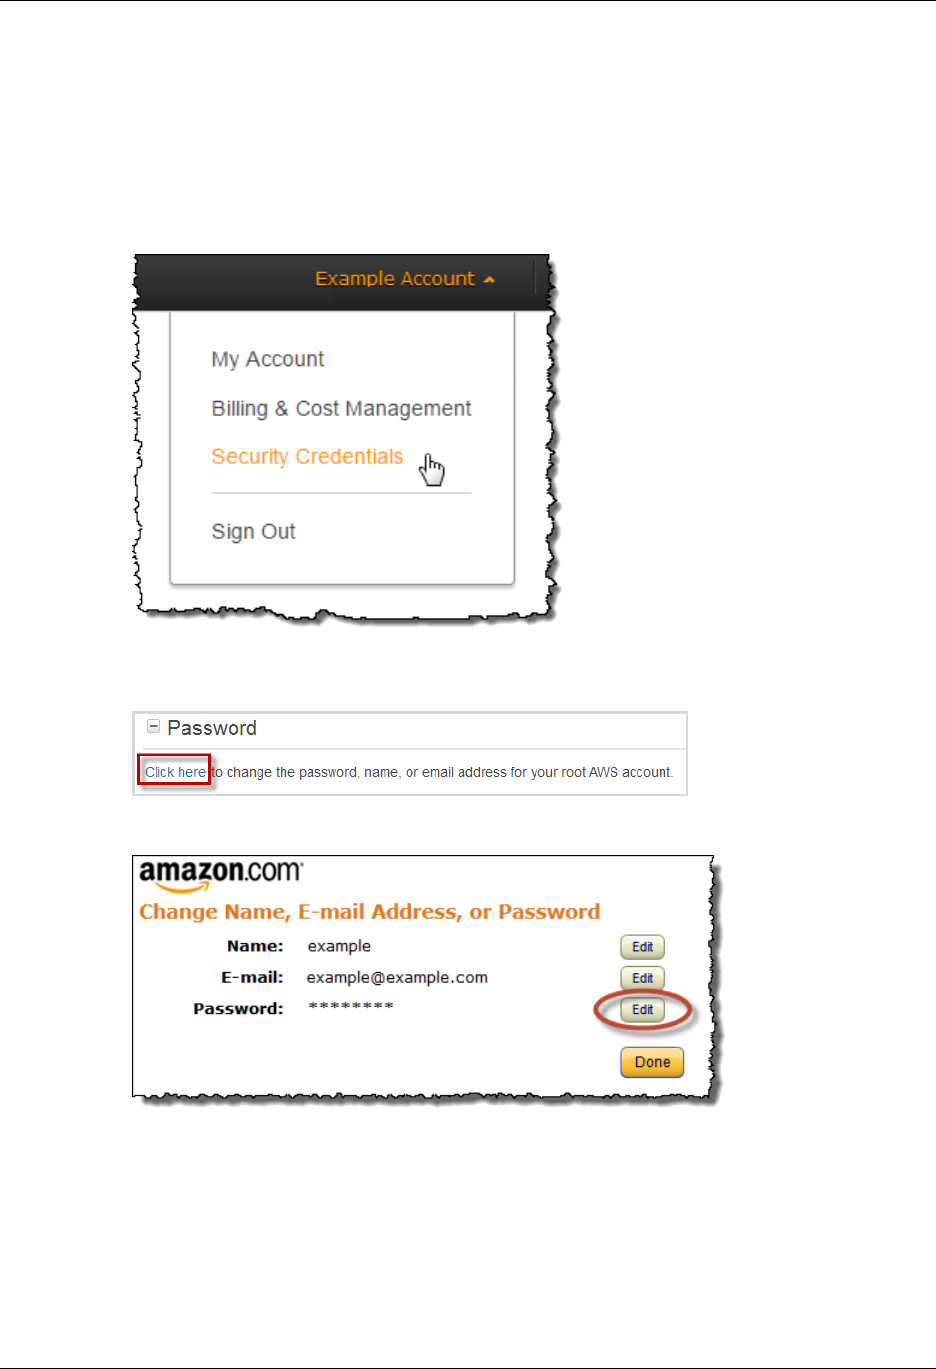
AWS Identity and Access Management User Guide
Passwords
Note
If you previously signed in to the console with IAM user credentials, your browser might
remember this preference and open your account-specific sign-in page. You cannot use
the user sign-in page to sign in with your root account credentials. If you see the user
sign-in page, click Sign in using root account credentials near the bottom of the page
to return to the root account sign-in page.
2. In the upper right corner of the console, click the arrow next to the account name or number and
then click Security Credentials. If a prompt appears, click Continue to Security Credentials.
3. On the Your Security Credentials page, expand the Password section and then click Click
here.
4. On the Password line click Edit to change your password.
Setting an Account Password Policy for IAM Users
You can set a password policy on your AWS account to specify complexity requirements and
mandatory rotation periods for your IAM users' passwords. You can use a password policy to do these
things:
• Set a minimum password length.
67

AWS Identity and Access Management User Guide
Passwords
• Require specific character types, including uppercase letters, lowercase letters, numbers, and non-
alphanumeric characters. Be sure to remind your users that passwords are case sensitive.
• Allow all IAM users to change their own passwords.
Note
When you allow your IAM users to change their own passwords, IAM automatically allows
them to view the password policy. IAM users need permission to view the account's
password policy in order to create a password that complies with the policy.
• Require IAM users to change their password after a specified period of time (enable password
expiration).
• Prevent IAM users from reusing previous passwords.
• Force IAM users to contact an account administrator when the user has allowed his or her password
to expire.
Important
The password settings described here apply only to passwords assigned to IAM users and
do not affect any access keys they might have. If a password expires, the user cannot sign-
in to the AWS Management Console. However, if the user has valid access keys, then the
user can still run any AWS CLI or Tools for Windows PowerShell commands or call any APIs
through an application that the user's permissions allow.
When you create or change a password policy, most of the password policy settings are enforced the
next time your users change their passwords, but some of the settings are enforced immediately. For
example:
• When you set minimum length and character type requirements, the settings are enforced the next
time your users change their passwords. Users are not forced to change their existing passwords,
even if the existing passwords do not adhere to the updated password policy.
• When you set a password expiration period, the expiration period is enforced immediately. For
example, when you set a password expiration period of 90 days, all IAM users that currently have an
existing password that is more than 90 days old are forced to change their password at next sign-in.
For information about the permissions that you need in order to set a password policy, see Permitting
IAM Users to Change Their Own Passwords (p. 74).
Topics
•Password Policy Options (p. 68)
•Setting a Password Policy (AWS Management Console) (p. 70)
•Setting a Password Policy (AWS CLI, Tools for Windows PowerShell, or AWS API) (p. 70)
Password Policy Options
The following list describes the options that are available when you configure a password policy for
your account.
Minimum password length
You can specify the minimum number of characters allowed in an IAM user password. You can
enter any number from 6 to 128.
Require at least one uppercase letter
You can require that IAM user passwords contain at least one uppercase character from the ISO
basic Latin alphabet (A to Z).
Require at least one lowercase letter
You can require that IAM user passwords contain at least one lowercase character from the ISO
basic Latin alphabet (a to z).
68

AWS Identity and Access Management User Guide
Passwords
Require at least one number
You can require that IAM user passwords contain at least one numeric character (0 to 9).
Require at least one nonalphanumeric character
You can require that IAM user passwords contain at least one of the following nonalphanumeric
characters:
! @ # $ % ^ & * ( ) _ + - = [ ] { } | '
Allow users to change their own password
You can permit all IAM users in your account to use the IAM console to change their own
passwords, as described in Permitting IAM Users to Change Their Own Passwords (p. 74).
Alternatively, you can let only some users manage passwords, either for themselves or for others.
To do so, you clear the Allow users to change their own password check box. For more
information about using policies to limit who can manage passwords, see Permitting IAM Users to
Change Their Own Passwords (p. 74).
Note
When you allow your IAM users to change their own passwords, IAM automatically allows
them to view the password policy. IAM users need permission to view the account's
password policy in order to create a password that complies with the policy.
Enable password expiration
You can set IAM user passwords to be valid for only the specified number of days. You specify
the number of days that passwords remain valid after they are set. For example, when you enable
password expiration and set the password expiration period to 90 days, an IAM user can use a
password for up to 90 days. After 90 days, the password expires and the IAM user must set a
new password before accessing the AWS Management Console. You can choose a password
expiration period between 1 and 1095 days, inclusive.
Note
The AWS Management Console warns IAM users when they are within 15 days of
password expiration. IAM users can change their password at any time (as long as they
have been given permission to do so). When they set a new password, the rotation period
for that password starts over. An IAM user can have only one valid password at a time.
Prevent password reuse
You can prevent IAM users from reusing a specified number of previous passwords. You can set
the number of previous passwords from 1 to 24, inclusive.
Password expiration requires administrator reset
You can prevent IAM users from choosing a new password after their current password has
expired. For example, if the password policy specifies a password expiration period, but an IAM
user fails to choose a new password before the expiration period ends, the IAM user cannot set
a new password. In that case, the IAM user must request a password reset from an account
administrator in order to regain access to the AWS Management Console. If you leave this check
box cleared and an IAM user allows his or her password to expire, the user will be required to set a
new password before accessing the AWS Management Console.
Caution
Before you enable this option, be sure that your AWS account has more than one user
with administrative permissions (that is, permission to reset IAM user passwords) or that
your administrators also have access keys that enable them to use the AWS CLI or Tools
for Windows PowerShell separately from the AWS Management Console. When this
option is enabled and one administrator's password expires, a second administrator is
required to sign-in to the console to reset the expired password of the first administrator.
However, if the administrator with the expired password has valid access keys then he
or she can run an AWS CLI or Tools for Windows PowerShell command to reset his or
her own password. The requirement for a second administrator applies only if a password
expires and the first administrator has no access keys.
69

AWS Identity and Access Management User Guide
Passwords
Setting a Password Policy (AWS Management Console)
You can use the AWS Management Console to create, change, or delete a password policy. As part of
managing the password policy, you can let all users manage their own passwords.
To create or change a password policy
1. Sign in to the Identity and Access Management (IAM) console at https://console.aws.amazon.com/
iam/.
2. In the navigation pane, click Account Settings.
3. In the Password Policy section, select the options you want to apply to your password policy.
4. Click Apply Password Policy.
To delete a password policy
1. Sign in to the Identity and Access Management (IAM) console at https://console.aws.amazon.com/
iam/.
2. In the navigation pane, click Account Settings, and then in the Password Policy section, click
Delete Password Policy.
Setting a Password Policy (AWS CLI, Tools for Windows PowerShell, or
AWS API)
To manage an account password policy from the AWS CLI, Tools for Windows PowerShell, or AWS
APIs, use the following commands:
To create or change a password policy
• AWS CLI: aws iam update-account-password-policy
• Tools for Windows PowerShell: Update-IAMAccountPasswordPolicy
• AWS API: UpdateAccountPasswordPolicy
To retrieve the password policy
• AWS CLI: aws iam get-account-password-policy
• Tools for Windows PowerShell: Get-IAMAccountPasswordPolicy
• AWS API: GetAccountPasswordPolicy
To delete a password policy
• AWS CLI: aws iam delete-account-password-policy
• Tools for Windows PowerShell: Remove-IAMAccountPasswordPolicy
• AWS APII: DeleteAccountPasswordPolicy
Managing Passwords for IAM Users
IAM users who work with your AWS resources from the AWS Management Console must have a
password in order to sign in. You can create, change, or delete a password for an IAM user in your
AWS account.
After you have assigned a password to a user, the user can sign in to the AWS Management Console
using the sign-in URL for your account, which looks like this:
70

AWS Identity and Access Management User Guide
Passwords
https://12-digit-AWS-account-ID.signin.aws.amazon.com/console
For more information about how IAM users sign in to the AWS Management Console, see The IAM
Console and the Sign-in Page (p. 48).
In addition to manually creating individual passwords for your IAM users, you can create a password
policy that applies to all IAM user passwords in your AWS account. You can use a password policy to
do these things:
• Set a minimum password length.
• Require specific character types, including uppercase letters, lowercase letters, numbers, and non-
alphanumeric characters. Be sure to remind your users that passwords are case sensitive.
• Allow all IAM users to change their own passwords.
Note
When you allow your IAM users to change their own passwords, IAM automatically allows
them to view the password policy. IAM users need permission to view the account's
password policy in order to create a password that complies with the policy.
• Require IAM users to change their password after a specified period of time (enable password
expiration).
• Prevent IAM users from reusing previous passwords.
• Force IAM users to contact an account administrator when the user has allowed his or her password
to expire.
For information about managing your account's password policy, see Setting an Account Password
Policy for IAM Users (p. 67).
Even if your users have their own passwords, they still need permissions to access your AWS
resources. By default, a user has no permissions. To give your users the permissions they need,
you assign policies to them or to the groups they belong to. For information about creating users and
groups, see Identities (Users, Groups, and Roles) (p. 55). For information about using policies to set
permissions, see Access Management (p. 250).
You can grant users permission to change their own passwords. For more information, see Permitting
IAM Users to Change Their Own Passwords (p. 74). For information about how users access your
account sign-in page, see The IAM Console and the Sign-in Page (p. 48).
Topics
•Creating, Changing, or Deleting an IAM User Password (AWS Management Console) (p. 71)
•Creating, Changing, or Deleting an IAM User Password (AWS CLI, Tools for Windows PowerShell,
and AWS API) (p. 73)
Creating, Changing, or Deleting an IAM User Password (AWS
Management Console)
You can use the AWS Management Console to manage passwords for your IAM users.
To use the console to set a password for an IAM user that currently has no password
1. Sign in to the Identity and Access Management (IAM) console at https://console.aws.amazon.com/
iam/.
2. In the navigation pane, choose Users.
3. Choose the name of the user whose password you want to create.
71

AWS Identity and Access Management User Guide
Passwords
4. Choose the Security Credentials tab, and then choose Manage Password.
5. Choose whether to create a custom password or to have IAM generate a password:
• To create a custom password, select Assign a custom password, and type the password.
Note
The password that you create must meet the account's password policy (p. 67), if
one is currently set.
• To have IAM generate a password, select Assign an auto-generated password.
To require the user to create a new password when he or she signs in, select Require user to
change password at next sign-in, and then choose Apply.
Important
If you select the Require user to change password at next sign-in option, make
sure the user has permission to change his or her password. For more information, see
Permitting IAM Users to Change Their Own Passwords (p. 74).
6. If you choose the option to auto-generate a password, choose Download Credentials to save the
password as a CSV file to your computer.
Important
For security reasons, you cannot access the password after completing this step, but you
can create a new password at any time.
To use the console to change an IAM user's password
1. Sign in to the Identity and Access Management (IAM) console at https://console.aws.amazon.com/
iam/.
2. In the navigation pane, choose Users.
3. Choose the name of the user whose password you want to change.
4. Choose the Security Credentials tab, and then choose Manage Password.
5. Choose whether to replace the existing password with a custom password or to have IAM
generate a new password:
• To create a custom password, choose Replace existing password with new custom
password, and then type the password.
Note
The password that you create must meet the account's password policy (p. 67), if
one is currently set.
• To have IAM generate a password, choose Replace existing password with new auto-
generated password.
To require users to create a new password when they sign in, select Require user to change
password at next sign-in, and then choose Apply.
Important
If you select Require user to change password at next sign-in, make sure the user
has permission to change his or her password. For more information, see Permitting IAM
Users to Change Their Own Passwords (p. 74).
6. If you selected the option to auto-generate a password, choose Download Credentials to save
the password as a CSV file to your computer.
Important
You will not be able to access the password again after completing this step, but you can
create a new password at any time.
72

AWS Identity and Access Management User Guide
Passwords
To delete an IAM user's password using the console
1. Sign in to the Identity and Access Management (IAM) console at https://console.aws.amazon.com/
iam/.
2. In the navigation pane, choose Users.
3. Choose the name of the user whose password you want to delete.
4. Choose the Security Credentials tab, and then choose Manage Password.
5. Choose Remove existing password, and then choose Apply.
Important
When you remove a user's password, the user cannot sign in to the AWS Management
Console. If the user has active access keys, they continue to function and allow access
through the AWS CLI, Tools for Windows PowerShell, or AWS API function calls.
Creating, Changing, or Deleting an IAM User Password (AWS CLI, Tools
for Windows PowerShell, and AWS API)
To manage passwords for IAM users, use the following commands:
To create a password
• AWS CLI: aws iam create-login-profile
• Tools for Windows PowerShell: New-IAMLoginProfile
• AWS API: CreateLoginProfile
To determine whether a user has a password
• AWS CLI: aws iam get-login-profile
• Tools for Windows PowerShell: Get-IAMLoginProfile
• AWS API: GetLoginProfile
To determine when a user's password was last used
• AWS CLI: aws iam get-user
• Tools for Windows PowerShell: Get-IAMUser
• AWS API: GetUser
To change a user's password
• AWS CLI: aws iam update-login-profile
• Tools for Windows PowerShell: Update-IAMLoginProfile
• AWS API: UpdateLoginProfile
To delete a user's password
• AWS CLI: aws iam delete-login-profile
• Tools for Windows PowerShell: Remove-IAMLoginProfile
• AWS API: DeleteLoginProfile
73

AWS Identity and Access Management User Guide
Passwords
Note
If you use the AWS CLI, Tools for Windows PowerShell, or AWS API to delete a user from
your AWS account, you must first delete the password as a separate step in the process of
removing the user. For more information, see Deleting an IAM User (AWS CLI and Tools for
Windows PowerShell) (p. 65).
Permitting IAM Users to Change Their Own Passwords
You can grant IAM users the permission to change their own passwords for signing in to the AWS
Management Console. You can do this in one of two ways:
•Allow all IAM users in the account to change their own passwords (p. 74).
•Allow only selected IAM users to change their own passwords (p. 74). In this scenario, you
disable the option for all users to change their own passwords and you use an IAM policy to grant
permissions to only some users to change their own passwords and optionally other credentials like
their own access keys.
Important
We recommend that you set a password policy (p. 67) so that users create strong
passwords.
To allow all IAM users change their own passwords
1. Sign in to the Identity and Access Management (IAM) console at https://console.aws.amazon.com/
iam/.
2. In the navigation pane, click Account Settings.
3. In the Password Policy section, select Allow users to change their own password, and then
click Apply Password Policy.
4. Point users to the following instructions that show how they can change their passwords: How IAM
Users Change Their Own Password (p. 75).
For information about the AWS CLI, Tools for Windows PowerShell, and API commands that you
can use to change the account's password policy (which includes letting all users change their own
passwords), see Setting a Password Policy (AWS CLI, Tools for Windows PowerShell, or AWS
API) (p. 70).
To allow selected IAM users change their own passwords
1. Sign in to the Identity and Access Management (IAM) console at https://console.aws.amazon.com/
iam/.
2. In the navigation pane, click Account Settings.
3. In the Account Settings section, make sure that Allow users to change their own password
is not selected. If this check box is selected, all users can change their own passwords. (See the
previous procedure.)
4. Create the users who should be able to change their own password, if they do not already exist.
For details, see Creating an IAM User in Your AWS Account (p. 59).
5. Create an IAM group for the users who should be allowed to change their passwords, and then
add the users from the previous step to the group. For details, see Creating Your First IAM Admin
User and Group (p. 14) and Managing IAM Groups (p. 121).
This step is optional, but it's a best practice to use groups to manage permissions so that you can
add and remove users and change the permissions for the group as a whole.
6. Assign the following policy to the group. For details, see Working with Policies (p. 280).
74

AWS Identity and Access Management User Guide
Passwords
{
"Version": "2012-10-17",
"Statement": {
"Effect": "Allow",
"Action": [
"iam:ChangePassword",
"iam:GetAccountPasswordPolicy"
],
"Resource": "*"
}
}
This policy grants access to the ChangePassword action, which lets users change their passwords
from the console, the AWS CLI, Tools for Windows PowerShell, or the API. It also grants access to
the GetAccountPasswordPolicy action, which lets the user view the current password policy; this
permission is required so that the user can display the Change Password page in the console.
The user must be able to read the current password policy to ensure the changed password meets
the requirements of the policy.
7. Point users to the following instructions that show how they can change their passwords: How IAM
Users Change Their Own Password (p. 75).
For More Information
For more information on managing credentials, see the following topics:
•Permitting IAM Users to Change Their Own Passwords (p. 74)
•Managing Passwords (p. 66)
•Setting an Account Password Policy for IAM Users (p. 67)
•Working with Policies (p. 280)
•How IAM Users Change Their Own Password (p. 75)
How IAM Users Change Their Own Password
If users have been granted permission to change their own passwords, they can use a special page in
the AWS Management Console to do this. They can also use the command line interface or the IAM
API.
For information about the permissions that users need in order to change their own passwords, see
Permitting IAM Users to Change Their Own Passwords (p. 74).
Topics
•How Users Change Their Own Password (AWS Management Console) (p. 75)
•How Users Change Their Own Password (AWS CLI, Tools for Windows PowerShell, and AWS
API) (p. 76)
How Users Change Their Own Password (AWS Management Console)
The following procedure describes how an IAM user can use the AWS Management Console to
change his or her own password.
75
AWS Identity and Access Management User Guide
Access Keys
To use the console to change your own password as an IAM user
1. Type your account sign-in URL (p. 17) into your browser's address bar. Then use your IAM user
name and password to sign in to the console. The URL looks like this, if you use the global sign-in
endpoint:
https://your_AWS_Account_ID.signin.aws.amazon.com/console/
To get the URL for your sign-in page, contact your administrator.
2. In the navigation bar of the console, click the arrow next to your user name and then click Security
Credentials.
3. For Old Password, type your current password. Type a new password in the New Password and
Confirm New Password boxes. Then click Change Password.
Note
If the account has a password policy, the new password must meet the requirements
of that policy. For more information, see Setting an Account Password Policy for IAM
Users (p. 67).
How Users Change Their Own Password (AWS CLI, Tools for Windows
PowerShell, and AWS API)
As an IAM user, you can use the AWS CLI, Tools for Windows PowerShell, or AWS API to change
your own password.
To change your own IAM password, use the following commands
• AWS CLI: aws iam change-password
• Tools for Windows PowerShell: Edit-IAMPassword
• AWS API: ChangePassword
Managing Access Keys for IAM Users
76

AWS Identity and Access Management User Guide
Access Keys
Note
If you found this topic because you are trying to configure the Product Advertising API to sell
Amazon products on your web site, see these topics:
•Getting Started with the Product Advertising API
•Getting Started as a Product Advertising API Developer
Users need their own access keys to make programmatic calls to AWS from the AWS Command Line
Interface (AWS CLI), Tools for Windows PowerShell, the AWS SDKs, or direct HTTP calls using the
APIs for individual AWS services. To fill this need, you can create, modify, view, or rotate access keys
(access key IDs and secret access keys) for IAM users.
When you create an access key, IAM returns the access key ID and secret access key. You should
save these in a secure location and give them to the user.
Important
To ensure the security of your AWS account, the secret access key is accessible only at
the time you create it. If a secret access key is lost, you must delete the access key for
the associated user and create a new key. For more details, see Retrieving Your Lost or
Forgotten IAM Access Keys (p. 80).
By default, when you create an access key, its status is Active, which means the user can use the
access key for AWS CLI, Tools for Windows PowerShell, and API calls. Each user can have two active
access keys, which is useful when you must rotate the user's access keys. You can disable a user's
access key, which means it can't be used for API calls. You might do this while you're rotating keys or
to revoke API access for a user.
You can delete an access key at any time. However, when you delete an access key, it's gone forever
and cannot be retrieved. (You can always create new keys.)
You can give your users permission to list, rotate, and manage their own keys. For more information,
see Allow Users to Manage Their Own Passwords, Access Keys, and SSH Keys (p. 256).
For more information about the credentials used with AWS and IAM, see Temporary Security
Credentials (p. 218), and Types of Security Credentials in the Amazon Web Services General
Reference.
Topics
•Creating, Modifying, and Viewing Access Keys (AWS Management Console) (p. 77)
•Creating, Modifying, and Viewing Access Keys (AWS CLI, Tools for Windows PowerShell, and
AWS API) (p. 78)
•Rotating Access Keys (AWS CLI, Tools for Windows PowerShell, and AWS API) (p. 79)
•Retrieving Your Lost or Forgotten IAM Access Keys (p. 80)
Creating, Modifying, and Viewing Access Keys (AWS
Management Console)
You can use the AWS Management Console to manage the access keys of IAM users.
To list a user's access keys
1. Sign in to the Identity and Access Management (IAM) console at https://console.aws.amazon.com/
iam/.
2. In the navigation pane, choose Users.
77

AWS Identity and Access Management User Guide
Access Keys
3. Choose the name of the desired user, and then choose the Security Credentials tab. The user's
access keys and the status of each key is displayed.
Note
Only the user's access key ID is visible. The secret access key can only be retrieved
when creating the key.
To create, modify, or delete a user's access keys
1. Sign in to the Identity and Access Management (IAM) console at https://console.aws.amazon.com/
iam/.
2. In the navigation pane, choose Users.
3. Choose the name of the desired user, and then choose the Security Credentials tab.
4. If needed, expand the Access Keys section and do any of the following:
• To create an access key, choose Create Access Key and then choose Download Credentials
to save the access key ID and secret access key to a CSV file on your computer. Store the file
in a secure location. You will not have access to the secret access key again after this dialog
box closes. After you have downloaded the CSV file, choose Close.
• To disable an active access key, choose Make Inactive.
• To reenable an inactive access key, choose Make Active.
• To delete an access key, choose Delete and then choose Delete to confirm.
Creating, Modifying, and Viewing Access Keys (AWS CLI,
Tools for Windows PowerShell, and AWS API)
To manage a user's access keys from the AWS CLI, Tools for Windows PowerShell, or the AWS API,
use the following commands:
To create an access key
• AWS CLI: aws iam create-access-key
• Tools for Windows PowerShell: New-IAMAccessKey
• AWS API: CreateAccessKey
To disable or reenable an access key
• AWS CLI: aws iam update-access-key
• Tools for Windows PowerShell: Update-IAMAccessKey
• AWS API: UpdateAccessKey
To list a user's access keys
• AWS CLI: aws iam list-access-keys
• Tools for Windows PowerShell: Get-IAMAccessKey
• AWS API: ListAccessKeys
To determine when an access key was most recently used
• AWS CLI: aws iam get-access-key-last-used
78

AWS Identity and Access Management User Guide
Access Keys
• Tools for Windows PowerShell: Get-IAMAccessKeyLastUsed
• AWS API: GetAccessKeyLastUsed
To delete an access key
• AWS CLI: aws iam delete-access-key
• Tools for Windows PowerShell: Remove-IAMAccessKey
• AWS API: DeleteAccessKey
Rotating Access Keys (AWS CLI, Tools for Windows
PowerShell, and AWS API)
As a security best practice, we recommend that you, an administrator, regularly rotate (change) the
access keys for IAM users in your account. If your users have the necessary permissions, they can
rotate their own access keys. For information about how to give your users permissions to rotate
their own access keys, see Allow Users to Manage Their Own Passwords, Access Keys, and SSH
Keys (p. 256).
You can also apply a password policy to your account to require that all of your IAM users periodically
rotate their passwords,. You can choose how often they must do so. For more information, see Setting
an Account Password Policy for IAM Users (p. 67).
Important
If you regularly use the AWS root account credentials, we recommend that you also
regularly rotate them. The account password policy does not apply to the AWS root account
credentials. IAM users cannot manage credentials for the AWS root account, so you must use
the AWS root account's credentials (not a user's) to change the AWS root account credentials.
Note that we recommend against using the AWS root account for everyday work in AWS.
The following steps describe the general process for rotating an access key without interrupting your
applications. These steps show the AWS CLI, Tools for Windows PowerShell and AWS API commands
for rotating access keys. You can also perform these tasks using the console; for details, see Creating,
Modifying, and Viewing Access Keys (AWS Management Console) (p. 77), in the section above.
1. While the first access key is still active, create a second access key, which will be active by default.
At this point, the user has two active access keys.
• AWS CLI: aws iam create-access-key
• Tools for Windows PowerShell: New-IAMAccessKey
• AWS API: CreateAccessKey
2. Update all applications and tools to use the new access key.
3. Determine if the first access key is still in use:
• AWS CLI: aws iam get-access-key-last-used
• Tools for Windows PowerShell: Get-IAMAccessKeyLastUsed
• AWS API: GetAccessKeyLastUsed
One approach is to wait several days and then check the old access key for any use before
proceeding.
4. Even if step 3 (p. 79) indicates no use of the old key, we recommend that you do not immediately
delete the first access key. Instead, change the state of the first access key to Inactive.
• AWS CLI: aws iam update-access-key
• Tools for Windows PowerShell: Update-IAMAccessKey
• AWS API: UpdateAccessKey
79

AWS Identity and Access Management User Guide
Multi-Factor Authentication (MFA)
5. Use only the new access key to confirm that your applications are working. Any applications and
tools that still use the original access key will stop working at this point because they no longer
have access to AWS resources. If you find such an application or tool, you can switch its state
back to Active to re-enable the first access key. Then return to step 2 (p. 79) and update this
application to use the new key.
6. After you wait some period of time to ensure that all applications and tools have been updated, you
can delete the first access key.
• AWS CLI: aws iam delete-access-key
• Tools for Windows PowerShell: Remove-IAMAccessKey
• AWS API: DeleteAccessKey
For more information, see the following:
•How to rotate access keys for IAM users. This entry on the AWS Security Blog provides more
information on key rotation.
•IAM Best Practices (p. 40). This page provides general recommendations for helping to secure your
AWS resources.
Retrieving Your Lost or Forgotten IAM Access Keys
For security reasons, and just as with passwords, you cannot retrieve the secret access key part of
an access key pair after you create it. If you lose it, it cannot be recovered and you must create a new
access key.
To create a new access key, see Creating, Modifying, and Viewing Access Keys (AWS Management
Console) (p. 77).
Just as with passwords, you should follow best practice (p. 43) and periodically change your AWS
access keys. In AWS, you change access keys by rotating them. This means that you create a new
one, configure your application(s) to use the new key, and then delete the old one. You are allowed
to have two access key pairs active at the same time for just this reason. For more information, see
Rotating Access Keys (AWS CLI, Tools for Windows PowerShell, and AWS API) (p. 79).
Using Multi-Factor Authentication (MFA) in AWS
For increased security, we recommend that you configure multi-factor authentication (MFA) to help
protect your AWS resources. MFA adds extra security because it requires users to enter a unique
authentication code from an approved authentication device or SMS text message when they access
AWS websites or services.
•Security token-based. This type of MFA requires you to assign an MFA device (hardware or virtual)
to the IAM user or the AWS root account. A virtual device is a software application running on a
phone or other mobile device that emulates a physical device. Either way, the device generates a
six digit numeric code based upon a time-synchronized one-time password algorithm. The user must
enter a valid code from the device on a second web page during sign-in. Each MFA device assigned
to a user must be unique; a user cannot enter a code from another user's device to authenticate. For
more information about enabling security token-based MFA, see Enabling a Hardware MFA Device
(AWS Management Console) (p. 85) and Enabling a Virtual Multi-factor Authentication (MFA)
Device (p. 82).
•SMS text message-based. This type of MFA requires you to configure the IAM user with the phone
number of the user's SMS-compatible mobile device. When the user signs in, AWS sends a six digit
numeric code by SMS text message to the user's mobile device and requires the user to enter that
code on a second web page during sign-in. Note that SMS-based MFA is available only for IAM
80

AWS Identity and Access Management User Guide
Multi-Factor Authentication (MFA)
users. You cannot use this type of MFA with the AWS root account. For more information about
enabling SMS text messaging-based MFA, see PREVIEW - Enabling SMS Text Message MFA
Devices (p. 87).
Note
SMS MFA is currently available only as a preview program. It is available to anyone who
signs up to participate. To sign up, follow the instructions on the Multi-Factor Authentication
details page.
No matter how the user receives the six digit numeric MFA code, the user enters it on a second page
of the sign-in process for the AWS Management Console, or passes it as a parameter to an AWS
STSAPI call to get temporary credentials.
This section shows you how to configure MFA for your users and set them up to use token devices or
SMS text messages. It also describes how to synchronize and deactivate existing token devices, and
what to do when a device is lost or stops working.
Note
• When you enable MFA for the root account, it affects only the root account credentials. IAM
users in the account are distinct identities with their own credentials, and each identity has
its own MFA configuration.
• If you enable MFA on your AWS account (the root user) and also enable MFA on the
associated Amazon.com account with the same email address, you will be prompted for two
different MFA codes whenever you sign in as the root user.
For answers to commonly asked questions about AWS MFA, go to the AWS Multi-Factor
Authentication FAQs.
Enabling MFA Devices
The following overview procedure describes how to set up and use MFA and provides links to related
information.
1. Get an MFA token device or an SMS-compatible mobile device such as one of the following. You
can enable only one MFA device per AWS root account or IAM user.
• A hardware-based token device, such as one of the AWS-supported hardware token devices
discussed on the Multi-Factor Authentication page.
• A virtual token device, which is a software application that is compliant with RFC 6238, a
standards-based TOTP (time-based one-time password) algorithm. You can install the application
on a mobile device, such as a tablet or smartphone. For a list of a few supported apps that you
can use as virtual MFA devices, see the Virtual MFA Applications section of the Multi-Factor
Authentication page.
• A mobile phone that can receive standard SMS text messages.
Note
If you choose to use SMS-based MFA, text messaging charges from your mobile device's
carrier may apply.
SMS-based MFA are only available for IAM users and cannot be used for the AWS
account root user.
2. Enable the MFA device. Enabling a device has two steps. First, you create an MFA device entity in
IAM. Then you associate the MFA device entity with the IAM user. You can perform these tasks in
the AWS Management Console, the AWS CLI, Tools for Windows PowerShell or the IAM API.
For information about enabling each type of MFA device, see the following topics:
• Physical MFA device: Enabling a Hardware MFA Device (AWS Management Console) (p. 85)
• Virtual MFA device: Enabling a Virtual Multi-factor Authentication (MFA) Device (p. 82)
81

AWS Identity and Access Management User Guide
Multi-Factor Authentication (MFA)
• SMS MFA device: PREVIEW - Enabling SMS Text Message MFA Devices (p. 87)
3. Use the MFA device when you log in to or access AWS resources. Note the following:
• To access an AWS website, you need an MFA code from the device in addition to the usual user
name and password. If AWS determines that the IAM user you sign in as is MFA-enabled with
SMS, then it automatically sends the MFA code to the configured phone number.
• To access MFA-protected APIs, you need an MFA code, the identifier for the MFA device (the
device serial number of a physical device or the ARN of a virtual or SMS device defined in AWS),
and the usual access key ID and secret access key.
Note
During the public preview of SMS MFA, you can authenticate with your SMS device only
in the AWS Management Console. You cannot pass the MFA information for an SMS
MFA device to AWS STS APIs to request temporary credentials.
For more inormation, see Using MFA Devices With Your IAM Sign-in Page (p. 52)
Topics
•Enabling a Virtual Multi-factor Authentication (MFA) Device (p. 82)
•Enabling a Hardware MFA Device (AWS Management Console) (p. 85)
•PREVIEW - Enabling SMS Text Message MFA Devices (p. 87)
•Enable and manage virtual MFA devices (AWS CLI, Tools for Windows PowerShell, or AWS
API) (p. 88)
Enabling a Virtual Multi-factor Authentication (MFA) Device
A virtual MFA device uses a software application to generate a six-digit authentication code that is
compatible with the time-based one-time password (TOTP) standard, as described in RFC 6238. The
app can run on mobile hardware devices, including smartphones. With most virtual MFA applications,
you can host more than one virtual MFA device, which makes them more convenient than hardware
MFA devices. However, you should be aware that because a virtual MFA might be run on a less secure
device such as a smartphone, a virtual MFA might not provide the same level of security as a hardware
MFA device.
An MFA device can be associated with only one AWS account or IAM user. Although some virtual MFA
software applications appear to support multiple accounts, each account you add represents a single
virtual MFA device, and that one virtual device can still associate with only one account or user.
For a list of virtual MFA apps that you can use on smartphones and tablets (including Google Android,
Apple iPhone and iPad, and Windows Phone), go to the Virtual MFA Applications section at http://
aws.amazon.com/iam/details/mfa/. Note that AWS requires a virtual MFA app that produces a six-digit
OTP.
Use the following steps to enable and manage MFA devices from the AWS Management Console. To
enable and manage MFA devices at the command line, or to use the API, see Enable and manage
virtual MFA devices (AWS CLI, Tools for Windows PowerShell, or AWS API) (p. 88).
Important
We recommend that when you configure a virtual MFA device to use with AWS that you save
a copy of the QR code or the secret key in a secure place. That way, if you lose the phone
or have to reinstall the MFA software application for any reason, you can reconfigure the app
to use the same virtual MFA and not need to create a new virtual MFA in AWS for the user or
root account.
Enable a virtual MFA device for an IAM user (AWS Management Console)
You can use IAM in the AWS Management Console to enable a virtual MFA device for an IAM user in
your account.
82

AWS Identity and Access Management User Guide
Multi-Factor Authentication (MFA)
Note
You must have physical access to the hardware that will host the user's virtual MFA device
in order to configure MFA. For example, if you are configuring MFA for a user who will use
a virtual MFA device running on a smartphone, you must have the smartphone available
in order to finish the wizard. Because of this, you might want to let users configure and
manage their own virtual MFA devices. In that case you must grant users the permissions
to perform the necessary IAM actions. For more information and for an example of an IAM
policy that grants these permissions, see Allow Users to Manage Only Their Own Virtual MFA
Devices (p. 260).
To enable a virtual MFA device for a user
1. Sign in to the Identity and Access Management (IAM) console at https://console.aws.amazon.com/
iam/.
2. In the navigation pane, choose Users.
3. In the User Name list, choose the name of the intended MFA user.
4. Choose the Security Credentials tab, and then choose Manage MFA Device.
5. In the Manage MFA Device wizard, choose A virtual MFA device, and then choose Next Step.
IAM generates and displays configuration information for the virtual MFA device, including a QR
code graphic. The graphic is a representation of the 'secret configuration key' that is available for
manual entry on devices that do not support QR codes.
6. Open your virtual MFA application. (For a list of apps that you can use for hosting virtual MFA
devices, see Virtual MFA Applications.) If the virtual MFA application supports multiple accounts
(multiple virtual MFA devices), choose the option to create a new account (a new virtual MFA
device).
7. Determine whether the MFA app supports QR codes, and then do one of the following:
• Use the app to scan the QR code. For example, you might choose the camera icon or choose
an option similar to Scan code, and then use the device's camera to scan the code.
• In the Manage MFA Device wizard, choose Show secret key for manual configuration, and
then type the secret configuration key into your MFA application.
When you are finished, the virtual MFA device starts generating one-time passwords.
8. In the Manage MFA Device wizard, in the Authentication Code 1 box, type the one-time
password that currently appears in the virtual MFA device. Wait up to 30 seconds for the device
to generate a new one-time password. Then type the second one-time password into the
Authentication Code 2 box. Choose Active Virtual MFA.
The virtual MFA device is now ready for use with AWS. For information about using MFA with the AWS
Management Console, see Using MFA Devices With Your IAM Sign-in Page (p. 52).
Enable a virtual MFA device for your AWS root account (AWS Management Console)
You can use IAM in the AWS Management Console to configure and enable a virtual MFA device for
your AWS root account.
Important
To manage MFA devices for the AWS account, you must be signed in to AWS using your
root account credentials. You cannot manage MFA devices for the root account using other
credentials.
Note
If you enable MFA on your AWS account (the root user) and also enable MFA on
the associated Amazon.com account with the same email address, you will be prompted for
two different MFA codes whenever you sign in as the root user.
83
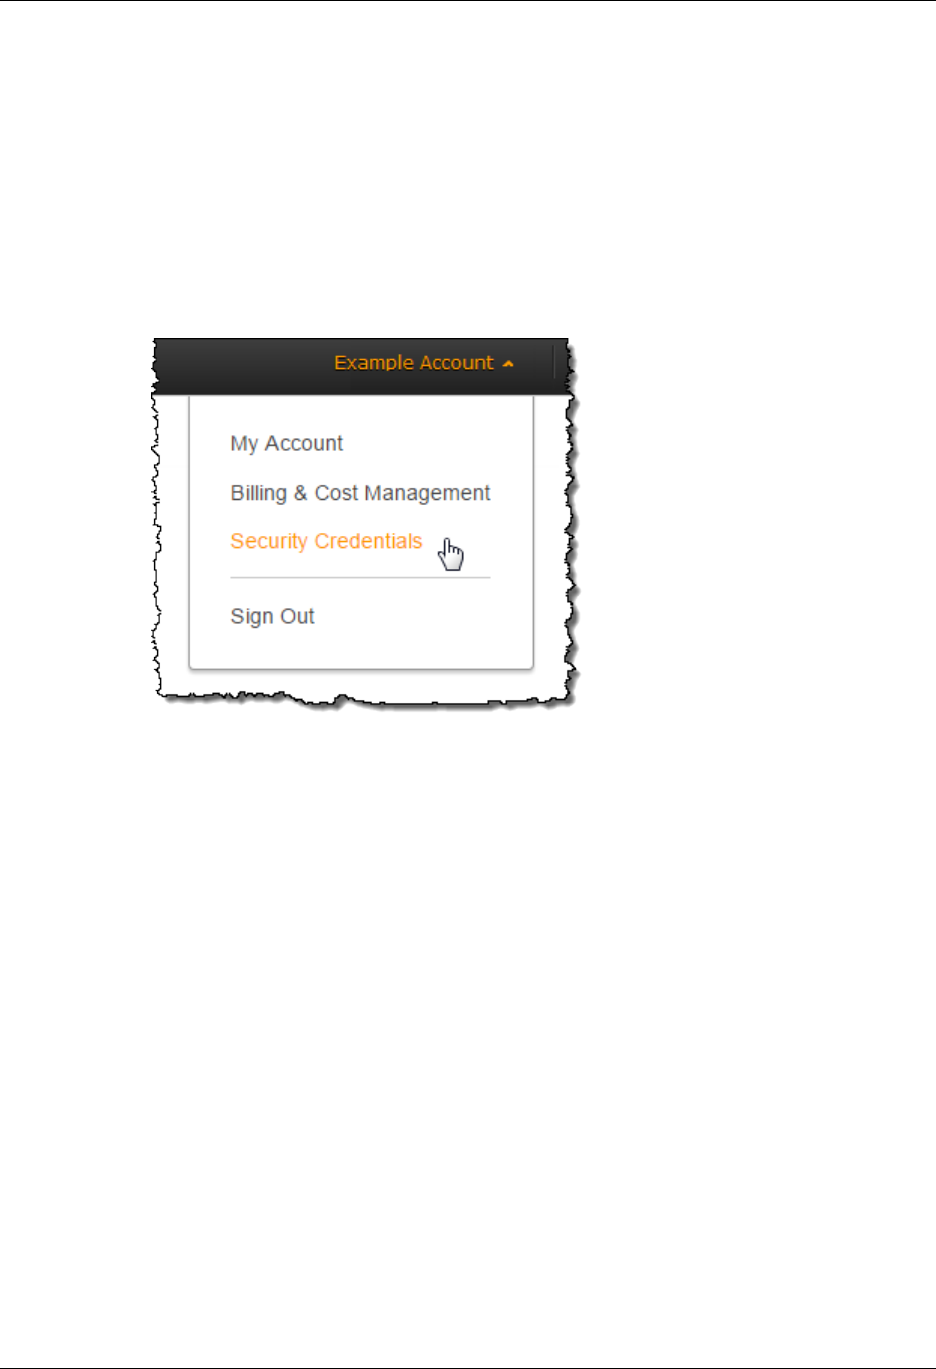
AWS Identity and Access Management User Guide
Multi-Factor Authentication (MFA)
To configure and enable a virtual MFA device for use with your root account
1. Sign in to the Identity and Access Management (IAM) console at https://console.aws.amazon.com/
iam/.
2. Do one of the following:
•Option 1: Choose Dashboard, and under Security Status, expand Activate MFA on your
root account.
•Option 2: On the right side of the navigation bar, choose your account name, and choose
Security Credentials. If necessary, choose Continue to Security Credentials. Then expand
the Multi-Factor Authentication (MFA) section on the page.
3. Choose Manage MFA or Activate MFA, depending on which option you chose in the preceding
step.
4. In the wizard, choose A virtual MFA device and then choose Next Step.
5. Confirm that a virtual MFA application is installed on the device, and then choose Next Step. IAM
generates and displays configuration information for the virtual MFA device, including a QR code
graphic. The graphic is a representation of the secret configuration key that is available for manual
entry on devices that do not support QR codes.
6. With the Manage MFA Device wizard still open, open the virtual MFA application on the device.
7. If the virtual MFA software supports multiple accounts (multiple virtual MFA devices), then choose
the option to create a new account (a new virtual device).
8. The easiest way to configure the application is to use the application to scan the QR code. If you
cannot scan the code, you can type the configuration information manually.
• To use the QR code to configure the virtual MFA device, follow the app instructions for scanning
the code. For example, you might need to tap the camera icon or tap a command like Scan
account barcode, and then use the device's camera to scan the QR code.
• If you cannot scan the code, type the configuration information manually by typing the Secret
Configuration Key value into the application. For example, to do this in the AWS Virtual MFA
application, choose Manually add account, and then type the secret configuration key and
choose Create.
Important
Make a secure backup of the QR code or secret configuration key, or make sure that
you enable multiple virtual MFA devices for your account. If the virtual MFA device is
unavailable (for example, if you lose the smartphone where the virtual MFA device is
84

AWS Identity and Access Management User Guide
Multi-Factor Authentication (MFA)
hosted), you will not be able to sign in to your account and you will have to contact
customer service to remove MFA protection for the account.
Note
The QR code and secret configuration key generated by IAM are tied to your AWS
account and cannot be used with a different account. They can, however, be reused to
configure a new MFA device for your account in case you lose access to the original MFA
device.
The device starts generating six-digit numbers.
9. In the Manage MFA Device wizard, in the Authentication Code 1 box, enter the six-digit number
that's currently displayed by the MFA device. Wait up to 30 seconds for the device to generate a
new number, and then type the new six-digit number into the Authentication Code 2 box.
10. Choose Next Step, and then choose Finish.
The device is ready for use with AWS. For information about using MFA with the AWS Management
Console, see Using MFA Devices With Your IAM Sign-in Page (p. 52).
Replace or "Rotate" a Virtual MFA device
You can have only one virtual MFA device assigned to a user at a time. If the user loses a device or
needs to replace it for any reason, you must first deactivate the old device. Then you can add the new
device for the user.
• To deactivate the device currently associated with a user, see Deactivating MFA devices (p. 92).
• To add a replacement virtual MFA device for an IAM user, follow the steps in the proecedure Enable
a virtual MFA device for an IAM user (AWS Management Console) (p. 82) above.
• To add a replacement virtual MFA device for the account root user, follow the steps in the
proecedure Enable a virtual MFA device for your AWS root account (AWS Management
Console) (p. 83) above.
Enabling a Hardware MFA Device (AWS Management Console)
Topics
•Enable a hardware MFA device for an IAM user (AWS Management Console) (p. 85)
•Enable a hardware MFA device for the AWS account root user (AWS Management
Console) (p. 86)
•Replace or "Rotate" a Physical MFA device (p. 87)
You can enable a hardware MFA device from the AWS Management ConsoleAWS Management
Console, the command line, or the IAM API. The following procedure shows you how to use the AWS
Management Console to enable the device for a user under your AWS account. To enable an MFA
device for your root account, see Enable a hardware MFA device for the AWS account root user (AWS
Management Console) (p. 86).
You can enable one MFA device (of any kind) per account root or IAM user.
Note
If you want to enable the device from the command line, use aws iam enable-mfa-device. To
enable the MFA device with the IAM API, use the EnableMFADevice action.
Enable a hardware MFA device for an IAM user (AWS Management Console)
To use the AWS Management Console to enable a hardware MFA device for an IAM user
1. Sign in to the Identity and Access Management (IAM) console at https://console.aws.amazon.com/
iam/.
85

AWS Identity and Access Management User Guide
Multi-Factor Authentication (MFA)
2. In the navigation pane, choose Users.
3. Choose the name of the user for whom you want to enable MFA, and then choose the Security
Credentials tab.
4. Choose Manage MFA Device.
5. In the Manage MFA Device wizard, choose A hardware MFA device and then choose Next
Step.
6. Type the device serial number. The serial number is usually on the back of the device.
7. In the Authentication Code 1 box, type the six-digit number displayed by the MFA device. You
might need to press the button on the front of the device to display the number.
8. Wait 30 seconds while the device refreshes the code, and then type the next six-digit number into
the Authentication Code 2 box. You might need to press the button on the front of the device
again to display the second number.
9. Choose Next Step.
The device is ready for use with AWS. For information about using MFA with the AWS Management
Console, see Using MFA Devices With Your IAM Sign-in Page (p. 52).
Enable a hardware MFA device for the AWS account root user (AWS Management
Console)
You can manage MFA devices for the AWS account root user only with the AWS Management
Console.
To use the AWS Management Console to enable the MFA device for your AWS root
account
1. Sign in to the Identity and Access Management (IAM) console at https://console.aws.amazon.com/
iam/.
Important
To manage MFA devices for the AWS account, you must use your root account
credentials to sign in to AWS. You cannot manage MFA devices for the root account
using other credentials.
Note
If you enable MFA on your AWS account (the root user) and also enable MFA on
the associated Amazon.com account with the same email address, you will be prompted
for two different MFA codes whenever you sign in as the root user.
2. Do one of the following:
•Option 1: Choose Dashboard, and under Security Status, expand Activate MFA on your
root account.
•Option 2: On the right side of the navigation bar, choose on your account name, and then
choose Security Credentials. If necessary, choose Continue to Security Credentials. Then
expand the Multi-Factor Authentication (MFA) section on the page.
86
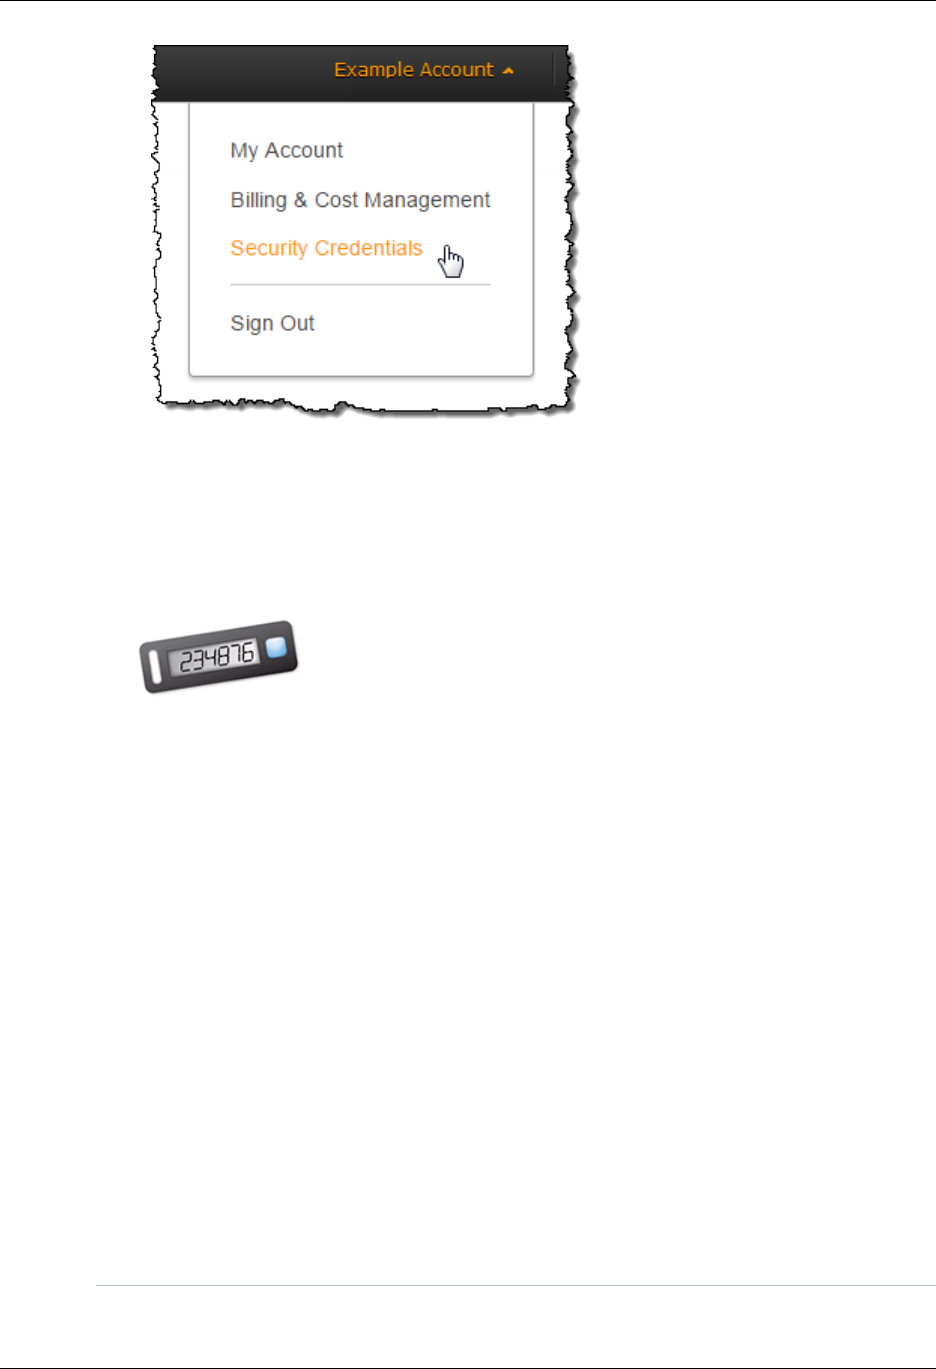
AWS Identity and Access Management User Guide
Multi-Factor Authentication (MFA)
3. Choose Manage MFA or Activate MFA, depending on which option you chose in the preceding
step.
4. In the wizard, choose A hardware MFA device and then choose Next Step.
5. In the Serial Number box, enter the serial number that is found on the back of the MFA device.
6. In the Authentication Code 1 box, enter the six-digit number displayed by the MFA device. You
might need to press the button on the front of the device to display the number.
7. Wait 30 seconds while the device refreshes the code, and then enter the next six-digit number into
the Authentication Code 2 box. You might need to press the button on the front of the device
again to display the second number.
8. Choose Next Step. The MFA device is now associated with the AWS account.
The next time you use your AWS account credentials to sign in, you must type a code from the
MFA device.
Replace or "Rotate" a Physical MFA device
You can have only one MFA device assigned to a user at a time. If the user loses a device or needs to
replace it for any reason, you must first deactivate the old device. Then you can add the new device for
the user.
• To deactivate the device currently associated with a user, see Deactivating MFA devices (p. 92).
• To add a replacement hardware MFA device for an IAM user, follow the steps in the procedure
Enable a hardware MFA device for an IAM user (AWS Management Console) (p. 85) above.
• To add a replacement virtual MFA device for the account root user, follow the steps in the
procedure Enable a hardware MFA device for the AWS account root user (AWS Management
Console) (p. 86) above.
PREVIEW - Enabling SMS Text Message MFA Devices
Sign Up for Preview Program
87

AWS Identity and Access Management User Guide
Multi-Factor Authentication (MFA)
SMS MFA is currently available only as a preview program. It is available to anyone who signs up to
participate. To sign up, follow the instructions on the Multi-factor Authentication details page.
An SMS MFA device can be any mobile device with a phone number that can receive standard SMS
text messages. When an MFA code is needed, AWS sends it to the phone number that is configured
for the IAM user.
Note
SMS MFA can be used only with IAM users. It cannot be used with the AWS root account.
To protect the root user with MFA, you must use either a hardware-based (p. 85) or virtual
(software-based) (p. 82) MFA token device.
Topics
•Enable an SMS MFA device for an IAM user (AWS Management Console) (p. 88)
•Change the phone number for SMS MFA for an IAM user (p. 88)
Enable an SMS MFA device for an IAM user (AWS Management Console)
Note
Currently, you can manage SMS MFA only in the AWS Management Console.
You can use IAM in the AWS Management Console to configure an IAM user with a phone number to
enable SMS MFA.
To enable SMS MFA for an IAM user (console)
1. Sign up for the preview of the SMS MFA feature. To sign up, follow the instructions on the Multi-
factor Authentication details page.
2. Sign in to the Identity and Access Management (IAM) console at https://console.aws.amazon.com/
iam/.
3. In the navigation pane, choose Users.
4. In the User Name list, choose the name (not the check box) of the intended MFA user.
5. Scroll down to the Security Credentials section, and then choose Manage MFA Device.
6. In the Manage MFA Device wizard, choose An SMS MFA device, and then choose Next Step.
7. Enter the phone number to which you want to send MFA codes for this IAM user, and then choose
Next Step.
8. A six-digit authentication code is immediately sent to the specified phone number for verification.
Type the six-digit code and then click Next Step. If the code does not arrive in a reasonable
amount of time), choose Resend Code. Note that SMS is not a service with a guaranteed delivery
time.
9. If AWS successfully verifies the code, the wizard ends. Choose Finish to close the wizard.
Change the phone number for SMS MFA for an IAM user
To change the phone number of the SMS MFA device assigned to an IAM user, you must delete the
current MFA device and create a new device with the new phone number. To delete the device, see
Deactivating MFA devices (p. 92). To create a new device, see the previous procedures in this
topic.
Enable and manage virtual MFA devices (AWS CLI, Tools for Windows
PowerShell, or AWS API)
The following list shows the command line commands or API actions to use to enable a virtual MFA
device.
88

AWS Identity and Access Management User Guide
Multi-Factor Authentication (MFA)
Note
You must use the AWS Management Console to manage any MFA device for the root user in
your AWS account. You cannot manage the MFA device for the root user with the AWS API,
AWS CLI, Tools for Windows PowerShell, or any other command-line tool.
At this time you can manage SMS MFA devices only by using the AWS Management
Console.
When you enable an MFA device from the AWS Management Console, the console performs many
of these steps for you. If you instead create a virtual device using the AWS CLI, Tools for Windows
PowerShell, or AWS API, then you must perform the steps manually and in the correct order. For
example, to create a virtual MFA device, you must create the IAM object, extract the code as either
a string or a QR code graphic, and then sync the device and associate it with an IAM user. See the
Examples section of New-IAMVirtualMFADevice for more details. For a physical device, you skip the
creation step and go directly to syncing the device and associating it with the user.
To create the virtual device entity in IAM to represent a virtual MFA device
These commands provide an ARN for the device that is used in place of a serial number in many of the
following commands.
• AWS CLI: aws iam create-virtual-mfa-device
• Tools for Windows PowerShell: New-IAMVirtualMFADevice
• AWS API: CreateVirtualMFADevice
To enable an MFA device for use with AWS
These commands synchronize the device with AWS and associates it with a user or the root account. If
the device is virtual, use the ARN of the virtual device as the serial number.
• AWS CLI: aws iam enable-mfa-device
• Tools for Windows PowerShell: Enable-IAMMFADevice
• AWS API: EnableMFADevice
To deactivate a device
These commands disassociate the device from the user and deactivates it. If the device is virtual, use
the ARN of the virtual device as the serial number. You must also separately delete the virtual device
entity.
• AWS CLI: aws iam deactivate-mfa-device
• Tools for Windows PowerShell: Disable-IAMMFADevice
• AWS API: DeactivateMFADevice
To list virtual MFA device entities
• AWS CLI: aws iam list-virtual-mfa-devices
• Tools for Windows PowerShell: Get-IAMVirtualMFADevice
• AWS API: ListVirtualMFADevices
To resynchronize an MFA device
Use these commands if the devices is generating codes that are not accepted by AWS. If the device is
virtual, use the ARN of the virtual device as the serial number.
• AWS CLI: aws iam resync-mfa-device
89

AWS Identity and Access Management User Guide
Multi-Factor Authentication (MFA)
• Tools for Windows PowerShell: Sync-IAMMFADevice
• AWS API: ResyncMFADevice
To delete a virtual MFA device entity in IAM
After the device is disassociated from the user, you can delete the device entity.
• AWS CLI: aws iam delete-virtual-mfa-device
• Tools for Windows PowerShell: Remove-IAMVirtualMFADevice
• AWS API: DeleteVirtualMFADevice
Checking MFA Status
Use the IAM console to check whether an AWS root account or IAM user has a valid MFA device
enabled.
To check the MFA status of a root account
1. Sign in to the AWS Management Console with your AWS account (root) credentials and then open
the IAM console at https://console.aws.amazon.com/iam/.
2. Check under Security Status to see whether MFA is enabled or disabled. If MFA has not been
activated, an alert symbol ( ) is displayed next to Activate MFA on your root account.
If you want to enable MFA for the account, see Enable a virtual MFA device for your AWS root account
(AWS Management Console) (p. 83) or Enable a hardware MFA device for the AWS account root
user (AWS Management Console) (p. 86).
To check the MFA status of an IAM user
1. Open the IAM console at https://console.aws.amazon.com/iam/.
2. In the navigation pane, choose Users.
3. Choose the name of the user whose MFA status you want to check, and then choose the Security
Credentials tab.
4. If no MFA device is active for the user, the console displays No next to Multi-Factor
Authentication Device. If the user has an MFA device enabled, the Multi-Factor Authentication
Device item shows a value for the device:
• The ARN in AWS for a virtual device, such as
arn:aws:iam::123456789012:mfa/username
• The ARN in AWS for an SMS device, such as arn:aws:iam::123456789012:sms-
mfa/username
• The device serial number of a hardware device (usually the number from the back of the
device), such as GAHT12345678
If you want to change the current setting, choose Manage MFA Device For virtual device information,
see Enabling a Virtual Multi-factor Authentication (MFA) Device (p. 82). For hardware device
information, see Enabling a Hardware MFA Device (AWS Management Console) (p. 85).
Synchronize MFA devices
An MFA device can get out of synchronization. If the device is not synchronized when the user
tries to use it, the user's sign-in attempt fails. If the user uses the MFA device to sign in to the AWS
Management Console, IAM prompts the user to resynchronize the device.
90
AWS Identity and Access Management User Guide
Multi-Factor Authentication (MFA)
IAM Console
To use the console to resynchronize an MFA device for a user
1. Sign in to the Identity and Access Management (IAM) console at https://console.aws.amazon.com/
iam/.
2. In the navigation pane, choose Users, and then choose the name of the user whose MFA device
needs to be resynchronized.
3. Choose the Security Credentials tab, and then choose Manage MFA Device.
4. In the Manage MFA Device wizard, choose Resynchronize MFA device, and then choose Next
Step.
5. Type the next two sequentially generated codes from the device into Authentication Code 1 and
Authentication Code 2. Then choose Next Step.
AWS CLI
AWS CLI: aws iam resync-mfa-device
• Virtual MFA device: specify Amazon Resource Name (ARN) of device as SerialNumber.
$ aws iam resync-mfa-device --user-name Bob --serial-number
arn:aws:iam::123456789012:mfa/BobsMFA --authentication-code-1 123456 --
authentication-code-2 987654
• Physical MFA device: specify physical device's serial number as SerialNumber. The format is
vendor specific.
PS C:\>Sync-IAMMFADevice -SerialNumber ABCD12345678 -AuthenticationCode1
123456 -AuthenticationCode2 987654 -UserName Bob
Tools for Windows PowerShell
Tools for Windows PowerShell: Sync-IAMMFADevice
• Virtual MFA device: specify Amazon Resource Name (ARN) of device as SerialNumber.
PS C:\>Sync-IAMMFADevice -UserName Bob -SerialNumber
arn:aws:iam::123456789012:mfa/BobsMFA -AuthenticationCode1 123456 -
AuthenticationCode2 987654
• Physical MFA device: specify physical device's serial number as SerialNumber. The format is
vendor specific.
PS C:\>Sync-IAMMFADevice -UserName Bob -SerialNumber ABCD12345678 -
AuthenticationCode1 123456 -AuthenticationCode2 987654
IAM API
For those that prefer to work with the API, IAM has an API call that performs synchronization. In this
case, we recommend that you give your MFA users permission to access this API call. You should
build a tool based on that API call that lets your users resynchronize their devices whenever they need
to.
91
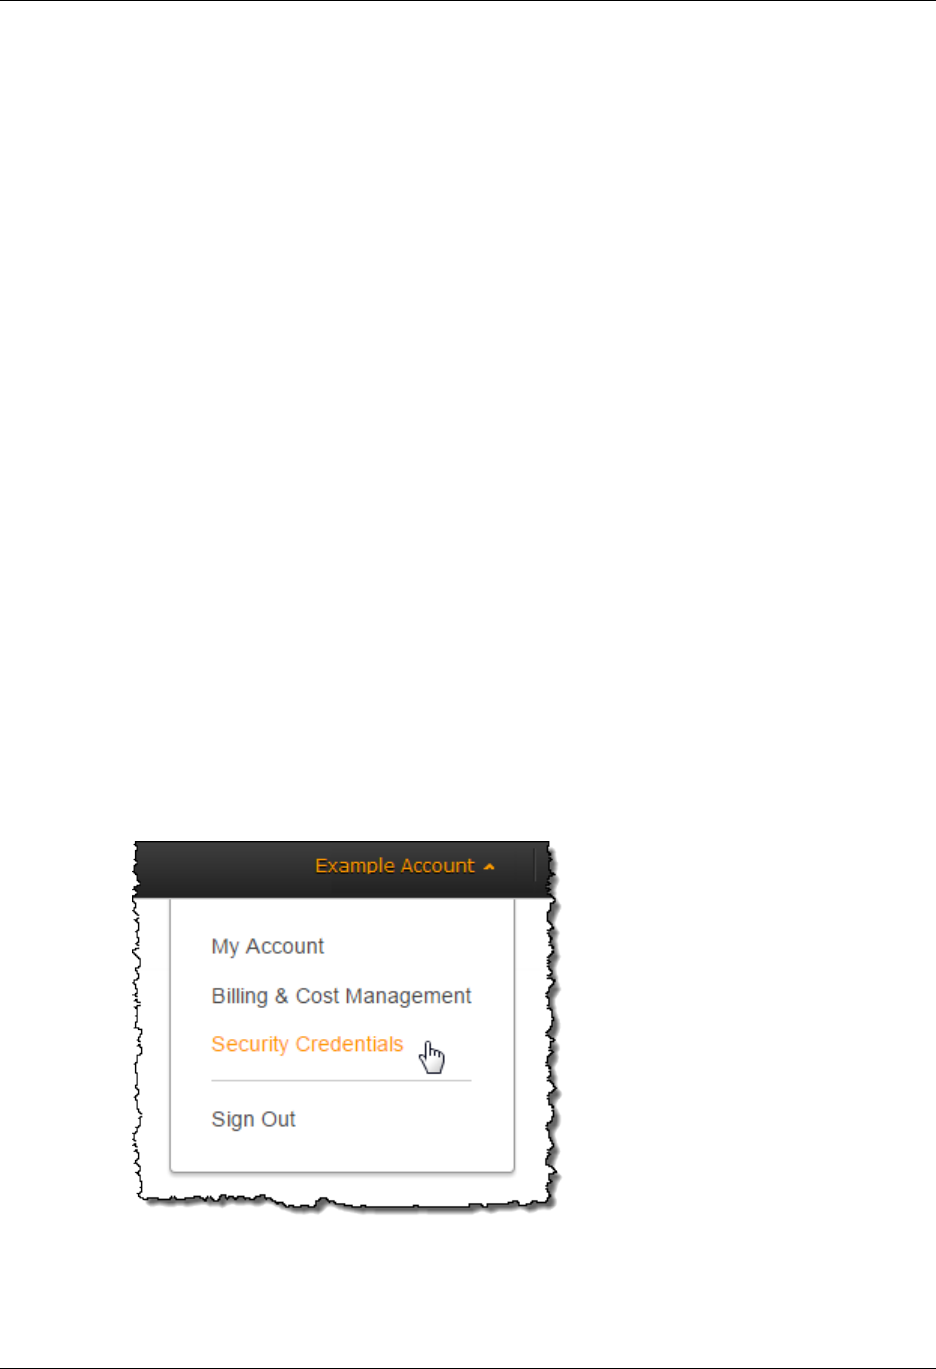
AWS Identity and Access Management User Guide
Multi-Factor Authentication (MFA)
IAM API: ResyncMFADevice
Deactivating MFA devices
You can deactivate an MFA device to disable it temporarily.
Note
If you use the API or CLI to delete a user from your AWS account, you must deactivate
or delete the user's MFA device as part of the process of removing the user. For more
information about deleting users, see Managing IAM Users (p. 63).
To use the console to deactivate an MFA device for a user
1. Sign in to the Identity and Access Management (IAM) console at https://console.aws.amazon.com/
iam/.
2. In the navigation pane, choose Users, and then choose the name of the user whose MFA device
you want to delete.
3. Choose the Security Credentials tab, and then choose Manage MFA Device.
4. In the Manage MFA Device wizard, choose Deactivate MFA device, and then choose Next Step.
The device is removed from AWS and cannot be used to sign in or authenticate requests until it is
reactivated and associated with an AWS user or root account.
To deactivate the MFA device for your AWS root account
1. Use your root credentials to sign in to the AWS Management Console.
Important
To manage MFA devices for the AWS account, you must sign in to AWS with your root
account credentials. You cannot manage MFA devices for the root account with other
credentials.
2. On the navigation bar, choose your account name, and then choose Security Credentials. If a
prompt appears, choose Continue to Security Credentials.
3. Expand the Multi-Factor Authentication (MFA) section.
4. In the row for the MFA device that you want to deactivate, choose Deactivate.
The MFA device is deactivated for the AWS account.
92

AWS Identity and Access Management User Guide
Multi-Factor Authentication (MFA)
To use the AWS CLI, Tools for Windows PowerShell, or AWS API to deactivate an MFA device
for a user
• AWS CLI: aws iam deactivate-mfa-device
• Tools for Windows PowerShell: Disable-IAMMFADevice
• AWS API: DeactivateMFADevice
What If an MFA Device Is Lost or Stops Working?
If an MFA device stops working, is lost, or is destroyed, and you can't sign in to the AWS Management
Console, then you need to deactivate the device. AWS can help you deactivate the device. The way
that you get help depends on whether an MFA device is assigned to the root account or to a user
within an AWS account.
Note
If the device appears to be functioning properly, but you cannot use it to access your
AWS resources, then it simply might be out of synchronization with the AWS system. For
information about synchronizing an MFA device, see Synchronize MFA devices (p. 90).
To get help for an MFA device associated with an AWS root account
1. Go to the AWS Contact Us page for help with disabling AWS MFA so that you can temporarily
access secure pages on the AWS website and the AWS Management Console with just your user
name and password.
2. Change your AWS password (p. 75) in case an attacker has stolen the authentication device
and might also have your current password.
3. If you are using a hardware MFA device, contact the third-party provider for help fixing or replacing
the device. If the device is a virtual MFA device, delete the old MFA virtual device entity in IAM for
the device before creating a new one.
4. After you have the new physical MFA device or you have deleted the old entry from the mobile
device, return to the AWS website and activate the MFA device to reenable AWS MFA for your
AWS account. To manage a hardware MFA for your AWS account, go to the AWS Security
Credentials page.
To get help for an MFA device associated with an IAM user
• Contact the system administrator or other person who gave you the user name and password
for the IAM user. The administrator must deactivate the MFA device as described in Deactivating
MFA devices (p. 92).
Configuring MFA-Protected API Access
With IAM policies, you can specify which APIs a user is allowed to call. In some cases, you might want
the additional security of requiring a user to be authenticated with AWS multi-factor authentication
(MFA) before the user is allowed to perform particularly sensitive actions.
For example, you might have a policy that allows a user to perform the Amazon EC2 RunInstances,
DescribeInstances, and StopInstances actions. But you might want to restrict a destructive
action like TerminateInstances and ensure that users can perform that action only if they
authenticate with an AWS MFA device.
Topics
•Overview (p. 94)
•Scenario: MFA Protection for Cross-Account Delegation (p. 96)
93

AWS Identity and Access Management User Guide
Multi-Factor Authentication (MFA)
•Scenario: MFA Protection for Access to APIs in the Current Account (p. 97)
•Scenario: MFA Protection for Resources That Have Resource-based Policies (p. 98)
Overview
Adding MFA protection to APIs involves these tasks:
1. The administrator configures an AWS MFA device for each user who needs to make API requests
that require MFA authentication. This process is described at Enabling MFA Devices (p. 81).
2. The administrator creates policies for the users that include a Condition element that checks
whether the user authenticated with an AWS MFA device.
3. The user calls one of the STS APIs that support the MFA parameters AssumeRole or
GetSessionToken, depending on the scenario for MFA protection, as explained later. As part of the
call, the user includes the device identifier for the device that's associated with the user, as well as
the time-based one-time password (TOTP) that the device generates. In either case, the user gets
back temporary security credentials that the user can then use to make additional requests to AWS.
Note
MFA protection for a service's APIs is available only if the service supports temporary
security credentials. For a list of these services, see Using Temporary Security Credentials
to Access AWS.
If authorization fails, AWS returns an "Access Denied" error message (as it does for any unauthorized
access). With MFA-protected API policies in place, AWS denies access to the APIs specified in
the policies if the user attempts to use an API without valid MFA authentication or if the timestamp
of the request for the API is outside of the allowed range specified in the policy. The user must be
reauthenticated with MFA by requesting new temporary security credentials with an MFA code and
device serial number.
IAM Policies with MFA Conditions
Policies with MFA conditions can be attached to the following:
• An IAM user or group
• A resource such as an Amazon S3 bucket, Amazon SQS queue, or Amazon SNS topic
• The trust policy of an IAM role that can be assumed by a user
You can use an MFA condition in a policy to check the following properties:
• Existence—To simply verify that the user did authenticate with MFA, check that the
aws:MultiFactorAuthPresent key is True in a bool condition.
• Duration—If you want to grant access only within a specified time after MFA authentication, use a
numeric condition type to compare the aws:MultiFactorAuthAge key's age to a value (such as
3600 seconds). Note that the aws:MultiFactorAuthAge key is not present if MFA was not used.
The following example shows the trust policy of an IAM role that includes an MFA condition to test for
the existence of MFA authentication. With this policy, users from the AWS account specified in the
Principal element (replace ACCOUNT-B-ID with a valid AWS account ID) can assume the role that
this policy is attached to, but only if the user is MFA authenticated.
{
"Version": "2012-10-17",
"Statement": {
"Effect": "Allow",
94

AWS Identity and Access Management User Guide
Multi-Factor Authentication (MFA)
"Principal": {"AWS": "ACCOUNT-B-ID"},
"Action": "sts:AssumeRole",
"Condition": {"Bool": {"aws:MultiFactorAuthPresent": "true"}}
}
}
For more information on the condition types for MFA, see Available Keys for Conditions (p. 359),
Numeric Condition Operators (p. 365), and Condition Operator to Check Existence of Condition Keys
(p. 370)
Choosing Between GetSessionToken and AssumeRole
AWS STS provides two APIs that let users pass MFA information: GetSessionToken and
AssumeRole. The API that the user calls to get temporary security credentials depends on which of
the following scenarios applies.
Use GetSessionToken for these scenarios:
• Call APIs that access resources in the same AWS account as the IAM user who makes the request.
Note that temporary credentials from a GetSessionToken request can access IAM and STS APIs
only if you include MFA information in the request for credentials. Because temporary credentials
returned by GetSessionToken include MFA information, you can check for MFA in individual API
calls made by the credentials.
• Access to resources that are protected with resource-based policies that include an MFA condition.
Use AssumeRole for these scenarios:
• Call APIs that access resources in the same or a different AWS account. The API calls can
include any IAM or STS API. Note that to protect access you enforce MFA at the time when the
user assumes the role. The temporary credentials returned by AssumeRole do not include MFA
information in the context, so you cannot check individual API calls for MFA. This is why you must
use GetSessionToken to restrict access to resources protected by resource-based policies.
Details about how to implement these scenarios are provided later in this document.
Important Points About MFA-Protected API Access
It's important to understand the following aspects of MFA protection for APIs:
• MFA protection is available only with temporary security credentials, which must be obtained with
AssumeRole or GetSessionToken.
• You cannot use MFA-protected API access with root account credentials.
• Federated users cannot be assigned an MFA device for use with AWS services, so they cannot
access AWS resources controlled by MFA. (See next point.)
• Other AWS STS APIs that return temporary credentials do not support MFA. For
AssumeRoleWithWebIdentity and AssumeRoleWithSAML, the user is authenticated by
an external provider and AWS cannot determine whether that provider required MFA. For
GetFederationToken, MFA is not necessarily associated with a specific user.
• Similarly, long-term credentials (IAM user access keys and root account access keys) cannot be
used with MFA-protected API access because they don't expire.
•AssumeRole and GetSessionToken can also be called without MFA information. In that case,
the caller gets back temporary security credentials, but the session information for those temporary
credentials does not indicate that the user authenticated with MFA.
• To establish MFA protection for APIs, you add MFA conditions to policies. If a policy doesn't include
the condition for MFAs, the policy does not enforce the use of MFA. For cross-account delegation, if
95

AWS Identity and Access Management User Guide
Multi-Factor Authentication (MFA)
the role's trust policy doesn’t include an MFA condition then there is no MFA protection for the API
calls that are made with the role's temporary security credentials.
• When you allow another AWS account to access resources in your account, even when you require
multi-factor authentication, the security of your resources depends on the configuration of the
trusted account—that is, the other account (not yours). Any identity in the trusted account that has
permission to create virtual MFA devices can construct an MFA claim to satisfy that part of your
role's trust policy. Before you allow another account's access to your AWS resources that require
multi-factor authentication, you should ensure that the trusted account's owner follows security
best practices and restricts access to sensitive APIs—such as MFA device-management APIs—to
specific, trusted identities.
• If a policy includes an MFA condition, a request is denied if users have not been MFA authenticated,
or if they provide an invalid MFA device identifier or invalid TOTP.
Scenario: MFA Protection for Cross-Account Delegation
In this scenario, you want to delegate access to IAM users in another account, but only if the users are
authenticated with an AWS MFA device. (For more information about cross-account delegation, see
Roles Terms and Concepts (p. 125).
Imagine that you have account A (the trusting account that owns the resource to be accessed), with the
IAM user Alice, who has administrator permission. She wants to grant access to user Bob in account B
(the trusted account), but wants to make sure that Bob is authenticated with MFA before he assumes
the role.
1. In the trusting account A, Alice creates an IAM role named CrossAccountRole and sets the
principal in the role's trust policy to the account ID of account B. The trust policy grants permission
to the AWS STS AssumeRole action. Alice also adds an MFA condition to the trust policy, as in the
following example.
{
"Version": "2012-10-17",
"Statement": {
"Effect": "Allow",
"Principal": {"AWS": "ACCOUNT-B-ID"},
"Action": "sts:AssumeRole",
"Condition": {"Bool": {"aws:MultiFactorAuthPresent": "true"}}
}
}
2. Alice adds an access policy to the role that specifies what the role is allowed to do. The access
policy for a role with MFA protection is no different than any other role-access policy. The following
example shows the policy that Alice adds to the role; it allows an assuming user to perform any
DynamoDB action on the table Books in account A.
Note
The access policy does not include an MFA condition. It is important to understand that the
MFA authentication is used only to determine whether a user can assume the role. Once
the user has assumed the role, no further MFA checks are made.
{
"Version": "2012-10-17",
"Statement": [{
"Effect": "Allow",
"Action": ["dynamodb:*"],
"Resource": ["arn:aws:dynamodb:region:ACCOUNT-A-ID:table/Books"]
}]
}
96

AWS Identity and Access Management User Guide
Multi-Factor Authentication (MFA)
3. In trusted account B, the administrator makes sure that IAM user Bob is configured with an AWS
MFA device and that he knows the ID of the device—that is, the serial number if it's a hardware MFA
device, or the device's ARN if it's a virtual MFA device.
4. In account B, the administrator attaches the following policy to user Bob (or a group that he's a
member of) that allows him to call the AssumeRole action. The resource is set to the ARN of the
role that Alice created in step 1. Notice that this policy does not contain an MFA condition.
{
"Version": "2012-10-17",
"Statement": [{
"Effect": "Allow",
"Action": ["sts:AssumeRole"],
"Resource": ["arn:aws:iam::ACCOUNT-A-ID:role/CrossAccountRole"]
}]
}
5. In account B, Bob (or an application that Bob is running) calls AssumeRole. The API call includes
the ARN of the role to assume (arn:aws:iam::ACCOUNT-A-ID:role/CrossAccountRole), the
ID of the MFA device, and the current TOTP that Bob gets from his device.
When Bob calls AssumeRole, AWS determines whether he has valid credentials, including the
requirement for MFA. If so, Bob successfully assumes the role and can perform any DynamoDB
action on the table named Books in account A while using the role's temporary credentials.
For an example of a program that calls AssumeRole, see Calling AssumeRole with MFA
Authentication (Python) (p. 103).
Scenario: MFA Protection for Access to APIs in the Current Account
In this scenario, you want to make sure that a user in your AWS account can access sensitive API
actions only when the user is authenticated using an AWS MFA device.
Imagine that you have account A that contains a group of developers who need to work with EC2
instances. Ordinary developers can work with the instances, but they are not granted permissions
for the ec2:StopInstances or ec2:TerminateInstances actions. You want to limit those
"destructive" privileged actions to just a few trusted users, so you add MFA protection to the policy that
allows these sensitive Amazon EC2 actions.
In this scenario, one of those trusted users is user Carol. User Alice is an administrator in account A.
1. Alice makes sure that Carol is configured with an AWS MFA device and that Carol knows the ID of
the device—the serial number if it's a hardware MFA device, or the device's ARN if it's a virtual MFA
device.
2. Alice creates a group named EC2-Admins and adds user Carol to the group.
3. Alice attaches the following policy to the EC2-Admins group. This policy grants users permission
to call the Amazon EC2 StopInstances and TerminateInstances actions only if the user has
authenticated using MFA.
{
"Version": "2012-10-17",
"Statement": [{
"Effect": "Allow",
"Action": [
"ec2:StopInstances",
"ec2:TerminateInstances"
],
"Resource": ["*"],
97

AWS Identity and Access Management User Guide
Multi-Factor Authentication (MFA)
"Condition": {"Bool": {"aws:MultiFactorAuthPresent": "true"}}
}]
}
4. If user Carol needs to stop or terminate an Amazon EC2 instance, she (or an application that she
is running) calls GetSessionToken passing the ID of the MFA device and the current TOTP that
Carol gets from her device.
5. User Carol (or an application that Carol is using) uses the temporary credentials provided by
GetSessionToken to call the Amazon EC2 StopInstances or StopInstances action.
For an example of a program that calls GetSessionToken, see Calling GetSessionToken with MFA
Authentication (Python and C#) (p. 101) later in this document.
Scenario: MFA Protection for Resources That Have Resource-based
Policies
In this scenario, you are the owner of an S3 bucket, an SQS queue, or an SNS topic and you want to
make sure that any user from any AWS account who accesses the resource is authenticated by an
AWS MFA device.
This scenario illustrates a way to provide cross-account MFA protection without requiring users
to assume a role first. If the user is authenticated by MFA and is able to get temporary security
credentials from GetSessionToken, and if the user's account is trusted by the resource's policy, the
user can access the resource.
Imagine that you are in account A and you create an S3 bucket. You want to grant access to this
bucket to users who are in several different AWS accounts, but only if those users are authenticated
with MFA.
In this scenario, user Alice is an administrator in account A. User Charlie is an IAM user in account C.
1. In account A, Alice creates a bucket named Account-A-bucket.
2. Alice adds the bucket policy to the bucket. The policy allows any user in account A, account B, or
account C to perform the S3 PutObject and DeleteObject actions in the bucket. The policy
includes an MFA condition.
{
"Version": "2012-10-17",
"Statement": [{
"Effect": "Allow",
"Principal": {"AWS": [
"ACCOUNT-A-ID",
"ACCOUNT-B-ID",
"ACCOUNT-C-ID"
]},
"Action": [
"s3:PutObject",
"s3:DeleteObject"
],
"Resource": ["arn:aws:s3:::ACCOUNT-A-BUCKET-NAME/*"],
"Condition": {"Bool": {"aws:MultiFactorAuthPresent": "true"}}
}]
}
Note
Amazon S3 offers an MFA Delete feature for root account access (only). You can enable
Amazon S3 MFA Delete when you set the versioning state of the bucket. Amazon S3
98

AWS Identity and Access Management User Guide
Multi-Factor Authentication (MFA)
MFA Delete cannot be applied to an IAM user, and is managed independently from MFA-
protected API access. An IAM user with permission to delete a bucket cannot delete a
bucket with Amazon S3 MFA Delete enabled. For more information on Amazon S3 MFA
Delete, see MFA Delete.
3. In account C, an administrator makes sure that user Charlie is configured with an AWS MFA device
and that he knows the ID of the device—the serial number if it's a hardware MFA device, or the
device's ARN if it's a virtual MFA device.
4. In account C, Charlie (or an application that he is running) calls GetSessionToken. The call
includes the ID or ARN of the MFA device and the current TOTP that Charlie gets from his device.
5. Charlie (or an application that he is using) uses the temporary credentials returned by
GetSessionToken to call the Amazon S3 PutObject action to upload a file to Account-A-
bucket.
For an example of a program that calls GetSessionToken, see Calling GetSessionToken with MFA
Authentication (Python and C#) (p. 101) later in this document.
Note
The temporary credentials that AssumeRole returns won't work in this case because
although the user can provide MFA information to assume a role, the temporary credentials
returned by AssumeRole don't include the MFA information that is required in order to meet
the MFA condition in the policy.
Sample Policies with MFA Conditions
The following examples show additional ways that MFA conditions can be added to policies.
Note
The following examples show policies attached directly to an IAM user or group in your own
AWS account. To adapt the example to MFA-protect APIs across accounts, you use IAM roles
instead and put the MFA condition check in the role trust policy, not in the role access policy.
For more information, see Scenario: MFA Protection for Cross-Account Delegation (p. 96).
Topics
•Example 1: Granting Access After Recent MFA Authentication (GetSessionToken) (p. 99)
•Example 2: Denying Access to Specific APIs Without Valid MFA Authentication
(GetSessionToken) (p. 100)
•Example 3: Denying Access to Specific APIs Without Recent Valid MFA Authentication
(GetSessionToken) (p. 100)
Example 1: Granting Access After Recent MFA Authentication
(GetSessionToken)
The following example shows a policy attached to a user or group that grants Amazon EC2 access
only if the user was authenticated with MFA within the last hour (3600 seconds).
{
"Version": "2012-10-17",
"Statement": [{
"Effect": "Allow",
"Action": ["ec2:*"],
"Resource": ["*"],
"Condition": {"NumericLessThan": {"aws:MultiFactorAuthAge": "3600"}}
}]
}
99

AWS Identity and Access Management User Guide
Multi-Factor Authentication (MFA)
Example 2: Denying Access to Specific APIs Without Valid MFA
Authentication (GetSessionToken)
The following example shows a policy attached to a user or group that grants access to the entire
Amazon EC2 API, but denies access to StopInstances and TerminateInstances if the user is
not authenticated with MFA. The policy requires two statements to achieve the intended effect. The
first statement (containing "Sid": "AllowAllActionsForEC2") allows all Amazon EC2 actions.
The second statement (containing "Sid": "DenyStopAndTerminateWhenMFAIsNotPresent")
denies the StopInstances and TerminateInstances actions when the MFA authentication context
is missing (meaning MFA was not used).
Note
The condition check for MultiFactorAuthPresent in the Deny statement should not
be a {"Bool":{"aws:MultiFactorAuthPresent":false}} because that key is not
present and cannot be evaluated when MFA is not used. So instead, check to see if the key is
present or missing. The test {"Null":{"aws:MultiFactorAuthPresent":true}} is true
(matches) if the MFA context is missing from the request. That can reliably be interpreted to
mean that MFA was not used.
{
"Version": "2012-10-17",
"Statement": [
{
"Sid": "AllowAllActionsForEC2",
"Effect": "Allow",
"Action": "ec2:*",
"Resource": "*"
},
{
"Sid": "DenyStopAndTerminateWhenMFAIsNotPresent",
"Effect": "Deny",
"Action": [
"ec2:StopInstances",
"ec2:TerminateInstances"
],
"Resource": "*",
"Condition": {"Null": {"aws:MultiFactorAuthPresent": true}}
}
]
}
Example 3: Denying Access to Specific APIs Without Recent Valid MFA
Authentication (GetSessionToken)
The following example shows a policy attached to a user or group that grants access to the entire
Amazon EC2 API, but denies access to StopInstances and TerminateInstances unless the
user authenticated with MFA within the last hour. This example expands on the previous example and
requires three statements to achieve the intended effect. The first two statements are the same as the
previous example. The second statement still contains the condition that denies StopInstances and
TerminateInstances if MFA isn't used at all (the MFA context is missing). The third statement in the
following example (containing "Sid": "DenyStopAndTerminateWhenMFAIsOlderThanOneHour")
contains an additional condition that denies the StopInstances and TerminateInstances
actions when MFA authentication is present but occurred more than one hour prior to the request. For
example, an IAM user might sign-in to the AWS Management Console with MFA and then attempt
to stop or terminate an EC2 instance two hours later. The following policy prevents this. To stop or
terminate an EC2 instance in this scenario, the user must sign out, sign in again with MFA, and then
stop or terminate the instance within one hour of signing in.
100

AWS Identity and Access Management User Guide
Multi-Factor Authentication (MFA)
Note
The condition check for MultiFactorAuthPresent in the first Deny statement should not
be a {"Bool":{"aws:MultiFactorAuthPresent":false}}, because that key is not
present and cannot be evaluated when MFA is not used. So instead, check to see if the key is
present or missing. The test {"Null":{"aws:MultiFactorAuthPresent":true}}. is true
(matches) if the MFA context is missing from the request. That can reliably be interpreted to
mean that MFA was not used.
The condition aws:MultiFactorAuthAge is only present when MFA context is present in
the request. So statement 2 covers the case when MFA is not present at all, and statement
3 covers the case when MFA is present and evaluates whether it occurred in the proper time
window.
{
"Version": "2012-10-17",
"Statement": [
{
"Sid": "AllowAllActionsForEC2",
"Effect": "Allow",
"Action": "ec2:*",
"Resource": "*"
},
{
"Sid": "DenyStopAndTerminateWhenMFAIsNotPresent",
"Effect": "Deny",
"Action": [
"ec2:StopInstances",
"ec2:TerminateInstances"
],
"Resource": "*",
"Condition": {"Null": {"aws:MultiFactorAuthPresent": true}}
},
{
"Sid": "DenyStopAndTerminateWhenMFAIsOlderThanOneHour",
"Effect": "Deny",
"Action": [
"ec2:StopInstances",
"ec2:TerminateInstances"
],
"Resource": "*",
"Condition": {"NumericGreaterThan": {"aws:MultiFactorAuthAge": "3600"}}
}
]
}
Sample Code: Requesting Credentials with Multi-factor
Authentication
The following examples show how to call GetSessionTokenRole and AssumeRole and pass MFA
authentication. The credentials returned are then used to list all S3 buckets in the account.
Calling GetSessionToken with MFA Authentication (Python and C#)
The following examples, written using the AWS SDK for Python (Boto) and AWS SDK for .NET, show
how to call GetSessionToken and pass MFA authentication information. The temporary security
credentials returned by GetSessionTokenRole are then used to list all S3 buckets in the account.
101

AWS Identity and Access Management User Guide
Multi-Factor Authentication (MFA)
The policy attached to the user who runs this code (or to a group that the user is in) is assumed to
include an MFA check. The policy also needs to grant the user permission to request the Amazon S3
ListBuckets action.
Using Python
import boto
from boto.s3.connection import S3Connection
from boto.sts import STSConnection
# Prompt for MFA time-based one-time password (TOTP)
mfa_TOTP = raw_input("Enter the MFA code: ")
# The calls to AWS STS GetSessionToken must be signed with the access key ID
and secret
# access key of an IAM user. The credentials can be in environment variables
or in
# a configuration file and will be discovered automatically
# by the STSConnection() function. For more information, see the Python SDK
# documentation: http://boto.readthedocs.org/en/latest/boto_config_tut.html
sts_connection = STSConnection()
# Use the appropriate device ID (serial number for hardware device or ARN for
virtual device).
# Replace ACCOUNT-NUMBER-WITHOUT-HYPHENS and MFA-DEVICE-ID with appropriate
values.
tempCredentials = sts_connection.get_session_token(
duration=3600,
mfa_serial_number="®ion-arn;iam::ACCOUNT-NUMBER-WITHOUT-HYPHENS:mfa/
MFA-DEVICE-ID",
mfa_token=mfa_TOTP
)
# Use the temporary credentials to list the contents of an S3 bucket
s3_connection = S3Connection(
aws_access_key_id=tempCredentials.access_key,
aws_secret_access_key=tempCredentials.secret_key,
security_token=tempCredentials.session_token
)
# Replace BUCKET-NAME with an appropriate value.
bucket = s3_connection.get_bucket(bucket_name="BUCKET-NAME")
objectlist = bucket.list()
for obj in objectlist:
print obj.name
Using C#
Console.Write("Enter MFA code: ");
string mfaTOTP = Console.ReadLine(); // Get string from user
/* The calls to AWS STS GetSessionToken must be signed using the access key
ID and secret
access key of an IAM user. The credentials can be in environment variables
or in
a configuration file and will be discovered automatically
102

AWS Identity and Access Management User Guide
Multi-Factor Authentication (MFA)
by the AmazonSecurityTokenServiceClient constructor. For more information,
see
http://docs.aws.amazon.com/AWSSdkDocsNET/latest/DeveloperGuide/net-dg-
config-creds.html
*/
AmazonSecurityTokenServiceClient stsClient =
new AmazonSecurityTokenServiceClient();
GetSessionTokenRequest getSessionTokenRequest = new GetSessionTokenRequest();
getSessionTokenRequest.DurationSeconds = 3600;
// Replace ACCOUNT-NUMBER-WITHOUT-HYPHENS and MFA-DEVICE-ID with appropriate
values
getSessionTokenRequest.SerialNumber = "arn:aws:iam::ACCOUNT-NUMBER-WITHOUT-
HYPHENS:mfa/MFA-DEVICE-ID";
getSessionTokenRequest.TokenCode = mfaTOTP;
GetSessionTokenResponse getSessionTokenResponse =
stsClient.GetSessionToken(getSessionTokenRequest);
// Extract temporary credentials from result of GetSessionToken call
GetSessionTokenResult getSessionTokenResult =
getSessionTokenResponse.GetSessionTokenResult;
string tempAccessKeyId = getSessionTokenResult.Credentials.AccessKeyId;
string tempSessionToken = getSessionTokenResult.Credentials.SessionToken;
string tempSecretAccessKey =
getSessionTokenResult.Credentials.SecretAccessKey;
SessionAWSCredentials tempCredentials = new
SessionAWSCredentials(tempAccessKeyId,
tempSecretAccessKey, tempSessionToken);
// Use the temporary credentials to list the contents of an S3 bucket
// Replace BUCKET-NAME with an appropriate value
ListObjectsRequest S3ListObjectsRequest = new ListObjectsRequest();
S3ListObjectsRequest.BucketName = "BUCKET-NAME";
S3Client = AWSClientFactory.CreateAmazonS3Client(tempCredentials);
ListObjectsResponse S3ListObjectsResponse =
S3Client.ListObjects(S3ListObjectsRequest);
foreach (S3Object s3Object in S3ListObjectsResponse.S3Objects)
{
Console.WriteLine(s3Object.Key);
}
Calling AssumeRole with MFA Authentication (Python)
The following example, written using the AWS SDK for Python (Boto), shows how to call AssumeRole
and pass MFA authentication information. The temporary security credentials returned by AssumeRole
are then used to list all Amazon S3 buckets in the account.
For more information about this scenario, see Scenario: MFA Protection for Cross-Account
Delegation (p. 96).
import boto
from boto.s3.connection import S3Connection
from boto.sts import STSConnection
# Prompt for MFA time-based one-time password (TOTP)
mfa_TOTP = raw_input("Enter the MFA code: ")
103

AWS Identity and Access Management User Guide
Finding Unused Credentials
# The calls to AWS STS AssumeRole must be signed with the access key ID and
secret
# access key of an IAM user. (The AssumeRole API can also be called using
temporary
# credentials, but this example does not show that scenario.)
# The IAM user credentials can be in environment variables or in
# a configuration file and will be discovered automatically
# by the STSConnection() function. For more information, see the Python SDK
# documentation: http://boto.readthedocs.org/en/latest/boto_config_tut.html
sts_connection = STSConnection()
# Use appropriate device ID (serial number for hardware device or ARN for
virtual device)
# Replace ACCOUNT-NUMBER-WITHOUT-HYPHENS, ROLE-NAME, and MFA-DEVICE-ID with
appropriate values
tempCredentials = sts_connection.assume_role(
role_arn="arn:aws:iam::ACCOUNT-NUMBER-WITHOUT-HYPHENS:role/ROLE-NAME",
role_session_name="AssumeRoleSession1",
mfa_serial_number="arn:aws:iam::ACCOUNT-NUMBER-WITHOUT-HYPHENS:mfa/MFA-
DEVICE-ID",
mfa_token=mfa_TOTP
)
# Use the temporary credentials to list the contents of an S3 bucket
s3_connection = S3Connection(
aws_access_key_id=tempCredentials.credentials.access_key,
aws_secret_access_key=tempCredentials.credentials.secret_key,
security_token=tempCredentials.credentials.session_token
)
# Replace BUCKET-NAME with a real bucket name
bucket = s3_connection.get_bucket(bucket_name="BUCKET-NAME")
objectlist = bucket.list()
for obj in objectlist:
print obj.name
Finding Unused Credentials
When users leave your organization or services are no longer used, it is important to find the
credentials that they were using and ensure that they are no longer operational. Ideally, you delete
credentials if they are no longer needed. You can always recreate them at a later date if the need
arises. At the very least you should change the credentials so that the former users no longer have
access.
Of course, the definition of "unused" can vary and usually means a credential that has not been used
within a specified period of time.
Finding Unused Passwords
The AWS Management Console provides two ways to find the last time a password was used: the
Users list or the downloadable credentials report. You can also access the information from the AWS
CLI, Tools for Windows PowerShell, or the IAM API.
To find unused passwords in the Users list in the IAM console
1. Sign in to the Identity and Access Management (IAM) console at https://console.aws.amazon.com/
iam/.
104

AWS Identity and Access Management User Guide
Finding Unused Credentials
2. In the navigation pane, choose Users.
3. In the list of users, choose the header for the Password Last Used column to sort them. Choose
the header to change the sort order from oldest to newest or vice versa. Some entries may display
the following:
•N/A – Users that do not have a password assigned at all.
•no_information – Users that have not used their password since IAM began tracking password
age on October 20, 2014.
To find unused passwords by downloading the credentials report in the IAM console
1. Sign in to the Identity and Access Management (IAM) console at https://console.aws.amazon.com/
iam/.
2. In the navigation pane, choose Credential Report.
3. Choose Download Report to download a comma-separated value (CSV) file named
status_reports_<date>T<time>.csv. The fifth column contains the password_last_used
column with the dates or one of the following:
•N/A – Users that do not have a password assigned at all.
•no_information – Users that have not used their password since IAM began tracking password
age on October 20, 2014.
To find unused passwords from the AWS CLI, Tools for Windows PowerShell and IAM API
You can use the following commands to find unused passwords:
• AWS CLI: aws iam list-users returns a list of users, each with a PasswordLastUsed value. If
the value is missing, then the user either has no password or the password has not been used since
IAM began tracking password age on October 20, 2014.
• Tools for Windows PowerShell: Get-IAMUsers returns a collection of User objects, each of which
has a PasswordLastUsed property. If the property value is 1/1/0001 12:00:00 AM, then the
user either has no password or the password has not been used since IAM began tracking password
age on October 20, 2014.
• IAM API: ListUsers returns a collection of users, each of which has a <PasswordLastUsed>
value. If the value is missing, then the user either has no password or the password has not been
used since IAM began tracking password age on October 20, 2014.
For information about the commands to download the credentials report, see Getting Credential
Reports (AWS CLI, Tools for Windows PowerShell, or IAM API) (p. 110).
Finding unused access keys
The AWS Management Console provides two ways to find the last time an access key was used: the
user's detail page or the downloadable credentials report. You can also access the information from
the AWS CLI, Tools for Windows PowerShell, or the IAM API.
To find unused access keys in the user's details page in the IAM console
1. Sign in to the Identity and Access Management (IAM) console at https://console.aws.amazon.com/
iam/.
2. In the navigation pane, choose Users.
3. Choose the user whose access keys you want check.
105

AWS Identity and Access Management User Guide
Getting Credential Reports
4. On the user's detail page, choose the Security Credentials tab. If the user has one or more
access keys, they appear in the Last Used column. If the column says N/A, then the access key
has not used been used since IAM began tracking access key age on April 22, 2015.
To find unused access keys by downloading the credentials report in the IAM console
1. Sign in to the Identity and Access Management (IAM) console at https://console.aws.amazon.com/
iam/.
2. In the navigation pane, choose Credential Report.
3. Choose Download Report to download a comma-separated value (CSV) file named
status_reports_<date>T<time>.csv. Columns 11 thru 13 contain the last used date, region,
and service information for access key 1, and columns 16 thru 18 contain the same information for
access key 2. The value is N/A if the user does not have an access key or the user has not used
the access key since IAM began tracking access key age on April 22, 2015.
To find unused access keys from the AWS CLI, Tools for Windows PowerShell and IAM API
You can use the following commands to find unused access keys:
• AWS CLI:
•aws iam list-access-keys returns information about the access keys for a user, including the
AccessKeyID.
•aws iam get-access-key-last-used takes an access key ID and returns output that includes
the LastUsedDate, the Region in which the access key was last used, and the ServiceName
of the last service requested. If the LastUsedDate field is missing, then the access key has not
been used since IAM began tracking access key age on April 22, 2015.
• Tools for Windows PowerShell:
•Get-IAMAccessKey returns a collection of access key objects associated with the specified user.
Each object has an AccessKeyId property.
•Get-IAMAccessKeyLastUsed takes an access key ID and returns an object with an
AccessKeyLastUsed property object. The methods of that object include the LastUsedDate,
the Region in which the access key was last used, and the ServiceName of the last service
requested. If the property value is 1/1/0001 12:00:00 AM, then the access key has not been
used since IAM began tracking access key age on April 22, 2015.
• IAM API:
•ListAccessKeys returns a list of AccessKeyID values for access keys that are associated with
the specified user.
•GetAccessKeyLastUsed takes an access key ID and returns a collection of values. Included are
the LastUsedDate, the Region in which the access key was last used, and the ServiceName
of the last service requested. If the value is missing, then user either has no access key or the
access key has not been used since IAM began tracking access key age on October 20, 2014.
For information about the commands to download the credentials report, see Getting Credential
Reports (AWS CLI, Tools for Windows PowerShell, or IAM API) (p. 110)
Getting Credential Reports for Your AWS
Account
You can generate and download a credential report that lists all users in your account and the status
of their various credentials, including passwords, access keys, and MFA devices. You can get a
credential report from the AWS Management Console, the AWS SDKs and Command Line Tools, or
the IAM API.
106

AWS Identity and Access Management User Guide
Getting Credential Reports
You can use credential reports to assist in your auditing and compliance efforts. You can use the report
to audit the effects of credential lifecycle requirements, such as password and access key rotation. You
can provide the report to an external auditor, or grant permissions to an auditor so that he or she can
download the report directly.
You can generate a credential report as often as once every four hours. When you request a report,
IAM first checks whether a report for the AWS account has been generated within the past four hours.
If so, the most recent report is downloaded. If the most recent report for the account is more than four
hours old, or if there are no previous reports for the account, IAM generates and downloads a new
report.
Required Permissions
• To create a credential report: GenerateCredentialReport
• To download the report: GetCredentialReport
Understanding the Report Format
Credential reports are formatted as comma-separated values (CSV) files. You can open CSV files with
common spreadsheet software to perform analysis, or you can build an application that consumes the
CSV files programmatically and performs custom analysis.
The CSV file contains the following columns:
userThe friendly name of the user.
arn The Amazon Resource Name (ARN) of the user. For more information about ARNs, see IAM
ARNs (p. 335).
user_creation_time
The date and time when the user was created, in ISO 8601 date-time format.
password_enabled
When the user has a password, this value is TRUE. Otherwise it is FALSE. The value for the AWS
account (root) is always not_supported.
password_last_used
The date and time when the AWS account (root) or IAM user's password was last used to sign in
to an AWS website, in ISO 8601 date-time format. AWS websites that capture a user's last sign-in
time are the AWS Management Console, the AWS Discussion Forums, and the AWS Marketplace.
When a password is used more than once in a 5-minute span, only the first use is recorded in this
field.
• The value in this field is no_information in these cases:
• The user's password has never been used.
• There is no sign-in data associated with the password, such as when user's password has not
been used after IAM started tracking this information on October 20, 2014.
• The value in this field is N/A (not applicable) when the user does not have a password.
password_last_changed
The date and time when the user's password was last set, in ISO 8601 date-time format. If the
user does not have a password, the value in this field is N/A (not applicable). The value for the
AWS account (root) is always not_supported.
password_next_rotation
When the account has a password policy that requires password rotation, this field contains the
date and time, in ISO 8601 date-time format, when the user is required to set a new password.
The value for the AWS account (root) is always not_supported.
107

AWS Identity and Access Management User Guide
Getting Credential Reports
mfa_active
When a multi-factor authentication (p. 80) (MFA) device has been enabled for the user, this
value is TRUE. Otherwise it is FALSE.
access_key_1_active
When the user has an access key and the access key's status is Active, this value is TRUE.
Otherwise it is FALSE.
access_key_1_last_rotated
The date and time, in ISO 8601 date-time format, when the user's access key was created or
last changed. If the user does not have an active access key, the value in this field is N/A (not
applicable).
access_key_1_last_used_date
The date and time, in ISO 8601 date-time format, when the user's access key was most recently
used to sign an AWS API request. When an access key is used more than once in a 15-minute
span, only the first use is recorded in this field.
The value in this field is N/A (not applicable) in these cases:
• The user does not have an access key.
• The access key has never been used.
• The access key has not been used after IAM started tracking this information on April 22, 2015.
access_key_1_last_used_region
The AWS region in which the access key was most recently used. When an access key is used
more than once in a 15-minute span, only the first use is recorded in this field.
The value in this field is N/A (not applicable) in these cases:
• The user does not have an access key.
• The access key has never been used.
• The access key was last used before IAM started tracking this information on April 22, 2015.
• The last used service is not region-specific, such as Amazon Simple Storage Service (Amazon
S3).
access_key_1_last_used_service
The AWS service that was most recently accessed with the access key. The value in this field
uses the service's namespace—for example, s3 for Amazon S3 and ec2 for Amazon Elastic
Compute Cloud (Amazon EC2). When an access key is used more than once in a 15-minute span,
only the first use is recorded in this field.
The value in this field is N/A (not applicable) in these cases:
• The user does not have an access key.
• The access key has never been used.
• The access key was last used before IAM started tracking this information on April 22, 2015.
access_key_2_active
When the user has a second access key and the second key's status is Active, this value is
TRUE. Otherwise it is FALSE.
Note
Users can have up to two access keys, to make rotation easier. For more information
about rotating access keys, see Rotating Access Keys (AWS CLI, Tools for Windows
PowerShell, and AWS API) (p. 79).
access_key_2_last_rotated
The date and time, in ISO 8601 date-time format, when the user's second access key was created
or last changed. If the user does not have a second active access key, the value in this field is N/A
(not applicable).
access_key_2_last_used_date
The date and time, in ISO 8601 date-time format, when the user's second access key was most
recently used to sign an AWS API request. When an access key is used more than once in a 15-
minute span, only the first use is recorded in this field.
108

AWS Identity and Access Management User Guide
Getting Credential Reports
The value in this field is N/A (not applicable) in these cases:
• The user does not have a second access key.
• The user's second access key has never been used.
• The user's second access key was last used before IAM started tracking this information on
April 22, 2015.
access_key_2_last_used_region
The AWS region in which the user's second access key was most recently used. When an access
key is used more than once in a 15-minute span, only the first use is recorded in this field. The
value in this field is N/A (not applicable) in these cases:
• The user does not have a second access key.
• The user's second access key has never been used.
• The user's second access key was last used before IAM started tracking this information on
April 22, 2015.
• The last used service is not region-specific, such as Amazon S3.
access_key_2_last_used_service
The AWS service that was most recently accessed with the user's second access key. The value
in this field uses the service's namespace—for example, s3 for Amazon S3 and ec2 for Amazon
Elastic Compute Cloud (Amazon EC2). When an access key is used more than once in a 15-
minute span, only the first use is recorded in this field. The value in this field is N/A (not applicable)
in these cases:
• The user does not have a second access key.
• The user's second access key has never been used.
• The user's second access key was last used before IAM started tracking this information on
April 22, 2015.
cert_1_active
When the user has an X.509 signing certificate and that certificate's status is Active, this value is
TRUE. Otherwise it is FALSE.
cert_1_last_rotated
The date and time, in ISO 8601 date-time format, when the user's signing certificate was created
or last changed. If the user does not have an active signing certificate, the value in this field is N/A
(not applicable).
cert_2_active
When the user has a second X.509 signing certificate and that certificate's status is Active, this
value is TRUE. Otherwise it is FALSE.
Note
Users can have up to two X.509 signing certificates, to make certificate rotation easier.
cert_2_last_rotated
The date and time, in ISO 8601 date-time format, when the user's second signing certificate was
created or last changed. If the user does not have a second active signing certificate, the value in
this field is N/A (not applicable).
Getting Credential Reports (AWS Management Console)
You can use the AWS Management Console to download a credential report as a comma-separated
values (CSV) file.
To download a credential report using the AWS Management Console
1. Sign in to the Identity and Access Management (IAM) console at https://console.aws.amazon.com/
iam/.
2. In the navigation pane, click Credential Report.
3. Click Download Report.
109

AWS Identity and Access Management User Guide
Using SSH Keys with AWS CodeCommit
Getting Credential Reports (AWS CLI, Tools for Windows
PowerShell, or IAM API)
To generate a credential report
You can use the following commands to create a credential report:
• AWS CLI: aws iam generate-credential-report
• Tools for Windows PowerShell: Request-IAMCredentialReport
• IAM API: GenerateCredentialReport
To retrieve a credential report
You can use the following commands to retrieve a generated credential report:
• AWS CLI: aws iam get-credential-report
• Tools for Windows PowerShell: Get-IAMCredentialReport
• IAM API: GetCredentialReport
Using SSH Keys with AWS CodeCommit
AWS CodeCommit is a managed source-control product that hosts private Git repositories in the
AWS cloud. To use AWS CodeCommit, you configure your Git client to communicate with AWS
CodeCommit repositories. As part of this configuration, you provide credentials that AWS CodeCommit
can use to authenticate you. AWS CodeCommit supports two types of credentials, AWS access
keys (p. 76) and SSH keys. You use AWS access keys and HTTPS to communicate with
AWS CodeCommit repositories. This is the recommended approach. If you need to use SSH to
communicate with AWS CodeCommit repositories, then you can use SSH keys. See the following
sections for more information about each option.
Use AWS Access Keys and HTTPS with AWS CodeCommit
(Recommended)
To use AWS access keys with AWS CodeCommit, you must have an AWS access key associated with
an IAM user. See the following topics for more information:
• To create an IAM user, see Creating an IAM User in Your AWS Account (p. 59).
• To create an access key for an IAM user, see Managing Access Keys for IAM Users (p. 76).
When you have an AWS access key associated with an IAM user, you can use that access key for
authentication with AWS CodeCommit. For more information, see Setting Up for AWS CodeCommit in
the AWS CodeCommit User Guide.
Note
We recommend this method as it is an industry standard way to access code repositories from
anywhere, even if you are behind a firewall or proxy.
Use SSH Keys and SSH With AWS CodeCommit
To use an SSH key with AWS CodeCommit, you must have an SSH public key associated with an IAM
user. See the following topics for more information:
• To create an IAM user, see Creating an IAM User in Your AWS Account (p. 59).
110

AWS Identity and Access Management User Guide
Working with Server Certificates
• To create an SSH public key and associate it with an IAM user, see Setting Up for AWS
CodeCommit in the AWS CodeCommit User Guide.
Note
IAM accepts public keys in the OpenSSH format only. If you provide your public key in another
format, you will see an error message stating the key format is not valid.
Working with Server Certificates
Some AWS services can use server certificates that you manage with IAM or AWS Certificate Manager
(ACM). In many cases, we recommend that you use ACM to provision, manage, and deploy your SSL/
TLS certificates. With ACM, you can request an SSL/TLS certificate, deploy it on AWS resources such
as Elastic Load Balancers, Amazon CloudFront distributions, or AWS Elastic Beanstalk environments,
and let ACM handle certificate renewals for you. SSL/TLS certificates provisioned through ACM are
free.
If you instead want to use SSL/TLS certificates that you purchased from a 3rd-party certificate vendor,
then you can use IAM to upload, verify, rename, or delete these certificates. When your SSL/TLS
certificates expire, you must work with your certificate vendor to renew them and then upload them to
IAM.
You can use ACM Certificates or 3rd-party certificates with the following AWS services:
• Elastic Load Balancing. For more information, see Create an HTTPS Listener in the Application Load
Balancer Guide or SSL Certificates in the Classic Load Balancer Guide.
• Amazon CloudFront. For more information, see Using an HTTPS Connection to Access Your
Objects in the Amazon CloudFront Developer Guide.
• AWS Elastic Beanstalk. For more information, see Configuring HTTPS for your Elastic Beanstalk
Environment in the AWS Elastic Beanstalk Developer Guide.
Other AWS services that use server certificates allow you to manage the server certificates directly
with that service. Examples of these services include AWS OpsWorks and Amazon API Gateway.
To learn how to create and manage server certificates with IAM, see the following topics.
Topics
•Creating a Server Certificate (p. 111)
•Managing Your Server Certificates (p. 115)
Creating a Server Certificate
This section describes how to manually create a X.509 public key certificate for use with AWS, which
this guide refers to as a server certificates. You'll also learn how to prepare a certificate for use with
AWS services through IAM.
Note
Instead of manually creating your own server certificates, you can use AWS Certificate
Manager (ACM) to provision, deploy, and manage the server certificates that you use with
AWS services. For more information, see the AWS Certificate Manager User Guide.
If you prefer, you can instead use one of the several third-party tools available to create server
certificates, as long as the resultant signed certificate is in X.509 PEM format.
Creating and uploading a certificate with this procedure requires OpenSSL. You use this tool
to generate a public/private key pair and a certificate signing request. Instructions for installing
and configuring OpenSSL are provided in the Installing OpenSSL (p. 112) and Configuring
OpenSSL (p. 112) sections.
111

AWS Identity and Access Management User Guide
Working with Server Certificates
Topics
•Installing OpenSSL (p. 112)
•Configuring OpenSSL (p. 112)
•Creating a Private Key (p. 113)
•Creating the Certificate Signing Request (p. 113)
•Submitting the CSR to a Certificate Authority (p. 114)
Installing OpenSSL
If you don't already have OpenSSL installed, follow the instructions in this section.
To install OpenSSL on Linux or Unix
1. Go to OpenSSL: Source, Tarballs (http://www.openssl.org/source/).
2. Download the latest source and build the package.
To install OpenSSL on Windows
1. Go to OpenSSL: Binary Distributions (http://www.openssl.org/community/binaries.html).
2. Click OpenSSL for Windows to see a page with links to the Windows downloads.
3. If it is not already installed on your system, select the Microsoft Visual C++ 2008
Redistributables link appropriate for your environment and click Download. Follow the
instructions provided by the Microsoft Visual C++ 2008 Redistributable Setup Wizard.
Note
If you are not sure whetherf the Microsoft Visual C++ 2008 Redistributables is already
installed on your system, you can try installing OpenSSL first. The OpenSSL installer
displays an alert if the Microsoft Visual C++ 2008 Redistributables is not yet installed.
Make sure you install the architecture (32-bit or 64-bit) that matches the version of
OpenSSL that you install.
4. After you have installed the Microsoft Visual C++ 2008 Redistributables, select the appropriate
version of the OpenSSL binaries for your environment and save the file locally. Start the OpenSSL
Setup Wizard.
5. Follow the instructions described in the OpenSSL Setup Wizard.
Configuring OpenSSL
Before you use OpenSSL commands, you must configure the operating system so that it has
information about the location where OpenSSL is installed.
To configure OpenSSL on Linux or Unix
1. At the command line, set the OpenSSL_HOME variable to the location of the OpenSSL installation:
export OpenSSL_HOME=path_to_your_OpenSSL_installation
2. Set the path to include the OpenSSL installation:
export PATH=$PATH:$OpenSSL_HOME/bin
Note
Any changes you make to environment variables with the export command are valid
only for the current session. You can make persistent changes to the environment
112

AWS Identity and Access Management User Guide
Working with Server Certificates
variables by setting them in your shell configuration file. For more information, see the
documentation for your operating system.
To configure OpenSSL on Windows
1. Open a Command Prompt window.
2. Set the OpenSSL_HOME variable to the location of the OpenSSL installation:
set OpenSSL_HOME=path_to_your_OpenSSL_installation
3. Set the OpenSSL_CONF variable to the location of the configuration file in your OpenSSL
installation:
set OpenSSL_CONF=path_to_your_OpenSSL_installation\bin\openssl.cfg
4. Set the path to include the OpenSSL installation:
set Path=%Path%;%OpenSSL_HOME%\bin
Note
Any changes you make to Windows environment variables in a Command Prompt
window are valid only for the current command line session. You can make persistent
changes to the environment variables by setting them as system properties. The
exact procedures depends on what version of Windows you're using. (For example,
in Windows 7, open Control Panel, System and Security, System. Then choose
Advanced system settings, Advanced tab, Environment Variables.) For more
information, see the Windows documentation.
Creating a Private Key
You need a unique private key to create your Certificate Signing Request (CSR).
To create a private key
• At the command line, use the openssl genrsa command and the following syntax:
openssl genrsa 2048 > private-key.pem
For private-key.pem, specify your own file name. In the example, 2048 represents 2048-bit
encryption. AWS also supports 1024-bit and 4096-bit encryption.
Note
Amazon CloudFront enforces a maximum key size of 2048 bits. For more information,
see Requirements and Limits on Using SSL Certificates with CloudFront in the Amazon
CloudFront Developer Guide.
We recommend you create an RSA key that is 2048 bits.
Creating the Certificate Signing Request
The next step is to create a Certificate Signing Request (CSR). This is a file that you can send to a
certificate authority (CA) to apply for a server certificate.
113

AWS Identity and Access Management User Guide
Working with Server Certificates
To create a CSR
• Use the openssl req command to create a CSR and the following syntax:
openssl req -new -key private-key.pem -out csr.pem
The output will look similar to the following example:
You are about to be asked to enter information that will be incorporated
into your certificate request.
What you are about to enter is what is called a Distinguished Name or a
DN.
There are quite a few fields but you can leave some blank.
For some fields there will be a default value.
If you enter '.', the field will be left blank.
The following table can help you create your certificate request.
Name Description Example
Country Name The two-letter ISO abbreviation for your
country. US = United States
State or Province The name of the state or province where your
organization is located. This name cannot be
abbreviated.
Washington
Locality Name The name of the city where your organization
is located. Seattle
Organization Name The full legal name of your organization. Do
not abbreviate your organization name. Example Corporation
Organizational Unit (Optional) additional organization information. Marketing
Common Name The fully qualified domain name for your
CNAME. You will receive a certificate name
check warning if this is not an exact match.
www.example.com
Email Address The server administrator's email address someone@example.com
Note
The Common Name field is often misunderstood and completed incorrectly. The common
name is typically your host plus domain name. It will look like "www.example.com" or
"example.com". You need to create a CSR that uses your correct common name.
Submitting the CSR to a Certificate Authority
Your CSR contains information identifying you. To apply for a server certificate, send your CSR to a
certificate authority (CA). The CA might require other credentials or proofs of identity.
If the request for a certificate is successful, the CA returns an identity certificate (and possibly a chain
certificate) that is digitally signed.
AWS does not recommend a specific CA. For a partial listing of available CAs, see Third-Party
Certificate Authorities.
114

AWS Identity and Access Management User Guide
Working with Server Certificates
After you get the completed, signed certificate back from the CA, you can upload the certificate
following the instructions at Uploading a Server Certificate to IAM (p. 115).
Managing Your Server Certificates
After you obtain or create a server certificate (p. 111), you upload it to IAM so other AWS services
can use it. You might also need to get certificate information, rename or delete a certificate, or perform
other management tasks.
Note
Instead of manually creating your own server certificates, you can use AWS Certificate
Manager (ACM) to provision, deploy, and manage the server certificates that you use with
AWS services. For more information, see the AWS Certificate Manager User Guide.
Topics
•Uploading a Server Certificate to IAM (p. 115)
•Verifying an IAM Server Certificate (p. 117)
•Listing Server Certificates (p. 118)
•Renaming a Server Certificate (p. 118)
•Deleting a Server Certificate from IAM (p. 118)
•Sample Server Certificate Formats (p. 118)
Uploading a Server Certificate to IAM
When you receive a server certificate from a certificate authority (CA), you can upload the certificate
to IAM along with the private certificate and a certificate chain. After you upload the certificates to IAM,
the certificates are available for other AWS services to use.
To upload server certificates to IAM, you can use the AWS Command Line Interface, the Tools for
Windows PowerShell, or the AWS API.
Note
A certificate authority might return a certificate in a format that is not supported by IAM. You
can convert the certificate to the correct format (X.509 PEM) by using OpenSSL. The specific
command depends on the current format of your certificate.
Note
To successfully upload a server certificate to IAM, make sure that the IAM user that you
are signed in as for the upload has a permission policy that grants that user the IAM's
UploadServerCertificate or UploadSigningCertificate permission, depending on the certificate
that you want to upload. For more information on how to create a customer managed policy,
see Creating Customer Managed Policies (p. 281).
To upload your certificate, you need three files:
• Your server certificate in PEM format.
• Your private key in PEM format.
• A certificate chain file. This contains all the intermediate certificates and the root certificate of the CA.
The certificate chain lets an end user's browser build a certificate chain to a root certificate it trusts.
As a result, the browser can implicitly trust your certificate.
Examples of all three are shown in Sample Server Certificate Formats (p. 118) below. You can
upload all three files with one command.
When you upload your certificates, IAM validates the certificates with the following criteria:
115

AWS Identity and Access Management User Guide
Working with Server Certificates
• Certificates must follow the X.509 PEM format.
• The current date must be between the certificate’s start and end date.
• Public and private certificate files must contain only a single certificate.
• The private key must match the public key that is in the certificate.
• The private key must be an RSA private key in PEM format, where the PEM header is BEGIN RSA
PRIVATE KEY and the footer is END RSA PRIVATE KEY (as shown in Sample Server Certificate
Formats (p. 118)).
• The private key cannot be encrypted with a password.
• The certificate chain file must include all of your CA’s intermediary certificates that lead to the root
certificate, and ends with your CA’s root certificate. Typically, both intermediary and root certificates
are provided by a CA in a bundled file with the proper chained order. If a certificate bundle is not
available or not available in the required order, you can create your own file similar to the sample
certificate chain in Sample Server Certificate Formats (p. 118). Use the intermediary certificates
that were provided by your CA. Any intermediaries that are not involved in the chain of trust path
must not be included.
Note
• Notice that when you specify a file as a parameter (for example, for the certificate-
body and private-key parameters), you include file:// as part of the file name. These
parameters expect the contents of the file, not the file name, and the file:// prefix in front
of the file name performs that read operation for you.
• The order of intermediary certificates should be documented by the CA. AWS does not
recommend any one CA. For a listing of some CAs, see Third-Party Certificate Authorities.
• Although the root certificate is optional, you can include it so that you can run full chain of
trust verifications, such as SSL Checker.
If you have certificates that result in an error when you upload them, ensure that they meet the criteria,
and then try uploading them again. If you are having difficulties uploading a server certificate, you
might find it helpful to follow the steps outlined in the following blog post: Setting up SSL on an Amazon
Elastic Load Balancer.
To see sample certificates that are valid with IAM, see Sample Server Certificate Formats (p. 118).
To upload a server certificate (AWS CLI)
• Use the aws iam upload-server-certificate command to upload a signed certificate:
aws iam upload-server-certificate --server-certificate-
name certificate_object_name --certificate-body
file://public_key_certificate_file --private-key file://privatekey.pem --
certificate-chain file://certificate_chain_file
If you are uploading a self-signed certificate and it's not important that browsers implicitly accept
the certificate, you can omit the --certificate-chain option and upload just the server
certificate and private key, as shown in the following example:
aws iam upload-server-certificate --server-certificate-
name certificate_object_name --certificate-body
file://public_key_certificate_file --private-key file://privatekey.pem
CloudFront: If you are uploading a server certificate specifically for use with Amazon CloudFront
distributions, you must specify a path using the --path option. The path must begin with /
116
AWS Identity and Access Management User Guide
Working with Server Certificates
cloudfront and must include a trailing slash (for example, /cloudfront/test/). Enter the
following command:
aws iam upload-server-certificate --server-certificate-
name certificate_object_name --certificate-body
file://public_key_certificate_file --private-key file://privatekey.pem --
certificate-chain file://certificate_chain_file --path /cloudfront/path/
You assign your own name to the certificate (the certificate_object_name parameter in the
preceding commands). For information about limitations on server certificate names, see Limitations on
IAM Entities and Objects (p. 338).
For the Amazon CloudFront example, the command displays the ARN and unique ID (p. 337) of the
uploaded certificate. If you use the CloudFront API to add a certificate to a distribution, you need the
certificate ID. (If you use the CloudFront console for this task, the console displays the certificate name
that you specified in the --server-certificate-name option.) For more information about using
server certificates with CloudFront, see Using an HTTPS Connection to Access Your Objects in the
Amazon CloudFront Developer Guide.
To upload a server certificate (Tools for Windows PowerShell and AWS API)
Use the following commands in a manner similar to that described in the CLI procedure (p. 116) to
upload your certificate:
• Tools for Windows PowerShell: Publish-IAMServerCertificate
• IAM API: UploadServerCertificate
Verifying an IAM Server Certificate
After the server certificate is uploaded, you can verify that the information is stored in IAM. Each
certificate object has a unique Amazon Resource Name (ARN) and ID. You can request these details
for a specific certificate object by referencing the name of the certificate object.
To view the certificate object's ARN and ID
Use the aws iam get-server-certificate command to verify the certificate object:
aws iam get-server-certificate --server-certificate-
name certificate_object_name
The output will look similar to the following example.
arn:aws:iam::Your_AWS_Account_ID:server-
certificate/Your_Certificate_Object_Name Certificate_Object_GUID
• AWS CLI:
• Tools for Windows PowerShell: Get-IAMServerCertificate
• IAM API: GetServerCertificate
You have now completed the process for creating and uploading a signed certificate. For information
about setting up an Elastic Load Balancing load balancer with HTTPS support, see the AWS
117

AWS Identity and Access Management User Guide
Working with Server Certificates
Command Line Interface (AWS CLI) examples in the How to Set Up a Load Balancer with HTTPS
Support section of the Elastic Load Balancing User Guide.
Listing Server Certificates
You can use the following tools to list your existing server certificates.
To list server certificates
• AWS CLI: aws iam list-server-certificates
• Tools for Windows PowerShell: Get-IAMServerCertificates
• IAM API: ListServerCertificates
Renaming a Server Certificate
When you rename a server certificate (using one of the commands that follow), the unique ID for
the server certificate remains the same (for more information about ID, see Unique IDs in IAM
Identifiers (p. 334)). However, IAM does not automatically update policies that refer to the server
certificate as a resource to use the new name. You must manually do that. For example, Alice is a
developer in the company ABC and has a policy attached to her IAM user that lets her manage the
company's build server certificate, arn:aws:iam::123456789012:server-certificate/abc/
certs/build. If an admin changes the name of the build server certificate to build_01 or changes
the path for the server certificate, the admin also needs to update the policy attached to the Alice IAM
user entity to use the new name or path so that Alice can continue to manage that server certificate.
To rename or move a server certificate
• AWS CLI: aws iam update-server-certificate
• Tools for Windows PowerShell: Update-IAMServerCertificate
• IAM API: UpdateServerCertificate
Deleting a Server Certificate from IAM
If you no longer need a certificate, you can delete it. If the command is successful, no output is
displayed.
To delete a certificate object
• AWS CLI: Use the aws iam delete-server-certificate command to remove an individual certificate.
aws iam delete-server-certificate --server-certificate-
name certificate_object_name
• Tools for Windows PowerShell: Remove-IAMServerCertificate
• IAM API: DeleteServerCertificate
Sample Server Certificate Formats
The following certificates show the valid format that IAM accepts for server certificates and their
associated private key and certificate chain.
The server certificate associates your public key with your identity. When you submit your Certificate
Signing Request (CSR) to a certificate authority (CA), a server certificate is returned to you by the CA.
The following example shows the format of a server certificate:
118

AWS Identity and Access Management User Guide
Groups
-----BEGIN CERTIFICATE-----
your-certificate-here
-----END CERTIFICATE-----
The private key allows you to decrypt messages that are encrypted with your public key. The following
example shows the format of a key:
-----BEGIN RSA PRIVATE KEY-----
your-key-here
-----END RSA PRIVATE KEY-----
The certificate chain includes all intermediary certificates that lead to the root certificate, as shown in
the following example. Intermediaries that are not involved in the trust path must not be included. The
chain ends with your CA’s root certificate. Typically, both intermediary and root certificates are provided
by a CA in a bundled file with the proper chained order.
Sample certificate chain
-----BEGIN CERTIFICATE-----
Intermediate certificate 2
-----END CERTIFICATE-----
-----BEGIN CERTIFICATE-----
Intermediate certificate 1
-----END CERTIFICATE-----
-----BEGIN CERTIFICATE-----
Optional: Root certificate
-----END CERTIFICATE-----
IAM Groups
An IAM group (p. 119) is a collection of IAM users. Groups let you specify permissions for multiple
users, which can make it easier to manage the permissions for those users. For example, you could
have a group called Admins and give that group the types of permissions that administrators typically
need. Any user in that group automatically has the permissions that are assigned to the group. If a
new user joins your organization and needs administrator privileges, you can assign the appropriate
permissions by adding the user to that group. Similarly, if a person changes jobs in your organization,
instead of editing that user's permissions, you can remove him or her from the old groups and add him
or her to the appropriate new groups.
Note that a group is not truly an "identity" in IAM because it cannot be identified as a Principal in a
permission policy. It is simply a way to attach policies to multiple users at one time.
Following are some important characteristics of groups:
• A group can contain many users, and a user can belong to multiple groups.
• Groups can't be nested; they can contain only users, not other groups.
• There's no default group that automatically includes all users in the AWS account. If you want to
have a group like that, you need to create it and assign each new user to it.
• There's a limit to the number of groups you can have, and a limit to how many groups a user can be
in. For more information, see Limitations on IAM Entities and Objects (p. 338).
The following diagram shows a simple example of a small company. The company owner creates an
Admins group for users to create and manage other users as the company grows. The Admins group
119
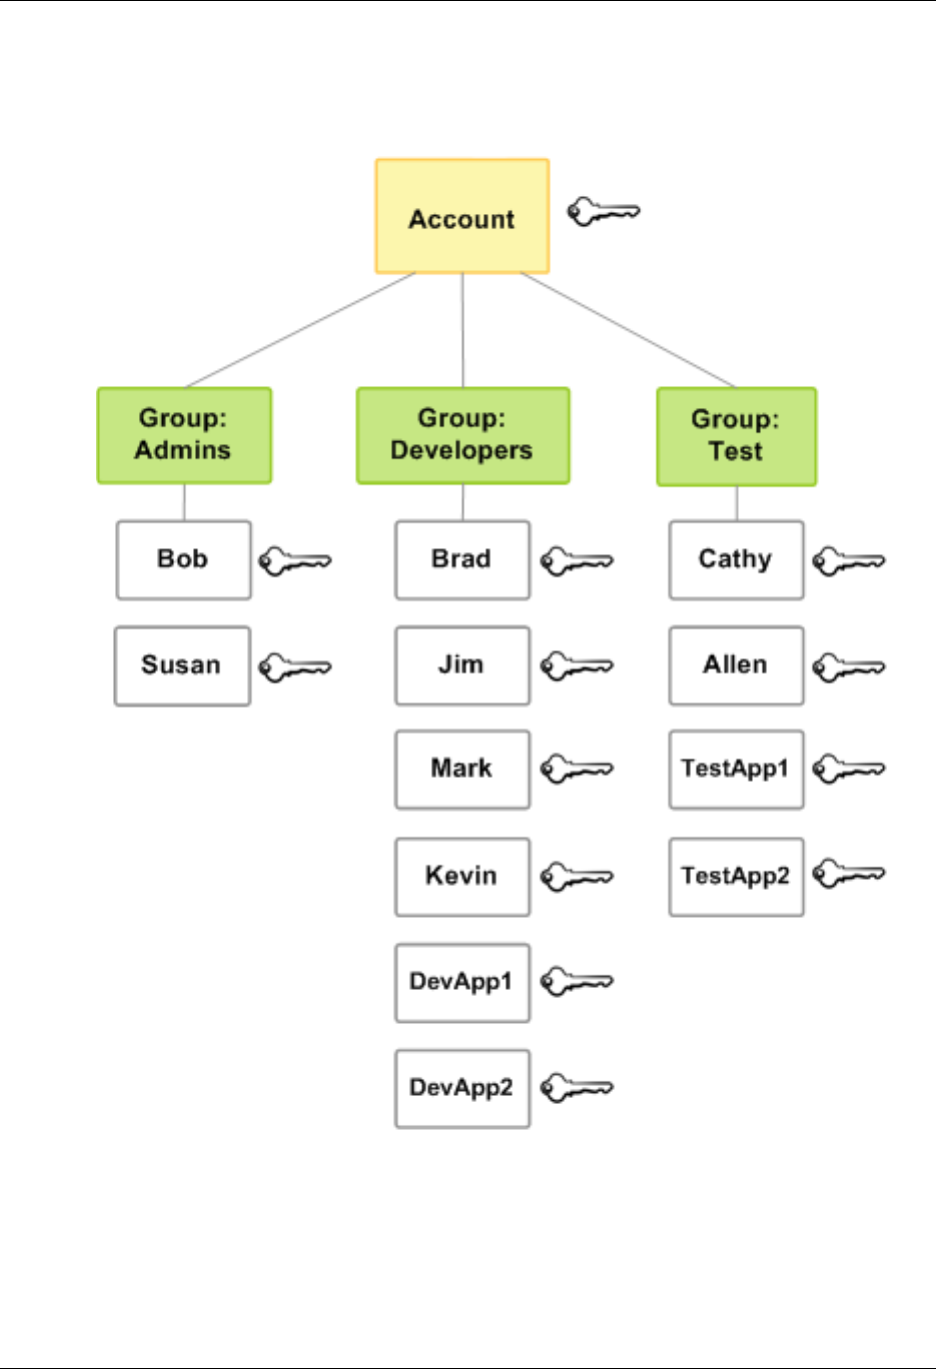
AWS Identity and Access Management User Guide
Creating Groups
creates a Development group and a Test group. Each of these groups consists of users (humans
and applications) that interact with AWS (Jim, Brad, DevApp1, and so on). Each user has an individual
set of security credentials. In this example, each user belongs to a single group. However, users can
belong to multiple groups.
Creating IAM Groups
To set up a group, you need to create the group, give it permissions based on the type of work that you
expect the users in the group to do, and then add users to the group.
120

AWS Identity and Access Management User Guide
Managing Groups
For information about the permissions that you need in order to create a group, see Delegating
Permissions to Administer IAM Users, Groups, and Credentials (p. 253).
To create an IAM group and attach policies (AWS Management Console)
1. Sign in to the Identity and Access Management (IAM) console at https://console.aws.amazon.com/
iam/.
2. In the navigation pane, click Groups and then click Create New Group.
3. In the Group Name box, type the name of the group and then click Next Step.
Important
Group names must be unique within an account. They are not distinguished by case, for
example, you cannot create groups named both "ADMINS" and "admins".
4. In the list of policies, select the check box for each policy that you want to apply to all members of
the group. Then click Next Step.
5. Click Create Group.
For an example of how to set up an Administrators group, see Creating Your First IAM Admin User
and Group (p. 14).
To create IAM groups and attach policies (AWS CLI, Tools for Windows PowerShell, AWS API)
Use one of the following commands to create a group:
• AWS CLI: aws iam create-group
• Tools for Windows PowerShell: New-IAMGroup
• AWS API: CreateGroup
Managing IAM Groups
Amazon Web Services offers multiple tools for managing IAM groups. For information about the
permissions that you need in order to add and remove users in a group, see Delegating Permissions to
Administer IAM Users, Groups, and Credentials (p. 253).
Topics
•Listing IAM Groups (p. 121)
•Adding and Removing Users in an IAM Group (p. 122)
•Attaching a Policy to an IAM Group (p. 122)
•Renaming an IAM Group (p. 123)
•Deleting an IAM Group (p. 123)
Listing IAM Groups
You can list all the groups in your account, list the users in a group, and list the groups a user belongs
to. If you use the AWS CLI, Tools for Windows PowerShell, or AWS API, you can list all the groups
with a particular path prefix
To list all the groups in your account
•AWS Management Console: In the navigation pane, choose Groups.
• AWS CLI: aws iam list-groups
• Tools for Windows PowerShell: Get-IAMGroups
• AWS API: ListGroups
121

AWS Identity and Access Management User Guide
Managing Groups
To list the users in a specific group
•AWS Management Console: In the navigation pane, choose Groups, choose the name of the group,
and then choose the Users tab.
• AWS CLI: aws iam get-group
• Tools for Windows PowerShell: Get-IAMGroup
• AWS API: GetGroup
To list all the groups that a user is in
•AWS Management Console: In the navigation pane, chose Users, choose the user name, and then
choose the Groups tab.
• AWS CLI: aws iam list-groups-for-user
• Tools for Windows PowerShell: Get-IAMGroupForUser
• AWS API: ListGroupsForUser
Adding and Removing Users in an IAM Group
At any time, you can add users to or remove users from an IAM group. This is useful as people enter
and leave your organization.
To add a user to an IAM group
•AWS Management Console: In the navigation pane, choose Groups and then choose the name of
the group. Choose the Users tab and then choose Add Users to Group. Select the users you want
to add and then choose Add Users to Group.
• AWS CLI: aws iam add-user-to-group
• Tools for Windows PowerShell: Add-IAMUserToGroup
• AWS API: AddUserToGroup
To remove a user from an IAM group
•AWS Management Console: In the navigation pane, choose Groups and then choose the name of
the group. Choose the Users tab and then choose Remove Users from Group. Select the users
you want to add and then choose Remove Users from Group.
• AWS CLI: aws iam remove-user-from-group
• Tools for Windows PowerShell: Remove-IAMUserFromGroup
• AWS API: RemoveUserFromGroup
Attaching a Policy to an IAM Group
You can attach an AWS managed policy (p. 266)—that is, a prewritten policy provided by AWS—to a
group, as explained in the following steps. To attach a customer managed policy—that is, a policy with
custom permissions that you create—you must first create the policy. For information about creating
customer managed policies, see Creating Customer Managed Policies (p. 281).
For more information about permissions and policies, see Access Management (p. 250).
To attach a policy to a group (AWS Management Console)
1. Sign in to the Identity and Access Management (IAM) console at https://console.aws.amazon.com/
iam/.
122

AWS Identity and Access Management User Guide
Managing Groups
2. In the navigation pane, select Policies.
3. In the list of policies, select the check box next to the name of the policy to attach. You can use the
Filter menu and the Search box to filter the list of policies.
4. Click Policy Actions, then click Attach.
5. Click All Types in the Filter menu, then click Groups.
6. Select the check box next to the name of the group to attach the policy to, then click Attach
Policy.
To attach a policy to a group (AWS CLI, Tools for Windows PowerShell, API)
• AWS CLI: aws iam attach-group-policy
• Tools for Windows PowerShell: Register-IAMGroupPolicy
• AWS API: AttachGroupPolicy
Renaming an IAM Group
When you change a group's name or path, the following happens:
• Any policies attached to the group stay with the group under the new name.
• The group retains all its users under the new name.
• The unique ID for the group remains the same. For more information about unique IDs, see Unique
IDs (p. 337).
IAM does not automatically update policies that refer to the group as a resource to use the new
name; you must manually do that. For example, let's say Bob is the manager of the testing part of the
organization, and he has a policy attached to his IAM user entity that lets him add and remove users
from the Test group. If an an admin changes the name of the group to Test_1 (or changes the path
for the group), the admin also needs to update the policy attached to Bob to use the new name (or new
path). Otherwise Bob won't be able to add and remove users from the group.
To change the name of an IAM group
•AWS Management Console: In the navigation pane, click Groups and then select the check box
next to the group name. From the Group Actions list at the top of the page, select Edit Group
Name. Type the new group name and then click Yes, Edit.
• AWS CLI: aws iam update-group
• Tools for Windows PowerShell: Update-IAMGroup
• AWS API: UpdateGroup
Deleting an IAM Group
When you delete a group in the AWS Management Console, the console automatically removes all
group members, detaches all attached managed policies, and deletes all inline policies.
In contrast, when you use the AWS CLI, Tools for Windows PowerShell, or AWS API to delete a group,
you must first remove the users in the group, delete any inline policies embedded in the group, and
detach any managed policies attached to the group before you can delete the group.
To delete an IAM group (AWS Management Console)
1. Sign in to the Identity and Access Management (IAM) console at https://console.aws.amazon.com/
iam/.
123
AWS Identity and Access Management User Guide
Roles
2. In the navigation pane, select Groups.
3. In the list of groups, select the check box next to the name of the group to delete. You can use the
Filter menu and the Search box to filter the list of policies.
4. Click Group Actions, then click Delete Group.
5. In the confirmation box, click Yes, Delete.
To delete an IAM group (AWS CLI, Tools for Windows PowerShell, AWSAPI)
1. Remove all users from the group.
• CLI: aws iam get-group (to get the list of users in the group), and aws iam remove-user-from-
group (to remove a user from the group)
• Tools for Windows PowerShell:
(Get-IAMGroup -GroupName "GroupToDelete").Users | Remove-
IAMUserFromGroup -GroupName "GroupToDelete" -Force
• AWS API: GetGroup (to get the list of users in the group), and RemoveUserFromGroup (to
remove a user from the group)
2. Delete all inline policies embedded in the group.
• CLI: aws iam list-group-policies (to get a list of the group's inline policies), and aws iam delete-
group-policy (to delete the group's inline policies)
• Tools for Windows PowerShell:
Get-IAMGroupPolicies -GroupName "GroupToReplace" | % { Remove-
IAMGroupPolicy -GroupName "GroupToReplace" -PolicyName $_ -Force}
• AWS API: ListGroupPolicies (to get a list of the group's inline policies), and DeleteGroupPolicy
(to delete the group's inline policies)
3. Detach all managed policies attached to the group.
• CLI: aws iam list-attached-group-policies (to get a list of the managed policies attached to the
group), and aws iam detach-group-policy (to detach a managed policy from the group)
• Tools for Windows PowerShell:
Get-IAMAttachedUserPolicies -UserName "UserToDelete" | % { Unregister-
IAMUserPolicy -PolicyArn $_.PolicyArn -UserName -UserName "UserToDelete"
-Force }
• AWS API: ListAttachedGroupPolicies (to get a list of the managed policies attached to the
group'), and DetachGroupPolicy (to detach a managed policy from the group)
4. Delete the group.
• CLI: aws iam delete-group
• Tools for Windows PowerShell: Remove-IAMGroup
• AWS API: DeleteGroup
IAM Roles
An IAM role is similar to a user, in that it is an AWS identity with permission policies that determine
what the identity can and cannot do in AWS. However, instead of being uniquely associated with one
124

AWS Identity and Access Management User Guide
Terms and Concepts
person, a role is intended to be assumable by anyone who needs it. Also, a role does not have any
credentials (password or access keys) associated with it. Instead, if a user is assigned to a role, access
keys are created dynamically and provided to the user.
You can use roles to delegate access to users, applications, or services that don't normally have
access to your AWS resources. For example, you might want to grant users in your AWS account
access to resources they don't usually have, or grant users in one AWS account access to resources
in another account. Or you might want to allow a mobile app to use AWS resources, but not want to
embed AWS keys within the app (where they can be difficult to rotate and where users can potentially
extract them). Sometimes you want to give AWS access to users who already have identities defined
outside of AWS, such as in your corporate directory. Or, you might want to grant access to your
account to third parties so that they can perform an audit on your resources.
For these scenarios, you can delegate access to AWS resources using an IAM role. This section
introduces roles and the different ways you can use them, when and how to choose among
approaches, and how to create, manage, switch to (or assume), and delete roles.
Topics
•Roles Terms and Concepts (p. 125)
•Common Scenarios for Roles: Users, Applications, and Services (p. 126)
•Identity Providers and Federation (p. 132)
•Creating IAM Roles (p. 167)
•Using IAM Roles (p. 191)
•Managing IAM Roles (p. 208)
•How IAM Roles Differ from Resource-based Policies (p. 215)
Roles Terms and Concepts
Here are some basic terms to help you get started with roles.
Role
A role is essentially a set of permissions that grant access to actions and resources in AWS.
These permissions are attached to the role, not to an IAM user or group. Roles can be used by the
following:
• An IAM user in the same AWS account as the role
• An IAM user in a different AWS account as the role
• A web service offered by AWS such as Amazon Elastic Compute Cloud (Amazon EC2)
• An external user authenticated by an external identity provider (IdP) service that is compatible
with SAML 2.0 or OpenID Connect, or a custom-built identity broker.
Delegation
Delegation is granting permission to someone that allows access to resources that you control.
This involves setting up a trust between the account that owns the resource (the trusting account),
and the account that contains the users that need to access the resource (the trusted account).
The trusted and trusting accounts can be any of the following:
• The same account.
• Two accounts that are both under your (organization's) control.
• Two accounts owned by different organizations.
To delegate permission to access a resource, you create an IAM role (p. 167) that has two
policies (p. ) attached. The permissions policy grants the user of the role the needed
permissions to carry out the desired tasks on the resource. The trust policy specifies which
trusted accounts are allowed to grant its users permissions to assume the role. The trust policy
125

AWS Identity and Access Management User Guide
Common Scenarios
on the role in the trusting account is one-half of the permissions. The other half is a permissions
policy attached to the user in the trusted account that allows that user to switch to, or assume
the role (p. 192). A user who assumes a role temporarily gives up his or her own permissions
and instead takes on the permissions of the role. When the user exits, or stops using the role, the
original user permissions are restored. An additional parameter called external ID (p. 172) helps
ensure secure use of roles between accounts that are not controlled by the same organization.
Federation
Federation is creating a trust relationship between an external identity provider and AWS. Users
can sign in to a web identity provider, such as Login with Amazon, Facebook, Google, or any
IdP that is compatible with OpenID Connect (OIDC). Users can also sign in to an enterprise
identity system that is compatible with Security Assertion Markup Language (SAML) 2.0, such as
Microsoft Active Directory Federation Services. When you use OIDC and SAML 2.0 to configure
a trust relationship between these external identity providers and AWS, the user is assigned to an
IAM role and receives temporary credentials that enable the user to access your AWS resources.
Policy
An IAM policy (p. 345) is a document in JSON format in which you define the permissions for a
role. The document is written according to the rules of the IAM Policy Language (p. 345).
When you create a role, you create two separate policies for it: a trust policy, which specifies
who is allowed to assume the role (the trusted entity, or principal; see the next term), and the
permissions policy, which defines what actions and resources the principal is allowed to use.
Principal
A principal is an entity in AWS that can perform actions and access resources. A principal can be
an AWS account (the "root" user), an IAM user, or a role. You can grant permissions to access a
resource in one of two ways:
• You can attach a permissions policy to a user (directly, or indirectly through a group) or to a role.
• For those services that support resource-based policies, you can identify the principal in the
Principal element of a policy attached to the resource.
If you reference an AWS account as principal, it generally means any principal defined within that
account.
Cross-account access
Granting access to resources in one account to a trusted principal in a different account is often
referred to as cross-account access. Roles are the primary way to grant cross-account access.
However, with some of the web services offered by AWS you can attach a policy directly to a
resource (instead of using a role as a proxy). These are called resource-based policies, and you
can use them to grant principals in another AWS account access to the resource. The following
services support resource-based policies for the specified resources: Amazon Simple Storage
Service (S3) buckets, Amazon Glacier vaults, Amazon Simple Notification Service (SNS) topics,
and Amazon Simple Queue Service (SQS) queues. For more information, see How IAM Roles
Differ from Resource-based Policies (p. 215).
Common Scenarios for Roles: Users,
Applications, and Services
As with most AWS features, you generally have two ways to use a role: interactively in the IAM
console, or programmatically with the AWS CLI, Tools for Windows PowerShell, or API.
• IAM users in your account using the IAM console can switch to a role to temporarily use the
permissions of the role in the console. The users give up their original permissions and take on
the permissions assigned to the role. When the users exit the role, their original permissions are
restored.
• An application or a service offered by AWS (like Amazon EC2) can assume a role by requesting
temporary security credentials for a role with which to make programmatic requests to AWS. You
126

AWS Identity and Access Management User Guide
Common Scenarios
use a role this way so that you don't have to share or maintain long-term security credentials (for
example, by creating an IAM user) for each entity that requires access to a resource.
Note
This guide uses the phrases switch to a role and assume a role interchangeably.
The simplest way to use roles is to grant your IAM users permissions to switch to roles that you create
within your own or another AWS account. They can switch roles easily using the IAM console to use
permissions that you don't ordinarily want them to have, and then exit the role to surrender those
permissions. This can help prevent accidental access to or modification of sensitive resources.
For more complex uses of roles, such as granting access to applications and services, or federated
external users, you can call the AssumeRole API. This API call returns a set of temporary credentials
that the application can use in subsequent API calls. Actions attempted with the temporary credentials
have only the permissions granted by the associated role. An application doesn't have to "exit" the role
the way a user in the console does; rather the application simply stops using the temporary credentials
and resumes making calls with the original credentials.
Federated users sign in by using credentials from an identity provider (IdP). AWS then provides
temporary credentials to the trusted IdP to pass on to the user for including in subsequent AWS
resource requests. Those credentials provide the permissions granted to the assigned role.
This section provides overviews of the following scenarios:
•Provide access for an IAM user in one AWS account that you own to access resources in another
account that you own (p. 127)
•Provide access to IAM users in AWS accounts owned by third parties (p. 129)
•Provide access for services offered by AWS to AWS resources (p. 130)
•Provide access for externally authenticated users (identity federation) (p. 130)
Providing Access to an IAM User in Another AWS Account
That You Own
You can grant your IAM users permission to switch to roles within your AWS account or to roles
defined in other AWS accounts that you own.
Note
If you want to grant access to an account that you do not own or control, see Providing
Access to AWS Accounts Owned by Third Parties (p. 129) later in this topic.
Imagine that you have Amazon Elastic Compute Cloud (Amazon EC2) instances that are critical to
your organization. Instead of directly granting your users permission to terminate the instances, you
can create a role with those privileges and allow administrators to switch to the role when they need to
terminate an instance. This adds the following layers of protection to the instances:
• You must explicitly grant your users permission to assume the role.
• Your users must actively switch to the role using the AWS Management Console.
• You can add multi-factor authentication (MFA) protection to the role so that only users who sign in
with an MFA device can assume the role.
We recommend using this approach to enforce the principle of least access, that is, restricting the use
of elevated permissions to only those times when they are needed for specific tasks. With roles you
127
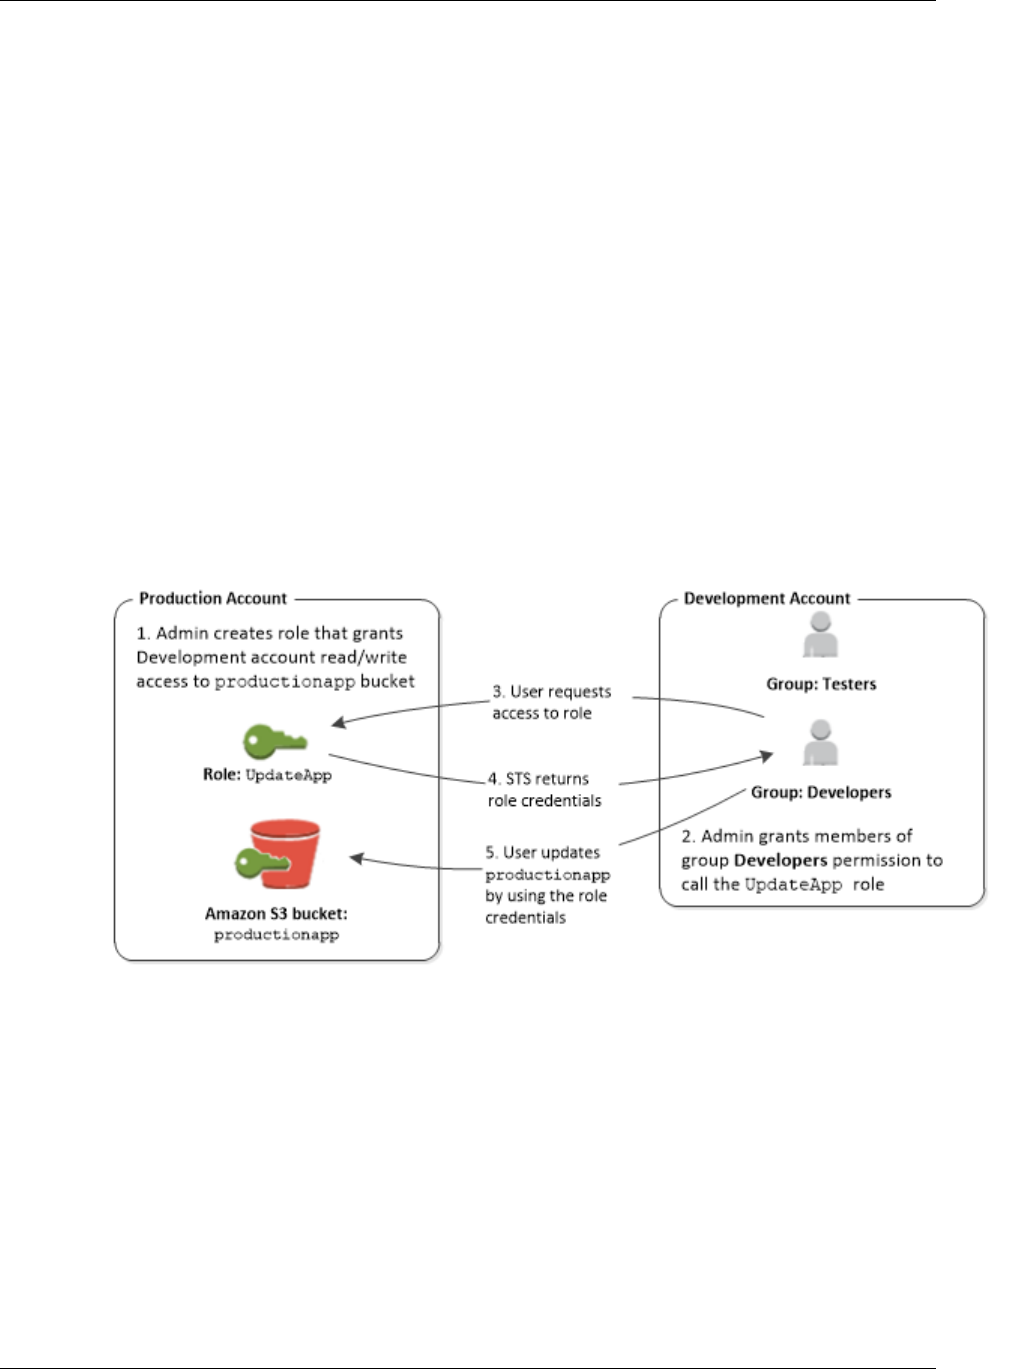
AWS Identity and Access Management User Guide
Common Scenarios
can help prevent accidental changes to sensitive environments, especially if you combine them with
auditing (p. 309) to help ensure that roles are only used when needed.
When you create a role for this purpose, you specify the accounts by ID whose users need access
in the Principal element of the role's trust policy. You can then grant specific users in those other
accounts permissions to switch to the role.
A user in one account can switch to a role in the same or a different account. While using the role, the
user can perform only the actions and access only the resources permitted by the role; their original
user permissions are suspended. When the user exits the role, the original user permissions are
restored.
For another example, imagine that your organization has multiple AWS accounts to isolate a
development environment from a production environment. Users in the development account might
occasionally need to access resources in the production account, such as when you are promoting an
update from the development environment to the production environment. Although you could create
separate identities (and passwords) for users who work in both accounts, managing credentials for
multiple accounts makes identity management difficult. In the following figure, all users are managed in
the development account, but some developers require limited access to the production account. The
development account has two groups: Testers and Developers, and each group has its own policy.
Use a role to delegate permissions to a user in a different account
1. In the production account an administrator uses IAM to create the UpdateAPP role in that account.
In the role, the administrator defines a trust policy that specifies the development account as a
Principal, meaning that authorized users from the development account can use the UpdateAPP
role. The administrator also defines a permissions policy for the role that specifies that users of the
role have read and write permissions to the Amazon Simple Storage Service (S3) bucket named
productionapp.
The administrator then shares the account number and name of the role (for AWS console users)
or the Amazon Resource Name (ARN) (for AWS CLI, Tools for Windows PowerShell, or AWS
API access) of the role with anyone who needs to assume the role. The role ARN might look like
arn:aws:iam::123456789012:role/UpdateAPP, where the role is named UpdateAPP and the
role was created in account number 123456789012.
128

AWS Identity and Access Management User Guide
Common Scenarios
Note
The administrator can optionally configure the role so that users who assume the role must
first be authenticated using multi-factor authentication (MFA). For more information, see
Configuring MFA-Protected API Access (p. 93).
2. In the development account an administrator grants members of the Developers group permission
to switch to the role. This is done by granting the Developers group permission to call the AWS
Security Token Service (AWS STS) AssumeRole API for the UpdateAPP role. Any IAM user that
belongs to the Developers group in the development account can now switch to the UpdateAPP role
in the production account. Other users who are not in the developer group do not have permission to
switch to the role and therefore cannot access the S3 bucket in the production account.
3. The user requests switches to the role:
• AWS console: The user clicks the account name in the navigation bar and choosesSwitch Role.
The user specifies the account ID (or alias) and role name. Alternatively, the user can click on a
link sent in email by the administrator. The link takes the user to the Switch Role page with the
details already filled in.
• AWS API/Tools for Windows PowerShell/AWS CLI: A user in the Developers group of the
development account calls the AssumeRole function to obtain credentials for the UpdateAPP
role. The user specifies the ARN of the UpdateAPP role as part of the call. If a user in the Testers
group makes the same request, the request fails because Testers do not have permission to call
AssumeRole for the UpdateAPP role ARN.
4. AWS STS returns temporary credentials:
• AWS console: AWS STS verifies the request with the role's trust policy to ensure that the request
is from a trusted entity (which it is: the development account). After verification, AWS STS returns
temporary security credentials to the AWS console.
• API/CLI: AWS STS verifies the request against the role's trust policy to ensure that the request is
from a trusted entity (which it is: the Development account). After verification, AWS STS returns
temporary security credentials to the application.
5. The temporary credentials allow access to the AWS resource:
• AWS console: The AWS console uses the temporary credentials on behalf of the user on all
subsequent console actions, in this case, to read and write to the productionapp bucket. The
console cannot access any other resource in the production account. When the user exits the
role, the user's permissions revert to the original permissions held before switching to the role.
• API/CLI: The application uses the temporary security credentials to update the productionapp
bucket. With the temporary security credentials, the application can only read from and write to
the productionapp bucket and cannot access any other resource in the Production account.
The application does not have to exit the role, but instead stops using the temporary credentials
and uses the original credentials in subsequent API calls.
For details about creating a role to delegate access to IAM users that you control, see Creating a Role
to Delegate Permissions to an IAM User (p. 167).
Providing Access to AWS Accounts Owned by Third
Parties
When third parties require access to your organization's AWS resources, you can use roles to delegate
access to them. For example, a third party might provide a service for managing your AWS resources.
With IAM roles, you can grant these third parties access to your AWS resources without sharing your
AWS security credentials. Instead, the third party can access your AWS resources by assuming a role
that you create in your AWS account.
Third parties must provide you with the following information for you to create a role that they can
assume:
129

AWS Identity and Access Management User Guide
Common Scenarios
• The third party's AWS account ID. You specify their AWS account ID as the principal when you
define the trust policy for the role.
• An external ID that the third party uses to uniquely associate you with your role. You specify
this third party-provided ID as a condition when you define the trust policy for the role. For more
information about the external ID, see How to Use an External ID When Granting Access to Your
AWS Resources to a Third Party (p. 172).
• The permissions that the third party requires to work with your AWS resources. You specify these
permissions when defining the role's access policy. This policy defines what actions they can take
and what resources they can access.
After you create the role, you must provide the role's Amazon Resource Name (ARN) to the third party.
They require your role's ARN in order to use the role.
For details about creating a role to delegate access to a third party, see How to Use an External ID
When Granting Access to Your AWS Resources to a Third Party (p. 172).
Important
When you grant third parties access to your AWS resources, they can access any resource
that you give them permissions to and their use of your resources is billed to you. Ensure that
you limit their use of your resources appropriately.
Providing Access to an AWS Service
Some AWS services use roles to control what the service can access. Each service is different in terms
of how it uses roles and how the roles are assigned to the service. When an AWS service such as an
EC2 instance that runs your application, needs to access an AWS resource, such as an S3 bucket or
a DynamoDB table, the service must have security credentials that grant permissions to the resource.
Do not embed or pass IAM user credentials directly into an instance, because distributing and rotating
long-term credentials to multiple instances is challenging to manage and a potential security risk. A
better strategy is to create a role that is assigned to the Amazon EC2 instance when it is launched.
AWS automatically provides temporary security credentials for the Amazon EC2 instance to use
on behalf of its applications. For more information, see Using an IAM Role to Grant Permissions to
Applications Running on Amazon EC2 Instances (p. 202).
See the AWS documentation for each service to see if it uses roles and how to assign a role for the
service to use.
For details about creating a role to delegate access to a service offered by AWS, see Creating a Role
to Delegate Permissions to an AWS Service (p. 176).
Providing Access to Externally Authenticated Users
(Identity Federation)
Your users might already have identities outside of AWS, such as in your corporate directory. If those
users need to work with AWS resources (or work with applications that access those resources), then
those users also need AWS security credentials. You can use an IAM role to specify permissions for
users whose identity is federated from your organization or a third-party identity provider (IdP).
Federating Users of a Mobile or Web-based App with Amazon Cognito
If you create a mobile or web-based app that accesses AWS resources, the app needs security
credentials in order to make programmatic requests to AWS. For most mobile application scenarios,
we recommend that you use Amazon Cognito. You can use this service with the AWS Mobile SDK
for iOS and the AWS Mobile SDK for Android and Fire OS to create unique identities for users and
authenticate them for secure access to your AWS resources. Amazon Cognito supports the same
130

AWS Identity and Access Management User Guide
Common Scenarios
identity providers as those listed in next section, and it also supports developer authenticated identities
and unauthenticated (guest) access. Amazon Cognito also provides APIs for synchronizing user data
so that it is preserved as users move between devices. For more information, see Using Amazon
Cognito for Mobile Apps (p. 133).
Federating Users with Public Identity Service Providers or OpenID
Connect
Whenever possible, use Amazon Cognito for mobile and web-based application scenarios. Amazon
Cognito does most of the behind-the-scenes work with public identity provider services for you. It works
with the same third-party services and also supports anonymous sign-ins. However, for more advanced
scenarios, you can work directly with a third-party service like Login with Amazon, Facebook, Google,
or any IdP that is compatible with OpenID Connect (OIDC). For more information about using web
identity federation using one of these services, see About Web Identity Federation (p. 133).
Federating users with SAML 2.0
If your organization already uses an identity provider software package that supports SAML 2.0
(Security Assertion Markup Language 2.0), you can create trust between your organization as an
identity provider (IdP) and AWS as the service provider. You can then use SAML to provide your
users with federated single-sign on (SSO) to the AWS Management Console or federated access to
call AWS APIs. For example, if your company uses Microsoft Active Directory and Active Directory
Federation Services, then you can federate using SAML 2.0. For more information about federating
users with SAML 2.0, see About SAML 2.0-based Federation (p. 138).
Federating users by creating a custom identity broker application
If your identity store is not compatible with SAML 2.0, then you can build a custom identity broker
application to perform a similar function. The broker application authenticates users, requests
temporary credentials for users from AWS, and then provides them to the user to access AWS
resources.
For example, Example Corp. has many employees who need to run internal applications that access
the company's AWS resources. The employees already have identities in the company identity and
authentication system, and Example Corp. doesn't want to create a separate IAM user for each
company employee.
Bob is a developer at Example Corp. To enable Example Corp. internal applications to access the
company's AWS resources, Bob develops a custom identity broker application. The application verifies
that employees are signed into the existing Example Corp. identity and authentication system, which
might use LDAP, Active Directory, or another system. The identity broker application then obtains
temporary security credentials for the employees. This scenario is similar to the previous one (a mobile
app that uses a custom authentication system), except that the applications that need access to AWS
resources all run within the corporate network, and the company has an existing authentication system.
To get temporary security credentials, the identity broker application calls either AssumeRole or
GetFederationToken to obtain temporary security credentials, depending on how Bob wants to
manage the policies for users and when the temporary credentials should expire. (For more information
about the differences between these APIs, see Temporary Security Credentials (p. 218) and
Controlling Permissions for Temporary Security Credentials (p. 233).) The call returns temporary
security credentials consisting of an AWS access key ID, a secret access key, and a session token.
The identity broker application makes these temporary security credentials available to the internal
company application. The app can then use the temporary credentials to make calls to AWS directly.
The app caches the credentials until they expire, and then requests a new set of temporary credentials.
The following figure illustrates this scenario.
131
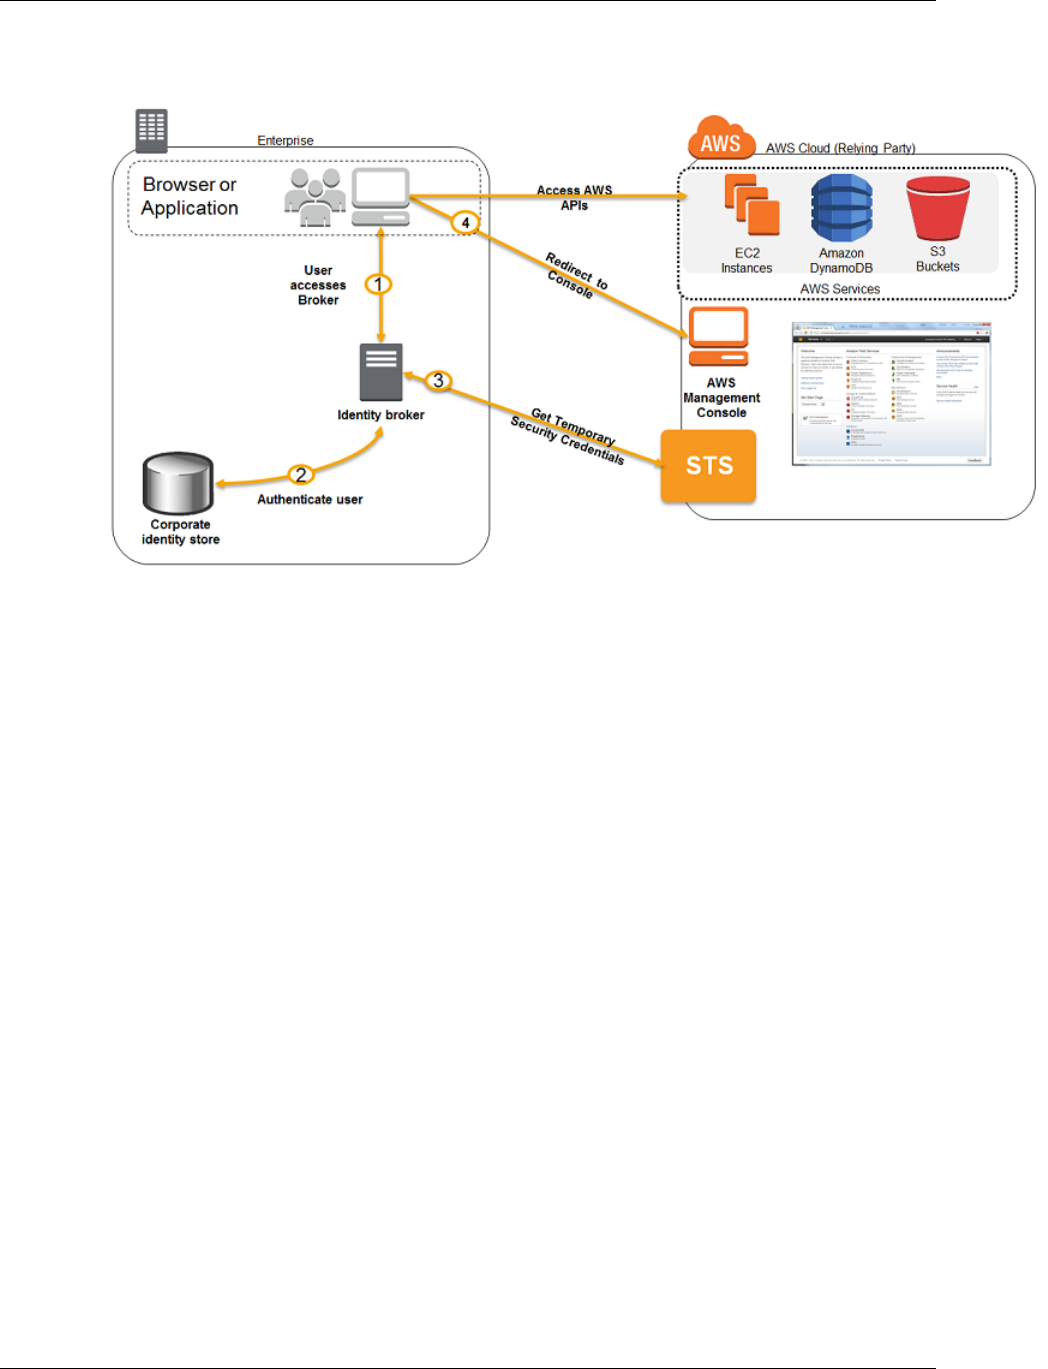
AWS Identity and Access Management User Guide
Identity Providers and Federation
Sample workflow using a custom identity broker application
This scenario has the following attributes:
• The identity broker application has permissions to access IAM's token service (STS) API to create
temporary security credentials.
• The identity broker application is able to verify that employees are authenticated within the existing
authentication system.
• Users are able to get a temporary URL that gives them access to the AWS Management Console
(which is referred to as single sign-on).
To see a sample application similar to the identity broker application that is described in this scenario,
go to Identity Federation Sample Application for an Active Directory Use Case at AWS Sample Code
& Libraries. For information about creating temporary security credentials, seeRequesting Temporary
Security Credentials (p. 219). For more information about federated users getting access to the AWS
Management Console, see Enabling SAML 2.0 Federated Users to Access the AWS Management
Console (p. 156).
Identity Providers and Federation
If you already manage user identities outside of AWS, you can use IAM identity providers instead of
creating IAM users in your AWS account. With an identity provider (IdP), you can manage your user
identities outside of AWS and give these external user identities permissions to use AWS resources
in your account. This is useful if your organization already has its own identity system, such as a
corporate user directory. It is also useful if you are creating a mobile app or web application that
requires access to AWS resources.
When you use an IdP, you don't have to create custom sign-in code or manage your own user
identities; the IdP provides that for you. Your external users sign in through a well-known identity
provider, such as Login with Amazon, Facebook, Google, and many others. You can give those
external identities permissions to use AWS resources in your account. Identity providers help
keep your AWS account secure because you don't have to distribute or embed long-term security
credentials, such as IAM access keys, in your application.
132

AWS Identity and Access Management User Guide
Identity Providers and Federation
To use an IdP, you create an IAM identity provider entity to establish a trust relationship between your
AWS account and the IdP. IAM supports IdPs that are compatible with OpenID Connect (OIDC) or
SAML 2.0 (Security Assertion Markup Language 2.0). For more information about using one of these
IdPs with AWS, see the following sections:
•About Web Identity Federation (p. 133)
•About SAML 2.0-based Federation (p. 138)
For details about creating the identity provider entity in IAM to establish a trust relationship between a
compatible IdP and AWS, see Creating IAM Identity Providers (p. 142)
About Web Identity Federation
Imagine that you are creating a mobile app that accesses AWS resources, such as a game that runs
on a mobile device and stores player and score information using Amazon S3 and DynamoDB.
When you write such an app, you'll make requests to AWS services that must be signed with an AWS
access key. However, we strongly recommend that you do not embed or distribute long-term AWS
credentials with apps that a user downloads to a device, even in an encrypted store. Instead, build
your app so that it requests temporary AWS security credentials dynamically when needed using
web identity federation. The supplied temporary credentials map to an AWS role that has only the
permissions needed to perform the tasks required by the mobile app.
With web identity federation, you don't need to create custom sign-in code or manage your own user
identities. Instead, users of your app can sign in using a well-known identity provider (IdP) —such as
Login with Amazon, Facebook, Google, or any other OpenID Connect (OIDC)-compatible IdP, receive
an authentication token, and then exchange that token for temporary security credentials in AWS
that map to an IAM role with permissions to use the resources in your AWS account. Using an IdP
helps you keep your AWS account secure, because you don't have to embed and distribute long-term
security credentials with your application.
For most scenarios, we recommend that you use Amazon Cognito because it acts as an identity broker
and does much of the federation work for you. For details, see the following section, Using Amazon
Cognito for Mobile Apps (p. 133).
If you don't use Amazon Cognito, then you must write code that interacts with a web IdP
(Login with Amazon, Facebook, Google, or any other OIDC-compatible IdP) and then calls the
AssumeRoleWithWebIdentity API to trade the authentication token you get from those IdPs for
AWS temporary security credentials. If you have already used this approach for existing apps, you can
continue to use it.
Topics
•Using Amazon Cognito for Mobile Apps (p. 133)
•Using Web Identity Federation APIs for Mobile Apps (p. 135)
•Identifying Users with Web Identity Federation (p. 136)
•Additional Resources for Web Identity Federation (p. 138)
Using Amazon Cognito for Mobile Apps
The preferred way to use web identity federation is to use Amazon Cognito. For example, Adele the
developer is building a game for a mobile device where user data such as scores and profiles is stored
in Amazon S3 and Amazon DynamoDB. Adele could also store this data locally on the device and use
Amazon Cognito to keep it synchronized across devices. She knows that for security and maintenance
reasons, long-term AWS security credentials should not be distributed with the game. She also knows
that the game might have a large number of users. For all of these reasons, she does not want to
create new user identities in IAM for each player. Instead, she builds the game so that users can sign
in using an identity that they've already established with a well-known identity provider, such as Login
133
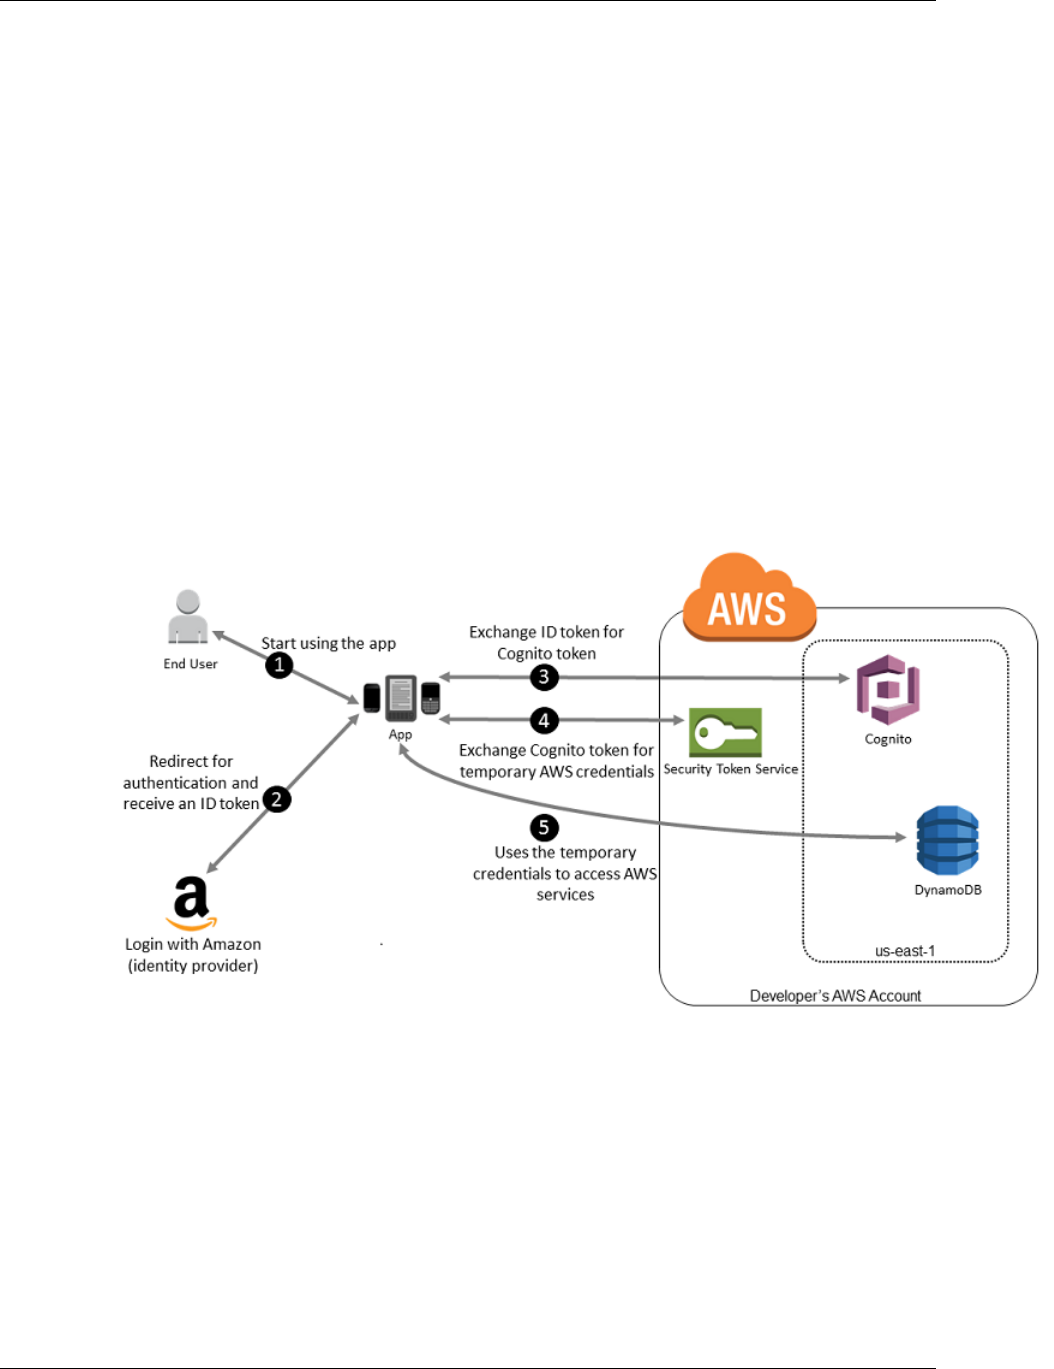
AWS Identity and Access Management User Guide
Identity Providers and Federation
with Amazon, Facebook, Google, or any OpenID Connect (OIDC)-compatible identity provider. Her
game can take advantage of the authentication mechanism from one of these providers to validate the
user's identity.
To enable the mobile app to access her AWS resources, Adele first registers for a developer ID with
her chosen IdPs. She also configures the application with each of these providers. In her AWS account
that contains the Amazon S3 bucket and DynamoDB table for the game, Adele uses Amazon Cognito
to create IAM roles that precisely define permissions that the game needs. If she is using an OIDC IdP,
she also creates an IAM OIDC identity provider entity to establish trust between her AWS account and
the IdP.
In the app's code, Adele calls the sign-in interface for the IdP that she configured previously. The IdP
handles all the details of letting the user sign in, and the app gets an OAuth access token or OIDC ID
token from the provider. Adele's app can trade this authentication information for a set of temporary
security credentials that consist of an AWS access key ID, a secret access key, and a session token.
The app can then use these credentials to access web services offered by AWS. The app is limited to
the permissions that are defined in the role that it assumes.
The following figure shows a simplified flow for how this might work, using Login with Amazon as the
IdP. For Step 2, the app can also use Facebook, Google, or any OIDC-compatible identity provider, but
that's not shown here.
Sample workflow using Amazon Cognito to federate users for a mobile application
1. A customer starts your app on a mobile device. The app asks the user to sign in.
2. The app uses Login with Amazon resources to accept the user's credentials.
3. The app uses Cognito APIs to exchange the Login with Amazon ID token for a Cognito token.
4. The app requests temporary security credentials from AWS STS, passing the Cognito token.
5. The temporary security credentials can be used by the app to access any AWS resources required
by the app to operate. The role associated with the temporary security credentials and its assigned
policies determines what can be accessed.
Use the following process to configure your app to use Amazon Cognito to authenticate users and
give your app access to AWS resources. For specific steps to accomplish this scenario, consult the
documentation for Amazon Cognito.
134

AWS Identity and Access Management User Guide
Identity Providers and Federation
1. (Optional) Sign up as a developer with Login with Amazon, Facebook, Google, or any other OpenID
Connect (OIDC)–compatible identity provider and configure one or more apps with the provider. This
step is optional because Amazon Cognito also supports unauthenticated (guest) access for your
users.
2. Go to Amazon Cognito in the AWS Management Console. Use the Amazon Cognito wizard to
create an identity pool, which is a container that Amazon Cognito uses to keep end user identities
organized for your apps. You can share identity pools between apps. When you set up an identity
pool, Amazon Cognito creates one or two IAM roles (one for authenticated identities, and one for
unauthenticated "guest" identities) that define permissions for Amazon Cognito users.
3. Download and integrate the AWS SDK for iOS or the AWS SDK for Android with your app, and
import the files required to use Amazon Cognito.
4. Create an instance of the Amazon Cognito credentials provider, passing the identity pool ID, your
AWS account number, and the Amazon Resource Name (ARN) of the roles that you associated with
the identity pool. The Amazon Cognito wizard in the AWS Management Console provides sample
code to help you get started.
5. When your app accesses an AWS resource, pass the credentials provider instance to the client
object, which passes temporary security credentials to the client. The permissions for the credentials
are based on the role or roles that you defined earlier.
For more information, see the following:
•Amazon Cognito Identity in the AWS Mobile SDK for Android Developer Guide.
•Amazon Cognito Identity in the AWS Mobile SDK for iOS Developer Guide.
Using Web Identity Federation APIs for Mobile Apps
For best results, use Amazon Cognito as your identity broker for almost all web identity federation
scenarios. Amazon Cognito is easy to use and provides additional capabilities like anonymous
(unauthenticated) access, and synchronizing user data across devices and providers. However,
if you have already created an app that uses web identity federation by manually calling the
AssumeRoleWithWebIdentity API, you can continue to use it and your apps will still work fine.
Note
To help understand how web identity federation works, you can use the Web Identity
Federation Playground. This interactive website lets you walk through the process of
authenticating via Login with Amazon, Facebook, or Google, getting temporary security
credentials, and then using those credentials to make a request to AWS.
The process for using web identity federation without Amazon Cognito follows this general outline:
1. Sign up as a developer with the IdP and configure your app with the IdP, who gives you a unique
ID for your app. (Different IdPs use different terminology for this process. This outline uses the term
configure for the process of identifying your app with the IdP.) Each IdP gives you an app ID that's
unique to that IdP, so if you configure the same app with multiple IdPs, your app will have multiple
app IDs. You can configure multiple apps with each provider.
The following external links provide information about using some of the commonly used identity
providers:
•Login with Amazon Developer Center
•Add Facebook Login to Your App or Website on the Facebook developers site.
•Using OAuth 2.0 for Login (OpenID Connect) on the Google developers site.
Note
Although Amazon Cognito and Google are based on OIDC technology, you don't have
to create an identity provider entity in IAM to use them. Support for Amazon Cognito and
Google are built-in to AWS.
135

AWS Identity and Access Management User Guide
Identity Providers and Federation
2. If you use an IdP that is compatible with OIDC, then create an identity provider entity for it in IAM.
3. In IAM, create one or more roles (p. 180). For each role, define who can assume the role (the
trust policy) and what permissions the app's users are to have (the permissions policy). Typically,
you create one role for each IdP that an app supports. For example, you might create a role that is
assumed by an app when the user signs in through Login with Amazon, a second role for the same
app where the user signs in through Facebook, and a third role for the app where the user signs in
through Google. For the trust relationship, specify the IdP (like Amazon.com) as the Principal
(the trusted entity), and include a Condition that matches the IdP assigned app ID. Examples of
roles for different providers are described later in this topic.
4. In your application, authenticate your users with the IdP. The specifics of how to do this vary both
according to which IdP you're using (Login with Amazon, Facebook, or Google) and on which
platform your app. For example, an Android app's method of authentication can differ from that of an
iOS app or a JavaScript-based web app.
Typically, if the user is not already signed in, the IdP takes care of displaying a sign-in page. After
the IdP authenticates the user, the IdP returns an authentication token with information about the
user to your app. The information included depends on what the IdP exposes and what information
the user is willing to share. You can use this information in your app.
5. In your app, make an unsigned call to the AssumeRoleWithWebIdentity action to request
temporary security credentials. In the request, you pass the IdP's authentication token and specify
the Amazon Resource Name (ARN) for the IAM role that you created for that IdP. AWS verifies that
the token is trusted and valid and if so, returns temporary security credentials to your app that have
the permissions for the role that you name in the request. The response also includes metadata
about the user from the IdP, such as the unique user ID that the IdP associates with the user.
6. Using the temporary security credentials from the AssumeRoleWithWebIdentity response, your
app makes signed requests to AWS APIs. The user ID information from the identity provider can
distinguish users in your app—for example, you can put objects into Amazon S3 folders that include
the user ID as prefixes or suffixes. This lets you create access control policies that lock the folder
so only the user with that ID can access it. For more information, see Identifying Users with Web
Identity Federation (p. 136) later in this topic.
7. Your app should cache the temporary security credentials so that you do not have to get new
ones each time the app needs to make a request to AWS. By default, the credentials are
good for one hour. When the credentials expire (or before then), you make another call to
AssumeRoleWithWebIdentity to obtain a new set of temporary security credentials. Depending
on the IdP and how they manage their tokens, you might have to refresh the IdP's token before you
make a new call to AssumeRoleWithWebIdentity, since the IdP's tokens also usually expire
after a fixed time. If you use the AWS SDK for iOS or the AWS SDK for Android, you can use the
AmazonSTSCredentialsProvider action, which manages the IAM temporary credentials, including
refreshing them as required.
Identifying Users with Web Identity Federation
When you create access policies in IAM, it's often useful to be able to specify permissions based
on configured apps and on the ID of users who have authenticated using an identity provider. For
example, your mobile app that's using web identity federation might keep information in Amazon S3
using a structure like this:
myBucket/app1/user1
myBucket/app1/user2
myBucket/app1/user3
...
myBucket/app2/user1
myBucket/app2/user2
myBucket/app2/user3
...
136

AWS Identity and Access Management User Guide
Identity Providers and Federation
You might also want to additionally distinguish these paths by provider. In that case, the structure might
look like the following (only two providers are listed to save space):
myBucket/Amazon/app1/user1
myBucket/Amazon/app1/user2
myBucket/Amazon/app1/user3
...
myBucket/Amazon/app2/user1
myBucket/Amazon/app2/user2
myBucket/Amazon/app2/user3
myBucket/Facebook/app1/user1
myBucket/Facebook/app1/user2
myBucket/Facebook/app1/user3
...
myBucket/Facebook/app2/user1
myBucket/Facebook/app2/user2
myBucket/Facebook/app2/user3
...
For these structures, app1 and app2 represent different apps, such as different games, and each
user of the app has a distinct folder. The values for app1 and app2 might be friendly names that you
assign (for example, mynumbersgame) or they might be the app IDs that the providers assign when
you configure your app. If you decide to include provider names in the path, those can also be friendly
names like Cognito, Amazon, Facebook, and Google.
You can typically create the folders for app1 and app2 through the AWS Management Console,
since the application names are static values. That's true also if you include the provider name
in the path, since the provider name is also a static value. In contrast, the user-specific folders
(user1, user2, user3, etc.) have to be created at run time from the app, using the user ID
that's available in the SubjectFromWebIdentityToken value that is returned by the request to
AssumeRoleWithWebIdentity.
To write policies that allow exclusive access to resources for individual users, you can match the
complete folder name, including the app name and provider name, if you're using that. You can then
include the following provider-specific context keys that reference the user ID that the provider returns:
•cognito-identity.amazonaws.com:sub
•www.amazon.com:user_id
•graph.facebook.com:id
•accounts.google.com:sub
For OIDC providers, use the fully qualified URL of the OIDC provider with the subcontext key, like the
following example:
•server.example.com:sub
The following example shows an access policy that grants access to a bucket in Amazon S3 only if the
prefix for the bucket matches the string:
myBucket/Amazon/mynumbersgame/user1
The example assumes that the user is signed in using Login with Amazon, and that the user is using
an app called mynumbersgame. The user's unique ID is presented as an attribute called user_id.
{
"Version": "2012-10-17",
137

AWS Identity and Access Management User Guide
Identity Providers and Federation
"Statement": [
{
"Effect": "Allow",
"Action": ["s3:ListBucket"],
"Resource": ["arn:aws:s3:::myBucket"],
"Condition": {"StringLike": {"s3:prefix": ["Amazon/mynumbersgame/
${www.amazon.com:user_id}/*"]}}
},
{
"Effect": "Allow",
"Action": [
"s3:GetObject",
"s3:PutObject",
"s3:DeleteObject"
],
"Resource": [
"arn:aws:s3:::myBucket/amazon/mynumbersgame/
${www.amazon.com:user_id}",
"arn:aws:s3:::myBucket/amazon/mynumbersgame/
${www.amazon.com:user_id}/*"
]
}
]
}
You would create similar policies for users who sign in using Amazon Cognito, Facebook, Google, or
another OpenID Connect–compatible IdP. Those policies would use a different provider name as part
of the path as well as different app IDs.
For more information about the web identity federation keys available for condition checks in policies,
see Available Keys for Web Identity Federation (p. 361).
Additional Resources for Web Identity Federation
The following resources can help you learn more about web identity federation:
•Amazon Cognito Identity in the AWS Mobile SDK for Android Developer Guide and Amazon Cognito
Identity in the AWS Mobile SDK for iOS Developer Guide.
• The Web Identity Federation Playground is an interactive website that lets you walk through the
process of authenticating via Login with Amazon, Facebook, or Google, , getting temporary security
credentials, and then using those credentials to make a request to AWS.
• The entry Web Identity Federation using the AWS SDK for .NET on the AWS .NET Development
blog walks through how to use web identity federation with Facebook and includes code snippets in
C# that show how to call AssumeRoleWithWebIdentity and how to use the temporary security
credentials from that API call to access an S3 bucket.
• The AWS SDK for iOS and the AWS SDK for Android contain sample apps. These apps include
code that shows how to invoke the identity providers and then how to use the information from these
providers to get and use temporary security credentials.
• The article Web Identity Federation with Mobile Applications discusses web identity federation and
shows an example of how to use web identity federation to get access to content in Amazon S3.
About SAML 2.0-based Federation
AWS supports identity federation with SAML 2.0 (Security Assertion Markup Language 2.0), an open
standard that many identity providers (IdPs) use. This feature enables federated single sign-on (SSO),
so users can log into the AWS Management Console or call the AWS APIs without you having to
create an IAM user for everyone in your organization. By using SAML, you can simplify the process
138
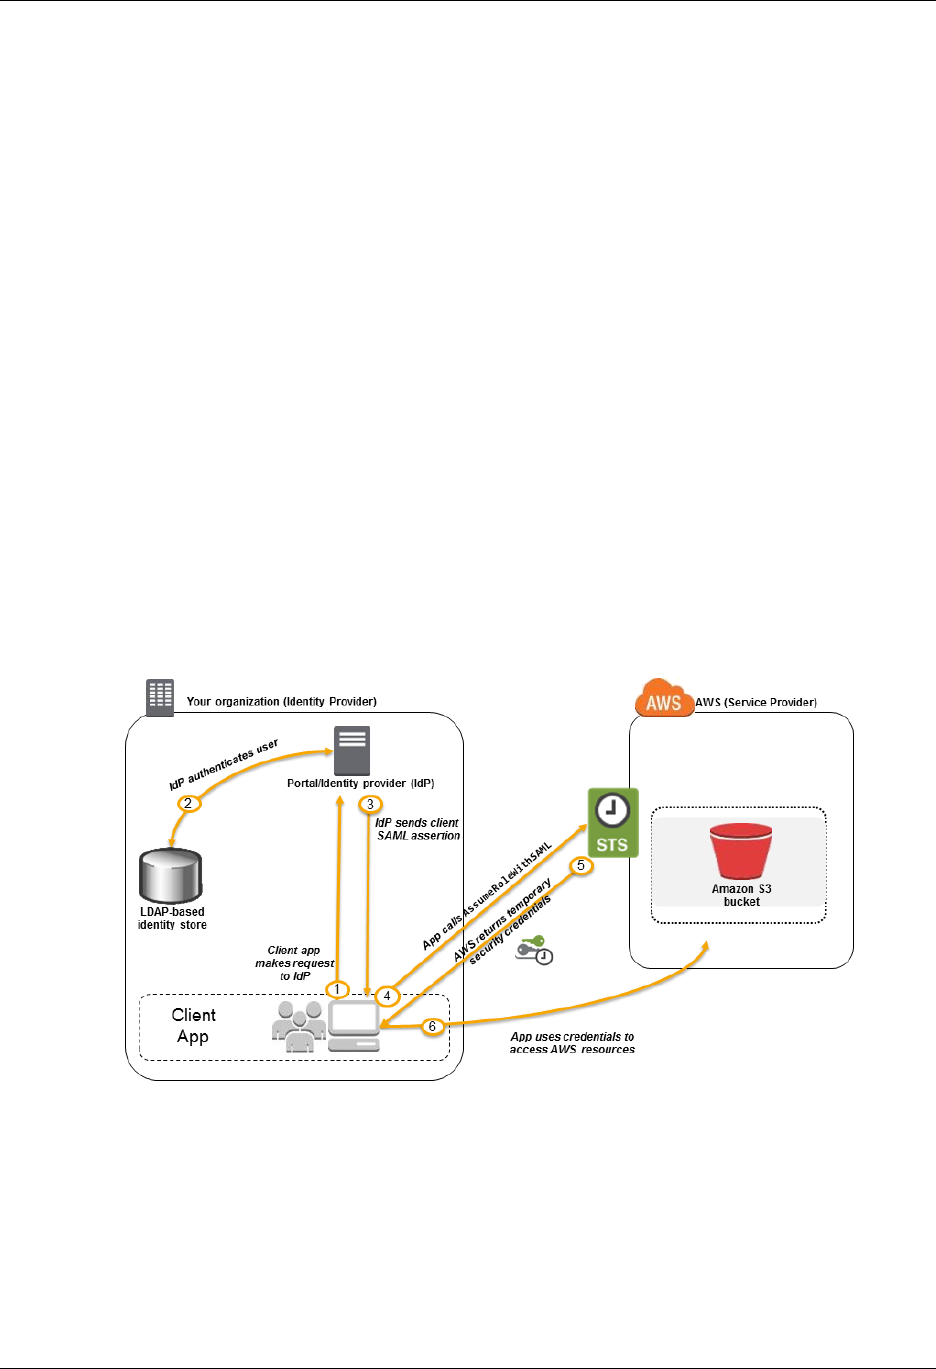
AWS Identity and Access Management User Guide
Identity Providers and Federation
of configuring federation with AWS, because you can use the IdP's service instead of writing custom
identity proxy code.
IAM federation supports these use cases:
•Federated access to allow a user or application in your organization to call AWS
APIs (p. 139). You use a SAML assertion (as part of the authentication response) that is
generated in your organization to get temporary security credentials. This scenario is similar to
other federation scenarios that IAM supports, like those described in Requesting Temporary
Security Credentials (p. 219) and About Web Identity Federation (p. 133). However, SAML 2.0–
based identity providers in your organization handle many of the details at run time for performing
authentication and authorization checking. This is the scenario discussed in this topic.
•Web-based single sign-on (SSO) to the AWS Management Console from your
organization (p. 156). Users can sign in to a portal in your organization hosted by a SAML 2.0–
compatible IdP, select an option to go to AWS, and be redirected to the console without having to
provide additional sign-in information. In addition to being able to use a third-party SAML IdP to
establish SSO access to the console, you can alternatively create a custom IdP to enable console
access for your external users. For more information about building a custom IdP, see Creating a
URL that Enables Federated Users to Access the AWS Management Console (Custom Federation
Broker) (p. 159).
Using SAML-Based Federation for API Access to AWS
Imagine that in your organization, you want to provide a way for users to copy data from their
computers to a backup folder. You build an application that users can run on their computers. On the
back end, the application reads and writes objects in an S3 bucket. Users don't have direct access to
AWS. Instead, the following process is used:
1. A user in your organization uses a client app to request authentication from your organization's IdP.
2. The IdP authenticates the user against your organization's identity store.
3. The IdP constructs a SAML assertion with information about the user and sends the assertion to the
client app.
4. The client app calls the AWS STS AssumeRoleWithSAML API, passing the ARN of the SAML
provider, the ARN of the role to assume, and the SAML assertion from IdP.
5. The API response to the client app includes temporary security credentials.
6. The client app uses the temporary security credentials to call Amazon S3 APIs.
139

AWS Identity and Access Management User Guide
Identity Providers and Federation
Overview of Configuring SAML 2.0-Based Federation
Before you can use SAML 2.0-based federation as described in the preceding scenario and diagram,
you must configure your organization's IdP and your AWS account to trust each other. The general
process for configuring this trust is described in the following steps. Inside your organization, you must
have an IdP that supports SAML 2.0 (p. 150), like Microsoft Active Directory Federation Service (AD
FS, part of Windows Server), Shibboleth, or another compatible SAML 2.0 provider.
1. You begin by registering AWS with your IdP. In your organization's IdP you register AWS as a
service provider (SP) by using the SAML metadata document that you get from the following URL:
https://signin.aws.amazon.com/static/saml-metadata.xml
2. Using your organization's IdP, you generate an equivalent metadata XML file that can describe your
IdP as an identity provider to AWS. It must include the issuer name, a creation date, an expiration
date, and keys that AWS can use to validate authentication responses (assertions) from your
organization.
3. In the IAM console, you create a SAML identity provider entity. As part of this process, you
upload the SAML metadata document that was produced by the IdP in your organization in step
2 (p. 140). For more information, see Creating SAML Identity Providers (p. 148).
4. In IAM, you create one or more IAM roles. In the role's trust policy, you set the SAML provider as
the principal, which establishes a trust relationship between your organization and AWS. The role's
permission policy establishes what users from your organization are allowed to do in AWS. For more
information, see Creating a Role for a Third-Party Identity Provider (Federation) (p. 180).
5. In your organization's IdP, you define assertions that map users or groups in your organization to
the IAM roles. Note that different users and groups in your organization might map to different IAM
roles. The exact steps for performing the mapping depend on what IdP you're using. In the earlier
scenario (p. 139) of an Amazon S3 folder for users, it's possible that all users will map to the same
role that provides Amazon S3 permissions. For more information, see Configuring SAML Assertions
for the Authentication Response (p. 152).
If your IdP enables SSO to the AWS console, then you can configure the maximum duration of the
console sessions. For more information, see Enabling SAML 2.0 Federated Users to Access the
AWS Management Console (p. 156).
Note
The AWS implementation of SAML 2.0 federation does not support encrypted SAML
assertions between the identity provider and AWS. However, the traffic between the identity
provider and AWS is transmitted over an encrypted (TLS) channel.
6. In the application that you're creating, you call the AWS Security Token Service
AssumeRoleWithSAML API, passing it the ARN of the SAML provider you created in step
3 (p. 140), the ARN of the role to assume that you created in step 4 (p. 140), and the SAML
assertion about the current user that you get from your IdP. AWS makes sure that the request to
assume the role comes from the IdP referenced in the SAML provider.
For more information, see AssumeRoleWithSAML in the AWS Security Token Service API
Reference.
7. If the request is successful, the API returns a set of temporary security credentials, which your
application can use to make signed requests to AWS. Your application has information about the
current user and can access user-specific folders in Amazon S3, as described in the previous
scenario.
Overview of the Role to Allow SAML-Federated Access to Your AWS Resources
The role or roles that you create in IAM define what federated users from your organization are allowed
to do in AWS. When you create the trust policy for the role, you specify the SAML provider that you
created earlier as the Principal. You can additionally scope the trust policy with a Condition to
allow only users that match certain SAML attributes to access the role. For example, you can specify
140

AWS Identity and Access Management User Guide
Identity Providers and Federation
that only users whose SAML affiliation is staff (as asserted by https://openidp.feide.no) are allowed
to access the role, as illustrated by the following sample policy:
{
"Version": "2012-10-17",
"Statement": [{
"Effect": "Allow",
"Principal": {"AWS": "arn:aws:sts::ACCOUNT-ID-WITHOUT-HYPHENS:saml-
provider/ExampleOrgSSOProvider"},
"Action": "sts:AssumeRoleWithSAML",
"Condition": {
"StringEquals": {
"saml:aud": "https://signin.aws.amazon.com/saml",
"saml:iss": "https://openidp.feide.no"
},
"ForAllValues:StringLike": {"saml:edupersonaffiliation": ["staff"]}
}
}]
}
For more information about the SAML keys that you can check in a policy, see Available Keys for
SAML-Based Federation.
For the access policy in the role, you specify permissions as you would for any role. For example, if
users from your organization are allowed to administer Amazon Elastic Compute Cloud instances,
you must explicitly allow Amazon EC2 actions in the permissions policy, such as those in the
AmazonEC2FullAccess managed policy.
Uniquely Identifying Users in SAML-Based Federation
When you create access policies in IAM, it's often useful to be able to specify permissions based on
the identity of users. For example, for users who have been federated using SAML, an application
might want to keep information in Amazon S3 using a structure like this:
myBucket/app1/user1
myBucket/app1/user2
myBucket/app1/user3
You can create the bucket (myBucket) and folder (app1) through the Amazon S3 console or the AWS
CLI, since those are static values. However, the user-specific folders (user1, user2, user3, etc.)
have to be created at run time using code, since the value that identifies the user isn't known until the
first time the user signs in through the federation process.
To write policies that reference user-specific details as part of a resource name, the user identity has
to be available in SAML keys that can be used in policy conditions. The following keys are available for
SAML 2.0–based federation for use in IAM policies. You can use the values returned by the following
keys to create unique user identifiers for resources like Amazon S3 folders.
•saml:namequalifier. A hash value based on the concatenation of the Issuer response value
(saml:iss) and a string with the AWS account ID and the friendly name (the last part of the ARN)
of the SAML provider in IAM. The concatenation of the account ID and friendly name of the SAML
provider is available to IAM policies as the key saml:doc. The account ID and provider name must
be separated by a '/' as in "123456789012/provider_name". For more information, see the saml:doc
key at Available Keys for SAML-Based Federation (p. 362).
The combination of NameQualifier and Subject can be used to uniquely identify a federated
user. The following pseudocode shows how this value is calculated. In this pseudocode + indicates
141

AWS Identity and Access Management User Guide
Identity Providers and Federation
concatenation, SHA1 represents a function that produces a message digest using SHA-1, and
Base64 represents a function that produces Base-64 encoded version of the hash output.
Base64 ( SHA1 ( "https://example.com/saml" + "123456789012" + "/
MySAMLIdP" ) )
For more information about the policy keys that are available for SAML-based federation, see
Available Keys for SAML-Based Federation (p. 362).
•saml:sub (string). This is the subject of the claim, which includes a value
that uniquely identifies an individual user within an organization (for example,
_cbb88bf52c2510eabe00c1642d4643f41430fe25e3).
•saml:sub_type (string). This key can be persistent or transient. A value of persistent
indicates that the value in saml:sub is the same for a user across all sessions. If the value is
transient, the user has a different saml:sub value for each session.
The following example shows an access policy that uses the preceding keys to grant permissions to a
user-specific folder in Amazon S3. The policy assumes that the Amazon S3 objects are identified using
a prefix that includes both saml:namequalifier and saml:sub. Notice that the Condition element
includes a test to be sure that saml:sub_type is set to persistent. If it is set to transient, the
saml:sub value for the user can be different for each session, and the combination of values should
not be used to identity user-specific folders.
{
"Version": "2012-10-17",
"Statement": {
"Effect": "Allow",
"Action": [
"s3:GetObject",
"s3:PutObject",
"s3:DeleteObject"
],
"Resource": [
"arn:aws:s3:::exampleorgBucket/backup/${saml:namequalifier}/
${saml:sub}",
"arn:aws:s3:::exampleorgBucket/backup/${saml:namequalifier}/
${saml:sub}/*"
],
"Condition": {"StringEquals": {"saml:sub_type": "persistent"}}
}
}
For more information about mapping assertions from the IdP to policy keys, see Configuring SAML
Assertions for the Authentication Response (p. 152).
Creating IAM Identity Providers
When you want to configure federation with an external identity provider service (IdP), you create an
identity provider in the IAM console to inform AWS about the IdP and its configuration. This establishes
"trust" between your AWS account and the IdP. The following topics include details about how to
create an identity provider in IAM for each of the IdP types.
Topics
•Creating OpenID Connect (OIDC) Identity Providers (p. 143)
•Creating SAML Identity Providers (p. 148)
142

AWS Identity and Access Management User Guide
Identity Providers and Federation
Creating OpenID Connect (OIDC) Identity Providers
OIDC identity providers are entities in IAM that describe an identity provider (IdP) service that supports
the OpenID Connect (OIDC) standard. You use an OIDC identity provider when you want to establish
trust between an OIDC-compatible IdP—such as Google, Salesforce, and many others—and your
AWS account. This is useful if you are creating a mobile app or web application that requires access
to AWS resources, but you don't want to create custom sign-in code or manage your own user
identities. For more information about this scenario, see the section called “About Web Identity
Federation” (p. 133).
You can create and manage an OIDC identity provider using the AWS Management Console, the AWS
Command Line Interface, the Tools for Windows PowerShell, or the IAM API.
Topics
•Creating and Managing an OIDC Provider (AWS Management Console) (p. 143)
•Creating and Managing an OIDC Identity Provider (AWS CLI, Tools for Windows PowerShell, and
IAM API) (p. 144)
•Obtaining the Thumbprint for an OpenID Connect Identity Provider (p. 145)
Creating and Managing an OIDC Provider (AWS Management Console)
Follow these instructions to create and manage an OIDC provider in the AWS Management Console.
To create an OIDC identity provider
1. Before you create an OIDC identity provider in IAM, you must register your application with the IdP
to receive a client ID. The client ID (also known as audience) is a unique identifier for your app that
is issued to you when you register your app with the IdP. For more information about obtaining a
client ID, see the documentation for your IdP.
2. Open the Identity and Access Management (IAM) console at https://console.aws.amazon.com/
iam/.
3. In the navigation pane, click Identity Providers, and then click Create Provider.
4. For Provider Type, click Choose a provider type, and then choose OpenID Connect.
5. For Provider URL, type the URL of the IdP. The URL must comply with these restrictions:
• The URL is case-sensitive.
• The URL must begin with https://
• The URL cannot include a colon (:) character, and therefore cannot specify a port number. This
means that the server must be listening on the default port 443.
• Within your AWS account, each OIDC identity provider must use a unique URL.
6. For Audience, type the client ID of the application that you registered with the IdP and received
in Step 1 (p. 143), and that will make requests to AWS. If you have additional client IDs (also
known as audiences) for this IdP, you can add them later on the provider detail page. Click Next
Step.
7. Use the Thumbprint to verify the server certificate of your IdP. To learn how, see Obtaining the
Thumbprint for an OpenID Connect Identity Provider (p. 145). Click Create.
8. In the confirmation message at the top of the screen, click Do this now to go to the Roles tab
to create a role for this identity provider. For more information about creating a role for an OIDC
identity provider, see Creating a Role for a Third-Party Identity Provider (Federation) (p. 180).
OIDC identity providers must have a role in order to access your AWS account. To skip this step
and create the role later, click Close.
143

AWS Identity and Access Management User Guide
Identity Providers and Federation
To add or remove a thumbprint or client ID (also known as audience) for an OIDC
identity provider
1. Open the Identity and Access Management (IAM) console at https://console.aws.amazon.com/
iam/.
2. In the navigation pane, click Identity Providers, then click the name of the identity provider that
you want to update.
3. To add a thumbprint or audience, click Add a Thumbprint or Add an Audience. To remove a
thumbprint or audience, click Remove next to the item that you want to remove.
Note
An OIDC identity provider must have at least 1 and can have a maximum of 5
thumbprints. An OIDC identity provider must have at least 1 and can have a maximum of
100 audiences.
When you are done, click Save Changes.
To delete an OIDC identity provider
1. Open the Identity and Access Management (IAM) console at https://console.aws.amazon.com/
iam/.
2. In the navigation pane, click Identity Providers.
3. Select the check box next to the identity provider that you want to delete.
4. Click Delete Providers.
Creating and Managing an OIDC Identity Provider (AWS CLI, Tools for Windows
PowerShell, and IAM API)
Use the following commands to create and manage an OIDC provider.
To create a new OIDC provider
• AWS CLI: aws iam create-open-id-connect-provider
• Tools for Windows PowerShell: New-IAMOpenIDConnectProvider
• IAM API: CreateOpenIDConnectProvider
To add a new client ID to an existing OIDC provider
• AWS CLI: aws iam add-client-id-to-open-id-connect-provider
• Tools for Windows PowerShell: Add-IAMClientIDToOpenIDConnectProvider
• IAM API: AddClientIDToOpenIDConnectProvider
To remove a client ID from an existing OIDC provider
• AWS CLI: aws iam remove-client-id-from-open-id-connect-provider
• Tools for Windows PowerShell: Remove-IAMClientIDToOpenIDConnectProvider
• IAM API: RemoveClientIDFromOpenIDConnectProvider
To update the list of server certificate thumbprints for an existing OIDC provider
• AWS CLI: aws iam update-open-id-connect-provider-thumbprint
• Tools for Windows PowerShell: Update-IAMOpenIDConnectProviderThumbprint
• IAM API: UpdateOpenIDConnectProviderThumbprint
144

AWS Identity and Access Management User Guide
Identity Providers and Federation
To get a list of all the OIDC providers in your AWS account
• AWS CLI: aws iam list-open-id-connect-providers
• Tools for Windows PowerShell: Get-IAMOpenIDConnectProviders
• IAM API: ListOpenIDConnectProviders
To get detailed information about an OIDC provider
• AWS CLI: aws iam get-open-id-connect-provider
• Tools for Windows PowerShellGet-IAMOpenIDConnectProvider:
• IAM API: GetOpenIDConnectProvider
To delete an OIDC provider
• AWS CLI: aws iam delete-open-id-connect-provider
• Tools for Windows PowerShell: Remove-IAMOpenIDConnectProvider
• IAM API: DeleteOpenIDConnectProvider
Obtaining the Thumbprint for an OpenID Connect Identity Provider
When you create an OpenID Connect (OIDC) identity provider (p. 143) in IAM, you must supply a
thumbprint for the identity provider (IdP). The thumbprint is a signature for the unique server certificate
that is used by the OIDC-compatible IdP. When you create an OIDC identity provider in IAM, you are
trusting identities authenticated by that IdP with access to your AWS account. By supplying the OIDC
IdP's thumbprint, you assert to AWS that you wish to trust a particular OIDC IdP with this access.
When you create an OIDC identity provider with the AWS Command Line Interface, the Tools for
Windows PowerShell, or the IAM API (p. 144), you must obtain the thumbprint manually and supply
it to AWS. When you create an OIDC identity provider with the IAM console (p. 143), the console
attempts to fetch the thumbprint for you. We recommend that you also obtain the thumbprint for your
OIDC IdP manually and verify that the thumbprint obtained by the IAM console matches the one you
expect for your OIDC provider.
You use a web browser and the OpenSSL command line tool to obtain the thumbprint for an OIDC
provider. For more information, see the following sections.
To obtain the thumbprint for an OIDC IdP
1. Before you can obtain the thumbprint for an OIDC IdP, you need to obtain the OpenSSL
command-line tool. You use this tool to download the OIDC IdP's certificate chain and produce
a thumbprint of the final certificate in the certificate chain. If you need to install and configure
OpenSSL, follow the instructions at Install OpenSSL (p. 147) and Configure OpenSSL (p. 147).
2. Start with the OIDC IdP's URL (for example, https://server.example.com), and then add
/.well-known/openid-configuration to form the URL for the IdP's configuration document,
like the following:
https://server.example.com/.well-known/openid-configuration
Open this URL in a web browser, replacing server.example.com with your IdP's server name.
3. In the document displayed in your web browser, find "jwks_uri". (Use your web browser's Find
feature to locate this text on the page.) Immediately following the text "jwks_uri" you will see a
colon (:) followed by a URL. Copy the fully qualified domain name of the URL. Do not include the
https:// or any path that comes after the top-level domain.
4. Use the OpenSSL command line tool to execute the following command. Replace
keys.example.com with the domain name you obtained in Step 3 (p. 145).
145
AWS Identity and Access Management User Guide
Identity Providers and Federation
openssl s_client -showcerts -connect keys.example.com:443
5. In your command window, scroll up until you see a certificate similar to the following example. If
you see more than one certificate, find the last certificate that is displayed (at the bottom of the
command output).
-----BEGIN CERTIFICATE-----
MIICiTCCAfICCQD6m7oRw0uXOjANBgkqhkiG9w0BAQUFADCBiDELMAkGA1UEBhMC
VVMxCzAJBgNVBAgTAldBMRAwDgYDVQQHEwdTZWF0dGxlMQ8wDQYDVQQKEwZBbWF6
b24xFDASBgNVBAsTC0lBTSBDb25zb2xlMRIwEAYDVQQDEwlUZXN0Q2lsYWMxHzAd
BgkqhkiG9w0BCQEWEG5vb25lQGFtYXpvbi5jb20wHhcNMTEwNDI1MjA0NTIxWhcN
MTIwNDI0MjA0NTIxWjCBiDELMAkGA1UEBhMCVVMxCzAJBgNVBAgTAldBMRAwDgYD
VQQHEwdTZWF0dGxlMQ8wDQYDVQQKEwZBbWF6b24xFDASBgNVBAsTC0lBTSBDb25z
b2xlMRIwEAYDVQQDEwlUZXN0Q2lsYWMxHzAdBgkqhkiG9w0BCQEWEG5vb25lQGFt
YXpvbi5jb20wgZ8wDQYJKoZIhvcNAQEBBQADgY0AMIGJAoGBAMaK0dn+a4GmWIWJ
21uUSfwfEvySWtC2XADZ4nB+BLYgVIk60CpiwsZ3G93vUEIO3IyNoH/f0wYK8m9T
rDHudUZg3qX4waLG5M43q7Wgc/MbQITxOUSQv7c7ugFFDzQGBzZswY6786m86gpE
Ibb3OhjZnzcvQAaRHhdlQWIMm2nrAgMBAAEwDQYJKoZIhvcNAQEFBQADgYEAtCu4
nUhVVxYUntneD9+h8Mg9q6q+auNKyExzyLwaxlAoo7TJHidbtS4J5iNmZgXL0Fkb
FFBjvSfpJIlJ00zbhNYS5f6GuoEDmFJl0ZxBHjJnyp378OD8uTs7fLvjx79LjSTb
NYiytVbZPQUQ5Yaxu2jXnimvw3rrszlaEXAMPLE=
-----END CERTIFICATE-----
Copy the certificate (including the -----BEGIN CERTIFICATE----- and -----END
CERTIFICATE----- lines) and paste it into a text file. Then save the file with the file name
certificate.crt.
6. Use the OpenSSL command-line tool to execute the following command.
openssl x509 -in certificate.crt -fingerprint -noout
Your command window displays the certificate thumbprint, which looks similar to the following
example:
SHA1
Fingerprint=99:0F:41:93:97:2F:2B:EC:F1:2D:DE:DA:52:37:F9:C9:52:F2:0D:9E
Remove the colon characters (:) from this string to produce the final thumbprint, like this:
990F4193972F2BECF12DDEDA5237F9C952F20D9E
7. If you are creating the IAM identity provider with the AWS CLI, Tools for Windows PowerShell, or
the IAM API, supply this thumbprint when creating the provider.
If you are creating the OIDC provider in the IAM console, compare this thumbprint to the
thumbprint that you see in the console on the Verify Provider Information page when creating an
OIDC provider.
Important
If the thumbprint you obtained does not match the one you see in the console, you should
not create the OIDC provider in IAM. Instead, you should wait a while and then try again
to create the OIDC provider, ensuring that the thumbprints match before you create the
provider. If the thumbprints still do not match after a second attempt, use the IAM Forum
to contact AWS.
146

AWS Identity and Access Management User Guide
Identity Providers and Federation
Install OpenSSL
If you don't already have OpenSSL installed, follow the instructions in this section.
To install OpenSSL on Linux or Unix
1. Go to OpenSSL: Source, Tarballs (http://www.openssl.org/source/).
2. Download the latest source and build the package.
To install OpenSSL on Windows
1. Go to OpenSSL: Binary Distributions (http://www.openssl.org/community/binaries.html).
2. Click OpenSSL for Windows to see a page with links to the Windows downloads.
3. If it is not already installed on your system, select the Microsoft Visual C++ 2008
Redistributables link appropriate for your environment and click Download. Follow the
instructions provided by the Microsoft Visual C++ 2008 Redistributable Setup Wizard.
Note
If you are not sure whetherf the Microsoft Visual C++ 2008 Redistributables is already
installed on your system, you can try installing OpenSSL first. The OpenSSL installer
displays an alert if the Microsoft Visual C++ 2008 Redistributables is not yet installed.
Make sure you install the architecture (32-bit or 64-bit) that matches the version of
OpenSSL that you install.
4. After you have installed the Microsoft Visual C++ 2008 Redistributables, select the appropriate
version of the OpenSSL binaries for your environment and save the file locally. Start the OpenSSL
Setup Wizard.
5. Follow the instructions described in the OpenSSL Setup Wizard.
Configure OpenSSL
Before you use OpenSSL commands, you must configure the operating system so that it has
information about the location where OpenSSL is installed.
To configure OpenSSL on Linux or Unix
1. At the command line, set the OpenSSL_HOME variable to the location of the OpenSSL installation:
export OpenSSL_HOME=path_to_your_OpenSSL_installation
2. Set the path to include the OpenSSL installation:
export PATH=$PATH:$OpenSSL_HOME/bin
Note
Any changes you make to environment variables with the export command are valid
only for the current session. You can make persistent changes to the environment
variables by setting them in your shell configuration file. For more information, see the
documentation for your operating system.
To configure OpenSSL on Windows
1. Open a Command Prompt window.
2. Set the OpenSSL_HOME variable to the location of the OpenSSL installation:
147

AWS Identity and Access Management User Guide
Identity Providers and Federation
set OpenSSL_HOME=path_to_your_OpenSSL_installation
3. Set the OpenSSL_CONF variable to the location of the configuration file in your OpenSSL
installation:
set OpenSSL_CONF=path_to_your_OpenSSL_installation\bin\openssl.cfg
4. Set the path to include the OpenSSL installation:
set Path=%Path%;%OpenSSL_HOME%\bin
Note
Any changes you make to Windows environment variables in a Command Prompt
window are valid only for the current command line session. You can make persistent
changes to the environment variables by setting them as system properties. The
exact procedures depends on what version of Windows you're using. (For example,
in Windows 7, open Control Panel, System and Security, System. Then choose
Advanced system settings, Advanced tab, Environment Variables.) For more
information, see the Windows documentation.
Creating SAML Identity Providers
A SAML 2.0 identity provider is an entity in IAM that describes an identity provider (IdP) service that
supports the SAML 2.0 (Security Assertion Markup Language 2.0) standard. You use a SAML identity
provider when you want to establish trust between an SAML-compatible IdP such as Shibboleth or
Active Directory Federation Services so that users in your organization can access AWS resources.
SAML identity providers in IAM are used as principals in an IAM trust policy.
For more information about this scenario, see About SAML 2.0-based Federation (p. 138).
You can create and manage a SAML identity provider in the AWS Management Console or with AWS
CLI, Tools for Windows PowerShell, or AWS API calls.
After you create a SAML provider, you must create one or more IAM roles. A role is an identity in AWS
that doesn't have its own credentials (as a user does) but is, in this context, dynamically assigned to a
federated user that is authenticated by your organization's identity provider (IdP). The role permits your
organization's IdP to request temporary security credentials for access to AWS. The policies assigned
to the role determine what the federated users are allowed to do in AWS. To create a role for SAML
federation, see Creating a Role for a Third-Party Identity Provider (Federation) (p. 180).
Finally, after you create the role, you complete the SAML trust by configure your IdP with information
about AWS and the role(s) that you want your federated users to use. This is referred to as configuring
relying party trust between your IdP and AWS. To configure relying party trust, see Configuring your
SAML 2.0 IdP with Relying Party Trust and Adding Claims (p. 150).
Topics
•Creating and Managing a SAML Identity Provider (AWS Management Console) (p. 149)
•Managing a SAML Provider (AWS CLI, Tools for Windows PowerShell and AWS API) (p. 149)
•Configuring your SAML 2.0 IdP with Relying Party Trust and Adding Claims (p. 150)
•Integrating Third-Party SAML Solution Providers with AWS (p. 150)
•Configuring SAML Assertions for the Authentication Response (p. 152)
148

AWS Identity and Access Management User Guide
Identity Providers and Federation
Creating and Managing a SAML Identity Provider (AWS Management Console)
You can use the AWS Management Console to create and delete SAML identity providers.
To create a SAML identity provider
1. Before you can create a SAML identity provider, you need the SAML metadata document that
you get from the IdP that includes the issuer's name, expiration information, and keys that can be
used to validate the SAML authentication response (assertions) that are received from the IdP.
To generate the metadata document, use the identity management software your organization
uses as its IdP. For instructions on how to configure many of the available IdPs to work with AWS,
including how to generate the required SAML metadata document, see Integrating Third-Party
SAML Solution Providers with AWS (p. 150).
2. Sign in to the Identity and Access Management (IAM) console at https://console.aws.amazon.com/
iam/.
3. In the navigation pane, click Identity Providers and then click Create Provider.
4. For Provider Type, click Choose a provider type and click SAML.
5. Type a name for the identity provider.
6. For Metadata Document, click Choose File, specify the SAML metadata document that you
downloaded in Step 1 (p. 149), and click Open. Click Next Step.
7. Verify the information you have provided, and click Create.
To delete a SAML provider
1. Sign in to the Identity and Access Management (IAM) console at https://console.aws.amazon.com/
iam/.
2. In the navigation pane, click Identity Providers.
3. Select the check box next to the identity provider that you want to delete.
4. Click Delete Providers.
Managing a SAML Provider (AWS CLI, Tools for Windows PowerShell and AWS API)
Use the following commands to create and manage a SAML provider.
To create an identity provider and upload a metadata document
• AWS CLI: aws iam create-saml-provider
• Tools for Windows PowerShell: New-IAMSAMLProvider
• AWS API: CreateSAMLProvider
To upload a new metadata document for an IdP
• AWS CLI: aws iam update-saml-provider
• Tools for Windows PowerShell: Update-IAMSAMLProvider
• AWS API: UpdateSAMLProvider
To get information about a specific provider, such as the ARN, creation date, and expiration
• AWS CLI: aws iam get-saml-provider
• Tools for Windows PowerShell: Get-IAMSAMLProvider
• AWS API: GetSAMLProvider
149

AWS Identity and Access Management User Guide
Identity Providers and Federation
To list information for all IdPs, such as the ARN, creation date, and expiration
• AWS CLI: aws iam list-saml-providers
• Tools for Windows PowerShell: Get-IAMSAMLProviders
• AWS API: ListSAMLProviders
To delete an IdP
• AWS CLI: aws iam delete-saml-provider
• Tools for Windows PowerShell: Remove-IAMSAMLProvider
• AWS API: DeleteSAMLProvider
Configuring your SAML 2.0 IdP with Relying Party Trust and Adding Claims
When you create a SAML provider and the role for SAML access in IAM, you are essentially telling
AWS about the identity provider (IdP) and what its users are allowed to do. Your next step is to then tell
the IdP about AWS as a service provider. This is called adding relying party trust between your IdP and
AWS. The exact process for adding relying party trust depends on what IdP you're using; for details,
see the documentation for your identity management software.
Many IdPs allow you to specify a URL from which the IdP can read an XML document
that contains relying party information and certificates. For AWS, you can use https://
signin.aws.amazon.com/static/saml-metadata.xml
If you can't specify a URL directly, then download the XML document from the preceding URL and
import it into your IdP software.
You also need to create appropriate claim rules in your IdP that specify AWS as a relying party. When
the IdP sends a SAML response to the AWS endpoint, it includes a SAML assertion that contains one
or more claims. A claim is information about the user and its groups. A claim rule maps that information
into SAML attributes. This lets you make sure that SAML authentication responses from your IdP
contain the necessary attributes that AWS uses in IAM policies to check permissions for federated
users. For more information, see the following topics:
•Overview of the Role to Allow SAML-Federated Access to Your AWS Resources (p. 140).
This topic discusses using SAML-specific keys in IAM policies and how to use them to restrict
permissions for SAML-federated users.
•Configuring SAML Assertions for the Authentication Response (p. 152). This topic discusses how
to configure SAML claims that include information about the user. The claims are bundled into a
SAML assertion and included in the SAML response that is sent to AWS. You must ensure that
the information needed by AWS policies is included in the SAML assertion in a form that AWS can
recognize and use.
•Integrating Third-Party SAML Solution Providers with AWS (p. 150). This topic provides links to
documentation provided by third-party organizations about how to integrate identity solutions with
AWS.
Integrating Third-Party SAML Solution Providers with AWS
The following links help you configure third-party SAML 2.0 identity provider solutions to work with
AWS federation.
Solution More information
Auth0 AWS Integration in Auth0 – This page on the Auth0
documentation website describes how to set up single sign-
150

AWS Identity and Access Management User Guide
Identity Providers and Federation
Solution More information
on (SSO) with the AWS Management Console and includes a
JavaScript example.
Bitium Configuring SAML for AWS – This article on the Bitium
support site explains how to use Bitium to set up Amazon
Web Services (AWS) with SAML SSO.
CA Technologies CA Security SSO Support for AWS – This page links to a
detailed runbook that provides a step-by-step process for
you to quickly include SAML-based, federated SSO in your
CA SiteMinder or CA CloudMinder SSO environment. Note:
registration is required.
Centrify Configure Centrify and Use SAML for SSO to AWS – This
page on the Centrify website explains how to configure
Centrify to use SAML for SSO to AWS.
CertiVox Configuring an AWS Service Provider – This page on the
CertiVox website explains how to configure an AWS service
provider for SSO authentication through your M-Pin SSO
system.
Clearlogin Amazon Web Services Setup – This article in the Clearlogin
Help Center explains how to set up SSO functionality
between Clearlogin and AWS.
Identacor Configuring SSO (SAML) for AWS – This article on the
Identacor website describes how to set up and enable SSO
for AWS.
Matrix42 MyWorkspace Getting Started Guide – This guide describes
how to integrate AWS identity services with Matrix42
MyWorkspace.
Microsoft Active Directory Federation
Services (AD FS) Enabling Federation to AWS using Windows Active Directory,
AD FS, and SAML 2.0 – This post on the AWS Security Blog
shows how to set up AD FS on an EC2 instance and enable
SAML federation with AWS.
PowerShell Automation to Give AWS Console Access – This
post on Sivaprasad Padisetty's blog describes how to use
Windows PowerShell to automate the process of setting
up Active Directory and AD FS as well as enabling SAML
federation with AWS.
miniOrange SSO for AWS – This page on the miniOrange website
describes how to establish secure access to AWS for
enterprises and full control over access of AWS applications.
Okta AWS AWS IAM Deployement Guide – From this page on the
Okta support site you can download a PDF file that describes
how to configure Okta for use with AWS.
OneLogin Configuring SAML Single-Role for AWS – This article in
the OneLogin Help Center explains how to set up SSO
functionality between OneLogin and AWS.
151

AWS Identity and Access Management User Guide
Identity Providers and Federation
Solution More information
Ping Identity PingFederate AWS Connector – From this page on the Ping
Identity website, you can download a PDF file that describes
how to configure a PingFederate server to enable SSO for
user accounts with AWS.
Configuring an SSO connection to AWS – This Ping Identity
page describes how to configure an SSO connection from
PingOne to AWS.
RadiantLogic Radiant Logic Technology Partners – Radiant Logic's
RadiantOne Federated Identity Service integrates with AWS
to provide an identity hub for SAML-based SSO.
Salesforce.com How to configure SSO from Salesforce to AWS – This how-to
article on the Salesforce.com developer site describes how to
set up an identity provider (IdP) in Salesforce and configure
AWS as a service provider.
SecureAuth AWS - SecureAuth SAML SSO – This article on the
SecureAuth website describes how to set up SAML
integration with AWS for a SecureAuth appliance.
Shibboleth How to use Shibboleth for SSO to the AWS Management
Console – This entry on the AWS Security Blog provides
a step-by-step tutorial on how to set up Shibboleth and
configure it as an identity provider for AWS.
For more details, see the IAM Partners page on the AWS website.
Configuring SAML Assertions for the Authentication Response
In your organization, after a user's identity has been verified, the IdP sends an authentication response
to the AWS SAML endpoint at https://signin.aws.amazon.com/saml. This response is a
POST request that includes a SAML token that adheres to the HTTP POST Binding for SAML 2.0
standard and that contains the following elements, or claims. You configure these claims in your
SAML-compatible IdP. Refer to the documenation for your IdP for instructions on how to enter these
claims.
When the IdP sends the response containing the claims to AWS, many of the incoming claims map
to AWS context keys that can be checked in IAM policies using the Condition element. A listing of
the available mappings follows in the section Mapping SAML Attributes to AWS Trust Policy Context
Keys (p. 154).
Subject and NameID
The following excerpt shows an example. Substitute your own values for the marked ones. The
value of the Recipient attribute inside the SubjectConfirmationData element must match
the AWS endpoint (https://signin.aws.amazon.com/saml), as shown in the following
example.
<Subject>
<NameID Format="urn:oasis:names:tc:SAML:2.0:nameid-
format:persistent">_cbb88bf52c2510eabe00c1642d4643f41430fe25e3</NameID>
<SubjectConfirmation Method="urn:oasis:names:tc:SAML:2.0:cm:bearer">
<SubjectConfirmationData NotOnOrAfter="2013-11-05T02:06:42.876Z"
Recipient="https://signin.aws.amazon.com/saml"/>
</SubjectConfirmation>
152

AWS Identity and Access Management User Guide
Identity Providers and Federation
</Subject>
AudienceRestriction and Audience
For security reasons, AWS must be included as an audience in the SAML assertion your IdP
sends to AWS. Therefore, the value of the Audience element must match one of the following
two values, either https://signin.aws.amazon.com/saml or urn:amazon:webservices.
AWS tests and enforces this value automatically. The following sample XML snippet from a SAML
assertion shows how this key can be specified by the IdP and shows both valid values; you only
need to include one.
<Conditions>
<AudienceRestriction>
<Audience>https://signin.aws.amazon.com/saml</Audience>
<Audience>urn:amazon:webservices</Audience>
</AudienceRestriction>
</Conditions>
Important
The SAML AudienceRestriction value in the SAML assertion from the IdP does
not map to the saml:aud context key that you can test in an IAM policy. Instead, the
saml:aud context key comes from the SAML recipient attribute because it is the SAML
equivalent to the OIDC audience field, for example, by accounts.google.com:aud.
An Attribute element with the Name attribute set to https://aws.amazon.com/SAML/
Attributes/Role
This element contains one or more AttributeValue elements that list the IAM role and
SAML identity provider to which the user is mapped by your IdP. The role and identity provider
are specified as a comma-delimited pair of ARNs in the same format as the RoleArn and
PrincipalArn parameters that are passed to AssumeRoleWithSAML. This element must contain
at least one role-provider pair—that is, at least one AttributeValue element—and can contain
multiple pairs. If the element contains multiple pairs, then the user is asked to select which role to
assume when he or she uses WebSSO to sign into the AWS Management Console.
Important
The value of the Name attribute in the Attribute tag is case-sensitive. It must be set to
https://aws.amazon.com/SAML/Attributes/Role exactly.
<Attribute Name="https://aws.amazon.com/SAML/Attributes/Role">
<AttributeValue>arn:aws:iam::account-number:role/role-
name1,arn:aws:iam::account-number:saml-provider/provider-name</
AttributeValue>
<AttributeValue>arn:aws:iam::account-number:role/role-
name2,arn:aws:iam::account-number:saml-provider/provider-name</
AttributeValue>
<AttributeValue>arn:aws:iam::account-number:role/role-
name3,arn:aws:iam::account-number:saml-provider/provider-name</
AttributeValue>
</Attribute>
An Attribute element with the Name attribute set to https://aws.amazon.com/SAML/
Attributes/RoleSessionName
This element contains one AttributeValue element that provides an identifier for the AWS
temporary credentials that are issued for SSO and is used to display user information in the AWS
Management Console. The value in the AttributeValue element must be between 2 and
64 characters long, can contain only alphanumeric characters, underscores, and the following
characters: + (plus sign), = (equals sign), , (comma), . (period), @ (at symbol), and - (hyphen).
It cannot contain spaces. The value is typically a user ID (bobsmith) or an email address
153

AWS Identity and Access Management User Guide
Identity Providers and Federation
(bobsmith@example.com). It should not be a value that includes a space, like a user's display
name (Bob Smith).
Important
The value of the Name attribute in the Attribute tag is case-sensitive. It must be set to
https://aws.amazon.com/SAML/Attributes/RoleSessionName exactly.
<Attribute Name="https://aws.amazon.com/SAML/Attributes/RoleSessionName">
<AttributeValue>user-id-name</AttributeValue>
</Attribute>
An optional Attribute element with the SessionDuration attribute set to https://
aws.amazon.com/SAML/Attributes/SessionDuration
This element contains one AttributeValue element that specifies the maximum time that
the user can access the AWS Management Console before having to request new temporary
credentials. The value is an integer representing the number of seconds, and can be a maximum
of 43200 seconds (12 hours). If this attribute is not present, then the maximum session
duration defaults to one hour (the default value of the DurationSeconds parameter of the
AssumeRoleWithSAML API). To use this attribute, you must configure the SAML provider to
provide single sign-on access to the AWS Management Console through the console sign-in web
endpoint at https://signin.aws.amazon.com/saml. Note that this attribute extends sessions
only to the AWS Management Console. It cannot extend the lifetime of other credentials. However,
if it is present in an AssumeRoleWithSAML API call, it can be used to shorten the lifetime of the
credentials returned by the call to less than the default of 60 minutes.
Note, too, that if a SessionNotOnOrAfter attribute is also defined, then the lesser value of the
two attributes, SessionDuration or SessionNotOnOrAfter, establishes the maximum duration
of the console session.
When you enable console sessions with an extended duration the risk of compromise of the
credentials rises. To help you mitigate this risk, you can immediately disable the active console
sessions for any role by choosing Revoke Sessions on the Role Summary page in the IAM
console. For more information, see Revoking IAM Role Temporary Security Credentials (p. 207).
Important
The value of the Name attribute in the Attribute tag is case-sensitive. It must be set to
https://aws.amazon.com/SAML/Attributes/SessionDuration exactly.
<Attribute Name="https://aws.amazon.com/SAML/Attributes/SessionDuration">
<AttributeValue>7200</AttributeValue>
</Attribute>
Mapping SAML Attributes to AWS Trust Policy Context Keys
The tables in this section list commonly used SAML attributes and how they map to trust policy
condition context keys in AWS. You can use these keys to control access to a role by evaluating them
against the values included in the assertions that accompany a SAML request to access a role.
Important
These keys are available only in IAM trust policies (policies that determine who can assume a
role) and are not applicable to permissions policies.
In the eduPerson and eduOrg attributes table, values are typed either as strings or as lists of strings.
For string values, you can test these values in IAM trust policies using StringEquals or StringLike
conditions. For values that contain a list of strings, you can use the ForAnyValue and ForAllValues
policy set operators (p. 377) to test the values in trust policies.
Note
You should include only one claim per AWS context key. If you include more than one, only
one claim will be mapped.
154

AWS Identity and Access Management User Guide
Identity Providers and Federation
eduPerson and eduOrg Attributes
eduPerson or eduOrg attribute Maps to this AWS
context key Type
urn:oid:1.3.6.1.4.1.5923.1.1.1.1 eduPersonAffiliation List of strings
urn:oid:1.3.6.1.4.1.5923.1.1.1.2 eduPersonNickname List of strings
urn:oid:1.3.6.1.4.1.5923.1.1.1.3 eduPersonOrgDN String
urn:oid:1.3.6.1.4.1.5923.1.1.1.4 eduPersonOrgUnitDN List of strings
urn:oid:1.3.6.1.4.1.5923.1.1.1.5 eduPersonPrimaryAffiliationString
urn:oid:1.3.6.1.4.1.5923.1.1.1.6 eduPersonPrincipalNameString
urn:oid:1.3.6.1.4.1.5923.1.1.1.7 eduPersonEntitlement List of strings
urn:oid:1.3.6.1.4.1.5923.1.1.1.8 eduPersonPrimaryOrgUnitDNString
urn:oid:1.3.6.1.4.1.5923.1.1.1.9 eduPersonScopedAffiliationList of strings
urn:oid:1.3.6.1.4.1.5923.1.1.1.10 eduPersonTargetedID List of strings
urn:oid:1.3.6.1.4.1.5923.1.1.1.11 eduPersonAssurance List of strings
urn:oid:1.3.6.1.4.1.5923.1.2.1.2 eduOrgHomePageURI List of strings
urn:oid:1.3.6.1.4.1.5923.1.2.1.3 eduOrgIdentityAuthNPolicyURIList of strings
urn:oid:1.3.6.1.4.1.5923.1.2.1.4 eduOrgLegalName List of strings
urn:oid:1.3.6.1.4.1.5923.1.2.1.5 eduOrgSuperiorURI List of strings
urn:oid:1.3.6.1.4.1.5923.1.2.1.6 eduOrgWhitePagesURI List of strings
urn:oid:2.5.4.3 cn List of strings
Active Directory Attributes
AD attribute Maps to this AWS
context key Type
http://schemas.xmlsoap.org/ws/2005/05/
identity/claims/name
name String
http://schemas.xmlsoap.org/claims/
CommonName
commonName String
http://schemas.xmlsoap.org/ws/2005/05/
identity/claims/givenname
givenName String
http://schemas.xmlsoap.org/ws/2005/05/
identity/claims/surname
surname String
http://schemas.xmlsoap.org/ws/2005/05/
identity/claims/emailaddress
mail String
http://schemas.microsoft.com/ws/2008/06/
identity/claims/primarygroupsid
uid String
155

AWS Identity and Access Management User Guide
Identity Providers and Federation
X.500 Attributes
X.500 Attribute Maps to this AWS context
key Type
2.5.4.3 commonName String
2.5.4.4 surname String
2.4.5.42 givenName String
2.5.4.45 x500UniqueIdentifier String
0.9.2342.19200300100.1.1 uid String
0.9.2342.19200300100.1.3 mail String
0.9.2342.19200300.100.1.45 organizationStatus String
Enabling SAML 2.0 Federated Users to Access the AWS
Management Console
You can use a role to configure your SAML 2.0-compliant IdP and AWS to permit your federated users
to access the AWS Management Console. The role grants the user permissions to carry out tasks in
the console. If instead you want to give SAML federated users other ways to access AWS, see one of
these topics:
• AWS CLI: Switching to an IAM Role (AWS Command Line Interface) (p. 197)
• Tools for Windows PowerShell: Switching to an IAM Role (Tools for Windows PowerShell) (p. 199)
• AWS API : Switching to an IAM Role (API) (p. 200)
Overview
The following diagram illustrates the flow for SAML-enabled single sign-on.
Note
This specific use of SAML differs from the more general one illustrated at About SAML 2.0-
based Federation (p. 138) because this workflow opens the AWS Management Console on
behalf of the user. This requires the use of the AWS SSO endpoint instead of directly calling
the AssumeRoleWithSAML API. The endpoint calls the API for the user and returns a URL
that automatically redirects the user's browser to the AWS Management Console.
156
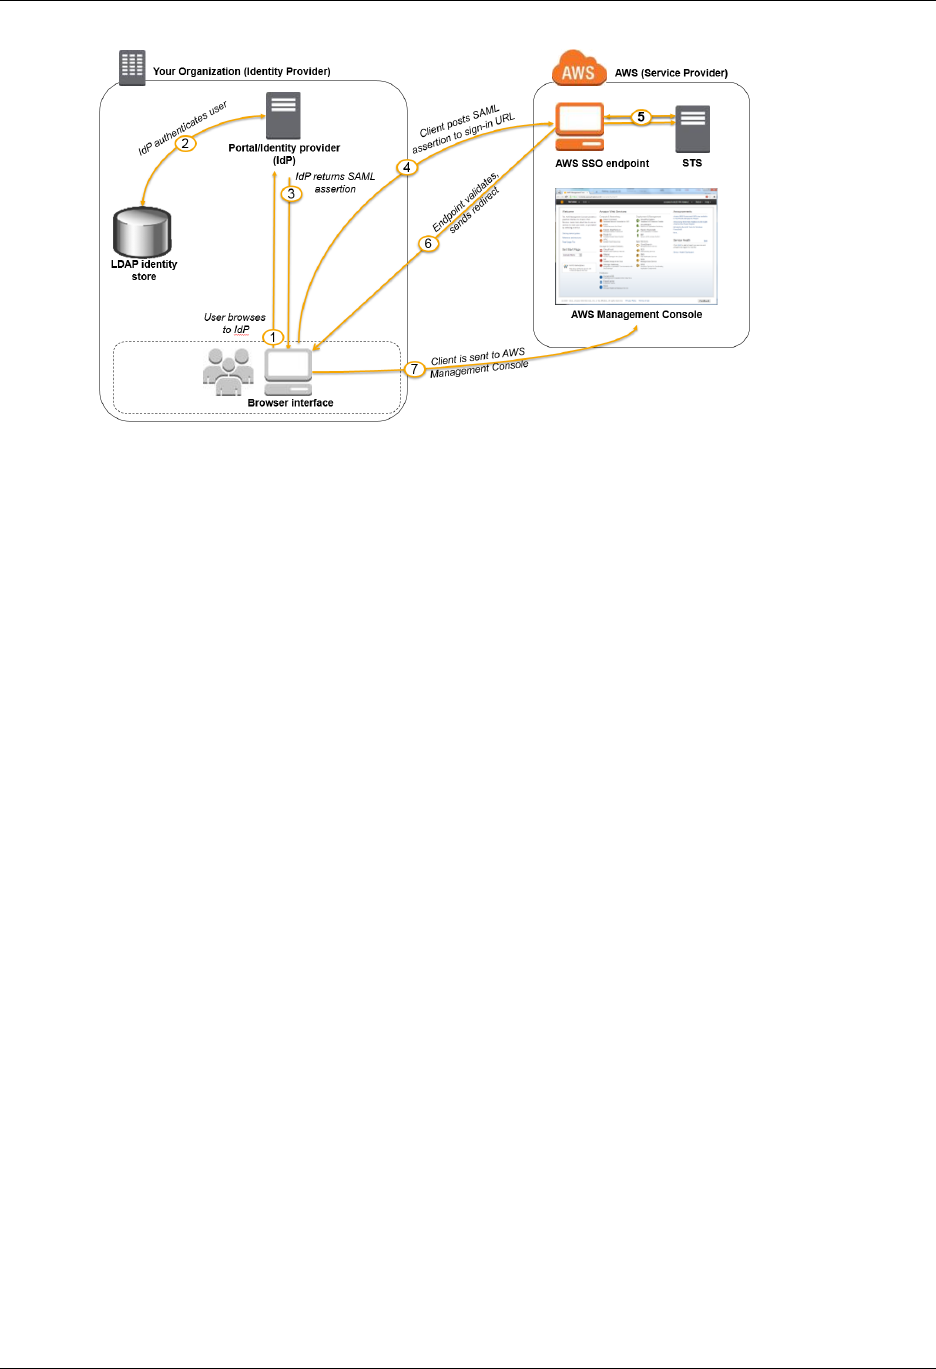
AWS Identity and Access Management User Guide
Identity Providers and Federation
The diagram illustrates the following steps:
1. The user browses to your organization's portal and selects the option to go to the AWS Management
Console. In your organization, the portal is typically a function of your identity provider (IdP)
that handles the exchange of trust between your organization and AWS. For example, in Active
Directory Federation Services, the portal URL is: https://ADFSServiceName/adfs/ls/
IdpInitiatedSignOn.aspx
2. The portal verifies the user's identity in your organization.
3. The portal generates a SAML authentication response that includes assertions that identify the user
and include attributes about the user. You can also configure your IdP to include a SAML assertion
attribute called SessionDuration that specifies how long the console session is valid. The portal
sends this response to the client browser.
4. The client browser is redirected to the AWS single sign-on endpoint and posts the SAML assertion.
5. The endpoint requests temporary security credentials on behalf of the user and creates a console
sign-in URL that uses those credentials.
6. AWS sends the sign-in URL back to the client as a redirect.
7. The client browser is redirected to the AWS Management Console. If the SAML authentication
response includes attributes that map to multiple IAM roles, the user is first prompted to select the
role to use for access to the console.
From the user's perspective, the process happens transparently: The user starts at your organization's
internal portal and ends up at the AWS Management Console, without ever having to supply any AWS
credentials.
Consult the following sections for an overview of how to configure this behavior along with links to
detailed steps.
Configure your network as a SAML provider for AWS
Inside your organization's network, you configure your identity store (such as Windows Active
Directory) to work with a SAML-based identity provider (IdP) like Windows Active Directory Federation
Services, Shibboleth, etc. Using your IdP, you generate a metadata document that describes
your organization as an identity provider and includes authentication keys. You also configure
your organization's portal to route user requests for the AWS Management Console to the AWS
SAML endpoint for authentication using SAML assertions. How you configure your IdP to produce
the metadata.xml file depends on your IdP. Refer to your IdP's documentation for instructions,
or see Integrating Third-Party SAML Solution Providers with AWS (p. 150) for links to the web
documentation for many of the SAML providers supported.
157

AWS Identity and Access Management User Guide
Identity Providers and Federation
Create a SAML provider in IAM
Next, you sign in to the AWS Management Console and go to the IAM console. There you create a
new SAML provider, which is an entity in IAM that holds information about your organization's identity
provider. As part of this process, you upload the metadata document produced by the IdP software in
your organization in the previous section. For details, see Creating SAML Identity Providers (p. 148).
Configure permissions in AWS for your federated users
The next step is to create an IAM role that establishes a trust relationship between IAM and your
organization's IdP that identities your IdP as a principal (trusted entity) for purposes of federation.
The role also defines what users authenticated by your organization's IdP are allowed to do in AWS.
You can use the IAM console to create this role. When you create the trust policy that indicates who
can assume the role, you specify the SAML provider that you created earlier in IAM along with one or
more SAML attributes that a user must match to be allowed to assume the role. For example, you can
specify that only users whose SAML eduPersonOrgDN value is ExampleOrg are allowed to sign in.
The role wizard automatically adds a condition to test the saml:aud attribute to make sure that the
role is assumed only for sign-in to the AWS Management Console. The trust policy for the role might
look like this:
{
"Version": "2012-10-17",
"Statement": [{
"Effect": "Allow",
"Principal": {"Federated": "arn:aws:iam::ACCOUNT-ID-WITHOUT-HYPHENS:saml-
provider/ExampleOrgSSOProvider"},
"Action": "sts:AssumeRoleWithSAML",
"Condition": {"StringEquals": {
"saml:edupersonorgdn": "ExampleOrg",
"saml:aud": "https://signin.aws.amazon.com/saml"
}}
}]
}
For the access policy (p. 250) in the role, you specify permissions as you would for any role, user, or
group. For example, if users from your organization are allowed to administer Amazon EC2 instances,
you explicitly allow Amazon EC2 actions in the access policy. You can do this by assigning a managed
policy (p. 280), such as the Amazon EC2 Full Access managed policy.
For details about creating a role for a SAML IdP, see Creating a Role for SAML 2.0 Federation (AWS
Management Console) (p. 186).
Finish configuring the SAML IdP and create assertions for the SAML authentication
response
After you create the role, inform your SAML IdP about AWS as a service provider by installing the
saml-metadata.xml file found at https://signin.aws.amazon.com/static/saml-metadata.xml. How you
install that file depends on your IdP. Some providers give you the option to type the URL, whereupon
the IdP gets and installs the file for you. Others require you to download the file from the URL and
then provide it as a local file. Refer to your IdP documentation for details, or see Integrating Third-
Party SAML Solution Providers with AWS (p. 150) for links to the web documentation for many of the
supported SAML providers.
You also configure the information that you want the IdP to pass as SAML attributes to AWS as part
of the authentication response. Most of this information appears in AWS as condition context keys that
you can evaluate in your policies to ensure that only authorized users in the right contexts are granted
permissions to access your AWS resources. You can specify time windows that restrict when the
console may be used and the maximum time (up to 12 hours) that users can access the console before
158

AWS Identity and Access Management User Guide
Identity Providers and Federation
having to refresh their credentials. For details, see Configuring SAML Assertions for the Authentication
Response (p. 152).
Creating a URL that Enables Federated Users to Access
the AWS Management Console (Custom Federation
Broker)
You can write and run code to create a URL that lets users who sign in to your organization's network
securely access the AWS Management Console. The URL includes a sign-in token that you get from
AWS and that authenticates the user to AWS.
Note
If your organization uses an identity provider (IdP) that is compatible with SAML, such as
Microsoft's Active Directory Federation Services or open-source Shibboleth, you can set up
access to the AWS Management Console without writing code. For details, see Enabling
SAML 2.0 Federated Users to Access the AWS Management Console (p. 156).
To enable your organization's users to access the AWS Management Console, you can create a
custom "identity broker" that performs the following steps:
1. Verify that the user is authenticated by your local identity system.
2. Call the AWS Security Token Service (AWS STS) AssumeRole (recommended) or
GetFederationToken APIs to obtain temporary security credentials for the user. The credentials
are associated with a role with permissions that control what the user can do. These credentials
have a maximum duration as specified in the DurationSeconds parameter of the AssumeRole or
GetFederationToken API call used to generate them.
Important
If you use the AssumeRole API, you must call it as an IAM user with long-term credentials.
The call to the federation endpoint in step 3 works only if the temporary credentials are
requested by an IAM user with long-term credentials. If the temporary credentials are
requested by an IAM assumed-role user with a different set of temporary credentials, then
the call to the federation endpoint fails.
3. Call the AWS federation endpoint and supply the temporary security credentials to request a sign-in
token.
• If you used one of the AssumeRole* APIs to get the temporary security credentials, then this
request to the AWS federation endpoint can include the HTTP parameter SessionDuration to
specify how long the federated consoled session is valid, up to a maximum of 12 hours.
• If you instead used the GetFederationToken API to get the credentials, then you don't need the
SessionDuration HTTP parameter because the temporary credentials are already valid for up
to 36 hours and specify the maximum length of the federated console session.
4. Construct a URL for the console that includes the token.
5. Give the URL to the user or invoke the URL on the user's behalf.
The URL that the federation endpoint provides is valid for 15 minutes after it is created. The temporary
security credentials associated with the URL are valid for the duration you specified when you created
them, starting from the time they were created.
Important
Keep in mind that the URL grants access to your AWS resources through the AWS
Management Console to the extent that you have enabled permissions in the associated
temporary security credentials. For this reason, you should treat the URL as a secret. We
recommend returning the URL through a secure redirect, for example, by using a 302 HTTP
response status code over an SSL connection. For more information about the 302 HTTP
response status code, go to RFC 2616, section 10.3.3.
159

AWS Identity and Access Management User Guide
Identity Providers and Federation
To view a sample application that shows you how you can implement a single sign-on solution, go to
AWS Management Console federation proxy sample use case in the AWS Sample Code & Libraries.
To complete these tasks, you can use the HTTPS Query API for AWS Identity and Access
Management (IAM) and the AWS Security Token Service (AWS STS). Or, you can use programming
languages, such as Java, Ruby, or C#, along with the appropriate AWS SDK. Each of these methods is
described in the following sections.
Topics
•Example Code Using IAM Query APIs (p. 160)
•Example Code Using Python (p. 162)
•Example Code Using Java (p. 164)
•Example Showing How to Construct the URL (Ruby) (p. 165)
Example Code Using IAM Query APIs
You can construct a URL that gives your federated users direct access to the AWS Management
Console. This task uses the IAM and AWS STS HTTPS Query API. For more information about making
query requests, see Making Query Requests.
Note
The following procedure contains examples of text strings. To enhance readability, line breaks
have been added to some of the longer examples. When you create these strings for your
own use, you should omit any line breaks.
To give a federated user access to your resources from the AWS Management Console
1. Authenticate the user in your identity and authorization system.
2. Obtain temporary security credentials for the user. The temporary credentials consist of an access
key ID, a secret access key, and a security token. For more information about creating temporary
credentials, see Temporary Security Credentials (p. 218).
To get temporary credentials, you call either the AWS STS AssumeRole API (recommended) or
the GetFederationToken API. For more information about the differences between these APIs, see
Understanding the API options for securely delegating access to your AWS account
Important
• When you create temporary security credentials, you must specify the permissions
the credentials grants to the user who holds them. For any of the APIs that begin with
AssumeRole*, you use an IAM role to assign permissions. For the other APIs, the
mechanism varies with the API. For more details, see Controlling Permissions for
Temporary Security Credentials (p. 233).
• If you use the AssumeRole API, you must call it as an IAM user with long-term
credentials. The call to the federation endpoint in step 3 works only if the temporary
credentials are requested by an IAM user with long-term credentials. If the temporary
credentials are requested by an IAM assumed-role user with a different set of
temporary credentials, then the call to the federation endpoint fails.
3. After you obtain the temporary security credentials, build them into a JSON "session" string to
exchange them for a sign-in token. The following example shows how to encode the credentials.
You replace the placeholder text with the appropriate values from the credentials that you receive
in the previous step.
{"sessionId":"*** temporary access key ID ***",
"sessionKey":"*** temporary secret access key ***",
"sessionToken":"*** security token ***"}
160

AWS Identity and Access Management User Guide
Identity Providers and Federation
4. URL encode the session string from the previous step. Because the information that you are
encoding is sensitive, we recommend that you avoid using a web service for this encoding.
Instead, use a locally installed function or feature in your development toolkit to securely encode
this information, such as the urllib.quote_plus function in Python, the URLEncoder.encode
function in Java, or the CGI.escape function in Ruby, as shown in the examples later in this topic.
5. Send your request to the AWS federation endpoint at the following address:
https://signin.aws.amazon.com/federation
The request must include the Action and Session parameters, and (optionally) if you used
AssumeRole, a SessionDuration HTTP parameter as shown in the following example.
Action = getSigninToken
SessionDuration = time in seconds
Session = *** the URL encoded JSON string created in steps 3 & 4 ***
The SessionDuration parameter specifies the number of seconds that the credentials for the
console session are valid. This is separate from the duration of the temporary credentials. You can
specify a SessionDuration maximum value of 43200 (12 hours). If the parameter is missing,
then the session defaults to the duration of the credentials you retrieved from AWS STS in step
2 (which defaults to one hour). See the documentation for the AssumeRole API for details about
how to specify duration using the DurationSeconds parameter. The ability to create a console
session that is longer than one hour is intrinsic to the getSigninToken action of the federation
endpoint. You cannot use the IAM or STS APIs to get credentials that are valid for longer than one
hour (3600 seconds).
Note
You do not need the SessionDuration HTTP parameter if you got the temporary
credentials with GetFederationToken, because the console session can be as long as
the temporary credentials are valid (up to 36 hours).
When you enable console sessions with an extended duration the risk of compromise of the
credentials rises. To help you mitigate this risk, you can immediately disable the active console
sessions for any role by choosing Revoke Sessions on the Role Summary page in the IAM
console. For more information, see Revoking IAM Role Temporary Security Credentials (p. 207).
The following is an example of what your request might look like. The lines are wrapped here for
readability, but you should submit it as a one-line string.
https://signin.aws.amazon.com/federation
?Action=getSigninToken
&SessionDuration=43200
&Session=%7B%22sessionId%22%3A%22ASIAEXAMPLEMDLUUAEYQ%22%2C%22sessionKey
%22
%3A%22tpSl9thxr2PkEXAMPLETAnVLVGdwC5zXtGDr%2FqWi%22%2C%22sessionToken
%22%3A
%22AQoDYXdzEXAMPLE4BrM96BJ7btBQRrAcCjQIbg55555555OBT7y8h2YJ7woJkRzsLpJBpklC
qPXxS2AjRorJAm%2BsBtv1YXlZF%2FfHljgORxOevE388GdGaKRfO9W4DxK4HU0fIpwL
%2BQ7oX
2Fj%2BJa%2FAb5u0cL%2BzI1P5rJuDzH%2F0pWEiYfiWXXH20rWruXVXpIIO%2FPhMHlV3Jw
%2B
gDc4ZJ0WItuLPsuyP7BVUXWLcAVyTFbxyLy36FBSXF1z8a
%2FvJN7utcj0mJRGIiIZSV7FQuepa
WP5YARYMrOUMqBB3v308LKBU8Z0xYe2%2FqthrLXf1nX0njbU%2FJTrct
%2BEdG9PRb3907qa5n
VbnnnxdVQJ3mPgQchAZpDI9LsDDbGsa67JHUyFYnyUUUkMRfe7G70gjvbz9gQ%EXAMPLE
161

AWS Identity and Access Management User Guide
Identity Providers and Federation
The response from the federation endpoint is a JSON document with an SigninToken value. It
will look similar to the following example.
{"SigninToken":"*** the SigninToken string ***"}
6. Finally, create the URL that your federated users can use to access the AWS Management
Console. The URL is the same federation URL endpoint that you used in Step 5 (p. 161), plus
the following parameters:
?Action = login
&Issuer = *** the form-urlencoded URL for your internal sign-in page ***
&Destination = *** the form-urlencoded URL to the desired AWS console page
***
&SigninToken = *** the value of SigninToken received in the previous step
***
The following example shows what the final URL might look like. The URL is valid for 15 minutes
from the time it is created. The temporary security credentials and console session embedded
within the URL are valid for the duration you specify in the SessionDuration parameter when
you initially request them.
https://signin.aws.amazon.com/federation
?Action=login
&Issuer=https%3A%2F%2Fexample.com
&Destination=https%3A%2F%2Fconsole.aws.amazon.com%2Fs
&SigninToken=VCQgs5qZZt3Q6fn8Tr5EXAMPLEmLnwB7JjUc-SHwnUUWabcRdnWsi4DBn-dvC
CZ85wrD0nmldUcZEXAMPLE-vXYH4Q__mleuF_W2BE5HYexbe9y4Of-
kje53SsjNNecATfjIzpW1
WibbnH6YcYRiBoffZBGExbEXAMPLE5aiKX4THWjQKC6gg6alHu6JFrnOJoK3dtP6I9a6hi6yPgm
iOkPZMmNGmhsvVxetKzr8mx3pxhHbMEXAMPLETv1pij0rok3IyCR2YVcIjqwfWv32HU2Xlj471u
3fU6uOfUComeKiqTGX974xzJOZbdmX_t_lLrhEXAMPLEDDIisSnyHGw2xaZZqudm4mo2uTDk9Pv
9l5K0ZCqIgEXAMPLEcA6tgLPykEWGUyH6BdSC6166n4M4JkXIQgac7_7821YqixsNxZ6rsrpzwf
nQoS14O7R0eJCCJ684EXAMPLEZRdBNnuLbUYpz2Iw3vIN0tQgOujwnwydPscM9F7foaEK3jwMkg
Apeb1-6L_OB12MZhuFxx55555EXAMPLEhyETEd4ZulKPdXHkgl6T9ZkIlHz2Uy1RUTUhhUxNtSQ
nWc5xkbBoEcXqpoSIeK7yhje9Vzhd61AEXAMPLElbWeouACEMG6-
Vd3dAgFYd6i5FYoyFrZLWvm
0LSG7RyYKeYN5VIzUk3YWQpyjP0RiT5KUrsUi-NEXAMPLExMOMdoODBEgKQsk-
iu2ozh6r8bxwC
RNhujg
Example Code Using Python
The following example shows how to use Python to programmatically construct a URL that gives
federated users direct access to the AWS Management Console. The example uses the AWS SDK for
Python (Boto).
The code uses the AssumeRole API to obtain temporary security credentials.
import urllib, json
import requests # 'pip install requests'
from boto.sts import STSConnection # AWS SDK for Python (Boto) 'pip install
boto'
# Step 1: Authenticate user in your own identity system.
162

AWS Identity and Access Management User Guide
Identity Providers and Federation
# Step 2: Using the access keys for an IAM user in your AWS account,
# call "AssumeRole" to get temporary access keys for the federated user
# Note: Calls to AWS STS AssumeRole must be signed using the access key ID
# and secret access key of an IAM user or using existing temporary
credentials.
# The credentials can be in EC2 instance metadata, in environment variables,
# or in a configuration file, and will be discovered automatically by the
# STSConnection() function. For more information, see the Python SDK docs:
# http://boto.readthedocs.org/en/latest/boto_config_tut.html
sts_connection = STSConnection()
assumed_role_object = sts_connection.assume_role(
role_arn="arn:aws:iam::ACCOUNT-ID-WITHOUT-HYPHENS:role/ROLE-NAME",
role_session_name="AssumeRoleSession"
)
# Step 3: Format resulting temporary credentials into JSON
json_string_with_temp_credentials = '{'
json_string_with_temp_credentials += '"sessionId":"' +
assumed_role_object.credentials.access_key + '",'
json_string_with_temp_credentials += '"sessionKey":"' +
assumed_role_object.credentials.secret_key + '",'
json_string_with_temp_credentials += '"sessionToken":"' +
assumed_role_object.credentials.session_token + '"'
json_string_with_temp_credentials += '}'
# Step 4. Make request to AWS federation endpoint to get sign-in token.
Construct the parameter string with
# the sign-in action request, a 12-hour session duration, and the JSON
document with temporary credentials
# as parameters.
request_parameters = "?Action=getSigninToken"
request_parameters += "&SessionDuration=43200"
request_parameters += "&Session=" +
urllib.quote_plus(json_string_with_temp_credentials)
request_url = "https://signin.aws.amazon.com/federation" + request_parameters
r = requests.get(request_url)
# Returns a JSON document with a single element named SigninToken.
signin_token = json.loads(r.text)
# Step 5: Create URL where users can use the sign-in token to sign in to
# the console. This URL must be used within 15 minutes after the
# sign-in token was issued.
request_parameters = "?Action=login"
request_parameters += "&Issuer=Example.org"
request_parameters += "&Destination=" + urllib.quote_plus("https://
console.aws.amazon.com/")
request_parameters += "&SigninToken=" + signin_token["SigninToken"]
request_url = "https://signin.aws.amazon.com/federation" + request_parameters
# Send final URL to stdout
print request_url
163

AWS Identity and Access Management User Guide
Identity Providers and Federation
Example Code Using Java
The following example shows how to use Java to programmatically construct a URL that gives
federated users direct access to the AWS Management Console. The following code snippet uses the
AWS SDK for Java.
import java.net.URLEncoder;
import java.net.URL;
import java.net.URLConnection;
import java.io.BufferedReader;
import java.io.InputStreamReader;
// Available at http://www.json.org/java/index.html
import org.json.JSONObject;
import com.amazonaws.auth.AWSCredentials;
import com.amazonaws.auth.BasicAWSCredentials;
import com.amazonaws.services.securitytoken.AWSSecurityTokenServiceClient;
import com.amazonaws.services.securitytoken.model.Credentials;
import com.amazonaws.services.securitytoken.model.GetFederationTokenRequest;
import com.amazonaws.services.securitytoken.model.GetFederationTokenResult;
/* Calls to AWS STS APIs must be signed using the access key ID
and secret access key of an IAM user or using existing temporary
credentials. The credentials should not be embedded in code. For
this example, the code looks for the credentials in a
standard configuration file.
*/
AWSCredentials credentials =
new PropertiesCredentials(
AwsConsoleApp.class.getResourceAsStream("AwsCredentials.properties"));
AWSSecurityTokenServiceClient stsClient =
new AWSSecurityTokenServiceClient(credentials);
GetFederationTokenRequest getFederationTokenRequest =
new GetFederationTokenRequest();
getFederationTokenRequest.setDurationSeconds(3600);
getFederationTokenRequest.setName("UserName");
// A sample policy for accessing Amazon Simple Notification Service (Amazon
SNS) in the console.
String policy = "{\"Version\":\"2012-10-17\",\"Statement\":[{\"Action\":
\"sns:*\"," +
"\"Effect\":\"Allow\",\"Resource\":\"*\"}]}";
getFederationTokenRequest.setPolicy(policy);
GetFederationTokenResult federationTokenResult =
stsClient.getFederationToken(getFederationTokenRequest);
Credentials federatedCredentials = federationTokenResult.getCredentials();
// The issuer parameter specifies your internal sign-in
// page, for example https://mysignin.internal.mycompany.com/.
// The console parameter specifies the URL to the destination console of the
// AWS Management Console. This example goes to Amazon SNS.
164

AWS Identity and Access Management User Guide
Identity Providers and Federation
// The signin parameter is the URL to send the request to.
String issuerURL = "https://mysignin.internal.mycompany.com/";
String consoleURL = "https://console.aws.amazon.com/sns";
String signInURL = "https://signin.aws.amazon.com/federation";
// Create the sign-in token using temporary credentials,
// including the access key ID, secret access key, and security token.
String sessionJson = String.format(
"{\"%1$s\":\"%2$s\",\"%3$s\":\"%4$s\",\"%5$s\":\"%6$s\"}",
"sessionId", federatedCredentials.getAccessKeyId(),
"sessionKey", federatedCredentials.getSecretAccessKey(),
"sessionToken", federatedCredentials.getSessionToken());
// Construct the sign-in request with the request sign-in token action, a
// 12-hour console session duration, and the JSON document with temporary
// credentials as parameters.
String getSigninTokenURL = signInURL +
"?Action=getSigninToken" +
"&SessionDuration=43200" +
"&SessionType=json&Session=" +
URLEncoder.encode(sessionJson,"UTF-8");
URL url = new URL(getSigninTokenURL);
// Send the request to the AWS federation endpoint to get the sign-in token
URLConnection conn = url.openConnection ();
BufferedReader bufferReader = new BufferedReader(new
InputStreamReader(conn.getInputStream()));
String returnContent = bufferReader.readLine();
String signinToken = new JSONObject(returnContent).getString("SigninToken");
String signinTokenParameter = "&SigninToken=" +
URLEncoder.encode(signinToken,"UTF-8");
// The issuer parameter is optional, but recommended. Use it to direct users
// to your sign-in page when their session expires.
String issuerParameter = "&Issuer=" + URLEncoder.encode(issuerURL, "UTF-8");
// Finally, present the completed URL for the AWS console session to the user
String destinationParameter = "&Destination=" +
URLEncoder.encode(consoleURL,"UTF-8");
String loginURL = signInURL + "?Action=login" +
signinTokenParameter + issuerParameter +
destinationParameter;
Example Showing How to Construct the URL (Ruby)
The following example shows how to use Ruby to programmatically construct a URL that gives
federated users direct access to the AWS Management Console. This code snippet uses the AWS
SDK for Ruby.
require 'rubygems'
165

AWS Identity and Access Management User Guide
Identity Providers and Federation
require 'json'
require 'open-uri'
require 'cgi'
require 'aws-sdk'
# Create a new AWS::STS instance.
#
# Note: Calls to AWS STS APIs must be signed using an access key ID
# and secret access key. The credentials can be in EC2 instance metadata
# or in environment variables and will be automatically discovered by
# the default credentials provider in the AWS Ruby SDK.
sts = AWS::STS.new
# The following policy grants permissions to work
# in the AWS SNS console.
policy = AWS::STS::Policy.new
policy.allow(:actions => "sns:*",:resources => :any)
# The following call creates a temporary session that returns
# temporary security credentials and a session token.
session = sts.new_federated_session(
"UserName",
:policy => policy,
:duration => 3600)
# The issuer value is the URL where users are directed (such as
# to your internal sign-in page) when their session expires.
#
# The console value specifies the URL to the destination console.
# This example goes to the Amazon SNS console.
#
# The sign-in value is the URL of the AWS STS federation endpoint.
issuer_url = "https://mysignin.internal.mycompany.com/"
console_url = "https://console.aws.amazon.com/sns"
signin_url = "https://signin.aws.amazon.com/federation"
# Create a block of JSON that contains the temporary credentials
# (including the access key ID, secret access key, and session token).
session_json = {
:sessionId => session.credentials[:access_key_id],
:sessionKey => session.credentials[:secret_access_key],
:sessionToken => session.credentials[:session_token]
}.to_json
# Call the federation endpoint, passing the parameters
# created earlier and the session information as a JSON block.
# The request returns a sign-in token that's valid for 15 minutes.
# Signing in to the console with the token creates a session
# that is valid for 12 hours.
get_signin_token_url = signin_url +
"?Action=getSigninToken" +
"&SessionDuration=43200" +
"&SessionType=json&Session=" +
CGI.escape(session_json)
returned_content = URI.parse(get_signin_token_url).read
# Extract the sign-in token from the information returned
# by the federation endpoint.
166

AWS Identity and Access Management User Guide
Creating Roles
signin_token = JSON.parse(returned_content)['SigninToken']
signin_token_param = "&SigninToken=" + CGI.escape(signin_token)
# Create the URL to give to the user, which includes the
# sign-in token and the URL of the console to open.
# The "issuer" parameter is optional but recommended.
issuer_param = "&Issuer=" + CGI.escape(issuer_url)
destination_param = "&Destination=" + CGI.escape(console_url)
login_url = signin_url + "?Action=login" + signin_token_param +
issuer_param + destination_param
Creating IAM Roles
To create a role, you can use the AWS Management Console, the AWS CLI, the Tools for Windows
PowerShell, or the IAM API.
If you use the AWS Management Console, a wizard guides you through the steps for creating a role.
The wizard has slightly different steps depending on whether you're creating a role for an AWS service,
for an AWS account, or for a federated user.
Topics
•Creating a Role to Delegate Permissions to an IAM User (p. 167)
•Creating a Role to Delegate Permissions to an AWS Service (p. 176)
•Creating a Role for a Third-Party Identity Provider (Federation) (p. 180)
•Examples of Policies for Delegating Access (p. 188)
Creating a Role to Delegate Permissions to an IAM User
You can use IAM roles to delegate access to your AWS resources. With IAM roles, you can establish
trust relationships between your trusting account and other AWS trusted accounts. The trusting
account owns the resource to be accessed and the trusted account contains the users who need
access to the resource. After you create the trust relationship, an IAM user or an application from
the trusted account can use the AWS Security Token Service (AWS STS) AssumeRole API action
to obtain temporary security credentials that enable access to AWS resources in your account. The
accounts can both be controlled by you, or the account with the users can be controlled by a third
party. If the other account with the users is in an AWS account that you do not control, then you can
use the externalID attribute and a unique identifier supplied by the third-party account to help ensure
that access occurs only in the correct contexts. For more information, see How to Use an External ID
When Granting Access to Your AWS Resources to a Third Party (p. 172).
For information about how to use roles to delegate permissions, see Roles Terms and
Concepts (p. 125).
Topics
•Creating a Role (AWS Management Console) (p. 167)
•Creating a Role (AWS Command Line Interface) (p. 169)
•Creating a Role (Tools for Windows PowerShell) (p. 170)
•Creating a Role (AWS API) (p. 172)
•How to Use an External ID When Granting Access to Your AWS Resources to a Third
Party (p. 172)
Creating a Role (AWS Management Console)
You can use the AWS Management Console to create a role that an IAM user can switch to.
167

AWS Identity and Access Management User Guide
Creating Roles
To create a role (AWS Management Console)
1. Sign in to the Identity and Access Management (IAM) console at https://console.aws.amazon.com/
iam/.
2. In the navigation pane of the console, click Roles and then click Create New Role.
3. For Role name, type a role name to help identify the purpose of this role. Role names must be
unique within your AWS account. After you enter the name, click Next Step.
Role names have character limitations. The number of roles in an AWS account and the policy
size for policies attached to roles are also limited. For more information, see Limitations on IAM
Entities and Objects (p. 338). Note that you cannot edit the name of the role after it is created.
Important
Role names must be unique within an account. They are not distinguished by case, for
example, you cannot create roles named both "PRODROLE" and "prodrole".
4. On the Select Role Type page, select the Role for Cross-Account Access section, and then
select the type of role that you want to create:
• Select Provide access between AWS accounts you own if you are the administrator of both
the user account and the resource account, or both accounts belong to the same company. This
is also the option to select when the users, role, and resource to be accessed are all in the same
account.
• Select Allows IAM users from a 3rd party AWS account to access this account if you are
the administrator of the account that owns the resource and you want to grant permissions to
users from an account that you do not control. This option requires you to specify an external ID
(which the third party must provide to you) to provide additional control over the circumstances
in which the third party can use the role to access your resources. For more information,
see How to Use an External ID When Granting Access to Your AWS Resources to a Third
Party (p. 172).
Important
Selecting this option enables access to the role only through the AWS CLI, Tools for
Windows PowerShell, or the AWS API. This is because you cannot use the AWS
console to switch to a role that has an externalID condition in its trust policy.
However, you can create this kind of access programmatically by writing a script or an
application using the relevant SDK. For more information and a sample script, see How
to enable cross-account access to the AWS Management Console in the AWS Security
Blog.
5. On the next page, specify the AWS account ID to which you want to grant access to your
resources.
The administrator of the specified trusted account can grant permission to assume this role to any
IAM user in the trusted account. To do this, the administrator attaches a policy to the user or a
group that grants permission for the sts:AssumeRole action and that specifies the role's ARN as
the Resource.
6. If you selected Allows IAM users from a 3rd party AWS account to access this account on
the Select Role Type page, type the external ID provided by the administrator of the third party
account. This automatically adds a condition to the trust policy that allows the user to assume the
role only if the request includes the correct sts:ExternalID. For more information, see How to
Use an External ID When Granting Access to Your AWS Resources to a Third Party (p. 172).
7. If you want to restrict the role to users who sign in by using multi-factor authentication (MFA)
device, select the Require MFA option. This adds a condition to the role's trust policy that checks
for an MFA sign-in. A user who wants to assume the role must sign in with a temporary one-
time password from a configured MFA device. Users without MFA authentication cannot assume
the role. For more information about MFA, see Using Multi-Factor Authentication (MFA) in
AWS (p. 80)
8. Click Next Step.
168

AWS Identity and Access Management User Guide
Creating Roles
9. On the Attach Policy page, select one or more permissions policies to attach to the role to
specify what actions can be done on specific resources (similar to setting permissions for IAM
groups). For information about managing permissions by using policies, see Overview of AWS
IAM Permissions (p. 250).
The permissions that you specify are available to any entity that uses the role. By default, a role
has no permissions.
Select the box next to the policy that assigns the permissions that you want the users to have,
and then click Attach Policy. You can choose to select no policies at this time, create the policies
later, and then attach them to the role.
10. Click Next Step to review the role settings. Note the link provided for you to give to users who can
use the role. When the user clicks this link, the user is taken directly to the Switch Role page with
the Account ID and Role Name already filled in. The user is asked for credentials if he or she
is not already signed in. The user can optionally set a Display Name and can select a Display
Color. When the user clicks Switch Role, the user immediately begins operating with the new
permissions.
Note
For later easy selection, the IAM console caches the last five roles that you use. If your
users need more than five roles, consider the following solutions for easy access:
• If only a small number of users switch roles, recommend that they bookmark the links
that you send them.
• If many users switch roles, consider creating a central location like a web page that
contains all the links that users need to access.
The format of the link is as follows:
https://signin.aws.amazon.com/switchrole?
account=ACCOUNT_NUMBER&roleName=ROLE_NAME&displayName=DISPLAYNAME
11. Click Create Role to complete the creation of the role.
Important
Remember that this is only the first half of the configuration required. You must also
enable individual users in the trusted account with permissions to switch to the role.
For more information about this step, see Granting a User Permissions to Switch
Roles (p. 192).
After you create the role and grant it permissions to perform AWS tasks or access AWS resources,
the user can switch to the role. For more information, see Switching to a Role (AWS Management
Console) (p. 196).
Creating a Role (AWS Command Line Interface)
Creating a role from the AWS CLI involves multiple steps. When you use the console to create a
role, many of the steps are done for you, but with the AWS CLI you must explicitly perform each step
yourself. You must create the policy and assign a permissions policy to the role.
To create a role for cross-account access (AWS CLI)
Use the following commands:
• Create a role: aws iam create-role
• Attach a managed access policy to the role: aws iam attach-role-policy
-or-
Create an inline access policy for the role: aws iam put-role-policy
169

AWS Identity and Access Management User Guide
Creating Roles
The following example shows both steps in a simple environment. The example assumes that you are
using a client computer running Windows, and have already configured your command line interface
with your account credentials and region. For more information, see Configuring the AWS Command
Line Interface.
The sample trust policy referenced in the first command contains the following JSON code to
enable users in the account 123456789012 to assume the role , but only if the user provides MFA
authentication. For more information about MFA, see Using Multi-Factor Authentication (MFA) in
AWS (p. 80).
{
"Version": "2012-10-17",
"Statement": {
"Effect": "Allow",
"Principal": { "AWS": "arn:aws:iam::123456789012:root" },
"Action": "sts:AssumeRole",
"Condition": { "Bool": { "aws:MultiFactorAuthPresent": "true" } }
}
}
The managed policy referenced in the second command is assumed to already exists in IAM and
allows the user who assumes the role to perform only the ListBucket action on an S3 bucket named
example_bucket. The policy looks like this:
{
"Version": "2012-10-17",
"Statement": {
"Effect": "Allow",
"Action": "s3:ListBucket",
"Resource": "arn:aws:s3:::example_bucket"
}
}
The commands to run are the following:
# Create the role and attach the trust policy that allows users in an account
to switch to the role.
aws iam create-role --role-name Test-UserAccess-Role --assume-role-policy-
document file://C:\policies\trustpolicyforacct123456789012.json
# Attach the permissions policy (in this example a managed policy) to the
role to specify what it is allowed to do.
aws iam attach-role-policy --role-name Test-UserAccess-Role --policy-arn
arn:aws:iam::123456789012:role/PolicyForRole
Important
Remember that this is only the first half of the configuration required. You must also enable
individual users in the trusted account with permissions to switch to the role. For more
information about this step, see Granting a User Permissions to Switch Roles (p. 192).
After you create the role and grant it permissions to perform AWS tasks or access AWS resources, the
user can switch to the role. For more information, see Switching to an IAM Role (AWS Command Line
Interface) (p. 197).
Creating a Role (Tools for Windows PowerShell)
Creating a role using the Tools for Windows PowerShell involves multiple steps. When you use the
console to create a role, many of the steps are done for you, but with the Windows PowerShell cmdlets
170

AWS Identity and Access Management User Guide
Creating Roles
you must explicitly perform each step yourself. You must create the policy, and assign an access policy
to the role.
To create a role for cross-account access (Tools for Windows PowerShell)
Use the following commands:
• Create a role: New-IAMRole
• Attach a managed access policy to the role: Register-IAMRolePolicy
-or-
Create an inline access policy for the role: Write-IAMRolePolicy
The following example shows both steps in a simple environment. The example assumes that you
have already configured your Tools for Windows PowerShell with your account credentials and region.
For more information, see Using AWS Credentials in the AWS Tools for Windows PowerShell User
Guide.
The sample trust policy file referenced in the first command contains the following JSON code to
enable users in the account 123456789012 to assume the role, but only if the user provides MFA
authentication. For more information about MFA, see Using Multi-Factor Authentication (MFA) in
AWS (p. 80).
{
"Version": "2012-10-17",
"Statement": {
"Effect": "Allow",
"Principal": { "AWS": "arn:aws:iam::123456789012:root" },
"Action": "sts:AssumeRole",
"Condition": { "Bool": { "aws:MultiFactorAuthPresent": "true" } }
}
}
The managed policy referenced in the second command is assumed to already exists in IAM and
allows the user who assumes the role to perform only the ListBucket action on an S3 bucket named
example_bucket. The policy looks like this:
{
"Version": "2012-10-17",
"Statement": {
"Effect": "Allow",
"Action": "s3:ListBucket",
"Resource": "arn:aws:s3:::example_bucket"
}
}
The commands to run are the following:
# Create the role and attach the trust policy that allows users in an account
to switch to the role.
New-IAMRole -RoleName Test-UserAccess-Role -AssumeRolePolicyDocument (Get-
Content -raw C:\policies\trustpolicyforacct123456789012.json)
# Attach the permissions policy (in this example a managed policy) to the
role to specify what it is allowed to do.
171

AWS Identity and Access Management User Guide
Creating Roles
Register-IAMRolePolicy -RoleName Test-UserAccess-Role --policy-arn
arn:aws:iam::123456789012:role/PolicyForRole
Important
Remember that this is only the first half of the configuration required. You must also enable
individual users in the trusted account with permissions to switch to the role. For more
information about this step, see Granting a User Permissions to Switch Roles (p. 192).
After you create the role and grant it permissions to perform AWS tasks or access AWS resources, the
user can switch to the role. For more information, see Switching to an IAM Role (Tools for Windows
PowerShell) (p. 199).
Creating a Role (AWS API)
You can use API calls to create a role that an IAM user can switch to.
To create a role in code using the API
Use the following commands:
• Create a role: CreateRole
For the role's trust policy, you can specify a file location.
• Attach a managed access policy to the role: AttachRolePolicy
-or-
Create an inline access policy for the role: PutRolePolicy
Important
Remember that this is only the first half of the configuration required. You must also enable
individual users in the trusted account with permissions to switch to the role. For more
information about this step, see Granting a User Permissions to Switch Roles (p. 192).
After you create the role and grant it permissions to perform AWS tasks or access AWS resources, the
user can switch to the role. For more information, see Switching to an IAM Role (API) (p. 200).
For more information about MFA, see Using Multi-Factor Authentication (MFA) in AWS (p. 80).
How to Use an External ID When Granting Access to Your AWS
Resources to a Third Party
At times, you need to give a third party access to your AWS resources (delegate access). One
important aspect of this scenario is the External ID, an optional piece of information that you can use in
an IAM role trust policy to designate who can assume the role.
For example, let's say that you decide to hire a third-party company called Example Corp to monitor
your AWS account and help optimize costs. In order to track your daily spending, Example Corp needs
to access your AWS resources. Example Corp also monitors many other AWS accounts for other
customers.
Although you could give Example Corp access to an IAM user and its long-term credentials in your
AWS account, you should choose instead to go with the highly recommended best practice of using
an IAM role. An IAM role provides a mechanism to allow a third party to access your AWS resources
without needing to share long-term credentials (for example, an IAM user's access key).
You can use an IAM role to establish a trusted relationship between your AWS account and the
account belonging to Example Corp. After this relationship is established, one of Example Corp's IAM
172

AWS Identity and Access Management User Guide
Creating Roles
users or applications in the trusted AWS account can call the AWS STS AssumeRole API to obtain
temporary security credentials that can then be used to access AWS resources in your account.
Note
For more information about the AssumeRole and other AWS APIs that you can call to obtain
temporary security credentials, see Requesting Temporary Security Credentials (p. 219).
Here's a more detailed breakdown of this scenario:
1. You hire Example Corp, so they create a unique customer identifier for you. They give you your
unique customer ID and their AWS account number. You need this information to create an IAM role
in the next step.
2. You sign in to AWS and create an IAM role that gives Example Corp access to your resources. Like
any IAM role, the role has two policies, an access policy and a trust policy. The role's trust policy
specifies who can assume the role. In our sample scenario, the policy specifies the AWS account
number of Example Corp as the Principal. This allows identities from that account to assume
the role. In addition, you add an Condition element to the trust policy that tests the ExternalID
context key to ensure that it matches the unique customer ID that Example Corp assigned to you
when you hired the company. For example:
"Principal": {"AWS": "Example Corp's AWS Account ID"},
"Condition": {"StringEquals": {"sts:ExternalId": "Unique ID Assigned by
Example Corp"}}
3. The access policy for the role specifies what the role allows someone to do. For example, you
could specify that the role allows someone to manage only your Amazon EC2 and Amazon RDS
resources but not your IAM users or groups. In our sample scenario, you use the access policy to
give Example Corp read-only access to all of the resources in your account.
4. After you create the role, you provide the Amazon Resource Name (ARN) of the role to Example
Corp.
5. When Example Corp needs to access your AWS resources, someone from the company calls the
AWS sts:AssumeRole API. The call includes the ARN of the role to assume and the ExternalID
parameter that corresponds to your customer ID.
All of this results in the request being authorized only if the role ARN and the external ID are correct,
and if the request comes from someone using Example Corp's AWS account. If the request succeeds,
it provides temporary security credentials that Example Corp can use to access the AWS resources
that your role allows.
In other words, when a role policy includes an external ID, anyone who wants to assume the role must
not only be specified as a principal in the role, but must also include the correct external ID.
Why Do You Need to Use an External ID?
In abstract terms, the external ID allows the user that is assuming the role to assert the circumstances
in which they are operating. It also provides a way for the account owner to permit the role to be
assumed only under specific circumstances. The primary function of the external ID is to address and
prevent the "confused deputy" problem.
The Confused Deputy Problem
To continue the previous example, Example Corp requires access to certain resources in your AWS
account. But in addition to you, Example Corp has other customers and needs a way to access each
customer's AWS resources. Instead of asking its customers for their AWS account access keys, which
are secrets that should never be shared, Example Corp requests a role ARN from each customer. But
if another Example Corp customer were able to guess or obtain your role ARN, that customer could
then use your role ARN to gain access to your AWS resources by way of Example Corp. This form of
privilege escalation is known as the confused deputy problem.
173
AWS Identity and Access Management User Guide
Creating Roles
The following diagram illustrates the confused deputy problem.
This diagram assumes the following:
•AWS1 is your AWS account.
•AWS1:ExampleRole is a role in your account. This role's trust policy trusts Example Corp by
specifying Example Corp's AWS account as the one that can assume the role.
Here's what happens:
1. When you start using Example Corp's service, you provide the ARN of AWS1:ExampleRole to
Example Corp.
2. Example Corp uses that role ARN to obtain temporary security credentials to access resources in
your AWS account. In this way, you are trusting Example Corp as a "deputy" that can act on your
behalf.
3. Another AWS customer also starts using Example Corp's service, and this customer also provides
the ARN of AWS1:ExampleRole for Example Corp to use. Presumably the other customer learned
or guessed the AWS1:ExampleRole, which isn't a secret.
4. When the other customer asks Example Corp to access AWS resources in (what it claims to be) its
account, Example Corp uses AWS1:ExampleRole to access resources in your account
This is how the other customer could gain unauthorized access to your resources. Because this other
customer was able to trick Example Corp into unwittingly acting on your resources, Example Corp is
now a "confused deputy."
How Does the External ID Prevent the Confused Deputy Problem?
You address the confused deputy problem by including the ExternalID condition check in the
role's trust policy. The "deputy" company inserts a unique external ID value for each customer into
the request for AWS credentials. The external ID is a customer ID value that must be unique among
Example Corp's customers and is out of the control of Example Corp's customers. This is why you get
it from Example Corp and you don't come up with it on your own. This helps prevent one customer from
successfully impersonating another customer. Example Corp always inserts the customer's assigned
external ID, so you should never see a request coming from Example Corp with any external ID except
your own.
In our scenario, imagine Example Corp's unique identifier for you is "12345," and its identifier for the
other customer is "67890." These identifiers are simplified for this scenario. Generally, these identifiers
are GUIDs. Assuming that these identifiers are unique among Example Corp's customers, they are
sensible values to use for the external ID.
Example Corp gives the external ID value of "12345" to you. You must then add a Condition element
to the role's trust policy that requires the sts:ExternalID value to be 12345, like this:
{
174

AWS Identity and Access Management User Guide
Creating Roles
"Version": "2012-10-17",
"Statement": {
"Effect": "Allow",
"Action": "sts:AssumeRole",
"Principal": {"AWS": "Example Corp's AWS Account ID"},
"Condition": {"StringEquals": {"sts:ExternalId": "12345"}}
}
}
The Condition element in this policy allows Example Corp to assume the role only when the
AssumeRole API call includes the external ID value of "12345". Example Corp makes sure that
whenever it assumes a role on behalf of a customer, it always includes that customer's external ID
value in the AssumeRole call. As shown in the following diagram, even if another customer supplies
Example Corp with your ARN, it cannot control the external ID that Example Corp includes in its
request to AWS. This helps prevent an unauthorized customer from gaining access to your resources:
1. As before, when you start using Example Corp's service, you provide the ARN of
AWS1:ExampleRole to Example Corp.
2. When Example Corp uses that role ARN to assume the role AWS1:ExampleRole, Example Corp
includes your external ID ("12345") in the AssumeRole API call. The external ID matches the role's
trust policy, so the AssumeRole API call succeeds and Example Corp obtains temporary security
credentials to access resources in your AWS account.
3. Another AWS customer also starts using Example Corp's service, and as before, this customer also
provides the ARN of AWS1:ExampleRole for Example Corp to use.
4. But this time, when Example Corp attempts to assume the role AWS1:ExampleRole, it provides
the external ID associated with the other customer ("67890"), and the other customer has no way
to change this. Example Corp does this because the request to use the role came from the other
customer, so "67890" indicates the circumstance in which Example Corp is acting. Because you
added a condition with your own external ID ("12345") to the trust policy of AWS1:ExampleRole,
the AssumeRole API call fails, and the other customer is prevented from gaining unauthorized
access resources in your account (indicated by the red "X" in the diagram).
The external ID helps prevent any other customer from tricking Example Corp into unwittingly
accessing your resources—it mitigates the confused deputy problem.
When Should I Use the External ID?
Use an external ID in the following situations:
• If you are an AWS account owner and you have configured a role for a third party that accesses
other AWS accounts in addition to yours, you should ask the third party for an external ID that it
includes when it assumes your role. Then you check for that external ID in your role's trust policy to
ensure that the external party can assume your role only when it is acting on your behalf.
• If you are in the position of assuming roles on behalf of different customers like Example Corp in
our previous scenario, then you should assign a unique external ID to each of your customers and
175

AWS Identity and Access Management User Guide
Creating Roles
instruct them to add the external ID to their role's trust policy. You must then ensure that you always
include the correct external ID in your requests to assume roles.
You probably already have a unique identifier for each of your customers, and this unique ID is
sufficient for use as an external ID. The external ID is not a special value that you need to create
explicitly, or track separately, just for this purpose.
You should always specify the external ID in your AssumeRole API calls. In addition when a
customer gives you a role ARN, test whether you can assume the role both with and without the
correct external ID. If you can assume the role without the correct external ID, don't store the
customer's role ARN in your system until your customer has updated the role trust policy to require
the correct external ID. In this way you help your customers to do the right thing, which helps to keep
both of you protected against the confused deputy problem.
Creating a Role to Delegate Permissions to an AWS
Service
You create a role for an AWS service when you want to grant permissions to a service like Amazon
EC2, AWS Data Pipeline, Amazon Elastic Transcoder, or AWS OpsWorks. These services can
access AWS resources, so you create a role to determine what the service is allowed to do with
those resources. In many scenarios, you can select an AWS managed policy that contains predefined
permissions. However, if you have requirements that are not covered by an AWS managed policy, you
can create a custom managed policy or start with a copy of an AWS managed policy.
For information about how roles enable you to delegate permissions, see Roles Terms and
Concepts (p. 125).
Topics
•Creating a Role for an AWS Service (AWS Management Console) (p. 176)
•Creating a Role for a Service (AWS Command Line Interface) (p. 177)
•Creating a Role for a Service (Tools for Windows PowerShell) (p. 178)
•Creating a Role for a Service (AWS API) (p. 180)
Creating a Role for an AWS Service (AWS Management Console)
You can use the AWS Management Console to create an IAM role for a service.
To create a role for an AWS service using the AWS Console
1. Sign in to the Identity and Access Management (IAM) console at https://console.aws.amazon.com/
iam/.
2. In the navigation pane of the IAM console, click Roles, and then click Create New Role.
3. For Role name, type a role name that can help you identify the purpose of this role. Role names
must be unique within your AWS account. After you type the name, click Next Step at the bottom
of the page.
Because various entities might reference the role, you cannot change the name of the role after it
has been created.
Important
Role names must be unique within an account. They are not distinguished by case, for
example, you cannot create roles named both "PRODROLE" and "prodrole".
4. Expand the AWS Service Roles section, and then select the service that you want to allow to
assume this role.
176

AWS Identity and Access Management User Guide
Creating Roles
5. Select the check box for a managed policy that grants the permissions that you want the service to
have. If the policy does not yet exist, then you can skip this step, create the policy later, and then
attach it to the role.
6. Click Next Step to review the role. Then click Create Role.
Creating a Role for a Service (AWS Command Line Interface)
Creating a role from the AWS CLI involves multiple steps. When you use the console to create a
role, many of the steps are done for you, but with the AWS CLI you must explicitly perform each step
yourself. You must create the policy and assign an access policy to the role. If the service you are
working with is Amazon EC2, then you must also create an instance profile and add the role to it.
To create a role for an AWS service from the AWS CLI, use the following commands:
• Create a role: aws iam create-role
• Attach a managed access policy to the role: aws iam attach-role-policy
or
Create an inline access policy for the role: aws iam put-role-policy
If you are going to use the role with Amazon EC2 or another AWS service that uses Amazon EC2,
you must store the role in an instance profile. An instance profile is a container for a role that can be
attached to an Amazon EC2 instance when launched. An instance profile can contain only one role.
If you create the role using the AWS Management Console, the instance profile is created for you
with the same name as the role. For more information about instance profiles, see Using Instance
Profiles (p. 206). For information about how to launch an EC2 instance with a role, see Using IAM
roles with Amazon EC2 instances in the Amazon EC2 User Guide for Linux Instances.
To create an instance profile and add a role to it from the AWS CLI, use the following commands:
• Create an instance profile: aws iam create-instance-profile
• Add the role to the instance profile: aws iam add-role-to-instance-profile
The following example shows all four steps. The example assumes that you are running on a client
computer running Windows and have already configured your command line interface with your
account credentials and region. For more information, see Configuring the AWS Command Line
Interface.
The sample trust policy referenced in the first command contains the following JSON code to enable
the Amazon EC2 service to assume the role.
{
"Version": "2012-10-17",
"Statement": {
"Effect": "Allow",
"Principal": {"Service": "ec2.amazonaws.com"},
"Action": "sts:AssumeRole"
}
}
The sample access policy referenced in the second command allows the role to perform only the
ListBucket action on an S3 bucket named example_bucket.
{
"Version": "2012-10-17",
177

AWS Identity and Access Management User Guide
Creating Roles
"Statement": {
"Effect": "Allow",
"Action": "s3:ListBucket",
"Resource": "arn:aws:s3:::example_bucket"
}
}
The AWS CLI commands to run for this example are the following:
# Create the role and attach the trust policy that enables EC2 to assume this
role.
aws iam create-role --role-name Test-Role-for-EC2 --assume-role-policy-
document file://C:\policies\trustpolicyforec2.json
# Embed the permissions policy (in this example an inline policy) to the role
to specify what it is allowed to do.
aws iam put-role-policy --role-name Test-Role-for-EC2 --policy-name
Permissions-Policy-For-Ec2 --policy-document file://c:\policies
\permissionspolicyforec2.json
# Create the instance profile required by EC2 to contain the role
aws iam create-instance-profile --instance-profile-name EC2-ListBucket-S3
# Finally, add the role to the instance profile
aws iam add-role-to-instance-profile --instance-profile-name EC2-ListBucket-
S3 --role-name Test-Role-for-EC2
When you launch the EC2 instance, specify the instance profile name in the Configure Instance
Details page if you use the AWS console, or the --iam-instance-profile parameter if you use the
aws ec2 run-instances CLI command.
Creating a Role for a Service (Tools for Windows PowerShell)
Creating a role using the Tools for Windows PowerShell involves multiple steps. When you use the
console to create a role, many of the steps are done for you, but with the Windows PowerShell cmdlets
you must explicitly perform each step yourself. You must create the policy and assign an access policy
to the role. If the service you are working with is Amazon EC2, then you must also create an instance
profile and add the role to it.
To create a role for an AWS service using the Tools for Windows PowerShell, use the following
commands:
• Create a role: New-IAMRole
• Attach a managed access policy to the role: Register-IAMRolePolilcy
or
Create an inline access policy for the role: Write-IAMRolePolicy
If you are going to use the role with Amazon EC2 or another AWS service that uses Amazon EC2,
you must store the role in an instance profile. An instance profile is a container for a role. An instance
profile can contain only one role. If you create the role in the AWS Management Console, the instance
profile is created for you with the same name as the role. For more information about instance profiles,
see Using Instance Profiles (p. 206). For information about how to launch an EC2 instance with
a role, see Using IAM roles with Amazon EC2 instances in the Amazon EC2 User Guide for Linux
Instances.
• Create an instance profile: New-IAMInstanceProfile
178

AWS Identity and Access Management User Guide
Creating Roles
• Add the role to the instance profile: Add-IAMRoleToInstanceProfile
The following example shows all four steps. The example assumes that you are running on a client
computer running Windows, and have already configured your command line interface with your
account credentials and region. For more information, see Using AWS Credentials in the AWS Tools
for Windows PowerShell User Guide.
The sample trust policy referenced in the first command contains the following JSON code to enable
the Amazon EC2 service to assume the role.
{
"Version": "2012-10-17",
"Statement": {
"Effect": "Allow",
"Principal": {"Service": "ec2.amazonaws.com"},
"Action": "sts:AssumeRole"
}
}
The sample access policy referenced in the second command allows the role to perform only the
ListBucket action on an S3 bucket named example_bucket.
{
"Version": "2012-10-17",
"Statement": {
"Effect": "Allow",
"Action": "s3:ListBucket",
"Resource": "arn:aws:s3:::example_bucket"
}
}
The Tools for Windows PowerShell commands to run for this example are the following:
# Create the role and attach the trust policy that enables EC2 to assume this
role.
New-IAMRole -RoleName Test-Role-for-EC2 -AssumeRolePolicyDocument (Get-
Content -raw C:\policies\trustpolicyforec2.json)
# Create an permissions policy (in this example an inline policy) for the
role to specify what it is allowed to do.
Write-IAMRolePolicy -RoleName Test-Role-for-EC2 -PolicyName Permissions-
Policy-For-Ec2 -PolicyDocument (Get-Content -raw c:\policies
\permissionspolicyforec2.json)
# The following two lines are only needed when the role is for the EC2
service
# Create the instance profile required by EC2 to contain the role
New-IAMInstanceProfile -InstanceProfileName EC2-ListBucket-S3
# Finally, add the role to the instance profile
Add-IAMRoleToInstanceProfile -InstanceProfileName EC2-ListBucket-S3 -RoleName
Test-Role-for-EC2
When you launch the EC2 instance, specify the instance profile name in the Configure
Instance Details page if you use the AWS console, or the -InstanceProfile_Name or -
InstanceProfile_Arn parameter if you use the New-EC2Instance Windows PowerShell cmdlet.
179

AWS Identity and Access Management User Guide
Creating Roles
Creating a Role for a Service (AWS API)
To create a role in code that uses the API, use the following commands.
• Create a role: CreateRole
For the role's trust policy, you can specify a file location.
• Attach a managed access policy to the role: AttachRolePolicy
or
Create an inline access policy for the role: PutRolePolicy
If you are going to use the role with Amazon EC2 or another AWS service that uses Amazon EC2, you
must store the role in an instance profile. An instance profile is a container for a role. Each instance
profile can contain only one role. If you create the role in the AWS Management Console, the instance
profile is created for you with the same name as the role. For more information about instance profiles,
see Using Instance Profiles (p. 206). For information about how to launch an Amazon EC2 instance
with a role, see Using IAM roles with Amazon EC2 instances in the Amazon EC2 User Guide for Linux
Instances.
• Create an instance profile: CreateInstanceProfile
• Add the role to the instance profile: AddRoleToInstanceProfile
Creating a Role for a Third-Party Identity Provider
(Federation)
Identity federation provides access to AWS resources to users by means of a third-party identity
provider (IdP). To set up identity federation, you configure the provider and then create an IAM role that
determines what permissions a federated user will have. For more information about federation and
identity providers, see Identity Providers and Federation (p. 132).
Creating a Role for Federated Users (AWS Management Console)
The steps for creating a role for federated users depends on your choice of third-party providers:
• To create a role for users federated with a Web Identity or OpenID Connect (OIDC) IdP,
see Creating a Role for Web Identity or OpenID Connect Federation (AWS Management
Console) (p. 182).
• To create a role for users federated with a SAML 2.0 IdP, see Creating a Role for SAML 2.0
Federation (AWS Management Console) (p. 186).
Creating a Role for Federated Access (AWS Command Line Interface)
The steps to create a role for the supported identity providers (OIDC or SAML) from the AWS CLI are
identical; —the difference is in the contents of the trust policy that you create in the prerequisite steps.
Begin by following the steps in the Prerequisites section for the type of provider you are using:
• For an OIDC provider, follow the steps in Prerequisites for an OIDC provider (p. 182).
• For a SAML provider, follow the steps in Prerequisites for a SAML provider (p. 186).
Creating a role from the AWS CLI involves multiple steps. When you use the console to create a role,
many of the steps are done for you, but with the CLI you must explicitly perform each step yourself.
You must create the trust policy first, create the role, and then assign an access policy to the role.
180

AWS Identity and Access Management User Guide
Creating Roles
To create a role using the AWS CLI
Use the following commands:
• To create a role: aws iam create-role
• To attach an access policy to the role:
aws iam attach-role-policy to attach an existing managed policy
or
aws iam put-role-policy to create an inline policy
The following example shows all the steps in a simple environment. The example assumes that you
are running the AWS CLI on a computer running Windows, and have already configured the AWS CLI
with your credentials. For more information, see Configuring the AWS Command Line Interface.
The commands to run are the following:
# Create the role and attach the trust policy that enables users in an
account to assume the role.
aws iam create-role --role-name Test-CrossAcct-Role --assume-role-policy-
document file://C:\policies\trustpolicyforcognitofederation.json
# Attach the permissions policy to the role to specify what it is allowed to
do.
aws iam put-role-policy --role-name Test-CrossAcct-Role --policy-name
Perms-Policy-For-CognitoFederation --policy-document file://c:\policies
\permspolicyforcognitofederation.json
Creating a Role for Federated Access (Tools for Windows PowerShell)
The steps to create a role for the supported identity providers (OIDC or SAML) is identical; the
difference is in the contents of the trust policy you create in the prerequisite steps. Follow the steps in
the Prerequisites section for the type of provider you are using:
• For an OIDC provider, follow the steps in Prerequisites for an OIDC provider (p. 182).
• For a SAML provider, follow the steps in Prerequisites for a SAML provider (p. 186).
Creating a role using the Tools for Windows PowerShell involves multiple steps. When you use
the console to create a role, many of the steps are done for you, but with the Tools for Windows
PowerShell you must explicitly perform each step yourself. You must create the trust policy first, create
the role, and then assign an access policy to the role.
To create a role using the Tools for Windows PowerShell
Use the following commands:
• To create a role: New-IAMRole
• To attach an access policy to the role:
Register-IAMRolePolicy to attach an existing managed policy
-or-
Write-IAMRolePolicy to create an inline policy
181

AWS Identity and Access Management User Guide
Creating Roles
The following example shows all of the steps in a simple environment. The example assumes that
you have already configured the Tools for Windows PowerShell with your credentials. For more
information, see Using AWS Credentials.
The commands to run are the following:
# Create the role and attach the trust policy that enables users in an
account to assume the role.
New-IAMRole -RoleName Test-Federation-Role -AssumeRolePolicyDocument (Get-
Content -Raw C:\policies\trustpolicyforfederation.json)
# Attach a managed permissions policy to the role to specify what it is
allowed to do.
Register-IAMRolePolicy -RoleName Test-Federation-Role -PolicyArn
arn:aws:iam::aws:policy/PolicyForFederation
Creating a Role for Federated Access (IAM API)
Before you create the role, you must follow the steps in the Prerequisites section for the type of
provider you are using:
• For an OIDC provider, follow the steps in Prerequisites for an OIDC provider (p. 182).
• For a SAML provider, follow the steps in Prerequisites for a SAML provider (p. 186).
To create a role for identity federation using the IAM API
Use the following commands:
• To create a role: CreateRole
• To attach an access policy to the role:
AttachRolePolicy to attach an existing managed policy
or
PutRolePolicy to create an inline policy
Creating a Role for Web Identity or OpenID Connect Federation (AWS
Management Console)
Before you can create a role for web identity federation, you must first complete the following
prerequisite steps.
To prepare to create a role for web identity federation
1. Begin by signing up as a developer with an IdP (or more than one). You also configure your
app with the provider; when you do, the provider gives you an application or audience ID that's
unique to your app. (Providers use different terminology for this process. This guide uses the term
configure for the process of identifying your app with the provider.) Each provider gives you an
app ID that's unique to that provider, so if you configure the same app with multiple providers, your
app will have multiple app IDs. You can configure multiple apps with each provider. The following
external links provide information about using one of the identity providers:
•Login with Amazon Developer Center
•Add Facebook Login to Your App or Website on the Facebook developers site.
182

AWS Identity and Access Management User Guide
Creating Roles
•Using OAuth 2.0 for Login (OpenID Connect) on the Google developers site.
2. After getting the required information from the identity provider, you can create an identity provider
in IAM. For more information, see Creating OpenID Connect (OIDC) Identity Providers (p. 143).
3. Prepare the policies for the role that the IdP-authenticated users will assume. As with any role, a
role for the mobile app contains two policies. One is the trust policy that specifies who can assume
the role (the trusted entity or principal). The other policy (the access policy) specifies the actual
AWS actions and resources that the mobile app is allowed or denied access to (similar to user or
resource policies).
For web identity providers, we recommend that you use Amazon Cognito to manage identities. In
that case, the trust policy for the role must include a Statement similar to the following:
{
"Version": "2012-10-17",
"Statement": {
"Effect": "Allow",
"Principal": {"Federated": "cognito-identity.amazonaws.com"},
"Action": "sts:AssumeRoleWithWebIdentity",
"Condition": {
"StringEquals": {"cognito-identity.amazonaws.com:aud": "us-
east-1:12345678-abcd-abcd-abcd-123456"},
"ForAnyValue:StringLike": {"cognito-identity.amazonaws.com:amr":
"unauthenticated"}
}
}
}
Replace us-east-1:12345678-abcd-abcd-abcd-123456 with the actual identity pool ID that
Amazon Cognito assigned to you.
If you manually configure a web identity IdP, then the trust policy must grant an Allow effect for
the sts:AssumeRoleWithWebIdentity action. In this role, you use two values that ensure that
only your application can assume the role:
• For the Principal element, use the string {"Federated":providerUrl}. For OpenID
Connect (OIDC) IdPs, the providerUrl is the fully qualified URL of the OIDC identity
provider (p. 133) that you created in Step 2 (p. 183). The following are acceptable ways to
specify the principal for some common IdPs:
"Principal":{"Federated":"cognito-identity.amazonaws.com"}
"Principal":{"Federated":"www.amazon.com"}
"Principal":{"Federated":"graph.facebook.com"}
"Principal":{"Federated":"accounts.google.com"}
• In the Condition element, use a StringEquals condition to test whether the identity pool
ID (for Amazon Cognito) or the app ID—also known as the client ID or audience—(for other
providers) in the request matches the app ID that you got when you configured the app with
the IdP. This ensures the request is coming from your app. In the Condition element of the
policy, you can test the app ID you have against the following policy variables; which one you
use depends on the IdP you are using:
"Condition": {"StringEquals": {"cognito-identity.amazonaws.com:aud":
"us-east:12345678-ffff-ffff-ffff-123456"}}
"Condition": {"StringEquals": {"www.amazon.com:app_id":
"amzn1.application-oa2-123456"}}
183

AWS Identity and Access Management User Guide
Creating Roles
"Condition": {"StringEquals": {"graph.facebook.com:app_id":
"111222333444555"}}
"Condition": {"StringEquals": {"accounts.google.com:aud":
"666777888999000"}}
For OIDC providers, use the fully qualified URL of the OIDC IdP with the aud context key, like
the following example:
"Condition": {"StringEquals": {"server.example.com:aud":
"appid_from_oidc_idp"}}
Notice that the values for the principal in the role are specific to an IdP. A role can specify only one
principal. Therefore, if the mobile app allows users to sign in from more than one IdP, you must
create a role for each IdP that you want to support.
Note
Because the policy for the trusted entity uses policy variables that represent the IdP
and the app ID, you must set the policy's Version element to 2012-10-17 or a later
supported version.
The following example shows a trust policy for a role designed for a mobile app if the user signs in
from Login with Amazon. In the example, amzn1.application-oa2-123456 represents the app
ID that Amazon assigned when you configured the app using Login with Amazon.
{
"Version": "2012-10-17",
"Id": "RoleForLoginWithAmazon",
"Statement": [{
"Effect": "Allow",
"Principal": {"Federated": "www.amazon.com"},
"Action": "sts:AssumeRoleWithWebIdentity",
"Condition": {"StringEquals": {"www.amazon.com:app_id":
"amzn1.application-oa2-123456"}}
}]
}
The following example shows a policy for a role that the mobile app could assume if the user has
signed in from Facebook. In this example, 111222333444555 represents the app ID assigned by
Facebook.
{
"Version": "2012-10-17",
"Id": "RoleForFacebook",
"Statement": [{
"Effect": "Allow",
"Principal": {"Federated": "graph.facebook.com"},
"Action": "sts:AssumeRoleWithWebIdentity",
"Condition": {"StringEquals": {"graph.facebook.com:app_id":
"111222333444555"}}
}]
}
The following example shows a policy for a role that the mobile app could assume if the user has
signed in from Google. In this example, 666777888999000 represents the app ID assigned by
Google.
184

AWS Identity and Access Management User Guide
Creating Roles
{
"Version": "2012-10-17",
"Id": "RoleForGoogle",
"Statement": [{
"Effect": "Allow",
"Principal": {"Federated": "accounts.google.com"},
"Action": "sts:AssumeRoleWithWebIdentity",
"Condition": {"StringEquals": {"accounts.google.com:aud":
"666777888999000"}}
}]
}
The following example shows a policy for a role that the mobile app could assume if the
application is using Amazon Cognito. In this example, us-east:12345678-ffff-ffff-
ffff-123456 represents the identity pool ID assigned by Amazon Cognito.
{
"Version": "2012-10-17",
"Id": "RoleForCognito",
"Statement": [{
"Effect": "Allow",
"Principal": {"Federated": "cognito-identity.amazonaws.com"},
"Action": "sts:AssumeRoleWithWebIdentity",
"Condition": {"StringEquals": {"cognito-identity.amazonaws.com:aud":
"us-east:12345678-ffff-ffff-ffff-123456"}}
}]
}
After you complete the prerequisites, you can create the role itself. The following procedure
describes how to create the role for web identity/OIDC federation in the AWS Management
Console. To create a role using the AWS CLI, Tools for Windows PowerShell, or AWS API, see
the procedures at Creating a Role for a Third-Party Identity Provider (Federation) (p. 180).
To create an IAM role for web identity federation (IAM console)
If you are using Amazon Cognito, you should use the Amazon Cognito console to set up the roles.
Otherwise, use the IAM console to create a role for web identity federation.
1. Open the Identity and Access Management (IAM) console at https://console.aws.amazon.com/
iam/.
2. In the navigation pane, click Roles and then click Create New Role.
3. For Role Name, type a role name that can help you identify the purpose of this role. Role names
must be unique within your AWS account. Because various entities might reference the role, you
cannot edit the name of the role after you create it. After you type the name, click Next Step at the
bottom of the page.
Important
Role names must be unique within an account. They are not distinguished by case, for
example, you cannot create roles named both "PRODROLE" and "prodrole".
4. Select Role for Identity Provider Access and then click the Select button for Grant access to
web identity providers.
5. In the Identity Provider list, select the identity provider that you're creating the role for:
• Select Amazon Cognito if you're creating a role for Amazon Cognito.
185

AWS Identity and Access Management User Guide
Creating Roles
Note
You only need to manually create a role for use with Amazon Cognito when you are
working on an advanced scenario. Otherwise, Amazon Cognito can create roles for
you for standard scenarios. For more information about Amazon Cognito, see Amazon
Cognito Identity in the AWS Mobile SDK for iOS Developer Guide and Amazon Cognito
Identity in the AWS Mobile SDK for Android Developer Guide.
• If you're creating a role for an individual web identity provider, select the name of the provider.
Note
You must create a separate role for each identity provider that you want to support.
6. Enter the application ID that identifies your application. The name of the box for the ID changes
depending on which provider you select.
• If you're creating a role for Amazon Cognito, enter the ID of the identity pool you have created
for your Amazon Cognito applications into the Identity Pool ID box.
• If you're creating a role for an individual web identity provider, enter or select the client ID that
the provider gave you when you registered your application with the provider.
7. (Optional) Click Add Conditions to create additional conditions that must be met before users
of your application can use the permissions granted by the role. For example, you can add a
condition that grants access to AWS resources only for a specific user ID.
8. Click Next Step to review the role's Trust Policy Document and then click Next Step.
9. Select the managed policy that assigns the permissions that you want the federated users to have,
and then click Next Step.
10. Review the role and then click Create Role.
Creating a Role for SAML 2.0 Federation (AWS Management Console)
By using identity federation, you can provide access to AWS resources for users who sign in using
a third-party identity provider (IdP). To configure identity federation, you configure the provider and
then you create an IAM role that determines what permissions a federated user will have. For more
information about federation and identity providers, see Identity Providers and Federation (p. 132).
The role-creation wizard in the IAM console provides two paths. One path is for creating a role for
single sign-on (SSO) to the AWS Management Console. The other path is for creating a role that can
be assumed programmatically. The following procedures describes both paths. The roles created
by both are similar, but the path for SSO creates a role whose trust policy includes a condition that
explicitly ensures that the SAML audience (aud attribute) is set to the AWS sign-in endpoint for SAML
(https://signin.aws.amazon.com/saml).
Before you can create a role for SAML 2.0 federation, you must first complete the following prerequisite
steps:
To prepare to create a role for SAML 2.0 federation
1. Before you create a role for SAML-based federation, you must create a SAML provider in IAM. For
more information, see Creating SAML Identity Providers (p. 148).
2. Prepare the policies for the role that the SAML 2.0–authenticated users will assume. As with any
role, a role for the SAML federation contains two policies. One is the trust policy that specifies who
can assume the role (the trusted entity, or principal). The other policy (the access policy) specifies
the actual AWS actions and resources that the federated user is allowed or denied access to
(similar to a user or resource policy).
For SAML 2.0 providers, the policy must include a Statement element similar to the following:
The trust policy must grant an Allow effect for the sts:AssumeRoleWithSAML action. In this
role, you use two values that ensure that the role can be assumed only by your application:
186

AWS Identity and Access Management User Guide
Creating Roles
• For the Principal element, use the string {"Federated":ARNofIdentityProvider}.
Replace ARNofIdentityProvider with the ARN of the SAML identity provider (p. 138) that
you created in Step 1 (p. 186).
• For the Condition element, use a StringEquals condition to test that the saml:aud attribute
from the SAML response an matches the SAML federation endpoint for AWS.
Note
Because the policy for the trusted entity uses policy variables that represent values in the
SAML response, you must set the policy's Version element to 2012-10-17 or a later
supported version.
The following example shows a trust policy for a role designed for a SAML federated user:
{
"Version": "2012-10-17",
"Statement": {
"Effect": "Allow",
"Action": "sts:AssumeRoleWithSAML",
"Principal": {"Federated": "arn:aws:iam::ACCOUNT-ID-WITHOUT-
HYPHENS:saml-provider/PROVIDER-NAME"},
"Condition": {"StringEquals": {"SAML:aud": "https://
signin.aws.amazon.com/saml"}}
}
}
Replace the principal ARN with the actual ARN for the SAML provider that you created in IAM. It
will have your own account ID and the actual provider name.
After completing the prerequisite steps, you can create the role itself.
To create a role for SAML-based federation using the IAM console
1. Make sure you've created a SAML provider in IAM, as described in About SAML 2.0-based
Federation (p. 138).
2. In the navigation pane of the console, click Roles and then click Create New Role.
3. For Role Name, type a role name that can help you identify the purpose of this role. Role names
must be unique within your AWS account. After you type the name, click Next Step at the bottom
of the page.
Because various entities might reference the role, you cannot edit the name of the role after it has
been created.
Important
Role names must be unique within an account. They are not distinguished by case, for
example, you cannot create roles named both "PRODROLE" and "prodrole".
4. Click Role for Identity Provider Access.
5. Select the type of role that you're creating: Grant Web Single Sign-On (SSO) access to SAML
identity providers or Grant API access to SAML identity providers.
6. In the SAML Provider list, select the provider that you're creating the role for.
7. If you're creating a role for API access, select an attribute from the Attribute list. Then in the
Value box, type a value that will be included in the role. This restricts access to the role to users
from the identity provider whose SAML authentication response (assertion) includes the attributes
you select. You must specify at least one attribute, which ensures that your role is scoped to a
subset of users at your organization.
187

AWS Identity and Access Management User Guide
Creating Roles
If you're creating a role for SAML single sign-on, the SAML:aud attribute is automatically added
and set to the URL of the AWS SAML endpoint (https://signin.aws.amazon.com/saml).
8. To add more attribute-related conditions to the trust policy, click Add Conditions, select the
additional condition, specify a value, and then click Add Condition.
The list displays a selected set of the most commonly used SAML attributes. IAM supports
additional attributes that you can use to create conditions. (For a list of the supported attributes,
see Available Keys for SAML Federation in the topic IAM Policy Elements Reference (p. 346).)
If you need to create a condition for a supported SAML attribute that's not displayed in the list, you
can manually add that condition in the next step.
9. Click Next Step. The wizard displays the trust policy for the role in an editable box. The policy
includes the condition or conditions based on what you entered.
10. When you've reviewed the policy and finished making any changes, click Next Step again.
11. By default, roles have no permissions. Select the managed policy that assigns the permissions
that you want the federated users to have, and then click Next Step.
12. Review the role and then click Create Role.
After you create the role, you complete the SAML trust by configuring your identity provider software
with information about AWS and the role(s) that you want your federated users to use. This is referred
to as configuring relying party trust between your IdP and AWS. For more information, see Configuring
your SAML 2.0 IdP with Relying Party Trust and Adding Claims (p. 150).
Examples of Policies for Delegating Access
The following examples show how you can allow or grant an AWSaccount access to the resources in
another AWS account.
Topics
•Using Roles to Delegate Access to Another AWS Account's Resources (p. 188)
•Using a Policy to Delegate Access To Services (p. 188)
•Using a Resource-based Policy to Delegate Access to an Amazon S3 Bucket in Another
Account (p. 189)
•Using a Resource-based Policy to Delegate Access to an Amazon SQS Queue in Another
Account (p. 190)
•Cannot Delegate Access When the Account is Denied Access (p. 191)
Using Roles to Delegate Access to Another AWS Account's Resources
For a complete walkthrough that shows how to use IAM roles to grant users in one account access
to AWS resources that are in another account, see Tutorial: Delegate Access Across AWS Accounts
Using IAM Roles (p. 23).
Using a Policy to Delegate Access To Services
The following example shows a policy that can be attached to a role. The policy enables two services,
Amazon EMR and AWS Data Pipeline, to assume the role. The services can then perform any tasks
granted by the permissions policy assigned to the role (not shown). Note that to specify multiple service
principals, you do not specify two Service elements; you can have only one. Instead, you use an
array of multiple service principals as the value of a single Service element.
{
"Version": "2012-10-17",
"Statement": [
188

AWS Identity and Access Management User Guide
Creating Roles
{
"Effect": "Allow",
"Principal": {
"Service": [
"elasticmapreduce.amazonaws.com",
"datapipeline.amazonaws.com"
]
},
"Action": "sts:AssumeRole"
}
]
}
Using a Resource-based Policy to Delegate Access to an Amazon S3
Bucket in Another Account
In this example, account A uses a resource-based policy (an Amazon S3 bucket policy) to grant
account B full access to account A's S3 bucket. Then account B creates an IAM user policy to delegate
that access to account A's bucket to one of the users in account B.
The S3 bucket policy in account A might look like the following policy. In this example, account A's S3
bucket is named mybucket, and account B's account number is 111122223333. It does not specify any
individual users or groups in account B, only the account itself.
{
"Version": "2012-10-17",
"Statement": {
"Sid": "AccountBAccess1",
"Effect": "Allow",
"Principal": {"AWS": "111122223333"},
"Action": "s3:*",
"Resource": [
"arn:aws:s3:::mybucket",
"arn:aws:s3:::mybucket/*"
]
}
}
Alternatively, account A can use Amazon S3 Access Control Lists (ACLs) to grant account B access
to an S3 bucket or a single object within a bucket. In that case, the only thing that changes is how
account A grants access to account B. Account B still uses a policy to delegate access to an IAM group
in account B, as described in the next part of this example. For more information about controlling
access on S3 buckets and objects, go to Access Control in the Amazon Simple Storage Service
Developer Guide.
The following policy sample completes the example above and shows the IAM group (or user) policy
that the administrator of account B might create to delegate read access to a group or user in account
B. Even though the policy above grants access to account B, individual groups and users in account
B cannot access the resource until a group or user policy explicitly grants permissions to the resource.
The permissions in this policy can only be a subset of those in the cross-account policy above. Account
B cannot grant more permissions to its groups and users than account A granted to account B in the
first policy. In this policy, the Action element is explicitly defined to allow only List actions, and the
Resource element of this policy matches the Resource for the bucket policy implemented by account
A.
To implement this policy account B uses IAM to attach it to the appropriate user (or group) in account
B.
189

AWS Identity and Access Management User Guide
Creating Roles
{
"Version": "2012-10-17",
"Statement": {
"Effect": "Allow",
"Action": "s3:List*",
"Resource": [
"arn:aws:s3:::mybucket",
"arn:aws:s3:::mybucket/*"
]
}
}
Using a Resource-based Policy to Delegate Access to an Amazon SQS
Queue in Another Account
In the following example, account A has an Amazon SQS queue that uses a resource-based policy
attached to the queue to grant queue access to account B. Then account B uses an IAM group policy
to delegate access to a group in account B.
The following example queue policy gives account B permission to perform the SendMessage and
ReceiveMessage actions on account A's queue named queue1, but only between noon and 3:00 p.m.
on November 30, 2014. Account B's account number is 1111-2222-3333. Account A uses Amazon
SQS to implement this policy.
{
"Version": "2012-10-17",
"Statement": {
"Effect": "Allow",
"Principal": {"AWS": "111122223333"},
"Action": [
"sqs:SendMessage",
"sqs:ReceiveMessage"
],
"Resource": ["arn:aws:sqs:*:123456789012:queue1"],
"Condition": {
"DateGreaterThan": {"aws:CurrentTime": "2014-11-30T12:00Z"},
"DateLessThan": {"aws:CurrentTime": "2014-11-30T15:00Z"}
}
}
}
Account B's policy for delegating access to a group in account B might look like the following example.
Account B uses IAM to attach this policy to a group (or user).
{
"Version": "2012-10-17",
"Statement": {
"Effect": "Allow",
"Action": "sqs:*",
"Resource": "arn:aws:sqs:*:123456789012:queue1"
}
}
In the preceding IAM user policy example, account B uses a wildcard to grant its user access to all
Amazon SQS actions on account A's queue. But, because account B can delegate access only to the
extent that account B has been granted access, the account B group that has the second policy can
190

AWS Identity and Access Management User Guide
Using Roles
access the queue only between noon and 3:00 p.m. on November 30, 2014, and the user can only
perform the SendMessage and ReceiveMessage actions, as defined in account A's Amazon SQS
queue policy.
Cannot Delegate Access When the Account is Denied Access
By default, other AWS accounts and their users cannot access your AWS account resources. But if
you use a policy to explicitly deny an AWS account access to your resources, the deny propagates
to the users under that account whether or not the users have existing policies granting them access.
This means that an AWS account cannot delegate access to another account's resources if the other
account has explicitly denied access to the user's parent account.
For example, account A writes a bucket policy on account A's S3 bucket that explicitly denies account
B access to account A's bucket. But account B writes an IAM user policy that grants a user in account
B access to account A's bucket. The explicit deny applied to account A's S3 bucket propagates to the
users in account B and overrides the IAM user policy granting access to the user in account B. (For
detailed information how permissions are evaluated, see IAM Policy Evaluation Logic (p. 381).)
Account A's bucket policy might look like the following policy. In this example, account A's S3 bucket is
named mybucket, and account B's account number is 1111-2222-3333. Account A uses Amazon S3 to
implement this policy.
{
"Version": "2012-10-17",
"Statement": {
"Sid": "AccountBDeny",
"Effect": "Deny",
"Principal": {"AWS": "111122223333"},
"Action": "s3:*",
"Resource": "arn:aws:s3:::mybucket/*"
}
}
To implement the following IAM user policy, account B uses IAM to attach it to the a user in account B.
{
"Version": "2012-10-17",
"Statement":{
"Effect":"Allow",
"Action":"s3:*",
"Resource":"arn:aws:s3:::mybucket/*"
}
}
Account A's bucket policy explicitly denies account B access to mybucket. Because you only delegate
a subset of permissions that have been granted to you, account B's IAM user policy granting the user
in account B access to account A's bucket has no effect. The user in account B cannot access account
A's bucket.
Using IAM Roles
Before an IAM user, application, or service can use a role that you created, you must grant permissions
to switch to the role. You can use any policy attached to one of an IAM user's groups or to the user
itself to grant the necessary permissions. This section describes how to grant users permission to use
a role, and then how the user can switch to a role using the AWS Management Console, the Tools for
Windows PowerShell, the AWS Command Line Interface (AWS CLI) and the AssumeRole API.
191

AWS Identity and Access Management User Guide
Using Roles
Important
If you create a role programmatically instead of in the IAM console, then you have an option
to add a Path of up to 512 characters in addition to the RoleName, which can be up to 64
characters long. However, if you intend to use a role with the Switch Role feature in the AWS
console, then the combined Path and RoleName cannot exceed 64 characters.
Note
When using the AWS Management Console, you can switch roles only when signed in as an
IAM user. You cannot switch roles when signed in as the AWS account root user.
Topics
•Granting a User Permissions to Switch Roles (p. 192)
•Granting a User Permissions to Pass a Role to an AWS Service (p. 194)
•Switching to a Role (AWS Management Console) (p. 196)
•Switching to an IAM Role (AWS Command Line Interface) (p. 197)
•Switching to an IAM Role (Tools for Windows PowerShell) (p. 199)
•Switching to an IAM Role (API) (p. 200)
•Using an IAM Role to Grant Permissions to Applications Running on Amazon EC2
Instances (p. 202)
•Revoking IAM Role Temporary Security Credentials (p. 207)
Granting a User Permissions to Switch Roles
When you create a role for cross-account access (p. 167), you establish trust from the account that
owns the role and the resources (trusting account) to the account that contains the users (trusted
account). To do this, you specify the trusted account number as the Principal in the role's trust
policy. That allows potentially any user in the trusted account to assume the role. To complete the
configuration, the administrator of the trusted account must give specific groups or users in that
account permission to switch to the role.
To grant a user permission to switch to a role, you create a new policy for the user or edit an existing
policy to add the required elements. You can then send the users a link that takes the user to the
Switch Role page with all the details already filled in. Alternatively, you can provide the user with the
account ID number or account alias that contains the role and the role name. The user then goes to
the Switch Role page and adds the details manually. For details on how a user switches roles, see
Switching to a Role (AWS Management Console) (p. 196).
Note that you can switch roles only when you sign in as an IAM user. You cannot switch roles when
you sign in as the AWS account root user.
Note
This topic discusses policies for a user, because we are ultimately granting permissions to
a user to accomplish a task. However, it is best practice not to grant permissions directly to
an individual user (p. 41). For easier management, we recommend assigning policies and
granting permissions to IAM groups and then making the users members of the appropriate
groups.
Creating or Editing the Policy
A policy that grants a user permission to assume a role must include a statement with the Allow
effect on the sts:AssumeRole action and the Amazon Resource Name (ARN) of the role in a
Resource element, as shown in the following example. Users that get the policy (either through group
membership or directly attached) are allowed to switch to the specified role.
Note
Note that if Resource is set to *, the user can assume any role in any account that trusts
the user's account (the role's trust policy specifies the user's account as Principal). As a
192

AWS Identity and Access Management User Guide
Using Roles
best practice, we recommend that you follow the principle of least privilege and specify the
complete ARN for only the role(s) that the user needs.
The following example shows a policy that lets the user assume roles in only one account and
additionally specifies by wildcard (*) that the user can only switch to a role in that account if the role
name begins with the letters "Test" followed by any other combination of characters.
{
"Version": "2012-10-17",
"Statement": {
"Effect": "Allow",
"Action": "sts:AssumeRole",
"Resource": "arn:aws:iam::ACCOUNT-ID-WITHOUT-HYPHENS:role/Test*"
}
}
Note
The permissions that the role grants to the user do not add to the permissions already granted
to the user. When a user switches to a role, the user temporarily gives up his or her original
permissions in exchange for those granted by the role. When the user exits the role, then the
original user permissions are automatically restored. For example, if the user's permissions
allow working with Amazon EC2 instances, but the role's permissions policy does not grant
those permissions, then while using the role the user cannot work with Amazon EC2 instances
in the console, and temporary credentials obtained via AssumeRole do not work with Amazon
EC2 instances programmatically.
Providing Information to the User
After you create a role and grant your user permissions to switch to it, you must provide the user with
the role name and the account ID number or account alias that contains the role. You can make things
easier for your users by sending them a link that is preconfigured with the account ID and role name.
You can see the role link on the final page of the Create Role wizard or in the Role Summary page for
any cross-account enabled role.
Note
If you create the role with the AWS CLI , Tools for Windows PowerShell,or the AWS API, then
you can create the role with a path in addition to a name. If you do so, then you must provide
the complete path and role name to your users to type on the Switch Role page of the AWS
Management Console. For example: division_abc/subdivision_efg/role_XYZ.
Important
If you create the role programmatically instead of in the IAM console, then you have an option
to add a Path of up to 512 characters in addition to the RoleName, which can be up to 64
characters long. However, to use a role with the Switch Role feature in the AWS console, the
combined Path and RoleName cannot exceed 64 characters.
You can also use the following format to manually construct the link. Substitute your account ID or alias
and the role name for the two parameters in the request:
https://signin.aws.amazon.com/switchrole?
account=YourAccountIDorAliasHere&roleName=pathIfAny/YourRoleNameHere
We recommend that you direct your users to the topic Switching to a Role (AWS Management
Console) (p. 196) to step them through the process.
Note
For security purposes, you can use AWS CloudTrail to audit role switching. If CloudTrail
is turned on for the account, IAM logs actions that are performed with the role's temporary
security credentials. For more information, see CloudTrail Event Reference in the AWS
CloudTrail User Guide.
193

AWS Identity and Access Management User Guide
Using Roles
Granting a User Permissions to Pass a Role to an AWS
Service
To configure many AWS services, you must "pass" an IAM role to the service that defines what that
service can do on your behalf. For example, to provide applications running on an Amazon EC2
instance with AWS credentials, you pass a role to EC2 to use with the instance that provides those
credentials. You define what the credentials allow the applications running on the instance to do by
attaching an AWS Identity and Access Management (IAM) policy that grants the required permissions
to the role.
To pass a role (and its permissions) to an AWS service, a user must have permissions to "pass the
role" to the service. This helps administrators ensure that only approved users can configure a service
with a role that grants permissions. To allow a user to pass a role to an AWS service, you must grant
the PassRole permission to the user's IAM user, role, or group.
When a user passes a role ARN as a parameter to any API that uses the role to assign permissions to
the service, the service checks that the user performing the action has the iam:PassRole permission.
To limit the user to passing only approved roles, you can filter the iam:PassRole permission with the
Resources element of the IAM policy statement.
Example 1
Imagine that you want to grant a user the ability to pass any of an approved set of roles to the Amazon
EC2 service upon launching an instance. You need three elements:
• An IAM permissions policy attached to the role that determines what the role can do. Scope
permissions to only the actions that the role needs to perform, and to only the resources that the role
needs for those actions. You can use AWS-managed or customer-created IAM permissions policy.
{
"Version": "2012-10-17",
"Statement": {
"Effect": "Allow",
"Action": [ "A list of the permissions the role is allowed to
use" ],
"Resource": [ "A list of the resources the role is allowed to
access" ]
}
}
• A trust policy for the role that allows the service to assume the role. For example, you could attach
the following trust policy to the role with the UpdateAssumeRolePolicy action. This trust policy
allows Amazon EC2 to use the role and the permissions attached to the role.
{
"Version": "2012-10-17",
"Statement": {
"Sid":
"TrustPolicyStatementThatAllowsEC2ServiceToAssumeTheAttachedRole"
"Effect": "Allow",
"Principal": { "Service": "ec2.amazonaws.com" },
"Action": "sts:AssumeRole"
}
}
• An IAM permissions policy attached to the IAM user that allows the user to pass only those policies
that are approved. iam:PassRole usually is accompanied by iam:GetRole so that the user can
194

AWS Identity and Access Management User Guide
Using Roles
get the details of the role to be passed. In this example, the user can pass only roles with names that
begin with EC2-roles-for-XYZ-:
{
"Version": "2012-10-17",
"Statement": [{
"Effect": "Allow",
"Action": [
"iam:GetRole",
"iam:PassRole"
],
"Resource": "arn:aws:iam::*:role/EC2-roles-for-XYZ-*"
}],
}
Now the user can start an Amazon EC2 instance with an assigned role. Applications running on the
instance can access temporary credentials for the role through the instance profile metadata. The
permission policies attached to the role determine what the instance can do.
Example 2
Amazon Relational Database Service (Amazon RDS) supports a feature called Enhanced Monitoring,
which enables Amazon RDS to monitor a DB instance using an agent and report metrics toAmazon
CloudWatch logs. To allow a user to enable Enhanced Monitoring for databases in your organization,
you must configure Amazon RDS with an IAM role that it assumes, which grants it the permissions to
monitor and write metrics to your logs. If the user who is setting up Amazon RDS had permissions to
create roles and attach policies to them, the user could use the Enhanced Monitoring feature in the
Amazon RDS console to create the role on their behalf. However, in this example the user does not
have permissions to create roles, so you must create the role in advance. You can then grant that user
permissions "pass" that one role to Amazon RDS when enabling Enhanced Monitoring.
To create a role for Amazon RDS Enhanced Monitoring
1. Sign in to the Identity and Access Management (IAM) console at https://console.aws.amazon.com/
iam/.
2. Choose Roles, and then choose Create new role.
3. Type a name for the role, such as RDS-Monitoring-Role, and then choose Next step.
4. On the Select Role Type page, in the AWS Service Roles list, find Amazon RDS Role for
Enhanced Monitoring, and then choose Select.
5. On the Attach Policy page, select AmazonRDSEnhancedMonitoringRole, choose Next Step,
and then choose Create Role.
The role automatically gets a trust policy that grants the monitoring.rds.amazonaws.com service
permissions to assume the role. After it does, Amazon RDS can perform all of the actions allowed by
the AmazonRDSEnhancedMonitoringRole policy.
The user that you want to enable Enhanced Monitoring needs a policy that includes a statement that
allows the user to pass the role, like the following. Use your account number and replace the role name
with the name you provided in step 3:
{
"SID": "PolicyStatementToAllowUserToPassOneSpecificRole",
"Effect": "Allow",
"Action": [ "iam:PassRole" ],
"Resource": "arn:aws:iam:::role/RDS-Monitoring-Role"
195

AWS Identity and Access Management User Guide
Using Roles
}
You can combine this statement with statements in another policy or put it in its own policy. To instead
specify that the user can pass any role that begins with RDS-, you can replace the role name in the
resource ARN with a wildcard, for example:
"Resource": "arn:aws:iam:::role/RDS-*"
Switching to a Role (AWS Management Console)
A role specifies a set of permissions that you can use to access AWS resources that you need. In that
sense, it is similar to a user in AWS Identity and Access Management (IAM). When you sign in as a
user, you get a specific set of permissions. However, you don't sign in to a role, but once signed in you
can switch to a role. This temporarily sets aside your original user permissions and instead gives you
the permissions assigned to the role. The role can be in your own account or any other AWS account.
For more information about roles, their benefits, and how to create them, see IAM Roles (p. 124), and
Creating IAM Roles (p. 167).
Important
The permissions of your IAM user and any roles that you switch to are not cumulative. Only
one set of permissions is active at a time. When you switch to a role, you temporarily give up
your user permissions and work with the permissions that are assigned to the role. When you
exit the role, your user permissions are automatically restored.
This section describes how to use the IAM console to switch to a role:
• You can only switch roles when you sign in as an IAM user. You cannot switch roles if you sign in as
the AWS account root user.
• If your administrator provides you with a link, click the link and then skip to step Step 5 (p. 197) in
the following procedure. The link takes you to the appropriate web page and fills in the account ID (or
alias) and the role name for you.
Tip
You can manually construct the link yourself by using the following format:
https://signin.aws.amazon.com/switchrole?
account=account_id_number&roleName=role_name&displayName=text_to_display
Where your administrator provides the account_id_number and role_name to you. For
text_to_display, see the explanation in step 5 in the following procedure.
Important
If you create the role programmatically instead of in the IAM console, then you have an
option to add a Path of up to 512 characters in addition to the RoleName, which can be
up to 64 characters long. However, to use a role with the Switch Role feature in the AWS
console, the combined Path and RoleName cannot exceed 64 characters.
• You can manually switch roles using the information your administrator provides by using the
following procedure:
To switch to a role
1. Sign in to the AWS Management Console as an IAM user and open the IAM console at https://
console.aws.amazon.com/iam/.
2. In the IAM console, click your user name in the navigation bar in the upper right. It typically looks
like this: username@account_ID_number_or_alias.
3. For Identity, select Switch Role. If this is the first time selecting this option, a page appears with
more information. After reading it, click Switch Role. If you clear your browser cookies, this page
can appear again.
196

AWS Identity and Access Management User Guide
Using Roles
4. On the Switch Role page, type the account ID number or the account alias and the name of the
role that was provided by your administrator.
Note
If your administrator created the role with a path, such as division_abc/
subdivision_efg/roleToDoXYZ, then you must type that complete path and name in
the Role box. If you type only the role name, the attempt to switch role fails.
Important
If you create the role programmatically instead of in the IAM console, then you have an
option to add a Path of up to 512 characters in addition to the RoleName, which can be
up to 64 characters long. However, to use a role with the Switch Role feature in the IAM
console, the combined Path and RoleName cannot exceed 64 characters. This is a limit
of the browser cookies that store the role name.
5. (Optional) Type text that you want to appear in the navigation bar in place of your user name when
this role is active. A name is suggested, based on the account and role information, but you can
change it to whatever has meaning for you. You can also select a color to highlight the display
name. The name and color can help remind you when this role is active, which changes your
permissions. For example, for a role that gives you access to the test environment, you might
specify a Display Name of Test and select the green Display Color. For the role that gives you
access to production, you might specify a Display Name of Production and select red as the
Display Color.
6. Click Switch Role. The display name and color replace your user name in the navigation bar, and
you can start using the permissions that the role grants you.
Tip
The last several roles that you used appear on the Identity menu. The next time you need to
switch to one of those roles, you can simply click the desired role. You only need to enter the
account and role information manually if the role is not displayed on the Identity menu.
To stop using a role
1. In the IAM console, select your role's Display Name on the right side of the navigation bar.
2. Select Back to UserName. The role and its permissions are deactivated, and the permissions
associated with your IAM user and groups are automatically restored.
Switching to an IAM Role (AWS Command Line Interface)
A role specifies a set of permissions that you can use to access AWS resources that you need. In that
sense, it is similar to a user in AWS Identity and Access Management (IAM). When you sign in as a
user, you get a specific set of permissions. However, you don't sign in to a role, but once signed in as
a user you can switch to a role. This temporarily sets aside your original user permissions and instead
gives you the permissions assigned to the role. The role can be in your own account or any other AWS
account. For more information about roles, their benefits, and how to create and configure them, see
IAM Roles (p. 124), and Creating IAM Roles (p. 167).
Important
The permissions of your IAM user and any roles that you switch to are not cumulative. Only
one set of permissions is active at a time. When you switch to a role, you temporarily give up
your user permissions and work with the permissions that are assigned to the role. When you
exit the role, your user permissions are automatically restored.
You can run an AWS CLI command using a role only when you are signed in as an IAM user, as an
the section called “Identity Providers and Federation” (p. 132) (the section called “About SAML 2.0
Federation” (p. 138) or the section called “About Web Identity Federation” (p. 133)) already using
a role, or when run from within an Amazon EC2 instance that is attached to a role through its instance
profile. You cannot switch to a role when you are signed in as the AWS account root user.
197

AWS Identity and Access Management User Guide
Using Roles
This section describes how to switch roles when you work at the command line with the AWS
Command Line Interface.
Imagine that you have an IAM user for working in the development environment and you occasionally
need to work with the production environment at the command line with the AWS CLI. You already
have an access key credential set available to you. This can be the access key pair assigned to your
standard IAM user; or, if you signed-in as a federated user, it can be the access key pair for the role
initially assigned to you. If your current permissions grant you the ability to assume a specific role,
then you can identify that role in a "profile" in the AWS CLI configuration files. That command is then
run with the permissions of the specified role, not the original identity. Note that when you specify that
profile, and thus use the new role, in an AWS CLI command, you cannot make use of your original
permissions in the development account at the same time because only one set of permissions can be
in effect at a time.
Note
For security purposes, you can use AWS CloudTrail to audit the use of roles in the account.
To identify a role's actions in CloudTrail logs, you can use the role session name. When
the AWS CLI assumes a role on a user's behalf as described in this topic, a role session
name is automatically created as AWS-CLI-session-nnnnnnnn, where nnnnnnnn is an
integer that represents the time in Unix epoch time (the number of seconds since midnight
UTC on January 1, 1970). For more information, see CloudTrail Event Reference in the AWS
CloudTrail User Guide.
To switch to a role using the AWS CLI
1. Open a command prompt and configure your default profile to use the access key from your IAM
user or from your federated role. If you have previously used the AWS CLI, then is likely already
done.
$ aws configure
AWS Access Key ID [None]: AKIAIOSFODNN7EXAMPLE
AWS Secret Access Key [None]: wJalrXUtnFEMI/K7MDENG/bPxRfiCYEXAMPLEKEY
Default region name [None]: us-west-2
Default output format [None]: json
For more information, see Configuring the AWS Command Line Interface in the AWS Command
Line Interface User Guide.
2. Create a new profile for the role in the .aws/config file. The following example creates a profile
called "prodaccess" that switches to the role ProductionAccessRole in the 123456789012
account. You get the role ARN from the account administrator who created the role. When
this profile is invoked, the AWS CLI uses the credentials of the source_profile to request
credentials for the role. Because of that, the identity referenced as the source_profile must
have sts:AssumeRole permissions to the role specified in the role_arn.
[profile prodaccess]
role_arn = arn:aws:iam::123456789012:role/ProductionAccessRole
source_profile = default
3. After you create the new profile, any AWS CLI command that specifies the parameter --profile
prodaccess runs under the permissions attached to the IAM role ProductionAccessRole instead
of the default user.
aws iam list-users --profile productionaccess
This command works if the permissions assigned to the ProductionAccessRole enable listing
the users in the current AWS account.
198

AWS Identity and Access Management User Guide
Using Roles
4. To return to the permissions granted by your original credentials, run commands without the --
profile parameter. The AWS CLI reverts to using the credentials in your default profile, which
you configured in Step 1 (p. 198).
For more information, see Assuming a Role in the AWS Command Line Interface User Guide.
Switching to an IAM Role (Tools for Windows PowerShell)
A role specifies a set of permissions that you can use to access AWS resources that you need. In that
sense, it is similar to a user in AWS Identity and Access Management (IAM). When you sign in as a
user, you get a specific set of permissions. However, you don't sign in to a role, but once signed in
you can switch to a role. This temporarily sets aside your original user permissions and instead gives
you the permissions assigned to the role. The role can be in your own account or any other AWS
account. For more information about roles, their benefits, and how to create and configure them, see
IAM Roles (p. 124), and Creating IAM Roles (p. 167).
Important
The permissions of your IAM user and any roles that you switch to are not cumulative. Only
one set of permissions is active at a time. When you switch to a role, you temporarily give up
your user permissions and work with the permissions that are assigned to the role. When you
exit the role, your user permissions are automatically restored.
This section describes how to switch roles when you work at the command line with the AWS Tools for
Windows PowerShell.
Imagine that you have an account in the development environment and you occasionally need to
work with the production environment at the command line using the Tools for Windows PowerShell.
You already have one access key credential set available to you. These can be an access key pair
assigned to your standard IAM user; or, if you signed-in as a federated user, they can be the access
key pair for the role initially assigned to you. You can use these credentials to run the Use-STSRole
cmdlet that passes the ARN of a new role as a parameter. The command returns temporary security
credentials for the requested role. You can then use those credentials in subsequent PowerShell
commands with the role's permissions to access resources in production. While you use the role,
you cannot make use of your user privileges in the Development account because only one set of
permissions can be in effect at a time.
Note
For security purposes, you can use AWS CloudTrail to audit the use of roles in the account.
The cmdlet Use-STSRole must include a -RoleSessionName parameter with a value
between 2 and 64 characters long that can include letters, numbers, and the =,.@-
characters. The role session name identifies actions in CloudTrail logs that are performed with
the temporary security credentials. For more information, see CloudTrail Event Reference in
the AWS CloudTrail User Guide.
Note that all access keys and tokens are examples only and cannot be used as shown. Replace with
the appropriate values from your live environment.
To switch to a role from the Tools for Windows PowerShell
1. Open a PowerShell command prompt and configure the default profile to use the access key
from your current IAM user or from your federated role. If you have previously used the Tools for
Windows PowerShell , then this is likely already done. Note that you can switch roles only if you
are signed in as an IAM user, not the AWS account root user.
PS C:\> Set-AWSCredentials -AccessKey AKIAIOSFODNN7EXAMPLE
-SecretKey wJalrXUtnFEMI/K7MDENG/bPxRfiCYEXAMPLEKEY -
StoreAs MyMainUserProfile
PS C:\> Initialize-AWSDefaults -ProfileName MyMainUserProfile -Region us-
west-2
199

AWS Identity and Access Management User Guide
Using Roles
For more information, see Using AWS Credentials in the AWS Tools for Windows PowerShell
User Guide.
2. To retrieve credentials for the new role, run the following command to switch to the RoleName
role in the 123456789012 account. You get the role ARN from the account administrator who
created the role. The command requires that you provide a session name as well. You can
choose any text for that. The following command requests the credentials and then captures
the Credentials property object from the returned results object and stores it in the $Creds
variable.
$Creds = (Use-STSRole -RoleArn "arn:aws:iam::123456789012:role/RoleName" -
RoleSessionName "MyRoleSessionName").Credentials
$Creds is an object that now contains the AccessKeyId, SecretAccessKey, and
SessionToken elements that you need in the following steps. The following sample commands
illustrate typical values:
PS C:\> $Creds.AccessKeyId
AKIAIOSFODNN7EXAMPLE
PS C:\> $Creds.SecretAccessKey
wJalrXUtnFEMI/K7MDENG/bPxRfiCYEXAMPLEKEY
PS C:\> $Creds.SessionToken
AQoDYXdzEGcaEXAMPLE2gsYULo
+Im5ZEXAMPLEeYjs1M2FUIgIJx9tQqNMBEXAMPLECvSRyh0FW7jEXAMPLEW+vE/7s1HRp
XviG7b+qYf4nD00EXAMPLEmj4wxS04L/uZEXAMPLECihzFB5lTYLto9dyBgSDyEXAMPLE9/
g7QRUhZp4bqbEXAMPLENwGPy
Oj59pFA4lNKCIkVgkREXAMPLEjlzxQ7y52gekeVEXAMPLEDiB9ST3UuysgsKdEXAMPLE1TVastU1A0SKFEXAMPLEiywCC/
C
s8EXAMPLEpZgOs+6hz4AP4KEXAMPLERbASP+4eZScEXAMPLEsnf87eNhyDHq6ikBQ==
PS C:\> $Creds.Expiration
Thursday, June 18, 2015 2:28:31 PM
3. To use these credentials for any subsequent command, include them with the -Credentials
parameter. For example, the following command uses the credentials from the role and works only
if the role is granted the iam:ListRoles permission and can therefore run the Get-IAMRoles
cmdlet:
get-iamroles -Credential $Creds
4. To return to your original credentials, simply stop using the -Credentials $Creds parameter
and allow PowerShell to revert to the credentials that are stored in the default profile.
Switching to an IAM Role (API)
A role specifies a set of permissions that you can use to access AWS resources that you need. In that
sense, it is similar to a user in AWS Identity and Access Management (IAM). An application assumes a
role to receive permissions to carry out required tasks and interact with AWS resources. The role can
be in your own account or any other AWS account. For more information about roles, their benefits,
and how to create and configure them, see IAM Roles (p. 124), and Creating IAM Roles (p. 167).
This section describes how to switch roles from within code that uses the AWS API.
200

AWS Identity and Access Management User Guide
Using Roles
Note that all access keys and tokens are examples only and cannot be used as shown. Replace with
the appropriate values from your live environment.
To assume a role, an application calls the AWS STS AssumeRole API and passes the ARN of the
role to use. The AssumeRole API returns a set of temporary security credentials that you can use
in subsequent AWS API calls to access resources in the account that owns the role. The temporary
credentials have whatever permissions are defined in the role's access policy. The call to AssumeRole
can optionally pass a supplemental policy that can further restrict (filter) the permissions of the
temporary security credentials that the AssumeRole API returns. You can call AssumeRole only IAM
user or IAM role credentials. You cannot call AssumeRole with the credentials of the AWS account
root user.
Note
For security purposes, you can use AWS CloudTrail to audit the use of roles in the account.
The call to AssumeRole must include a role session name between 2 and 64 characters long
that can include letters, numbers, and the =,.@- characters. The role session name is used in
CloudTrail logs to identify actions performed by the temporary security credentials. For more
information, see CloudTrail Event Reference in the AWS CloudTrail User Guide.
The following example in Python using the Boto3 interface to AWS (AWS SDK for Python (Boto)
V3) shows how to call AssumeRole and how to use the temporary security credentials returned by
AssumeRole to list all Amazon S3 buckets in the account that owns the role.
import boto3
# The calls to AWS STS AssumeRole must be signed with the access key ID
# and secret access key of an existing IAM user or by using existing
temporary
# credentials such as those from antoher role. (You cannot call AssumeRole
# with the access key for the root account.) The credentials can be in
# environment variables or in a configuration file and will be discovered
# automatically by the boto3.client() function. For more information, see
the
# Python SDK documentation:
# http://boto3.readthedocs.org/en/latest/guide/sqs.html
# create an STS client object that represents a live connection to the
# STS service
sts_client = boto3.client('sts')
# Call the assume_role method of the STSConnection object and pass the role
# ARN and a role session name.
assumedRoleObject = sts_client.assume_role(
RoleArn="arn:aws:iam::account-of-role-to-assume:role/name-of-role",
RoleSessionName="AssumeRoleSession1"
)
# From the response that contains the assumed role, get the temporary
# credentials that can be used to make subsequent API calls
credentials = assumedRoleObject['Credentials']
# Use the temporary credentials that AssumeRole returns to make a
# connection to Amazon S3
s3_resource = boto3.resource(
's3',
aws_access_key_id = credentials['AccessKeyId'],
aws_secret_access_key = credentials['SecretAccessKey'],
aws_session_token = credentials['SessionToken'],
)
201

AWS Identity and Access Management User Guide
Using Roles
# Use the Amazon S3 resource object that is now configured with the
# credentials to access your S3 buckets.
for bucket in s3_resource.buckets.all():
print(bucket.name)
Using an IAM Role to Grant Permissions to Applications
Running on Amazon EC2 Instances
Applications that run on an EC2 instance must include AWS credentials in their AWS API requests.
You could have your developers store AWS credentials directly within the EC2 instance and allow
applications in that instance to use those credentials. But developers would then have to manage the
credentials and ensure that they securely pass the credentials to each instance and update each EC2
instance when it's time to rotate the credentials. That's a lot of additional work.
Instead, you can and should use an IAM role to manage temporary credentials for applications that
run on an EC2 instance. When you use a role, you don't have to distribute long-term credentials to
an EC2 instance. Instead, the role supplies temporary permissions that applications can use when
they make calls to other AWS resources. When you launch an EC2 instance, you specify an IAM role
to associate with the instance. Applications that run on the instance can then use the role-supplied
temporary credentials to sign API requests.
Using roles to grant permissions to applications that run on EC2 instances requires a bit of extra
configuration. An application running on an EC2 instance is abstracted from AWS by the virtualized
operating system. Because of this extra separation, an additional step is needed to assign an AWS role
and its associated permissions to an EC2 instance and make them available to its applications. This
extra step is the creation of an instance profile that is attached to the instance. The instance profile
contains the role and can provide the role's credentials to an application that runs on the instance.
Those credentials can then be used in the application's API calls to access resources and to limit
access to only those resources that the role specifies. Note that only one role can be assigned to an
EC2 instance at a time, and all applications on the instance share the same role and permissions.
Using roles in this way has several benefits. Because role credentials are temporary and rotated
automatically, you don't have to manage credentials, and you don't have to worry about long-term
security risks. In addition, if you use a single role for multiple instances, you can make a change to that
one role and the change is propagated automatically to all the instances.
Important
A role is assigned to an EC2 instance when you launch it. It cannot be assigned to an
instance that is already running. If you need to add a role to an instance that is already
running, you can create an image of the instance, and then launch a new instance from the
image with the desired role assigned.
How Do Roles for EC2 Instances Work?
In the following figure, a developer runs an application on an EC2 instance that requires access to the
S3 bucket named photos. An administrator creates the Get-pics role. The role includes policies
that grant read permissions for the bucket and that allow the developer to launch the role with an EC2
instance. When the application runs on the instance, it can use the role's temporary credentials to
access the photos bucket. The administrator doesn't have to grant the developer permission to access
the photos bucket, and the developer never has to share or manage credentials.
202
AWS Identity and Access Management User Guide
Using Roles
Application on an EC2 instance accessing an AWS resource
1. The administrator uses IAM to create the Get-pics role. In the role's trust policy, the administrator
specifies that only EC2 instances can assume the role. In the role's access policy, the administrator
specifies read-only permissions for the photos bucket.
2. A developer launches an EC2 instance and assigns the Get-pics role to that instance.
Note
If you use the IAM console, the instance profile is managed for you and is mostly
transparent to you. However, if you use the AWS CLI or API to create and manage the role
and EC2 instance, then you must create the instance profile and assign the role to it as
separate steps. Then, when you launch the instance, you must specify the instance profile
name instead of the role name.
3. When the application runs, it obtains temporary security credentials from Amazon EC2 instance
metadata, as described in Retrieving Security Credentials from Instance Metadata. These are
temporary security credentials (p. 218) that represent the role and are valid for a limited period of
time.
With some AWS SDKs, the developer can use a provider that manages the temporary security
credentials transparently. (The documentation for individual AWS SDKs describes the features
supported by that SDK for managing credentials.)
Alternatively, the application can get the temporary credentials directly from the instance metadata
of the EC2 instance. Credentials and related values are available from the iam/security-
credentials/role-name category (in this case, iam/security-credentials/Get-pics) of
the metadata. If the application gets the credentials from the instance metadata, it can cache the
credentials.
4. Using the retrieved credentials, the application accesses the photo bucket. Because of the policy
attached to the Get-pics role, the application has read-only permissions.
The temporary security credentials that are available on the instance are automatically rotated
before they expire so that a valid set is always available. The application just needs to make sure
that it gets a new set of credentials from the instance metadata before the current ones expire. If the
AWS SDK manages credentials, the application doesn't need to include additional logic to refresh
the credentials. However, if the application gets temporary security credentials from the instance
metadata and has cached them, it should get a refreshed set of credentials every hour, or at least
15 minutes before the current set expires. The expiration time is included in the information that is
returned in the iam/security-credentials/role-name category.
203

AWS Identity and Access Management User Guide
Using Roles
Permissions Required for Using Roles with Amazon EC2
To launch an instance with a role, the developer must have permission to launch EC2 instances and
permission to pass IAM roles.
The following sample policy allows users to use the AWS Management Console to launch an instance
with a role. The policy includes wildcards (*) to allow a user to pass any role and to perform all
Amazon EC2 actions. The ListInstanceProfiles action allows users to view all of the roles that
are available in the AWS account.
Example policy that grants a user permission to use the Amazon EC2 console to launch
an instance with any role
{
"Version": "2012-10-17",
"Statement": [{
"Effect": "Allow",
"Action": [
"iam:PassRole",
"iam:ListInstanceProfiles",
"ec2:*"
],
"Resource": "*"
}]
}
Restricting Which Roles Can Be Passed to EC2 Instances (Using PassRole)
You can use the PassRole permission to restrict which role a user can pass to an EC2 instance when
the user launches the instance. This helps prevent the user from running applications that have more
permissions than the user has been granted—that is, from being able to obtain elevated privileges.
For example, imagine that user Alice has permissions only to launch EC2 instances and to work with
Amazon S3 buckets, but the role she passes to an EC2 instance has permissions to work with IAM and
Amazon DynamoDB. In that case, Alice might be able to launch the instance, log into it, get temporary
security credentials, and then perform IAM or DynamoDB actions that she's not authorized for.
To restrict which roles a user can pass to an EC2 instance, you create a policy that allows the
PassRole action. You then attach the policy to the user (or to an IAM group that the user belongs to)
who will launch EC2 instances. In the Resource element of the policy, you list the role or roles that
the user is allowed to pass to EC2 instances. When the user launches an instance and associates a
role with it, Amazon EC2 checks whether the user is allowed to pass that role. Of course, you should
also ensure that the role that the user can pass does not include more permissions than the user is
supposed to have.
Note
PassRole is not an API action in the same way that RunInstances or
ListInstanceProfiles is. Instead, it's a permission that AWS checks whenever a role
ARN is passed as a parameter to an API (or the console does this on the user's behalf). It
helps an administrator to control which roles can be passed by which users. In this case, it
ensures that the user is allowed to attach a specific role to an Amazon EC2 instance.
204

AWS Identity and Access Management User Guide
Using Roles
Example policy that grants a user permission to launch an EC2 instance with a specific
role
The following sample policy allows users to use the Amazon EC2 API to launch an instance with a role.
The Resource element specifies the Amazon Resource Name (ARN) of a role. By specifying the ARN,
the policy grants the user the permission to pass only the Get-pics role. If the user tries to specify a
different role when launching an instance, the action fails.
{
"Version": "2012-10-17",
"Statement": [
{
"Effect": "Allow",
"Action": "ec2:RunInstances",
"Resource": "*"
},
{
"Effect": "Allow",
"Action": "iam:PassRole",
"Resource": "arn:aws:iam::ACCOUNT-ID-WITHOUT-HYPHENS:role/Get-pics"
}
]
}
How Do I Get Started?
To understand how roles work with EC2 instances, you need to use the IAM console to create a role,
launch an EC2 instance that uses that role, and then examine the running instance. You can examine
the instance metadata to see how the role credentials are made available to an instance. You can also
see how an application that runs on an instance can use the role. Use the following resources to learn
more.
•
• SDK walkthroughs. The AWS SDK documentation includes walkthroughs that show an application
running on an EC2 instance that uses role credentials to read an Amazon S3 bucket. Each of the
following walkthroughs presents similar steps with a different programming language:
•Using IAM Roles for EC2 Instances with the SDK for Java in the AWS SDK for Java Developer
Guide
•Using IAM Roles for EC2 Instances with the SDK for .NET in the AWS SDK for .NET Developer
Guide
•Using IAM Roles for EC2 Instances with the SDK for Ruby in the AWS SDK for Ruby Developer
Guide
The walkthroughs provide complete step-by-step instructions for creating and compiling the
example program, creating the role, launching the instance, connecting to the instance, deploying
the example program, and testing it.
Related Information
For more information about creating roles or roles for EC2 instances, see the following information:
• For more information about using IAM roles with Amazon EC2 instances, go to the Amazon EC2
User Guide for Linux Instances.
• To create a role, see Creating IAM Roles (p. 167)
• For more information about using temporary security credentials, see Temporary Security
Credentials (p. 218).
205

AWS Identity and Access Management User Guide
Using Roles
• If you work with the IAM API or CLI, you must create and manage IAM instance profiles. For more
information about instance profiles, see Using Instance Profiles (p. 206).
• For more information about role credentials in the instance metadata, see Retrieving Security
Credentials from Instance Metadata in the Amazon EC2 User Guide for Linux Instances.
Using Instance Profiles
An instance profile is a container for an IAM role that you can use to pass role information to an EC2
instance when the instance starts.
Managing Instance Profiles using the AWS Management Console
If you use the AWS Management Console to create a role for Amazon EC2, the console automatically
creates an instance profile and gives it the same name as the role. When you then use the Amazon
EC2 console to launch an instance with an IAM role, you can select a role to associate with the
instance. In the console, the list that's displayed is actually a list of instance profile names. The console
does not create an instance profile for a role that is not associated with Amazon EC2.
Managing Instance Profiles using the AWS CLI, Tools for Windows PowerShell, and
AWS API
If you manage your roles from the AWS CLI, Tools for Windows PowerShell, or the AWS API, you
create roles and instance profiles as separate actions. You can give the roles and instance profiles
different names, so you have to know the names of your instance profiles as well as the names of roles
they contain so that you can choose the correct instance profile when you launch an EC2 instance.
Note
An instance profile can contain only one IAM role. However, a role can be included in multiple
instance profiles.
You can use the following commands to work with instance profiles in an AWS account.
Create an instance profile
• AWS CLI: aws iam create-instance-profile
• Tools for Windows PowerShell: New-IAMInstanceProfile
• AWS API: CreateInstanceProfile
Add a role to an instance profile
• AWS CLI: aws iam add-role-to-instance-profile
• Tools for Windows PowerShell: Add-IAMRoleToInstanceProfile
• AWS API: AddRoleToInstanceProfile
List instance profiles
• AWS CLI: aws iam list-instance-profiles, aws iam list-instance-profiles-for-
role
• Tools for Windows PowerShell: Get-IAMInstanceProfiles
• AWS API: ListInstanceProfiles, ListInstanceProfilesForRole
Get information about an instance profile
• AWS CLI: aws iam get-instance-profile
206

AWS Identity and Access Management User Guide
Using Roles
• Tools for Windows PowerShell: Get-IAMInstanceProfile
• AWS API: GetInstanceProfile
Remove a role from an instance profile
• AWS CLI: aws iam remove-role-from-instance-profile
• Tools for Windows PowerShell: Remove-IAMRoleFromInstanceProfile
• AWS API: RemoveRoleFromInstanceProfile
Delete an instance profile
• AWS CLI: aws iam delete-instance-profile
• Tools for Windows PowerShell: Remove-IAMInstanceProfile
• AWS API: DeleteInstanceProfile
Revoking IAM Role Temporary Security Credentials
Warning
If you follow the steps on this page, all users with current sessions created by assuming the
role are denied access to all AWS actions and resources. This can result in users losing
unsaved work.
When you enable users to access the AWS Management Console with a long session duration time
(such as 12 hours), their temporary credentials do not expire as quickly. If users inadvertently expose
their credentials to an unauthorized third party, that party has access for the duration of the session.
However, you can immediately revoke all permissions to the role's credentials issued before a certain
point in time if you need to. All temporary credentials for that role issued before the specified time
become invalid. This forces all users to reauthenticate and request new credentials.
When you revoke permissions for a role using the procedure in this topic, AWS attaches a new inline
policy to the role that denies all permissions to all actions. It includes a condition that applies the
restrictions only if the user assumed the role before the point in time when you revoke the permissions.
If the user assumes the role after you revoked the permissions, then the deny policy does not apply to
that user.
Important
Note that this deny policy applies to all users of the specified role, not just those with longer
duration console sessions.
Minimum permissions to revoke session permissions from a role
To successfully revoke session permissions from a role, you must have the AttachRolePolicy
permission for the role. This allows you to add the AWSRevokeOlderSessions policy to the role.
Revoking session permissions
To revoke the session permissions from a role, take the following steps:
To immediately deny all permissions to any current user of role credentials
1. Sign in to the Identity and Access Management (IAM) console at https://console.aws.amazon.com/
iam/.
2. In the navigation pane of the IAM Dashboard, choose Roles, and then choose the name (not the
check box) of the role whose permissions you want to revoke.
3. On the Summary page for the selected role, choose the Revoke Sessions tab.
207

AWS Identity and Access Management User Guide
Managing Roles
4. On the Revoke Sessions tab, choose Revoke active sessions.
5. AWS asks you to confirm the action. Choose Revoke active sessions on the dialog box.
IAM immediately attaches a policy named AWSRevokeOlderSessions to the role. The policy
denies all access to users who assumed the role before the moment you chose Revoke active
sessions. Any user who assumes the role after you chose Revoke active sessions is not
affected.
Important
When you update existing policy permissions, or when you apply a new policy to a user or
a resource, it may take a few minutes for policy updates to take effect.
Note
Don't worry about remembering to delete the policy. Any user who assumes the role after you
revoked sessions is not affected by the policy. If you choose to Revoke Sessions again later,
then the date/time stamp in the policy is refreshed and it again denies all permissions to any
user who assumed the role before the new specified time.
For more information, see Disabling Permissions for Temporary Security Credentials (p. 240).
Managing IAM Roles
Occasionally you need to modify or delete the roles that you have created. To change a role you can
modify the policies associated with the role, change who can access the role, and edit the permissions
that the role grants to users. You can also delete roles that are no longer needed. You can manage
your roles from the AWS Management Console, the AWS CLI, and the API.
Topics
•Modifying a Role (p. 208)
•Deleting Roles or Instance Profiles (p. 212)
Modifying a Role
You can change or modify a role in the following ways:
• To change who can use a role, modify the role's trust policy.
• To change the permissions allowed by the role, modify the role's permissions policy (or policies).
You can use the AWS Management Console, the AWS Command Line Tools, the Tools for Windows
PowerShell, or the IAM API to make these changes.
Topics
•Modifying a Role (AWS Management Console) (p. 208)
•Modifying a Role (AWS Command Line Tools or the IAM API) (p. 210)
Modifying a Role (AWS Management Console)
You can use the AWS Management Console to modify a role.
To change which trusted principals can access the role
1. In the navigation pane of the IAM console, choose Roles.
2. In the list of roles in your account, choose the name of the role that you want to modify.
208

AWS Identity and Access Management User Guide
Managing Roles
3. Choose the Trust Relationships tab, and then choose Edit Trust Relationship.
4. Edit the trust policy as needed. To add additional trusted principals, specify them in the
Principal element. Remember that policies are written in the JSON format, and JSON arrays
are surrounded by square brackets [ ] and separated by commas. As an example, the following
policy snippet shows how to reference two AWS accounts in the Principal element:
"Principal": {
"AWS": [
"arn:aws:iam::111122223333:root",
"arn:aws:iam::444455556666:root"
]
},
Remember that adding an account to the trust policy of a role is only half of establishing the
trust relationship. By default, no users in the trusted accounts can assume the role until the
administrator for that account grants the users the permission to assume the role by adding the
Amazon Resource Name (ARN) of the role to an Allow element for the sts:AssumeRole action.
For more information, see the next procedure and the topic Granting a User Permissions to Switch
Roles (p. 192).
If your role can be used by one or more trusted services rather than AWS accounts, then the
policy might contain an element similar to the following:
"Principal": {
"Service": [
"opsworks.amazonaws.com",
"ec2.amazonaws.com"
]
},
5. When you are done editing, choose Update Trust Policy to save your changes.
For more information about policy structure and syntax, see Overview of IAM Policies (p. 262)
and the IAM Policy Elements Reference (p. 346).
To allow users in a trusted external account to use the role
For more information and detail about this procedure, see Granting a User Permissions to Switch
Roles (p. 192).
1. Sign in to the trusted external AWS account.
2. Decide whether to attach the permissions to a user or to a group. In the navigation pane of the
IAM console, choose Users or Groups accordingly.
3. Choose the name of the user or group to which you want to grant access, and then choose the
Permissions tab.
4. Do one of the following:
• To edit a customer managed policy, choose the name of the policy. If you see the Welcome
to Managed Policies page, you chose an AWS managed policy. You cannot edit an AWS
managed policy. For more information about the difference between AWS managed policies and
customer managed policies, see Managed Policies and Inline Policies (p. 266).
• To edit an inline policy, choose Edit Policy next to the name of the policy.
5. In the policy editor, add a new Statement element that specifies the following:
{
209

AWS Identity and Access Management User Guide
Managing Roles
"Effect": "Allow",
"Action": "sts:AssumeRole",
"Resource": "arn:aws:iam::AWS account ID that contains the
role:role/role name"
}
Replace the values in red with the actual values from the ARN of the role in the original account
that users in this trusted external account can use.
Remember that you can have only one Statement keyword. However, a statement can have
several elements in an array, with elements separated by commas in their own curly braces { } and
all of the elements surrounded by square brackets [ ].
6. Follow the prompts on screen to finish editing the policy.
For more information about editing customer managed policies in the AWS Management Console,
see Editing Customer Managed Policies (p. 282).
For more information about editing inline policies in the AWS Management Console, see Working
with Inline Policies using the AWS Management Console (p. 285).
To change the permissions allowed by a role
1. In the navigation pane of the IAM console, choose Roles.
2. Choose the name of the role to modify, and then choose the Permissions tab.
3. Do one of the following:
• To edit an existing customer managed policy, choose the name of the policy.
Note
If you see the Welcome to Managed Policies page, you chose an AWS managed
policy. You cannot edit an AWS managed policy. For more information about the
difference between AWS managed policies and customer managed policies, see
Managed Policies and Inline Policies (p. 266).
• To attach an existing managed policy, choose Attach Policy.
• To edit an existing inline policy, choose Edit Policy next to the name of the policy.
• To embed a new inline policy, choose Create Role Policy.
For example policies that delegate permissions through roles, see Examples of Policies for
Delegating Access (p. 188).
For more information about permissions, see Overview of IAM Policies (p. 262).
Modifying a Role (AWS Command Line Tools or the IAM API)
You can use the AWS Command Line Interface or IAM API to modify a role.
To change the trusted principals that can access the role
1. If you don't know the name of the role that you want to modify, use one of the following commands
to list the roles in your account:
• AWS CLI: aws iam list-roles
• AWS Tools for Windows PowerShell: Get-IAMRoles
• IAM API: ListRoles
2. (Optional) To view the current trust policy for a role, use one of the following commands:
210

AWS Identity and Access Management User Guide
Managing Roles
• AWS CLI: aws iam get-role
• AWS Tools for Windows PowerShell: Get-IAMRole
• IAM API: GetRole
3. To modify the trusted principals that can access the role, create a text file with the updated trust
policy. You can use any text editor to construct the policy.
For example, the following policy snippet shows how to reference two AWS accounts in the
Principal element:
"Principal": {
"AWS": [
"arn:aws:iam::111122223333:root",
"arn:aws:iam::444455556666:root"
]
},
Remember that adding an account to the trust policy of a role is only half of establishing the
trust relationship. By default, no users in the trusted accounts can assume the role until the
administrator for that account grants the users the permission to assume the role. To do this, the
administrator must add the Amazon Resource Name (ARN) of the role to to an Allow element for
the sts:AssumeRole action. For more information, see the next procedure and the topic Granting
a User Permissions to Switch Roles (p. 192).
4. To update the trust policy, use one of the following commands:
• AWS CLI: aws iam update-assume-role-policy
• AWS Tools for Windows PowerShell: Update-IAMAssumeRolePolicy
• IAM API: UpdateAssumeRolePolicy
To allow users in a trusted external account to use the role
For more information and detail about this procedure, see Granting a User Permissions to Switch
Roles (p. 192).
1. Begin by creating a policy that grants permissions to assume the role. For example, the following
policy contains the minimum necessary permissions:
{
"Version": "2012-10-17",
"Statement": {
"Effect": "Allow",
"Action": "sts:AssumeRole",
"Resource": "arn:aws:iam::AWS account ID that contains the
role:role/role name"
}
}
Create a JSON file that contains a policy similar to the preceding example. Replace the values in
red with the actual values from the ARN of the role that users are allowed to assume. After you
have created the policy, use one of the following commands to upload it to IAM:
• AWS CLI: aws iam create-policy
• AWS Tools for Windows PowerShell: New-IAMPolicy
• IAM API: CreatePolicy
211

AWS Identity and Access Management User Guide
Managing Roles
The output of this command contains the ARN of the policy. Make note of this ARN because you
will need to use it in a later step.
2. Decide which user or group to attach the policy to. If you don't know the name of the user or group
that you want to modify, use one of the following commands to list the users or group in your
account:
• AWS CLI: aws iam list-users or aws iam list-groups
• AWS Tools for Windows PowerShell: Get-IAMUsers or Get-IAMGroups
• IAM API: ListUsers or ListGroups
3. Use one of the following commands to attach the policy that you created in a previous step to the
user or group:
• AWS CLI: aws iam attach-user-policy or aws iam attach-group-policy
• AWS Tools for Windows PowerShell: Register-IAMUserPolicy or Register-IAMGroupPolicy
• IAM API: AttachUserPolicy or AttachGroupPolicy
To change the permissions allowed by a role
1. (Optional) To view the current permissions associated with a role, use the following commands:
• AWS CLI: aws iam list-role-policies (to list inline policies) and aws iam list-attached-role-policies
(to list managed policies)
• AWS Tools for Windows PowerShell: Get-IAMRolePolicies (to list inline policies) and Get-
IAMAttachedRolePolicies (to list managed policies)
• IAM API: ListRolePolicies (to list inline policies) and ListAttachedRolePolicies (to list managed
policies)
2. The command to update permissions for the role differs depending on whether you are updating a
managed policy or an inline policy.
To update a managed policy use one of the following commands to create a new version of the
managed policy:
• AWS CLI: aws iam create-policy-version
• AWS Tools for Windows PowerShell: New-IAMPolicyVersion
• IAM API: CreatePolicyVersion
To update an inline policy, use one of the following commands:
• AWS CLI: aws iam put-role-policy
• AWS Tools for Windows PowerShell: Write-IAMRolePolicy
• IAM API: PutRolePolicy
Deleting Roles or Instance Profiles
If you no longer need a role, we recommend that you delete the role and its associated permissions so
that you don’t have an unused entity that is not actively monitored or maintained.
If the role was associated with an EC2 instance, then you can also remove the role from the instance
profile and then delete the instance profile.
212

AWS Identity and Access Management User Guide
Managing Roles
Caution
Make sure you do not have any Amazon EC2 instances running with the role or instance
profile you are about to delete. Deleting a role or instance profile that is associated with a
running instance will break any applications running on the instance.
Topics
•Deleting a Role (AWS Management Console) (p. 213)
•Deleting a Role (AWS CLI) (p. 213)
•Deleting a Role (Tools for Windows PowerShell) (p. 214)
•Deleting a Role (AWS API) (p. 215)
•Related Information (p. 215)
Deleting a Role (AWS Management Console)
When you use the AWS Management Console to delete a role, IAM also automatically deletes the
policies associated with the role as well as any Amazon EC2 instance profile that contains the role.
Important
If a role is associated with an Amazon EC2 instance profile, and the role and the instance
profile have the exact same name, then you can use the AWS console to delete the role
and the instance profile. This happens automatically if you create them in the console. If you
created the role from the AWS CLI, Tools for Windows PowerShell, or the AWS API, then the
role and the instance profile might have different names, and you cannot use the console to
delete them. Instead, you must use the AWS CLI, Tools for Windows PowerShell, or AWS API
to first remove the role from the instance profile and then (as a separate step) delete the role.
To use the AWS Management Console to delete a role
1. Sign in to the Identity and Access Management (IAM) console at https://console.aws.amazon.com/
iam/.
2. In the navigation pane, choose Roles, and then select the check box next to the role name that
you want to delete, not the name or row itself.
3. For Role Actions at the top of the page, choose Delete Role.
4. In the confirmation dialog box, review the service last accessed data, which shows when each of
the selected roles last accessed an AWS service. This helps you to confirm whether the role is
currently active. If you want to proceed, choose Yes, Delete. If you are sure, you can proceed with
the deletion even if the service last accessed data is still loading.
Note
You cannot use the console to delete an instance profile, except when it has the exact same
name as the role and you delete it as part of the process of deleting a role as described in the
preceding procedure. To delete an instance profile without also deleting the role, you must
use the AWS CLI, Tools for Windows PowerShell, or AWS API. For more information, see the
following sections.
Deleting a Role (AWS CLI)
When you use the AWS CLI to delete a role, you must first delete the policies associated with the role.
Also, if you want to delete the associated instance profile that contains the role, you must delete it
separately.
To use the AWS CLI to delete a role
1. If you don't know the name of the role that you want to delete, type the following command to list
the roles in your account:
213

AWS Identity and Access Management User Guide
Managing Roles
aws iam list-roles
A list of roles with their Amazon Resource Name (ARN) is displayed. Use the role name, not
the ARN, to refer to roles with the CLI commands. For example, if a role has the following ARN:
arn:aws:iam::123456789012:role/myrole, you refer to the role as myrole.
2. Remove the role from all instance profiles that the role is in.
a. To list all instance profiles that the role is associated with, type the following command:
aws iam list-instance-profiles-for-role --role-name role-name
b. To remove the role from an instance profile, type the following command for each instance
profile:
aws iam remove-role-from-instance-profile --instance-profile-
name instance-profile-name --role-name role-name
3. Delete all policies that are associated with the role.
a. To list all policies that are in the role, type the following command:
aws iam list-role-policies --role-name role-name
b. To delete each policy from the role, type the following command for each policy:
aws iam delete-role-policy --role-name role-name --policy-name policy-
name
4. Type the following command to delete the role:
aws iam delete-role --role-name role-name
5. If you do not plan to reuse the instance profiles that were associated with the role, you can type
the following command to delete them:
aws iam delete-instance-profile --instance-profile-name instance-profile-
name
Deleting a Role (Tools for Windows PowerShell)
When you use Windows PowerShell to delete a role, you must first delete the policies associated with
the role. Also, if you want to delete the associated instance profile that contains the role, you must
delete it separately.
To use the Tools for Windows PowerShell to delete a role
1. If you don't know the name of the role that you want to delete, type the following command to list
the roles in your account:
PS C:\> Get-IAMRoles | Select RoleName
214

AWS Identity and Access Management User Guide
Roles vs. Resource-based Policies
Use the role name, not the ARN, to refer to roles with the PowerShell cmdlets. For example, if a
role has the following ARN: arn:aws:iam::123456789012:role/myrole, you refer to the role
as myrole.
2. Remove the role from all instance profiles that the role is in. The following command gets the list
of all instance profiles that contain the role, removes the role from each instance profile in the list,
and then deletes the now empty instance profiles. If you plan to reuse the instance profiles, then
you can omit the last cmdlet in the command.
PS C:\> Get-IAMInstanceProfileForRole -RoleName RoleName | Remove-
IAMRoleFromInstanceProfile -RoleName RoleName | Remove-IAMInstanceProfile
3. Delete all policies that are associated with the role. The following command gets the list all policies
that are attached to the role and detaches each one.
PS C:\> Get-IAMAttachedRolePolicies -RoleName RoleName | Unregister-
IAMRolePolicy -RoleName RoleName
4. Type the following command to delete the role:
PS C:\> Remove-IAMRole -RoleName RoleName
Deleting a Role (AWS API)
When you use the IAM API to delete a role, you must first delete the policies associated with the role.
Also, if you want to delete the associated instance profile that contains the role, you must delete it
separately.
To use the AWS API to delete a role
1. To list all instance profiles that a role is in, call ListInstanceProfilesForRole.
To remove the role from all instance profiles that the role is in, call
RemoveRoleFromInstanceProfile. You must pass the role name and instance profile name.
If you are not going to reuse an instance profile that was associated with the role, you call
DeleteInstanceProfile to delete it.
2. To list all policies for a role, call ListRolePolicies.
To delete all policies that are associated with the role, call DeleteRolePolicy. You must pass
the role name and policy name.
3. Call DeleteRole to delete the roll.
Related Information
For general information about instance profiles, see Using Instance Profiles (p. 206).
How IAM Roles Differ from Resource-based
Policies
For some AWS services, you can grant cross-account access to your resources. To do this, you attach
a policy directly to the resource that you want to share, instead of using a role as a proxy. The resource
that you want to share must support resource-based policies (p. 251). Unlike a user-based policy, a
215

AWS Identity and Access Management User Guide
Roles vs. Resource-based Policies
resource-based policy specifies who (in the form of a list of AWS account ID numbers) can access that
resource.
Cross-account access with a resource-based policy has an advantage over a role. With a resource that
is accessed through a resource-based policy, the user still works in the trusted account and does not
have to give up his or her user permissions in place of the role permissions. In other words, the user
continues to have access to resources in the trusted account at the same time as he or she has access
to the resource in the trusting account. This is useful for tasks such as copying information to or from
the shared resource in the other account.
The disadvantage is that not all services support resource-based policies. A few of the AWS services
that support resource-based policies are listed here:
•Amazon S3 buckets – The policy is attached to the bucket, but the policy controls access to both
the bucket and the objects in it. For more information, go to Access Control in the Amazon Simple
Storage Service Developer Guide.
•Amazon Simple Notification Service (Amazon SNS) topics – For more information, go to
Managing Access to Your Amazon SNS Topics in the Amazon Simple Notification Service Developer
Guide.
•Amazon Simple Queue Service (Amazon SQS) queues – For more information, go to Appendix:
The Access Policy Language in the Amazon Simple Queue Service Developer Guide.
For a complete list of the growing number of AWS services that support attaching permission policies
to resources instead of principals, see AWS Services That Work with IAM (p. 340) and look for the
services that have Yes in the Resource Based column.
About Delegating AWS Permissions in a Resource-based
Policy
After a resource grants your AWS account permissions as a principal in its resource-based policy,
you can then delegate permissions to specific users or groups under your AWS account. You attach
a policy to the user or group that you want to delegate the permissions to. Note that you can only
delegate permissions equivalent to, or less than, the permissions granted to your account by the
resource owning account. For example, if your account is granted full access to the resources of
another AWS account, then you can delegate full access, list access, or any other partial access to
users under your AWS account. If, on the other hand, your account is granted list access only, then
you can delegate only list access. If you try to delegate more permissions than your account has, your
users will still have only list access only. This is illustrated in the following figure. For information about
attaching a policy to a user or group, see Working with Policies (p. 280).
216
AWS Identity and Access Management User Guide
Roles vs. Resource-based Policies
1. Account A gives account B full access to account A's S3 bucket by naming account B as a principal
in the policy. As a result, account B is authorized to perform any action on account A's bucket, and
the account B administrator can delegate access to its users in account B.
2. The account B administrator grants user 1 read-only access to account A's S3 bucket. User 1 can
view the objects in account A's bucket. The level of access account B can delegate is equivalent to,
or less than, the access the account has. In this case, the full access granted to account B is filtered
to read only for user 1.
3. The account B administrator does not give access to user 2. Because users by default do not have
any permissions except those that are explicitly granted, user 2 does not have access to account A's
Amazon S3 bucket.
Important
In the preceding example, if account B had used wildcards (*) to give user 1 full access to all
its resources, user 1 would automatically have access to any resources that account B has
access to, including access granted by other accounts to those accounts' resources. In this
case, user 1 would have access to any Account A resources granted to account B, in addition
to those explicitly granted to user 1.
IAM evaluates a user's permissions at the time the user makes a request. Therefore, if you
use wildcards (*) to give users full access to your resources, users are able to access any
resources that your AWS account has access to, even resources you add or gain access to
after creating the user's policy.
For information about permissions, policies, and the access policy language that you use to write
policies, see Access Management (p. 250).
Important
Give access only to entities you trust, and give the minimum amount of access necessary.
Whenever the trusted entity is another AWS account, that account can in turn delegate access
217

AWS Identity and Access Management User Guide
Temporary Security Credentials
to any of its IAM users. The trusted AWS account can delegate access only to the extent that
it has been granted access; it cannot delegate more access than the account itself has been
granted.
Temporary Security Credentials
You can use the AWS Security Token Service (AWS STS) to create and provide trusted users with
temporary security credentials that can control access to your AWS resources. Temporary security
credentials work almost identically to the long-term access key credentials that your IAM users can
use, with the following differences:
• Temporary security credentials are short-term, as the name implies. They can be configured to
last for anywhere from a few minutes to several hours. After the credentials expire, AWS no longer
recognizes them or allows any kind of access from API requests made with them.
• Temporary security credentials are not stored with the user but are generated dynamically and
provided to the user when requested. When (or even before) the temporary security credentials
expire, the user can request new credentials, as long as the user requesting them still has
permissions to do so.
These differences lead to the following advantages for using temporary credentials:
• You do not have to distribute or embed long-term AWS security credentials with an application.
• You can provide access to your AWS resources to users without having to define an AWS identity for
them. Temporary credentials are the basis for roles and identity federation (p. 124).
• The temporary security credentials have a limited lifetime, so you do not have to rotate them or
explicitly revoke them when they're no longer needed. After temporary security credentials expire,
they cannot be reused. You can specify how long the credentials are valid, up to a maximum limit.
AWS STS and AWS Regions
Temporary security credentials are generated by AWS STS. By default, AWS STS is a global service
with a single endpoint at https://sts.amazonaws.com. However, you can also choose to make
AWS STS API calls to endpoints in any other supported region. This can reduce latency (server lag) by
sending the requests to servers in a region that is geographically closer to you. No matter which region
your credentials come from, they work globally. For more information, see Activating and Deactivating
AWS STS in an AWS Region (p. 244).
Common Scenarios for Temporary Credentials
Temporary credentials are useful in scenarios that involve identity federation, delegation, cross-
account access, and IAM roles.
Identity Federation
You can manage your user identities in an external system outside of AWS and grant users who sign in
from those systems access to perform AWS tasks and access your AWS resources. IAM supports two
types of identity federation. In both cases, the identities are stored outside of AWS. The distinction is
where the external system resides—in your data center or an external third party on the web. For more
information about external identity providers, see Identity Providers and Federation (p. 132).
•Enterprise identity federation – You can authenticate users in your organization's network, and
then provide those users access to AWS without creating new AWS identities for them and requiring
them to sign in with a separate user name and password. This is known as the single sign-on (SSO)
approach to temporary access. AWS STS supports open standards like Security Assertion Markup
218

AWS Identity and Access Management User Guide
Requesting Temporary Security Credentials
Language (SAML) 2.0, with which you can use Microsoft AD FS to leverage your Microsoft Active
Directory. You can also use SAML 2.0 to manage your own solution for federating user identities. For
more information, see About SAML 2.0-based Federation (p. 138).
•Custom federation broker – You can use your organization's authentication system to grant
access to AWS resources. For an example scenario, see Creating a URL that Enables Federated
Users to Access the AWS Management Console (Custom Federation Broker) (p. 159).
•Federation using SAML 2.0 – You can use your organization's authentication system and SAML
to grant access to AWS resources. For more information and an example scenario, see About
SAML 2.0-based Federation (p. 138).
•Web identity federation – You can let users sign in using a well-known third party identity provider
such as Login with Amazon, Facebook, Google, or any OpenID Connect (OIDC) 2.0 compatible
provider. You can exchange the credentials from that provider for temporary permissions to use
resources in your AWS account. This is known as the web identity federation approach to temporary
access. When you use web identity federation for your mobile or web application, you don't need
to create custom sign-in code or manage your own user identities. Using web identity federation
helps you keep your AWS account secure, because you don't have to distribute long-term security
credentials, such as IAM user access keys, with your application. For more information, see About
Web Identity Federation (p. 133).
AWS STS web identity federation supports Login with Amazon, Facebook, Google, and any OpenID
Connect (OICD)-compatible identity provider.
Note
For mobile applications, we recommend that you use Amazon Cognito. You can use this
service with the AWS Mobile SDK for iOS and the AWS Mobile SDK for Android and Fire
OS to create unique identities for users and authenticate them for secure access to your
AWS resources. Amazon Cognito supports the same identity providers as AWS STS,
and also supports unauthenticated (guest) access and lets you migrate user data when a
user signs in. Amazon Cognito also provides APIs for synchronizing user data so that it is
preserved as users move between devices. For more information, see the following:
•Amazon Cognito Identity in the AWS Mobile SDK for iOS Developer Guide
•Amazon Cognito Identity in the AWS Mobile SDK for Android Developer Guide
Roles for Cross-account Access
Many organizations maintain more than one AWS account. Using roles and cross-account access, you
can define user identities in one account, and use those identities to access AWS resources in other
accounts that belong to your organization. This is known as the delegation approach to temporary
access. For more information, see Creating a Role to Delegate Permissions to an IAM User (p. 167).
Roles for Amazon EC2
If you run applications on Amazon EC2 instances and those applications need access to AWS
resources, you can provide temporary security credentials to your instances when you launch them.
These temporary security credentials are available to all applications that run on the instance, so you
don't need to store any long-term credentials on the instance. For more information, see Using an IAM
Role to Grant Permissions to Applications Running on Amazon EC2 Instances (p. 202).
Other AWS Services
You can use temporary security credentials to access most AWS services. For a list of the services
that accept temporary security credentials, see AWS Services That Work with IAM (p. 340).
Requesting Temporary Security Credentials
To request temporary security credentials, you can use the AWS STS API actions.
219

AWS Identity and Access Management User Guide
Requesting Temporary Security Credentials
To call the APIs, you can use one of the AWS SDKs, which are available for a variety of programming
languages and environments, including Java, .NET, Python, Ruby, Android, and iOS. The SDKs
take care of tasks such as cryptographically signing your requests, retrying requests if necessary,
and handling error responses. You can also use the AWS STS Query API, which is described in the
AWS Security Token Service API Reference. Finally, two command line tools support the AWS STS
commands: the AWS Command Line Interface, and the AWS Tools for Windows PowerShell.
The AWS STS API actions return temporary security credentials that consist of an access key and a
session token. The access key consists of an access key ID and a secret key. Users (or an application
that the user runs) can use these credentials to access your resources. When the credentials are
created, they are associated with an IAM access control policy that limits what the user can do when
using the credentials. For more information, see Using Temporary Security Credentials to Request
Access to AWS Resources (p. 229).
Important
Although temporary security credentials are short lived, users who have temporary access can
make lasting changes to your AWS resources. For example, if a user with temporary access
launches an Amazon EC2 instance, the instance can continue to run and incur charges to
your AWS account even after the user's temporary security credentials expire.
Note
The size of the security token that STS APIs return is not fixed. We strongly recommend that
you make no assumptions about the maximum size. As of this writing, the typical size is less
than 4096 bytes, but that can vary. Also, future updates to AWS might require larger sizes.
Using AWS STS with AWS Regions
You can send AWS STS API calls either to a global endpoint or to one of the regional endpoints. If you
choose an endpoint closer to you, you can reduce latency and improve the performance of your API
calls. You also can choose to direct your calls to an alternative regional endpoint if you can no longer
communicate with the original endpoint. If you are using one of the various AWS SDKs, then use that
SDK's method to select a region before you make the API call. If you are manually constructing HTTP
API requests, then you must direct the request to the correct endpoint yourself. For more information,
see the AWS STS section of Regions and Endpoints and Activating and Deactivating AWS STS in an
AWS Region (p. 244).
Following are the APIs that you can use to acquire temporary credentials for use in your AWS
environment and applications.
AssumeRole—Cross-Account Delegation and Federation
Through a Custom Identity Broker
This API action is useful for allowing existing IAM users to access AWS resources that they don't
already have access to, such as resources in another AWS account. It is also useful for existing
IAM users as a means to temporarily gain privileged access—for example, to provide multi-factor
authentication (MFA). You must call this API using existing IAM user credentials. For more information,
see Creating a Role to Delegate Permissions to an IAM User (p. 167) and Configuring MFA-
Protected API Access (p. 93).
This call must be made using valid AWS security credentials. When you make this call, you pass the
following information:
• The Amazon Resource Name (ARN) of the role that the app should assume.
• The duration, which specifies how long the temporary security credentials are valid. The minimum
is 15 minutes (900 seconds) and the maximum (and the default) is 1 hour (3600 seconds). You
need to pass this value only if you want the temporary credentials to expire before 1 hour. This is
separate from the duration of a console session that you might request using these credentials. The
request to the federation endpoint for a console sign-in token takes a SessionDuration parameter
220

AWS Identity and Access Management User Guide
Requesting Temporary Security Credentials
that specifies the maximum length of the console session, separately from the DurationSeconds
parameter on this API. For more information, see Creating a URL that Enables Federated Users to
Access the AWS Management Console (Custom Federation Broker) (p. 159).
• A role session name, which is a string value that you can use to identify the session. This value can
be captured and logged by CloudTrail to help you distinguish between your role users during an
audit.
• Optionally, a policy (in JSON format). This policy is combined with the policy associated with the role.
If specified, the permissions are the intersection of those granted to the role and those granted by
this policy. You can use this policy to you further restrict the access permissions that are associated
with the temporary credentials, beyond the restrictions already established by the role access policy.
Note that this policy cannot be used to elevate privileges beyond what the assumed role is allowed to
access.
• If configured to use multi-factor authentication (MFA), then you include the identifier for an MFA
device and the one-time code provided by that device.
• An optional ExternalID value that can be used when delegating access to your account to a third-
party. This value helps ensure that only the specified third-party can access the role. For more
information, see How to Use an External ID When Granting Access to Your AWS Resources to a
Third Party (p. 172).
The following example shows a sample request and response using AssumeRole. In this example,
the request includes the name for the session named Bob. The Policy parameter includes a JSON
document that specifies that the resulting credentials have permissions to access only Amazon S3.
Example Request
https://sts.amazonaws.com/
?Version=2011-06-15
&Action=AssumeRole
&RoleSessionName=Bob
&RoleArn=arn:aws::iam::123456789012:role/demo
&Policy=%7B%22Version%22%3A%222012-10-17%22%2C%22Statement%22%3A%5B%7B
%22Sid%22%3A%20%22Stmt1%22%2C%22Effect%22%3A%20%22Allow%22%2C%22Action%22%3A
%20%22s3%3A*%22%2C%22Resource%22%3A%20%22*%22%7D%5D%7D
&DurationSeconds=3600
&ExternalId=123ABC
&AUTHPARAMS
Note
The policy value shown in the example above is the URL-encoded version of the following
policy:
{"Version":"2012-10-17","Statement":
[{"Sid":"Stmt1","Effect":"Allow","Action":"s3:*","Resource":"*"}]}
Also, note that the AUTHPARAMS parameter in the preceding example is meant as a
placeholder for the authentication information—that is, the signature—that you must include
with AWS HTTP API requests. We recommend using the AWS SDKs to create API requests,
and one benefit of doing so is that the SDKs handle request signing for you. If you must create
and sign API requests manually, go to Signing AWS Requests By Using Signature Version 4
in the Amazon Web Services General Reference to learn how to sign a request.
This API supports a parameter for DurationSeconds that specifies how long the temporary
credentials are valid. This is not the same as the duration of a console session that might request using
those temporary credentials. You can request a console sign-in token by calling the federation endpoint
and supplying the temporary credentials to get a sign-in token for the console. That console request
uses a different SessionDuration parameter of up to 12 hours. For more information, see Creating
a URL that Enables Federated Users to Access the AWS Management Console (Custom Federation
Broker) (p. 159).
221

AWS Identity and Access Management User Guide
Requesting Temporary Security Credentials
In addition to the temporary security credentials, the response includes the Amazon Resource Name
(ARN) for the federated user and the expiration time of the credentials.
Example Response
<AssumeRoleResponse xmlns="https://sts.amazonaws.com/doc/2011-06-15/">
<AssumeRoleResult>
<Credentials>
<SessionToken>
AQoDYXdzEPT//////////wEXAMPLEtc764bNrC9SAPBSM22wDOk4x4HIZ8j4FZTwdQW
LWsKWHGBuFqwAeMicRXmxfpSPfIeoIYRqTflfKD8YUuwthAx7mSEI/qkPpKPi/kMcGd
QrmGdeehM4IC1NtBmUpp2wUE8phUZampKsburEDy0KPkyQDYwT7WZ0wq5VSXDvp75YU
9HFvlRd8Tx6q6fE8YQcHNVXAkiY9q6d+xo0rKwT38xVqr7ZD0u0iPPkUL64lIZbqBAz
+scqKmlzm8FDrypNC9Yjc8fPOLn9FX9KSYvKTr4rvx3iSIlTJabIQwj2ICCR/oLxBA==
</SessionToken>
<SecretAccessKey>
wJalrXUtnFEMI/K7MDENG/bPxRfiCYzEXAMPLEKEY
</SecretAccessKey>
<Expiration>2011-07-15T23:28:33.359Z</Expiration>
<AccessKeyId>AKIAIOSFODNN7EXAMPLE</AccessKeyId>
</Credentials>
<AssumedRoleUser>
<Arn>arn:aws:sts::123456789012:assumed-role/demo/Bob</Arn>
<AssumedRoleId>ARO123EXAMPLE123:Bob</AssumedRoleId>
</AssumedRoleUser>
<PackedPolicySize>6</PackedPolicySize>
</AssumeRoleResult>
<ResponseMetadata>
<RequestId>c6104cbe-af31-11e0-8154-cbc7ccf896c7</RequestId>
</ResponseMetadata>
</AssumeRoleResponse>
Note
AssumeRole stores the policy in a packed format. AssumeRole returns the size as a
percentage of the maximum size allowed so you can adjust the calling parameters. For more
information about the size constraints on the policy, go to AssumeRole in the AWS Security
Token Service API Reference.
AssumeRoleWithWebIdentity—Federation Through a Web-
based Identity Provider
This API returns a set of temporary security credentials for federated users who are authenticated
through a public identity provider such as Login with Amazon, Facebook, Google, or any OpenID
Connect (OIDC)-compatible identity provider. This API is useful for creating mobile applications or
client-based web applications that require access to AWS in which users do not have their own AWS or
IAM identities. For more information, see About Web Identity Federation (p. 133).
Note
Instead of directly calling AssumeRoleWithWebIdentity, we recommend that you use
Amazon Cognito and the Amazon Cognito credentials provider with the AWS SDKs for mobile
development. For more information, see the following:
•Amazon Cognito Identity in the AWS Mobile SDK for Android Developer Guide
•Amazon Cognito Identity in the AWS Mobile SDK for iOS Developer Guide
If you are not using Amazon Cognito, you call the AssumeRoleWithWebIdentity action of AWS
STS. This is an unsigned call, meaning that the app does not need to have access to any AWS
222

AWS Identity and Access Management User Guide
Requesting Temporary Security Credentials
security credentials in order to make the call. When you make this call, you pass the following
information:
• The Amazon Resource Name (ARN) of the role that the app should assume. If your app supports
multiple ways for users to sign in, you must define multiple roles, one per identity provider. The call
to AssumeRoleWithWebIdentity should include the ARN of the role that is specific to the provider
through which the user signed in.
• The token that the app gets from the IdP after the app authenticates the user.
• The duration, which specifies how long the temporary security credentials are valid. The minimum
is 15 minutes (900 seconds) and the maximum (and the default) is 1 hour (3600 seconds). You
need to pass this value only if you want the temporary credentials to expire before 1 hour. This is
separate from the duration of a console session that you might request using these credentials. The
request to the federation endpoint for a console sign-in token takes a SessionDuration parameter
that specifies the maximum length of the console session, separately from the DurationSeconds
parameter on this API. For more information, see Creating a URL that Enables Federated Users to
Access the AWS Management Console (Custom Federation Broker) (p. 159).
• A role session name, which is a string value that you can use to identify the session. This value can
be captured and logged by CloudTrail to help you distinguish between your role users during an
audit.
• Optionally, a policy (in JSON format). This policy is combined with the policy associated with the role.
If specified, the permissions are the intersection of those granted to the role and those granted by
this policy. You can use this policy to you further restrict the access permissions that are associated
with the temporary credentials, beyond the restrictions already established by the role access policy.
Note that this policy cannot be used to elevate privileges beyond what the assumed role is allowed to
access.
Note
Because a call to AssumeRoleWithWebIdentity is not signed (encrypted), you should
only include this optional policy if the request is not being transmitted through an untrusted
intermediary who could alter the policy to remove the restrictions.
When you call AssumeRoleWithWebIdentity, AWS verifies the authenticity of the token. For
example, depending on the provider, AWS might make a call to the provider and include the token that
the app has passed. Assuming that the identity provider validates the token, AWS returns the following
information to you:
• A set of temporary security credentials. These consist of an access key ID, a secret access key, and
a session token.
• The role ID and the ARN of the assumed role.
• A SubjectFromWebIdentityToken value that contains the unique user ID.
When you have the temporary security credentials, you can use them to make AWS API calls. This is
the same process as making an AWS API call with long-term security credentials, except that you must
include the session token, which lets AWS verify that the temporary security credentials are valid.
Your app should cache the credentials. As noted, by default the credentials expire after an hour. If you
are not using the AmazonSTSCredentialsProvider action in the AWS SDK, it's up to you and your app
to call AssumeRoleWithWebIdentity again to get a new set of temporary security credentials before
the old ones expire.
AssumeRoleWithSAML—Federation Through an
Enterprise Identity Provider Compatible with SAML 2.0
This API returns a set of temporary security credentials for federated users who are authenticated
by your organization's existing identity system and who use SAML 2.0 (Security Assertion Markup
223

AWS Identity and Access Management User Guide
Requesting Temporary Security Credentials
Language) to pass authentication and authorization information to AWS. This API is useful in
organizations that have integrated their identity systems (such as Windows Active Directory or
OpenLDAP) with software that can produce SAML assertions to provide information about user identity
and permissions (such as Active Directory Federation Services or Shibboleth). For more information,
see About SAML 2.0-based Federation (p. 138).
This is an unsigned call, which means that the app does not need to have access to any AWS security
credentials in order to make the call. When you make this call, you pass the following information:
• The Amazon Resource Name (ARN) of the role that the app should assume.
• The ARN of the SAML provider created in IAM that describes the identity provider.
• The SAML assertion, encoded in base-64, that was provided by the SAML identity provider in its
authentication response to the sign-in request from your app.
• The duration, which specifies how long the temporary security credentials are valid. The maximum
(and the default) is 1 hour (3600 seconds). You need to pass this value only if you want the
temporary credentials to expire before 1 hour. The minimum duration for the credentials is 15
minutes (900 seconds). This is separate from the duration of a console session that you might
request using these credentials. The request to the federation endpoint for a console sign-in token
takes a SessionDuration parameter that specifies the maximum length of the console session,
separately from the DurationSeconds parameter on this API. For more information, see Creating
a URL that Enables Federated Users to Access the AWS Management Console (Custom Federation
Broker) (p. 159).
• A policy (in JSON format). This policy is combined with the policy associated with the role. If
specified, the permissions are the intersection of those granted to the role and those granted by this
policy. You can use this policy to further restrict the access permissions that are associated with the
temporary credentials, beyond the restrictions already established by the role access policy. Note
that this policy cannot be used to elevate privileges beyond what the assumed role is allowed to
access.
When you call AssumeRoleWithSAML, AWS verifies the authenticity of the SAML assertion. Assuming
that the identity provider validates the assertion, AWS returns the following information to you:
• A set of temporary security credentials. These consist of an access key ID, a secret access key, and
a session token.
• The role ID and the ARN of the assumed role.
• An Audience value that contains the value of the Recipient attribute of the
SubjectConfirmationData element of the SAML assertion.
• An Issuer value that contains the value of the Issuer element of the SAML assertion.
• A NameQualifier element that contains a hash value built from the Issuer value, the AWS
account ID, and the friendly name of the SAML provider. When combined with the Subject element,
they can uniquely identify the federated user.
• A Subject element that contains the value of the NameID element in the Subject element of the
SAML assertion.
• A SubjectType element that indicates the format of the Subject element. The value can be either
transient or persistent.
When you have the temporary security credentials, you can use them to make AWS API calls. This is
the same process as making an AWS API call with long-term security credentials, except that you must
include the session token, which lets AWS verify that the temporary security credentials are valid.
Your app should cache the credentials. By default the credentials expire after an hour. If you are not
using the AmazonSTSCredentialsProvider action in the AWS SDK, it's up to you and your app to call
AssumeRoleWithSAML again to get a new set of temporary security credentials before the old ones
expire.
224

AWS Identity and Access Management User Guide
Requesting Temporary Security Credentials
GetFederationToken—Federation Through a Custom
Identity Broker
This API returns a set of temporary security credentials for federated users. This API differs from
AssumeRole in that the default expiration period is substantially longer (up to 36 hours instead of up
to 1 hour). The longer expiration period can help reduce the number of calls to AWS because you do
not need to get new credentials as often. For more information, see Requesting Temporary Security
Credentials (p. 219).
The GetFederationToken call returns temporary security credentials that consist of the security
token, access key, secret key, and expiration. You can use GetFederationToken if you want to
manage permissions inside your organization (for example, using the proxy application to assign
permissions). To view a sample application that uses GetFederationToken, go to Identity Federation
Sample Application for an Active Directory Use Case in the AWS Sample Code & Libraries.
The following example shows a sample request and response that uses GetFederationToken. In
this example, the request includes the name for a federated user named Jean. The Policy parameter
includes a JSON document that specifies that the resulting credentials have permissions to access
only Amazon S3. In addition to the temporary security credentials, the response includes the Amazon
Resource Name (ARN) for the federated user and the expiration time of the credentials.
Example Request
https://sts.amazonaws.com/
?Version=2011-06-15
&Action=GetFederationToken
&Name=Jean
&Policy=%7B%22Version%22%3A%222012-10-17%22%2C%22Statement%22%3A%5B%7B%22Sid
%22%3A%22Stmt1%22%2C%22Effect%22%3A%22Allow%22%2C%22Action%22%3A%22s3%3A*
%22%2C%22Resource%22%3A%22*%22%7D%5D%7D
&DurationSeconds=3600
&AUTHPARAMS
Note
The policy value shown in the example above is the URL-encoded version of this policy:
{"Version":"2012-10-17","Statement":
[{"Sid":"Stmt1","Effect":"Allow","Action":"s3:*","Resource":"*"}]}
Also, note that the &AUTHPARAMS parameter in the preceding example is meant as a
placeholder for the authentication information—that is, the signature—that you must include
with AWS HTTP API requests. We recommend using the AWS SDKs to create API requests,
and one benefit of doing so is that the SDKs handle request signing for you. If you must create
and sign API requests manually, go to Signing AWS Requests By Using Signature Version 4
in the Amazon Web Services General Reference to learn how to sign a request.
Example Response
<GetFederationTokenResponse xmlns="https://sts.amazonaws.com/
doc/2011-06-15/">
<GetFederationTokenResult>
<Credentials>
<SessionToken>
AQoDYXdzEPT//////////wEXAMPLEtc764bNrC9SAPBSM22wDOk4x4HIZ8j4FZTwdQW
LWsKWHGBuFqwAeMicRXmxfpSPfIeoIYRqTflfKD8YUuwthAx7mSEI/qkPpKPi/kMcGd
QrmGdeehM4IC1NtBmUpp2wUE8phUZampKsburEDy0KPkyQDYwT7WZ0wq5VSXDvp75YU
9HFvlRd8Tx6q6fE8YQcHNVXAkiY9q6d+xo0rKwT38xVqr7ZD0u0iPPkUL64lIZbqBAz
+scqKmlzm8FDrypNC9Yjc8fPOLn9FX9KSYvKTr4rvx3iSIlTJabIQwj2ICCEXAMPLE==
</SessionToken>
<SecretAccessKey>
225

AWS Identity and Access Management User Guide
Requesting Temporary Security Credentials
wJalrXUtnFEMI/K7MDENG/bPxRfiCYzEXAMPLEKEY
</SecretAccessKey>
<Expiration>2011-07-15T23:28:33.359Z</Expiration>
<AccessKeyId>AKIAIOSFODNN7EXAMPLE;</AccessKeyId>
</Credentials>
<FederatedUser>
<Arn>arn:aws:sts::123456789012:federated-user/Jean</Arn>
<FederatedUserId>123456789012:Jean</FederatedUserId>
</FederatedUser>
<PackedPolicySize>6</PackedPolicySize>
</GetFederationTokenResult>
<ResponseMetadata>
<RequestId>c6104cbe-af31-11e0-8154-cbc7ccf896c7</RequestId>
</ResponseMetadata>
</GetFederationTokenResponse>
Note
GetFederationToken stores the policy in a packed format. The action returns the size as a
percentage of the maximum size allowed so that you can adjust the calling parameters. For
more information about size constraints on the policy, go to GetFederationToken in the AWS
Security Token Service API Reference.
If you prefer to grant permissions at the resource level (for example, you attach a policy to an Amazon
S3 bucket), you can omit the Policy parameter. However, if you do not include a policy for the
federated user, the temporary security credentials will not grant any permissions. In this case, you must
use resource policies to grant the federated user access to your AWS resources.
For example, if your AWS account number is 111122223333, and you have an Amazon S3 bucket
that you want to allow Susan to access even though her temporary security credentials don't include a
policy for the bucket, you would need to ensure that the bucket has a policy with an ARN that matches
Susan's ARN, such as arn:aws:sts::111122223333:federated-user/Susan.
GetSessionToken—Temporary Credentials for Users in
Untrusted Environments
This API returns a set of temporary security credentials to an existing IAM user. It is useful for providing
enhanced security, for example, to restrict AWS requests to only when MFA is enabled for the IAM
user. Because the credentials are temporary, they provide enhanced security when you have an IAM
user who accesses your resources through a less secure environment, such as a mobile device or
web browser. For more information, see Requesting Temporary Security Credentials (p. 219) or
GetSessionToken in the AWS Security Token Service API Reference.
By default, temporary security credentials for an IAM user are valid for a maximum of 12 hours, but you
can request a duration as short as 15 minutes or as long as 36 hours. For security reasons, a token for
an AWS account's root identity is restricted to a duration of one hour.
GetSessionToken returns temporary security credentials consisting of a security token, an access
key ID, and a secret access key. The following example shows a sample request and response
using GetSessionToken. The response also includes the expiration time of the temporary security
credentials.
Example Request
https://sts.amazonaws.com/
?Version=2011-06-15
&Action=GetSessionToken
&DurationSeconds=3600
&AUTHPARAMS
226

AWS Identity and Access Management User Guide
Requesting Temporary Security Credentials
Note
The &AUTHPARAMS parameter in the preceding example is meant as a placeholder for the
authentication information—that is, the signature—that you must include with AWS HTTP
API requests. We recommend using the AWS SDKs to create API requests, and one benefit
of doing so is that the SDKs handle request signing for you. If you must create and sign API
requests manually, go to Signing AWS Requests By Using Signature Version 4 in the Amazon
Web Services General Reference to learn how to sign a request.
Example Response
<GetSessionTokenResponse xmlns="https://sts.amazonaws.com/doc/2011-06-15/">
<GetSessionTokenResult>
<Credentials>
<SessionToken>
AQoEXAMPLEH4aoAH0gNCAPyJxz4BlCFFxWNE1OPTgk5TthT+FvwqnKwRcOIfrRh3c/L
To6UDdyJwOOvEVPvLXCrrrUtdnniCEXAMPLE/IvU1dYUg2RVAJBanLiHb4IgRmpRV3z
rkuWJOgQs8IZZaIv2BXIa2R4OlgkBN9bkUDNCJiBeb/AXlzBBko7b15fjrBs2+cTQtp
Z3CYWFXG8C5zqx37wnOE49mRl/+OtkIKGO7fAE
</SessionToken>
<SecretAccessKey>
wJalrXUtnFEMI/K7MDENG/bPxRfiCYzEXAMPLEKEY
</SecretAccessKey>
<Expiration>2011-07-11T19:55:29.611Z</Expiration>
<AccessKeyId>AKIAIOSFODNN7EXAMPLE</AccessKeyId>
</Credentials>
</GetSessionTokenResult>
<ResponseMetadata>
<RequestId>58c5dbae-abef-11e0-8cfe-09039844ac7d</RequestId>
</ResponseMetadata>
</GetSessionTokenResponse>
Optionally, the GetSessionToken request can include SerialNumber and TokenCode values for
AWS multi-factor authentication (MFA) verification. If the provided values are valid, AWS STS provides
temporary security credentials that include the state of MFA authentication so that the temporary
security credentials can be used to access the MFA-protected API actions or AWS websites for as long
as the MFA authentication is valid.
The following example shows a GetSessionToken request that includes an MFA verification code
and device serial number.
https://sts.amazonaws.com/
?Version=2011-06-15
&Action=GetSessionToken
&DurationSeconds=7200
&SerialNumber=YourMFADeviceSerialNumber
&TokenCode=123456
&AUTHPARAMS
Note
The call to AWS STS can be to the global endpoint or to any of the regional endpoints for
which you activate your AWS account. For more information, see the AWS STS section of
Regions and Endpoints.
Also, note that the &AUTHPARAMS parameter in the preceding example is meant as a
placeholder for the authentication information—that is, the signature—that you must include
with AWS HTTP API requests. We recommend using the AWS SDKs to create API requests,
and one benefit of doing so is that the SDKs handle request signing for you. If you must create
and sign API requests manually, go to Signing AWS Requests By Using Signature Version 4
in the Amazon Web Services General Reference to learn how to sign a request.
227

AWS Identity and Access Management User Guide
Requesting Temporary Security Credentials
Comparing the AWS STS APIs
The following table compares features of the actions (APIs) in AWS STS that return temporary security
credentials.
Comparing your API options
AWS
STS API Who can call Credential
lifetime
(min/
max/
default)
MFA
support* Passed
policy
support*
Restrictions on resulting
temporary credentials
AssumeRoleIAM user or user
with existing
temporary security
credentials
15m/1hr/1hrYes Yes Cannot call
GetFederationToken or
GetSessionToken.
AssumeRoleWithSAMLAny user; caller
must pass a SAML
authentication
response
that indicates
authentication from
a known identity
provider
15m/1hr/1hrNo Yes Cannot call
GetFederationToken or
GetSessionToken.
AssumeRoleWithWebIdentityAny user; caller
must pass a web
identity token
that indicates
authentication from
a known identity
provider
15m/1hr/1hrNo Yes Cannot call
GetFederationToken or
GetSessionToken.
GetFederationTokenIAM user or root
account IAM
user:
15m/36hr/12hr
Root
account:
15m/1hr/1hr
No Yes Cannot call IAM APIs directly.
SSO to console is allowed.*
Cannot call AWS STS APIs
except GetCallerIdentity.
GetSessionTokenIAM user or root
account IAM
user:
15m/36hr/12hr
Root
account:
15m/1hr/1hr
Yes No Cannot call IAM APIs unless
MFA information is included with
the request.
Cannot call AWS STS APIs
except AssumeRole or
GetCallerIdentity.
Single sign-on (SSO) to console
is not allowed, but any user with
a password (root or IAM user)
can sign into the console.*
•MFA support. You can include information about a multi-factor authentication (MFA) device when
you call the AssumeRole and GetSessionToken APIs. This ensures that the temporary security
228

AWS Identity and Access Management User Guide
Using Temporary Security Credentials
to Request Access to AWS Resources
credentials that result from the API call can be used only by users who are authenticated with an
MFA device. For more information, see Configuring MFA-Protected API Access (p. 93).
•Passed policy support. You can pass an IAM policy as a parameter to most of the AWS STS APIs
to be used in conjunction with other policies affecting the user (if any) to determine what the user is
allowed to do with the temporary credentials that result from the API call. For more information, see
the following topics:
•Permissions for AssumeRole, AssumeRoleWithSAML, and
AssumeRoleWithWebIdentity (p. 233)
•Permissions for GetFederationToken (p. 235)
•Permissions for GetSessionToken (p. 239)
•Single sign-on (SSO) to the console. To support SSO, AWS lets you call a federation endpoint
(https://signin.aws.amazon.com/federation) and pass temporary security credentials.
The endpoint returns a token that you can use to construct a URL that signs a user directly into the
console without requiring a password. For more information, see Enabling SAML 2.0 Federated
Users to Access the AWS Management Console (p. 156) and How to enable cross-account
access to the AWS Management Console in the AWS Security Blog.
Using Temporary Security Credentials to
Request Access to AWS Resources
You can use temporary security credentials to make programmatic requests for AWS resources with
the AWS SDKs or API calls, the same way that you can use long-term security credentials such as IAM
user credentials. However, there are a few differences:
• When you make a call using temporary security credentials, the call must include a session token,
which is returned along with those temporary credentials. AWS uses the session token to validate
the temporary security credentials.
• The temporary credentials expire after a specified interval. After the credentials expire, any calls that
you make with those credentials will fail, so you must get a new set of credentials.
If you are using the AWS SDKs, the AWS Command Line Interface (AWS CLI), or the Tools for
Windows PowerShell, the way in which you get and use temporary security credentials differs
depending on the context. If you are running code, AWS CLI, or Tools for Windows PowerShell
commands inside an EC2 instance, you can take advantage of roles for Amazon EC2. Otherwise, you
can call an AWS STS API to get the temporary credentials, and then use them explicitly to make calls
to AWS services.
Note
AWS STS is a global service that has a default endpoint at https://sts.amazonaws.com.
This endpoint is in the US East (N. Virginia) region, although credentials that you get from
this and other endpoints are valid globally and work with services and resources in any
region. You can also choose to make AWS STS API calls to endpoints in any of the supported
regions. This can reduce latency by making the requests from servers in a region that is
geographically closer to you. No matter which region your credentials come from, they
work globally. For more information, see Activating and Deactivating AWS STS in an AWS
Region (p. 244).
Contents
•Using Temporary Credentials in Amazon EC2 Instances (p. 230)
•Using Temporary Security Credentials with the AWS SDKs (p. 230)
•Using Temporary Security Credentials with the AWS CLI (p. 230)
•Using Temporary Security Credentials with the Tools for Windows PowerShell (p. 231)
•Using Temporary Security Credentials with APIs (p. 232)
229

AWS Identity and Access Management User Guide
Using Temporary Security Credentials
to Request Access to AWS Resources
•More Information (p. 232)
Using Temporary Credentials in Amazon EC2 Instances
If you want to run AWS CLI commands or code inside an EC2 instance, the recommended way to get
credentials is to use roles for Amazon EC2. You create an IAM role that specifies the permissions that
you want to grant to applications that run on the EC2 instances. When you launch the instance, you
associate the role with the instance.
Applications, AWS CLI, and Tools for Windows PowerShell commands that run on the instance can
then get automatic temporary security credentials from the instance metadata. You do not have to
explicitly get the temporary security credentials—the AWS SDKs, AWS CLI, and Tools for Windows
PowerShell automatically get the credentials from the EC2 instance metadata service and use them.
The temporary credentials have the permissions that you define for the role that is associated with the
instance.
For more information and for examples, see the following:
•Using IAM Roles for EC2 Instances with the AWS SDK for Java
•Using IAM Roles for Amazon EC2 Instances with the AWS SDK for .NET
•Using IAM Roles for Amazon EC2 Instances with the AWS SDK for Ruby
•Using IAM roles for Amazon EC2 instances in the AWS SDK for PHP documentation.
Using Temporary Security Credentials with the AWS SDKs
To use temporary security credentials in code, you programmatically call an AWS STS API like
AssumeRole, extract the resulting credentials and session token, and then use those values as
credentials for subsequent calls to AWS. The following example shows pseudocode for how to use
temporary security credentials if you're using an AWS SDK:
assumeRoleResult = AssumeRole(role-arn);
tempCredentials = new SessionAWSCredentials(
assumeRoleResult.AccessKeyId,
assumeRoleResult.SecretAccessKey,
assumeRoleResult.SessionToken);
s3Request = CreateAmazonS3Client(tempCredentials);
For an example written in Python (using the AWS SDK for Python (Boto)) that shows how to call
AssumeRole to get temporary security credentials, and then use those credentials to make a call to
Amazon S3, see Switching to an IAM Role (API) (p. 200).
For details about how to call AssumeRole, GetFederationToken, and other APIs, and about how to
get the temporary security credentials and session token from the result, see the documentation for the
SDK that you're working with. You can find the documentation for all the AWS SDKs on the main AWS
documentation page.
You must make sure that you get a new set of credentials before the old ones expire. In some
SDKs, you can use a provider that manages the process of refreshing credentials for you; check the
documentation for the SDK you're using.
Using Temporary Security Credentials with the AWS CLI
You can use temporary security credentials with the AWS CLI. This can be useful for testing policies.
Using the AWS CLI, you can call an AWS STS API like AssumeRole or GetFederationToken and
then capture the resulting output. The following example shows a call to AssumeRole that sends the
230
AWS Identity and Access Management User Guide
Using Temporary Security Credentials
to Request Access to AWS Resources
output to a file. In the example, the profile parameter is assumed to be a profile in the AWS CLI
configuration file and is assumed to reference credentials for an IAM user who has permissions to
assume the role.
aws sts assume-role --role-arn arn:aws:iam::123456789012:role/role-name --
role-session-name "RoleSession1" --profile IAM-user-name > /tmp/assume-role-
output.txt
When the command is finished, you can extract the access key ID, secret access key, and session
token from wherever you've routed it, either manually or by using a script. You can then assign these
values to environment variables.
When you run AWS CLI commands, the AWS CLI looks for credentials in a specific order—first in
environment variables and then in the configuration file. Therefore, after you've put the temporary
credentials into environment variables, the AWS CLI uses those credentials by default. (If you specify
a profile parameter in the command, the AWS CLI skips the environment variables and looks in the
configuration file, which lets you override the credentials in the environment variables if you need to.)
The following example shows how you might set the environment variables for temporary security
credentials and then call an AWS CLI command. Because no profile parameter is included in the
AWS CLI command, the AWS CLI looks for credentials first in environment variables and therefore
uses the temporary credentials.
Linux
export AWS_ACCESS_KEY_ID=AKIAI44QH8DHBEXAMPLE
export AWS_SECRET_ACCESS_KEY=wJalrXUtnFEMI/K7MDENG/bPxRfiCYEXAMPLEKEY
export AWS_SECURITY_TOKEN=AQoDYXdzEJr...<remainder of security token>
aws ec2 describe-instances --region us-west-1
Windows
SET AWS_ACCESS_KEY_ID=AKIAI44QH8DHBEXAMPLE
SET AWS_SECRET_ACCESS_KEY=wJalrXUtnFEMI/K7MDENG/bPxRfiCYEXAMPLEKEY
SET AWS_SECURITY_TOKEN=AQoDYXdzEJr...<remainder of security token>
aws ec2 describe-instances --region us-west-1
Using Temporary Security Credentials with the Tools for
Windows PowerShell
You can use temporary security credentials with the AWS Tools for Windows PowerShell. This can be
useful for testing policies.
With the Tools for Windows PowerShell, you can call an AWS STS API action like AssumeRole
or GetFederationToken and then capture the resulting output. The following example shows a
PowerShell command that calls AssumeRole and stores the resulting role object in the variable $role.
The StoredCredentials parameter is assumed to be a profile in the Tools for Windows PowerShell
configuration file set up by Set-AWSCredentials or Initialized-AWSDefaults and is assumed
to reference credentials for an IAM user who has permissions to assume the role.
PS C:\> $role = Use-STSRole -RoleArn
arn:aws:iam::123456789012:role/MySampleRole -RoleSessionName RoleSession1 -
StoredCredentials IAM-user-name
231

AWS Identity and Access Management User Guide
Using Temporary Security Credentials
to Request Access to AWS Resources
When the command is finished, you can extract the access key ID, secret access key, and session
token from the variable.
PS C:\> $role.AssumedRoleUser
Arn AssumedRoleId
--- -------------
arn:aws:sts::123456789012:assumed-role/clirole/RoleSession1
AROAJVIFQ5TJISRUTVTUE:RoleSession1
PS C:\> $role.Credentials.AccessKeyId
AKIAIOSFODNN7EXAMPLE
PS C:\> $role.Credentials.SecretAccessKey
wJalrXUtnFEMI/K7MDENG/bPxRfiCYEXAMPLEKEY
PS C:\> $role.Credentials.SessionToken
AQoDYXdzEPT//////////
wEXAMPLEtc764bNrC9SAPBSM22wDOk4x4HIZ8j4FZTwdQWLWsKWHGBuFqwAeMicRXmxfpSPfIeoIYRqT
flfKD8YUuwthAx7mSEI/qkPpKPi/
kMcGdQrmGdeehM4IC1NtBmUpp2wUE8phUZampKsburEDy0KPkyQDYwT7WZ0wq5VSXDvp75YU9
HFvlRd8Tx6q6fE8YQcHNVXAkiY9q6d+xo0rKwT38xVqr7ZD0u0iPPkUL64lIZbqBAz
+scqKmlzm8FDrypNC9Yjc8fPOLn9FX9KSYv
KTr4rvx3iSIlTJabIQwj2ICCR/oLxBA==
PS C:\> $role.Credentials.Expiration
Wednesday, July 08, 2015 3:22:32 PM
The following example shows how you might use the variable-stored credentials and then use them to
call an AWS CLI command.
Get-EC2Instance -Region us-west-2 -Credential $role.Credentials
Using Temporary Security Credentials with APIs
If you're making direct HTTPS API requests to AWS, you can sign those requests with the temporary
security credentials that you get from the AWS Security Token Service (AWS STS). To do this, you use
the access key ID and secret access key that you receive from AWS STS the same way you would use
long-term credentials to sign a request. You also add to your API request the session token that you
receive from AWS STS. You add the session token to an HTTP header or to a query string parameter
named X-Amz-Security-Token. You add the session token to the HTTP header or the query string
parameter, but not both. For more information about signing HTTPS API requests, see Signing AWS
API Requests in the AWS General Reference.
More Information
For more information about using AWS STS with other AWS services, see the following links:
•Amazon S3. See Making Requests Using IAM User Temporary Credentials or Making Requests
Using Federated User Temporary Credentials in the Amazon Simple Storage Service Developer
Guide.
•Amazon SNS. See Using Temporary Security Credentials in the Amazon Simple Notification Service
Developer Guide.
•Amazon SQS. See Using Temporary Security Credentials in the Amazon Simple Queue Service
Developer Guide.
•Amazon SimpleDB. See Using Temporary Security Credentials in the Amazon SimpleDB Developer
Guide.
232

AWS Identity and Access Management User Guide
Controlling Permissions for
Temporary Security Credentials
Controlling Permissions for Temporary Security
Credentials
After AWS STS issues temporary security credentials, they are valid through the expiration period and
cannot be revoked. However, the permissions assigned to temporary security credentials are evaluated
each time a request is made that uses the credentials, so you can achieve the effect of revoking the
credentials by changing their access rights after they have been issued.
The following topics assume you have a working knowledge of AWS permissions and policies. For
more information on these topics, see Access Management (p. 250).
Topics
•Permissions for AssumeRole, AssumeRoleWithSAML, and AssumeRoleWithWebIdentity (p. 233)
•Permissions for GetFederationToken (p. 235)
•Permissions for GetSessionToken (p. 239)
•Disabling Permissions for Temporary Security Credentials (p. 240)
•Granting Permissions to Create Temporary Security Credentials (p. 242)
Permissions for AssumeRole, AssumeRoleWithSAML, and
AssumeRoleWithWebIdentity
The permission policy of the role that is being assumed determines the permissions for
the temporary security credentials returned by AssumeRole, AssumeRoleWithSAML, and
AssumeRoleWithWebIdentity. You define these permissions when you create or update the role.
Optionally, you can pass a separate policy as a parameter of the AssumeRole,
AssumeRoleWithSAML, or AssumeRoleWithWebIdentity API call. You use the passed policy
to scope down the permissions assigned to the temporary security credentials—that is, to allow
only a subset of the permissions that are allowed by the permission policy of the role. You cannot
use the passed policy to grant permissions that are in excess of those allowed by the permission
policy of the role; it is a filter only. If you do not pass a policy as a parameter of the AssumeRole,
AssumeRoleWithSAML, or AssumeRoleWithWebIdentity API call, then the permissions attached
to the temporary security credentials are the same as the permissions defined in the role permissions
policy of the role that is being assumed.
When the temporary security credentials returned by AssumeRole, AssumeRoleWithSAML, and
AssumeRoleWithWebIdentity are used to make AWS requests, AWS determines whether to allow
or deny access by evaluating all of the following policies:
• The combination of the role permission policy of the role that was assumed and the policy passed as
a parameter to the API, as discussed previously.
• Any resource-based policies (such as an Amazon S3 bucket policy) attached to the resource that is
being accessed by the temporary security credentials.
AWS uses all of these policies to arrive at an "allow" or "deny" authorization decision that follows the
IAM policy evaluation logic (p. 381).
It is important to understand that the policies that are attached to the IAM user or the credentials
that made the original call to AssumeRole are not evaluated by AWS when making the "allow"
or "deny" authorization decision. The user temporarily gives up its original permissions in favor
of the permissions assigned by the assumed role. In the case of the AssumeRoleWithSAML and
AssumeRoleWithWebIdentity APIs, there are no policies to evaluate because the caller of the API
is not an AWS identity.
233

AWS Identity and Access Management User Guide
Controlling Permissions for
Temporary Security Credentials
Example: Assigning Permissions Using AssumeRole
You can use the AssumeRole API action with different kinds of policies. Here are a few examples.
Role Permission Policy
In this example, you call the AssumeRole API and do not include the optional Policy parameter.
The permissions assigned to the temporary security credentials that are returned by the call to
AssumeRole—that is, the permissions assigned to the assumed role user—are determined by
the permission policy of the role being assumed. The following example is a role permission policy
that grants the assumed role user permission to list all objects contained in an S3 bucket named
productionapp, and to get, put, and delete objects within that bucket.
Example Role Permission Policy
{
"Version": "2012-10-17",
"Statement": [
{
"Effect": "Allow",
"Action": "s3:ListBucket",
"Resource": "arn:aws:s3:::productionapp"
},
{
"Effect": "Allow",
"Action": [
"s3:GetObject",
"s3:PutObject",
"s3:DeleteObject"
],
"Resource": "arn:aws:s3:::productionapp/*"
}
]
}
Policy Passed as a Parameter
Imagine that you want to allow a user to assume the same role as in the previous example, but you
want the assumed role user to have permission only to get and put objects—but not delete objects
—in the productionapp S3 bucket. One way to accomplish this is to create a new role and specify
the desired permissions in that role's permission policy. Another way to accomplish this is to call the
AssumeRole API and include the optional Policy parameter as part of the API call. For example,
imagine that the following policy is passed as a parameter of the API call. The assumed role user
would have permissions to perform only these actions:
• List all objects in the productionapp bucket.
• Get and put objects in the productionapp bucket.
Note that because the s3:DeleteObject permission is not specified in the following policy, it is
filtered out and the assumed role user is not granted the s3:DeleteObject permission. When you
pass a policy as a parameter of the AssumeRole API call, the effective permissions of the assumed
role user consist of only those permissions that are granted both in the role permission policy and the
passed policy.
234

AWS Identity and Access Management User Guide
Controlling Permissions for
Temporary Security Credentials
Example Policy Passed with AssumeRole API call
{
"Version": "2012-10-17",
"Statement": [
{
"Effect": "Allow",
"Action": "s3:ListBucket",
"Resource": "arn:aws:s3:::productionapp"
},
{
"Effect": "Allow",
"Action": [
"s3:GetObject",
"s3:PutObject"
],
"Resource": "arn:aws:s3:::productionapp/*"
}
]
}
Resource-based Policy
Some AWS resources support resource-based policies, and these policies provide another mechanism
to define permissions that affect temporary security credentials. Only a few resources, like Amazon
S3 buckets, Amazon SNS topics, and Amazon SQS queues support resource-based policies. The
following example expands on the previous examples, using an S3 bucket named productionapp.
The following policy is attached to the bucket.
When you attach the following policy to the productionapp bucket, all users are denied permission to
delete objects from the bucket (note the Principal element in the policy). This includes all assumed
role users, even though the role permission policy grants the DeleteObject permission. An explicit
Deny statement always takes precedence over an explicit Allow statement.
Example Bucket Policy
{
"Version": "2012-10-17",
"Statement": {
"Principal": {"AWS": "*"},
"Effect": "Deny",
"Action": "s3:DeleteObject",
"Resource": "arn:aws:s3:::productionapp/*"
}
}
For more information about how multiple policies are combined and evaluated by AWS, see IAM Policy
Evaluation Logic (p. 381).
Permissions for GetFederationToken
The permissions for the temporary security credentials returned by GetFederationToken are
determined by a combination of the following:
• The policy or policies that are attached to the IAM user whose credentials are used to call
GetFederationToken.
• The policy that is passed as a parameter in the call.
235

AWS Identity and Access Management User Guide
Controlling Permissions for
Temporary Security Credentials
The passed policy is attached to the temporary security credentials that result from the
GetFederationToken API call—that is, to the federated user. When the federated user makes an
AWS request, AWS evaluates the policy attached to the federated user in combination with the policy
or policies attached to the IAM user whose credentials were used to call GetFederationToken.
Important
AWS allows the federated user's request only when both the attached policy and the IAM user
policy explicitly allow the federated user to perform the requested action.
The permissions assigned to the federated user are defined in one of two places:
• The policy passed as a parameter of the GetFederationToken API call. (This is most common.)
• A resource-based policy that explicitly names the federated user in the Principal element of the
policy. (This is less common.)
This means that in most cases if you do not pass a policy with the GetFederationToken API call,
the resulting temporary security credentials have no permissions. The only exception is when the
credentials are used to access a resource that has a resource-based policy that specifically references
the federated user in the Principal element of the policy.
The following figures show a visual representation of how the policies interact to determine permissions
for the temporary security credentials returned by a call to GetFederationToken.
Example: Assigning Permissions Using GetFederationToken
You can use the GetFederationToken API action with different kinds of policies. Here are a few
examples.
Policy Attached to the IAM User
In this example, you have a browser-based client application that relies on two back-end web
services. One back-end service is your own authentication server that uses your own identity
system to authenticate the client application. The other back-end service is an AWS service that
provides some of the client application's functionality. The client application is authenticated by your
server, and your server creates or retrieves the appropriate access policy. Your server then calls the
GetFederationToken API to obtain temporary security credentials, and returns those credentials
to the client application. The client application can then make requests directly to the AWS service
with the temporary security credentials. This architecture allows the client application to make AWS
requests without embedding long-term AWS credentials.
Your authentication server calls the GetFederationToken API with the long-term security credentials
of an IAM user named token-app, but the long-term IAM user credentials remain on your server and
are never distributed to the client. The following example policy is attached to the token-app IAM user
and defines the broadest set of permissions that your federated users (clients) will need. Note that the
sts:GetFederationToken permission is required for your authentication service to obtain temporary
security credentials for the federated users.
236

AWS Identity and Access Management User Guide
Controlling Permissions for
Temporary Security Credentials
Note
AWS provides a sample Java application to serve this purpose, which you can download here:
Token Vending Machine for Identity Registration - Sample Java Web Application.
Example Policy Attached to IAM User token-app that Calls GetFederationToken
{
"Version": "2012-10-17",
"Statement": [
{
"Effect": "Allow",
"Action": "sts:GetFederationToken",
"Resource": "*"
},
{
"Effect": "Allow",
"Action": "dynamodb:*",
"Resource": "*"
},
{
"Effect": "Allow",
"Action": "sqs:*",
"Resource": "*"
},
{
"Effect": "Allow",
"Action": "s3:*",
"Resource": "*"
},
{
"Effect": "Allow",
"Action": "sns:*",
"Resource": "*"
}
]
}
Although the preceding policy grants several permissions, by itself it is not enough to grant any
permissions to the federated user. If the IAM user that has the permissions defined in the preceding
policy calls GetFederationToken and does not pass a policy as a parameter of the API call, the
resulting federated user has no effective permissions.
Policy Passed as Parameter
The most common way to ensure that the federated user is assigned appropriate permission is to pass
a policy as a parameter of the GetFederationToken API call. Expanding on our previous example,
imagine that GetFederationToken is called with the credentials of the IAM user token-app and
imagine that the following policy is passed as a parameter of the API call. The federated user would
have permission to perform only these actions:
• List the contents of the Amazon S3 bucket named productionapp.
• Perform the Amazon S3 GetObject, PutObject, and DeleteObject actions on items in the
productionapp bucket.
The federated user is assigned these permissions because the permissions have been granted to both
the IAM user who called GetFederationToken (via the policy attached to the IAM user) and to the
federated user (via the passed policy). The federated user could not perform actions in Amazon SNS,
237

AWS Identity and Access Management User Guide
Controlling Permissions for
Temporary Security Credentials
Amazon SQS, Amazon DynamoDB, or in any S3 bucket except productionapp, even though those
permissions are granted to the IAM user associated with the GetFederationToken call. This is true
because the effective permissions for the federated user consist of only those permissions that are
granted in both the IAM user policy and the passed policy.
Example Policy Passed as Parameter of GetFederationToken API call
{
"Version": "2012-10-17",
"Statement": [
{
"Effect": "Allow",
"Action": ["s3:ListBucket"],
"Resource": ["arn:aws:s3:::productionapp"]
},
{
"Effect": "Allow",
"Action": [
"s3:GetObject",
"s3:PutObject",
"s3:DeleteObject"
],
"Resource": ["arn:aws:s3:::productionapp/*"]
}
]
}
Resource-based Policies
Some AWS resources support resource-based policies, and these policies provide another mechanism
to grant permissions directly to a federated user. Only some AWS services support resource-based
policies. For example, Amazon S3 has buckets, Amazon SNS has topics, and Amazon SQS has
queues that you can attach policies to. For a list of all services that support resource-based policies,
see AWS Services That Work with IAM (p. 340) and review the "Resource Based" column of the
tables. If you use one of these services and resource-based policies makes sense for your scenario,
you assign permissions directly to a federated user by specifying the Amazon Resource Name of
the federated user in the Principal element of the resource-based policy. The following example
illustrates this. The following example expands on the previous examples, using an S3 bucket named
productionapp.
The following policy is attached to the bucket. The policy allows a federated user named Carol
to access the bucket. When the following resource-based policy is in place, and the example
policy described earlier is attached to IAM user token-app, the federated user named Carol has
permission to perform the s3:GetObject, s3:PutObject, and s3:DeleteObject actions on the
bucket named productionapp. This is true even when no policy is passed as a parameter of the
GetFederationToken API call. That's because in this case the federated user named Carol has been
explicitly granted permissions by the following resource-based policy.
Remember, a federated user is granted permissions only when those permissions are explicitly granted
to both the IAM user and the federated user. Permissions can be granted to the federated user by the
policy passed as a parameter of the GetFederationToken API call, or by a resource-based policy
that explicitly names the federated user in the Principal element of the policy, as in the following
example.
238

AWS Identity and Access Management User Guide
Controlling Permissions for
Temporary Security Credentials
Example Bucket Policy that Allows Access to Federated User
{
"Version": "2012-10-17",
"Statement": {
"Principal": {"AWS": "arn:aws:sts::ACCOUNT-ID-WITHOUT-HYPHENS:federated-
user/Carol"},
"Effect": "Allow",
"Action": [
"s3:GetObject",
"s3:PutObject",
"s3:DeleteObject"
],
"Resource": ["arn:aws:s3:::productionapp/*"]
}
}
Permissions for GetSessionToken
The permissions for the temporary security credentials returned by GetSessionToken match the
permissions associated with the IAM user or the AWS root account whose credentials are used
to call the GetSessionToken API. If GetSessionToken is called with the credentials of an IAM
user, the temporary security credentials have the same permissions as the IAM user. Similarly, if
GetSessionToken is called with root account credentials, the temporary security credentials have root
account permissions.
Note
We recommend that you do not call GetSessionToken with root account credentials.
Instead, follow our best practices (p. 40) and create one or more IAM users with the
permissions they need. Then use these IAM users for everyday interaction with AWS.
The primary reason for calling GetSessionToken is that a user needs to perform actions that are
allowed only when the user is authenticated with multi-factor authentication (MFA). It is possible
to write a policy that allows certain actions only when those actions are requested by a user who
has been authenticated with MFA. In order to successfully pass the MFA authorization check, a
user must first call GetSessionToken and include the optional SerialNumber and TokenCode
parameters in the GetSessionToken API call. If the user passes valid values for the SerialNumber
and TokenCode parameters—that is, if the user is successfully authenticated with an MFA device—
the credentials returned by the GetSessionToken API call will include the MFA context. Subsequent
calls to AWS with the credentials returned by GetSessionToken will allow the user to successfully call
AWS APIs that require MFA authentication.
The temporary credentials that you get when you call GetSessionToken have the following
capabilities and limitations:
• You can use the credentials to access the AWS Management Console by passing the credentials
to the federation single sign-on endpoint at https://signin.aws.amazon.com/federation.
For more information, see Creating a URL that Enables Federated Users to Access the AWS
Management Console (Custom Federation Broker) (p. 159).
• You cannot use the credentials to call IAM or AWS STS APIs. You can use them to call APIs for
other AWS services.
Compare this API and its limitations and capability with the other APIs that create temporary security
credentials at Comparing the AWS STS APIs (p. 228)
For more information about MFA-protected API access using GetSessionToken, see Configuring
MFA-Protected API Access (p. 93).
239

AWS Identity and Access Management User Guide
Controlling Permissions for
Temporary Security Credentials
Disabling Permissions for Temporary Security Credentials
Temporary security credentials are valid until they expire, and they cannot be revoked. However,
because permissions are evaluated each time an AWS request is made using the credentials, you can
achieve the effect of revoking the credentials by changing the permissions for the credentials even
after they have been issued. If you remove all permissions from the temporary security credentials,
subsequent AWS requests that use those credentials will fail. The mechanisms for changing or
removing the permissions assigned to temporary security credentials are explained in the following
sections.
Note
When you update existing policy permissions, or when you apply a new policy to a user or a
resource, it may take a few minutes for policy updates to take effect.
Topics
•Denying Access to the Creator of the Temporary Security Credentials (p. 240)
•Denying Access to Temporary Security Credentials by Name (p. 241)
•Denying Access to Temporary Security Credentials Issued Before a Specific Time (p. 242)
Denying Access to the Creator of the Temporary Security Credentials
To change or remove the permissions assigned to temporary security credentials, you can change
or remove the permissions that are associated with the creator of the credentials. The creator of
the credentials is determined by the AWS STS API that was used to obtain the credentials. The
mechanisms for changing or removing the permissions associated with this creator are explained in the
following sections.
Denying Access to Credentials Created by AssumeRole, AssumeRoleWithSAML, or
AssumeRoleWithWebIdentity
To change or remove the permissions assigned to the temporary security credentials obtained by
calling the AssumeRole, AssumeRoleWithSAML, or AssumeRoleWithWebIdentity APIs, you edit
or delete the role access policy that defines the permissions for the assumed role. The temporary
security credentials obtained by assuming a role can never have more permissions than those
defined in the access policy of the assumed role, and the permissions assigned to temporary security
credentials are evaluated each time they are used to make an AWS request. When you edit or delete
the access policy of a role, the changes affect the permissions of all temporary security credentials
associated with that role, including credentials that were issued before you changed the role's access
policy.
For more information about editing a role access policy, see Modifying a Role (p. 208).
Denying Access to Credentials Created by GetFederationToken or GetSessionToken
To change or remove the permissions assigned to the temporary security credentials obtained
by calling the GetFederationToken or GetSessionToken APIs, you edit or delete the policies
that are attached to the IAM user whose credentials were used to call GetFederationToken
or GetSessionToken. The temporary security credentials that were obtained by calling
GetFederationToken or GetSessionToken can never have more permissions than the IAM user
whose credentials were used to obtain them. In addition the permissions assigned to temporary
security credentials are evaluated each time they are used to make an AWS request. It is important to
note that when you edit or delete the permissions of an IAM user, the changes affect the IAM user as
well as all temporary security credentials created by that user.
Important
You cannot change the permissions for an AWS root account. Likewise, you cannot
change the permissions for the temporary security credentials that were created by calling
GetFederationToken or GetSessionToken with a root account. For this reason, we
240
AWS Identity and Access Management User Guide
Controlling Permissions for
Temporary Security Credentials
recommend that you do not call GetFederationToken or GetSessionToken with root
account credentials.
For information about how to change or remove the policies associated with the IAM user whose
credentials were used to call GetFederationToken or GetSessionToken, seeWorking with
Policies (p. 280).
Denying Access to Temporary Security Credentials by Name
You can deny access to temporary security credentials without affecting the permissions of the IAM
user or role that created the credentials. You do this by specifying the Amazon Resource Name (ARN)
of the temporary security credentials in the Principal element of a resource-based policy. (Only
some AWS services support resource-based policies.)
Denying Access to Federated Users
For example, imagine you have an IAM user named token-app whose credentials are used to
call GetFederationToken. The GetFederationToken API call resulted in temporary security
credentials associated with a federated user named Bob (the federated user's name is taken from
the Name parameter of the API call). To deny federated user Bob's access to an S3 bucket called
EXAMPLE-BUCKET, you attach the following example bucket policy to EXAMPLE-BUCKET. It is
important to note that this affects the federated user's Amazon S3 permissions only—any other
permissions granted to the federated user remain intact.
{
"Version": "2012-10-17",
"Statement": {
"Principal": {"AWS": "arn:aws:sts::ACCOUNT-ID-WITHOUT-HYPHENS:federated-
user/Bob"},
"Effect": "Deny",
"Action": "s3:*",
"Resource": "arn:aws:s3:::EXAMPLE-BUCKET"
}
}
You can specify the ARN of the IAM user whose credentials were used to call GetFederationToken
in the Principal element of the bucket policy, instead of specifying the federated user. In that case,
the Principal element of the preceding policy would look like this:
"Principal": {"AWS": "arn:aws:iam::ACCOUNT-ID-WITHOUT-HYPHENS:user/token-
app"}
It is important to note that specifying the ARN of IAM user token-app in the policy will result in
denying access to all federated users created by token-app, not only the federated user named Bob.
Denying Access to Assumed Role Users
It is also possible to specify the ARN of the temporary security credentials that were created by
assuming a role. The difference is the syntax used in the Principal element of the resource-
based policy. For example, a user assumes a role called Accounting-Role and specifies a
RoleSessionName of Mary (RoleSessionName is a parameter of the AssumeRole API call). To
deny access to the temporary security credentials that resulted from this API call, the Principal
element of the resource-based policy would look like this:
"Principal": {"AWS": "arn:aws:sts::ACCOUNT-ID-WITHOUT-HYPHENS:assumed-role/
Accounting-Role/Mary"}
241

AWS Identity and Access Management User Guide
Controlling Permissions for
Temporary Security Credentials
You can also specify the ARN of the IAM role in the Principal element of a resourced-based policy,
as in the following example. In this case, the policy will result in denying access to all temporary
security credentials associated with the role named Accounting-Role.
"Principal": {"AWS": "arn:aws:iam::ACCOUNT-ID-WITHOUT-HYPHENS:role/
Accounting-Role"}
Denying Access to Temporary Security Credentials Issued Before a
Specific Time
It is possible to deny access only to temporary security credentials that were created before a specific
time and date. You do this by specifying a value for the aws:TokenIssueTime key in the Condition
element of a policy. The following policy shows an example. You attach a policy similar to the following
example to the IAM user that created the temporary security credentials. The policy denies all
permissions but only when the value of aws:TokenIssueTime is earlier than the specified date and
time. The value of aws:TokenIssueTime corresponds to the exact time at which the temporary
security credentials were created. The aws:TokenIssueTime value is only present in the context of
AWS requests that are signed with temporary security credentials, so the Deny statement in the policy
will not affect requests that are signed with the long-term credentials of the IAM user.
The following policy can also be attached to a role. In that case, the policy affects only the temporary
security credentials that were created by the role before the specified date and time. If the credentials
were created by the role after the specified date and time, the Condition element in the policy is
evaluated to false, so the Deny statement has no effect.
Example Policy that Denies All Permissions to Temporary Credentials by Issue Time
{
"Version": "2012-10-17",
"Statement": {
"Effect": "Deny",
"Action": "*",
"Resource": "*",
"Condition": {"DateLessThan": {"aws:TokenIssueTime":
"2014-05-07T23:47:00Z"}}
}
}
Granting Permissions to Create Temporary Security
Credentials
By default, IAM users do not have permission to create temporary security credentials for federated
users and roles. However, by default IAM users can call GetSessionToken with their own
permissions and thereby create temporary credentials for others..
Note
Although you can grant permissions directly to a user, we strongly recommend that you grant
permissions to a group. This makes management of the permissions much easier. When
someone no longer needs to perform the tasks associated with the permissions, you simply
remove them from the group. If someone else needs to perform that task, add them to the
group to grant the permissions.
To grant an IAM group permission to create temporary security credentials for federated users or roles,
you attach a policy that grants one or both of the following privileges:
• For federated users to access an IAM role, grant access to AWS STS AssumeRole.
242

AWS Identity and Access Management User Guide
Controlling Permissions for
Temporary Security Credentials
• For federated users that don't need a role, grant access to AWS STS GetFederationToken.
For more information about the differences between the AssumeRole and GetFederationToken
APIs, see Requesting Temporary Security Credentials (p. 219).
Example : A policy that grants permission to assume a role
The following example policy grants permission to call AssumeRole for the UpdateApp role in AWS
account 123123123123. When AssumeRole is used, the user (or application) that creates the security
credentials on behalf of a federated user cannot delegate any permissions not already specified in the
role access policy.
{
"Version": "2012-10-17",
"Statement": [{
"Effect": "Allow",
"Action": "sts:AssumeRole",
"Resource": "arn:aws:iam::123123123123:role/UpdateAPP"
}]
}
Example : A policy that grants permission to create temporary security credentials for a
federated user
The following example policy grants permission to access GetFederationToken.
{
"Version": "2012-10-17",
"Statement": [{
"Effect": "Allow",
"Action": "sts:GetFederationToken",
"Resource": "*"
}]
}
Important
When you give an IAM user permission to create temporary security credentials for federated
users with GetFederationToken, be aware that this permits the IAM user to delegate his or
her own permissions. For more information about delegating permissions across IAM users
and AWS accounts, see Examples of Policies for Delegating Access (p. 188). For more
information about controlling permissions in temporary security credentials, see Controlling
Permissions for Temporary Security Credentials (p. 233).
Example : A policy that grants a user limited permission to create temporary security
credentials for federated users
When you let an IAM user call GetFederationToken to create temporary security credentials for
federated users, it is a best practice to restrict as much as practical the permissions that the IAM
user is allowed to delegate. For example, the following policy shows how to let an IAM user create
temporary security credentials only for federated users whose names start with Manager.
{
"Version": "2012-10-17",
"Statement": [{
"Effect": "Allow",
"Action": "sts:GetFederationToken",
"Resource": ["arn:aws:sts::123456789012:federated-user/Manager*"]
243

AWS Identity and Access Management User Guide
Activating and Deactivating
AWS STS in an AWS Region
}]
}
Activating and Deactivating AWS STS in an AWS
Region
By default, the AWS Security Token Service (AWS STS) is available as a global service, and all AWS
STS requests go to a single endpoint at https://sts.amazonaws.com. You can optionally send
your AWS STS requests to endpoints in any of the AWS regions shown in the table that follows. All
regions are enabled by default, but you can disable any regions that you know you don't need.
You might choose to send your AWS STS requests to a regional endpoint for the following reasons:
•Reduce latency – By making your AWS STS calls to an endpoint that is geographically closer to
your services and applications, you can access AWS STS services with lower latency and better
response times.
•Build in Redundancy – By adding code to your application that switches your AWS STS API calls
to a different region, you ensure that if the first region stops responding, your application continues to
operate. This redundancy is not automatic; you must build the functionality into your code.
When you activate a region for an account, you enable the STS endpoints in that region to issue
temporary credentials for users and roles in that account when a request is made to an endpoint in the
region. The credentials are still recognized and usable globally. It is not the account of the caller, but
the account from which temporary credentials are requested that must activate the region.
For example, imagine a user in account A wants to send an sts:AssumeRole API request to the
STS regional endpoint https://sts.us-west-2.amazonaws.com. The request is for temporary
credentials for the role named Developer in account B. Because the request is to create credentials
for an entity in account B, account B must activate the us-west-2 region. Users from account A (or
any other account) can call the us-west-2 endpoint to request credentials for account B whether or
not the region is activated in their accounts.
To activate or deactivate AWS STS in a region
Note
All regions are activated by default. You need to activate a region only if it was previously
deactivated.
1. Sign in as an IAM user with permissions to perform IAM administration tasks ("iam:*") for the
account for which you want to activate AWS STS in a new region.
2. Open the IAM console and in the navigation pane choose Account Settings.
3. Expand the Security Token Service Regions list, find the region that you want to use, and then
choose Activate or Deactivate.
Writing Code to Use AWS STS Regions
After you activate a region for your AWS account, you can direct AWS STS API calls
to that region. The following Java code snippet demonstrates how to configure an
AWSSecurityTokenServiceClient object to make requests from the EU (Ireland) (eu-west-1)
region with the setEndpoint method.
AWSSecurityTokenServiceClient stsClient = new
AWSSecurityTokenServiceClient();
stsClient.setEndpoint("sts.eu-west-1.amazonaws.com");
244

AWS Identity and Access Management User Guide
Sample Applications That Use Temporary Credentials
Important
Do not use the setRegion method to set a regional endpoint for AWS STS because, for
backward compatibility, that method continues to resolve to the original single global endpoint
of sts.amazonaws.com.
In the example, the first line instantiates an AWSSecurityTokenServiceClient object called
stsClient. The second line configures the stsClient object by calling its setEndpoint method
and passing the URL of the endpoint as the only parameter. All API calls that use this stsClient
object are now directed to the specified endpoint.
For all other language and programming environment combinations, refer to the documentation for the
relevant SDK.
Nothing else about using AWS STS in a region changes. As always, the credentials retrieved from the
AWS STS endpoint in a region are not limited to that region; you can use them globally.
The following table lists the regions and their endpoints. It indicates which ones are activated by default
and which ones you can activate or deactivate.
Region Name Endpoint Can be
activated/
deactivated
--Global-- sts.amazonaws.com No
US East (N. Virginia) sts.us-east-1.amazonaws.com No
US West (N. California) sts.us-west-1.amazonaws.com Yes
US West (Oregon) sts.us-west-2.amazonaws.com Yes
Asia Pacific (Tokyo) sts.ap-northeast-1.amazonaws.com Yes
Asia Pacific (Seoul) sts.ap-northeast-2.amazonaws.com Yes
Asia Pacific (Mumbai) sts.ap-south-1.amazonaws.com Yes
Asia Pacific (Singapore) sts.ap-southeast-1.amazonaws.com Yes
Asia Pacific (Sydney) sts.ap-southeast-2.amazonaws.com Yes
EU (Frankfurt) sts.eu-central-1.amazonaws.com Yes
EU (Ireland) sts.eu-west-1.amazonaws.com Yes
South America (São
Paulo) sts.sa-east-1.amazonaws.com Yes
Note
Calls to regional endpoints, such as sts.us-east-1.amazonaws.com, are logged in
AWS CloudTrail the same as any call to a regional service. Calls to the global endpoint,
sts.amazonaws.com, are logged as calls to a global service. For more information, see
Logging IAM Events with AWS CloudTrail (p. 309).
Sample Applications That Use Temporary
Credentials
To see how you can use AWS STS to manage temporary security credentials, you can download the
following sample applications that implement complete example scenarios:
245

AWS Identity and Access Management User Guide
Additional Resources for Temporary Credentials
•Identity Federation Sample Application for an Active Directory Use Case. Demonstrates how to use
permissions that are tied to a user defined in Active Directory (.NET/C#) to issue temporary security
credentials for accessing Amazon S3 files and buckets.
•AWS Management Console Federation Proxy Sample Use Case. Demonstrates how to create a
custom federation proxy that enables single sign-on (SSO) so that existing Active Directory users
can sign into the AWS Management Console (.NET/C#).
•Integrate Shibboleth with AWS Identity and Access Management. Shows how to use Shibboleth
and SAML (p. 138) to provide users with single sign-on (SSO) access to the AWS Management
Console.
Samples for Web Identity Federation
The following sample applications illustrate various ways to use web identity federation, which lets
you trade authentication from a known identity provider like Login with Amazon, Amazon Cognito,
Facebook, or Google for temporary AWS security credentials that your app can use to access AWS
services.
Note
As an alternative to the approaches that are illustrated in the following samples, we
recommend you use Amazon Cognito with the AWS SDKs for mobile development. Amazon
Cognito is the simplest way to manage identity for mobile apps, and it provides additional
features like synchronization and cross-device identity. For more information about Amazon
Cognito, see Amazon Cognito Identity in the AWS Mobile SDK for Android Developer Guide
and Authenticate Users with Amazon Cognito Identity in the AWS Mobile SDK for iOS
Developer Guide.
•Web Identity Federation Playground. This website provides an interactive demonstration of web
identity federation (p. 133) and the AssumeRoleWithWebIdentity API.
•Build and Deploy a Federated Web Identity Application with AWS Elastic Beanstalk and Login with
Amazon. This blog post describes how to use AssumeRoleWithWebIdentity to obtain temporary
security credentials through web identity federation and Login with Amazon. It also explains how to
use those credentials in a Python web application that runs on Elastic Beanstalk to make calls to
AWS.
•Authenticating Users of AWS Mobile Applications with a Token Vending Machine at AWS Articles
& Tutorials. This sample demonstrates a server-based proxy application that serves temporary
credentials to remote clients (such as mobile apps) so that the clients can sign web requests to
AWS. This sample can be used with the sample client that is part of the AWS Mobile SDK for
Android and the AWS Mobile SDK for iOS. For more information, see Credential Management for
Mobile Applications, which provides details on how to secure AWS resources when you use the
token vending machine (TVM) with mobile applications.
Additional Resources for Temporary Security
Credentials
The following scenarios and applications can guide you in using temporary security credentials:
•About Web Identity Federation (p. 133). This section discusses how to configure IAM roles when
you use web identity federation and the AssumeRoleWithWebIdentity API.
•Configuring MFA-Protected API Access (p. 93). This topic explains how to use roles to require
multi-factor authentication (MFA) to protect sensitive API actions in your account.
•Token Vending Machine for Identity Registration. This sample Java web application uses the
GetFederationToken API to serve temporary security credentials to remote clients.
246

AWS Identity and Access Management User Guide
The Root User
For more information on policies and permissions in AWS see the following topics:
•Access Management (p. 250)
•IAM Policy Evaluation Logic (p. 381).
•Managing Access Permissions to Your Amazon S3 Resources in Amazon Simple Storage Service
Developer Guide.
The Account Root User
When you first create an Amazon Web Services account, you begin only with a single sign-in identity
that has complete access to all AWS services and resources in the account. This identity is called the
root user and is accessed by signing-in with the email address and password you used to create the
account.
Important
We strongly recommend that you do not use the root user for your everyday tasks, even the
administrative ones. Instead, adhere to the best practice of using the root user only to create
your first IAM user (p. 41) and then securely locking away the root user credentials. For a
tutorial on how to set this administrator user up, see Creating Your First IAM Admin User and
Group (p. 14).
To manage your root user, follow the steps in the following procedures.
Topics
•Creating Access Keys for the Root User (p. 247)
•Deleting Access Keys from the Root User (p. 248)
•Activate MFA on the Root User (p. 248)
•Changing the Root User's Password (p. 249)
Creating Access Keys for the Root User
You can use the AWS Management Console or various programming tools to create access keys for
the root user.
To create an access key for the root user (console)
1. Sign in to the AWS Management Console with your account credentials (not as an IAM user) and
open the IAM console at https://console.aws.amazon.com/iam/. An IAM user page has three text
boxes; you cannot sign in as a root user on that page. If you determine that you are on an IAM
user sign-in page, first choose the Sign-in using root account credentials link below the boxes
on that page.
2. On the IAM Dashboard page, choose your account name in the navigation bar, and then choose
Security Credentials.
3. If you see a warning about accessing the security credentials for your AWS account, choose
Continue to Security Credentials.
4. Expand the Access Keys (Access Key ID and Secret Access Key) section.
5. Choose Create New Access Key. A dialog warns you that you have only this one opportunity to
view or download the secret access key. It cannot be retrieved later.
• If you choose Show Access Key, you can copy the access key ID and secret key from your
browser window and paste it somewhere else.
• If you choose Download Key File, you receive a file named rootkey.csv that contains the
access key ID and the secret key. Save the file somewhere safe.
247

AWS Identity and Access Management User Guide
Deleting Access Keys from the Root User
6. When you no longer need to use the access key we recommend that you delete it (p. 43), or at
least mark it inactive so that it cannot be misused if leaked.
To create an access key for the root user (programmatically)
Use one of the following commands:
• AWS CLI: aws iam create-access-key
• Tools for Windows PowerShell: New-IAMAccessKey
• AWS API: CreateAccessKey
Deleting Access Keys from the Root User
You can use the AWS Management Console or various programming tools to delete access keys for
the root user.
To delete an access key from the root user (console)
1. Sign in to the AWS Management Console with your account credentials (not as an IAM user) and
open the IAM console at https://console.aws.amazon.com/iam/. An IAM user sign-in page has
three text boxes; you cannot sign in as a root user on that page. If you determine that you are on
an IAM user sign-in page, first choose the Sign-in using root account credentials link below the
boxes on that page.
2. On the IAM Dashboard page, choose your account name in the navigation bar, and then choose
Security Credentials.
3. If you see a warning about accessing the security credentials for your AWS account, choose
Continue to Security Credentials.
4. Expand the Access Keys (Access Key ID and Secret Access Key) section.
5. Find the access key that you want to delete, and then, under the Actions column, choose Delete.
Note
You can mark an access key as inactive instead of deleting it. This enables you to
resume use of it in the future without having to change either the key ID or secret key.
While it is inactive, any attempts to use it in requests to the AWS API fail with the status of
access denied.
To delete an access key for the root user (programmatically)
Use one of the following commands:
• AWS CLI: aws iam delete-access-key
• Tools for Windows PowerShell: Remove-IAMAccessKey
• AWS API: DeleteAccessKey
Activate MFA on the Root User
Another security best practice is to always enable multi-factor authentication (MFA) on any user that
can perform sensitive operations in your account. There are multiple types of MFA available. For more
information about enabling MFA, see the following:
•Enable virtual MFA for the root user (p. 83)
•Enable a physical MFA device for the root user (p. 86)
•During the SMS MFA Preview, you can't use SMS-based MFA for the root user (p. 87).
248


AWS Identity and Access Management User Guide
Permissions
Access Management
When you use your account's root credentials, you can access all the resources in your AWS account.
In contrast, when you create IAM users, IAM groups, or IAM roles, you must explicitly give permissions
to these entities so that users can access your AWS resources.
This section describes permissions, which are rights that you grant to a user, group, or role that define
what tasks users are allowed to perform in your AWS account. To define permissions, you use policies,
which are documents in JSON format.
To learn more, we recommend you read the following sections:
•Overview of AWS IAM Permissions (p. 250) — This section discusses types of permissions, how to
grant them, and how to manage permissions.
•Overview of IAM Policies (p. 262) — This section discusses how to specify what actions are
allowed, which resources to allow the actions on, and what the effect will be when the user requests
access to the resources.
•Working with Policies (p. 280) — This section describes how to create and manage policies by
using the AWS Management Console, the AWS CLI, and the IAM API.
•Testing IAM Policies with the IAM Policy Simulator (p. 287) — This section describes how to test
user and group policies using the IAM Policy Simulator.
•Using Policy Validator (p. 293) — This section describes how to use the Policy Validator when you
have policies that do not comply with the AWS policy grammar.
•AWS IAM Policy Reference (p. 345) — This section describes the elements, variables, and
evaluation logic used in policies.
•Example Policies for Administering IAM Resources (p. 255) — This section lists policies that let
users perform tasks specific to IAM, like administer users, groups, and credentials.
•Example Policies for Administering AWS Resources (p. 299) — This section lists policies that let
users perform tasks with other AWS services, like Amazon S3, Amazon EC2, and DynamoDB.
Overview of AWS IAM Permissions
250

AWS Identity and Access Management User Guide
Identity-Based (IAM) Permissions
and Resource-Based Permissions
Permissions let you specify who has access to AWS resources, and what actions they can perform on
those resources. Every IAM user starts with no permissions. In other words, by default, users can do
nothing, not even view their own access keys. To give a user permission to do something, you can add
the permission to the user (that is, attach a policy to the user) or add the user to a group that has the
desired permission.
For example, you might grant a user permission to list his or her own access keys. You might also
expand that permission and also let each user create, update, and delete their own keys.
When you give permissions to a group, all users in that group get those permissions. For example, you
can give the Admins group permission to perform any of the IAM actions on any of the AWS account
resources. Another example: You can give the Managers group permission to describe the AWS
account's Amazon EC2 instances.
For information about how to delegate basic permissions to your users, groups, and roles, see
Delegating Permissions to Administer IAM Users, Groups, and Credentials (p. 253). For additional
examples of policies that illustrate basic permissions, see Example Policies for Administering IAM
Resources (p. 255).
Identity-Based (IAM) Permissions and Resource-
Based Permissions
Permissions can be assigned in two ways: as identity-based or as resource-based.
• Identity-based, or IAM permissions are attached to an IAM user, group, or role and let you specify
what that user, group, or role can do. For example, you can assign permissions to the IAM user
named Bob, stating that he has permission to use the Amazon Elastic Compute Cloud (Amazon
EC2) RunInstances action and that he has permission to get items from an Amazon DynamoDB
table named MyCompany. The user Bob might also be granted access to manage his own IAM
security credentials. Identity-based permissions can be managed or inline (p. 266).
• Resource-based permissions are attached to a resource. You can specify resource-based
permissions for Amazon S3 buckets, Amazon Glacier vaults, Amazon SNS topics, Amazon SQS
queues, and AWS Key Management Service encryption keys. Resource-based permissions let you
specify who has access to the resource and what actions they can perform on it. Resource-based
policies are inline only, not managed.
Note
There's a difference between resource-based permissions and resource-level permissions.
Resource-based permissions are permissions you can attach directly to a resource, as
described in this topic. Resource-level permissions refers to the ability to specify not just
what actions users can perform, but which resources they're allowed to perform those actions
on. Some AWS services let you specify permissions for actions, but don't let you specify
the individual resources for those actions. Other services let you specify permissions for a
combination of actions and individual resources.
Resource-based permissions are supported only by some AWS services. For a list of
which services support resource-level permissions, see AWS Services That Work with
IAM (p. 340).
The following figure illustrates both types of permissions. The first column shows permissions attached
to identities (two users and two groups). Some of those permissions identify specific resources that the
actions can be used against. Those actions support resource-level permissions. The second column
shows permissions attached to resources. Those services support resource-based permissions.
251

AWS Identity and Access Management User Guide
Identity-Based (IAM) Permissions
and Resource-Based Permissions
Note
When you attach a policy to an AWS resource (including the trust policy of an IAM role), AWS
validates, processes, and transforms the policy you write before storing it. When AWS returns
the policy in response to a user query, AWS transforms the policy back into a human-readable
format. This can result in differences in what you see in the policy: non-significant whitespace
can be removed, elements within JSON maps can be re-ordered, and AWS account IDs within
the Principal elements can be substituted with the ARN of the account root user. Because of
these possible changes, you should not compare JSON policies documents as strings.
A user who has specific permissions might request a resource that also has permissions attached
to it. In that case, both sets of permissions are evaluated when AWS determines whether to grant
access to the resource. For information about how policies are evaluated, see IAM Policy Evaluation
Logic (p. 381).
Note
Amazon S3 supports policies both for IAM users and for resources (referred to in Amazon
S3 as bucket policies). In addition, Amazon S3 supports a permission mechanism known
as an ACL that's independent of IAM policies and permissions. You can use IAM policies in
combination with Amazon S3 ACLs. For more information, see Access Control in the Amazon
Simple Storage Service Developer Guide.
252

AWS Identity and Access Management User Guide
Resource Creators Do Not
Automatically Have Permissions
Resource Creators Do Not Automatically Have
Permissions
Someone using the AWS account's security credentials has permission to perform any action on
resources that belong to the account. However, this isn't true for IAM users. An IAM user might be
granted access to create a resource, but the user's permissions, even for that resource, are limited to
what's been explicitly granted. The user's permission can be revoked at any time by the account owner
or by another user who has been granted access to manage user permissions.
Granting Permissions Across AWS Accounts
You can directly grant IAM users in your own account access to your resources. If users from another
account need access to your resources, you can create an IAM role, which is an entity that includes
permissions but that isn't associated with a specific user. Users from other accounts can then use
the role and access resources according to the permissions you've assigned to the role. For more
information, see IAM Roles (p. 124).
Note
For services that support resource-based policies as described in Identity-Based (IAM)
Permissions and Resource-Based Permissions (p. 251) (such as Amazon S3, Amazon
SNS, and Amazon SQS), an alternative to using roles is to attach a policy to the resource
(bucket, topic, or queue) that you want to share. The resource-based policy can specify the
AWS account that has permissions to access the resource.
Permissions For One Service to Access Another
Many AWS services access other AWS services. For example, several AWS services—
including Amazon EMR, Elastic Load Balancing, and Auto Scaling—manage Amazon EC2
instances. Other AWS services make use of Amazon S3 buckets, Amazon SNS topics,
Amazon SQS queues, and so on.
The scenario for managing permissions in these cases varies by service. Here are some
examples of how permissions are handled for different services:
• In Auto Scaling, users must have permission to use Auto Scaling, but don't need to be
explicitly granted permission to manage Amazon EC2 instances.
• In AWS Data Pipeline, an IAM role determines what a pipeline can do; users need
permission to assume the role. (For details, see Granting Permissions to Pipelines with
IAM in the AWS Data Pipeline Developer Guide.)
For details about how to configure permissions properly so that an AWS service is able to accomplish
the tasks you intend, refer to the documentation for the service you are calling.
Configuring a service with an IAM role to work on your behalf
When you want to configure an AWS service to work on your behalf, you typically provide the ARN
for an IAM role that defines what the service is allowed to do. AWS checks to ensure that you have
permissions to pass a role to a service. For more information, see Granting a User Permissions to
Pass a Role to an AWS Service (p. 194).
Delegating Permissions to Administer IAM
Users, Groups, and Credentials
If you are signed in with AWS account (root) credentials, you have no restrictions on administering
IAM users or groups or on managing their credentials. However, IAM users must explicitly be given
253

AWS Identity and Access Management User Guide
Delegating Permissions to Administer
IAM Users, Groups, and Credentials
permissions to administer users or credentials for themselves or for other IAM users. This topic
describes IAM policies that let IAM users manage other users and user credentials.
Topics
•Overview (p. 254)
•Permissions for Working in the AWS Management Console (p. 255)
•Example Policies for Administering IAM Resources (p. 255)
Overview
In general, the permissions that are required in order to administer users, groups, and credentials
correspond to the API actions for the task. For example, in order to create users, a user must have
the iam:CreateUser permission (API command: CreateUser). To allow a user to create other IAM
users, you could attach a policy like the following one to that user:
{
"Version": "2012-10-17",
"Statement": {
"Effect": "Allow",
"Action": "iam:CreateUser",
"Resource": "*"
}
}
In a policy, the value of the Resource element depends on the action and what resources the action
can affect. In the preceding example, the policy allows a user to create any user (* is a wildcard that
matches all strings). In contrast, a policy that allows users to change only their own access keys (API
actions CreateAccessKey and UpdateAccessKey) typically has a Resource element where the
ARN includes a variable that resolves to the current user's name, as in the following example (replace
ACCOUNT-ID-WITHOUT-HYPHENS with your AWS account ID):
{
"Version": "2012-10-17",
"Statement": {
"Effect": "Allow",
"Action": [
"iam:CreateAccessKey",
"iam:UpdateAccessKey"
],
"Resource": "arn:aws:iam::accountid:user/${aws:username}"
}
}
In the previous example, ${aws:username} is a variable that resolves to the user name of the current
user. For more information about policy variables, see IAM Policy Variables Overview (p. 371).
Using a wildcard character (*) in the action name often makes it easier to grant permissions for all the
actions related to a specific task. For example, to allow users to perform any IAM action, you can use
iam:* for the action. To allow users to perform any action related just to access keys, you can use
iam:*AccessKey* in the Action element of a policy statement. This gives the user permission to
perform the CreateAccessKey, DeleteAccessKey, GetAccessKeyLastUsed, ListAccessKeys,
and UpdateAccessKey actions. (If an action is added to IAM in the future that has "AccessKey" in the
name, using iam:*AccessKey* for the Action element will also give the user permission to that new
action.) The following example shows a policy that allows users to perform all actions pertaining to their
own access keys (replace ACCOUNT-ID-WITHOUT-HYPHENS with your AWS account ID):
254

AWS Identity and Access Management User Guide
Delegating Permissions to Administer
IAM Users, Groups, and Credentials
{
"Version": "2012-10-17",
"Statement": {
"Effect": "Allow",
"Action": "iam:*AccessKey*",
"Resource": "arn:aws:iam::ACCOUNT-ID-WITHOUT-HYPHENS:user/
${aws:username}"
}
}
Some tasks, such as deleting a group, involve multiple actions: You must first remove users from the
group, then detach or delete the group's policies, and then actually delete the group. If you want a user
to be able to delete a group, you must be sure to give the user permissions to perform all of the related
actions.
Permissions for Working in the AWS Management
Console
The preceding examples show policies that allow a user to perform the actions with the AWS CLI or
the AWS SDKs. If users want to use the AWS Management Console to administer users, groups, and
permissions, they need additional permissions. As users work with the console, the console issues
requests to IAM to list users and groups, get the policies associated with a user or group, get AWS
account information, and so on.
For example, if user Bob wants to use the console to change his own access keys, he goes to the IAM
console and chooses Users. This action causes the console to make a ListUsers request. If Bob
doesn't have permission for the iam:ListUsers action, the console is denied access when it tries
to list users. As a result, Bob can't get to his own name and to his own access keys, even if he has
permissions for the CreateAccessKey and UpdateAccessKey actions.
If you want to give users permissions to administer users, groups, and credentials with the AWS
Management Console, you need to include permissions for the actions that the console performs.
For some examples of policies that you can use to grant a user for these permissions, see Example
Policies for Administering IAM Resources (p. 255).
Example Policies for Administering IAM Resources
Following are examples of IAM policies that allow users to perform tasks associated with managing
IAM users, groups, and credentials. This includes policies that permit users manage their own
passwords, access keys, and multi-factor authentication (MFA) devices.
For examples of policies that let users perform tasks with other AWS services, like Amazon S3,
Amazon EC2, and DynamoDB, see Example Policies for Administering AWS Resources (p. 299).
Topics
•Allow Users to Manage Their Own Passwords (from the My Password Page) (p. 256)
•Allow Users to Manage Their Own Passwords, Access Keys, and SSH Keys (p. 256)
•Allow a User to List the Account's Groups, Users, Policies, and More for Reporting
Purposes (p. 257)
•Allow a User to Manage a Group's Membership (p. 258)
•Allow a User to Manage IAM Users (p. 258)
•Allow Users to Set Account Password Policy (p. 259)
•Allow Users to Generate and Retrieve IAM Credential Reports (p. 260)
•Allow Users to Manage Only Their Own Virtual MFA Devices (p. 260)
255

AWS Identity and Access Management User Guide
Delegating Permissions to Administer
IAM Users, Groups, and Credentials
•Allow All IAM Actions (Admin Access) (p. 261)
Allow Users to Manage Their Own Passwords (from the My Password
Page)
If the account's password policy (p. 67) is set to allow all users to change their own passwords, you
don't need to attach any permissions to individual users or groups. All users will be able to go to the My
Password page (p. 75) in the AWS Management Console that lets them change their own password.
If the account's password policy is not set to allow all users to change their own passwords, you
can attach the following policy to selected users or groups to allow those users to change their own
passwords. This policy only allows users to use the special My Password page in the console; it does
not give users permissions to work through the dashboard in the IAM console.
{
"Version": "2012-10-17",
"Statement": {
"Effect": "Allow",
"Action": [
"iam:ChangePassword",
"iam:GetAccountPasswordPolicy"
],
"Resource": "*"
}
}
If users do not use the console to change their own password, they do not need the
iam:GetAccountPasswordPolicy permission. They can instead run the aws iam change-
password command from the AWS CLI, or make a request with the ChangePassword action.
For information about letting selected users manage passwords using the Users section of the IAM
console, see the next section.
Allow Users to Manage Their Own Passwords, Access Keys, and SSH
Keys
The following policy allows users to perform these actions in the AWS Management Console:
• Create, change, or remove their own password. This includes the CreateLoginProfile,
DeleteLoginProfile, GetLoginProfile, and UpdateLoginProfile actions.
• Create or delete their own access key (access key ID and secret access key). This includes the
CreateAccessKey, DeleteAccessKey, GetAccessKeyLastUsed, ListAccessKeys, and
UpdateAccessKey actions.
• Create or delete their own SSH keys. This includes the UploadSSHPublicKey,
DeleteSSHPublicKey, GetSSHPublicKey, ListSSHPublicKeys, and UpdateSSHPublicKey
actions.
{
"Version": "2012-10-17",
"Statement": [
{
"Effect": "Allow",
"Action": [
"iam:*LoginProfile",
256

AWS Identity and Access Management User Guide
Delegating Permissions to Administer
IAM Users, Groups, and Credentials
"iam:*AccessKey*",
"iam:*SSHPublicKey*"
],
"Resource": "arn:aws:iam::account-id-without-hyphens:user/
${aws:username}"
},
{
"Effect": "Allow",
"Action": [
"iam:ListAccount*",
"iam:GetAccountSummary",
"iam:GetAccountPasswordPolicy",
"iam:ListUsers"
],
"Resource": "*"
}
]
}
The actions in the preceding policy include wildcards (for example,
iam:*LoginProfile,iam:*AccessKey*, and iam:*SSHPublicKey*). This is a convenient way to
include a set of related actions. If you want to remove permissions for any one of the related actions,
you must instead list each of the individual actions. For example, if you don't want users to be able to
delete a password, you must individually list iam:CreateLoginProfile, iam:GetLoginProfile,
and iam:UpdateLoginProfile, and omit iam:DeleteLoginProfile.
The second element in the Statement arrary, including iam:GetAccountSummary,
iam:GetAccountPasswordPolicy, iam:ListAccount*, and iam:ListUsers permissions, allows
the user to see certain information on the IAM console dashboard, such as whether a password policy
is enabled, how many groups the account has, what the account URL and alias are, etc. For example,
the GetAccountSummary action returns an object that contains a collection of information about the
account that is then displayed on the IAM console dashboard.
The following policy is like the previous one but excludes the permissions that are needed only for
console access. This policy lets users manage their credentials with the AWS CLI, Tools for Windows
PowerShell, the AWS SDKs, or the IAM HTTP query API.
{
"Version": "2012-10-17",
"Statement": {
"Effect": "Allow",
"Action": [
"iam:*LoginProfile",
"iam:*AccessKey*",
"iam:*SSHPublicKey*"
],
"Resource": "arn:aws:iam::account-id-without-hyphens:user/
${aws:username}"
}
}
Allow a User to List the Account's Groups, Users, Policies, and More for
Reporting Purposes
The following policy allows the user to call any IAM action that starts with the string Get or List.
{
257

AWS Identity and Access Management User Guide
Delegating Permissions to Administer
IAM Users, Groups, and Credentials
"Version": "2012-10-17",
"Statement": {
"Effect": "Allow",
"Action": [
"iam:Get*",
"iam:List*"
],
"Resource": "*"
}
}
The benefit of using Get* and List* actions is that if new types of entities are added to IAM in the
future, the access granted in the policy to Get* and List* all actions would automatically allow the
user to list those new entities.
Allow a User to Manage a Group's Membership
The following policy allows the user to update the membership of the group called MarketingGroup. To
use the following policy, replace ACCOUNT-ID-WITHOUT-HYPHENS with your AWS account ID.
{
"Version": "2012-10-17",
"Statement": {
"Effect": "Allow",
"Action": [
"iam:AddUserToGroup",
"iam:RemoveUserFromGroup",
"iam:GetGroup"
],
"Resource": "arn:aws:iam::account-id-without-hyphens:group/
MarketingGroup"
}
}
Allow a User to Manage IAM Users
The following policy allows a user to perform all the tasks associated with managing IAM users but not
to perform actions on other entities, such as creating groups or policies. Allowed actions include these:
• Creating the user (the CreateUser action).
• Deleting the user. This task requires permissions to perform all of the following actions:
DeleteSigningCertificate, DeleteLoginProfile, RemoveUserFromGroup, and
DeleteUser.
• Listing users in the account and in groups (the GetUser, ListUsers and ListGroupsForUser
actions).
• Listing and removing policies for the user (the ListUserPolicies,
ListAttachedUserPolicies, DetachUserPolicy, DeleteUserPolicy actions)
• Renaming or changing the path for the user (the UpdateUser action). The Resource element must
include an ARN that covers both the source path and the target path. For more information on paths,
see Friendly Names and Paths (p. 334).
{
"Version": "2012-10-17",
"Statement": [
258

AWS Identity and Access Management User Guide
Delegating Permissions to Administer
IAM Users, Groups, and Credentials
{
"Sid": "AllowUsersToPerformUserActions",
"Effect": "Allow",
"Action": [
"iam:CreateUser",
"iam:ListUsers",
"iam:GetUser",
"iam:UpdateUser",
"iam:DeleteUser",
"iam:ListGroupsForUser",
"iam:ListUserPolicies",
"iam:ListAttachedUserPolicies",
"iam:DeleteSigningCertificate",
"iam:DeleteLoginProfile",
"iam:RemoveUserFromGroup",
"iam:DetachUserPolicy",
"iam:DeleteUserPolicy"
],
"Resource": "*"
},
{
"Sid": "AllowUsersToSeeStatsOnIAMConsoleDashboard",
"Effect": "Allow",
"Action": [
"iam:GetAccount*",
"iam:ListAccount*"
],
"Resource": "*"
}
]
}
A number of the permissions included in the preceding policy allow the user to perform tasks
in the AWS Management Console. Users who perform user-related tasks from the AWS CLI,
the AWS SDKs, or the IAM HTTP query API only might not need certain permissions. For
example, if users already know the ARN of policies to detach from a user, they do not need the
iam:ListAttachedUserPolicies permission. The exact list of permissions that a user requires
depends on the tasks that the user must perform while managing other users.
The following permissions in the policy allow access to user tasks via the AWS Management Console:
•iam:GetAccount*
•iam:ListAccount*
Allow Users to Set Account Password Policy
You might give some users permissions to get and update your AWS account's password
policy (p. 67). The following example policy grants these permissions.
{
"Version": "2012-10-17",
"Statement": {
"Effect": "Allow",
"Action": [
"iam:GetAccountPasswordPolicy",
"iam:UpdateAccountPasswordPolicy"
],
259

AWS Identity and Access Management User Guide
Delegating Permissions to Administer
IAM Users, Groups, and Credentials
"Resource": "*"
}
}
Allow Users to Generate and Retrieve IAM Credential Reports
You can give users permission to generate and download a report that lists all users in your AWS
account and the status of their various credentials, including passwords, access keys, MFA devices,
and signing certificates. The following example policy grants these permissions.
{
"Version": "2012-10-17",
"Statement": {
"Effect": "Allow",
"Action": [
"iam:GenerateCredentialReport",
"iam:GetCredentialReport"
],
"Resource": "*"
}
}
For more information about credential reports, see the section called “Getting Credential
Reports” (p. 106).
Allow Users to Manage Only Their Own Virtual MFA Devices
A virtual MFA device (p. 82) is a software implementation of a device that provides one-time
passwords. Virtual MFA devices are hosted on a physical hardware device (typically a smartphone). In
order to configure a virtual MFA device, you must have access to the physical device where the virtual
MFA device is hosted. If your users create virtual MFA devices inside a smartphone app on their own
smartphone, you might want to let them configure the devices themselves. For more about using virtual
MFA devices with IAM, see Enabling a Virtual Multi-factor Authentication (MFA) Device (p. 82).
The following policy allows a user to configure and manage his or her own virtual MFA device from
the AWS Management Console or using any of the command-line tools. The policy allows only MFA-
authenticated users to deactivate and delete their own virtual MFA devices.
{
"Version": "2012-10-17",
"Statement": [
{
"Sid": "AllowUsersToCreateEnableResyncDeleteTheirOwnVirtualMFADevice",
"Effect": "Allow",
"Action": [
"iam:CreateVirtualMFADevice",
"iam:EnableMFADevice",
"iam:ResyncMFADevice",
"iam:DeleteVirtualMFADevice"
],
"Resource": [
"arn:aws:iam::account-id-without-hyphens:mfa/${aws:username}",
"arn:aws:iam::account-id-without-hyphens:user/${aws:username}"
]
},
{
"Sid": "AllowUsersToDeactivateTheirOwnVirtualMFADevice",
260

AWS Identity and Access Management User Guide
Delegating Permissions to Administer
IAM Users, Groups, and Credentials
"Effect": "Allow",
"Action": [
"iam:DeactivateMFADevice"
],
"Resource": [
"arn:aws:iam::account-id-without-hyphens:mfa/${aws:username}",
"arn:aws:iam::account-id-without-hyphens:user/${aws:username}"
],
"Condition": {
"Bool": {
"aws:MultiFactorAuthPresent": true
}
}
},
{
"Sid": "AllowUsersToListMFADevicesandUsersForConsole",
"Effect": "Allow",
"Action": [
"iam:ListMFADevices",
"iam:ListVirtualMFADevices",
"iam:ListUsers"
],
"Resource": "*"
}
]
}
Note
The action iam:DeleteVirtualMFADevice is not subject to the MFA condition check
because it is included in the first statement instead of the second. This isn't a security concern
because you can only delete an MFA device after you deactivate it, which the user can do
only if they are MFA authenticated. This prevents a situation that can occur if you cancel the
Create MFA Device wizard after it creates the device but before it validates the two codes
and associates it with the user. Because the user is not yet MFA authenticated at this point,
the wizard (which operates with the user's permissions) fails to clean up the device if the
policy requires MFA authentication to delete the device.
Allow All IAM Actions (Admin Access)
You might give some users administrative permissions to perform all actions in IAM, including
managing passwords, access keys, MFA devices, and user certificates. The following example policy
grants these permissions.
Caution
When you give a user full access to IAM, there is no limit to the permissions that user can
grant to him/herself or others. The user can create new IAM entities (users or roles) and
grant those entities full access to all resources in your AWS account. When you give a user
full access to IAM, you are effectively giving them full access to all resources in your AWS
account. This includes access to delete all resources. You should grant these permissions to
only trusted administrators, and you should enforce multi-factor authentication (MFA) for these
administrators.
{
"Version": "2012-10-17",
"Statement": {
"Effect": "Allow",
"Action": "iam:*",
"Resource": "*"
261

AWS Identity and Access Management User Guide
Policies
}
}
Overview of IAM Policies
This section provides an overview of IAM policies. A policy is a document that formally states one or
more permissions.
For a complete reference to the IAM policy syntax and grammar, see AWS IAM Policy
Reference (p. 345).
Topics
•Managed Policies and Inline Policies (p. 266)
•Versioning for Managed Policies (p. 270)
•Deprecated AWS Managed Policies (p. 272)
•Controlling Access to Managed Policies (p. 273)
•Creating a New Policy (p. 277)
•Working with Policies (p. 280)
•Testing IAM Policies with the IAM Policy Simulator (p. 287)
•Using Policy Validator (p. 293)
•Service Last Accessed Data (p. 295)
•Example Policies for Administering AWS Resources (p. 299)
Introduction
To assign permissions to a user, group, role, or resource, you create a policy, which is a document that
explicitly lists permissions. In its most basic sense, a policy lets you specify the following:
•Actions: what actions you will allow. Each AWS service has its own set of actions. For example, you
might allow a user to use the Amazon S3 ListBucket action, which returns information about the
items in a bucket. Any actions that you don't explicitly allow are denied.
•Resources: which resources you allow the action on. For example, what specific Amazon S3
buckets will you allow the user to perform the ListBucket action on? Users cannot access any
resources that you have not explicitly granted permissions to.
•Effect: what the effect will be when the user requests access—either allow or deny. Because the
default is that resources are denied to users, you typically specify that you will allow users access to
resource.
Policies are documents that are created using JSON. A policy consists of one or more statements,
each of which describes one set of permissions. Here's an example of a simple policy.
{
"Version": "2012-10-17",
"Statement": {
"Effect": "Allow",
"Action": "s3:ListBucket",
"Resource": "arn:aws:s3:::example_bucket"
}
}
262

AWS Identity and Access Management User Guide
Policies
You can attach this policy to an IAM user or group. If that's the only policy for the user or group, the
user or group is allowed to perform only this one action (ListBucket) on one Amazon S3 bucket
(example_bucket).
To specify resource-based permissions, you can attach a policy to the resource, such as an Amazon
SNS topic, an Amazon S3 bucket, or an Amazon Glacier vault. In that case, the policy has to include
information about who is allowed to access the resource, known as the principal. (For user-based
policies, the principal is the IAM user that the policy is attached to, or the user who gets the policy from
a group.)
The following example shows a policy that might be attached to an Amazon S3 bucket and that grants
permission to a specific AWS account to perform any Amazon S3 actions in mybucket. This includes
both working with the bucket and with the objects in it. (Because the policy grants trust only to the
account, individual users in the account must still be granted permissions for the specified Amazon S3
actions.)
{
"Version": "2012-10-17",
"Id": "S3-Account-Permissions",
"Statement": [{
"Sid": "1",
"Effect": "Allow",
"Principal": {"AWS": ["arn:aws:iam::ACCOUNT-ID-WITHOUT-HYPHENS:root"]},
"Action": "s3:*",
"Resource": [
"arn:aws:s3:::mybucket",
"arn:aws:s3:::mybucket/*"
]
}]
}
IAM policies control access regardless of the interface. For example, you could provide a user with
a password to access the AWS Management Console, and the policies for that user (or any groups
the user belongs to) would control what the user can do in the AWS Management Console. Or, you
could provide the user with AWS access keys for making API calls to AWS, and the policies would
control what actions the user could call through a library or client that uses those access keys for
authentication.
For basic example policies that cover common scenarios, see Example Policies for Administering AWS
Resources (p. 299), AWS Services That Work with IAM (p. 340), and the AWS Policy Examples
page in the AWS Sample Code & Libraries section of the AWS website.
AWS managed policies and the Policy Generator are available from the IAM console in the AWS
Management Console. For more information about creating policies in the console, see Working with
Policies (p. 280). Also, you can use the AWS Policy Generator online to create policies for AWS
products without accessing the console.
Important
You cannot save any policy that does not comply with the established policy syntax. You can
use Policy Validator to detect and correct invalid policies. One click takes you to an editor
that shows both the existing policy and a copy with the recommended changes. You can
accept the changes or make further modifications. For more information, see Using Policy
Validator (p. 293).
Note
When you apply a custom policy, IAM checks its syntax. However, because IAM evaluates
policies at run time using a specific request context (in which multiple policies might
be in effect), it cannot check the validity of all resources, actions, and permissions in a
263
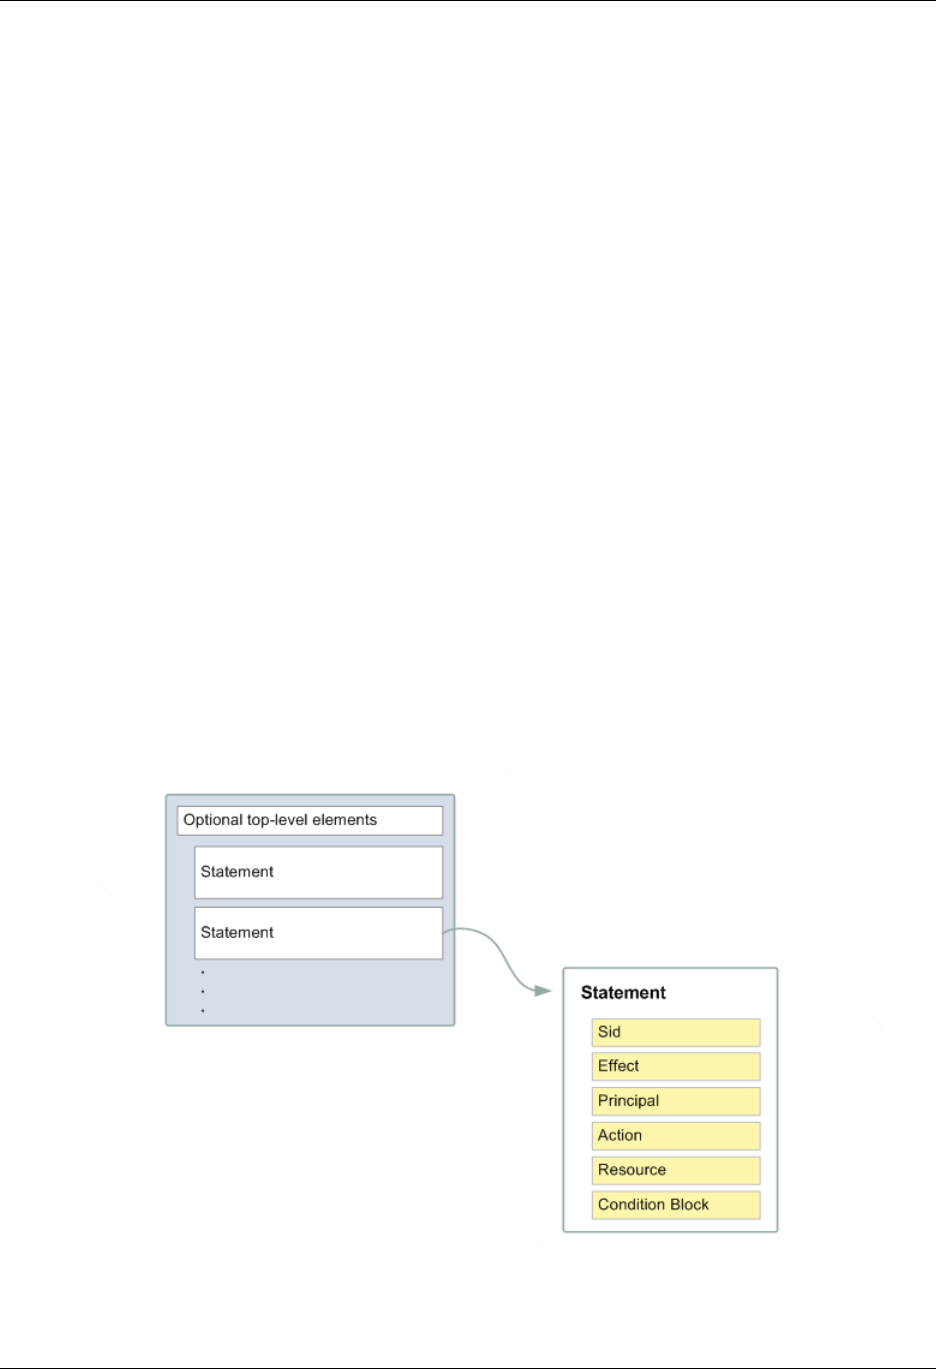
AWS Identity and Access Management User Guide
Policies
custom policy at the time that you apply the policy. If you need help in creating a policy, we
recommend using an AWS managed policy or the Policy Generator. For help testing the
effects of your IAM policies, see Testing IAM Policies with the IAM Policy Simulator (p. 287).
Multiple Statements and Multiple Policies
You can attach more than one policy to an entity. If you have multiple permissions to grant to an entity,
you can put them in separate policies, or you can put them all in one policy.
Generally, each statement in a policy includes information about a single permission. If your policy
includes multiple statements, a logical OR is applied across the statements at evaluation time.
Similarly, if multiple policies are applicable to a request, a logical OR is applied across the policies at
evaluation time.
Users often have multiple policies that apply to them (but aren't necessarily attached to them). For
example, IAM user Bob could have policies attached to him, and other policies attached to the groups
he's in. In addition, he might be accessing an Amazon S3 bucket that has its own bucket policy
(resource-based policy). All applicable policies are evaluated and the result is always that access
is either granted or denied. For more information about the evaluation logic we use, see IAM Policy
Evaluation Logic (p. 381).
Policy Structure
Each policy is a JSON document. As illustrated in the following figure, a policy includes:
• Optional policy-wide information (at the top of the document)
• One or more individual statements
Each statement includes the core information about a single permission. If a policy includes multiple
statements, AWS applies a logical OR across the statements at evaluation time. If multiple policies are
applicable to a request, AWS applies a logical OR across the policies at evaluation time.
The information in a statement is contained within a series of elements. For information about these
elements, see IAM Policy Elements Reference (p. 346).
264

AWS Identity and Access Management User Guide
Policies
Example Policy with Multiple Statements
Policies often include multiple statements, where each statement grants permissions to a different set
of resources or grants permissions under a specific condition. For example, the following policy has
three statements, each of which grants a separate set of permissions. Assume that the user or group
that the policy is attached to is in AWS account 123456789012. (Policies can't reference resources in
other accounts.) The statements do the following:
• The first statement, with a Sid (Statement ID) element set to FirstStatement, lets users manage
their own passwords. The Resource element in this statement is "*" (which means "all resources"),
but in practice, the ChangePassword API (or equivalent change-password CLI command) affects
only the password for the user who makes the request.
• The second statement ("Sid": "SecondStatement") lets the user list all the Amazon S3
buckets in their AWS account. The Resource element in this statement is "*" (which means "all
resources"), but because policies don't grant access to resources in other accounts, the user can list
only the buckets in their own AWS account. (This permission is necessary for the user to access a
bucket from the AWS Management Console.)
• The third statement ("Sid": "ThirdStatement") lets the user list and retrieve any object that
is in a bucket called confidential-data, but only when the user has authenticated with a multi-
factor authentication (MFA) device. The Condition element in the policy checks whether the user is
MFA-authenticated, and if so, the user can list and retrieve objects in the bucket.
When a policy statement contains a Condition element, the statement is only in effect when the
Condition element evaluates to true. In this case, the Condition evaluates to true when the user
is MFA-authenticated. If the user is not MFA-authenticated, this Condition evaluates to false. In
that case, the third statement in this policy will not take effect, so the user will not have access to the
confidential-data bucket.
{
"Version": "2012-10-17",
"Statement": [
{
"Sid": "FirstStatement",
"Effect": "Allow",
"Action": ["iam:ChangePassword"],
"Resource": "*"
},
{
"Sid": "SecondStatement",
"Effect": "Allow",
"Action": "s3:ListAllMyBuckets",
"Resource": "*"
},
{
"Sid": "ThirdStatement",
"Effect": "Allow",
"Action": [
"s3:List*",
"s3:Get*"
],
"Resource": [
"arn:aws:s3:::confidential-data",
"arn:aws:s3:::confidential-data/*"
],
"Condition": {"Bool": {"aws:MultiFactorAuthPresent": "true"}}
}
]
}
265

AWS Identity and Access Management User Guide
Managed Policies and Inline Policies
Managed Policies and Inline Policies
Using IAM, you apply permissions to IAM users, groups, and roles (which we refer to as principal
entities) by creating policies. You can create two types of IAM, oridentity-based policies:
•Managed policies – Standalone policies that you can attach to multiple users, groups, and roles
in your AWS account. Managed policies apply only to identities (users, groups, and roles) - not
resources. You can use two types of managed policies:
•AWS managed policies – Managed policies that are created and managed by AWS. If you are
new to using policies, we recommend that you start by using AWS managed policies.
•Customer managed policies – Managed policies that you create and manage in your AWS
account. Using customer managed policies, you have more precise control over your policies than
when using AWS managed policies.
•Inline policies – Policies that you create and manage, and that are embedded directly into a single
user, group, or role. Resource-based policies are another form of inline policy. Resource-based
policies are not discussed here. For more information about resource-based policies, see Identity-
Based (IAM) Permissions and Resource-Based Permissions (p. 251).
Identity-based (IAM) policies can be either inline or managed. Resource-based policies are attached to
the resources (inline) only and are not managed.
Generally speaking, the content of the policies is the same in all cases—each kind of policy defines a
set of permissions using a common structure and a common syntax.
Note
For AWS managed policies and customer managed policies, the policy's Version element
must be set to 2012-10-17. For inline policies, the policy's Version element can be set
to 2012-10-17 or to 2008-10-17. We recommend that you set the Version element to
2012-10-17 for all policies.
For more information about the Version element, see Version (p. 347) in this guide's Policy
Element Reference.
You can use the different types of policies together. You are not limited to using only one type.
The following sections provide more information about each of the types of policies and when to use
them.
Topics
•AWS Managed Policies (p. 266)
•Customer Managed Policies (p. 267)
•Inline Policies (p. 268)
•Choosing Between Managed Policies and Inline Policies (p. 269)
AWS Managed Policies
An AWS managed policy is a standalone policy that is created and administered by AWS. Standalone
policy means that the policy has its own Amazon Resource Name (ARN) that includes the policy name.
AWS managed policies are designed to provide permissions for many common use cases. For
example, there are AWS managed policies that define typical permissions for administrators (all
access), for power users (all access except IAM), and for other various levels of access to AWS
services. AWS managed policies make it easier for you to assign appropriate permissions to users,
groups, and roles than if you had to write the policies yourself.
You cannot change the permissions defined in AWS managed policies. AWS will occasionally update
the permissions defined in an AWS managed policy. When AWS does this, the update affects all
266
AWS Identity and Access Management User Guide
Managed Policies and Inline Policies
principal entities (users, groups, and roles) that the policy is attached to. AWS is most likely to update
an AWS managed policy when a new AWS service is launched or new APIs become available for
existing services, and the policy needs to include permissions for the new service(s) or APIs. For
example, the AWS managed policy called ReadOnlyAccess provides read-only access to all AWS
services and resources. When AWS launches a new service, AWS will update the ReadOnlyAccess
policy to add read-only permissions for the new service. The updated permissions are applied to all
principal entities that the policy is attached to.
The following diagram illustrates AWS managed policies. The diagram shows three AWS managed
policies: AdministratorAccess, PowerUserAccess, and AWSCloudTrailReadOnlyAccess. Notice
that a single AWS managed policy can be attached to principal entities in different AWS accounts, and
to different principal entities in a single AWS account.
Customer Managed Policies
You can create standalone policies that you administer in your own AWS account, which we refer to
as a customer managed policies. You can then attach the policies to multiple principal entities in your
AWS account. When you attach a policy to a principal entity, you give the entity the permissions that
are defined in the policy.
A great way to create a customer managed policy is to start by copying an existing AWS-managed
policy. That way you know that the policy is correct at the beginning and all you need to do is
customize it to your environment.
The following diagram illustrates customer managed policies. Each policy is an entity in IAM with its
own Amazon Resource Name (ARN) that includes the policy name. Notice that the same policy can
be attached to multiple principal entities—for example, the same DynamoDB-books-app policy is
attached to two different IAM roles.
267
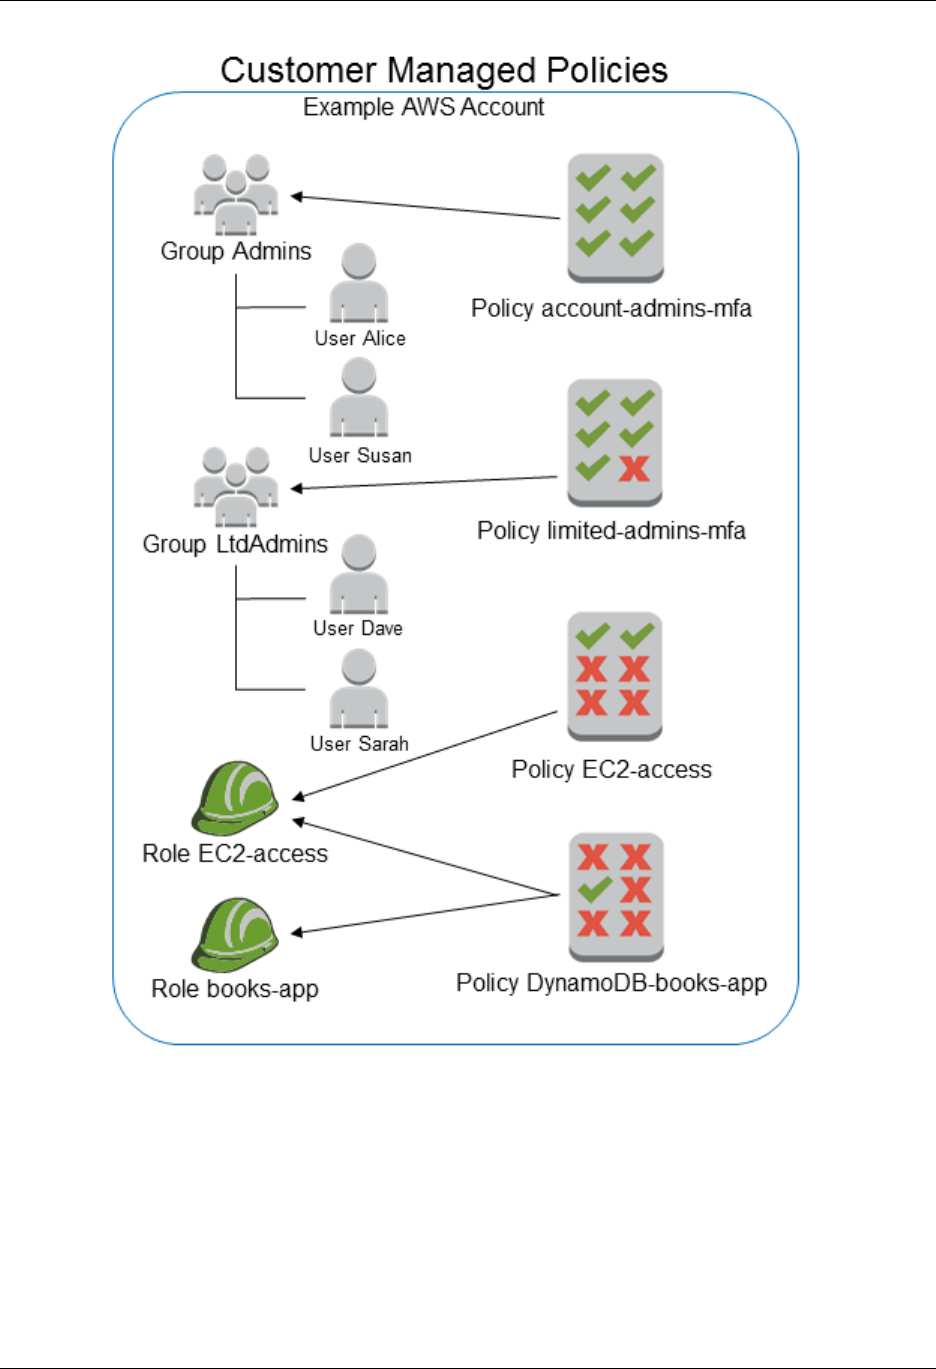
AWS Identity and Access Management User Guide
Managed Policies and Inline Policies
Inline Policies
An inline policy is a policy that's embedded in a principal entity (a user, group, or role)—that is, the
policy is an inherent part of the principal entity. You can create a policy and embed it in a principal
entity, either when you create the principal entity or later.
The following diagram illustrates inline policies. Each policy is an inherent part of the user, group, or
role. Notice that two roles include the same policy (the DynamoDB-books-app policy), but they are
not sharing a single policy; each role has its own copy of the policy.
268
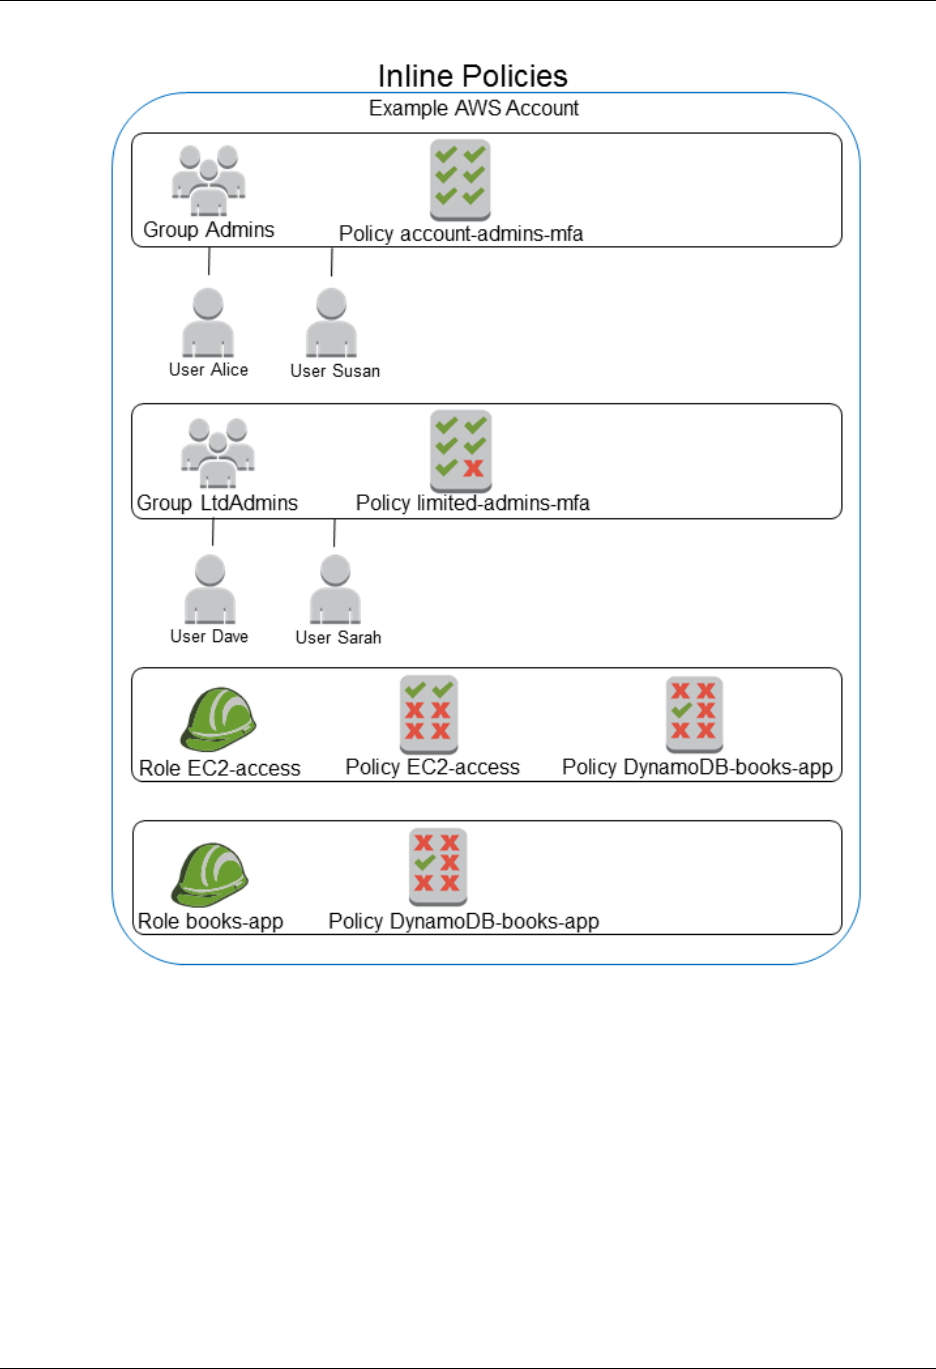
AWS Identity and Access Management User Guide
Managed Policies and Inline Policies
Choosing Between Managed Policies and Inline Policies
The different types of policies are for different use cases. In most cases, we recommend that you use
managed policies instead of inline policies.
Managed policies provide the following features:
Reusability
A single managed policy can be attached to multiple principal entities (users, groups, and roles).
In effect, you can create a library of policies that define permissions that are useful for your AWS
account, and then attach these policies to principal entities as needed.
Central change management
When you change a managed policy, the change is applied to all principal entities that the policy is
attached to. For example, if you want to add permission for a new AWS API, you can update the
269
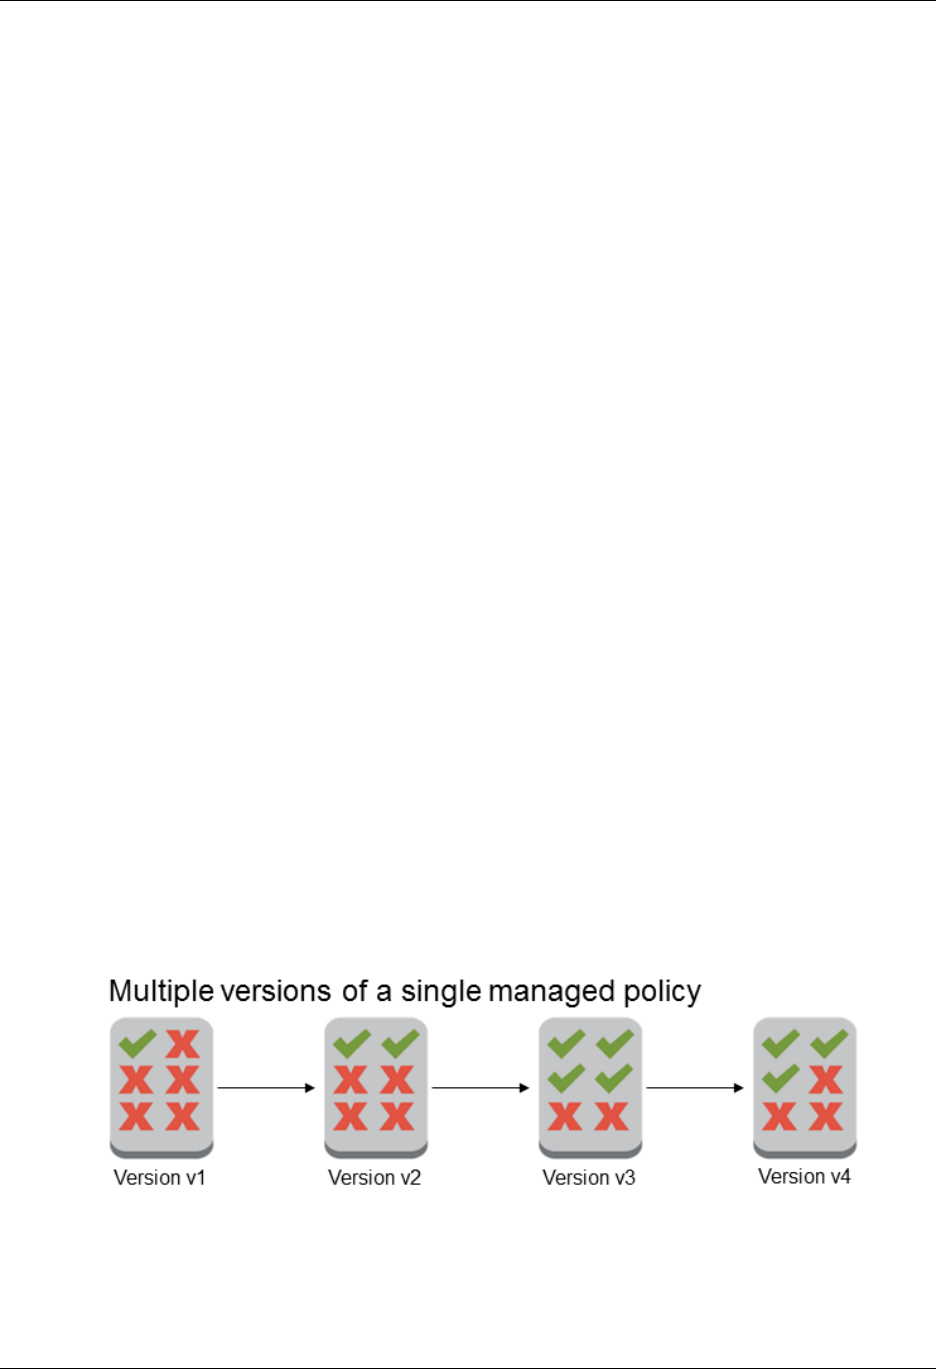
AWS Identity and Access Management User Guide
Versioning for Managed Policies
managed policy to add the permission. (If you're using an AWS managed policy, AWS updates
to the policy.) When the policy is updated, the changes are applied to all principal entities that the
policy is attached to. In contrast, to change an inline policy you must individually edit each principal
entity that contains the policy—for example, if a group and a role both contain the same inline
policy, you must individually edit both principal entities in order to change that policy.
Versioning and rolling back
Changes to managed policies are implemented as versions—making a change to a managed
policy creates a new version of the policy with a new version identifier. You can use policy versions
to revert a policy to an earlier version if you need to.
For more information about policy versions, see Versioning for Managed Policies (p. 270).
Delegating permissions management
You can allow users in your AWS account to attach and detach policies while maintaining control
over the permissions defined in those policies. In effect, you can designate some users as full
admins—that is, admins that can create, update, and delete policies. You can then designate other
users as limited admins—that is, admins that can attach policies to other principal entities, but only
the policies that you have allowed them to attach.
For more information about delegating permissions management, see Controlling Access to
Managed Policies (p. 273).
Automatic updates for AWS managed policies
AWS maintains AWS managed policies and updates them when necessary (for example, to
add permissions for new AWS services), without you having to make changes. The updates are
automatically applied to the principal entities that you have attached the AWS managed policy to.
Using Inline Policies
Inline policies are useful if you want to maintain a strict one-to-one relationship between a policy and
the principal entity that it's applied to. For example, you want to be sure that the permissions in a
policy are not inadvertently assigned to a principal entity other than the one they're intended for. When
you use an inline policy, the permissions in the policy cannot be inadvertently attached to the wrong
principal entity. In addition, when you delete that principal entity using the AWS Management Console,
the policies embedded in the principal entity are deleted as well, because they are part of the principal
entity.
Versioning for Managed Policies
When you make changes to a customer managed policy, and when AWS makes changes to an AWS
managed policy, the changed policy doesn't overwrite the existing policy. Instead, IAM creates a new
version of the managed policy. The following diagram illustrates this.
You can use versions to track changes to a managed policy. For example, you might make a change to
a managed policy and then discover that the change had unintended effects. In this case, you can roll
back to a previous version of the managed policy by setting the previous version as the default version.
The following sections explain how you can use versioning for managed policies.
270
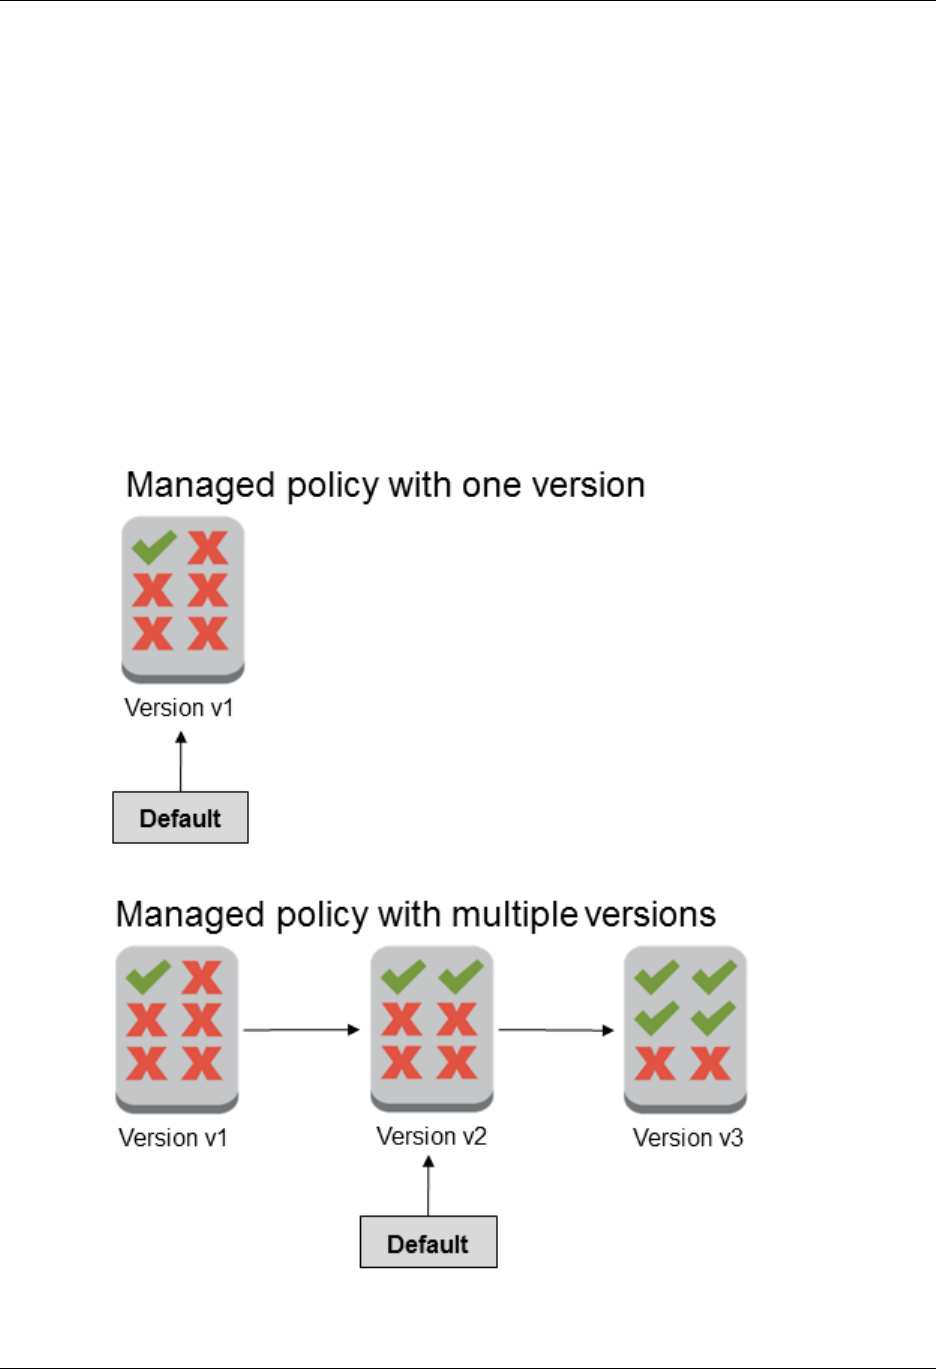
AWS Identity and Access Management User Guide
Versioning for Managed Policies
Topics
•Setting the Default Version (p. 271)
•Using Versions to Roll Back Changes (p. 272)
•Version Limits (p. 272)
Setting the Default Version
One of the versions of a managed policy is set as the default version. The policy's default version is the
operative version—that is, it's the version that is in effect for all of the principal entities (users, groups,
and roles) that the managed policy is attached to.
When you create a customer managed policy, the policy begins with a single version identified as
v1. For managed policies with only a single version, that version is automatically set as the default.
For customer managed policies with more than one version, you choose which version to set as
the default. For AWS managed policies, the default version is set by AWS. The following diagrams
illustrate this concept.
271

AWS Identity and Access Management User Guide
Deprecated AWS Managed Policies
You can set the default version of your customer managed policies, but AWS sets the default version
of AWS managed policies. You set the default version of a customer managed policy using the AWS
Management Console, the AWS Command Line Interface, or the IAM API.
Using Versions to Roll Back Changes
When you make changes to a customer managed policy, your changes are stored as policy versions.
In some cases, you may want to roll back your changes. For example, consider the following scenario.
You create a customer managed policy that allows users to administer a particular Amazon S3 bucket
using the AWS Management Console. Upon creation, your customer managed policy has only one
version, identified as v1, so that version is automatically set as the default. The policy works as
intended.
Later, you update the policy to add permission to administer a second Amazon S3 bucket. IAM creates
a new version of the policy, identified as v2, that contains your changes. You set version v2 as the
default, and a short time later your users report that they are unable to use the Amazon S3 console
at all due to a permissions error. In this case, you can roll back to version v1 of the policy, which you
know works as intended. To do this, you set version v1 as the default version. Your users are now able
to use the Amazon S3 console to administer the original bucket.
Later, after you determine the error in version v2 of the policy, you update the policy again to add
permission to administer the second Amazon S3 bucket. IAM creates another new version of the
policy, identified as v3. You set version v3 as the default, and this version works as intended. At this
point, you delete version v2 of the policy.
Version Limits
A managed policy can have up to five versions. If you need to make changes to a managed policy
beyond five versions, you must first delete one or more existing versions. You can delete any version
of the managed policy that you want, except for the default version.
When you delete a version, the version identifiers for the remaining versions do not change. As a
result, version identifiers might not be sequential. For example, if you delete versions v2 and v4 of a
managed policy and add two new versions, the remaining version identifiers might be v1, v3, v5, v6,
and v7.
Deprecated AWS Managed Policies
To simplify the assignment of permissions, AWS provides managed policies (p. 266)—predefined
policies that are ready to be attached to your IAM users, groups, and roles.
Sometimes AWS needs to add a new permission to an existing policy, such as when a new service is
introduced. Adding a new permission to an existing policy does not disrupt or remove any feature or
ability.
However, AWS might choose to create a new policy when the needed changes could impact
customers if they were applied to an existing policy. For example, removing permissions from an
existing policy could break the permissions of any IAM entity or application that depended upon it,
potentially disrupting a critical operation.
Therefore, when such a change is required, AWS creates a completely new policy with the required
changes and makes it available to customers. The old policy is then marked deprecated. A deprecated
managed policy appears with a warning icon next to it in the Policies list in the IAM console.
A deprecated policy has the following characteristics:
272

AWS Identity and Access Management User Guide
Controlling Access to Managed Policies
• It continues to work for all currently attached users, groups, and roles. Nothing breaks.
• It cannot be attached to any new users, groups, or roles. If you detach it from a current entity, you
cannot reattach it.
• After you detach it from all current entities, it is no longer visible and can no longer be used in any
way.
If any user, group, or role requires the policy, you must instead attach the new policy. When you
receive notice that a policy is deprecated, we recommend that you immediately plan to attach all users,
groups, and roles to the replacement policy and detach them from the deprecated policy. Continuing to
use the deprecated policy can carry risks that are mitigated only by switching to the replacement policy.
Controlling Access to Managed Policies
Managed policies give you precise control over how your users can manage policies and manage
permissions for others. You can separately control who can create, update, and delete policies, and
who can attach and detach policies to and from principal entities (users, groups, and roles). You can
also control which policies a user can attach or detach, and to and from which entities.
A typical scenario is that you give permissions to an account administrator to create, update, and
delete policies. Then, you give permissions to a team leader or other limited administrator to attach and
detach these policies to and from principal entities that the limited administrator manages.
Topics
•Controlling Permissions for Creating, Updating, and Deleting Customer Managed
Policies (p. 273)
•Controlling Permissions for Attaching and Detaching Managed Policies (p. 274)
•Specifying the Amazon Resource Name (ARN) for Managed Policies (p. 276)
Controlling Permissions for Creating, Updating, and
Deleting Customer Managed Policies
You can use IAM policies (p. 262) to control who is allowed to create, update, and delete customer
managed policies in your AWS account. The following list contains APIs that pertain directly to
creating, updating, and deleting policies or policy versions:
•CreatePolicy
•CreatePolicyVersion
•DeletePolicy
•DeletePolicyVersion
•SetDefaultPolicyVersion
The APIs in the preceding list correspond to actions that you can allow or deny—that is, permissions
that you can grant—using an IAM policy.
The following example shows a policy that allows a user to create, update (that is, create a new policy
version), delete, and set a default version for all customer managed policies in the AWS account. The
example policy also allows the user to list policies and get policies.
273

AWS Identity and Access Management User Guide
Controlling Access to Managed Policies
Example policy that allows creating, updating, deleting, listing, getting, and setting the
default version for all policies
{
"Version": "2012-10-17",
"Statement": {
"Effect": "Allow",
"Action": [
"iam:CreatePolicy",
"iam:CreatePolicyVersion",
"iam:DeletePolicy",
"iam:DeletePolicyVersion",
"iam:GetPolicy",
"iam:GetPolicyVersion",
"iam:ListPolicies",
"iam:ListPolicyVersions",
"iam:SetDefaultPolicyVersion"
],
"Resource": "*"
}
}
You can create policies that limit the use of these APIs to affect only the managed policies that you
specify. For example, you might want to allow a user to set the default version and delete policy
versions, but only for specific customer managed policies. You do this by specifying the policy ARN in
the Resource element of the policy that grants these permissions.
The following example shows a policy that allows a user to delete policy versions and set the default
version, but only for the customer managed policies that include the path /TEAM-A/. The customer
managed policy ARN is specified in the Resource element of the policy (in this example the ARN
includes a path and a wildcard and thus matches all customer managed policies that include the path /
TEAM-A/).
For more information about using paths in the names of customer managed policies, see Friendly
Names and Paths (p. 334).
Example policy that allows deleting policy versions and setting the default version for
only specific policies
{
"Version": "2012-10-17",
"Statement": {
"Effect": "Allow",
"Action": [
"iam:DeletePolicyVersion",
"iam:SetDefaultPolicyVersion"
],
"Resource": "arn:aws:iam::ACCOUNT-ID-WITHOUT-HYPHENS:policy/TEAM-A/*"
}
}
Controlling Permissions for Attaching and Detaching
Managed Policies
You can also use IAM policies to allow users to work with only specific managed policies—in effect,
you can control which permissions a user is allowed to grant to other principal entities.
274

AWS Identity and Access Management User Guide
Controlling Access to Managed Policies
The following list shows APIs that pertain directly to attaching and detaching managed policies to and
from principal entities:
•AttachGroupPolicy
•AttachRolePolicy
•AttachUserPolicy
•DetachGroupPolicy
•DetachRolePolicy
•DetachUserPolicy
You can create policies that limit the use of these APIs to affect only the specific managed policies and/
or principal entities that you specify. For example, you might want to allow a user to attach managed
policies, but only the managed policies that you specify. Or, you might want to allow a user to attach
managed policies, but only to the principal entities that you specify.
The following example policy allows a user to attach managed policies to only the groups and roles
that include the path /TEAM-A/. The group and role ARNs are specified in the Resource element of
the policy (in this example the ARNs include a path and a wildcard and thus match all groups and roles
that include the path /TEAM-A/).
Example policy that allows attaching managed policies to only specific groups or roles
{
"Version": "2012-10-17",
"Statement": {
"Effect": "Allow",
"Action": [
"iam:AttachGroupPolicy",
"iam:AttachRolePolicy"
],
"Resource": [
"arn:aws:iam::ACCOUNT-ID-WITHOUT-HYPHENS:group/TEAM-A/*",
"arn:aws:iam::ACCOUNT-ID-WITHOUT-HYPHENS:role/TEAM-A/*"
]
}
}
You can further limit the actions in the preceding example to affect only specific policies—that is,
you can control which permissions a user is allowed to attach to other principal entities—by adding a
condition to the policy.
In the following example, the condition ensures that the AttachGroupPolicy and
AttachRolePolicy permissions are allowed only when the policy being attached matches one of the
specified policies. The condition uses the iam:PolicyArn condition key (p. 356) to determine which
policy or policies are allowed to be attached. The following example policy expands on the previous
example by allowing a user to attach only the managed policies that include the path /TEAM-A/ to only
the groups and roles that include the path /TEAM-A/.
Example policy that allows attaching only specific managed policies to only specific
groups or roles
{
"Version": "2012-10-17",
"Statement": {
"Effect": "Allow",
275

AWS Identity and Access Management User Guide
Controlling Access to Managed Policies
"Action": [
"iam:AttachGroupPolicy",
"iam:AttachRolePolicy"
],
"Resource": [
"arn:aws:iam::ACCOUNT-ID-WITHOUT-HYPHENS:group/TEAM-A/*",
"arn:aws:iam::ACCOUNT-ID-WITHOUT-HYPHENS:role/TEAM-A/*"
],
"Condition": {"ArnLike":
{"iam:PolicyArn": "arn:aws:iam::ACCOUNT-ID-WITHOUT-HYPHENS:policy/TEAM-
A/*"}
}
}
}
Specifying the Amazon Resource Name (ARN) for
Managed Policies
To control access to specific managed policies, you use the Amazon Resource Name (ARN) (p. 335)
of the managed policy. In some cases you use the ARN of the managed policy in the Resource
element of a policy, and in other cases you use the ARN of the managed policy in the Condition
element of a policy.
The following sections explain when to use each.
Using the Resource Element to Control Access to Actions That Affect the
Managed Policy
To control access to specific managed policies for actions that affect the managed policy, you specify
the ARN of the managed policy in the Resource element of a policy.
The following list contains IAM actions (APIs) that affect a managed policy:
•CreatePolicy
•CreatePolicyVersion
•DeletePolicy
•DeletePolicyVersion
•GetPolicy
•GetPolicyVersion
•ListEntitiesForPolicy
•ListPolicyVersions
•SetDefaultPolicyVersion
You can limit the use of these actions to affect only the managed policies that you specify. You do this
by specifying the policy ARN in the Resource element of the policy that grants these permissions. For
example, to specify the ARN of a customer managed policy:
"Resource": "arn:aws:iam::123456789012:policy/POLICY-NAME"
You can also specify the ARN of an AWS managed policy in a policy's Resource element. The ARN
of an AWS managed policy uses the special alias aws in the policy ARN instead of an account ID, as in
this example:
276
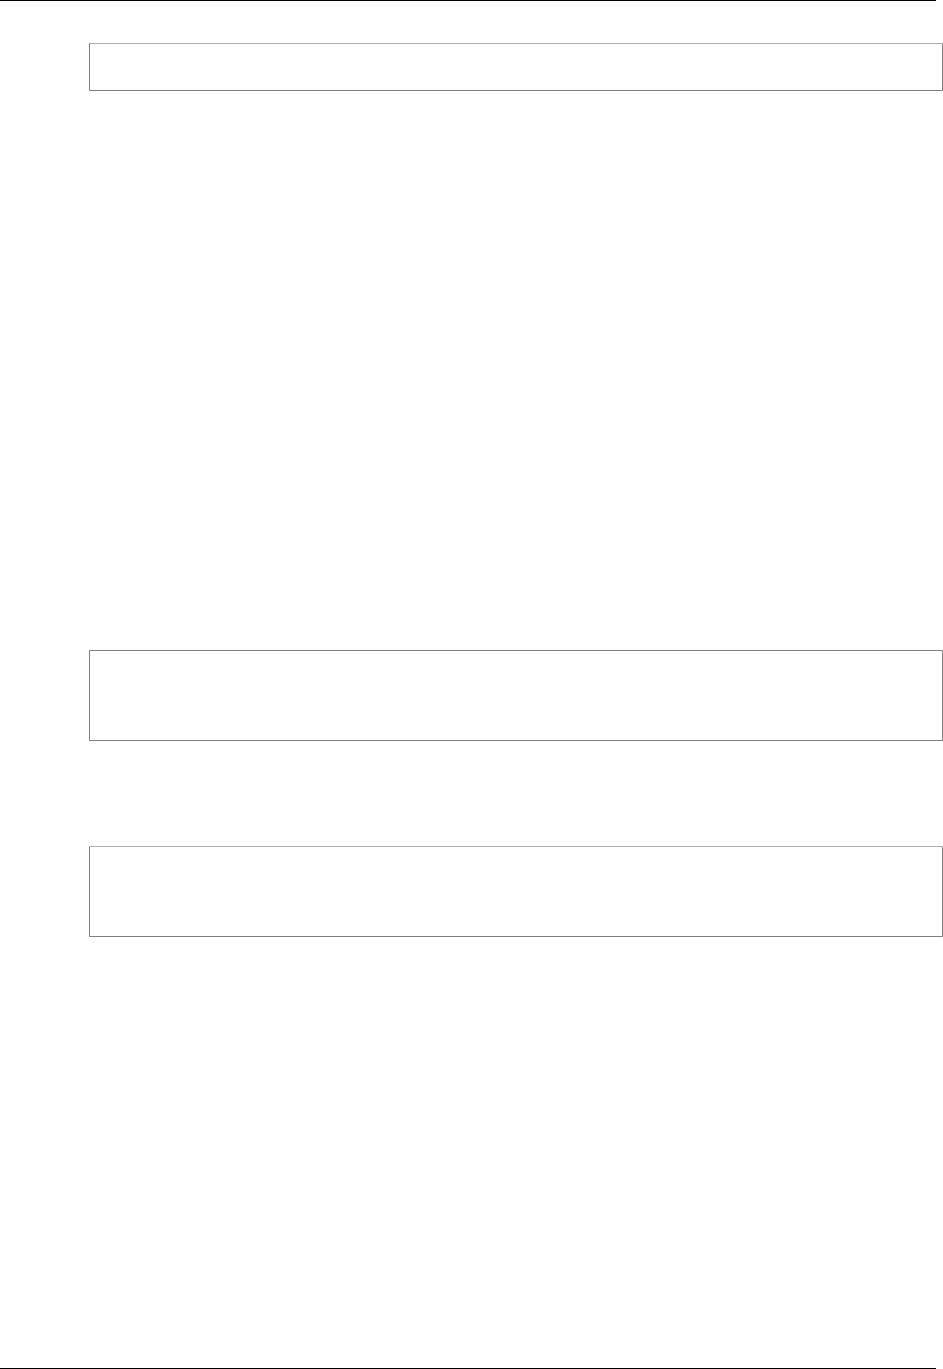
AWS Identity and Access Management User Guide
Creating IAM Policies
"Resource": "arn:aws:iam::aws:policy/AmazonEC2FullAccess"
Using the Condition Element to Control Access to Actions That Affect the
Principal Entity (User, Group, or Role)
To control access to specific managed policies for actions that involve a managed policy but that affect
a principal entity (user, group, or role), you specify the ARN of the managed policy in the Condition
element of a policy. In this case, the Resource element of a policy is used to specify the ARN of the
principal entity that is affected.
The following list contains IAM actions (APIs) that involve a managed policy but that affect a principal
entity:
•AttachGroupPolicy
•AttachRolePolicy
•AttachUserPolicy
•DetachGroupPolicy
•DetachRolePolicy
•DetachUserPolicy
You can limit the use of these actions to involve only the managed policies that you specify. You
do this by specifying the policy ARN in the Condition element of the policy that grants these
permissions. For example, to specify the ARN of a customer managed policy:
"Condition": {"ArnEquals":
{"iam:PolicyArn": "arn:aws:iam::123456789012:policy/POLICY-NAME"}
}
You can also specify the ARN of an AWS managed policy in a policy's Condition element. The ARN
of an AWS managed policy uses the special alias aws in the policy ARN instead of an account ID, as in
this example:
"Condition": {"ArnEquals":
{"iam:PolicyArn": "arn:aws:iam::aws:policy/AmazonEC2FullAccess"}
}
You can use the ArnLike or ArnEquals condition types. For more information about ArnLike and
ArnEquals, see Amazon Resource Name (ARN) Condition Operators (p. 368) in the Condition
Types section of the Policy Element Reference.
Creating a New Policy
You have several ways to create a new IAM permission policy. You can copy a complete AWS
managed policy that already does some of what you're looking for and then customize it to your
specific requirements. You can alternatively construct the policy by selecting actions and conditions
from lists in the policy generator to build the statements into a policy for you, or you can create a policy
from scratch by writing the JSON code.
A policy consists of one or more statements. Each statement generally contains all the actions that
share the same effect (Allow or Deny) and the same resources. If one action requires "*" for the
resource, and another action specifies the ARN of a specific resource, then they must be in two
separate statements.
277

AWS Identity and Access Management User Guide
Creating IAM Policies
For general information about IAM policies, see Overview of IAM Policies (p. 262). For information
about the IAM policy language, see AWS IAM Policy Reference (p. 345).
Create a policy
No matter which option you choose, they all start the same way:
To start creating a new policy
1. Sign in to the Identity and Access Management (IAM) console at https://console.aws.amazon.com/
iam/.
2. In the navigation column on the left, choose Policies.
If this is your first time choosing Policies, the Welcome to Managed Policies page appears.
Choose Get Started.
3. At the top of the page, choose Create Policy.
4. On the Create Policy page choose Select for one of the following options. Then follow the steps
in the selected procedure:
•Copy an AWS Managed Policy (p. 278) — Copies an existing managed policy and enables
you to customize the copy for its new purpose.
•Policy Generator (p. 278) — Creates a policy by letting you select items from lists.
•Create Your Own Policy (p. 279) — Opens the policy editor with a blank policy that you can
type or copy and paste into.
Copy an existing managed policy
An easy way to create a new policy is to start with a copy of a policy that has at least some of
the needed functionality already in it. You can then customize the policy to match it to your new
requirements. Start by following the steps in the preceding procedure, Create a policy (p. 278).
To create a copy of an existing policy
1. On the Copy an AWS Managed Policy page, choose Select for the managed policy that most
closely approximates the policy you want to create. You can filter the list by typing in the Search
Policies box at the top of the page.
2. On the Review Policy page, enter a Policy Name and Description (optional), and edit the policy
in the Policy Document box so that it meets your new requirements. Choose Create Policy when
you are ready to save.
Construct a policy with the policy generator
The policy generator can create a policy without you having to write JSON syntax. Start by following
the steps in the procedure Create a policy (p. 278) at the top of this page.
To use the policy generator to create a policy
1. On the Edit Permissions page, for Effect, choose Allow or Deny. Because we deny by default,
we recommend as a security best practice that you allow permissions to only those actions and
resources that a user needs access to. This is sometime called "whitelisting". You only need to
create a statement with an explicit Deny ("blacklisting") only if you want to override a permission
separately allowed by another statement or policy. We recommend that you limit the number of
explicit Deny statements to a minimum because they can increase the difficulty of troubleshooting
permissions.
278

AWS Identity and Access Management User Guide
Creating IAM Policies
2. Select the AWS service whose actions you want to allow or deny from the list.
3. Choose the actions that you want to allow or deny. The list shows actions for the service that you
selected in the step 2. You can specify All Actions or specify individual actions by selecting the
box next to each action name. When you are done selecting actions, click outside of the list to
close it. The list shows how many actions you selected.
4. Type the resource you want to allow or deny access to. Some operations allow only "Resource":"*"
while other allow you to specify the Amazon Resource Name (ARN) of individual resources. You
can include an asterisk (*) as a wildcard in any field of the ARN (between each pair of colons),
or simply specify an asterisk by itself to mean "any resource in the account." For example,
arn:aws:s3:::* represents all S3 buckets in the same account as the policy. For more
information, see Resource (p. 355).
5. You can add Condition elements to limit a statement's effect. For example, you can specify
that a user is allowed to perform the actions on the resources only when that user's request
happens within a certain time range, or is authenticated with a multi-factor authentication device,
or originates from within a certain range of IP addresses. For lists of all of the context keys you can
use in the Condition element, see AWS Service Actions and Condition Context Keys for Use in
IAM Policies (p. 392). To begin, click Add Conditions (optional).
a. For Condition choose the type of comparison that you want to perform.
b. For Key choose the context key whose value you want to evaluate when a user makes a
request.
c. For Value type the value you want to compare to the specified key.
d. Choose Add Condition to add this completed condition to the current statement. To add
another condition, modify the settings and choose Add Condition again. Repeat as needed.
Each condition applies only to this one statement. All the conditions must be true for the
permission statement to be considered a match. You can consider the conditions as being
connected by a logical 'AND' element.
For more information about the Condition element, see Condition (p. 356) in the AWS IAM
Policy Reference (p. 345).
6. When you have completed all of the fields needed for this statement, choose Add Statement. If
you need to add more statements to the policy, repeat the preceding steps. Any time you need to
change the effect or change the affected resources, you must create a new statement.
7. After you have added all of the statements that you need, choose Next Step to see your
statements in the policy editor. If you want to make changes, you can manually edit the policy
further. Edit and save the policy using the steps shown in the following procedure.
Edit a policy using the policy editor
You can also use the policy editor to create a new policy. Start by following the steps in the procedure
Create a policy (p. 278) at the top of the page.
To create a new policy in the policy editor
1. For Policy Name, type a unique name that helps you to remember what your policy is intended to
do.
2. (Optional) For Description, type an explanation for future reference.
3. For Policy Document, add or edit policy statements. For details about the IAM policy language,
see AWS IAM Policy Reference (p. 345).
4. You can choose Validate Policy any time during editing to ensure the policy is syntactically
correct. You can save the policy only if the syntax is correct.
5. When you are done with the policy, choose Create Policy to save your completed policy.
6. After you create a policy, you can apply it by attaching it to your users, groups, or roles. For more
information, see Attaching Managed Policies (p. 281)
279

AWS Identity and Access Management User Guide
Working with Policies
Working with Policies
This section describes how to create and manage all types of IAM policies (managed policies and
inline policies).
For more information about the different types of IAM policies, see Managed Policies and Inline
Policies (p. 266).
For general information about IAM policies, see Overview of IAM Policies (p. 262).
To add permissions to an IAM principal entity—that is, an IAM user, group, or role—you create a policy
and then attach the policy to the principal entity. You can attach multiple policies to a principal entity,
and each policy can contain multiple permissions.
For information about how permissions are evaluated when multiple policies are in effect for a given
IAM principal entity, see IAM Policy Evaluation Logic (p. 381).
For information about policy size limitations and other quotas, see Limitations on IAM Entities and
Objects (p. 338).
Topics
•Working with Managed Policies (p. 280)
•Working with Inline Policies (p. 285)
Working with Managed Policies
This section describes how to work with AWS managed policies, and how to create and work with
customer managed policies, that is, managed policies that you create yourself. You can manage and
create managed policies using the AWS Management Console, the AWS Command Line Interface
(AWS CLI), or the IAM API.
For more information about the different types of IAM policies, see Managed Policies and Inline
Policies (p. 266).
For general information about IAM policies, see Overview of IAM Policies (p. 262).
For information about policy size limitations and other quotas, see Limitations on IAM Entities and
Objects (p. 338).
Topics
•Working with Managed Policies Using the AWS Management Console (p. 280)
•Working with Managed Policies Using the AWS CLI or the IAM API (p. 283)
Working with Managed Policies Using the AWS Management Console
This section describes how to manage managed policies (p. 266) using the AWS Management
Console.
For information about managing managed policies using the AWS Command Line Interface (AWS CLI)
or the IAM API, see Working with Managed Policies Using the AWS CLI or the IAM API (p. 283).
Topics
•Attaching Managed Policies (p. 281)
•Detaching Managed Policies (p. 281)
•Creating Customer Managed Policies (p. 281)
280

AWS Identity and Access Management User Guide
Working with Policies
•Editing Customer Managed Policies (p. 282)
•Setting the Default Version of Customer Managed Policies (p. 282)
•Deleting Versions of Customer Managed Policies (p. 283)
•Deleting Customer Managed Policies (p. 283)
Attaching Managed Policies
You can attach a managed policy to a principal entity (a user, group, or role) to apply the permissions
in the policy to the principal entity. You can attach up to ten managed policies to each principal entity.
To attach a managed policy using the AWS Management Console
1. Sign in to the Identity and Access Management (IAM) console at https://console.aws.amazon.com/
iam/.
2. In the navigation pane, choose Policies.
3. In the list of policies, select the check box next to the name of the policy to attach. You can use the
Filter menu and the Search box to filter the list of policies.
4. Choose Policy Actions, and then choose Attach.
5. Select the principal entities to attach the policy to. You can use the Filter menu and the Search
box to filter the list of principal entities. After selecting the principal entities to attach the policy to,
choose Attach Policy.
Detaching Managed Policies
You can detach a managed policy from a principal entity (a user, group, or role) to remove the
permissions in the policy from the principal entity.
To detach a managed policy using the AWS Management Console
1. Sign in to the Identity and Access Management (IAM) console at https://console.aws.amazon.com/
iam/.
2. In the navigation pane, choose Policies.
3. In the list of policies, select the check box next to the name of the policy to detach. You can use
the Filter menu and the Search box to filter the list of policies.
4. Choose Policy Actions, and then choose Detach.
5. Select the principal entities to detach the policy from. You can use the Filter menu and the Search
box to filter the list of principal entities. After selecting the principal entities to detach the policy
from, choose Detach Policy.
Creating Customer Managed Policies
You can create customer managed policies to define sets of permissions to attach to principal entities
(users, groups, and roles) in your AWS account. For more information about customer managed
policies, see Managed Policies and Inline Policies (p. 266)
To create a managed policy using the AWS Management Console
1. Sign in to the Identity and Access Management (IAM) console at https://console.aws.amazon.com/
iam/.
2. In the navigation pane, choose Policies, and then choose Create Policy.
3. Choose the Select button that corresponds to the way that you want to create your policy.
•Copy an AWS Managed Policy. See a list of all existing policies and then choose Select next
to the one you want to copy.
281

AWS Identity and Access Management User Guide
Working with Policies
•Policy Generator. Build a policy by selecting elements from lists of available options. Select
the appropriate Effect, AWS Service, and Actions options, enter the Amazon Resource Name
ARN (if applicable), and add any conditions you want to include. Then choose Add Statement.
You can add as many statements as you want to the policy. When you are finished adding
statements, choose Next Step.
•Create Your Own Policy. Type a Policy Name in the space provided. For Policy Document,
type or paste a policy document into the editor.
4. In the editor, make any customizations that you need to tailor the policy to your environment.
5. After you complete your changes, choose Validate Policy and ensure that no errors display in a
red box at the top of the screen. Correct any errors that are reported.
Note
If Use autoformatting is selected, the policy is reformatted whenever you open a policy
or choose Validate Policy.
6. Choose Create Policy to save your new policy.
Editing Customer Managed Policies
You edit customer managed policies to change the permissions that are defined in the policy. You
cannot edit AWS managed policies.
To edit a customer managed policy using the AWS Management Console
1. Sign in to the Identity and Access Management (IAM) console at https://console.aws.amazon.com/
iam/.
2. In the navigation pane, choose Policies.
3. In the list of policies, choose the policy name of the policy to edit. You can use the Filter menu and
the Search box to filter the list of policies.
4. Choose the Policy Document tab, and then on the far right, choose Edit, and then edit the policy
document.
5. After you complete your changes, choose Validate Policy and ensure that no errors appear in a
red box at the top of the screen. Correct any that are reported.
Note
If Use autoformatting is selected, then the policy is reformatted whenever you open a
policy or choose Validate Policy.
6. When you are finished editing the policy, decide whether you want to immediately apply your
changes to all principal entities (users, groups, and roles) that this policy is attached to:
• To immediately apply your changes to all attached entities, select Save as default version.
• To save your changes without affecting the currently attached entities, clear the checkbox for
Save as default version.
7. Choose Save.
Setting the Default Version of Customer Managed Policies
You can specify the default version of a customer managed policy to make that version the one that is
in effect for every principal entity (user, group, and role) that the policy is attached to. You cannot set
the default version for an AWS managed policy.
You can set the default version of a customer managed policy when you edit the policy. To set the
default version while editing the policy, see Editing Customer Managed Policies (p. 282). To set the
default version of a customer managed policy independently of editing the policy, see the following
procedure.
282

AWS Identity and Access Management User Guide
Working with Policies
To set the default version of a customer managed policy using the AWS Management
Console
1. Sign in to the Identity and Access Management (IAM) console at https://console.aws.amazon.com/
iam/.
2. In the navigation pane, choose Policies.
3. In the list of policies, choose the policy name of the policy to set the default version of. You can
use the Filter menu and the Search box to filter the list of policies.
4. Choose the Policy Versions tab. Select the check box next to the version that you want to set as
the default version, and then choose Set as Default.
Deleting Versions of Customer Managed Policies
You can delete a version of a customer managed policy to ensure that version can never be set as
the default version of the policy—that is, to ensure that version can never be attached to any entities
(users, groups, and roles) in your AWS account. You cannot delete versions of AWS managed policies.
To delete a version of a customer managed policy using the AWS Management Console
1. Sign in to the Identity and Access Management (IAM) console at https://console.aws.amazon.com/
iam/.
2. In the navigation pane, choose Policies.
3. Choose the name of the customer managed policy to delete a version of. You can use the Filter
menu and the Search box to filter the list of policies.
4. Choose the Policy Versions tab. Select the check box next to the version to delete, and then
choose Delete.
5. Confirm that you want to delete the version, and then choose Delete.
Deleting Customer Managed Policies
You can delete a customer managed policy to remove it from your AWS account. You cannot delete
AWS managed policies.
To delete a customer managed policy using the AWS Management Console
1. Sign in to the Identity and Access Management (IAM) console at https://console.aws.amazon.com/
iam/.
2. In the navigation pane, choose Policies.
3. Select the check box next to the customer managed policy to delete. You can use the Filter menu
and the Search box to filter the list of policies.
4. Choose Policy Actions, and then choose Delete.
5. Confirm that you want to delete the policy, and then choose Delete.
Working with Managed Policies Using the AWS CLI or the IAM API
This section describes how to manage managed policies (p. 266) using the AWS Command Line
Interface (AWS CLI) or the IAM API. Information in this section applies to both AWS managed policies
and customer managed policies, that is, managed policies that you create.
For information about managing managed policies using the AWS Management Console, see Working
with Managed Policies Using the AWS Management Console (p. 280).
To list managed policies
• AWS CLI: list-policies
283

AWS Identity and Access Management User Guide
Working with Policies
• IAM API: ListPolicies
To retrieve detailed information about a managed policy
• AWS CLI: get-policy
• IAM API: GetPolicy
To list the versions of a managed policy
• AWS CLI: list-policy-versions
• IAM API: ListPolicyVersions
To retrieve detailed information about a version of a managed policy, including the policy
document
• AWS CLI: get-policy-version
• IAM API: GetPolicyVersion
To list the principal entities (users, groups, and roles) attached to a managed policy
• AWS CLI: list-entities-for-policy
• IAM API: ListEntitiesForPolicy
To list the managed policies attached to a principal entity (a user, group, or role)
• AWS CLI:
•list-attached-group-policies
•list-attached-role-policies
•list-attached-user-policies
• IAM API:
•ListAttachedGroupPolicies
•ListAttachedRolePolicies
•ListAttachedUserPolicies
To attach a managed policy to a group, role, or user
• AWS CLI:
•attach-group-policy
•attach-role-policy
•attach-user-policy
• IAM API:
•AttachGroupPolicy
•AttachRolePolicy
•AttachUserPolicy
To detach a managed policy from a group, role, or user
• AWS CLI:
•detach-group-policy
284

AWS Identity and Access Management User Guide
Working with Policies
•detach-role-policy
•detach-user-policy
• IAM API:
•DetachGroupPolicy
•DetachRolePolicy
•DetachUserPolicy
To create a customer managed policy
• AWS CLI: create-policy
• IAM API: CreatePolicy
To edit a customer managed policy
• AWS CLI: create-policy-version
• IAM API: CreatePolicyVersion
To set the default version of a customer managed policy
• AWS CLI: set-default-policy-version
• IAM API: SetDefaultPolicyVersion
To delete a version of a customer managed policy
• AWS CLI: delete-policy-version
• IAM API: DeletePolicyVersion
To delete a customer managed policy
• AWS CLI: delete-policy
• IAM API: DeletePolicy
Working with Inline Policies
This section describes how to create and manage inline policies (p. 266).
For information about managing managed policies, see Working with Managed Policies (p. 280).
Topics
•Working with Inline Policies using the AWS Management Console (p. 285)
•Working with Inline Policies using the AWS CLI or the IAM API (p. 286)
Working with Inline Policies using the AWS Management Console
To create an inline policy and embed it in a group, user, or role
1. Sign in to the Identity and Access Management (IAM) console at https://console.aws.amazon.com/
iam/.
2. In the navigation pane, choose Groups, Users, or Roles.
3. In the list, choose the name of the group, user, or role to embed a policy in.
285

AWS Identity and Access Management User Guide
Working with Policies
4. Choose the Permissions tab and, if necessary, expand the Inline Policies section.
5. Choose Create Another Policy if in Groups, Create User Policy if in Users, or Create Role
Policy if in Roles.
6. Choose Policy Generator or Custom Policy, and then choose Select.
7. Do one of the following:
• If you chose Custom Policy, specify a name for the policy and create your policy document.
• If you are using the policy generator to create your policy, select the appropriate Effect, AWS
Service, and Actions options, enter the Amazon Resource Name ARN (if applicable), and
add any conditions you want to include. Then choose Add Statement. You can add as many
statements as you want to the policy. When you are finished adding statements, choose Next
Step.
8. Choose Validate Policy and ensure that no errors display in a red box at the top of the screen.
Correct any that are reported.
Note
If Use autoformatting is selected, the policy is reformatted whenever you open a policy
or choose Validate Policy.
9. When you are satisfied with the policy, choose Apply Policy.
To view a policy or a list of all policies associated with a user, group, or role
• In the navigation pane, choose Users, Groups, or Roles, choose the name of the entity to view,
and then choose the Permissions tab.
To edit or delete an inline policy for a group, user, or role
1. In the navigation pane, choose Groups, Users, or Roles.
2. Choose the name of the group, user, or role with the policy you want to modify, and then choose
the Permissions tab.
3. To edit an inline policy, choose Edit Policy.
4. To delete an inline policy, choose Remove Policy.
Working with Inline Policies using the AWS CLI or the IAM API
To list all inline policies that are embedded in a principal entity (user, group, or role)
• AWS CLI:
•list-group-policies
•list-role-policies
•list-user-policies
• IAM API:
•ListGroupPolicies
•ListRolePolicies
•ListUserPolicies
To retrieve an inline policy document that is embedded in a principal entity (user, group, or
role)
• AWS CLI:
•get-group-policy
•get-role-policy
286

AWS Identity and Access Management User Guide
Testing IAM Policies
•get-user-policy
• IAM API:
•GetGroupPolicy
•GetRolePolicy
•GetUserPolicy
To embed an inline policy in a principal entity (user, group, or role)
• AWS CLI:
•put-group-policy
•put-role-policy
•put-user-policy
• IAM API:
•PutGroupPolicy
•PutRolePolicy
•PutUserPolicy
To delete an inline policy that is embedded in a principal entity (user, group, or role)
• AWS CLI:
•delete-group-policy
•delete-role-policy
•delete-user-policy
• IAM API:
•DeleteGroupPolicy
•DeleteRolePolicy
•DeleteUserPolicy
Testing IAM Policies with the IAM Policy
Simulator
For more information about how and why to use IAM policies, see Overview of IAM Policies (p. 262).
The following video provides an introduction to using the IAM policy simulator. Getting Started with the
IAM Policy Simulator
With the IAM policy simulator, you can test and troubleshoot IAM and resource-based policies in the
following ways:
• Test policies that are attached to IAM users, groups, or roles in your AWS account. If more than
one policy is attached to the user, group, or role, you can test all the policies, or select individual
policies to test. You can test which actions are allowed or denied by the selected policies for specific
resources.
• Test policies that are attached to AWS resources, such as Amazon S3 buckets, Amazon SQS
queues, Amazon SNS topics, or Amazon Glacier vaults.
• Test new policies that are not yet attached to a user, group, or role by typing or copying them into the
simulator. These are used only in the simulation and are not saved. Note: you cannot type or copy a
resource-based policy into the simulator. To use a resource-based policy in the simulator, you must
include the resource in the simulation and select the check box to include that resource's policy in
the simulation.
287

AWS Identity and Access Management User Guide
Testing IAM Policies
• Test the policies with selected services, actions, and resources. For example, you can test to
ensure that your policy allows an entity to perform the ListAllMyBuckets, CreateBucket, and
DeleteBucket actions in the Amazon S3 service on a specific bucket.
• Simulate real-world scenarios by providing context keys, such as an IP address or date, that are
included in Condition elements in the policies being tested.
• Identify which specific statement in a policy results in allowing or denying access to a particular
resource or action.
Topics
•How the IAM Policy Simulator Works (p. 288)
•Using the IAM Policy Simulator (AWS Management Console) (p. 288)
•Using the IAM Policy Simulator (AWS CLI, Tools for Windows PowerShell, and AWS
API) (p. 292)
How the IAM Policy Simulator Works
The simulator evaluates the policies that you choose and determines the effective permissions for
each of the actions that you specify. The simulator uses the same policy evaluation engine that is used
during real requests to AWS services. But the simulator differs from the live AWS environment in the
following ways:
• The simulator does not make an actual AWS service request, so you can safely test requests that
might make unwanted changes to your live AWS environment.
• Because the simulator does not simulate running the selected actions it cannot report any response
to the simulated request. The only result returned is whether the requested action would be allowed
or denied.
• If you edit a policy inside the simulator, these changes affect only the simulator. The corresponding
policy in your AWS account remains unchanged.
Using the IAM Policy Simulator (AWS Management
Console)
You can use the simulator to test an IAM user, group, role, or resource policy.
To test an existing policy:
1. Open the IAM policy simulator at https://policysim.aws.amazon.com/. (If you are not already
signed in to AWS, you are prompted to sign in).
Note
To sign in to the policy simulator as an IAM user, use your unique sign-in URL to sign in
to the AWS Management Console. Then go to https://policysim.aws.amazon.com/. For
more information about signing in as an IAM user, see How IAM Users Sign In to Your
AWS Account (p. 61).
The simulator opens in Existing Policies mode and lists the IAM users in your account under
Users, Groups, and Roles.
2. Choose the option that is appropriate to your task:
To test this: Do this:
A policy attached to a
user Choose Users in the Users, Groups, and Roles list. Then choose the
user.
288

AWS Identity and Access Management User Guide
Testing IAM Policies
To test this: Do this:
A policy attached to a
group Choose Groups in the Users, Groups, and Roles list. Then choose
the group.
A policy attached to a
role Choose Roles in the Users, Groups, and Roles list. Then choose the
role.
A policy attached to a
resource See Step 7 (p. 290).
A custom policy Select New Policy from the mode list in the top right corner. Then, in
the Policy Sandbox pane on the left, click Create New Policy, enter or
paste a policy, then click Apply.
Tip
If you want to test a policy that is attached to a user or group, you can launch the IAM
policy simulator directly from the IAM console: In the navigation pane, click Users or
Groups. Choose the name of the user or group that you want to test a policy on, and
then scroll down to the Permissions section. In the Inline Policies or Managed Policies
section, locate the policy that you want to test. In the Actions column for that policy,
choose Simulate Policy. The IAM Policy Simulator opens in a new window and displays
the selected policy in the Policies pane.
3. (Optional) To test only a subset of policies attached to a user, group, or role, clear the check box
next to each policy that you want to exclude.
4. Under Policy Simulator, click Select service and then choose the service to test. Then click
Select actions and select one or more actions to test. Although the menus show the available
selections for only one service at a time, all the services and actions that you have selected
appear in Action Setttings and Results. If you return to a for which you selected actions, the
Select actions menu continues to show your selections.
5. (Optional) If any of the policies that you choose in Step 2 (p. 288) and Step 3 (p. 289) test the
value of global AWS context keys in a Condition element, then the key names appear in the
Global Settings section. You can supply values for those keys by expanding the Global Settings
section and typing values for the key names displayed there.
Caution
If you leave the value for a condition key empty then that key is ignored during the
simulation. In some cases, this results in an error and the simulation fails to run. In other
cases the simulation runs, but the results might not be reliable because the simulation
does not match the real-world conditions that include a value for the condition key or
variable.
6. (Optional) Each selected action appears in the Results list with Not simulated shown in the
Permission column until you actually run the simulation. Before you run the simulation, you can
configure each action with a resource. To configure individual actions for a specific scenario, click
the arrow to expand the action's row. If the action supports resource-level permissions, you can
type the Amazon Resource Name (ARN) of the specific resource that you want to simulate access
to. By default, each resource is set to a wildcard (*). You can also specify a value for any context
keys that are referenced by the policy's Condition element. As noted previously, keys with empty
values are ignored, which can cause simulation failures or unreliable results.
a. Expand each row by clicking the arrow next to the action name to configure any additional
information required to accurately simulate the action in your scenario. If the action requires
any resource-level permissions, you can type the Amazon Resource Name (ARN) of the
specific resource that you want to simulate access to. By default, each resource is set to a
wildcard (*).
289

AWS Identity and Access Management User Guide
Testing IAM Policies
b. If the action supports a resource-level permissions but does not require it, then you can
choose the Add Resource button to select the resource type you want to add to the
simulation.
c. If any of the selected policies include a Condition element that references a context key for
this action's service, then that key name is displayed under the action. You can specify the
value to be used during the simulation of that action against the specified resource.
Actions that require different groups of resource types
Some actions require different resource types under different circumstances. Each group of
resource types is associated with a scenario. If one of these applies to your simulation, select
it and the simulator requires the resource types appropriate for that scenario. The following list
shows each of the supported scenario options and the resources that you must define to run the
simulation.
Each of the EC2 scenarios requires that you specify instance, image, and security-group
resources. If your scenario includes an EBS volume, then you must specify that volume as a
resource. If the EC2 scenario includes VPC, then you must supply the network-interface
resource. If it includes an IP subnet, then you must specify the subnet resource. For more
information on the EC2 scenario options, see Supported Platforms in the AWS EC2 User Guide.
•EC2-Classic-InstanceStore
instance, image, security-group
•EC2-Classic-EBS
instance, image, security-group, volume
•EC2-VPC-InstanceStore
instance, image, security-group, network-interface
•EC2-VPC-InstanceStore-Subnet
instance, image, security-group, network-interface, subnet
•EC2-VPC-EBS
instance, image, security-group, network-interface, volume
•EC2-VPC-EBS-Subnet
instance, image, security-group, network-interface, subnet, volume
7. (Optional) If you want to include a resource-based policy in your simulation, then you must
first select the actions you want to simulate on that resource in Step 4 (p. 289). Expand the
rows for the selected actions, and type the ARN of the resource with a policy that you want
to simulate. Then select Include Resource Policy next to the ARN text box. The IAM policy
simulator currently supports resource-based policies from only the following services: Amazon S3
(resource-based policies only; ACLs are not currently supported), Amazon SQS, Amazon SNS,
and unlocked Amazon Glacier vaults (locked vaults are not currently supported).
8. Choose Run Simulation in the upper-right corner.
The Permission column in each row of Action Settings and Results displays the result of the
simulation of that action on the specified resource.
9. To see which statement in a policy explicitly allowed or denied an action, choose the N matching
statement(s) link in the Permissions column to expand the row, and then choose the Show
statement link. The Policies pane shows the relevant policy with the statement that affected the
simulation result highlighted.
290

AWS Identity and Access Management User Guide
Testing IAM Policies
Note
If an action is implicitly denied—that is, if the action is denied only because it is not
explicitly allowed—the List and Show statement options are not displayed.
Troubleshooting IAM Policy Simulator Console Messages
The following table lists the informational and warning messages you might encounter when using the
IAM policy simulator. The table also provides steps you can take to resolve them.
Message Steps to resolve
This policy has been edited. Changes will not be
saved to your account. No action required.
This message is informational. If you edit an
existing policy in the IAM policy simulator, your
change does not affect your AWS account. The
simulator allows you to make changes to policies
for testing purposes only.
Cannot get the resource policy. Reason:
detailed error message
The simulator is not able to access a requested
resource-based policy. Ensure that the specified
resource ARN is correct and that the user
running the simulation has permission to read the
resource's policy.
One or more policies require values in the
simulation settings. The simulation might fail
without these values.
This message appears if the policy you are
testing contains condition keys or variables but
you have not entered any values for these keys
or variables in Simulation Settings.
To dismiss this message, click Simulation
Settings, then enter a value for each condition
key or variable.
You have changed policies. These results are no
longer valid. This message appears if you have changed the
selected policy while results are displayed in the
Results pane. Results shown in the Results
pane do not update dynamically.
To dismiss this message, click Run Simulation
again to display new simulation results based on
the changes made in the Policies pane.
The resource you entered for this simulation
does not match this service. This message appears if you have entered
an Amazon Resource Name (ARN) in the
Simulation Settings pane that does not match
the service you chose for the current simulation.
For example, this message appears if you
specify an ARN for a Amazon DynamoDB
resource but you chose Amazon Redshift as the
service to simulate, you will see this message.
To dismiss this message, do one of the following:
• Remove the ARN from the box in the
Simulation Settings pane.
291

AWS Identity and Access Management User Guide
Testing IAM Policies
Message Steps to resolve
• Choose the service that matches the ARN you
specified in Simulation Settings.
This action belongs to a service that supports
special access control mechanisms in addition
to resource-based policies, such as S3 ACLs
or Glacier vault lock policies. The policy
simulator does not support these mechanisms,
so the results can differ from your production
environment.
No action required.
This message is informational. In the current
version, the simulator evaluates policies attached
to users and groups, and can evaluate resource-
based policies for Amazon S3, Amazon SQS,
Amazon SNS, and Amazon Glacier. The policy
simulator does not support all access control
mechanisms supported by other AWS services.
DynamoDB FGAC is currently not supported. No action required.
This message is informational. It refers to fine-
grained access control, which is the ability to
use IAM policy conditions to determine who can
access individual data items and attributes in
DynamoDB tables and indexes as well as the
actions that can be performed on them. The
current version of the IAM policy simulator does
not support this type of policy condition. For more
information on DynamoDB fine-grained access
control, see Fine-Grained Access Control for
DynamoDB.
You have policies that do not comply with the
policy syntax. You can use the Policy Validator to
review and accept the recommended updates to
your policies.
This message is displayed at the top of the policy
list if you have policies that do not comply with
the IAM policy grammar. In order to simulate
these policies, follow the instructions at Using
Policy Validator (p. 293) to identify and fix
these policies.
This policy must be updated to comply with the
latest policy syntax rules. This message is displayed if you have policies
that do not comply with the IAM policy grammar.
In order to simulate these policies, follow the
instructions at Using Policy Validator (p. 293) to
identify and fix these policies.
Using the IAM Policy Simulator (AWS CLI, Tools for
Windows PowerShell, and AWS API)
Policy simulator commands typically require calling APIs to do two things:
1. Evaluate the policies and return the list of context keys that they reference. You need to know what
context keys are referenced so that you can supply values for them in the next step.
2. Simulate the policies, providing a list of actions, resources, and context keys that are used during
the simulation.
For security reasons, the APIs have been broken into two groups:
• APIs that simulate only policies passed directly to the API as strings. This set includes
GetContextKeysForCustomPolicy and SimulateCustomPolicy.
292

AWS Identity and Access Management User Guide
Using Policy Validator
• APIs that simulate the policies attached to a specified IAM user, group, role, or resource. Because
these APIs can reveal details of permissions assigned to other IAM entities, you should consider
restricting access to these APIs. This set includes GetContextKeysForPrincipalPolicy and
SimulatePrincipalPolicy. For more information about restricting access to APIs, see Restrict Access
to the Policy Simulator APIs (p. 306).
In both cases, the APIs simulate the effect of one or more policies on a list of actions and resources.
Each action is paired with each resource and the simulation determines whether the policies allow
or deny that action for that resource. You can also provide values for any context keys that your
policies reference. You can get the list of context keys that the policies reference by first calling
GetContextKeysForCustomPolicy or GetContextKeysForPrincipalPolicy. If you don't
provide a value for a context key, the simulation still runs, but the results might not be reliable because
the simulator cannot include that context key in the evaluation.
To get the list of context keys
These commands evaluate a list of policies and return a list of context keys used in the policies.
• AWS CLI: aws iam get-context-keys-for-custom-policy and aws iam get-context-
keys-for-principal-policy
• Tools for Windows PowerShell: Get-IAMContextKeysForCustomPolicy and Get-
IAMContextKeysForPrincipalPolicy
• AWS API: GetContextKeysForCustomPolicy and GetContextKeysForPrincipalPolicy
To simulate IAM policies
These commands simulate IAM policies to determine a user's effective permissions.
• AWS CLI: aws iam simulate-custom-policy and aws iam simulate-principal-policy
• Tools for Windows PowerShell: Test-IAMCustomPolicy and Test-IAMPrincipalPolicy
• AWS API: SimulateCustomPolicy and SimulatePrincipalPolicy
Using Policy Validator
Policy Validator automatically examines your existing IAM access control policies to ensure that
they comply with the IAM policy grammar. A policy is a JSON document written using the IAM policy
grammar. It defines access permissions for the AWS user, group, or role you attach the policy to. If the
Policy Validator determines that a policy is not in compliance with the grammar, it prompts you to fix
the policy. Policy Validator is only available if you have non-compliant policies.
Important
You cannot save any new or updated policies that do not comply with the policy syntax. If
a policy fails validation, it cannot be saved until the error is corrected. Existing policies with
errors that were set up prior to the introduction of the Policy Validator will continue to function,
however you cannot edit and save them without fixing the policy syntax errors.
Identifying and fixing non-compliant access control policies to comply with the policy
grammar
1. Sign in to the IAM console. If you have any non-compliant policies, a yellow banner titled Fix
policy syntax appears at the top of the console screen. If this banner does not appear, then all of
your policies are in good shape and you can stop right now.
2. Click the Fix Now link.
3. A list of the non-compliant policies appears. Select the policy that you want to correct by clicking
the policy name.
293
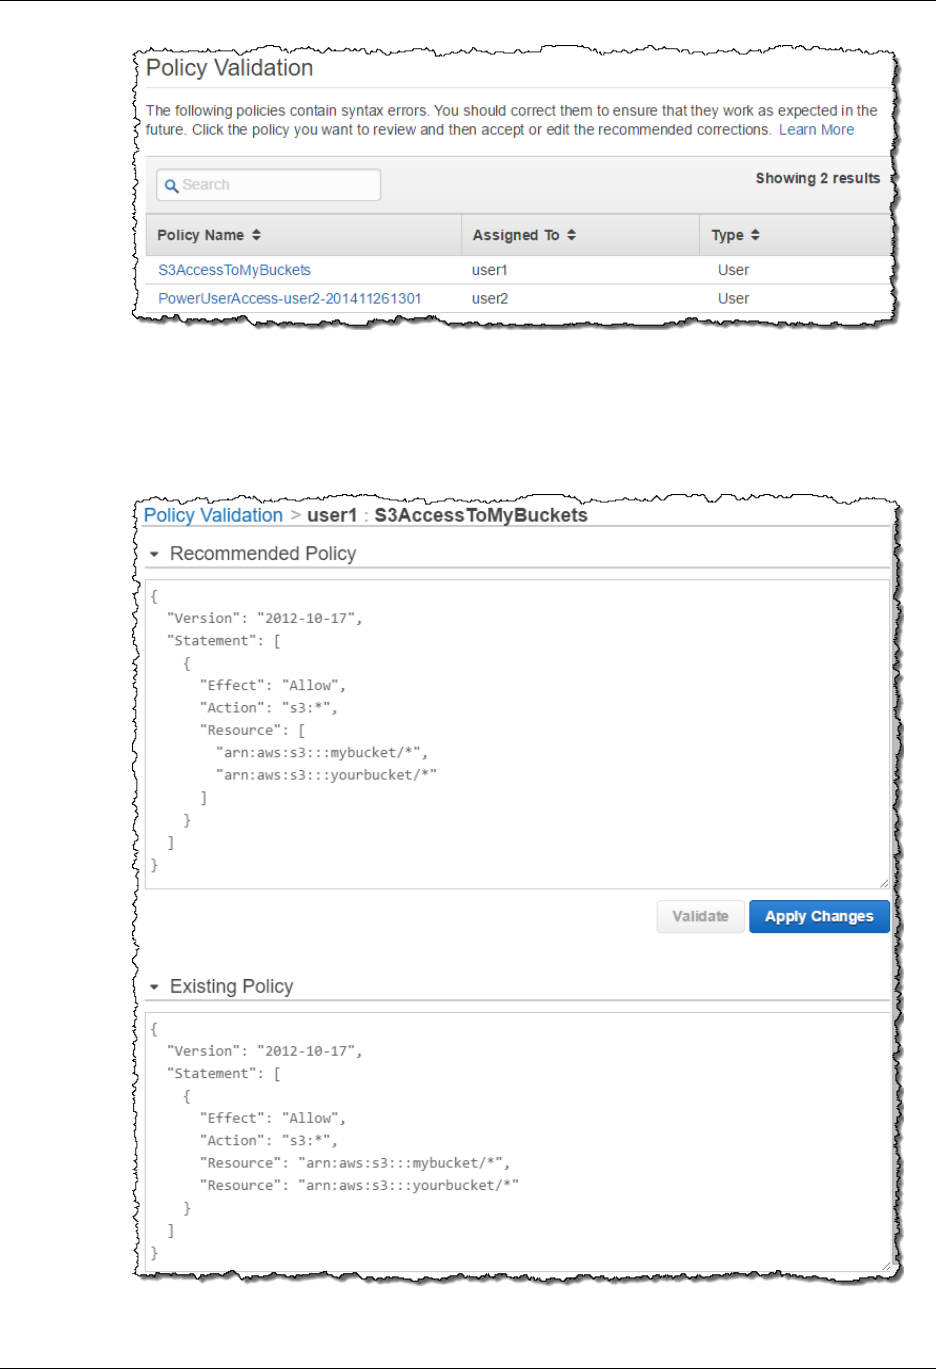
AWS Identity and Access Management User Guide
Using Policy Validator
4. A screen similar to the following appears, showing the recommended changes to your policy at
the top of the page in an editing window and the original version at the bottom. In the following
example, the policy engine recommends changing two separate Resource elements (not valid)
into a single Resource array element with two items in it (valid). For more information about the
policy rules, see the AWS IAM Policy Reference.
5. Do one of the following:
294

AWS Identity and Access Management User Guide
Service Last Accessed Data
• If you want to accept the recommended changes, click Apply Changes.
• If you want to alter the policy further, you can edit directly in the top edit box. If you make any
changes, the Validate button is enabled. When you are done, check the syntax against the
rules by clicking Validate. If Policy Validator confirms that your edited policy is OK, click Apply
Changes. If errors are reported, continue to edit the policy until it passes validation and then
click Apply Changes.
6. You are returned to the list of non-compliant policies, if any. Repeat the procedure for each until
you have fixed all of your policies.
You can edit any of your policies on your own at any time, without using the Policy Validator. If you fix
any compliance issues then they are automatically removed from the list of non-compliant policies.
Service Last Accessed Data
The IAM console provides information about when IAM users and roles last attempted to access
AWS services. This information is called service last accessed data. This data can help you identify
unnecessary permissions so that you can refine your IAM policies to better adhere to the principle of
"least privilege", granting the minimum permissions required to perform a specific task.
You can get the date and hour when an IAM entity (user, group, or role) last accessed an AWS service
through permissions granted by an IAM policy. You can use this information to identify unused and
not recently used permissions in your IAM policies. You can then choose to remove permissions
for unused services or reorganize users with similar usage patterns into a group to help improve
account security. Knowing if and when an IAM entity last exercised a permission can help you remove
unnecessary permissions and tighten your IAM policies with less effort.
Important
The service last accessed data includes all attempts to access an AWS API, not just the
successful ones. This includes all access attempts made using the AWS Management
Console, the AWS API through any of the SDKs, or any of the command line tools. Note
that seeing an unexpected entry in the service last accessed data does not mean that your
account has been compromised, because the request might have been denied. Refer to your
CloudTrail logs as the authoritative source for information about all API calls and whether they
were successful or denied access. For more information, see Logging IAM Events with AWS
CloudTrail (p. 309).
This topic describes the functionality of the IAM service last accessed data and how you can use it with
the IAM console. It also describes two practical scenarios of using the service last accessed data to
remove unnecessary permissions from an IAM policy.
Topics
•Viewing Access Advisor Information (p. 295)
•Notes (p. 297)
•Troubleshooting tips (p. 297)
•Sample Usage Scenarios (p. 297)
•Tracking Period Regional Differences (p. 299)
•Regions not currently supported (p. 299)
Viewing Access Advisor Information
You can find the data on the Access Advisor tab in the IAM console by examining the detail view for
any IAM user, group, role, or managed policy.
295

AWS Identity and Access Management User Guide
Service Last Accessed Data
Minimum permissions to see access advisor information
In addition to other permissions needed to see user, group, role, or policy details in the
IAM console, to view the service last accessed data you must have at least the following
permission:
•iam:GenerateServiceLastAccessedDetails
•iam:GetServiceLastAccessedDetails
•iam:GetServiceLastAccessedDetailsWithEntities
•iam:ListPoliciesGrantingServiceAccess
None of these are resource-level permissions. They all take only "Resource": "*" in an
IAM policy.
Be aware that granting these permissions enables the user to see which users, groups,
or roles are attached to a managed policy, which services a user or role has access
to, and which services have been accessed, by whom, and when. This is similar to the
iam:ListEntitiesForPolicy and iam:ListAttached[User/Group/Role]Policies
permissions.
To view access advisor information
1. Sign in to the Identity and Access Management (IAM) console at https://console.aws.amazon.com/
iam/.
2. In the navigation pane, choose either Groups, or Users, or Roles, or Policies.
3. Choose any user, group, role, or policy name to open its detailed view and choose the Access
Advisor tab. The tab displays a table with the following columns:
Service Name
A list of services with permissions granted by an IAM policy (if you are examining a policy),
or the list of services with permissions granted to the IAM entity by all IAM policies (if you are
examining a user, group, or role).
A row for a service appears if the entity is granted any permission to that service by an IAM
policy, whether that permission is for only one action in the service or all of them.
Policies Granting Permissions
The name of one policy and a count of other polices that grant this entity permission to access
the specified service. Choose the link with the policy name and count to see a list of all of
the IAM policies that grant this entity permission to access the specified service. The list also
includes the name, the type of policy (AWS managed, customer managed, or inline), and the
group (if applicable) through which a user gets the policy.
If you choose the name of a managed policy in the Policies Granting Permissions dialog
box, IAM opens a new browser tab that shows the policy text. If you click a group name in the
dialog box, IAM opens a new browser tab that displays the details for the group.
Last Accessed
The length of time since this user, role, or a member of a group last accessed the specified
service.
The service last accessed data goes back to the tracking start date for your region (p. ).
That date through the present is called the tracking period. If the service has never been
accessed, or has not been accessed any time during the tracking period then the message
Not accessed in the tracking period appears in place of a time stamp. Activity that occurred
before the tracking period is not available.
Access by Members
(Group only) The name of one user and a count of other users who are members of the group
and that have accessed this service. Choose the link to see a list of all of the IAM users who
are members of the group and when each member last accessed the specified service.
296

AWS Identity and Access Management User Guide
Service Last Accessed Data
If you choose the name of a user in the dialog box, IAM opens a new browser tab that
displays the details for the user.
Access by Entities
(Policy only) The name of one user or role and a count of other users and roles who have
used this policy to access the specified service. Choose the link to see a list of all of the users
and roles to which this policy is attached and when each last accessed the specified service.
Additional options
• Use the Filter menu on the Access Advisor tab to limit the list to Services accessed and
Services not accessed. For example, you might select Services not accessed for a policy to
discover which services listed in that policy are never used and therefore might be a candidate
to remove from the policy. You can also type a name (or part of a name) in the Filter box to
restrict the list to only those entities whose name matches what you type.
• Choose one of the column heads to sort the information according to that column's information.
Choose the header a second time to sort in the opposite order.
Notes
• The list of services in the table reflects the current state of your IAM policies, not any historical state.
For example, if the current version of your policy allows only Amazon S3 access and it previously
allowed access to other AWS services, the service last accessed data shows only a table entry for
Amazon S3. If you are trying to determine the history of access control changes in your account, or
want to audit historical access, we recommend that you use AWS CloudTrail.
• It usually takes less than 4 hours for recent Last Accessed activity to appear in the table. However,
under some circumstances it can take up to 12 hours. If the service is running unusually slow, you
will see a notification in the IAM console.
Troubleshooting tips
If the service last accessed table is empty, it might be caused by one of the following:
• You selected a user that has no attached policies, either directly or through group memberships.
• You selected a managed policy attached to a group that has no members.
• You selected a user, group, or role that has neither inline nor managed policies attached.
• You selected a user that has permissions granted only by a resource-based policy.
Sample Usage Scenarios
Some examples that show the value of using the IAM access advisor for both policies (the first
example) and principals (the second).
Scoping Down Permissions for an IAM Policy
Imagine an administrator who is responsible for managing a team’s AWS infrastructure. The team has
created an application that runs on Amazon EC2 and calls other AWS services. This means that the
administrator needs to provision an EC2 instance for this application and manage its configuration, one
part of which is to attach an IAM role to this EC2 instance.
Note
You can attach IAM roles to EC2 instances to enable applications that run on those instances
to make API requests without requiring you to manually manage the security credentials
297

AWS Identity and Access Management User Guide
Service Last Accessed Data
that the applications use. Instead of creating and distributing your AWS credentials, you can
delegate permission to make API requests to an IAM role that is assigned to the instance. For
more information, see IAM Roles for Amazon EC2.
However, the administrator is new to IAM and when attaching the IAM role to the EC2 instance,
the administrator is not sure what to put in the role’s permission policy. The administrator wants to
implement a thorough access control mechanism, but the immediate priority is to make sure that the
application works. To do that the administrator simply copies the PowerUserAccess AWS-managed
policy shown below with the intention of modifying it as it becomes clear over time what permissions
are really needed. This policy grants full read-write permissions to all AWS services and resources in
the account except for IAM (and is definitely not recommended as a long-term solution).
{
"Statement": [
{
"Effect": "Allow",
"NotAction": "iam:*",
"Resource": "*"
}
]
}
After the application runs for a while, the administrator can use the service last accessed data to
view which permissions are actually used and then reduce the permissions for the application. The
administrator signs in to the IAM console and chooses Policies, finds the policy attached to the IAM
role associated with the EC2 instance where the application is running, chooses the policy name to
view its details, and then chooses the Access Advisor tab.
The administrator reviews the time stamps listed in the Last Accessed column and notices that the
team's application is using only Amazon DynamoDB, Amazon S3, Amazon CloudWatch, Amazon
Simple Notification Service (Amazon SNS), and Amazon Simple Queue Service (Amazon SQS).
The administrator can then choose the Policy Document tab and use the policy editor or the policy
generator to revise the IAM role's access to only include those permissions required for the application
to successfully run.
Scoping Down Permissions for an IAM User
Imagine an IT administrator who is responsible for ensuring that people in the organization do not
have excess AWS permissions. As part of a periodic security check, the administrator reviews the
permissions of all IAM users. One of these users is an application developer, who previously filled the
role of a security engineer. Because of the change in job requirements, the developer is a member
of both the “app-dev” group for the new job (which grants permissions to multiple services including
Amazon EC2, Amazon EBS, Auto Scaling, etc.) and the “security-team” group for the old job (which
grants permissions to IAM and CloudTrail).
The administrator signs into the IAM console and chooses Users, then chooses the name of the IAM
user of the developer and then chooses the Access Advisor tab.
The administrator reviews the time stamps in the Last Accessed column and notices that the
developer has not recently accessed IAM, CloudTrail, Amazon Route 53, Amazon Elastic Transcoder,
and a number of other AWS services. The administrator is now ready to act on the service last
accessed information. However, unlike the previous example, the next steps for a principal like the
developer's IAM user (who may be subject to multiple policies and a member of multiple IAM groups)
requires the administrator to proceed with caution to avoid inadvertently disrupting other users’ access.
So his first step is to determine how the developer is receiving these permissions.
The administrator confirms that the developer has no business need for access to IAM and CloudTrail
anymore because the developer is no longer a member of the internal security team. For these
permissions, after analyzing the group memberships and policies, the administrator realizes that the
298

AWS Identity and Access Management User Guide
Example Policies for AWS Access
simplest solution is to remove the developer’s membership in the security-team IAM group, rather than
make any policy changes.
The administrator might also infer that the developer’s access to Amazon Route 53, Elastic
Transcoder, etc. from the app-dev group should also be revoked due to lack of use. However, before
cutting these permissions out of the app-dev policy (which may adversely affect other members of
the group), the administrator should consult the service last accessed data for the app-dev group
policies to see whether these permissions are universally unused by all app-dev group members, or
simply unused by this particular developer. If they are truly unused by all group members, then the
administrator can probably safely go ahead and remove those permissions from the app-dev group's
policy. If it is only this one developer that is not using the permissions, then the administrator may want
to craft a different set of permissions for the developer, or even do nothing, accepting that not all users
will exercise all the permissions granted to them.
As is clear from this example, you might use the service last accessed data for principals as a starting
point for a number of possible next steps in response to unused services, including the following
suggestions. However, it’s up to you as an IAM administrator to choose the steps that strike the right
balance of accessibility and least-privilege that’s appropriate to your organization.
•Removing membership in a group (p. 122)
•Detaching a managed policy (p. 281)
•Deleting a managed policy (p. 283)
•Deleting an inline policy and converting to a managed policy (p. 285)
•Editing an existing policy to remove permissions (p. 282)
•Adding an explicit deny to an existing policy (p. 385)
Tracking Period Regional Differences
AWS began collecting service last accessed data in most regions on October 1, 2015. As AWS adds
support for service last accessed to additional regions, those regions have different dates for when
tracking in those regions begins. Here is a list of the regions that have later tracking period start dates:
Region Tracking period start date
All supported regions (unless otherwise listed) October 1, 2015
South America (São Paulo) (sa-east-1) December 11, 2015
Asia Pacific (Seoul) (ap-northeast-2) January 6, 2016
Asia Pacific (Mumbai) (ap-south-1) June 27, 2016
Regions not currently supported
The following regions do not currently provide service last accessed data.
• China (Beijing) (cn-north-1)
• AWS GovCloud (US) (region-gov-us-west-1)
Example Policies for Administering AWS
Resources
This section shows some examples of policies that control access to resources in AWS services.
For examples of policies that show how to let IAM users administer IAM resources—for example,
299

AWS Identity and Access Management User Guide
Example Policies for AWS Access
to allow users to change their own access keys—see Example Policies for Administering IAM
Resources (p. 255).
Topics
•Allow Users to Access a Specific Bucket in Amazon S3 (p. 300)
•Allow Users to Access a Personal "Home Directory" in Amazon S3 (p. 301)
•Allow Users Signed In with Amazon Cognito to Access their Own Amazon S3 Folder (p. 302)
•Allow Users to Access All Actions on a DynamoDB Table Whose Name Matches the User
Name (p. 302)
•Allow Users to Manage Amazon EBS Volumes and Amazon EC2 Instances That Have the
Specified Tag (p. 303)
•Allow only a specific Amazon EC2 Instance to Run Certain AWS Commands (p. 304)
•Use Conditions to Restrict When Permissions Are Allowed (p. 304)
•Deny All Access Except to a Specific Set of AWS Products and Resources (p. 305)
•Block Requests That Don't Come From an Approved IP Address or Range (p. 306)
•Restrict Access to the Policy Simulator APIs (p. 306)
•Enable Users to Upload Server Certificates and Use them with Elastic Load Balancing (p. 307)
Allow Users to Access a Specific Bucket in Amazon S3
The following policy can be attached to an IAM user or an IAM group. It gives the user or group
members access to a specific bucket and to all the objects in it. Users can also list all the buckets in
the account (the s3:ListAllMyBuckets permission); this permission lets the user perform the other
actions using the Amazon S3 console.
Note
In the following policy, you need to replace EXAMPLE-BUCKET-NAME with the name of your
bucket.
{
"Version": "2012-10-17",
"Statement": [
{
"Effect": "Allow",
"Action": "s3:ListAllMyBuckets",
"Resource": "arn:aws:s3:::*"
},
{
"Effect": "Allow",
"Action": [
"s3:ListBucket",
"s3:GetBucketLocation"
],
"Resource": "arn:aws:s3:::EXAMPLE-BUCKET-NAME"
},
{
"Effect": "Allow",
"Action": [
"s3:PutObject",
"s3:GetObject",
"s3:DeleteObject"
],
"Resource": "arn:aws:s3:::EXAMPLE-BUCKET-NAME/*"
}
300

AWS Identity and Access Management User Guide
Example Policies for AWS Access
]
}
Allow Users to Access a Personal "Home Directory" in
Amazon S3
The following policy can be attached to an IAM group. It lets an IAM user in that group use the AWS
Management Console access a "home directory" in Amazon S3 that matches their user name. For
example, user Bob can access s3://BUCKET-NAME/home/Bob/, but he cannot access s3://
BUCKET-NAME/home/Alice/. Inside his or her "home directory," each user can perform all Amazon
S3 actions, such as GetObject, ListBucket, PutObject, and DeleteObject.
Note
In the following policy, you need to replace BUCKET-NAME with the name of a bucket under
which you have created a home folder and folders for individual users.
{
"Version": "2012-10-17",
"Statement": [
{
"Effect": "Allow",
"Action": [
"s3:ListAllMyBuckets",
"s3:GetBucketLocation"
],
"Resource": "arn:aws:s3:::*"
},
{
"Effect": "Allow",
"Action": "s3:ListBucket",
"Resource": "arn:aws:s3:::BUCKET-NAME",
"Condition": {"StringLike": {"s3:prefix": [
"",
"home/",
"home/${aws:username}/*"
]}}
},
{
"Effect": "Allow",
"Action": "s3:*",
"Resource": [
"arn:aws:s3:::BUCKET-NAME/home/${aws:username}",
"arn:aws:s3:::BUCKET-NAME/home/${aws:username}/*"
]
}
]
}
The previous example policy uses a policy variable (p. 371) (${aws:username}) that is evaluated at
run time and contains the friendly name (p. 334) of the IAM user who made the request.
Console-based access is granted by the statements that include the ListAllMyBuckets,
GetBucketLocation, and ListBucket actions; these actions are required in order to be able to get
to the bucket listings in the AWS Management Console. When the preceding policy is attached to a
group, each user in the group can read, write, and list objects only in their home directory. The policy
also lets the user see that other user directories exist in the bucket, but users cannot list, read, nor
write the contents of the other users' directories.
301

AWS Identity and Access Management User Guide
Example Policies for AWS Access
Allow Users Signed In with Amazon Cognito to Access
their Own Amazon S3 Folder
Amazon Cognito is an easy way to use web identity federation in your mobile app. Using Amazon
Cognito, you can provide access to AWS resources for users who have signed in to your app using
a third-party identity provider like Login with Amazon, Facebook, Google, or any Open-ID Connect
(OIDC) compatible identity provider instead of using an IAM user. To use Amazon Cognito for web
identity federation, you create a role that determines what permissions the federated user will have.
You can create one role for authenticated users. If your app allows unauthenticated (guest) users, you
can create a second role that defines the permissions for those users.
For more information about Amazon Cognito, see the following:
•Amazon Cognito Identity in the AWS Mobile SDK for Android Developer Guide
•Amazon Cognito Identity in the AWS Mobile SDK for iOS Developer Guide
The following example shows a policy that might be used for a mobile app that uses Amazon Cognito.
The condition makes sure that the user has access to objects in the Amazon S3 bucket represented by
EXAMPLE-BUCKET-NAME only if the object's name includes a provider name (here, cognito), the
friendly name of the application (here, mynumbersgame), and the federated user's ID.
{
"Version": "2012-10-17",
"Statement": [
{
"Effect": "Allow",
"Action": ["s3:ListBucket"],
"Resource": ["arn:aws:s3:::EXAMPLE-BUCKET-NAME"],
"Condition": {"StringLike": {"s3:prefix": ["cognito/mynumbersgame/"]}}
},
{
"Effect": "Allow",
"Action": [
"s3:GetObject",
"s3:PutObject",
"s3:DeleteObject"
],
"Resource": [
"arn:aws:s3:::EXAMPLE-BUCKET-NAME/cognito/mynumbersgame/${cognito-
identity.amazonaws.com:sub}",
"arn:aws:s3:::EXAMPLE-BUCKET-NAME/cognito/mynumbersgame/${cognito-
identity.amazonaws.com:sub}/*"
]
}
]
}
Allow Users to Access All Actions on a DynamoDB Table
Whose Name Matches the User Name
The following policy can be attached to an IAM group and gives a user permission to programmatically
access an DynamoDB table whose name matches the user's name. For example, user Bob can
perform any DynamoDB actions in the table named Bob. The policy can be attached to a group that
contains users who are allowed to each manage their own DynamoDB table.
302

AWS Identity and Access Management User Guide
Example Policies for AWS Access
{
"Version": "2012-10-17",
"Statement": [{
"Effect": "Allow",
"Action": "dynamodb:*",
"Resource": "arn:aws:dynamodb:AWS-REGION-IDENTIFIER:ACCOUNT-ID-WITHOUT-
HYPHENS:table/${aws:username}"
}]
}
The policy uses a policy variable (p. 371) (${aws:username}) that is evaluated at run time and
contains the friendly name (p. 334) of the IAM user who made the request.
Allow Users to Manage Amazon EBS Volumes and
Amazon EC2 Instances That Have the Specified Tag
The following example policy allows users to attach Amazon EBS volumes that have the tag
volume_user=IAM user name to Amazon EC2 instances that have the tag department=dev,
and to detach the volumes from those instances. When you attach this policy to an IAM group, the
${aws:username} policy variable (p. 371) resolves to the user name of the IAM user, and thus
the policy grants each IAM user in the group permission to attach or detach volumes that have a tag
named volume_user that has his or her IAM user name as a value.
For more information about creating IAM policies to control access to Amazon EC2 resources, see
Controlling Access to Amazon EC2 Resources in the Amazon EC2 User Guide for Linux Instances.
{
"Version": "2012-10-17",
"Statement": [
{
"Effect": "Allow",
"Action": [
"ec2:AttachVolume",
"ec2:DetachVolume"
],
"Resource": "arn:aws:ec2:AWS-REGION-IDENTIFIER:ACCOUNT-ID-WITHOUT-
HYPHENS:instance/*",
"Condition": {"StringEquals": {"ec2:ResourceTag/department": "dev"}}
},
{
"Effect": "Allow",
"Action": [
"ec2:AttachVolume",
"ec2:DetachVolume"
],
"Resource": "arn:aws:ec2:AWS-REGION-IDENTIFIER:ACCOUNT-ID-WITHOUT-
HYPHENS:volume/*",
"Condition": {"StringEquals": {"ec2:ResourceTag/volume_user":
"${aws:username}"}}
}
]
}
303

AWS Identity and Access Management User Guide
Example Policies for AWS Access
Allow only a specific Amazon EC2 Instance to Run Certain
AWS Commands
AWS commands called from an Amazon EC2 instance run with the permissions granted to the
role that is attached to the instance profile. The following example policy, if attached to that role,
allows commands from the instance to attach or detach volumes associated with that same instance.
The identity of the instance is specified with an ARN in the Condition element. Adding the
SourceInstanceArn condition to one statement in a policy that otherwise grants permissions for
many Amazon EC2 instances enables you to specify one instance in a fleet as a an exception that can
perform a unique task that others with the same attached policy cannot perform. In the example that
follows, only the instance identified by instance-id can attach or detach volumes to instances in the
account, including its own. Other statement elements that might exist in the policy are not impacted by
the restriction of this one statement.
For more information about creating IAM policies to control access to Amazon EC2 resources, see
Controlling Access to Amazon EC2 Resources in the Amazon EC2 User Guide for Linux Instances.
{
"Version": "2012-10-17",
"Statement": [
{
"Effect": "Allow",
"Action": [
"ec2:AttachVolume",
"ec2:DetachVolume"
],
"Resource": [
"arn:aws:ec2:region:account-id:volume/*",
"arn:aws:ec2:region:account-id:instance/*"
],
"Condition": {
"ArnEquals": {
"ec2:SourceInstanceARN": "arn:aws:ec2:region:account-
id:instance/instance-id"
}
}
}
]
}
Use Conditions to Restrict When Permissions Are Allowed
The following example policy allows users to perform all Amazon EC2 actions on all Amazon EC2
resources, but only when the user has authenticated using multifactor authentication (MFA) (p. 80),
and only when the action occurs between the 20th of April 2015 and the 24th of April 2015 (UTC),
inclusive. This policy shows an example of multiple conditions, which are evaluated using a logical
AND.
{
"Version": "2012-10-17",
"Statement": {
"Action": "ec2:*",
"Effect": "Allow",
"Resource": "*",
"Condition": {
"Bool": {"aws:MultiFactorAuthPresent": true},
304

AWS Identity and Access Management User Guide
Example Policies for AWS Access
"DateGreaterThan": {"aws:CurrentTime": "2015-04-20T00:00:00Z"},
"DateLessThan": {"aws:CurrentTime": "2015-04-24T00:00:00Z"}
}
}
}
For more information about adding conditions to policies, see Condition (p. 356) in the Policy
Element Reference.
Deny All Access Except to a Specific Set of AWS Products
and Resources
The following policy gives users access to only the following:
• The DynamoDB table whose name is represented by EXAMPLE-TABLE-NAME.
• The AWS account's corporate Amazon S3 bucket whose name is represented by EXAMPLE-
BUCKET-NAME and all the objects it contains.
The policy includes an explicit deny (p. 383) ("Effect":"Deny"). In conjunction with the
NotAction and NotResource elements, this helps to ensure that the users can't use any AWS
actions or resources except those specified in the policy, even if permissions have been granted in
another policy. (An explicit deny statement takes precedence over an allow statement.) For more
information, see IAM Policy Evaluation Logic (p. 381).
Note
The following policy works only for API access. For more information about granting bucket
access through the AWS Management Console, see An Example: Using IAM Policies to
Control Access to your Bucket in the Amazon Simple Storage Service Developer Guide.
{
"Version": "2012-10-17",
"Statement": [
{
"Effect": "Allow",
"Action": [
"dynamodb:*",
"s3:*"
],
"Resource": [
"arn:aws:dynamodb:AWS-REGION-IDENTIFIER:ACCOUNT-ID-WITHOUT-
HYPHENS:table/EXAMPLE-TABLE-NAME",
"arn:aws:s3:::EXAMPLE-BUCKET-NAME",
"arn:aws:s3:::EXAMPLE-BUCKET-NAME/*"
]
},
{
"Effect": "Deny",
"NotAction": [
"dynamodb:*",
"s3:*"
],
"NotResource": [
"arn:aws:dynamodb:AWS-REGION-IDENTIFIER:ACCOUNT-ID-WITHOUT-
HYPHENS:table/EXAMPLE-TABLE-NAME",
"arn:aws:s3:::EXAMPLE-BUCKET-NAME",
"arn:aws:s3:::EXAMPLE-BUCKET-NAME/*"
]
305

AWS Identity and Access Management User Guide
Example Policies for AWS Access
}
]
}
Block Requests That Don't Come From an Approved IP
Address or Range
You might find this policy useful to apply to an IAM group that all the users in your company belong
to. The policy denies access to all actions in the account when the request comes from outside the
IP range 192.0.2.0 to 192.0.2.255 or 203.0.113.0 to 203.0.113.255. (The policy assumes the IP
addresses for your company are within the specified ranges.) Use this policy in combination with other
policies that allow specific actions. Regardless of which actions are allowed to a user or group via
another policy, this policy ensures that all actions will be denied if the request originates from outside
your company's IP address ranges.
Important
The aws:SourceIp condition key works only in an IAM policy if you are calling the tested
API directly as a user. If you instead use a service to call the target service on your behalf,
the target service sees the IP address of the calling service rather than the IP address of
the originating user. This can happen, for example, if you use AWS CloudFormation to call
Amazon EC2 to construct instances for you. There is currently no way to pass the originating
IP address through a calling service to the target service for evaluation in an IAM policy. For
these types of service API calls, do not use the aws:SourceIp condition key.
{
"Version": "2012-10-17",
"Statement": {
"Effect": "Deny",
"Action": "*",
"Resource": "*",
"Condition": {"NotIpAddress": {"aws:SourceIp": [
"192.0.2.0/24",
"203.0.113.0/24"
]}}
}
}
Restrict Access to the Policy Simulator APIs
The policy simulator APIs GetContextKeyForPrincipalPolicy and SimulatePrincipalPolicy can return
information about the permissions granted to an IAM user, group, or role to the user calling the APIs.
You might want to grant permissions to these APIs only to approved users. Others users can still
call GetContextKeyForCustomPolicy and SimulateCustomPolicy because they only evaluate policies
provided by that user as strings; there is no disclosure of sensitive information.
The following example shows how to allow access to the less sensitive "custom" APIs. The "principal"
APIs are restricted by the default implicit deny, and so the user cannot simulate policies attaches to
entities.
{
"Version": "2012-10-17",
"Statement": [{
"Action": [
"iam:GetContextKeysForCustomPolicy",
"iam:SimulateCustomPolicy"
],
306

AWS Identity and Access Management User Guide
Example Policies for AWS Access
"Effect": "Allow",
"Resource": “*"
}]
}
The following example allows the user to simulate policies only for those users that have the path
developers.
{
"Version": "2012-10-17",
"Statement": [{
"Action": [
"iam:GetContextKeysForPrincipalPolicy",
"iam:SimulatePrincipalPolicy"
],
"Effect": "Allow",
"Resource":"arn:aws:iam::123456789012:user/developers/*"
}]
}
The following example allows the user to simulate any policy that is attached to any user in the current
AWS account.
{
"Version" : "2012-10-17",
"Statement" : [{
"Action" : [
"iam:GetContextKeysForCustomPolicy",
"iam:GetContextKeysForPrincipalPolicy",
"iam:SimulateCustomPolicy",
"iam:SimulatePrincipalPolicy"
],
"Effect" : "Allow",
"Resource" : “*"
}]
}
Enable Users to Upload Server Certificates and Use them
with Elastic Load Balancing
The following example allows the user to upload and manage SSL/TSL server certificates and to attach
them to an Elastic Load Balancing balancer.
{
"Version" : "2012-10-17",
"Statement" : [{
"Effect" : "Allow",
"Action" : [
"iam:DeleteServerCertificate",
"iam:GetServerCertificate",
"iam:ListServerCertificates",
"iam:UpdateServerCertificate",
"iam:UploadServerCertificate"
"elasticloadbalancing:SetLoadBalancerListenerSSLCertificate"
307

AWS Identity and Access Management User Guide
Additional Resources
],
"Resource": [ "*" ]
}]
}
Resources for Learning About Permissions
and Policies
For more information about permissions and about creating policies, see the following resources:
•Overview of IAM Policies (p. 262) – This section discusses types of permissions, how to grant
them, and how to manage permissions.
•Working with Policies (p. 280) – This section discusses how to specify what actions are allowed,
which resources to allow the actions on, and what the effect will be when the user requests access to
the resources.
• The following entries in the AWS Security Blog cover common ways to write policies for access to
Amazon S3 buckets and objects.
•Writing IAM Policies: How to grant access to an Amazon S3 bucket
•Writing IAM policies: Grant access to user-specific folders in an Amazon S3 bucket
•IAM Policies and Bucket Policies and ACLs! Oh My! (Controlling Access to S3 Resources)
•A primer on RDS resource-level permissions
•Demystifying EC2 Resource-Level Permissions
•Testing IAM Policies with the IAM Policy Simulator (p. 287) – This tool lets you test the effects of
IAM policies to determine whether they will allow or deny access to actions in AWS services.
•Example Policies for Administering IAM Resources (p. 255) – This section contains example
policies that show how to perform tasks specific to IAM, like administer users, groups, and
credentials.
308

AWS Identity and Access Management User Guide
Types of IAM Information Logged in CloudTrail
Logging IAM Events with AWS
CloudTrail
AWS Identity and Access Management (IAM) is integrated with AWS CloudTrail, a service that logs
AWS events made by or on behalf of your AWS account. CloudTrail logs authenticated AWS API
calls and also AWS sign-in events, and collects this event information in files that are delivered to
Amazon S3 buckets. Using information collected by CloudTrail, you can determine what requests were
successfully made to AWS services, who made the request, when it was made, and so on.
To learn more about CloudTrail, including how to configure and enable it, see the AWS CloudTrail User
Guide.
Topics
•Types of IAM Information Logged in CloudTrail (p. 309)
•Examples of Logged Events in CloudTrail Files (p. 312)
•Preventing Duplicate Log Entries in CloudTrail (p. 317)
Types of IAM Information Logged in CloudTrail
IAM information is available to CloudTrail in these ways:
•API requests to IAM and AWS Security Token Service (AWS STS) – CloudTrail logs all
authenticated API requests (made with credentials) to IAM and AWS STS APIs, with the exception
of DecodeAuthorizationMessage. CloudTrail also logs nonauthenticated requests to the AWS
STS actions AssumeRoleWithSAML and AssumeRoleWithWebIdentity and logs information
provided by the identity provider. You can use this information to map calls made by an assumed
role back to the originating external federated user. The userIdentity section of the JSON data
in the CloudTrail log entry contains the information that you need to map the AssumeRole request
with a specific federated user. For more information, see CloudTrail userIdentity Element in the AWS
CloudTrail User Guide.
For example, calls to the IAM CreateUser, DeleteRole, ListGroups, and other API operations
are all logged by CloudTrail.
309

AWS Identity and Access Management User Guide
Types of IAM Information Logged in CloudTrail
Examples for this type of log entry are presented later in this topic.
Important
If you activate AWS STS endpoints in regions other than the default global endpoint, then
you must also turn on CloudTrail logging in those regions to record any AWS STS API
calls made in those regions. For more information, see Turning On CloudTrail in Additional
Regions in the AWS CloudTrail User Guide.
•API requests to other AWS services – Authenticated requests to other AWS service APIs are
logged by CloudTrail, and these log entries contain information about who generated the request.
For example, if a request is made to list Amazon EC2 instances or create an AWS CodeDeploy
deployment group, the user identity of the person or service that made the request is contained in
the log entry for that request. The user identity information helps you determine whether the request
was made with IAM user credentials, with temporary security credentials for a role or federated user,
or by another AWS service.
For more details about the user identity information in CloudTrail log entries, see userIdentity
Element in the AWS CloudTrail User Guide.
•AWS sign-in events – Sign-in events to the AWS Management Console, the AWS Discussion
Forums, and the AWS Marketplace are logged by CloudTrail.
For example, IAM and federated user sign-in events—successful sign-ins and failed sign-in attempts
—are logged by CloudTrail.
If you enable CloudTrail to log sign-in events to your logs, you need to be aware of how CloudTrail
chooses where to log the events.
• If your users sign-in directly to a console, they are redirected to either a global or a regional sign-in
endpoint, based on whether the selected service console supports regions. For example, the main
console home page supports regions, so if you sign in to the following URL:
https://alias.signin.aws.amazon.com/console
you are redirected to a regional sign-in endpoint such as https://us-
east-1.signin.aws.amazon.com, resulting in a regional CloudTrail log entry in the user's
region's log:
On the other hand, the Amazon S3 console does not support regions, so if you sign in to the
following URL
https://alias.signin.aws.amazon.com/console/s3
AWS redirects you to the global sign-in endpoint at https://signin.aws.amazon.com,
resulting in a global CloudTrail log entry.
• You can manually request a certain regional sign-in endpoint by signing in to the region-enabled
main console home page using a URL syntax like the following:
https://alias.signin.aws.amazon.com/console?ap-southeast-1
AWS redirects you to the ap-southeast-1 regional sign-in endpoint and results in a regional
CloudTrail log event.
Important
As a security best practice, AWS does not log the entered user name text when the sign-
in failure is caused by an incorrect user name. The user name text is masked by the value
HIDDEN_DUE_TO_SECURITY_REASONS. For an example of this, see Sign-in Failure Event
310

AWS Identity and Access Management User Guide
Types of IAM Information Logged in CloudTrail
Caused by Incorrect User Name (p. 316), later in this topic. The reason the user name is
obscured is because such failures might be caused by user errors like the following, which,
if logged, could expose potentially sensitive information:
• You accidentally type your password in the user name field.
• You click the link for one AWS account's sign-in page, but then type the account number
for a different one.
• You forget which account you are signing in to and accidentally type the account name of
your personal email account, your bank sign-in identifier, or some other private ID.
Whether the sign-in event is considered to a regional event or a global one depends on the console
the user is signing into, and how the user constructs the sign-in URL.
• Is the service console regionalized? If so, then the sign-in request is automatically redirected to
a regional sign-in endpoint and the event is logged in that region's CloudTrail log. For example, if
you sign in to https://alias.signin.aws.amazon.com/console the console home page
which is regionalized, you are automatically redirected you to a sign-in endpoint in your region
(for example, https://us-east-1.signin.aws.amazon.com), and the event is logged in that
region's log.
However, some services are not regionalized yet. For example, the Amazon S3 service is
not currently regionalized, so if you sign in to https://alias.signin.aws.amazon.com/
console/s3, you are redirected to the global sign-in endpoint at https://
signin.aws.amazon.com, resulting in an event in your global log.
• You can also manually request a certain regional sign-in endpoint by using a URL syntax like
https://alias.signin.aws.amazon.com/console?ap-southeast-1, which redirects to
the ap-southeast-1 regional sign-in endpoint and results in an event in the regional log.
•How temporary credential requests are logged – When a principal requests temporary
credentials, the principal type determines how CloudTrail logs the event. The following table
shows how CloudTrail logs different information for each of the API calls that generate temporary
credentials.
Principal Type IAM/STS API User Identity
in CloudTrail
Log for Calling
Account
User Identity in
CloudTrail Log
for Role Owner
User Identity in
CloudTrail Log
for Role Owner
for Subsequent
API calls
Root / Account
credentials GetSessionToken Root identity Role owner
account is same
as calling account
Root identity
IAM user GetSessionToken IAM user identity Role owner
account is same
as calling account
IAM user identity
IAM user GetFederationTokenIAM user identity Role owner
account is same
as calling account
IAM user identity
IAM user AssumeRole IAM user identity Not recorded Role identity only
(no user)
Externally
authenticated
user
AssumeRoleWithSAMLn/a SAML user
identity Role identity only
(no user)
311

AWS Identity and Access Management User Guide
Examples of Logged Events in CloudTrail Files
Principal Type IAM/STS API User Identity
in CloudTrail
Log for Calling
Account
User Identity in
CloudTrail Log
for Role Owner
User Identity in
CloudTrail Log
for Role Owner
for Subsequent
API calls
Externally
authenticated
user
AssumeRoleWithWebIdentityn/a OIDC/Web user
identity Role identity only
(no user)
Examples of Logged Events in CloudTrail Files
CloudTrail log files contain events that are formatted using JSON. An event represents a single API
request or sign-in event and includes information about the requested action, any parameters, and the
date and time of the action.
IAM API Event in CloudTrail Log File
The following example shows a CloudTrail log entry for a request made for the IAM GetUserPolicy
action.
{
"eventVersion": "1.01",
"userIdentity": {
"type": "IAMUser",
"principalId": "AIDACKCEVSQ6C2EXAMPLE",
"arn": "arn:aws:iam::444455556666:user/Alice",
"accountId": "444455556666",
"accessKeyId": "AKIAI44QH8DHBEXAMPLE",
"userName": "Alice",
"sessionContext": {
"attributes": {
"mfaAuthenticated": "false",
"creationDate": "2014-07-15T21:39:40Z"
}
},
"invokedBy": "signin.amazonaws.com"
},
"eventTime": "2014-07-15T21:40:14Z",
"eventSource": "iam.amazonaws.com",
"eventName": "GetUserPolicy",
"awsRegion": "us-east-1",
"sourceIPAddress": "signin.amazonaws.com",
"userAgent": "signin.amazonaws.com",
"requestParameters": {
"userName": "Alice",
"policyName": "ReadOnlyAccess-Alice-201407151307"
},
"responseElements": null,
"requestID": "9EXAMPLE-0c68-11e4-a24e-d5e16EXAMPLE",
"eventID": "cEXAMPLE-127e-4632-980d-505a4EXAMPLE"
}
From this event information, you can determine that the request was made to get a user policy named
ReadOnlyAccess-Alice-201407151307 for user Alice, as specified in the requestParameters
312

AWS Identity and Access Management User Guide
AWS STS API Event in CloudTrail Log File
element. You can also see that the request was made by an IAM user named Alice on July 15, 2014
at 9:40 PM (UTC). In this case, the request originated in the AWS Management Console, as you can
tell from the userAgent element.
AWS STS API Event in CloudTrail Log File
The following example shows a CloudTrail log entry for a request made for the AWS STS AssumeRole
action.
{
"eventVersion": "1.01",
"userIdentity": {
"type": "IAMUser",
"principalId": "AIDAQRSTUVWXYZEXAMPLE",
"arn": "arn:aws:iam::777788889999:user/Bob",
"accountId": "777788889999",
"accessKeyId": "AKIAQRSTUVWXYZEXAMPLE",
"userName": "Bob"
},
"eventTime": "2014-07-18T15:07:39Z",
"eventSource": "sts.amazonaws.com",
"eventName": "AssumeRole",
"awsRegion": "us-east-1",
"sourceIPAddress": "192.0.2.101",
"userAgent": "aws-cli/1.3.23 Python/2.7.6 Linux/2.6.18-164.el5",
"requestParameters": {
"roleArn": "arn:aws:iam::777788889999:role/EC2-dev",
"roleSessionName": "Bob-EC2-dev"
},
"responseElements": {
"credentials": {
"sessionToken": "<encoded session token blob>",
"accessKeyId": "AKIAQRSTUVWXYZEXAMPLE",
"expiration": "Jul 18, 2014 4:07:39 PM"
},
"assumedRoleUser": {
"assumedRoleId": "AIDAQRSTUVWXYZEXAMPLE:Bob-EC2-dev",
"arn": "arn:aws:sts::777788889999:assumed-role/EC2-dev/Bob-EC2-dev"
}
},
"requestID": "4EXAMPLE-0e8d-11e4-96e4-e55c0EXAMPLE",
"eventID": "dEXAMPLE-ac7f-466c-a608-4ac8dEXAMPLE"
}
The following example shows a CloudTrail log entry for a request made for the AWS STS
AssumeRoleWithSAML action.
{
"eventVersion": "1.04",
"userIdentity": {
"type": "SAMLUser",
"principalId": "<id of identity provider>:<canonical id of user>",
"userName": "<canonical id of user>",
"identityProvider": "<id of identity provider>"
},
"eventTime": "2016-03-23T01:39:57Z",
"eventSource": "sts.amazonaws.com",
313

AWS Identity and Access Management User Guide
AWS STS API Event in CloudTrail Log File
"eventName": "AssumeRoleWithSAML",
"awsRegion": "us-east-1",
"sourceIPAddress": "192.0.2.101",
"userAgent": "aws-cli/1.3.23 Python/2.7.6 Linux/2.6.18-164.el5",
"requestParameters": {
"sAMLAssertionID": "_c0046cEXAMPLEb9d4b8eEXAMPLE2619aEXAMPLE",
"roleSessionName": "MyAssignedRoleSessionName",
"durationSeconds": 3600,
"roleArn": "arn:aws:iam::444455556666:role/SAMLTestRoleShibboleth",
"principalArn": "arn:aws:iam::444455556666:saml-provider/Shibboleth"
},
"responseElements": {
"subjectType": "transient",
"issuer": "https://server.example.com/idp/shibboleth",
"credentials": {
"accessKeyId": "AKIAIOSFODNN7EXAMPLE",
"expiration": "Mar 23, 2016 2:39:57 AM",
"sessionToken": "<encoded session token blob>"
},
"nameQualifier": "<id of identity provider>",
"assumedRoleUser": {
"assumedRoleId": "AROAD35QRSTUVWEXAMPLE:MyAssignedRoleSessionName",
"arn": "arn:aws:sts::444455556666:assumed-role/SAMLTestRoleShibboleth/
MyAssignedRoleSessionName"
},
"subject": "<canonical id of user>",
"audience": "https://signin.aws.amazon.com/saml"
},
"requestID": "6EXAMPLE-e595-11e5-b2c7-c974fEXAMPLE",
"eventID": "dEXAMPLE-265a-41e0-9352-4401bEXAMPLE",
"eventType": "AwsApiCall",
"recipientAccountId": "444455556666"
}
The following example shows a CloudTrail log entry for a request made for the AWS STS
AssumeRoleWithWebIdentity action.
{
"eventVersion": "1.04",
"userIdentity": {
"type": "WebIdentityUser",
"principalId": "accounts.google.com:<id-of-
application>.apps.googleusercontent.com:<id-of-user>",
"userName": "<id of user>",
"identityProvider": "accounts.google.com"
},
"eventTime": "2016-03-23T01:39:51Z",
"eventSource": "sts.amazonaws.com",
"eventName": "AssumeRoleWithWebIdentity",
"awsRegion": "us-east-1",
"sourceIPAddress": "192.0.2.101",
"userAgent": "aws-cli/1.3.23 Python/2.7.6 Linux/2.6.18-164.el5",
"requestParameters": {
"durationSeconds": 3600,
"roleArn": "arn:aws:iam::444455556666:role/FederatedWebIdentityRole",
"roleSessionName": "MyAssignedRoleSessionName"
},
"responseElements": {
314

AWS Identity and Access Management User Guide
Sign-in Failure Event in CloudTrail Log File
"provider": "accounts.google.com",
"subjectFromWebIdentityToken": "<id of user>",
"audience": "<id of application>.apps.googleusercontent.com",
"credentials": {
"accessKeyId": "ASIACQRSTUVWRAOEXAMPLE",
"expiration": "Mar 23, 2016 2:39:51 AM",
"sessionToken": "<encoded session token blob>"
},
"assumedRoleUser": {
"assumedRoleId": "AROACQRSTUVWRAOEXAMPLE:MyAssignedRoleSessionName",
"arn": "arn:aws:sts::444455556666:assumed-role/
FederatedWebIdentityRole/MyAssignedRoleSessionName"
}
},
"requestID": "6EXAMPLE-e595-11e5-b2c7-c974fEXAMPLE",
"eventID": "bEXAMPLE-0b30-4246-b28c-e3da3EXAMPLE",
"eventType": "AwsApiCall",
"recipientAccountId": "444455556666"
}
Sign-in Failure Event in CloudTrail Log File
The following example shows a CloudTrail log entry for a failed sign-in event.
{
"eventVersion": "1.01",
"userIdentity": {
"type": "IAMUser",
"principalId": "AIDACKCEVSQ6C2EXAMPLE",
"arn":"arn:aws:iam::111122223333:user/Alice",
"accountId": "111122223333",
"userName": "Alice"
},
"eventTime": "2014-07-08T17:35:27Z",
"eventSource": "signin.amazonaws.com",
"eventName": "ConsoleLogin",
"awsRegion": "us-east-1",
"sourceIPAddress": "192.0.2.100",
"userAgent": "Mozilla/5.0 (Windows NT 6.1; WOW64; rv:24.0) Gecko/20100101
Firefox/24.0",
"errorMessage": "Failed authentication",
"requestParameters": null,
"responseElements": {
"ConsoleLogin": "Failure"
},
"additionalEventData": {
"MobileVersion": "No",
"LoginTo": "https://console.aws.amazon.com/sns",
"MFAUsed": "No"
},
"eventID": "11ea990b-4678-4bcd-8fbe-62509088b7cf"
}
From this information, you can determine that the sign-in attempt was made by an IAM user named
Alice, as shown in the userIdentity element. You can also see that the sign-in attempt failed, as
shown in the responseElements element. You can see that Alice tried to sign in to the Amazon SNS
console at 5:35 PM (UTC) on July 8th, 2014.
315

AWS Identity and Access Management User Guide
Sign-in Failure Event Caused by Incorrect User Name
Sign-in Failure Event Caused by Incorrect User
Name
The following example shows a CloudTrail log entry for an unsuccessful sign-in event
caused by the user entering an incorrect user name. AWS masks the userName text with
HIDDEN_DUE_TO_SECURITY_REASONS to help prevent exposing potentially sensitive information.
{
"eventVersion": "1.02",
"userIdentity": {
"type": "IAMUser",
"accountId": "123456789012",
"accessKeyId": "",
"userName": "HIDDEN_DUE_TO_SECURITY_REASONS"
},
"eventTime": "2015-03-31T22:20:42Z",
"eventSource": "signin.amazonaws.com",
"eventName": "ConsoleLogin",
"awsRegion": "us-east-1",
"sourceIPAddress": "192.0.2.101",
"userAgent": "Mozilla/5.0 (Windows NT 6.1; WOW64; rv:24.0) Gecko/20100101
Firefox/24.0",
"errorMessage": "No username found in supplied account",
"requestParameters": null,
"responseElements": {
"ConsoleLogin": "Failure"
},
"additionalEventData": {
"LoginTo": "https://console.aws.amazon.com/console/home?state=hashArgs
%23&isauthcode=true",
"MobileVersion": "No",
"MFAUsed": "No"
},
"eventID": "a7654656-0417-45c6-9386-ea8231385051",
"eventType": "AwsConsoleSignin",
"recipientAccountId": "123456789012"
}
Sign-in Success Event in CloudTrail Log File
The following example shows a CloudTrail log entry for a successful sign-in event.
{
"eventVersion": "1.01",
"userIdentity": {
"type": "IAMUser",
"principalId": "AIDACKCEVSQ6C2EXAMPLE",
"arn":"arn:aws:iam::111122223333:user/Bob",
"accountId": "111122223333",
"userName": "Bob"
},
"eventTime": "2014-07-16T15:49:27Z",
"eventSource": "signin.amazonaws.com",
"eventName": "ConsoleLogin",
"awsRegion": "us-east-1",
316

AWS Identity and Access Management User Guide
Preventing Duplicate Log Entries in CloudTrail
"sourceIPAddress": "192.0.2.110",
"userAgent": "Mozilla/5.0 (Windows NT 6.1; WOW64; rv:24.0) Gecko/20100101
Firefox/24.0",
"requestParameters": null,
"responseElements": {
"ConsoleLogin": "Success"
},
"additionalEventData": {
"MobileVersion": "No",
"LoginTo": "https://console.aws.amazon.com/s3",
"MFAUsed": "No"
},
"eventID": "3fcfb182-98f8-4744-bd45-10a395ab61cb"
}
For more details about the information contained in CloudTrail log files, see CloudTrail Event
Reference in the AWS CloudTrail User Guide.
Preventing Duplicate Log Entries in CloudTrail
CloudTrail creates trails in each region separately. These trails include information for events that
occur in those regions, plus global (that is, non-region-specific) events such as IAM API calls, non-
region specific AWS STS calls (calls to sts.amazonaws.com), and AWS sign-in events. For example,
by default, if you have two trails, each in a different region, and you then create a new IAM user, the
CreateUser event is added to the log files in both regions, creating a duplicate log entry.
Note
By default, AWS Security Token Service (STS) is a global service with a single endpoint at
https://sts.amazonaws.com. Calls to this endpoint are logged as calls to a global service.
However, because this endpoint is physically located in the US East (N. Virginia) region, your
logs list "us-east-1" as the event region. CloudTrail does not write these logs to the US East
(N. Virginia) region unless you choose to include global service logs in that region. CloudTrail
writes calls to all regional endpoints to their respective regions. For example, calls to sts.us-
east-1.amazonaws.com are published to the US East (N. Virginia) region, calls to sts.eu-
central-1.amazonaws.com are published to the EU (Frankfurt) region, etc.
For more information about multiple regions and AWS STS see Activating and Deactivating
AWS STS in an AWS Region (p. 244).
The following table lists the regions and how CloudTrail logs AWS STS requests in each region. The
"Location" column indicates which logs CloudTrail writes to. "Global" means the event is logged in any
region for which you choose to include global service logs in that region. "Region" means that the event
is logged only in the region where the endpoint is located. The last column indicates how the request's
region is identified in the log entry.
Region name Region
identity in
CloudTrail log
Endpoint Location of
CloudTrail logs
n/a - global us-east-1 sts.amazonaws.com global
US East (N. Virginia) us-east-1 sts.us-east-1.amazonaws.com region
US West (N. California) us-west-1 sts.us-west-1.amazonaws.com region
US West (Oregon) us-west-2 sts.us-west-2.amazonaws.com region
EU (Ireland) eu-west-1 sts.eu-west-1.amazonaws.com region
317

AWS Identity and Access Management User Guide
Preventing Duplicate Log Entries in CloudTrail
Region name Region
identity in
CloudTrail log
Endpoint Location of
CloudTrail logs
EU (Frankfurt) eu-central-1 sts.eu-
central-1.amazonaws.com region
Asia Pacific (Mumbai) ap-south-1 sts.ap-south-1.amazonaws.com region
Asia Pacific (Singapore) ap-southeast-1 sts.ap-
southeast-1.amazonaws.com region
Asia Pacific (Sydney) ap-southeast-2 sts.ap-
southeast-2.amazonaws.com region
Asia Pacific (Tokyo) ap-northeast-1 sts.ap-
northeast-1.amazonaws.com region
Asia Pacific (Seoul) ap-northeast-2 sts.ap-
northeast-2.amazonaws.com region
South America (São
Paulo) sa-east-1 sts.sa-east-1.amazonaws.com region
When you configure CloudTrail to aggregate trail information from multiple regions in your account
into a single Amazon S3 bucket, IAM events are duplicated in the logs—the trail for each region writes
the same IAM event to the aggregated log. To prevent this duplication, you can include global events
selectively. A typical approach is to enable global events in one trail and to disable global events in all
other trails that write to the same Amazon S3 bucket. That way only one set of global events is written.
For more information, see Aggregating Logs in the AWS CloudTrail User Guide.
318

AWS Identity and Access Management User Guide
Troubleshooting General Issues
Troubleshooting IAM
If you encounter access-denied issues or similar difficulties when working with AWS Identity and
Access Management (IAM), consult the topics in this section.
Topics
•Troubleshooting General Issues (p. 319)
•Troubleshoot IAM Policies (p. 321)
•Troubleshooting IAM Roles (p. 325)
•Troubleshooting Amazon EC2 and IAM (p. 326)
•Troubleshooting Amazon S3 and IAM (p. 329)
•Troubleshooting SAML 2.0 Federation with AWS (p. 330)
Troubleshooting General Issues
Use the information here to help you diagnose and fix access-denied or other common issues that you
might encounter when working with AWS Identity and Access Management (IAM).
Topics
•I lost my access keys. (p. 319)
•I get "access denied" when I make a request to an AWS service. (p. 320)
•I get "access denied" when I make a request with temporary security credentials. (p. 320)
•Policy variables aren't working. (p. 320)
•Changes that I make are not always immediately visible (p. 321)
I lost my access keys.
Access keys consist of two parts:
•The access key identifier. This is not a secret, and can be seen in the IAM console wherever
access keys are listed, such as on the user summary page.
•The secret access key. This is provided when you initially create the access key pair. Just like a
password, it cannot be retrieved later. If you cannot find your secret access key then you must
delete the access key pair and recreate it.
319

AWS Identity and Access Management User Guide
I get "access denied" when I make
a request to an AWS service.
For more information, see Retrieving Your Lost or Forgotten IAM Access Keys (p. 80).
I get "access denied" when I make a request to
an AWS service.
Verify that you have permission to call the action and resource that you have requested. If any
conditions are set, you must also meet those conditions when you send the request. For information
about viewing or modifying policies for an IAM user, group, or role, see Working with Policies (p. 280).
If you're trying to access a service that has resource-based (or access control) policies, such as
Amazon S3, Amazon SNS, or Amazon SQS, verify that the resource policy specifies you as a principal
and grants you access. For more information about resource-based policies, see the documentation for
that service.
If you are signing requests manually (without using the AWS SDKs), verify that you have correctly
signed the request.
I get "access denied" when I make a request
with temporary security credentials.
• Verify that the service accepts temporary security credentials, see Using Temporary Security
Credentials to Access AWS.
• Verify that your requests are being signed correctly and that the request is well-formed. For details,
see your toolkit documentation or Using Temporary Security Credentials to Authenticate an AWS
Request.
• Verify that your temporary security credentials haven't expired. For more information, see Using
Temporary Security Credentials.
• Verify that the IAM user or role has the correct permissions. Permissions for temporary security
credentials are derived from an IAM user or role, so the permissions are limited to those granted to
the IAM user or role. For more information about how permissions for temporary security credentials
are determined, see Controlling Permissions for Temporary Security Credentials (p. 233).
• If you are accessing a resource that has a resource-based policy by using a role, verify that the
policy grants permissions to the role. For example, the following policy allows MyRole from account
111122223333 to access MyBucket.
{
"Version": "2012-10-17",
"Statement": [{
"Sid": "S3BucketPolicy",
"Effect": "Allow",
"Principal": {"AWS": ["arn:aws:iam::111122223333:role/MyRole"]},
"Action": ["s3:PutObject"],
"Resource": ["arn:aws:s3:::MyBucket/*"]
}]
}
Policy variables aren't working.
• Verify that all policies that include variables include the following version number in the policy:
"Version": "2012-10-17"
320

AWS Identity and Access Management User Guide
Changes that I make are not
always immediately visible
Without the correct version number, the variables are not replaced during evaluation. Instead, the
variables are evaluated literally. Any policies that don't include variables will still work if you include
the latest version number.
• Verify that your policy variables are in the right case. For details, see IAM Policy Variables
Overview (p. 371).
Changes that I make are not always immediately
visible
As a service that is accessed through computers in data centers around the world, IAM uses a
distributed computing model called eventual consistency. Any change that you make in IAM (or other
AWS services) takes time to become visible from all possible endpoints. Some of the delay results from
the time it takes to send the data from server to server, from replication zone to replication zone, and
from region to region around the world. IAM also uses caching to improve performance, but in some
cases this can add time; the change might not be visible until the previously cached data times out.
You must design your global applications to account for these potential delays and ensure that they
work as expected, even when a change made in one location is not instantly visible at another.
For more information about how some other AWS services are affected by this, consult the following
resources:
•Managing Data Consistency in the Amazon Redshift Database Developer Guide
•Amazon S3 Data Consistency Model in the Amazon Simple Storage Service Developer Guide
•Ensuring Consistency When Using Amazon S3 and Amazon Elastic MapReduce for ETL Workflows
in the AWS Big Data Blog
•EC2 Eventual Consistency in the Amazon EC2 API Reference.
Troubleshoot IAM Policies
Use the information here to help you diagnose and fix common errors found in IAM policies.
IAM policies use a syntax that begins with the rules of JavaScript Object Notation (JSON). JSON
describes an 'object' and the name and value pairs that make up an object. The IAM policy grammar
builds on that by defining what names and values have meaning for, and are understood by, the AWS
services that use policies to grant permissions.
Common policy errors
•More than one policy object (p. 321)
•More than one Statement element (p. 322)
•More than one Effect, Action, or Resource element in a Statement element (p. 323)
•Missing Version Element (p. 325)
More than one policy object
An IAM policy must consist of one and only one JSON object. You denote an object by placing { }
braces around it. Although you can nest other objects within a JSON object by embedding additional
{ } braces within the outer pair, a policy can contain only one outermost pair of { } braces. The following
example is incorrect because it contains two objects at the top level (called out in red:
321

AWS Identity and Access Management User Guide
More than one Statement element
{
"Version": "2012-10-17",
"Statement":
{
"Effect":"Allow",
"Action":"ec2:Describe*",
"Resource":"arn:aws:ec2:us-east-1:ACCOUNT-ID-WITHOUT-HYPHENS:instance/*"
}
}
{
"Statement": {
"Effect": "Allow",
"Action": "s3:*",
"Resource": "arn:aws:s3:::my-bucket/*"
}
}
You can, however, meet the intention of the previous example with the use of correct policy grammar.
Instead of including two complete policy objects each with its ownStatement element, you can
combine the two blocks into a single Statement element. The Statement element has an array of
two objects as its value, as shown in the following example:
{
"Version": "2012-10-17",
"Statement": [
{
"Effect": "Allow",
"Action": "ec2:Describe*",
"Resource":" arn:aws:ec2:us-east-1:ACCOUNT-ID-WITHOUT-HYPHENS:instance/
*"
},
{
"Effect": "Allow",
"Action": "s3:*",
"Resource": "arn:aws:s3:::my-bucket/*"
}
]
}
More than one Statement element
This error might at first appear to be a variation on the previous section. However, syntactically it is a
different type of error. In the following example there is only one policy object as denoted by a single
pair of { } braces at the top level. However, that object contains two Statement elements within it.
An IAM policy must contain only one Statement element, consisting of the name (Statement)
appearing to the left of a colon, followed by its value on the right. The value of a Statement element
must be an object, denoted by { } braces, containing one Effect element, one Action element,
and one Resource element. The following example is incorrect because it contains two Statement
elements in the policy object.
{
"Version": "2012-10-17",
"Statement": {
"Effect": "Allow",
"Action": "ec2:Describe*",
322

AWS Identity and Access Management User Guide
More than one Effect, Action, or
Resource element in a Statement element
"Resource": "*"
},
"Statement": {
"Effect": "Allow",
"Action": "s3:*",
"Resource": "arn:aws:s3:::my-bucket/*"
}
}
Because a value object can be an array of multiple value objects, you can solve this problem by
combining the two Statement elements into one element with an object array, as shown in the
following example:
{
"Version": "2012-10-17",
"Statement": [
{
"Effect": "Allow",
"Action": "ec2:Describe*",
"Resource":"*"
},
{
"Effect": "Allow",
"Action": "s3:*",
"Resource": "arn:aws:s3:::my-bucket/*"
}
]
}
The value of the Statement element is an object array. The array in this example consists of two
objects, each of which is by itself is a correct value for a Statement element. Each object in the array
is separated by commas.
More than one Effect, Action, or Resource
element in a Statement element
On the value side of the Statement name/value pair, the object must consist of only one Effect
element, one Action element, and one Resource element. The following policy is incorrect because it
has two Effect elements in the value object of the Statement:
{
"Version": "2012-10-17",
"Statement": {
"Effect": "Deny",
"Effect": "Allow",
"Action": "ec2:* ",
"Resource": "*"
}
}
Note
Although the policy engine has been updated to block such errors in new or edited policies,
the policy engine continues to permit policies that were saved before the engine was updated.
The behavior of existing policies with the error is as follows:
323

AWS Identity and Access Management User Guide
More than one Effect, Action, or
Resource element in a Statement element
• Multiple Effect elements: only the last Effect element is observed. The others are
ignored.
• Multiple Action elements: all Action elements are combined internally and treated as if
they were a single list.
• Multiple Resource elements: all Resource elements are combined internally and treated
as if they were a single list.
The policy engine does not allow you to save any policy with syntax errors. You must correct
the errors in the policy before you can save it. The Policy Validator (p. 293) tool can help you
to find all older policies with errors and can recommend corrections for them.
In each case, the solution is to remove the incorrect extra element. For Effect elements, this is
straightforward: if you want the previous example to deny permissions to Amazon EC2 instances, then
you must remove the line "Effect": "Allow", from the policy, as follows:
{
"Version": "2012-10-17",
"Statement": {
"Effect": "Deny",
"Action": "ec2:* ",
"Resource": "*"
}
}
However, if the duplicate element is Action or Resource, then the resolution can be more
complicated. You might have multiple actions that you want to allow (or deny) permission to, or you
might want to control access to multiple resources. For example, the following example is incorrect
because it has multiple Resource elements:
{
"Version": "2012-10-17",
"Statement": {
"Effect": "Allow",
"Action": "s3:*",
"Resource": "arn:aws:s3:::my-bucket",
"Resource": "arn:aws:s3:::my-bucket/*"
}
}
Each of the required elements in a Statement element's value object can be present only once. The
solution is to place each value in an array. The following example illustrates this by making the two
separate resource elements into one Resource element with an array as the value object:
{
"Version": "2012-10-17",
"Statement": {
"Effect": "Allow",
"Action": "s3:*",
"Resource": [
"arn:aws:s3:::my-bucket",
"arn:aws:s3:::my-bucket/*"
]
}
}
324

AWS Identity and Access Management User Guide
Missing Version Element
Missing Version Element
As AWS features evolve, new capabilities are added to IAM policies to support those features.
Sometimes, an update to the policy syntax includes a new version number. If you use newer features
of the policy grammar in your policy, then you must tell the policy parsing engine which version you
are using. The default policy version is "2008-10-17". If you want to use any policy feature that was
introduced later, then you must specify the version number that supports the feature you want. We
recommend that you always include the latest policy syntax version number, which is "Version":
"2012-10-17". For example, the following policy is incorrect because it uses a policy variable
${...} in the ARN for a resource without specifying a policy syntax version that supports policy
variables:
{
"Statement":
{
"Action": "iam:*AccessKey*",
"Effect": "Allow",
"Resource": "arn:aws:iam::123456789012:user/${aws:username}"
}
}
Adding a Version element at the top of the policy with the value 2012-10-17, the first version to
support policy variables, solves this problem:
{
"Version": "2012-10-17",
"Statement":
{
"Action": "iam:*AccessKey*",
"Effect": "Allow",
"Resource": "arn:aws:iam::123456789012:user/${aws:username}"
}
}
Troubleshooting IAM Roles
Use the information here to help you diagnose and fix common issues that you might encounter when
working with IAM roles.
I cannot assume a role.
• Verify that your IAM policy grants you privilege to call sts:AssumeRole for the role that you want
to assume. The Action element of your IAM policy must allow you to call the AssumeRole action,
and the Resource element of your IAM policy must specify the role that you want to assume. For
example, the Resource element can specify a role by its Amazon Resource Name (ARN) or by
using a wildcard (*). For example, at least one policy applicable to you must grant permissions
similar to the following:
"Effect": "Allow",
"Action": "sts:AssumeRole",
"Resource": "arn:aws:iam::account_id_number:role/role-name-you-want-to-
assume"
325

AWS Identity and Access Management User Guide
Troubleshooting Amazon EC2 and IAM
• Verify that you meet all the conditions that are specified in the role's trust policy. A Condition
can specify an expiration date, an external ID, or that a request must come only from specific IP
addresses. In the following example, if the current date is any time after the specified date, then the
policy never matches and cannot grant you the permission to assume the role.
"Effect": "Allow",
"Action": "sts:AssumeRole",
"Resource": "arn:aws:iam::account_id_number:role/role-name-you-want-to-
assume"
"Condition": {
"DateLessThan" : {
"aws:CurrentTime" : "2016-05-01T12:00:00Z"
}
}
• Verify that the AWS account that you are calling AssumeRole from is a trusted entity for the role that
you are assuming. Trusted entities are defined as a Principal in a role's trust policy. The following
example is a trust policy attached to the role you want to assume. In this example, the account ID
with the IAM user you signed-in with must be 123456789012. If your account number is not listed in
the Principal element of the role's trust policy, then you cannot assume the role, no matter what
permissions are granted to you in access policies. Note that the example policy also requires that
users who access the role must sign in using multi-factor authentication (MFA). If you do not sign-in
as a user in the specified AWS account or by using an MFA device, then the policy does not match,
and you cannot assume the role.
"Effect": "Allow",
"Principal": { "AWS": "arn:aws:iam::123456789012:root" },
"Action": "sts:AssumeRole",
"Condition": { "Bool": { "aws:MultiFactorAuthPresent": "true" } }
Troubleshooting Amazon EC2 and IAM
Use the information here to help you troubleshoot and fix access denied or other issues that you might
encounter when working with Amazon EC2 and IAM.
Topics
•When attempting to launch an instance, I don't see the role I expected to see in the Amazon EC2
console IAM role list. (p. 326)
•The credentials on my instance are for the wrong role. (p. 327)
•When I attempt to call the AddRoleToInstanceProfile, I get an AccessDenied error. (p. 327)
•Amazon EC2: When I attempt to launch an instance with a role, I get an AccessDenied
error. (p. 327)
•I can't access the temporary security credentials on my EC2 instance. (p. 328)
•What do the errors from the info document in the IAM subtree mean? (p. 328)
When attempting to launch an instance, I don't
see the role I expected to see in the Amazon EC2
console IAM role list.
Check the following:
326

AWS Identity and Access Management User Guide
The credentials on my instance are for the wrong role.
• If you are signed in as an IAM user, verify that you have permission to call
ListInstanceProfiles. For information about the permissions necessary to work with roles,
see "Permissions Required for Using Roles with Amazon EC2" in Using an IAM Role to Grant
Permissions to Applications Running on Amazon EC2 Instances (p. 202). For information about
adding permissions to a user, see Working with Policies (p. 280).
If you cannot modify your own permissions, you must contact an administrator who can work with
IAM in order to update your permissions.
• If you created a role by using the IAM CLI or API, verify that you created an instance profile and
added the role to that instance profile. Also, if you name your role and instance profile differently,
you won't see the correct role name in the list of IAM roles in the Amazon EC2 console. The IAM
Role list in the Amazon EC2 console lists the names of instance profiles, not the names of roles. You
will have to select the name of the instance profile that contains the role you want. For details about
instance profiles, see Using Instance Profiles (p. 206).
Note
If you use the IAM console to create roles, you don't need to work with instance profiles. For
each role that you create in the IAM console, an instance profile is created with the same
name as the role, and the role is automatically added to that instance profile.
The credentials on my instance are for the
wrong role.
If the role in the instance profile was replaced recently, your application will need to wait for the next
automatically scheduled credential rotation before credentials for your role become available.
When I attempt to call the AddRoleToInstanceProfile, I get
an AccessDenied error.
If you are making requests as an IAM user, verify that you have the following permissions:
•iam:AddRoleToInstanceProfile with the resource matching the instance profile ARN (for
example, arn:aws:iam::999999999999:instance-profile/ExampleInstanceProfile).
For more information about the permissions necessary to work with roles, see "How Do I Get
Started?" in Using an IAM Role to Grant Permissions to Applications Running on Amazon
EC2 Instances (p. 202). For information about adding permissions to a user, see Working with
Policies (p. 280).
Amazon EC2: When I attempt to launch an
instance with a role, I get an AccessDenied error.
Check the following:
• Launch an instance without an instance profile. This will help ensure that the problem is limited to
IAM roles for Amazon EC2 instances.
• If you are making requests as an IAM user, verify that you have the following permissions:
•ec2:RunInstances with a wildcard resource ("*")
•iam:PassRole with the resource matching the role ARN (for example,
arn:aws:iam::999999999999:role/ExampleRoleName)
327
AWS Identity and Access Management User Guide
I can't access the temporary security
credentials on my EC2 instance.
• Call the IAM GetInstanceProfile action to ensure that you are using a valid instance profile
name or a valid instance profile ARN. For more information, see Using IAM roles with Amazon EC2
instances.
• Call the IAM GetInstanceProfile action to ensure that the instance profile has a role. Empty
instance profiles will fail with an AccessDenied error. For more information about creating a role,
see Creating IAM Roles (p. 167).
For more information about the permissions necessary to work with roles, see "How Do I Get
Started?" in Using an IAM Role to Grant Permissions to Applications Running on Amazon
EC2 Instances (p. 202). For information about adding permissions to a user, see Working with
Policies (p. 280).
I can't access the temporary security credentials
on my EC2 instance.
Check the following:
• Can you can access another part of the instance metadata service (IMDS)? If not, check that you
have no firewall rules blocking access to requests to the IMDS.
[ec2-user@domU-12-31-39-0A-8D-DE ~]$ GET http://169.254.169.254/latest/meta-
data/hostname; echo
• Does the iam subtree of the IMDS exist? If not, verify that your instance has an IAM instance profile
associated with it by calling ec2:DescribeInstances.
[ec2-user@domU-12-31-39-0A-8D-DE ~]$ GET http://169.254.169.254/latest/meta-
data/iam; echo
• Check the info document in the IAM subtree for an error. If you have an error, see What do the
errors from the info document in the IAM subtree mean? (p. 328) for more information.
[ec2-user@domU-12-31-39-0A-8D-DE ~]$ GET http://169.254.169.254/latest/meta-
data/iam/info; echo
What do the errors from the info document in the
IAM subtree mean?
The iam/info document indicates "Code":"InstanceProfileNotFound".
Your IAM instance profile has been deleted and Amazon EC2 can no longer provide credentials to your
instance. You will need to terminate your instances and restart with a valid instance profile.
If an instance profile with that name exists, check that the instance profile wasn't deleted and another
was created with the same name.
To verify the status of the instance profile:
1. Call the IAM GetInstanceProfile action to get the InstanceProfileId.
2. Call the Amazon EC2 DescribeInstances action to get the IamInstanceProfileId for the
instance.
328

AWS Identity and Access Management User Guide
Troubleshooting Amazon S3 and IAM
3. Verify that the InstanceProfileId from the IAM action matches the IamInstanceProfileId
from the Amazon EC2 action.
If the IDs are different, then the instance profile attached to your instances is no longer valid. You will
need to terminate your instances and restart with a valid instance profile.
The iam/info document indicates a success but indicates
"Message":"Instance Profile does not contain a role..."
The role has been removed from the instance profile by the IAM RemoveRoleFromInstanceProfile
action. You can use the IAM AddRoleToInstanceProfile action to attach a role to the instance
profile. Your application will need to wait until the next scheduled refresh to access the credentials for
the role.
The iam/security-credentials/[role-name] document indicates
"Code":"AssumeRoleUnauthorizedAccess".
Amazon EC2 does not have permission to assume the role. Permission to assume the role is
controlled by the trust policy attached to the role, like the example that follows. Use the IAM
UpdateAssumeRolePolicy API to update the trust policy.
{"Version": "2012-10-17","Statement": [{"Effect": "Allow","Principal":
{"Service": ["ec2.amazonaws.com"]},"Action": ["sts:AssumeRole"]}]}
Your application will need to wait until the next automatically scheduled refresh to access the
credentials for the role.
Troubleshooting Amazon S3 and IAM
Use the information here to help you troubleshoot and fix issues that you might encounter when
working with Amazon S3 and IAM.
How do I grant anonymous access to an Amazon
S3 bucket?
You use an Amazon S3 bucket policy that specifies a wildcard (*) in the principal element, which
means anyone can access the bucket. With anonymous access, anyone (including users without an
AWS account) will be able to access the bucket. For a sample policy, see Example Cases for Amazon
S3 Bucket Policies in the Amazon Simple Storage Service Developer Guide.
I'm signed in as a root user, why can't I access
an Amazon S3 bucket under my account?
In some cases, you might have an IAM user with full access to IAM and Amazon S3. If the IAM user
assigns a bucket policy to an Amazon S3 bucket and doesn't specify the root user as a principal, the
root user is denied access to that bucket. However, as the root user, you can still access the bucket by
modifying the bucket policy to allow root user access.
329

AWS Identity and Access Management User Guide
Troubleshooting SAML 2.0 Federation with AWS
Troubleshooting SAML 2.0 Federation with
AWS
Use the information here to help you diagnose and fix issues that you might encounter when working
with SAML 2.0 and federation with IAM.
How to View a SAML Response in Your Browser
for Troubleshooting
The following procedures describe how to view the SAML response from your service provider from in
your browser when troubleshooting a SAML 2.0–related issue.
For all browsers, go to the page where you can reproduce the issue. Then follow the steps for the
appropriate browser:
Topics
•Google Chrome (p. 330)
•Mozilla Firefox (p. 330)
•Apple Safari (p. 331)
•Microsoft Internet Explorer (p. 331)
•What to do with the Base64-encoded SAML response (p. 331)
Google Chrome
To view a SAML response in Chrome
These steps were tested using version 42.0.2311.135m. If you use another version, you might need to
adapt the steps accordingly.
1. Press F12 to start the developer console.
2. Select the Network tab, and then select Preserve log.
3. Reproduce the issue.
4. Look for a SAML Post in the developer console pane. Select that row, and then view the Headers
tab at the bottom. Look for the SAMLResponse attribute that contains the encoded request.
Mozilla Firefox
To view a SAML response in Firefox
This procedure was tested on version 37.0.2 of Mozilla Firefox. If you use another version, you might
need to adapt the steps accordingly.
1. Press F12 to start the developer console.
2. In the upper right of the developer tools window, click options (the small gear icon). Under
Common Preferences select Enable persistent logs.
3. Select the Network tab.
4. Reproduce the issue.
330

AWS Identity and Access Management User Guide
How to View a SAML Response in
Your Browser for Troubleshooting
5. Look for a POST SAML in the table. Select that row. In the Form Data window on the right, select
the Params tab and find the SAMLResponse element.
Apple Safari
To view a SAML response in Safari
These steps were tested using version 8.0.6 (10600.6.3). If you use another version, you might need to
adapt the steps accordingly.
1. Enable Web Inspector in Safari. Open the Preferences window, select the Advanced tab, and
then select Show Develop menu in the menu bar.
2. Now you can open Web Inspector. Click Develop, then select Show Web Inspector.
3. Select the Resources tab.
4. Reproduce the issue.
5. Look for a saml-signin.aws.amazon.com request.
6. Scroll down to find Request Data with the name SAMLResponse. The associated value is the
Base64-encoded response.
Microsoft Internet Explorer
To view a SAML response in Internet Explorer
The best way analyze network traffic in Internet Explorer is through the use of a third-party tool.
• Follow the steps at http://social.technet.microsoft.com/wiki/contents/articles/3286.ad-fs-2-0-how-to-
use-fiddler-web-debugger-to-analyze-a-ws-federation-passive-sign-in.aspx to download and install
Fiddler and capture the data.
What to do with the Base64-encoded SAML response
Once you find the Base64-encoded SAML response element in your browser, copy it and use your
favorite Base-64 decoding tool to extract the XML tagged response.
Security Tip
Because the SAML response data that you are viewing might contain sensitive security data,
we recommend that you do not use an online base64 decoder. Instead use a tool installed on
your local computer that does not send your SAML data over the network.
Topics
•Error: Your request included an invalid SAML response. To logout, click here. (p. 332)
•Error: RoleSessionName is required in AuthnResponse (Service: AWSSecurityTokenService;
Status Code: 400; Error Code: InvalidIdentityToken) (p. 332)
•Error: Not authorized to perform sts:AssumeRoleWithSAML (Service: AWSSecurityTokenService;
Status Code: 403; Error Code: AccessDenied) (p. 332)
•Error: RoleSessionName in AuthnResponse must match [a-zA-Z_0-9+=,.@-]{2,64} (Service:
AWSSecurityTokenService; Status Code: 400; Error Code: InvalidIdentityToken) (p. 333)
•Error: Response signature invalid (Service: AWSSecurityTokenService; Status Code: 400; Error
Code: InvalidIdentityToken) (p. 333)
•Error: Failed to assume role: Issuer not present in specified provider
(Service: AWSOpenIdDiscoveryService; Status Code: 400; Error Code:
AuthSamlInvalidSamlResponseException) (p. 333)
331

AWS Identity and Access Management User Guide
Error: Your request included an invalid
SAML response. To logout, click here.
Error: Your request included an invalid SAML
response. To logout, click here.
This error can occur when the SAML response from the identity provider does not include an attribute
with the Name set to https://aws.amazon.com/SAML/Attributes/Role. The attribute must
contain one or more AttributeValue elements, each containing a comma-separated pair of strings:
• The ARN of a role that the user can be mapped to
• The ARN of the SAML provider
For more information, see Configuring SAML Assertions for the Authentication Response (p. 152). To
view the SAML response in your browser, follow the steps listed in How to View a SAML Response in
Your Browser for Troubleshooting (p. 330).
Error: RoleSessionName is required
in AuthnResponse (Service:
AWSSecurityTokenService; Status Code: 400;
Error Code: InvalidIdentityToken)
This error can occur when the SAML response from the identity provider does not include an attribute
with the Name set to https://aws.amazon.com/SAML/Attributes/RoleSessionName. The
attribute value is an identifier for the user and is typically a user ID or an email address.
For more information, see Configuring SAML Assertions for the Authentication Response (p. 152). To
view the SAML response in your browser, follow the steps listed in How to View a SAML Response in
Your Browser for Troubleshooting (p. 330).
Error: Not authorized to perform
sts:AssumeRoleWithSAML (Service:
AWSSecurityTokenService; Status Code: 403;
Error Code: AccessDenied)
This error can occur if the IAM role specified in the SAML response is misspelled or does not exist.
Correct the name of the role in the SAML service provider configuration.
This error can also occur if the federated users do not have permissions to assume the role. The role
must have a trust policy that specifies the ARN of the IAM SAML identity provider as the Principal.
The role also contains conditions that control which users can assume the role. Ensure that your users
meet the requirements of the conditions.
This error can also occur if the SAML response does not include a Subject containing a NameID.
For more information see Establish Permissions in AWS for Federated Users and Configuring
SAML Assertions for the Authentication Response (p. 152). To view the SAML response in
your browser, follow the steps listed in How to View a SAML Response in Your Browser for
Troubleshooting (p. 330).
332

AWS Identity and Access Management User Guide
Error: RoleSessionName in AuthnResponse
must match [a-zA-Z_0-9+=,.@-]{2,64} (Service:
AWSSecurityTokenService; Status Code:
400; Error Code: InvalidIdentityToken)
Error: RoleSessionName in AuthnResponse
must match [a-zA-Z_0-9+=,.@-]{2,64} (Service:
AWSSecurityTokenService; Status Code: 400;
Error Code: InvalidIdentityToken)
This error can occur if the RoleSessionName attribute value is too long or contains invalid characters.
The maximum valid length is 64 characters.
For more information, see Configuring SAML Assertions for the Authentication Response (p. 152). To
view the SAML response in your browser, follow the steps listed in How to View a SAML Response in
Your Browser for Troubleshooting (p. 330).
Error: Response signature invalid (Service:
AWSSecurityTokenService; Status Code: 400;
Error Code: InvalidIdentityToken)
This error can occur when federation metadata of the identity provider does not match the metadata
of the IAM identity provider. For example, the metadata file for the identity service provider might have
changed to update an expired certificate. Download the updated SAML metadata file from your identity
service provider. Then update it in the AWS identity provider entity that you define in IAM with the aws
iam update-saml-provider cross-platform CLI command or the Update-IAMSAMLProvider
PowerShell cmdlet.
Error: Failed to assume role: Issuer
not present in specified provider
(Service: AWSOpenIdDiscoveryService;
Status Code: 400; Error Code:
AuthSamlInvalidSamlResponseException)
This error can occur if the issuer in the SAML response does not match the issuer declared in the
federation metadata file uploaded to AWS when you created the identity provider in IAM.
333

AWS Identity and Access Management User Guide
IAM Identifiers
Reference Information for AWS
Identity and Access Management
Use the topics in this section to find detailed reference material for various aspects of IAM and AWS
STS.
Topics
•IAM Identifiers (p. 334)
•Limitations on IAM Entities and Objects (p. 338)
•AWS Services That Work with IAM (p. 340)
•AWS IAM Policy Reference (p. 345)
IAM Identifiers
IAM uses a few different identifiers for users, groups, roles, policies, and server certificates. This
section describes the identifiers and when you use each.
Topics
•Friendly Names and Paths (p. 334)
•IAM ARNs (p. 335)
•Unique IDs (p. 337)
Friendly Names and Paths
When you create a user, a role, a group, or a policy, or when you upload a server certificate, you
give it a friendly name, such as Bob, TestApp1, Developers, ManageCredentialsPermissions, or
ProdServerCert.
If you are using the IAM API or AWS Command Line Interface (AWS CLI) to create IAM entities, you
can also optionally give the entity a path. You might use the path to identify which division or part
334

AWS Identity and Access Management User Guide
IAM ARNs
of the organization the entity belongs in. For example: /division_abc/subdivision_xyz/product_1234/
engineering/. Examples of how you might use paths are shown in the next section (see IAM
ARNs (p. 335)).
Just because you give a user and group the same path doesn't automatically put that user in that
group. For example, you might create a Developers group and specify its path as /division_abc/
subdivision_xyz/product_1234/engineering/. Just because you create a user named Bob and give him
that same path doesn't automatically put Bob in the Developers group.
IAM doesn't enforce any boundaries between users or groups based on their paths. Users with
different paths can use the same resources (assuming they've been granted permission to those
resources). For information about limitations on names, see Limitations on IAM Entities and
Objects (p. 338).
IAM ARNs
Most resources have a friendly name (for example, a user named Bob or a group named
Developers). However, the access policy language requires you to specify the resource or resources
using the following Amazon Resource Name (ARN) format.
arn:aws:service:region:account:resource
Where:
•service identifies the AWS product. For IAM resources, this is always iam.
•region is the region the resource resides in. For IAM resources, this is always left blank.
•account is the AWS account ID with no hyphens (for example, 123456789012).
•resource is the portion that identifies the specific resource by name.
You can use ARNs in IAM for users (IAM and federated), groups, roles, policies, instance profiles,
virtual MFA devices, and server certificates (p. 111). The following table shows the ARN format for
each and an example. The region portion of the ARN is blank because IAM resources are global.
Note
Many of the following examples include paths in the resource part of the ARN. Paths cannot
be created or manipulated in the AWS Management Console. To use paths you must work
with the resource by using the AWS API, the AWS CLI, or the Tools for Windows PowerShell.
The following examples show ARNs for different types of IAM resources.
The root account - the account itself:
arn:aws:iam::123456789012:root
An IAM user in the account:
arn:aws:iam::123456789012:user/Bob
Another user with a path reflecting an organization chart:
arn:aws:iam::123456789012:user/division_abc/subdivision_xyz/Bob
An IAM group:
arn:aws:iam::123456789012:group/Developers
An IAM group with a path:
arn:aws:iam::123456789012:group/division_abc/subdivision_xyz/product_A/
Developers
An IAM role:
arn:aws:iam::123456789012:role/S3Access
A managed policy:
arn:aws:iam::123456789012:policy/ManageCredentialsPermissions
An instance profile that can be associated with an EC2 instance:
335

AWS Identity and Access Management User Guide
IAM ARNs
arn:aws:iam::123456789012:instance-profile/Webserver
A federated user identified in IAM as "Bob":
arn:aws:sts::123456789012:federated-user/Bob
The active session of someone assuming the role of "Accounting-Role", with a
role session name of "Mary":
arn:aws:sts::123456789012:assumed-role/Accounting-Role/Mary
The multi-factor authentication device assigned to the user named Bob:
arn:aws:iam::123456789012:mfa/Bob
A server certificate
arn:aws:iam::123456789012:server-certificate/ProdServerCert
A server certificate with a path that reflects an organization chart:
arn:aws:iam::123456789012:server-certificate/division_abc/
subdivision_xyz/ProdServerCert
Identity providers (SAML and OIDC):
arn:aws:iam::123456789012:saml-provider/ADFSProvider
arn:aws:iam::123456789012:oidc-provider/GoogleProvider
The following example shows a policy you could assign to Bob to allow him to manage his own access
keys. Notice that the resource is the IAM user Bob.
{
"Version": "2012-10-17",
"Statement": [{
"Effect": "Allow",
"Action": ["iam:*AccessKey*"],
"Resource": "arn:aws:iam::ACCOUNT-ID-WITHOUT-HYPHENS:user/division_abc/
subdivision_xyz/Bob"
}]
}
Note
When you use ARNs to identify resources in an IAM policy, you can include policy variables
that let you include placeholders for run-time information (such as the user's name) as part of
the ARN. For more information, see IAM Policy Variables Overview (p. 371)
You can use wildcards in the resource portion of the ARN to specify multiple users or groups or
policies. For example, to specify all users working on product_1234, you would use:
arn:aws:iam::123456789012:user/division_abc/subdivision_xyz/product_1234/*
Let's say you have users whose names start with the string app_. You could refer to them all with the
following ARN.
arn:aws:iam::123456789012:user/division_abc/subdivision_xyz/product_1234/
app_*
To specify all users, groups, or policies in your AWS account, use a wildcard after the user/, group/,
or policy part of the ARN, respectively.
arn:aws:iam::123456789012:user/*
arn:aws:iam::123456789012:group/*
arn:aws:iam::123456789012:policy/*
Don't use a wildcard in the user/, group/, or policy part of the ARN. In other words, the following is
not allowed:
336

AWS Identity and Access Management User Guide
Unique IDs
arn:aws:iam::123456789012:u*
Example Use of Paths and ARNs for a Project-Based Group
Note
Paths cannot be created or manipulated in the AWS Management Console. To use paths you
must work with the resource by using the AWS API, the AWS CLI, or the Tools for Windows
PowerShell.
In this example, Jules in the Marketing_Admin group creates a project-based group within the /
marketing/ path, and assigns users from different parts of the company to the group. This example
illustrates that a user's path isn't related to the groups the user is in.
The marketing group has a new product they'll be launching, so Jules creates a new group in the /
marketing/ path called Widget_Launch. Jules then assigns the following policy to the group, which
gives the group access to objects in the part of the example_bucket designated to this particular
launch.
{
"Version": "2012-10-17",
"Statement": [
{
"Effect": "Allow",
"Action": "s3:*",
"Resource": "arn:aws:s3:::example_bucket/marketing/newproductlaunch/
widget/*"
},
{
"Effect": "Allow",
"Action": "s3:ListBucket*",
"Resource": "arn:aws:s3:::example_bucket",
"Condition": {"StringLike": {"s3:prefix": "marketing/newproductlaunch/
widget/*"}}
}
]
}
Jules then assigns the users who are working on this launch to the group. This includes Patricia and
Eli from the /marketing/ path. It also includes Chris and Chloe from the /sales/ path, and Aline and Jim
from the /legal/ path.
Unique IDs
When IAM creates a user, group, role, policy, instance profile, or server certificate, it assigns to each
entity a unique ID that looks like the following example:
AIDAJQABLZS4A3QDU576Q
For the most part, you use friendly names and ARNs when you work with IAM entities, so you don't
need to know the unique ID for a specific entity. However, the unique ID can sometimes be useful
when it isn't practical to use friendly names.
One example pertains to reusing friendly names in your AWS account. Within your account, a
friendly name for a user, group, or policy must be unique. For example, you might create an IAM user
named David. Your company uses Amazon S3 and has a bucket with folders for each employee; the
bucket has a resource-based policy (a bucket policy) that lets users access only their own folders
in the bucket. Suppose that the employee named David leaves your company and you delete the
337

AWS Identity and Access Management User Guide
Limits
corresponding IAM user. But later another employee named David starts and you create a new IAM
user named David. If the bucket policy specifies the IAM user named David, the policy could end up
granting the new David access to information in the Amazon S3 bucket that was left by the former
David.
However, every IAM user has a unique ID, even if you create a new IAM user that reuses a friendly
name that you deleted before. In the example, the old IAM user David and the new IAM user David
have different unique IDs. If you create resource policies for Amazon S3 buckets that grant access by
unique ID and not just by user name, it reduces the chance that you could inadvertently grant access to
information that an employee should not have.
Another example where user IDs can be useful is if you maintain your own database (or other store) of
IAM user information. The unique ID can provide a unique identifier for each IAM user you create, even
if over time you have IAM users that reuse a name, as in the previous example.
Getting the Unique ID
The unique ID for an IAM entity is not available in the IAM console. To get the unique ID, you can use
the following AWS CLI commands or IAM API calls.
AWS CLI:
•get-group
•get-role
•get-user
•get-policy
•get-instance-profile
•get-server-certificate
IAM API:
•GetGroup
•GetRole
•GetUser
•GetPolicy
•GetInstanceProfile
•GetServerCertificate
Limitations on IAM Entities and Objects
This section lists restrictions on IAM entities, and describes how to get information about entity usage
and IAM quotas.
Note
To get account-level information about entity usage and quotas, use the GetAccountSummary
API action or the get-account-summary AWS CLI command.
The following are restrictions on names:
• Policy documents can contain only the following Unicode characters: horizontal tab (U+0009),
linefeed (U+000A), carriage return (U+000D), and characters in the range U+0020 to U+00FF.
• Names of users, groups, roles, policies, instance profiles, and server certificates must be
alphanumeric, including the following common characters: plus (+), equal (=), comma (,), period (.),
at (@), underscore (_), and hyphen (-).
338

AWS Identity and Access Management User Guide
Limits
• Names of users, groups, and roles must be unique within the account. They are not distinguished by
case, for example, you cannot create groups named both "ADMINS" and "admins".
• Path names must begin and end with a forward slash (/).
• Policy names for inline policies (p. 266) must be unique to the user, group, or role they are
embedded in, and can contain any Basic Latin (ASCII) characters minus the following reserved
characters: backward slash (\), forward slash (/), asterisk (*), question mark (?), and white space.
These characters are reserved according to RFC 3986.
• User passwords (login profiles) can contain any Basic Latin (ASCII) characters.
• AWS account ID aliases must be unique across AWS products, and must be alphanumeric following
DNS naming conventions. An alias must be lowercase, it must not start or end with a hyphen, it
cannot contain two consecutive hyphens, and it cannot be a 12 digit number.
For a list of Basic Latin (ASCII) characters, go to the Library of Congress Basic Latin (ASCII) Code
Table.
The following are the default maximums for IAM entities:
• Groups in an AWS account: 100
• Users in an AWS account: 5000
If you need to add a large number of users, consider using temporary security credentials. For more
information about temporary security credentials, go to Temporary Security Credentials (p. 218).
• Roles in an AWS account: 250
• Instance profiles in an AWS account: 100
• Roles in an instance profile: 1 (each instance profile can contain only 1 role)
• Groups a user can be a member of: 10
• Access keys assigned to a user: 2
• MFA devices in use by a user: 1
• MFA devices in use by the AWS root account: 1
• Virtual MFA devices (assigned or unassigned) in an AWS account: equal to the user quota for the
account
• Signing certificates assigned to a user: 2
• Server certificates stored in an AWS account: 20
• Aliases for an AWS account: 1
• Login profiles for a user: 1
• SAML providers in an AWS account: 100
• Identity providers (IdPs) associated with an IAM SAML provider object: 10
• Keys per SAML provider: 10
• Customer managed policies for an AWS account: 1000
• Versions of a managed policy that can be stored: 5
• Managed policies attached to an IAM user, group, or role: 10
You can request to increase some of these quotas for your AWS account on the IAM Limit Increase
Contact Us Form. Currently you can request to increase the limit on users per AWS account, groups
per AWS account, roles per AWS account, instance profiles per AWS account, and server certificates
per AWS account.
The following are the maximum lengths for entities:
• Path: 512 characters
339

AWS Identity and Access Management User Guide
AWS Services That Work with IAM
• User name: 64 characters
• Group name: 128 characters
• Role name: 64 characters
Important
If you intend to use a role with the Switch Role feature in the AWS console, then the
combined Path and RoleName cannot exceed 64 characters.
• Instance profile name: 128 characters
• Unique ID (applicable to users, groups, roles, managed policies, and server certificates): 32
characters
• Policy name: 128 characters
• Certificate ID: 128 characters
• Login profile password: 1 to 128 characters
• AWS account ID alias: 3 to 63 characters
• Role trust policy (the policy that determines who is allowed to assume the role): 2,048 characters
• Role session name: 64 characters
• For inline policies (p. 266): You can add as many inline policies as you want to a user, role, or group,
but the total aggregate policy size (the sum size of all inline policies) per entity cannot exceed the
following limits:
• User policy size cannot exceed 2,048 characters
• Role policy size cannot exceed 10,240 characters
• Group policy size cannot exceed 5,120 characters
Note
IAM does not count whitespace when calculating the size of a policy against these
limitations.
• For managed policies (p. 266): You can add up to 10 managed policies to a user, role, or group. The
size of each managed policy cannot exceed 5,120 characters.
Note
IAM does not count whitespace when calculating the size of a policy against this limitation.
AWS Services That Work with IAM
Many AWS services are integrated with AWS Identity and Access Management. The following tables
group these services by category and show the IAM permission types each service supports, tips to
help you write policies to control service access, and links to related information.
Specifically, each table provides the following information:
•Action-level permissions. The service supports specifying individual actions in a policy's Action
element (p. 353). If the service does not support action-level permissions, policies for the
service use * in the Action element. For a list of all of the permissions for the AWS services can
be used in IAM policies, see AWS Service Actions and Condition Context Keys for Use in IAM
Policies (p. 392).
•Resource-level permissions. The service has one or more APIs that support specifying individual
resources (using ARNs) in the policy's Resource element (p. 355). If an API does not support
resource-level permissions then that statement in the policy must use * in the Resource element.
See the footnotes after each table for more information.
•Resource-based permissions (p. 251). The service enables you to attach policies to the service's
resources in addition to IAM users, groups, and roles. The policies specify who can access that
resource by including a Principal element.
340

AWS Identity and Access Management User Guide
Compute Services
•Tag-based permissions. The service supports testing resource tags in a Condition
element (p. 356).
•Temporary security credentials. The service lets users make requests using temporary security
credentials that are obtained by calling AWS STS APIs like AssumeRole or GetFederationToken.
Temporary credentials are commonly used in federation scenarios (p. 132). For more information,
see Temporary Security Credentials (p. 218).
•More information. Links to more information in the documentation of the product.
Compute Services
Supports the following permissions
Service and Related
IAM Info Action Level Resource
Level Resource
Based Tag Based Temporary
Credentials
Amazon Elastic
Compute Cloud
(Amazon EC2) Yes Yes¹ No Yes¹ Yes
Amazon EC2
Container Service
(Amazon ECS) Yes Yes² No No Yes
Auto Scaling Yes No No No Yes
Elastic Load
Balancing Yes Yes³ No No Yes
AWS Lambda Yes Yes# Yes No Yes
Storage and Content Delivery Services
Supports the following permissions
Service and Related
IAM Info Action Level Resource
Level Resource
Based Tag Based Temporary
Credentials
Amazon Simple
Storage Service
(Amazon S3) Yes Yes Yes No Yes
Amazon EFS Yes Yes No No Yes
AWS Storage
Gateway Yes Yes No No Yes
Amazon Glacier Yes Yes Yes Yes Yes
Amazon CloudFront Yes¹ No No No Yes
Amazon Elastic Block
Store (Amazon EBS) Yes Yes² No Yes² Yes
AWS Import/Export Yes No No No Yes
341

AWS Identity and Access Management User Guide
Database Services
Database Services
Supports the following permissions
Service and Related
IAM Info Action
Level Resource
Level Resource
Based Tag Based Temporary
Credentials
Amazon Relational
Database Service
(Amazon RDS) Yes Yes No Yes Yes
Amazon DynamoDB Yes Yes No No Yes
Amazon ElastiCache Yes No No No Yes
Amazon Redshift Yes Yes No No Yes
Amazon SimpleDB Yes Yes No No Yes
Networking Services
Supports the following permissions
Service and Related
IAM Info Action
Level Resource
Level Resource
Based Tag Based Temporary
Credentials
Amazon Virtual Private
Cloud (Amazon VPC) Yes Yes¹ Yes² Yes Yes
Amazon Route 53 Yes Yes No No Yes
AWS Direct Connect Yes No No No Yes
Administration and Security Services
Supports the following permissions
Service and Related
IAM Info Action
Level Resource
Level Resource
Based Tag Based Temporary
Credentials
AWS Directory Service Yes No No No Yes
AWS Identity and
Access Management
(IAM) Yes Yes No No Yes¹
AWS Security Token
Service (AWS STS) Yes Yes² No No Yes²
AWS Certificate
Manager (ACM) Yes Yes No No Yes
AWS CloudTrail Yes Yes No No Yes
342

AWS Identity and Access Management User Guide
Deployment and Management Services
AWS Config Yes No No No Yes
Amazon CloudWatch Yes No No No Yes
Amazon CloudWatch
Events Yes Yes No No Yes
Amazon CloudWatch
Logs Yes Yes No No Yes
AWS Key Management
Service (AWS KMS) Yes Yes Yes No Yes
AWS CloudHSM Yes No No No No
AWS Service Catalog Yes Yes No No Yes
AWS WAF Yes Yes No No Yes
Deployment and Management Services
Supports the following permissions
Service and Related
IAM Info Action
Level Resource
Level Resource
Based Tag Based Temporary
Credentials
AWS Elastic Beanstalk Yes Yes¹ No No Yes
AWS OpsWorks Yes Yes Yes No Yes
AWS CloudFormation Yes Yes No No Yes
AWS CodeCommit Yes Yes No No Yes
AWS CodeDeploy Yes Yes No No Yes
AWS CodePipeline Yes Yes² No No Yes
¹ Only some API actions for Elastic Beanstalk can be used as permissions against specific resources.
For more information, see Resources and Conditions for Elastic Beanstalk Actions in the AWS Elastic
Beanstalk Developer Guide.
² Only some API actions for AWS CodePipeline can be used as permissions against specific
resources. For more information, see the "Operation and Resource Syntax" section of AWS
CodePipeline Access Permissions Reference in the AWS CodePipeline User Guide.
Analytics Services
Supports the following permissions
Service and Related
IAM Info Action
Level Resource
Level Resource
Based Tag Based Temporary
Credentials
Amazon EMR (Amazon
EMR) Yes No No No Yes
343

AWS Identity and Access Management User Guide
Application Services
Amazon Kinesis Yes Yes No No Yes
AWS Data Pipeline Yes Yes No Yes Yes
Amazon Machine
Learning Yes Yes No No Yes
Amazon Elasticsearch
Service Yes Yes Yes No Yes
Application Services
Supports the following permissions
Service and Related
IAM Info Action
Level Resource
Level Resource
Based Tag Based Temporary
Credentials
Amazon Simple Queue
Service (Amazon SQS) Yes Yes Yes No Yes
Amazon Simple
Workflow Service
(Amazon SWF) Yes Yes No Yes Yes
Amazon AppStream Yes No No No Yes
Amazon Elastic
Transcoder Yes Yes No No Yes
Amazon Simple Email
Service (Amazon SES) Yes Yes¹ No No Yes²
Amazon CloudSearch Yes Yes No No Yes
Amazon API Gateway Yes Yes No No Yes
Internet of Things
Supports the following permissions
Service and Related
IAM Info Action
Level Resource
Level Resource
Based Tag Based Temporary
Credentials
AWS IoT Yes¹ Yes² Yes³ No Yes
Game Development Services
Supports the following permissions
Service and Related
IAM Info Action
Level Resource
Level Resource
Based Tag Based Temporary
Credentials
Amazon GameLift Yes No No No Yes
344

AWS Identity and Access Management User Guide
Mobile Services
Mobile Services
Supports the following permissions
Service and Related
IAM Info Action
Level Resource
Level Resource
Based Tag Based Temporary
Credentials
Amazon Cognito Yes Yes No No Yes
Amazon Simple
Notification Service
(Amazon SNS) Yes Yes Yes No Yes
AWS Device Farm Yes No No No Yes
Amazon Mobile
Analytics Yes No No No Yes
Enterprise Applications
Supports the following permissions
Service and Related
IAM Info Action
Level Resource
Level Resource
Based Tag Based Temporary
Credentials
Amazon WorkSpaces Yes Yes No No Yes
Amazon WorkDocs Yes No No No Yes
Amazon WorkMail Yes No No No Yes
Additional Resources
Supports the following permissions
Service and Related
IAM Info Action
Level Resource
Level Resource
Based Tag Based Temporary
Credentials
AWS Billing and Cost
Management Yes No No No Yes
AWS Marketplace Yes Yes No No Yes
AWS Support No No No No Yes
AWS Trusted Advisor Yes¹ Yes No No Yes¹
AWS IAM Policy Reference
This section presents detailed syntax, descriptions, and examples of the elements, variables, and
evaluation logic of IAM policies. It includes the following sections.
345

AWS Identity and Access Management User Guide
Element Reference
•IAM Policy Elements Reference (p. 346) — This section describes each of the elements that you
can use when you create a policy. It includes additional policy examples and describes conditions,
supported data types, and how they are used in various services.
•IAM Policy Variables Overview (p. 371) — This section describes placeholders that you can
specify in a policy that are replaced during policy evaluation with values from the request.
•Creating a Condition That Tests Multiple Key Values (Set Operations) (p. 377) — This section
describes how to create policies for requests in which a request key includes multiple items that you
need to test against a set of values.
•IAM Policy Evaluation Logic (p. 381) — This section describes AWS requests, how they are
authenticated, and how AWS uses policies to determine access to resources.
•Grammar of the IAM Policy Language (p. 387) — This section presents a formal grammar for the
language used to create policies in IAM.
•AWS Service Actions and Condition Context Keys for Use in IAM Policies (p. 392) — This section
presents a list of all of the AWS API actions that can be used as permissions in an IAM policy and
the service-specific condition keys that can be used to further refine the request.
Important
You cannot save any policy that does not comply with the established policy syntax. You can
use Policy Validator to detect and correct invalid policies. One click takes you to an editor
that shows both the existing policy and a copy with the recommended changes. You can
accept the changes or make further modifications. For more information, see Using Policy
Validator (p. 293).
IAM Policy Elements Reference
This section describes the elements that you can use in an IAM policy. The elements are listed here
in the general order you use them in a policy. The order of the elements doesn't matter—for example,
the Resource element can come before the Action element. You're not required to specify any
Condition elements in the policy.
Topics
•Version (p. 347)
•Id (p. 347)
•Statement (p. 347)
•Sid (p. 348)
•Effect (p. 348)
•Principal (p. 349)
•NotPrincipal (p. 351)
•Action (p. 353)
•NotAction (p. 354)
•Resource (p. 355)
•NotResource (p. 356)
•Condition (p. 356)
•Supported Data Types (p. 370)
Note
The details of what goes into a policy vary for each service, depending on what actions the
service makes available, what types of resources it contains, and so on. When you're writing
policies for a specific service, it's helpful to see examples of policies for that service. For a list
346

AWS Identity and Access Management User Guide
Element Reference
of all the services that support IAM, and for links to the documentation in those services that
discusses IAM and policies, see AWS Services That Work with IAM (p. 340).
Version
The Version element specifies the policy language version. If you include the Version element, it
must appear before the Statement element. The only allowed values are these:
•2012-10-17. This is the current version of the policy language, and you should use this version
number for all policies.
•2008-10-17. This was an earlier version of the policy language. You might see this version on
existing policies. Do not use this version for any new policies or any existing policies that you are
updating.
If you do not include a Version element, the value defaults to 2008-10-17. However, it is a good
practice to always include a Version element and set it to 2012-10-17.
Note
If your policy includes policy variables (p. 371), you must include a Version element and
set it to 2012-10-17. If you don't include a Version element set to 2012-10-17 or later,
variables such as ${aws:username} won't be recognized as variables and will instead be
treated as literal strings in the policy.
"Version":"2012-10-17"
Id
The Id element specifies an optional identifier for the policy. The ID is used differently in different
services.
For services that let you set an ID element, we recommend you use a UUID (GUID) for the value, or
incorporate a UUID as part of the ID to ensure uniqueness.
"Id":"cd3ad3d9-2776-4ef1-a904-4c229d1642ee"
Note
Some AWS services (for example, Amazon SQS or Amazon SNS) might require this element
and have uniqueness requirements for it. For service-specific information about writing
policies, refer to the documentation for the service you're working with.
Statement
The Statement element is the main element for a policy. This element is required. It can include
multiple elements (see the subsequent sections in this page). The Statement element contains an
array of individual statements. Each individual statement is a JSON block enclosed in braces { }.
"Statement":[{...},{...},{...}]
The following example shows a policy that contains an array of three statements inside a single
Statement element. (The policy allows you to access your own "home folder" in the Amazon S3
console.) The policy includes the aws:username variable, which is replaced during policy evaluation
with the user name from the request. For more information, see Introduction (p. 371).
{
347

AWS Identity and Access Management User Guide
Element Reference
"Version": "2012-10-17",
"Statement": [
{
"Effect": "Allow",
"Action": [
"s3:ListAllMyBuckets",
"s3:GetBucketLocation"
],
"Resource": "arn:aws:s3:::*"
},
{
"Effect": "Allow",
"Action": "s3:ListBucket",
"Resource": "arn:aws:s3:::BUCKET-NAME",
"Condition": {"StringLike": {"s3:prefix": [
"",
"home/",
"home/${aws:username}/"
]}}
},
{
"Effect": "Allow",
"Action": "s3:*",
"Resource": [
"arn:aws:s3:::BUCKET-NAME/home/${aws:username}",
"arn:aws:s3:::BUCKET-NAME/home/${aws:username}/*"
]
}
]
}
Sid
The Sid (statement ID) is an optional identifier that you provide for the policy statement. You can
assign a Sid value to each statement in a statement array. In services that let you specify an ID
element, such as SQS and SNS, the Sid value is just a sub-ID of the policy document's ID. In IAM, the
Sid value must be unique within a policy.
"Sid":"1"
In IAM, the Sid is not exposed in the IAM API. You can't retrieve a particular statement based on this
ID.
Note
Some AWS services (for example, Amazon SQS or Amazon SNS) might require this element
and have uniqueness requirements for it. For service-specific information about writing
policies, refer to the documentation for the service you're working with.
Effect
The Effect element is required and specifies whether the statement will result in an allow or an
explicit deny. Valid values for Effect are Allow and Deny.
"Effect":"Allow"
By default, access to resources is denied. To allow access to a resource, you must set the Effect
element to Allow. To override an allow (for example, to override an allow that is otherwise in
348

AWS Identity and Access Management User Guide
Element Reference
force), you set the Effect element to Deny. For more information, see IAM Policy Evaluation
Logic (p. 381).
Principal
Use the Principal element to specify the user (IAM user, federated user, or assumed-role user),
AWS account, AWS service, or other principal entity that is allowed or denied access to a resource.
You use the Principal element in the trust policies for IAM roles and in resource-based policies—
that is, in policies that you embed directly in a resource. For example, you can embed such policies in
an Amazon S3 bucket, an Amazon Glacier vault, an Amazon SNS topic, an Amazon SQS queue, or an
AWS KMS customer master key (CMK).
Use the Principal element in these ways:
• In IAM roles, use the Principal element in the role's trust policy to specify who can assume the
role. For cross-account access, you typically specify the identifier of the trusted account.
• In resource-based policies, use the Principal element to specify the accounts or users who are
allowed to access the resource.
Do not use the Principal element in policies that you attach to IAM users and groups. Similarly, you
do not specify a principal in the access policy for an IAM role. In those cases, the principal is implicitly
the user that the policy is attached to (for IAM users) or the user who assumes the role (for role access
policies). When the policy is attached to an IAM group, the principal is the IAM user in that group who
is making the request.
Specifying a Principal
You specify a principal using the Amazon Resource Name (ARN) (p. 335) of the AWS account, IAM
user, IAM role, federated user, or assumed-role user. You cannot specify IAM groups as principals.
When you specify an AWS account, you can use a shortened form that consists of the AWS: prefix
followed by the account ID, instead of using the account's full ARN.
The following examples show various ways in which principals can be specified.
Everyone (anonymous users)
The following are equivalent:
"Principal": "*"
"Principal" : { "AWS" : "*" }
Note
You can use an asterisk only as a placeholder for Everyone/Anonymous. You cannot use it as
a wildcard to match part of a name or an ARN.
Specific AWS accounts
When you use an AWS account identifier as the principal in a policy, the permissions in the policy
statement can be granted to all identities contained in that account, including IAM users and roles in
that account. The following examples show different ways to specify an AWS account as a principal.
"Principal": { "AWS": "arn:aws:iam::AWS-account-ID:root" }
349

AWS Identity and Access Management User Guide
Element Reference
"Principal": { "AWS": "AWS-account-ID" }
You can specify more than one AWS account as a principal, as shown in the following example.
"Principal": {
"AWS": [
"arn:aws:iam::AWS-account-ID:root",
"arn:aws:iam::AWS-account-ID:root"
]
}
Individual IAM user or users
You can specify an individual IAM user (or array of users) as the principal, as in the following
examples.
Note
In a Principal element, the user name is case sensitive.
"Principal": { "AWS": "arn:aws:iam::AWS-account-ID:user/user-name" }
"Principal": {
"AWS": [
"arn:aws:iam::AWS-account-ID:user/user-name-1",
"arn:aws:iam::AWS-account-ID:user/UserName2"
]
}
When you specify users in a Principal element, you cannot use a wildcard (*) to mean "all users".
Principals must always name a specific user or users.
Federated users (using web identity federation)
"Principal": { "Federated": "cognito-identity.amazonaws.com" }
"Principal": { "Federated": "www.amazon.com" }
"Principal": { "Federated": "graph.facebook.com" }
"Principal": { "Federated": "accounts.google.com" }
Federated users (using a SAML identity provider)
"Principal": { "Federated": "arn:aws:iam::AWS-account-ID:saml-
provider/provider-name" }
IAM role
"Principal": { "AWS": "arn:aws:iam::AWS-account-ID:role/role-name" }
350

AWS Identity and Access Management User Guide
Element Reference
Specific assumed-role user
"Principal": { "AWS": "arn:aws:sts::AWS-account-ID:assumed-role/role-
name/role-session-name" }
AWS service
When you create a trust policy for an IAM role that will be assumed by an AWS service, you typically
specify the principal using a friendly name for that service, as in the following example.
"Principal": {
"Service": [
"ec2.amazonaws.com",
"datapipeline.amazonaws.com"
]
}
Some AWS services support additional options for specifying a principal. For example, Amazon S3 lets
you use a canonical user in a format like this:
"Principal": { "CanonicalUser":
"79a59df900b949e55d96a1e698fbacedfd6e09d98eacf8f8d5218e7cd47ef2be" }
More Information
For more information, see the following:
•Bucket Policy Examples in the Amazon Simple Storage Service Developer Guide
•Example Policies for Amazon SNS in the Amazon Simple Notification Service Developer Guide
•Amazon SQS Policy Examples in the Amazon Simple Queue Service Developer Guide
•Key Policies in the AWS Key Management Service Developer Guide
•Account Identifiers in the AWS General Reference
•About Web Identity Federation (p. 133)
NotPrincipal
Use the NotPrincipal element to specify an exception to a list of principals. For example, you can
deny access to all principals except the one named in the NotPrincipal element. The syntax for
specifying NotPrincipal is the same as for specifying Principal (p. 349).
Note that you can also use NotPrincipal to allow all principals except the one named in the
NotPrincipal element; however, we do not recommend this.
Warning
When you use NotPrincipal in the same policy statement as "Effect": "Allow", the
permissions specified in the policy statement will be granted to all principals except for the
one(s) specified, including anonymous (unauthenticated) users. We strongly recommend you
do not use NotPrincipal in the same policy statement as "Effect": "Allow".
When you use NotPrincipal in the same policy statement as "Effect": "Deny", the permissions
specified in the policy statement are explicitly denied to all principals except for the one(s) specified.
This enables you to implement a form of "whitelisting". When you explicitly deny access to an AWS
account, you deny access to all users contained in that account.
351

AWS Identity and Access Management User Guide
Element Reference
Note that if a resource-based policy combines "Effect": "Deny" with a NotPrincipal element
that specifies only a principal in an AWS account, the policy is likely denying access to the account
containing the principal, and that in turn results in the specified principal not being able to access the
resource. To understand how this can happen, see the examples in the next section.
Caution
Very few scenarios require the use of NotPrincipal, and we recommend that you explore
other authorization options before you decide to use NotPrincipal.
Specifying NotPrincipal in the same policy statement as "Effect": "Deny"
You specify principals in the NotPrincipal element using the same syntax that you use for
specifying principals in the Principal (p. 349) element. However, it can be difficult to achieve the
intended effect, particularly when you combine NotPrincipal with "Effect": "Deny" in the same
policy statement and you work across AWS account boundaries.
Important
Combining Deny and NotPrincipal is the only time that the order in which AWS evaluates
principals makes a difference. AWS internally validates the principals from the "top down,"
meaning that AWS checks the account first and then the user. If an assumed-role user
(someone who is using a role rather than an IAM user) is being evaluated, AWS looks at
the account first, then the role, and finally the assumed-role user. The assumed-role user is
identified by the role session name that is specified when the user assumes the role.
Normally, this order does not have any impact on the results of the policy evaluation.
However, when you use both Deny and NotPrincipal, the evaluation order requires you to
explicitly include the ARNs for the entities associated with the specified principal. For example,
to specify a user, you must explicitly include the ARN for the user's account. To specify an
assumed-role user, you must also include both the ARN for the role and the ARN for the
account containing the role.
The following examples show how to use NotPrincipal and "Effect": "Deny" in the same policy
statement effectively.
Example 1: An IAM user in the same or a different account
In the following example, all principals except the user named Bob in AWS account 444455556666 are
explicitly denied access to a resource. Note that to achieve the intended effect, the NotPrincipal
element contains the ARN of both the user Bob and the AWS account that Bob belongs to
(arn:aws:iam::444455556666:root). If the NotPrincipal element contained only Bob's ARN,
the effect of the policy would be to explicitly deny access to the AWS account that contains the user
Bob. A user cannot have more permissions than its parent account, so if Bob's account is explicitly
denied access then Bob is also unable to access the resource.
This example works as intended when it is part of a policy statement in a resource-based policy that
is attached to a resource in either the same or a different AWS account (not 444455556666). This
example by itself does not grant access to Bob, it only omits Bob from the list of principals that are
explicitly denied. To give Bob access to the resource, another policy statement must explicitly allow
access using "Effect": "Allow".
"Effect": "Deny",
"NotPrincipal": {
"AWS": [
"arn:aws:iam::444455556666:user/Bob",
"arn:aws:iam::444455556666:root"
]
}
352

AWS Identity and Access Management User Guide
Element Reference
Example 2: An IAM role in the same or different account
In the following example, all principals except the assumed-role user named cross-account-audit-
app in AWS account 444455556666 are explicitly denied access to a resource. Note that to achieve
the intended effect, the NotPrincipal element contains the ARN of the assumed-role user (cross-
account-audit-app), the role (cross-account-read-only-role), and the AWS account that the role belongs
to (444455556666). If the NotPrincipal element was missing the ARN of the role, the effect of the
policy would be to explicitly deny access to the role. Similarly, if the NotPrincipal element was
missing the ARN of the AWS account that the role belongs to, the effect of the policy would be to
explicitly deny access to the AWS account and all entities in that account. Assumed-role users cannot
have more permissions than their parent role, and roles cannot have more permissions than their
parent AWS account, so when the role or the account is explicitly denied access, the assumed role
user is unable to access the resource.
This example works as intended when it is part of a policy statement in a resource-based policy that
is attached to a resource in a different AWS account (not 444455556666). This example by itself does
not grant access to the assumed-role user cross-account-audit-app, it only omits cross-account-audit-
app from the list of principals that are explicitly denied. To give cross-account-audit-app access to the
resource, another policy statement must explicitly allow access using "Effect": "Allow".
"Effect": "Deny",
"NotPrincipal": {
"AWS": [
"arn:aws:sts::444455556666:assumed-role/cross-account-read-only-role/
cross-account-audit-app",
"arn:aws:iam::444455556666:role/cross-account-read-only-role",
"arn:aws:iam::444455556666:root"
]
}
Action
The Action element describes the specific action or actions that will be allowed or denied. Statements
must include either an Action or NotAction element. Each AWS service has its own set of
actions that describe tasks that you can perform with that service. For example, the list of actions
for Amazon S3 can be found at Specifying Permissions in a Policy in the Amazon Simple Storage
Service Developer Guide, the list of actions for Amazon EC2 can be found in the Amazon EC2 API
Reference, and the list of actions for AWS Identity and Access Management can be found in the IAM
API Reference. To find the list of actions for other services, consult the API reference documentation
for the service.
You specify a value using a namespace that identifies a service (iam, ec2 sqs, sns, s3, etc.) followed
by the name of the action to allow or deny. The name must match an action that is supported by the
service. The prefix and the action name are case insensitive. For example, iam:ListAccessKeys
is the same as IAM:listaccesskeys. The following examples show Action elements for different
services.
Amazon SQS action
"Action":"sqs:SendMessage"
Amazon EC2 action
"Action":"ec2:StartInstances"
IAM action
353

AWS Identity and Access Management User Guide
Element Reference
"Action":"iam:ChangePassword"
Amazon S3 action
"Action":"s3:GetObject"
You can specify multiple values for the Action element.
"Action": [ "sqs:SendMessage", "sqs:ReceiveMessage" ]
You can use a wildcard (*) to give access to all the actions the specific AWS product offers. For
example, the following Action element applies to all S3 actions.
"Action": "s3:*"
You can also use wildcards (*) as part of the action name. For example, the following Action
element applies to all IAM actions that include the string AccessKey, including CreateAccessKey,
DeleteAccessKey, ListAccessKeys, and UpdateAccessKey.
"Action": "iam:*AccessKey*"
Some services let you limit the actions that are available. For example, Amazon SQS lets you make
available just a subset of all the possible Amazon SQS actions. In that case, the * wildcard doesn't
allow complete control of the queue; it allows only the subset of actions that you've shared. For more
information, see Understanding Permissions in the Amazon Simple Queue Service Developer Guide.
NotAction
The NotAction element lets you specify an exception to a list of actions. For example, you can use
NotAction to let users use only the Amazon SQS SendMessage action, without having to list all the
actions that the user is not allowed to perform. Using NotAction can sometimes result in shorter
policies than using an Action element and listing many actions.
The following example refers to all actions other than the Amazon SQS SendMessage action. You
might use this in a policy with "Effect":"Deny" to keep users from accessing any other actions
except SendMessage Note, however, that this would not grant the user access to any actions, it would
only explicitly deny all other actions except SendMessage.
"NotAction": "sqs:SendMessage"
The following example matches any action except Publish.
"NotAction": "sns:Publish"
The following example shows how to reference all actions except Amazon S3's GetObject action.
"NotAction": "s3:GetObject"
For an example of how to use the NotAction element in a policy that controls access to an Amazon
S3 bucket, see Example Policies for Amazon S3 in the Amazon Simple Storage Service Developer
Guide.
354
AWS Identity and Access Management User Guide
Element Reference
Resource
The Resource element specifies the object or objects that the statement covers. Statements must
include either a Resource or a NotResource element. You specify a resource using an ARN. (For
more information about the format of ARNs, see Amazon Resource Names (ARNs) and AWS Service
Namespaces.)
Each service has its own set of resources. Although you always use an ARN to specify a resource,
the details of the ARN for a resource depend on the service and the resource. For information about
how to specify a resource, refer to the documentation for the service whose resources you're writing a
statement for.
Note
Some services do not let you specify actions for individual resources; instead, any actions that
you list in the Action or NotAction element apply to all resources in that service. In these
cases, you use the wildcard * in the Resource element.
The following example refers to a specific Amazon SQS queue.
"Resource": "arn:aws:sqs:us-west-2:account-ID-without-hyphens:queue1"
The following example refers to the IAM user named Bob in an AWS account.
"Resource": "arn:aws:iam::account-ID-without-hyphens:user/Bob"
You can use wildcards as part of the resource ARN. You can use wildcard characters (* and ?) within
any ARN segment (the parts separated by colons). An asterisk (*) represents any combination of
characters and a question mark (?) represents any single character. You can have use multiple * or ?
characters in each segment, but a wildcard cannot span segments. The following example refers to all
IAM users whose path is /accounting.
"Resource": "arn:aws:iam::account-ID-without-hyphens:user/accounting/*"
The following example refers to all items within a specific Amazon S3 bucket.
"Resource": "arn:aws:s3:::my_corporate_bucket/*"
You can specify multiple resources. The following example refers to two DynamoDB tables.
"Resource": [
"arn:aws:dynamodb:us-west-2:account-ID-without-hyphens:table/
books_table",
"arn:aws:dynamodb:us-west-2:account-ID-without-hyphens:table/
magazines_table"
]
In the Resource element, you can use policy variables (p. 371) in the part of the ARN that
identifies the specific resource (that is, in the trailing part of the ARN). For example, you can use the
key {aws:username} as part of a resource ARN to indicate that the current user's name should
be included as part of the resource's name. The following example shows how you can use the
{aws:username} key in a Resource element. The policy allows access to a Amazon DynamoDB
table that matches the current user's name.
{
"Version": "2012-10-17",
355

AWS Identity and Access Management User Guide
Element Reference
"Statement": {
"Effect": "Allow",
"Action": "dynamodb:*",
"Resource": "arn:aws:dynamodb:us-east-1:ACCOUNT-ID-WITHOUT-HYPHENS:table/
${aws:username}"
}
}
For more information about policy variables, see IAM Policy Variables Overview (p. 371).
NotResource
The NotResource element lets you grant or deny access to all but a few of your resources, by
allowing you to specify only those resources to which your policy should not be applied.
For example, imagine you have a group named Developers. Members of Developers should have
access to all of your Amazon S3 resources except the CompanySecretInfo folder in the mybucket
bucket. The following example shows what the policy to establish these permissions might look like.
{
"Version": "2012-10-17",
"Statement": {
"Effect": "Allow",
"Action": "s3:*",
"NotResource": [
"arn:aws:s3:::mybucket/CompanySecretInfo",
"arn:aws:s3:::mybucket/CompanySecretInfo/*"
]
}
}
Normally you would write a policy that uses "Effect":"Allow" and that includes a Resources
element that lists each folder individually that the Developers group has access to. However, in
that case, each time you added a folder to mybucket that users should have access to, you would
have to add its name to the list in Resource. If you use a NotResource element instead, users will
automatically have access to new folders unless you add the folder names to the NotResource
element.
Condition
The Condition element (or Condition block) lets you specify conditions for when a policy is in
effect. The Condition element is optional. In the Condition element, you build expressions in
which you use boolean condition operators (equal, less than, etc.) to match the condition in the policy
against values in the request. Condition values can include date, time, the IP address of the requester,
the ARN of the request source, the user name, user ID, and the user agent of the requester. Some
services let you specify additional values in conditions; for example, Amazon S3 lets you write a
condition using the s3:VersionId key, which is unique to that service. (For more information about
writing conditions in policies for Amazon S3, see Using IAM Policies in the Amazon Simple Storage
Service Developer Guide.)
The Condition Block
The following example shows the basic format of a Condition element:
"Condition": {
"DateGreaterThan" : {
"aws:CurrentTime" : "2013-12-15T12:00:00Z"
356
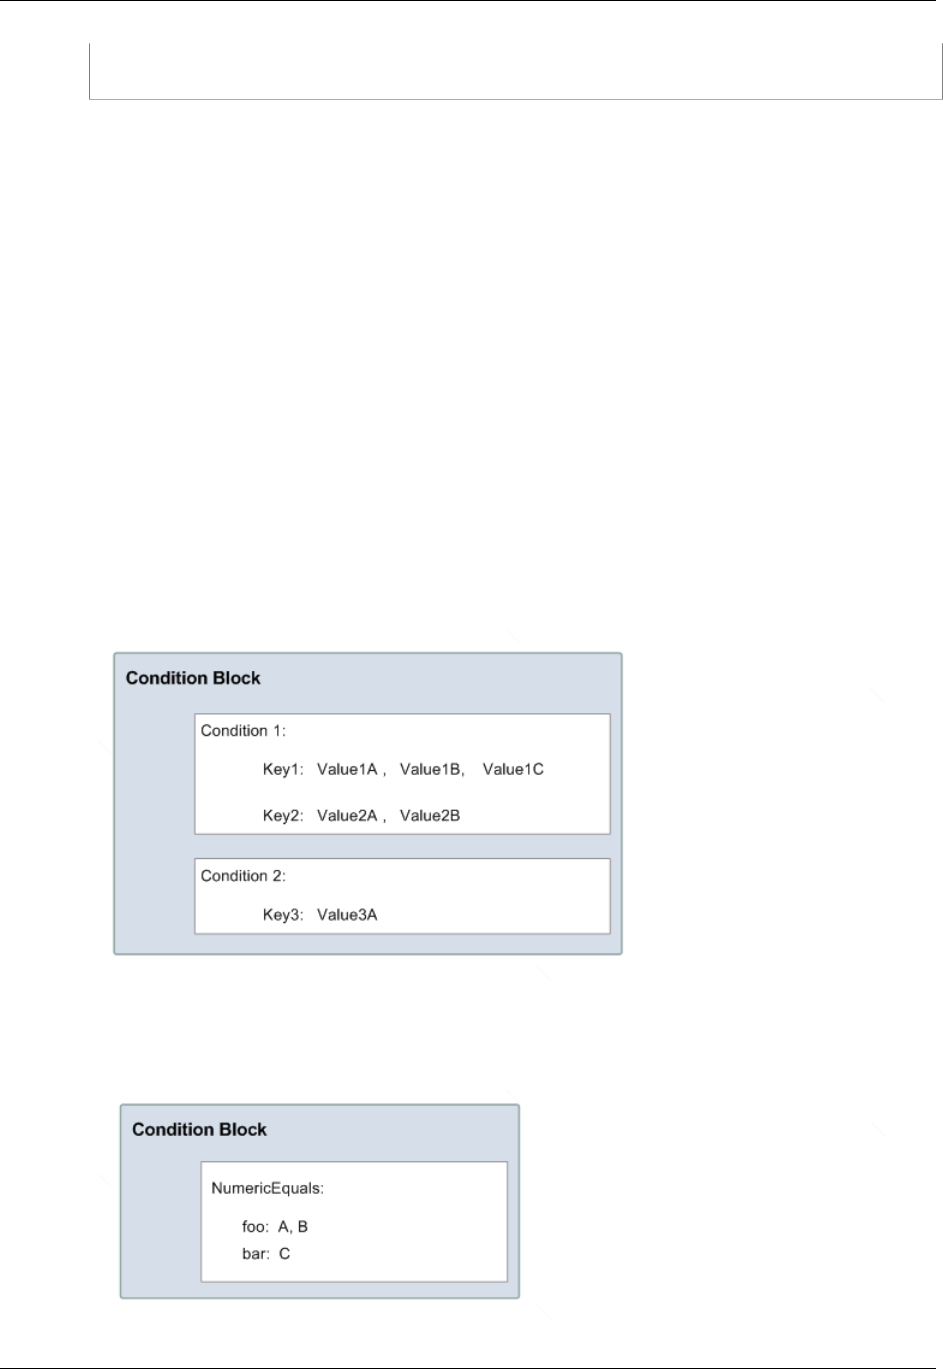
AWS Identity and Access Management User Guide
Element Reference
}
}
A value from the request is represented by a key, in this case aws:CurrentTime. The key value
is compared to a value that you specify either as a literal value (2013-08-16T12:00:00Z) or as
a policy variable, as explained later. The type of comparison to make is specified by the condition
operator (p. 363) (here, DateGreaterThan). You can create conditions that compare strings, dates,
numbers, and so on, using typical boolean comparisons like equals, greater than, and less than.
Under some circumstances, keys can contains multiple values. For example, a request to DynamoDB
might ask to return or update multiple attributes from a table. A policy for access to DynamoDB tables
can include the dynamodb:Attributes key, which contains all the attributes listed in the request.
You can test the multiple attributes in the request against a list of allowed attributes in a policy by using
set operators in the Condition element. For more information, see Creating a Condition That Tests
Multiple Key Values (Set Operations) (p. 377).
When the policy is evaluated during a request, AWS replaces the key with the corresponding value
from the request. (In this example, AWS would use the date and time of the request.) The condition
is evaluated to return true or false, which is then factored into whether the policy as a whole allows or
denies the request.
Multiple Values in a Condition
A Condition element can contain multiple conditions, and each condition can contain multiple key-
value pairs. The following figure illustrates this. Unless otherwise specified, all keys can have multiple
values.
Let's say you want to let John use a resource only if a numeric value foo equals either A or B, and
another numeric value bar equals C. You would create a condition block that looks like the following
figure.
357
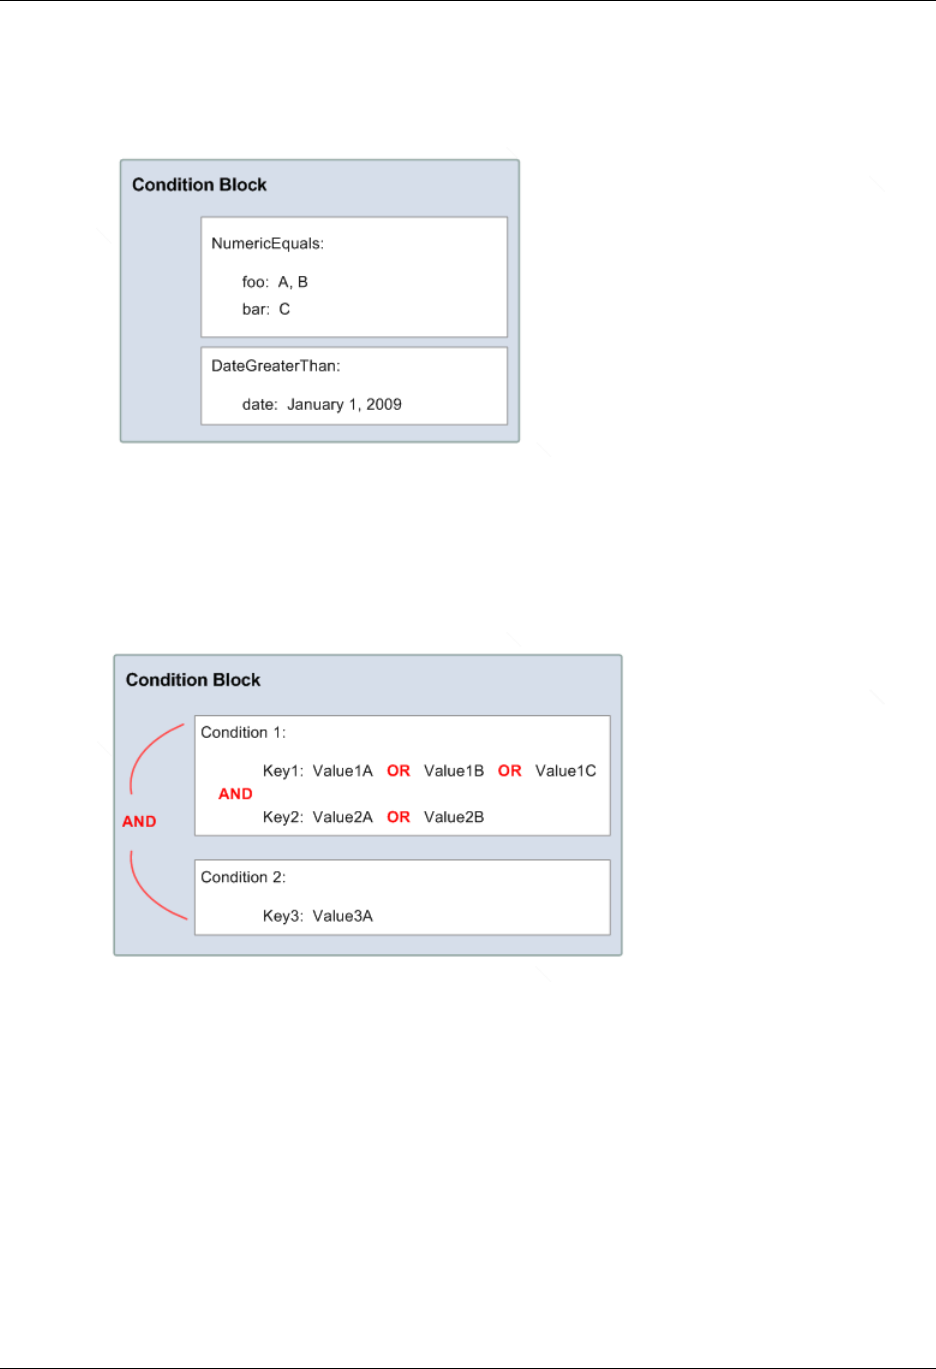
AWS Identity and Access Management User Guide
Element Reference
Let's say you also want to restrict John's access to after January 1, 2009. You would add another
condition, DateGreaterThan, with a date equal to January 1, 2009. The condition block would then
look like the following figure.
If there are multiple condition operators, or if there are multiple keys attached to a single condition
operator, the conditions are evaluated using a logical AND. If a single condition operator includes
multiple values for one key, that condition operator is evaluated using a logical OR. All condition
operators must be met for an allow or an explicit deny decision. If any one condition operator isn't met,
the result is a deny.
As noted, AWS has predefined condition operators and keys (like aws:CurrentTime). Individual AWS
services also define service-specific keys.
As an example, let's say you want to let user John access your Amazon SQS queue under the
following conditions:
• The time is after 12:00 noon on 8/16/2013
• The time is before 3:00 p.m. on 8/16/2013
• The request (IAM or SQS) or message (SNS) comes from an IP address within the range 192.0.2.0
to 192.0.2.255 or 203.0.113.0 to 203.0.113.255.
Your condition block has three separate condition operators, and all three of them must be met for
John to have access to your queue, topic, or resource.
358
AWS Identity and Access Management User Guide
Element Reference
The following shows what the condition block looks like in your policy. The two values for
aws:SourceIp are evaluated using OR. The three separate condition operators are evaluated using
AND.
"Condition" : {
"DateGreaterThan" : {
"aws:CurrentTime" : "2013-08-16T12:00:00Z"
},
"DateLessThan": {
"aws:CurrentTime" : "2013-08-16T15:00:00Z"
},
"IpAddress" : {
"aws:SourceIp" : ["192.0.2.0/24", "203.0.113.0/24"]
}
}
Finally, under some circumstances, individual keys in a policy can contain multiple values, and you
can use condition set operators to test these multi-valued keys against one or more values listed
in the policy. For more information, see Creating a Condition That Tests Multiple Key Values (Set
Operations) (p. 377).
Available Keys for Conditions
Condition keys in a condition element represent values that are part of the request sent by a user.
AWS provides the following predefined condition keys for all AWS services that support IAM for access
control:
•aws:CurrentTime – To check for date/time conditions (see Date Condition Operators (p. 366)).
•aws:EpochTime – To check for date/time conditions using a date in epoch or UNIX time (see Date
Condition Operators (p. 366)).
•aws:TokenIssueTime – To check the date/time that temporary security credentials were issued
(see Date Condition Operators (p. 366)). This key is only present in requests that are signed using
temporary security credentials. For more information about temporary security credentials, see
Temporary Security Credentials (p. 218).
•aws:MultiFactorAuthPresent – To check whether multi-factor authentication (MFA) was
used to validate the security credentials making the current request (see Boolean Condition
Operators (p. 366)).
It is important to understand that you cannot check for MFA not being used by the following
Condition block:
"Condition" : { "Bool" : { "aws:MultiFactorAuthPresent" : false } }
This is because when MFA is not used, the key aws:MultifactorAuthPresent is not present in the
request and the test always fails and results in a non-match. Instead, you must check to see if that
key is missing (Null test returns true) with a condition similar to the following:
"Condition" : { "Null" : { "aws:MultiFactorAuthPresent" : true } }
The key being missing can reliably be interpreted to mean that MFA was not used.
•aws:MultiFactorAuthAge – To check how long ago (in seconds) the MFA-validated security
credentials making the request were issued using multi-factor authentication (MFA). If MFA was
not used, this key is not present (see Condition Operator to Check Existence of Condition Keys
(p. 370), Numeric Condition Operators (p. 365) and Using Multi-Factor Authentication (MFA) in
AWS (p. 80).
359

AWS Identity and Access Management User Guide
Element Reference
•aws:PrincipalType – To check the type of principal (user, account, federated user, etc.) for the
current request (see String Condition Operators (p. 364)).
•aws:Referer – To check who referred the client browser to the address the request is being sent
to. It is only supported by some services, such as Amazon S3, as a service that can be directly
addressed by a web browser. The value comes from the referer header in the HTTPS request made
to AWS.
Caution
This key should be used carefully: aws:referer allows Amazon S3 bucket owners to help
prevent their content from being served up by unauthorized third-party sites to standard
web browsers (for more information, see the link above). Since the aws:referer value is
provided by the caller in an http header, unauthorized parties can use modified or custom
browsers to provide any aws:referer value that they choose. As a result, aws:referer
should not be used to prevent unauthorized parties from making direct AWS requests. It is
offered only to allow customers to protect their digital content, stored in Amazon S3, from
being referenced on unauthorized, third-party sites.
•aws:SecureTransport – To check whether the request was sent using SSL (see Boolean
Condition Operators (p. 366)).
•aws:SourceArn – To check the source of the request, using the Amazon Resource Name
(ARN) (p. 335) of the source. (This value is available for only some services.)
•aws:SourceIp – To check the requester's IP address (see IP Address Condition
Operators (p. 367)).
Note
If the request comes from a host that uses an Amazon VPC endpoint, then the
aws:SourceIp key is not available. You should instead use a VPC-specific key. For more
information, see VPC Endpoints - Controlling the Use of Endpoints in the Amazon VPC
User Guide.
•aws:SourceVpc – To restrict access to a specific VPC. For more information, see Restricting
Access to a Specific VPC in the Amazon Simple Storage Service Developer Guide. (This value is
available for only some services.)
•aws:SourceVpce – To restrict access to a specific VPC endpoint For more information, see
Restricting Access to a Specific VPC Endpoint in the Amazon Simple Storage Service Developer
Guide.
•aws:UserAgent – To check the requester's client application. For more information, see String
Condition Operators (p. 364).
•aws:userid – To check the requester's user ID. For more information, see String Condition
Operators (p. 364).
•aws:username – To check the requester's user name. For more information, see String Condition
Operators (p. 364).
Some AWS services also provide service-specific keys. For example, for information about keys that
you can use in policies for Amazon S3 resources, see Amazon S3 Policy Keys in the Amazon Simple
Storage Service Developer Guide. For information about keys that you can use in policies for IAM
resources, see the following section. For information about keys that you can use in policies for other
services, see the documentation for the individual services.
Note
If you use condition keys that are available only in some scenarios (such as aws:SourceIp and
aws:SourceVpc) you must use ...IfExists Condition Operators (p. 369). This is necessary
because these context keys are not always present. If they are missing (and you haven't set
IfExists), the policy engine may fail the evaluation and fall back to deny the authorization. For
example, if you want to write a policy that restricts access from a particular IP range or from a
particular VPC, you must construct the conditions as follows:
"Condition": {"IpAddressIfExists": {"aws:SourceIp" : [xxx] },
"StringEqualsifExists" : {"aws:SourceVpc", [yyy]} }
360

AWS Identity and Access Management User Guide
Element Reference
This condition matches (1) if the aws:SourceIp context key exists and has the value xxx or (2)
if the aws:SourceVpc context key exists and has the value yyy.
Available Keys for IAM
You can use the following condition keys in policies that control access to IAM resources:
•iam:PolicyArn – To check the Amazon Resource Name (ARN) of a managed policy in requests
that involve a managed policy. For more information, see Specifying the Amazon Resource Name
(ARN) for Managed Policies (p. 276).
Available Keys for Web Identity Federation
If you are using web identity federation to give temporary security credentials to users who have been
authenticated using an identity provider (IdP) such as Login with Amazon, Amazon Cognito, Google, or
Facebook, additional condition keys are available when the temporary security credentials are used to
make a request. These keys let you write policies that make sure that federated users can get access
only to resources that are associated with a specific provider, app, or user.
Federated Provider
The aws:FederatedProvider key identifies which of the IdPs was used to authenticate the user.
For example, if the user authenticated using Amazon Cognito, the key would contain cognito-
identity.amazonaws.com. Similarly, if the user authenticated using Login with Amazon, the
key would contain the value www.amazon.com. You might use the key in a resource policy like
the following, which uses the aws:FederatedProvider key as a policy variable in the ARN of a
resource. The policy allows any user who has been authenticated using an IdP to get objects out of a
folder in an Amazon S3 bucket that's specific to the provider they used to authenticate with.
{
"Version": "2012-10-17",
"Statement": {
"Effect": "Allow",
"Principal": "*",
"Action": "s3:GetObject",
"Resource": "arn:aws:s3:::BUCKET-NAME/${aws:FederatedProvider}/*"
}
}
Application ID and User ID
You can also use two keys that provide a unique identifier for the user and an identifier for the
application or site that the user authenticated with. These keys have the following IdP-specific names:
• For Amazon Cognito users, the keys are cognito-identityamazonaws.com:aud (for the identity
pool ID) and cognito-identity.amazonaws.com:sub (for the user ID).
• For Login With Amazon users, the keys are www.amazon.com:app_id and
www.amazon.com:user_id
• For Facebook users, the keys are graph.facebook.com:app_id and graph.facebook.com:id
• For Google users, the keys are accounts.google.com:aud (for the app ID) and
accounts.google.com:sub (for the user ID).
The amr Key in Amazon Cognito
If you are using Amazon Cognito for web identity federation, the cognito-
identity.amazonaws.com:amr key (Authenticated Methods Reference) in a trust policy includes
361

AWS Identity and Access Management User Guide
Element Reference
login information about the user. The key is multivalued, meaning that you test it in a policy using
condition set operators (p. 377). The key can contain the following values:
• If the user is unauthenticated, the key contains only unauthenticated.
• If the user is authenticated, the key contains the value authenticated and the name of the login
provider used in the call (graph.facebook.com, accounts.google.com, or www.amazon.com).
As an example, the following condition in the trust policy for an Amazon Cognito role tests whether the
user is unauthenticated:
"Condition": {
"StringEquals":
{ "cognito-identity.amazonaws.com:aud": "us-east-1:identity-pool-id" },
"ForAnyValue:StringLike":
{ "cognito-identity.amazonaws.com:amr": "unauthenticated" }
}
More Information About Web Identity Federation
For more information about web identity federation, see the following:
•Amazon Cognito Overview in the AWS Mobile SDK for Android Developer Guide guide
•Amazon Cognito Overview in the AWS Mobile SDK for iOS Developer Guide guide
•About Web Identity Federation (p. 133)
Available Keys for SAML-Based Federation
If you are working with SAML-based federation, you can include additional condition keys in the policy.
Trust Policies
In the trust policy of a role, you can include the following keys, which help you establish whether the
caller is allowed to assume the role. Except for saml:doc, all the values are derived from the SAML
assertion. Items in the list that are marked with an asterisk (*) are available in the console UI to create
conditions.
•saml:aud (URL). An endpoint to which SAML assertions are presented. The value for this key
comes from the SAML Recipient field in the assertion, not the Audience field.
•saml:cn (list). This is an eduOrg attribute.
•saml:doc (string).* This represents the principal that was used to assume the role. The format is
account-ID/provider-friendly-name, such as 123456789012/SAMLProviderName. The
account-ID value refers to the account that owns the SAML provider (p. 148).
•saml:edupersonaffiliation (list). This is an eduPerson attribute.
•saml:edupersonassurance (list). This is an eduPerson attribute.
•saml:edupersonentitlement (list).* This is an eduPerson attribute.
•saml:edupersonnickname (list). This is an eduPerson attribute.
•saml:edupersonorgdn (string).* This is an eduPerson attribute.
•saml:edupersonorgunitdn (list). This is an eduPerson attribute.
•saml:edupersonprimaryaffiliation (string). This is an eduPerson attribute.
•saml:edupersonprimaryorgunitdn (string). This is an eduPerson attribute.
•saml:edupersonprincipalname (string). This is an eduPerson attribute.
362

AWS Identity and Access Management User Guide
Element Reference
•saml:edupersonscopedaffiliation (list). This is an eduPerson attribute.
•saml:edupersontargetedid (list). This is an eduPerson attribute.
•saml:eduorghomepageuri (list). This is an eduOrg attribute.
•saml:eduorgidentityauthnpolicyuri (list). This is an eduOrg attribute.
•saml:eduorglegalname (list). This is an eduOrg attribute.
•saml:eduorgsuperioruri (list). This is an eduOrg attribute.
•saml:eduorgwhitepagesuri (list). This is an eduOrg attribute.
•saml:namequalifier (string). * A hash value based on the concatenation of the Issuer response
value (saml:iss), the AWS account ID and the friendly name (the last part of the ARN) of the SAML
provider in IAM, separated by a '/' character. The concatenation of the account ID and friendly name
of the SAML provider is available to IAM policies as the key saml:doc. For more information, see
Uniquely Identifying Users in SAML-Based Federation (p. 141).
•saml:iss (string).* The issuer, which is represented by a URN.
•saml:sub (string).* This is the subject of the claim, which includes a value
that uniquely identifies an individual user within an organization (for example,
_cbb88bf52c2510eabe00c1642d4643f41430fe25e3).
•saml:sub_type (string).* This key can be "persistent" or "transient". A value of "persistent"
indicates that the value in saml:sub is the same for a user between sessions. If the value is
"transient", the user has a different saml:sub value for each session.
For general information about eduPerson and eduOrg attributes, see the Internet2 website. For a list
of eduPerson attributes, see eduPerson Object Class Specification (201203).
Condition keys whose type is a list can include multiple values. To create conditions in the policy for list
values, you can use set operators (p. 377) (ForAllValues, ForAnyValue). For example, to allow
any user whose affiliation is "faculty", "staff", or "employee" (but not "student", "alum", or other possible
affiliations), you might use a condition like the following:
"Condition": {
"ForAllValues:StringLike": {
"saml:edupersonaffiliation":[ "faculty", "staff", "employee" ]
}
}
Access (Permissions) Policies
In the access policy of a role for SAML federation that defines what users are allowed to access in
AWS, you can include the following keys:
•saml:namequalifier. This contains a hash value that represents the combination of the
saml:doc and saml:iss values. It is used as a namespace qualifier; the combination of
saml:namequalifier and saml:sub uniquely identifies a user.
•saml:sub. As described in the previous list.
•saml:sub_type. As described in the previous list.
For more information about using these keys, see About SAML 2.0-based Federation (p. 138).
Condition Operators
Condition operators are the "verbs" of conditions and specify the type of comparison that IAM
performs. The condition operators can be grouped into the following categories:
363

AWS Identity and Access Management User Guide
Element Reference
• String
• Numeric
• Date and time
• Boolean
• Binary
• IP address
• Amazon Resource Name (ARN). (This value is available for only some services.)
• ...IfExists
• Existence of condition keys
String Condition Operators
String condition operators let you construct Condition elements that restrict access based on
comparing a key to a string value.
Condition Operator Description
StringEquals Exact matching, case sensitive
StringNotEquals Negated matching
StringEqualsIgnoreCase Exact matching, ignoring case
StringNotEqualsIgnoreCase Negated matching, ignoring case
StringLike Case-sensitive matching. The values can include a multi-character
match wildcard (*) or a single-character match wildcard (?)
anywhere in the string.
Note
If a key contains multiple values, StringLike
can be qualified with set operators
—ForAllValues:StringLike and
ForAnyValue:StringLike. For more information, see
Creating a Condition That Tests Multiple Key Values (Set
Operations) (p. 377).
StringNotLike Negated case-sensitive matching. The values can include a multi-
character match wildcard (*) or a single-character match wildcard
(?) anywhere in the string.
For example, the following statement contains a Condition element that uses the StringEquals
condition operator with the aws:UserAgent key to specify that the request must include a specific
value in its user agent header.
{
"Version": "2012-10-17",
"Statement": {
"Effect": "Allow",
"Action": "iam:*AccessKey*",
"Resource": "arn:aws:iam::ACCOUNT-ID-WITHOUT-HYPHENS:user/*",
"Condition": {"StringEquals": {"aws:UserAgent": "Example Corp Java
Client"}}
}
}
364

AWS Identity and Access Management User Guide
Element Reference
The following example uses the StringLike condition operator to perform string matching with
a policy variable (p. 371) to create a policy that lets an IAM user use the Amazon S3 console to
manage his or her own "home directory" in an Amazon S3 bucket. The policy allows the specified
actions on an S3 bucket as long as the s3:prefix matches any one of the specified patterns.
{
"Version": "2012-10-17",
"Statement": [
{
"Effect": "Allow",
"Action": [
"s3:ListAllMyBuckets",
"s3:GetBucketLocation"
],
"Resource": "arn:aws:s3:::*"
},
{
"Effect": "Allow",
"Action": "s3:ListBucket",
"Resource": "arn:aws:s3:::BUCKET-NAME",
"Condition": {"StringLike": {"s3:prefix": [
"",
"home/",
"home/${aws:username}/"
]}}
},
{
"Effect": "Allow",
"Action": "s3:*",
"Resource": [
"arn:aws:s3:::BUCKET-NAME/home/${aws:username}",
"arn:aws:s3:::BUCKET-NAME/home/${aws:username}/*"
]
}
]
}
For an example of a policy that shows how to use the Condition element to restrict access to
resources based on an application ID and a user ID for web identity federation, see Allow Users Signed
In with Amazon Cognito to Access their Own Amazon S3 Folder (p. 302).
Numeric Condition Operators
Numeric condition operators let you construct Condition elements that restrict access based on
comparing a key to an integer or decimal value.
Condition Operator Description
NumericEquals Matching
NumericNotEquals Negated matching
NumericLessThan "Less than" matching
NumericLessThanEquals "Less than or equals" matching
NumericGreaterThan "Greater than" matching
NumericGreaterThanEquals "Greater than or equals" matching
365

AWS Identity and Access Management User Guide
Element Reference
For example, the following statement contains a Condition element that uses the
NumericLessThanEquals condition operator with the s3:max-keys key to specify that the requester
can list up to 10 objects in example_bucket at a time.
{
"Version": "2012-10-17",
"Statement": {
"Effect": "Allow",
"Action": "s3:ListBucket",
"Resource": "arn:aws:s3:::example_bucket",
"Condition": {"NumericLessThanEquals": {"s3:max-keys": "10"}}
}
}
Date Condition Operators
Date condition operators let you construct Condition elements that restrict access based on
comparing a key to a date/time value. You use these condition operators with the aws:CurrentTime
key or aws:EpochTime keys. You must specify date/time values with one of the W3C implementations
of the ISO 8601 date formats or in epoch (UNIX) time.
Note
Wildcards are not permitted for date condition operators.
Condition Operator Description
DateEquals Matching a specific date
DateNotEquals Negated matching
DateLessThan Matching before a specific date and time
DateLessThanEquals Matching at or before a specific date and time
DateGreaterThan Matching after a specific a date and time
DateGreaterThanEquals Matching at or after a specific date and time
For example, the following statement contains a Condition element that uses the DateLessThan
condition operator with the aws:CurrentTime key to specify that the request must be received before
June 30, 2013.
{
"Version": "2012-10-17",
"Statement": {
"Effect": "Allow",
"Action": "iam:*AccessKey*",
"Resource": "arn:aws:iam::ACCOUNT-ID-WITHOUT-HYPHENS:user/*",
"Condition": {"DateLessThan": {"aws:CurrentTime":
"2013-06-30T00:00:00Z"}}
}
}
Boolean Condition Operators
Boolean conditions let you construct Condition elements that restrict access based on comparing a
key to "true" or "false."
366

AWS Identity and Access Management User Guide
Element Reference
Condition Operator Description
Bool Boolean matching
For example, the following statement uses the Bool condition operator with the
aws:SecureTransport key to specify that the request must use SSL.
{
"Version": "2012-10-17",
"Statement": {
"Effect": "Allow",
"Action": "iam:*AccessKey*",
"Resource": "arn:aws:iam::ACCOUNT-ID-WITHOUT-HYPHENS:user/*",
"Condition": {"Bool": {"aws:SecureTransport": "true"}}
}
}
Binary Condition Operators
The BinaryEquals condition operator let you construct Condition elements that test key values
that are in binary format. It compares the value of the specified key byte for byte against a base-64
encoded representation of the binary value in the policy.
"Condition" : {
"BinaryEquals": {
"key" : "QmluYXJ5VmFsdWVJbkJhc2U2NA=="
}
}
IP Address Condition Operators
IP address condition operators let you construct Condition elements that restrict access based
on comparing a key to an IPv4 or IPv6 address or range of IP addresses. You use these with the
aws:SourceIp key. The value must be in the standard CIDR format (for example, 203.0.113.0/24 or
2001:DB8:1234:5678::/64). For IPv6, we support using :: to represent a range of 0s.
Note
Not all AWS services support IPv6 yet. Please refer to the documentation of a specific service
for information about whether it supports IPv6.
Condition Operator Description
IpAddress The specified IP address or range
NotIpAddress All IP addresses except the specified IP address or range
For example, the following statement uses the IpAddress condition operator with the aws:SourceIp
key to specify that the request must come from the IP range 203.0.113.0 to 203.0.113.255.
{
"Version": "2012-10-17",
"Statement": {
"Effect": "Allow",
"Action": "iam:*AccessKey*",
367

AWS Identity and Access Management User Guide
Element Reference
"Resource": "arn:aws:iam::ACCOUNT-ID-WITHOUT-HYPHENS:user/*",
"Condition": {"IpAddress": {"aws:SourceIp": "203.0.113.0/24"}}
}
}
The aws:SourceIp condition key resolves to the IP address that the request originates from. If the
requests originates from an Amazon EC2 instance, aws:SourceIp evaluates to the instance's public
IP address. <para>The following example shows how to mix IPv4 and IPv6 addresses to cover all of
your organization's valid IP addresses. We recommend that you augment your organization's policies
with your IPv6 address ranges in addition to IPv4 ranges you already have to ensure the policies
continue to work as you make the transition to IPv6.
{
"Version": "2012-10-17",
"Statement": {
"Effect": "Allow",
"Action": "someservice:*",
"Resource": "*",
"Condition": {
"IpAddress": {
"aws:SourceIp": [
"203.0.113.0/24",
"2001:DB8:1234:5678::/64"
]
}
}
}
}
The aws:SourceIp condition key works only in an IAM policy if you are calling the tested API directly
as a user. If you instead use a service to call the target service on your behalf, the target service
sees the IP address of the calling service rather than the IP address of the originating user. This can
happen, for example, if you use AWS CloudFormation to call Amazon EC2 to construct instances
for you. There is currently no way to pass the originating IP address through a calling service to the
target service for evaluation in an IAM policy. For these types of service API calls, do not use the
aws:SourceIp condition key.
Amazon Resource Name (ARN) Condition Operators
Amazon Resource Name (ARN) condition operators let you construct Condition elements that
restrict access based on comparing a key to an ARN. The ARN is considered a string. This value is
available for only some services; not all services support request values that can be compared as
ARNs.
Condition Operator Description
ArnEquals Matching for ARN
ArnNotEquals Negated matching for ARN
ArnLike Case-insensitive matching of the ARN. Each of the six colon-delimited
components of the ARN is checked separately and each can include a
multi-character match wildcard (*) or a single-character match wildcard
(?).
ArnNotLike Negated case-insensitive matching of the ARN. The values can include
a multi-character match wildcard (*) or a single-character match wildcard
(?) anywhere in the string.
368

AWS Identity and Access Management User Guide
Element Reference
The following example shows a policy you need to attach to any Amazon SNS queue that you want to
send SNS messages to. It gives Amazon SNS permission to send messages to the queue (or queues)
of your choice, but only if the service is sending the messages on behalf of a particular Amazon SNS
topic (or topics). You specify the queue in the Resource field, and the Amazon SNS topic as the value
for the SourceArn key.
{
"Version": "2012-10-17",
"Statement": {
"Effect": "Allow",
"Principal": {"AWS": "123456789012"},
"Action": "SQS:SendMessage",
"Resource": "arn:aws:sqs:REGION:123456789012:QUEUE-ID",
"Condition": {"ArnEquals": {"aws:SourceArn":
"arn:aws:sns:REGION:123456789012:TOPIC-ID"}}
}
}
...IfExists Condition Operators
You can add IfExists to the end of any condition operator name except the Null condition—for
example, StringLikeIfExists. You do this to say "If the policy key is present in the context of the
request, process the key as specified in the policy. If the key is not present, I don't care."
Example using IfExists
Many condition keys describe information about a certain type of resource and only exist when
accessing that type of resource. These condition keys are not present on other types of resources. This
doesn't cause an issue when the policy statement applies to only one type of resource. However, there
are cases where a single statement can apply to multiple types of resources, such as when the policy
statement references actions from multiple services or when a given action within a service accesses
several different resource types within the same service. In such cases, including a condition key that
applies to only one of the resources in the policy statement can cause the Condition element in the
policy statement to fail such that the statement's "Effect" does not apply.
For example, consider the following policy example:
{
"Version": "2012-10-17",
"Statement": {
"Sid": "THISPOLICYDOESNOTWORK",
"Effect": "Allow",
"Action": "ec2:RunInstances",
"Resource": "*",
"Condition": {"StringLike": {"ec2:InstanceType": [
"t1.*",
"t2.*",
"m3.*"
]}}
}
}
The intent of the preceding policy is to enable the user to launch any instance that is type t1, t2 or m3.
However, launching an instance actually requires accessing many resources in addition to the instance
itself; for example, images, key pairs, security groups, etc. The entire statement is evaluated against
every resource that is required to launch the instance. These additional resources do not have the
ec2:InstanceType condition key, so the StringLike check fails, and the user is not granted the
369

AWS Identity and Access Management User Guide
Element Reference
ability to launch any instance type. To address this, use the StringLikeIfExists condition operator
instead. This way, the test only happens if the condition key exists. You could read the following as:
"If the resource being checked has an "ec2:InstanceType" condition key, then allow the action only
if the key value begins with "t1.*", "t2.*", or "m3.*". If the resource being checked does not have that
condition key, then don't worry about it."
{
"Version": "2012-10-17",
"Statement": {
"Effect": "Allow",
"Action": "ec2:RunInstances",
"Resource": "*",
"Condition": {"StringLikeIfExists": {"ec2:InstanceType": [
"t1.*",
"t2.*",
"m3.*"
]}}
}
}
Condition Operator to Check Existence of Condition Keys
Use a Null condition operator to check if a condition key is present at the time of authorization. In the
policy statement, use either true (the key doesn't exist — it is null) or false (the key exists and its
value is not null).
For example, you can use this condition operator to determine whether a user is using their own
credentials for the operation or temporary credentials. If the user is using temporary credentials, then
the key aws:TokenIssueTime exists and has a value. The following example shows a condition that
states that the user must not be using temporary credentials (the key must not exist) for the user to use
the Amazon EC2 API.
{
"Version": "2012-10-17",
"Statement":{
"Action":"ec2:*",
"Effect":"Allow",
"Resource":"*",
"Condition":{"Null":{"aws:TokenIssueTime":"true"}}
}
}
Supported Data Types
This section lists the data types that are supported when you specify values in IAM policies. The policy
language doesn't support all types for each policy element; for information about each element, see the
preceding sections.
• Strings
• Numbers (Ints and Floats)
• Boolean
• Null
• Lists
• Maps
370

AWS Identity and Access Management User Guide
Policy Variables
• Structs (which are just nested Maps)
The following table maps each data type to the serialization. Note that all policies must be in UTF-8.
For information about the JSON data types, go to RFC 4627.
Type JSON
String String
Integer Number
Float Number
Boolean true false
Null null
Date String adhering to the W3C Profile of ISO 8601
IpAddress String adhering to RFC 4632
List Array
Object Object
IAM Policy Variables Overview
Topics
•Introduction (p. 371)
•Where You Can Use Policy Variables (p. 373)
•Request Information That You Can Use for Policy Variables (p. 374)
•For More Information (p. 377)
Introduction
In IAM policies, you can provide a name for the specific resources that want to control access to. The
following policy allows the user who gets these permissions to programmatically list, read, and write
objects with a prefix David in the Amazon S3 bucket mybucket.
{
"Version": "2012-10-17",
"Statement": [
{
"Action": ["s3:ListBucket"],
"Effect": "Allow",
"Resource": ["arn:aws:s3:::mybucket"],
"Condition": {"StringLike": {"s3:prefix": ["David/*"]}}
},
{
"Action": [
"s3:GetObject",
"s3:PutObject"
],
"Effect": "Allow",
"Resource": ["arn:aws:s3:::mybucket/David/*"]
371

AWS Identity and Access Management User Guide
Policy Variables
}
]
}
In some cases, you might not know the exact name of the resource when you write the policy. For
example, you might want to allow each user to have his or her own objects in an Amazon S3 bucket,
as in the previous example. However, instead of creating a separate policy for each user that specifies
the user's name as part of the resource, you want to create a single group policy that works for any
user in that group.
You can do this by using policy variables, a feature that lets you specify placeholders in a policy. When
the policy is evaluated, the policy variables are replaced with values that come from the request itself.
The following example shows a policy for an Amazon S3 bucket that uses a policy variable.
{
"Version": "2012-10-17",
"Statement": [
{
"Action": ["s3:ListBucket"],
"Effect": "Allow",
"Resource": ["arn:aws:s3:::mybucket"],
"Condition": {"StringLike": {"s3:prefix": ["${aws:username}/*"]}}
},
{
"Action": [
"s3:GetObject",
"s3:PutObject"
],
"Effect": "Allow",
"Resource": ["arn:aws:s3:::mybucket/${aws:username}/*"]
}
]
}
When this policy is evaluated, IAM uses the friendly name (p. 334) of the authenticated user in place
of the variable ${aws:username}. This means that a single policy applied to a group of users can be
used to control access to a bucket by using the user name as part of the resource.
The variable is marked using a $ prefix followed by a pair of curly braces ({ }). Inside the ${ }
characters, you can include the name of the value from the request that you want to use in the policy.
The values you can use are discussed later on this page.
Note
In order to use policy variables, you must include the Version element in a statement, and
the version must be set to the value 2012-10-17. Earlier versions of the policy language
don't support policy variables. If you don't include the Version element and set it to this
version date, variables like ${aws:username} are treated as literal strings in the policy.
You can use policy variables in a similar way to allow each user to manage his or her own access
keys. A policy that allows a user to programmatically change the access key for user David looks like
this:
{
"Version": "2012-10-17",
"Statement": [{
"Action": ["iam:*AccessKey*"],
"Effect": "Allow",
372

AWS Identity and Access Management User Guide
Policy Variables
"Resource": ["arn:aws:iam::ACCOUNT-ID-WITHOUT-HYPHENS:user/David"]
}]
}
If this policy is attached to user David, that user can change his own access key. As with the policies
for accessing user-specific Amazon S3 objects, you'd have to create a separate policy for each user
that includes the user's name, and then attach each policy to the individual users.
By using a policy variable, you can create a policy like this:
{
"Version": "2012-10-17",
"Statement": [{
"Action": ["iam:*AccessKey*"],
"Effect": "Allow",
"Resource": ["arn:aws:iam::ACCOUNT-ID-WITHOUT-HYPHENS:user/
${aws:username}"]
}]
}
When you use a policy variable for the user name like this, you don't have to have a separate policy for
each individual user. Instead, you can attach this new policy to an IAM group that includes everyone
who should be allowed to manage their own access keys. When a user makes a request to modify his
or her access key, IAM substitutes the user name from the current request for the ${aws:username}
variable and evaluates the policy.
Where You Can Use Policy Variables
You can use policy variables in the Resource element and in string comparisons in the Condition
element.
Resource Element
A policy variable can appear as the last part of the ARN that identifies a resource. The following policy
might be attached to a group. It gives each of the users in the group full programmatic access to a
user-specific object (their own "home directory") in Amazon S3.
{
"Version": "2012-10-17",
"Statement": [
{
"Action": ["s3:ListBucket"],
"Effect": "Allow",
"Resource": ["arn:aws:s3:::mybucket"],
"Condition": {"StringLike": {"s3:prefix": ["${aws:username}/*"]}}
},
{
"Action": [
"s3:GetObject",
"s3:PutObject"
],
"Effect": "Allow",
"Resource": ["arn:aws:s3:::mybucket/${aws:username}/*"]
}
]
}
373

AWS Identity and Access Management User Guide
Policy Variables
Note
This example uses the aws:username key, which returns the user's friendly name (like
"Adele" or "David"). Under some circumstances, you might want to use the aws:userid key
instead, which is a globally unique value. For more information, see Unique IDs (p. 337).
The following policy might be used for an IAM group. It gives users in that group the ability to create,
use, and delete queues that have their names and that are in the us-west-2 region.
{
"Version": "2012-10-17",
"Statement": [{
"Effect": "Allow",
"Action": "sqs:*",
"Resource": "arn:aws:sqs:us-west-2:*:${aws:username}-queue"
}]
}
Condition Element
A policy variable can also be used for Condition values in any condition that involves the string
operators (StringEquals, StringLike, StringNotLike, etc.) or the ARN operators (ArnEquals,
ArnLike, etc.). The following Amazon SNS topic policy gives users in AWS account 999999999999
the ability to manage (perform all actions for) the topic only if the URL matches their AWS user name.
{
"Version": "2012-10-17",
"Statement": [{
"Principal": {"AWS": "999999999999"},
"Effect": "Allow",
"Action": "sns:*",
"Condition": {"StringLike": {"sns:endpoint": "https://example.com/
${aws:username}/*"}}
}]
}
Request Information That You Can Use for Policy
Variables
The values that can be substituted for policy variables must come from the current request
context (p. 382).
Information Available in All Requests
Policies contain keys whose values you can use as policy variables. (Under some circumstances, the
keys do not contain a value—see the information that follows this list.)
•aws:CurrentTime This can be used for conditions that check the date and time.
•aws:EpochTime This is the date in epoch or UNIX time, for use with date/time conditions.
•aws:TokenIssueTime This is the date and time that temporary security credentials were issued
and can be used with date/time conditions. Note: This key is only available in requests that are
signed using temporary security credentials. For more information about temporary security
credentials, see Temporary Security Credentials (p. 218).
•aws:principaltype This value indicates whether the principal is an account, user, federated, or
assumed role—see the explanation that follows later.
374

AWS Identity and Access Management User Guide
Policy Variables
•aws:SecureTransport This is a boolean value that represents whether the request was sent using
SSL.
•aws:SourceIp This is the requester's IP address, for use with IP address conditions. Refer to IP
Address Condition Operators (p. 367) for information about when SourceIp is valid and when you
should use a VPC-specific key instead.
•aws:UserAgent This value is a string that contains information about the requester's client
application.
•aws:userid This value is the unique ID for the current user—see the chart that follows.
•aws:username This is a string containing the friendly name (p. 334) of the current user—see the
chart that follows.
•ec2:SourceInstanceARN This is the Amazon Resource Name (ARN) of the Amazon EC2 instance
from which the request is made. This key is present only when the request comes from an Amazon
EC2 instance using an IAM role associated with an EC2 instance profile.
Important
The names of all condition keys are case sensitive.
The values for aws:username, aws:userid, and aws:principaltype depend on what type
of principal initiated the request—whether the request was made using the credentials of an AWS
account, an IAM user, an IAM role, and so on. The following list shows values for these keys for
different types of principal.
•AWS Account
•aws:username: (not present)
•aws:userid: AWS account ID
•aws:principaltype: Account
•IAM user
•aws:username: IAM-user-name
•aws:userid: unique ID (p. 337)
•aws:principaltype: User
•Federated user
•aws:username: (not present)
•aws:userid: account:caller-specified-name
•aws:principaltype: FederatedUser
•Web federated user and SAML federated user
Note
For information about policy keys that are available when you use web identity federation,
see Identifying Users with Web Identity Federation (p. 136).
•aws:username: (not present)
•aws:userid: (not present)
•aws:principaltype: AssumedRole
•Assumed role
•aws:username: (not present)
•aws:userid: role-id:caller-specified-role-name
•aws:principaltype: Assumed role
•Role assigned to Amazon EC2 instance
•aws:username: (not present)
•aws:userid: role-id:ec2-instance-id
•aws:principaltype: Assumed role
•Anonymous caller (Amazon SQS Amazon SNS and Amazon S3 only)
375

AWS Identity and Access Management User Guide
Policy Variables
•aws:username: (not present)
•aws:userid: (not present)
•aws:principaltype: Anonymous
In this list:
•not present means that the value is not in the current request information, and any attempt to match
it fails and causes the request to be denied.
•role-id is a unique identifier assigned to each role at creation. You can display the role ID with the
AWS CLI command: aws iam get-role --role-name rolename
•caller-specified-name and caller-specified-role-name are names that are passed by
the calling process (e.g. application or service) when it makes a call to get temporary credentials.
•ec2-instance-id is a value assigned to the instance when it is launched and appears on the
Instances page of the Amazon EC2 console. You can also display the instance ID by running the
AWS CLI command: aws ec2 describe-instances
Information Available in Requests for Federated Users
Federated users are users who are authenticated using a system other than IAM. For example, a
company might have an application for use in-house that makes calls to AWS. It might be impractical
to give an IAM identity to every corporate user who uses the application. Instead, the company might
use a proxy (middle-tier) application that has a single IAM identity, or the company might use a
SAML identity provider (IdP). The proxy application or SAML IdP authenticates individual users using
the corporate network. A proxy application can then use its IAM identity to get temporary security
credentials for individual users; a SAML IdP can in effect exchange identity information for AWS
temporary security credentials. The temporary credentials can then be used to access AWS resources.
Similarly, you might create an app for a mobile device in which the app needs to access AWS
resources. In that case, you might use web identity federation, where the app authenticates the user
using a well-known identity provider like Login with Amazon, Amazon Cognito, Facebook, or Google.
The app can then use the user's authentication information from these providers to get temporary
security credentials for accessing AWS resources.
The recommended way to use web identity federation is by taking advantage of Amazon Cognito and
the AWS mobile SDKs. For more information, see the following:
•Amazon Cognito Overview in the AWS Mobile SDK for Android Developer Guide
•Amazon Cognito Overview in the AWS Mobile SDK for iOS Developer Guide
•Common Scenarios for Temporary Credentials (p. 218).
Service-Specific Information
Requests can also include service-specific keys and values in its request context. Examples include
the following:
•s3:prefix
•s3:max-keys
•s3:x-amz-acl
•sns:Endpoint
•sns:Protocol
For information about service-specific keys that you can use to get values for policy variables, refer to
the documentation for the individual services. For example, see the following topics:
376

AWS Identity and Access Management User Guide
Conditions with Multiple Key Values
•Bucket Keys in Amazon S3 Policies in the Amazon Simple Storage Service Developer Guide.
•Amazon SNS Keys in the Amazon Simple Notification Service Developer Guide.
Special characters
There are a few special predefined policy variables that have fixed values that enable you to represent
characters that otherwise have special meaning. If these special characters are part of the string you
are trying to match and you inserted them literally they would be misinterpreted. For example, inserting
an * asterisk in the string would be interpreted as a wildcard, matching any characters, instead of as a
literal *. In these cases, you can use the following predefined policy variables:
•${*} - use where you need an * asterisk character.
•${?} - use where you need a ? question mark character.
•${$} - use where you need a $ dollar sign character.
These predefined policy variables can be used in any string where you can use regular policy
variables.
For More Information
For more information about policies, see the following:
•Overview of AWS IAM Permissions (p. 250)
•Example Policies for Administering AWS Resources (p. 299)
•IAM Policy Elements Reference (p. 346)
•IAM Policy Evaluation Logic (p. 381)
•About Web Identity Federation (p. 133)
Creating a Condition That Tests Multiple Key
Values (Set Operations)
This topic discusses how to create a policy Condition element that lets you test multiple values
for a single key in a request. In effect, you can create a condition that uses set operations. This type
of condition is useful for creating policies that allow fine-grained control for DynamoDB tables (for
example, allowing or denying access to particular attributes).
To create this type of condition, you can use the ForAllValues or ForAnyValue qualifier with the
condition operator. These qualifiers add set-operation functionality to the condition operator so that you
can test multiple request values against multiple condition values.
Contents
•Introduction (p. 377)
•Examples of Condition Set Operators (p. 378)
•Evaluation Logic for Condition Set Operators (p. 379)
Introduction
In some situations, you need to create a policy in which you test multiple values in a request against
one or more values that you specify in the policy. A good example is a request for attributes from
an Amazon DynamoDB table. Imagine an Amazon DynamoDB table named Thread that is used to
377

AWS Identity and Access Management User Guide
Conditions with Multiple Key Values
store information about threads in a technical support forum. The table might have attributes like ID,
UserName, PostDateTime, Message, and Tags (among others).
{
ID=101
UserName=Bob
PostDateTime=20130930T231548Z
Message="A good resource for this question is http://aws.amazon.com/
documentation/"
Tags=["AWS", "Database", "Security"]
}
You might want to create a policy that allows users to see only some attributes—for example, maybe
you want to let these users to see only PostDateTime, Message, and Tags. If the user's request
contains any of these attributes, it is allowed; but if the request contains any other attributes (for
example, ID), the request is denied. Logically speaking, you want to create a list of allowed attributes
(PostDateTime, Message, Tags) and indicate in the policy that all of the user's requested attributes
must be in that list of allowed attributes.
Or you might want to make sure that users are explicitly forbidden to include some attributes in a
request, such as the ID and UserName attributes. For example, you might exclude attributes when the
user is updating the DynamoDB table, because an update (PUT operation) should not change certain
attributes. In that case, you create a list of forbidden attributes (ID, UserName), and if any of the user's
requested attributes match any of the forbidden attributes, the request is denied.
To support these scenarios, you can use the following modifiers to a condition operator:
•ForAnyValue – The condition returns true if any one of the key values in the request matches any
one of the condition values in the policy.
•ForAllValues – The condition returns true if there's a match between every one of the specified
key values in the request and at least one value in the policy.
For information about how set operators are used in DynamoDB to implement fine-grained access to
individual data items and attributes, see Fine-Grained Access Control for DynamoDB in the Amazon
DynamoDB Developer Guide guide.
Examples of Condition Set Operators
The following example policy shows how to use the ForAllValues qualifier with the StringLike
condition operator. The condition allows a user to request only the attributes PostDateTime,
Message, or Tags from the DynamoDB table named Thread.
{
"Version": "2012-10-17",
"Statement": [{
"Effect": "Allow",
"Action": "GetItem",
"Resource": "arn:aws:dynamodb:REGION:ACCOUNT-ID-WITHOUT-HYPHENS:table/
Thread",
"Condition": {"ForAllValues:StringLike": {"dynamodb:requestedAttributes":
[
"PostDateTime",
"Message",
"Tags"
]}}
}]
}
378

AWS Identity and Access Management User Guide
Conditions with Multiple Key Values
If the user makes a request to DynamoDB to get the attributes PostDateTime and Message from
the Threads table, the request is allowed, because the user's requested attributes all match values
specified in the policy. However, if the user's request includes the ID attribute, the request fails,
because ID is not within the list of allowed attributes, and the ForAllValues qualifier requires all
requested values to be listed in the policy.
The following example shows how to use the ForAnyValue qualifier as part of a policy that denies
access to the ID and PostDateTime attributes if the user tries to perform the PutItem action—that is,
if the user tries to update either of those attributes. Notice that the Effect element is set to Deny.
{
"Version": "2012-10-17",
"Statement": [{
"Effect": "Deny",
"Action": "PutItem",
"Resource": "arn:aws:dynamodb:REGION:ACCOUNT-ID-WITHOUT-HYPHENS:table/
Thread",
"Condition": {"ForAnyValue:StringLike": {"dynamodb:requestedAttributes":
[
"ID",
"PostDateTime"
]}}
}]
}
Imagine that the user makes a request to update the PostDateTime and Message attributes. The
ForAnyValue qualifier determines whether any of the requested attributes appear in the list in the
policy. In this case, there is one match (PostDateTime), so the condition is true. Assuming the other
values in the request also match (for example, the resource), the overall policy evaluation returns true.
Because the policy's effect is Deny, the request is denied.
Imagine the user instead makes a request to perform PutItem with just the UserName attribute.
None of the attributes in the request (just UserName) match any of attributes listed in the policy (ID,
PostDateTime). The condition returns false, so the effect of the policy (Deny) is also false, and the
request is not denied by this policy. (For the request to succeed, it must be explicitly allowed by a
different policy. It is not explicitly denied by this policy, but all requests are implicitly denied.)
Evaluation Logic for Condition Set Operators
This section discusses the specifics of the evaluation logic used with the ForAllValues and
ForAnyValue qualifiers. The following table illustrates possible keys that might be included
in a request (PostDateTime and UserName) and a policy condition that includes the values
PostDateTime, Message, and Tags.
Key (in the request) Condition Value (in the policy)
PostDateTime PostDateTime
UserName Message
Tags
The evaluation for the combination is this:
PostDateTime matches PostDateTime?
379

AWS Identity and Access Management User Guide
Conditions with Multiple Key Values
PostDateTime matches Message?
PostDateTime matches Tags?
UserName matches PostDateTime?
UserName matches Message?
UserName matches Tags?
The result of the condition operator depends on which modifier is used with the policy condition:
•ForAllValues. If every key in the request (PostDateTime or UserName) matches at least one
condition value in the policy (PostDateTime, Message, Tags), the condition operator returns
true. Stated another way, in order for the condition to be true, (PostDateTime must equal
PostDateTime, Message, or Tags) and (UserName must equal PostDateTime, Message, or
Tags).
•ForAnyValue. If any combination of request value and policy value (any one of the six in the
example) returns true, the condition operator returns true.
The following policy includes a ForAllValues qualifier:
{
"Version": "2012-10-17",
"Statement": [{
"Effect": "Allow",
"Action": "GetItem",
"Resource": "arn:aws:dynamodb:REGION:ACCOUNT-ID-WITHOUT-HYPHENS:table/
Thread",
"Condition": {"ForAllValues:StringLike": {"dynamodb:requestedAttributes":
[
"PostDateTime",
"Message",
"Tags"
]}}
}]
}
Suppose that the user makes a request to DynamoDB to get the attributes PostDateTime and
UserName. The keys in the request and condition values in the policy are these:
Key (in the request) Condition Value (in the policy)
PostDateTime PostDateTime
UserName Message
Tags
The evaluation for the combination is this:
PostDateTime matches PostDateTime?True
PostDateTime matches Message?False
380

AWS Identity and Access Management User Guide
IAM Policy Evaluation Logic
PostDateTime matches Tags?False
UserName matches PostDateTime?False
UserName matches Message?False
UserName matches Tags?False
The policy includes the ForAllValues condition operator modifier, meaning that there must be at
least one match for PostDateTime and one match for UserName. There's no match for UserName, so
the condition operator returns false, and the policy does not allow the request.
The following policy includes a ForAnyValue qualifier:
{
"Version": "2012-10-17",
"Statement": [{
"Effect": "Deny",
"Action": "PutItem",
"Resource": "arn:aws:dynamodb:REGION:ACCOUNT-ID-WITHOUT-HYPHENS:table/
Thread",
"Condition": {"ForAnyValue:StringLike": {"dynamodb:requestedAttributes":
[
"ID",
"PostDateTime"
]}}
}]
}
Notice that the policy includes "Effect":"Deny" and the action is PutItem. Imagine that the user
makes a PutItem request that includes the attributes UserName, Message, and PostDateTime. The
evaluation is this:
UserName matches ID?False
UserName matches PostDateTime?False
Messages matches ID?False
Message matches PostDateTime?False
PostDateTime matches ID?False
PostDateTime matches PostDateTime?True
With the modifier ForAnyValue, if any one of these tests returns true, the condition returns true. The
last test returns true, so the condition is true; because the Effect element is set to Deny, the request
is denied.
Note
If the key values in the request resolve to an empty data set (for example, an empty string), a
condition operator modified by ForAllValues returns true, and a condition operator modified
by ForAnyValue returns false.
IAM Policy Evaluation Logic
Topics
381

AWS Identity and Access Management User Guide
IAM Policy Evaluation Logic
•Policy Evaluation Basics (p. 382)
•The Request Context (p. 382)
•Determining Whether a Request is Allowed or Denied (p. 383)
•The Difference Between Denying by Default and Explicit Deny (p. 385)
Policy Evaluation Basics
When an AWS service receives a request, the request is first authenticated using information about
the access key ID and signature. (A few services, like Amazon S3, allow requests from anonymous
users.) If the request passes authentication, AWS then determines whether the requester is authorized
to perform the action represented by the request.
Requests that are made using the credentials of the AWS account owner (the root credentials) for
resources in that account are allowed. However, if the request is made using the credentials of an
IAM user, or if the request is signed using temporary credentials that are granted by AWS STS, AWS
uses the permissions defined in one or more IAM policies to determine whether the user's request is
authorized.
Note
Amazon S3 supports Access Control Lists (ACLs) and resource-level policies for buckets
and objects. The permissions established using ACLs and bucket-level policies can affect
what actions the root owner is allowed to perform on a bucket. For more information, see
Guidelines for Using the Available Access Policy Options in the Amazon Simple Storage
Service Developer Guide.
The Request Context
When AWS authorizes a request, information about the request is assembled from several sources:
• Principal (the requester), which is determined based on the secret access key. This might represent
the root user, an IAM user, a federated user (via STS), or an assumed role, and includes the
aggregate permissions that are associated with that principal.
• Environment data, such as the IP address, user agent, SSL enabled, the time of day, etc. This
information is determined from the request.
• Resource data, which pertains to information that is part of the resource being requested. This can
include information such as a DynamoDB table name, a tag on an Amazon EC2 instance, etc.
This information is gathered into a request context, which is a collection of information that's derived
from the request. During evaluation, AWS uses values from the request context to determine whether
to allow or deny the request. For example, does the action in the request context match an action in
the Action element? If not, the request is denied. Similarly, does the resource in the request context
match one of the resources in the Resource element? If not, the request is denied.
This is also how the keys work that you can use in the Condition element. For example, for the
following policy fragment, AWS uses the date and time from the current request context for the
aws:CurrentTime key and then performs the DateGreaterThan and DateLessThan comparisons.
"Condition" : {
"DateGreaterThan" : {
"aws:CurrentTime" : "2013-08-16T12:00:00Z"
},
"DateLessThan": {
"aws:CurrentTime" : "2013-08-16T15:00:00Z"
}
}
382
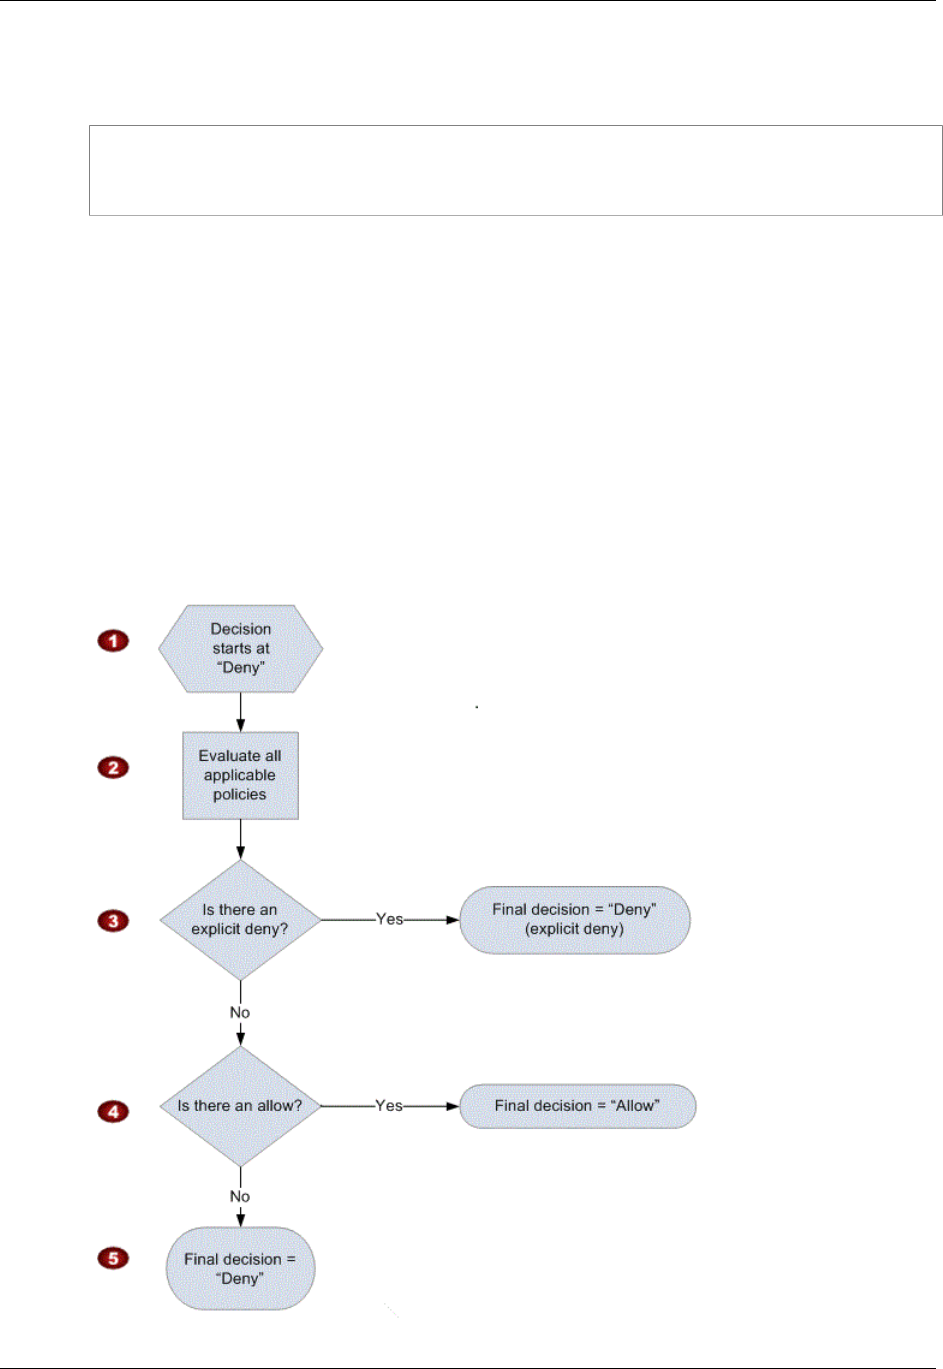
AWS Identity and Access Management User Guide
IAM Policy Evaluation Logic
Policy variables like ${aws:username} also work like this. In the following policy fragment,
AWS gets the user name from the request context and uses it in the policy at the place where the
${aws:username} occurs.
"Resource": [
"arn:aws:s3:::mybucket/${aws:username}/*"
]
Determining Whether a Request is Allowed or Denied
When a request is made, the AWS service decides whether a given request should be allowed or
denied. The evaluation logic follows these rules:
• By default, all requests are denied. (In general, requests made using the account credentials for
resources in the account are always allowed.)
• An explicit allow overrides this default.
• An explicit deny overrides any allows.
The order in which the policies are evaluated has no effect on the outcome of the evaluation. All
policies are evaluated, and the result is always that the request is either allowed or denied.
The following flow chart provides details about how the decision is made.
383

AWS Identity and Access Management User Guide
IAM Policy Evaluation Logic
1. The decision starts by assuming that the request will be denied.
2. The enforcement code evaluates all user-based and resource-based policies that are applicable to
the request (based on the resource, principal, action, and conditions).
The order in which the enforcement code evaluates the policies is not important.
3. In all those policies, the enforcement code looks for an explicit deny instruction that would apply to
the request.
If the code finds even one explicit deny that applies, the code returns a decision of "deny" and the
process is finished.
4. If no explicit deny is found, the code looks for any "allow" instructions that would apply to the
request.
If it finds even one explicit allow, the code returns a decision of "allow" and the service continues to
process the request.
5. If no allow is found, the final decision is "deny."
The following example illustrates how you can use an explicit deny to override a broad policy that
allows access to a wide set of resources. Let's say that you give an IAM group permissions to use any
Amazon SQS queues in your AWS account whose names begin with the string test.
The following diagram represents that set of queues.
Let's say that you have a queue called test0 that you want to remove the group's access to. The
following diagram represents that set of queues.
You could add another policy to the group, or another statement to the existing policy, that explicitly
denies the group's access to the test0 queue. The group would still have access to all other queues
whose names begin with the string test. The following diagram illustrates those two statements in the
policy.
384
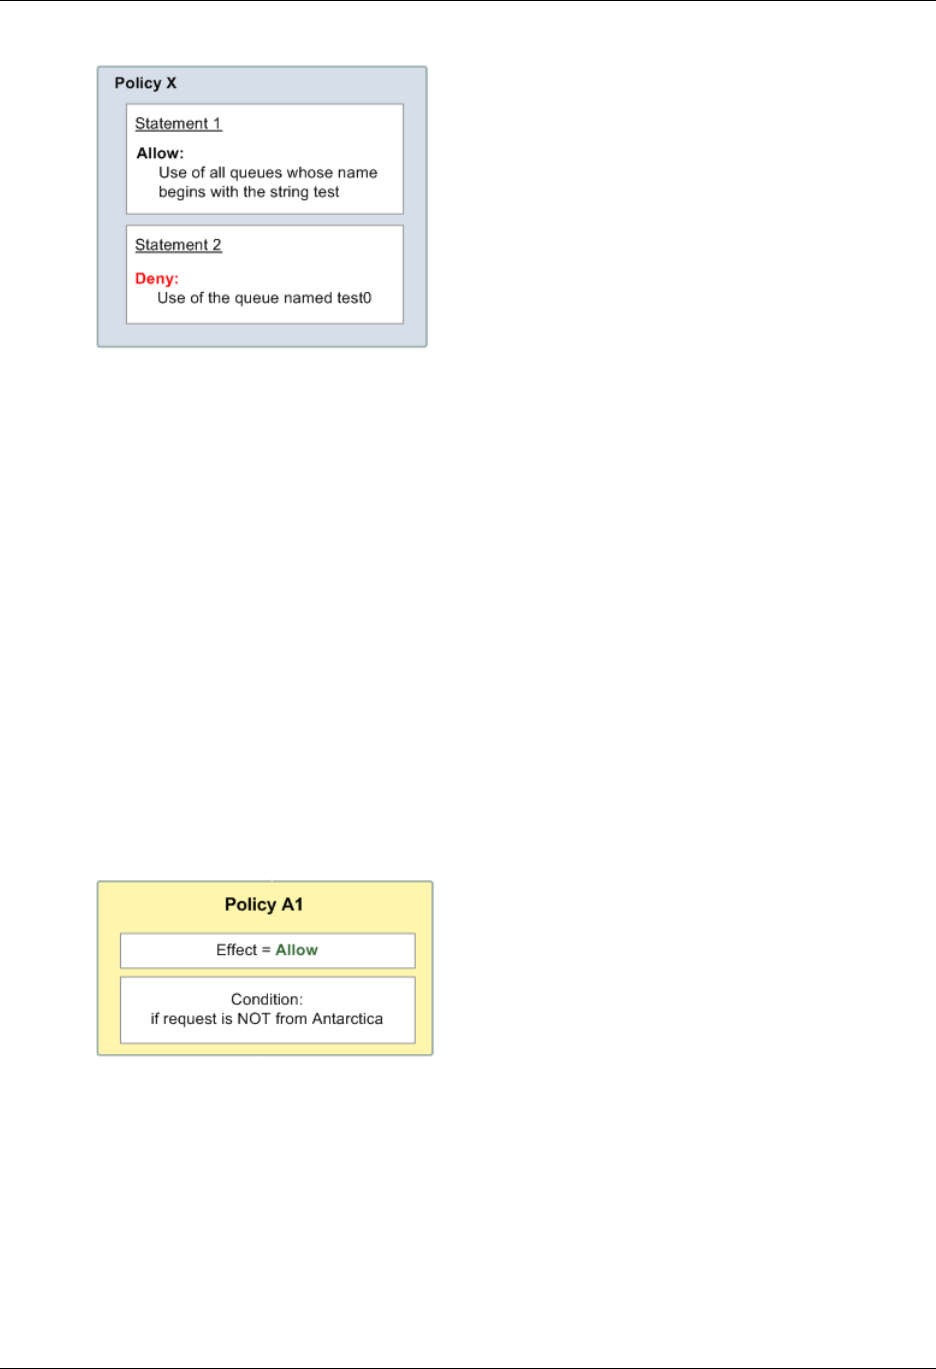
AWS Identity and Access Management User Guide
IAM Policy Evaluation Logic
When any user in the group makes a request to use the queue test0, the explicit deny overrides the
allow, and the user is denied access to the queue.
The Difference Between Denying by Default and Explicit
Deny
A policy results in a deny if the policy doesn't directly apply to the request. For example, if a user
makes a request to use Amazon SQS, but the only policy that applies to the user states that the user
can use Amazon S3, the request is denied.
A policy also results in a deny if a condition in a statement isn't met. If all conditions in the statement
are met, the policy results in either an allow or an explicit deny, based on the value of the Effect
element in the policy. Policies don't specify what to do if a condition isn't met, so the result in that case
is a deny.
For example, let's say you want to prevent requests that come from Antarctica. You write a policy
called Policy A1 that allows a request only if it doesn't come from Antarctica. The following diagram
illustrates the policy.
If someone sends a request from the U.S., the condition is met (the request is not from Antarctica).
Therefore, the request is allowed. But if someone sends a request from Antarctica, the condition isn't
met, and the policy's result is therefore a deny.
You could explicitly deny access from Antarctica by creating a different policy (named Policy A2) as in
the following diagram.
385

AWS Identity and Access Management User Guide
IAM Policy Evaluation Logic
If this policy applies to a user who sends a request from Antarctica, the condition is met, and the
policy's result is therefore a deny.
The distinction between a request being denied by default and an explicit deny in a policy is important.
By default, a request is denied, but this can be overridden by an allow. In contrast, if a policy explicitly
denies a request, that deny can't be overridden.
For example, let's say there's another policy that allows requests if they arrive on June 1, 2010. How
does this policy affect the outcome when evaluated together with the policy that restricts access from
Antarctica? We'll compare the outcome when evaluating the date-based policy (we'll call it Policy B)
with the preceding policies (A1 and A2). Scenario 1 evaluates Policy A1 with Policy B, and Scenario 2
evaluates Policy A2 with Policy B. The following figure show the results when a request comes in from
Antarctica on June 1, 2010.
386
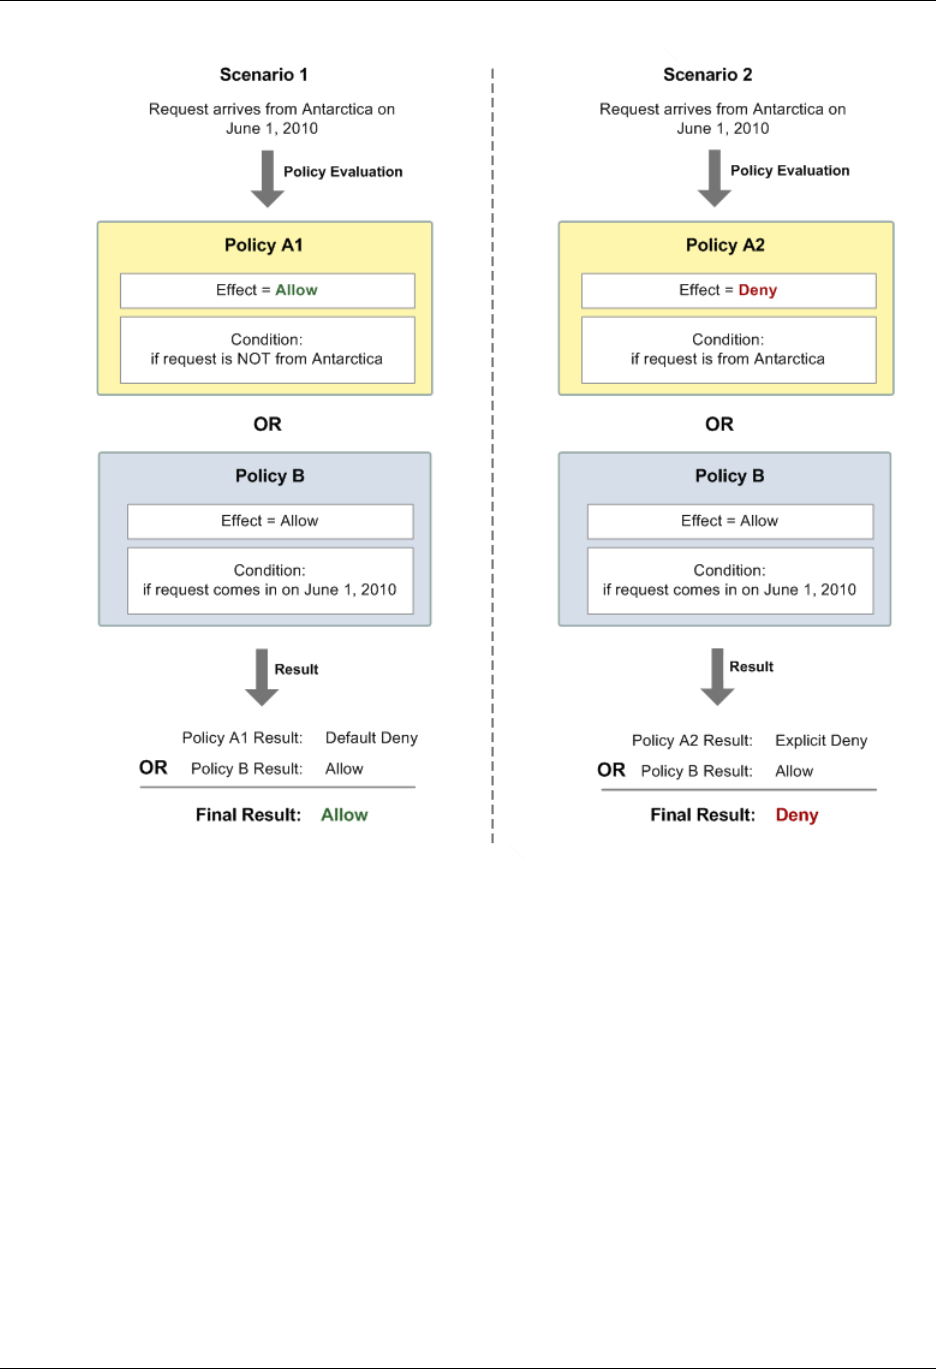
AWS Identity and Access Management User Guide
Policy Grammar
In Scenario 1, Policy A1 returns a deny because requests are allowed only if they don't come from
Antarctica; any other condition (requests that do come from Antarctica) are denied by default. Policy B
returns an allow because the request arrives on June 1, 2010. The allow from Policy B overrides the
default deny from Policy A1, and the request is therefore allowed.
In Scenario 2, Policy A2 returns an explicit deny, as described earlier in this section. Again, Policy B
returns an allow. However, the explicit deny from Policy A2 overrides the allow from Policy B, and the
request is therefore denied.
Grammar of the IAM Policy Language
This page presents a formal grammar for the language used to create policies in IAM. We present this
grammar so that you can understand how to construct and validate policies.
For examples of policies, see the following topics:
•Overview of IAM Policies (p. 262)
•Example Policies for Administering AWS Resources (p. 299)
387

AWS Identity and Access Management User Guide
Policy Grammar
•Example Policies for Working in the Amazon EC2 Console and Example Policies for Working With
the AWS CLI, the Amazon EC2 CLI, or an AWS SDK in the Amazon EC2 User Guide for Linux
Instances.
•Bucket Policy Examples and User Policy Examples in the Amazon Simple Storage Service
Developer Guide.
For examples of policies used in other AWS services, go to the documentation for those services.
Topics
•The Policy Language and JSON (p. 388)
•Conventions Used in This Grammar (p. 388)
•Grammar (p. 389)
•Policy Grammar Notes (p. 390)
The Policy Language and JSON
Policies are expressed in JSON. When a policy is submitted to IAM, it is first validated to make sure
that the JSON syntax is correct. In this document, we do not provide a complete description of what
constitutes valid JSON. However, here are some basic JSON rules:
• Whitespace between individual entities is allowed.
• Values are enclosed in quotation marks. Quotation marks are optional for numeric and boolean
values.
• Many elements (for example, action_string_list and resource_string_list) can take a
JSON array as a value. Arrays can take one or more values. If more than one value is included, the
array is in square brackets ([ and ]) and comma-delimited, as in the following example:
"Action" : ["ec2:Describe*","ec2:List*"]
• Basic JSON datatypes (boolean, number, and string) are defined in RFC 7159.
You can use a JSON validator to check the syntax of a policy. You can find a validator online, and
many code editors and XML-editing tools include JSON validation features.
Conventions Used in This Grammar
The following conventions are used in this grammar:
• The following characters are JSON tokens and are included in policies:
{ } [ ] " , :
• The following characters are special characters in the grammar and are not included in policies:
= < > ( ) |
• If an element allows multiple values, it is indicated using repeated values, a comma delimiter, and an
ellipsis (...). Examples:
[<action_string>, <action_string>, ...]
<principal_map> = { <principal_map_entry>, <principal_map_entry>, ... }
If multiple values are allowed, it is also valid to include only one value. For only one value, the trailing
comma must be omitted. If the element takes an array (marked with [ and ]) but only one value is
included, the brackets are optional. Examples:
388

AWS Identity and Access Management User Guide
Policy Grammar
"Action": [<action_string>]
"Action": <action_string>
• A question mark (?) following an element indicates that the element is optional. Example:
<version_block?>
However, be sure to refer to the notes that follow the grammar listing for details about optional
elements.
• A vertical line (|) between elements indicates alternatives. In the grammar, parentheses define the
scope of the alternatives. Example:
("Principal" | "NotPrincipal")
• Elements that must be literal strings are enclosed in double quotation marks ("). Example:
<version_block> = "Version" : ("2008-10-17" | "2012-10-17")
For additional notes, see Policy Grammar Notes (p. 390) following the grammar listing.
Grammar
The following listing describes the policy language grammar. For conventions used in the listing, see
the preceding section. For additional information, see the notes that follow.
Note
This grammar describes policies marked with a version of 2008-10-17 and 2012-10-17.
policy = {
<version_block?>
<id_block?>
<statement_block>
}
<version_block> = "Version" : ("2008-10-17" | "2012-10-17")
<id_block> = "Id" : <policy_id_string>
<statement_block> = "Statement" : [ <statement>, <statement>, ... ]
<statement> = {
<sid_block?>,
<principal_block?>,
<effect_block>,
<action_block>,
<resource_block>,
<condition_block?>
}
<sid_block> = "Sid" : <sid_string>
<effect_block> = "Effect" : ("Allow" | "Deny")
<principal_block> = ("Principal" | "NotPrincipal") : ("*" | <principal_map>)
<principal_map> = { <principal_map_entry>, <principal_map_entry>, ... }
<principal_map_entry> = ("AWS" | "Federated" | "Service") :
389

AWS Identity and Access Management User Guide
Policy Grammar
[<principal_id_string>, <principal_id_string>, ...]
<action_block> = ("Action" | "NotAction") :
("*" | [<action_string>, <action_string>, ...])
<resource_block> = ("Resource" | "NotResource") :
("*" | [<resource_string>, <resource_string>, ...])
<condition_block> = "Condition" : { <condition_map> }
<condition_map> {
<condition_type_string> : { <condition_key_string> :
<condition_value_list> },
<condition_type_string> : { <condition_key_string> :
<condition_value_list> }, ...
}
<condition_value_list> = [<condition_value>, <condition_value>, ...]
<condition_value> = ("string" | "number" | "Boolean")
Policy Grammar Notes
• A single policy can contain an array of statements.
• Policies have a maximum size between 2048 characters and 10,240 characters, depending on
what entity the policy is attached to. For more information, see Limitations on IAM Entities and
Objects (p. 338). Policy size calculations do not include whitespace characters.
• Individual elements must not contain multiple instances of the same key. For example, you cannot
include the Effect block twice in the same statement.
• Blocks can appear in any order. For example, version_block can follow id_block in a policy.
Similarly, effect_block, principal_block, action_block can appear in any order within a
statement.
• The id_block is optional in resource-based policies. It must not be included in user-based policies.
• The principal_block element is required in resource-based policies (for example, in Amazon S3
bucket policies) and in trust policies for IAM roles. It must not be included in user-based policies.
• Each string value (policy_id_string, sid_string, principal_ID_string, action_string,
resource_string, condition_type_string, condition_key_string, and the string version
of condition_value) can have its own minimum and maximum length restrictions, specific allowed
values, or required internal format.
Notes About String Values
This section provides additional information about string values that are used in different elements in a
policy.
action_string
Consists of a service namespace, a colon, and the name of an action. Action names can include
wildcards. Examples:
"Action":"ec2:StartInstances"
"Action":[
"ec2:StartInstances",
"ec2:StopInstances"
]
"Action":"cloudformation:*"
390

AWS Identity and Access Management User Guide
Policy Grammar
"Action":"*"
"Action":[
"s3:Get*",
"s3:List*"
]
policy_id_string
Provides a way to include information about the policy as a whole. Some services, such as
Amazon SQS and Amazon SNS, use the Id element in reserved ways. Unless otherwise
restricted by an individual service, policy_id_string can include spaces. Some services require this
value to be unique within an AWS account.
Note
The id_block is allowed in resource-based policies, but not in user-based policies.
There is no limit to the length, although this string contributes to the overall length of the policy,
which is limited.
"Id":"Admin_Policy"
"Id":"cd3ad3d9-2776-4ef1-a904-4c229d1642ee"
sid_string
Provides a way to include information about an individual statement. For IAM policies, basic
alphanumeric characters (A-Z,a-z,0-9) are the only allowed characters in the Sid value. Other
AWS services that support resource policies may have other requirements for the Sid value.
For example, some services require this value to be unique within an AWS account, and some
services allow additional characters such as spaces in the Sid value.
"Sid":"1"
"Sid": "ThisStatementProvidesPermissionsForConsoleAccess"
principal_string
Provides a way to specify a principal using the Amazon Resource Name (ARN) (p. 335) of the
AWS account, IAM user, IAM role, federated user, or assumed-role user. For an AWS account,
you can also use the short form AWS:accountnumber instead of the full ARN. For all of the
options including AWS services, assumed roles, and so on, see Specifying a Principal (p. 349).
Note that you can use * only to specify "everyone/anonymous". You cannot use it to specify part of
a name or ARN.
resource_string
In most cases, consists of an Amazon Resource Name (ARN).
"Resource":"arn:aws:iam::123456789012:user/Bob"
"Resource":"arn:aws:s3:::examplebucket/*"
condition_type_string
Identifies the type of condition being tested, such as StringEquals, StringLike,
NumericLessThan, DateGreaterThanEquals, Bool, BinaryEquals, IpAddress,
ArnEquals, etc. For a complete list of condition types, see Condition Operators (p. 363).
"Condition": {
"NumericLessThanEquals": {
391

AWS Identity and Access Management User Guide
Actions and Context Keys for IAM Policies
"s3:max-keys": "10"
}
}
"Condition": {
"Bool": {
"aws:SecureTransport": "true"
}
}
"Condition": {
"StringEquals": {
"s3:x-amz-server-side-encryption": "AES256"
}
}
condition_key_string
Identifies the condition key whose value will be tested to determine whether the condition is
met. AWS defines a set of condition keys that are available in all AWS services, including
aws:principaltype, aws:SecureTransport, and aws:userid.
For a list of AWS condition keys, see Available Keys for Conditions (p. 359). For condition
keys that are specific to a service, see the documentation for that service, such as Specifying
Conditions in a Policy in the Amazon Simple Storage Service Developer Guide and IAM Policies
for Amazon EC2 in the Amazon EC2 User Guide for Linux Instances.
"Condition":{
"Bool": {
"aws:SecureTransport": "true"
}
}
"Condition": {
"StringNotEquals": {
"s3:x-amz-server-side-encryption": "AES256"
}
}
"Condition": {
"StringEquals": {
"ec2:ResourceTag/purpose": "test"
}
}
AWS Service Actions and Condition Context
Keys for Use in IAM Policies
Each AWS service can provide actions and condition context keys for use in IAM policies. Not all
API actions defined by a service can be used in an IAM policy, and a service might define some
permissions that don't directly correspond to an API action. Use this list to determine which actions can
be used as permissions in an IAM policy.
• Use actions found in these lists in the Action element of an IAM policy to allow or deny what a
user can do within a service. For more information about the Action element, see Action in the IAM
Policy Element Reference.
392

AWS Identity and Access Management User Guide
Actions and Context Keys for IAM Policies
• Use the context keys in these lists in the Condition element of an IAM policy to allow or deny
access only when specified values are present. For more information about the Condition element,
see Condition (p. 356).
• For the list of the global condition context keys that are available to all services, see Available Keys
for Conditions (p. 359).
AWS services with actions and/or condition context keys:
•Amazon API Gateway (p. 394)
•Application Auto Scaling (p. 395)
•AWS Application Discovery Service (p. 395)
•Amazon AppStream (p. 396)
•Auto Scaling (p. 396)
•AWS Billing (p. 398)
•AWS Certificate Manager (p. 398)
•AWS CloudFormation (p. 399)
•Amazon CloudFront (p. 400)
•AWS CloudHSM (p. 401)
•Amazon CloudSearch (p. 401)
•AWS CloudTrail (p. 402)
•Amazon CloudWatch (p. 403)
•Amazon CloudWatch Events (p. 403)
•Amazon CloudWatch Logs (p. 404)
•AWS CodeCommit (p. 405)
•AWS CodeDeploy (p. 406)
•AWS CodePipeline (p. 407)
•Amazon Cognito Identity (p. 408)
•Amazon Cognito Sync (p. 408)
•AWS Config (p. 409)
•Data Pipeline (p. 410)
•AWS Database Migration Service (p. 410)
•AWS Device Farm (p. 411)
•AWS Direct Connect (p. 412)
•AWS Directory Service (p. 413)
•Amazon DynamoDB (p. 414)
•Amazon EC2 (p. 415)
•Amazon EC2 Container Registry (p. 420)
•Amazon EC2 Container Service (p. 421)
•AWS Elastic Beanstalk (p. 422)
•Amazon Elastic File System (p. 423)
•Elastic Load Balancing (p. 424)
•Amazon Elastic MapReduce (p. 425)
•Amazon Elastic Transcoder (p. 426)
•Amazon ElastiCache (p. 426)
•Amazon Elasticsearch Service (p. 428)
•Amazon GameLift (p. 428)
•Amazon Glacier (p. 429)
393

AWS Identity and Access Management User Guide
Actions and Context Keys for IAM Policies
•AWS Identity and Access Management (p. 430)
•AWS Import Export (p. 433)
•Amazon Inspector (p. 434)
•AWS IoT (p. 435)
•AWS Key Management Service (p. 436)
•Amazon Kinesis (p. 437)
•Amazon Kinesis Analytics (p. 438)
•Amazon Kinesis Firehose (p. 439)
•AWS Lambda (p. 439)
•Amazon Machine Learning (p. 440)
•Manage - Amazon API Gateway (p. 441)
•AWS Marketplace (p. 441)
•AWS Marketplace Management Portal (p. 442)
•Amazon Mechanical Turk (p. 442)
•Amazon Mobile Analytics (p. 443)
•AWS Mobile Hub (p. 444)
•AWS OpsWorks (p. 444)
•Amazon RDS (p. 446)
•Amazon Redshift (p. 448)
•Amazon Route 53 (p. 450)
•Amazon Route53 Domains (p. 451)
•Amazon S3 (p. 452)
•AWS Security Token Service (p. 454)
•Amazon SES (p. 454)
•Amazon Simple Systems Manager (p. 455)
•Amazon Simple Workflow Service (p. 456)
•Amazon SimpleDB (p. 458)
•Amazon SNS (p. 458)
•Amazon SQS (p. 459)
•Amazon Storage Gateway (p. 460)
•AWS Trusted Advisor (p. 461)
•AWS WAF (p. 462)
•Amazon WorkDocs (p. 463)
•Amazon WorkMail (p. 464)
•Amazon WorkSpaces (p. 465)
Actions and Condition Context Keys for Amazon API
Gateway
Amazon API Gateway provides the following service-specific actions and condition context keys for use
in IAM policies.
Actions for Amazon API Gateway
For more information about controlling access to API Gateway, see User Access Permissions for
Amazon API Gateway in the API Gateway Developer Guide.
394

AWS Identity and Access Management User Guide
Actions and Context Keys for IAM Policies
•execute-api:Invoke
•execute-api:InvalidateCache
Condition context keys for Amazon API Gateway
Amazon API Gateway has no service-specific context keys that can be used in an IAM policy. For
the list of the global condition context keys that are available to all services, see Available Keys for
Conditions (p. 359) in the IAM Policy Elements Reference.
Actions and Condition Context Keys for Application Auto
Scaling
Application Auto Scaling provides the following service-specific actions and condition context keys for
use in IAM policies.
Actions for Application Auto Scaling
For information about using the following Application Auto Scaling API actions in an IAM policy, see
Controlling Access to Your Auto Scaling Resources in the Auto Scaling User Guide.
•application-autoscaling:DeleteScalingPolicy
•application-autoscaling:DeregisterScalableTarget
•application-autoscaling:DescribeScalableTargets
•application-autoscaling:DescribeScalingActivities
•application-autoscaling:DescribeScalingPolicies
•application-autoscaling:PutScalingPolicy
•application-autoscaling:RegisterScalableTarget
Condition context keys for Application Auto Scaling
Application Auto Scaling has no service-specific context keys that can be used in an IAM policy. For
the list of the global condition context keys that are available to all services, see Available Keys for
Conditions (p. 359) in the IAM Policy Elements Reference.
Actions and Condition Context Keys for AWS Application
Discovery Service
AWS Application Discovery Service provides the following service-specific actions and condition
context keys for use in IAM policies.
Actions for AWS Application Discovery Service
For information about using the following Application Discovery Service actions in an IAM policy, see
Setting Up Access to Application Discovery Service in the Application Discovery Service User Guide.
•discovery:CreateTags
•discovery:DeleteTags
•discovery:DescribeAgents
•discovery:DescribeConfigurations
•discovery:DescribeExportConfigurations
•discovery:DescribeTags
•discovery:ExportConfigurations
395

AWS Identity and Access Management User Guide
Actions and Context Keys for IAM Policies
•discovery:ListConfigurations
•discovery:StartDataCollectionByAgentIds
•discovery:StopDataCollectionByAgentIds
Condition context keys for AWS Application Discovery Service
AWS Application Discovery Service has no service-specific context keys that can be used in an IAM
policy. For the list of the global condition context keys that are available to all services, see Available
Keys for Conditions (p. 359) in the IAM Policy Elements Reference.
Actions and Condition Context Keys for Amazon
AppStream
Amazon AppStream provides the following service-specific actions and condition context keys for use
in IAM policies.
Actions for Amazon AppStream
For more information about the Amazon AppStream API actions in the following list, see Amazon
AppStream REST API in the Amazon AppStream Developer Guide.
•appstream:CreateApplication
•appstream:CreateSession
•appstream:DeleteApplication
•appstream:GetApiRoot
•appstream:GetApplication
•appstream:GetApplications
•appstream:GetApplicationError
•appstream:GetApplicationErrors
•appstream:GetApplicationStatus
•appstream:GetSession
•appstream:GetSessions
•appstream:GetSessionStatus
•appstream:UpdateApplication
•appstream:UpdateApplicationState
•appstream:UpdateSessionState
Condition context keys for Amazon AppStream
Amazon AppStream has no service-specific context keys that can be used in an IAM policy. For
the list of the global condition context keys that are available to all services, see Available Keys for
Conditions (p. 359) in the IAM Policy Elements Reference.
Actions and Condition Context Keys for Auto Scaling
Auto Scaling provides the following service-specific actions and condition context keys for use in IAM
policies.
Actions for Auto Scaling
For information about using the following Auto Scaling API actions in an IAM policy, see Auto Scaling
Actions in the Auto Scaling User Guide.
396

AWS Identity and Access Management User Guide
Actions and Context Keys for IAM Policies
•autoscaling:AttachInstances
•autoscaling:AttachLoadBalancers
•autoscaling:CompleteLifecycleAction
•autoscaling:CreateAutoScalingGroup
•autoscaling:CreateLaunchConfiguration
•autoscaling:CreateOrUpdateTags
•autoscaling:DeleteAutoScalingGroup
•autoscaling:DeleteLaunchConfiguration
•autoscaling:DeleteLifecycleHook
•autoscaling:DeleteNotificationConfiguration
•autoscaling:DeletePolicy
•autoscaling:DeleteScheduledAction
•autoscaling:DeleteTags
•autoscaling:DescribeAccountLimits
•autoscaling:DescribeAdjustmentTypes
•autoscaling:DescribeAutoScalingGroups
•autoscaling:DescribeAutoScalingInstances
•autoscaling:DescribeAutoScalingNotificationTypes
•autoscaling:DescribeLaunchConfigurations
•autoscaling:DescribeLifecycleHookTypes
•autoscaling:DescribeLifecycleHooks
•autoscaling:DescribeLoadBalancers
•autoscaling:DescribeMetricCollectionTypes
•autoscaling:DescribeNotificationConfigurations
•autoscaling:DescribePolicies
•autoscaling:DescribeScalingActivities
•autoscaling:DescribeScalingProcessTypes
•autoscaling:DescribeScheduledActions
•autoscaling:DescribeTags
•autoscaling:DescribeTerminationPolicyTypes
•autoscaling:DetachInstances
•autoscaling:DetachLoadBalancers
•autoscaling:DisableMetricsCollection
•autoscaling:EnableMetricsCollection
•autoscaling:EnterStandby
•autoscaling:ExecutePolicy
•autoscaling:ExitStandby
•autoscaling:PutLifecycleHook
•autoscaling:PutNotificationConfiguration
•autoscaling:PutScalingPolicy
•autoscaling:PutScheduledUpdateGroupAction
•autoscaling:RecordLifecycleActionHeartbeat
•autoscaling:ResumeProcesses
•autoscaling:SetDesiredCapacity
•autoscaling:SetInstanceHealth
397

AWS Identity and Access Management User Guide
Actions and Context Keys for IAM Policies
•autoscaling:SetInstanceProtection
•autoscaling:SuspendProcesses
•autoscaling:TerminateInstanceInAutoScalingGroup
•autoscaling:UpdateAutoScalingGroup
Condition context keys for Auto Scaling
For more information about using condition keys in an IAM policy for Auto Scaling, see Auto Scaling
Keys in the Auto Scaling User Guide.
Auto Scaling has no service-specific context keys that can be used in an IAM policy. For the
list of the global condition context keys that are available to all services, see Available Keys for
Conditions (p. 359) in the IAM Policy Elements Reference.
Actions and Condition Context Keys for AWS Billing
AWS Billing provides the following service-specific actions and condition context keys for use in IAM
policies.
Actions for AWS Billing
For information about controlling access to your billing data by using an IAM policy, see Billing and
Cost Management Permissions Reference in the AWS Billing and Cost Management User Guide.
•aws-portal:ModifyAccount
•aws-portal:ModifyBilling
•aws-portal:ModifyPaymentMethods
•aws-portal:ViewAccount
•aws-portal:ViewBilling
•aws-portal:ViewBudget
•aws-portal:ViewPaymentMethods
•aws-portal:ViewUsage
Condition context keys for AWS Billing
AWS Billing has no service-specific context keys that can be used in an IAM policy. For the list
of the global condition context keys that are available to all services, see Available Keys for
Conditions (p. 359) in the IAM Policy Elements Reference.
Actions and Condition Context Keys for AWS Certificate
Manager
AWS Certificate Manager provides the following service-specific actions and condition context keys for
use in IAM policies.
Actions for AWS Certificate Manager
For information about controlling access to ACM by using an IAM policy, see Permissions and Policies
in the AWS Certificate Manager User Guide.
•acm:AddTagsToCertificate
•acm:DeleteCertificate
•acm:DescribeCertificate
398

AWS Identity and Access Management User Guide
Actions and Context Keys for IAM Policies
•acm:GetCertificate
•acm:ListCertificates
•acm:ListTagsForCertificate
•acm:RemoveTagsFromCertificate
•acm:RequestCertificate
•acm:ResendValidationEmail
Condition context keys for AWS Certificate Manager
AWS Certificate Manager has no service-specific context keys that can be used in an IAM policy. For
the list of the global condition context keys that are available to all services, see Available Keys for
Conditions (p. 359) in the IAM Policy Elements Reference.
Actions and Condition Context Keys for AWS
CloudFormation
AWS CloudFormation provides the following service-specific actions and condition context keys for use
in IAM policies.
Actions for AWS CloudFormation
For information about using the following AWS CloudFormation API actions in an IAM policy, see AWS
CloudFormation Actions and Resources in the AWS CloudFormation User Guide.
•cloudformation:CancelUpdateStack
•cloudformation:ContinueUpdateRollback
•cloudformation:CreateChangeSet
•cloudformation:CreateStack
•cloudformation:CreateUploadBucket
•cloudformation:DeleteStack
•cloudformation:DescribeAccountLimits
•cloudformation:DescribeChangeSet
•cloudformation:DescribeStackEvents
•cloudformation:DescribeStackResource
•cloudformation:DescribeStackResources
•cloudformation:DescribeStacks
•cloudformation:EstimateTemplateCost
•cloudformation:ExecuteChangeSet
•cloudformation:GetStackPolicy
•cloudformation:GetTemplate
•cloudformation:GetTemplateSummary
•cloudformation:ListChangeSets
•cloudformation:ListStackResources
•cloudformation:ListStacks
•cloudformation:PreviewStackUpdate
•cloudformation:SetStackPolicy
•cloudformation:SignalResource
•cloudformation:UpdateStack
•cloudformation:ValidateTemplate
399

AWS Identity and Access Management User Guide
Actions and Context Keys for IAM Policies
Condition context keys for AWS CloudFormation
For information about using conditions in an IAM policy, see AWS CloudFormation Conditions in the
AWS CloudFormation User Guide.
AWS CloudFormation has the following service-specific context keys that can be used in an IAM policy.
For the list of the global condition context keys that are available to all services, see Available Keys for
Conditions (p. 359) in the IAM Policy Elements Reference.
•cloudformation:TemplateUrl
•cloudformation:StackPolicyUrl
•cloudformation:ResourceTypes
Actions and Condition Context Keys for Amazon
CloudFront
Amazon CloudFront provides the following service-specific actions and condition context keys for use
in IAM policies.
Actions for Amazon CloudFront
For information about using the following CloudFront API actions in an IAM policy, see CloudFront
Actions in the Amazon CloudFront Developer Guide.
•cloudfront:CreateCloudFrontOriginAccessIdentity
•cloudfront:CreateDistribution
•cloudfront:CreateInvalidation
•cloudfront:CreateStreamingDistribution
•cloudfront:DeleteCloudFrontOriginAccessIdentity
•cloudfront:DeleteDistribution
•cloudfront:DeleteStreamingDistribution
•cloudfront:GetCloudFrontOriginAccessIdentity
•cloudfront:GetCloudFrontOriginAccessIdentityConfig
•cloudfront:GetDistribution
•cloudfront:GetDistributionConfig
•cloudfront:GetInvalidation
•cloudfront:GetStreamingDistribution
•cloudfront:GetStreamingDistributionConfig
•cloudfront:ListCloudFrontOriginAccessIdentities
•cloudfront:ListDistributions
•cloudfront:ListDistributionsByWebACLId
•cloudfront:ListInvalidations
•cloudfront:ListStreamingDistributions
•cloudfront:UpdateCloudFrontOriginAccessIdentity
•cloudfront:UpdateDistribution
•cloudfront:UpdateStreamingDistribution
Condition context keys for Amazon CloudFront
For information about using condition keys in an IAM policy, see Policy Keys in the Amazon CloudFront
Developer Guide.
400

AWS Identity and Access Management User Guide
Actions and Context Keys for IAM Policies
Amazon CloudFront has no service-specific context keys that can be used in an IAM policy. For
the list of the global condition context keys that are available to all services, see Available Keys for
Conditions (p. 359) in the IAM Policy Elements Reference.
Actions and Condition Context Keys for AWS CloudHSM
AWS CloudHSM provides the following service-specific actions and condition context keys for use in
IAM policies.
Actions for AWS CloudHSM
For information about controlling access to AWS CloudHSM by using an IAM policy, see Controlling
Access to AWS CloudHSM Resources in the AWS CloudHSM User Guide.
•cloudhsm:CreateLunaClient
•cloudhsm:CreateHapg
•cloudhsm:CreateHsm
•cloudhsm:DeleteLunaClient
•cloudhsm:DeleteHapg
•cloudhsm:DeleteHsm
•cloudhsm:DescribeLunaClient
•cloudhsm:DescribeHapg
•cloudhsm:DescribeHsm
•cloudhsm:GetConfig
•cloudhsm:ListAvailableZones
•cloudhsm:ListLunaClients
•cloudhsm:ListHapgs
•cloudhsm:ListHsms
•cloudhsm:ModifyLunaClient
•cloudhsm:ModifyHapg
•cloudhsm:ModifyHsm
Condition context keys for AWS CloudHSM
AWS CloudHSM has no service-specific context keys that can be used in an IAM policy. For the
list of the global condition context keys that are available to all services, see Available Keys for
Conditions (p. 359) in the IAM Policy Elements Reference.
Actions and Condition Context Keys for Amazon
CloudSearch
Amazon CloudSearch provides the following service-specific actions and condition context keys for use
in IAM policies.
Actions for Amazon CloudSearch
For additional information about using Amazon CloudSearch actions in an IAM policy, see Configuring
Access for Amazon CloudSearch in the Amazon CloudSearch Developer Guide.
•cloudsearch:BuildSuggesters
•cloudsearch:CreateDomain
•cloudsearch:DefineAnalysisScheme
401

AWS Identity and Access Management User Guide
Actions and Context Keys for IAM Policies
•cloudsearch:DefineExpression
•cloudsearch:DefineIndexField
•cloudsearch:DefineIndexFields
•cloudsearch:DefineSuggester
•cloudsearch:DeleteAnalysisScheme
•cloudsearch:DeleteDomain
•cloudsearch:DeleteExpression
•cloudsearch:DeleteIndexField
•cloudsearch:DeleteSuggester
•cloudsearch:DescribeAnalysisSchemes
•cloudsearch:DescribeAvailabilityOptions
•cloudsearch:DescribeDomains
•cloudsearch:DescribeExpressions
•cloudsearch:DescribeIndexFields
•cloudsearch:DescribeScalingParameters
•cloudsearch:DescribeServiceAccessPolicies
•cloudsearch:DescribeSuggesters
•cloudsearch:document - this is an IAM policy permission only, not an API action that can be
called.
•cloudsearch:IndexDocuments
•cloudsearch:ListDomainNames
•cloudsearch:search - this is an IAM policy permission only, not an API action that can be called.
•cloudsearch:suggest - this is an IAM policy permission only, not an API action that can be
called.
•cloudsearch:UpdateAvailabilityOptions
•cloudsearch:UpdateScalingParameters
•cloudsearch:UpdateServiceAccessPolicies
Condition context keys for Amazon CloudSearch
Amazon CloudSearch has no service-specific context keys that can be used in an IAM policy. For
the list of the global condition context keys that are available to all services, see Available Keys for
Conditions (p. 359) in the IAM Policy Elements Reference.
Actions and Condition Context Keys for AWS CloudTrail
AWS CloudTrail provides the following service-specific actions and condition context keys for use in
IAM policies.
Actions for AWS CloudTrail
For more information about using the following CloudTrail API actions in an IAM policy, see Granting
Permissions for CloudTrail Actions in the AWS CloudTrail User Guide.
•cloudtrail:AddTags
•cloudtrail:CreateTrail
•cloudtrail:DeleteTrail
•cloudtrail:DescribeTrails
•cloudtrail:GetTrailStatus
•cloudtrail:ListPublicKeys
402

AWS Identity and Access Management User Guide
Actions and Context Keys for IAM Policies
•cloudtrail:ListTags
•cloudtrail:LookupEvents
•cloudtrail:RemoveTags
•cloudtrail:StartLogging
•cloudtrail:StopLogging
•cloudtrail:UpdateTrail
Condition context keys for AWS CloudTrail
AWS CloudTrail has no service-specific context keys that can be used in an IAM policy. For the
list of the global condition context keys that are available to all services, see Available Keys for
Conditions (p. 359) in the IAM Policy Elements Reference.
Actions and Condition Context Keys for Amazon
CloudWatch
Amazon CloudWatch provides the following service-specific actions and condition context keys for use
in IAM policies.
Actions for Amazon CloudWatch
For information about using the following CloudWatch API actions in an IAM policy, see CloudWatch
Actions in the Amazon CloudWatch Developer Guide.
•cloudwatch:DeleteAlarms
•cloudwatch:DescribeAlarmHistory
•cloudwatch:DescribeAlarms
•cloudwatch:DescribeAlarmsForMetric
•cloudwatch:DisableAlarmActions
•cloudwatch:EnableAlarmActions
•cloudwatch:GetMetricData
•cloudwatch:GetMetricStatistics
•cloudwatch:ListMetrics
•cloudwatch:PutMetricAlarm
•cloudwatch:PutMetricData
•cloudwatch:SetAlarmState
Condition context keys for Amazon CloudWatch
For information about using conditions to control access to CloudWatch in an IAM policy, see
CloudWatch Keys in the Amazon CloudWatch Developer Guide.
Amazon CloudWatch has no service-specific context keys that can be used in an IAM policy. For
the list of the global condition context keys that are available to all services, see Available Keys for
Conditions (p. 359) in the IAM Policy Elements Reference.
Actions and Condition Context Keys for Amazon
CloudWatch Events
Amazon CloudWatch Events provides the following service-specific actions and condition context keys
for use in IAM policies.
403

AWS Identity and Access Management User Guide
Actions and Context Keys for IAM Policies
Actions for Amazon CloudWatch Events
For information about controlling access to CloudWatch Events by using an IAM policy, see Controlling
User Access to Rules and Events in the Amazon CloudWatch Developer Guide.
•events:DeleteRule
•events:DescribeRule
•events:DisableRule
•events:EnableRule
•events:ListRuleNamesByTarget
•events:ListRules
•events:ListTargetsByRule
•events:PutEvents
•events:PutRule
•events:PutTargets
•events:RemoveTargets
•events:TestEventPattern
Condition context keys for Amazon CloudWatch Events
For information about using condition keys to provide more granular control over CloudWatch Events
with IAM policies, see Condition Keys for CloudWatch Events in the Amazon CloudWatch Developer
Guide.
Amazon CloudWatch Events has the following service-specific context keys that can be used in an IAM
policy. For the list of the global condition context keys that are available to all services, see Available
Keys for Conditions (p. 359) in the IAM Policy Elements Reference.
•events:source
•events:detail-type
•events:detail.userIdentity.principalId
•events:TargetArn
Actions and Condition Context Keys for Amazon
CloudWatch Logs
Amazon CloudWatch Logs provides the following service-specific actions and condition context keys
for use in IAM policies.
Actions for Amazon CloudWatch Logs
•logs:CancelExportTask
•logs:CreateExportTask
•logs:CreateLogGroup
•logs:CreateLogStream
•logs:DeleteDestination
•logs:DeleteLogGroup
•logs:DeleteLogStream
•logs:DeleteMetricFilter
•logs:DeleteRetentionPolicy
404

AWS Identity and Access Management User Guide
Actions and Context Keys for IAM Policies
•logs:DeleteSubscriptionFilter
•logs:DescribeDestinations
•logs:DescribeExportTasks
•logs:DescribeLogGroups
•logs:DescribeLogStreams
•logs:DescribeMetricFilters
•logs:DescribeSubscriptionFilters
•logs:FilterLogEvents
•logs:GetLogEvents
•logs:PutDestination
•logs:PutDestinationPolicy
•logs:PutLogEvents
•logs:PutMetricFilter
•logs:PutRetentionPolicy
•logs:PutSubscriptionFilter
•logs:TestMetricFilter
Condition context keys for Amazon CloudWatch Logs
Amazon CloudWatch Logs has no service-specific context keys that can be used in an IAM policy. For
the list of the global condition context keys that are available to all services, see Available Keys for
Conditions (p. 359) in the IAM Policy Elements Reference.
Actions and Condition Context Keys for AWS
CodeCommit
AWS CodeCommit provides the following service-specific actions and condition context keys for use in
IAM policies.
Actions for AWS CodeCommit
For information about using the following AWS CodeCommit actions in an IAM policy, see Access
Permissions Reference in the AWS CodeCommit User Guide.
•codecommit:BatchGetRepositories
•codecommit:CreateBranch
•codecommit:CreateRepository
•codecommit:DeleteRepository
•codecommit:GetBlob - this is an IAM policy permission only, not an API action that can be called.
•codecommit:GetBranch
•codecommit:GetObjectIdentifier - this is an IAM policy permission only, not an API action
that can be called.
•codecommit:GetRepository
•codecommit:GetTree - this is an IAM policy permission only, not an API action that can be called.
•codecommit:GitPull - this is an IAM policy permission only, not an API action that can be called.
•codecommit:GitPush - this is an IAM policy permission only, not an API action that can be called.
•codecommit:ListBranches
•codecommit:ListRepositories
•codecommit:UpdateDefaultBranch
405

AWS Identity and Access Management User Guide
Actions and Context Keys for IAM Policies
•codecommit:UpdateRepositoryDescription
•codecommit:UpdateRepositoryName
Condition context keys for AWS CodeCommit
AWS CodeCommit has no service-specific context keys that can be used in an IAM policy. For the
list of the global condition context keys that are available to all services, see Available Keys for
Conditions (p. 359) in the IAM Policy Elements Reference.
Actions and Condition Context Keys for AWS CodeDeploy
AWS CodeDeploy provides the following service-specific actions and condition context keys for use in
IAM policies.
Actions for AWS CodeDeploy
For information about using the following AWS CodeDeploy API actions in an IAM policy, see AWS
CodeDeploy User Access Permissions Reference in the AWS CodeDeploy User Guide.
•codedeploy:AddTagsToOnPremisesInstances
•codedeploy:BatchGetApplications
•codedeploy:BatchGetDeployments
•codedeploy:BatchGetOnPremisesInstances
•codedeploy:CreateApplication
•codedeploy:CreateDeployment
•codedeploy:CreateDeploymentConfig
•codedeploy:CreateDeploymentGroup
•codedeploy:DeleteApplication
•codedeploy:DeleteDeploymentConfig
•codedeploy:DeleteDeploymentGroup
•codedeploy:DeregisterOnPremisesInstance
•codedeploy:GetApplication
•codedeploy:GetApplicationRevision
•codedeploy:GetDeployment
•codedeploy:GetDeploymentConfig
•codedeploy:GetDeploymentGroup
•codedeploy:GetDeploymentInstance
•codedeploy:GetOnPremisesInstance
•codedeploy:ListApplicationRevisions
•codedeploy:ListApplications
•codedeploy:ListDeploymentConfigs
•codedeploy:ListDeploymentGroups
•codedeploy:ListDeploymentInstances
•codedeploy:ListDeployments
•codedeploy:ListOnPremisesInstances
•codedeploy:RegisterApplicationRevision
•codedeploy:RegisterOnPremisesInstance
•codedeploy:RemoveTagsFromOnPremisesInstances
406

AWS Identity and Access Management User Guide
Actions and Context Keys for IAM Policies
•codedeploy:StopDeployment
•codedeploy:UpdateApplication
•codedeploy:UpdateDeploymentGroup
Condition context keys for AWS CodeDeploy
AWS CodeDeploy has no service-specific context keys that can be used in an IAM policy. For the
list of the global condition context keys that are available to all services, see Available Keys for
Conditions (p. 359) in the IAM Policy Elements Reference.
Actions and Condition Context Keys for AWS
CodePipeline
AWS CodePipeline provides the following service-specific actions and condition context keys for use in
IAM policies.
Actions for AWS CodePipeline
For information about controlling access to AWS CodePipeline by using an IAM policy, see AWS
CodePipeline Access Permissions Reference in the AWS CodePipeline User Guide.
•codepipeline:AcknowledgeJob
•codepipeline:AcknowledgeThirdPartyJob
•codepipeline:CreateCustomActionType
•codepipeline:CreatePipeline
•codepipeline:DeleteCustomActionType
•codepipeline:DeletePipeline
•codepipeline:DisableStageTransition
•codepipeline:EnableStageTransition
•codepipeline:GetPipeline
•codepipeline:GetPipelineState
•codepipeline:GetThirdPartyJobDetails
•codepipeline:ListActionTypes
•codepipeline:ListPipelines
•codepipeline:PollForJobs
•codepipeline:PollForThirdPartyJobs
•codepipeline:PutActionRevision
•codepipeline:PutJobFailureResult
•codepipeline:PutJobSuccessResult
•codepipeline:PutThirdPartyJobFailureResult
•codepipeline:PutThirdPartyJobSuccessResult
•codepipeline:StartPipelineExecution
•codepipeline:UpdatePipeline
Condition context keys for AWS CodePipeline
AWS CodePipeline has no service-specific context keys that can be used in an IAM policy. For
the list of the global condition context keys that are available to all services, see Available Keys for
Conditions (p. 359) in the IAM Policy Elements Reference.
407

AWS Identity and Access Management User Guide
Actions and Context Keys for IAM Policies
Actions and Condition Context Keys for Amazon Cognito
Identity
Amazon Cognito Identity provides the following service-specific actions and condition context keys for
use in IAM policies.
Actions for Amazon Cognito Identity
•cognito-identity:CreateIdentityPool
•cognito-identity:DeleteIdentityPool
•cognito-identity:DeleteIdentities
•cognito-identity:DescribeIdentity
•cognito-identity:DescribeIdentityPool
•cognito-identity:GetIdentityPoolRoles
•cognito-identity:GetOpenIdTokenForDeveloperIdentity
•cognito-identity:ListIdentities
•cognito-identity:ListIdentityPools
•cognito-identity:LookupDeveloperIdentity
•cognito-identity:MergeDeveloperIdentities
•cognito-identity:SetIdentityPoolRoles
•cognito-identity:UnlinkDeveloperIdentity
•cognito-identity:UpdateIdentityPool
Condition context keys for Amazon Cognito Identity
Amazon Cognito Identity has no service-specific context keys that can be used in an IAM policy. For
the list of the global condition context keys that are available to all services, see Available Keys for
Conditions (p. 359) in the IAM Policy Elements Reference.
Actions and Condition Context Keys for Amazon Cognito
Sync
Amazon Cognito Sync provides the following service-specific actions and condition context keys for
use in IAM policies.
Actions for Amazon Cognito Sync
•cognito-sync:BulkPublish
•cognito-sync:DeleteDataset
•cognito-sync:DescribeDataset
•cognito-sync:DescribeIdentityUsage
•cognito-sync:DescribeIdentityPoolUsage
•cognito-sync:GetBulkPublishDetails
•cognito-sync:GetCognitoEvents
•cognito-sync:GetIdentityPoolConfiguration
•cognito-sync:ListDatasets
•cognito-sync:ListIdentityPoolUsage
•cognito-sync:ListRecords
•cognito-sync:RegisterDevice
•cognito-sync:SetCognitoEvents
408

AWS Identity and Access Management User Guide
Actions and Context Keys for IAM Policies
•cognito-sync:SetIdentityPoolConfiguration
•cognito-sync:SubscribeToDataset
•cognito-sync:UpdateRecords
•cognito-sync:UnsubscribeFromDataset
Condition context keys for Amazon Cognito Sync
Amazon Cognito Sync has no service-specific context keys that can be used in an IAM policy. For
the list of the global condition context keys that are available to all services, see Available Keys for
Conditions (p. 359) in the IAM Policy Elements Reference.
Actions and Condition Context Keys for AWS Config
AWS Config provides the following service-specific actions and condition context keys for use in IAM
policies.
Actions for AWS Config
For information about using the following AWS Config API actions in an IAM policy, see Recommended
IAM Permissions for Using the AWS Config Console and the AWS CLI in the AWS Config Developer
Guide.
•config:DeleteConfigRule
•config:DeleteConfigurationRecorder
•config:DeleteDeliveryChannel
•config:DeleteEvaluationResults
•config:DeliverConfigSnapshot
•config:DescribeComplianceByConfigRule
•config:DescribeComplianceByResource
•config:DescribeConfigRuleEvaluationStatus
•config:DescribeConfigRules
•config:DescribeConfigurationRecorderStatus
•config:DescribeConfigurationRecorders
•config:DescribeDeliveryChannelStatus
•config:DescribeDeliveryChannels
•config:GetComplianceDetailsByConfigRule
•config:GetComplianceDetailsByResource
•config:GetComplianceSummaryByConfigRule
•config:GetComplianceSummaryByResourceType
•config:GetResourceConfigHistory
•config:GetResources
•config:GetTagKeys
•config:ListDiscoveredResources
•config:PutConfigRule
•config:PutConfigurationRecorder
•config:PutDeliveryChannel
•config:PutEvaluations
•config:StartConfigRulesEvaluation
•config:StartConfigurationRecorder
•config:StopConfigurationRecorder
409

AWS Identity and Access Management User Guide
Actions and Context Keys for IAM Policies
Condition context keys for AWS Config
AWS Config has no service-specific context keys that can be used in an IAM policy. For the
list of the global condition context keys that are available to all services, see Available Keys for
Conditions (p. 359) in the IAM Policy Elements Reference.
Actions and Condition Context Keys for Data Pipeline
Data Pipeline provides the following service-specific actions and condition context keys for use in IAM
policies.
Actions for Data Pipeline
For information about using the following AWS Data Pipeline API actions in an IAM policy, see
Controlling Access to Pipelines and Resources in the AWS Data Pipeline Developer Guide.
•datapipeline:ActivatePipeline
•datapipeline:AddTags
•datapipeline:CreatePipeline
•datapipeline:DeactivatePipeline
•datapipeline:DeletePipeline
•datapipeline:DescribeObjects
•datapipeline:DescribePipelines
•datapipeline:EvaluateExpression
•datapipeline:GetAccountLimits
•datapipeline:GetPipelineDefinition
•datapipeline:ListPipelines
•datapipeline:PollForTask
•datapipeline:PutAccountLimits
•datapipeline:PutPipelineDefinition
•datapipeline:QueryObjects
•datapipeline:RemoveTags
•datapipeline:ReportTaskProgress
•datapipeline:ReportTaskRunnerHeartbeat
•datapipeline:SetStatus
•datapipeline:SetTaskStatus
•datapipeline:ValidatePipelineDefinition
Condition context keys for Data Pipeline
Data Pipeline has no service-specific context keys that can be used in an IAM policy. For the
list of the global condition context keys that are available to all services, see Available Keys for
Conditions (p. 359) in the IAM Policy Elements Reference.
Actions and Condition Context Keys for AWS Database
Migration Service
AWS Database Migration Service provides the following service-specific actions and condition context
keys for use in IAM policies.
Actions for AWS Database Migration Service
410

AWS Identity and Access Management User Guide
Actions and Context Keys for IAM Policies
For information about using the following AWS Database Migration Service API actions in an IAM
policy, see IAM Permissions Needed to Use AWS DMS in the AWS DMS User Guide.
•dms:AddTagsToResource
•dms:CreateEndpoint
•dms:CreateReplicationInstance
•dms:CreateReplicationSubnetGroup
•dms:CreateReplicationTask
•dms:DeleteEndpoint
•dms:DeleteReplicationInstance
•dms:DeleteReplicationSubnetGroup
•dms:DeleteReplicationTask
•dms:DescribeAccountAttributes
•dms:DescribeConnections
•dms:DescribeEndpointTypes
•dms:DescribeEndpoints
•dms:DescribeOrderableReplicationInstances
•dms:DescribeRefreshSchemasStatus
•dms:DescribeReplicationInstances
•dms:DescribeReplicationSubnetGroups
•dms:DescribeReplicationTasks
•dms:DescribeSchemas
•dms:DescribeTableStatistics
•dms:ListTagsForResource
•dms:ModifyEndpoint
•dms:ModifyReplicationInstance
•dms:ModifyReplicationSubnetGroup
•dms:RefreshSchemas
•dms:RemoveTagsFromResource
•dms:StartReplicationTask
•dms:StopReplicationTask
•dms:TestConnection
Condition context keys for AWS Database Migration Service
AWS Database Migration Service has no service-specific context keys that can be used in an IAM
policy. For the list of the global condition context keys that are available to all services, see Available
Keys for Conditions (p. 359) in the IAM Policy Elements Reference.
Actions and Condition Context Keys for AWS Device Farm
AWS Device Farm provides the following service-specific actions and condition context keys for use in
IAM policies.
Actions for AWS Device Farm
For more information about the Device Farm API actions in the following list, see User Access
Permissions for AWS Device Farm in the Device Farm Developer Guide.
•devicefarm:CreateDevicePool
411

AWS Identity and Access Management User Guide
Actions and Context Keys for IAM Policies
•devicefarm:CreateProject
•devicefarm:CreateUpload
•devicefarm:GetDevice
•devicefarm:GetDevicePool
•devicefarm:GetDevicePoolCompatibility
•devicefarm:GetJob
•devicefarm:GetProject
•devicefarm:GetRun
•devicefarm:GetSuite
•devicefarm:GetTest
•devicefarm:GetUpload
•devicefarm:ListArtifacts
•devicefarm:ListDevicePools
•devicefarm:ListDevices
•devicefarm:ListJobs
•devicefarm:ListProjects
•devicefarm:ListRuns
•devicefarm:ListSamples
•devicefarm:ListSuites
•devicefarm:ListTests
•devicefarm:ListUniqueProblems
•devicefarm:ListUploads
•devicefarm:ScheduleRun
Condition context keys for AWS Device Farm
AWS Device Farm has no service-specific context keys that can be used in an IAM policy. For the
list of the global condition context keys that are available to all services, see Available Keys for
Conditions (p. 359) in the IAM Policy Elements Reference.
Actions and Condition Context Keys for AWS Direct
Connect
AWS Direct Connect provides the following service-specific actions and condition context keys for use
in IAM policies.
Actions for AWS Direct Connect
For information about using the following AWS Direct Connect API actions in an IAM policy, see AWS
Direct Connect Actions in the AWS Direct Connect User Guide.
•directconnect:AllocateConnectionOnInterconnect
•directconnect:AllocatePrivateVirtualInterface
•directconnect:AllocatePublicVirtualInterface
•directconnect:ConfirmConnection
•directconnect:ConfirmPrivateVirtualInterface
•directconnect:ConfirmPublicVirtualInterface
•directconnect:CreateConnection
•directconnect:CreateInterconnect
412

AWS Identity and Access Management User Guide
Actions and Context Keys for IAM Policies
•directconnect:CreatePrivateVirtualInterface
•directconnect:CreatePublicVirtualInterface
•directconnect:DeleteConnection
•directconnect:DeleteInterconnect
•directconnect:DeleteVirtualInterface
•directconnect:DescribeConnections
•directconnect:DescribeConnectionsOnInterconnect
•directconnect:DescribeInterconnects
•directconnect:DescribeLocations
•directconnect:DescribeVirtualGateways
•directconnect:DescribeVirtualInterfaces
Condition context keys for AWS Direct Connect
For information about using conditions in an IAM policy to control access to AWS Direct Connect, see
AWS Direct Connect Keys in the AWS Direct Connect User Guide.
AWS Direct Connect has no service-specific context keys that can be used in an IAM policy. For
the list of the global condition context keys that are available to all services, see Available Keys for
Conditions (p. 359) in the IAM Policy Elements Reference.
Actions and Condition Context Keys for AWS Directory
Service
AWS Directory Service provides the following service-specific actions and condition context keys for
use in IAM policies.
Actions for AWS Directory Service
For information about using the following AWS Directory Service API actions in an IAM policy, see
Controlling Access to AWS Directory Service Resources in the AWS Directory Service Administration
Guide.
•ds:CreateComputer
•ds:CreateDirectory
•ds:CreateSnapshot
•ds:CheckAlias
•ds:ConnectDirectory
•ds:DeleteDirectory
•ds:DeleteSnapshot
•ds:DescribeDirectories
•ds:DescribeSnapshots
•ds:GetDirectoryLimits
•ds:GetSnapshotLimits
•ds:ListAuthorizedApplications
•ds:RepairDirectory
•ds:RestoreFromSnapshot
•ds:UpdateDirectory
Condition context keys for AWS Directory Service
413

AWS Identity and Access Management User Guide
Actions and Context Keys for IAM Policies
AWS Directory Service has no service-specific context keys that can be used in an IAM policy. For
the list of the global condition context keys that are available to all services, see Available Keys for
Conditions (p. 359) in the IAM Policy Elements Reference.
Actions and Condition Context Keys for Amazon
DynamoDB
Amazon DynamoDB provides the following service-specific actions and condition context keys for use
in IAM policies.
Actions for Amazon DynamoDB
For information about using the following DynamoDB API actions in an IAM policy, see DynamoDB
Actions in the Amazon DynamoDB Developer Guide.
•dynamodb:BatchGetItem
•dynamodb:BatchWriteItem
•dynamodb:CreateTable
•dynamodb:DeleteItem
•dynamodb:DeleteTable
•dynamodb:DescribeLimits
•dynamodb:DescribeReservedCapacity
•dynamodb:DescribeReservedCapacityOfferings
•dynamodb:DescribeStream
•dynamodb:DescribeTable
•dynamodb:GetItem
•dynamodb:GetRecords
•dynamodb:GetShardIterator
•dynamodb:ListStreams
•dynamodb:ListTables
•dynamodb:PurchaseReservedCapacityOfferings
•dynamodb:PutItem
•dynamodb:Query
•dynamodb:Scan
•dynamodb:UpdateItem
•dynamodb:UpdateTable
Condition context keys for Amazon DynamoDB
For information about using the following DynamoDB condition keys in an IAM policy, see IAM Policy
Keys in the Amazon DynamoDB Developer Guide.
Amazon DynamoDB has the following service-specific context keys that can be used in an IAM policy.
For the list of the global condition context keys that are available to all services, see Available Keys for
Conditions (p. 359) in the IAM Policy Elements Reference.
•dynamodb:Attributes
•dynamodb:ReturnValues
•dynamodb:ReturnConsumedCapacity
•dynamodb:Select
•dynamodb:LeadingKeys
414

AWS Identity and Access Management User Guide
Actions and Context Keys for IAM Policies
Actions and Condition Context Keys for Amazon EC2
Amazon EC2 provides the following service-specific actions and condition context keys for use in IAM
policies.
Actions for Amazon EC2
For information about using the following Amazon EC2 API actions in an IAM policy, see Actions for
Amazon EC2 in the Amazon EC2 User Guide for Linux Instances.
•ec2:AcceptVpcPeeringConnection
•ec2:AllocateAddress
•ec2:AllocateHosts
•ec2:AssignPrivateIpAddresses
•ec2:AssociateAddress
•ec2:AssociateDhcpOptions
•ec2:AssociateRouteTable
•ec2:AttachClassicLinkVpc
•ec2:AttachInternetGateway
•ec2:AttachNetworkInterface
•ec2:AttachVolume
•ec2:AttachVpnGateway
•ec2:AuthorizeSecurityGroupEgress
•ec2:AuthorizeSecurityGroupIngress
•ec2:BundleInstance
•ec2:CancelBundleTask
•ec2:CancelConversionTask
•ec2:CancelExportTask
•ec2:CancelImportTask
•ec2:CancelReservedInstancesListing
•ec2:CancelSpotFleetRequests
•ec2:CancelSpotFleetRequests
•ec2:CancelSpotInstanceRequests
•ec2:ConfirmProductInstance
•ec2:CopyImage
•ec2:CopySnapshot
•ec2:CreateCustomerGateway
•ec2:CreateDhcpOptions
•ec2:CreateFlowLogs
•ec2:CreateImage
•ec2:CreateInstanceExportTask
•ec2:CreateInternetGateway
•ec2:CreateKeyPair
•ec2:CreateNatGateway
•ec2:CreateNetworkAcl
•ec2:CreateNetworkAclEntry
•ec2:CreateNetworkInterface
•ec2:CreatePlacementGroup
415

AWS Identity and Access Management User Guide
Actions and Context Keys for IAM Policies
•ec2:CreateReservedInstancesListing
•ec2:CreateRoute
•ec2:CreateRouteTable
•ec2:CreateSecurityGroup
•ec2:CreateSnapshot
•ec2:CreateSpotDatafeedSubscription
•ec2:CreateSubnet
•ec2:CreateTags
•ec2:CreateVolume
•ec2:CreateVpc
•ec2:CreateVpcEndpoint
•ec2:CreateVpcPeeringConnection
•ec2:CreateVpnConnection
•ec2:CreateVpnConnectionRoute
•ec2:CreateVpnGateway
•ec2:DeleteCustomerGateway
•ec2:DeleteDhcpOptions
•ec2:DeleteFlowLogs
•ec2:DeleteInternetGateway
•ec2:DeleteKeyPair
•ec2:DeleteNatGateway
•ec2:DeleteNetworkAcl
•ec2:DeleteNetworkAclEntry
•ec2:DeleteNetworkInterface
•ec2:DeletePlacementGroup
•ec2:DeleteRoute
•ec2:DeleteRouteTable
•ec2:DeleteSecurityGroup
•ec2:DeleteSnapshot
•ec2:DeleteSpotDatafeedSubscription
•ec2:DeleteSubnet
•ec2:DeleteTags
•ec2:DeleteVolume
•ec2:DeleteVpc
•ec2:DeleteVpcEndpoints
•ec2:DeleteVpcPeeringConnection
•ec2:DeleteVpnConnection
•ec2:DeleteVpnConnectionRoute
•ec2:DeleteVpnGateway
•ec2:DeregisterImage
•ec2:DescribeAccountAttributes
•ec2:DescribeAddresses
•ec2:DescribeAvailabilityZones
•ec2:DescribeBundleTasks
•ec2:DescribeClassicLinkInstances
416

AWS Identity and Access Management User Guide
Actions and Context Keys for IAM Policies
•ec2:DescribeConversionTasks
•ec2:DescribeCustomerGateways
•ec2:DescribeDhcpOptions
•ec2:DescribeExportTasks
•ec2:DescribeFlowLogs
•ec2:DescribeHostReservationOfferings
•ec2:DescribeHostReservations
•ec2:DescribeHosts
•ec2:DescribeIdentityIdFormat
•ec2:DescribeIdFormat
•ec2:DescribeImageAttribute
•ec2:DescribeImages
•ec2:DescribeImportImageTasks
•ec2:DescribeImportSnapshotTasks
•ec2:DescribeInstanceAttribute
•ec2:DescribeInstances
•ec2:DescribeInstanceStatus
•ec2:DescribeInternetGateways
•ec2:DescribeKeyPairs
•ec2:DescribeMovingAddresses
•ec2:DescribeNatGateways
•ec2:DescribeNetworkAcls
•ec2:DescribeNetworkInterfaceAttribute
•ec2:DescribeNetworkInterfaces
•ec2:DescribePlacementGroups
•ec2:DescribePrefixLists
•ec2:DescribeRegions
•ec2:DescribeReservedInstances
•ec2:DescribeReservedInstancesListings
•ec2:DescribeReservedInstancesModifications
•ec2:DescribeReservedInstancesOfferings
•ec2:DescribeRouteTables
•ec2:DescribeSecurityGroups
•ec2:DescribeSnapshotAttribute
•ec2:DescribeSnapshots
•ec2:DescribeSpotDatafeedSubscription
•ec2:DescribeSpotFleetInstances
•ec2:DescribeSpotFleetInstances
•ec2:DescribeSpotFleetRequestHistory
•ec2:DescribeSpotFleetRequestHistory
•ec2:DescribeSpotFleetRequests
•ec2:DescribeSpotFleetRequests
•ec2:DescribeSpotInstanceRequests
•ec2:DescribeSpotPriceHistory
•ec2:DescribeStaleSecurityGroups
•ec2:DescribeSubnets
417

AWS Identity and Access Management User Guide
Actions and Context Keys for IAM Policies
•ec2:DescribeTags
•ec2:DescribeVolumeAttribute
•ec2:DescribeVolumes
•ec2:DescribeVolumeStatus
•ec2:DescribeVpcAttribute
•ec2:DescribeVpcClassicLink
•ec2:DescribeVpcClassicLinkDnsSupport
•ec2:DescribeVpcEndpoints
•ec2:DescribeVpcEndpointServices
•ec2:DescribeVpcPeeringConnections
•ec2:DescribeVpcs
•ec2:DescribeVpnConnections
•ec2:DescribeVpnGateways
•ec2:DetachClassicLinkVpc
•ec2:DetachInternetGateway
•ec2:DetachNetworkInterface
•ec2:DetachVolume
•ec2:DetachVpnGateway
•ec2:DisableVgwRoutePropagation
•ec2:DisableVpcClassicLink
•ec2:DisableVpcClassicLinkDnsSupport
•ec2:DisassociateAddress
•ec2:DisassociateRouteTable
•ec2:EnableVgwRoutePropagation
•ec2:EnableVolumeIO
•ec2:EnableVpcClassicLink
•ec2:EnableVpcClassicLinkDnsSupport
•ec2:GetConsoleOutput
•ec2:GetConsoleScreenshot
•ec2:GetHostReservationPurchasePreview
•ec2:GetPasswordData
•ec2:ImportImage
•ec2:ImportInstance
•ec2:ImportKeyPair
•ec2:ImportSnapshot
•ec2:ImportVolume
•ec2:ModifyHosts
•ec2:ModifyIdentityIdFormat
•ec2:ModifyIdFormat
•ec2:ModifyImageAttribute
•ec2:ModifyInstanceAttribute
•ec2:ModifyInstancePlacement
•ec2:ModifyNetworkInterfaceAttribute
•ec2:ModifyReservedInstances
•ec2:ModifySnapshotAttribute
•ec2:ModifySpotFleetRequest
418

AWS Identity and Access Management User Guide
Actions and Context Keys for IAM Policies
•ec2:ModifySpotFleetRequest
•ec2:ModifySubnetAttribute
•ec2:ModifyVolumeAttribute
•ec2:ModifyVpcAttribute
•ec2:ModifyVpcEndpoint
•ec2:ModifyVpcPeeringConnectionOptions
•ec2:MonitorInstances
•ec2:MoveAddressToVpc
•ec2:PurchaseHostReservation
•ec2:PurchaseReservedInstancesOffering
•ec2:PurchaseScheduledInstances
•ec2:RebootInstances
•ec2:RegisterImage
•ec2:RejectVpcPeeringConnection
•ec2:ReleaseAddress
•ec2:ReleaseHosts
•ec2:ReplaceNetworkAclAssociation
•ec2:ReplaceNetworkAclEntry
•ec2:ReplaceRoute
•ec2:ReplaceRouteTableAssociation
•ec2:ReportInstanceStatus
•ec2:RequestSpotFleet
•ec2:RequestSpotFleet
•ec2:RequestSpotInstances
•ec2:ResetImageAttribute
•ec2:ResetInstanceAttribute
•ec2:ResetNetworkInterfaceAttribute
•ec2:ResetSnapshotAttribute
•ec2:RestoreAddressToClassic
•ec2:RevokeSecurityGroupEgress
•ec2:RevokeSecurityGroupIngress
•ec2:RunInstances
•ec2:RunScheduledInstances
•ec2:StartInstances
•ec2:StopInstances
•ec2:TerminateInstances
•ec2:UnassignPrivateIpAddresses
•ec2:UnmonitorInstances
Condition context keys for Amazon EC2
For information about using the following Amazon EC2 conditions in an IAM policy, see Condition Keys
for Amazon EC2 in the Amazon EC2 User Guide for Linux Instances.
Amazon EC2 has the following service-specific context keys that can be used in an IAM policy. For
the list of the global condition context keys that are available to all services, see Available Keys for
Conditions (p. 359) in the IAM Policy Elements Reference.
419

AWS Identity and Access Management User Guide
Actions and Context Keys for IAM Policies
•ec2:AccepterVpc
•ec2:AvailabilityZone
•ec2:EbsOptimized
•ec2:ImageType
•ec2:InstanceProfile
•ec2:InstanceType
•ec2:Owner
•ec2:ParentSnapshot
•ec2:PlacementGroup
•ec2:PlacementGroupStrategy
•ec2:Public
•ec2:Region
•ec2:RequesterVpc
•ec2:ResourceTag
•ec2:RootDeviceType
•ec2:Subnet
•ec2:Tenancy
•ec2:VolumeIops
•ec2:VolumeSize
•ec2:VolumeType
•ec2:Vpc
Actions and Condition Context Keys for Amazon EC2
Container Registry
Amazon EC2 Container Registry provides the following service-specific actions and condition context
keys for use in IAM policies.
Actions for Amazon EC2 Container Registry
For information about controlling access to Amazon ECR by using an IAM policy, see Amazon ECR
IAM Policies and Roles in the Amazon EC2 Container Registry User Guide.
•ecr:BatchCheckLayerAvailability
•ecr:BatchDeleteImage
•ecr:BatchGetImage
•ecr:CompleteLayerUpload
•ecr:CreateRepository
•ecr:DeleteRepository
•ecr:DeleteRepositoryPolicy
•ecr:DescribeRepositories
•ecr:GetAuthorizationToken
•ecr:GetDownloadUrlForLayer
•ecr:GetRepositoryPolicy
•ecr:InitiateLayerUpload
•ecr:ListImages
•ecr:PutImage
420

AWS Identity and Access Management User Guide
Actions and Context Keys for IAM Policies
•ecr:SetRepositoryPolicy
•ecr:UploadLayerPart
Condition context keys for Amazon EC2 Container Registry
Amazon EC2 Container Registry has no service-specific context keys that can be used in an IAM
policy. For the list of the global condition context keys that are available to all services, see Available
Keys for Conditions (p. 359) in the IAM Policy Elements Reference.
Actions and Condition Context Keys for Amazon EC2
Container Service
Amazon EC2 Container Service provides the following service-specific actions and condition context
keys for use in IAM policies.
Actions for Amazon EC2 Container Service
For information about using the following Amazon ECS API actions in an IAM policy, see Amazon ECS
IAM Policies in the Amazon ECS Developer Guide.
•ecs:CreateCluster
•ecs:CreateService
•ecs:DeleteCluster
•ecs:DeleteService
•ecs:DeregisterContainerInstance
•ecs:DeregisterTaskDefinition
•ecs:DescribeClusters
•ecs:DescribeContainerInstances
•ecs:DescribeServices
•ecs:DescribeTaskDefinition
•ecs:DescribeTasks
•ecs:DiscoverPollEndpoint
•ecs:ListClusters
•ecs:ListContainerInstances
•ecs:ListServices
•ecs:ListTaskDefinitionFamilies
•ecs:ListTaskDefinitions
•ecs:ListTasks
•ecs:Poll
•ecs:RegisterContainerInstance
•ecs:RegisterTaskDefinition
•ecs:RunTask
•ecs:StartTask
•ecs:StopTask
•ecs:StartTelemetrySession
•ecs:SubmitContainerStateChange
•ecs:SubmitTaskStateChange
•ecs:UpdateContainerAgent
421

AWS Identity and Access Management User Guide
Actions and Context Keys for IAM Policies
•ecs:UpdateService
Condition context keys for Amazon EC2 Container Service
For information about using the following Amazon ECS conditions in an IAM policy, see Amazon ECS
IAM Policies in the Amazon ECS Developer Guide.
Amazon EC2 Container Service has the following service-specific context keys that can be used in
an IAM policy. For the list of the global condition context keys that are available to all services, see
Available Keys for Conditions (p. 359) in the IAM Policy Elements Reference.
•ecs:cluster
•ecs:container-instances
Actions and Condition Context Keys for AWS Elastic
Beanstalk
AWS Elastic Beanstalk provides the following service-specific actions and condition context keys for
use in IAM policies.
Actions for AWS Elastic Beanstalk
For information about using the following Elastic Beanstalk API actions in an IAM policy, see Policy
Information for Elastic Beanstalk Actions in the AWS Elastic Beanstalk Developer Guide.
•elasticbeanstalk:CheckDNSAvailability
•elasticbeanstalk:CreateApplication
•elasticbeanstalk:CreateApplicationVersion
•elasticbeanstalk:CreateConfigurationTemplate
•elasticbeanstalk:CreateEnvironment
•elasticbeanstalk:CreateStorageLocation
•elasticbeanstalk:DeleteApplication
•elasticbeanstalk:DeleteApplicationVersion
•elasticbeanstalk:DeleteConfigurationTemplate
•elasticbeanstalk:DeleteEnvironmentConfiguration
•elasticbeanstalk:DescribeApplicationVersions
•elasticbeanstalk:DescribeApplications
•elasticbeanstalk:DescribeConfigurationOptions
•elasticbeanstalk:DescribeConfigurationSettings
•elasticbeanstalk:DescribeEnvironmentHealth
•elasticbeanstalk:DescribeEnvironmentResources
•elasticbeanstalk:DescribeEnvironments
•elasticbeanstalk:DescribeEvents
•elasticbeanstalk:DescribeInstancesHealth
•elasticbeanstalk:ListAvailableSolutionStacks
•elasticbeanstalk:RebuildEnvironment
•elasticbeanstalk:RequestEnvironmentInfo
•elasticbeanstalk:RestartAppServer
•elasticbeanstalk:RetrieveEnvironmentInfo
•elasticbeanstalk:SwapEnvironmentCNAMEs
422

AWS Identity and Access Management User Guide
Actions and Context Keys for IAM Policies
•elasticbeanstalk:TerminateEnvironment
•elasticbeanstalk:UpdateApplication
•elasticbeanstalk:UpdateApplicationVersion
•elasticbeanstalk:UpdateConfigurationTemplate
•elasticbeanstalk:UpdateEnvironment
•elasticbeanstalk:ValidateConfigurationSettings
Condition context keys for AWS Elastic Beanstalk
For information about using the following Elastic Beanstalk conditions in an IAM policy, see Condition
Keys for Elastic Beanstalk Actions in the AWS Elastic Beanstalk Developer Guide.
AWS Elastic Beanstalk has the following service-specific context keys that can be used in an IAM
policy. For the list of the global condition context keys that are available to all services, see Available
Keys for Conditions (p. 359) in the IAM Policy Elements Reference.
•elasticbeanstalk:InApplication
•elasticbeanstalk:FromApplication
•elasticbeanstalk:FromSolutionStack
•elasticbeanstalk:FromApplicationVersion
•elasticbeanstalk:FromConfigurationTemplate
•elasticbeanstalk:FromEnvironment
Actions and Condition Context Keys for Amazon Elastic
File System
Amazon Elastic File System provides the following service-specific actions and condition context keys
for use in IAM policies.
Actions for Amazon Elastic File System
For information about using the following Amazon EFS API actions in an IAM policy, see Authentication
and Access Control in the Amazon Elastic File System User Guide.
•elasticfilesystem:CreateFileSystem
•elasticfilesystem:CreateTags
•elasticfilesystem:DescribeTags
•elasticfilesystem:DeleteTags
•elasticfilesystem:CreateMountTarget
•elasticfilesystem:ModifyMountTargetSecurityGroups
•elasticfilesystem:DescribeMountTargetSecurityGroups
•elasticfilesystem:DescribeFileSystems
•elasticfilesystem:DescribeMountTargets
•elasticfilesystem:DeleteMountTarget
•elasticfilesystem:DeleteFileSystem
Condition context keys for Amazon Elastic File System
Amazon Elastic File System has no service-specific context keys that can be used in an IAM policy.
For the list of the global condition context keys that are available to all services, see Available Keys for
Conditions (p. 359) in the IAM Policy Elements Reference.
423

AWS Identity and Access Management User Guide
Actions and Context Keys for IAM Policies
Actions and Condition Context Keys for Elastic Load
Balancing
Elastic Load Balancing provides the following service-specific actions and condition context keys for
use in IAM policies.
Actions for Elastic Load Balancing
For information about using the following Elastic Load Balancing API actions in an IAM policy, see
Specifying ELB Actions in an IAM Policy in the Elastic Load Balancing User Guide.
•elasticloadbalancing:AddTags
•elasticloadbalancing:ApplySecurityGroupsToLoadBalancer
•elasticloadbalancing:AttachLoadBalancerToSubnets
•elasticloadbalancing:ConfigureHealthCheck
•elasticloadbalancing:CreateAppCookieStickinessPolicy
•elasticloadbalancing:CreateListener
•elasticloadbalancing:CreateLBCookieStickinessPolicy
•elasticloadbalancing:CreateLoadBalancer
•elasticloadbalancing:CreateLoadBalancerListeners
•elasticloadbalancing:CreateLoadBalancerPolicy
•elasticloadbalancing:CreateRule
•elasticloadbalancing:CreateTargetGroup
•elasticloadbalancing:DeleteListener
•elasticloadbalancing:DeleteLoadBalancer
•elasticloadbalancing:DeleteLoadBalancerListeners
•elasticloadbalancing:DeleteLoadBalancerPolicy
•elasticloadbalancing:DeleteRule
•elasticloadbalancing:DeleteTargetGroup
•elasticloadbalancing:DeregisterInstancesFromLoadBalancer
•elasticloadbalancing:DeregisterTargets
•elasticloadbalancing:DescribeInstanceHealth
•elasticloadbalancing:DescribeListeners
•elasticloadbalancing:DescribeLoadBalancerAttributes
•elasticloadbalancing:DescribeLoadBalancerPolicyTypes
•elasticloadbalancing:DescribeLoadBalancerPolicies
•elasticloadbalancing:DescribeLoadBalancers
•elasticloadbalancing:DescribeRules
•elasticloadbalancing:DescribeSSLPolicies
•elasticloadbalancing:DescribeTags
•elasticloadbalancing:DescribeTargetGroupAttributes
•elasticloadbalancing:DescribeTargetGroups
•elasticloadbalancing:DescribeTargetHealth
•elasticloadbalancing:DetachLoadBalancerFromSubnets
•elasticloadbalancing:DisableAvailabilityZonesForLoadBalancer
•elasticloadbalancing:EnableAvailabilityZonesForLoadBalancer
•elasticloadbalancing:ModifyListener
424

AWS Identity and Access Management User Guide
Actions and Context Keys for IAM Policies
•elasticloadbalancing:ModifyLoadBalancerAttributes
•elasticloadbalancing:ModifyRule
•elasticloadbalancing:ModifyTargetGroup
•elasticloadbalancing:ModifyTargetGroupAttributes
•elasticloadbalancing:RegisterTargets
•elasticloadbalancing:RegisterInstancesWithLoadBalancer
•elasticloadbalancing:RemoveTags
•elasticloadbalancing:SetLoadBalancerListenerSSLCertificate
•elasticloadbalancing:SetLoadBalancerPoliciesForBackendServer
•elasticloadbalancing:SetLoadBalancerPoliciesOfListener
•elasticloadbalancing:SetRulePriorities
•elasticloadbalancing:SetSecurityGroups
•elasticloadbalancing:SetSubnets
Condition context keys for Elastic Load Balancing
For information about using conditions in an IAM policy to control access to Elastic Load Balancing,
see Specifying Condition Keys in an IAM Policy in the Elastic Load Balancing User Guide.
Elastic Load Balancing has no service-specific context keys that can be used in an IAM policy. For
the list of the global condition context keys that are available to all services, see Available Keys for
Conditions (p. 359) in the IAM Policy Elements Reference.
Actions and Condition Context Keys for Amazon Elastic
MapReduce
Amazon Elastic MapReduce provides the following service-specific actions and condition context keys
for use in IAM policies.
Actions for Amazon Elastic MapReduce
For information about controlling access to Amazon EMR by specifying actions in an IAM policy, see
Set Access Policies for IAM Users in the Amazon EMR Developer Guide.
•elasticmapreduce:AddInstanceGroups
•elasticmapreduce:AddTags
•elasticmapreduce:AddJobFlowSteps
•elasticmapreduce:DescribeCluster
•elasticmapreduce:DescribeJobFlows
•elasticmapreduce:DescribeStep
•elasticmapreduce:ListBootstrapActions
•elasticmapreduce:ListClusters
•elasticmapreduce:ListInstanceGroups
•elasticmapreduce:ListInstances
•elasticmapreduce:ListSteps
•elasticmapreduce:ModifyInstanceGroups
•elasticmapreduce:RemoveTags
•elasticmapreduce:RunJobFlow
•elasticmapreduce:SetTerminationProtection
•elasticmapreduce:SetVisibleToAllUsers
425

AWS Identity and Access Management User Guide
Actions and Context Keys for IAM Policies
•elasticmapreduce:TerminateJobFlows
Condition context keys for Amazon Elastic MapReduce
Amazon Elastic MapReduce has no service-specific context keys that can be used in an IAM policy.
For the list of the global condition context keys that are available to all services, see Available Keys for
Conditions (p. 359) in the IAM Policy Elements Reference.
Actions and Condition Context Keys for Amazon Elastic
Transcoder
Amazon Elastic Transcoder provides the following service-specific actions and condition context keys
for use in IAM policies.
Actions for Amazon Elastic Transcoder
For information about using the following Elastic Transcoder API actions in an IAM policy, see List of
Elastic Transcoder Operations with Controllable Access in the Amazon Elastic Transcoder Developer
Guide.
•elastictranscoder:CancelJob
•elastictranscoder:CreateJob
•elastictranscoder:CreatePipeline
•elastictranscoder:CreatePreset
•elastictranscoder:DeletePipeline
•elastictranscoder:DeletePreset
•elastictranscoder:ListJobsByPipeline
•elastictranscoder:ListJobsByStatus
•elastictranscoder:ListPipelines
•elastictranscoder:ListPresets
•elastictranscoder:ReadJob
•elastictranscoder:ReadPipeline
•elastictranscoder:ReadPreset
•elastictranscoder:TestRole
•elastictranscoder:UpdatePipeline
•elastictranscoder:UpdatePipelineNotifications
•elastictranscoder:UpdatePipelineStatus
Condition context keys for Amazon Elastic Transcoder
Amazon Elastic Transcoder has no service-specific context keys that can be used in an IAM policy.
For the list of the global condition context keys that are available to all services, see Available Keys for
Conditions (p. 359) in the IAM Policy Elements Reference.
Actions and Condition Context Keys for Amazon
ElastiCache
Amazon ElastiCache provides the following service-specific actions and condition context keys for use
in IAM policies.
Actions for Amazon ElastiCache
426

AWS Identity and Access Management User Guide
Actions and Context Keys for IAM Policies
When you create an ElastiCache policy in IAM you must use the "*" wildcard character for the
Resource block. For information about using the following ElastiCache API actions in an IAM policy,
see ElastiCache Actions and IAM in the Amazon ElastiCache User Guide.
•elasticache:AddTagsToResource
•elasticache:AuthorizeCacheSecurityGroupIngress
•elasticache:CopySnapshot
•elasticache:CreateCacheCluster
•elasticache:CreateCacheParameterGroup
•elasticache:CreateCacheSecurityGroup
•elasticache:CreateCacheSubnetGroup
•elasticache:CreateReplicationGroup
•elasticache:CreateSnapshot
•elasticache:DeleteCacheCluster
•elasticache:DeleteCacheParameterGroup
•elasticache:DeleteCacheSecurityGroup
•elasticache:DeleteCacheSubnetGroup
•elasticache:DeleteReplicationGroup
•elasticache:DeleteSnapshot
•elasticache:DescribeCacheClusters
•elasticache:DescribeCacheEngineVersions
•elasticache:DescribeCacheParameterGroups
•elasticache:DescribeCacheParameters
•elasticache:DescribeCacheSecurityGroups
•elasticache:DescribeCacheSubnetGroups
•elasticache:DescribeEngineDefaultParameters
•elasticache:DescribeEvents
•elasticache:DescribeReplicationGroups
•elasticache:DescribeReservedCacheNodes
•elasticache:DescribeReservedCacheNodesOfferings
•elasticache:DescribeSnapshots
•elasticache:ListAllowedNodeTypeModifications
•elasticache:ListTagsForResource
•elasticache:ModifyCacheCluster
•elasticache:ModifyCacheParameterGroup
•elasticache:ModifyCacheSubnetGroup
•elasticache:ModifyReplicationGroup
•elasticache:PurchaseReservedCacheNodesOffering
•elasticache:RebootCacheCluster
•elasticache:RemoveTagsFromResource
•elasticache:ResetCacheParameterGroup
•elasticache:RevokeCacheSecurityGroupIngress
Condition context keys for Amazon ElastiCache
For information about conditions in an IAM policy to control access to ElastiCache, see ElastiCache
Keys in the Amazon ElastiCache User Guide.
427

AWS Identity and Access Management User Guide
Actions and Context Keys for IAM Policies
Amazon ElastiCache has no service-specific context keys that can be used in an IAM policy. For
the list of the global condition context keys that are available to all services, see Available Keys for
Conditions (p. 359) in the IAM Policy Elements Reference.
Actions and Condition Context Keys for Amazon
Elasticsearch Service
Amazon Elasticsearch Service provides the following service-specific actions and condition context
keys for use in IAM policies.
Actions for Amazon Elasticsearch Service
For information about using the following Amazon ElasticSearch API actions in an IAM policy, see
Configuring an Access Policy for an Elasticsearch Domain in the Amazon Elasticsearch Developer
Guide.
•es:AddTags
•es:CreateElasticsearchDomain
•es:DeleteElasticsearchDomain
•es:DescribeElasticsearchDomain
•es:DescribeElasticsearchDomains
•es:DescribeElasticsearchDomainConfig
•es:ListDomainNames
•es:ListTags
•es:RemoveTags
•es:UpdateElasticsearchDomainConfig
Condition context keys for Amazon Elasticsearch Service
Amazon Elasticsearch Service has no service-specific context keys that can be used in an IAM policy.
For the list of the global condition context keys that are available to all services, see Available Keys for
Conditions (p. 359) in the IAM Policy Elements Reference.
Actions and Condition Context Keys for Amazon GameLift
Amazon GameLift provides the following service-specific actions and condition context keys for use in
IAM policies.
Actions for Amazon GameLift
For information about using the following Amazon GameLift API actions in an IAM policy, see Amazon
GameLift IAM Policy Examples in the Amazon GameLift Developer Guide.
•gamelift:CreateAlias
•gamelift:CreateBuild
•gamelift:CreateFleet
•gamelift:CreateGameSession
•gamelift:CreatePlayerSession
•gamelift:CreatePlayerSessions
•gamelift:DeleteAlias
•gamelift:DeleteBuild
•gamelift:DeleteFleet
428

AWS Identity and Access Management User Guide
Actions and Context Keys for IAM Policies
•gamelift:DescribeAlias
•gamelift:DescribeBuild
•gamelift:DescribeEC2InstanceLimits
•gamelift:DescribeFleetAttributes
•gamelift:DescribeFleetCapacity
•gamelift:DescribeFleetEvents
•gamelift:DescribeFleetPortSettings
•gamelift:DescribeFleetUtilization
•gamelift:DescribeGameSessions
•gamelift:DescribePlayerSessions
•gamelift:GetGameSessionLogUrl
•gamelift:ListAliases
•gamelift:ListBuilds
•gamelift:ListFleets
•gamelift:RequestUploadCredentials
•gamelift:ResolveAlias
•gamelift:UpdateAlias
•gamelift:UpdateBuild
•gamelift:UpdateFleetAttributes
•gamelift:UpdateFleetCapacity
•gamelift:UpdateFleetPortSettings
•gamelift:UpdateGameSession
Condition context keys for Amazon GameLift
Amazon GameLift has no service-specific context keys that can be used in an IAM policy. For the
list of the global condition context keys that are available to all services, see Available Keys for
Conditions (p. 359) in the IAM Policy Elements Reference.
Actions and Condition Context Keys for Amazon Glacier
Amazon Glacier provides the following service-specific actions and condition context keys for use in
IAM policies.
Actions for Amazon Glacier
For information about using the following Amazon Glacier API actions in an IAM policy, see Access
Control Using AWS Identity and Access Management (IAM) in the Amazon Glacier Developer Guide.
•glacier:AbortVaultLock
•glacier:AddTagsToVault
•glacier:AbortMultipartUpload
•glacier:CompleteMultipartUpload
•glacier:CompleteVaultLock
•glacier:CreateVault
•glacier:DeleteArchive
•glacier:DeleteVault
•glacier:DeleteVaultAccessPolicy
•glacier:DeleteVaultNotifications
429

AWS Identity and Access Management User Guide
Actions and Context Keys for IAM Policies
•glacier:DescribeJob
•glacier:DescribeVault
•glacier:GetDataRetrievalPolicy
•glacier:GetJobOutput
•glacier:GetVaultAccessPolicy
•glacier:GetVaultLock
•glacier:GetVaultNotifications
•glacier:InitiateJob
•glacier:InitiateMultipartUpload
•glacier:InitiateVaultLock
•glacier:ListJobs
•glacier:ListMultipartUploads
•glacier:ListParts
•glacier:ListTagsForVault
•glacier:ListVaults
•glacier:RemoveTagsFromVault
•glacier:SetDataRetrievalPolicy
•glacier:SetVaultAccessPolicy
•glacier:SetVaultNotifications
•glacier:UploadArchive
•glacier:UploadMultipartPart
Condition context keys for Amazon Glacier
Amazon Glacier has the following service-specific context keys that can be used in an IAM policy. For
the list of the global condition context keys that are available to all services, see Available Keys for
Conditions (p. 359) in the IAM Policy Elements Reference.
•glacier:ArchiveAgeInDays
Actions and Condition Context Keys for AWS Identity and
Access Management
AWS Identity and Access Management provides the following service-specific actions and condition
context keys for use in IAM policies.
Actions for AWS Identity and Access Management
For information about controlling access to IAM managed policies, see Controlling Access to Managed
Policies in the IAM User Guide guide. For information about controlling who can manage users and
groups, see Permissions for Administering IAM Users, Groups, and Credentials in the IAM User Guide
guide.
•iam:AddRoleToInstanceProfile
•iam:AddUserToGroup
•iam:AddClientIDToOpenIDConnectProvider
•iam:AttachGroupPolicy
•iam:AttachRolePolicy
•iam:AttachUserPolicy
•iam:ChangePassword
430

AWS Identity and Access Management User Guide
Actions and Context Keys for IAM Policies
•iam:CreateAccessKey
•iam:CreateAccountAlias
•iam:CreateGroup
•iam:CreateInstanceProfile
•iam:CreateLoginProfile
•iam:CreateOpenIDConnectProvider
•iam:CreatePolicy
•iam:CreatePolicyVersion
•iam:CreateRole
•iam:CreateSAMLProvider
•iam:CreateUser
•iam:CreateVirtualMFADevice
•iam:DeactivateMFADevice
•iam:DeleteAccessKey
•iam:DeleteAccountAlias
•iam:DeleteAccountPasswordPolicy
•iam:DeleteGroup
•iam:DeleteGroupPolicy
•iam:DeleteInstanceProfile
•iam:DeleteLoginProfile
•iam:DeleteOpenIDConnectProvider
•iam:DeletePolicy
•iam:DeletePolicyVersion
•iam:DeleteRole
•iam:DeleteRolePolicy
•iam:DeleteSAMLProvider
•iam:DeleteSSHPublicKey
•iam:DeleteServerCertificate
•iam:DeleteSigningCertificate
•iam:DeleteUser
•iam:DeleteUserPolicy
•iam:DeleteVirtualMFADevice
•iam:DetachGroupPolicy
•iam:DetachRolePolicy
•iam:DetachUserPolicy
•iam:EnableMFADevice
•iam:GenerateCredentialReport
•iam:GenerateServiceLastAccessedDetails - this is an IAM policy permission only, not an API
action that can be called.
•iam:GetAccessKeyLastUsed
•iam:GetAccountAuthorizationDetails
•iam:GetAccountPasswordPolicy
•iam:GetAccountSummary
•iam:GetContextKeysForCustomPolicy
•iam:GetContextKeysForPrincipalPolicy
•iam:GetCredentialReport
431

AWS Identity and Access Management User Guide
Actions and Context Keys for IAM Policies
•iam:GetGroup
•iam:GetGroupPolicy
•iam:GetInstanceProfile
•iam:GetLoginProfile
•iam:GetOpenIDConnectProvider
•iam:GetPolicy
•iam:GetPolicyVersion
•iam:GetRole
•iam:GetRolePolicy
•iam:GetSAMLProvider
•iam:GetSSHPublicKey
•iam:GetServerCertificate
•iam:GetServiceLastAccessedDetails - this is an IAM policy permission only, not an API action
that can be called.
•iam:GetServiceLastAccessedDetailsWithEntities
•iam:GetUser
•iam:GetUserPolicy
•iam:ListAccessKeys
•iam:ListAccountAliases
•iam:ListAttachedGroupPolicies
•iam:ListAttachedRolePolicies
•iam:ListAttachedUserPolicies
•iam:ListEntitiesForPolicy
•iam:ListGroupPolicies
•iam:ListGroups
•iam:ListGroupsForUser
•iam:ListInstanceProfiles
•iam:ListInstanceProfilesForRole
•iam:ListMFADevices
•iam:ListOpenIDConnectProviders
•iam:ListPolicies
•iam:ListPoliciesGrantingServiceAccess
•iam:ListPolicyVersions
•iam:ListRolePolicies
•iam:ListRoles
•iam:ListSAMLProviders
•iam:ListSSHPublicKeys
•iam:ListServerCertificates
•iam:ListSigningCertificates
•iam:ListUserPolicies
•iam:ListUsers
•iam:ListVirtualMFADevices
•iam:PassRole - this is an IAM policy permission only, not an API action that can be called.
•iam:PutGroupPolicy
•iam:PutRolePolicy
•iam:PutUserPolicy
432

AWS Identity and Access Management User Guide
Actions and Context Keys for IAM Policies
•iam:RemoveClientIDFromOpenIDConnectProvider
•iam:RemoveRoleFromInstanceProfile
•iam:RemoveUserFromGroup
•iam:ResyncMFADevice
•iam:SetDefaultPolicyVersion
•iam:SimulateCustomPolicy
•iam:SimulatePrincipalPolicy
•iam:UpdateAccessKey
•iam:UpdateAccountPasswordPolicy
•iam:UpdateAssumeRolePolicy
•iam:UpdateGroup
•iam:UpdateLoginProfile
•iam:UpdateOpenIDConnectProviderThumbprint
•iam:UpdateSAMLProvider
•iam:UpdateSSHPublicKey
•iam:UpdateServerCertificate
•iam:UpdateSigningCertificate
•iam:UpdateUser
•iam:UploadSSHPublicKey
•iam:UploadServerCertificate
•iam:UploadSigningCertificate
Condition context keys for AWS Identity and Access Management
AWS Identity and Access Management has the following service-specific context keys that can be
used in an IAM policy. For the list of the global condition context keys that are available to all services,
see Available Keys for Conditions (p. 359) in the IAM Policy Elements Reference.
•iam:PolicyArn
Actions and Condition Context Keys for AWS Import
Export
AWS Import Export provides the following service-specific actions and condition context keys for use in
IAM policies.
Actions for AWS Import Export
For information about using the following AWS Import/Export API actions in an IAM policy, see
Controlling Access to AWS Import/Export Jobs in the AWS Import/Export Developer Guide.
•importexport:CreateJob
•importexport:UpdateJob
•importexport:CancelJob
•importexport:ListJobs
•importexport:GetStatus
•importexport:GetShippingLabel
Condition context keys for AWS Import Export
433

AWS Identity and Access Management User Guide
Actions and Context Keys for IAM Policies
AWS Import Export has no service-specific context keys that can be used in an IAM policy. For
the list of the global condition context keys that are available to all services, see Available Keys for
Conditions (p. 359) in the IAM Policy Elements Reference.
Actions and Condition Context Keys for Amazon Inspector
Amazon Inspector provides the following service-specific actions and condition context keys for use in
IAM policies.
Actions for Amazon Inspector
Amazon Inspector requires an IAM role to access your account to do its assessment. For more
information, see Setting Up Amazon Inspector in the Amazon Inspector User Guide.
•inspector:AddAttributesToFindings
•inspector:AttachAssessmentAndRulesPackage
•inspector:CreateApplication
•inspector:CreateAssessment
•inspector:CreateResourceGroup
•inspector:DeleteApplication
•inspector:DeleteAssessment
•inspector:DeleteRun
•inspector:DescribeApplication
•inspector:DescribeAssessment
•inspector:DescribeCrossAccountAccessRole
•inspector:DescribeFinding
•inspector:DescribeResourceGroup
•inspector:DescribeRulesPackage
•inspector:DescribeRun
•inspector:DetachAssessmentAndRulesPackage
•inspector:GetAssessmentTelemetry
•inspector:ListApplications
•inspector:ListAssessmentAgents
•inspector:ListAssessments
•inspector:ListAttachedAssessments
•inspector:ListAttachedRulesPackages
•inspector:ListFindings
•inspector:ListRulesPackages
•inspector:ListRuns
•inspector:ListTagsForResource
•inspector:LocalizeText
•inspector:PreviewAgentsForResourceGroup
•inspector:RegisterCrossAccountAccessRole
•inspector:RemoveAttributesFromFindings
•inspector:RetireRulesPackage
•inspector:RunAssessment
•inspector:SetTagsForResource
•inspector:StartDataCollection
434

AWS Identity and Access Management User Guide
Actions and Context Keys for IAM Policies
•inspector:StopDataCollection
•inspector:UpdateApplication
•inspector:UpdateAssessment
Condition context keys for Amazon Inspector
Amazon Inspector has no service-specific context keys that can be used in an IAM policy. For the
list of the global condition context keys that are available to all services, see Available Keys for
Conditions (p. 359) in the IAM Policy Elements Reference.
Actions and Condition Context Keys for AWS IoT
AWS IoT provides the following service-specific actions and condition context keys for use in IAM
policies.
Actions for AWS IoT
For information about using IAM policies to grant permissions to run AWS IoT actions and access AWS
IoT resources, see Security and Identity for AWS IoT in the AWS IoT User Guide.
•iot:AcceptCertificateTransfer
•iot:AttachPrincipalPolicy
•iot:AttachThingPrincipal
•iot:CancelCertificateTransfer
•iot:Connect
•iot:CreateCertificateFromCsr
•iot:CreateKeysAndCertificate
•iot:CreatePolicy
•iot:CreatePolicyVersion
•iot:CreateThing
•iot:CreateTopicRule
•iot:DeleteCertificate
•iot:DeletePolicy
•iot:DeletePolicyVersion
•iot:DeleteThing
•iot:DeleteThingShadow
•iot:DeleteTopicRule
•iot:DescribeCertificate
•iot:DescribeEndpoint
•iot:DescribeThing
•iot:DetachPrincipalPolicy
•iot:DetachThingPrincipal
•iot:GetLoggingOptions
•iot:GetPolicy
•iot:GetPolicyVersion
•iot:GetThingShadow
•iot:GetTopicRule
•iot:ListCertificates
•iot:ListPolicies
435

AWS Identity and Access Management User Guide
Actions and Context Keys for IAM Policies
•iot:ListPolicyVersions
•iot:ListPrincipalPolicies
•iot:ListPrincipalThings
•iot:ListThingPrincipals
•iot:ListThings
•iot:ListTopicRules
•iot:Publish
•iot:Receive
•iot:RejectCertificateTransfer
•iot:ReplaceTopicRule
•iot:SetDefaultPolicyVersion
•iot:SetLoggingOptions
•iot:Subscribe
•iot:TransferCertificate
•iot:UpdateCertificate
•iot:UpdateThing
•iot:UpdateThingShadow
Condition context keys for AWS IoT
AWS IoT has the following service-specific context keys that can be used in an IAM policy. For the
list of the global condition context keys that are available to all services, see Available Keys for
Conditions (p. 359) in the IAM Policy Elements Reference.
•iot:ClientId
Actions and Condition Context Keys for AWS Key
Management Service
AWS Key Management Service provides the following service-specific actions and condition context
keys for use in IAM policies.
Actions for AWS Key Management Service
For information about using the following AWS KMS API actions in an IAM resource policy attached to
a AWS KMS key, see Key Policies in the AWS Key Management Service Developer Guide.
•kms:CancelKeyDeletion
•kms:CreateAlias
•kms:CreateGrant
•kms:CreateKey
•kms:Decrypt
•kms:DeleteAlias
•kms:DeleteImportedKeyMaterial
•kms:DescribeKey
•kms:DisableKey
•kms:DisableKeyRotation
•kms:EnableKey
•kms:EnableKeyRotation
436

AWS Identity and Access Management User Guide
Actions and Context Keys for IAM Policies
•kms:Encrypt
•kms:GenerateDataKey
•kms:GenerateDataKeyWithoutPlaintext
•kms:GenerateRandom
•kms:GetKeyPolicy
•kms:GetKeyRotationStatus
•kms:GetParametersForImport
•kms:ImportKeyMaterial
•kms:ListAliases
•kms:ListGrants
•kms:ListKeyPolicies
•kms:ListKeys
•kms:ListRetirableGrants
•kms:PutKeyPolicy
•kms:ReEncryptFrom
•kms:ReEncryptTo
•kms:ReEncrypt* - this is an IAM policy permission only, not an API action that can be called.
•kms:RevokeGrant
•kms:ScheduleKeyDeletion
•kms:UpdateAlias
•kms:UpdateKeyDescription
Condition context keys for AWS Key Management Service
AWS Key Management Service has the following service-specific context keys that can be used in
an IAM policy. For the list of the global condition context keys that are available to all services, see
Available Keys for Conditions (p. 359) in the IAM Policy Elements Reference.
•kms:BypassPolicyLockoutSafetyCheck
•kms:EncryptionContextKeys
•kms:EncryptionContext
•kms:CallerAccount
•kms:GrantOperations
•kms:GrantConstraintType
•kms:GrantIsForAWSResource
•kms:ReEncryptOnSameKey
•kms:ViaService
Actions and Condition Context Keys for Amazon Kinesis
Amazon Kinesis provides the following service-specific actions and condition context keys for use in
IAM policies.
Actions for Amazon Kinesis
For information about using the following Amazon Kinesis API actions in an IAM policy, see Actions for
Amazon Kinesis in the Amazon Kinesis Developer Guide.
•kinesis:AddTagsToStream
437

AWS Identity and Access Management User Guide
Actions and Context Keys for IAM Policies
•kinesis:CreateStream
•kinesis:DecreaseStreamRetentionPeriod
•kinesis:DeleteStream
•kinesis:DescribeStream
•kinesis:GetShardIterator
•kinesis:GetRecords
•kinesis:IncreaseStreamRetentionPeriod
•kinesis:ListStreams
•kinesis:ListTagsForStream
•kinesis:MergeShards
•kinesis:PutRecord
•kinesis:PutRecords
•kinesis:RemoveTagsFromStream
•kinesis:SplitShard
Condition context keys for Amazon Kinesis
Amazon Kinesis has no service-specific context keys that can be used in an IAM policy. For the
list of the global condition context keys that are available to all services, see Available Keys for
Conditions (p. 359) in the IAM Policy Elements Reference.
Actions and Condition Context Keys for Amazon Kinesis
Analytics
Amazon Kinesis Analytics provides the following service-specific actions and condition context keys for
use in IAM policies.
Actions for Amazon Kinesis Analytics
For information about using the following Amazon Kinesis Analytics API actions in an IAM policy, see
Granting Amazon Kinesis Analytics Permissions to Access Streaming Sources (Creating an IAM Role)
in the Amazon Kinesis Analytics Developer Guide.
•kinesisanalytics:AddApplicationInput
•kinesisanalytics:AddApplicationOutput
•kinesisanalytics:AddApplicationReferenceDataSource
•kinesisanalytics:CreateApplication
•kinesisanalytics:DeleteApplication
•kinesisanalytics:DeleteApplicationOutput
•kinesisanalytics:DeleteApplicationReferenceDataSource
•kinesisanalytics:DescribeApplication
•kinesisanalytics:DiscoverInputSchema
•kinesisanalytics:GetApplicationState
•kinesisanalytics:ListApplications
•kinesisanalytics:StartApplication
•kinesisanalytics:StopApplication
•kinesisanalytics:UpdateApplication
Condition context keys for Amazon Kinesis Analytics
438

AWS Identity and Access Management User Guide
Actions and Context Keys for IAM Policies
Amazon Kinesis Analytics has no service-specific context keys that can be used in an IAM policy. For
the list of the global condition context keys that are available to all services, see Available Keys for
Conditions (p. 359) in the IAM Policy Elements Reference.
Actions and Condition Context Keys for Amazon Kinesis
Firehose
Amazon Kinesis Firehose provides the following service-specific actions and condition context keys for
use in IAM policies.
Actions for Amazon Kinesis Firehose
For information about using IAM policies to grant permissions to run Firehose actions and access
Firehose resources, see Controlling Access with Firehose in the Amazon Kinesis Firehose Developer
Guide.
•firehose:CreateDeliveryStream
•firehose:DeleteDeliveryStream
•firehose:DescribeDeliveryStream
•firehose:ListDeliveryStreams
•firehose:PutRecord
•firehose:PutRecordBatch
•firehose:UpdateDestination
Condition context keys for Amazon Kinesis Firehose
Amazon Kinesis Firehose has no service-specific context keys that can be used in an IAM policy. For
the list of the global condition context keys that are available to all services, see Available Keys for
Conditions (p. 359) in the IAM Policy Elements Reference.
Actions and Condition Context Keys for AWS Lambda
AWS Lambda provides the following service-specific actions and condition context keys for use in IAM
policies.
Actions for AWS Lambda
For information about using the following Lambda API actions in an IAM policy, see Permission Model
in the AWS Lambda Developer Guide.
•lambda:AddPermission
•lambda:CreateAlias
•lambda:CreateEventSourceMapping
•lambda:CreateFunction
•lambda:DeleteAlias
•lambda:DeleteEventSourceMapping
•lambda:DeleteFunction
•lambda:GetAlias
•lambda:GetEventSourceMapping
•lambda:GetFunction
•lambda:GetFunctionConfiguration
•lambda:GetPolicy
439

AWS Identity and Access Management User Guide
Actions and Context Keys for IAM Policies
•lambda:InvokeAsync
•lambda:InvokeFunction - this is an IAM policy permission only, not an API action that can be
called.
•lambda:ListAliases
•lambda:ListEventSourceMappings
•lambda:ListFunctions
•lambda:ListVersionsByFunction
•lambda:PublishVersion
•lambda:RemovePermission
•lambda:UpdateAlias
•lambda:UpdateEventSourceMapping
•lambda:UpdateFunctionCode
•lambda:UpdateFunctionConfiguration
Condition context keys for AWS Lambda
AWS Lambda has no service-specific context keys that can be used in an IAM policy. For the
list of the global condition context keys that are available to all services, see Available Keys for
Conditions (p. 359) in the IAM Policy Elements Reference.
Actions and Condition Context Keys for Amazon Machine
Learning
Amazon Machine Learning provides the following service-specific actions and condition context keys
for use in IAM policies.
Actions for Amazon Machine Learning
For information about using the following Amazon ML API actions in an IAM policy, see Permission
Model in the Amazon Machine Learning Developer Guide.
•machinelearning:AddTags
•machinelearning:CreateBatchPrediction
•machinelearning:CreateDataSourceFromRDS
•machinelearning:CreateDataSourceFromRedshift
•machinelearning:CreateDataSourceFromS3
•machinelearning:CreateEvaluation
•machinelearning:CreateMLModel
•machinelearning:CreateRealtimeEndpoint
•machinelearning:DeleteBatchPrediction
•machinelearning:DeleteDataSource
•machinelearning:DeleteEvaluation
•machinelearning:DeleteMLModel
•machinelearning:DeleteRealtimeEndpoint
•machinelearning:DeleteTags
•machinelearning:DescribeBatchPredictions
•machinelearning:DescribeDataSources
•machinelearning:DescribeEvaluations
•machinelearning:DescribeMLModels
440

AWS Identity and Access Management User Guide
Actions and Context Keys for IAM Policies
•machinelearning:DescribeTags
•machinelearning:GetBatchPrediction
•machinelearning:GetDataSource
•machinelearning:GetEvaluation
•machinelearning:GetMLModel
•machinelearning:Predict
•machinelearning:UpdateBatchPrediction
•machinelearning:UpdateDataSource
•machinelearning:UpdateEvaluation
•machinelearning:UpdateMLModel
Condition context keys for Amazon Machine Learning
Amazon Machine Learning has no service-specific context keys that can be used in an IAM policy. For
the list of the global condition context keys that are available to all services, see Available Keys for
Conditions (p. 359) in the IAM Policy Elements Reference.
Actions and Condition Context Keys for Manage - Amazon
API Gateway
Manage - Amazon API Gateway provides the following service-specific actions and condition context
keys for use in IAM policies.
Actions for Manage - Amazon API Gateway
For more information about controlling access to API Gateway, see User Access Permissions for
Amazon API Gateway in the API Gateway Developer Guide.
•apigateway:DELETE
•apigateway:GET
•apigateway:HEAD
•apigateway:OPTIONS
•apigateway:PATCH
•apigateway:POST
•apigateway:PUT
Condition context keys for Manage - Amazon API Gateway
Manage - Amazon API Gateway has no service-specific context keys that can be used in an IAM
policy. For the list of the global condition context keys that are available to all services, see Available
Keys for Conditions (p. 359) in the IAM Policy Elements Reference.
Actions and Condition Context Keys for AWS Marketplace
AWS Marketplace provides the following service-specific actions and condition context keys for use in
IAM policies.
Actions for AWS Marketplace
For information about using the following MarketPlace Subscription API actions in an IAM policy, see
Permission Details for AWS Marketplace Subscriptions in the AWS Marketplace User Guide.
•aws-marketplace:Subscribe
441

AWS Identity and Access Management User Guide
Actions and Context Keys for IAM Policies
•aws-marketplace:Unsubscribe
•aws-marketplace:ViewSubscriptions
Condition context keys for AWS Marketplace
AWS Marketplace has no service-specific context keys that can be used in an IAM policy. For the
list of the global condition context keys that are available to all services, see Available Keys for
Conditions (p. 359) in the IAM Policy Elements Reference.
Actions and Condition Context Keys for AWS Marketplace
Management Portal
AWS Marketplace Management Portal provides the following service-specific actions and condition
context keys for use in IAM policies.
Actions for AWS Marketplace Management Portal
For information about using the following MarketPlace Management API actions in an IAM policy, see
Permission Details for AWS Marketplace Management Portal in the AWS Marketplace User Guide.
•aws-marketplace-management:uploadFiles
•aws-marketplace-management:viewMarketing
•aws-marketplace-management:viewReports
•aws-marketplace-management:viewSupport
Condition context keys for AWS Marketplace Management Portal
AWS Marketplace Management Portal has no service-specific context keys that can be used in an IAM
policy. For the list of the global condition context keys that are available to all services, see Available
Keys for Conditions (p. 359) in the IAM Policy Elements Reference.
Actions and Condition Context Keys for Amazon
Mechanical Turk
Amazon Mechanical Turk provides the following service-specific actions and condition context keys for
use in IAM policies.
Actions for Amazon Mechanical Turk
•mechanicalturk:ApproveAssignment
•mechanicalturk:ApproveRejectedAssignment
•mechanicalturk:AssignQualification
•mechanicalturk:BlockWorker
•mechanicalturk:ChangeHITTypeOfHIT
•mechanicalturk:CreateHIT
•mechanicalturk:CreateQualificationType
•mechanicalturk:DisableHIT
•mechanicalturk:DisposeHIT
•mechanicalturk:DisposeQualificationType
•mechanicalturk:ExtendHIT
•mechanicalturk:ForceExpireHIT
•mechanicalturk:GetAccountBalance
442

AWS Identity and Access Management User Guide
Actions and Context Keys for IAM Policies
•mechanicalturk:GetAssignment
•mechanicalturk:GetAssignmentsForHIT
•mechanicalturk:GetBlockedWorkers
•mechanicalturk:GetBonusPayments
•mechanicalturk:GetFileUploadURL
•mechanicalturk:GetHIT
•mechanicalturk:GetHITsForQualificationType
•mechanicalturk:GetQualificationRequests
•mechanicalturk:GetQualificationScore
•mechanicalturk:GetQualificationType
•mechanicalturk:GetQualificationsForQualificationType
•mechanicalturk:GetRequesterStatistic
•mechanicalturk:GetRequesterWorkerStatistic
•mechanicalturk:GetReviewResultsForHIT
•mechanicalturk:GetReviewableHITs
•mechanicalturk:GrantBonus
•mechanicalturk:GrantQualification
•mechanicalturk:NotifyWorkers
•mechanicalturk:RegisterHITType
•mechanicalturk:RejectAssignment
•mechanicalturk:RejectQualificationRequest
•mechanicalturk:RevokeQualification
•mechanicalturk:SearchHITs
•mechanicalturk:SearchQualificationTypes
•mechanicalturk:SendTestEventNotification
•mechanicalturk:SetHITAsReviewing
•mechanicalturk:SetHITTypeNotification
•mechanicalturk:UnblockWorker
•mechanicalturk:UpdateQualificationScore
•mechanicalturk:UpdateQualificationType
Condition context keys for Amazon Mechanical Turk
Amazon Mechanical Turk has no service-specific context keys that can be used in an IAM policy. For
the list of the global condition context keys that are available to all services, see Available Keys for
Conditions (p. 359) in the IAM Policy Elements Reference.
Actions and Condition Context Keys for Amazon Mobile
Analytics
Amazon Mobile Analytics provides the following service-specific actions and condition context keys for
use in IAM policies.
Actions for Amazon Mobile Analytics
•mobileanalytics:PutEvents
•mobileanalytics:GetReports
•mobileanalytics:GetFinancialReports
443

AWS Identity and Access Management User Guide
Actions and Context Keys for IAM Policies
Condition context keys for Amazon Mobile Analytics
Amazon Mobile Analytics has no service-specific context keys that can be used in an IAM policy. For
the list of the global condition context keys that are available to all services, see Available Keys for
Conditions (p. 359) in the IAM Policy Elements Reference.
Actions and Condition Context Keys for AWS Mobile Hub
AWS Mobile Hub provides the following service-specific actions and condition context keys for use in
IAM policies.
Actions for AWS Mobile Hub
•mobilehub:CreateProject
•mobilehub:CreateServiceRole
•mobilehub:DeleteProject
•mobilehub:GenerateProjectParameters
•mobilehub:GetProject
•mobilehub:ListAvailableFeatures
•mobilehub:ListAvailableRegions
•mobilehub:ListProjects
•mobilehub:UpdateProject
•mobilehub:ValidateProject
•mobilehub:VerifyServiceRole
Condition context keys for AWS Mobile Hub
AWS Mobile Hub has no service-specific context keys that can be used in an IAM policy. For the
list of the global condition context keys that are available to all services, see Available Keys for
Conditions (p. 359) in the IAM Policy Elements Reference.
Actions and Condition Context Keys for AWS OpsWorks
AWS OpsWorks provides the following service-specific actions and condition context keys for use in
IAM policies.
Actions for AWS OpsWorks
For information about using the following AWS OpsWorks API actions in an IAM policy, see the Action
section in Managing AWS OpsWorks Permissions by Attaching an IAM Policy in the AWS OpsWorks
User Guide.
•opsworks:AssignInstance
•opsworks:AssignVolume
•opsworks:AssociateElasticIp
•opsworks:AttachElasticLoadBalancer
•opsworks:CloneStack
•opsworks:CreateApp
•opsworks:CreateDeployment
•opsworks:CreateInstance
•opsworks:CreateLayer
•opsworks:CreateStack
•opsworks:CreateUserProfile
444

AWS Identity and Access Management User Guide
Actions and Context Keys for IAM Policies
•opsworks:DeleteApp
•opsworks:DeleteInstance
•opsworks:DeleteLayer
•opsworks:DeleteStack
•opsworks:DeleteUserProfile
•opsworks:DeregisterEcsCluster
•opsworks:DeregisterElasticIp
•opsworks:DeregisterInstance
•opsworks:DeregisterVolume
•opsworks:DescribeApps
•opsworks:DescribeCommands
•opsworks:DescribeDeployments
•opsworks:DescribeEcsClusters
•opsworks:DescribeElasticIps
•opsworks:DescribeElasticLoadBalancers
•opsworks:DescribeInstances
•opsworks:DescribeLayers
•opsworks:DescribeLoadBasedAutoScaling
•opsworks:DescribePermissions
•opsworks:DescribeRaidArrays
•opsworks:DescribeRdsDbInstances
•opsworks:DescribeServiceErrors
•opsworks:DescribeStackProvisioningParameters
•opsworks:DescribeStackSummary
•opsworks:DescribeStacks
•opsworks:DescribeTimeBasedAutoScaling
•opsworks:DescribeUserProfiles
•opsworks:DescribeVolumes
•opsworks:DetachElasticLoadBalancer
•opsworks:DisassociateElasticIp
•opsworks:GetHostnameSuggestion
•opsworks:GrantAccess
•opsworks:RebootInstance
•opsworks:RegisterEcsCluster
•opsworks:RegisterElasticIp
•opsworks:RegisterInstance
•opsworks:RegisterRdsDbInstance
•opsworks:RegisterVolume
•opsworks:SetLoadBasedAutoScaling
•opsworks:SetPermission
•opsworks:SetTimeBasedAutoScaling
•opsworks:StartInstance
•opsworks:StartStack
•opsworks:StopInstance
•opsworks:StopStack
•opsworks:UnassignInstance
445

AWS Identity and Access Management User Guide
Actions and Context Keys for IAM Policies
•opsworks:UnassignVolume
•opsworks:UpdateApp
•opsworks:UpdateElasticIp
•opsworks:UpdateInstance
•opsworks:UpdateLayer
•opsworks:UpdateMyUserProfile
•opsworks:UpdateRdsDbInstance
•opsworks:UpdateStack
•opsworks:UpdateUserProfile
•opsworks:UpdateVolume
Condition context keys for AWS OpsWorks
AWS OpsWorks has no service-specific context keys that can be used in an IAM policy. For the
list of the global condition context keys that are available to all services, see Available Keys for
Conditions (p. 359) in the IAM Policy Elements Reference.
Actions and Condition Context Keys for Amazon RDS
Amazon RDS provides the following service-specific actions and condition context keys for use in IAM
policies.
Actions for Amazon RDS
For information about using the following Amazon RDS API actions in an IAM policy, see Using AWS
Identity and Access Management (IAM) to Manage Access to Amazon RDS Resources in the Amazon
Relational Database Service User Guide.
For the REST API for DownloadCompleteDBLogFile, see DownloadCompleteDBLogFile.
•rds:AddTagsToResource
•rds:AddSourceIdentifierToSubscription
•rds:ApplyPendingMaintenanceAction
•rds:AuthorizeDBSecurityGroupIngress
•rds:CopyDBClusterSnapshot
•rds:CopyDBParameterGroup
•rds:CopyDBSnapshot
•rds:CopyOptionGroup
•rds:CreateDBClusterParameterGroup
•rds:CreateDBClusterSnapshot
•rds:CreateDBCluster
•rds:CreateDBInstance
•rds:CreateDBInstanceReadReplica
•rds:CreateDBParameterGroup
•rds:CreateDBSecurityGroup
•rds:CreateDBSnapshot
•rds:CreateDBSubnetGroup
•rds:CreateEventSubscription
•rds:CreateOptionGroup
•rds:DeleteDBClusterParameterGroup
446

AWS Identity and Access Management User Guide
Actions and Context Keys for IAM Policies
•rds:DeleteDBClusterSnapshot
•rds:DeleteDBCluster
•rds:DeleteDBInstance
•rds:DeleteDBParameterGroup
•rds:DeleteDBSecurityGroup
•rds:DeleteDBSnapshot
•rds:DeleteDBSubnetGroup
•rds:DeleteEventSubscription
•rds:DeleteOptionGroup
•rds:DescribeAccountAttributes
•rds:DescribeCertificates
•rds:DescribeEngineDefaultClusterParameters
•rds:DescribeEngineDefaultParameters
•rds:DescribeDBClusterParameterGroups
•rds:DescribeDBClusterParameters
•rds:DescribeDBClusterSnapshots
•rds:DescribeDBClusters
•rds:DescribeDBInstances
•rds:DescribeDBLogFiles
•rds:DescribeDBParameterGroups
•rds:DescribeDBParameters
•rds:DescribeDBSecurityGroups
•rds:DescribeDBSnapshotAttributes
•rds:DescribeDBSnapshots
•rds:DescribeDBEngineVersions
•rds:DescribeDBSubnetGroups
•rds:DescribeEventCategories
•rds:DescribeEvents
•rds:DescribeEventSubscriptions
•rds:DescribeOptionGroups
•rds:DescribeOptionGroupOptions
•rds:DescribeOrderableDBInstanceOptions
•rds:DescribePendingMaintenanceActions
•rds:DescribeReservedDBInstances
•rds:DescribeReservedDBInstancesOfferings
•rds:DownloadCompleteDBLogFile - this is an IAM policy permission only, not an API action that
can be called.
•rds:DownloadDBLogFilePortion
•rds:FailoverDBCluster
•rds:ListTagsForResource
•rds:ModifyDBClusterParameterGroup
•rds:ModifyDBCluster
•rds:ModifyDBInstance
•rds:ModifyDBParameterGroup
•rds:ModifyDBSnapshotAttribute
•rds:ModifyDBSubnetGroup
447

AWS Identity and Access Management User Guide
Actions and Context Keys for IAM Policies
•rds:ModifyEventSubscription
•rds:ModifyOptionGroup
•rds:PromoteReadReplica
•rds:PurchaseReservedDBInstancesOffering
•rds:RebootDBInstance
•rds:RemoveSourceIdentifierFromSubscription
•rds:RemoveTagsFromResource
•rds:RestoreDBClusterFromSnapshot
•rds:RestoreDBClusterToPointInTime
•rds:RestoreDBInstanceFromDBSnapshot
•rds:RestoreDBInstanceToPointInTime
•rds:ResetDBClusterParameterGroup
•rds:ResetDBParameterGroup
•rds:RevokeDBSecurityGroupIngress
Condition context keys for Amazon RDS
For information about using the following Amazon RDS conditions in an IAM policy, see Specifying
Conditions in an IAM Policy for Amazon RDS in the Amazon Relational Database Service User Guide.
Amazon RDS has the following service-specific context keys that can be used in an IAM policy. For
the list of the global condition context keys that are available to all services, see Available Keys for
Conditions (p. 359) in the IAM Policy Elements Reference.
•rds:DatabaseClass
•rds:DatabaseEngine
•rds:DatabaseName
•rds:MultiAz
•rds:Piops
•rds:StorageSize
•rds:Vpc
•rds:db-tag
•rds:es-tag
•rds:og-tag
•rds:pg-tag
•rds:req-tag
•rds:secgrp-tag
•rds:snapshot-tag
•rds:subgrp-tag
Actions and Condition Context Keys for Amazon Redshift
Amazon Redshift provides the following service-specific actions and condition context keys for use in
IAM policies.
Actions for Amazon Redshift
•redshift:AuthorizeClusterSecurityGroupIngress
•redshift:AuthorizeSnapshotAccess
448

AWS Identity and Access Management User Guide
Actions and Context Keys for IAM Policies
•redshift:CancelQuerySession
•redshift:CopyClusterSnapshot
•redshift:CreateCluster
•redshift:CreateClusterParameterGroup
•redshift:CreateClusterSecurityGroup
•redshift:CreateClusterSnapshot
•redshift:CreateClusterSubnetGroup
•redshift:CreateEventSubscription
•redshift:CreateHsmClientCertificate
•redshift:CreateHsmConfiguration
•redshift:CreateTags
•redshift:DeleteCluster
•redshift:DeleteClusterParameterGroup
•redshift:DeleteClusterSecurityGroup
•redshift:DeleteClusterSnapshot
•redshift:DeleteClusterSubnetGroup
•redshift:DeleteEventSubscription
•redshift:DeleteHsmClientCertificate
•redshift:DeleteHsmConfiguration
•redshift:DeleteTags
•redshift:DescribeClusterParameterGroups
•redshift:DescribeClusterParameters
•redshift:DescribeClusterSecurityGroups
•redshift:DescribeClusterSnapshots
•redshift:DescribeClusterSubnetGroups
•redshift:DescribeClusterVersions
•redshift:DescribeClusters
•redshift:DescribeDefaultClusterParameters
•redshift:DescribeEventCategories
•redshift:DescribeEventSubscriptions
•redshift:DescribeEvents
•redshift:DescribeHsmClientCertificates
•redshift:DescribeHsmConfigurations
•redshift:DescribeLoggingStatus
•redshift:DescribeOrderableClusterOptions
•redshift:DescribeReservedNodeOfferings
•redshift:DescribeReservedNodes
•redshift:DescribeResize
•redshift:DescribeTags
•redshift:DisableLogging
•redshift:DisableSnapshotCopy
•redshift:EnableLogging
•redshift:EnableSnapshotCopy
•redshift:ModifyCluster
•redshift:ModifyClusterParameterGroup
•redshift:ModifyClusterSubnetGroup
449

AWS Identity and Access Management User Guide
Actions and Context Keys for IAM Policies
•redshift:ModifyEventSubscription
•redshift:ModifySnapshotCopyRetentionPeriod
•redshift:PurchaseReservedNodeOffering
•redshift:RebootCluster
•redshift:ResetClusterParameterGroup
•redshift:RestoreFromClusterSnapshot
•redshift:RevokeClusterSecurityGroupIngress
•redshift:RevokeSnapshotAccess
•redshift:RotateEncryptionKey
•redshift:ViewQueriesInConsole
Condition context keys for Amazon Redshift
Amazon Redshift has no service-specific context keys that can be used in an IAM policy. For the
list of the global condition context keys that are available to all services, see Available Keys for
Conditions (p. 359) in the IAM Policy Elements Reference.
Actions and Condition Context Keys for Amazon Route 53
Amazon Route 53 provides the following service-specific actions and condition context keys for use in
IAM policies.
Actions for Amazon Route 53
For information about using the following Amazon Route 53 API actions in an IAM policy, see Amazon
Route 53 Actions in the Amazon Route 53 Developer Guide.
•route53:AssociateVPCWithHostedZone
•route53:ChangeResourceRecordSets
•route53:ChangeTagsForResource
•route53:CreateHealthCheck
•route53:CreateHostedZone
•route53:CreateReusableDelegationSet
•route53:CreateTrafficPolicy
•route53:CreateTrafficPolicyInstance
•route53:CreateTrafficPolicyVersion
•route53:DeleteHealthCheck
•route53:DeleteHostedZone
•route53:DeleteReusableDelegationSet
•route53:DeleteTrafficPolicy
•route53:DeleteTrafficPolicyInstance
•route53:DisableDomainAutoRenew
•route53:DisassociateVPCFromHostedZone
•route53:EnableDomainAutoRenew
•route53:GetChange
•route53:GetCheckerIpRanges
•route53:GetGeoLocation
•route53:GetHealthCheck
•route53:GetHealthCheckCount
•route53:GetHealthCheckLastFailureReason
450

AWS Identity and Access Management User Guide
Actions and Context Keys for IAM Policies
•route53:GetHealthCheckStatus
•route53:GetHostedZone
•route53:GetHostedZoneCount
•route53:GetReusableDelegationSet
•route53:GetTrafficPolicy
•route53:GetTrafficPolicyInstance
•route53:GetTrafficPolicyInstanceCount
•route53:ListGeoLocations
•route53:ListHealthChecks
•route53:ListHostedZones
•route53:ListHostedZonesByName
•route53:ListResourceRecordSets
•route53:ListReusableDelegationSets
•route53:ListTagsForResource
•route53:ListTagsForResources
•route53:ListTrafficPolicies
•route53:ListTrafficPolicyInstances
•route53:ListTrafficPolicyInstancesByHostedZone
•route53:ListTrafficPolicyInstancesByPolicy
•route53:ListTrafficPolicyVersions
•route53:UpdateHealthCheck
•route53:UpdateHostedZoneComment
•route53:UpdateTrafficPolicyComment
•route53:UpdateTrafficPolicyInstance
Condition context keys for Amazon Route 53
For information about using Amazon Route 53 condition keys in an IAM policy, see Amazon Route 53
Keys in the Amazon Route 53 Developer Guide.
Amazon Route 53 has no service-specific context keys that can be used in an IAM policy. For the
list of the global condition context keys that are available to all services, see Available Keys for
Conditions (p. 359) in the IAM Policy Elements Reference.
Actions and Condition Context Keys for Amazon Route53
Domains
Amazon Route53 Domains provides the following service-specific actions and condition context keys
for use in IAM policies.
Actions for Amazon Route53 Domains
For information about using the following Amazon Route 53 API actions in an IAM policy, see Amazon
Route 53 Actions in the Amazon Route 53 Developer Guide.
•route53domains:CheckDomainAvailability
•route53domains:DeleteDomain
•route53domains:DeleteTagsForDomain
•route53domains:DisableDomainTransferLock
•route53domains:EnableDomainTransferLock
451

AWS Identity and Access Management User Guide
Actions and Context Keys for IAM Policies
•route53domains:GetDomainDetail
•route53domains:GetOperationDetail
•route53domains:ListDomains
•route53domains:ListOperations
•route53domains:ListTagsForDomain
•route53domains:RegisterDomain
•route53domains:RetrieveDomainAuthCode
•route53domains:TransferDomain
•route53domains:UpdateDomainContact
•route53domains:UpdateDomainContactPrivacy
•route53domains:UpdateDomainNameservers
•route53domains:UpdateTagsForDomain
Condition context keys for Amazon Route53 Domains
For information about using Amazon Route 53 condition keys in an IAM policy, see Amazon Route 53
Keys in the Amazon Route 53 Developer Guide.
Amazon Route53 Domains has no service-specific context keys that can be used in an IAM policy.
For the list of the global condition context keys that are available to all services, see Available Keys for
Conditions (p. 359) in the IAM Policy Elements Reference.
Actions and Condition Context Keys for Amazon S3
Amazon S3 provides the following service-specific actions and condition context keys for use in IAM
policies.
Actions for Amazon S3
For information about using the following Amazon S3 API actions in an IAM policy, see Specifying
Permissions in a Policy in the Amazon Simple Storage Service Developer Guide.
•s3:AbortMultipartUpload
•s3:CreateBucket
•s3:DeleteBucket
•s3:DeleteBucketPolicy
•s3:DeleteBucketWebsite
•s3:DeleteObject
•s3:DeleteObjectVersion
•s3:GetAccelerateConfiguration
•s3:GetBucketAcl
•s3:GetBucketCORS
•s3:GetBucketLocation
•s3:GetBucketLogging
•s3:GetBucketNotification
•s3:GetBucketPolicy
•s3:GetBucketRequestPayment
•s3:GetBucketTagging
•s3:GetBucketVersioning
•s3:GetBucketWebsite
452

AWS Identity and Access Management User Guide
Actions and Context Keys for IAM Policies
•s3:GetLifecycleConfiguration
•s3:GetObject
•s3:GetObjectAcl
•s3:GetObjectTorrent
•s3:GetObjectVersion
•s3:GetObjectVersionAcl
•s3:GetObjectVersionTorrent
•s3:GetReplicationConfiguration
•s3:ListAllMyBuckets
•s3:ListBucket
•s3:ListBucketMultipartUploads
•s3:ListBucketVersions
•s3:ListMultipartUploadParts
•s3:PutAccelerateConfiguration
•s3:PutBucketAcl
•s3:PutBucketCORS
•s3:PutBucketLogging
•s3:PutBucketNotification
•s3:PutBucketPolicy
•s3:PutBucketRequestPayment
•s3:PutBucketTagging
•s3:PutBucketVersioning
•s3:PutBucketWebsite
•s3:PutLifecycleConfiguration
•s3:PutReplicationConfiguration
•s3:PutObject
•s3:PutObjectAcl
•s3:PutObjectVersionAcl
•s3:ReplicateDelete
•s3:ReplicateObject
•s3:RestoreObject
Condition context keys for Amazon S3
For information about using the following Amazon S3 conditions in an IAM policy, see Specifying
Conditions in a Policy in the Amazon Simple Storage Service Developer Guide.
Amazon S3 has the following service-specific context keys that can be used in an IAM policy. For
the list of the global condition context keys that are available to all services, see Available Keys for
Conditions (p. 359) in the IAM Policy Elements Reference.
•s3:x-amz-acl
•s3:x-amz-copy-source
•s3:x-amz-metadata-directive
•s3:x-amz-server-side-encryption
•s3:VersionId
•s3:LocationConstraint
•s3:delimiter
453

AWS Identity and Access Management User Guide
Actions and Context Keys for IAM Policies
•s3:max-keys
•s3:prefix
•s3:x-amz-server-side-encryption-aws-kms-key-id
Actions and Condition Context Keys for AWS Security
Token Service
AWS Security Token Service provides the following service-specific actions and condition context keys
for use in IAM policies.
Actions for AWS Security Token Service
For information about using the following AWS STS API actions in an IAM policy, see Granting
Permissions to Create Temporary Security Credentials in the Using Temporary Security Credentials.
•sts:AssumeRole
•sts:AssumeRoleWithSAML
•sts:AssumeRoleWithWebIdentity
•sts:DecodeAuthorizationMessage
•sts:GetFederationToken
•sts:GetSessionToken
Condition context keys for AWS Security Token Service
AWS Security Token Service has no service-specific context keys that can be used in an IAM policy.
For the list of the global condition context keys that are available to all services, see Available Keys for
Conditions (p. 359) in the IAM Policy Elements Reference.
Actions and Condition Context Keys for Amazon SES
Amazon SES provides the following service-specific actions and condition context keys for use in IAM
policies.
Actions for Amazon SES
For information about using the following Amazon SES API actions in an IAM policy, see Controlling
User Access to Amazon SES in the Amazon Simple Email Service Developer Guide.
•ses:CloneReceiptRuleSet
•ses:CreateReceiptFilter
•ses:CreateReceiptRule
•ses:CreateReceiptRuleSet
•ses:DeleteIdentity
•ses:DeleteIdentityPolicy
•ses:DeleteReceiptFilter
•ses:DeleteReceiptRule
•ses:DeleteReceiptRuleSet
•ses:DeleteVerifiedEmailAddress
•ses:DescribeActiveReceiptRuleSet
•ses:DescribeReceiptRule
•ses:DescribeReceiptRuleSet
454

AWS Identity and Access Management User Guide
Actions and Context Keys for IAM Policies
•ses:GetIdentityDkimAttributes
•ses:GetIdentityNotificationAttributes
•ses:GetIdentityPolicies
•ses:GetIdentityVerificationAttributes
•ses:GetSendQuota
•ses:GetSendStatistics
•ses:ListIdentities
•ses:ListIdentityPolicies
•ses:ListReceiptFilters
•ses:ListReceiptRuleSets
•ses:ListVerifiedEmailAddresses
•ses:PutIdentityPolicy
•ses:ReorderReceiptRuleSet
•ses:SendBounce
•ses:SendEmail
•ses:SendRawEmail
•ses:SetActiveReceiptRuleSet
•ses:SetIdentityDkimEnabled
•ses:SetIdentityNotificationTopic
•ses:SetIdentityFeedbackForwardingEnabled
•ses:SetReceiptRulePosition
•ses:UpdateReceiptRule
•ses:VerifyDomainDkim
•ses:VerifyDomainIdentity
•ses:VerifyEmailAddress
•ses:VerifyEmailIdentity
Condition context keys for Amazon SES
Amazon SES has the following service-specific context keys that can be used in an IAM policy. For
the list of the global condition context keys that are available to all services, see Available Keys for
Conditions (p. 359) in the IAM Policy Elements Reference.
•ses:Recipients
•ses:FromAddress
•ses:FromDisplayName
•ses:FeedbackAddress
Actions and Condition Context Keys for Amazon Simple
Systems Manager
Amazon Simple Systems Manager provides the following service-specific actions and condition context
keys for use in IAM policies.
Actions for Amazon Simple Systems Manager
For information about using the following Amazon EC2 Simple Systems Manager API actions in
an IAM policy, see Managing Windows Instance Configuration in the Amazon EC2 User Guide for
Windows Instances.
455

AWS Identity and Access Management User Guide
Actions and Context Keys for IAM Policies
•ssm:CancelCommand
•ssm:CreateAssociation
•ssm:CreateAssociationBatch
•ssm:CreateDocument
•ssm:DeleteAssociation
•ssm:DeleteDocument
•ssm:DescribeAssociation
•ssm:DescribeDocument
•ssm:DescribeDocumentPermission
•ssm:DescribeInstanceInformation
•ssm:GetDocument
•ssm:ListAssociations
•ssm:ListCommandInvocations
•ssm:ListCommands
•ssm:ListDocuments
•ssm:ModifyDocumentPermission
•ssm:SendCommand
•ssm:UpdateAssociationStatus
Condition context keys for Amazon Simple Systems Manager
Amazon Simple Systems Manager has no service-specific context keys that can be used in an IAM
policy. For the list of the global condition context keys that are available to all services, see Available
Keys for Conditions (p. 359) in the IAM Policy Elements Reference.
Actions and Condition Context Keys for Amazon Simple
Workflow Service
Amazon Simple Workflow Service provides the following service-specific actions and condition context
keys for use in IAM policies.
Actions for Amazon Simple Workflow Service
For information about using the following Amazon SWF API actions in an IAM policy, see Using IAM
to Manage Access to Amazon SWF Resources in the Amazon Simple Workflow Service Developer
Guide.
•swf:CancelTimer
•swf:CancelWorkflowExecution
•swf:CompleteWorkflowExecution
•swf:ContinueAsNewWorkflowExecution
•swf:CountClosedWorkflowExecutions
•swf:CountOpenWorkflowExecutions
•swf:CountPendingActivityTasks
•swf:CountPendingDecisionTasks
•swf:DeprecateActivityType
•swf:DeprecateDomain
•swf:DeprecateWorkflowType
•swf:DescribeActivityType
•swf:DescribeDomain
456

AWS Identity and Access Management User Guide
Actions and Context Keys for IAM Policies
•swf:DescribeWorkflowExecution
•swf:DescribeWorkflowType
•swf:FailWorkflowExecution
•swf:GetWorkflowExecutionHistory
•swf:ListActivityTypes
•swf:ListClosedWorkflowExecutions
•swf:ListDomains
•swf:ListOpenWorkflowExecutions
•swf:ListWorkflowTypes
•swf:PollForActivityTask
•swf:PollForDecisionTask
•swf:RecordActivityTaskHeartbeat
•swf:RecordMarker
•swf:RegisterActivityType
•swf:RegisterDomain
•swf:RegisterWorkflowType
•swf:RequestCancelActivityTask
•swf:RequestCancelExternalWorkflowExecution
•swf:RequestCancelWorkflowExecution
•swf:RespondActivityTaskCanceled
•swf:RespondActivityTaskCompleted
•swf:RespondActivityTaskFailed
•swf:RespondDecisionTaskCompleted
•swf:ScheduleActivityTask
•swf:SignalExternalWorkflowExecution
•swf:SignalWorkflowExecution
•swf:StartChildWorkflowExecution
•swf:StartTimer
•swf:StartWorkflowExecution
•swf:TerminateWorkflowExecution
Condition context keys for Amazon Simple Workflow Service
For information about using the following Amazon SWF condition keys in an IAM policy, see API
Summary in the Amazon Simple Workflow Service Developer Guide. Each API lists the condition keys
that you can use with that API call.
Amazon Simple Workflow Service has the following service-specific context keys that can be used in
an IAM policy. For the list of the global condition context keys that are available to all services, see
Available Keys for Conditions (p. 359) in the IAM Policy Elements Reference.
•swf:activityType.name
•swf:activityType.version
•swf:defaultTaskList.name
•swf:name
•swf:tagFilter.tag
•swf:taskList.name
•swf:typeFilter.name
457

AWS Identity and Access Management User Guide
Actions and Context Keys for IAM Policies
•swf:typeFilter.version
•swf:version
•swf:workflowType.name
•swf:workflowType.version
•swf:workflowTypeVersion
Actions and Condition Context Keys for Amazon
SimpleDB
Amazon SimpleDB provides the following service-specific actions and condition context keys for use in
IAM policies.
Actions for Amazon SimpleDB
For information about using the following Amazon SimpleDB API actions in an IAM policy, see Amazon
SimpleDB Actions in the Amazon Simple Workflow Service Developer Guide.
•sdb:BatchDeleteAttributes
•sdb:BatchPutAttributes
•sdb:CreateDomain
•sdb:DeleteAttributes
•sdb:DeleteDomain
•sdb:DomainMetadata
•sdb:GetAttributes
•sdb:ListDomains
•sdb:PutAttributes
•sdb:Select
Condition context keys for Amazon SimpleDB
For information about using condition keys in an IAM policy to control access to Amazon SimpleDB,
see Amazon SimpleDB Keys in the Amazon SimpleDB Developer Guide.
Amazon SimpleDB has no service-specific context keys that can be used in an IAM policy. For the
list of the global condition context keys that are available to all services, see Available Keys for
Conditions (p. 359) in the IAM Policy Elements Reference.
Actions and Condition Context Keys for Amazon SNS
Amazon SNS provides the following service-specific actions and condition context keys for use in IAM
policies.
Actions for Amazon SNS
For information about using the following Amazon SNS API actions in an IAM policy, see Amazon SNS
Actions in the Amazon Simple Notification Service Developer Guide.
•sns:AddPermission
•sns:CheckIfPhoneNumberIsOptedOut
•sns:ConfirmSubscription
•sns:CreatePlatformApplication
•sns:CreatePlatformEndpoint
458

AWS Identity and Access Management User Guide
Actions and Context Keys for IAM Policies
•sns:CreateTopic
•sns:DeleteEndpoint
•sns:DeletePlatformApplication
•sns:DeleteTopic
•sns:GetEndpointAttributes
•sns:GetPlatformApplicationAttributes
•sns:GetSMSAttributes
•sns:GetSubscriptionAttributes
•sns:GetTopicAttributes
•sns:ListEndpointsByPlatformApplication
•sns:ListPhoneNumbersOptedOut
•sns:ListPlatformApplications
•sns:ListSubscriptions
•sns:ListSubscriptionsByTopic
•sns:ListTopics
•sns:OptInPhoneNumber
•sns:Publish
•sns:RemovePermission
•sns:SetEndpointAttributes
•sns:SetPlatformApplicationAttributes
•sns:SetSMSAttributes
•sns:SetSubscriptionAttributes
•sns:SetTopicAttributes
•sns:Subscribe
•sns:Unsubscribe
Condition context keys for Amazon SNS
For information about using condition keys in an IAM policy to control access to Amazon SNS, see
Amazon SNS Keys in the Amazon Simple Notification Service Developer Guide.
Amazon SNS has the following service-specific context keys that can be used in an IAM policy. For
the list of the global condition context keys that are available to all services, see Available Keys for
Conditions (p. 359) in the IAM Policy Elements Reference.
•aws:SourceArn
•sns:Endpoint
•sns:Protocol
Actions and Condition Context Keys for Amazon SQS
Amazon SQS provides the following service-specific actions and condition context keys for use in IAM
policies.
Actions for Amazon SQS
For information about using the following Amazon SQS API actions in an IAM policy, see Amazon SQS
Actions in the Amazon Simple Queue Service Developer Guide.
•sqs:AddPermission
459

AWS Identity and Access Management User Guide
Actions and Context Keys for IAM Policies
•sqs:ChangeMessageVisibility
•sqs:ChangeMessageVisibilityBatch
•sqs:CreateQueue
•sqs:DeleteMessage
•sqs:DeleteMessageBatch
•sqs:DeleteQueue
•sqs:GetQueueAttributes
•sqs:GetQueueUrl
•sqs:ListDeadLetterSourceQueues
•sqs:ListQueues
•sqs:PurgeQueue
•sqs:ReceiveMessage
•sqs:RemovePermission
•sqs:SendMessage
•sqs:SendMessageBatch
•sqs:SetQueueAttributes
Condition context keys for Amazon SQS
For information about using condition keys in an IAM policy to control access to SQS resources, see
Amazon SQS Keys in the Amazon Simple Queue Service Developer Guide.
Amazon SQS has no service-specific context keys that can be used in an IAM policy. For the
list of the global condition context keys that are available to all services, see Available Keys for
Conditions (p. 359) in the IAM Policy Elements Reference.
Actions and Condition Context Keys for Amazon Storage
Gateway
Amazon Storage Gateway provides the following service-specific actions and condition context keys for
use in IAM policies.
Actions for Amazon Storage Gateway
For information about using the following AWS Storage Gateway API actions in an IAM policy, see
Access Control Using AWS Identity and Access Management (IAM) in the AWS Storage Gateway User
Guide.
•storagegateway:ActivateGateway
•storagegateway:AddCache
•storagegateway:AddUploadBuffer
•storagegateway:AddWorkingStorage
•storagegateway:CancelArchival
•storagegateway:CancelRetrieval
•storagegateway:CreateCachediSCSIVolume
•storagegateway:CreateSnapshot
•storagegateway:CreateSnapshotFromVolumeRecoveryPoint
•storagegateway:CreateStorediSCSIVolume
•storagegateway:CreateTapes
•storagegateway:DeleteBandwidthRateLimit
460

AWS Identity and Access Management User Guide
Actions and Context Keys for IAM Policies
•storagegateway:DeleteChapCredentials
•storagegateway:DeleteGateway
•storagegateway:DeleteSnapshotSchedule
•storagegateway:DeleteTape
•storagegateway:DeleteTapeArchive
•storagegateway:DeleteVolume
•storagegateway:DescribeBandwidthRateLimit
•storagegateway:DescribeCache
•storagegateway:DescribeCachediSCSIVolumes
•storagegateway:DescribeChapCredentials
•storagegateway:DescribeGatewayInformation
•storagegateway:DescribeMaintenanceStartTime
•storagegateway:DescribeSnapshotSchedule
•storagegateway:DescribeStorediSCSIVolumes
•storagegateway:DescribeTapeArchives
•storagegateway:DescribeTapeRecoveryPoints
•storagegateway:DescribeTapes
•storagegateway:DescribeUploadBuffer
•storagegateway:DescribeVTLDevices
•storagegateway:DescribeWorkingStorage
•storagegateway:DisableGateway
•storagegateway:ListGateways
•storagegateway:ListLocalDisks
•storagegateway:ListTagsForResource
•storagegateway:ListVolumeRecoveryPoints
•storagegateway:ListVolumes
•storagegateway:RetrieveTapeArchive
•storagegateway:RetrieveTapeRecoveryPoint
•storagegateway:ShutdownGateway
•storagegateway:StartGateway
•storagegateway:UpdateBandwidthRateLimit
•storagegateway:UpdateChapCredentials
•storagegateway:UpdateGatewayInformation
•storagegateway:UpdateGatewaySoftwareNow
•storagegateway:UpdateMaintenanceStartTime
•storagegateway:UpdateSnapshotSchedule
Condition context keys for Amazon Storage Gateway
Amazon Storage Gateway has no service-specific context keys that can be used in an IAM policy. For
the list of the global condition context keys that are available to all services, see Available Keys for
Conditions (p. 359) in the IAM Policy Elements Reference.
Actions and Condition Context Keys for AWS Trusted
Advisor
AWS Trusted Advisor provides the following service-specific actions and condition context keys for use
in IAM policies.
461

AWS Identity and Access Management User Guide
Actions and Context Keys for IAM Policies
Actions for AWS Trusted Advisor
AWS Trusted Advisor provides the following service-specific actions and condition context keys for
use in IAM policies. Note that these actions apply only to Trusted Advisor in the AWS Management
Console; they do not apply to the Trusted Advisor-related actions provided by the AWS Support API
(such as DescribeTrustedAdvisorChecks). For more information about how these actions affect
access to the Trusted Advisor console, see Controlling Access to the Trusted Advisor Console.
To use the Trusted Advisor-related actions provided by the AWS Support API, your policy must include
the support:* action (explicitly or implicitly); none of the trustedadvisor action permissions
restrict your access.
•trustedadvisor:DescribeCheckItems
•trustedadvisor:DescribeCheckRefreshStatuses
•trustedadvisor:DescribeCheckStatusHistoryChanges
•trustedadvisor:DescribeCheckSummaries
•trustedadvisor:DescribeNotificationPreferences
•trustedadvisor:ExcludeCheckItems
•trustedadvisor:IncludeCheckItems
•trustedadvisor:RefreshCheck
•trustedadvisor:UpdateNotificationPreferences
Condition context keys for AWS Trusted Advisor
AWS Trusted Advisor has no service-specific context keys that can be used in an IAM policy. For
the list of the global condition context keys that are available to all services, see Available Keys for
Conditions (p. 359) in the IAM Policy Elements Reference.
Actions and Condition Context Keys for AWS WAF
AWS WAF provides the following service-specific actions and condition context keys for use in IAM
policies.
Actions for AWS WAF
For information about using the following AWS WAF API actions in an IAM policy, see Using IAM to
Control Access to AWS WAF Resources in the AWS WAF Developer Guide.
•waf:CreateByteMatchSet
•waf:CreateIPSet
•waf:CreateRule
•waf:CreateSqlInjectionMatchSet
•waf:CreateWebACL
•waf:DeleteByteMatchSet
•waf:DeleteIPSet
•waf:DeleteRule
•waf:DeleteSqlInjectionMatchSet
•waf:DeleteWebACL
•waf:GetByteMatchSet
•waf:GetChangeToken
•waf:GetChangeTokenStatus
•waf:GetIPSet
462

AWS Identity and Access Management User Guide
Actions and Context Keys for IAM Policies
•waf:GetRule
•waf:GetSampledRequests
•waf:GetSqlInjectionMatchSet
•waf:GetWebACL
•waf:ListByteMatchSets
•waf:ListIPSets
•waf:ListRules
•waf:ListSqlInjectionMatchSets
•waf:ListWebACLs
•waf:UpdateByteMatchSet
•waf:UpdateIPSet
•waf:UpdateRule
•waf:UpdateSqlInjectionMatchSet
•waf:UpdateWebACL
Condition context keys for AWS WAF
AWS WAF has no service-specific context keys that can be used in an IAM policy. For the list
of the global condition context keys that are available to all services, see Available Keys for
Conditions (p. 359) in the IAM Policy Elements Reference.
Actions and Condition Context Keys for Amazon
WorkDocs
Amazon WorkDocs provides the following service-specific actions and condition context keys for use in
IAM policies.
Actions for Amazon WorkDocs
For information about using the following Amazon WorkDocs API actions in an IAM policy, see IAM
Policies for Amazon WorkDocs in the Amazon WorkDocs Administration Guide.
•workdocs:ActivateUser
•workdocs:AddUserToGroup
•workdocs:CheckAlias
•workdocs:CreateInstance
•workdocs:DeactivateUser
•workdocs:DeleteInstance
•workdocs:DeregisterDirectory
•workdocs:DescribeAvailableDirectories
•workdocs:DescribeInstances
•workdocs:RegisterDirectory
•workdocs:RemoveUserFromGroup
•workdocs:UpdateInstanceAlias
Condition context keys for Amazon WorkDocs
Amazon WorkDocs has no service-specific context keys that can be used in an IAM policy. For
the list of the global condition context keys that are available to all services, see Available Keys for
Conditions (p. 359) in the IAM Policy Elements Reference.
463

AWS Identity and Access Management User Guide
Actions and Context Keys for IAM Policies
Actions and Condition Context Keys for Amazon WorkMail
Amazon WorkMail provides the following service-specific actions and condition context keys for use in
IAM policies.
Actions for Amazon WorkMail
For information about using the following Amazon WorkMail API actions in an IAM policy, see AWS
Identity and Access Management Policies for Amazon WorkMail in the Amazon WorkMail Administrator
Guide.
•workmail:AddMembersToGroup
•workmail:CreateGroup
•workmail:CreateMailDomain
•workmail:CreateMailUser
•workmail:CreateOrganization
•workmail:DeleteOrganization
•workmail:DeleteMailDomain
•workmail:DeleteMobileDevice
•workmail:DescribeDirectories
•workmail:DescribeKmsKeys
•workmail:DescribeOrganizations
•workmail:DescribeMailDomains
•workmail:DescribeMailGroups
•workmail:DescribeMailUsers
•workmail:DisableMailGroups
•workmail:DisableMailUsers
•workmail:EnableMailDomain
•workmail:EnableMailUsers
•workmail:EnableMailGroups
•workmail:GetMailDomainDetails
•workmail:GetMailGroupDetails
•workmail:GetMailUserDetails
•workmail:GetMobileDeviceDetails
•workmail:GetMobileDevicesForUser
•workmail:GetMobilePolicyDetails
•workmail:ListMembersInMailGroup
•workmail:RemoveMembersFromGroup
•workmail:ResetUserPassword
•workmail:SearchMembers
•workmail:SetAdmin
•workmail:SetDefaultMailDomain
•workmail:SetMailGroupDetails
•workmail:SetMailUserDetails
•workmail:SetMobilePolicyDetails
•workmail:WipeMobileDevice
Condition context keys for Amazon WorkMail
464

AWS Identity and Access Management User Guide
Actions and Context Keys for IAM Policies
Amazon WorkMail has no service-specific context keys that can be used in an IAM policy. For the
list of the global condition context keys that are available to all services, see Available Keys for
Conditions (p. 359) in the IAM Policy Elements Reference.
Actions and Condition Context Keys for Amazon
WorkSpaces
Amazon WorkSpaces provides the following service-specific actions and condition context keys for use
in IAM policies.
Actions for Amazon WorkSpaces
For information about using the following Amazon WorkSpaces API actions in an IAM policy
attached to an IAM user, see Controlling Access to Amazon WorkSpaces Resources in the Amazon
WorkSpaces Administration Guide.
•workspaces:CreateTags
•workspaces:CreateWorkspaces
•workspaces:DeleteTags
•workspaces:DescribeTags
•workspaces:DescribeWorkspaceBundles
•workspaces:DescribeWorkspacesConnectionStatus
•workspaces:DescribeWorkspaceDirectories
•workspaces:DescribeWorkspaces
•workspaces:ModifyWorkspaceProperties
•workspaces:StartWorkspaces
•workspaces:StopWorkspaces
•workspaces:RebootWorkspaces
•workspaces:RebuildWorkspaces
•workspaces:TerminateWorkspaces
Condition context keys for Amazon WorkSpaces
Amazon WorkSpaces has no service-specific context keys that can be used in an IAM policy. For
the list of the global condition context keys that are available to all services, see Available Keys for
Conditions (p. 359) in the IAM Policy Elements Reference.
465

AWS Identity and Access Management User Guide
Users and Groups
Resources
IAM is a rich product, and you'll find many resources to help you learn more about how IAM can help
you secure your AWS account and resources.
Topics
•Users and Groups (p. 466)
•Credentials (Passwords, Access Keys, and MFA devices) (p. 466)
•Permissions and Policies (p. 467)
•Federation and Delegation (p. 467)
•IAM and Other AWS Products (p. 467)
•General Security Practices (p. 468)
•General Resources (p. 468)
Users and Groups
Consult these resources for creating, managing, and using users and groups.
•Creating Your First IAM Admin User and Group (p. 14) – A step-by-step procedure that shows
how to create an IAM users and assign permissions.
•Identities (Users, Groups, and Roles) (p. 55) – An in-depth discussion of how to administer IAM
users and groups.
•Guidelines for when to use Accounts, Users, and Groups – An AWS Security Blog post that
discusses how to organize user access with separate AWS accounts or with IAM users and groups
in a single account.
Credentials (Passwords, Access Keys, and
MFA devices)
Review the following guides to manage passwords for your AWS account and for IAM users. You'll also
find information about access keys—the secret key that you use to make programmatic calls to AWS.
•AWS Security Credentials – Describes the types of credentials you use to access Amazon Web
Services, explains how to create and manage them, and includes recommendations for managing
access keys securely.
466

AWS Identity and Access Management User Guide
Permissions and Policies
•Managing Passwords (p. 66) and Managing Access Keys for IAM Users (p. 76) – Describes
options for managing credentials for IAM users in your account.
•Using Multi-Factor Authentication (MFA) in AWS (p. 80) – Describes how to configure your
account and IAM users to require both a password and a one-time use code that is generated on a
device before sign-in is allowed. (This is sometimes called two-factor authentication.)
Permissions and Policies
Learn the inner workings of IAM policies and find tips on the best ways to confer permissions:
•Overview of AWS IAM Permissions (p. 250) – Describes how permissions can be attached to
users or groups or, for some AWS products, to resources themselves.
•Overview of IAM Policies (p. 262) – Introduces the policy language that is used to define
permissions.
•IAM Policy Elements Reference (p. 346) – Provides descriptions and examples of each policy
language element.
•Example Policies for Administering AWS Resources (p. 299) – Shows examples of policies for
common tasks in various AWS products.
•AWS Policy Generator – Create custom policies by choosing products and actions from a list.
•IAM Policy Simulator – Test whether a policy would allow or deny a specific AWS action. The
following video (6:28) provides an overview and shows the policy simulator in action.
Getting Started with the IAM Policy Simulator
Federation and Delegation
You can grant access to resources in your AWS account for users who are authenticated (signed
in) elsewhere. These can be IAM users in another AWS account (known as delegation), users who
are authenticated with your organization's sign-in process, or users from an Internet identity provider
like Login with Amazon, Facebook, Google, or any other OpenID Connect (OIDC) compatible identity
provider. In these cases, the users get temporary security credentials to access AWS resources.
•Tutorial: Delegate Access Across AWS Accounts Using IAM Roles (p. 23) – Guides you through
granting cross-account access to an IAM user in another AWS account.
•Common Scenarios for Temporary Credentials (p. 218) – Describes ways in which users can be
federated into AWS after being authenticated outside of AWS.
•Web Identity Federation Playground – Lets you experiment with Login with Amazon, Google, or
Facebook to authenticate and then make a call to Amazon S3.
IAM and Other AWS Products
Most AWS products are integrated with IAM so that you can use IAM features to help protect access
to the resources in those products. The following resources discuss IAM and security for some of the
most popular AWS products. For a complete list of products that work with IAM, including links to more
information on each, see AWS Services That Work with IAM (p. 340).
Using IAM with Amazon EC2
•Controlling Access to Amazon EC2 Resources – Describes how to use IAM features to permit users
to administer Amazon EC2 instances, volumes, and more.
467

AWS Identity and Access Management User Guide
Using IAM with Amazon S3
•Using Instance Profiles (p. 206) – Describes how to use IAM roles to securely provide credentials for
applications that run on Amazon EC2 instances and that need access to other AWS products.
Using IAM with Amazon S3
•Managing Access Permissions to Your Amazon S3 Resources – Discusses the Amazon S3 security
model for buckets and objects, which includes IAM policies.
•Writing IAM policies: Grant access to user-specific folders in an Amazon S3 bucket – Discusses how
to let users protect their own folders in Amazon S3. (For more posts about Amazon S3 and IAM,
choose the S3 tag below the title of the blog post.)
Using IAM with Amazon RDS
•Using AWS Identity and Access Management (IAM) to Manage Access to Amazon RDS Resources
– Describes how to use IAM to control access to database instances, database snapshots, and
more.
•A primer on RDS resource-level permissions – Describes how to use IAM to control access to
specific Amazon RDS instances.
Using IAM with Amazon DynamoDB
•Using IAM to Control Access to DynamoDB Resources – Describes how to use IAM to permit users
to administer DynamoDB tables and indexes.
• The following video (8:55) explains how to provide access control for individual DynamoDB database
items or attributes (or both).
Getting Started with Fine-Grained Access Control for DynamoDB
General Security Practices
Find expert tips and guidance on the best ways to secure your AWS account and resources:
•AWS Security Best Practices (PDF) – Provides an in-depth look at how to manage security across
AWS accounts and products, including suggestions for security architecture, use of IAM, encryption
and data security, and more.
•IAM Best Practices (p. 40) – Offers recommendations for ways to use IAM to help secure your
AWS account and resources.
•AWS CloudTrail User Guide – Use AWS CloudTrail to track a history of API calls made to AWS
and store that information in log files. This helps you determine which users and accounts accessed
resources in your account, when the calls were made, what actions were requested, and more.
General Resources
Explore the following resources to learn more about IAM and AWS.
•Product Information for IAM – General information about the AWS Identity and Access
Management product.
•Discussion Forms for AWS Identity and Access Management – A community forum for
customers to discuss technical questions related to IAM.
468

AWS Identity and Access Management User Guide
General Resources
•AWS Training and Courses – Links to role-based and specialty courses as well as self-paced labs
to help sharpen your AWS skills and gain practical experience.
•AWS Developer Tools – Links to developer tools and resources that provide documentation, code
samples, release notes, and other information to help you build innovative applications with AWS.
•AWS Support Center – The hub for creating and managing your AWS Support cases. Also includes
links to other helpful resources, such as forums, technical FAQs, service health status, and AWS
Trusted Advisor.
•AWS Support – The primary web page for information about AWS Support, a one-on-one, fast-
response support channel to help you build and run applications in the cloud.
•Contact Us – A central contact point for inquiries concerning AWS billing, account, events, abuse,
and other issues.
•AWS Site Terms – Detailed information about our copyright and trademark; your account, license,
and site access; and other topics.
469

AWS Identity and Access Management User Guide
Endpoints
Calling the API by Making HTTP
Query Requests
Topics
•Endpoints (p. 470)
•HTTPS Required (p. 471)
•Signing IAM API Requests (p. 471)
This section contains general information about using the Query API for AWS Identity and Access
Management (IAM) and AWS Security Token Service (AWS STS). For details about the API actions
and errors, go to the IAM API Reference or the AWS Security Token Service API Reference.
Note
Instead of making direct calls to the IAM or AWS STS APIs, you can use one of the AWS
SDKs. The AWS SDKs consist of libraries and sample code for various programming
languages and platforms (Java, Ruby, .NET, iOS, Android, etc.). The SDKs provide a
convenient way to create programmatic access to IAM and AWS. For example, the SDKs
take care of tasks such as cryptographically signing requests (see below), managing errors,
and retrying requests automatically. For information about the AWS SDKs, including how to
download and install them, see the Tools for Amazon Web Services page.
The Query API for IAM and AWS STS lets you call service actions. Query API requests are HTTPS
requests that must contain an Action parameter to indicate the action to be performed. IAM and AWS
STS support GET and POST requests for all actions. That is, the API does not require you to use GET
for some actions and POST for others. However, GET requests are subject to the limitation size of a
URL; although this limit is browser dependent, a typical limit is 2048 bytes. Therefore, for Query API
requests that require larger sizes, you must use a POST request.
The response is an XML document. For details about the response, see the individual action pages in
the IAM API Reference or the AWS Security Token Service API Reference.
Endpoints
IAM and AWS STS each have a single global endpoint:
• (IAM) https://iam.amazonaws.com
470

AWS Identity and Access Management User Guide
HTTPS Required
• (AWS STS) https://sts.amazonaws.com
Note
AWS STS also supports sending requests to regional endpoints in addition to the global
endpoint. Before you can use AWS STS in a region, you must first activate STS in that region
for your AWS account. For more information about activating additional regions for AWS STS,
see Activating and Deactivating AWS STS in an AWS Region (p. 244).
For more information about AWS endpoints and regions for all services, see Regions and Endpoints in
the AWS General Reference.
HTTPS Required
Because the Query API returns sensitive information such as security credentials, you must use
HTTPS with all API requests.
Signing IAM API Requests
Requests must be signed using an access key ID and a secret access key. We strongly recommend
that you do not use your AWS root account credentials for everyday work with IAM. You can use the
credentials for an IAM user or you can use AWS STS to generate temporary security credentials.
To sign your API requests, we recommend using AWS Signature Version 4. For information about
using Signature Version 4, go to Signature Version 4 Signing Process in the AWS General Reference.
If you need to use Signature Version 2, information about using Signature Version 2 is available in the
AWS General Reference.
For more information, see the following:
•AWS Security Credentials. Provides general information about the types of credentials used for
accessing AWS.
•IAM Best Practices (p. 40). Presents a list of suggestions for using IAM service to help secure your
AWS resources.
•Temporary Security Credentials (p. 218). Describes how to create and use temporary security
credentials.
471


AWS Identity and Access Management User Guide
Document History
The following table describes the important changes to the documentation since the last release of
AWS Identity and Access Management.
•API version: 2010-05-08
•Latest major documentation update: August 26, 2015
Change Description Release Date
Longer
federated
console
sessions
Added documentation describing how to take advantage of
new parameters to the APIs that create console sessions for
federated users that allow a console session to be up to 12 hours
long. For more information see, Creating a URL that Enables
Federated Users to Access the AWS Management Console
(Custom Federation Broker) (p. 159).
July 28, 2016
SMS-based
Multi-factor
Authentication
Added documentation to support the new feature that enables
IAM users to authenticate with a mobile device that can receive
SMS-based text messages. For more information, see PREVIEW -
Enabling SMS Text Message MFA Devices (p. 87).
November 17,
2015
Major
reorganization
of IAM User
Guide and
merger with
STS User
Guide
Merged the STS User Guide into the IAM User Guide.
Reorganized the content to more directly map to what our
customers need. This includes grouping content into major
sections on Identities (users, groups, and roles) and Access
Management (policies and permissions). Also introduced a new
Reference section and moved all reference content to that one
spot.
August 26,
2015
SSH keys for
IAM users Added new documentation relating to SSH keys. You can
now upload SSH public keys to IAM and use those keys for
authentication with AWS CodeCommit. When you upload
SSH public keys to IAM, you associate the keys with IAM
users. For more information, see Using SSH Keys with AWS
CodeCommit (p. 110).
July 9, 2015
View access
key last used
information
Updated the documentation to describe the access key last used
feature. You can now determine when any access key in your
AWS account was last used. You can query for an individual
access key using the GetAccessKeyLastUsed API, or request a
credential report (p. 106) to view all access keys in your account.
April 22, 2015
473

AWS Identity and Access Management User Guide
Change Description Release Date
The report includes the last used information for all access
keys (and passwords, too). You can use this new feature to
more easily address potential security concerns in your AWS
account by identifying and deleting access keys that are no longer
being used. For more information, see Remove unnecessary
credentials (p. 43).
Managed
Policies Added new documentation relating to managed policies (p. 266).
You can now use the IAM section of the AWS Management
Console to attach AWS managed policies to your IAM users,
groups, and roles. You can also create customer managed
policies, which are standalone policies that you can attach to
multiple IAM users, groups, and roles. Standalone policies means
that each policy has its own Amazon Resource Name (ARN).
February 11,
2015
Switch Role in
the Console Added new documentation relating to Switching to a Role (AWS
Management Console) (p. 196). You can now switch to a role in an
account from within the AWS Management Console. This enables
you to more easily delegate console tasks.
January 8,
2015
Create
OpenID
Connect
(OIDC)
identity
providers and
use them
with Amazon
Cognito
Added new documentation relating to Creating OpenID Connect
(OIDC) Identity Providers (p. 143). You can now use the IAM
section of the AWS Management Console to add any OIDC-
compatible identity provider, and then you can use the identity
provider in your mobile apps that use Amazon Cognito.
October 23,
2014
View a user's
last sign-in
time
Updated the documentation relating to the section called “Getting
Credential Reports” (p. 106) to add information about the
password_last_used field.
October 16,
2014
Sign-in
Events now
in AWS
CloudTrail
Log Files
Updated the documentation relating to Logging IAM Events
with AWS CloudTrail (p. 309) to add sign-in events to the IAM
information that is logged by AWS CloudTrail.
July 24, 2014
Credential
Lifecycle
Management
Updated the documentation relating to Setting an Account
Password Policy for IAM Users (p. 67) to add new password
management options.
Added new documentation relating to the section called “Getting
Credential Reports” (p. 106).
July 16, 2014
Updates to
web identity
federation
documentation
for Amazon
Cognito
Updated the documentation relating to web identity federation (for
example, pages about how to create a role and about IAM policy
condition keys) to include information about Amazon Cognito. For
more information about Amazon Cognito, see the AWS Mobile
SDK for Android Developer Guide and the AWS Mobile SDK for
iOS Developer Guide.
July 10, 2014
474

AWS Identity and Access Management User Guide
Change Description Release Date
MFA Support
for Cross-
Account API
Actions
This release lets you enforce multi-factor authentication (MFA)
when providing programmatic access across AWS accounts. You
can create policies that require an IAM user to be authenticated
using an MFA device before assuming an IAM role. For more
information, see Configuring MFA-Protected API Access (p. 93).
February 27,
2014
Support for
SAML-Based
Federation,
Updated
Documentation
This release adds support for SAML-based federation. In IAM you
can create a SAML provider, which is an entity that describes an
identity provider (IdP) that supports SAML 2.0 (Security Assertion
Markup Language 2.0). You create a SAML provider in IAM if you
want to establish trust between AWS and an identity provider. For
more information, see Creating SAML Identity Providers (p. 148).
The documentation was also reorganized to make it easier to find
information. In particular, the sections pertaining to IAM users and
groups and to working with credentials were updated.
November 7,
2013
Policy
Variables,
Updated
Documentation
This release adds support for including variables in policies; this
makes it easier to create policies that apply to the current request
context, such as to the current user. For details, see IAM Policy
Variables Overview (p. 371).
The documentation was also reorganized to make it easier to find
information (for example, the table of contents was restructured),
and examples were added to Example Policies for Administering
AWS Resources (p. 299).
April 3, 2013
Best
Practices This release includes a topic on IAM best practices. For details,
see IAM Best Practices (p. 40).January 10,
2013
Cross-
account API
access
This release adds support for cross-account API access with IAM
roles. With IAM roles, you can delegate access to resources in
your AWS account so that IAM users from another AWS account
can access your resources. For details, see IAM Roles (p. 124).
November 19,
2012
MFA-
Protected API
Access
This release introduces MFA-protected API access, a feature that
enables you to add an extra layer of security over AWS APIs using
AWS Multi-Factor Authentication (MFA), see Configuring MFA-
Protected API Access (p. 93).
July 8, 2012
Business Use
Cases This section has been rewritten and updated. For more
information, see Business Use Cases (p. 44).June 22, 2012
IAM Roles for
Amazon EC2
Instances
This release introduces IAM roles for Amazon EC2 instances.
Use roles to enable applications running on your Amazon
EC2 instances to securely access your AWS resources. For
more information about IAM roles for EC2 instances, see IAM
Roles (p. 124).
June 7, 2012
AWS Storage
Gateway This release introduces AWS Storage Gateway integration with
IAM. For more information about using IAM with AWS Storage
Gateway, go to Access Control Using AWS Identity and Access
Management (IAM) in the AWS Storage Gateway User Guide.
For a general description of AWS Storage Gateway, go to AWS
Storage Gateway.
May 14, 2012
475

AWS Identity and Access Management User Guide
Change Description Release Date
Updated
Documentation The IAM Getting Started Guide was merged into Using IAM, and
Using IAM was reorganized to enhance usability. The Getting
Started is now available at Getting Started (p. 13).
May 2, 2012
Signature
Version 4 With this release of IAM, you can use Signature Version 4 to sign
your IAM API requests. For more information about Signature
Version 4, go to Signature Version 4 Signing Process in the AWS
General Reference.
March 15,
2012
User
Password
Management
With this release of IAM, you can enable your IAM users to change
their password. For more information, see Temporary Security
Credentials (p. 218).
March 8, 2012
Account
Password
Policy
IAM now includes an account-wide password policy you can use
to ensure your IAM users create strong passwords. For more
information, see Setting an Account Password Policy for IAM
Users (p. 67).
March 8, 2012
IAM User
Access to
Your AWS
Account
Billing
Information
With this release of IAM, you can enable your IAM users to
access your AWS account billing and usage information. For more
information, see Controlling Access to Your Billing Information.
March 8, 2012
Amazon
Simple
Workflow
Service
(SWF)
This release introduces Amazon Simple Workflow Service (SWF)
integration with IAM. For more information about using IAM with
Amazon Simple Workflow Service, go to Managing Access to
Your Amazon SWF Workflows in the Amazon Simple Workflow
Service Developer Guide . For a general description of Amazon
Simple Workflow Service, go to Amazon Simple Workflow Service.
February 22,
2012
Single Sign-
on Access
to the AWS
Management
Console for
Federated
Users
With this release, you can give your federated users single
sign-on access to the AWS Management Console through your
identity and authorization system, without requiring users to sign
in to Amazon Web Services (AWS). For more information, see
Creating a URL that Enables Federated Users to Access the AWS
Management Console (Custom Federation Broker) (p. 159).
January 19,
2012
Amazon
DynamoDB This release introduces Amazon DynamoDB integration with IAM.
For more information about using IAM with Amazon DynamoDB,
go to Controlling Access to Amazon DynamoDB Resources in the
Amazon DynamoDB Developer Guide. For a general description of
Amazon DynamoDB, go to Amazon DynamoDB.
January 18,
2012
AWS Elastic
Beanstalk This release introduces AWS Elastic Beanstalk integration with
IAM. For more information about using IAM with AWS Elastic
Beanstalk, go to Using AWS Elastic Beanstalk with AWS Identity
and Access Management (IAM) in the AWS Elastic Beanstalk
Developer Guide. For a general description of AWS Elastic
Beanstalk, go to AWS Elastic Beanstalk. For IAM use cases, see
Business Use Cases (p. 44).
November 21,
2011
476

AWS Identity and Access Management User Guide
Change Description Release Date
AWS Virtual
MFA With this release, you can use IAM to configure and enable
a virtual MFA device. A virtual MFA device uses a software
application that can generate six-digit authentication codes that
are compatible with the time-based one-time password (TOTP)
standard, as described in RFC 6238. The software application
can run on any mobile hardware device, including a smartphone.
For more information about virtual MFA and about using IAM to
configure and enable a virtual MFA device, see Enabling a Virtual
Multi-factor Authentication (MFA) Device (p. 82).
November 2,
2011
Policy
Generator
Integration
with the
AWS Identity
and Access
Management
Console
This release introduces the integration of the policy generator
with the AWS Identity and Access Management (IAM) console.
Integrating the policy generator with the IAM console makes it
even easier to set permissions for your IAM users and groups. To
use the policy generator in the console, select Policy Generator in
the user or group permissions dialogs.
For more information about the AWS access policy syntax, see
Overview of IAM Policies (p. 262). If you want to use the policy
generator online to create policies for AWS products without
accessing the console, go to the AWS policy penerator .
October 6,
2011
Amazon
ElastiCache This release introduces Amazon ElastiCache integration with IAM.
For more information about using IAM with Amazon ElastiCache,
go to Controlling User Access to Your AWS Account in the
Amazon ElastiCache User Guide. For a general description of
Amazon ElastiCache, go to Amazon ElastiCache. For IAM use
cases, see Business Use Cases (p. 44).
August 23,
2011
Temporary
Security
Credentials
This release of IAM introduces temporary security credentials
that you can use to grant temporary access to non-AWS users
(federated users), to IAM users who need temporary access
to your AWS resources, and to your mobile and browser-
based applications that need to access your AWS resources
securely. For more information, go to Temporary Security
Credentials (p. 218).
August 3, 2011
Cross-
Account
Access for
IAM Users
This release of IAM introduces cross-account access for IAM
users. For more information, see IAM Roles (p. 124).June 6, 2011
The AWS
Management
Console IAM
Tab
This release of IAM introduces AWS Management Console
support. The IAM tab of the console is a graphical user interface
(GUI) that enables you to do almost everything you can do with the
IAM APIs. For more information, see Accessing IAM (p. 2).
May 3, 2011
Amazon
CloudFront This release of IAM includes integration with Amazon CloudFront.
For more information, go to Controlling User Access to Your AWS
Account in the Amazon CloudFront Developer Guide.
March 10,
2011
AWS
CloudFormation This release introduces AWS CloudFormation integration with
IAM. For more information, go to Controlling User Access With
AWS Identity and Access Management in the Amazon CloudFront
Developer Guide.
February 24,
2011
477

AWS Identity and Access Management User Guide
Change Description Release Date
Amazon EMR This release introduces Amazon EMR integration with IAM. For
more information, go to Amazon Elastic MapReduce in Business
Use Cases (p. 44) in IAM User Guide.
February 22,
2011
IAM-Enabled
User Access
to the AWS
Management
Console
and AWS
Developer
Forums
IAM now provides an IAM-enabled sign-in page for the AWS
Management Console. You provide your users with a login
profile and with appropriate permissions so they can access your
available AWS resources through the AWS Management Console.
For information about accessing the AWS Management Console
through IAM, see The IAM Console and the Sign-in Page (p. 48).
For information about the AWS Management Console, see AWS
Management Console.
February 14,
2011
Amazon
Simple Email
Service
This release introduces Amazon Simple Email Service (Amazon
SES) integration with IAM. For more information, see Controlling
User Access with IAM.
January 24,
2011
AWS IAM
Integration
with Amazon
Route 53
Amazon Route 53 DNS service is now integrated with IAM. For
information about using Amazon Route 53 with IAM, see AWS
Services That Work with IAM (p. 340). For more information about
Amazon Route 53, go to Amazon Route 53 on the AWS website.
December 5,
2010
AWS IAM
Integration
with Amazon
CloudWatch
Amazon CloudWatch is now integrated with IAM. For information
about using Amazon CloudWatch with IAM, see Controlling
User Access to Your AWS Account. For more information about
Amazon CloudWatch, see Amazon CloudWatch on the AWS
website.
November 29,
2010
Server
Certificate
Support
IAM now provides server certificate APIs for use with Elastic
Load Balancing server certificates. For information about using
IAM to manage server certificates, see Working with Server
Certificates (p. 111).
October 14,
2010
Initial Release This is the first release of IAM User Guide. September 2,
2010
478
