Accela GIS For ArcGIS Configuration Guide 9.2.0 Arc
User Manual:
Open the PDF directly: View PDF ![]() .
.
Page Count: 64
- Accela GIS for ArcGIS Configuration Guide
- Table of Contents
- Chapter 1: Introduction
- Chapter 2: Configuration Prerequisites
- Chapter 3: Setting Up Map Functionality
- Chapter 4: Creating a Cached Map Service
- Chapter 5: Setting Up Geocoding Functionality
- Chapter 6: Setting Up Routing Functionality
- Chapter 7: Setting Up Accela Mobile Office Offline Mapping
- Ensuring GIS Data Sources Are in the ArcSDE Geodatabase
- Ensuring ArcGIS Engine Is Installed and Licensed Properly
- Verifying the SDE Server Name
- Entering the IP Address as the ArcGIS Server Name
- Verifying the User Access
- Creating a Map Service and a Geodata Service
- Configuring the MIME Type and Request Filtering in IIS
- Updating the Map Integration Environment
- Chapter 8: Enabling Users to Create GIS Features
- Chapter 9: ArcGIS Online Web Map Configuration

Version 9.2.0
ArcGISTM Configuration Guide
Accela GISTM

Accela GIS for ArcGIS Configuration Guide
© 2017 Accela, Inc. All rights reserved.
Accela, the Accela logo, the Accela logo with “Government Software” notation, Accela Automation, Accela
Asset Management, Accela Citizen Access, Accela Mobile Citizen Access, Accela ERS, Accela GIS, Accela
IVR, Accela Land Management, Accela Licensing, Accela Mobile Office, Accela Public Health and Safety,
Accela Service Request, Accela Wireless, Kiva DMS, Kiva Development Management System, 'PERMITS'
Plus, SiteSynch, Tidemark Advantage, Civic Platform, Civic Cloud, Civic Hero, E-Boardroom,
EnvisionConnect, Envista, GEOTMS, IQM2, Mediatraq, Minutetraq, PublicStuff, Trusted To Do More,
VelocityHall, Vantage360, and other Accela logos, devices, product names, and service names are
trademarks or service marks of Accela, Inc. Brava! Viewer is a trademark of Informative Graphics
Corporation. Windows is a registered trademark of Microsoft Corporation. Acrobat is a trademark of Adobe
Systems Incorporated. Portions copyright 2009 Ching-Lan 'digdog' Huang and digdog software. All other
company names, product names, and designs mentioned herein are held by their respective owners.
Version 9.2.0
October 2017
Corporate Headquarters
2633 Camino Ramon
Suite 500
Bishop Ranch 3
San Ramon, CA 94583
Tel: (888) 722-2352
Fax: (925) 659-3201
www.accela.com

3
TABLE OF CONTENTS
Chapter 1
Introduction ...............................................................................................5
Revision History................................................................................................ 5
About Esri’s ArcGIS .......................................................................................... 5
Obtaining Technical Assistance........................................................................ 6
Related Publications ......................................................................................... 6
Documentation Feedback................................................................................. 7
Chapter 2
Configuration Prerequisites.....................................................................8
Chapter 3
Setting Up Map Functionality.................................................................20
Creating a Feature Dataset............................................................................. 20
Creating Feature Classes in the Feature Dataset........................................... 20
Creating an MXD or MSD File ........................................................................ 20
Adding Layers to a Map .................................................................................. 21
Publishing Services......................................................................................... 21
Chapter 4
Creating a Cached Map Service.............................................................31
Creating an MXD or MSD File ....................................................................... 31
Verifying the Scale Range Settings for Each Map Layer ................................ 31
Publishing a Map Service ............................................................................... 32
Creating a Map Cache.................................................................................... 32
Chapter 5
Setting Up Geocoding Functionality.....................................................34
Creating an Address Locator .......................................................................... 34
Publishing a Geocode Service........................................................................ 35
Updating the Map Integration Environment .................................................... 35
Chapter 6
Setting Up Routing Functionality ..........................................................36
Installing and Licensing the ArcMap Network Analyst Extension ................... 36
Creating a Separate Feature Dataset for Routing .......................................... 36
Performing a Route Analysis in ArcGIS Network Analyst............................... 36

Accela GIS for ArcGIS Configuration Guide
Table of Contents
4
Publishing a Map Service for Routing............................................................. 50
Updating the Map Integration Environment .................................................... 50
Chapter 7
Setting Up Accela Mobile Office Offline Mapping................................51
Ensuring GIS Data Sources Are in the ArcSDE Geodatabase....................... 51
Ensuring ArcGIS Engine Is Installed and Licensed Properly.......................... 51
Verifying the SDE Server Name ..................................................................... 52
Entering the IP Address as the ArcGIS Server Name .................................... 52
Verifying the User Access............................................................................... 52
Creating a Map Service and a Geodata Service............................................. 52
Configuring the MIME Type and Request Filtering in IIS................................ 53
Updating the Map Integration Environment .................................................... 53
Chapter 8
Enabling Users to Create GIS Features ................................................55
Creating an ArcGIS Map Service with Non-Shapefile Source ........................ 55
Applying Geodatabase Attribute Domains to Attributes (Optional)................. 55
Chapter 9
ArcGIS Online Web Map Configuration ................................................57
Configuring and publishing a map in ArcMap ................................................. 57
Creating a web map in ArcGIS Online............................................................ 60
Configuring the map service in Accela GIS .................................................... 64

5
CHAPTER 1:
INTRODUCTION
This guide includes the following information:
ArcGIS Server Configuration - see Chapter 2:Configuration Prerequisites thru Chapter
8:Enabling Users to Create GIS Features.
ArcGIS Online Web Map Configuration - see Chapter 9:ArcGIS Online Web Map
Configuration.
Enhanced functions, such as routing and offline mapping, require advanced level configuration
using ArcMap, ArcCatalog, ArcSDE, and ArcGIS Server. Although this document provides
guidance for installing and configuring these components, details about ESRI-specific and
custom data-specific procedures are found on ESRI’s ArcGIS Server documentation.
When installation and setup are complete, refer to the Civic Platform GIS Administrator Guide
for further site configuration.
Revision History
This revision history summarizes changes made during each release of this document,
About Esri’s ArcGIS
Esri's ArcGIS is a geographic information system (GIS) for working with maps and geographic
information. The ArcGIS system contains ArcMap, ArcCatalog, ArcGIS Server (also known as
ArcGIS for Server), ArcGIS Online, and other products. You can use the ArcGIS product suite
for these purposes:
Creating and using maps
Compiling geographic data
Analyzing mapped information
Sharing and discovering geographic information
Using maps and geographic information in a range of applications
Managing geographic information in a database
Table 1: Revision History
Date Description
October 2017 Accela GIS version 9.2.0.
Added ArcGIS Online configuration,
Removed support for file geodatabase.

Accela GIS for ArcGIS Configuration Guide
1: Introduction
6
Accela GIS can integrate the GIS services that you publish to Esri’s ArcGIS, including map
services, geocode services, geodata services, geometry services, and image services.
This guide describes how to configure all supported versions of Esri’s ArcGIS. Wherever a
specific version of ArcGIS is not specified, the instructions apply to all supported versions of
Esri’s ArcGIS.
Obtaining Technical Assistance
As a starting point for all technical assistance, visit the Accela Success Community. At this site
you can search the knowledge base to find answers to commonly asked questions about our
products and register at the Accela Forum to join in an information exchange with other Accela
users.
If you still have questions after visiting Success Community, or if you encounter any problems
as you use the product, contact your system administrator. If you determine that you need
professional technical assistance, have your agency’s designated contact call the Accela
Customer Support at (888) 7-ACCELA, ext. 5 or (888) 722-2352 ext. 5. Accela Customer
Support is available Monday through Friday from 6:00 AM to 6:00 PM Pacific Daylight/Standard
Time.
Before calling, please have this information available for the Customer Support representative:
The Accela product name and version number
Steps to replicate the issue, including any error message or error number
Screenshots, if possible
Whether the problem is specific to a machine or to a user
Exactly when the problem began
Anything that changed on your computer or your network (for example, was new software
loaded?)
A copy of your configuration file, if appropriate
Related Publications
Accela provides a set of Accela GIS documents for users and a set for agency administrators.
The installation and configuration documents include:
Accela GIS Installation Guide
Accela GIS Administrator Guide
Accela GIS Open Geospatial Consortium (OGC) Map Service Configuration Guide
User documents include:
Accela GIS User Guide
Accela Extension for Esri ArcMap User Guide

Accela GIS for ArcGIS Configuration Guide
1: Introduction
7
Documentation Feedback
Accela’s technical publications team wants to provide you with the most accurate and useful
documentation possible. We welcome your feedback in helping us improve future versions of
this guide. If you have feedback and want to assist in improving the documentation, please
send an email message to documentation@accela.com. Please include the product name and
the version number, the title of the printed manual or online help, the specific topic (copy/paste
the section you are referring to), and a detailed description of your suggestion.

8
CHAPTER 2:
CONFIGURATION PREREQUISITES
This chapter provides prerequisites to configuring the ArcGIS Server machine before you start
setting up any GIS functionality. There are a few tasks that you need to complete on the ArcGIS
Server machine.
Your agency must use Accela GIS with the supported version of ArcGIS for Server. The
configuration is the same between ArcGIS Server 10.x and a later version. For simplicity, this
configuration guide refers to the ArcGIS Server version as 10.x. See the Civic Platform release
notes on Accela Community for details about the supported versions of ArcGIS Server.
Follow the instructions in this chapter to complete configuration.
Topics
Installing ArcGIS Server 10.x
Installing ArcGIS 10.x Web Adapter (IIS)
Connecting to ArcGIS Server 10.x
Registering Your Data with ArcGIS Server 10.x
Installing and Configuring Accela GIS Server Object Extensions (SOE) for ArcGIS 10.x
Installing ArcGIS Server 10.x
As an exclusive 64-bit application, ArcGIS Server 10.x requires a 64-bit Windows computing
system, such as Windows Server 2008 R2. Before you install ArcGIS Server 10.x, make sure
you have completely removed the earlier version of ArcGIS Server from that machine.
See the “Installation Guide” on ESRI’s ArcGIS Server documentation for details about installing
ArcGIS Server 10.x.
Installing ArcGIS 10.x Web Adapter (IIS)
ArcGIS 10.x Web Adapter is a component in ArcGIS 10.x that allows ArcGIS Server 10.x to
integrate with your existing web server. If you want users to see the existing port such as 80
instead of the default port 6080, install the web adapter after completing the installation of
ArcGIS Server 10.x.
Note:
The machine that hosts the Accela GIS server must install
Microsoft .NET Framework 4.6. See the Civic Platform release
notes on Accela Community for the latest supported version.

Accela GIS for ArcGIS Configuration Guide
2: Configuration Prerequisites
9
See “Installing ArcGIS Web Adapter” on ESRI’s ArcGIS Server documentation for details about
installing ArcGIS 10.x Web Adapter (IIS)
Connecting to ArcGIS Server 10.x
If you want to manage ArcGIS 10.x for Sever and create required GIS services, you must
connect to ArcGIS Server 10.x in ArcMap 10.x.
The Catalog window in ArcMap 10.x allows three options for connecting to an ArcGIS Server
site:
Use GIS services: User connection. You can only view and use the services published to
the site.
Publish GIS services: Publisher connection. You can publish GIS resources to your
server, configure and publish draft services, but you cannot edit any properties of the site.
Administer GIS server: Administrative connection. You can edit server properties and
manage services. Accela recommends that you create an administrative connection to
manage GIS services.
To connect to ArcGIS Server 10.x
1.
Open ArcMap 10.x.
2.
In the Catalog window, expand the GIS Servers node and double-click Add ArcGIS
Server.
ArcMap launches the Add ArcGIS Server wizard.
Accela GIS for ArcGIS Configuration Guide
2: Configuration Prerequisites
10
3.
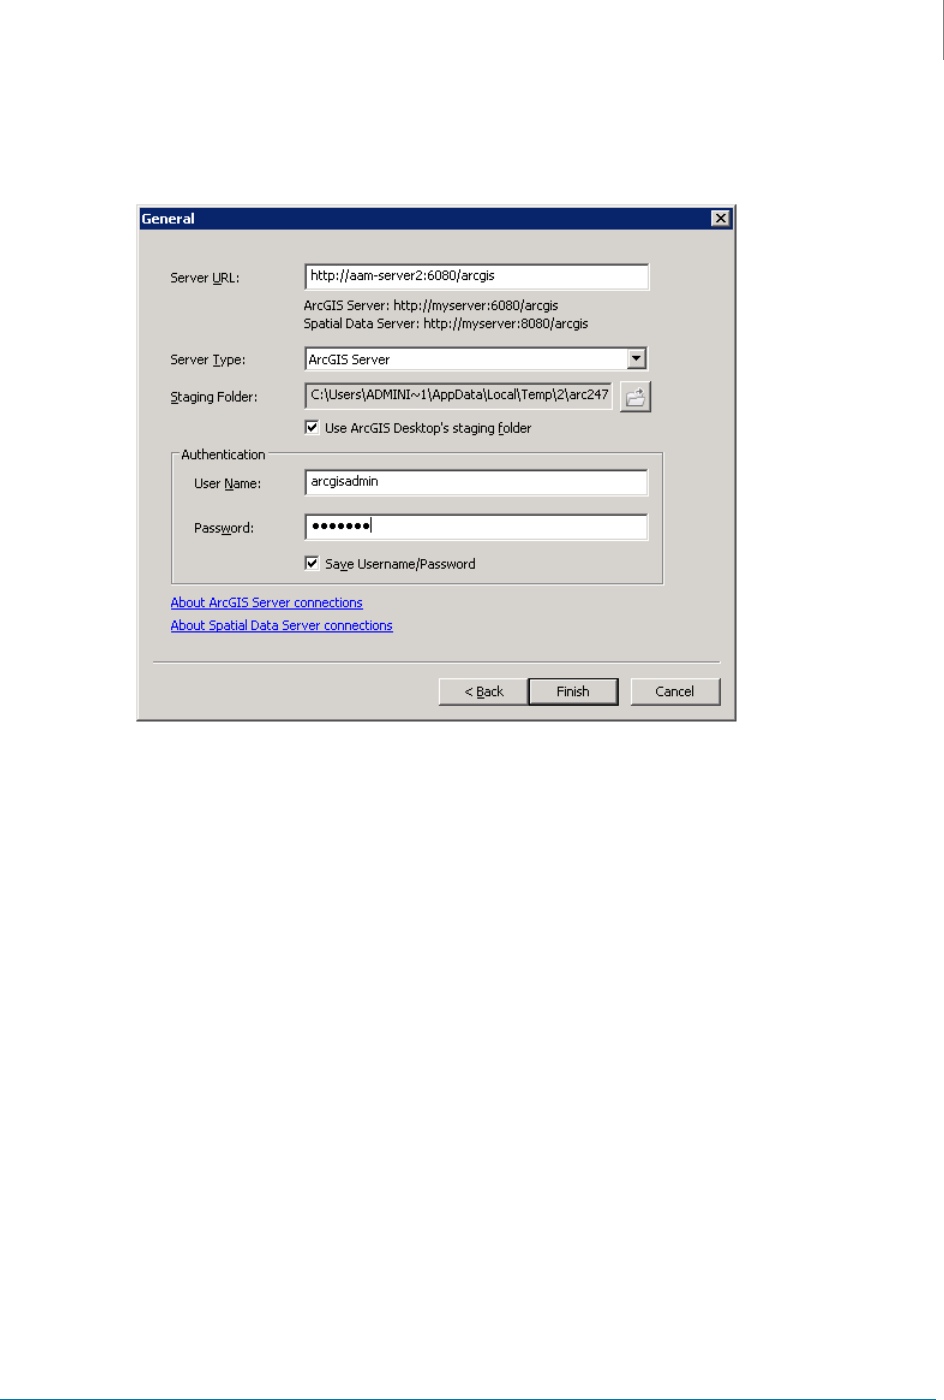
Mark the Administer GIS server option and then click the Next button.
The wizard displays the General page.
4.
Complete these fields:
Server URL Enter the URL of the ArcGIS Server site you want to connect to.
Server Type Select “ArcGIS Server” from the drop-down list.
Staging Folder Mark the Use ArcGIS Desktop’s staging folder option.
User Name Enter you user name and password for the ArcGIS Server site
you want to connect to.
You can mark the Save Username/Password option.
Password

Accela GIS for ArcGIS Configuration Guide
2: Configuration Prerequisites
11
5.
Click the Finish button.
ArcMap adds a new ArcGIS Server connection node in the GIS Servers folder.
Registering Your Data with ArcGIS Server 10.x
Before you publish a service to ArcGIS Server 10.x, you can use ArcMap 10.x to register data
directories and databases with the ArcGIS Server. Data registration gives the server a list of
locations that the server administrator has verified that the GIS server can access. Data
registration also helps the GIS server understand how to adjust data paths when publishing
across machines.
For details about how to register your data with ArcGIS Server 10.x, see http://
resources.arcgis.com/en/help/main/10.x/index.html#//015400000504000000/.
Installing and Configuring Accela GIS Server Object
Extensions (SOE) for ArcGIS 10.x
This section only applies to Accela Silverlight GIS. ArcGIS Server 10.x does not support
local connections from Web ADF applications. If your agency uses Accela GIS 7.2.0 or a later
version with ArcGIS Server, you must install Accela GIS Server Object Extensions to migrate
the business logic from local connections to HTTP connections.
This section provides instructions about how to install and configure Accela GIS Server Object
Extensions (SOE) when your agency uses ArcGIS Server 10.x or later. Take ArcGIS Server
10.x for illustration purposes.
Topics
Software Requirements
Installing Accela GIS Server Object Extensions
Enabling Capabilities for a Map Service on ArcGIS Server 10.x

Accela GIS for ArcGIS Configuration Guide
2: Configuration Prerequisites
12
Setting a Time-out Value for Offline Map Downloading
Software Requirements
Make sure your operating system meets the software requirements before you install or
upgrade to a new version of Accela GIS Server Object Extensions for ArcGIS Server 10.x or
later.
Installing Accela GIS Server Object Extensions
Depending on whether you have installed Accela GIS Server Object Extensions before, the
installer provides different options for you to perform a fresh installation, modify an existing
instance, and uninstall an existing instance.
To deploy Accela GIS Server Object Extensions to ArcGIS Server 10.x
1.
Get the latest Accela GIS Server Object Extensions Installer zip file from the CRC:
•
If ArcGIS Server is hosted on Windows 2012, use the
AGIS_Server_Object_Extension_For2012_9.1.0.zip file to deploy Accela GIS Server
Object Extensions to ArcGIS Server.
•
If ArcGIS Server is hosted on Windows 2008 R2, use the
AGIS_Server_Object_Extension_For2008R2_9.1.0.zip file to deploy Accela GIS
Server Object Extensions to ArcGIS Server.
2.
Unzip the file, and make note of the Accela GIS Server Object Extensions install folder
location.
The install folder contains a readme file and two SOE files:
•
Accela.GIS.EditFeatureSoapSOE.soe
•
Accela.GIS.LimitDownloadSoapSOE.soe
3.
Log in to ArcGIS Server Manager.
Table 2: Software Requirements
Host Requirements
ArcGIS Server • Microsoft Internet Information Services (IIS) 7.x or later
• Internet Explorer 11
• .NET Framework 4.6
• ArcGIS10.x for Server or later (post installed and licensed)
Note:
See the Civic Platform release notes on Accela Community
for the latest supported versions.
Accela GIS for ArcGIS Configuration Guide
2: Configuration Prerequisites
13
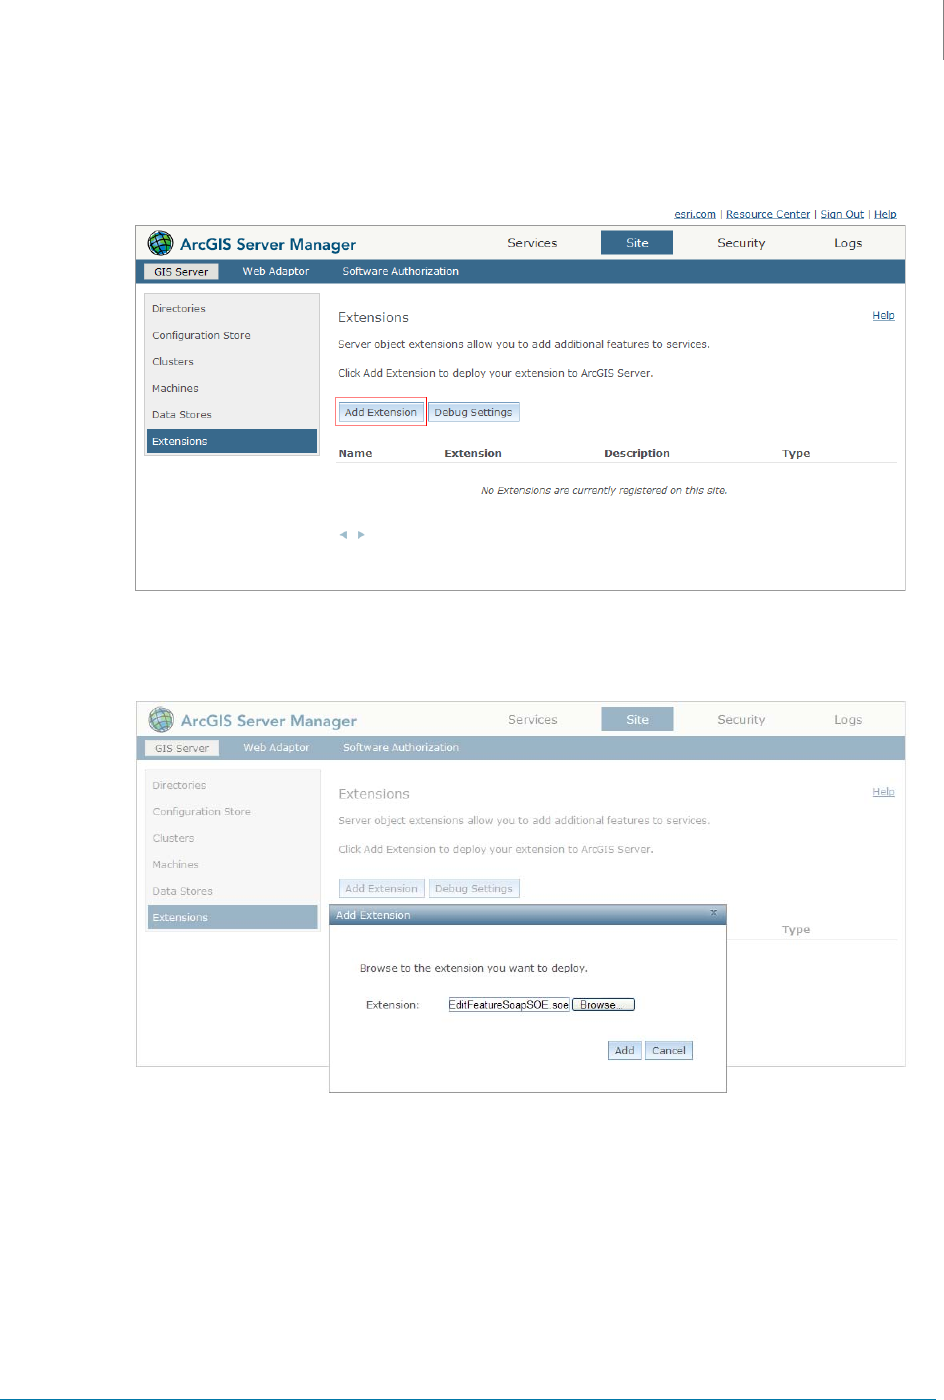
4.
Navigate to Site > Extensions.
ArcGIS Server Manager displays the extensions list.
5.
Click the Add Extension button.
ArcGIS Server Manager displays the Add Extension window.
6.
Browse to the Accela.GIS.EditFeatureSoapSOE.soe file under the Accela GIS Server
Object Extensions install folder and click the Add button.
ArcGIS Server Manager adds Accela.GIS.EditFeatureSoapSOE.soe to the extensions list.

Accela GIS for ArcGIS Configuration Guide
2: Configuration Prerequisites
14
7.
Repeat step 5 to step 6 to deploy Accela.GIS.LimitDownloadSoapSOE.soe to ArcGIS for
Server.
ArcGIS Server Manager adds Accela.GIS.LimitDownloadSoapSOE.soe to the extensions
list.
8.
If any of the SOE files is updated later, do the following to deploy the updated SOE file to
ArcGIS Server:
a. At the extensions list, click the pen icon next to the SOE file that has updates.

Accela GIS for ArcGIS Configuration Guide
2: Configuration Prerequisites
15
b. Browse to the updated SOE file and click the Save button.
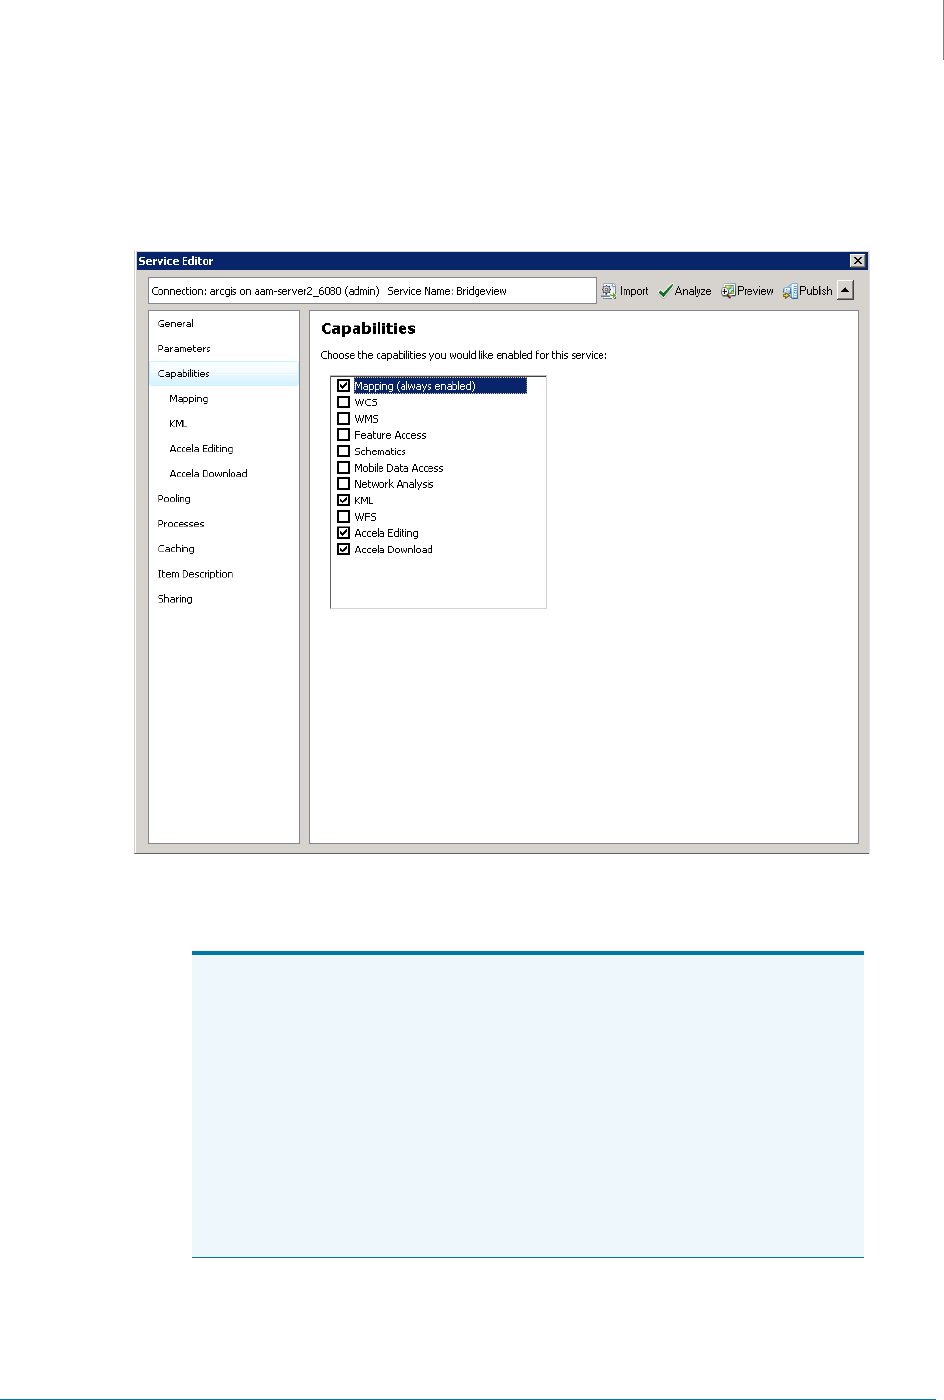
Enabling Capabilities for a Map Service on ArcGIS Server 10.x
When you install Accela GIS Server Object Extensions, the Accela Editing and Accela
Download capabilities are added to map service properties. To enable users to create and edit
GIS features on a map service, you must enable the Accela Editing capability for the map
service. To allow the Accela GIS server to download a data package from the ArcGIS server for
offline maps, you must enable the Accela Download capability for both the map service and the
routing service.
This section provides instructions about how to enable those capabilities for a map service that
the ArcGIS Server 10.x hosts. The process of enabling the Accela Download capability for a
routing service is just similar to that for a map service. For offline map downloading, you may
also follow the instructions in Setting a Time-out Value for Offline Map Downloading on page 18
to set proper time-out values.
To enable capabilities for a map service on ArcGIS Server 10.x
1.
Open ArcMap 10.x.
2.
In the Catalog window, expand the GIS Servers node and then expand the ArcGIS Server
node that you have added as Connecting to ArcGIS Server 10.x on page 9 instructed.
3.
Right-click the desired map service that the ArcGIS Server hosts and click Service
Properties.
ArcMap displays the Service Editor window.

Accela GIS for ArcGIS Configuration Guide
2: Configuration Prerequisites
16
4.
Click the Capabilities tab.
ArcMap displays a list of capabilities for the map service in the Service Editor window.
5.
Do any of the following:
•
To enable users to create and edit GIS features on the map service, mark the Accela
Editing check box on the Capabilities tab and do the following:
Accela GIS for ArcGIS Configuration Guide
2: Configuration Prerequisites
17
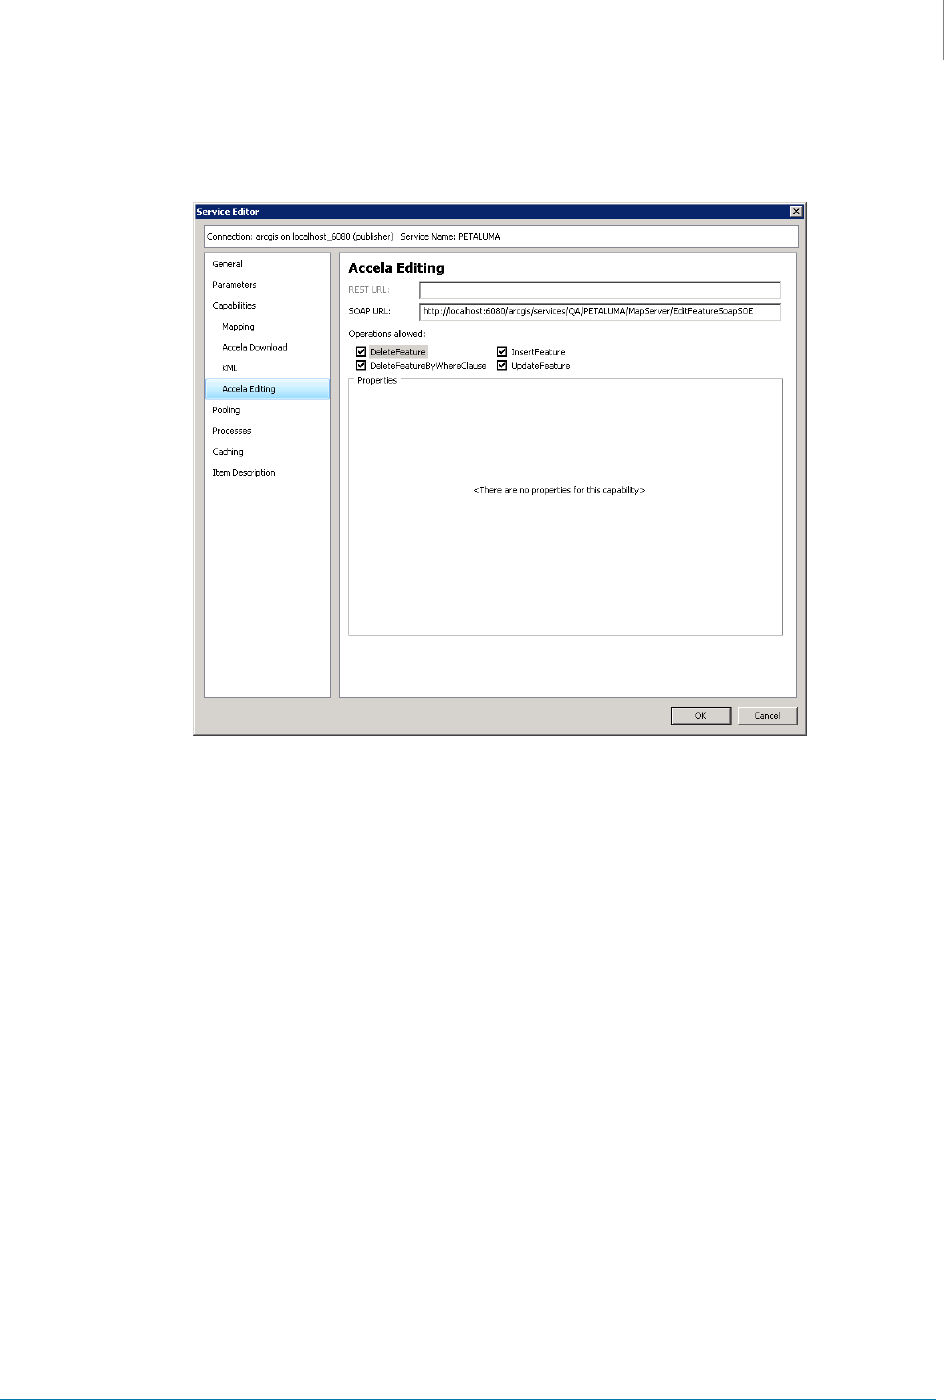
1) Click the Accela Editing subtab.
ArcMap displays the Accela Editing subtab.
2) Mark the check boxes next to all available operations for the Accela Editing
capability.
•
To allow the Accela GIS server to download a data package from the ArcGIS server for
offline maps, mark the Accela Download check box on the Capabilities tab and do the
following:
Accela GIS for ArcGIS Configuration Guide
2: Configuration Prerequisites
18
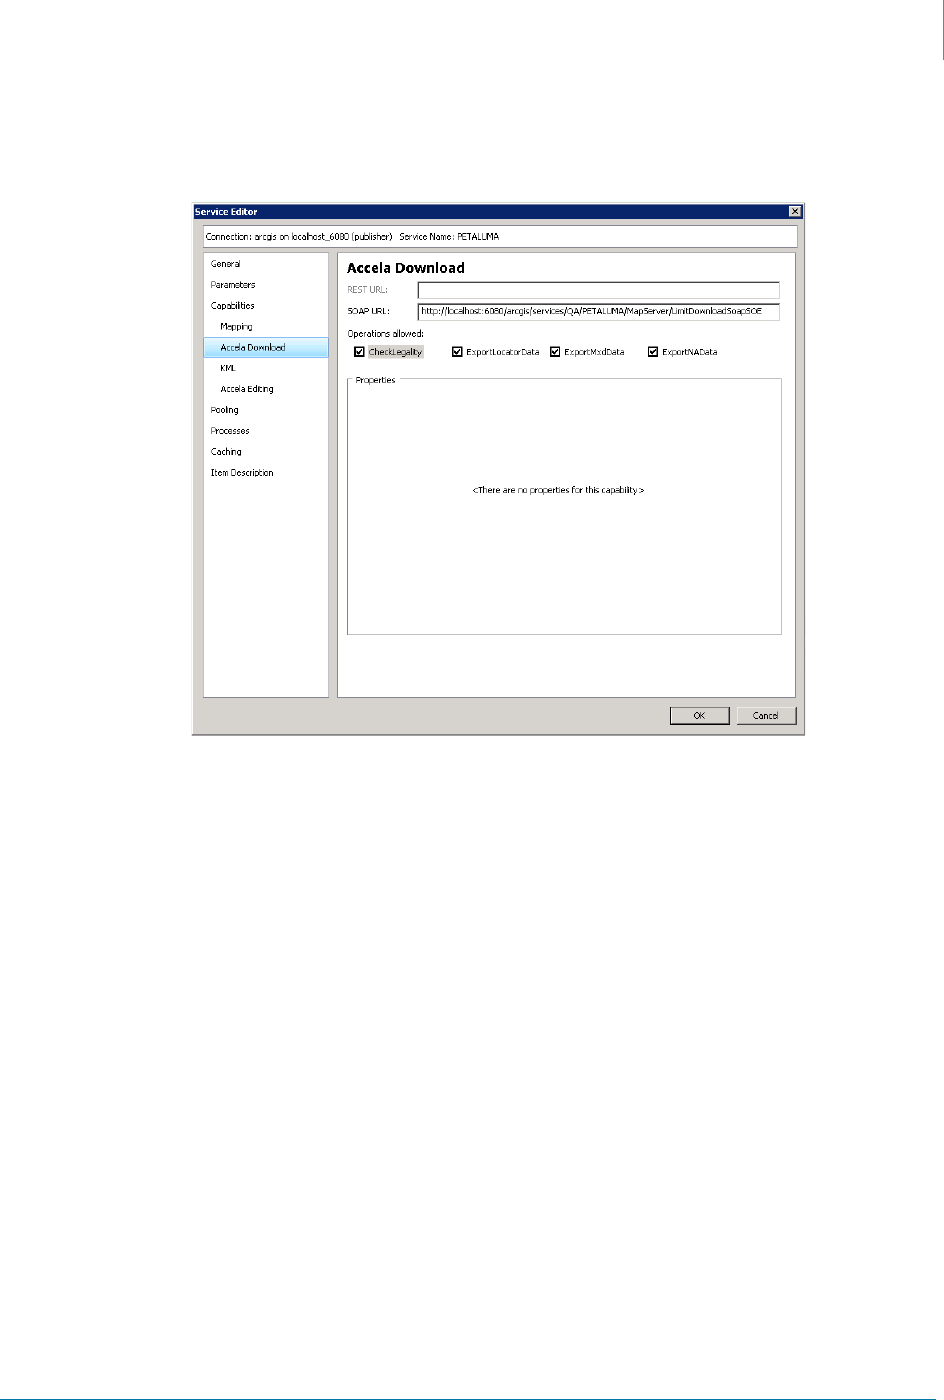
1) Click the Accela Download subtab.
ArcMap displays the Accela Download subtab.
2) Mark the check boxes next to all available operations for the Accela Download
capability.
6.
Click the OK button.
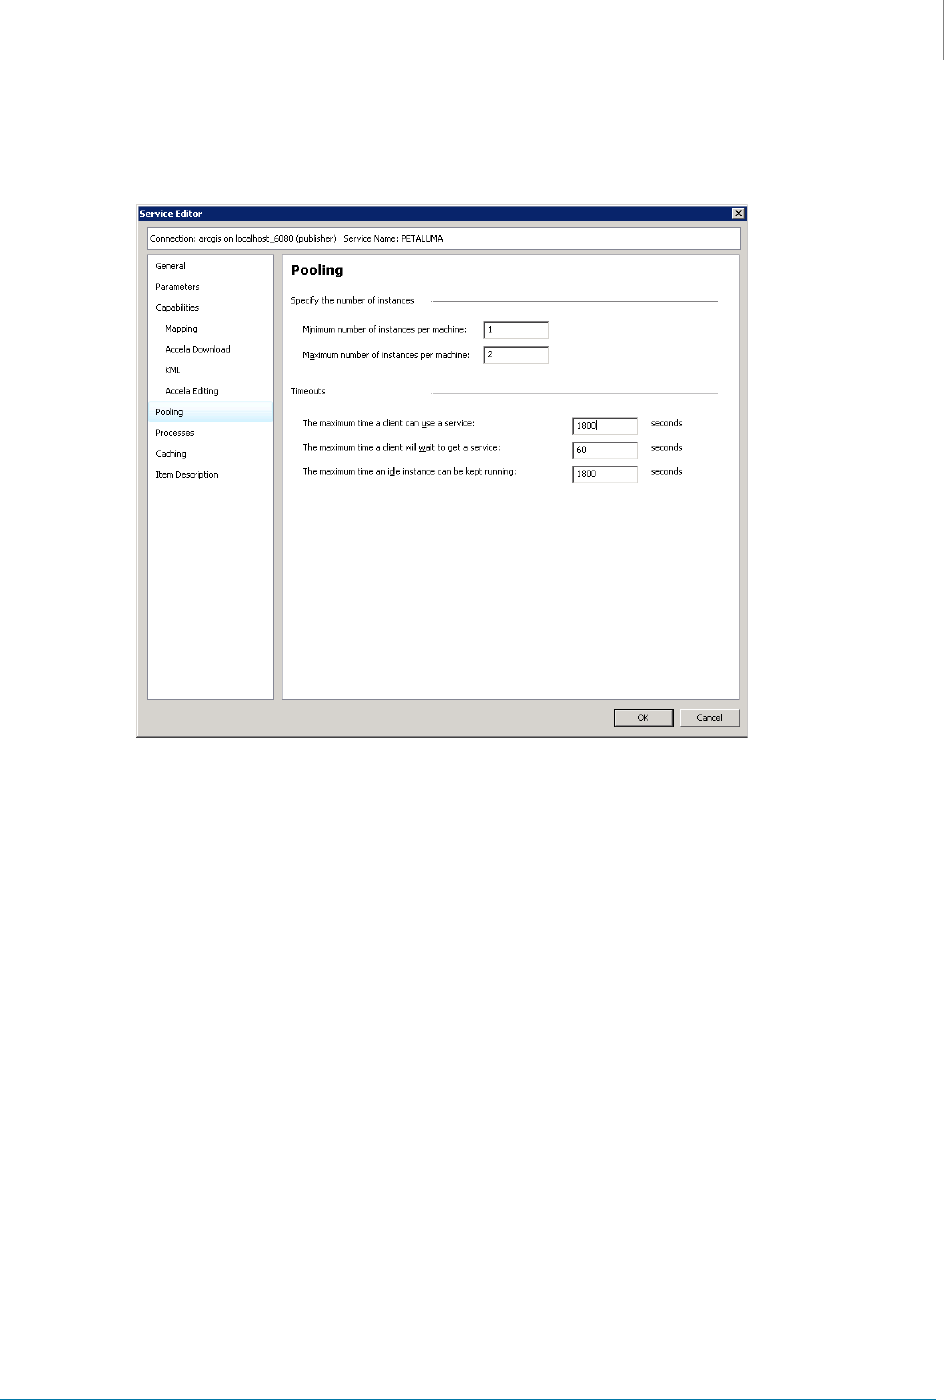
Setting a Time-out Value for Offline Map Downloading
If there is any problem with offline map downloading, you can increase the value of the
maximum time that a client can use a service. Accela recommends you set a time-out value no
less than 1,800 seconds.
To set a time-out value on a map service using ArcMap 10.x
1.
Open ArcMap 10.x.
2.
In the Catalog window, expand the GIS Servers node and then expand the ArcGIS Server
node that you have added as Connecting to ArcGIS Server 10.x on page 9 instructed.
3.
Right-click the desired map service hosted on the ArcGIS Server and choose Stop.
4.
Right-click the stopped map service and choose Service Properties.
ArcMap displays the Service Editor window.

20
CHAPTER 3:
SETTING UP MAP
FUNCTIONALITY
This chapter explains how to configure the basic settings necessary to use a map in Accela
GIS.
Topics
Creating a Feature Dataset
Creating Feature Classes in the Feature Dataset
Creating an MXD or MSD File
Adding Layers to a Map
Publishing Services
Creating a Feature Dataset
For information about how to create a feature dataset, see ESRI’s ArcGIS Server
documentation.
Creating Feature Classes in the Feature Dataset
For information about how to create feature classes in the feature dataset, see ESRI’s ArcGIS
Server documentation.
Creating an MXD or MSD File
To publish a GIS service such as a map service or a geometry service, you must first create a
map document (.mxd) or a map service definition (.msd) file.
The map service definition (MSD) file is a new file that the fast map service drawing engine
uses. Creation of an MSD file always starts with an MXD file. After you finish creating and
configuring an MXD map document, you use the Map Service Publishing toolbar to analyze
your MXD file in ArcMap. When you have addressed issues returned by the analysis, you can
use the same toolbar to save the MXD map document as a map service definition file in any
location where the ArcGIS Server administrator can access and publish it.
After you save the MSD file, it is no longer connected with its parent MXD. If you edit the MXD,
you need to use the Map Service Publishing toolbar to save an updated MSD. When you
overwrite the old MSD, remember to restart the map service to register the changes.
Accela GIS for ArcGIS Configuration Guide
3: Setting Up Map Functionality
21
For information about creating a map document, see ESRI’s ArcGIS Server documentation.
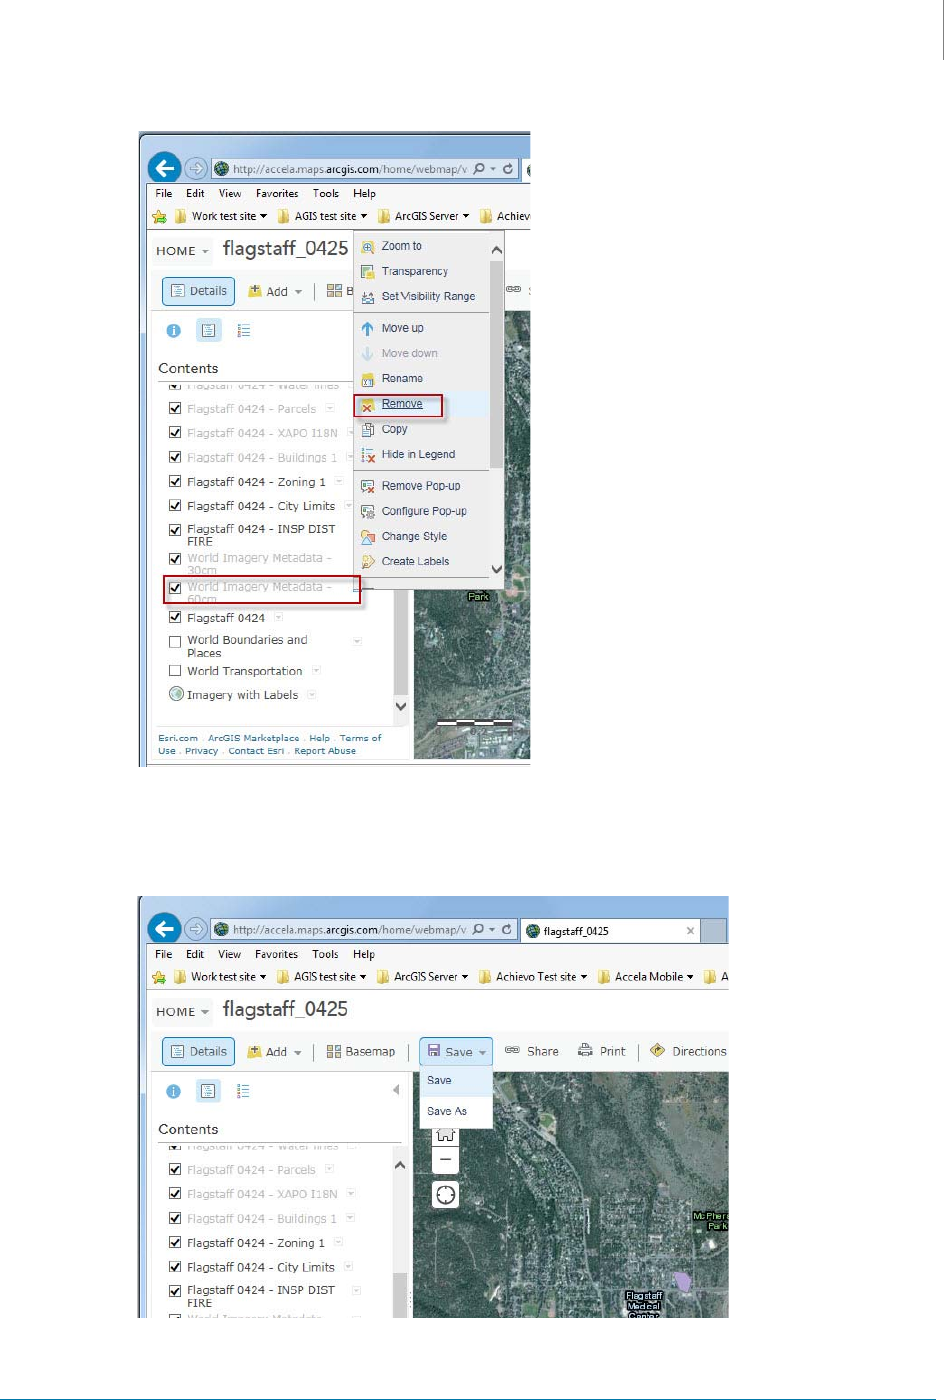
Adding Layers to a Map
Each layer references a dataset that is stored in a geodatabase, coverage, shapefile, raster,
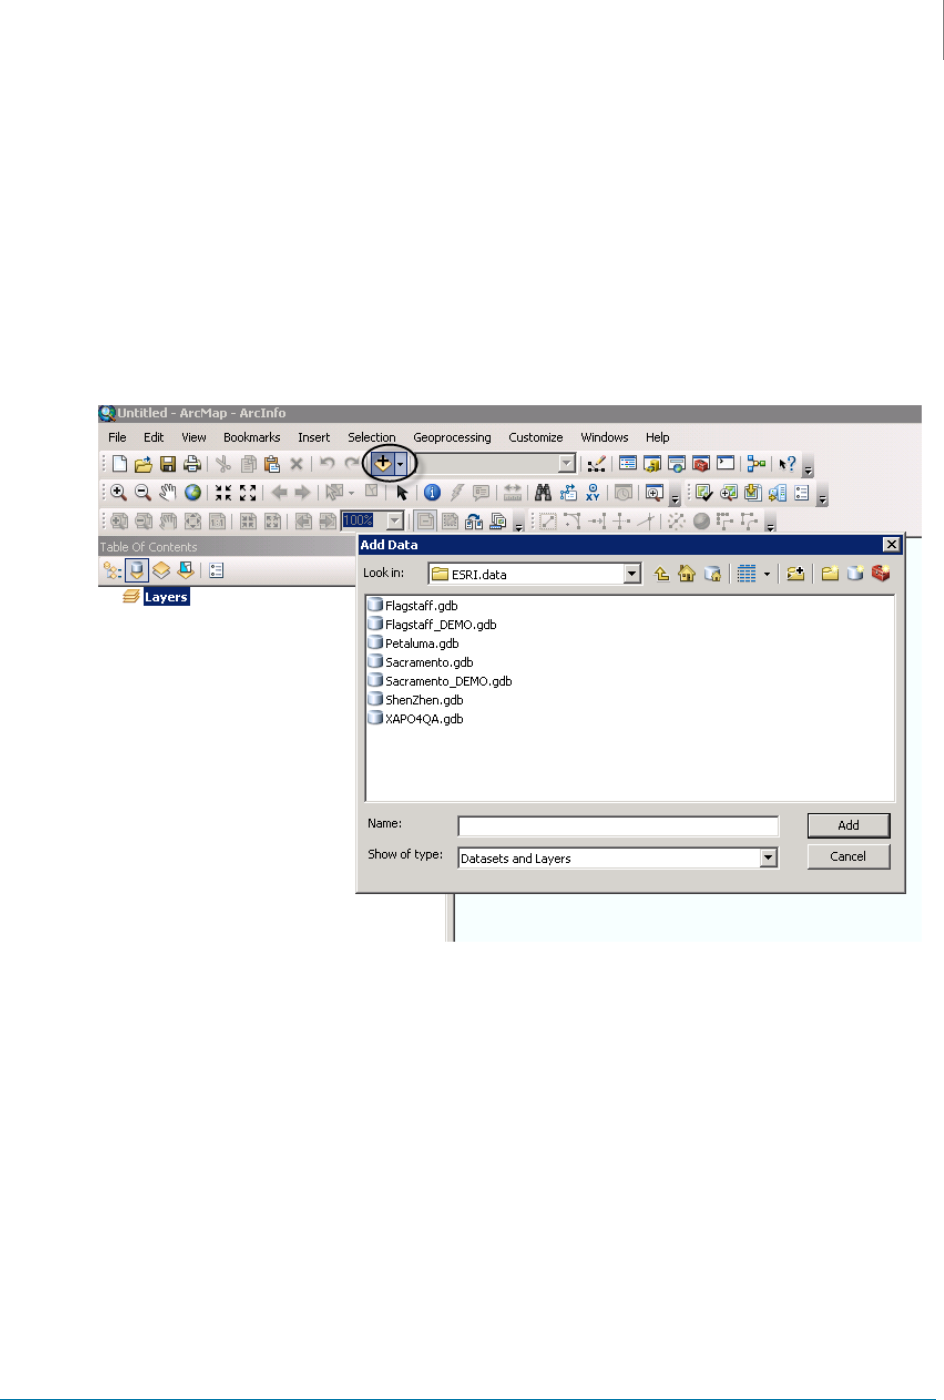
and so forth. To add layers to a map, you simply click the Add Data button on the ArcMap
toolbar and navigate to the desired dataset. Then select and add the dataset to your map. After
then, save the map document. Figure 1: Add a Dataset to a Map on page 21 shows how to add
a dataset to a map.
Figure 1: Add a Dataset to a Map
For other ways to add map layers, see ESRI’s ArcGIS Server documentation.
Publishing Services
You can use ArcMap 10.x or later to publish services to the ArcGIS Server. Table 3: Accela GIS
Supported Services on page 22 lists the service types that Accela GIS supports.

Accela GIS for ArcGIS Configuration Guide
3: Setting Up Map Functionality
22
Table 3: Accela GIS Supported Services
Service Type Description
Map service
(including map service
for routing)
Publish a map service if you want to make the map available to Accela
GIS users.
The procedure of publishing a map service for routing is the same as that
of publishing a map service. The only difference is that the GIS resource
for a routing service contains the data sources with the routing layer
information while a map service does not have routing layers. See
Chapter 6: Setting Up Routing Functionality on page 36 for more
information.
After publishing map services, you can retrieve them from the ArcGIS
Server through the Accela GIS Administration site. If you choose Esri
ArcGIS Server as the GIS provider, the Map Service drop-down list in the
GIS Server Settings section on the Map Service Connection page
contains all the map services that your agency published either to the
root folder or its subfolders. And the Routing Service drop-down list in
the Routing Service Settings section contains all the routing services
published either to the root folder or its subfolders. For more information
about how to retrieve services, see the “Setting up a Connection to a
Map Service” section in the “Setting up a Map Service Connection”
chapter of the Accela GIS Administrator Guide.
Geocode service Publish a geocode service if you want to enable the geocoding
functionality for Accela GIS users. See Chapter 5: Setting Up Geocoding
Functionality on page 34 for more information.
After publishing geocode services you can retrieve them from the ArcGIS
Server through the Accela GIS Administration site. If you choose Esri
ArcGIS Server as the GIS provider, the Geocoding Service drop-down
list in the Geocoding Service Settings section on the Map Service
Connection page contains all the geocode services that your agency
published either to the root folder or its subfolders. For more information
about how to retrieve services, see the “Setting up a Connection to a
Map Service” section in the “Setting up a Map Service Connection”
chapter of the Accela GIS Administrator Guide.
Geodata service Publish a map service at first, and then publish a geodata service with
the same name as the map service, if you want to enable the Accela
Mobile Office Offline Mapping functionality for Accela GIS users. See
Chapter 7: Setting Up Accela Mobile Office Offline Mapping on page 51
for more information.

Accela GIS for ArcGIS Configuration Guide
3: Setting Up Map Functionality
23
This section provides you with instructions about publish a map service, a geocode service, a
geodata service, a geometry service, and an image service to ArcGIS Server 10.x or later. The
process of publishing a service with ArcGIS Server 10.x is the same as that with a later version
of ArcGIS for Server so this section takes ArcGIS Server 10.x for illustration purposes.
Topics
Publishing a Map Service to ArcGIS Server 10.x
Publishing a Geocode Service to ArcGIS Server 10.x
Publishing a Geodata Service to ArcGIS Server 10.x
Administering the Geometry Service on ArcGIS Server 10.x
Publishing an Image Service to ArcGIS Server 10.x
Publishing a Map Service to ArcGIS Server 10.x
You can publish a map document as a map service or as a map service for routing to ArcGIS
Server 10.x.
To publish a map service to ArcGIS Server 10.x
1.
Open ArcMap 10.x.
2.
From the Catalog window, open the MXD document that you want to publish.
Geometry service The geometry service helps applications do geometric calculations such
as buffering, simplifying, calculating areas and lengths, and projecting.
To make the buffer tool in Accela GIS work, this service is always
required.
In ArcGIS 10.x or later, you just need to start the geometry service
because it is automatically created for you in the Utilities folder when you
install ArcGIS for Server.
Image service Publish an image service if you want to make Esri’s world street and
imagery maps available to Accela GIS users.
After publishing image services, you can retrieve them from Esri Image
Server through the Accela GIS Administration site. When you choose
Esri Image Server as the GIS provider, the Map Service drop-down list in
the GIS Server Settings section on the Map Service Connection page
populates with all the image services that your agency published either
to the root folder or its subfolders. For more information about how to
retrieve services, see the “Setting up a Connection to a Map Service”
section in the “Setting up a Map Service Connection” chapter of the
Accela GIS Administrator Guide.
Table 3: Accela GIS Supported Services (Continued)
Service Type Description
Accela GIS for ArcGIS Configuration Guide
3: Setting Up Map Functionality
24
3.
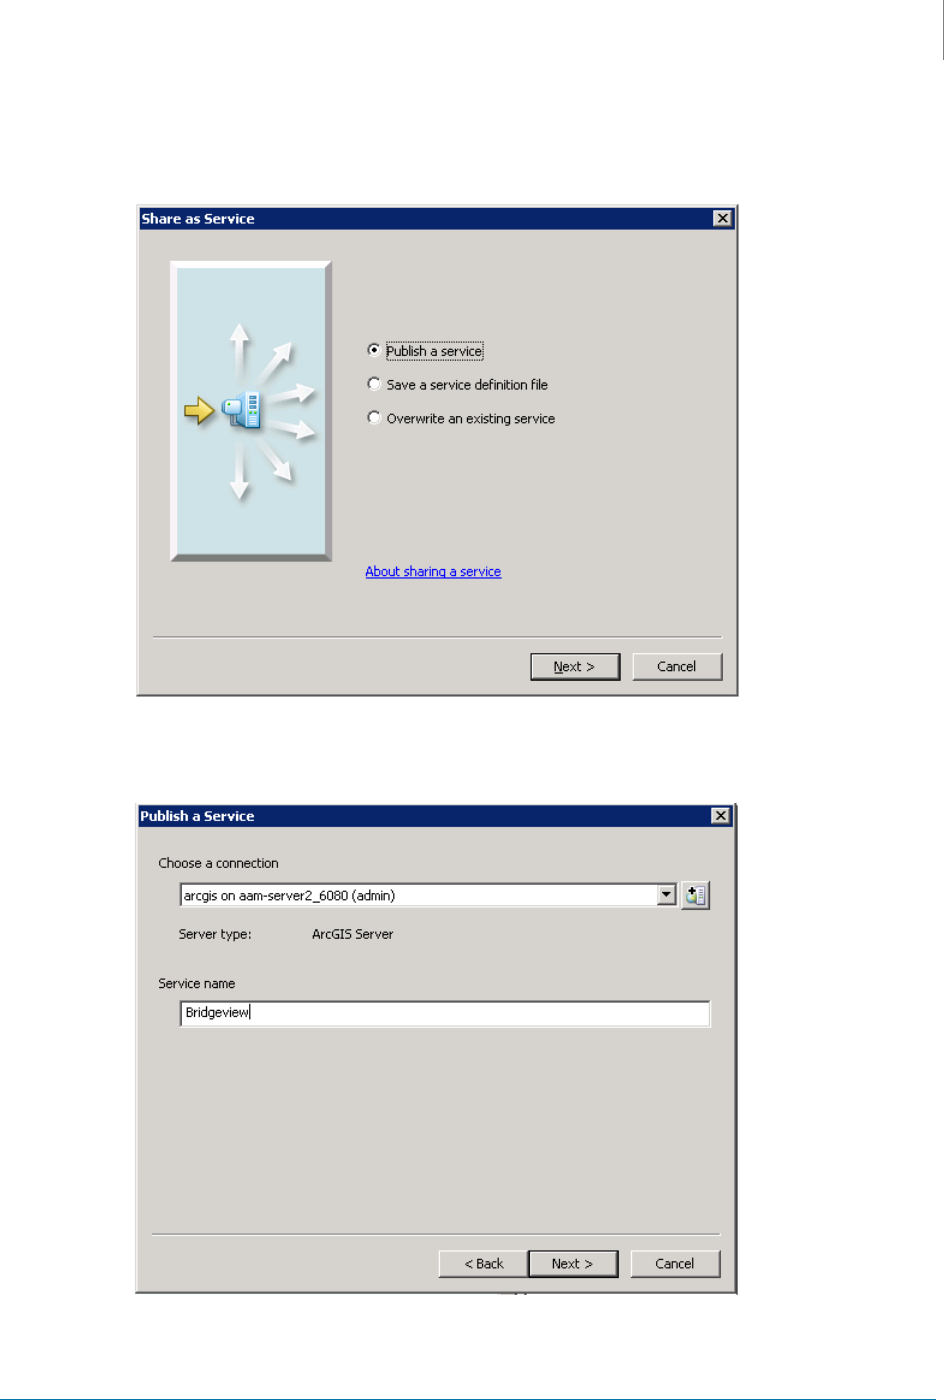
Click File > Share As > Service from the main menu.
ArcMap displays the Share as Service window.
4.
Mark the Publish as a service option and then click the Next button.
ArcMap displays the Publish a Service window.
5.
Complete the fields.
Accela GIS for ArcGIS Configuration Guide
3: Setting Up Map Functionality
25
6.
Click the Next button.
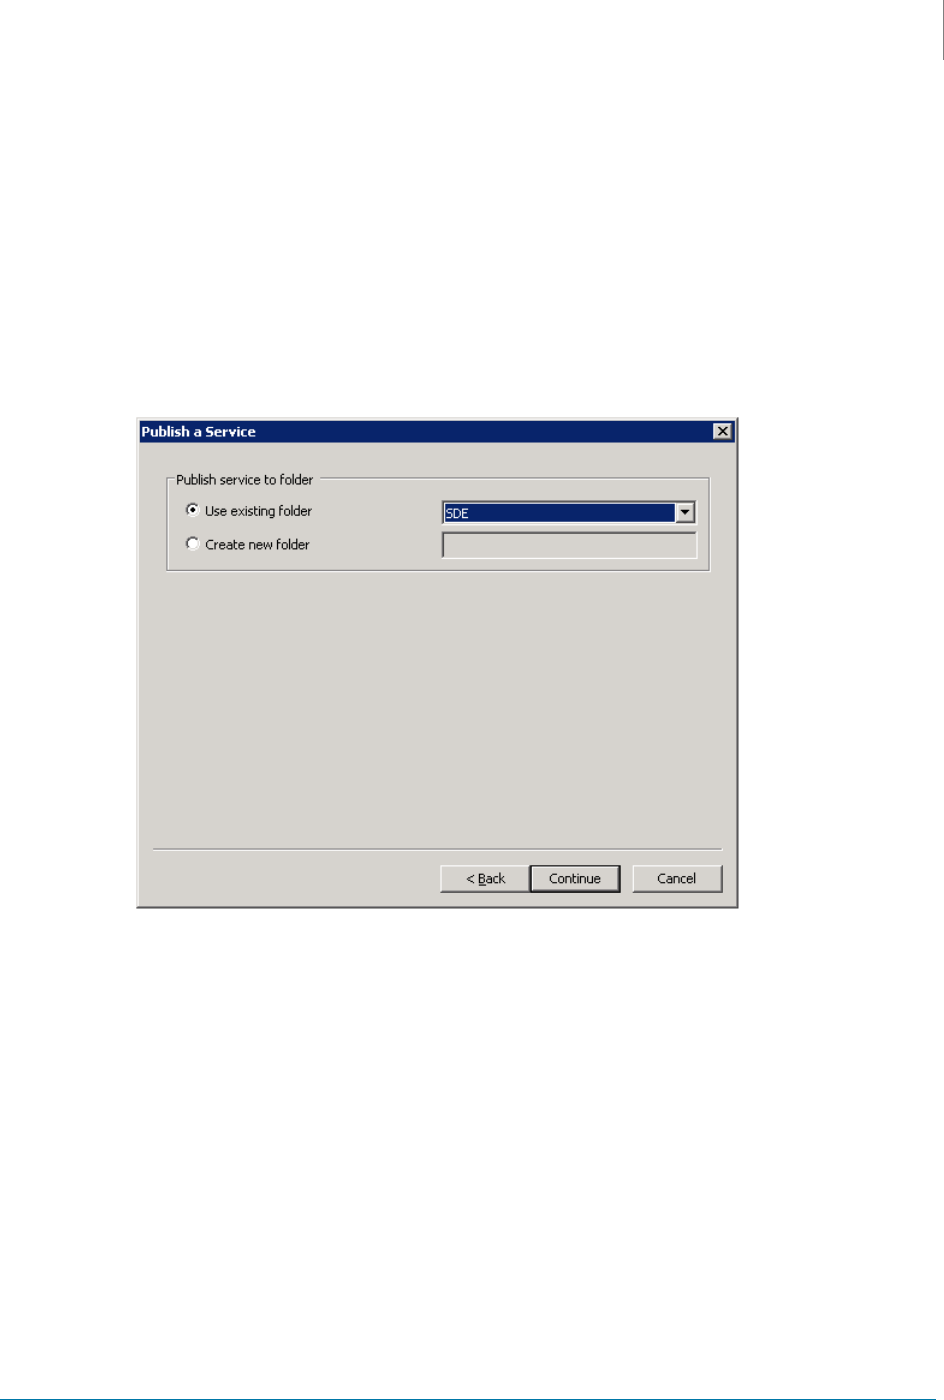
ArcMap displays the Publish a Service window, prompting you for folder selection.
7.
Complete the Publish service to folder field:
•
Use existing folder: Mark this option if you want to publish the service to an existing
folder. You can select the root folder (root) of ArcGIS Server or a subfolder under the
root folder from the drop-down list.
•
Create new folder: Mark this option and enter the name of a new folder if you want to
create the new folder to contain the service.
8.
Click the Continue button.
ArcMap displays the Service Editor window.
Choose a connection Select the ArcGIS Server connection you want to use from this
drop-down list.
If the server connection you want to use is not available, you can
create a new connection by clicking the Connect To ArcGIS
Server icon next this drop-down list. For more information, see
Connecting to ArcGIS Server 10.x on page 9.
Service name Enter the name of the service.
Accela GIS for ArcGIS Configuration Guide
3: Setting Up Map Functionality
26
9.
Click the Capabilities tab.
ArcMap displays a list of capabilities in the Service Editor window depending on the type of
service you are publishing. For example, when you are publishing a map service, ArcMap
displays this page.
10.
Mark the check box next to the capabilities that you want to enable for the resource and
click the Analyze button.
11.
Fix the analyzed error and click the Publish button.
Note:
If you are publishing a map service for routing, you must enable the
Network Analysis capability.
Note:
To enable users to create and edit GIS features on a map service, you
must enable the Accela Editing capability on the map service. To allow
the Accela GIS server to download a data package from the ArcGIS
Server for offline maps, you must enable the Accela Download
capability on the map service.
If the Accela Editing and Accela Download options are not available for
the map service you are working with, check whether you have
installed and configured Accela GIS SOE properly. For more
information, see Installing and Configuring Accela GIS Server Object
Extensions (SOE) for ArcGIS 10.x on page 11.
Accela GIS for ArcGIS Configuration Guide
3: Setting Up Map Functionality
27
For complete information about publishing a map service to ArcGIS Server 10.x, see http://
resources.arcgis.com/en/help/main/10.x/index.html#//015400000457000000/.
Publishing a Geocode Service to ArcGIS Server 10.x
To publish a geocode service to ArcGIS Server 10.x
1.
Open ArcMap 10.x.
2.
In the Catalog window, right-click the address locator that you want to publish.
3.
In the right-click menu, click Share As > Geocode Service.
ArcMap displays the Share as Service window.
4.
Follow step 4 to step 11 to publish the address locator as a geocode service.
For complete information about publishing a geocode service to ArcGIS Server 10.x, see
http://resources.arcgis.com/en/help/main/10.x/index.html#//00250000004p000000.
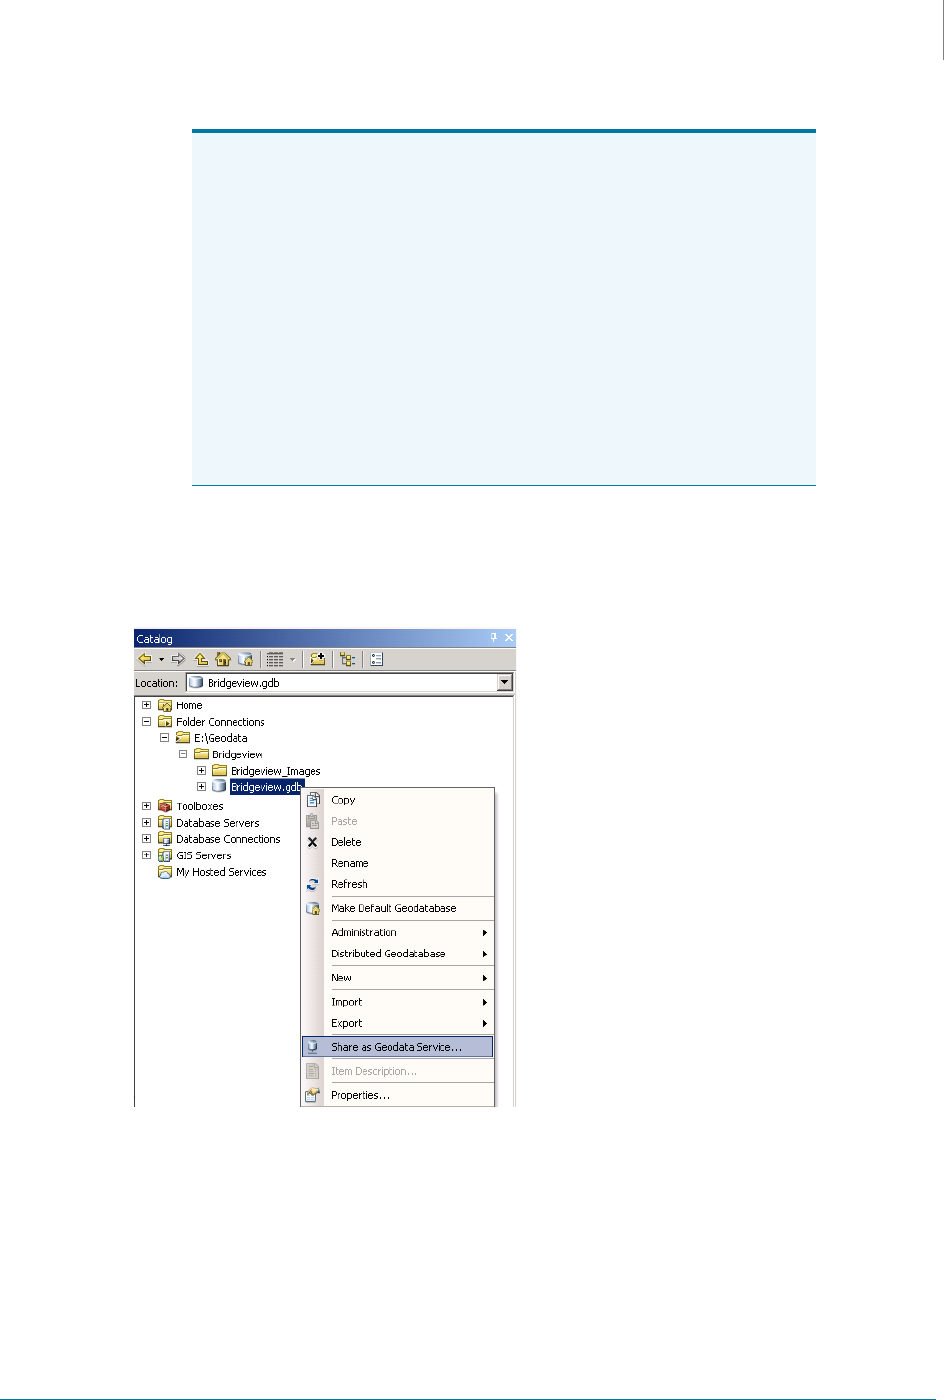
Publishing a Geodata Service to ArcGIS Server 10.x
This section only applies to Accela Mobile Office. In ArcGIS 10.x, the Geodata Access
capability is no longer available and you must follow the steps in this topic if you want to access
the Distributed Geodatabase toolbar through a geodata service.
Accela GIS for ArcGIS Configuration Guide
3: Setting Up Map Functionality
28
To publish a geodata service to ArcGIS Server 10.x
1.
Open ArcMap 10.x.
2.
In the Catalog window, right-click the geodatabase that you want to publish.
Note:
Pay attention to the following things when you publish a geodata
service:
•
There must be a map service with the same name as the
geodata service you are about to publish. If there is no such a
map service, publish it at first and then publish the geodata
service. See Publishing a Map Service to ArcGIS Server 10.x
on page 23 for more information.
•
The dataset names in the geodatabase for the geodata
service must match the layer names in the map document for
the map service. For example, if the map document have a
layer named “Streets”, the geodatabase must have a dataset
exactly named “Streets”.Open the map document in ArcMap
and go to the Table of Contents window to check the layer
names.

Accela GIS for ArcGIS Configuration Guide
3: Setting Up Map Functionality
29
3.
From the right-click menu, click Share as Geodata Service.
ArcMap displays the Share as Service window.
4.
Follow step 4 to step 11 to publish the geodatabase as a geodata service.
For information about publishing a geodata service to ArcGIS Server, see http://
resources.arcgis.com/en/help/main/10.x/index.html#//015400000378000000/.
Administering the Geometry Service on ArcGIS Server 10.x
The geometry service is automatically created for you in the Utilities folder when you install
ArcGIS Server 10.x. By default, the geometry service is not started after you complete your
ArcGIS for Server installation. Before you can use the geometry service to do geometric
calculations, you need to start it in ArcGIS for Desktop. For complete information about starting
a geometry service, see ESRI’s ArcGIS Server documentation.
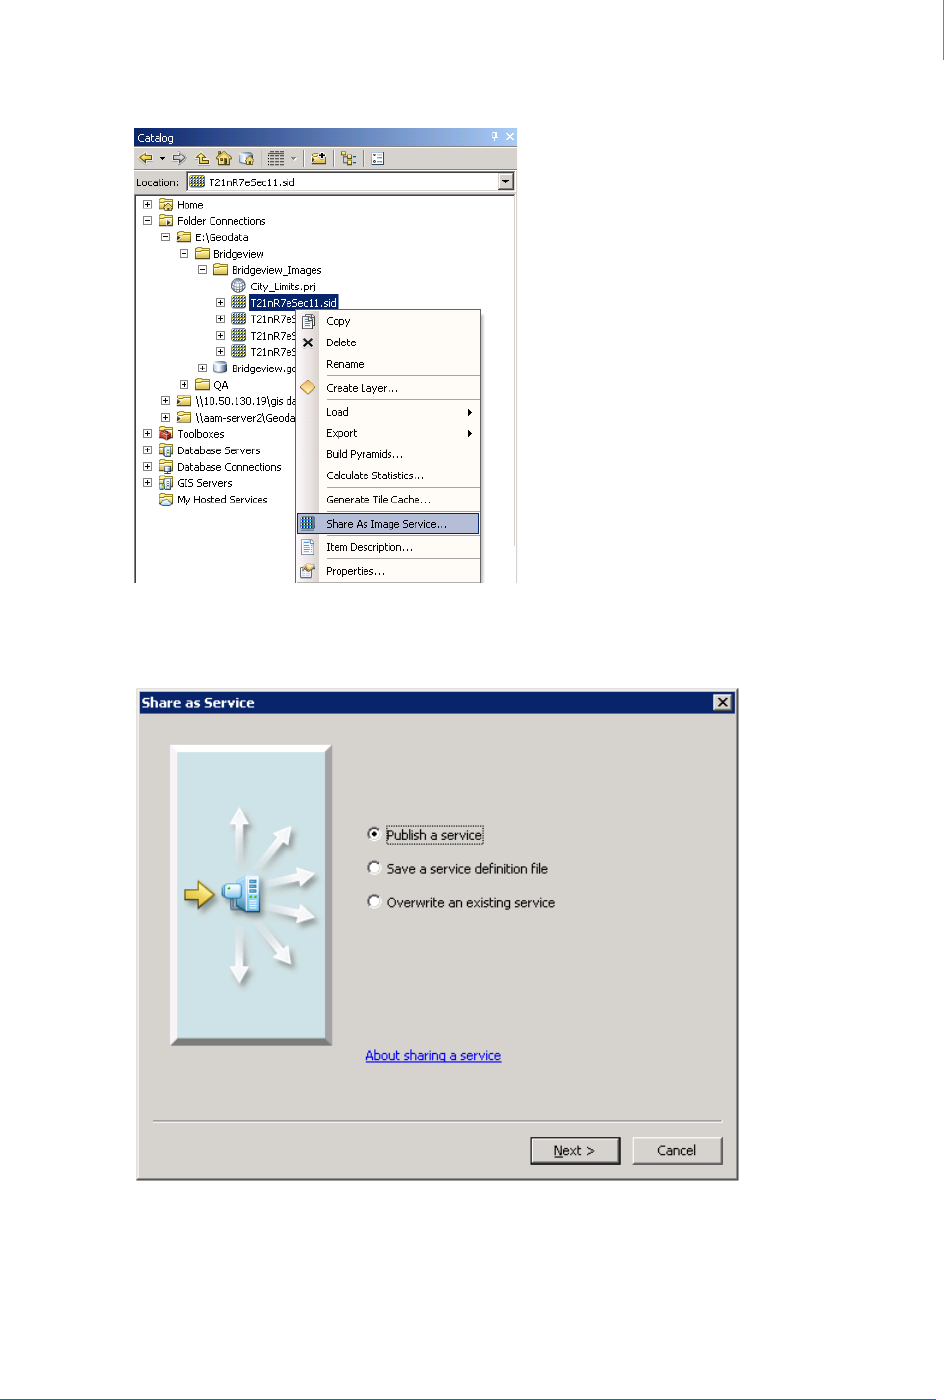
Publishing an Image Service to ArcGIS Server 10.x
To publish an image service to ArcGIS Server 10.x
1.
Open ArcMap 10.x.
2.
From the Catalog window, right-click the dataset or layer that you want to work with.
Note:
Please do not move the geometry service from the Utilities folder
to another folder on the server. ArcGIS for Server may not find
the geometry service if you have ever moved it.
Accela GIS for ArcGIS Configuration Guide
3: Setting Up Map Functionality
30
3.
From the right-click menu, click Share As Image Service.
ArcMap displays the Share as Service window.
4.
Follow step 4 to step 11 to publish the dataset or layer as an image service.
For information about publishing an image service to ArcGIS Server 10.x, see ESRI’s
ArcGIS Server documentation.

31
CHAPTER 4:
CREATING A CACHED MAP
SERVICE
A cached map service is a regular map service that is enhanced to serve maps very quickly
using a cache of static images. You can create a cache from any existing map service using
ArcMap. After you create the map cache, ArcGIS Server can use the tiles and does not have to
dynamically render the map again. For complete information about how to plan, create, and use
a cached map service, see ESRI’s ArcGIS Server documentation.
Cached map services support all the other functionality as dynamic map services do, except the
Creating and Editing GIS Features, Dynamic Themes, and Accela Mobile Office Offline
Mapping functionality.
To enable users to use the cached map service in Accela GIS, follow the instructions in this
chapter to configure the ArcGIS Server.
Topics
Creating an MXD or MSD File
Verifying the Scale Range Settings for Each Map Layer
Publishing a Map Service
Creating a Map Cache
Creating an MXD or MSD File
You can publish either an MSD or an MXD map document as a map service. However, cache tiles
get created more quickly with an MSD-based service. For more information, see Creating an
MXD or MSD File on page 20.
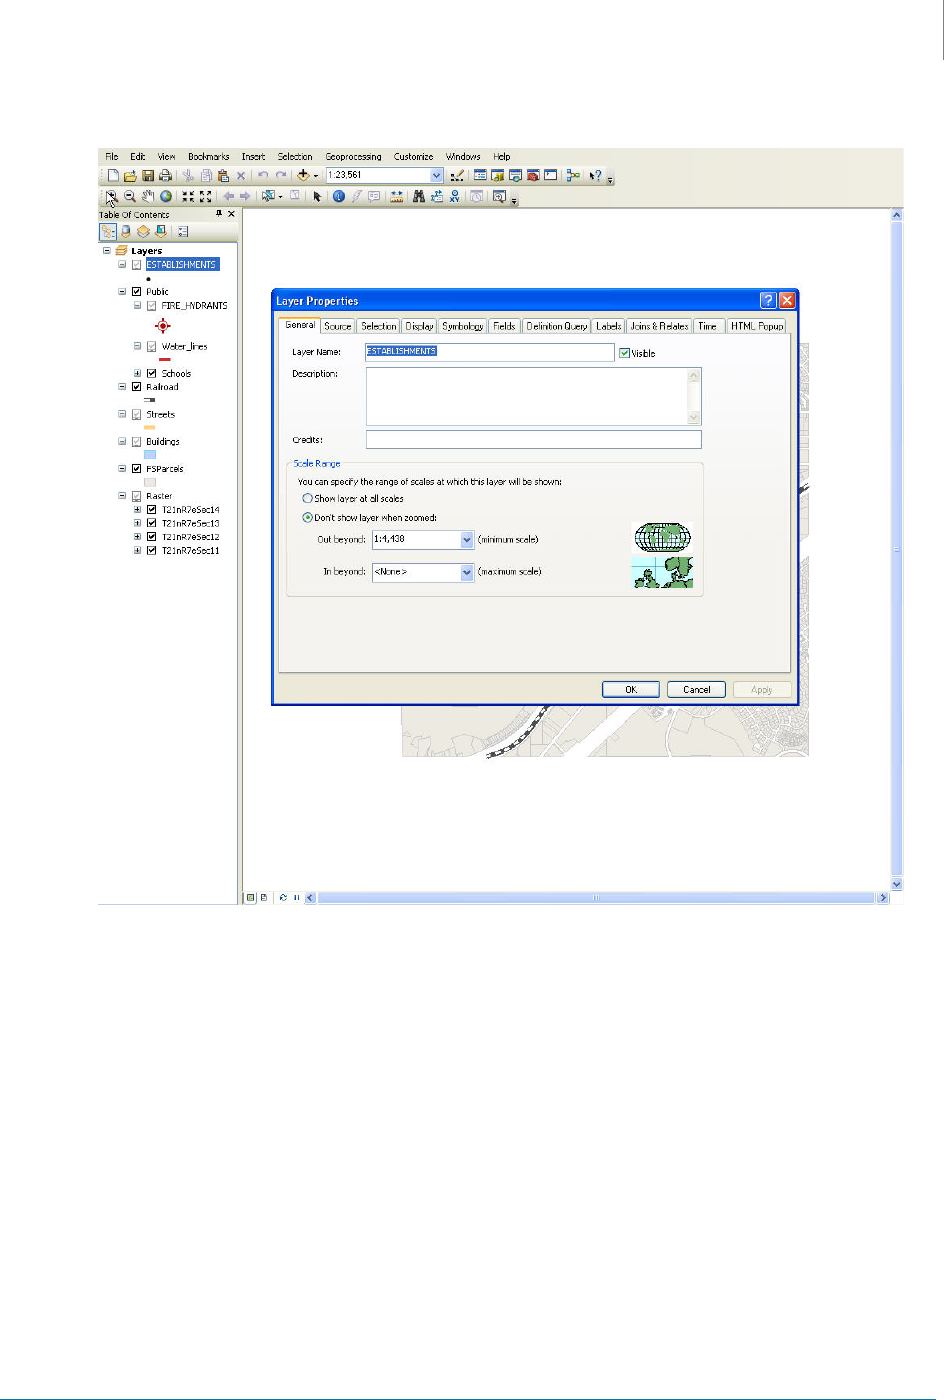
Verifying the Scale Range Settings for Each Map Layer
Open the map in ArcMap and examine the layer properties to determine if there are any scale-
dependent layers and at which scales they turn on and off. If a layer does have a scale
dependency, include a scale level in your tiling scheme at which the layer is visible. For more
information about adding scale levels in your tiling scheme, see Creating a Map Cache on
page 32.
For example, if a layer is set to be visible between the scales 1:15,000 and 1:25,000, you can
include 1:20,000 as a scale in your tiling scheme to ensure the layer appears in your cache.
See Figure 2: Scale Range Example as an illustrative example of a correct scale range.
Accela GIS for ArcGIS Configuration Guide
4: Creating a Cached Map Service
32
Figure 2: Scale Range Example
Publishing a Map Service
Before creating a map cache, you have to publish a dynamic map service to ArcGIS Server 10.x
or later. For more information, see Publishing Services on page 21.
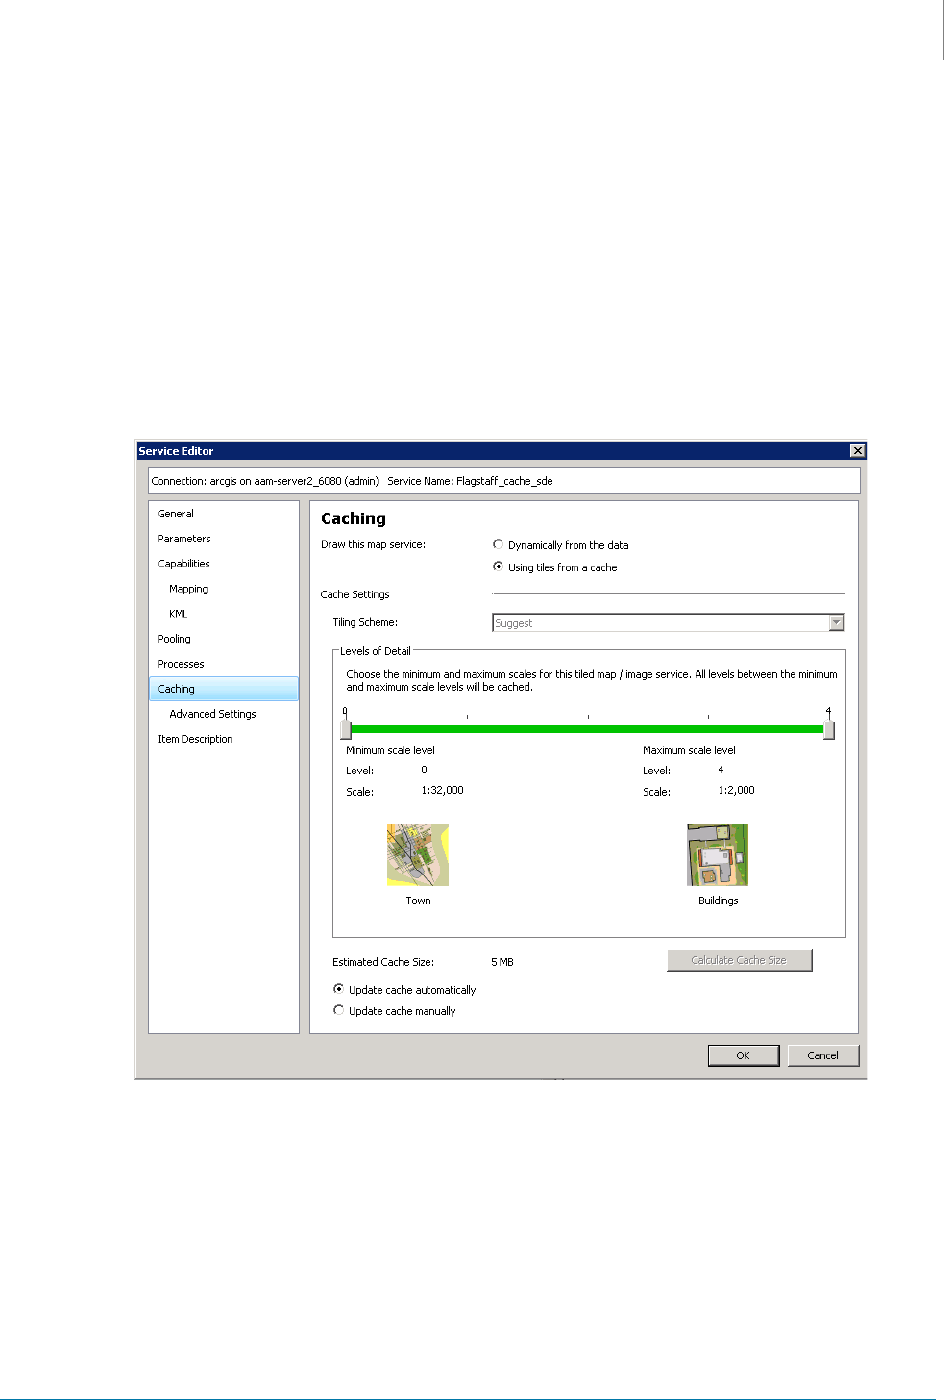
Creating a Map Cache
You can use ArcGIS 10.x or later to create a map cache based on the dynamic map service you
just published. After creating the map cache, you can configure it through the Accela GIS
administration site. For more information about configuring a cached map service, see the
“Setting up a Connection to a Map Service” section in the “Modifying Map Integration Settings”
chapter of the Accela GIS Administrator Guide.
The procedure of creating a map cache using ArcMap 10.x is the same as that using a later
version of ArcMap. This section takes ArcMap 10.x for illustration purposes.
Accela GIS for ArcGIS Configuration Guide
4: Creating a Cached Map Service
33
To create a map cache using ArcMap 10.x
1.
Open ArcMap 10.x and create an administrative connection to the server that contains the
map service you want to cache.
For more information, see Connecting to ArcGIS Server 10.x on page 9.
2.
Right-click a dynamic map service in the GIS Servers folder of the Catalog window and click
Service Properties.
ArcMap displays the Service Editor window.
3.
Click the Caching tab.
ArcMap displays the Caching details.
4.
Mark the Using tiles from a cache option.
5.
From the Tiling Scheme drop-down list, select the tiling scheme for your cache.
Accela recommends you select “Suggest” to let ArcGIS suggest some scales for you.
6.
Click the OK button.

34
CHAPTER 5:
SETTING UP GEOCODING
FUNCTIONALITY
This chapter provides instructions on how to set up the geocoding functionality.
Topics
Creating an Address Locator
Publishing a Geocode Service
Updating the Map Integration Environment
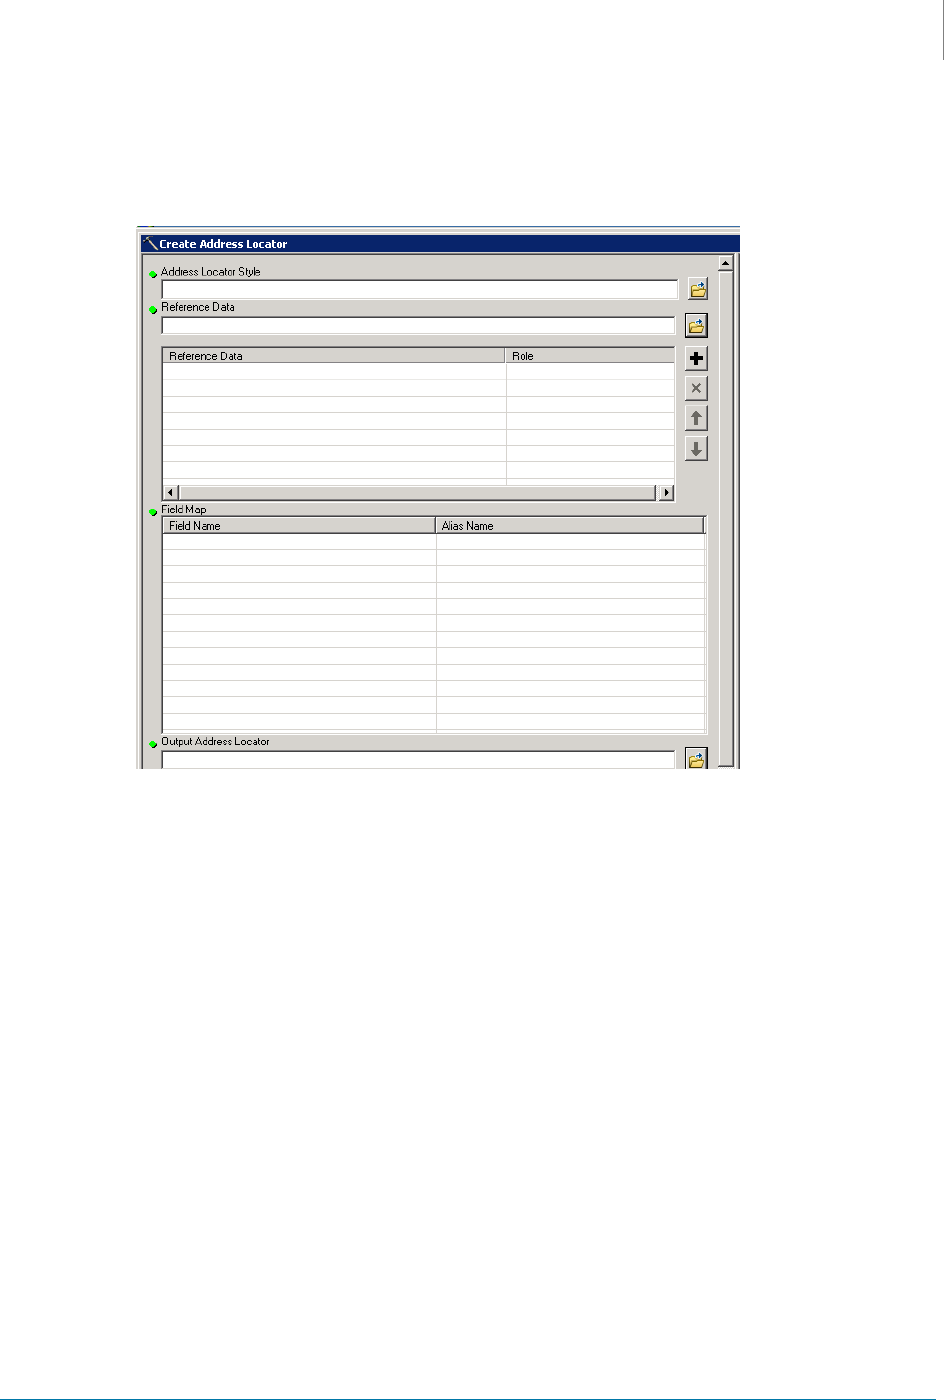
Creating an Address Locator
You can create an address locator using ArcMap 10.x or later. The procedure of creating an
address locator from ArcMap 10.x is the same as that from a later version of ArcMap. This
section takes ArcMap 10.x for illustration purposes.
To create an address locator with ArcMap
1.
Expand the Database Connections folder in the Catalog window.
2.
Right-click a desired database connection and choose New > Address Locator.
Accela GIS for ArcGIS Configuration Guide
5: Setting Up Geocoding Functionality
35
You can also expand the SDE Connection folder in the Catalog window and right-click an
ArcSDE connection file to create an address locator.
The Create Address Locator dialog box displays.
3.
Create an address locator using the dialog box.
For information about creating an address locator, see ESRI’s ArcGIS Server
documentation.
Publishing a Geocode Service
Use the address locator that you just created to publish a geocode service. For more
information, see Publishing Services on page 21.
Updating the Map Integration Environment
If you have already set up a map integration environment, add the Geocoding service to the
map integration environment. For more information on how to edit an existing map integration
environment, see the “Editing a Map Integration Environment” section in the “Modifying Map
Integration Settings” chapter of the Accela GIS Administrator Guide.

36
CHAPTER 6:
SETTING UP ROUTING
FUNCTIONALITY
This chapter applies only to Accela Silverlight GIS.
Topics
Installing and Licensing the ArcMap Network Analyst Extension
Creating a Separate Feature Dataset for Routing
Performing a Route Analysis in ArcGIS Network Analyst
Publishing a Map Service for Routing
Updating the Map Integration Environment
Installing and Licensing the ArcMap Network Analyst
Extension
Ensure that the ArcMap Network Analyst extension is installed and licensed. For more
information about licensing and the Network Analyst, see ESRI’s ArcGIS Server documentation.
Creating a Separate Feature Dataset for Routing
You must create a separate feature datasheet for routing, particularly if your agency uses
Accela Mobile Office in offline mode. For example, your feature dataset for mapping might be
named BRIDGEVIEW and the feature dataset for routing might be named
BRIDGEVIEW_ROUTING. For more information, see Creating a Feature Dataset on page 20.
Accela Silverlight GIS needs to package the complete feature datasheet to download the
routing data for offline use in Accela Mobile Office.
Performing a Route Analysis in ArcGIS Network
Analyst
A route analysis is a kind of network analysis. You can use ArcGIS Network Analyst to perform
a route analysis.
Topics
Configuring the Network Analyst Environment
Accela GIS for ArcGIS Server Configuration Guide
6: Setting Up Routing Functionality
37
Creating a Network Dataset in the Routing Feature Dataset
Creating an MXD File for the Routing Map Service
Adding a Network Layer to the Map
Creating a Route Analysis Layer
Configuring the Network Analyst Environment
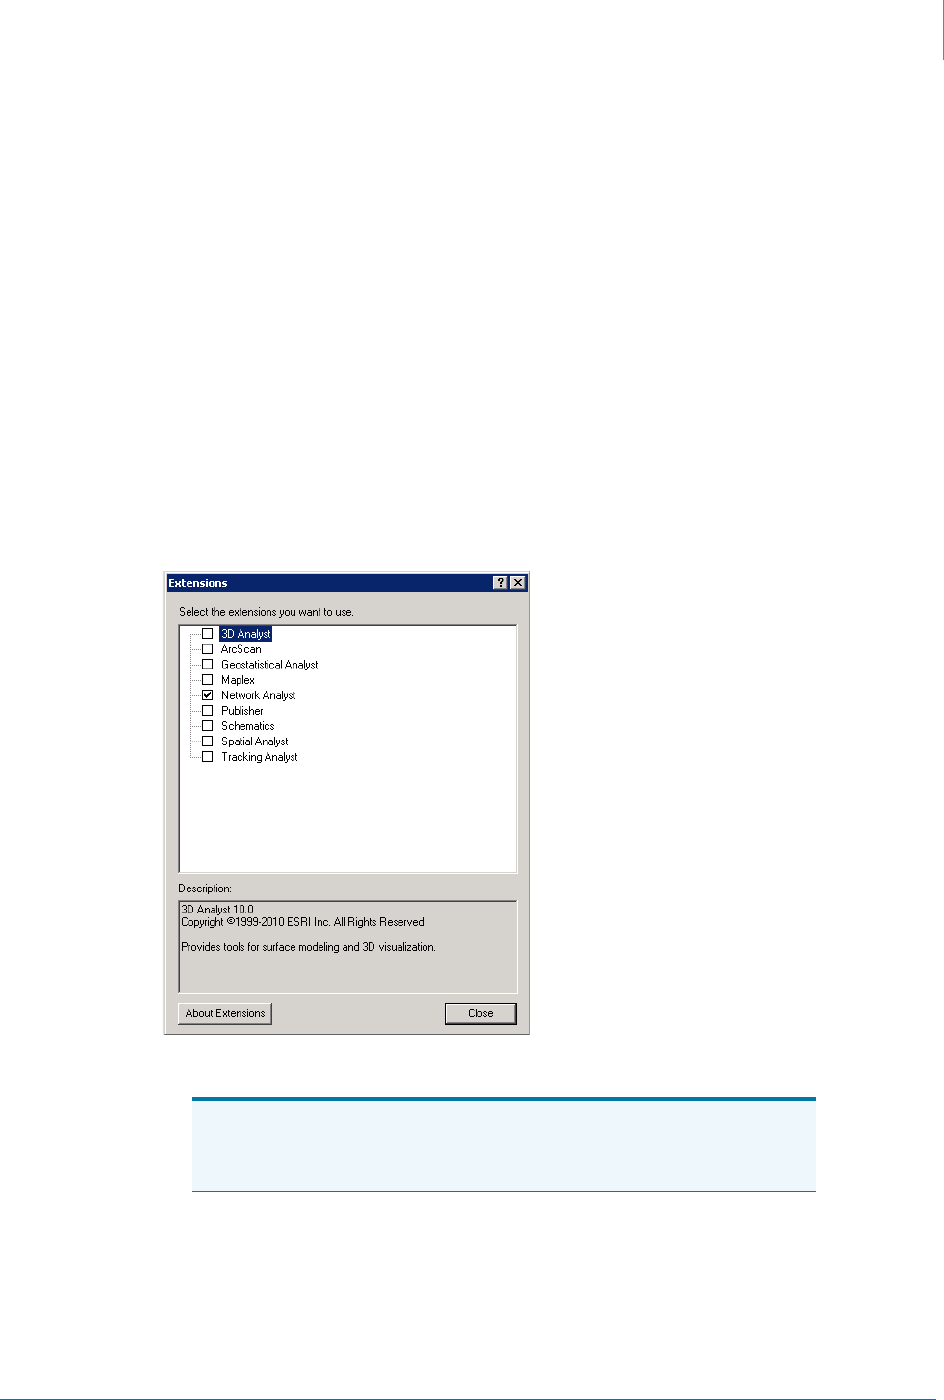
Network Analyst is an extension to ArcGIS. Thus, you must set up the Network Analyst
environment prior to performing any route analysis in ArcMap.
To configure the Network Analyst environment
1.
Enable the Network Analyst extension by doing all the following:
a. Click Customize > Extensions.
The Extensions pop-up window opens.
b. Mark the Network Analyst check box.
c. Click the Close button.
2.
Display the Network Analyst toolbar by choosing Customize > Toolbars > Network
Analyst.
Note:
You must have installed and licensed the Network Analyst
feature. Otherwise, the Network Extensions check box is not
available.
Accela GIS for ArcGIS Server Configuration Guide
6: Setting Up Routing Functionality
38
Creating a Network Dataset in the Routing Feature Dataset
You need to have a network on which to perform the route analysis. Thus you must add a
network dataset to ArcMap using the routing feature dataset created as Creating a Separate
Feature Dataset for Routing on page 36 describes. For information about creating a network
dataset, see ESRI’s ArcGIS Server documentation.
If necessary, add a feature layer to the network dataset that you created for routing. For
example, you might want to add the Streets feature layer to the network dataset.
To create a network dataset
1.
Expand the Folder Connections node in the Catalog pane of ArcMap.
2.
Right-click the feature dataset that you created for routing and choose New > Network
Dataset.
For information about how to create a feature dataset for routing, see Creating a Separate
Feature Dataset for Routing on page 36.
ArcMap launches the New Network Dataset wizard.
Accela GIS for ArcGIS Server Configuration Guide
6: Setting Up Routing Functionality
39
3.
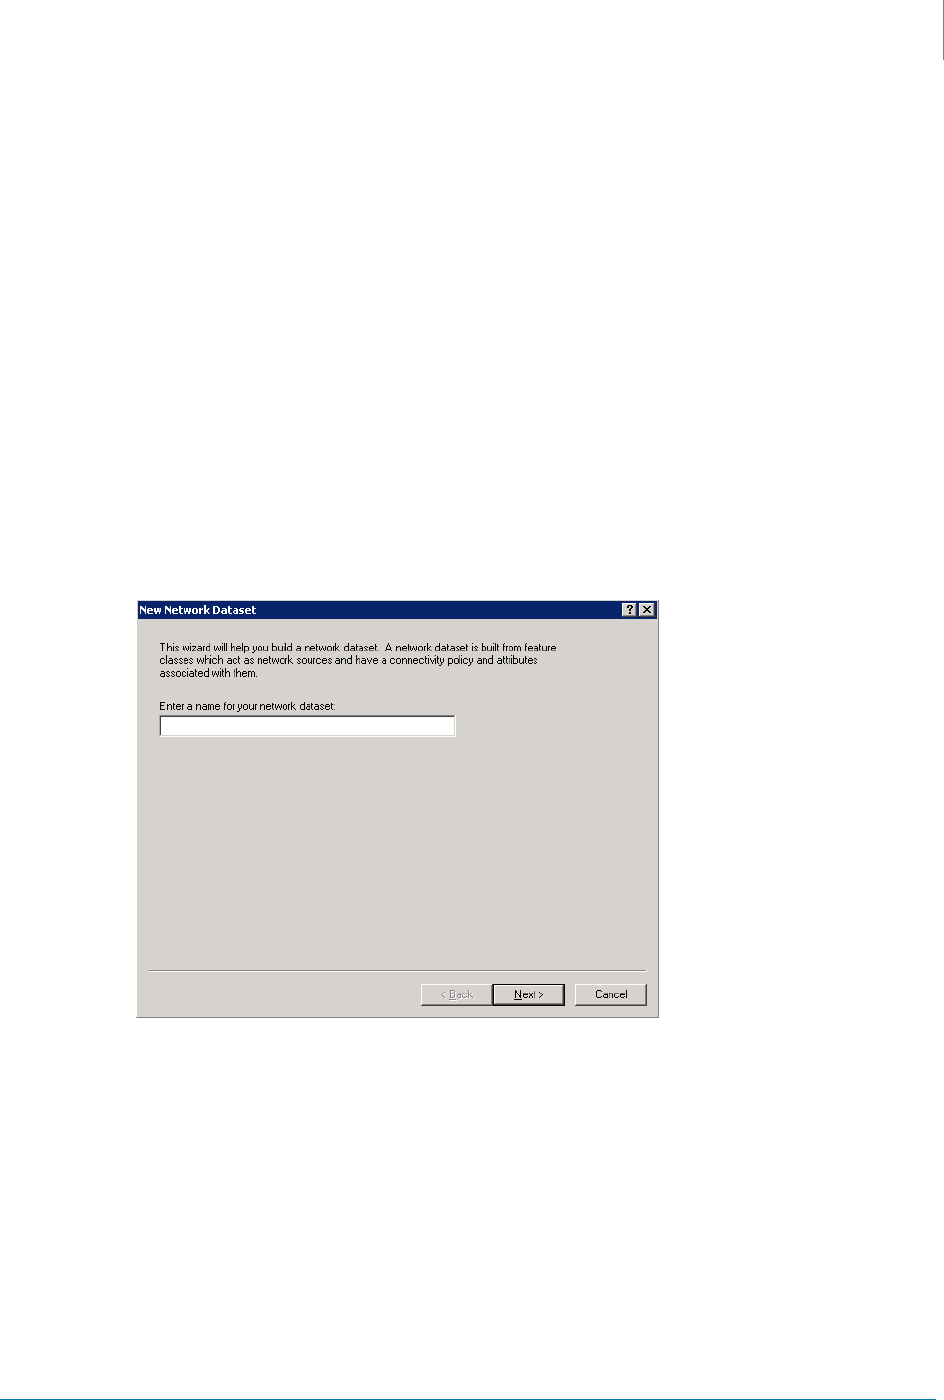
Enter the name of the network dataset and click the Next button.
The wizard displays the following page.
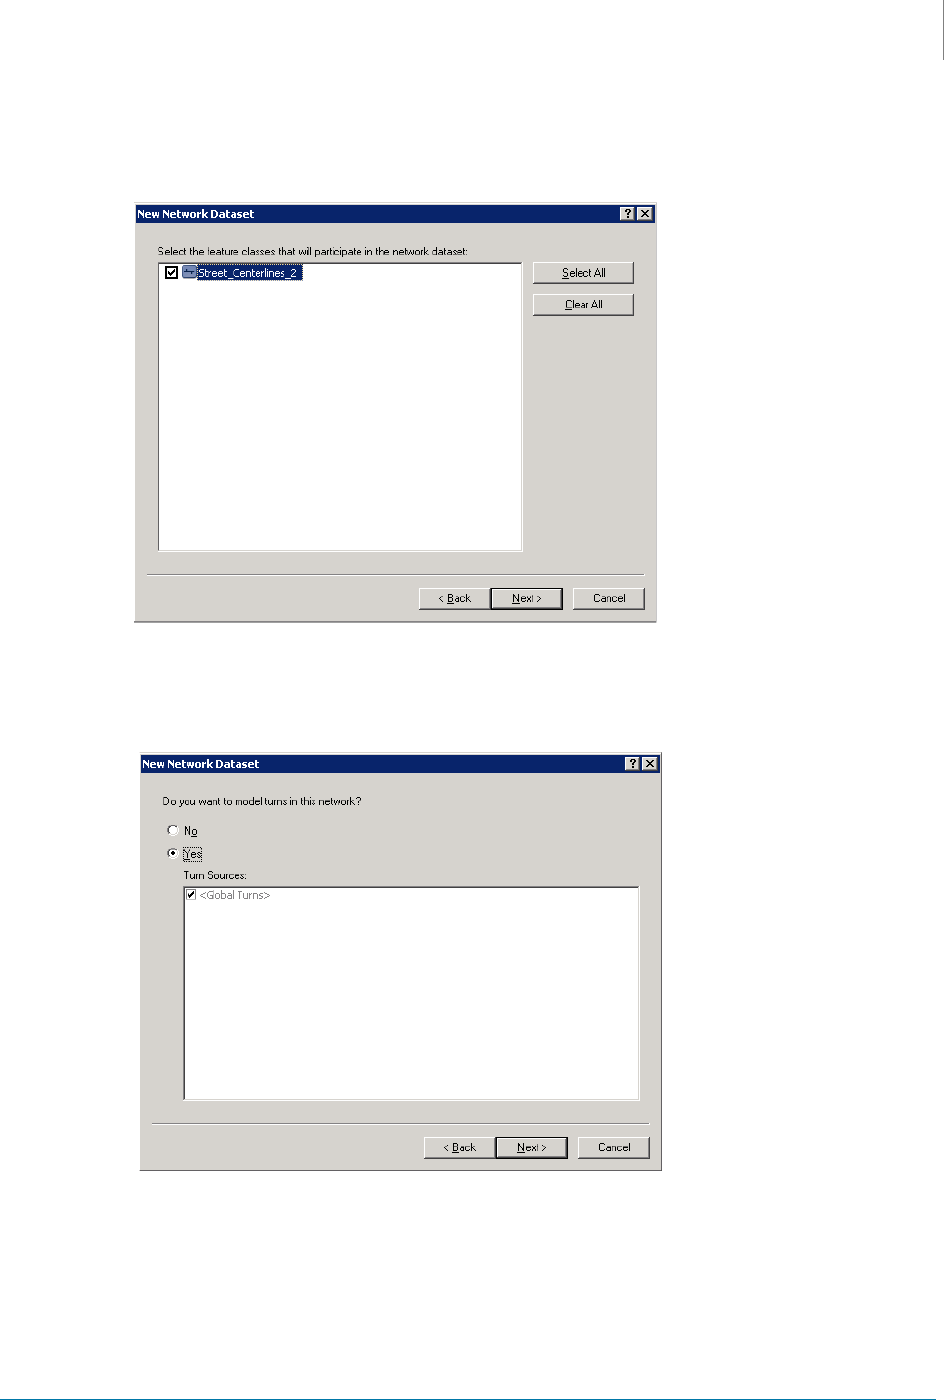
4.
Mark the feature class that you want to use it as a source for the network dataset and click
the Next button.
The wizard displays the following page.
Accela GIS for ArcGIS Server Configuration Guide
6: Setting Up Routing Functionality
40
5.
Mark the Yes option and the check box next to <GlobalTurns>, and click the Next button.
The wizard displays the following page.
6.
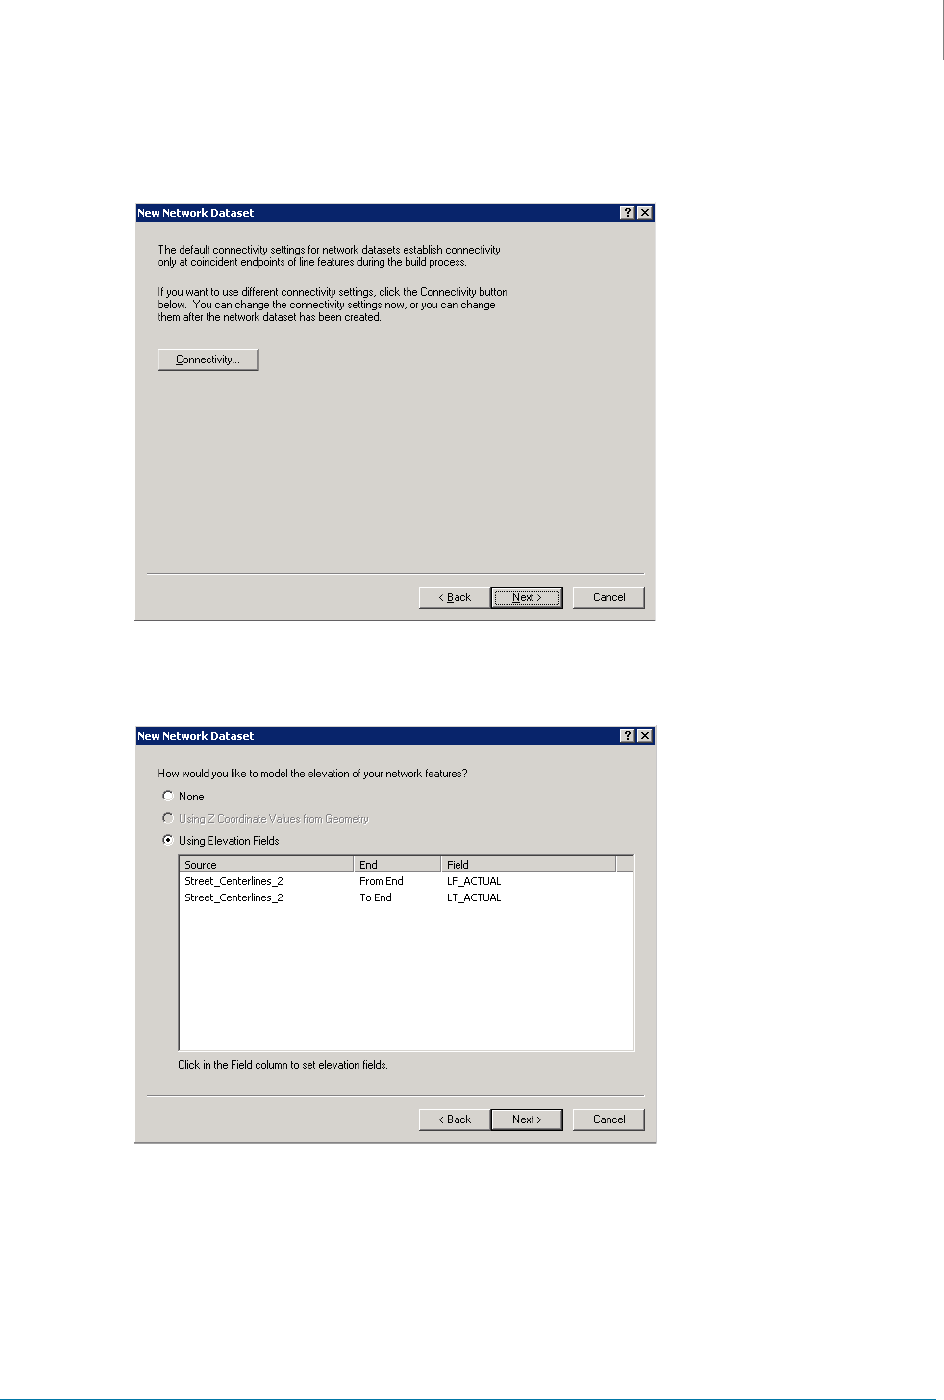
Accept the default settings and click the Next button.
The wizard displays the following page.
Accela GIS for ArcGIS Server Configuration Guide
6: Setting Up Routing Functionality
41
7.
Mark the desired option for modeling the elevation and click the Next button.
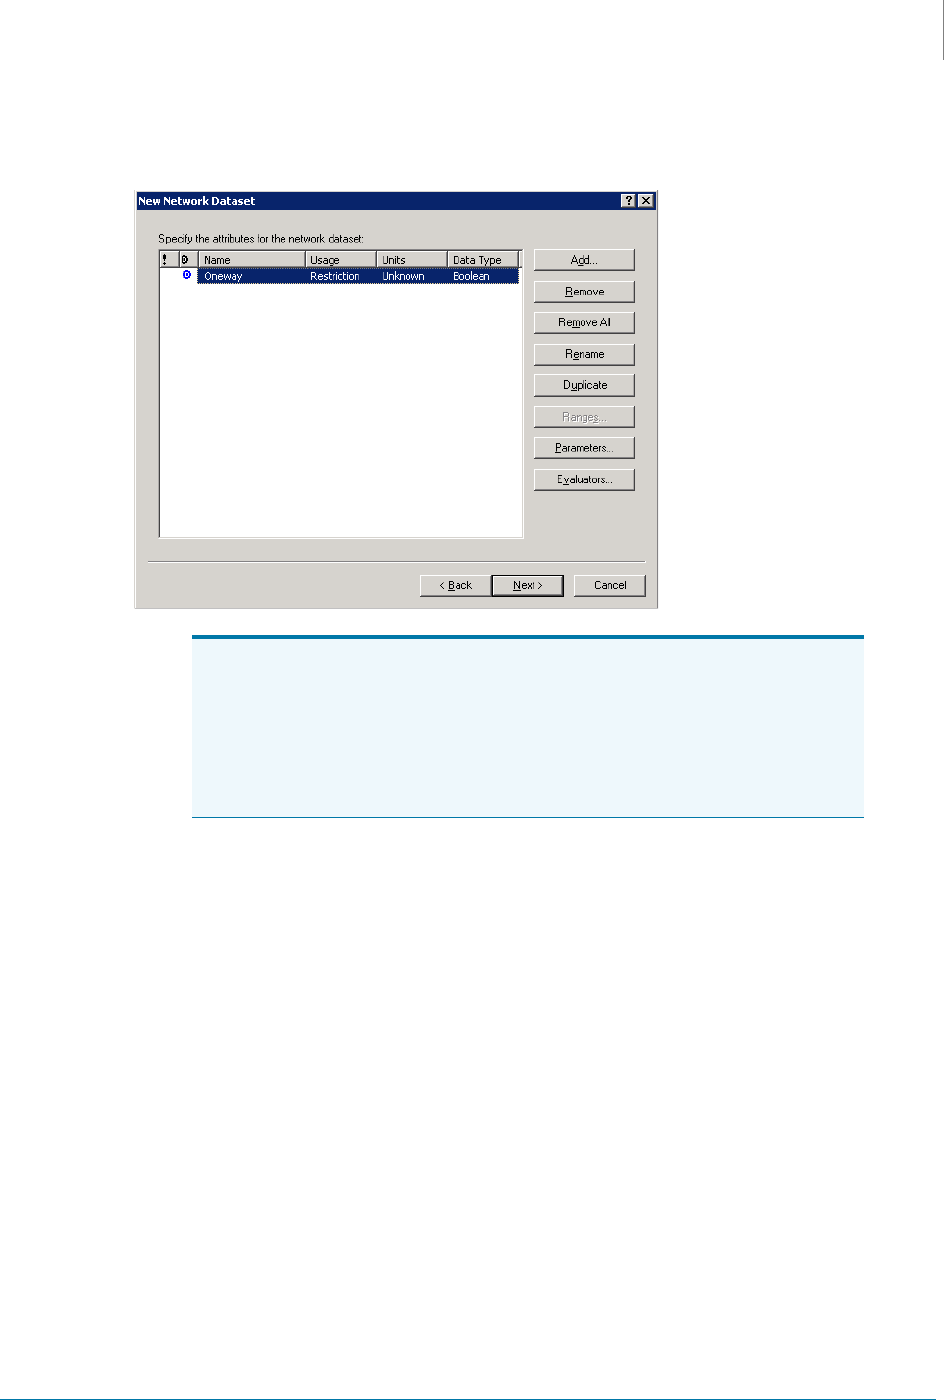
The wizard displays a list of attributes.
8.
If necessary, add the required attribute and assign evaluators to it.
a. Click the Add button.
The wizard displays the Add New Attribute pop-up window.
Note:
These attributes are used to optimize route lists by distance and time.
The first attribute with length units such as Feet or Miles, is used in
calculating optimized distance route. The first attribute with time units,
such as Minutes or Hours, is used in calculating optimized time route. If
you chose to set these attributes later, make sure to rebuild the
network dataset after specifying the attributes. For more information
about the network attribute, see ESRI’s ArcGIS Server documentation.
Accela GIS for ArcGIS Server Configuration Guide
6: Setting Up Routing Functionality
42
b. Complete all the fields that display on the Add New Attribute pop-up window and click
the OK button.
The new attribute is added to the list of attributes.
c. Click the Evaluators button.
The wizard displays the Evaluators pop-up window.
d. Complete all the fields that display on the pop-up window and click the OK button.
The values are assigned to the new attribute by source.
Accela GIS for ArcGIS Server Configuration Guide
6: Setting Up Routing Functionality
43
9.
Click the Next button on the wizard.
The wizard displays the following page.
10.
Mark the Yes option and click the Directions button.
The wizard displays the Network Directions Properties pop-up window.
11.
Specify the fields used to report directions for network analysis results and click the OK
button.
12.
Click the Next button on the wizard.
The wizard displays a summary of the settings for your review.
Accela GIS for ArcGIS Server Configuration Guide
6: Setting Up Routing Functionality
44
13.
Click the Finish button.
The New Network Dataset progress bar opens showing you that Network Analyst is
creating the network dataset. When the network dataset is created, a prompt message
displays and asks if you want to build the network dataset.
14.
Click the Yes button.
The Build Network Dataset progress bar opens. When the building process is finished, the
progress bar disappears.
Creating an MXD File for the Routing Map Service
You can create an MXD file using the network dataset created as Creating a Network Dataset in
the Routing Feature Dataset on page 38 describes. For example, you might name the MXD for
routing Bridgeview_Routing.mxd. You must use the MXD file to create a map service for routing.
Adding a Network Layer to the Map
When a network dataset is added to ArcMap, it is referred to as a network dataset layer, or
simply a network layer. You can decide whether to only add the network dataset or add it and all
its source feature classes to the map. For more information about adding layers to a map, see
ESRI’s ArcGIS Server documentation.
Note:
When you create a network dataset or edit an existing one, you
must build it. For more information about building a network
dataset, see ESRI’s ArcGIS Server documentation.
Accela GIS for ArcGIS Server Configuration Guide
6: Setting Up Routing Functionality
45
To add a network layer to the map
1.
Click the Add Data button on the toolbar of ArcMap.
The Add Data pop-up window displays.
2.
Navigate to the network dataset that you created in the routing feature dataset and click the
Add button.
For more information about creating a network dataset in the routing feature dataset, see
Creating a Network Dataset in the Routing Feature Dataset on page 38.
The Adding Network Layer pop-up window displays.

Accela GIS for ArcGIS Server Configuration Guide
6: Setting Up Routing Functionality
46
3.
Click the No button.
ArcMap only adds the network dataset to the map and displays it in the Table of Contents
window.
Creating a Route Analysis Layer
Network analyses are always performed on network datasets. Consequently, a route analysis
layer must be bound to the network dataset that you created based on the routing feature
dataset.
For more information about the network analysis workflow, see ESRI’s ArcGIS Server
documentation.
For more information about the route analysis, see ESRI’s ArcGIS Server documentation.
To create a route analysis layer
1.
Open the MXD file that you just created for routing in ArcMap.
For more information about creating an MXD file for routing, see Creating an MXD File for
the Routing Map Service on page 44.
2.
On the Network Analyst toolbar, click the Network Analyst drop-down menu and click the
New Route option.
A new route analysis layer is created and it displays in the Network Analyst window and
bound to the active network dataset. The layer also appears in the Table of Contents
Accela GIS for ArcGIS Server Configuration Guide
6: Setting Up Routing Functionality
47
window as a composite layer, which is named Route (or, if a route analysis layer with the
same name already exists in the map document, Route 1, Route 2, and so forth).
3.
Add route analysis objects to the map.
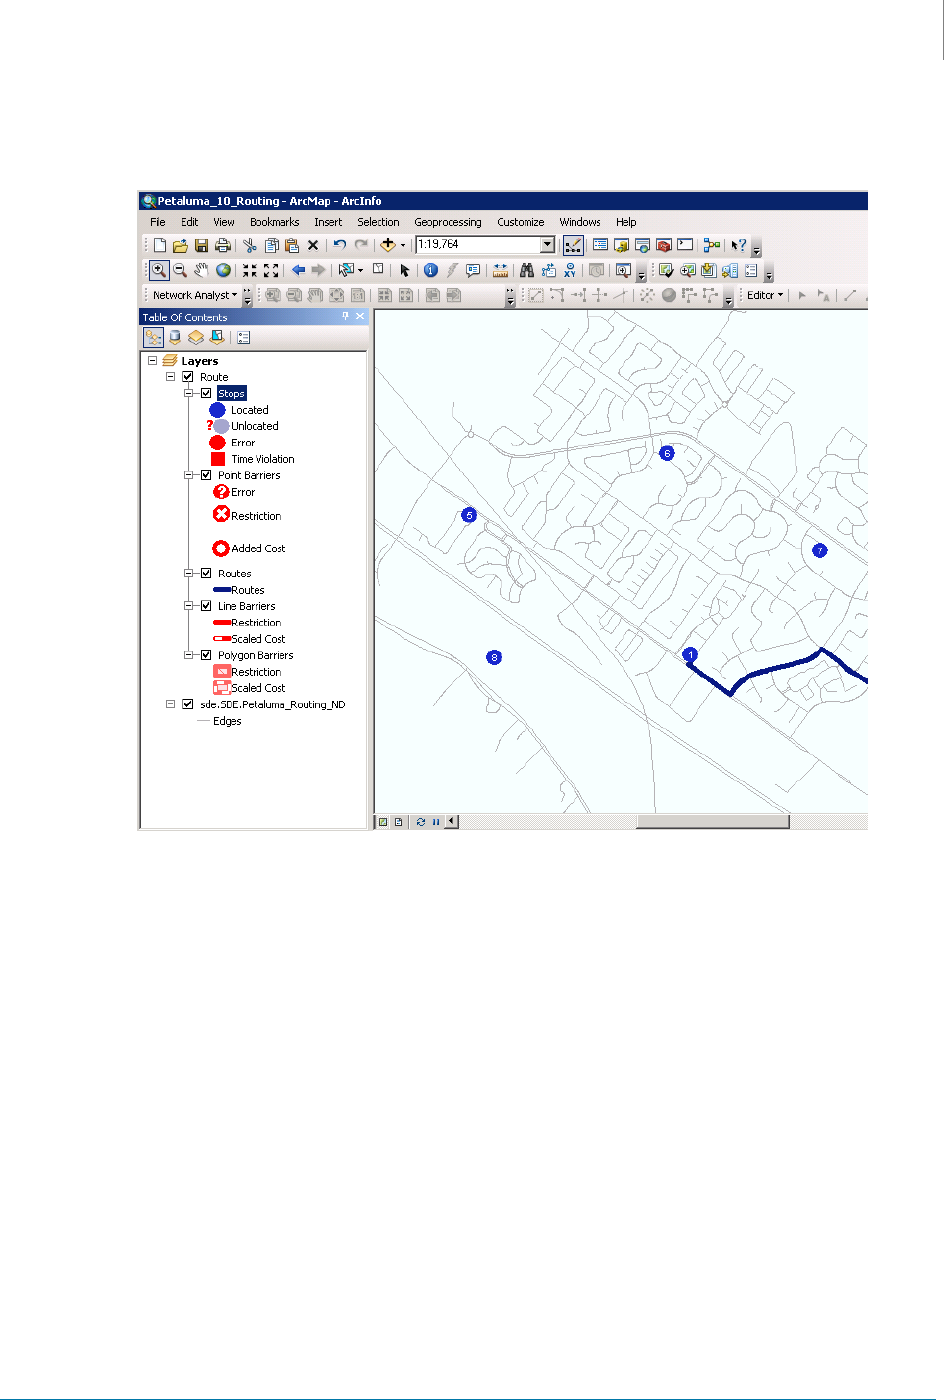
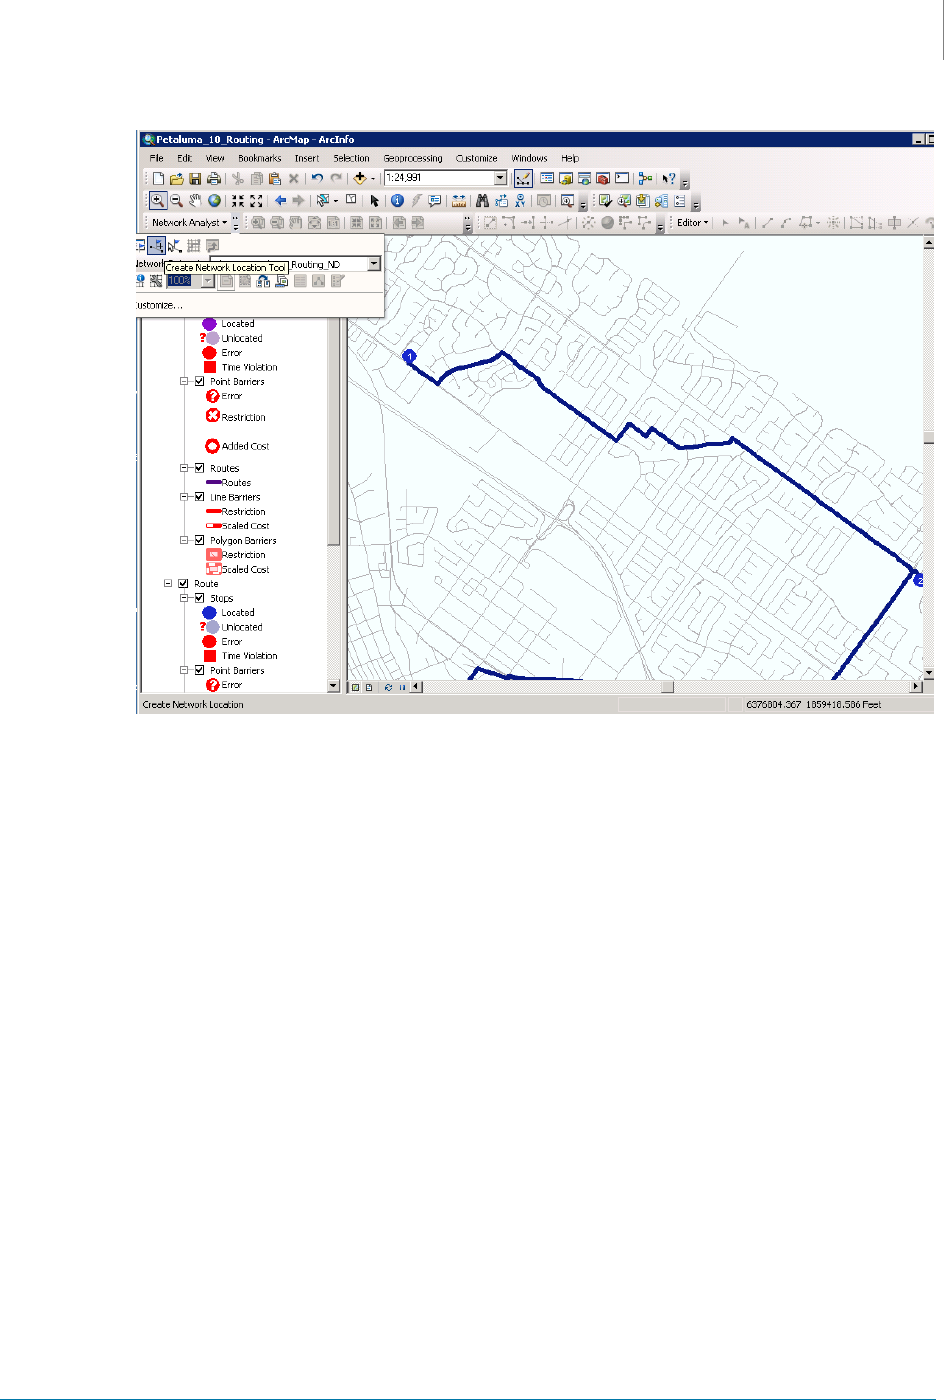
For example, click the New Network Location Tool button on the Network Analyst toolbar
and click anywhere on the map to add routing stops.
Accela GIS for ArcGIS Server Configuration Guide
6: Setting Up Routing Functionality
48

Accela GIS for ArcGIS Server Configuration Guide
6: Setting Up Routing Functionality
49
4.
Right-click the route analysis layer in the Table Of Contents window and click the
Properties option.
The Layer Properties pop-up window opens.
5.
Set route analysis layer properties.
For example, select an option from the Distance Units drop-down list on the Analysis
Settings tab.
6.
Click the OK button.
ArcMap saves your changes and closes the Layer Properties window.
7.
Click the Solve button on the Network Analyst toolbar.
Network Analyst generates the solution, which becomes part of the route analysis layer.
Accela GIS for ArcGIS Server Configuration Guide
6: Setting Up Routing Functionality
50
8.
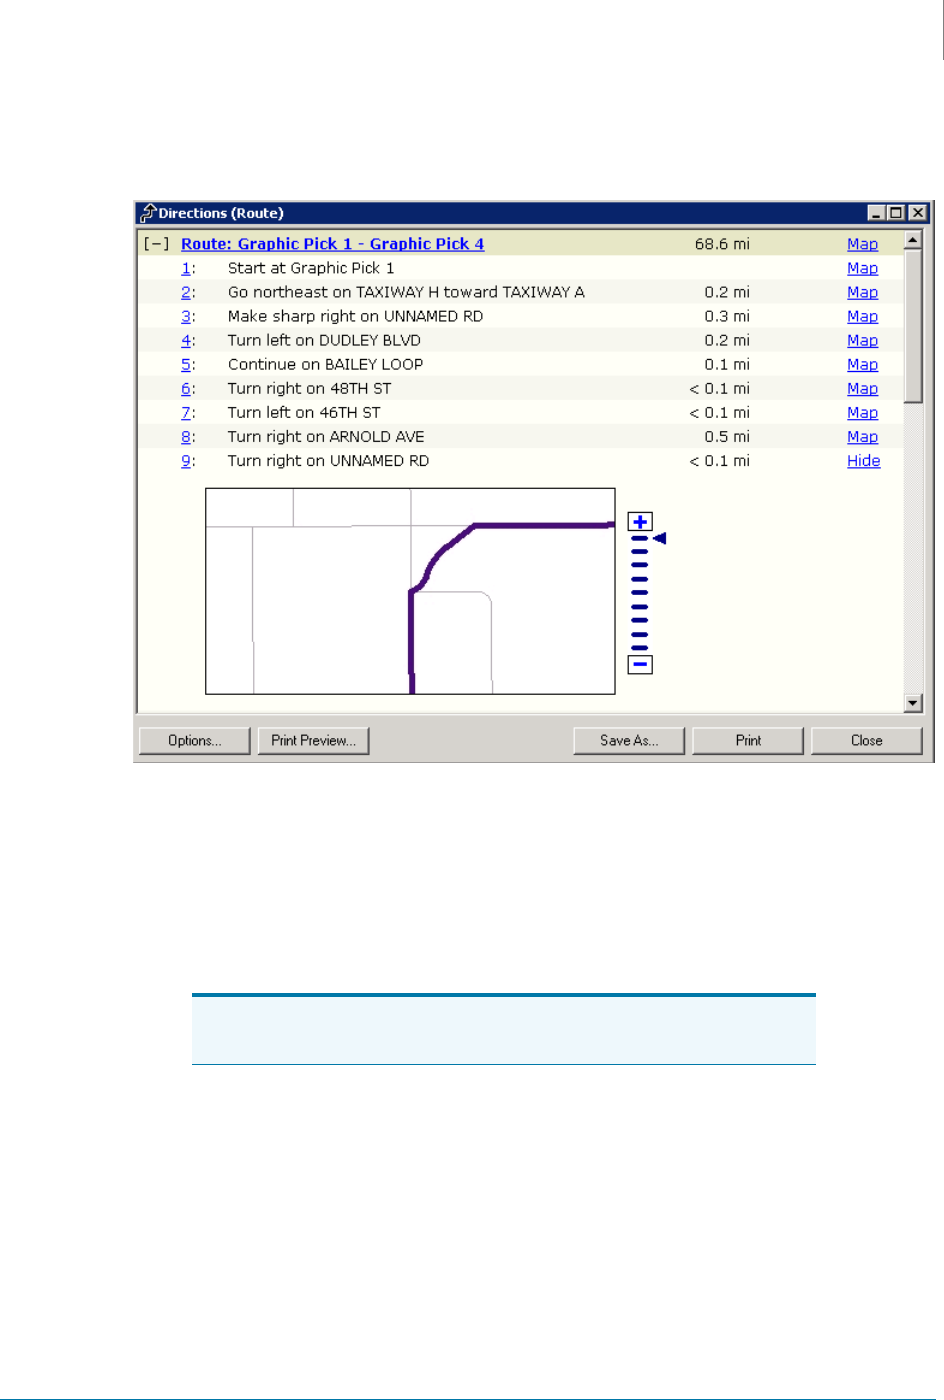
If necessary, click the Directions Window button on the Network Analyst toolbar.
The Directions window displays.
9.
Save the MXD file with the route layer information.
Publishing a Map Service for Routing
Use the MXD file that you just saved with the route layer information to create a map service for
routing and publish it to the ArcGIS Server. For more information about publishing a map
service to the ArcGIS Server, see Publishing Services on page 21.
Updating the Map Integration Environment
If you have already set up a map integration environment, add the Routing service to the map
integration environment. For more information on how to edit an existing map integration
environment, see the “Editing a Map Integration Environment” section in the “Modifying Map
Integration Settings” chapter of the Accela GIS Administrator Guide.
Note:
Make sure you have enabled the Network Analysis feature when
creating the map service for routing.

51
CHAPTER 7:
SETTING UP ACCELA MOBILE
OFFICE OFFLINE MAPPING
This chapter only applies to Accela Mobile Office. To use Accela Mobile Office offline
mapping, you must download the GIS data and the Map document to the local Accela Mobile
Office client machine. Accela Mobile Office uses ArcGIS Engine software and locally
downloaded map document and data to provide offline mapping functionality.
Topics
Ensuring GIS Data Sources Are in the ArcSDE Geodatabase
Ensuring ArcGIS Engine Is Installed and Licensed Properly
Verifying the SDE Server Name
Entering the IP Address as the ArcGIS Server Name
Verifying the User Access
Creating a Map Service and a Geodata Service
Configuring the MIME Type and Request Filtering in IIS
Updating the Map Integration Environment
Ensuring GIS Data Sources Are in the ArcSDE
Geodatabase
Ensure that all the GIS data sources used for Mapping and Routing, including Imagery data, are
in the ArcSDE geodatabase. If GIS data is stored in a file or personal geodatabase, use the
geodatabase to create a geodata service. Typically, the MXD file is used to create a geodata
service. If the MXD file is used to create a geodata service, the data cannot be downloaded for
offline use from the file or personal geodatabase.
Ensuring ArcGIS Engine Is Installed and Licensed
Properly
Ensure ArcGIS Engine Runtime for Windows is installed and licensed on each Accela Mobile
Office client machine. ArcGIS Engine is a subset of ESRI ArcMap desktop software. If you have
ArcMap installed, ArcGIS Engine needs not be installed.

Accela GIS for ArcGIS Configuration Guide
7: Setting Up Accela Mobile Office Offline Mapping
52
Verifying the SDE Server Name
Use the computer name or domain name as the SDE Server name. Accela recommends using
the computer name or domain name as the SDE Server name in the SDE Connection file. The
MXD file including connection information is downloaded to the Accela Mobile Office client
machine using ArcGIS Engine. After the MXD file is downloaded to the Accela Mobile Office
client, ArcGIS Engine API changes the MXD data source from SDE to the local data. While
changing the data source, ArcGIS Engine opens the MXD file. If the name is used, ArcGIS
Engine API attempts to resolve name; if the name cannot be reached, it times out immediately
and successfully changes the MXD data source to use the local data.
Entering the IP Address as the ArcGIS Server Name
When you configure Accela GIS, Accela recommends entering the IP Address as the ArcGIS
Server name. If you use the Domain Name System (DNS) as the ArcGIS Server name but the
ESRI API cannot resolve the DNS to retrieve services, then you must enter the IP address as
the ArcGIS Server name on the Map Service Connection page. For more information on how to
configure Accela GIS, refer to the Accela GIS Administrator Guide.
Verifying the User Access
In order for ArcGIS Server to package data, you must verify if the user has proper access to the
directories where the related data reside, as shown in Table 4: User Access Verification on
page 52.
Creating a Map Service and a Geodata Service
Use the same MXD file to create a map service and a Geodata service and ensure the Geodata
service name is the same as the map service name. For complete information about publishing
a geodata service, see Publishing Services on page 21.
Table 4: User Access Verification
User Modify access to these
directories Read access to these directories
arcgis
• ArcGISServer\config-store
Typically, the ESRI ArcGIS Server
installer sets directory permissions.
• The directory where the MXD files used by Map and Route
map services reside.
• The directory where the SDE connection file resides.
The SDE connection file used by MXD is typically available in
ArcCatalog directory under the User Profile, for example,
C:\Documents and Settings\alakkyreddy\Application
Data\ESRI\ArcCatalog.
Note:
To allow the Accela GIS server to download a data package from the
ArcGIS Server for offline maps, you must enable the Accela Download
capability for the map service and the routing service and set proper
time-out values for offline map downloading. For more information, see
Enabling Capabilities for a Map Service on ArcGIS Server 10.x on
page 15.

Accela GIS for ArcGIS Configuration Guide
7: Setting Up Accela Mobile Office Offline Mapping
53
Configuring the MIME Type and Request Filtering in IIS
You must manually add the MIME type .mxd into the “arcgisoutput” virtual directory on the
ArcGIS Server machine, if it is not available. And you must update the “Request Filtering”
setting to allow the access to the “.mxd” file name extension.
To configure the MIME type and request filtering
1.
Open Internet Information Services (IIS) Manager.
2.
In the Connections pane, navigate to the “arcgisoutput” directory and click it.
3.
In the arcgisoutput Home page, do all of the following:
•
To add the MIME type, if necessary.
1) Double-click MIME Types.
2) In the Actions pane, click the Add button.
3) Complete the fields in the Add MIME Type dialog box:
4) Click OK.
•
To allow access to the “.mxd” file name extension
1) Double-click Request Filtering.
2) In the Request Filtering pane, click the File Name Extensions tab.
3) Right-click the “.mxd” file name extension and click Allow File Name Extension.
Updating the Map Integration Environment
If you have already set up a map integration environment for Accela Mobile Office offline
mapping, open the Accela GIS Administration site and create a map data package for Accela
Mobile Office clients to download and use for offline mapping. For more information on how to
edit an existing map integration environment, see the “Editing a Map Integration Environment”
section in the “Modifying Map Integration Settings” chapter of the Accela GIS Administrator
Guide.
To allow the Accela GIS server to download offline maps with geocoding data, you must provide
the name and the physical location of the address locator that is published as the geocoding
Note:
The ArcGIS installer usually creates the “arcgisoutput” directory
and displays it in IIS on the ArcGIS Server machine. If the
directory is not available in IIS, you need to manually add an
application for it in IIS. Select the correct physical path of the
“arcgisoutput” directory that is used by the ArcGIS Server.
File name extension .mxd
MIME type application/octet-stream

Accela GIS for ArcGIS Configuration Guide
7: Setting Up Accela Mobile Office Offline Mapping
54
service in ArcGIS Server when updating the map integration through the Accela GIS
Administration site. For more information, see the “Retrieving and Selecting a Geocoding
Service” section in the “Setting up a Map Service Connection” chapter of the Accela GIS
Administrator Guide.

55
CHAPTER 8:
ENABLING USERS TO CREATE
GIS FEATURES
This chapter applies only to Accela Silverlight GIS, and explains the tasks that you must
complete to enable users to create or edit GIS features on a map.
Topics
Creating an ArcGIS Map Service with Non-Shapefile Source
Applying Geodatabase Attribute Domains to Attributes (Optional)
Creating an ArcGIS Map Service with Non-Shapefile
Source
You can only use SDE data source to create an ArcGIS map service.
Applying Geodatabase Attribute Domains to Attributes
(Optional)
To ensure that users enter valid attribute values when creating or editing a GIS feature in Accela
Silverlight GIS, you can create attribute domains for the geodatabase and apply them to the
attribute fields of map layers in ArcCatalog. A geodatabase attribute domain defines a set of
acceptable attribute values for a field type. An attribute domain is a property of the
geodatabase, it can be shared by fields across feature classes (map layers), tables, and
subtypes in the geodatabase. You can create either a coded value domain or a range domain.
For more information about creating a range domain, see ESRI’s ArcGIS Server
documentation.
For more information about creating a coded value domain, see ESRI’s ArcGIS Server
documentation.
Note:
To enable users to create and edit GIS features on a map service, you
must enable the Accela Editing capability for the map service. For
more information, see Enabling Capabilities for a Map Service on
ArcGIS Server 10.x on page 15.
Accela GIS for ArcGIS Configuration Guide
8: Enabling Users to Create GIS Features
56
To apply a geodatabase attribute domain to an attribute field of a map layer
1.
In ArcMap, right-click the feature class (map layer) that you want to apply the attribute
domain to and click Properties in the context menu.
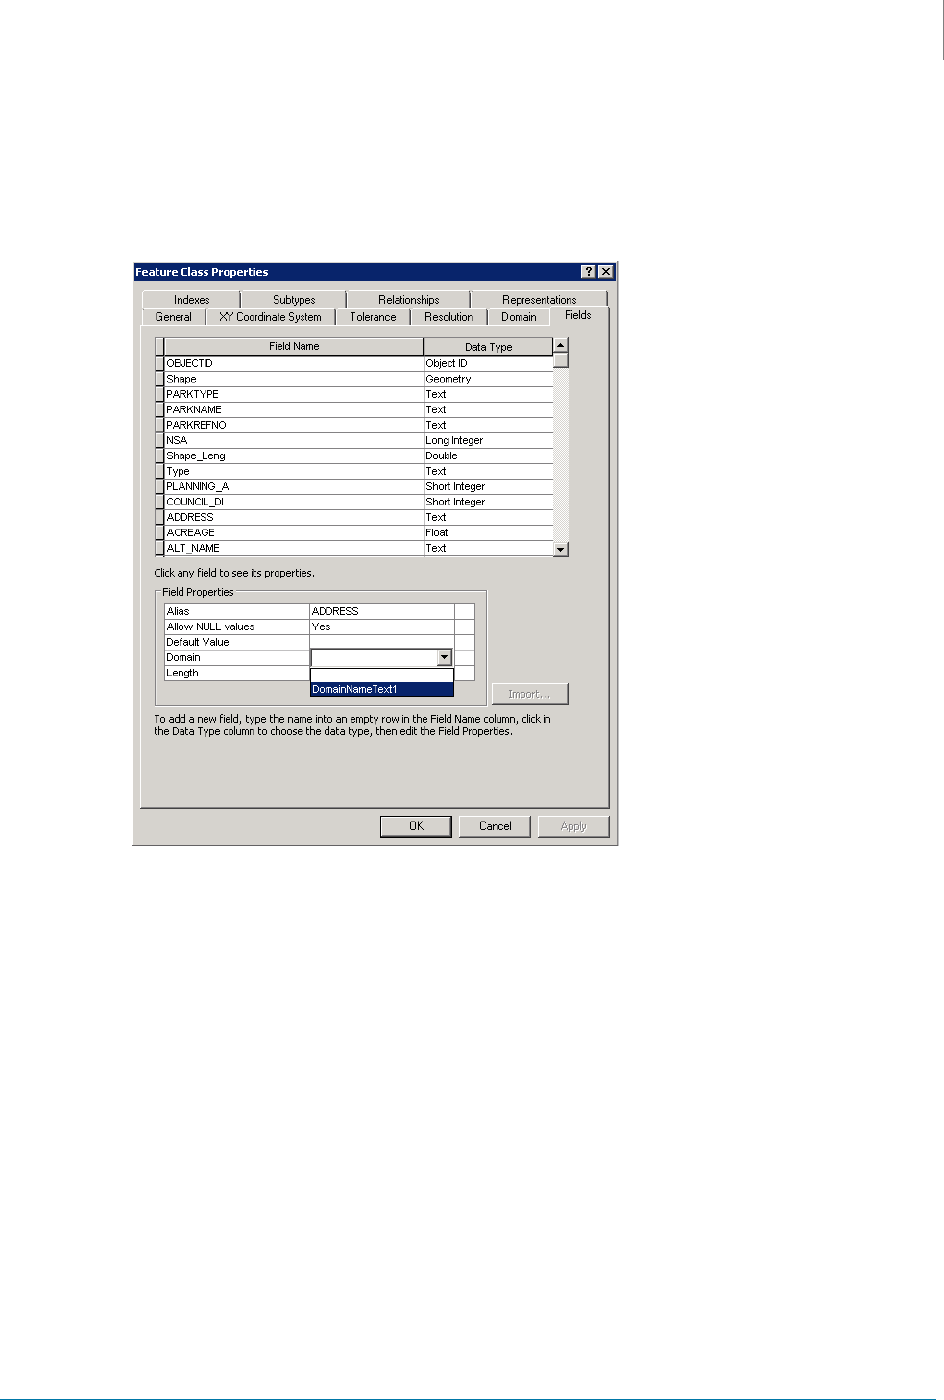
ArcMap displays the Feature Class Properties dialog box.
2.
Click the Fields tab.
3.
In the Field Name column, click the field that you want to modify.
ArcMap displays the properties of the field in the Field Properties area.
4.
In the Field Properties area, click the Domain field.
ArcMap displays a drop-down list with all the attribute domains defined for the
geodatabase.
5.
Select an attribute domain and then click the Apply button.
ArcMap applies the attribute domain to the selected field. Accela Silverlight GIS then
displays the attribute fields accordingly when users create or edit a GIS feature. If a coded
value domain is applied to the attribute field, the attribute field displays a drop-down list of
valid attribute values in Accela Silverlight GIS. If a range domain is applied to the attribute
field, Accela users can enter a numeric attribute value only within the specified range.

57
CHAPTER 9:
ARCGIS ONLINE WEB MAP
CONFIGURATION
This chapter is a quick guide for configuring and publishing an ArcGIS Online Web Map service.
It assumes the audience has knowledge about using ArcGIS Online and its components. For
complete details about configuring ArcGIS Online, see Esri’s ArcGIS Online Administration
Help.
Topics
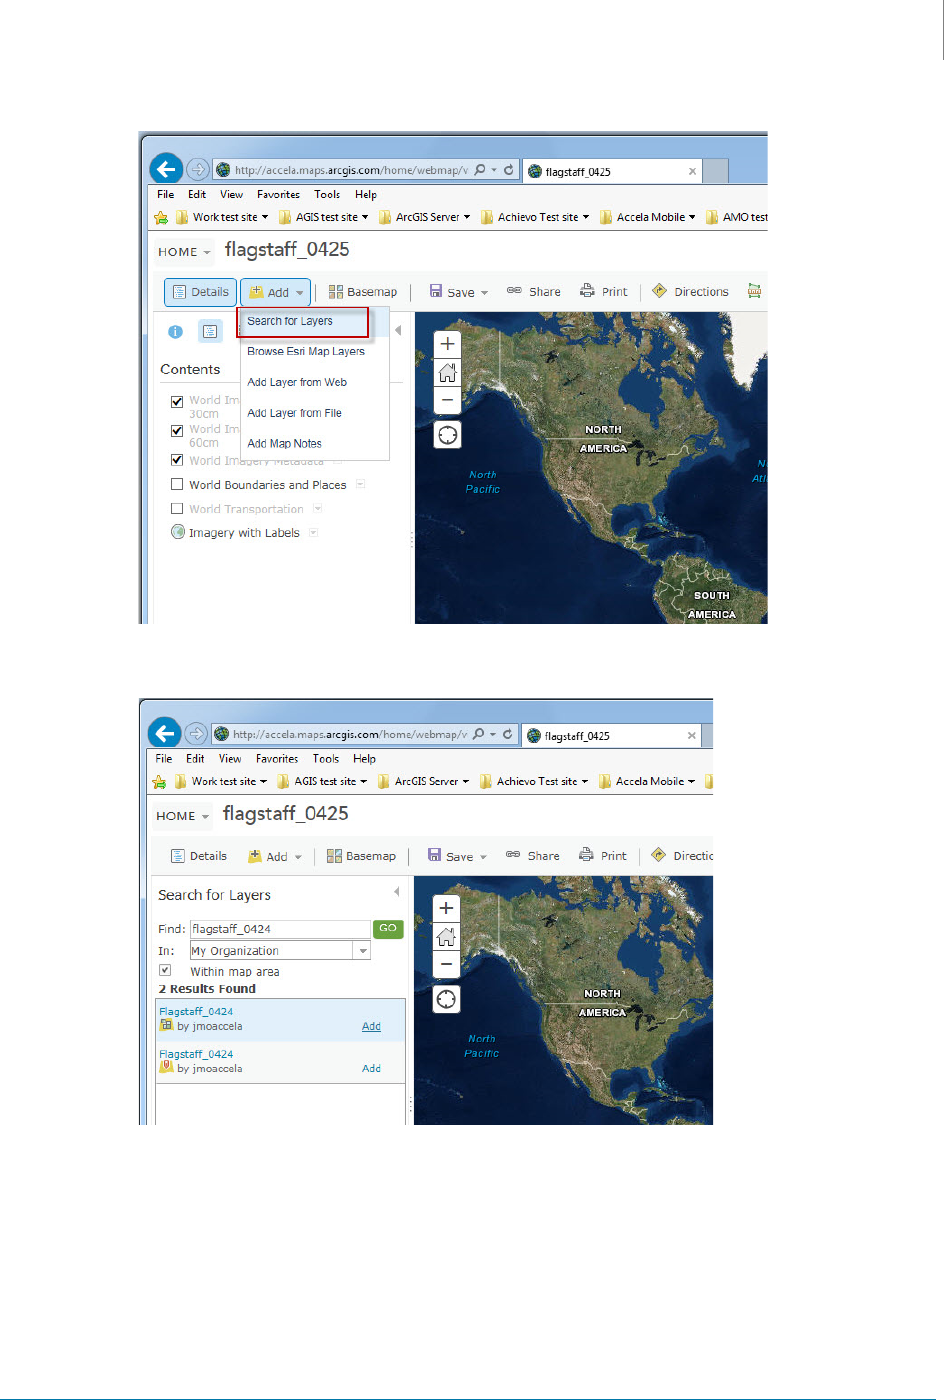
Configuring and publishing a map in ArcMap
Creating a web map in ArcGIS Online
Configuring the map service in Accela GIS
Configuring and publishing a map in ArcMap
To configure and publish an ArcGIS Online Web Map service:
1.
Open ArcMap, and configure your agency’s MXD file.
2.
Sign in ArcGIS Online, and enter your ArcGIS Online username and password.
3.
Click File > Share As > Service.
4.
On the Share as Service window, choose Publish a service, and click Next.
5.
On the Publish a Service window, choose My Hosted Services, and enter a name for
your map service.
Accela GIS for ArcGIS Configuration Guide
9: ArcGIS Online Web Map Configuration
58
6.
On the Service Editor window, select the Tiled Mapping and Feature Access capabilities.
For details about the service configuration parameters, see “Define and publish a map in
ArcMap” in Esri’s ArcGIS Online documentation.

Accela GIS for ArcGIS Configuration Guide
9: ArcGIS Online Web Map Configuration
64
Configuring the map service in Accela GIS
To enable Civic Platform map users to view the ArcGIS Online map in Accela GIS, configure the
map in Accela GIS Administration.
1.
Log in the Accela GIS Administration site.
2.
Navigate to agency’s home page.
3.
If you do not yet have a map profile, add a map profile.
4.
On the map profile, define the map service, specifying Esri ArcGIS Online as the map
service provider.
5.
Retrieve the map service, and configure the map layers.
For details about configuring an ArcGIs Online Web Map in Accela GIS Administration, see
“Configuring Map Services” in Civic Platform GIS Administration Guide > Configuring Accela
GIS. (For the Silverlight GIS version, see “Setting up a Map Service Connection” in Civic
Platform GIS Administrator Guide > Configuring Accela Silverlight GIS.)
