Acrobat Application Security Guide
User Manual:
Open the PDF directly: View PDF ![]() .
.
Page Count: 98

Acrobat® Family of Products
Acrobat
Application Security Guide
(all versions)
© 2012 Adobe Systems Incorporated. All rights reserved.
Adobe Application Security Guide for the Adobe® Acrobat Family of Products.
If this guide is distributed with software that includes an end user agreement, this guide, as well as the software
described in it, is furnished under license and may be used or copied only in accordance with the terms of such license.
Except as permitted by any such license, no part of this guide may be reproduced, stored in a retrieval system, or
transmitted, in any form or by any means, electronic, mechanical, recording, or otherwise, without the prior written
permission of Adobe Systems Incorporated. Please note that the content in this guide is protected under copyright law
even if it is not distributed with software that includes an end user license agreement.
The content of this guide is furnished for informational use only, is subject to change without notice, and should not be
construed as a commitment by Adobe Systems Incorporated. Adobe Systems Incorporated assumes no responsibility or
liability for any errors or inaccuracies that may appear in the informational content contained in this guide.
Please remember that existing artwork or images that you may want to include in your project may be protected under
copyright law. The unauthorized incorporation of such material into your new work could be a violation of the rights of
the copyright owner. Please be sure to obtain any permission required from the copyright owner.
Any references to company names in sample templates are for demonstration purposes only and are not intended to
refer to any actual organization.
Adobe, Acrobat®, Reader®, and the Adobe logo are either registered trademarks or trademarks of Adobe Systems
Incorporated in the United States and/or other countries.
Windows®, Windows 7®, and Windows XP® are registered trademarks of Microsoft® Corporation registered in the United
States and/or other countries. Mac® and Macintosh® are registered trademarks of Apple Computer®, Inc. in the United
States and other countries. All other trademarks are the property of their respective owners.
Adobe Systems Incorporated, 345 Park Avenue, San Jose, California 95110, USA. Notice to U.S. Government End Users.
The Software and Documentation are “Commercial Items,” as that term is defined at 48 C.F.R. §2.101, consisting of
“Commercial Computer Software” and “Commercial Computer Software Documentation,” as such terms are used in 48
C.F.R. §12.212 or 48 C.F.R. §227.7202, as applicable. Consistent with 48 C.F.R. §12.212 or 48 C.F.R. §§227.7202-1 through
227.7202-4, as applicable, the Commercial Computer Software and Commercial Computer Software Documentation are
being licensed to U.S. Government end users (a) only as Commercial Items and (b) with only those rights as are granted to
all other end users pursuant to the terms and conditions herein. Unpublished-rights reserved under the copyright laws of
the United States. Adobe Systems Incorporated, 345 Park Avenue, San Jose, CA 95110-2704, USA. For U.S. Government
End Users, Adobe agrees to comply with all applicable equal opportunity laws including, if appropriate, the provisions of
Executive Order 11246, as amended, Section 402 of the Vietnam Era Veterans Readjustment Assistance Act of 1974 (38
USC 4212), and Section 503 of the Rehabilitation Act of 1973, as amended, and the regulations at 41 CFR Parts 60-1
through 60-60, 60-250, and 60-741. The affirmative action clause and regulations contained in the preceding sentence
shall be incorporated by reference.
Contents
1 Application Security Overview 1
2 Protected View 3
2.1€€€Overview 3
2.2€€€Configuration 5
2.2.2€€€Trust overrides 5
2.3€€€Unsupported configurations 7
2.4€€€FAQs 8
3 Protected Mode 10
3.1€€€Overview 10
3.2€€€Changes across releases 11
3.3€€€Configuration 11
3.3.2€€€Trust overrides 12
3.4€€€Read policy changes for 11.0 14
3.4.2€€€User experience 15
3.5€€€Unsupported configurations 16
3.6€€€FAQs 17
4 Enhanced Security 21
4.1€€€Feature interaction 21
4.2€€€Changes across releases 21
4.3€€€Configuration 22
4.4€€€Trust overrides 26
4.4.1€€€Privileged locations 26
4.4.2€€€Internet Access 26
4.5€€€User experience 27
4.6€€€Examples 30
4.7€€€Troubleshooting and FAQs 31
5 JavaScript Controls 32
5.1€€€Permissions basics 32
5.2€€€Workflow diagrams 32
5.3€€€Changes across releases 32
5.4€€€Disabling JavaScript 33
5.5€€€Blacklisting JS APIs 34
5.5.3€€€Trusted override 35
5.6€€€Disabling menu-invoked JS 38
5.7€€€Disabling global object access 39
5.8€€€High privileged JavaScript 39
5.9€€€Certified document trust 41
5.10€€€JavaScript invoked URLs 41
5.11€€€JavaScript injection 41
5.12€€€Workflow changes by version 42
5.12.3.2€€€Overview 44
6 Attachments 46
6.1€€€Black lists and white lists 46
6.2€€€Configuration 46
6.3€€€Blacklisted extensions 49
7 Cross Domain Configuration 52
7.1€€€Cross domain basics 52
7.1.6€€€User experience 56
7.2€€€Policy file configuration 57
7.3€€€Certificate-based permissions 61
7.4€€€Server configuration 64
7.5€€€Calling policies via JavaScript 68
7.6€€€Troubleshooting 68
8 External Content Access 77
8.1€€€Internet access 77
8.1.1€€€Changes across releases 77
8.1.2€€€Configuration 77
8.2€€€Multimedia (legacy) 79
8.3€€€XObjects 83
8.4€€€3D content (9.5.1 and later) 84
8.5€€€Flash integration 84
9 Trust Methods 86
9.1€€€Privileged locations 86
9.1.1€€€Changes across releases 86
9.2€€€Internet access 90
9.3€€€Certified document trust 90
9.4€€€Per-certificate trust 91
9.5€€€Cross domain trust 92
9.6€€€XObject (stream) access 92
10 Content security 94

1 Application Security Overview
This Application Security Guide describes configuration details for the Acrobat family of products,
including sandboxing (Protected View and Protected Mode), enhanced security, scripting controls,
attachments, and other features. The primary goal here is to encourage enterprise stakeholders who
configure and deploy clients to manage them in a secure way. This content is designed for IT
administrators, workflow owners, and technically savvy users who need to customize their application's
security capabilities.
Adobe provides a security model designed to help you protect your environment from security attacks.
You should explore the options for tuning applications for the desired security level. The big picture is
relatively simple: Acrobat products allow you to apply application-wide protections and disable risky
features while at the same time allowing you to selectively assign trust to files, folders, hosts, protocols,
apis, and other workflow components.
Note
The easiest way to propagate settings across your organization is to configure an installed application
and then use the Customization Wizard's registry feature to copy the settings to the application
installer.
Best practice checklist
Protect your systems and users
1. Enable Protected Mode.
2. Enable Protected View.
3. Enable Enhanced Security.
4. Review the JavaScript controls and set as needed.
5. Review the attachment white and black lists.
6. Review multimedia restrictions.
7. Review settings for XObjects, 3D content, and Flash.
Assign trust to workflow components
1. Set up privileged locations for files, folders, and hosts.
2. Use Trust Manager to configure internet access if you need more control than that offered by
Privileged Locations.
3. Set up cross domain access if you need it.
4. For digital signature workflows, set certificate trust and control user interaction with signed PDFs via
certificates, seed values, etc.
Many HKCU settings have an HKLM mirror so that IT can disable, lock, and control permissions in a way
that prevents end user changes.
Additional resources
Core Documentation
Resource Description
Application Security Guide Section 1€€€Application Security Overview
Section 1€€€Application Security Overview Page 1
Preference Reference A dictionary of plist and registry configuration preferences.
Enhanced Security Quick Key A one page guide to enhanced security configuration.
JavaScript Quick Key A one page guide to JavaScript execution workflows and configuration.
IT-centric videos A series of configuration and deployment videos for enterprise IT.
Specs, Tools, Whitepapers
Resource Description
JavaScript Blacklist Tool This LABs utility allows IT to modify the JS API blacklist for any Acrobat product.
Flash Security in Acrobat Describes the security model when Flash runs inside a PDF document.
Cross Domain Policy File Specification A specification and guide for creating server-based cross domain policy files with examples.
News
Resource Description
Security Bulletins & Advisories Keep abreast of the latest updates which mitigate security issues.
Security Notification Service Receive alerts about vulnerabilities and updates.
Incident Response Team Blog Get news and pre-notification of updates about all Adobe products.
Secure Software Eng. Team Blog Track news and events from Adobe and the security software industry.
Section 1€€€Application Security Overview Application Security Guide
Page 2 Section 1€€€Application Security Overview
2 Protected View
On Windows, Acrobat 10.1 introduced a sandbox called Protected View (PV). With 11.0, the feature is
improved and extended to Reader. PV is a highly secure, read-only mode that blocks most actions and
application behavior until the user decides whether or not to trust the document.
Note
In Reader, Protected View is only supported when Protected Mode is enabled. There can by no HKCU
or HKLM Protected Mode registry preference set to 0 (off) when Protected View is enabled.
PV is another defense-in-depth feature that is tightly integrated with the existing enhanced security
feature. PV in Acrobat leverages the successful sandbox implementation already in place for Adobe
Reader while providing a user experience that should be familiar to Microsoft Office 2010 users.
Protected View
2.1 Overview
Under the covers, the PV sandbox is similar to Reader's Protected Mode sandbox, but is built on a
stronger model which provides greater protections. Just like Reader, Acrobat strictly confines the
execution environment of untrusted programs; that is, any PDF and the processes it invokes. When PV is
enabled, Acrobat assumes some or all PDFs are potentially malicious based on user preferences and
confines processing to a restricted sandbox.
Due to the rich nature of Acrobat's capabilities, Acrobat's behavior with PV enabled is slightly more
complex than Reader's. The Acrobat team has specifically tailored application behavior for two types of
scenarios: viewing PDFs with the standalone application and viewing PDFs with a browser. The rationale
behind providing two protection experiences was driven by a need to preserve usability as well as the right
level of functionality and security in each mode.
2.1.1 PV in a standalone product
Application Security Guide Section 2€€€Protected View
Section 2€€€Protected View Page 3
Note
With 11.x, PV behaviors in the standalone product and the browser are identical.
In the standalone application, behavior is simple and parallels the Protected View provided by Office
2010. During a file download and/or save, web browsers and email programs typically mark documents
such as Internet files and attachments with a "potentially unsafe" flag. When you open such a document,
Acrobat displays a warning bar at the top of the viewing window. In this state, many of Acrobat's features
that interact with and change the document are disabled and the associated menu items are greyed out in
order to limit user interaction.
The view is essentially read-only, and the disabled features prevent any embedded or tag-along malicious
content from tampering with your system. Once you've decided to trust the document, choosing Enable
All Features exits PV, re-enables all menu items, and provides permanent trust for the file by adding to
enhanced security's list of privileged locations (see Integration with enhanced security. The document is
now open in a full, unsandboxed Acrobat process.
Protected View: Yellow message bar
2.1.2 PV in a browser
When a PDF is opened in a browser, Protected View provides a streamlined experience that doesn't
utilize a warning bar. Instead, browser-based PDFs provide a Reader-like experience for documents that
have been "rights enabled." That is, all of Reader's features are available in addition to features that
become enabled when a document author uses Acrobat to extend features to Reader users. These
features include signing existing form fields, adding new signature fields, saving form data, etc.
In this respect, a PDF in the browser's Protected View is more capable than a PDF in the standalone
Protected View. On the other hand, the browser-based capabilities are always limited while the
standalone application enables users to achieve full functionality with a single click of a button.
Protected View 10.x: standalone vs browser functionality
Feature Standalone Browser
Drag-drop PDFs to the reading or navigation
pane
No Yes
Printing No Yes
Advanced Printing No No
Saving No Yes
Pan and Zoom No No
Loupe Tool No No
Reading mode No Yes
Full screen mode No Yes
Protected View 11.x: standalone vs browser functionality
Feature Standalone Browser
Drag-drop PDFs to the reading or navigation
pane
No No
Section 2€€€Protected View Application Security Guide
Page 4 Section 2€€€Protected View
Printing No No
Advanced Printing No No
Saving No No
Pan and Zoom No No
Loupe Tool No No
Reading mode No Yes
Full screen mode No No
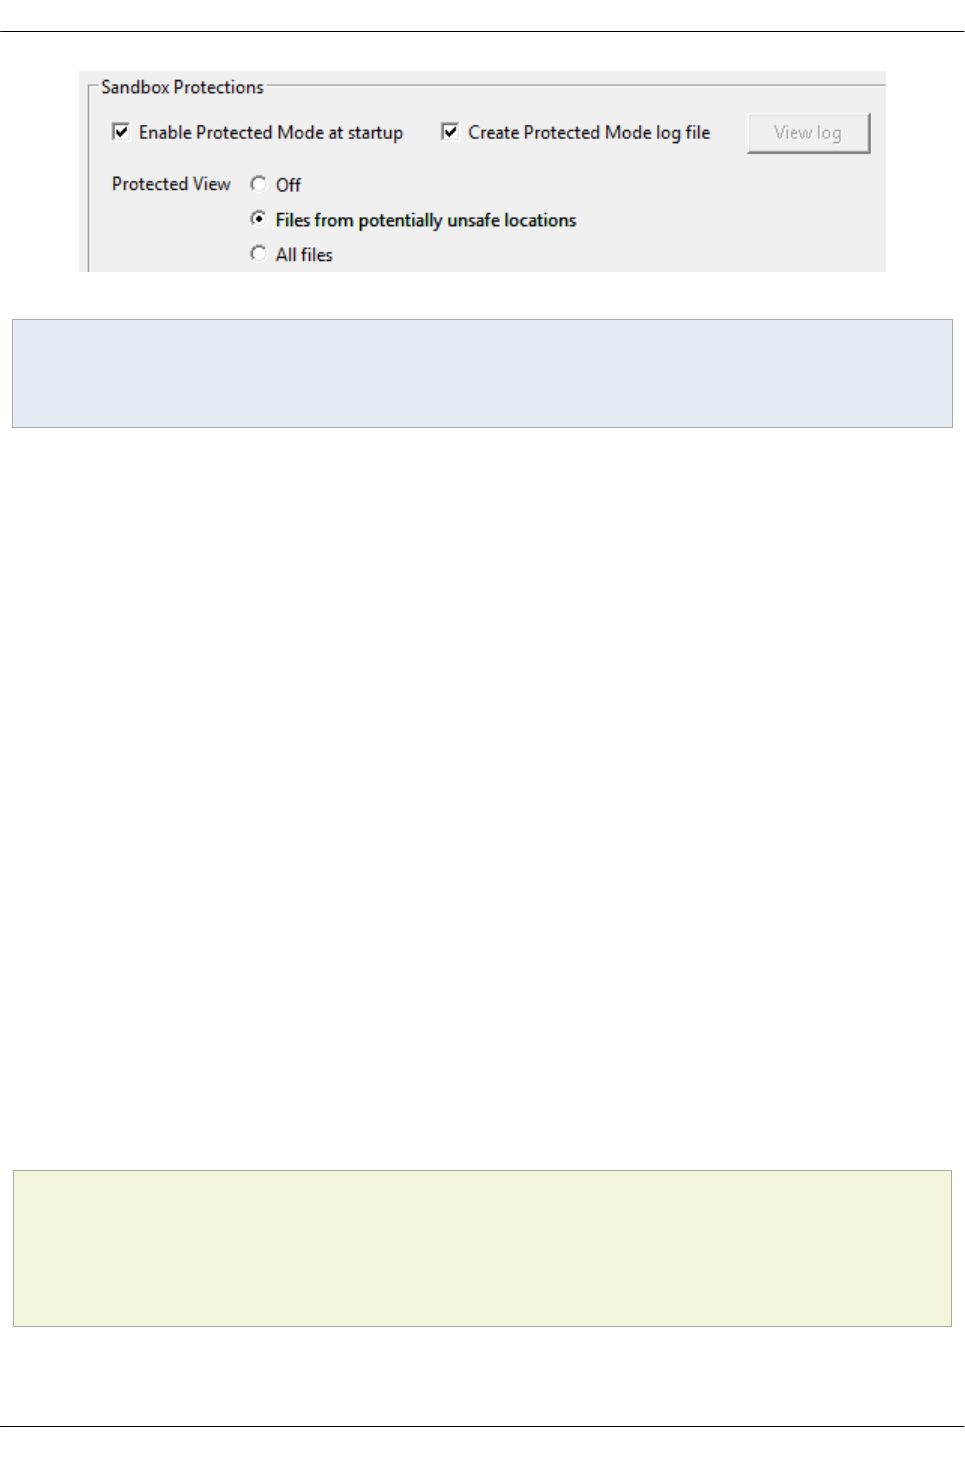
2.2 Configuration
2.2.1 UI and registry config
Protected View can be enabled, disabled, and configured in other ways to provide the level of security you
need. That is, you decide when and how to use Protected View based on your level of trust for the PDFs
you interact with.
1. Go to Preferences > Security (Enhanced).
2. In the Protected View panel, select one of the following to set iProtectedView:
Registry configuration enables pre and post deployment configuration via the Customization Wizard,
scripts, GPO, and other IT-centric methodologies. The application often uses internal keys that aren't
visible by default. If the requisite key does not exist, manually create it.
2.2.2 Trust overrides
There are several ways to assign trust so that this feature works in a trusted context:
• Users can trust documents on-the-fly when the PDF opens: When the Yellow Message Bar appears,
choose the Options button and then trust the document once or always.
• Create a privileged location via the UI for the file, folder, or host.
• Create a privileged location via the registry/plist by placing a tID at:
• Choose Trust sites from my Win OS security zones. Trust is assigned when PV is set to
Potentially Unsafe locations. When set to All Files, then OS trusted sites does allow PDFs to open
outside of PV.
[HKCU\Software\Adobe\<product name>\<version>\TrustManager\<cTrustedSites or TrustedFolders>\]
"(All of the cabs are populated)"
2.2.3 Locking Protected View
Protected View can be locked so that the end user cannot change the setting. When locked, the user
interface is disabled (greyed out). To do so, simply set the HKLM key as you would HKCU:
Application Security Guide Section 2€€€Protected View
Section 2€€€Protected View Page 5

[HKEY_LOCAL_MACHINE\SOFTWARE\Policies\Adobe\<product name>\<version>\FeatureLockDown]
"iProtectedView"
2.2.4 Enabling logging
Logging is available for users who need to troubleshoot problems where a workflow or plugin does not
work when Protected Mode is enabled. The log may provide guidance as to whether a custom policy file
should be used to re-enable broken workflows or plugins.
In addition to enabling logging via the UI (above), you can turn on logging and configure a log file location
via the registry.
To enable logging, specify a log file location:
1. Go to HKEY_CURRENT_USER\Software\Adobe\Adobe Acrobat\(version)\Privileged.
2. Right click and choose New > REG_SZ Value.
3. Create tBrokerLogfilePath.
4. Right click on tBrokerLogfilePath and choose Modify.
5. Set the value. For example: C:\DOCUME~1\<username>\LOCALS~1\Temp\BrL4FBA.tmp
Policy logging for a policy violation:
[08:12/13:46:16] real_path: \BaseNamedObjects\ZonesCacheCounterMutex
[08:12/13:46:16] Consider modifying policy using this policy rule: MUTANT_ALLOW_ANY
[08:12/13:46:16] NtCreateMutant: STATUS_ACCESS_DENIED
[08:12/13:46:16] real_path: \BaseNamedObjects\ZonesLockedCacheCounterMutex
[08:12/13:46:16] Consider modifying policy using this policy rule: MUTANT_ALLOW_ANY
[08:12/13:46:16] NtCreateKey: STATUS_ACCESS_DENIED
[08:12/13:46:16] real path: \REGISTRY\USER\S-1-5-21-762979615-2031575299-929701000-51250\Software\Microsoft\Windows NT\CurrentVersion\Winlogon
[08:12/13:46:16] Consider modifying policy using this policy rule: REG_ALLOW_ANY
[08:12/13:46:16] NtCreateKey: STATUS_ACCESS_DENIED
[08:12/13:46:16] real path: \REGISTRY\USER\S-1-5-21-762979615-2031575299-929701000-51250\Software\Microsoft\Windows NT\CurrentVersion\Winlogon
[08:12/13:46:16] Consider modifying policy using this policy rule: REG_ALLOW_ANY
2.2.5 Policy configuration
Protected view prevents a number of actions which IT can bypass by creating a white list of allowed
actions. The component that reads these policies is called a "broker." The broker performs actions based
on those policies, and when an admin provides a properly configured policy file, the broker can bypass the
application's default restrictions.
The broker first reads and applies all custom policies prior to applying the default policies. Since custom
policies take precedence, they are useful for fixing broken workflows, supporting third party plug-ins, and
cases where an unsupported machine configurations cause the Protected Mode to impair required
functionality.
Configurable policies have two requirements:
• They must reside in the Reader install directory adjacent to the AcroRd32.exe in the install folder:
D:\Program Files (x86)\Adobe\Acrobat (version)\Acrobat\
• The name of the policy file must be ProtectedModeWhitelistConfig.txt.
2.2.5.1 Enabling custom policies
To allow the application to read and use a policy file, registry configuration is required. To enable policy
files:
1. Go to
HKEY_LOCAL_MACHINE\SOFTWARE\Policies\Adobe\Adobe Acrobat\10.0\FeatureLockDown.
Section 2€€€Protected View Application Security Guide
Page 6 Section 2€€€Protected View
2. Right click and choose New > DWORD Value.
3. Create bUseWhitelistConfigFile.
4. Right click on bUseWhitelistConfigFile and choose Modify.
5. Set the value to 1 to enable the white list.
2.2.6 Verifying PV is on
While you can verify whether the application has Protected View enabled by viewing the Enhanced
Security panel, it is also possible to verify the document you are currently viewing is subject to Protected
View's protections.
Note
When using the standalone application, verification should be obvious since a document that opens in
Protected View displays the Yellow Message Bar.
To verify if the browser-based document you are viewing is opened in Protected View:
1. Open a PDF in a browser.
2. Right click on the document.
3. Choose Document Properties > Advanced tab. When Protected Mode or View is invoked, the
status will be Protected Mode: On.
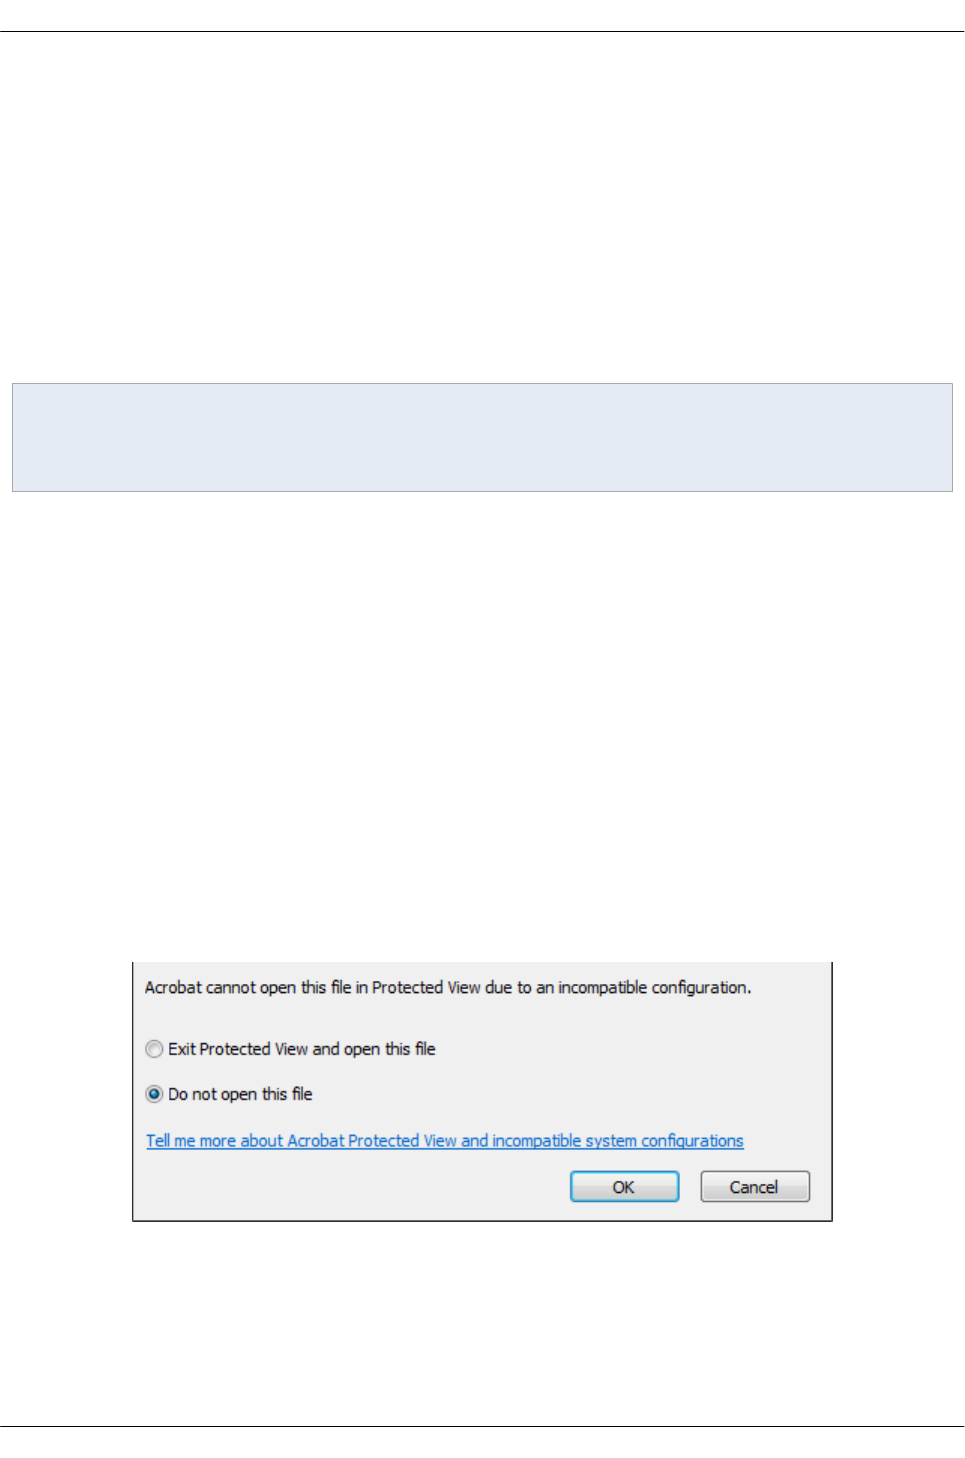
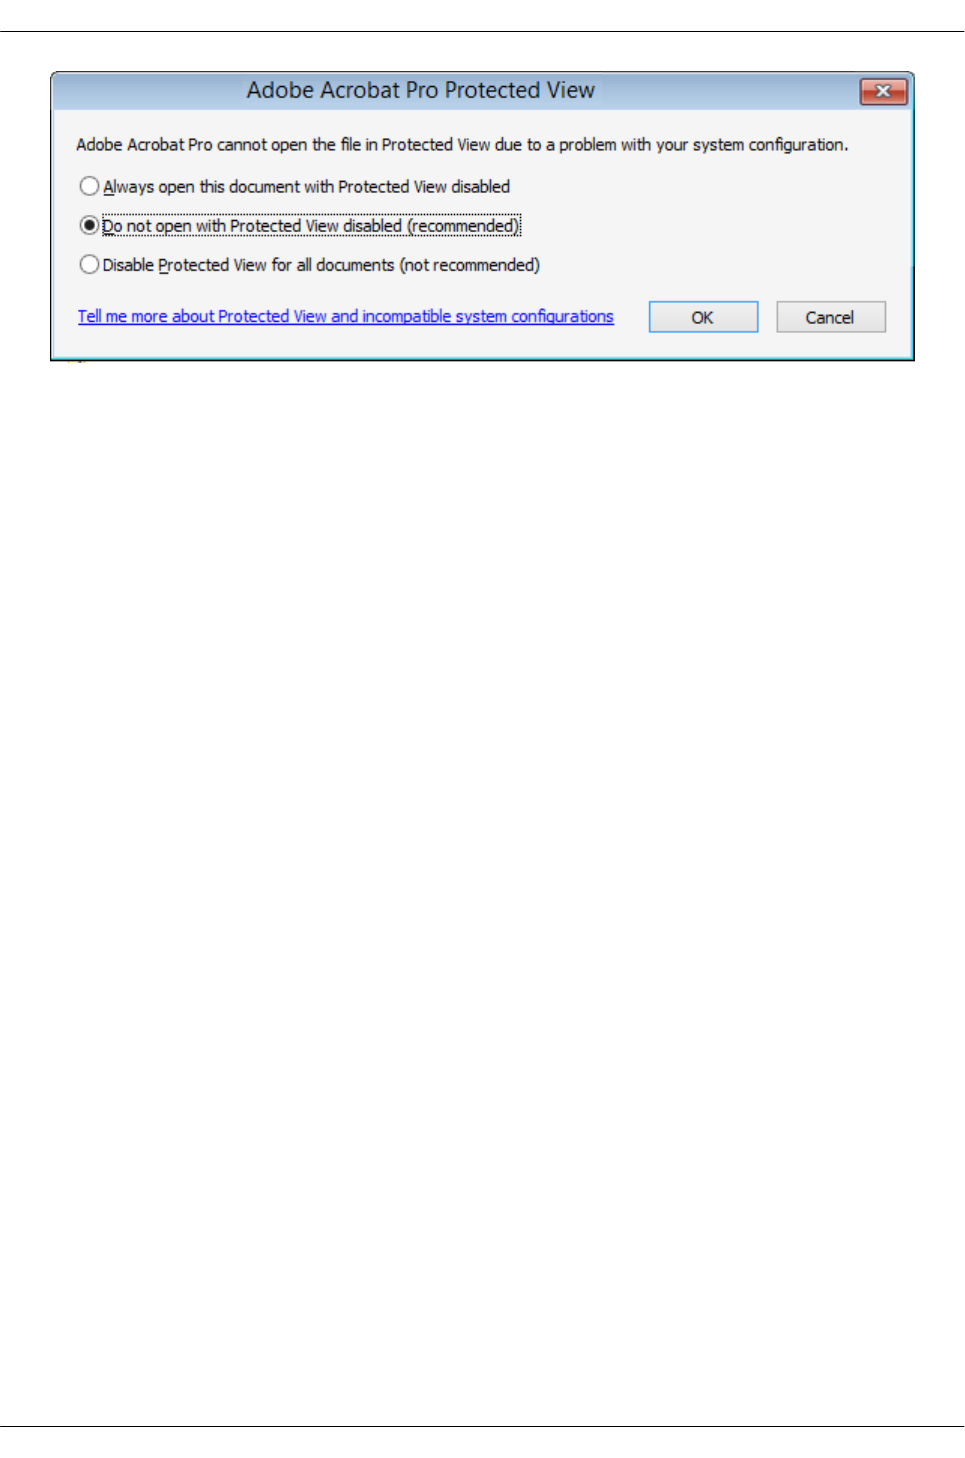
2.3 Unsupported configurations
When Protected View cannot launch due to an unsupported configuration, a dialog alerts the user of the
incompatibility and provides the user with the option to disable Protected View.
Unsupported configurations for Acrobat running in Protected View change across releases as the product
evolves. For example, Protected Mode supports Citrix and Windows Terminal Services deployments with
10.1. For a list of unsupported configurations and workarounds, see
http://kb2.adobe.com/cps/860/cpsid_86063.html.
Unsupported configuration dialog for 10.x
Unsupported configuration dialog for 11.x
Application Security Guide Section 2€€€Protected View
Section 2€€€Protected View Page 7
2.4 FAQs
Design principles
Some of the high-level design criteria for Protected View include the following:
•PDFs in a browser are more functional than PDFs in a Reader's sandbox: For PV in a browser,
the UI provides access to all of the features provided by Reader as well as the features that are
available for any rights enabled document when viewed in Reader.
•As secure as sandboxed Reader: Acrobat leverages the same technology and implementation as
Reader and is just as secure.
•Transitioning out of PV should be simple: In PV, exiting the read-only mode is as simple as
choosing Enable All Features.
•Disabled features should not be hidden: If a feature is not enabled in the sandbox, the UI still
displays the disabled feature in the menu as a greyed out item.
•Trust can be assigned to documents so that they bypass PV restrictions: Because of its
integration with enhanced security, users can specify files, folders, and hosts as privileged locations
that are not subject to PV trust restrictions. PDFs originating from a privileged location will not open
in PV.
System requirements?
Due to the fundamental differences in OS and product implementations, sandbox designs must be tailored
to each environment. The current release includes support for the following:
• Adobe Acrobat 10.1 or later.
• Windows 32 and 64 bit platforms, including XP SP3. Adobe's initial efforts focus on hardening its
Windows products because there are more Windows users and Windows applications with proven
sandboxing implementations.
• Any supported browser. PDFs opened in a browser run inside Acrobat's sandboxed process. For IE,
Acrobat uses IE's trust zone settings.
When should Protected View be enabled or disabled?
Protected View should be enabled all the time for casual users who interact with PDFs in unsecure
environments. There are a limited number of cases where you might want to disable Protected View:
• In enterprise settings where PDF workflows are entirely confined to trusted environments under an
administrator's control.
• If you have third-party or custom plugins that cause issues when running in Protected View. For
example, some workflows that use ActiveX plugins may not work by default.
Section 2€€€Protected View Application Security Guide
Page 8 Section 2€€€Protected View
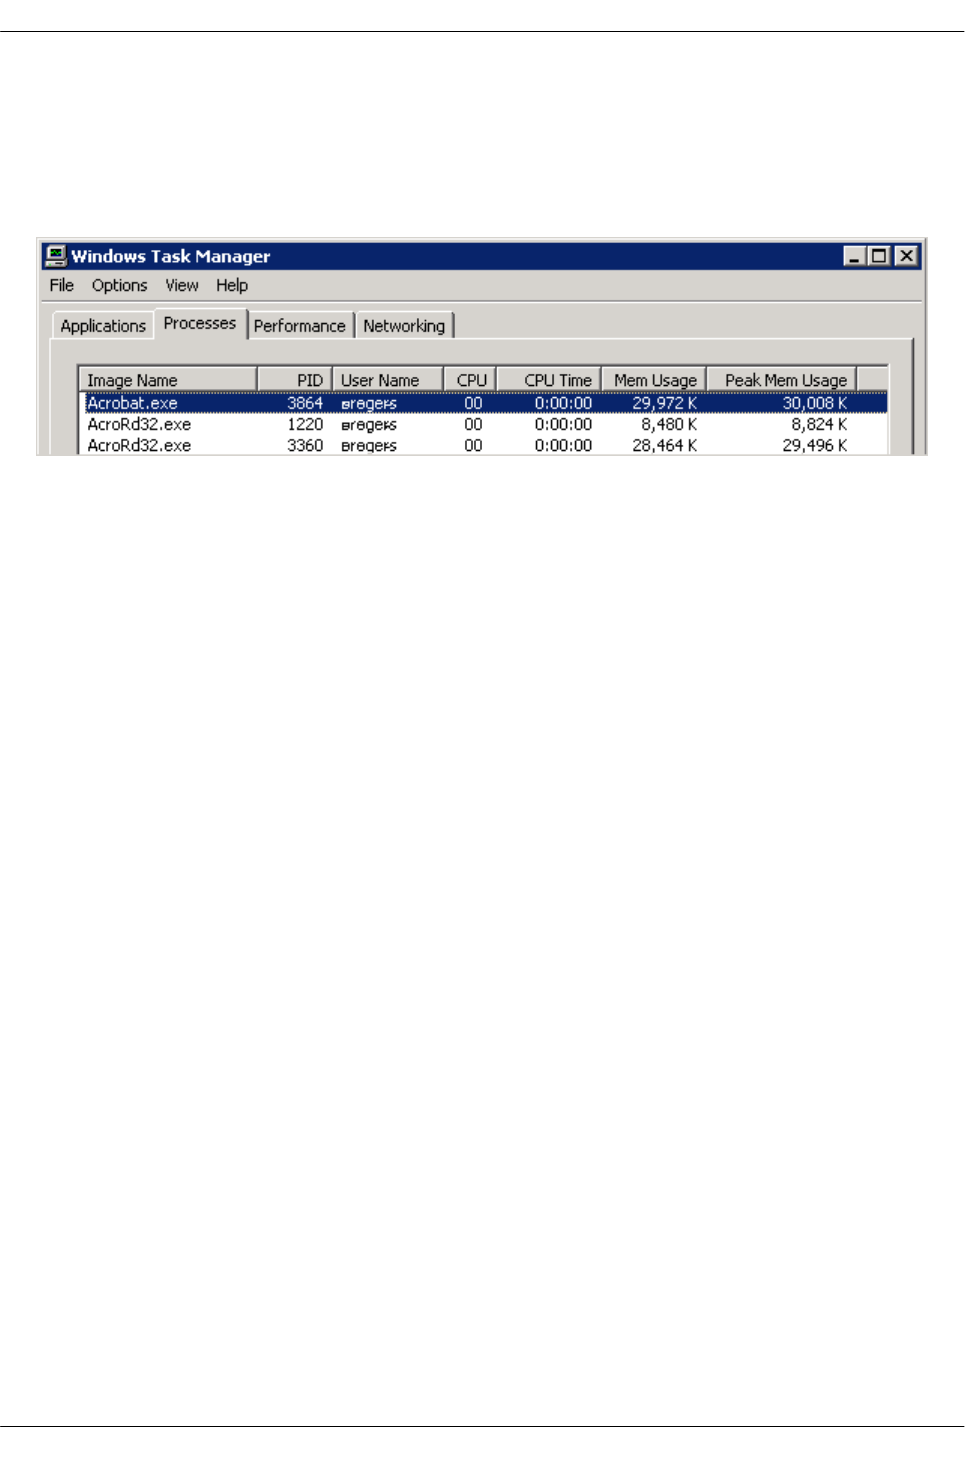
How many processes should be running when I use Protected View?
Open the process explorer or task manager. When in Protected View, two AcroRd32.exe processes will
be running alongside the Acrobat.exe process. More processes will appear based on how many browser
instances you have viewing a PDF, invoked shell extensions, and iFilter.
Protected View: processes
Application Security Guide Section 2€€€Protected View
Section 2€€€Protected View Page 9

3 Protected Mode
Protected Mode (PM) was introduced with Reader 10.0 on Windows. It transparently protects users
against attacks by sandoxing application processes. Protected Mode is one of the most powerful features
in Reader's security arsenal. Note that many dot releases have NOT included a Reader update for
Windows because the application is not subject to many vulnerabilities when Protected Mode is enabled.
Note
In Reader 11.0, Protected View is only supported when Protected Mode is enabled. There can by no
HKCU or HKLM Protected Mode registry preference set to 0 (off) when Protected View is enabled.
3.1 Overview
What is a "sandbox" and Protected Mode?
For application developers, sandboxing is a technique for creating a confined execution environment for
running untrusted programs. In the context of Adobe Reader, the "untrusted program" is any PDF and the
processes it invokes. When Reader sandboxing is enabled, Reader assumes all PDFs are potentially
malicious and confines any processing they invoke to the sandbox.
Sandboxes are typically used when data (such as documents or executable code) arrives from an
untrusted source. A sandbox limits, or reduces, the level of access its applications have. For example,
creating and executing files and modifying system information such as certain registry settings and other
control panel functions may be prohibited.
If a process P runs a child process Q in a sandbox, then Q's privileges would typically be restricted to a
subset of P's. For example, if P is running on a system, then P may be able to look at all processes on the
system. Q, however, will only be able to look at processes that are in the same sandbox as Q. Barring any
vulnerabilities in the sandbox mechanism itself, the scope of potential damage caused by a misbehaving
Q is reduced.
The Reader sandbox leverages the operating system's security controls, and processes execute under a
"principle of least privileges." Thus, processes that could be subject to an attacker's control run with
limited capabilities and must perform actions such as reading and writing through a separate, trusted
process. This design has two primary effects:
• All PDF processing such as PDF and image parsing, JavaScript execution, and 3D rendering
happens in the sandbox and are subject to its limits; for example, processes cannot access other
processes.
• Processes that need to perform some action outside the sandbox boundary must do so through a
trusted proxy called a "broker process."
Sandboxing is relatively new for most enterprise applications because it is difficult to implement in mature
software (e.g. millions of lines of code) that is already deployed across an almost limitless number of
environments. A few recently shipped products that demonstrate the sandboxing proof of concept include
Microsoft Office 2007 MOICE, Google Chrome's rendering engine, and Office 2010 Protected View. The
challenge is to enable sandboxing while keeping user workflows functional and without turning off features
on which users depend. The ultimate goal is to proactively provide a high level of protection rather than
just fixing bugs and vulnerabilities as they appear.
System requirements
Due to the fundamental differences in OS and product implementations, sandbox designs must be tailored
to each environment. The current release includes support for the following:
Section 3€€€Protected Mode Application Security Guide
Page 10 Section 3€€€Protected Mode
• Adobe Reader 10.0.
• Windows 32 and 64 bit platforms, including XP. Much like Google's Chrome, Adobe's initial efforts
are focused on hardening its Windows products because there are more Windows users and
Windows applications with proven sandboxing implementations.
• Any supported browser. PDFs opened in a browser run inside the Reader sandboxed process
without any dependency on the browser or the browser's trust zones.
3.2 Changes across releases
Evolution of Protected Mode
Version Change
10.0 Protected Mode introduced in Reader.
10.x-11.0 Many changes and improvement were made for dot releases as described at
http://helpx.adobe.com/acrobat/kb/protected-mode-troubleshooting-reader.html
11.0 See Read policy changes for 11.0
3.3 Configuration
While different users will have different security needs, casual users who interact with PDFs in unsecure
environments should enable Protected Mode all the time.
There are a limited number of cases where you might want to disable Protected Mode:
• When you want to use an unsupported feature such as Accessibility on XP.
• In enterprise settings where PDF workflows are entirely confined to trusted environments under an
administrator's control.
• If you have third-party or custom plugins that cause issues when running in Protected Mode. For
example, some workflows that use ActiveX plugins may not work by default.
3.3.1 UI and registry config
1. Go to Edit > Preferences > General.
2. In the Application Startup panel, check or uncheck Enable Protected Mode at startup.
3. When the dialog appears asking if you would like to continue, choose Yes. This preference sets:
[HKEY_CURRENT_USER\Software\Adobe\Acrobat Reader\10.0\Privileged]
"bProtectedMode"=(0 = off; 1 = on)
1. Choose whether or not you would like to have a log file created.
2. Restart the application.
Protected Mode preference
Application Security Guide Section 3€€€Protected Mode
Section 3€€€Protected Mode Page 11
Note
The application uses an internal key. The actual key does not exist by default and so does not appear
until the key is manually created.
3.3.2 Trust overrides
None. PM is designed to protect users transparently and without impacting other features.
3.3.3 PM and shell extensions
While Protected Mode can be disabled for PDFs viewed with the product, Adobe continues to protect you
when 3rd party software invokes a Reader process; that is, Protected Mode sandboxing cannot be
disabled for shell extensions. For example, when you use Windows Explorer to preview a PDF in the
Preview Pane, it starts a Reader process to display the preview. In such cases, Task Manager shows that
two AcroRd32.exe processes spawn and that the operation is occurring with Protected Mode enabled.
3.3.4 Logging registry config
Logging is available for users who need to troubleshoot problems where a workflow or plugin does not
work when Protected Mode is enabled. The log may provide guidance as to whether a custom policy file
should be used to re-enable broken workflows or plugins.
In addition to enabling logging via the UI (above), you can turn on logging and configure a log file location
via the registry.
To enable logging, specify a log file location:
1. Go to HKEY_CURRENT_USER\Software\Adobe\Acrobat Reader\10.0\Privileged.
2. Right click and choose New > REG_SZ Value.
3. Create tBrokerLogfilePath.
4. Right click on tBrokerLogfilePath and choose Modify.
5. Set the value. For example: C:\DOCUME~1\<username>\LOCALS~1\Temp\BrL4FBA.tmp.
Policy logging for a policy violation:
[08:12/13:46:16] real_path: \BaseNamedObjects\ZonesCacheCounterMutex
[08:12/13:46:16] Consider modifying policy using this policy rule: MUTANT_ALLOW_ANY
[08:12/13:46:16] NtCreateMutant: STATUS_ACCESS_DENIED
[08:12/13:46:16] real_path: \BaseNamedObjects\ZonesLockedCacheCounterMutex
[08:12/13:46:16] Consider modifying policy using this policy rule: MUTANT_ALLOW_ANY
[08:12/13:46:16] NtCreateKey: STATUS_ACCESS_DENIED
[08:12/13:46:16] real path: \REGISTRY\USER\S-1-5-21-762979615-2031575299-929701000-51250\Software\Microsoft\Windows NT\CurrentVersion\Winlogon
[08:12/13:46:16] Consider modifying policy using this policy rule: REG_ALLOW_ANY
[08:12/13:46:16] NtCreateKey: STATUS_ACCESS_DENIED
[08:12/13:46:16] real path: \REGISTRY\USER\S-1-5-21-762979615-2031575299-929701000-51250\Software\Microsoft\Windows NT\CurrentVersion\Winlogon
[08:12/13:46:16] Consider modifying policy using this policy rule: REG_ALLOW_ANY
3.3.5 Locking Protected Mode
Section 3€€€Protected Mode Application Security Guide
Page 12 Section 3€€€Protected Mode

Protected Mode can be locked as enabled or disabled as follows:
1. Go to
HKEY_LOCAL_MACHINE\SOFTWARE\Policies\Adobe\<product name>\<version>\FeatureLockDown.
2. Right click and choose New > DWORD Value.
3. Create bProtectedMode.
4. Right click on the key and choose Modify.
5. Set the value as follows:
•0: Disables the feature.
•1: Enables the feature.
3.3.6 Verifying the current mode
There are two ways to verify if the application is running in Protected Mode:
• Open the process explorer or task manager. When protected mode is on, two reader processes run.
• When a file is open, choose File > Properties > Advanced tab and view the Protected Mode
status. When Protected Mode is enabled, the status will be Protected mode: On.
3.3.7 Policy configuration
Protected mode prevents a number of actions which IT can bypass by creating a white list of allowed
actions. The component that reads these policies is called a "broker." The broker performs actions based
on those policies, and when an admin provides a properly configured policy file, the broker can bypass the
application's default restrictions.
The broker first reads and applies all custom policies prior to applying the default policies. Since custom
policies take precedence, they are useful for fixing broken workflows, supporting third party plug-ins, and
cases where unsupported machine configurations cause the Protected Mode to impair required
functionality.
Configurable policies have two requirements:
• They must reside in the Reader install directory adjacent to AcroRd32.exe in the install folder. for
example: D:\Program Files (x86)\Adobe\Reader 10.0\Reader\
• The name of the policy file must be ProtectedModeWhitelistConfig.txt.
3.3.7.1 Enabling custom policies
To allow the application to read and use a policy file, registry configuration is required. To enable policy
files:
1. Go to HKEY_LOCAL_MACHINESOFTWAREPoliciesAdobeAcrobat Reader10.0FeatureLockDown.
2. Right click and choose New > DWORD Value.
3. Create bUseWhitelistConfigFile.
4. Right click on bUseWhitelistConfigFile and choose Modify.
5. Set the value to 1 to enable the white list.
3.3.7.2 Creating policies
Once you've enabled policies as described in Enabling custom policies, you can write and deploy a policy
file. A policy file is a set of policy-rules. There can be one per line, empty lines, or full-line comments that
begin with a semi-colon. Each policy rule (one on each line) has the format:
Application Security Guide Section 3€€€Protected Mode
Section 3€€€Protected Mode Page 13

POLICY_RULE_TYPE = pattern string
Pattern strings denote file names, registry locations, exe paths, etc. These strings support the following:
•*: Matches zero or more characters. Only one in series allowed. For example:
• FILES_ALLOW_ANY = c:temp
• REG_ALLOW_ANY = HKEY_CURRENT_USERSoftware(SomeProgram)
• SECTION_ALLOW_ANY = imejp
•?: Matches a single character. One or more in series are allowed.
•Environment variables: For example, %SystemRoot% could be used in:
PROCESS_ALL_EXEC = %SystemRoot%\system32\calc.exe
Adobe-provided policy rules include those shown below.
Protected mode policy rules
Policy rule Description
FILES_ALLOW_ANY Allows open or create for any kind of access that the file system supports.
FILES_ALLOW_DIR_ANY Allows open or create with directory semantics only.
REG_ALLOW_ANY Allows read and write access to a registry key.
PROCESS_ALL_EXEC Allows the creation of a process and return fill access on the returned handles.
NAMEDPIPES_ALLOW_ANY Allows creation of a named pipe.
EVENTS_ALLOW_ANY Allows the creation of an event with full access.
MUTANT_ALLOW_ANY Allows creation of a mutant with full access (MUTANT_ALL_ACCESS)
SECTION_ALLOW_ANY Allows creation/opening of a section with full access
FILES_ALLOW_READONLY
(11.0 and later)
Allows read access to a specific path.
Policy configuration file
; Files Section
FILES_ALLOW_ANY = c:\temp\*
FILES_ALLOW_ANY=%APPDATA%\Citrix\*
; Processes
PROCESS_ALL_EXEC = %SystemRoot%\system32\calc.exe
; Registry
REG_ALLOW_ANY = HKEY_CURRENT_USER\Software\(SomeProgram)
; Mutants
MUTANT_ALLOW_ANY = *imejp*
; Sections
SECTION_ALLOW_ANY = *imejp*
3.4 Read policy changes for 11.0
While Protected Mode in Reader 10.x prevented arbitrary writes to file locations in the user's profile area
such as My Documents, Pictures, Downloads folder, %AppData%, etc., it did not prevent the reading of
files. In 11.0, Reader's Protected Mode does prevent the sandbox from reading arbitrary files in these
Section 3€€€Protected Mode Application Security Guide
Page 14 Section 3€€€Protected Mode

locations. This enhancement makes it harder for malicious PDFs to steal user's confidential information.
3.4.1 Read policy overview
In Reader 11 Protected Mode, the sandboxed AcroRd32.exe process only has read access to those files
and folders under the %USERPROFILE% for the following:
1. The correct functioning of Adobe Reader itself; for example %appdata%\Adobe\Acrobat\11.0\*.
2. PDFs explicitly opened by the user via the File Open dialog or double-clicking.
While %USERPROFILE% is protected, the actual implementation is not based on folder names but rather
on the ACL (access control entry) of the folders. Any folder or file that grants Everyone or
BUILTIN\Users groups read access is not protected with read-restrictions. Other folders such as the
per-user profile folder that don't grant such an access are protected. Note that many user-account
protected network shares don't grant access to everyone. So, again, those would be protected.
3.4.2 User experience
There is no UI to turn read-restrictions on or off: this feature is an enhancement to the existing Protected
Mode feature and is always enabled as part of it.
Read-warning dialogs
Like Protected Mode generally, the new behavior should be transparent to users except for new
confirmation dialogs that may now appear under certain scenarios. A few confirmation dialogs are
necessary for workflows that required Reader in Protected Mode to read arbitrary files. These files include
files that were neither explicitly opened by the user nor required by Reader to store its preferences and so
weren't white-listed for access. In such cases, the broker is forced to check with the user before granting
the Protected Mode sandbox read access to those files. As the feature evolves in the course of A11
development, it is expected that users will rarely encounter situations where they will see these dialogs.
A confirmation dialog is shown for the following cases:
• When the user clicks a link in a PDF that points to another PDF on the user's disk ("interdoc PDF
link"). Note that this is not applicable for internet links (where a different dialog is already shown),
but only to links to PDFs on the local disk.
• When the PDF has a multimedia annotation references a media file kept at a read-restricted location
on the user's disk or a network share.
• When a PDF tries to access data from an FDF file kept at a read-restricted location on the user's
disk or a network share.
• When an FDF or XFDF is opened and it tries to reference a PDF file kept at a read-restricted
location on the user's disk or a network share.
• When the user tries to open a review from the review tracker.
Note that these are restricted to access to the user's disk or network share, not an HTTP(S) URL. So
these dialogs almost never appear in the browser. For example, in a browser situation, an FDF or PDF in
cases 3 or 4 above will be on a HTTP(S) server, and so will not be impacted. Also, most "interdoc PDF
links" in the web will be to PDF on the web, not the user's machine or network share.
Search-warning dialogs
Finally, it is impossible to securely support the index search and Reader's desktop search features via
Edit > Advanced Search > Show more options with read-restrictions enabled. So if the user tries to
use any of the following features, a warning is thrown: "The operation you are trying to perform potentially
requires read access to your drives. Do you want to allow this operation?".
If the user allows the operation, read-restrictions are temporarily disabled while that Reader process is
running. In this case, Protected Mode is ON, but it will temporarily grant the sandbox read access to all of
Application Security Guide Section 3€€€Protected Mode
Section 3€€€Protected Mode Page 15

the user's files. Once the user restarts the Reader process, Protected Mode read-restrictions will again be
in place. The idea is that rather than having the user turn Protected Mode completely off to use these
index-search or desktop-search features, it is better to turn off just read-restrictions temporarily.
The dialog appears in the following scenarios:
1. When the user tries to open an index (PDX) file.
2. When the user tries to search inside an already selected or shelved index, inside a folder, or in an
index linked to a PDF.
3.4.3 Policy rules
The new read policy includes the new FILES_ALLOW_READONLY rule that works just like the
FILES_ALLOW_ANY rule, but grants read-only access to a specific path. Admins can use the
FILES_ALLOW_READONLY rule of the config policy to grant read-only access to certain areas of the
user's disk.
3.5 Unsupported configurations
For complete details, see http://helpx.adobe.com/acrobat/kb/protected-mode-troubleshooting-reader.html.
Limitations with Protected Mode enabled include the following:
• 3rd party plugins may require modification.
• XP only: Accessibility features may or may not work. For example, some assistive technologies may
not be able read document content while in Protected Mode.
• Citrix and WTS environments are supported with 10.1 and later.
• Protected Mode and Protected View are not supported until 10.1 and later.
Note
When a screen reader like JAWS or Window-Eyes is already running when Reader is started for the
first time on XP systems, a warning is shown instructing the user to turn Protected Mode off manually.
On Vista and Windows 7, screen readers do work normally.
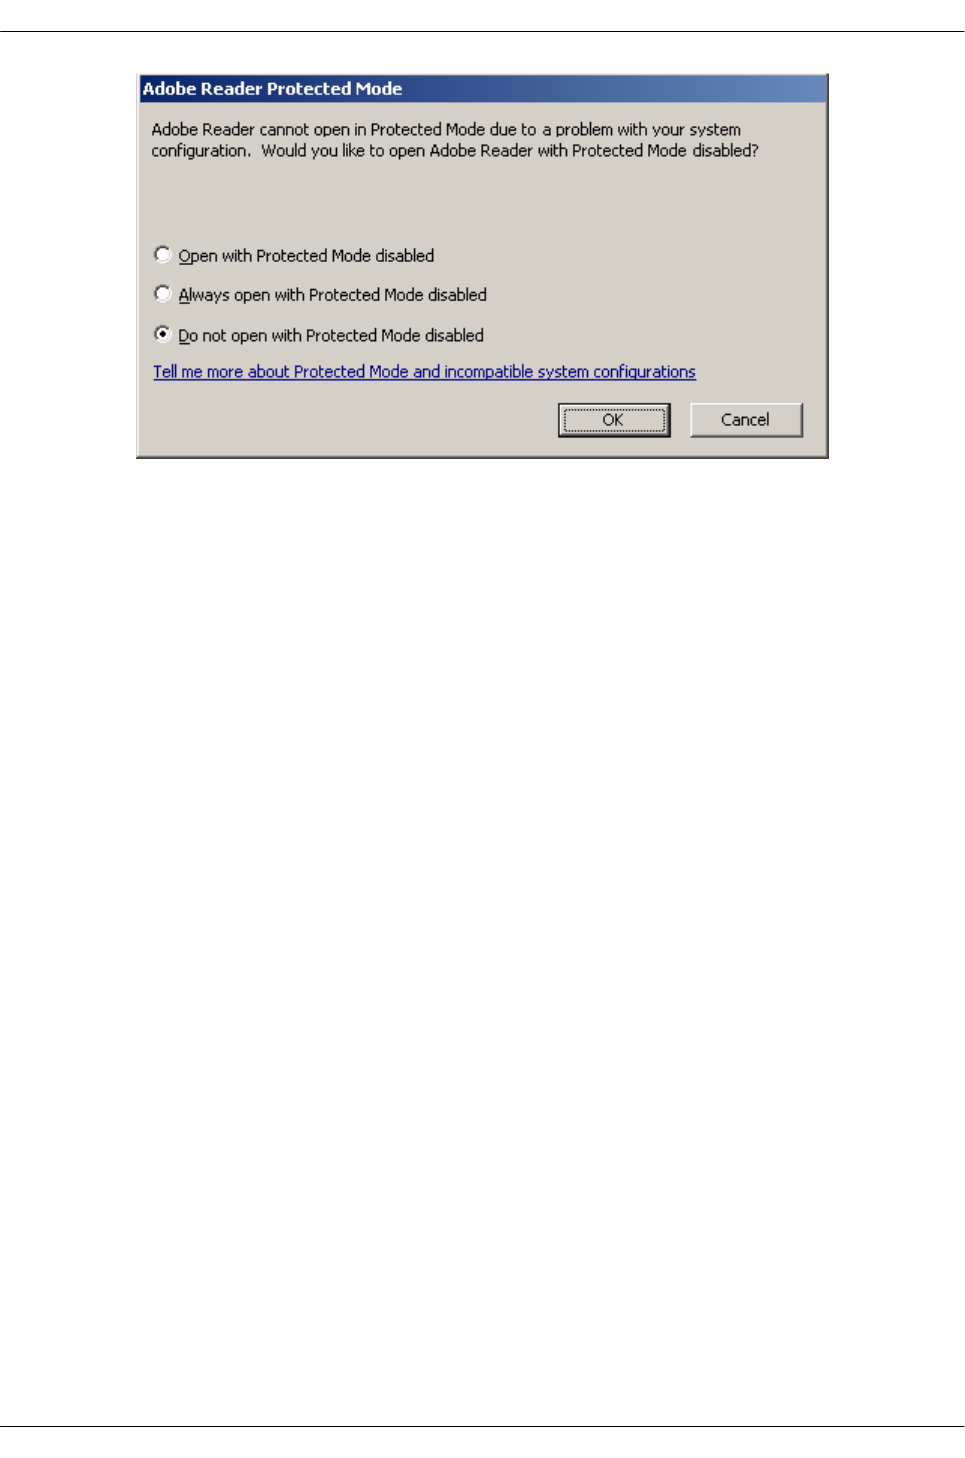
When Protected Mode cannot launch due to an unsupported configuration, Reader displays a dialog
alerting the user of the incompatibility and provides the user with the option to disable Protected Mode.
Note
"Adobe Reader cannot open in Protected Mode due to a problem with your system configuration.
Would you like to open Adobe Reader with Protected Mode disabled?"
Unsupported configurations for Reader running in Protected Mode change across releases as the product
evolves. For example, Protected Mode supports Citrix and Windows Terminal Services deployments with
10.1.
Protected Mode: Unsupported configuration dialog
Section 3€€€Protected Mode Application Security Guide
Page 16 Section 3€€€Protected Mode
3.6 FAQs
Does Adobe have plans for Protected Mode in Acrobat?
Yes. With the release of 10.1, Acrobat's Protected View is a sandbox mode similar to the Protected View
feature in Microsoft Office 2010.
Is there a reason why Acrobat X is not sandboxed vs. Reader X?
In order to reduce our attack surface, and most effectively thwart malicious activity, we always follow the
common security strategy of protecting the greatest number of end-users as expediently as possible.
Is Reader X on Mac OSX less vulnerable?
While Protected Mode is not available for Macintosh, Adobe has not seen any targeted attacks against
Unix and Mac Reader so far.
Is Adobe Reader X sandboxed on Unix and Mac?
While sandboxing technologies do exist on the Unix and Mac platforms, we have not seen targeted
attacks against Unix and Mac Reader so far and therefore it's not a priority at this point in time.
What configuration are not supported?
For a current list of issues, see
http://helpx.adobe.com/acrobat/kb/protected-mode-troubleshooting-reader.html.
Does the fact that Protected Mode invoke two Reader processes affect updating and patching?
No. The patching mechanism will remain the same as before. Broker and sandboxed processes do not
get patched separately.
Is the Reader Sandbox similar to the low integrity Protected Mode of Internet Explorer?
No. Despite the name similarities, Reader's Protected Mode the sandbox we have implemented is a more
effective at mitigating threats in applications on desktop windows than just running a process at low
integrity. While our sandbox indeed runs at at low integrity, it is a much more constrained computing
environment.
Is Remote Desktop Services supported?
Yes. Remote Desktop Services (formerly known as Terminal Services) is supported.
What is the difference between Microsoft's Application Virtualization Sandbox technology and
Reader X's Protected Mode?
Application Security Guide Section 3€€€Protected Mode
Section 3€€€Protected Mode Page 17

Sandboxing leverages the Operating System's security model to sandbox an application. Virtualization
uses another software program to segregate the application from the host operating system. With
virtualization the end users have to deal with the overhead of managing and patching the OS and the
application separately and there is also the performance impact of rendering the application in a
virtualized environment. For more information please refer to our technical blog posts.
What is the difference between Protected Mode in Microsoft IE browser and Reader X Protected
Mode?
The sandbox we have implemented is more effective at mitigating threats in applications on desktop
windows than just running a process at low integrity. While our sandbox runs at a low integrity, it is a much
more constrained computing environment. For more information please refer to our technical blog posts.
What effect does Protected Mode have on a PDF viewed in Citrix?
Citrix is not supported. When Protected Mode cannot launch due to an unsupported configuration, Reader
displays a dialog alerting the user of the incompatibility and provides the user with the option to disable
Protected Mode.
What is the percentage increase in memory footprint because of Protected Mode?
Very little.
Will Protected Mode have any effect on viewing LC Reader-Extended PDFs?
It should work fine out of the box.
Is there any special status for certified documents so that one can disable Protected Mode only
with certified documents?
No.
Can the security policies for the broker be configured through Customization Wizard or
downloaded from a server?
No. Custom policies should be tailored to meet your business requirements and deployed by an
administrator.
Are there any unforeseen major issues with the rich PDF types containing content e.g. interactive
multimedia, geo, and 3D with Reader X?
Not many. The feature is designed to be transparent.
Do plug-ins have read and write permissions to things like config files that maybe stored on the
user's system?
Plug-ins will not be able to write log files to non-whitelisted locations. They can continue to write logs to
the Temp directory (as returned by GetTempPath() Windows API or equivalent Acrobat API). Another
white-listed location is Adobe Reader's own appdata area.
Does the Protected Mode impair a PDF's ability to access trusted web sites?
No.
Can I still save Acrobat forms on my own computer?
Yes. There is no change in behavior.
Is Protected Mode the reason why Reader X runs with two AcroRd32.exe processes?
Yes. One of the processes is the sandboxed process and the other one is the broker.
If multiple PDFs are open (either standalone or within the browser), is the number of spawned
processes the same?
Section 3€€€Protected Mode Application Security Guide
Page 18 Section 3€€€Protected Mode

Yes. There will only be two processes. However, if PDFs are open in both the browser and standalone
application, one process pair will be used for each.
Can my plug-in create and update a preference file in the 'C:Documents and
SettingsloggedinuserApplication DataAdobeAcrobat10.0Preferences' folder?
Yes, Reader X allows writing to these type of locations.
Will plug-ins that access web services via an URL work?
Yes, it should work.
Will Protected Mode affect the functioning of URLs in a PDF?
No.
Will the broker allow an embedded Flash Player 10.1 instance to access hardware features such as
GPU acceleration and a system.capabilities object?
Yes.
Will the broker in Reader X be initially setup with default locations approved for writing? Will
plug-in developers be able to add "safe" locations to the broker's list?
Plugins could leverage the broker white-list config file to extend the file/registry locations writable by the
sandbox.
Do shell extensions work in Reader X?
Shell extensions run inside a sandbox when Reader is the default owner of PDFs. The shell extensions
we support include Thumbnails, Properties, Preview, and they all operate as they did in 9.x, except that
they will run sandboxed.
The iFilter shell extension has a limitation with Microsoft Desktop Search and is not installed with
Reader X.
Does the Reader X need to go through the broker if we are saving a Reader extended document? Yes.
Are the policies in the broker process configurable by the users?
Custom policies can be setup by the administrator or plugin-installers.
Is PM a pure whitelisting mechanism to allow/deny access to the OS, or is it a mix of blacklisting
and whitelisting policies working together in the broker?
Both.
If Reader X needs to make OS calls through the broker, is there additional overhead (such as more
threads) which has a performance impact?
Performance of Reader X is comparable to Reader 9. There are no additional threads.
What is the user experience like for screen readers invoked via viewing a PDF in the browser?
Most accessibility features work. In some cases they do not work on XP. For a list of known issues, see
http://kb2.adobe.com/cps/860/cpsid_86063.html.
Why do we see 2 Reader processes in the Task Manager with the same name?
The Reader X application now has 2 processes: one for the target (sandbox) and the broker.
What if I inadvertently kill one of the processes?
Killing any of the processes brings down the entire Reader X application.
When custom policies fail for certain workflows, what are the options other than disabling
Protected Mode?
Application Security Guide Section 3€€€Protected Mode
Section 3€€€Protected Mode Page 19

One option is to add custom policies to bypass protected mode restrictions.
Can plug-in developers write their own broker?
No, we do not currently provide the option for developers to write their own brokers, but we may do so for
future releases.
Do the Broker and the Sandbox processes share both the WindowStation and the Desktop?
Yes.
Section 3€€€Protected Mode Application Security Guide
Page 20 Section 3€€€Protected Mode
4 Enhanced Security
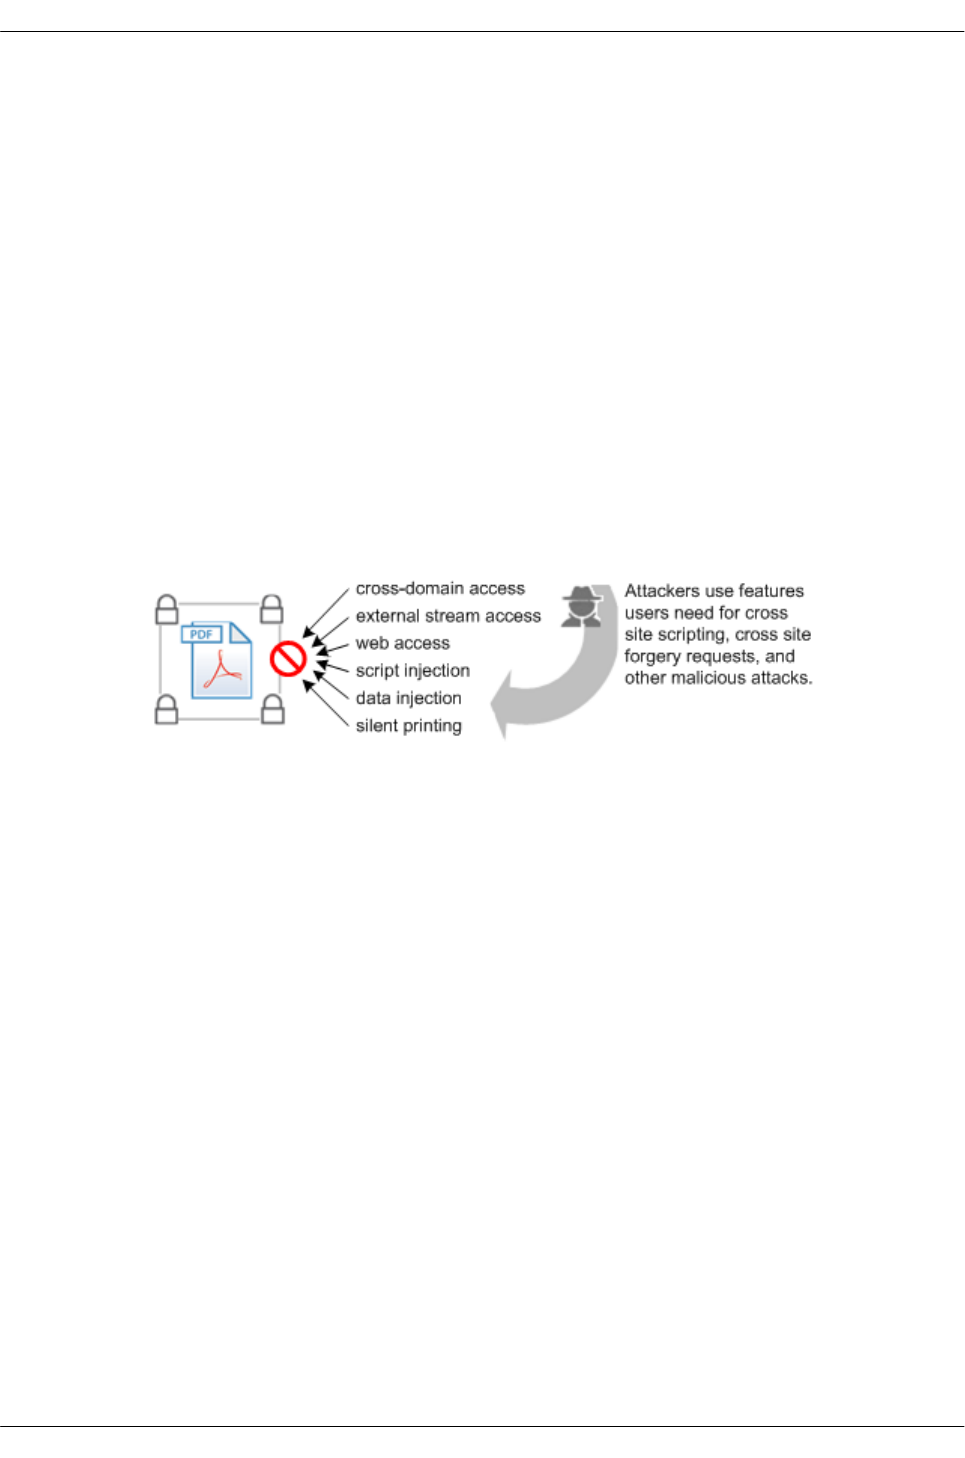
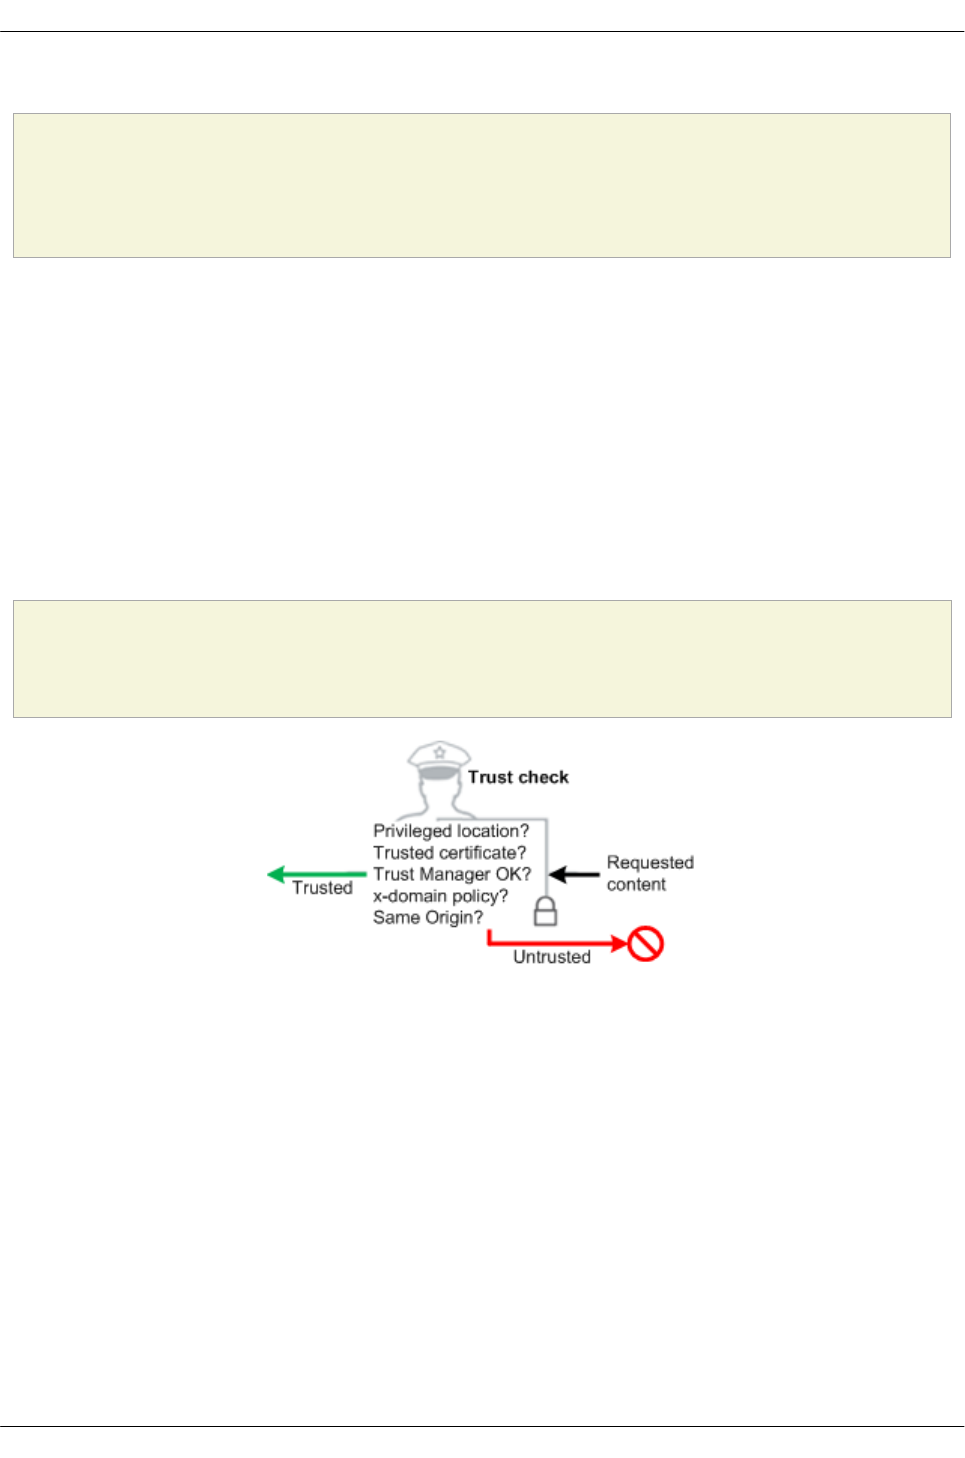
Introduced in version 9.0-8.17 and enabled by default for the 9.3 and 8.2 updates, enhanced security
"hardens" your application against risky actions by doing the following for any document not specifically
trusted:
• Prevents cross domain access. It forces requests for new content to adhere to a "same-origin"
policy and blocks web attacks such as cross site scripting and cross site request forgeries.
• Prohibits script and data injection via an FDF, XFDF, and XDP NOT returned as the result of a post
from the PDF.
• Blocks stream access to XObjects such as external images.
• Stops silent printing to a file or hardware printer.
The feature is designed to let you decide what content to trust and help you selectively bypass those
restrictions for trusted files, folders, and hosts. These trusted domains--called privileged locations--are
exempt from enhanced security rules. There are several other methods for establishing trust, and just as
you tune your browser, so should you tune your application so that it operates at a risk level appropriate
for your environment.
Enhanced security: effect on workflows
4.1 Feature interaction
This feature interacts with other features that also assign trust. When content is trusted as a result of a
cross domain policy file, for example, that content is not subject to enhanced security restrictions. It is
important to understand the various ways that trust can be assigned prior to configuring applications and
setting up workflows. Workflows should be designed for compatibility with enhanced security enabled, so
keep in mind that the following features interact with enhanced security:
•Internet access permissions: While enhanced security prevents access to different origin locations
that try to return data, scripts, or content to the calling PDF, internet access can be set on a per site
basis via the Trust Manager. Trust Manager settings may or may not override enhanced security
settings depending on your application version and particular workflow.
•Import and export of FDF, XFDF (form), and XDP data: Data file behavior is fundamentally
altered when this feature is on.
•Certified document workflows: Access to a certified document may or may not be allowed
depending on whether:
• The signing certificate's fingerprint is in a cross domain policy file, or
• The signing certificate is trusted or chains up to a trust anchor that is trusted for
privileged networked operations.
4.2 Changes across releases
Application Security Guide Section 4€€€Enhanced Security
Section 4€€€Enhanced Security Page 21
Changes across releases: Enhanced security
Version Change
9.0 Enhanced security introduced.
9.1 Support added for bypassing enhanced security restrictions by assigning trust to certified documents when the SHA1 hash of
the public key is specified in a cross domain policy file. Certificates can be trusted for privileged networked operations such
as cross domain access.
8.1.7 & 9.2 Enhanced security added for 8.1.7.
8.2 & 9.3
• Enhanced security turned on by default.
• Enhanced security settings may take precedence of Trust Manager internet
access settings.
• A non-intrusive Yellow Message Bar (YMB) that doesn't block workflows replaces
many of the modal dialogs. Depending on how the client is configured, the YMB
appears at the top of the document and offers the user to trust the document
"once" or "always." The YMB does not appear for silent printing or xobject
access.
• Cross domain logging can be enabled and the log viewed via the user interface.
• Cross domain policy files support all the mime types specified in the Cross
Domain Policy File Specification.
4.3 Configuration
The following preference rules apply irrespective of the user's platform:
• Windows, Macintosh, and UNIX platforms use similarly named keys.
• When configuring paths, use your product (Adobe Acrobat or Acrobat Reader) and version (9.0 or
8.0).
• For 8.x, only one key (bEnhancedSecurityStandalone) controls behavior for both standalone
and browser modes.
• Preferences are usually boolean. True (1) enables the feature. False (0) disables the feature.
• Both cTrustedFolders and bDisableTrustedFolders control the behavior for folders AND
files.
• Preferences may or may not be visible in the registry by default when the value has been set by the
application. It is often the case that the UI must be exercised to actually write the value to the
preference file or registry. When configuring preferences, it is usually expedient to toggle all the
values and restart the application. Doing so writes the values to the registry and lets you change the
preference setting without needing to create the key from scratch.
4.3.1 UI and registry config
To enable enhanced security, do the following:
1. Choose Edit > Preferences (Windows) or <application name> > Preferences (Macintosh).
2. Select Security (Enhanced) in the Categories panel.
3. Check the Enable Enhanced Security checkbox.
4. Windows only: If your workflows involve cross domain access enabled by accessing a server-based
cross domain policy file, check Create log file. This step is typically only need when troubleshooting.
Logging is not available on Macintosh.
Section 4€€€Enhanced Security Application Security Guide
Page 22 Section 4€€€Enhanced Security
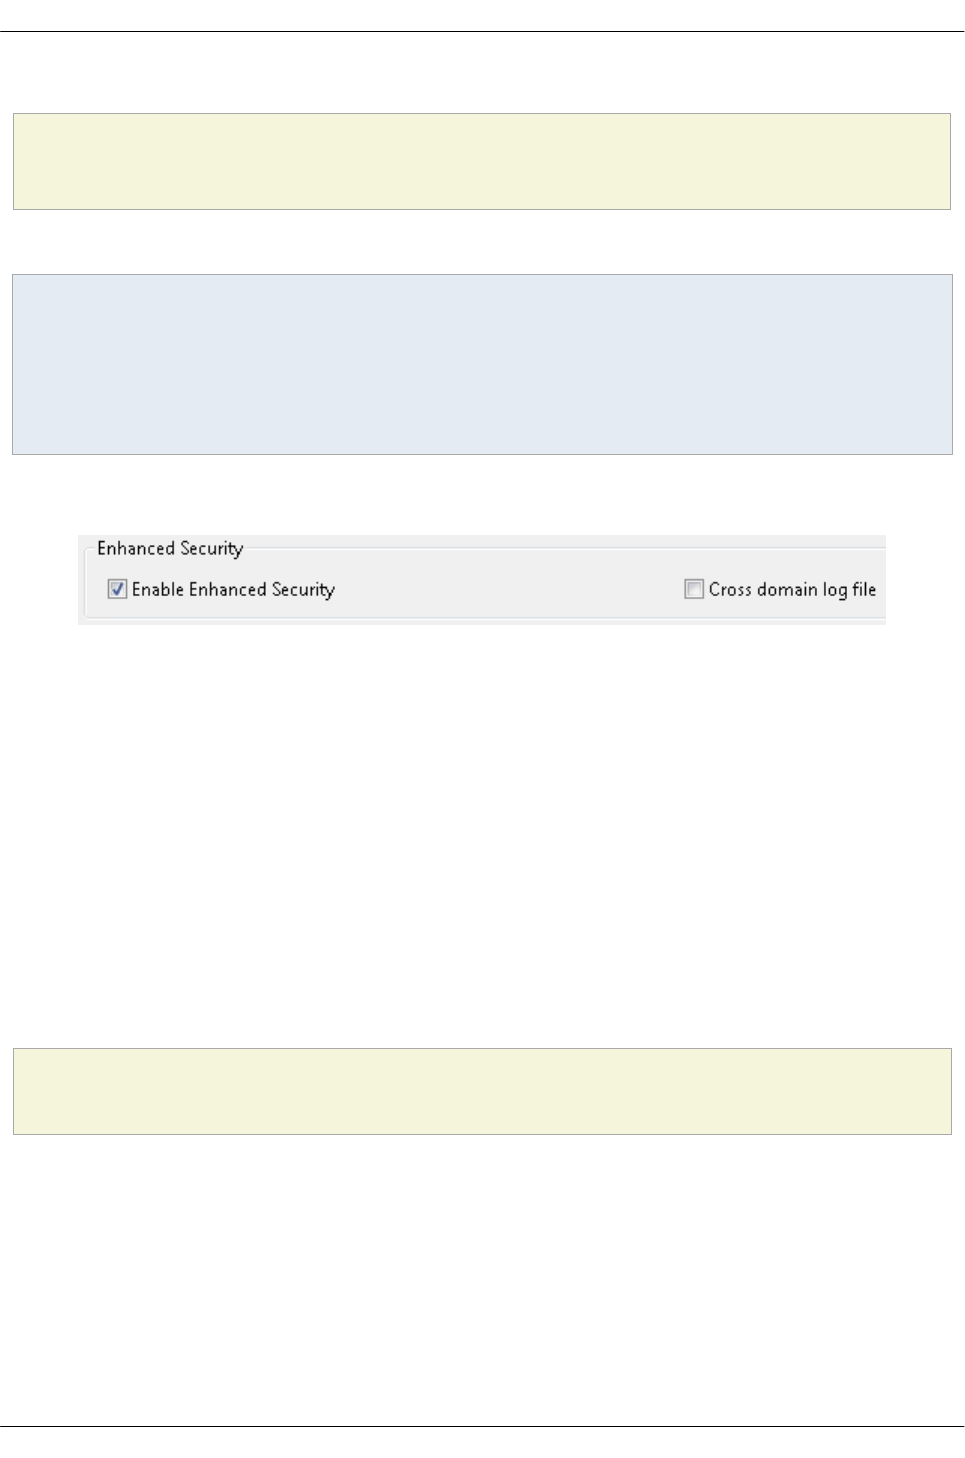
The UI sets the following
[HKEY_CURRENT_USER\Software\Adobe\<product name>\<version>\TrustManager]
"bEnhancedSecurityStandalone"=dword:00000001
"bEnhancedSecurityInBrowser"=dword:00000001
Note
When viewing a PDF in a browser, users do not have direct access to the application's Preferences
panel. To configure enhanced security while browsing on the fly, right click on the PDF displayed in the
browser and choose Page Display Preferences. For versions 9.x and 8.2 and later, enhanced security
settings are managed separately for the application running as a standalone application versus in a
browser.
Enhanced security panel: Windows
4.3.2 Locking enhanced security
Enhanced security can be locked as enabled or disabled. To do so:
1. Go to
HKEY_LOCAL_MACHINE\SOFTWARE\Policies\Adobe\<product name>\<version>\FeatureLockDown.
2. Right click and choose New > DWORD Value.
3. Create bEnhancedSecurityStandalone and/or bEnhancedSecurityInBrowser.
4. Right click on the key and choose Modify.
5. Set the value as follows:
•0: Disables enhanced security and locks the feature.
•1: Enables enhanced security and locks the feature.
Registry Configuration: Enhanced security locked as enabled
[HKEY_LOCAL_MACHINE\SOFTWARE\Policies\Adobe\<product name>\<version>\FeatureLockDown]
"bEnhancedSecurityStandalone"=dword:00000001
"bEnhancedSecurityInBrowser"=dword:00000001
4.3.3 Macintosh configuration
Enhanced security preferences cannot be locked on Macintosh systems.
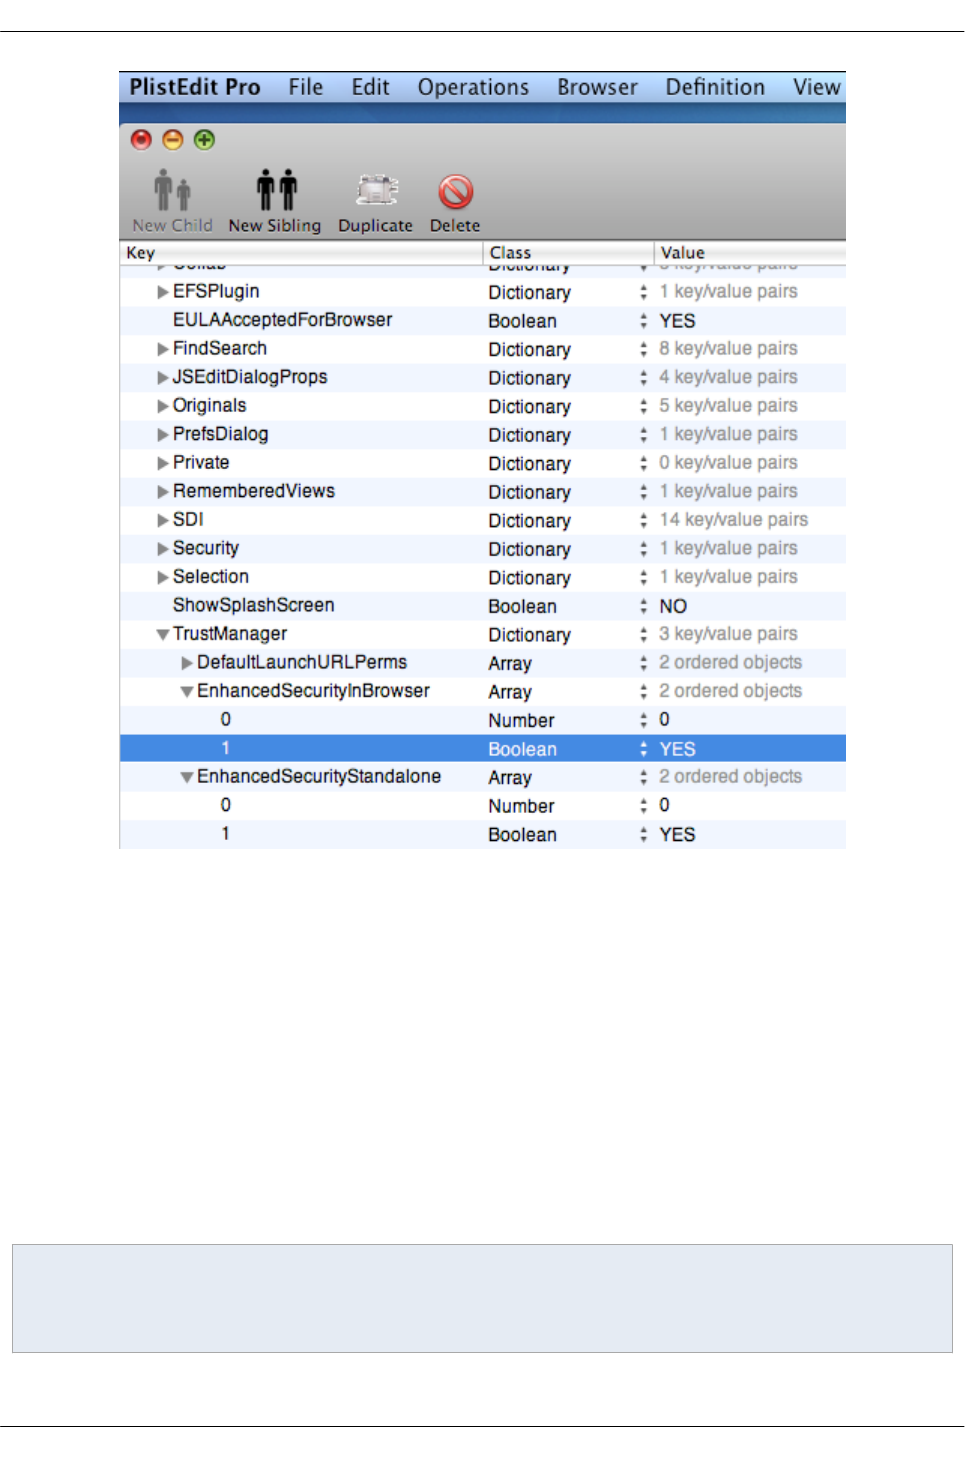
Before continuing, install some plist editor such as PlistEdit Pro. Change the root path to reflect the
product (Acrobat or Reader) and version number (9.0 or 8.0) you are using.
To configure the settings:
1. Navigate to the .plist file:
Application Security Guide Section 4€€€Enhanced Security
Section 4€€€Enhanced Security Page 23

• Mactel: UserLibraryPreferencescom.adobe.Acrobat.Pro_x86_9.0.plist
• Mactel: UserLibraryPreferencescom.adobe.Acrobat.Pro_x86_8.0.plist
• PowerPC machine: UserLibraryPreferencescom.adobe.Acrobat.Pro_ppc_8.0.plist
• PowerPC machine: UserLibraryPreferencescom.adobe.Acrobat.Pro_ppc_9.0.plist
• PowerPC machine: UserLibraryPreferencescom.adobe.Reader_ppc_8.0.plist
• PowerPC machine: UserLibraryPreferencescom.adobe.Reader_ppc_9.0.plist
2. Go to TrustManager.
3. Set EnhancedSecurityInBrowser (Boolean YES/NO).
4. Set EnhancedSecurityStandalone (Boolean YES/NO).
5. Exit the editor.
Note
Do not configure Number. For 8.x, only one key (bEnhancedSecurityStandalone) controls
behavior for both standalone and browser modes. Do not set EnhancedSecurityInBrowser.
Preferences: Enhanced security settings for UNIX
Section 4€€€Enhanced Security Application Security Guide
Page 24 Section 4€€€Enhanced Security
4.3.4 UNIX configuration
Enhanced security preferences cannot be locked on UNIX systems.
To configure the settings:
1. Navigate to the .preferences file. For example:
• ~/.adobe/Acrobat/9.0/Preferences/reader_prefs
• ~/.adobe/Acrobat/8.0/Preferences/reader_prefs
2. Navigate to /TrustManager.
3. Add and set the keys in the file.
4. Save and exit.
Note
For 8.x, only one key (bEnhancedSecurityStandalone) controls behavior for both standalone and
browser modes. Do not set bEnhancedSecurityInBrowser.
Application Security Guide Section 4€€€Enhanced Security
Section 4€€€Enhanced Security Page 25
Preferences: Enhanced security settings for UNIX
/TrustManager
[/c <<
/EnhancedSecurityInBrowser [/b false]
/EnhancedSecurityStandalone [/b false]
>>]
4.4 Trust overrides
There are several ways to assign trust so that this feature works in a trusted context:
• Specifying trusted URLs via Trust Manager
• Trusting certificates for privileged network operations
• Server side management of cross domain access
• Users can trust documents on-the-fly when the PDF opens: When the Yellow Message Bar appears,
choose the Options button and then trust the document once or always.
• Create a privileged location via the UI for the file, folder, or host.
• Create a privileged location via the registry/plist by placing a tID under each cab/dict at:
[HKCU\Software\Adobe\<product name>\<version>\TrustManager\(cTrustedSites or TrustedFolders)\cCrossdomain]
[HKCU\Software\Adobe\<product name>\<version>\TrustManager\(cTrustedSites or TrustedFolders)\cDataInjection]
[HKCU\Software\Adobe\<product name>\<version>\TrustManager\(cTrustedSites or TrustedFolders)\cExternalStream]
[HKCU\Software\Adobe\<product name>\<version>\TrustManager\(cTrustedSites or TrustedFolders)\cScriptInjection]
[HKCU\Software\Adobe\<product name>\<version>\TrustManager\(cTrustedSites or TrustedFolders)\cSilentPrint]
[HKCU\Software\Adobe\<product name>\<version>\TrustManager\(cTrustedSites or TrustedFolders)\cWeblink]
4.4.1 Privileged locations
The most common way to assign trust to files, folders, and hosts is via privileged locations.
4.4.2 Internet Access
There are two ways to control internet access:
• The Trust Manager's Internet Access settings allow you to trust individual web-based files,
directories, and specific hosts (wildcards are supported).
•8.1€€€Internet access settings in the Trust Manager support both global and granular trust of all or
specific URLs.
4.4.3 Certificate trust
When enhanced security is on, a certified document can bypass its restrictions if the following conditions
are true:
Section 4€€€Enhanced Security Application Security Guide
Page 26 Section 4€€€Enhanced Security
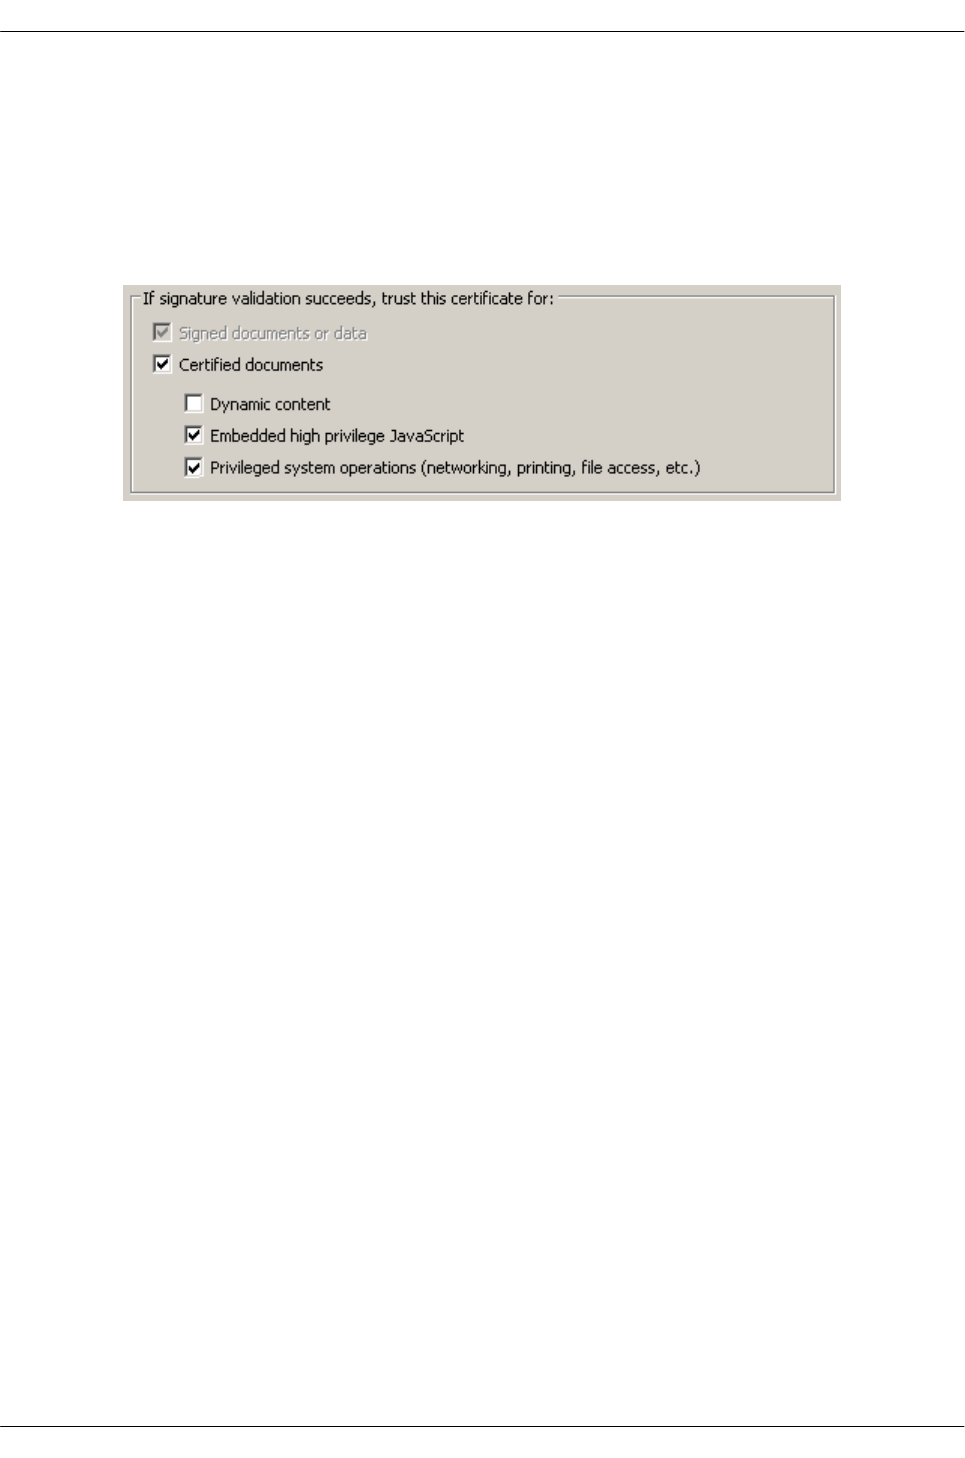
• The document is certified; that is, the first signature in the document is a certification signature.
• The certification signature is valid.
• The document recipient has specifically trusted the signer's certificate for privileged network
operations.
Configure certificate trust as described in 9.4€€€Per-certificate trust.
Setting certificate trust
4.4.4 xdomain policy files
Enhanced security's cross domain restrictions can also be bypassed and managed at the server.
Managing cross domain access at the server
Clients have the capability of automatically detecting and using crossdomain.xml policy files to access
content from a different origin. Administrators can configure the policy file as needed so that clients can
access trusted content. For more information, see the Cross Domain Policy File Specification.
Enabling cross domain access for specific PDFs
For a PDF that comes from a server, the server has a domain and hence the PDF has a domain;
however, a stand-alone PDF residing on a user's machine has no domain. When such a PDF accesses a
server, Acrobat's default behavior is to consider that communication as cross domain.
To allow a "domain-less," local PDF to access a server, it must be signed either with a certification
signature or a "reader enabled" signature (the hidden signature applied during Reader enablement) and
registered in a cross domain policy file. Again, the signature can be one of two types:
•A certification signature in a certified document: Best for certified document workflows and
when high privileged JavaScript should be permitted.
•A Reader enabled signature applied by a LiveCycle ES server: PDFs that are granted additional
usage rights are signed by the server. Using this fingerprint allows customers with many Reader
extended documents to continue accessing the server after enhanced security is enabled without
having to change their forms.
The fingerprint for the certificate that was used for the signing is registered in the cross domain file on the
server. In effect, the cross domain file on the server is saying "files signed with this certificate may access
this server." To register the fingerprint, an administrator extracts the SHA-1 hash of the public key from the
signing certificate and places it in the cross domain policy file.
4.5 User experience
The user experience with enhanced security enabled and there is untrusted content in the workflow is
significantly different than when enhanced security is disabled. The feature is specifically designed so that
users and admins can preconfigure trust or assign it on the fly so that workflows remain operational even
with the extra security and restrictions that enhanced security provides.
Application Security Guide Section 4€€€Enhanced Security
Section 4€€€Enhanced Security Page 27
4.5.1 FDF, XFDF, and XDP
XFDF, FDF, and XDP files are data files which simplify moving form, certificate, server, and other data
from one machine to another. This data transfer usually involves some mechanism such as data injection
into a PDF form field, installing files, executing a script, and so on. Because these actions represent a
potential security risk, enhanced security restricts this functionality unless the data containing file has
been assigned trust in some way. Trust assignment can occur via privileged locations, a trusted
certificate, or by cross domain policy files. Rules for opening a PDF via FDF lists the high level rules
defining the behavior.
Note
If you distribute forms that request data from a server, the user may find that filled form fields become
blank after being asked to trust a document from the Yellow Message Bar. If you find that your workflow
is impaired, Adobe recommends that you leave enhanced security enabled and assign trust as needed
via one of the available methods prior to sending such a form.
Exceptions
XFDF and XDP files use the same rules as FDF with the following exceptions:
• XFDF does not support script injection.
• XDP is only affected by these rules if the PDF is externally referenced (not embedded).
Rules for opening a PDF via FDF
Action
Data
file
location PDF
location 8.x behavior 9.x behavior
Opening a target PDF local local PDF opens. No
authentication required.
No change.
Opening a target PDF local server PDF opens Allow via dialog or enable enhanced security and set
privileged location.
Opening a target PDF server server PDF opens. No
authentication required.
No change.
Opening a target PDF https
server
local Blocked Http hosted FDFs cannot open local files.
Data injection n/a n/a Allowed Allowed if: * Data retuned via a form submit with
url#FDF. * FDF has no /F or /UF key. * cross-domain
policy permits it.
Data injection server browser Allowed Allowed if: * Link to PDF contains #FDF=url. * FDF has
no /F or UF key. * cross domain policy permits it.
Data injection server Acrobat/ReaderAllowed Allowed if: * PDF makes EFS POST/GET and FDF
sends data in https response to same PDF. * cross
domain policy permits it.
Data injection Varied Varied Allowed Allow via dialog or enable enhanced security and set
privileged location.
Script injection Any Any Allowed Blocked if enhanced security is on and FDF is not in a
privileged location.
FDF restriction examples
The following are examples of disallowed actions when enhanced security is on:
Section 4€€€Enhanced Security Application Security Guide
Page 28 Section 4€€€Enhanced Security

• If the PDF opens in the browser, and the URL to the PDF contains a #FDF=url, then the FDF data
specified by that url may be injected into the open PDF if the FDF has no /F key and if the PDF may
receive data from the FDF based on the cross domain policy.
• If the PDF opens in the Acrobat/Reader standalone application and the FDF data comes back in the
https response to a POST/GET initiated by the PDF, then the FDF data may be injected into the
open PDF if the PDF specified in the FDF is the PDF that made the POST/GET and if the PDF may
receive data from the FDF based on the cross domain policy (i.e. * in crossdomain.xml).
FDF permissions examples
The following are examples of scenarios where FDF data injection does need a user-authorization dialog
when enhanced security is on:
• You submit data from a PDF in the browser and the URL has #FDF at the end. The returned FDF
has an /F key pointing to a different PDF which needs to get loaded (everything is happening in the
browser). The FDF data gets injected into the second PDF.
• Same as above, except it all happens in Acrobat rather than in the browser. In this case, the #FDF
at the end of the URL is not needed.
• The "spontaneous FDF" case: In the browser, an unsolicited FDF arrives (via a link from an HTML
page before, and Acrobat is not running yet), and the FDF has an /F key for a PDF that it needs to
open and populate.
• Opening a link of the form http://A.com/file.pdf#FDF=http://B.com/getFDF.
4.5.2 Dialogs and warnings
Beginning with the 9.3 and 8.2 updates, a non-intrusive Yellow Message Bar (YMB) that doesn't block
workflows replaces many of the modal dialogs. Depending on how the client is configured, the YMB
appears at the top of the document and offers the user to trust the document "once" or "always."
4.5.2.1 9.2, 8.1.7, and earlier
Pre 9.3 and 8.2, the application displayed modal dialogs whenever a risky behavior was invoked. The user
had to click through the dialog to continue.
Enhanced Security: Data access dialog (pre 9.3 and 8.2)
4.5.2.2 9.3, 8.2, and later
With 9.3 and 8.2, many warning messages were moved to an unobtrusive Yellow Message Bar at the top
of the document. If the administrator has not disabled the feature, users can choose to trust a document
Application Security Guide Section 4€€€Enhanced Security
Section 4€€€Enhanced Security Page 29
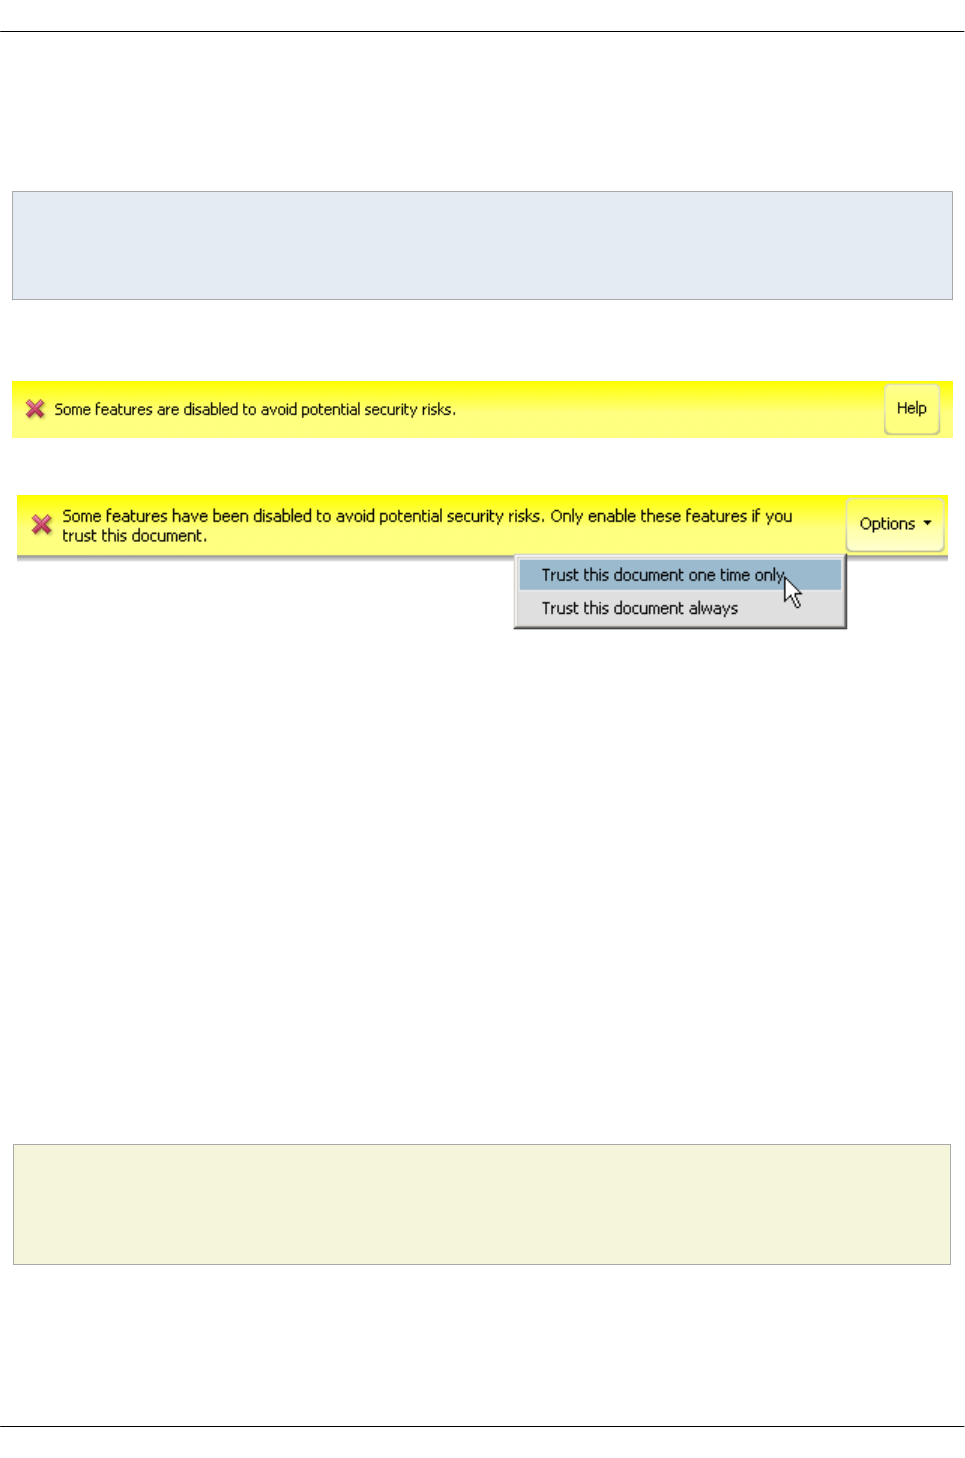
once or always for the particular action. A choice of "always" adds the document or host to the privileged
locations list. The message and the options button choices varies depending on the type of blocked
content.
Note
Workflows where end users or administrators assign trust to files, folders, and hosts avoid the
appearance of the YMB and most other modal dialogs.
Yellow Message Bar: Cross domain access
Yellow Message Bar: JavaScript injection
4.6 Examples
4.6.1 Default settings: 10.0+
The default settings are similar to 9.3.4. See Changes across releases.
4.6.2 Default settings: 9.3/8.2
The default settings for 9.3 and 8.2 are as follows:
• Enhanced security is enabled.
• Privileged locations are enabled. The locations list is empty.
End users have the option to disable the feature or to leave it enabled and add privileged locations for
trusted files, folders, and hosts. Adobe recommends that enhanced security is enabled and care exercised
when assigning trust.
Administrators can of course configure all the options as well as lock down the user interface so that users
can't change the settings. In many enterprise settings, admins will enable enhanced security, preconfigure
trust, and lock all settings. See the examples below.
Default enhanced security settings (Windows 9.3 and 8.2)
[HKEY_CURRENT_USER\Software\Adobe\<product name>\<version>\TrustManager]
"bTrustOSTrustedSites"=dword:00000001
"bEnhancedSecurityStandalone"=dword:00000001
"bEnhancedSecurityInBrowser"=dword:00000001
4.6.3 Most restrictive settings
The following examples show the most restrictive settings with the features locked. This results in the
following:
Section 4€€€Enhanced Security Application Security Guide
Page 30 Section 4€€€Enhanced Security

• All enhanced security protections will be in place.
• Only administrators can configure privileged locations.
• End users cannot change any of the settings.
• Documents and workflows that are subject to these protections will need to have trust assigned by
some mechanism that the security model recognizes as a trustworthy way to bypass these
restrictions. Possibilities include those listed in Bypassing enhanced security restrictions.
Note
10.x products use the same settings.
Most restrictive enhanced security settings: 9.x and 10.x
[HKEY_LOCAL_MACHINE\SOFTWARE\Policies\Adobe\<Adobe Acrobat OR Acrobat Reader><9.0 or 10.0>\FeatureLockDown]
"bEnhancedSecurityStandalone"=dword:00000001
"bEnhancedSecurityInBrowser"=dword:00000001
"bDisableTrustedFolders"=dword:00000001
"bDisableTrustedSites"=dword:00000001
"bDisableOSTrustedSites"=dword:00000001
4.6.4 Least restrictive settings
"Secure by default" is Adobe's recommended best practice. However, you can disable all the features if
you are already operating within a secured environment. The following examples show the least restrictive
settings with the features not locked.
Note
10.x products use the same settings.
Least restrictive enhanced security settings: 9.x and 10.x
[HKEY_CURRENT_USER\Software\Adobe\(Adobe Acrobat or Acrobat Reader)\(9.0 or 10.0)\TrustManager]
"bEnhancedSecurityStandalone"=dword:00000000
"bEnhancedSecurityInBrowser"=dword:00000000
"bTrustOSTrustedSites"=dword:00000001
4.7 Troubleshooting and FAQs
See Enhanced Security FAQ.
Application Security Guide Section 4€€€Enhanced Security
Section 4€€€Enhanced Security Page 31

5 JavaScript Controls
JavaScript support is one of Acrobat's and Adobe Reader's most powerful features, and Adobe provides
several controls that enable tuning application behavior so that JavaScript (JS) executes within your
desired level of security where unrestricted access to JS APIs is undesirable or workflows do not leverage
this feature at all.
5.1 Permissions basics
There are a number of JavaScript controls that allow you to balance needed features with the level of
security needed for your workflows. At a high level, these options include:
•Restrict JavaScript: Turn off JavaScript altogether or restrict JS by API.
•Trust JavaScript: Allow JavaScript globally, by API, or by trusting specific document for it.
Configuration is possible either through the user interface, the registry, or both as follows:
•User interface:
• Application trust can be set by choosing Preferences > JavaScript.
• Document trust can be assigned in some workflows via the Yellow Message Bar's
Options button.
• High privileged API trust can be assigned via certificate trust in certified document
workflows.
•Registry-level preferences (and plist): As described in subsequent sections, many settings are
available to administrators.
JS Workflow: Simple view
5.2 Workflow diagrams
For a visual overview, see the JavaScript Quick Key
5.3 Changes across releases
Evolution of JavaScript execution
Version Change
Section 5€€€JavaScript Controls Application Security Guide
Page 32 Section 5€€€JavaScript Controls
8.1.7 & 9.2
• JavaScript blacklist introduced thereby allowing selective blocking of vulnerable APIs.
Default lists are null.
• A non-intrusive Yellow Message Bar (YMB) that doesn't block workflows replaces
many of the modal dialogs. Depending on how the client is configured, the YMB
appears at the top of the document and offers the user to trust the document "once" or
"always."
•cAlwaysTrustedForJavaScript can override the global JS off preference for
specifically trusted documents.
• cJavaScript can override the high privileged JS restrictions for specifically trusted
documents.
8.2 & 9.3 None.
9.3.4 cJavaScriptURL is introduced as part of enhanced security. An untrusted document that tries to invoke an URL via JS displays
the YMB.
10.1.1
• Changes to the global variable and user JavaScripts features are made more secure.
These changes require action by IT as described in Migrating to 10.1.1+.
• JavaScript Blacklist Framework Tool is introduced which provides IT with a GUI for
managing JS APIs.
11.0 bEnableCertificateBasedTrust provides a way to make certified documents trusted as a privileged location.
5.4 Disabling JavaScript
Global JS configuration may occur via the user interface or the registry/plist.
1. Go to Preferences > JavaScript (The exact path varies by product and platform).
2. In the JavaScript panel, uncheck Enable Acrobat JavaScript. This preference sets:
[HKCU\Software\Adobe\<product name>\<version>\JSPrefs]
"bEnableJS"=dword:00000000
Note
If JS is disabled, the user experience when a document tries to execute JavaScript varies by product
version.
5.4.1 Trusted override
There are several ways to assign trust so that this feature works in a trusted context:
• Users can trust documents on-the-fly when the PDF opens: When the Yellow Message Bar appears,
choose the Options button and then trust the document once or always.
• Create a privileged location via the UI for the file, folder, or host.
• Create a privileged location via the registry/plist by placing a tID at:
[HKCU\Software\Adobe\<product name>\<version>\TrustManager\(cTrustedSites or TrustedFolders)\cAlwaysTrustedForJavaScript]
"t8"="C:\\someTrustedPDF"
Application Security Guide Section 5€€€JavaScript Controls
Section 5€€€JavaScript Controls Page 33
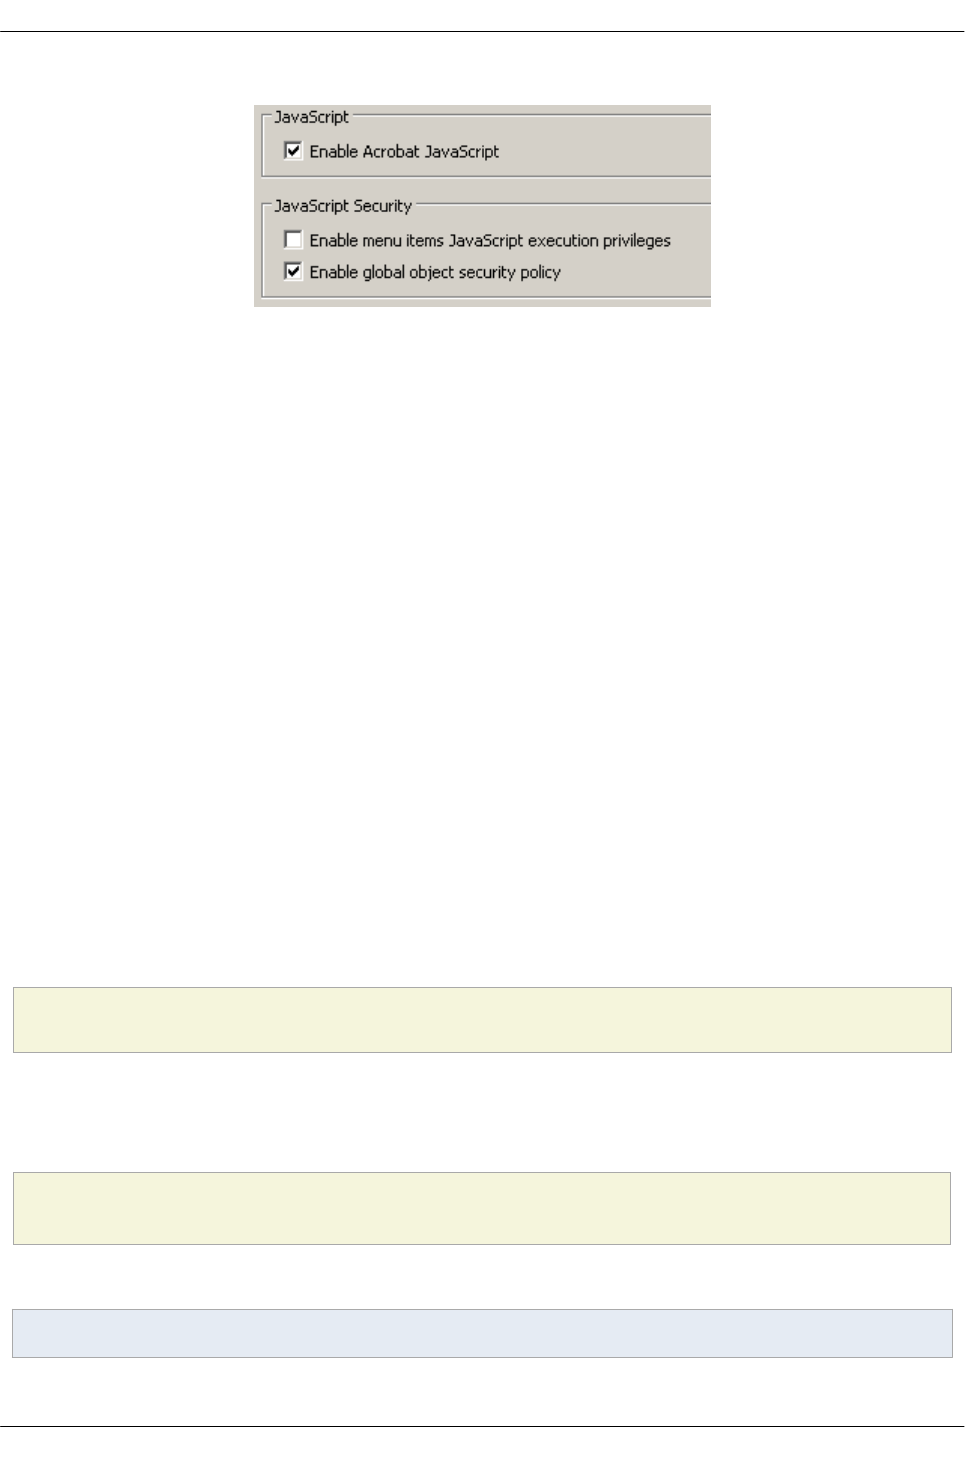
JS Workflow: Enabling-disabling JS
5.5 Blacklisting JS APIs
The Acrobat JavaScript Blacklist Framework introduced in versions 9.2 and 8.1.7 provides granular
control over the execution of specific JavaScript APIs. This mechanism allows selective blocking of
vulnerable APIs so that you do not have to resort to disabling JavaScript altogether. The blacklist is
maintained in the Windows registry and the Macintosh OS X FeatureLockdown file. On Windows, there
are two blacklists, one for enterprise administrators, and one for Adobe patches and updates.
Blacklist rules of operation
• Blacklist settings do not apply to 3D JavaScript.
• If a blacklisted script is encountered, all other scripts in the document are blocked. Only documents
that don't contain any blacklisted JavaScript will be given permission to run other JavaScripts.
• The two blacklists interact so that the more restrictive setting takes precedence; that is, if one
blacklist blocks an API and the other does not, the API is blocked.
5.5.1 Blacklist locations
•Macintosh: Policy deployment is specific to Windows, so Macintosh, has only one update/path
blacklist at
Contents::MacOS::Preferences > FeatureLockDown/cJavaScriptPerm/tBlackList.
This location is updated by Acrobat patch installers.
The JS API blacklist may reside in two locations on Windows.
•Windows: Enterprise list: This blacklist helps enterprises roll out policies that block exploitable
API(s) from executing in their environment. Populating the blacklist in this location is the
responsibility of the enterprise. Adobe patches never modify this registry location.
[HKLM\SOFTWARE\Policies\Adobe\<product>\<version>\FeatureLockDown\cJavaScriptPerms\]
"tBlackList"
•Windows: Adobe's update/patch list: The Adobe blacklist is modified by Acrobat and Adobe
Reader patches whenever an API is deemed vulnerable. APIs are also removed from the blacklist
whenever a fix for a vulnerability is provided by the current patch.
[HKLM\SOFTWARE\Adobe\<product>\<version>\JavaScriptPerms\]
"tBlackList"
Note
Section 5€€€JavaScript Controls Application Security Guide
Page 34 Section 5€€€JavaScript Controls
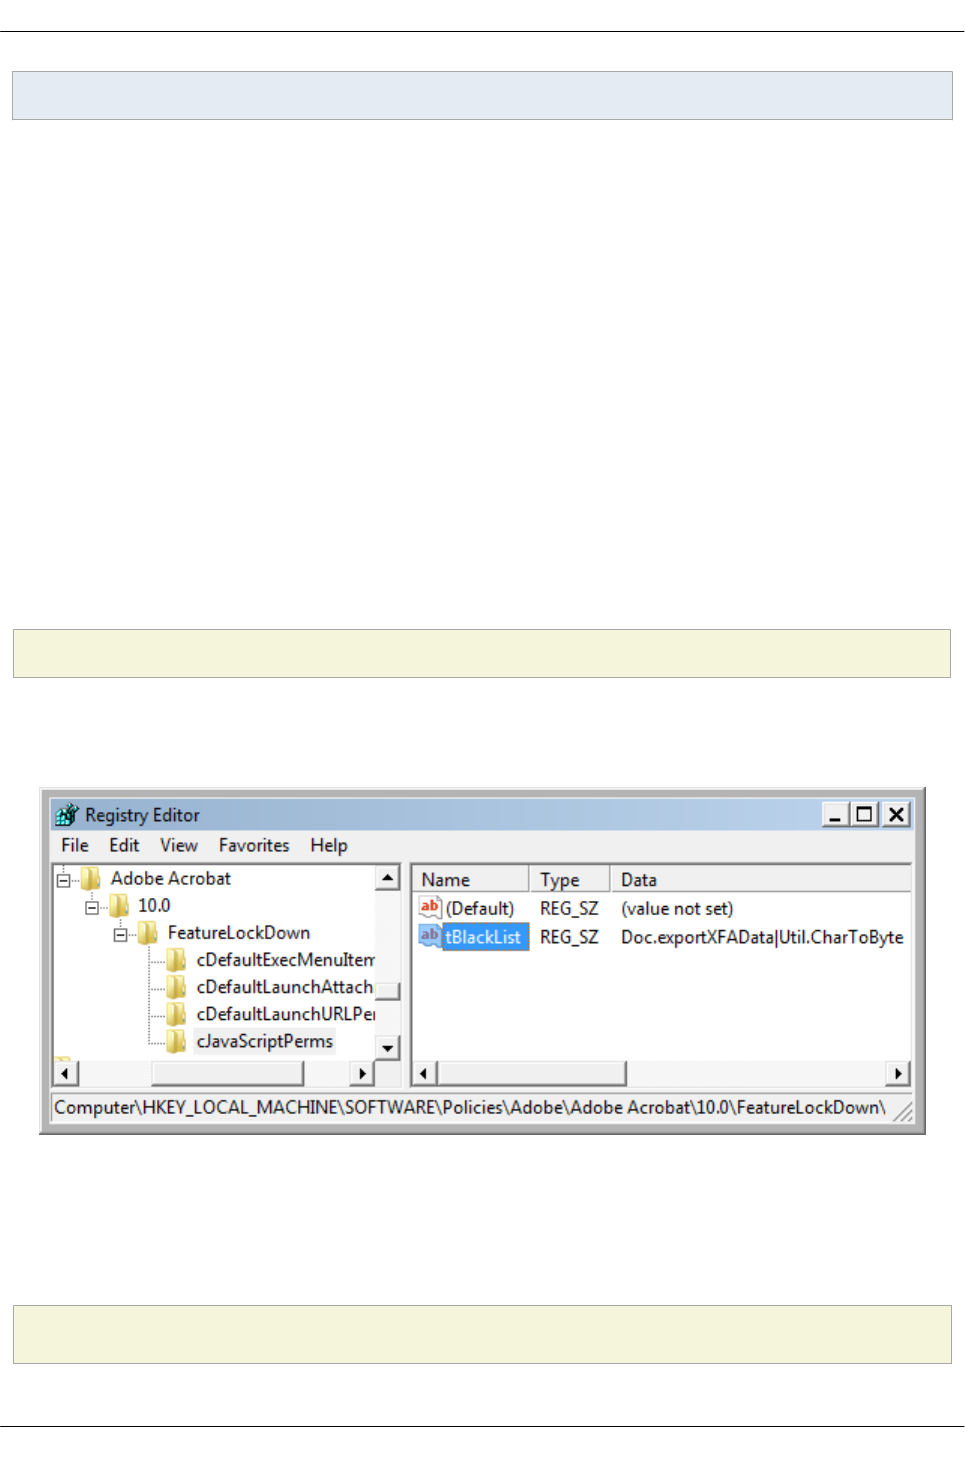
On a 64 bit Windows system, the path is HKEY_LOCAL_MACHINE\SOFTWARE\Wow6432Node\Adobe.
5.5.2 Blacklist configuration
The manual steps described below require administrator privileges on a machine and should only be
undertaken by someone experienced in registry-level configuration. In most cases, configuration occurs
via the Customization Wizard prior to client deployment or via a scripting mechanism post-deployment.
To manually configure a blacklist:
1. Open the registry editor.
2. Go to
HKLM\SOFTWARE\Policies\Adobe\<product>\<version>\FeatureLockDown\cJavaScriptPerms\.
3. Create cJavaScriptPerms if it does not exist by right clicking and choosing New Key.
4. Create tBlackList: right click in the right hand panel and choose New > String value.
5. Enter tBlackList.
6. Right click on tBlackList and choose Modify.
7. Add the APIs to block as a pipe-separated list in for the format of
<some Object Name>.<Some API Name>. For example:
Util.CharToByte|App.alert|Collab.getIcon
8. Exit and restart the application.
cJavaScriptPerms: Registry configuration
5.5.3 Trusted override
There are several ways to assign trust so that the APIs continue to function in a trusted context:
• Create a privileged location via the UI for the file, folder, or host.
• Create a privileged location via the registry/plist by placing a tID at:
[HKCU\Software\Adobe\<product name>\<version>\TrustManager\<cTrustedSites or TrustedFolders>\]
"cUnsafeJavaScript"
Application Security Guide Section 5€€€JavaScript Controls
Section 5€€€JavaScript Controls Page 35
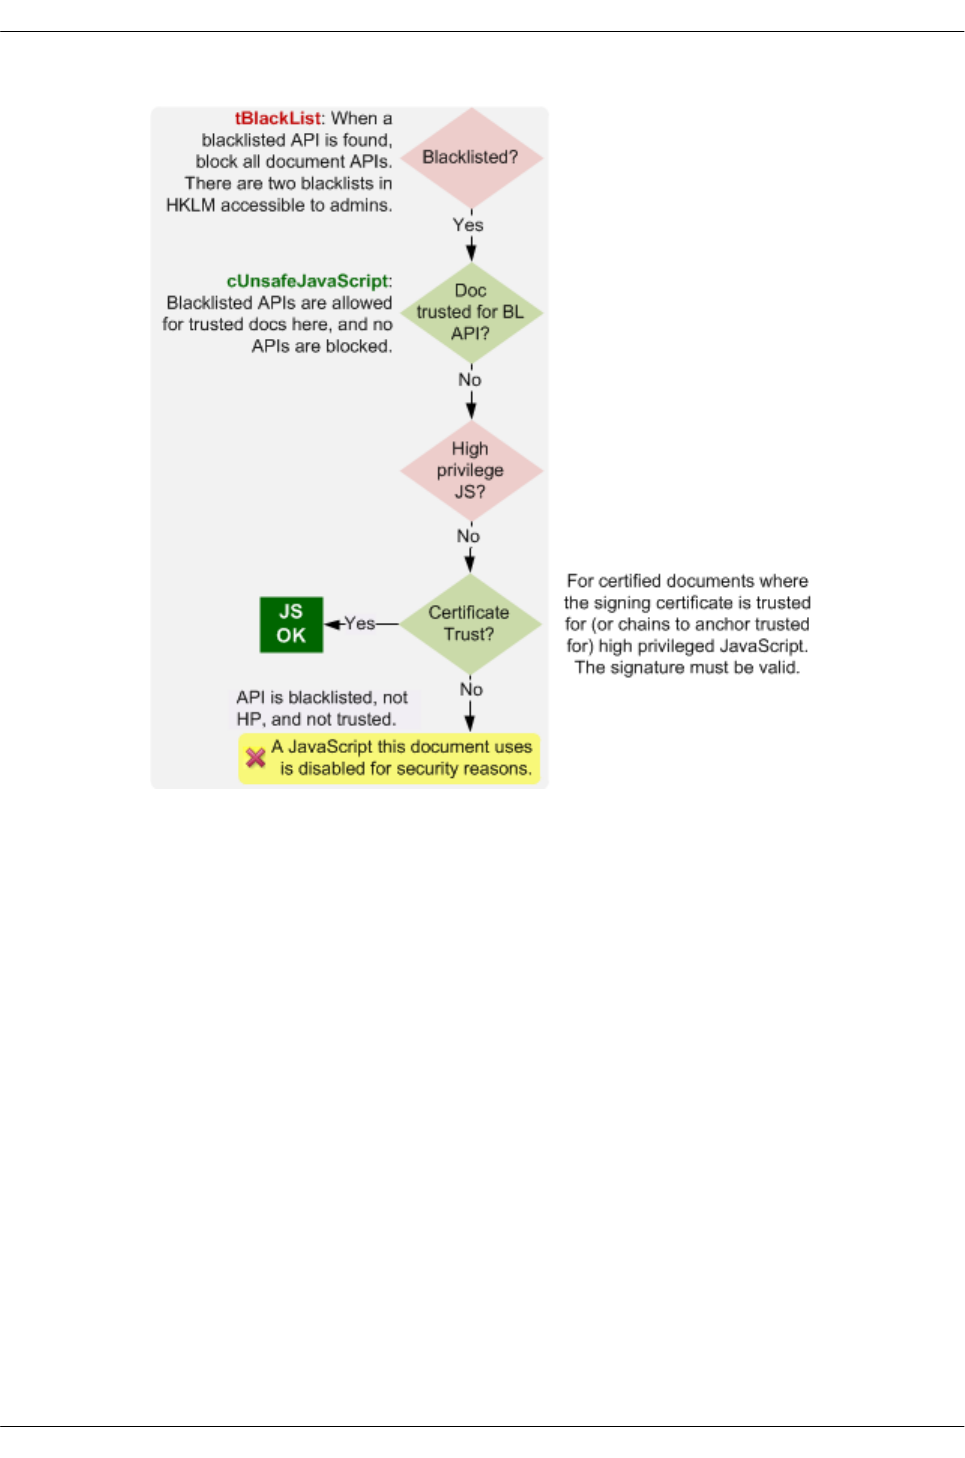
JS Workflow: Blacklisted APIs
5.5.4 JS blacklist tool
Adobe intends to periodically release beta and experimental tools, utilities, and scripts on LABS. This
informal pre-release program provides a way to help customers while opening up channels for feedback
that will help improve the product and related enterprise resources. Items posted on LABs should be
tested by your organization in order to determine their compatibility with the particulars of your
environment.
One such tool is the JavaScript Blacklist Framework Tool for Acrobat and Adobe Reader. The tool offers
protections against an entire class of vulnerabilities that target JavaScript APIs.
5.5.4.1 Installation
To install the tool:
1. Go to LABS at http://labs.adobe.com/technologies/acrobat/.
2. Verify the following:
• You have the Microsoft .NET 4.0 framework. If you don't, the tool's installer should
prompt you to install it.
• You are using it for Reader and Acrobat 9.2 and 8.1.7 and later versions as well as
any 10.x version.
3. Agree to the Terms of Use and download the installer.
4. Unzip and run the installer.
Section 5€€€JavaScript Controls Application Security Guide
Page 36 Section 5€€€JavaScript Controls

5. Choose Next.
6. Choose an installation directory or accept the default (Under Program FilesAdobe).
7. Choose whether the blacklist will apply to everyone or just the current user.
Note
The Disk Cost button is just a default button. The disk size is very small.
8. Choose Next.
9. Choose Next again to confirm the installation.
10. Choose Close.
5.5.4.2 Usage
The tool presents a list of JavaScript APIs that have been attacked in the past. It retrieves a current list of
APIs from an Adobe server but presents a default list if an Internet connection is unavailable.
To use the tool:
1. Choose Start > Programs > JS Blacklist Framework for Adobe Reader or Acrobat.
2. Check and uncheck multiple APIs to Add or Remove them to and from the blacklist.
3. Choose Add or Remove.
4. Choose View to see what's currently blacklisted.
Note
The data is saved in a text file in the application's installation directory. Simply check and uncheck
multiple APIs to Add or Remove them to and from the blacklist.
Blacklist tool
Application Security Guide Section 5€€€JavaScript Controls
Section 5€€€JavaScript Controls Page 37
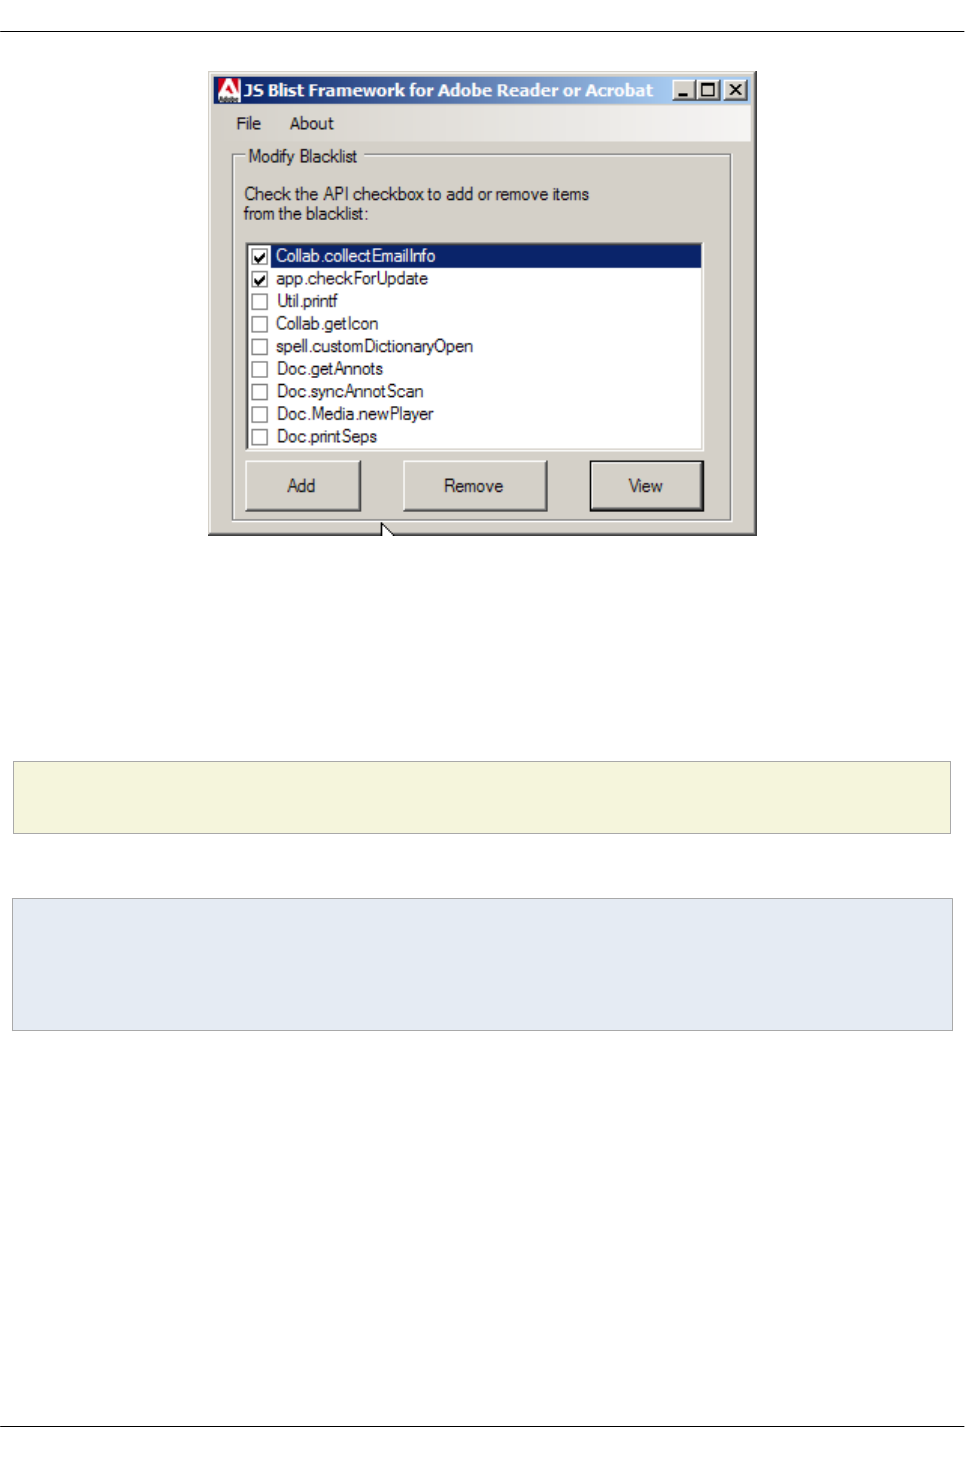
5.6 Disabling menu-invoked JS
Beginning with Acrobat 7.0, execution of JavaScript through a menu event is no longer privileged. By
default, this setting is off.
1. Go to Preferences > JavaScript (The exact path varies by product and platform).
2. In the JavaScript Security panel, set Enable menu items JavaScript execution privileges. This
values sets:
[HKCU\Software\Adobe\<product name>\<version>\JSPrefs]
"bEnableMenuItems"
Note
Enables executing JS by clicking menu items. When off, privileged JS calls can be executed via the
menu unless they have been wrapped in the app.trustFunction. Executing non-privileged JS calls via
menu items is not blocked whether this box has been checked or not.
5.6.1 Trusted override
There are several ways to assign trust so that this feature works in a trusted context:
• Choose Preferences > JavaScript and check Enable menu items JavaScript execution
privileges.
• Enabling via a trusted function: Trusted functions allow privileged code that normally requires a
privileged context to execute to execute in a non-privileged context. For details and examples, see
the app.trustedFunction in the JavaScript for Acrobat API Reference. This feature was
introduced in Acrobat 7.0.
• Add the requisite function to:
Section 5€€€JavaScript Controls Application Security Guide
Page 38 Section 5€€€JavaScript Controls

HKLM\SOFTWARE\Policies\Adobe\<product name>\<version>\FeatureLockDown\cDefaultExecMenuItems\
"tWhiteList"
5.7 Disabling global object access
By default, global object access is not allowed.
1. Go to Preferences > JavaScript (The exact path varies by product and platform).
2. In the JavaScript Security panel, set Enable global object security policy as needed. This values
sets:
[HKCU\Software\Adobe\<product name>\<version>\JSPrefs]
"bEnableGlobalSecurity"
Note
Toggles on and off the ability of a script to access objects outside of the current document sandbox. If
enabled, JavaScript objects are globally accessible.
5.8 High privileged JavaScript
High privileged JavaScript is restricted by default.
High privilege JavaScripts are Acrobat methods with security restrictions. These are marked by an "S" in
the third column of the quick bar in the JavaScript for Acrobat API Reference. These methods can be
executed only in a privileged context, which includes the console, batch, menu (for versions prior to 7.x),
and application initialization events. All other events (for example, page open and mouse-up events) are
considered non-privileged. The description of each security-restricted method indicates the events during
which the method can be executed.
Beginning with Acrobat 6.0, security-restricted methods can execute in a non-privileged context if the
document is certified and the certifier's certificate is trusted for executing embedded high privilege
JavaScript. In Acrobat versions earlier than 7.0, menu events were considered privileged contexts.
JS Workflow: High privileged APIs
Application Security Guide Section 5€€€JavaScript Controls
Section 5€€€JavaScript Controls Page 39
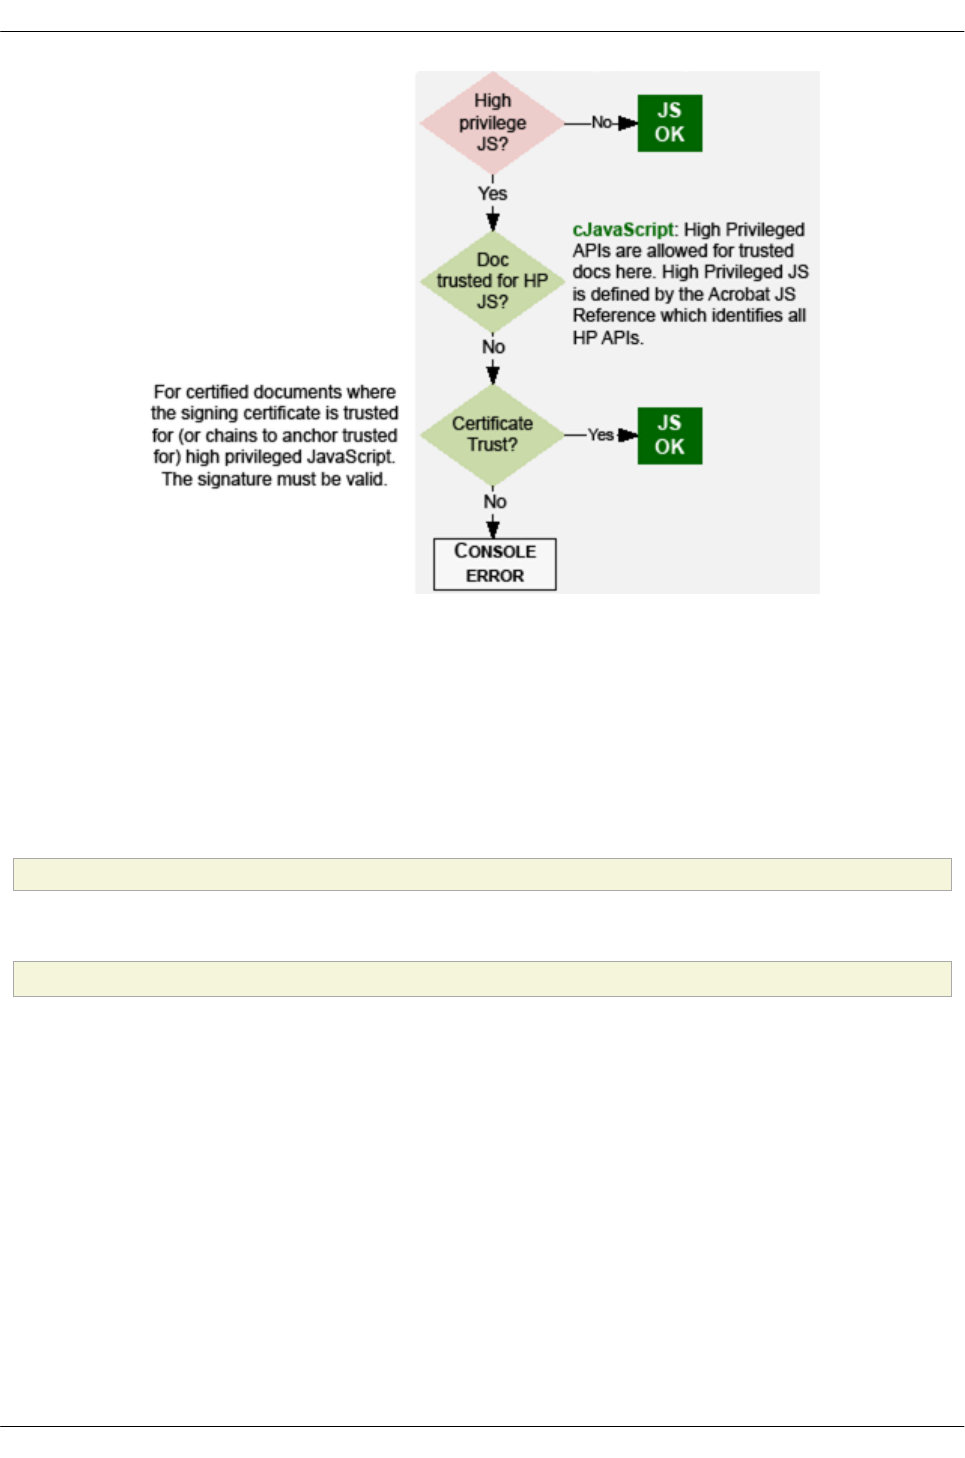
5.8.1 Trusted override
There are several ways to assign trust so that this feature works in a trusted context:
• Configure certificate trust for digital signature workflows as described below.
• Create a privileged location via the UI for the file, folder, or host.
• Create a privileged location via the registry/plist by placing a tID at either:
•Administrator list: This list requires administrator rights to modify and locks down the feature. It
resides at:
HKLM\SOFTWARE\Policies\Adobe\<product name>\<version>\FeatureLockDown\(cTrustedSites or TrustedFolders)\cJavaScript
•User list: The user list is for the current user only and is editable via the user interface. It resides at:
HKCU\Software\Adobe\<product name>\<version>\TrustManager\(cTrustedSites or TrustedFolders)\cJavaScript
5.8.1.1 Certificate trust
You can control script behavior on a per-certificate basis or by using trust anchors. If a signer's certifying
certificate chains up to another certificate (a trust anchor) that allows high privileged JavaScript, then high
privileged JavaScript will run in that document. For example, some enterprises may issue a MyCompany
certificate that allows high privileged JavaScript. If all employee certificates use ExampleCompany as a
trust anchor, then they can send and receive certified documents within the company that allow high
privileged JavaScript execution.
Thus, certificate trust settings can override blacklist settings under the following conditions:
• The document must be certified.
• The certification signature must be valid.
• The signer's certificate is trusted for or chains up to a trust anchor trusted for executing high
privilege JavaScript.
Section 5€€€JavaScript Controls Application Security Guide
Page 40 Section 5€€€JavaScript Controls
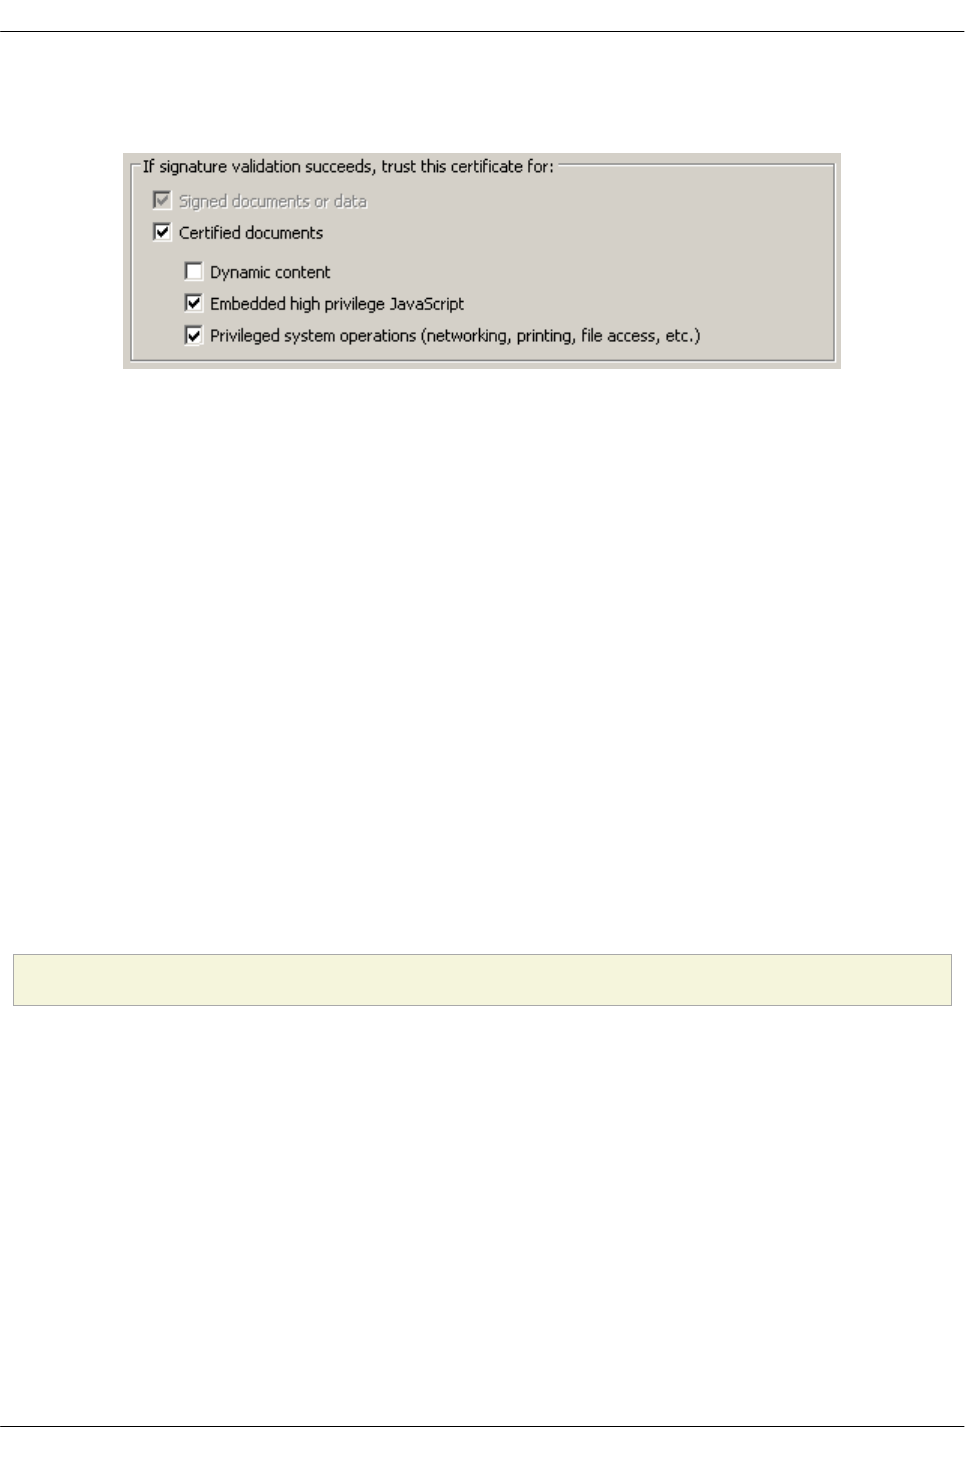
Configure certificate trust as described in 9.4€€€Per-certificate trust.
Certificate trust settings
5.9 Certified document trust
11.0 introduces a new setting that elevates certified documents to a privileged location. When enabled,
certified documents with a valid certification signature whose certificate chains to a trusted root are trusted
in the same way as privileged locations and can therefore override JavaScript restrictions. For details, see
9.3€€€Certified document trust.
5.10 JavaScript invoked URLs
With 9.3.4, cJavaScriptURL is introduced as part of enhanced security. An untrusted document that
tries to invoke an URL via JS displays the YMB by default. The user is given the option to trust the
document for such actions via the Options button on the YMB.
An untrusted document that tries to invoke an URL via JS displays the YMB by default. The user is given
the option to trust the document for such actions via the Options button on the YMB.
5.10.1 Trusted override
There are several ways to assign trust so that this feature works in a trusted context:
• Users can trust documents on-the-fly when the PDF opens: When the Yellow Message Bar appears,
choose the Options button and then trust the document once or always.
• Create a privileged location via the UI for the file, folder, or host.
• Create a privileged location via the registry/plist by placing a tID at:
[HKCU\Software\Adobe\<product name>\<version>\TrustManager\(cTrustedSites or TrustedFolders)\cJavaScriptURL]
"t8"="C:\\someTrustedPDF"
5.11 JavaScript injection
You can block JS injection by enabling Enhanced Security.
Yellow message bar: JavaScript injection
Application Security Guide Section 5€€€JavaScript Controls
Section 5€€€JavaScript Controls Page 41
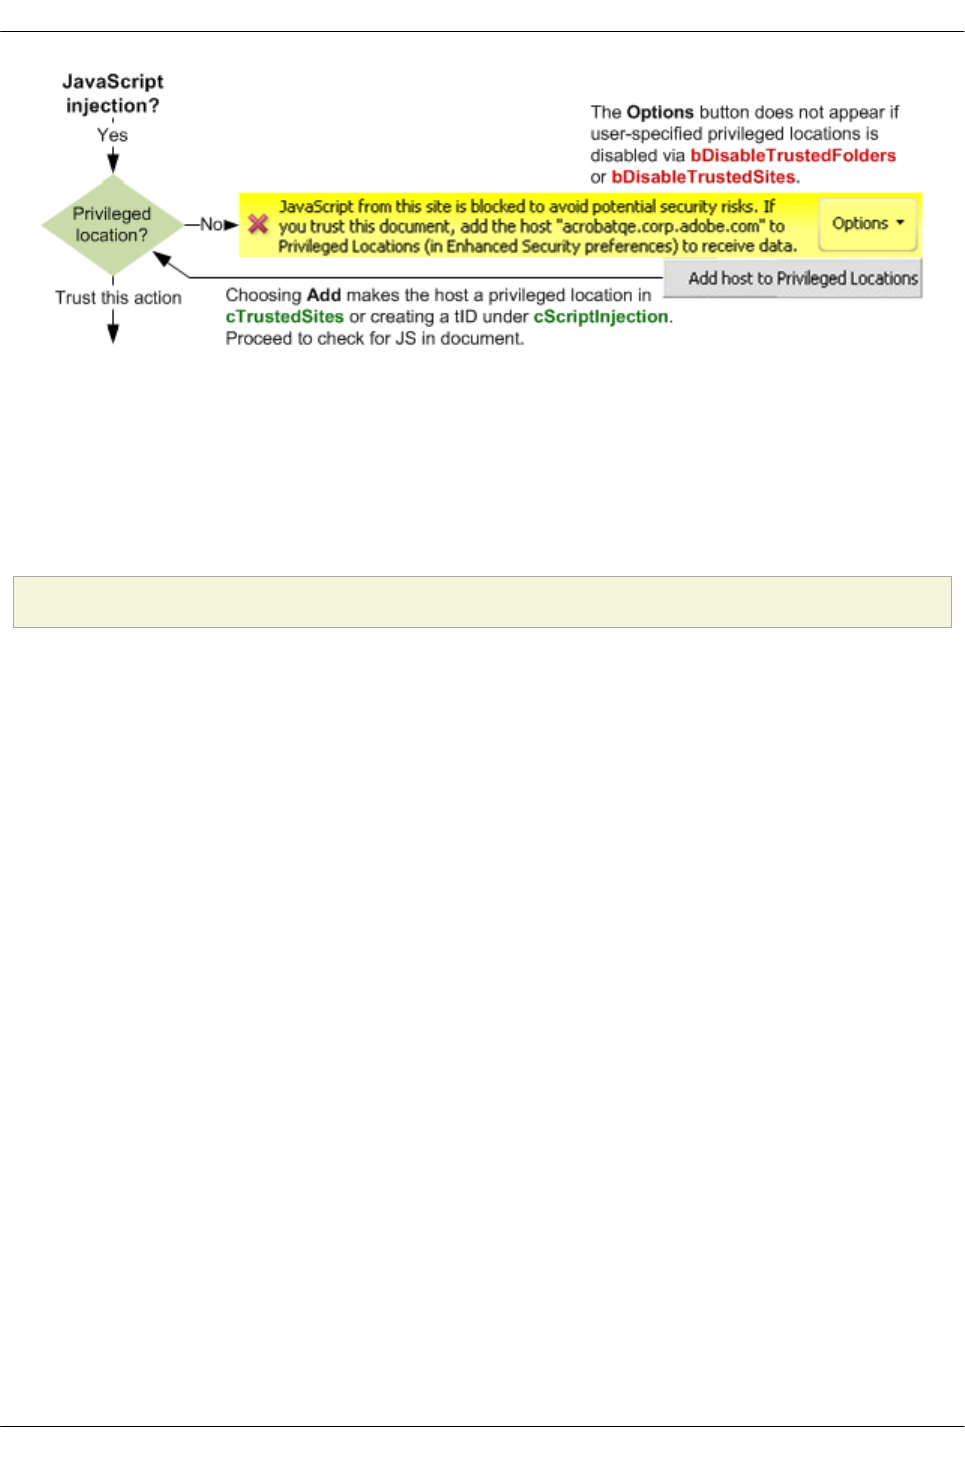
5.11.1 Trusted override
There are several ways to assign trust so that this feature works in a trusted context:
• Users can trust documents on-the-fly when the PDF opens: When the Yellow Message Bar appears,
choose the Options button and then trust the document once or always.
• Create a privileged location via the UI for the file, folder, or host.
• Create a privileged location via the registry/plist by placing a tID at:
[HKCU\Software\Adobe\<product name>\<version>\TrustManager\(cTrustedSites or TrustedFolders)\cScriptInjection]
"t8"="C:\\someTrustedPDF"
5.12 Workflow changes by version
Acrobat and Adobe Reader have always provided controls for managing JavaScript. Over time, these
controls have become more rich in an effort to provide granular control over document behavior. The
behavior across versions is as follows:
5.12.1 9.1 and 8.1.6 and earlier
• If the application has JavaScript enabled:
• Non-high privileged JavaScript runs.
• High privileged JS will run if permitted to do so by other controls.
• If the application has JavaScript disabled:
• Non-high privileged JavaScript invokes a dialog stating that the document contains
JavaScript. Users are asked whether they would like to enable JS from now on for all
documents. If the user selects the Yes button, the JavaScript preference is enabled
for the application from then on
• High privileged JavaScript will not execute unless the user has established a prior
trust relationship with the document via a trusted certificate or privileged location.
What happens when JS is off
Section 5€€€JavaScript Controls Application Security Guide
Page 42 Section 5€€€JavaScript Controls
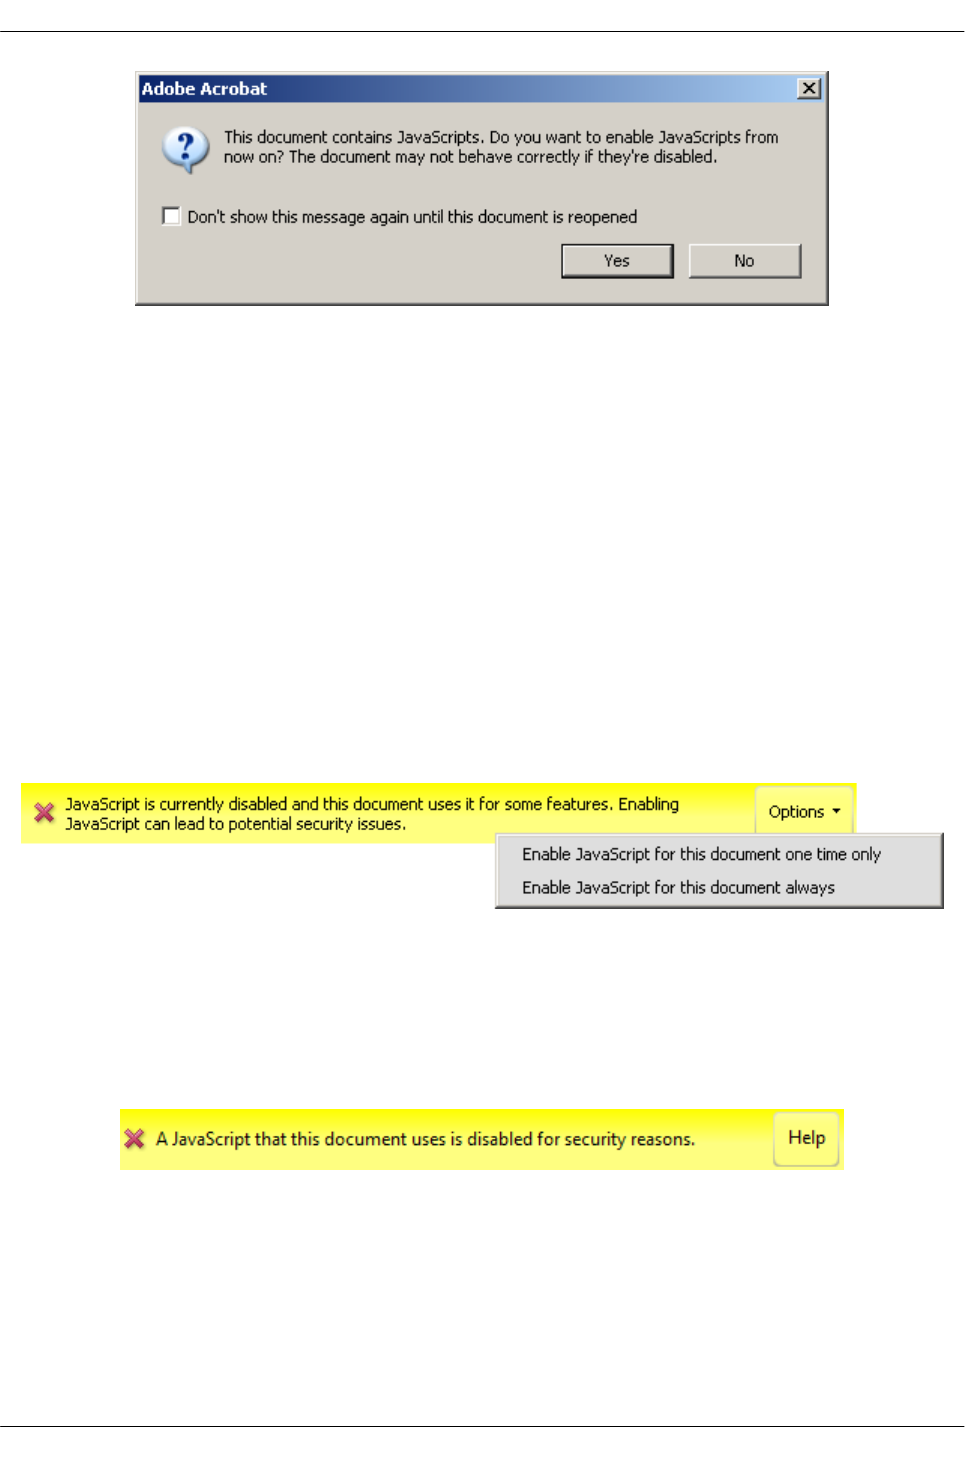
5.12.2 9.2 and 8.1.7 and later
These versions will behave as follows:
• If the application has JavaScript enabled:
• Non-high privileged JavaScript runs.
• High privileged JS will run if permitted to do so by other controls.
• If the application has JavaScript disabled:
• Any JavaScript invokes a Yellow Message Bar warning about the script. Users have
two options:
•Enable JavaScript for this document one time only
•Enable JavaScript for this document always: This option stores a unique document ID in
HKCU\Software\Adobe\<product name>\<version>\TrustManager\cTrustedFolders\cAlwaysTrustedForJavaScript
Yellow message bar: JS off warning (9.2 and 8.1.7 and later)
• High privileged JavaScript will not execute unless the user has established a prior trust relationship
with the document via a trusted certificate or privileged location.
• If JavaScript is enabled and a blacklisted JavaScript is encountered, the Document Message Bar
warns the user about the script and no script is executed even if they are not blacklisted. A
NotAllowedError exception is thrown on the JavaScript console.
Yellow message bar: Blacklisted JS warning
9.3 and 8.2 and later
Encountering an attempt to inject JavaScript over cross domain communications results in a YMB.
Yellow message bar: Blacklisted JS warning
Application Security Guide Section 5€€€JavaScript Controls
Section 5€€€JavaScript Controls Page 43
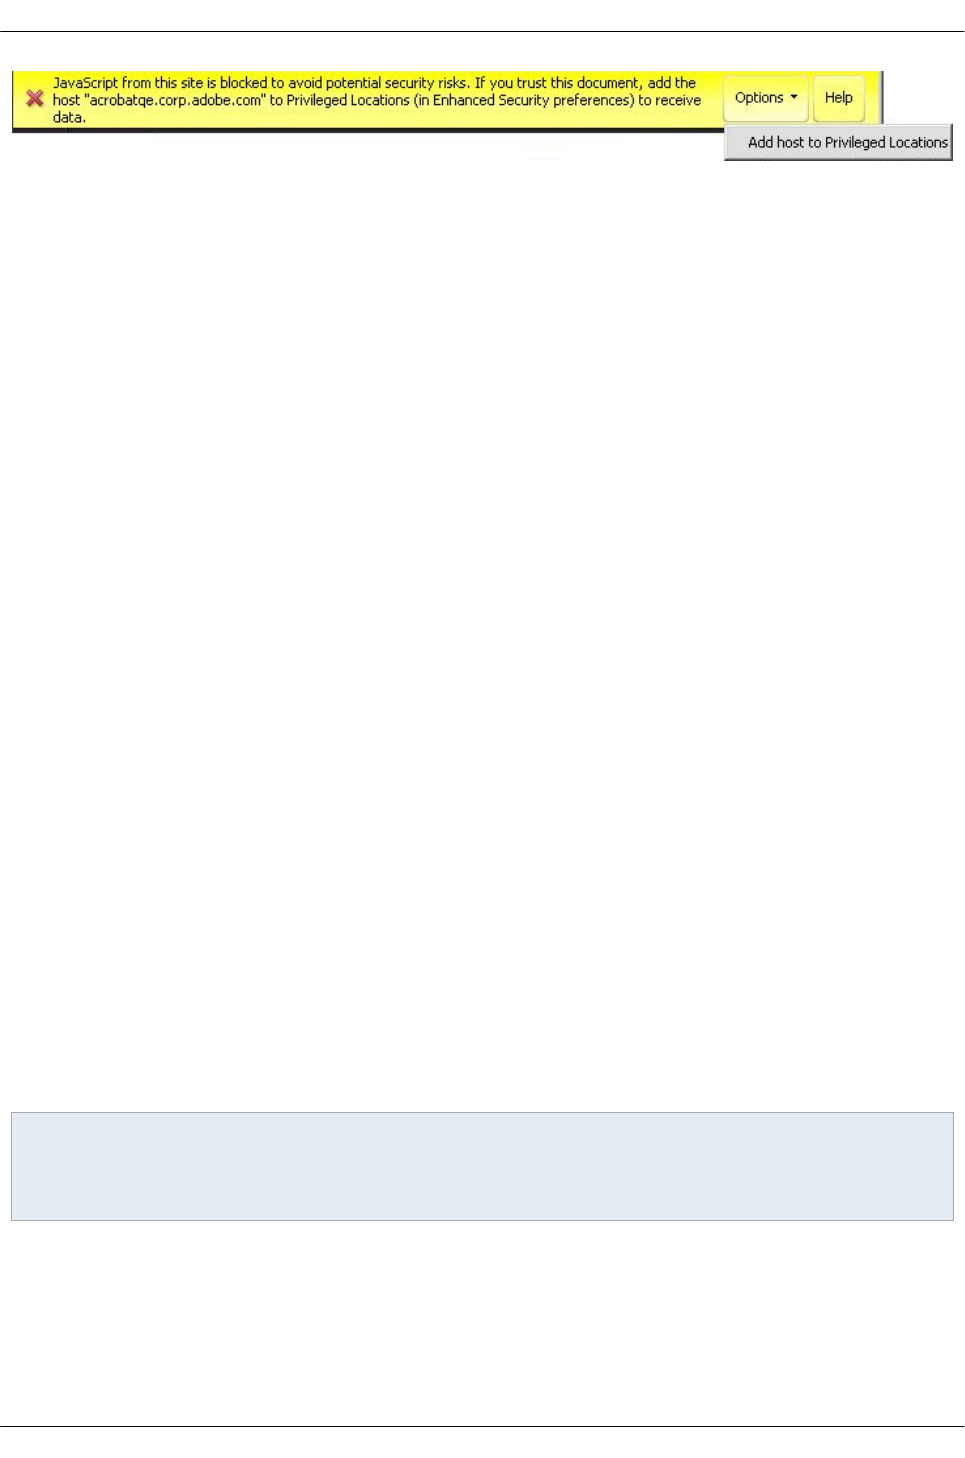
5.12.3 Migrating to 10.1.1+
5.12.3.1 Affected users
These changes for 10.1.1 impact existing workflows that use persistent global variables (Windows and
Macintosh) or custom JavaScripts (Windows only). Enterprise IT should take action to preserve workflows
that leverage these features.
5.12.3.2 Overview
Due to Adobe's high interest in security, changes to existing Acrobat and Adobe Reader functionality are
periodically released to further strengthen the product's resistance to malicious attacks. As part of this
effort, 10.1.1 introduces changes to the JavaScript feature that stores global variables and executes
user-defined scripts.
Prior to 10.1.1, end users could place JavaScript files in %ApplicationData%Adobe<product
name><version>JavaScripts, and these files would execute automatically on application startup. For
example, IT might place a JS file for modifying the product user interface by hiding or adding menu items
on a Windows XP machine in
C:\Documents and Settings\(username)\Application Data\Adobe\Acrobat\10.0\JavaScripts.
Additionally, the folder contains glob.js and glob.settings.js, two files which the product can read and write
to when storing global variables.
By design, Acrobat processes do not write to the %ApplicationData%\Acrobat\Privileged\10.0
folder. Additionally, sandboxed processes are specifically prohibited from writing to that folder. Thus, the
most secure operation involves enabling Protected View in Acrobat and Protected Mode in Reader,
thereby sandboxing all processes. Additionally, 10.1.1 introduces the following changes:
• New user JS location: The user JavaScript folder is moved from
•Vista and Windows 7:
Users\(username)\AppData\Roaming\Adobe\Acrobat\10.0\JavaScripts to
Users\(username)\AppData\Roaming\Adobe\Acrobat\Privileged\10.0\JavaScripts.
For example, the new path might be:
C:\Users\JoeUser\AppData\Roaming\Adobe\Acrobat\Privileged\10.0\JavaScripts
•XP: Documents and Settings\(username)\Application Data\Adobe\Acrobat\10.0\JavaScripts to
Documents and Settings\(username)\Application Data\Adobe\Acrobat\Privileged\10.0\JavaScripts.
For example, the new path might be:
C:\Documents and Settings\JoeUser\Application Data\Adobe\Acrobat\Privileged\10.0\JavaScripts
Note
This is a Windows-only change. Also, the change does not impact the behavior of
C:\Program Files\Adobe\(product name and version)\(product name)\JavaScripts.
• New format and location for persistent global variables: Variable settings stored in glob.settings.js
and glob.js now reside in a new directory at
%ApplicationData%\Adobe\Acrobat\10.0\JSCache. The key value pairs read from the
ASCab are used to initialize the persistent global variables. No settings are saved as JavaScript files
in this directory.
Section 5€€€JavaScript Controls Application Security Guide
Page 44 Section 5€€€JavaScript Controls

5.12.3.3 What you should do
If you have not stored variables as persistent global variables or placed custom JavaScripts in the affected
directories, then you can ignore this change. However, if you have done either, maintain the integrity of
your workflows by doing the following:
Global variable issues
• Verify glob.js and glob.settings.js do not store anything other than key value pairs and scalar values.
Workflows that use these files to store other methods will break.
• Since any data residing in glob.js and glob.setting.js at the time of applying 10.1.1 will be lost,
maintain the integrity of your workflows by doing the following:
1. For Acrobat, you can either:
• Copy the JavaScript in the existing glob.js and glob.setting.js files from the old
JavaScripts folder and execute it in the JavaScript console in a new Acrobat session.
This will export the stored global variables to the new Acrobat session. Or,
• Copy glob.js and glob.setting.js from the old JavaScripts folder to the
%Program Files%/Adobe/Reader/JavaScript folder and then delete the
original files. Restart the product to export the variables to the new format.
Note
For Adobe Reader, you can only use the latter method since the JavaScript console is not available
unless you have enabled it as described at
http://blogs.adobe.com/pdfdevjunkie/2008/10/how_to_use_the_javascript_debu.html.
2. Manually execute the JavaScript setPersistent method on all global variables to ensure they are
correctly migrated to the new format. For example, run the following JavaScript in the console:
for (var name in global) global.setPersistent("global."+name, true);
User JavaScript issues (Windows only)
Copy all user-created JavaScript files from %APPDATA%\Adobe\Acrobat\10.0\JavaScripts to
%APPDATA%\Adobe\Acrobat\Privileged\10.0\JavaScripts.
Application Security Guide Section 5€€€JavaScript Controls
Section 5€€€JavaScript Controls Page 45

6 Attachments
Acrobat products provide a way for you to add, remove, open, and save file attachments. However,
attachments represent a potential security risk because they can contain malicious content, open other
dangerous files, or launch applications. Certainly file types such as .bin, .exe, .bat, and so on will be
recognized as threats by most users and are not allowed as attachments.
To mitigate the risk inherent in attachments:
• Know what the content is and from where it originated.
• Be aware of dangerous file types and how the application manages those types. Adobe applications
maintain Black lists and white lists which control application behavior.
• Prevent attachments from opening other files and launching applications. This is the default
behavior. For details about changing this behavior, see Allowing attachments to launch applications.
6.1 Black lists and white lists
The applications store a list of some of these good (white) and bad (black) file types in the registry.
Application behavior is controlled by the file type's membership in a list:
• File types on the white list: These can be attached and may be opened or saved if the file extension
is associated with the requisite program.
• File types on the black list: These can be attached, but a warning dialog appears stating that they
cannot be saved or opened from the application. No actions are available for these files.
• File types not on any list: These can be attached without a warning dialog. Trying to open or save
them invokes a dialog which allows the user to perform the action just once or to add them to the
good type (white) list or bad type (black) list.
Attachment: Dangerous type warning
You can attach file types that are on the black list because a document recipient may have a less
restrictive black list than you (the sender). While the recipient may be able to open the file, the attacker will
not be able to execute or open it from within the application. Attempting to open a prohibited file type
results in a warning that the action is not allowed.
Attachment: "Cannot open" warning
6.2 Configuration
6.2.1 UI and registry config
The default application behavior for file types in the attachment list can be modified manually as needed.
New file extensions can be added to the list, existing ones removed, and the behavior changed for file
types already in the list.
Permissions settings are as follows:
Section 6€€€Attachments Application Security Guide
Page 46 Section 6€€€Attachments

• 0: User is warned that the file may be unsafe and is given two choices: open or permanently set the
behavior to Prohibited.
• 1: User is warned that the file may be unsafe and is given three choices: open or permanently set
the behavior to Allowed or Prohibited.
• 2: Always open this file type.
• 3: This file type does not open and a warning message appears.
Windows
Note
This HKLM setting does not work for any version of Reader 10.x with Protected Mode enabled.
Modifying the registry settings in HKLM requires administrator rights. To edit the registry to modify the
default behavior of file attachments in Windows:
1. Navigate to
HKLM\SOFTWARE\Policies\Adobe\<product name>\<version>\FeatureLockDown\cDefaultLaunchAttachmentPerms.
2. Double click the tBuiltInPermList value.
3. Edit or add an extension and value in the format of <.extension>:<0-3>. For example, zip:1.
Note
The ordering of the entries is irrelevant, but it is important that the list has no duplicate entries.
Attachment permissions by file type
version:1|.ade:3|.adp:3|.app:3|.arc:3|.arj:3|.asp:3|.bas:3|.bat:3|.bz:3|.bz2:3|
.cab:3|.chm:3|.class:3|.cmd:3|.com:3|.command:3|.cpl:3|.crt:3|.csh:3|.desktop:3|
.dll:3|.exe:3|.fxp:3|.gz:3|.hex:3|.hlp:3|.hqx:3|.hta:3|.inf:3|.ini:3|.ins:3|
.isp:3|.its:3|.job:3|.js:3|.jse:3|.ksh:3|.lnk:3|.lzh:3|.mad:3|.maf:3|.mag:3|.mam:3|
.maq:3|.mar:3|.mas:3|.mat:3|.mau:3|.mav:3|.maw:3|.mda:3|.mdb:3|.mde:3|.mdt:3|.mdw:3|
.mdz:3|.msc:3|.msi:3|.msp:3|.mst:3|.ocx:3|.ops:3|.pcd:3|.pi:3|.pif:3|.prf:3|.prg:3|
.pst:3|.rar:3|.reg:3|.scf:3|.scr:3|.sct:3|.sea:3|.shb:3|.shs:3|.sit:3|.tar:3|.taz:3|
.tgz:3|.tmp:3|.url:3|.vb:3|.vbe:3|.vbs:3|.vsmacros:3|.vss:3|.vst:3|.vsw:3|.webloc:3|
.ws:3|.wsc:3|.wsf:3|.wsh:3|.z:3|.zip:3|.zlo:3|.zoo:3|.pdf:2|.fdf:2|.jar:3|.pkg:3|
.tool:3|.term:3
Macintosh
To edit the registry to modify the default behavior of file attachments in Macintosh:
1. Locate the FeatureLockDown file and edit it in a text editor. This file is normally located in
Applications/<application> <version number><product name>/<application> [version number] Professional/Contents/MacOS/Preferences.
2. Hold the Ctrl key and click the application file in
Applications/Adobe Acrobat <product name>.
3. Choose Show Package Contents.
4. Navigate to Contents > MacOS > Preferences.
Application Security Guide Section 6€€€Attachments
Section 6€€€Attachments Page 47
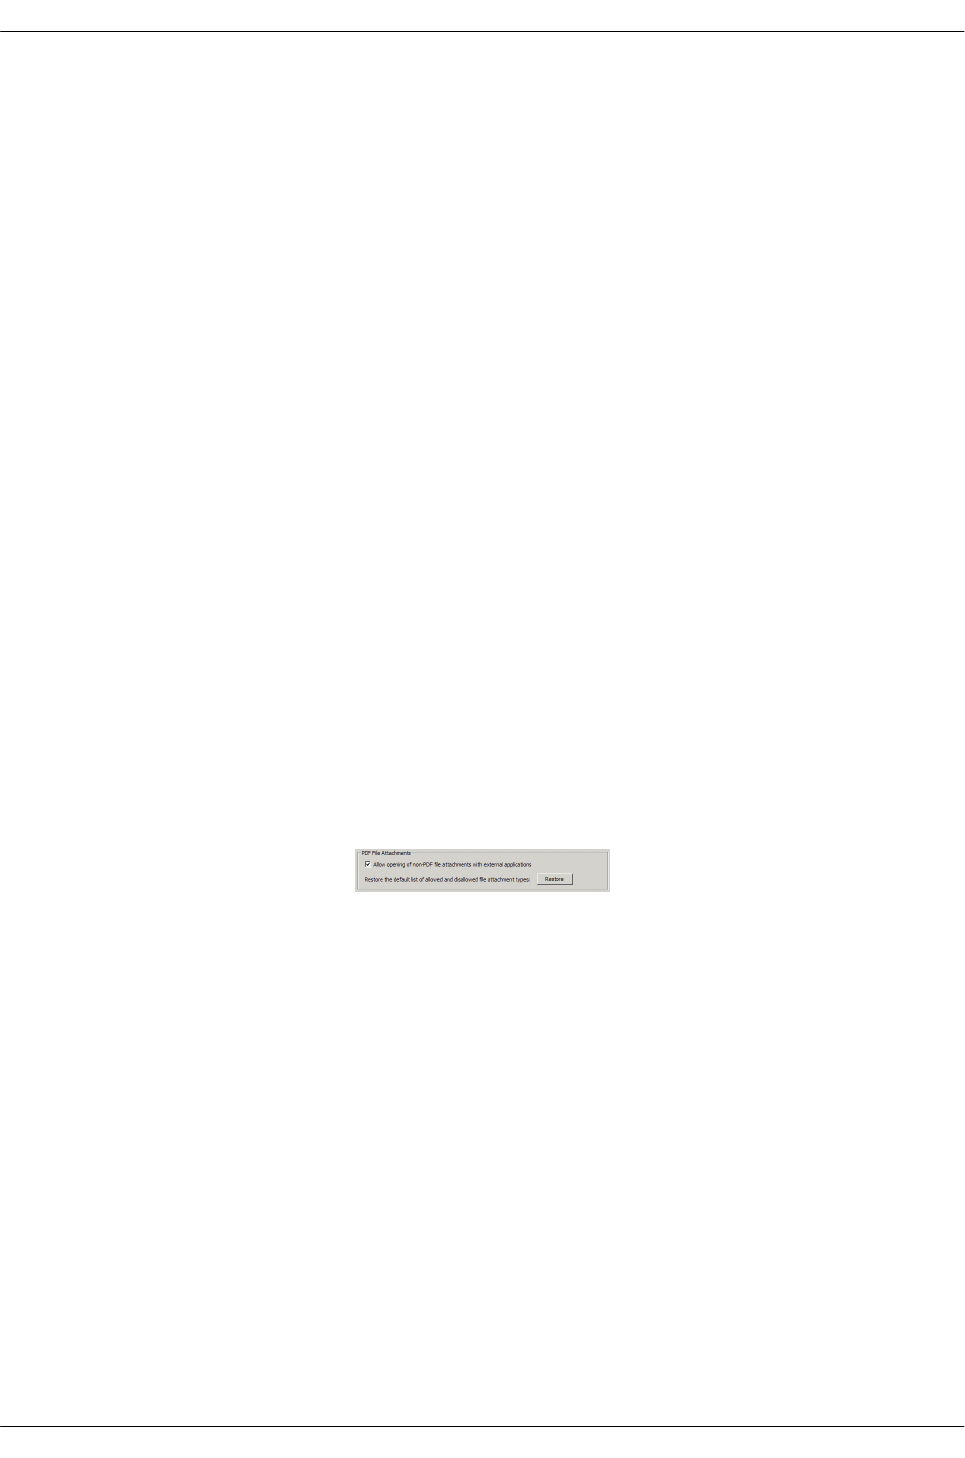
5. Locate the FeatureLockDown file in the Preferences folder, and open it in a text editor.
6. Find BuiltInPermList [/s.
7. Edit or add an extension and value in the format of <.extension>:<0-3>. For example, .zip:1.
Linux
To edit the registry to modify the default behavior of file attachments in Linux:
1. Navigate to
<install location>/Adobe/<application and version/Reader/globalPrefs.
2. Open AttachmentPerms in a text editor.
3. Edit or add an extension and value in the format of <.extension>:<0-3>. For example, .zip:1.
Adding Custom Attachment Extensions
To add custom extensions, add your own file extension entries to the very end of the list. The method is
the same on both Windows and Macintosh. Use the following format for each custom extension:
|.FILEEXTENSION:PERMVALUE
For example, to add the extension .`ext` with a value of Always Allowed, you would add:
.ext:2
6.2.2 Resetting attachment permissions
Because the registry list could grow over time and users do not have direct access to the lists through the
user interface, resetting the list to its original state may result in the highest level of security.
To reset the black and white lists:
1. Choose Preferences > Trust Manager.
2. In the PDF File Attachments panel, choose Restore.
Attachment panel in Trust Manager
6.2.3 Allowing attachments to launch applications
The Trust Manager enables users to control whether or not non-PDF attachments can open with other
applications. By default, this option is enabled so that common file types such as .doc (not on the
application's black list) can be easily opened in the appropriate application.
To set attachment preferences:
1. Choose Preferences > Trust Manager.
2. Configure Allow opening of non-PDF file attachments with external applications:
• Checked: Default. The application uses its stored black list to determine whether
Acrobat should let the attachment launch an application action, so the attachment can
be opened.
• Unchecked: Clicking or opening an attachment will never result in launching it's
associated viewing application. Use this option if a higher level of security is needed.
6.2.4 Modifying permissions on-the-fly
Section 6€€€Attachments Application Security Guide
Page 48 Section 6€€€Attachments
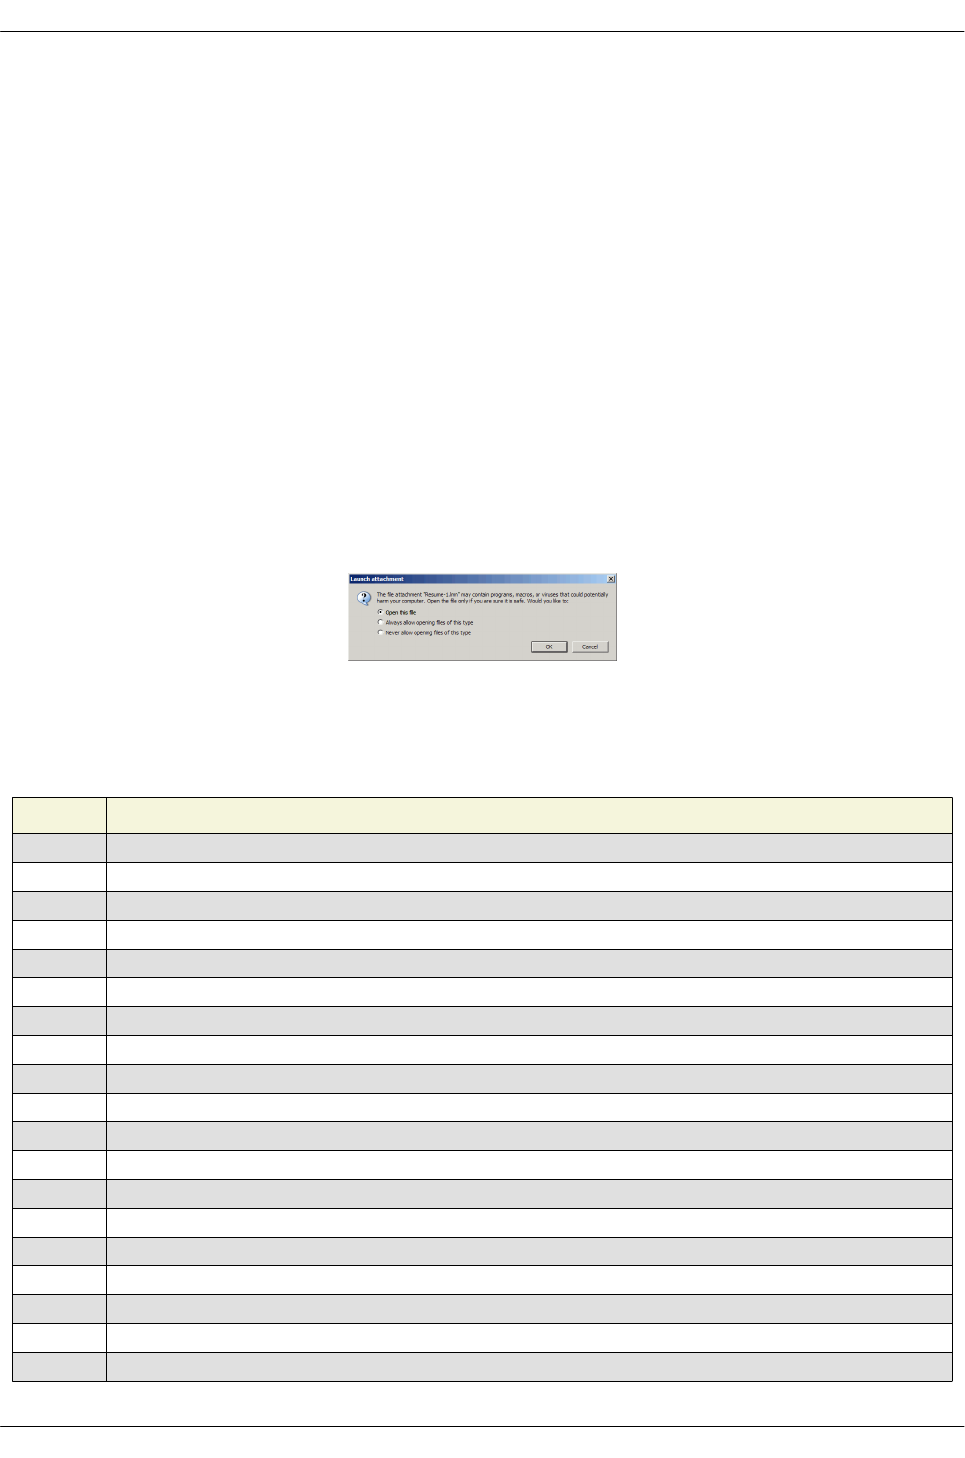
Users can indirectly manage the registry list of which file types can be opened and saved. In other words,
the list in Attachment black list can be extended one at a time as each attached file is opened.
Administrators can modify the registry.
To add a file to a black or white list, attach the new file type to a document and then try to open it:
1. Acrobat: Choose Document > Attach a File and attach a file type not on the black or white list (e.g.
yfile.xyz)
2. Open the file by highlighting it in the Attachments pane and choosing Open.
3. When the Launch Attachment dialog appears, choose one of the following:
•Open this file: Opens the files without changing the registry list.
•Always allow opening files of this type: Adds the file type to the white list and
prevents future warnings.
•Never allow opening files of this type: Adds the file type to the black list and does
not open it.
4. Choose OK.
Launch Attachment dialog
6.3 Blacklisted extensions
Attachment black list
Extension Description
.ade Access Project Extension (Microsoft)
.adp Access Project (Microsoft)
.app Executable Application
.asp Active Server Page
.bas BASIC Source Code
.bat Batch Processing
.bz Bzip UNIX Compressed file
.bz2 Bzip 2 UNIX Compressed file (replaces BZ)
.cer Internet Security Certificate file (MIME x-x509-ca-cert)
.chm Compiled HTML Help
.class Java Class file
.cmd DOS CP/M Command file, Command file for Windows NT
.com Command
.command Mac OS Command Line executable
.cpl Windows Control Panel Extension (Microsoft)
.crt Certificate file
.csh UNIX csh shell script
.exe Executable file
.fxp FoxPro Compiled Source (Microsoft)
Application Security Guide Section 6€€€Attachments
Section 6€€€Attachments Page 49

.gz Gzip Compressed Archive
.hex Macintosh BinHex 2.0 file
.hlp Windows Help file
.hqx Macintosh BinHex 4 Compressed Archive
.hta Hypertext Application
.inf Information or Setup file
.ini Initialization/Configuration file
.ins IIS Internet Communications Settings (Microsoft)
.isp IIS Internet Service Provider Settings (Microsoft)
.its Internet Document Set, International Translation
.jar Java Archive
.job Windows Task Scheduler Task Object
.js JavaScript Source Code
.jse JScript Encoded Script file
.ksh UNIX ksh shell script
.lnk Windows Shortcut file
.lzh Compressed archive (LH ARC)
.mad Access Module Shortcut (Microsoft)
.maf Access (Microsoft)
.mag Access Diagram Shortcut (Microsoft)
.mam Access Macro Shortcut (Microsoft)
.maq Access Query Shortcut (Microsoft)
.mar Access Report Shortcut (Microsoft)
.mas Access Stored Procedures (Microsoft)
.mat Access Table Shortcut (Microsoft)
.mau Media Attachment Unit
.mav Access View Shortcut (Microsoft)
.maw Access Data Access Page (Microsoft)
.mda Access Add-in (Microsoft), MDA Access 2 Workgroup (Microsoft)
.mde Access MDE Database file (Microsoft)
.mdt Access Add-in Data (Microsoft)
.mdw Access Workgroup Information (Microsoft)
.mdz Access Wizard Template (Microsoft)
.msc Microsoft Management Console Snap-in Control file (Microsoft)
.msi Windows Installer file (Microsoft)
.msp Windows Installer Patch
.mst Windows SDK Setup Transform Script
.ocx Microsoft Object Linking and Embedding (OLE) Control Extension
.ops Office Profile Settings file
.pcd Visual Test (Microsoft)
.pkg Mac OS X Installer Package
.pif Windows Program Information file (Microsoft)
.prf Windows System file
.prg Program file
.pst MS Exchange Address Book file, Outlook Personal Folder file (Microsoft)
Section 6€€€Attachments Application Security Guide
Page 50 Section 6€€€Attachments

.rar WinRAR Compressed Archive
.reg Registration Information/Key for Windows 95/98, Registry Data file
.scf Windows Explorer Command
.scr Windows Screen Saver
.sct Windows Script Component, Foxpro Screen (Microsoft)
.sea Self-expanding archive (used by Stuffit for Mac files and possibly by others)
.shb Windows Shortcut into a Document
.shs Shell Scrap Object file
.sit Compressed archive of Mac files (Stuffit)
.tar Tape Archive file
.tgz UNIX Tar file Gzipped
.tmp Temporary file or Folder
.url Internet Location
.vb VBScript file or Any VisualBasic Source
.vbe VBScript Encoded Script file
.vbs VBScript Script file, Visual Basic for Applications Script
.vsmacros Visual Studio .NET Binary-based Macro Project (Microsoft)
.vss Visio Stencil (Microsoft)
.vst Visio Template (Microsoft)
.vsw Visio Workspace file (Microsoft)
.webloc Mac OS Finder Internet Location
.ws Windows Script file
.wsc Windows Script Component
.wsf Windows Script file
.wsh Windows Script Host Settings file
.zip Compressed Archive file
.zlo ZoneLabs ZoneAlarm Mailsafe Renamed .PIF file
.zoo An early compressed file format
Application Security Guide Section 6€€€Attachments
Section 6€€€Attachments Page 51

7 Cross Domain Configuration
This document describes how to configure the Acrobat family of products to allow cross domain access for
PDFs in one domain that attempt to access data from another domain. By default, when requested
content is not from the same origin as the requesting document, Acrobat and Adobe Reader automatically
attempt to load a server-based policy file from that domain to get permission for such access. Default
behavior is subject to customization by administrators, IT, workflow stakeholders, and others who need to
enable or disable cross domain access.
Changes across releases: Cross domain support
Version Change
9.0 Support for controlling cross domain access via policy files is introduced. The implementation leverages the Flash model.
9.1 Support for allowing cross domain access on a per document basis by identifying certified documents by the SHA-1 hash of
the signing certificate's public key. The hash is added to the cross-domain policy file.
8.1.7 & 9.2 Enhanced security added for 8.1.7.
8.2 & 9.3
• Enhanced security turned on by default. Enhanced security takes precedence of
Trust Manager internet access settings.
• On Windows, the ability to trust sites that the user already trusts via Internet
Explorer can be configured via the user interface or registry.
• A non-intrusive Yellow Message Bar (YMB) that doesn't block workflows replaces
many of the modal dialogs. Depending on how the client is configured, the YMB
appears at the top of the document and offers the user to trust the document
"once" or "always."
• Cross domain logging can be enabled and the log viewed via the user interface.
• cross-domain policy files support all the mime types specified in the Cross
Domain Policy File Specification.
7.1 Cross domain basics
7.1.1 Same-origin policies
As the Acrobat family of products became more powerful over the years (i.e. support for JavaScript and
web service interaction), the line between document and application gradually blurred. With the addition of
interactive form features, multimedia, and scripting, PDFs became more capable with each release. On
the one hand, support for JavaScript and dynamic content within a Web page allows developers to add
rich interactivity and behaviors to their content. Yet these features can be abused by attackers, and
default configurations for clients that support them make such attacks even more dangerous.
One of the earliest attempts to combat such attacks was Netscape's same-origin policy introduced with
Netscape Navigator 2.0. The policy prevented a document or script loaded from one origin from accessing
resources loaded from another origin. To counter the same-origin policy, a wide variety of attack patterns
evolved, including cross-site scripting (XSS) and cross-site request forgery (XSRF). These attack patterns
have one thing in common: they exploit the trust shared between a user and a website by circumventing
its primary protection mechanism (the same-origin policy).
Adobe began addressing this problem several releases ago by implementing a standardized
cross-domain security model that has evolved over the years into a robust, secure solution. By providing
controls for who may receive data from whom, Adobe clients such as Flash and rich PDF documents are
safe and extremely flexible.
Section 7€€€Cross Domain Configuration Application Security Guide
Page 52 Section 7€€€Cross Domain Configuration

7.1.2 Cross domain workflow
A cross-domain policy file is an XML document that grants a web client, such as Adobe Flash Player or
Adobe Acrobat permission to handle data across domains. When a client hosts content from a particular
source domain and that content makes requests directed towards a domain other than its own, the remote
domain needs to host a cross-domain policy file that grants access to the source domain, allowing the
client to continue the transaction.
As shown below, b.com hosts a policy file that grants permission for a file on a.com to load data from
some or all of the b.com site. The b.com administrator should exercise care because policy files give
permission for files from other domains to operate with users' credentials when accessing b.com.
The user browses to a file on a.com (1). The file from a.com obtains permission from b.com's policy file (2)
to load data from b.com (3). If b.com hosts a policy and requires credentials for access then any
documents served from the domains listed in b.com's policy file gain the right to use those credentials on
the user's behalf. Now that the a.com file has access to data from b.com, the document can upload the
b.com data back to its own server at a.com (4)
It is important here to compare a user's and a.com's server's access to b.com. If the user is able to access
b.com because both are inside a network firewall or because a required login returned an HTTP cookie,
then the user has greater privileges than the a.com server. In this situation, it may be risky to create a
policy file on b.com because files from a.com must then be trusted not to disclose data that is private to
b.com, the user, or both. Therefore, an administrator should limit the number and location of policy files. It
should always be possible to easily audit the current set of permissions and control who can add and
modify policy files.
Cross domain workflow
Application Security Guide Section 7€€€Cross Domain Configuration
Section 7€€€Cross Domain Configuration Page 53
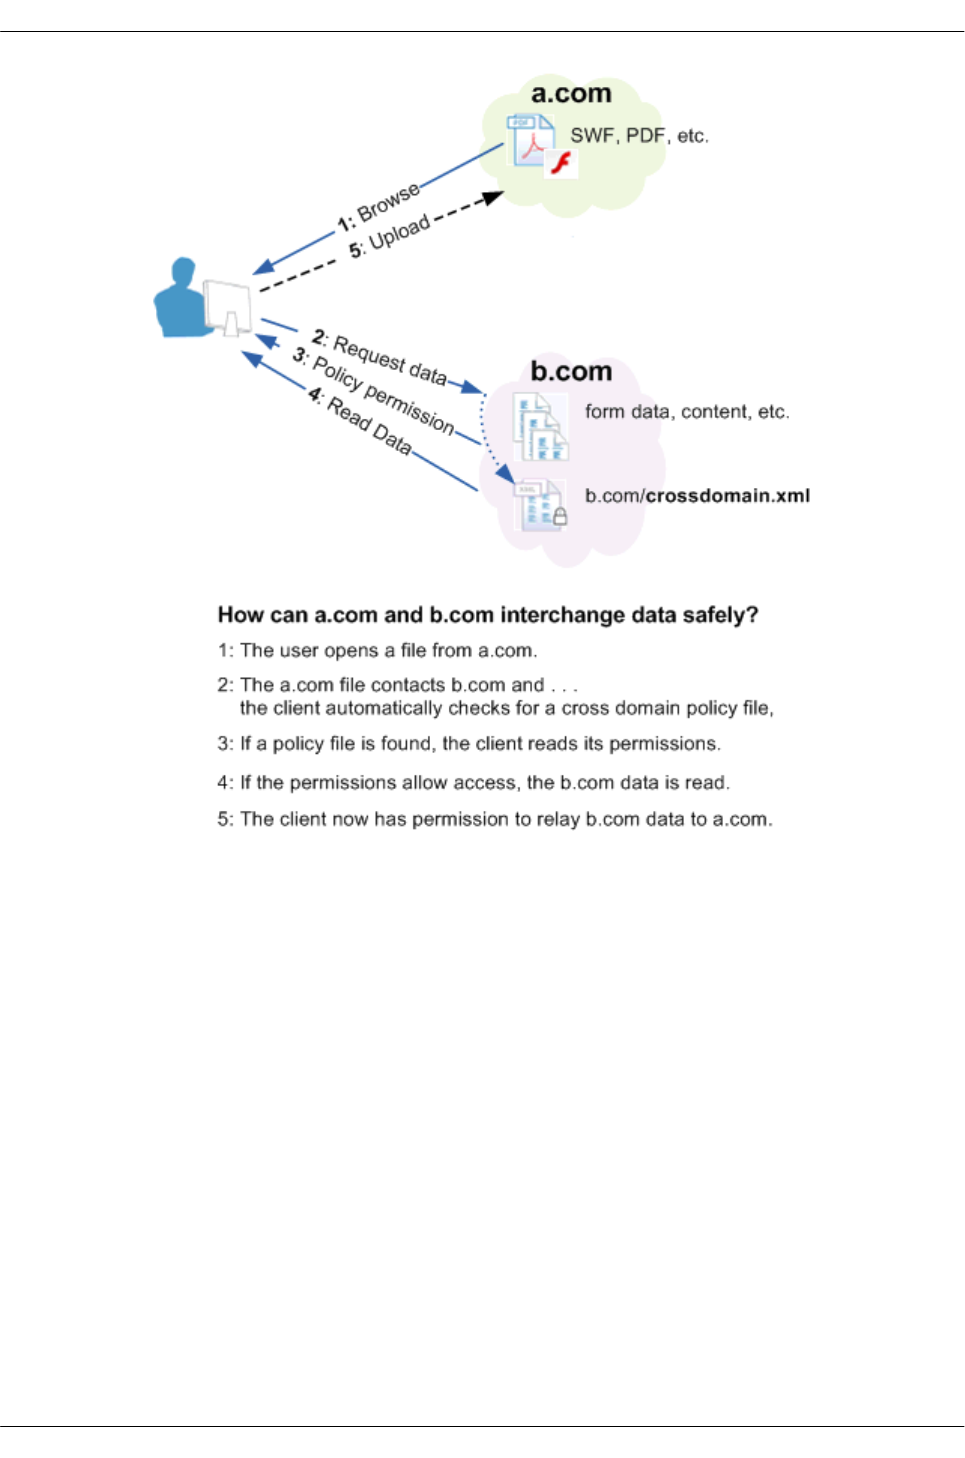
7.1.3 When you need cross domain access
Cross domain access is permitted for Acrobat and Adobe Reader default installations in versions 9.2/8.17
and earlier. You can prevent such access by turning on the enhanced security feature.
Cross domain support is specifically intended for organizations that want the heightened level of security
assurance that the enhanced security feature provides but still need to maintain access to data that would
otherwise be restricted. While data access permissions may be defined within the client using the
"privileged locations" panel provided by the enhanced security preference, Acrobat's cross domain
support becomes important when:
• Enhanced security is enabled because uncontrolled cross domain access should not be permitted.
• You require selective cross domain access and need to leverage other features such as document
fingerprint recognition based on a certificate.
• You want to centrally manage cross domain access permissions from a single, server based
location.
• Workflows include data requests from multiple and even many domains (see above) for returning
form data, SOAP requests, references to streaming media such as audio and video,
Net.HTTP.request, and so on.
7.1.4 When you don't need cross domain support
Section 7€€€Cross Domain Configuration Application Security Guide
Page 54 Section 7€€€Cross Domain Configuration
The following cases do not require leveraging Adobe's cross domain feature:
• Enhanced security is turned off.
• Enhanced security is turned on, but the document and/or data is in a privileged location.
• Data upload; for example, when a form sends data to a server, but no data is sent back into the
form.
• A form sends and receives data to a server on the same host as the one on which the form is
hosted.
• A user clicks on a hyperlink: such data requests offer protection via warning dialogs or the Yellow
Message Bar.
• A user participates in a shared workflow such as a document review using a collaboration server.
The dialog presented to the user is considered adequate warning that downloading may occur.
• Cross domain access is permitted for users who have already trusted the certificate in a certified
document's certification signature. The signature must be valid and the certificate must be trusted
for Privileged network operations.
• Web service proxy alternative: When forms are opened in the browser, a web service calls back to
the origin serving the document is allowed by default in the cross-domain security policy and
therefore does not require configuration of a crossdomain.xml at the site of the Web service. This
typical LiveCycle deployment pattern allows developers to employ the Web Service Proxy pattern. In
this design pattern, new Web services are authored using LiveCycle at the same origin as the
hosted document which then acts as a proxy to call the third-party Web service (similar to Web
mash-ups).
Note
Cross-domain restrictions do not apply to data requested by Reader for non-document request
operations. For example, if Adobe Reader requests a timestamp from a remote server to validate a
digital signature, it is not restricted because the data was not requested by the document.
same-origin and cross-domain examples
PDF
Location:
Received
data
location: x-domain
required? allow-access-from domain examples
c:test.pdf c:xyz.data No N/A
c:test.pdf smb://smb_server/xyz.dataNo N/A
\smb_servertest.pdf smb://smb_server/xyz.dataNo N/A
\smb_servertest.pdf c:xyz.data No N/A
c:test.pdf http://xyz.com/xyz.dataYes Use certificate fingerprint
\smb_servertest.pdf http://xyz.com/xyz.dataYes Use certificate fingerprint
http://www.xyz.com/test.pdfhttp://www.xyz.com/xyz.dataNo N/A
http://www.xyz.com/test.pdfhttps://www.xyz.com/xyz.dataYes *.xyz.com or www.xyz.com
https://www.xyz.com/test.pdfhttp://www.xyz.com/xyz.dataYes
•*.xyz.com
• www.xyz.com
http://www.xyz.com/test.pdfhttp://www.xyz.com:8080/xyz.dataYes secure="false" should follow each entry: * *.xyz.com * www.xyz.com
Application Security Guide Section 7€€€Cross Domain Configuration
Section 7€€€Cross Domain Configuration Page 55

http://www.xyz.com/test.pdfhttp://www.xyz.com/xyz.dataNo N/A
http://www.xyz.com/test.pdfhttp://xyz.com/xyz.dataNo N/A
http://www.xyz.com/test.pdfhttp://bar.com/xyz.dataYes
•*.xyz.com
• www.xyz.com
http://www.xyz.com/test.pdfhttp://www.bar.com/foo.dataYes
•*.xyz.com
• www.xyz.com
7.1.5 PDFs in a standalone application vs. the browser
Acrobat and Adobe Reader behave similarly with respect to data access, and their behavior is consistent
whether running in the browser or as a standalone application. However, behavior inside and outside of a
browser varies because of differences in http(s) request handling:
•PDF viewed in a browser: When the application is run from inside the browser, the application
behaves similarly to Flash running in the browser: Same domain requests do not require a check,
and cross domain checks do.
•PDF viewed in a standalone application: When the application runs outside of a browser, such as
viewing a document on a local file system or opened as an attachment in e-mail, data requests from
an http[s] server are blocked. A check is always required (the server must have a cross-domain
policy file containing a wild card, or the local file must be in a privileged location).
• Local files: A PDF can be opened directly from a local disk or referenced by a file:URL. Files have
no domain when the URL does not begin with http or https and is referenced as follows:
•file://
• \serverfolderfile.pdf
• C:folderfile.pdf.
Note
Access to these files via a cross domain file should be provided by a certificate fingerprint.
7.1.6 User experience
For trusted documents, cross domain access should be secure and transparent. When trust is not
assigned, an attempt at cross domain access results in a Yellow Message Bar (YMB) warning the user of
such an attempt. The YMB's appearance varies based on the following:
• Enhanced security is enabled and an administrator has disabled the privileged locations feature. In
this case, the user sees a warning but is not given any option to trust the action. It is also likely the
administrator has enabled and locked enhanced security. Remedies include:
• Having the administrator assign trust via a privileged location or cross-domain policy
file.
• Having the document owner/author sign the document with a certificate you trust for
privileged network operations.
Section 7€€€Cross Domain Configuration Application Security Guide
Page 56 Section 7€€€Cross Domain Configuration

• Enhanced security is enabled and privileged locations are not locked. Here the warning button
appears with an options button. The user is provided with the option to trust the document once or
always. Trusting the document "always" results in adding the document as a privileged location.
Yellow message bar: Cross domain access not locked
Yellow message bar: Cross domain access locked
7.2 Policy file configuration
A cross-domain policy is simply a user-defined set of permitted data access rules encapsulated in a
crossdomain.xml file. It is only viable on servers that communicate via HTTP, HTTPS, or FTP. A
cross-domain policy file is an XML document that grants a web client permission to handle data across
one or more domains. When a client hosts content from a particular source domain and that content
makes requests directed towards a domain other than its own, the remote domain would need to host a
cross-domain policy file that grants access to the source domain, allowing the client to continue with the
transaction. Policy files grant read access to data as well as permit a client to include custom headers in
cross-domain requests.
The cross domain feature introduced with 9.0 allows administrators to:
• Create a cross-domain policy based on a specification.
• Configure access to a broad range of locations relative to the requestor.
• Locate the policy according to a flexible set of rules.
7.2.1 Policy file syntax
An XML policy file contains a single <cross-domain-policy> tag, which contains zero or more
<allow-access-from> tags. Each <allow-access-from> tag contains a domain attribute specifying either an
exact IP address, an exact domain, or a wildcard domain (an asterisk followed by a suffix which matches
only domains that end with the specified suffix).
The full syntax of crossdomain.xml files is beyond the scope of this document, as those details are
available in the Cross Domain Policy File Specification DTD and XSDs are available to define the generic
policy file schema as well as each different type of policy file (either HTTP, HTTPS, FTP) since policy files
hosted in each of those contexts are slightly different.
Note
Because Acrobat and Flash share the same cross domain model, the specification as well as much of
the Flash documentation may prove useful to you.
7.2.2 Policy file best practices
Application Security Guide Section 7€€€Cross Domain Configuration
Section 7€€€Cross Domain Configuration Page 57

Workflow developers should have a thorough understanding of what is and isn't allowed when enhanced
security is enabled. For example, a cross-domain policy file may be needed if privileged locations are not
set. same-origin and cross-domain examples shows examples of combinations of PDF and server
locations for both same-origin and cross-domain data requests.
• Use same-origin communications exclusively if you can.
• Never use a standalone * wildcard to provide unlimited cross domain access. Keep your
permissions as granular as possible.
• Don't hard code the hostname of same-origin communications.
• Choose one full qualified domain name. Use a redirect for alternate variations.
• Use a "www" domain name when you staging and production servers and want cross domain
access to work consistently without modification during the development-deployment life cycle.
• Use SSL consistently (don't use cross domain files to help http://example.com and
https://example.com communicate with each other. Use secure="false" if you have to mix and match
http and https.
• For local files and files referenced by a file URL, provide access via a certificate fingerprint.
7.2.3 Typical policy
Policy files grant read access to data, permit a client to include custom headers in cross-domain requests,
and grant permissions for socket-based connections. The most common location for a policy file on a
server is in the root directory of a target domain with the filename crossdomain.xml (e.g.
http://example.com/crossdomain.xml)—the default location that clients check when a policy file is
required. Policy files hosted this way are known as master policy files. allow-access-from: Allowing access
to root domains shows a typical URL (i.e. non-socket) master policy file which allows access to the
example.com root domain with and without the www subdomain as well as any subdomains.
allow-access-from: Allowing access to root domains
<?xml version="1.0"?>
<!DOCTYPE cross-domain-policy SYSTEM
"http://www.adobe.com/xml/dtds/cross-domain-policy.dtd">
<cross-domain-policy>
<site-control permitted-cross-domain-policies="master-only"/>
<allow-access-from domain="*.example.com"/>
<allow-access-from domain="www.example.com"/>
<allow-http-request-headers-from domain="*.adobe.com" headers="SOAPAction"/>
</cross-domain-policy>
The site-control element here specifies that only this master policy file should be considered valid on
this domain. Below that, the allow-access-from element specifies that content from the
example.com requesting domain can access any data within the target domain (the domain in which this
policy file has been saved). Finally, the allow-http-request-headers-from element indicates that
a SOAPAction header is also allowed to be sent with requests made to the target domain from
adobe.com.
7.2.4 Permissive vs. restrictive policies
The following is the least permissive master policy file definition. It enforces a meta-policy that restricts
any policy file, including this one, from granting permissions of any type to any requesting domain:
cross-domain-policy: Least permissive policy
Section 7€€€Cross Domain Configuration Application Security Guide
Page 58 Section 7€€€Cross Domain Configuration

<?xml version="1.0"?>
<!DOCTYPE cross-domain-policy SYSTEM
"http://www.adobe.com/xml/dtds/cross-domain-policy.dtd">
<cross-domain-policy>
<site-control permitted-cross-domain-policies="none"/>
</cross-domain-policy>
The following is the most permissive master policy file definition (strongly not recommended ). It allows
any policy file on the target domain to grant permissions, allows access to any of its file, and permits any
header to be sent to the server. All of this possible even through HTTPS despite the source being HTTP:
cross-domain-policy: Least restrictive policy
<?xml version="1.0"?>
<!DOCTYPE cross-domain-policy SYSTEM
"http://www.adobe.com/xml/dtds/cross-domain-policy.dtd">
<cross-domain-policy>
<site-control permitted-cross-domain-policies="all"/>
<allow-access-from domain="*" secure="false"/>
<allow-http-request-headers-from domain="*" headers="*" secure="false"/>
</cross-domain-policy>
7.2.5 Meta vs. master policies
While Meta policy: Allowing non-master policy files does not allow data access to this
target domain, it does define a meta-policy that allows other policy files within this domain to determine
how access is handled. In this case, the client is instructed to look for a policy file other than the master for
permissions related to this domain.
Meta policy: Allowing non-master policy files
<?xml version="1.0"?>
<!DOCTYPE cross-domain-policy SYSTEM
"http://www.adobe.com/xml/dtds/cross-domain-policy.dtd">
<cross-domain-policy>
<site-control permitted-cross-domain-policies="by-content-type"/>
</cross-domain-policy>
Meta policy: allowing only a master policy defines a meta-policy that allows only this
master policy file to function for this target domain. It allows access to data on example.com and all of its
subdomains:
Meta policy: allowing only a master policy
<?xml version="1.0"?>
<!DOCTYPE cross-domain-policy SYSTEM
"http://www.adobe.com/xml/dtds/cross-domain-policy.dtd">
<cross-domain-policy>
<site-control permitted-cross-domain-policies="master-only"/>
<allow-access-from domain="*.example.com"/>
</cross-domain-policy>
7.2.6 HTTP-HTTPS communications
Application Security Guide Section 7€€€Cross Domain Configuration
Section 7€€€Cross Domain Configuration Page 59

allow-access-from: Most permissive access demonstrates the most permissive use of
allow-access-from granting any other domain access to the files on this target domain, even if an
HTTP source is accessing data on this domain through HTTPS. It should be obvious that this practice is
not recommended.
allow-access-from: Most permissive access
<?xml version="1.0"?>
<!DOCTYPE cross-domain-policy SYSTEM
"http://www.adobe.com/xml/dtds/cross-domain-policy.dtd">
<cross-domain-policy>
<allow-access-from domain="www.example.com" secure="false"/>
</cross-domain-policy>
7.2.7 Socket permissions
allow-access-from: Socket policy should be served to a client through a socket connection
when requested with policy-file-request. It permits access to content from example.com or any of its
subdomains through ports 507 and any port between 516 and 523 (including 516 and 523).
allow-access-from: Socket policy
<?xml version="1.0"?>
<!DOCTYPE cross-domain-policy SYSTEM
"http://www.adobe.com/xml/dtds/cross-domain-policy.dtd">
<cross-domain-policy>
<allow-access-from domain="*.example.com" to-ports="507,516-523"/>
</cross-domain-policy>
7.2.8 Credential-based permissions
allow-access-from-identity: Required configuration
<allow-access-from-identity>
<signatory>
<certificate
fingerprint="01:23:45:67:89:ab:cd:ef:01:23:45:67:89:ab:cd:ef:01:23:45:67"
fingerprint-algorithm="sha-1"/>
</signatory>
</allow-access-from-identity>
7.2.9 Friendly names and alias use
Any alias or friendly name can be used as long as your DNS server can resolve these names:
<allow-access-from domain="myalias.com" />
<allow-access-from domain="myfriendlyname" />
7.2.10 IP address
If you specify an IP address, access is granted only to files loaded from that IP address using IP syntax
(for example, http://65.57.83.12/document.pdf), not those loaded using domain-name syntax. Acrobat
does not perform reverse DNS lookup. The following lines enable access only to 105.216.0.40.
Section 7€€€Cross Domain Configuration Application Security Guide
Page 60 Section 7€€€Cross Domain Configuration
<allow-access-from domain="105.216.0.40" />
7.2.11 Header-based permissions
The following shows how to allow any requesting domain to send the SOAPAction header to this target
domain.
allow-http-request-headers-from: Header usage with SOAPAction
<?xml version="1.0"?>
<!DOCTYPE cross-domain-policy SYSTEM
"http://www.adobe.com/xml/dtds/cross-domain-policy.dtd">
<cross-domain-policy>
<allow-http-request-headers-from domain="*" headers="SOAPAction"/>
</cross-domain-policy>
The following allows the Authorization header and any header beginning with the characters X-Foo from
www.example.com to be sent to this target domain. If a request is coming from foo.example.com, only
headers beginning with the characters X-Foo are allowed, not Authorization:
allow-http-request-headers-from: Header usage with wildcard
<?xml version="1.0"?>
<!DOCTYPE cross-domain-policy SYSTEM
"http://www.adobe.com/xml/dtds/cross-domain-policy.dtd">
<cross-domain-policy>
<allow-http-request-headers-from domain="www.example.com" headers="Authorization,X-Foo*"/>
<allow-http-request-headers-from domain="foo.example.com" headers="X-Foo*"/>
</cross-domain-policy>
7.3 Certificate-based permissions
Acrobat and Adobe Reader 9.1 introduces an extension to cross-domain policies that enables cross
domain access on a per document basis. You do so by identifying a certified document signed with a
specific certificate that should be able to access web servers in another domain. Since these documents
contain an embedded and unique public key certificate, a SHA-1 hash of the certificate can be used as an
identifier, much like a fingerprint. The fingerprint is extracted from the document and placed in the
crossdomain.xml file, thereby providing access.
Two types of certificate fingerprints are supported:
• Certificates extracted from a certified document. The signature must be valid. Documents signed
with approval (sometimes called "ordinary") signatures are not supported.
• The certificate associated with the digital ID provided to the LiveCycle ES administrator so that the
server can Reader enable documents and provide it with additional usage rights.
Note
The signature must be valid and the certificate must be trusted.
7.3.1 Certified documents
There are several methods for finding the certificate hash. At a high level, the steps involve opening the
certificate in the Certificate Viewer and copying the Value data for the SHA1 digest field.
Application Security Guide Section 7€€€Cross Domain Configuration
Section 7€€€Cross Domain Configuration Page 61

Note
If you are using a certificate hash for documents that are Reader enabled by a LiveCycle ES server,
you should use the certificate issued in conjunction with the server. This certificate will be unique to
your organization.
To extract a certificate hash from a certified document:
1. Open the certified document.
2. View the signature properties by doing one of the following:
• Open the signature panel, right click on the signature and choose Show Signature
Properties.
• If the signature is visible, right click on the signature and choose Show Signature
Properties.
3. Choose the Details tab in the Certificate Viewer to see the list of all data for the selected certificate.
4. In the Certificate Data pane, select the SHA1 digest field.
5. In the bottom pane, highlight and copy the hex data fingerprint.
Extracting the SHA1 hash from the certificate
7.3.2 Reader enabled documents
The digital ID delivered with LiveCycle ES so that it can Reader enable documents is a valuable
commodity and should be protected. This task should only be undertaken by the LiveCycle ES
administrator or someone identified as the certificate owner. It should not be handed off to others for any
Section 7€€€Cross Domain Configuration Application Security Guide
Page 62 Section 7€€€Cross Domain Configuration

reason.
Note
Other methods of extracting the certificate hash include using openSSL or importing the ID into the
Windows store. Only one method is described here.
To extract a certificate hash:
1. Open Acrobat.
2. Do one of the following to open the Digital ID list:
• 9.x: Choose Advanced > Security Settings.
• 10.x: Choose Tools > Sign and Certify > More Sign and Certify > Security
Settings.
• 11.x: Choose Edit > Preferences > Signatures > Identities and Trusted
Certificates > More.
3. Highlight Digital IDs in the left-hand tree.
4. Choose Add ID.
5. Navigate through the import dialogs.
6. Select (highlight) a digital ID in the right hand panel.
7. Choose Certificate Details icon at the top menu bar.
8. Choose the Details tab in the Certificate Viewer to see the list of all data for the selected certificate.
9. In the Certificate Data pane, select the SHA1 digest field.
10. In the bottom pane, highlight and copy the hex data fingerprint.
Note
You should now remove the ID from the machine so that it doesn't exist outside it's designated
protected location.
7.3.3 Adding a certificate hash to a policy file
Full details appear in the Cross Domain Policy File Specification. At a high level, adding the certificate
hash to the cross-domain policy file involves the following steps:
1. Navigate to the cross-domain policy file on the server.
2. Open the file and add an <allow-access-from-identity> block.
3. Add a <signatory> and <certificate> block as shown in
Typical allow-access-from-identity block.
4. The certificate element should have the following attributes:
• fingerprint: A 40 character string (colons and spaces are ignored).
• fingerprint-algorithm: sha-1 is the only permitted value.
Application Security Guide Section 7€€€Cross Domain Configuration
Section 7€€€Cross Domain Configuration Page 63

5. Save and close the policy file.
Typical allow-access-from-identity block
<allow-access-from-identity>
<signatory>
<certificate
fingerprint="01:23:45:67:89:ab:cd:ef:01:23:45:67:89:ab:cd:ef:01:23:45:67"
fingerprint-algorithm="sha-1"/>
</signatory>
</allow-access-from-identity>
7.3.4 Fingerprint usage rules
• Multiple signatories require multiple <allow-access-from-identity> blocks.
• There must be one and only one <signatory> block inside an
<allow-access-from-identity>.
• Only <certificate> is allowed inside a <signatory>. Since <public-key> is not supported
for 9.1, <public-key> blocks encountered are skipped.
• The fingerprint attribute is required. If it is missing or malformed, the certificate block is
skipped. The string must be 40 characters long not counting spaces or colons.
• The fingerprint-algorithm attribute is required. If it is missing or malformed, the certificate
block is skipped. The string is case insensitive.
7.4 Server configuration
Policy files function only on servers that communicate over HTTP, HTTPS, or FTP.
7.4.1 Policy file host basics
When creating and using a policy file, the following rules apply:
• It's name must be crossdomain.xml.
• The file MIME type should be set to
• 9.2/8.17: text/x-cross-domain-policy
• 9.3/8.2: Any type supported by the specification.
• The file usually resides at the server's root. However, a master policy file can point to policies in
other locations. While a "root" is defined differently by each server, it is always true that you should
be able to enter the following in a browser to see the file:
http(s)://myserverroot.com/crossdomain.xml
• Non-master policies permit access only to files at or beneath their level in the directory tree. You can
avoid the master policy requirement by calling the policy via JavaScript. See
Calling policies via JavaScript.
7.4.2 Differences between Acrobat and Flash
The Acrobat family of products leverages the Flash model. However, there are differences.
Section 7€€€Cross Domain Configuration Application Security Guide
Page 64 Section 7€€€Cross Domain Configuration
• For 9.2, Acrobat requires that cross-domain policy files return from the server with the content-type
text/cross-domain-policy.
• For 9.3, both clients support all of the mime types listed in the specification:
• Any content type that starts with "text/"
• application/xml
• application/xhtml+xml
Note
Acrobat allows these content types with version 9.3
• The use of non-master policy files require a site to have a meta-policy of "by-content-type" or "all". If
using "by-content-type", policy files need to be returned with a Content-Type of
text/x-cross-domain-policy. While it's possible to use the meta-policy "all", this is risky if your site
serves user-generated content. Normally a meta-policy is declared in the master policy file, but for
those who can't write to the root directory, they can also declare a meta-policy using the
X-Permitted-Cross-Domain-Policies HTTP response header.
• Acrobat does NOT support the Socket usage. However, Flash does support policy files that grant
permissions for socket-based connections. For a socket connection, a policy file can be used for
both same domain connections as well as connections made across domains.
7.4.3 Server setup examples
Administrators should be familiar with their systems and refer to the documentation provided for their
particular server. Details will vary; however, the two high level rules include:
• Placing the policy file at the server's root. While a "root" is defined differently by each server, it is
always true that you should be able to enter the following in a browser to see the file:
http(s)://myserverroot.com/crossdomain.xml
• Setting the policy file's MIME type.
7.4.3.1 JBoss
Copy the policy file to:
...\jboss\server\lc_turnkey\deploy\jboss-web.deployer\ROOT.war\crossdomain.xml
7.4.3.2 WebSphere
Generate a crossdomain.war application and deploy it to the application server.
1. Go to the WAS administrator console.
2. Choose Install New Application.
3. For the context root enter: /
4. For Map virtual hosts for Web modules, select your virtual host.
5. Choose Finish.
Application Security Guide Section 7€€€Cross Domain Configuration
Section 7€€€Cross Domain Configuration Page 65
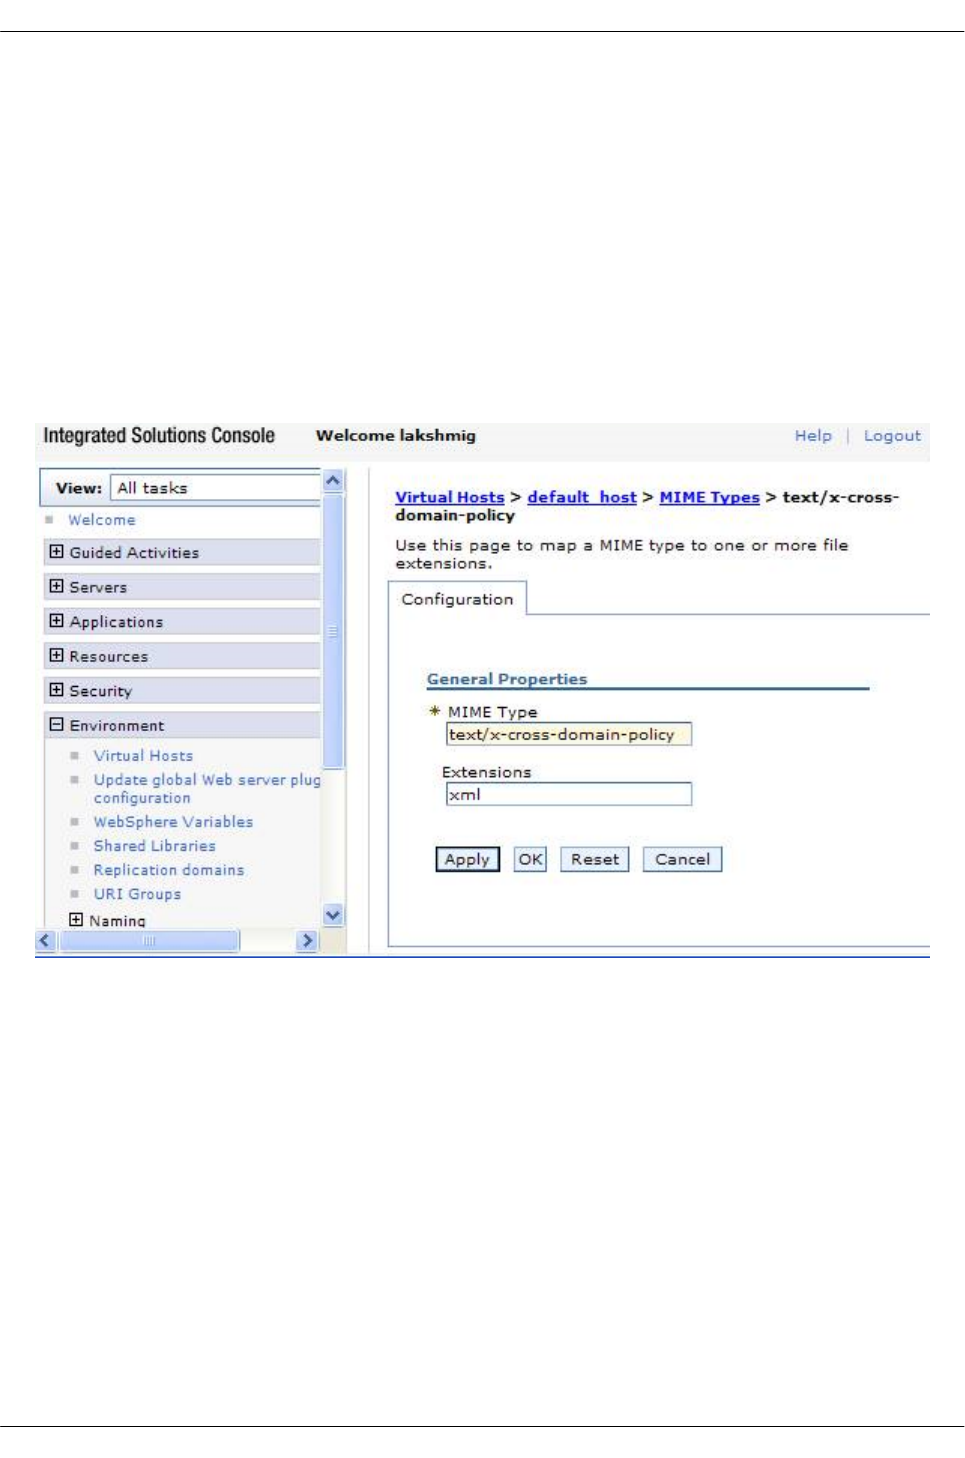
6. Specify the MIME type for the policy file:
1. In the left hand column, choose Environment > Virtual hosts.
7. Select the** (host name) > MIME Types**.
8. Configure the following:
• MIME Type: text/x-cross-domain-policy (or a type supported per the specification).
• Extensions: xml
9. Choose Apply and OK. S
10. Start the application.
WebSphere: Mime type configuration for policy files
7.4.3.3 SAP Netweaver 7 and 7.1
1. Copy the policy file to
C:\usr\sap\<Server ID>\J00(JC00 for Netweaver 7.0)\j2ee\cluster\apps\sap.com\com.sap.eng\crossdomain.xml.
2. Specify the MIME type for the policy file:
• For Netweaver 7.0, Netweaver 7.0 EhP1, and Netweaver 2004:
1. Open the Visual Administrator.
2. Choose the Properties tab of the HTTP Provider Service running on the
server process.
3. Enter a new MIME type in the list that appears as a value for the MIME
property. You must specify the file extension first and then the MIME
type, and separate them by a comma. For example:
.xml,text/x-cross-domain-policy.
4. Choose Save Properties.
• For Netweaver 7.1 and Netweaver 7.1 EhP1
Section 7€€€Cross Domain Configuration Application Security Guide
Page 66 Section 7€€€Cross Domain Configuration
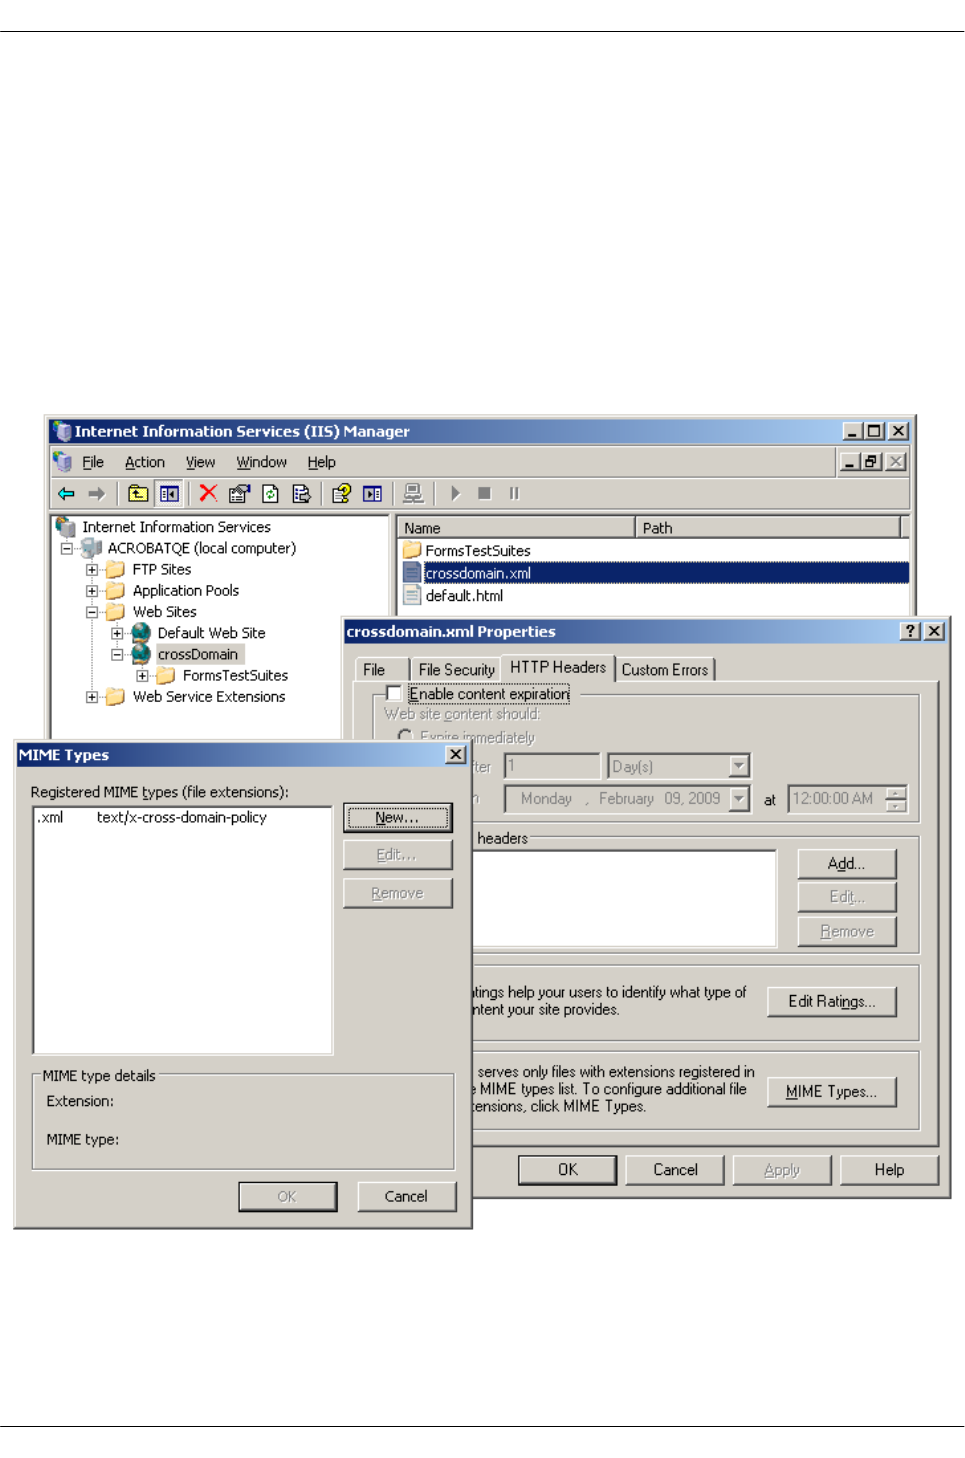
1. Open NetWeaver Administrator.
2. Navigate to Java System Properties: Configuration Management >
Infrastructure.
3. In the Services tab, select HTTP Provider Service. A list of all service
properties is displayed on the Extended Details tab page.
4. Enter a new MIME type in the list that appears as a value for the MIME
property. You must specify the file extension first and then the MIME
type, and separate them by a comma. For
example:.xml,text/x-cross-domain-policy.
5. Choose Save Changes.
7.4.3.4 Windows
Cross domain configuration on a Windows server
7.4.3.5 WebLogic
Setting the MIME type and policy file is relatively straightforward.
1. Navigate to <your WAR file>/web-inf folder.
2. In the weblogic.xml, set <wls:context-root>/</wls:context-root>.
Application Security Guide Section 7€€€Cross Domain Configuration
Section 7€€€Cross Domain Configuration Page 67

3. In the web.xml set the mime-mapping tag:
<mime-mapping>
<extension>xml</extension>
<mime-type>text/x-cross-domain-policy</mime-type>
</mime-mapping>
1. Deploy the ear file as usual.
7.5 Calling policies via JavaScript
One exception to the requirement that a master policy file be present is when a document specifies a
policy via JavaScript.
When a master file is not used, the following rules are enforced:
• Acrobat can load policy files from arbitrary locations via the JavaScript method
app.loadPolicyFile(url); for example:
app.loadPolicyFile("http://www.example.com/sub/dir/pf.xml").
Note
There is a single cross domain file cache, so a call such as app.loadPolicyFile(url) will affect
other PDFs opened during that client's session. For details, refer to the JavaScript™ for Acrobat® API
Reference .
• SWFs can load policies from other locations via the JavaScript method
Security.loadPolicyFile. Refer to the Flex documentation for more information.
7.6 Troubleshooting
When cross domain access fails, users will likely see a dialog or the Yellow Message Bar. To troubleshoot
the problem, enable logging and try again. The log error messages should indicate what's wrong.
You can verify the policy file is in the right location by entering the following in a browser to see the file:
http(s)://myserverroot.com/crossdomain.xml
Enhanced Security: Data access dialog (pre 9.3 and 8.2)
Section 7€€€Cross Domain Configuration Application Security Guide
Page 68 Section 7€€€Cross Domain Configuration

7.6.1 Enabling logging
If you need to debug cross domain access, enable logging.
Note
Logging is not available on Macintosh.
Cross domain logging
Logging: User interface configuration
The 9.3 and 8.2 updates and later allow configuration via the user interface. To do so:
1. Choose Edit > Preferences (Windows only).
2. Select Security (Enhanced) in the Categories panel.
3. Check Create log file.
Enhanced security panel
Logging: Registry configuration
Available for all versions beginning with 9.0.
Application Security Guide Section 7€€€Cross Domain Configuration
Section 7€€€Cross Domain Configuration Page 69

1. Open the registry.
2. Create an AVPrivate key if it does not exist at:
HKDCUSoftwareAdobe<Adobe Acrobat or Acrobat Reader><version>AVPrivate
3. Right click on AVPrivate and create a new DWORD.
4. Create a key called bCrossDomainLogging and set its value to 1.
5. Exit.
6. Navigate to Acrobat's user account Application Data. For example:
•XP: C:Documents and Settings<user name>Application
DataAdobe<application><version>
•Windows 7: C:UsersusernameAppDataRoamingAdobeAcrobat9.0
7. Create an empty file called AcrobatCrossDomain.log.
Note
The log name is identical for Adobe Reader.
7.6.2 General log messages
Request for resource at %s by requestor from %s is permitted due to policy file at %s
A file attempted an operation that requires a policy file permission and the policy was found. The URLs
indicate:
• The resource requested.
• Where the PDF was loaded from.
• The policy file granting the permission.
Note
It is possible that multiple policy files would have permitted the operation, but only one of them is
mentioned in this type of log message.
Request for resource at %s by requestor from %s is denied due to lack of policy file permissions.
A file has attempted an operation that requires policy file permissions from a policy file, but the file or the
required permissions were not found. The URLs in the message indicate:
• The resource requested.
• Where the PDF was loaded from.
The message may be caused by:
• A certificate fingerprint is not used. It must adhere to the rules described in Using certificates for
cross domain access.
• A web service request was made by allow-http-request-headers-from but did not specify the allowed
header type.
Section 7€€€Cross Domain Configuration Application Security Guide
Page 70 Section 7€€€Cross Domain Configuration

• No applicable policy file exists to authorize the operation. If you control the server where the
resource resides, you may need to add a policy file on that server. Otherwise, you may need to
proxy the operation through the file's own server.
• An applicable policy file exists, but the server where both the policy file and the resource are located
is unreachable at the moment. Try pinging the server host to see if it appears to be reachable. If the
file called allowDomain to load an applicable policy file, this message will generally be preceded by
the message "Failed to load policy file from (URL)".
Note
Flash only: For a socket connection, you should see a message about being unable to reach the
server. For any other request, you should see this message.
• The policy file does not grant permission for access by the file's domain. Try adding the domain to
an existing policy file, moving the file to a domain authorized by an existing policy file, adding a new
policy file, or proxying the request through the SWF file's own server.
• An applicable policy file exists, but it is in a non-default location and can't be found. Verify the files
are correctly pointed to.
• A policy file exists but is invalid for some reason. In this case, this message should be preceded by
a more specific message that shows the policy file URL and the problem that was found; see
messages about failures to load policy files.
OK
No problem exists.
Policy file accepted %s
No problem exists.
Failed to load policy file from %s
There is no policy file or it could not be found. Verify a master policy file resides at the server root and that
other files are correctly pointed to.
Warning <some message>
TBD
Error <some message>
TBD
[strict] Ignoring policy file at %s due to missing Content-Type.
The server did not return a content type. Verify it is configured to return text/x-cross-domain-policy.
[strict] Ignoring policy file at %s due to bad Content-Type '%s'."
The server returned a content type not supported by the client. The file MIME type should be set to
text/x-cross-domain-policy. Like Flash, Acrobat will soon support these additional content-types:
• Any content type that starts with "text/"
• application/xml
• application/xhtml+xml
HTTP response headers not available on this platform. Strict policy file rules cannot be enforced.
Application Security Guide Section 7€€€Cross Domain Configuration
Section 7€€€Cross Domain Configuration Page 71
The client made an HTTP request but was not able to see HTTP response headers. As detailed in the
section on meta-policies, some of the new, strict policy file rules require that the client be able to access
HTTP response headers; for example, so that Content-Type and X-Permitted-Cross-Domain-Policies
information from the server is known. Any meta-policy information from servers will be unavailable.
For a list of precise effects and a list of browser configurations where this behavior is expected, see the
browser dependency appendix. This warning should not indicate that previously working content will stop
working; rather it indicates that the new, stricter rules cannot be enforced, which may result in reduced
security for servers and users. The latest versions of most popular browsers enable Flash Player to see
HTTP response headers, so upgrading your browser will usually eliminate this message.
The two features that require HTTP response header access are as follows:
•Content-Type whitelist: When the client has access to HTTP response headers, it rejects HTTP
policy files that have non-textual Content-Type values, as well as those that have no Content-Type
at all. With no access, it accepts HTTP policy files regardless of their Content-Type.
•HTTP meta-policies: When Flash Player has access to HTTP response headers, it honors the
HTTP meta-policies declared in master HTTP policy files and X-Permitted-Cross-Domain-Policies
response headers. With no access, all HTTP servers are assumed to have a meta-policy of all.
Browsers tested for HTTP response headers
Browser No headers provided Headers provided
Internet Explorer (Windows) N/A 5.5 and later
Moselle Firefox 2.0.0.3 and earlier 2.0.0.4 and later
Safari (Macintosh) 2.x and earlier 3.x and later
[strict] Policy file requested from %s redirected to %s; will use final URL in determining scope.
An HTTP policy file request was redirected to a different location in the same domain.
If you see this warning, check the log to see if requests that depend on this policy file are in fact still
succeeding. If they are not, you may need to add a non-redirected policy file at the originally requested
URL. You can also put a non-redirected policy file at a different URL, which may require using JavaScript
to use the new policy file URL. In any case, you should consider avoiding redirecting policy file requests,
since they tend to make policy file debugging more difficult.
Ignoring policy file requested from %s because a cross-domain redirect to %s occurred.
An illegal attempt to retrieve a policy file from the first URL was redirected to a second URL in a different
domain. This policy file has been ignored and will not authorize any operations.
Ignoring policy file at %s due to X-Permitted-Cross-Domain-Policies none-this-response
The server returned the HTTP response header X-Permitted-Cross-Domain-Policies: none-this-response
thereby indicating that this HTTP response is not permitted to be used as a policy file.
This is usually used to prevent server scripts from generating policy files. This policy file has been ignored
and will not authorize any operations. You may need to change your server configuration to avoid
generating a none-this-response header.
7.6.3 Meta policy messages
Unrecognized meta-policy in HTTP header from %s %s
An invalid meta-policy was specified in an X-Permitted-Cross-Domain-Policies HTTP header. It has been
ignored.
Section 7€€€Cross Domain Configuration Application Security Guide
Page 72 Section 7€€€Cross Domain Configuration

HTTP header from %s specifies meta-policy 'by-ftp-filename', which is only applicable to FTP, not
HTTP.
A by-ftp-filename meta-policy was found in an X-Permitted-Cross-Domain-Policies HTTP response
header, but it is only valid for FTP servers.
The X-Permitted-Cross-Domain-Policies header has been ignored, but any policy file at this URL has not
necessarily been ignored (there should be a further error message if it is).
Conflicting meta-policy in HTTP header from %s %s
Multiple conflicting meta-policies were found in one or more X-Permitted-Cross-Domain-Policies HTTP
header.
The entire meta-policy string is shown, as received from the server. If multiple
X-Permitted-Cross-Domain-Policies headers were provided, they have been coalesced into a single
header with semicolon-separated values as is normal for HTTP headers. The client applied the most
restrictive meta-policy that was found in this string. It is generally not legal to provide multiple
meta-policies in HTTP response headers; the only exception is none-this-response, which may be
combined with any other meta-policy, but only affects the individual HTTP response where it is found.
Meta-policy %s in HTTP header from %s conflicts with previously established meta-policy %s
Meta-policies are incorrectly configured. It is likely that a less restrictive meta-policy was found in the
HTTP header before a more restrictive policy. The less restrictive meta-policy may have been in effect for
some time until the conflict was found later.
Ignoring <site-control> tag in policy file from %s. This tag is only allowed in master policy files.
A meta policy was specified in a non master policy file. The site-control tag is only legal in master policy
files (/crossdomain.xml on an HTTP/HTTPS/FTP server, or a socket policy file from port 843).
The meta policy has been ignored, but the policy file has not necessarily been ignored (there should be a
further error message if it is).
Ignoring <site-control> tag in policy file from %s. The 'by-content-type' meta-policy is only
applicable to HTTP sites.
A by-content-type meta policy was incorrectly specified in the policy for an FTP server since it is only valid
for HTTP and HTTPS servers.
The meta policy has been ignored, but the policy file has not necessarily been ignored (there should be a
further error message if it is).
Ignoring <site-control> tag in policy file from %s. The 'by-ftp-filename' meta-policy is only
applicable to FTP sites.
A by-ftp-filename meta policy was incorrectly specified in the policy for an HTTP(S) server.
The X-Permitted-Cross-Domain-Policies header has been ignored, but the policy file has not necessarily
been ignored (there should be a further error message if it is).
Ignoring <site-control> tag in policy file from %s. The 'none-this-response' meta-policy is only
allowed in the X-Permitted-Cross-Domain-Policies HTTP response header.
A none-this-response meta-policy was incorrectly specified. It is only valid in the
X-Permitted-Cross-Domain-Policies HTTP response header and is intended as a mechanism by which
HTTP servers can prevent server scripts from generating policy files.
The meta-policy has been ignored, but the policy file itself has not necessarily been ignored (there should
be a further error message if it is).
Unrecognized meta-policy in policy file from %s %s
An invalid meta-policy was specified in the master policy file.
Application Security Guide Section 7€€€Cross Domain Configuration
Section 7€€€Cross Domain Configuration Page 73

The meta-policy has been ignored, but the policy file itself has not necessarily been ignored (there should
be a further error message if it is).
Meta-policy %s in policy file from %s conflicts with previously established meta-policy %s
Meta-policies are incorrectly configured. It is likely that a less restrictive meta-policy was found in the
policy file before a more restrictive policy. The less restrictive meta-policy may have been in effect for
some time until the conflict was found later.
Domain %s does not specify a meta-policy. All policy files from this domain will be ignored.
This common message appears when the client obtains a policy file from an HTTP, HTTPS, or FTP server
that has not specified a meta-policy.
Domain %s does not specify a meta-policy. Applying default meta-policy 'all'. This configuration is
deprecated.
This common message appears when the client obtains a policy file from an HTTP, HTTPS, or FTP server
that has not specified a meta-policy.
Domain %s does not explicitly specify a meta-policy, but Content-Type of policy file %s is
'text/x-cross-domain-policy'. Applying meta-policy 'by-content-type'.
The client looked for a meta policy in the HTTP headers and in the master policy file, but did not find it. A
policy file was returned with a Content-Type of text/x-cross-domain-policy, which indicates that the
administrator deliberately made changes to support meta-policies.
Since the official Content-Type for HTTP policy files is in use, the client assumes a meta-policy of
by-content-type for this domain. It is recommended that, for clarity, this server should explicitly declare a
meta-policy, rather than relying on this implicit mechanism. This can be done using a <site-control> tag in
the master policy file, or using the HTTP response header X-Permitted-Cross-Domain-Policies.
Ignoring policy file at %s due to meta-policy '%s'.
A meta-policy found in a site-control in the master policy file or in an X-Permitted-Cross-Domain-Policies
HTTP header expressly forbids this file from being valid as a policy file, so this policy file will not authorize
any operations.
If you intended for this policy file to be valid, change its Content-Type or its FTP filename or change the
meta-policy.
Policy file at %s invalidates its own <allow-access-from> directives by declaring the meta-policy
'none'.
The policy file specifies a meta-policy of none as well as allow-access-from. Remove allow-access-from.
The declared meta-policy none means that no policy files are permitted on this server and that the master
policy file is permitted to exist only to declare the meta-policy and cannot contain allow-access-from.
7.6.4 Policy file parsing/syntax errors
[strict] Ignoring policy file with incorrect syntax %s
The policy file syntax is incorrect. Refer to the Cross Domain Policy File Specification.
Ignoring invalid <allow-access-from> tag for domain '%s' in policy file at %s
The string identifying the domain was not recognized as valid. This particular <allow-access-from>
directive will be ignored, although other directives in the same policy file may be valid and accepted.
Ignoring illegal port number specification '%s' in policy file at %s
The to-ports attribute in allow-access-from was not recognized as a valid port range.
Section 7€€€Cross Domain Configuration Application Security Guide
Page 74 Section 7€€€Cross Domain Configuration

Port ranges may include the wildcard *, individual port numbers, port ranges separated by dashes, or
comma-separated lists of individual numbers and/or ranges. The allow-access-from is ignored, although
other directives in the same policy file may be valid and accepted.
Ignoring 'secure' attribute in policy file from %s. The 'secure' attribute is only permitted in HTTPS
and socket policy files.
A found a policy file contained one or more <allow-access-from> directives that specified the attribute
secure="true|false", but this is neither an HTTPS policy file nor a socket policy file. Remove the secure
attribute from this policy file.
The secure attribute has been ignored, but the <allow-access-from> directive is not necessarily being
ignored (there will be a further error message if it is). The secure attribute is only legal in HTTPS policy
files and socket policy files. This rule has been enforced since policy files were first introduced. This is
because the policy file itself is not being transmitted over a tamper-resistant protocol, so a
man-in-the-middle attacker could replace a secure="true" declaration with secure="false", which would
then allow a non-HTTPS SWF file to retrieve data from this domain, contrary to the policy expressed in
this policy file.
7.6.5 Flash only messages
Theoretically, Acrobat clients should not receive these messages. However, since Acrobat leverages the
Flash model, these are provided for informational purposes.
Root-level SWF loaded %s
Only pertinent to Flash.
Found secure='true' in policy file from %s, but host %s does not appear to refer to the local
machine. This may be insecure.
Only pertinent to Flash and socket policy files.
Request for resource at %s by requestor from %s has failed because the server cannot be
reached.
Only pertinent to Flash.
Ignoring socket policy file at %s because it is too large. Socket policy files may not exceed 20
kilobytes.
Only pertinent to Flash and socket policy files.
Policy file from %s will permit SWF from %s to connect to a socket on host %s. This configuration
is deprecated.
Only pertinent to Flash and socket policy files.
SWF from %s may not connect to a socket in its own domain without a policy file.
Only pertinent to Flash and socket policy files.
Policy file from %s does not permit SWF from %s to connect to a socket on host %s, due to
meta-policy '%s'.
Only pertinent to Flash and socket policy files.
SWF from %s will be permitted to connect to a socket in its own domain without a policy file. This
configuration is deprecated.
Only pertinent to Flash and socket policy files.
[strict] Requesting socket policy file from %s due to socket connection request from SWF at %s.
Only pertinent to Flash and socket policy files.
Application Security Guide Section 7€€€Cross Domain Configuration
Section 7€€€Cross Domain Configuration Page 75

Timeout on %s (at 3 seconds) while waiting for socket policy file.
Only pertinent to Flash and socket policy files.
[strict] Local socket connection forbidden to host %s without a socket policy file.
Only pertinent to Flash and socket policy files.
Section 7€€€Cross Domain Configuration Application Security Guide
Page 76 Section 7€€€Cross Domain Configuration
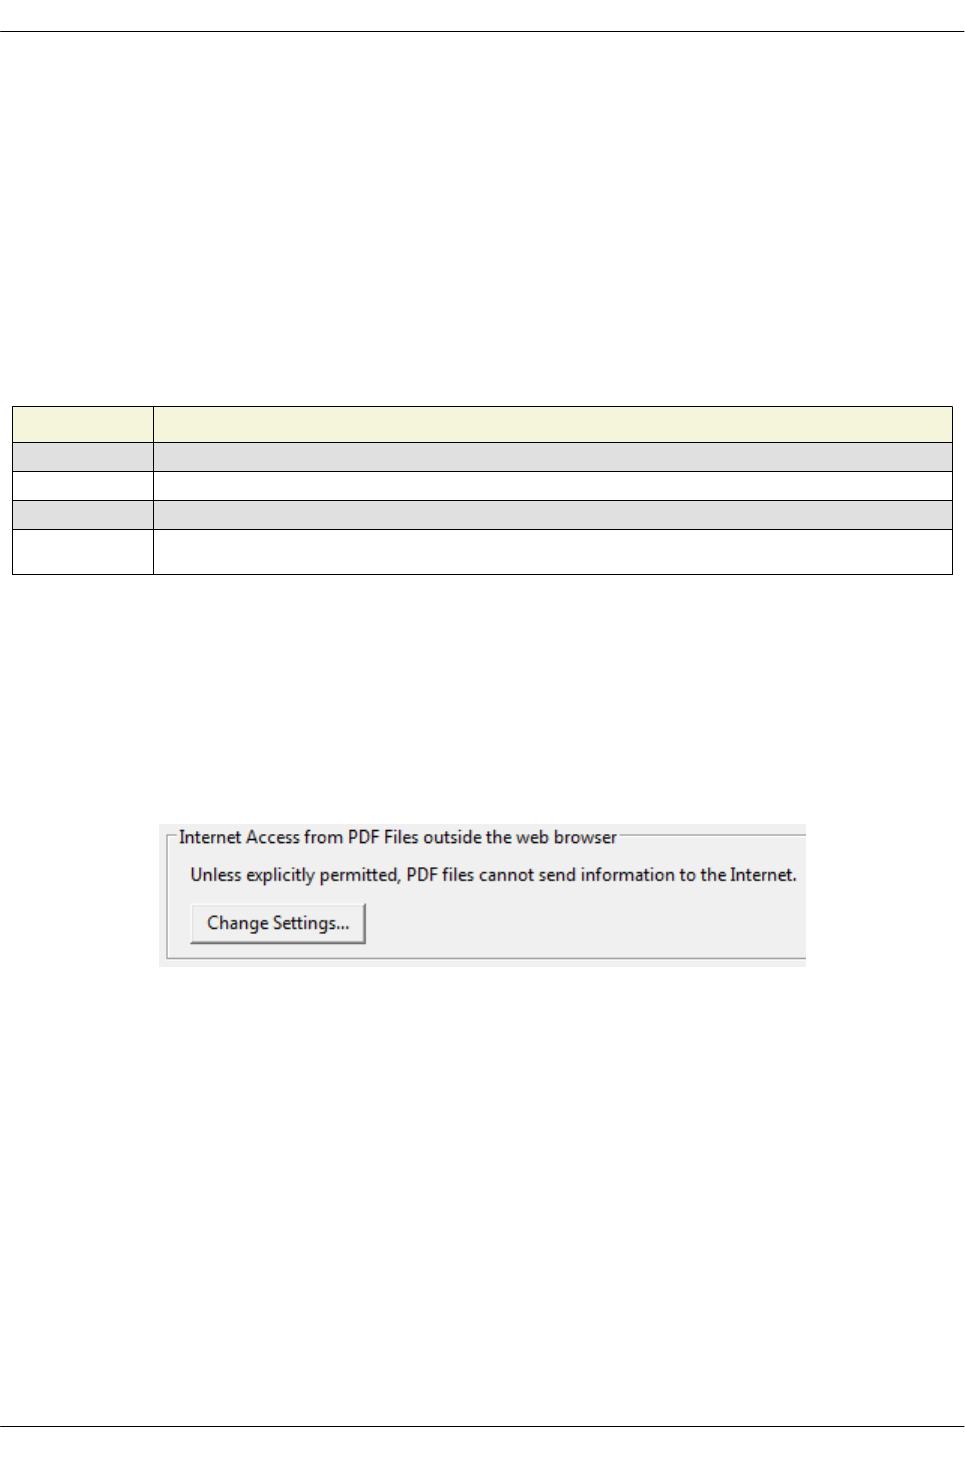
8 External Content Access
8.1 Internet access
Your application can inform you when a PDF file is attempting to connect to an Internet site. Opening a
Web page represents a security risk because malicious content can be transferred whenever a PDF
communicates with the Internet. In addition to visible links in a PDF document, form fields can contain
hidden JavaScript calls that open a page in a browser or silently requests data from the Internet.
8.1.1 Changes across releases
Changes across releases: URL access
Version Change
9.0 None, but enhanced security is introduced which restricts cross domain communications when enabled.
9.1 None.
8.1.7 & 9.2 None.
8.2 & 9.3 Enhanced security is turned on by default. Enhanced security settings now take precedence over Trust Manager internet
access settings.
8.1.2 Configuration
For 9.2 and earlier, this feature overrides enhanced security settings for files and folders. With 9.3,
enhanced security settings take precedence. For example, with enhanced security enabled, files and
folders can be trusted as privileged locations and access will be granted even if Trust Manager is set to
"Block all." Also, cross domain access always requires specifically trusting those domains as a privileged
location in the Enhanced Security panel--simply trusting those sites in the Trust Manager will not work.
Internet access panel
To control web site access behavior:
1. Choose Preferences > Trust Manager.
2. Choose Change Settings in the Internet Access... panel.
3. Choose whether to allow, block, or create custom settings for PDF access to web sites.
4. Choose OK.
Manage Internet Access dialog
Application Security Guide Section 8€€€External Content Access
Section 8€€€External Content Access Page 77
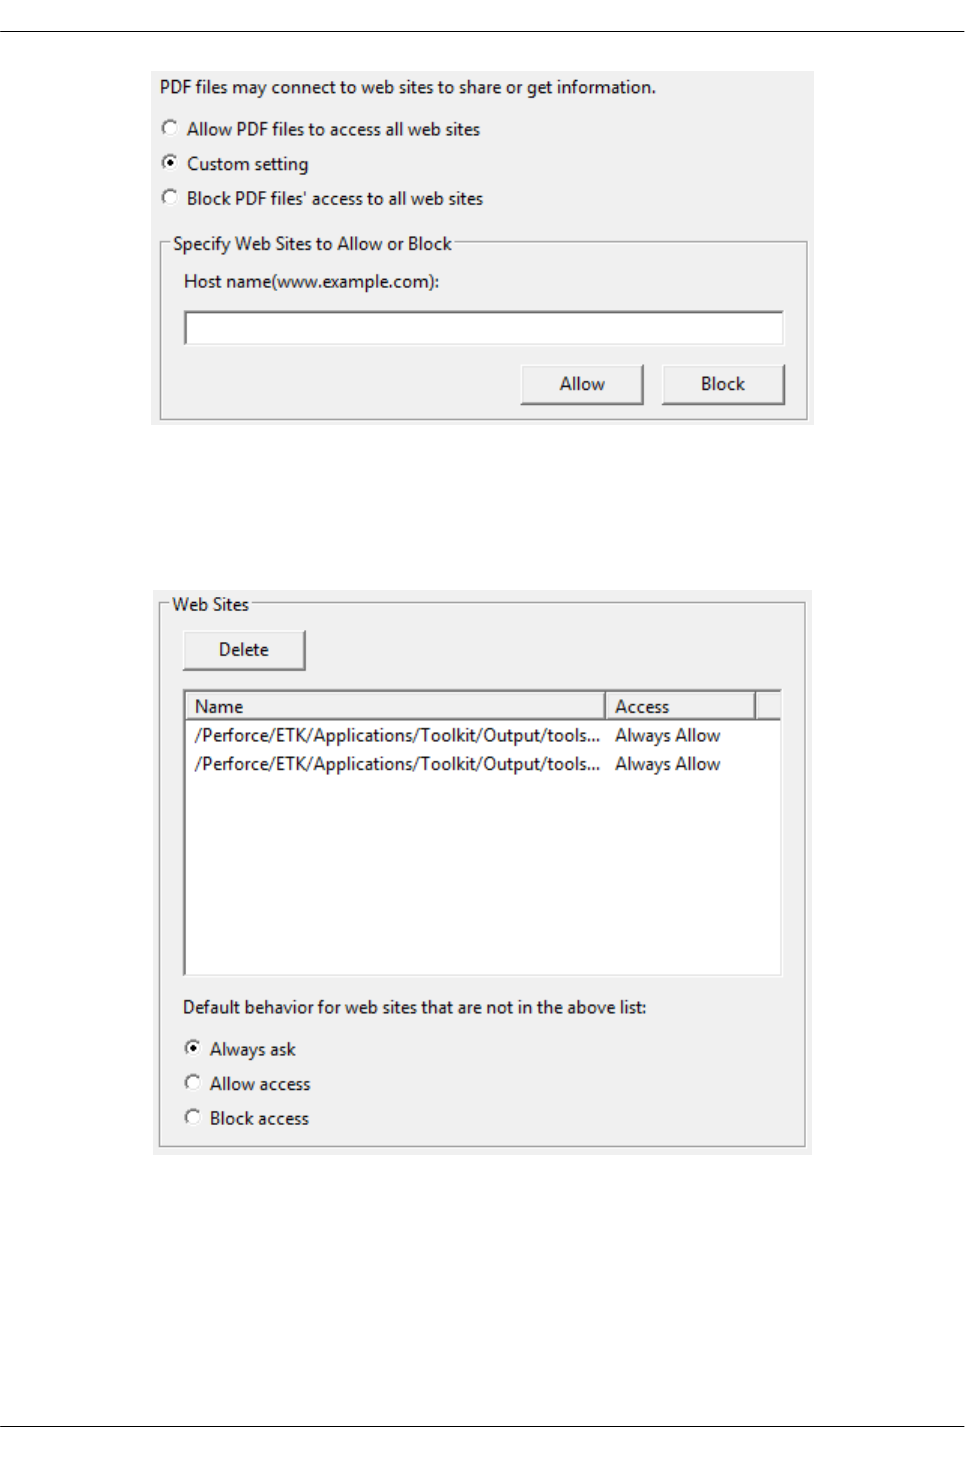
If you choose the custom settings option, the Web Sites panel becomes active and you can enter unique
URLs. URLs must begin with www and end with a valid suffix. The Acrobat family of products maintains a
white and black list of URLs called the Trust List. Users can specify whether or not URL access is allowed
on a global or per-URL basis.
Manage Internet Access dialog
For URLs that aren't explicitly trusted or blocked (they are not on the white or black list), a warning
appears whenever a document tries to access the Internet. When you check Remember my action for this
site, the site is added to your URL white or black list.
Blocked URL alert
Section 8€€€External Content Access Application Security Guide
Page 78 Section 8€€€External Content Access
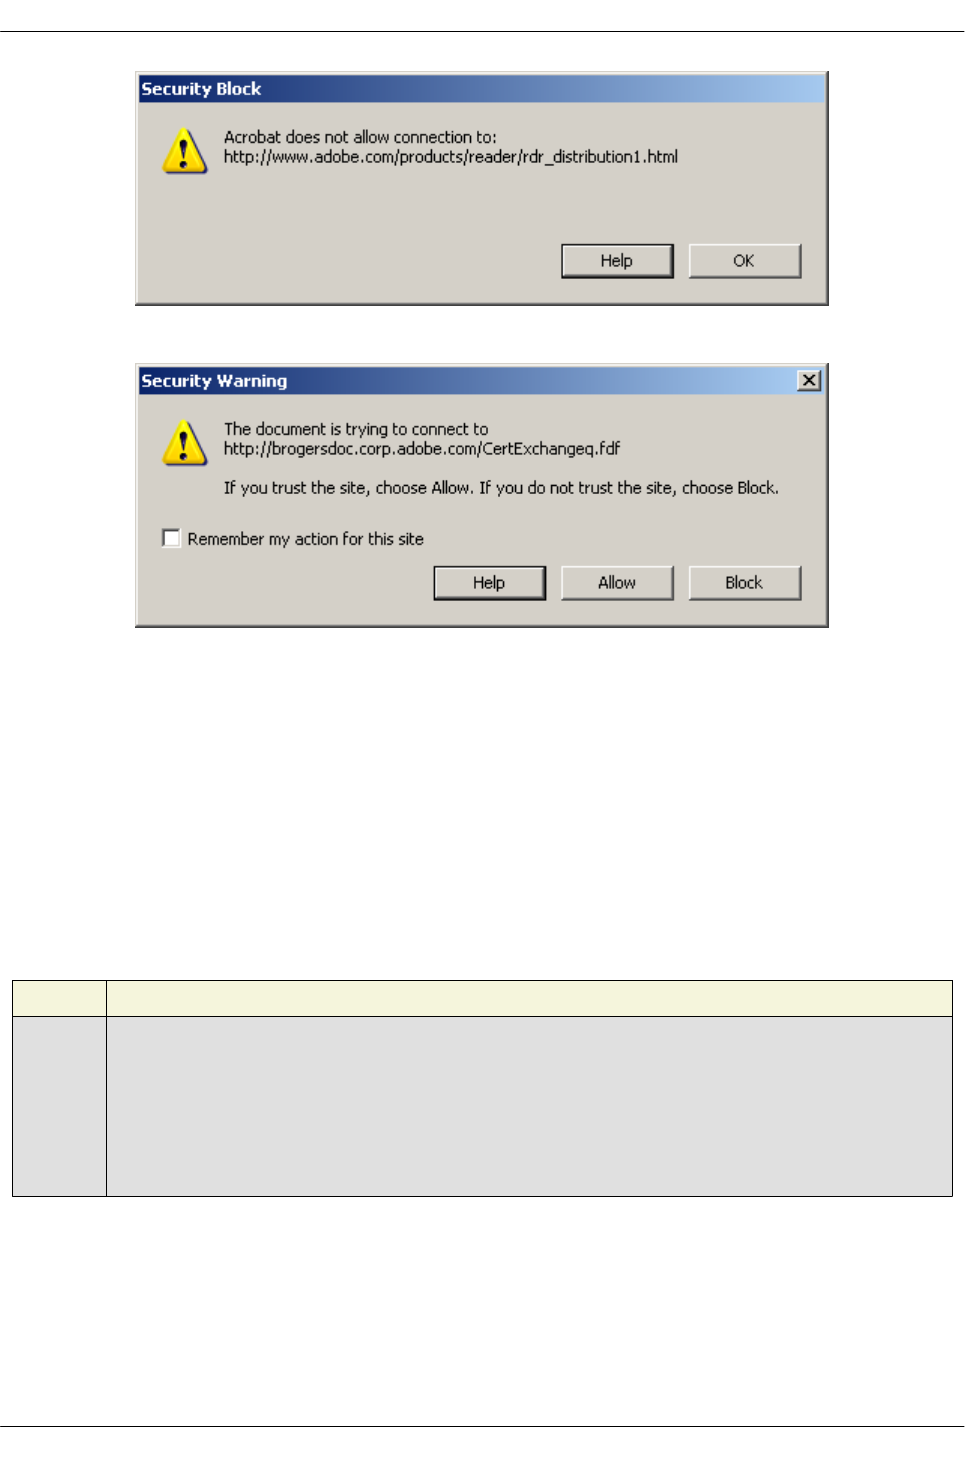
External connection warning
8.2 Multimedia (legacy)
Multimedia poses a security risk because it could potentially change the document's appearance or
present security holes through multimedia players. There are two types of multimedia, and application
behavior varies with each type:
•Legacy multimedia: Any multimedia content which uses 3rd party multimedia plug-ins for playing
content is legacy multimedia. The Yellow Message Bar appears on playing the legacy multimedia.
•Default supported multimedia: Any multimedia content which uses the Authplay.dll for playing
content is defined as non-legacy multimedia. Files like .flv and h.264 encoded files play by default.
The Yellow Message Bar doesn't appear in the presence of these media types.
Changes across releases: Multimedia support
Version Change
8.2 & 9.3
• Legacy multimedia support is disabled by default. For media types other than Flash,
support must be manually enabled.
• A non-intrusive Yellow Message Bar (YMB) that doesn't block workflows replaces
many of the modal dialogs. Depending on how the client is configured, the YMB
appears at the top of the document and offers the user to trust the document "once" or
"always."
Application Security Guide Section 8€€€External Content Access
Section 8€€€External Content Access Page 79

9.5 &
10.1.2
Multimedia trust is integrated into the Trust Manager framework and the following changes have been made:
• The following UI items are removed from Preferences > Multimedia Trust (Legacy):
Clear your list of trusted documents AND Display permissions for ( ) Trusted
documents ( ) Other documents.
• Legacy Multimedia trust (trust for media types that use a player other than the
product's) is now stored as a privileged location at cMultiMedia rather than
TMDocs.sav. The Trusted Documents list is not longer used.
11.0 The product no longer uses an embedded Flash player. Instead, the product leverages the user's system player such as the Flash
Player plug-in for browsers which use the Netscape plug-in API for FireFox and Safari. It is therefore subject to the browser's
security restrictions and limitations. For example, Flash local connections and FileReference are not allowed.
8.2.1 Configuration
To configure multimedia preferences:
1. Choose Preferences > Multimedia Trust (legacy).
2. (Removed with 9.5 and 10.1.2): From the Display Permissions for radio buttons, choose Trusted
documents or Non-trusted documents. The Trust Manager displays the selected trust preferences.
Note
Beginning with 9.5 and 10.1.2, trust for legacy multimedia formats is stored in cMultiMedia. Prior
versions stored information about trusted and untrusted documents for legacy multimedia types in a file
called TMDocs.sav.
3. Configure the Trust Options panel:
1. Check or uncheck Allow multimedia operations.
2. Set multimedia player permissions as follows: Select the player in the list and select an
option from the Change permission for selected multimedia player to drop-down
list:
•Always: The player is used without prompting.
•Never: Prevents the player from being used.
•Prompt: Prompts the user to enable the player when a media clip tries
to use that player.
3. Select one or more of the playback options:
•Allow playback in floating window with no title bars: Opens the
media in a separate window without a title bar.
•Allow document to set title text in a floating-playback window:
Opens the media in a separate window with a title bar.
•Allow playback in full-screen window: Opens the media in full-screen
mode.
4. Choose OK.
Note
Section 8€€€External Content Access Application Security Guide
Page 80 Section 8€€€External Content Access
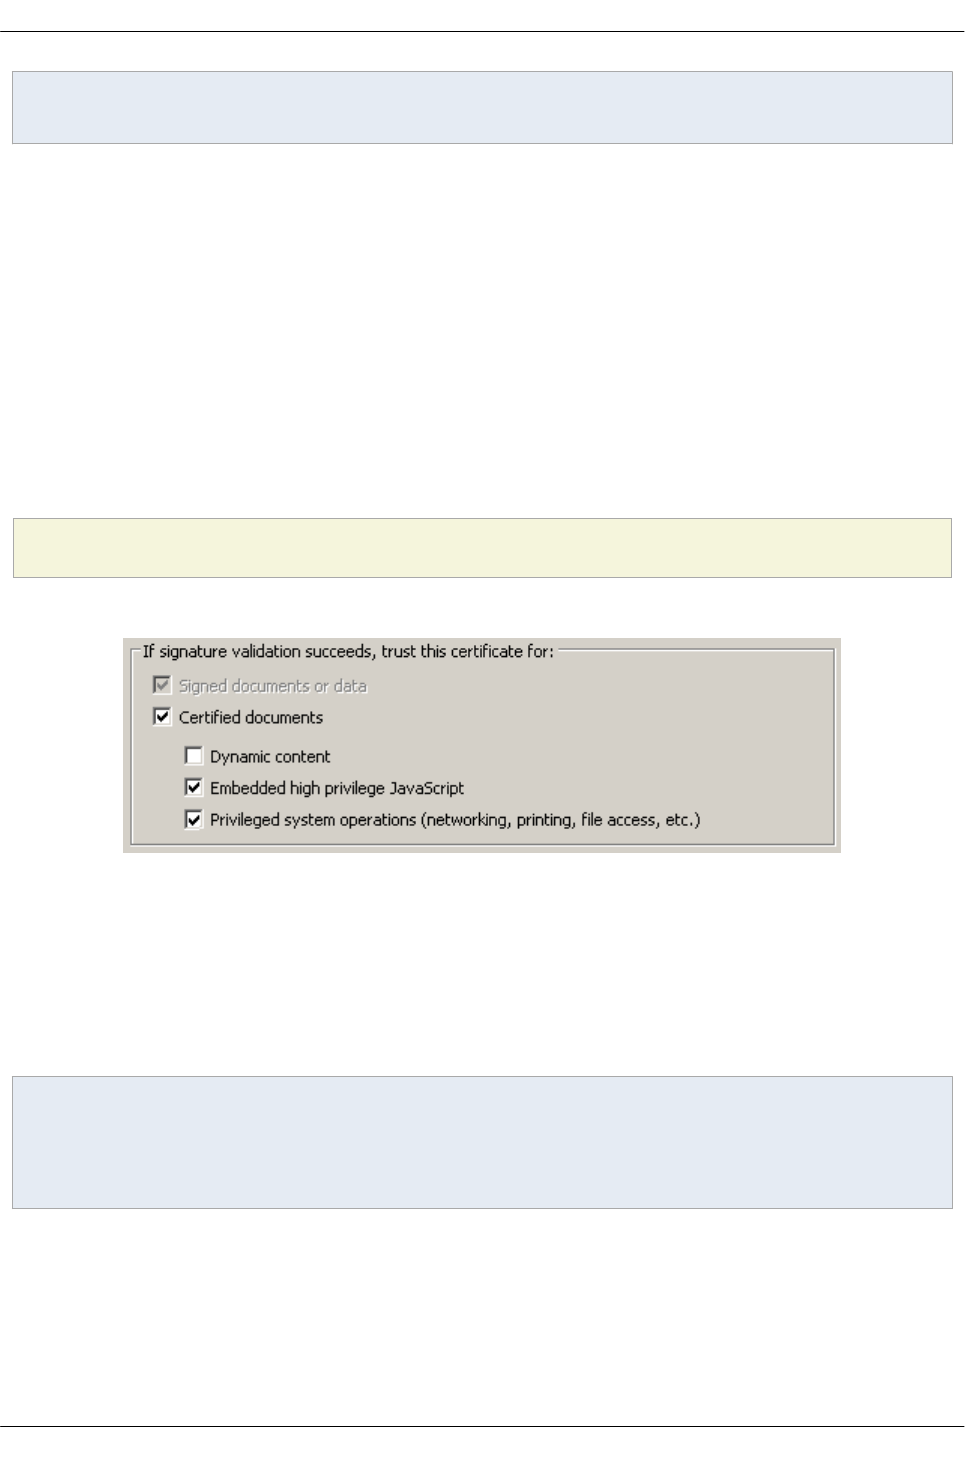
Membership on the trusted document list is permanent until the list is manually cleared. Choose Clear
to remove all documents from that list.
8.2.2 Trusted overrides
There are several ways to assign trust so that this feature works in a trusted context:
• For older product versions, add files to the trusted and untrusted documents lists via modal dialogs
as described below.
• With 8.2 & 9.3 and later, users can trust documents on-the-fly when the PDF opens: When the
Yellow Message Bar appears, choose the Options button and then trust the document once or
always.
• Configure certificate trust as described in 9.4€€€Per-certificate trust.
• With 9.5 & 10.1.2 and later, create a privileged location via the UI for the file, folder, or host.
• With 9.5 & 10.1.2 and later, create a privileged location via the registry/plist by placing a tID at:
[HKCU\Software\Adobe\<product name>\<version>\TrustManager\<cTrustedSites or TrustedFolders>\]
"cMultiMedia"
Certificate trust settings
8.2.3 Historical notes
8.2.3.1 Pre-10.1-9.5 behavior
Trust is stored in TMDocs.sav. Once a document is trusted, it is added to the Trusted Document list and
will always use the preferences set for trusted documents. You can clear this list by selecting Clear in the
Multimedia Trust panel.
Note
Membership on the trusted document list is permanent until the list is manually cleared. Therefore,
once a document is on that list, changing the certificate trust level to disallowing dynamic content will
have no effect.
Multimedia behavior workflow
Application Security Guide Section 8€€€External Content Access
Section 8€€€External Content Access Page 81
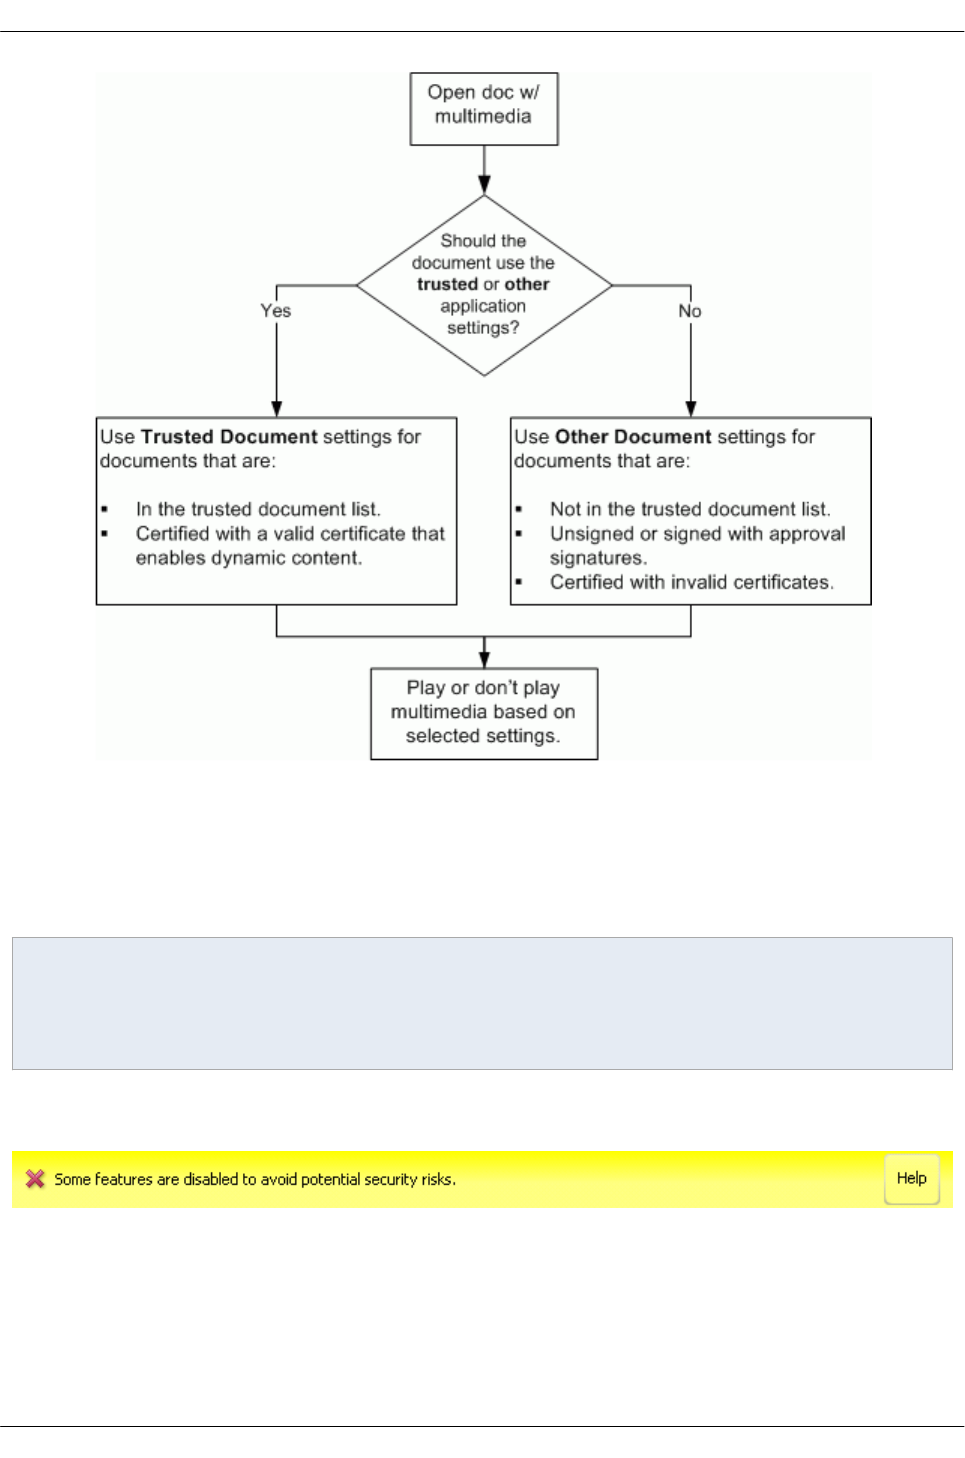
8.2.3.2 9.3-8.2 & later
For 9.3 and 8.2, modal dialogs have been replaced by a Yellow Message Bar. The options button allows
users to trust once or always. Choosing Always adds the item to the already existing Trusted Documents
list.
Note
For versions 8.2-9.3 to 9.4.7-10.1.1, this feature does not interact with enhanced security and the
Trusted Documents list is not the same as the privileged locations list. Trust is stored in a file called
TMDocs.sav.
9.3-8.2 & later: Multimedia user trust assignment locked
9.3-8.2 & later: Multimedia user trust assignment not locked
Section 8€€€External Content Access Application Security Guide
Page 82 Section 8€€€External Content Access
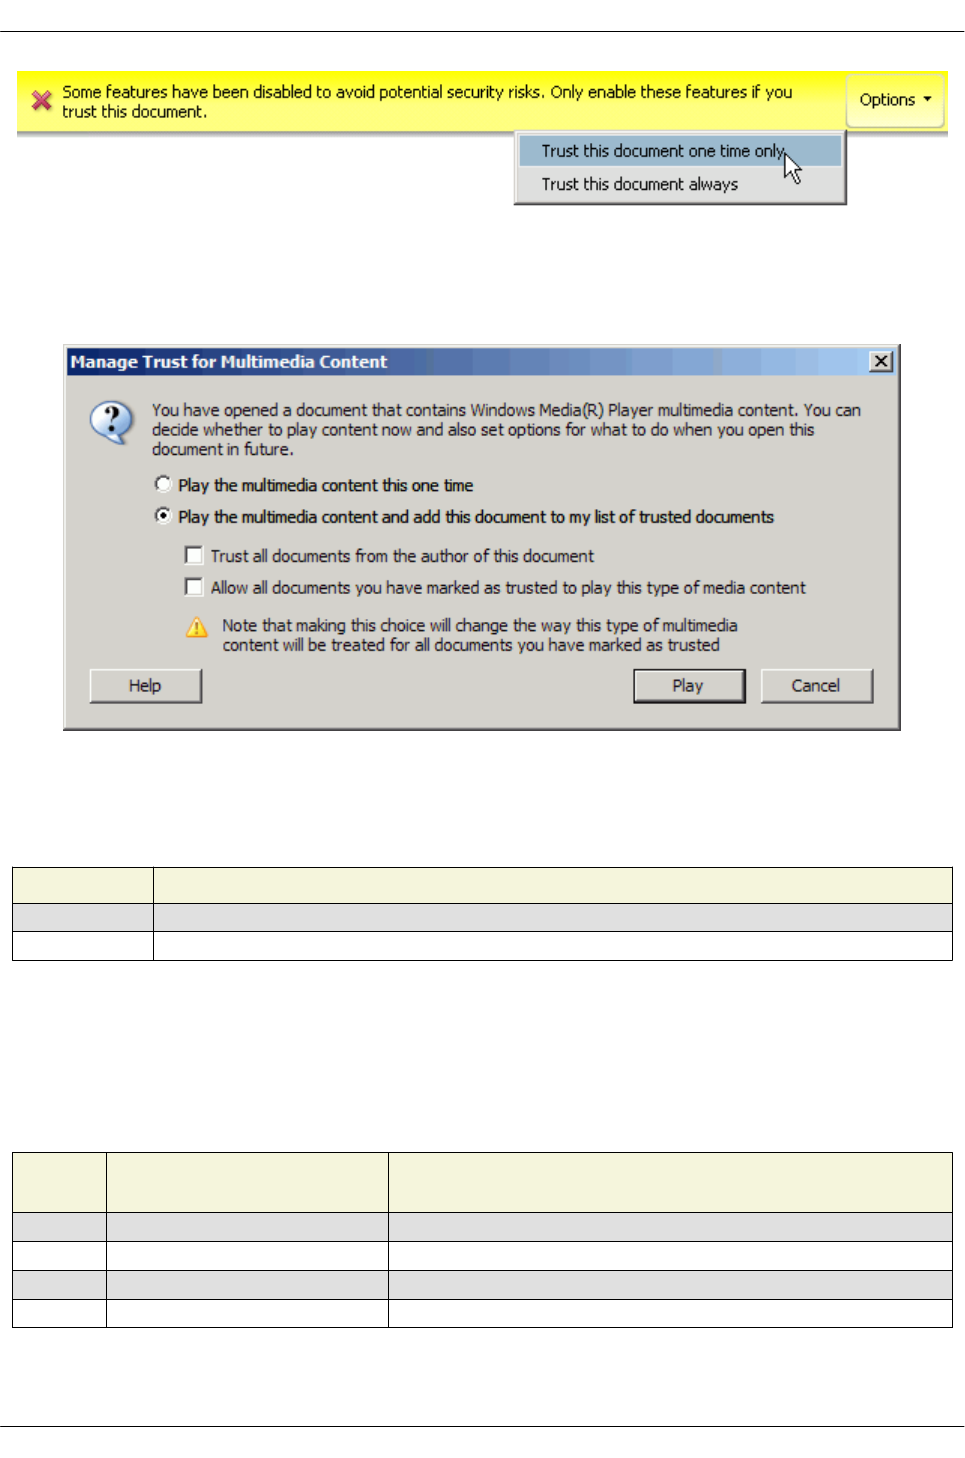
8.2.3.3 Up to 9.2-8.1.7
These product versions displayed the dialog below rather than the YMB.
9.2-8.1.7 and earlier: Manage Trust for Multimedia Content dialog
8.3 XObjects
Changes across releases: XObject (external stream) access
Version Change
pre 9.2 External streams can be managed through preferences in the user interface.
8.1.7 & 9.2 External streams can be blocked by enabling enhanced security.
The application can inform you when a PDF file tries to access external content identified as a stream
object by flags which are defined in the PDF Reference. For example, an URL might point to an image
external to the document. Only PDF developers create PDF files with streams, so you may not need to
enable access to external content. This feature interacts with enhanced security as shown below:
XObjects and enhanced security
XObject
setting Enhanced Security Behavior
Never On No XObject access; proxy displays, if any.
Never Off No XObject access; proxy displays, if any.
Always On (w/ privileged location set) XObject displays.
Always Off No XObject access; proxy displays, if any.
To configure external content access:
Application Security Guide Section 8€€€External Content Access
Section 8€€€External Content Access Page 83

1. Choose Preferences > Page Display.
2. Configure the Reference XObjects View Mode panel. Set Show reference XObject targets to:
• Always
• Never
• Only PDF/X-5 compliant ones
3. Set the location of referenced files (if any).
4. Choose OK.
Resource access
8.4 3D content (9.5.1 and later)
9.x products change the default behavior with 9.5.1 because the dynamic nature of 3D provides the
potential for it to be subject to security vulnerabilities. Several new changes have been implemented:
• 3D is disabled by default.
• The user interface has a new checkbox at Preferences > 3D and Multimedia > Enable 3D
Content.
• 3D content has been integrated into the Trust Framework so that it's possible to display 3D content
for trusted content even when 3D is disabled. The feature allows you to:
• Disable or enable 3D content.
• Trust files, folders, and hosts as privileged locations via Preferences > Security
(Enhanced) > Privileged Locations panel so that when a PDF with 3D content
opens:
• If it is trusted, the 3D content renders.
• If it is not trusted, a Yellow Message Bar appears which says "Some
features have been disabled due to potential security risks. Only
enable these features if you trust this document."
•Options button provides the Trust Once and Trust Always options.
• Enterprise IT can configure the end user settings via
HKCU\Software\Adobe\<product name>\<version>\3D\bEnable3DContent.
• Enterprise IT can disable and lock 3D rendering so that the user cannot change the setting via
HKLM\SOFTWARE\Policies\Adobe\<product name>\<version>\FeatureLockDown\bEnable3D.
Note
This is a 9.5.1-only change since Protected Mode in 10.x products provides effective mitigation against
3D attack vectors.
8.5 Flash integration
Section 8€€€External Content Access Application Security Guide
Page 84 Section 8€€€External Content Access
Beginning with 9.5.1, Adobe Reader and Acrobat no longer include a Flash Player for displaying Flash in
PDF files. Instead, rendering Flash content embedded in a PDF now requires that a Flash Player already
resides on the user machine. This new strategy simplifies Acrobat and Reader deployments by reducing
the number of future required updates should a security issue arise. Moreover, you can now manage and
update Acrobat products and Flash individually.
If you open a PDF that requires Flash, a dialog prompts you to download and install the latest Flash
player. To preinstall Flash, go here:
•Windows: Adobe Reader and Acrobat Flash Player Download for Windows
•Macintosh: Adobe Reader and Acrobat Flash Player Download for Mac
Note
Flash de-coupling is not available in Safari for this release. Otherwise, Acrobat 9.x products require the
Flash Player browser plug-in (Safari and Firefox) version 11.2 or higher. Flash Player 11.2 stopped
supporting Windows 2000 and Mac OS lower than 10.6. Therefore, users need at least Windows XP
and Mac OS 10.6.x to view Flash content in a PDF.
Enterprise IT can control how Flash plays within PDFs by setting the bEnableFlash registry entry (Win) or
EnableFlash plist entry (Mac). When set to 0, Flash only plays if the PDF is a trusted privileged location.
The paths are as follows:
•32 and 64-bit XP:
HKLM\SOFTWARE\Policies\Adobe\[Adobe Reader|Adobe Acrobat]\9.0\FeatureLockDown\bEnableFlash
•64-bit Windows 7:
HKLM\SOFTWARE\Wow6432Node\Adobe\[Adobe Reader|Adobe Acrobat]\9.0\ FeatureLockDown\bEnableFlash
•Macintosh:
Contents::MacOS::Preferences << FeatureLockdown << /EnableFlash [ /b false ] >>
Flash configuration
Setting Behavior
bEnableFlash = 0 Flash does not play within PDFs.
bEnableFlash = 1 Default. Same as when the key is not present. Play Flash in any PDF file without restriction.
Note that this change results in two new behaviors:
• When bEnableFlash = 0, Flash content is rendered as an empty, white box and does not play. A
yellow message bar also appears at the top of the document stating that "Some features are
disabled to avoid potential security risks."
• When bEnableFlash = 1, Flash plays if there is a system player present. If a player is not found,
then the user is prompted to download the latest version.
Application Security Guide Section 8€€€External Content Access
Section 8€€€External Content Access Page 85

9 Trust Methods
Ideally, you've enabled and configured all of the product's security mechanisms and are now ready to
assign trust to elements in your workflows. Available trust mechanisms include:
9.1 Privileged locations
Privileged locations (PLs) are synonumous with "trusted locations." PLs are the primary way that users
and administrators can specify trusted content that should be exempt from security retrictions. The feature
behaves as follows:
• A privileged location may be a file, folder, or host.
• There may be an HKCU list and an HKLM list: administrator's can lock down the feature in HKLM so
that users cannot change the setting.
• Privileged locations can be permanently disabled or enabled by the administrator.
• The Trust Manager hive does not appear in the registry until the user interface is exercised.
However, you can create it manually.
• Configuration may occur via the user interface or directly in the registry.
• If configured through the user interface, the privileged location ID only may or may not appear under
under all the possible cabs. Functionality changes across releases, so test the UI and see what trust
is assigned.
• Permissions granted by other features often overlap. For example, cross domain policies, internet
access settings in Trust Manager, and certificate trust settings for certified documents sometimes
interact so that the most permissive setting takes precedence. Users should TEST THEIR
CONFIGURATION prior to deployment.
• All key (tID) names under a particular cab must be unique.
• You can also elevate Trusted Win OS zones to privileged locations.
9.1.1 Changes across releases
Evolution of the privileged location feature
Version Change
9.0 Privileged locations introduced as a way to assign trust to content blocked when enhanced security is enabled.
8.1.7 Enhanced security added for 8.1.7.
8.2 & 9.3
• Enhanced security turned on by default, so the use of privileged locations
becomes critical.
9.3.4
•cJavaScriptURL was introduced thereby adding a way to restrict JavaScript
invoked URLs via enhanced security. Trust can be assigned through privileged
locations.
• Trusting a location as a privileged location also trusts that location for high
privileged JavaScript. cJavaScript is populated.
• Trusting a location as a privileged location also trusts that location for blacklisted
JavaScript APIs. cUnsafeJavaScript is populated.
Section 9€€€Trust Methods Application Security Guide
Page 86 Section 9€€€Trust Methods

10.0
• Wildcards are supported when specifying hosts as privileged locations.
• A sandbox for Reader is introduced called Protected Mode (PM). PM restrictions
can be overridden via privileged locations.
10.1
• Folder trust is recursive by default.
•bDisableDefaultRecursiveFolderTrust was introduced to disable the
default recursive trust.
• A sandbox for Acrobat is introduced called Protected View (PV). PV restrictions
can be overridden via privileged locations.
9.5 & 10.1.2
• Wild card handling for trusted hosts now conforms to the Cross Domain
Specification.
• The error dialog for invalid trusted host names that use wildcards is improved.
• A new preference (cTrustedSitesPrivate) allows IT to permit less restrictive
wildcard usage when specifying trusted hosts.
•bDisableTrustedFolders in HKLM now removes Options button from YMB
when disabled and locked.
•bDisableJavaScript in HKLM allows locking the JS engine off. An admin's
privileged location list in HKLM can bypass this restriction.
• The Win OS Security Zone setting in the Privileged Locations panel now includes
Local Intranet zones in addition to the current Trusted Sites zone. The product
should assign trust as Internet Explorer does.
• LC Workspace XFA in Flex forms will now honor Win OS trust zone override.
• Legacy multimedia trust is stored in cMultiMedia. Prior versions stored trust for
legacy multimedia type in a file called TMDocs.sav. Possible values include:
9.1.2 UI configuration
To specify a privileged location through the user interface:
1. Go to Preferences > Security (Enhanced).
2. Set a privileged location by selecting one of the following buttons:
•Add File: A file is defined by a path, so its security settings will be invalid if that file is
moved.
•Add Folder Path: Prior to 10.1, trust is not recursive. With 10.1 and later, trust is
recursive but can be disabled via a registry preference.
•Add Host: Enter the complete name of the root URL only with no wildcards. For
example, www.adobe.com but not www.adobe.com/lc. To specify HTTPS, select
Secure Connections Only.
3. Choose OK.
Privileged locations
Application Security Guide Section 9€€€Trust Methods
Section 9€€€Trust Methods Page 87
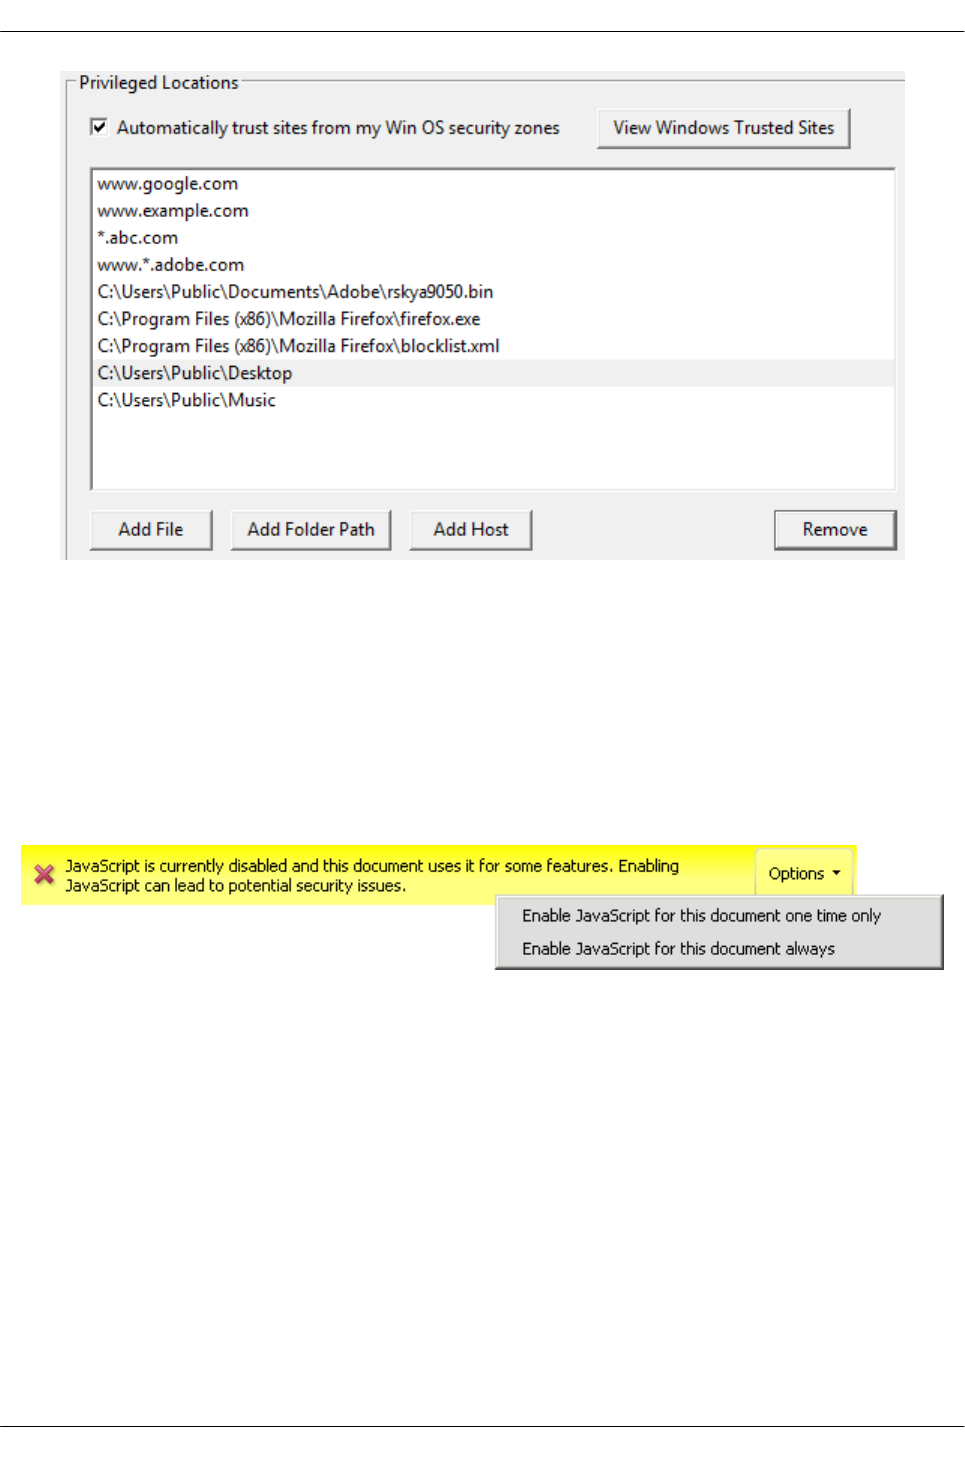
9.1.3 UI (on-the-fly) config.
Whenever a PDF opens that contains content which is blocked by a security feature, a Yellow Message
Bar (YMB) appears. If the feature has not been disabled by the administrator, users can trust the
document on-the-fly as follows:
• When the YMB appears, choose Options.
• Choose from one of the available trust options which vary by feature. Choosing Trust Always adds
the current item to privileged locations.
YMB with trust options
9.1.4 Registry configuration
The application stores information about privileged location trust in the registry and plist. Once a file is
trusted via the UI or YMB, a t<unique id> is added to each of the cabs under
cTrustedFolders|cTrustedSites. The container cab determines which restriction the document can
bypass. For example, a tID under cCrossDomain allows cross domain access. For a complete list of
available preferences see the Preference Reference.
While you can create PLs manually at the registry level, it's easier to use the UI and then propagate those
settings across your organization with the Wizard or post deployment via GPO or some other method. If
you do decide to manually edit the registry, note the following:
•TrustManager\cTrustedFolders contains cabs for trusted folders AND files.
•TrustManager\cTrustedSites contains cabs for trusted http and https hosts.
• Each t(ID) must be unique. In the example below, t3 could reside in each of the cabs, but there
could not be more than one t3 in each cab.
Section 9€€€Trust Methods Application Security Guide
Page 88 Section 9€€€Trust Methods
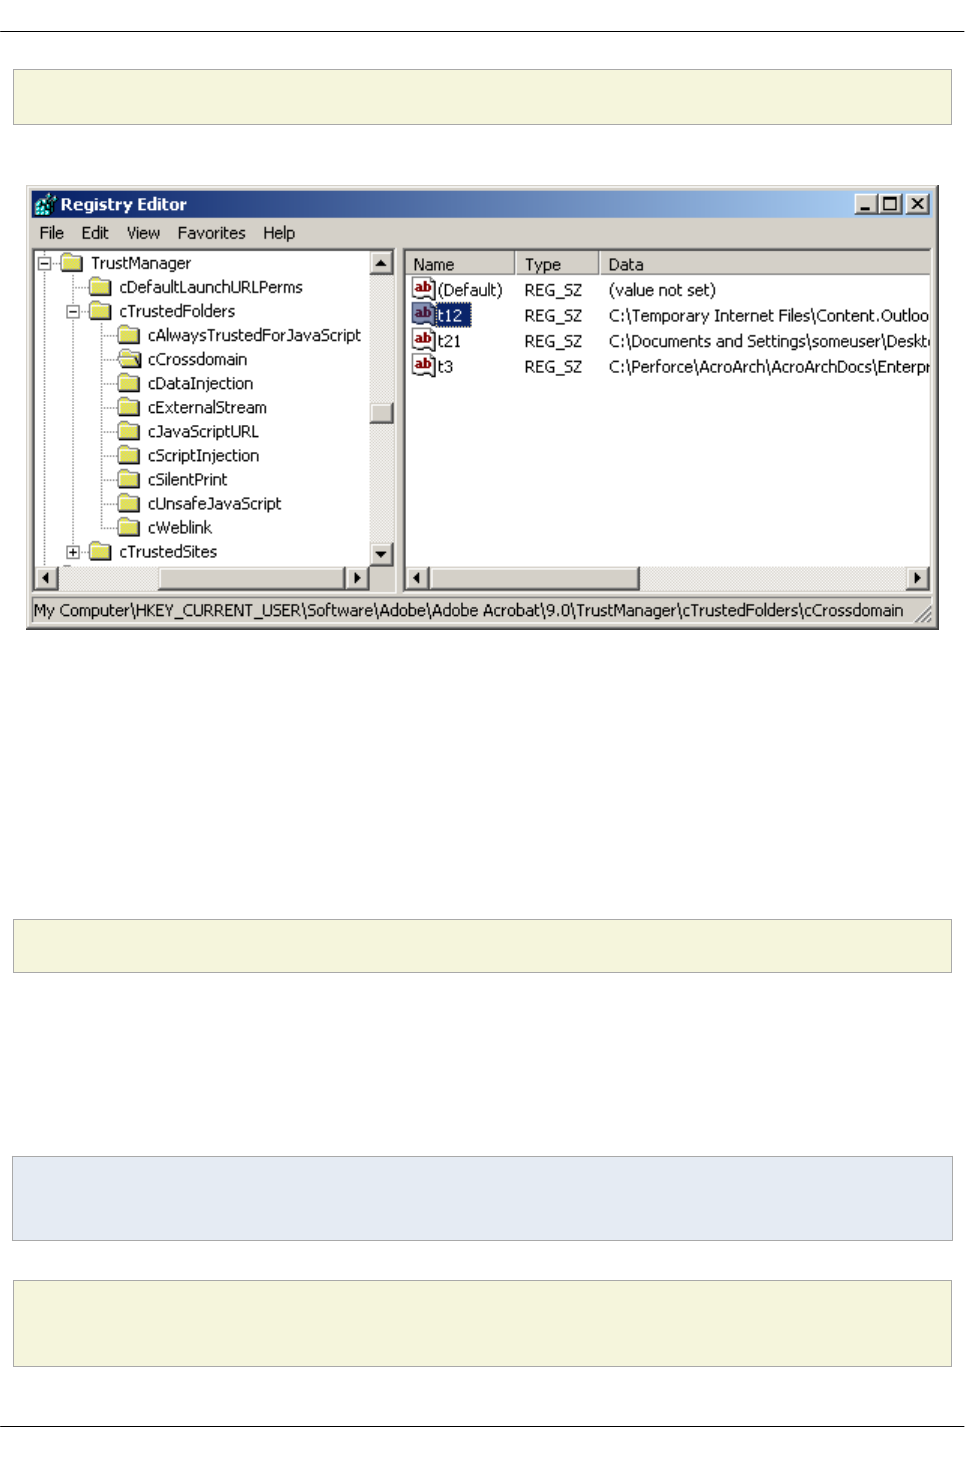
[HKEY_CURRENT_USER\Software\Adobe\<product name>\<version>\TrustManager\cTrustedFolders\cCrossdomain]
"t3"="C:\\Documents and Settings\\username\\My Documents\\acrobat_logo16.png"
Protected View: trust set in the registry
9.1.5 Recursive directory trust
Recursivity is on by default with 10.1. Prior to 10.1, if you make a folder a privileged location its
subdirectories are not automatically included. To make trust recursive, do the following:
1. Go to
HKEY_CURRENT_USER\Software\Adobe\<product name>\<version>\TrustManager\cTrustedFolders\.
2. For each subkey (e.g. cCrossdomain) where trust should be recursive, go to the subkey.
3. For each folder ID that should be recursive, modify the name by appending _recursive to it.
Registry Configuration: Recursive trust
[HKEY_CURRENT_USER\Software\Adobe\<product name>\<version>\TrustManager\cTrustedFolders\cScriptInjection]
t5_recursive"="C:\\Aardvark"
9.1.6 Disabling Priv. Locations
You can disable and lock the ability to add privileged locations by setting the preferences as shown in the
example below. This feature allows administrators to control what users can trust. Simply lock the feature
and provide your own trust list to user machines. To do so, set the following:
Note
11.0 introduces support for locking on Macintosh.
[HKEY_LOCAL_MACHINE\SOFTWARE\Policies\Adobe\<product name>\<version>\FeatureLockDown]
"bDisableTrustedFolders"=dword:00000001
"bDisableTrustedSites"=dword:00000001
Application Security Guide Section 9€€€Trust Methods
Section 9€€€Trust Methods Page 89

9.1.7 Wildcard and host trust
10.x products support the use of wildcard matching of subdomain components for trusted host URLs. For
example, for a basic URL of a.b.c.adobe.com, you can wildcard on all of a, b, or c. It is required that at
least the first subdomain is specified (adobe in this case). So *.corp.adobe.com or
11lcforms.*.adobe.com`` works, but *.forms.corp.adobe.com or lcforms.corp.*.com will not.
Wild cards also work with IP addresses. For example, when http:// 153.39.154.100 or its wildcard
combinations such as 153.39.154.* or 153.39.*.100 or 153.*.154.* are added to OS trusted locations, then
the File opens outside PV.
9.1.8 Trusting IE trusted sites
You can also elevate Trusted Win OS zones to privileged locations since these are already under IT
control. Prior to 10.1.2/9.5, bTrustOSTrustedSites provided trust for Trusted Sites. Beginning with
10.1.2 and 9.5, trust is also extended to Local Intranet Zones.
Note
Choosing Trust sites from my Win OS security zones extends trust to files when PV is set to
Potentially unsafe locations. When set to All Files, then OS trusted sites does allow PDFs to open
outside of PV.
To make Internet Explorer's trusted sites and zones behave as PLs:
1. Go to Preferences > Security (Enhanced).
2. Check Automatically trust sites from my Win OS security zones.
3. Choose OK. This options sets:
[HKEY_CURRENT_USER\Software\Adobe\<product name>\<version>\TrustManager]
"bTrustOSTrustedSites"=dword:00000001
9.1.8.1 Locking IE trusted sites
Windows OS trust can be locked so that users can't change the setting via the UI as follows by setting
bDisableOSTrustedSites as follows:
•0: Disables trusting sites from IE and locks the feature.
•1: Enables trusting sites from IE and locks the feature.
[HKEY_LOCAL_MACHINE\SOFTWARE\Policies\Adobe\<product name>\<version>\FeatureLockDown]
"bDisableOSTrustedSites"=dword:00000000
9.2 Internet access
URLs can be blocked or allowed globally, or URL-specific settings can be created. See 8.1€€€Internet
access for details.
9.3 Certified document trust
11.0 introduces the ability to elevate any certified document to a privileged location for the Windows and
Macintosh versions of Reader and Acrobat. When set, certified documents become trusted for exemption
from the same security restrictions from which other privileged locations are exempt. Note the following:
Section 9€€€Trust Methods Application Security Guide
Page 90 Section 9€€€Trust Methods
• The PDF's certification signature must be valid and chain to a trusted root.
• The setting is off by default.
• The one exception to such trusted PDF's parity with privileged locations is that this level of trust
does not apply when the PDF is viewed in Protected View.
To enable this feature:
1. Choose Edit > Preferences (Windows) or (application name) > Preferences (Macintosh).
2. Select Security (Enhanced) in the Categories panel.
3. Check Automatically trust documents with valid certification. This sets:
[HKEY_CURRENT_USER\Software\Adobe\<product>\<version>\TrustManager]
"bTrustCertifiedDocuments"=dword:00000001
To lock the setting, set the following:
[HKLM\SOFTWARE\Policies\Adobe\<product>\<version>\FeatureLockDown\
"bEnableCertificateBasedTrust"=dword:00000001
9.4 Per-certificate trust
Trust can be configured on a per-certificate basis so that certified documents signed with a specific
certificate can be made exempt from some security restrictions. For the certification signature, the
signature must be valid and the certificate must chain to a valid and trusted root certificate.
To set certificate trust:
1. Open Acrobat.
2. Do one of the following to open the Trusted Identities List:
• 9.x: Choose Security > Manage Trusted Identities and from the Display drop down
list, choose Certificates.
• 10.x: Choose Tools > Sign and Certify > More Sign and Certify > Manage Trusted
Identities and From the Display drop down list, choose Certificates.
• 11.x: Choose Edit > Preferences > Signatures > Identities and Trusted
Certificates > More and select Trusted Certificates.
3. Select a certificate.
4. Choose Edit Trust.
5. Check one or more of the following.
•Dynamic content: Enables multimedia. See 8.2€€€Multimedia (legacy).
•High privileged JavaScript: Enables HP JS execution. See 5.8€€€High privileged
JavaScript.
•Privileged network operations: Enables those operations which are blocked when
Enhanced Security is enabled. See 4€€€Enhanced Security.
6. Choose Ok.
Certificate trust options
Application Security Guide Section 9€€€Trust Methods
Section 9€€€Trust Methods Page 91
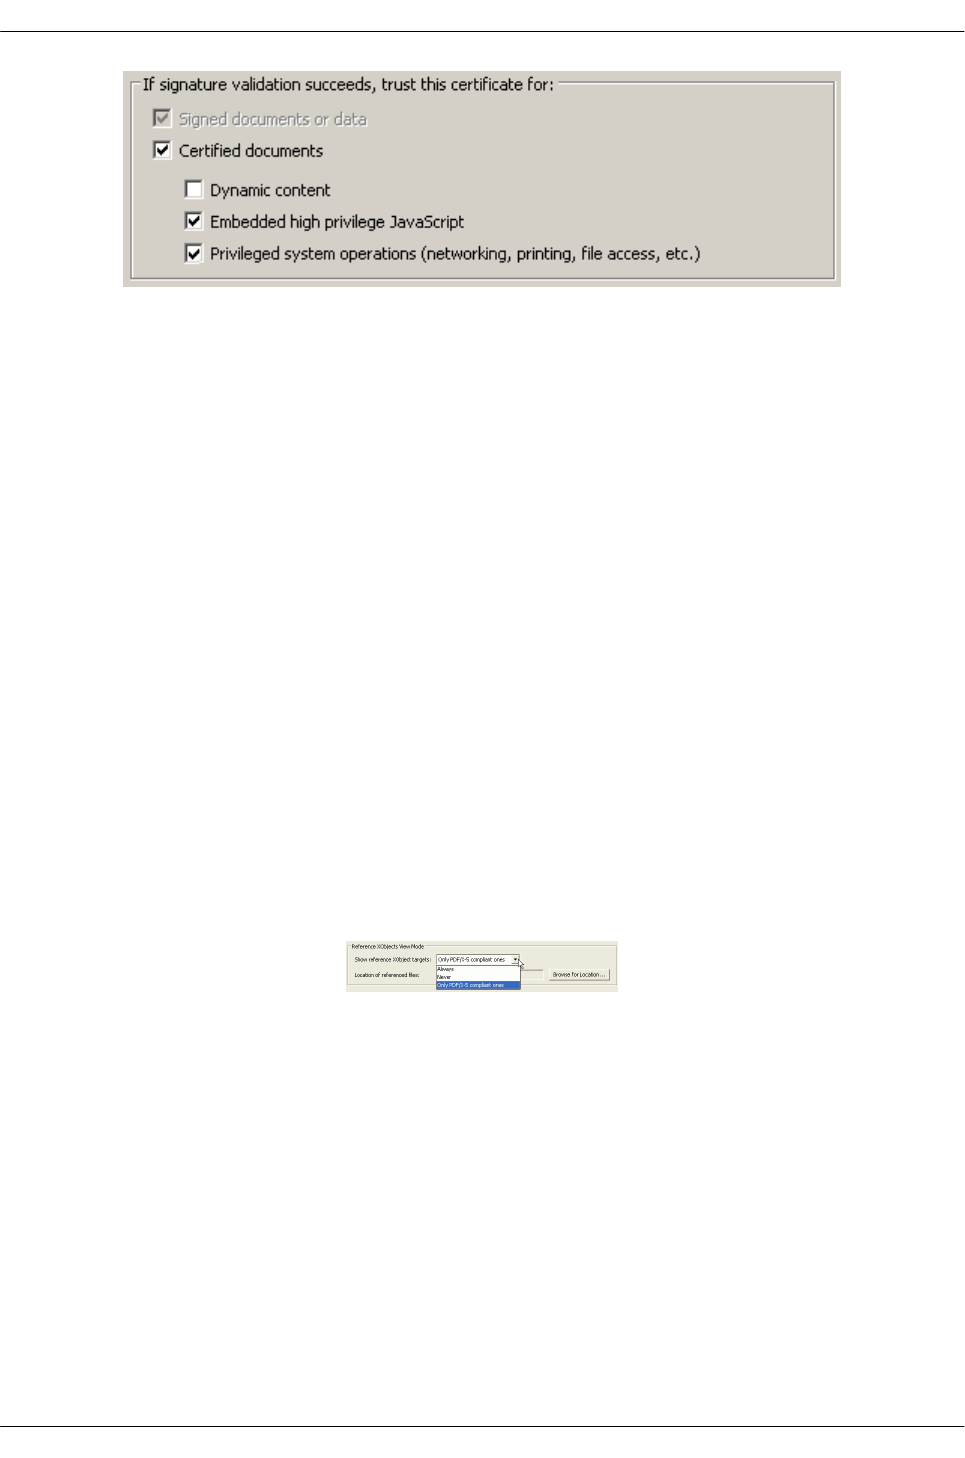
9.5 Cross domain trust
For details about setting up trust for cross domain access other than via privileged locations, see 7€€€Cross
Domain Configuration.
9.6 XObject (stream) access
Preference configuration can be a mystery if you don't take to time to understand related features and
how they interact. For example, enhanced security settings interact with certificate trust settings and Trust
Manager settings. The following provides just one use case where two settings must be configured to get
one feature to work as expected.
Since reference XObjects access external content, security is a concern. Therefore, XObject (external
stream) access requires that such access be granted though the user interface (or registry) and that the
referencing document is specified as trust-worthy when cross domain access is involved.
To configure XObject access:
To configure external content access:
1. Choose Edit > Preferences > Page Display (Windows) or Acrobat > Preferences Page Display
(Macintosh).
2. Configure the Reference XObjects View Mode panel by setting Show reference XObject targets.
3. Set the location of referenced files (if any).
4. Choose OK.
Resource access
To configure trust via the registry:
1. Open the registry editor.
2. Go to
HKEY_CURRENT_USER\Software\Adobe\<product>\<version>\TrustManager\cTrustedFolders\cExternalStream.
3. Right click and choose New String.
4. Enter a document ID in the form of t(some integer).
5. Right click on the new ID and choose Modify.
6. Enter the path to the trusted document in the Value Data field.
7. Go to
HKEY_CURRENT_USER\Software\Adobe\<product name>\<version>\TrustManager\cTrustedFolders\cCrossdomain
and repeat the same steps. Use the same ID and value.
Section 9€€€Trust Methods Application Security Guide
Page 92 Section 9€€€Trust Methods

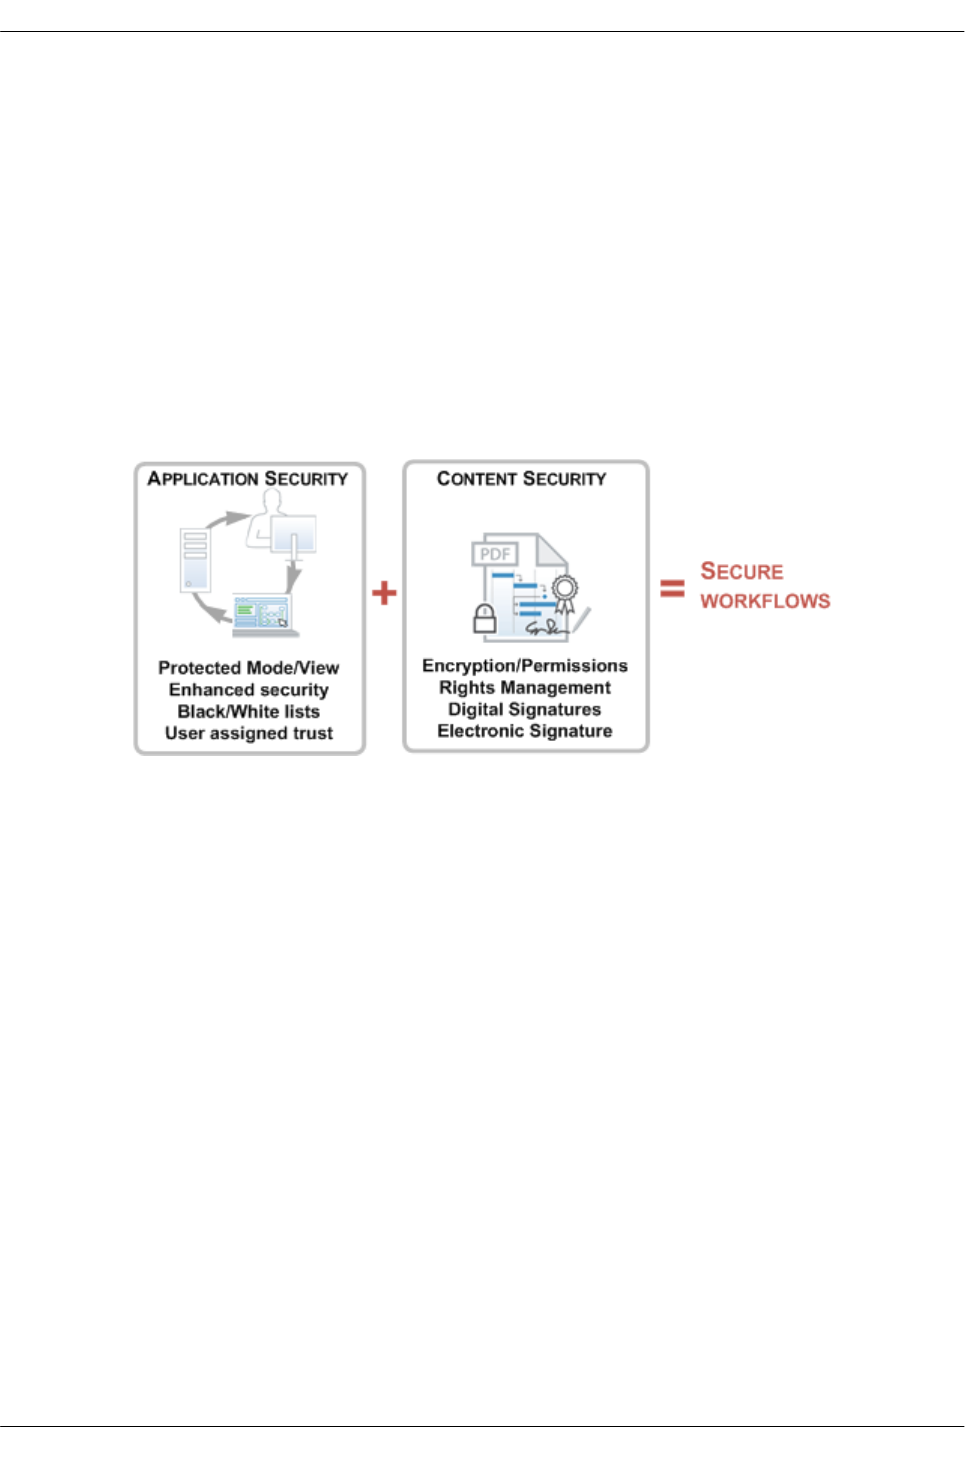
10 Content security
Application security is all about hardening the application against malicious attacks. Content security is
designed to protect workflows and content within the application's secured environment. The product's
application security options as well as its content security features such as digital signatures, encryption,
and permissions provide unparallelled control over PDF-based workflows. These two are not always
functionally distinct, and both are critical components of information assurance. For example, signing
certificates in certified documents can be used to assign trust for operations that would otherwise be
restricted by enhanced security.
This guide focuses solely on application security--configuring the application to enable, disable, or restrict
features and PDF functionality that may pose a security risk. In all cases, configuration may occur before
or after deploying clients. For details about content security features, refer to the digital signatures and
document security documentation.
Information assurance components
Section 10€€€Content security Application Security Guide
Page 94 Section 10€€€Content security
