Addmen OMR Sheet Design Guide 17.2
Addmen-OMR-Sheet-Design-Guide
Addmen-OMR-Sheet-Design-Guide
User Manual:
Open the PDF directly: View PDF ![]() .
.
Page Count: 42

OMR Sheet Design and Calibration Guide 17.1
CERTIFIED ISO 27001 & 9001
Ph.: +91-9229113522, 9229113544, 9229113566 Email: info@addmengroup.com Website: www.addmengroup.com
About this document :
Features mentioned in this document are super set of all features spread over all modules and
versions that include Standard/ Professional/ Server & Browser versions of Addmen OMR Software.
Some features may not essentially be a part of the version and module under procurement.
References from the User Guide and other Guides are also given in this document.
Note on Design and Calibration of OMR Sheet
The OMR Sheet designer is an integral part of the OMR Software.
There are two basic OMR modules in Addmen OMR software: Answer Sheet Checker & Form Reader.
These can be procured independently or in several combinations. In either case, the Standard Sheet
Designer is integrated and FREE. The user can learn to design and create as many layouts as he wants.
IMPORTANT ! The OMR Software can easily read sheet layouts that have been created using the inbuilt
sheet designer. Any sheet designs that have been created outside the Addmen OMR software must be
calibrated into the software. Read more about Creation of New Sheets and Calibration of Externally
designed/ Pre-printed sheets in this document.
It is most convenient to read layouts created inside the software and get 100% accurate results with
ease because and internally created sheet allows the use of full flexibility and features of the software.
This does not mean that you have a limitation to use readymade layouts only. The Addmen OMR
software has a sheet designer, so you can create as many layouts using the design facility. But either
the layout must be created using software or it should be calibrated in the software only then the
software will respond to it.
If there are any externally designed or pre-printed sheets to be read then they have to be calibrated
into the software. If this is a regular requirement, then the user will need the Advance Sheet Designer
module and he will be trained to make use of it. If it is a onetime requirement, you may also consider
the option of getting it calibrated by the support team on additional charges.
Generally it is suggested to avoid the use of calibrated sheets as it demands high user involvement and
attention. So calibration should be seen as a last resort only in SoS situation when due to some reason,
the test has already been taken on an externally designed sheet and the only option is to read these
sheets.
For externally designed or pre-printed sheets that have been calibrated, the user has to follow cautious
scanning and reading procedure to get accurate results. If there is slightest negligence at the time of
scanning or reading, the result of calibrated sheets may come out inaccurate. Hence in case of
calibration accuracy of the output cannot be guaranteed.
Calibration depends on availability of certain parameters and components in the printed sheet. If the
sheet has necessary parameters required for calibration, then only the sheet can be calibrated and
read from the software.
The Advanced Sheet Designer module can be used to calibrate most type of pre-printed OMR layouts
which have been made according to OMR guidelines. Some typical sheets can be calibrated with some
specific customization in the software. Not all layouts can be calibrated. Consult the technical support
team to know whether this sheet is suitable for calibration & reading.

OMR Sheet Design and Calibration Guide 17.1
CERTIFIED ISO 27001 & 9001
Ph.: +91-9229113522, 9229113544, 9229113566 Email: info@addmengroup.com Website: www.addmengroup.com
OMR Sheet Design Training and Support
IMPORTANT ! Though sheet design is apparently the first step in the process, but it is the last step in
training. The user must first perform & practice basic steps of OMR reading and result extraction on
some of the pre- designed sheet. A hands on experience in printing, scanning and reading OMR sheets
is utmost important to understand the need and importance of sheet design components.
Without clarity on basic reading and the output obtained for various types of blocks, it will be difficult
to understand the concept & the need of design parameters. Thus sheet design training is taken up as
last part of the training curriculum.
Difference between Facility to design and Ability to design
It is important to acknowledge that Sheet Designer only provides a tool to creating designs. Same sheet
design tool may be used differently by different individuals depending upon their individual sense of
design and ability to execute it.
For ex. Using the same brush and palette, a deft artist can create magic within minutes, while a novice
might not get any close to it, whilst the tool is the same, sense of visualization and planning is
important for designing.
Users will be taught the use of sheet design module, and about sheet calibration, but this does not
guarantee that they will be able to design or calibrate their sheets with professional efficiency.
Using this tool properly to create various layout depends on individual’s creative ability to :
1) visualize the desired output and select the correct type of block for it;
2) arrange different blocks aesthetically and systematically to fit on a piece of paper;
3) understand and follow OMR design guidelines.
If required, Addmen support services can be availed to create or calibrate designs for users, the effort
shall be charged separately.
Sheet Design and Calibration Services
OMR software has a sheet design feature using which you can create your own layouts. If you have not
received the training of sheet design or yet not comfortable with using this feature, we can once again
give you training for sheet design.
During startup, we create initially one design from our end to make your start up with OMR software
comfortable. But regularly you have to create your sheet layouts yourself.
Any more layouts created from our side would be chargeable.
If Addmen technical support team has to do the calibration, we will require you to send about 5 to 10
images of the sheet scanned perfectly straight, in colour mode, in 100% size with no scaling and saved
as BMP/JPG/TIFF.
In some cases where we feel the pre-designed/pre-printed sheet does not fulfill the basic criteria for
accurate reading, we alert the user. If still insisted to calibrate against our advice, we do not assure any
accuracy.
Sheets cannot be made or calibrated urgently. We shall deliver the new design in max 2 working days
excluding date of order. Please take timely decision and place order with sufficient time buffer.

OMR Sheet Design and Calibration Guide 17.1
CERTIFIED ISO 27001 & 9001
Ph.: +91-9229113522, 9229113544, 9229113566 Email: info@addmengroup.com Website: www.addmengroup.com
OMR Sheet Design Process
Design of OMR Sheets can be divided into two parts:
1) the technical OMR readable part; and
2) the ornamental part containing text instructions and images.
The design of OMR layout is done in the OMR designer panel through a very simple Drag-n-Drop
process. The OMR layout is then exported to a PDF for direct printing, or Word or to an open source
format that can be used in several popular DTP softwares for further editing.
OMR sheets are designed for various purposes and users of different regions, so sometimes they may
contain instructions in different languages and might be required to make it more picturesque. These
provisions would require the flexibility of DTP software. So after the technically readable OMR part is
designed in OMR designer, we have kept a provision for exporting for further editing in DTP softwares.
When we create a sheet, its design reading information is stored in software and its layout is exported
for printing. Both parts of sheet (printed layout and reading information) are important. Just printed
sheet is not sufficient because if the software does not know where to look for bubbles, it will not read
the sheet correctly and this information is provided by the reading layout stored inside the software. So
the layouts to be read must be designed or calibrated using OMR Software so that both printing and
reading information is generated.
There is difference between an Answer Sheet and Data Collection Form in terms of design
requirements, design components and later process.
If only Answer Sheet Checker module is active, we can design only Answer Sheets that contain Form ID,
Test ID and Questions. If only Form Reader module is active, we can design only OMR Forms which
include all types of block except questions. But if both modules are active then we can design-Answer
Sheets, Forms and Combo Sheets which work as Form & Answer Sheet simultaneously.
Sheet ID or Design ID
Each sheet design is given a unique ID. The Sheet ID or Design ID or Layout ID is in the format
XXXNNN or XXXXNNN, where XXX or XXXX is the client ID and NNN is the sheet sequence number.
Together it forms a unique design number.
A user can create sheet ID series only on his own client ID.
The common sheets or readymade standard templates are available on ID series 101NNN and
112NNN. These cannot be edited or uploaded. They can only be duplicated and saved on Client ID
series for further editing.
The Sheet IDs of the multiple layouts used in reading Multipage Forms, must be in sequence of the
page number. For example for 3 page form, the IDs would be : 101006, 101007 and 101008
In case of Duplex (both side printed) sheets, each side is considered as an independent layout and
the sheet ID must be in sequence. The design or page with the form ID block is kept as first in order.

OMR Sheet Design and Calibration Guide 17.1
CERTIFIED ISO 27001 & 9001
Ph.: +91-9229113522, 9229113544, 9229113566 Email: info@addmengroup.com Website: www.addmengroup.com
Backup Facility to keep the Designs Safe
IMPORTANT ! The sheet design that is created, is stored in your local database. If the database is
refreshed intentionally or if mistakenly replaced due to reinstallation, then the sheet designs stored
locally will be lost. If the sheet reading information is lost, then it will not be possible to read the
printouts corresponding to this design. It is thus important to be aware about the backup of your
sheets while replacing your database. However, if a layout is lost, it can be recreated, though it will
take some effort to check and recheck with the printed layout.
Addmen provides a free online server backup facility to all the users during their active support term.
It is an optional facility that can be used to upload the sheet designs to have a safe backup outside your
local database.
If the sheet design is backed up on the server it can be downloaded back by the same license user who
uploaded it. Because of this facility the Server can also be used to share sheet design in multi-branch
institutes where one user can create and upload the design to be downloaded and used by all the other
branches.
When the user creates and uploads a sheet on some ID and if a sheet is already uploaded on the
same ID on the server, then the sheet on the server will be overwritten and vice versa.
To keep a final design safe on server and to safeguard it from accidental overwriting by any of the
users, it can be locked while uploading. This will prompt the user when trying to upload again on
the same ID and save the final sheet from being overwritten.
There is a provision to see the list on the server with last creation and upload details.
If your design is final and is being read properly, press the UPLOAD button to upload it on Addmen
Server to keep it safe.
You can check the ‘Lock Design’ checkbox so that this design is safe on the server and yourself or no
other user ever overwrites it by mistake.
In case of data loss at your end you can regain your sheet template back by downloading it from the
server. Press the DOWNLOAD button to do so.
Uploading facility can be used in case of distributed branches where one branch can create a sheet
design and upload it for other branches to download.
OMR Sheet Design and Calibration Guide 17.1
CERTIFIED ISO 27001 & 9001
Ph.: +91-9229113522, 9229113544, 9229113566 Email: info@addmengroup.com Website: www.addmengroup.com
Sample Sheet Design
with OMR, OCR, ICR, Barcode, Image, Lithocode
and
Variable Printing.
All type of fields can be read in single pass. Parallel Reading at Multiple Threshold in single Pass.
Handwritten
Name
Read: ICR(PC)
Preprinted
number
Print: VDP (PE)
Read: OCR (PC)
Name as OMR
Read: OMR(SB)
Unique ID
Field
Read: All OMR
Additional Info
fields
Read: OMR(SB)
Variable Data
Print:VDP (PE)
Image/Photo
Capture: OMR (SB)
Handwritten
Numbers
Read: ICR (PC)
Auto Sort
Field
Read: All
OMR
Lithocode
Print:
VDP
(PE)
Read :
OMR
(PG)
Multi Choice
Questions
Read: OMR
(SA)
Barcode
Print: VDP
(PE)
Barcode
Read: All
OMR
You must add Form Reader (SB) with OMR Answer Sheet
Checker (SA) when you have to read any more type of fields
like Name, Exam Date etc. beyond the basic test purpose fields
like Unique ID, Auto Sorter and Questions on your sheet.
OMR Sheet Design and Calibration Guide 17.1
CERTIFIED ISO 27001 & 9001
Ph.: +91-9229113522, 9229113544, 9229113566 Email: info@addmengroup.com Website: www.addmengroup.com
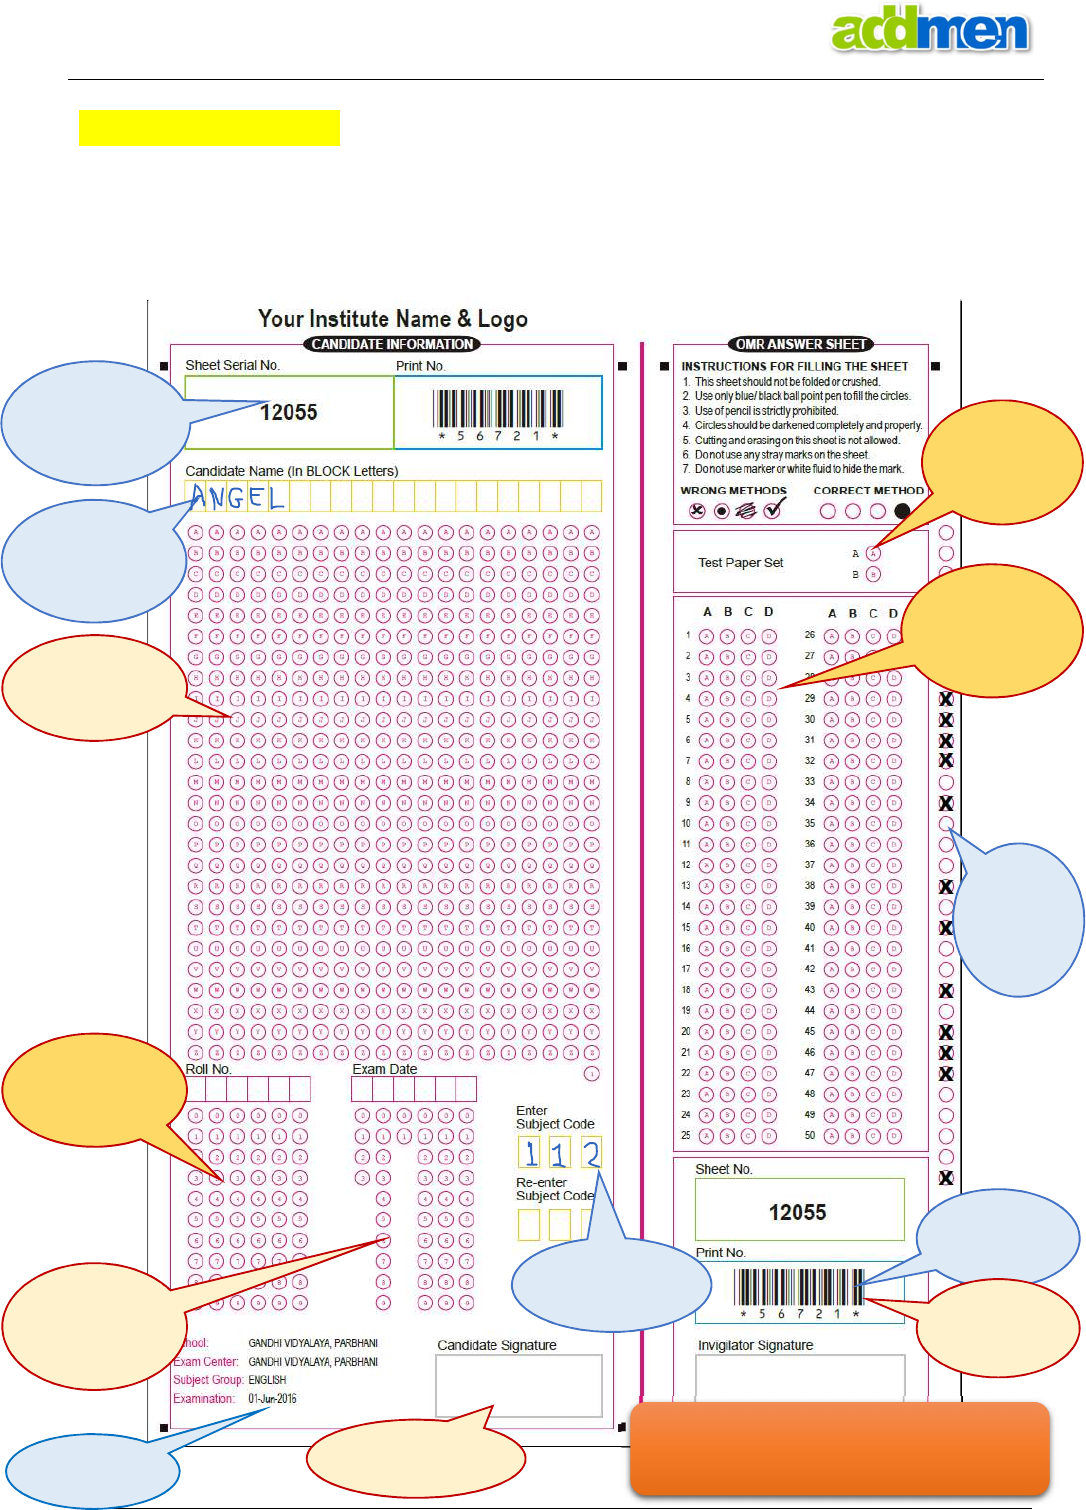
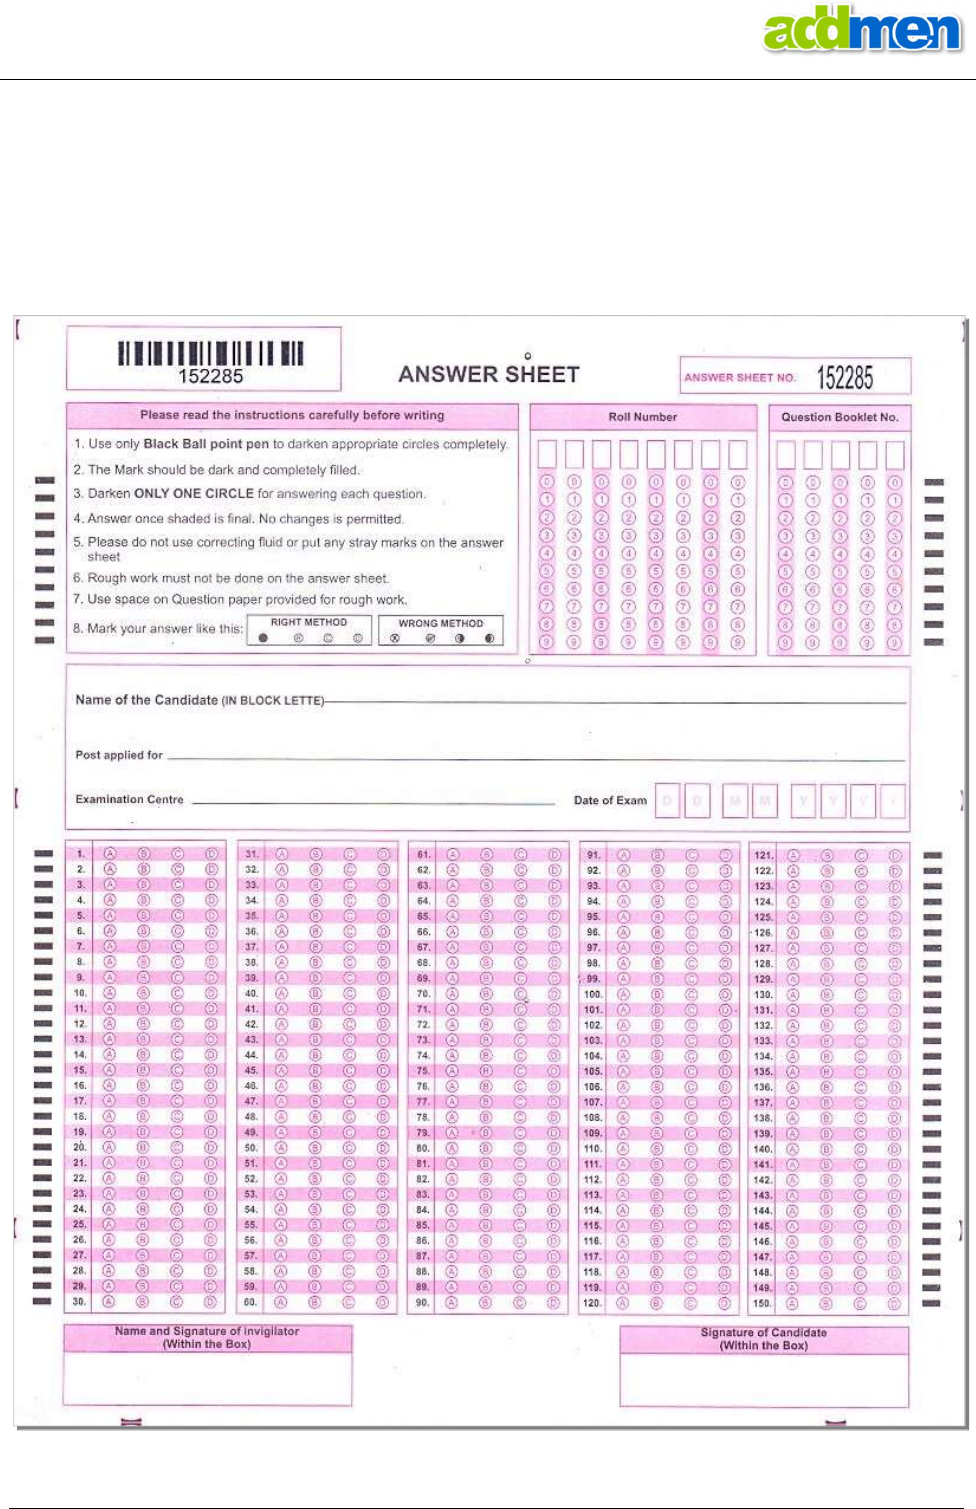
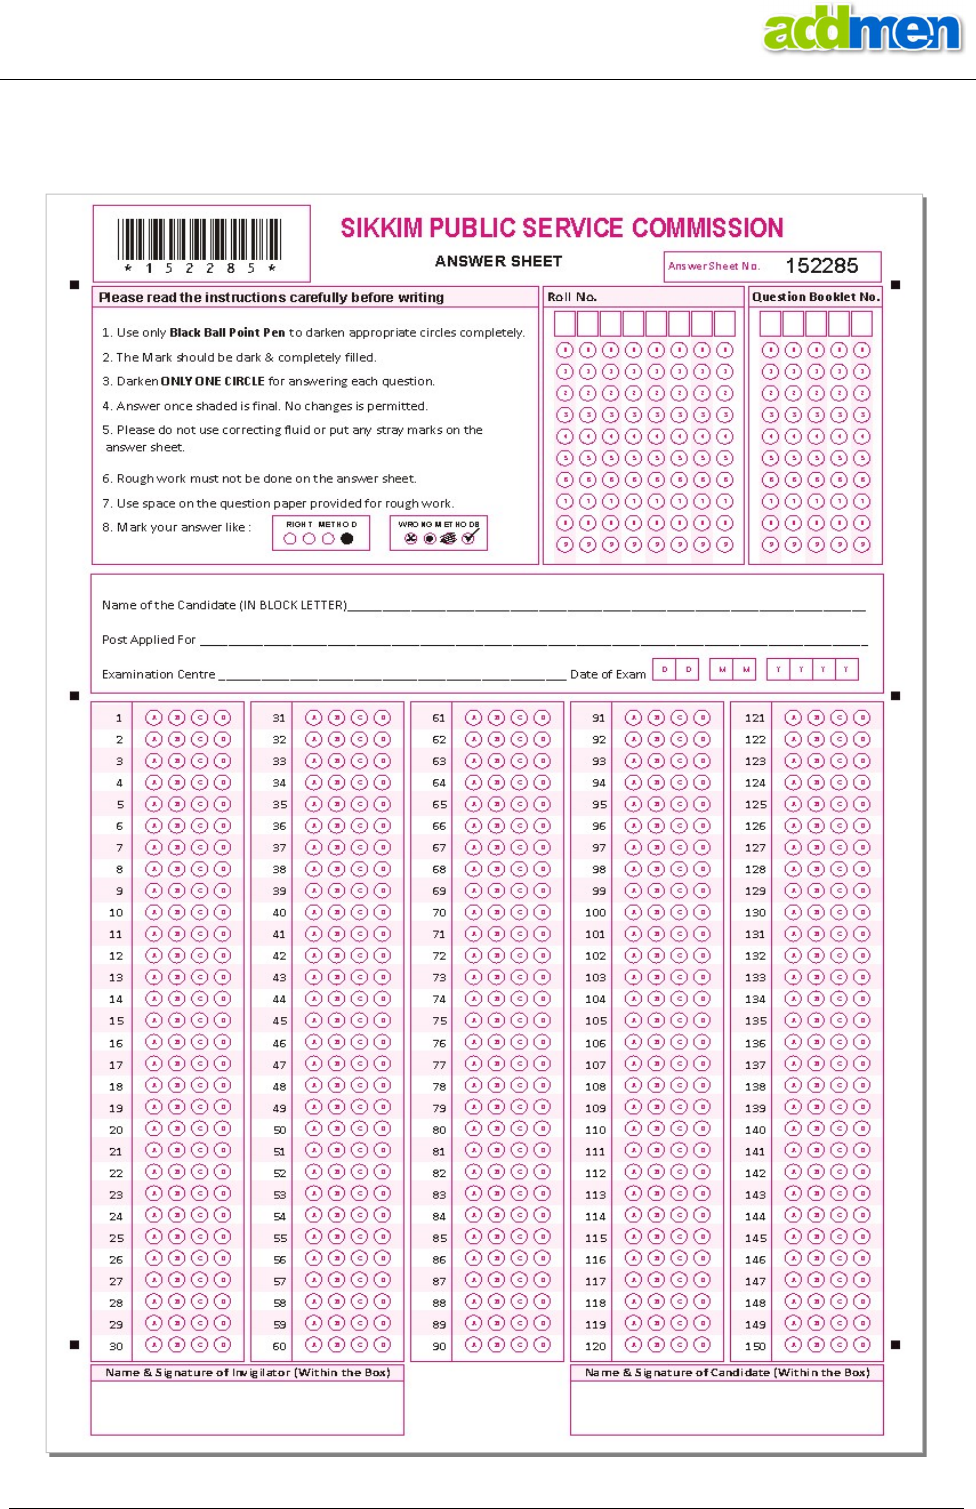
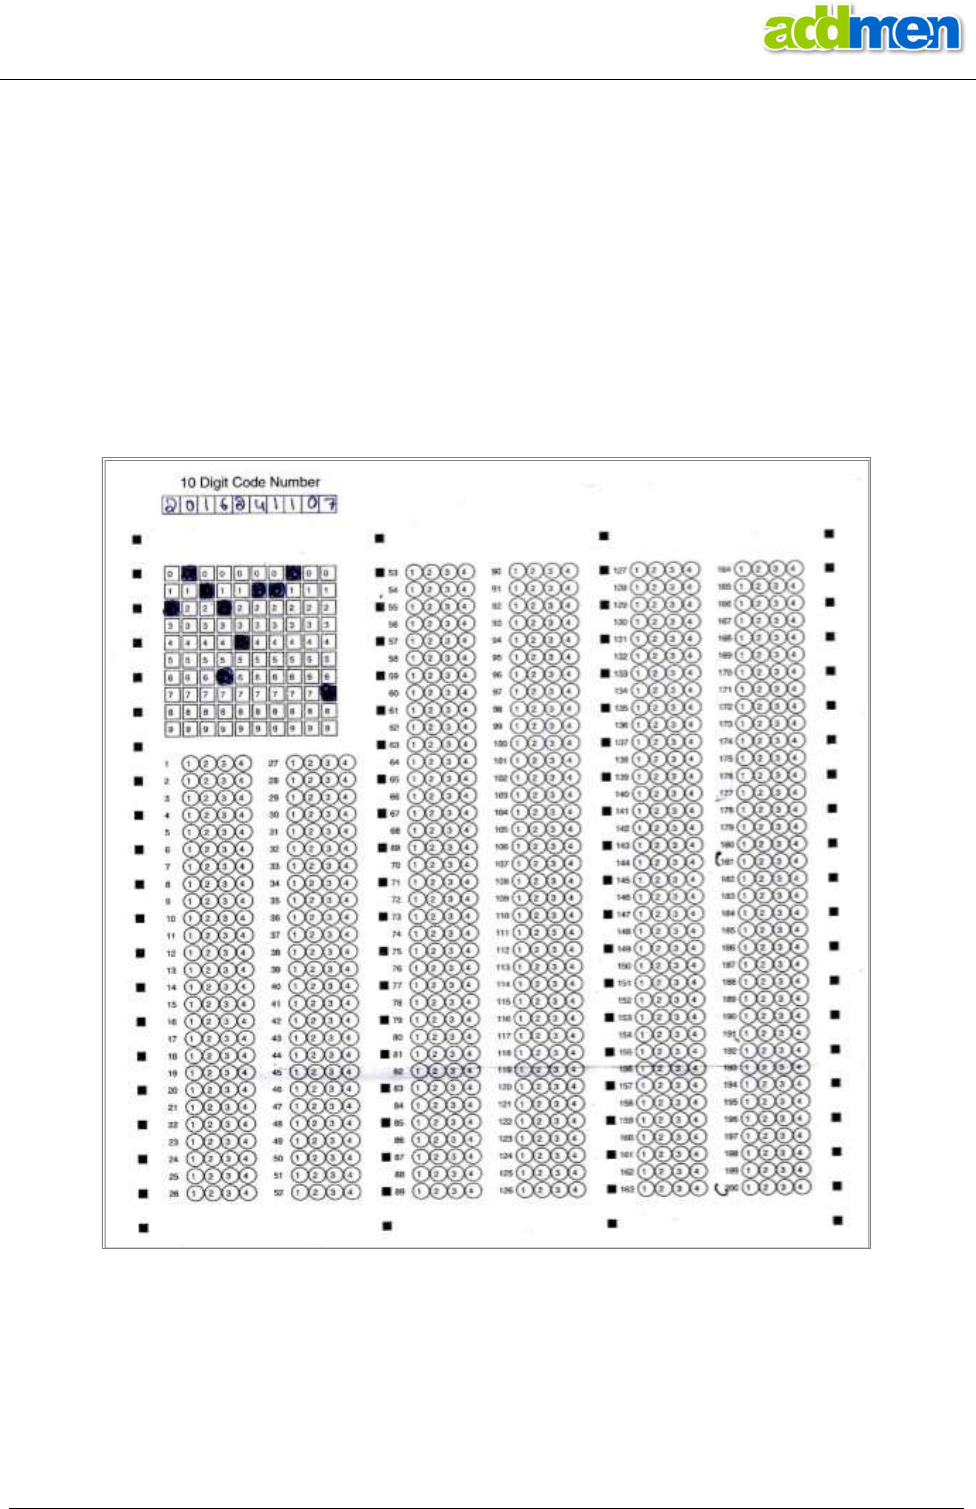
Understanding the OMR Sheet
An OMR sheet has 5 main components:
Index Points These 4 points provided at the 4 corners of the OMR sheet are the most important
components of an OMR sheet. The evaluation and accuracy of evaluation depends
on the clarity of these 4 points in the scanned OMR sheet image.
In the old pattern, machine read sheets, were additional black marks placed at equal
increments running throughout the length of the sheet on either side or on both
sides. This strip of black marks is called a timeline which helps the OMR machine to
identify the next row of bubbles.
But Addmen software does not need a timeline to read. It has a radically different
algorithm, which needs only 4 index points placed in a perfect rectangle.
In case of calibrated sheets, in which the index points have different sizes or are not
arranged in a perfect rectangle, the advance sheet designer can be used to calibrate
improperly placed index points.
Unique
ID
Field
This block is required to identify to which candidate this sheet belongs and in whose
record this data should be recorded. In case of Answer Sheet it is the Roll
No./Registration No. block. In case of a data collection form, it is the Form No. block.
Unique ID block may be kept on the sheet as an alphanumeric OMR block for the
candidate to fill or as Digitally pre-printed number to be read as OCR or Barcode or
Lithocode.
Sorter / Test ID Field
This block serves the purpose of a sheet
segregator block which the software uses
to identify the sheet to read it differently in a mixed lot of scanned images.
This block is required on Answer Sheet to recall the test definition to identify which
set of correct answers to use for the evaluation of this sheet and how to calculate
and distribute the marks into different sections.
Sorter block can be of OMR, Barcode, OCR, ICR type. However the value must be
numeric always.
Response Fields/
Information Fields
These are various types of OMR block matrices delivering different types of outputs.
In case of Answer Sheet these are the question blocks to be evaluated. For an
application or Survey Form these are various OMR based data collection fields.
Besides the OMR based Information fields and Multiple Choice Question, the
response blocks can be ICR type to accept and read handwritten input. In some
sheets photographs are also pasted or the image of a certain area of the sheet has
to be captured. Thus image blocks can also be assumed as one of the types of
response blocks. OCR, Barcode, Lithocode and Qcode can also be used.
Open Design Area This is a blank area which is not heeded by the software and can be customized
aesthetically according to user requirements, the logo and name of the institute and
the column for candidate information can be printed within this area. There can be
several such areas on a OMR sheet. The content in text blocks and alteration thereof
does not affect the OMR sheet.
OMR Sheet Design and Calibration Guide 17.1
CERTIFIED ISO 27001 & 9001
Ph.: +91-9229113522, 9229113544, 9229113566 Email: info@addmengroup.com Website: www.addmengroup.com
Important Info about sheet components while creating a New Sheet Design
Unique ID field
Any sheet design must have a unique Form ID field which uniquely identifies this sheet and its data
from all the others. For example, a test answer sheet must have the student unique number or the
registration ID field so that the scores from this sheet are posted in the database against this
unique Form ID.
Without the Unique Form ID field, the sheet design is not complete and does not show up in the list
on the Test Definition Interface or Sheet Reading interface.
In case of Two or more parameters forming the Form ID field, then the placement of such fields
should be made such that they can be read as a unique block.
It is possible to keep one single Form ID block overlapping on the visibly distinct multiple fields.
The Form ID block gets special treatment than other block on the OMR Sheet. Unlike the other
blocks, any exceptions and discrepancies in filling of Form ID field are prompted at the time of
reading. There are several conditions for which the Form ID field is checked while reading.
BID: Blank ID (Candidate ID not filled)
DUP: Duplicate ID (Same Candidate ID Filled by more
than 1 candidate)
IID: Invalid ID (Candidate ID not in list)
LID: Invalid ID Length (ID does not have specified no. of
digits)
DID: Multi Filled ID (Multiple bubbles filled in same
column of Candidate ID Block)
There are several Read-time Settings for the special treatment of Form ID block.
FormID
Length [0
-
10],
Sorter
Length [0
-
10]
Set the LENGTH and RANGE of Form ID and Test ID fields, in case they are fixed in your institute. This
will help in additional vigilance of erroneous filling of sheets.
ID Replace 1/2/3[0=Off/Column No, Values=V1|V2|...]
To obtain alphabetical form IDs, alphabet/general block can be used. To obtain numeric form IDs,
numeric block can be used but to obtain alphanumeric form IDs, we use a Numeric Block with special
arrangement to replace the numeric values of some column to alphabetical value. In current version
upto 3 columns can be replaced with alphabets. This feature is only available with form ID field.
To read a column as alphabet, enter the column number separated by comma and followed by 10
values that would appear as replacements of 10 numerical values each of them separated by pipe “|”.
For example to obtain a form ID like F2010M, do as follows:
Insert a 6 column numeric form ID block on your sheet layout.
Set the “ID replace 1” parameter value to- 1,A|B|C|D|E|F|G|H|I|J
Set the “ID replace 2” parameter value to- 6,M|N|O|P|Q|R|S|T|U|V
Default value is 0 for no replacements.
Auto ID [0=No; 1=Yes; 2=Ask]
To provide Auto system generated unique ID for each and every sheet.
Add Leading Zero to Form ID [0=No;1=Marked;2=Always]
To read Leading Zeros in the field of Form ID or Candidate ID.
For eg. 0001, 0002 etc
OMR Sheet Design and Calibration Guide 17.1
CERTIFIED ISO 27001 & 9001
Ph.: +91-9229113522, 9229113544, 9229113566 Email: info@addmengroup.com Website: www.addmengroup.com
Unique ID field as Auto ID
In case there is no need to collect any unique ID from the sheet, then such sheets will be read on
the Auto ID mode, where the Form ID will not be read from the sheet, instead it will be auto
allocated by the software in the sequence of reading of scanned images.
To meet this situation, a hidden Form ID field must be placed somewhere on the sheet. The unique
Auto ID obtained upon sheet reading will be saved in the hidden form ID field that exist in the
layout but is not actually seen on the printed OMR sheet.
The hidden Form ID field can be 1x1 numeric block. The bubble of this dummy field can be deleted
in the printout before printing, while the bubble corresponding to it in the reading layout will
remain on the reading layout.
When a sheet is read on Auto ID, the system allocates ID starting from 1, unless the Read-time
setting is set as 2, which allows the user to specify the starting number of the series.
Unique ID field in Duplex Sheet
In case of Duplex Sheet, the unique Form ID field must always be kept on the first scanned side.
In case of Duplex sheet to be used in Test (which bears question blocks), the layout of the sheet
must be so designed that the Question and the Form IDs are preferably kept on the same side i.e.
the first side. However even if questions are placed on the second side, it is acceptable. Though the
Form ID is always fetched from the first side.
Sorter Field (Test ID field)
This field is used by the system to segregate the mixed up sheets according to the different values
of the sorter field.
The sorter field also gets special treatment at the time of reading. Unlike the other blocks, any
exceptions and discrepancies in filling of Sorter / Test ID field are prompted at the time of reading.
There are several conditions for which the sorter field is checked while reading.
BLT: Blank Test ID (Test ID not filled)
DBT: Multi Filled Test (Multiple bubbles filled in same
column of Test ID Block)
IVT: Invalid Test (Test ID not defined)
ILT: Invalid Test or Length (Test ID does not have
specified no. of digits)
FRM: Manual ID or Test Skipped (Candidate ID or Test ID
entered manually)
Sorter block is not compulsory. If it is not required to read the Sorter block (in case no sorting is
needed), then it is not must to keep a Sorter Block.
The sorter field is always numeric. It can be horizontal numeric or vertical numeric in structure.
In case of Answer Sheet Design the software will not seek the sorter block if it is not placed on the
sheet. Even if it is placed, and yet not to be checked, then the ‘Skip Test’ option is must be selected
during reading.
The sorter finds its most common use in case of tests where multiple test papers are created by
shuffling the same set of questions and called as Set A / Set B/ Set C…. by using the sorter field, the
Answer Sheets can be segregated so that sheets of Set A are checked against the answer key of Test
A and likewise.
The Sorter block is also required in case of Answer Sheets to sort Answer Sheets according to the
Test ID. So when a Test with multiple sets is to be evaluated, the Test Paper Sets are filled in the
Sorter field. So that the software can automatically segregate sheets according to Answer Key.
OMR Sheet Design and Calibration Guide 17.1
CERTIFIED ISO 27001 & 9001
Ph.: +91-9229113522, 9229113544, 9229113566 Email: info@addmengroup.com Website: www.addmengroup.com
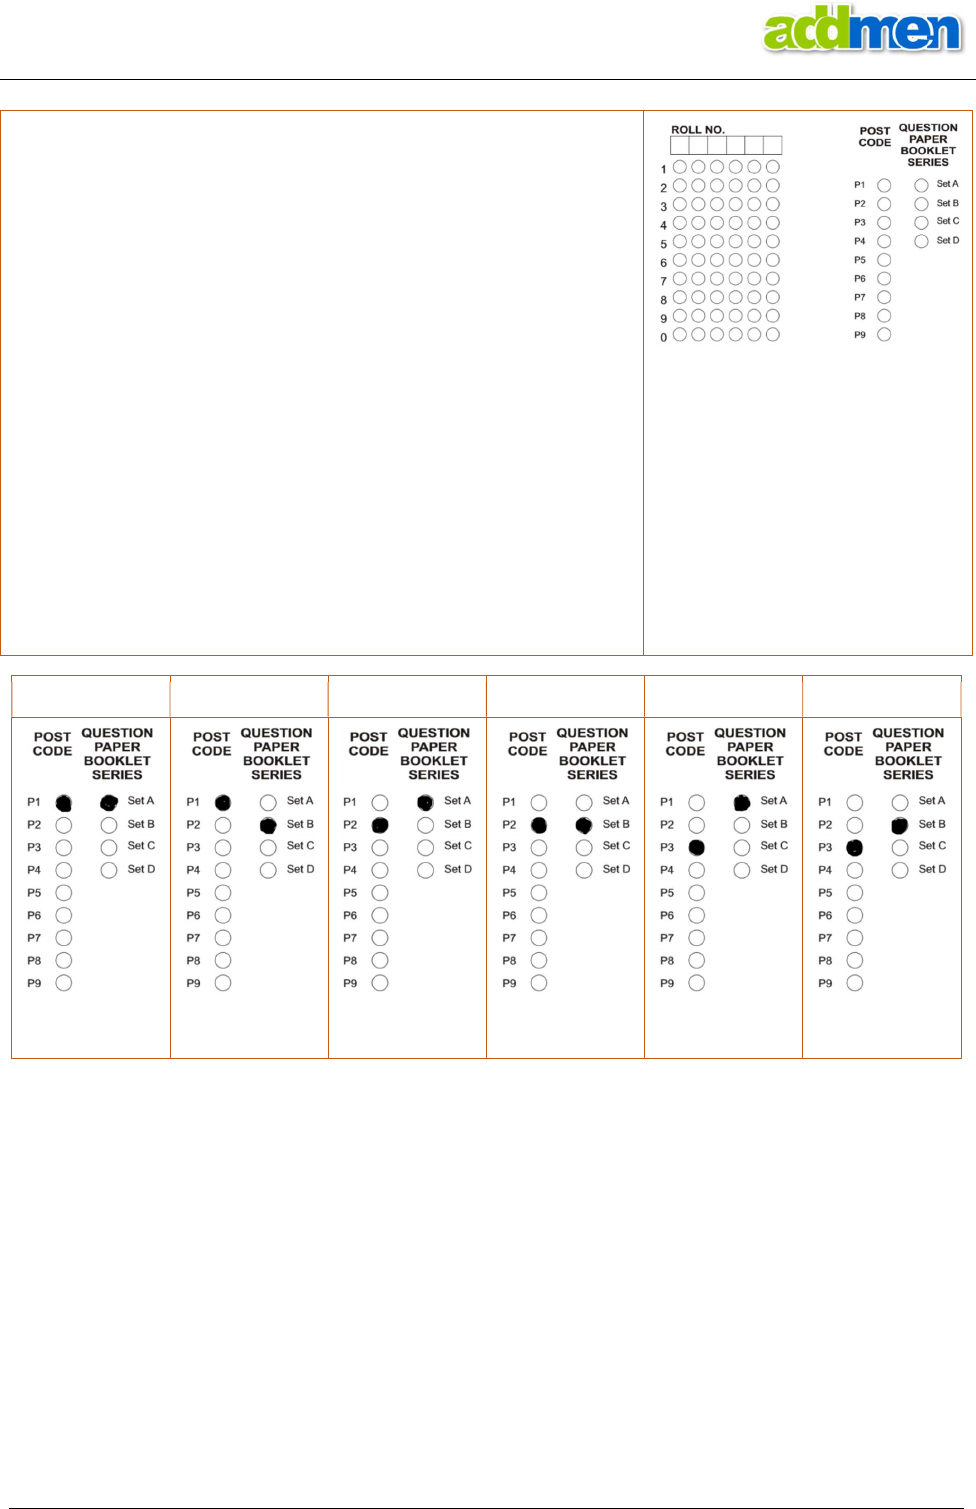
Sometimes a test is conducted for multiple posts where there is a
different question paper for each post. There are also multiple sets
(A/B/C/D) for each test paper.
For example there are 3 posts P1, P2 and P3. Each post has a
different level of test paper, each test paper is different from the
other and has different questions. But at the same time, to avoid
copying, each test paper of each post has been shuffled to form 2
test papers having same questions in a different sequence.
Thus there are total 3x2 question papers distributed in the room.
The test answer key is changing as per the post and as per the set
within the post. Then there are 3x2=6 Answer Keys. So we need to
sort the sheets for each type of answer key.
Sorter values for Post 1: 11, 12
Sorter values for Post 2: 21, 22
Sorter values for Post 3: 31, 32
Total 6 filled as following.
This is how we will place a 3
column Vertical Numeric Block to
be used as Sorter.
We will remove the central
column so that it appears as two
distinct blocks but will serve in
combination as one Sorter block.
Fig. 1A Fig. 1B Fig. 1C Fig. 1D Fig. 1E Fig. 1F
Post 1 Set 1
Sorter Value 11
Post 1 Set 2
Sorter Value 12
Post 2 Set 1
Sorter Value 21
Post 2 Set 2
Sorter Value 22
Post 3 Set 1
Sorter Value 31
Post 3 Set 2
Sorter Value 32
In case of Two or more parameters forming the Sorter field, and these fields have also to be
captured separately then the placement of these fields should be made adjoining such that they
can be read as a unique block. One Sorter block should be kept overlapping the other two blocks.
Sorter/ Test ID field in Duplex Sheet
In case of Duplex Sheet which is read from the Form reader, the Sorter field must be placed on the
first page of the form. So that when mixed up forms are sorted, all the related pages are prefixed
with the sort code on the first page. Even if the sorter field is placed on the second page, it will be
treated as dummy field and not read by the software.
In case of more number of questions or because of the need of design, if a test Answer sheet is so
designed that the questions spread over both sides of the sheet, then 2 different tests should be
defined. The Test ID must be in same order as the sheet ID, i.e. the first sheet should be used to
define first test and the second sheet layout should be used in the second test in sequence.

OMR Sheet Design and Calibration Guide 17.1
CERTIFIED ISO 27001 & 9001
Ph.: +91-9229113522, 9229113544, 9229113566 Email: info@addmengroup.com Website: www.addmengroup.com
In case of Duplex sheets, if the tests are to be sorted then single side tests should be made. Sorting
of two-sided test sheets is not possible. This means that if a duplex answer sheet is to be used for
multiple sets of a test paper, then in such a design all the questions must be placed on the same
side of the sheet.
Inclusion of Required Blocks
Various types of fields in a layout are ‘Block’, ‘Question’, ‘FormID’ & ‘TestID’.
In case of Data Collection Form only one key field – ‘Form ID’ is required and any type of ‘Blocks’
can be used.
In case of Answer Sheet ‘FormID’ and ‘Question’ are required. If a sheet layout has these 2 field
types, only then Answer Sheet will appear in ‘Select Sheet’ dropdown list in Step 1: Define Test
panel.
OMR Sheet Design and Calibration Guide 17.1
CERTIFIED ISO 27001 & 9001
Ph.: +91-9229113522, 9229113544, 9229113566 Email: info@addmengroup.com Website: www.addmengroup.com
Various Block Types and Value Exceptions
Various type of Readable blocks available for design are listed below. Each read type has a different
arrangement of bubble array. Their output is shown on right.
> OMR-General MCQ
> OMR Numeric Integer
(Horizontal/Vertical)
> OMR Numeric Decimal
> OMR Alpha-Numeric
> OMR Matrix (X-Matrix / Y-Matrix)
> OMR Lithocode
> OCR
> ICR (Alphabet/Alphanum/Custom)
> Barcode
> Picture
Various type of Non-Readable blocks available
for design are given below
> Header
> Label
> Image
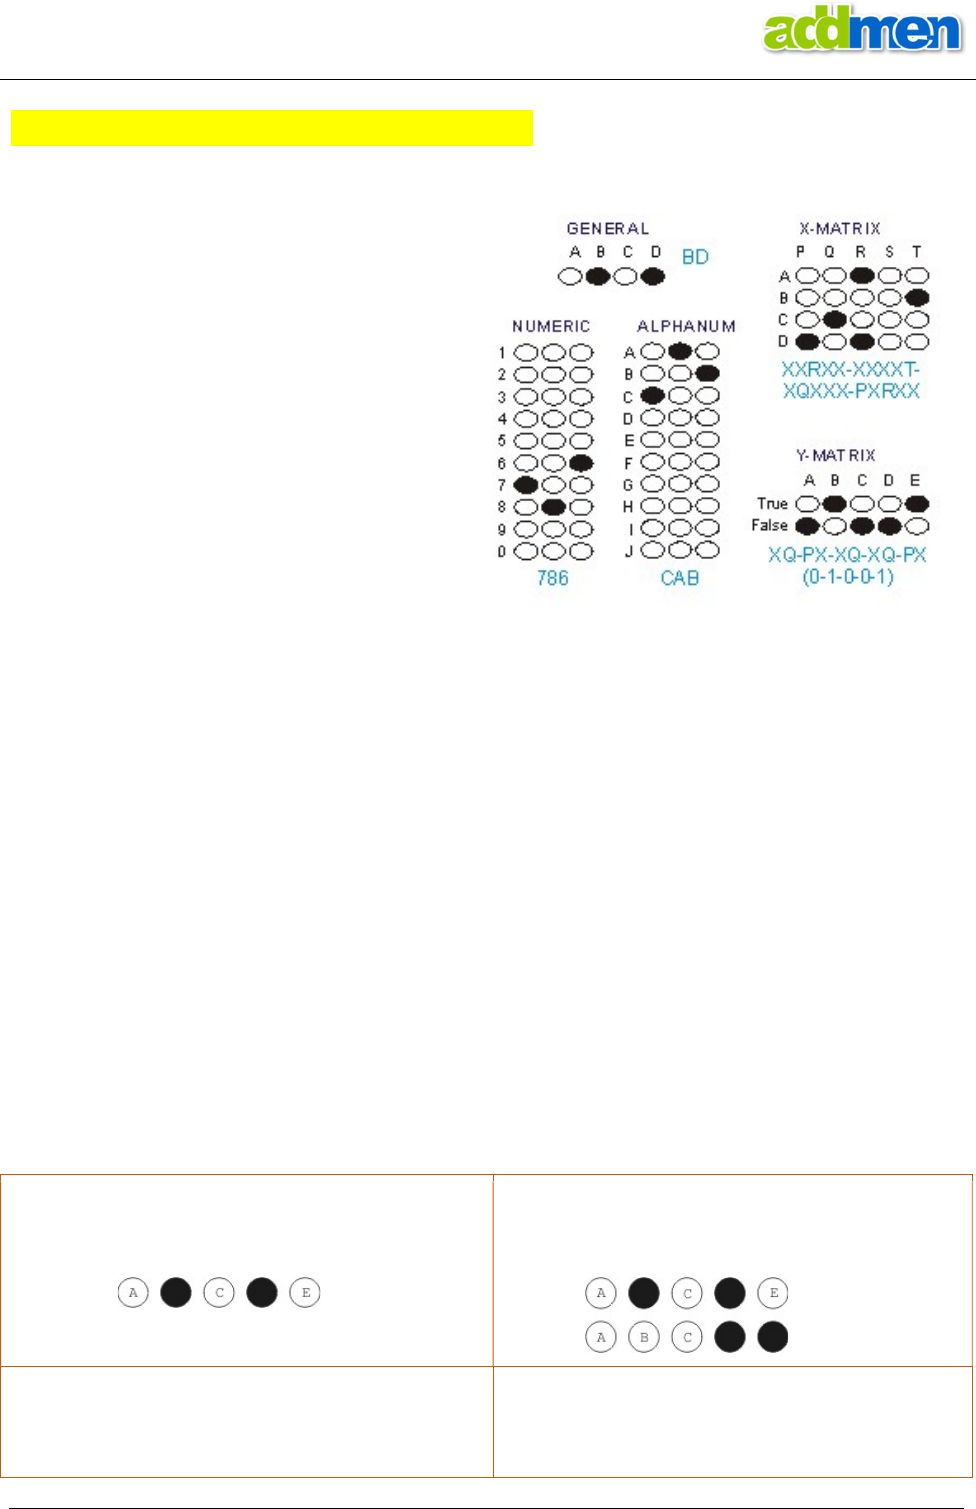
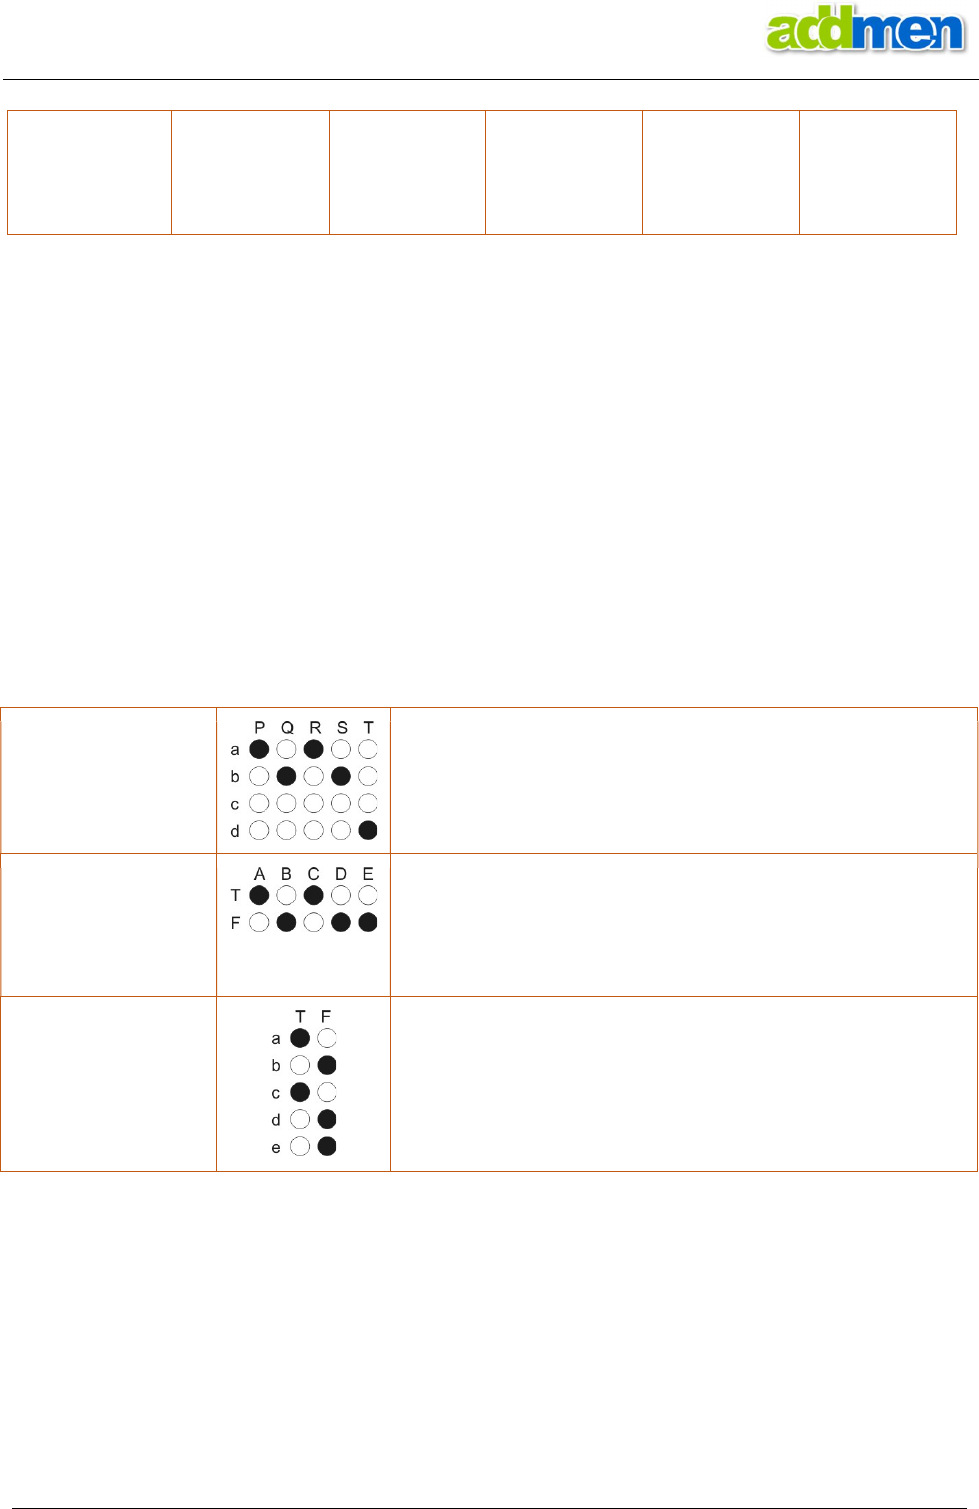
OMR General (used for MCQ)
This is the most basic type of OMR block which is horizontal in structure and in which each bubble
(i.e. each column) corresponds to alphabets ABCD….upto Z (maximum 26 bubbles in a row).
When this block is placed with more than 2 rows then the output is received as ABCD-ABCD i.e
output of each row separated by a “-“.
While multiple rows might be suitable to obtain certain type of output in case of Form Reading or
Data Collection, but when used as a Multiple Choice Question it is preferred to place this block as a
single row block which give output like ABCDE…
This type of block is used when (Yes/No/Cant Say) or (Poor, Average, Good) type responses are
sought.
This block can also be used in case of Feedback Forms where a range of responses on a scale of 1-5
are required. In this case replacement values must be set. A=1, B=2….E=5 and so on.
Fig. 2A
Single Row General Block
= BD
Fig. 2B
Multiple Row General Block
= BD
-
DE
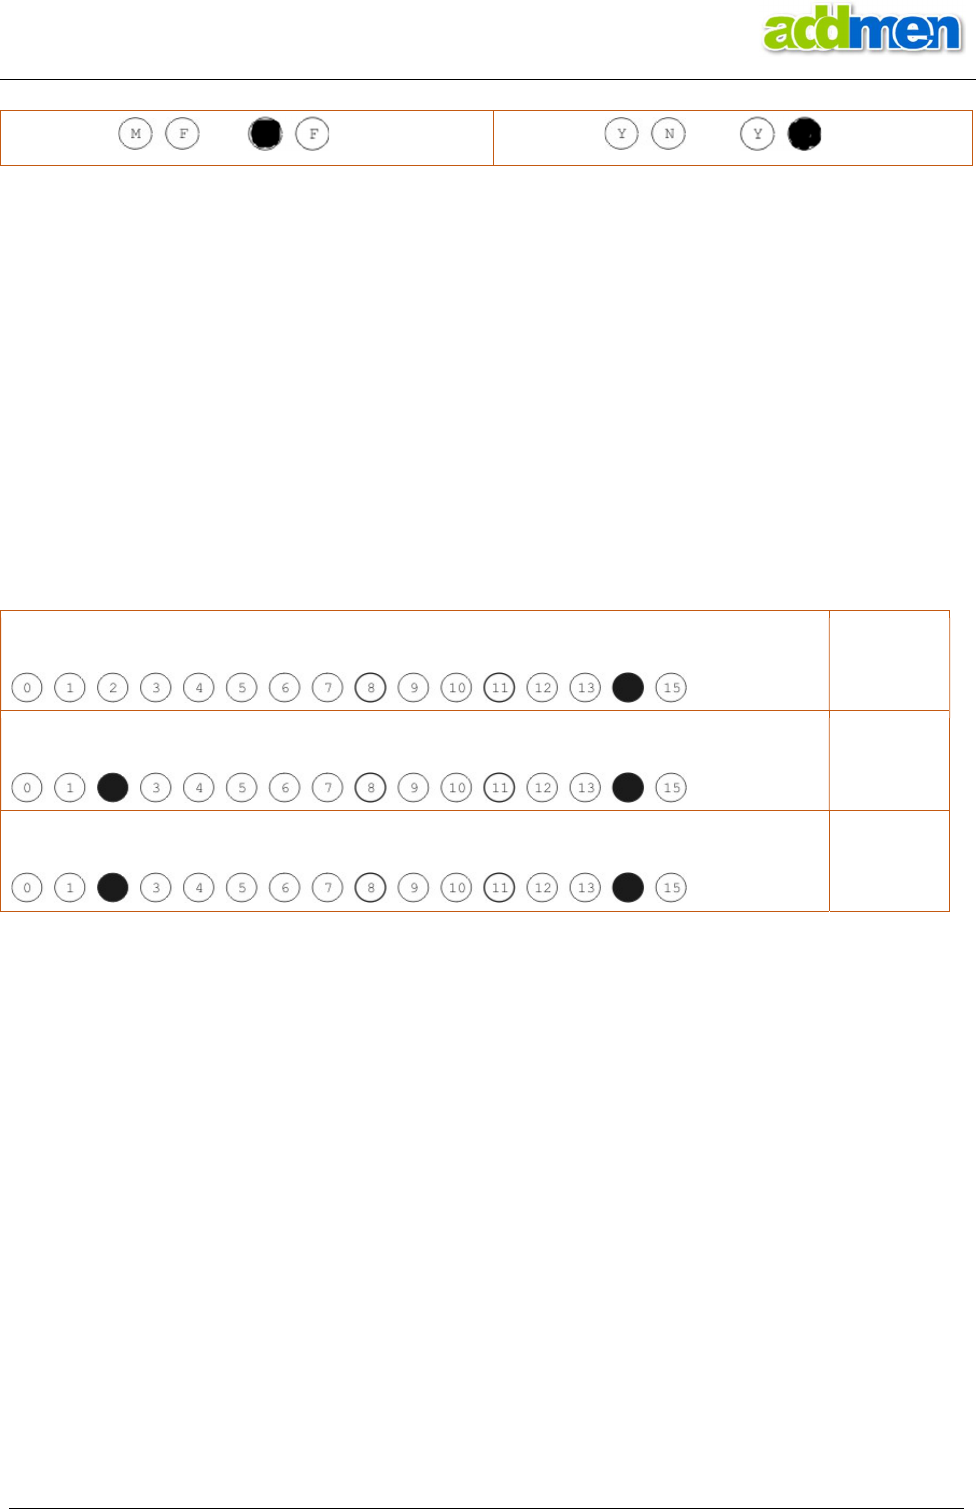
Fig. 2C
Single Row General Block used as M/F
Fig.
2D
Single Row General Block used as Y/N
OMR Sheet Design and Calibration Guide 17.1
CERTIFIED ISO 27001 & 9001
Ph.: +91-9229113522, 9229113544, 9229113566 Email: info@addmengroup.com Website: www.addmengroup.com
= A
= B
OMR Numeric Integer (Horizontal)
The Numeric Integer block delivers output in numbers. It only delivers positive integer values.
All numeric blocks on the sheet will follow the same reading sequence either starting from ‘1’ like
1234567890 or starting from ‘0’ like 0123456789 depending upon the setting made for the sheet.
A single row OMR Numeric block is treated as Horizontal Numeric OMR block. However if the
Numeric block is inserted with more than one rows, it follows the properties of Vertical Numeric
block.
In Horizontal Numeric block each bubble in the single row corresponds to values starting from
1,2,3,4,5…… or from 0,1,2,3,4,5….. depending upon the setting made for the sheet.
Horizontal Numeric block is used when Yes/No type responses are sought or in case of Feedback
Forms where a range of responses on a scale of 1-5 are required.
If more than one bubble is filled in the same row of horizontal Numeric block, then all bubbles are
read and a concatenated string is presented as output.
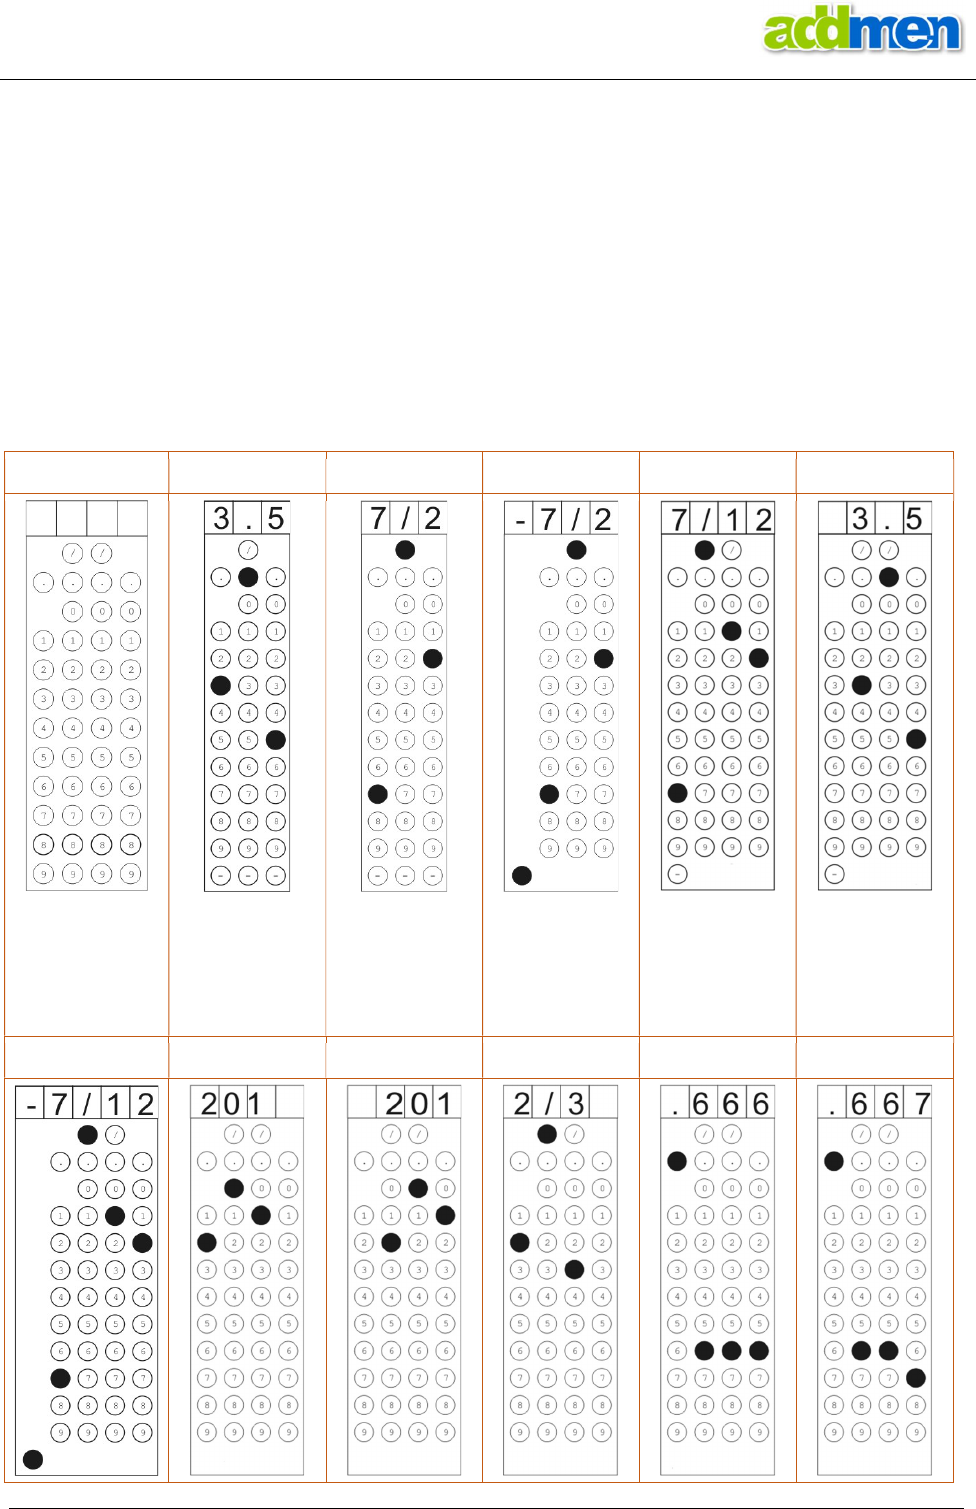
Fig. 3A
Horizontal Numeric Block
Output
14
Fig. 3B
Horizontal Numeric Block used regular block
Output
214
Fig. 3C
Horizontal Numeric Block used as Sorter
System
Alert
DBT
OMR Numeric Integer (Vertical)
Single column vertical numeric block behaves in the same way as Horizontal Numeric block except
that its structure is vertical.
In vertical Numeric block each bubble in the single column corresponds to values starting from
1,2,3,4,5…… or from 0,1,2,3,4,5….. going upto 8,9,10,11,12,13,14,15….and so on.
In the multiple column vertical Numeric block, each row corresponds to a digit from 1-0 or from 0-9
(depending upon the numeric block read settings), while each column corresponds to a digit in a
string of digits.
The multiple column vertical Numeric block also has provision to deliver negative number values as
output. If vertical Numeric block is allotted more than 10 rows, the 11th row is read as ‘-‘ (minus)
sign and delivers a negative integer.
Columns left blank are omitted during reading. So if a vertical Numeric block having 3 columns is
filled only for 2 columns, then a 2 digit string will be obtained irrespective of the position of
columns filled.
If more than one bubble is filled in the same column of Vertical Numeric Block, then all bubbles are
read and a concatenated string is presented as output.

OMR Sheet Design and Calibration Guide 17.1
CERTIFIED ISO 27001 & 9001
Ph.: +91-9229113522, 9229113544, 9229113566 Email: info@addmengroup.com Website: www.addmengroup.com
However the Form ID and the Sorter blocks are an exception to this and system either prompts for
correction or skips the sheet with appropriate tag.
Fig. 4A Fig. 4B Fig. 4C Fig. 4D Fig. 4E
Single Column
Vertical Numeric
Block Starting from
0 or 1
Output 10
In both cases
Blank
Multi Column
Vertical Numeric
Block
Starting 0
Vertical Numeric
with Limited Rows
Starting 0
Read _102
Output 102
Starting 1
Read _213
Output 213
Blank Vertical
Numeric Block
With 11 rows for
Negative numbers
Correct print of
Vertical Numeric
Block
With 11 rows for
Negative numbers
Read -102
Output -102
Fig.
5
A
Fig.
5
B
Fig.
5
C
Fig.
5
D
Fig.
5
E
Fig.
5
F
Blank Vertical
Numeric Block
Read _25
Output 25
Read 25_
Output 25
Read 2_5
Output 25
Read 025
Output 25
Read 275_
Output 275
OMR Sheet Design and Calibration Guide 17.1
CERTIFIED ISO 27001 & 9001
Ph.: +91-9229113522, 9229113544, 9229113566 Email: info@addmengroup.com Website: www.addmengroup.com
Use the setting ‘Sort Multiple Marked’ to set the behavior of the field that has multiple filling in the
same column of a Numeric block.
If the Vertical Numeric block is used as Form ID, it has a provision to insert Leading Zero depending
upon the settings made for the sheet.
OMR Numeric Decimal
This is similar to OMR Numeric Vertical with some added restrictions. The reading sequence of
bubbles in a column starts from 0 irrespective of the setting. It is always multiple columns with
minimum 3 columns. The number of columns can be increased.
It is essentially either 12 or 13 rows. It is 12 rows when the positive number is expected. It is
essentially 13 rows for negative numbers output.
Fig.
6
A
Fig.
6
B
Fig.
6
C
Fig.
6
D
Fig.
6
E
Fig.
6
F
Decimal Block
expecting only
positive value
Minimum size
of Decimal
Block expecting
only positive
value
Minimum size
of Decimal
Block expecting
only positive
value
Minimum size
of Decimal
Block expecting
negative value
Decimal Block
expecting
negative value
Decimal Block
expecting
negative value
Fig. 6G
Fig. 6H
Fig. GJ
Fig. 6K
Fig. 6L
Fig. 6M
OMR Sheet Design and Calibration Guide 17.1
CERTIFIED ISO 27001 & 9001
Ph.: +91-9229113522, 9229113544, 9229113566 Email: info@addmengroup.com Website: www.addmengroup.com
Correct print of
Decimal Block
expecting
negative value
OMR Matrix (X-Matrix and Y-Matrix)
A Matrix type block has multiple rows and columns of bubbles which are read collectively to
provide a string of output.
There are 2 types of matrix blocks: X-matrix and Y-matrix.
This type of block is an excellent option when a single string output of several interrelated
questions is expected in the same field.
X-Matrix and Y-matrix type of block is generally used as question especially where several sub
questions or multiple interrelated questions are asked and each question has multiple choices and
the correct answer is a perfect combination of all the answers to all questions.
The Matrix blocks are most used in case of comprehension passage based questions where each
sub-question has to be evaluated and scored individually as well as collectively, while the general
MCQ block can be used only when each sub-question has to be treated individually.
The X-Matrix block is best used in case of matching type questions while the Y-Matrix block is most
suitable for true-false type questions..
X
-
Matrix
Output String
PXRXX-XQXSX-XXXXX-XXXXT
Responses are read in a row first, then output of several
rows is concatenated.
Y
-
Matrix
Output String
PX-XQ-PX-XQ-XQ
Responses are read in a column first, then output of several
columns is concatenated.
Y
-
matrix type
question asked as X-
Matrix type block
Output String
PX-XQ-PX-XQ-XQ
OMR Sheet Design and Calibration Guide 17.1
CERTIFIED ISO 27001 & 9001
Ph.: +91-9229113522, 9229113544, 9229113566 Email: info@addmengroup.com Website: www.addmengroup.com
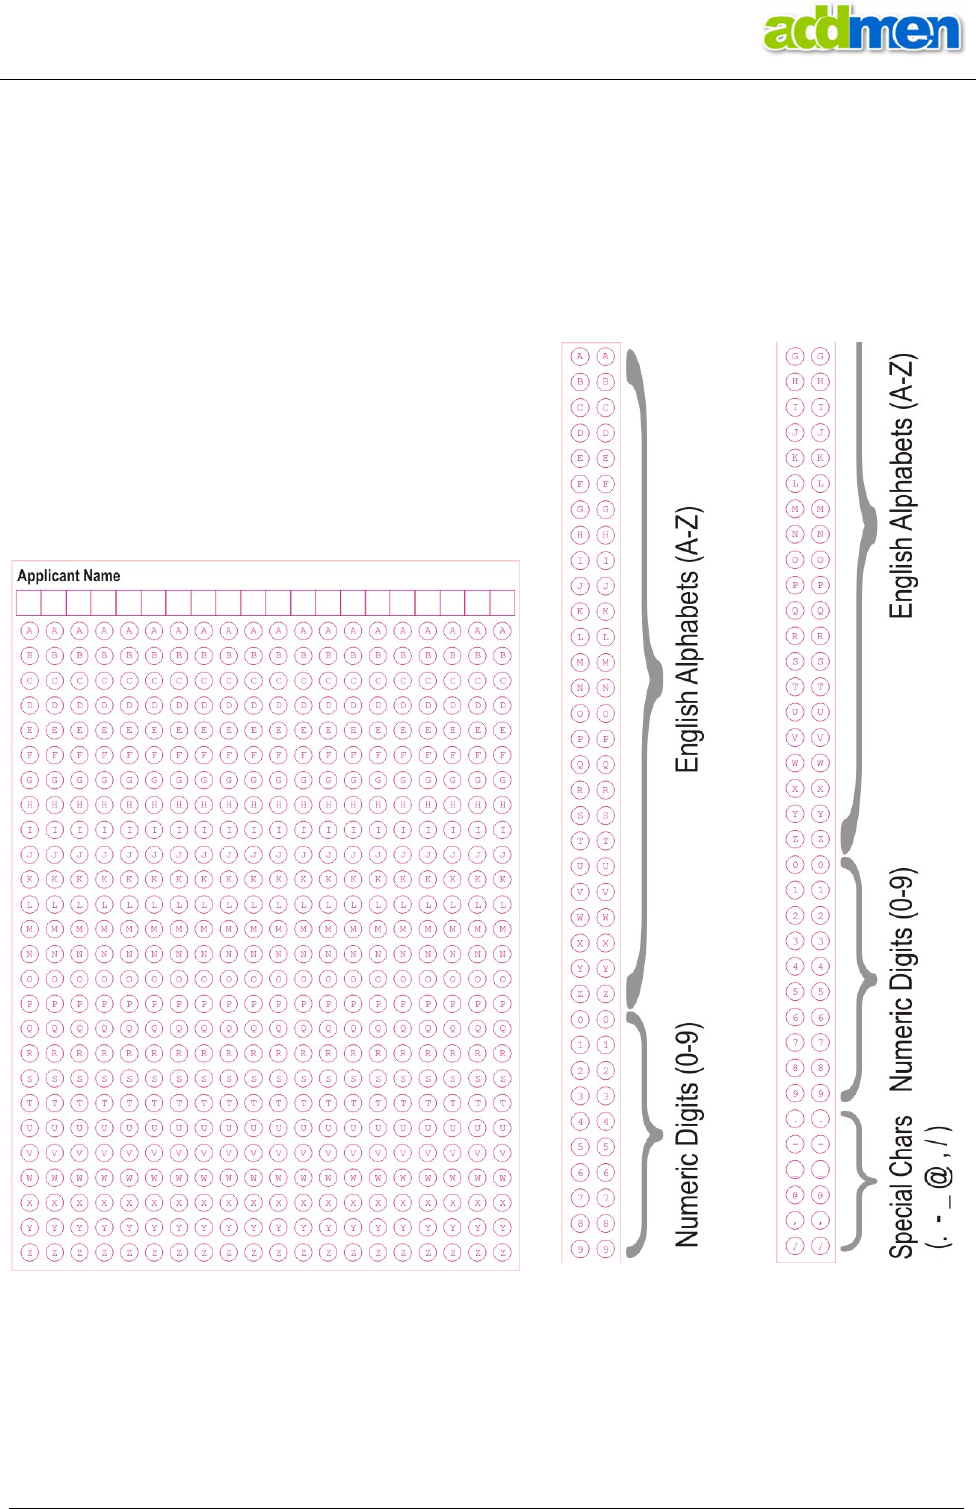
OMR Alphanumeric
This block is used to take Alphabetic input like Candidate Name, Parent Name, City Name etc…Since
this block is a matrix of 26 English alphabets thus it consumes maximum space on the sheet.
In case of Address or Email or certain Alphanumeric IDs, the character on the same location could
be a Alphabet or a Numeric digit. For this the number of rows of the Alphabet block can be
increased to 36 (26 Alphabets + 10 digits) ABCD….XYZ0123456789. Numeric bubbles read from 0,
irrespective of settings.
Further if special characters like “ . (dot) -(dash)
_(underscore) @(at) ,(comma) /(slash) ” are to be
used, the number of rows should be further
increased to 42.
In order to take the input of Name upto 20
characters long, there must be 26 rows for 26
alphabets and 20 columns for 20 characters.
If the space permits, it is always better to keep separate blocks for First name and last name.
However if the space is limited, it is suggested to have just one block so that the total number of
characters and corresponding number of columns can be decreased to occupy less space.
Since the printed size of this block is quite large, with too many bubbles close to each other, hence
It is mostly suggested to make use of blocks with inner label inside the bubbles to help the user to
easily identify the bubble he is marking. It is for this reason also recommended to print color sheets
when using this block.

OMR Sheet Design and Calibration Guide 17.1
CERTIFIED ISO 27001 & 9001
Ph.: +91-9229113522, 9229113544, 9229113566 Email: info@addmengroup.com Website: www.addmengroup.com
ICR Alphanumeric / ICR Alphabet / ICR Custom
ICR is always single character block.
ICR does not read special characters. So if fields like email have to be captured, the ‘@’ sign should
be pre printed on the layout and ICR should be made to capture only the preceding and succeeding
part of ‘@’ sign.
ICR Alphabet field is used in ICR block that expects to receive only alphabet values. For example in
the block where name is expected, there is no possibility of receiving numeric input. So we shall use
ICR Alphabet field which restricts its search and matching only to alphabetic characters. In this way,
conflict between L / I / 1 / 7 can be eased out.
ICR Alphanumeric block is used where the expected output could either be alphabetic or numeric.
Hence it finds most likely use in Address or Email fields.
ICR Custom block allow you to restrict the data values which are expected on reading that block.
Thus ICR custom block is used in case of digits, it can be used in case of Alphabets or Alphanumeric
expected values.
The default values of ICR custom blocks are set as digits from 0-9. ICR custom can also be used for
Alphabetic values if possibilities are limited.
The MERGE keyword must be used to merge values obtained from different ICR blocks.
OCR Block
OCR is always single bubble block, the entire text to be read must fall within one single bubble.
The OCR block can contain text written in 0
O
, 90
O
, 180
O
, 270
O
orientation.
There is suggested minimum font size and spacing of text to be used for accurate reading through
OCR. This dictates the required size of OCR bubble.
In case of black and white sheets, or where the design requires to print the border of the OCR
bubble, it is suggested to keep the OCR bubble sufficiently large to avoid conflict of border lines
with the strokes of the text to be read.
OCR reads only Alphabets and Numeric Digits. It does not read special characters.
Incorrect Bubble for OCR
Correct Bubble for OCR
OMR Sheet Design and Calibration Guide 17.1
CERTIFIED ISO 27001 & 9001
Ph.: +91-9229113522, 9229113544, 9229113566 Email: info@addmengroup.com Website: www.addmengroup.com
Steps for Creating a new OMR Sheet Design
Screen Shot of the OMR Sheet Designer Module- Starting Page
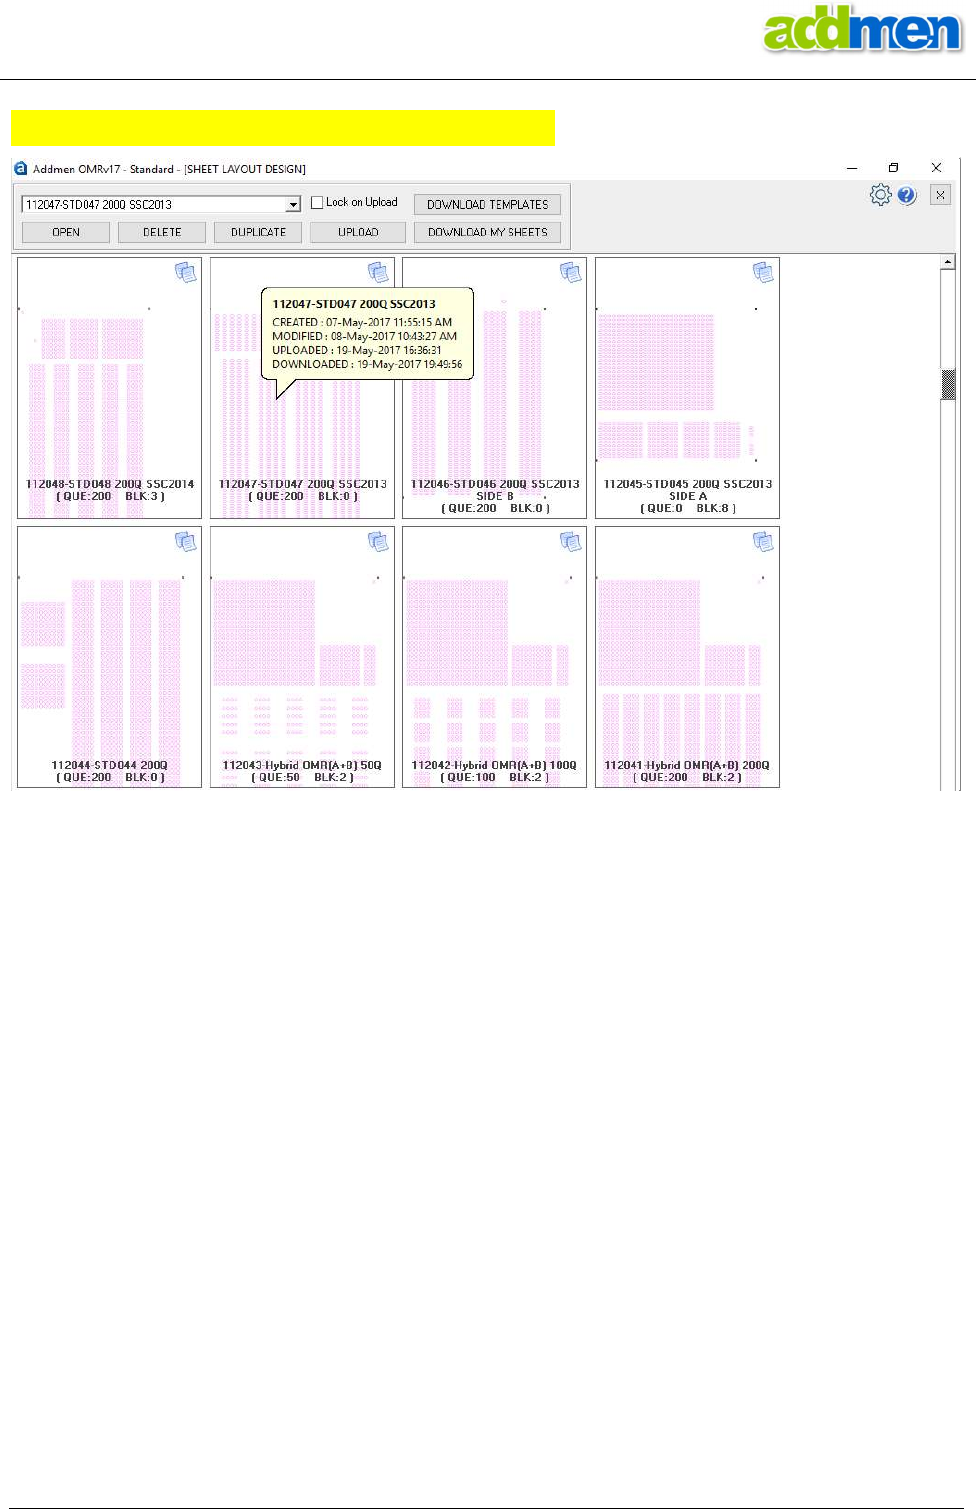
Start with the sheet Designer icon on the Homepage. The Sheet Designer index page opens up, which
lets you choose the required sheet design for editing.
All the sheets created are available in the dropdown list of sheets in the descending order of ID
(Last sheet first).
Thumbnails of all the sheets are also available facilitate visual selection. Thumbnails appear in
order of last modified listed first.
Besides the Sheet name, brief info about Number of blocks used in sheet is displayed on the sheet
thumbnail. Date of Creation, last Modified Date, last Upload Date and last Download dates are also
visible on the thumbnail to facilitate easy selection.
Click on the ‘Blank Layout’ thumbnail to begin a new design.
Each thumbnail has a [DUPLICATE] and [DELETE] icons on the right top. To open the same layout,
click directly on the thumbnail.
Using Readymade Standard Templates
Though you can yourself create as many new templates as you want, but to make your work easy
and to avoid repetition, the software has many readymade templates that are helpful. These
templates can be used as starting point to quickly create desired template with minor changes.
You can download these several ready to print and use readymade templates created by Addmen
by pressing the [DOWNLOAD TEMPLATES] button.

OMR Sheet Design and Calibration Guide 17.1
CERTIFIED ISO 27001 & 9001
Ph.: +91-9229113522, 9229113544, 9229113566 Email: info@addmengroup.com Website: www.addmengroup.com
The Readymade Templates are Standard layouts that cannot be edited directly. For editing in
standard sheet template first you have to duplicate it and then you can do customization in the
duplicate copy and save it by new name.
If your requirement is to make a design which mostly resembles a standard design or your own
design that you created earlier, you may choose an existing layout and duplicate it.
Once you have selected an existing template for editing or created a new duplicate,
The selected layout opens on a page. If it is a bank sheet, it only contains the rectangular main
container with 4 index points on its 4 corners.
Sheet Design page opened with a Duplicate Standard Template
Sheet Design page opened with a Blank Template – Block Icons Guide the Output Type
Adding Blocks on the Sheet

OMR Sheet Design and Calibration Guide 17.1
CERTIFIED ISO 27001 & 9001
Ph.: +91-9229113522, 9229113544, 9229113566 Email: info@addmengroup.com Website: www.addmengroup.com
The type of OMR blocks that can be placed for a particular type are depicted as small icons. Put the
mouse over the icon to see the output type of the block. It helps the user to easily identify the type
of bubble he wants to use and type of output expected.
There are 2 Radio buttons on the top which decide the basic treatment of the block to be added. If
the block is only to be used as data extraction, leave the ‘Block’ button as default choice. If a block
is to be used as a Question, which will be further considered for comparison with answer key, then
use the ‘Question’ button.
Click the desired block icon, to add a new block with default properties. The new block is placed on
the left-center of the screen.
Specific blocks appear in specific color.
o OMR readable bubbles = Pink Bubbles
o Barcode Box = Blue Border
o OCR Box = Orange Border
o ICR Box = Cyan Blue Border
o Photo Capture Box = Light Green Border
o Non-readable Design Blocks (Label, Header, Image) = Black Border
The Block title alongwith block ID is shown on the left top corner of each block.
Multiple identical blocks can be placed on the sheet by creating copies of an existing block. The
copy is inserted either below or to the right of the existing block.
New Block with identical definition can be inserted in between by clicking the [INSERT DOWN] or
[INSERT RIGHT] button at the bottom of the property menu of the block.
When a copy of any block is inserted, it automatically changes the numbering sequence of blocks.
The new block is inserted in-between, immediately after the selected block. The earlier immediate-
next block is shifted to next in sequence.
OMR Sheet Design and Calibration Guide 17.1
CERTIFIED ISO 27001 & 9001
Ph.: +91-9229113522, 9229113544, 9229113566 Email: info@addmengroup.com Website: www.addmengroup.com
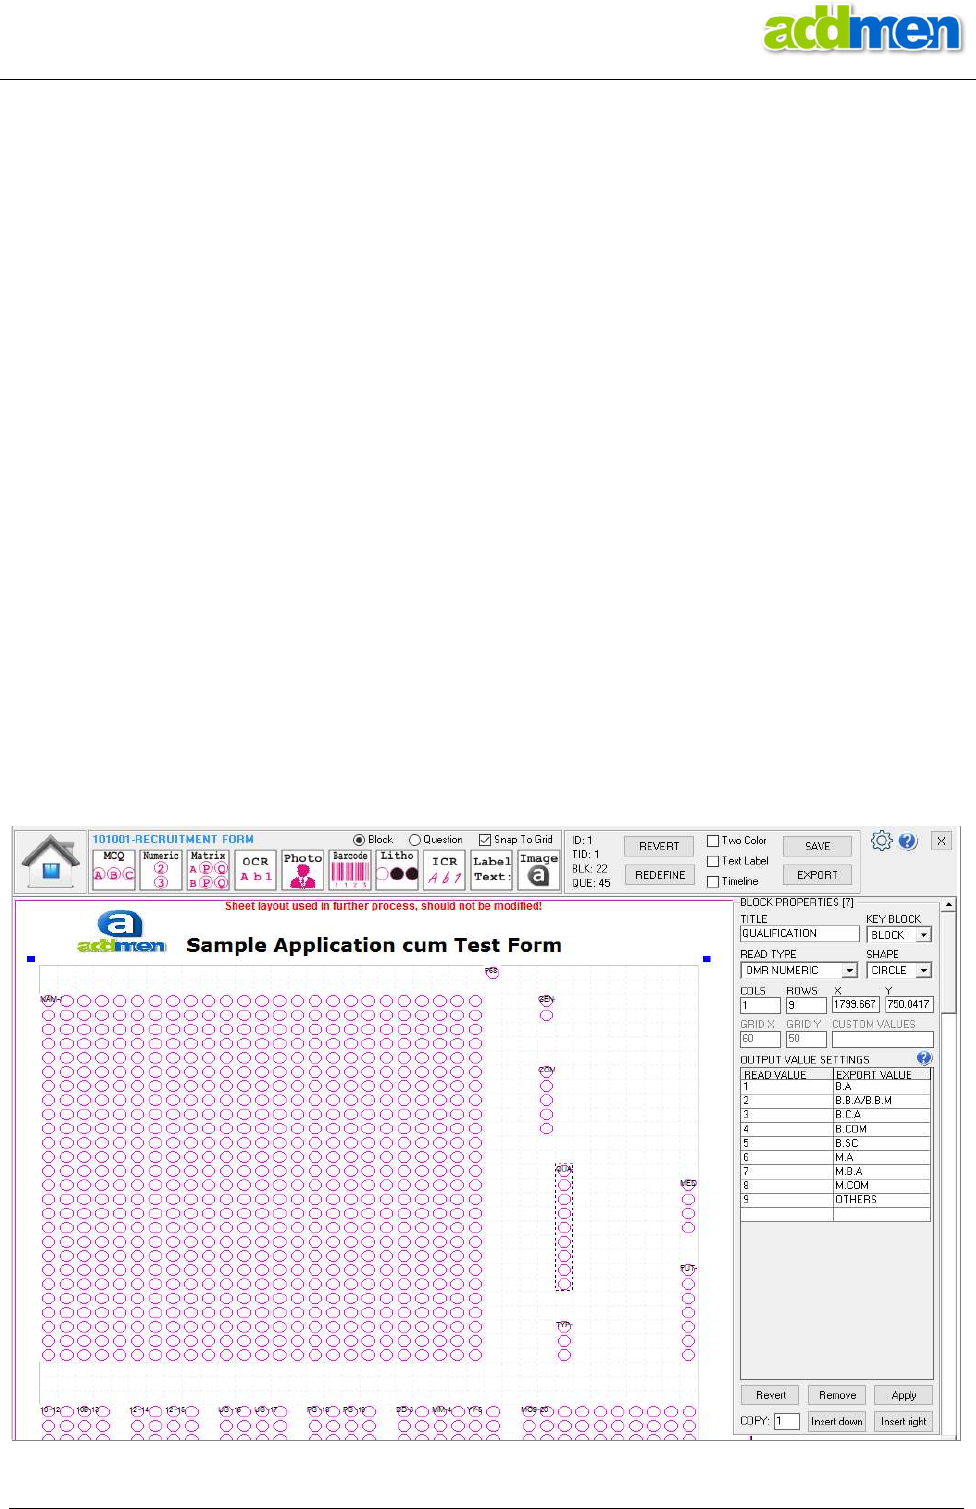
Changing Block Properties
Upon selecting any block on the sheet, the block properties panel is displayed on the right hand
side of the screen. These properties can be altered to get the desired block.
The ‘Block Title’ is displayed as the column header in the Excel file where the data is exported.
Certain block types have different variants like Matrix (X-Matrix and Y-matrix); Numeric (Horizontal
Integer, Vertical Integer and Decimal Number); ICR (ICR Alphabet, ICR Alphanumeric and ICR
Custom). Each variant has a different form of output. ‘Read Type’ can be changed in certain block
types to use the desired variant of the block.
‘Count of Rows and Columns’ to get block with required number of bubbles for desired output.
‘X and Y location’ are the coordinates of the starting bubble with reference to the left top index
point to create block at the desired location.
‘Horizontal and Vertical Grid’ is the distance of the bubbles within a block. In standard designer a
uniform grid applies throughout the sheet and the ability to alter block specific grid is disabled.
# Block specific ‘Horizontal and Vertical Grid’ can be set in Advanced Designer.
‘Custom Values’ can be set to restrict the output for certain types of blocks. This feature is mostly
used in ICR blocks to narrow down the range of expected value and thus improve accuracy.
Right Click on the block to [DELETE] or to change the layer order of selected block (‘Bring to Front’,
‘Send to Back’).
When a block is inserted in between, it clears the output column settings of the sheet, because the
output column settings are purely dependent on the column sequence.
Setting the properties of a Readable Block
OMR Sheet Design and Calibration Guide 17.1
CERTIFIED ISO 27001 & 9001
Ph.: +91-9229113522, 9229113544, 9229113566 Email: info@addmengroup.com Website: www.addmengroup.com
The panel opens with current set of properties everytime you click on a block. Press the [APPLY]
button to affect the changes. Press [REVERT] to discard all last changes not applied. Click anywhere
on the sheet to close panel and deselect the block.
Output Values of the blocks can be different from the read values of the block. Replacement values
can be set for each distinct read value or a combination of read values.
Use the setting ‘Sort Multiple Marked=4’ to tag the field that has a concatenated output string due
to multiple filling in the same column of a Numeric block.
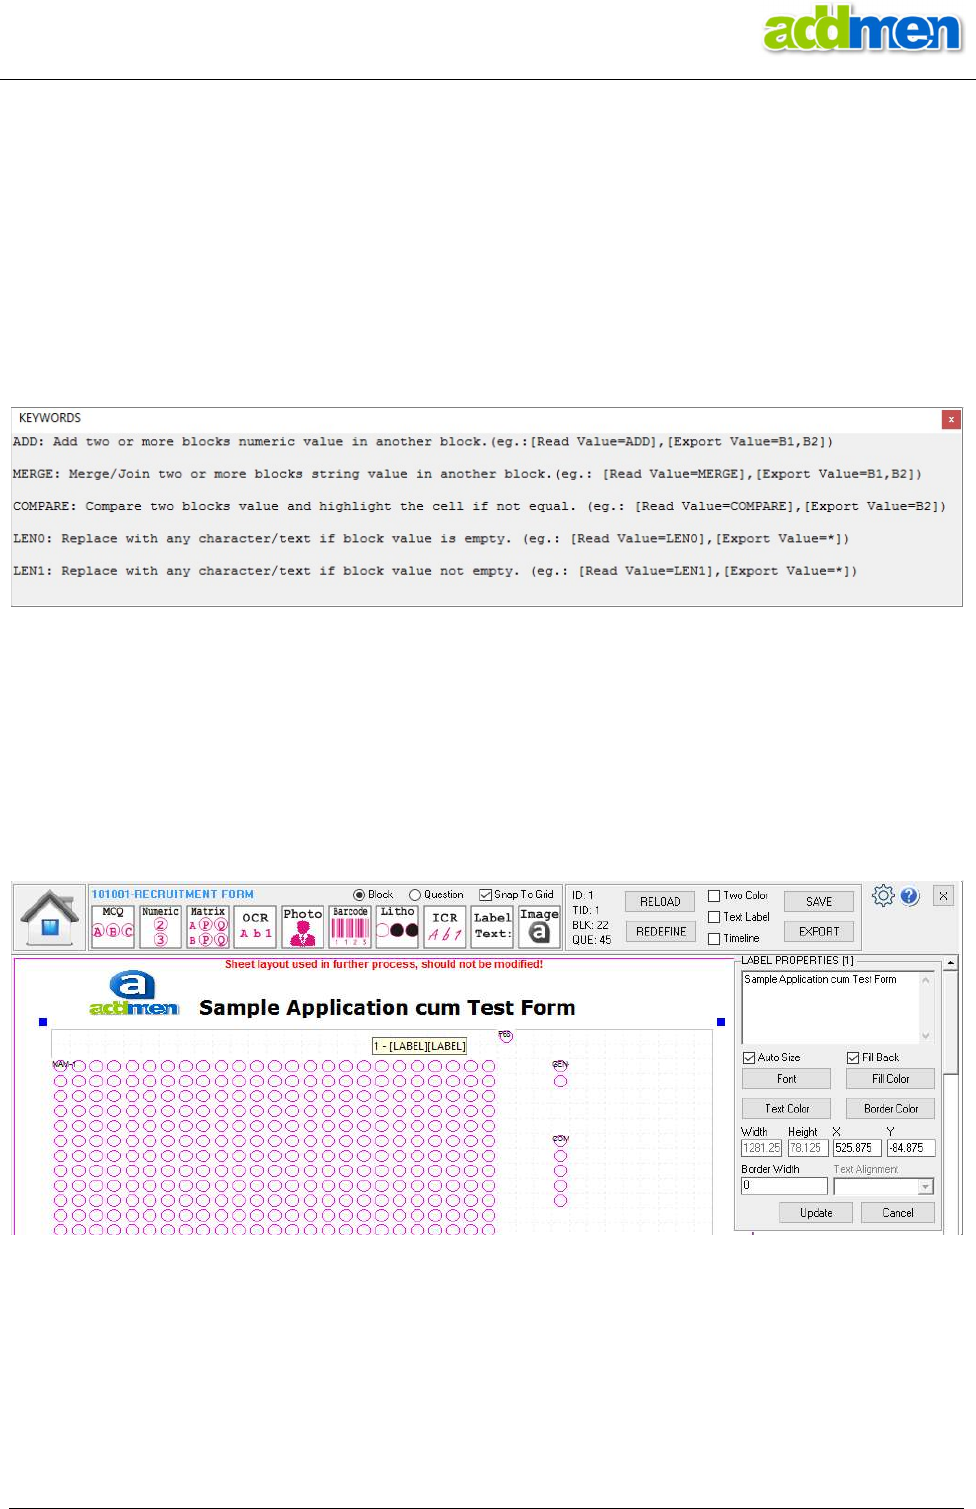
Certain Keywords (ADD, MERGE, COMPARE, LEN0, LEN1) can be used to perform specific
manipulation of the read values.
Keywords for Manipulating Values of a Readable Block
Certain Blocks like Text Label, Block Header, Logo Image are used only for design. The property
Panel for these blocks is different.
Header is single row block. It is a dead non-readable block only used for ornamentation.
Label can contain text, the font properties of which can be modified to make as desired
presentation.
Image can be inserted to place logo or illustrations on the OMR sheet. Image must be in JPG format.
Adding Text Labels

OMR Sheet Design and Calibration Guide 17.1
CERTIFIED ISO 27001 & 9001
Ph.: +91-9229113522, 9229113544, 9229113566 Email: info@addmengroup.com Website: www.addmengroup.com
Adding Logo and other Images
Setting the Layout Properties
Layout Properties Panel opens on the right hand side of the screen. It does not open unless you
have saved the new blank or duplicate design with a name. Once saved, click on [REDEFINE] button
to open Layout Properties.
Layout dimensions are defined on the basis of 2 parameters: Grid (distance between bubbles) and
Span (Number of Bubbles (horizontally and vertically)).
The printable size of the layout in pixels is equal to :
(Horizontal Span * Horizontal Grid)
X
(Vertical Span * Vertical Grid)
Changing Grid (Distance between bubbles) or Span (No. of Bubbles) will alter the final layout size.
Different grid sizes can be used. Most commonly used grid sizes range between 60-45 pixels. Grid of
60x60 is the most strongly recommended size as it gives most appropriate bubble size and
interspacing between bubbles.
It is not recommended to reduce the bubble size or spacing between the bubbles below a certain
extent. Crammed up designs with too small or tightly placed bubbles are not suggested because
they are likely to get affected on accuracy.
Preset Layout sizes like ‘A4’ OR ‘B5’ can be selected to begin a new sheet layout with grid and span
properties that fits well into a standard size of paper.
In case of timeline based sheets, mostly grid of 52px is used. This information is useful when the
user is attempting calibration of preprinted sheet, which is most likely to have a grid size of 52px.
So keeping 52px as the starting grid, the user can attempt several combinations to see if they
match.
OMR Sheet Design and Calibration Guide 17.1
CERTIFIED ISO 27001 & 9001
Ph.: +91-9229113522, 9229113544, 9229113566 Email: info@addmengroup.com Website: www.addmengroup.com
Setting the properties of Sheet Layout
Horizontal and Vertical grid is applicable throughout the layout and affects all blocks uniformly.
# The Advanced Sheet designer module, allows the horizontal or vertical grid of any specific block
to be altered in the Block Properties Panel.
The layout properties panel also makes it possible to edit all block locations through a single grid.
This feature is useful in case of calibration where you need to repeatedly align and adjust the block
locations to properly overlap an image used at the background.
Bubble size is defined as % of grid size. The default value is set as 70%. However it can be increased
and decreased as per the requirement of size of printed bubble on the sheet.
Size of the inner text label must be kept minimum yet readable. So if the size of the bubble is
reduced beyond suggested limits or if the grid is small, then it is preferred to use a coloured sheet
instead of black and white sheet. The default label inside the bubble is kept as text in Courier Font
in 6pts size.
The size of Index point is defined in pixels on redefine panel. It is generally 7px X 7px in new sheet
designs created form the software.
Click on the [SETTINGS] icon on the sheet properties panel to open additional dialogue to set Read-
time preferences.
OMR Sheet Design and Calibration Guide 17.1
CERTIFIED ISO 27001 & 9001
Ph.: +91-9229113522, 9229113544, 9229113566 Email: info@addmengroup.com Website: www.addmengroup.com
Additional Read Time Settings Panel opened from the Sheet Layout properties Panel
Change the margin (distance from left/top edge of paper) on the Sheet Design Panel Preference
Settings to alter overall position of layout container on page.
The position of the container on the page can be changed by simple drag and drop procedure.
When you drag the container, it contents are also moved. This ability is required when the OMR
sheet does not cover the entire page. Instead a large part of the page is covered by simple non-
readable text or design and the OMR fields are concentrated to the lower or upper half of the page.
# In Advanced Sheet Designer, for calibration of pre-printed designs, where timeline or other
markers have to be used as index points, the size of each index points can be different.
# In Advanced Sheet Designer, it is possible to set displacement of index point. This feature is useful
in case of sheets where 4 index points do not form a perfect rectangle.
# Advanced version allows to insert a ‘background image to trace’ and create an overlapping OMR
layout suitable for reading the OMR sheet images identical to the one that has been used as
background. This process of tracing a pre-existing OMR design plays major role in calibration.
Positioning and Navigation of Blocks
Alter ‘Snap to Grid’ Check box in the menu bar to activate or deactivate snapping. Blocks can be
moved with or without snapping either using arrow keys or mouse.

OMR Sheet Design and Calibration Guide 17.1
CERTIFIED ISO 27001 & 9001
Ph.: +91-9229113522, 9229113544, 9229113566 Email: info@addmengroup.com Website: www.addmengroup.com
Press [SHIFT+Arrow] to move by double grid distance and press [CTRL+Arrow] to move by half grid
distance.
Blocks and Questions should be essentially placed in the sequence as they are to be read.
It does not matter whether position wise the block for Question 2 is placed before Question 1, but
while reading the block for Question 1 will always be read prior to Question 2. Hence it is a good
practice to create the blocks in sequence as they are to be placed on the printable layout.
The maximum number of rows or columns in any type of OMR block (except Matrix) is limited by
the horizontal and vertical span of the sheet. i.e. if the sheet can contain maximum 30 bubbles
horizontally, then a horizontal numeric block of more than 30 bubbles cannot be added.
Blocks can be placed at negative coordinate locations and at locations exceeding the OMR layout
container. This however is not suggested until the user is mature enough to know the implications
of blocks laced outside the readable area.
OMR Sheet Design and Calibration Guide 17.1
CERTIFIED ISO 27001 & 9001
Ph.: +91-9229113522, 9229113544, 9229113566 Email: info@addmengroup.com Website: www.addmengroup.com
Output Column Settings
Generic output contains one row for one sheet. In certain cases the sheet layout is intended to
collect data of multiple candidates. This data of multiple candidates is then to be presented in
multiple excel rows one below the other.
In order to break the output of one sheet into multiple rows, there is provision to create Output
Column settings, where certain fields fall below the other in a certain predefined columns.
Click on the ‘Column Settings’ icon to set the column structure and row wrapping in the output
spreadsheet.
The fields (blocks) that will form distinct columns must be kept first in sequence and all in
continuity.
Enter the Column# of the Header column against the field which is to be taken under that column.
Example Sheet
Output Column Setting
Generic Output
All fields of a sheet in one row.
FRMID
S1 S1Q1
S1Q2
S2 S2Q1
S2Q2
S3 S3Q1
S3Q2
123456
1001
Y
N
1002
N
N
1003
N
Y
Columnised Output
Single row record broken into multiple rows
under fixed columns.
FRMID STU Q1 Q2
123456 1001 Y N
123456 1002 N N
123456 1003 N Y
Save & Export for Editing
After finalizing the sheet design, save and export it. Take a few printouts and check their scanned
images before doing any other ornamentation.
Designed template can be exported in black and white or colored formats with or without the
labels inside the bubbles. Use ‘Two Color’ and ‘Text Label’ checkboxes are given near the [EXPORT]
button.
The design can be exported to SVG format (Open source) which can be edited in open source
InkScape Software or CorelDraw. The design can directly be printed or converted to PDF.
While you edit the reading information of fields on the sheet in the Create Sheet Design Panel,
mostly there is no need to export the design again unless there is any inclusion of new blocks or
change in location of existing blocks. If you have only deleted or reduced the number of rows or
columns of some blocks then you may save the changed design in the panel and directly edit the
exported standard file in DTP software.
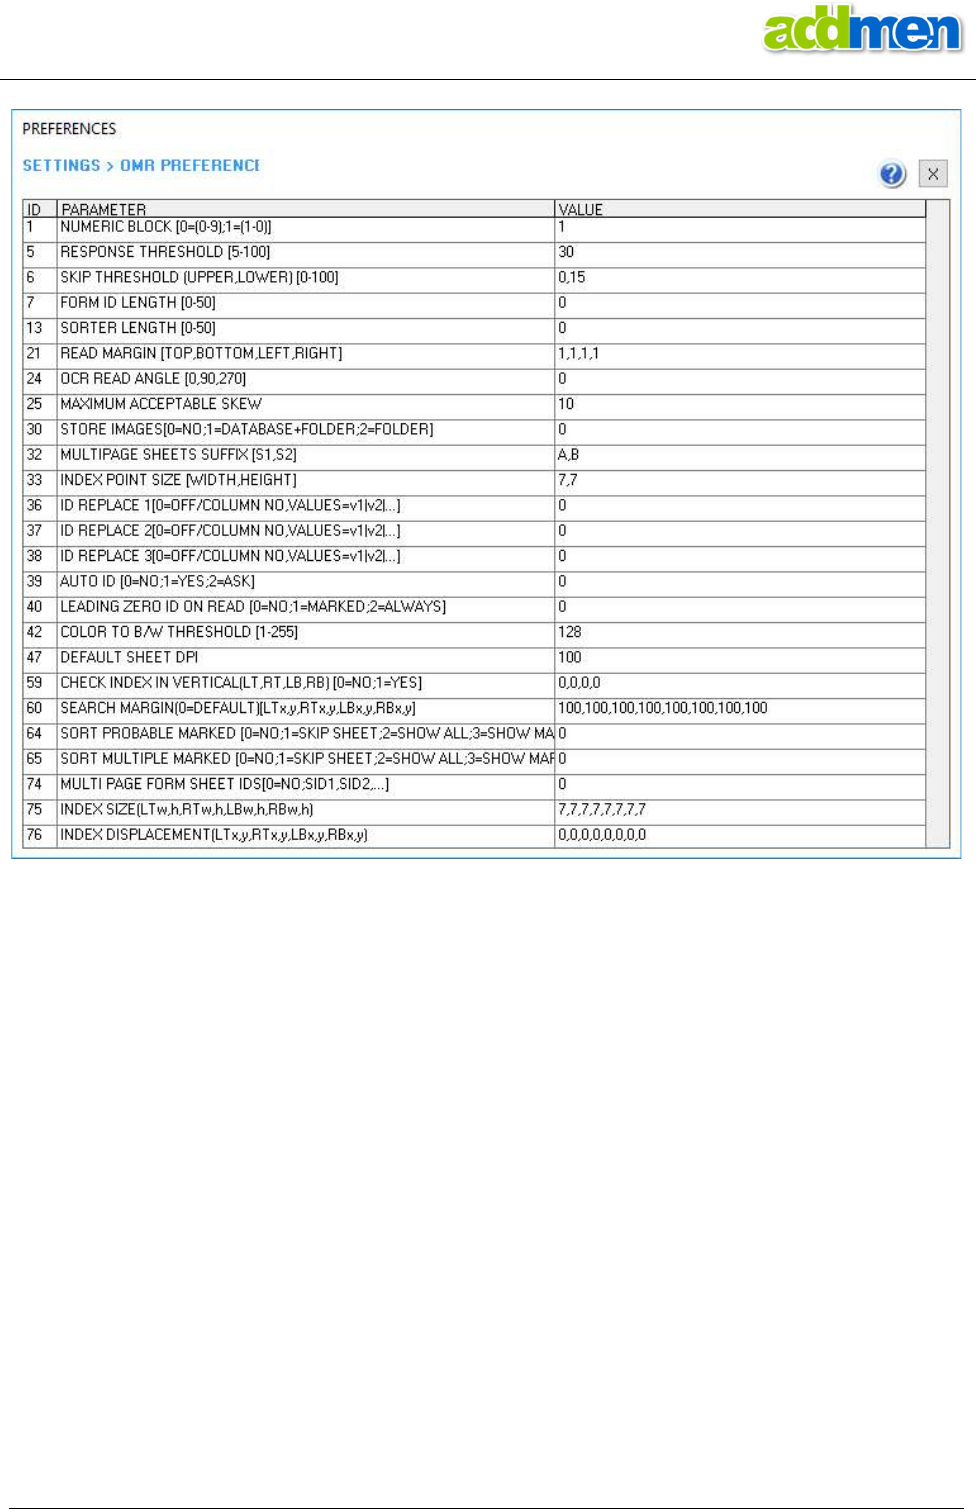
Click on the [SETTINGS] icon on the sheet design panel to set additional preferences as seen in the
screenshot below.

OMR Sheet Design and Calibration Guide 17.1
CERTIFIED ISO 27001 & 9001
Ph.: +91-9229113522, 9229113544, 9229113566 Email: info@addmengroup.com Website: www.addmengroup.com

OMR Sheet Design and Calibration Guide 17.1
CERTIFIED ISO 27001 & 9001
Ph.: +91-9229113522, 9229113544, 9229113566 Email: info@addmengroup.com Website: www.addmengroup.com
Design of sheets with BARCODE/ OCR/ ICR/ Stamped Serial no.
Barcode- All barcodes are not the same. The size and quality of Barcode dictates the scanning
resolution, speed and many other parameters of the process to follow. Barcode type and printing
method and quality should be planned and checked properly such that it supports further
processes and does not pose unwanted limitations.
For example, in a project of 100,000 sheets, the result was urgently required and the purpose of barcode was just to
collect sheet number, to be used if ever required in future. But the barcode was printed of very poor quality which posed
a limitation to scan at high resolution and this tremendously increased the time involved in scanning, reading and file
handling (copy-paste) of heavy size images. Though the result was urgent and the value of barcode was of no immediate
need, still it delayed the project and made it more difficult. It could have been a simple clear barcode or simply a
stamped number captured as image, which could have been read at minimum resolution sufficient for OMR reading.
Barcode- There are specific fonts for certain types of Barcode. Code-39 Barcode fonts can be
download from within the software. These barcode (fonts) to be printed in 32-36 font size in black
color only. Size of Barcode font should be decided based on DPI used for scanning and vice versa.
Barcode- Some Barcode are generated by external Software and included in the OMR design as
embedded image or printed on the sheet on a second run. Such barcodes should be first sampled
by adopting same printing and scanning mode and method as will be used to scan the final sheet.
OCR/ICR- OCR and ICR technologies are not 100% accurate like OMR. So they are only used as
supportive tools to help in data collection. Manual interpretation and correction may be required.
OCR/ICR- Valid only for English Alphabets and English Numbers. The characters and digits should be
written in capitals, clearly and neatly with consistent strokes.
OCR- Characters to be read through OCR should be printed in basic OCR-friendly fonts like Arial,
Courier. Times family and other few can also be used, if there is no choice. Fonts can also be
download from within the software. Should be printed in 16+ font size in black color only.
ICR- For best results, maintain the optimal size of character box (60x90px) and inter-spacing (90px)
in a ICR block. It can however be varied in certain limits as per the needs of the design, provided the
basic technical requirements for ICR reading are fulfilled.
ICR- Colored sheet with thin bubble outlines should be used. It helps to minimize the impression of
the bubble outlines during scanning and color dropping, so that the software is easily able to
identify the filled mark without conflict. Use of color sheets for ICR highly improves the accuracy.
Barcode/OCR- Sheets that require digital reading should be produced either using digital offset
printing process or laser/Inkjet printing. Photocopies should not be used for such sheets.
Barcode/OCR- The barcode and OCR characters should be clear and smudge free. Never use
barcodes or OCR characters printed on dot-matrix or dithered mode.
Stamp- Stamped numbers can be read only where the quality of stamp and other parameters
required for OCR reading are largely fulfilled. Confirm with sufficient sampling before assuming to
read stamped numbers. During stamping, DO NOT spoil the sheet by stray ink marks.
Barcode/OCR/ICR/Stamp- The character or value to be read should not touch or be closer than
roughly 10 pixels to border of the area box.
Barcode/OCR/ICR/Stamp- If you are printing Barcode or OCR for Critical blocks that are to be used
as key fields like sheet ID/ student ID etc., then it is suggested to print at two different places in the
same sheet so that in rare case if one is not read accurately, the other one can be read. Same
precaution can be applied for ICR and stamp wherever possible.
Barcode/OCR/ICR/Stamp- The sheets should be created strictly as per guidelines to achieve best
results. Any deviations from Guidelines or use of preprinted sheets will affect the accuracy.

OMR Sheet Design and Calibration Guide 17.1
CERTIFIED ISO 27001 & 9001
Ph.: +91-9229113522, 9229113544, 9229113566 Email: info@addmengroup.com Website: www.addmengroup.com
Design of sheets with Pencil filling or Tick marks
Read the Note on Accuracy Document to understand better the concept and provisions that should
be made for accurate pencil reading.
Just writing in Instructions to use HB pencil, and then allowing any pencil will not make sense.
If pattern allows pencil filling, a light colored sheet with thin outlines and big bubbles should be
used. By using color sheets we are able to minimize scanning impression of the bubble outlines and
are able to clearly identify the filled mark.
If black & white sheets are used with pencil, then the black outlines of bubbles will be scanned and
will create conflict if we read at high sensitivity to accommodate for light pencil marks. However, if
pencil filling is strictly done using dark pencil, even black and white sheets are OK.
In case of pencil use, it is better to have bigger bubbles on the sheet. By using sheets with bigger
bubbles, it facilitates to draw contrast between the size of blackness created by mark to the size of
blackness created by the outlines of bubble and label text.
A Black and white design that is suitable for use of Pen may not become suitable for use of pencil
just by printing it in color. Always keep into consideration the basic guidelines and objective behind
development of certain design before altering its usage instructions.

OMR Sheet Design and Calibration Guide 17.1
CERTIFIED ISO 27001 & 9001
Ph.: +91-9229113522, 9229113544, 9229113566 Email: info@addmengroup.com Website: www.addmengroup.com
Pre-printed/Externally designed OMR Sheet Calibration Process
How to judge whether OMR sheet will be calibrated or not?
OMR Sheet must have four index points in corners. The markers assumed to be index points must
be same in size and must form a perfect rectangle.
The timeline or any other printed material should not be so near the index point so as to affect the
clarity of the index point.
Bubbles should be of same size and placed in uniform grid distance i.e. horizontal and vertical
distance between the bubbles of one field and all the fields must be equal to X & Y Grids.
Example of OMR sheet that can be calibrated, but NEEDS CUSTOMIZATION at
programmer level:
Limitations/Incorrect parameters in the above sheet:
1. Index points do not form a proper rectangle. (However his can be managed with extended
capabilities of advanced designer, we can consider the sixth marker from top on the left as top-left
index point.)
2. The vertical grid spacing is unequal amongst various blocks. Observe the vertical distance between
bubble of 6
th
and 7
th
columns. The columns 1,2,7,8,9,10,11,12,13,14 have same vertical gap but
columns 3,4,5,6 have a different vertical gap. (This will need program customization.)
OMR Sheet Design and Calibration Guide 17.1
CERTIFIED ISO 27001 & 9001
Ph.: +91-9229113522, 9229113544, 9229113566 Email: info@addmengroup.com Website: www.addmengroup.com
Example of OMR sheet that can be calibrated, but NOT SUGGESTED to be calibrated:
This following sheet can be calibrated with customization, BUT if the user with basic knowledge and
exposure to the system has to read this himself, it is definitely not suggested because it will require
very meticulous reading or else it might give inaccurate results. It is suggested that this calibrated sheet
should be used only if it is going to be read by a professional team (by us or any other).

OMR Sheet Design and Calibration Guide 17.1
CERTIFIED ISO 27001 & 9001
Ph.: +91-9229113522, 9229113544, 9229113566 Email: info@addmengroup.com Website: www.addmengroup.com
It has several Limitations/Incorrect parameters which might give problem later on while reading.
1. There is almost no space between two questions. Sufficient vertical in-between space is required,
to avoid any misreads due to tilt or overlapping-overfilling by candidates.
2. The sizes of bubbles are different in Questions and Rollno fields. This makes it evident that it is not
a mature design and standard directions have not been followed while designing this. So it might
have been created by some specific team for use by self, but it is not a generally acceptable design.
3. Correspondingly there is difference in the timeline vertical increment gap (different gap for Rollno
block and different gap for Question blocks) while in any correct sheet it should ideally be uniform
throughout. It seems this sheet was arranged to make suitable for some specific machine. Not a
correct sheet generally.
4. Lot of space has been wasted in unimportant parameters while the actual technical components of
critical concern have been crammed up. See that the handwriting are space could have been
optimized to create more free space for the OMR bubbles which are almost sticking to each other.
Such negligence in sheet design are the root cause of inaccurate results.
These alerts are for the good of the user. If still they insist, they/we can calibrate it, but user will have
to be extra careful about proper size absolute straight scanning and reading of sheets and the software
would not be responsible for any inaccuracies.
If this is the first sheet that the user is going to read, it is definitely not suggested, because it will make
their experience cumbersome.
We would suggest the right approach is to talk to the user and explain him these issues and
immediately create a correct design (replica of the existing layout) and discard the printed lot.
OMR Sheet Design and Calibration Guide 17.1
CERTIFIED ISO 27001 & 9001
Ph.: +91-9229113522, 9229113544, 9229113566 Email: info@addmengroup.com Website: www.addmengroup.com
Following is a technically correct design replica created for the above defective sheet:
OMR Sheet Design and Calibration Guide 17.1
CERTIFIED ISO 27001 & 9001
Ph.: +91-9229113522, 9229113544, 9229113566 Email: info@addmengroup.com Website: www.addmengroup.com
Specific Requirements of Calibrated Sheets
Even if some technically incorrect layouts are calibrated in dire circumstances, it is important to know
that some sheet layouts need some specific type of filling to work correctly.
For example, in the below given sheet,
1. the outline of the circle and the letter written inside the circle both are printed with black and are
so thick, that they would create a sufficient black impression to conflict with the filled mark, if the
filled mark is very light or rarified.
2. The circles are placed so congested that the outline of the adjacent circles add up, to increase the
thickness of the outline or correspondingly, the density of pre-printed blackness.
Thus in order to detect the filled mark accurately, it is required that the marks made on this sheet are
made big and solid black in this case to create sufficient contrast in size for accurate identification. So
only blue or black pen should be used.
Pencil filling and rubbing should not be allowed on the above sheet.

OMR Sheet Design and Calibration Guide 17.1
CERTIFIED ISO 27001 & 9001
Ph.: +91-9229113522, 9229113544, 9229113566 Email: info@addmengroup.com Website: www.addmengroup.com
Steps for Calibration of a Pre-Printed Design
1. Use either Flatbed or ADF scanner to scan one printed sheet in colour mode, 100 DPI, BMP Format.
Scan it absolutely straight.
2. Count the total rows and columns of all the questions including the gap between questions to
calculate the number of blocks that can be placed horizontally and vertically between index points.
3. Start a NEW Template design and create a design with all the suitable blocks for desired output
placed at tentatively correct location. Then save the Template by a name.
4. Then export-print-scan-read and check that you are getting the desired output. This step is
somewhat similar to creating a fresh design from the software without any text labels or
ornamentation. This step is done to ensure that other than exact alignment of OMR blocks to pre-
printed sheet, everything else is OK.
5. Browse and Set the image as a background by clicking on the image icon near NEW button and
LOAD the template to be calibrated, that you just created. Now we have to perform the task of
alignment.
6. Match the location of the index point by dragging the top left index in the template to overlap the
top left index of the background image.
7. Match the size of the index points by adjusting index point size in the ‘Redefine’ panel.
8. Set the number of calculated blocks and adjust grid that is distance between the bubbles & size of
the bubbles by REDEFINE.
9. Further all adjustments of the grid size and the number of blocks are based on human judgement
and experience. These adjustments have to be made manually and tested empirically to reach to
final settings that exactly overlap the required design. In between the design will have to be saved
and tested various times in the read sheet panel by trying to read the image used as background.
10. Set the value of setting ‘Display Read Indicator’=2 so that the software will show the location of
bubble it is reading as yellow. If the calibrated design is able to exactly read the BMP image then
your sheet calibration is done.
11. If Addmen technical support team has to do the calibration, we will require you to send about 5 to
10 images of the sheet scanned perfectly straight, in color mode, in 100% size with no scaling and
saved as BMP/JPG/TIFF.
More details can be found at: http://www.admengroup.com/
Please do not confuse that Standard Designer can only make ABCDE type of blocks. It can also make all
type of blocks. So long as you are making new sheets, systematically as per OMR guidelines, standard
designer is sufficient.
Advanced Designer is required if you have to calibrate and read a externally designed or preprinted lot
of sheets which was originally not created according to OMR guidelines and had misplaced/misaligned
bubbles or index points of different sizes in same sheet.

OMR Sheet Design and Calibration Guide 17.1
CERTIFIED ISO 27001 & 9001
Ph.: +91-9229113522, 9229113544, 9229113566 Email: info@addmengroup.com Website: www.addmengroup.com
VARIABLE DATA PRINTING (VDP MODULE)
VDP STAGE I- Blank Sheet Template to be used for Variable Data Printing
In this template design different type of fields have been depicted with different colors.
OCR fields used for reading printed numbers is depicted in Green color. Barcode fields are depicted
with Blue color. ICR fields used for reading hand written text are depicted in Orange color. Image fields
used for capturing photo or snapshot of portion of form are depicted in Grey color.
OMR Sheet Design and Calibration Guide 17.1
CERTIFIED ISO 27001 & 9001
Ph.: +91-9229113522, 9229113544, 9229113566 Email: info@addmengroup.com Website: www.addmengroup.com
VDP STAGE 2- Sheet Template inlayed with Variable Data Parameters
The template is added with variable data parameters, which accepts data from Variable Data Printing
module using input given in Excel or Access. Reading of various type of data blocks like OMR, OCR, ICR,
Image, Barcode or Lithocode may need different modules added together to achieve the purpose.
OMR Sheet Design and Calibration Guide 17.1
CERTIFIED ISO 27001 & 9001
Ph.: +91-9229113522, 9229113544, 9229113566 Email: info@addmengroup.com Website: www.addmengroup.com
VDP STAGE 3- Print Sheet with Variable Data Values
The template is printed with variable values using Variable Data Printing module. VDP module is not
essential for variable data printing. Variable values can also be printed using third party arrangements
like regular Mail merging process using Word-Excel combination. However the use of VDP module
helps in accurate positioning of values which is very important for accurate reading of dynamic data
fields to be read by OMR software.
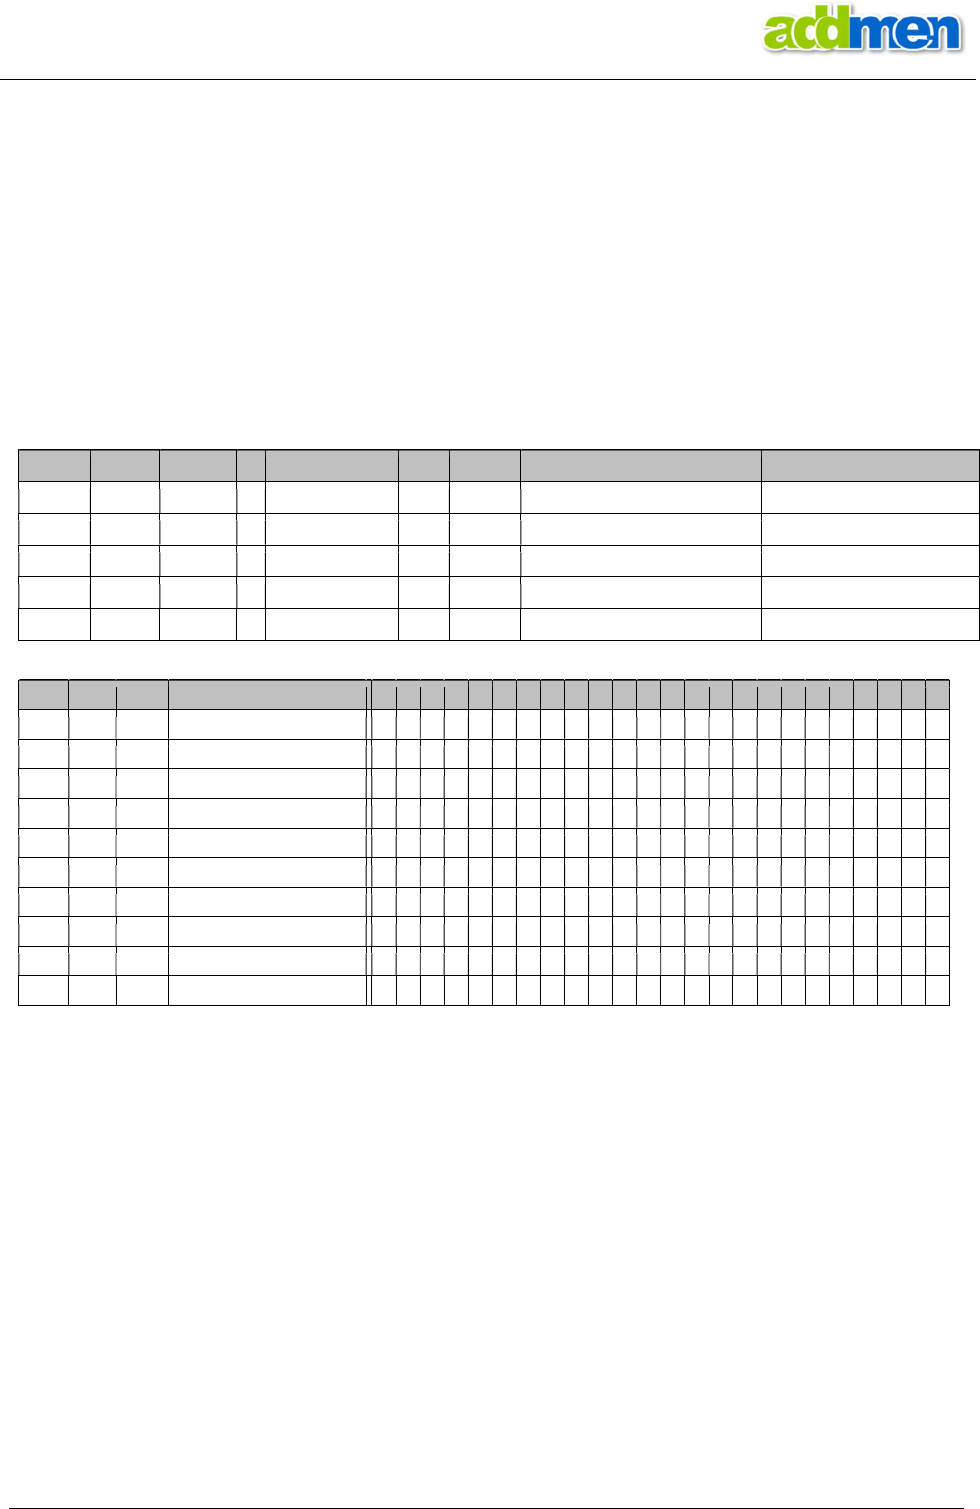
Can accept input from Access or Excel. There is no specific format. The Access or Excel may contain
as many tables or worksheets. Each worksheet may contain as many fields.
The variable data input may be created manually or from a third party software.
Lithocode can be generated for any given field. Lithocode fields are added to the same excel sheet.
SHEETNO
PRINTNO
SECURITY
SR
CANDIDATE NAME
EXAM
SUBJECT
SCHOOL
CENTER
12055
56721
16012001
1
DEMO STUDENT 1
Jun
-
16
ENGLISH
GANDHI VIDYALAYA, PARBHANI
APJ KALAM SCHOOL, PARBHANI
12056
56722
16013001
2
DEMO STUDENT 2
Jun
-
16
ENGLISH
DNYANSADHANA PUBLILC SCHOOL
APJ KALAM SCHOOL, PARBHANI
12057
56723
16013002
3
DEMO STUDENT 3
Jun
-
16
ENGLISH
DNYANSADHANA PUBLILC SCHOOL
APJ KALAM SCHOOL, PARBHANI
12058
56724
16013003
4
DEMO STUDENT 4
Jun
-
16
ENGLISH
DNYANSADHANA PUBLILC SCHOOL
APJ
KALAM SCHOOL, PARBHANI
12059
56725
16014001
5
DEMO STUDENT 5
Jun
-
16
ENGLISH
BHARTIYA BALVIDYAMANDIR
APJ KALAM SCHOOL, PARBHANI
SHEETNO
PRINTNO
SECURITY
BINARY NO
L09
L10
L11
L12
L13
L14
L15
L16
L17
L18
L19
L20
L21
L22
L23
L24
L25
L26
L27
L28
L29
L30
L31
L32
12055
56721
16012001
00000000111101000101001011100001
X
X
X
X
X
X
X
X
X
X
X
X
12056 56722 16013001
00000000111101000101011011001001
X
X
X
X
X
X
X
X
X
X
X
X
X
12057 56723 16013002
00000000111101000101011011001010
X
X
X
X
X
X
X
X
X
X
X
X
X
12058 56724 16013003
00000000111101000101011011001011
X
X
X
X
X
X
X
X
X
X
X
X
X
X
12059 56725 16014001
00000000111101000101101010110001
X
X
X
X
X
X
X
X
X
X
X
X
X
12060 56726 16014002
00000000111101000101101010110010
X
X
X
X
X
X
X
X
X
X
X
X
X
12061 56727 16014003
00000000111101000101101010110011
X
X
X
X
X
X
X
X
X
X
X
X
X
X
12062
56728
16014004
00000000111101000101101010110100
X
X
X
X
X
X
X
X
X
X
X
X
X
12063
56729
16015003
00000000111101000101111010011011
X
X
X
X
X
X
X
X
X
X
X
X
X
X
X
12064
56730
16015005
00000000111101000101111010011101
X
X
X
X
X
X
X
X
X
X
X
X
X
X
X
The OMR template to be printed is saved in SVG format with the fields written on the page as
*FIELD*. There should be ‘*’ on both side of the field name.
The field name should be written in capital on the input SVG file and in the input data source file.
The Barcode field must be named *BARCODE*. In case there are more than one barcodes to be
placed, then the fields should be named as*BARCODE1*, *BARCODE2*….and so on..
The VDP module can also accept input layout as Word file, in case you need to create multiple
copies of question papers with uniquely printed Question Booklet No., then this is the option.
The VDP module can be used to generate Lithocode out of numerical values given in any field.
Output PDF Files can be named according to any Unique ID field in the data sheet.
COPIES lets you create multiple copies of each data merged template, the copies are generated as
FILENAME+COPYNO. For Example: AAA01, AAA02, AAA03…..
PDF/FOLDER lets you automatically create subfolders containing specific number of files in a folder.
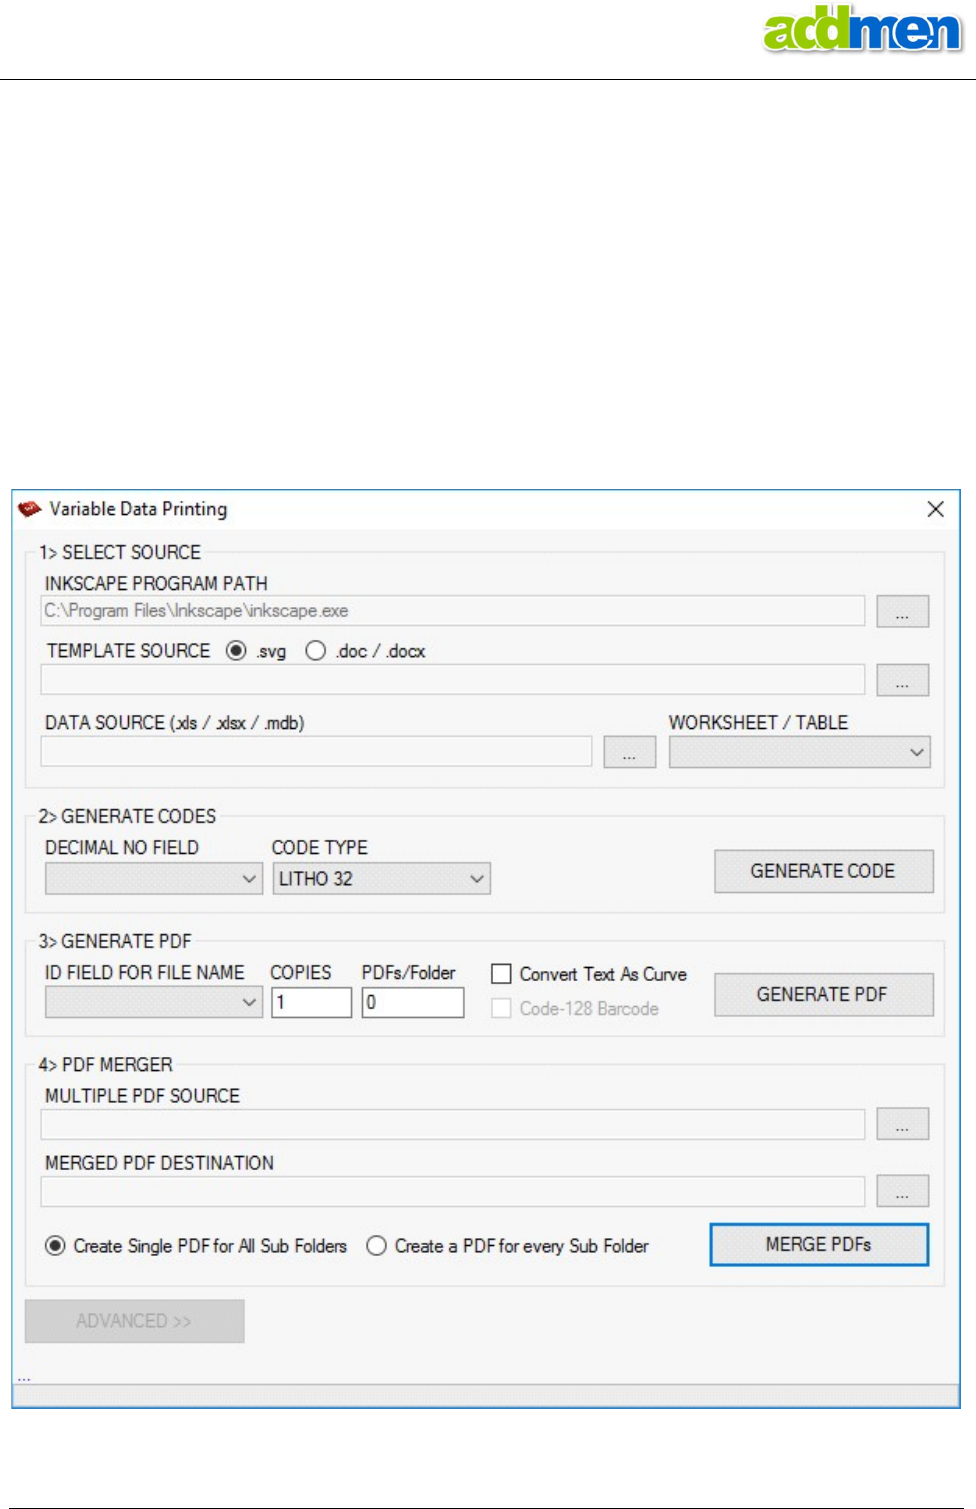
OMR Sheet Design and Calibration Guide 17.1
CERTIFIED ISO 27001 & 9001
Ph.: +91-9229113522, 9229113544, 9229113566 Email: info@addmengroup.com Website: www.addmengroup.com
Several single page PDFs can be merged together to make on single multi-page file.
Sometimes OMR forms are large and extend to multiple pages. VDP module can be used to
generate multi-page forms, by joining various variable printed templates in sequence.
The combined PDF is created for all the files in a folder. If several PDFs are required containing a
desired series of pages, then the PDF/FOLDER option should be used while creating PDF. It forms
several PDF folders with respective series of PDFs, which when merged, after selecting [Merge by
Sub Folder] option then a single PDF for each folder is created.
Still if it is desired to have one single file for all the files in all the sub folders, then chose the [Merge
Sub Folder] option.
Screenshot of the Variable Data Printing Module
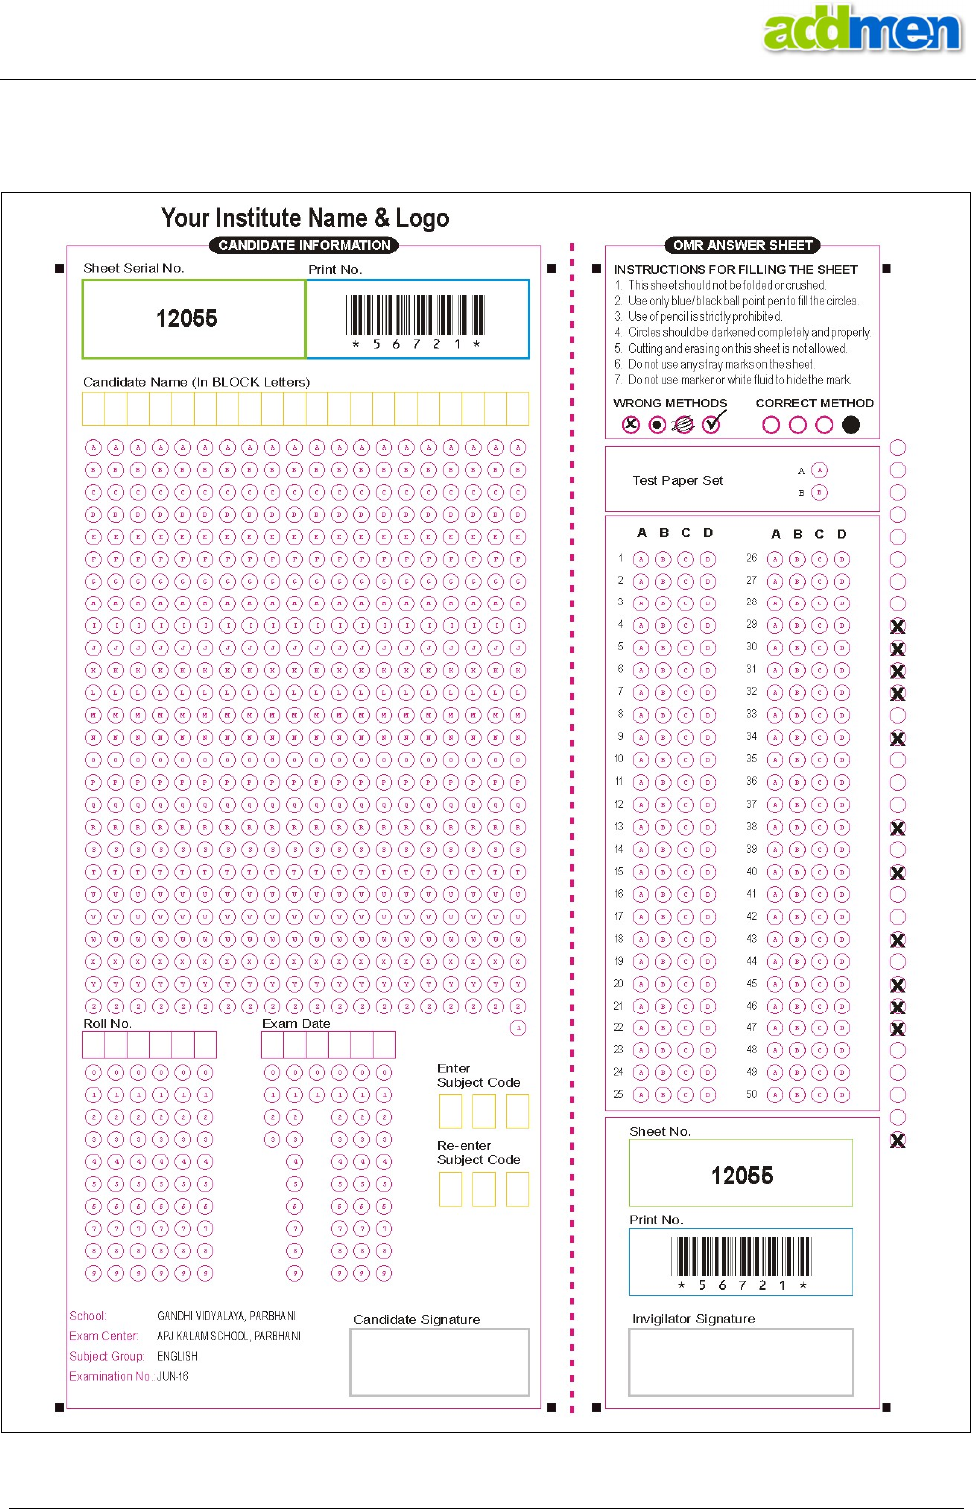
OMR Sheet Design and Calibration Guide 17.1
CERTIFIED ISO 27001 & 9001
Ph.: +91-9229113522, 9229113544, 9229113566 Email: info@addmengroup.com Website: www.addmengroup.com
This sheet is now merged with variable data and ready as PDF to be printed and distributed for
filling.
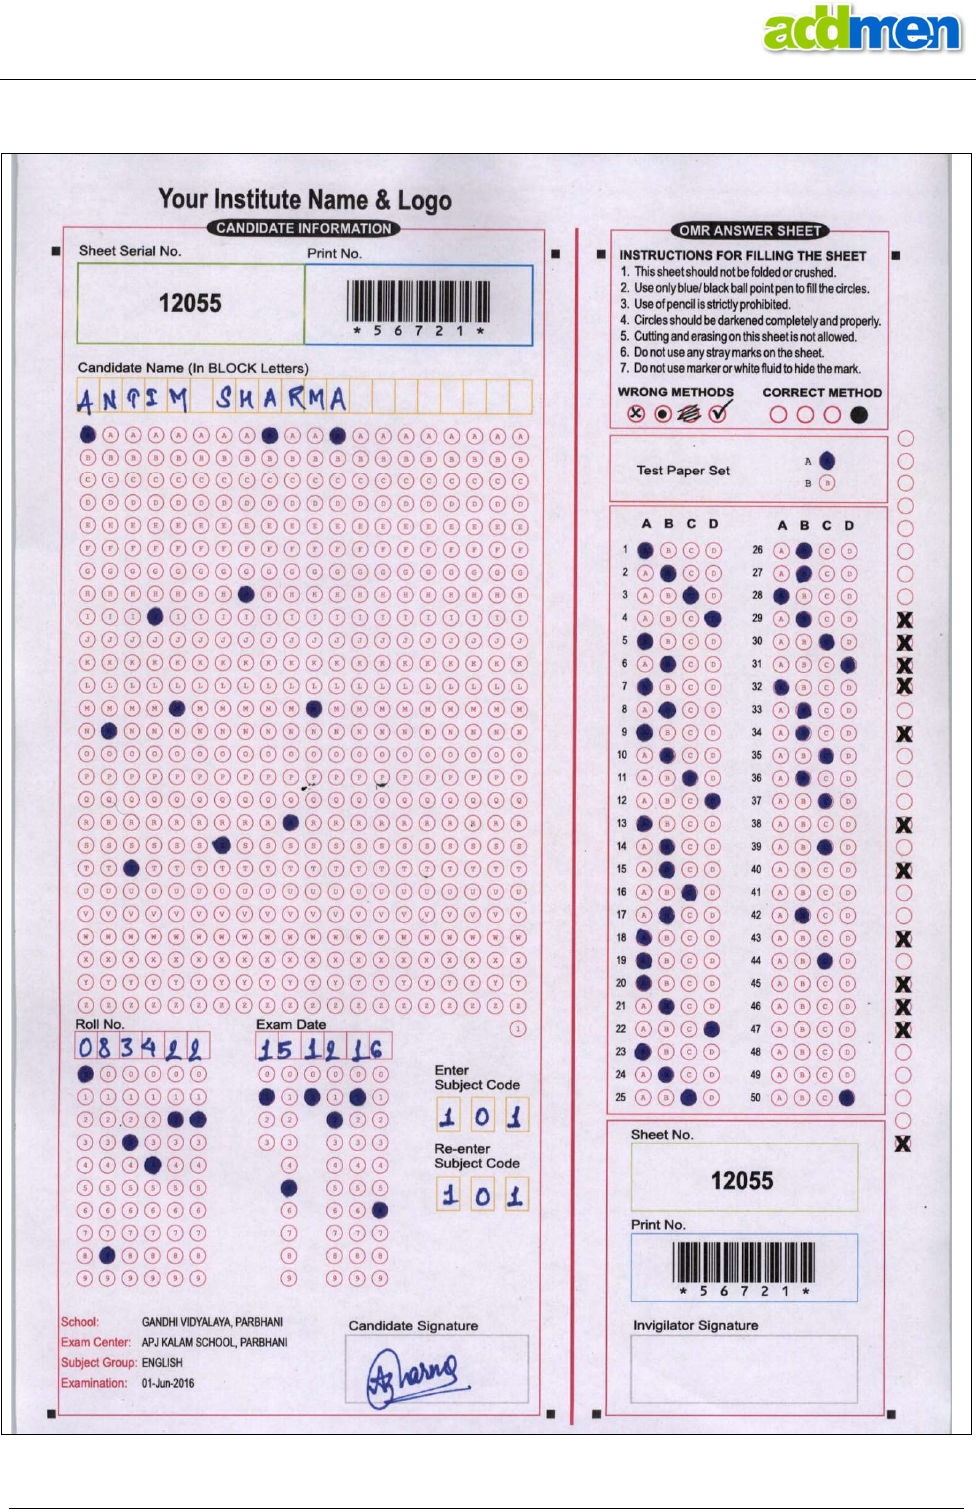
OMR Sheet Design and Calibration Guide 17.1
CERTIFIED ISO 27001 & 9001
Ph.: +91-9229113522, 9229113544, 9229113566 Email: info@addmengroup.com Website: www.addmengroup.com
VDP STAGE 4- Sheet Scan ready for reading
