Data Management Administrator’s Guide Admin
User Manual:
Open the PDF directly: View PDF ![]() .
.
Page Count: 84
- Preface
- Introduction
- Installing and configuring the tool
- Completing the spreadsheets
- Importing data
- Managing customizations
- How tabs map from spreadsheet to target form
- Exclusions from bulk load
- Error messages
- Data values
- Index

www.bmc.com
BMC Remedy IT Service Management 7.0
Data Management
Administrator’s Guide
November 2007

If you have comments or suggestions about this documentation, contact Information Design and Development by email at
doc_feedback@bmc.com.
Contacting BMC Software
You can access the BMC Software website at http://www.bmc.com. From this website, you can obtain information
about the company, its products, corporate offices, special events, and career opportunities.
United States and Canada
Address BMC SOFTWARE INC
2101 CITYWEST BLVD
HOUSTON TX 77042-2827
USA
Telephone 713 918 8800 or
800 841 2031
Fax 713 918 8000
Outside United States and Canada
Telephone (01) 713 918 8800 Fax (01) 713 918 8000
© Copyright 2007 BMC Software, Inc.
BMC, BMC Software, and the BMC Software logo are the exclusive properties of BMC Software, Inc., are registered with the U.S. Patent
and Trademark Office, and may be registered or pending registration in other countries. All other BMC trademarks, service marks, and
logos may be registered or pending registration in the U.S. or in other countries. All other trademarks or registered trademarks are the
property of their respective owners.
ITIL is a registered trademark, and a registered community trademark of the Office of Government Commerce, and is registered in the
U.S. Patent and Trademark Office.
Linux is the registered trademark of Linus Torvalds in the U.S. and other countries.
Oracle is a registered trademark of Oracle Corporation.
UNIX is a registered trademark of The Open Group.
BMC Software considers information included in this documentation to be proprietary and confidential. Your use of this information is
subject to the terms and conditions of the applicable End User License Agreement for the product and the proprietary and restricted
rights notices included in this documentation.
Restricted rights legend
U.S. Government Restricted Rights to Computer Software. UNPUBLISHED -- RIGHTS RESERVED UNDER THE COPYRIGHT LAWS OF
THE UNITED STATES. Use, duplication, or disclosure of any data and computer software by the U.S. Government is subject to
restrictions, as applicable, set forth in FAR Section 52.227-14, DFARS 252.227-7013, DFARS 252.227-7014, DFARS 252.227-7015, and
DFARS 252.227-7025, as amended from time to time. Contractor/Manufacturer is BMC Software, Inc., 2101 CityWest Blvd., Houston, TX
77042-2827, USA. Any contract notices should be sent to this address.

Customer Support
You can obtain technical support by using the Support page on the BMC Software website or by contacting Customer
Support by telephone or email. To expedite your inquiry, please see “Before Contacting BMC Software.”
Support website
You can obtain technical support from BMC Software 24 hours a day, 7 days a week at
http://www.bmc.com/support_home. From this website, you can:
■Read overviews about support services and programs that BMC Software offers.
■Find the most current information about BMC Software products.
■Search a database for problems similar to yours and possible solutions.
■Order or download product documentation.
■Report a problem or ask a question.
■Subscribe to receive email notices when new product versions are released.
■Find worldwide BMC Software support center locations and contact information, including email addresses, fax
numbers, and telephone numbers.
Support by telephone or email
In the United States and Canada, if you need technical support and do not have access to the Web, call 800 537 1813 or
send an email message to customer_support@bmc.com. (In the Subject line, enter
SupID:<yourSupportContractID>, such as SupID:12345.) Outside the United States and Canada, contact your local
support center for assistance.
Before contacting BMC Software
Have the following information available so that Customer Support can begin working on your issue immediately:
■Product information
—Product name
— Product version (release number)
— License number and password (trial or permanent)
■Operating system and environment information
—Machine type
— Operating system type, version, and service pack
— System hardware configuration
— Serial numbers
— Related software (database, application, and communication) including type, version, and service pack or
maintenance level
■Sequence of events leading to the problem
■Commands and options that you used
■Messages received (and the time and date that you received them)
— Product error messages
— Messages from the operating system, such as file system full
— Messages from related software

License key and password information
If you have a question about your license key or password, contact Customer Support through one of the following
methods:
■E-mail customer_support@bmc.com. (In the Subject line, enter SupID:<yourSupportContractID>, such as
SupID:12345.)
■In the United States and Canada, call 800 537 1813. Outside the United States and Canada, contact your local support
center for assistance.
■Submit a new issue at http://www.bmc.com/support_home.

5
Contents
Preface 7
About the BMC Remedy IT Service Management Suite . . . . . . . . . . . . . . . . . . . . . . . . . 8
BMC Atrium CMDB 2.0.1. . . . . . . . . . . . . . . . . . . . . . . . . . . . . . . . . . . . . . . . . . . . . . . . 8
BMC Remedy Asset Management 7.0 . . . . . . . . . . . . . . . . . . . . . . . . . . . . . . . . . . . . . 8
BMC Remedy Change Management 7.0 . . . . . . . . . . . . . . . . . . . . . . . . . . . . . . . . . . . 8
BMC Remedy Incident Management 7.0 . . . . . . . . . . . . . . . . . . . . . . . . . . . . . . . . . . . 9
BMC Remedy Problem Management 7.0. . . . . . . . . . . . . . . . . . . . . . . . . . . . . . . . . . . 9
BMC Service Request Management . . . . . . . . . . . . . . . . . . . . . . . . . . . . . . . . . . . . . . . 9
BMC Service Level Management 7.0 . . . . . . . . . . . . . . . . . . . . . . . . . . . . . . . . . . . . . 10
Audience . . . . . . . . . . . . . . . . . . . . . . . . . . . . . . . . . . . . . . . . . . . . . . . . . . . . . . . . . . . . . . . . 10
Related documentation . . . . . . . . . . . . . . . . . . . . . . . . . . . . . . . . . . . . . . . . . . . . . . . . . . . . 11
Chapter 1 Introduction 13
When to use the ITSM Data Management tool . . . . . . . . . . . . . . . . . . . . . . . . . . . . . . . . 14
Using the ITSM Data Management tool for migration . . . . . . . . . . . . . . . . . . . . . . 15
Overview of the bulk load process . . . . . . . . . . . . . . . . . . . . . . . . . . . . . . . . . . . . . . . . . . 16
Components of the tool. . . . . . . . . . . . . . . . . . . . . . . . . . . . . . . . . . . . . . . . . . . . . . . . . . . . 17
Hardware and software prerequisites . . . . . . . . . . . . . . . . . . . . . . . . . . . . . . . . . . . . . . . 19
Performance benchmarks . . . . . . . . . . . . . . . . . . . . . . . . . . . . . . . . . . . . . . . . . . . . . . . . . . 19
Chapter 2 Installing and configuring the tool 21
Turning on Development Cache Mode . . . . . . . . . . . . . . . . . . . . . . . . . . . . . . . . . . . . . . 22
Running the ITSM Data Management tool installer . . . . . . . . . . . . . . . . . . . . . . . . . . . . 22
Turning off Development Cache Mode . . . . . . . . . . . . . . . . . . . . . . . . . . . . . . . . . . . . . . 24
Configuring performance enhancements. . . . . . . . . . . . . . . . . . . . . . . . . . . . . . . . . . . . . 25
Setting the Next Request ID Block Size . . . . . . . . . . . . . . . . . . . . . . . . . . . . . . . . . . . 25
Configuring the AR System server for multi-threading . . . . . . . . . . . . . . . . . . . . . 26
Configuring the CAI:Plugin Registry form . . . . . . . . . . . . . . . . . . . . . . . . . . . . . . . . 27
Setting the plugin filter threads. . . . . . . . . . . . . . . . . . . . . . . . . . . . . . . . . . . . . . . . . . 28
Chapter 3 Completing the spreadsheets 29
Understanding the spreadsheets . . . . . . . . . . . . . . . . . . . . . . . . . . . . . . . . . . . . . . . . . . . . 30
Populating data in the spreadsheets . . . . . . . . . . . . . . . . . . . . . . . . . . . . . . . . . . . . . . . . . 31

6 Data Management Administrator’s Guide
Chapter 4 Importing data 35
Creating the CSV files . . . . . . . . . . . . . . . . . . . . . . . . . . . . . . . . . . . . . . . . . . . . . . . . . . . . . 36
Editing the data load batch file. . . . . . . . . . . . . . . . . . . . . . . . . . . . . . . . . . . . . . . . . . . . . . 36
Running the batch file . . . . . . . . . . . . . . . . . . . . . . . . . . . . . . . . . . . . . . . . . . . . . . . . . . . . . 37
Validating and promoting the data . . . . . . . . . . . . . . . . . . . . . . . . . . . . . . . . . . . . . . . . . . 38
Understanding the Data Load Console . . . . . . . . . . . . . . . . . . . . . . . . . . . . . . . . . . . 39
Validating imported data . . . . . . . . . . . . . . . . . . . . . . . . . . . . . . . . . . . . . . . . . . . . . . . 40
About license compliance . . . . . . . . . . . . . . . . . . . . . . . . . . . . . . . . . . . . . . . . . . . . . . . 41
Fixing errors . . . . . . . . . . . . . . . . . . . . . . . . . . . . . . . . . . . . . . . . . . . . . . . . . . . . . . . . . . 42
Promoting validated data into the ITSM forms. . . . . . . . . . . . . . . . . . . . . . . . . . . . . 43
Recovering from halted validation or promotion . . . . . . . . . . . . . . . . . . . . . . . . . . . 43
Deleting data . . . . . . . . . . . . . . . . . . . . . . . . . . . . . . . . . . . . . . . . . . . . . . . . . . . . . . . . . . . . . 44
Chapter 5 Managing customizations 45
Identifying customizations . . . . . . . . . . . . . . . . . . . . . . . . . . . . . . . . . . . . . . . . . . . . . . . . . 46
Analyzing your customizations for impact . . . . . . . . . . . . . . . . . . . . . . . . . . . . . . . . . . . 46
Making your customizations work . . . . . . . . . . . . . . . . . . . . . . . . . . . . . . . . . . . . . . . . . . 47
Understanding the staging forms . . . . . . . . . . . . . . . . . . . . . . . . . . . . . . . . . . . . . . . . 47
Adding custom fields . . . . . . . . . . . . . . . . . . . . . . . . . . . . . . . . . . . . . . . . . . . . . . . . . . 49
Appendix A How tabs map from spreadsheet to target form 53
Foundation data mapping. . . . . . . . . . . . . . . . . . . . . . . . . . . . . . . . . . . . . . . . . . . . . . . . . . 54
Appendix B Exclusions from bulk load 57
Appendix C Error messages 59
Invalid data errors . . . . . . . . . . . . . . . . . . . . . . . . . . . . . . . . . . . . . . . . . . . . . . . . . . . . . . . . 60
Required field errors . . . . . . . . . . . . . . . . . . . . . . . . . . . . . . . . . . . . . . . . . . . . . . . . . . . . . . 63
Duplicate data errors . . . . . . . . . . . . . . . . . . . . . . . . . . . . . . . . . . . . . . . . . . . . . . . . . . . . . . 65
Appendix D Data values 69
Configuration Item types . . . . . . . . . . . . . . . . . . . . . . . . . . . . . . . . . . . . . . . . . . . . . . . . . . 70
Notification events . . . . . . . . . . . . . . . . . . . . . . . . . . . . . . . . . . . . . . . . . . . . . . . . . . . . . . . . 72
Permission groups and license types. . . . . . . . . . . . . . . . . . . . . . . . . . . . . . . . . . . . . . . . . 75
Time zones. . . . . . . . . . . . . . . . . . . . . . . . . . . . . . . . . . . . . . . . . . . . . . . . . . . . . . . . . . . . . . . 76
Index 79

Preface 7
Preface
The BMC Remedy IT Service Management 7.0 Data Management Administrator’s Guide
describes how to install and use the BMC Remedy ITSM Data Management (ITSM
Data Management) tool.
The BMC Remedy IT Service Management Suite (ITSM) includes the following
applications and solutions:
!The BMC Remedy Asset Management application
!The BMC Remedy Change Management application
!The BMC Remedy Service Desk solution (which includes the BMC Remedy
Incident Management application and the BMC Remedy Problem Management
application)
ITSM can be integrated with the following applications:
!The BMC Service Request Management application
!The BMC Service Level Management application
The applications run in conjunction with the BMC Remedy Action Request System
platform (AR System) and share a common database. All five applications
consume data from the BMC Atrium Configuration Management Database
(CMDB) application.

8 Data Management Administrator’s Guide
BMC Remedy IT Service Management 7.0
About the BMC Remedy IT Service
Management Suite
The following sections provide an overview of IT Service Management products.
BMC Atrium CMDB 2.0.1
The BMC Atrium CMDB 2.0.1 is installed prior to Asset Management, Change
Management, and Service Desk (including Incident Management and Problem
Management). It stores information about configuration items (CIs) and their
relationships in an inheritance-based data model, and has the ability to reconcile
data from different sources. The BMC Atrium CMDB 2.0.1 provides a “single
source of truth” about your IT environment, enabling other BMC applications to
manage CIs, predict the impact of configuration changes, and perform other
Business Service Management (BSM) functions.
For more information, see the BMC Atrium CMDB 2.0.1 User’s Guide.
BMC Remedy Asset Management 7.0
The BMC Remedy Asset Management application lets IT professionals track and
manage enterprise configuration items (CIs)—and their changing relationships—
throughout the entire asset life cycle. As part of the BMC Remedy ITSM Suite,
Asset Management is integrated with BMC Remedy Service Desk (which contains
the BMC Remedy Incident Management and BMC Remedy Problem Management
applications), BMC Remedy Change Management, and BMC Service Level
Management, and offers flexibility to support customized business processes.
For more information, see the BMC Remedy Asset Management 7.0 User’s Guide.
BMC Remedy Change Management 7.0
Using ITIL®-compatible best practices, BMC Remedy Change Management
provides IT organizations with the ability to manage changes by enabling them to
assess impact, risk, and resource requirements, and then create plans and
automate approval functions for implementing changes. It provides scheduling
and task assignment functionality, and reporting capabilities for reviewing
performance and improving processes. Because Change Management is
integrated with the BMC Atrium CMDB, Change Management lets you relate
changes to other records, such as CIs (including services) and incidents.
For more information, see the BMC Remedy Change Management 7.0 User’s Guide.

Preface 9
About the BMC Remedy IT Service Management Suite
BMC Remedy Incident Management 7.0
BMC Remedy Incident Management is used to manage incidents. Incident
management is reactive, and is typically initiated in response to a customer call or
automated event. An example of an automated event might be an alert from a
monitoring system, such as BMC Service Impact Management (BMC SIM). The
primary goal of the incident management process, according to ITIL standards, is
“to restore normal service operation as quickly as possible with minimum
disruption to the business, thus ensuring that the best achievable levels of
availability and service are maintained.”
An incident is any event that is not part of the standard operation of a service and
that causes an interruption to or a reduction in the quality of that service. Normal
service operation is the operation of services within the limits specified by Service
Level Management (SLM).
For more information, see the BMC Service Desk: Incident Management 7.0 User’s
Guide.
BMC Remedy Problem Management 7.0
BMC Remedy Problem Management is used to manage problem investigations,
known errors, and solution database entries. Problem management can
proactively prevent the occurrence of incidents, errors, and additional problems.
A problem investigation helps an IT organization get to the root cause of incidents.
It initiates actions that help to improve or correct the situation, preventing the
incident from recurring.
After a problem investigation identifies the cause, this information can result in
either a known error or a solution database entry. A known error is a problem that
has been successfully diagnosed and for which a temporary workaround or
permanent solution has been identified. A solution database entry contains
information that might be required to provide or restore a service.
For more information, see the BMC Service Desk: Problem Management 7.0 User’s
Guide.
BMC Service Request Management
BMC Service Request Management (SRM) allows IT to define offered services,
publish those services in a service catalog, and automate the fulfillment of those
services for their users. With SRM, users have the ability to help themselves, which
reduces the requests coming into the service desk. This enables IT to focus on more
mission-critical activities, such as resolving incidents related to service failures and
restoring critical services. SRM also provides the ability to automate workflow for
each service, enforcing consistency of process and faster fulfillment of the request.
For more information, see the BMC Service Request Management 2.0 Administrator’s
and User's Guide.

10 Data Management Administrator’s Guide
BMC Remedy IT Service Management 7.0
BMC Service Level Management 7.0
BMC Service Level Management enables a service provider, such as an IT
organization, a customer support group, or an external service provider, to
formally document the needs of its customers or lines of business using service
level agreements, and provide the correct level of service to meet those needs.
Service Level Management also provides a means to review, enforce, and report on
the level of service provided. It streamlines the most important task of all, which is
the communication between a service provider and its customers. Multiple service
targets can be defined and monitored, acting as a bridge between IT service
support and IT operations. This enables costs to be controlled and helps to provide
a consistent level of service in support of key business services.
For more information, see the BMC Service Level Management 7.0 User’s Guide.
Audience
This document is intended for the following IT professionals:
!Application administrators
!AR System administrators

Preface 11
Related documentation
Related documentation
Table 1 lists the available documentation for IT Service Management. It also lists
other documents referenced within the BMC Remedy ITSM 7.0 Data Management
Administrator’s Guide and within the instructions in the spreadsheets.
Unless otherwise noted, online documentation in Adobe Acrobat (PDF) format is
available on the product installation distribution media, on the Customer Support
website (http://www.bmc.com/support_home), or both. You can order printed
documentation from the Customer Support website. A complete list of documents
available for the ITSM 7.0 applications is available from the Customer Support
website.
NOTE
To access the support website, you must have a support contract.
Table 1: Related documentation
Title Description Audience Format
BMC Atrium CMDB 2.0.1 User’s
Guide
Information about using the BMC
Atrium CMDB, including searching for
CIs and relationships, launching
federated data, reporting, and running
reconciliation jobs.
Users Print and
PDF
BMC Remedy Asset Management 7.0
User’s Guide
Procedures for using the BMC Remedy
Asset Management application; includes
new features and overview.
Everyone Print and
PDF
BMC Remedy Change Management
7.0 User’s Guide
Procedures for using the BMC Remedy
Change Management application;
includes new features and overview.
Everyone Print and
PDF
BMC Remedy Import Help Procedures for using BMC Remedy
Import.
Administrators Help file
BMC Remedy IT Service
Management 7.0 Configuration Guide
Procedures for configuring the BMC
Remedy IT Service Management
applications.
Administrators Print and
PDF
BMC Remedy ITSM 7.0 Data
Management Administrator’s Guide.
Installation and usage instructions for
the ITSM Data Management tool.
Administrators PDF
BMC Remedy ITSM 7.0 Data
Management Release Notes
Information about known issues in the
ITSM Data Management tool.
Administrators PDF
BMC Remedy Service Desk: Incident
Management 7.0 User’s Guide.
Procedures for using the BMC Remedy
Service Desk: Incident Management
application; includes new features and
overview.
Everyone Print and
PDF
BMC Remedy Service Desk: Problem
Management 7.0 User’s Guide
Procedures for using the BMC Remedy
Service Desk: Problem Management
application; includes new features and
overview.
Everyone Print and
PDF

12 Data Management Administrator’s Guide
BMC Remedy IT Service Management 7.0
BMC Service Level Management 7.0
User’s Guide
Procedures for using the BMC Service
Level Management application; includes
new features and overview.
Everyone Print and
PDF
BMC Service Request Management
2.0 Administrator’s and User's Guide
Procedures for administrating and using
the BMC Service Request Management
application.
Administrators
and users
PDF
Table 1: Related documentation (Continued)
Title Description Audience Format

Chapter 1 Introduction 13
Chapter
1Introduction
You can use the ITSM Data Management tool to import foundation data into ITSM
7.0.
The following topics are provided:
!When to use the ITSM Data Management tool (page 14)
!Overview of the bulk load process (page 16)
!Components of the tool (page 17)
!Hardware and software prerequisites (page 19)
!Performance benchmarks (page 19)

14 Data Management Administrator’s Guide
BMC Remedy IT Service Management 7.0
When to use the ITSM Data Management tool
You can use the ITSM Data Management tool whenever you wish to import
foundation data, such as in the following scenarios:
!A new installation of ITSM
!An existing installation of ITSM to which another company, business unit,
department, or other group is being added
!Migration from a previous version of ITSM
Foundation data refers to configuration data that applies to all of the ITSM
applications, such as companies, sites, people, and categorization. Figure 1-1
illustrates the three levels of data in ITSM.
Figure 1-1: Levels of data in ITSM
NOTE
At this time, only foundation data can be loaded with the ITSM Data Management
tool.
Service Desk
Transactional
Data
Process Setup
Data
Foundation
Data
Change
Management
Asset
Management
Approvals,
configurations
Incidents,
problems
Change
requests
Configuration
items, contracts,
purchase requests
Change templates,
approvals,
assignment
mapping
Decision trees,
scripts, assignment
mapping
Companies, sites, people,
categorization

Chapter 1 Introduction 15
When to use the ITSM Data Management tool
Using the ITSM Data Management tool for migration
Migration scenarios for using the ITSM Data Management tool include:
!Migrating from a version earlier than 6.0—If you use automated migrations,
you would have to run more than one migration, to first migrate to 6.0, and then
to 7.0. The procedure using the ITSM Data Management tool can eliminate steps.
!Migrating in a phased approach—You can load different portions of data at
different times. For example, if you have both Help Desk and Change
Management 6.0, you might choose to initially install Service Desk, and bulk
load the appropriate foundation data. At a later date, you could install Change
Management and bulk load the appropriate foundation data.
!Migrating as a fresh install—You might wish to treat migration as a fresh
install, for example if your earlier version of ITSM includes many
customizations, or if the existing data is of questionable quality. In this case, you
can bulk load your quality foundation data.
In each of these scenarios, you must do the following steps:
Step 1 Install ITSM 7.0.
Step 2 Export data from your earlier version of ITSM.
Step 3 Import the data into the spreadsheets.
Step 4 Clean up the data in the spreadsheets. This might include adding newly required
information that is missing.
Step 5 Run the ITSM Data Management tool to import the data into ITSM 7.0.
16 Data Management Administrator’s Guide
BMC Remedy IT Service Management 7.0
Overview of the bulk load process
This section provides an overview of the bulk load process. The following chapters
provide detailed instructions.
Figure 1-2: Overview of the bulk load process
1
2
5
4
3
Service
Desk
Add data to
spreadsheets
Convert
spreadsheets
to CSV
Load data
Promote data
to ITSM
Validate data
Asset
Management
Change
Management
A B C
111 xxx yyy
222 xxx yyy
333 xxx yyy
444 xxx yyy

Chapter 1 Introduction 17
Components of the tool
The bulk load process consists of the following steps:
Step 1 Add data to spreadsheets.
The ITSM Data Management tool includes Excel workbooks. Each tab on the Excel
workbook corresponds to a form in ITSM 7.0, as described in Appendix A, “How
tabs map from spreadsheet to target form.”
For instructions, see Chapter 3, “Completing the spreadsheets.”
Step 2 Convert data in spreadsheets to CSV files.
The tool includes macros to convert the spreadsheet data to the appropriate CSV
files, as described in “Creating the CSV files” on page 36.
Step 3 Load the data.
You must perform steps to load the data. For instructions, see “Editing the data
load batch file” on page 36, and “Running the batch file” on page 37.
Step 4 Validate the data.
Step 5 Promote the data into ITSM.
For instructions, see “Validating and promoting the data” on page 38.
NOTE
If you have customized ITSM, see Chapter 5, “Managing customizations.”
Components of the tool
The ITSM Data Management tool includes the following components:
!Excel workbook files for loading data—Each of these workbook files has
individual tabs that correspond to the different foundation data structures that
can be imported. The following workbook files are included:
!Company.xls
!Financials.xls
!GenericCatalog.xls
!Geography.xls
!Location.xls
!OperationalCatalog.xls
!People.xls
!PeopleOrg.xls
!ProductCatalog.xls
!SupportGroup.xls
!SystemSetup.xls

18 Data Management Administrator’s Guide
BMC Remedy IT Service Management 7.0
!Excel conversion files—Each data load workbook has a corresponding
conversion file. Each conversion file contains a macro to convert the individual
tabs in the data load workbook into separate files in CSV format. The following
conversion files are included:
!CompanyCSV.xls
!FinancialsCSV.xls
!GenericCatalogCSV.xls
!GeographyCSV.xls
!LocationCSV.xls
!OperationalCatalogCSV.xls
!PeopleCSV.xls
!PeopleOrgCSV.xls
!ProductCatalogCSV.xls
!SupportGroupCSV.xls
!SystemSetupCSV.xls
!Definition files—The DEF files contain the necessary AR System staging forms
and AR System workflow to manage, validate, and promote the data that you
are importing into the appropriate ITSM forms.
!Mapping file list—Foundation.lst lists the mapping files that are used during
the automated import.
!Data load batch file—Foundation.bat automates the importing of the data in
the CSV files and makes sure that they are imported in the correct order. Data is
imported into a staging area for validation before you promote the data into the
target forms.
!ARX files—These files contain back-end data required by the ITSM Data
Management tool.
!Import mapping files—Files with the extension .arm (AR Mapping) are import
mapping files used by the ITSM Data Management tool.

Chapter 1 Introduction 19
Hardware and software prerequisites
Hardware and software prerequisites
The ITSM Data Management tool has two sets of hardware and software
prerequisites, as listed in Table 1-1.
Performance benchmarks
The following table shows how many records per hour were processed by the
ITSM Data Management tool in BMC Software’s performance lab.
The test data for these performance benchmarks consisted of 238,000 People
records, which included 1,200 support staff.
Table 1-1: ITSM Data Management requirements
System Requirements
Server running AR System and
ITSM 7.0
!AR System server 7.0.01 patch 004 or later.
Note: BMC recommends using AR System server
7.1 or later due to performance enhancements.
!ITSM 7.0 patch 006 or later.
!Hardware and software requirements for the
ITSM 7.0 server, as described in the BMC
Remedy IT Service Management 7.0 Installation
Guide.
Note: For compatibility information, see the
compatibility matrix for BMC Remedy IT
Service Management at the product availability
and compatibility area of the Customer Support
website
(http://www.bmc.com/support_home).
Workstation from which you are
running the tool
!Microsoft Windows
!Microsoft Excel
!BMC Remedy Administrator 7.0
!87 Mb free disk space
Note: The Excel spreadsheets and the batch files
are supported only in this environment.
Table 1-2: Performance benchmarks for foundation data
Task Throughput (records per hour)
Load people data from the CSV file to staging
forms
225,000
Validate people data in staging forms 1,000,000
Promote people data into ITSM forms 220,000

20 Data Management Administrator’s Guide
BMC Remedy IT Service Management 7.0
Hardware
environment
The performance benchmarks were performed on two Dell PowerEdge 1850
servers connected to a LAN with 100M Bps network interface card. Each server has
two 3.8Ghz Intel Xenon processors, 4Gb RAM and two local hard drives (10K
rpm).
Software
environment
The following table indicates the software environment for the two servers.
The AR System server was configured for multi-threading, as described in
“Configuring performance enhancements” on page 25.
For Oracle configuration, the initialization parameters were set as follows:
!cursor_share=force
!optimizer_index_cost_adj=25
!optimizer_index_caching=90
!sga_target=800M
!pga_aggregate_target=200M
!open_cursors=300
Data files were on one hard drive, while all the online redo log files were on
another dedicated hard drive.
NOTE
After starting validation, and after starting promotion, the Data Load console was
closed to maximize throughput.
Table 1-3: Software environment for performance benchmark lab
Server Component Version Running on
A Windows 2003 server Enterprise Edition SP1 Dell PowerEdge 1850
A AR Server 7.0.1 patch 004 Windows 2003 Server
A BMC Remedy ITSM applications 7.0.2 patch 005
B Redhat Linux®2.6.9-55.ELsmp Dell PowerEdge 1850
BOracle
® 10g R2 10.2.0.3 Redhat Linux

Chapter 2 Installing and configuring the tool 21
Chapter
2Installing and configuring the
tool
Follow these steps to install and configure the tool:
Step 1 Turn on Development Cache Mode.
Step 2 Run the ITSM Data Management tool installer.
BMC recommends that you run the installer on your workstation. The installer
installs components, such as the Data Load Console to your AR System server. It
installs other components, such as the data load spreadsheets, to your workstation.
Step 3 Turn off Development Cache Mode.
Step 4 Optionally, to enhance bulk data load performance, you can configure the tool to
use multi-threading.
The following topics are provided:
!Turning on Development Cache Mode (page 22)
!Running the ITSM Data Management tool installer (page 22)
!Turning off Development Cache Mode (page 24)
!Configuring performance enhancements (page 25)

22 Data Management Administrator’s Guide
BMC Remedy IT Service Management 7.0
Turning on Development Cache Mode
To install the ITSM Data Management tool, you must first turn on Development
Cache Mode. After you do this, run the ITSM Data Management tool installer.
When the installer finishes running, turn off Development Cache Mode.
NOTE
After you turn on Development Cache Mode in the following procedure, you must
restart the AR System server.
To turn on Development Cache Mode
1Open BMC Remedy Administrator.
2Log in to the AR System server to which you are importing data.
3Select the appropriate server.
4Choose File > Server Information.
The Server Information window appears.
5Click the Configuration tab.
6Select Development Cache Mode.
7Click OK.
The Server information window closes and the system prompts you to restart the
AR System server.
8Close BMC Remedy Administrator, and then restart the AR System server.
Running the ITSM Data Management tool
installer
Follow this procedure to install the ITSM Data Management tool.
To install the ITSM Data Management tool
1Run setup.exe.
BMC recommends that you run the installer from your Windows workstation.
After the installer loads, the ITSM Data Management Tool window appears,
displaying the Introduction screen of the installer.
NOTE
Depending on your Windows security settings, you might see a Windows Security
Alert.
Chapter 2 Installing and configuring the tool 23
Running the ITSM Data Management tool installer
2Click Next to continue.
The End User License Agreement appears.
3Accept the terms of the license agreement and click Next to continue.
You are prompted for the installation location. The default location is
C:\Program Files\BMC Software\BMC Remedy ITSM Data Management Tool. You can
change this location, if appropriate.
4Click Next to continue.
After the tool is configured for your environment, you are prompted to enter
connection information for your AR System server. The installer requires this
information so that it can install the necessary DEF and ARX files.
Figure 2-1: BMC Remedy ITSM Data Management Tool—Connection Information screen
5Complete the Connection Information screen as described in Table 2-1.
6Click Next to continue.
After the installer connects to your AR System server, the Version Summary screen
appears, displaying a table of currently installed ITSM products, and their
corresponding version numbers, patch levels, and installed languages.
Table 2-1: Connection information
Field Description
AR System Server Enter the name of the server to which you are importing data.
AR Administrator Enter the login name of an AR System administrator.
AR Password Enter the password for the AR System administrator account.
AR TCP Port If necessary, enter the AR System server’s TCP port.
AR RPC Socket If necessary, enter the AR System server’s RPC socket.

24 Data Management Administrator’s Guide
BMC Remedy IT Service Management 7.0
IMPORTANT
If any of the installed applications are not at version 7.0 patch 006 or later, your system
does not meet the prerequisites of the ITSM Data Management tool. You must
cancel installation of the tool. Prerequisites for the tool are described in “Hardware
and software prerequisites” on page 19.
7Click Next to continue.
The pre-installation summary displays the product name, installation folder, and
disk space requirements.
8Click Install to install the tool.
During installation, the progress is displayed. When the tool has been installed, the
screen displays the message, “Execution complete.”
9Click Next to continue.
The installer displays the status of the installation.
10 Click Done to exit the installer.
11 If you ran the installer on the server, copy the files from the installation location
(default of C:\Program Files\BMC Software\BMC Remedy ITSM Data Management
Tool) to the workstation on which you will run the tool.
Turning off Development Cache Mode
After you install the tool, turn off Development Cache Mode.
NOTE
After you turn off Development Cache Mode, you must restart the AR System
server.
To turn off Development Cache Mode
1Open BMC Remedy Administrator.
2Log in to the AR System server to which you are importing data.
3Select the appropriate server.
4Choose File > Server Information.
The Server Information window appears.
5Click the Configuration tab.
6Clear Development Cache Mode.
7Click OK.
The Server Information window closes and the system prompts you to restart the
AR System server.
8Close BMC Remedy Administrator, and then restart the AR System server.

Chapter 2 Installing and configuring the tool 25
Configuring performance enhancements
Configuring performance enhancements
If you are bulk loading significant amounts of data, you will see performance
improvements by:
!Setting the Next Request ID Block Size to 40.
This setting enhances performance when importing data from the CSV files into
the staging forms.
!Using multi-threading.
Multi-threading allows multiple chunks of data to be processed at the same
time. You can configure multiple threads to be run simultaneously, depending
on how powerful your server is.
IMPORTANT
If you configure these performance enhancements, when the ITSM Data
Management tool is running validation or promotion, the AR System server
utilizes 100 percent CPU capacity to achieve maximum throughput. This means
that during validation and promotion, the AR System server is not responsive to
other requests.
To configure the tool to use multi-threading, you must:
Step 1 Configure the AR System server information for multi-threading.
Step 2 Configure the CAI:Plugin Registry form.
Step 3 Set the plugin filter API threads.
Setting the Next Request ID Block Size
You can set this performance enhancement, regardless of whether you configure
multi-threading.
To set the Next ID Block Size
1Open BMC Remedy Administrator.
2Log in to the AR System server to which you are importing data.
3Select the appropriate server.
4Choose File > Server Information.
5Click the Configuration tab.
6Set the Next Request ID Block Size to 40.
7If you are configuring the AR System server for multi-threading, continue with the
next procedure, which is on this screen. Otherwise, click OK to save your settings.
26 Data Management Administrator’s Guide
BMC Remedy IT Service Management 7.0
Configuring the AR System server for multi-threading
To see performance improvements from multi-threading, you must configure
several settings for AR System server information.
To configure multi-threading
1If it is not already open, open the Server Information window.
2Click the Server Ports and Queues tab.
Figure 2-2: Server Information window—Server Ports and Queues tab
3If no private server queue exists, create one by performing the following steps:
aClick the “Click to add” row.
bFor Type, select Private.
cSelect an available RPC Program Number.
4Set (or modify) the minimum and maximum number of threads as indicated in
Table 2-2.
Table 2-2: Server queue configuration
Queue type Min Threads setting Max Threads setting
Fast 16 32
Private 16 32
Chapter 2 Installing and configuring the tool 27
Configuring performance enhancements
5Make sure that the Plug-in Loopback RPC Program Number is set to the private
queue’s RPC Program Number.
Take note of this number. You will need it in subsequent steps, after you close this
window.
6Click OK to save your changes.
Configuring the CAI:Plugin Registry form
You must configure the CAI:Plugin Registry form as indicated in the following
steps.
To configure the CAI:Plugin Registry form
1Open BMC Remedy User.
2Log in to the AR System server as an administrator.
3Open the CAI:Plugin Registry form.
4Click Search to search for the record.
5If no record is found, create a new record.
Figure 2-3: CAI Plug-in Registry form
6Set the Private Queue # to the RPC Program Number.
7Set the Number of Threads to 16.
The number of threads must be within the minimum and maximum number that
you set for the Private server queue. BMC recommends 16 threads.
8Click Save.

28 Data Management Administrator’s Guide
BMC Remedy IT Service Management 7.0
Setting the plugin filter threads
To see performance improvements from multi-threading, you set the plugin filter
threads.
To set the plugin filter threads
1On the server, open the AR System configuration file in a text editor.
On a Windows server, the configuration file is ar.cfg. On a UNIX® server, the file
is ar.conf.
2Add the following line to the end:
Plugin-Filter-API-Threads: 8 40
3Save your changes.
4Restart the AR System server.

30 Data Management Administrator’s Guide
BMC Remedy IT Service Management 7.0
Understanding the spreadsheets
This section provides an overview of the data load spreadsheets. Additional
instructions are provided within the spreadsheets.
Each workbook contains related spreadsheets. The first tab provides instructions
for using the spreadsheet. Each of the subsequent tabs corresponds to the form into
which the data is populated.
Figure 3-1: Example spreadsheet
Column headings provide instructions for completing that column of the
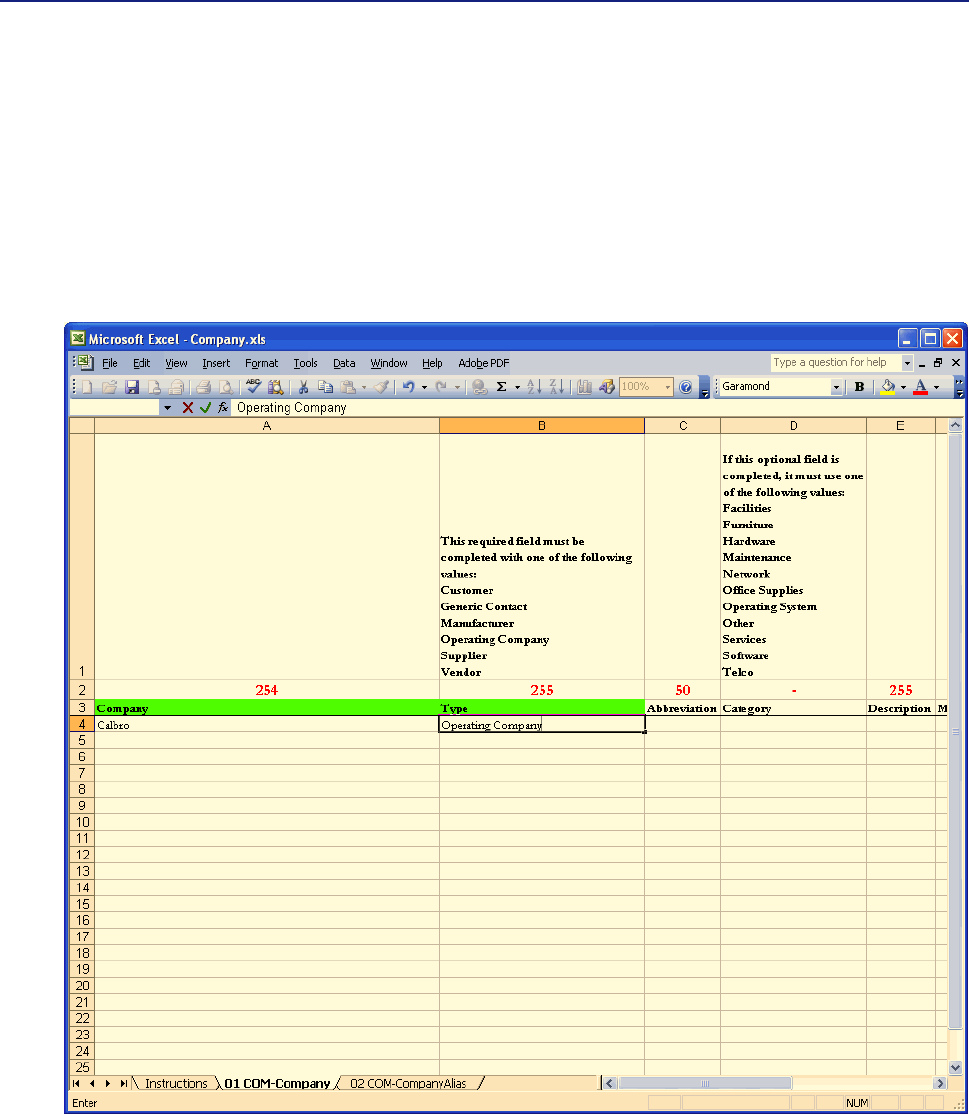
spreadsheets according to the following standards:
!A green column heading indicates a required field.
!An orange column heading indicates a field that might be required, depending
on a value set in another column.
!Text in the first row provides instructions for entering data in the column.

Chapter 3 Completing the spreadsheets 31
Populating data in the spreadsheets
The number above each column heading is the database length of the field. This
number corresponds to the number of bytes in the field. For English and other
single-byte languages, the number of bytes is the same as the number of characters.
Double-byte languages use two characters per byte.
Validation on each column indicates if you entered data longer than this maximum
allowed length.
NOTE
This validation occurs only when you type in the spreadsheet cells. If you bring in
data by copying and pasting from another source or by importing data into the
spreadsheet, you bypass the validation.
Populating data in the spreadsheets
This section provides general instructions for populating data in the data load
spreadsheets. To make it easier for you to distribute the spreadsheets to others to
complete, each spreadsheet includes instructions specific to the spreadsheet.
Are all
spreadsheets
required?
If you are updating an existing ITSM system, for example, loading data for a new
department or location, some data already exists on your ITSM system. Do not re-
enter data that is already loaded on your system. You must complete spreadsheet
only for the new data that you are loading.
If you are loading data for a new ITSM 7.0 system, you might choose to configure
all foundation data through the spreadsheets. To load only the minimum standard
configuration, you must complete the required tabs within the required
spreadsheets, which are listed in Table 3-1.
Table 3-1: Spreadsheets and tabs required to load minimum standard configuration
Required
spreadsheets
Required tabs Description
Company.xls 01 COM-Company Use this tab to specify companies.
Location.xls 01 SIT-Site Use this tab to specify sites.
5 SIT-SiteCompanyAssociation Use this tab to associate each site to a company.
Sites are physical locations.
Supportgroup.xls 01 CTM-SupportGroup Use this tab to specify support groups.
32 Data Management Administrator’s Guide
BMC Remedy IT Service Management 7.0
Where do you
start?
Start with spreadsheets that are self-contained and do not have dependencies on
data in other spreadsheets. BMC suggests that you start with Company.xls.
What are the
dependencies?
When entering data, be aware that data in one spreadsheet can be dependent upon
data that is either entered on another spreadsheet or already loaded in the system.
For example, the company field, which is entered on most spreadsheets, must
match a company either created in Company.xls or already loaded on the system.
These dependencies are noted as instructions in the spreadsheets. Table 3-2 lists
dependencies among spreadsheets.
People.xls 01 CTM-PeopleTemplate To load support staff, you must use people
templates. On this tab you specify the Template
Names that are referenced on the other tabs.
Use other tabs to set the permission groups,
support groups, and support group functional
roles for each people template.
People templates make it easier to load people
who fulfill the same role within a given support
group.
Even support staff who fulfill a unique role
within their support group, however, must be
related to a people template.
When you load people, the purpose of this tab is
only to specify the Template Names. The other
fields, such as Company Name, are loaded from
the 02 CTM-People tab. These other fields,
however, are stored in the People Template, and
are used when creating individual people
records through the Application Administration
console.
02 CTM-People Use this tab to load people.
03 CTM-PeoplePermissionGroups Use this tab to specify the ITSM application
permission groups for each people template.
04 CTM-SupportGroupAssociation Use this tab to specify the support groups for
each people template.
05 CTM-SupportGrpFunctionalRole Use this tab to specify the support group
functional roles for each people template.
Table 3-1: Spreadsheets and tabs required to load minimum standard configuration (Continued)
Required
spreadsheets
Required tabs Description

Chapter 3 Completing the spreadsheets 33
Populating data in the spreadsheets
The spreadsheets are listed in the order that the corresponding data is validated
and promoted in the Data Load Console. You might choose to complete
spreadsheets in this sequence.
To populate data in the spreadsheet
1Complete the spreadsheets according to the instructions on the Instructions tab
and in the column headings.
All leading and trailing spaces and tab characters are stripped when the data is
imported into staging forms.
2Save the file to the ITSM Data Management tool directory.
IMPORTANT
Leave the tabs in their original order. Deleting, inserting, or changing the order of
tabs causes errors when you perform the steps to convert the spreadsheets to CSV
(comma-separated value) files.
Table 3-2: Dependencies among spreadsheets
Data entered in this
spreadsheet
Depends on data entered in these spreadsheets
Company Geography System
Setup
People
Org
Location Financials Support
Group
Catalogs
(all)
Company
Geography
Location Yes Yes
SystemSetup
PeopleOrg Yes
SupportGroup Yes Yes
Financials Yes
People Yes Yes Yes Yes Yes Yes
ProductCatalog Yes
OperationalCatalog Yes
GenericCatalog Yes Yes

34 Data Management Administrator’s Guide
BMC Remedy IT Service Management 7.0

Chapter 4 Importing data 35
Chapter
4Importing data
After the spreadsheet is complete, you must complete the following steps to
import the data:
Step 1 Create the CSV files.
Step 2 Edit the data load batch file.
Step 3 Run the batch file.
Step 4 Validate and promote the data.
When appropriate, you can delete the data from the staging forms.
The following topics are provided:
!Creating the CSV files (page 36)
!Editing the data load batch file (page 36)
!Running the batch file (page 37)
!Validating and promoting the data (page 38)
!Deleting data (page 44)
36 Data Management Administrator’s Guide
BMC Remedy IT Service Management 7.0
Creating the CSV files
After you populate the data load spreadsheets, you must create the CSV files. The
ITSM Data Management tool imports the data from the CSV file.
To create the CSV file
1Open the appropriate conversion spreadsheet, such as CompanyConvertCSV.xls.
When you open the spreadsheet, depending on your Excel security settings, you
might receive a security warning. Make sure that you enable macros. The macros
in the spreadsheet create the appropriate CSV files.
Figure 4-1: Example of conversion spreadsheet
2On the first tab, click Run ConvertCSV Macro.
For each tab in the corresponding data load workbook (such as Company.xls), the
macro creates a CSV file in the <ITSM Data Management>\CSVs directory.
Editing the data load batch file
The data load batch file imports data from the CSV files into the data load staging
forms. For a successful import, you must specify values in this batch file. For
foundation data, this batch file is named foundation.bat.
To edit the data load batch file
1Open the data load batch file (Foundation.bat) in a text editor.
2Complete the values in the “set” section as indicated in Table 4-1.
Table 4-1: Values to set in the data load batch file
Value Description
user_name The user name of an administrative user
password The corresponding password

Chapter 4 Importing data 37
Running the batch file
Make sure you have no spaces between the equal sign (=) and the value you enter.
The directories in Table 4-2 are already set to the default values. You can leave
these values, unless you move the directories.
3Save the file.
Running the batch file
The data load batch file imports data from the CSV files into the data load staging
forms.
To run the batch file
1Make sure that the following files and directories are all located in the same
directory:
!Foundation.bat—file
!Foundation.lst—file
!CSVs—directory
!Mappings—directory
!Logs—directory
2Run the data load batch file (Foundation.bat).
Data is imported into staging forms.
NOTE
This import process strips all leading and trailing spaces, and all tab characters
from the data.
server_name The AR System into which you are importing data
external_authentication_string External authentication, if required by the AR System
server
rpc_number RPC number, if required by the AR System server
port_number Port number, if a port other than the default is required
arsystem_admin_directory The local directory for AR System commands
Table 4-2: Preset values in the data load batch file
Value Description
mapping_file_directory Already set to the mapping file directory
csv_file_directory Already set to the CSV file directory
log_file_path Already set to the log file directory
Table 4-1: Values to set in the data load batch file (Continued)
Value Description

38 Data Management Administrator’s Guide
BMC Remedy IT Service Management 7.0
The import process creates a log file in the Logs directory for each CSV file that was
imported. If a CSV file is missing or has no data, an error is generated in the log
file, but the data load utility continues, and loads data for CSV files that do exist
and have valid data.
3Examine the log files for errors.
Error messages indicated in Table 4-3 are benign and can be ignored.
4If you are using an Oracle® database, after loading large amounts of data, run the
following SQL command:
begin
dbms_stats.gather_schema_stats(
ownname=> '"ARADMIN"' ,
cascade=> TRUE,
estimate_percent=> null,
degree=> null,
no_invalidate=> FALSE,
granularity=> 'AUTO',
method_opt=> 'FOR ALL COLUMNS SIZE AUTO',
options=> 'GATHER');
end;
This SQL command re-gathers Oracle Optimizer Statistics.
Validating and promoting the data
Data is initially loaded into staging forms. To validate and promote the data you
must use the Data Load Console to:
Step 1 Validate the imported data.
Step 2 Fix errors.
If there are licensing warnings, you must also fix those warnings.
Step 3 Promote validated data from the staging forms into the appropriate ITSM forms.
Table 4-3: Benign error messages
Error message Explanation
The Datafile option given does not exist.
Cannot import.
The CSV file did not exist. If you did not intend
to load data from the corresponding Excel
workbook tab, you can ignore this error.
The Datafile type is not supported.
Cannot import.
AR Import generates this error in response to
files with a CSV extension. The file is
successfully imported, however.
Chapter 4 Importing data 39
Validating and promoting the data
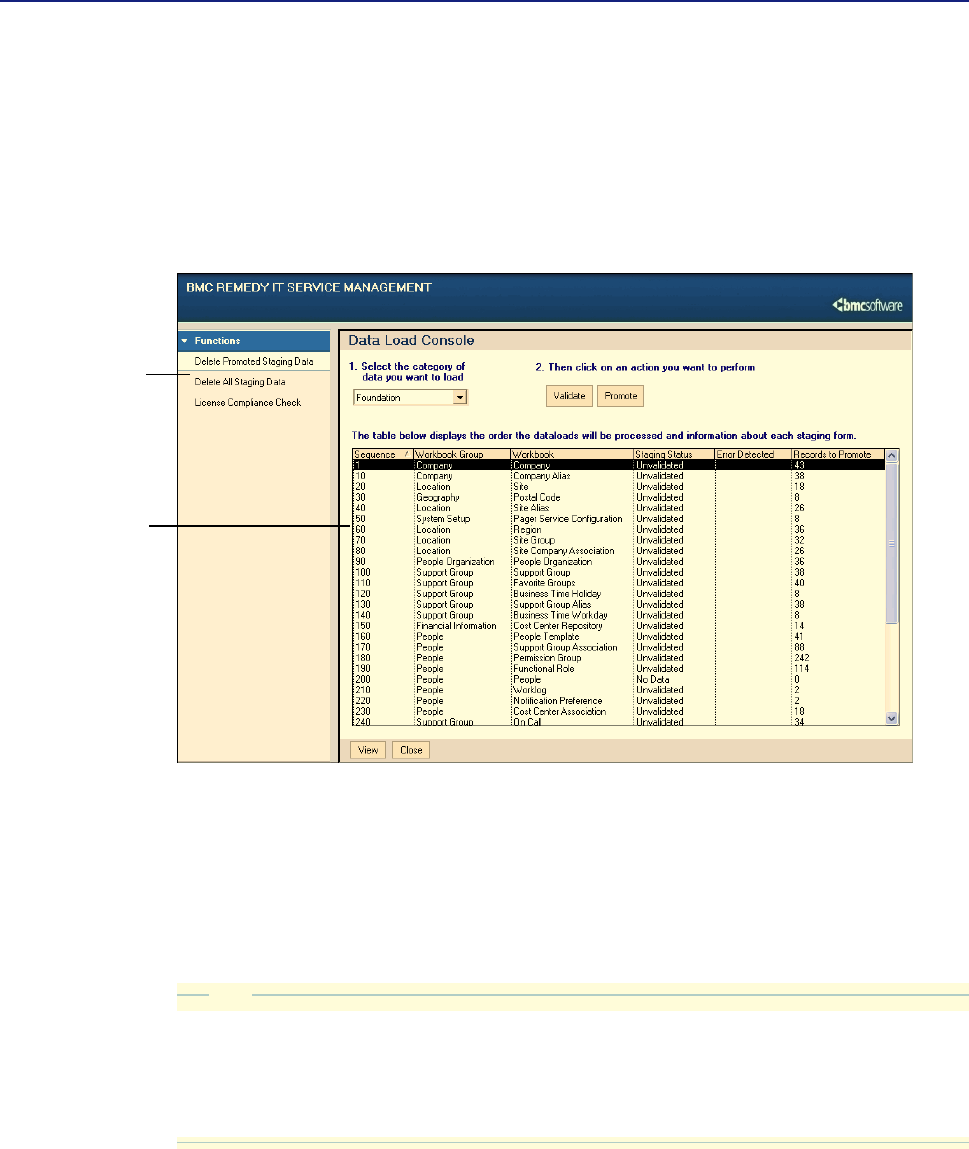
Understanding the Data Load Console
This section provides an overview of the Data Load Console. Instructions for using
the console are provided in the following sections.
You use the Data Load Console to load data into ITSM. The current version
supports loading foundation data.
Figure 4-2: Data Load Console
A table lists the staging forms. The default order of these forms in the table
corresponds to the sequence in which they are processed.
For each form, the table indicates the staging status, whether errors were detected,
and the number of records to be promoted. The table refreshes every 10 minutes.
During validation and promotion, you can monitor progress by checking which
forms have been validated or promoted.
TIP
If you are loading large amounts of data, BMC recommends that you close the Data
Load Console after you start validation or promotion. The table refresh affects
performance. To check the progress, you can either reopen the Data Load Console
or run the following SQL query:
select DL_STATUS,count(*) rowcnt from CTM_loadpeople group by DL_STATUS
The table lists staging
forms. The sequence
number indicates the
order in which forms
are validated and
promoted.
Functions provide
related functions.

40 Data Management Administrator’s Guide
BMC Remedy IT Service Management 7.0
Validating imported data
Before you can promote the data, you must validate it.
NOTE
When you proceed with validation, the max filter setting is temporarily changed
to 999999999. It is changed back to its original value when validation is complete.
BMC recommends that you note the current value of max filters before proceeding;
if the procedure is halted before it completes, you might need to manually reset
this value.
To validate imported data
1Access the Data Load Console.
aLog into BMC Remedy Administrator.
bFrom the Application Administration Console, click the Custom Configuration
tab.
cFrom the Application Setting list, choose Foundation > Data Management Tool
> Data Load Console.
2For the category, select Foundation.
The table lists all foundation staging forms. Forms with data that you loaded from
the CSV files are currently listed with a staging status of Unvalidated. A staging
status of No Data indicates a form that does not have data loaded from a CSV form.
3Click Validate.
After you confirm that you wish to proceed, validation is performed on all
unvalidated data in staging forms. Validated data is revalidated if it appears on the
list below unvalidated data.
After validation is completed for a form, its staging status changes to Validated.
Validated forms might have errors.
If you validate new people records, the tool validates whether sufficient licenses
are available. If the number of licenses available is insufficient, an error message
appears, and the data remains unvalidated. To view details of the license
compliance check, choose Functions > License Compliance Check.

Chapter 4 Importing data 41
Validating and promoting the data
About license compliance
You can load people into the system only if you have sufficient licenses. If you do
not have enough licenses, an error message is displayed during validation. To
view details of the license compliance check, choose Functions > License
Compliance Check.
Figure 4-3: License Compliance Check window
To fix the license compliance, you must either:
!Add the required licenses.
!Load people only for whom you have sufficient licenses.
42 Data Management Administrator’s Guide
BMC Remedy IT Service Management 7.0
Fixing errors
After validation is complete, the Error Detected column indicates whether an error
was detected in a staging form.
To fix errors
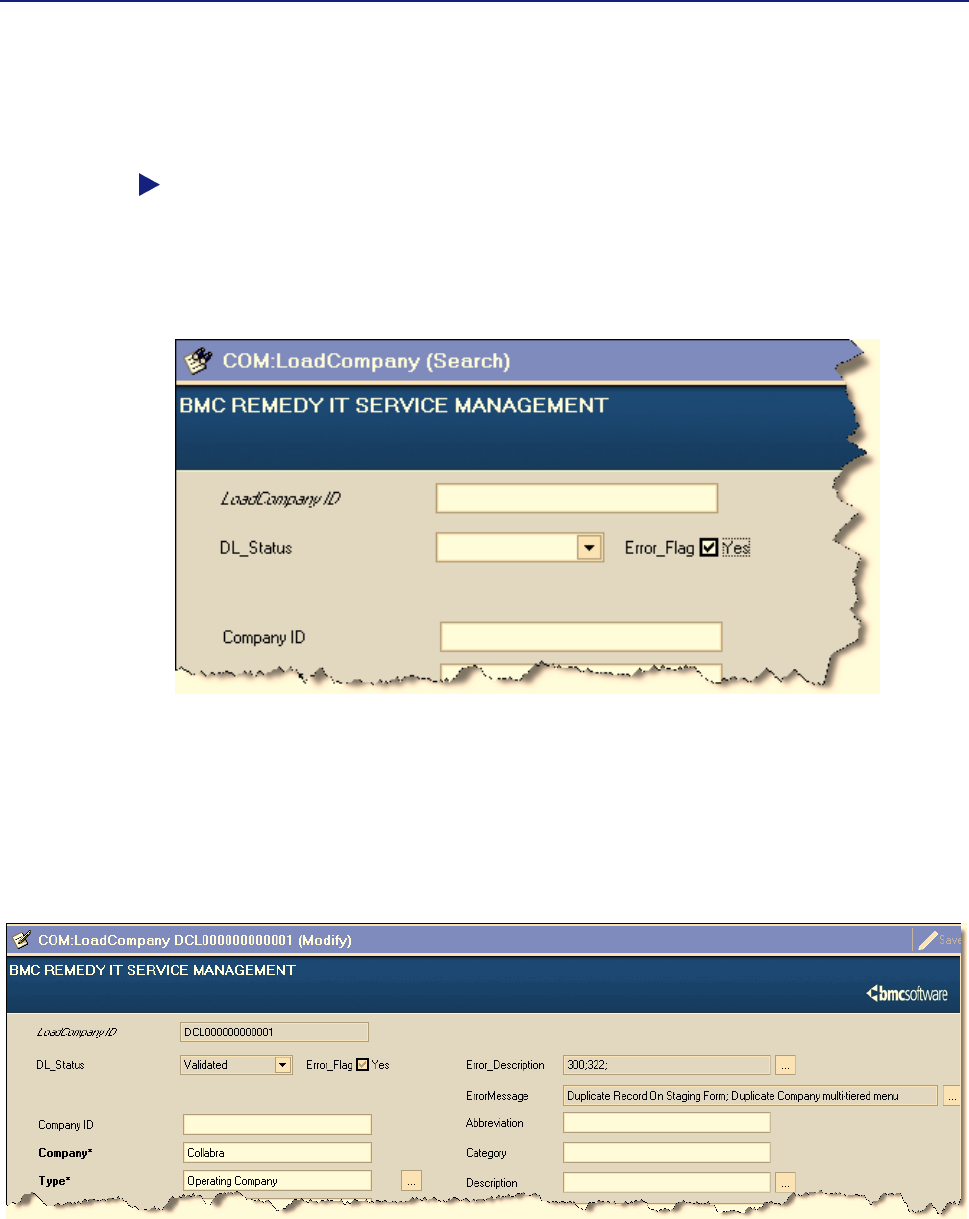
1Select the form with errors, then click View.
The staging form opens in Search mode.
Figure 4-4: Example of a staging form in Search mode
2To find records with errors, set Error_Flag to Yes, then click Search.
When you open a record that has an error, the staging form includes one or more
error description codes and the corresponding error messages. For example, the
record in Figure 4-5 has two errors. For a listing of error messages, see Appendix
C, “Error messages.”
Figure 4-5: A staging form displaying a record with an error
3Correct the errors, then save the form.
The staging status for the form is reset to Unvalidated. Error_Flag remains set to
Yes until after you validate the data.

Chapter 4 Importing data 43
Validating and promoting the data
TIP
Because an error in a form can result in errors in dependent forms, you can
sometimes save time by validating the data after fixing errors in one or two forms.
4Click Validate.
Validation starts with the first staging form marked as Unvalidated and continues
with the remaining forms in sequence. If errors are still detected, you must repeat
this procedure until all the errors are corrected. You cannot promote data while
errors remain.
Promoting validated data into the ITSM forms
When all the staging forms are validated with no errors detected, you can promote
the data into the ITSM forms.
To promote validated data
1Click Promote.
NOTE
When you proceed with promotion, the max filter setting is temporarily changed
to 999999999. It is changed back to its original value when promotion is complete.
2Confirm that you wish to continue.
After data is promoted from a staging form into the ITSM form, the staging status
changes to All Data Promoted and the number of records to promote is reset to 0.
3If you are using an Oracle database, after promoting large amounts of data, run the
following SQL command:
begin
dbms_stats.gather_schema_stats(
ownname=> '"ARADMIN"' ,
cascade=> TRUE,
estimate_percent=> null,
degree=> null,
no_invalidate=> FALSE,
granularity=> 'AUTO',
method_opt=> 'FOR ALL COLUMNS SIZE AUTO',
options=> 'GATHER');
end;
This SQL command re-gathers Oracle Optimizer Statistics.
Recovering from halted validation or promotion
If either validation or promotion is halted before the operation is complete, an
administrator must:
!Reset the maximum number of filters for an operation to the original value.
!Delete the DLD:ThreadManager records.

44 Data Management Administrator’s Guide
BMC Remedy IT Service Management 7.0
To recover from halted validation or promotion
1Reset the maximum number of filters for an operation to the original value.
aOpen BMC Remedy Administrator.
bLog in to the AR System server to which you are importing data.
cSelect the appropriate server.
dChoose File > Server Information.
eClick the Advanced tab.
fChange the value in the Maximum Filters for an Operation field to the original
value and then click OK.
AR System is installed with this value set to 200000.
2Delete the DLD:ThreadManager records.
aOpen BMC Remedy User.
bLog in to the AR System server as an administrator.
cOpen DLD:ThreadManager.
dSearch for all records.
To do this, put % in the RequestID field and click Search.
eSelect all the records.
fChoose Actions > Delete.
A message asks you to confirm whether to delete the records.
gClick OK.
You can now rerun validation or promotion.
Deleting data
At any point you can delete data from staging forms.
The navigation pane on the left of the Data Load Console provides two functions:
!Delete Promoted Staging Data—This deletes only promoted data from all
staging forms.
!Delete All Staging Data—This deletes all data from all staging forms,
regardless of the current status.

Chapter 5 Managing customizations 45
Chapter
5Managing customizations
The ITSM Data Management tool is designed to load data into an out-of-the-box
ITSM 7.0 product suite. The ITSM 7.0 product suite is a leap forward in terms of
functionality, and the types of data being stored. Despite these capabilities, you
might have customized ITSM, due to various business drivers.
To make sure that the ITSM Data Management tool functions correctly in a
customized ITSM application, you must identify the customizations, analyze the
impact, and make the customizations work with the tool.
The following topics are provided:
!Identifying customizations (page 46)
!Analyzing your customizations for impact (page 46)
!Making your customizations work (page 47)

46 Data Management Administrator’s Guide
BMC Remedy IT Service Management 7.0
Identifying customizations
Use these tips to identify your customizations:
!Documentation—If your customizations are documented, you can use this
information to create a list of the workflow, fields, and forms that have been
added or changed within your application.
!Naming conventions—Application developers sometimes use a naming
convention that identifies customized workflow. The workflow is then placed
within a namespace reserved for this purpose. For example, if the HPD:HPD-
GetPerson active link is modified, it could have been copied to HPD:CUS-
GetPerson, using “CUS” in the name to indicate that it is customized workflow.
Analyzing your customizations for impact
After you identify customizations, you must determine the impact to the data load
functionality. The types of customizations to ITSM that impact the functionality of
the ITSM Data Management tool are listed in this section.
The following guidelines can help with your analysis:
!Custom fields with Required entry mode—Whether these fields are new or are
modified on existing ITSM forms, they impact the data load. You must make
sure that these fields are populated with data. Otherwise, the data load will fail.
!Fields with Optional entry mode—If these fields have custom workflow to
enforce data entry upon record creation or update, they impact the data load. If
required, duplicate the custom workflow on the data load staging forms to
enforce the same constraints. To determine the appropriate staging form, see
Appendix A, “How tabs map from spreadsheet to target form.”
!Custom workflow—In most cases, workflow customizations do not impact the
ITSM Data Management tool. When data is loaded by the tool, all ITSM
workflow on forms targeted for the load are bypassed, with the exception of
workflow firing from the tool itself.
This workflow bypass on target forms is performed by using filter workflow
with goto actions. These filters fire on execution order 0 based on keywords that
are received from the data load staging forms.
Some custom workflow, however, does impact the data load function. For
example, the workflow might be triggered on creation of the record on the form
to create other child or dependent records elsewhere.
!New customized forms—In most cases, new forms do not impact the data load
function. If dependencies are created between this new customized form and
data load target forms, however, you must perform additional evaluation.

Chapter 5 Managing customizations 47
Making your customizations work
Making your customizations work
This section contains some detailed steps on how to incorporate your
customizations into the ITSM Data Management tool.
The following topics are provided:
!“Understanding the staging forms”
!“Adding custom fields” on page 49
Understanding the staging forms
This section describes how the workflow in the data load staging forms is
structured. Use this information for customizations of the ITSM Data Management
tool.
The following topics are provided:
!“Staging form filters”
!“Staging form permissions” on page 48
!“Staging form fields” on page 48
Staging form filters
You can customize two types of filters. Both of these types of filters run on modify
and only on records that have not been promoted:
!Filters that run on validation—The filters that perform the validations are
coded in the 200-299 execution order range. For fields that must be set for use in
validation, the filters with those actions are coded in this range. Validation
filters look at the keyword “VALIDATE.”
!Filters that run on promote—The calculation filters that set the fields needed for
promotion, and the filters that perform the actual promotion (push to target
forms) are coded in the 700-798 execution order range. Promotion filters look at
keyword “LOAD.”
The following table lists the execution order and filter actions for the staging forms.
IMPORTANT
Make customizations only in the 200 - 299 and the 700 - 798 execution order range.
Table 5-1: Execution order and filter actions
Execution order Filter actions
0 Skip to execution order 1001
10 - 13 Related to error handling
200 - 200 Validation
300 Set dataload status to Validated
48 Data Management Administrator’s Guide
BMC Remedy IT Service Management 7.0
Staging form permissions
Staging forms have Public-Hidden permission. All fields on staging forms have
Public-Write permission.
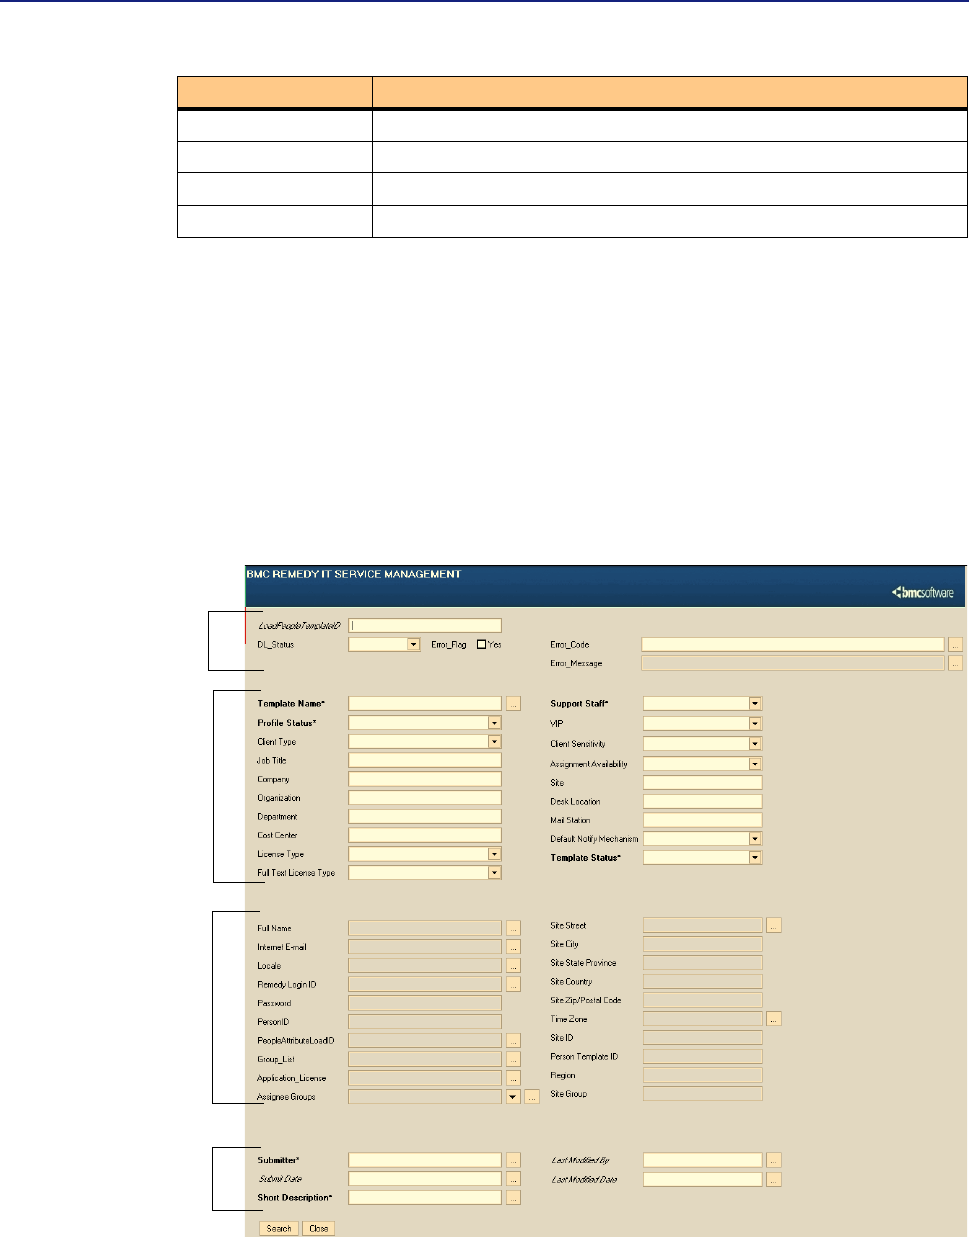
Staging form fields
Fields on staging forms are grouped in different sections, as indicated in the
following illustration.
Figure 5-1: Example of a staging form
500 If any field data is changed, set dataload status to Unvalidated
700 - 798 Calculation, promotion
799 Set dataload status to Promoted
900 Delete record
Table 5-1: Execution order and filter actions (Continued)
Execution order Filter actions
A
B
C
D

Chapter 5 Managing customizations 49
Making your customizations work
The following table describes the types of fields in each section of the staging form.
NOTE
Hidden fields, which are not in the view, are used for temporary calculation by
workflow.
Adding custom fields
The following scenario demonstrates the steps to take when a new field is added
to a target form and how to incorporate the field into the ITSM Data Management
tool.
TIP
To determine the staging form equivalent of the target form you are loading data
into, see Appendix A, “How tabs map from spreadsheet to target form.”
In this scenario, a new required character field called “Employee ID,” with field ID
536871147, has been created in the CTM:People form. The requirement is to
incorporate this new field into the ITSM Data Management tool so that the
contents of this field can be loaded at the same time as the other out-of-the-box
fields.
NOTE
This scenario is relatively straightforward, because filters for this staging form use
the “Matching IDs” feature. Some forms require an additional step, as described in
“Modifying workflow to promote custom fields” on page 50.
Table 5-2: Purpose of fields in each section of the staging form
Section Purpose of fields
A These fields provide information about processing of the staging
form. They include fields for ID, data load status, error flag, error
code, and error message. These fields are not promoted to the
target form.
B These fields contain the data being imported. These fields
correspond to the columns of data entered on the staging form.
These fields are promoted to the target form.
C These fields are calculated from data in section B. These fields are
read-only; the values are entered only through filter calculations.
These fields are promoted to the target form.
D These are system fields.

50 Data Management Administrator’s Guide
BMC Remedy IT Service Management 7.0
To make the customization from the scenario work
1Add a new column called “Employee ID” in the 02 CTM-People tab of the
People.xls spreadsheet.
This spreadsheet is installed with the ITSM Data Management tool. You can use
this column to populate and load the contents of the custom field at the same time
as the other People records.
2Update the CTM-People.arm file.
This file is located in the <ITSM Data Management>\Mappings directory. Update the
file by adding the following line:
Mapping: $536871147$="Employee ID"
This mapping is required for importing the modified spreadsheet into the staging
form.
3Recreate an exact copy of this field in the CTM:LoadPeople staging form.
The field must exist on the staging form, so that it can accept the new customized
field.
After this step, you can load new People records that contain the customized
Employee ID column. For some forms, however, you must first modify the filter
on the staging form before you can promote the data. For more information, see
“Modifying workflow to promote custom fields.”
Modifying workflow to promote custom fields
For most forms, you do not need to modify the workflow for the promotion of data
from the staging form to the target form. In the Employee ID example, the filters
use the Matching IDs feature, so no modification is needed. For some forms,
however, the workflow must be modified.
If you add fields to a form that does not use this feature, such as the
FIN:LoadCostCenterUDAAssoc form, you must:
Step 1 Copy the new fields from the target form to the staging form.
Step 2 In the Push Field action, select the new fields in the Field and Value fields.
The staging versions of these target forms do not use the Matching IDs feature, and
require the workflow modification for custom fields:
!FIN:CostCenterUDAAssoc
!Business Time Holidays
!Business Time Workdays
!COM:Company Alias
!All people attributes forms:
!CTM:People IT Skills
!CTM:Login ID

Chapter 5 Managing customizations 51
Making your customizations work
!CTM:People Benefit Info
!CTM:People Education
!CTM:People HR Attendance Mgmt
!CTM:People HR Time Management
!CTM:People Travel Profile
!CTM:People Wallet
!CTM:People Worklog
!NTE:CFG-Notification Events
To modify workflow to promote custom fields
1Copy the new field from the target form to the staging form.
2View the filters on the staging form.
3Open the filter that pushes to the target form.
This filter is in the 700 range. For example, on the FIN:LoadCostCenterUDAAssoc
form, the filter is called:
FIN:DCU:CreatCostCenterUDA_750_FIN‘!
4On the If Action tab, in the fields area, choose the Name and choose Value > Field.
The Name indicates the field name on the target form. Choose Value > Field to
select the field name on the staging form. These two fields might be the same field
name.
5Save your changes.

52 Data Management Administrator’s Guide
BMC Remedy IT Service Management 7.0

Appendix A How tabs map from spreadsheet to target form 53
Appendix
AHow tabs map from
spreadsheet to target form
This section describes how tabs in the Excel (XLS) spreadsheets map to staging
forms, and how the staging forms map to the primary target forms in ITSM 7.0.
The following topic is provided:
!Foundation data mapping (page 54)

54 Data Management Administrator’s Guide
BMC Remedy IT Service Management 7.0
Foundation data mapping
Table A-1 lists the mapping from spreadsheet to the target form of foundation
data.
Table A-1: Foundation data mapping
Spreadsheet Tab Staging form Target form or forms
Company.xls 01 COM-Company COM:LoadCompany COM:Company
Company.xls 02 COM-Company
Alias
COM:LoadCompanyAlias COM:Company Alias
Financials.xls 01 FIN-ConfigCost
CentersRepository
FIN:LoadConfigCostCenters
Rep
FIN:ConfigCostCenters
Repository
Financials.xls 02 FIN-CostCenterUD
Associations
FIN:LoadCostCenterUDA
Assoc
FIN:CostCenterUDA
Associations
GenericCatalog.xls 01 CFG-GenericCatalog CFG:LoadGenericCatalog CFG:Generic Catalog
GenericCatalog.xls 02 CFG-GenericProd
ServiceAssoc
CFG:LoadGenericProdSer
Assoc
CFG:GenericProdService
Assoc
GenericCatalog.xls 02 CFG-Generic
CompanyModuleAsso
CFG:LoadGenericCpyModule
Assoc
CFG:GenericCompany
ModuleAssoc
Geography.xls CTM-Postal Codes CTM:LoadPostalCodes CTM:PostalCodes
Location.xls 01 SIT-Site SIT:LoadSite SIT:Site
Location.xls 02 SIT-SiteAlias SIT:LoadSiteAlias SIT:Site Alias
Location.xls 03 CTM-Region CTM:LoadRegion CTM:Region
Location.xls 04 SIT-SiteGroup SIT:LoadSiteGroup SIT:Site Group
Location.xls 05 SIT-SiteCompany
Association
SIT:LoadSite CompanyAssoc SIT:Site Company
Association
OperationalCatalog.xls 01 CFG-Operational
Catalog
CFG:LoadServiceCatalog CFG:Service Catalog
OperationalCatalog.xls 02 CFG-Operational
CatalogAssoc
CFG:LoadServiceCatalog
Assoc
CFG:Service Catalog Assoc
People.xls 01 CTM-People
Template
CTM:LoadPeopleTemplate CTM:People Template
People.xls 02 CTM-People CTM:LoadPeople !CTM:People
!User (if a Remedy Login
ID is specified)
People.xls 03 CTM-People
PermissionGroups
CTM:LoadPeopleTemplatePG !CTM:People Template
PG
!CTM:People Permission
Groups
People.xls 04 CTM-SupportGroup
Association
CTM:LoadPeopleTemplateSG !CTM:People Template
SG
!CTM:Support Group
Association

Appendix A How tabs map from spreadsheet to target form 55
Foundation data mapping
People.xls 05 CTM-SupportGroup
FunctionalRole
CTM:LoadPeopleTemplateSFR !CTM:SupportGroup
FunctionalRole
!AP:Role
People.xls 06 CTM-Login CTM:LoadPeopleAttributes CTM:Login ID
People.xls 07 CTM-PeopleWallet CTM:LoadPeopleAttributes CTM:People Wallet
People.xls 08 CTM-PeopleHR
AttendanceMgmt
CTM:LoadPeopleAttributes CTM:People HR
Attendance Mgmt
People.xls 09 CTM-PeopleHR
TimeManagement
CTM:LoadPeopleAttributes CTM:People HR Time
Management
People.xls 10 CTM-People
Education
CTM:LoadPeopleAttributes CTM:People Education
People.xls 11 CTM-PeopleTravel
Profile
CTM:LoadPeopleAttributes CTM:People Travel Profile
People.xls 12 CTM-PeopleBenefit
Info
CTM:LoadPeopleAttributes CTM:People Benefit Info
People.xls 13 CTM-PeopleITSkills CTM:LoadPeopleAttributes CTM:People IT Skills
People.xls 14 FIN-CostCenterUD
Associations
FIN:LoadCostCenterUDA
Assoc
FIN:CostCenterUDA
Associations
People.xls 15 CTM-PeopleWork
Log
CTM:LoadPeopleWorkLog CTM:People WorkLog
People.xls 16 NTE-CFG-
Notification
Events
NTE:LoadCFGNotification
Events
NTE:CFG-Notification
Events
PeopleOrg.xls CTM-People
Organization
CTM:LoadPeople
Organization
CTM:People Organization
ProductCatalog.xls 01 PCT-ProductCatalog PCT:LoadProductCatalog PCT:Product Catalog
ProductCatalog.xls 02 PCT-ProductAlias PCT:LoadProductAlias PCT:Product Alias
ProductCatalog.xls 03 PCT-Product
CompanyAssoc
PCT:LoadProdComAssoc PCT:ProductCompany
Association
ProductCatalog.xls 04 PCT-ProductModel
Version
PCT:LoadProdModelVersion PCT:Product Model/
Version
ProductCatalog.xls 05 PCT-ModelVersion
Patch
PCT:LoadModelVersionPatch PCT:ModelVersion Patch
ProductCatalog.xls 06 PCT-ProdCatalog
AliasMapping
PCT:LoadProdCatAlias
Mapping
PCT:ProductCatalogAlias
MappingForm
SupportGroup.xls 01 CTM-SupportGroup CTM:LoadSupportGroup CTM:Support Group
SupportGroup.xls 02 CTM-SupportGroup
Assignments
CTM:LoadSGPAssignments CTM:Support Group
Assignments
SupportGroup.xls 03 CTM-SupportGroup
Alias
CTM:LoadSupportGroupAlias CTM:Support Group Alias
SupportGroup.xls 04 CTM-SupportGroup
OnCall
CTM:LoadSGPOnCall CTM:Support Group On-
Call
Table A-1: Foundation data mapping (Continued)
Spreadsheet Tab Staging form Target form or forms

56 Data Management Administrator’s Guide
BMC Remedy IT Service Management 7.0
SupportGroup.xls 05 BusinessTime
Workdays
CFG:LoadBusinessTimeWork
days
Business Time Workdays
SupportGroup.xls 06 BusinessTime
Holidays
CFG:LoadBusinessTime
Holidays
!CFG:Business Holidays
Storage
!Business Time Holidays
SystemSetup.xls NTE-CFG-PagerService
Config
NTE:LoadCFGPagerService
Config
NTE:CFG-Pager Service
Config
Table A-1: Foundation data mapping (Continued)
Spreadsheet Tab Staging form Target form or forms

Appendix B Exclusions from bulk load 57
Appendix
BExclusions from bulk load
The following areas are excluded from bulk load data management:
!Attachments—File attachments cannot be loaded into AR System attachment
fields because AR System supports importing attachments only as ARX files.
!Geography—The following foundation forms are excluded from bulk load:
!CFG:Geography City
!CFG:Geography Country
!CFG:Geography Stat/Province
These foundation geography forms are excluded because ITSM provides
extensive data for all these forms with installation of the applications. To import
additional data, import the records directly into these forms using BMC Remedy
Import. For information about using BMC Remedy Import, see the BMC
Remedy Import Help.

58 Data Management Administrator’s Guide
BMC Remedy IT Service Management 7.0


60 Data Management Administrator’s Guide
BMC Remedy IT Service Management 7.0
Invalid data errors
This section lists error codes from invalid data that is identified during the
validation operation on records in staging forms.
Table C-1: Error codes from invalid data
Code Message Explanation
100 Invalid Bargaining Unit
101 Invalid Benefit Group
102 Invalid Compensation Method
103 Invalid Dental Plan
104 Invalid Employment Status
105 Invalid Marital Status
106 Invalid Medical Plan
107 Invalid Pension Plan
108 Invalid Person
109 Invalid Operational Category Fields For
IT Skills
110 Invalid Product Category Fields For IT
Skills
111 Invalid Category/Type The Category and Type values are invalid. Correct
values can be obtained from CFG:Generic Catalog.
112 Invalid Contact Type
113 Invalid Home Country
114 Invalid Manager
115 Invalid Pager Service Provider
116 Invalid Template
117 Invalid Title
118 Invalid Company
119 Invalid Department
120 Invalid Organization
121 Invalid Site
122 Invalid Site for selected Company
123 Invalid Support Group
124 Invalid Permission Group
125 Invalid Country
126 Invalid Region
127 Invalid Site Group
128 Invalid City
129 Assignment Group Cannot Be The Same
As The Support Group

Appendix C Error messages 61
Invalid data errors
130 Invalid Assignment Group
131 Invalid Functional Role
132 Invalid Product Catalog The functional role that is selected is not valid or is
not applicable to your currently installed
applications.
133 Invalid Product Model/Version
134 Invalid Operational Catalog
135 Invalid Manufacturer. Manufacturer
must match entries found in the
Company form or Company staging form
with a company type of Manufacturer
136 Both Start And End Times Must Be
Entered Or Left Blank
137 Start Time Must Be Earlier Than End
Time
138 Start Time Of The Next Schedule Must Be
Later Than The End Time Of The
Previous Schedule
139 Invalid Timezone
140 Invalid Primary Cost Center Code
141 Invalid Cost Center
142 Invalid Source Cost Center
143 Person Does Not Have A Primary Cost
Center Defined
144 Total Distribution Percentage Is Greater
Than 100
145 Cost Center And Source Cost Center
Must Not Be The Same
146 The Allocation Method For The Source
Cost Center In The Finance Cost Center
Configuration Form Is Not Set To 'Equal
Distribution' Or 'User-Defined
Percentage'
147 Relationship Type Must Be Set To
Secondary Cost Center
148 Invalid Notification Event For The
Module Name
149 Invalid Login ID
150 Invalid CI Type
151 Invalid Company or Company is not
enabled
Table C-1: Error codes from invalid data (Continued)
Code Message Explanation

62 Data Management Administrator’s Guide
BMC Remedy IT Service Management 7.0
152 Support Group must exist as a valid
Support Group on
CTM:LoadPeopleTemplatesSG for the
specified Template
153 HR Attendance Management record does
not exist for the HR Time Management
record
154 Invalid work time. Open Time has to be
earlier than Close Time for any workday
155 Invalid Person ID
156 The Allocation Method For The Source
Cost Center In the
FIN:LoadConfigCostCentersRep Form Is
Not Set To 'Equal Distribution' Or 'User-
Defined Percentage'
157 Invalid Manager Name
158 Invalid Generic Catalog
159 A valid Generic Product Operational
relationship record cannot be found
A valid record that matches the record's Generic,
Product, and Operational catalog cannot be found in
CFG:LoadGenericProdSerAssoc or
CFG:GenericProdServiceAssoc forms. You must
create a relationship first between those catalog
entries before creating a Company Module
relationship to it.
160 General Access is automatically given
and is not a valid permission group for
this form
161 Asset Viewer is automatically given If the following permission groups are specified for
the Template Name, “Asset Viewer” is not valid
since it is automatically given:
!Task Manager
!Task User
!Incident User
!Incident Master
!Problem User
!Problem Master
!Infrastructure Change User
!Infrastructure Change Master
!Infrastructure Change Config
!Purchasing User
Table C-1: Error codes from invalid data (Continued)
Code Message Explanation

Appendix C Error messages 63
Required field errors
Required field errors
This section lists error codes from missing required fields.
162 Invalid Client Type The following client types are valid. You can use
either the number or words to specify the client type:
!2000 or Office-Based Employee
!3000 or Field-Based Employee
!4000 or Home-Based Employee
!5000 or Contractor
!7000 or Customer
!8000 or Prospect
!10000 or Vendor
163 Invalid Assignment Event
164 Invalid Company, Region, Site Group
and Site combination
165 Invalid Process Name
166 Invalid Contact Company
167 Invalid Currency
Table C-1: Error codes from invalid data (Continued)
Code Message Explanation
Table C-2: Error codes from missing required fields
Code Message Explanation
200 Missing Required Fields For Access IF
201 Missing Required Fields For It Skills When IT Skills is selected, Operational Category Tier
1 and Product Category Tier 1 are required.
202 Missing Home Fields Home fields are required when client type is set to
Home-based.
203 Paging Times Is Required
204 Time Zone Is Required
205 Corresponding Values For Open Times
And Close Times Must Be Entered Or
Both Must Be Empty
206 Pager Service Provider Is Required When
On-Call Paging Type Is Generic
207 Pager Parameters Email Is Required For
The Selected Pager Service Provider
208 Pager Parameters Pin Is Required For The
Selected Pager Service Provider
209 Pager Parameters Phone Is Required For
The Selected Pager Service Provider

64 Data Management Administrator’s Guide
BMC Remedy IT Service Management 7.0
210 Pager Parameters Pin And Phone Is
Required For The Selected Pager Service
Provider
211 Operational Category Tier 1 and 2 is a
required field when Operational
Category Tier 3 is entered
212 Incident Management selected, at least
one sub category is required
213 Change Management selected, at least
one sub category is required
214 Source Cost Center And Distribution
Percentage Are Required
215 Person ID Is Required
216 Source Cost Center Is Required
217 Both the Product Name and
Manufacturer are required when
defining a Product within Product
Catalog
218 Login ID is required when On-Call
paging type is set to Individual
219 Site Required when the Client Type is
Office-Based Employee, Field-Based
Employee or Contractor
220 Missing Required Fields for Wallet
attribute
When Wallet Attribute is selected, Category and
Type are required.
221 Generic Category Tier 1 and 2 is a
required field when Generic Category
Tier 3 is entered
222 Manufacturer is required when
specifying Product Name
223 Product Name required with specifying
Manufacturer
224 Product Tier 1 through 3, Manufacturer
and Product Name is required with
specifying a Model Version
225 Product Tier 1 through 3 is required when
specifying a Product Name or
Manufacturer
226 Product Tier 1 is required when Product
Tier 2 or 3 is entered
227 Product Tier 1 and 2 is a required field
when Product Category Tier 3 is entered
228 Operational Category Tier 1 is required
when Operational Category 2 or 3 is
entered
Table C-2: Error codes from missing required fields (Continued)
Code Message Explanation

Appendix C Error messages 65
Duplicate data errors
Duplicate data errors
This section lists error codes from duplicate data.
229 Company Menu Structure Tier 1 is
required when Menu Structure Tier 2 is
entered
230 Company Menu Structure Tier 1 and Tier
2 are required when Menu Structure Tier
3 is entered
231 Organization is required when specifying
Department
232 User Service Restoration, User Service
Request, Infrastructure Restoration or
Infrastructure Event is required when
Incident Management flag is selected
233 Organization and Department must be
blank when specifying Global Contact
Company
234 Region, Site Group and Site must be
blank when specifying Global Company
235 The License Type, Full Text License Type
and Default Notification Mechanism is
required when specifying Login ID
236 The Login ID is required when the
Support Staff flag is set to Yes
237 The Currency is required when
specifying the Hourly Rate Value
247 'Time Management Type', Year and
'Status Reason' fields are required when
the 'Attribute Type' is set to 'HR Time
Management'
Table C-2: Error codes from missing required fields (Continued)
Code Message Explanation
Table C-3: Error codes from duplicate data
Code Message Explanation
300 Duplicate Record On Staging Form
301 Duplicate Record On Target Form
304 Navigation Tiers for Company are not
unique
305 Login ID Exist On Staging Form
306 Login ID Exist On User Form

66 Data Management Administrator’s Guide
BMC Remedy IT Service Management 7.0
307 An entry with this Product
Categorization and blank Product Name
already exists on target form
308 An entry with the Product Name and
Manufacturer already exists on target
form
309 An entry with this Product
Categorization and blank Product Name
already exists on staging form
310 An entry with the Product Name and
Manufacturer already exists on staging
form
311 Invalid Product Alias, duplicate alias will
be created from Product Catalog staging
form
312 Duplicate Site Alias from Site staging
form
313 Duplicate Support Group Alias from
Support Group staging form
314 Cannot create Company relationship.
Global relationship is already being
created from the
PCT:LoadProductCatalog staging form
315 Cannot create Company relationship.
Global relationship is already being
created from the
CFG:LoadGenericProdSerAssoc staging
form
316 Cannot create association to the specified
company. Global association already
exists on target form
317 Cannot create association to the specified
company. Global association already
exists on staging form
318 Cannot create Global Company
relationship. Relationship already exists
with other company on target form
319 Cannot create Global Company
relationship. Relationship already exists
with other company on staging form
320 Invalid Company Alias, duplicate alias
will be created from Company staging
form
Table C-3: Error codes from duplicate data (Continued)
Code Message Explanation

Appendix C Error messages 67
Duplicate data errors
321 Cannot create Company relationship.
Global relationship is already being
created from the
CFG:LoadServiceCatalog staging form
322 Duplicate Company Multi-tiered menu
structure already exists
The duplicate Company multi-tiered menu structure
exists either in the COM:Company form or in the
COM:LoadCompany staging form.
Table C-3: Error codes from duplicate data (Continued)
Code Message Explanation

68 Data Management Administrator’s Guide
BMC Remedy IT Service Management 7.0

Appendix D Data values 69
Appendix
DData values
The spreadsheets for data migration include instructions on how to complete the
spreadsheet columns. This section provides tables of data values where the list of
values was too lengthy to display in the spreadsheet.
The following topics are provided:
!Configuration Item types (page 70)
!Notification events (page 72)
!Permission groups and license types (page 75)
!Time zones (page 76)

70 Data Management Administrator’s Guide
BMC Remedy IT Service Management 7.0
Configuration Item types
On the ProductCatalog.xls spreadsheet, the 01 PCT-ProductCatalog tab includes
a column for configuration item (CI) type, which must be completed with one of
the following values:
!Account
!Activity
!Admin Domain
!Application
!Application Infrastructure
!Application Service
!Application System
!BIOS Element
!Bulk Inventory
!Business Process
!Business Service
!Card
!CDROM Drive
!Chassis
!Cluster
!Communication Endpoint
!Computer System
!Connectivity Collection
!Connectivity Segment
!Database
!Database Storage
!Disk Drive
!Disk Partition
!Document
!Equipment
!File System
!Floppy Drive
!Hardware Package
!Hardware System Component
!Inventory Location

Appendix D Data values 71
Configuration Item types
!IP Connectivity Subnet
!IP Endpoint
!IPX Connectivity Network
!Keyboard
!Local Area Network (LAN)
!LNs Collection
!Local File System
!Logical System Component
!LPAR
!Mainframe
!Media
!Memory
!Monitor
!Network Port
!NT Domain
!Operating System
!Package
!Patch
!Physical Location
!Pointing Device
!Printer
!Processor
!Product
!Protocol Endpoint
!Rack
!Remote File System
!Role
!Share
!Software Server
!System Resource
!System Software
!Tape Drive
!UPS
!Virtual System

72 Data Management Administrator’s Guide
BMC Remedy IT Service Management 7.0
!Virtual System Enabler
!VM Ware
!Wide Area Network (WAN)
Notification events
On the People.xls spreadsheet, the 16 NTE-CFG-NotificationEvents tab includes
columns for Module Name and Notification Event, both of which are required
fields. The following table lists the module names in ITSM 7.0 along with the
applicable notification events.
Table D-1: ITSM 7.0 module names and applicable notification events
ITSM 7.0 modules Applicable notification events
Asset Management !Asset Scheduled Maintenance
!Bulk Inventory Reorder
!CI Status Change
!Configuration Item Approval
!Configuration Scheduled Maintenance
!Contract Expiration
!Contract Expiration Warning
!Escalated Notifications
!License Management Exception
!Resolution Escalation
!Response Escalation
!Unavailability Assignment
Broadcast !Broadcast Notification
Incident
(Continued on next page)
!Assignment
!Cancellation
!Change Associations
!Incident Escalation
!Known Error Solution
!Known Error Workaround
!OLA Resolution Escalated Notification
!OLA Resolution Escalation
!OLA Response Escalated Notification
!OLA Response Escalation
!Ownership Assignment
!Problem Investigation Associations
!Problem Investigation Completion
!Requester Incident Re-Opened
!Requester Incident Receipt Confirmation
!Requester Incident Resolution
!Resolution

Appendix D Data values 73
Notification events
Incident
(Continued from previous page)
!SLA Resolution Escalated Notification
!SLA Resolution Escalation
!SLA Response Escalated Notification
!SLA Response Escalation
!UC Resolution Escalated Notification
!UC Response Escalation
!Unavailability Restored
Infrastructure Change
(Continued on next page)
!Approval
!Approval Information
!Approval Resolution Escalated Notification
!Approval Resolution Escalation
!Cancellation
!Change Assignee Assignment
!Change Assignee Approval Rejection
!Change Assignee Completion
!Change Assignee Latent Completion
!Change Assignee Planning
!Change Assignee Pre-planning
!Change Assignee Re-scheduled
!Change Assignee Scheduled
!Change Assignee Scheduled For Review
!Change Management Assignment
!Change Management Approval Rejection
!Change Manager Completion
!Change Manager Group Escalation
!Change Manager Latent Completion
!Change Manager Next Dependent Change
!Change Manager Planning
!Change Manager Pre-planning
!Change Manager Predecessor Completion
!Change Manager Re-scheduled
!Change Manager Scheduled
!Change Manager Scheduled for Review
!Change Worklog Assignment
!Completion
!Implementer Assignment
!Implementer Planning
!Implementer Pre-planner
!Implementer Scheduled
!Manual Notification
!Non-Approval Information
!OLA Resolution Escalated Notification
!OLA Resolution Escalation
Table D-1: ITSM 7.0 module names and applicable notification events (Continued)
ITSM 7.0 modules Applicable notification events

74 Data Management Administrator’s Guide
BMC Remedy IT Service Management 7.0
Infrastructure Change
(Continued from previous page)
!OLA Response Escalated Notification
!OLA Response Escalation
!Receipt Confirmation
!Requester Change Cancellation
!Requester Change Receipt Confirmation
!Requester Completion
!Requester Change Re-scheduled
!Requester Change Scheduled
!Requester Rejection
!Scheduled
!SLA Response Escalated Notification
!Task Cancellation
!Task Pending
!Unavailability Restored
Problem Management !Change Completed
!Known Error Assignment
!Known Error Manager Assignment
!Problem Assignment
!Problem Cancelled
!Problem Completed
!Problem Manager Assignment
!Solution Assignment
!Unavailability Restored
Reminders !Reminders Notification
Request Management !Request Status Changed
!Request Submitted
Task Management !Task Assigned
!Task Status Changed
Table D-1: ITSM 7.0 module names and applicable notification events (Continued)
ITSM 7.0 modules Applicable notification events

Appendix D Data values 75
Permission groups and license types
Permission groups and license types
On the People.xls spreadsheet, the 03 CTM-PeoplePermissionGroups tab
includes columns for Permissions Group and License Type, both of which are
required fields. The following table lists the permission groups in ITSM 7.0 along
with the applicable license types.
For a description of each permission group, see the BMC Remedy IT Service
Management 7.0 Configuration Guide.
Table D-2: ITSM 7.0 permission groups and applicable license types
Permission group Applicable license types
Read Fixed Floating None
Administrator Yes
ApprovalAdmin Yes
ASE-Administrator Yes
Asset Admin Yes Yes Yes
Asset Config Yes Yes Yes
Asset User Yes Yes Yes
Asset Viewer Yes
Browser Yes
CM Dashboard User Yes
Command Event Master Yes
Config Categorization Admin Yes
Config Categorization User Yes
Config Group Mapping Admin Yes
Contact Location Admin Yes
Contact Organization Admin Yes
Contact People Admin Yes
Contact People HR Admin Yes
Contact People User Yes
Contact Support Admin Yes
Cost Manager Yes Yes Yes
Customize Yes
DSL Master Yes
DSL Viewer Yes
Incident Config Yes Yes
Incident Master Yes Yes
Incident Submitter Yes
Incident User Yes Yes
Incident Viewer Yes
Infrastructure Change Config Yes Yes

76 Data Management Administrator’s Guide
BMC Remedy IT Service Management 7.0
Time zones
On the SupportGroup.xls spreadsheet, the 06 BusinessTimeHolidays tab includes
a column for time zone, which must be completed with one of the following values:
!(GMT -12:00) Eriwetok, Kwajalein
!(GMT -11:00) Midway Island, Samoa
!(GMT -10:00) Hawaii
!(GMT -09:00) Alaska
Infrastructure Change Master Yes Yes
Infrastructure Change Submit Yes
Infrastructure Change User Yes Yes
Infrastructure Change Viewer Yes
Licensing Yes
Notification Admin Yes
Problem Config Yes Yes
Problem Master Yes Yes
Problem Submitter Yes
Problem User Yes Yes
Problem Viewer Yes
Purchasing User Yes Yes
Receiving User Yes
Requester Console Config Yes
Requester Console Master Yes
Security Yes
SLM Config Yes Yes
SLM Customer Yes Yes
SLM Manager Yes Yes
Sub Administrator Yes
Summary Definition Config Yes
Task Administrator Yes
Task Application Config Yes
Task Manager Yes
Task Process Config Yes
Task User Yes
Table D-2: ITSM 7.0 permission groups and applicable license types (Continued)
Permission group Applicable license types
Read Fixed Floating None

Appendix D Data values 77
Time zones
!(GMT -08:00) Pacific Time (US & Canada); Tijuana
!(GMT -07:00) Arizona
!(GMT -07:00) Mountain Time (US & Canada)
!(GMT -0600) Central Time (US & Canada)
!(GMT -06:00) Mexico City (Tegucigalpa)
!(GMT -06:00) Saskatchewan
!(GMT -05:00) Bogota, Lima, Quito
!(GMT -05:00) Eastern Time (US & Canada)
!(GMT -05:00) Indiana (East)
!(GMT -04:00) Atlantic Time (Canada)
!(GMT -04:00) Caracas, La Paz
!(GMT -03:30) Newfoundland
!(GMT -03:00) Brasilia
!(GMT -03:00) Buenos Aries, Georgetown
!(GMT -02:00) Mid-Atlantic
!(GMT -01:00) Azores, Cape Verde Is.
!(GMT) Casablanca, Monrovia
!(GMT) Greenwich Mean Time: Dublin, Edinburgh, Lisbon, London
!(GMT +1:00) Amsterdam, Copenhagen, Madrid, Paris, Vilnius
!(GMT +1:00) Belgrade, Sarajevo, Skopje, Sofija, Zagreb
!(GMT+1:00) Bratislava, Budapest, Ljubljana, Prague, Warsaw
!(GMT +1:00) Brussels, Berlin, Bern, Rome, Stockholm, Vienna
!(GMT +2:00) Athens, Istanbul, Minsk
!(GMT +2:00) Bucharest
!(GMT +2:00) Cairo
!(GMT +2:00) Harare, Pretoria
!(GMT +2:00) Helsinki, Riga, Tallinn
!(GMT +2:00) Israel
!(GMT +3:00) Baghdad, Kuwait, Riyadh
!(GMT+3:00) Moscow, St. Petersburg, Volgograd
!(GMT +3:00) Nairobi
!(GMT +3:30) Tehran
!(GMT +4:00) Abu Dhabi, Muscat
!(GMT +4:00) Baku, Tbilisi

78 Data Management Administrator’s Guide
BMC Remedy IT Service Management 7.0
!(GMT +4:30) Kabul
!(GMT +5:00) Ekaterinburg
!(GMT +5:30) Bombay, Calcutta, Madras, New Delhi
!(GMT +6:00) Colombo
!(GMT +7:00) Bangkok, Hanoi, Jakarta
!(GMT+8:00) Beijing, Chongqing, Hong Kong, Urumqi
!(GMT +8:00) Perth
!(GMT +8:00) Singapore
!(GMT +8:00) Taipei
!(GMT +9:00) Osaka, Sapporo, Tokyo
!(GMT +9:00) Seoul
!(GMT +9:00) Yakutsk
!(GMT +9:30) Adelaide
!(GMT +10:00) Canberra, Melbourne, Sydney
!(GMT +10:00) Guam, Port Moresby
!(GMT +10:00) Hobart
!(GMT+10:00) Vladivostok
!(GMT +11:00) Magadan, Solomon Is., New Caledonia
!(GMT +12:00) Auckland, Wellington
!(GMT +12:00) Fiji, Kamchatka, Marshall Is.

Index 79
A B C D E F G H I J K L M N O P Q R S T U V W X Y Z
Index
A
AR System server information and
multi-threading 26
Asset Management, about 8
attachment fields, exclusion from loading 57
audience 10
B
batch files
data load 36
editing 36
running 37
benchmarks, performance 19
BMC Software, contacting 2
bulk load
exclusions 57
process overview 16
C
CAI plugins
registry form 27
threads, setting 28
Change Management, about 8
CMDB, about 8
components 17
Configuration Item types 70
configuring
AR System server information for
multi-threading 26
CAI Plugin Registry form 27
performance enhancements 25
creating CSV files 36
CSV files
creating 36
errors creating 33
customer support 3
customizations
analyzing impact 46
fields
adding custom 49
optional 46
required 46
workflow and 50
forms
loading data 45
new 46
identifying 46
incorporating into tool 47
workflow 46
D
data
deleting 44
errors
duplicate 65
invalid 60
populating in spreadsheets 31
promoting 43
validating 40
Data Load Console, overview 39
data mapping, foundation 54
default location, ITSM Data Management Tool 23
deleting data 44
dependencies, spreadsheets 32
Development Cache Mode
turning off 24
turning on 22
documentation, related 11
duplicate data errors 65
E
editing batch file 36
errors
CSV fields, creating 33
duplicate data 65
80 Data Management Administrator’s Guide
A B C D E F G H I J K L M N O P Q R S T U V W X Y Z
errors (continued)
fixing 42
invalid data 60
license compliance 40
messages, benign 38
required fields 63
events, notification 72
exclusions 57
F
fields
attachments 57
custom 46, 49
errors 63
staging form 48
filters, about 47
fixing errors 42
forms
customized, new 46
geography 57
promoting data into 43
staging, described 47
foundation data mapping 54
G
geography forms, exclusion from bulk load 57
H
hardware
performance lab environment 20
prerequisites 19
I
identifying customizations 46
Incident Management, about 9
installing, ITSM Data Management Tool 22
invalid data errors 60
IT Service Management, about product family 8–10
ITSM Data Management Tool
components 17
default location 23
installing 22
migration, and 15
when to use 14
L
license compliance
about 41
errors 40
license types, permission groups and 75
loading data, customized forms 45
M
mapping foundation data 54
migrating data 15
multi-threading, AR System server information 26
N
Next Request ID Block Size, setting 25
notification events 72
P
patches, prerequisite 24
performance benchmarks 19
performance enhancements
configuring 25
data import 25
multi-threading 26
performance lab, hardware and software
environments 20
permission groups, license types and 75
permissions, staging forms 48
populating data in spreadsheets 31
prerequisites
hardware 19
ITSM patch 006 24
software 19
Problem Management, about 9
product support 3
promoting, data into ITSM forms 43
promotion
filters, and 47
halted, recovering from 43
R
recovering from halted validation or promotion 43
related documentation 11
required
fields, errors 63
spreadsheets 31
Index 81
A B C D E F G H I J K L M N O P Q R S T U V W X Y Z
running
batch file 37
ITSM Data Management Tool installer 22
S
Service Level Management. See SLM
setting
Next Request ID Block Size 25
plugin filter threads 28
SLM, about 10
software
performance lab 20
prerequisites 19
spreadsheets
dependencies 32
overview 30
populating 31
required 31
starting point 32
tab order 33
SRM, about 9
staging forms
described 47
fields, overview 48
filters, described 47
permissions 48
support, customer 3
T
tab order, spreadsheets 33
technical support 3
threads, plugin filter 28
time zones 76
V
validating data 40
validation
filters, and 47
halted, recovering from 43
W
workflow
customized 46
modifying for custom data 50

*71769*
