Administrator's Guide Admin
User Manual:
Open the PDF directly: View PDF ![]() .
.
Page Count: 61
- Administrator's Guide
- Table of Contents
- Preface
- Chapter 1. Managing VoltDB Databases
- Chapter 2. Preparing the Servers
- Chapter 3. Starting and Stopping the Database
- Chapter 4. Maintenance and Upgrades
- 4.1. Backing Up the Database
- 4.2. Updating the Database Schema
- 4.3. Upgrading the Cluster
- 4.4. Upgrading VoltDB Software
- Chapter 5. Deploying Clusters with the VoltDB Deployment Manager
- Chapter 6. Monitoring VoltDB Databases
- Chapter 7. Logging and Analyzing Activity in a VoltDB Database
- Chapter 8. What to Do When Problems Arise
- Appendix A. Server Configuration Options
- Appendix B. Snapshot Utilities

Administrator's Guide
Abstract
This books explains how to create and manage VoltDB databases and the clusters that run
them.
V6.6

Administrator's Guide
V6.6
Copyright © 2014-2016 VoltDB Inc.
The text and illustrations in this document are licensed under the terms of the GNU Affero General Public License Version 3 as published by the
Free Software Foundation. See the GNU Affero General Public License (http://www.gnu.org/licenses/) for more details.
Many of the core VoltDB database features described herein are part of the VoltDB Community Edition, which is licensed under the GNU Affero
Public License 3 as published by the Free Software Foundation. Other features are specific to the VoltDB Enterprise Edition, which is distributed
by VoltDB, Inc. under a commercial license. Your rights to access and use VoltDB features described herein are defined by the license you received
when you acquired the software.
This document was generated on August 24, 2016.

iii
Table of Contents
Preface ............................................................................................................................. vi
1. Structure of This Book ............................................................................................ vi
2. Related Documents ................................................................................................. vi
1. Managing VoltDB Databases ............................................................................................. 1
1.1. Getting Started ..................................................................................................... 1
1.2. Understanding the VoltDB Utilities .......................................................................... 2
1.3. Management Tasks ................................................................................................ 3
2. Preparing the Servers ....................................................................................................... 4
2.1. Server Checklist .................................................................................................... 4
2.2. Install Required Software ....................................................................................... 4
2.3. Configure Memory Management ............................................................................. 5
2.3.1. Disable Swapping ....................................................................................... 5
2.3.2. Disable Transparent Huge Pages ................................................................... 5
2.3.3. Enable Virtual Memory Mapping and Overcommit ........................................... 6
2.4. Turn off TCP Segmentation .................................................................................... 6
2.5. Configure NTP ..................................................................................................... 7
2.6. Configure the Network ........................................................................................... 7
2.7. Assign Network Ports ............................................................................................ 7
3. Starting and Stopping the Database .................................................................................... 9
3.1. Configuring the Cluster and Database ....................................................................... 9
3.2. Starting the Database ........................................................................................... 10
3.3. Loading the Database Definition ............................................................................ 11
3.4. Stopping the Database .......................................................................................... 11
3.5. Restarting the Database ........................................................................................ 12
4. Maintenance and Upgrades .............................................................................................. 14
4.1. Backing Up the Database ...................................................................................... 14
4.2. Updating the Database Schema .............................................................................. 15
4.2.1. Performing Live Schema Updates ................................................................ 15
4.2.2. Performing Updates Using Save and Restore ................................................. 15
4.3. Upgrading the Cluster .......................................................................................... 16
4.3.1. Performing Server Upgrades ....................................................................... 17
4.3.2. Performing Rolling Hardware Upgrades on K-Safe Clusters .............................. 17
4.3.3. Adding Servers to a Running Cluster with Elastic Scaling ................................ 18
4.3.4. Reconfiguring the Cluster During a Maintenance Window ................................ 18
4.4. Upgrading VoltDB Software ................................................................................. 19
4.4.1. Upgrading VoltDB on a Single Database Cluster ............................................ 19
4.4.2. Using a DR Replica to Upgrade VoltDB With Reduced Downtime ..................... 19
4.4.3. Using Cross Data Center Replication (XDCR) to Upgrade VoltDB Without
Downtime ........................................................................................................ 23
5. Deploying Clusters with the VoltDB Deployment Manager ................................................... 24
5.1. Starting the VoltDB Deployment Manager ............................................................... 24
5.1.1. Starting the Deployment Manager Manually .................................................. 24
5.1.2. Starting the Deployment Manager as a Service ............................................... 24
5.2. What the Deployment Manager Does ...................................................................... 25
5.3. How the Deployment Manager Works .................................................................... 25
5.4. Using the VoltDB Deployment Manager Web Interface .............................................. 26
5.5. Using the VoltDB Deployment Manager REST API .................................................. 27
6. Monitoring VoltDB Databases ......................................................................................... 29
6.1. Monitoring Overall Database Activity ..................................................................... 29
6.1.1. VoltDB Management Center ....................................................................... 29
6.1.2. System Procedures .................................................................................... 29

Administrator's Guide
iv
6.2. Setting the Database to Read-Only Mode When System Resources Run Low .................. 31
6.2.1. Monitoring Memory Usage ......................................................................... 32
6.2.2. Monitoring Disk Usage .............................................................................. 32
6.3. Integrating VoltDB with Other Monitoring Systems ................................................... 33
6.3.1. Integrating with Nagios .............................................................................. 33
6.3.2. Integrating with New Relic ......................................................................... 34
7. Logging and Analyzing Activity in a VoltDB Database ........................................................ 35
7.1. Introduction to Logging ........................................................................................ 35
7.2. Creating the Logging Configuration File .................................................................. 35
7.3. Enabling Logging for VoltDB ............................................................................... 37
7.4. Changing the Timezone of Log Messages ................................................................ 37
7.5. Changing the Configuration on the Fly .................................................................... 38
8. What to Do When Problems Arise .................................................................................... 39
8.1. Where to Look for Answers .................................................................................. 39
8.2. Handling Errors When Restoring a Database ............................................................ 39
8.2.1. Logging Constraint Violations ..................................................................... 40
8.2.2. Safe Mode Recovery ................................................................................. 40
8.3. Collecting the Log Files ....................................................................................... 41
A. Server Configuration Options .......................................................................................... 43
A.1. Server Configuration Options ................................................................................ 43
A.1.1. Network Configuration (DNS) .................................................................... 43
A.1.2. Time Configuration (NTP) ......................................................................... 44
A.2. Process Configuration Options .............................................................................. 44
A.2.1. Maximum Heap Size ................................................................................ 44
A.2.2. Other Java Runtime Options (VOLTDB_OPTS) ............................................ 44
A.3. Database Configuration Options ............................................................................ 45
A.3.1. Sites per Host .......................................................................................... 45
A.3.2. K-Safety ................................................................................................. 45
A.3.3. Network Partition Detection ....................................................................... 45
A.3.4. Read Level Consistency ............................................................................ 46
A.3.5. Automated Snapshots ................................................................................ 46
A.3.6. Import and Export .................................................................................... 46
A.3.7. Command Logging ................................................................................... 46
A.3.8. Heartbeat ................................................................................................ 47
A.3.9. Temp Table Size ...................................................................................... 47
A.3.10. Query Timeout ....................................................................................... 47
A.4. Path Configuration Options .................................................................................. 48
A.4.1. VoltDB Root ........................................................................................... 48
A.4.2. Snapshots Path ......................................................................................... 48
A.4.3. Export Overflow Path ............................................................................... 48
A.4.4. Command Log Path .................................................................................. 49
A.4.5. Command Log Snapshots Path ................................................................... 49
A.5. Network Ports .................................................................................................... 49
A.5.1. Client Port .............................................................................................. 49
A.5.2. Admin Port ............................................................................................. 50
A.5.3. Web Interface Port (httpd) ......................................................................... 50
A.5.4. Internal Server Port .................................................................................. 51
A.5.5. Replication Port ....................................................................................... 52
A.5.6. Zookeeper Port ........................................................................................ 52
B. Snapshot Utilities .......................................................................................................... 53
snapshotconvert ......................................................................................................... 54
snapshotverify ........................................................................................................... 55

v
List of Tables
1.1. Database Management Tasks .......................................................................................... 3
3.1. Configuring Database Features in the Deployment File ........................................................ 9
5.1. REST API Objects and Methods .................................................................................... 28
6.1. Nagios Plugins ............................................................................................................ 33
7.1. VoltDB Components for Logging ................................................................................... 37
A.1. VoltDB Port Usage ..................................................................................................... 49

vi
Preface
This book explains how to manage VoltDB databases and the clusters that host them. It is intended for
database administrators and operators, responsible for the ongoing management and maintenance of data-
base infrastructure.
1. Structure of This Book
This book is divided into 8 chapters and 2 appendices:
• Chapter 1, Managing VoltDB Databases
• Chapter 2, Preparing the Servers
• Chapter 3, Starting and Stopping the Database
• Chapter 4, Maintenance and Upgrades
• Chapter 5, Deploying Clusters with the VoltDB Deployment Manager
• Chapter 6, Monitoring VoltDB Databases
• Chapter 7, Logging and Analyzing Activity in a VoltDB Database
• Chapter 8, What to Do When Problems Arise
• Appendix A, Server Configuration Options
• Appendix B, Snapshot Utilities
2. Related Documents
This book does not describe how to design or develop VoltDB databases. For a complete description of
the development process for VoltDB and all of its features, please see the accompanying manual Using
VoltDB. For new users, see the VoltDB Tutorial. These and other books describing VoltDB are available
on the web from http://docs.voltdb.com/.

1
Chapter 1. Managing VoltDB Databases
VoltDB is a distributed, in-memory database designed from the ground up to maximize throughput perfor-
mance on commodity servers. The VoltDB architecture provides many advantages over traditional data-
base products while avoiding the pitfalls of NoSQL solutions:
• By partitioning the data and stored procedures, VoltDB can process multiple queries in parallel without
sacrificing the consistency or durability of an ACID-compliant database.
• By managing all data in memory with a single thread for each partition, VoltDB avoids overhead such
as record locking, latching, and device-contention inherent in traditional disk-based databases.
• VoltDB databases can scale up to meet new capacity or performance requirements simply by adding
more nodes to the cluster.
• Partitioning is automated, based on the schema, so there is no need to manually shard or repartition the
data when scaling up as with many NoSQL solutions.
• Finally, VoltDB Enterprise Edition provides features to ensure durability and high availability through
command logging, locally replicating partitions (K-safety), and wide-area database replication.
Each of these features is described, in detail, in the Using VoltDB manual. This book explains how to use
these and other features to manage and maintain a VoltDB database cluster from a database administrator's
perspective.
1.1. Getting Started
To initialize a VoltDB database cluster, you need a deployment file. The deployment file defines:
•The physical structure of the cluster — including the number of nodes in the cluster and how many
partitions each node manages.
•The configuration of individual database features — different elements of the deployment file let
you enable and configure various database options including availability, durability, and security.
When using the VoltDB Enterprise Edition, you will also need a license file, often called license.xml.
VoltDB automatically looks for the license file in the user's current working directory, the home directory,
or the voltdb/ subfolder where VoltDB is installed. If you keep the license file in a different directory
or under a different name, you can use to --license argument on the voltdb command to specify the
license file location.
Finally, to prepare the database for a specific application, you will need the database schema, including the
DDL statements that describe the database's logical structure, and a JAR file containing stored procedure
class files. In general, the database schema and stored procedures are produced as part of the database
development process, which is described in the Using VoltDB manual.
This book assumes the schema and stored procedures have already been created. The deployment file, on
the other hand, defines the run-time configuration of the cluster. Establishing the correct settings for the
deployment file and physically managing the database cluster is the duty of the administrators who are
responsible for maintaining database operations. This book is written for those individuals and covers the
standard procedures associated with database administration.

Managing VoltDB Databases
2
1.2. Understanding the VoltDB Utilities
VoltDB provides several command line utilities, each with a different function. Familiarizing yourself with
these utilities and their uses can make managing VoltDB databases easier. The three primary command
line tools for creating, managing, and testing VoltDB databases are:
voltdb Starts the VoltDB database process. The voltdb command can also collect log files
for analyzing possible system errors (see Section 8.3, “Collecting the Log Files” for
details).
The voltdb command runs locally and does not require a running database.
voltadmin Issues administrative commands to a running VoltDB database. You can use voltad-
min to save and restore snapshots, pause and resume admin mode, and to shutdown
the database, among other tasks.
The voltadmin command can be run remotely, performs cluster-wide operations
and requires a running database to connect to.
sqlcmd Lets you issue SQL queries and invoke stored procedures interactively. The sqlcmd
command is handy for testing database access without having to write a client ap-
plication.
The sqlcmd command can be run remotely and requires a running database to con-
nect to.
In addition to the preceding general-purpose tools, VoltDB provides several other tools for specific tasks:
csvloader Loads records from text files into an existing VoltDB database. The command's
primary use is for importing data into VoltDB from CSV and other text-based data
files that were exported from other data utilities,
The csvloader command can be run remotely and requires a running database to
connect to.
snapshotconvert Converts native snapshot files to csv or tabbed text files. The snapshotconvert com-
mand is useful when exporting a snapshot in native format to text files for import
into another data utility. (This utility is provided for legacy purposes. It is now pos-
sible to write snapshots directly to CSV format without post-processing, which is
the recommended approach.)
The snapshotconvert command runs locally and does not require a running data-
base.
snapshotverify Verifies that a set of native snapshot files are complete and valid.
The snapshotverify command runs locally and does not require a running database.
Finally, VoltDB includes two browser-based administrative tools:
• VoltDB Deployment Manager — for configuring and starting VoltDB clusters
• VoltDB Management Center — for monitoring running databases in realtime
See Chapter 5, Deploying Clusters with the VoltDB Deployment Manager and Section 6.1.1, “VoltDB
Management Center”, respectively, for more information about using these tools.

Managing VoltDB Databases
3
1.3. Management Tasks
Database administration responsibilities fall into five main categories, as described in Table 1.1, “Database
Management Tasks”. The following chapters are organized by category and explain how to perform each
task for a VoltDB database.
Table 1.1. Database Management Tasks
Preparing the Servers Before starting the database, you must make sure that the server hardware and
software is properly configured. This chapter provides a checklist of tasks to
perform before starting VoltDB.
Basic Database Opera-
tions The basic operations of starting and stopping the database. This chapter de-
scribes the procedures needed to handle these fundamental tasks.
Maintenance and Up-
grades Over time, both the cluster and the database may require maintenance — either
planned or emergency. This chapter explains the procedures for performing
hardware and software maintenance, as well as standard maintenance, such
as backing up the database and upgrading the hardware, the software, and the
database schema.
Performance Monitoring Another important role for many database administrators is monitoring data-
base performance. Monitoring is important for several reasons:
• Performance Analysis
• Load Balancing
• Fault Detection
This chapter describes the tools available for monitoring VoltDB databases.
Problem Reporting &
Analysis If an error does occur and part or all of the database cluster fails, it is not only
important to get the database up and running again, but to diagnose the cause
of the problem and take corrective actions. VoltDB produces a number of log
files that can help with problem resolution. This chapter describes the different
logs that are available and how to use them to diagnose database issues.

4
Chapter 2. Preparing the Servers
VoltDB is designed to run on commodity servers, greatly reducing the investment required to operate
a high performance database. However, out of the box, these machines are not necessarily configured
for optimal performance of a dedicated, clustered application like VoltDB. This is especially true when
using cloud-based services. This chapter provides best practices for configuring servers to maximize the
performance and stability of your VoltDB installation.
2.1. Server Checklist
The very first step in configuring the servers is making sure you have sufficient memory, computing power,
and system resources such as disk space to handle the expected workload. The VoltDB Planning Guide
provides detailed information on how to size your server requirements.
The next step is to configure the servers and assign appropriate resources for VoltDB tasks. Specific server
features that must be configured for VoltDB to perform optimally are:
• Install required software
• Configure memory management
• Turn off TCP Segmentation
• Configure NTP (time services)
• Define network addresses for all nodes in the cluster
• Assign network ports
2.2. Install Required Software
To start, VoltDB requires a recent release of the Linux operating system. The supported operating systems
for running production VoltDB databases are:
• CentOS V6.6 or later. Including CentOS 7.0
• Red Hat (RHEL) V6.6 or later, including Red Hat 7.0
• Ubuntu 12.04, 14.04, and 16.04
It may be possible to run VoltDB on other versions of Linux. Also, an official release for Macintosh OS X
10.9 and later is provided for development purposes. However, the preceding operating system versions
are the only fulled tested and supported base platforms for running VoltDB in production.
In addition to the base operating system, VoltDB requires the following software at a minimum:
• Java 8
• NTP
• Python 2.5 or later
Sun Java SDK 8 is recommended, but OpenJDK 8 is also supported. Note that although the VoltDB server
requires Java 8, the Java client is also compatible with Java 7.

Preparing the Servers
5
VoltDB works best when the system clocks on all cluster nodes are synchronized to within 100 millisec-
onds or less. However, the clocks are allowed to differ by up to 200 milliseconds before VoltDB refuses
to start. NTP, the Network Time Protocol, is recommended for achieving the necessary synchronization.
NTP is installed and enabled by default on many operating systems. However, the configuration may need
adjusting (see Section 2.5, “Configure NTP” for details) and in cloud instances where hosted servers are
run in a virtual environment, NTP is not always installed or enabled by default. Therefore you need to
do this manually.
Finally, VoltDB implements its command line interface through Python. Python 2.4 or later is required
to use the VoltDB shell commands.
2.3. Configure Memory Management
Because VoltDB is an in-memory database, proper memory management is vital to the effective operation
of VoltDB databases. Three important aspects of memory management are:
• Swapping
• Memory Mapping (Transparent Huge Pages)
• Virtual memory
The following sections explain how best to configure these features for optimal performance of VoltDB.
2.3.1. Disable Swapping
Swapping is an operating system feature that optimizes memory usage when running multiple processes
by swapping processes in and out of memory. However, any contention for memory, including swapping,
will have a very negative impact on VoltDB performance and functionality. You should disable swapping
when using VoltDB.
To disable swapping on Linux systems, use the swapoff command. If swapping cannot be disabled for
any reason, you can reduce the likelihood of VoltDB being swapped out by setting the kernel parameter
vm.swappiness to zero.
2.3.2. Disable Transparent Huge Pages
Transparent Huge Pages (THP) are another operating system feature that optimizes memory usage for
systems with large amounts of memory. THP changes the memory mapping to use larger physical pages.
This can be helpful for general-purpose computing running multiple processes. However, for memory-in-
tensive applications such as VoltDB, THP can actually negatively impact performance.
Therefore, it is important to disable Transparent Huge Pages on servers running VoltDB. The following
commands disable THP:
$ echo never >/sys/kernel/mm/transparent_hugepage/enabled
$ echo never >/sys/kernel/mm/transparent_hugepage/defrag
Or:
$ echo madvise >/sys/kernel/mm/transparent_hugepage/enabled
$ echo madvise >/sys/kernel/mm/transparent_hugepage/defrag
For RHEL systems (including CentOS), replace "transparent_hugepage" with
"redhat_transparent_hugepage".

Preparing the Servers
6
Note, however, that these commands disable THP only while the server is running. Once the server reboots,
the default setting will return. Therefore, we recommend you disable THP permanently as part of the
startup process. For example, you can add the following commands to a server startup script (such as /
etc/rc.local):
#!/bin/bash
for f in /sys/kernel/mm/*transparent_hugepage/enabled; do
if test -f $f; then echo never > $f; fi
done
for f in /sys/kernel/mm/*transparent_hugepage/defrag; do
if test -f $f; then echo never > $f; fi
done
THP are not enabled by default in Ubuntu prior to release 14.04 or RHEL 5.x. But they are enabled by
default for recent Ubuntu releases and RHEL 6.x. To see if they are enabled on your current system, use
either of the following pair of commands:
$ cat /sys/kernel/mm/transparent_hugepage/enabled
$ cat /sys/kernel/mm/transparent_hugepage/defrag
$ cat /sys/kernel/mm/redhat_transparent_hugepage/enabled
$ cat /sys/kernel/mm/redhat_transparent_hugepage/defrag
If THP is disabled, the output from the preceding commands should be either “always madvise [never]”
or “always [madvise] never”.
2.3.3. Enable Virtual Memory Mapping and Overcommit
Although swapping is bad for memory-intensive applications like VoltDB, the server does make use of vir-
tual memory (VM) and there are settings that can help VoltDB make effective use of that memory. First, it is
a good idea to enable VM overcommit. This avoids VoltDB encountering unnecessary limits when manag-
ing virtual memory. This is done on Linux by setting the system parameter vm.overcommit_memory
to a value of "1".
$ sysctl -w vm.overcommit_memory=1
Second, for large memory systems, it is also a good idea to increase the VM memory mapping limit. So
for servers with 64 Gigabytes or more of memory, the recommendation is to increase VM memory map
count to 1048576. You do this on Linux with the system parameter max_map_count. For example:
$ sysctl -w vm.max_map_count=1048576
Remember that for both overcommit and the memory map count, the parameters are only active while the
system is running and will be reset to the default on reboot. So be sure to add your new settings to the file
/etc/sysctl.conf to ensure they are in effect when the system is restarted.
2.4. Turn off TCP Segmentation
Under certain conditions, the use of TCP segmentation offload (TSO) and generic receive offload (GRO)
can cause nodes to randomly drop out of a cluster. The symptoms of this problem are that nodes timeout
— that is, the rest of the cluster thinks they have failed — although the node is still running and no other
network issues (such as a network partition) are the cause.
Disabling TSO and GRO is recommended for any VoltDB clusters that experience such instability. The
commands to disable offloading are the following, where N is replaced by the number of the ethernet card:

Preparing the Servers
7
ethtool -K ethN tso off
ethtool -K ethN gro off
Note that these commands disable offloading temporarily. You must issue these commands every time the
node reboots or, preferably, put them in a startup configuration file.
2.5. Configure NTP
To orchestrate activities between the cluster nodes, VoltDB relies on the system clocks being synchro-
nized. Many functions within VoltDB — such as cluster start up, nodes rejoining, and schema updates
among others — are sensitive to variations in the time values between nodes in the cluster. Therefore, it
is important to keep the clocks synchronized within the cluster. Specifically:
• The server clocks in the cluster must be synchronized to within 200 milliseconds of each other when
the cluster starts. (Ideally, skew between nodes should be kept under 10 milliseconds.)
• Time must not move backwards
The easiest way to achieve these goals is to install and configure the NTP (Network Time Protocol) service
to use a common time host server for synchronizing the servers. NTP is often installed by default but may
require additional configuration to achieve acceptable synchronization. Specifically, listing only one time
server (and the same one for all nodes in the cluster) ensures minimal skew between servers. You can even
establish your own time server to facilitate this. All nodes in the cluster should also list each other as peers.
For example, the following NTP configuration file uses a local time server (myntpsvr) and establishes all
nodes in the cluster as peers:
server myntpsvr burst iburst minpoll 4 maxpoll 4
peer voltsvr1 burst iburst minpoll 4 maxpoll 4
peer voltsvr2 burst iburst minpoll 4 maxpoll 4
peer voltsvr3 burst iburst minpoll 4 maxpoll 4
server 127.127.0.1
See the chapter on Configuring NTP in the Guide to Performance and Customization for more details on
setting up NTP.
2.6. Configure the Network
It is also important to ensure that the network is configured correctly so all of the nodes in the VoltDB
cluster recognize each other. If the DNS server does not contain entries for all of the servers in the cluster,
an alternative is to add entries in the /etc/hosts file locally for each server in the cluster. For example:
12.24.48.101 voltsvr1
12.24.48.102 voltsvr2
12.24.48.103 voltsvr3
12.24.48.104 voltsvr4
12.24.48.105 voltsvr5
2.7. Assign Network Ports
VoltDB uses a number of network ports for functions such as internal communications, client connections,
rejoin, database replication, and so on. For these features to perform properly, the ports must be open and

Preparing the Servers
8
available. Review the following list of ports to ensure they are open and available (that is, not currently
in use).
Function Default Port
Number
Client Port 21212
Admin Port 21211
Web Interface Port (httpd) 8080
Internal Server Port 3021
Replication Port 5555
Zookeeper port 7181
Alternately, you can reassign the port numbers that VoltDB uses. See Section A.5, “Network Ports” for
a description of the ports and how to reassign them.

9
Chapter 3. Starting and Stopping the
Database
The fundamental operations for database administration are starting and stopping the database. But before
you start the database, you need to decide what database features you want to enable and how they should
work. These features include the initial size of the cluster, what amount of replication you want to use to
increase availability in case of server failure, and what level of durability is required for those cases where
the database itself stops. These and other settings are defined in the deployment file, which you specify
on the command line when you start the server.
This chapter explains how to configure the cluster's physical structure and features in the deployment file
and how to start and stop the database.
3.1. Configuring the Cluster and Database
You specify the cluster configuration and what features to use in the deployment file, which is an XML
file that you can create and edit manually. In the simplest case, the deployment file specifies how many
servers the cluster has initially, how many partitions to create on each server, and what level of availability
(K-safety) to use. For example:
<?xml version="1.0"?>
<deployment>
<cluster hostcount="5"
sitesperhost="4"
kfactor="1"
/>
</deployment>
• The hostcount attribute specifies the number of servers the cluster will start with.
• The sitesperhost attribute specifies the number of partitions (or "sites") to create on each server.
Set to eight by default, it is possible to optimize the number of sites per host in relation to the number
of processors per machine. The optimal number is best determined by performance testing against the
expected workload. See the chapter on "Benchmarking" in the VoltDB Planning Guide for details.
• The kfactor attribute specifies the K-safety value to use. The higher the K-safety value, the more
node failures the cluster can withstand without affecting database availability. However, increasing the
K-safety value increases the number of copies of each unique partition. High availability is a trade-
off between replication to protect against node failure and the number of unique partitions, therefore
throughput performance. See the chapter on availability in the Using VoltDB manual for more informa-
tion on determining an optimal K-safety value.
In addition to the cluster configuration, you can use the deployment file to enable and configure specific
database features such as export, command logging, and so on. The following table summarizes some of
the key features that are settable in the deployment file.
Table 3.1. Configuring Database Features in the Deployment File
Feature Example
Command Logging — Command logging
provides durability by logging transactions to <commandlog enabled="true"
synchronous="false">

Starting and Stopping the Database
10
Feature Example
disk so they can be replayed during a recov-
ery. You can configure the type of command
logging (synchronous or asynchronous), the
log file size, and the frequency of the logs (in
terms of milliseconds or number of transac-
tions).
<frequency time="300"
transactions="1000"/>
</commandlog>
Snapshots — Automatic snapshot provide an-
other form of durability by creating snapshots
of the database contents, that can be restored
later. You can configure the frequency of the
snapshots, the unique file prefix, and how
many snapshots are kept at any given time.
<snapshot enabled="true"
frequency="30m"
prefix="mydb"
retain="3" />
Export — Export allows you to write select-
ed records from the database to one or more
external targets, which can be files, another
database, or another service. VoltDB provides
different export connectors for each protocol.
You can configure the type of export for each
stream as well as other properties, which are
specific to the connector type. For example,
the file connector requires a specific type (or
format) for the files and a unique identifier
called a "nonce".
<export>
<configuration enabled="true" type="file">
<property name="type">csv</property>
<property name="nonce">mydb</property>
</configuration>
</export>
Security & Accounts — Security lets you
protect your database against unwanted ac-
cess by requiring all connections authenticate
against known usernames and passwords. In
the deployment file you can define the user ac-
counts and passwords and what role or roles
each user fulfills. Roles define what permis-
sions the account has. Roles are defined in the
database schema.
<security enabled="true"/>
<users>
<user name="admin"
password="superman"
roles="dev,ops"/>
<user name="mitty"
password="thurber"
roles="user"/>
</users>
File Paths — Paths define where VoltDB
writes any files or other disc-based content.
You can configure the default root for all files
as well as specific paths for each type of ser-
vice, such as snapshots, command logs, export
overflow, etc.
<paths>
<voltdbroot path="/tmp/vroot" />
<snapshots path="/opt/archive" />
</paths>
3.2. Starting the Database
Once you create the deployment file, you are ready to start a VoltDB database cluster1 for the first time
using the voltdb create command. You issue this command, specifying the same deployment file and host
on each node of the cluster. For example:
$ voltdb create --deployment=deployment.xml \
--host=voltsvr1 \
--license=~/license.xml
1When testing with a single server, several of the command line arguments have defaults and can be left out. However, in production when starting
a multi-node cluster, the arguments are required.

Starting and Stopping the Database
11
On the command line, you specify four arguments:
The deployment file, which specifies the physical layout of the cluster and configures specific Volt-
DB features
One node of the cluster identified as the "host", to coordinate the initial startup of the cluster
The license file (when using the VoltDB Enterprise Edition)
What happens when you start the database is that each server contacts the named "host" server. The host
then:
1. Waits until the necessary number of servers (as specified in the deployment file) are connected
2. Creates the network mesh between the servers
3. Distributes the deployment file to ensure all nodes are using the same configuration
At this point, the cluster is fully initialized and the "host" ends its special role and becomes a peer to all
the other nodes. All nodes in the cluster then write an informational message to the console verifying that
the database is ready:
Server completed initialization.
3.3. Loading the Database Definition
Responsibility for loading the database schema and stored procedures varies from company to company.
In some cases, operators and administrators are only responsible for initiating the database; developers
may load and modify the schema themselves. In other cases, the administrators are responsible for both
starting the cluster and loading the correct database schema as well.
If you are responsible for establishing the correct schema, the next step is to load the Java stored procedures
and the schema definition. Stored procedures are compiled into classes and then packaged into a JAR file,
as described in the section on installing stored procedures in the Using VoltDB manual. To fully load the
database definition you will need the JAR of stored procedure classes and a text file containing the data
definition language (DDL) statements that declare the database schema.
The following example assumes these two files are storedprocs.jar and dbschema.sql. Once
the database cluster has started, you can load the schema and stored procedures using the sqlcmd utility.
To load them at the sqlcmd prompt, you can use the sqlcmd load classes and file directives:
$ sqlcmd
1> load classes storedprocs.jar;
2> file dbschema.sql;
Note that when loading the schema, you should always load the stored procedures first, so the class files
are available for any CREATE PROCEDURE statements within the schema.
3.4. Stopping the Database
How you choose to stop a VoltDB depends on what features you have enabled. For example, if you do
not have any durability features enabled (such as auto snapshots or command logging), it is strongly rec-
ommended that you pause the database and take a manual snapshot before shutting down, so you preserve
the data across sessions.
If you have command logging enabled, a manual snapshot is not necessary. However, it is still a good
idea to pause the database before shutting down to ensure that all active client queries have a chance to
complete and return their results (and no new queries start) before the shutdown occurs.

Starting and Stopping the Database
12
To pause and shutdown the cluster you can use the voltadmin pause and shutdown commands:
$ voltadmin pause
$ voltadmin shutdown
As with all voltadmin commands, you can use them remotely by specifying one of the cluster servers on
the command line:
$ voltadmin pause --host=voltsvr2
$ voltadmin shutdown --host=voltsvr2
If security is enabled, you will also need to specify a username and password for a user with admin per-
missions:
$ voltadmin pause --host=voltsvr2 -u root -p Suda51
$ voltadmin shutdown --host=voltsvr2 -u root -p Suda51
Finally, if you are not using the durability features of automatic snapshots or command logging, you should
perform a manual snapshot using the save command after pausing and before shutting down. Use the --
blocking flag to ensure the snapshot completes before the shutdown occurs:
$ voltadmin pause
$ voltadmin save --blocking /tmp/voltdb backup
$ voltadmin shutdown
3.5. Restarting the Database
Restarting a VoltDB database is different than starting it for the first time. How you restart the database
depends on what durability features were in effect previously.
If you just use the voltdb create command, you create a new, empty database. Because VoltDB keeps
its data in memory, to return the database to its last known state — including its content — you need to
restore the data from a saved copy.
If you are using automatic snapshots or command logging, VoltDB can automatically reinstate the data
when you use the voltdb recover command:
$ voltdb recover --deployment=deployment.xml \
--host=voltsvr1 \
--license=~/license.xml
Just as when starting a database for the first time, you must invoke the recover command on all nodes of the
cluster before the database can start, You must also select one of the nodes as the "host" to facilitate startup
and identify that node as the host on each of the servers when you issue the voltdb recover command.
When you recover a VoltDB database, the cluster performs the same initial coordination activities as when
creating a new database: the host node facilitates establishing a quorum and ensures all nodes connect.
Then the database servers restore the most recent snapshot plus (if command logging is enabled) the last
logged transactions. Once the schema is loaded and all data is restored, the database enables client access.
If you are not using automatic snapshots or command logging, you must restore the last snapshot manually.
You do this with the following procedure:
1. Start a new database using the voltdb create command on each server as described in Section 3.2,
“Starting the Database”.

Starting and Stopping the Database
13
2. Use the voltadmin pause command to pause the database.
3. Use the voltadmin restore command to restore the data from the manual snapshot.
4. Use the voltadmin resume command to resume client activity.
For example, if the last snapshot was saved in /tmp/voltdb using the unique ID backup, you can
restore the data with the following commands:
$ voltadmin pause
$ voltadmin restore /tmp/voltdb backup
$ voltadmin resume

14
Chapter 4. Maintenance and Upgrades
Once the database is running, it is the administrator's role to keep it running. This chapter explains how
to perform common maintenance and upgrade tasks, including:
• Database backups
• Schema and stored procedure updates
• Software and hardware upgrades
4.1. Backing Up the Database
It is a common safety precaution to backup all data associated with computer systems and store copies off-
site in case of system failure or other unexpected events. Backups are usually done on a scheduled basis
(every day, every week, or whatever period is deemed sufficient).
VoltDB provides several options for backing up the database contents. The easiest option is to save a
native snapshot then backup the resulting snapshot files to removable media for archiving. The advantage
of this approach is that native snapshots contain both a complete copy of the data and the schema. So
in case of failure the snapshot can be restored to the current or another cluster using a single voltadmin
recover command.
The key thing to remember when using native snapshots for backup is that each server saves its portion
of the database locally. So you must fetch the snapshot files for all of the servers to ensure you have a
complete set of files. The following example performs a manual snapshot on a five node cluster then uses
scp to remotely copy the files from each server to a single location for archiving.
$ voltadmin save --blocking --host=voltsvr3 \
/tmp/voltdb backup
$ scp -l 100 'voltsvr1:/tmp/voltdb/backup*' /tmp/archive/
$ scp -l 100 'voltsvr2:/tmp/voltdb/backup*' /tmp/archive/
$ scp -l 100 'voltsvr3:/tmp/voltdb/backup*' /tmp/archive/
$ scp -l 100 'voltsvr4:/tmp/voltdb/backup*' /tmp/archive/
$ scp -l 100 'voltsvr5:/tmp/voltdb/backup*' /tmp/archive/
Note that if you are using automated snapshots or command logging (which also creates snapshots), you
can use the automated snapshots as the source of the backup. However, the automated snapshots use a
programmatically generated file prefix, so your backup script will need some additional intelligence to
identify the most recent snapshot and its prefix.
The preceding example also uses the scp limit flag (-l 100) to constrain the bandwidth used by the copy
command to 100kbits/second. Use of the -l flag is recommended to avoid the copy operation blocking the
VoltDB server process and impacting database performance.
Finally, if you wish to backup the data in a non-proprietary format, you can use the voltadmin save --
format=csv command to create a snapshot of the data as comma-separated value (CSV) formatted text
files. The advantage is that the resulting files are usable by more systems than just VoltDB. The disadvan-
tage is that the CSV files only contain the data, not the schema. These files cannot be read directly into
VoltDB, like a native snapshot can. Instead, you will need to create a new database, load the schema, then
use the csvloader utility to load individual files into each table to restore the database completely.

Maintenance and Upgrades
15
4.2. Updating the Database Schema
As an application evolves, the database schema often needs changing. This is particularly true during
the early stages of development and testing but also happens periodically with established applications,
as the database is tuned for performance or adjusted to meet new requirements. In the case of VoltDB,
these updates may involve changes to the table definitions, to the indexes, or to the stored procedures. The
following sections explain how to:
• Perform live schema updates
• Change unique indexes and partitioning using save and restore
4.2.1. Performing Live Schema Updates
There are two ways to update the database schema for a VoltDB database: live updates and save/restore
updates. For most updates, you can update the schema while the database is running. To perform this
type of live update, you use the DDL CREATE, ALTER, and DROP statements to modify the schema
interactively as described in the section on modifying the schema in the Using VoltDB manual.
You can make any changes you want to the schema as long as the tables you are modifying do not contain
any data. The only limitations on performing live schema changes are that you cannot:
• Add or broaden unique constraints (such as indexes or primary keys) on tables with existing data
• Reduce the datatype size of columns on tables with existing data (for example, changing the datatype
from INTEGER to TINYINT)
These limitations are in place to guarantee that the schema change will succeed without any pre-existing
data violating the constraint. If you know that the data in the database does not violate the new constraints
you can make these changes using the save and restore commands, as described in the following section.
4.2.2. Performing Updates Using Save and Restore
If you need to add unique indexes or reduce columns to database tables with existing data, you must use
the voltadmin save and restore commands to perform the schema update. This requires shutting down
and restarting the database to allow VoltDB to validate the existing data against the new constraints.
To perform a schema update using save and restore, use the following steps:
1. Create a new schema file containing the updated DDL statements.
2. Pause the database (voltadmin pause).
3. Create a snapshot of the database contents (voltadmin save --blocking).
4. Shutdown the database (voltadmin shutdown).
5. Create a new database starting in admin mode (voltdb create --pause --force).
6. Load the stored procedures and new schema (using the sqlcmd LOAD CLASSES and FILE directives)
7. Restore the snapshot created in Step #3 (voltadmin restore).

Maintenance and Upgrades
16
8. Return the database to normal operations (voltadmin resume).
For example:
$ # Issue once
$ voltadmin pause
$ voltadmin save --blocking /opt/archive/ mydb
$ voltadmin shutdown
$ # Issue next command on all servers
$ voltdb create --force --deployment=deployment.xml \
--host=voltsvr1 --license=~/license.xml
$ # Issue only once
$ sqlcmd
1> load classes storedprocs.jar;
2> file newschema.sql;
3> exit
$ voltadmin restore /opt/archive mydb
$ voltadmin resume
The key point to remember when adding new constraints is that there is the possibility that the restore
operation will fail if existing records violate the new constraint. This is why it is important to make sure
your database contents are compatible with the new schema before performing the update.
4.3. Upgrading the Cluster
Sometimes you need to update or reconfigure the server infrastructure on which the VoltDB database is
running. Server upgrades are one example. A server upgrade is when you need to fix or replace hardware,
update the operating system, or otherwise modify the underlying system.
Server upgrades usually require stopping the VoltDB database process on the specific server being ser-
viced. However, if your database cluster uses K-safety for enhanced availability, it is possible to complete
server upgrades without any database downtime by performing a rolling hardware upgrade, where each
server is upgraded in turn using the voltadmin stop and rejoin commands.
Another type of upgrade is when you want to reconfigure the cluster as a whole. Reasons for reconfiguring
the cluster are because you want to add or remove servers from the cluster or you need to modify the
number of partitions per server that VoltDB uses.
Adding servers to the cluster can happen without stopping the database. This is called elastic scaling.
Removing servers or changing the number of sites per host requires restarting the cluster during a main-
tenance window.
The following sections describe four methods of cluster upgrade:
• Performing server upgrades
• Performing rolling upgrades on K-safe clusters
• Adding servers to a running cluster through elastic scaling
• Reconfiguring the cluster with a maintenance window

Maintenance and Upgrades
17
4.3.1. Performing Server Upgrades
If you need to upgrade or replace the hardware or software (such as the operating system) of the individual
servers, this can be done without taking down the database as a whole. As long as the server is running
with a K-safety value of one or more, it is possible to take a server out of the cluster without stopping the
database. You can then fix the server hardware, upgrade software (other than VoltDB), even replace the
server entirely with a new server, then bring the server back into the cluster.
To perform a server upgrade:
1. Stop the VoltDB server process on the server using the voltadmin stop command. As long as the cluster
is K-safe, the rest of the cluster will continue running.
2. Perform the necessary upgrades.
3. Have the server rejoin the cluster using the voltdb rejoin command.
The rejoin command starts the database process on the server, contacts the database cluster, then copies the
necessary partition content from other cluster nodes so the server can then participate as a full member of
the cluster, While the server is rejoining, the other database servers remain accessible and actively process
queries from client applications.
When rejoining a cluster you must specify a host server that the rejoining node will connect to. The host
can be any server still in the cluster; it does not have to be the same host specified when the cluster was
initially started. For example:
$ voltdb rejoin --host=voltsvr4 \
--deployment=deployment.xml \
--license=~/license.xml
If the cluster is not K-safe — that is, the K-safety value is 0 — then you must follow the instructions in
Section 4.3.4, “Reconfiguring the Cluster During a Maintenance Window” to upgrade the servers.
4.3.2. Performing Rolling Hardware Upgrades on K-Safe
Clusters
If you need to upgrade all of the servers in a K-safe cluster (for example, if you are upgrading the operating
system), you can perform a rolling hardware upgrade by stopping, upgrading, then rejoining each server
one at a time. Using this process the entire cluster can be upgraded without suffering any downtime of
the database. Just be sure to wait until the rejoining server has become a full member of the cluster before
removing and upgrading the next server in the rotation. Specifically, wait until the following message
appears in the log or on the console for the rejoining server:
Node rejoin completed.
Alternately, you can attempt to connect to the server remotely — for example, using the sqlcmd command
line utility. If your connection is rejected, the rejoin has not finished. If you successfully connect to the
client port of the rejoining node, you know the rejoin is complete:
$ sqlcmd --servers=myserver
SQL Command :: myserver:21212
1>

Maintenance and Upgrades
18
Note
You cannot update the VoltDB software itself using the rolling hardware upgrade process, on-
ly the operating system, hardware, or other software. See Section 4.4, “Upgrading VoltDB Soft-
ware” for information about minimizing downtime during a VoltDB software upgrade.
4.3.3. Adding Servers to a Running Cluster with Elastic Scal-
ing
If you want to add servers to a VoltDB cluster — usually to increase performance and/or capacity — you
can do this without having to restart the database. You add servers to the cluster with the voltdb add
command, specifying one of the existing nodes with the --host flag. For example:
$ voltdb add --host=voltsvr4 \
--license=~/license.xml
You must add a full complement of servers to match the K-safety value (K+1) before the servers can
participate in the cluster. For example, if the K-safety value is 2, you must add 3 servers before they
actually become part of the cluster and the cluster rebalances its partitions.
When you add servers to a VoltDB database, the cluster performs the following actions:
1. The new servers are added to the cluster configuration and sent copies of the schema, stored procedures,
and deployment file.
2. Once sufficient servers are added, copies of all replicated tables and their share of the partitioned tables
are sent to the new servers.
3. As the data is rebalanced, the new servers begin processing transactions for the partition content they
have received.
4. Once rebalancing is complete, the new servers are full members of the cluster.
4.3.4. Reconfiguring the Cluster During a Maintenance Win-
dow
If you want to remove servers from the cluster permanently (as opposed to temporarily removing them for
maintenance as described in Section 4.3, “Upgrading the Cluster”) or you want to change other cluster-wide
attributes, such as the number of partitions per server, you need to restart the server. Stopping the database
temporarily to perform this sort of reconfiguration is known as a maintenance window.
The steps for reconfiguring the cluster with a maintenance window are:
1. Place the database in admin mode (voltadmin pause).
2. Perform a manual snapshot of the database (voltadmin save --blocking).
3. Shutdown the database (voltadmin shutdown).
4. Make the necessary changes to the deployment file.
5. Start a new database in admin mode using the voltdb create --pause --force option and the edited
deployment file.
6. Restore the snapshot created in Step #2 (voltadmin restore).

Maintenance and Upgrades
19
7. Return the database to normal operations (voltadmin resume).
4.4. Upgrading VoltDB Software
Finally, as new versions of VoltDB become available, you will want to upgrade the VoltDB software on
your database cluster. The simplest approach for upgrading a VoltDB cluster is to pause the database, save
the data, shutdown, upgrade the software on all servers, then restart the database and restore the data.
However, this method involves downtime while the software is being updated. An alternative is to use
database replication (DR) — either passive DR or cross data center replication (XDCR) — with minimal
or no downtime.
Using passive DR you can copy the active database contents to a new cluster, then switch the application
clients to point to the new server. The advantage of this process is that the only downtime the business
application sees is the time needed to promote the new cluster and redirect the clients.
Using cross data center replication (XDCR), where both clusters are active participants, you can shutdown
and upgrade the clusters, one at a time, to perform the upgrade leaving at least one cluster available at
all times.
The following sections describe all three approaches:
• Upgrading VoltDB on a Single Database Cluster
• Using a DR Replica to Upgrade VoltDB With Reduced Downtime
• Using Cross Data Center Replication (XDCR) to Upgrade VoltDB Without Downtime
4.4.1. Upgrading VoltDB on a Single Database Cluster
To upgrade the VoltDB software on a single database cluster, you must first shutdown the database then
upgrade all servers in the cluster before restarting the database. The steps to perform this procedure are:
1. Place the database in admin mode (voltadmin pause).
2. Perform a manual snapshot of the database (voltadmin save --blocking).
3. Shutdown the database (voltadmin shutdown).
4. Upgrade VoltDB on all cluster nodes.
5. Start a new database in admin mode (voltdb create --pause --force).
6. Restore the snapshot created in Step #2 (voltadmin restore).
7. Return the database to normal operations (voltadmin resume).
Note that you must use restore after a software upgrade; you cannot use command logs to recover across
software versions. However, you can use database replication (DR) between clusters running two different
versions, as described in the following section.
4.4.2. Using a DR Replica to Upgrade VoltDB With Reduced
Downtime
When upgrading the VoltDB software in a production environment, it is possible to minimize the disruption
to client applications by upgrading across two clusters using passive database replication (DR). To use this

Maintenance and Upgrades
20
process you need a second database cluster to act as the DR replica and you must have a unique cluster
ID assigned to the current database.
The basic process for upgrading the VoltDB software using DR is to:
1. Install the new VoltDB software on the secondary cluster
2. Use passive DR to synchronize the database contents from the current cluster to the new cluster
3. Pause the current database and promote the new cluster, switching the application clients to the new
upgraded database
The following sections describe in detail the prerequisites for using this process, the steps to follow, and
— in case there are any issues with the updated database — the process for falling back to the previous
software version.
4.4.2.1. Prerequisites for Upgrading with Passive DR
The prerequisites for using DR to upgrade VoltDB are:
• A second cluster with the same configuration (that is, the same number of servers and sites per host)
as the current database cluster.
• The current database cluster must have a unique cluster ID assigned in its deployment file.
The cluster ID is assigned in the <dr> section of the deployment file and must be set when the cluster
starts. It cannot be added or altered while the database is running. So if you are considering using this
process for upgrading your production systems, be sure to add a <dr> tag to the deployment and assign a
unique cluster ID when starting the database, even if you do not plan on using DR for normal operations.
For example, you would add the following element to the deployment file when starting your primary
database cluster to assign it the unique ID of 3.
<dr id="3">
Important
An important constraint to be aware of when using this process is that you must not make any
schema changes during the upgrade process. This includes the period after the upgrade while you
verify the application's proper operation on the new software version. If any changes are made to
the schema, you may not be able to readily fall back to the previous version.
4.4.2.2. The Passive DR Upgrade Process
The procedure for upgrading the VoltDB software on a running database using DR is the following. In the
examples, we assume the existing database is running on a cluster with the nodes oldsvr1 and oldsvr2
and the new cluster includes servers newsvr1 and newsvr2. We will assign the clusters unique IDs 3
and 4, respectively.
1. Install the new VoltDB software on the secondary cluster.
Follow the steps in the section "Installing VoltDB" in the Using VoltDB manual to install the latest
VoltDB software.

Maintenance and Upgrades
21
2. Start the second cluster as a replica of the current database cluster.
Once the new software is installed, create a new database on the secondary server using the voltdb
create --replica command and including the necessary DR configuration to create a replica of the
current database. For example, the deployment file on the new cluster might look like this:
<dr id="4">
<connection source="oldsvr1,oldsvr2"/>
</dr>
Once the second cluster starts, apply the schema from the current database to the second cluster. Once
the schema match on the two databases, replication will begin.
3. Wait for replication to stabilize.
During replication, the original database will send a snapshot of the current content to the new replica,
then send binary logs of all subsequent transactions. You want to wait until the snapshot is finished and
the ongoing DR is processing normally before proceeding.
• First monitor the DR statistics on the new cluster. The DR consumer state changes to "RECEIVE"
once the snapshot is complete. You can check this in the Monitor tab of the VoltDB Management
Center or from the command line by using sqlcmd to call the @Statistics system procedure, like so:
$ sqlcmd --servers=newsvr1
1> exec @Statistics drconsumer 0;
• Once the new cluster reports the consumer state as "RECEIVE", you can monitor the rate of replica-
tion on the existing database cluster using the DR producer statistics. Again, you can view these sta-
tistics in the Monitor tab of the VoltDB Management Center or by calling @Statistics using sqlcmd:
$ sqlcmd --servers=oldsvr1
1> exec @Statistics drproducer 0;
What you are looking for on the producer side is that the DR latency is low; ideally under a second.
Because the DR latency helps determine how long you will wait for the cluster to quiesce when you
pause it and, subsequently, how long the client applications will be stalled waiting for the new cluster
to be promoted. You determine the latency by looking at the difference between the statistics for the
last queued timestamp and the last ACKed timestamp. The difference between these values gives you
the latency in microseconds. When the latency reaches a stable, low value you are ready to proceed.
4. Pause the current database.
The next step is to pause the current database. You do this using the voltadmin pause --wait command:
$ voltadmin pause --host=oldsvr1 --wait
The --wait flag tells voltadmin to wait until all DR and export queues are flushed to their downstream
targets before returning control to the shell prompt. This guarantees that all transactions have reached
the new replica cluster.
If DR or export are blocked for any reason — such as a network outage or the target server unavail-
able — the voltadmin pause --wait command will continue to wait and periodically report on what
queues are still busy. If the queues do not progress, you will want to fix the underlying problem before
proceeding to ensure you do not lose any data.
5. Promote the new database.

Maintenance and Upgrades
22
Once the current database is fully paused, you can promote the new database, using the voltadmin
promote command:
$ voltadmin promote --host=newsvr1
At this point, your database is up and running on the new VoltDB software version.
6. Redirect client applications to the new database.
To restore connectivity to your client applications, redirect them from the old cluster to the new cluster
by creating connections to the new cluster servers newsvr1, newsvr2, and so on.
7. Shutdown the original cluster.
At this point you can shutdown the old database cluster.
8. Verify proper operation of the database and client applications.
The last step is to verify that your applications are operating properly against the new VoltDB software.
Use the VoltDB Management Center to monitor database transactions and performance and verify
transactions are completing at the expected rate and volume.
Your upgrade is now complete. If, at any point, you decide there is an issue with your application or your
database, it is possible to fall back to the previous version of VoltDB as long as you have not made any
changes to the underlying database schema. The next section explains how to fall back when necessary.
4.4.2.3. Falling Back to a Previous Version
In extreme cases, you may find there is an issue with your application and the latest version of VoltDB. Of
course, you normally would discover this during testing prior to a production upgrade. However, if that
is not the case and an incompatibility or other conflict is discovered after the upgrade is completed, it is
possible to fall back to a previous version of VoltDB. The basic process for falling back is to the following:
• If any problems arise before Step #6 (redirecting the clients) is completed, simply shutdown the new
replica and resume the old database using the voltadmin resume command:
$ voltadmin shutdown --host=newsvr1
$ voltadmin resume --host=oldsvr1
• If issues are found after Step #6, the fall back procedure is basically to repeat the upgrade procedure
described in Section 4.4.2.2, “The Passive DR Upgrade Process” except reversing the roles of the clus-
ters and replicating the data from the new cluster to the old cluster. That is:
1. Update the deployment file on the new cluster to enable DR as a master, removing the <connection>
element:
<dr id="4"/>
2. Shutdown the original database and edit the deployment file to enable DR as a replica of the new
cluster:
<dr id="3">
<connection source="newsvr1,newsvr2"/>
</dr>
3. Start the old cluster using the voltdb create --force --replica command.

Maintenance and Upgrades
23
4. Follow steps 3 through 8 in Section 4.4.2.2, “The Passive DR Upgrade Process” reversing the roles
of the new and old clusters.
4.4.3. Using Cross Data Center Replication (XDCR) to Up-
grade VoltDB Without Downtime
It is also possible to upgrade the VoltDB software using cross data center replication (XDCR), by sim-
ply shutting down, upgrading, and then re-initalizing each cluster, one at a time. This process requires
no downtime, assuming your client applications are already designed to switch between the two active
clusters.
Use of XDCR for upgrading the VoltDB software is easiest if you are already using XDCR because it
does not require any additional hardware or reconfiguration. The following instructions assume that is
the case. Of course, you could also create a new cluster and establish XDCR replication between the old
and new clusters just for the purpose of upgrading VoltDB. The steps for the upgrade outlined in the
following sections are the same. But first you must establish the cross data center replication between the
two clusters. See the chapter on Database Replication in the Using VoltDB manual for instructions on
completing this initial step.
Once you have two clusters actively replicating data with XCDCR (let's call them clusters A and B), the
steps for upgrading the VoltDB software on the clusters is as follows:
1. Pause and shutdown cluster A (voltadmin pause --wait and shutdown).
2. Update the VoltDB software on cluster A
3. Start a new database instance on A, making sure to use the old deployment file so the XDCR connections
are configured properly (voltdb create --force)
4. Load the schema on Cluster A so replication starts.
5. Once the two clusters are synchronized, repeat steps 1 through 4 for cluster B.
Note that since you are upgrading the software, you must create a new instance after the upgrade (step #3).
When upgrading the software, you cannot use voltdb recover to restart the cluster; you must use voltdb
create --force and reload existing data from the running cluster B.
Also, be sure all data has been copied to the upgraded cluster A after step #4 and before proceeding to
upgrade the second cluster. You can do this by checking the @Statistics system procedure selector DR-
CONSUMER on cluster A. Once the DRCONSUMER statistics State column changes to "RECEIVE",
you know the two clusters are properly synchronized and you can proceed to step #5.
4.4.3.1. Falling Back to a Previous Version
In extreme cases, you may decide after performing the upgrade that you do not want to use the latest
version of VoltDB. If this happens, it is possible to fall back to the previous version of VoltDB.
To "downgrade" from a new version back to the previous version, follow the steps outlined in Section 4.4.3,
“Using Cross Data Center Replication (XDCR) to Upgrade VoltDB Without Downtime” except rather
than upgrading to the new version in Step #2, reinstall the older version of VoltDB. This process is valid
as long as you have not modified the schema or deployment to use any new or changed features introduced
in the new version.

24
Chapter 5. Deploying Clusters with the
VoltDB Deployment Manager
The VoltDB Deployment Manager is a tool for simplifying the configuration and starting of VoltDB clus-
ters. The Deployment Manager provides both a web-based interface for interactively configuring and start-
ing clusters and a REST API for remote scripting. The Deployment Manager also integrates with the Volt-
DB Management Center — the web-based interface for monitoring and managing running databases —
to support the entire database lifecycle.
The main component of the VoltDB Deployment Manager is the deployment engine — a daemon process
that runs on all servers where you want to manage the deployment of VoltDB databases. The deployment
engine comes as part of the VoltDB software kit. So any server with VoltDB installed can start the daemon
process and be managed by the Deployment Manager.
5.1. Starting the VoltDB Deployment Manager
There are two ways to start the Deployment Manager: you can start it manually as a process or you can
configure and start it as a service. Starting the manager as a process is the simper method, but requires you
to remember to start it each time the system restarts. Configuring the Deployment Manager as a service
lets you set it up as a persistent system service, like other common services that are started automatically
on system startup.
5.1.1. Starting the Deployment Manager Manually
You start the Deployment Manager manually by starting the daemon process on all participating nodes.
The shell command to start the deployment engine is voltdeploy. Because this is a daemon process and
should be left running, it is a good idea to issue the command as a detached process. For example, by
using the nohup command:
$ nohup voltdeploy &
5.1.2. Starting the Deployment Manager as a Service
To start the Deployment Manager as a service, you must first install the files into the appropriate system
directories for the Linux configuration service, /etc/init.d. You only need to do this once, as long as you
install new versions of VoltDB in the same location each time. To install the Deployment Manager files
perform the following steps (you will need root privileges):
1. Locate the top-level folder of your VoltDB installation. This is the folder containing the README file
and the /bin, /doc, /examples, /lib, and /voltdb subfolders, among others.
2. Copy lib/python/vdm/server/voltdeploy from the VoltDB root directory to the /etc/
init.d/ system folder.
3. Edit the new file /etc/init.d/voldeploy and set the environment variable VOLT_HOME in
the script equal to the VoltDB root. For example, if the root directory is /home/myaccount/voltdb:
VOLT_HOME=/home/myaccount/voltdb/
4. Change the permissions on the script to make it executable:

Deploying Clusters with the
VoltDB Deployment Manager
25
$ sudo chmod a+x /etc/init.d/voltdeploy
5. Add the Deployment Manager to the list of services that start and stop automatically with the operating
system:
$ sudo update-rc.d voltdeploy defaults
Once the VoltDB Deployment Manager is installed, you can start, stop, and manage the daemon process
like any other system service with the following commands:
voltdeploy start
voltdeploy stop
voltdeploy reload
voltdeploy restart
voltdeploy status
5.2. What the Deployment Manager Does
The Deployment Manager assists you in performing four primary tasks:
• Creating a database instance
• Adding and/or removing servers from the database cluster
• Configuring database properties (that is, the deployment file)
• Starting the database
All of these functions can be performed from either the web interface or through the REST API and changes
are persisted in the infrastructure regardless of which interface is used.
5.3. How the Deployment Manager Works
The deployment engine runs as a background process, accessible both to operators — through the web or
REST interfaces — and to other servers running the deployment engine. For example, say you start the
deployment engine on three servers: A, B, and C. You can connect to any one of those servers, define a
database, add the other two servers to the cluster and press start, to start a three node database cluster. Note
that you only need to connect to one of the servers. That deployment engine takes care of communicating
with the servers in the cluster.
What happens is that when you add a server to the database definition, that servers sends the full database
configuration information to the other servers that are defined part of the cluster. Similarly, when you
issue a start command on server A, it takes care of coordinating starting the database process on the other
servers, through their deployment engines.
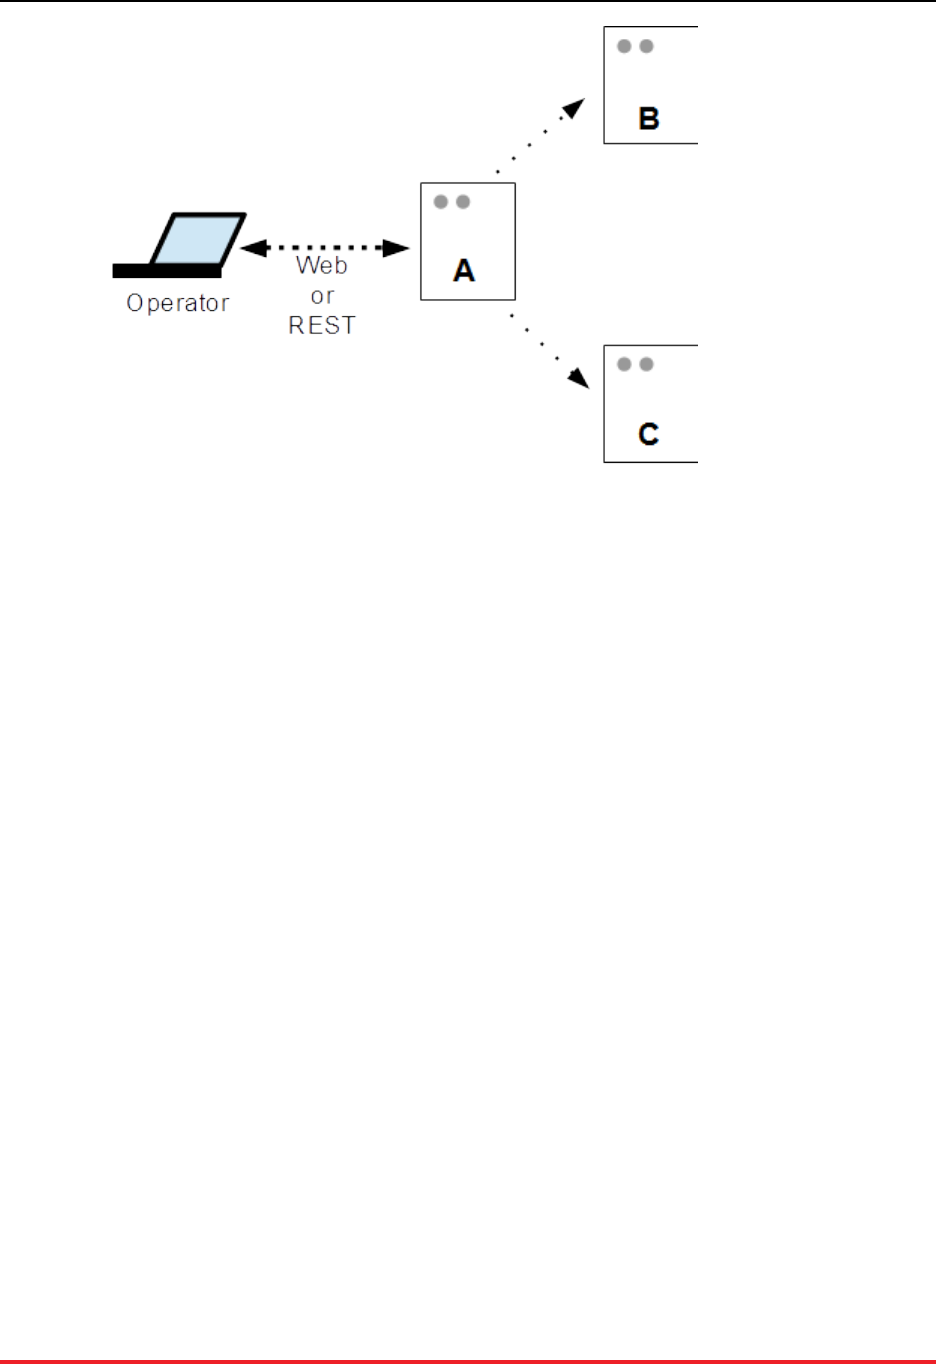
Deploying Clusters with the
VoltDB Deployment Manager
26
By default, when you connect to a server running the deployment engine, it automatically defines one
cluster with one node: the server you are connected to. By issuing the start command you start a one node
cluster with the default configuration options, just as if you had run the voltdb create command from a
command line on that node.
Alternately, you can add more servers to that database definition, as in the diagram. Since the database
definitions are automatically copied between the servers whenever a change is made, it doesn't matter
which node you are connected to — you can connect to any server defined as part of the cluster to perform
deployment tasks.
In fact, you can define multiple databases and the server you are connected to does not even need to be
a member of any of those databases, just as long as it has VoltDB installed and the deployment engine
daemon running. So you could use one server simply as an administration hub that manages the deployment
of databases on other servers.
However, one important point to take note of is that whenever you make a change through one deployment
engine, all database definitions from that server are then copied to any server defined as part of the database.
So if you connect to the Deployment Manager on two servers and make changes simultaneously, one
change will overwrite the other.
5.4. Using the VoltDB Deployment Manager Web
Interface
To access the web interface for the VoltDB Deployment Manager, simply point your browser at port 8000
of a server running the deployment engine: http://server-name:8000/.
The picture below identifies the main components of the web interface:
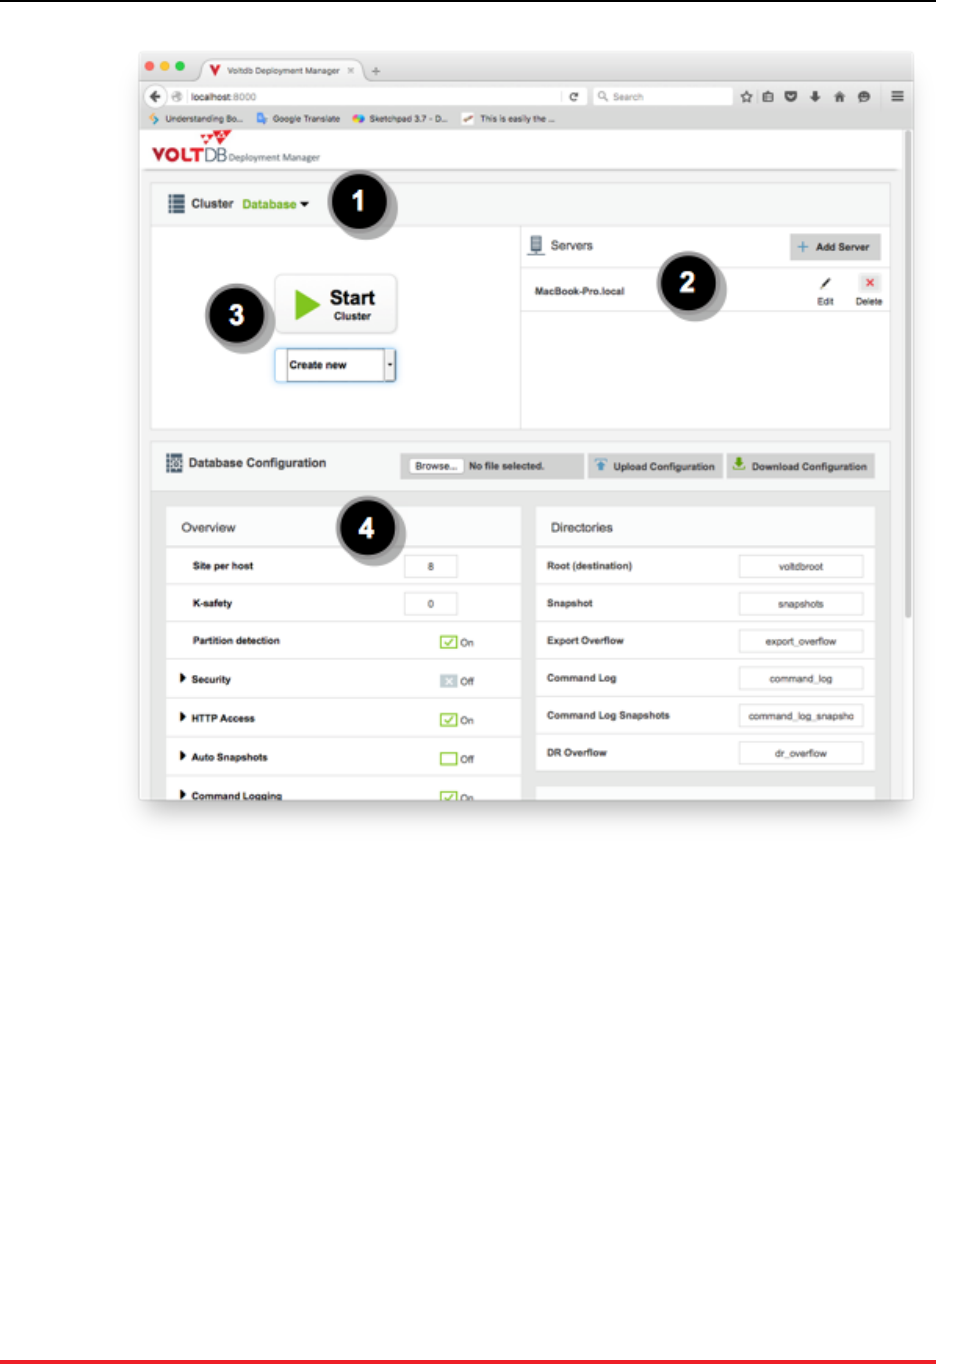
Deploying Clusters with the
VoltDB Deployment Manager
27
1. Lists the current database. Also can be used to add or delete database definitions.
2. Lists the servers associated with the database cluster. Can be used to add or remove servers from the
currently selected database.
3. Starts the current database. If the database is running, links to the VoltDB Management Center on the
running database.
4. Let's you customize the configuration options for the current database.
5.5. Using the VoltDB Deployment Manager REST
API
You use the REST API by sending HTTP requests to the URL http:///server-name:8000/api/1.0/ of a server
running the deployment manager. The following table lists the currently supported REST objects and
methods.

Deploying Clusters with the
VoltDB Deployment Manager
28
Table 5.1. REST API Objects and Methods
URI GET POST PUT DELETE
/api/1.0/databases/ List databas-
es Add database
/api/1.0/databases/{id} Database ob-
ject Update data-
base proper-
ties
Delete data-
base
/api/1.0/databases/{id}/deployment Database de-
ployment that
will be used.
Update de-
ployment
properties
/api/1.0/databases/{id}/status Get Status of
database
/api/1.0/databases/{id}/start Start Data-
base
/api/1.0/databases/{id}/recover Recovers
database
/api/1.0/databases/{id}/stop Stops data-
base
/api/1.0/databases/{id}/servers/ Get Server
list from data-
base
Add Server
/api/1.0/databases/{id}/servers/{id}/ Get Server
Details of a
database
Update Remove
Server
/api/1.0/databases/{id}/servers/{id}/start Start a Node
of a Data-
base (Always
do rejoin)
/api/1.0/databases/{id}/servers/{id}/stop Stop a Node
of a Database
/api/1.0/databases/{id}/servers/{id}/status Get Status of
node.

29
Chapter 6. Monitoring VoltDB Databases
Monitoring is an important aspect of systems administration. This is true of both databases and the infra-
structure they run on. The goals for database monitoring include ensuring the database meets its expected
performance target as well as identifying and resolving any unexpected changes or infrastructure events
(such as server failure or network outage) that can impact the database. This chapter explains:
• How to monitor overall database health and performance using VoltDB
• How to automatically pause the database when resource limits are exceeded
• How to integrate VoltDB monitoring with other enterprise monitoring infrastructures
6.1. Monitoring Overall Database Activity
VoltDB provides several tools for monitoring overall database activity. The following sections describe
the two primary monitoring tools within VoltDB:
• VoltDB Management Center
• System Procedures
6.1.1. VoltDB Management Center
http://voltserver:8080/
The VoltDB Management Center provides a graphical display of key aspects of database performance,
including throughput, memory usage, query latency, and partition usage. To use the Management Center,
connect to one of the cluster nodes using a web browser, specifying the HTTP port (8080 by default)
as shown in the example URL above. The Management Center shows graphs for cluster throughput and
latency as well as CPU and memory usage for the current server. You can also use the Management Center
to examine the database schema and to issue ad hoc SQL queries.
6.1.2. System Procedures
VoltDB provides callable system procedures that return detailed information about the usage and perfor-
mance of the database. In particular, the @Statistics system procedure provides a wide variety of informa-
tion depending on the selector keyword you give it. Some selectors that are particularly useful for moni-
toring include the following:
•MEMORY — Provides statistics about memory usage for each node in the cluster. Information includes
the resident set size (RSS) for the server process, the Java heap size, heap usage, available heap memory,
and more. This selector provides the type of information displayed by the Process Memory Report,
except that it returns information for all nodes of the cluster in a single call.
•PROCEDUREPROFILE — Summarizes the performance of individual stored procedures. Informa-
tion includes the minimum, maximum, and average execution time as well as the number of invocations,
failures, and so on. The information is summarized from across the cluster as whole. This selector re-
turns information similar to the latency graph in VoltDB Management Center.
•TABLE — Provides information about the size, in number of tuples and amount of memory consumed,
for each table in the database. The information is segmented by server and partition, so you can use

Monitoring VoltDB Databases
30
it to report the total size of the database contents or to evaluate the relative distribution of data across
the servers in the cluster.
When using the @Statistics system procedure with the PROCEDUREPROFILE selector for monitoring,
it is a good idea to set the second parameter of the call to "1" so each call returns information since the
last call. In other words, statistics for the interval since the last call. Otherwise, if the second parameter is
"0", the procedure returns information since the database started and the aggregate results for minimum,
maximum, and average execution time will have little meaning.
When calling @Statistics with the MEMORY or TABLE selectors, you can set the second parameter to
"0" since the results are always a snapshot of the memory usage and table volume at the time of the call. For
example, the following Python script uses @Statistics with the MEMORY and PROCEDUREPROFILE
selectors to check for memory usage and latency exceeding certain limits. Note that the call to @Statistics
uses a second parameter of 1 for the PROCEDUREPROFILE call and a parameter value of 0 for the
MEMORY call.
import sys
from voltdbclient import *
nano = 1000000000.0
memorytrigger = 4 * (1024*1024) # 4gbytes
avglatencytrigger = .01 * nano # 10 milliseconds
maxlatencytrigger = 2 * nano # 2 seconds
server = "localhost"
if (len(sys.argv) > 1): server = sys.argv[1]
client = FastSerializer(server, 21212)
stats = VoltProcedure( client, "@Statistics",
[ FastSerializer.VOLTTYPE_STRING,
FastSerializer.VOLTTYPE_INTEGER ] )
# Check memory
response = stats.call([ "memory", 0 ])
for t in response.tables:
for row in t.tuples:
print 'RSS for node ' + row[2] + "=" + str(row[3])
if (row[3] > memorytrigger):
print "WARNING: memory usage exceeds limit."
# Check latency
response = stats.call([ "procedureprofile", 1 ])
avglatency = 0
maxlatency = 0
for t in response.tables:
for row in t.tuples:
if (avglatency < row[4]): avglatency = row[4]
if (maxlatency < row[6]): maxlatency = row[6]
print 'Average latency= ' + str(avglatency)
print 'Maximum latency= ' + str(maxlatency)
if (avglatency > avglatencytrigger):
print "WARNING: Average latency exceeds limit."
if (maxlatency > maxlatencytrigger):
print "WARNING: Maximum latency exceeds limit."

Monitoring VoltDB Databases
31
client.close()
The @Statistics system procedure is the the source for many of the monitoring options discussed in this
chapter. Two other system procedures, @SystemCatalog and @SystemInformation, provide general in-
formation about the database schema and cluster configuration respectively and can be used in monitoring
as well.
The system procedures are useful for monitoring because they let you customize your reporting to whatever
level of detail you wish. The other advantage is that you can automate the monitoring through scripts
or client applications that call the system procedures. The downside, of course, is that you must design
and create such scripts yourself. As an alternative for custom monitoring, you can consider integrating
VoltDB with existing third party monitoring applications, as described in Section 6.3, “Integrating VoltDB
with Other Monitoring Systems”. You can also set the database to automatically pause if certain system
resources run low, as described in the next section.
6.2. Setting the Database to Read-Only Mode
When System Resources Run Low
VoltDB, like all software, uses system resources to perform its tasks. First and foremost, as an in-memory
database, VoltDB relies on having sufficient memory available for storing the data and processing queries.
However, it also makes use of disk resources for snapshots and caching data for other features, such as
export and database replication.
If system resources run low, one or more nodes may fail impacting availability, or worse, causing a service
interruption. The best solution for this situation is to plan ahead and provision sufficient resources for your
needs. The goal of the VoltDB Planning Guide is to help you do this.
However, even with the best planning, unexpected conditions can result in resource shortages or overuse.
In these situations, you want the database to protect itself against all-out failure.
You can do this by setting resource limits in the VoltDB deployment file. System resource limits are set
within the <systemsettings> and <resourcemonitor> elements. For example:
<systemsettings>
<resourcemonitor frequency="30">
<memorylimit size="70%"/>
<disklimit>
<feature name="snapshots" size="75%"/>
<feature name="droverflow" size="60%"/>
</disklimit>
</resourcemonitor>
</systemsettings>
The deployment file lets you set limits on two types of system resources:
• Memory Usage
• Disk Usage
In both cases, the maximum allowable amount of the resource to be used can be specified as either a value
representing a number of gigabytes or a percentage of the total available. If this limit is exceeded, the

Monitoring VoltDB Databases
32
database will be "paused", putting it into read-only mode to avoid using any further resources or possibly
failing when the resource becomes exhausted. When the database pauses, an error message is written to
the log file (and the console) reporting the event. This allows you as the system administrator to correct
the situation by reducing memory usage or deleting unnecessary files. Once sufficient resources are freed
up, you can return the database to normal operation using the voltadmin resume command.
The resource limits are checked every 60 seconds by default. However, you can adjust how frequently
they are checked — to accommodate the relative stability or volatility of your resource usage — using
the frequency attribute of the <resourcemonitor> tag. In the preceding example, the frequency
has been reduced to 30 seconds.
Of course, the ideal is to catch excessive resource use before the database is forced into read-only mode.
Use of system monitors such as Nagios and New Relic to generate alerts at limits lower than the VoltDB
resource monitor are strongly recommended. And you can integrate other VoltDB monitoring with these
monitoring utilities as described in Section 6.3, “Integrating VoltDB with Other Monitoring Systems”.
But the resource monitor is provided as a last resort to ensure the database does not completely exhaust
resources and crash before the issue can be addressed.
The following sections describe how to set limits for the individual resource types.
6.2.1. Monitoring Memory Usage
You specify a memory limit in the deployment file using the <memorylimit> element and specifying
the maximum allowable resident set size (RSS) for the VoltDB process in the size attribute. You can
express the limit as a fixed number of gigabytes or as a percentage of total available memory. Use a percent
sign to specify a percentage. For example, the following setting will cause the VoltDB database to go into
read-only mode if the RSS size exceeds 10 gigabytes on any of the cluster nodes.
<systemsettings>
<resourcemonitor>
<memorylimit size="10"/>
</resourcemonitor>
</systemsettings>
Whereas the following example sets the limit at 70% of total available memory.
<systemsettings>
<resourcemonitor>
<memorylimit size="70%"/>
</resourcemonitor>
</systemsettings>
If you do not specify a limit in the deployment file, VoltDB automatically sets a limit of 80% by default.
6.2.2. Monitoring Disk Usage
You specify disk usage limits in the deployment file using the <disklimit> element. Within the
<disklimit> element, you use the <feature> element to identify the limit for a device based on the
VoltDB feature that utilizes it. For example, to set a limit on the amount of space used on the device where
automatic snapshots are stored, you identify the feature as "snapshots" and specify the limit as a number
of gigabytes or as a percentage of total space on the disk. The following deployment file entry sets the disk
limit for snapshots at 200 gigabytes and the limit for command logs at 70% of the total available space:

Monitoring VoltDB Databases
33
<systemsettings>
<resourcemonitor>
<disklimit>
<feature name="snapshots" size="200"/>
<feature name="commandlog" size="70%"/>
</disklimit>
</resourcemonitor>
</systemsettings>
Note that you specify the device based on the feature that uses it. However, the limits applies to all data on
that device, not just the space used by that feature. If you specify limits for two features that use the same
device, the lower of the two limits will be applied. So, in the previous example, if snapshots and command
logs both use a device with 250 gigabytes of total space, the database will be set to read-only mode if the
total amount of used space exceeds the command logs limit of 70%, or 175 gigabytes.
You can identify disk limits for any of the following VoltDB features, using the specified keywords:
• Automated snapshots (snapshots)
• Command logs (commandlog)
• Command log snapshots (commandlogsnapshot)
• Database replication overflow (droverflow)
• Export overflow (exportoverflow)
6.3. Integrating VoltDB with Other Monitoring
Systems
In addition to the tools and system procedures that VoltDB provides for monitoring the health of your
database, you can also integrate this data into third-party monitoring solutions so they become part of your
overall enterprise monitoring architecture. VoltDB supports integrating VoltDB statistics and status with
the following monitoring systems:
• Nagios
• New Relic
6.3.1. Integrating with Nagios
If you use Nagios to monitor your systems and services, you can include VoltDB in your monitoring
infrastructure. VoltDB Enterprise Edition provides Nagios plugins that let you monitor four key aspects of
VoltDB. The plugins are included in a subfolder of the tools directory where VoltDB is installed. Table 6.1,
“Nagios Plugins” lists each plugin and what it monitors.
Table 6.1. Nagios Plugins
Plugin Monitors Scope Description
check_voltdb_ports Availability Server Reports whether the specified server is reachable
or not.
check_voltdb_memory Memory
usage Server Reports on the amount of memory in use by Volt-
DB for a individual node. You can specify the
severity criteria as a percentage of total memory.

Monitoring VoltDB Databases
34
Plugin Monitors Scope Description
check_voltdb_cluster K-safety Clus-
ter-wide Reports on whether a K-safe cluster is complete or
not. That is, whether the cluster has the full com-
plement of nodes or if any have failed and not re-
joined yet.
check_voltdb_replication Database
replication Clus-
ter-wide Reports the status of database replication. Con-
nect the plugin to one or more nodes on the master
database.
Note that the httpd and JSON options must be enabled in the deployment file for the VoltDB database for
the Nagios plugins to query the database status.
6.3.2. Integrating with New Relic
If you use New Relic as your monitoring tool, there is a VoltDB plugin to include monitoring of VoltDB
databases to your New Relic dashboard. To use the New Relic plugin, you must:
• Define the appropriate configuration for your server.
• Start the voltdb-newrelic process that gathers and sends data to New Relic.
You define the configuration by editing and renaming the template files that can be found in the /tools
/monitoring/newrelic/config folder where VoltDB is installed. The configuration files let you
specify your New Relic license and which databases are monitored. A README file in the /newrelic
folder provides details on what changes to make to the configuration files.
You start the monitoring process by running the script voltdb-newrelic that also can be found in
the/newrelic folder. The script must be running for New Relic to monitor your databases.

35
Chapter 7. Logging and Analyzing Activity
in a VoltDB Database
VoltDB uses Log4J, an open source logging service available from the Apache Software Foundation, to
provide access to information about database events. By default, when using the VoltDB shell commands,
the console display is limited to warnings, errors, and messages concerning the status of the current process.
A more complete listing of messages (of severity INFO and above) is written to log files in the subfolder
/log, relative to the user's current default location.
The advantages of using Log4J are:
• Logging is compiled into the code and can be enabled and configured at run-time.
• Log4J provides flexibility in configuring what events are logged, where, and the format of the output.
• By using an open source logging service with standardized output, there are a number of different ap-
plications, such as Chainsaw, available for filtering and presenting the results.
Logging is important because it can help you understand the performance characteristics of your applica-
tion, check for abnormal events, and ensure that the application is working as expected.
Of course, any additional processing and I/O will have an incremental impact on the overall database
performance. To counteract any negative impact, Log4J gives you the ability to customize the logging to
support only those events and servers you are interested in. In addition, when logging is not enabled, there
is no impact to VoltDB performance. With VoltDB, you can even change the logging profile on the fly
without having to shutdown or restart the database.
The following sections describe how to enable and customize logging of VoltDB using Log4J. This chap-
ter is not intended as a tutorial or complete documentation of the Log4J logging service. For general in-
formation about Log4J, see the Log4J web site at http://wiki.apache.org/logging-log4j/.
7.1. Introduction to Logging
Logging is the process of writing information about application events to a log file, console, or other
destination. Log4J uses XML files to define the configuration of logging, including three key attributes:
•Where events are logged. The destinations are referred to as appenders in Log4J (because events are
appended to the destinations in sequential order).
•What events are logged. VoltDB defines named classes of events (referred to as loggers) that can be
enabled as well as the severity of the events to report.
•How the logging messages are formatted (known as the layout),
7.2. Creating the Logging Configuration File
VoltDB ships with a default Log4J configuration file, voltdb/log4j.xml, in the installation directory. The
sample applications and the VoltDB shell commands use this file to configure logging and it is recom-
mended for new application development. This default Log4J file lists all of the VoltDB-specific logging
categories and can be used as a template for any modifications you wish to make. Or you can create a
new file from scratch.

Logging and Analyzing Ac-
tivity in a VoltDB Database
36
The following is an example of a Log4J configuration file:
<?xml version="1.0" encoding="UTF-8" ?>
<!DOCTYPE log4j:configuration SYSTEM "log4j.dtd">
<log4j:configuration xmlns:log4j="http://jakarta.apache.org/log4j/">
<appender name="Async" class="org.apache.log4j.AsyncAppender">
<param name="Blocking" value="true" />
<appender-ref ref="Console" />
<appender-ref ref="File" />
</appender>
<appender name="Console" class="org.apache.log4j.ConsoleAppender">
<param name="Target" value="System.out" />
<layout class="org.apache.log4j.TTCCLayout" />
</appender>
<appender name="File" class="org.apache.log4j.FileAppender">
<param name="File" value="/tmp/voltdb.log" />
<param name="Append" value="true" />
<layout class="org.apache.log4j.TTCCLayout" />
</appender>
<logger name="AUTH">
<!-- Print all VoltDB authentication messages -->
<level value="trace" />
</logger>
<root>
<priority value="debug" />
<appender-ref ref="Async" />
</root>
</log4j:configuration>
The preceding configuration file defines three destinations, or appenders, called Async, Console, and File.
The appenders define the type of output (whether to the console, to a file, or somewhere else), the location
(such as the file name), as well as the layout of the messages sent to the appender. See the log4J documen-
tation for more information about layout.
Note that the appender Async is a superset of Console and File. So any messages sent to Async are routed
to both Console and File. This is important because for logging of VoltDB, you should always use an
asynchronous appender as the primary target to avoid the processing of the logging messages from blocking
other execution threads.
More importantly, you should not use any appenders that are susceptible to extended delays, blockages,
or slow throughput, This is particularly true for network-based appenders such as SocketAppender and
third-party log infrastructures including logstash and JMS. If there is any prolonged delay in writing to the
appenders, messages can end up being held in memory causing performance degradation and, ultimately,
generating out of memory errors or forcing the database into read-only mode.
The configuration file also defines a root class. The root class is the default logger and all loggers inherit the
root definition. So, in this case, any messages of severity "debug" or higher are sent to the Async appender.
Finally, the configuration file defines a logger specifically for VoltDB authentication messages. The logger
identifies the class of messages to log (in this case "AUTH"), as well as the severity ("trace"). VoltDB

Logging and Analyzing Ac-
tivity in a VoltDB Database
37
defines several different classes of messages you can log. Table 7.1, “VoltDB Components for Logging”
lists the loggers you can invoke.
Table 7.1. VoltDB Components for Logging
Logger Description
ADHOC Execution of ad hoc queries
AUTH Authentication and authorization of clients
COMPILER Interpretation of SQL in ad hoc queries
CONSOLE Informational messages intended for display on the
console
DR Database replication sending data
DRAGENT Database replication receiving data
EXPORT Exporting data
GC Java garbage collection
HOST Host specific events
NETWORK Network events related to the database cluster
REJOIN Node recovery and rejoin
SNAPSHOT Snapshot activity
SQL Execution of SQL statements
TM Transaction management
7.3. Enabling Logging for VoltDB
Once you create your Log4J configuration file, you specify which configuration file to use by defining the
variable LOG4J_CONFIG_PATH before starting the VoltDB database. For example:
$ LOG4J_CONFIG_PATH="$HOME/MyLog4jConfig.xml"
$ voltdb create -H localhost -d mydeployment.xml
7.4. Changing the Timezone of Log Messages
By default all VoltDB logging is reported in GMT (Greenwich Mean Time). If you want the logging to be
reported using a different timezone, you can use extensions to the Log4J service to achieve this.
To change the timezone of log messages:
1. Download the extras kit from the Apache Extras for Apache Log4J website, http://logging.apache.org/
log4j/extras/.
2. Unpack the kit and place the included JAR file in the /lib/extension folder of the VoltDB instal-
lation directory.
3. Update your Log4J configuration file to enable the Log4J extras and specify the desired timezone for
logging for each appender.
You enable the Log4J extras by specifying EnhancedPatternLayout as the layout class for the ap-
penders you wish to change. You then identify the desired timezone as part of the layout pattern. For

Logging and Analyzing Ac-
tivity in a VoltDB Database
38
example, the following XML fragment changes the timezone of messages written to the file appender to
GMT minus four hours:
<appender name="file" class="org.apache.log4j.DailyRollingFileAppender">
<param name="file" value="log/volt.log"/>
<param name="DatePattern" value="'.'yyyy-MM-dd" />
<layout class="org.apache.log4j.EnhancedPatternLayout">
<param name="ConversionPattern" value="%d{ISO8601}{GMT-4} %-5p [%t] %c: %m%n"/>
</layout>
</appender>
You can use any valid ISO-8601 timezone specification, including named timezones, such as EST.
7.5. Changing the Configuration on the Fly
Once the database has started, you can still start or reconfigure the logging without having to stop and
restart the database. By calling the system procedure @UpdateLogging you can pass the configuration
XML to the servers as a text string. For any appenders defined in the new updated configuration, the
existing appender is removed and the new configuration applied. Other existing appenders (those not
mentioned in the updated configuration XML) remain unchanged.

39
Chapter 8. What to Do When Problems
Arise
As with any high performance application, events related to the database process, the operating system, and
the network environment can impact how well or poorly VoltDB performs. When faced with performance
issues, or outright failures, the most important task is identifying and resolving the root cause. VoltDB
and the server produce a number of log files and other artifacts that can help you in the diagnosis. This
chapter explains:
• Where to look for log files and other information about the VoltDB server process
• What to do when recovery fails
• How to collect the log files and other system information when reporting a problem to VoltDB
8.1. Where to Look for Answers
The first place to look when an unrecognized problem occurs with your VoltDB database is the console
where the database process was started. VoltDB echoes key messages and errors to the console. For exam-
ple, if a server becomes unreachable, the other servers in the cluster will report an error indicating which
node has failed. Assuming the cluster is K-safe, the remaining nodes will then re-establish a quorum and
continue, logging this event to the console as well.
However, not all messages are echoed on the console.1 A more complete record of errors, warnings, and
informational messages is written to a log file, log/volt.log, in a subfolder of the working directory
where the VoltDB server process was started. The volt.log file can be extremely helpful for identifying
unexpected but non-fatal events that occurred earlier and may identify the cause of the current issue.
If VoltDB encounters a fatal error and exits, shutting down the database process, it also attempts to write
out a crash file in the current working directory. The crash file name has the prefix "voltdb_crash" followed
by a timestamp identifying when the file is created. Again, this file can be useful in diagnosing exactly
what caused the crash, since it includes the last error message, a brief profile of the server and a dump of
the Java threads running in the server process before it crashed.
To summarize, when looking for information to help analyze system problems, three places to look are:
1. The console where the server process was started.
2. The log file in log/volt.log
3. The crash file named voltdb_crash{timestamp}.txt in the server process's working directory
8.2. Handling Errors When Restoring a Database
After determining what caused the problem, the next step is often to get the database up and running
again as soon as possible. When using snapshots or command logs, this is done using the voltdb recover
command described in Section 3.5, “Restarting the Database”. However, in unusual cases, the resume
itself may fail.
1Note that you can change which messages are echoed to the console and which are logged by modifying the Log4j configuration file. See the
chapter on logging in the Using VoltDB manual for details.

What to Do When Problems Arise
40
There are several situations where an attempt to recover a database — either from a snapshot or command
logs — may fail. For example, restoring data from a snapshot to a schema where a unique index has been
added can result in a constraint violation. In this case, the restore operation continues but any records that
caused a constraint violation are saved to a CSV file.
Or when recovering command logs, the log may contain a transaction that originally succeeded but fails
and raises an exception during playback. In this situation, VoltDB issues a fatal error and stops the database
to avoid corrupting the contents.
Although protecting you from an incomplete recovery is the appropriate default behavior, there may be
cases where you want to recover as much data as possible, with full knowledge that the resulting data
set does not match the original. VoltDB provides two processes for performing partial recoveries in case
of failure:
• Logging constraint violations during snapshot restore
• Performing command log recovery in safe mode
The following sections describe these procedures.
Warning
It is critically important to recognize that the techniques described in this section do not produce
a complete copy of the original database or resolve the underlying problem that caused the initial
recovery to fail. These techniques should never be attempted without careful consideration and
full knowledge and acceptance of the risks associated with partial data recovery.
8.2.1. Logging Constraint Violations
There are several situations that can cause a snapshot restore to fail because of constraint violations. Rather
than have the operation fail as a whole, VoltDB continues with the restore process and logs the constraint
violations to a file instead. This way you can review the tuples that were excluded and decide whether to
ignore or replace their content manually after the restore completes.
By default, the constraint violations are logged to one or more files (one per table) in the same directory
as the snapshot files. In a cluster, each node logs the violations that occur on that node. If you know there
are going to constraint violations and want to save the logged constraints to a different location, you can
use a special JSON form of the @SnapshotRestore system procedure. You specify the path of the log
files in a JSON attribute, duplicatePaths. For example, the following commands perform a restore
of snapshot files in the directory /var/voltdb/snapshots/ with the unique identifier myDB. The
restore operation logs constraint violations to the directory /var/voltdb/logs.
$ sqlcmd
1> exec @SnapshotRestore '{ "path":"/var/voltdb/snapshots/",
"nonce":"myDB",
"duplicatesPath":"/var/voltdb/logs/" }';
2> exit
Constraint violations are logged as needed, one file per table, to CSV files with the name {table}-
duplicates-{timestamp}.csv.
8.2.2. Safe Mode Recovery
On rare occasions, recovering a database from command logs may fail. This can happen, for example, if
a stored procedure introduces non-deterministic content. If a recovery fails, the specific error is known.

What to Do When Problems Arise
41
However, there is no way for VoltDB to know the root cause or how to continue. Therefore, the recovery
fails and the database stops.
When this happens, VoltDB logs the last successful transaction before the recovery failed. You can then
ask VoltDB to recover up to but not including the failing transaction by performing a recovery in safe mode.
You request safe mode by adding the --safemode switch to the command line when starting the recovery
operation, like so:
$ voltdb recover --safemode -license ~/license.xml
When VoltDB recovers from command logs in safe mode it enables two distinct behaviors:
• Snapshots are restored, logging any constraint violations
• Command logs are replayed up to the last valid transaction
This means that if you are recovering using an automated snapshot (rather than command logs), you can
recover some data even if there are constraint violations during the snapshot restore. Also, when recovering
from command logs, VoltDB will ignore constraint violations in the command log snapshot and replay all
transactions that succeeded in the previous attempt.
It is important to note that to successfully use safe mode with command logs, you must perform a regular
recovery operation first — and have it fail — so that VoltDB can determine the last valid transaction. Also,
if the snapshot and the command logs contain both constraint violations and failed transactions, you may
need to run recovery in safe mode twice to recover as much data as possible. Once to complete restoration
of the snapshot, then a second time to recover the command logs up to a point before the failed transaction.
8.3. Collecting the Log Files
VoltDB includes a utility that collects all of the pertinent logs for a given server. The log collector retrieves
the necessary system and process files from the server, creates a compressed archive file and, optionally,
uploads it via SFTP to a support site. For customers requesting support from VoltDB, your support contact
will often provide instructions on how and when to use the log collector and where to submit the files.
Note that the database does not need to be running to use the log collector. It can find and collect the log
files based solely on the location of the VoltDB root directory where the database was run.
To collect the log files, use the voltdb collect command:
$ voltdb collect --prefix=mylogs /home/db/voltdbroot
When you run the command you must specify the location of the root directory for the database as an
argument to the command. For example, if you are in the same working directory where the database was
originally started, by default the root directory is the subdirectory voltdbroot.
$ voltdb collect --prefix=mylogs $(pwd)/voltdbroot
The archive file that the collect command generates is created in your current working directory.
The collect command has optional arguments that let you control what data is collected, the name of the
resulting archive file, as well as whether to upload the file to an FTP server. In the preceding example
the --prefix flag specifies the prefix for the archive file name. If you are submitting the log files to an
FTP server via SFTP, you can use the --upload, --username, and --password flags to identify
the target server and account. For example:

What to Do When Problems Arise
42
$ voltdb collect --prefix=mylogs \
--upload=ftp.mycompany.com \
--username=babbage
--password=charles /home/db/voltdbroot
Note that the voltdb collect command collects log files for the current system only. To collect logs for all
servers in a cluster, you will need to issue the voltdb collect command locally on each server separately.
See the voltdb collect documentation in the Using VoltDB manual for details.

43
Appendix A. Server Configuration Options
There are a number of system, process, and application options that can impact the performance or behavior
of your VoltDB database. You control these options when starting VoltDB. The configuration options fall
into five main categories:
• Server configuration
• Process configuration
• Database configuration
• Path configuration
• Network ports used by the database cluster
This appendix describes each of the configuration options, how to set them, and their impact on the result-
ing VoltDB database and application environment.
A.1. Server Configuration Options
VoltDB provides mechanisms for setting a number of options. However, it also relies on the base operating
system and network infrastructure for many of its core functions. There are operating system configuration
options that you can adjust to to maximize your performance and reliability, including:
• Network configuration
• Time configuration
A.1.1. Network Configuration (DNS)
VoltDB creates a network mesh among the database cluster nodes. To do that, all nodes must be able to
resolve the IP address and hostnames of the other server nodes. Make sure all nodes of the cluster have
valid DNS entries or entries in the local hosts files.
For servers that have two or more network interfaces — and consequently two or more IP addresses — it
is possible to assign different functions to each interface. VoltDB defines two sets of ports:
• External ports, including the client and admin ports. These are the ports used by external applications
to connect to and communicate with the database.
• Internal ports, including all other ports. These are the ports used by the database nodes to communicate
among themselves. These include the internal port, the zookeeper port, and so on. (See Section A.5,
“Network Ports” for a complete listing of ports.)
You can specify which network interface the server expects to use for each set of ports by specifying the
internal and external interface when starting the database. For example:
$ voltdb create -d deployment.xml \
-H serverA -l license.xml \
--externalinterface=10.11.169.10 \
--internalinterface=10.12.171.14

Server Configuration Options
44
Note that the default setting for the internal and external interface can be overridden for a specific port by
including the interface and a colon before the port number when specifying a port on the command line.
See Section A.5, “Network Ports” for details on setting specific ports.
A.1.2. Time Configuration (NTP)
Keeping VoltDB cluster nodes in close synchronization is important for the ongoing performance of your
database. At a minimum, use of NTP to synchronize time across the cluster is recommended. If the time
difference between nodes is too large (greater than 200 milliseconds) VoltDB refuses to start. It is also
important to avoid having nodes adjust time backwards, or VoltDB will pause while it waits for time to
"catch up" to its previous setting.
A.2. Process Configuration Options
In addition to system settings, there are configuration options pertaining to the VoltDB server process
itself that can impact performance. Runtime configuration options are set as command line options when
starting the VoltDB server process.
The key process configuration for VoltDB is the Java maximum heap size. It is also possible to pass other
arguments to the Java Virtual Machine directly.
A.2.1. Maximum Heap Size
The heap size is a parameter associated with the Java runtime environment. Certain portions of the VoltDB
server software use the Java heap. In particular, the part of the server that receives and responds to stored
procedure requests uses the Java heap.
Depending upon how many transactions your application executes a second, you may need additional heap
space. The higher the throughput, the larger the maximum heap needed to avoid running out of memory.
In general, a maximum heap size of two gigabytes (2048) is recommended. For production use, a more
accurate measurement of the needed heap size can be calculated from the size of the schema (number of
tables), number of sites per host, and what durability and availability features are in use. See the VoltDB
Planning Guide for details.
It is important to remember that the heap size is not directly related to data storage capacity. Increasing the
maximum heap size does not provide additional data storage space. In fact, quite the opposite. Needlessly
increasing the maximum heap size reduces the amount of memory available for storage.
To set the maximum heap size when starting VoltDB, define the environment variable
VOLTDB_HEAPMAX as an integer value (in megabytes) before issuing the voltdb command. For ex-
ample, the following commands start VoltDB with a 3 gigabyte heap size (the default is 2 gigabytes):
$ export VOLTDB_HEAPMAX="3072"
$ voltdb create -d deployment.xml -H serverA
A.2.2. Other Java Runtime Options (VOLTDB_OPTS)
VoltDB sets the Java options — such as heap size and classpath — that directly impact VoltDB. There are
a number of other configuration options available in the Java Virtual machine (JVM).
VoltDB provides a mechanism for passing arbitrary options directly to the JVM. If the environment vari-
able VOLTDB_OPTS is defined, its value is passed as arguments to the Java command line. Note that
the contents of VOLTDB_OPTS are added to the Java command line on the current server only. In other
words, you must define VOLTDB_OPTS on each server to have it take effect for all servers.

Server Configuration Options
45
Warning
VoltDB does not validate the correctness of the arguments you specify using VOLTDB_OPTS
or their appropriateness for use with VoltDB. This feature is intended for experienced users only
and should be used with extreme caution.
A.3. Database Configuration Options
Runtime configuration options are set either as part of the deployment file or as command line options
when starting the VoltDB server process. These database configuration options are only summarized here.
See the Using VoltDB manual for a more detailed explanation. The configuration options include:
• Sites per host
• K-Safety
• Network partition detection
• Read level consistency
• Automated snapshots
• Import and export
• Command logging
• Heartbeat
• Temp table size
A.3.1. Sites per Host
Sites per host specifies the number of unique VoltDB "sites" that are created on each physical database
server. The section on "Determining How Many Sites per Host" in the Using VoltDB manual explains how
to choose a value for sites per host.
You set the value of sites per host using the sitesperhost attribute of the <cluster> tag in the
deployment file.
A.3.2. K-Safety
K-safety defines the level of availability or durability that the database can sustain, by replicating individual
partitions to multiple servers. K-safety is described in detail in the "Availability" chapter of the Using
VoltDB manual.
You specify the level of K-safety that you want in the deployment file using the kfactor attribute of
the <cluster> tag.
A.3.3. Network Partition Detection
Network partition detection protects a VoltDB cluster in environments where the network is susceptible
to partial or intermittent failure among the server nodes. Partition detection is described in detail in the
"Availability" chapter of the Using VoltDB manual.
Use of network partition detection is strongly recommended for production systems and therefore is en-
abled by default. You can enable or disable network partition detection in the deployment file using the
<partition-detection> tag.

Server Configuration Options
46
A.3.4. Read Level Consistency
In a highly available cluster (that is, a VoltDB cluster using K-safety), write transactions are executed on
all copies of a partition. This guarantees data consistency across the cluster. By default, read transactions
are also processed on all copies of the partition, using safe read level consistency.
Since the data is the same on all copies of the partition, it is possible to optimize read transactions by
processing the queries on a single copy of the partition only. However, using this fast read level consis-
tency, read transactions can access data modified by write transactions on the local server, before all nodes
confirm those write transactions. During a node failure or network partition, it is possible that the locally
completed writes could be rolled back as part of the network partition resolution. Of course, this only
happens when the read transaction accesses data modified by an immediately preceding write that is not
committed on all copies of the partition prior to a network partition.
If you do not need guaranteed read consistency in all cases, you can choose to have the cluster produce
faster read transactions by setting the read level consistency to "fast" in the deployment file, so read trans-
actions are processed on only one copy of the partition. To set the read level consistency, use the the <con-
sistency> element in the deployment file and set the readlevel attribute to either "safe" (the default)
or "fast". For example:
<consistency readlevel="fast"/>
A.3.5. Automated Snapshots
Automated snapshots provide ongoing protection against possible database failure (due to hardware or
software issues) by taking periodic snapshots of the database's contents. Automated snapshots are de-
scribed in detail in the section on "Scheduling Automated Snapshots" in the Using VoltDB manual.
You enable and configure automated snapshots with the <snapshot> tag in the deployment file.
Snapshot activity involves both processing and disk I/O and so may have a noticeable impact on perfor-
mance (in terms of throughput and/or latency) on a very busy database. You can control the priority of
snapshots activity using the <snapshot/> tag within the <systemsettings> element of the deployment file.
The snapshot priority is an integer value between 0 and 10, with 0 being the highest priority and 10 being
the lowest. The closer to 10, the longer snapshots take to complete, but the less they can affect ongoing
database work.
Note that snapshot priority affects all snapshot activity, including automated snapshots, manual snapshots,
and command logging snapshots.
A.3.6. Import and Export
The import and export functions let you automatically import and/or export selected data between your
VoltDB database and another database or distributed service at runtime. These features are described in
detail in the chapter on "Importing and Exporting Live Data" in the Using VoltDB manual.
You enable and disable import and export using the <import> and <export> tags in the deployment file.
A.3.7. Command Logging
The command logging function saves a record of each transaction as it is initiated. These logs can then be
"replayed" to recreate the database's last known state in case of intentional or accidental shutdown. This

Server Configuration Options
47
feature is described in detail in the chapter on "Command Logging and Recovery" in the Using VoltDB
manual.
To enable and disable command logging, use the <commandlog> tag in the deployment file.
A.3.8. Heartbeat
The database servers use a "heartbeat" to verify the presence of other nodes in the cluster. If a heartbeat is
not received within a specified time limit, that server is assumed to be down and the cluster reconfigures
itself with the remaining nodes (assuming it is running with K-safety). This time limit is called the "heart-
beat timeout" and is specified as a integer number of seconds.
For most situations, the default value for the timeout (10 seconds) is appropriate. However, if your cluster
is operating in an environment that is susceptible to network fluctuations or unpredictable latency, you
may want to increase the heartbeat timeout period.
You can set an alternate heartbeat timeout using the <heartbeat> tag in the deployment file.
A.3.9. Temp Table Size
VoltDB uses temporary tables to store intermediate table data while processing transactions. The default
temp table size is 100 megabytes. This setting is appropriate for most applications. However, extremely
complex queries or many updates to large records could cause the temporary space to exceed the maximum
size, resulting in the transaction failing with an error.
In these unusual cases, you may need to increase the temp table size. You can specify a different size for
the temp tables using the <temptables> tag in the deployment file and specifying a whole number of
megabytes. Note: since the temp tables are allocated as needed, increasing the maximum size can result
in a Java out-of-memory error at runtime if the system is memory-constrained. Modifying the temp table
size should be done with caution.
A.3.10. Query Timeout
In general, SQL queries execute extremely quickly. But it is possible, usually by accident, to construct
a query that takes an unexpectedly long time to execute. This usually happens when the query is overly
complex or accesses extremely large tables without the benefit of an appropriate filter or index.
You have the option to set a query timeout limit cluster-wide, for an interactive session, or per transaction.
The query limit sets a limit on the length of time any read-only query (or batch of queries in the case of
the voltExecuteSQL() method in a stored procedure) is allowed to run. You specify the timeout limit in
milliseconds.
To set a cluster-wide query limit you use the <systemsettings> and <query
timeout="{limit}"> tags in the deployment file. To set a limit for an interactive session in the
sqlcmd utility, you use the --query-timeout flag when invoking sqlcmd. To specify a limit when
invoking a specific stored procedure, you use the callProcedureWithTimeout method in place of the call-
Procedure method.
The cluster-wide limit is set when the database starts. By default, the system-wide limit is 10 seconds.
You can set a different timeout in the deployment file. Or It can be adjusted using the voltadmin update
command to modify the deployment settings while the database is running. If security is enabled, any user
can set a lower query limit on a per session or per transaction basis. However, the user must have the
ADMIN privilege to set a query limit longer than the cluster-wide setting.

Server Configuration Options
48
The following example deployment file sets a cluster-wide query timeout value of three seconds:
<systemsettings>
<query timeout="3000"/>
</systemsettings>
If any query or batch of queries exceeds the query timeout, the query is interrupted and an error returned
to the calling application. Note that the limit is applied to read-only ad hoc queries or queries in read-
only stored procedures only. In a K-Safe cluster, queries on different copies of a partition may execute at
different rates. Consequently the same query may timeout in one copy of the partition but not in another.
To avoid possible non-deterministic changes, VoltDB does not apply the time out limit to any queries or
procedures that may modify the database contents.
A.4. Path Configuration Options
The running database uses a number of disk locations to store information associated with runtime features,
such as export, network partition detection, and snapshots. You can control which paths are used for these
disk-based activities. The path configuration options include:
• VoltDB root
• Snapshots path
• Export overflow path
• Command log path
• Command log snapshots path
A.4.1. VoltDB Root
VoltDB defines a root directory for any disk-based activity which is required at runtime. This directory
also serves as a root for all other path definitions that take the default or use a relative path specification.
By default, the VoltDB root is the directory voltdbroot created as a subfolder in the current working
directory for the process that starts the VoltDB server process. (If the subfolder does not exist, VoltDB
creates it on startup.) You can specify an alternate root in the deployment file using the <voltdbroot>
element. However, if you explicitly name the root directory in the deployment file, the directory must exist
or the database server cannot start. See the section on "Configuring Paths for Runtime Features" in the
Using VoltDB manual for details.
A.4.2. Snapshots Path
The snapshots path specifies where automated and network partition snapshots are stored. The default
snapshots path is the "snapshots" subfolder of the VoltDB root directory. You can specify an alternate
path for snapshots using the <snapshots> child element of the <paths> tag in the deployment file.
A.4.3. Export Overflow Path
The export overflow path specifies where overflow data is stored if the export queue gets too large. The
default export overflow path is the "export_overflow" subfolder of the VoltDB root directory. You
can specify an alternate path using the <exportoverflow> child element of the <paths> tag in the
deployment file.

Server Configuration Options
49
See the chapter on "Exporting Live Data" in the Using VoltDB manual for more information on export
overflow.
A.4.4. Command Log Path
The command log path specifies where the command logs are stored when command logging is enabled.
The default command log path is the "command_log" subfolder of the VoltDB root directory. However,
for production use, it is strongly recommended that the command logs be written to a dedicated device,
not the same device used for snapshotting or export overflow. You can specify an alternate path using the
<commandlog> child element of the <paths> tag in the deployment file.
See the chapter on "Command Logging and Recovery" in the Using VoltDB manual for more information
on command logging.
A.4.5. Command Log Snapshots Path
The command log snapshots path specifies where the snapshots created by command logging are stored.
The default path is the "command_log_snapshot" subfolder of the VoltDB root directory. (Note that
command log snapshots are stored separately from automated snapshots.) You can specify an alternate
path using the <commandlogsnapshot> child element of the <paths> tag in the deployment file.
See the chapter on "Command Logging and Recovery" in the Using VoltDB manual for more information
on command logging.
A.5. Network Ports
A VoltDB cluster opens network ports to manage its own operation and to provide services to client ap-
plications. When using the command line, the network ports are configurable as part of the command that
starts the VoltDB database process or through the deployment file. When specifying a port on the command
line, you can specify just a port number or the network interface and the port number, separated by a colon.
Table A.1, “VoltDB Port Usage” summarizes the ports that VoltDB uses, their default value, and how to
change the default. The following sections describe each port in more detail.
Table A.1. VoltDB Port Usage
Port Default Val-
ue Where to Set (Community Edition)
Client Port 21212 VoltDB command line
Admin Port 21211 VoltDB command line or deployment file
Web Interface Port (httpd) 8080 VoltDB command line or deployment file
Internal Server Port 3021 VoltDB command line
Replication Port 5555 VoltDB command line
Zookeeper port 7181 VoltDB command line
A.5.1. Client Port
The client port is the port VoltDB client applications use to communicate with the database cluster nodes.
By default, VoltDB uses port 21212 as the client port. You can change the client port. However, all client
applications must then use the specified port when creating connections to the cluster nodes.

Server Configuration Options
50
To specify a different client port on the command line, use the --client flag when starting the VoltDB
database. For example, the following command starts the database using port 12345 as the client port:
$ voltdb create -l ~/license.xml \
-d deployment.xml -H serverA \
--client=12345
If you change the default client port, all client applications must also connect to the new port. The client
interfaces for Java and C++ accept an additional, optional argument to the createConnection method for
this purpose. The following examples demonstrate how to connect to an alternate port using the Java and
C++ client interfaces.
Java
org.voltdb.client.Client voltclient;
voltclient = ClientFactory.createClient();
voltclient.createConnection("myserver",12345);
C++
boost::shared_ptr<voltdb::Client> client = voltdb::Client::create();
client->createConnection("myserver", 12345);
A.5.2. Admin Port
The admin port is similar to the client port, it accepts and processes requests from applications. However,
the admin port has the special feature that it continues to accept write requests when the database enters
admin, or read-only, mode.
By default, VoltDB uses port 21211 on the default external network interface as the admin port. You can
change the port assignment in the deployment file using the <admin-mode> tag or on the command line
using the --admin flag. For example, the following deployment file sets the admin port to 2222:
<deployment>
...
<admin-mode port="2222" />
</deployment>
The same effect can be achieved using the --admin flag on the command line:
$ voltdb create -l ~/license.xml \
-d deployment.xml -H serverA \
--admin=2222
When the admin port is set in both the deployment file and on the command line, the command line setting
supersedes the deployment file.
A.5.3. Web Interface Port (httpd)
The web interface port is the port that VoltDB listens to for web-based connections. This port is used for
both the JSON interface and access to the VoltDB Management Center. There are two related attributes
associated with the web interface. The first attribute is whether the port is enabled. If the port is not enabled,
then neither the JSON interface nor the Management Center are available from the cluster. The second

Server Configuration Options
51
attribute is which port to use. (Note that you can also use the --http flag on the command line to set the
httpd port.) By default, the web interface is enabled and the default port is 8080.
A.5.3.1. JSON Interface
In addition to the overall availability and port for the web interface, you can also specify separately whether
the JSON interface is available. To enable the httpd port but disable the JSON interface, specify the attribute
enabled="false" in the <jsonapi> tag in the deployment file when starting VoltDB. For example,
the following deployment file fragment enables the web interface and the JSON interface, specifying the
alternate port 8083.
<httpd port="8083">
<jsonapi enabled="true"/>
</httpd>
If you change the port number, be sure to use the new port number when connecting to the cluster using
the JSON interface. For example, the following URL connects to the port 8083, instead of 8080:
http://athena.mycompany.com:8083/api/1.0/?Procedure=@SystemInformation
For more information about the JSON interface, see the section on "How the JSON Interface Works" in
the Using VoltDB manual.
A.5.3.2. SSL Encryption (HTTPS)
You can also choose whether to use the basic HTTP protocol for the web interface (the default) or use
SSL encryption via the HTTPS protocol. To enable SSL encryption you need an appropriate SSL certifi-
cate, which VoltDB accesses through a Java key store and trust store. You enable SSL encryption in the
deployment file using the <https> child element of the <httpd> element. Within <https> you specify the
location and password for the key store and, optionally, trust store in separate elements like so:
<httpd>
<https enabled="true">
<keystore path="/etc/mydb/keystore" password="twiddledee"/>
<truststore path="/etc/mydb/truststore" password="twiddledum"/>
</https>
</httpd>
You can specify the passwords as plain text or as a hash. You can use the Jetty libraries included with
VoltDB to hash the password. For example, if VoltDB is installed in the directory ~/voltdb, you can create
an obfuscated version of "twiddledee" with the following command:
$ java -cp $HOME/voltdb/lib/jetty-util*.jar \
org.eclipse.jetty.util.security.Password twiddledee
A.5.4. Internal Server Port
A VoltDB cluster uses ports to communicate among the cluster nodes. This port is internal to VoltDB and
should not be used by other applications.
By default, the internal server port is port 3021 for all nodes in the cluster1. You can specify an alternate
port using the --internal flag when starting the VoltDB process. For example, the following command
starts the VoltDB process using an internal port of 4000:
1In the special circumstance where multiple VoltDB processes are started for one database, all on the same server, the internal server port is
incremented from the initial value for each process.

Server Configuration Options
52
$ voltdb create -l ~/license.xml \
-d deployment.xml -H serverA \
--internal=4000
A.5.5. Replication Port
During database replication, the replica uses a dedicated port to connect to the master database. By default,
the replication port is port 5555. You can use a different port by specifying a different port number either
on the voltdb command line or in the deployment file.
• On the command line, use the --replication flag to specify a different port (and, optionally, a
different network interface):
$ voltdb create -l ~/license.xml \
-d deployment.xml -H serverA \
--replication=6666
• In the deployment file, specify the replication port number using the port attribute of the <dr> tag:
<dr id="3" port="6666" />
Adding the replication port to the deployment file is useful when setting the port for all nodes in the cluster.
Using the command line option is useful for changing the default port for only one node in the cluster or
for specifying a specific network interface. If you specify the replication port in both the deployment file
and on the command line, the command line argument takes precedence.
A.5.6. Zookeeper Port
VoltDB uses a version of Apache Zookeeper to communicate among supplementary functions that require
coordination but are not directly tied to database transactions. Zookeeper provides reliable synchroniza-
tion for functions such as command logging without interfering with the database's own internal commu-
nications.
VoltDB uses a network port bound to the local interface (127.0.0.1) to interact with Zookeeper. By default,
7181 is assigned as the Zookeeper port for VoltDB. You can specify a different port number using the
--zookeeper flag when starting the VoltDB process. It is also possible to specify a different network
interface, like with other ports. However, accepting the default for the zookeeper network interface is
recommended where possible. For example:
$ voltdb create -l ~/license.xml \
-d deployment.xml -H serverA \
--zookeeper=2288

53
Appendix B. Snapshot Utilities
VoltDB provides two utilities for managing snapshot files. These utilities verify that a native snapshot
is complete and usable and convert the snapshot contents to a text representation that can be useful for
uploading or reloading data in case of severe errors.
It is possible, as the result of a design flaw or failed program logic, for a database application to become
unusable. However, the data is still of value. In such emergency cases, it is desirable to extract the data
from the database and possibly reload it. This is the function that save and restore perform within VoltDB.
But there may be cases when you want to use the data created by a VoltDB snapshot elsewhere. The goal
of the utilities is to assist in that process. The snapshot utilities are:
•snapshotconvert converts a snapshot (or part of a snapshot) into text files, creating one file for each
table in the snapshot.
•snapshotverify verifies that a VoltDB snapshot is complete and usable.
To use the snapshotconvert and snapshotverify commands, be sure that the voltdb /bin direc-
tory is in your PATH, as described in the section on "Setting Up Your Environment" in the Using VoltDB
manual. The following sections describe how to use these two commands.

Snapshot Utilities
54
snapshotconvert
snapshotconvert — Converts the tables in a VoltDB snapshot into text files.
Syntax
snapshotconvert {snapshot-id} --type {csv|tsv} \
--table {table} [...] [--dir {directory}]... \
[--outdir {directory}]
snapshotconvert --help
Description
SnapshotConverter converts one or more tables in a valid snapshot into either comma-separated (csv) or
tab-separated (tsv) text files, creating one file per table.
Where:
{snapshot-id} is the unique identifier specified when the snapshot was created. (It is also the name
of the .digest file that is part of the snapshot.) You must specify a snapshot ID.
{csv|tsv} is either "csv" or "tsv" and specifies whether the output file is comma-separated or
tab-separated. This argument is also used as the filetype of the output files.
{table} is the name of the database table that you want to export to text file. You can spec-
ify the --table argument multiple times to convert multiple tables with a single
command.
{directory} is the directory to search for the snapshot (--dir) or where to create the resulting
output files (--outdir). You can specify the --dir argument multiple times to
search multiple directories for the snapshot files. Both --dir and --outdir are
optional; they default to the current directory path.
Example
The following command exports two tables from a snapshot of the flight reservation example used in the
Using VoltDB manual. The utility searches for the snapshot files in the current directory (the default) and
creates one file per table in the user's home directory:
$ snapshotconvert flightsnap --table CUSTOMER --table RESERVATION \
--type csv -- outdir ~/

Snapshot Utilities
55
snapshotverify
snapshotverify — Verifies that the contents of one or more snapshot files are complete and usable.
Syntax
snapshotverify [snapshot-id] [--dir {directory}] ...
snapshotverify --help
Description
SnapshotVerifier verifies one or more snapshots in the specified directories.
Where:
[snapshot-id] is the unique identifier specified when the snapshot was created. (It is also the name
of the .digest file that is part of the snapshot.) If you specify a snapshot ID, only
snapshots matching that ID are verified. If you do not specify an ID, all snapshots
found will be verified.
{directory} is the directory to search for the snapshot. You can specify the --dir argument
multiple times to search multiple directories for snapshot files. If you do not specify
a directory, the default is to search the current directory.
Examples
The following command verifies all of the snapshots in the current directory:
$ snapshotverify
This example verifies a snapshot with the unique identifier "flight" in either the directory /etc/volt-
db/save or ~/mysaves:
$ snapshotverify flight --dir /etc/voltdb/save/ --dir ~/mysaves
