Admin Instructions
User Manual:
Open the PDF directly: View PDF ![]() .
.
Page Count: 20

1
Grant Activity Reporting and Scheduling – G.A.R.S.
GARS Supervisor Role Instructions
2
Landing Page Tab Overview:
Landing Page:
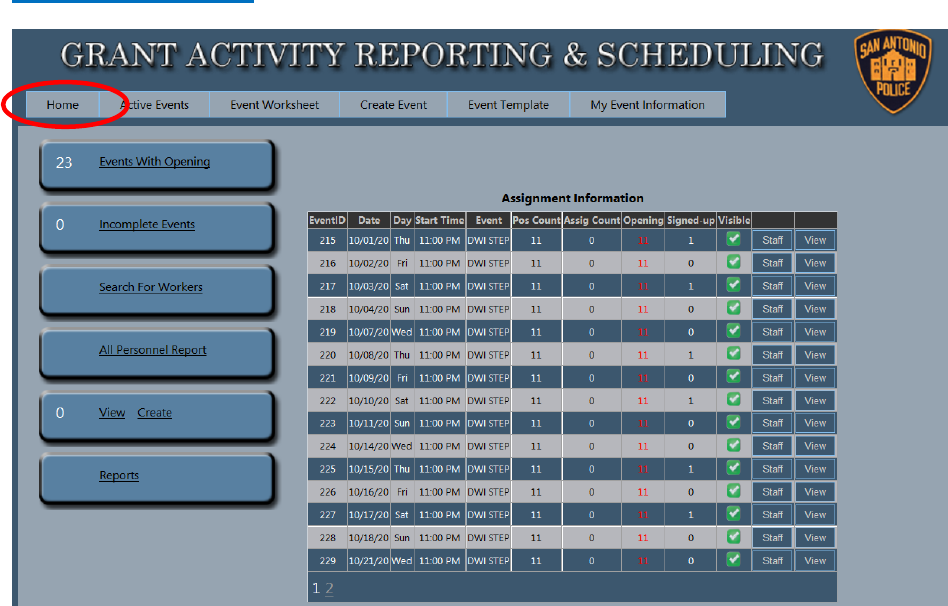
Top Tabs:
• Home – Basic information about the active assignments and tab selection. Similar to
in mainframe
• Active Events – By selecting an event from the dropdown, this is where you will find the
assignment shell information, status of officers, cost and other information related to the
assignment. Combines mainframe functions
3
• Event Worksheet – Gives the ability to print, create or change the worksheet. This is the same
format as in Patrol Activity system
• Create Event – to create new events once they have been built in the template tab, then
it’s just selecting the appropriate information from the dropdowns.
• Event Template – build completely new events by filling in the required information. Once the
template has been built, creating daily assignments becomes much simpler.
• My Event Information – Displays the supervisors assignment information
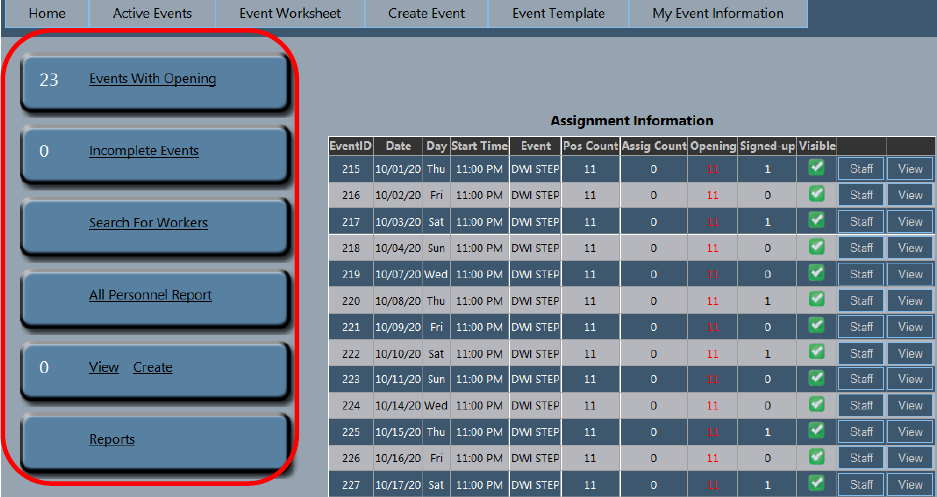
Left Page Tabs
• The ‘Events With Opening’ tab will only show assignments that have openings
• The ‘Incomplete Events’ tab will show only assignments that still need to be
completed and invoiced
• The ‘Search For Workers’ can either pull up the officers information, directly place
them in an assignment or place them in queue for potential download
4
• The ‘All Personnel Report’ tab will show how many hours officers have accumulated
in the system
• The ‘View and Create’ selections create the invoices for payroll
• The ‘Reports’ tab provides stats such as costs, man-hours, avg cost per hour
In Depth Instruction
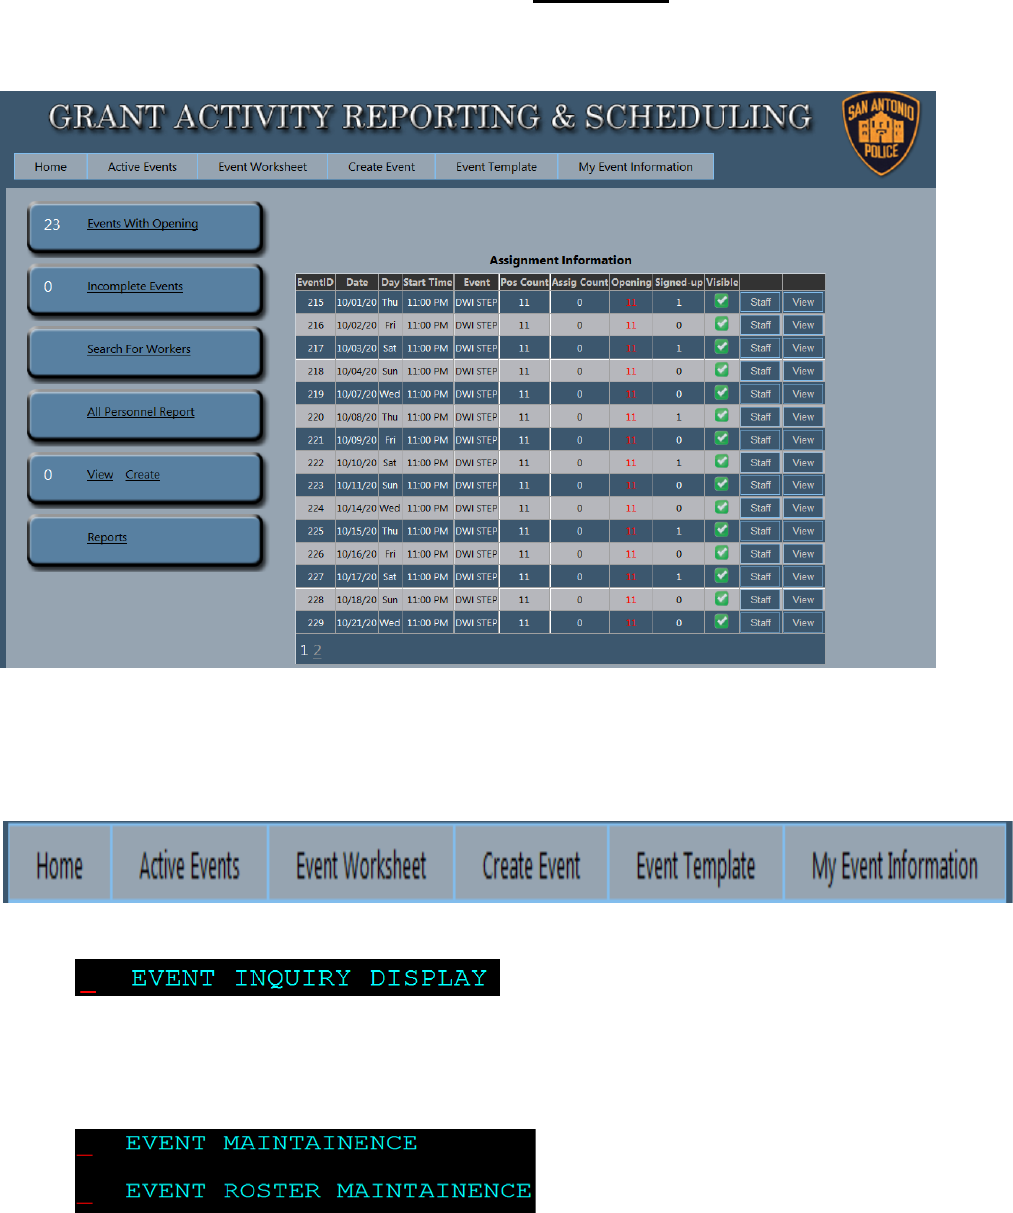
HOME: Landing page
Note about Home Tab:
• The assignments will disappear from the home page on the day following the assignment. For
example, all 3 assignments on 5/18 will not be displayed on the home page once you log into GARS
on the 19th. The assignments must be opened through ‘Active Events’
5
The column headers for the assignment are:
1. EventID – Unique number associated with a specific event. This number will help you
identify a specific assignment when working in the different tabs
2. Event – Name of the assignment
3. Date – Date of assignment
4. Day – Displays the day of the assignment
5. Start Time – Time assignment begins
6. Pos Count – Number of positions
7. Assig Count – Displays the number of people assigned
8. Opening – Displays how many openings for the assignment
9. Signed-up – Shows how many people signed up and are in queue
10. Visible – Confirms if the assignment is visible for officers to see when signing up in
GARS.
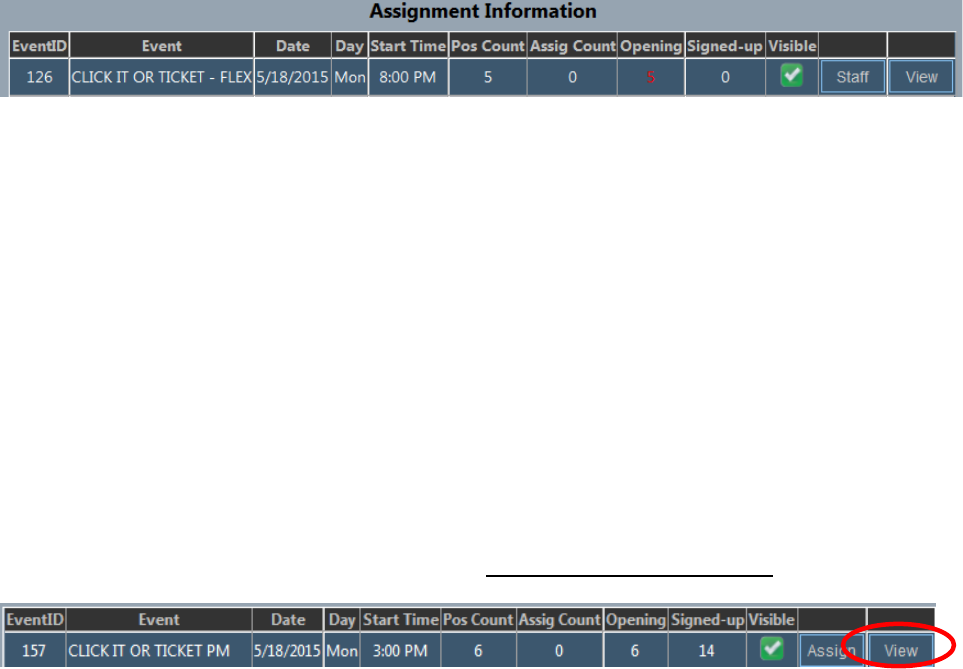
11. Staff – By selecting ‘Staff’, the computer will load the assignment with officers
12. View – By selecting ‘View’, the shell of the assignment, officers queue, ability to assign
event or assign specific officers are displayed. It’s a shortcut to ‘Active Events’
If you select ‘view’, the page below appears…….
6
7
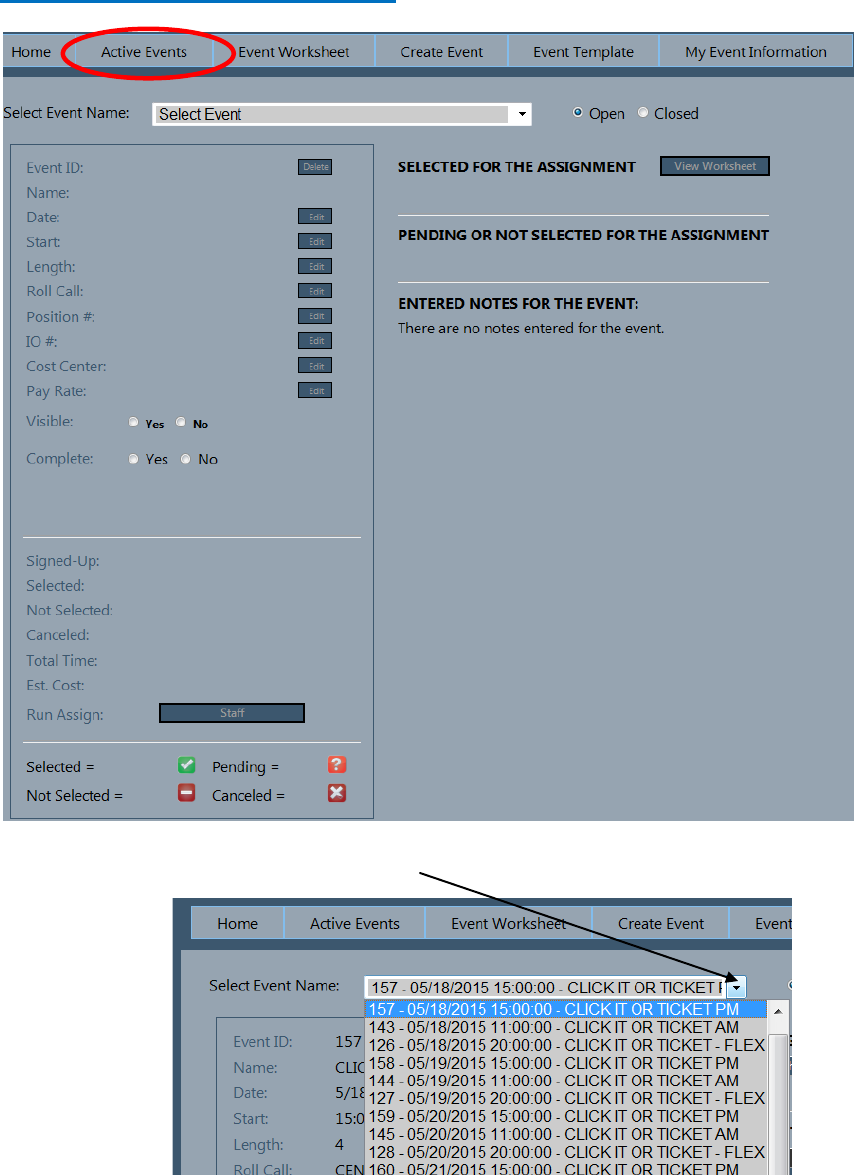
ACTIVE EVENTS: Landing page
Must select an assignment from the dropdown
8
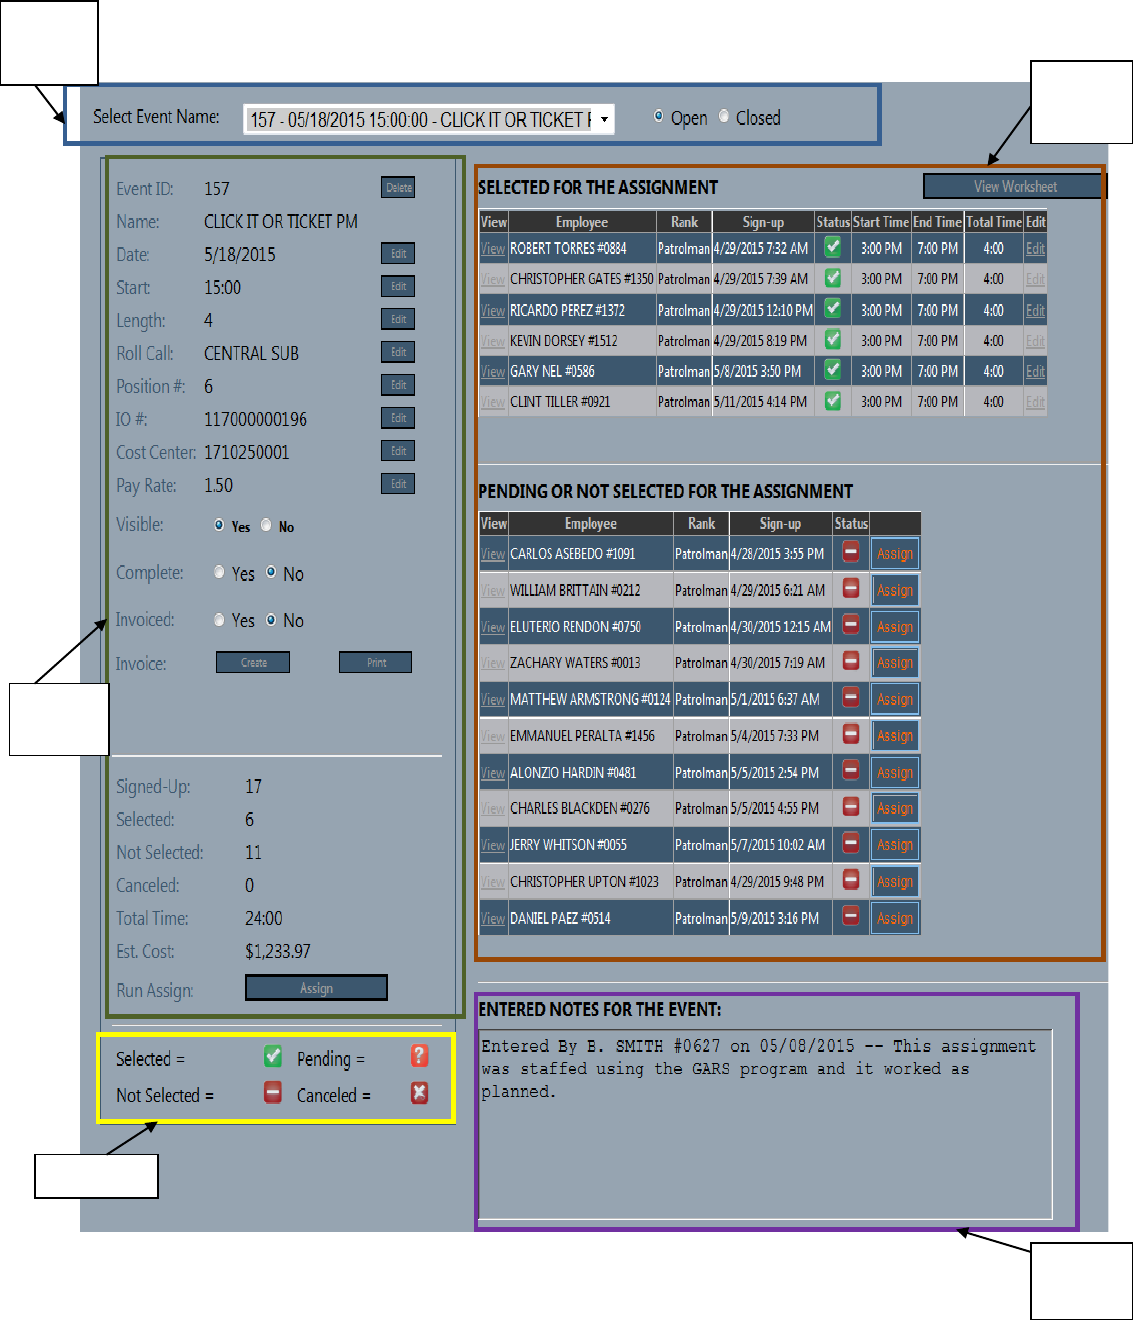
Once you select an event, the following page is displayed. Let’s break the information down on this
important page.
Section
1
Section
3
Section 4
Section
5
Section
2
9
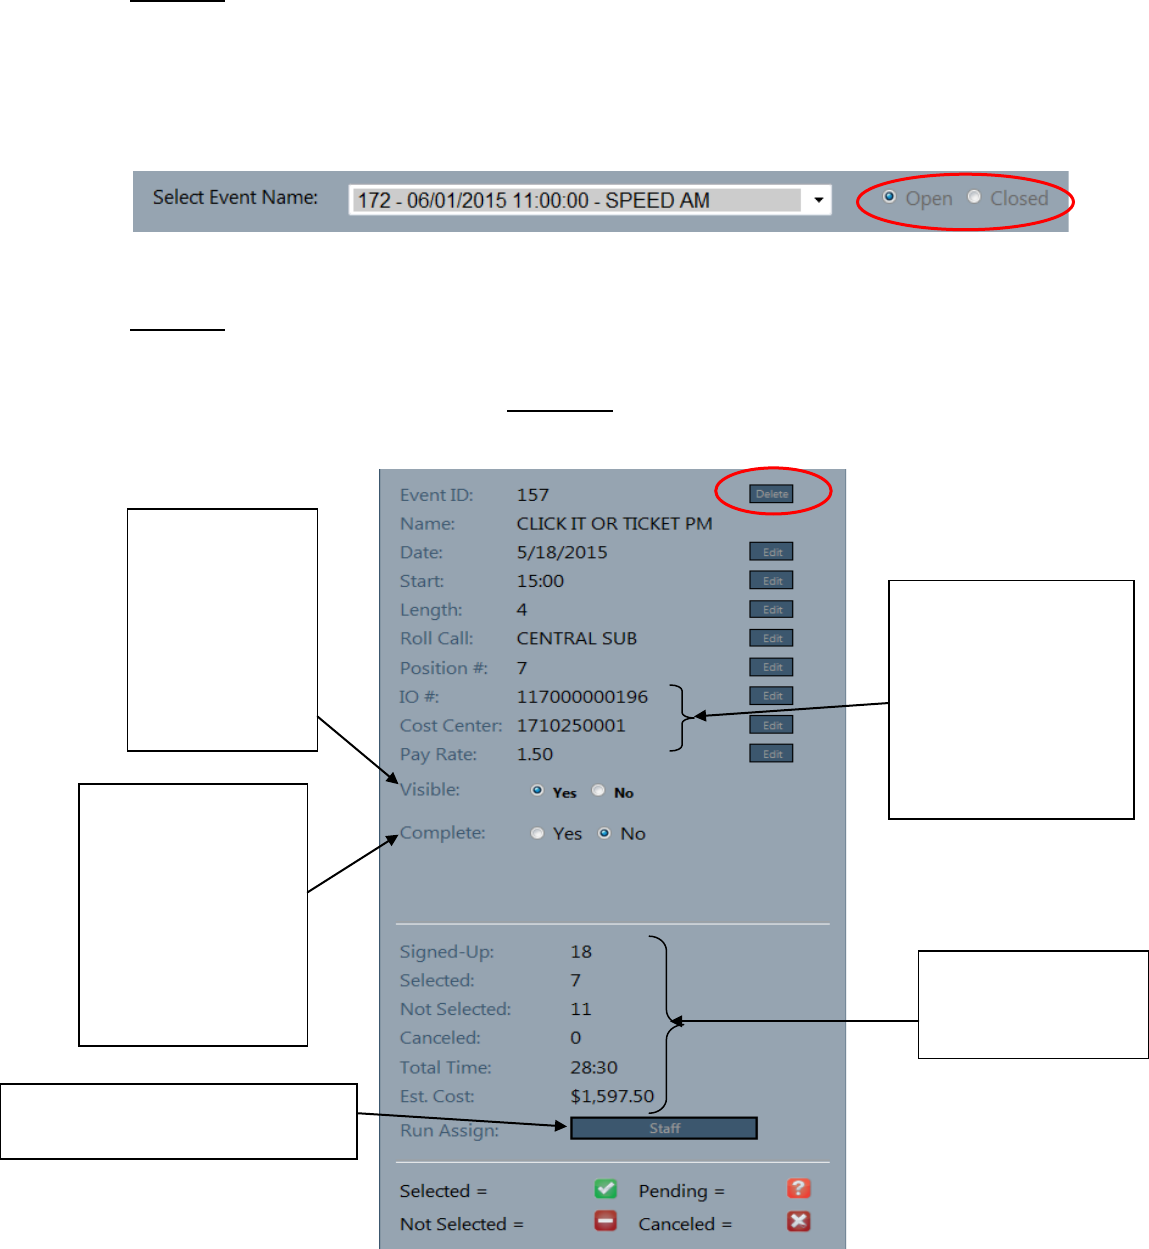
SECTION 1
Event ID 172 was selected. Notice the radio button ‘Open’ and ‘Closed’ to the right. There is a separate
dropdown selection for ‘Open’ and ‘Closed’ assignments. Open assignments are still active and needs to be
completed. Once the assignment is complete and has been closed for invoice, then the assignment can be
found in the ‘Closed’ dropdown menu.
SECTION 2
The information in the event template is shown in this section of the ‘Active Events’ page and can be
edited if necessary. The ‘Delete’ function completely eliminates the record from the system and neither
the assignment nor the information can be retrieved.
The ‘Visible’
button allows the
creator to make
the assignment
visible or hidden
on the officer’s
home page
‘Complete’ – Once an
assignment has been
updated and is ready
to be paid, select
‘yes’. The event
becomes locked at
this point. To unlock,
simply select ‘no’
The pems index and
police/ personnel codes
have been eliminated
and the IO and Cost
Center numbers are
now the accounting
information
General sign up
counts, time total and
cost estimate
To manually staff the assignment at
anytime, click here
10
Selecting ‘Yes’ for ‘Complete’ is like finalizing an event in mainframe with FA which would change the
status to ‘C’. To unlock the assignment, select ‘No’ for ‘Complete’ and that unlocks the event to allow
changes.
Selecting ‘Yes’ for ‘Invoiced’ permanently locks the assignment since the payment information is sent to
financing. It is like the ‘X’ status in mainframe.
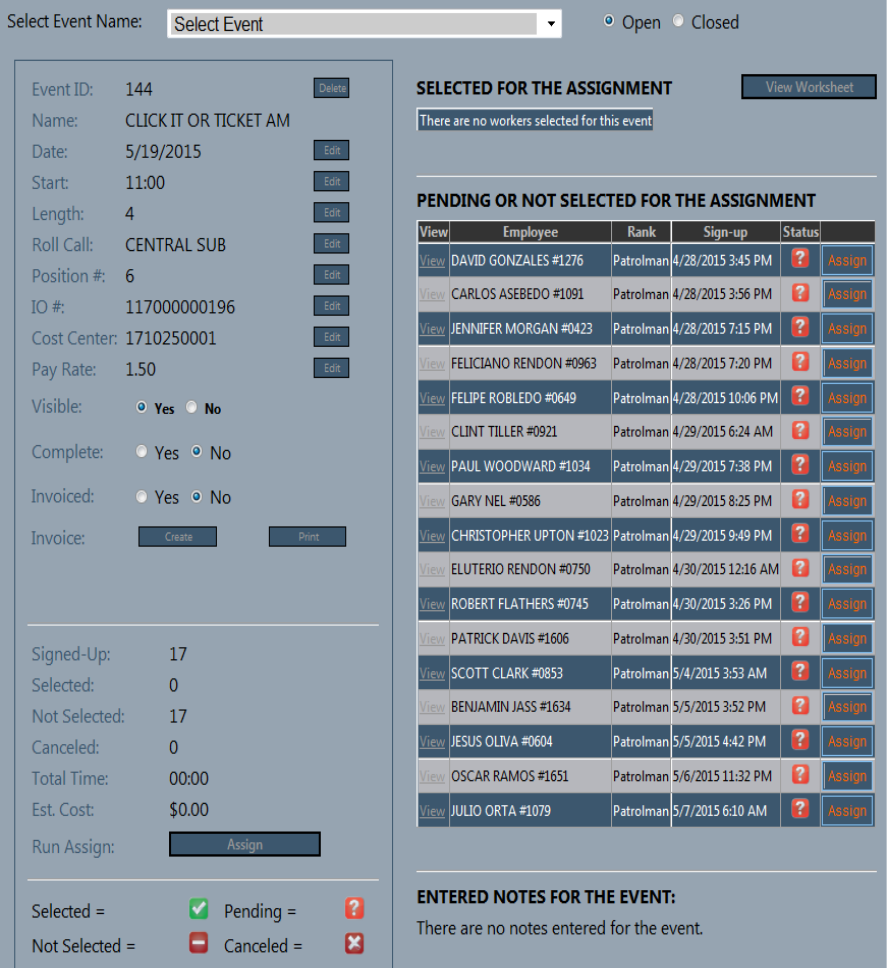
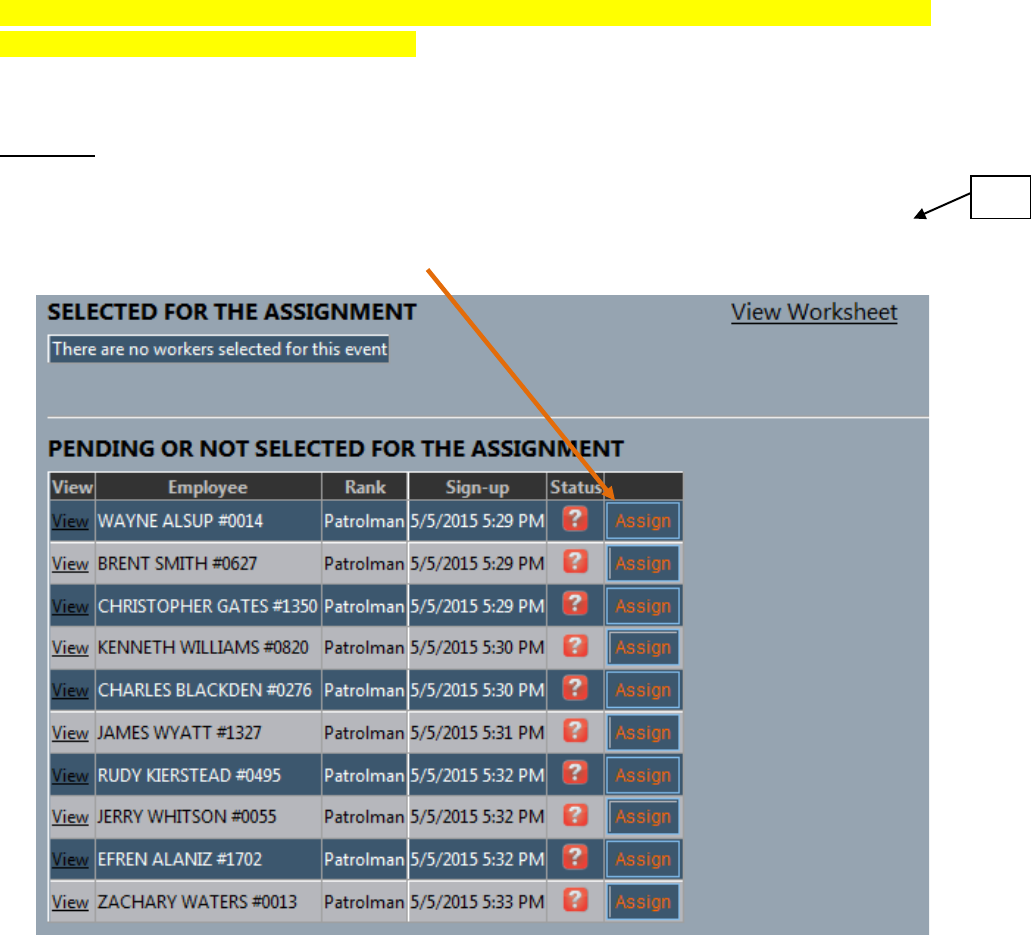
SECTION 3
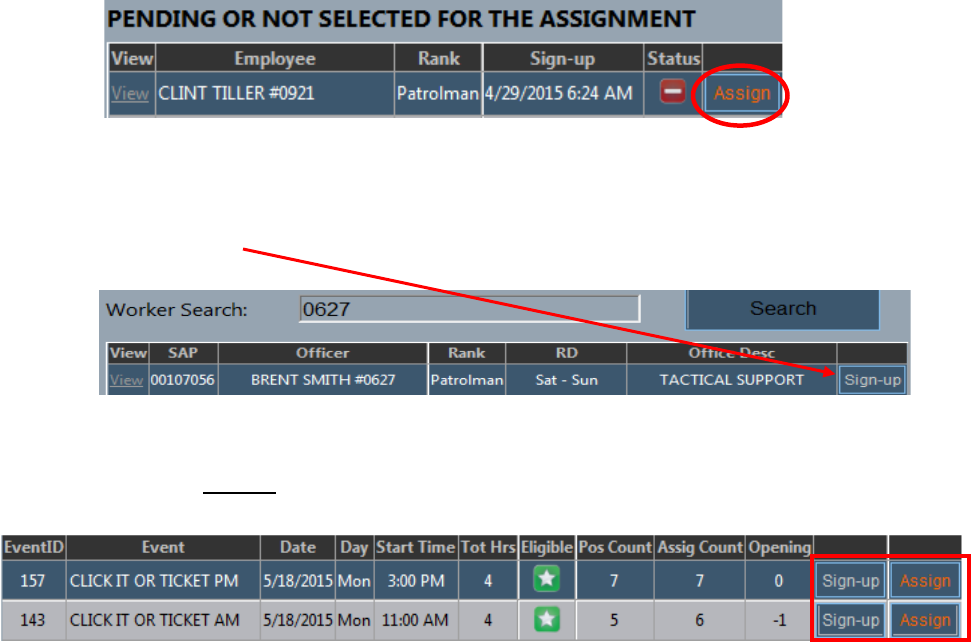
Since the assignment has not been staffed yet, all officers who signed up (listed by sign up time order) are
displayed under the “PENDING OR NOT SELECTED FOR THE ASSIGNMENT” section. From here you can
load officers individually just by clicking the ‘Assign’ button.
TIP
11
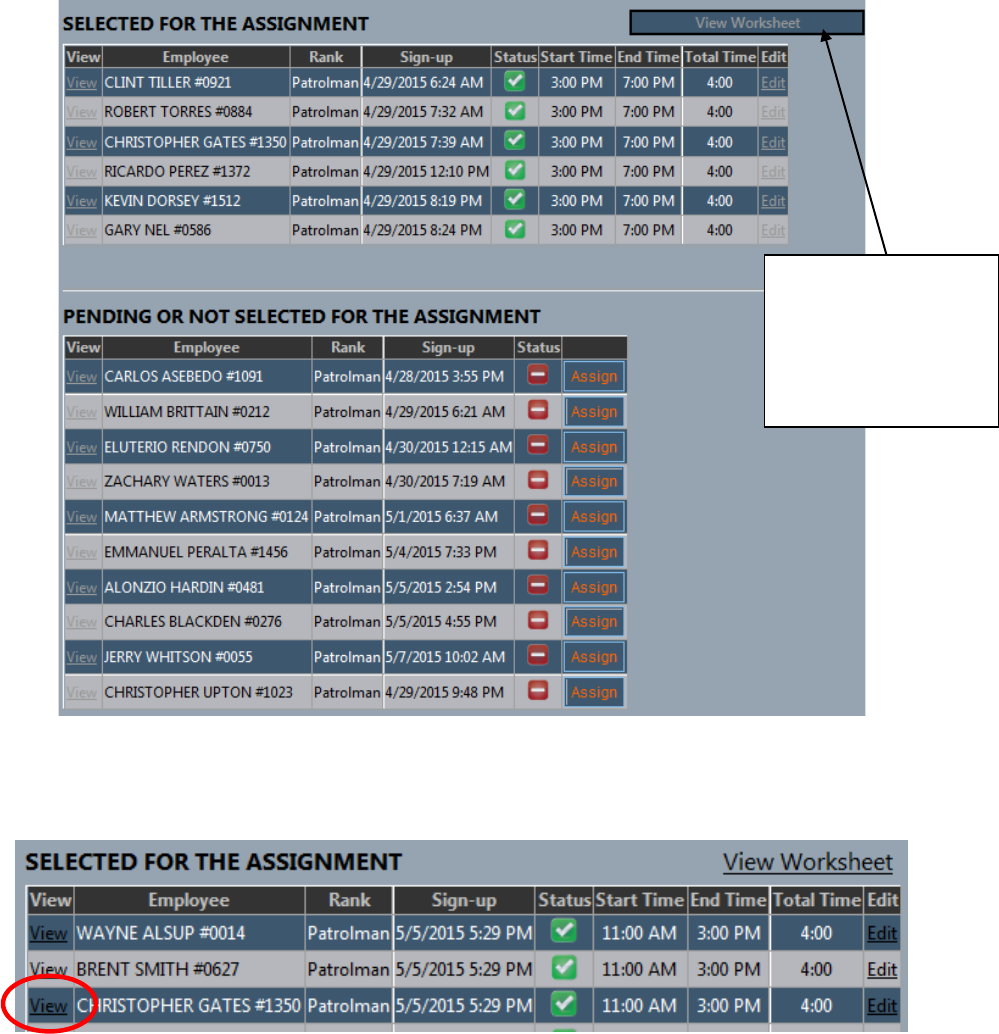
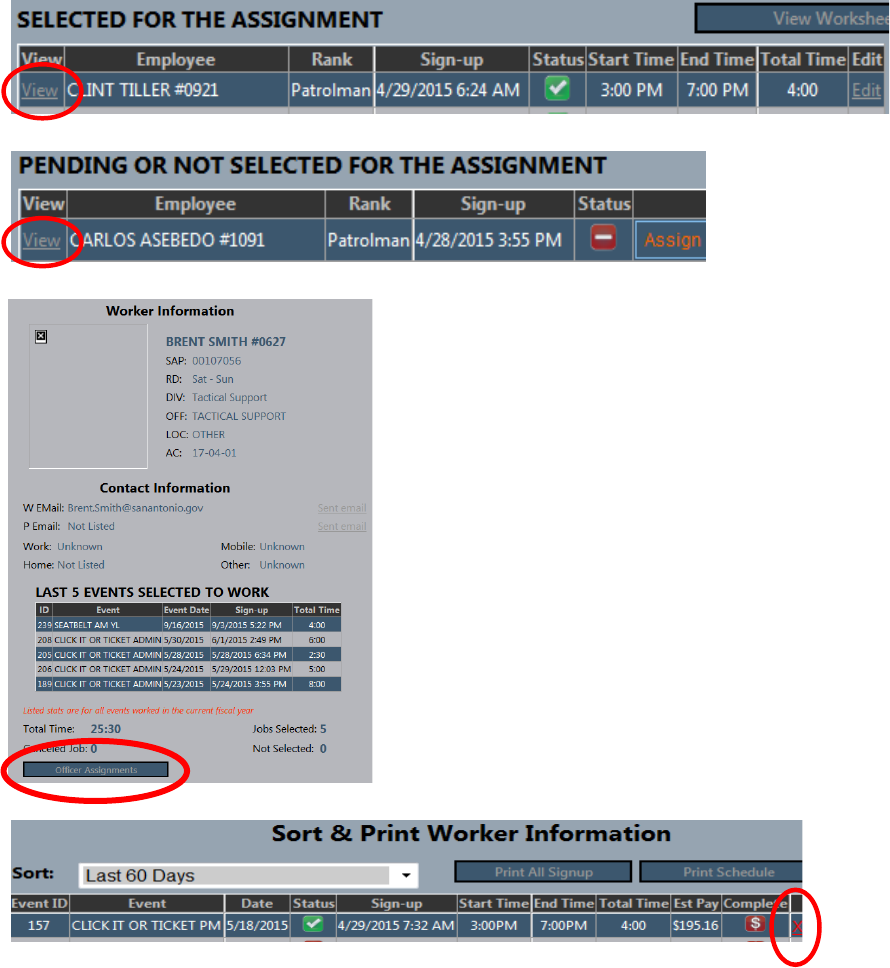
Once the assignment has been staffed, those selected officers are moved to the “SELECTED FOR THE
ASSIGNMENT” section. Those that signed up but weren’t selected remain in the pending / not selected
queue.
There are 2 choices once an officer has been selected to make adjustments - ‘VIEW’ and ‘EDIT’
Once the worksheets
have been made, you
can print them from
the ‘Active Events’
page.
12
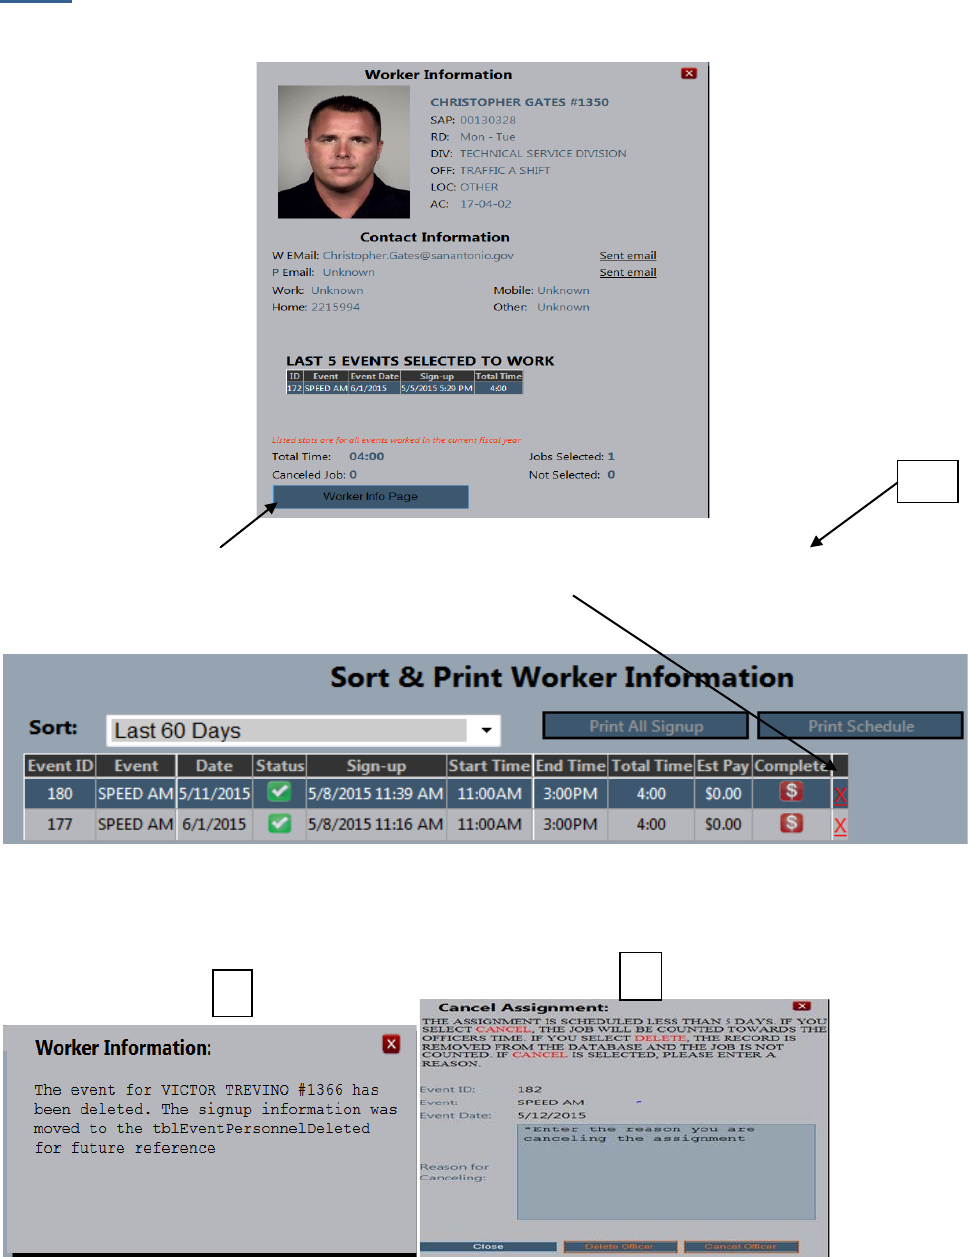
VIEW – Shows the officers information including number of jobs selected, canceled and not selected. In
addition it will have a total number of overtime hours in GARS.
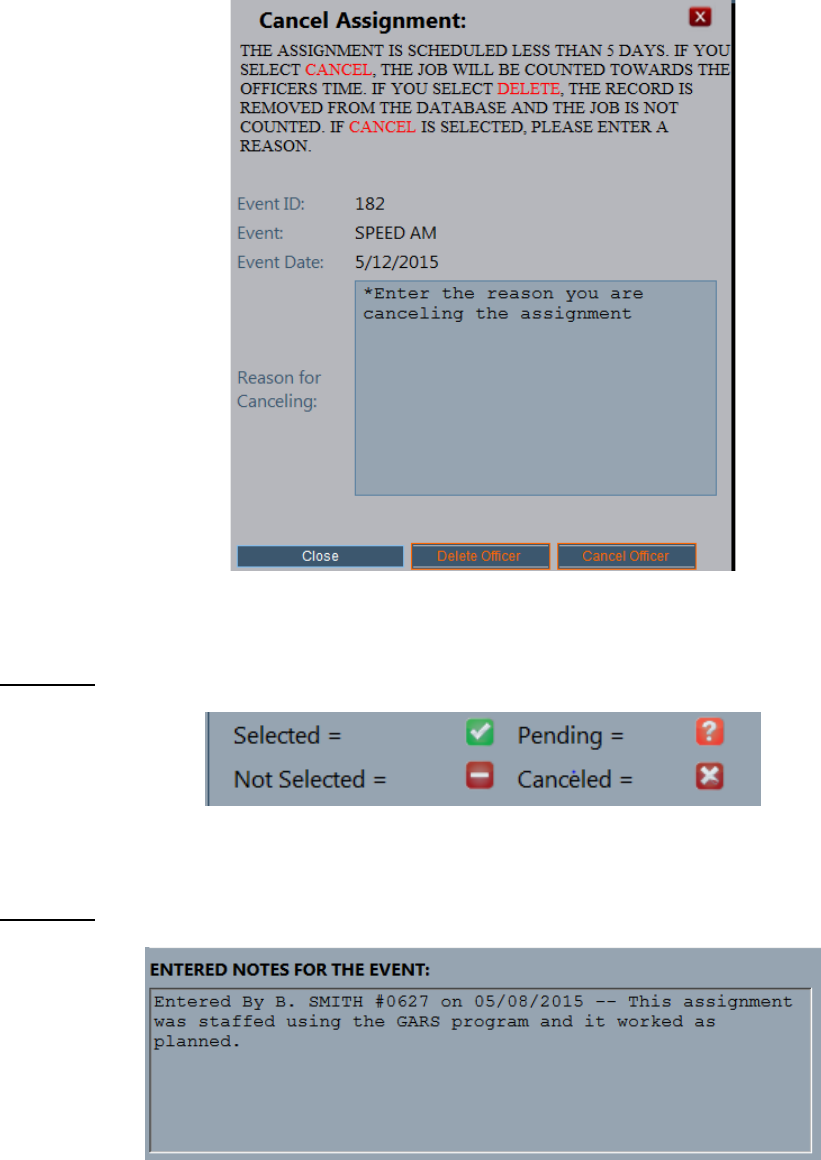
Select ‘Worker Info Page’ to see the officer’s individual sign up page. From here you can cancel an
officer’s sign up request or an assignment by clicking the red ‘X’. A confirmation pop up will appear (See
1 and 2 below).
1) – If canceled 5 days or more from the date of assignment. 2) - If canceled less than 5 days of the
assignment, a reason for canceling must be stated.
TIP
1
2
13
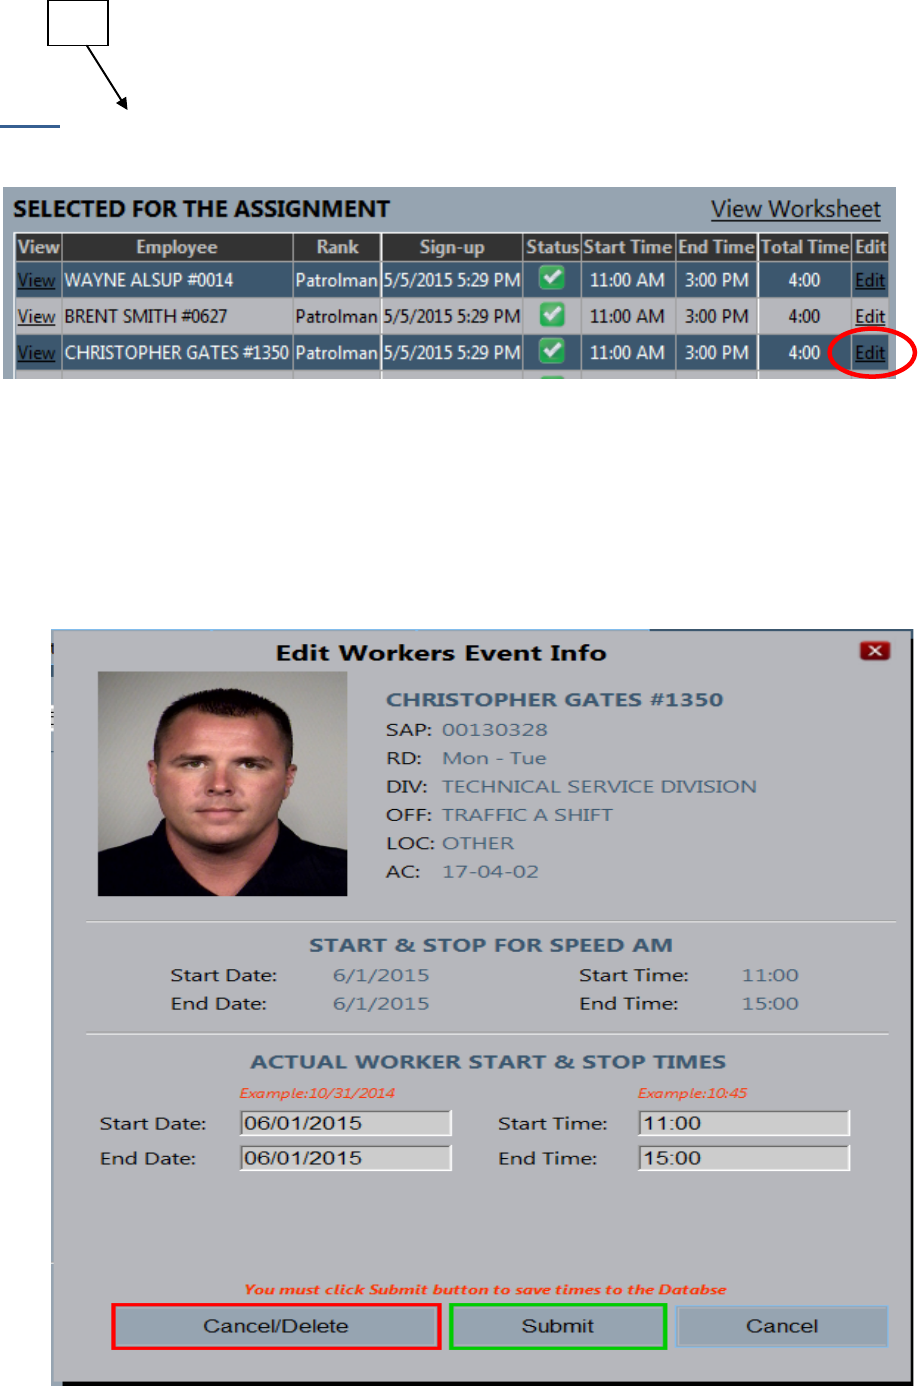
EDIT - Update officer’s start and end times. Through ‘Edit’ you may also cancel or delete the officer
from this page.
THE ‘CANCEL/DELETE’ FEATURE MAY BE REMOVED FROM THE EDIT PAGE BUT FOR NOW YOU CAN USE IT
To cancel an officer assigned to an event, select ‘edit’, click on ‘Cancel/Delete’, list a reason and pick either
the ‘cancel or delete assignment’ button. If ‘cancel’ is selected, then the hours count against the officer if
he is removed less than 5 days from the assignment. If ‘delete’ is selected, the officer is completely
removed from the database and the hours do not count against him. In mainframe, cancel is like using EA
and delete is like using **.
TIP
14
SECTION 4 - It’s a simple legend of the officer’s status
SECTION 5 – Notes written from the ‘Worksheet’ page are displayed here.

15
EVENT Worksheet: Landing Page
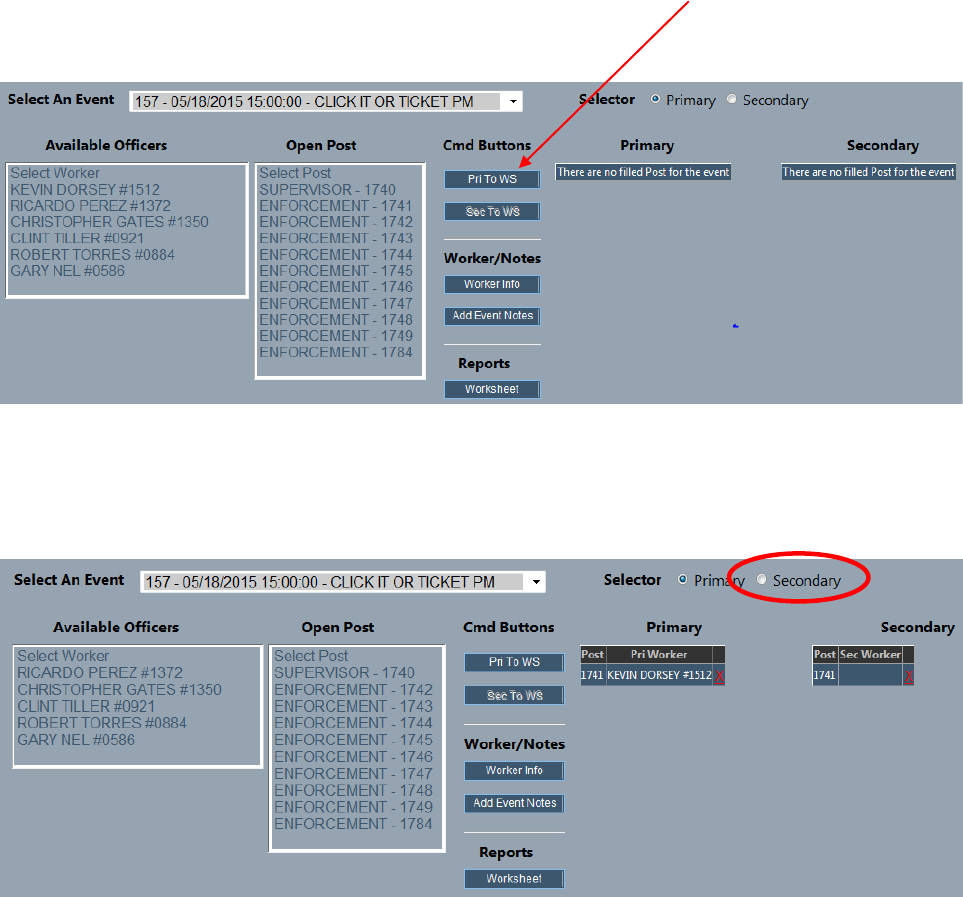
Once the event is selected, you will see ‘Available Officers’ and ‘Open Post’
16
To make the worksheet, simply click a name, click post number and click ‘Pri To WS’ (Primary to
Worksheet). The officer moves and is posted under ‘Primary’. Just keep clicking a name, post number and
‘Pri To WS’ until all officers are posted.
To post two officers together, click the ‘Secondary’ button, click name, post number and then select ‘Sec To
WS’
17
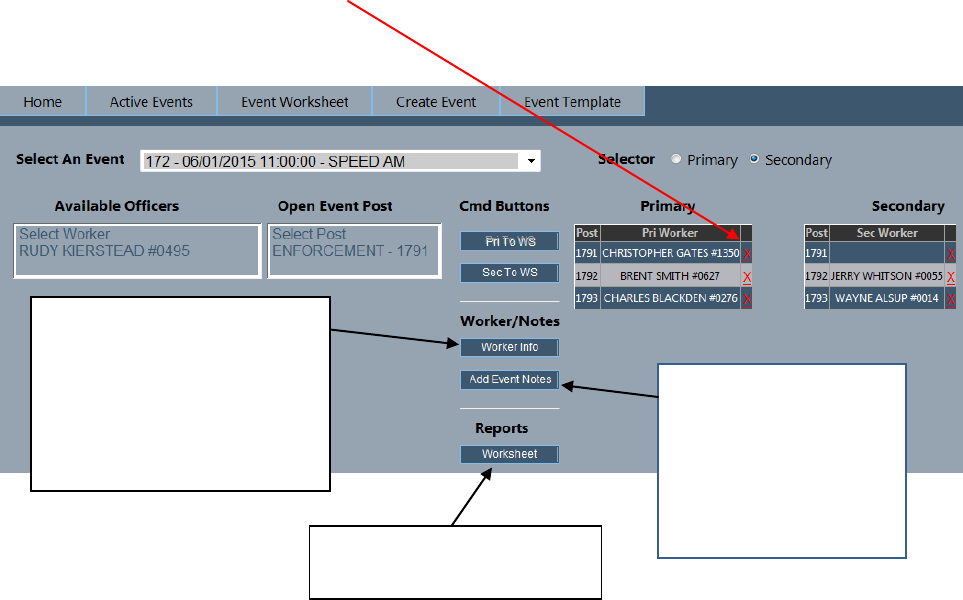
To change officer’s posts, click on the ‘X’ next to their name and the system moves them back to ‘Available
Officers’. Then you can repost by clicking name, post number and selecting either ‘Pri To WS’ or ‘Sec To
WS’
If someone is listed under
‘Available Officers’, you can
pull up the worker
information by clicking their
name and selecting ‘Worker
Info’
Notes can be added to
the worksheet. For
example; heavy rains
tonight and light traffic
by selecting ‘Add Event
Notes’
Print worksheets by selecting
‘Worksheet’
18
How To:
1. Find the assignment I am supervising – select ‘Active Events’ and pick from the dropdown.
If the job is on the ‘home’ page, then you can click ‘view’.
2. Add officer to an assignment –
a. If the officer is in the ‘pending or not selected’ queue, then just click ‘assign’.
b. If the officer is not in queue, select ‘search for workers’ on the home page, enter a
badge number or partial name and hit ‘search’. Once the officer’s name appears
select ‘sign up’. This puts the officer in queue to potentially be downloaded.
c.
d. ‘Sign up’ puts the officer in queue to potentially be downloaded. ‘Assign’ will load
the officer directly into the assignment(s).
19
3. To cancel or remove an officer – **** This is temporary****
a. Select from either ‘active events’ dropdown or ‘view’ from home page. Click on
‘view’ next to the name from either the ‘selected’ or ‘pending/not selected’
column. Select ‘officer assignments’ and then select ‘X’. If the assignment is in less
than 5 days, another pop will appear asking for a reason.
20
4. To make worksheets – see page 14 – 16.
