Administrator's Guide To Portal Capabilities For Microsoft Dynamics 365
User Manual:
Open the PDF directly: View PDF ![]() .
.
Page Count: 328 [warning: Documents this large are best viewed by clicking the View PDF Link!]
1
Administrator’s Guide to Portal Capabilities for
Microsoft Dynamics 365

2
Contents
What’s new .............................................................................................................................................. 11
Privacy notice ....................................................................................................................................... 11
Installation Guide ........................................................................................................................................ 13
Provision a portal ..................................................................................................................................... 13
Before you provision a portal................................................................................................................ 13
Provision a portal .................................................................................................................................. 13
Troubleshoot Provisioning .................................................................................................................... 17
Set up custom domains and SSL certificates for a Dynamics 365 portal ............................................ 18
Enable multiple-language portal support ................................................................................................. 20
Supported languages ........................................................................................................................... 21
Create content in multiple languages ................................................................................................... 22
Configuration Guide .................................................................................................................................... 25
Configure a Dynamics 365 portal ............................................................................................................ 25
Create web roles for portals..................................................................................................................... 26
Attributes and relationships .................................................................................................................. 26
Optional default web role for authenticated users ................................................................................ 27
Optional default web role for unauthenticated users ............................................................................ 27
Enable help for Dynamics 365 portals ................................................................................................. 27
Customize Dynamics 365 portal forms, dashboards, and reports ....................................................... 27
Change the Dynamics 365 instance, audience, or type of portal ......................................................... 28
Manage knowledge articles using content access levels ........................................................................ 29
Create content access levels ............................................................................................................... 29
Assign content access levels to knowledge articles ............................................................................ 29
Assign content access levels to portal users ....................................................................................... 29
Use faceted search to improve portal search .......................................................................................... 30
Enable or disable faceted search ......................................................................................................... 30
Group entities as part of a record type for faceted view ...................................................................... 30
Use faceted search to improve knowledge search results ................................................................... 30
Engage with communities by using the community portal ....................................................................... 31
Set up and moderate forums ................................................................................................................... 32
Create a new forum .............................................................................................................................. 32
Edit an existing forum ........................................................................................................................... 32
Manage forums on a portal .................................................................................................................. 32
Forum attributes used by portals .......................................................................................................... 33
Manage forum threads ............................................................................................................................. 35
Manage forum threads in Microsoft Dynamics 365 .............................................................................. 35
Create forum threads on the portal ...................................................................................................... 36
Forum thread attributes used by portals .............................................................................................. 37
Manage forum thread types in Dynamics 365 ...................................................................................... 38
Forum thread type attributes ................................................................................................................ 38
Configure and manage knowledge categories and articles ..................................................................... 39
3
Create a new knowledge category ....................................................................................................... 39
Associate knowledge articles ............................................................................................................... 39
Delete a knowledge category ............................................................................................................... 39
Configure web roles for a PRM portal ..................................................................................................... 40
Partner administrator ............................................................................................................................ 40
Partner manager .................................................................................................................................. 40
Partner seller ........................................................................................................................................ 40
Create a partner account on a partner relationship management (PRM) portal ..................................... 41
Create a partner account ...................................................................................................................... 41
Associate partner contacts with an account ......................................................................................... 41
Get started with the portal content editor ................................................................................................. 41
Use the content editor toolbar .............................................................................................................. 42
Edit the header ..................................................................................................................................... 42
Add a new webpage ............................................................................................................................. 42
Edit the primary navigation ................................................................................................................... 44
Manage child pages ............................................................................................................................. 44
Delete a page ....................................................................................................................................... 44
Use the front-side editing engine to publish content ............................................................................... 45
Content editor commands and controls ............................................................................................... 45
Create a link ......................................................................................................................................... 47
Link properties and commands ............................................................................................................ 47
Insert an image ..................................................................................................................................... 48
Image properties and commands ......................................................................................................... 48
Browse pages and files by using the file picker ................................................................................... 49
File picker commands .......................................................................................................................... 49
Create a theme for your portal ................................................................................................................. 50
What is Bootstrap? ............................................................................................................................... 50
Implement portal templates by using Bootstrap ................................................................................... 50
Customize Bootstrap ............................................................................................................................ 51
Apply a custom Bootstrap theme to your website ................................................................................ 51
Additional portal theme options ............................................................................................................ 52
Configure site settings for portals ............................................................................................................ 53
Manage site settings in Dynamics 365 ................................................................................................. 53
Configure Dynamics 365 portal authentication ........................................................................................ 54
Place child nodes by using shortcuts for portals ..................................................................................... 54
Manage shortcuts in Dynamics 365 ..................................................................................................... 54
Attributes and relationships .................................................................................................................. 55
Secure shortcuts .................................................................................................................................. 55
Navigate with shortcuts ........................................................................................................................ 56
Register and invite for a portal ................................................................................................................. 56
Local authentication ............................................................................................................................. 56
External authentication ......................................................................................................................... 56
Account sign-up (registration) .............................................................................................................. 57
Configure a contact for use on a portal ................................................................................................... 57
4
Invite contacts to your portals .................................................................................................................. 58
Edit the Send Invitation workflow email template ................................................................................. 58
Create and configure invitations ........................................................................................................... 58
Run the Send Invitation workflow ......................................................................................................... 58
Set authentication identity for a portal ..................................................................................................... 59
Requirements ....................................................................................................................................... 60
Authentication overview ....................................................................................................................... 60
Forgot password or password reset ..................................................................................................... 61
Redeem an invitation ............................................................................................................................ 62
Manage user accounts through profile pages ...................................................................................... 63
Set or change a password .................................................................................................................... 63
Change or confirm an email address ................................................................................................... 63
Change or confirm mobile phone ......................................................................................................... 64
Enable two-factor authentication .......................................................................................................... 64
Manage external accounts ................................................................................................................... 65
Enable ASP.NET identity authentication .............................................................................................. 65
Enable/disable user registration ........................................................................................................... 67
User credential validation ..................................................................................................................... 67
User account lockout settings .............................................................................................................. 68
OAuth2 provider settings for portals ........................................................................................................ 69
Create OAuth applications ................................................................................................................... 69
Create site settings using OAuth2 ........................................................................................................ 71
Open ID Connect provider settings for portals ........................................................................................ 73
OpenID settings for Azure Active Directory .......................................................................................... 74
Create site settings using OpenID ....................................................................................................... 74
WS-Federation provider settings for portals ............................................................................................ 77
Create an AD FS relying party trust ..................................................................................................... 77
WS-Federation settings for Azure Active Directory .............................................................................. 80
SAML 2.0 provider settings for portals .................................................................................................... 81
AD FS (IdP) .......................................................................................................................................... 82
SAML 2.0 settings for Azure Active Directory ...................................................................................... 86
Shibboleth Identity Provider 3 .............................................................................................................. 87
Configure AD FS by using PowerShell ................................................................................................ 89
Facebook App (Page Tab) authentication for portals .............................................................................. 92
Prerequisites......................................................................................................................................... 92
Configure IIS......................................................................................................................................... 92
Configure display mode ........................................................................................................................ 93
Test the site bindings ........................................................................................................................... 93
Set up the Facebook app ..................................................................................................................... 93
Publish the app ..................................................................................................................................... 94
Add the Facebook page tab to your Facebook page ........................................................................... 94
Control webpage access for portals ........................................................................................................ 95
Assign a permission set to a web role for portals .................................................................................... 97
Add record-based security by using entity permissions for portals ......................................................... 98
5
Adding entity permissions to a web role ............................................................................................... 98
Global scope......................................................................................................................................... 99
Contact scope ...................................................................................................................................... 99
Account scope .................................................................................................................................... 100
Self scope ........................................................................................................................................... 100
Parental scope ................................................................................................................................... 100
Attributes and relationships ................................................................................................................ 100
Global permissions for tasks related to leads .................................................................................... 101
Contact-scoped permissions for tasks ............................................................................................... 103
Define entity forms and custom logic within the Dynamics 365 portal .................................................. 104
Add a form to your portal .................................................................................................................... 104
Secure your forms .............................................................................................................................. 105
Web form properties for portals ............................................................................................................. 105
Web form attributes ............................................................................................................................ 106
Progress indicator settings ................................................................................................................. 107
“Save changes” warning ..................................................................................................................... 109
Web form metadata ............................................................................................................................ 109
Web form steps for portals ..................................................................................................................... 117
Load form and load tab step type .......................................................................................................... 119
In this topic ......................................................................................................................................... 119
Settings ............................................................................................................................................... 119
Additional settings .............................................................................................................................. 121
Form options....................................................................................................................................... 122
Associate the current portal user with the creation of a record .......................................................... 122
Entity reference .................................................................................................................................. 122
Additional functionality ........................................................................................................................ 124
Redirect step type .................................................................................................................................. 125
Conditional step type ............................................................................................................................. 126
Attributes ............................................................................................................................................ 126
Format ................................................................................................................................................ 127
Custom JavaScript ................................................................................................................................. 128
Form fields .......................................................................................................................................... 128
Additional client-side field validation .................................................................................................. 128
General validation .............................................................................................................................. 129
Web form metadata for portals .............................................................................................................. 130
Web form metadata properties ........................................................................................................... 130
Web form metadata type = Attribute .................................................................................................. 131
Web Form metadata type = Section ................................................................................................... 136
Web Form metadata type = Tab ........................................................................................................ 136
Web Form subgrid configuration for portals .......................................................................................... 137
Adding subgrid metadata to your form ............................................................................................... 137
Attributes ............................................................................................................................................ 139
Create action ...................................................................................................................................... 140
Download action ................................................................................................................................. 141
6
Associate action ................................................................................................................................. 142
Details action ...................................................................................................................................... 143
Edit action ........................................................................................................................................... 144
Delete action....................................................................................................................................... 146
Workflow action .................................................................................................................................. 147
Disassociate action ............................................................................................................................ 147
Notes configuration for web forms for portals ........................................................................................ 148
Attributes ............................................................................................................................................ 149
Create dialog options ......................................................................................................................... 150
Edit dialog options .............................................................................................................................. 151
Delete dialog options .......................................................................................................................... 152
Add a webpage to render a list of records ............................................................................................. 153
Add an entity list to your portal ........................................................................................................... 154
Entity list attributes and relationships ................................................................................................. 154
Add custom Javascript ....................................................................................................................... 156
Entity list configuration ....................................................................................................................... 157
Securing entity lists ............................................................................................................................ 164
Adding a view details page ................................................................................................................. 164
Entity list filter configuration ................................................................................................................ 166
Entity list map view ............................................................................................................................. 172
Entity list calendar view ...................................................................................................................... 173
Enhanced Dynamics 365 view filter for entity lists ............................................................................. 173
Entity list OData feeds ........................................................................................................................ 173
Create and run advertisements on a portal ........................................................................................... 173
Create and run advertisements .......................................................................................................... 174
Ads ..................................................................................................................................................... 174
Ad placements .................................................................................................................................... 174
Using Liquid templates to place advertisements ................................................................................ 176
Attributes ............................................................................................................................................ 177
Gather feedback by using polls on a portal ........................................................................................... 178
Add a poll to the page ........................................................................................................................ 179
Create a poll placement ..................................................................................................................... 179
Polls .................................................................................................................................................... 180
Poll attributes ...................................................................................................................................... 180
Poll options ......................................................................................................................................... 182
Poll option attributes ........................................................................................................................... 182
Poll submissions ................................................................................................................................. 182
Rate or vote on a webpage or blog post on a portal ............................................................................. 185
Enable page ratings ........................................................................................................................... 185
Use ratings ......................................................................................................................................... 185
Manage ratings in Dynamics 365 ....................................................................................................... 186
Redirect to a new URL on a portal ........................................................................................................ 186
Create a redirect ................................................................................................................................. 187
Use the redirect .................................................................................................................................. 188
7
End User Guide ......................................................................................................................................... 189
Manage portal content ........................................................................................................................... 189
Create forum posts on the portal ........................................................................................................... 189
Create forum posts ............................................................................................................................. 189
Attribute relationships ......................................................................................................................... 190
Moderate forums .................................................................................................................................... 190
Assign moderators to forums in Microsoft Dynamics 365 .................................................................. 191
Forum moderation within the portal .................................................................................................... 191
Manage forum access permissions in Dynamics 365 ........................................................................ 192
Attributes relationships ....................................................................................................................... 194
Subscribe to alerts ................................................................................................................................. 194
Subscribe to alerts in the portal .......................................................................................................... 194
Unsubscribe from alerts in the portal ................................................................................................. 195
Manage forum alerts in Microsoft Dynamics 365 ............................................................................... 195
Attributes relationships ....................................................................................................................... 196
Manage blogs ........................................................................................................................................ 196
Manage blogs in Dynamics 365 ......................................................................................................... 196
Manage blogs on a portal ................................................................................................................... 196
Security ............................................................................................................................................... 197
Blog attributes and relationships ........................................................................................................ 197
Manage blog posts in Dynamics 365 ................................................................................................. 199
Manage blogs posts on a portal ......................................................................................................... 199
Blog post attributes and relationships ................................................................................................ 200
Manage blog post comments on a portal ........................................................................................... 201
Blog post comment attributes and relationships ................................................................................ 201
Crowdsource ideas ................................................................................................................................ 202
Manage idea forums in Microsoft Dynamics 365 ............................................................................... 203
Access permissions ............................................................................................................................ 203
Idea forum attributes and relationships .............................................................................................. 203
Manage ideas in Dynamics 365 ......................................................................................................... 204
Idea attributes and relationships ........................................................................................................ 204
Manage idea comments in Dynamics 365 ......................................................................................... 206
Idea comment attributes and relationships ........................................................................................ 206
Manage idea votes in Dynamics 365 ................................................................................................. 206
Idea vote attributes and relationships ................................................................................................ 206
Create, edit, and distribute opportunities in Dynamics 365 ................................................................... 207
Create an opportunity ......................................................................................................................... 207
Distribute an opportunity .................................................................................................................... 207
Enable partners to view the progress of an opportunity ..................................................................... 208
How partners can collaborate with each other ................................................................................... 208
Partner dashboard contains data on current managed and distributed opportunities ....................... 208
Register a deal for a new or existing opportunity ............................................................................... 209
Approve opportunities registered by a partner ................................................................................... 209
Project Service Automation integration ................................................................................................. 209
8
View projects on the partner portal .................................................................................................... 209
View and approve project quotes on the partner portal ..................................................................... 210
View project invoices on the partner portal ........................................................................................ 210
View project contracts and order forms on the partner portal ............................................................ 211
View confirmed, bookable resources by project and role on the partner portal ................................. 211
Field Service integration ........................................................................................................................ 212
View agreements on the partner portal .............................................................................................. 212
View assets on the partner portal ....................................................................................................... 213
View work orders for field service on the partner portal ..................................................................... 213
View invoices for field service on the partner portal ........................................................................... 214
Automatically distribute opportunities to preferred partners ............................................................... 215
Partner ranking metrics ...................................................................................................................... 215
Partner ranking weights ...................................................................................................................... 216
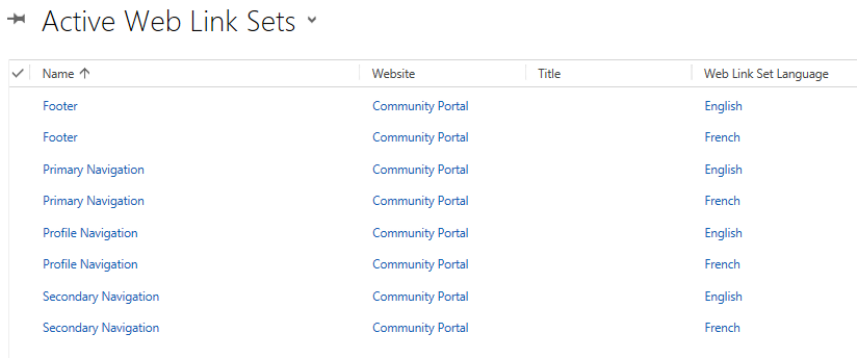
Manage web links in Dynamics 365 or on portals ................................................................................. 217
Manage web links in Dynamics 365 ................................................................................................... 217
Manage web links in a portal .............................................................................................................. 217
Multilevel web link sets ....................................................................................................................... 217
Web link set attributes and relationships ............................................................................................ 217
Web link attributes and relationships ................................................................................................. 218
Invite contacts to your portals ................................................................................................................ 219
Edit Send Invitation workflow email template ..................................................................................... 220
Create and configure invitations ......................................................................................................... 220
Run the Send Invitation workflow ....................................................................................................... 220
Customization Guide ................................................................................................................................. 222
Customize content by using content snippets ....................................................................................... 222
Edit snippets ....................................................................................................................................... 222
Edit using the front-side editing engine .............................................................................................. 222
Edit by using Dynamics 365 ............................................................................................................... 222
Add dynamic content and create custom templates .............................................................................. 223
In this section ..................................................................................................................................... 223
Store source content by using web templates ....................................................................................... 224
Web template attributes ..................................................................................................................... 224
Web templates as page templates ..................................................................................................... 224
Web templates as website headers and footers ................................................................................ 225
Built-in web templates ........................................................................................................................ 225
Understand Liquid operators ................................................................................................................. 228
Basic operators .................................................................................................................................. 229
contains .............................................................................................................................................. 229
startswith ............................................................................................................................................ 229
endswith ............................................................................................................................................. 229
Liquid types ............................................................................................................................................ 230
String .................................................................................................................................................. 230
Number ............................................................................................................................................... 230
Boolean .............................................................................................................................................. 230
9
Array ................................................................................................................................................... 231
Dictionary............................................................................................................................................ 231
DateTime ............................................................................................................................................ 231
Null ..................................................................................................................................................... 232
Conditional ............................................................................................................................................. 232
Liquid objects ......................................................................................................................................... 233
ads ...................................................................................................................................................... 235
blogs ................................................................................................................................................... 238
entities ................................................................................................................................................ 240
entitylist ............................................................................................................................................... 244
entityview ............................................................................................................................................ 248
events ................................................................................................................................................. 249
forloop ................................................................................................................................................. 250
forums ................................................................................................................................................. 252
page .................................................................................................................................................... 255
polls .................................................................................................................................................... 257
request ................................................................................................................................................ 260
searchindex ........................................................................................................................................ 261
settings ............................................................................................................................................... 262
sitemap ............................................................................................................................................... 263
sitemarkers ......................................................................................................................................... 265
snippets .............................................................................................................................................. 266
tablerowloop ....................................................................................................................................... 266
user ..................................................................................................................................................... 267
weblinks .............................................................................................................................................. 268
website ............................................................................................................................................... 268
Liquid tags.............................................................................................................................................. 271
White space control ............................................................................................................................ 271
Tags ....................................................................................................................................................... 272
Control flow tags ................................................................................................................................. 272
Iteration tags ....................................................................................................................................... 274
Variable tags....................................................................................................................................... 279
Template tags ..................................................................................................................................... 280
Dynamics 365 entity tags ................................................................................................................... 281
Liquid filters ............................................................................................................................................ 292
Array filters ......................................................................................................................................... 292
Date filters .......................................................................................................................................... 298
Entity list filters ................................................................................................................................... 301
Math filters .......................................................................................................................................... 302
String filters......................................................................................................................................... 305
Type filters .......................................................................................................................................... 310
URL filters ........................................................................................................................................... 311
Additional filters .................................................................................................................................. 314
Create advanced templates for portals .................................................................................................. 315
10
Create a custom page template by using Liquid and a web template page template ........................... 316
Create a custom page template to render an RSS feed ....................................................................... 320
Render the entity list associated with the current page ......................................................................... 323
Render a website header and primary navigation bar ........................................................................... 326
Render up to three levels of page hierarchy by using hybrid navigation ............................................... 328

11
What’s new
Applies To: Dynamics 365 (online), Dynamics CRM Online
The December 2016 update has brought many new features to the portal capabilities of Dynamics 365.
These updates allow for better interactions among companies, partners, and customers and make the
experience of navigating the portal faster and easier. Some of the major updates include:
Multiple language support: Support customers from multiple regions by using a single portal.
East Asian language support: Multi-byte languages such as Japanese, Chinese, and Korean
are now supported.
Faceted search: New filters improve how quickly customers can find the content they are looking
for while granting more control over visibility of content.
Product filtering: Portal users can trim access knowledge articles related to their product
ownership to avoid information overload.
Content access levels: A new level of ownership associated with Portal contact, account, or
web role that is used to control access to knowledge articles. Provide the right article for the right
audience and prevent irrelevant articles from surfacing.
Knowledge article reporting enhancement: The portal tracks where a knowledge article was
used in the portal.
Project Service Automation integration: Provide access and visibility for active and closed
projects across all stages of a project lifecycle to partners and customers. Team members,
reviewers, and customers can view project status, quotes, order forums, and bookable resources
on the portal with this solution.
Field Service integration: Expose information about active agreements, assets, work orders,
invoices, and support cases to partners and customers on the portal with this solution.
Partner onboarding: Recruit new partners for better customer sales and service experiences.
Potential partners can apply for partner status through the portal.
Privacy notice
By enabling the portal capabilities for Microsoft Dynamics 365, Dynamics 365 data, such as customer
name, product name, case number, or any custom entity data, can be exposed through an external-facing
Dynamics 365 portal. Any data exposed through the portal is stored in memory in Microsoft Azure Web
Apps for caching and also as files on the local hard drive to enable portal search functionality.
A tenant administrator enables Dynamics 365 portals by configuring it through the Dynamics 365
Administration Center, which also installs a package (with solutions and data) in the selected Dynamics
365 instance. A tenant administrator or a Dynamics 365 user set up as a Portal Administrator can then
specify the data that will be exposed through the portal. To subsequently disable the portal capabilities, a
tenant administrator can cancel the Portal Add-on subscription with Office 365.
Azure components and services that are involved with the portal capabilities are detailed in the following
sections.
Note: For more information about additional Azure service offerings, see the Microsoft Azure Trust
Center.
Azure Web Apps
Azure Web Apps are used to host the portal in Azure.
Azure Traffic Manager

12
Azure Traffic Manager is used to ensure the high availability of the service by routing the user to the Web
Apps that are up and running.
Azure Service Bus
Azure Service Bus (Topics/Subscriptions) is used for cache invalidation of the portals. Azure Service
Bus temporarily stores the messages, which are triggered when any portal-related record is changed in
Dynamics 365, and are passed along to Web Apps to do the cache invalidation.
Azure Key Vault
All services store configuration data in Azure Key Vault.
Azure Storage
Data related to the organization, tenant, and portal is stored in Azure Storage.
Azure Active Directory
All the web services use Azure Active Directory to authenticate.

13
Installation Guide
Provision a portal
Applies To: Dynamics 365 (online), Dynamics CRM Online
Portals are websites that you can customize to provide a more personalized experience to your
customers, partners, or internal employees. Portals integrate with Dynamics 365 to show data from
Dynamics on the portal. By using portals, you can create a variety of experiences where portal users can
perform several tasks. For example:
Customers can submit cases and find knowledge articles
Partners can see and manage sales opportunities
Internal employees can create and see best practices
Note: You must be a Global Administrator role to provision a portal.
Before you provision a portal
You must create portal resources and finish the portal package installation before provisioning a portal.
Create portal resources
1. Go to the Applications page of the Dynamics 365 Administration Center.
2. Under Application, the portal will have the name of “Name-Configuring”.
3. After this task is finished, this will change to “Name”.
Verify completion of the package installation
1. Go to the Applications page of the Dynamics 365 Administration Center.
2. Select the portal, and then select the blue pencil button labeled Manage.
a. If the installation process is not finished, there will be a message at the top stating “This
portal is currently being configured and updates are not allowed. Please try again later.”
b. If the portal resources are created but the package installation is not finished, the
message will instead be “Your Portal URL has been created. However, package
installation is still in progress. Please check status here.”
Provision a portal
To complete provisioning a portal, after you have purchased a new portal license, return to your
Dynamics 365 instance.
1. Go to the Dynamics 365 Administration Center and click the Applications tab.
2. Select the application row titled Portal Add-On and click Manage.
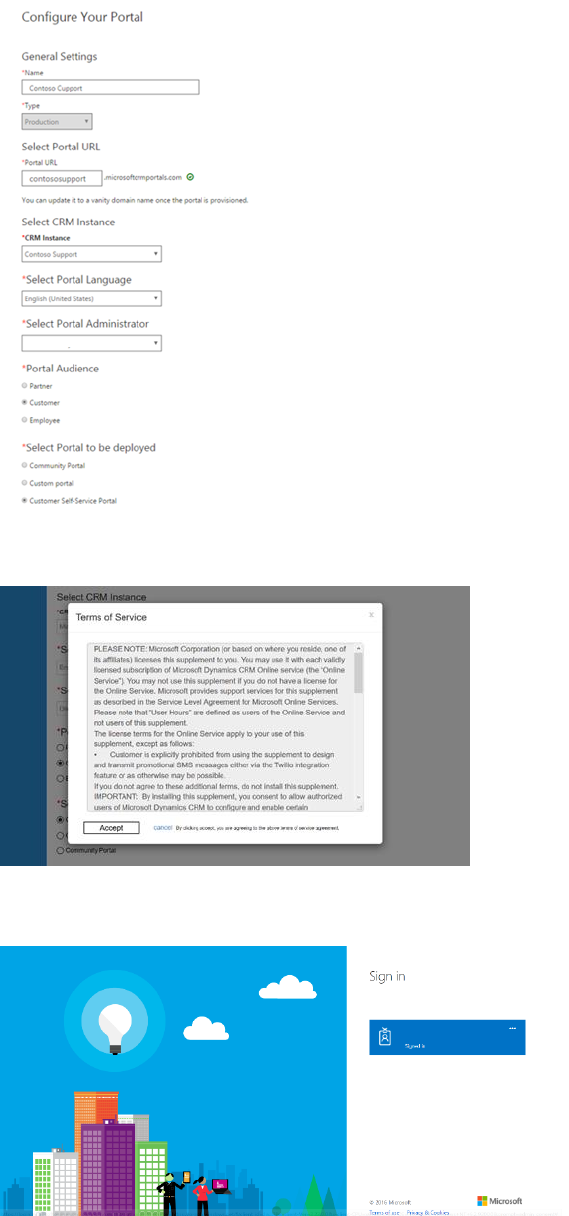
3. In the General Settings section, enter a Name for your portal. The Name will help to identify the
portal and can be changed later.
14
4. The Type field represents the type of portal subscription (Trial or Production). This is a system
field, so it cannot be changed by the user. The value changes based on if it is trial subscription or
paid subscription.
5. In the Portal URL field, enter the subdomain name you want for your portal. You may only use
alphanumeric characters or hyphens (-); other characters are not permitted. After the portal is
provisioned, the URL cannot be changed, but a custom domain name can be used.
6. Use the Dynamics 365 Instance drop-down list to choose which Dynamics 365 instance you
want to link the portal to. Requires System Administrator or System Customizer role in the
Dynamics 365 instance you pick to select it.
7. Choose the default language for your portal from the Select Portal Language drop-down list.
The available languages will depend on the languages that are installed in your Dynamics 365
instance. Sample data is only provided in one language, so choosing a default language will also
decide how the sample data is translated. Arabic and Hebrew are not supported and will not show
up.
8. In the Select Portal Administrator drop-down list, select the Dynamics 365 user who will
configure, customize, and maintain the portal. All Dynamics 365 users who have the System
Administrator role in the organization will show up as options.
9. In the Portal Audience section, choose the type of audience who will visit the new portal. This
will determine what options of portals you will be given. You can choose:
Partner
o Customer Self Service Portal
o Custom Portal
o Partner Portal
Partner Project Service (Optional, requires solutions installed)
Partner Field Service (Optional, requires solutions installed)
o Community Portal
Customer
o Customer Self Service Portal
o Custom Portal
o Community Portal
Employee
o Employee Self Service Portal
Feature
Customer Self-
Service Portal
Partner
Portal
Employee Self-
Service Portal
Community
Portal
Custom Portal
World Ready
•
•
•
•
•
Multi-Language Support
•
•
•
•
•
Portal Administration
•
•
•
•
•
Customization and Extensibility
•
•
•
•
•
Theming
•
•
•
•
•
Content Management
•
•
•
Knowledge Management
•
•
•
•
15
Feature
Customer Self-
Service Portal
Partner
Portal
Employee Self-
Service Portal
Community
Portal
Custom Portal
Support/Case Management
•
•
•
Forums
•
•
•
Faceted Search
•
•
Profile Management
•
•
Subscribe to Forum Thread
•
•
Comments
•
•
•
Azure AD Authentication
•
Ideas
•
Blogs
•
Project Service Automation
Integration
•
Field Service Integration
•
Partner Onboarding
•
Portal Base
•
Portal Workflows
•
Web Notifications
•
Microsoft Identity
•
Identity Workflows
•
Web Forms
•
Feedback
•
10. In the Select portal to be deployed section, choose what type of portal you want to create. The
options you see are based on the audience you selected.
16
11. Click Submit, and accept the Terms of Service.
You will be redirected to the Microsoft Office 365 sign in page. Select the Dynamics 365 user that
you used to create the portal.
You will be asked to provide consent for the Dynamics 365 portals.

17
After you consent, your portal will begin provisioning. Provisioning usually takes a few hours, but can take
more depending on system load. The Name of the portal on the Application tab will change to “Name-
Configuring” while it is provisioning. Navigate back to the portal management page to check whether
provisioning has succeeded.
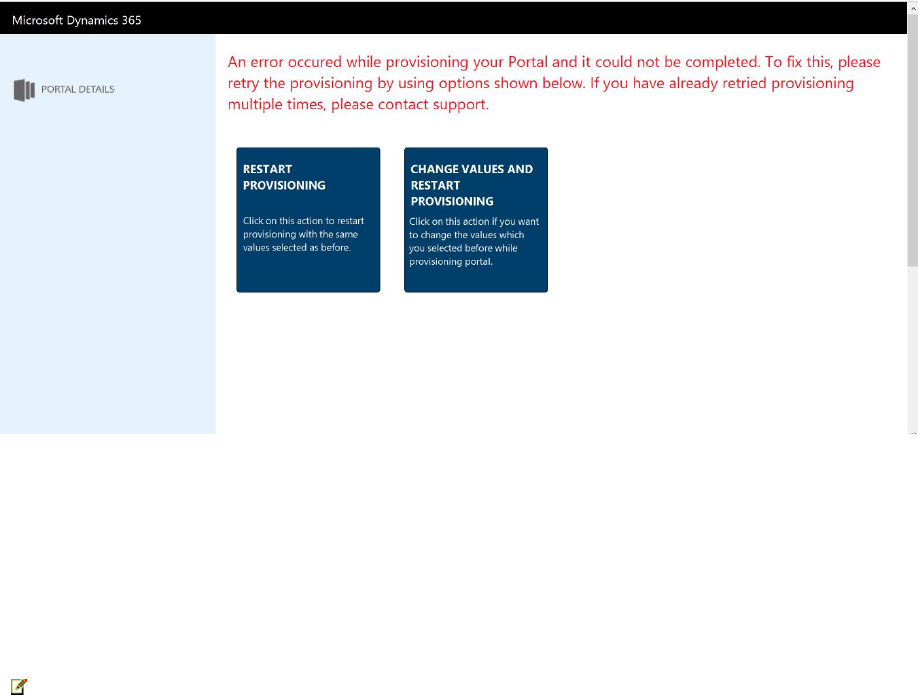
Troubleshoot Provisioning
Sometimes the package installation process or URL creation process can error out. In these cases, the
processes can be restarted.
If “Name-Configuring” changes to “Name-Provisioning Failed,” you need to restart the provisioning
process.
1. Go to the Applications page and select the portal.
2. Select the blue pencil button labeled Manage.
3. Choose one of the following options:
Restart Provisioning: Restarts the installation process with the configuration that was
previously defined.
Change Values and Restart Provisioning: Lets you change some of the values before
restarting the provisioning process.
18
If the package installation has failed, the Portal administrator page will open without any issues, but
navigating to the actual portal URL will show a message “Getting set up.” To confirm this:
1. Go to the Solution Management page of the Dynamics 365 Administration Center and check that
the package status is “Install Failed.”
2. If the package status is “Install Failed,” try retrying the installation from the solution page. Also,
be sure to check that a system administrator in Dynamics 365 is installing the solution with the
default language in Dynamics 365 set to the language the portal should be installed in.
Note
Some solutions have prerequisites for their installation, so an installation will fail if the prerequisites are
not met. For example, to install the Partner Field Service for a partner portal, the Partner Portal and Field
Service solutions must have already been installed. If you attempt to install the Partner Field Service first,
the installation will fail and give you an error message.
Set up custom domains and SSL certificates for a
Dynamics 365 portal
A custom domain can help your customers find your support resources more easily and enhance your
brand. Only one custom domain name can be added to a portal. After you have provisioned your portal
and acquired your domain name, you will need an SSL certificate to set up a custom host name.
19
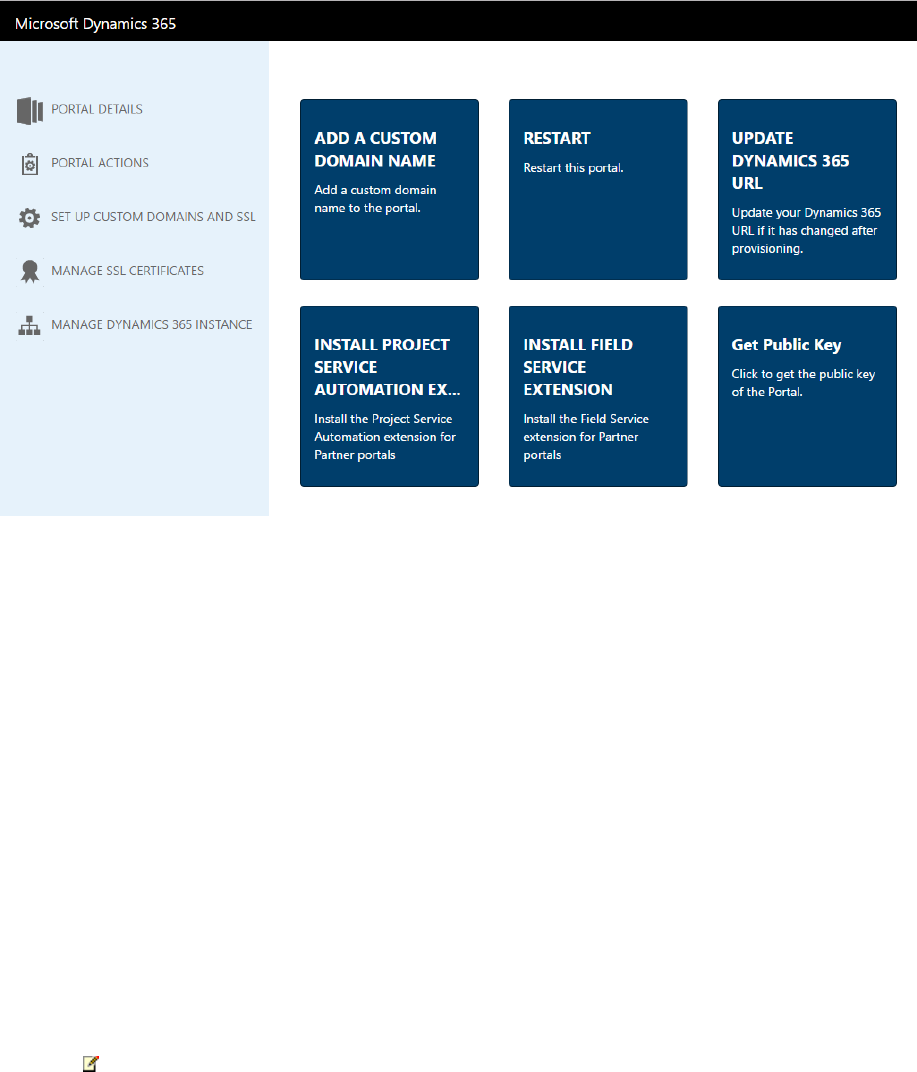
1. Go to the Dynamics 365 Online Admin center and click the Applications tab.
2. Select the name of the portal you want to set up a custom domain for and click Manage.
3. Click on Portal Actions.
4. Click on Add a Custom Domain Name
After you have purchased an SSL certificate for your domain, you can use it to link your Dynamics 365
portal to a custom domain using the wizard.
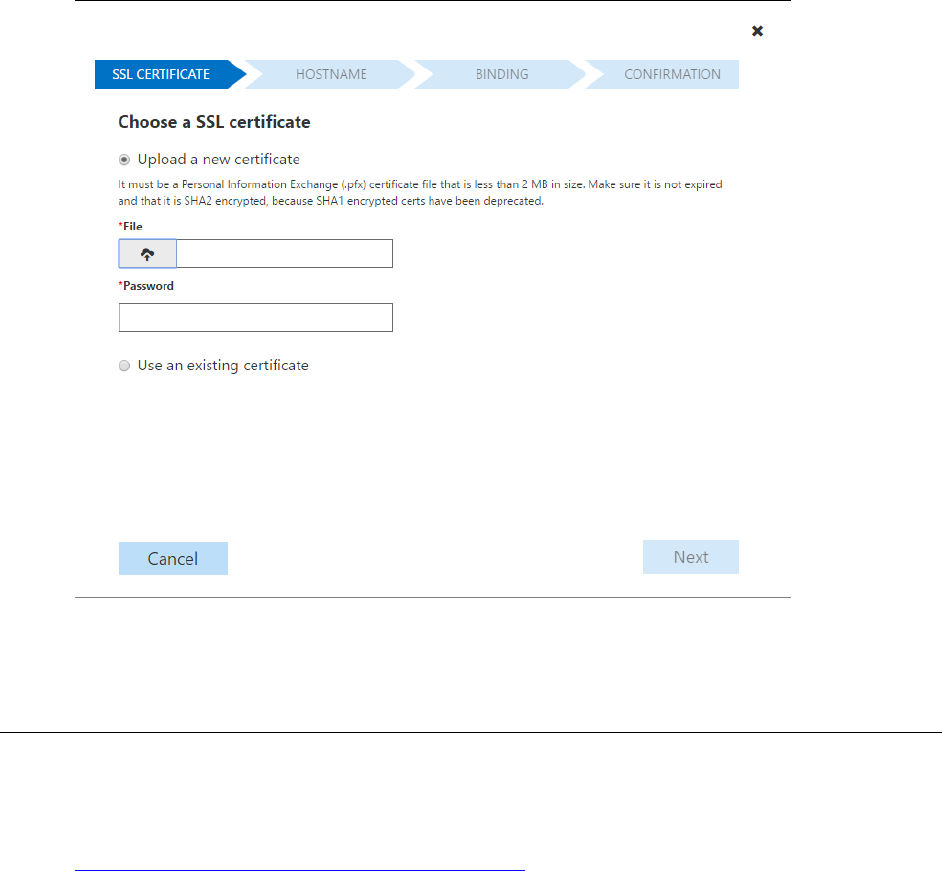
1. Click Upload a new certificate if you have not yet uploaded the .pfx file to the organization. Click
the upload button underneath File and select the .pfx file. Next enter the password for your SSL
certificate in the Password field. Otherwise click Use an existing certificate and choose the
correct certificate from the drop-down menu. Be sure that you are using a SHA2 certificate, SHA1
support is being removed from popular browsers.
2. Click Add a new hostname to create a new custom domain. Enter the desired domain name into
the Domain Name field. Otherwise, click Use an existing host name and choose the desired
host name from the drop-down menu. You can only have one custom domain name for a portal.
Note
To create a custom host name, you will need to create a CNAME with your domain provider
that points your domain to the URL of your Dynamics 365 portal.
20
If you have just added a CNAME with your domain provider, it will take some time to propagate
to all DNS servers. If the name is not propagated and you add it here, this will show a message
“Plead add a CNAME record to this domain name.” Retry after some time passes.
3. Review the information you have entered, then click Next to begin creating the SSL Binding.
4. You should see the message “Custom Domain name has been successfully configured for this
Portal. You can now go to {Custom Domain Name} to access this portal.” {Custom Domain
Name} will be a hyperlink to the Custom Portal URL that was just configured. Click Finish to
close the wizard
Enable multiple-language portal support
Applies To: Dynamics 365 (online), Dynamics CRM Online
Business is not confined to a single language. One portal’s surface content can now exist in multiple
languages to reach customers around the world while keeping a single content hierarchy. To enable
multiple languages for a portal, follow these steps after signing in to Dynamics 365:
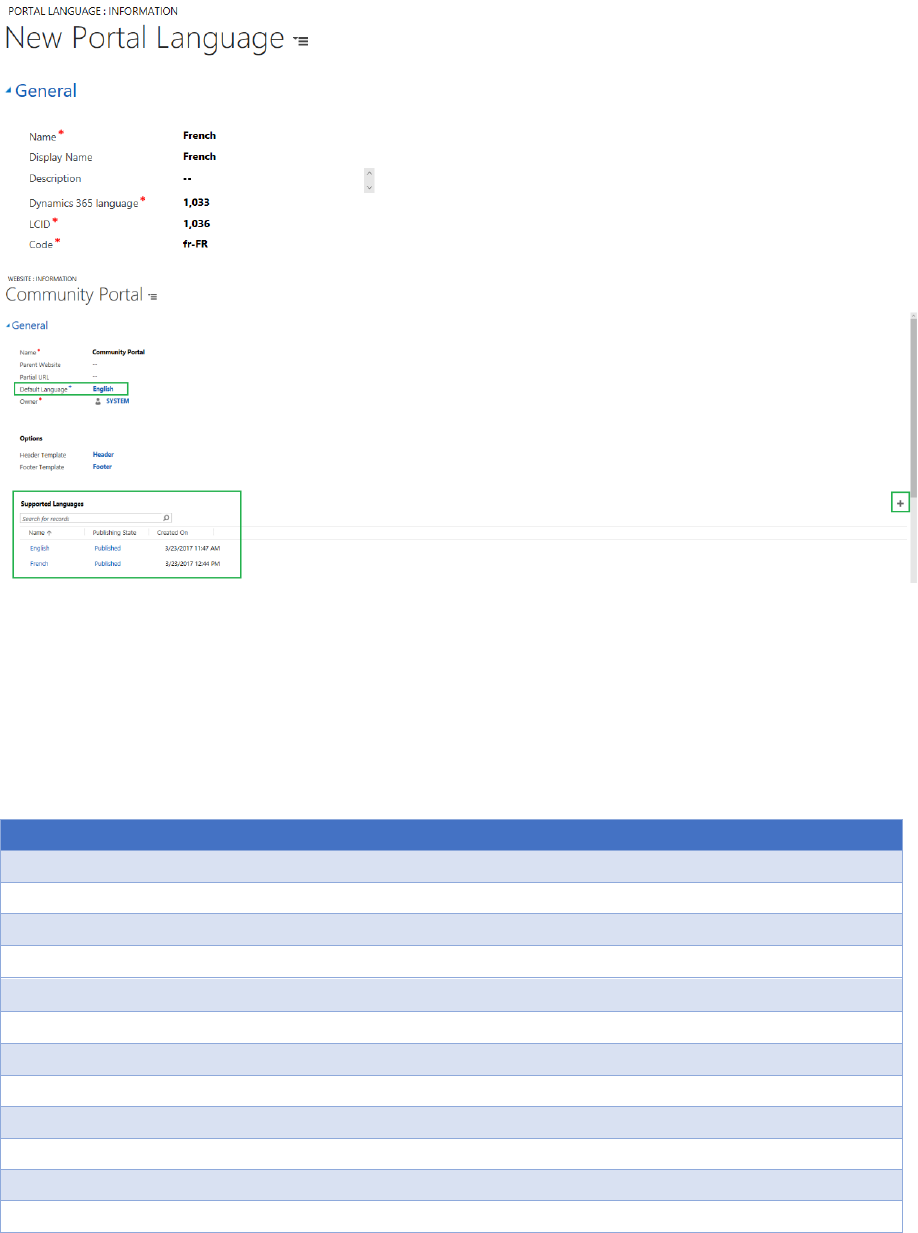
1. Enable languages in a Dynamics 365 organization.
2. Go to Portals > Website > Websites.
3. Select the website to add language support to.
4. Find the Supported Languages section under the General tab, and click the + button.
5. Fill in the form, including Portal Language (a lookup of languages that are activated in the
organization and are supported by portals) and Publishing State.
21
Supported languages
The table below shows all 43 languages currently available out of the box. This list can be found in
Dynamics 365 by going to Portals > Content > Portal Languages. The Portal Display Name of a
language can be changed after selecting the language to change from this page. Note that the list now
includes East Asian languages (Japanese, Chinese, and Korean).
Name
Language Code
LCID
Portal Display Name
Basque - Basque
eu-ES
1069
euskara
Bulgarian - Bulgaria
bg-BG
1026
български
Catalan - Catalan
ca-ES
1027
català
Chinese - China
zh-CN
2052
中文(中国)
Chinese - Hong Kong SAR
zh-HK
3076
中文(香港特別行政區)
Chinese - Traditional
zh-TW
1028
中文(台灣)
Croatian - Croatia
hr-HR
1050
hrvatski
Czech - Czech Republic
cs-CZ
1029
čeština
Danish - Denmark
da-DK
1030
dansk
Dutch - Netherlands
nl-NL
1043
Nederlands
English
en-US
1033
English
Estonian - Estonia
et-EE
1061
eesti

22
Finnish - Finland
fi-FI
1035
suomi
French - France
fr-FR
1036
français
Galician - Spain
gl-ES
1110
galego
German - Germany
de-DE
1031
Deutsch
Greek - Greece
el-GR
1032
Ελληνικά
Hindi - India
hi-IN
1081
ह दी
Hungarian - Hungary
hu-HU
1038
magyar
Indonesian - Indonesia
id-ID
1057
Bahasa Indonesia
Italian - Italy
it-IT
1040
italiano
Japanese - Japan
ja-JP
1041
日本語
Kazakh - Kazakhstan
kk-KZ
1087
қазақ тілі
Korean - Korea
ko-KR
1042
한국어
Latvian - Latvia
lv-LV
1062
latviešu
Lithuanian - Lithuania
lt-LT
1063
lietuvių
Malay - Malaysia
ms-MY
1086
Bahasa Melayu
Norwegian (Bokmål) - Norway
nb-NO
1044
norsk bokmål
Polish - Poland
pl-PL
1045
polski
Portuguese - Brazil
pt-BR
1046
português (Brasil)
Portuguese - Portugal
pt-PT
2070
português (Portugal)
Romanian - Romania
ro-RO
1048
română
Russian - Russia
ru-RU
1049
русский
Serbian (Cyrillic) - Serbia
sr-Cyrl-CS
3098
српски
Serbian (Latin) - Serbia
sr-Latn-CS
2074
srpski
Slovak - Slovakia
sk-SK
1051
slovenčina
Slovenian - Slovenia
sl-SI
1060
slovenščina
Spanish (Traditional Sort) - Spain
es-ES
3082
español
Swedish - Sweden
sv-SE
1053
svenska
Thai - Thailand
th-TH
1054
ไทย
Turkish - Turkey
tr-TR
1055
Türkçe
Ukrainian - Ukraine
uk-UA
1058
українська
Vietnamese - Vietnam
vi-VN
1066
Tiếng Việt
Create content in multiple languages
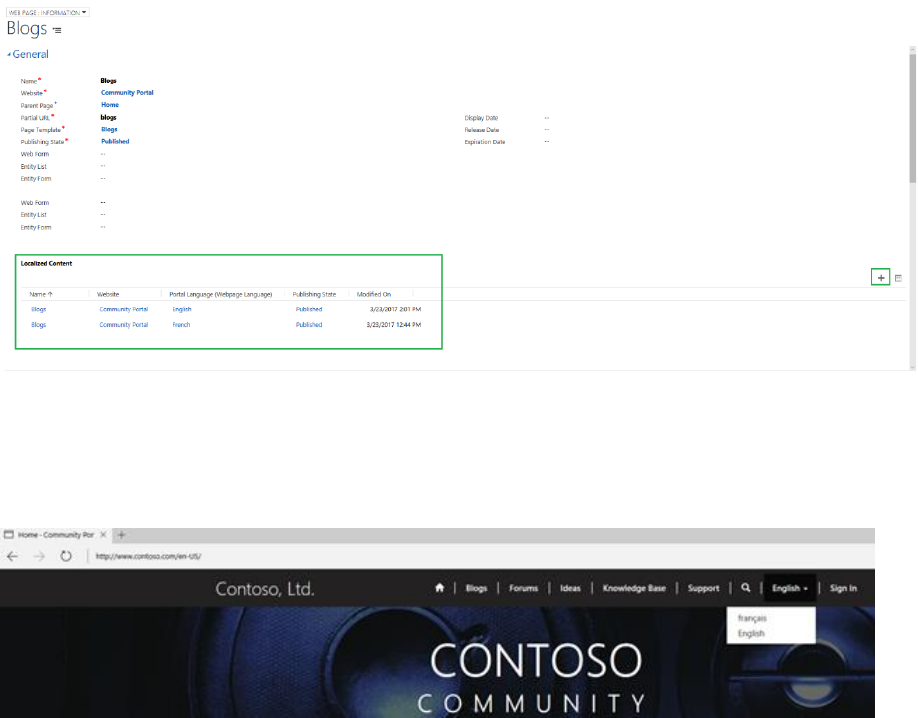
In Dynamics 365, go to Portals > Content > Web Pages to see a list of content. For each web page,
there will be a parent version of the page and a child version of the page for each language activated for
the portal. To add a new localization of the page, navigate to a base page and scroll down to Localized
Content. Click on the + button on the right side to create a look-up for the localized version.
23
If a portal will be in multiple languages, it is best to create the portal after all the languages you want have
been activated in the organization. This will allow for the drop-down menu at the top of the Web Pages
window to be translated into all the chosen languages. If languages are activated after the portal has
been provisioned, this menu will not be translated into the newly activated languages.
Knowledge articles will only be displayed if they have been translated into the language the user sets the
portal to. However, forums and blogs allow for more control over how they are presented in other
languages. After navigating to a forum or blog entity in Dynamics 365, changing the Form Language field
will allow for control over how these entities are translated. If specific languages are defined, it will
function like the knowledge articles. If the field is blank it will be agnostic and show up in all versions of
the portal as the primary language of the organization.
Web link sets are the navigation links at the top of the portal. By navigating to Portals > Content > Web
Link Sets you can control how this content is translated. When a language is active for the portal, a new
set of links will be created for the newly activated language.
24

25
Configuration Guide
Configure a Dynamics 365 portal
Applies To: Dynamics 365 (online), Dynamics CRM Online
Learn how to configure portals and customize Microsoft Dynamics 365. Dynamics 365 portals offer
powerful customization options to:
Modify the behavior or visual style of a portal. More information: Configure site settings for
portals
Add dynamic content to pages and create a wide variety of custom templates. More information:
Add dynamic content and create custom templates
Associate an authenticated portal user with either a Dynamics 365 contact or system user. More
information: Configure a contact for use on a portal
Authenticate portal users by using local user credentials and external identity provider accounts.
A new user can register for an account or redeem an invitation to create an account. More
information: Set authentication identity for a portal
Assign permissions to secure content and allow front-side editing.
Let users add forms to collect data from portals. Entity forms that are created in Dynamics 365
can be added to web pages in portals, or used with subgrids to build complete web applications.
More information: Define entity forms and custom logic within the Dynamics 365 portal
Customize Dynamics 365 to create surveys and customize questions by combining Dynamics
365 native field types with additional metadata.
Create and run advertisements on a portal
Gather feedback by using polls on a portal
Rate or vote on a webpage or blog post on a portal
Redirect to a new URL on a portal
See also
Configure site settings for portals
Place child nodes by using shortcuts for portals
Add dynamic content and create custom templates
Configure Dynamics 365 portal authentication
Set authentication identity for a portal
Define entity forms and custom logic within the Dynamics 365 portal
Add a webpage to render a list of records
Create and run advertisements on a portal
Gather feedback by using polls on a portal
Rate or vote on a webpage or blog post on a portal
Redirect to a new URL on a portal
26
Create web roles for portals
Applies To: Dynamics 365 (online), Dynamics CRM Online
After a contact has been configured to use the portal, it must be given one or more web roles to perform
any special actions or access any protected content on the portal. For example, to access a restricted
page, the contact must be assigned to a role to which read for that page is restricted to. To publish new
content, the contact must be placed in a role which is given content publishing permissions.
To create a web role:
1. Navigate to Portals
2. Click Web Roles
3. Click New
4. Specify values for the fields provided
5. Click Save
Attributes and relationships
The table below explains many of the Web Role attributes used by Dynamics 365 portals.
Name
Description
Name
The descriptive name of the Web Role
Website
The associated website
Description
An explanation of the Web Role's purpose.
Optional.
Authenticated Users Role
Boolean. If set to true, this will be the default web
role for authenticated users (see below).
Note
Only one Web Role with the Authenticated
Users Role attribute set to true should exist for a
given website. This will be the default web role
for authenticated users that have not been
assigned a web role.
Anonymous Users Role
Boolean. If set to true, this will be the default web
role for unauthenticated users (see below).
Note
Only one Web Role with the Anonymous Users
Role attribute set to true should exist for a given
website. This will be the default web role for
unauthenticated users. **The Anonymous
Users Role will only respect Entity
Permissions.
27
Name
Description
Now that the Web Role has been created, you will be able to configure it to meet your needs via various
permissions, rules, and associations.
Optional default web role for authenticated users
By enabling the "Authenticated Users Role", it will become the default web role for all users. This role is
commonly used to provide a predetermined access for users that are not associated to any other roles.
Keep in mind that users can have multiple web roles, but there can only be one Authenticated Users web
role for authenticated users.
Optional default web role for unauthenticated users
The Anonymous Users Role is intended to be used with Entity Permissions. It will not respect any other
rules or permissions. By enabling the "Anonymous Users Role" it will become the default web role for all
users. There can only be one Anonymous Users web role for unauthenticated users.
See also
Control webpage access for portals
Assign permission set to a web role for portals
Add record-based security by using entity permissions for portals
Enable help for Dynamics 365 portals
To make sure users get the right information when they click the Help button, you need to set Dynamics
365 to use custom Help. Go to Settings > Administration, click System Settings, click the General tab,
and select Yes for Use custom Help for customizable entities.
Customize Dynamics 365 portal forms, dashboards,
and reports
If you want to customize any of the portal forms, dashboards, or reports, you can find more information
about customizing Microsoft Dynamics 365 in the following links:
TechNet: Customize your Dynamics 365 system
TechNet: Create and design forms
TechNet: Create and edit dashboards
TechNet: Create and edit processes
TechNet: Report & Analytics with Dynamics 365
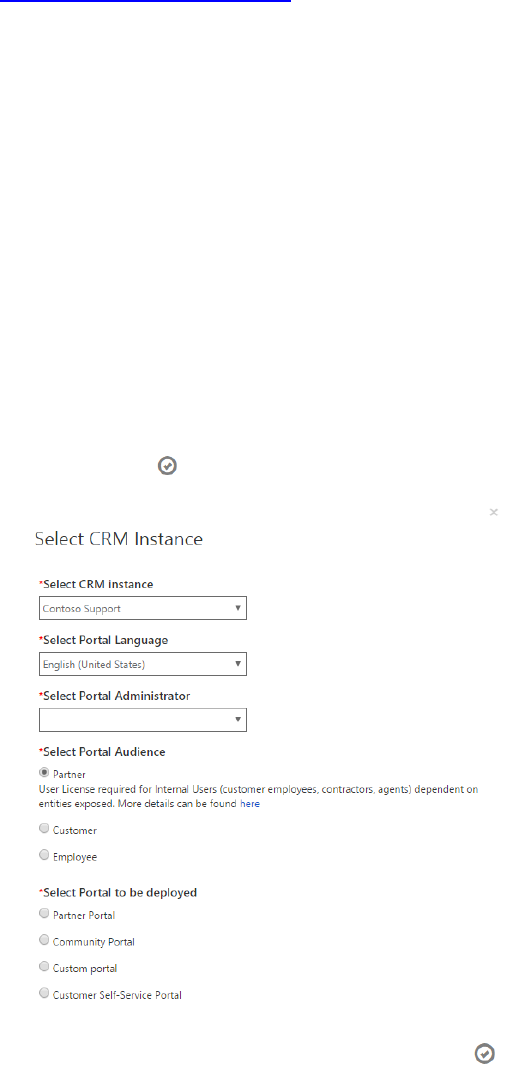
28
See also
Configure a Dynamics 365 portal
Change the Dynamics 365 instance, audience, or type
of portal
After your portal is created and provisioned, you can change the details of your Dynamics 365 instance
and portal.
1. Go to the Dynamics 365 Online Admin center and click the Applications tab.
2. Select the name of the portal you want to edit and click Manage.
3. Click the Manage Dynamics 365 Instance tab. On this page, you can review the Dynamics 365
instance that is currently linked to your portal.
4. Click the Update Dynamics 365 Instance button. In the dialog, use the provided fields to change
your Dynamics 365 instance, portal language, or your portal administrator. You can also keep the
same Dynamics 365 instance, but change Portal audience or type of portal.
5. Click the button to confirm your changes.

29
See also
Engage with communities by using the community portal
Configure a Dynamics 365 portal
Manage knowledge articles using content access
levels
Applies To: Dynamics 365 (online), Dynamics CRM Online
Content access levels give another level of control separate from web roles to be able to control access
to knowledge articles in a portal. Content access levels make a well-designed knowledge base more
capable to provide the right content to the right audience. This allows for more structured learning paths
that keep irrelevant content from surfacing.
Create content access levels
1. Log into Dynamics and navigate to Portals > Security > Content Access Levels.
2. Click the New button in the ribbon.
3. Fill in the Name and Description.
4. Change Default Access Level from No to Yes if it should be the default.
5. Click the Save button in the ribbon.
Assign content access levels to knowledge articles
1. Open the Interactive Service Hub.
2. Select the Knowledge Article you wish to edit or create a new article.
3. Click Summary just above the progress bar.
4. Under Related Information (third column) select the symbol that looks like a lock.
5. Press + to add a new Content Access Level or the Trash Can symbol next to a Content Access
Level to remove it.
Assign content access levels to portal users
1. Log into Dynamics and navigate to Portals > Security > Contacts.
2. Select the Contact you wish to edit.
3. Under the Details tab, find the Content Access Levels section.
4. Press + to add a new content access level or the Trash Can symbol next to a content access
level to remove it.
Content access levels can also be inherited to a user if assigned to a Web Role, Parent Contact, or
Account that the user is connected to. This inheritance avoids the need to reassign/update content

30
access levels at an individual level. Web Roles are assigned a content access level by navigating to
Portals > Security > Web Roles and then following the same steps. Accounts are assigned a
content access level by navigating to Sales > Accounts then selecting the account to edit. After the
account is selected, find the Content Access Levels section on the right side of the screen and use
the + and Trash Can buttons to add or remove a content access level.
Use faceted search to improve portal search
Applies To: Dynamics 365 (online), Dynamics CRM Online
Portal content may be searched using filters based on characteristics of the content. Faceted portal
searches allow customers to find their desired content faster than a traditional search through the filters
implemented by this feature.
Enable or disable faceted search
Out-of-the-box faceted search is enabled in your portals. To control and/or enable it follow these steps:
1. Log into Dynamics and navigate to Portals > Website > Site Settings.
2. Locate the Site Setting named Search/FacetedView and select it.
3. Change the Value to True to enable or False to disable Faceted Search.
If you wish to only disable one piece of the Faceted View, then follow these steps instead:
1. Log into Dynamics and navigate to Portals > Web Templates.
2. Select view to disable (i.e. Knowledge Management – Top Rated Articles)
3. Click the Deactivate button at the top of the page.
Group entities as part of a record type for faceted view
The site setting Search/RecordTypeFacetsEntities allows you to group similar entities together so users
have logical ways of filtering search results. For example, instead of having separate options for forums,
forum posts, and forum threads; these entities are grouped under the Forums record type.
In Dynamics 365, navigate to Portals > Websites > Site Settings and open the
Search/RecordTypeFacetsEntities site setting. Notice that the different entities are preceded by the
word Forums:. This is because the first value is the name with they are grouped as. This word will be
translated based on the language that is being used on the portal.
Use faceted search to improve knowledge search
results
Faceted search enables portals to have search filters on the left side allowing you to choose between
items like forums, blogs, and knowledge articles. More filters are added for specific search types. For
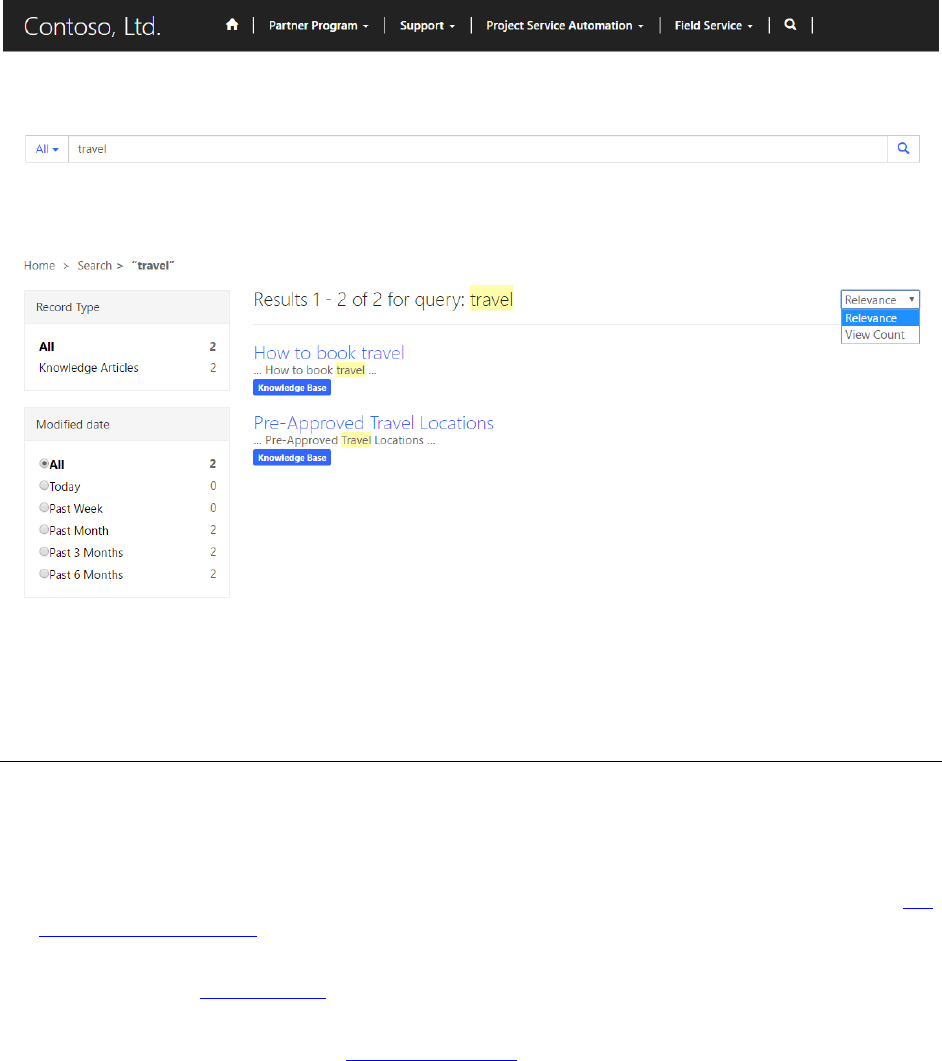
31
example, knowledge articles can be filtered by Record Type, Modified Date, Rating, and Products to help
customers find the content they need. The right side also has a drop-down box that sorts results based on
the customer’s choice of Relevance or View Count (specific to knowledge articles). Below is a screen
capture with an example of some of the available filters.
Engage with communities by using the
community portal
Applies To: Dynamics 365 (online), Dynamics CRM Online
Keep your customer engagement strong by growing a community, publishing articles, gathering user
feedback, and acting on user-provided ideas. With out-of-the-box solutions available with portals you can:
Allow your users to hold conversations by posting messages on a forum. A forum can contain a
number of topics, also known as threads, and can be replied to by many users. More information: Set
up and moderate forums
Manage multiple corporate or community blogs on a single portal, with multiple authors per blog.
More information: Manage blogs
Engage with and gather feedback from your community, including gather ideas, votes, and comments
on suggestions. More information: Crowdsource ideas
32
See also
Create a theme for your portal
Configure a Dynamics 365 portal
Set up and moderate forums
Applies To: Dynamics 365 (online), Dynamics CRM Online
Forums can be created, edited and deleted within Dynamics 365. To access forums, sign in to Dynamics
365 and go to Community > Forums.
Create a new forum
To create a new forum, click New.
Edit an existing forum
1. Double-click on the Form listed in the grid.
2. Specify values for the fields provided and click Save & Close.
Manage forums on a portal
For portal users with content management permissions, a limited set of properties of forums can be
managed by using the front-side editing engine to publish content. If your user account has been
assigned the necessary permission set, the inline editing interface will appear automatically when you
sign in to the portal.
1. Navigate to the forums parent page within the portal.
2. On the portal inline editing toolbar, click New.
3. Click Child forum.
4. Specify values for the fields provided and click Save.

33
Forum attributes used by portals
The table below explains many of the Forum attributes used by portals. It is important to note that the way
many of the content and display-oriented attributes are rendered is controlled by the page template used,
and thus by the portal developer.
Name
Description
Name
The descriptive name of the entity. This value will
be used as the page title in most templates,
particularly if a Title value is not provided. This
field is required.
Website
The website to which the entity belongs. This field
is required.
Parent Page
The parent webpage of the entity in the website
content hierarchy.
Partial URL
The URL path segment used to build the portal
URL of this forum.
Note
Partial URL values are used as URL path
segments. As such, they should not contain
illegal URL path characters, such as "?", "#", "!",
"%". Because portal URLs are generated by
34
Name
Description
joining together partial URL values with slashes
("/"), they should also not contain slashes.
Note
We recommend you restrict Partial URL values
to letters, numbers, and hyphens or
underscores. For example: "press-releases",
"Users_Guide", "product1".
Display Order
An integer value indicating the order in which the
forum will be placed relative to other forums in a
listing.
Publishing State
The current publishing workflow state of the forum,
which may dictate whether the forum is visible on
the site. The most common use of this feature is to
control whether content is in a published or draft
state.
Note
Users with content management permissions
may be granted the ability to use Preview Mode,
which allows these users to see ("preview")
unpublished content.
Hidden From Sitemap
Controls whether the forum is visible as part of the
portal site map. If this value is selected, the forum
will still be available on the site at its URL, and can
be linked to, but standard navigational elements
such as menus will not include the forum.
Forum Page Template
The page template to be used to render the page
listing the forums on the portal. This field is
required.
Note
The page template assigned should be a
template that a developer has specifically
created to provide the details of a forum.
Selecting a template other than the one
developed for the forum page may produce
erroneous results when viewing the forum's
webpage in the portal.
Thread Page Template
The page template to be used to render each
forum thread page on the portal. This field is
required.
Note
The page template assigned should be a
template that a developer has specifically
created to provide the forum thread details.
Selecting a template other than the one
developed for the forum thread page may

35
Name
Description
produce erroneous results when viewing the
forum thread's webpage in the portal.
Description
Information about the forum.
Thread Count
Number of forum threads within the forum.
Post Count
Number of forum posts created on the forum
threads within the forum.
Last Post
The most recently created forum posts on the
portal.
See also
Manage forum threads
Create forum posts on the portal
Moderate forums
Subscribe to alerts
Manage forum threads
Applies To: Dynamics 365 (online), Dynamics CRM Online
A forum thread (sometimes called a topic) is a collection of posts, usually displayed from oldest to newest.
A thread can contain any number of posts, including multiple posts from the same members, even if they
were added to the thread one after the other. A thread is contained in a forum and may have an
associated date that is taken as the date of the last post. The content or purpose of the thread is identified
by the first post, also known as the original post (OP). When a member posts in a thread, the thread
jumps to the top because it is the latest updated thread. Similarly, other threads will jump to the top when
they receive posts. Sometimes, a member posts in a thread for no reason but to “bump” that thread
(cause it to be displayed as the top thread).. Threads that are important but rarely receive posts are made
“sticky” (or, as it is sometimes called, "pinned"). A sticky thread will always appear in front of normal
threads, often in its own section. A thread's popularity is measured on forums in reply (total posts minus
one, the opening post, in most default forum settings) counts. Some forums also track page views.
Manage forum threads in Microsoft Dynamics 365
You can create, edit, and delete forum threads in Dynamics 365.
Note
Although you can create forum threads in Dynamics 365, we recommend you do this in the portal,
where the process is less involved and ensures the thread is correctly associated with the original forum
post.
1. Login to Dynamics 365
2. Navigate to Community

36
3. Click Forum Threads
Create a new thread
1. Click New
Edit an existing thread
1. Double-click on the Forum Thread listed in the grid
2. Specify values for the fields provided.
Note
You will need to create the original forum posts to be associated with this thread and assign the newly
created forum post record to the First Post and Last Post lookup fields provided.
3. Click Save & Close
Create forum threads on the portal
The forum thread editor will appear automatically when a user has successfully signed in to the portal and
navigated to a forum page, provided the developer has implemented the functionality in the forum's page
template.
1. Navigate to the forum page within the portal that you would like to post a new thread in
2. Specify a Thread Title
3. Specify a Thread Type
4. Compose the content of the thread in the rich text editor
5. Click Create this thread
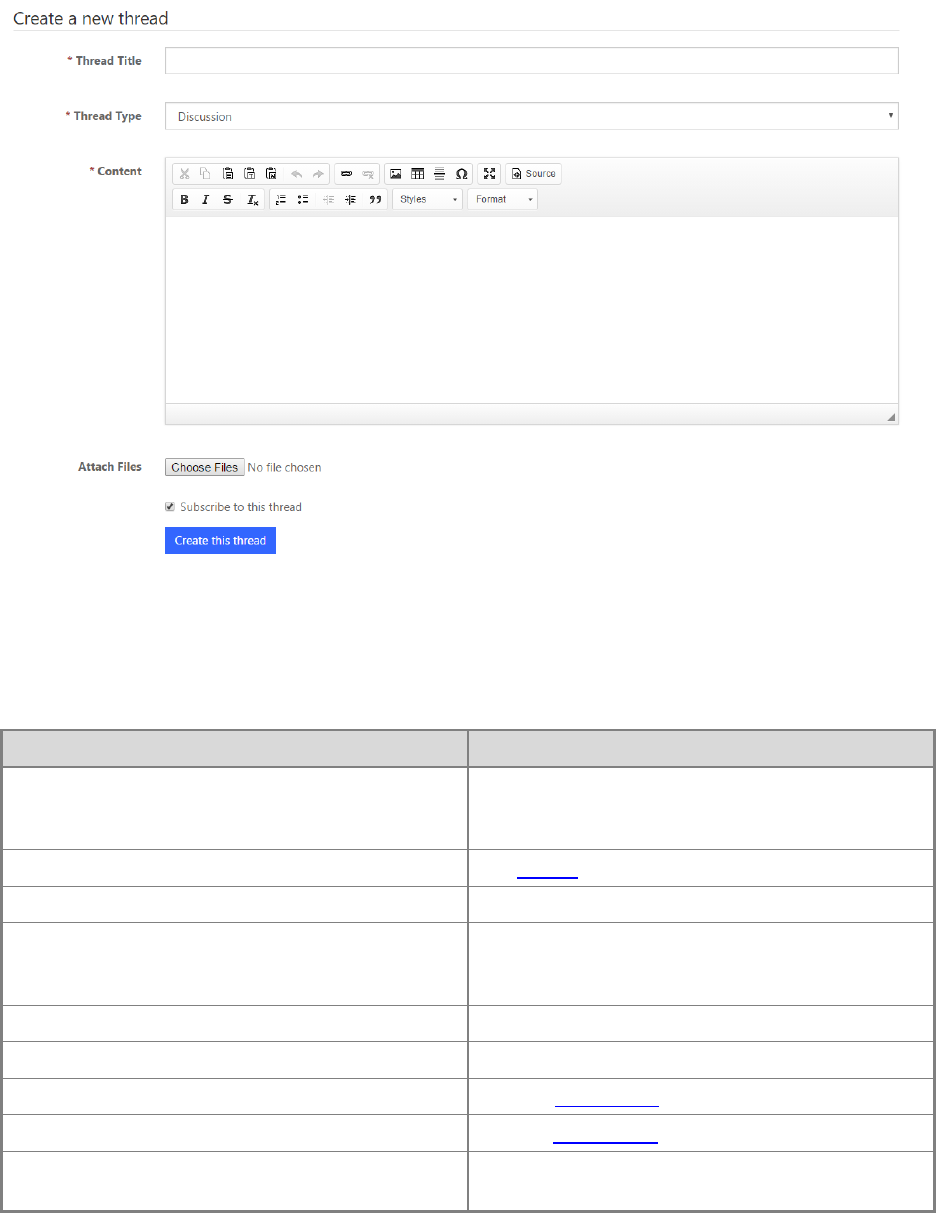
37
Forum thread attributes used by portals
The table below explains many of the Forum Thread attributes used by Portals. It is important to note that
the way in which many of the content/display-oriented attributes are rendered is controlled by the page
template used.
Name
Description
Name
The descriptive name of the record. This value will
be used as the thread title in most templates. This
field is required.
Forum
The forums associated with the thread.
Type
The forum thread type associated with the thread.
Sticky?
Checked indicates the thread should always
remain at the top of forum's listing of threads, even
if new threads are posted.
Last Post Date
The date and time the last post was created.
Answered?
Checked indicates the thread has been answered.
First Post
The first forum posts created on the thread.
Last Post
The last forum posts created on the thread.
Post Count
The number of posts that have been created on
the thread.

38
Name
Description
View Count
The number of times the thread has been viewed
in the portal.
Manage forum thread types in Dynamics 365
Create, edit and delete forum thread types
1. Login to Dynamics 365
2. Navigate to Community
3. Click Forum Thread Types
Create a new thread type
1. Click New
Edit an existing thread type
1. Double-click on the Forum Thread Type listed in the grid
2. Specify values for the fields provided
3. Click Save & Close
Forum thread type attributes
The table below explains many of the Forum Thread Type attributes used by portals. It is important to
note that the way in which many of the content/display-oriented attributes are rendered is controlled by
the page template used.
Name
Description
Name
The descriptive name of the record. This value will
be used as the title of the type in the page
templates. This field is required.
Website
The webpages associated with the type.
Requires Answer
Checked indicates that a forum post within the
thread of this type can be marked as an answer.
Display Order
An integer value indicating the order in which the
forum thread type will be placed, relative to other
forum thread types in a listing.
Is Default
Checked indicates that type is to be used as the
default. It is recommended that only one type per
website have this field checked.
39
See also
Setup and moderate forums
Create forum posts on the portal
Moderate forums
Subscribe to alerts
Configure and manage knowledge categories
and articles
Applies To: Dynamics 365 (online), Dynamics CRM Online
Create a new knowledge category
1. On the Interaction Centric Dashboard, click Settings > Service Management.
2. In the Knowledge Base Management section, click Categories.
3. Click the New button.
4. Enter a Name and Description for your category.
5. Choose a Parent Category. If you want this to be a top-level category, leave this field blank.
Associate knowledge articles
To associate a knowledge article with a category, open the Summary tab when viewing a knowledge
article record. In the Related Information section, click the + button. Select the category you want to
associate to the article and click the Associate button.
To remove a category from an article, choose the category you want to remove from the Category
subgrid on the knowledge article record and click the Delete button. When the confirmation message
displays, click the Delete button.
Delete a knowledge category
To delete a category, under Settings > Service Management > Categories, choose the category from
the list view and click the Delete button. Knowledge articles associated with this category will be
disassociated after the category is deleted.
See also
Get started with the portal content editor
Add dynamic content and create custom templates

40
Configure web roles for a PRM portal
Applies To: Dynamics 365 (online), Dynamics CRM Online
Web roles for the PRM portal grant specific access to the different areas of the portal. By assigning the
appropriate roles, you can grant your primary partner contacts the right permissions to manage their team
members and streamline their processes.
Continue for more information on the web roles that are available out-of-the-box.
Partner administrator
Partner administrators are contacts who serve as the primary contact for a partner account. They are
responsible for adding and deactivating their team members and for any administrative activities related
to their partner account information.
Partner administrators can:
View, accept, and reject all distributed opportunities
View, manage, and perform actions on all managed opportunities
Manage partner account information, associated partner contacts, and their web roles
Manage partner contact roles Create and edit customer accounts
Create and edit customer contacts
Create and edit new opportunities
Partner manager
Partner managers are contacts who manage opportunities distributed by the parent company. They are
responsible for accepting or rejecting distributed opportunities and sharing accepted opportunities with
team members.
Partner managers can:
View, accept, and reject all distributed opportunities
View, manage, and perform actions on all managed opportunities
Manage partner account information
Create and edit customer accounts
Create and edit customer contacts
Create and edit new opportunities
Partner seller
Partner sellers are contacts who manage and perform actions on opportunities. They can view and
perform actions on opportunities that are shared with them, but will not be able to view opportunities that
they are not associated with.
Partner Sellers can:
View, manage, and perform actions on managed opportunities that have been shared with them
Create and edit customer accounts
Create and edit customer contacts
Create and edit new opportunities
41
See also
Create a partner account on a partner relationship management (PRM) portal
Create web roles for portals
Assign permission set to a web role for portals
Create a partner account on a partner
relationship management (PRM) portal
Applies To: Dynamics 365 (online), Dynamics CRM Online
You can use partner accounts to keep track of your various partners. We recommend creating a separate
account for each partner so that you can manage each partner organization separately.
Create a partner account
1. Go to Sales > Accounts.
2. Choose New.
3. Fill in your information.
4. In the Partner Details area, use the Classification field and select the Partner classification.
5. Click Save.
Associate partner contacts with an account
Dynamics 365 contacts become partner contacts when they are associated with a partner account. To
associate a contact with a partner account when creating or editing a contact, enter the name of a partner
account in the Account Name field.
Get started with the portal content editor
Applies To: Dynamics 365 (online), Dynamics CRM Online
Dynamics 365 portals offers a powerful suite of editing tools. Users with suitable permissions can add,
modify, or delete webpages and their content without having to directly access the databases and web
servers that physically contain these entities. Editing can be performed in any modern browser and is
accomplished through the use of two powerful yet intuitive tools. More information: Control webpage
access for portals
This document assumes that you have permission to perform these tasks. If you do not, ask your portal
administrator to arrange this for you. The permissions can be assigned to individual pages, so be sure to
specify which pages you will need to edit.
Note
If you are using the sample organization, sign in with administrator as the username and pass@word1
as the password.
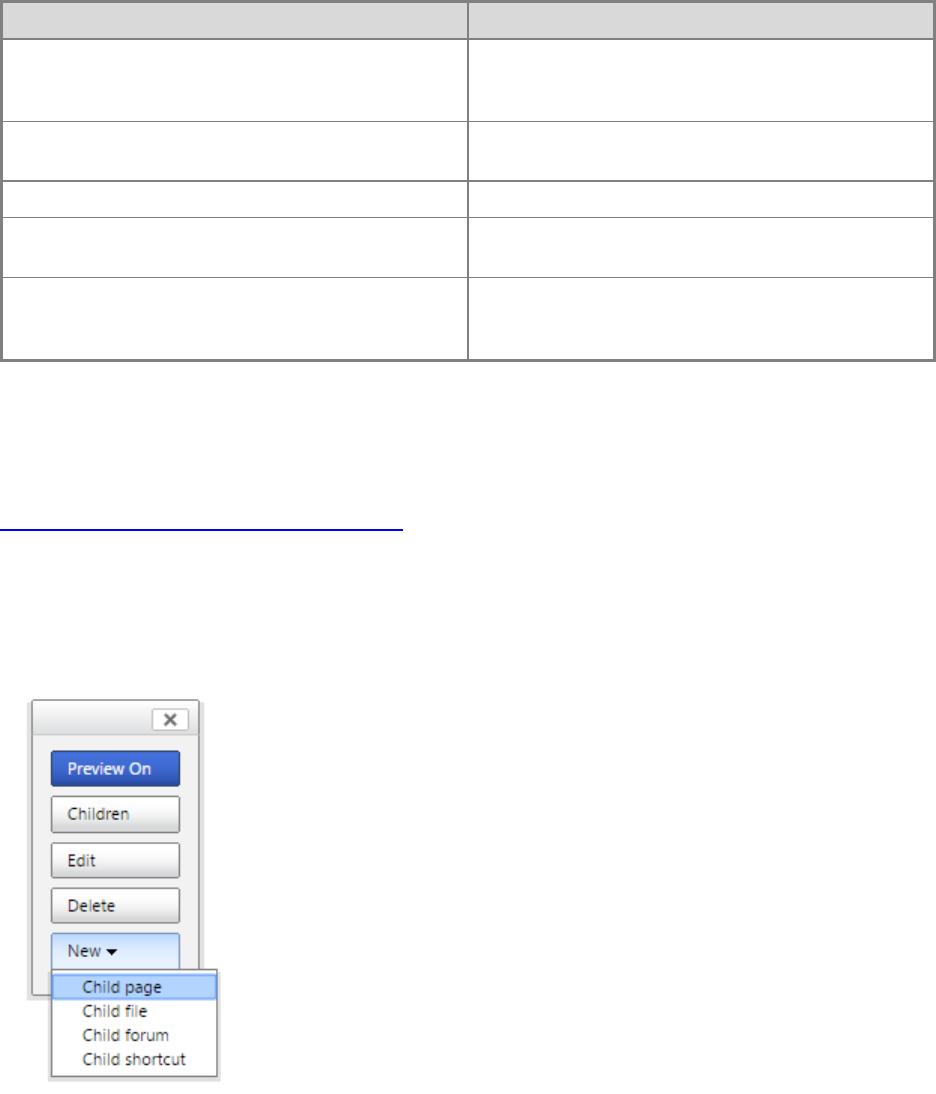
42
Use the content editor toolbar
Sign in first. This will enable content editing for users with this permission. A toolbar on the right hand side
allows you to edit the page properties. A blue edit button will appear when the mouse moves over any
content that can be managed by the user.
Option
Description
Preview On/Off
When on, published and unpublished content will
be visible. When off, only published content can
be seen.
Edit
Opens a dialog where one can change the
properties for the current page.
Delete
Deletes the current page.
New
Opens a menu where one can chose to create a
child page, file, event, forum or shortcut.
Children
Opens a dialog containing child records for the
current page where one can reorder, edit, or
delete them.
Edit the header
Place the mouse cursor over the page header and click the blue edit button that appears. This will open a
rich-text editor. Change the header text and click the disk icon to save the changes. More information:
Customize content by using content snippets.
Add a new webpage
To add a new webpage from the portal, click New in the toolbar, and then click Child page in the drop-
down menu. Fill in the properties for the new child page. Click Save to create the new page. The new
page is created as a child of the webpage you were on when you clicked New > Child page.

43
After being redirected to the newly created page. Point to the large rectangular box under the page title
and click the blue edit button that appears. Add some content, and then click the disk icon to save the
changes. More information: Get started with the portal content editor.
Web pages can also be added in Dynamics 365. Translating a webpage is done in Dynamics 365, so
start by navigating to Portals > Web Pages and clicking the +New button. Fill in the form and click Save.
Change the Publishing State from Draft to Published when it is ready for use on the website. The
Localized Content section can be filled in after the webpage is created to create the different translations
needed.
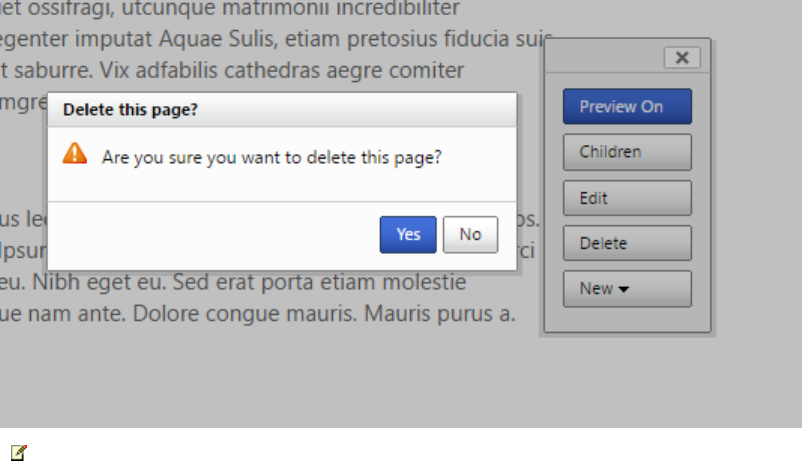
44
Edit the primary navigation
Web link sets are groups of links used for navigation based on location on the webpage. Primary
Navigation is the web link set that you see at the top of every webpage, and it can be edited in the portal
with the system administrator web role.
1. Place the mouse cursor over the primary navigation and click the Edit button that appears.
This will open a dialog with a list of web links that can be reordered or removed, as well as an
option to add new links.
2. Click the row with the green plus icon.
3. Enter the name for the page just created.
4. Set a link to it using the Page field drop-down.
5. Click the Save button for the new link dialog and for the primary navigation dialog.
Manage child pages
From the home page, Click Children in the toolbar. This will open a dialog with a list of all child pages for
the page you were on when you clicked Children. There should be some pages with an icon of an eye
with a line through it. This icon indicates the page is not visible in the site map, but if published it can still
be viewed if linked to directly. As with a web link set, one can reorder, edit, or delete the webpages listed.
Delete a page
Navigate to the page to be deleted and click the Delete button in the toolbar. Click Yes to confirm. When
deleting from the toolbar the pages are placed into a deactivated state instead of being deleted. Any child
pages of the deleted page will also be deactivated.
Note
Certain webpages are important to have for a properly functioning website, for instance, a sign in page
or 404 page. Be sure not to delete these pages, as doing so can cause a website to stop functioning
properly.
45
See also
How to provision a portal
Use the front-side editing engine to publish content
Customize content by using content snippets
Use the front-side editing engine to publish
content
Applies To: Dynamics 365 (online), Dynamics CRM Online
Learn how to use the content editor and edit the content of a webpage: edit text, create links and display
images.
To use the content editor, you need the appropriate permissions and the content to be modified must be
in the page template. To open the content editor, point to the content to be modified, and then click the
blue edit button that appears in the top left corner.
Content editor commands and controls
The editor toolbar has a number of buttons to help with content editing. Move the mouse cursor over a
button to see a tool tip for the buttons function. The table below also has more detail about the available
buttons, listed in the order they appear in the toolbar.
Name
Description
Save
Saves the changes made to the content and
closes the editor.
Cancel All Changes
Discards any changes made and closes the editor.
Toggle Full Screen Mode
Resizes the editor to the size of the containing
browser window.
Note
When in Full Screen Mode, the Save and
Cancel All Changes buttons will not be
available. To save or cancel, click the Toggle
Full Screen Mode button to return to the regular
mode where the buttons are available.
Bold, Italic, Underline, Strikethrough
Makes selected text bold, italic, underline, or
strikethrough as well as newly typed text.
Align Left, Center, Right, Full
Aligns selected text to the left, center, right, or full
as well as newly typed text.
Direction Left to Right, Right to Left
Changes the direction of the written text to be left
to right or right to left.
Edit CSS Style
Opens a dialog to an interface that allows full
control over the CSS styling of selected text as
well as newly typed text.
If you wish to set the style of a single word or
selection of text, simply select the text, then in the
46
Name
Description
Edit CSS Style dialog check the box titled "Insert
span at selection".
Note
Overusing custom styling can greatly reduce the
consistency of the content's look and feel
between pages. It is recommended to use this
method only when absolutely necessary.
Format
Changes the selected text as well as newly typed
text to the pre-defined style selected.
Help
Opens a dialog about TinyMCE.
Cut, Copy, Paste
Cuts, copies, or pastes the selected text to and
from the clipboard.
Paste as Plain Text
Pastes text from the clipboard with all formatting
and styling removed.
Paste from Word
Pastes text from the clipboard while trying to
maintain formatting and styling that originated from
Microsoft Word.
Find, Find/Replace
Opens a dialog for searching content and
optionally replacing found content.
Insert/Remove Bulleted List, Numbered List
Inserts a bulleted or numbered list for selected text
or at the text cursor if the list isn't already present.
If the list is already present, it will be removed.
Decrease, Increase Indent
Reduces or increases the indentation of the text or
a list item.
Block Quote
Places the selected text or newly typed text within
a quote block.
Undo, Redo
Will undo the previous change or redo an undone
change.
Note
Only changes that have been done since the
editor was opened can be undone. Changes that
have been saved or canceled cannot be
undone, or re-done.
Insert/Edit Link
Inserts or edits a hyperlink for selected text. See
Create a Link below for more details about this
feature.
Unlink
Changes a hyperlink back to text.
Insert/Edit Anchor
Inserts or edits an anchor link for selected text.
Insert/Edit Image
Inserts or edits an image into the content. See
Insert an Image below for more details about this
feature.
47
Name
Description
Insert/Edit Embedded Media
Inserts or edits embedded media such as a video
or application.
Cleanup Messy Code
Tries to remove invalid markup that may have
come from pasting.
Edit HTML Source
Opens a dialog containing the HTML source for
the content. The HTML can be directly modified
and updated from this window.
Note
This dialog will not validate the HTML! It is
recommended that only users with knowledge of
HTML use this feature.
Insert/Edit Table to Merge Table Cells
Inserts or edits tables and their rows, cells, and
properties.
Insert Horizontal Line
Inserts a horizontal line at the text cursor.
Remove Formatting
Removes the formatting and styling for the
selected text.
Show/Hide Guidelines/Invisible Elements
Toggles table border guidelines and other invisible
elements on or off.
Subscript, Superscript
Makes selected text subscript or superscript as
well as newly typed text.
Insert Special Character
Opens a dialog containing special characters and
inserts the selected character at the text cursor.
Create a link
From within the content editor, select the text to make a hyperlink for and click the Insert/Edit Link button.
Enter the properties for the hyperlink and click the insert button. Click the save button in the content editor
toolbar to save the change.
Link properties and commands
Name
Description
Link URL
The URL to link to. It can be any properly
formatted URL, external to the website or within
the same website. If within, it can be relative and it
can be looked up using Browse (found just right of
the Link URL field).
Browse
Opens a file picker for the website. The URL for
the selected page or file will be placed into the
Link URL field when selected. See Using the File
Picker.
48
Name
Description
Target
Specifies whether the link will be opened in the
same or a new browser window when clicked. If
not set, the link will open in the same window by
default.
Title
A descriptive title for the hyperlink. Usually
displayed when the mouse cursor hovers on the
hyperlink.
Insert, Update
Makes or updates the hyperlink with the specified
properties and closes the dialog.
Note
Note that the change is only done in the content
editor until the save button has been clicked in
the content editor toolbar.
Cancel
Discards any changes made and closes the
dialog.
Insert an image
From within the content editor, put the text cursor in the place to insert an image and click the Insert/Edit
Image button. Enter the properties for the image and click the insert button. Click the save button in the
content editor toolbar to save the change.
Image properties and commands
Name
Description
Image URL
The URL for the image. It can be any properly
formatted URL to an image, external to the
website or within the same website. It's
recommended that the URL be within. When
within, it can be relative and it can be looked up
using Browse (found just right of the Image URL
field).
Browse
Opens a file picker for the website. The URL for
the selected image file will be placed into the
Image URL field when selected. See Using the
File Picker.
Image Description
Specifies the alt attribute for the image. It's read
by screen readers, and is typically seen when the
image doesn't load properly.
Title
A descriptive title for the hyperlink. Usually
displayed when the mouse cursor hovers on the
image.
49
Name
Description
Preview
Provides a preview of the image being inserted or
updated.
Appearance (Tab)
Provides options for overriding the actual image
properties, its styling, and its placement.
Advanced (Tab)
Provides advanced options that may need page
template support.
Insert, Update
Makes or updates the image with the specified
properties and closes the dialog.
Note
Note that the change is only done in the content
editor until the save button has been clicked in
the content editor toolbar.
Cancel
Discards any changes made and closes the
dialog.
Browse pages and files by using the file picker
The file picker provides a way to browse pages and files that belong to the same website. New files can
be uploaded using the file picker as well. The file picker is available when adding a link or an image
through the content editor. Click on the icon that looks like a Windows Explorer window to open the file
picker. Browse to a page or file using the left tree view and double click the page or file in the right list
view to select it.
To upload new files, navigate to the folder to upload the file to and click the disk icon with a green plus on
it. In the dialog that opens, click Browse and pick a file to upload. Do the same in the next field to add
more than one file. Click Ok and the files will be uploaded.
File picker commands
The table below has more detail about the available buttons, listed in the order they appear in the toolbar.
Name
Description
Back
Move to the folder that was being viewed
previously.
Reload
Refresh the folder's view.
Select file
Use the selected page or file's URL.
Open
View the page or file in a new browser window.
Upload files
Opens a dialog for uploading new files.
Note
Note that new files are uploaded immediately to
the folder when clicking Ok from this dialog.
Copy, Cut
Disabled
50
Name
Description
Remove
Deletes the selected file.
Note
Note that only files can be removed and not
pages. Pages should be removed by using the
delete button in the content publishing toolbar.
Get Info
Displays additional information about the selected
page or file.
Preview with Quick Look
View the file and some information about it in a
small overlay window.
View as icons
Displays the folder contents as icons.
View as list
Displays the folder contents as a table with more
details about each item.
Help
Opens a dialog about elFinder: Web file manager.
See also
How to provision a portal
Get started with the portal content editor
Customize content by using content snippets
Create a theme for your portal
Applies To: Dynamics 365 (online), Dynamics CRM Online
When you build portals with the portal capabilities for with Microsoft Dynamics 365, you'll be using the
Bootstrap front-end framework. By taking advantage of the Bootstrap ecosystem, you can quickly and
easily brand these portals for your organization.
What is Bootstrap?
Bootstrap is a front-end framework that includes CSS and JavaScript components for common web
application interface elements. It includes styles for navigation elements, forms, buttons, and a
responsive grid layout system, which allow site layouts to dynamically adjust to devices that have different
screen sizes, such as phones and tablets. By using the Bootstrap layout system, you can develop a
single site that presents an appropriate interface to all devices your customers might use.
Implement portal templates by using Bootstrap
The templates included with Dynamics 365 portals are implemented by using standard Bootstrap
components, with minimal additional custom styles. So when you implement the templates, you can take
advantage of the Bootstrap customization options. You can customize the theme (fonts, colors, and so
on) quickly, and in a way that is applied consistently across the portal.

51
Customize Bootstrap
Bootstrap supports customization through a set of variables. You can set any or all of these variables to
custom values and then download a custom version of Bootstrap that is compiled based on these values.
The power of Bootstrap variables is that they don't dictate the style of a single element. All styles in the
framework are based on and derived from these values. For example, consider the variable @font-size-
base. This specifies the size that Bootstrap assigns to normal body text. However, Bootstrap also uses
this variable to indicate the font size for headings and other elements. The size for an h1 element may be
defined as 300 percent the size of @font-size-base. By setting this one variable, you control the entire
typographic scale of your portal in a consistent way. Similarly, the @link-color variable controls the color
of hyperlinks. For the color you assign to this value, Bootstrap will define the hover color for links as 15
percent darker than your custom value.
The standard way to create a custom version of Bootstrap is through the official Bootstrap site. However,
due to the popularity of Bootstrap, many third-party sites have also been created for this purpose. These
sites might provide an easier-to-use interface for Bootstrap customization or might provide predesigned
versions of Bootstrap for you to download. The official Bootstrap customizer site provides more
information on Bootstrap customization. The site will always be the most up to date, but currently doesn't
include some UI features like color pickers and live preview.
Apply a custom Bootstrap theme to your website
When you download a customized version of Bootstrap, it contains the following directory structure.
css/ |-- bootstrap.min.css img/
|-- glyphicons-halflings-white.png |-- glyphicons-halflings.png js/ |-- bootstrap.min.js
Or, depending on the customizer application used, it may only contain bootstrap.min.css. Regardless,
bootstrap.min.css is the file that contains your customizations. The other files are the same for all custom
versions of Bootstrap and are already included in your Dynamics 365 portal.
After you have your custom bootstrap.min.css, you can apply it to your portal in one of two ways. If you
are a developer and prefer to work directly with the source code of your application, you can overwrite the
version of bootstrap.min.css included in your application source with your custom version. In most cases,
however, we recommend that you apply your custom Bootstrap theme without modifying your site code
by uploading it as a web file in the Dynamics 365 portal’s content management system.
1. Sign in to your application as a user with content management permissions. More information:
Assign a permission set to a web role for portals.
2. Go to the Home page of your application.
3. Select Children > Edit this file (the pencil and paper button) for bootstrap.min.css from the
content editing toolbar (found in the upper-right corner of your browser window).
4. Select your custom bootstrap.min.css file, using the Upload File field in the Edit This File dialog
box that appears.
5. Ensure that the Partial URL field is set to bootstrap.min.css. This value indicates to the
Dynamics 365 portal’s framework that it should use your custom version of Bootstrap instead of
the default version included.
6. You may also want to select the Hidden from Sitemap checkbox (selected by default), so that
this file doesn't appear to users in any navigation elements on the site.
7. Save the file.
8. Refresh your page, and your customized styles will appear immediately.
Here, we can see a customized version of Bootstrap applied to the Community portal.
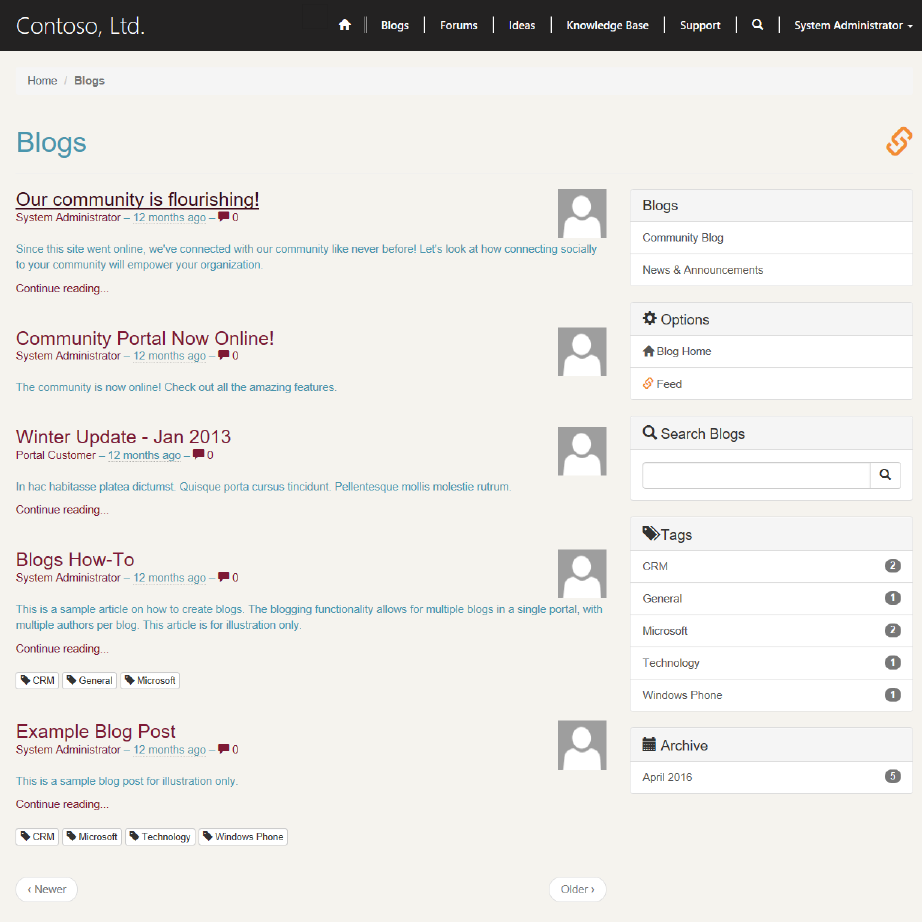
52
Additional portal theme options
In addition to a custom Bootstrap version, Dynamics 365 portals support uploading of your own custom
CSS files into the content management system. This lets you apply additional styling to your portal,
without having to deploy a new version of its code. To do this, follow the procedure described previously
for uploading custom Bootstrap CSS by using a file that contains your own CSS, and then choose a new
Partial URL for this web file. As long as the Partial URL ends in .css, Dynamics 365 portals will
recognize it and apply it to your site.
Along with a customized version of Bootstrap, you can use the content-editing system to add a custom
logo and brand to your portal header. With these simple but powerful options, you're only a few minutes
away from having your Dynamics 365 portal’s application reflect your brand.
53
See also
Engage with communities by using the community portal
Configure a Dynamics 365 portal
Configure site settings for portals
Applies To: Dynamics 365 (online), Dynamics CRM Online
A Site Setting is a configurable named value that is used by website code to modify the behavior or visual
style of the portal. Typically when a developer creates the website code, they will reference Site Settings
for various components to enable an end user to modify the setting values to alter the website without
having to change the code, recompile, and redeploy the website.
The sample portals that are provided with the installation of Dynamics 365 portals contain several
configurable Site Settings for various styles used to modify many visual elements within the site such as
background style, text color, and layout width.
Manage site settings in Dynamics 365
1. Login to Dynamics 365
2. Go to Portals > Site Settings
3. To create a new setting: Click New
4. To edit an existing setting: Double-click on the Site Setting listed in the grid
5. Specify values for the fields provided
Name
Description
Name
A label referenced by website code to retrieve the
appropriate setting. The name should be unique
for the associated website as the code retrieving
the setting will take the first record found with the
matching name.
Website
The associated website.
Value
The setting.
Description
The purpose of the setting or special instructions.
6. Click Save & Close
See also
How to provision a portal
Configure a Dynamics 365 portal
Configure Dynamics 365 portal authentication
Configure a Dynamics 365 portal

54
Configure Dynamics 365 portal authentication
Define entity forms and custom logic within the Dynamics 365 portal
Configure Dynamics 365 portal authentication
Applies To: Dynamics 365 (online), Dynamics CRM Online
In a portal application, an authenticated portal user is associated with either a Dynamics 365 contact or
system user. The default portals configuration is contact-based. To log in, a contact must have the
appropriate web authentication information configured. Portal users must be assigned to a web roles to
gain permissions beyond unauthenticated users. To configure permissions for a web role, configure its
webpage access and website access control rules.
To take an in-depth look at configuration of out-of-the-box registration modes and invitation model, see
Register and invite for a portal.
See also
Add dynamic content and create custom templates
Set authentication identity for a portal
Define entity forms and custom logic within the Dynamics 365 portal
Place child nodes by using shortcuts for portals
Applies To: Dynamics 365 (online), Dynamics CRM Online
Use shortcuts to place child nodes throughout your portal's sitemap that simply point to other nodes that
exist in your sitemap, or to URLs external to your portal. In other words, webpages, web files, events, and
forums can all be considered "solid" nodes of your portal's sitemap: they are added to your sitemap and
when you navigate to them, you see the actual content of those nodes directly. Shortcuts, on the other
hand, can be considered “intangible” nodes: they are also added to the sitemap (unlike web links, which
are not), but when you navigate to them, you see the content for the target "solid" node that the shortcut
points to, and that content is rendered by the page template for that node.
Manage shortcuts in Dynamics 365
Creating, editing, and deleting shortcuts can be done within Dynamics 365.
1. Login to Dynamics 365
2. Navigate to Portals > Shortcuts
3. To create a Shortcut: Click New
4. To edit an existing Shortcut: Double-click on the existing Shortcut listed in the grid
5. Enter values for the fields provided
6. Click Save & Close
55
Attributes and relationships
Name
Description
Name
A Descriptive Name for the shortcut. For internal
use only.
Website
The website that the shortcut belongs to.
Parent Page
The parent webpage of the shortcut entity in the
sitemap. The shortcut will be added to the sitemap
as a child of this page.
External URL
Target of the shortcut to a URL of a resource
outside of your organization.
Web Page
Target of the shortcut to an internal webpage.
Web File
Target of the shortcut to a web file.
Event
Target of the shortcut to an event.
Forum
Target of the shortcut to a forum.
Title
The title for the shortcut. This is the name that will
appear in the sitemap and child navigation view
areas. If left blank, the title (or name) of the target
entity will be shown instead.
Description
A description to appear in child nav views.
Optional.
Display Order
The front-side editable order that the shortcut will
appear in sitemap and child nav views, in relation
to other nodes in the site map.
Disable Shortcut Target Validation
If unchecked, the security of the shortcut will be
based on the target. Otherwise, it will be based on
the parent. For more details, see "Security" below.
Note
A shortcut needs only to have one of the 'Target' fields (External URL, Web Page, Survey, Web File,
Event, Forum) assigned a value, and a shortcut will only have one target.
For example, a shortcut does not point at both a Web Page and a survey, or an External URL and a
Web File. If more than one target attribute exists for a shortcut, the shortcut will just take the first one,
ignoring all others. The order of priority for which target will be chosen is reflected on the main
Dynamics 365 shortcut form. So, it will first check if there exists an External URL for the shortcut, and if
there is, then the shortcut's target will be the External URL and all other target attributes will be ignored.
If there is no External URL, then the shortcut will check the Web Page, then the Survey, Web file,
Event, and finally Forum.
Secure shortcuts
Security for shortcuts can be based either on the parent page of the shortcut or on the target of the
shortcut. This will determine whether the shortcut will be visible in the sitemap. Naturally, if security is
56
based off the parent, the write access of the target of the shortcut will still determine whether front-side
editing will function after the shortcut has been used to navigate to the target of the shortcut. Therefore,
shortcut security only affects navigation and edit rights for front-side editing of shortcuts. The security
method used is specific to the shortcut. If you leave the Boolean value Disable Shortcut Target
Validation unselected, the security of the shortcut will be based on the target; otherwise, it will be based
on the parent.
Navigate with shortcuts
After the shortcut entity has been created, it will appear in your website.
In the above example, Basic Site has two additional pages, Page One and Page Two. Page Two Is a
Child of Page One, which is a Child of the Home Page. Additionally, there is a shortcut that is a child of
the Home page which points to Page Two.
See also
Configure a Dynamics 365 portal
Configure site settings for portals
Configure Dynamics 365 portal authentication
Define entity forms and custom logic within the Dynamics 365 portal
Manage web links in Dynamics 365 or on portals
Register and invite for a portal
Applies To: Dynamics 365 (online), Dynamics CRM Online
The latest portal authentication experience allows portal users to sign in with their choice of a local
contact membership provider based account or an external account based on ASP.NET Identity. Both
local and external account registration can use invitation codes for sign up, as well as the email
confirmation workflow. In addition, portal administrators may choose to enable or disable any combination
of authentication options through portal site settings.
Local authentication
Local authentication is the common forms-based authentication uses the contact records of a Dynamics
365 organization for authentication. To build custom authentication experiences, developers can use the
ASP.Net Identity API to create custom login pages and tools.
External authentication
External authentication is provided by the ASP.NET Identity API. In this case, account credentials and
password management are handled by a third-party identity provider. This includes OpenID based
providers such as Yahoo! and Google and OAuth 2.0 based providers such as Twitter, Facebook, and
Microsoft. Users sign up to the portal by selecting an external identity to register with the portal. After it is
registered, an external identity has access to the same features as a local account.

57
Account sign-up (registration)
Portal administrators have several options for controlling account sign-up behavior. Open registration is
the least restrictive sign-up configuration where the portal allows a user account to be registered by
simply providing a user identity. Alternative configurations may require users to provide an invitation code
or valid email address to register with the portal. Regardless of the registration configuration, both local
and external accounts participate equally in the registration workflow. That is, users have the option to
choose which type of account they want to register.
Open registration
During sign-up, the user has the option of creating a local account (providing a username and password)
or selecting an external identity from a list of identity providers. If an external identity is selected, the user
is required to sign in through the chosen identity provider to prove that they own the external account. In
either case, the user is immediately registered and authenticated with the portal. A new contact record is
created in the Dynamics 365 organization upon sign-up.
With open registration enabled, users are not required to provide an invitation code to complete the sign-
up process.
See also
Configure a contact for use on a portal
Invite contacts to your portals
Set authentication identity for a portal
Configure a contact for use on a portal
Applies To: Dynamics 365 (online), Dynamics CRM Online
After filling out the basic information for a contact in Dynamics 365, (or having a user fill it out the signup
form in a portal), navigate to the web authentication tab on the portal contact form to configure a contact
using local authentication. For details on federated authentication options see Set authentication identity
for a portal. To configure a contact for portals using local authentication, follow these instructions:
1. Enter a username.
2. On the command ribbon, click More Commands > Change Password.
Complete the change password workflow, and the necessary fields will be automatically configured.
When you have done this, your contact will be configured for your portals.
See also
Register and invite for a portal
Invite contacts to your portals
Set authentication identity for a portal

58
Invite contacts to your portals
Applies To: Dynamics 365 (online), Dynamics CRM Online
Use the Dynamics 365 portals invitation feature to invite contacts to your portal through automated
email(s) created in your Dynamics 365 system. The people you invite receive an email, fully customizable
by you, with a link to your portal and an invitation code. This code can be used to gain special access
configured by you. With this feature you have the ability to:
Send Single or Group Invitations
Specify an expiry date if desired
Specify a user or portal contact as the inviter if desired
Automatically assign the invited contact(s) to an account upon invite redemption
Automatically execute a workflow upon invite redemption
Automatically assign the invited contact(s) to a Web Role(s) upon redemption
Invitation redemption can be accomplished using any of our many authentication options. For
documentation regarding portal authentication, see Set authentication identity for a portal and choose the
model applicable to your portal version and configuration. The user will adopt any settings provided by the
administrator upon redemption. An Invite Redemption Activity will be created for the Invite and Contact.
Invitations are sent via the Send Invitation workflow. By default, the workflow creates an email with a
generic message and sends it to the invited Contact's primary email address. The Send Invitation
workflow contains an email template that will need to be edited to contain a specific message for your
portal and the correct hyperlink to your portal's Invite Redemption Page.
Edit the Send Invitation workflow email template
Locate the Send Invitation workflow and deactivate it. After it is deactivated, edit the email template to
send the message you want and provide a link to the Invite Redemption Page of your portal.
Create and configure invitations
To create an Invitation record within Dynamics 365, click the Create Invitation button in the command
bar. The button is available when a single Contact is selected in a Contact View and when viewing a
Contact record. Clicking the button will open a new invitation form for the Contact. Invitations can also be
created via the Invitations View by clicking +New. After the Invitation record has been created the Run
Workflow button will appear enabling you to send the Invitation to the Contact(s).
Run the Send Invitation workflow
The invitation will not be sent to the Contact(s) until the Send Invitation workflow is initiated.
The Invitation Form has the following fields:
Name
Description
Name
A descriptive name for helping recognize the
invitation.
Type
Single or Group. Single will allow only one
contact to be invited and only one redemption.
59
Name
Description
Group allows multiple contacts to be invited and
multiple redemptions.
Owner/Sender
The Dynamics 365 user that will be the sender of
the email when the invitation is sent. This can be
overridden in the Send Invitation workflow if the
created email already contains someone in the
from field.
Invitation Code
A unique code for the invitation that only the
invitee will know. This is automatically generated
when creating a new invitation.
Expiry Date
The date that represents when the invitation will
become invalid for redemption. Optional.
Inviter
Can be used when a contact is the sender of the
invitation. Optional.
Invited Contact(s)
The contact(s) to be invited to a portal.
Assign to Account
An account record to be associated as the
redeeming contact's parent customer when the
invite is redeemed. Optional.
Execute Workflow on Redeeming Contact
A workflow process to be executed when the invite
is redeemed. The workflow will be passed the
redeeming contact as the primary entity. Optional.
Assign to Web Roles
A set of web roles to be associated with the
redeeming contact when the invite is redeemed.
Optional.
Redeemed Contact(s)
The contact(s) that have successfully redeemed
the invitation.
Maximum Redemptions Allowed
The number of times the invitation can be
redeemed. Available for Group type invitations
only.
See also
Register and invite for a portal
Configure a contact for use on a portal
Set authentication identity for a portal
Set authentication identity for a portal
Applies To: Dynamics 365 (online), Dynamics CRM Online
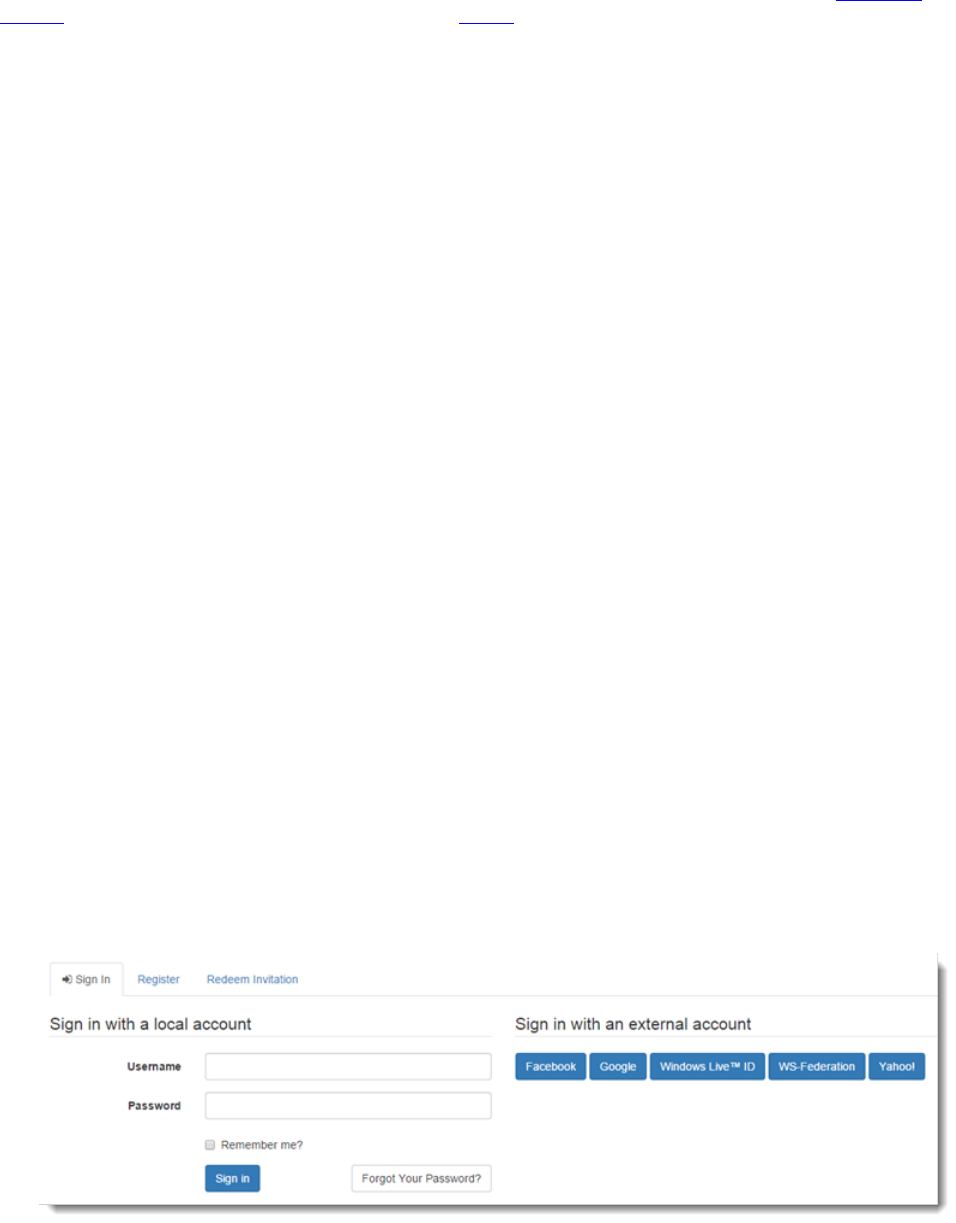
60
Portal capabilities for Microsoft Dynamics 365 provides authentication functionality built on the ASP.NET
Identity API. ASP.NET Identity is in turn built on the OWIN framework, which is also an important
component of the authentication system. The services provided include:
Local (username/password) user sign-in
External (social provider) user sign-in through third party identity providers
Two-factor authentication with email or SMS
Email address confirmation
Password recovery
Invitation code sign-up for registering pre-generated contact records
Requirements
Portal capabilities for Microsoft Dynamics 365 requires
Microsoft Dynamics 365 Portal Base, the Microsoft Identity, and the Microsoft Identity
Workflows solution packages
Authentication overview
Returning portal visitors have the option to authenticate using local user credentials and/or external
identity provider accounts. A new visitor can register for a new user account either by providing a
username/password or by signing-in through an external provider. Visitors who are sent an invitation code
(by the portal administrator) have the option to redeem the code in the process of signing-up for a new
user account.
Related Site Settings:
Authentication/Registration/Enabled
Authentication/Registration/LocalLoginEnabled
Authentication/Registration/ExternalLoginEnabled
Authentication/Registration/OpenRegistrationEnabled
Authentication/Registration/InvitationEnabled
Authentication/Registration/RememberMeEnabled
Authentication/Registration/ResetPasswordEnabled
Sign-in with a local identity or external identity
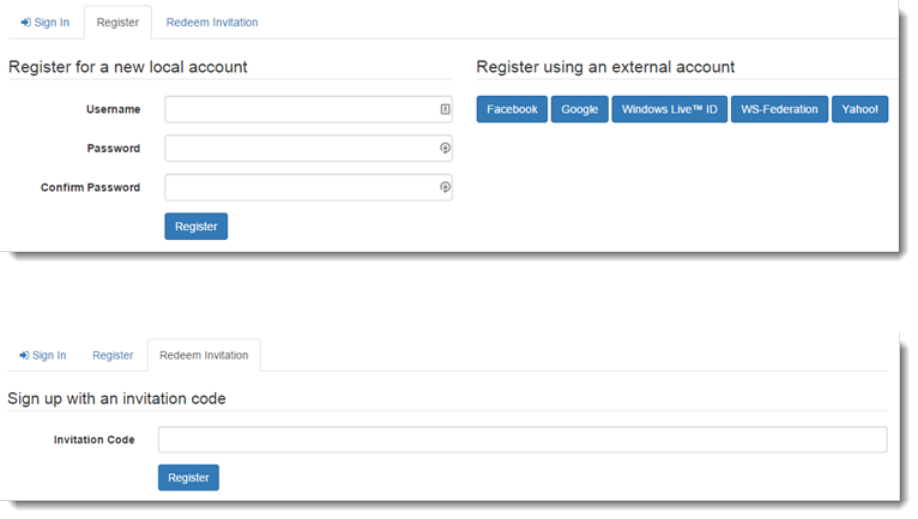
61
Sign-up with a local identity or external identity
Redeem an invitation code manually
Forgot password or password reset
Returning visitors who require a password reset (and have previously specified an email address on their
user profile) have the option of requesting a password reset token to be sent to their email account. A
reset token allows its owner to choose a new password. Alternatively, the token can be abandoned,
leaving the user’s original password unmodified.
Related Site Settings:
Authentication/Registration/ResetPasswordEnabled
Authentication/Registration/ResetPasswordRequiresConfirmedEmail
Related Processes:
Send Password Reset To Contact
1. Customize the email in the workflow as necessary
2. Submit email to invoke process
3. Visitor prompted to check email
4. Process: Send Password Reset To Contact
5. Password reset email with instructions
6. Visitor returns to the reset form
7. Password reset complete
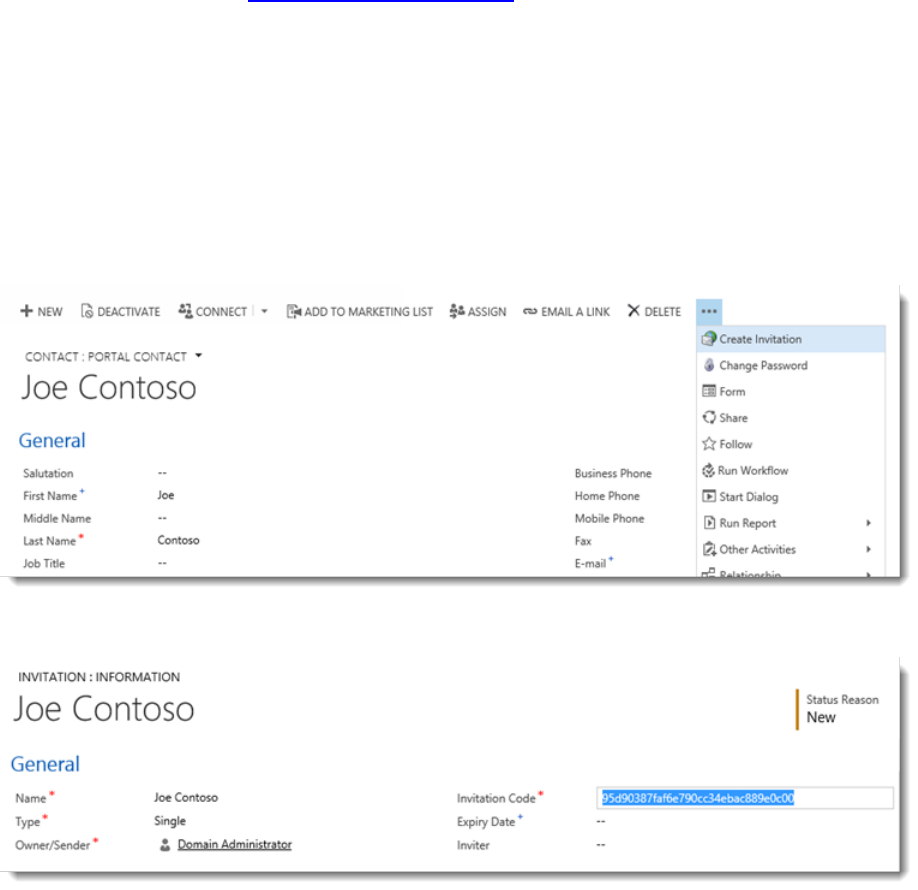
62
Redeem an invitation
Redeeming an invitation code allows a registering visitor to be associated to an existing contact record
that was prepared in advance specifically for that visitor. Typically, the invitation codes are sent out by
email but a general code submission form is available for codes sent though other channels. After a valid
invitation code is submitted, the normal user registration (sign-up) process takes place to setup the new
user account. More information: Register and invite for a portal.
Related Site Settings:
Authentication/Registration/InvitationEnabled
Related Processes:
Send Invitation
Note: the email sent by this workflow must be customized with the URL to the redeem invitation
page on the portal.
http://portal.contoso.com/register/?returnurl=%2f&invitation={Invitation Code(Invitation)}
1. Create invitation for a new contact
2. Customize and save the new invitation
3. Process: Send Invitation
4. Customize the invitation email
5. Invitation email opens the redemption page
6. Sign-up using the submitted invitation code
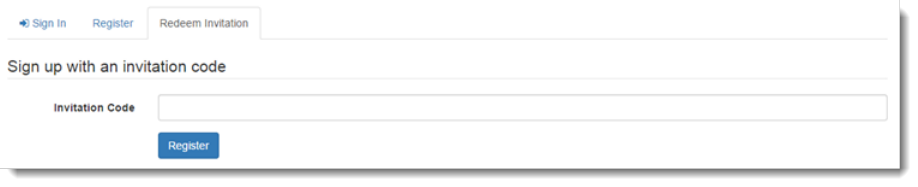
63
Manage user accounts through profile pages
Authenticated users manage their user accounts through the Security navigation bar of the profile page.
Users are not limited to the single local account or single external account chosen at user registration
time. Users with an external account may choose to create a local account by applying a username and
password. Otherwise, users who started with a local account can choose to associate multiple external
identities to their account. The profile page is also where the user is reminded to confirm their email
address by requesting a confirmation email to be sent to their email account.
Related Site Settings:
Authentication/Registration/LocalLoginEnabled
Authentication/Registration/ExternalLoginEnabled
Authentication/Registration/TwoFactorEnabled
Authentication/Registration/MobilePhoneEnabled
Set or change a password
A user with an existing local account can apply a new password by providing the original password. A
user without a local account can choose a username and password to set up a new local account. The
username cannot be changed after it is set.
Related Site Settings:
Authentication/Registration/LocalLoginEnabled
1. Create a username and password
2. Change an existing password
Change or confirm an email address
Changing an email address (or setting it for the first time) puts it into an unconfirmed state. The user can
request a confirmation email to be sent to the new email address, including instructions on completing the
email confirmation process.
Related Processes:
Send Email Confirmation To Contact
Customize the email in the workflow as necessary
1. Submit a new email (unconfirmed)
2. Check email for confirmation
64
3. Process: Send Email Confirmation To Contact
4. Customize the confirmation email
5. Click the confirmation link to complete
Change or confirm mobile phone
Changing the mobile phone value occurs slightly differently from changing the email. The new value is
held in a temporary storage without changing the original value. An SMS message containing a security
code is sent to the new mobile phone number. Only after the security code is submitted back to the portal
(and verified) is the old mobile number replaced with the new value.
Related Processes:
Authentication/Registration/MobilePhoneEnabled
Related Processes:
Send Sms Confirmation To Contact
Note: the workflow for this process contains a temporary step that sends the security code by
email. This is a placeholder step that needs to be replaced by a new step capable of sending
SMS messages.
1. Submit new mobile phone (unconfirmed)
2. Wait for SMS with security code
3. Process: Send Sms Confirmation To Contact
4. Replace this email step with SMS step
5. After submitting a valid security code
Enable two-factor authentication
The two-factor authentication feature increases user account security by requiring proof of ownership of a
confirmed email or mobile phone in addition to the standard local/external account sign-in. A user trying to
sign into an account with two-factor authentication enabled is sent a security code to the confirmed email
or mobile phone associated to their account. The security code must be submitted to complete the sign-in
process. A user can choose to remember the browser that successfully passes the verification such that
the security code is not required for subsequent sign-ins from the same browser.
Each user account enables this feature individually and requires either a confirmed email or confirmed
mobile phone. User accounts with both may choose which method to receive the security code.
Related Site Settings:
Authentication/Registration/TwoFactorEnabled
Authentication/Registration/RememberBrowserEnabled
Related Processes:
Send Email Two Factor Code To Contact
Send Sms Two Factor Code To Contact
1. Enable two-factor authentication
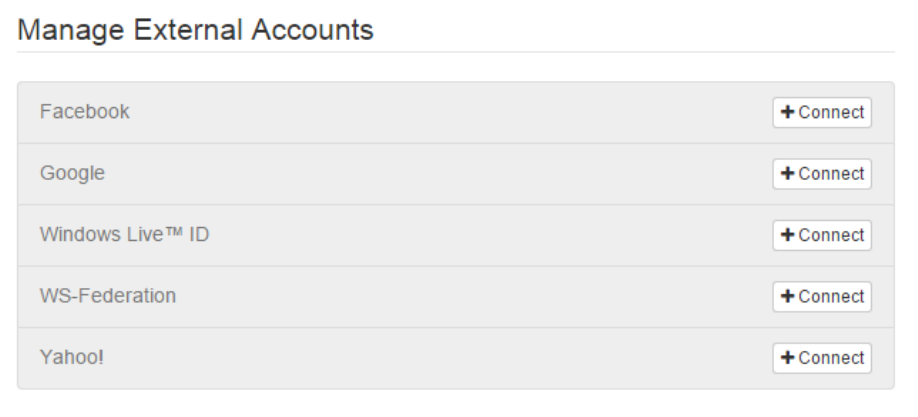
65
2. Choose to receive security code by email or SMS
3. Wait for email/SMS with security code
4. Process: Send Email Two Factor Code To Contact
5. Process: Send Sms Two Factor Code To Contact
6. Two-factor authentication can be disabled
Manage external accounts
An authenticated user may connect (register) multiple external identities to their user account one from
each of the configured identity providers. After the identities are connected, the user may choose to sign
in with any of the connected identities. Existing identities can also be disconnected, as long as a single
external or local identity remains.
Related Site Settings:
Authentication/Registration/ExternalLoginEnabled
External Identity Provider Site Settings
1. Select a provider to connect
2. Sign-in with provider to connect
3. Provider is connected
4. Provider can be disconnected
Enable ASP.NET identity authentication
The following describes the settings for enabling/disabling various authentication features and behaviors:
Site Setting Name
Description
66
Authentication/Registration/LocalLoginEnabled
Enables or disables local account sign-in based on
a username (or email) and password. Default:
false
Authentication/Registration/LocalLoginByEmail
Enables or disables local account sign-in using an
email address field instead of a username field.
Default: false
Authentication/Registration/ExternalLoginEnabl
ed
Enables or disables external account sign-in and
registration. Default: true
Authentication/Registration/RememberMeEnabled
Enables or disables a "Remember Me?" checkbox
on local sign-in to allow authenticated sessions to
persist even when the web browser is closed.
Default: true
Authentication/Registration/TwoFactorEnabled
Enables or disables the option for users to enable
two-factor authentication. Users with a confirmed
email address or confirmed mobile number can opt
into the added security of two-factor
authentication. Default: false
Authentication/Registration/MobilePhoneEnabled
Enables or disables the option to add and confirm
a mobile phone number. When enabled, it is also
necessary to update the Send Sms Confirmation To
Contact process in Dynamics 365 such that the
workflow is able to send out SMS messages.
Default: false
Authentication/Registration/RememberBrowserEna
bled
Enables or disables a "Remember Browser?"
checkbox on second-factor validation (email/SMS
code) to persist the second-factor validation for the
current browser. The user will not be required to
pass the second-factor validation for subsequent
sign-ins as long as the same browser is being
used. Default: true
Authentication/Registration/ResetPasswordEnabl
ed
Enables or disables the password reset feature.
Default: true
Authentication/Registration/ResetPasswordRequi
resConfirmedEmail
Enables or disables password reset for confirmed
email addresses only. If enabled, unconfirmed
email addresses cannot be used to send password
reset instructions. Default: false
Authentication/Registration/TriggerLockoutOnFa
iledPassword
Enables or disables recording of failed password
attempts. If disabled, user accounts will not be
locked out. Default: true
Authentication/Registration/IsDemoMode
Enables or disables a demo mode flag to be used
in development or demonstration environments
only. Do not enable this setting on production
environments. Demo mode also requires the web
browser to be running locally to the web
application server. When demo mode is enabled,
the password reset code and 2nd-factor code are
displayed to the user for quick access. Default:
false

67
Authentication/Registration/LoginButtonAuthent
icationType
If a portal only requires a single external identity
provider (to handle all authentication), this allows
the Sign-In button of the header nav bar to link
directly to the login page of that external identity
provider (instead linking to the intermediate local
login form and identity provider selection page).
Only a single identity provider can be selected for
this action. Specify the AuthenticationType value
of the provider.
For OAuth2 based providers the accepted values
are: Facebook, Google, Yahoo, Microsoft, LinkedIn,
Yammer, or Twitter
For WS-Federation based providers use the value
specified for the
Authentication/WsFederation/ADFS/Authenticatio
nType and
Authentication/WsFederation/Azure/[provider]/A
uthenticationType site settings. Examples:
http://adfs.contoso.com/adfs/services/trust,
Facebook-0123456789, Google, Yahoo!,
uri:WindowsLiveID.
Enable/disable user registration
The following describes the settings for enabling/disabling user registration (sign-up) options:
Site Setting Name
Description
Authentication/Registration/Enabled
Enables or disables all forms of user
registration. Registration must be enabled for
the other settings in this section to take effect.
Default: true
Authentication/Registration/OpenRegistrationEnabled
Enables or disables the sign-up registration
form for creating new local users. The sign-up
form allows any anonymous visitor to the
portal to create a new user account. Default:
true
Authentication/Registration/InvitationEnabled
Enables or disables the invitation code
redemption form for registering users who
possess invitation codes. Default: true
User credential validation
The following describes the settings for adjusting username and password validation parameters.
Validation occurs when signing up for a new local account or changing a password.
Site Setting Name
Description
Authentication/UserManager/PasswordValidator/Enfor
cePasswordPolicy
Whether the password contains characters
from three of the following categories:

68
1. Uppercase letters of European
languages (A through Z, with diacritic
marks, Greek and Cyrillic characters)
2. Lowercase letters of European
languages (a through z, sharp-s, with
diacritic marks, Greek and Cyrillic
characters)
3. Base 10 digits (0 through 9)
4. Non-alphanumeric characters (special
characters) (for example, !, $, #, %)
Default: true. MSDN.
Authentication/UserManager/UserValidator/AllowOnly
AlphanumericUserNames
Whether to allow only alphanumeric
characters for the user name. Default: false.
MSDN.
Authentication/UserManager/UserValidator/RequireUn
iqueEmail
Whether unique e-mail is needed for validating
the user. Default: true. MSDN.
Authentication/UserManager/PasswordValidator/Requi
redLength
The minimum required password length.
Default: 8. MSDN.
Authentication/UserManager/PasswordValidator/Requi
reNonLetterOrDigit
Whether the password requires a non-letter or
digit character. Default: false. MSDN.
Authentication/UserManager/PasswordValidator/Requi
reDigit
Whether the password requires a numeric digit
('0' - '9'). Default: false. MSDN.
Authentication/UserManager/PasswordValidator/Requi
reLowercase
Whether the password requires a lower case
letter ('a' - 'z'). Default: false. MSDN.
Authentication/UserManager/PasswordValidator/Requi
reUppercase
Whether the password requires an upper case
letter ('A' - 'Z'). Default: false. MSDN.
User account lockout settings
The following describes the settings that define how and when an account becomes locked from
authentication. When a certain number of failed password attempts are detected under a short period of
time, the user account is locked for a period of time. The use can try again after the lockout period
elapses.
Site Setting Name
Description
Authentication/UserManager/UserLockoutEnabledB
yDefault
Indicates whether the user lockout is enabled
when users are created. Default: true. MSDN.
Authentication/UserManager/DefaultAccountLocko
utTimeSpan
The default amount of time that a user is locked
out for after
Authentication/UserManager/MaxFailedAccessAtte
mptsBeforeLockout is reached. Default: 24:00:00 (1
Day). MSDN.

69
Authentication/UserManager/MaxFailedAccessAtte
mptsBeforeLockout
The maximum number of access attempts allowed
before a user is locked out (if lockout is enabled).
Default: 5. MSDN.
Authentication/ApplicationCookie/ExpireTimeSpa
n
The default amount of time cookie authentication
sessions are valid for. Default: 24:00:00 (1 Day).
MSDN.
See also
Configure Dynamics 365 portal authentication
OAuth2 provider settings for portals
Open ID Connect provider settings for portals
WS-Federation provider settings for portals
SAML 2.0 provider settings for portals
Facebook App (Page Tab) authentication for portals
OAuth2 provider settings for portals
Applies To: Dynamics 365 (online), Dynamics CRM Online
The OAuth 2.0 based external identity providers involve registering an "application" with a third-party
service to obtain a "client ID" and "client secret" pair. Often this application requires specifying a redirect
URL that allows the identity provider to send users back to the portal (relying party). The client ID and
client secret are configured as portal site settings in order to establish a secure connection from relying
party to identity provider. The settings are based on the properties of the
MicrosoftAccountAuthenticationOptions, TwitterAuthenticationOptions, FacebookAuthenticationOptions,
and GoogleOAuth2AuthenticationOptions classes.
The supported providers are:
Microsoft Account
Twitter
Facebook
Google
LinkedIn
Yahoo
Create OAuth applications
In general, if an OAuth provider uses app settings that require a redirect URI value, specify
http://portal.contoso.com/or http://portal.contoso.com/signin-[provider] depending on how the
provider performs redirect URI validation (some providers require the full URL path to be specified along
with the domain name). Substitute the name of the provider in place of [provider] in the redirect URI.
Google
Google OAuth2 API Credentials Instructions

70
Open Google Developers Console
Create an API project or open an existing project
Navigate to APIs & auth > APIs
Under Social APIs, click Google+ API then click Enable API
Navigate to APIs & auth > Consent screen
Specify an Email address
Specify a custom Product name
Click Save
Navigate to APIs & auth > Credentials
Create new Client ID
Application Type: Web application
Authorized JavaScript Origins: http://portal.contoso.com
Authorized Redirect URIs: http://portal.contoso.com/signin-google
Click Create Client ID
Facebook app settings
Open Facebook Developers App Dashboard
Click Add a New App
Select Website
Click Skip and Create App ID
Specify a Display Name
Select a Category
Click Create App ID
While on the Dashboard for the new app, navigate to Settings > Basic (tab)
(Optional) App Domains: portal.contoso.com
Contact Email: <email address of your choice>
Click Add Platform and select Website
Site URL: http://portal.contoso.com/ or http://portal.contoso.com/signin-facebook
Click Save Changes
Navigate to Status & Review > Status (tab)
Do you want to make this app an all its features available to the general public? YES
The Contact Email field is required to enable this setting

71
Microsoft application settings
Open Microsoft account Developer Center
Click Create application
Specify an Application name
Click I accept
Navigate to Settings > API settings
Redirect URLs: http://portal.contoso.com/signin-microsoft
Twitter apps settings
Open Twitter Application Management
Click Create New App
Specify a Name and Description
Website: http://portal.contoso.com
Callback URL: http://portal.contoso.com or http://portal.contoso.com/signin-twitter
Click Create your Twitter application
LinkedIn app settings
Open LinkedIn Developer Network
Click Add New Application
Specify an Application Name, Description, etc.
Website URL: http://portal.contoso.com
OAuth User Agreement/Default Scope: r_basicprofie and r_emailaddress
OAuth 2.0 Redirect Urls: http://portal.contoso.com/signin-linkedin
Click Add Application
Yahoo! YDN App settings
Open Yahoo! Developer Network
Click Create an App
Specify an Application Name
Application Type: Web Application
Callback Domain: portal.contoso.com
Click Create App
Create site settings using OAuth2
The application dashboard for each provider will display the client ID (app ID, consumer key) and client
secret (app secret, consumer secret) for each application. Use these two values to configure the portal
site settings.

72
Note
A standard OAuth2 configuration only requires the following settings (choosing Facebook as an
example):
Authentication/OpenAuth/Facebook/ClientId
Authentication/OpenAuth/Facebook/ClientSecret
Substitute the [provider] tag in the site setting name with a specific identity provider name: Facebook,
Google, Yahoo,Microsoft, LinkedIn, or Twitter.
Site Setting Name
Description
Authentication/Registration/ExternalLoginEnabl
ed
Enables or disables external account sign-in and
registration. Default: true
Authentication/OpenAuth/[provider]/ClientId
Required. The client ID value from the provider
application. It may also be referred to as an "App
ID" or "Consumer Key".
The following setting names are allowed for
backwards compatibility:
Authentication/OpenAuth/Twitter/ConsumerKey
Authentication/OpenAuth/Facebook/AppId
Authentication/OpenAuth/LinkedIn/ConsumerKe
y
Authentication/OpenAuth/[provider]/ClientSecre
t
Required. The client secret value from the provider
application. It may also be referred to as an "App
Secret" or "Consumer Secret".
The following setting names are allowed for
backwards compatibility:
Authentication/OpenAuth/Twitter/ConsumerSecret
Authentication/OpenAuth/Facebook/AppSecret
Authentication/OpenAuth/LinkedIn/ConsumerSe
cret
Authentication/OpenAuth/[provider]/Authenticat
ionType
The OWIN authentication middleware type.
Example: yahoo. MSDN:
authenticationoptions.authenticationtype.
Authentication/OpenAuth/[provider]/Scope
A comma separated list of permissions to request.
MSDN:
microsoftaccountauthenticationoptions.scope.
Authentication/OpenAuth/[provider]/Caption
The text that the user can display on a sign in user
interface. MSDN:
microsoftaccountauthenticationoptions.caption.
Authentication/OpenAuth/[provider]/Backchannel
Timeout
Timeout value in milliseconds for back channel
communications. MSDN:
microsoftaccountauthenticationoptions.backchann
eltimeout.
73
Authentication/OpenAuth/[provider]/CallbackPat
h
The request path within the application's base path
where the user-agent will be returned. MSDN:
microsoftaccountauthenticationoptions.callbackpat
h.
Authentication/OpenAuth/[provider]/SignInAsAut
henticationType
The name of another authentication middleware
which will be responsible for actually issuing a
userClaimsIdentity. MSDN:
microsoftaccountauthenticationoptions.signinasaut
henticationtype.
Authentication/OpenAuth/[provider]/Authenticat
ionMode
The OWIN authentication middleware mode.
MSDN:
security.authenticationoptions.authenticationmode.
See also
Configure Dynamics 365 portal authentication
Set authentication identity for a portal
Open ID Connect provider settings for portals
WS-Federation provider settings for portals
SAML 2.0 provider settings for portals
Facebook App (Page Tab) authentication for portals
Open ID Connect provider settings for portals
Applies To: Dynamics 365 (online), Dynamics CRM Online
Note
This documentation applies to Dynamics 365 portals and later versions.
OpenID Connect external identity providers are services that conform to the Open ID Connect
specifications. Integrating a provider involves locating the authority (or issuer) URL associated with the
provider. A configuration URL can be determined from the authority which supplies metadata required
during the authentication workflow. The provider settings are based on the properties of the
OpenIdConnectAuthenticationOptions class.
Examples of authority URLs are:
Google - https://accounts.google.com/https://accounts.google.com/.well-known/openid-configuration
Azure Active Directory - https://login.windows.net/<Azure AD Application>/
Each OpenID Connect provider also involves registering an application (similar to that of an OAuth 2.0
provider) and obtaining a Client Id. The authority URL and the generated application Client Id are the
settings required to enable external authentication between the portal and the identity provider.
Note

74
The Google OpenID Connect endpoint is currently not supported because the underlying libraries are
still in the early stages of release with compatibility issues to address. The OAuth2 provider settings for
portals endpoint can be used instead.
OpenID settings for Azure Active Directory
To get started sign into the Azure Management Portal and create or select an existing directory. When a
directory is available follow the instructions to add an application to the directory.
1. Under the Applications menu of the directory, click the Add button
2. Choose Add an application my organization is developing
3. Specify a custom name for the application and choose the type web application and/or web
API
4. For the Sign-On URL and the App ID URI, specify the URL of the portal for both fields
https://portal.contoso.com/
5. At this point, a new application is created. Navigate to the Configure section in the menu
Under the single sign-on section, update the first Reply URL entry to include a path in the URL
http://portal.contoso.com/signin-azure-ad
This corresponds to the RedirectUri site setting value
Under the properties section, locate the client ID field. This corresponds to the ClientId site
setting value.
6. In the footer menu click the View Endpoints button and note the Federation Metadata
Document field
The left portion of the URL is the Authority value and is in one of the following formats:
https://login.microsoftonline.com/01234567-89ab-cdef-0123-456789abcdef/
https://login.microsoftonline.com/contoso.onmicrosoft.com/
To get the service configuration URL, replace the FederationMetadata/2007-
06/FederationMetadata.xml path tail with the path .well-known/openid-configuration
https://login.microsoftonline.com/contoso.onmicrosoft.com/.well-known/openid-
configuration
This corresponds to the MetadataAddress site setting value
Create site settings using OpenID
Apply portal site settings referencing the above application.
Note
A standard Azure AD configuration only uses the following settings (with example values):
Authentication/OpenIdConnect/AzureAD/Authority - https://login.microsoftonline.com/01234567-89ab-
cdef-0123-456789abcdef/
Authentication/OpenIdConnect/AzureAD/ClientId - fedcba98-7654-3210-fedc-ba9876543210

75
Note, the Client ID and the authority URL do not contain the same value and should be
retrieved separately.
Authentication/OpenIdConnect/AzureAD/RedirectUri - https://portal.contoso.com/signin-azure-ad
Multiple identity providers can be configured by substituting a label for the [provider] tag. Each unique
label forms a group of settings related to an identity provider. Examples: AzureAD, MyIdP
Site Setting Name
Description
Authentication/Registration/ExternalLoginEnabled
Enables or disables external account sign-in
and registration. Default: true
Authentication/OpenIdConnect/[provider]/Authority
Required. The Authority to use when making
OpenIdConnect calls. Example:
https://login.windows.net/contoso.onmicroso
ft.com/. MSDN.
Authentication/OpenIdConnect/[provider]/MetadataAd
dress
The discovery endpoint for obtaining
metadata. Commonly ending with the
path:/.well-known/openid-configuration .
Example:
https://login.windows.net/contoso.onmicroso
ft.com/.well-known/openid-configuration.
MSDN.
Authentication/OpenIdConnect/[provider]/Authentica
tionType
The OWIN authentication middleware type.
Specify the value of the issuer in the service
configuration metadata. Example:
https://sts.windows.net/contoso.onmicrosoft
.com/. MSDN.
Authentication/OpenIdConnect/[provider]/ClientId
Required. The client ID value from the provider
application. It may also be referred to as an
"App ID" or "Consumer Key". MSDN.
Authentication/OpenIdConnect/[provider]/ClientSecr
et
The client secret value from the provider
application. It may also be referred to as an
"App Secret" or "Consumer Secret". MSDN.
Authentication/OpenIdConnect/[provider]/RedirectUr
i
Recommended. The AD FS WS-Federation
passive endpoint. Example:
https://portal.contoso.com/signin-saml2.
MSDN.
Authentication/OpenIdConnect/[provider]/Caption
Recommended. The text that the user can
display on a sign in user interface. Default:
[provider]. MSDN.
Authentication/OpenIdConnect/[provider]/Resource
The 'resource'. MSDN.
Authentication/OpenIdConnect/[provider]/ResponseTy
pe
The 'response_type'. MSDN.
Authentication/OpenIdConnect/[provider]/Scope
A space separated list of permissions to
request. Default: openid. MSDN.
Authentication/OpenIdConnect/[provider]/CallbackPa
th
An optional constrained path on which to
process the authentication callback. If not
provided and RedirectUri is available, this

76
value will be generated from RedirectUri.
MSDN.
Authentication/OpenIdConnect/[provider]/Backchanne
lTimeout
Timeout value for back channel
communications. Example: 00:05:00 (5 mins).
MSDN.
Authentication/OpenIdConnect/[provider]/RefreshOnI
ssuerKeyNotFound
Determines whether a metadata refresh
should be attempted after a
SecurityTokenSignatureKeyNotFoundExceptio
n. MSDN.
Authentication/OpenIdConnect/[provider]/UseTokenLi
fetime
Indicates that the authentication session
lifetime (e.g. cookies) should match that of the
authentication token. MSDN.
Authentication/OpenIdConnect/[provider]/Authentica
tionMode
The OWIN authentication middleware mode.
MSDN.
Authentication/OpenIdConnect/[provider]/SignInAsAu
thenticationType
The AuthenticationType used when creating
the System.Security.Claims.ClaimsIdentity.
MSDN.
Authentication/OpenIdConnect/[provider]/PostLogout
RedirectUri
The 'post_logout_redirect_uri'. MSDN.
Authentication/OpenIdConnect/[provider]/ValidAudie
nces
Comma-separated list of audience URLs.
MSDN.
Authentication/OpenIdConnect/[provider]/ValidIssue
rs
Comma-separated list of issuer URLs. MSDN.
Authentication/OpenIdConnect/[provider]/ClockSkew
The clock skew to apply when validating times.
Authentication/OpenIdConnect/[provider]/NameClaimT
ype
The claim type used by the ClaimsIdentity to
store the name claim.
Authentication/OpenIdConnect/[provider]/RoleClaimT
ype
The claim type used by the ClaimsIdentity to
store the role claim.
Authentication/OpenIdConnect/[provider]/RequireExp
irationTime
A value indicating whether tokens must have
an 'expiration' value.
Authentication/OpenIdConnect/[provider]/RequireSig
nedTokens
A value indicating whether a
System.IdentityModel.Tokens.SecurityToken
xmlns="http://ddue.schemas.microsoft.com/aut
horing/2003/5" can be valid if not signed.
Authentication/OpenIdConnect/[provider]/SaveSignin
Token
A Boolean to control if the original token is
saved when a session is created.
Authentication/OpenIdConnect/[provider]/ValidateAc
tor
A value indicating whether the
System.IdentityModel.Tokens.JwtSecurityToke
n.Actor should be validated.
Authentication/OpenIdConnect/[provider]/ValidateAu
dience
A Boolean to control if the audience will be
validated during token validation.
Authentication/OpenIdConnect/[provider]/ValidateIs
suer
A Boolean to control if the issuer will be
validated during token validation.
Authentication/OpenIdConnect/[provider]/ValidateLi
fetime
A Boolean to control if the lifetime will be
validated during token validation.
77
Authentication/OpenIdConnect/[provider]/ValidateIs
suerSigningKey
A Boolean that controls if validation of the
System.IdentityModel.Tokens.SecurityKey that
signed the securityToken
xmlns="http://ddue.schemas.microsoft.com/aut
horing/2003/5" is called.
See also
Configure Dynamics 365 portal authentication
Set authentication identity for a portal
OAuth2 provider settings for portals
WS-Federation provider settings for portals
SAML 2.0 provider settings for portals
Facebook App (Page Tab) authentication for portals
WS-Federation provider settings for portals
Applies To: Dynamics 365 (online), Dynamics CRM Online
A single Active Directory Federation Services server can be added (or another WS-Federation–compliant
security token service) as an identity provider. In addition, a single Azure ACS namespace can be
configured as a set of individual identity providers. The settings for both AD FS and ACS are based on
the properties of the WsFederationAuthenticationOptions class.
Create an AD FS relying party trust
Using the AD FS Management tool, select Trust Relationships > Relying Party Trusts.
1. Click Add Relying Party Trust…
2. Welcome: Click Start
3. Select Data Source: Select Enter data about the relying party manually, click Next
4. Specify Display Name: Enter a name, click Next
Example: https://portal.contoso.com/
5. Choose Profile: Select AD FS 2.0 profile, click Next
6. Configure Certificate: Click Next
7. Configure URL: Check Enable support for the WS-Federation Passive protocol
Relying party WS-Federation Passive protocol URL: Enter https://portal.contoso.com/signin-
federation
Note: AD FS requires that the portal run on HTTPS
Note
The resulting endpoint has the following settings:

78
Endpoint type: WS-Federation
Binding: POST
Index: n/a (0)
URL: https://portal.contoso.com/signin-federation
8. Configure Identities: Specify https://portal.contoso.com/, click Add, click Next
If applicable, more identities can be added for each additional relying party portal. Users will be able to
authenticate across any or all of the available identities.
9. Choose Issuance Authorization Rules: Select Permit all users to access this relying party,
click Next
10. Ready to Add Trust: Click Next
11. Click Close
Add the Name ID claim to the relying party trust:
TransformWindows account name to Name ID claim (Transform an Incoming Claim):
Create AD FS site settings
Apply portal site settings referencing the above AD FS Relying Party Trust.
Note
A standard AD FS (STS) configuration only uses the following settings (with example values):
Authentication/WsFederation/ADFS/MetadataAddress -
https://adfs.contoso.com/FederationMetadata/2007-06/FederationMetadata.xml
Authentication/WsFederation/ADFS/AuthenticationType - http://adfs.contoso.com/adfs/services/trust
Use the value of the entityID attribute in the root element of the Federation Metadata (open the
MetadataAddress URL in a browser that is the value of the above site setting)
Authentication/WsFederation/ADFS/Wtrealm - https://portal.contoso.com/
Authentication/WsFederation/ADFS/Wreply - https://portal.contoso.com/signin-federation
The WS-Federation metadata can be retrieved in PowerShell by running the following script on the
AD FS server:
Import-Module adfs Get-ADFSEndpoint -AddressPath /FederationMetadata/2007-
06/FederationMetadata.xml
Site Setting Name
Description
Authentication/Registration/ExternalLoginEnable
d
Enables or disables external account sign-in and
registration. Default: true
Authentication/WsFederation/ADFS/MetadataAddres
s
Required. The WS-Federation metadata URL of
the AD FS (STS) server. Commonly ending with
the path:/FederationMetadata/2007-
06/FederationMetadata.xml .

79
Example:https://adfs.contoso.com/FederationMe
tadata/2007-06/FederationMetadata.xml. MSDN.
Authentication/WsFederation/ADFS/Authentication
Type
Required. The OWIN authentication middleware
type. Specify the value of the entityID attribute at
the root of the federation metadata XML.
Example:
http://adfs.contoso.com/adfs/services/trust.
MSDN.
Authentication/WsFederation/ADFS/Wtrealm
Required. The AD FS relying party identifier.
Example: https://portal.contoso.com/. MSDN.
Authentication/WsFederation/ADFS/Wreply
Required. The AD FS WS-Federation passive
endpoint. Example:
https://portal.contoso.com/signin-federation.
MSDN.
Authentication/WsFederation/ADFS/Caption
Recommended. The text that the user can display
on a sign in user interface. Default: ADFS. MSDN.
Authentication/WsFederation/ADFS/CallbackPath
An optional constrained path on which to process
the authentication callback. MSDN.
Authentication/WsFederation/ADFS/SignOutWreply
The 'wreply' value used during sign-out. MSDN.
Authentication/WsFederation/ADFS/BackchannelTim
eout
Timeout value for back channel communications.
Example: 00:05:00 (5 mins). MSDN.
Authentication/WsFederation/ADFS/RefreshOnIssue
rKeyNotFound
Determines if a metadata refresh should be
attempted after a
SecurityTokenSignatureKeyNotFoundException.
MSDN.
Authentication/WsFederation/ADFS/UseTokenLifeti
me
Indicates that the authentication session lifetime
(e.g. cookies) should match that of the
authentication token. MSDN.
Authentication/WsFederation/ADFS/Authentication
Mode
The OWIN authentication middleware mode.
MSDN.
Authentication/WsFederation/ADFS/SignInAsAuthen
ticationType
The AuthenticationType used when creating the
System.Security.Claims.ClaimsIdentity. MSDN.
Authentication/WsFederation/ADFS/ValidAudiences
Comma separated list of audience URLs. MSDN.
Authentication/WsFederation/ADFS/ValidIssuers
Comma separated list of issuer URLs. MSDN.
Authentication/WsFederation/ADFS/ClockSkew
The clock skew to apply when validating times.
MSDN.
Authentication/WsFederation/ADFS/NameClaimType
The claim type used by the ClaimsIdentity to store
the name claim. MSDN.
Authentication/WsFederation/ADFS/RoleClaimType
The claim type used by the ClaimsIdentity to store
the role claim. MSDN.
Authentication/WsFederation/ADFS/RequireExpirat
ionTime
A value indicating whether tokens must have an
'expiration' value. MSDN.
Authentication/WsFederation/ADFS/RequireSignedT
okens
A value indicating whether a
System.IdentityModel.Tokens.SecurityToken

80
xmlns="http://ddue.schemas.microsoft.com/author
ing/2003/5" can be valid if not signed. MSDN.
Authentication/WsFederation/ADFS/SaveSigninToke
n
A Boolean to control if the original token is saved
when a session is created. MSDN.
Authentication/WsFederation/ADFS/ValidateActor
A value indicating whether the
System.IdentityModel.Tokens.JwtSecurityToken.A
ctor should be validated. MSDN.
Authentication/WsFederation/ADFS/ValidateAudien
ce
A Boolean to control if the audience will be
validated during token validation. MSDN.
Authentication/WsFederation/ADFS/ValidateIssuer
A Boolean to control if the issuer will be validated
during token validation. MSDN.
Authentication/WsFederation/ADFS/ValidateLifeti
me
A Boolean to control if the lifetime will be validated
during token validation. MSDN.
Authentication/WsFederation/ADFS/ValidateIssuer
SigningKey
A Boolean that controls if validation of the
System.IdentityModel.Tokens.SecurityKey that
signed the securityToken
xmlns="http://ddue.schemas.microsoft.com/author
ing/2003/5" is called. MSDN.
Authentication/WsFederation/ADFS/Whr
Specifies a "whr" parameter in the identity
provider redirect URL. MSDN.
WS-Federation settings for Azure Active Directory
The previous section describing AD FS can also be applied to Azure Active Directory (Azure AD),
because Azure AD behaves like a standard WS-Federation compliant security token service. To get
started sign into the Azure Management Portal and create or select an existing directory. When a
directory is available follow the instructions to add an application to the directory.
1. Under the Applications menu of the directory, click the Add button
2. Choose Add an application my organization is developing
3. Specify a custom name for the application and choose the type web application and/or web
API
4. For the Sign-On URL and the App ID URI, specify the URL of the portal for both fields
https://portal.contoso.com/
This corresponds to the Wtrealm site setting value
5. At this point, a new application is created. Navigate to the Configure section in the menu
Under the single sign-on section, update the first Reply URL entry to include a path in the URL
http://portal.contoso.com/signin-azure-ad
This corresponds to the Wreply site setting value
6. Click Save in the footer
7. In the footer menu click the View Endpoints button and note the Federation Metadata
Document field

81
This corresponds to the MetadataAddress site setting value
Paste this URL in a browser window to view the federation metadata XML and note the entityID
attribute of the root element
This corresponds to the AuthenticationType site setting value
Note
A standard Azure AD configuration only uses the following settings (with example values):
Authentication/WsFederation/ADFS/MetadataAddress - https://login.microsoftonline.com/01234567-89ab-
cdef-0123-456789abcdef/federationmetadata/2007-06/federationmetadata.xml
Authentication/WsFederation/ADFS/AuthenticationType - https://sts.windows.net/01234567-89ab-
cdef-0123-456789abcdef/
Use the value of the entityID attribute in the root element of the Federation Metadata (open the
MetadataAddress URL in a browser that is the value of the above site setting)
Authentication/WsFederation/ADFS/Wtrealm - https://portal.contoso.com/
Authentication/WsFederation/ADFS/Wreply - https://portal.contoso.com/signin-azure-ad
Configure Facebook app authentication
Apply the configuration described in the topic Facebook App (Page Tab) authentication for portals.
See also
Configure Dynamics 365 portal authentication
Set authentication identity for a portal
OAuth2 provider settings for portals
Open ID Connect provider settings for portals
SAML 2.0 provider settings for portals
Facebook App (Page Tab) authentication for portals
SAML 2.0 provider settings for portals
Applies To: Dynamics 365 (online), Dynamics CRM Online
Note
This documentation applies to Dynamics 365 portals and later versions.
One or more SAML 2.0–compliant Identity Providers (IdP) can be added to provide external
authentication. This document describes how to setup various identity providers to integrate with a portal
acting as a Service Provider (SP).
82
AD FS (IdP)
Settings for an IdP such as AD FS.
Create an AD FS relying party trust
Note
See Configure AD FS by using PowerShell, below, for information about how to perform these steps in
a PowerShell script.
Using the AD FS Management tool, select Service > Claim Descriptions.
1. Click Add Claim Description...
2. Specify the claim:
Display name: Persistent Identifier
Claim identifier: urn:oasis:names:tc:SAML:2.0:nameid-format:persistent
Enable checkbox for: Publish this claim description in federation metadata as a claim type that
this Federation Service can accept
Enable checkbox for: Publish this claim description in federation metadata as a claim type that
this Federation Service can send
Click OK
Using the AD FS Management tool, select Trust Relationships > Relying Party Trusts.
1. Click Add Relying Party Trust...
2. Welcome: Click Start
3. Select Data Source: Select Enter data about the relying party manually, click Next
4. Specify Display Name: Enter a name, click Next
Example: https://portal.contoso.com/
5. Choose Profile: Select AD FS 2.0 profile, click Next
6. Configure Certificate: Click Next
7. Configure URL: Check Enable support for the SAML 2.0 WebSSO protocol
Relying party SAML 2.0 SSO service URL: Enter https://portal.contoso.com/signin-saml2
Note: AD FS requires that the portal run on HTTPS
Note
The resulting endpoint has the following settings:
Endpoint type: SAML Assertion Consume Endpoints
Binding: POST
Index: n/a (0)

83
URL: https://portal.contoso.com/signin-saml2
8. Configure Identities: Specify https://portal.contoso.com/, click Add, click Next
If applicable, more identities can be added for each additional relying party portal. Users will be able to
authenticate across any or all of the available identities.
9. Choose Issuance Authorization Rules: Select Permit all users to access this relying party,
click Next
10. Ready to Add Trust: Click Next
11. Click Close
Add the Name ID claim to the relying party trust:
TransformWindows account name to Name ID claim (Transform an Incoming Claim):
Incoming claim type: Windows account name
Outgoing claim type: Name ID
Outgoing name ID format: Persistent Identifier
Pass through all claim values
Create site settings
Apply portal site settings referencing the above AD FS Relying Party Trust.
Note
A standard AD FS (IdP) configuration only uses the following settings (with example values):
Authentication/SAML2/ADFS/MetadataAddress - https://adfs.contoso.com/FederationMetadata/2007-
06/FederationMetadata.xml
Authentication/SAML2/ADFS/AuthenticationType - http://adfs.contoso.com/adfs/services/trust
Use the value of the entityID attribute in the root element of the Federation Metadata (open the
MetadataAddress URL in a browser that is the value of the above site setting)
Authentication/SAML2/ADFS/ServiceProviderRealm - https://portal.contoso.com/
Authentication/SAML2/ADFS/AssertionConsumerServiceUrl - https://portal.contoso.com/signin-saml2
The Federation metadata can be retrieved in PowerShell by running the following script on the AD FS
server:
Import-Module adfs
Get-ADFSEndpoint -AddressPath /FederationMetadata/2007-06/FederationMetadata.xml
Multiple IdP services can be configured by substituting a label for the [provider] tag. Each unique label
forms a group of settings related to an IdP. Examples: ADFS, AzureAD, MyIdP
Site Setting Name
Description
Authentication/Registration/ExternalLoginEnabled
Enables or disables external account sign-in
and registration. Default: true

84
Authentication/SAML2/[provider]/MetadataAddress
Required. The WS-Federation metadata URL
of the AD FS (STS) server. Commonly ending
with the path:/FederationMetadata/2007-
06/FederationMetadata.xml . Example:
https://adfs.contoso.com/FederationMetadat
a/2007-06/FederationMetadata.xml. MSDN.
Authentication/SAML2/[provider]/AuthenticationType
Required. The OWIN authentication
middleware type. Specify the value of the
entityID attribute at the root of the federation
metadata XML. Example:
http://adfs.contoso.com/adfs/services/trus
t. MSDN.
Authentication/SAML2/[provider]/ServiceProviderReal
m
or
Authentication/SAML2/[provider]/Wtrealm
Required. The AD FS relying party identifier.
Example: https://portal.contoso.com/.
MSDN.
Authentication/SAML2/[provider]/AssertionConsumerSe
rviceUrl
or
Authentication/SAML2/[provider]/Wreply
Required. The AD FS SAML Consumer
Assertion endpoint. Example:
https://portal.contoso.com/signin-saml2.
MSDN.
Authentication/SAML2/[provider]/Caption
Recommended. The text that the user can
display on a sign in user interface. Default:
[provider]. MSDN.
Authentication/SAML2/[provider]/CallbackPath
An optional constrained path on which to
process the authentication callback. MSDN.
Authentication/SAML2/[provider]/BackchannelTimeout
Timeout value for back channel
communications. Example: 00:05:00 (5 mins).
MSDN.
Authentication/SAML2/[provider]/UseTokenLifetime
Indicates that the authentication session
lifetime (e.g. cookies) should match that of the
authentication token. MSDN.
Authentication/SAML2/[provider]/AuthenticationMode
The OWIN authentication middleware mode.
MSDN.
Authentication/SAML2/[provider]/SignInAsAuthenticat
ionType
The AuthenticationType used when creating
the System.Security.Claims.ClaimsIdentity.
MSDN.
Authentication/SAML2/[provider]/ValidAudiences
Comma separated list of audience URLs.
MSDN.
Authentication/SAML2/[provider]/ClockSkew
The clock skew to apply when validating
times.
Authentication/SAML2/[provider]/RequireExpirationTi
me
A value indicating whether tokens must have
an 'expiration' value.
Authentication/SAML2/[provider]/ValidateAudience
A boolean to control if the audience will be
validated during token validation.

85
IdP initiated sign-In
AD FS supports the IdP initiated SSO profile of the SAML 2.0 specification. In order for the portal (SP) to
respond properly to the SAML request initiated by the IdP, the RelayState parameter must be encoded
properly.
The basic string value to be encoded into the SAML RelayState parameter must be in the format:
ReturnUrl=/content/sub-content/ where /content/sub-content/ is the path to the webpage you want to
navigate to on the portal (SP). The path can be replaced by any valid webpage on the portal. The string
value is encoded and placed into a container string of the format: RPID=<URL encoded
RPID>&RelayState=<URL encoded RelayState>. This entire string is once again encoded and added to
another container of the format:
https://adfs.contoso.com/adfs/ls/idpinitiatedsignon.aspx?RelayState=<URL encoded
RPID/RelayState>.
For example, given the SP path: /content/sub-content/ and the relying party ID:
https://portal.contoso.com/, construct the URL with the steps:
Encode the value ReturnUrl=/content/sub-content/
to get ReturnUrl%3D%2Fcontent%2Fsub-content%2F
Encode the value https://portal.contoso.com/
to get https%3A%2F%2Fportal.contoso.com%2F
Encode the value
RPID=https%3A%2F%2Fportal.contoso.com%2F&RelayState=ReturnUrl%3D%2Fcontent%2Fsub-content%2F
to get
RPID%3Dhttps%253A%252F%252Fportal.contoso.com%252F%26RelayState%3DReturnUrl%253D%252Fcont
ent%252Fsub-content%252F
Prepend the ADFS IdP initiated SSO path to get the final URL
https://adfs.contoso.com/adfs/ls/idpinitiatedsignon.aspx?RelayState=RPID%3Dhttps%253A%252
F%252Fportal.contoso.com%252F%26RelayState%3DReturnUrl%253D%252Fcontent%252Fsub-
content%252F
The following PowerShell script can be used to construct the URL (save to a file named Get-
IdPInitiatedUrl.ps1).
<#
.SYNOPSIS
Constructs an IdP initiated SSO URL to access a portal page on the SP.
.PARAMETER path
The path to the portal page.
.PARAMETER rpid
The relying party identifier.
.PARAMETER adfsPath
The AD FS IdP initiated SSO page.

86
.EXAMPLE
PS C:\> .\Get-IdPInitiatedUrl.ps1 -path "/content/sub-content/" -rpid
"https://portal.contoso.com/" -adfsPath
"https://adfs.contoso.com/adfs/ls/idpinitiatedsignon.aspx"
#>
param
(
[parameter(mandatory=$true,position=0)]
$path,
[parameter(mandatory=$true,position=1)]
$rpid,
[parameter(position=2)]
$adfsPath = "https://adfs.contoso.com/adfs/ls/idpinitiatedsignon.aspx"
)
$state = "ReturnUrl=$path"
$encodedPath = [uri]::EscapeDataString($state)
$encodedRpid = [uri]::EscapeDataString($rpid)
$encodedPathRpid = [uri]::EscapeDataString("RPID=$encodedRpid&RelayState=$encodedPath")
$idpInitiatedUrl = "{0}?RelayState={1}" -f $adfsPath, $encodedPathRpid
Write-Output $idpInitiatedUrl
SAML 2.0 settings for Azure Active Directory
The previous section describing AD FS can also be applied to Azure AD because Azure AD behaves like
a standard SAML 2.0 compliant IdP. To get started sign into the Azure Management Portal and create or
select an existing directory. When a directory is available, follow the instructions to add an application to
the directory.
1. Under the Applications menu of the directory, click the Add button
2. Choose Add an application my organization is developing
3. Specify a custom name for the application and choose the type web application and/or web
API

87
4. For the Sign-On URL and the App ID URI, specify the URL of the portal for both fields
https://portal.contoso.com/
This corresponds to the ServiceProviderRealm (Wtrealm) site setting value
5. At this point, a new application is created. Navigate to the Configure section in the menu
Under the single sign-on section, update the first Reply URL entry to include a path in the URL
http://portal.contoso.com/signin-azure-ad
This corresponds to the AssertionConsumerServiceUrl (Wreply) site setting value
6. In the footer menu click the View Endpoints button and note the Federation Metadata
Document field
This corresponds to the MetadataAddress site setting value
Paste this URL in a browser window to view the federation metadata XML and note the entityID
attribute of the root element
This corresponds to the AuthenticationType site setting value
Note
A standard Azure AD configuration only uses the following settings (with example values):
Authentication/SAML2/AzureAD/MetadataAddress - https://login.microsoftonline.com/01234567-89ab-
cdef-0123-456789abcdef/federationmetadata/2007-06/federationmetadata.xml
Authentication/SAML2/AzureAD/AuthenticationType - https://sts.windows.net/01234567-89ab-cdef-
0123-456789abcdef/
Use the value of the entityID attribute in the root element of the Federation Metadata (open the
MetadataAddress URL in a browser that is the value of the above site setting)
Authentication/SAML2/AzureAD/ServiceProviderRealm - https://portal.contoso.com/
Authentication/SAML2/AzureAD/AssertionConsumerServiceUrl - https://portal.contoso.com/signin-
azure-ad
Shibboleth Identity Provider 3
Use the following guidelines for correctly configuration Shibboleth Identity Provider as an IdP service. The
following assumes the IdP is hosted on the domain: https://idp.contoso.com.
The federation metadata URL is: https://idp.contoso.com/idp/shibboleth
The IdP must be configured to generate/serve a Persistent Identifier. Follow the instructions to enable
Persistent Identifier Generation.
The IdP federation metadata (<IDPSSODescriptor>) must be configured to include a SSO redirect
binding. Example.
<SingleSignOnService Binding="urn:oasis:names:tc:SAML:2.0:bindings:HTTP-Redirect"
Location="https://idp.contoso.com/idp/profile/SAML2/Redirect/SSO"/>
Configure the Service Providers (Relying Parties) by setting up the metadata-providers.xml.

88
Each SP federation metadata (<SPSSODescriptor>) must include an assertion consumer service
post binding. One option is to use a FilesystemMetadataProvider and reference a configuration
file that contains:
<AssertionConsumerService index="1" isDefault="true"
Binding="urn:oasis:names:tc:SAML:2.0:bindings:HTTP-POST"
Location="https://portal.contoso.com/signin-saml2"/>
The Location attribute corresponds to the AssertionConsumerServiceUrl (Wreply) setting.
The SP federation metadata should specify an entityID attribute for the EntityDescriptor which
corresponds to the AuthenticationType setting.
<EntityDescriptor entityID="https://portal.local.contoso.com/">...
Note
A standard Shibboleth configuration only uses the following settings (with example values):
Authentication/SAML2/Shibboleth/MetadataAddress - https://idp.contoso.com/idp/shibboleth
Authentication/SAML2/Shibboleth/AuthenticationType - https://idp.contoso.com/idp/shibboleth
Use the value of the entityID attribute in the root element of the Federation Metadata (open the
MetadataAddress URL in a browser that is the value of the above site setting)
Authentication/SAML2/Shibboleth/ServiceProviderRealm - https://portal.contoso.com/
Authentication/SAML2/Shibboleth/AssertionConsumerServiceUrl - https://portal.contoso.com/signin-
saml2
IdP initiated sign-in
Shibboleth supports the IdP initiated SSO profile of the SAML 2.0 specification. For the portal (SP) to
respond properly to the SAML request initiated by the IdP, the RelayState parameter must be encoded
properly.
The basic string value to be encoded into the SAML RelayState parameter must be in the format:
ReturnUrl=/content/sub-content/ where /content/sub-content/ is the path to the desired webpage to
navigate to on the portal (SP). The path can be replaced by any valid webpage on the portal. The full IdP
initiated SSO URL should be in the format:
https://idp.contoso.com/idp/profile/SAML2/Unsolicited/SSO?providerId=<URL encoded provider
ID>&target=<URL encoded return path>.
For example, given the SP path: /content/sub-content/ and the relying party ID:
https://portal.contoso.com/, the final URL is:
https://idp.contoso.com/idp/profile/SAML2/Unsolicited/SSO?providerId=https%3A%2F%2Fportal.contoso
.com%2F&target=ReturnUrl%3D%2Fcontent%2Fsub-content%2F
The following PowerShell script can be used to construct the URL (save to a file named Get-
ShibbolethIdPInitiatedUrl.ps1).
<#
.SYNOPSIS
Constructs an IdP initiated SSO URL to access a portal page on the SP.
89
.PARAMETER path
The path to the portal page.
.PARAMETER providerId
The relying party identifier.
.PARAMETER shibbolethPath
The Shibboleth IdP initiated SSO page.
.EXAMPLE
PS C:\> .\Get-ShibbolethIdPInitiatedUrl.ps1 -path "/content/sub-content/" -providerId
"https://portal.contoso.com/" -shibbolethPath
"https://idp.contoso.com/idp/profile/SAML2/Unsolicited/SSO"
#>
param
(
[parameter(mandatory=$true,position=0)]
$path,
[parameter(mandatory=$true,position=1)]
$providerId,
[parameter(position=2)]
$shibbolethPath = "https://idp.contoso.com/idp/profile/SAML2/Unsolicited/SSO"
)
$state = "ReturnUrl=$path"
$encodedPath = [uri]::EscapeDataString($state)
$encodedRpid = [uri]::EscapeDataString($providerId)
$idpInitiatedUrl = "{0}?providerId={1}&target={2}" -f $shibbolethPath, $encodedRpid, $encodedPath
Write-Output $idpInitiatedUrl
Configure AD FS by using PowerShell
The process of adding a relying party trust in AD FS can also be performed by running the following
PowerShell script on the AD FS server (save contents to a file named Add-
90
AdxPortalRelyingPartyTrustForSaml.ps1). After running the script, continue with configuring the portal
site settings.
<#
.SYNOPSIS
Adds a SAML 2.0 relying party trust entry for a Dynamics CRM portals website.
.PARAMETER domain
The domain name of the portal.
.EXAMPLE
PS C:\> .\Add-AdxPortalRelyingPartyTrustForSaml.ps1 -domain "portal.contoso.com"
#>
param
(
[parameter(Mandatory=$true,Position=0)]
$domain,
[parameter(Position=1)]
$callbackPath = "/signin-saml2"
)
$VerbosePreference = "Continue"
$ErrorActionPreference = "Stop"
Import-Module adfs
Function Add-CrmRelyingPartyTrust
{
param (
[parameter(Mandatory=$true,Position=0)]
$name
)
$identifier = "https://{0}/" -f $name
91
$samlEndpoint = New-ADFSSamlEndpoint -Binding POST -Protocol SAMLAssertionConsumer -Uri
("https://{0}{1}" -f $name, $callbackPath)
$identityProviderValue = Get-ADFSProperties | % { $_.Identifier.AbsoluteUri }
$issuanceTransformRules = @'
@RuleTemplate = "MapClaims"
@RuleName = "Transform Windows Account Name to Name ID claim"
c:[Type == "http://schemas.microsoft.com/ws/2008/06/identity/claims/windowsaccountname"]
=> issue(Type = "http://schemas.xmlsoap.org/ws/2005/05/identity/claims/nameidentifier", Issuer =
c.Issuer, OriginalIssuer = c.OriginalIssuer, Value = c.Value, ValueType = c.ValueType,
Properties["http://schemas.xmlsoap.org/ws/2005/05/identity/claimproperties/format"] =
"urn:oasis:names:tc:SAML:2.0:nameid-format:persistent");
@RuleTemplate = "LdapClaims"
@RuleName = "Send LDAP Claims"
c:[Type == "http://schemas.microsoft.com/ws/2008/06/identity/claims/windowsaccountname", Issuer
== "AD AUTHORITY"]
=> issue(store = "Active Directory", types =
("http://schemas.xmlsoap.org/ws/2005/05/identity/claims/givenname",
"http://schemas.xmlsoap.org/ws/2005/05/identity/claims/surname",
"http://schemas.xmlsoap.org/ws/2005/05/identity/claims/emailaddress"), query =
";givenName,sn,mail;{{0}}", param = c.Value);
'@ -f $identityProviderValue
$issuanceAuthorizationRules = @'
@RuleTemplate = "AllowAllAuthzRule"
=> issue(Type = "http://schemas.microsoft.com/authorization/claims/permit", Value = "true");
'@
Add-ADFSRelyingPartyTrust -Name $name -Identifier $identifier -SamlEndpoint $samlEndpoint -
IssuanceTransformRules $issuanceTransformRules -IssuanceAuthorizationRules
$issuanceAuthorizationRules
}
# add the 'Identity Provider' claim description if it is missing
92
if (-not (Get-ADFSClaimDescription | ? { $_.Name -eq "Persistent Identifier" })) {
Add-ADFSClaimDescription -name "Persistent Identifier" -ClaimType
"urn:oasis:names:tc:SAML:2.0:nameid-format:persistent" -IsOffered:$true -IsAccepted:$true
}
# add the portal relying party trust
Add-CrmRelyingPartyTrust $domain
See also
Configure Dynamics 365 portal authentication
Set authentication identity for a portal
OAuth2 provider settings for portals
Open ID Connect provider settings for portals
WS-Federation provider settings for portals
Facebook App (Page Tab) authentication for portals
Facebook App (Page Tab) authentication for
portals
Applies To: Dynamics 365 (online), Dynamics CRM Online
Dynamics 365 portals are capable of hosting Facebook Apps in the context of a Facebook Page Tab.
This is achieved by employing features such as Login with Facebook and ASP.Net MVC Display Modes.
Prerequisites
Start by setting up a standard portal.
Configure IIS
The same website used to host the standard portal is also used to host the Facebook App portal.
However, the website must be configured to respond to Facebook specific site bindings in addition to the
existing bindings. The specific site bindings should contain a host name value that distinguishes it as a
Facebook App portal. For example, a standard portal hosted from the domain contoso.com can specify
the domain facebook-contoso.com for hosting the Facebook App.
Type
Host Name
Port
Notes
http
contoso.com
80
The standard portal.
http
facebook-contoso.com
80
The Facebook App portal.
https
facebook-contoso.com
443
The Secure Facebook App portal.
93
Configure display mode
The MVC Display Modes feature allows the Facebook App to present a customized user experience. The
Facebook display mode is enabled by adding the following site setting.
Site Setting Name
Value (examples - replace
with your Page Tab URL)
Note
DisplayModes/Facebook/HostName
facebook-contoso.com,
facebook-*
The host name of the
Facebook App portal.
Accepts wildcard.
Test the site bindings
View the portal through each of the site bindings in a web browser to ensure that the bindings are
functioning correctly. Verify that the Facebook site bindings render a customized view distinct from the
other bindings
Set up the Facebook app
1. Go to the Facebook Developers site and sign in with a Facebook account. Under the My Apps
drop-down menu click the Add a New App button, then click Skip and Create App ID.
2. In the resulting Create a New App ID dialog, specify a valid Display Name, Namespace, and
Choose a Category (such as Apps for Pages) because this will eventually be required to publish
an app to the public. The Namespace can be left blank. Click Create App. Submit the Security
Check (captcha) dialog as well.
3. After landing on the Dashboard, navigate to the Settings area in the left column navigation.
4. Complete the Basic form by entering the fields shown in the following example:
Display Name
Contoso Portal
Contact Email
administrator@contoso.com
App Domains
portal.contoso.comfacebook-portal.contoso.com
Note
If the domain values cannot be successfully set, leave this field blank for now,
complete the next step to specify a Site URL, and then return to this field.
5. Click the + Add Platform button and click Website from the Select Platform dialog. Enter a Site
URL.
94
Website
Site URL
Example - http://contoso.com
6. Again, click the + Add Platform button and this time click Page Tab. Complete this new section
based on the following fields.
Page tab
Secure Page Tab URL
https://facebook-contoso.com/app/facebook
Page Tab Name
Contoso Portal
Note
The Page Tab URL should have the /app/facebook path appended to the App domain URL. The portal
uses this endpoint to launch the App portal.
7. Click Save Changes.
Take note of the App ID and App Secret values of the new app. Use these values when configuring the
site settings. The two Authentication Site Settings that need to be configured are:
Authentication/OpenAuth/Facebook/AppId
Authentication/OpenAuth/Facebook/AppSecret
The Value and Website of each site setting must also be added into the site settings. ***The Facebook
Authentication Site Settings may require the Website's Application Pool to be recycled before they are
functional***
Publish the app
Click over to the Status & Review area (under Settings area). The first option of the Status tab asks: Do
you want to make this app and all its live features available to the general public? Change this setting to
YES.
Add the Facebook page tab to your Facebook page
If you do not have a Facebook Page, follow the instructions here to create one Create a Page. If you will
be using an existing page, the current Facebook user must have sufficient permission to add a Page Tab
to the Page. If your Facebook Page does not already have the Page Tab functionality enabled, you must
enable it by browsing to a specific URL (substituting the relevant App ID and "next" URL value). The URL
below can be used if you substitute the App ID and encoded URL with your information. Further details
can be found in Using Page Tabs and URL Encoding.
https://www.facebook.com/dialog/pagetab?app_id=0123456789&next=http%3a%2f%2ffacebook-
contoso.com%2F
This displays the Add Page Tab dialog to select the Page that will contain the Page Tab and app.
Browse back to the Page and the app should be available in the grid of added Page Tabs. Click the Page
Tab to view the Facebook App portal framed within the Facebook Page.
Note

95
By default, Internet Explorer does not allow third-party cookies to be created for portals/apps that are
rendered in an iFrame of another host portal. This is the case of a Facebook App portal hosted from a
Page Tab. A side effect of this cookie blocking is that an app is unable to create and maintain an
authenticated session. This is resolved by updating the App portal to publish a Platform for Privacy
Preferences (P3P) policy. There are various options for achieving this one of which is to update the
web.config of the App portal to include a custom header. For Example:
<configuration>
<system.webServer>
<httpProtocol>
<customHeaders>
<add name="P3P" value='CP="ALL ADM DEV PSAi COM OUR OTRo STP IND ONL"'/>
</customHeaders>
</httpProtocol>
</system.webServer>
</configuration>
See also
Configure Dynamics 365 portal authentication
Set authentication identity for a portal
OAuth2 provider settings for portals
Open ID Connect provider settings for portals
WS-Federation provider settings for portals
SAML 2.0 provider settings for portals
Control webpage access for portals
Applies To: Dynamics 365 (online), Dynamics CRM Online
Web page access control rules are rules that you create for your site to control both the publishing actions
that a web role can perform across the pages of your website as well as to control what pages are visible
by what web roles. The webpage access entity has the following attributes:
Name
Description
Name
A descriptive name for the rule.
96
Name
Description
Website
The website that this rule applies to; must match
the website of the page to which this rule is
applied. Filters Web Page.
Web Page
The Web Page that this rule applies to.
Note
The rule will affect not only the page but all child
pages of the page, therefore making this
attribute select the branch of the website to
which the rule will apply. If a rule is applied to
the home page, then it will apply to the entire
Portal.
Right
Grant Change or Restrict Read. See Grant
change below.
Description
A description of the rule. Optional.
After creating a new access control rule, associate it with a page, this will cause it to affect both the page
you assign the rule to as well as all child pages in other words, the entire 'branch' of the website.
There are two type of access control rule: Grant Change and Restrict Read.
Grant Change
Grant Change allows a user in a web role associated with the rule to publish content changes for
this page and all child pages of this page. Grant Change takes precedence over restrict read. For
example, you might have a "news" section of the site; which you want to be editable by users in
the "news editor" web role. These users might not have access to the entire site, and certainly
can't edit the entire site, but within this branch they have full content publishing authority. You
would create a webpage access control rule called "grant news publishing to news editors".
Next you would set the right to "grant change" and the webpage to the parent page of the entire
"news" branch of your site.
You would then assign this web role to any contacts you want to designate as news editors. Bear
in mind one user can have many web roles.
A Grant Change rule should always be present in any portal that you wish to enable front-side
editing for. This rule will apply to the home page of the site, thus making it the default rule for the
entire site. This rule will be associated with a web role that is to represent the administrative role
for the site. Users that are to be given front-side content publishing rights will be assigned to this
role.
Restrict read
The restrict read rule is used to limit viewing of a page (and its child pages) and its content to
specific users. Whereas grant change is a permissive rule (it grants the ability to do something to
its users), restrict read is a restrictive rule in that it restricts an action to a limited set of users. For
example, you might have a section of the site meant to be used by employees only. You might
restrict read of this branch to only people in the "employee" web role. You would create a new
rule called "restrict read to Employees only".
97
You would then set the right to restrict read and the page to the page at the top of the branch
which is to be read only by employees.
You would then associate this rule with the employee web role and then assign users to this role.
Note
The root 'home' page of a website is a special node and must not have a restrict read rule applied to it.
This will produce a runtime error. The security validation requires that all users must be able to read the
root page of a website to validate contents within the site. The login, access denied, page not found,
and error page are also special cases that also must be readable by all users.
See also
Create web roles for portals
Assign permission set to a web role for portals
Add record-based security using entity permissions for portals
Assign a permission set to a web role for portals
Applies To: Dynamics 365 (online), Dynamics CRM Online
Website Access Permissions is a permission set, associated with a web role, that permits front-side
editing of the various content managed elements within the portal other than just webpages. The
permission settings determine which components can be managed in the portal. More information:
Create web roles for portals
Name
Description
Manage Content Snippets
Allows the editing of Snippet controls. More
information: Customize content by using content
snippets
Manage Site Markers
Allows the editing of hyperlinks that use
sitemarkers
Manage Web Link Sets
Allows the editing of web link sets, including
adding and removing web links from a web link
set. More information: Manage web links in
Dynamics 365 or on portals
Preview Unpublished Entities
Allows the viewing of portal-exposed entities that
have a publishing state of Draft.
To add website access permission to a web role, just create a new Website Access entity, give it the
permission set you want, name it, associate with the website in question, save, and then associate it with
the web role(s) you desire.

98
See also
Create web roles for portals
Control webpage access for portals
Add record-based security using entity permissions for portals
Add record-based security by using entity
permissions for portals
Applies To: Dynamics 365 (online), Dynamics CRM Online
Record-based security in Dynamics 365 portals that applies to individual records is provided by using
Entity Permissions.
Although permissions to change and access URLs in a portal sitemap is granted via Content
Authorization, site managers will also want to secure their custom web applications built with Entity Forms
and Entity Lists. More information: Define entity forms and custom logic within the Dynamics 365 portal
and Add a webpage to render a list of records
To secure these features, Entity Permissions allow for granular rights to be granted for arbitrary entities
and for record-level security to be enabled via relationship definitions.
Adding entity permissions to a web role
Entity Permissions are added to Web Roles, allowing you to define roles in your organization which
logically correspond to the privileges and concepts of record ownership/access that are introduced with
Entity permissions. Remember that a given Contact can belong to any number of roles and a given role
can contain any number of Entity Permissions. More information: Create web roles for portals
To add an Entity Permission to a Web Role, navigate first to the Web Role you wish to add the
permissions to. Web roles for a website can be found in Dynamics 365 in either Portals > Web Roles or
Portals > {your portal} > Web Roles.
Click to Add an Existing Entity Permission. From there you may click to create a New Entity Permissions
Record.
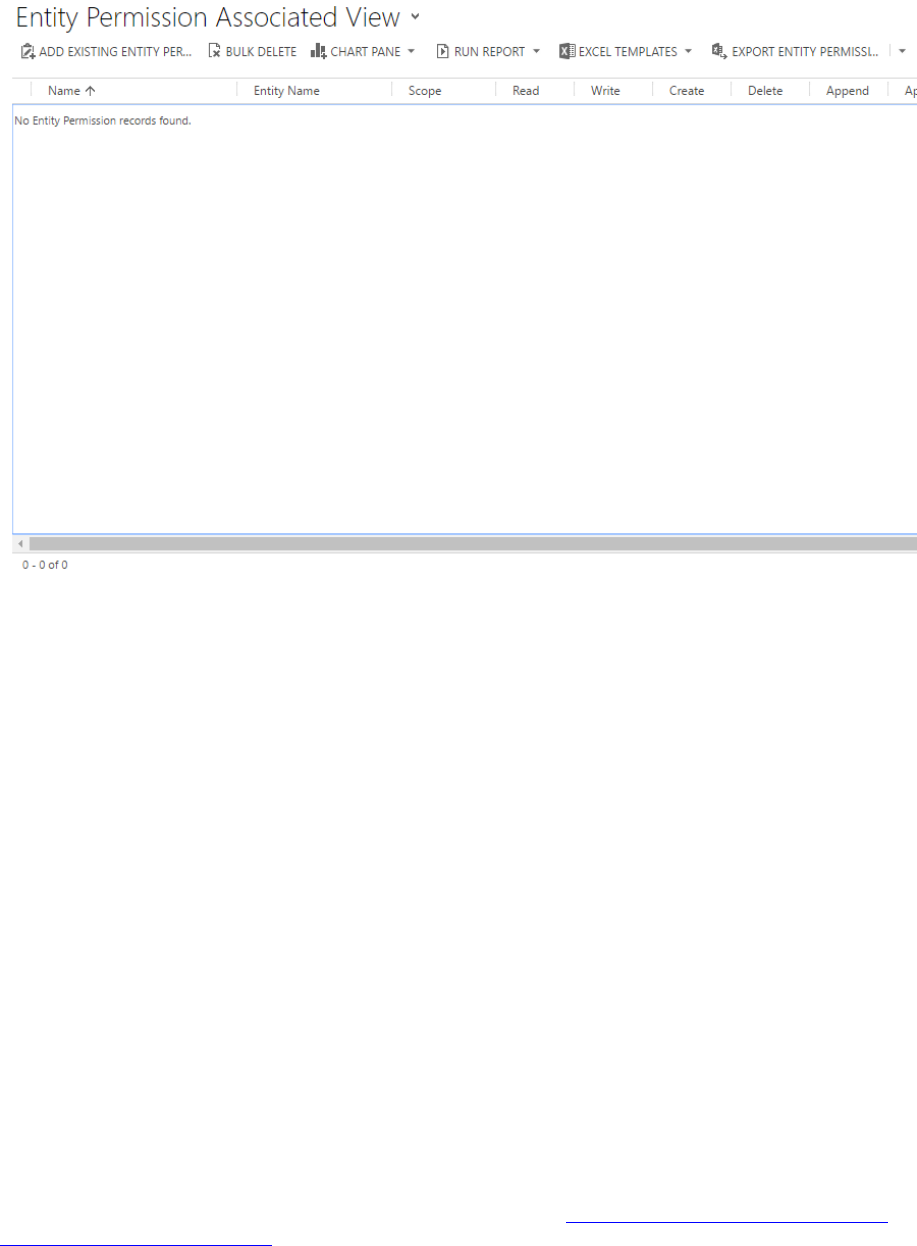
99
When creating a new Entity Permission record, the first step is to Determine the Entity that will be
secured. The next step is to define Scope, as discussed below, and in the case of any scope besides
Global, the Relationships that define that scope must be specified. Finally, determine the Rights that are
being granted to the Role via this permission. Note that rights are cumulative, so if a user is in a role that
grants Read, and another that grants read and update, the user will have read and update to any records
that overlap between the two roles.
Global scope
If a Permission record with Read permission is granted to a role that has global scope, any contact in that
role will have access to all records of the defined Entity in Dynamics 365. For example, they can see all
leads, all accounts, and so on. This permission will be automatically respected by any entity lists;
essentially showing all records according to the Dynamics 365 views that have been defined for that list.
Further, if a user attempt to access a record via an Entity Form that they do not have access to, they will
receive a permission error.
Contact scope
With Contact scope, a signed-in user in the role for which the permission record is defined will have the
rights granted by that permission only for records that are related to that user's contact record via a
relationship that is defined in Dynamics 3655.
On an entity list, this means a filter will be added to whatever Dynamics 365 views are surfaced by that
list, which retrieves only records linked to the current user directly. (Depending on the scenario, this
relationship can be thought of as "ownership," "management rights," and so on.)
Entity Forms will only allow the appropriate permission for Read, Create, Write, and so on if this
relationship exists when the record is loaded. More information: Define entity forms and custom logic
within the Dynamics 365 portal.
100
Account scope
With Account Scope, a signed-in user in the Role for which the permission record is defined will have the
rights granted by that permission only for records that are related to that user's parent account record via
a relationship that is defined in Dynamics 365.
Self scope
Self Scope allows you to define the rights a user has to their own Contact (Identity) record. This allows
users to use Entity Forms or Web Forms to make changes to their own Contact Record linked with their
profile. Note that the default Profile Page has a special built-in form that allows any user to change their
basic contact info and opt in or out of marketing lists. If this form is included in your portal (which it is by
default), users do not require this permission to use it. However, they will require this permission to use
any custom Entity Forms or Web Forms that target their User Contact Record.
Parental scope
In this most complex case, permissions are granted for an entity that is a relationship away from an entity
for which a permission record has already been defined. This permission is actually a child record of the
parent Entity Permission.
The Parent Permission Record defines a permission and scope for an entity (probably Global or Contact
Scope, although parent is also possible). That entity may be related to contact (in the case of Contact
scope) or globally defined. With that permission in place, a Child Permission is created that defines a
relationship from another entity to the entity defined in the parent relationship.
Thus, users in a web role who have access to records defined by parent entity permissions will also have
rights as defined by the child permission record to records related to the parent record.
Attributes and relationships
The table below explains the Entity Permission attributes.
Name
Description
Name
The descriptive name of the record. This field is required.
Entity Name
The logical name of the entity that is to be secured or that will define the
Contact Relationship or Parent Relationship to secure a related entity on
a child permission. This field is required.
Scope
One of the following:
Global - Grant privileges to the entity record without any requirement
for an owner (contact).
Contact - Grant privileges to the entity record that has a direct
relationship to an owner (contact).
Account - Grant privileges to the entity record that has a relationship
to an account, which serves as the owner, assuming the account is
the parent customer of the contact.
Parent - Grant privileges to the entity record through the chain of its
parent permissions' relationships.
This is a mandatory field.
101
Name
Description
Contact Relationship
Required only if Scope = Contact. The schema name of the relationship
between contact and the entity specified by the Entity Name field.
Parent Relationship
Required only if a Parent Entity Permission is assigned. The schema
name of the relationship between the entity specified by the Entity Name
field and the entity specified by the Entity Name field on its Parent Entity
Permission.
Parent Entity Permission
Requires only if Scope = Parent. The parent Entity Permission.
Read
Privilege that controls whether the user can read a record.
Write
Privilege that controls whether the user can update a record.
Create
Privilege that controls whether the user can create a new record. The right
to create a record for an entity type does not apply to an individual record,
but instead to a class of entities.
Delete
Privilege that controls whether the user can delete a record.
Append
Privilege that controls whether the user can attach another record to the
specified record.
The Append and Append To access rights work in combination. Every
time that a user attaches one record to another, the user must have both
rights. For example, when you attach a note to a case, you must have the
Append access right on the note and the Append To access right on the
case for the operation to work.
Append To
Privilege that controls whether the user can append the record in question
to another record.
The Append and Append To access rights work in combination. For more
information, see the description for Append.
Global permissions for tasks related to leads
In one scenario, one might want to use an entity list and entity form(s) to surface all leads on the portal, to
anyone in a custom "Lead Manager" Web Role. On the Lead Edit Form, which is launched whenever a
lead row is clicked on the List, there will be a subgrid displaying related Task records. These records
should be accessible to anyone in the Lead manager role. As the first step, we'll give Global Permissions
to leads to anyone in our Lead Manager Role.
This role has a related Entity Permission for the "Lead" entity, with a Global scope.
Users in this role can access all leads via Entity Lists or Forms on the portal.
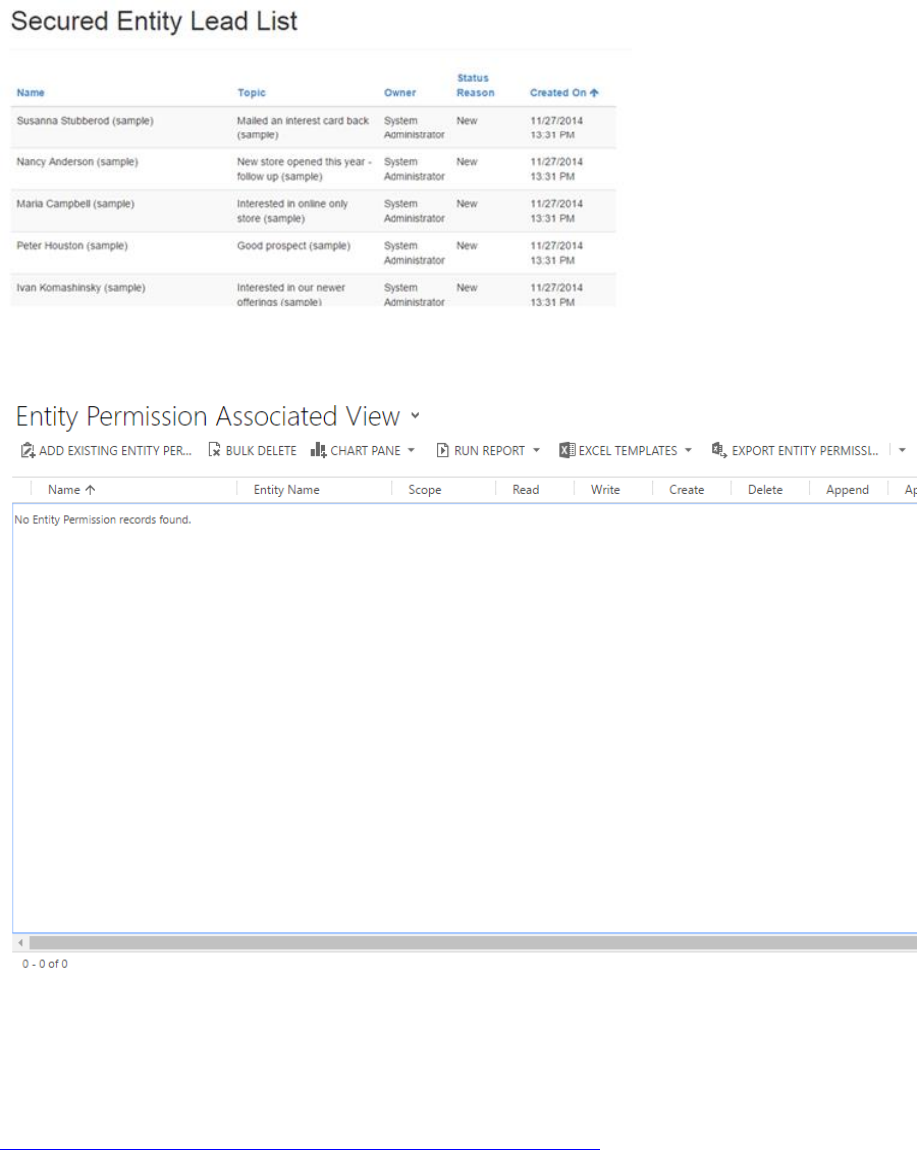
102
We will now add a Child Permission to the Global Lead Permission. With the Parent permission record
open, first navigate to the Child Entity Permissions subgrid and click New to open a lookup for entity
permissions, then click the magnifying glass and click New to add a new record.
Select the entity as Tasks and the Scope as Parental. Note that you can then select the parent
relationship (Lead_Tasks). This permission implies that a contact that is in a web role with the parent
permission will then have global permission to all tasks that are related to leads.
Remember that in order for your list to respect these permissions, you must have enabled Entity
Permissions on the list AND there must be actions that will actually allow the users to perform the actions
for which their permissions have been granted. Furthermore, Permissions must also be enabled on the
Define entity forms and custom logic within the Dynamics 365 portal record, and that form must be
surfacing a page that has a subgrid on it for the entity that you want to enable with child permissions, in
this case Tasks. Furthermore, to enable read or create for tasks, you will need to configure those Entity
Forms too, and edit the forms to remove the Regrading lookup field from said forms.
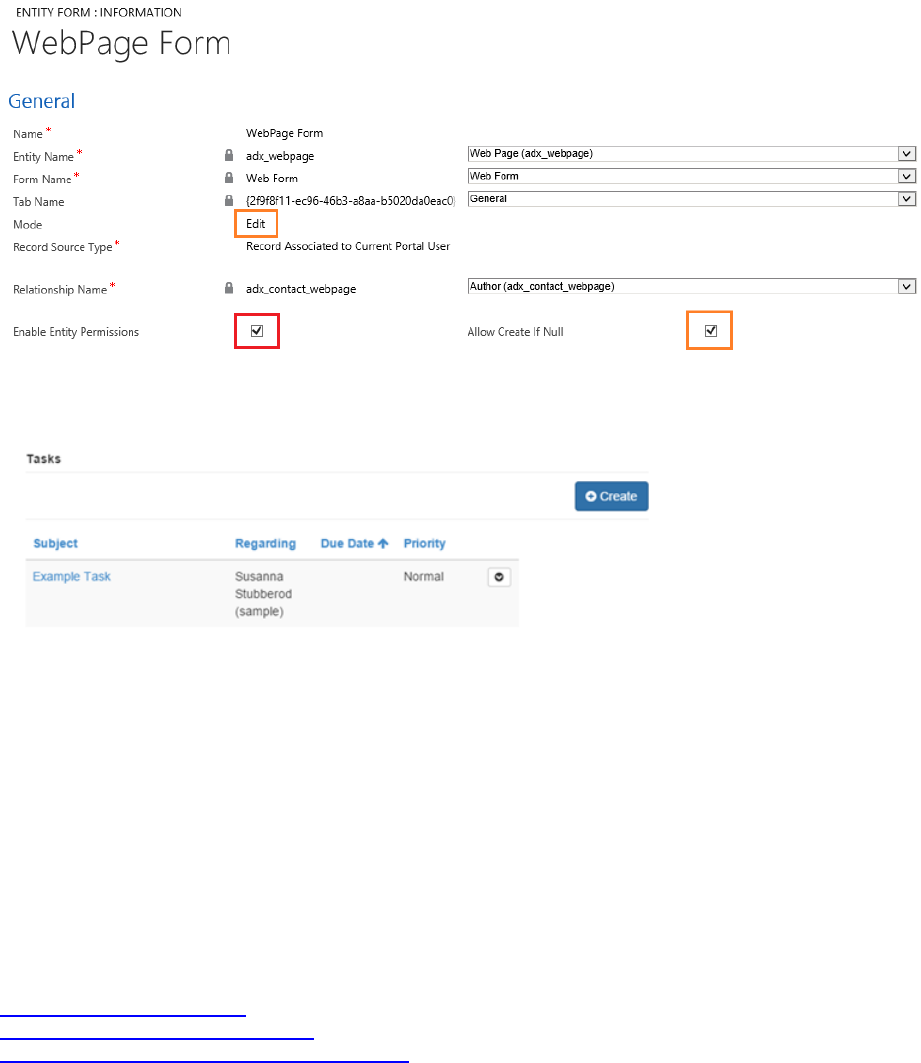
103
This then grants permissions for all tasks that are related to leads. If Tasks are being surfaced on an
entity list, a filter is essentially added to the list so that only tasks that are related to a lead will show up in
the list. In our example, they are being surfaced with a subgrid on an entity form.
Contact-scoped permissions for tasks
Another example would be if you wanted to allow access to tasks for which a contact is related to the
parent Lead for that task. This scenario is nearly identical to the above except that in this case the parent
permission has a scope of Contact, instead of global. A relationship must be specified on the parent
relationship between the Lead entity and the Contact Entity.
After these permissions are in place, users in the Lead Manager role can access leads that are related to
them directly as specified by the contact-scope permission, and Tasks related to those same Leads as
specified by the child permission record.
See also
Create web roles for portals
Control webpage access for portals
Assign permission set to a web role for portals

104
Define entity forms and custom logic within the
Dynamics 365 portal
Applies To: Dynamics 365 (online), Dynamics CRM Online
A data driven configuration to allow end users to add a form to collect data in the portal without the need
for a developer to surface the form in the portal. Entity Forms are created in Dynamics 365 and then
placed into webpages in the Portal or used in conjunction with Sub-Grids and Entity Lists to build out
complete web applications. More information: Add a webpage to render a list of records.
Add a form to your portal
The Entity Form contains relationships to webpages and additional properties in order to control the
initialization of the form within the portal. The relationship to Web Page allows dynamic retrieval of the
form definition for a given page node within the website.
To view existing Entity Forms or to create new Entity Forms navigate to Portals > Entity Forms
When creating a new Entity Form the first step is to decide the Entity and Form Name that you will be
rendering as well as the mode: Insert, Edit, or Read Only. The mode selected will determine if you are
creating a new record from the portal, editing an existing record, or just displaying info about a record on
the portal.
Note
An Entity Form must be associated with a Web Page for a given website for the form to be viewable
within the site.
The Web Pages associated with the Entity Form can be viewed by clicking the Web Pages link listed in
the Related navigation links in the leftmost menu.
When creating or editing a Web Page, an Entity Form can be specified in the lookup field provided on
the Web Page form.

105
The various master pages used by the portal found in the Dynamics 365 portal installation directory
contains declarations of the EntityForm server control. When rendering the Web Page containing either
the Page (~/Pages/Page.aspx) page template or Full Page (~/Pages/FullPage.aspx) page template, the
controls will determine if the Entity Form lookup contains a value then the form will be rendered.
Secure your forms
To secure your forms, you must create entity permissions that determine access and ownership of the
records in Dynamics 365 according to Web Roles. If a user lands on an Entity Form and does not have
permissions, they will receive an error message. To Enable Permissions for an Entity Form. set Enable
Entity Permissions to true. More information: Create web roles for portals.
See also
Configure a Dynamics 365 portal
Web Form properties for portals
Web Form steps for portals
Web Forms metadata for portals
Web Form subgrid configuration for portals
Notes configuration for Web Forms for portals
Web form properties for portals
Applies To: Dynamics 365 (online), Dynamics CRM Online
The Web Form contains relationships to webpages and a start step to control the initialization of the form
within the portal. The relationship to Web Page allows dynamic retrieval of the form definition for a given
page node within the website.
The other options on the Web Form record itself control top-level preferences for the multiple-step
process as a whole, for example whether you'd like to display a progress bar.
To view existing Web Forms or to create new Web Forms, navigate to Portals -> Web Forms
Note
A Web Form must be associated with a Web Page for a given website for the form to be viewable
within the site.
When creating or editing a Web Page, a Web Form can be specified in the lookup field provided on the
Web Page form.

106
Web form attributes
The following attributes and relationships determine the functionality of the Web Form.
Name
Description
Name
A title of the form used for reference.
Start Step
The first step of the form. A Web Form will consist
of one or more steps. For more detail regarding
steps please refer to the section titled Web Form
Step found below.
Note
Note: The first step cannot be of type
"Condition".
Authentication Required
If checked, when a user that is not logged in visits
the page containing the form, they will be
redirected to the login page. Upon successful login
the user will be redirected back to the page
containing the form.
Start New Session On Load
Selecting Yes indicates that if the user opens the
form in a new browser, or new tab or closes the
browser or page and returns the form will start a
completely new session and begin at the first step.
Otherwise the session will be persisted and the
user can close the browser or page and resume
later exactly where they left off. Default: No.
Multiple Records Per User Permitted
Selecting Yes indicates that a user is permitted to
create more than one submission. This assists the
form in determining what to do when a user
revisits a form. Default: Yes.

107
Name
Description
Edit Expired State Code
The target entity's state code integer value that
when combined with the status reason indicates
when an existing record can no longer be edited.
Edit Expired Status Reason
The target entity's status code integer value that
when combined with the state code, indicates
when an existing record has these values then the
record is not to be edited anymore i.e. when a
record is updated as complete for example.
Edit Expired Message
The message displayed when the existing record's
state code and status reason match the values
specified. For each language pack installed and
enabled for the Dynamics 365 organization a field
will be available to enter the message in the
associated language. Default message; "You have
already completed a submission. Thank you!"
Progress indicator settings
Name
Description
Enabled
Check to display the progress indicator. Default:
Disabled.
Type
One of the following:
Title
Numeric (Step x of n)
Progress Bar
Default: Title
Position
One of the following:
Top
Bottom
Left
Right
Position is relative to the form. Default: Top.
Prepend Step Number to Step Title
Check to add the number of the step to the
beginning of the title of the step. Default is
unchecked.
Example of the various progress indicator types:
Title
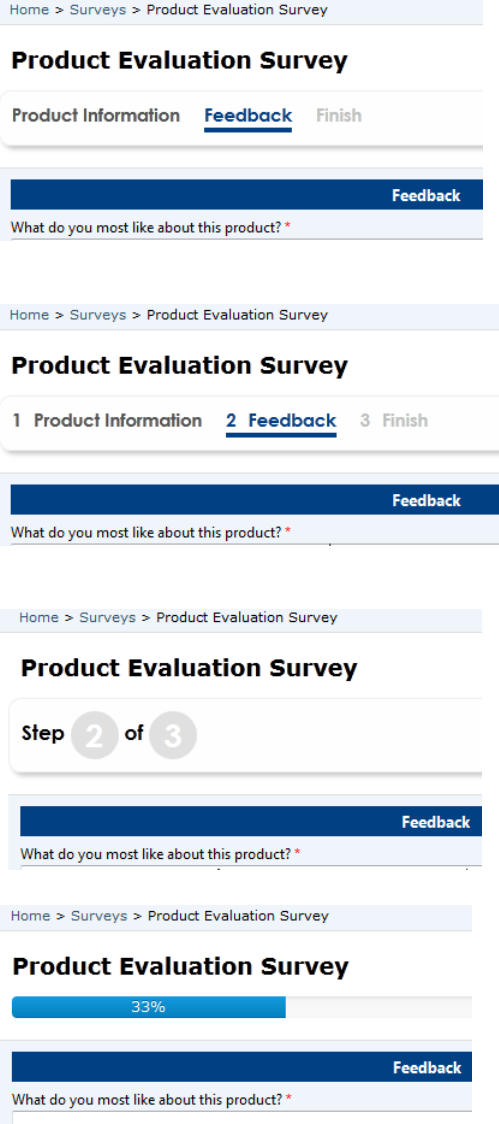
108
Title with Step Number prepended
Numeric
Progress Bar
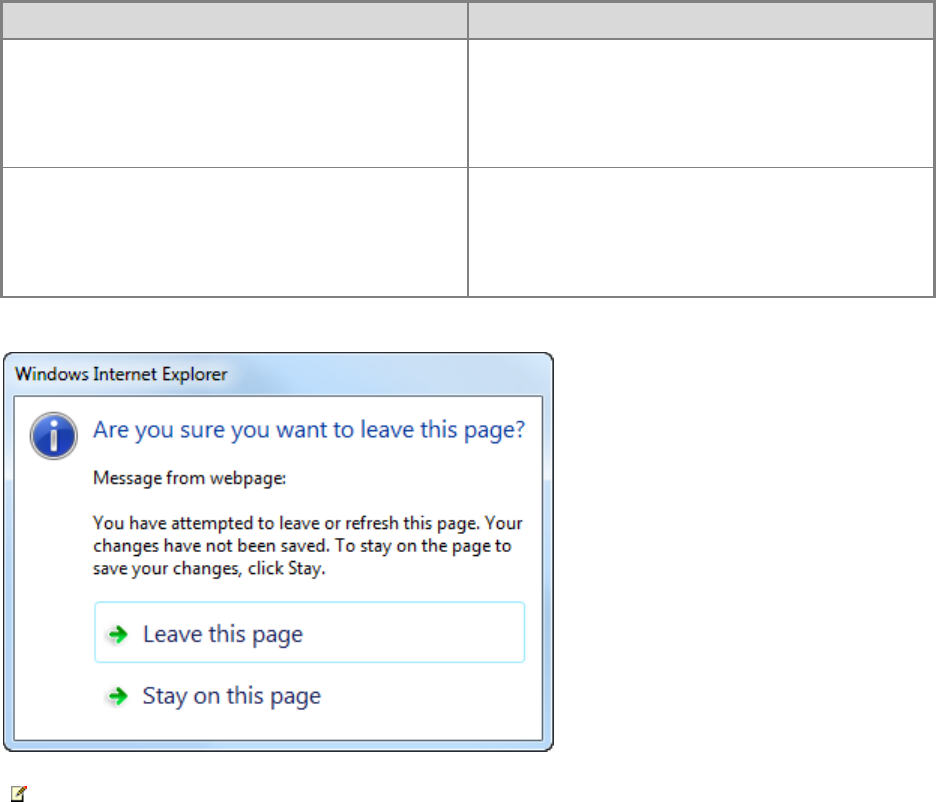
109
“Save changes” warning
Name
Description
Display Save Changes Warning On Close
Select to display a warning message if the user
has made changes to field(s) and they try to
reload the page, close the browser, click the
browser's back button, or click the previous button
in a multiple step form.
Save Changes Warning Message
For each language pack installed and enabled for
the Dynamics 365 organization, a field will be
available to enter the message in the associated
language. If no message is specified, the
browser's default will be used.
Example:
Note
Firefox does not provide the ability to specify a custom message.
Web form metadata
Web Form Metadata contains additional behavior modification logic to augment or override the
functionality of form fields that is otherwise not possible with the Dynamics 365 native entity form editing
capabilities.
On the Web Form Step that has fields that you would like to modify
Click the Metadata link in the leftmost navigation area.
To add a new record:
1. Click Add New Web Form Metadata
To edit an existing record:
1. Double-click on a record in the grid

110
Web form metadata properties
The following attributes provide additional styling and capabilities for elements on a form.
Name
Description
Web Form Step
The Web Form Step associated with the Web
Form Metadata record.
Type
Available options are:
Web Form Metadata Type = Attribute: displays
the appropriate options for modifying fields on the
current form rendered for the related step.
Web Form Metadata Type = Section:
displays the options available for modifying a
section on the form.
Web Form Metadata Type = Tab: displays
the options available for modifying a tab on a
form.
Web Form Metadata Type = Purchase:
displays products for purchase and to
generate a quote record in Dynamics 365 to
persist the user's purchase selections to
create an order and process payment.
Web form metadata type = attribute
The following properties are displayed when the Type selected is Attribute.
Name
Description
Attribute Logical Name
The logical name of the attribute field to be
modified.
Label
Replaces the default label assigned to the attribute
on the entity with the text specified in this input.
For each language pack installed and enabled for
the Dynamics 365 organization a field will be
available to enter the message in the associated
language.
Control style
The following options modify the style and functionality of an attribute's field.
Name
Description
Style
One of the following:
Option Set as Vertical Radio Button List

111
Name
Description
Option Set as Horizontal Radio Button List
Single Line of Text as Geolocation Lookup
Validator (requires Bing Maps Settings)
Group Whole Number as Constant Sum
(requires Group Name)
Group Whole Number as Rank Order Scale
No Ties (requires Group Name)
Group Whole Number as Rank Order Scale
Allow Ties (requires Group Name)
Multiple Choice Matrix (requires Group Name)
Multiple Choice (requires Group Name)
Group Whole Number as Stack Rank
(requires Group Name)
Group Name
A name used to group controls together as a
composite control.
Multiple Choice Minimum Required Selected
Count
This is the required minimum values selected in
the multiple choice question. Only necessary if
'Multiple Choice' Control Style is selected.
Multiple Choice Max Selected Count
This is the maximum number of values that is
permitted to be selected in the multiple choice
question. Only necessary if 'Multiple Choice'
Control Style is selected.
Constant Sum Minimum Total
This is the required minimum value applied to a
constant sum response field. Only necessary if
'Group Whole Number as Constant Sum' Control
Style is selected.
Constant Sum Maximum Total
This is the maximum number of value that is
permitted to be applied to a constant sum
response field. Only necessary if 'Group Whole
Number as Constant Sum' Control Style is
selected.
Randomize Option Set Values
Specifying Yes results in randomly ordered
options listed for an Option Set control. Only
applicable to attributes that are of type Option Set.
CSS Class
Adds a custom CSS class name to the control.
Prepopulate field
The following options provide a default value for a field on the form.
112
Name
Description
Ignore Default Value
Ignores the default value of the specified attribute
field. Useful for attributes that are Two Option
fields that are rendered as Yes and No radio
buttons. Because Dynamics 365 automatically
assigns a value of yes or no by default, this option
makes it possible to display Yes/No questions
without a predefined response.
Type
One of the following:
Value
Today's Date
Current User's Contact
Selecting Value requires a value to be specified in
the Value field that will be assigned to the field
when the form is loaded. Selecting Today's Date
will assign the current date and time to the
attribute field. Selecting Current User's Contact
requires a From Attribute that is an attribute on
the contact entity that will be retrieved from the
current user's contact record and set on the
attribute field specified.
Value
A value to be assigned to the field when the form
is loaded.
From Attribute
An attribute on the contact entity that will be
retrieved from the current portal user's record and
assigned to the field when the form is loaded.
Set value on save
The following options specify a value to be set when the form is saved.
Name
Description
Set Value On Save
Yes indicates that a value should be assigned to
the attribute using the input provided in the Value
field.
Note
All attribute types are supported except the
following: Unique Identifier.
Type
One of the following:
Value
Today's Date
Current User's Contact

113
Name
Description
Selecting Value requires a value to be specified in
the Value field that will be assigned to the field
when the form is loaded. Selecting Today's Date
will assign the current date and time to the
attribute field. Selecting Current User's Contact
requires a From Attribute that is an attribute on
the contact entity that will be retrieved from the
current user's contact record and set on the
attribute field specified.
Value
Value assigned to the attribute when the form is
being saved.
For Two Option (Boolean) fields use true or false
For Option Set field use the integer value for the
option
For Lookup (EntityReference) fields, use the GUID
Note
If the attribute is also on the form the user's
value will be overwritten with this value.
From Attribute
An attribute on the contact entity that will be
retrieved from the current portal user's record and
assigned to the field during save.
Validation
The following section contains properties that modify various validation parameters and error messages.
For each language pack installed and enabled for the Dynamics 365 organization, a field will be available
to enter the message in the associated language.
Name
Description
Validation Error Message
Overrides the default validation error message for
the field.
Regular Expression
A regular expression to be added to validate the
field.
Regular Expression Validation Error Message
The validation error message to display if the
regular expression validated fails.
Field is Required
Check to make the attribute field required to
contain a value.
Required Field Validation Error Message
Overrides the default required field error message
if the field does not contain a value.
Range Validation Error Message
Overrides the default range validation error
message displayed if the field's value is outside of
the appropriate minimum and maximum values
114
Name
Description
specified on the entity attribute that are of type
Whole Number, Decimal Number, Floating Point
Number or Currency.
Name
Description
Geolocation Validator Error Message
Applicable if the attribute is a Single Line of Text
and the Control Style specified is Single Line of
Text as Geolocation Lookup Validator then this will
override the default error message displayed if
input validation fails.
Constant Sum Validation Error Message
Applicable if the attribute is a Whole Number type
and the Control Style specified is Group Whole
Number as Constant Sum then this will override
the default error message displayed if input
validation fails.
Multiple Choice Validation Error Message
Applicable if the attribute is a Two Option type and
the Control Style specified is Multiple Choice then
this will override the default error message
displayed if input validation fails.
Rank Order No Ties Validation Error Message
Applicable if the attribute is a Whole Number type
and the Control Style specified is Group Whole
Number as Rank Order No Ties then this will
override the default error message displayed if
input validation fails.
Description and instructions
The following properties specify the location and content of custom description or instructions.
Name
Description
Add Description
Yes results in custom text being displayed on the
form in the position specified.
Position
One of the following:
Above the field
Below the field
Above the label
Use Attribute's Description Property
Select Yes to use the description assigned to the
attribute metadata on the entity. Select 'No' to
provide a custom description. Default: No.
Description
Custom text to be displayed on the form. Used in
conjunction when Use Attribute's Description
Property is set to No. For each language pack
installed and enabled for the Dynamics 365

115
Name
Description
organization a field will be available to enter the
message in the associated language.
Web form metadata type = section
The following properties are displayed when the Type selected equals Section.
Name
Description
Section Name
The name of the section on the entity's form in
Dynamics 365 to be modified.
Label
Replaces the default label assigned to the section
on the entity with the text specified in this input.
For each language pack installed and enabled for
the Dynamics 365 organization a field will be
available to enter the message in the associated
language.
Web form metadata type = tab
The following properties are displayed when the Type selected equals Tab
Name
Description
Tab Name
The name of the tab on the entity's form in
Dynamics 365 to be modified.
Label
Replaces the default label assigned to the tab on
the entity with the text specified in this input. For
each language pack installed and enabled for the
Dynamics 365 organization a field will be available
to enter the message in the associated language.
Web form metadata type = purchase
The following properties are displayed when the Type selected equals Purchase. These options provide
the necessary details for a Web Form to be able to display products for purchase and to generate a quote
record in Dynamics 365 to persist the user's purchase selections to create an order and process
payment.
Name
Description
Target Entity Relationship Name
Relationship from the web form step target entity
to the purchase entity, if the step target is not the
purchase entity.
Required Products Relationship Name
Relationship from the purchase entity for products
to be purchased that are a required part of the
purchase.

116
Name
Description
Optional Products Relationship Name
Relationship from the purchase entity for products
to be purchased that are optional (the user must
opt in to purchase these items).
Line Item Relationship Name
Relationship from the purchase entity that defines
purchase line items.
Line Item Product Attribute Name
Purchase line item entity attribute name for
Product lookup. If this value is not present and set,
the corresponding line item will be excluded from
the purchase.
Line Item Description Attribute Name
Purchase line item entity attribute name for
description.
Line Item Quantity Attribute Name
Purchase line item entity attribute name for item
quantity. (Should be a decimal attribute.)
Line Item UoM Attribute Name
Purchase line item entity attribute name for Unit of
Measure lookup.
Line Item Required Attribute Name
Purchase line item entity attribute name for
whether a line item is required.
Line Item Order Attribute Name
Purchase line item entity attribute name for the
order in which a line item should be displayed.
Line Item Instructions Attribute Name
Purchase line item entity attribute name for
instructions.
Quote Name
The name to be used for all purchase quotes
generated by this step.
Requires Shipping
A Boolean value. When checked, forces the
purchase process to collect shipping information.
Note: If a product has a freight weight value then
shipping will be required regardless of this setting.
Fulfill Order on Payment
A Boolean value. Checked indicates that the order
state should be set to Fulfilled when the payment
is verified. Requires Target Entity Order
Relationship Name. If the target entity is
adx_shoppingcart, an order will be created
automatically upon successful payment and
Target Entity Order Relationship Name is not
required.
Create Invoice on Payment
A Boolean value. Checked indicates that an
invoice should be created when the payment is
verified. Requires Target Entity Invoice
Relationship Name, unless the target entity is
adx_shoppingcart, in which case this relationship
is not needed.
Target Entity Order Relationship Name
Relationship from the web form step target entity
to the order entity.
117
Name
Description
Target Entity Invoice Relationship Name
Relationship from the web form step target entity
to the invoice entity.
See also
Configure a Dynamics 365 portal
Define entity forms and custom logic within the Dynamics 365 portal
Web Form steps for portals
Web Forms metadata for portals
Web Form subgrid configuration for portals
Notes configuration for Web Forms for portals
Web form steps for portals
Applies To: Dynamics 365 (online), Dynamics CRM Online
The Web Form Step provides the flow logic of the form's user experience such as steps and conditional
branching. It also provided details regarding the rendering of a form and additional behavior.
Note
Web Forms persists the history of the steps a user has visited in an object on a Web Form Session
entity. If a Web Form's steps have been modified, previously created history data could now be stale.
Anytime steps are changed, it is recommended that you delete all Web Form Session records to
eliminate miss match between sequence of steps logged in history and the current sequence.
Each Web Form will be presented on the portal has one or more steps. These steps share some common
properties, outlined below. Each Step contains a pointer (a lookup) to the next step, with the exception of
terminal steps. Terminal steps do not have a next time, and are thus the last step of the Web Form (due
to conditional branching, there can be multiple terminal steps)
118
Name
Description
Name
A title used for reference.
Web Form
The Web Form associated with the current step.
Type
One of the following:
Load Form/Load Tab step type: displays
properties of forms.
Load Form/Load Tab step type: displays
properties of tabs.
Conditional step type: displays properties for
specifying expressions to be evaluated for
conditional branching.
Redirect step type: displays the settings
appropriate for configuring a website
redirection.
For further details on the settings for these web
form step types, please refer to their
corresponding sections below.
Note: The first step cannot be of type
"Condition".
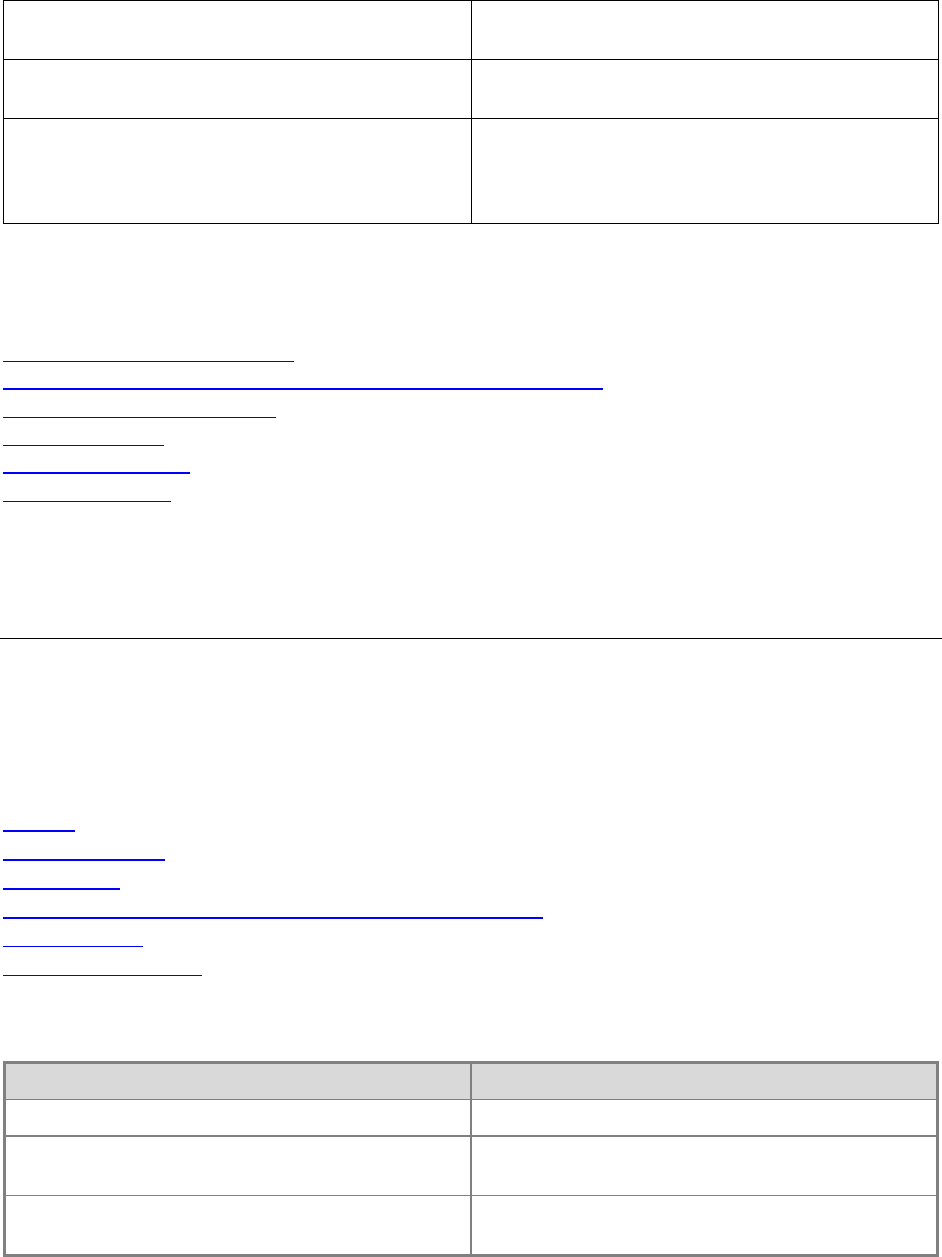
119
Next Step
The step that will follow the current step. This will
be blank for single step single form.
Target Entity Logical Name
The logical name of the entity associated with the
form.
Move Previous Permitted
Indicates whether the user is given an option to
navigate to the previous step in a multiple step
web form. Default is true. Uncheck to prevent the
user from being able to move to the previous step.
See also
Configure a Dynamics 365 portal
Define entity forms and custom logic within the Dynamics 365 portal
Load Form/Load Tab step type
Redirect step type
Conditional step type
Custom JavaScript
Load form and load tab step type
Applies To: Dynamics 365 (online), Dynamics CRM Online
This step type allows the web form step to act as an entity form within the overall web form process. It
loads a form from Dynamics 365 with a similar set of options available as an Entity Form.
In this topic
Settings
Additional settings
Form options
Associate the current portal user with the creation of a record
Entity reference
Additional functionality
Settings
Name
Description
Name
The descriptive name of the record. Required
Entity Name
The name of the entity from which the form will be
loaded from. Required
Form Name
The name of the Form on the target entity that is
to be rendered. Required

120
Name
Description
Tab Name
The name of a Tab on a Form for a specified entity
that is to be rendered. Optional
Mode
One of the following values:
Insert
Edit
ReadOnly
Selecting Insert indicates the form should insert a
new record upon submission. Specifying Edit
indicates the form should edit an existing record.
Selecting ReadOnly indicates the form should
display an existing record's noneditable form. Edit
and ReadOnly requires that a source record exist
and parameters specified in the 'Record Source
Type' and 'Record ID Query String Parameter
Name' fields to select the appropriate record when
the form is loaded in the portal.
Auto Generate Steps From Tabs
Checked indicates that multiple tabs on an entity
form will be displayed with each tab as a
sequential step starting with the first tab and
continue until all tabs have been navigated to and
upon final submission a record is inserted.
Unchecked is the default behavior. Unchecked
value indicates that only one tab or form is to be
rendered for the current step. If the Tab Name is
not specified, the first tab is displayed.
Record Source Type
One of the following values:
Query String
Current Portal User
Result From Previous Step
Selecting Query String requires a parameter name
that must be provided in the query string of the
URL to the form. This can be specified in the
'Record ID Query String Parameter Name' field.
Selecting Current Portal User will retrieve the
portal user record for the current authenticated
user.
Selecting Result from previous step will retrieve
the record that was the record source for a
previous step of the web form.
Record ID Query String Parameter Name
A parameter name provided in the query string of
the URL to the Web Page containing this Entity
Form.
Relationship Name
Required when Record Source Type is Record
Associated to Current Portal User. The logical
name of the relationship between the current
portal user record and the target record. This must
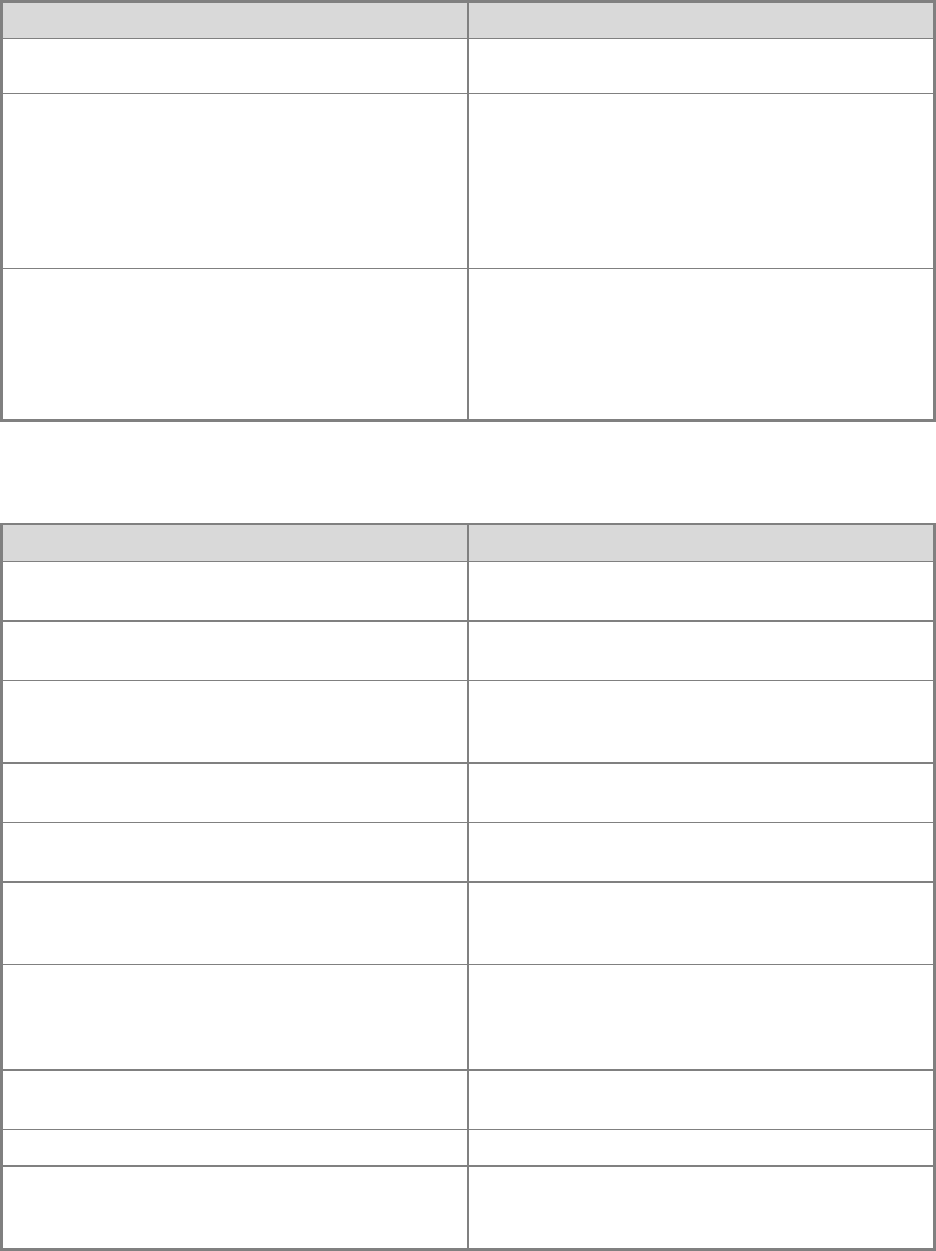
121
Name
Description
return the same entity type specified by the Entity
Name field.
Allow Create If Null
An optional Boolean value available when Record
Source Type is Record Associated to Current
Portal User. Checked indicates that if the related
record does not exist, allow the user to create it
the first time, otherwise an exception will be
thrown if the record does not already exist
because the form needs a record to data-bind to.
Enable Entity Permissions
Will cause the form to respect Entity Permissions.
The default is false for backwards compatibility
reasons. If set to true, explicit permissions are
REQUIRED for any user wanting to access the
form. Note that this only applies to the FIRST step
of a form.
Additional settings
Name
Description
Render Web Resources Inline
Eliminates the iFrame that encompasses a web
resource in a Dynamics 365 entity form.
ToolTips Enabled
The tooltip is set using the description of the
attribute on the target entity.
Show Unsupported Fields
All fields are currently supported. This is reserved
for potential changes Dynamics 365 may make to
field types.
Set Recommended Fields as Required
Makes all attributes required that have the field
requirement level set to 'Business Recommended'.
Make All Fields Required
Makes all fields required regardless of the field
requirement level.
Validation Summary CSS Class
CSS Class name assigned to the validation
summary. Default: 'validation-summary alert alert-
error alert-block'
Enable Validation Summary Links
A Boolean value of true or false that indicates
whether anchor links should be rendered in the
validation summary to scroll to the field containing
an error. Default: true
Validation Summary Link Text
The label assigned to the validation summary
links. Default: click here
Instructions
Display a block of text at the top of the form.
Record Not Found Message
Message displayed when the source record
cannot be loaded. Default: "The record you are
looking for could not be found."
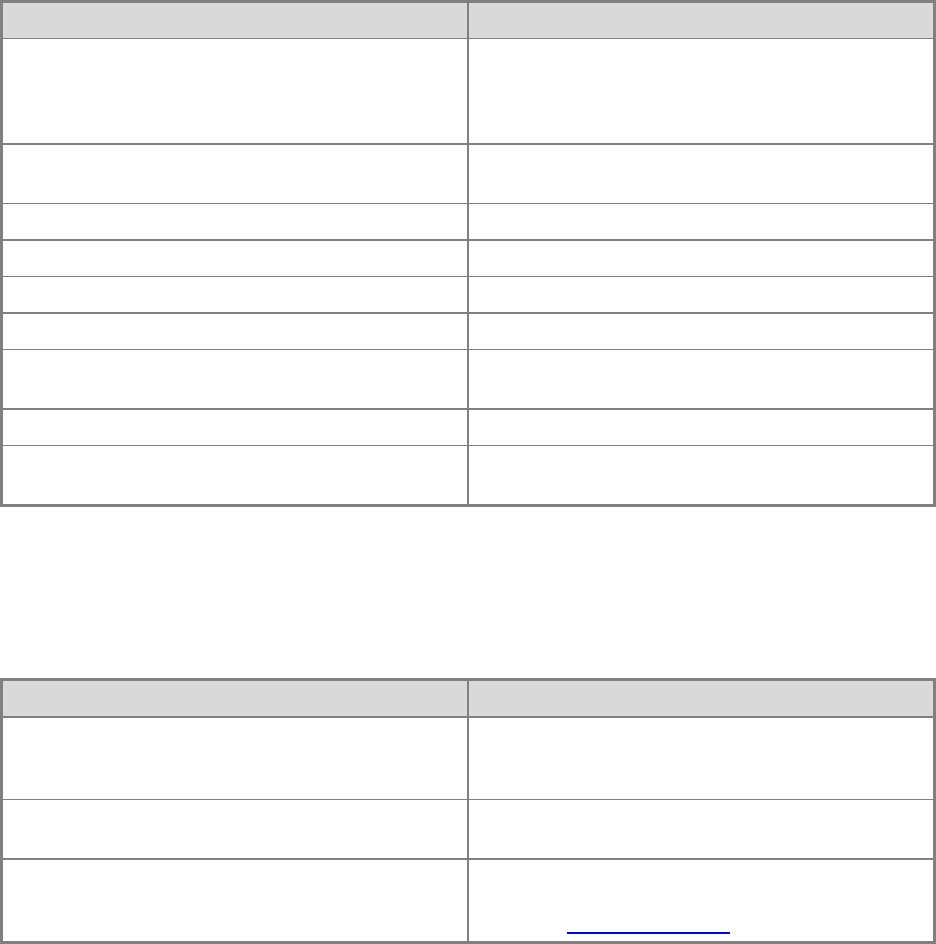
122
Form options
Name
Description
Add Captcha
reCAPTCHA is a free CAPTCHA service used by
the portal to prevent malicious spam attacks. The
service requires a unique key to authenticate
requests for your portal application.
Validation Group
The group name assigned to input controls for
evaluating valid input of named groups.
Previous Button CSS Class
CSS Class name assigned to the Previous button.
Previous Button Text
Label on the previous button.
Next Button CSS Class
CSS Class name assigned to the next button.
Submit Button Text
Label on the next button.
Submit Button CSS Class
CSS Class name assigned to the submit button.
Default: button submit
Submit Button Text
Label on the submit button. Default is 'Submit'
Submit Button Busy Text
Label on the submit button during the running
process. Default: Processing...
Associate the current portal user with the creation of a
record
These options are used to keep track of which portal contact creates a record through the portal UI
Name
Description
Associate Current Portal User
Checked indicates the currently logged in user's
record should be associated with the target entity
record.
Target Entity Portal User Lookup Attribute
The logical name of the attribute on the target
entity that stores the portal user.
Is Activity Party
Boolean value indicating whether the Target Entity
Portal User Lookup Attribute is an Activity Party
type. See ActivityParty entity
Entity reference
The following parameters pertain to setting an entity reference when the form is saved.
This provides a way to associate the current record being created or updated by the form with another
target record. This is useful if you have multiple steps with multiple entity types and wish to relate the
123
resulting records or if the page is passed a query string of a record ID that you would like associated. For
example we have a careers page that lists job postings, each with a link to an application for the job that
contains the id of the job posting to the application form so that when the application is created the job
posting is associated with the record.
Name
Description
Set Entity Reference On Save
Yes or No. A value of yes indicates that an entity
reference should be assigned when the form is
saved, otherwise none will be set.
Relationship Name
The Relationship Definition Name for a given
relationship between two entity types.
Note
Do not specify a relationship name if you specify
a Target Lookup Attribute Logical Name.
Entity Logical Name
The logical name of the reference entity.
Target Lookup Attribute Logical Name
Logical name of the lookup attribute on the target
entity being created or updated.
Note
Do not specify a relationship name if you specify
a Target Lookup Attribute Logical Name.
Populate Lookup Field
If the lookup regarding the reference entity is on
the form, checking this value will populate the field
on the form with the value retrieved using the
setting below.
Source Type
One of the following values:
Query String
Current Portal User
Result From Previous Step
Selecting Query String requires a parameter name
that must be provided in the query string of the
URL to the form. This can be specified in the
Query String Name field. If this parameter is the
primary key then select Yes for the Query String
Is Primary Key, otherwise select No and provide
the logical name of the attribute on the target
entity to query by specified in the Query Attribute
Logical Name field. Selecting Current Portal User
will retrieve the contact record for the current
authenticated user. Selecting Result From
Previous Step will retrieve the record created as a
124
Name
Description
result of the step prior to the current step or from a
specific step based on the step associated with
the Entity Source Step.
Reference Entity Step
The Web Form Step record of a previous step to
retrieve the entity created or edited in that step to
associate it with the record for this current step.
Query String Name
Parameter name provided in the Query String of
the URL to the Web Page containing the Web
Form.
Query String Is Primary Key
Yes indicates the Query String value is the
Primary Key value. No indicates the Query String
value is an attribute type other than the Primary
Key.
Query Attribute Logical Name
Logical name of the attribute to query the record.
Show ReadOnly Details
Checked indicates that a form should be rendered
at the top of the page displaying read-only
information pertaining to the reference record.
Requires a Form Name.
Form Name
The name of the form on the reference entity that
should be used to display read-only details.
Additional functionality
Name
Description
Attach File
Check to have the form include a file upload control to
the bottom of the form to allow a file to be attached to
the record.
Allow Multiple Files
A Boolean value that indicates whether the user can
upload more than one file.
Accept
The accept attribute specifies the MIME types of files
that the server accepts through file upload. To specify
more than one value, separate the values with a
comma (for example, audio/*,video/*,image/*).
Label
The text displayed next to the file upload control. For
each language pack installed and enabled for the
Dynamics 365 organization a field will be available to
enter the message in the associated language.
Is Required
Checked makes the attachment of a file required to
proceed.
Required Error Message
The message displayed during form validation if Is
Required is true and the user has not attached a file.
For each language pack installed and enabled for the

125
Name
Description
Dynamics 365 organization a field will be available to
enter the message in the associated language.
Custom JavaScript
A custom block of JavaScript that will added to the
bottom of the page just before the closing form tag
element. The HTML input id of an entity field is set to
the logical name of the attribute. This makes selecting
a field, setting values, or other client side manipulation
easy with jQuery.
$(document).ready(function() {
$("#address1_stateorprovince").val("Saskatchewan");
});
See also
Configure a Dynamics 365 portal
Define entity forms and custom logic within the Dynamics 365 portal
Web Form steps for portals
Redirect step type
Conditional step type
Custom JavaScript
Redirect step type
Applies To: Dynamics 365 (online), Dynamics CRM Online
The Redirect Step Type allow for a redirect of the User's browser session to another page in the portal or
to an external URL. This is useful for seamlessly directing flow.
Name
Description
External URL
Requires On Success set to Redirect. Specify a
URL to an external resource on the web.
or Web Page
Requires On Success set to Redirect. Select a
Web Page from the current website.
Append Existing Query String
Requires On Success set to Redirect. When
checked the existing query string parameters will
be added to the target URL prior to redirection.
Append Record ID To Query String
Requires On Success set to Redirect. When
checked the ID of the record created is appended
to the query string of the URL being redirected to.

126
Name
Description
Record ID Query String Parameter Name
Requires On Success set to Redirect. The name
of the ID parameter in the query string of the URL
being redirected to.
Append Custom Query String
Requires On Success set to Redirect. A custom
string that can be appended to the existing Query
String of the redirect URL.
Append Attribute Value to Query String -
Parameter Name
Requires On Success set to Redirect. A name to
give to the parameter that correlates to the
attribute value on the target entity that gets
appended to the Query String of the redirect URL.
Append Attribute Value to Query String - Attribute
Logical Name
Requires On Success set to Redirect. A logical
name of an attribute on the target entity to get the
value to be appended to the Query String of the
redirect URL.
See also
Configure a Dynamics 365 portal
Define entity forms and custom logic within the Dynamics 365 portal
Web Form steps for portals
Load Form/Load Tab step type
Conditional step type
Custom JavaScript
Conditional step type
Applies To: Dynamics 365 (online), Dynamics CRM Online
A Web Form Step can be a 'Condition' type that indicates the step should evaluate an expression. If the
expression evaluates to true then the next step is displayed. If the expression evaluates to false and if the
'Next Step If Condition Fails' has been specified, that step will be displayed. The current entity is the
target used to evaluate the expression against. Record Source defaults to the Record Source of the
previous step.
Attributes
Name
Description
Condition
The Conditional expression to be evaluated
Next Step if Condition Fails
The Conditional Step Type, unlike all others, has
two Next Step lookups. The default Next Step
lookup will be respected if the condition evaluates
to true. This property sets the next step should the
condition evaluate to false.
127
The available operands are as follows:
Operand(s)
Type
=, ==
Equals
!=
Not Equals
>
Greater Than
<
Less Than
>=
Greater Than or Equals
<=
Less Than or Equals
&
And
|
Or
!
Not
=*, ==*, -=
Like
!=*
Not Like
Format
The format of the expression is as follows:
[entity attribute logical name] [operand] [value]
Example:
new_categorycode = 750101
A condition can have multiple expressions. You can use parentheses to group nested expressions, for
example:
new_categorycode = 750101 & gendercode = 2
new_categorycode = 750101 & (gendercode = 2 | gendercode = 3)
new_name = Jane Doe
new_twooptionfield = true
new_twooptionfield = false
See also
Configure a Dynamics 365 portal
Define entity forms and custom logic within the Dynamics 365 portal
Web Form steps for portals
Load Form/Load Tab step type
Redirect step type
Custom JavaScript

128
Custom JavaScript
Applies To: Dynamics 365 (online), Dynamics CRM Online
The Web Form Step record contains a field named Custom JavaScript that can be used to store
JavaScript code to allow you to extend or modify the form's visual display or function.
The custom block of JavaScript will added to the bottom of the page just before the closing form tag
element.
Form fields
The HTML input id of an entity field is set to the logical name of the attribute. This makes selecting a field,
setting values, or other client side manipulation easy with jQuery.
$(document).ready(function() {
$("#address1_stateorprovince").val("Saskatchewan");
});
Additional client-side field validation
Sometimes you may need to customize the validation of fields on the form. The following example
demonstrates adding a custom validator. This particular example forces the user to specify an email only
if the another field for preferred method of contact is set to 'Email'.
if (window.jQuery) {
(function ($) {
$(document).ready(function () {
if (typeof (Page_Validators) == 'undefined') return;
// Create new validator
var newValidator = document.createElement('span');
newValidator.style.display = "none";
newValidator.id = "emailaddress1Validator";
newValidator.controltovalidate = "emailaddress1";
newValidator.errormessage = "<a href='#emailaddress1_label'>Email is a required
field.</a>";
newValidator.validationGroup = ""; // Set this if you have set ValidationGroup on the
form
newValidator.initialvalue = "";
newValidator.evaluationfunction = function () {
var contactMethod = $("#preferredcontactmethodcode").val();
if (contactMethod != 2) return true; // check if contact method is not 'Email'.
// only require email address if preferred contact method is email.
129
var value = $("#emailaddress1").val();
if (value == null || value == "") {
return false;
} else {
return true;
}
};
// Add the new validator to the page validators array:
Page_Validators.push(newValidator);
// Wire-up the click event handler of the validation summary link
$("a[href='#emailaddress1_label']").on("click", function () {
scrollToAndFocus('emailaddress1_label','emailaddress1'); });
});
}(window.jQuery));
}
General validation
On click of the next/submit button a function named webFormClientValidate is executed. You can
extend this method to add custom validation logic.
if (window.jQuery) {
(function ($) {
if (typeof (webFormClientValidate) != 'undefined') {
var originalValidationFunction = webFormClientValidate;
if (originalValidationFunction && typeof (originalValidationFunction) == "function") {
webFormClientValidate = function() {
originalValidationFunction.apply(this, arguments);
// do your custom validation here
// return false; // to prevent the form submit you need to return false
// end custom validation.
return true;
};
}
}
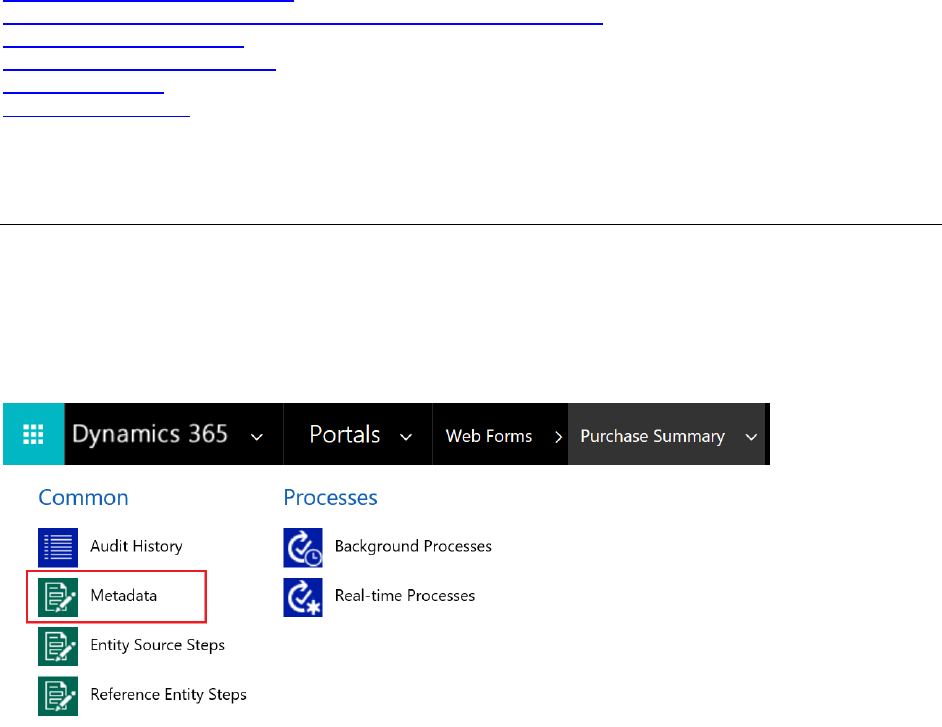
130
}(window.jQuery));
}
See also
Configure a Dynamics 365 portal
Define entity forms and custom logic within the Dynamics 365 portal
Web Form steps for portals
Load Form/Load Tab step type
Redirect step type
Conditional step type
Web form metadata for portals
Applies To: Dynamics 365 (online), Dynamics CRM Online
The Web Form Metadata contains additional behavior modification logic to augment or override the
functionality of form fields that is otherwise not possible with Dynamics 365's native entity form editing
capabilities.
On the Web Form Step that has fields that you would like to modify
Click the Metadata link in the top navigation
To add a new record
Click Add New Web Form Metadata
Web form metadata properties
The following attributes provide additional styling and capabilities for elements on a form.
131
Name
Description
Web Form Step
The Web Form Step associated with the Web
Form Metadata record.
Type
Available options are:
Attribute
Section
Tab
Selecting Attribute as the Type value displays the
appropriate options for modifying fields on the
current form rendered for the related step.
Selecting Section as the Type value displays the
options available for modifying a section on the
form. Selecting Tab as the Type value displays
the options available for modifying a tab on a form.
Web form metadata type = Attribute
The following properties are displayed when the Type selected is 'Attribute'.
Name
Description
Attribute Logical Name
The logical name of the attribute field to be
modified.
Label
Replaces the default label assigned to the attribute
on the entity with the text specified in this input.
For each language pack installed and enabled for
the Dynamics 365 organization a field will be
available to enter the message in the associated
language.
Control style
The following options modify the style and functionality of an attribute's field.
Name
Description
Style
One of the following:
Option Set as Vertical Radio Button List
Option Set as Horizontal Radio Button List
Single Line of Text as Geolocation Lookup
Validator (requires Bing Maps Settings -
details found here)
132
Name
Description
Group Whole Number as Constant Sum
(requires Group Name)
Group Whole Number as Rank Order Scale
No Ties (requires Group Name)
Group Whole Number as Rank Order Scale
Allow Ties (requires Group Name)
Multiple Choice Matrix (requires Group Name)
Multiple Choice (requires Group Name)
Group Whole Number as Stack Rank
(requires Group Name)
Group Name
A name used to group controls together as a
composite control.
Multiple Choice Minimum Required Selected
Count
This is the required minimum values selected in
the multiple choice question. Only necessary if
'Multiple Choice' Control Style is selected.
Multiple Choice Max Selected Count
This is the maximum number of values that is
permitted to be selected in the multiple choice
question. Only necessary if 'Multiple Choice'
Control Style is selected.
Constant Sum Minimum Total
This is the required minimum value applied to a
constant sum response field. Only necessary if
'Group Whole Number as Constant Sum' Control
Style is selected.
Constant Sum Maximum Total
This is the maximum number of value that is
permitted to be applied to a constant sum
response field. Only necessary if 'Group Whole
Number as Constant Sum' Control Style is
selected.
Randomize Option Set Values
Specifying Yes results in randomly ordered
options listed for an Option Set control. Only
applicable to attributes that are of type Option Set.
CSS Class
Adds a custom CSS class name to the control.
Prepopulate field
The following options provide a default value for fields on the form.
Name
Description
Ignore Default Value
Ignores the default value of the specified attribute
field. Useful for attributes that are Two Option
fields that are rendered as Yes and No radio
buttons. Because Dynamics 365 automatically
133
Name
Description
assigns a value of yes or no by default, this option
makes it possible to display Yes/No questions
without a predefined response.
Type
One of the following:
Value
Today's Date
Current User's Contact
Selecting Value requires a value to be specified in
the Value field that will be assigned to the field
when the form is loaded. Selecting Today's Date
will assign the current date and time to the
attribute field. Selecting Current User's Contact
requires a From Attribute that is an attribute on
the contact entity that will be retrieved from the
current user's contact record and set on the
attribute field specified.
Value
A value to be assigned to the field when the form
is loaded.
From Attribute
An attribute on the contact entity that will be
retrieved from the current portal user's record and
assigned to the field when the form is loaded.
Set Value On Save
The following options specify a value to be set when the form is saved.
Name
Description
Set Value On Save
Yes indicates that a value should be assigned to
the attribute using the input provided in the Value
field.
Note
All attribute types are supported except the
following: Unique Identifier.
Type
One of the following:
Value
Today's Date
Current User's Contact
Selecting Value requires a value to be specified in
the Value field that will be assigned to the field
when the form is loaded. Selecting Today's Date
will assign the current date and time to the
134
Name
Description
attribute field. Selecting Current User's Contact
requires a From Attribute that is an attribute on
the contact entity that will be retrieved from the
current user's contact record and set on the
attribute field specified.
Value
Value assigned to the attribute when the form is
being saved.
For Two Option (Boolean) fields use true or false
For Option Set field use the integer value for the
option
For Lookup (EntityReference) fields, use the GUID
Note
If the attribute is also on the form the user's
value will be overwritten with this value.
From Attribute
An attribute on the contact entity that will be
retrieved from the current portal user's record and
assigned to the field during save.
Validation
The following section contains properties that modify various validation parameters and error messages.
For each language pack installed and enabled for the Dynamics 365 organization, a field will be available
to enter the message in the associated language.
Name
Description
Validation Error Message
Overrides the default validation error message for
the field.
Regular Expression
A regular expression to be added to validate the
field.
Regular Expression Validation Error Message
The validation error message to display if the
regular expression validated fails.
Field is Required
Check to make the attribute field required to
contain a value.
Required Field Validation Error Message
Overrides the default required field error message
if the field does not contain a value.
Range Validation Error Message
Overrides the default range validation error
message displayed if the field's value is outside of
the appropriate minimum and maximum values
specified on the entity attribute that are of type
135
Name
Description
Whole Number, Decimal Number, Floating Point
Number or Currency.
Name
Description
Geolocation Validator Error Message
Applicable if the attribute is a Single Line of Text
and the Control Style specified is Single Line of
Text as Geolocation Lookup Validator then this will
override the default error message displayed if
input validation fails.
Constant Sum Validation Error Message
Applicable if the attribute is a Whole Number type
and the Control Style specified is Group Whole
Number as Constant Sum then this will override
the default error message displayed if input
validation fails.
Multiple Choice Validation Error Message
Applicable if the attribute is a Two Option type and
the Control Style specified is Multiple Choice then
this will override the default error message
displayed if input validation fails.
Rank Order No Ties Validation Error Message
Applicable if the attribute is a Whole Number type
and the Control Style specified is Group Whole
Number as Rank Order No Ties then this will
override the default error message displayed if
input validation fails.
Description and instructions
The following properties specify the location and content of custom description or instructions.
Name
Description
Add Description
Yes results in custom text being displayed on the
form in the position specified.
Position
One of the following:
Above the field
Below the field
Above the label
Use Attribute's Description Property
Select 'Yes' to use the description assigned to the
attribute metadata on the entity. Select 'No' to
provide a custom description. Default is 'No'.
Description
Custom text to be displayed on the form. Used in
conjunction when Use Attribute's Description
Property is set to 'No'. For each language pack
installed and enabled for the Dynamics 365
136
Name
Description
organization a field will be available to enter the
message in the associated language.
Web Form metadata type = Section
The following properties are displayed when the Type selected equals 'Section'.
Name
Description
Section Name
The name of the section on the entity's form in
Dynamics 365 to be modified.
Label
Replaces the default label assigned to the section
on the entity with the text specified in this input.
For each language pack installed and enabled for
the Dynamics 365 organization a field will be
available to enter the message in the associated
language.
Web Form metadata type = Tab
The following properties are displayed when the Type selected equals 'Tab'
Name
Description
Tab Name
The name of the tab on the entity's form in
Dynamics 365 to be modified.
Label
Replaces the default label assigned to the tab on
the entity with the text specified in this input. For
each language pack installed and enabled for the
Dynamics 365 organization a field will be available
to enter the message in the associated language.
See also
Configure a Dynamics 365 portal
Define entity forms and custom logic within the Dynamics 365 portal
Web Form properties for portals
Web Form steps for portals
Web Form subgrid configuration for portals
Notes configuration for Web Forms for portals

137
Web Form subgrid configuration for portals
Applies To: Dynamics 365 (online), Dynamics CRM Online
Web Form Subgrids are configured in an identical fashion to Entity Form Subgrids. First, Create a
Metadata record for the Web Form Step that has a subgrid, and add configuration metadata.
Adding Subgrids to your Managed forms on the portal is easy—just add the subgrid to the Dynamics 365
form that you are managing by using the out-of-the-box Dynamics 365 form designer and you’re done.
The grid will use the view that is specified in the Dynamics 365 form designer, show only related records if
that option was chosen in Dynamics 365, optionally show a search bar, and even respect entity
permissions for portals It doesn't get any simpler to display a read-only list of records. To enable actions
for the grid— Create, Update, Delete, and so on—you must configure those actions by using metadata
configurations.
Adding subgrid metadata to your form
To add Subgrid Metadata to an Entity Form, navigate to Entity Form Metadata by using either the top
drop-down or the subgrid right on the main form of the Define entity forms and custom logic within the
Dynamics 365 portal record that you are working with.
To add a new record, Click Add New Entity Form Metadata
To edit an existing record, double-click on a record in the grid. Selecting Subgrid as the Type value
displays another attribute, "Subgrid Name".
Name
Description
Subgrid Name
The unique name of the subgrid on the entity's
related Dynamics 365 form.
Double clicking on the Sub-Grid in the form editor will display a properties window. This contains a Name
field that should be used to assign to the Subgrid Name field on the Entity Form Metadata record.

138
Specifying a valid subgrid name will display the subgrid configuration settings. By default, only Basic
Settings are shown. Select Advanced Settings to show additional settings.
By default, most settings are shown collapsed to save space. Click "" to expand a section and see
additional options. Click "" to collapse a section.
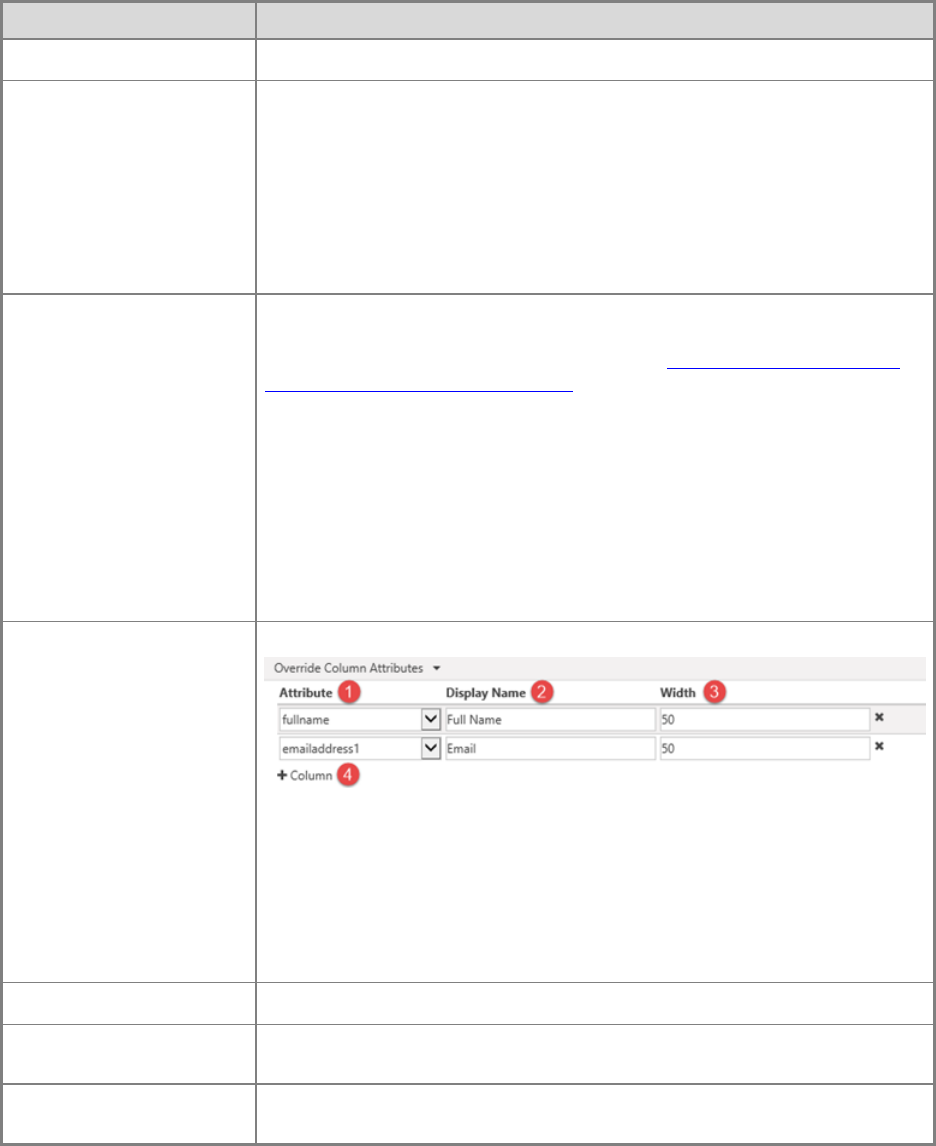
139
Attributes
Name
Description
Basic Settings
View Actions
Allows you to add action buttons for actions that are applicable for the
entity set and will appear above the subgrid. The available actions are:
Create Action
Download Action
Associate Action
Clicking on one of these options displays a configuration area for that
action. See below for details about each action.
Item Actions
Allows you to add action buttons for actions that are applicable for an
individual record and will appear in each row in the subgrid provided the
associated privilege has been granted by the Add record-based security
using entity permissions for portals procedure. The available actions are:
Details Action
Edit Action
Delete Action
Workflow Action
Disassociate Action
Clicking on one of these options displays a configuration area for that
action. See below for details about each action.
Override Column
Attributes
Allows you to override display settings for individual columns in the grid.
1. Attribute - the logical name of the column you wish to override
2. Display Name - a new column title to override the default
3. Width - the width (in either percent or pixels) of the column to
override the default. See also Grid Column Width Style
To override settings on a column, click " Column" (4) and fill in the details.
Advanced Settings
Loading Message
Overrides the default HTML message that appears while the subgrid is
loading.
Error Message
Overrides the default HTML message that appears when an error occurs
while loading the subgrid.
140
Name
Description
Access Denied Message
Overrides the default HTML message that appears when a user does not
have sufficient permissions to read the entity type associated with the
subgrid.
For information on permissions, see
Empty Message
Overrides the HTML message that appears when the associated subgrid
contains no data.
Lookup Dialog
Controls the settings for the dialog that appears when a user activates the
Associate Action.
Details Form Dialog
Controls the settings for the dialog that appears when a user activates the
Details Action
Edit Form Dialog
Controls the settings for the dialog that appears when a user activates the
Edit Action
Create Form Dialog
Controls the settings for the dialog that appears when a user activates the
Create Action
Delete Dialog
Controls the settings for the dialog that appears when a user activates the
Delete Action
Error Dialog
Controls the settings for the dialog that appears when an error occurs
during any action.
CSS Class
Specify a CSS class or classes that will be applied to the HTML element
that contains the entire subgrid area, including the grid and action buttons.
Grid CSS Class
Specify a CSS class or classes that will be applied to the Subgrid's HTML
<table> element.
Grid Column Width Style
Configures whether the Width values in the Override Column Attributes
are specified in Pixels or Percent.
Create action
Enabling a Create Action renders a button above the Subgrid that, when clicked, pops up a dialog with
an entity form that allows a user to create a new record.
Create Action Settings
Name
Description
Basic Settings
Entity Form
Specifies the entity forms and custom logic that
will be used to create the new record. The drop-
down will list all Entity Forms that are configured
for the Subgrid's entity type.
Note: If the Subgrid's entity type has no Entity
Forms, the drop-down will appear empty. If no
Entity Form is supplied for the Create Action it will
be ignored, and the button will not render on the
Subgrid's Entity Form.

141
Name
Description
Advanced Settings
Button Label
Overrides the HTML label displayed in the Create
Action button above the subgrid.
Button Tooltip
Overrides the tooltip text that appears when the
mouse is hovered over the Create Action button.
Create form dialog (advanced) settings
Name
Description
Loading Message
Overrides the message that appears while the
dialog is loading
Title
Overrides the HTML that appears in the title bar of
the dialog
Dismiss Button Sr Text
Overrides the screen reader text associated with
the dialog's dismiss button.
Size
Specifies the size of the Create Form dialog. The
Options are Default, Large, and Small. For the
Create Form dialog, the default size is Large.
CSS Class
Specify a CSS class or classes that will be applied
to the resulting dialog.
Title CSS Class
Specify a CSS class or classes that will be applied
to the resulting dialog's title bar.
Download action
Enabling a Download Action renders a button above the Subgrid that, when clicked, downloads the data
from the subgrid to an Excel (.xlsx) file.
Download action settings
Name
Description
Basic Settings
None
Advanced Settings
Button Label
Overrides the HTML label displayed in the
Download Action button above the subgrid.
Button Tooltip
Overrides the tooltip text that appears when the
mouse is hovered over the Download Action
button.
142
Associate action
Enabling an Associate Action displays a button above the subgrid that, when selected, opens a table of
entities that the user can choose to associate to the entity record currently being displayed by the Define
entity forms and custom logic within the Dynamics 365 portal provided the 'Append' and 'AppendTo'
privilege has been granted by Add record-based security using entity permissions for portals for the
applicable entity types.
Associate action settings
Name
Description
Basic Settings
View
Specifies the View (Saved Query) that will be used
to find and display the list of eligible entities.
Note: If the Subgrid's entity type has no Saved
Queries, the drop-down will appear empty. If no
View is supplied for the Associate Action it will be
ignored, and the button will not render on the
Subgrid's Entity Form.
Advanced Settings
Button Label
Overrides the HTML label displayed in the
Associate Action button above the subgrid.
Button Tooltip
Overrides the tooltip text that appears when the
mouse is hovered over the Associate Action
button.
Lookup dialog (advanced) settings
Name
Description
Title
Overrides the HTML that appears in the title bar of
the dialog
Primary Button Text
Overrides the HTML that appears in the Primary
("Add") button on the dialog.
Close Button Text
Overrides the HTML that appears in the Close
("Cancel") button on the dialog.
Dismiss Button Sr Text
Overrides the screen reader text associated with
the dialog's dismiss button.
Size
Specifies the size of the Associate dialog. The
Options are Default, Large, and Small. For the
Associate dialog, the default size is Large.
CSS Class
Specify a CSS class or classes that will be applied
to the resulting dialog.
Title CSS Class
Specify a CSS class or classes that will be applied
to the resulting dialog's title bar.

143
Name
Description
Primary Button CSS Class
Specify a CSS class or classes that will be applied
to the dialog's Primary ("Add") button.
Close Button CSS Class
Specify a CSS class or classes that will be applied
to the dialog's Close ("Cancel") button.
Select Records Title
Overrides the HTML that appears in the title of the
Record Selection area.
Default Error Message
Overrides the message that appears when an
error occurs while associating the selected entity
or entities.
Grid Options
Specify settings for the appearance of the entity
grid. See below for options.
Lookup dialog (advanced) grid options settings
Name
Description
Loading Message
Overrides the message that appears while the grid
of entities is loading.
Error Message
Overrides the message that appears when an
error occurs while loading the grid of entities
Access Denied Message
Overrides the message that appears when a user
does not have sufficient entity permissions to view
the grid of entities.
Empty Message
Overrides the message that appears when there
are no entities that can be associated with the
current Entity Form.
CSS Class
Specify a CSS class or classes that will be applied
to the associate grid area.
Grid CSS Class
Specify a CSS class or classes that will be applied
to the associate grid's <table> element.
Details action
Enabling a Details Action allows a user to view a read-only entity form that is data-bound to the record of
the subgrid's selected row.
Details Action settings
Name
Description
Basic Settings
Entity Form
Specifies the entity form that will be used to view
the details of the selected record. The drop-down
144
Name
Description
will list all Entity Forms that are configured for the
Subgrid's entity type.
Note: If the Subgrid's entity type has no Entity
Forms, the drop-down will appear empty. If no
Entity Form is supplied for the Details Action it will
be ignored, and the button will not render in the
Subgrid.
Advanced Settings
Record ID Query String Parameter Name
Specifies the name of the query string parameter
that will be used to select the entity to view in the
selected Entity Form. This should match the value
in that Entity Form's Record ID Query String
Parameter Name. The default value for this field,
both here and in Entity Form configuration, is "id".
Button Label
Overrides the HTML label for this action displayed
in the Subgrid row.
Button Tooltip
Overrides the tooltip text that appears when the
mouse is hovered over the button for this action
displayed in the Subgrid row.
Details form dialog (advanced) settings
Name
Description
Loading Message
Overrides the HTML that appears when the dialog
is loading.
Title
Overrides the HTML that appears in the title bar of
the dialog.
Dismiss Button Sr Text
Overrides the screen reader text associated with
the dialog's dismiss button.
Size
Specifies the size of the Details dialog. The
Options are Default, Large, and Small. For the
Details dialog, the default size is Large.
CSS Class
Specify a CSS class or classes that will be applied
to the resulting dialog.
Title CSS Class
Specify a CSS class or classes that will be applied
to the resulting dialog's title bar.
Edit action
Enabling an Edit Action allows a user to view an editable entity form that is data-bound to the record of
the subgrid's selected row, if the 'Write' privilege has been granted by Add record-based security using
entity permissions for portals.
145
Edit action settings
Name
Description
Basic Settings
Entity Form
Specifies the entity form that will be used to edit
the selected record. The drop-down will list all
Entity Forms that are configured for the Subgrid's
entity type.
Note: If the Subgrid's entity type has no Entity
Forms, the drop-down will appear empty. If no
Entity Form is supplied for the Edit Action it will be
ignored, and the button will not render in the
Subgrid.
Advanced Settings
Record ID Query String Parameter Name
Specifies the name of the query string parameter
that will be used to select the entity to edit in the
selected Entity Form. This should match the value
in that Entity Form's Record ID Query String
Parameter Name. The default value for this field,
both here and in Entity Form configuration, is "id".
Button Label
Overrides the HTML label for this action displayed
in the Subgrid row.
Button Tooltip
Overrides the tooltip text that appears when the
mouse is hovered over the button for this action
displayed in the Subgrid row.
Edit form dialog (advanced) settings
Name
Description
Loading Message
Overrides the HTML that appears when the dialog
is loading.
Title
Overrides the HTML that appears in the title bar of
the dialog.
Dismiss Button Sr Text
Overrides the screen reader text associated with
the dialog's dismiss button.
Size
Specifies the size of the Edit dialog. The Options
are Default, Large, and Small. For the Edit dialog,
the default size is Large.
CSS Class
Specify a CSS class or classes that will be applied
to the resulting dialog.
Title CSS Class
Specify a CSS class or classes that will be applied
to the resulting dialog's title bar.
146
Delete action
Enabling a Delete Action allows a user to permanently delete the entity represented by a row in the
subgrid, if the Delete privilege has been granted by Add record-based security using entity permissions
for portals.
Delete action settings
Name
Description
Basic Settings
none
Advanced Settings
Confirmation
Overrides the confirmation HTML message
displayed when the user activates the Delete
Action.
Button Label
Overrides the HTML label for this action displayed
in the Subgrid row.
Button Tooltip
Overrides the tooltip text that appears when the
mouse is hovered over the button for this action
displayed in the Subgrid row.
Delete dialog (advanced) settings
Name
Description
Title
Overrides the HTML that appears in the title bar of
the dialog.
Primary Button Text
Overrides the HTML that appears in the Primary
("Delete") button on the dialog.
Close Button Text
Overrides the HTML that appears in the Close
("Cancel") button on the dialog.
Dismiss Button Sr Text
Overrides the screen reader text associated with
the dialog's dismiss button.
Size
Specifies the size of the Delete Dialog. The
Options are Default, Large, and Small. For the
Delete dialog, the default size is Default.
CSS Class
Specify a CSS class or classes that will be applied
to the resulting dialog.
Title CSS Class
Specify a CSS class or classes that will be applied
to the resulting dialog's title bar.
Primary Button CSS Class
Specify a CSS class or classes that will be applied
to the dialog's Primary ("Delete") button.
147
Name
Description
Close Button CSS Class
Specify a CSS class or classes that will be applied
to the dialog's Close ("Cancel") button.
Workflow action
Enabling a Workflow Action allows a user to run an On-Demand Workflow against the selected record in
the subgrid. You may add any number of Workflow Actions to the Subgrid Metadata.
Workflow action settings
Name
Description
Basic Settings
Workflow
Specifies the On-Demand Workflow that will run
when the user activates this action.
Note: If the Subgrid's entity type has no
Workflows, the drop-down will appear empty. If no
Workflow is supplied for the Workflow Action it will
be ignored, and the button will not render in the
subgrid.
Button Label
Sets the HTML label for this action displayed in
the Subgrid row. This setting is required.
Advanced Settings
Button Tooltip
Overrides the tooltip text that appears when the
mouse is hovered over the button for this action
displayed in the subgrid row.
Disassociate action
Enabling a Disassociate Action allows a user to remove the link between the record represented by the
currently viewed Define entity forms and custom logic within the Dynamics 365 portal and the record
represented by the selected row in the subgrid, as long as the 'Append' and 'AppendTo' privileges have
been granted by Add record-based security using entity permissions for portals for the applicable entity
types.
Disassociate action settings
Name
Description
Basic Settings
None
Advanced Settings

148
Name
Description
Button Label
Overrides the HTML label for this action displayed in the
Subgrid row.
Button Tooltip
Overrides the tooltip text that appears when the mouse is
hovered over the button for this action displayed in the subgrid
row.
See also
Configure a Dynamics 365 portal
Define entity forms and custom logic within the Dynamics 365 portal
Web Form properties for portals
Web Form steps for portals
Web Forms metadata for portals
Notes configuration for Web Forms for portals
Notes configuration for web forms for portals
Applies To: Dynamics 365 (online), Dynamics CRM Online
Web Form Notes are configured in an identical fashion to Entity Form Notes. First, Create a Metadata
record for the Web Form Step that has notes, and add configuration metadata. This process is described
here.
Just like with Subgrids, adding notes to your Managed forms on the portal is easy - just add the notes
control to the Dynamics 365 form through the out-of-the-box Dynamics 365 form designer and you’re
done. You can configure the behavior of the notes control by using metadata.
Note
Explicit Add record-based security using entity permissions for portals are required for any notes to
appear on the portal. For read and edit, the 'Read' and 'Write' privileges must be granted. For create,
two permissions must exist, a permission with the 'Create' and 'Append' privileges must be granted for
the note (annotation) entity, the second permission must be assigned to the entity type the note is being
attached to with the 'Append To' privilege granted.
To Edit or Add notes, among other things, you must configure the control using a metadata record.
To add Metadata to an Entity form, navigate to Entity Form Metadata either using the top drop-down or
the subgrid right on the main form of the Entity Form record that you are working with. Then click to add a
new record.
When Creating your record, select Type of Notes. You will then be able to add Note configuration:
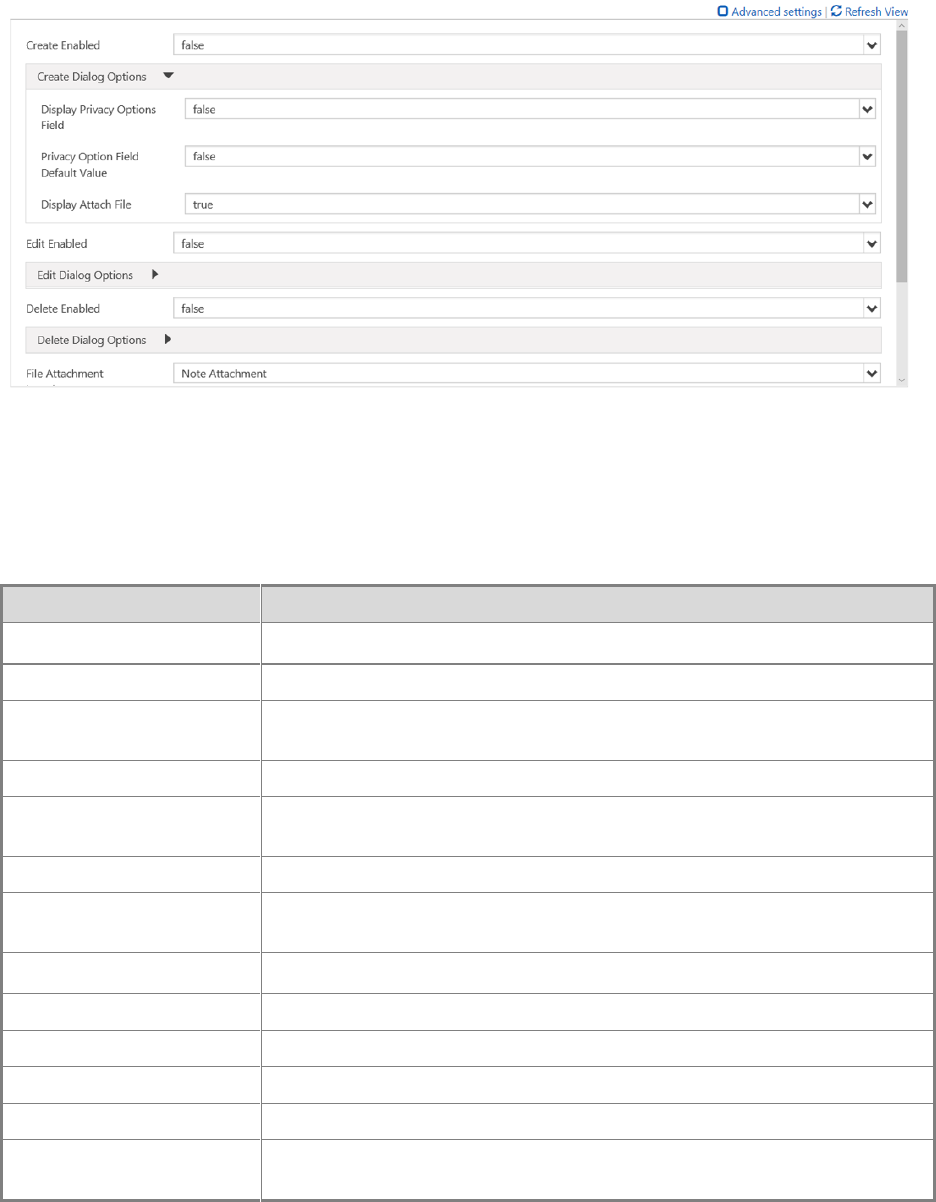
149
Upon adding the Configuration, the Note control will render with the appropriate options enabled on the
portal.
Most settings are shown collapsed to save space by default. Click "" to expand a section and see
additional options. Click "" to collapse a section.
Attributes
Name
Description
Basic Settings
Create Enabled
Enables the ability to add new Notes to the entity.
Create Dialog Options
Contains settings for configuring the dialog when Create Enabled is true.
See Create Dialog Options for more details.
Edit Enabled
Enables the ability to edit existing Notes on the entity.
Edit Dialog Options
Contains settings for configuring the dialog when EditEnabled is true.
See Edit Dialog Options for more details.
Delete Enabled
Enables the ability to delete Notes from the entity.
Delete Dialog Options
Contains settings for configuring the dialog when DeleteEnabled is true.
See Delete Dialog Options for more details.
Advanced Settings
List Title
Overrides the title over the Notes area.
Add Note Button Label
Overrides the label in the Add Notes button.
Note Privacy Label
Overrides the label denoting that a note is Private.
Loading Message
Overrides the message shown while the list of notes is loading.
Error Message
Overrides the message shown when an error occurs while trying to load
the list of notes.

150
Name
Description
Access Denied Message
Overrides the message shown when the user does not have sufficient
permissions to view the list of notes.
Empty Message
Overrides the message shown when the current entity does not have any
notes that can be viewed.
List Orders
Allows you to set the order in which notes will be displayed.
Attribute - the logical name of the column by which you wish to
sort
Alias - the alias for the attribute in the query
Direction - Choose Ascending (smallest to largest, or first to last),
or Descending (largest to smallest, or last to first).
To add a sorting rule, click " Column" (4) and fill in the details. List Orders
will be processed in order from the top of the list having highest priority.
Create dialog options
Name
Description
Basic Settings
Display Privacy Options Field
Enables a checkbox in the Add Note dialog that
allows the user to mark a note as Private.
Privacy Option Field Default Value
Specifies the default value for the Display Privacy
Options Field checkbox. The default value of this
field is "false".
Display Attach File
Enables a file upload field in the Add Note dialog,
allowing a user to attach a file to a note.
Attach File Accept
The MIME type accepted by the file upload input.
Advanced Settings
Note Field Label
Overrides the label for the Note field in the Add
Note dialog.
Note Field Columns
Sets the cols value in the Note <textarea>
Note Field Rows
Sets the rows value in the Note <textarea>
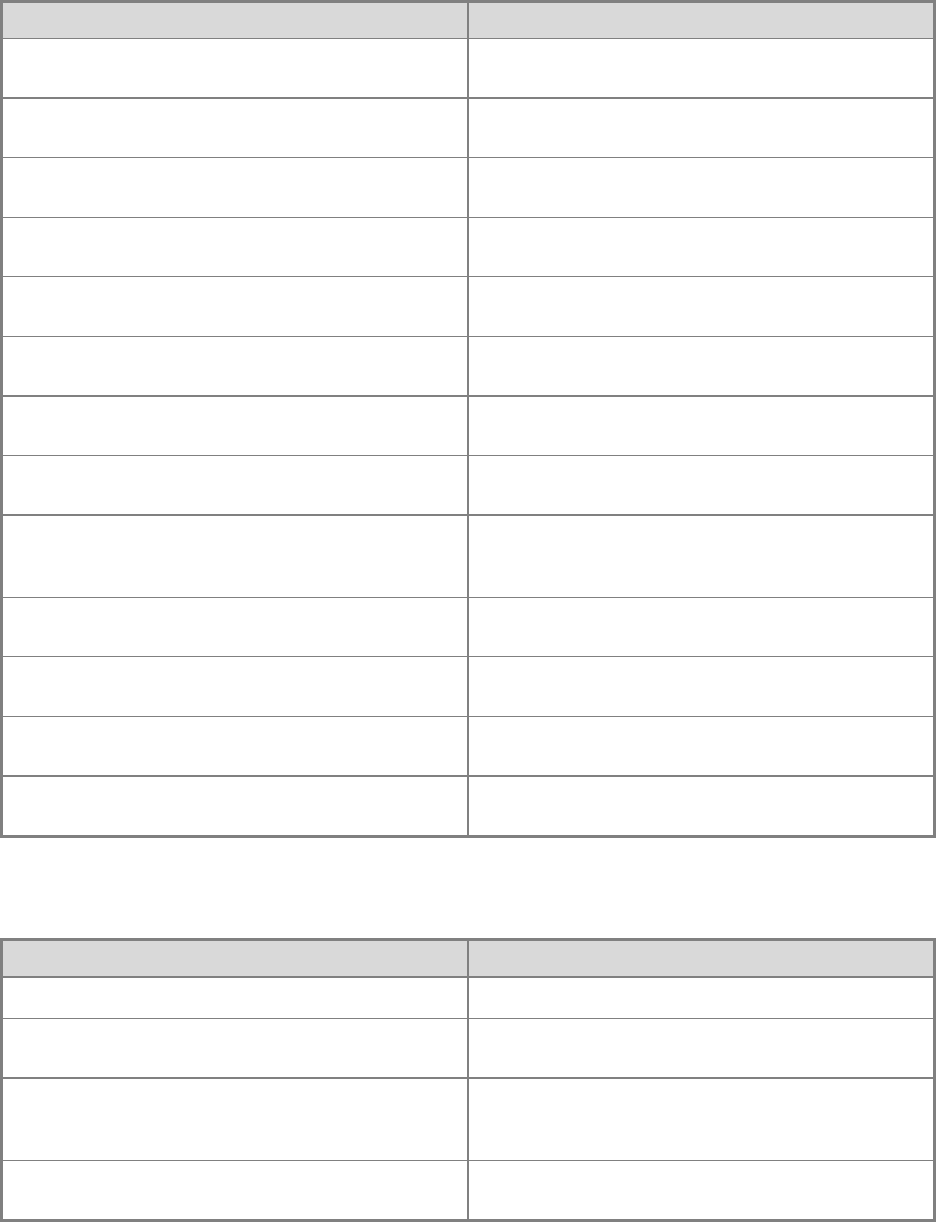
151
Name
Description
Privacy Option Field Label
Overrides the label for the Privacy Option field (if
enabled).
Attach File Label
Overrides the label for the Attach File field (if
enabled)
Left Column CSS Class
Adds the CSS class or classes to the left column
containing labels on the Add Note dialog.
Right Column CSS Class
Adds the CSS class or classes to the right column
containing field inputs on the Add Note dialog.
Title
Overrides the HTML text in the header of the Add
Note dialog.
Primary Button Text
Overrides the HTML that appears in the Primary
("Add Note") button on the dialog.
Dismiss Button SR Text
Overrides the screen reader text associated with
the dialog's dismiss button.
Close Button Text
Overrides the HTML that appears in the Close
("Cancel") button on the dialog.
Size
Specifies the size of the Add Note dialog. The
Options are Default, Large, and Small. For the
Add Note dialog, the default size is Default.
CSS Class
Specify a CSS class or classes that will be applied
to the resulting dialog.
Title CSS Class
Specify a CSS class or classes that will be applied
to the resulting dialog's title bar.
Primary Button CSS Class
Specify a CSS class or classes that will be applied
to the dialog's Primary ("Add Note") button.
Close Button CSS Class
Specify a CSS class or classes that will be applied
to the dialog's Close ("Cancel") button.
Edit dialog options
Name
Description
Basic Settings
Display Privacy Options Field
Enables a checkbox in the Edit Note dialog that
allows the user to mark a note as Private.
Privacy Option Field Default Value
Specifies the default value for the Display Privacy
Options Field checkbox. The default value of this
field is "false".
Display Attach File
Enables a file upload field in the Edit Note dialog,
allowing a user to attach a file to a note.

152
Name
Description
Attach File Accept
The MIME type accepted by the file upload input.
Advanced Settings
Note Field Label
Overrides the label for the Note field in the Edit
Note dialog.
Note Field Columns
Sets the cols value in the Note <textarea>
Note Field Rows
Sets the rows value in the Note <textarea>
Privacy Option Field Label
Overrides the label for the Privacy Option field (if
enabled).
Attach File Label
Overrides the label for the Attach File field (if
enabled)
Left Column CSS Class
Adds the CSS class or classes to the left column
containing labels on the Edit Note dialog.
Right Column CSS Class
Adds the CSS class or classes to the right column
containing field inputs on the Edit Note dialog.
Title
Overrides the HTML text in the header of the Edit
Note dialog.
Primary Button Text
Overrides the HTML that appears in the Primary
("Update Note") button on the dialog.
Dismiss Button SR Text
Overrides the screen reader text associated with
the dialog's dismiss button.
Close Button Text
Overrides the HTML that appears in the Close
("Cancel") button on the dialog.
Size
Specifies the size of the Edit Note dialog. The
Options are Default, Large, and Small. For the Edit
Note dialog, the default size is Default.
CSS Class
Specify a CSS class or classes that will be applied
to the resulting dialog.
Title CSS Class
Specify a CSS class or classes that will be applied
to the resulting dialog's title bar.
Primary Button CSS Class
Specify a CSS class or classes that will be applied
to the dialog's Primary ("Update Note") button.
Close Button CSS Class
Specify a CSS class or classes that will be applied
to the dialog's Close ("Cancel") button.
Delete dialog options
Name
Description
Basic Settings

153
Name
Description
Confirmation
Override the confirmation message to delete the
note.
Advanced Settings
Title
Overrides the HTML text in the header of the
Delete Note dialog.
Primary Button Text
Overrides the HTML that appears in the Primary
("Delete") button on the dialog.
Dismiss Button SR Text
Overrides the screen reader text associated with
the dialog's dismiss button.
Close Button Text
Overrides the HTML that appears in the Close
("Cancel") button on the dialog.
Size
Specifies the size of the Delete Note dialog. The
Options are Default, Large, and Small. For the
Delete Note dialog, the default size is Default.
CSS Class
Specify a CSS class or classes that will be applied
to the resulting dialog.
Title CSS Class
Specify a CSS class or classes that will be applied
to the resulting dialog's title bar.
Primary Button CSS Class
Specify a CSS class or classes that will be applied
to the dialog's Primary ("Delete") button.
Close Button CSS Class
Specify a CSS class or classes that will be applied
to the dialog's Close ("Cancel") button.
See also
Configure a Dynamics 365 portal
Define entity forms and custom logic within the Dynamics 365 portal
Web Form properties for portals
Web Form steps for portals
Web Forms metadata for portals
Web Form subgrid configuration for portals
Add a webpage to render a list of records
Applies To: Dynamics 365 (online), Dynamics CRM Online
Entity List is a data-driven configuration that provides you with the ability to add a webpage that will
render a list of records without the need for a developer to surface the grid in the portal. Using Entity List,
you can expose Dynamics 365 records for display on portals.

154
The grid supports sorting and will be paginated if the number of records is larger than the Page Size
specified. If the Web Page for Details View has been specified, each record will contain a link to the page
and the ID of the record will be appended to the Query String along with the ID Query String Parameter
Name. The Entity List also supports multiple views. If more than one view has been specified, a drop-
down will rendered to allow the user to toggle between the various views.
The data can also be filtered by the current portal user, the current portal user's Parent Customer, and the
current portal website. If a value exists for both filter conditions Portal User Attribute and Account
Attribute, the portal will render a drop-down to allow the user to view 'My' data or his/her Parent Customer
account's data.
Add an entity list to your portal
The Entity List contains relationships to webpages and various properties in order to control the
initialization of the list of records within the portal. The relationship to Web Page allows dynamic retrieval
of the list definition for a given page node within the website. To view existing Entity Views or to create
new Entity Views, navigate to Portals > Entity Lists
Note
A Entity List must be associated with a Web Page for a given website for the list to be viewable within
the site.
The Web Pages associated with the Entity List can be viewed by clicking the Web Pages link listed in the
Related navigation links in the leftmost menu. When Creating your Entity List, the first step is to choose
the Entity for which you want to render a list on the portal. You'll then choose one or more Dynamics 365
Views to render.
When creating or editing a Web Page, an Entity List can be specified in the lookup field provided on the
Web Page form. The Page Template typically will be the "Page" template but can be one of several other
templates designed for content as the master templates contain the necessary logic to determine if an
Entity List should be rendered.
Entity list attributes and relationships
Name
Description
Name
The descriptive name of the record. This field is required.
Entity Name
The name of the entity from which the Saved Query View will
be loaded from. This field is required.
View
The Saved Query View(s) of the target entity that is to be
rendered. This field is required. If more than one view has been
specified, the webpage will contain a drop-down to allow the
user to toggle between the various views.
Page Size
An integer value that specifies the number of records per page.
This field is required. Default: 10

155
Web Page for Details View
An optional Web Page that can be linked to for each record.
The ID Query String Parameter Name and record ID will be
appended to the Query String of the URL to this Web Page.
Details Button Label
The text displayed for the details view button if Web Page for
Details View has been specified. Default: View details
For each language pack installed and enabled for the Dynamics
365 organization, a field will be available to enter the message
in the associated language.
Web Page for Create
An optional Web Page that will be the target of the create
button.
Create Button Label
The text displayed for the create button if Web Page for Create
has been specified. Default: Create
For each language pack installed and enabled for the Dynamics
365 organization a field will be available to enter the message
in the associated language.
ID Query String Parameter Name
A parameter name provided in the query string of the URL to
the Web Page for Details View. Default: id
Empty List Text
The message displayed when there are no records.
For each language pack installed and enabled for the Dynamics
365 organization a field will be available to enter the message
in the associated language.
Portal User Attribute
An optional lookup attribute on the primary entity that
represents the portal user record, either contact or system user
that the current user's ID can be applied to filter the data
rendered in the list.
Account Attribute
An optional lookup attribute on the primary entity that
represents an account record that the current user contact's
Parent Customer value can be applied to filter the data
rendered in the list.
Website Attribute
An optional lookup attribute on the primary entity that
represents the website that the current website's ID can be
applied to filter the data rendered in the list.
Search Enabled
An optional Boolean value indicating if search should be
enabled or not. A textbox will be rendered to allow users to do
a quick search for records. Use asterisk (*) wildcard character
to search on partial text. The search appends 'or' condition
filters for each column in the view to the view's existing
predefined filter conditions to query and return the resulting
records.
Search Placeholder Text
An optional string used as the label displayed in the textbox on
initial load.
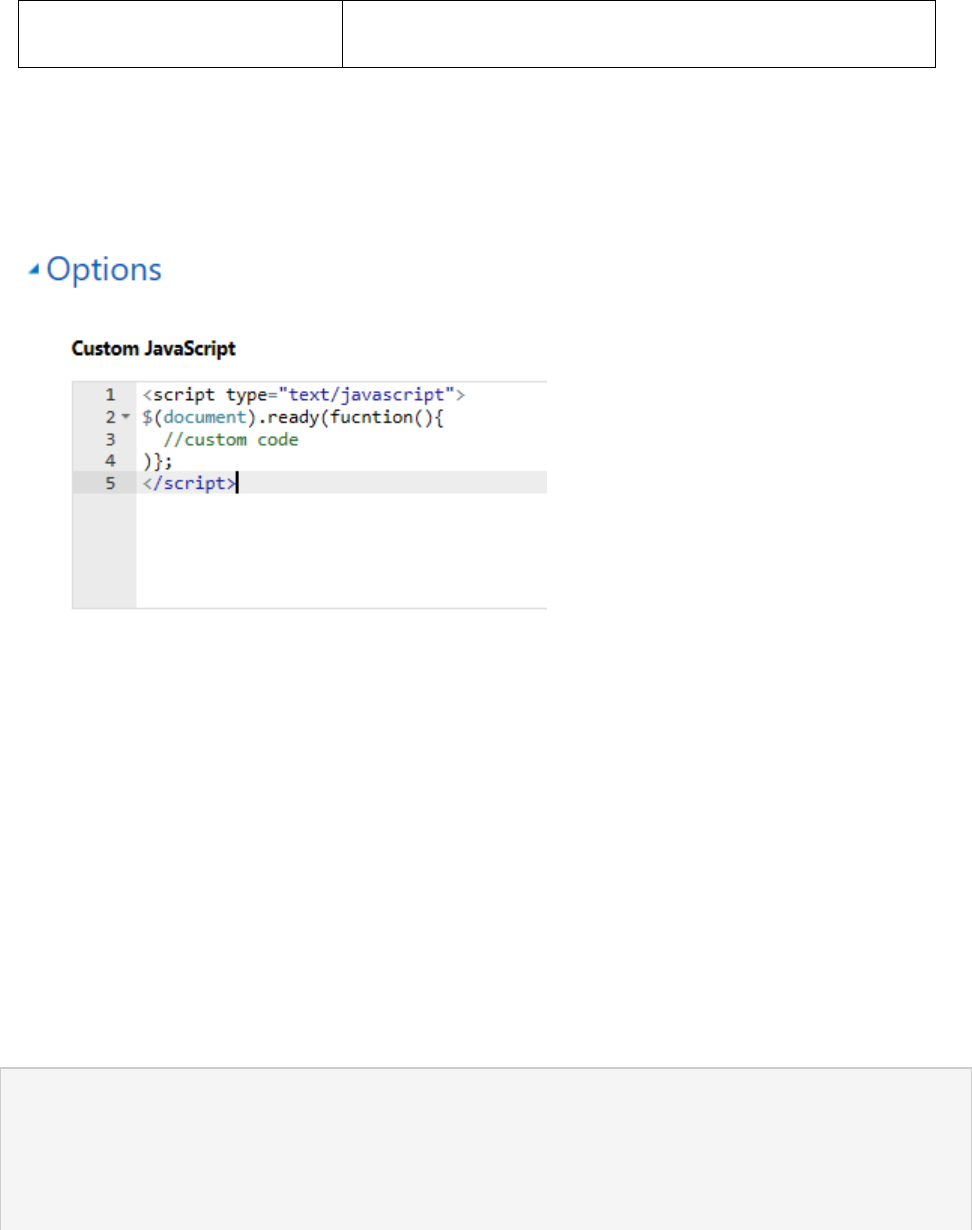
156
Search Tooltip Text
An optional string used as the tooltip displayed when the
mouse moves over the search textbox.
Add custom Javascript
The Options tab on the form contains a text area that you can enter custom JavaScript and if your page
includes jQuery library then you can use that here as well. The script block will be added at the bottom of
the webpage just before the page’s closing form tag.
The list gets its data asynchronously and when it is complete it will trigger an event "loaded" that your
custom JavaScript can listen for and do something with items in the grid. The following is a trivial
example:
1. $(document).ready(function (){
2. $(".entitylist.entity-grid").on("loaded", function () {
3. $(this).children(".view-grid").find("tr").each(function (){
4. // do something with each row
5. $(this).css("background-color", "yellow");
6. });
7. });
8. });
Find a particular attribute field and get its value to possibly modify the rendering of the value. The
following gets each cell that is for the attribute named 'accountnumber'. Replace 'accountnumber' with
attribute appropriate for your entity and view.
$(document).ready(function (){
$(".entitylist.entity-grid").on("loaded", function () {
$(this).children(".view-grid").find("td[data-attribute='accountnumber']").each(function
(i, e){
var value = $(this).data("value");
// now that you have the value you can do something to the value
});
157
});
});
Entity list configuration
You can easily enable and configure actions for records in an Entity List (Create, Edit, Delete, and so on).
It is also possible to override default labels, sizes, and other attributes so that the Entity List will be
displayed exactly the way you want.
These settings are found in the Configuration section of the Entity List form. By default, only Basic
Settings are shown. Select Advanced Settings to see additional settings.
Attributes
Name
Description
Basic Settings
View Actions
Allows you to add action buttons for actions that are applicable for
the entity set and will appear above the grid. The available actions
are:
Create Action
Download Action
Selecting one of these options displays a configuration area for that
action. See below for details about each action.
Items Actions
Allows you to add action buttons for actions that are applicable for
an individual record and will appear for each row in the grid,
provided the appropriate privilege has been granted by Entity
Permissions. The actions generally available are:
Details Action
Edit Action
Delete Action
Workflow Action
Activate Action

158
Deactivate Action
Selecting one of these options displays a configuration area for that
action. See below for details about each action.
Furthermore, certain entities have special actions that are available
to them on a per-entity basis:
Calculate Value of Opportunity (opportunity)
Cancel Case Action (incident)
Close (resolve) Case Action (incident)
Convert Quote to Order (quote)
Convert Order to Invoice (salesorder)
Generate Quote from Opportunity (opportunity)
Lose Opportunity Action (opportunity)
Win Opportunity Action (opportunity)
Reopen Case Action (incident)
Set Opportunity on Hold (opportunity)
Override Column Attributes
Allows you to override display settings for individual columns in the
grid.
1. Attribute - the logical name of the column you wish to
override
2. Display Name - a new column title to override the default
3. Width - the width (in either percent or pixels) of the column
to override the default. See also Grid Column Width Style
To override settings on a column, click " + Column" and fill in the
details.
Advanced Settings
Loading Message
Overrides the default HTML message that appears while the grid is
loading.
Error Message
Overrides the default HTML message that appears when an error
occurs while loading the grid.
Access Denied Message
Overrides the default HTML message that appears when a user
does not have sufficient Entity Permissions to view the Entity List.
Empty Message
Overrides the HTML message that appears when the grid contains
no data.
Details Form Dialog
Controls the settings for the dialog that appears when a user
activates the Details Action
Edit Form Dialog
Controls the settings for the dialog that appears when a user
activates the Edit Action
Create Form Dialog
Controls the settings for the dialog that appears when a user
activates the Create Action
Delete Dialog
Controls the settings for the dialog that appears when a user
activates the Delete Action
159
Error Dialog
Controls the settings for the dialog that appears when an error
occurs during any action.
CSS Class
Specify a CSS class or classes that will be applied to the HTML
element that contains the entire grid area, including the grid and
action buttons.
Grid CSS Class
Specify a CSS class or classes that will be applied to the Entity
List's HTML <table> element.
Grid Column Width Style
Configures whether the Width values in the Override Column
Attributes are specified in Pixels or Percent.
General action settings
In general, Entity Actions have settings that can be configured. In all cases, this is to give you more
options in terms of customization, and the fields are not required. Simply adding the action will allow the
action to be taken on the portal, provided the appropriate privilege has been granted by Entity
Permissions.
Generally, you can configure the corresponding dialog for each action, which will appear only if you select
Confirmation Required.
Name
Description
Basic Settings
Confirmation Required?
Determines whether a confirmation will prompt the user to confirm when
the action is clicked.
Advanced Settings
Confirmation
Overrides the confirmation HTML message displayed when the user
activates the Action.
Button Label
Overrides the HTML label for this action displayed in the Entity List row.
Button Tooltip
Overrides the tooltip text that appears when the mouse is hovered over
the button for this action displayed in the Entity List row.
Button CSS Class
Adds a CSS class to the Button. Designed to be used in conjunction
with
Redirect to Webpage
Some actions (not all) allow a redirect upon the completion of the action.
Highly Recommended for the delete action, optional in most other
cases. This allows you to choose a webpage to redirect to upon action
completion.
Redirect URL
An alternative to the Redirect to Webpage option - allows to redirecting
to a specific URL.
General dialog (advanced) settings
Name
Description
Title
Overrides the HTML that appears in the title bar of the dialog.
Primary Button Text
Overrides the HTML that appears in the Primary ("Delete") button on
the dialog.
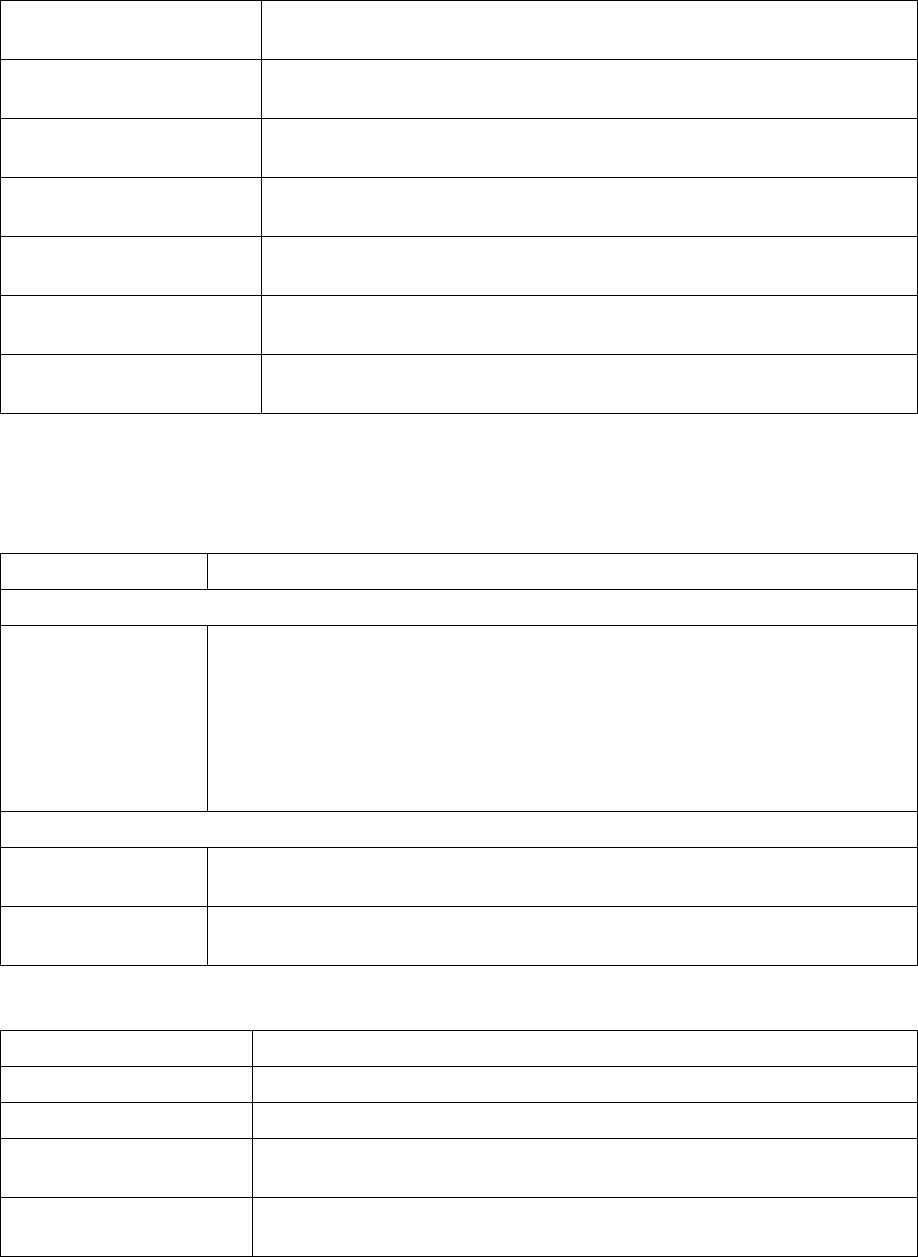
160
Closer Button Text
Overrides the HTML that appears in the Close ("Cancel") button on the
dialog.
Dismiss Button Sr Text
Overrides the screen reader text associated with the dialog's dismiss
button.
Size
Specifies the size of the Delete Dialog. The Options are Default, Large,
and Small. For the Delete dialog, the default size is Default.
CSS Class
Specify a CSS class or classes that will be applied to the resulting
dialog.
Tile CSS Class
Specify a CSS class or classes that will be applied to the resulting
dialog's title bar.
Primary Button CSS Class
Specify a CSS class or classes that will be applied to the dialog's
Primary ("Delete") button.
Close Button CSS Class
Specify a CSS class or classes that will be applied to the dialog's Close
("Cancel") button.
Create action settings
Enabling a Create Action renders a button above the Entity List that, when clicked, pops up a dialog with
an Entity Form that allows a user to create a new record provided the 'Create' privilege has been granted
by Entity Permissions.
Name
Description
Basic Settings
Entity Form
Specifies the Entity Form that will be used to create the new record. The
drop-down will list all Entity Forms that are configured for the Entity List's
entity type.
Note: If the Entity List's entity type has no Entity Forms, the drop-down list
will appear empty. If no Entity Form is supplied for the Create Action, it will be
ignored and the button will not render on the Entity List.
Advanced Settings
Button Label
Overrides the HTML label displayed in the Create Action button above the
list.
Button Tooltip
Overrides the tooltip text that appears when the cursor hovers over the
Create Action button.
Create Form Dialog (Advanced Settings)
Name
Description
Loading Message
Overrides the message that appears while the dialog is loading
Title
Overrides the HTML that appears in the title bar of the dialog
Dismiss Button Sr Text
Overrides the screen reader text associated with the dialog's dismiss
button.
Size
Specifies the size of the Create Form dialog. The Options are Default,
Large, and Small. For the Create Form dialog, the default size is Large.
161
CSS Class
Specify a CSS class or classes that will be applied to the resulting
dialog.
Title CSS Class
Specify a CSS class or classes that will be applied to the resulting
dialog's title bar.
Download action settings
Enabling a Download Action renders a button above the Entity List that, when clicked, downloads the
data from the list to an Excel (.xlsx) file.
Name
Description
Basic Settings
None
Advanced Settings
Button Label
Overrides the HTML label displayed in the Download Action button above
the Entity List.
Button Tooltip
Overrides the tooltip text that appears when the mouse is hovered over the
Download Action button.
Details action settings
Enabling a Details Action allows a user to view a read-only Entity Form of a selected row in the Entity
List.
Name
Description
Basic Settings
Entity Form
Specifies the Entity Form that will be used to view the details of the
selected entity. The drop-down will list all Entity Forms that are
configured for the Entity List's entity type.
Note: If the Entity List's entity type has no Entity Forms, the drop-down
list will appear empty. If no Entity Form is supplied for the Details Action it
will be ignored, and the button will not render in the Entity List.
Advanced Settings
Record ID Query String
Parameter Name
Specifies the name of the query string parameter that will be used to
select the entity to view in the selected Entity Form. This should match
the value in that Entity Form's Record ID Query String Parameter Name.
The default value for this field, both here and in Entity Form configuration,
is "id".
Button Label
Overrides the HTML label for this action displayed in the Entity List row.
Button tooltip
Overrides the tooltip text that appears when the mouse is hovered over
the button for this action displayed in the Entity List row.
162
Details form dialog (advanced) settings
Name
Description
Loading Message
Overrides the HTML that appears when the dialog is loading.
Title
Overrides the HTML that appears in the title bar of the dialog.
Dismiss Button Sr Text
Overrides the screen reader text associated with the dialog's dismiss
button.
Size
Specifies the size of the Details dialog. The Options are Default, Large,
and Small. For the Details dialog, the default size is Large.
CSS Class
Specify a CSS class or classes that will be applied to the resulting dialog.
Title CSS Class
Specify a CSS class or classes that will be applied to the resulting
dialog's title bar.
Edit action settings
Enabling an Edit Action allows a user to view an editable Entity Form that is data-bound to the record of
the selected row from the Entity List provided the 'Write' privilege has been granted by Entity Permissions.
Name
Description
Basic Settings
Entity Form
Specifies the Entity Form that will be used to edit the selected entity. The
drop-down will list all Entity Forms that are configured for the Entity List's
entity type.
Note: If the Entity List's entity type has no Entity Forms, the drop-down will
appear empty. If no Entity Form is supplied for the Edit Action it will be
ignored, and the button will not render in the Entity List.
Advanced Settings
Record ID Query String
Parameter Name
Specifies the name of the query string parameter that will be used to
select the entity to edit in the selected Entity Form. This should match the
value in that Entity Form's Record ID Query String Parameter Name. The
default value for this field, both here and in Entity Form configuration, is
"id".
Button Label
Overrides the HTML label for this action displayed in the Entity List row.
Button Tooltip
Overrides the tooltip text that appears when the mouse is hovered over
the button for this action displayed in the Entity List row.
Edit form dialog (advanced) settings
Name
Description
Loading Message
Overrides the HTML that appears when the dialog is loading.
Title
Overrides the HTML that appears in the title bar of the dialog.
Dismiss Button Sr Text
Overrides the screen reader text associated with the dialog's dismiss
button.

163
Size
Specifies the size of the Edit dialog. The Options are Default, Large, and
Small. For the Edit dialog, the default size is Large.
CSS Class
Specify a CSS class or classes that will be applied to the resulting dialog.
Title CSS Class
Specify a CSS class or classes that will be applied to the resulting dialog's
title bar.
Delete action settings
Enabling a Delete Action allows a user to permanently delete the record of the selected row from the
Entity List provided the 'Delete' privilege has been granted by Entity Permissions.
Name
Description
Basic Settings
none
Advanced Settings
Confirmation
Overrides the confirmation HTML message displayed when the user activates
the Delete Action.
Button Label
Overrides the HTML label for this action displayed in the Entity List row.
Button Tooltip
Overrides the tooltip text that appears when the mouse is hovered over the
button for this action displayed in the Entity List row.
Delete dialog (advanced) settings
Name
Description
Title
Overrides the HTML that appears in the title bar of the dialog.
Primary Button Text
Overrides the HTML that appears in the Primary ("Delete") button on
the dialog.
Close Button Text
Overrides the HTML that appears in the Close ("Cancel") button on the
dialog.
Dismiss Button Sr Text
Overrides the screen reader text associated with the dialog's dismiss
button.
Size
Specifies the size of the Delete Dialog. The Options are Default, Large,
and Small. For the Delete dialog, the default size is Default.
CSS Class
Specify a CSS class or classes that will be applied to the resulting
dialog.
Title CSS Class
Specify a CSS class or classes that will be applied to the resulting
dialog's title bar.
Primary Button CSS Class
Specify a CSS class or classes that will be applied to the dialog's
Primary ("Delete") button.
Close Button CSS Class
Specify a CSS class or classes that will be applied to the dialog's Close
("Cancel") button.
164
Workflow action settings
Enabling a Workflow Action allows a user to run an On-Demand Workflow against the record of the
selected row from the Entity List. You may add any number of Workflow Actions to the Entity List.
Name
Description
Basic Settings
Workflow
Specifies the On-Demand Workflow that will run when the user activates this
action.
Note: If the Entity List's entity type has no Workflows, the drop-down will
appear empty. If no Workflow is supplied for the Workflow Action it will be
ignored, and the button will not render in the Entity List.
Button Label
Sets the HTML label for this action displayed in the Entity List row. This
setting is required.
Advanced Settings
Button Tooltip
Overrides the tooltip text that appears when the mouse is hovered over the
button for this action displayed in the Entity List row.
Securing entity lists
To secure an entity list, you must configure Entity Permissions for the Entity for which records are being
displayed and also set the "Enable Entity Permissions" Boolean value on the Entity List record in
Dynamics 365 to true.
The act of securing an Entity List will ensure that for any user that accesses the page, only records that
they have been given permission to are shown. This is achieved by an additional filter being added to the
Dynamics 365 views that are being surfaced via the list. This filter will filter for only records that are
accessible to the user, via Read permission.
Further to this, any actions that are defined for the List will respect the corresponding permissions for that
action, on a per-record basis. i.e., if you have Edit for a record, the Edit action will be enabled for that
record. Same applies for Delete, Create, etc.
Note that if no records are available, a message indicating this will be shown when the list is loaded.
However, good website design determines that if a user is not in a role that has any permissions for the
entity (that is, there will never be a situation where they should see any records), they should not have
access to the page at all. Ideally, the page should be protected with Webpage Access Permissions.
Adding a view details page
By setting the Web Page for Details View lookup to a Web Page, the details of a record listed in the grid
can be viewed as read-only or edited, depending on the configuration of the associated form or page.

165
This page can be a completely custom page template, perhaps created with Liquid. The most common
scenario is probably to have the details page be a webpage that either contains an Entity Form or Web
Form.
The important thing to be aware of is that each record listed in the grid will have a hyperlink to the details
page, and the link will contain a named Query String parameter with the ID of the record. The name of the
Query String parameter depends on the ID Query String Parameter Name specified on the Entity List.
The final thing to note is that the targeted details webpage must also be aware of the name of this Query
String parameter to get the ID of the record that it needs to query and load its data.
Using entity form to display details
To create an Entity Form please refer the instructions found on the Entity Form page.
The following are the important settings to be aware of for ensuring the record from the Entity List is
loaded in the Entity Form.
The Record ID Query String Parameter Name on Entity Form must match the ID Query String Parameter
Name on Entity List.
The Mode can be either Edit or ReadOnly depending on your needs.
Using web form to display details
To create a Web Form, please refer the instructions found on the Web Form pages.
The following are the important settings to be aware of for ensuring the record from the Entity List is
loaded in the Web Form.
The Primary Key Query String Parameter Name on Web Form Step must match the ID Query String
Parameter Name on Entity List.
The Mode can be either Edit or ReadOnly depending on your needs.
Using a details page for create
You can use a custom page, Entity Form, or Web Form, in the same fashion for the create function. This
is an alternative to defining a Create Action on the form. You cannot define both a create action and a
custom page for Create: defining a custom action takes precedence.
If you assign a Web Page to the Create Lookup on the Entity List, and do not specify a Create Action by
using Configuration, then a create button will be rendered on the list which will link the user to the custom
page you have designated for Create.

166
Entity list filter configuration
Adding the ability to filter records on an Entity List is easy - simply enable the filtering option and then
choose one or more filter types to display to users. It is possible to filter by an attribute matching some
text provided by the user, or to select from a series of options. You can even design virtually any type of
filter you can imagine by using Advanced Find in Dynamics 365.
Enable the entity list filter
In the Metadata Filter section, check the box labeled Enabled. This will add the filter area to the Entity List
when it is displayed. Until you have defined at least one filter type, the box will appear empty.
You can define how the Filter area on the Entity List will rendered using the Orientation. The default,
Horizontal, renders the Filter area above the Entity List. Vertical Orientation renders the Filter area as a
box to the left of the Entity List.
Filter types
Filter Type
Description
Text Filter
Filter the Entity List using a textbox to search for matching text in a selected
Attribute of the given Entity.
Attribute Filter Set
Filter the Entity List using a series of checkboxes, each of which tries to
match its condition against a particular Attribute of the given Entity.
Lookup Set
Filter the Entity List using a series of checkboxes, each of which represents
a Relationship between a Record for the given Entity and a Record for a
related Entity.
Range Filter Set
Similar to the Attribute Filter Set, except that each checkbox can represent
two conditions rather than one (for example, "greater than or equal to 0
AND less than 100").
Dynamic Picklist Set
Similar to choosing a Picklist value on an Attribute Filter Set. The Dynamic
Picklist Set does not require that you specify the picklist options to filter by;
instead, it generates the full list of options when the Entity List is loaded.
Dynamic Lookup Set
Similar to the Lookup Set. The Dynamic Lookup Set does not require that
you specify the lookup options to filter by; instead, it generates the full list of
options when the Entity List is loaded.
FetchXML Filter
Filter the Entity List using a FetchXML filter condition.
Text filter
The Text Filter adds a textbox to the Entity List Filter area that is tied to an attribute of the Entity List's
Entity Type. When a user applies the filter, the Entity List only displays those records whose selected
attribute contains the value.

167
To add a Text Filter, click " + Text Filter":
The Text Filter uses the following attributes:
Name
Description
Attribute
The name of the Attribute on the Entity List's selected Entity Type to filter by.
Only attributes with the type "String" are valid for a Text Filter.
Display Name
Override the label for the Filter when the Entity List is displayed. By default, this
will be automatically set to the name of the selected Attribute.
Attribute filter set
The Attribute Filter Set adds a series of options to filter the Entity List by, tied to a single attribute of the
Entity List's selected Entity Type. When a user applies the filter, the Entity List only displays those records
that exactly match at least one of the selected options.
The Attribute Filter Set uses the following attributes:
Name
Description
Attribute
The name of the Attribute on the Entity List's selected Entity Type to filter by.
Only attributes with the following types are valid for a Text Filter:
String
BigInt
Decimal
Double
Integer
Money

168
Picklist
DateTime
Boolean
Display Name
Override the label for the Filter when the Entity List is displayed. By default, this
will be automatically set to the name of the selected Attribute.
Options
A collection of possible values to filter by. See below for more details.
Attribute filter set options
An Attribute Filter Set can usually have any number of options, with the exceptions of Picklist and
Boolean attributes. A Boolean Attribute Filter Set can have only one or two options— one true option and
one false option. A Picklist Attribute Filter Set can have at most one option for each possible value in the
Picklist.
Options have the following attributes:
Name
Description
Operator
The comparison operator used to filter results, for example Equals, Less Than, and
so on. The list of Operators for the option will depend on the type of the Attribute
selected for the Filter.
For example, numeric types ("Decimal") will have Operators such as "Less Than" or
"Greater Than", whereas "String" attributes will use Operators such as "Begins
With" or "Contains".
Picklist and Boolean operators are always "Equals".
Value
The actual value used for this filter condition.
Display Name
Overrides the display name for this Option in the Filter box. By default, this will be
set to the same value as the Value attribute.
Lookup set
The Lookup Set adds a series of options to filter the Entity List by, tied to a related entity to the Entity
List's selected Entity Type. When a user applies the filter, the Entity List only displays those records that
exactly match at least one of the selected related records.
The Lookup Set uses the following attributes:
Name
Description
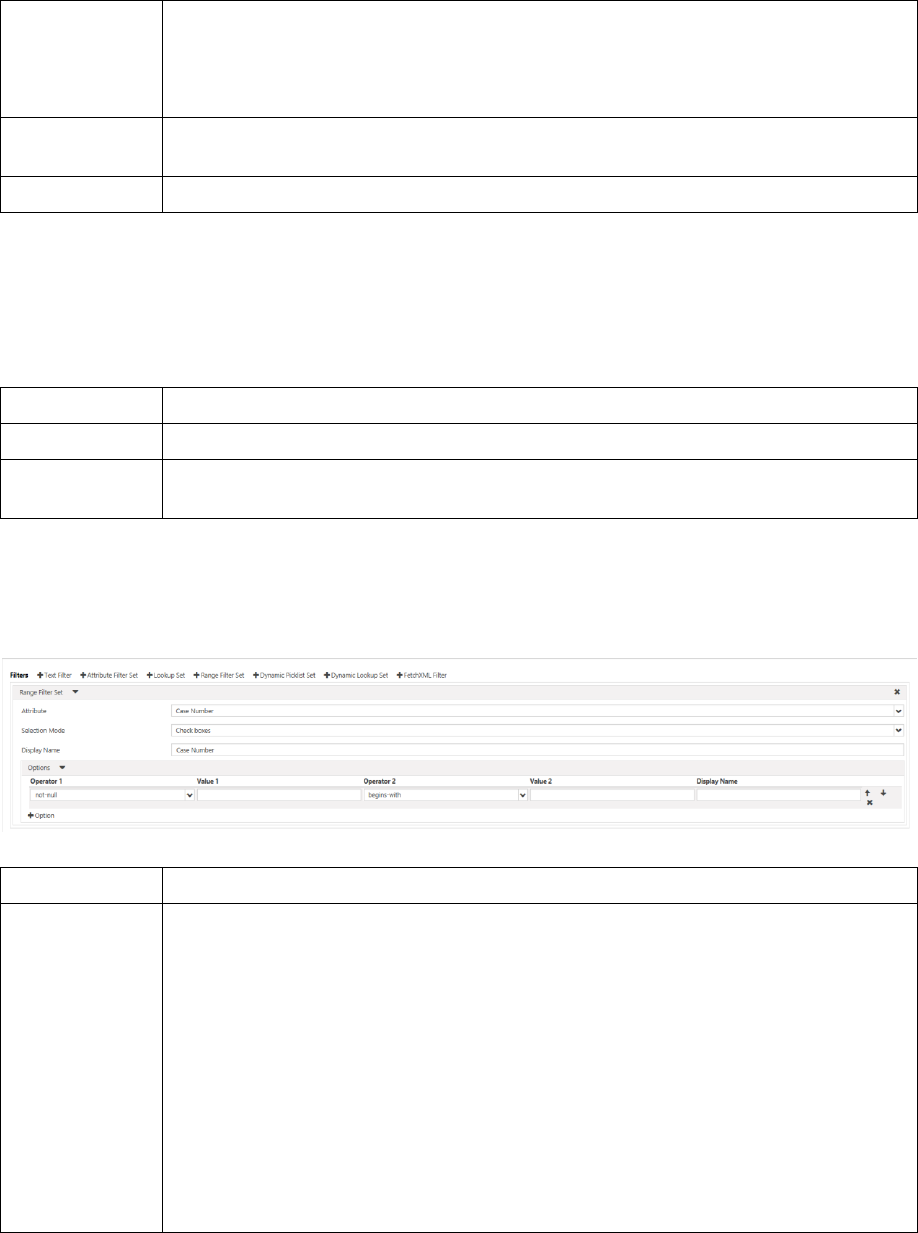
169
Relationship
The name of the Related Entity to the Entity List's selected Entity Type to filter by.
Only entities with a one-to-many or many-to-many relationship with the Entity List's
selected Entity Type appear as options for this filter type.
Display Name
Override the label for the Filter when the Entity List is displayed. By default, this
will be automatically set to the name of the selected Relationship.
Options
A collection of possible values to filter by. See below for more details.
Lookup set options
A Lookup Set can typically have any number of options, with the only limit being the number of related
records of the selected related type.
Options have the following attributes:
Name
Description
Value
The record of the selected related type to filter by.
Display Name
Overrides the display name for this Option in the Filter box. By default, this will be
set to the same value as the Value attribute.
Range filter set
The Range Filter Set adds a series of options, each with one or two conditions, to the Filter area. When a
user applies the filter, the Entity List only displays those records that exactly matches all conditions on at
least one of the selected options.
The Range Filter Set Uses the following attributes:
Name
Description
Attribute
The name of the Attribute on the Entity List's selected Entity Type to filter by.
Only attributes with the following types are valid for a Text Filter:
String
BigInt
Decimal
Double
Integer
Money
DateTime

170
Display Name
Override the label for the Filter when the Entity List is displayed. By default, this
will be automatically set to the name of the selected Attribute.
Options
A collection of possible values to filter by. See below for more details.
Range filter set options
A Range Filter Set can have any number of options. Each option will produce a filter condition with either
one or two subconditions, both of which must be met for the condition to be true.
Options have the following attributes:
Name
Description
Operator 1
The first comparison operator used to filter results, e.g. "Equals", "Less
Than", etc. The list of Operators for the option will depend on the type of the
Attribute selected for the Filter.
For example, numeric types ("Decimal") will have Operators such as "Less
Than" or "Greater Than", whereas "String" attributes will use Operators such
as "Begins With" or "Contains".
Picklist and Boolean operators are always "Equals".
Value 1
The first value used for this filter condition.
Operator 2 (optional)
The second comparison operator used to filter results, e.g. "Equals", "Less
Than", etc. The list of Operators for the option will depend on the type of the
Attribute selected for the Filter.
For example, numeric types ("Decimal") will have Operators such as "Less
Than" or "Greater Than", whereas "String" attributes will use Operators such
as "Begins With" or "Contains".
Picklist and Boolean operators are always "Equals".
Value 2 (optional)
The second value used for this filter condition.
Display Name
Overrides the display name for this Option in the Filter box. By default, this
will be set dynamically based on the operator(s) and value(s) selected.
Dynamic picklist set
The Dynamic Picklist Set adds a series of options to filter by that represent all the values of a specified
Picklist field. This is different from selecting a Picklist in the Attribute Filter Set. In the Attribute Filter Set,
you must specify a set of options that will be made available to the user to filter by; in the Dynamic Picklist
Set, you need only specify the Picklist field and the entire set of options will be provided automatically. If
you need greater control, we recommend that you use the Attribute Filter Set.

171
The Dynamic Picklist Set uses the following options:
Name
Description
Attribute
The name of the Picklist Attribute on the Entity List's selected Entity Type to filter
by.
Display Name
Override the label for the Filter when the Entity List is displayed. By default, this will
be automatically set to the name of the selected Attribute.
Dynamic lookup set
The Dynamic Lookup Set adds a dynamic series of options to filter the Entity List by, tied to a related
entity to the Entity List's selected Entity Type. When a user applies the filter, the Entity List only displays
those records that exactly match at least one of the selected related records.
This is different from a Lookup Set. In the Lookup Set, you must manually specify the related entities to
filter by; In the Dynamic Lookup Set, you need only specify the relationship on which to filter, and a list of
options will be generated based on the specified View of related entities.
The Dynamic Lookup Set uses the following options:
Name
Description

172
Relationship
The name of the Related Entity to the Entity List's selected Entity
Type to filter by.
Only entities with a one-to-many or many-to-many relationship with
the Entity List's selected Entity Type appear as options for this filter
type.
View
The View (saved query) to use as a source for the dynamic list of
entities to filter by
Label Column
The field from the View that provides each entity's "Name" value.
Filter Lookup On Relationship
Specifies a relationship between the entity specified by the
Relationship field and the logged in user.
If the entity specified by the Relationship field also has a relationship
to a contact, you may optionally narrow the list of filter options to
those related to the logged in user.
Display Name
Override the label for the Filter when the Entity List is displayed. By
default, this will be automatically set to the name of the selected
Relationship.
FetchXML filter
The range filter can create either a simple textbox filter like the Text Filter, or a set of options like the other
filter types. It allows you to manually create virtually any type of filter for the Entity List by using
FetchXML, the query language used by Dynamics 365.
The FetchXML Filter uses only one attribute:
Name
Description
FetchXML
The XML statement representing the filter.
Entity list map view
With Entity Lists it is possible to enable and configure a map view of the data, powered by Bing maps with
search functionality to find locations near an address. By populating your records with latitude and
longitude coordinate values and specifying the necessary configuration options listed in this section, your
records can be rendered as pinpoints on a map. Any record that does not have a latitude or longitude
value will be excluded from the search. The initial load of the page will display all records within the initial
value of the Distance Values field (in miles or Km depending on the Distance Units specified) from the

173
Default Center Latitude and Default Center Longitude coordinates. The view specified is ignored when
map view is used, and a distance query is applied to the dataset to return the mappable results.
Entity list calendar view
Entity List Calendar View allows rendering of an entity list as a calendar, with each individual record
configured to act as a single event.
In order for records to be displayed using a calendar, those records need to have at a minimum a date
field on them. In order for events to have exact start and end times, then the appropriate fields need to
be in place, and so on. Assuming these fields are configured, then an Entity Calendar view will appear on
the portal
Enhanced Dynamics 365 view filter for entity lists
If enabled, an entity can be published to an OData feed. The OData Protocol is an application-level
protocol for interacting with data via RESTful web services. For configuration settings please refer to the
Entity List page. Data from this feed can be viewed in a web browser, consumed by a client-side web
application, or imported into Excel.
Entity list OData feeds
You may utilize Entity Permissions if you wish to secure records, but if you want to simply provide a filter
as part of the set of filter options that is relevant to the current portal user, the Entity List feature supports
filtering of current user, user's parent account, and/or website at any depth. Simply build the view filter in
Dynamics 365 to match any single contact record and the code will replace its value with the actual value
at runtime. No need to assign values to fields on the Filter Conditions section.
Note: The oData feed that is published is anonymous and does not have any authorization checks;
therefore, it is important not to enable oData feeds for Dynamics 365 data that is unsuitable for
anonymous portal access.
See also
Configure a Dynamics 365 portal
Create and run advertisements on a portal
Gather feedback by using polls on a portal
Rate or vote on a webpage or blog post on a portal
Redirect to a new URL on a portal
Create and run advertisements on a portal
Applies To: Dynamics 365 (online), Dynamics CRM Online
174
Create and run advertisements
Create text or image-based ads and have them run in multiple placements throughout your site.
Randomize ads or select specific ads for specific placements. You can choose release and expiration
dates for time-sensitive, scheduled content. Ads can be hyperlinked to any destination and open in the
current window or a new window. Advertisements are displayed in the portal via two Dynamics 365
entities: The Ad Placement entity and associated Ad entity. Ads can be surfaced in many ways: with pre-
made Liquid Templates available within the Dynamics 365 portals application via Liquid
Templating/example Web Templates, or within the.aspx page via MVC actions.
Ads
Ads represent the specific advertisement or image that will appear on the portal at a given time. The Ad
entity will be displayed in the location specified by the Ad placement. The Ad must be associated with an
Ad Placement to appear on the portal. For this demonstration, the out-of-the-box example "Place Holder"
Ad and "Sidebar Bottom" Ad Placement will be surfaced in the Company Portal to exhibit basic
functionality and gain familiarity prior to creating more complex Ads. Any of the starter sites can be used
in place of the Company Portal; however, note that the Liquid Templating used for this demonstration
calls on the "Sidebar Bottom" Ad Placement name.
To Begin:
Navigate to Portals then Ads
Open the Placeholder Ad associated with the Company Portal website (this can be done with
starter site of your choosing by clicking +NEW and creating an identical Ad sub the Website)
Click the Save icon in the lower right corner (or Save & Close in the upper left corner if you have
created a new ad)
Within the Ad Form you specify a Name to describe the Ad, the Website where the Ad will be displayed,
and a Publishing State. Optionally you can specify a Web Template and Release/Expiration date. You
must provide some sort of data for the Ad to be displayed. Use the Ad entity attribute table later in this
guide to craft the specifics of your ad.
Ad placements
Navigate to Portals then Ad Placements
Click the Web Template Field to select a Web Template. For demonstration purposes the "Random
Ad" Web Template was chosen.
On the right corner of the Ads grid click + to select the Ad created in the previous step
Click the Save icon in the lower right corner
When creating a new Ad Placement, specify a Name to describe the Ad Placement and the Website
where the Ad Placement will be displayed as required. The example Web Templates that enable use of
Ads as an out-of-the-box feature will be displayed within the lookup of the Web Template field in the
Form. These templates are also intended to be used as a source to create custom templates.

175

176
Note: The Ad created above will not be displayed on the home page of the starter portal.
Using Liquid templates to place advertisements
Content managers may use Liquid to add an Ad to any editable content area, as described in Add
dynamic content and create custom templates and, more specifically, Ads.
This template renders an Ad by name, or a random Ad from an Ad Placement. Currently, the code below
will not render multiple Ads in the Ad Placement (that is, a rotating ad). To render multiple Ads in the Ad
Placement, you would need to build a Liquid Ads API. For more information about built-in web templates,
see Store source content by using web templates.
{% include 'ad' ad_name:'Name' %}
{% include 'ad' ad_placement_name:'Placement Name' %}
1. {% include 'Random Ad' placement:ads.placements["Sidebar Bottom"] %}
or
1. {% include 'Ad Template' ad:ads{"Retail Ad - Go Greene"] %}
177
Attributes
The Ad Entity has the following attributes:
Name
Description
Name
A descriptive name for the Ad
Website
The associated Website Required.
Web Template
The associated web templates that will be used by
default to render the Ad. This field is optional; if it
is blank the Ad will be rendered using a default
template.
Release Date
Controls a date/time after which the Ad will be
visible on the portal. If the Ad Placement is
rotating through multiple ads, an unreleased ad
will not show. If no released ads are associated
with an Ad Placement, nothing will appear. This is
useful for controlling the release of time-sensitive
content.
Expiration Date
Controls a date/time prior to which the Ad will be
visible on the portal.
Publishing State
The current Publishing State.
Redirect URL
When the Ad is clicked, the user will navigate to
this URL. This field is optional. If no value is
given, the Ad will not be clickable.
Open In New Window
Boolean. If set to true, the Ad will open a new
browser window when clicked.
Title
A single line of text for the ad which can be
displayed on the portal. Whether it is displayed is
determined by a property on the AdPlacement
control. This is primary useful for text-based ads or
simple one-line links that you want to place on the
portal by using Ad Placements.
Note
If the title is displayed, by default it will be
rendered as a hyperlink which points to the
Redirect URL. This behavior may be altered by
using a custom web template.
Copy
A multiline body of text or other web content that
will be displayed in the ad placement. This allows
the placement to be used in a similar way to
content snippets, but it is best to avoid using them
to serve simply as a bucket to hold content (use
snippets for that). Instead, they are best used to
display rotating image or textual content.
178
Name
Description
Image URL
The URL of the image which will be displayed by
the ad. Optional; Use this field if you want the Ad
to render a static resource or a web file. The
Image will be clickable and link to the redirect
URL, if one is given.
Note
If an Ad has a note attached to it with an image
file attachment, the Ad will render that as its
image. This is possibly the most convenient way
to set up images for ads, and ties the image
directly with the Ad. In this case, Using the
Image URL field is not necessary.
Image width
Width of the image.
This field is not required but is recommended to
ensure that the rendered Ad is valid and
accessible HTML
Image Height
Height of the image.
This field is not required but is recommended to
ensure that the rendered Ad is valid and
accessible HTML
Image Alt Text
Alt Text for the image.
This field is not required but is recommended to
ensure that the rendered Ad is valid and
accessible HTML
See also
Configure a Dynamics 365 portal
Add a webpage to render a list of records
Create and run advertisements on a portal
Gather feedback by using polls on a portal
Rate or vote on a webpage or blog post on a portal
Redirect to a new URL on a portal
Gather feedback by using polls on a portal
Applies To: Dynamics 365 (online), Dynamics CRM Online
Polls give your web audiences a quick and easy way to voice their opinion on concise topics and then
immediately see feedback from their vote, automatically.
179
The polls capability of Dynamics 365 portals provide single question or multiple choice response polls on
simple topics of interest. Either way, responses are instantly stored and associated with the applicable
Dynamics 365 Contact record for immediate review or aggregate reporting. You can use them as simple
market research tools and, if you refresh or rotate the polls dynamically, you'll keep your website looking
current and topical.
Polls may be placed on the portal via the PollPlacement control. This control works very similarly to the
AdPlacement control. If there are any polls associated with the Poll Placement entity that is being
rendered by the PollPlacement control, those polls will be rendered. If there is more than one poll for a
given placement, the placement will randomly present one of the specified polls.
Note
Users may vote anonymously. Duplicate votes are not permitted. Basic information about submissions
is tracked in Dynamics 365, and users who sign in to the website will have their submissions linked to
the contact entity that tracks that user in Dynamics 365.
Add a poll to the page
Content managers may use Template tags to add a poll to any editable content area:
{% include 'Random Poll' placement:polls.placements["Sidebar"] %}
or
{% include 'Poll Template' ad:ads["Wireframe Development"] %}
Note
Example Web Templates are configured in the starter websites. You may use the template
"Random Poll" to display a random Poll from a particular Poll Placement, or the template "Poll
Template" to display a specific Poll. You may edit these templates, or create your own based on their
example, using Polls.
Create a poll placement
To Create a new poll placement region:
Navigate to Portals and then to Poll Placements
Click New
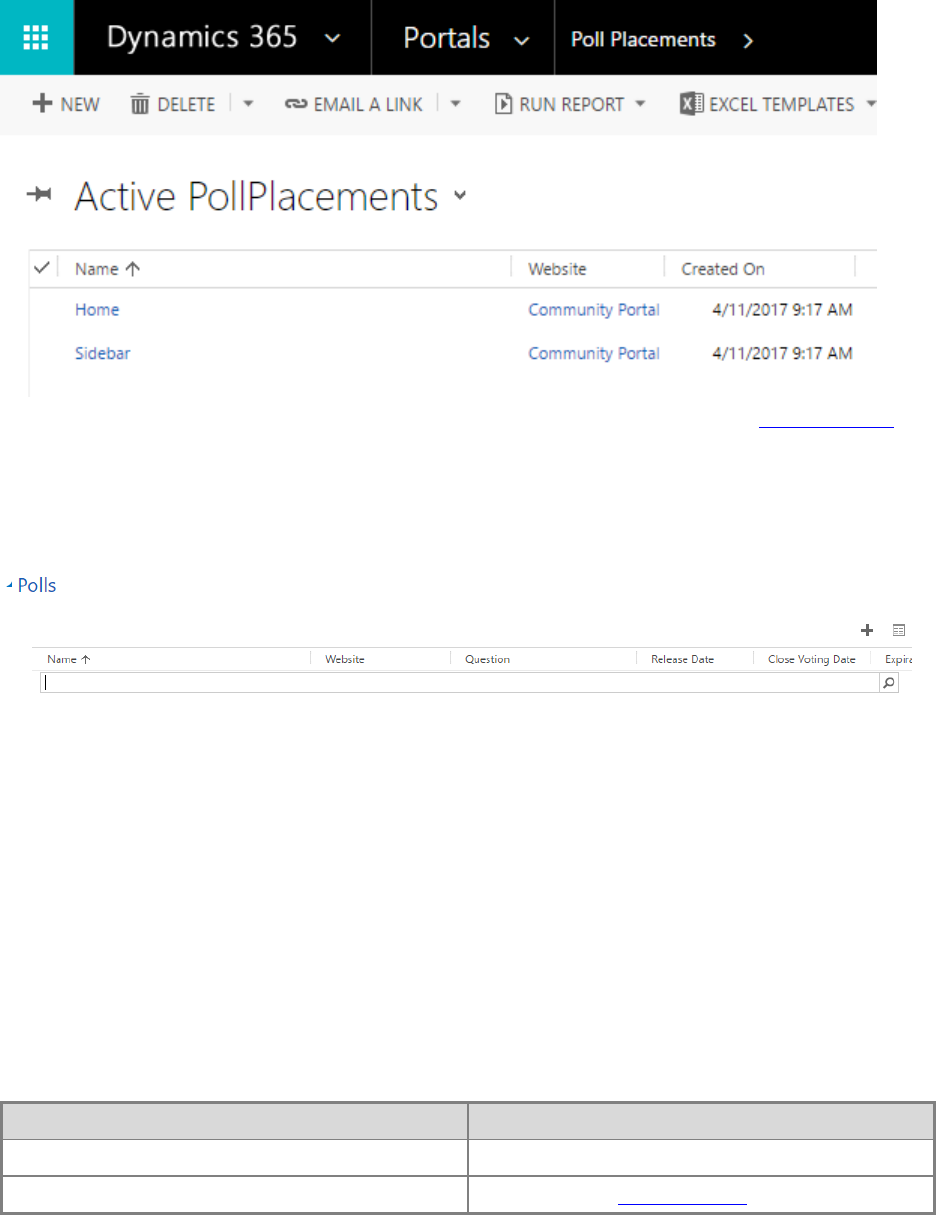
180
Select the associated Website, give the placement a Name, and optionally select the web templates that
will control how it renders.
Now the placement has been created; you must associate one or more polls with this placement
In the Polls tab of the Poll Placement, click the Add Poll Record button ("+")
In the resulting lookup box, select an existing poll record or create a new poll by clicking New
Polls
A poll is a simple yes/no or multiple-choice question that you can display on your portal via Poll
Placements. There are many customizable options for the display of polls available for developers, but for
content managers adding polls to your website is as easy as choosing a question and series of possible
answers (Poll Options). A poll must have related options to function, and must be associated with a Poll
Placement to be rendered on the portal.
A new poll can be created in two ways: by navigating to the Polls section in the Portals area in Dynamics
365 or by clicking the New button on the Look Up Records window while adding a poll to a poll
placement.
Poll attributes
Name
Description
Name
The descriptive name of the poll.
Website
The associated web templates.
181
Name
Description
Web Template
The associated web templates that will be used by
default to render the Poll. This field is optional; if it
is blank the Poll will be rendered using a default
template.
Question
This is the actual Question that is being asked in
the poll. The associated Poll Options are the
possible answers can be selected for this poll.
Submit Button Label
The text that is to be used for the submission
button.
Release Date
Controls the date and time after which the Poll will
be visible on the portal. If the Poll Placement is
rotating through multiple Polls, an unreleased poll
will not be shown. If no released polls are
associated with a Poll Placement, nothing will
appear. This is useful for controlling the release of
time-sensitive content.
Expiration Date
Controls a date/time prior to which the Poll will be
visible on the portal.
Close Voting Date
Until this date, users who have not yet voted on a
poll can vote on the poll.
Note
When a user has voted on a poll, they will see a
summary of current results for the poll. These
results will also be displayed for a poll that is
past its closed date, but for which the user has
not yet voted. This allows you to continue to
reveal the results of polls after you no longer
want people to be able to vote on them.
Note
The difference between the close voting date
and expiration date is that after the expiration
date has passed, the poll will no longer show up
on the poll placement (it will not be cycled to).
The close Voting date only determines the date
past which users cannot vote on the poll.
Now the poll has been created; you must associate one or more poll options with this poll.
In the Options tab of the Poll, click the Add Poll Option button ("+")

182
Poll options
A poll is a question that is being presented to the user. A Poll has two or more possible answers as
determined by the content author. These answers are represented in Dynamics 365 by Poll Options,
which must be associated with the Poll in question. A new Poll Option is created via the Look Up Records
window when adding Poll Options to a Poll, as described above.
Poll option attributes
Name
Description
Name
The descriptive name for the Poll Option.
Poll
The Poll that the option is associated with.
Answer
The text to display as an available poll voting
option.
Votes
The number of votes the poll option has received
(read-only).
Display Order
A numeric value that will determine the display
order of the poll options.
Poll submissions
When a user visits the website, they will be given the opportunity to vote on the poll displayed on the
page.

183
Users may vote only one time, after this if the poll is displayed, they will see the results for that poll:
The details of the poll voting results are stored in Dynamics 365 as Poll Submissions records. The poll
submission entity contains the following information:

184
Name
Description
Name
Displays the name of the voter if the user is logged
on; otherwise, records the anonymous ID.
Poll
The associated Poll.
Poll Option
The Poll Option that the user selected.
Contact
The associated Contact record of the voter if the
user is logged on
Visitor ID
The anonymous ID of the voter if the user is
anonymous.
See also
Configure a Dynamics 365 portal
Add a webpage to render a list of records
Create and run advertisements on a portal
Rate or vote on a webpage or blog post on a portal
Redirect to a new URL on a portal
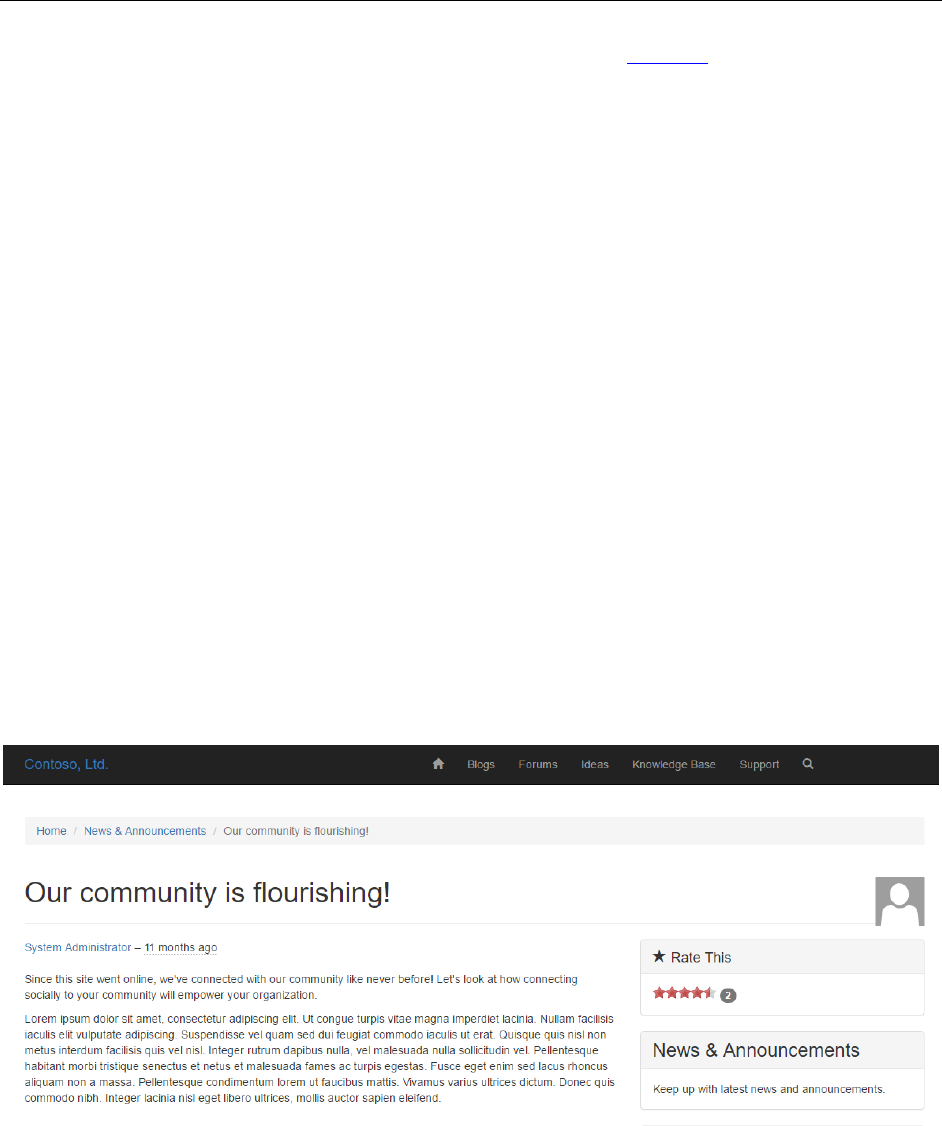
185
Rate or vote on a webpage or blog post on a
portal
Applies To: Dynamics 365 (online), Dynamics CRM Online
Ratings provides users with the ability to rate or vote on a webpage or blog post. Ratings can also be
enabled for comments on pages or blog posts. By default, this feature is disabled and can be enabled on
a page-by-page basis within Dynamics 365.
Ratings are custom Dynamics 365 activities and thus can be used in the same way as any other activity
such as emails, phone calls, and so on. Because Ratings are activities, it is possible, with customization,
to have ratings appear for any entity you choose that appears and is rendered on the portal, including
custom entities.
Enable page ratings
1. Login to Dynamics 365.
2. Navigate to Portals.
3. Click Web Pages.
4. Double-click on the desired Web Page listed in the grid.
5. Set Enable Ratings to Yes.
6. Click Save & Close.
Enabling Ratings for blog posts works in much the same way.
Use ratings
For webpages that have page ratings enabled and the developer has applied the control to the template,
users can rate the page either by using the rating scale or voting, depending on the type chosen when the
control was added to the page template.
Rating Type

186
Vote Type
Manage ratings in Dynamics 365
The ratings for webpages can be viewed, modified, or deleted within Dynamics 365.
1. Login to Dynamics 365.
2. Navigate to the Web page, Blog Post, Page Comment, or Blog Post Comment that you are
interested in seeing the ratings for.
3. Navigate to Activities.
The associated view lists the ratings for the selected webpage, blog post, or idea. Within this view, users
can modify or delete existing ratings.
See also
Configure a Dynamics 365 portal
Add a webpage to render a list of records
Create and run advertisements on a portal
Gather feedback by using polls on a portal
Redirect to a new URL on a portal
Redirect to a new URL on a portal
Applies To: Dynamics 365 (online), Dynamics CRM Online
Customers frequently want to have a simple URL that redirects to a page deeper in the site, or they want
to allow for a legacy URL to be used with the site and automatically redirect to a new URL in the site.
Page redirects allow a content author to specify a URL that when requested will be redirected on a
permanent or temporary basis to a specific webpage or web file. These redirect URLs are managed
separately from the page content so that they do not have to fit directly in the web hierarchy.
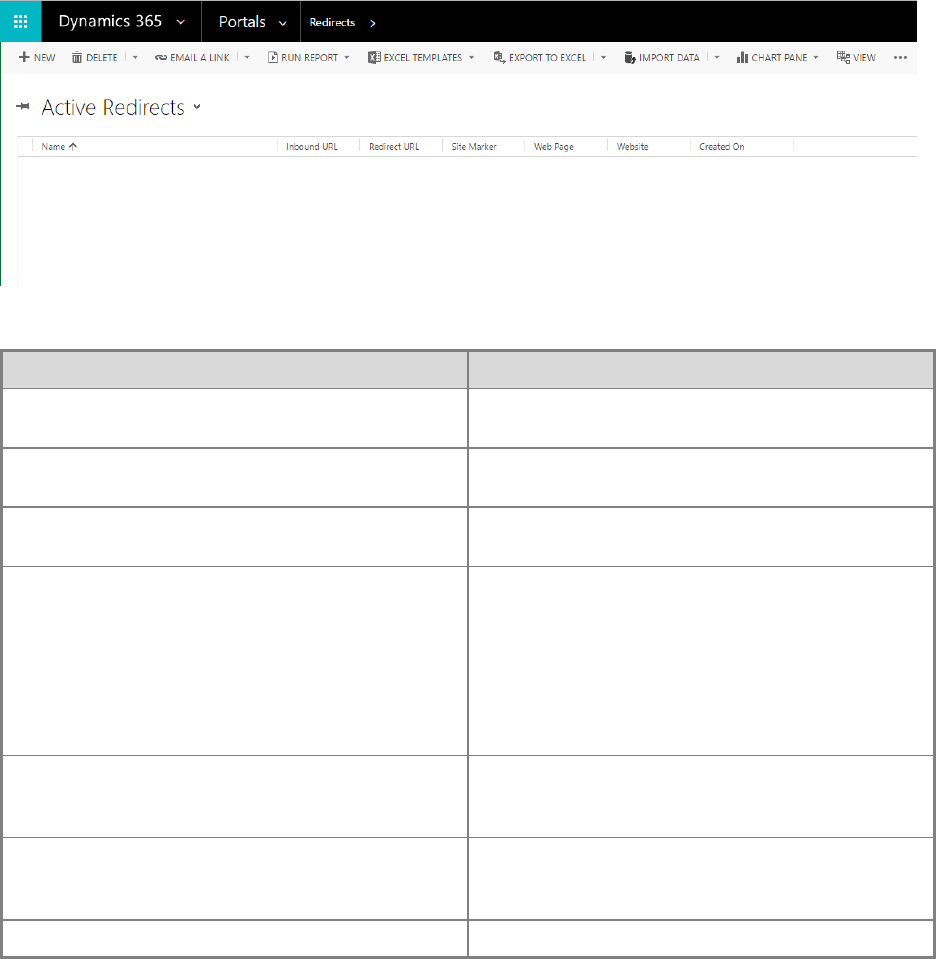
187
Create a redirect
Navigate to the Portals area and, under the Website section, select Redirects. Next, click New on the
toolbar.
Use the form to enter the redirect information.
Name
Description
Name
The friendly name of the redirect. (Can be
anything. Make it easy to identify.)
Website
The website the redirect is associated with. (The
site the user is redirected from.)
Inbound URL
The partial URL that is to be redirected. (The page
the user is redirected from.)
Status Code
One of the following:
302 (Temporary Redirect)- returns a temporary
redirect status. This is the default.
301 (Permanent Redirect)- returns a
permanent redirect status indicating the
resource has moved permanently.
URL
A target External URL to be redirected to. (Use
this if the redirect is external to the website
specified above.)
Web Page
A target internal webpage to be redirected to. (Use
this if the user is being redirected to a page
internal to the website specified above.)
Site Marker
A target internal site marker to be redirected to.
After entering the required fields and specifying a value for at least one of the URL, Web Page, or Site
Marker fields, click Save.
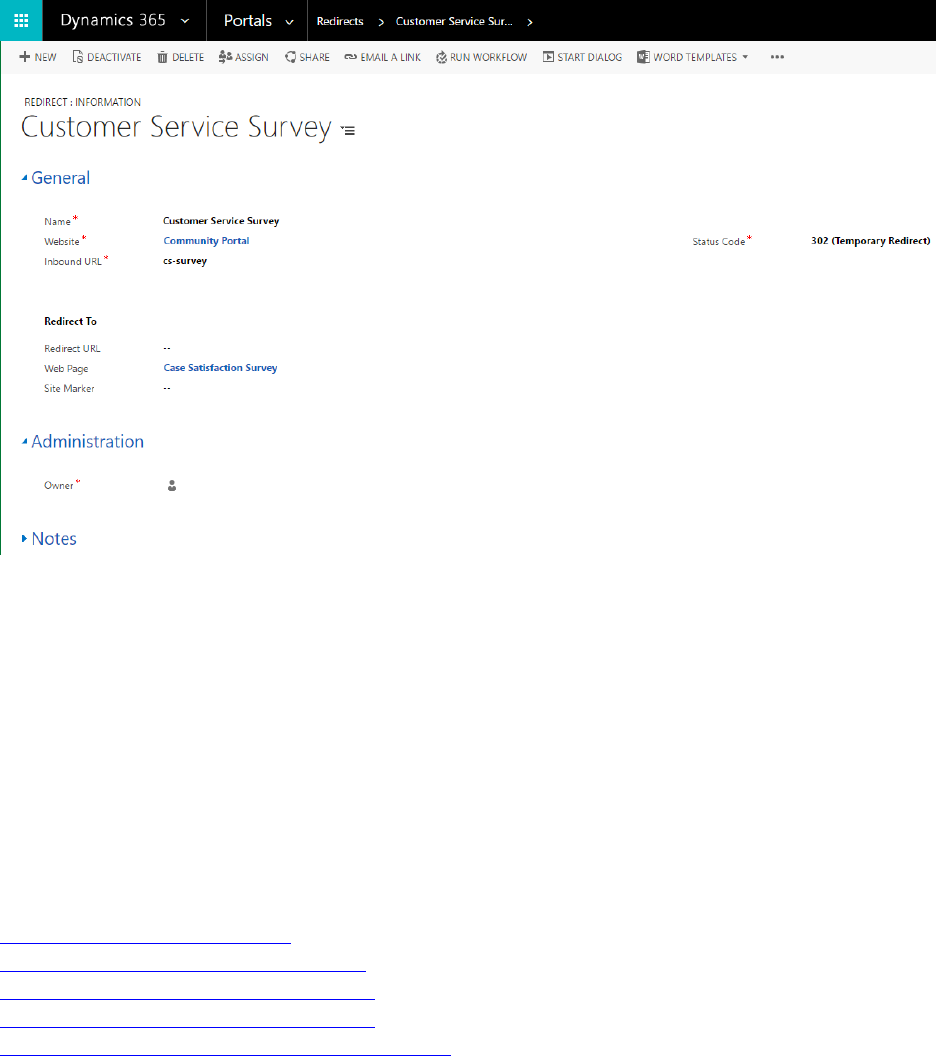
188
Use the redirect
When the inbound URL is requested, the browser is redirected to the URL of the target webpage for the
matching redirects entry.
For example, for an Inbound URL value of cs-survey with a target webpage set to the Customer Support
Survey page, the following request:
http://customerportal.contoso.com/cs-survey
results in the browser requesting the following URL:
http://customerportal.contoso.com/surveys/customer-service-survey/
See also
Configure a Dynamics 365 portal
Add a webpage to render a list of records
Create and run advertisements on a portal
Gather feedback by using polls on a portal
Rate or vote on a webpage or blog post on a portal

189
End User Guide
Manage portal content
Applies To: Dynamics 365 (online), Dynamics CRM Online
Create, edit, and curate your portal content to provide information and illustrate the products and services
that you offer. By managing portal content, you can create a helpful environment to foster discussion,
solve issues, and learn.
Learn the tools you’ll need to manage your content effectively. More information: Get started with the
portal content editor
Edit a portal in real time and see your changes live. More information: Use the front-side editing
engine to publish content
Manage webpage data and attributes to organize the content on your portal.
Provide download files to add functionality and usability, or to supplement products, features, and
services.
Create links to internal or external pages to help users find the right information. More information:
Manage web links in Dynamics 365 or on portals
Use content snippets to create reusable content and update all relevant content at once. More
information: Customize content by using content snippets
See also
Engage with communities by using the community portal
Create a theme for your portal
Configure a Dynamics 365 portal
Create forum posts on the portal
Applies To: Dynamics 365 (online), Dynamics CRM Online
A forum post is a user-submitted message enclosed into a block containing the user's details and the date
and time it was submitted. Members are usually allowed to edit or delete their own posts. Posts are
contained in forum threads, where they appear as boxes one after another. The first post starts the
thread; this may be called the OP (original post). Posts that follow in the thread are meant to continue
discussion about that post, or respond to other replies; it is not uncommon for discussions to be derailed.
Create forum posts
The forum post editor will appear automatically when a user has successfully signed in to the portal and
navigated to a forum thread page, provided the developer has implemented the functionality in the forum
thread's page template.
Sign in to the portal.
190
Navigate to a Manage forum threads.
Compose your reply in the rich text editor.
Click Submit.
Attribute relationships
The table below explains many of the Forum Post attributes used by portals. It is important to note that
the way in which many of the content/display-oriented attributes are rendered is controlled by the page
template used.
Name
Description
Name
The descriptive name of the record. This value will
be used as a title to the post. This field is required.
Forum Thread
The forum thread the post is regarding.
Author
The Contact record associated with the user who
wrote the post.
Date
The date and time the post was created.
Content
The body or message of the post.
Answer?
Checked indicates that the post is identified as
being the answer to the thread's question.
See also
Setup and moderate forums
Manage forum threads
Moderate forums
Subscribe to alerts
Moderate forums
Applies To: Dynamics 365 (online), Dynamics CRM Online
The moderators are users of the forum who are granted access to the forum's threads and posts of all
members for moderating the discussion and keeping the forum clean (neutralizing spam and spambots,
for example). Moderators also answer users' concerns about the forum, general questions, as well as
respond to specific complaints. They also can do anything to lend a helping hand to a user in need.
Common privileges of moderators include: deleting, adding, editing, removing of threads or posts.
Essentially, it is the duty of the moderator to manage the day-to-day affairs of a forum or board as it
applies to the stream of user contributions and interactions. The relative effectiveness of this user
management directly impacts the quality of a forum in general, its appeal, and its usefulness as a
community of interrelated users.

191
Assign moderators to forums in Microsoft Dynamics
365
To specify moderators for a forum within Dynamics 365, the contact record of the portal user must be
assigned to a web role that is associated with a Forum Access Permission record that has the Right set to
Grant Change. For more information, see Create web roles for portals.
Forum moderation within the portal
For portal users with moderation permission, moderation controls will automatically be displayed in the
portal once signed in. Depending on the page template implemented by your developer, the functionality
providing users the ability to moderate may or may not be present and the images displayed within this
document may be different than your actual portal.
Delete an entire forum thread
1. Click Delete on the admin toolbar
2. Select Yes on the pop up “Delete this thread?”
Edit the forum thread
1. Click Edit on the admin toolbar
2. Make the changes you want in the pop up “Edit Thread”
3. Click Save
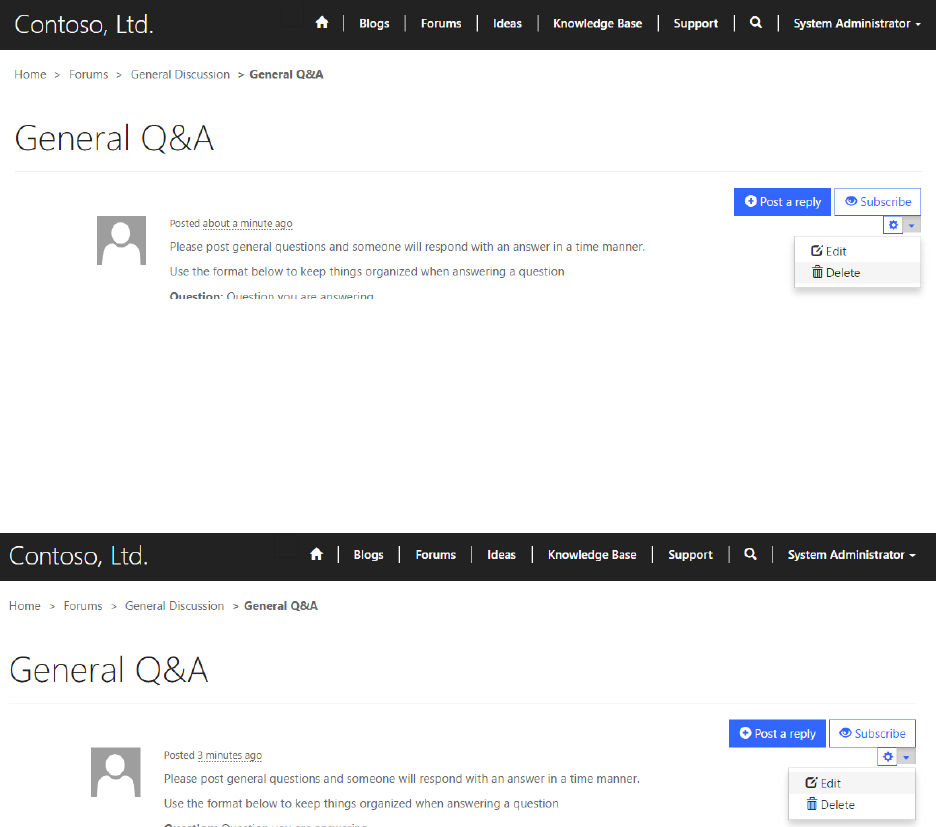
192
Delete a forum post
1. Click the down arrow next to the post you want to delete.
2. Click Delete
3. Select Yes on the pop up “Delete this thread?”
Edit a forum post
1. Click the down arrow next to the post you wish to edit.
2. Click Edit
3. Change the desired information in the pop up “Edit this content”
4. Click Save
Manage forum access permissions in Dynamics 365
Forum Access Permission is a security rule that can be assigned to a particular forum and web role that
can restrict particular users from viewing the forum or granting particular users the ability to moderate a
forum within the webpages. To create, edit, or delete forum access permissions from within Dynamics
365:
1. Login to Dynamics 365
2. Navigate to Community
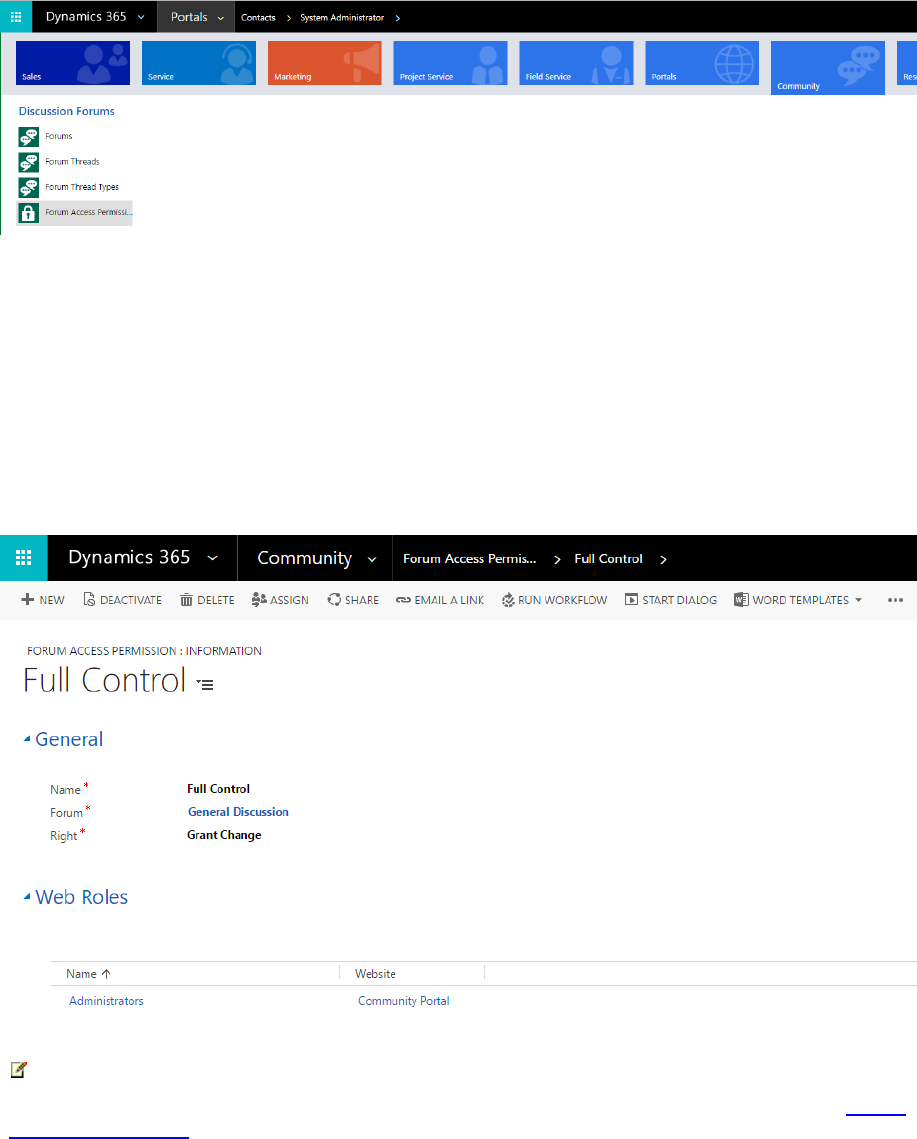
193
3. Click Forum Access Permissions
Create a new forum access permission
1. Click New
Edit an existing forum access permission
1. Double-click on an existing Forum Access Permission listed in the grid
2. Specify values for the fields provided
3. Click Save & Close
Note
A web role must be assigned for the rule to apply for users associated with the given role. See Create
web roles for portals.

194
Attributes relationships
The table below explains many of the Forum Access Permission attributes used by portals.
Name
Description
Name
A name used for reference within Dynamics 365.
Forum
The Manage forum threads associated with the
permission.
Right
The permission setting can be one of the
following:
Restrict Read
Grant Change
Restrict Read prevents viewing of the forum for
users in a web role associated with the rule.
Grant Change allows a user in a web role
associated with the rule to moderate the forum.
Grant Change takes precedence over Restrict
Read.
See also
Setup and moderate forums
Manage forum threads
Create forum posts on the portal
Subscribe to alerts
Subscribe to alerts
Applies To: Dynamics 365 (online), Dynamics CRM Online
Forum users can subscribe to threads and receive alerts when new posts are added keeping them up-to-
date on conversations of importance. Alert settings are attached to the user's contact record providing
further insight into the user's intent.
Depending on the page template implemented by your developer, the functionality providing users the
ability to subscribe or unsubscribe to alerts may or may not be present and the images displayed within
this document may be different that your actual portal.
Subscribe to alerts in the portal
Users can indicate they wish to receive notification when new posts are created by navigating to a forum
thread and clicking the Alert Me link.
1. Login to the Portal
2. Navigate to a Forum Thread
3. Click Subscribe

195
Unsubscribe from alerts in the portal
Users can indicate that they do not wish to receive notification when new posts are created for a given
thread by navigating to the forum thread and clicking the RemoveAlert link.
1. Login to the Portal
2. Navigate to a Forum Thread
3. Click Unsubscribe
Manage forum alerts in Microsoft Dynamics 365
Although the portal is the primary source for creating or removing alerts. Forum alerts can be created,
edited or deleted within Dynamics 365.
1. Login to Dynamics 365
2. Navigate to Community
3. Click Forum Threads
4. Double-click on an existing Forum Thread listed in the grid
5. Click Forum Alerts in the leftmost navigation menu
Create a new alert subscription
1. Click Add New Forum Alert
196
Edit an existing alert
1. Double-click on the Forum Alert listed in the grid
2. Specify values for the fields provided
3. Click Save & Close
Attributes relationships
The table below explains many of the Forum Alert attributes used by portals.
Name
Description
Subscriber
The Dynamics 365 Contact record of the portal
user that is to receive a notification when posts are
created in the associated thread.
Thread
The forum thread that is being subscribed to
notification of newly created posts.
Expiration Date
The date and time when notifications should stop.
See also
Setup and moderate forums
Manage forum threads
Create forum posts on the portal
Moderate forums
Manage blogs
Applies To: Dynamics 365 (online), Dynamics CRM Online
Learn how to manage blog comments and blog posts both within Microsoft Dynamics 365 and in your
portal.
Manage blogs in Dynamics 365
Dynamics 365 users can manage Blog records under the Portals tab after your portal customizations
have been imported into your Dynamics 365 organization.
Manage blogs on a portal
Portal users who have blog author permissions can edit or delete blogs by using the portal inline editing
interface. If your portal contact has been assigned the necessary permissions, the inline editing interface
will appear automatically when you sign in to the portal. Note that although a blog can be edited or
deleted through the portal editing interface, it must be created and initially configured in Dynamics 365.
To edit a blog, navigate to the blog's home page, and click the Edit button on the edit toolbar.
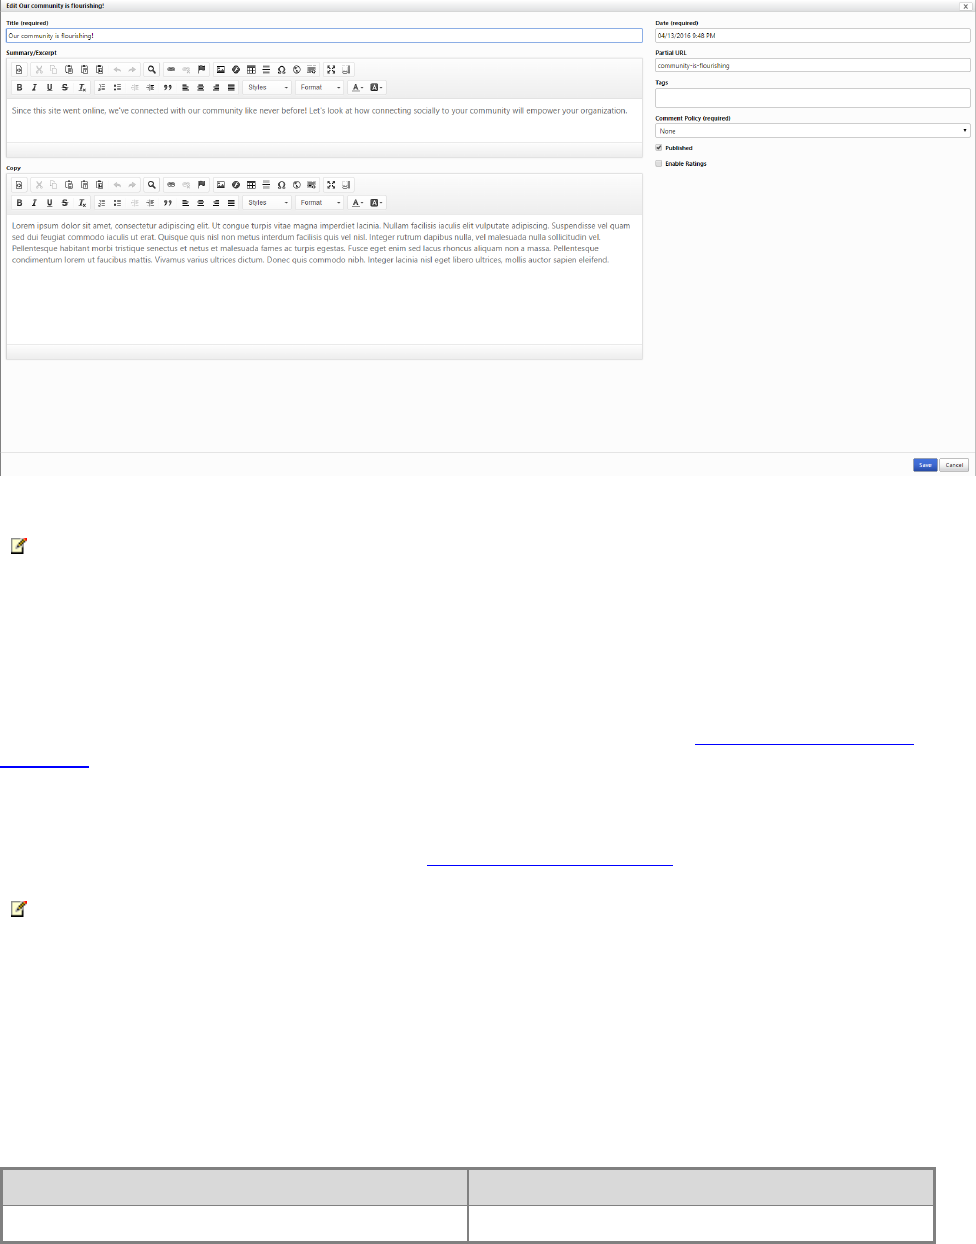
197
To delete the blog, click the Delete button, and click Yes on the confirmation dialog.
Note
Deleting a blog will also delete all its associated posts and comments.
Security
Read access to a blog is inherited from read permissions on the blog's Parent Page. If a user can read
the parent webpage, they can read the blog and all of its published posts. See Control webpage access
for portals.
Change/Write access to a blog is controlled through the Author Roles relationship. This relationship
specifies the web roles that grant authorship permission on the blog. Any portal users associated with any
of these roles will be granted the permission to create new posts, edit and delete their own posts, and edit
the attributes and settings of the blog itself. See Create web roles for portals.
Note
Only the specific author of a blog post can edit or delete that post, through the front-side portal editing
interface. The author of a post can also see their own unpublished posts, but not those of other authors.
Blog attributes and relationships
The table below explains the standard attributes and relationships of the Blog entity.
It is important to note that the way in which many of the content/display-oriented attributes are rendered is
controlled by the page templates used.
Name
Description
Name
The title of the blog.

198
Name
Description
Website
The website to which the blog belongs.
Parent Page
The parent webpage of the blog, in the website
content hierarchy.
Partial URL
The URL path segment used to build the portal
URL of the blog.
Note
Partial URL values are used as URL path
segments. As such, they should not contain
illegal URL path characters, such as "?", "#", "!",
"%". Because portal URLs are generated by
joining together Partial URL values with slashes
("/"), they should also not generally contain
slashes.
Recommended practice would be to restrict
Partial URL values to letters, numbers, and
hyphens or underscores. For example: "press-
releases", "Users_Guide", "product1".
Home Template
The page template to be used to render the
home/main page of the blog. This template will
typically be used to render the latest post(s) in the
blog.
Post Template
The page template to be used to render an
individual post in the blog, when navigated to. This
template will also typically have the responsibility
of rendering any comments associated with the
post.
Archive Template
The page template to be used to render archive
views (i.e., views of posts that may no longer be
visible on the blog home page). This template will
generally have multiple responsibilities:
To render a view of all posts in a given calendar
month.
To render a view of all posts related to a given
tag.
To render a view of all posts by a given
author.
Summary
HTML content providing a description of the blog.
Comment Policy
An option that specifies how comments on posts
should be handled on the blog.
Blog Posts
Relationship specifying all posts associated with
the blog.
199
Name
Description
Author Roles
Relationship specifying the Web Roles that grant
authorship permission on the blog. Any portal
users associated with any of these roles will be
granted the permission to create new posts, edit
and delete their own posts, and edit the attributes
and settings of the blog itself.
Manage blog posts in Dynamics 365
For Dynamics 365 users, Blog Posts can be managed by launching the editor for the desired Blog and
then navigating to its related Blog Posts.
Manage blogs posts on a portal
For portal users with blog author permissions, blog posts can be managed using the portal inline editing
interface. If your user account has been assigned the necessary permissions, the inline editing interface
will appear automatically when you sign in to the portal and navigate to the blog.
To create a new blog post, navigate to the blog home page, and click New > Blog post on the edit
toolbar. The blog post editor dialog will appear.
Make any edits desired, then click Save to save your changes.
To edit a blog post, navigate to the blog post's page, and click the Edit button on the edit toolbar. The
blog post editor dialog will appear. Make any edits desired, then click Save to save your changes.
When creating or editing a blog post, if the Partial URL field is left blank, one will be generated
automatically. The auto-generated Partial URL will have the format yyyy-mm-dd-post-title, where yyyy-
mm-dd is the year, month, and day of the post's Date, and the remainder is the post Title, transformed into
a URL-appropriate form.
200
The Tags field of the post editor provides auto-complete of tag names, to associated posts with existing
tags. It is also possible to simply type the name of a new tag. To end a tag name and start a new one,
type Tab, Enter, or ,. To remove a tag, click the x beside the tag name, or press Backspace.
To delete the blog post, click the Delete button, and click Yes on the confirmation dialog.
Note
Deleting a blog post will also delete its associated comments.
Note
Only the author of a blog post can edit or delete that post, through the front-side portal editing interface.
The author of a post can also see their own unpublished posts, but not those of other authors.
Blog post attributes and relationships
The table below explains the standard attributes and relationships of the Blog Post entity.
It is important to note that the way in which many of the content/display-oriented attributes are rendered is
controlled by the page templates used.
Name
Description
Title
The title of the blog post.
Blog
The blog to which the post belongs.
Partial URL
The URL path segment used to build the portal
URL of the blog post.
Note
Partial URL values are used as URL path
segments. As such, they should not contain
illegal URL path characters, such as "?", "#", "!",
"%". Because portal URLs are generated by
joining together Partial URL values with slashes
("/"), they should also not generally contain
slashes.
Recommended practice would be to restrict
Partial URL values to letters, numbers, and
hyphens or underscores. For example: "press-
releases", "Users_Guide", "product1".
Author
The author of the post, represented by a Contact
record.
Date
The publishing date for the post, to be displayed
on a portal. This value determines how posts are
sorted for display in views that display posts from

201
Name
Description
newest to oldest. This value does not control when
or if the post is actually made visible on a portal.
Summary
HTML content providing a short summary or
excerpt of the post. If present, this should be used
by the blog templates and syndication feeds as the
content of the post, with the full content only being
available at the post URL.
Copy
The full HTML content of the post.
Published
Determines whether a post will be visible on a
portal. If checked, the post is visible to all users
that have read access to the blog. If not checked,
only the author of the post will be able to preview
the post on a portal.
Comment Policy
An option that specifies how comments on the
post should be handled.
Blog Posts Comments
All comments associated with the post.
Web Files
All files associated with the post.
Tags
All tags associated with the post.
Manage blog post comments on a portal
For portal users with blog author permissions, blog comments can be managed using the portal inline
editing interface. See Use the front-side editing engine to publish content. If your user account has the
necessary permissions, the inline editing interface will appear automatically when you sign in to the portal
and navigate to a blog post.
The exact appearance of the user interface used to edit or delete a blog post comment is determined by
the page template being used to render the post, but it will generally involve links or buttons positioned
inline, alongside each comment. Clicking Edit will launch the comment editor, which allows comment
moderators to edit comment content or toggle its approval status.
Blog post comment attributes and relationships
The table below explains the standard attributes and relationships of the Blog Post Comment entity.
It is important to note that the way in which many of the content/display-oriented attributes are rendered is
controlled by the page template used.
Name
Description
Name
The descriptive name of the comment. This will
typically be auto-generated by the portal
application.
Blog Post
The blog post to which the comment belongs.
Author
The author of the comment, represented by a
Contact record. This will be populated if the
202
Name
Description
comment was submitted by an authenticated
portal user.
Author Name
The display name of the author of the comment.
This is typically used in the anonymous
submission scenario, when there is no portal user
Contact record to associate with the comment,
and is generally submitted by the comment author
themselves.
Author E-mail
The email address of the author of the comment.
This is typically used in the anonymous
submission scenario, when there is no portal user
Contact record to associate with the comment,
and is generally submitted by the comment author
themselves.
Author URL
A website URL for the author of the comment -
perhaps to their own blog or personal website.
This is typically used in the anonymous
submission scenario, when there is no portal user
Contact record to associate with the comment,
and is generally submitted by the comment author
themselves.
Posted On
The timestamp for when the comment was
submitted, to be displayed on a portal. This value
determines how comments are sorted for display.
This value does not control when or whether the
comment is made visible on a portal.
Content
The full HTML content of the comment.
Approved
Determines whether a comment will be visible on
a portal. If checked, the comment is visible to all
users that have read access to the blog post. If not
checked, only the author of the post will be able to
preview the comment on the portal.
See also
Get started with the portal content editor
Add dynamic content and create custom templates
Crowdsource ideas
Applies To: Dynamics 365 (online), Dynamics CRM Online
Learn how to manage Forum Ideas, Idea Comments, and Idea Votes.
203
Manage idea forums in Microsoft Dynamics 365
Dynamics 365 users can manage Idea Forum records under the Community tab, provided the portal
customizations have been imported into your Dynamics 365 organization.
Access permissions
Read access to an idea forum can be restricted to certain web roles by using the Roles with Read Access
relationship. This relationship specifies the web roles that have permission to see and participate in the
idea forum. Any portal users associated with any of these roles will be granted access to the idea forum.
See Create web roles for portals.
Change access to an idea forum is controlled through the Moderators relationship. There is currently no
front-side moderation functionality built into the idea portal application.
Idea forum attributes and relationships
The table below explains the standard attributes and relationships of the Idea Forum entity.
It is important to note that the way in which many of the content/display-oriented attributes are rendered is
controlled by the views created by the portal developer.
Name
Description
Title
The name of the idea forum.
Website
The website to which the idea forum belongs.
Partial URL
The URL path segment used to build the portal
URL of the idea forum.
Note
Partial URL values are used as URL path
segments. As such, they should not contain
illegal URL path characters, such as "?", "#", "!",
"%". Because portal URLs are generated by
joining together Partial URL values with slashes
("/"), they should also not generally contain
slashes.
Recommended practice would be to restrict
Partial URL values to letters, numbers, and
hyphens or underscores. For example: "press-
releases", "Users_Guide", "product1".
Summary
HTML content providing a description of the idea
forum.
Ideas
Relationship specifying all idea records associated
with the idea forum.
New Idea Policy
An option that specifies how new idea records
should be handled in the idea forum.
Comment Policy
An option that specifies how comments on ideas
should be handled in the idea forum.
204
Name
Description
Voting Policy
An option that specifies how votes on ideas should
be handled in the idea forum.
Voting Type
The type of voting the idea forum will allow.
Votes Per Idea
The number of votes a user is allowed for a single
idea belonging to an idea forum. When Voting
Type is Up or Down this value is set to 1.
Votes Per User
The number of votes a user is allowed to use in an
idea forum. If no value is set, users have unlimited
votes within the idea forum.
Roles with Read Access
Relationship specifying the web roles that have
permission to see and participate in the idea
forum. Any portal users associated with any of
these roles will be granted access to the idea
forum.
Moderators
Relationship specifying the web roles that have
permission to moderate the idea forum. There is
currently no front-side moderation functionality
built into the idea portal application.
Manage ideas in Dynamics 365
For Dynamics 365 users, provided the portal customizations have been imported into your Dynamics 365
organization, Idea records can be managed under the Community tab.
Idea attributes and relationships
The table below explains the standard attributes and relationships of the Idea entity.
It is important to note that the way in which many of the content/display-oriented attributes are rendered is
controlled by the views created by the portal developer.
Name
Description
Title
A descriptive title for the idea.
Idea Forum
The idea forum to which the idea belongs.
Partial URL
The URL path segment used to build the portal
URL of the idea forum.
Note
Partial URL values are used as URL path
segments. As such, they should not contain
illegal URL path characters, such as "?", "#", "!",
"%". Because portal URLs are generated by
joining together Partial URL values with slashes
("/"), they should also not generally contain
slashes.

205
Name
Description
Recommended practice would be to restrict
Partial URL values to letters, numbers, and
hyphens or underscores. For example: "press-
releases", "Users_Guide", "product1".
Published to Web
Whether the idea is visible on the website.
Copy
HTML content providing a description of the idea.
Summary
A shortened summary of the idea.
Author Name
Text specifying the name of the user that
submitted the idea.
Author E-mail
Text specifying the e-mail of the user that
submitted the idea.
Author
Relationship specifying which portal user is
associated with the idea.
Submitted On
The date and time that the idea was created.
Status Reason
An option that specifies the current status of the
idea.
Status Author
Relationship specifying which portal user is
associated with the idea's status and status
comment.
Status Comment
An optional comment for the idea's status reason.
In other words, when it's planned to be
implemented, why it has been rejected, etc.
Comment Policy
An option that specifies how comments on the
idea should be handled.
Votes Up
The number of positive votes the idea has
received.
Votes Down
The number of negative votes the idea has
received.
Vote Sum
The number of positive votes minus the number of
negative votes.
Total Number of Votes
The number of positive votes plus the number of
negative votes.
Idea Comments
Relationship specifying all comments associated
with the idea.
Idea Votes
Relationship specifying all votes associated with
the idea.
206
Manage idea comments in Dynamics 365
For Dynamics 365 users, provided the portal customizations have been imported into your Dynamics 365
organization, Idea Comment records can be managed under the Community tab.
Idea comment attributes and relationships
The table below explains the standard attributes and relationships of the Idea Comment entity.
It is important to note that the way in which many of the content/display-oriented attributes are rendered is
controlled by the views created by the portal developer.
Name
Description
Name
A title for the idea comment.
Idea
The idea to which the comment belongs.
Content
The content of the comment in HTML format.
Published to Web
Whether the comment is visible on the website.
Author Name
Text specifying the name of the user that
submitted the comment.
Author E-mail
Text specifying the e-mail of the user that
submitted the comment.
Author
Relationship specifying which portal user is
associated with the comment.
Posted On
The date and time that the comment was created.
Manage idea votes in Dynamics 365
For Dynamics 365 users, provided the portal customizations have been imported into your Dynamics 365
organization, Idea Vote records can be managed under the Community tab.
Idea vote attributes and relationships
The table below explains the standard attributes and relationships of the Idea Vote entity.
It is important to note that the way in which many of the content/display-oriented attributes are rendered is
controlled by the views created by the portal developer.
Name
Description
Value
A whole number representing the value of the
vote.
Name
A title for the vote.
Idea
The idea to which the vote belongs.
Voter Name
Text specifying the name of the user that
submitted the vote.
207
Name
Description
Voter E-mail
Text specifying the e-mail of the user that
submitted the vote.
Voter
Relationship specifying which portal user is
associated with the vote.
Submitted On
The date and time that the vote was created.
See also
Manage forum threads
Create forum posts on the portal
Moderate forums
Subscribe to alerts
Create, edit, and distribute opportunities in
Dynamics 365
Applies To: Dynamics 365 (online), Dynamics CRM Online
In your partner portal, you can use opportunities to notify your partners of sales prospects that they can
follow up on. You may have opportunities for existing customers or from new customers, and by
distributing them to your partners, you can create new revenue sources or strengthen relationships with
current customers.
Distributing opportunities to specific partners can also help connect customers with the sellers who have
the right knowledge and skills for their specific needs.
Create an opportunity
1. Go to Sales > Opportunities.
2. Click New.
3. In the Summary area of the Opportunity page, enter the topic and contact information for the
opportunity. You can also change the currency for the opportunity.
4. Add any details in the Customer Situation, Customer Need, and Proposed Solution fields.
5. Click Save.
Distribute an opportunity
You can distribute opportunities manually or use the preferred partner assignment system to
automatically distribute opportunities to suitable partner accounts.
Distribute opportunities manually when you know which partner you want to assign an opportunity to. By
manually distributing an opportunity, you can ensure that it goes to the partner who is most suited to meet
the customer's needs.
208
Distribute opportunities manually
1. Go to Sales > Opportunities.
2. Click the opportunity you want to edit.
3. In the Partner Details area of the Opportunity page, enter the partner account you want to
distribute the opportunity to in the Partner field.
4. Change the Status of the opportunity to Delivered.
5. Click Save.
Distribute opportunities to multiple partners
1. Go to Sales > Opportunities.
2. Click the opportunity you want to edit.
3. Under the General tab in the Partner Pipeline section, select the Partner Collaboration
checkbox.
4. Scroll down to the Partner Collaboration Accounts section and press the + button to add the
partners you want to distribute the opportunity to.
5. Change the Status of the opportunity to Accepted.
6. Click Save.
Enable partners to view the progress of an
opportunity
After an opportunity has been distributed to a partner, they will be able to view the details and progress of
the opportunity in the portal. Partners will find the opportunity under the Opportunities tab of the portal.
Opportunities that need to be accepted will be under the Distributed Opportunities section of the page,
and accepted opportunities will be under the Managed Opportunities section.
How partners can collaborate with each other
One of the most noticeable differences in an opportunity that partners are collaborating on is that they will
no longer be able to close or extend the opportunity. However, most of the options of the options viewing
the opportunity will be the same. This includes the ability to add notes to the timeline that other partners
will be able to view. It is important to note that partners are unable to assign opportunities to other
partners.
Partner dashboard contains data on current managed
and distributed opportunities
After an opportunity has been properly distributed to a partner, information on that opportunity will show
up on the partner’s dashboard on the portal. Two of the most important parts of the dashboard are the
distributed and managed opportunities. Distributed opportunities are opportunities that have yet to be
accepted by the partner and managed opportunities are ones that have been accepted. Due to this

209
difference the managed opportunity portion of the dashboard will give more information on the opportunity
including whether partners are collaborating on the opportunity.
Register a deal for a new or existing opportunity
Partners can register deals for opportunities that they have made on the portal to have exclusivity on the
opportunity. Partners first navigate to the opportunity they have created on the portal and find the
“Register” button at the bottom of the page. This creates a Deal Registration Request that can be seen on
the opportunity in Dynamics.
Approve opportunities registered by a partner
After an opportunity has been made by a partner through the portal, the opportunity will appear as an
open opportunity in Dynamics 365. Navigate to the opportunity through Sales > Opportunities and it will
function like any other opportunity created in Dynamics. To approve the opportunity, change the status to
“Accepted”.
Project Service Automation integration
Applies To: Dynamics 365 (online), Dynamics CRM Online
The Project Service Automation (PSA) solution for Dynamics 365 can now be installed on a Partner
Portal (PSA for Dynamics 365 and Partner Portal Solutions must be installed first). With this solution
installed customers and partners will be able to view projects and confirmed bookable resources.
Customers will also be able to approve quotes, view invoices, and view contract/order forms.
View projects on the partner portal
Both Customers and Partners can view projects pertaining to them on the Partner Portal. Customers can
view Active and Closed Projects associated with their organization. Partners can view projects when a
Bookable Resource from their organization is associated with the projected. In both cases the User must
have an appropriate PSA-specific Web Roles (PSA Customer Approver/Reviewer or PSA Partner
Approver/Reviewer). After logging in to the portal, the customer or partner can view the project by going
to Customer Projects. From here they can see basic information for each project and choose to view by
Active Projects, Closed Projects, or All Projects.
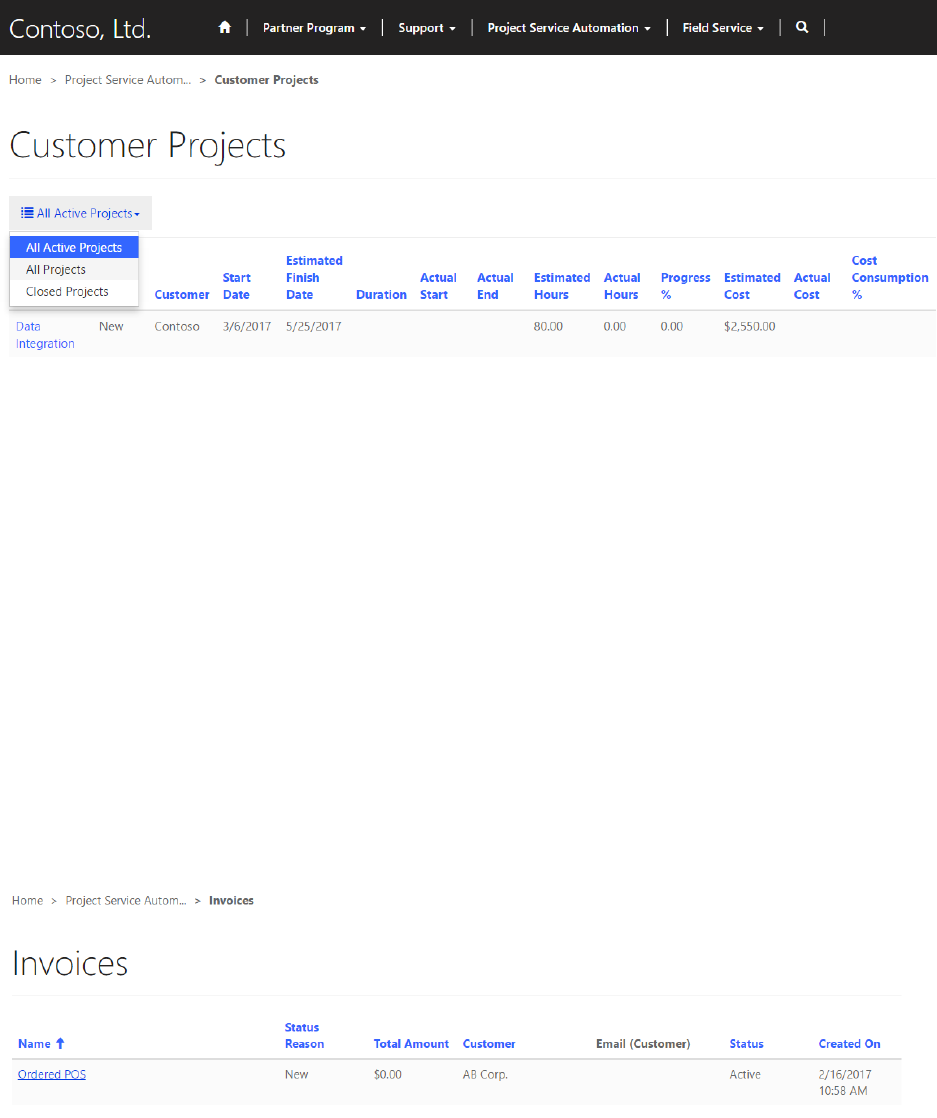
210
View and approve project quotes on the partner portal
Customers can view and approve project quotes created in Dynamics 365 that are associated with their
organization. After logging into the portal, the customer navigates to Project Service Automation >
Quotes then change the filer to Last 7 Days. From here the customer will be shown pending quotes
along with basic details like Status and Total Amount. The Customer can now click on a quote for more
detailed information and the ability to approve or reject the quote with the Approve Quote or Reject
Quote buttons near the bottom of the project.
View project invoices on the partner portal
Customers can view final versions of Project Invoices on the partner portal after the invoice has been
approved in Dynamics 365 and the Visible to customer checkbox has been selected. To view an
invoice, the customer must sign in to the partner portal and navigate to Partner Service Automation >
Invoices. Here a customer will be presented with basic information and can click on an invoice for more
details.
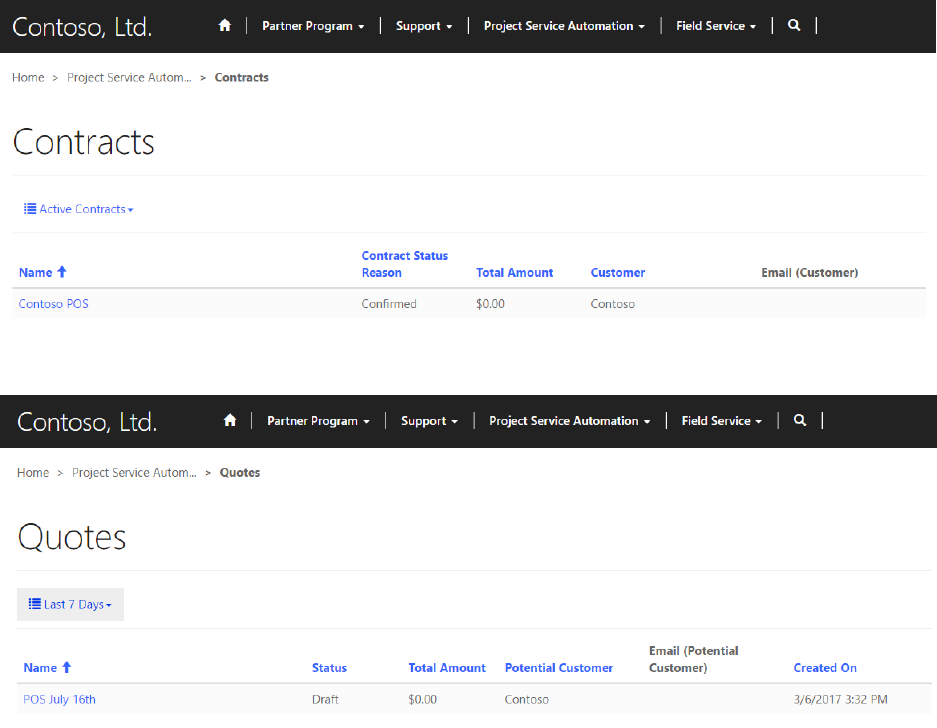
211
View project contracts and order forms on the partner
portal
Customers can view final versions of Project Contracts or Orders on the partner portal after a project
contract has been opened in Dynamics 365 with the Visible to customer checkbox selected on the
contract. After signing in to the partner portal, the customer navigates to Project Service Automation >
Contracts. Here customers can see a sorted list of contracts with some basic information, or select a
contract for more details.
View confirmed, bookable resources by project and
role on the partner portal
Both Customers and Partners can view bookable resources on the partner portal following the same
process. After signing in to the partner portal, they must navigate to Project Service Automation >
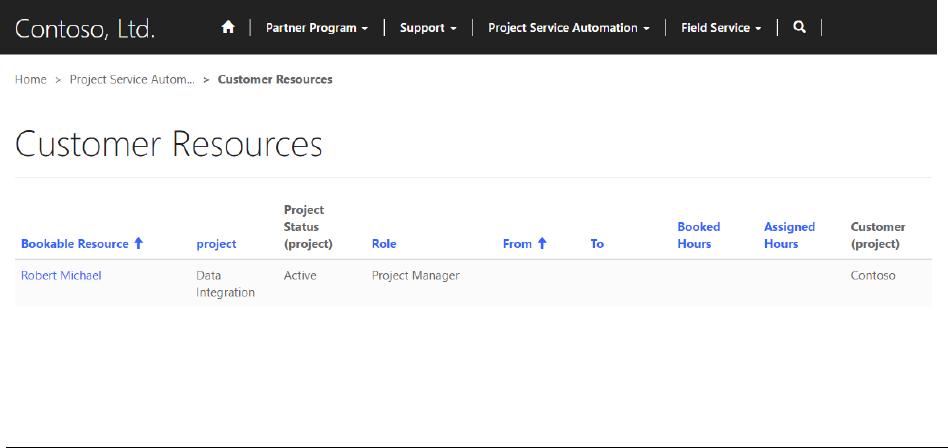
212
Customer Resources. Here Customers and Partners can see list of resources with their role, booked
hours, and other basic information. By selecting a resource, they will be able to see what tasks that
resource has been assigned to.
Field Service integration
Applies To: Dynamics 365 (online), Dynamics CRM Online
The Partner Field Service solution for Dynamics 365 can now be installed on a Partner Portal (Field
Service for CRM and Partner Portal Solutions must be installed first). With this solution installed,
customers and partners will be able to view various parts of the Field Service section of Dynamics 365 on
the Partner Portal. Some of the available entities that can be viewed are assets, work orders, and
invoices.
View agreements on the partner portal
Customers can view Active and Expired Agreements on the portal that are connected to their account on
the partner portal if they have the correct web role and the agreement is properly created. By assigning
the FS Customer Approver or FS Customer Reviewer web role to the customer, they will be able to view
agreements on the partner portal. To create/edit an agreement to be visible on the portal, navigate in
Dynamics 365 to Field Service > Service Delivery > Agreements. From here select an agreement or
create a new one with the + New button at the top of the page. Fill in the Service Account field with the
account the customer is connected to and select the Expose to Customer checkbox (both under the
General tab). After all of this is done, a customer can sign in to the portal and navigate to Field Service >
Agreements and change the filer to All Agreements. Now the customer can view the agreements
created in Dynamics 365. The page will show basic details and the customer can click on an agreement
to view the specific agreement details.
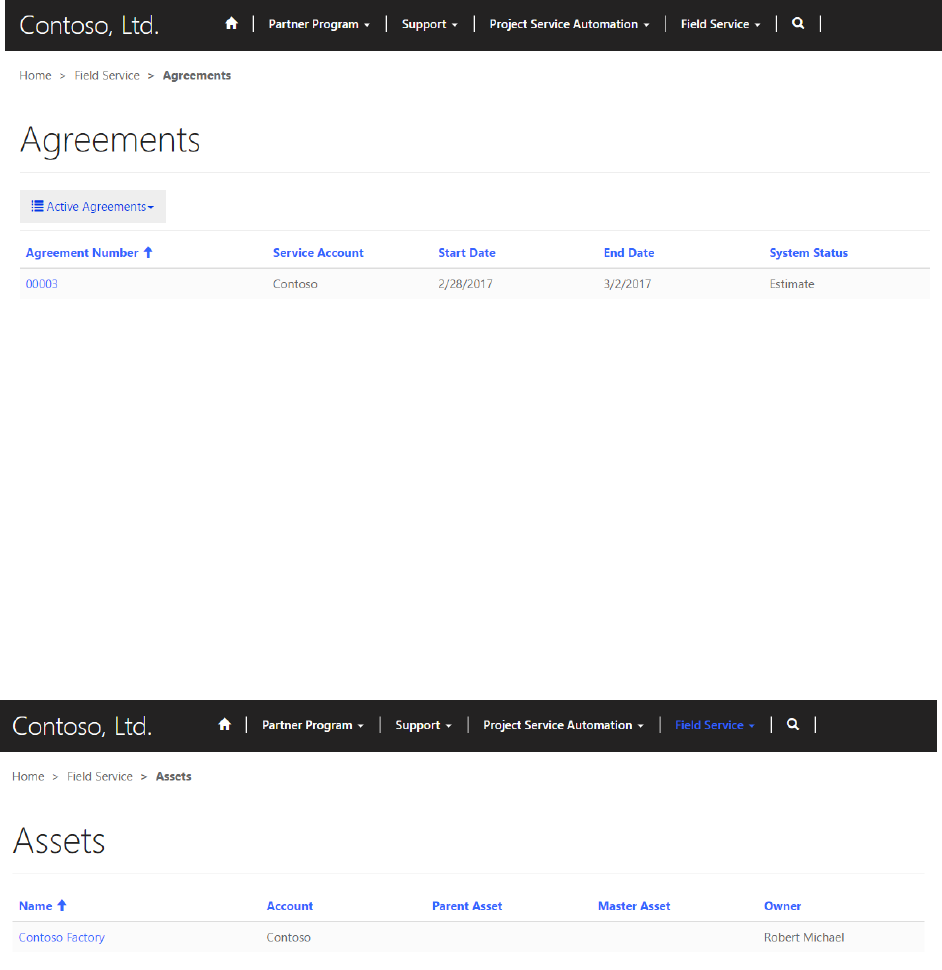
213
View assets on the partner portal
Customers can view existing assets on the portal that are connected to their account on the partner portal
if they have the correct web role and the asset is properly created. By assigning the FS Customer
Approver or FS Customer Reviewer web role to the customer, they will be able to view assets on the
partner portal. To create/edit an asset to be visible on the portal, navigate in Dynamics 365 to Field
Service > Service Delivery > Customer Assets. From here select an asset or create a new one with the
+ New button at the top. Set Account to the account the customer is connected to and select the Expose
to Customer checkbox. The customer can then sign in to the portal and navigate to Field Service >
Assets to see the assets created in Dynamics 365. The customer will be able to see each asset
connected to their account with what parent and/or master assets the asset is connected to.
View work orders for field service on the partner portal
Customers can view active and inactive work orders on the portal that are connected to their account on
the partner portal if they have the correct web role and the work order is properly created. By assigning
the FS Customer Approver or FS Customer Review web role to the customer, they will have the correct
web role to view work orders on the partner portal. To make a work order viewable in a portal it must be
defined as viewable in Dynamics 365. Go to Field Service > Work Order & Schedule > Work Orders.

214
Click on the work order to edit or click the + New button to create a new one. Fill in the Service Account
with the account the customer is connected to and select the Expose to Customer checkbox to allow a
customer to view it on the portal. After signing in to the portal, the customer can navigate to Field Service
> Work Orders and see the work orders that are connected to their account.
View invoices for field service on the partner portal
Customers can view active and inactive invoices that are connected to their account on the partner portal
if they have the correct web role and the work order has been properly created. By assigning the FS
Customer Approver or FS Customer Review web role to the customer, they will have the correct web role
to view invoices on the partner portal. To make an invoice viewable in a portal, it must be defined as
viewable in Dynamics 365. Go to Field Service > Service Delivery > Invoices. Select the invoice to edit
it, or click the + New button to create a new one. Be sure that the invoice is on the Invoice section of the
drop-down menu on the top left side of the page. Fill in the necessary details for the invoice and ensure
the Expose to Customer checkbox has been selected. After signing in to the portal and going to Field
Service > Invoices, the customer will be able to view the invoice.

215
Automatically distribute opportunities to preferred
partners
You can automatically distribute opportunities to partners based on a set of criteria that determines the
best partner for the job. The built-in metrics for opportunity assignment first determine which partners are
available to take on this opportunity. This table shows the factors that are used to decide whether a
partner is available.
Capacity
A partner’s capacity is the maximum number of
opportunities that partner can take on at once.
This value can be adjusted from the account
details page for each partner.
Note
Capacity includes opportunities that are in
progress, as well as those that have not yet
been accepted by a partner. It does not include
internal opportunities created by that partner.
Estimated revenue
You can set a minimum and maximum range for
estimated revenue on the account details page for
each partner. If the estimated revenue for an
opportunity falls within this range, the partner will
be available for assignment.
Territory
Territories are geographic regions that are
assigned to a partner account. If the address of
the customer associated with the opportunity is
within a territory covered by a partner, the partner
will be available for assignment.
Lead type
The lead type entity can be used to categorize
opportunities. You can assign which lead types
each partner is able to work on.
Associated products
If the products associated with an opportunity are
all covered by a partner, they will be available for
assignment. If any of the products are not covered
by a partner, they will not be available for
assignment.
Partner ranking metrics
After the available partners have been identified, the opportunity is distributed to a partner based on a
ranking system. This system takes the following factors into account.
Distance
The distance between the address of the partner
and the address of the customer account that is
associated with the opportunity.
Win rate
The percentage of distributed opportunities
historically won by the partner.
216
Return rate
The percentage of distributed opportunities
historically lost (returned) by the partner.
Feedback rate
The percentage of delivered opportunities that
received feedback from customers.
Stall rate
The percentage of distributed opportunities that
have been accepted by the partner, but have not
progressed through workflow stages.
Touch rate
The percentage of distributed opportunities that
were promptly accepted or declined and were not
allowed to expire after delivery.
Average time to close
The average length of time, in days, that the
partner takes to close opportunities.
Partner ranking weights
The metrics used to rank partners for opportunity distribution are weighted to determine how they affect
partner ranking. These weights can be adjusted using site settings, and affect how heavily a metric is
used to rank partners. A setting of zero (0) will cause that metric to be disregarded when ranking partners
for opportunity distribution.
Note
A positive weight means that a higher number for this metric is more desirable, and a negative weight
means that a lower number is more desirable.
The range of accepted values for each metric’s site setting is as follows.
Description
Setting name
Value range
Distance
distribution/weights/distance
Negative, 0 to -0.01
Win rate
distribution/weights/winrate
Positive, 0 to 5
Return rate
distribution/weights/returnrate
Negative, 0 to -5
Feedback rate
distribution/weights/feedbackrate
Positive, 0 to 5
Stall rate
distribution/weights/stallrate
Negative, 0 to -5
Touch rate
distribution/weights/touchrate
Positive, 0 to 5
Average time to close
distribution/weights/avgtimetoclose
Negative, 0 to -0.5
See also
Create a partner account on PRM portal

217
Manage web links in Dynamics 365 or on portals
Applies To: Dynamics 365 (online), Dynamics CRM Online
A web link can link to any URL or it can link to another webpage within the same website. When a web
link is to a webpage, the security and publishing state of the webpage will apply to the web link as well.
Web links are always part of a web link set. A web link set is a group of links such as a primary navigation
or a group of footer links. Web link sets allow internal, regardless of placement in the site map, and
external links to be grouped together and ordered.
Manage web links in Dynamics 365
For Dynamics 365 users, provided the portal customizations have been imported into the Dynamics 365
organization, Web links can be managed in the Portals section.
Manage web links in a portal
To modify a web link set, you need appropriate permissions and the web link set you want to modify must
be part of the page template. To edit a web link set, point to the web link set and click the blue edit button
that appears. Drag and drop the move icon to reorder the web links. Click the paper & pencil icon to edit a
web link. Click the red minus icon to delete a web link from the set. Click the green plus icon to add a new
web link to the set.
Multilevel web link sets
Web link sets can support a multilevel tree of web links. This allows the creation of multilevel link menus
and navigation elements.
Links can be moved to their desired level and position using drag-and-drop, in the same way that they are
re-ordered. A light blue placeholder indicates where the link will be dropped. Any light yellow placeholders
that appear during the drag indicate that the web link above has no child links, and the dragged web link
can be dropped here to make it a child of that link.
Web link set attributes and relationships
The table below explains many of the standard Web Link Set properties used by portals. It is important to
note that the way in which many of the content/display-oriented properties are rendered is controlled by
the page template used.
Name
Description
Name
The descriptive name of the web link set. This
value usually describes the placement of the set in
the page template such as "Primary Navigation."
This field is required.
Website
The website to which the entity belongs. This field
is required.
Title
An optional title for the web link set. This value can
be used on the portal if it's part of the page
template. It could be something like "Our Partners"
and be displayed in a side bar.

218
Name
Description
Copy
An optional description for the web link set. This
value can be used on the portal if it's part of the
page template. It could further describe something
like "Our Partners" in a side bar.
Web link attributes and relationships
The table below explains many of the standard Web Link properties used by Dynamics 365 portals. It is
important to note that the way in which many of the content/display-oriented properties are rendered is
controlled by the page template used.
Name
Description
Name
The title for the web link. This value will be used
as the web link title in most templates. This field is
required.
Web Link Set
The web link set to which the entity belongs. This
field is required.
Parent Web Link
The parent web link of the entity, in a multilevel
web link set. If no parent web link is specified, the
entity is at the top/root level of the web link set.
Page
An optional webpage from the same website to
link to.
Note
When a web link is to a webpage, the security
and publishing state of the webpage will apply to
the web link as well.
This validation can be disabled with the "Disable
Page Validation" option.
External URL
An optional URL to link to. This value can be any
properly formatted URL.
Description
An optional summary for the web link. This value
can be used on the portal if it's part of the page
template.
Publishing State
The current publishing workflow state of the web
link, which may dictate whether the web link is
visible on the site. The most common use of this
feature is to provide "published/draft" control over
content. This field is required.
Note
Users with content management permissions
may be granted the ability to use "Preview
219
Name
Description
Mode", which allows these users to see
("preview") unpublished content.
Robots Follow Link
Indicates whether or not search indexers should
follow and index the contents of the link. This field
is required.
Display Order
An integer value indicating the order in which the
web link will be placed, relative to other web links
within the same web link set.
Display Page Child Links
In a template that supports multilevel web link
sets, generate child links for this entity using the
portal site map provider. Note that this option is
only valid for web links that refer to internal pages,
and not external URLs.
Open in New Window
Indicates whether selecting the link will load the
link in a new browser window.
Disable Page Validation
Indicates whether the security of a linked webpage
will be applied to the web link as well.
Image URL
An optional URL to an image. The linked image
can be used on the portal if it's part of the page
template; for example, as an icon.
Image Height
An optional height for the image from the Image
URL property.
Image Width
An optional width for the image from the Image
URL property.
Image Alt Text
An optional description for the image from the
Image URL property.
Display Image Only
Indicates that the template should render only an
image link for this web link, rather than both the
image and link name together.
See also
Get started with the portal content editor
Customize content by using content snippets
Invite contacts to your portals
Applies To: Dynamics 365 (online), Dynamics CRM Online
With the Dynamics 365 portals invitation feature you have the ability to invite contacts to your portal
through automated email(s) created in your Dynamics 365 system. People invited will receive an email,

220
fully customizable by you, with a link to your portal and an invitation code. This code can be used to gain
special access configured by you. With this feature you have the ability to:
Send Single or Group Invitations
Specify an expiry date if desired
Specify a user or portal contact as the inviter if desired
Automatically assign the invited contact(s) to an account upon invite redemption
Automatically execute a workflow upon invite redemption
Automatically assign the invited contact(s) to a Web Role(s) upon redemption
Invitation redemption can be accomplished using one of several authentication options. For
documentation about portal authentication, see Set authentication identity for a portal and choose the
model applicable to your portal version and configuration. The user will adopt any settings provided by the
administrator upon redemption. An Invite Redemption Activity will be created for the Invite and Contact.
Invitations are sent via the Send Invitation workflow. By default, the workflow creates an email with a
generic message and sends it to the invited Contact's primary email address. The Send Invitation
workflow contains an email template that will need to be edited to contain a specific message for your
portal and the correct hyperlink to your portal's Invite Redemption Page.
Edit Send Invitation workflow email template
Locate the Send Invitation workflow and deactivate it. After it is deactivated, edit the email template to
send the message you want and provide a link to the Invite Redemption Page of your portal.
Create and configure invitations
To create an Invitation record within Dynamics 365 click the Create Invitation button in the command
bar. The button is available when a single Contact is selected in a Contact View and when viewing a
Contact record. Clicking the button will open a new invitation form for the Contact. Invitations can also be
created via the Invitations View by clicking +New. After the Invitation record has been created the Run
Workflow button will appear enabling you to send the Invitation to the Contact(s).
Run the Send Invitation workflow
The invitation will not be sent to the Contact(s) until the Send Invitation workflow is initiated.
The Invitation Form has the following fields:
Name
Description
Name
A descriptive name for helping recognize the
invitation.
Type
Single or Group. Single will allow only one
contact to be invited and only one redemption.
Group allows multiple contacts to be invited and
multiple redemptions.
Owner/Sender
The Dynamics 365 user that will be the sender of
the email when the invitation is sent. This can be
overridden in the Send Invitation workflow if the
created email already contains someone in the
from field.
221
Name
Description
Invitation Code
A unique code for the invitation that only the
invitee will know. This is automatically generated
when creating a new invitation.
Expiry Date
The date that represents when the invitation will
become invalid for redemption. Optional.
Inviter
Can be used when a contact is the sender of the
invitation. Optional.
Invited Contact(s)
The contact(s) to be invited to a portal.
Assign to Account
An account record to be associated as the
redeeming contact's parent customer when the
invite is redeemed. Optional.
Execute Workflow on Redeeming Contact
A workflow process to be executed when the invite
is redeemed. The workflow will be passed the
redeeming contact as the primary entity. Optional.
Assign to Web Roles
A set of web roles to be associated with the
redeeming contact when the invite is redeemed.
Optional.
Redeemed Contact(s)
The contact(s) that have successfully redeemed
the invitation.
Maximum Redemptions Allowed
The number of times the invitation can be
redeemed. Available for Group type invitations
only.
See also
Register and invite for a portal
Configure a contact for use on a portal
Set authentication identity for a portal
222
Customization Guide
Customize content by using content snippets
Applies To: Dynamics 365 (online), Dynamics CRM Online
Content snippets are small chunks of editable content that can be placed by a developer on a page
template, allowing for customizable content to populate any portion of a page's layout easily. Snippet
controls, which are responsible for rendering the content of snippets on the web-facing portal, are placed
on .aspx pages by developers. For information on how to develop with snippets, see the developer's
guide.
Edit snippets
Snippets can be edited either through the front-side or through the Dynamics 365 interface. The main
power of the snippet is the fact that you can abstract a bit of content (other than the main copy of the
page) and edit it separately, allowing essentially any static content on your site to be fully content-
managed and front-side editable but still backed by Dynamics 365.
Edit using the front-side editing engine
To edit snippets on the front side, users must be associated with a Web Role that is associated with a
Website Access Permission record with the Manage Content Snippets permission set to true.
To edit through the front side, hover over the snippet element and click the edit button. You must have
website access permissions to edit snippets. More information: Control webpage access for portals
When editing a snippet, either a simple text box will appear, allowing you to quickly edit the content, or
the full editor appears, as it does when editing a page's copy.
Which of these two interfaces appears is determined by the edit type of the snippet, which also
determines the type of content the snippet can hold (full, stylized HTML content versus plain text). A
snippet can be assigned an edit type of either text or HTML when a developer adds the Content Snippet
control to the page template in the Portal's Visual Studio project.
Edit by using Dynamics 365
1. Navigate to Portals -> Content Snippets
2. To create a new snippet: Click New
3. To edit an existing snippet: Double-Click on an existing Content Snippet in the grid
Enter values for the following fields:
Name
Description
Name
The name can be used by a developer to place
the snippet value into a page template within the
portal's code.
Website
The website that is associated with the snippet.

223
Name
Description
Value
The content of the snippet to be displayed in the
portal. This can contain plain text or HTML
markup.
See also
How to provision a portal
Get started with the portal content editor
Use the front-side editing engine to publish content
Add dynamic content and create custom templates
Add dynamic content and create custom
templates
Applies To: Dynamics 365 (online), Dynamics CRM Online
Liquid is an open-source template language integrated into portals. It can be used to add dynamic content
to pages, and to create a wide variety of custom templates. With Liquid, you can:
Add dynamic content directly to the Copy field of a webpage or the content of a content snippet.
Store source content by using web templates, entirely through configuration within Dynamics 365, for
use throughout the Dynamics 365 portals content management system.
Render a website header and primary navigation bar, entirely through configuration within Dynamics
365.
In all of these scenarios, you'll have dynamic access to Dynamics 365 portal features, such as entitylist,
content snippets, site settings for portals, and web links.
In this section
Store source content by using web templates
Understand Liquid operators
Liquid types
Conditional
Liquid Objects
Liquid Tags
Liquid Filters
Create advanced templates for portals
See also
How to provision a portal
Get started with the portal content editor
224
Store source content by using web templates
Applies To: Dynamics 365 (online), Dynamics CRM Online
Web Template is a Dynamics 365 entity (adx_webtemplate), included with Dynamics 365 portals, that is
used to store template source content. A web template will generally contain Liquid for dynamic content
rendering and is the central entity used to integrate Liquid templates with the rest of the Dynamics 365
portals system.
Web Templates can be included in other content or combined with other templates by using template
tags, and are referenced in these tags by their Name attribute. They can also be used to create entire
custom Page Templates, or create custom headers and footers for your portal website.
Web template attributes
Name
The name of the template. Used to reference this
template when it is included in other content, or
extended by other templates.
Source
The source content of the template.
In Dynamics 365, a source code editor with syntax
highlighting and other code editing features is
provided for this field.
MIME Type
Optionally provides a MIME type for the content of
the template. If none is provided, a type of
text/html is assumed.
This value will only be used in cases where the
template is associated with a Page Template, and
controls the rendering of all content for that
template.
Web templates as page templates
Web Templates can be used in conjunction with page templates to create new templates for the
Dynamics 365 portals content management system. This can be done entirely within Dynamics 365,
without the need to write .NET code or redeploy your portal application.
To create a new page template based on a web template, select a Type of Web Template when creating a
new Page Template record. Then select a Web Template.
Note the option Use Website Header and Footer (which is checked by default). If this is checked, your
Web Template will control rendering of all page content between the global website header and footer. If
this option is unchecked, your Web Template will be responsible for rendering the entire response in the
case that you're rendering HTML, this means everything from the doctype to the root <html> tags, and
everything in between.
While the most common use cases for Web Templates will be to render HTML, rendering the entire
response (by deselecting Use Website Header and Footer) gives you the option of rendering any text-
based format you choose. This is where the MIME Type attribute of Web Template becomes relevant.
When a Page Template that does not use the website header and footer is rendered, the HTTP response
Content-Type header will be set to the MIME Type of the associated Web Template. (text/html will be
used if no MIME Type is provided.) This gives you a wide variety of options for rendering non-HTML
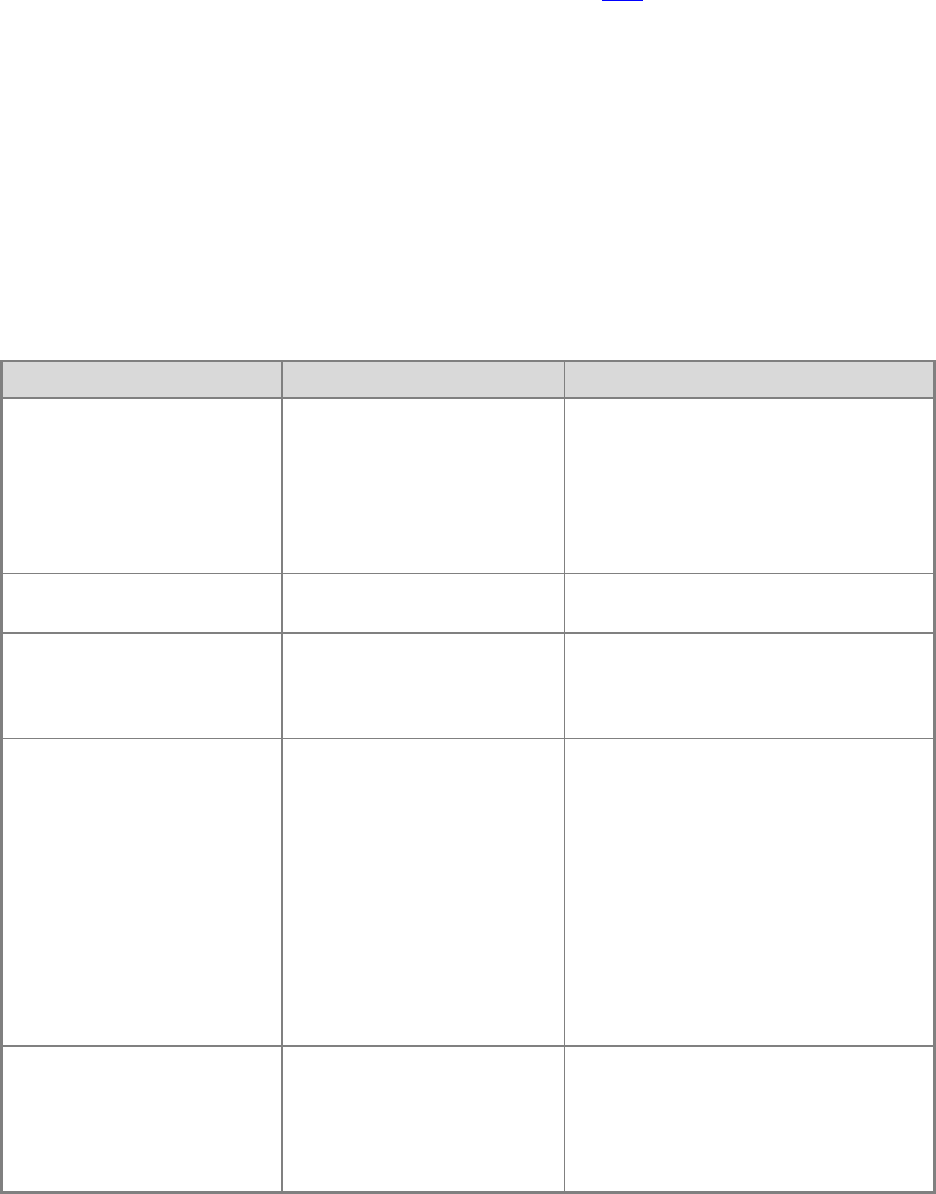
225
content by using Liquid. A common use case would be to render an RSS feed, by setting a MIME Type of
application/rss+xml.
Web templates as website headers and footers
Web templates can also be used to override the global header and footer used by a Dynamics 365 portal.
To do this, set the Header Template or Footer Template field of your website to the web template of
your choice. Note that if you override Website Header, your selected template assumes responsibility for
rendering the primary navigation, sign-in/sign-out links, search interface, and so on for your site interface
elements that are normally handled by the default header template.
Built-in web templates
There is a set of premade Liquid templates available within Dynamics 365 portals. To use them, you must
include them by name, using the list below as a reference.
Name
Description
Code
Ad
This template renders an ad
by name, or a random ad
from an ad placement.
{% include 'ad' ad_name:'Name' %}
{% include 'ad'
ad_placement_name:'Placement Name'
%}
Blogs
This template renders recent
blog posts in a list group.
{% include 'blogs' %}
Breadcrumbs
This template renders links of
ancestor pages back to the
Home page from the current
page.
{% include 'breadcrumbs' %}
Child Link List Group
This template renders links to
any child pages of the current
page in a list group.
{% include 'child_link_list_group'
%}
{% include 'child_link_list_group'
title_only:true %}
{% include 'child_link_list_group'
image_width:'64px',
image_height:'64px' %}
Events: Upcoming
This template renders links to
events that occur between
now and 60 days from now.
{% include 'events_upcoming' %}
{% include 'events_upcoming'
number_of_days_in_advance:60 %}

226
Name
Description
Code
Forums
This template renders a list of
the website's forums with
their respective number of
threads and posts.
{% include 'forums' %}
Layout 1 Column
This template renders a
single column layout
containing breadcrumbs,
page title, and page copy
content.
{% extends 'layout_1_column' %}
{% block main %}
...
{% endblock %}
Layout 2 Column Wide Left
This template renders a two
column layout. The left
column is wider than the
right. It contains
breadcrumbs, page title at the
top of the page and the page
copy content is located in the
left column.
{% extends
'layout_2_column_wide_left' %}
{% block main %}
...
{% endblock %}
{% block aside %}
...
{% endblock %}
Layout 2 Column Wide Right
This template renders a two
column layout. The right
column is wider than the left.
It contains breadcrumbs,
page title at the top of the
page and the page copy
content is located in the right
column.
{% extends
'layout_2_column_wide_right' %}
{% block main %}
...
{% endblock %}

227
Name
Description
Code
{% block aside %}
...
{% endblock %}
Layout 3 Column Wide
Middle
This template renders a three
column layout. The middle
column is wider than the left
and right. The layout contains
breadcrumbs and the page
title at the top of the page and
the page copy content is
located in the middle column.
{% extends
'layout_3_column_wide_middle' %}
{% block left_aside %}
...
{% endblock %}
{% block main %}
...
{% endblock %}
{% block right_aside %}
...
{% endblock %}
Page Copy
This template renders the
editable page copy content
HTML with support for
embedded Liquid.
{% include 'page_copy' %}
Page Header
This template renders the
page title.
{% include 'page_header' %}
Poll
This template renders a poll
by name, or a random poll
from a poll placement.
{% include 'poll' poll_name:'Name'
%}
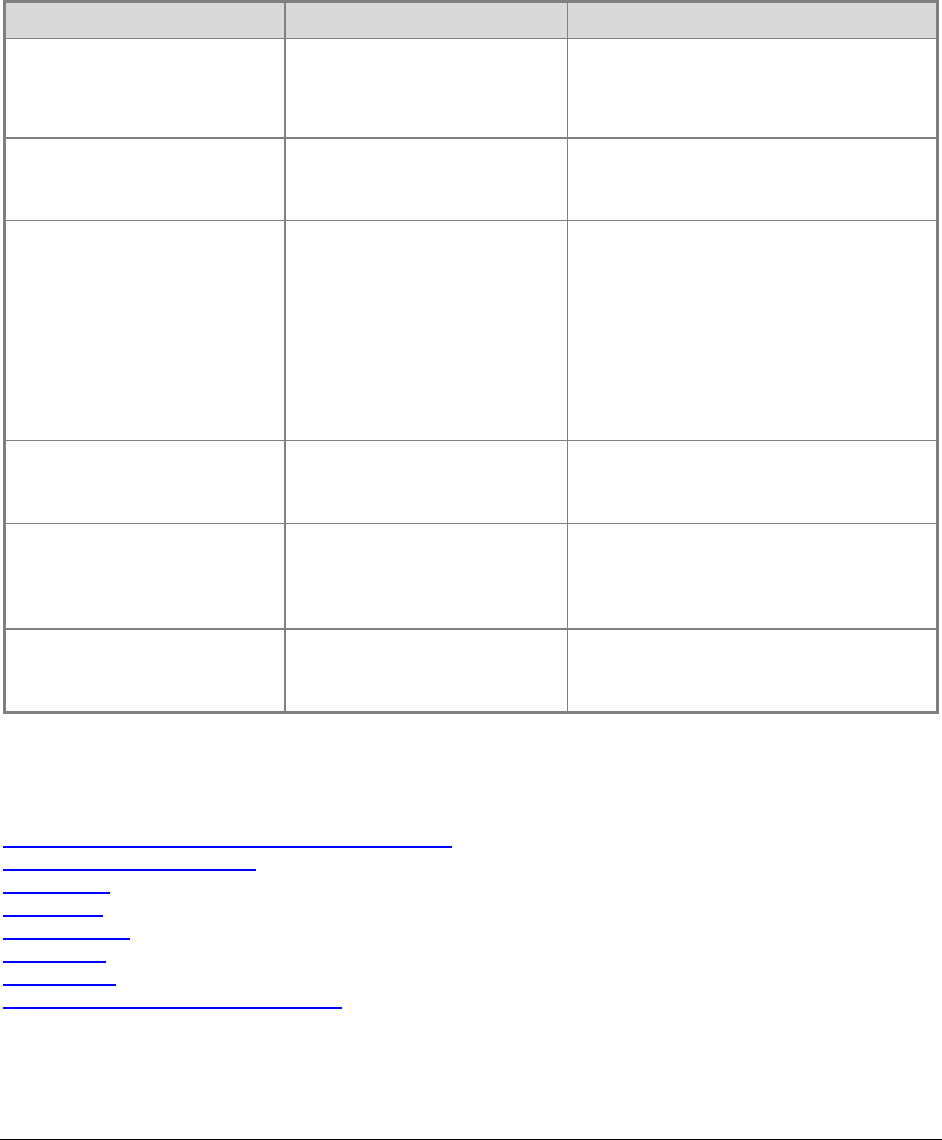
228
Name
Description
Code
{% include 'poll'
poll_placement_name:'Placement Name'
%}
Search
This template renders a basic
search form with a single text
input and search button.
{% include 'search' %}
Side Navigation
This template renders a
vertical tree view style
navigation. It has links to
ancestor pages back to the
first level (or specified depth
offset), links to sibling pages
of the current page, and links
to children of the current
page.
{% include 'side_navigation' %}
{% include 'side_navigation'
depth_offset:1 %}
Snippet
This template renders an
editable HTML content
snippet by name.
{% include 'snippet'
snippet_name:'Name' %}
Top Navigation
This template renders an
editable nav bar with drop-
down menus for the Primary
Navigation web link set.
{% include 'top_navigation' %}
Weblink List Group
This template renders a list
group of links for a web link
set.
{% include 'weblink_list_group'
weblink_set_name:'Name' %}
See also
Add dynamic content and create custom templates
Understand Liquid operators
Liquid types
Conditional
Liquid Objects
Liquid Tags
Liquid Filters
Create advanced templates for portals
Understand Liquid operators
Applies To: Dynamics 365 (online), Dynamics CRM Online
Liquid has access to all common logical and comparison operators. These can be used in tags such as if
and unless.
229
Basic operators
==
Equals
!=
Does not equal
>
Greater than
<
Less than
>=
Greater than or equal to
<=
Less than or equal to
Or
Condition A or condition B
And
Condition A and condition B
contains
contains tests for the presence of a substring within a string.
{% if page.title contains 'Product' %}
The title of this page contains the word Product.
{% endif %}
contains can also test for the presence of a string within an array of strings.
startswith
startswith tests whether a string starts with a given substring.
{% if page.title startswith 'Profile' %}
This is a profile page.
{% endif %}
endswith
endswith tests whether a string ends with a given substring.
{% if page.title endswith 'Forum' %}
This is a forum page.

230
{% endif %}
See also
Add dynamic content and create custom templates
Store source content by using web templates
Liquid types
Conditional
Liquid Objects
Liquid Tags
Liquid Filters
Create advanced templates for portals
Liquid types
Applies To: Dynamics 365 (online), Dynamics CRM Online
Liquid objects can return one of seven basic types: String, Number, Boolean, Array, Dictionary,
DateTime, or Null. Liquid variables can be initialized by using the assign or capture tags.
String
A String is declared by wrapping text in single or double quotes.
{% assign string_a = "Hello World!" %}
{% assign string_b = 'Single quotes work too.' %}
Get the number of characters in a string with the size property.
{{ string_a.size }} <!-- Output: 12 -->
Number
Numbers can be integers or floats.
{% assign pi = 3.14 %}
{% if page.title.size > 100 %}
This page has a long title.
{% endif %}
Boolean
A Boolean is either true or false.
{% assign x = true %}

231
{% assign y = false %}
{% if x %}
This will be rendered, because x is true.
{% endif %}
Array
An array holds a list of values of any type. You can access a given item by (zero-based) index using [ ],
iterate over them using the for tag, and get the number of items in the array using the size property. See
also: Array filters
{% for view in entitylist.views %}
{{ view.name }}
{% endfor %}
{{ entitylist.views[0] }}
{% if entitylist.views.size > 0 %}
This entity list has {{ entitylist.views.size }} views.
{% endif %}
Dictionary
Dictionaries hold a collection of values that can be accessed by a string key. You can access a given item
by string key using [ ], iterate over them using the for tag, and get the number of items in the dictionary
using the size property.
{{ request.params["ID"] }}
{% if request.params.size > 0 %}
The request parameters collection contains some items.
{% endif %}
DateTime
A DateTime object represents a specific date and time.
{{ page.modifiedon | date: 'f' }}
Note
Date filters.

232
Null
Null represents an empty or non-existent value. Any outputs that attempt to return a null value will render
nothing. It will be treated as false in conditions.
{% if request.params["ID"] %}
This will render if the ID request parameter is NOT null.
{% endif %}
See also
Add dynamic content and create custom templates
Store source content by using web templates
Understand Liquid operators
Conditional
Liquid Objects
Liquid Tags
Liquid Filters
Create advanced templates for portals
Conditional
Applies To: Dynamics 365 (online), Dynamics CRM Online
When used in conditional statements (if, unless), some Liquid values will be treated as true, and some
will be treated as false.
In Liquid, null and the Boolean value false are treated as false; everything else is treated as true. Empty
strings, empty arrays, etc. are treated as true.
Examples:
{% assign empty_string = "" %}
{% if empty_string %}
<p>This will render.</p>
{% endif %}
You can test for empty strings and arrays using the special value empty if necessary.
{% unless page.title == empty %}
<h1>{{ page.title }}</h1>
{% endunless %}
You can also test the size of Liquid types, Liquid types, or Liquid types using the special size property.
{% if page.children.size > 0 %}
<ul>
{% for child in page.children %}
233
<li>{{ child.title }}</li>
{% endfor %}
</ul>
{% endif %}
Summary
True
False
True
×
False
×
Null
×
String
×
empty string
×
0
×
1, 3.14
×
array or dictionary
×
empty array or dictionary
×
Object
×
See also
Add dynamic content and create custom templates
Store source content by using web templates
Understand Liquid operators
Liquid types
Liquid Objects
Liquid Tags
Liquid Filters
Create advanced templates for portals
Liquid objects
Applies To: Dynamics 365 (online), Dynamics CRM Online
Liquid objects contain attributes to output dynamic content to the page. For example, the pageobject has
an attribute called title that can be used to output the title of the current page.
To access an object attribute by name, use a dot . To render an object's attribute in a template, wrap it in
{{ and }}.
234
{{ page.title }}
Attributes of an object can also be accessed using a string name and []. This is useful in cases where the
desired attribute is determined dynamically, or the attribute name contains characters , spaces, special
characters, etc., that would be invalid when using the . syntax.
{{ page["title"] }}
{% assign attribute_name = "Name with spaces" %}
{{ object[attribute_name] }}
The following objects can be used and accessed anywhere, in any template.
entities
Allows you to load any Dynamics 365 entity by ID.
More information: entities
Now
A date/time object that refers to the current UTC
time, at the time the template is rendered. More
information: Date filters
Page
Refers to the current portal request page.
The page object provides access to things like the
breadcrumbs for the current page, the title or URL
of the current page, and any other attributes or
related entities of the underlying Dynamics 365
record. More information: page
params
A convenient shortcut for request.params. More
information: request
request
Contains information about the current HTTP
request. More information: request
settings
Allows you to load any Site Setting by name. More
information: settings, Configure site settings for
portals
sitemap
Allows access to the portal site map. More
information: sitemap
sitemarkers
Allows you to load any Site Markers by name.
More information: sitemarkers
snippets
Allows you to load any Content Snippet by name.
More information: Customize content by using
content snippets
User
Refers to the current portal user, allowing access
to all attributes of the underlying Dynamics 365
contact record. If no user is signed in, this variable
will be null. More information: Liquid types
weblinks
Allows you to load any Web Link Set by name or
ID. More information: weblinks
235
website
Refers to the portal Website record, allowing
access to all attributes of the Dynamics 365
Website (adx_website) record for the portal. More
information: website
All Liquid Objects
ads
blogs
entities
entitylist
entityview
events
forloop
forums
page
polls
request
searchindex
settings
sitemap
sitemarkers
snippets
tablerowloop
user
weblinks
website
See also
Add dynamic content and create custom templates
Store source content by using web templates
Understand Liquid operators
Liquid types
Conditional
Liquid Tags
Liquid Filters
Create advanced templates for portals
ads
Applies To: Dynamics 365 (online), Dynamics CRM Online
Provides the ability to access and render an ad.
The ads object allows you to select a specific ad or ad placement:

236
<div>
{% assign ad = ads["Ad Name"] %}
<h4>{{ ad.title }}</h4>
<a href="{{ ad.redirect_url }}">
<img src="{{ ad.image.url }}" alt="{{ ad.image.alternate_text }}" />
</a>
</div>
Ads attributes
placements
Returns the adplacements object.
[ad name or id]
You can access any ad by its Name or Id
properties.
{% assign ad = ads["Ad Name"] %}
{% assign ad = ads["da8b8a92-2ee6-476f-8a21-
782b047ff460"] %}
Ad Placements attributes
[ad placement name or id]
You can access any adplacement by its Name or Id
properties.
{% assign placement =
ads.placements["Placement Name or Id"] %}
{% assign placement =
ads.placements["2423d713-abb3-44c3-8a7d-
c445e16fccad"] %}
Ad Placement attributes
An adplacement is an entity object, with all of the same attributes, in addition to those listed below.
Ads
Returns the collection of ad objects associated
with the placement.
Iteration tags and Array filters may be used with
this collection.
Name
Returns the Name field for the ad placement.
237
placement_url
The URL that can be used to retrieve the ad
placement fully rendered by a template.
random_url
The URL that can be used to retrieve a random ad
from the placement fully rendered by a template.
Ad attributes
Note
An ad is an entity object, with all of the same attributes, in addition to those listed below.
ad_url
The URL that can be used to retrieve the ad fully
rendered by a template.
Copy
Returns the Copy field for the ad.
image
Returns the image object (if any) for the ad.
Name
Returns the Name field for the ad.
open_in_new_window
Returns true if the URL specified by redirect_url
should open in a new window.
redirect_url
The URL that the user will be directed to by
clicking on the ad.
Ad Image attributes
alternate_text
Return the text that is intended to appear in the
tag's alt attribute.
height
Returns the height in pixels for the image
url
Returns the URL source for the image.
width
Returns the width in pixels for the image
See also
Add dynamic content and create custom templates
Liquid types
Liquid Objects
Liquid Tags
Liquid Filters
238
blogs
Applies To: Dynamics 365 (online), Dynamics CRM Online
Provides the ability to access and render Blogs and Blog Posts.
The blogs object allows you to select a specific blog or blog posts.
{% assign posts = blogs.posts | paginate: 0,4 %}
<div class="content-panel panel panel-default">
<div class="panel-heading">
{% assign sitemarker = sitemarkers["Blog Home"] %}
{% assign snippet = snippets["Home Blog Activity Heading"] %}
<a class="pull-right" href="{{sitemarker.url}}"> All Blogs </a>
<h4>
<a class="feed-icon fa fa-rss-square" href="{{ blogs.feedpath }}" />
{{ snippet.adx_value }}
</h4>
</div>
<ul class="list-group">
{% for post in posts.all %}
<li class="list-group-item" >
<a class="user-avatar" href="{{ post.author_url }}">
<img src="{{ post.user_image_url }}" />
</a>
<h4 class="list-group-item-heading">
<a href="{{ post.app_relative_path }}">{{ post.title }}</a>
</h4>
<div class="content-metadata">
<abbr class="timeago">{{ post.publish_date }}</abbr>
–
<a href="{{ post.author_url }}"> {{ post.author_name }} </a>
–
<a href="{{ post.application_path }}#comments">
<span class="fa fa-comment" aria-hidden="true"></span> {{ post.comment_count }}
</a>
</div>
</li>
{% endfor %}

239
</ul>
</div>
blogs Object
The blogs object allows you to access any specific blog in the portal, or to access all blog posts in the
portal (regardless of the blog).
The following table explains the attributes associated with the blogs object.
posts
Returns a blogposts object containing all blog
posts in the portal.
[blog name or id]
You can access any blog by its Name or Id
properties.
{% assign blog = blogs["Blog Name"] %}
{% assign blog = blogs["da8b8a92-2ee6-476f-
8a21-782b047ff460"] %}
blog Object
The blog object allows you to work with a single blog, allowing you to access the posts for that blog.
The following table explains various attributes associated with blog Object.
posts
Returns a blogposts object containing all blog
posts for the blog.
Name
The name of the blog.
title
The title of the blog.
url
The URL of the blog.
blogposts Object
The blogposts object allows you to access a collection of blog post objects. You can order the blog posts
and achieve pagination as well using liquid filters:
{% assign blogposts = blogs.posts | order_by “adx_name”, “desc” | paginate: 0,4 | all %}
Note that blogs.posts.all is also a valid way to get all blog posts
blogs.posts | from_index: 0 | take: 2 is also possible
The following table explains various attributes associated with blogposts Object.
All
Returns all blogpost objects in the collection
240
blogpost Object
Refers to a single blog post.
The following table explains various attributes associated with blogpost Object.
url
The URL of the post.
content
Returns the content field for the post.
content
Returns the Content field for the post.
author
Returns the authorf for the post (which is simply a
contact entity object.
title
The Title of the post.
comment_count
Returns the integer value of the count of how
many comments there for a given post.
publish_date
The date at which the post was published.
See also
Add dynamic content and create custom templates
Liquid types
Liquid Objects
Liquid Tags
Liquid Filters
entities
Applies To: Dynamics 365 (online), Dynamics CRM Online
Allows you to load any Dynamics 365 entity by ID. If the entity exists, an entity object will be returned. If
an entity with the given ID is not found, Liquid types will be returned.
{% assign account = entities.account['936DA01F-9ABD-4d9d-80C7-02AF85C822A8'] %}
{% if account %}
{{ account.name }} ({{ account.statecode.label }})
{% endif %}
{% assign entity_logical_name = 'contact' %}
{% assign contact = entities[entity_logical_name][request.params.contactid] %}
{% if contact %}
{{ contact.fullname }} ({{ contact.parentcustomerid.name }})
{% endif %}

241
Entity
An entity object provides access to the attributes of a Dynamics 365 entity record.
Attribute
Description
Id
The GUID ID of the entity, as a string.
e.g. 936DA01F-9ABD-4d9d-80C7-02AF85C822A8
logical_name
The Dynamics 365 logical name of the entity.
Notes
Loads any notes (annotation) associated with the
entity, ordered from oldest to newest (createdon).
Notes are returned as note objects.
permissions
Loads Entity Permission assertion results for the
entity. Results are returned as a permissions
object.
url
Returns the Dynamics 365 portals content
management system URL path for the entity. If the
entity has no valid URL in the current website,
returns null.
Generally, this will only return a value for certain
entity types that have been integrated into the
portal CMS , unless you have customized the URL
Provider in your application.
[attribute or relationship name]
You can access any attribute of the Dynamics 365
entity by logical name.
{{ entity.createdon }}
{% assign attribute_name = 'name' %}
{{ entity[attribute_name] }}
The values of most entity attributes map directly to
Liquid types: Two Option fields map to Booleans,
text fields to strings, numeric/currency fields to
numbers, date/time fields to date objects. But,
some attribute types are returned as objects:
Lookup (Entity Reference) fields are returned as
entity reference objects.
Option Set/Picklist fields are returned as option set
value objects.
You can also load any related entities by
relationship schema name.
{{ page.adx_webpage_entitylist.adx_name }}
In the case that a relationship is reflexive (i.e. self-
referential), a reflexive relationship object will be
returned. (Otherwise, the desired result would be
ambiguous.)
242
Attribute
Description
{{
page.adx_webpage_webpage.referencing.adx_name
}}
Note
Loading large numbers of related entities, or
accessing large numbers of relationships in a
single template, can have a negative impact on
template rendering performance. Avoid loading
related entities for each item in an array, within a
loop.
Where possible, use Dynamics 365 entity tags to
load collections of entities.
Entity Reference
Lookup attribute values are returned as entity reference objects, with the following attributes.
Attribute
Description
Id
The GUID ID of the referenced entity, as a string.
e.g. 936DA01F-9ABD-4d9d-80C7-02AF85C822A8
logical_name
The Dynamics 365 logical name of the referenced
entity.
Name
The primary name attribute of the referenced
entity.
Note
A note is an entity object that provides access to the attributes and relationships of an annotation record.
In addition to all the attributes of an entity object, a note has the following additional attributes.
Attribute
Description
documentbody
Loads the documentbody attribute of the note
annotation record, as a Base64-encoded string.
As the content of this attribute may be large, it is
not loaded with the rest of the note attributes, and
only loaded on demand.
Note
Use of the documentbody attribute could have a
negative impact on template rendering
performance, and should be done with caution.
243
Attribute
Description
Use the url attribute to provide a link to the note
attachment instead, if possible.
url
Returns the URL path for the built-in portal
annotation attachment handler. If the user has
permission, and the note has an attached file, a
request to this URL will download the note file
attachment.
Note
Additional filters
Option Set Value
Option Set/Picklist attribute values are returned as entity reference objects, with the following attributes.
Attribute
Description
Label
The localized label of the option set/picklist
attribute value.
e.g. Active
Value
The integer value of the option set/picklist attribute
value.
e.g. 0
Entity Permissions
The Entity Permissions object provides access to aggregated permission assertion results for an entity.
Attribute
Description
can_append
Returns true if the current user has permission to
append records to relationships of this record.
Returns false otherwise.
can_append_to
Returns true if the current user has permission to
append this record to a relationship of another
entity. Returns false otherwise.
can_create
Returns true if the current user has permission to
create new records of this entity type. Returns
false otherwise.
can_delete
Returns true if the current user has permission to
delete this record. Returns false otherwise.
244
Attribute
Description
can_read
Returns true if the current user has permission to
read this record. Returns false otherwise.
can_write
Returns true if the current user has permission to
update this record. Returns false otherwise.
rules_exist
Returns true if the permission results represented
by this object are the result of explicitly-defined
permission rules. Returns false if they are the
default results in the absence of explicitly-defined
permissions.
Reflexive Relationship
Attempts to load reflexive (i.e. self-referential) relationships on entities are returned as objects with the
following attributes.
Attribute
Description
is_reflexive
Returns true. Can be used to test if an object
returned by a relationship is a reflexive
relationship object.
referenced
Returns an array of referenced entities for the
given relationship.
referencing
Returns a referencing entity for the given
relationship. Returns null if no referencing entity
exists.
If the relationship is many-to-many (N:N), returns
an array of referencing entities.
See also
Add dynamic content and create custom templates
Liquid types
Liquid Objects
Liquid Tags
Liquid Filters
entitylist
Applies To: Dynamics 365 (online), Dynamics CRM Online
The entitylist object is used within the Dynamics 365 entity tags. It provides access to all the
attributes of a given entity list.
Note
Render the entity list associated with the current page
245
Attributes
Note
entities
create_enabled
Returns true if creation of new records
is configured for the entity list. Returns false
otherwise.
create_label
Returns the configured localized label for a
creation link/button for the entity list.
create_url
Returns the configured URL path for a creation
link/button for the entity list.
detail_enabled
Returns true if a detail view for
individual records is configured for the entity list.
Returns false otherwise.
detail_id_parameter
Returns the query string parameter
name to use for the record ID when constructing a
record detail view URL. See URL filters for details
on using Liquid filters to construct URLs.
e.g. id
detail_label
Returns the configured localized label for detail
view links/buttons for the entity list.
detail_url
Returns the configured URL path for a detail view
links/buttons for the entity list.
empty_list_text
Returns the configured localized text to be
displayed when the entity list view returns no
results.
enable_entity_permissions
Returns true if Entity Permission
filtering is enabled for this entity list. Returns false
otherwise.
entity_logical_name
Returns the Dynamics 365 entity logical name for
records to be displayed by this entity list.
e.g. contact
filter_account_attribute_name
Returns the attribute logical name for
the lookup to account that will be used to filter
result records by the current portal user's parent
account.
e.g. accountid
filter_apply_label
Returns the configured localized label to be used
for the link/button that applies an advanced
attribute filter to the entity list results.

246
filter_definition
Returns the JSON attribute filter
definition for the entity list. See Entity List filters for
details on how to use the metafilters Liquid filter
to process this definition.
filter_enabled
Returns true if advanced attribute
filtering is enabled for the entity list. Returns false
otherwise.
filter_portal_user_attribute_name
Returns the attribute logical name for
the lookup to contact that will be used to filter
result records by current portal user's contact.
e.g. contactid
filter_website_attribute_name
Returns the attribute logical name for
the lookup to adx_website that will be used to filter
result records by the current portal website.
e.g. adx_websiteid
language_code
Returns the Dynamics 365 integer language code
that will be used to select all localized labels for
this entity list.
page_size
Returns the configured result page size for the
entity list.
primary_key_name
Returns the primary key attribute logical name for
records to be displayed by this entity list.
search_enabled
Returns true if search is enabled for
this entity list. Returns false otherwise.
search_placeholder
Returns the configured localized text for the entity
list search field placeholder.
search_tooltip
Returns the configured localized text for the entity
list search tooltip.
views
Returns the available views for the
entity list, as entity list view objects.
[attribute logical name]
You can access any attribute of the
entity list (adx_entitylist) Dynamics 365 record
by logical name, in the same manner as an
entities.
e.g. {{ entitylist.adx_name }}
Entity List View Attributes
columns
Returns the columns of the view, as
entity list view column objects.
entity_logical_name
Returns the Dynamics 365 entity logical name for
the records included in the view.
e.g. contact

247
Id
Returns the GUID ID of the view.
language_code
Returns the Dynamics 365 integer language code
that will be used to select all localized labels
(column headers, etc.) for the view.
Name
Returns the Dynamics 365 display name of the
view.
primary_key_logical_name
Returns the Dynamics 365 entity primary key
logical name for the records included in the view.
e.g. contactid
sort_expression
Returns the default sort expression for the view.
e.g. name ASC, createdon DESC
Entity List View Column Attributes
attribute_type
Returns the Dynamics 365 attribute type name for
the column, as a string.
e.g. Lookup, Picklist, String, Boolean,
DateTime
logical_name
Returns the Dynamics 365 attribute logical name
for the column.
e.g. createdon
Name
Returns the localized Dynamics 365 display name
for the column.
e.g. Created On
sort_ascending
Returns a sort expression string for sorting the
column in ascending order.
e.g. createdon ASC
sort_descending
Returns a sort expression string for sorting the
column in descending order.
e.g. createdon DESC
sort_disabled
Returns true if sorting is disabled for
the column. Returns false otherwise.
sort_enabled
Returns true if sorting is enabled for
the column. Returns false otherwise.
width
Returns the configured width for the column, in
pixels.
See also
Add dynamic content and create custom templates
Liquid types

248
Liquid Objects
Liquid Tags
Liquid Filters
entityview
Applies To: Dynamics 365 (online), Dynamics CRM Online
The entityview object is used within the entityview tag, and provides access to the metadata for the view,
as well as view result records.
Attributes
columns
Returns the columns in the view, as entitylist view
column objects.
entity_permission_denied
Returns true if access to view results was denied
due to insufficient Entity Permissions for the
current user. Returns false if read access to view
results was granted.
entity_logical_name
The Dynamics 365 entity logical name of the view
result records. For example, contact
first_page
The page number of the first page of view results.
This will be 1 unless there were no results
returned, in which case it will be null.
Id
The GUID ID of the Dynamics 365 view that
defines this entityview.
language_code
The Dynamics 365 integer language code being
used to load localized labels for the current view.
last_page
The page number of the last page of view results.
If there were no results returned, this will be null.
name
The name of the Dynamics 365 view that defines
this entityview., for example, Active Contacts.
next_page
The page number of the next page of view results.
If there is no next page of results, this will be null.
Page
The page number of the current page of view
results.
pages
Returns an array of page numbers containing all
pages of results for the current view.
page_size
The number of results returned per page
for the current view.
previous_page
The page number of the next page of view results.
If there is no previous page of results, this will be
null.

249
primary_key_logical_name
The Dynamics 365 logical name of the primary key
attribute of the result entity for this view. For
example, contactid.
records
The current page of result records for the
view, as entity objects.
sort_expression
The default sort expression for the view. For
example, nameASC, createdon DESC.
total_pages
The total number of result pages for the view.
total_records
The total number of results for the view (across all
pages).
See also
Add dynamic content and create custom templates
Liquid types
Liquid Objects
Liquid Tags
Liquid Filters
events
Applies To: Dynamics 365 (online), Dynamics CRM Online
Provides the ability to access and render Events. The events object allows you to select a specific event,
or all events.
events Object
The events object allows you to access any specific event in the portal, or to access all events in the
portal (regardless of the event).
The events object has following attributes:
occurences
Returns a eventoccurancessobject containing all
event occurrences in the portal
[event name or id]
You can access any event by its Name or Id
properties.
{% assign event = events["Event Name"] %}
{% assign event = events["da8b8a92-2ee6-476f-
8a21-782b047ff460"] %}
event Object
The event object allows you to work with a single event, allowing you to access the schedules and
occurrences for that event.
The event object has following attributes:
250
occurences
Returns a eventoccurrencesobject containing all
occurrences for the event.
name
The name of the event.
url
The URL of the event.
eventoccurences Object
The eventoccurrences object allows you to access a collection of event occurrences objects. You can
order the event occurrences and specify a date range for the occurrences to retrieve, and achieve
pagination as well using liquid filters
{% assign occurances = event.occurrences.from[today].to[advance_date] %}
note that
{% assign occurances = event.occurrences.min[today].max[advance_date] %}
is also possible.
Following attributes are associated with eventoccurrences object
All
Returns all eventoccurance objects in the
collection.
eventoccurence Object
Represents a single event occurrence. The associated attributes are given below:
url
The URL of the occurrence.
is_all_day_event
Is this an all-day event?
start_time
The start time for the event.
end_time
The end time for the event.
See also
Add dynamic content and create custom templates
Liquid types
Liquid Objects
Liquid Tags
Liquid Filters
forloop
Applies To: Dynamics 365 (online), Dynamics CRM Online
Contains properties useful within a Iteration tags loop block.
Note
251
forloop can only be used within a Iteration tags tag.
Code
{% for child in page.children %}
{% if forloop.first %}
This is the first child page!
{% else %}
This is child page number {{ forloop.index }}.
{% endif %}
{% endfor %}
Output
This is the first child page!
This is child page number 2.
This is child page number 3.
Attributes
first
Returns true if it's the first iteration of the loop.
Returns false if it's not the first iteration.
index
The current item's position in the collection, where
the first item has a position of 1.
index0
The current item's position in the collection, where
the first item has a position of 0.
Last
Returns true if it's the last iteration of the loop.
Returns false if it's not the last iteration.
length
Returns the number of iterations for the loop ߝ the
number of items in the collection being iterated
over.
rindex
Number of items remaining in the loop (length -
index) where 1 is the index of the last item.
rindex0
Number of items remaining in the loop (length -
index) where 0 is the index of the last item.
See also
Add dynamic content and create custom templates
Liquid types
Liquid Objects
Liquid Tags

252
Liquid Filters
forums
Applies To: Dynamics 365 (online), Dynamics CRM Online
Provides the ability to access and render Forums and Forum Threads. Note that the ability to use liquid
to render forum data extends to posts, but in order to create a new post of thread, you must use an
ASP.NET web forms Page Template with said functionality built in (such as the default Forum Thread and
Forum Post Page Templates).
The forums object allows you to select a Forum or Forum Threads :
<div class="content-panel panel panel-default">
<div class="panel-heading">
<h4>
<span class="fa fa-comments" aria-hidden="true"></span>
{{ snippets["Home Forum Activity Heading"] | default: "Forum Activity" | h }}
</h4>
</div>
{% for forum in website.forums %}
<ul class="list-group">
<li class="list-group-item">
<div class="row">
<div class="col-sm-6">
<h4 class="list-group-item-heading"><a href="{{ forum.url | h }}"> {{ forum.name | h
}}</a></h4>
<div class="list-group-item-text content-metadata">{{ forum.adx_description | h
}}</div>
</div>
<div class="col-sm-3 content-metadata">{{ forum.thread_count }} threads</div>
<div class="col-sm-3 content-metadata">{{ forum.post_count }} posts</div>
</div>
</li>
</ul>
{% endfor %}
</div>
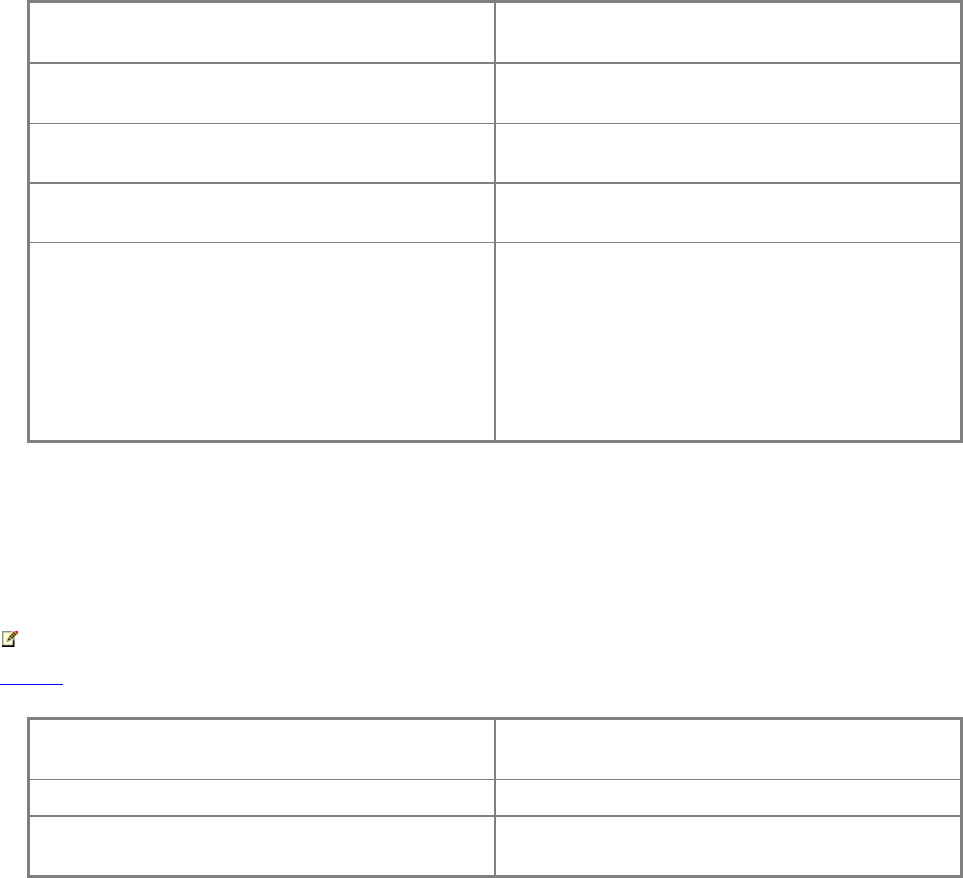
253
forums Object
The forums object allows you to access any specific forum in the portal, or to access all forum threads in
the portal (regardless of the forum).
The forum object allows you to work with a single forum, allowing you to access the threads for that forum.
The forumthreads object allows you to access a collection of forumthread objects. You can order the
forum threads and achieve pagination as well by using liquid filters.
{% assign threads = forum.threads | order_by "adx_name", "desc" | paginate: 0,4 | all %}
A Single Forum Thread
The forumposts object allows you to access a collection of forumpost objects.
Attributes
threads
Returns a forumthreads object containing all
forumthread objects in the portal.
All
Returns all forum objects in the portal. Note that
website.forums Is also an equivalent.
thread_count
Returns the integer value of the count of how
many threads there are in the entire website.
post_count
Returns the integer value of the total number of
posts in the portal.
[forum name or id]
You can access any forum by its Name or Id
properties.
{% assign forum = forums["Forum Name"] %}
{% assign forum = forums["da8b8a92-2ee6-476f-
8a21-782b047ff460"] %}
forum Object
Attributes
Note
entities
threads
Returns a forumthreads object containing all forum
threads for the forum.
Name
The Name of the Forum.
thread_count
Returns the integer value of the count of how
many threads there are in the forum.
254
post_count
Returns the integer value of the count of how
many posts there are in the entire forum.
forumthreads Object
Attributes
All
Returns all forumthread objects in the collection.
forumthread Object
Attributes
Note
entities
posts
Returns a forumposts object containing all forum
posts for the thread.
author
Returns the author for the thread (which is simply
a contact entity object).
latest_post
Returns the latest post in the thread.
first_post
Returns the first post in the thread.
post_count
Returns the integer value of the count of how
many posts there are in the thread.
is_answered
Is the thread answered or not?
is_sticky
Is the thread a sticky thread?
forumposts Object
Attributes
All
Returns all forumthread objects in the collection.
A Single Forum Post
Attributes
Note
255
entities
author
Returns the author for the post (which is simply a
contact entity object).
content
The content of the post.
is_answer
Is this post an answer to the thread?
See also
Add dynamic content and create custom templates
Liquid types
Liquid Objects
Liquid Tags
Liquid Filters
page
Applies To: Dynamics 365 (online), Dynamics CRM Online
Refers to the current portal request page. This object combines the attributes of the sitemap and the
current request entities (usually a webpage).
The page object provides access to things like the breadcrumbs for the current page, the title or URL of
the current page, and any other attributes or related entities of the underlying Dynamics 365 record.
<ul class="breadcrumb">
{% for crumb in page.breadcrumbs %}
<li><a href="{{ crumb.url | escape }}">{{ crumb.title | escape }}</a></li>
{% endfor %}
<li class="active">{{ page.title | escape }}</li>
</ul>
<div class="page-header">
<h1>{{ page.title | escape }}</h1>
</div>
<div class="page-copy">
{{ page.adx_copy }}
</div>
<div class="list-group">
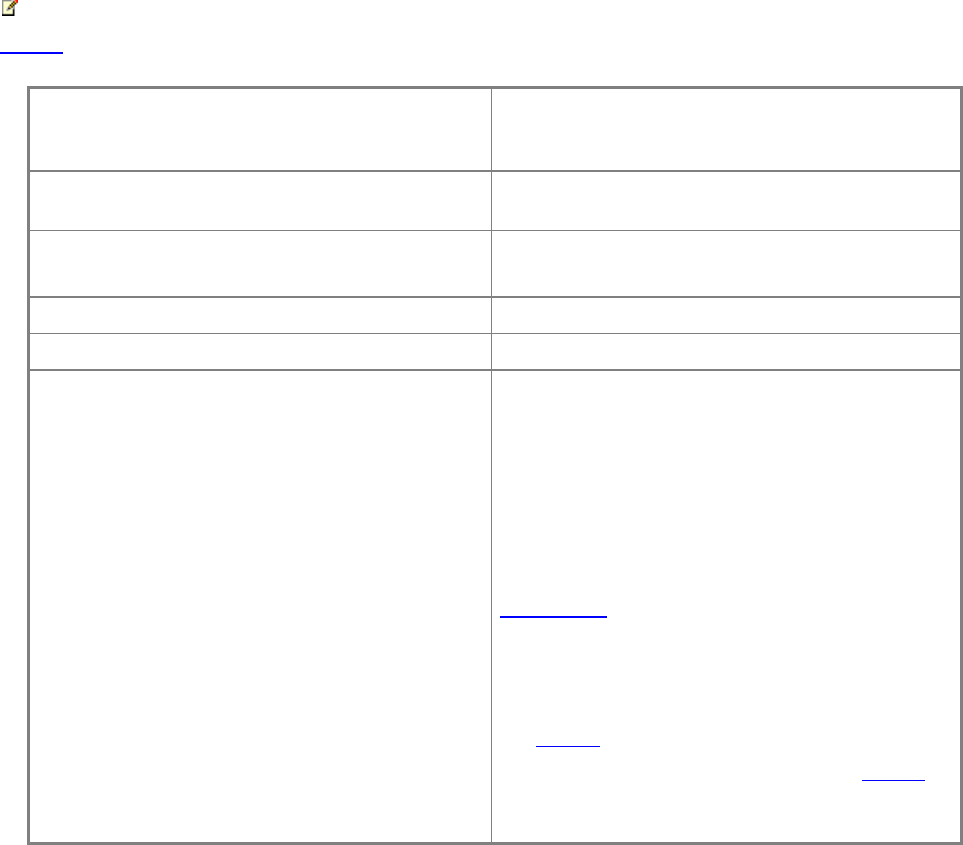
256
{% for child in page.children %}
<a class="list-group-item" href="{{ child.url | escape }}">
{{ child.title | escape }}
</a>
{% endfor %}
</div>
<!-- Page {{ page.id }} was last modified on {{ page.modifiedon }}. -->
Page attributes
Note
entities
breadcrumbs
Returns the breadcrumb site map node objects for
the page, starting from the site map root node and
ending at parent.
children
Returns the child site map node objects of the
page.
parent
Returns the parent site map node of the page.
If the page is the Home page, parent will be null.
title
The title of the page.
url
The URL of the page.
[attribute or relationship name]
You can access any attribute of the page's
underlying Dynamics 365 record by logical name.
{{ page.createdon }}
{% assign attribute_name = 'name' %}
{{ page[attribute_name] }}
The values of most entity attributes map directly to
Liquid types: Two Option fields map to Booleans,
text fields to strings, numeric/currency fields to
numbers, date/time fields to date objects. But,
some attribute types are returned as objects:
Lookup (Entity Reference) fields are returned as
entities.
Option Set/Picklist fields are returned as entities.
You can also load any related entities by
relationship schema name.
257
{{ page.adx_webpage_entitylist.adx_name }}
In the case that a relationship is reflexive (that is,
self-referential), a entities object will be returned.
(Otherwise, the desired result would be
ambiguous.)
{{
page.adx_webpage_webpage.referencing.adx_name
}}
Note
Loading large numbers of related entities, or
accessing large numbers of relationships in a
single template, can have a negative impact on
template rendering performance. Avoid loading
related entities for each item in an array, within a
loop.
Where possible, prefer use of the Dynamics 365
entity tags to load collections of entities.
See also
Add dynamic content and create custom templates
Liquid types
Liquid Objects
Liquid Tags
Liquid Filters
polls
Applies To: Dynamics 365 (online), Dynamics CRM Online
Provides the ability to access and render a poll.
The polls object allows you to select a specific poll or poll placement:
<div>
{% assign poll = polls["Poll Name"] %}
<h4>{{ poll.question }}</h4>
{% for option in poll.options %}
<div>
<input type="radio" name="{{ poll.name }}" id="{{ option.id }}" />
<label for="{{ option.id }}">{{ option.answer }}</label>
</div>
{% endfor %}
<button type="button">{{ poll.submit_button_label }}</button>

258
</div>
Polls Attributes
placements
Returns the pollplacements object.
[poll name or id]
You can access any poll by its Name or Id
properties.
{% assign poll = polls["Poll Name"] %}
{% assign poll = polls["41827a5c-33de-49b8-
a0c7-439e6a02eb98"] %}
Poll Placements Attributes
[poll placement name or id]
You can access any poll placement by its Name or
Id properties.
{% assign placement =
polls.placements["Placement Name or Id"] %}
{% assign placement =
polls.placements["7677c5d4-406e-4b6c-907c-
916ac17dba0f"] %}
Poll Placement Attributes
Note
entities
Name
Returns the Name field for the poll placement.
placement_url
The URL that can be used to retrieve the poll
placement fully rendered by a template.
polls
Returns the collection of poll objects associated
with the placement.
Iteration tags and Array filters may be used with
this collection.
random_url
The URL that can be used to retrieve a random
poll from the placement fully rendered by a
template.
259
submit_url
The URL to which a completed poll is submitted.
Poll Attributes
Note
entities
has_user_voted
Returns true if the current user (logged in or
anonymous) has already voted in this poll.
Name
Returns the Name field for the poll.
options
Returns the collection of poll option objects
associated with the poll.
Iteration tags and entities may be used with this
collection.
poll_url
The URL that can be used to retrieve the poll fully
rendered by a template.
question
Returns the Question field for the poll.
submit_button_label
Returns a string that can be used to override the
submit button label for the poll.
submit_url
The URL to which a completed poll is submitted.
user_selected_option
Returns the polloption object selected by the user
(if they have already voted).
votes
Returns the number of votes that have been
tabulated for the poll.
Poll Option Attributes
Note
entities
answer
Returns the Answer field for the poll.
percentage
Returns the percentage of votes in the poll for the
option as a decimal number between 0 and 100.
votes
Returns the number of votes that have been
tabulated for the option.
260
See also
Add dynamic content and create custom templates
Liquid types
Liquid Objects
Liquid Tags
Liquid Filters
request
Applies To: Dynamics 365 (online), Dynamics CRM Online
Contains information about the current HTTP request.
{% assign id = request.params['id'] %}
<a href="{{ request.url | add_query: 'foo', 1 }}">Link</a>
Note
You can build URLs dynamically in Liquid using URL Filters. More information:
Attributes
params
Named parameter values for the current request.
params is a combination of URL query string
parameters, form post parameters, and cookies.
Path
The path of the current request URL.
/profile/
path_and_query
The path and query of the current request URL.
/profile/?foo=1&bar=something
query
The query part of the current request URL.
?foo=1&bar=something
url
The full URL of the current request.
http://www.example.com/profile/?foo=1&bar=something
See also
Add dynamic content and create custom templates
Liquid types
Liquid Objects
Liquid Tags
Liquid Filters
261
searchindex
Applies To: Dynamics 365 (online), Dynamics CRM Online
The searchindex object is used within the Dynamics 365 entity tags, and provides access to the results of
a query.
{% searchindex query: 'support', page: params.page, page_size: 10 %}
{% if searchindex.results.size > 0 %}
<p>Found about {{ searchindex.approximate_total_hits }} matches:</p>
<ul>
{% for result in searchindex.results %}
<li>
<h3><a href="{{ result.url | escape }}">{{ result.title | escape }}</a></h3>
<p>{{ result.fragment }}</p>
</li>
{% endfor %}
</ul>
{% else %}
<p>Your query returned no results.</p>
{% endif %}
{% endsearchindex %}
Attributes
approximate_total_hits
Returns an approximate count of total hits
matching the index query.
Note that due to the way the search index works in
regard to security filtering and other design
factors, this number is only an approximation, and
may not exactly match the total number of results
available to the current user in some situations.
Page
Returns the page number of the current query.
page_size
Returns the maximum page size of the current
query.
Note that if you want the actual number of results
returned for the current page (as this may be less
than the specified maximum page size), use
results.size.
results
Returns the query result page, as search index
result objects.
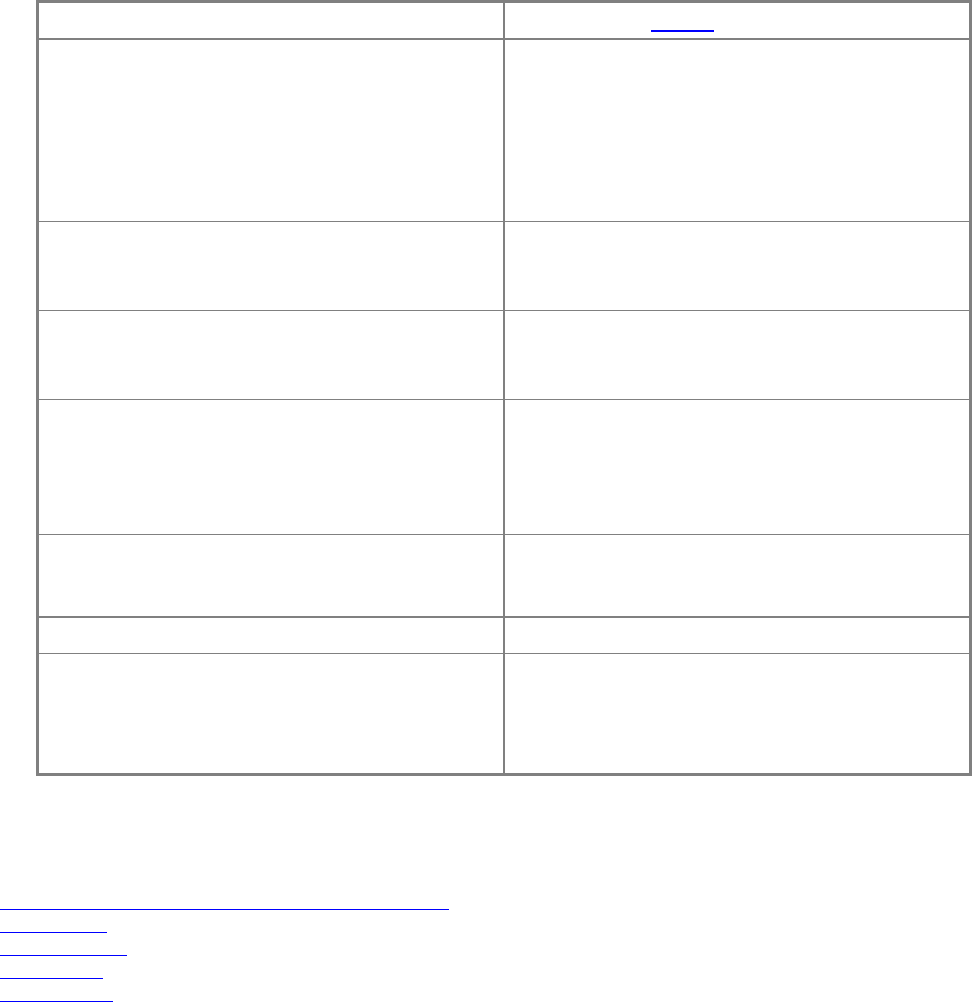
262
Search Index Results
entity
The underlying entities for the result.
fragment
A relevant short text fragment for the result, with
terms matching the specified query highlighted
using the <em> HTML tag.
Note that certain types of queries do not support
highlighted fragments, such as fuzzy queries (~)
and wildcard queries (*). This property will be null
in those cases.
Id
The Dynamics 365 entity ID of the underlying
record for the result, as a string.
e.g. 936DA01F-9ABD-4d9d-80C7-02AF85C822A8
logical_name
The Dynamics 365 entity logical name of the
underlying record for the result.
e.g. adx_webpage
number
The number of the result, across all result pages,
starting from 1.
For example, for the first result of the second page
of results, with a page size of 10, this value will be
11.
score
The Lucene score of the result, as a floating-point
value. Results will be returned ordered by this
value.
title
The title of the result.
url
The URL for the result. This will usually ߝ but not
necessarily ߝ be an absolute path for the current
application, rather than a full URL.
For example: /articles/article1/
See also
Add dynamic content and create custom templates
Liquid types
Liquid Objects
Liquid Tags
Liquid Filters
settings
Applies To: Dynamics 365 (online), Dynamics CRM Online
263
Allows you to load any Configure site settings for portals by name. If a setting with the given name is not
found, Liquid types will be returned.
Note
Settings are returned as Liquid types, but you can use Type filters to convert them to other types.
{{ settings["My Setting"] }}
{% assign search_enabled = settings["Search/Enabled"] | boolean %}
{% if search_enabled %}
Search is enabled.
{% endif %}
{% assign pagesize = settings['page size'] | integer | default: 10 %}
{% if pagesize > 10 %}
Page size is greater than 10.
{% endif %}
Note
Render a website header and primary navigation bar
See also
Add dynamic content and create custom templates
Liquid types
Liquid Objects
Liquid Tags
Liquid Filters
sitemap
Applies To: Dynamics 365 (online), Dynamics CRM Online
Allows access to the portal site map.
<h1>{{ sitemap.root.title }}</h1>
<ul class="breadcrumb">
{% for crumb in sitemap.current.breadcrumbs %}
<li><a href="{{ crumb.title }}">{{ crumb.title }}</a></li>
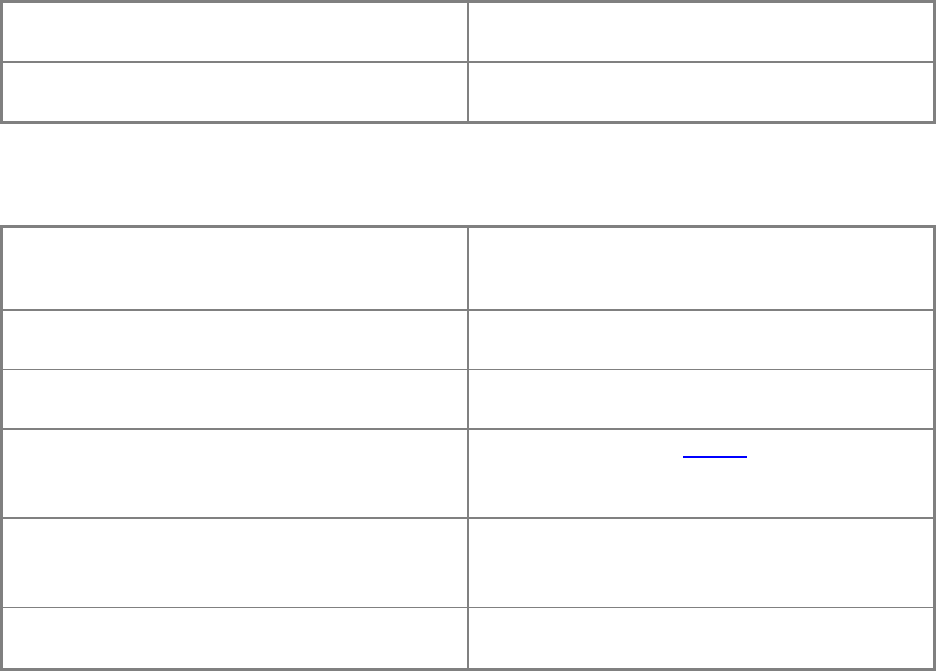
264
{% endfor %}
<li class="active">{{ sitemap.current.title }}</li>
</ul>
{% for child in sitemap.current.children %}
<a href="{{ child.url }}">{{ child.title }}</a>
{% endfor %}
It's also possible to load a site map node by URL path:
{% assign node = sitemap["/content/page1/"] %}
{% if node %}
{% for child in node.children %}
<a href="{{ child.url }}">{{ child.title }}</a>
{% endfor %}
{% endif %}
Site Map Attributes
Current
Returns the site map node object for the current
page.
Root
Returns the site map node object for the root
(home) page of the website.
Site Map Node Attributes
Breadcrumbs
Returns the breadcrumb site map node objects for
the node, starting from the site map root node and
ending at parent.
Children
Returns the child site map node objects of the
node.
Description
The description/summary content for the node.
(This field may contain HTML.)
Entity
Returns the underlying entities of the node.
If the node has no underlying entity, this value will
be null.
is_sitemap_ancestor
Returns true if the sitemap node is an ancestor of
the current node, otherwise false.
Added 7.0.0008
is_sitemap_current
Returns true if the sitemap node is the current
node, otherwise false.

265
Added 7.0.0008
Parent
Returns the parent site map node of the node.
If the node is the root node, parent will be null.
Title
The title of the node.
url
The URL of the node.
See also
Add dynamic content and create custom templates
Liquid types
Liquid Objects
Liquid Tags
Liquid Filters
sitemarkers
Applies To: Dynamics 365 (online), Dynamics CRM Online
Allows you to load any site marker by name. If the sitemarker exists, a sitemarker object will be returned.
If a sitemarker with the given name is not found, Liquid types will be returned.
{{ sitemarkers["Login"].url }}
{% assign my_sitemarker = sitemarkers["My Site Marker"] %}
{% if my_sitemarker %}
<a href="{{ my_sitemarker.url }}">{{ my_sitemarker.adx_name }}</a>
{% else %}
Site marker "My Site Marker" does not exist.
{% endif %}
Note
Render a website header and primary navigation bar
Sitemarker Attributes
url
The URL of the sitemarker target.
[attribute logical name]
You can access any attribute of the sitemarker
target Dynamics 365 record by logical name.
e.g. {{ sitemarker.adx_name }}

266
See also
Add dynamic content and create custom templates
Liquid types
Liquid Objects
Liquid Tags
Liquid Filters
snippets
Applies To: Dynamics 365 (online), Dynamics CRM Online
Allows you to load any content snippets by name. If a snippet with the given name is not found, Null will
be returned.
{{ snippets["Header"] }}
{% assign footer = snippets["Footer"] %}
{% if footer %}
{{ footer }}
{% else %}
No footer snippet was found.
{% endif %}
See also
Add dynamic content and create custom templates
Liquid types
Liquid Objects
Liquid Tags
Liquid Filters
tablerowloop
Applies To: Dynamics 365 (online), Dynamics CRM Online
Contains properties useful within a Iteration tags loop block.
Note
tablerowloop can only be used within a Iteration tags tag.
Attributes
Col
Returns the index of the current row, starting at 1.
267
col0
Returns the index of the current row, starting at 0.
col_first
Returns true if the current column is the first
column in a row, returns false if it is not.
col_last
Returns true if the current column is the last
column in a row, returns false if it is not.
First
Returns true if it's the first iteration of the loop.
Returns false if it's not the first iteration.
Index
The current item's position in the collection, where
the first item has a position of 1.
index0
The current item's position in the collection, where
the first item has a position of 0.
Last
Returns true if it's the last iteration of the loop.
Returns false if it's not the last iteration.
Length
Returns the number of iterations for the loop ߝ the
number of items in the collection being iterated
over.
Rindex
Number of items remaining in the loop (length -
index) where 1 is the index of the last item.
rindex0
Number of items remaining in the loop (length -
index) where 0 is the index of the last item.
See also
Add dynamic content and create custom templates
Liquid types
Liquid Objects
Liquid Tags
Liquid Filters
user
Applies To: Dynamics 365 (online), Dynamics CRM Online
Refers to the current portal user, allowing access to all attributes of the underlying Dynamics 365
contact record. If no user is signed in, this variable will be Liquid types.
user is an entities.
{% if user %}
Hello, {{ user.fullname }}!
{% else %}
Hello, anonymous user!

268
{% endif %}
Attributes
In addition to having all of the attributes of an entities, user has the following attributes.
See also
Add dynamic content and create custom templates
Liquid types
Liquid Objects
Liquid Tags
Liquid Filters
weblinks
Applies To: Dynamics 365 (online), Dynamics CRM Online
Refers to the portal website, allowing access to all attributes of the Dynamics 365 Website (adx_website)
record for the portal.
Note
entities
Code
{{ website.adx_name }} ({{ website.id }})
Output
Community Portal (936DA01F-9ABD-4d9d-80C7-02AF85C822A8)
See also
Add dynamic content and create custom templates
Liquid types
Liquid Objects
Liquid Tags
Liquid Filters
website
Applies To: Dynamics 365 (online), Dynamics CRM Online
Allows you to load any weblinks by name or ID.

269
If the web link set exists, a web link set object will be returned. If a web link set with the given name or ID
is not found, Liquid types will be returned.
<!-- Load web link set by ID -->
{{ weblinks[page.adx_navigation.id].name }}
<!-- Load web link set by name -->
{% assign nav = weblinks["Primary Navigation"] %}
{% if nav %}
<h1>{{ nav.title | escape }}</h1>
<ul>
{% for link in nav.weblinks %}
<li>
<a href="{{ link.url | escape }}" title="{{ link.tooltip | escape }}">
{% if link.image %}
<img src="{{ link.image.url | escape }}" alt="{{ link.image.alternate_text | escape
}}" />
{% endif %}
{{ link.name | escape }}
</a>
</li>
{% endfor %}
</ul>
{% endif %}
Note
Render a website header and primary navigation bar
Web Link Set Attributes
Note
entities
Copy
The HTML copy of the web link set.
Name
The name of the web link set.
Title
The title of the web link set.
270
Weblinks
The array of web link objects associated with the
web link set.
[attribute logical name]
You can access any attribute of the web link set
Dynamics 365 record by logical name.
e.g. {{ weblinkset.createdon }}
Web Link Attributes
Note
entities
Description
The HTML description of the web link.
display_image_only
Boolean attribute indicating whether the web link
should be displayed as an image only, with no link
text.
display_page_child_links
Boolean attribute indicating whether the web link
should show links to the sitemap child pages of
the linked page, as sub-links.
Image
The web link image object for this link. This
attribute will be null if no image is present.
is_external
Boolean attribute indicating whether the target
URL of the web link is to an external site (rather
than to an internal portal page).
is_sitemap_ancestor
Returns true if the weblink's URL references an
ancestor of the current sitemap node, otherwise
false.
Added 7.0.0008
is_sitemap_current
Returns true if the weblink's URL references the
current sitemap node, otherwise false.
Added 7.0.0008
Name
The name/title of the web link.
Nofollow
Boolean attribute indicating whether the web link
should be marked as rel="nofollow".
open_in_new_window
Boolean attribute indicating whether the web link
should be opened in a new browser window/tab
when clicked.
Tooltip
Tooltip text for the web link.
url
The URL of the web link.
Weblinks
The array of child web link objects associated with
the web link.
271
[attribute logical name]
You can access any attribute of the web link
Dynamics 365 record by logical name.
e.g. {{ weblink.createdon }}
Web Link Image Attributes
alternate_text
Alternate text for the image.
Height
Integer containing the specified height of the
image. If no height value was provided, this
attribute will be null.
url
The URL of the image.
Width
Integer containing the specified width of the
image. If no width value was provided, this
attribute will be null.
See also
Add dynamic content and create custom templates
Liquid types
Liquid Objects
Liquid Tags
Liquid Filters
Liquid tags
Applies To: Dynamics 365 (online), Dynamics CRM Online
Tags make up the programming logic that tells templates what to do. Tags are wrapped in {% %}.
{% if user.fullname == 'Dave Bowman' %} Hello, Dave. {% endif %}
White space control
Normally, Liquid renders everything outside of variable and tag blocks verbatim, with all the white space
as-is. Occasionally you don't want the extra white space, but you still want to format the template cleanly,
which requires white space.
You can tell the engine to strip all leading or trailing white space by adding a hyphen (-) to the start or end
block tag.
Code
{% for i in (1..5) --%}
{{ i }}

272
{%-- endfor %}
Output
12345
Tags
The following topics describe each type of tag:
Control flow tags
Iteration tags
Variable tags
Template tags
Dynamics 365 entity tags
See also
Add dynamic content and create custom templates
Store source content by using web templates
Understand Liquid operators
Liquid types
Conditional
Liquid Objects
Liquid Filters
Create advanced templates for portals
Control flow tags
Applies To: Dynamics 365 (online), Dynamics CRM Online
Control Flow tags determine which block of code should be executed and what content should be
rendered based on given conditions. Conditions are built using the available Understand Liquid operators,
or just based on Conditional.
if
Executes a block of code if a given condition is met.
{% if user.fullname == 'Dave Bowman' %}
Hello, Dave.
{% endif %}

273
unless
Like if, except it executes a block of code if a given condition is not met.
{% unless page.title == 'Home' %}
This is not the Home page.
{% endunless %}
elsif/else
Adds more conditions to an if or unless block.
{% if user.fullname == 'Dave Bowman' %}
Hello, Dave.
{% elsif user.fullname == 'John Smith' %}
Hello, Mr. Smith.
{% else %}
Hello, stranger.
{% endif %}
case/when
A switch statement to compare a variable to different values, and execute a different block of code for
each value.
{% case user.fullname %}
{% when 'Dave Bowman' %}
Hello, Dave.
{% when 'John Smith' %}
Hello, Mr. Smith.
{% else %}
Hello, stranger.
{% endcase %}
See also
Add dynamic content and create custom templates
Liquid types
Liquid Objects
Liquid Tags

274
Liquid Filters
Iteration tags
Applies To: Dynamics 365 (online), Dynamics CRM Online
Iteration tags are used to run/render a block of code repeatedly.
for
Executes a block of code repeatedly. It is most commonly used to iterate over the items in an array or
dictionary.
Within the for tag block, the forloop is available.
Code
{% for child_page in page.children %}
<a href="{{ child_page.url }}">{{ child_page.title }}</a>
{% endfor %}
Output
<a href="/parent/child1/">Child 1</a>
<a href="/parent/child2/">Child 2</a>
<a href="/parent/child3/">Child 3</a>
Parameters
These parameters of for can be used alone, or in combination.
limit
Exits the loop after a given number of items.
Code
{% for child_page in page.children limit:2 %}
<a href="{{ child_page.url }}">{{ child_page.title }}</a>
{% endfor %}
Output
<a href="/parent/child1/">Child 1</a>
<a href="/parent/child2/">Child 2</a>
offset
Starts the loop at given index.
Code
{% for child_page in page.children offset:1 %}
<a href="{{ child_page.url }}">{{ child_page.title }}</a>
275
{% endfor %}
Output
<a href="/parent/child2/">Child 2</a>
<a href="/parent/child3/">Child 3</a>
range
Defines a range of numbers to loop through.
Code
{% assign n = 4 %}
{% for i in (2..n) %}
{{ i }}
{% endfor %}
{% for i in (10..14) %}
{{ i }}
{% endfor }}
Output
2 3 4
10 11 12 14
reversed
Iterates through the loop in reverse order, starting from the last item.
Code
{% for child_page in page.children reversed %}
<a href="{{ child_page.url }}">{{ child_page.title }}</a>
{% endfor %}
Output
<a href="/parent/child3/">Child 3</a>
<a href="/parent/child2/">Child 2</a>
<a href="/parent/child1/">Child 1</a>
cycle
Loops through a group of strings and outputs them in the order that they were passed as parameters.
Each time cycle is called, the next string that was passed as a parameter is output.
Code
{% for item in items %}
<div class="{% cycle 'red', 'green', 'blue' %}"> {{ item }} </div>

276
{% end %}
Output
<div class="red"> Item one </div>
<div class="green"> Item two </div>
<div class="blue"> Item three </div>
<div class="red"> Item four </div>
<div class="green"> Item five</div>
tablerow
Generates an HTML table. Must be wrapped in an opening <table> and closing </table> HTML tags.
Within the tablerow tag block, the tablerowloop is available.
Code
<table>
{% tablerow child_page in page.children %}
{{ child_page.title }}
{% endtablerow %}
</table>
Output
<table>
<tr class="row1">
<td class="col1">
Child Page 1
</td>
<td class="col2">
Child Page 2
</td>
<td class="col3">
Child Page 3
</td>
<td class="col4">
Child Page 4
</td>
</tr>
</table>
277
Parameters
These parameters of tablerowcan be used alone, or in combination.
Output
<table>
<tr class="row1">
<td class="col1">
Child Page 1
</td>
<td class="col2">
Child Page 2
</td>
</tr>
<tr class="row2">
<td class="col3">
Child Page 3
</td>
<td class="col4">
Child Page 4
</td>
</tr>
</table>
Code
<table>
{% tablerow child_page in page.children cols:2 %}
{{ child_page.title }}
{% endtablerow %}
</table>
Dictates how many rows the generated table should have.
cols
limit
Exits the loop after a given number of items.
Code
<table>
{% tablerow child_page in page.children limit:2 %}
278
{{ child_page.title }}
{% endtablerow %}
</table>
Output
<table>
<tr class="row1">
<td class="col1">
Child Page 1
</td>
<td class="col2">
Child Page 2
</td>
</tr>
</table>
offset
Starts the loop at given index.
Code
<table>
{% tablerow child_page in page.children offset:2 %}
{{ child_page.title }}
{% endtablerow %}
</table>
Output
<table>
<tr class="row1">
<td class="col1">
Child Page 3
</td>
<td class="col2">
Child Page 4
</td>
</tr>
</table>

279
range
Defines a range of numbers to loop through.
Code
<table>
{% tablerow i in (1..3) %}
{{ i }}
{% endtablerow %}
</table>
See also
Add dynamic content and create custom templates
Liquid types
Liquid Objects
Liquid Tags
Liquid Filters
Variable tags
Applies To: Dynamics 365 (online), Dynamics CRM Online
Variable tags are used to create new Liquid variables.
assign
Creates a new variable. Assignments can also use Liquid Filters to modify the value.
Code
{% assign is_valid = true %}
{% if is_valid %}
It is valid.
{% endif %}
{% assign name = "dave bowman' | upcase %}
{{ name }}
Output
It is valid.
DAVE BOWMAN
280
capture
Captures the content within its block and assigns it to a variable. This content can then be rendered later
by using output tags.
Code
{% capture hello %}Hello, {{ user.fullname }}.{% endcapture %}
{{ hello }}
{{ hello }}
Output
Hello, DAVE BOWMAN.
Hello, DAVE BOWMAN.
See also
Add dynamic content and create custom templates
Liquid types
Liquid Objects
Liquid Tags
Liquid Filters
Template tags
Applies To: Dynamics 365 (online), Dynamics CRM Online
Template tags control the output of a template in various ways, and allow the combination of multiple
templates into a single output.
include
Includes the contents of one template in another, by name. In Dynamics 365 portals, the source of this
other template will generally be a web template. This allows for the reuse of common template fragments
in multiple places.
When a template is included in another, the included template will have access to any variables defined in
the parent template.
{% include 'My Template' %}
It's also possible to pass any number of named parameters to the include tag. These will then be defined
as variables in the included template.
{% include 'My Template' a:x, b:y %}
block
Used in conjunction with extends to provide template inheritance. See extends for usage.

281
extends
Used in conjunction with the block tag, provides template inheritance. This allows multiple templates to
use a shared layout, while overriding specific areas of the parent layout.
In Dynamics 365 portals, the parent template name provided to the tag will generally refer to the name of
a web template.
When extends is used, it must be the first content in the template, and can only be followed by one or
more block tags.
If a block defined in the parent template is not overridden, its contents in the parent template (if any) will
be rendered.
comment
Allows you to leave un-rendered code inside a Liquid template. Any content within the block will not be
rendered, and any Liquid code within will not be executed.
Code
Hello{% comment %}, {{ user.fullname }}{% endcomment %}. My name is Charles.
Output
Hello. My name is Charles.
raw
Allows output of Liquid code on a page without having it parsed and executed.
Output
Hello, {{ user.fullname }}. My name is Charles.
See also
Add dynamic content and create custom templates
Liquid types
Liquid Objects
Liquid Tags
Liquid Filters
Dynamics 365 entity tags
Applies To: Dynamics 365 (online), Dynamics CRM Online
Dynamics 365 entity tags are used to load and display Dynamics 365 data, or use other Dynamics 365
portals framework services. These tags are Dynamics 365-specific extensions to the Liquid language.
editable
Renders a given Dynamics 365 portals CMS object as Use the front-side editing engine to publish
content, for users with content editing permission for that object. Editable objects include page, snippets,
and weblinks.
282
{% editable page 'adx_copy' type: 'html', title: 'Page Copy', escape: false, liquid: true %}
{% editable snippets "Header" type: 'html' %}
<!--
An editable web link set required a specific DOM structure, with
certain classes on the containing element, as demonstrated here.
-->
{% assign primary_nav = weblinks["Primary Navigation"] %}
{% if primary_nav %}
<div {% if primary_nav.editable %}class="xrm-entity xrm-editable-adx_weblinkset"{% endif %}>
<ul>
<!-- Render weblinks... -->
</ul>
{% editable primary_nav %}
</div>
{% endif %}
Parameters
The first parameter provided to editable is the editable object. For example, this may be a web link set,
snippets, or the current page. The optional second parameter is to specify an attribute name or key within
that object that is to be rendered and edited. This may be the name of an entity attribute, or a snippet
name, for example.
After these initial parameters, the tag supports a number of optional named parameters.
class
Specifies a class attribute value for the root element rendered by this tag.
default
A default value to be rendered in the case that the editable item has no value.
escape
A Boolean value indicating whether a value rendered by this tag will be HTML-encoded. This is false by
default.
liquid
A Boolean value indicating whether any Liquid template code found within the text value rendered by this
tag will be processed. This is true by default.

283
tag
The name of the container HTML tags that will be rendered by this tag. This tag will render div elements
by default. It is generally recommended that you choose between div or span as a value for this
parameter.
title
Specifies a label for this editable item within the content editing interface. If none is provided, a friendly
label will be generated automatically.
type
A string value indicating the type of editing interface to be presented, for editable text values. Valid values
for this parameter are html or text. html is the default.
entitylist
Loads a given entity list, by name or ID. The properties of the entity list can then be accessed using an
entitylist that will be available within the tag block. To render the actual result records of the entity list, use
the entityview tag within the block.
If the entity list is loaded successfully, the content within the block will be rendered. If the entity list is not
found, the block content will not be rendered.
{% entitylist name:"My Entity List" %}
Loaded entity list {{ entitylist.adx_name }}.
{% endentitylist %}
By default, the entitylist object will be given the variable name entitylist. Optionally, a different variable
name can be provided.
{% entitylist my_list = name:"My Entity List" %}
Loaded entity list {{ my_list.adx_name }}.
{% endentitylist %}
Note
Render the entity list associated with the current page
Parameters
Provide only one of id, name, or key to select the Entity List to load.
id
Loads an entity list by GUID ID. id must be a string that can be parsed as a GUID.
{% entitylist id:"936DA01F-9ABD-4d9d-80C7-02AF85C822A8" %}
Loaded entity list {{ entitylist.adx_name }}.
{% endentitylist %}

284
Generally, literal GUID strings will not be used. Instead, id will be specified using a GUID property of
another variable.
{% entitylist id:page.adx_entitylist.id %}
Loaded entity list {{ entitylist.adx_name }}.
{% endentitylist %}
name
Loads an entity list by name.
{% entitylist name:"My Entity List" %}
Loaded entity list {{ entitylist.adx_name }}.
{% endentitylist %}
key
Loads an entity list by ID or name. If the provided key value can be parsed as a GUID, the entity list will
be loaded by ID. Otherwise, it will be loaded by name.
<!-- key_variable can hold an ID or name -->
{% entitylist key:key_variable %}
Loaded entity list {{ entitylist.adx_name }}.
{% endentitylist %}
language_code
A Dynamics 365 integer language code to select the entity list localized labels to be loaded. If no
language_code is provided, the default language of the portal application Dynamics 365 connection will be
used.
{% entitylist name:"My Entity List", language_code:1033 %}
Loaded entity list {{ entitylist.adx_name }}.
{% endentitylist %}
entityview
Loads a given Dynamics 365 view, by name or ID. The properties of the view ߝ view column metadata,
paginated result records, etc. can then be accessed using an entityview that will be available within the
tag block.
If the view is loaded successfully, the content within the block will be rendered. If the view is not found,
the block content will not be rendered.
{% entityview logical_name:'contact', name:"Active Contacts" %}
Loaded entity view with {{ entityview.total_records }} total records.
{% endentityview %}
By default, the entityview object will be given the variable name entityview. Optionally, a different
variable name can be provided.

285
{% entityview my_view = logical_name:'contact', name:"Active Contacts" %}
Loaded entity view with {{ my_view.total_records }} total records.
{% endentityview %}
If entityview is nested within an entitylist block, it will inherit its default configuration (result page size,
filter options, etc.) from the entity list. If no view id or name parameters are provided to entityview, it will
load the default view from the enclosing entitylist.
{% entitylist id:page.adx_entitylist.id %}
{% entityview %}
Loaded default view of the entity list associated with the current page, with {{
entityview.total_records }} total records.
{% endentityview %}
{% endentitylist %}
Note
Render the entity list associated with the current page
Parameters
Provide either id or logical_name with name to select the Dynamics 365 view to load. If neither is
provided, and the entityview tag is nested within an entitylist tag, the default view of the enclosing
entitylist will be loaded.
id
id must be a string that can be parsed as a GUID.
{% entityview id:"936DA01F-9ABD-4d9d-80C7-02AF85C822A8" %}
Loaded entity view {{ entityview.name }}.
{% endentityview %}
Generally, literal GUID strings will not be used. Instead, id will be specified using a GUID property of
another variable.
{% entityview id:request.params.view %}
Loaded entity view {{ entityview.name }} using "view" query string request parameter.
{% endentityview %}
logical_name
The Dynamics 365 entity logical name of the view to be loaded. Must be used in combination with name.
{% entityview logical_name:'contact', name:"Active Contacts" %}
Loaded entity view with {{ entityview.total_records }} total records.
{% endentityview %}
286
name
The Dynamics 365 name of the view to be loaded. Must be used in combination with logical_name.
{% entityview logical_name:'contact', name:"Active Contacts" %}
Loaded entity view with {{ entityview.total_records }} total records.
{% endentityview %}
filter
Specifies whether to filter the view results by user or account. Must have a string value of "user" or
"account".
{% entityview id:request.params.view, filter:'user' %}
Loaded entity view with {{ entityview.total_records }} total records.
{% endentityview %}
A common use case is to set this parameter based on a request.
{% entityview id:request.params.view, filter:request.params.filter %}
Loaded entity view with {{ entityview.total_records }} total records.
{% endentityview %}
metafilter
Specifies the Entity List metadata filter expression by which to filter view results. This parameter is only
valid when entityview is used in combination with entitylist. In most cases, this parameter is set based on
a request.
{% entitylist id:page.adx_entitylist.id %}
{% entityview id:request.params.view, metafilter:request.params.mf %}
Loaded entity view with {{ entityview.total_records }} total records.
{% endentityview %}
{% endentitylist %}
Note
Entity List filters
order
Specifies a sort expression for ordering view results. A sort expression can contain one or more entity
attribute logical names, followed by a sort direction of either ASC or DESC.
{% entityview id:request.params.view, order:'name ASC, createdon DESC' %}
Loaded entity view with {{ entityview.total_records }} total records.
{% endentityview %}
A common use case is to set this parameter based on a request.
{% entityview id:request.params.view, order:request.params.order %}

287
Loaded entity view with {{ entityview.total_records }} total records.
{% endentityview %}
page
Specifies the view result page to load. If this parameter is not specified, the first page of results will be
loaded.
This parameter must be passed either an integer value, or a string that can be parsed as an integer. If a
value is provided for this parameter, but the value is null or otherwise cannot be parsed as an integer, the
first page of results will be loaded.
{% entityview id:request.params.view, page:2 %}
Loaded page {{ entityview.page }} of entity view with {{ entityview.total_records }} total
records.
{% endentityview %}
A common use case is to set this parameter based on a request.
{% entityview id:request.params.view, page:request.params.page %}
Loaded page {{ entityview.page }} of entity view with {{ entityview.total_records }} total
records.
{% endentityview %}
page_size
Specifies the number of results to load for the current result page. If no value is provided for this
parameter, and entityview is used within an entitylist block, the entity list page size will be used. If not
within an entitylist block, a default value of 10 will be used.
This parameter must be passed either an integer value, or a string that can be parsed as an integer. If a
value is provided for this parameter, but the value is null or otherwise cannot be parsed as an integer, the
default page size will be used.
{% entityview id:request.params.view, page_size:20 %}
Loaded entity view with {{ entityview.total_records }} total records.
{% endentityview %}
A common use case is to set this parameter based on a request.
{% entityview id:request.params.view, page_size:request.params.pagesize %}
Loaded entity view with {{ entityview.total_records }} total records.
{% endentityview %}
search
Specifies a search expression by which to filter view results. Simple keyword search expressions will filter
by whether attributes begin with the keyword. Wildcards * can also be included in the expression.
{% entityview id:request.params.view, search:'John*' %}
Loaded entity view with {{ entityview.total_records }} total matching records.
{% endentityview %}

288
A common use case is to set this parameter based on a request, so that the search filter can be set
based on user input.
{% entityview id:request.params.view, search:request.params.search %}
Loaded entity view with {{ entityview.total_records }} total matching records.
{% endentityview %}
enable_entity_permissions
Specifies whether to apply entity permission filtering on view results. This parameter is set to false by
default. If entityview is used within an entitylist block, the value of this parameter will be inherited from
the entity list configuration.
This parameter must be passed either an Liquid types value, or a string that can be parsed as a Boolean
("true", "false"). If a value is provided for this parameter, but the value is null or otherwise cannot be
parsed as a Boolean, the default of false will be used.
{% entityview id:request.params.view, enable_entity_permissions:true %}
Loaded entity view with {{ entityview.total_records }} total records to which the user has read
permission.
{% endentityview %}
language_code
A Dynamics 365 integer language code to select the entity view localized labels (column header labels,
etc.) to be loaded. If no language_code is provided, the default language of the portal application Dynamics
365 connection will be used.
If entityview is used within an entitylist block, entityview will inherit its language code configuration from
entitylist.
{% entityview logical_name:'contact', name:"Active Contacts", language_code:1033 %}
Loaded entity view {{ entityview.name }}.
{% endentitylist %}
searchindex
Performs a query against the portal search index. The matching results can then be accessed using a
searchindex that will be available within the tag block.
{% searchindex query: 'support', page: params.page, page_size: 10 %}
{% if searchindex.results.size > 0 %}
<p>Found about {{ searchindex.approximate_total_hits }} matches:</p>
<ul>
{% for result in searchindex.results %}
<li>
<h3><a href="{{ result.url | escape }}">{{ result.title | escape }}</a></h3>
<p>{{ result.fragment }}</p>

289
</li>
{% endfor %}
</ul>
{% else %}
<p>Your query returned no results.</p>
{% endif %}
{% endsearchindex %}
By default, the search index object will be given the variable name searchindex. Optionally, a different
variable name can be provided.
{% searchindex liquid_search = query: 'support', page: params.page, page_size: 10 %}
{% if liquid_search.results.size > 0 %}
...
{% endif %}
{% endsearchindex %}
Parameters
The searchindex tag accepts the following parameters.
query
The query used to match results. This parameter is intended to accept the user-specified part of the index
query (if any).
{% searchindex query: 'support' %}
...
{% endsearchindex %}
A common use case is to set this parameter based on a request.
{% searchindex query: request.params.query %}
...
{% endsearchindex %}
This parameter supports the Lucene Query Parser syntax.
filter
An additional query used to match results. This parameter is intended to accept a developer-specified
filter for results, if desired.
{% searchindex query: request.params.query, filter: '+statecode:0' %}
...
{% endsearchindex %}
This parameter supports the Lucene Query Parser syntax.

290
Note
The difference between filter and query is that while both will accept the Lucene Query Parser syntax,
query is intended to be more forgiving about how this syntax is parsed ߝ as it's expected that most end
users will not be aware of this syntax.
So, in the case that parsing query according to this syntax fails, the entire query will be escaped and
submitted as the query text. filter, on the other hand, will be parsed strictly and return an error if the
case of invalid syntax.
logical_names
The Dynamics 365 entity logical names to which matching results will be restricted, as a comma-delimited
string. If not provided, all matching entities will be returned.
{% searchindex query: request.params.query, logical_names: 'kbarticle,incident' %}
...
{% endsearchindex %}
page
The search result page to be returned. If not provided, the first page (1) will be returned.
{% searchindex query: request.params.query, page: 2 %}
...
{% endsearchindex %}
A common use case is to set this parameter based on a request.
{% searchindex query: request.params.query, page: request.params.page %}
...
{% endsearchindex %}
page_size
The size of the result page to be returned. If not provided, a default size of 10 will be used.
{% searchindex query: request.params.query, page_size: 20 %}
...
{% endsearchindex %}
provider
Specifies the name of the configured search provider to use. If not specified, the default search provider
will be used.
Having multiple search providers is an advanced configuration that will not apply to most environments.
Generally, it will not be necessary to specify this parameter.
{% searchindex query: request.params.query, provider: 'AlternateIndex' %}
...
{% endsearchindex %}

291
entityform
Fully renders a Dynamics 365-configured Define entity forms and custom logic within the Dynamics 365
portal, by name or ID.
Note
The entityform tag is only available for use in content rendered inside a web template–based page
template. Attempting to use the tag inside a Rewrite-based Page Template will not render anything.
You may only render a single entityform or webform tag per page. entityform or webform tags after the
first will not be rendered.
{% entityform name: 'My Entity Form' %}
Parameters
name
The name of the Entity Form you wish to load.
{% entityform name:"My Entity Form" %}
{% webform name:"My Web Form" %}
The name of the Web Form you wish to load.
name
Parameters
webform
Fully renders a Dynamics 365-configured web form, by name or ID.
Note
The webform tag is only available for use in content rendered inside a web template–based page
template. Attempting to use the tag inside a Rewrite-based Page Template will not render anything.
You may only render a single entityform or webform tag per page. entityform or webform tags after the
first will not be rendered.
{% webform name: 'My Web Form' %}
See also
Add dynamic content and create custom templates
Liquid types
Liquid Objects

292
Liquid Tags
Liquid Filters
Liquid filters
Applies To: Dynamics 365 (online), Dynamics CRM Online
Liquid filters are used to modify the output of strings, numbers, variables, and objects. They are
separated from the value to which they are being applied by a |.
{{ 'hal 9000' | upcase }} <!-- Output: HAL 9000 -->
Some filters accept parameters. Filters can also be combined, and are applied in order from left to right.
{{ 2 | times: 2 | minus: 1 }} <!-- Output: 3 -->
{{ "Hello, " | append: user.firstname }} <!-- Output: Hello, Dave -->
Filters
The following topics describe each type of filter:
Array filters
Entity List filters
Date filters
Math filters
String filters
Type filters
URL filters
Additional filters
See also
Add dynamic content and create custom templates
Store source content by using web templates
Understand Liquid operators
Liquid types
Conditional
Liquid Objects
Liquid Tags
Create advanced templates for portals
Array filters
Applies To: Dynamics 365 (online), Dynamics CRM Online
Array filters are used to work with Liquid types.
293
batch
Divides an array into multiple arrays of a given size.
Code
{% assign batches = entityview.records | batch: 2 %}
{% for batch in batches %}
<ul>
{% for item in batch %}
<li>{{ item.fullname }}</li>
{% endfor %}
</ul>
{% endfor %}
Output
<ul>
<li>John Smith</li>
<li>Dave Thomas</li>
</ul>
<ul>
<li>Jake Johnson</li>
<li>Jack Robinson</li>
</ul>
concat
Concatenates two arrays into a single new array.
Given a single item as a parameter, concat returns a new array that consists of the original array, with the
given item as the last element.
Code
Group #1: {{ group1 | join: ', ' }}
Group #2: {{ group2 | join: ', ' }}
Group #1 + Group #2: {{ group1 | concat: group2 | join: ', ' }}
Group #1 + Leslie: {{ group1 | concat: 'Leslie' | join: ', ' }}
Output
Group #1: John, Pete, Hannah
Group #2: Joan, Bill
Group #1 + Group #2: John, Pete, Hannah, Joan, Bill
Group #1 + Leslie: John, Pete, Hannah, Leslie
294
except
Select all the objects in an array where a given attribute does not have a given value. (This is the inverse
of where.)
Code
{% assign redmond = entityview.records | except: 'address1_city', 'Redmond' %}
{% for item in redmond %}
{{ item.fullname }}
{% endfor %}
Output
Jack Robinson
first
Returns the first element of an array.
first can also be used with a special dot notation, in cases where it needs to be used inside a tag.
Code
{% assign words = "This is a run of text" | split: " " %}
{{ words | first }}
{% if words.first == "This" %}
The first word is "This".
{% endif %}
Output
{% assign words = "This is a run of text" | split: " " %}
{{ words | first }}
{% if words.first == "This" %}
The first word is "This".
{% endif %}
group_by
Group the items in an array by a given attribute.
Code
{% assign groups = entityview.records | group_by: 'address1_city' %}
{% for group in groups %}
{{ group.key }}:
{% for item in group.items %}
{{ item.fullname }}
{% endfor %}
295
{% endfor %}
Output
Redmond:
John Smith
Dave Thomas
Jake Johnson
New York:
Jack Robinson
join
Joins the elements of an array with the character passed as the parameter. The result is a single string.
Code
{% assign words = "This is a run of text" | split: " " %}
{{ words | join: ", " }}
Output
{% assign words = "This is a run of text" | split: " " %}
{{ words | join: ", " }}
last
Returns the last element of an array.
last can also be used with a special dot notation, in cases where it needs to be used inside a tag.
Code
{% assign words = "This is a run of text" | split: " " -%}
{{ words | last }}
{% if words.last == "text" -%}
The last word is "text".
{% endif -%}
Output
{% assign words = "This is a run of text" | split: " " -%}
{{ words | last }}
{% if words.last == "text" -%}
The last word is "text".
{% endif -%}
296
order_by
Returns the elements of an array ordered by a given attribute of the elements of the array.
Optionally, you can provide desc as a second parameter to sort the elements in descending order, rather
than ascending.
Code
{{ entityview.records | order_by: 'fullname' | join: ', ' }}
{{ entityview.records | order_by: 'fullname', 'desc' | join: ', ' }}
Output
Dave Thomas, Jack Robinson, Jake Johnson, John Smith
John Smith, Jake Johnson, Jack Robinson, Dave Thomas
random
Returns a single randomly-selected item from the array.
Code
{{ group1 | join: ', ' }}
{{ group1 | random }}
Output
John, Pete, Hannah
Pete
select
Selects the value of a given attribute for each item in an array, and returns these values as an array.
Code
{{ entityview.records | select: 'address1_city' | join: ', ' }}
Output
Redmond, New York
shuffle
Applied to an array, returns a new array with the same items, in randomized order.
Code
{{ group1 | join: ', ' }}
{{ group1 | shuffle | join: ', ' }}
Output
John, Pete, Hannah
Hannah, John, Pete
297
size
Returns the number of items in an array.
size can also be used with a special dot notation, in cases where it needs to be used inside a tag.
Code
{% assign words = "This is a run of text" | split: " " -%}
{{ words | size }}
{% if words.size == 6 -%}
The text contains 6 words.
{% endif -%}
Output
{% assign words = "This is a run of text" | split: " " -%}
{{ words | size }}
{% if words.size == 6 -%}
The text contains 6 words.
{% endif -%}
skip
Skips a given number of items in an array, and returns the rest.
Code
{% assign words = "This is a run of text" | split: " " %}
{{ words | skip: 3 | join: ', ' }}
Output
{% assign words = "This is a run of text" | split: " " %}
{{ words | skip: 3 | join: ', ' }}
take
Takes a given number of items from the array, returning the taken items.
Code
{% assign words = "This is a run of text" | split: " " %}
{{ words | take: 3 | join: ', ' }}
Output
{% assign words = "This is a run of text" | split: " " %}
{{ words | take: 3 | join: ', ' }}
then_by
Adds additional subsequent ordering to an array already ordered by order_by.

298
Optionally, you can provide desc as a second parameter to sort the elements in descending order, rather
than ascending.
Code
{{ entityview.records | order_by: 'address1_city' | then_by: 'fullname' | join: ', ' }}
{{ entityview.records | order_by: 'address1_city' | then_by: 'fullname', 'desc' | join: ', ' }}
Output
Dave Thomas, Jack Robinson, Jake Johnson, John Smith
John Smith, Jake Johnson, Jack Robinson, Dave Thomas
where
Select all the objects in an array where a given attribute has a given value.
Code
{% assign redmond = entityview.records | where: 'address1_city', 'Redmond' %}
{% for item in redmond %}
{{ item.fullname }}
{% endfor %}
Output
John Smith
Dave Thomas
Jake Johnson
See also
Add dynamic content and create custom templates
Liquid types
Liquid Objects
Liquid Tags
Liquid Filters
Date filters
Applies To: Dynamics 365 (online), Dynamics CRM Online
Date filters can be used for date arithmetic or to convert DateTime values into various formats.
date
Formats a DateTime value using a .NET format string.
Standard Date and Time Format Strings
Custom Date and Time Format Strings
Code
299
{{ now | date: 'g' }}
{{ now | date: 'MMMM dd, yyyy' }}
Output
{{ now | date: 'g' }}
{{ now | date: 'MMMM dd, yyyy' }}
date_add_days
Adds the specified number of whole and fractional days to the DateTime value. The parameter can be
positive or negative.
Code
{{ now }}
{{ now | date_add_days: 1 }}
{{ now | date_add_days: -2.5 }}
Output
{{ now }}
{{ now | date_add_days: 1 }}
{{ now | date_add_days: -2.5 }}
date_add_hours
Adds the specified number of whole and fractional hours to the DateTime value. The parameter can be
positive or negative.
Code
{{ now }}
{{ now | date_add_hours: 1 }}
{{ now | date_add_hours: -2.5 }}
Output
{{ now }}
{{ now | date_add_hours: 1 }}
{{ now | date_add_hours: -2.5 }}
date_add_minutes
Adds the specified number of whole and fractional minutes to the DateTime value. The parameter can be
positive or negative.
Code
{{ now }}
{{ now | date_add_minutes: 10 }}
{{ now | date_add_minutes: -2.5 }}
300
Output
{{ now }}
{{ now | date_add_minutes: 10 }}
{{ now | date_add_minutes: -2.5 }}
date_add_months
Adds the specified number of whole months to the DateTime value. The parameter can be positive or
negative.
Code
{{ now }}
{{ now | date_add_months: 1 }}
{{ now | date_add_months: -2 }}
Output
{{ now }}
{{ now | date_add_months: 1 }}
{{ now | date_add_months: -2 }}
date_add_seconds
Adds the specified number of whole and fractional seconds to the DateTime value. The parameter can be
positive or negative.
Code
{{ now }}
{{ now | date_add_seconds: 10 }}
{{ now | date_add_seconds: -1.25 }}
Output
{{ now }}
{{ now | date_add_seconds: 10 }}
{{ now | date_add_seconds: -1.25 }}
date_add_years
Adds the specified number of whole years to the DateTime value. The parameter can be positive or
negative.
Code
{{ now }}
{{ now | date_add_years: 1 }}
{{ now | date_add_years: -2 }}
Output

301
{{ now }}
{{ now | date_add_years: 1 }}
{{ now | date_add_years: -2 }}
date_to_iso8601
Formats a DateTime value according to the ISO 8601 standard. Useful when creating Atom feeds, or the
HTML5 <time> element.
Code
{{ now | date_to_iso8601 }}
Output
{{ now | date_to_iso8601 }}
date_to_rfc822
Formats a DateTime value according to the RFC 822 standard. Useful when creating RSS feeds.
Code
{{ now | date_to_rfc822 }}
Output
{{ now | date_to_rfc822 }}
See also
Add dynamic content and create custom templates
Liquid types
Liquid Objects
Liquid Tags
Liquid Filters
Entity list filters
Applies To: Dynamics 365 (online), Dynamics CRM Online
Entity List filters are used to work with certain entitylist attribute values, and to help create entity list views.
current_sort
Given a sort expression, returns the current sort direction for a given attribute.
Code
{{ 'name ASC, createdon DESC' | current_sort: 'createdon' }}
Output
DESC

302
metafilters
Parses an entitylist filter_definition JSON value into filter option group objects.
metafilters can be optionally provided with a current attribute filter query and current entitylist, allowing
the returned filter objects to be flagged as either selected or unselected.
reverse_sort
Given a sort direction, returns the opposite sort direction.
Code
<!-- Sort direction is not case-sensitive -->
{{ 'ASC' | reverse_sort }}
{{ 'desc' | reverse_sort }}
Output
DESC
ASC
See also
Add dynamic content and create custom templates
Liquid types
Liquid Objects
Liquid Tags
Liquid Filters
Math filters
Applies To: Dynamics 365 (online), Dynamics CRM Online
Math filters allow you to perform mathematical operations on Liquid types.
As with all filters, math filters can be chained, and are applied in order from left to right.
Code
{{ 10 | times: 2 | minus: 5 | divided_by: 3 }}
Output
{{ 10 | times: 2 | minus: 5 | divided_by: 3 }}
ceil
Rounds a value up to the nearest integer.
Code
{{ 4.6 | ceil }}
{{ 4.3 | ceil }}
Output
303
5
5
divided_by
Divides a number by another number.
Code
{{ 10 | divided_by: 2 }}
{{ 10 | divided_by: 3 }}
{{ 10.0 | divided_by: 3 }}
Output
{{ 10 | divided_by: 2 }}
{{ 10 | divided_by: 3 }}
{{ 10.0 | divided_by: 3 }}
floor
Rounds a value down to the nearest integer.
Code
{{ 4.6 | floor }}
{{ 4.3 | floor }}
Output
4
4
minus
Subtracts a number from another number.
Code
<!-- entityview.page = 11 -->
{{ entityview.page | minus: 1 }}
{{ 10 | minus: 1.1 }}
{{ 10.1 | minus: 1 }}
Output
10
{{ 10 | minus: 1.1 }}
{{ 10.1 | minus: 1 }}
304
modulo
Divides a number by another number and returns the remainder.
Code
{{ 12 | modulo: 5 }}
Output
{{ 12 | modulo: 5 }}
plus
Adds a number to another number.
Code
<!-- entityview.page = 11 -->
{{ entityview.page | plus: 1 }}
{{ 10 | plus: 1.1 }}
{{ 10.1 | plus: 1 }}
Output
12
{{ 10 | plus: 1.1 }}
{{ 10.1 | plus: 1 }}
round
Rounds a value to the nearest integer or specified number of decimals.
Code
{{ 4.6 | round }}
{{ 4.3 | round }}
{{ 4.5612 | round: 2 }}
Output
5
4
4.56
times
Multiplies a number by another number.
Code
{{ 10 | times: 2 }}
{{ 10 | times: 2.2 }}
{{ 10.1 | times: 2 }}

305
Output
{{ 10 | times: 2 }}
{{ 10 | times: 2.2 }}
{{ 10.1 | times: 2 }}
See also
Add dynamic content and create custom templates
Liquid types
Liquid Objects
Liquid Tags
Liquid Filters
String filters
Applies To: Dynamics 365 (online), Dynamics CRM Online
String filters manipulate Liquid types.
append
Appends a string to the end of another string.
Code
{{ 'filename' | append: '.js' }}
Output
{{ 'filename' | append: '.js' }}
capitalize
capitalizes the first word in a string.
Code
{{ 'capitalize me' | capitalize }}
Output
{{ 'capitalize me' | capitalize }}
downcase
Converts a string into lowercase.
Code
{{ 'MIxed Case TExt' | downcase }}
Output
{{ 'MIxed Case TExt' | downcase }}
306
escape
HTML-escapes a string.
Code
{{ '<p>test</p>' | escape }}
Output
<p>test</p>
newline_to_br
Inserts a <br /> line break HTML tag at each line break in a string.
Code
{% capture text %}
A
B
C
{% endcapture %}
{{ text | newline_to_br }}
Output
A<br />
B<br />
C<br />
prepend
Prepends a string to the beginning of another string.
Code
{{ 'Jane Johnson' | prepend: 'Dr. ' }}
Output
{{ 'Jane Johnson' | prepend: 'Dr. ' }}
remove
Remove all occurrences of a substring from a string.
Code
{{ 'Hello, Dave. How are you, Dave?' | remove: 'Dave' }}
Output
{{ 'Hello, Dave. How are you, Dave?' | remove: 'Dave' }}
307
remove_first
Removes the first occurrence of a substring from a string.
Code
{{ 'Hello, Dave. How are you, Dave?' | remove_first: 'Dave' }}
Output
{{ 'Hello, Dave. How are you, Dave?' | remove_first: 'Dave' }}
replace
Replaces all occurrences of a string with a substring.
Code
{{ 'Hello, Dave. How are you, Dave?' | replace: 'Dave', 'John' }}
Output
{{ 'Hello, Dave. How are you, Dave?' | replace: 'Dave', 'John' }}
replace_first
Replaces the first occurrence of a string with a substring.
Code
{{ 'Hello, Dave. How are you, Dave?' | replace_first: 'Dave', 'John' }}
Output
{{ 'Hello, Dave. How are you, Dave?' | replace_first: 'Dave', 'John' }}
split
The split filter takes on a substring as a parameter. The substring is used as a delimiter to divide a string
into an array.
Code
{% assign words = "This is a demo of the split filter" | split: ' ' %}
First word: {{ words.first }}
First word: {{ words[0] }}
Second word: {{ words[1] }}
Last word: {{ words.last }}
All words: {{ words | join: ', ' }}
Output
{% assign words = "This is a demo of the split filter" | split: ' ' %}
First word: {{ words.first }}
First word: {{ words[0] }}
Second word: {{ words[1] }}
Last word: {{ words.last }}
308
All words: {{ words | join: ', ' }}
strip_html
Strips all HTML tags from a string.
Code
<p>Hello</p>
Output
Hello
strip_newlines
Strips any line breaks from a string.
Code
{% capture text %}
A
B
C
{% endcapture %}
{{ text | strip_newlines }}
Output
ABC
text_to_html
Formats a plain text string as simple HTML. All text will be HTML encoded, blocks of text separated by a
blank line will be wrapped in paragraph <p> tags, single line breaks will be replaced with <br>, and URLs
will be converted to hyperlinks.
Code
{{ note.notetext | text_to_html }}
Output
<p>This is the first paragraph of notetext. It contains a URL: <a href="http://example.com/"
rel="nofollow">http://example.com</a></p>
<p>This is a second paragraph.</p>
truncate
Truncates a string down to a given number of characters. An ellipsis (...) is appended to the string and is
included in the character count.
Code
{{ 'This is a long run of text.' | truncate: 10 }}
Output
309
{{ 'This is a long run of text.' | truncate: 10 }}
truncate_words
Truncates a string down to a given number of words. An ellipsis (...) is appended to the truncated string.
Code
{{ 'This is a long run of text.' | truncate_words: 3 }}
Output
{{ 'This is a long run of text.' | truncate_words: 3 }}
upcase
Converts a string into uppercase.
Code
{{ 'MIxed Case TExt' | upcase }}
Output
{{ 'MIxed Case TExt' | upcase }}
url_escape
URI-escape a string, for inclusion in a URL.
Code
{{ 'This & that//' | url_escape }}
Output
This+%26+that%2F%2F
xml_escape
XML-escape a string, for inclusion in XML output.
Code
{{ '<p>test</p>' | xml_escape }}
Output
<p>test</p>
See also
Add dynamic content and create custom templates
Liquid types
Liquid Objects
Liquid Tags
Liquid Filters

310
Type filters
Applies To: Dynamics 365 (online), Dynamics CRM Online
Type filters allow you to convert values of one type into other types.
boolean
Attempts to convert a string value into a Boolean. If the value is already a Boolean, it will be returned
unchanged. If the value cannot be converted into a Boolean, null will be returned.
This filter will also accept "on", "enabled", or "yes" as true, and "off", "disabled", and "no" as false.
Note
Additional filters
Code
{{ true | boolean }}
{{ 'false' | boolean }}
{{ 'enabled' | boolean }}
{{ settings['something/enabled'] | boolean | default: false }}
Output
{{ true | boolean }}
{{ 'false' | boolean }}
{{ 'enabled' | boolean }}
false
decimal
Attempts to convert a string value into a decimal number. If the value is already a decimal number, it will
be returned unchanged. If the value cannot be converted into a decimal number, null will be returned.
Note
Additional filters
Code
{{ 10.1 | decimal }}
{{ '3.14' | decimal }}
{{ 'text' | decimal | default: 3.14 }}
Output
{{ 10.1 | decimal }}
{{ '3.14' | decimal }}
{{ 'text' | decimal | default: 3.14 }}

311
integer
Attempts to convert a string value into an integer. If the value is already an integer, it will be returned
unchanged. If the value cannot be converted into an integer, null will be returned.
Note
Additional filters
Code
{{ 10 | integer }}
{{ '10' | integer }}
{{ '10.1' | integer }}
{{ 'text' | integer | default: 2 }}
Output
{{ 10 | integer }}
{{ '10' | integer }}
{{ '10.1' | integer }}
{{ 'text' | integer | default: 2 }}
string
Attempts to convert a value into its string representation. If the value is already a string, it will be returned
unchanged. If the value is null, null will be returned.
See also
Add dynamic content and create custom templates
Liquid types
Liquid Objects
Liquid Tags
Liquid Filters
URL filters
Applies To: Dynamics 365 (online), Dynamics CRM Online
URL filters allow you to build or extract parts of URLs.
add_query
Appends a query string parameter to a URL. If the parameter already exists in the URL, the parameter
value will be updated.
If this filter is applied to a full absolute URL, an updated absolute URL will be the result. If it is applied to a
path, an updated path will be the result.
312
Code
{{ 'http://example.com/path?page=1' | add_query: 'foo', 'bar' }}
{{ '/path?page=1' | add_query: 'page', 2 }}
Output
{{ 'http://example.com/path?page=1' | add_query: 'foo', 'bar' }}
{{ '/path?page=1' | add_query: 'page', 2 }}
base
Gets the base URL of a given URL.
Code
{{ 'http://example.com/path?foo=bar&page=2' | base }}
Output
http://example.com
host
Gets the host part of a URL.
Code
{{ 'http://example.com/path?foo=bar&page=2' | host }}
Output
{{ 'http://example.com/path?foo=bar&page=2' | host }}
path
Gets the path part of a URL.
Code
{{ 'http://example.com/path?foo=bar&page=2' | path }}
{{ '/path?foo=bar&page=2' | path }}
Output
{{ 'http://example.com/path?foo=bar&page=2' | path }}
{{ '/path?foo=bar&page=2' | path }}
path_and_query
Gets the path and query part of a URL.
Code
{{ 'http://example.com/path?foo=bar&page=2' | path_and_query }}
{{ '/path?foo=bar&page=2' | path_and_query }}
Output
/path?foo=bar&page=2

313
/path?foo=bar&page=2
port
Gets the port number of a URL.
Code
{{ 'http://example.com/path?foo=bar&page=2' | port }}
{{ 'https://example.com/path?foo=bar&page=2' | port }}
{{ 'https://example.com:9000/path?foo=bar&page=2' | port }}
Output
{{ 'http://example.com/path?foo=bar&page=2' | port }}
{{ 'https://example.com/path?foo=bar&page=2' | port }}
{{ 'https://example.com:9000/path?foo=bar&page=2' | port }}
remove_query
Removes a query string parameter from a URL. If the parameter does not exists in the URL, the URL will
be returned unchanged.
If this filter is applied to a full absolute URL, an updated absolute URL will be the result. If it is applied to a
path, an updated path will be the result.
Code
{{ 'http://example.com/path?page=1' | remove_query: 'page' }}
{{ '/path?page=1' | remove_query: 'page' }}
Output
{{ 'http://example.com/path?page=1' | remove_query: 'page' }}
{{ '/path?page=1' | remove_query: 'page' }}
scheme
Gets the scheme part of a URL.
Code
{{ 'http://example.com/path?foo=bar&page=2' | scheme }}
{{ 'https://example.com/path?foo=bar&page=2' | scheme }}
Output
{{ 'http://example.com/path?foo=bar&page=2' | scheme }}
{{ 'https://example.com/path?foo=bar&page=2' | scheme }}
See also
Add dynamic content and create custom templates
Liquid types

314
Liquid Objects
Liquid Tags
Liquid Filters
Additional filters
Applies To: Dynamics 365 (online), Dynamics CRM Online
These filters provide useful general functionality.
default
Returns a default value for any variable with no assigned value (i.e. null).
Code
{{ snippets["Header"] | default: 'My Website' }}
Output
<!-- If a snippet with the name "Header" returns null -->
My Website
file_size
Applied to a number value representing a number of bytes, returns a formatted file size with a unit of
appropriate scale.
Optionally, a precision parameter can be passed, to control the number of decimal places in the result.
The default precision is 1.
Code
{{ 10000000 | file_size }}
{{ 2050 | file_size: 0 }}
{{ entity.notes.first.filesize | file_size: 2 }}
Output
9.5 MB
2 KB
207.14 KB
has_role
Applied to a user, returns true if the user belongs to the given role. Returns false if not.
Code
{% assign is_admin = user | has_role: 'Administrators' %}
{% if is_admin %}
User is an administrator.
{% endif %}

315
liquid
Renders a string as Liquid code. This code will have access to the current Liquid execution context
(variables, etc.).
Note
This filter should be used with caution and should generally only be applied to values that are under the
exclusive control of portal content authors, or other users that can be trusted to write Liquid code.
Code
{{ page.adx_copy | liquid }}
See also
Add dynamic content and create custom templates
Liquid types
Liquid Objects
Liquid Tags
Liquid Filters
Create advanced templates for portals
Applies To: Dynamics 365 (online), Dynamics CRM Online
Learn how to create advanced templates using these examples:
Create a custom page template by using Liquid and a web template page template
Create a custom page template to render an RSS feed
Render the entity list associated with the current page
Render a website header and primary navigation bar
Render up to three levels of page hierarchy by using hybrid navigation
See also
Add dynamic content and create custom templates
Store source content by using web templates
Understand Liquid operators
Liquid types
Conditional
Liquid Objects
Liquid Tags
Liquid Filters

316
Create a custom page template by using Liquid
and a web template page template
Applies To: Dynamics 365 (online), Dynamics CRM Online
In this example, we'll create a custom page template by using Liquid and a Web Template page template.
More information: Store source content by using web templates
Our goal is to build a simple two-column template that uses a web link set as left-side navigation, with the
page content to the right. Something like this:
First, we'll create our Web Template and write the Liquid template code. But, thinking ahead, we realize
we're likely to reuse some common elements of this template in future templates. So, we'll create a
common base template that we'll then extend with our specific template. Our base template will provide
breadcrumb links and our page title/header, as well as define our one-column layout:


319
Now, all that's left to do is create a Web Page that uses our page template, and has an associated Web
Link Set, and we have our result.
See also
Create advanced templates for portals
Create a custom page template to render an RSS feed
Render the entity list associated with the current page
Render a website header and primary navigation bar
Render up to three levels of page hierarchy by using hybrid navigation

320
Create a custom page template to render an RSS
feed
Applies To: Dynamics 365 (online), Dynamics CRM Online
In this example, we'll create a custom page template to render an RSS feed of news articles, using Liquid
and a Web Template Page Template. More information: Store source content by using web templates
First, we'll create a new Dynamics 365 view that we'll use to load the data for our feed. In this example,
we'll make it a view on Web Pages, and use this entity to store our articles. We can use this view to
configure the sorting and filtering of results, and include as columns the entity attributes that we want
available in our Liquid template.
Next, we'll create a Web Template for our RSS feed. This template will be applied to a particular webpage
in our website, so we'll use the title and summary of that page as the title and description of the feed. The
we'll use the entityview tag to load our newly-created "News Articles" view. More information: Dynamics
365 entity tags. Note that we also set the MIME Type field of the Web Template to application/rss+xml.
This indicates what the response content type could be when our template is rendered.

321
Now, we'll create a new page template, allowing us to assign our RSS feed template to any webpage in
our website. Note that we deselect Use Website Header and Footer, as we want to take over rendering
of the entire page response for our feed.
Now all that's left is to create a new Web Page to host our feed, giving it a title and summary, and
assigning it our "RSS Feed" template. We can do this in Dynamics 365 or by using the portal inline editing
features:
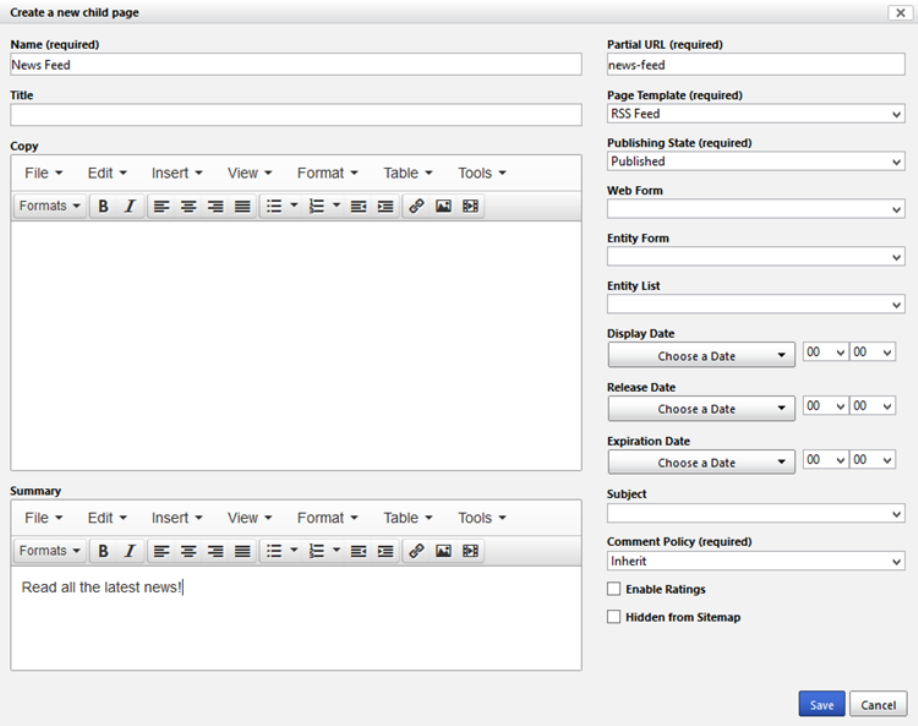
322
Now, when we request this new webpage, we'll receive our RSS feed XML:
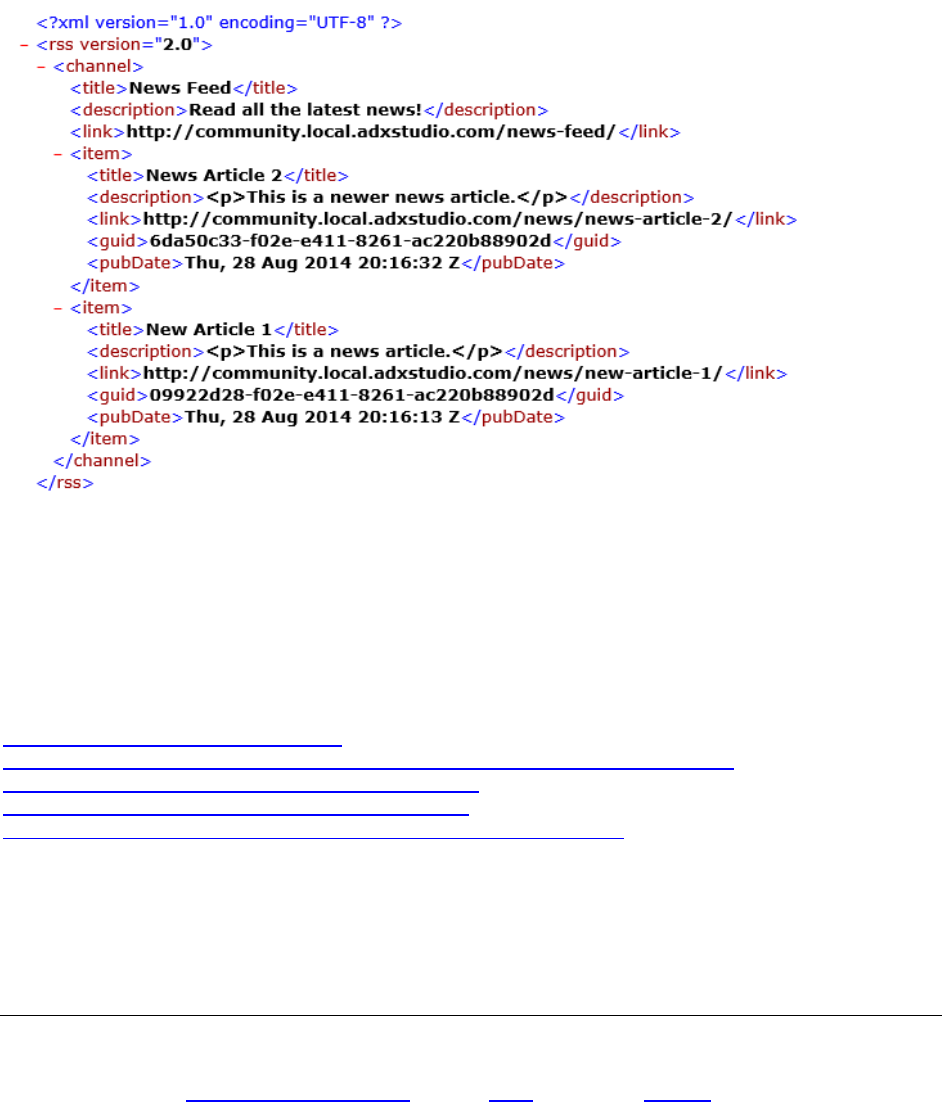
323
In this example, we've seen how we can combine Liquid, Web Templates, Dynamics 365 views, and
portals content management features to create a custom RSS feed. The combination of these features
adds powerful customization capabilities to any portal application.
See also
Create advanced templates for portals
Create a custom page template by using Liquid and a web template page template
Render the entity list associated with the current page
Render a website header and primary navigation bar
Render up to three levels of page hierarchy by using hybrid navigation
Render the entity list associated with the current
page
Applies To: Dynamics 365 (online), Dynamics CRM Online
Render the Entity List associated with the current page, as a paginated, sortable table. Uses
entitylist, entityview (Dynamics 365 entity tags), page, and request parameters, and
includes search and multiple view selection.
{%entitylistid:page.adx_entitylist.id%}<divclass="navbar navbar-default"><divclass="container-
fluid"><divclass="navbar-header"><buttontype="button"class="navbar-toggle"data-
toggle="collapse"data-target="#entitylist-navbar-{{entitylist.id}}"><spanclass="sr-only">Toggle
324
navigation</span><spanclass="icon-bar"></span><spanclass="icon-bar"></span><spanclass="icon-
bar"></span></button><aclass="navbar-
brand"href="{{page.url}}">{{entitylist.adx_name}}</a></div><divclass="collapse
navbar-collapse"id="entitylist-navbar-
{{entitylist.id}}">{%ifentitylist.views.size>1%}<ulclass="nav navbar-
nav"><liclass="dropdown"><ahref="#"class="dropdown-toggle"data-toggle="dropdown"><iclass="fa fa-
list"></i> Views <spanclass="caret"></span></a><ulclass="dropdown-
menu"role="menu">{%forviewinentitylist.views
-
%}<li{%ifparams.view==view.id%}class="active"{%endif%}><ahref="{{request.path|add_query:'view',vi
ew.id}}">{{view.name}}</a></li>{%endfor -
%}</ul></li></ul>{%endif%}{%ifentitylist.search_enabled%}<formclass="navbar-form
navbar-left"method="get"><divclass="input-group">{%ifparams.search.size>0%}<divclass="input-
group-btn"><aclass="btn btn-
default"href="{{request.path_and_query|remove_query:'search'}}">×</a></div>{%endif%}<inputn
ame="search"class="form-
control"value="{{params.search}}"placeholder="{{entitylist.search_placeholder|default:'Search'}}"
type="text"/><divclass="input-group-btn"><buttontype="submit"class="btn
btn-default"title="{{entitylist.search_tooltip}}"><iclass="fa fa-
search"> </i></button></div></div></form>{%endif%}{%ifentitylist.create_enabled%}<ulclass="n
av navbar-nav navbar-right"><li><ahref="{{entitylist.create_url}}"><iclass="fa
fa-
plus"></i>{{entitylist.create_label|default:'Create'}}</a></li></ul>{%endif%}</div></div></div>{%
entityviewid:params.view,search:params.search,order:params.order,page:params.page,pagesize:params
.pagesize,metafilter:params.mf%}{%assignorder=params.order|default:entityview.sort_expression%}<t
ableclass="table"data-order="{{order}}"><thead><tr>{%forcinentityview.columns
-%}<thwidth="{{c.width}}"data-
logicalname="{{c.logical_name}}">{%ifc.sort_enabled%}{%assigncurrent_sort=order|current_sort:c.lo
gical_name%}{%casecurrent_sort%}{%when'ASC'%}<ahref="{{request.path_and_query|add_query:'order',c
.sort_descending}}">{{c.name}}<iclass="fa
fa-sort-
asc"></i></a>{%when'DESC'%}<ahref="{{request.path_and_query|add_query:'order',c.sort_ascending}}"
>{{c.name}}<iclass="fa fa-sort-
desc"></i></a>{%else%}<ahref="{{request.path_and_query|add_query:'order',c.sort_ascending}}">{{c.
name}}<iclass="fa
fa-unsorted"></i></a>{%endcase%}{%else%}{{c.name}}{%endif%}</th>{%endfor -
%}<thwidth="1"></th></tr></thead><tbody>{%foreinentityview.records -
%}<tr>{%forcinentityview.columns -
%}{%assignattr=e[c.logical_name]%}{%assignattr_type=c.attribute_type|downcase%}<tddata-
logicalname="{{c.logical_name}}">{%ifattr.is_entity_reference

325
-
%}{{attr.name}}{%elsifattr_type=='datetime'%}{%ifattr%}<timedatetime="{{attr|date_to_iso8601}}">{
{attr}}</time>{%endif%}{%elsifattr_type=='picklist'%}{{attr.label}}{%else%}{{attr}}{%endif -
%}</th>{%endfor -%}<td>{%ifentitylist.detail_enabled
-%}<aclass="btn btn-default btn-
xs"href="{{entitylist.detail_url}}?{{entitylist.detail_id_parameter}}={{e.id}}"title="{{entitylis
t.detail_label}}"><iclass="fa fa-external-link"></i></a>{%endif -%}</td><tr>{%endfor -
%}</tbody></table>{%ifentityview.pages.size>0%}{%assignfirst_page=entityview.first_page%}{%assign
last_page=entityview.last_page%}{%assignpage_offset=entityview.page|minus:1|divided_by:10|times:1
0%}{%assignpage_slice_first_page=page_offset|plus:1%}{%assignpage_slice_last_page=page_offset|plu
s:10%}<ulclass="pagination"><li{%unlessfirst_pageandentityview.page>1%}class="disabled"{%endunles
s%}><a{%iffirst_pageandentityview.page>1%}href="{{request.url|add_query:'page',first_page|path_an
d_query}}"{%endif%}>«</a></li><li{%unlessentityview.previous_page%}class="disabled"{%endunl
ess%}><a{%ifentityview.previous_page%}href="{{request.url|add_query:'page',entityview.previous_pa
ge|path_and_query}}"{%endif%}>‹</a></li>{%ifpage_slice_first_page>1%}{%assignprevious_slic
e_last_page=page_slice_first_page|minus:1%}<li><ahref="{{request.url|add_query:'page',previous_sl
ice_last_page|path_and_query}}">…</a></li>{%endif%}{%forpageinentityview.pagesoffset:page_
offsetlimit:10
-
%}<li{%ifpage==entityview.page%}class="active"{%endif%}><ahref="{{request.url|add_query:'page',pa
ge|path_and_query}}">{{page}}</a></li>{%endfor -
%}{%ifpage_slice_last_page<entityview.pages.size%}{%assignnext_slice_first_page=page_slice_last_p
age|plus:1%}<li><ahref="{{request.url|add_query:'page',next_slice_first_page|path_and_query}}">&h
ellip;</a></li>{%endif%}<li{%unlessentityview.next_page%}class="disabled"{%endunless%}><a{%ifenti
tyview.next_page%}href="{{request.url|add_query:'page',entityview.next_page|path_and_query}}"{%en
dif%}>›</a></li><li{%unlesslast_pageandentityview.page<last_page%}class="disabled"{%endunl
ess%}><a{%iflast_pageandentityview.page<last_page%}href="{{request.url|add_query:'page',last_page
|path_and_query}}"{%endif%}>»</a></li></ul>{%endif%}{%endentityview%}{%endentitylist%}
See also
Create advanced templates for portals
Create a custom page template by using Liquid and a web template page template
Create a custom page template to render an RSS feed
Render a website header and primary navigation bar
Render up to three levels of page hierarchy by using hybrid navigation

326
Render a website header and primary navigation
bar
Applies To: Dynamics 365 (online), Dynamics CRM Online
Render a website header and primary navigation bar, using portals settings, snippets, weblinks, and
sitemarkers. More information: Store source content by using web templates
Note
The example in this topic will only function correctly if cross-request header caching is disabled for your
application. It is enabled by default in version 7.0.0019 and later. It can be disabled by creating a Site
Setting named Header/OutputCache/Enabled, and setting its value to false.
<divclass="masthead hidden-xs"><divclass="container"><divclass="toolbar"><divclass="toolbar-
row">{%assignsearch_enabled=settings['search/enabled']|boolean|default:true%}{%assignsearch_page=
sitemarkers['Search']%}{%ifsearch_enabledandsearch_page%}<divclass="toolbar-item
toolbar-
search"><formmethod="GET"action="{{search_page.url}}"role="search"><labelfor="q"class="sr-
only">{{snippets["Header/Search/Label"]|default:"Search"}}</label><divclass="input-
group"><inputtype="text"class="form-
control"id="q"name="q"placeholder="{{snippets["Header/Search/Label"]|default:"Search"}}"value="{{
params.q}}"title="{{snippets["Header/Search/Label"]|default:"Search"}}"><divclass="input-group-
btn"><buttontype="submit"class="btn
btn-
default"title="{{snippets["Header/Search/ToolTip"]|default:"Search"}}"><spanclass="fa fa-
search"aria-hidden="true"></span></button></div></div></form></div>{%endif%}<divclass="toolbar-
item"><divclass="btn-toolbar"role="toolbar">{%ifuser%}<divclass="btn-group"><ahref="#"class="btn
btn-default dropdown-toggle"data-toggle="dropdown"><spanclass="fa fa-user"aria-
hidden="true"></span><spanclass="username">{{user.fullname}}</span><spanclass="caret"></span></a>
<ulclass="dropdown-menu pull-
right"role="menu">{%assignshow_profile_nav=settings["Header/ShowAllProfileNavigationLinks"]|boole
an|default:true%}{%ifshow_profile_nav%}{%assignprofile_nav=weblinks["Profile
Navigation"]%}{%ifprofile_nav%}{%forlinkinprofile_nav.weblinks%}<li><ahref="{{link.url}}">{{link.
name}}</a></li>{%endfor%}{%endif%}{%else%}<li><ahref="{{sitemarkers['Profile'].url}}">{{snippets[
"Profile Link
Text"]|default:"Profile"}}</a></li>{%endif%}<liclass="divider"></li><li><ahref="/account-
signout?returnUrl={{request.raw_url}}">{{snippets["links/logout"]|default:"Sign
Out"}}</a></li></ul></div>{%else%}<divclass="btn-group"><aclass="btn btn-
primary"href="{{sitemarkers['Login'].url|add_query:'returnurl',request.path_and_query}}"><spancla
ss="fa fa-sign-in"aria-hidden="true"></span>{{snippets["links/login"]|default:"Sign

327
In"}}</a></div>{%endif%}</div></div></div></div>{%editablesnippets'Header'type:'html'%}</div></di
v><divclass="header-navbar navbar navbar-default navbar-static-
top"role="navigation"><divclass="container"><divclass="navbar-
header"><buttontype="button"class="navbar-toggle"data-toggle="collapse"data-target="#header-
navbar-collapse"><spanclass="sr-only">Toggle
navigation</span><spanclass="icon-bar"></span><spanclass="icon-
bar"></span><spanclass="icon-bar"></span></button><divclass="navbar-left visible-
xs">{%editablesnippets'Mobile Header'type:'html'%}</div></div><divid="header-navbar-
collapse"class="navbar-collapse
collapse"><divclass="navbar-left hidden-xs">{%editablesnippets'Navbar
Left'type:'html'%}</div>{%assignprimary_nav=weblinks["Primary
Navigation"]%}{%ifprimary_nav%}<divclass="navbar-left {%ifprimary_nav.editable%}xrm-entity xrm-
editable-adx_weblinkset{%endif%}"data-weblinks-maxdepth="2"><ulclass="nav
navbar-nav
weblinks">{%forlinkinprimary_nav.weblinks%}{%iflink.display_page_child_links%}{%assignsublinks=si
temap[link.url].children%}{%else%}{%assignsublinks=link.weblinks%}{%endif%}<liclass="weblink
{%ifsublinks.size>0%} dropdown{%endif%}"><a{%ifsublinks.size>0%}href="#"class="dropdown-
toggle"data-
toggle="dropdown"{%else%}href="{{link.url}}"{%endif%}{%iflink.nofollow%}rel="nofollow"{%endif%}{%
iflink.tooltip%}title="{{link.tooltip}}"{%endif%}>{%iflink.image%}{%iflink.image.urlstartswith'.'
%}<spanclass="{{link.image.url|split:'.'|join}}"aria-
hidden="true"></span>{%else%}<imgsrc="{{link.image.url}}"alt="{{link.image.alternate_text|default
:link.tooltip}}"{%iflink.image.width%}width="{{link.image.width}}"{%endif%}{%iflink.image.height%
}height="{{link.image.height}}"{%endif%}/>{%endif%}{%endif%}{%unlesslink.display_image_only%}{{li
nk.name}}{%endunless%}{%ifsublinks.size>0%}<spanclass="caret"></span>{%endif%}</a>{%ifsublinks.si
ze>0%}<ulclass="dropdown-
menu"role="menu">{%iflink.url%}<li><ahref="{{link.url}}"{%iflink.nofollow%}rel="nofollow"{%endif%
}{%iflink.tooltip%}title="{{link.tooltip}}"{%endif%}>{{link.name}}</a></li><liclass="divider"></l
i>{%endif%}{%forsublinkinsublinks%}<li><ahref="{{sublink.url}}"{%ifsublink.nofollow%}rel="nofollo
w"{%endif%}{%ifsublink.tooltip%}title="{{link.tooltip}}"{%endif%}>{{sublink.name|default:sublink.
title}}</a></li>{%endfor%}</ul>{%endif%}</li>{%endfor%}</ul>{%editableprimary_nav%}</div>{%endif%
}<divclass="navbar-right
hidden-xs">{%editablesnippets'Navbar Right'type:'html'%}</div></div></div></div>
See also
Create advanced templates for portals
Create a custom page template by using Liquid and a web template page template
Create a custom page template to render an RSS feed
Render the entity list associated with the current page

328
Render up to three levels of page hierarchy by using hybrid navigation
Render up to three levels of page hierarchy by
using hybrid navigation
Applies To: Dynamics 365 (online), Dynamics CRM Online
This example renders a type of hybrid navigation, based on the portal sitemap, that renders up to three
levels of page hierarchy. The rules of this component are:
The ancestor pages of the current page will be shown, back to the Home page (or to the maximum depth
specified by the optional depth_offset parameter).
If the current page has children, those child pages will be shown.
If the current page has no children, the siblings of the current page will be shown.
See also
Create advanced templates for portals
Create a custom page template by using Liquid and a web template page template
Create a custom page template to render an RSS feed
Render the entity list associated with the current page
Render a website header and primary navigation bar
Copyright
Applies To: Dynamics 365 (online), Dynamics CRM Online
This document is provided "as-is". Information and views expressed in this document, including URL and
other Internet Web site references, may change without notice.
Some examples depicted herein are provided for illustration only and are fictitious. No real association or
connection is intended or should be inferred.
This document does not provide you with any legal rights to any intellectual property in any Microsoft
product. You may copy and use this document for your internal, reference purposes.
© 2017 Microsoft. All rights reserved.
Microsoft, Azure, Dynamics, Excel, Internet Explorer, Microsoft Dynamics, MSDN, Power BI, PowerShell,
Visual Studio, Windows, and are trademarks of the Microsoft group of companies. All other trademarks
are property of their respective owners.
