Alaris SE DFU V8.5 7131 User Manual
User Manual: Alaris 7131 User Manual
Open the PDF directly: View PDF ![]() .
.
Page Count: 188 [warning: Documents this large are best viewed by clicking the View PDF Link!]

Alaris® Products
Directions for Use
Alaris® SE Pump
Models 7130/7131 and 7230/7231
Supports Guardrails® Suite MX
June 2006
OPTION
SEC
PRI
POWER
RUN
HOLD
Clear Enter
PRI SEC HLD OPT KVO
HLD PRI SECKVO OPT
23
456
789
•0
1
POWER
RUN
HOLD
AB
A B
ml/hr ml/hr
SEC
PRI
Clear Enter
OPT PRI HLD SEC KVO
1
RUN
HOLD
POWER
OPTIONS
23
456
789
.0
ml/hr

Directions for Use
Alaris® SE Pump
Models 7130/7131, 7320/7231
General Contact Information
©2006 Cardinal Health, Inc. or one of its subsidiaries. All rights reserved.
For service contact your local Affiliate Office or Distributor.
AE
Cardinal Health,
PO Box 5527,
Dubai, United Arab Emirates.
Tel: (971) 4 28 22 842
Fax: (971) 4 28 22 914
DE
Cardinal Health,
Pascalstr. 2,
52499 Baesweiler,
Deutschland.
Tel: (49) 2401 604 0
Fax: (49) 2401 604 121
IT
Cardinal Health,
Via Ticino 4,
50019 Sesto Fiorentino,
Firenze, Italia.
Tél: (39) 055 30 33 93 00
Fax: (39) 055 34 00 24
US
Cardinal Health
10221 Wateridge Circle,
San Diego, CA 92121,
USA.
Tel: (1) 800 854 7128
Fax: (1) 858 458 6179
AU
Cardinal Health,
8/167 Prospect Highway,
Seven Hills, NSW 2147,
Australia.
Tel: (61) 2 9838 0255
Fax: (61) 2 9674 4444
Fax: (61) 2 9624 9030
ES
Cardinal Health,
Avenida Valdeparra 27,
28108 - Alcobendas, Madrid,
España.
Tel: (34) 91 657 20 31
Fax: (34) 91 657 20 42
NL
Cardinal Health,
Kantorenpand “Hoefse Wing”,
Printerweg, 11,
3821 AP Amersfoort,
Nederland.
Tel: (31) 33 455 51 00
Fax: (31) 33 455 51 01
ZA
Cardinal Health,
Unit 2 Oude Molen Business
Park,
Oude Molen Road, Ndabeni,
Cape Town 7405, South Africa.
Tel: (27) (0) 860 597 572
Tel: (27) 21 510 7562
Fax: (27) 21 5107567
BE
Cardinal Health,
Otto De Mentockplein 19,
1853 Strombeek - Bever,
Belgium.
Tel: (32) 2 267 38 99
Fax: (32) 2 267 99 21
FR
Cardinal Health,
Immeuble Antares - Technoparc,
2, rue Charles-Edouard Jeanneret.
78300 POISSY,
France.
Tél: (33) 1 30 06 74 60
Fax: (33) 1 39 11 48 34
NO
Cardinal Health
Solbråveien 10 A,
1383 ASKER,
Norge.
Tel: (47) 66 98 76 00
Fax: (47) 66 98 76 01
CA
Cardinal Health,
235 Shields Court,
Markham,
Ontario L3R 8V2,
Canada.
Tel: (1) 905-752-3333
Fax: (1) 905-752-3343
GB
Cardinal Health,
The Crescent, Jays Close,
Basingstoke,
Hampshire, RG22 4BS,
United Kingdom.
Tel: (44) 0800 917 8776
Fax: (44) 1256 330860
NZ
Cardinal Health,
14 George Bourke Drive
Mt Wellington, Auckland
PO Box 14234
Panmure, Auckland
Tel: 09 270 2420
Freephone: 0508 422734
Fax: 09 270 6285
CN
Cardinal Health,
Shanghai Representative Office,
Suite 9B,
Century Ba-Shi Building,
398 Huai Hai Rd(M.),
Shanghai 200020,
China.
Tel: (56) 8621-63844603
Tel: (56) 8621-63844493
Fax: (56) 8621-6384-4025
HU
Cardinal Health,
Döbrentei tér 1,
H-1013 Budapest,
Magyarország.
Tel: (36) 14 88 0232
Tel: (36) 14 88 0233
Fax: (36) 12 01 5987
SE
Cardinal Health,
Hammarbacken 4B,
191 46 Sollentuna,
Sverige.
Tel: (46) 8 544 43 200
Fax: (46) 8 544 43 225

Directions for Use
Alaris® SE Pump
Models 7130/7131, 7230/7231
i
Table of Contents
Table of Contents
GETTING STARTED
INTRODUCTION ................................................................................................................................................................................................ 1
UNPACKING ......................................................................................................................................................................................................... 3
CHECK-IN AND CONFIGURATION .......................................................................................................................................................... 4
Rate Accuracy Qualification Test ...................................................................................................................................................... 4
Alternative Rate Accuracy Qualification Test .............................................................................................................................. 8
Set Sensor Check / Pressure Calibration Verification ............................................................................................................. 11
Functional Test .......................................................................................................................................................................................... 11
Flow Stop Test ........................................................................................................................................................................................... 13
Ground Current Leakage Test ............................................................................................................................................................ 13
Ground Resistance Test ....................................................................................................................................................................... 13
Instrument Configuration ...................................................................................................................................................................... 13
ADMINISTRATION SET INFORMATION ................................................................................................................................................ 14
General ......................................................................................................................................................................................................... 14
SmartSite® Infusion Set ......................................................................................................................................................................... 14
Preparing Solution Container and Set ............................................................................................................................................ 15
Loading Set ................................................................................................................................................................................................ 16
Removing Set ............................................................................................................................................................................................ 18
Changing Solution Container .............................................................................................................................................................. 18
PROGRAMMING
PROGRAMMING AND NAVIGATION TIPS ........................................................................................................................................... 19
Soft Keys ..................................................................................................................................................................................................... 19
Entering Values ......................................................................................................................................................................................... 19
Menus - With Guardrails® Suite MX Protection .......................................................................................................................... 20
Menus - NO Guardrails® Suite MX Protection ............................................................................................................................. 21
Split Screen (Dual Channel Only) ..................................................................................................................................................... 21
Powering On and Off .............................................................................................................................................................................. 21
Responding to Maintenance Reminder .......................................................................................................................................... 23
Responding to Time Set Reminder .................................................................................................................................................. 23
GUARDRAILS® SUITE MX PROMPTS .................................................................................................................................................... 24
Soft Limits ................................................................................................................................................................................................... 24
Hard Limits .................................................................................................................................................................................................. 24
PRIMARY INFUSION - WITH GUARDRAILS® SUITE MX PROTECTION .............................................................................. 25
Selecting New Patient and Profile Options ................................................................................................................................... 25
Primary Infusion Introduction ............................................................................................................................................................. 27
Continuous Infusion ................................................................................................................................................................................ 27
Pausing and Restarting Infusion ....................................................................................................................................................... 31
Making Changes During Continuous Infusion ............................................................................................................................. 31
Resuming Interrupted Infusion ........................................................................................................................................................... 32
KVO Mode .................................................................................................................................................................................................. 33
Resuming Operation from KVO Mode ............................................................................................................................................ 34
Clearing Volume Infused ...................................................................................................................................................................... 34
Bolus Dose ................................................................................................................................................................................................. 34
Delivering a Bolus Dose Prior to Beginning Continuous Infusion ...................................................................................... 35
Delivering a Bolus Dose During a Continuous Infusion .......................................................................................................... 36
Bolus Only ................................................................................................................................................................................................... 37
Stopping Bolus Dose .............................................................................................................................................................................. 39
Repeating a Bolus Dose ....................................................................................................................................................................... 39
Intermittent Infusion ................................................................................................................................................................................ 40
Making Changes During Intermittent Infusion ............................................................................................................................. 43
IV Fluid Infusion ........................................................................................................................................................................................ 44

Directions for Use
Alaris® SE Pump
Models 7130/7131, 7230/7231
ii Table of Contents
PROGRAMMING (Continued)
SECONDARY INFUSION - WITH GUARDRAILS® SUITE MX PROTECTION ...................................................................... 46
Introduction ................................................................................................................................................................................................. 46
Setup ............................................................................................................................................................................................................. 47
Secondary Intermittent Infusion ........................................................................................................................................................ 48
PRIMARY INFUSION - NO GUARDRAILS® SUITE MX PROTECTION ................................................................................... 52
Selecting New Patient Option-Profiles Feature Not Enabled (OFF) ................................................................................. 52
Basic Infusion ............................................................................................................................................................................................ 52
Promoting Basic Infusion to Guardrails® Suite MX Protection Infusion ........................................................................... 53
Promoting Basic Infusion to Guardrails® Drug Infusion .......................................................................................................... 53
Promoting Basic Infusion to Guardrails® IV Fluid Infusion ..................................................................................................... 55
Dose Rate Calculation- Drug? NO DOSE LIMIT-Profiles Feature Enabled (ON) ....................................................... 56
Dose Rate Calculation- Drug? NO DOSE LIMIT-Profiles Feature Not Enabled (OFF) ............................................ 58
LOADING DOSE ................................................................................................................................................................................................. 61
Programming ............................................................................................................................................................................................. 61
MULTI-DOSE ........................................................................................................................................................................................................ 63
Programming ............................................................................................................................................................................................. 63
Resuming an Interrupted Multi-Dose .............................................................................................................................................. 68
MULTI-STEP ......................................................................................................................................................................................................... 69
Programming ............................................................................................................................................................................................. 69
Making Changes During Multi-Step ................................................................................................................................................. 75
Resuming an Interrupted Multi-Step ............................................................................................................................................... 78
QUITTING MULTI-DOSE AND MULTI-STEP ....................................................................................................................................... 79
SECONDARY INFUSION - NO GUARDRAILS® SUITE MX PROTECTION ........................................................................... 80
Introduction ................................................................................................................................................................................................. 80
Basic Secondary Infusion-Profiles Feature Enabled (On) ..................................................................................................... 80
Basic Secondary Infusion-Profiles Feature Not Enabled (Off) ............................................................................................ 81
DYNAMIC MONITORING SYSTEM
MONITORING OPTIONS - GENERAL ..................................................................................................................................................... 83
Selecting Monitoring Option ................................................................................................................................................................ 84
MONITORING OPTIONS - RESISTANCE MODE .............................................................................................................................. 86
Detection of Downstream Occlusions ............................................................................................................................................. 86
Auto Restart Plus Feature .................................................................................................................................................................... 87
Resistance Alert ....................................................................................................................................................................................... 88
Resistance Trend Graphs .................................................................................................................................................................... 89
MONITORING OPTIONS - PRESSURE MODE .................................................................................................................................. 92
Detection of Downstream Occlusions ............................................................................................................................................. 92
Auto Restart Plus Feature .................................................................................................................................................................... 92
Adjustable Pressure Alarm .................................................................................................................................................................. 93
Pressure Baseline ................................................................................................................................................................................... 95
Pressure Trend Graphs ......................................................................................................................................................................... 97
UPSTREAM OCCLUSION DETECTION ................................................................................................................................................. 100
GENERAL SETUP AND OPERATION
AUDIO ADJUST .................................................................................................................................................................................................. 103
TAMPER RESIST ............................................................................................................................................................................................... 103
Locking and Unlocking Panel Lock .................................................................................................................................................. 103

Directions for Use
Alaris® SE Pump
Models 7130/7131, 7230/7231
iii
Table of Contents
GENERAL INFORMATION
WARNINGS AND CAUTIONS ...................................................................................................................................................................... 105
General ......................................................................................................................................................................................................... 105
Guardrails® Suite MX ............................................................................................................................................................................. 106
Administration Sets ................................................................................................................................................................................. 107
Epidural Administration ......................................................................................................................................................................... 107
Electromagnetic Compatibility ............................................................................................................................................................ 108
BATTERY MANAGEMENT SYSTEM ........................................................................................................................................................ 109
Battery Power Gauge and Indicator ................................................................................................................................................ 110
Battery Recharge ..................................................................................................................................................................................... 110
FLOW SENSOR .................................................................................................................................................................................................. 110
ALERTS COUNTER .......................................................................................................................................................................................... 112
Definitions ................................................................................................................................................................................................... 112
Viewing Alerts Counter ......................................................................................................................................................................... 113
NURSE CALL (7130/7230 ONLY) ............................................................................................................................................................... 114
Activating Nurse Call Feature ............................................................................................................................................................. 114
If an Alarm Occurs .................................................................................................................................................................................. 114
POLE CLAMP ...................................................................................................................................................................................................... 115
Changing Pole Clamp Orientation .................................................................................................................................................... 115
RS-232 COMPUTER LINK ............................................................................................................................................................................. 116
Connecting to a Computer ................................................................................................................................................................... 116
Disconnecting from a Computer ....................................................................................................................................................... 117
FEATURES AND DISPLAYS ......................................................................................................................................................................... 118
Operating Features, Controls, Indicators ...................................................................................................................................... 118
Displays ........................................................................................................................................................................................................ 121
Feature Definitions .................................................................................................................................................................................. 122
CONFIGURABLE SETTINGS ...................................................................................................................................................................... 123
Configurable Option Definitions-General ...................................................................................................................................... 124
Configurable Option Definitions-Guardrails® Suite MX ........................................................................................................... 128
Configurable Options ............................................................................................................................................................................. 129
System Configurable Options ............................................................................................................................................................ 130
SPECIFICATIONS .............................................................................................................................................................................................. 130
SYMBOLS AND TERMS ................................................................................................................................................................................. 134
TRUMPET AND START-UP CURVES ..................................................................................................................................................... 137
Pressure Mode .......................................................................................................................................................................................... 138
Resistance Mode ..................................................................................................................................................................................... 140
High Resistance Mode .......................................................................................................................................................................... 142
TROUBLESHOOTING AND MAINTENANCE
GENERAL .............................................................................................................................................................................................................. 143
AIR IN LINE ASSEMBLY ................................................................................................................................................................................. 143
SINGLE OR ACCUMULATED AIR BUBBLE DETECTION (NO RESET FEATURE) .......................................................... 144
ALARMS, ALERTS, PROMPTS .................................................................................................................................................................. 145
Alarms ........................................................................................................................................................................................................... 146
Alerts ............................................................................................................................................................................................................. 150
Prompts ........................................................................................................................................................................................................ 151
INSPECTION REQUIREMENTS ................................................................................................................................................................. 156
CLEANING ............................................................................................................................................................................................................ 156
SERVICE INFORMATION .............................................................................................................................................................................. 158
Technical Support .................................................................................................................................................................................... 158
WARRANTY ......................................................................................................................................................................................................... 159

Directions for Use
Alaris® SE Pump
Models 7130/7131, 7230/7231
iv Table of Contents
REGULATIONS AND STANDARDS
COMPLIANCE ..................................................................................................................................................................................................... 161
Electromagnetic Environment ............................................................................................................................................................ 161
Standards .................................................................................................................................................................................................... 168
TRADEMARKS .................................................................................................................................................................................................... 168
DIRECTIONS FOR USE SUPPLEMENTS
SUPPLEMENTS................................................................................................................................................ 169

Directions for Use
Alaris® SE Pump
Models 7130/7131, 7230/7231
1
Getting Started
Getting Started
Introduction
This document provides directions for use for the SE Pump,
Models 7130/7131 and 7230/7231. It is used in conjunction
with:
Alaris® product administration set instructions
Drug product labeling
SE Pump Technical Service Manual
Ground test equipment instructions
ECG monitoring system instructions
The SE Pump is intended for use in professional healthcare
environments, including healthcare facilities, home care, and
medical transport, that utilize infusion pumps for the delivery of
fluids, medications, blood, and blood products. It is indicated
for continuous or intermittent delivery through clinically
acceptable routes of administration; such as, intravenous
(IV), intra-arterial (IA), subcutaneous, epidural, enteral, and
irrigation of fluid spaces.
The SE Pump is available as either a single or a dual channel
pump that supports the Guardrails® Suite MX. The SE Dual
Channel Pump is a two-channel device intended to deliver
multiple infusions to a single patient.
Guardrails® Suite MX for the SE Pump brings a new level
of medication error prevention to the point of patient care.
Guardrails® Suite MX features programming guidelines for
medication dosing, delivery rate, duration, bolus dose and
bolus dose administration rate, concentration and optional
initial programming values in up to 15 patient-specific care
areas referred to as profiles. Each profile contains a specific
Drug Library and an IV Fluid library as well as instrument
configurations appropriate for the care area. Optional drug-
specific or fluid-specific clinical advisories provide visual
messages. Limits for each Guardrails® drug or fluid entry may
include Hard Limits that cannot be overridden during infusion
programming and/or Soft Limits that can be overridden, based
on clinical requirements.
A Data Set is developed and approved by the facility’s own
multi-disciplinary team using the Editor Software, the PC-
based authoring tool. A Data Set is then transferred to the
SE Pump by qualified personnel. Approved Data Sets are
maintained by the Editor Software for future updates and
reference.
CAUTION
WARNING
Read all instructions before using
the SE Pump.

Directions for Use
Alaris® SE Pump
Models 7130/7131, 7230/7231
2Getting Started
Information about a Guardrails® alert that occurs during use
is stored within the SE Pump, and can be accessed using the
CQI Reporter.
The SE Pump may be operated with or without the Guardrails®
Suite MX protection. When an approved Data Set is
transferred to the SE Pump by qualified personnel and the
Profiles feature is enabled (ON) in instrument configuration,
then Guardrails® Suite MX protection is available. When
the Profiles feature is not enabled (Off), or when no Data
Set has been transferred to the SE Pump, Guardrails® Suite
MX protection is not available (see "Primary Infusion – NO
Guardrails® Suite MX Protection", and "Secondary Infusion
- NO Guardrails® Suite MX Protection"). Programming and
navigation may differ when Guardrails® Suite MX software is
not in use.
Documentation provided with this product may reference
product not present in your facility or not yet available for sale
in your area.
A superscript number (for example, À) identifies additional
information provided as a note at the end of the section.
Administration Sets: Reference “General Information” for
specific “Administration Set Information”.
Alarms, Alerts, Prompts: Reference “Troubleshooting and
Maintenance” for specific alarms, alerts and prompts.
Electromagnetic Environment: Reference “Regulations and
Standards”, "Compliance”.
Contraindications: None known.
Warnings and Cautions:
Warnings and cautions provide information needed to safely and
effectively use the SE Pump. Reference "General Information",
"Warnings and Cautions".
A DANGER is an alert to an imminent hazard which
could result in serious personal injury and/or product damage
if proper procedures are not followed.
A WARNING is an alert to a potential hazard which could
result in serious personal injury and/or product damage if
proper procedures are not followed.
Introduction (Continued)

Directions for Use
Alaris® SE Pump
Models 7130/7131, 7230/7231
3
Getting Started
1. Remove instrument from carton.
2. Important: Plug instrument into an AC outlet a minimum
of 24 hours prior to use.
Maximum battery capacity, as well as gauge accuracy, is
reached after several charge/discharge/recharge cycles,
in the refresh process. Cardinal Health recommends that
the battery be fully charged/discharged/recharged, using
the refresh cycle, before placing the instrument in use.
3. Perform Periodic Inspections (reference "Troubleshooting
and Maintenance", “Inspection Requirements”).
See "General Information", "Configurable Settings" for a list of
the configurable features.
AC
WARNING
Failure to properly charge the
battery results in an instrument
malfunction. Biomedical personnel
in the facility are responsible for
unpacking the instrument and
ensuring the battery is fully charged
before placing the instrument in use.
Unpacking
Introduction (Continued)
Warnings and Cautions: (Continued)
A CAUTION is an alert to a potential hazard which could
result in minor personal injury and/or product damage if proper
procedures are not followed.
DEFINED TERMS:
The following table identifies the defined terms used
throughout this document for certain products and product
features.
Product Name Defined Term
AccuSlide® flow regulator Flow Regulator
Alaris® SE pump SE Pump
Guardrails® clinical advisory Clinical Advisory
Guardrails® CQI Reporter CQI Reporter
Guardrails® data set Data Set
Guardrails® drug library Drug Library
Guardrails® Editor Editor Software
Guardrails® hard limit Hard Limit
Guardrails® IV fluid IV Fluid
Guardrails® soft limit Soft Limit
SmartSite® needle-free valve Needle-Free Valve
SmartSite® positive bolus needle-free valve Needle-Free Valve

Directions for Use
Alaris® SE Pump
Models 7130/7131, 7230/7231
4Getting Started
Rate Accuracy Qualification Test
This procedure is to be used only for the testing of an
instrument during New Instrument Check-In or when just
received from the Service Depot Center. This test is to verify
that damage or changes to the instrument did not occur during
shipment and handling.
Rate accuracy should be tested using a Model 80VCS
Calibration Set. The system is designed to produce overall
accuracy of ±5% for rates greater than 1 mL/h and up to
999.9 mL/h, and ±6.5% for rates equal to or less than 1 mL/h,
95% of the time with 95% confidence (reference "General
Information", "Trumpet and Start-Up Curves" for additional
information). The system performance with a calibration
set produces a smaller variability. In order to ensure overall
accuracy is achieved, new instruments are tested to an
accuracy of ±3% with the Model 80VCS set during New
Instrument Check-In.
Due to the dynamic monitoring feature, the rate is varied during
operation. For this reason, automatic testers should not be
used to check rate accuracy. Generally, these devices collect
small samples and may cause the results to be incorrect, even
though the instrument is accurate.
This is a quick reference procedure for check-in and
configuration of new and recently serviced instruments.
Check-In and Configuration
WARNING
Instruments returned from the
service depot may be set to
factory defaults and not have a
hospital-defined Data Set loaded.
Biomedical personnel in the facility
are responsible for checking-in the
instrument and ensuring the current
hospital-approved Data Set is
loaded.
CAUTION
Charge the battery for a minimum
of 24 hours prior to performing
the check-in and configuration
procedures. Batteries without
a full charge on initial use may
become damaged and/or cause a
malfunction.
Directions for Use
Alaris® SE Pump
Models 7130/7131, 7230/7231
5
Getting Started
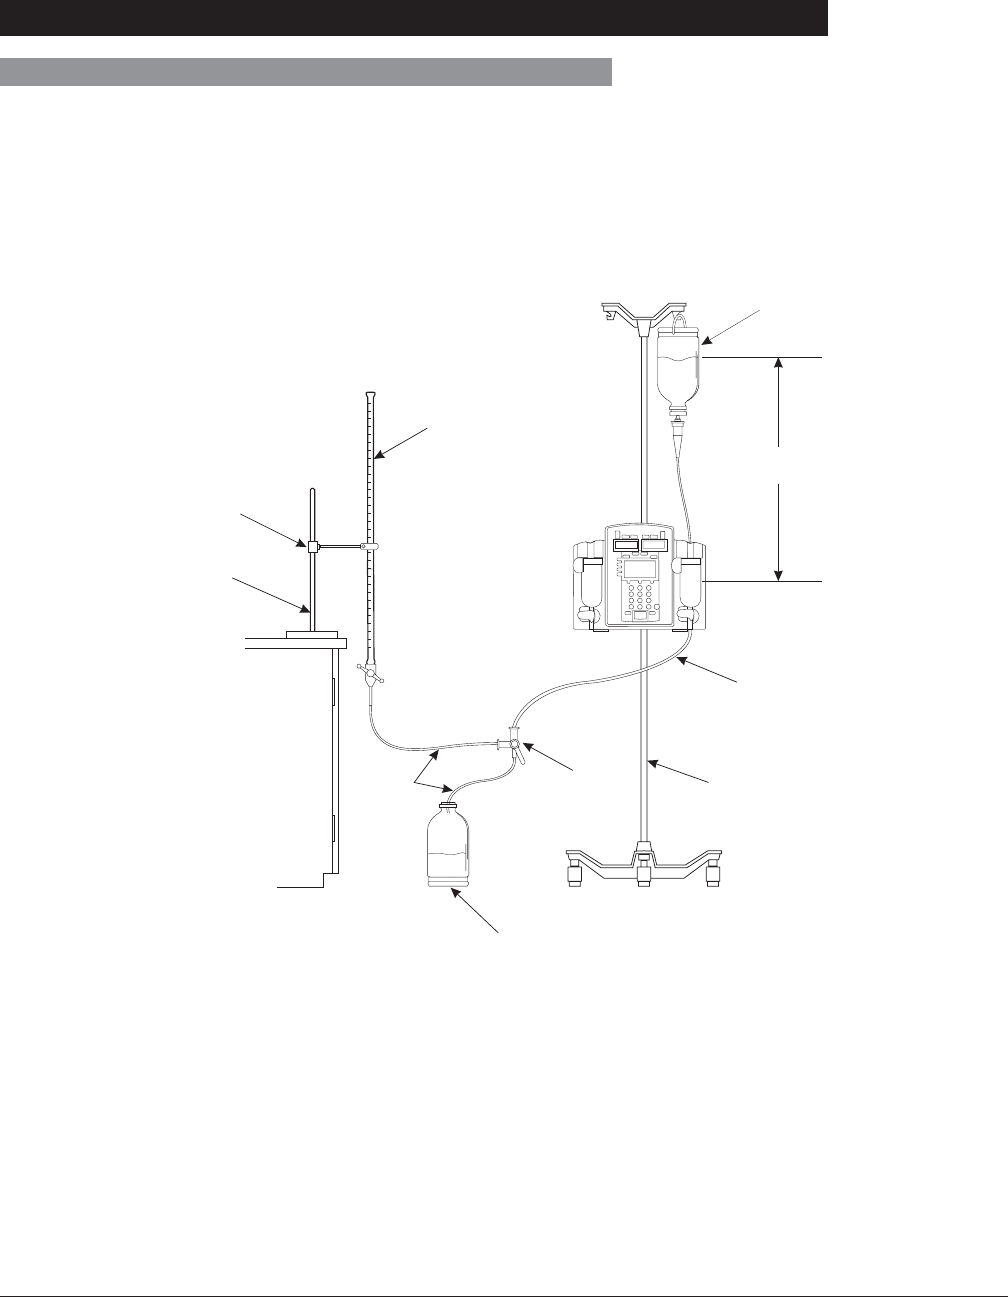
Rate Accuracy Qualification Test (Continued)
able or Bench
30 ±1 in
76.2 cm±2.5
Water Source
80VCS Calibration Set
Instrument Stand
Used Fluid Receptacle
IV Tubing Three-Way
Stopcock
Burette (50 ml)
Burette Clamp
Equipment Stand
Table or Bench
Test Setup
1. Fill solution container with clean tap water. Close Flow
Regulator clamp on 80VCS set and then insert spike into
solution container.
2. Open Flow Regulator clamp and prime set. Ensure all air
is expelled from set. Close Flow Regulator clamp.
3. Connect output of set to one side of three-way stopcock.
4. Load set into instrument.
Check-In and Configuration (Continued)
Do not use the Model 80VCS Calibration Set for more than
30 rate verification runs (15 rate calibration number changes).
Keep track of the number of times the set is used by recording
each use on the 80VCS insert or on a separate record.

Directions for Use
Alaris® SE Pump
Models 7130/7131, 7230/7231
6Getting Started
Check-In and Configuration (Continued)
Rate Accuracy Qualification Test (Continued)
5. Close latch.
6. Verify no fluid flow or drops falling in drip chamber.
7. Plug instrument into a properly grounded AC outlet.
8. Set stopcock to output into a class A or B burette.
9. Press POWER key to turn channel on.
10. Set primary infusion rate to 400 mL/h.
11. Set VTBI to 20 mL.
12. Ensure instrument (both channels if dual channel) is set to
Pressure mode. À
13. Press RUN/HOLD key to start primary infusion. Infuse
until tubing and burette are fully primed (approximately 1
minute).
14. Press RUN/HOLD key to stop infusion.
15. Adjust height of instrument and/or fluid container to attain
a head height of 30 ±1 inches / 76.2 ±2.5 centimeters
between middle of pumping mechanism and fluid level in: Á
• bag or vented bottle (vent closed on administration set)
OR
• drip chamber (unvented bottle with vent open on
administration set).
16. Adjust fluid level in burette until meniscus is level with zero
mark on burette. Â
17. Verify primary infusion rate is 400 mL/h.
18. Reset VTBI to 40 mL and clear volume infused.
19. Press RUN/HOLD key to start primary infusion.
20. Instrument will run approximately 360 seconds (6 minutes)
to complete delivery and then go into KVO mode. Stop
instrument within 1 second of its entering KVO mode.
21. Make a note of volume collected in burette.
22. Note expected volume, as identified on 80VCS set insert.
23. Do not remove 80VCS set from instrument until one of
following conclusions is determined:

Directions for Use
Alaris® SE Pump
Models 7130/7131, 7230/7231
7
Getting Started
Rate Accuracy Qualification Test (Continued)
• Instrument passes rate verification and calibration is
not needed.
• Rate calibration number was changed and instrument
now passes verification.
• Mechanism replacement is required.
24. Calculate volume accuracy, as follows:
Volumetric Volume Accuracy Error Computation
Vcollected = volume in burette in milliliters
Vexpected = characterized volume printed on 80VCS set
insert
Step 1: A = Vcollected ÷ Vexpected
Step 2: B = A x 100
Step 3: % Error (round % Error to nearest tenth of a percent)
= B – 100
25. Result should be 0.0±3%.
26. If volume accuracy does not fall within required range of
±3% from expected volume and test results were:
• inside a range of -5.5% to +7.0% from expected
volume,
perform rate calibration (reference Technical Service
Manual). Set rate calibration number to 0.0% before
running rate test, to determine a new calibration
number.
• outside a range of -5.5% to +7.0% from expected
volume,
return instrument to Cardinal Health for repair or
replace mechanism.
27. Set stopcock to drain fluid in burette to zero level, in
preparation for next test.
NOTES:
À The factory default for the Monitoring Options mode is
Pressure.
Á A 30-inch head height was used in the initial qualification of
this process and is the recommended head height for the
Check-In Rate Accuracy Test. Based on observed field use, a
24-inch head height was also tested and verified for the Rate
Accuracy Specification.
 The instrument may need to be run to prime the line to the
zero level of the burette (step 13).
Check-In and Configuration (Continued)

Directions for Use
Alaris® SE Pump
Models 7130/7131, 7230/7231
8Getting Started
Alternative Rate Accuracy Qualification Test
Check-In and Configuration (Continued)
This procedure is to be used only for the testing of an
instrument during New Instrument Check-In or when just
received from the Service Depot Center. This test is to verify
that damage or changes to the instrument did not occur during
shipment and handling.
Make the following changes to Test Setup:
• Burette and equipment stand have been replaced by digital
scale, Acculab Vic-212 or equivalent and 50 or 100 mL
flask (plastic or glass).
• Three-way stopcock and used fluid receptacle are no
longer needed.
Due to the dynamic monitoring feature, the rate is varied
during operation. For this reason, Cardinal Health does not
recommend using automatic testers to check rate accuracy.
Generally, these devices collect small samples and may cause
the results to be incorrect, even though the instrument is
accurate.
Do not use the Model 80VCS set for more than 30 rate
verification runs (15 rate calibration number changes). Keep
track of the number of times the set is used by recording each
use on the 80VCS insert or on a separate record.
1. Fill solution container with clean tap water. Close Flow
Regulator clamp on 80VCS Calibration Set and then insert
spike into solution container.
2. Open Flow Regulator clamp and prime set. Ensure all air
is expelled from set. Close Flow Regulator clamp.
3. Place flask in middle of scale.
4. Load set into instrument.
5. Close latch.
6. Verify no fluid flow or drops falling in drip chamber.
7. Plug instrument into a properly grounded AC outlet.
8. Place output of set so it drips into flask. (Do not let set rest
on flask.)
9. Press channel’s POWER switch to turn channel on.
10. Set primary infusion rate to 400 mL/h.

Directions for Use
Alaris® SE Pump
Models 7130/7131, 7230/7231
9
Getting Started
Alternative Rate Accuracy Qualification Test (Continued)
Check-In and Configuration (Continued)
11. Set VTBI to 20 mL.
12. Ensure instrument (both channels if dual channel) is set to
Pressure mode. À
13. Press RUN/HOLD key to start primary infusion. Infuse
until tubing is fully primed (approximately 1 minute).
14. Press RUN/HOLD key to stop infusion.
15. Adjust height of instrument and/or fluid container to attain
a head height of 30 ±1 inches between middle of pumping
mechanism and fluid level in:
• bag or vented bottle (vent closed on administration set)
OR
• drip chamber (unvented bottle with vent open on
administration set).
16. Zero reading on scale.
17. Verify primary infusion rate is 400 mL/h.
18. Reset VTBI to 40 mL and clear volume infused.
19. Press RUN/HOLD key to start primary infusion.
20. Instrument will run approximately 360 seconds (6 minutes)
to complete delivery and then go into KVO mode. Stop
instrument within 1 second of entering KVO mode.
21. Make a note of scale reading in grams.
22. Note expected volume, as identified on 80VCS set insert.
23. Do not remove 80VCS set from instrument until one of
following conclusions is determined:
• Instrument passes rate verification and calibration is
not needed.
• Rate calibration number was changed and instrument
now passes verification.
• Mechanism replacement is required.

Directions for Use
Alaris® SE Pump
Models 7130/7131, 7230/7231
10 Getting Started
Alternative Rate Accuracy Qualification Test (Continued)
Check-In and Configuration (Continued)
24. Calculate gravimetric accuracy as follows:
Gravimetric Volume Accuracy Error Computation
Vcollected = volume in flask in grams
Vexpected = characterized volume printed on 80VCS set
insert
Step 1: A = Vcollected / Vexpected
Step 2: B = A x 100
Step 3: % Error (Round % Error to nearest tenth of a
percent.) = B – 100
25. Result should be 0.0 ±3%.
26. If volume accuracy does not fall within required range of
±3.0% from expected volume and test results were:
• inside a range of -5.5% to +7.0% from expected
volume,
perform rate calibration (reference Technical Service
Manual). Set rate calibration number to 0.0% before
running rate test, to determine a new calibration
number.
• outside a range of -5.5% to +7.0% from expected
volume,
return instrument to Cardinal Health for repair or
replace mechanism.
27. Empty flask and reset scale to zero, in preparation for next
test.
NOTE:
À The factory default for the Monitoring Options mode is
Pressure.

Directions for Use
Alaris® SE Pump
Models 7130/7131, 7230/7231
11
Getting Started
Check-In and Configuration (Continued)
Functional Test
1. Turn instrument on without set installed. Verify it beeps
and red alarm light flashes but does not stay lit.
2. Set infusion rate to 460 mL/h and VTBI to 100 mL.
3. With latch closed, press RUN/HOLD key and rate and
VTBI ≠ 0 to cause Set Out and Air In Line messages.
4. Open latch.
5. Install primed administration set with latch open.
6. Verify instrument displays Air In Line and Latch Open
messages.
7. Close latch and verify display returns to setup page.
Set Sensor Check / Pressure Calibration Verification
1. Access DIAGNOSTICS MODE by pressing and holding
upper left soft key on power-up. Reference Technical
Service Manual, “Troubleshooting” chapter, for details or
contact Cardinal Health Technical Support. À
2. Advance to D6 page and choose Cal Pressure (both
Channel A and Channel B for dual channel instruments).
3. Verify both 0 mmHg and 500 mmHg readings indicate
Pass.
4. Install a standard set and close latch. Verify reading is
over 170, to confirm set sensor operation.
5. Remove standard set and verify Sensor = reading is in
-80 to +30 mmHg range without set installed, to verify
pressure calibration. Á
DIAGNOSTICS MODE
ID No. : 000000000
SW Rev.: 08.XX
PM Due : 52 weeks
1
page
AB OPTIONS
D
NOTES:
À “08.XX” in the illustrated display represents the current
software revision.
Á If the reading is out of range, reference the Technical Service
Manual, “Pressure Calibration” section, or contact Cardinal
Health Technical Support for assistance.

Directions for Use
Alaris® SE Pump
Models 7130/7131, 7230/7231
12 Getting Started
Check-In and Configuration (Continued)
Functional Test (Continued)
8. Perform Upstream Occlusion Test, as follows:
a. Verify infusion rate is set to 460 mL/h.
b. With instrument on hold, or at start-up, verify primary
VTBI is set to greater than 100 mL.
c. Press RUN/HOLD key to begin infusion.
d. Clamp off IV line just above instrument (about
2 inches) to simulate an upstream occlusion.
e. Verify instrument stops running, alarms, and displays
OCCLUSION UPSTREAM within 60 seconds.
f. Press RUN/HOLD key to silence alarm and put
instrument on hold.
g. Release or open clamp and remove from tubing.
h. Press RUN/HOLD key to resume infusion. Alarm
should not reoccur.
9. Perform Downstream Occlusion Test, as follows:
a. Continue infusing (from step 8h).
b. Verify rate is set to 460 mL/h.
c. Clamp off IV line just below instrument (about
2 inches) to simulate a downstream occlusion.
d. Allow instrument to run until it alarms OCCLUSION
DOWNSTREAM. Verify this occurs within 60
seconds.
e. Press RUN/HOLD key to silence alarm and put
instrument on hold.
f. Release or open clamp and remove from tubing.
g. Press RUN/HOLD key to resume infusion. Alarm
should not reoccur.
h. Press RUN/HOLD key to stop infusion.

Directions for Use
Alaris® SE Pump
Models 7130/7131, 7230/7231
13
Getting Started
Flow Stop Test
1. With an administration set primed and loaded in
instrument, turn power off.
2. With all tubing clamps open and fluid container 2 or more
feet above instrument, verify no fluid flows through set.
3. Open latch and remove set. Verify no fluid flows through
set.
Ground Current Leakage Test
Use a DNI Nevada Model 232D (or equivalent) to measure
the ground leakage current. Refer to the test equipment’s
operation manual for the proper setup and measurement
technique. Leakage current must be ≤100μA for normal and
reversed line polarity.
Ground Resistance Test
Use a DNI Nevada Model 232D (or equivalent) to measure the
ground resistance. Measure resistance from the AC power
plug ground pin to the screw for the power cord strap, or to
the screw for the battery cover on the chassis. Refer to the
test equipment’s operation manual for the proper setup and
measurement technique. Resistance must be ≤0.10Ω.
CAUTION
Do not connect the ground
resistance probe to the pressure
transducer.
Instrument Configuration
Instrument Configuration for the SE Pump with the Guardrails®
Suite MX is set for each profile using the Editor Software, the
PC-based authoring tool. The Data Set is then transferred to
the SE Pump by qualified personnel.
The SE Pump may be operated with or without the Guardrails®
Suite MX protection. When an approved Data Set is
transferred to the SE Pump by qualified personnel and the
Profiles feature is enabled (ON) in instrument configuration,
then Guardrails® Suite MX protection is available.
Instrument configuration is set by qualified personnel in the
Data Set or Configuration and Diagnostics modes. When
the Profiles feature is not enabled (Off), or when no Data
Set has been transferred to the SE Pump, Guardrails® Suite
MX protection is not available (see "Primary Infusion – NO
Guardrails® Suite MX Protection" and "Secondary Infusion
- NO Guardrails® Suite MX Protection").
Check-In and Configuration (Continued)

Directions for Use
Alaris® SE Pump
Models 7130/7131, 7230/7231
14 Getting Started
Administration Set Information
The SE Pump uses a wide variety of Flow Regulator
administration sets. The sets dedicated for use with the SE
Pump are designed for use with the instruments as well as
for gravity-flow stand-alone use. The unique, patented Flow
Regulator has an integral flow control device that minimizes
the risk of unintended flow when the set is removed from the
instrument, and provides accurate rate control during gravity
administration.
• For specific administration set instructions, reference
directions for use provided with set.
• Use aseptic technique when handling sets and syringes.
• Administration sets are supplied with a sterile and non-
pyrogenic fluid path for one time use. Do not re-sterilize
or re-use.
• For administration set replacement interval, refer to facility
protocol and/or government standards (such as: CDC
guidelines in the United States) and see "SmartSite®
Infusion Set" section of this Directions for Use (DFU).
• Discard administration set per facility protocol.
• For IV push medication (put instrument on hold), occlude
tubing above injection port during administration.
• Flush port(s) per facility protocol.
• Place a sterile replacement cap on open end of tubing
connector when not in use. Discard tubing when integrity
has been compromised.
General
SmartSite® Infusion Set
The Needle-Free Valve is designed to permit injection and
aspiration of fluids without the use of needles.
1. Use proper hand-hygiene procedures. Wash hands with
conventional antiseptic-containing soap and water or
disinfect with waterless alcohol-based gels or foams.
2. Prepare Needle-Free Valve.
• Always swab top of valve port, prior to every access,
with sterile 70% isopropyl alcohol wipe and allow to
dry.À
-- Continued Next Page --

Directions for Use
Alaris® SE Pump
Models 7130/7131, 7230/7231
15
Getting Started
Administration Set Information (Continued)
NOTES:
À For multiple syringes, swab prior to each syringe access.
Á For infusions of blood, blood products or lipid emulsions
replace every 24 hours.
SmartSite® Infusion Set (Continued)
• Replace every 72 hours or 100 activations, whichever
comes first. Á
Prepare the primary solution container in accordance with the
manufacturer’s directions for use.
Use only sets dedicated for use with SE Pump.
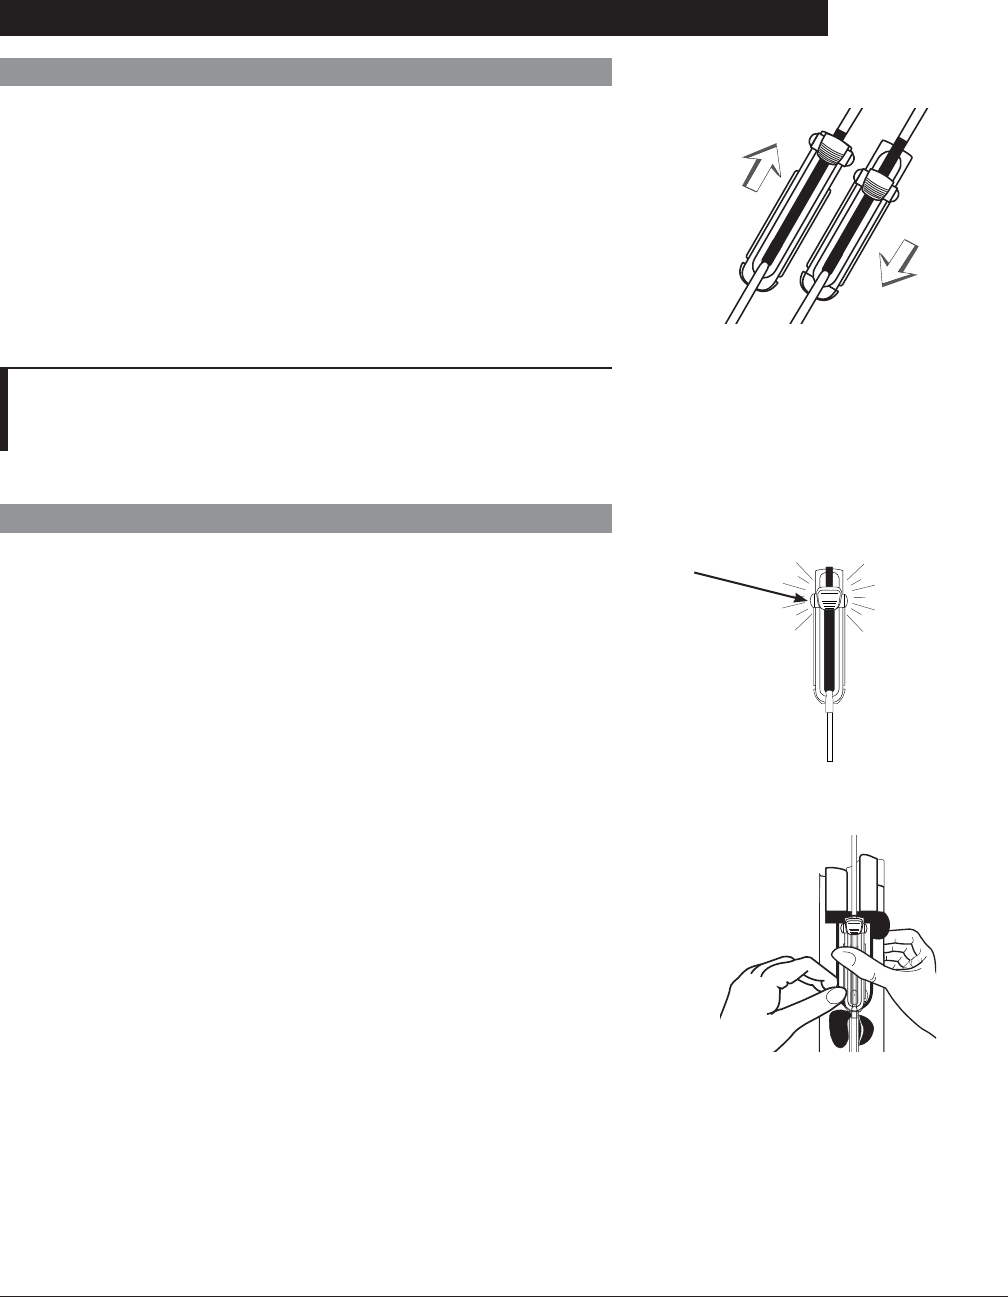
Preparing Solution Container and Set
Thumb Clamp
Click
Flow Regulator
WARNINGS
• Use only sets dedicated for
use with the SE Pump. The
use of any other set may cause
improper instrument operation,
resulting in an inaccurate fluid
delivery or other potential
hazard.
• Discard if packaging is not intact
or protector caps are unattached.
1. Slide Flow Regulator thumb clamp down until an audible
click verifies it is in fully closed position.
2. Spike solution container.
3. Fill drip chamber to 2/3 full. À
4. Invert Flow Regulator.
Directions for Use
Alaris® SE Pump
Models 7130/7131, 7230/7231
16 Getting Started
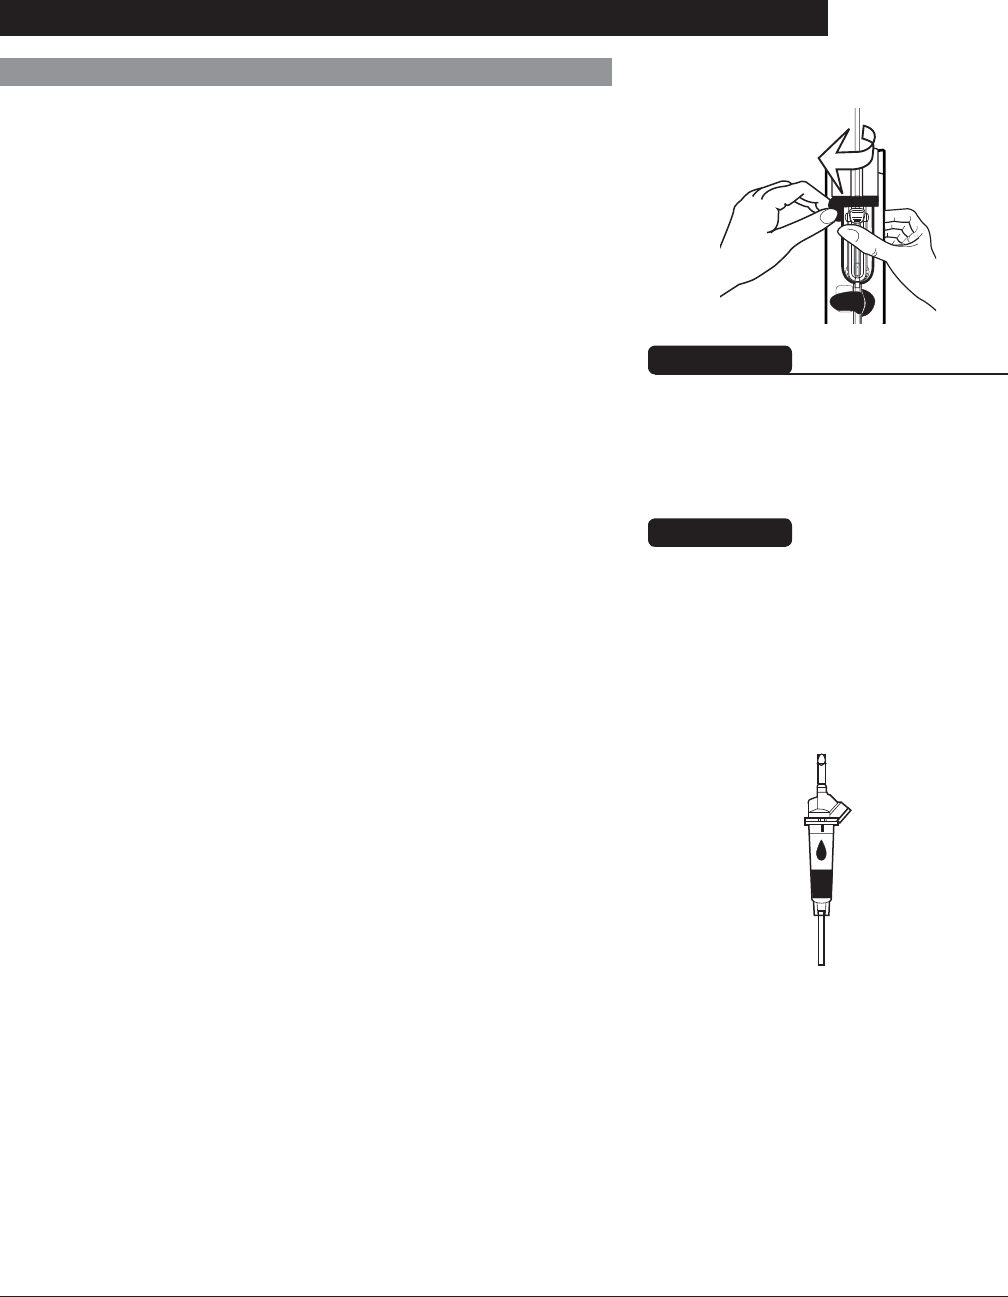
Administration Set Information (Continued)
5. Slide Flow Regulator thumb clamp to open position to
slowly prime set.
6. Close Flow Regulator clamp when priming is complete, as
in Step 1. Verify no fluid is flowing.
7. A gravity flow rate may be adjusted with Flow Regulator
thumb clamp, if desired.
NOTE:
À Open the vent cap on the spike if the container requires
venting.
Slide up to open
for priming.
Slide down to
close for loading.
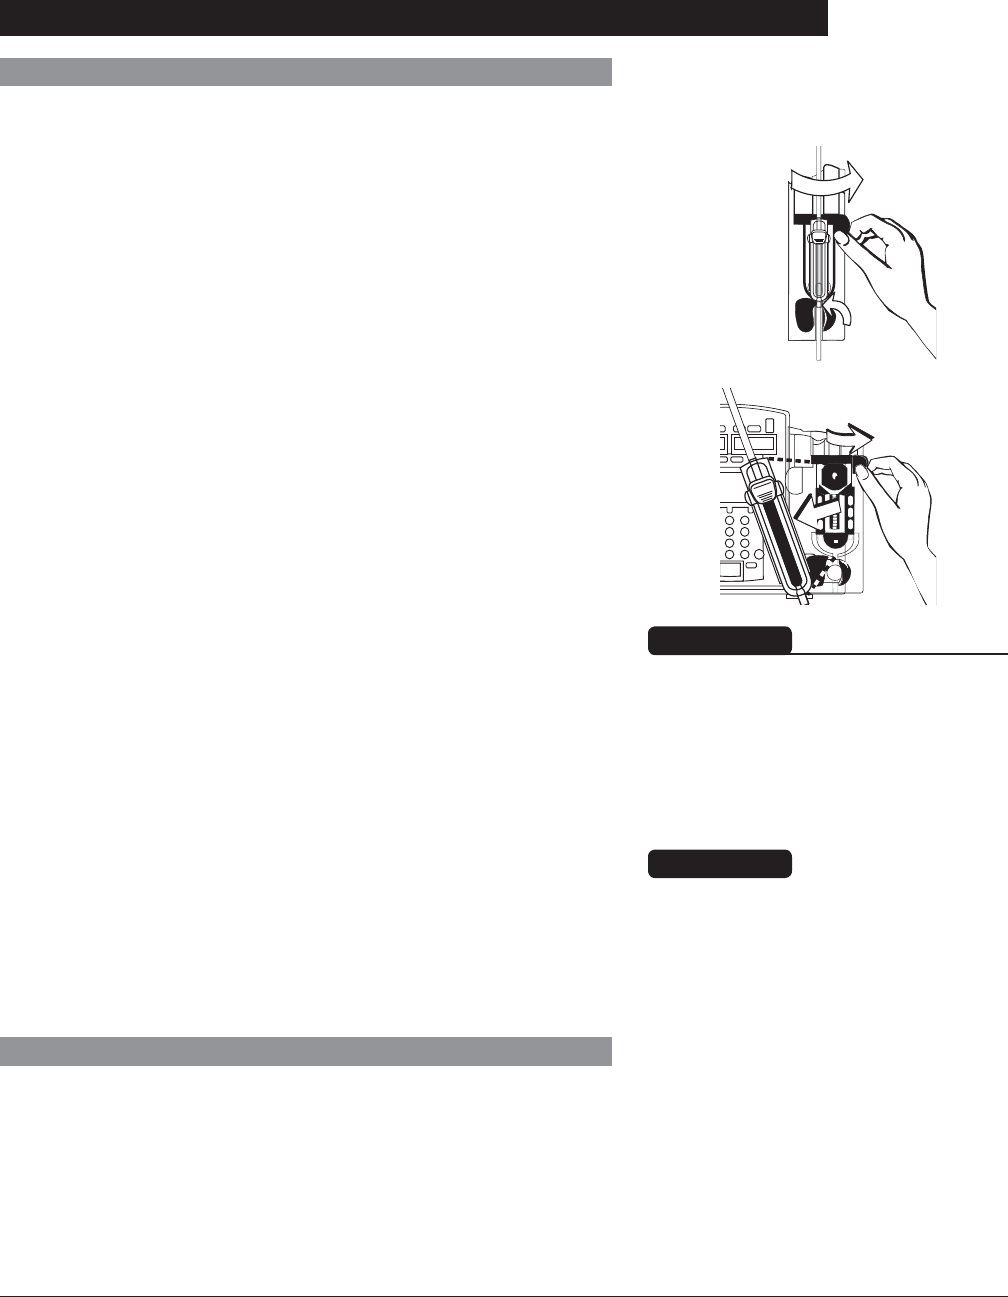
Loading Set
1. Slide Flow Regulator thumb clamp down until an audible
click verifies it is in fully closed position.
Thumb Clamp
Click
Flow Regulator
AC
2. Using both hands, press top and bottom of Flow Regulator
into instrument until it snaps into place.
a. Verify 3 gray fingers (clamp arms) on each side of
pumping mechanism have engaged Flow Regulator.
b. Let go of set. A properly loaded set should stay in
instrument.
Preparing Solution Container and Set (Continued)
Directions for Use
Alaris® SE Pump
Models 7130/7131, 7230/7231
17
Getting Started
Administration Set Information (Continued)
WARNING
After set installation, verify no fluid
is flowing through the administration
set’s drip chamber, to avoid free-
flow.
3. Press firmly just below blue thumb clamp on Flow
Regulator with one hand while using other hand to close
latch fully to left.
• If resistance is met while closing latch, remove set,
verify Flow Regulator is fully closed and then reinstall
set.
• Verify thumb clamp has moved to open (up) position
prior to starting infusion.
CAUTION
Before operating instrument, verify
that administration set is free from
kinks and installed correctly in
instrument.
Loading Set (Continued)
4. Attach set to patient’s vascular access device.
5. Verify flow from IV container after starting infusion.
Directions for Use
Alaris® SE Pump
Models 7130/7131, 7230/7231
18 Getting Started
Removing Set
1. Place channel on hold.
2. Open latch.
• Flow Regulator automatically closes to prevent
accidental unintended flow.
Administration Set Information (Continued)
IV
3. Press latch fully to right.
• Set is ejected from instrument.
WARNING
Even though the instrument
automatically closes the Flow
Regulator, verify the Flow
Regulator is closed when the set
is removed from the instrument to
prevent unintended flow.
CAUTION
Do not attempt to force the set
from the instrument. Send the
instrument to qualified service
personnel.
Changing Solution Container
1. Place channel on hold.
2. Remove empty solution container.
3. Spike new container.
4. Ensure drip chamber is filled to 2/3 full.
Directions for Use
Alaris® SE Pump
Models 7130/7131, 7230/7231
19
Programming
Programming
References throughout this procedure to specific drugs and
drug doses are for illustration purposes only. Refer to specific
drug product labeling for information concerning appropriate
administration techniques and dosages.
Programming and Navigation Tips
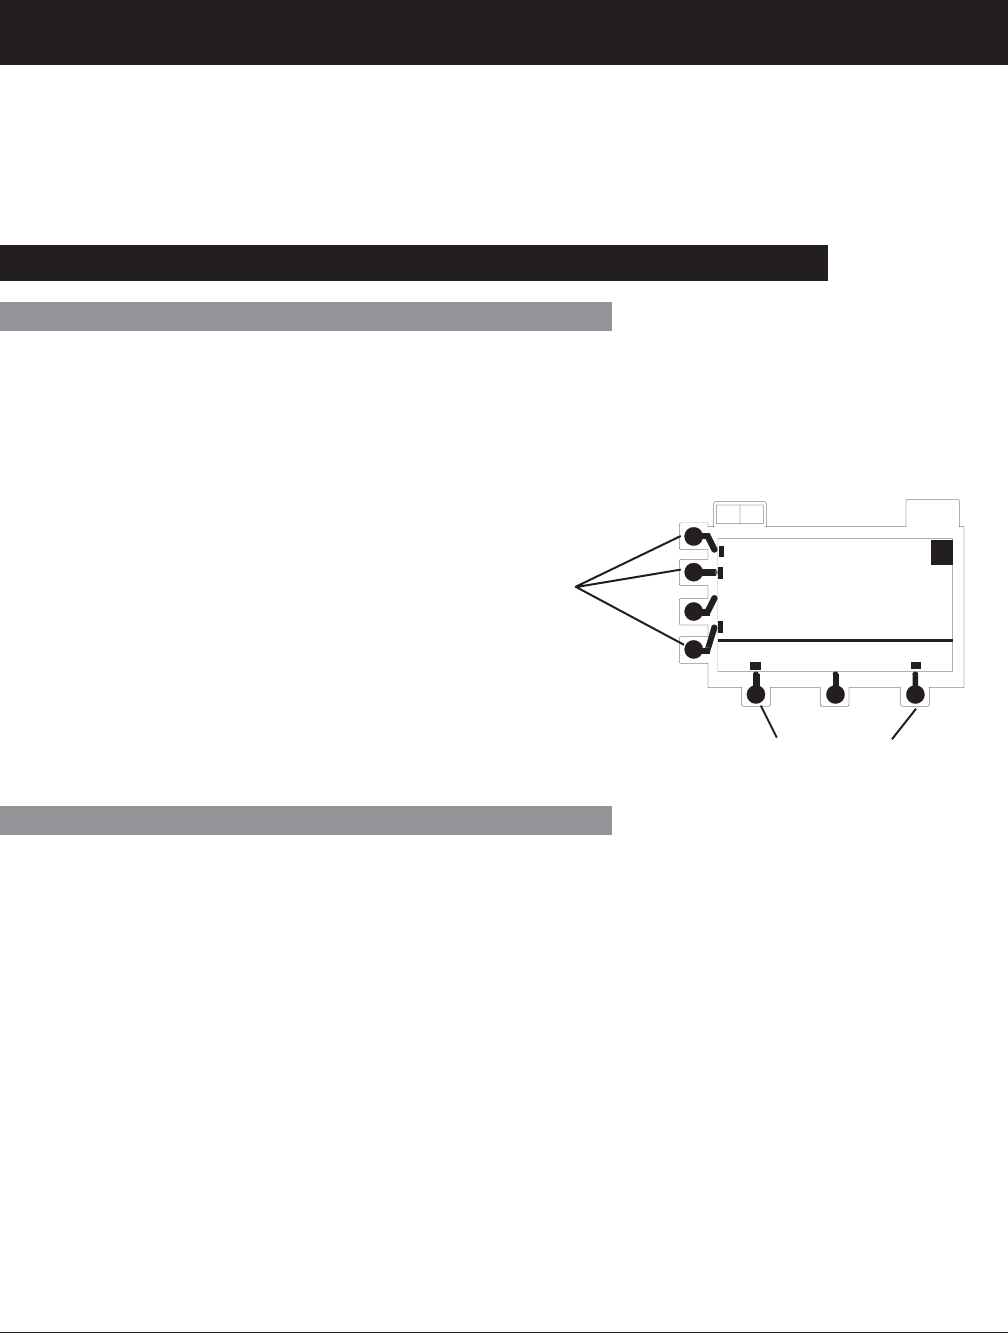
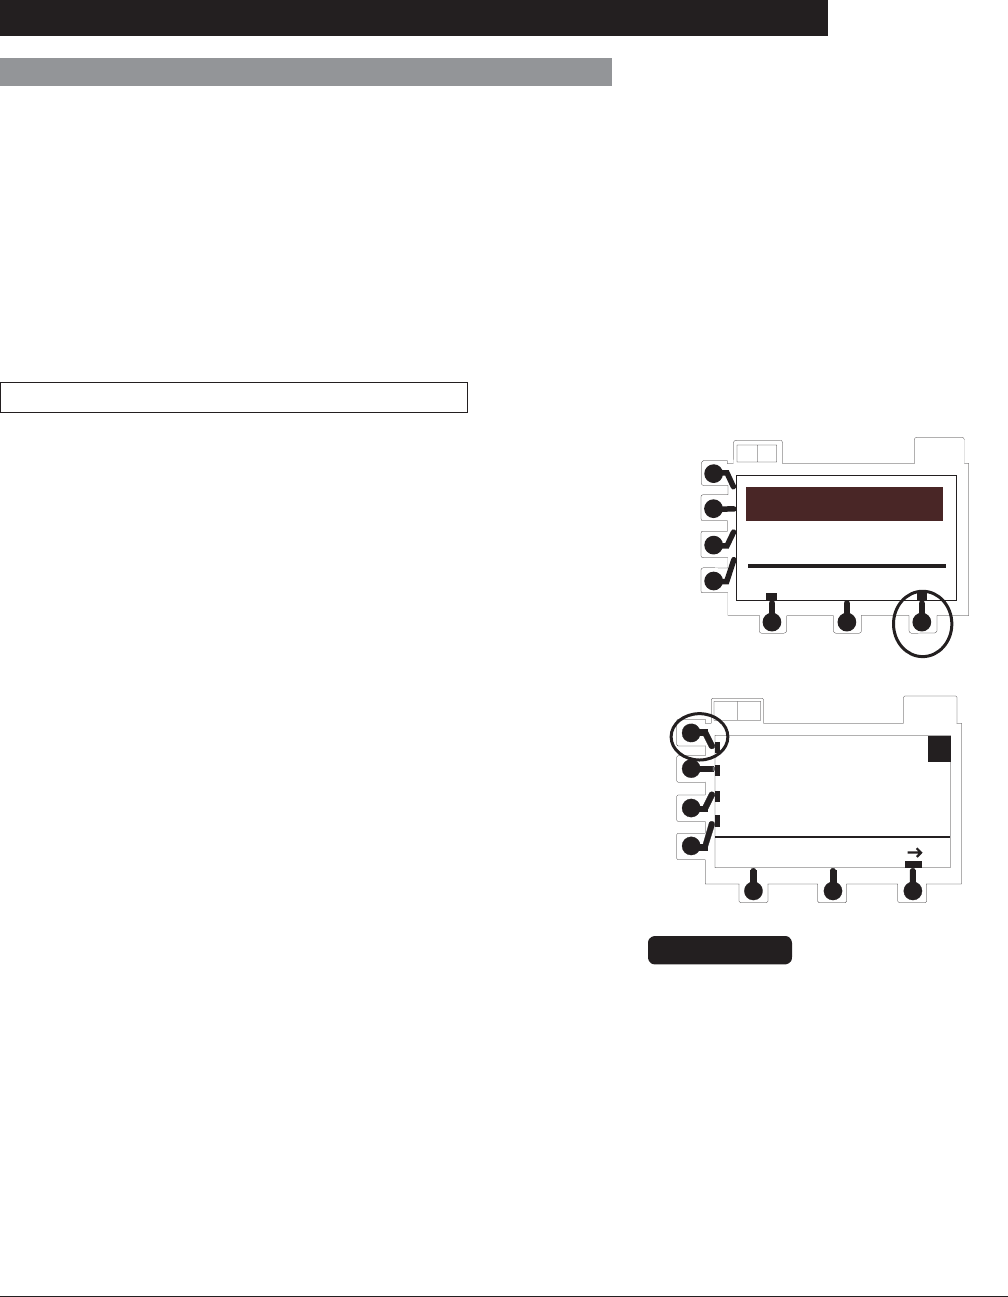
Soft Keys
Soft Keys are the keys located on the left side and the bottom
of the main LCD display. They serve a variety of functions, as
indicated by the text in the display at the time. A soft key is
active if there is a tick mark (y) next to the key.
If there is no tick mark next to the key, then it is not active
and cannot be selected. [In the illustrated example Conc
(concentration) is not active.] Pressing an inactive key results
in an invalid keypress tone. Rate = 56.0 mL/h
Dose= 0.8 mg/kg/h
Conc= 100 mg/ 100 mL
Wt= 70 kg
AB OPTIONS
A
ok
menu
Entering Values
To enter programming values, select the desired parameter by
pressing the corresponding soft key. The field is highlighted.
To enter desired value, use the numeric keys then press the
ENTER key.
A value must be highlighted to be changed.
A flashing highlight indicates that the entry is incomplete.
Complete the entry and press the ENTER key.
To clear an existing value, press the CLEAR key. If the existing
value should not be cleared, pressing the CLEAR key a
second time (before pressing the ENTER key) restores that
value.
When all parameters required on a programming setup screen
have been entered, the ok soft key is used to confirm all
entries and continue programming.
Active Soft Keys
Active Soft Keys

Directions for Use
Alaris® SE Pump
Models 7130/7131, 7230/7231
20 Programming
Programming and Navigation Tips (Continued)
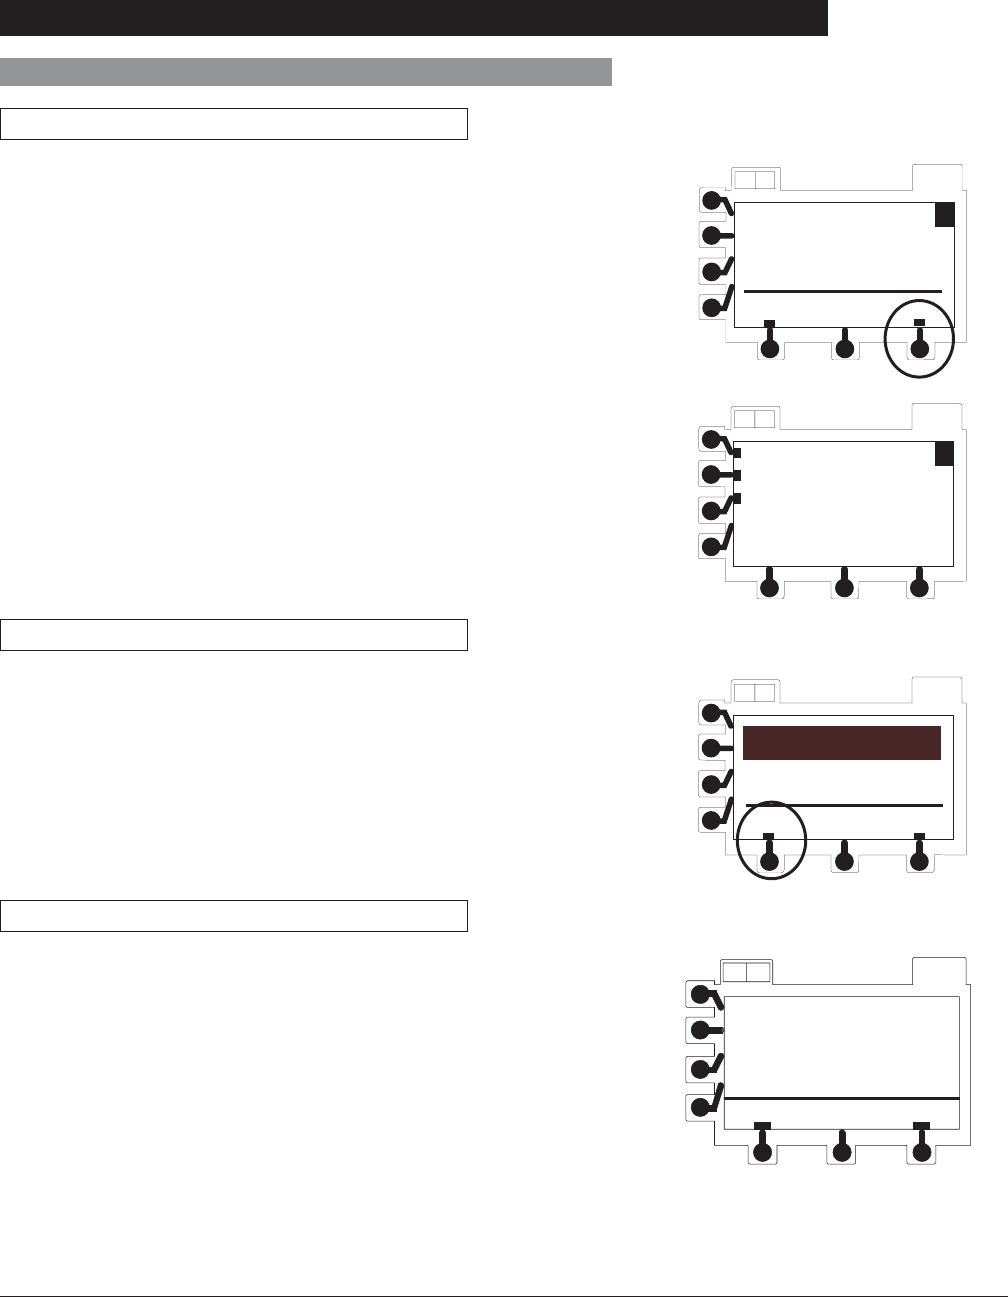
Menus - With Guardrails® Suite MX Protection
MENU screens provide access to the Profile drug libraries and
to basic programming in both the primary and the secondary
mode: À
• MENU (Primary Main Menu)
• BOLUS MENU
• SECONDARY MENU
Press menu soft key while in primary programming mode to
display MENU.
OPTIONS
AB
MENU
New Guardrails Fluid
Basic Infusion
New Guardrails Drug A
OPTIONS
AB
BOLUS MENU
Repeat Last Bolus
New Bolus
Quit Bolus
A
OPTIONS
AB
SECONDARY MENU
Basic SEC
Return to PRI
Guardrails SEC Drug A
Press menu soft key while in bolus programming mode to
display BOLUS MENU.
NOTE:
À When the Profiles feature is not enabled (Off), or when no
Data Set has been transferred to the SE Pump, Guardrails®
Suite MX protection is not available and these menus do not
appear.
Press menu soft key while in secondary programming mode to
display SECONDARY MENU.
Directions for Use
Alaris® SE Pump
Models 7130/7131, 7230/7231
21
Programming
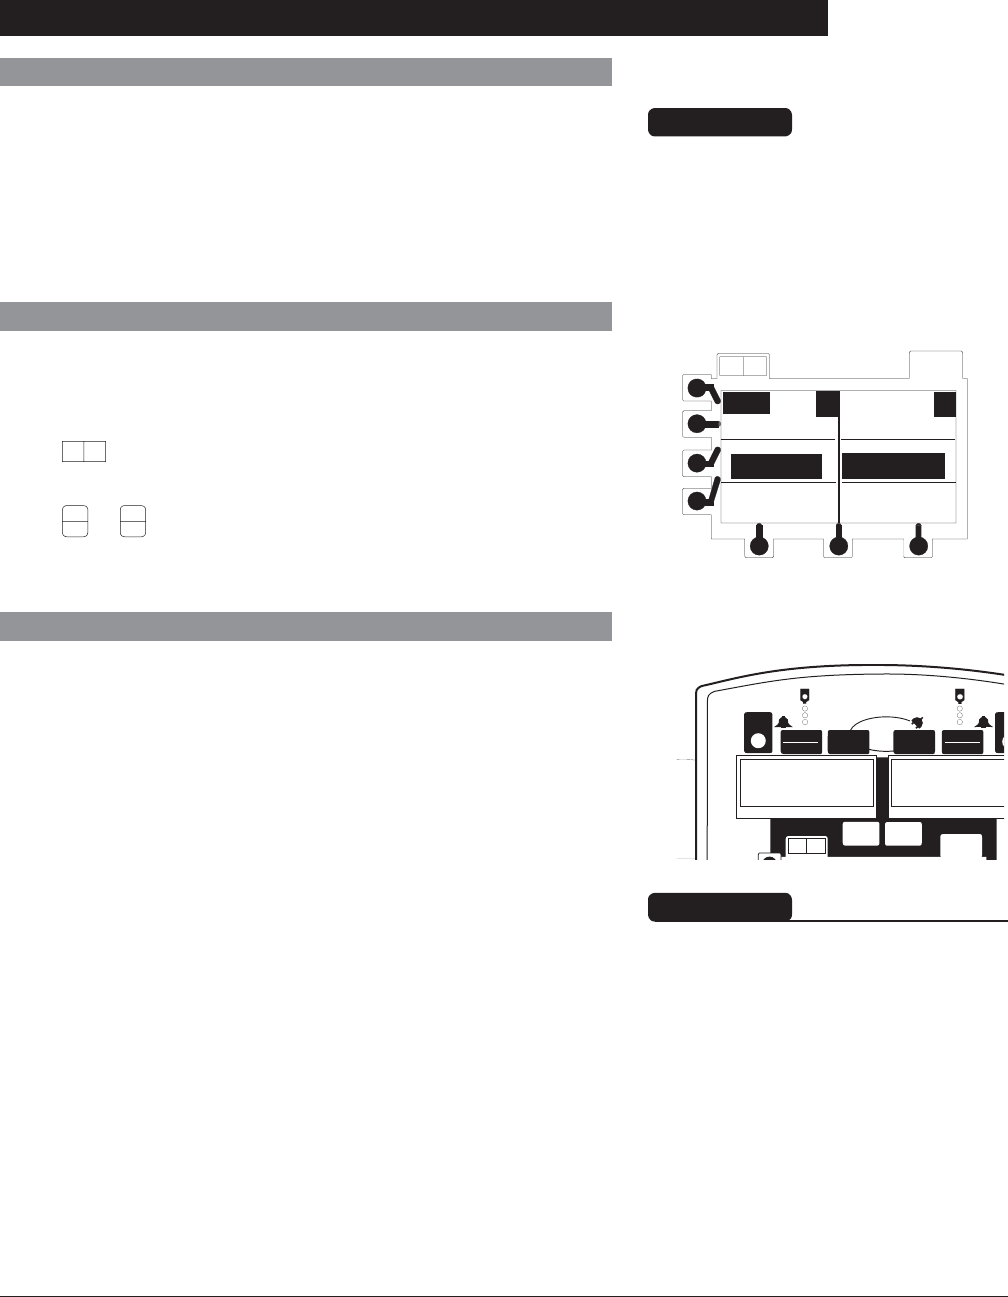
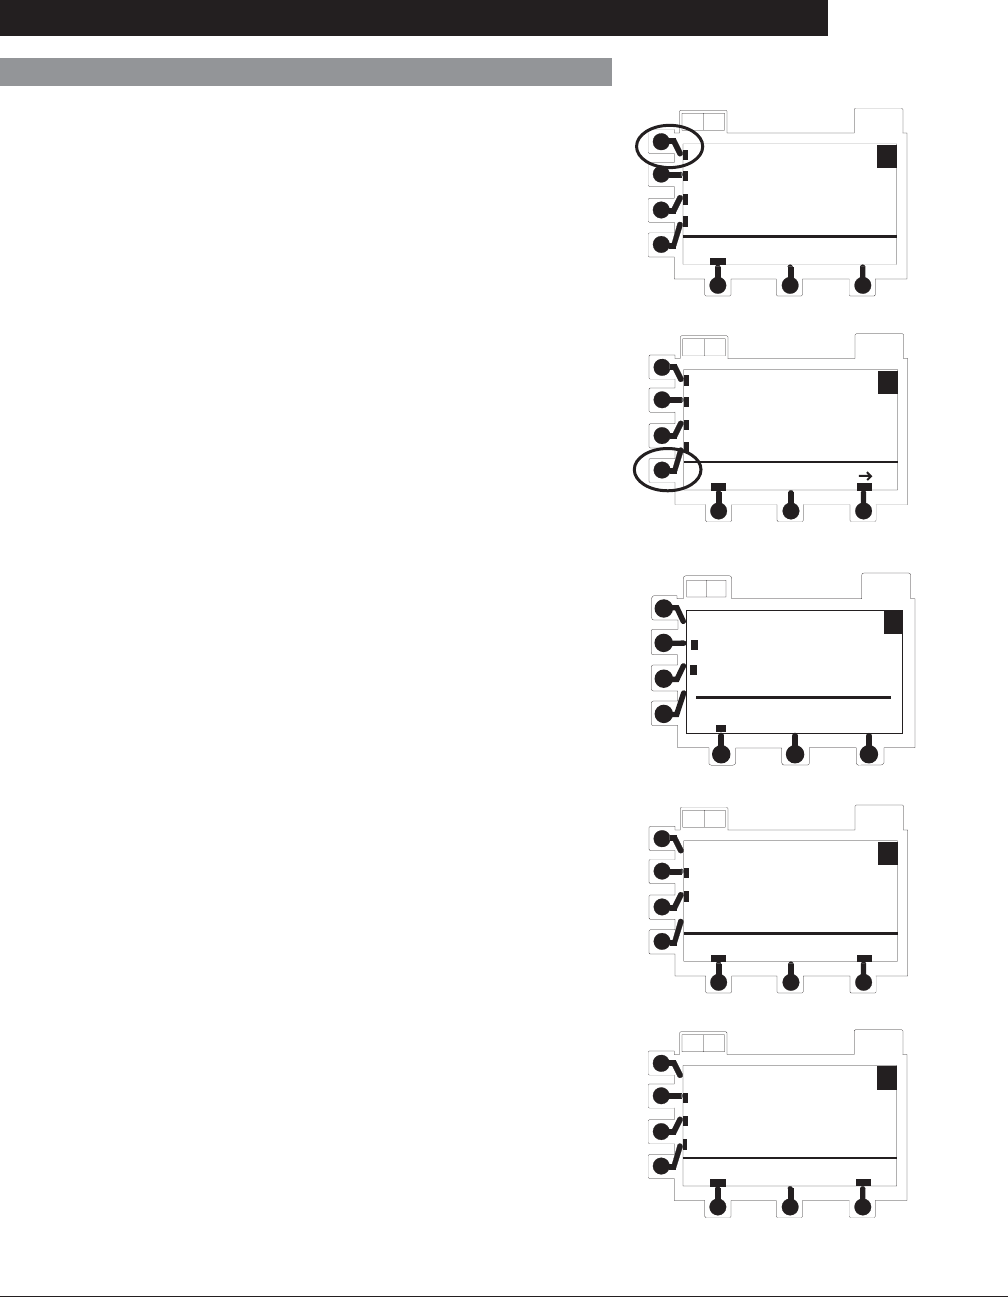
Split Screen (Dual Channel Only)
When both channels are infusing, a split screen showing
programmed information for both channels displays
automatically after one minute.
Press A B key to switch immediately to split screen.
Press
A
O or
B
O key to stop split screen.
AB OPTIONS
B
A5
mcg/kg/min
DOPamine
VI = 0.5
Fluid
Rate = 75.0
0.9% NS
VI = 40.9
Programming and Navigation Tips (Continued)
Menus - NO Guardrails® Suite MX Protection
MENU screens for optional modes can be accessed using the
OPTIONS key:
• MULTI-STEP MENU
• MULTI-DOSE MENU
• DOSE RATE MENU
CAUTION
Guardrails® Suite MX protection is
not available within the MULTI-STEP,
MULTI-DOSE OR DOSE-RATE
MENU options.
Powering On and Off
1. To turn channel on, press channel's POWER key.
• Instrument performs a self test when first channel is
powered on.
• All indicators and displays momentarily light.
• An audio tone sounds.
• Hold indicator flashes.
WARNING
Each time the instrument is
turned on verify and/or set the
monitoring mode, resistance alert
and/or pressure alarm limit. If the
monitoring mode, resistance alert
and/or pressure alarm limit are not
verified, the instrument may not be
operating with the desired occlusion
detection parameter(s).
OPTIONS
SEC
PRI
POWER
RUN
HOLD
PRI SEC HLD OPT
K
HLD PRI SECKVO OPT
POWER
RUN
HOLD
A
A B
ml/hr ml
-- Continued Next Page --

Directions for Use
Alaris® SE Pump
Models 7130/7131, 7230/7231
22 Programming
Programming and Navigation Tips (Continued)
• System startup page displays briefly (08.XX in
example display represents current software
revision; ID No. is instrument serial number).
OPTIONS
AB
© 2002, 2006
Cardinal Health
SW Rev. : 08.xx
ID No. : - - - - - - - - -
• When self test completes, if Guardrails® Suite MX
protection is available, current profile screen appears. OPTIONS
AB
Current Profile Is
Adult ICU
Hospital Name
DataSet ID 123456789
Accept Change
2. To power off, press and hold POWER key until display
turns off.
• If Profiles feature is not enabled, then NEW PATIENT?
screen appears.
AB OPTIONS
A
NEW PATIENT ?
"Yes" Clears Previous
Patient Data
no yes
Powering On and Off (Continued)
CAUTIONS
• Appearance of lines and/or dots
that remain on constantly when
the instrument is powered on may
indicate improper functioning of
the Main Display. Although the
instrument is functioning, return it
to qualified service personnel.
• Inspect LCD for anomalies
(improperly lit/unlit pixels).
Directions for Use
Alaris® SE Pump
Models 7130/7131, 7230/7231
23
Programming
Programming and Navigation Tips (Continued)
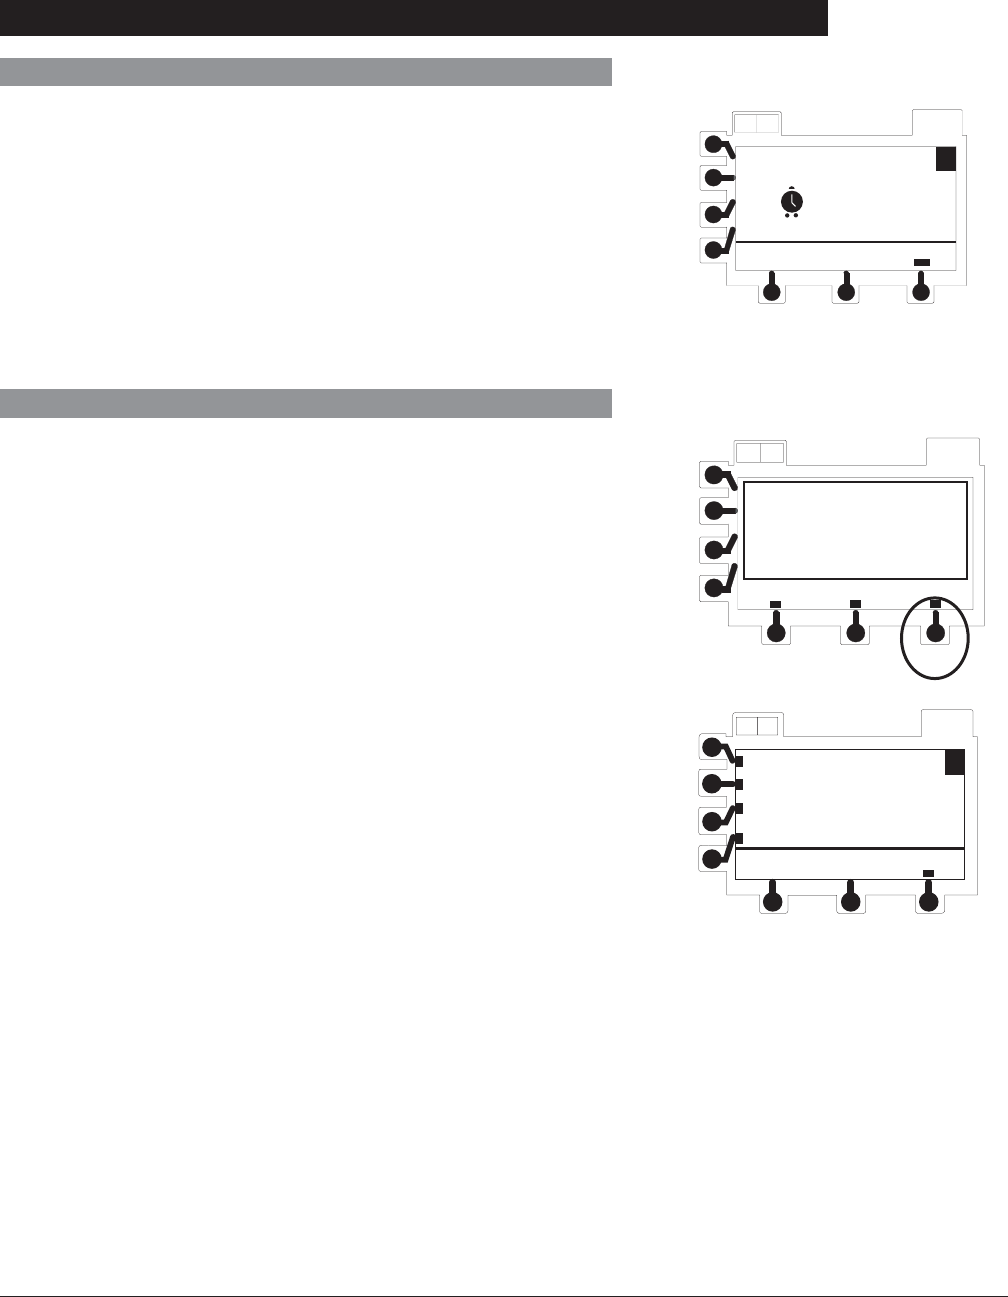
Responding to Maintenance Reminder
If the Preventive Maintenance Reminder option is enabled and
the device is due for preventive maintenance a Maintenance
Reminder message appears at power up.
1. Notify appropriate facility personnel if a Maintenance
Reminder message appears.
2. If necessary, press continue soft key to temporarily
bypass reminder.
AB OPTIONS
A
continue
Maintenace
Reminder
Responding to Time Set Reminder
Following certain battery depleted conditions it is necessary to
re-set the internal clock so that CQI Reporter data integrity is
maintained. In such cases, a Verify Time reminder message
appears at power up.
1. Press Change soft key.
• Time set screen displays.
2. Press soft key next to parameter to be changed.
• Current value is highlighted.
3. To enter a new value, use numeric keypad, then press
ENTER key.
4. Verify that all fields are correct then press ok soft key to
continue programming.
OPTIONS
Accept Change
Skip
Verify Date / Time
Feb 28 2006
16:43
AB
Month
OPTIONS
Day
Year
A
ok
Time
02
28
2006
16h 43min
AB
Directions for Use
Alaris® SE Pump
Models 7130/7131, 7230/7231
24 Programming
Guardrails® Suite MX Prompts
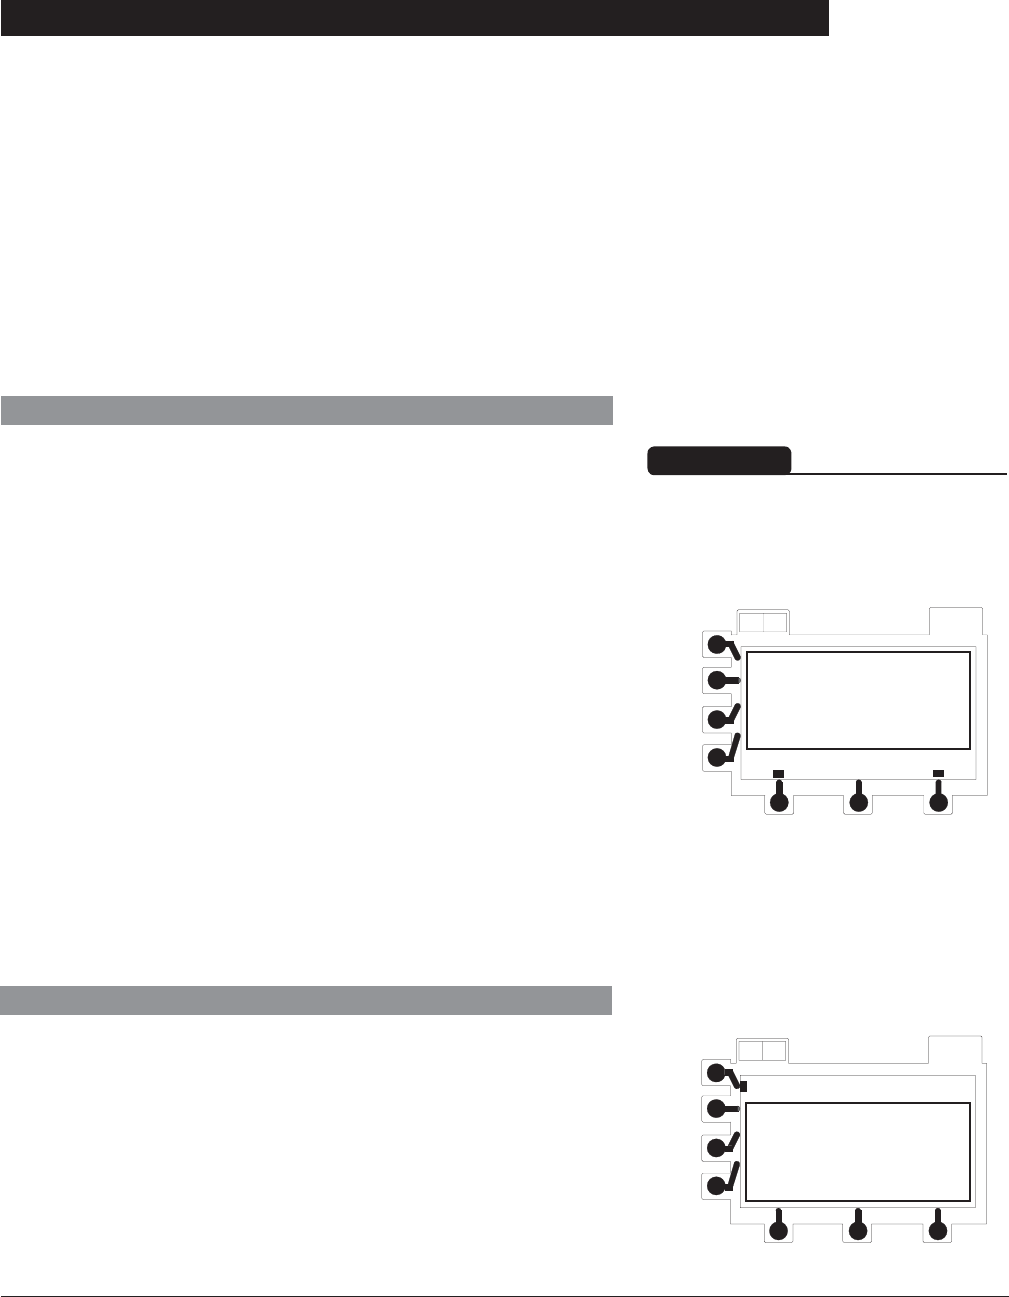
Soft Limits
Hard Limits
If programmed parameter is outside the Hard Limit for that care
area, a prompt appears indicating a value within range must be
entered before programming can continue.
Use numeric keys to enter a new value, then press ENTER
key.
AB OPTIONS
DOPAmine
Exceeds Hard Limit:
50 mcg/kg/min
REPROGRAM
Rate = 600.0 mL/h
Guardrails® Suite MX software allows the facility to create
Soft and/or Hard Limits for Guardrails® continuous dose,
Concentration, Guardrails® Bolus Dose, Bolus Dose
Administration Rate, Guardrails® intermittent total dose,
Intermittent Time, and IV Fluid Rate.
Within each profile the facility may also pre-define the following
Hard Limits: maximum patient weight (kg), maximum patient
body surface area (m2) and maximum rate (mL/h).
Additional prompts are provided if Time or VTBI are edited
resulting in a rate change, or if a VTBI significantly larger or
smaller than the bag volume is entered.
AB OPTIONS
no yes
override?
alteplase
Exceeds Soft Limit:
0.81 mg/kg/h
Override Dose Limit?
If programmed parameter is outside Soft Limit for that care area,
a prompt appears before programming can continue.
1. If it is inappropriate to override Soft Limit, press no soft key.
• Drug set up page displays.
2. Use numeric keys to enter a new value, then press ENTER
key.
OR
3. If it is clinically appropriate and necessary to override
Soft Limit, press yes soft key.
• Programming may continue.
When a maximum dose limit is exceeded, ↑↑↑ precedes the drug
or fluid name. This indicates that the drug is infusing at a rate
exceeding the defined maximum limit for that profile.
When a minimum dose limit is exceeded, ↓↓↓ precedes the drug
or fluid name. This indicates that the drug is infusing at a rate
less than the defined minimum limit for that profile.
WARNING
Prior to overriding a Soft Limit
prompt, confirm the infusion
parameters are correct.
Directions for Use
Alaris® SE Pump
Models 7130/7131, 7230/7231
25
Programming
Primary Infusion - With Guardrails® Suite MX Protection
1. To change Profile, press change soft key.
• Profile selection menu displays.
Adult ICU
AB OPTIONS
A
Cardiac Care Unit
Labor and Delivery
Medical / Surgical
page
2. To view additional Profile selections, press page soft key.
3. Press soft key next to desired new Profile.
• Confirm Profile screen appears.
CAUTION
If the correct profile is not
selected, the instrument may not
operate within the appropriate dosing
limits and operating parameters.
OPTIONS
AB
Current Profile Is
Oncology
Hospital Name
DataSet ID 123456789
Accept Change
Selecting New Patient and Profile Options
Previous programming parameters may either be cleared or
preserved.
Cleared, if:
• Profile is changed.
• Profile is accepted but New Patient? - yes is selected.
Preserved, only if:
• Current Profile is accepted and New Patient? - no is
selected.
Changing Profile
Directions for Use
Alaris® SE Pump
Models 7130/7131, 7230/7231
26 Programming
OPTIONS
AB
MENU
New Guardrails Fluid
Basic Infusion
New Guardrails Drug A
Once confirmed:
• Abbreviated Profile name appears in lower display.
• All previous programming parameters are cleared.
• MENU screen displays.
Primary Infusion - With Guardrails® Suite MX Protection (Continued)
To retain currently active Profile, press Accept soft key.
• NEW PATIENT? screen displays.
OPTIONS
AB
Current Profile Is
Oncology
Hospital Name
DataSet ID 123456789
Accept Change
To indicate programming is for a new patient and clear all
stored patient parameters from memory, press yes soft key.
• All previous patient data clears and there is no option to
Resume Previous Drug or Resume Previous Fluid.
• MENU screen displays.
OR
NEW PATIENT?
“Yes” Clears Previous
Patient Data
no
AB OPTIONS
yes
Confirm Profile
Adult ICU
return
A
ABOPTIONS
ok
4. To confirm Profile selection, press ok soft key.
OR
To select another Profile, press return soft key.
Selecting New Patient and Profile Options (Continued)
Changing Profile (Continued)
Accepting Profile
Selecting New Patient Option
-- Continued Next Page --

Directions for Use
Alaris® SE Pump
Models 7130/7131, 7230/7231
27
Programming
Primary Infusion - With Guardrails® Suite MX Protection
The following procedures are to be used only when the drug
to be infused is listed in the Drug Library. To access the Drug
Library, a hospital-defined best-practice Data Set must be
transferred using the Editor Software and the Profiles feature
must be enabled.
Continuous Infusion
When using a drug listed in the Drug Library, the drug
parameters are automatically calculated based on:
• drug and concentration selected
• weight entry (if required)
• rate or dose entry
1. Press New Guardrails Drug soft key.
• If 15 or less drugs are available in selected profile, a
list of drug names displays; otherwise, an alphabetic
preselection menu displays.
OPTIONS
AB
MENU
New Guardrails Fluid
Basic Infusion
New Guardrails Drug A
Selecting New Patient and Profile Options (Continued)
Selecting New Patient Option (Continued)
To confirm programming is for same patient and retain all
stored patient parameters, press no soft key.
• All previous patient data is maintained.
• MENU screen displays.
• If last infusion on that channel was a Drug Library
entry, Resume Previous Drug appears as a MENU
selection.
• If last infusion on that channel was an IV Fluid,
Resume Previous Fluid appears as a MENU
selection.
• If last infusion on that channel was an optional mode
or a Basic Infusion, Return to ….? appears as a
MENU selection.
Primary Infusion Introduction
Directions for Use
Alaris® SE Pump
Models 7130/7131, 7230/7231
28 Programming
Primary Infusion - With Guardrails® Suite MX Protection (Continued)
Continuous Infusion (Continued)
acyclovir
menu
AB OPTIONS
A
albumin 25%
albumin 5%
alteplase
page
DOPamine
return
AB OPTIONS
A
400 mg / 250 mL
800 mg / 250 mL
- - - - mg / - - - - mL
alteplase
MI
Stroke
return
A
AB
OPTIONS
Dose in?
return
AB OPTIONS
A
Un/h
Un/kg/h
2. To use pre-selection menu press soft key corresponding
to first letter of desired drug. Select Drug A - F
menu
AB OPTIONS
A
Select DrugG-M
Select DrugN-S
Select Drug T - Z
3. Press soft key next to desired drug name to select it.
• page soft key(s) may be used to view additional
selections.
• If applicable, an optional hospital-defined therapy
or clinical indication for delivery of this infusion may
appear (as in illustrated example, which reflects use
of alteplase). Different limits can be defined for same
drug with different therapeutic indications.
• If applicable, a weight-based or non-weight-based
option for delivery of this infusion may appear (as in
illustrated example which reflects use of heparin).
• If applicable, multiple concentration listings for delivery
of this infusion may appear (as in illustrated example
which reflects use of dopamine).
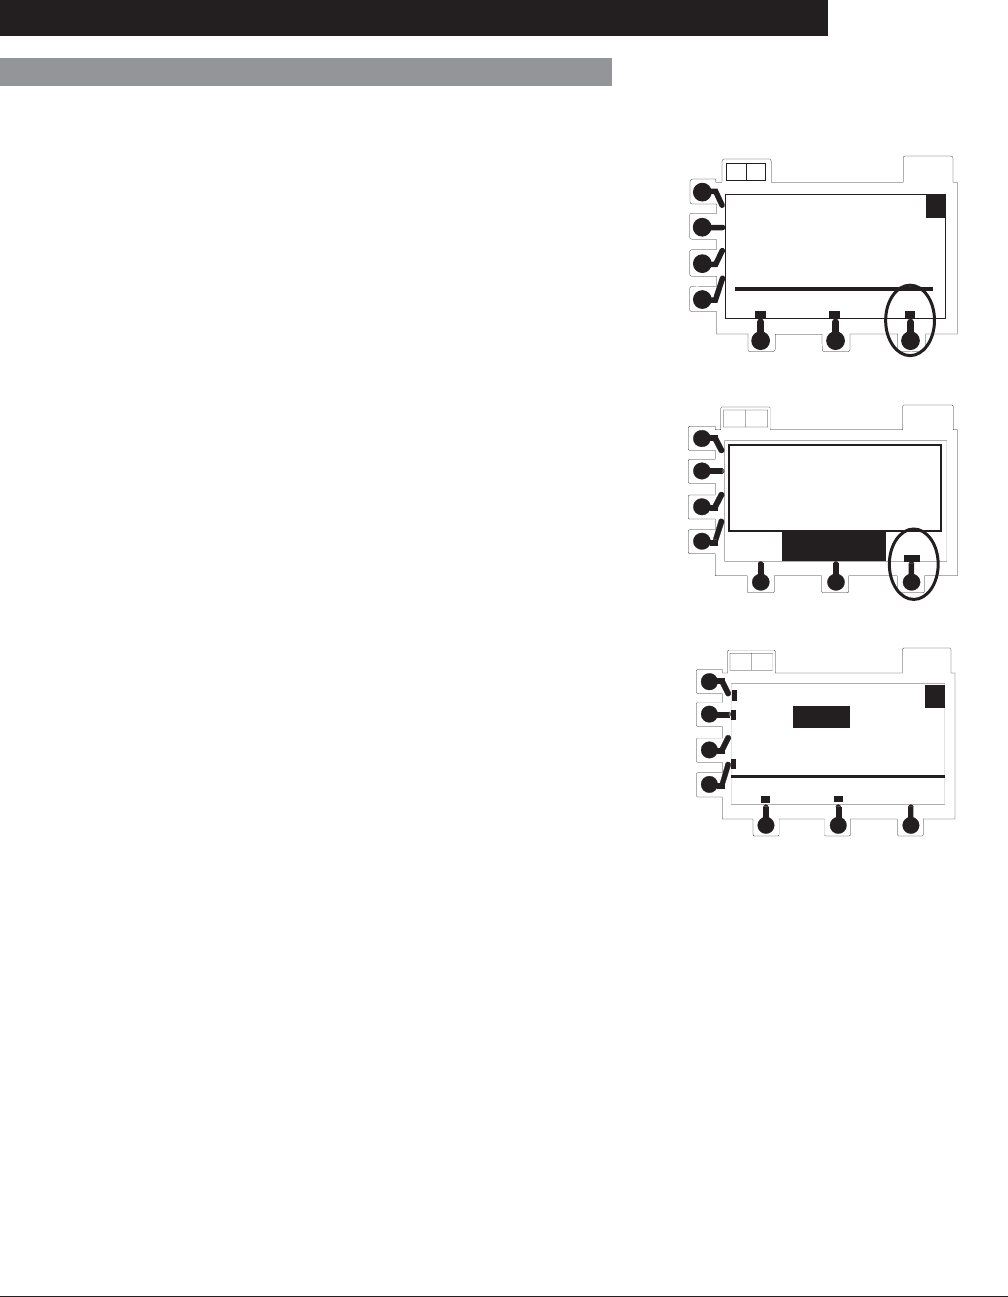
Directions for Use
Alaris® SE Pump
Models 7130/7131, 7230/7231
29
Programming
Primary Infusion - With Guardrails® Suite MX Protection (Continued)
Continuous Infusion (Continued)
4. Press soft key next to desired selection.
5. To confirm selection and continue programming, press ok
soft key.
• If a different selection is desired, press return soft
key to return to the drug list or press menu soft key
to return to MENU screen, then navigate to desired
selection and press ok soft key.
AB
OPTIONS
ok
ADVISORY
This Dosing Is For
Acute Ischemic
STROKE
alteplase
100 mg/100 mL
Dose in mg/kg/h
menu return ok
A
ABOPTIONS
stroke
AB OPTIONS
A
BolusOnly
menu
Rate = - - - - - mL/h
Dose= - - - - - mg/kg/h
Conc= 100 mg/ 100 mL
Wt= - - - - - kg
6. If facility has defined a Clinical Advisory for selected drug,
a message appears. To indicate that information has
been noted and continue programming, press ok soft key.
• Infusion setup page displays.
7. An optional hospital-defined and editable starting value for
continuous infusion dose may already be entered.
OR
To enter a value, use numeric data entry keys then press
ENTER key.
• Dose field is highlighted for first entry, but soft keys
can be used to highlight other parameters for entry
prior to dose. To automatically calculate dose
instead of rate, press Rate soft key and enter a rate
value. Once all entries have been completed, dose is
automatically calculated.
• If a drug with a defined standard concentration was
selected, Conc (concentration values, drug amount
and diluent volume) are automatically entered. (Notice
that these values are not editable).
• If a drug with -- / -- mL was selected, Conc
(concentration values of drug amount and diluent
volume), needs to be entered.
-- Continued Next Page --
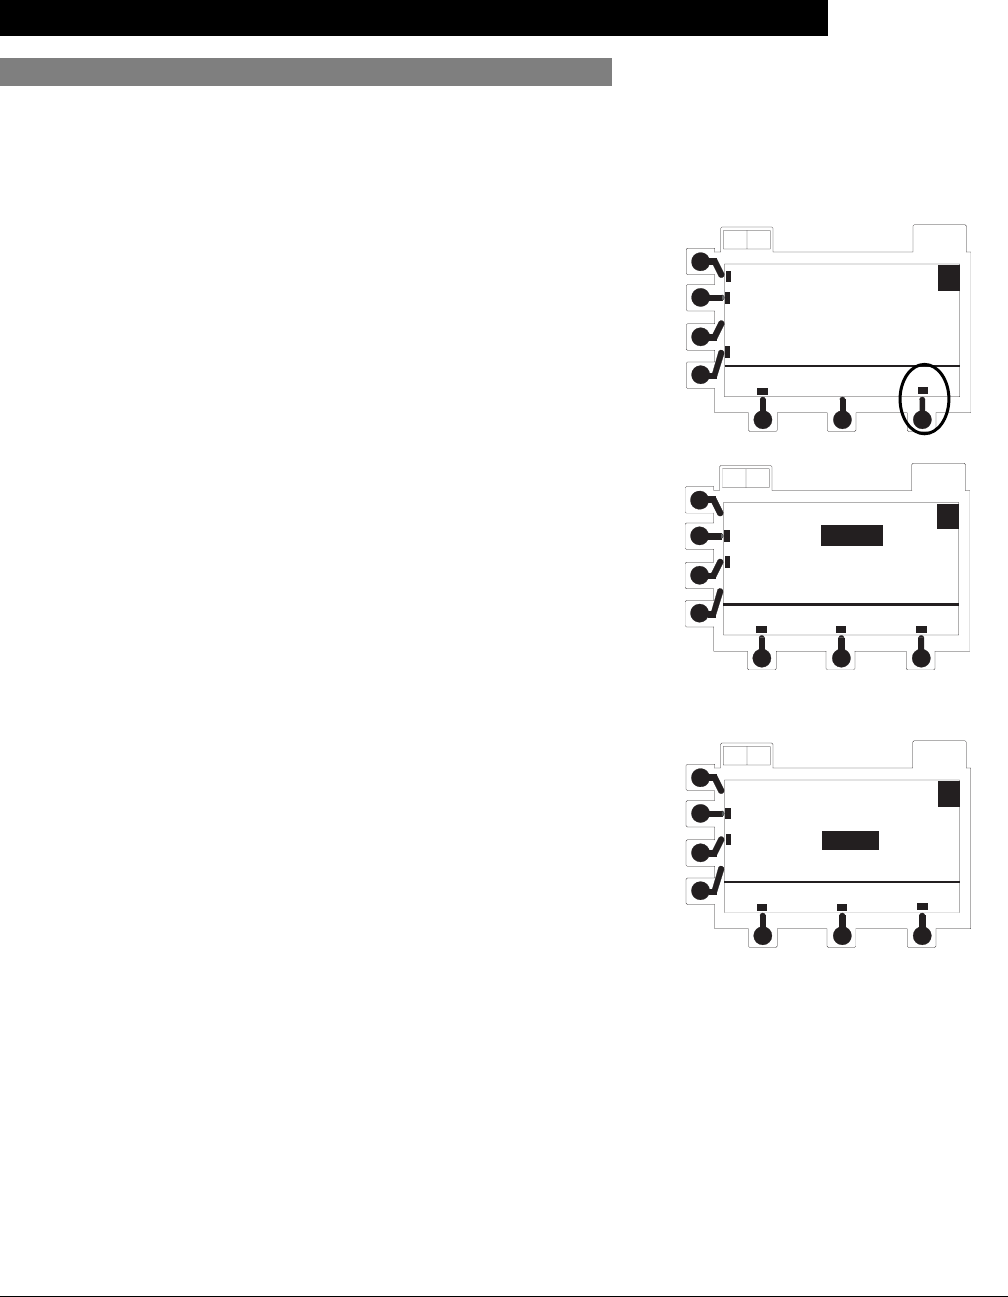
Directions for Use
Alaris® SE Pump
Models 7130/7131, 7230/7231
30 Programming
Primary Infusion - With Guardrails® Suite MX Protection (Continued)
Continuous Infusion (Continued)
AB OPTIONS
A
ok
menu
VTBI= 0.0 mL
VI= 0.0 mL
alteplase
Bolus
AB OPTIONS
A
ok
menu
Rate = 56.0mL/h
Dose= 0.8 mg/kg/h
Conc= 100 mg/ 100 mL
Wt= 70 kg
OPTIONS
A
ok
menu
VTBI= 100.0 mL
VI=
alteplase
Bolus
mL0.0
AB
• If selected drug is weight-based, Wt (patient weight in
kg) needs to be entered.
• If selected drug is not weight-based, Wt field does not
appear.
8. Verify that all parameters are correct and press ok soft
key to confirm.
• VTBI and VI setup page displays.
• VTBI field is highlighted.
9. To enter desired VTBI, use numeric keys then press
ENTER key.
• VI field is highlighted.
10. If there is a VI value that needs to be cleared, press
CLEAR key or press 0 (zero) key then press ENTER key.
11. To continue programming, press ok soft key.
• RUN/HOLD page displays.
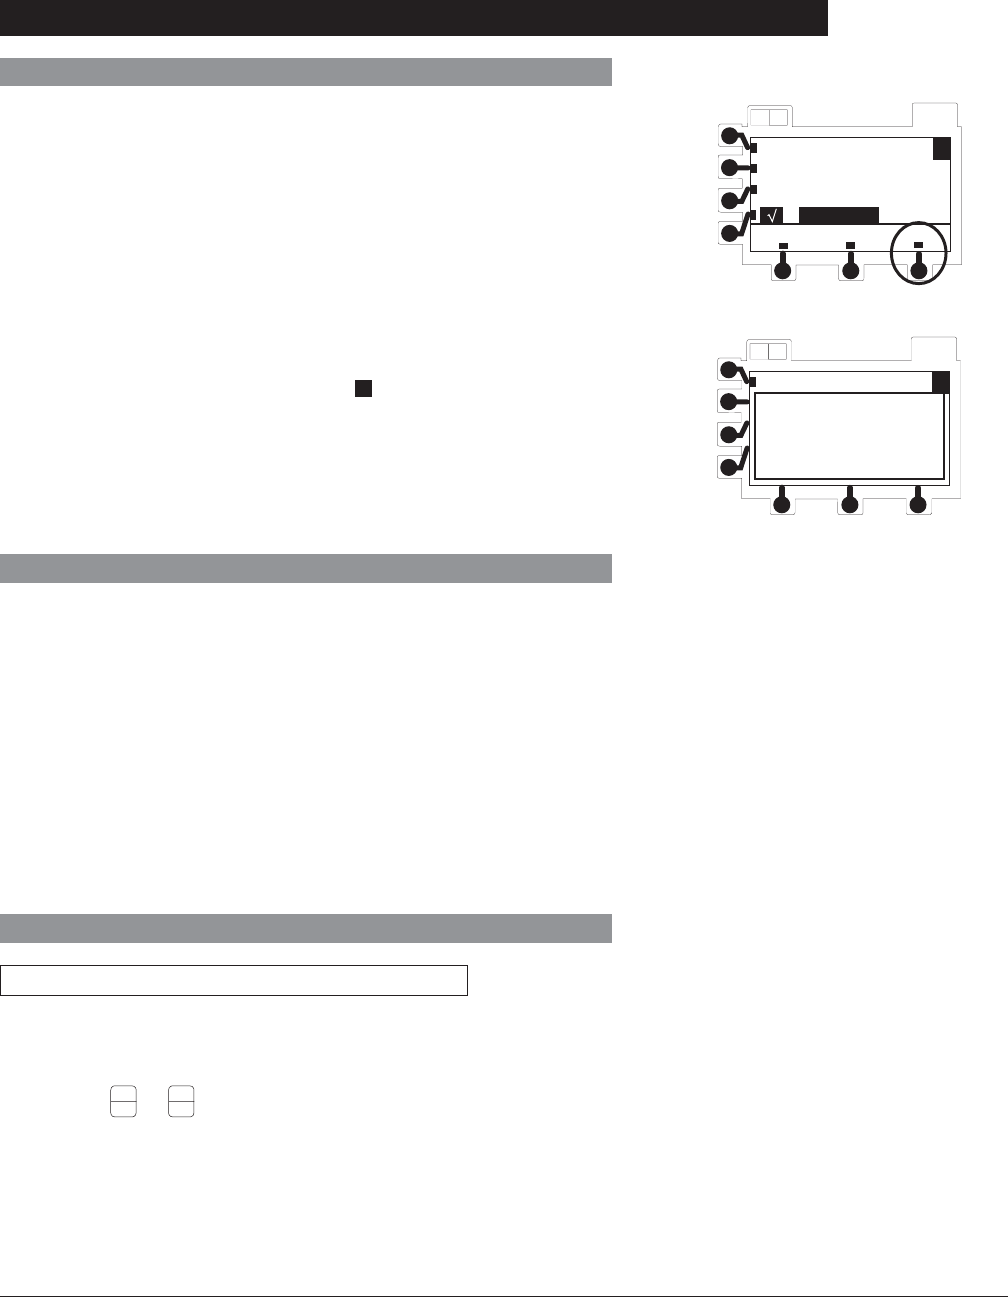
Directions for Use
Alaris® SE Pump
Models 7130/7131, 7230/7231
31
Programming
12. Verify that all parameters are correct, then press run soft
key or RUN/HOLD key to start infusion
Primary Infusion - With Guardrails® Suite MX Protection (Continued)
Continuous Infusion (Continued)
Pausing and Restarting Infusion
1. An infusion may be paused temporarily by pressing
channel RUN/HOLD key.
• Rate LED flashes while infusion is on hold.
• After 2 minutes, “Hold Time Exceeded” visual and
audio prompts begin. An additional 2 minute period
may be initiated by pressing either hold soft key or
channel RUN/HOLD key.
2. To restart infusion while on hold, press channel RUN/
HOLD key.
OPTIONS
AB
Stroke
Rate = 56.0 mL/h A
Conc = 100 mg/100 mL
Wt = 70 kg
Adult ICU
OPTIONS
AB
Dose = 0.8 mg/kg/h
VTBI = 100.0 VI = 0.0
Rate = 56.0 mL/h A
run
menu setup
alteplase
13. To briefly view setup parameters (therapy, concentration,
patient weight, current profile) from RUN/HOLD page or
during a running infusion, press 4 soft key.
Making Changes During Continuous Infusion
Continuous infusion parameters (Rate, Dose or VTBI) may be
changed without pausing the infusion and VI may be cleared.
1. Select
A
O or
B
O key, as necessary.
2. Press soft key next to parameter to be edited.
• Current value is highlighted.
Making Changes to Rate, Dose or VTBI

Directions for Use
Alaris® SE Pump
Models 7130/7131, 7230/7231
32 Programming
Primary Infusion - With Guardrails® Suite MX Protection (Continued)
Making Changes to Concentration or
Patient Weight
Infusion must be paused before making changes. If a drug
with a defined standard concentration was selected, Conc
(concentration) values are not editable.
1. To pause infusion, press channel's RUN/HOLD key.
2. Press set up soft key.
3. Press soft key next to parameter to be edited.
• Current value is highlighted.
4. To enter a new value, use numeric keypad then press
ENTER key.
Resuming Interrupted Infusion
If a channel has been powered off during an infusion, previous
programming may be resumed if:
• One channel of a dual channel device remained on.
• Current profile is accepted and New Patient? – no is
selected during start up (see "Selecting New Patient and
Profile Options").
1. Select desired channel as necessary.
Making Changes During Continuous Infusion (Continued)
Making Changes to Rate, Dose or VTBI
(Continued)
3. Make changes:
a. To enter a new value, use numeric keypad.
b. To reset Volume Infused to 0.0 mL, press CLEAR or
0 (zero) key.
4. To accept new value, press ENTER key.
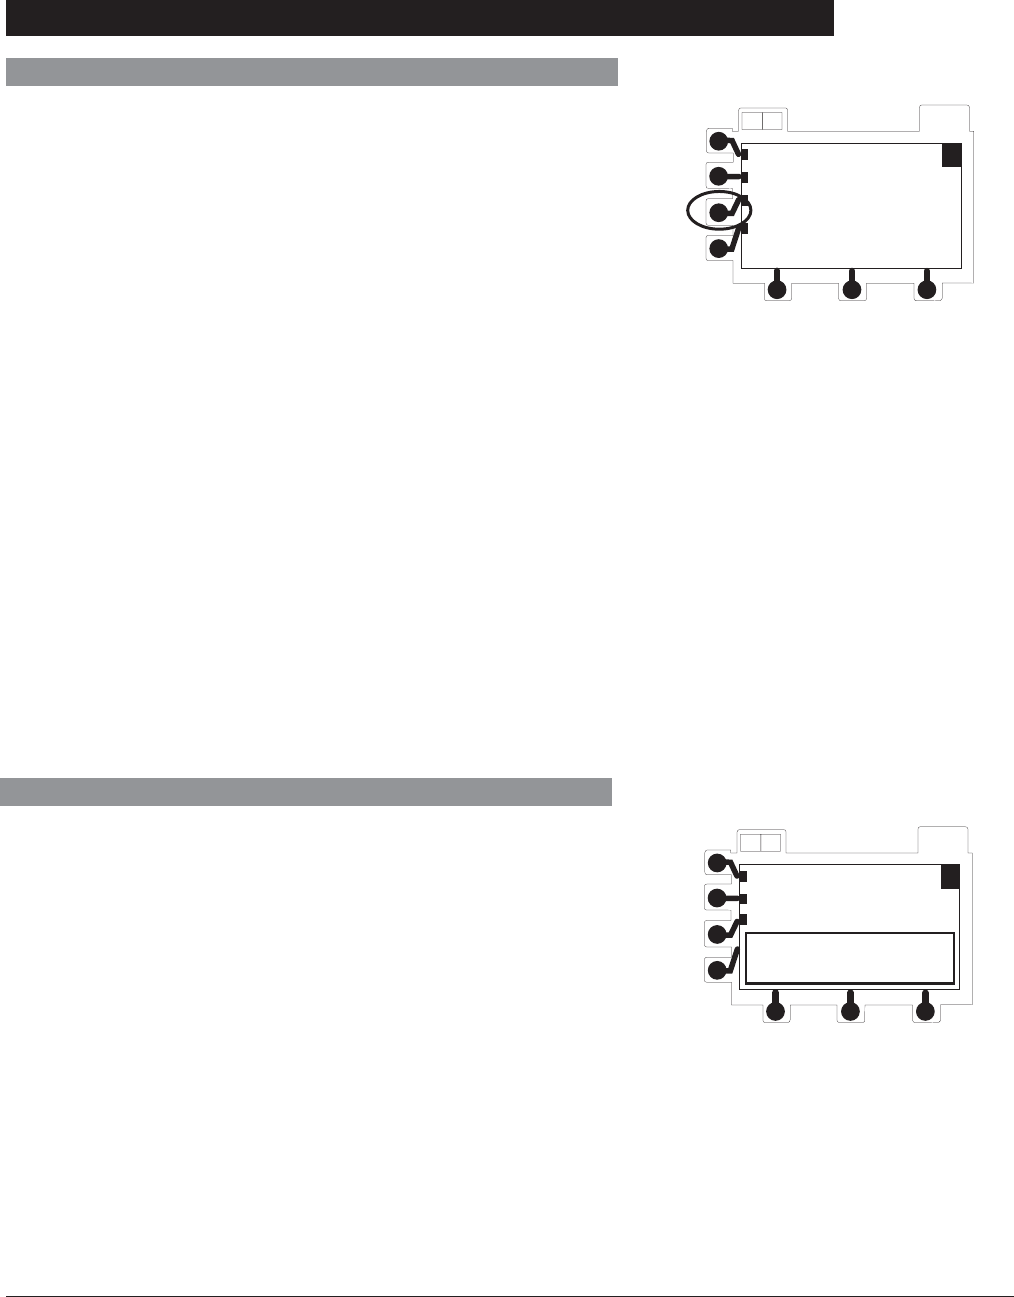
Directions for Use
Alaris® SE Pump
Models 7130/7131, 7230/7231
33
Programming
OPTIONS
AB
MENU
New Guardrails Fluid
Resume Previous Drug
New Guardrails Drug A
Basic Infusion
Primary Infusion - With Guardrails® Suite MX Protection (Continued)
3. Press ok soft key to confirm drug, therapy, concentration
and dosing units.
4. If facility has defined a Clinical Advisory for selected drug,
a message appears. To indicate that information has
been noted and continue programming, press ok soft key.
• Previous infusion setup page appears.
5. Verify parameters are correct. If a change is required, see
“Making Changes During Continuous Infusion”.
6. Press ok soft key to continue.
• RUN/HOLD page displays.
7. Verify that all parameters are correct, then press run soft
key or RUN/HOLD key to start infusion.
2. Press Resume Previous Drug soft key.
• Previous drug review screen displays.
Resuming Interrupted Infusion (Continued)
When the primary VTBI reaches 0.0mL, the instrument
automatically switches to the configured KVO (keep vein open)
rate, or remains at the current infusion rate, whichever is less.
• KVO rate flashes in rate LED display.
• Programmed infusion rate continues to display in Main
Display.
• KVO flashes in infusion status bar.
• KVO alert tone sounds (may be silenced for 2 minutes
using Silence key).
• VTBI = 0 (INFUSION IN KVO in Models 7131/7231)
message flashes in Main Display.
OPTIONS
AB
Dose = 0.8 mg/kg/h
VTBI = 0.0 VI = 100.0
Rate = 56.0 mL/h A
Channel A
VTBI = 0
KVO Mode

Directions for Use
Alaris® SE Pump
Models 7130/7131, 7230/7231
34 Programming
Primary Infusion - With Guardrails® Suite MX Protection (Continued)
Resuming Operation from KVO Mode
1. To place channel on hold, press RUN/HOLD key.
2. Press VTBI soft key.
• VTBI is highlighted.
3. To enter desired VTBI, use numeric keys then press
ENTER key.
4. To resume infusion, press run soft key or RUN/HOLD key.
Clearing Volume Infused
The volume infused counter increments as fl uids are infused
through a given channel. All fl uids infused in primary mode,
including boluses, all fl uids infused in secondary mode and all
fl uids infused in KVO mode are counted.
1. To reset volume infused counter to 0.0mL, press VI soft
key.
• VI field is highlighted.
2. Press CLEAR key or press 0 (zero) key then press
ENTER key.
Bolus Dose
A Bolus Dose can be programmed at the beginning of, or
during a continuous infusion. The drug being programmed
must be a bolusable drug selected from the Drug Library, as
described in the following procedures.
Bolus volume must be at least 1 mL and not more than
999.9 mL. Programming a bolus dose that calculates a bolus
volume outside that range results in a message, "Bolus
VTBI Less than 1 mL Not Allowed" or "Bolus VTBI More than
999.9 mL Not Allowed".
Bolus dose parameters may not be edited during bolus
infusion. If new parameters are desired, select New Bolus
Dose from the Bolus menu.
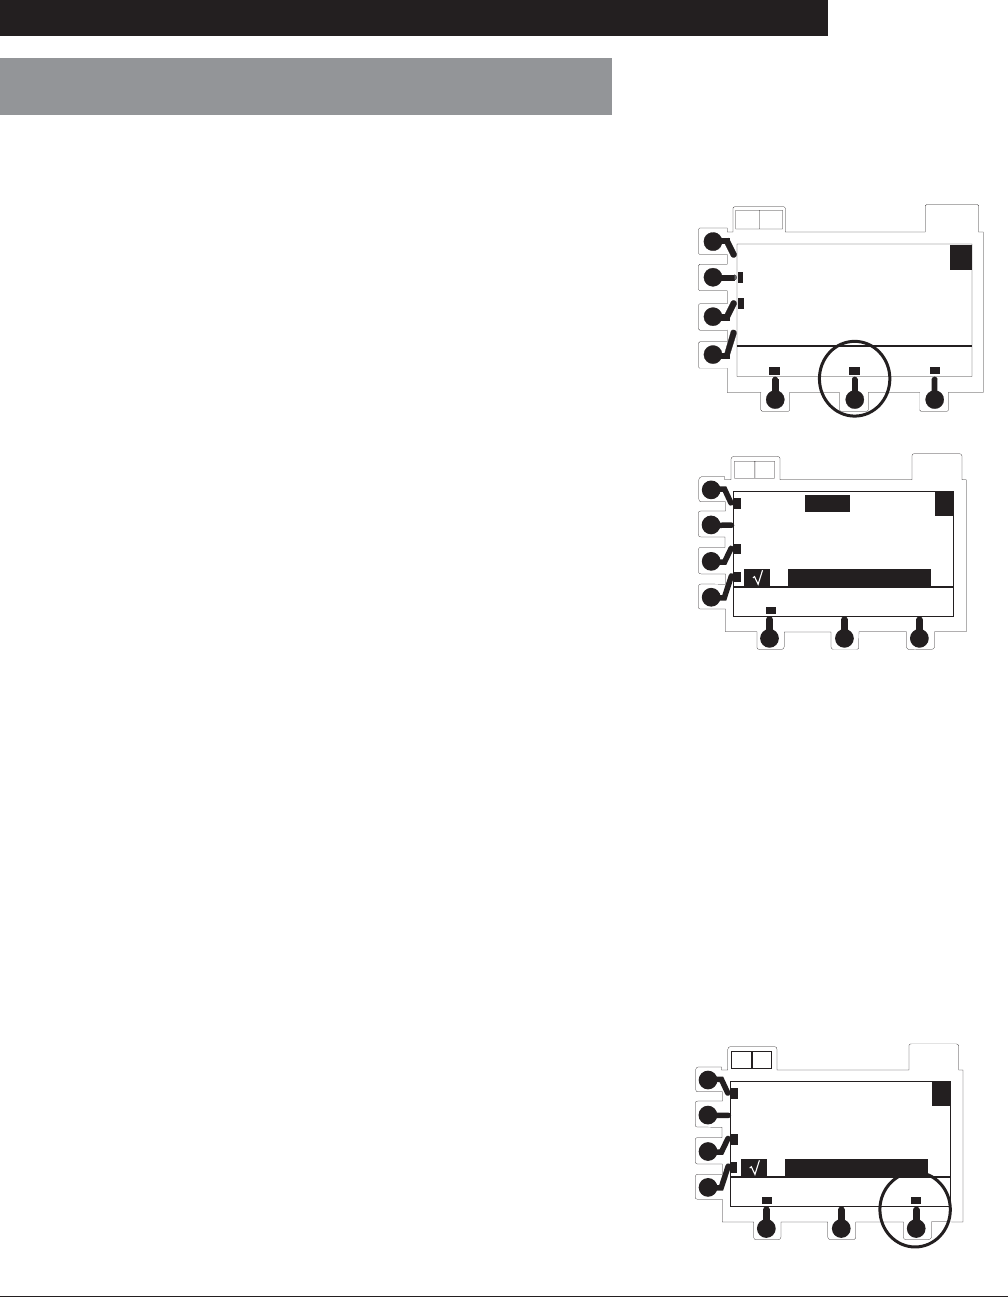
Directions for Use
Alaris® SE Pump
Models 7130/7131, 7230/7231
35
Programming
Primary Infusion - With Guardrails® Suite MX Protection (Continued)
Delivering a Bolus Dose Prior to Beginning
Continuous Infusion
1. Set up infusion as described in “Continuous Infusion”
procedure, steps 1 - 10. Do not start infusion.
2. On VTBI and VI setup page, press Bolus soft key.
• Bolus programming page displays.
• Bolus field is highlighted.
AB OPTIONS
A
ok
menu
VTBI= 100.0 mL
VI= 0.0 mL
alteplase
Bolus
3. An optional hospital-defined and editable starting value for
bolus dose may already be entered.
OR
To enter a value, use numeric data entry keys then press
ENTER key.
• If bolus is weight-based and weight has already been
programmed in same channel, Wt (patient weight in
kg) is automatically entered.
• If bolus is weight-based and weight has not yet been
programmed in same channel, Wt (patient weight in
kg) needs to be entered.
• If bolus is not weight-based, Not Used displays in Wt
field.
4. An optional hospital-defined bolus dose administration
rate may have been used to calculate an editable Time in
minutes (1-99) to deliver programmed bolus dose.
OR
To enter a Time value, use numeric data entry keys then
press ENTER key.
5. Verify parameters are correct and press ok soft key (see
"Guardrails® Suite MX Prompts").
• Bolus RUN/HOLD page displays.
OPTIONS
AB
Wt = - - kg
Time = - - min
A
menu
Alteplase Bolus
Bolus = - - - - mg/kg
Bolus = 0.09 mg/kg
OPTIONS
AB
Wt = 70 kg
Time = 1 min
A
ok
menu
Alteplase Bolus
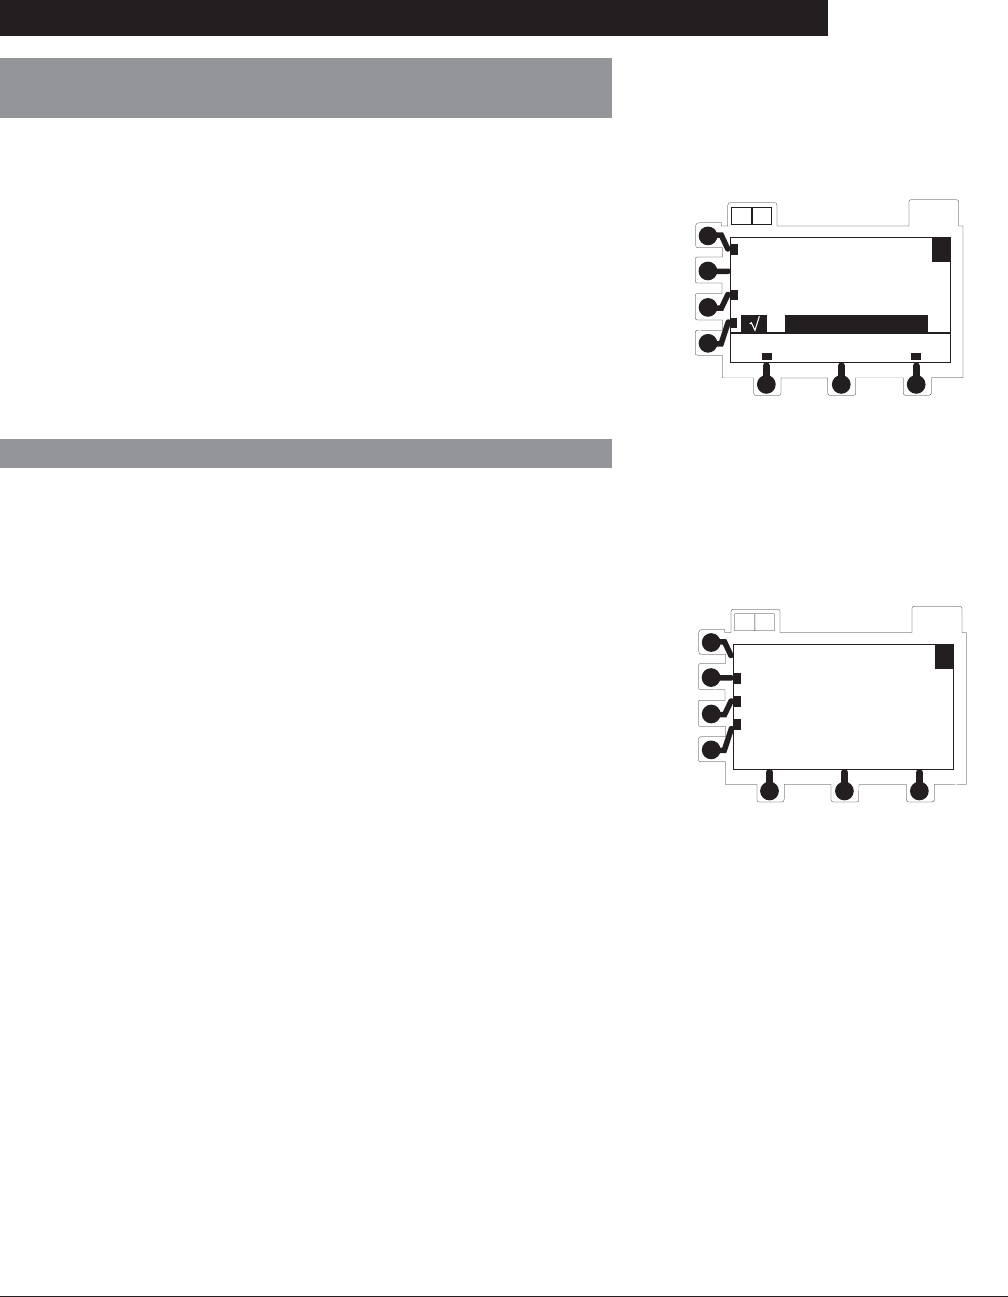
Directions for Use
Alaris® SE Pump
Models 7130/7131, 7230/7231
36 Programming
Primary Infusion - With Guardrails® Suite MX Protection (Continued)
Delivering a Bolus Dose Prior to Beginning
Continuous Infusion (Continued)
6. Verify that all parameters are correct, then press run soft
key or RUN/HOLD key to start infusion.
• When bolus dose completes, an audio tone sounds
and “Bolus Dose Complete” briefly displays, and
infusion automatically transitions to continuous rate. Bolus = 0.09 mg/kg
OPTIONS
AB
Wt = 70 kg
Time Left = 1 min
A
run
menu
Alteplase Bolus
1. Press OPTIONS key.
2. Press Bolus soft key.
• BOLUS MENU displays.
3. Press New Bolus soft key.
OR
To repeat a previous bolus, press Repeat Last Bolus soft
key.
• Bolus Programming page displays.
• Bolus field is highlighted.
4. An optional hospital-defined and editable starting value for
bolus dose may already be entered.
OR
To enter a value, use numeric data entry keys then press
ENTER key.
• If bolus is weight-based and weight has already been
programmed in same channel, Wt (patient weight in
kg) is automatically entered.
• If bolus is weight-based and weight has not yet been
programmed in same channel, Wt (patient weight in
kg) needs to be entered.
• If bolus is not weight-based, Not Used displays in Wt
field.
Delivering a Bolus Dose During a Continuous Infusion
OPTIONS
AB
BOLUS MENU
Repeat Last Bolus
New Bolus
Quit Bolus
A
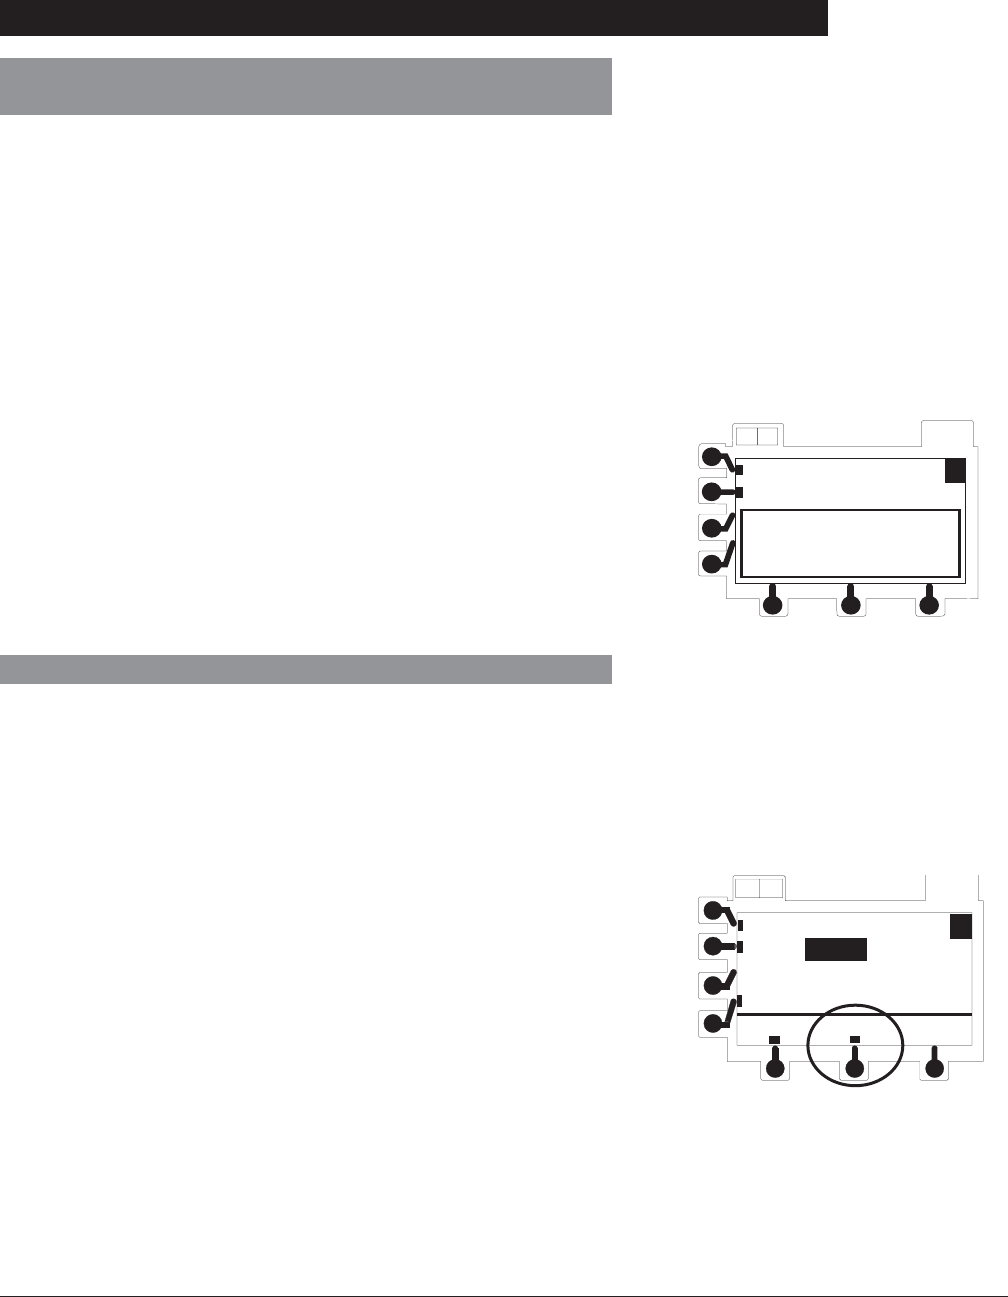
Directions for Use
Alaris® SE Pump
Models 7130/7131, 7230/7231
37
Programming
Primary Infusion - With Guardrails® Suite MX Protection (Continued)
Delivering a Bolus Dose During a Continuous Infusion
(Continued)
5. An optional hospital-defined bolus dose administration
rate may have been used to calculate an editable Time in
minutes to deliver programmed bolus dose.
OR
To enter a value, use numeric data entry keys then press
ENTER key.
6. Verify parameters are correct and press ok soft key
to transition from continuous to bolus infusion (see
"Guardrails® Suite MX Prompts").
• When bolus dose completes, an audio tone sounds
and Bolus Dose Complete briefly displays, and
infusion automatically transitions back to continuous
rate.
OPTIONS
AB
Dose = 0.9 mg/kg/h
Rate = 50.0 mL/h A
Channel A
Bolus Dose Complete
The Bolus Only feature is used to deliver single boluses from
a fluid container without delivering a continuous infusion. The
feature is not available once a continuous dose or rate has
been entered, or if an initial value for continuous infusion dose
has been entered in the Data Set.
1. Follow steps 1 - 6 in "Continuous Infusion". DO NOT enter
a dose or rate.
2. Press BolusOnly soft key.
• Bolus Programming page displays.
• Bolus field is highlighted.
3. An optional hospital-defined and editable starting value for
bolus dose may already be entered.
OR
Bolus Only
AB OPTIONS
A
BolusOnly
menu
Rate = - - - - - mL/h
Dose= - - - - - mg/kg/h
Conc= 100 mg/ 100 mL
Wt= - - - - - kg
-- Continued Next Page --
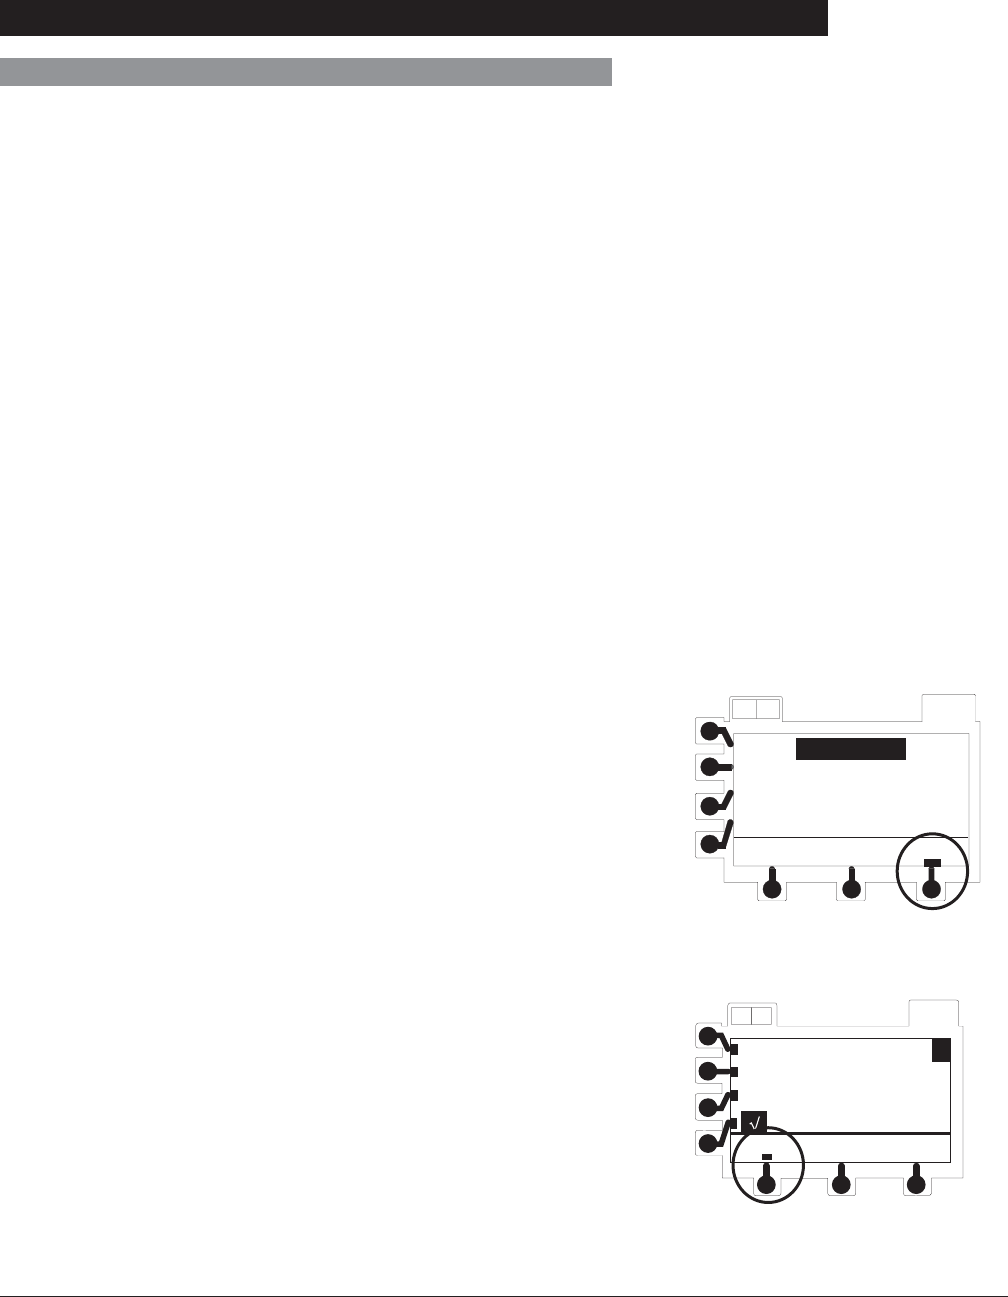
Directions for Use
Alaris® SE Pump
Models 7130/7131, 7230/7231
38 Programming
Primary Infusion - With Guardrails® Suite MX Protection (Continued)
Bolus Only (Continued)
To enter a value, use numeric data entry keys then press
ENTER key.
• If bolus is weight-based and weight has already been
programmed in same channel, Wt (patient weight in
kg) is automatically entered.
• If bolus is weight-based and weight has not yet been
programmed in same channel, Wt (patient weight in
kg) needs to be entered.
• If bolus is not weight-based, Not Used displays in Wt
field.
4. An optional hospital-defined bolus dose administration
rate may have been used to calculate an editable Time in
minutes (1-99) to deliver programmed bolus dose.
OR
To enter a time value, use numeric data entry keys then
press ENTER key.
5. Verify parameters are correct and press ok soft key (see
"Guardrails® Suite MX Prompts").
• Bolus Only bag volume confirmation page displays.
6. Verify that bag contains an adequate volume to deliver
programmed dose as specified and press ok soft key.
• Bolus RUN/HOLD page displays.
AB OPTIONS
ok
Bolus Only
Make Sure Bag
Contains At Least
6.3 mL
return
OPTIONS
AB
Bolus Dose Complete A
menu
7. Verify that all parameters are correct and press run soft
key or RUN/HOLD key to start infusion.
• When bolus dose completes, an audio tone sounds
and Bolus Dose Complete displays until user takes
action.
• No continuous infusion or KVO rate occurs.
• Dashes “----“ appear in Rate LED display.
• No alarm occurs.
8. Press menu key to return to Bolus Menu.
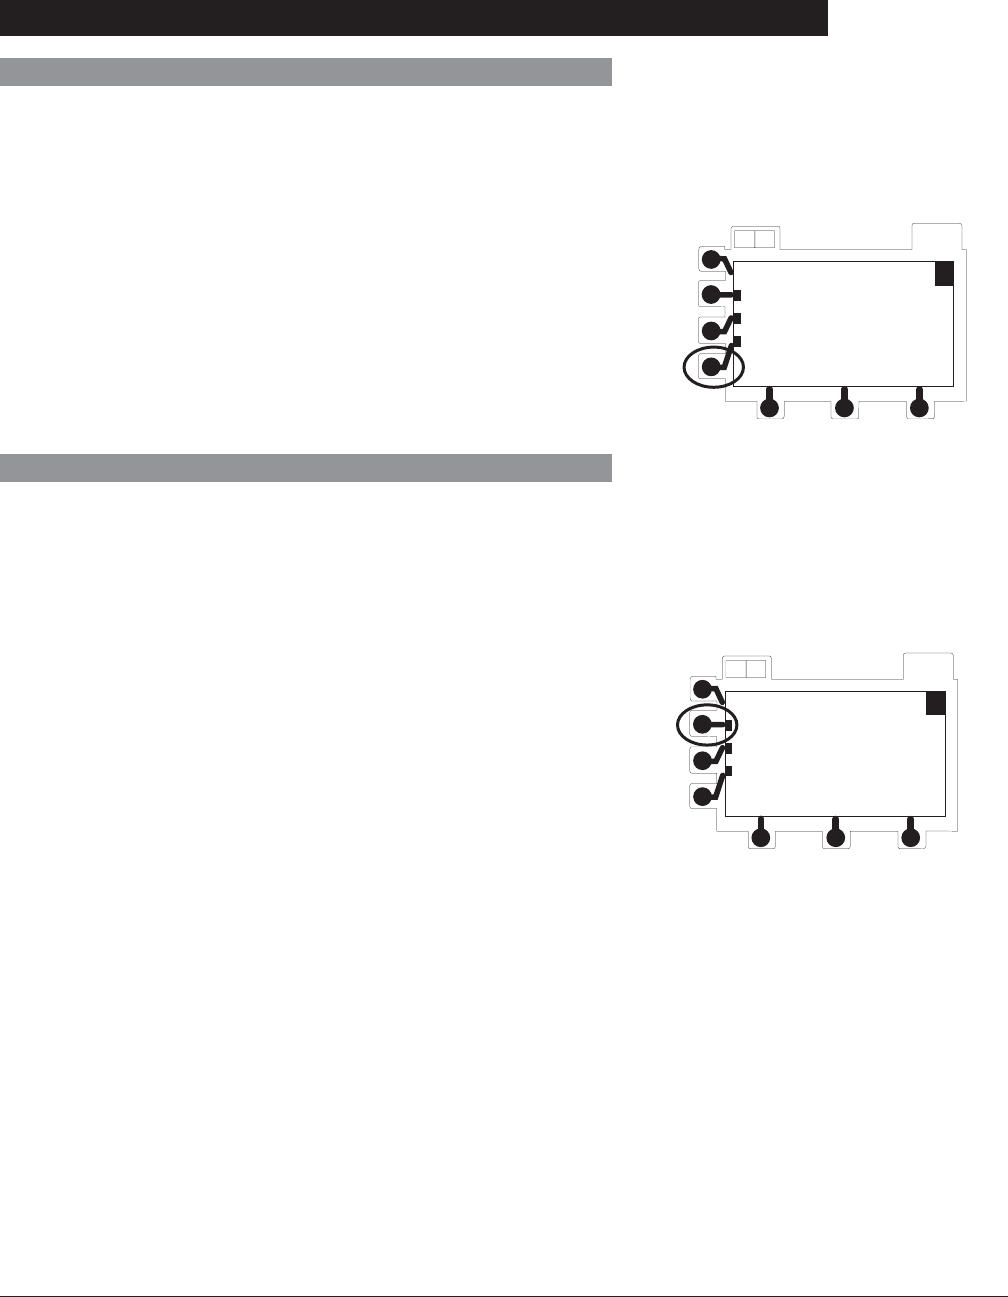
Directions for Use
Alaris® SE Pump
Models 7130/7131, 7230/7231
39
Programming
Primary Infusion - With Guardrails® Suite MX Protection (Continued)
Stopping Bolus Dose
1. To place channel on hold, press channel RUN/HOLD key.
2. Press menu soft key.
• Bolus Menu displays.
3. Press Quit Bolus soft key.
4. To start continuous infusion, if one was programmed,
verify parameters are correct and then press run soft key
or channel RUN/HOLD key.
Repeating a Bolus Dose
A bolus dose that has completed may be repeated. If a bolus
dose was stopped prior to completion the Repeat Bolus Dose
soft key becomes inactive.
1. Press Options key.
2. Press Bolus soft key.
• Bolus Menu displays.
3. Press Repeat Last Bolus soft key.
• Bolus Programming page displays.
4. To accept current bolus dose and time values and begin
bolus delivery, press ok soft key.
OR
To edit bolus or time, select desired field, use numeric
data entry keys to enter a new value, then press ENTER
key and press ok soft key to begin bolus delivery.
• When bolus dose completes, an audio tone sounds,
Bolus Dose Complete briefly displays, and infusion
automatically transitions to continuous rate if one was
programmed.
• If no continuous rate or dose was programmed an
audio tone sounds and Bolus Dose Complete
displays until user takes action (see "Bolus Only").
OPTIONS
AB
BOLUS MENU
Repeat Last Bolus
New Bolus
Quit Bolus
A
OPTIONS
AB
BOLUS MENU
Repeat Last Bolus
New Bolus
Quit Bolus
A
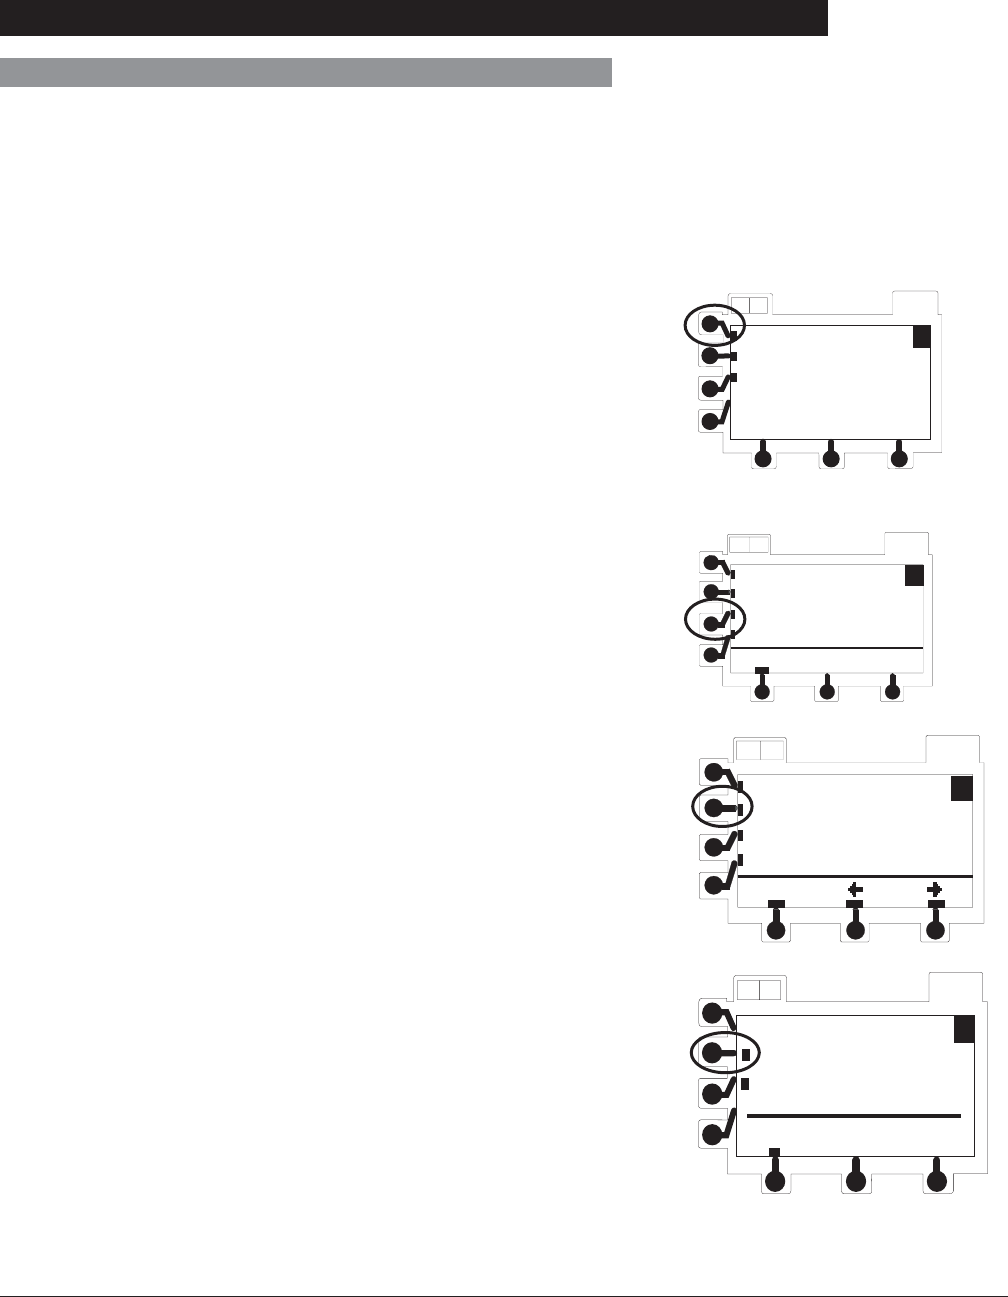
Directions for Use
Alaris® SE Pump
Models 7130/7131, 7230/7231
40 Programming
Intermittent Infusion
When using a drug listed in the Drug Library, the drug
parameters are automatically calculated based on:
• drug amount
• weight entry or BSA entry (if required)
• VTBI entry
• time or rate entry
1. Press New Guardrails Drug soft key.
• If 15 or less drugs are available in selected profile, a
list of drug names displays; otherwise, an alphabetic
pre-selection menu displays.
OPTIONS
AB
MENU
New Guardrails Fluid
Basic Infusion
New Guardrails Drug A
2. To use pre-selection menu press soft key corresponding
to first letter of desired drug. Select Drug A - F
menu
AB OPTIONS
A
Select DrugG-M
Select DrugN-S
Select Drug T - Z
Primary Infusion - With Guardrails® Suite MX Protection (Continued)
octreotide
menu
OPTIONS
A
paclitaxel
pentostatin
potassium CHLORIDE
page
AB
3. Press soft key next to desired drug name to select it.
• page soft key(s) may be used to view additional
selections.
• If applicable, an optional hospital-defined therapy
or clinical indication for delivery of this infusion may
appear (as in illustrated example, which reflects use
of paclitaxel). Different limits can be defined for same
drug with different therapeutic indications.
paclitaxel
every three weeks
weekly
return
A
ABOPTIONS
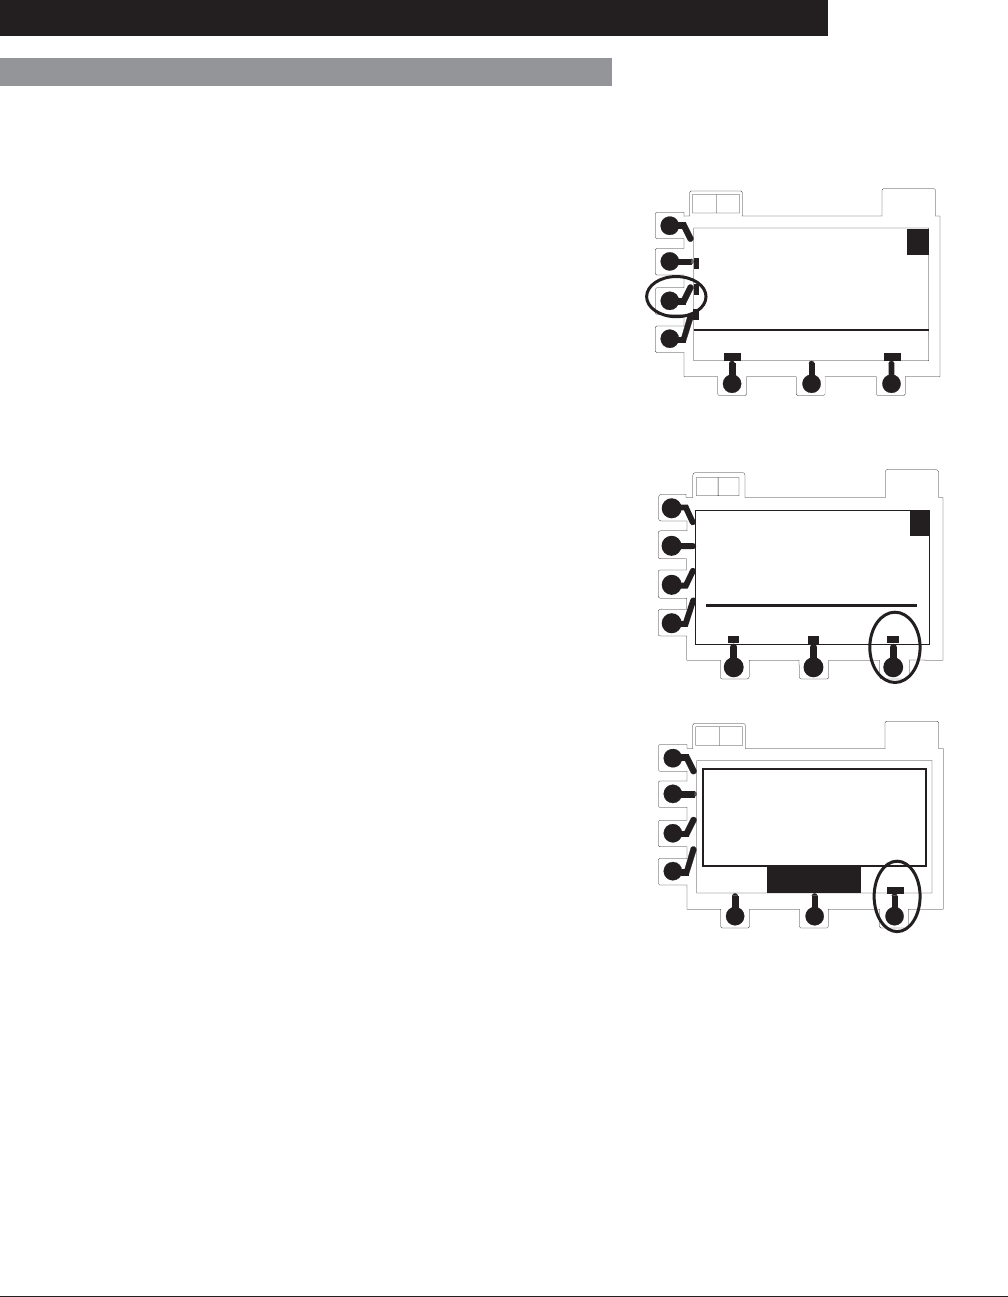
Directions for Use
Alaris® SE Pump
Models 7130/7131, 7230/7231
41
Programming
Primary Infusion - With Guardrails® Suite MX Protection (Continued)
VANCOmycin
return
AB OPTIONS
A
1000 mg / 200 mL
1000 mg / 250 mL
- - - - mg / - - - - mL
• If applicable, a weight-based, non-weight-based or
BSA-based option for delivery of this infusion may
appear.
• If applicable, multiple concentration listings for delivery
of this infusion may appear (as in illustrated example
which reflects use of vancomycin).
4. Press soft key next to desired selection.
5. To confirm selection and continue programming, press ok
soft key.
• If a different selection is desired, press return soft key
to return to drug list or press menu soft key to return to
MENU screen, then navigate to desired selection and
press ok soft key.
Intermittent Infusion (Continued)
paclitaxel
every three weeks
Dose in mg/m
menu
A
AB
OPTIONS
2
okreturn
6. If facility has defined a Clinical Advisory for selected drug,
a message appears. To indicate that information has
been noted and continue programming, press ok soft key.
• Intermittent infusion setup page displays.
OPTIONS
Steroid Premeds
Non-PVC tubing
Filter Required
ADVISORY ok
AB
7. Enter parameters as needed.
• If a drug with a defined standard concentration was
selected, Conc (concentration values, drug amount
and diluent volume) are automatically entered. (Note
that these values are not editable).
-- Continued Next Page --
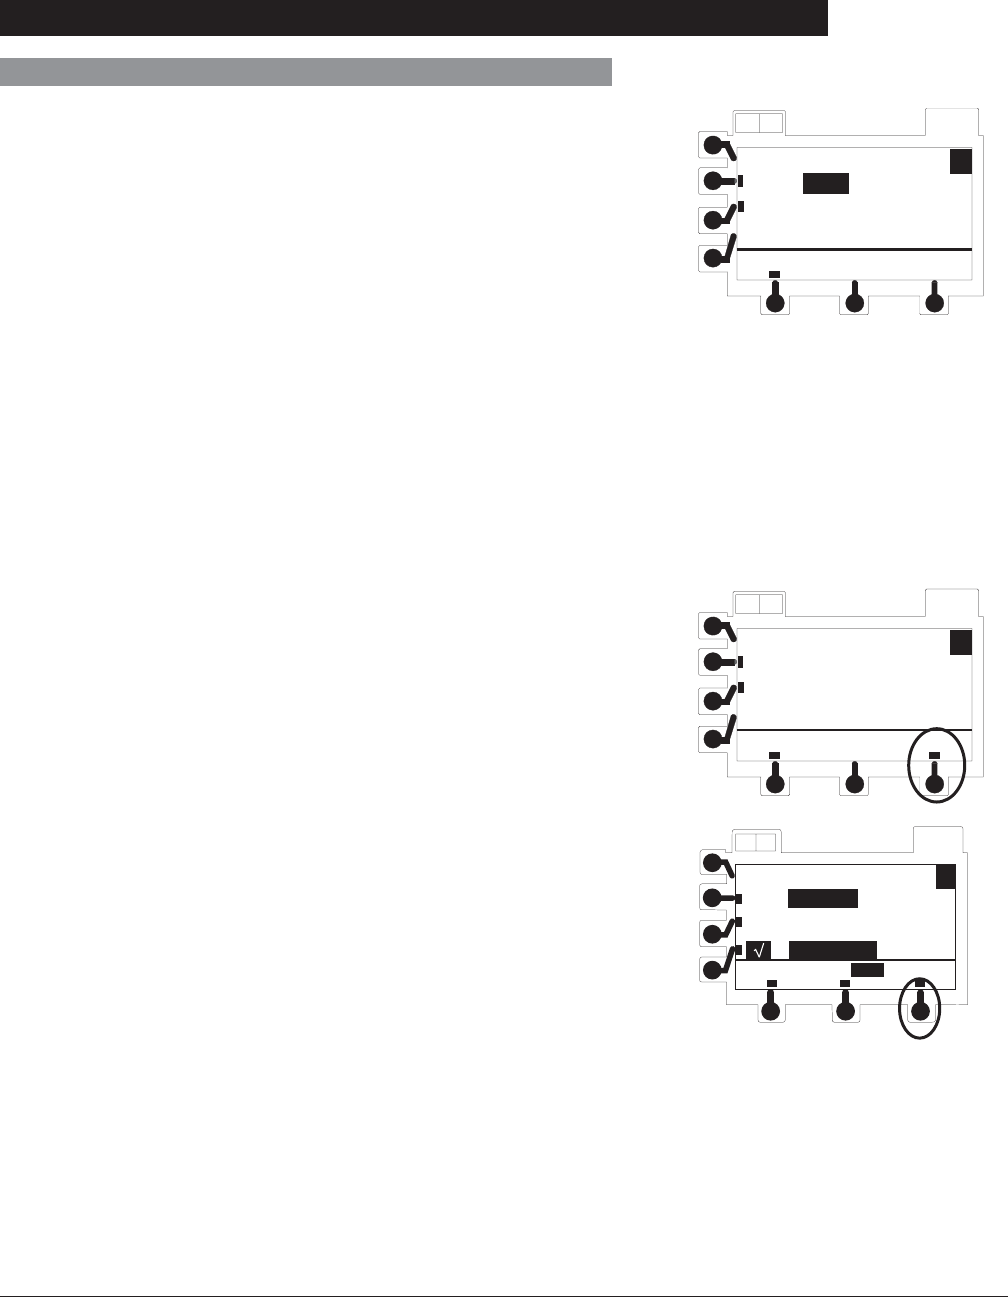
Directions for Use
Alaris® SE Pump
Models 7130/7131, 7230/7231
42 Programming
Primary Infusion - With Guardrails® Suite MX Protection (Continued)
Intermittent Infusion (Continued)
Conc = 280 mg/ 500 mL
BSA = 1.6 m2
Dose =175 mg/m2
AB OPTIONS
A
menu
paclitaxel
ok
OPTIONS
Time=3h0min
Rate = 166.7 mL/h A
ok
menu
paclitaxel
rate - time
VTBI= VI = 0.0 mL500.0 mL
AB
AB OPTIONS
A
menu
paclitaxel
Conc = - - - - mg/ - - - - mL
BSA = - - - - m2
Dose = - - - - - mg/m2
• If a drug with -- / -- mL was selected, Conc
(concentration values, drug amount and diluent
volume), need to be entered. Drug amount is total
dose of drug in fluid container. Diluent Volume is total
volume of fluid container.
• If selected drug is weight-based, Wt (patient weight in
kg) needs to be entered.
• If selected drug is BSA-based, BSA (body surface
area in meters squared) needs to be entered.
• If selected drug is not weight-based or BSA-based, Wt
or BSA field does not appear.
• Once all required parameters have been entered, total
calculated dose displays. This value is not editable.
8. Verify that all parameters are correct and press ok soft
key to confirm (see "Guardrails® Suite MX Prompts”).
• Rate/VTBI/Time page displays.
• VTBI value is highlighted.
• An editable value derived from diluent volume is
automatically entered.
9. To accept value, press ENTER key.
OR
To enter another value, use numeric data entry keys then
press ENTER key.
• The VI field is highlighted.
10. If there is a VI value that needs to be cleared, press
CLEAR key or press 0 (zero) key then press ENTER key.

Directions for Use
Alaris® SE Pump
Models 7130/7131, 7230/7231
43
Programming
Intermittent infusions must be paused to change parameters
(Rate, VTBI or Time) or to clear VI.
1. Press RUN/HOLD key for desired channel.
2. Press soft key next to parameter to be edited.
• Current value is highlighted.
3. Make changes:
a. To enter a new value, use numeric keypad.
b. To reset volume infused to 0.0 mL, press CLEAR or 0
(zero) key.
4. To accept new value, press ENTER key.
• Rate can be entered to calculate time or if time entry
is desired, press rate - time soft key. It changes to
rate - time , indicating that time may be entered.
Primary Infusion - With Guardrails® Suite MX Protection (Continued)
Intermittent Infusion (Continued)
11. An optional hospital-defined and editable starting value for
time may already be entered.
OR
To enter a value, use numeric data entry keys to enter
hours (0-99), then minutes (0-59). Press ENTER key to
accept each entry.
• Time can be entered to calculate rate or if rate entry
is desired, press rate - time soft key. It changes to
rate - time, indicating that rate may be entered.
12. Verify that all parameters are correct and press ok soft
key (see "Guardrails® Suite MX Prompts”).
• RUN/HOLD page displays.
13. Verify that all parameters are correct and press run soft
key or RUN/HOLD key to start infusion.
14. To briefly view setup parameters (therapy, total dose,
concentration, patient weight or BSA, current profile) from
RUN/HOLD page or during a running infusion, press 4
soft key.
Making Changes During Intermittent Infusion
OPTIONS
AB
VTBI = 500.0 mL VI = 0.0 mL
Time = 3 h 0 min
Rate = 166.7 mL/h A
run
menu rate - time
paclitaxel
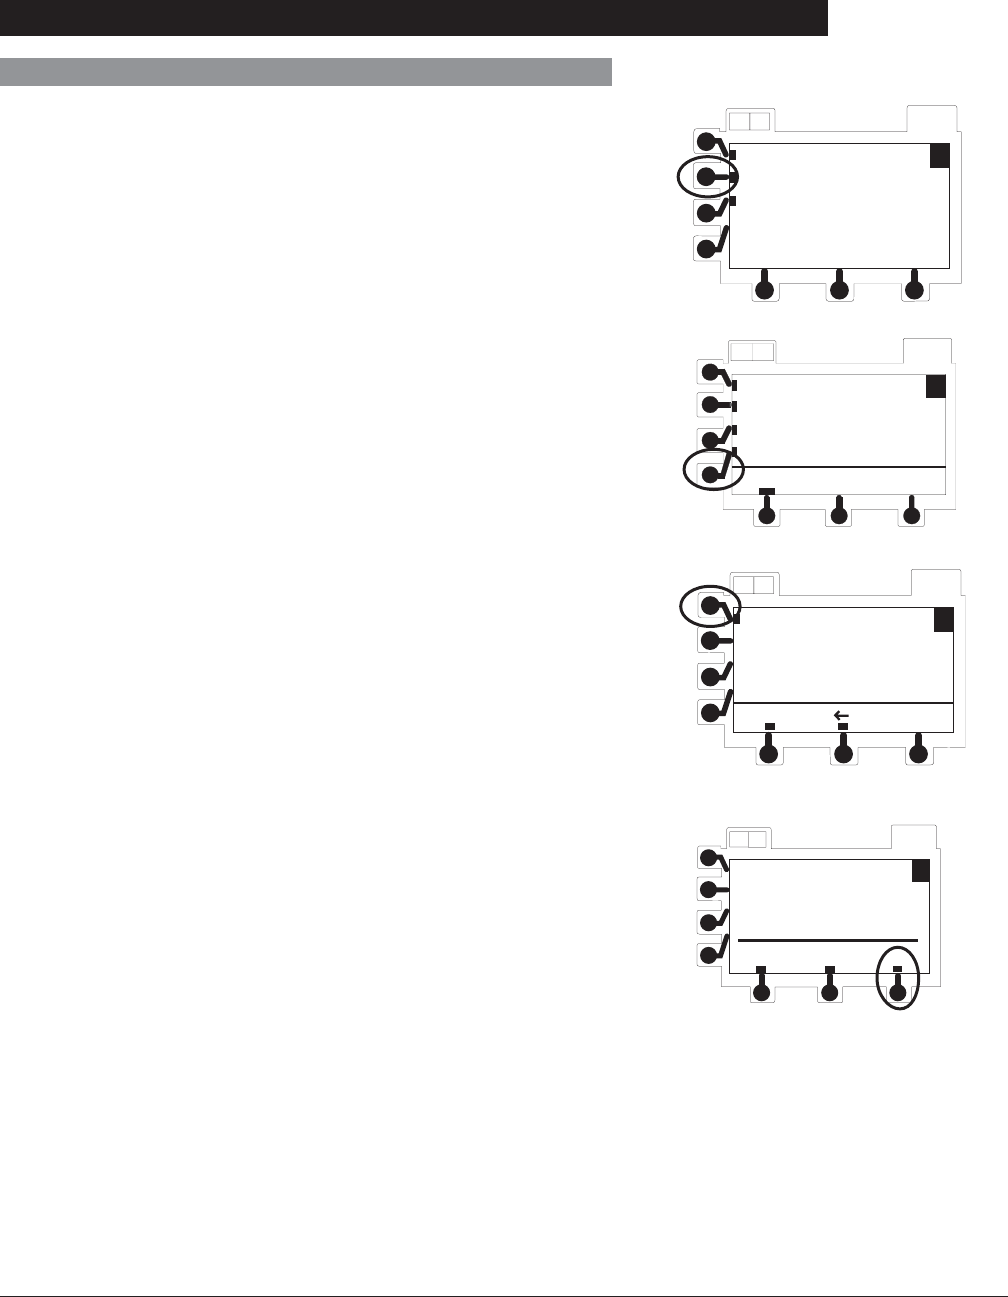
Directions for Use
Alaris® SE Pump
Models 7130/7131, 7230/7231
44 Programming
Primary Infusion - With Guardrails® Suite MX Protection (Continued)
IV Fluid Infusion
1. Press New Guardrails Fluid soft key.
• If 15 or less fluids are available in selected profile, a
list of fluid names displays; otherwise, an alphabetic
pre-selection menu displays.
2. To use pre-selection menu press soft key corresponding
to first letter of desired fluid.
OPTIONS
AB
A
menu
TPN
page
3. Press soft key next to desired fluid name to select it.
• page soft key(s) may be used to view additional
selections.
• If applicable, an optional hospital-defined therapy
or clinical indication for delivery of this infusion may
appear. Different rate limits can be defined for same
fluid with different therapeutic indications.
4. Press soft key next to desired selection.
5. To confirm selection and continue programming, press ok
soft key.
• If a different selection is desired, press return soft key
to return to fluid list or press menu soft key to return to
MENU screen, then navigate to desired selection and
press ok soft key.
OPTIONS
AB
MENU
New Guardrails Fluid
Basic Infusion
New Guardrails Drug A
Select Fluid A - F
menu
AB OPTIONS
A
Select Fluid G-M
Select Fluid N-S
Select Fluid T - Z
Confirm fluid
TPN
menu
A
ABOPTIONS
ok return
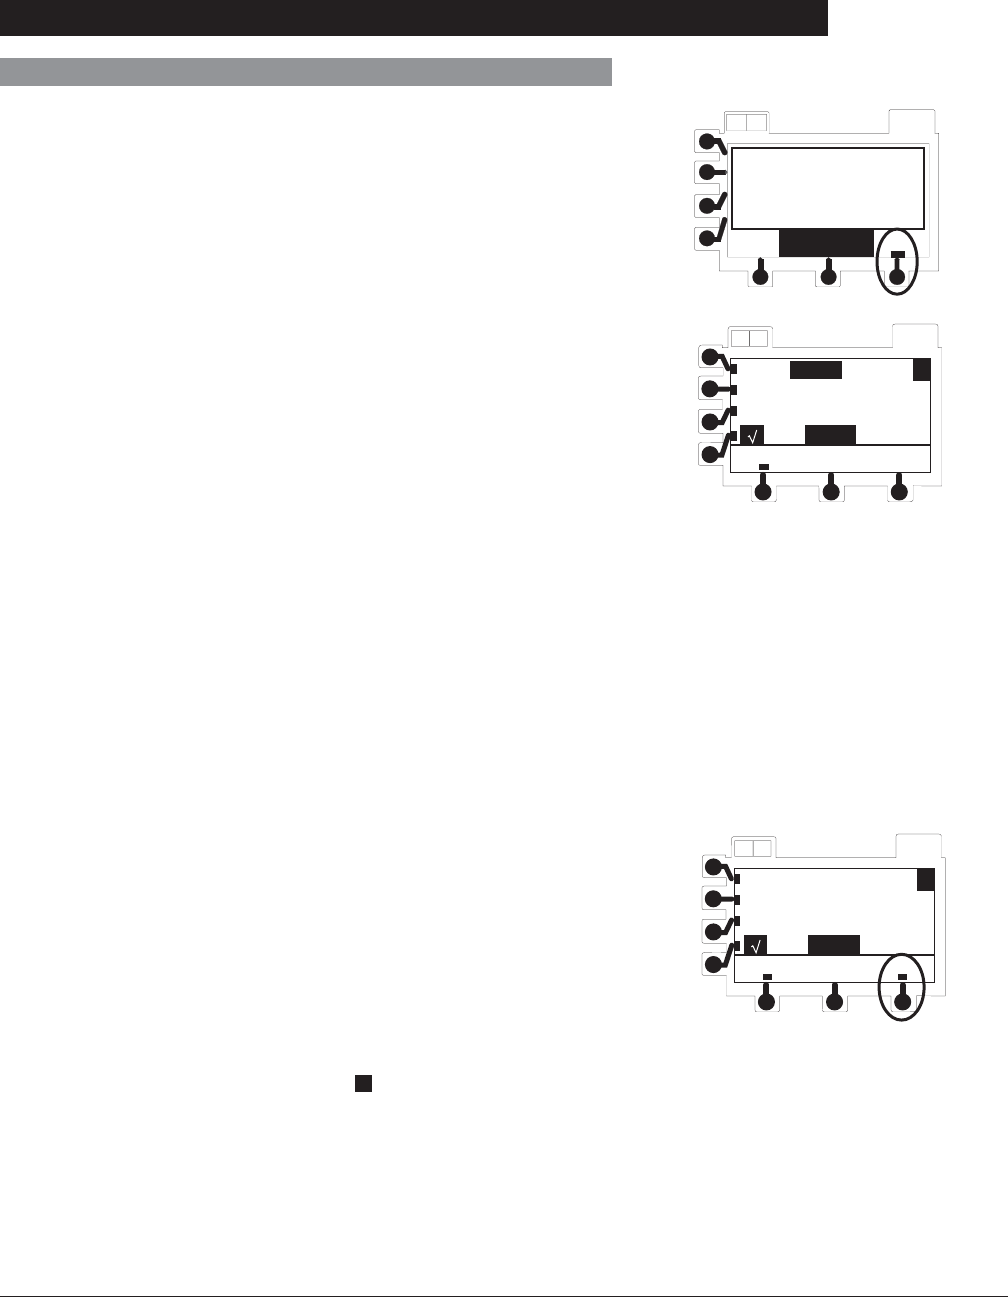
Directions for Use
Alaris® SE Pump
Models 7130/7131, 7230/7231
45
Programming
6. If a Clinical Advisory has been defined for selected fluid, a
message appears. To indicate that information has been
noted and continue programming, press ok soft key.
Primary Infusion - With Guardrails® Suite MX Protection (Continued)
IV Fluid Infusion (Continued)
• IV Fluid setup page displays.
• Rate field is highlighted.
OPTIONS
AB
VTBI = 0.0 mL
VI = 0.0 mL
A
menu
TPN
Rate = - - - - - mL/h
7. To enter a value, use numeric data entry keys then press
ENTER key (see "Guardrails® Suite MX Prompts”).
• VTBI field is highlighted.
8. To enter a VTBI value, use numeric data entry keys then
press ENTER key.
• VI field is highlighted.
9. If there is a VI value that needs to be cleared, press
CLEAR key or press 0 (zero) key then press ENTER key.
10. Verify that all parameters are correct and press run soft
key or RUN/HOLD key to start infusion. Rate = 83.3 mL/h
OPTIONS
AB
VTBI = 2000.0 mL
VI = 0.0 mL
A
menu
TPN
run
AB OPTIONS
ok
ADVISORY
0.22 micron filter
Dedicated Line
11. To briefly view current profile from RUN/HOLD page or
during a running infusion, press 4 soft key.

Directions for Use
Alaris® SE Pump
Models 7130/7131, 7230/7231
46 Programming
Secondary Infusion - With Guardrails® Suite MX Protection
Introduction
This mode is designed to support automatic secondary
infusions (“piggybacking”) in the same channel. A secondary
infusion can be programmed as a Basic SEC or Guardrails
SEC drug. When the secondary VTBI reaches zero, an audio
tone sounds (if enabled), Secondary Complete message
displays briefly, and the primary infusion rate automatically
resumes.
When the instrument is programmed and delivering in the
secondary mode, the primary infusion is temporarily stopped
and fluid is drawn from the secondary container. Delivery
from the primary container resumes when the fluid level in the
secondary line is level with the fluid in the primary container.
Primary infusion must be on hold to program secondary
infusion.
A secondary infusion may be programmed only after a primary
IV Fluid (that supports secondary mode) or a primary Basic
Infusion has been programmed.
A list of IV Fluid entries is created in the Data Set that is
developed and approved by the facility’s own multidisciplinary
team using the Editor Software, the PC-based authoring tool.
Each entry is determined to be either appropriate to support
secondary infusions or not. The secondary key is unavailable
for selections that have been designated as inappropriate for
secondary delivery. Pressing the SEC key after programming
a fluid that does not support secondary infusions results in a
message, “Secondary not allowed with this fluid”.
The maximum rate for a secondary infusion is 600 mL/h.
For information regarding flow sensor use with secondary
infusions, see "General Information", "Flow Sensor".
WARNINGS
• Secondary applications require
the use of a check valve set on
the primary IV line.
• The secondary solution
container must be higher than
the primary solution container.
• The secondary VTBI settings
require consideration of
variables; such as, factory
overfill, medication additions.
Underestimating the volume
causes the remaining secondary
solution to be infused at the
primary rate; overestimating
results in the primary solution
being infused at the secondary
rate. Multiple doses from a
single container are not possible.
• The clamp on the secondary
administration set must be
opened. If the clamp is not
opened, the fluid is delivered
from the primary container.
• The secondary administration
set must be primed prior
to beginning the secondary
infusion.
• Ensure proper setup of
secondary systems to make sure
of proper flow.
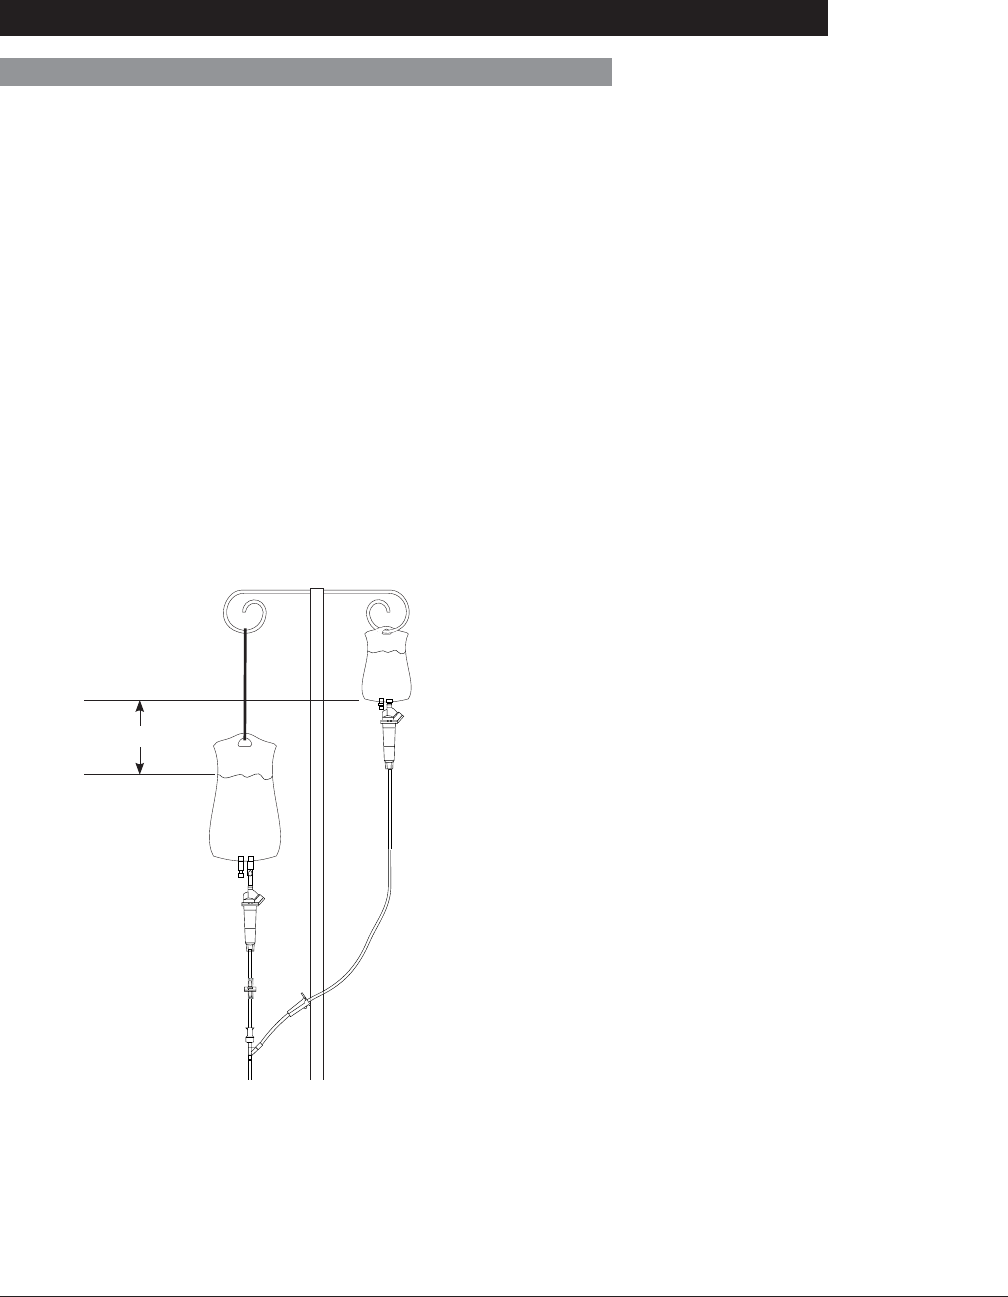
Directions for Use
Alaris® SE Pump
Models 7130/7131, 7230/7231
47
Programming
Setup
1. Open secondary administration set package, remove set
and close clamp.
2. Insert administration set spike into prepared fluid container
and hang secondary container, following accepted
hospital/facility procedure.
3. Fill drip chamber to 2/3 full.
4. Open secondary administration set clamp and prime set.
Close clamp.
5. Attach secondary administration set to upper injection site
on primary set.
6. Using hanger(s) provided with secondary administration
sets, lower primary fluid container until bottom of
secondary container is at least 9½” above fluid level in
primary container.
Secondary Infusion - With Guardrails® Suite MX Protection (Continued)
Hanger
Secondary Container
Primary Container
at least 9½”
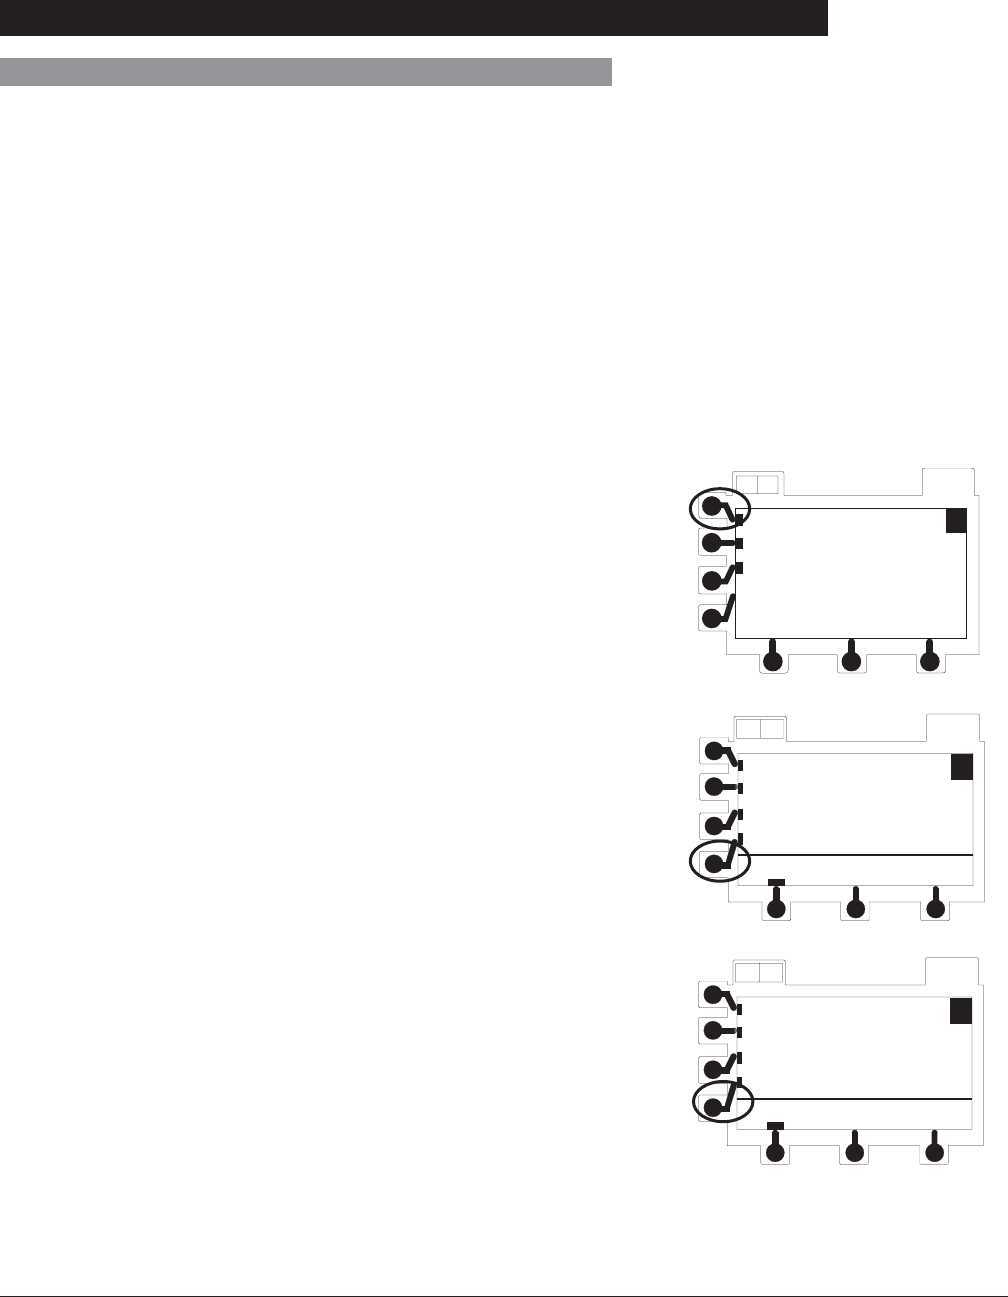
Directions for Use
Alaris® SE Pump
Models 7130/7131, 7230/7231
48 Programming
Secondary Infusion - With Guardrails® Suite MX Protection (Continued)
When using a secondary intermittent drug listed in the Drug
Library, the drug parameters are automatically calculated
based on:
• drug amount
• weight entry or BSA entry (if required)
• VTBI entry
• time or rate entry
Primary infusion must be on hold to program secondary
infusion.
1. Press SEC key.
• Secondary Menu displays.
2. Press Guardrails SEC Drug soft key.
• If 15 or less drugs are available in secondary library
of selected profile, a list of drug names displays;
otherwise, an alphabetic pre-selection menu displays.
OPTIONS
AB
SECONDARY MENU
Basic SEC
Return to PRI
Guardrails SEC Drug A
Tobramycin
menu
AB OPTIONS
A
TOPOtecan
Trastuzumab
VANCOmycin
Select Drug A - F
menu
AB OPTIONS
A
Select DrugG-M
Select DrugN-S
Select Drug T - Z
4. Press soft key next to desired drug name to select it.
3. To use pre-selection menu press soft key corresponding
to first letter of desired drug.
Secondary Intermittent Infusion
-- Continued Next Page --
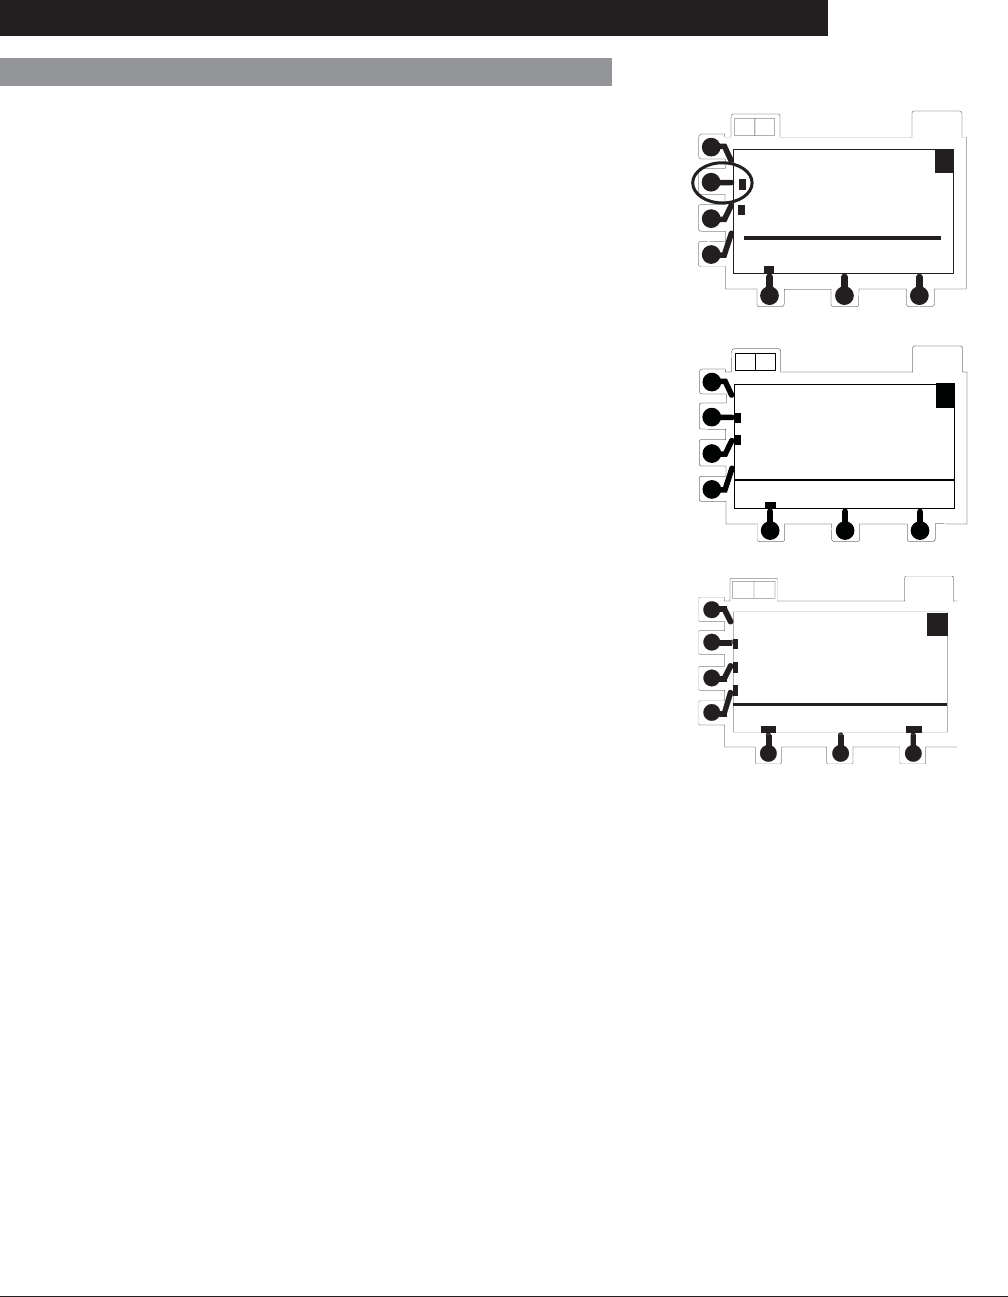
Directions for Use
Alaris® SE Pump
Models 7130/7131, 7230/7231
49
Programming
Secondary Infusion - With Guardrails® Suite MX Protection (Continued)
Secondary Intermittent Infusion (Continued)
VANCOmycin
Central
Peripheral
return
A
ABOPTIONS
• If applicable, an optional hospital-defined therapy
or clinical indication for delivery of this infusion may
appear (as in illustrated example, which reflects use of
vancomycin). Different limits can be defined for same
drug with different therapeutic indications.
• If applicable, a weight-based, non-weight-based or
BSA-based option for delivery of this infusion may
appear (as in illustrated example, which reflects use of
acyclovir).
OPTIONS
A
acyclovir
mg/kg
return
mg/m 2
AB
VANCOmycin
return
AB OPTIONS
A
500 mg / 100 mL
1000 mg / 200 mL
- - - - mg / - - - - mL
• If applicable, multiple concentration listings for delivery
of this infusion may appear (as in illustrated example
which reflects use of vancomycin).
5. Press soft key next to desired selection.
6. To confirm selection and continue programming, press ok
soft key.
• If a different selection is desired, press return soft key
to return to drug list or press menu soft key to return to
MENU screen, then navigate to desired selection and
press ok soft key.
7. If a Clinical Advisory has been defined for selected drug, a
message appears. To indicate that information has been
noted and continue programming, press ok soft key.
• Intermittent infusion setup page displays.

Directions for Use
Alaris® SE Pump
Models 7130/7131, 7230/7231
50 Programming
Secondary Intermittent Infusion (Continued)
8. Enter parameters as needed.
• If a drug with a defined standard concentration was
selected, Conc (concentration values, drug amount
and diluent volume) are automatically entered. (Note
that these values are not editable).
• If a drug with -- / -- mL was selected, Conc
(concentration values, drug amount and diluent
volume), needs to be entered. Drug amount is total
dose of drug in fluid container. Diluent volume is total
volume of fluid container.
• If selected drug is weight-based, Wt (patient weight in
kg) needs to be entered.
• If selected drug is BSA-based, BSA (body surface
area in meters squared) needs to be entered.
• If selected drug is not weight-based or BSA-based, Wt
or BSA field does not appear.
• Once all required parameters have been entered, total
calculated dose displays. This value is not editable.
9. Verify that all parameters are correct and press ok soft
key to confirm (see "Guardrails® Suite MX Prompts”).
• Rate/VTBI/Time page displays.
• VTBI field is highlighted.
• An editable value derived from diluent volume is
automatically entered.
10. To accept value, press ENTER key.
OR
To enter another value, use numeric data entry keys then
press ENTER key.
• VI field is highlighted.
11. If there is a VI value that needs to be cleared, press
CLEAR key or press 0 (zero) key then press ENTER key.
(This VI value includes all fluids infused on this channel in
Primary and Secondary mode since last cleared.)
Secondary Infusion - With Guardrails® Suite MX Protection (Continued)
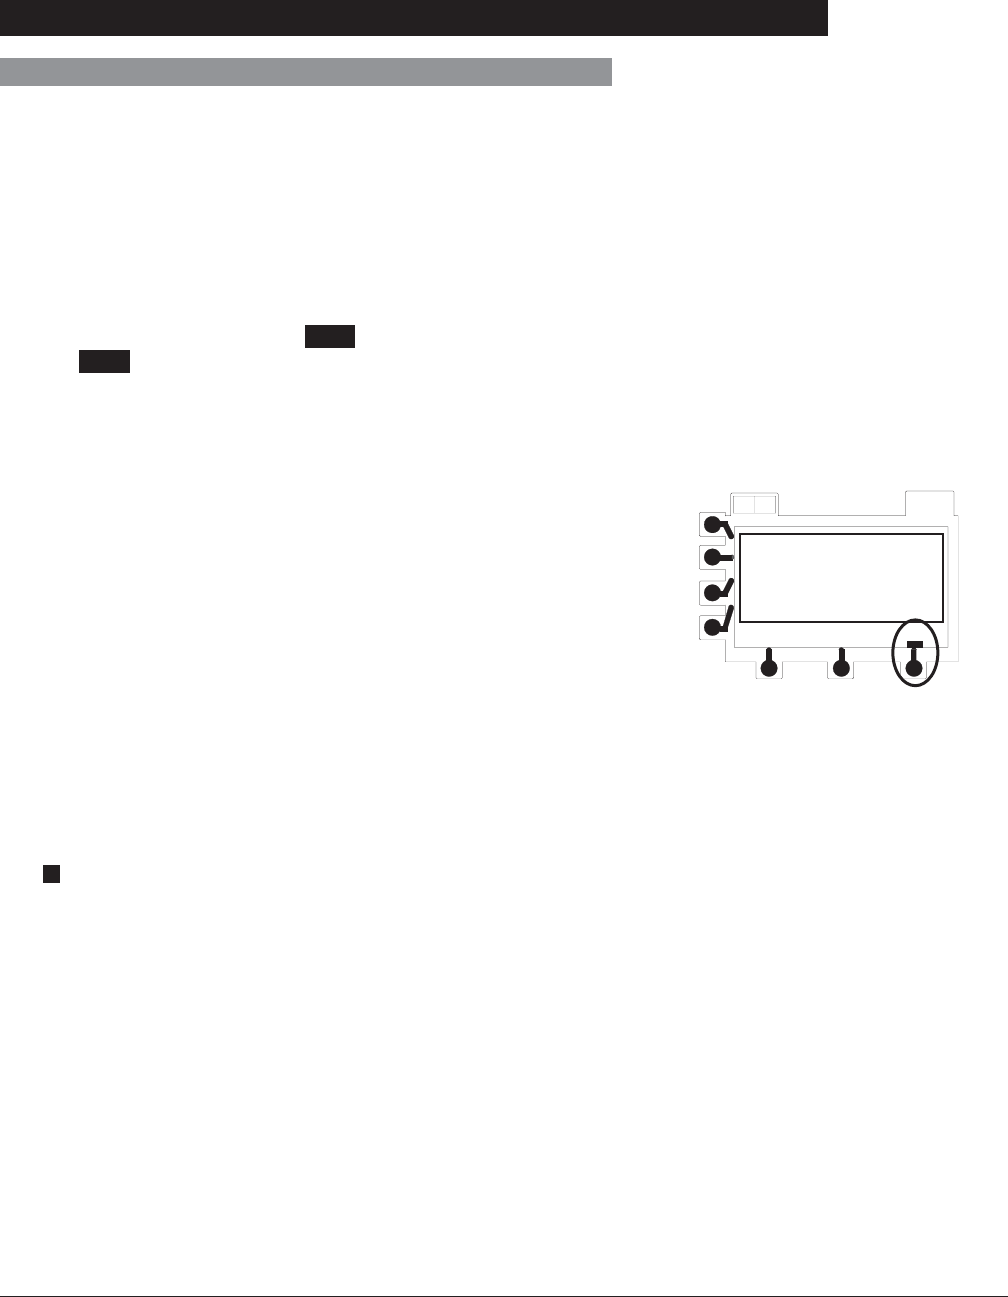
Directions for Use
Alaris® SE Pump
Models 7130/7131, 7230/7231
51
Programming
12. An optional hospital-defined and editable starting time for
Time may already be entered.
OR
To enter a value, use numeric data entry keys to enter
hours (0-99), then minutes (0-59). Press ENTER key to
accept each entry.
• Time can be entered to calculate rate or if rate entry
is desired, press rate - time soft key. It changes to
rate - time, indicating that rate may be entered.
13. Verify that all parameters are correct and press ok soft
key (see "Guardrails® Suite MX Prompts”).
• A Secondary Clamp reminder message displays.
14. Verify that secondary clamp is open before proceeding,
then press yes soft key.
• RUN/HOLD page displays.
Secondary Intermittent Infusion (Continued)
Secondary Infusion - With Guardrails® Suite MX Protection (Continued)
AB OPTIONS
IS SECONDARY
CLAMP OPEN?
yes
15. Verify that all parameters are correct and press run soft
key or RUN/HOLD key to start infusion.
16. To briefly view setup parameters (therapy, total dose,
concentration, patient weight or BSA and current profile)
from RUN/HOLD page or during a running infusion, press
4 soft key.
• When secondary VTBI reaches 0.0mL:
© An audio tone sounds (if enabled).
© Channel _ Secondary Complete briefly displays.
© Infusion automatically transitions to primary rate.
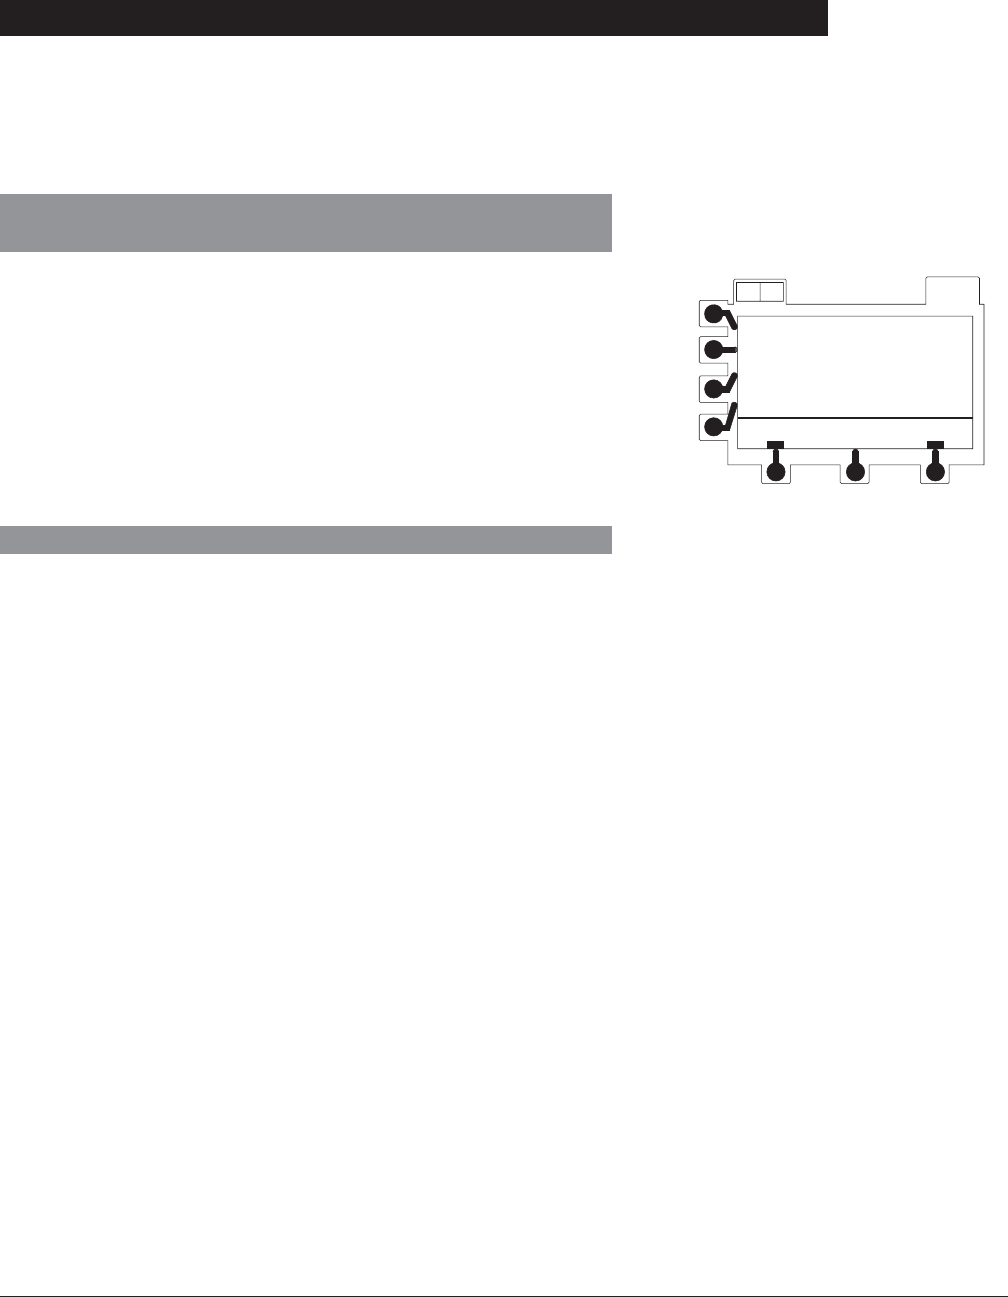
Directions for Use
Alaris® SE Pump
Models 7130/7131, 7230/7231
52 Programming
Primary Infusion - NO Guardrails® Suite MX Protection
The following procedures should be used only when the
drug to be infused is not listed in the Drug Library or when
the Profile feature is set to OFF in the instrument system
configuration.
To indicate programming is for a new patient and clear all
stored patient parameters from memory, press yes soft key.
• All previous patient data clears.
OR
To confirm programming is for same patient and retain all
stored patient parameters, press no soft key.
NEW PATIENT?
“Yes” Clears Previous
Patient Data
no
AB OPTIONS
yes
Selecting New Patient Option - Profiles Feature Not
Enabled (OFF)
Basic Infusion
If Guardrails® Suite MX protection is available and Basic
Infusion is desired, it can be accessed through the MENU.
If the Profile feature is set to OFF in the instrument
configuration, or no Data Set is loaded, the Basic Infusion
page displays by default.
1. Press Basic Infusion soft key.
• Basic Infusion RUN/HOLD page displays.
• Rate field is highlighted.
2. To accept current value, press ENTER key.
OR
To enter desired value, use numeric data entry keys then
press ENTER key.
• VTBI field is highlighted.
3. To accept value, press ENTER key.
OR
To enter another VTBI value, use numeric data entry keys
then press ENTER key.
• VI field is highlighted.

Directions for Use
Alaris® SE Pump
Models 7130/7131, 7230/7231
53
Programming
Primary Infusion - NO Guardrails® Suite MX Protection (Continued)
4. If there is a VI value that needs to be cleared, press
CLEAR key or press 0 (zero) key then press ENTER key.
5. Verify that all parameters are correct and press run soft
key or RUN/HOLD key to start infusion.
6. To briefly view current profile from RUN/HOLD page or
during a running infusion, press 4 soft key.
Basic Infusion (Continued)
When the Profiles feature is set to OFF or when no Data Set
has been transferred to the SE Pump, Guardrails® Suite MX
protection is not available and this section does not apply.
A basic infusion may be promoted to a continuous drug
infusion or a fluid infusion with Guardrails® Suite MX protection
while infusing.
A basic infusion may not be promoted to an intermittent drug.
If an intermittent drug is selected a Pri Running message is
displayed.
Promoting Basic Infusion to
Guardrails® Suite MX Protection Infusion
Infusion must be running in the Basic Primary Mode.
1. Select desired channel as necessary.
2. Press Options key.
3. Press Guardrails Menu soft key.
4. Press New Guardrails Drug soft key.
5. To use pre-selection menu press soft key corresponding
to first letter of desired drug.
Promoting Basic Infusion to
Guardrails® Drug Infusion
Select Drug A - F
menu
AB OPTIONS
A
Select DrugG-M
Select DrugN-S
Select Drug T - Z

Directions for Use
Alaris® SE Pump
Models 7130/7131, 7230/7231
54 Programming
Primary Infusion - NO Guardrails® Suite MX Protection (Continued)
OPTIONS
AB
Alprostadil
Bretylium
Bumetanide
Diltiazem
page
menu
A
7. To confirm selection and continue programming, press ok
soft key.
• If a different selection is desired, press return soft key
to return to drug list or press menu soft key to return to
MENU screen, then navigate to desired selection and
press ok soft key.
8. If a Clinical Advisory has been defined for selected drug, a
message appears. To indicate that information has been
noted and continue programming, press ok soft key.
• Dose field is highlighted.
9. An optional hospital-defined and editable starting value for
continuous infusion dose may already be entered.
OR
To enter a value, use numeric data entry keys then press
ENTER key.
• Dose field is highlighted for first entry, but soft keys
can be used to highlight other parameters for entry
prior to dose. To automatically calculate dose
instead of rate, press rate soft key and enter a rate
value. Once all entries have been completed, dose is
automatically calculated.
• If a drug with a defined standard concentration was
selected, Conc (concentration values, drug amount
and diluent volume) is automatically entered. (Note
that these values are not editable).
• If a drug with -- / -- mL was selected, Conc
(concentration values, drug amount and diluent
volume), needs to be entered.
6. Press soft key next to desired drug name to select it.
• page soft key(s) may be used to view additional
selections.
Promoting Basic Infusion to
Guardrails® Drug Infusion (Continued)
-- Continued Next Page --
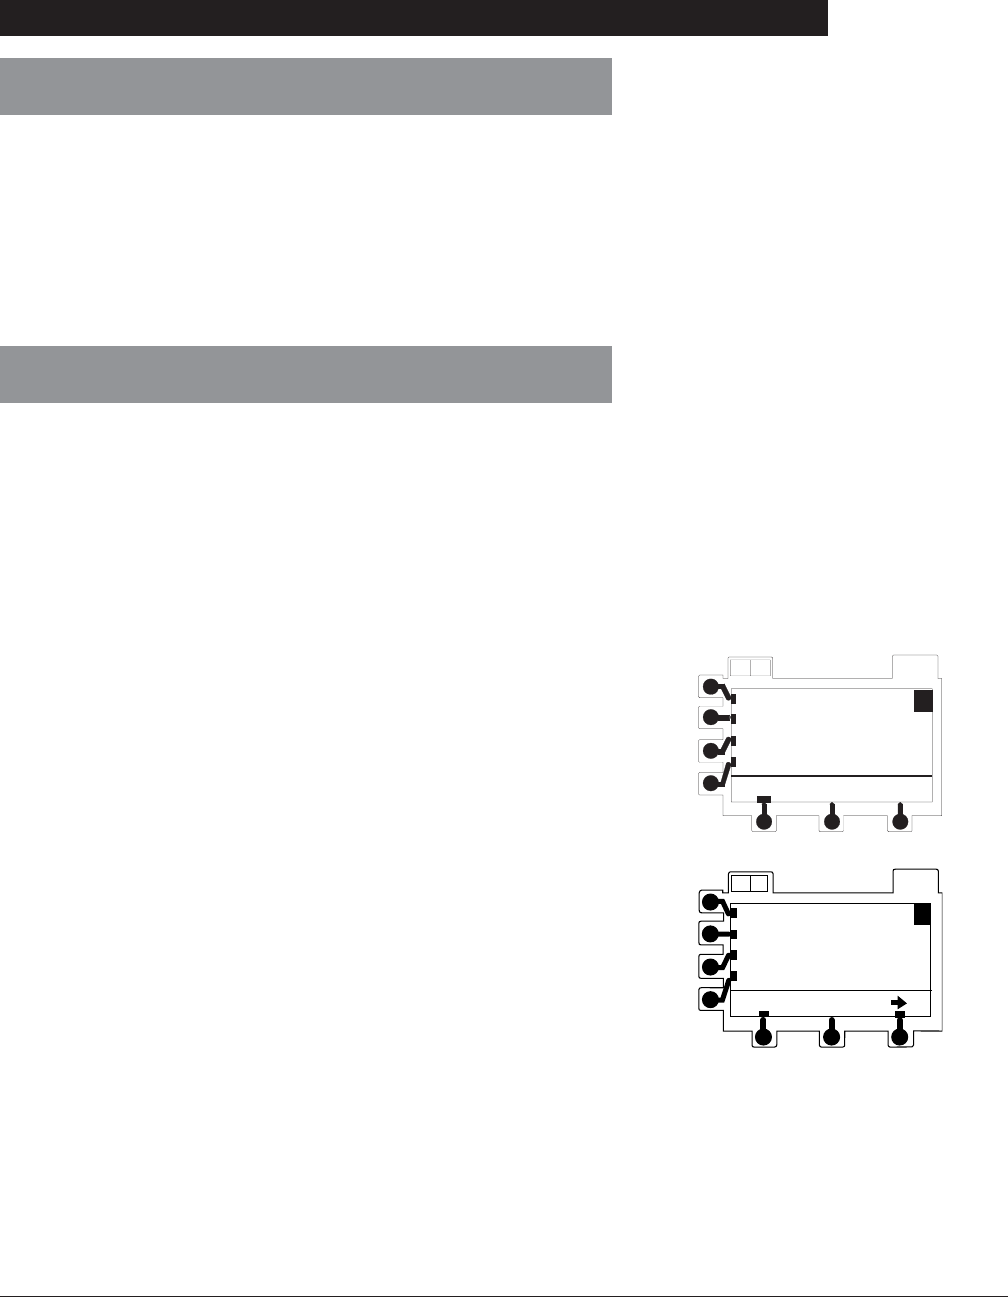
Directions for Use
Alaris® SE Pump
Models 7130/7131, 7230/7231
55
Programming
Primary Infusion - NO Guardrails® Suite MX Protection (Continued)
Promoting Basic Infusion to
Guardrails® Drug Infusion (Continued)
• If selected drug is weight-based, Wt (patient weight in
kg) needs to be entered.
• If selected drug is not weight-based, Wt (patient
weight) field does not appear.
10. Verify that all parameters are correct and press ok soft
key to confirm.
Promoting Basic Infusion to
Guardrails® IV Fluid Infusion
Infusion must be running in the Basic Primary Mode.
1. Select desired channel as necessary.
2. Press Options key.
3. Press Guardrails Menu soft key.
4. Press New Guardrails Fluid soft key.
5. To use pre-selection menu press soft key corresponding
to first letter of desired fluid.
6. Press soft key next to desired fluid name to select it.
• page soft key(s) may be used to view additional
selections.
Select Fluid A - F
menu
AB OPTIONS
A
Select Fluid G-M
Select Fluid N-S
Select Fluid T - Z
OPTIONS
AB
A
1/2 NS
Blood (RBCs)
return page
D5 1/2 NS+KCL 10mEq/L
D5 1/2 NS
7. To confirm selection and continue programming, press ok
soft key.
• If a different selection is desired, press return soft key
to return to fluid list or press menu soft key to return to
MENU screen, then navigate to desired selection and
press ok soft key.
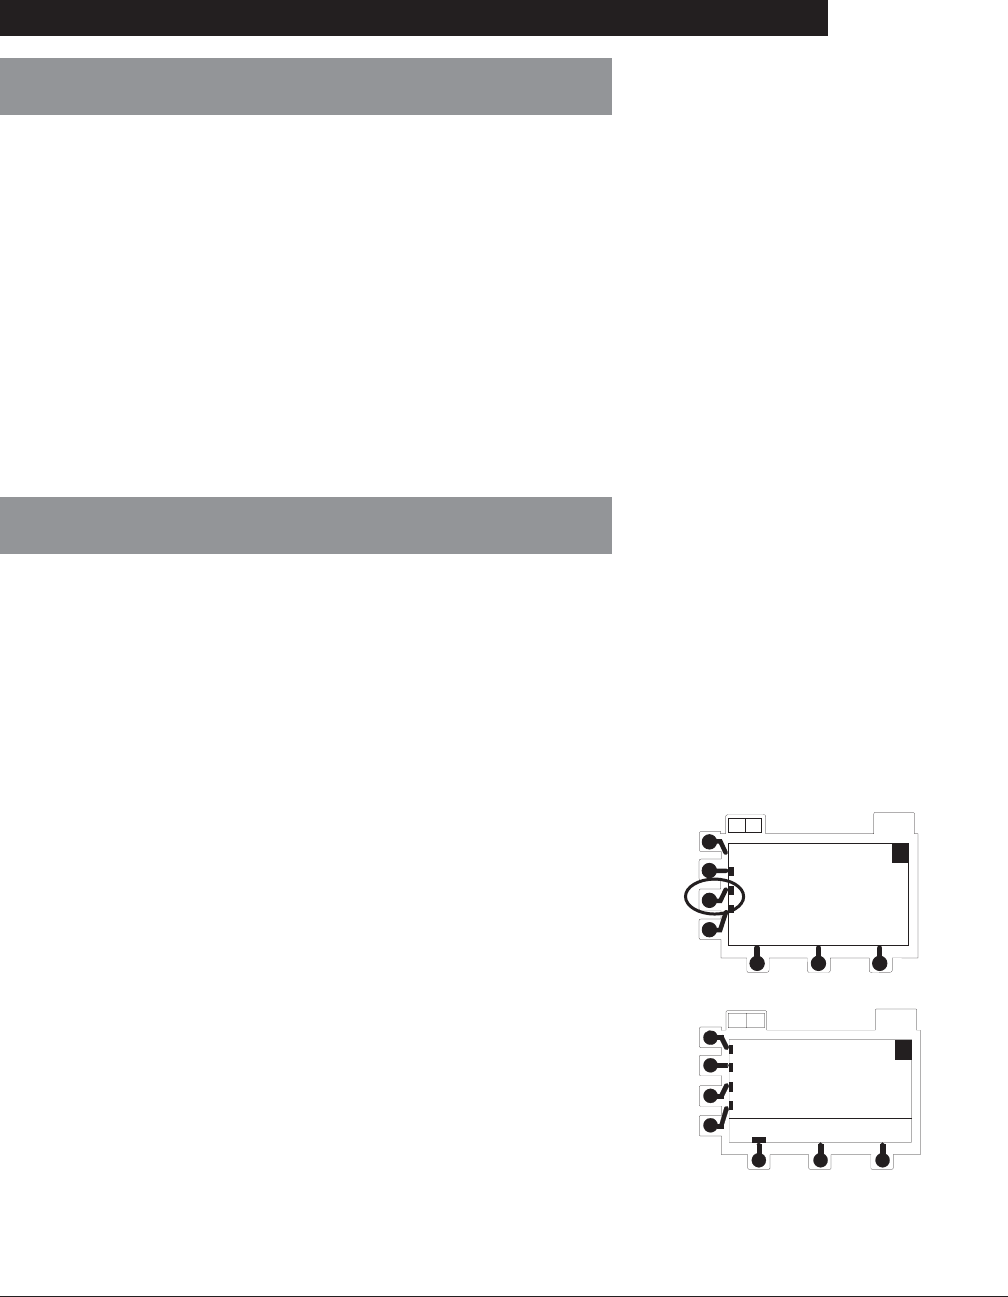
Directions for Use
Alaris® SE Pump
Models 7130/7131, 7230/7231
56 Programming
Primary Infusion - NO Guardrails® Suite MX Protection (Continued)
Promoting Basic Infusion to
Guardrails® IV Fluid Infusion (Continued)
8. If a Clinical Advisory has been defined for selected fluid, a
message appears. To indicate that information has been
noted and continue programming, press ok soft key.
• IV Fluid setup page displays.
• Rate field is highlighted and flashing indicating that
current value must be either approved or edited.
9. To accept current rate press ENTER key.
OR
To enter a value, use numeric data entry keys then press
ENTER key.
Dose Rate Calculation-Drug? NO DOSE LIMIT - Profiles
Feature Enabled (ON)
The following procedures are to be used only when the drug to
be infused is NOT listed in the Drug Library.
When using Drug? – NO DOSE LIMIT, drug parameters are
automatically calculated based on:
• concentration
• weight entry (if required)
• rate or dose entry
1. Press New Guardrails Drug soft key.
• If 15 or less drugs are available in selected profile, a
list of drug names displays; otherwise, an alphabetic
pre-selection menu displays.
OPTIONS
AB
MENU
Primary Infusion
New Guardrails Drug
Resume Previous Drug
A
2. To use pre-selection menu press T – Z soft key, press
page soft key to go to end of drug list, then press Drug?
– NO DOSE LIMIT soft key.
OR
Select Drug A - F
menu
AB OPTIONS
A
Select DrugG-M
Select DrugN-S
Select Drug T - Z
-- Continued Next Page --
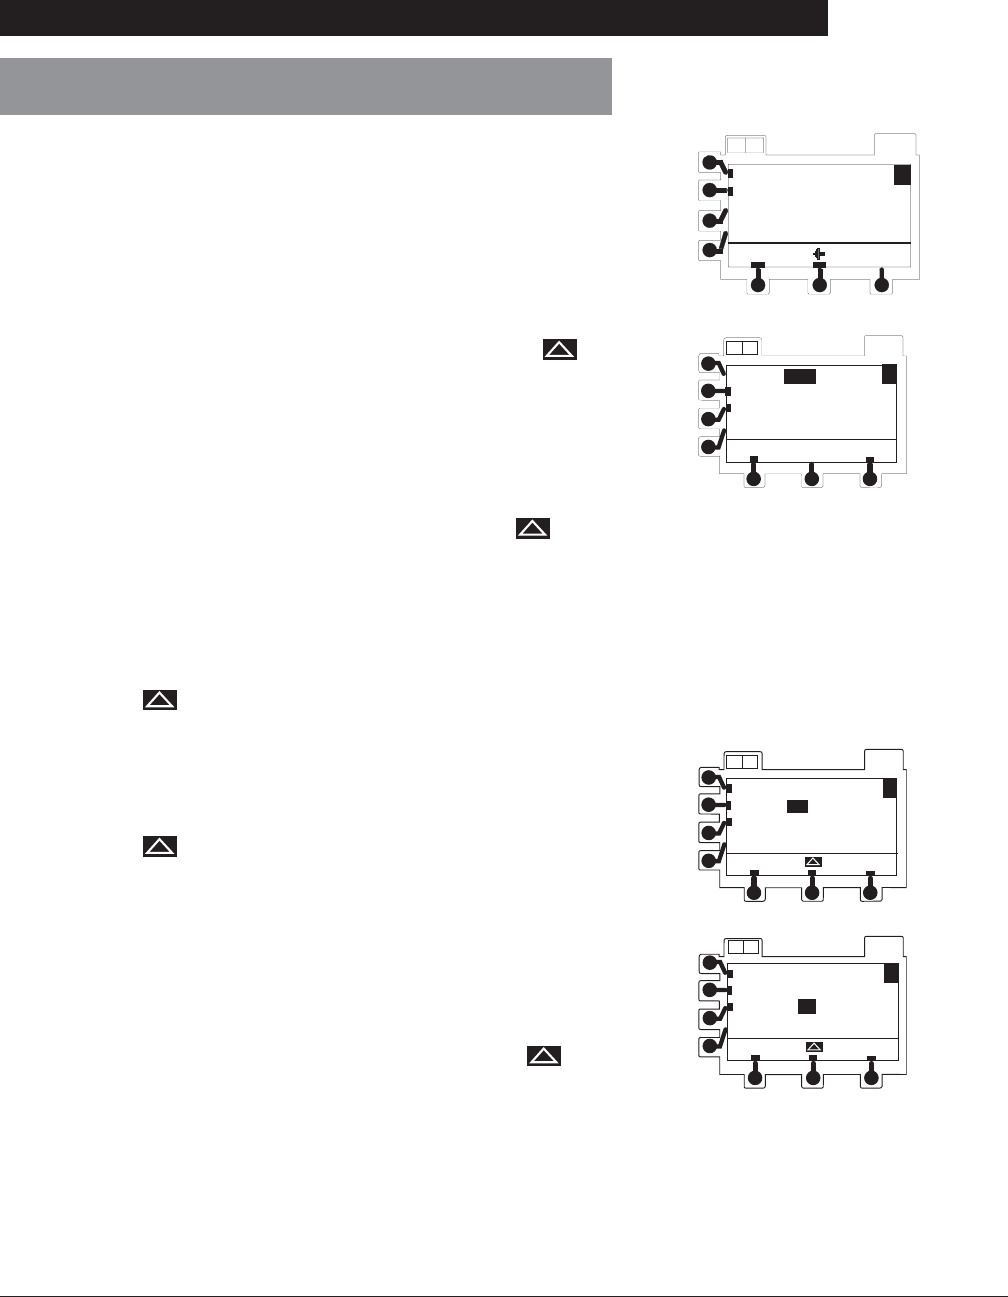
Directions for Use
Alaris® SE Pump
Models 7130/7131, 7230/7231
57
Programming
Primary Infusion - NO Guardrails® Suite MX Protection (Continued)
menu
AB OPTIONS
A
Drug? NO DOSE LIMIT
page
Press 0 (zero) numeric key then press Drug? – NO DOSE
LIMIT soft key.
• Dosing unit in dose/weight/time displays with dose
segment highlighted.
Dose Rate Calculation-Drug? NO DOSE LIMIT - Profiles
Feature Enabled (ON) (Continued)
3. To scroll through units available, press and release
soft key. When correct unit is displayed, press ENTER
key.
• If weight-based dosing is desired, press ENTER to
advance to time segment
OR
If non-weight-based dosing is desired, press soft
key to clear segment, then press ENTER (weight field
disappears).
• If time unit is appropriate, press ENTER to advance to
concentration field.
OR
Press soft key to scroll through available time unit
choices. Press ENTER when correct unit displays.
• If concentration unit is appropriate, press ENTER to
advance.
OR
Press soft key to scroll through available
concentration unit choices. Press ENTER when
correct unit displays.
OPTIONS
AB
A
menuok
Conc in mg/mL
Weight in kg
Dose in /kg/minmcg
OPTIONS
A B
A
menu ok
Dose in mcg/kg/min
Conc in mg/mL
Weight in kg
• If weight field appears and weight entry in kg
(kilograms) is desired, press ok soft key to advance to
programming page.
OR
If weight entry in lb (pounds) is desired, press soft
then press ENTER. Press ok soft key to advance to
programming page. Patient weight in pounds is used
to automatically calculate dose per kilogram per time.
OPTIONS
A B
A
menu ok
Dose in mcg/kg/min
Conc in mg/mL
Weight in kg
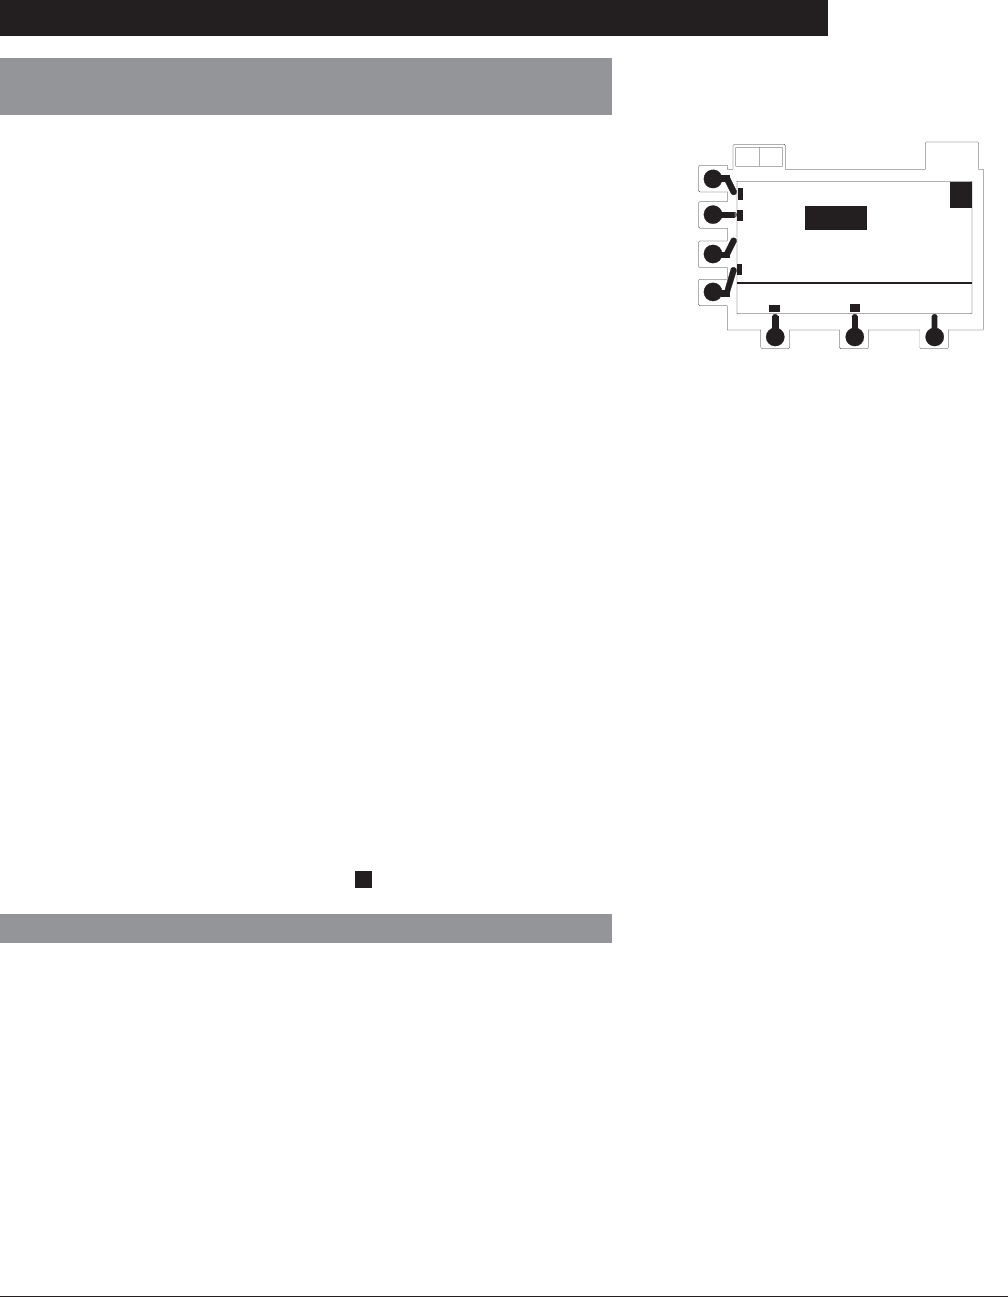
Directions for Use
Alaris® SE Pump
Models 7130/7131, 7230/7231
58 Programming
AB OPTIONS
A
BolusOnly
menu
Rate = - - - - - mL/h
Dose= - - - - - mg/kg/h
Conc= - - - - - mL/h
Wt= - - - - - kg
Primary Infusion - NO Guardrails® Suite MX Protection (Continued)
Dose Rate Calculation-Drug? NO DOSE LIMIT - Profiles
Feature Enabled (ON) (Continued)
Dose Rate Calculation-Profiles Feature Not Enabled (OFF)
This feature allows the clinician to select a drug name from
a pre-set list or to select a generic calculation feature by
selecting “Drug?” to calculate drug parameters for drugs
not on the list. If the preset list is disabled in the instrument
configuration settings, then only generic calculation is
available. Parameters are calculated automatically based on:
• concentration
• weight entry (if required)
• rate or dose entry
4. Enter parameters as needed.
• Dose field is highlighted for first entry but soft keys can
be used to highlight other parameters for entry prior to
dose. To automatically calculate dose instead of rate,
press rate soft key and enter a rate value. Once all
entries have been completed dose is automatically
calculated.
5. Verify that all parameters are correct and press ok soft
key to confirm.
• VTBI and VI setup page displays.
• VTBI field is highlighted.
6. To enter a VTBI value, use numeric data entry keys then
press ENTER key.
• VI field is highlighted.
7. If there is a VI value that needs to be cleared, press
CLEAR key or press 0 (zero) key then press ENTER key.
8. To continue programming, press ok soft key.
• RUN/HOLD page displays.
9. Verify that all parameters are correct and press run soft
key or RUN/HOLD key to start infusion.
10. To briefly view current setup parameters (concentration,
patient weight, current profile) from RUN/HOLD page or
during a running infusion, press 4 soft key.
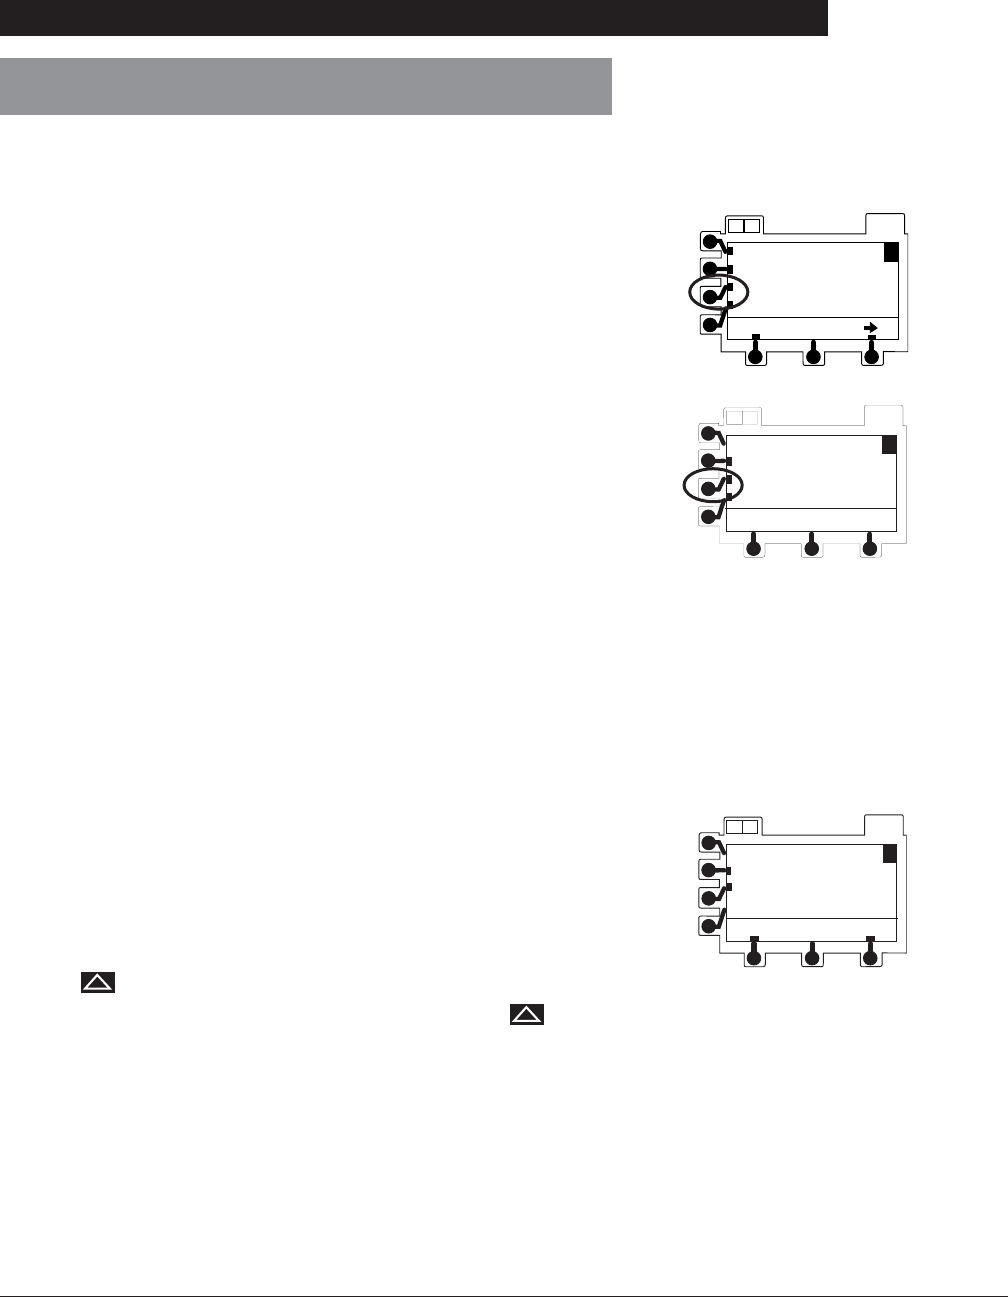
Directions for Use
Alaris® SE Pump
Models 7130/7131, 7230/7231
59
Programming
Primary Infusion - NO Guardrails® Suite MX Protection (Continued)
1. Press OPTIONS soft key.
• Options page appears.
2. Press Dose Rate Calculator soft key. OPTIONS
AB
A
Resistance Trend
Monitoring Options
Set Pressure Baseline
return page
Dose Rate Calculator
OPTIONS
AB
DOSE RATE MENU
Review/Resume
Enter New Program
Quit Program
A
3. Press Enter New Program soft key.
• An alphabetic pre-selection menu is displayed.
Dose Rate Calculation-Profiles Feature Not Enabled (OFF)
(Continued)
4. To use pre-selection menu press soft key corresponding
to first letter of desired drug.
5. Press soft key next to desired drug name to select it.
• page soft key(s) may be used to view additional
selections.
• If desired drug name is not listed, see “Drug? NO
DOSE LIMIT-Profiles Feature Enabled (On)”.
6. To approve all displayed information and advance to setup
page press ok soft key
OR
To change concentration or weight units press soft key
next to parameter to be changed.
• soft key appears.
• To scroll through available selections, press soft
key. When desired unit displays, press ENTER key,
then press ok soft key to continue programming.
7. Pr e s s ok soft key to confirm selection and dosing units.
• Infusion setup page displays.
OPTIONS
A B
A
menu ok
Dose in mcg/kg/min
Conc in mg/mL
Weight in kg

Directions for Use
Alaris® SE Pump
Models 7130/7131, 7230/7231
60 Programming
Primary Infusion - NO Guardrails® Suite MX Protection (Continued)
Dose Rate Calculation-Drug? NO DOSE LIMIT - Profiles
Feature Not Enabled (OFF) (Continued)
8. To enter desired values, use numeric keys then press
ENTER key.
• Dose field is highlighted for first entry, but soft keys
can be used to highlight other parameters for entry
prior to dose. To automatically calculate dose
instead of rate, press Rate soft key and enter a rate
value. Once all entries have been competed, dose is
automatically calculated.
• Conc (concentration values of drug amount and
diluent volume) needs to be entered.
• If drug is weight-based, Wt (patient weight) needs to
be entered.
• If drug is not weight-based, Wt field does not appear.
9. When all fields have been completed, verify that all
parameters are correct and press ok soft key to confirm
• VTBI and VI setup page displays.
• VTBI field is highlighted.
10. To enter a VTBI value, use numeric data entry keys then
press ENTER key.
• VI field is highlighted.
11. If there is a VI value that needs to be cleared, press
CLEAR key or press 0 (zero) key then press ENTER key.
12. To continue programming, press ok soft key.
• RUN/HOLD page displays.
13. Verify that all parameters are correct and press run soft
key or RUN/HOLD key to start infusion.
14. To briefly view current dose rate setup parameters
(concentration, patient weight) from RUN/HOLD page or
during a running infusion, press 4 soft key.
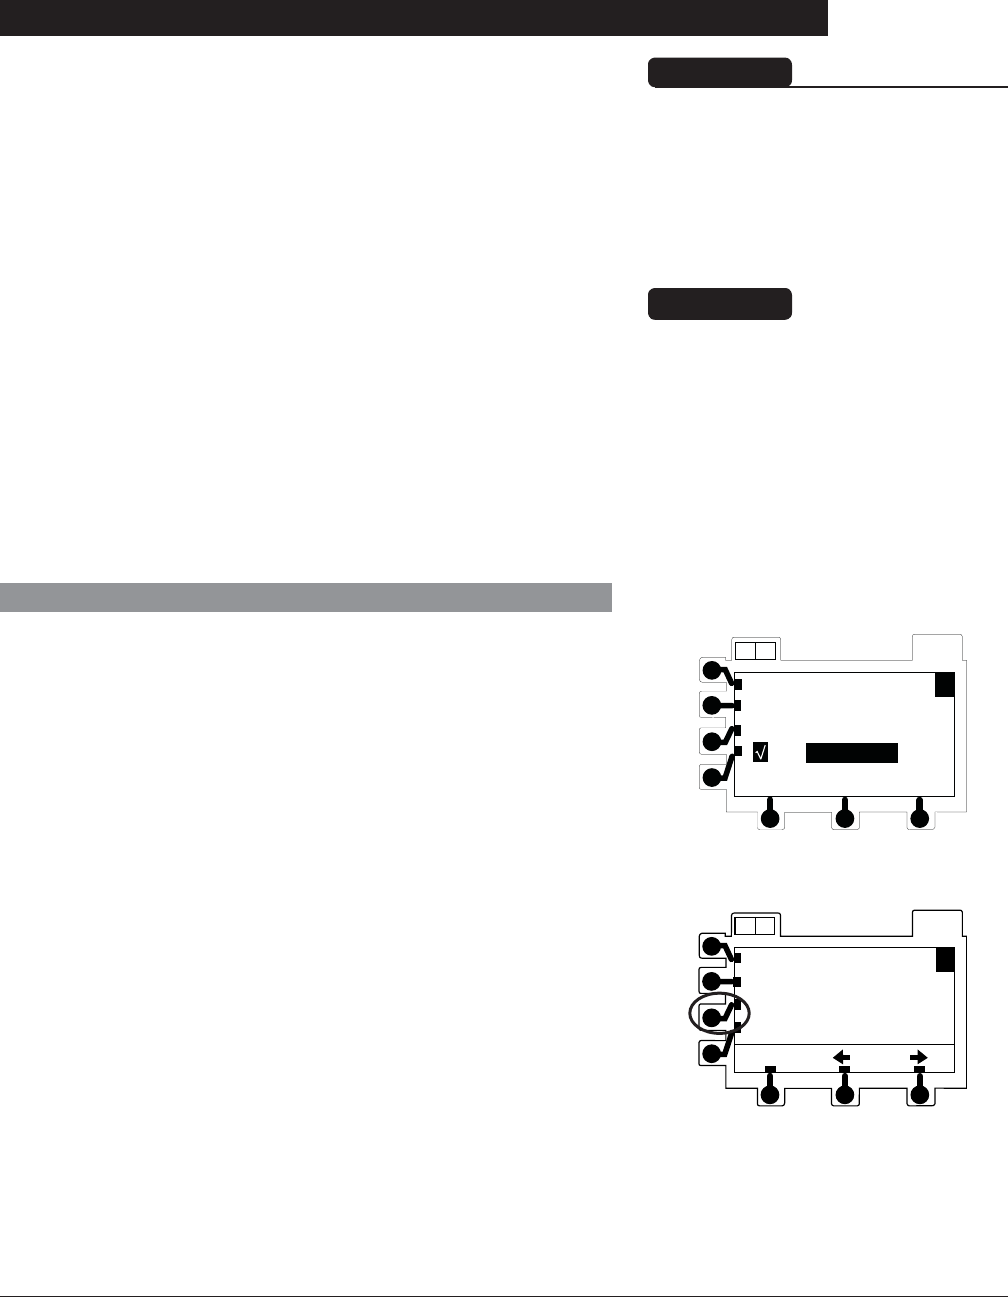
Directions for Use
Alaris® SE Pump
Models 7130/7131, 7230/7231
61
Programming
OPTIONS
A
PRIMARY
Rate= 25.0 mL/h
VTBI= 10000 mL
VI= 1.0 mL
AB
Loading Dose
This feature allows an initial infusion rate to be set up for a
specific volume, automatically followed by a maintenance
rate (primary settings) from the same container. If delivering
a bolus dose of medication to load prior to the start of a
continuous infusion, see "Primary Infusion - With Guardrails®
Suite MX Protection", "Bolus Dose". The primary VTBI and
VI include the loading dose volumes. When the loading dose
VTBI reaches zero, a transition tone sounds (if transition tone
feature is enabled), Load Dose Complete message displays
briefly, and the primary settings automatically take effect.
Verify the primary mode parameters prior to accessing the
Loading Dose option.
WARNING
This mode is useful for delivering
fluid challenges. This feature is for
delivery from primary containers
only. Using this feature with 2
separate containers may result in
unintended flow rates.
CAUTION
Guardrails® drug dosing limits
are available only within the
New Guardrails Drug or New
Guardrails IV Fluids option.
Dosing limits do not apply when
using Loading Dose programming.
Profile configurable options, as
defined in the Data Set, do apply.
Programming
1. Select desired channel, as necessary. Channel must be
on hold in primary mode.
2. Press OPTIONS key.
3. Press Loading Dose soft key.
• Loading Dose infusion rate is highlighted.
OPTIONS
AB
A
Multi-Step
Multi-Dose
View Curr. Settings
return page
Loading Dose
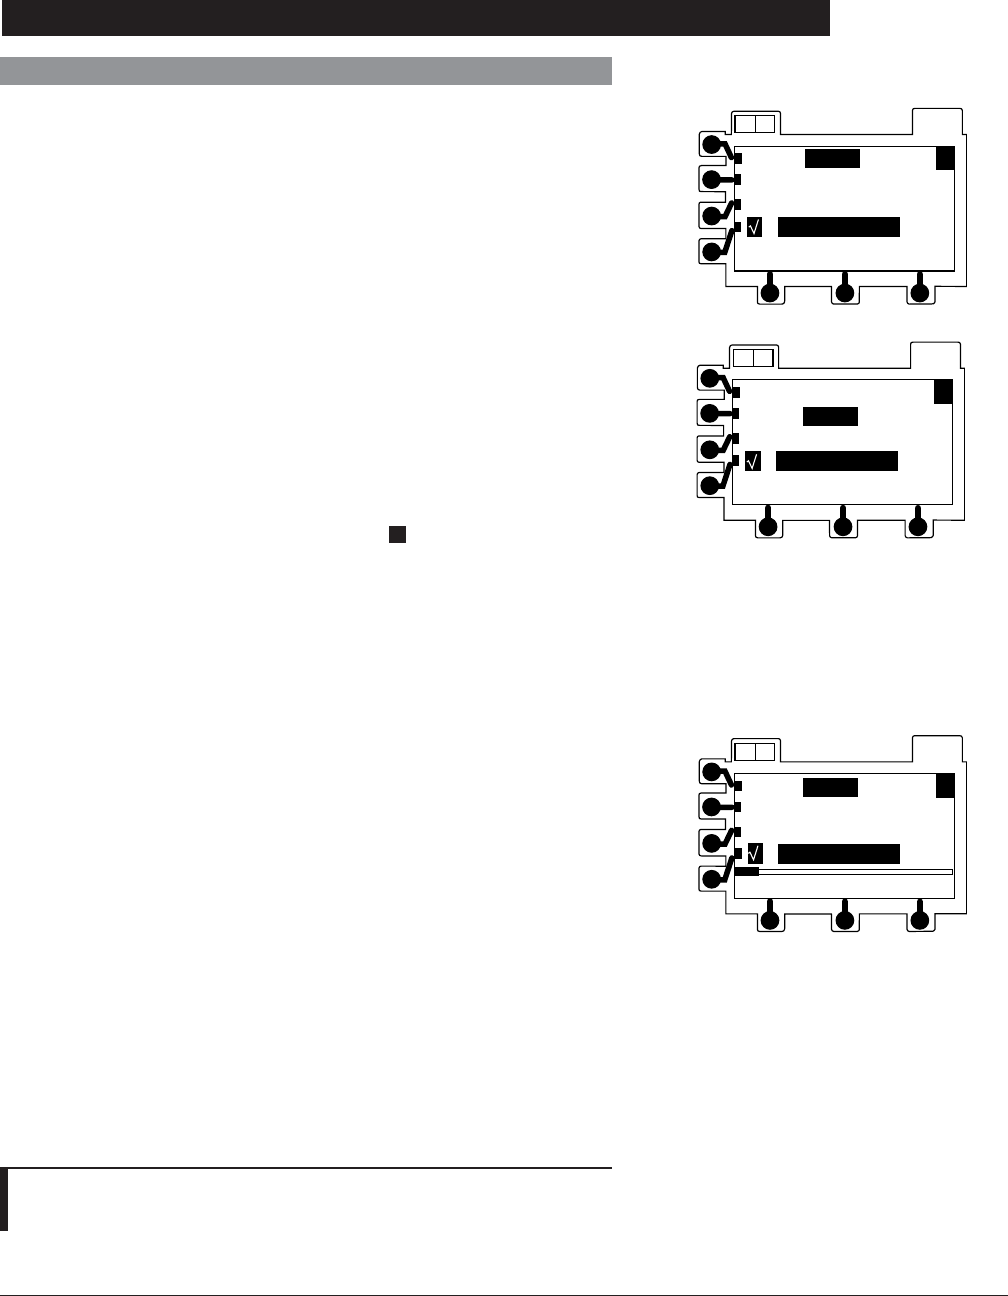
Directions for Use
Alaris® SE Pump
Models 7130/7131, 7230/7231
62 Programming
Loading Dose (Continued)
Programming (Continued)
4. If current value is appropriate, press ENTER key.
OR
To enter a new infusion rate, use numeric keypad and
press ENTER key.
• Loading Dose VTBI is highlighted.
NOTE:
À The Loading Dose VTBI must be less than the primary VTBI.
OPTIONS
AB
A
LOADING DOSE
Primary Settings
Rate= mL/h200.0
VTBI= mL500.0
OPTIONS
AB
A
LOADING DOSE
Rate= mL/h200.0
VTBI= 500.0 mL
Primary Settings
10% Resistance
OPTIONS
AB
A
LOADING DOSE
VTBI= mL500.0
Primary Settings
Rate= mL/h200.0
5. If current value is appropriate, press ENTER key.
OR
To enter a new VTBI, use numeric keypad and press
ENTER key. À
6. To start loading dose infusion, press RUN/HOLD key.
7. To briefly view current profile press 4 soft key.
8. To briefly view primary settings (Pri Rate, Pri VTBI, Total
VI) during loading dose infusion, press Primary Settings
soft key.
9. To change Primary Settings during a loading dose
infusion, press Primary Settings soft key.
10. Press soft key next to parameter to be edited.
• Current value is highlighted.
11. Make changes:
a. To enter a new value, use numeric keypad.
b. To reset volume infused to 0.0 mL, press CLEAR or 0
(zero) key.
12. To accept new value, press ENTER key.
13. When complete:
• Loading Dose Complete is displayed.
• Pump returns to Primary Infusion.
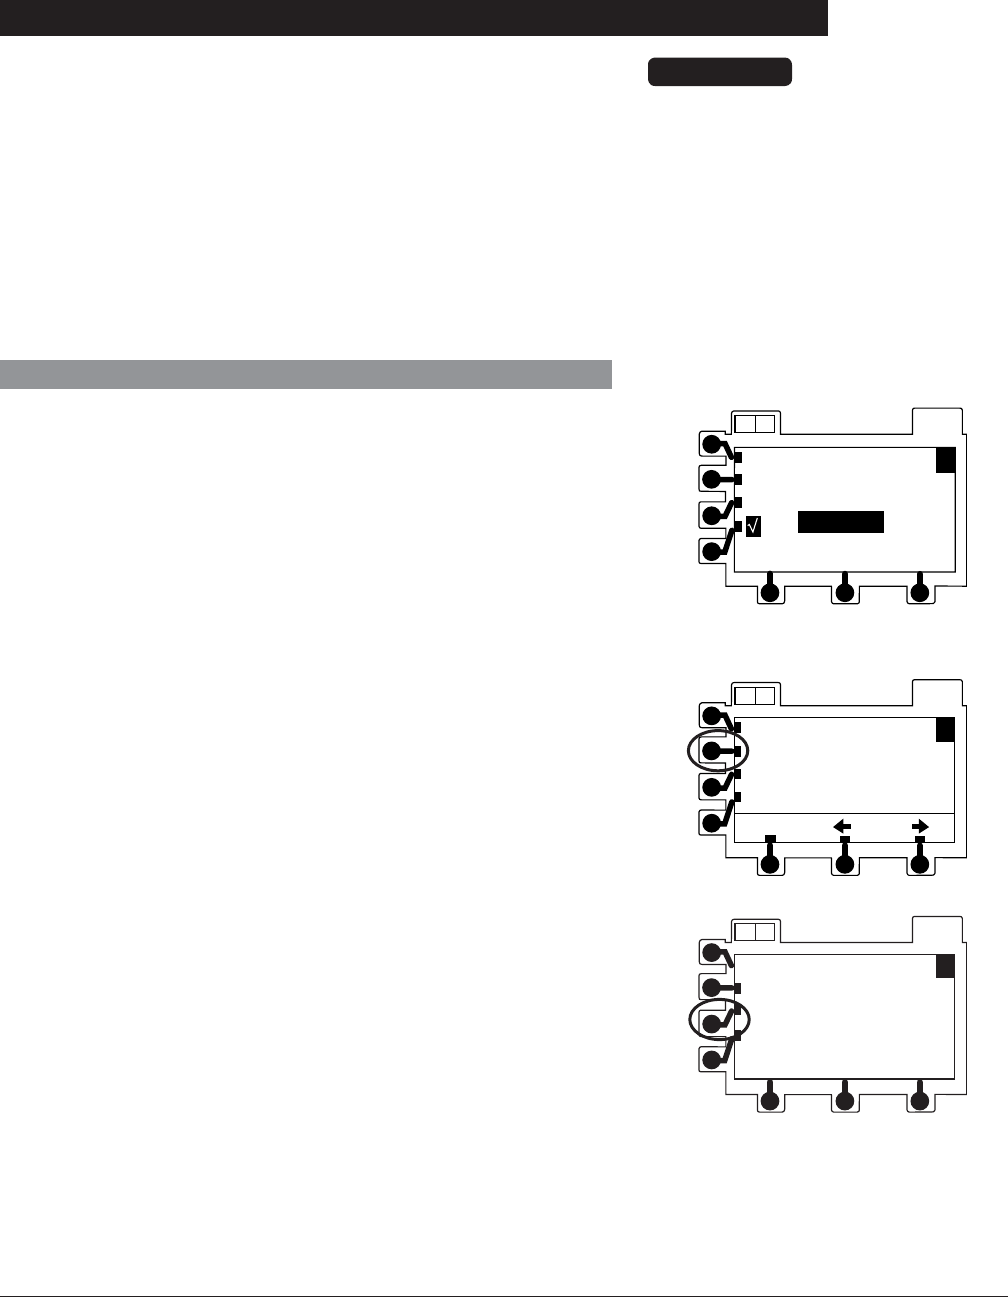
Directions for Use
Alaris® SE Pump
Models 7130/7131, 7230/7231
63
Programming
Multi-Dose
This feature allows 1 to 24 infusions to be preprogrammed with
the same rate and volume, to be delivered at equally spaced
intervals, over a period of up to 24 hours. It also offers a
delayed start option up to 8 hours and a Dose Complete Alert
Option. These features can be turned on or off.
This program requires another infusing line to keep the vein
open between programmed doses since there is no KVO
infusion between doses or following program completion.
CAUTION
Guardrails® drug dosing limits
are available only within the
New Guardrails Drug or New
Guardrails IV Fluids option.
Dosing limits do not apply when
using Multi-Dose programming.
Profile configurable options, as
defined in the Data Set, do apply.
Programming
1. Select desired channel, as necessary. Channel must be
on hold in primary mode.
2. Press OPTIONS key.
3. Press Multi-Dose soft key.
OPTIONS
AB
Rate= 25.0 mL/h
VTBI= 4.0 mL
VI= 0.0 mL
Primary
A
OPTIONS
AB
A
Multi-Step
Multi-Dose
View Curr. Settings
return page
Loading Dose
4. Press Enter New Program soft key. OPTIONS
A B
A
MULTI-DOSE MENU
Review/Resume
Enter New Program
Quit Program
-- Continued Next Page --
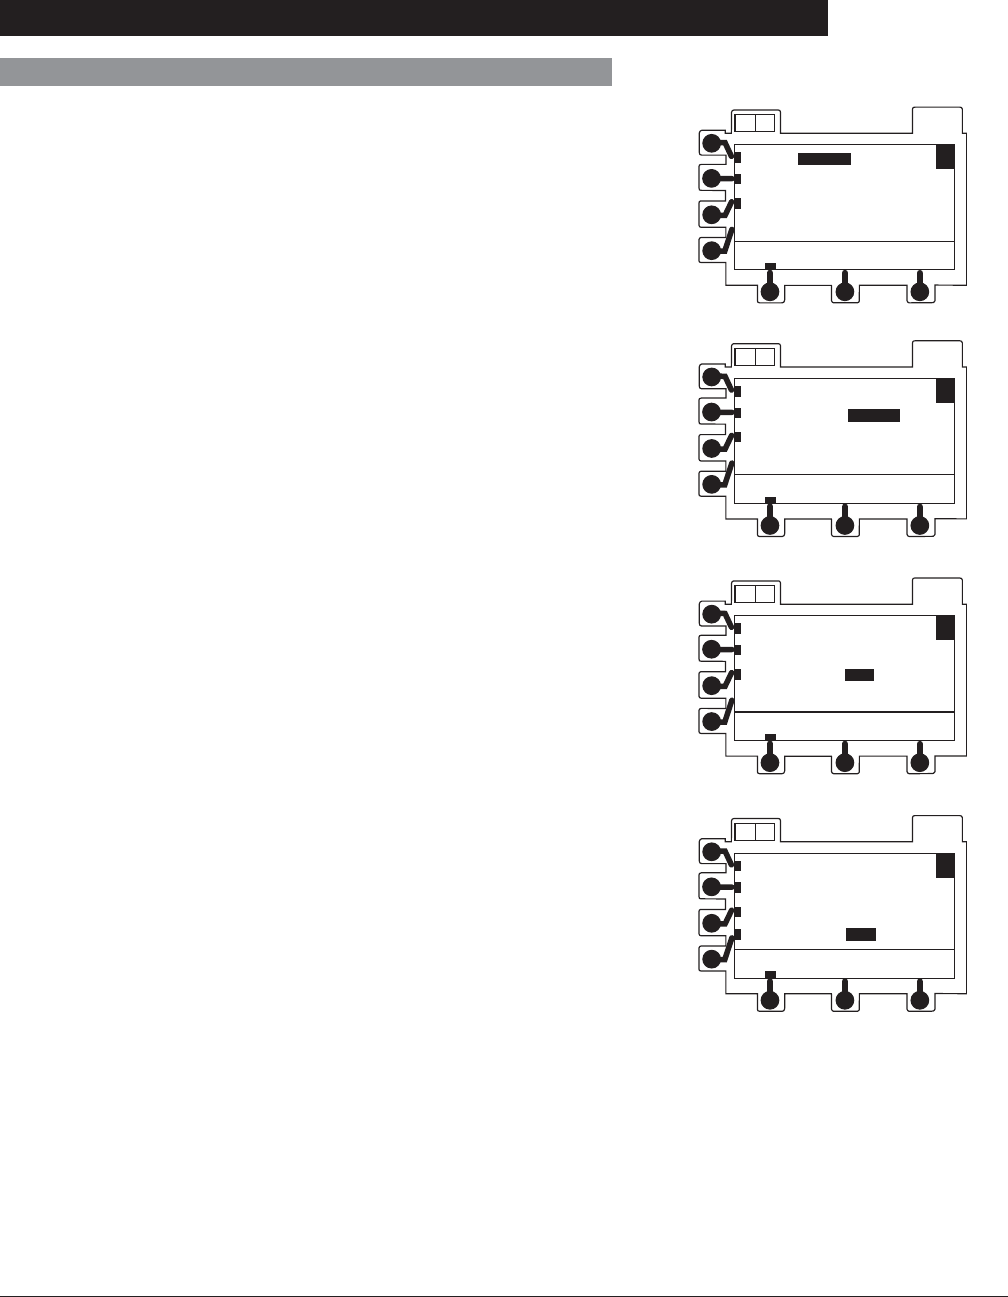
Directions for Use
Alaris® SE Pump
Models 7130/7131, 7230/7231
64 Programming
Multi-Dose (Continued)
Programming (Continued)
• Setup page appears with infusion rate highlighted.
OPTIONS
A B
A
menu
Rate=250.0 mL/h
VTBI/Dose= ----- mL
No. Doses= --
Frequency= -- h
OPTIONS
A B
A
menu
Rate=250.0 mL/h
VTBI/Dose=100.0 mL
No. Doses= --
Frequency= -- h
OPTIONS
A B
A
menu
Rate=250.0 mL/h
VTBI/Dose=100.0 mL
No. Doses= 4
Frequency= -- h
OPTIONS
A B
A
menu
Rate= ----- mL/h
VTBI/Dose= ----- mL
No. Doses= --
Frequency= -- h
6. To enter VTBI/Dose, use numeric keypad. Press ENTER
key.
7. To enter number of doses, use numeric keypad. Press
ENTER key.
5. To enter infusion rate, use numeric keypad. Press ENTER
key.
8. To enter dose frequency (time interval from start of one
dose until start of next), use numeric keypad. Press
ENTER key.
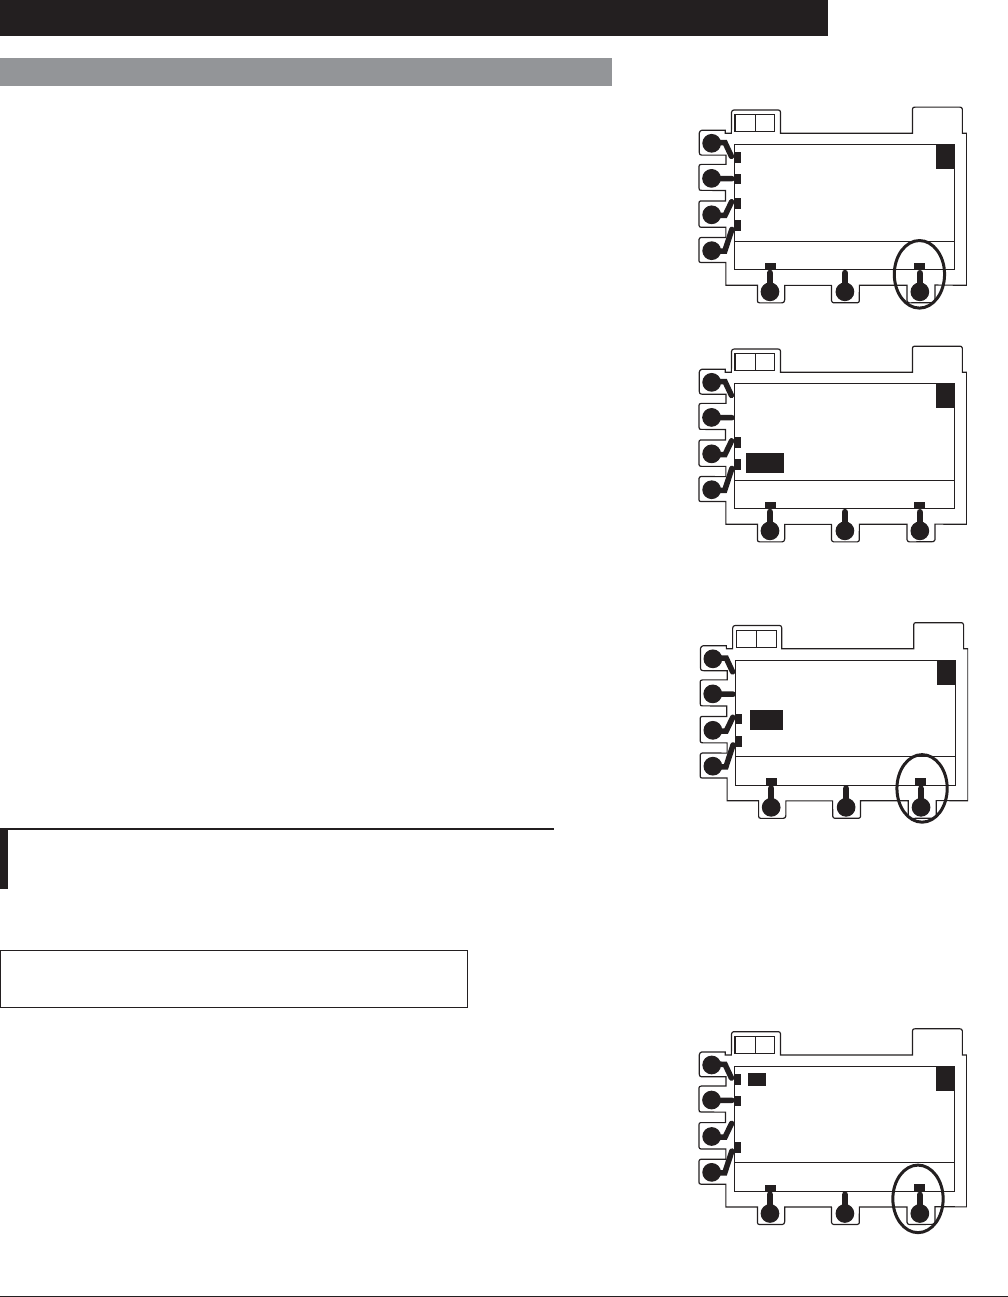
Directions for Use
Alaris® SE Pump
Models 7130/7131, 7230/7231
65
Programming
Multi-Dose (Continued)
Programming (Continued)
9. Verify that all parameters are correct then press ok soft
key.
• If Dose Complete Alert Option is enabled, DOSE
COMPLETE ALERT OPTION page appears.
10. To select On or Off, use soft keys.
11. To continue programming, press ok soft key. À
• To start first dose immediately, see “Starting First
Dose Immediately After Programming”.
• To delay start of first dose, see “Delaying Start of First
Dose”.
NOTE:
À All doses must be programmed to start within 24 hours.
OPTIONS
A B
A
menu
ok
Rate=250.0 mL/h
VTBI/Dose=100.0 mL
No. Doses= 4
Frequency= 6 h
OPTIONS
A B
A
menu
ok
DOSE COMPLETE
ALERT OPTION
On
Off
OPTIONS
A B
A
menu
ok
DOSE COMPLETE
ALERT OPTION
On
Off
Starting First Dose Immediately After
Programming
1. A displayed time of 0 hours, 0 minutes identifies that first
dose starts immediately after programming.
2. To approve and advance to main hold page, press ok soft
key.
OPTIONS
A B
A
menu
ok
0 h
0 min
Until First Dose
VI= 0.0 mL
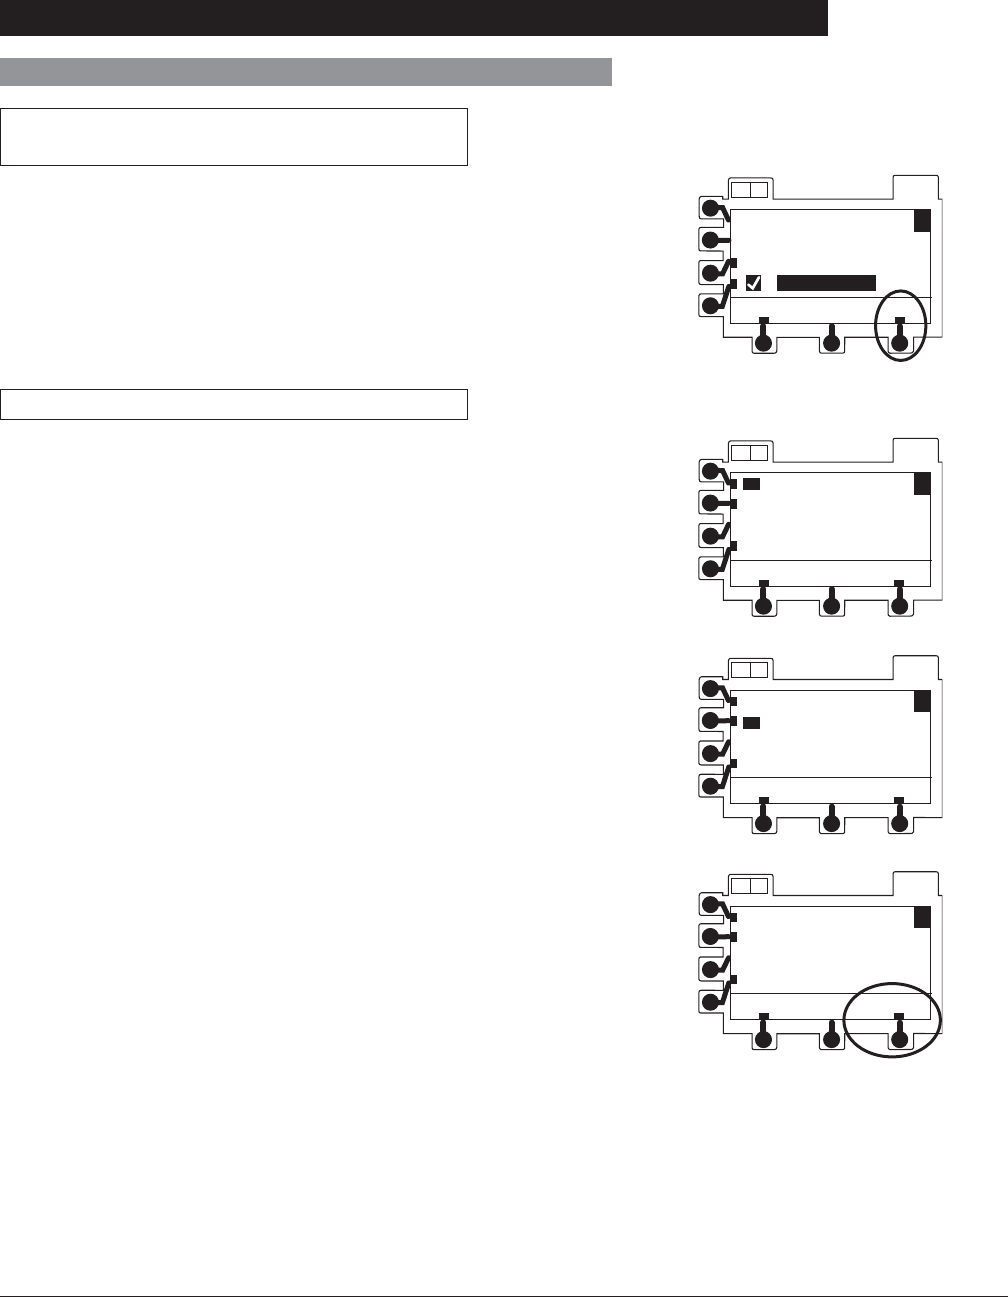
Directions for Use
Alaris® SE Pump
Models 7130/7131, 7230/7231
66 Programming
Multi-Dose (Continued)
Programming (Continued)
Starting First Dose Immediately After
Programming (Continued)
3. To start infusion, press RUN/HOLD key or run soft key.
Delaying Start of First Dose
1. To enter number of hours until first dose, use numeric
keypad. Press ENTER key.
OPTIONS
A B
A
menu
run
Rate=250.0 mL/h
VTBI=100.0 mL
VI= 0.0 mL
Dose 1 of 4
2. To enter number of minutes (0 to 59) until first dose, use
numeric keypad. Press ENTER key.
3. To advance to timer hold page, press start timer soft key.
OPTIONS
A B
A
menu
ok
0 h
0 min
Until First Dose
VI= 0.0 mL
OPTIONS
A B
A
menu
start timer
3 h
12 min
Until First Dose
VI= 0.0 mL
OPTIONS
A B
A
menu
start timer
3 h
0 min
Until First Dose
VI= 0.0 mL
-- Continued Next Page --
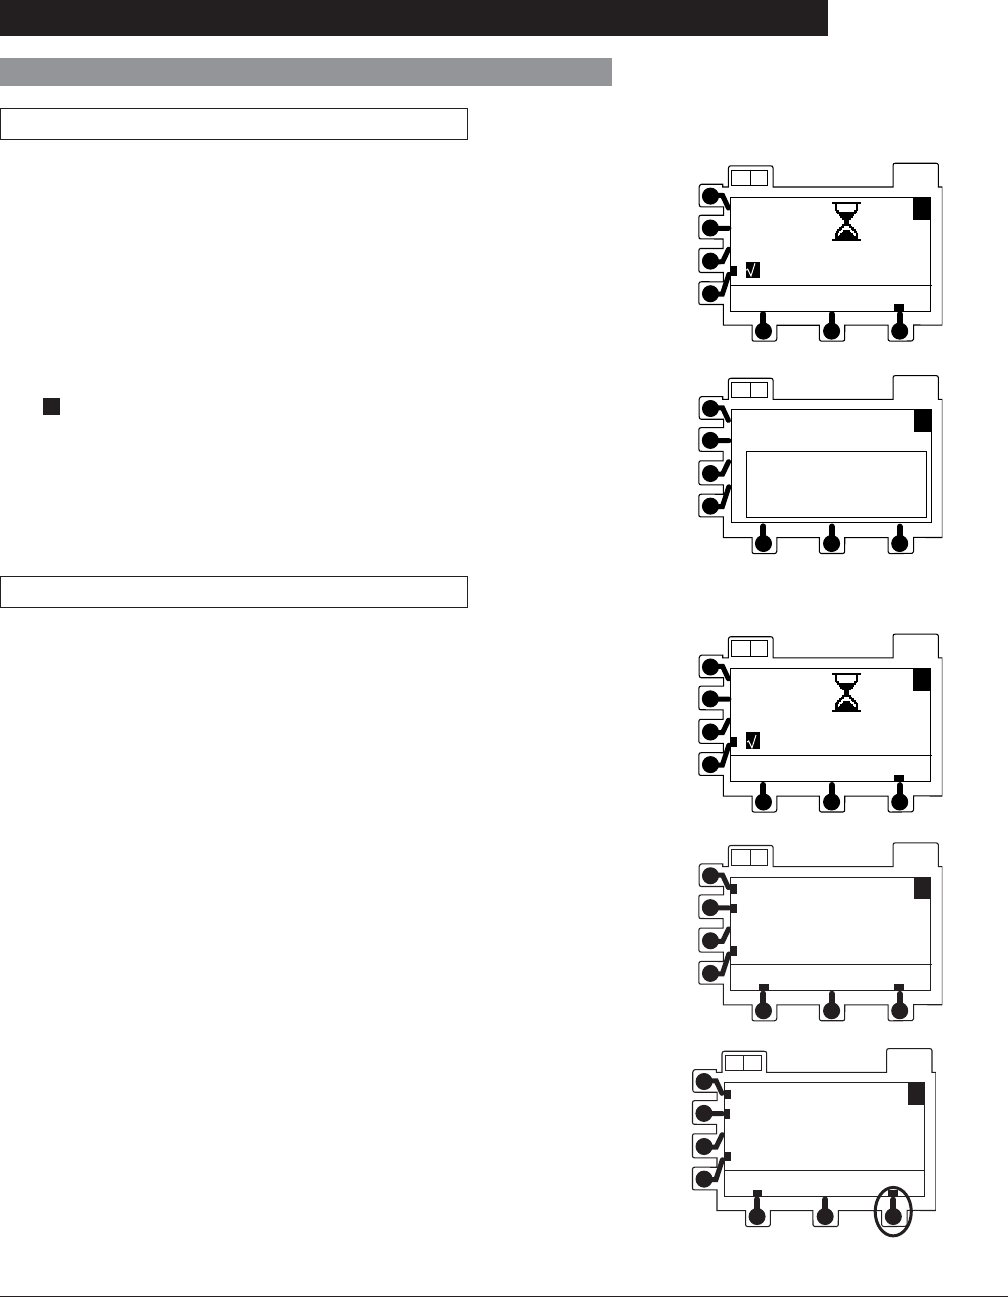
Directions for Use
Alaris® SE Pump
Models 7130/7131, 7230/7231
67
Programming
OPTIONS
AB
A
stop timer
3h
12 min
Until First Dose
Multi-Dose (Continued)
OPTIONS
AB
A
Rate=250.0 mL/h
VTBI=100.0 mL
100.0mL @250.0mL/h
Q6
h x 4 VI=100.0
Adult ICU
Changing Time Interval Until Next Dose
1. Press stop timer soft key.
2. To select a value for editing, press a soft key.
OPTIONS
AB
A
stop timer
3h
12 min
Until Dose 2 of 4
OPTIONS
A B
A
menu
start timer
3 h
12 min
Until Dose 2 of 4
VI= 100.0 mL
Programming (Continued)
Delaying Start of First Dose (Continued)
• Hourglass icon flashes to indicate timer is counting
down to start of dose.
• Dose automatically starts its infusion when timer
reaches 0 hours, 0 minutes.
4. To briefly view Multi-Dose programmed information, press
4 soft key.
OPTIONS
A B
A
menu
start timer
2 h
12 min
Until Dose 2 of 4
VI= 100.0 mL
3. To enter new value, use numeric keypad. Press ENTER
key.
4. When editing is complete, press start timer soft key.
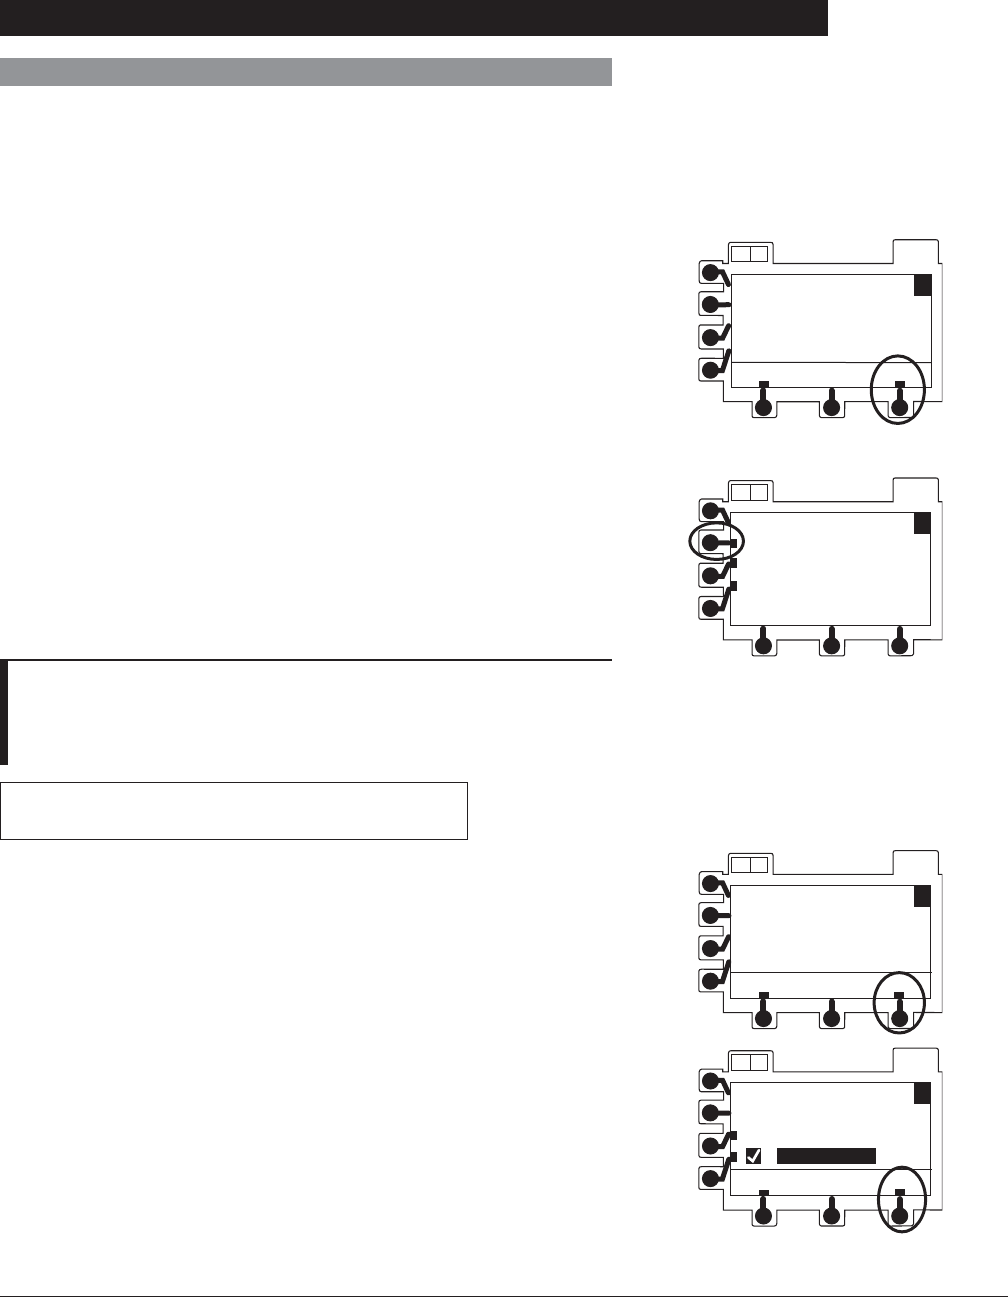
Directions for Use
Alaris® SE Pump
Models 7130/7131, 7230/7231
68 Programming
OPTIONS
A B
A
Return To
Multi-Dose?
no yes
Multi-Dose (Continued)
Resuming an Interrupted Multi-Dose
1. Select desired channel, as necessary.
2. Select New Patient and Profile Options, as necessary. À
• Return To Multi-Dose? page appears.
3. Press yes soft key.
OPTIONS
A B
A
MULTI-DOSE MENU
Review/Resume
Enter New Program
Quit Program
If Infusion Was in Progress When
Interrupted
1. To approve and advance to main hold page, press ok soft
key.
OPTIONS
A B
A
menu
ok
Rate=250.0 mL/h
VTBI/Dose=100.0 mL
Frequency= 6 h
DOSE 1 INCOMPLETE
OPTIONS
A B
A
menu
run
Rate=250.0 mL/h
VTBI=80.0 mL
VI= 20.0 mL
DOSE 1 of 4
2. To resume infusion, press RUN/HOLD key or run soft key.
• Pressing no soft key returns screen to primary setup
page.
4. To access setup parameters, press Review/Resume soft
key.
• If infusion was in progress when interrupted, see "If
Infusion Was In Progress When Interrupted”.
• If infusion was not in progress when interrupted, see “If
Infusion Was Not In Progress When Interrupted”.
NOTE:
À Previous programming parameters will be preserved only
if current profile is accepted and NEW PATIENT?-NO is
selected.
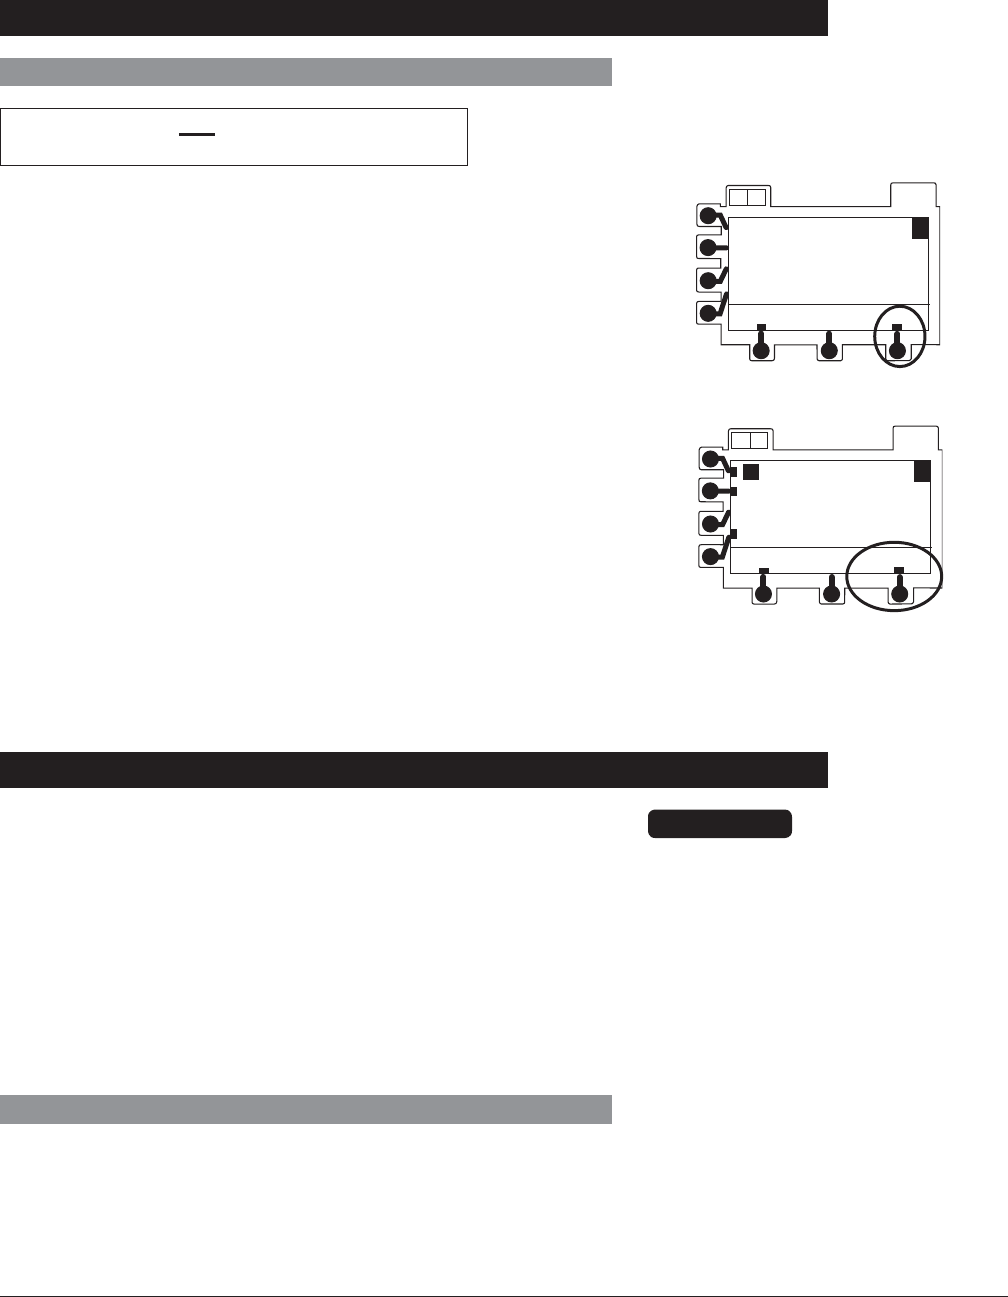
Directions for Use
Alaris® SE Pump
Models 7130/7131, 7230/7231
69
Programming
Multi-Dose (Continued)
Resuming an Interrupted Multi-Dose (Continued)
If Infusion Was Not in Progress When
Interrupted
1. Press ok soft key. OPTIONS
A B
A
menu
ok
Rate=250.0 mL/h
VTBI/Dose=100.0 mL
Frequency= 6 h
DOSE 1 COMPLETE
OPTIONS
A B
A
menu
start timer
2 h
4 min
Until Dose 2 of 4
VI= 100.0 mL
2. Edit time to delivery of next dose, as necessary.
3. To begin timer’s countdown to delivery of next dose, press
start timer soft key.
Multi-Step
The Multi-Step feature allows a sequential drug delivery
program (up to 9 steps) to be set, delivering volumes of fluid
at different rates during each step. This allows the instrument
parameters to be set up once and to deliver a sequence
eliminating the need to change the rate and VTBI after each
infusion step.
The infusion may be programmed in either rate and volume or
volume and time. At completion of the last programmed step,
the channel switches to the preset KVO rate or remains at the
current rate, whichever is less.
CAUTION
Guardrails® drug dosing limits
are available only within the
New Guardrails Drug or New
Guardrails IV Fluid option. Dosing
limits do not apply when using
Multi-Step programming. Profile
configurable options, as defined in
the Data Set, do apply.
Programming
1. Select desired channel, as necessary. Channel must be
on hold in primary mode.
2. Press OPTIONS key.
4. When final dose is complete:
• Dose _ of _ Complete displays until user takes
action.
• No Continuous Infusion or KVO Rate occurs.
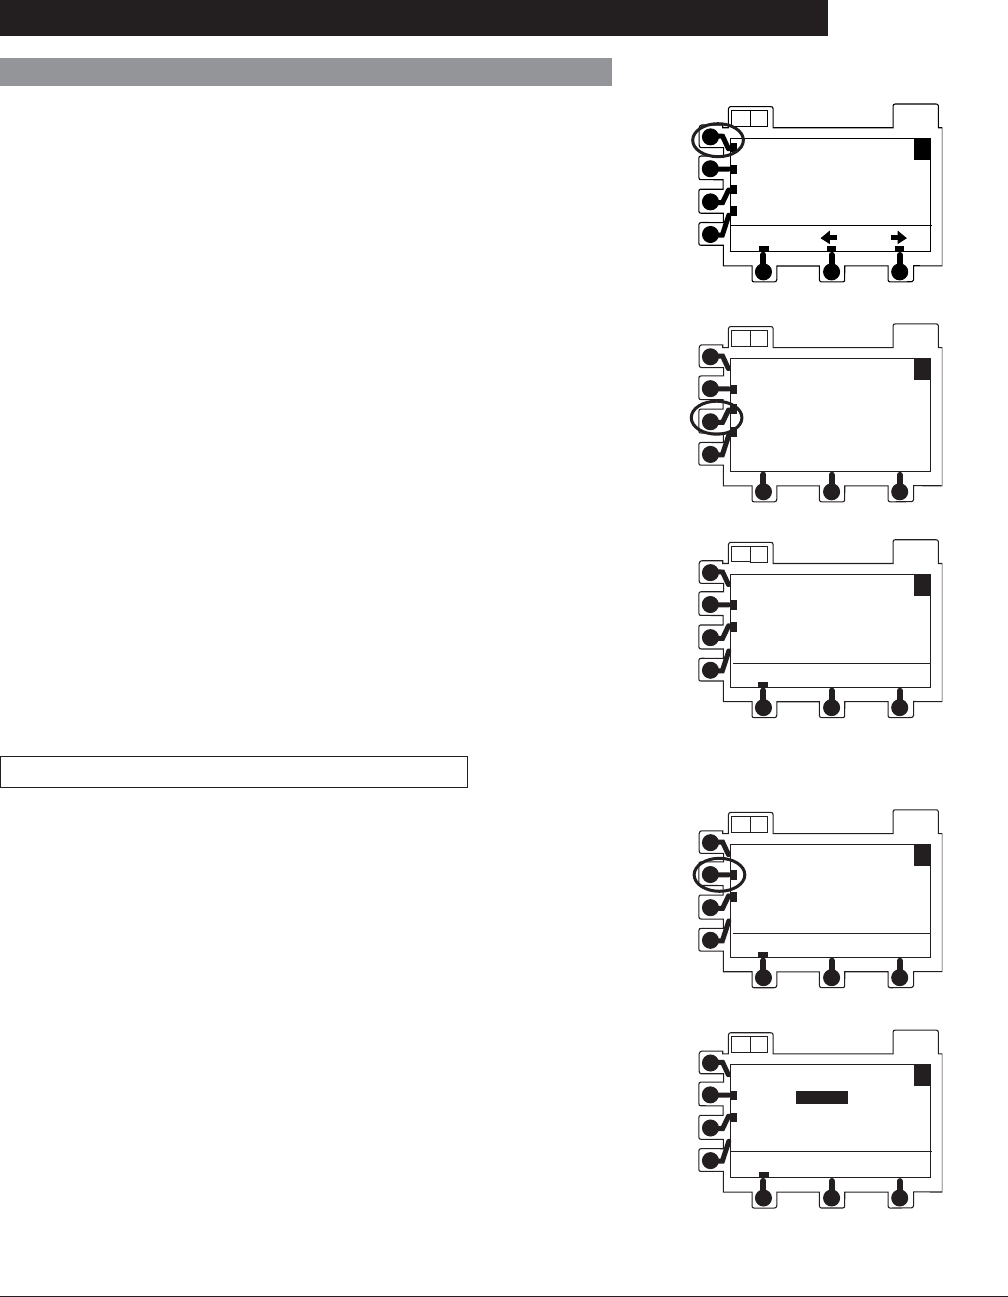
Directions for Use
Alaris® SE Pump
Models 7130/7131, 7230/7231
70 Programming
Multi-Step (Continued)
3. Press Multi-Step soft key.
OPTIONS
A B
A
menu
PROGRAMMING OPTIONS
Rate and Volume
Volume and Time
4. Press Enter New Program soft key.
OPTIONS
AB
A
Multi-Step
Multi-Dose
View Curr. Settings
return page
LoadingDose
OPTIONS
A B
A
MULTI-STEP MENU
Review/Resume
Enter New Program
Quit Program
Programming by Rate and Volume
1. Press Rate and Volume soft key.
• Step 1 of infusion sequence displays.
OPTIONS
A B
A
menu
PROGRAMMING OPTIONS
Rate and Volume
Volume and Time
OPTIONS
A B
A
menu
STEP 1
Rate= -------- mL/h
VTBI= ----- mL
Time= -- h -- min
Programming (Continued)
5. Determine setup method:
• Rate and Volume: Instrument calculates step
infusion time. Proceed to "Programming by Rate and
Volume".
• Volume and Time: Instrument calculates rate.
"Proceed to Programming by Volume and Time".
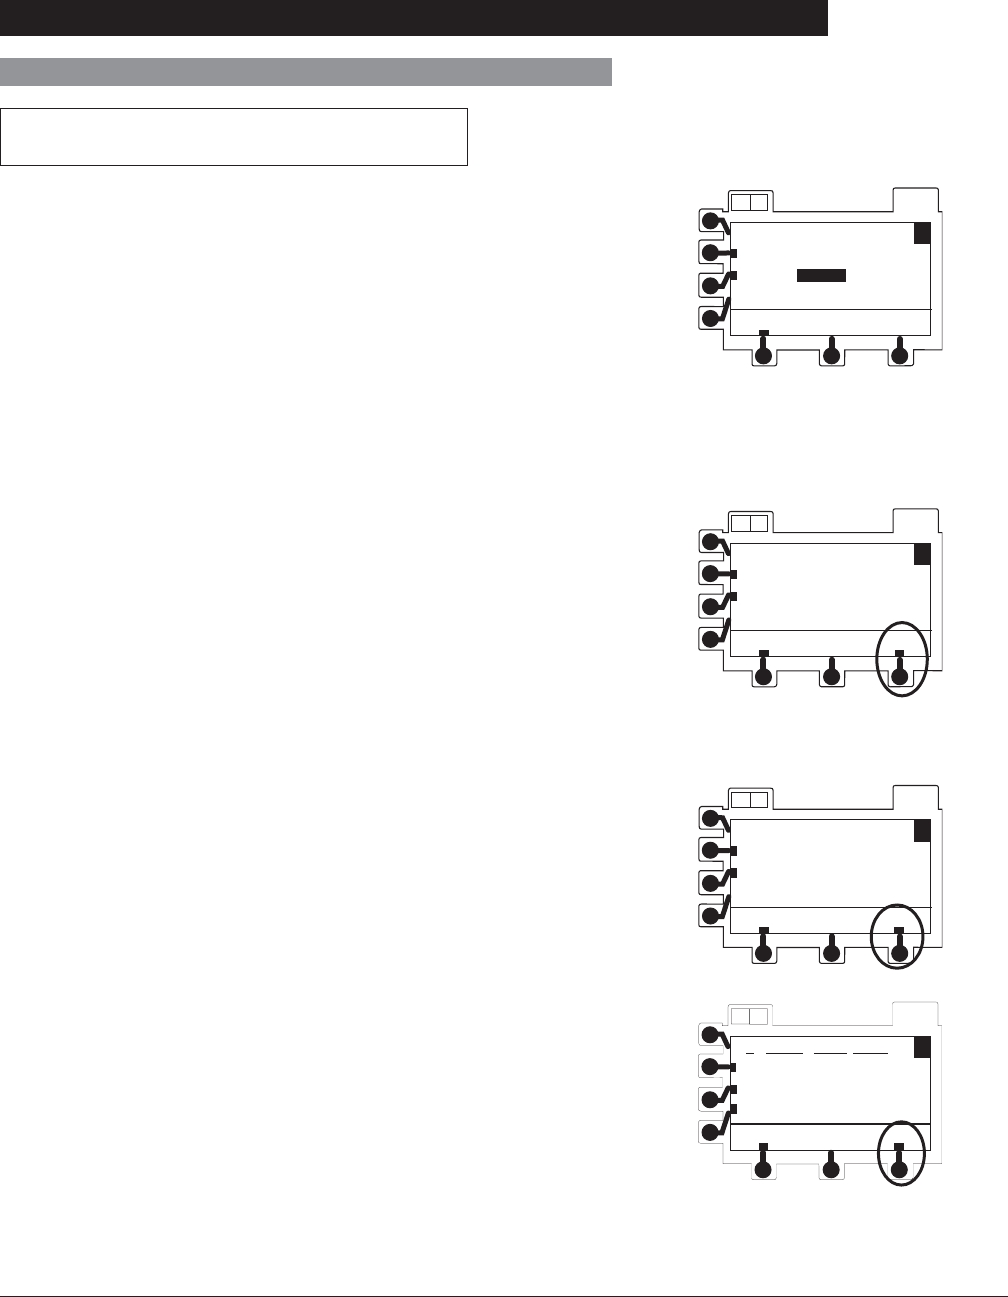
Directions for Use
Alaris® SE Pump
Models 7130/7131, 7230/7231
71
Programming
Multi-Step (Continued)
Programming (Continued)
3. To enter VTBI, use numeric keypad. Press ENTER key.
• Time in hours and minutes is automatically calculated
and displayed.
4. To approve all displayed information and advance to step
2 of infusion sequence, press ok soft key.
2. To enter a rate, use numeric keypad. Press ENTER key.
5. To set up each additional step of infusion sequence,
repeat steps 2 through 4.
6. When all steps have been entered and accepted, press
done soft key.
• Review page(s) display 3 sequence steps at a time.
OPTIONS
A B
A
menu
STEP 1
Rate= 25.0 mL/h
VTBI= ----- mL
Time= -- h -- min
OPTIONS
A B
A
menu
ok
STEP 1
Rate= 25.0 mL/h
VTBI= 5.0 mL
Time= 0 h 12 min
OPTIONS
A B
A
menu
STEP 4
Rate= ----- mL/h
VTBI= ----- mL
Time= -- h -- min
done
Programming by Rate and Volume
(Continued)
OPTIONS
AB
A
# RATE VTBI TIME
1 25.0 5.0 0h12m
2 50.0 25.0 0h30m
3 100.0 100.0 1h 0m
okmenu
7. To approve and advance through review page(s), press ok
soft key.
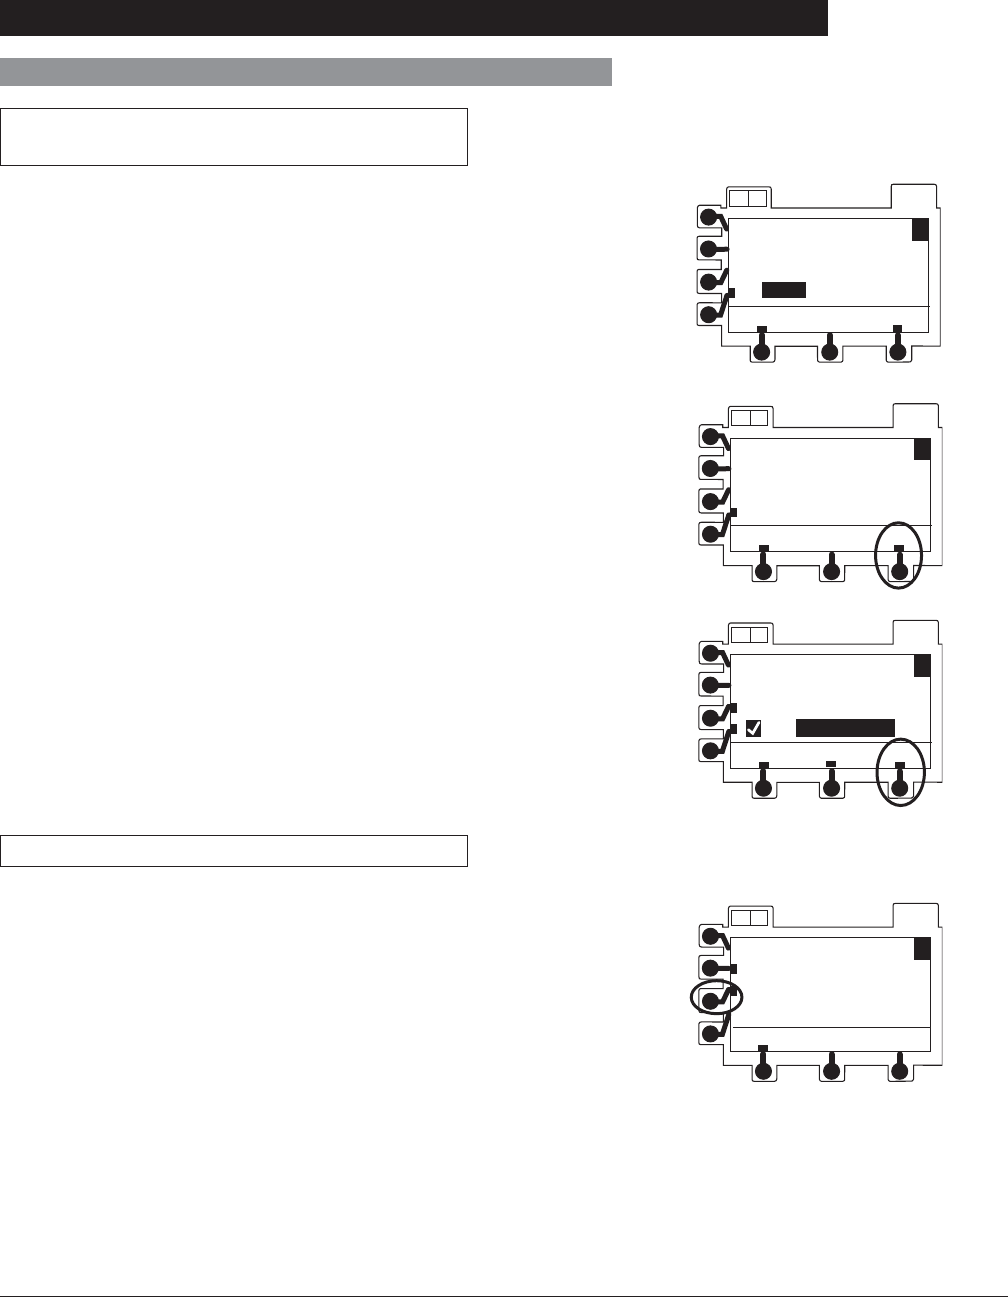
Directions for Use
Alaris® SE Pump
Models 7130/7131, 7230/7231
72 Programming
Multi-Step (Continued)
Programming (Continued)
Programming by Rate and Volume
(Continued)
OPTIONS
A B
A
menu
STEP TOTALS (3)
VTBI= 130.0 mL
Time= 1 h 42 min
VI 25.0 mL
ok
8. To clear VI, if desired, press CLEAR or 0 (zero) key.
Press ENTER key.
OPTIONS
A B
A
menu
STEP TOTALS (3)
VTBI= 130.0 mL
Time= 1 h 42 min
VI 0.0 mL
ok
9. To accept STEP TOTALS page, press ok soft key.
10. To start Multi-Step infusion program, press run soft key or
RUN/HOLD key.
OPTIONS
A B
A
menu
runsetup
STEP 1 of 3
Rate= 25.0 mL/h
VTBI= 5.0 mL
VI= 0.0 mL
Programming by Volume and Time
1. Press Volume and Time soft key OPTIONS
A B
A
menu
PROGRAMMING OPTIONS
Rate and Volume
Volume and Time
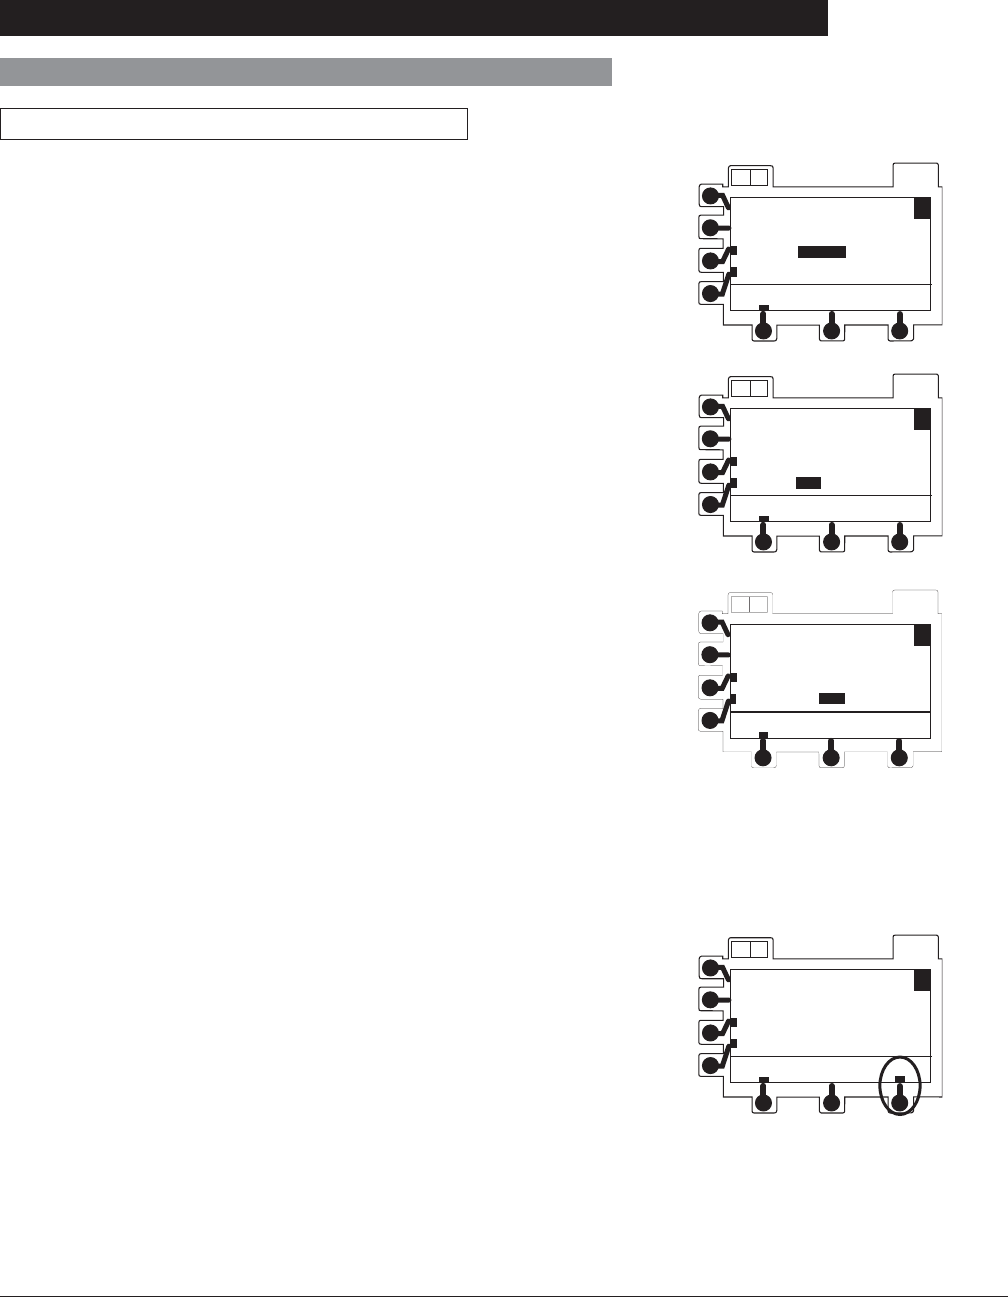
Directions for Use
Alaris® SE Pump
Models 7130/7131, 7230/7231
73
Programming
Multi-Step (Continued)
Programming (Continued)
OPTIONS
A B
A
menu
STEP 1
Rate= ----- mL/h
VTBI= ----- mL
Time= -- h -- min
• Step 1 of infusion profile displays.
• VTBI is highlighted.
2. To enter VTBI, use numeric keypad. Press ENTER key.
• Time (hours) is highlighted.
3. To enter hours, use numeric keypad. Press ENTER key.
• Time (minutes) is highlighted.
OPTIONS
A B
A
menu
STEP 1
Rate= ----- mL/h
VTBI= 5.0 mL
Time= -- h -- min
OPTIONS
AB
A
menu
STEP 1
Rate= ----- mL/h
VTBI= 5.0 mL
Time= 0 h -- min
Programming by Volume and Time
4. To enter minutes (0-59), if desired, use numeric keypad.
Press ENTER key.
• Volumetric rate is automatically calculated and
displayed.
5. To approve all displayed information and advance to STEP
2 of infusion profile, press ok soft key.
OPTIONS
A B
A
menu
ok
STEP 1
Rate= 25.0 mL/h
VTBI= 5.0 mL
Time= 0 h 12 min
6. To set up each additional step of infusion profile, repeat
steps 1 through 4.
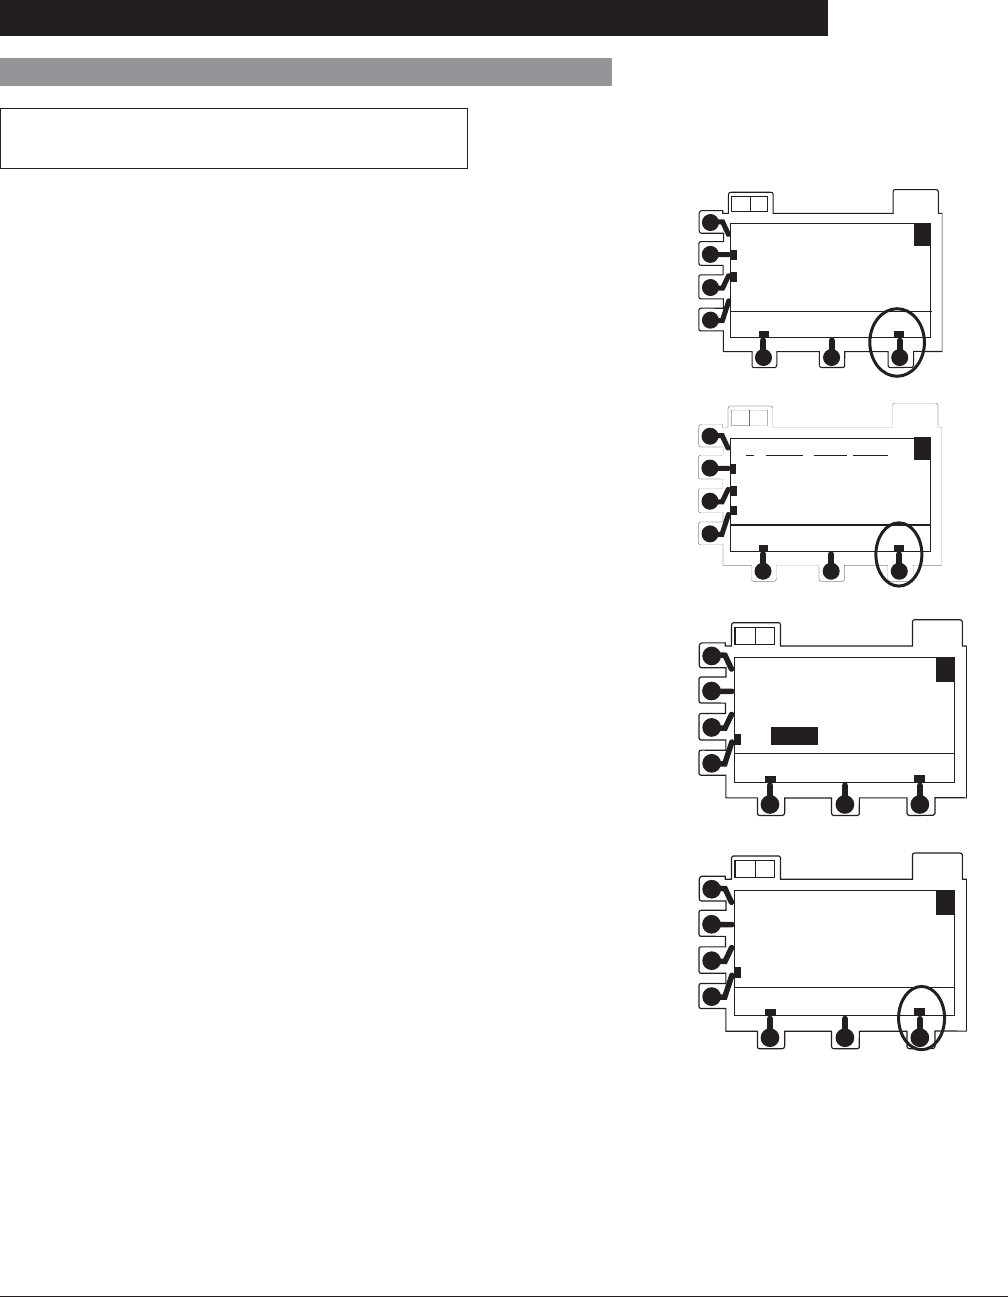
Directions for Use
Alaris® SE Pump
Models 7130/7131, 7230/7231
74 Programming
Multi-Step (Continued)
Programming (Continued)
7. When all steps have been entered and accepted, press
done soft key.
• Review page(s) display 3 profile steps at a time.
8. To approve and advance through review page(s), press ok
soft key.
OPTIONS
A B
A
menu
STEP 4
Rate= ----- mL/h
VTBI= ----- mL
Time= -- h -- min
done
Programming by Volume and Time
(Continued)
OPTIONS
AB
A
# RATE VTBI TIME
1 25.0 5.0 0h12m
2 50.0 25.0 0h30m
3 100.0 100.0 1h 0m
okmenu
9. To clear VI, if desired, press CLEAR or 0 (zero) key.
Press ENTER key.
10. To approve STEP TOTALS page, press ok soft key.
OPTIONS
A B
A
menu
STEP TOTALS (3)
VTBI= 130.0 mL
Time= 1 h 42 min
VI 25.0 mL
ok
OPTIONS
A B
A
menu
STEP TOTALS (3)
VTBI= 130.0 mL
Time= 1 h 42 min
VI 0.0 mL
ok
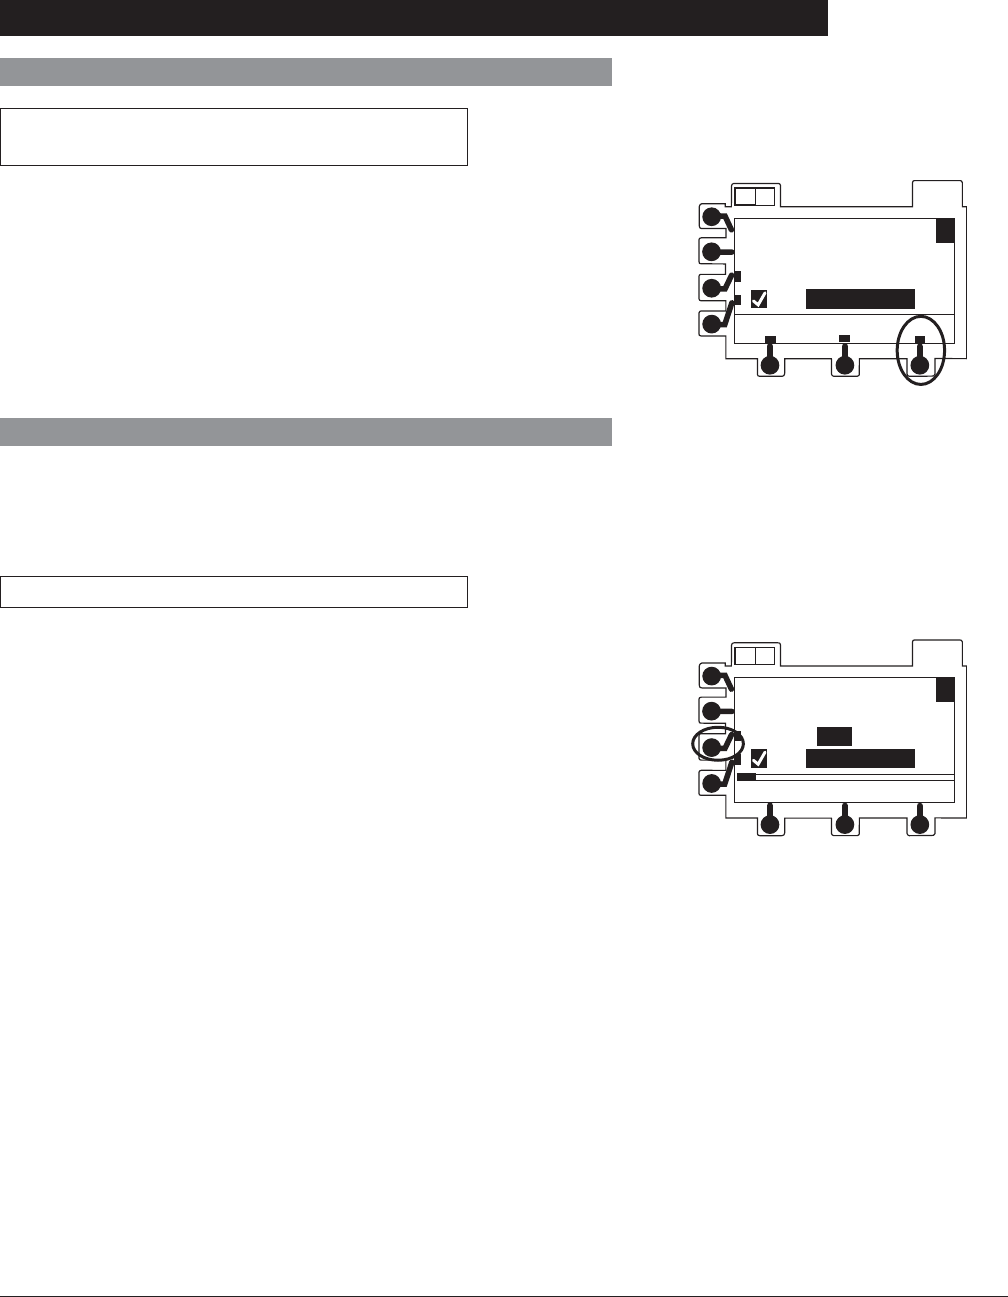
Directions for Use
Alaris® SE Pump
Models 7130/7131, 7230/7231
75
Programming
Multi-Step (Continued)
Programming (Continued)
Programming by Volume and Time
(Continued)
11. To start Multi-Step infusion program, press RUN/HOLD
key or run soft key.
OPTIONS
A B
A
menu
run
setup
STEP 1 of 3
Rate= 25.0 mL/h
VTBI= 5.0 mL
VI= 0.0 mL
Making Changes During Multi-Step
Select the desired channel, as necessary. The channel does
not need to be on hold to clear the VI or to view the totals
remaining.
Clearing Volume Infused
1. Press VI soft key. OPTIONS
A B
A
STEP 1 of 3
10% Resistance
Rate= 25.0 mL/h
VTBI= 4.0 mL
VI= 1.0 mL
2. Press CLEAR or 0 (zero) key.
3. Press ENTER key.
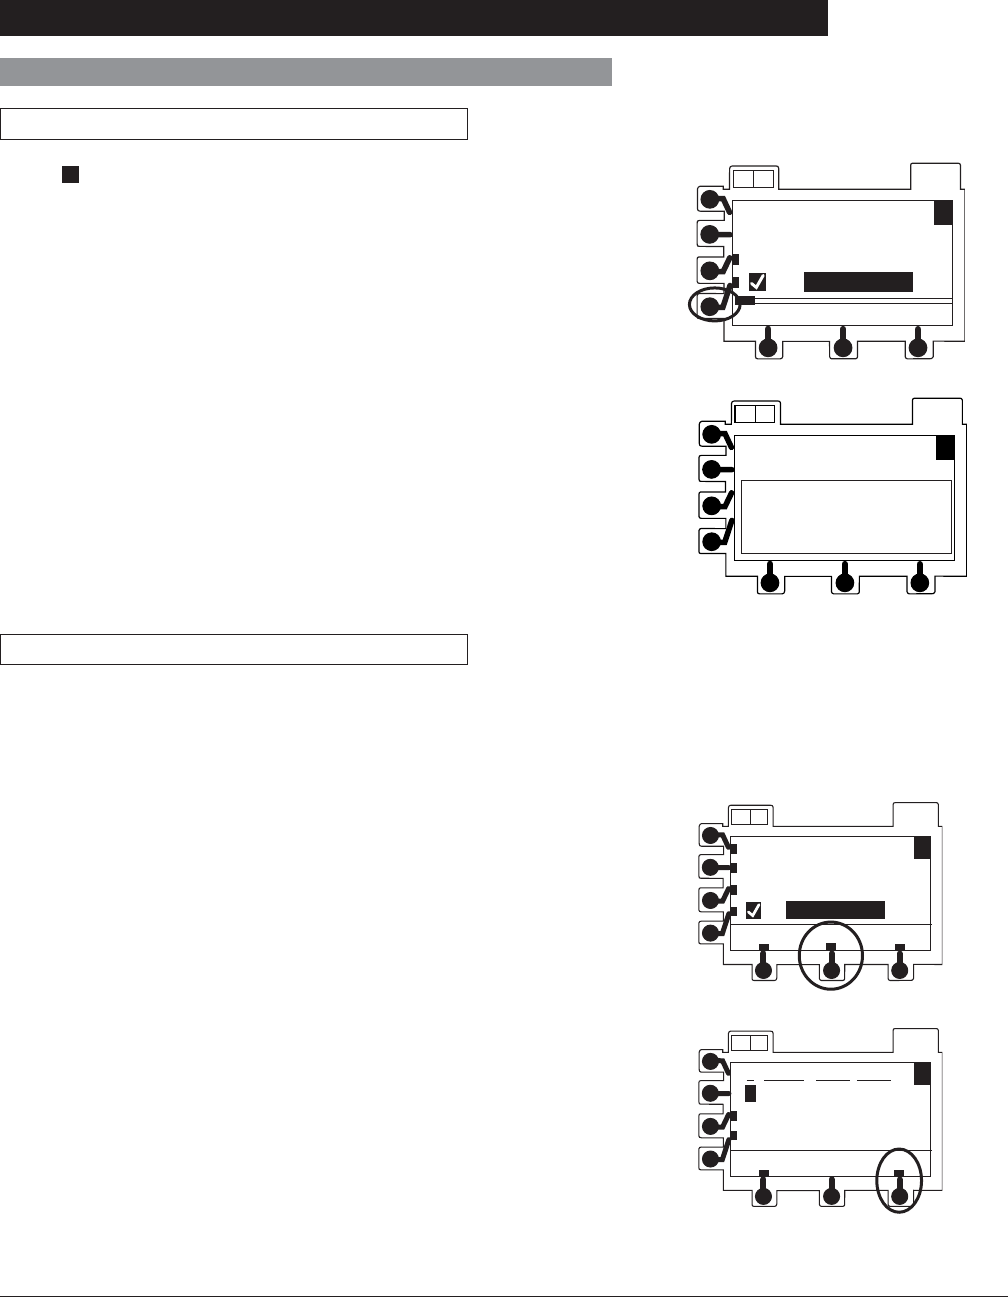
Directions for Use
Alaris® SE Pump
Models 7130/7131, 7230/7231
76 Programming
Multi-Step (Continued)
Viewing Totals Remaining
Press 4 soft key. OPTIONS
A B
A
STEP 2 of 3
10% Resistance
Rate= 50.0 mL/h
VTBI= 25.0 mL
VI= 5.0 mL
OPTIONS
AB
A
Rate= 50.0 mL/h
VTBI= 25.0 mL
Totals Remaining
VTBI= 125.0 mL
Time= 1 h 30 min
Adult ICU
• Time and VTBI remaining in Multi-Step program display for
a short interval.
Viewing or Editing
The channel must be on hold to view or edit the steps in the
program.
1. To place channel on hold, press RUN/HOLD key.
2. To return to review page(s), press setup soft key.
• A tick mark (y) next to a step on review page(s)
indicates it has not started.
• Only steps having a (y) can be edited.
• Completed steps, or a step in progress, do not have
a (y).
• A step number in progress is highlighted.
3. To advance through review page(s) of program, press ok
soft key.
OPTIONS
A B
A
menu
runsetup
STEP 1 of 3
Rate= 25.0 mL/h
VTBI= 4.0 mL
VI= 1.0 mL
# RATE VTBI TIME
1 25.0 5.0 0h12m
2 50.0 25.0 0h30m
3 100.0 100.0 1h 0m
OPTIONS
A B
A
menu
ok
Making Changes During Multi-Step (Continued)
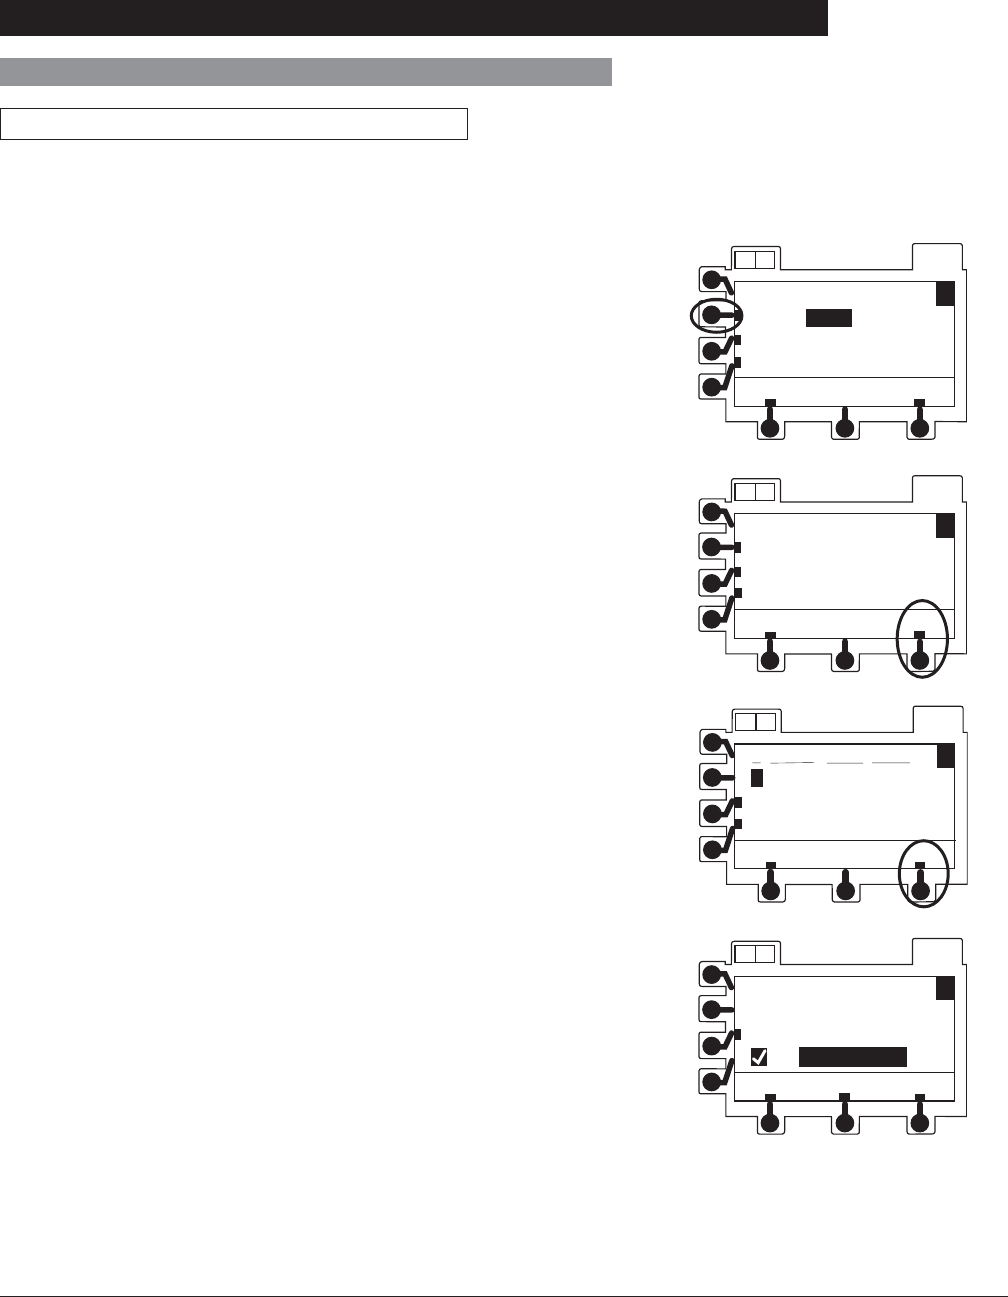
Directions for Use
Alaris® SE Pump
Models 7130/7131, 7230/7231
77
Programming
Multi-Step (Continued)
Making Changes During Multi-Step (Continued)
4. To select a step for editing, press a soft key.
5. To select value for editing, press a soft key.
6. To enter new value, use numeric keypad. Press ENTER
key.
7. To return to review page(s) when programming is
complete, press ok soft key.
Viewing or Editing (Continued)
8. To approve review page(s) and STEP TOTALS page,
press ok soft key.
OPTIONS
A B
A
menu
ok
STEP 2
Rate= 50.0 mL/h
VTBI= 25.0 mL
Time= 0 h 30 min
9. To resume infusion, press RUN/HOLD key or run soft key.
OPTIONS
A B
A
menu
ok
STEP 2
Rate= 25.0 mL/h
VTBI= 25.0 mL
Time= 1 h 00 min
# RATE VTBI TIME
1 25.0 5.0 0h12m
2 25.0 25.0 1h00m
3 100.0 100.0 1h 0m
OPTIONS
A B
A
menu
ok
OPTIONS
A B
A
menu
run
setup
STEP 1 of 3
Rate= 25.0 mL/h
VTBI= 4.0 mL
VI= 1.0 mL
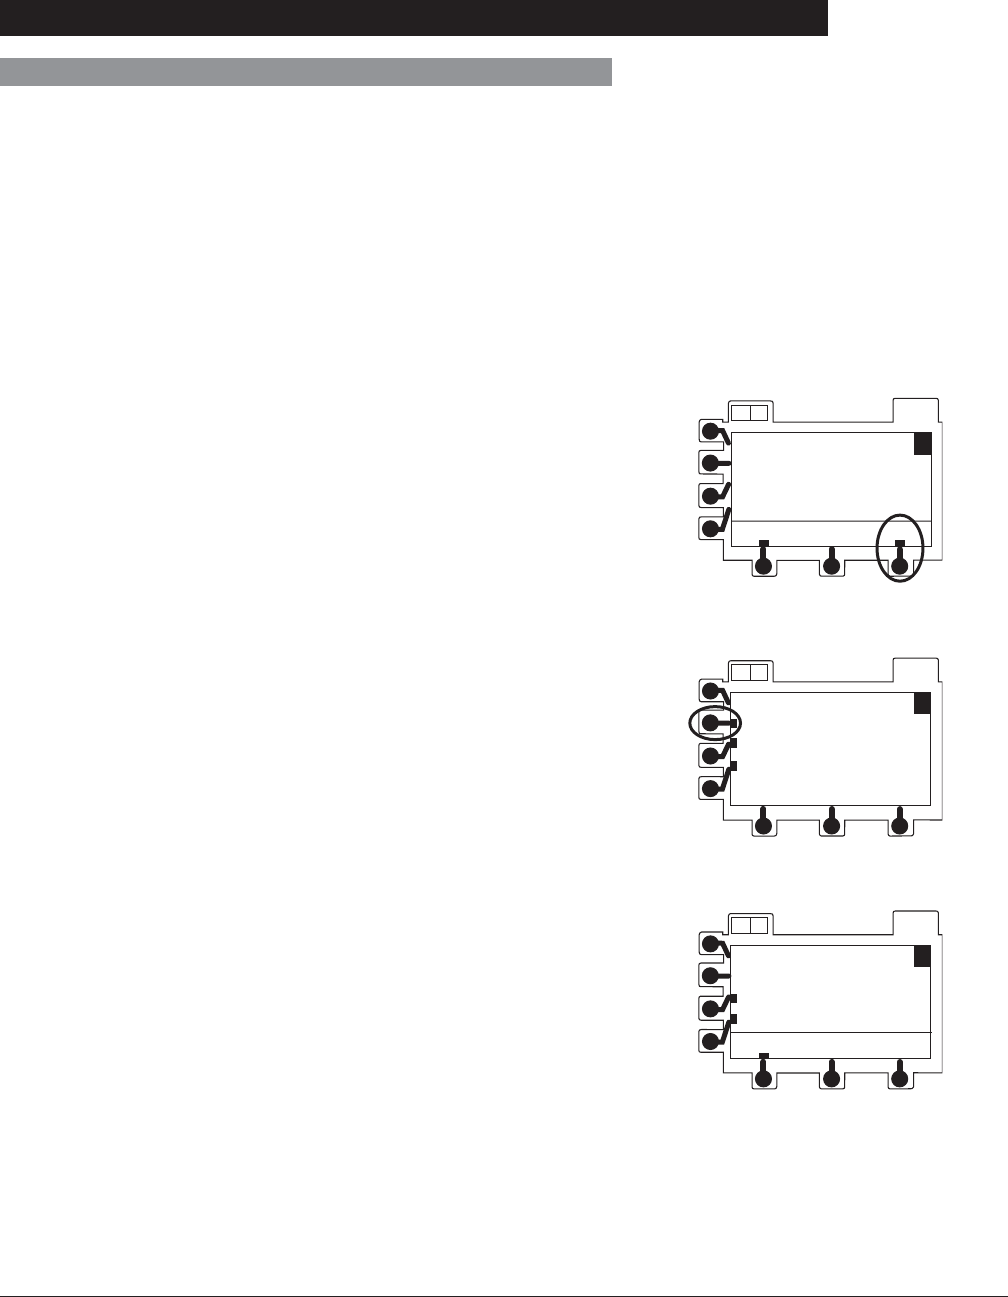
Directions for Use
Alaris® SE Pump
Models 7130/7131, 7230/7231
78 Programming
Multi-Step (Continued)
3. Press yes soft key.
• Pressing no soft key returns screen to primary setup
page.
4. Press Review/Resume soft key.
Resuming an Interrupted Multi-Step
The channel retains its place in the program if the instrument
is turned off. The program can be restarted from step 1 or
resumed where it left off.
1. Select desired channel, as necessary.
2. Select New Patient and Profile Options, as necessary. À
• Return To Multi-Step? page appears.Á
OPTIONS
A B
A
Return To
Multi-Step?
no yes
OPTIONS
A B
A
MULTI-STEP MENU
Review/Resume
Enter New Program
Quit Program
5. To resume program from point of interruption, press
Continue Program soft key.
OR
To restart program at beginning of step 1, press Restart
Program soft key.
6 Verify all settings are correct. If a change is required, see
“Making Changes During Multi-Step”.
OPTIONS
A B
A
menu
STEP 1 of 3
In Progess
Continue Program
Restart Program
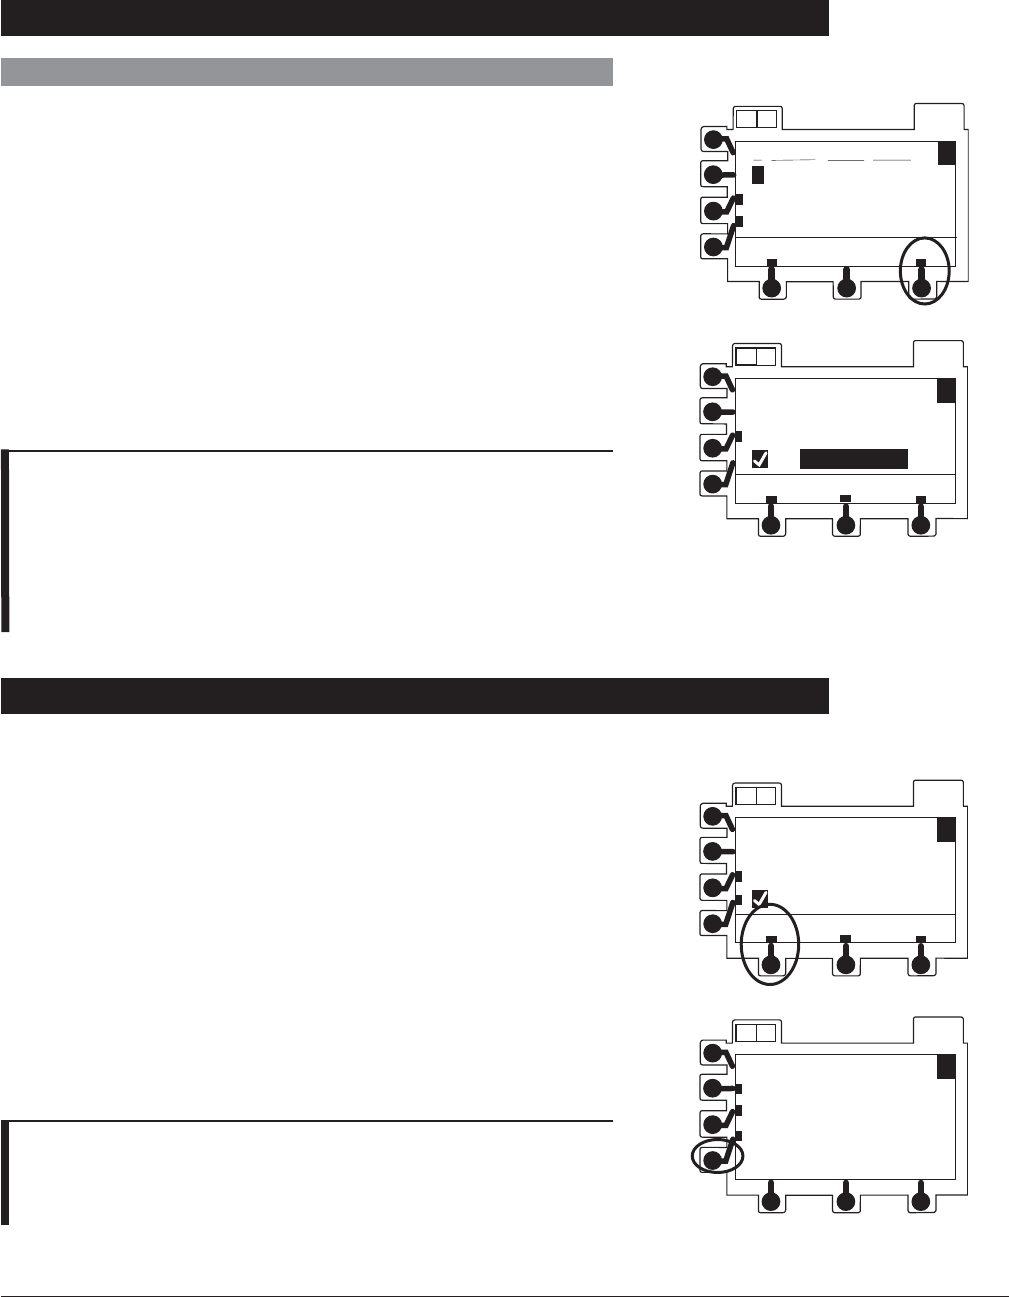
Directions for Use
Alaris® SE Pump
Models 7130/7131, 7230/7231
79
Programming
Multi-Step (Continued)
7. To approve review page(s) and STEP TOTALS page,
press ok soft key.
Resuming an Interrupted Multi-Step (Continued)
NOTES:
À Previous programming parameters will be preserved only
if current profile is accepted and NEW PATIENT?-NO is
selected.
Á If resuming an infusion on a dual channel instrument with an
infusion currently running, display goes directly to Return To
Multi-Step? during startup.
OPTIONS
A B
A
menu
run
setup
STEP 1 of 3
Rate= 25.0 mL/h
VTBI= 4.0 mL
VI= 1.0 mL
# RATE VTBI TIME
1 25.0 5.0 0h12m
2 25.0 25.0 1h00m
3 100.0 100.0 1h 0m
OPTIONS
A B
A
menu
ok
Quitting Multi-Dose and Multi-Step
The channel must be on hold or the last dose complete.
1. Press menu soft key. OPTIONS
A B
A
menu
run
setup
STEP 1 of 3
Rate= 25.0 mL/h
VTBI= 4.0 mL
VI= 1.0 mL
NOTE:
À Primary setup page parameters may be different from those of
the Multi-Dose or Multi-Step program. Verify all settings prior
to resuming an infusion.
2. To return to primary setup page, press Quit Program soft
key. À
OPTIONS
A B
A
MULTI-STEP MENU
Review/Resume
Enter New Program
Quit Program
8. To continue or restart program, press RUN/HOLD key or
run soft key.

Directions for Use
Alaris® SE Pump
Models 7130/7131, 7230/7231
80 Programming
Secondary Infusion - NO Guardrails® Suite MX Protection
Introduction
Basic Secondary Infusion- Profiles Feature Enabled (On)
Primary infusion must be on hold to program secondary
infusion.
Secondary mode must be set to ON in the instrument system
configuration settings. If secondary mode is OFF an invalid
keypress tone sounds and "Secondary Not Allowed" displays
when the SEC key is pressed.
1. Press SEC key
• Secondary Menu displays
2. Press Basic SEC soft key
• Basic secondary programming page displays.
• VTBI field is highlighted.
3. To enter desired VTBI, use numeric keys then press
ENTER key.
• VI field is highlighted.
4. If there is a VI value that needs to be cleared, press
CLEAR key or press 0 (zero) key then press ENTER key.
• Time is highlighted.
5. To enter a value, use numeric data entry keys to enter
hours (0-99), then minutes (0-59). Press the ENTER key
to accept each entry.
• Time can be entered to calculate rate or if rate entry
is desired, press rate - time soft key. It changes to
rate - time, indicating that rate may be entered.
6. To continue programming press ok soft key.
• A Secondary Clamp reminder message displays.
See “Secondary Infusion With Guardrails® Suite MX
Protection, Introduction and Setup".

Directions for Use
Alaris® SE Pump
Models 7130/7131, 7230/7231
81
Programming
Secondary Infusion - NO Guardrails® Suite MX Protection (Continued)
Basic Secondary Infusion- Profiles Feature Enabled (On)
(Continued)
AB OPTIONS
IS SECONDARY CLAMP
OPEN?
yes
Basic Secondary Infusion- Profiles Feature
Not Enabled (Off)
1. Press SEC key
• Secondary setup page displays.
• Secondary rate is highlighted.
2. If current secondary infusion rate is appropriate, press
ENTER key.
OR
To enter a new rate, use numeric keypad then press
ENTER key.
• Maximum rate for secondary infusion is 600 mL/h.
• Secondary VTBI is highlighted.
3. If Secondary VTBI is appropriate, press ENTER key.
OR
To enter a new VTBI, use numeric keypad then press
ENTER key.
7. Verify that secondary clamp is open before proceeding,
then press yes soft key.
• Basic secondary RUN/HOLD page displays.
8. Verify that all parameters are correct and press run soft
key or RUN/HOLD key to start infusion.
9. To briefly view primary parameters (Pri rate, Pri VTBI) and
current profile from RUN/HOLD page or during a running
infusion, press 4 soft key.
10. When secondary infusion is complete:
• An audio tone sounds (if enabled).
• Channel _ Secondary Complete briefly displays.
• Infusion automatically transitions to primary rate.

Directions for Use
Alaris® SE Pump
Models 7130/7131, 7230/7231
82 Programming
Secondary Infusion - NO Guardrails® Suite MX Protection (Continued)
Basic Secondary Infusion- Profiles Feature
Not Enabled (Off) (Continued)
4. To start secondary infusion, press RUN/HOLD key.
• Secondary clamp reminder message displays.
5. Verify that secondary clamp is open before proceeding,
then press yes soft key.
6. To briefly view primary settings during secondary infusion
press Primary Settings soft key.
• Primary rate (PriRate), primary volume to be infused
(PriVTBI) and total volume infused (ToalVI) are
displayed.
• Display returns to normal secondary page after 6
seconds.
7. To change Primary settings, press soft key for Pri Rate,
Pri VTBI or Total VI to freeze display and highlight
desired value, then edit as usual (see "Primary Infusion
- With Guardrails® Suite MX Protection", "Making Changes
During Continuous Infusion").
8. When secondary infusion is complete:
• An audio tone sounds (if enabled).
• Channel _ Secondary Complete briefly displays.
• Infusion automatically transitions to primary rate.

Directions for Use
Alaris® SE Pump
Models 7130/7131, 7230/7231
83
Dynamic Monitoring System
Dynamic Monitoring System
Monitoring Options - General
All features and options in this section are shown enabled.
Options are enabled through the hospital Data Set profile
configuration settings, or through the instrument configuration
settings if the Profiles feature is not enabled (OFF).
The Dynamic Monitoring System provides the ability to monitor
downstream pressure or resistance, allowing rapid detection of
full and partial occlusions. Resistance monitoring eliminates
the impact of patient elevation and flow rate to provide the
most direct assessment of patency. Components of this
system are:
• Monitoring Options: to select IV line/site monitoring
modes of resistance, high resistance, and adjustable or
fixed pressure.
• Auto Restart Plus Feature: allows instrument to
automatically resume operation when specific instrument
operating conditions are met.
• Adjustable Resistance Alert: to provide an early
warning of increases in downstream flow resistance.
• Adjustable Pressure Alarm: to provide an early warning
of increases in downstream pressure.
• Trend Graph: to display downstream pressure or flow
resistance over time.
• Pressure Baseline: to provide a starting point from which
to measure changes in system pressure.
IV lines, catheters, and applications create various levels of
resistance to flow. Monitoring mode options are available to
meet each clinical need.
• Resistance: designed to monitor IV line/site resistance
providing optimum sensitivity for most IV applications.
• High Resistance: designed to monitor IV line/site
resistance with optimum sensitivity where higher resistance
catheters are used.
OPTIONS
AB
Rate= 125.0 mL/h
VTBI=1000.0 mL
VI= 0.0 mL
Primary
50% Resistance
A
Resistance Monitoring
WARNINGS
• The SE Pump is designed to
stop fluid flow under alarm
conditions. Periodic patient
monitoring must be performed to
ensure the infusion is proceeding
as expected. It is a positive
displacement delivery system,
capable of developing positive
fluid pressures to overcome
widely varying resistances to
flow encountered in practice,
including resistances to flow
imposed by small gauge
catheters, filters and intra-arterial
infusion. It is neither designed
nor intended to detect infiltrations
and will not alarm under
infiltration conditions.
• Before each use, verify the
pressure or resistance alarm
limits are appropriate for the
patient.
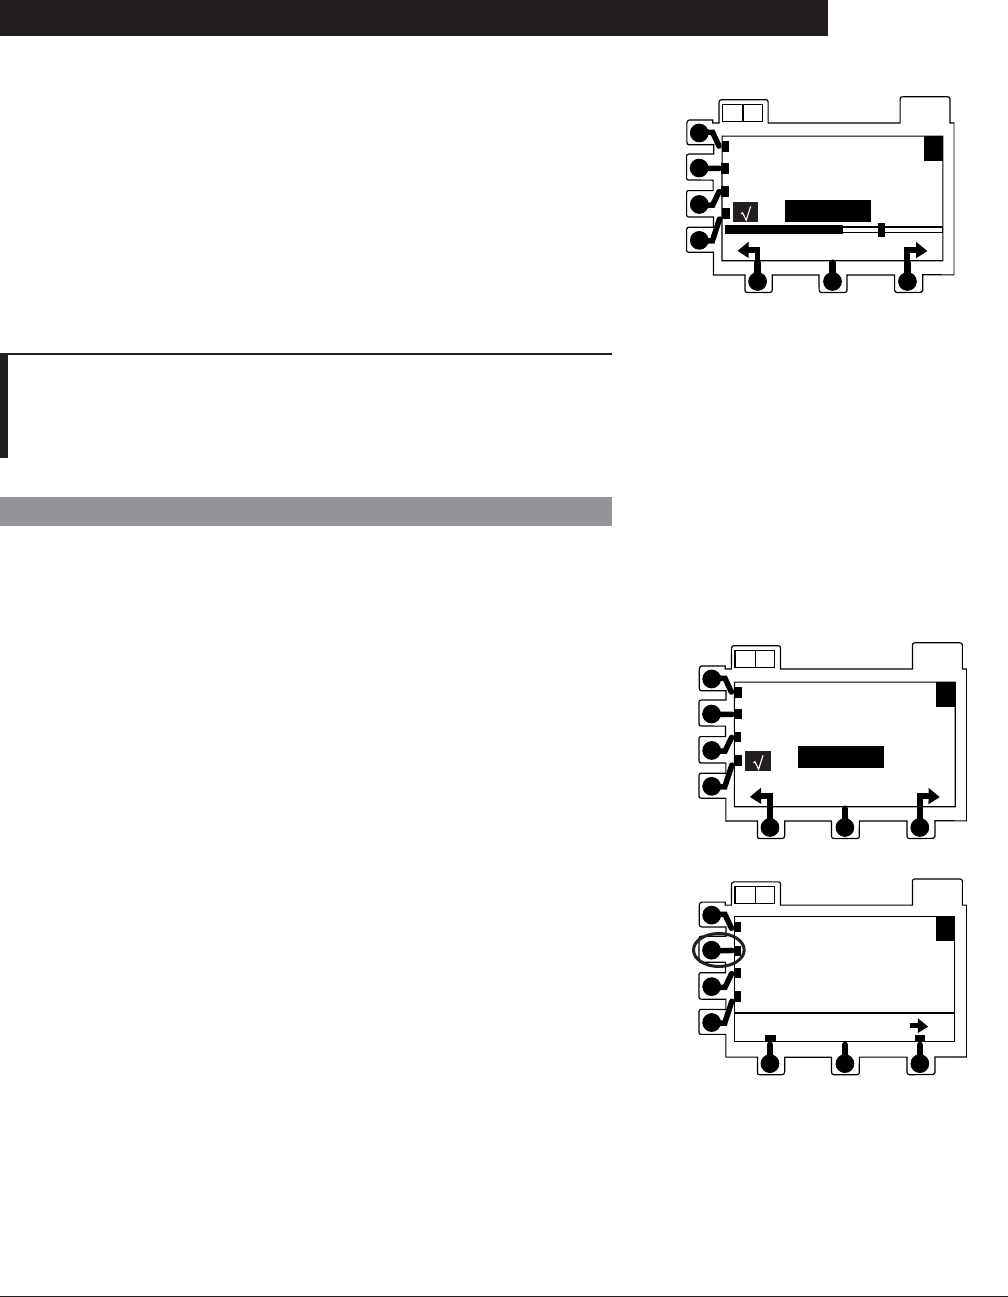
Directions for Use
Alaris® SE Pump
Models 7130/7131, 7230/7231
84 Dynamic Monitoring System
Monitoring Options - General (Continued)
• Adjustable Pressure: designed to monitor IV line/
site pressure and provide user-adjustable pressure
alarm limits. Used for Precision Flow mode or for high
resistance systems; such as, infusion through transducers,
into dialysis systems and through highest resistance
catheters. À
• Pressure: designed to monitor IV line/site pressure and
alarm based on a fixed pressure limit. À
NOTE:
À Precision Flow: in fixed and adjustable pressure modes, the
SE Pump provides enhanced flow continuity at rates below
50 mL/h.
Selecting Monitoring Option
For dual channel instruments, select the desired channel
as necessary. The bar graph and numeric displays are not
available when the split screen is displayed.
1. Press OPTIONS key.
OPTIONS
AB
Rate= 125.0 mL/h
VTBI= 1000.0 mL
VI= 0.0 mL
Primary
450 mmHg
A
Pressure Monitoring
OPTIONS
AB
Rate= 125.0 mL/h
VTBI=1000.0 mL
VI= 0.0 mL
Primary
Limit=250 mmHg
A
2. Press Monitoring Options soft key. OPTIONS
AB
A
Resistance Trend
Monitoring Options
Set Pressure Baseline
return page
Guardrails Library
®
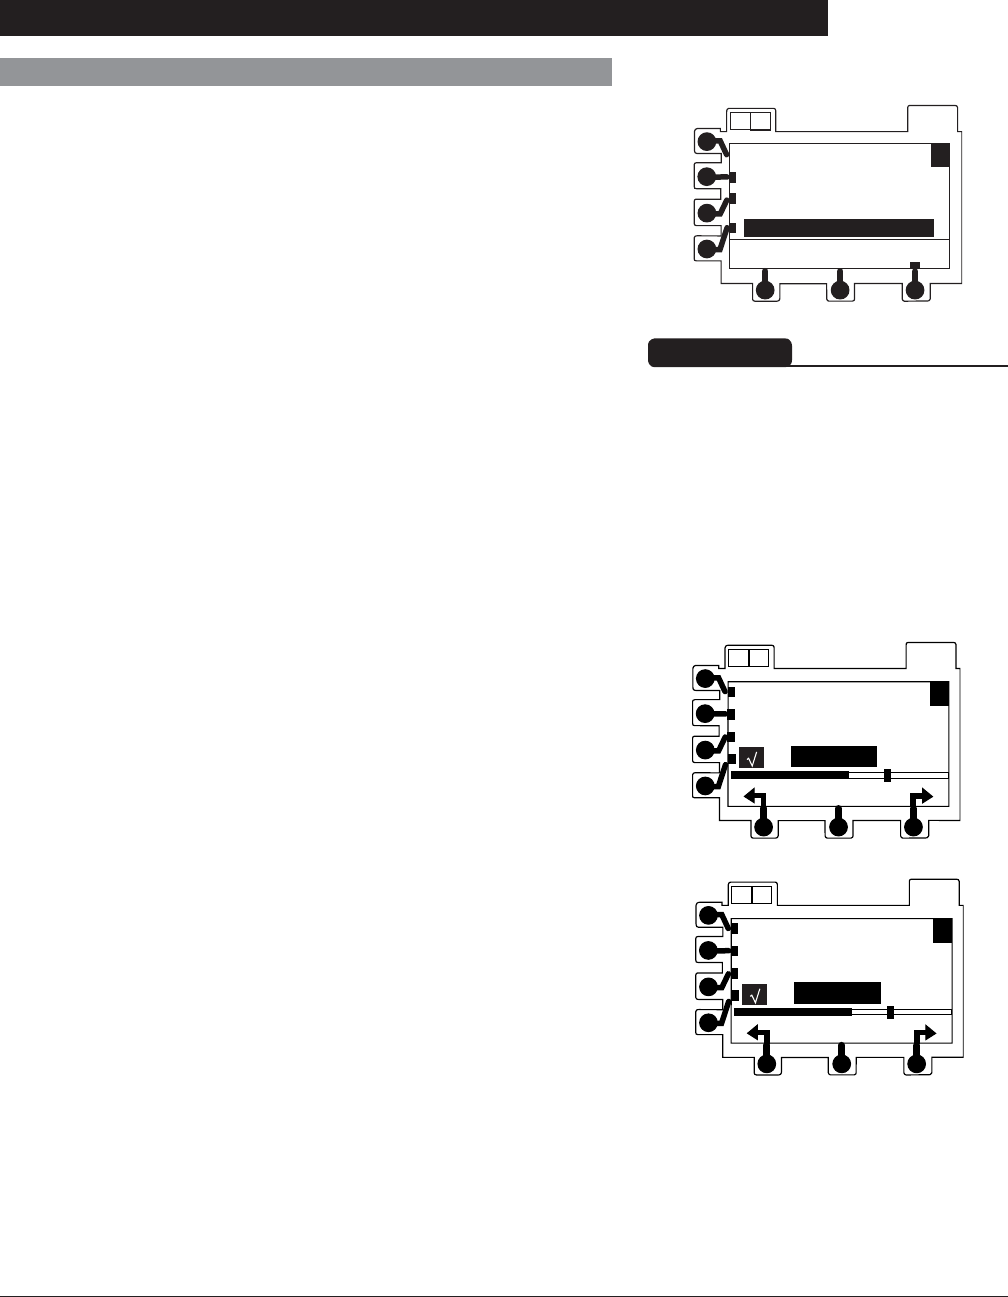
Directions for Use
Alaris® SE Pump
Models 7130/7131, 7230/7231
85
Dynamic Monitoring System
WARNING
Each time the instrument is
turned on, verify and/or set the
monitoring mode, resistance alert
and/or pressure alarm limit. If the
monitoring mode, resistance alert
and/or pressure alarm limit are not
verified, the instrument may not be
operating with the desired occlusion
detection parameter(s).
Monitoring Options - General (Continued)
Selecting Monitoring Option (Continued)
3. Press soft key for Resistance, High Resistance or
Adjustable Pressure. À
OPTIONS
A B
A
ok
Monitoring Options
Resistance
High Resistance
Adjustable Pressure
4. Press ok soft key. Display automatically returns to normal
operating screen. Á
OPTIONS
AB
Rate= 125.0 mL/h
VTBI= 1000.0 mL
VI= 0.0 mL
Primary
50% Resistance
A
OPTIONS
AB
Rate= 125.0 mL/h
VTBI= 1000.0 mL
VI= 0.0 mL
Primary
50% Hi Resist.
A
a. If Resistance option is selected, % Resistance
displays below bar graph while infusing. Â
b. If High Resistance option is selected, % Hi Resist.
displays below bar graph while infusing. Ã
-- Continued Next Page --
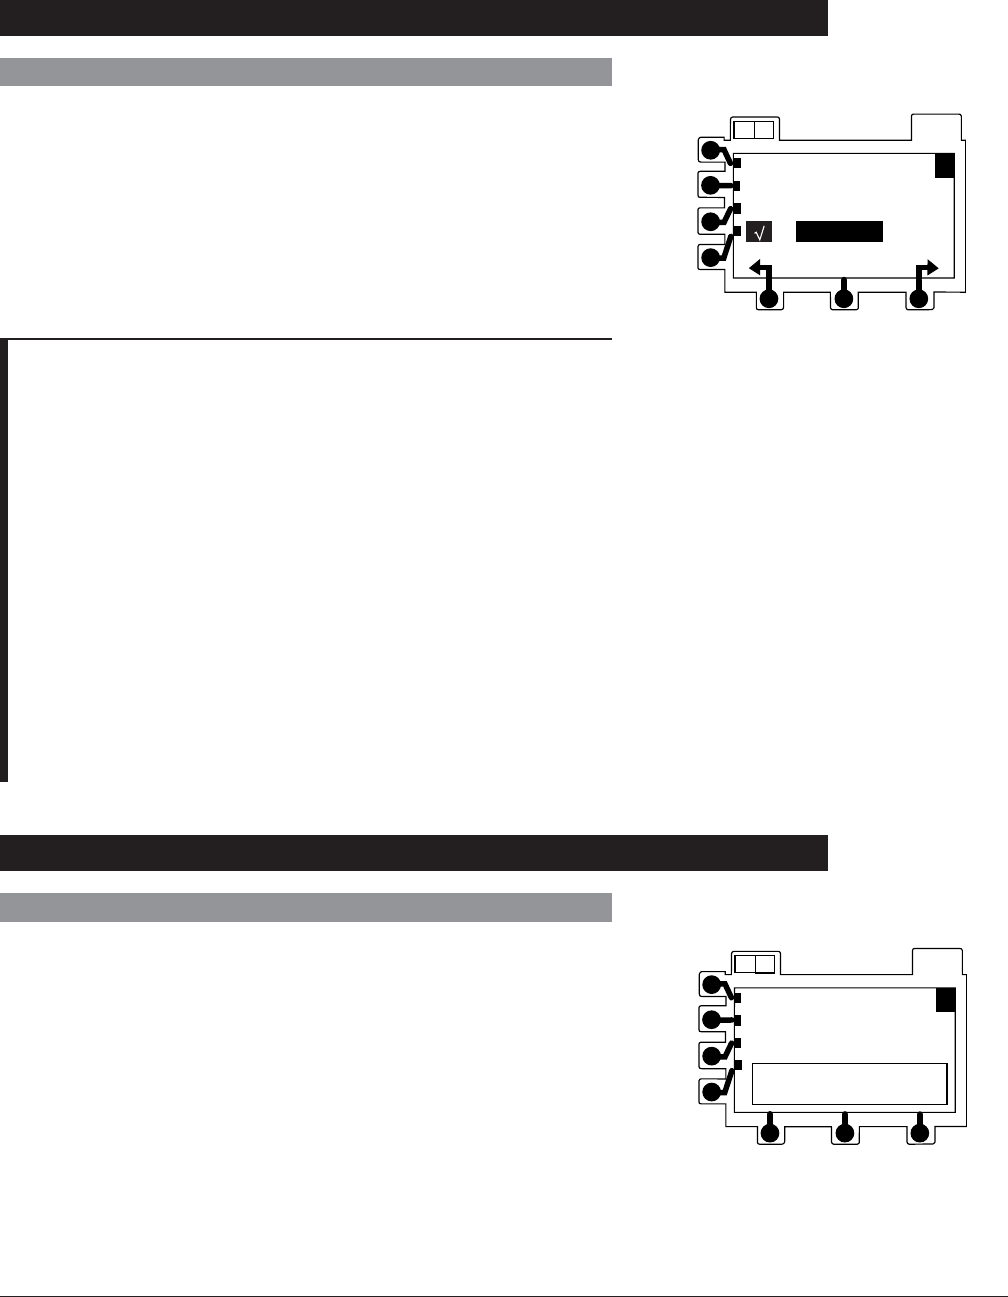
Directions for Use
Alaris® SE Pump
Models 7130/7131, 7230/7231
86 Dynamic Monitoring System
NOTES:
À If pressure limit adjustment is available, selection reads
Adjustable Pressure; otherwise, it reads Pressure.
Á While the channel is on, the selected option, resistance alert
and pressure alarm thresholds remain in effect until changed
by the operator.
 Resistance alert limit may be adjusted using the soft keys
located below the arrow symbols (see "Monitoring Options
- Resistance Mode", “Resistance Alert”).
à High Resistance alert limit may be adjusted using the soft
keys located below the arrow symbols.
Ä Pressure alarm limits may be adjusted when operating in
Adjustable Pressure mode using the soft keys located below
the arrow symbols (see "Monitoring Options - Pressure Mode",
“Adjustable Pressure Alarm”).
Å Maximum pressure limit settings may be configured by
qualified service personnel.
Monitoring Options - General (Continued)
Selecting Monitoring Option (Continued)
Detection of Downstream Occlusions
In the Resistance or High Resistance monitoring mode, a
RESISTANCE ALERT condition occurs when the measured
resistance reaches the alert limit.
Monitoring Options - Resistance Mode
OPTIONS
AB
Rate= 125.0 mL/h
VTBI= 1000.0 mL
VI= 0.0 mL
Primary
Limit=250 mmHg
A
c. If Adjustable Pressure option is selected, pressure
system accuracy can be enhanced by ensuring no
occlusion or other pressure source exists in IV line
when activating RUN/HOLD. Ä Å
OPTIONS
AB
Rate= 125.0 mL/h
VTBI= 1000.0 mL
VI= 0.0 mL
Resistance Alert
A
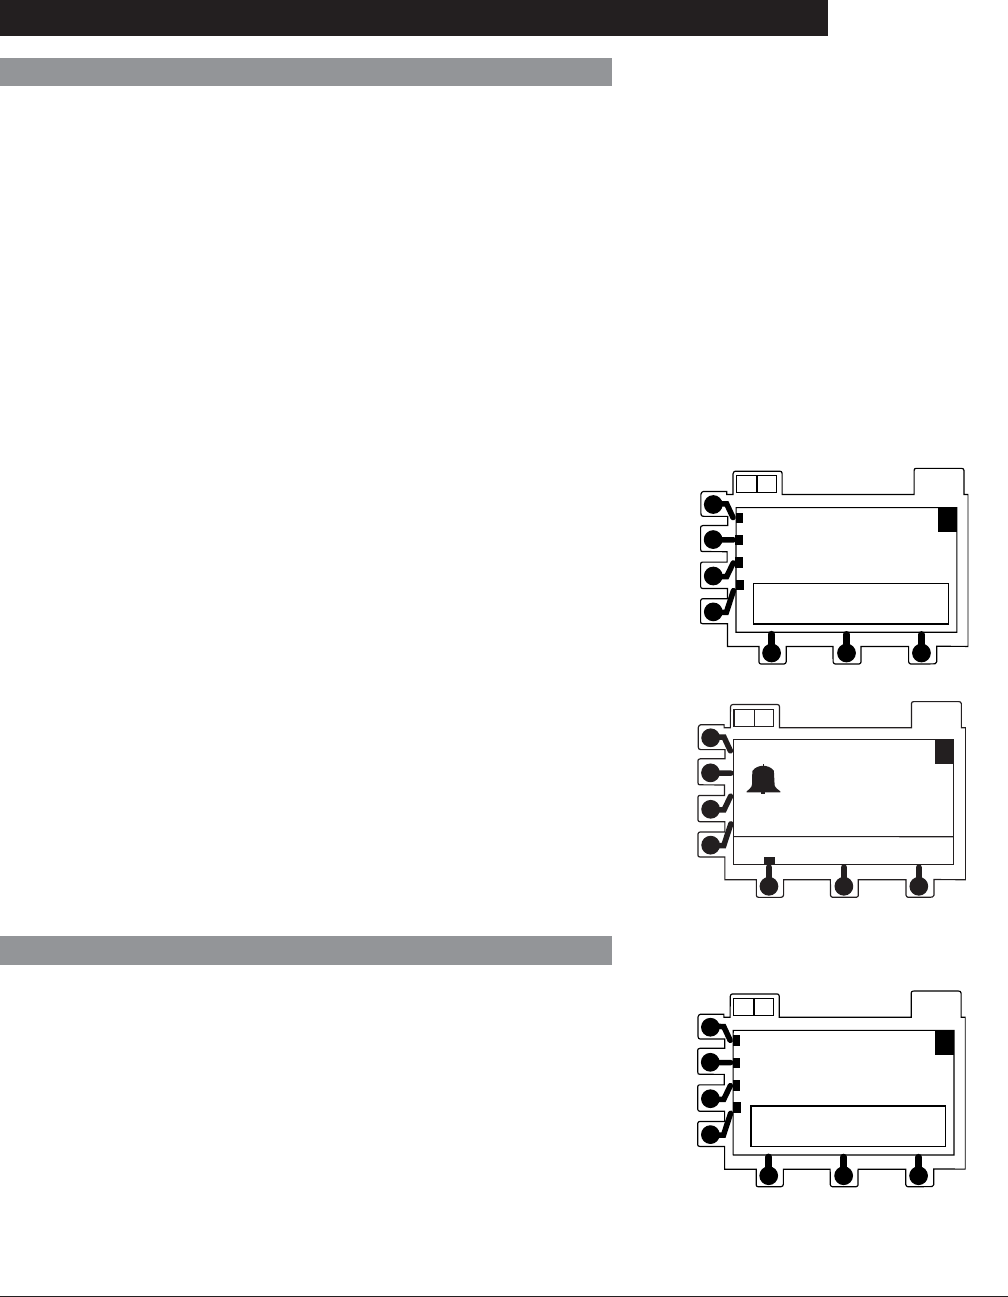
Directions for Use
Alaris® SE Pump
Models 7130/7131, 7230/7231
87
Dynamic Monitoring System
Detection of Downstream Occlusions (Continued)
Monitoring Options - Resistance Mode (Continued)
An OCCLUSION DOWNSTREAM condition is detected when
the measured resistance reaches 100% of scale. For the
Resistance mode, 100% results from a resistance producing
2 mmHg per mL/h of flow. For the High Resistance mode,
100% results from a resistance producing 6 mmHg per mL/h
flow.
An OCCLUSION DOWNSTREAM condition is also detected
when the configured pressure limit is exceeded. This limit
may be set, by qualified service personnel, from 1 mmHg to
600 mmHg ( Pressure Limit, Maximum).
When a Downstream Occlusion is detected, one of the
following responses occur:
• If Auto Restart Plus feature is on, Checking Line message
displays and audible tone sounds.
• If Auto Restart Plus feature is off, OCCLUSION
DOWNSTREAM alarm occurs.
OPTIONS
A B
A
run
OCCLUSION
DOWNSTREAM
OPTIONS
AB
Rate= 125.0 mL/h
VTBI= 1000.0 mL
VI= 0.0 mL
Checking Line
A
Auto Restart Plus Feature
The Auto Restart Plus feature provides the ability to
automatically continue an infusion if downstream resistance or
pressure measurements indicate that an occlusion condition
has cleared within a 40-second Checking Line period
(excluding High Resistance Monitoring mode).
The Checking Line message and tone are presented when
a resistance measurement exceeds the alarm threshold of
100%.
OPTIONS
AB
Rate= 125.0 mL/h
VTBI= 1000.0 mL
VI= 0.0 mL
Checking Line
A
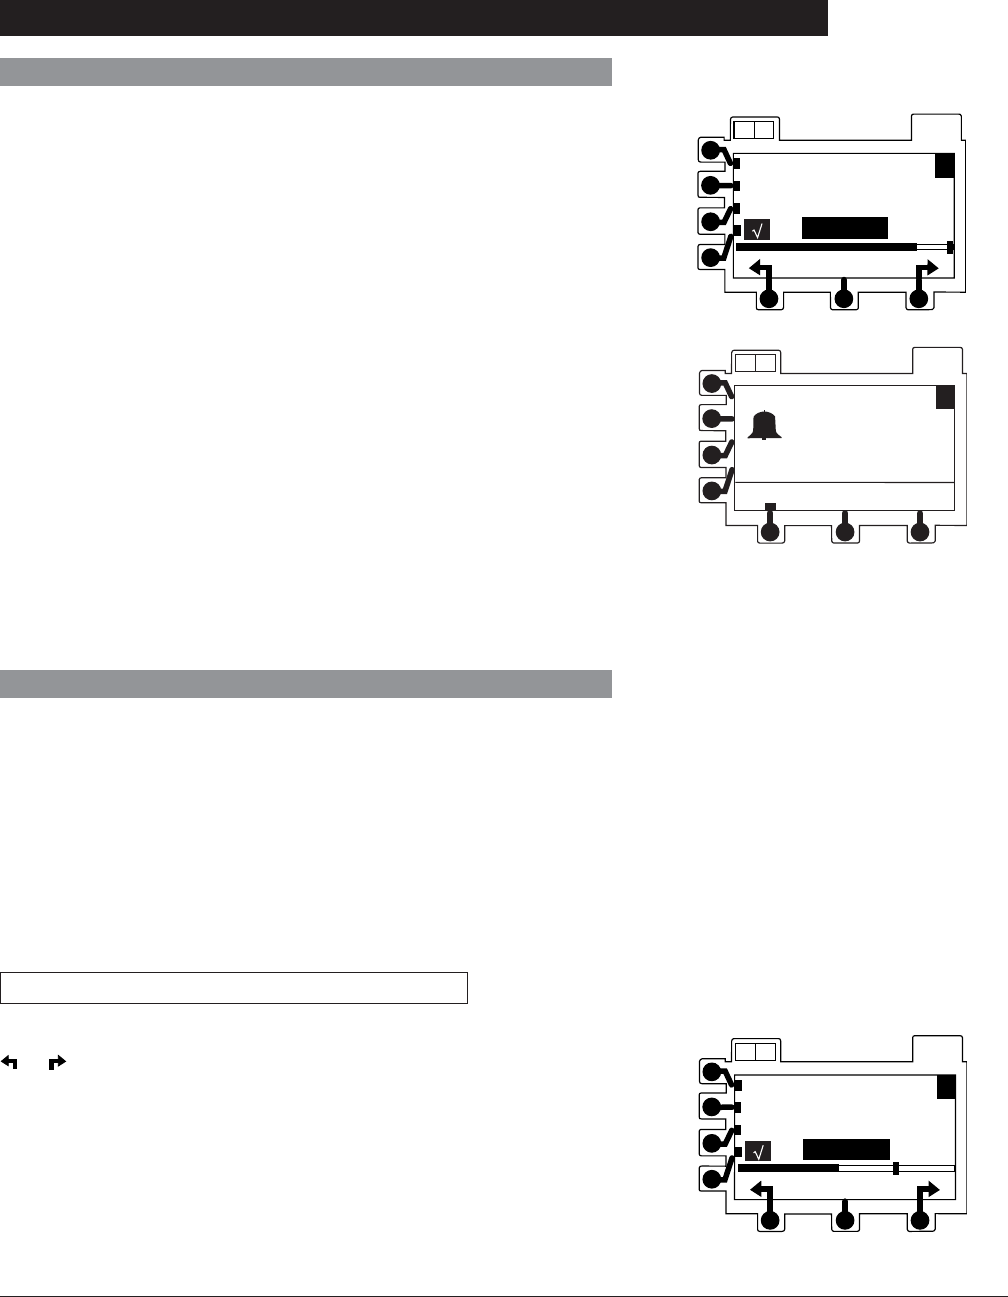
Directions for Use
Alaris® SE Pump
Models 7130/7131, 7230/7231
88 Dynamic Monitoring System
Monitoring Options - Resistance Mode (Continued)
Resistance Alert
The Resistance Alert provides an early warning of increasing
flow resistance. The Resistance Alert marker can be set from
0% to 100% of scale in 5% increments. This feature can be
enabled or disabled and a power-on default alert level is set
through the hospital Data Set.
To optimize the alert feature, it is advisable to set the alert level
20-30% higher than the initial displayed resistance. Read the
resistance approximately 2 minutes after starting an infusion.
Setting Alert Marker
To numerically display present alert level marker, press either
or soft key. Vertical line on resistance bar graph visually
indicates alert level.
Each additional press of either arrow soft key increases or
decreases alert level marker and numeric value by 5%.
OPTIONS
AB
Rate= 125.0 mL/h
VTBI= 1000.0 mL
VI= 0.0 mL
Primary
90% Resistance
A
OPTIONS
A B
A
run
OCCLUSION
DOWNSTREAM
OPTIONS
AB
Rate= 125.0 mL/h
VTBI= 1000.0 mL
VI= 0.0 mL
Primary
Alert = 70%
A
If resistance measurements initiate the Checking Line
condition, the channel continues infusing in order to
determine if the measured flow resistance has changed. If
the measured flow resistance falls to any value below 100%
within 40 seconds, the channel automatically resumes normal
operating conditions (excluding High Resistance Monitoring
mode).
Pressure measurements initiate the Checking Line period
when the pressure exceeds the configured limit. If the
pressure falls to less than one-third of the configured limit
within 40 seconds, normal flow resumes. If the condition is not
cleared, the OCCLUSION DOWNSTREAM alarm occurs and
infusion stops until manually restarted.
This feature can be configured through the hospital Data
Set to allow from 1 to 9 Checking Line restarts. After the
programmed number of restarts has occurred or the 40-
second Checking Line period has been exceeded, the
channel immediately alarms OCCLUSION DOWNSTREAM
when resistance or pressure conditions indicate an occlusion.
Auto Restart Plus Feature (Continued)
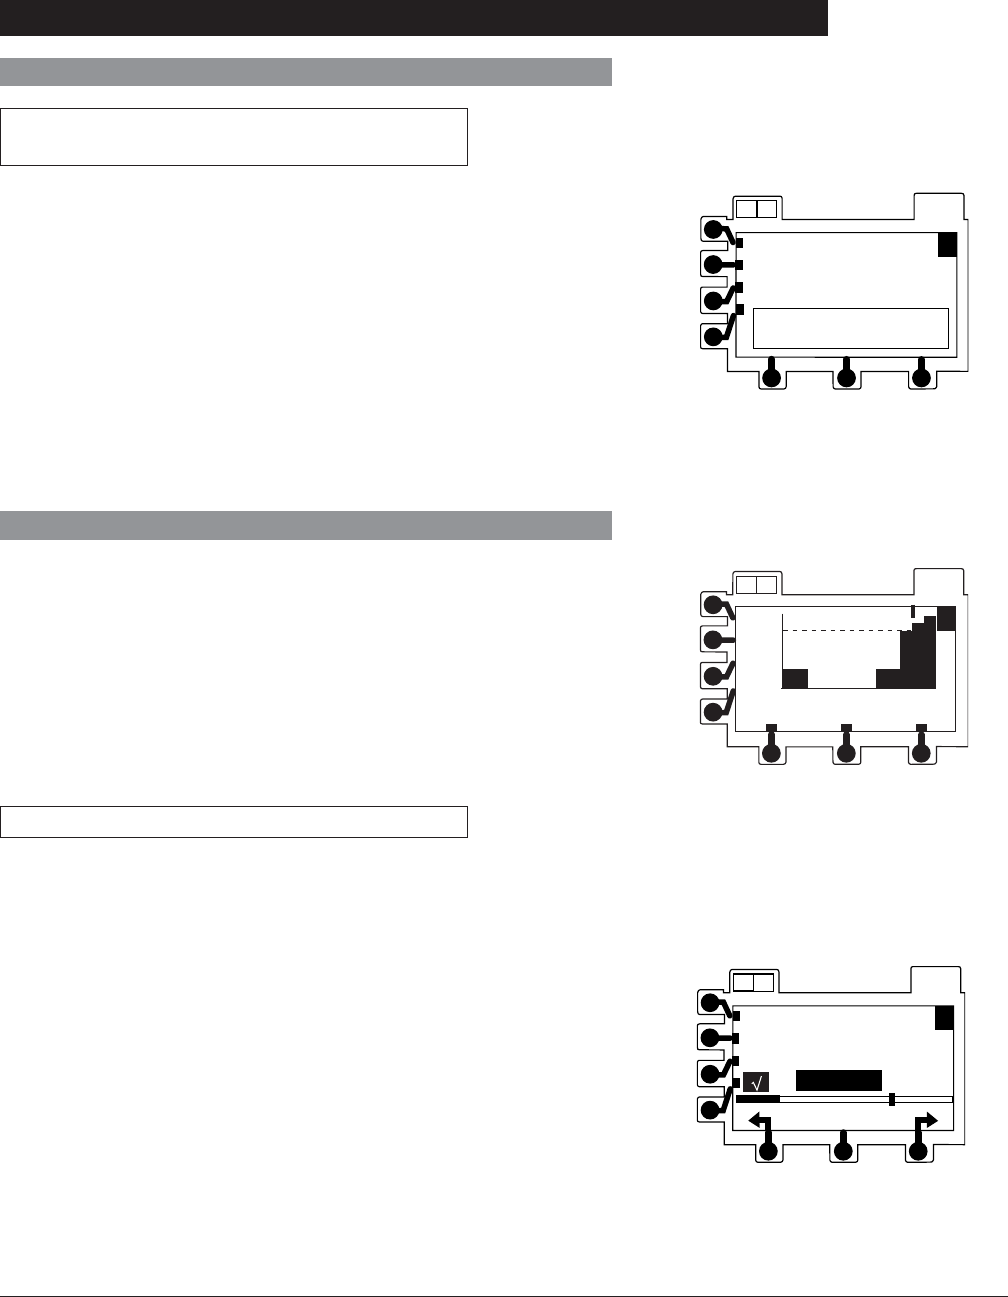
Directions for Use
Alaris® SE Pump
Models 7130/7131, 7230/7231
89
Dynamic Monitoring System
Monitoring Options - Resistance Mode (Continued)
If Flow Resistance Exceeds Alert Level
Marker
If flow resistance exceeds the alert level marker, a Resistance
Alert message displays and an alert tone sounds. The
channel continues to infuse, and the message and tone
continue until one of the following resistance levels occurs:
• IV line/site resistance falls below alert level marker.
• Resistance alert level marker increases above current
measured resistance value.
• Resistance rises to 100%, initiating a Checking Line or
OCCLUSION DOWNSTREAM condition.
OPTIONS
AB
Rate= 125.0 mL/h
VTBI= 1000.0 mL
VI= 0.0 mL
Resistance Alert
A
Resistance Alert
Resistance Trend Graphs
In Resistance and High Resistance monitoring modes, a trend
graph displays flow resistance over time. Trend graphs of
15 minutes, 1 hour, 4 hours and 12 hours are available during
normal operation when enabled through the hospital Data Set.
Downstream Occlusions are indicated by a tick mark (y) at the
top of the trend screen.
Viewing Graphs
For dual channel instruments, select the desired channel, as
necessary. The trend graph is not available while the split
screen is displayed.
1. Press OPTIONS key.
OPTIONS
A B
A
return time
clear
RESISTANCE
now
-12h
100%
50
0
OPTIONS
AB
Rate= 125.0 mL/h
VTBI= 1000.0 mL
VI= 0.0 mL
Primary
25% Resistance
A
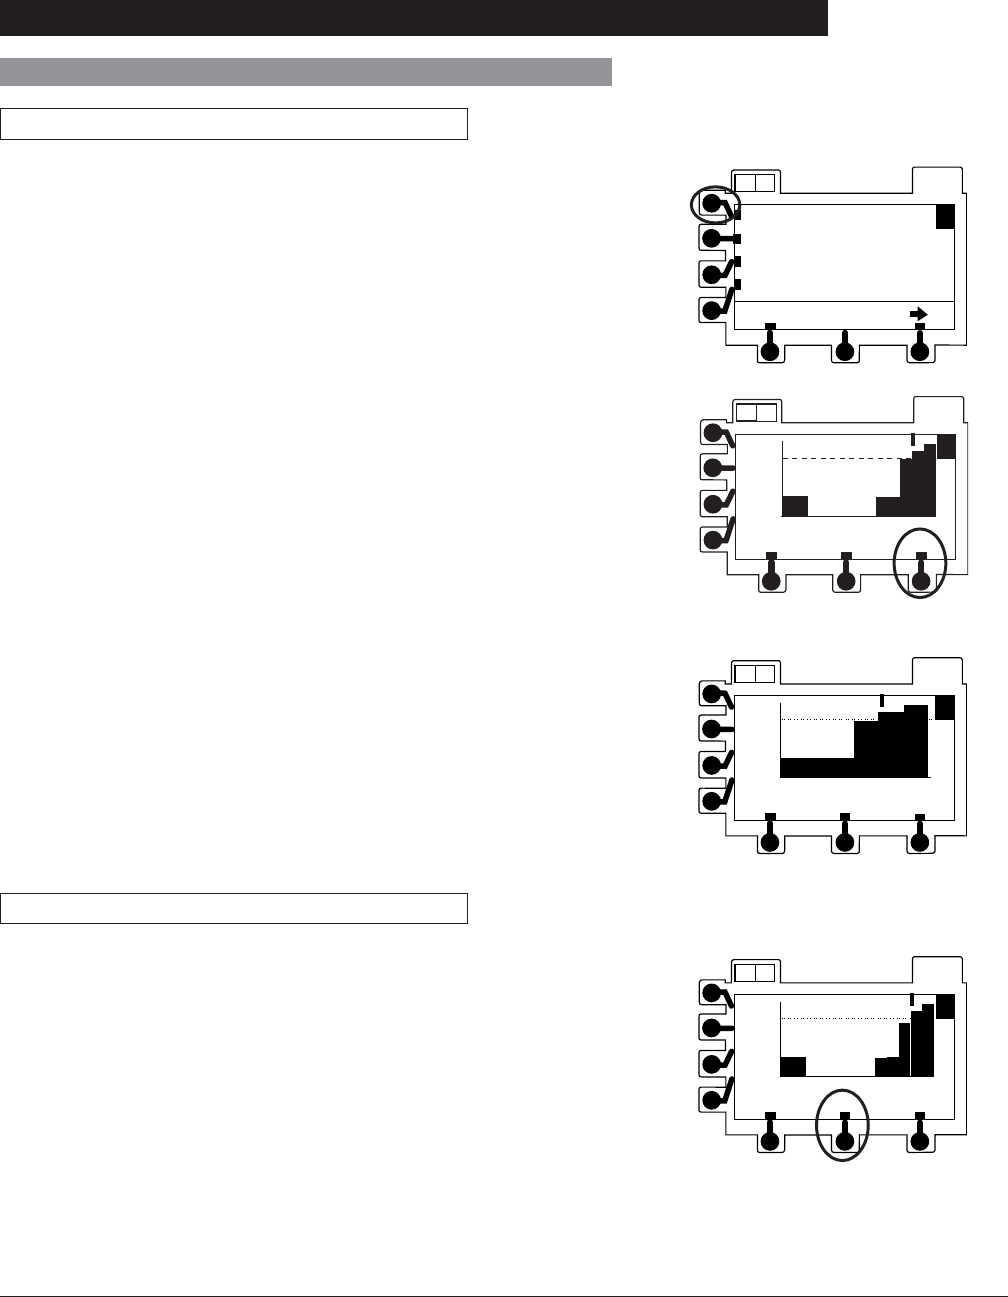
Directions for Use
Alaris® SE Pump
Models 7130/7131, 7230/7231
90 Dynamic Monitoring System
Monitoring Options - Resistance Mode (Continued)
2. Press Resistance Trend soft key. OPTIONS
AB
A
Resistance Trend
Monitoring Options
Set Pressure Baseline
return page
Guardrails Library
®
3. To change graph time frame, press time soft key.
• A dashed horizontal line represents current resistance
alert level.
• Gaps in graph may indicate noninfusing conditions;
such as, turned off, on hold, in alarm.
• If channel has been placed in Pressure Monitoring
mode for some portion of a trend graph window,
resistance data is not available and zero values are
plotted.
• A tick mark (y) at top of graph indicates an occlusion.
• When viewing Resistance Trend Graphs in High
Resistance mode, HI RESIST displays under graph.
OPTIONS
AB
A
return time
clear
HI RESIST now-12h
100
%
50
0
Clearing Graphs
1. To clear graphed data, press clear soft key. OPTIONS
AB
A
return time
clear
RESISTANCE now-12h
100
%
50
0
OPTIONS
A B
A
return time
clear
RESISTANCE
now
-12h
100%
50
0
Viewing Graphs (Continued)
Resistance Trend Graphs (Continued)
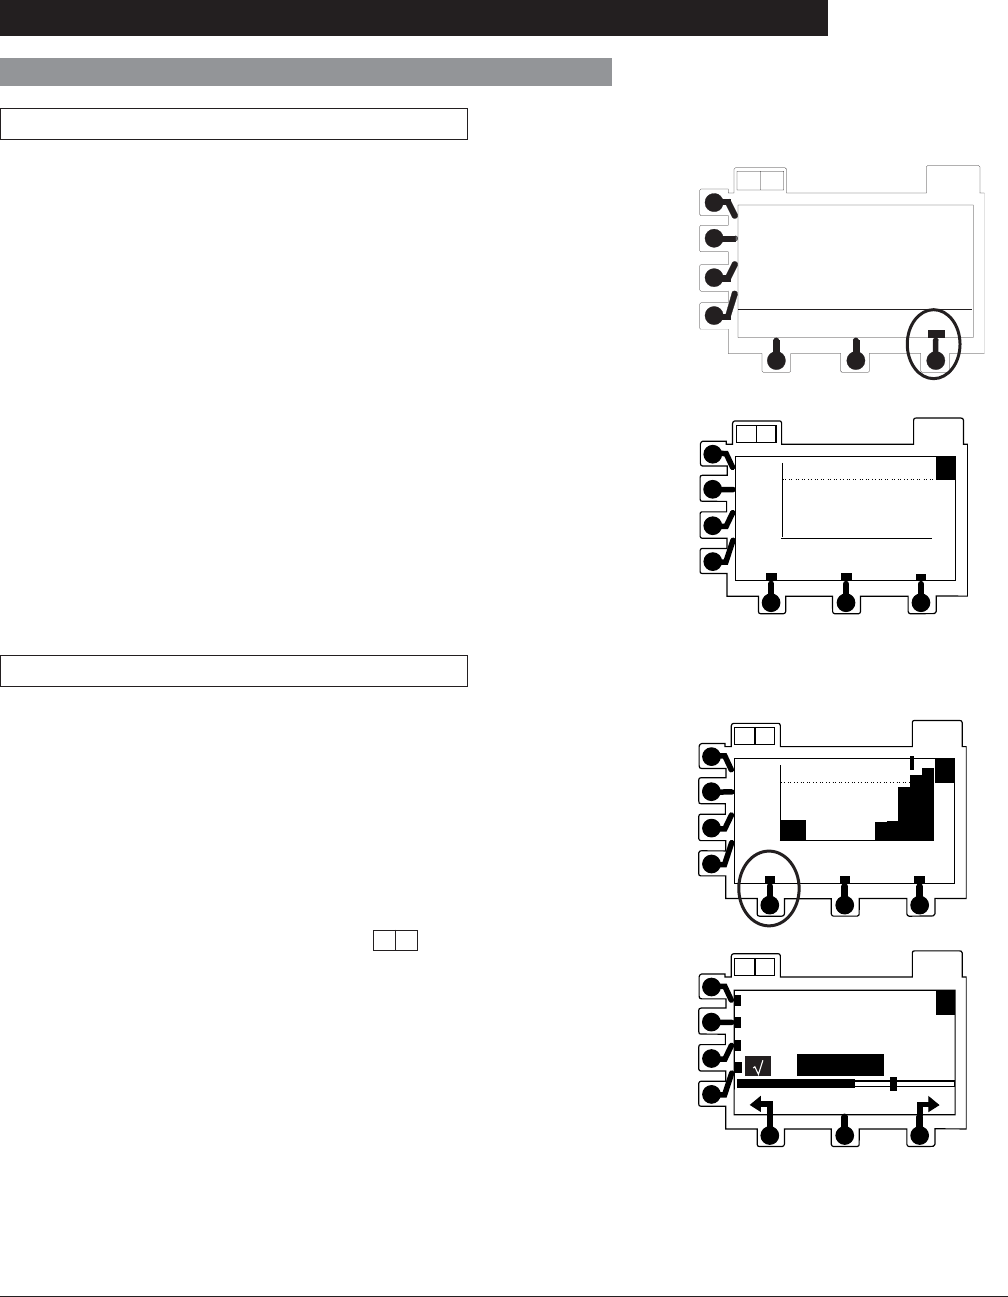
Directions for Use
Alaris® SE Pump
Models 7130/7131, 7230/7231
91
Dynamic Monitoring System
Monitoring Options - Resistance Mode (Continued)
Resistance Trend Graphs (Continued)
Clearing Graphs (Continued)
2. Press ok soft key.
• All data is cleared from graphs.
Returning to Normal Operating Screen
Press return soft key.
• Normal operating screen appears.
Following events also turn off trend graph:
• Pressing RUN/HOLD key.
• An alarm.
• Dual channel instrument: pressing A B .
• Dual channel instrument: replaced with a split screen
display after 1 minute if both channels are infusing.
OPTIONS
AB
A
return time
clear
RESISTANCE now-12h
100
%
50
0
AB OPTIONS
ok
All trend data
will be cleared
return
OPTIONS
AB
A
return time
clear
RESISTANCE now-12 h
100
%
50
0
OPTIONS
AB
Rate= 125.0 mL/h
VTBI= 1000.0 mL
VI= 0.0 mL
Primary
33% Resistance
A
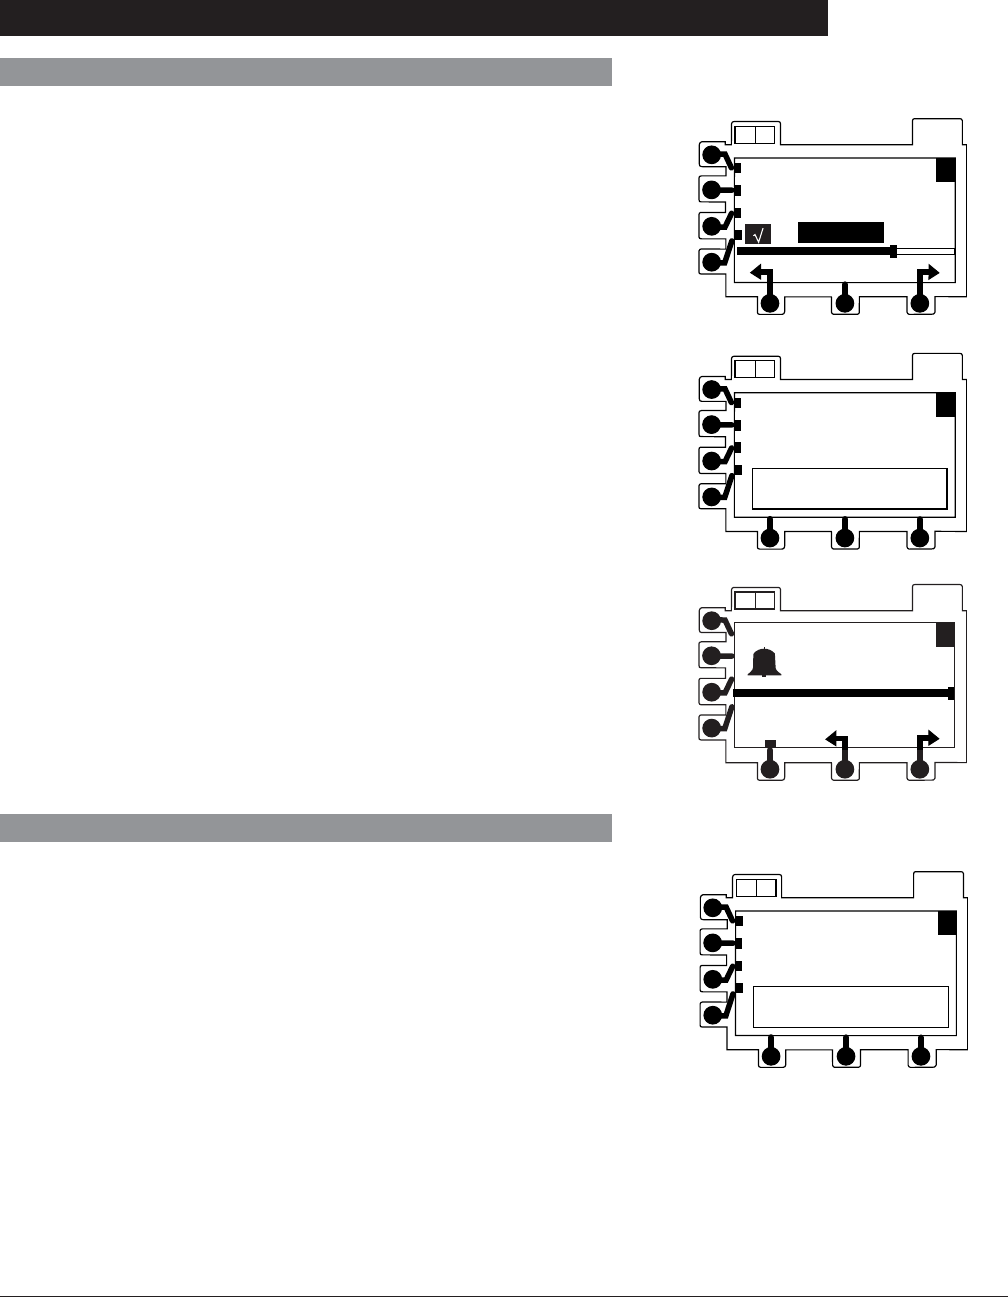
Directions for Use
Alaris® SE Pump
Models 7130/7131, 7230/7231
92 Dynamic Monitoring System
Monitoring Options - Pressure Mode
Detection of Downstream Occlusions
When using the Adjustable Pressure monitoring mode, a
pressure alarm limit may be selected, in 25 mmHg increments,
from 25 mmHg to the maximum configured pressure limit.
When measured pressure exceeds this level, an OCCLUSION
DOWNSTREAM condition occurs.
When a Downstream Occlusion is detected, one of following
responses occurs:
OPTIONS
AB
Rate= 125.0 mL/h
VTBI= 1000.0 mL
VI= 0.0 mL
Primary
500 mmHg
A
OPTIONS
AB
Rate= 125.0 mL/h
VTBI= 1000.0 mL
VI= 0.0 mL
Checking Line
A
OPTIONS
A B
A
run
OCCLUSION
DOWNSTREAM
600 mmHg
• If Auto Restart Plus feature is on, a Checking Line
message appears, along with an audible tone. (Reference
“Auto Restart Plus Feature” for further details.)
The Auto Restart Plus feature provides the ability to
automatically continue an infusion if downstream pressure
measurements indicate that an occlusion condition has cleared
within a 40-second Checking Line period (excluding High
Resistance Monitoring mode).
OPTIONS
AB
Rate= 125.0 mL/h
VTBI= 1000.0 mL
VI= 0.0 mL
Checking Line
A
• If Auto Restart Plus feature is off, an OCCLUSION
DOWNSTREAM alarm occurs.
Auto Restart Plus Feature
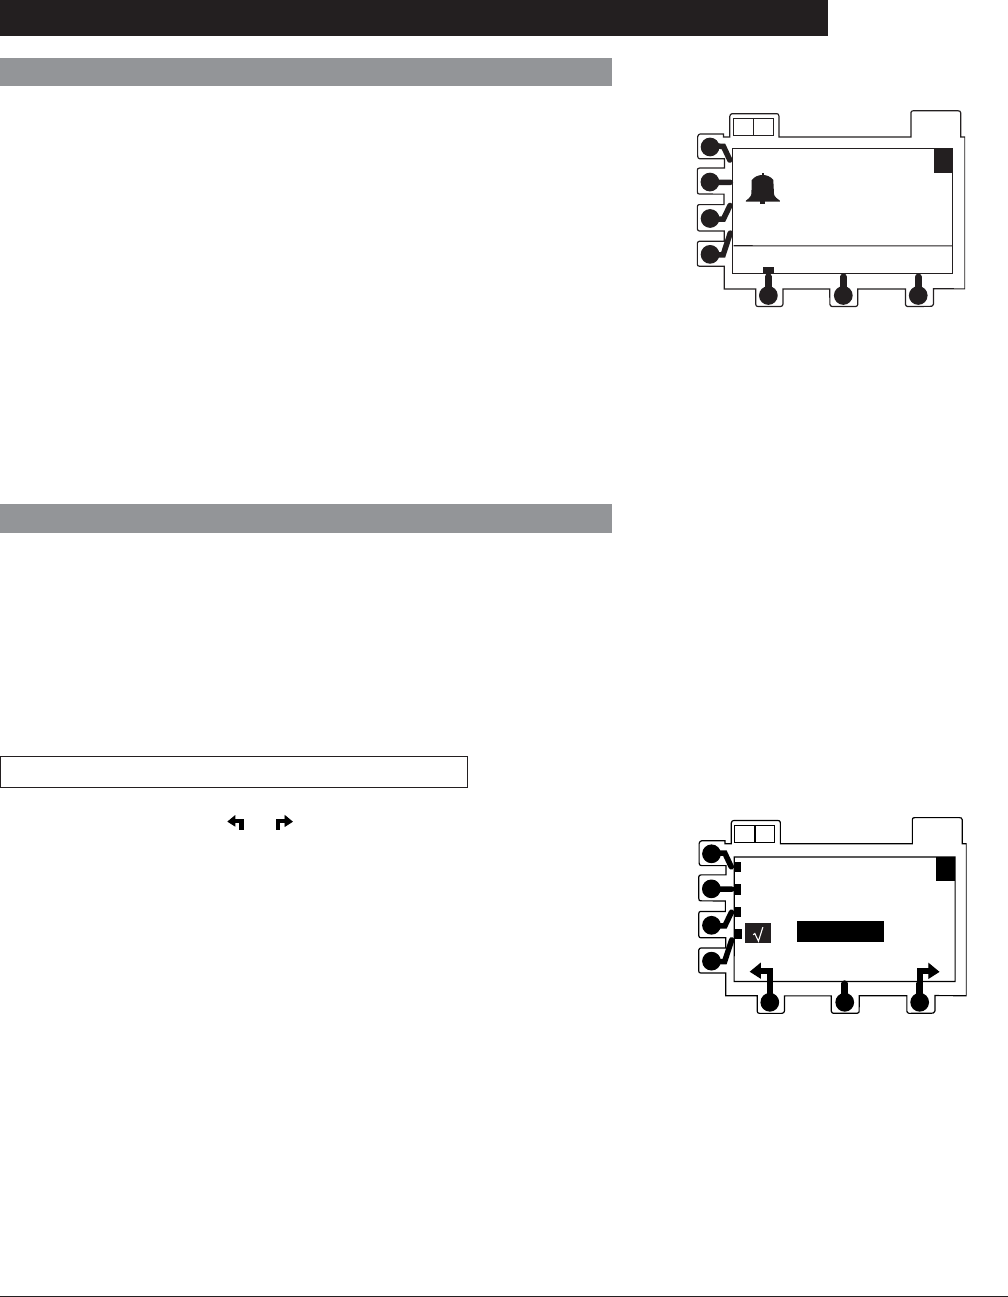
Directions for Use
Alaris® SE Pump
Models 7130/7131, 7230/7231
93
Dynamic Monitoring System
Monitoring Options - Pressure Mode (Continued)
Auto Restart Plus Feature (Continued)
OPTIONS
A B
A
run
OCCLUSION
DOWNSTREAM
The Checking Line message and tone occur whenever a
pressure measurement exceeds the selected alarm threshold.
If the pressure falls to less than one-third of the alarm limit
within 40 seconds, normal flow resumes. The Adjustable
Pressure mode allows control of the pressure alarm limit. If
the condition is not cleared, the OCCLUSION DOWNSTREAM
alarm occurs and infusion stops until manually restarted.
This feature can be configured through the hospital Data
Set to allow from 1 to 9 Checking Line restarts. After the
programmed number of restarts has occurred or the 40-
second Checking Line period has been exceeded, the
channel immediately alarms OCCLUSION DOWNSTREAM
when resistance or pressure conditions indicate an occlusion.
Adjustable Pressure Alarm
In the Adjustable Pressure monitoring mode, the pressure
alarm limit may be varied from 25 mmHg to the maximum
configured pressure limit, in 25 mmHg increments. A default
alarm level and a maximum pressure limit are set through the
hospital Data Set profile configuration settings or through the
instrument confirmation settings if the Profiles feature is not
enabled (OFF).
Setting Alarm Limit Marker
Pressing either arrow ( or ) soft key changes alarm limit by
25 mmHg in corresponding direction. It is advisable to select
an alarm limit appropriate for flow rate. At lower flow rates,
alarm limit should be set lower, to shorten time to alarm.
OPTIONS
AB
Rate= 125.0 mL/h
VTBI= 1000.0 mL
VI= 0.0 mL
Primary
Limit = 450mmHg
A

Directions for Use
Alaris® SE Pump
Models 7130/7131, 7230/7231
94 Dynamic Monitoring System
Monitoring Options - Pressure Mode (Continued)
Pressure Monitoring Using Automatic
Baseline Calibration
The auto pressure baseline calibration remains in effect until
the instrument is turned off, the latch is opened, the set is
reloaded, or the Set Pressure Baseline function is performed.
• First activation of RUN/HOLD for a new infusion
automatically establishes a pressure baseline based
on current system pressure. An optimal baseline is
maintained upon subsequent activations of RUN/HOLD, as
follows:
- If current system pressure is same or higher than
original baseline, pressure baseline does not change.
- If current system pressure is less than original baseline,
system automatically resets to new system pressure
value.
• Pressure measurement can be optimized, particularly
at low flow rates (less than 3 mL/h), by pausing and
restarting at least once every 2 hours (for example, when
reprogramming VTBI). This allows pressure baseline to
calibrate based on current system pressure.
• Prior to activation, ensure that pressure has not built
up in IV line due to either occlusion or flow from other
instruments through a common catheter. This will result in
a more accurate pressure measurement.
• When loading a set connected to a small diameter catheter,
wait at least 5 seconds after loading set before activating
RUN/HOLD. This allows pressure generated by loading
process to dissipate and sensor to stabilize. (Very small
PICC catheters; such as, 28 gauge/1.2 French, may require
60 seconds or more for stabilization.)
• When multiple instruments are infusing through a common
small diameter catheter, pressure measurement accuracy
can be optimized by temporarily stopping all infusions,
then restarting all instruments beginning with instrument
delivering at lowest rate.
Adjustable Pressure Alarm
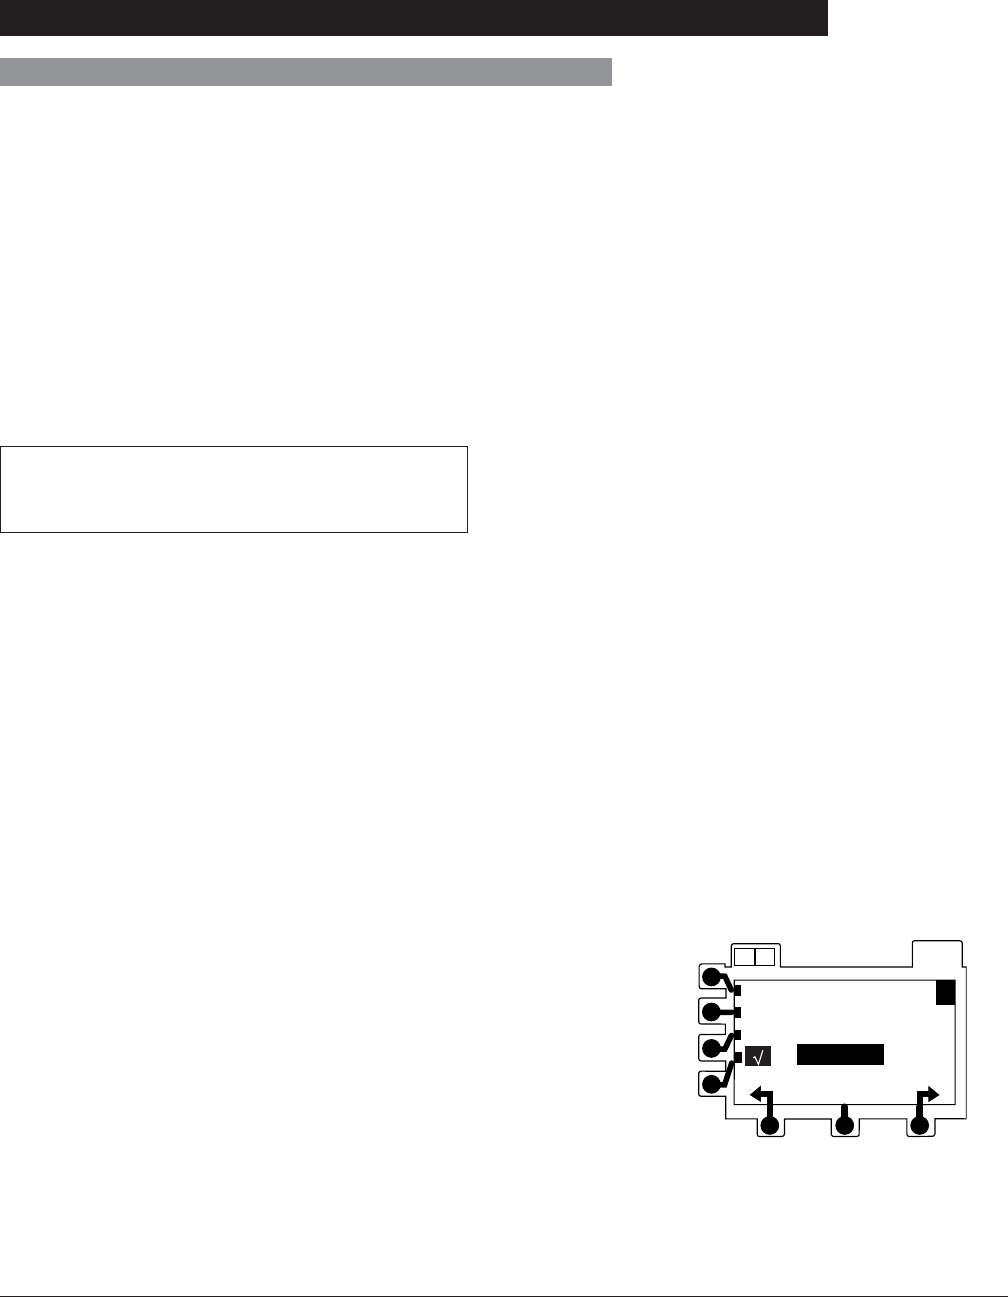
Directions for Use
Alaris® SE Pump
Models 7130/7131, 7230/7231
95
Dynamic Monitoring System
Monitoring Options - Pressure Mode (Continued)
Pressure Baseline
The Pressure Baseline feature, when enabled through the
hospital Data Set profile configuration settings, provides a real-
time bar graph and numeric display of line pressure.
The pressure limit may be reduced if the pressure in the line
is high or changing. This results in the pressure limit being
lowered from the selected setting. If this occurs, first try to
remove or reduce the downstream pressure. Following that,
try to reload the set, wait 15 to 30 seconds and then perform a
Set Pressure Baseline operation. The pressure baseline may
need to be set a second time, after the pressure readings have
stabilized.
For dual channel instruments, select the desired channel as
necessary. The pressure bar graph is not shown when the
split screen display is active.
For optimal results, set the baseline 15 minutes after starting
an infusion. The pressure baseline can be optimized,
particularly at low flow rates (less than 3 mL/h), by resetting
the pressure baseline when the readings are negative.
Check periodically for negative readings; for example, when
programming VTBI. This allows the pressure baseline to
calibrate based on current system pressure.
1. To place channel on hold, press channel’s RUN/HOLD
key. (All infusions connected to channel being base-lined
must be on hold.)
2. Press OPTIONS key.
Manually Setting Pressure Baseline
While Operating in Adjustable Pressure
Mode
OPTIONS
AB
Rate= 125.0 mL/h
VTBI= 1000.0 mL
VI= 0.0 mL
Primary
Limit = 600mmHg
A
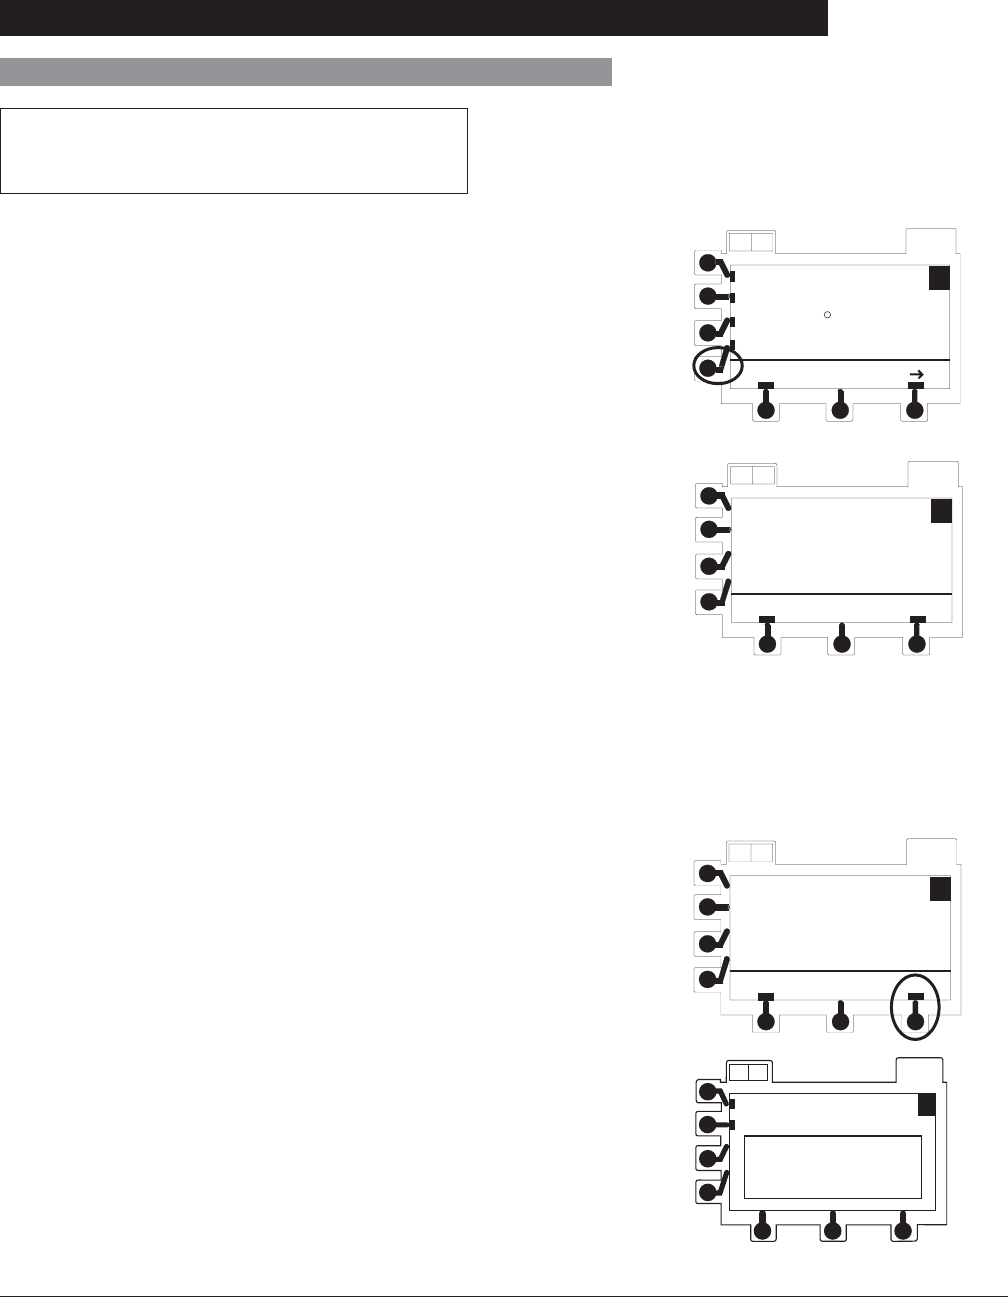
Directions for Use
Alaris® SE Pump
Models 7130/7131, 7230/7231
96 Dynamic Monitoring System
Monitoring Options - Pressure Mode (Continued)
Pressure Baseline (Continued)
3. Press Set Pressure Baseline soft key. À
Pressure Trend
return
AB OPTIONS
A
Monitoring Options
Guardrails Library
Set Pressure Baseline
page
R
• Set Pressure Baseline screen appears.
return
AB OPTIONS
A
Set
Pressure
Baseline
ok
4. Verify no pressure, due to occlusion or other infusions
through a common line, is present in IV line at this time.
5. For best results, verify set outlet (for example, stopcock) is
located at patient’s heart level before continuing with next
step.
6. Press ok soft key.
return
AB OPTIONS
A
Set
Pressure
Baseline
ok
OPTIONS
A B
Rate=125.0 mL/h
VTBI=500.0 mL
A
New
Baseline
Set
Manually Setting Pressure Baseline
While Operating in Adjustable Pressure
Mode (Continued)
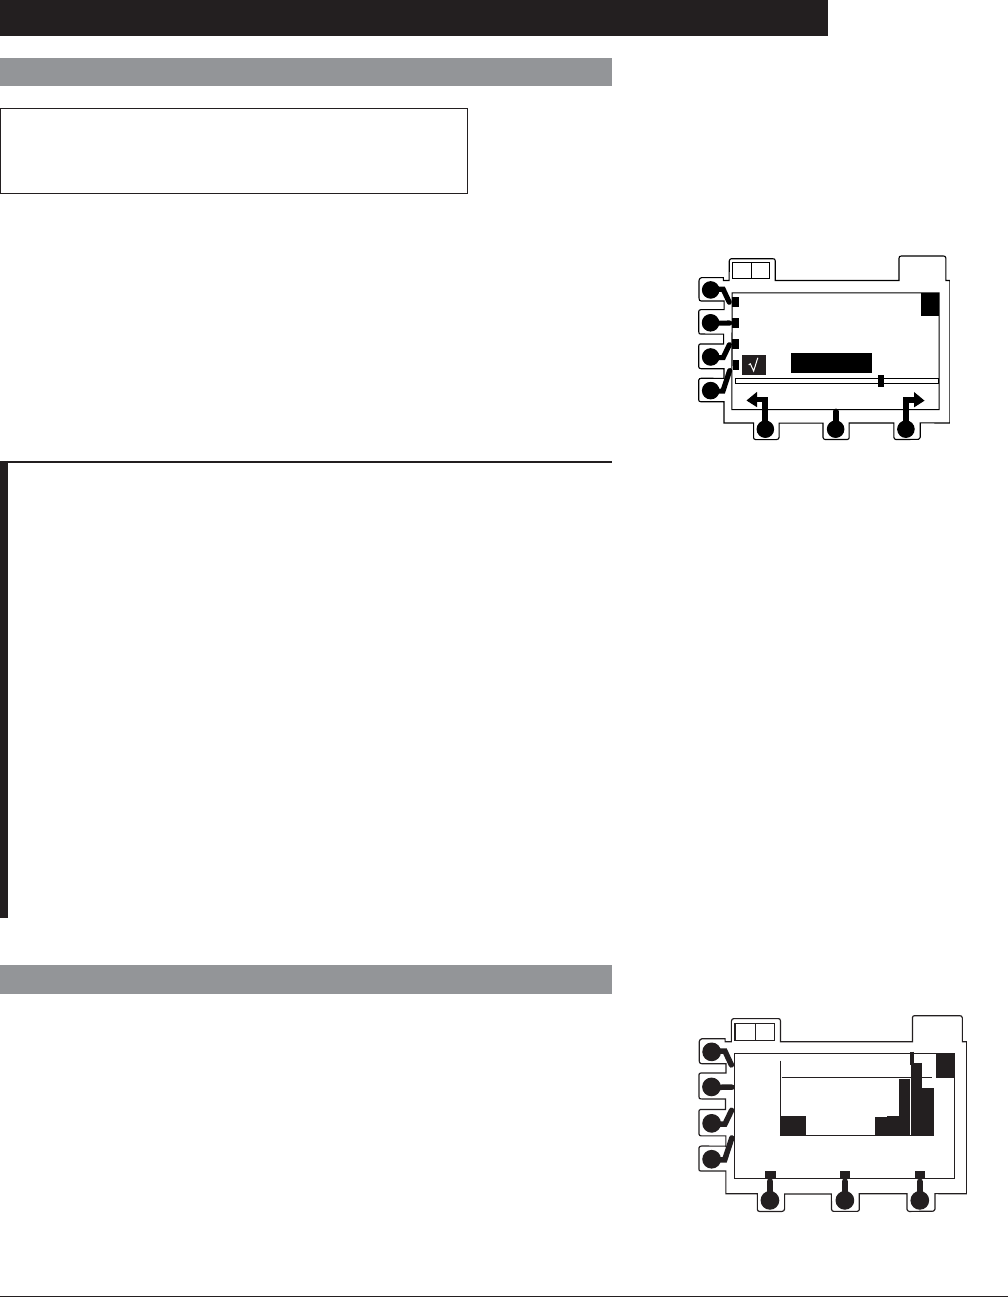
Directions for Use
Alaris® SE Pump
Models 7130/7131, 7230/7231
97
Dynamic Monitoring System
Monitoring Options - Pressure Mode (Continued)
Pressure Baseline (Continued)
Manually Setting Pressure Baseline
While Operating in Adjustable Pressure
Mode (Continued)
7. Verify pressure readout is 0 (zero) mmHg. Á
8. To start infusion, press RUN/HOLD key. Â Ã Ä
OPTIONS
AB
Rate= 125.0 mL/h
VTBI=1000.0 mL
VI= 0.0 mL
Primary
0 mmHg
A
NOTES:
À To return to the normal screen without setting the baseline,
press return soft key.
Á True baseline pressure will be zero or within a few mmHg of
zero. If not, and the pressure is unstable, allow the pressure
to drop to the lowest level and then repeat the Set Pressure
Baseline process.
 The pressure baseline calibration remains in effect until
the instrument is turned off, the latch is opened, the set is
reloaded, or the set Pressure Baseline function is performed
again.
à Setting the manual baseline overrides the auto baseline until
the instrument is turned off, the latch is opened, set is loaded,
or another manual baseline is set.
Ä Setting a manual Pressure Baseline displays a horizontal real-
time bar graph and numeric pressure readings. The vertical
line on the pressure bar graph visually indicates the pressure
alarm limit.
In Pressure Monitoring mode, a trend graph displays monitored
pressure over time. Trend graphs of 15 minutes, 1 hour,
4 hours and 12 hours are available during normal operation
when enabled through the hospital Data Set.
Downstream Occlusions, which occur in Pressure or
Resistance modes, are indicated by a tick mark (y) at the top of
the trend screen.
Pressure Trend Graphs
OPTIONS
A B
A
return time
clear
PRESSURE
now
-12h
600
m
m
H
g
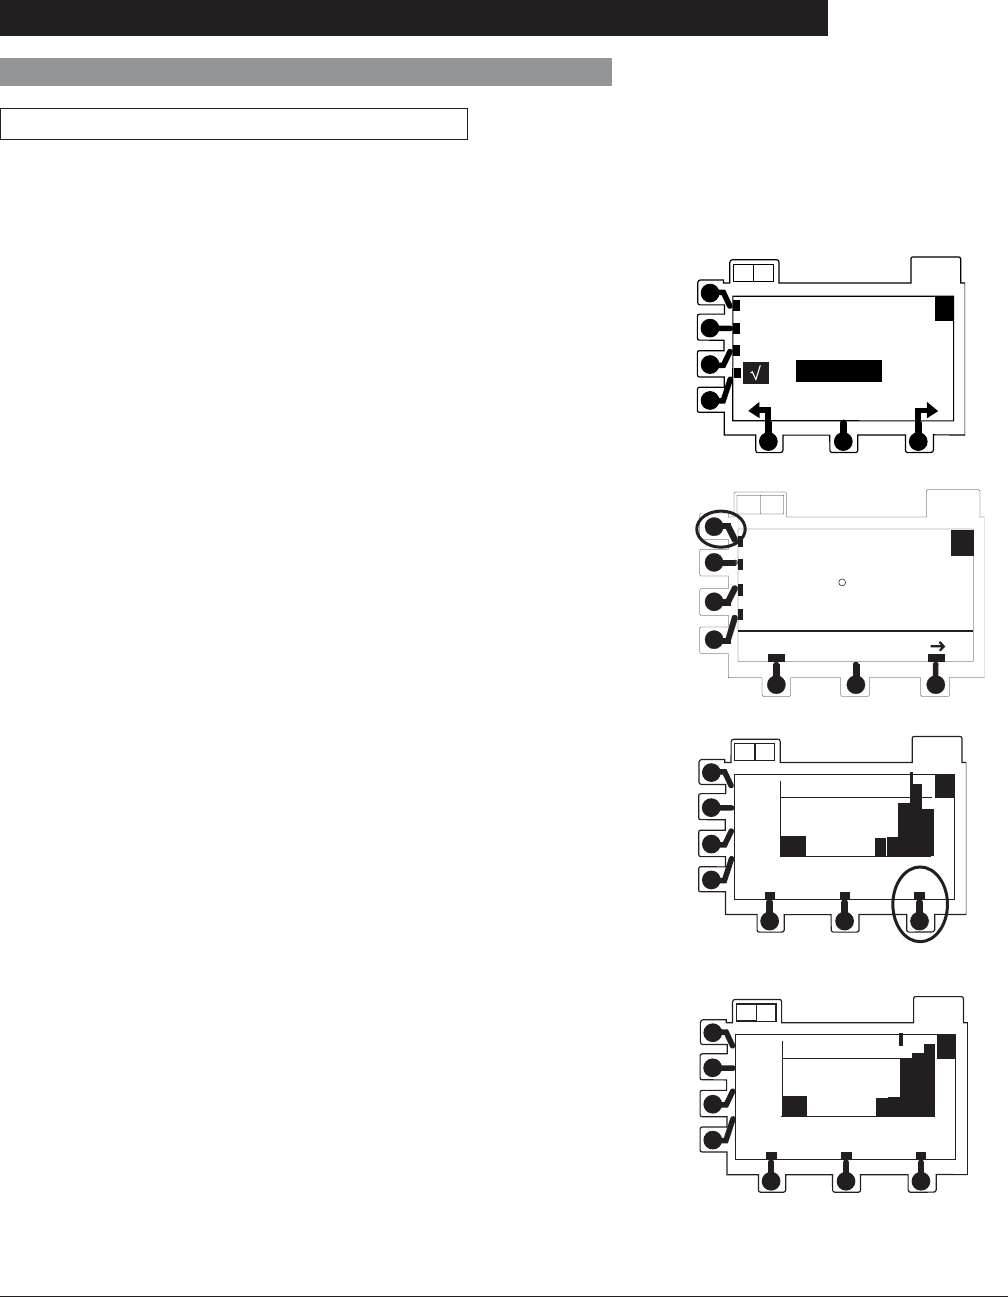
Directions for Use
Alaris® SE Pump
Models 7130/7131, 7230/7231
98 Dynamic Monitoring System
Monitoring Options - Pressure Mode (Continued)
Pressure Trend Graphs (Continued)
Viewing Graphs
1. Dual channel instruments: Select desired channel, as
necessary. Trend graph is not available while split screen
is displayed.
2. Press OPTIONS key.
3. Press Pressure Trend soft key.
OPTIONS
AB
Rate= 125.0 mL/h
VTBI=1000.0 mL
VI= 0.0 mL
Primary
Limit = 300 mmHg
A
Pressure Trend
return
AB OPTIONS
A
Monitoring Options
Guardrails Library
Set Pressure Baseline
page
R
OPTIONS
A B
A
return time
clear
PRESSURE
now
-12h
600
m
m
H
g
4. To change graph time frame, press time soft key.
• A solid horizontal line represents current pressure
alarm limit level.
• Gaps in graph may indicate noninfusing conditions;
such as, turned off, on hold, in alarm.
• If channel has been placed in Resistance Monitoring
mode for some portion of a trend graph window,
pressure data is not available and zero values are
plotted.
• A tick mark (y) at top of graph indicates an occlusion. OPTIONS
A B
A
return time
clear
PRESSURE
now
-12h
600
m
m
H
g
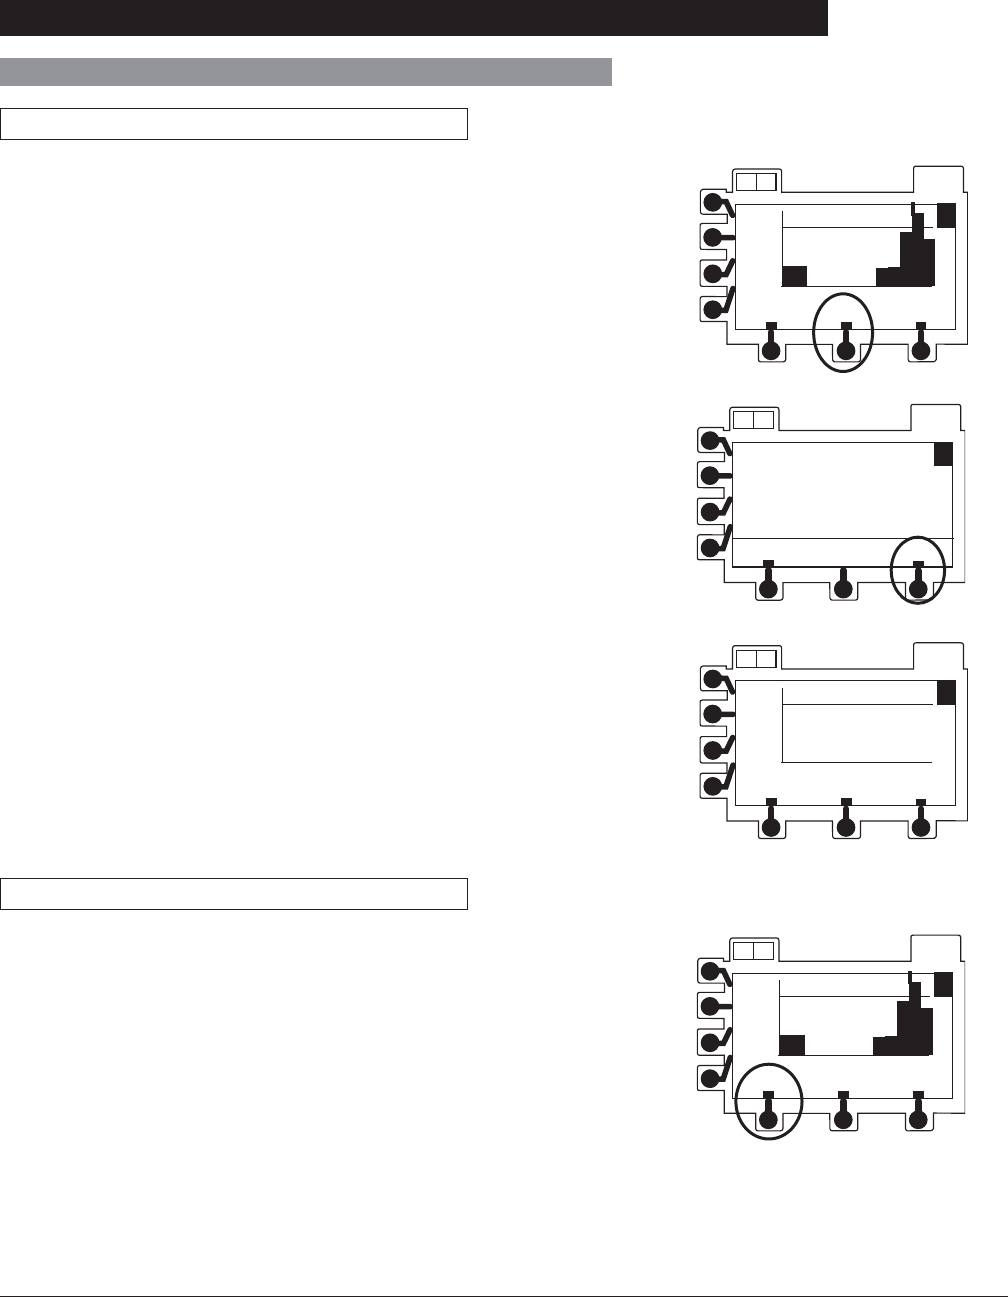
Directions for Use
Alaris® SE Pump
Models 7130/7131, 7230/7231
99
Dynamic Monitoring System
Clearing Graphs
1. To clear graphed data, press clear soft key.
Monitoring Options - Pressure Mode (Continued)
Pressure Trend Graphs (Continued)
OPTIONS
A B
A
return time
clear
PRESSURE
now
-12h
600
m
m
H
g
2. Press ok soft key.
• All data is cleared from graphs.
OPTIONS
A B
A
return ok
All trend data
will be cleared
OPTIONS
A B
A
return time
clear
PRESSURE
now
-12h
600
m
m
H
g
Returning to Normal Operating Screen
Press return soft key. OPTIONS
A B
A
return time
clear
PRESSURE
now
-12h
600
m
m
H
g
-- Continued Next Page --

Directions for Use
Alaris® SE Pump
Models 7130/7131, 7230/7231
100 Dynamic Monitoring System
Monitoring Options - Pressure Mode (Continued)
Pressure Trend Graphs (Continued)
OPTIONS
AB
Rate= 125.0 mL/h
VTBI=1000.0 mL
VI= 0.0 mL
Primary
Limit = 200 mmHg
A
• Normal operating screen appears.
Following events also turn off trend graph:
• Pressing RUN/HOLD key.
• An alarm.
• Dual channel instrument: pressing A B .
• Dual channel instrument: replaced with a split screen
display after 1 minute if both channels are infusing.
Upstream Occlusions Detection
If the flow pathway between the fluid container and the
Pressure Sensor is obstructed due to kinked tubing, a closed
clamp or an improperly installed set, then an OCCLUSION
UPSTREAM condition exists.
Depending on where the upstream path is occluded, flow
may continue for a fraction of a mL before the OCCLUSION
UPSTREAM alarm is produced. At high infusion rates, the
instrument takes relatively little time to alarm. At low infusion
rates, a longer time elapses before the instrument detects the
condition and alarms. In either case, some flow continues
from the instrument during the time prior to the alarm, due to
the elastic behavior of the tubing between the occlusion site
and the pumping mechanism.
If an OCCLUSION UPSTREAM alarm occurs, investigate and
remedy the cause. Ensure that the upstream flow path (such
as tubing) is free of obstructions, that any clamp is open and
that the blue thumb clamp on the Flow Regulator is in the open
(up) position before resuming the infusion.
Returning to Normal Operating Screen
(Continued)

Directions for Use
Alaris® SE Pump
Models 7130/7131, 7230/7231
101
Dynamic Monitoring System
Upstream Occlusions Detection (Continued)
When an upstream occlusion condition is detected:
• OCCLUSION UPSTREAM message appears.
• Audio alarm sounds and infusion stops.
• In certain conditions, upstream alarm system may briefly
pause instrument and present Checking Line message for
10 seconds to confirm or rule out presence of an occlusion.
If occlusion condition is determined not to exist, flow
resumes and no alarm is produced.

Directions for Use
Alaris® SE Pump
Models 7130/7131, 7230/7231
102 Dynamic Monitoring System
THIS PAGE
INTENTIONALLY
LEFT BLANK
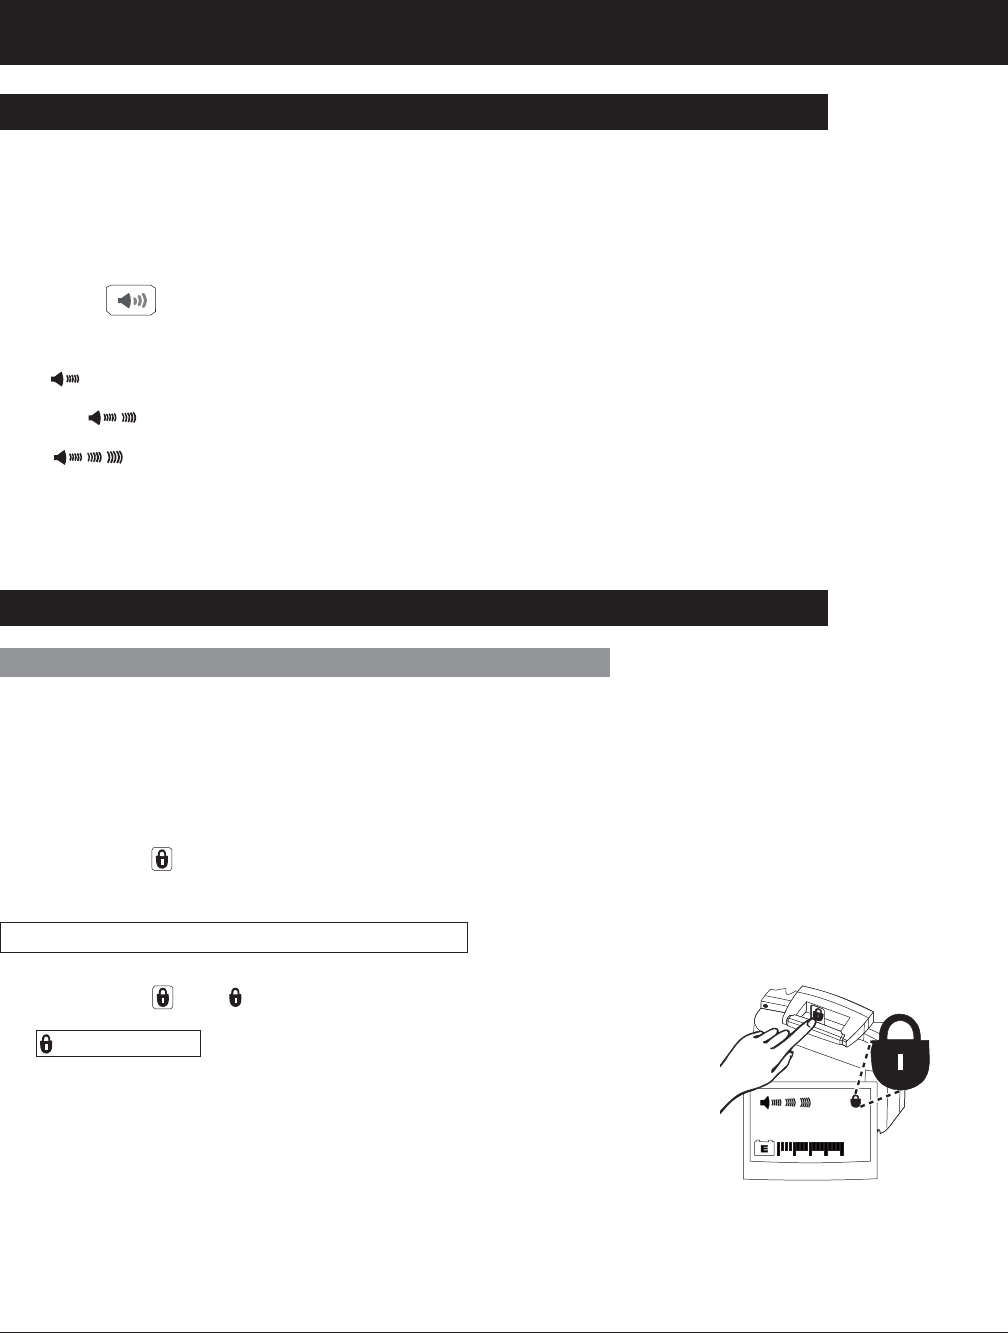
Directions for Use
Alaris® SE Pump
Models 7130/7131, 7230/7231
103
General Set Up and Operation
General Set Up and Operation
Audio Adjust
This feature allows the audio volume to be adjusted for alarms,
alerts and KVO tone to either High, Medium or Low if all audio
volume levels are enabled in the Profile configuration or in the
instrument configuration settings and the Profiles features is
set to OFF (not enabled).
1. Press soft key next to lower LCD display.
• Audio volume level displays in the lower LCD display.
Low
Medium
High
• Instrument can be configured to enable only Medium and
High, or only High audio volume levels.
Tamper Resist
Locking and Unlocking Panel Lock
The panel lock feature helps prevent unauthorized changes
to the instrument settings, including turning the instrument off.
The panel lock feature must be set to ON in the hospital Data
Set or in the instrument configuration settings if the Profiles
feature is set to OFF (not enabled). To make changes or
respond to an alarm, the panel lock must be turned off. The
panel lock key ( ) is located behind the handle.
Turning Panel Lock Feature On
Press and hold until appears in lower display.
• Panel Locked appears in Main LCD Display if any other
key is pressed.
GOLD
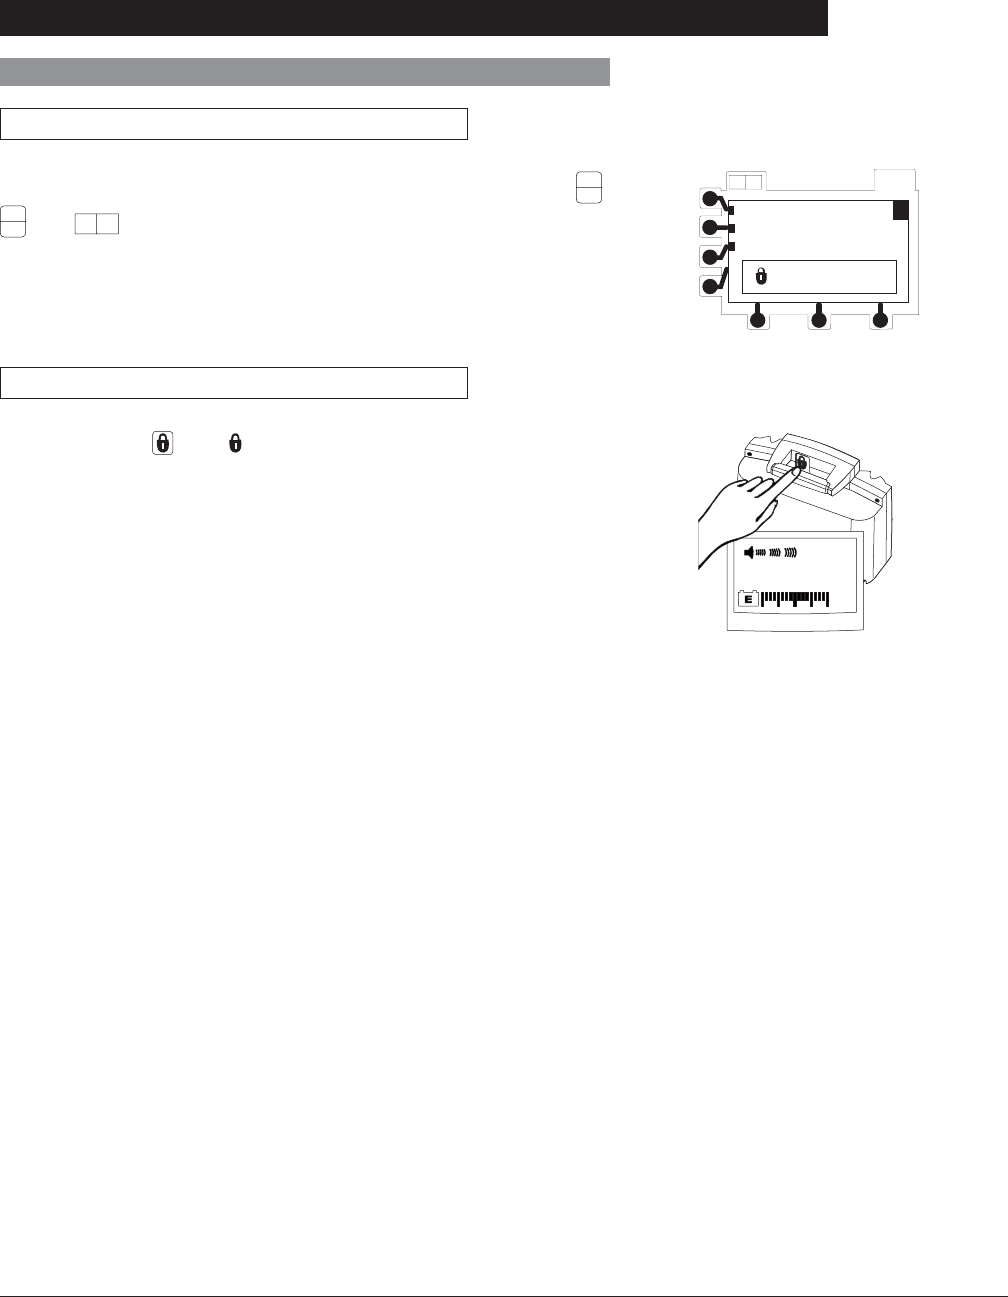
Directions for Use
Alaris® SE Pump
Models 7130/7131, 7230/7231
104 General Set Up and Operation
Tamper Resist (Continued)
Locking and Unlocking Panel Lock (Continued)
Turning Panel Lock Feature Off
Press and hold until disappears from lower display.
GOLD
OPTIONS
AB
A
Panel Locked
VI= 0.0 mL
Rate= 125.0 mL/h
VTBI=1000.0 mL
For dual channel instruments, while panel lock is activated, A
O,
B
O and A B keys can be used to view settings.
Since panel lock must be inactivated to power down
instrument, it is always off when instrument is powered on.
Turning Panel Lock Feature On (Continued)

Directions for Use
Alaris® SE Pump
Models 7130/7131, 7230/7231
105
General Information
General Information
Warnings and Cautions
General
WARNINGS
• The SE Pump is designed to stop fluid flow under
alarm conditions. Periodic patient monitoring must
be performed to ensure the infusion is proceeding as
expected. It is a positive displacement delivery system,
capable of developing positive fluid pressures to overcome
widely varying resistances to flow encountered in practice,
including resistances to flow imposed by small gauge
catheters, filters and intra-arterial infusion. It is neither
designed nor intended to detect infiltrations and will not
alarm under infiltration conditions.
• The use of positive displacement infusion devices ported
together with gravity flow infusion systems into a
common IV site may impede the flow of common gravity-
only systems, affecting their performance. Hospital/facility
personnel must ensure the performance of the common IV
site is satisfactory under these circumstances.
• Each time the SE Pump is turned on, verify and/or set
the monitoring mode, resistance alert, and/or pressure
alarm limit. If the monitoring mode, resistance alert,
and/or pressure alarm limit are not verified, the instrument
may not operate within the desired occlusion detection
parameter(s).
• Before each use, verify the pressure or resistance
alarm limits are appropriate for the patient.
• A new alarm or alert reinstates the audio tone.
• Assess patient’s condition before silencing an alarm. Do
not silence alarm if patient safety might be compromised.
• Disconnect from main (AC) and battery power when
performing maintenance.
• To disconnect from main (AC), unplug the power cord
from the back of the instrument.
DANGER
Explosion risk if used in the presence of flammable anesthetic
agents or gases.

Directions for Use
Alaris® SE Pump
Models 7130/7131, 7230/7231
106 General Information
Warnings and Cautions (Continued)
General (Continued)
• Electrical shock hazard. Do not open case. Refer to
qualified service personnel.
WARNINGS
CAUTIONS
• The SE Pump is not intended to replace supervision by
medical personnel. The user must become thoroughly
familiar with the SE Pump features, operation and
accessories prior to use.
• Always use a grounded, three-wire receptacle. Where
the integrity of the protective earth grounding system is in
doubt, operate on internal battery.
• Should an instrument or accessory be dropped or
severely jarred, it should be immediately taken out of use
and inspected by qualified service personnel, to ensure its
proper function prior to reuse.
• If an instrument appears damaged, contact Cardinal
Health for authorization to return it for repair.
Guardrails® Suite MX
WARNINGS
• The Guardrails® Suite MX incorporates dosing limits
and instrument configuration parameters based on
hospital/facility protocol. The software adds a test of
reasonableness to drug programming based on the
limits defined by the hospital/facility. Qualified personnel
must ensure the appropriateness of drug dosing limits,
drug compatibility, and instrument performance, as part
of the overall infusion. Potential hazards include drug
interactions, inaccurate delivery rates and pressure alarms,
and nuisance alarms.
• When delivering an infusion with the Guardrails® Suite
MX protection, ensure the correct profile (for patient
care area) is selected prior to starting an infusion. Failure
to select the appropriate profile could cause serious
consequences.

Directions for Use
Alaris® SE Pump
Models 7130/7131, 7230/7231
107
General Information
Administration Sets
WARNINGS
• When priming:
- Ensure patient is not connected.
- Ensure air is expelled from line prior to beginning
infusion (unexpelled air in line could have serious
consequences).
Failure to prime correctly can delay infusion delivery and
cause the total volume to be infused to read higher than
the actual total delivered to the patient.
• Discard if packaging is not intact or protector caps are
unattached.
• Use only sets dedicated for use with the SE Pump.
The use of any other set may cause improper instrument
operation, resulting in an inaccurate fluid delivery or other
potential hazard.
Warnings and Cautions (Continued)
CAUTION
• Before operating instrument, verify that administration set
is free from kinks and installed correctly in instrument.
Epidural Administration
WARNINGS
• Epidural administration of drugs other than those
indicated for epidural use could result in serious injury to
the patient.
• It is strongly recommended that the source container,
administration set, and SE Pump used for epidural drug
delivery be clearly differentiated from those used for other
types of administration.

Directions for Use
Alaris® SE Pump
Models 7130/7131, 7230/7231
108 General Information
Warnings and Cautions (Continued)
Electromagnetic Compatibility
WARNINGS
• Do not use the SE Pump near Magnetic Resonance
Imaging (MRI).
• Use of any accessory or cable other than those specified
may result in increased emissions or decreased SE Pump
immunity.
• Do not use the SE Pump in a hyperbaric chamber.
Epidural Administration (Continued)
CAUTIONS
• The instrument should not be used adjacent or stacked
with other equipment. If adjacent or stacked use is
necessary, the instrument should be observed to verify
normal operation in the configuration in which it will be
used.
• Portable and Mobile RF communications can affect
Medical Electrical Equipment.
WARNINGS
• The SE Pump can be used for epidural administration of
anesthetic and analgesic drugs. This application is
only appropriate when using anesthetics and analgesics
labeled for continuous epidural administration and
catheters intended specifically for epidural use. Use only
sets dedicated for use with the SE Pump, without a ‘Y’
connector or injection port, for epidural infusions.
- Epidural administration of anesthetic drugs: Use
indwelling catheters specifically indicated for short-term
(96 hours or less) anesthetic epidural drug delivery.
- Epidural administration of analgesic drugs: Use
indwelling catheters specifically indicated for either
short-term or long-term analgesic epidural drug
delivery.

Directions for Use
Alaris® SE Pump
Models 7130/7131, 7230/7231
109
General Information
Battery Management System
The Battery Management System incorporates features which
enhance battery maintenance in order to maximize the life of
the battery, reduce associated costs and increase instrument
availability. The system provides:
• Green : lights when instrument is plugged in.
• Amber : flashes when instrument is operating on battery
power.
• Automatic battery power: if instrument is unplugged or in
the event of a power failure.
• Low battery alert: indicates battery depletion is imminent,
beginning at least 30 minutes prior to a BATTERY
DEPLETED alarm.
Maximum battery capacity, as well as optimal gauge accuracy,
is reached after several complete charge/discharge/recharge
cycles in the refresh process. It is recommended that the
battery be fully charged/discharged/recharged, using the
refresh cycle, before placing the instrument in use. Reference
the Technical Service Manual for detailed information on the
refresh cycle.
Warnings and Cautions (Continued)
Electromagnetic Compatibility (Continued)
CAUTIONS
• The SE pump is intended for use under the supervision of
healthcare professionals only. This is a CISPR 11 Class B
device without the use of the Model 180 (Flow Sensor) and
CISPR 11 Class A when the Model 180 (Flow Sensor) is
used. In a domestic environment, this system may cause
radio interference. Reorienting, relocating or shielding
the system, or filtering the connection to the public mains
network, are examples of steps that can be taken to reduce
or eliminate interference.

Directions for Use
Alaris® SE Pump
Models 7130/7131, 7230/7231
110 General Information
Battery Recharge
The battery recharges whenever the instrument is plugged
into an AC outlet. The battery can be replaced when charging
capacity gets too low.
All batteries gradually lose their capacity to hold a charge
over time and use. To maintain optimal battery performance,
ensure the instrument is connected to AC power whenever
possible, including when it is powered off or stored.
Following certain battery depleted conditions it is necessary
to reset the internal clock so the CQI Reporter data integrity
is maintained (see "Programming", "Programming and
Navigation Tips", "Responding to Time Set Reminder".
Flow Sensor À
The optional flow sensor notifies users of empty containers
and/or upstream occlusions. A handle cap accessory is
available for storing the flow sensor when not in use.
The flow sensor is not used for the first 25 mL delivered when
changing from secondary to primary. This is to account for
overfill of secondary containers.
Battery Management System (Continued)
WARNING
The protective cover over the RS-232
connector must remain in place when
not in use.
Battery Power Gauge and Indicator
The gauge indicates approximate battery run time remaining
under current operating conditions. It is located in the
lower display and is always on. To ensure a more accurate
battery gauge reading, review the remaining battery run time
5 minutes after starting an infusion.
Battery run time may be affected by the operating mode, rate,
monitoring options and back pressure. The gauge accuracy is
based on the last refresh cycle and is affected by the number
of charge/discharge/recharge cycles. The instrument label
and battery gauge are always displayed, even when the
instrument is turned off; however, the battery gauge does not
represent the battery time remaining when the instrument is
turned off.
GOLD
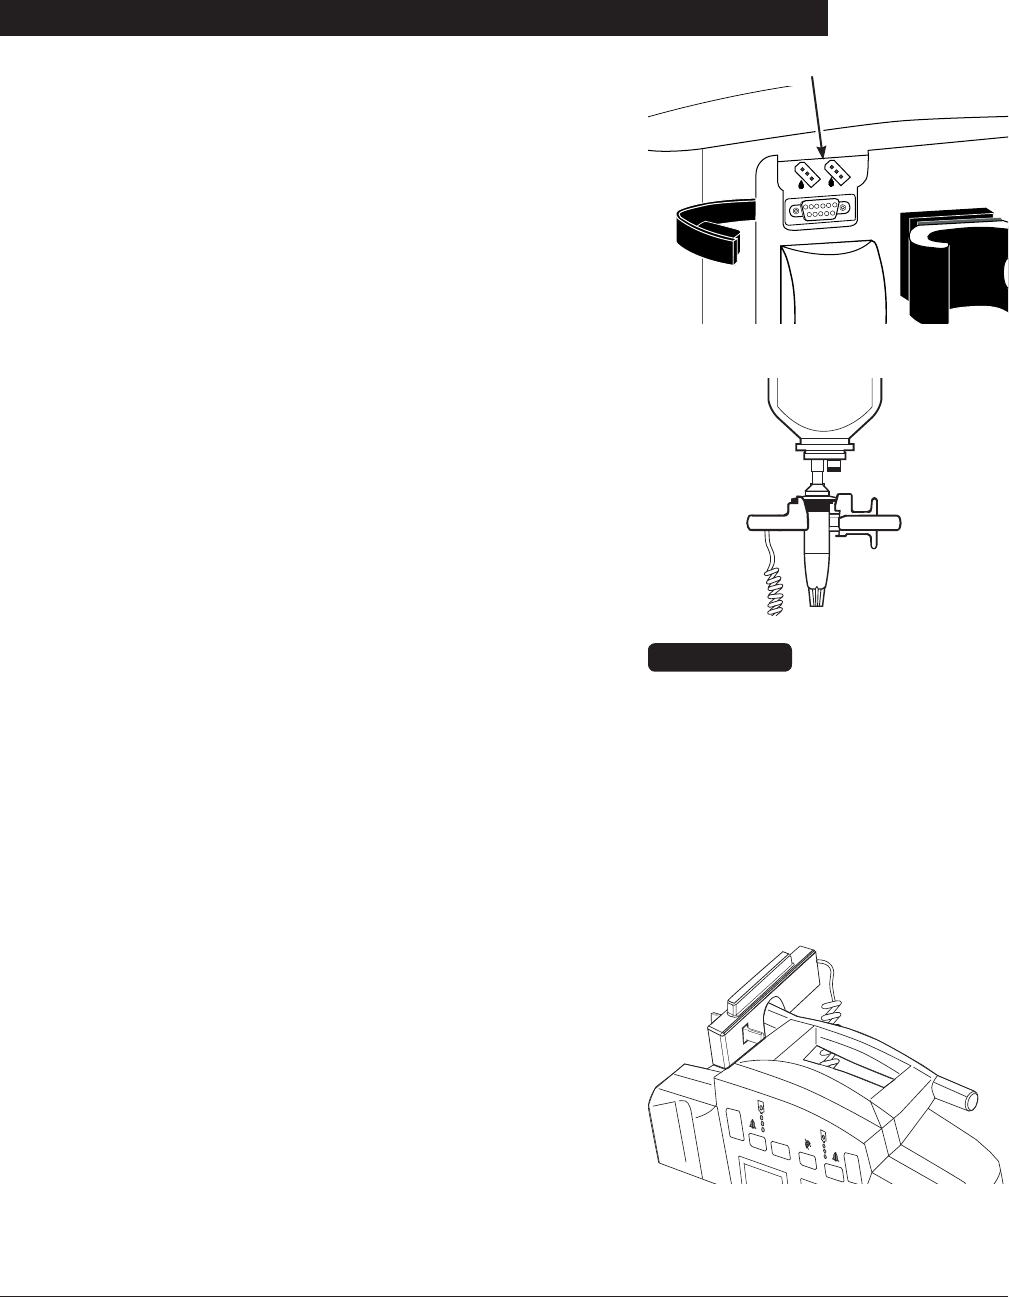
Directions for Use
Alaris® SE Pump
Models 7130/7131, 7230/7231
111
General Information
A
BA
B
Flow Sensor Connectors
Flow Sensor (Continued)
If a flow sensor is not connected to the instrument, ensure
protective plugs are installed at the connector site to prevent
entry of foreign material.
1. Plug a Model 180 Flow Sensor into applicable channel
connector on back of instrument.
CAUTION
Infusing fluids which form smaller
drops, through a 60 drops/mL set,
at high rates may result in a No
Upstream Flow Detected alarm.
This is because the small, rapidly
falling drops form a continuous
stream which does not trigger the
flow sensor. In this event, unplug the
flow sensor from the instrument.
2. Attach flow sensor to upper portion of drip chamber.
• When using flow sensor, correct placement is essential
for proper operation. Some administration set drip
chambers have a flange at top to which flow sensor
can be attached. Attachment on flange ensures
proper placement.
Upper surface of flow sensor should be slightly below
drop-forming orifice but above level of fluid in drip
chamber.
Ensure drip chamber is at least 2/3 full and sensor
optics are clean. Fluid level in drip chamber must be
checked/re–established after each empty container
condition
• When using flow sensor option while ambulating
or transporting a patient from one area to another,
use care to avoid excessive swinging of solution
container(s).
3. Attach flow sensor to instrument handle when not in use.

Directions for Use
Alaris® SE Pump
Models 7130/7131, 7230/7231
112 General Information
Alerts Counter À
The instrument keeps a running count of Guardrails® Alerts
that occur. This information may be viewed with the Alerts
Counter feature.
Definitions Á
GR Alerts: Total number of Hard Limit and Soft Limit
Guardrails® alerts that occur.
GR Starts: Total starts when a Guardrails® drug or
Guardrails® fluid is selected. GR Start counter
also increments if a rate or dose rate change
occurs during a running infusion. A transition to
KVO rate is not counted as a start.
Log % Full: CQI log retained by instrument can hold up
to 300 Guardrails® alerts and resolutions
snapshots. The % full indication represents
percentage of 300 available logged snapshots
used. For example, if log currently contains 30
snapshots, % full indication is 10%. Log always
retains most recent 300 snapshots, therefore,
even if this indication is 100% full, subsequent
Guardrails® alerts and resolution snapshots
are stored and oldest ones are deleted to make
space for newer ones.
CAUTION
Do not use solvents or cleaning
agents. Damage to plastic parts of
the flow sensor could occur.
NOTE:
À If the flow sensor option is in use, VTBI can be turned off by
selecting VTBI, pressing CLEAR and then ENTER keys.
OR
Primary VTBI can be deleted from the primary mode setup
page (see “General Information, System Confi gurable
Options”).
Flow Sensor (Continued)
4. Routinely clean flow sensor with warm water while
actuating slider, then dry thoroughly.

Directions for Use
Alaris® SE Pump
Models 7130/7131, 7230/7231
113
General Information
Viewing Alerts Counter
1. Press OPTIONS key.
2. Press Alerts Counters soft key.
3. To return to main display, press return soft key.
OR
To clear counter (reset all values to zero), press clear soft
key.
OR
To view second event counter page, press page soft key.
• Last cleared date displays.
Alerts Counter (Continued)
Definitions (Continued)
New Patients: Total number of new patients or profiles
selected. Counter increments when yes to New
Patient? screen prompt or a different profile at
instrument power up is selected.
Overrides: Total number of Soft Limit Guardrails® alerts
that are overridden. Counter increments when
yes is selected in response to soft override alert
prompt.
Soft Alerts: Total number of Soft Limit Guardrails® alerts that
occur. Counter increments when either yes or
no is selected in response to soft override alert
prompt.
Total Starts: Total number of infusion starts. A start occurs
when run key is selected from an inactive or
paused condition.
NOTES:
À For dual channel instruments, the counters represent the total
counts for both channels.
Á These are the counter labels as they appear on the Main
Display.

Directions for Use
Alaris® SE Pump
Models 7130/7131, 7230/7231
114 General Information
Nurse Call (7130/7230 Only)
Activating Nurse Call Feature
If the instrument is equipped with the optional nurse call
feature, alarms and some alerts from the instrument are
relayed to the hospital’s existing nurse call system. No
instrument operating features are changed. The instrument
alarms with or without the nurse call installed.
1. Plug nurse call cable into
RS 232
on instrument back
panel. À
2. Press channel’s POWER key.
• Instrument beeps briefly to signal proper operation.
3. Plug nurse call cable into nurse call system.
4. Operate instrument as described in this document. Á Â
NOTES:
À A false remote alarm may occur if the nurse call plug is not
properly inserted.
Á All alarms and some alerts activate the nurse call system.
The following alerts will not activate the nurse call system:
Checking Line, Load Dose Complete, Secondary Complete.
 Disconnecting the nurse call cable from the wall or
turning off the instrument activates the nurse call system.
Disconnecting the nurse call cable from the instrument
will not activate the nurse call system.
If an Alarm Occurs
1. Determine cause and appropriate corrective action (see
"Troubleshooting and Maintenance", “Alarms, Alerts,
Prompts”).
2. Reset nurse call system, as required.
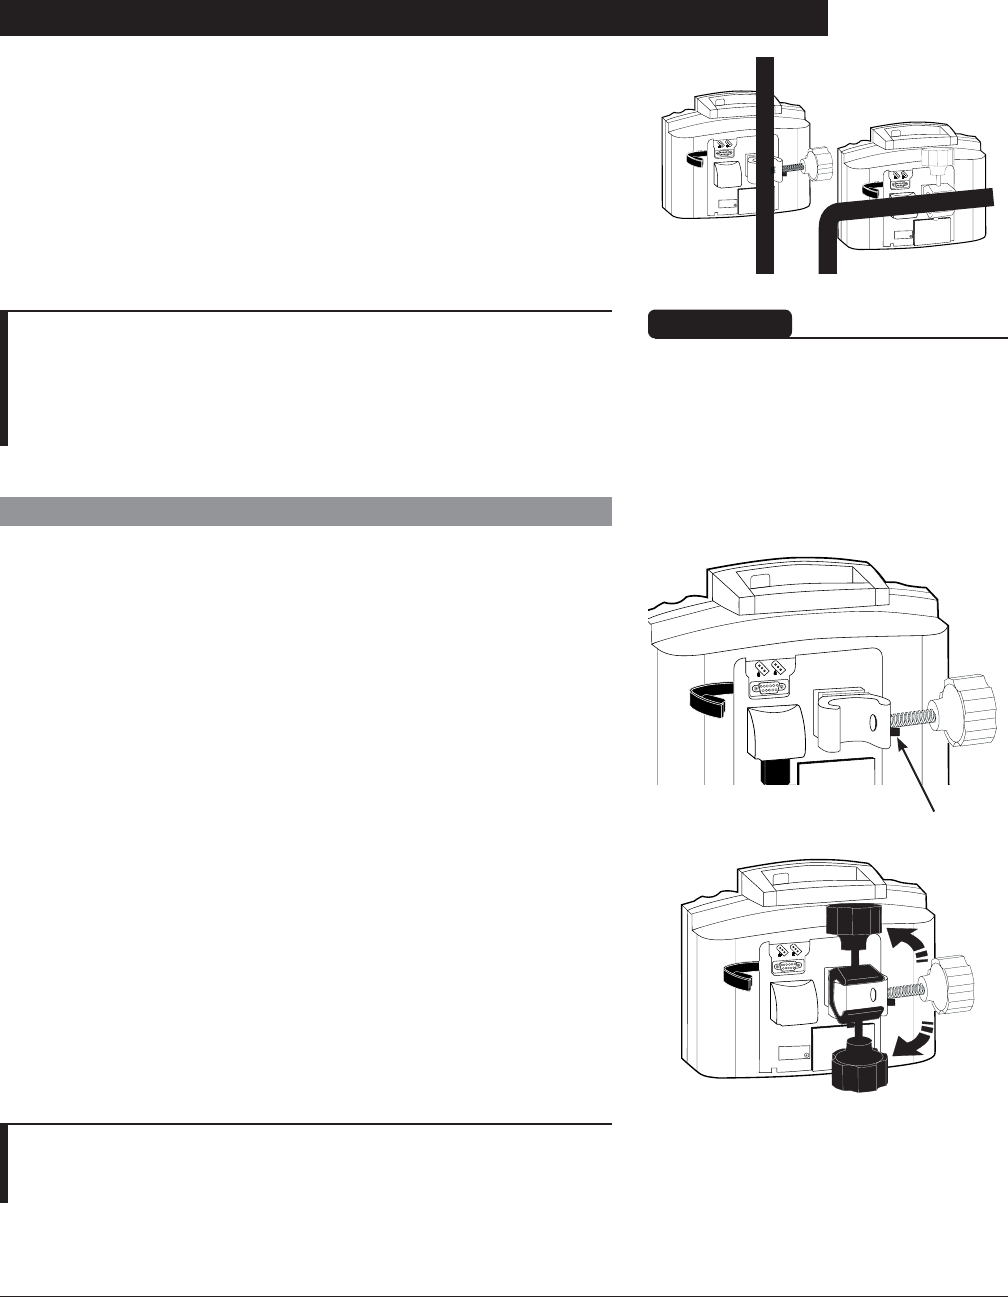
Directions for Use
Alaris® SE Pump
Models 7130/7131, 7230/7231
115
General Information
Pole Clamp
The uniquely designed pole clamp adapts to a wide variety
of surfaces (such as, poles, bed rails) to provide greater
versatility and to simplify transports.À Á It features:
• 360º rotation in 90º increments
• ergonomically designed knob
• accommodates diameters from 15 to 35 millimeters
NOTES:
À The illustrated pole clamp knob may not reflect the knob in
use on the instrument.
Á When using multiple instruments, care should be taken to
evenly distribute the instruments to ensure stability.
A
BA
B
A
BA
B
WARNING
To ensure proper occlusion
detection, DO NOT operate the
instrument tilted back more than 45º
from the upright position.
Changing Pole Clamp Orientation À
1. Press and hold rotation lever.
A
BA
B
Lever
NOTE:
À The illustrated pole clamp knob may not reflect the knob in
use on the instrument.
2. Reposition clamp.
3. Release lever at desired position.
A
BA
B
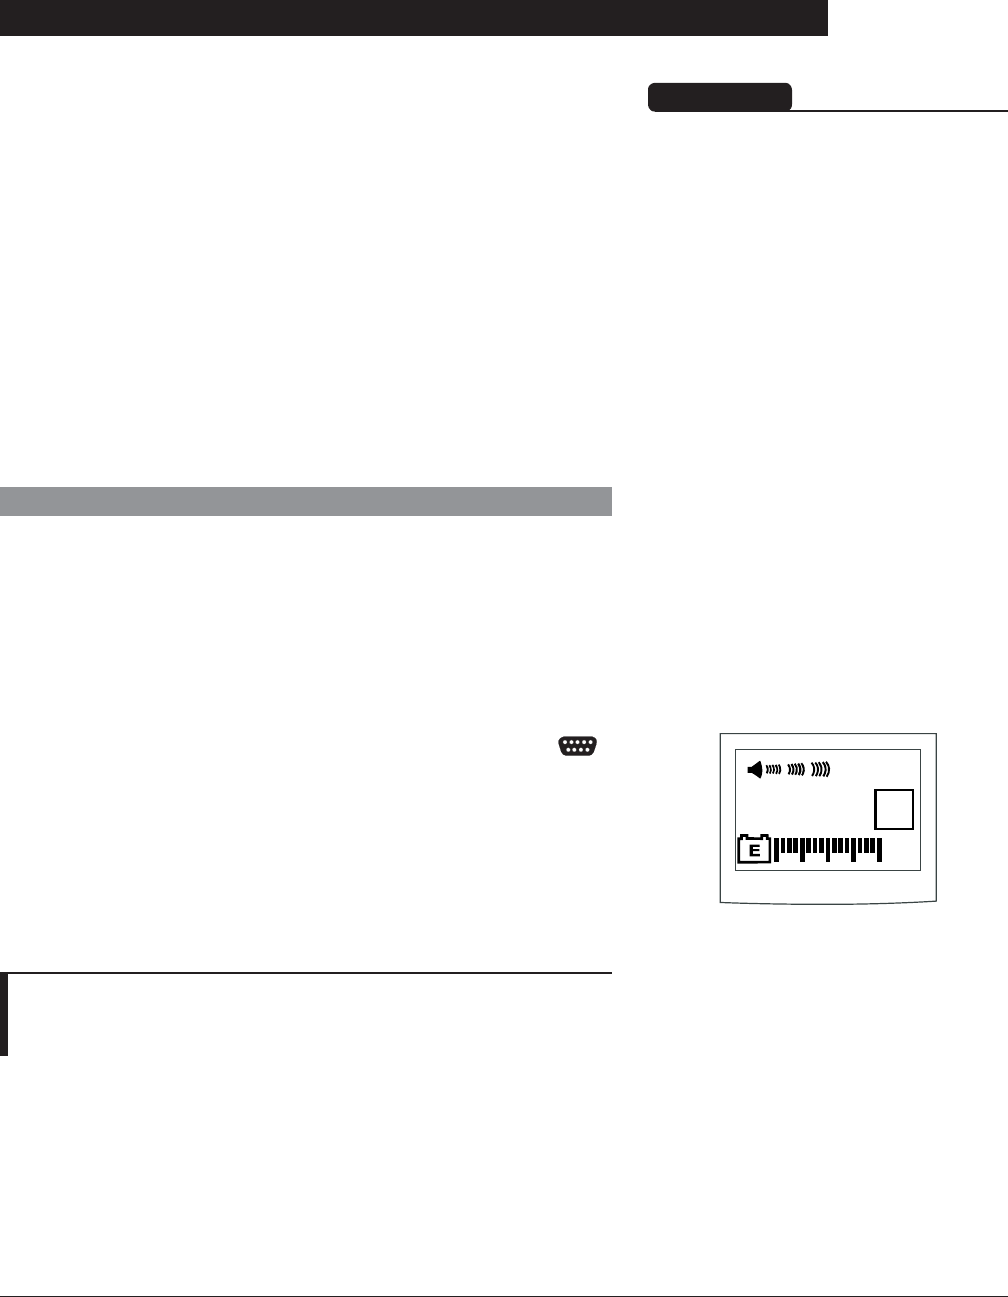
Directions for Use
Alaris® SE Pump
Models 7130/7131, 7230/7231
116 General Information
RS-232 Computer Link
The optional Computer Link feature allows a hospital/facility
computer to interact with the instrument. The computer cannot
start or stop the instrument, set the rate, or make any change
in status. The feature may be enabled or disabled by qualified
personnel in the instrument configuration settings. If the
feature is enabled (On) the user may select Monitor, to allow
the computer to receive information from the instrument, or
Off. When Off is selected, the computer cannot communicate
with the instrument.
To assure continued electromagnetic compatibility
performance, the communications cable attached to the
instrument should be no longer than 1 meter, have fully
shielded connector housings, and have a 100% coverage
braid/foil shield attached to the connector housings around the
signal conductors with the cable jacket.
Connecting to a Computer
1. Press OPTIONS key.
2. To advance to next page, press page soft key.
3. Press Computer Link soft key.
4. Press Monitor soft key.
5. Press ok soft key.
6. Connect an RS-232 cable from hospital computer to
RS 232
port on instrument back panel.
• During communication between host computer and
instrument, MNTR (Monitor Mode) appears in lower
LCD. À
• If communication is interrupted, MNTR flashes for 60
seconds.
MNTR
GOLD
NOTE:
À MNTR remains in the lower display once the mode is selected
and communication with the computer has been established.
WARNINGS
• Use of any accessory or cable
other than those specified may
result in increased emissions or
decreased SE Pump immunity.
• The protective cover over the
RS-232 connector must remain
in place when not in use.
• Only equipment that complies
with IEC EN 60601-1 or UL
1069 (approved medical or
hospital signaling equipment)
should be connected to the RS-
232 connector.

Directions for Use
Alaris® SE Pump
Models 7130/7131, 7230/7231
117
General Information
RS-232 Computer Link (Continued)
Disconnecting from a Computer
1. Press OPTIONS key.
2. To advance to next page, press page soft key.
3. Press Computer Link soft key.
4. Press Off soft key.
5. Press ok soft key.
6. Disconnect RS-232 cable from
RS 232
port on instrument
back panel.
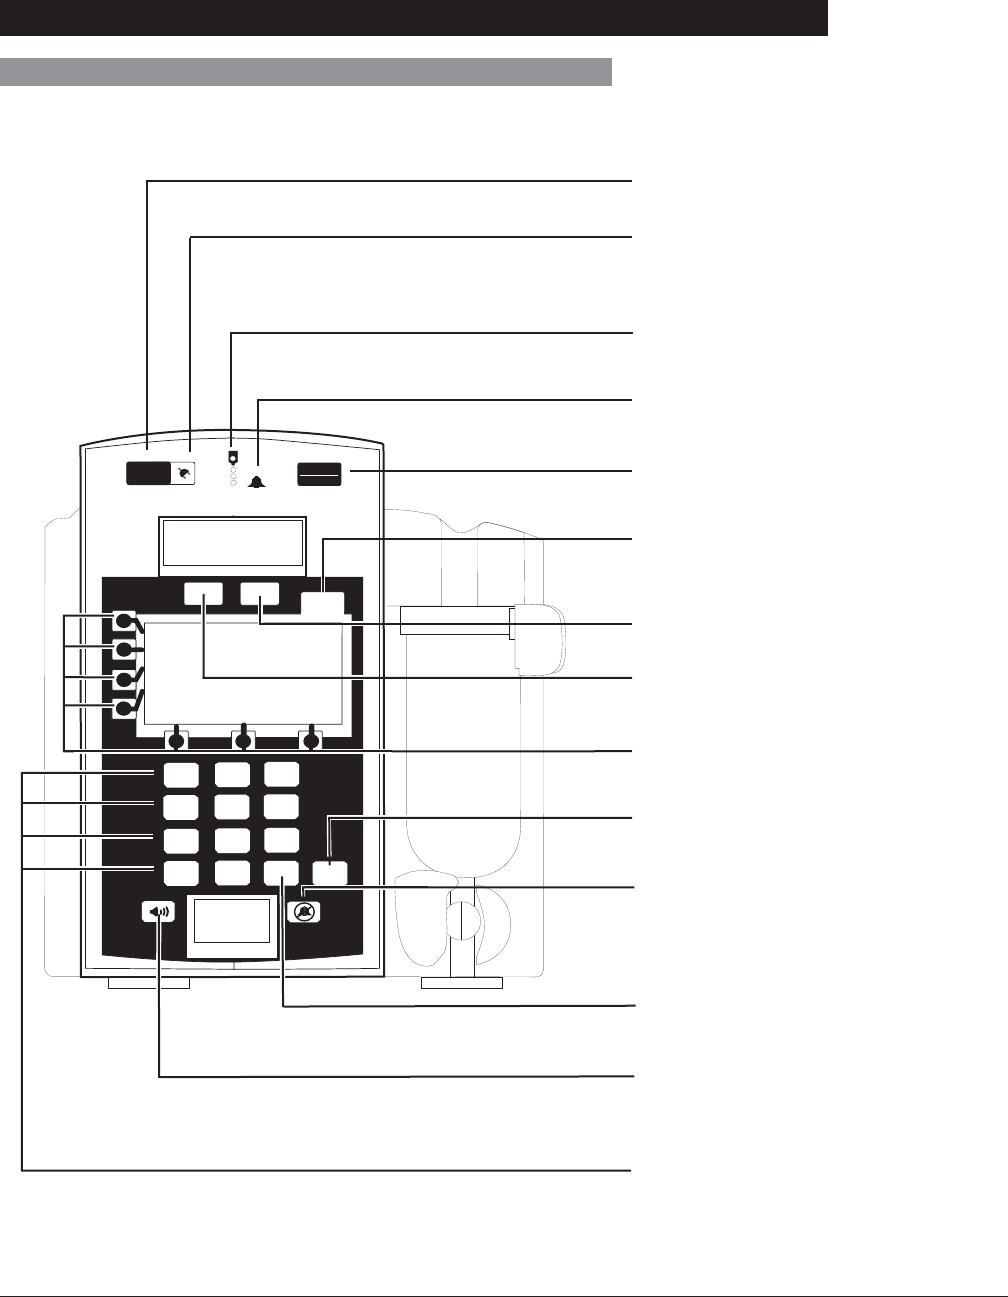
Directions for Use
Alaris® SE Pump
Models 7130/7131, 7230/7231
118 General Information
Features and Displays
Operating Features, Controls, Indicators
Models 7130/7131
SEC
PRI
Clear Enter
OPT PRI HLD SEC KVO
1
RUN
HOLD
POWER
OPTIONS
23
456
789
.0
ml/hr
Power Key: Turns instrument on and
off.
Power Indicator:
Green = Plugged in and charging.
Flashing Amber = Battery power.
Infusing Indicator: Indicates
instrument is infusing.
Alarm Indicator: Indicates instrument
is in alarm and has stopped infusing.
RUN/HOLD Key: Starts and stops
infusion.
OPTIONS Key: Accesses additional
features.
Secondary (SEC) Key: Selects
secondary mode.
Primary (PRI) Key: Selects primary
mode.
Soft Keys: Reference “Programming
and Navigation Tips”.
ENTER Key: Accepts value or
selection entered.
Silence Key: Silences audible alarm or
alert for 2 minutes; message remains on
screen. New alarm or alert reinstates
audible tone.
CLEAR Key: Clears selected numeric
value.
Audio Volume Key: Sets audio volume
for alarms, alerts and KVO tone. Press
key to adjust volume.
Numeric Keypad: Enters/changes
values.
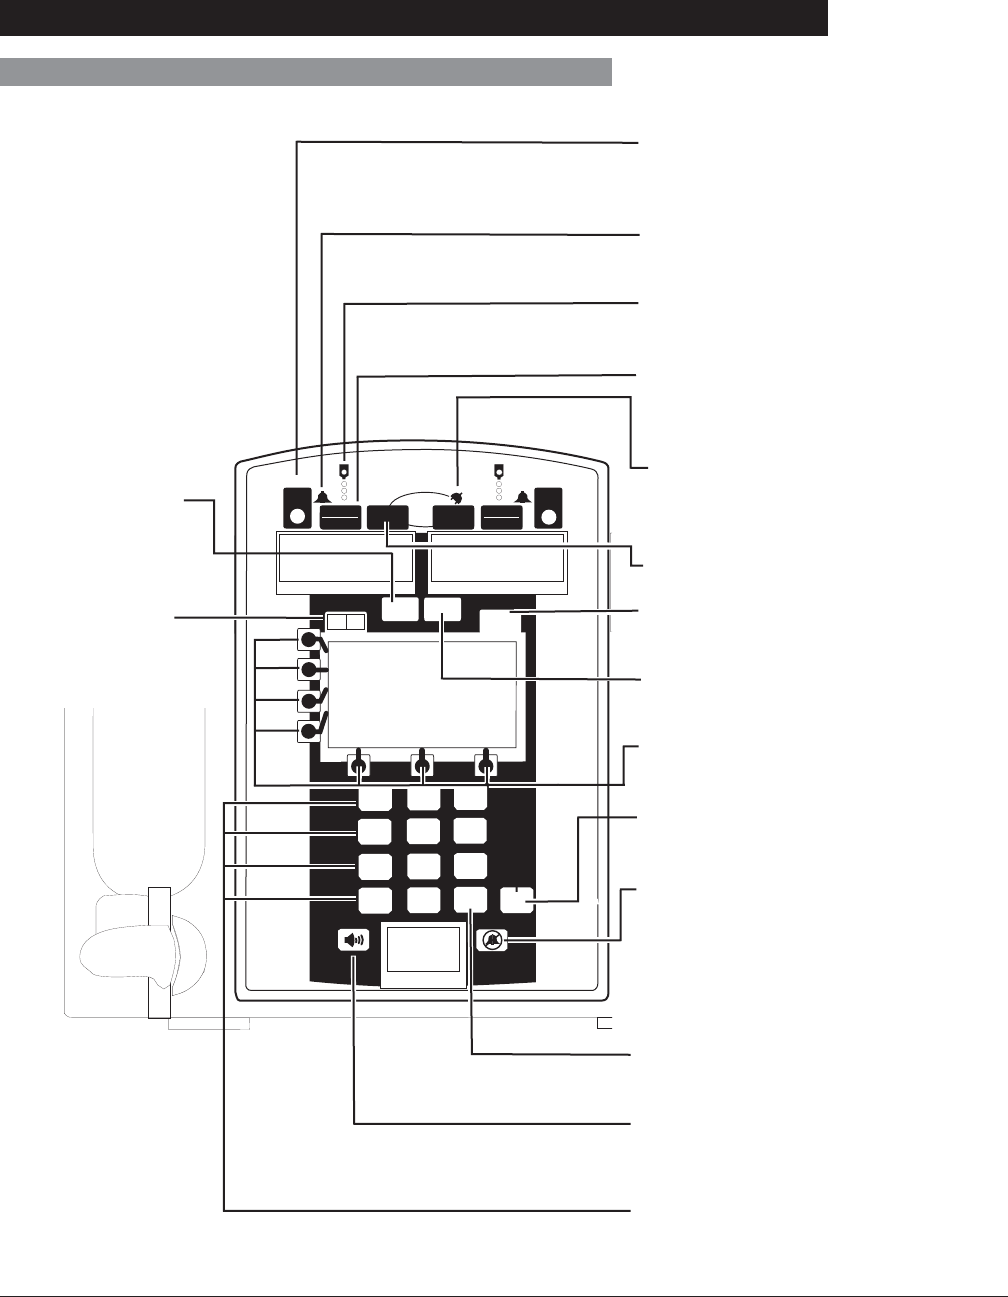
Directions for Use
Alaris® SE Pump
Models 7130/7131, 7230/7231
119
General Information
Features and Displays (Continued)
Operating Features, Controls, Indicators (Continued)
Channel Select Keys/Indicators:
Select channel A or B. Light to indicate
which channel is selected.
Alarm Indicators: Indicate a channel
is in alarm and has stopped infusing.
Infusing Indicators: Indicate a
channel is infusing.
RUN/HOLD Keys: Start and stop
infusion on selected channel. To restart,
channel must be selected.
Power Indicator:
Green = Plugged in and charging.
Flashing Amber = Battery power.
Power Keys: Turn channels on and off.
OPTIONS Key: Accesses additional
features.
Secondary (SEC) Key: Selects
secondary mode.
Soft Keys: Reference “Programming
and Navigation Tips”.
ENTER Key: Accepts value or
selection entered.
Silence Key: Silences audible alarm or
alert for 2 minutes; message remains on
screen. New alarm or alert reinstates
audible tone.
CLEAR Key: Clears selected numeric
value.
Audio Volume Key: Sets audio volume
for alarms, alerts and KVO tone. Press
key to adjust volume.
Numeric Keypad: Enters/changes
values.
OPTIONS
SEC
PRI
POWER
RUN
HOLD
Clear Enter
PRI SEC HLD OPT KVO
HLD PRI SECKVO OPT
23
456
789
•0
1
POWER
RUN
HOLD
AB
A B
ml/hr ml/hr
Models 7230/7231
Primary (PRI) Key:
Selects primary mode.
Channel must be
selected.
Split Screen Key:
Displays information for
both channels when both
channels are infusing.
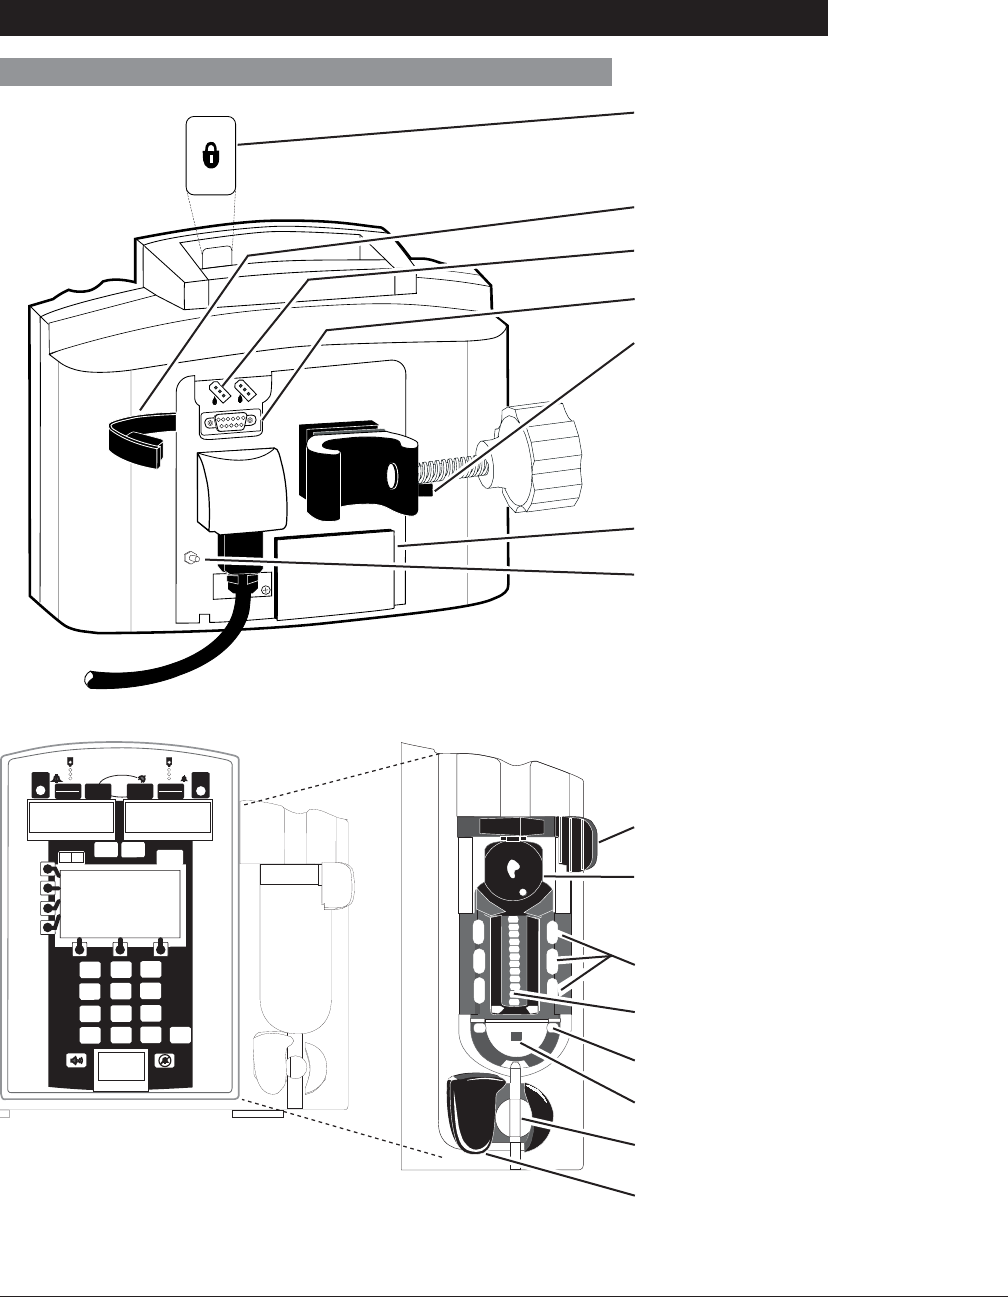
Directions for Use
Alaris® SE Pump
Models 7130/7131, 7230/7231
120 General Information
OPTIONS
SEC
PRI
POWER
RUN
HOLD
Clear Enter
PRI SEC HLD OPT KVO
HLD PRI SECKVO OPT
23
456
789
•0
1
POWER
RUN
HOLD
AB
A B
ml/hrml/hr
Features and Displays (Continued)
Operating Features, Controls, Indicators (Continued)
A
BA
B
Panel Lock Key
RS-232 Connector Cover
Flow Sensor Receptacle(s)
RS-232 Connector
Pole Clamp Rotation Lever
Battery Door
Potential Equalization Connector
(7131/7231)
Latch
Flow Control Actuator
Clamp Arms
Pumping Mechanism
Loading Guide
Pressure Transducer
Air-in-Line Detector
Air-in-Line Arm
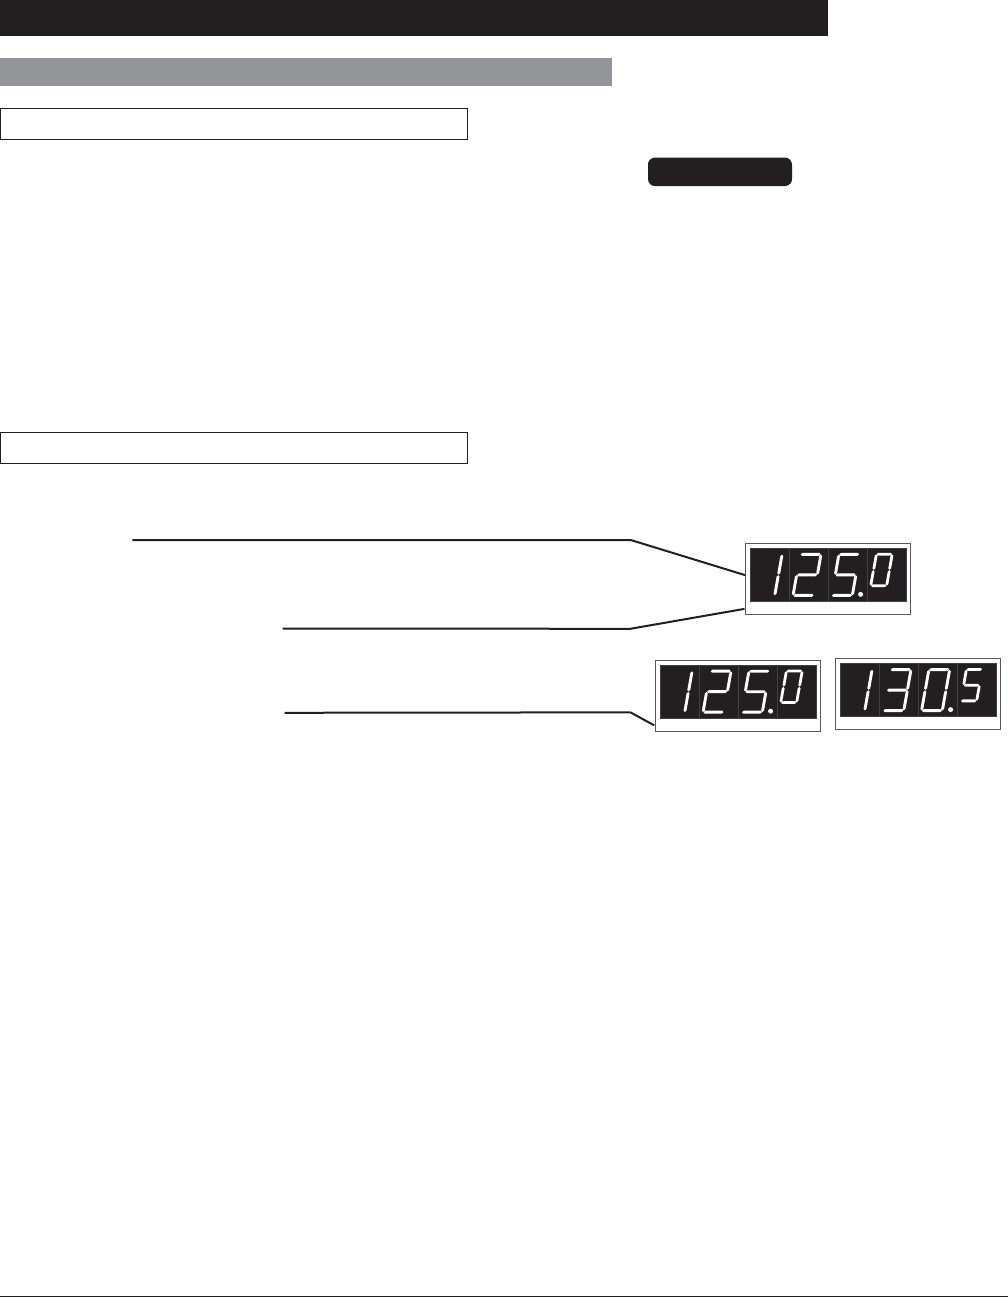
Directions for Use
Alaris® SE Pump
Models 7130/7131, 7230/7231
121
General Information
LED rate display is easily viewed from a distance.
Rate Display
Indicates current infusion rate(s) in mL/h. Flashes to indicate
hold or alarm condition, and when in KVO mode.
Model 7130/7131 Status bar
Indicates which mode instrument is in: Optional Modes,
Primary, Hold, Secondary, or KVO.
Model 7230/7231 Status bar
Indicates which mode each channel is in: KVO, Optional
Modes, Hold, Primary, or Secondary.
Features and Displays (Continued)
Displays
Main Display
The Main Display is backlit for easy viewing. The backlight
dims when operating on battery power as an energy-saving
feature. Pressing any key automatically turns the backlight up
again.
CAUTION
Appearance of lines and/or dots
that remain on constantly when
the instrument is powered on may
indicate improper functioning of
the Main Display. Although the
instrument is functioning properly,
return it to qualified service
personnel.
Rate Display
KVOOPT HLD SEC
PRI
ml/hr
KVO OPT HLD SECPRI
ml/hr ml/hr
PRI SEC HLD KVOOPT
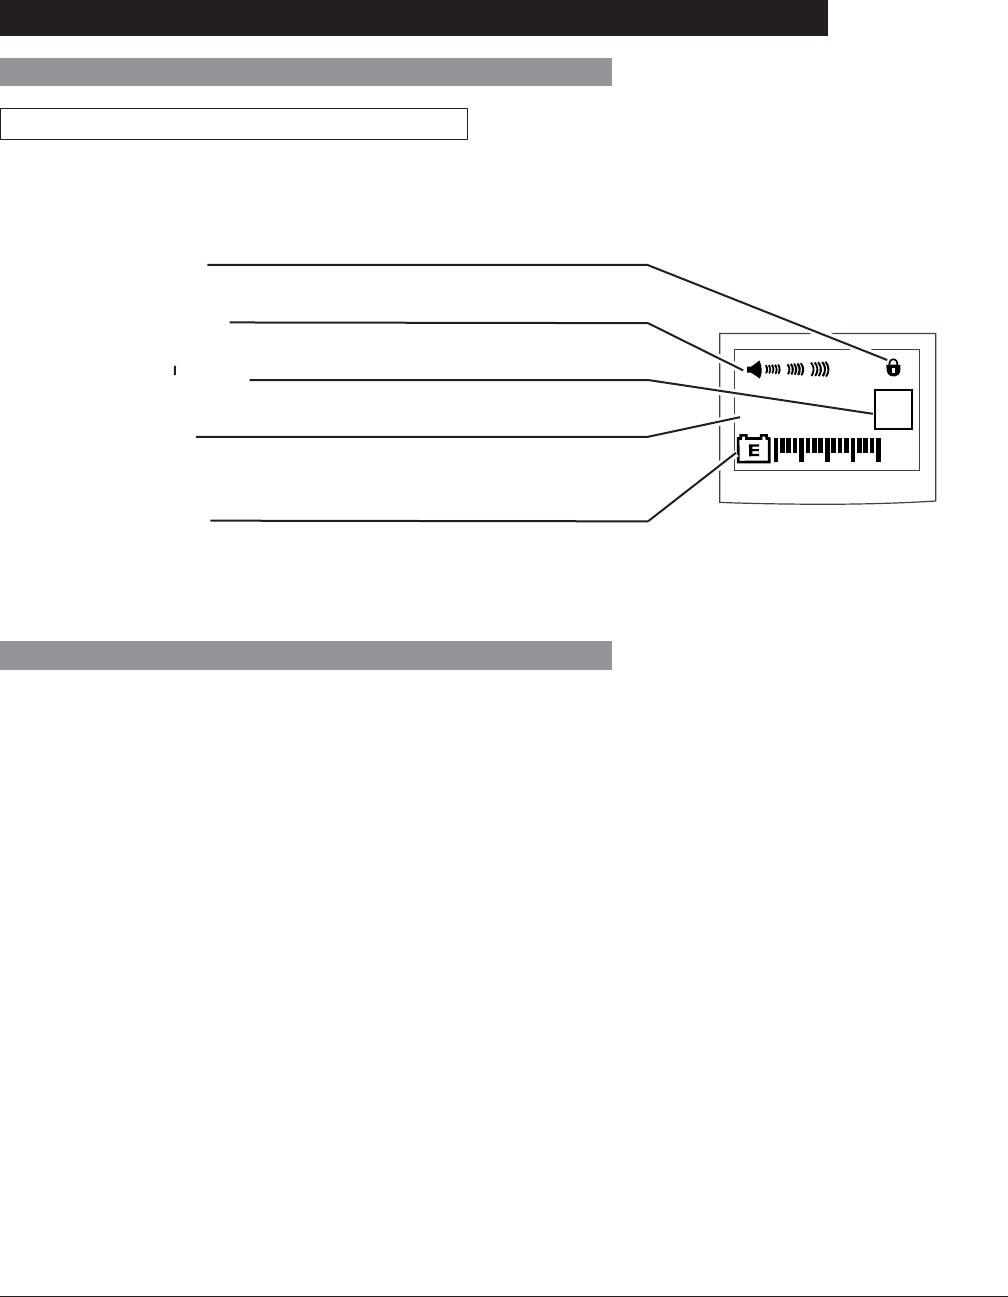
Directions for Use
Alaris® SE Pump
Models 7130/7131, 7230/7231
122 General Information
Features and Displays (Continued)
Displays (Continued)
Lower Display
The lower LCD display is backlit for easy viewing. The display
dims when operating on battery power, as an energy-saving
feature.
Panel Lock Indicator
Displayed if panel lock is on.
Audio Volume Indicator
Indicates audio volume for alarms and alerts.
Computer Mode Indicator
Displayed if instrument is in computer monitor mode.
Instrument ID Label
Characters are entered to identify selected Profile or
configuration, ownership, location, etc.
Battery Power Gauge
Indicates approximate battery time remaining under current
infusing conditions.
MNTR
GOLD
Feature Definitions
Bolus Dose Continuous infusions within Dose Rate Calculator mode may include Bolus
dosing. Enabling this mode allows a bolus infusion to be programmed using
either Drug Library or Drug? NO DOSE LIMIT option. Bolus infusion can be
programmed with or without a continuous infusion to follow bolus.
Data Set Created using Editor Software authoring tool and then transferred to SE
Pump. A Data Set reflects facility’s best-practice guidelines for IV Drug
administration and includes: Profile Drug Libraries, Profile Fluid Libraries,
Clinical Advisories and instrument configurations.
Drug Library Allows flow rate or drug dose rate to be entered for a continuous infusion.
System then calculates alternate parameter based on drug concentration and
weight if used.
Guardrails® Suite MX Designed to help prevent programming errors by:
• Customizing instrument configurable settings to meet need of selected
hospital/facility area/unit (profile).
• Comparing user programming with hospital-defined best-practice
guidelines.
• Providing a prompt if an out-of-limits entry is made.

Directions for Use
Alaris® SE Pump
Models 7130/7131, 7230/7231
123
General Information
Configurable Settings
With the Profiles feature enabled, the settings are configured
independently for each profile. A hospital-defined, best-
practice Data Set must be uploaded to enable the Profiles
feature.
If the Profiles feature is not enabled (off) or if no Data Set is
loaded, the configurations options are set in the configuration
mode by qualified service personnel. If the configuration
settings need to be changed from the factory default settings,
reference the Technical Service Manual or contact Cardinal
Health Technical Support for technical, troubleshooting, and
preventive maintenance information.
Features and Displays (Continued)
Feature Definitions (Continued)
IV Fluid Allows rate and volume to be entered for an infusion that is delivered in mL/h,
providing a prompt if a rate is entered that is outside facility’s best-practice
guidelines.
Profile A unique set of system configuration settings and best-practice guidelines
for a specific patient population or patient type, and can consist of following
components:
• Instrument configuration settings.
• A Drug Library, which includes Guardrails® drug names, standard
concentrations, dosing units, duration limits, and optional associated
Clinical Advisories for continuous, intermittent and bolus dose infusions.
• An IV Fluid library, an optional library consisting of IV fluids (for example,
TPN) and limits around rate of delivery.
Profile settings are established by facility’s own multi-disciplinary team prior
to system implementation. Profile parameters are used to create a Data
Set, which is then transferred to SE Pump.

Directions
f
or
U
se
Ala
r
is
®
SE Pump
®
Models 7130
/
7131
,
7230
/
7231
124
G
eneral In
f
ormation
Configurable Settings (Continued)
Configurable Option Definitions - General
Ai
r
i
n L
i
ne:
Air in Line Threshold
(
microliters
)
Sets upper limit for a sin
g
le bolus of air to pass without alarm.
I
n other words, it is amount of air allowed to pass through air
-
i
n-line detector be
f
ore an air-in-line alarm sounds.
O
ne o
f
4
different air-in-line detection settings can be selected: 50, 100,
200,
5
00
mcL
.
AIL A
ccu
m
u
l
ator
Detects presence of multiple air bubbles that are too small to
r
b
e
d
etecte
d
by
s
i
n
gl
e
b
o
l
us
AIL
d
etect
i
on
li
m
i
t.
A
ccumu
l
ato
r
feature, when enabled, looks for 10-15% of downstream fluid
p
ath to be air be
f
ore
g
ivin
g
an A
CC
UMULATED AIR IN LINE
alarm. Volume of air that tri
p
s accumulated air detection alarm
v
aries based on current settin
g
f
or sin
g
le air bolus.
AIL R
eset
Allows clinician to res
p
ond to an air-in-line alarm, assess its
c
linical si
g
ni
f
icance, and choose whether or not to continue
i
nfusion without removing air. Reset feature allows only current
bubble to proceed without trippin
g
alarm.
Aud
i
o:
T
rans
i
t
i
on
T
on
e
P
rov
id
es an au
dibl
e tone w
h
en secon
d
ary
VTBI
reac
h
es zero, to
i
n
di
cate
i
n
f
usion has transitioned to primar
y
rate
.
V
o
l
u
m
e
Provides clinician with ability to adjust audio volume for alarms, alerts
and KV
O
tone to either Hi
g
h, Medium, or Low i
f
all audio volume levels
are enabled. Audio volume indicator in lower LCD display indicates audio
v
olume selected. Instrument can be con
f
i
g
ured to enable onl
y
Medium
and High, or only High audio volume levels if desired
.
(S
econdary to Primary)
C
on
f
i
g
uration Nam
e
A
llows a 4-di
g
it instrument ID label to appear in lower L
C
D displa
y
, identi
fy
in
g
p
atient care
p
rofile.
(Continued)

Directions for Use
Alaris® SE Pump
Models 7130/7131, 7230/7231
125
General Information
Configurable Settings (Continued)
Configurable Option Definitions - General (Continued)
Dynamic Monitoring:
Auto Restart Plus Part of the Dynamic Monitoring system and designed to help minimize
nuisance “occlusion downstream” alarms. It allows instrument to
automatically continue an infusion following detection of a downstream
occlusion if downstream pressure falls to an acceptable level within a 40-
second Checking Line period. May be set to off (0 restarts) or to allow from
1 – 9 Checking Line restarts. If allowable number of restarts is exceeded, or
when resistance or pressure conditions indicate an occlusion, an occlusion
downstream alarm occurs.
Monitoring Options Dynamic monitoring provides clinician ability to select one of following
monitoring modes: Resistance mode, High Resistance mode or Pressure
mode. All of these modes offer an optional Auto-Restart Plus feature and
optional trend graph display.
Trends Provides ability to display downstream pressure or flow resistance over time.
Trend graphs of 15 minutes, 1 hour, 4 hours and 12 hours are available during
normal operation. When Trends is enabled, if instrument is operating in
pressure mode, a pressure trend graph is available, and when it is operating
in resistance mode, a resistance trend graph is available.
Dynamic Monitoring - Pressure:
Adjustable pressure is designed to monitor IV line/site pressure and provide user-adjustable pressure
alarm limits. It is used for Precision Flow mode or for high resistance systems; such as, infusion
through transducers, into dialysis systems and through highest resistance catheters. Pressure mode
may be configured to operate with a fixed pressure alarm limit threshold so that it is not user-adjustable.
Manual Pressure Baseline Provides a real-time bar graph and numeric display of line pressure.
Pressure Alarm When Pressure Display is enabled, Pressure Alarm may be set to
Adjustable Pressure mode or Fixed Pressure mode.
Pressure Display In Adjustable Pressure monitoring mode, pressure alarm limit may
be varied by from 25 mmHg to maximum configured pressure limit in
25 mmHg increments. Pressure Display indicates current pressure
limit and provides ability to adjust limit by pressing “increase” or
“decrease” arrows.
In Fixed Pressure mode, pressure limit of 600 mmHg displays,
with no means of adjusting it. When Pressure Display is disabled,
instrument automatically defaults to Fixed Pressure mode.

Directions for Use
Alaris® SE Pump
Models 7130/7131, 7230/7231
126 General Information
Configurable Settings (Continued)
Configurable Option Definitions - General (Continued)
Dynamic Monitoring - Pressure:
(Continued)
Pressure Limit, Initial This is default pressure alarm limit that is automatically set when
instrument is powered on and a new profile is selected or New
Patient? - Yes is selected. Alarm level must be less than or equal to
maximum pressure limit.
Pressure Limit, Maximum In Adjustable Pressure monitoring mode, pressure alarm limit may be
varied by from 25 mmHg to this maximum configured pressure limit in
25 mmHg increments. A value that exceeds this pressure limit cannot
be selected.
Dynamic Monitoring - Resistance:
Resistance Monitoring eliminates the impact of patient elevation and flow rate, to provide the most direct
assessment of patency. It is designed to monitor IV line/site resistance providing optimum sensitivity
for most IV applications. High Resistance is designed to monitor IV line/site resistance with optimum
sensitivity where higher resistance catheters are used.
Default Resistance Alert Default resistance alert level that is automatically set when instrument
is powered on and a new profile is selected or New Patient? - Yes is
selected. Resistance Alert Marker can be adjusted up or down from
this default setting, as needed.
Resistance Alert Provides an early warning of increasing flow resistance. When
enabled, Resistance Alert marker can be set by from 0% to 100% of
scale in 5% increments (Resistance Display must also be enabled).
To optimize alert feature, it is advisable to set alert level 20-30%
higher than initial displayed resistance, which should be read
approximately 2 minutes after starting an infusion.
Resistance Display When enabled provides a bar graph on Main Display to indicate
current % resistance on a scale of 0 – 100%. When disabled,
resistance alert feature is unavailable.
Resistance Pressure Setting Provides an “Occlusion Downstream” alarm when measured pressure
reaches Resistance Pressure limit while operating in Resistance
Mode. This threshold may be set from 1 to 600 mmHg in 1 mmHg
increments. In other words, while operating in Resistance mode or
High Resistance mode, an “Occlusion Downstream” condition can be
detected in 2 ways; measured resistance reaches 100% of scale or
configured Resistance Pressure Setting is exceeded.

Directions for Use
Alaris® SE Pump
Models 7130/7131, 7230/7231
127
General Information
KVO Rate
KVO (keep vein open) mode automatically occurs when primary VTBI has
counted down to 0.0 mL. Channel switches to preset KVO rate or remains at
current rate, whichever is less. KVO rate may be set to a value between 0.1 and
20 mL/h in 0.1 mL/h increments. KVO rate is not adjustable by the clinician.
Configurable Settings (Continued)
Configurable Option Definitions - General (Continued)
Optional Modes:
Optional modes include Loading Dose, Dose Rate Calculator, Multi-Step, and Multi-Dose. Each of
these can be either enabled or disabled. When disabled, they will not appear on the Options menu and
cannot be accessed by the clinician.
Dose Rate Calculator Allows clinician to enter either flow rate or drug dose rate for a continuous
infusion. System then calculates alternate parameter based on drug
concentration and weight if used.
For an intermittent infusion, system calculates total dose based on drug
amount and patient weight (kg) or BSA (m2) if used. Next, clinician enters
either volume and time to calculate rate, or rate and volume to calculate
time.
Dose rate calculator must be enabled in order to access Bolus Dose feature
and Drug Library.
Loading Dose Allows clinician to set up an initial infusion rate for a specific volume, to
be followed automatically by a maintenance rate (primary settings) from
same container. This is useful for delivering fluid challenges. Limits do
not apply when using Loading Dose feature. To deliver a loading dose of a
medication selected from Drug Library, Bolus Dose feature may be used.
Multi-Dose Allows 1 - 24 doses to be programmed at equally spaced intervals on same
instrument over a 24-hour period. This mode allows delivery of multiple,
equal doses from same IV container at regularly scheduled intervals. Limits
do not apply when using Multi-Dose feature. Within this mode, a delayed
start option allows instrument to be programmed to delay infusion start for
up to 8 hours.
Multi-Dose Alert When enabled, this feature alerts clinician of completion of each dose
delivered during a Multi-Dose program.

Directions for Use
Alaris® SE Pump
Models 7130/7131, 7230/7231
128 General Information
Configurable Settings (Continued)
Configurable Option Definitions - General (Continued)
Optional Modes: (Continued)
Multi-Step Allows a sequential drug delivery program (up to 9 steps) to be set
delivering volumes of fluid at different rates at each step. This allows
instrument parameters to be set up once and deliver a step profile,
eliminating need to change rate and VTBI after each step of infusion.
Infusion may be programmed in rate/volume or volume/time. Limits do not
apply when using Multi-Step feature.
Rate, Maximum
Maximum infusion rate may be set to a value from 0.1 to 999.9 mL/h in 0.1 mL/h
increments.
Configurable Option Definitions - Guardrails® Suite MX
BSA, Maximum Sets maximum patient body surface area for each profile. May be set to a
value from 0.05 to 3 m2 (meters squared) in 0.01 m2 increments.
Dose Checking Mode Dose Checking (limit checking) has 2 selectable options:
• Always checking option causes a Guardrails® alert to occur each time
a dose limit is exceeded. If limit is overridden, drug label displays an
indicator (↑↑↑ or ↓↓↓ arrows) that infusion is beyond current Soft Limit.
• Smart option causes an initial Guardrails® alert to occur when a dose
limit is exceeded. Subsequent programming beyond dose limit does
not cause an alert to display. If limit is overridden, drug label displays
an indicator (↑↑↑ or ↓↓↓ arrows) that infusion is beyond current Soft
Limit
Weight, Maximum Sets maximum patient weight (kg) for each profile. May be set to a value
from 0 to 4534 kg in 1 kg increments.

Directions for Use
Alaris® SE Pump
Models 7130/7131, 7230/7231
129
General Information
Configurable Options
Configurable Settings (Continued)
* These features are configured only within a hospital-defined best-practice Data Set.
Feature Options Default
Air-in-Line:
Air-in-Line Accumulator
Air-in-Line Threshold
Air-in-Line Reset
On/Off
50,100,200, or 500 mcL
On/Off
On
100 mcL
Off
Audio:
Transition Tone
Volumes
On/Off
Low/Med/Hi Med/Hi Hi
On
Low/Med/Hi
Configuration Name 4 alphanumeric characters GOLD
BSA, Maximum* 0.05 - 3 3
Dynamic Monitoring:
Auto Restart Plus
Monitoring Options
Trends
0 (Off) /1 to 9
Resistance/High Resistance/Pressure
On/Off
3
Pressure
On
Pressure:
Manual Pressure Baseline
Pressure Alarm
Pressure Display
Pressure Limit, Initial
(Configuration Mode: Def Alarm)
Pressure Limit, Maximum
On/Off
Adjustable/Fixed
On/Off
25-600 mmHg
25-600 mmHg/600 mmHg
On
Adjustable
On
600 mmHg
600 mmHg
Resistance:
Default Resistance Alert
Resistance Alert
Resistance Display
Resistance Pressure Setting
0-100%
On/Off
On/Off
1-600 mmHg
100%
On
On
600 mmHg
Dose Checking Mode* Smart/Always Always
KVO Rate 0.1 - 20 mL/h 5.0 mL/h
Optional Modes:
Bolus
Dose Rate Calculator
Loading Dose
Multi-Dose
Multi Dose Alert
Multi-Step
On/Off
On/Off
On/Off
On/Off
On/Off
On/Off
Off
Off
On
Off
Off
Off
Panel Lock On/Off On
Rate, Maximum 0.1 - 999.9 mL/h 999.9 mL/h
Weight, Maximum* 0.001 - 4,534 kg 4,534 kg

Directions for Use
Alaris® SE Pump
Models 7130/7131, 7230/7231
130 General Information
System Configurable Options
The following features can be customized by qualified service personnel in the Configuration or
Diagnostic Modes.
Configurable Settings (Continued)
Feature Options Default
Computer Link:
Baud Rate
Mode
Parity
300/600/1200/1800/2400/4800/9600
Monitor/Off, Off
Even/Odd/None
9600
Off
None
Instrument ID* 9 digits 000000000
Maintenance:*
Maintenance Interval
Maintenance Reminder
1-52 wks
On/Off
52 wks
On
Pressure Sensor*
Self Check Interval 1-52 wks 12 wks
Profiles On/Off Off
Regional Settings Region: North America, European
Language: English North America English **
VTBI On/Off (Flow Sensor use) On
* These features are configured in the Diagnostics Mode.
** Instruments manufactured for sale in Europe will be set, at the factory, to European English. If a new
logic board is installed or the instrument is set to factory defaults, the instrument defaults to North
America English. If the language needs to be reset, contact qualified service personnel.
Specifications
Administration Sets: Use only administration sets for SE Pump.
Alarms: Accumulated Air In Line Key Stuck
Air In Line Latch Open
Battery Depleted No Upstream Flow Detected
Channel Malfunction Occlusion Downstream
Computer Link Failure Occlusion Upstream
Flow Sensor Unplugged Primary Flow Detected During Secondary
Hold Time Exceeded Set Out
Instrument Malfunction Set Up Time Exceeded

Directions for Use
Alaris® SE Pump
Models 7130/7131, 7230/7231
131
General Information
Battery: Rechargeable nickel-cadmium. A single channel instrument operates
for 4 hours nominal and a dual channel instrument operates for 3 hours
nominal, under following conditions:
• new, fully charged battery
• ambient room temperature, 73±7°F (23±4°C)
• resistance monitoring modes
• rate: 100 mL/h on a single channel instrument and 50 mL/h on each
channel of a dual channel instrument
Battery run time is affected by operating mode, rate, monitoring options
and back pressure (see "General Information", “Battery Management
System”).
Case: Impact and flame resistant plastic.
Critical Volume: Maximum incremental volume in case of single point failure does not
exceed 1.0 mL at 999.9 mL/h.
Dimensions: (Nominal) 7130/7131 7230/7231
Depth* 5.0 in/12.7 cm 5.0 in/12.7 cm
Height 8.6 in/21.8 cm 8.6 in/21.8 cm
Power Cord 10 ft/3 m 10 ft/3 m
Weight** 6.6 lb/3.0 kg 8.4 lb/3.8 kg
Width 7.6 in/19.3 cm 10.7 in/26.7 cm
* Without pole clamp. ** Without power cord.
Downstream Occlusion: À
Time to Alarm
When occlusion alarm pressure limit is set to maximum threshold setting,
maximum infusion pressure generated into a hard occlusion at 25 mL/h is
11.6±3.9 psi.
Specifications (Continued)
Maximum 2 75 2 7
Typical 0.6 30 0.6 4
Maximum 1 25 1 3
Typical 0.1 1 0.1 1
Monitoring Options
Time to Detect
Downstream Occlusion
(minutes)
Threshold Settings
1 mL/h
25 mL/h
Pressure Resistance and
High Resistance
100%
600 mmHg
100%
25 mmHg
25
mmHg
600
mmHg

Directions for Use
Alaris® SE Pump
Models 7130/7131, 7230/7231
132 General Information
Specifications (Continued)
Downstream Occlusion: À (Continued)
Bolus Volume
Testing performed using Model 72003 administration set, at 68±8°F
(20±4°C).
Environmental Conditions: Operating Storage
Atmospheric Pressure 700 to 1060 hPa 500 to 1060 hPa
Relative Humidity 20 to 90% 5 to 95%
Noncondensing Noncondensing
Temperature Range 41 to 104°F -40 to 140°F
(5 to 40°C) (-40 to 60°C)
Flow Rate Range: 0.1 to 600.0 mL/h in 0.1 mL/h increments (secondary mode)
0.1 to 999.9 mL/h in 0.1 mL/h increments (all other modes)
Ground Current Leakage: Electrical leakage current, enclosure: <100 microamperes
Electrical leakage current, patient: <10 microamperes
KVO Flow Range: 0.1 to 20.0 mL/h in 0.1 mL/h increments
Mode of Operation: Continuous
Power Requirements: 100-240 V~, 50/60 HZ (72 VA MAX), 3-wire grounded system
Class 1 with Internal Power Source
Maximum 0.5 0.5 0.5 0.5
Typical <0.1 0.3 <0.1 <0.1
Maximum 0.5 0.5 0.5 0.5
Typical <0.1 0.3 <0.1 0.3
Monitoring Options
Bolus Volume Released
Upon Correcting
Downstream Occlusion
(mL)
Threshold Settings
1 mL/h
25 mL/h
Pressure Resistance and
High Resistance
100%
600 mmHg
100%
25 mmHg
25
mmHg
600
mmHg

Directions for Use
Alaris® SE Pump
Models 7130/7131, 7230/7231
133
General Information
Specifications (Continued)
Rate Accuracy: For rates greater than 1 mL/h, up to 999.9 mL/h: ±5%, 95% of time with
95% confidence, under conditions listed below.
For rates equal to or less than 1 mL/h: ±6.5%, 95% of time with 95%
confidence, under conditions listed below.
Rate Accuracy Test Conditions:
Infusion rate range: 0.1 to 999.9 mL/h
Head height: 24 ±1 in. (61±2.5 cm)
Test solution: distilled water
Environment temperature: 68±8°F (20±4°C)
Back pressure: 0 psi
Needle: 18 gauge
Set Model: 72003
Minimum collection volume: 6 mL
Volume Infused Range: 0.0 to 9999.9 mL in 0.1 mL increments
VTBI Range: 0.1 to 9999.9 mL in 0.1 mL increments (Basic Infusion, Drug Library
Primary Infusion, IV Fluid Infusion and Multi-Step mode); 0.1 to 999.9 mL
in 0.1 mL increments (all other modes)
NOTE:
À Time to Occlusion and Bolus Volume data tested to standards defined in AAMI ID26:1998, Section
51.101 b.
CAUTION
Variations of head height, back pressure, time, monitoring mode option,
pump tilt or any combination of these may affect rate accuracy. Factors
that can influence head height and back pressure are: Administration set
configuration, IV solution viscosity, and IV solution temperature. Back
pressure may also be affected by catheter type. See "Trumpet and Start-
up Curves" for data on how certain factors influence rate accuracy.
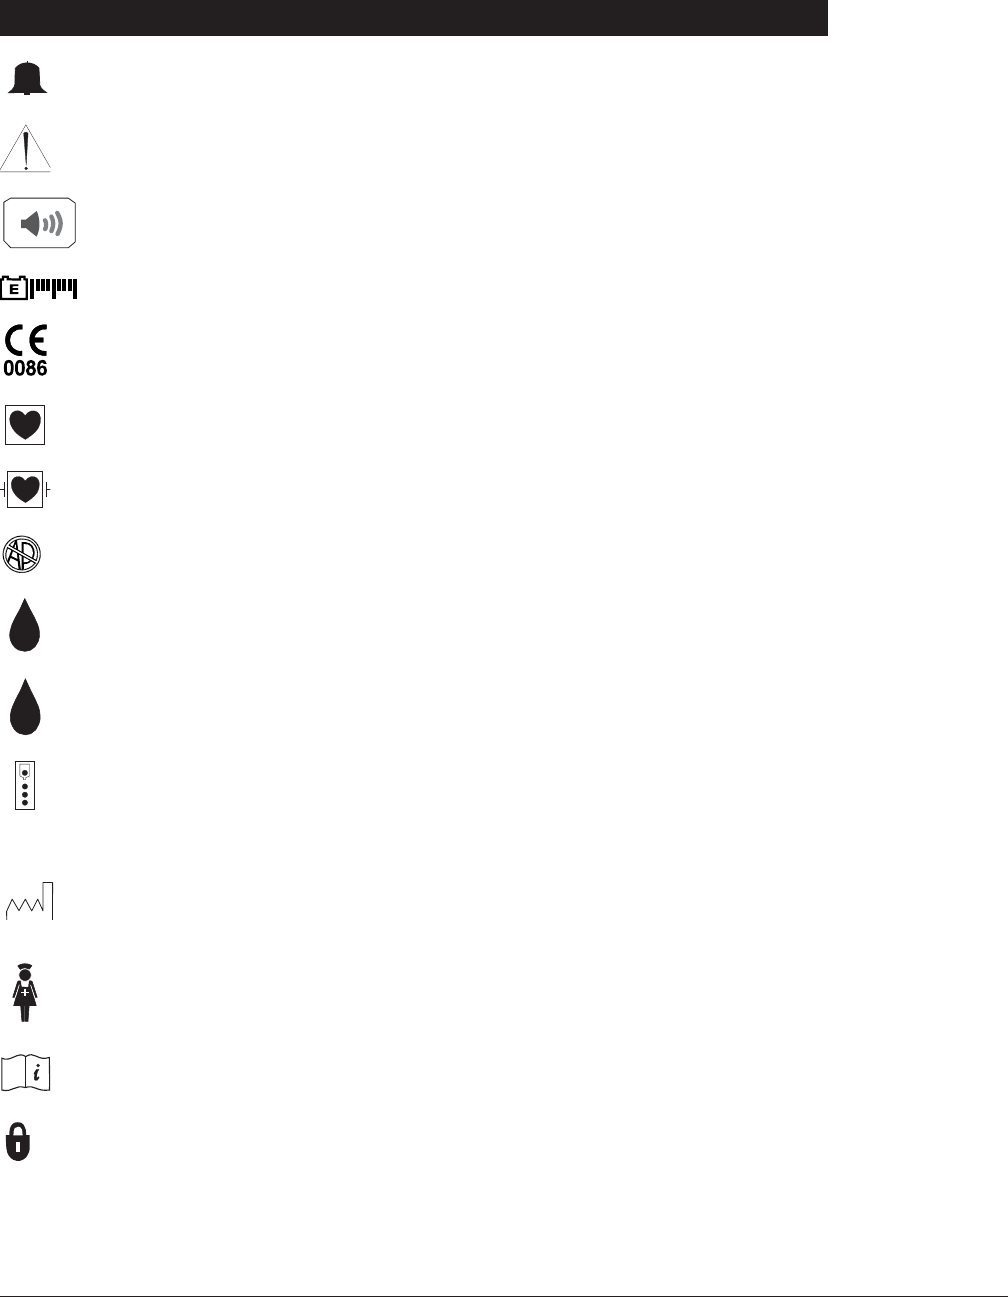
Directions for Use
Alaris® SE Pump
Models 7130/7131, 7230/7231
134 General Information
Symbols and Terms
A
B
MM-YYYY
IPX1
Alarm indicator.
Caution: Refer to accompanying documentation.
Audio volume.
Approximate battery time remaining under current infusing conditions. Battery gauge does
not represent battery time remaining when instrument is turned off.
Conformité Européenne [CE - Marking] notified body “0086”: British Standards Institution.
Electrical shock protection rating: Type CF À
Type CF defibrillation-proof equipment. À
Explosion risk if used in presence of flammable anesthetics.
Flow sensor receptacle (optional), channel A.
Flow sensor receptacle (optional), channel B.
Infusing indicator.
Indicates degree of protection, liquid ingress.
Manufacturing Date: Number adjacent to symbol indicates month and year of
manufacture.
Nurse Call (optional for 7130/7230).
Consult operating instructions.
Panel lock.

Directions for Use
Alaris® SE Pump
Models 7130/7131, 7230/7231
135
General Information
Symbols and Terms (Continued)
Green = instrument plugged into AC power and battery being charged.
Flashing amber = instrument running on battery power and battery being depleted.
RS-232 connector.
Silence mode.
Split screen (dual channel instrument only).
A brief tone during transition from one mode to another.
Canadian and U.S. Certification Mark: Products bearing this mark have been tested
and certified in accordance with applicable U.S. and Canadian electrical safety and
performance standards (CSA C22.2 No. 125).
Single-Use. Do not re-use.
DEHP in fluid pathway.
No DEHP in fluid pathway.
Product contains latex.
Product is latex free.
Drops per milliliter specification for product is identified on drop symbol.
Product incorporates Needle-Free Valve ports and should not be accessed by a
needle.
Approximate set priming volume.
Expiration date for product is identified near hour glass symbol.
Do not use if package is damaged.
Transition Tone
A B
XX
RS 232
Single-Use
2
DEHP
LATEX
»XX ml

Directions for Use
Alaris® SE Pump
Models 7130/7131, 7230/7231
136 General Information
Symbols and Terms (Continued)
cm centimeter
day day (d)
gm gram (g)
h hour
HLD infusion in “hold” mode
in inch
kg kilogram
KVO “keep vein open” infusion rate mode
lb pound
mcg microgram (μg)
mcL microliter (μL)
mEq milliequivalent
mg milligram
min minute
mL milliliter
mmol millimole
mUn milliunit
nan nanogram (ng)
OPT optional mode
PRI primary infusion mode
rev revolution (r)
SEC secondary infusion mode
Un unit
VI volume infused
VTBI volume to be infused
wks weeks
NOTE:
À Depending on manufacturing and distribution timing, the SE Pump may bear either the CF or
CF Defibrillator-Proof symbol on the main rating label. The SE Pump has been tested and
complies with IEC 60601-1 Amendment 2, Clause 17 (h) for Defibrillator-Proof Equipment.

Directions for Use
Alaris® SE Pump
Models 7130/7131, 7230/7231
137
General Information
Trumpet and Start-Up Curves
DESCRIPTION AND EXPLANATION OF TRUMPET
AND START-UP CURVES
In this instrument, as with all infusion systems,
the action of the pumping mechanism and
variations in individual administration sets cause
short-term fluctuations in rate accuracy. The
following graphs show typical performance of the
system for both Pressure and Resistance modes
in two ways:
• Accuracy during various time periods over
which fluid delivery is measured (trumpet
curves).
• Delay in onset of fluid flow when infusion
commences (start-up curves).
Product operation is not affected by the selection
of Resistance or High Resistance at 0.1, 1.0, and
25 mL/h; therefore, High Resistance graphs are
not included.
Trumpet curves are named for their characteristic
shape. They display discrete accuracy data
averaged over particular time periods or
“observation windows”, not continuous data
versus operating time. Over long observation
windows, short-term fluctuations have little
effect on accuracy, as represented by the flat
part of the curve. As the observation window is
reduced, short-term fluctuations have greater
effect, as represented by the “mouth” of the
trumpet. Knowledge of system accuracy over
vari ous observation windows may be of interest
when certain drugs are being administered.
Because the clinical impact of short-term
fluctuations on rate accuracy depends on the
half-life of the drug be ing infused and on the
degree of intravascular integration, the clinical
effect cannot be determined from the trumpet
curves alone. Knowledge of the start-up
characteristics should also be considered.
The start-up curves represent continuous flow
rate versus operating time for two hours from the
start of the infusion. They exhibit the delay in
onset of delivery due to mechanical compliance
and provide a visual representation of uniformity.
Trumpet curves are derived from the second
hour of this data.
FLOW CHARACTERISTICS UNDER VARYING
DELIVERY CONDITIONS
Effects of Pressure Variations
Under conditions of +100 mmHg pressure, the
SE Pump typically exhibits a long-term accuracy
offset of approximately -1.4% from mean values.
Under conditions of +300 mmHg pressure, the
SE Pump typically exhibits a long-term accuracy
offset of approximately -1.5% from mean values.
Under conditions of -100 mmHg pressure, the
SE Pump typically exhibits a long-term accuracy
offset of approximately -0.8% from mean values.
Resulting trumpet observation points typically
track those of accuracy; therefore, no significant
change in short–term variations result under
these pressure conditions.
Effects of Negative Solution Container Heights
With a negative head height of -0.5 meters, the
SE Pump typically exhibits a long–term accuracy
offset of approximately -5.8% from mean values.
Resulting trumpet observation points typically
track those of accuracy; therefore, no significant
change in short–term variations result under
negative head height conditions.
Effects of Rate
For applications where flow uniformity is a
concern, use of the Pressure Mode at rates of
1.0 mL/h or above is recommended.
NOTE: Tests conducted in accordance with
IEC 60601–2–24, “Particular requirements for
safety of infusion pumps and controllers” and
AAMI ID26–1998 “Medical electrical equipment
- Part 2: Particular requirements for the safety
of infusion pumps and controllers”, using a
Model 72003 Administration Set (includes Flow
Regulator).
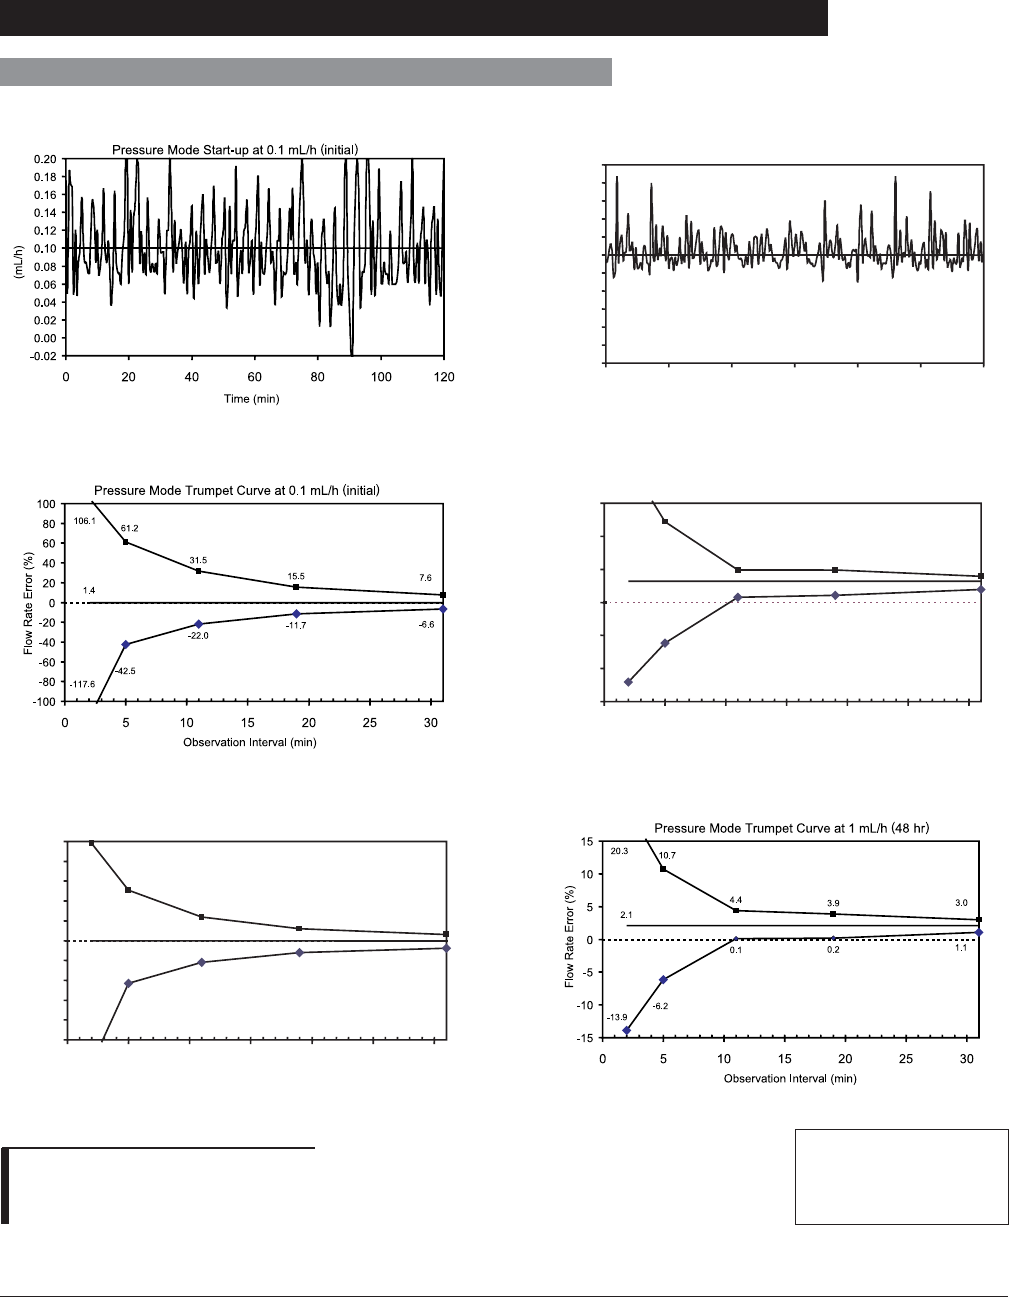
Directions for Use
Alaris® SE Pump
Models 7130/7131, 7230/7231
138 General Information
Trumpet and Start-Up Curves (Continued)
Pressure Mode
Pressure Mode Start-up at 1 mL/h (initial)
-0.2
0.0
0.2
0.4
0.6
0.8
1.0
1.2
1.4
1.6
1.8
2.0
0 20 40 60 80 100 120
Time (min)
(mL/h)
Pressure Mode Trumpet Curve at 1 mL/h (initial)
0.8 1.1
4.9 4.9
-6.2
2.0
-12.1
3.9
21.2 12.2
3.2
-15
-10
-5
0
5
10
15
0 5 10 15 20 25 30
Observation Interval (min)
Flow Rate Error (%)
NOTE: The plot range has
been increased to ±100%, to
allow visualization of the graph.
Pressure Mode Trumpet Curve at 0.1 mL/h (48 hr)
-21.8
-11.9
23.8
12.3
-42.9
-7.5
-124.5
6.0
98.0
51.0
0.0
-100
-80
-60
-40
-20
0
20
40
60
80
100
0 5 10 15 20 25 30
Observation Interval (min)
Flow Rate Error (%)
Legend:
n Maximum rate error
y
Overall rate error
u Minimum rate error
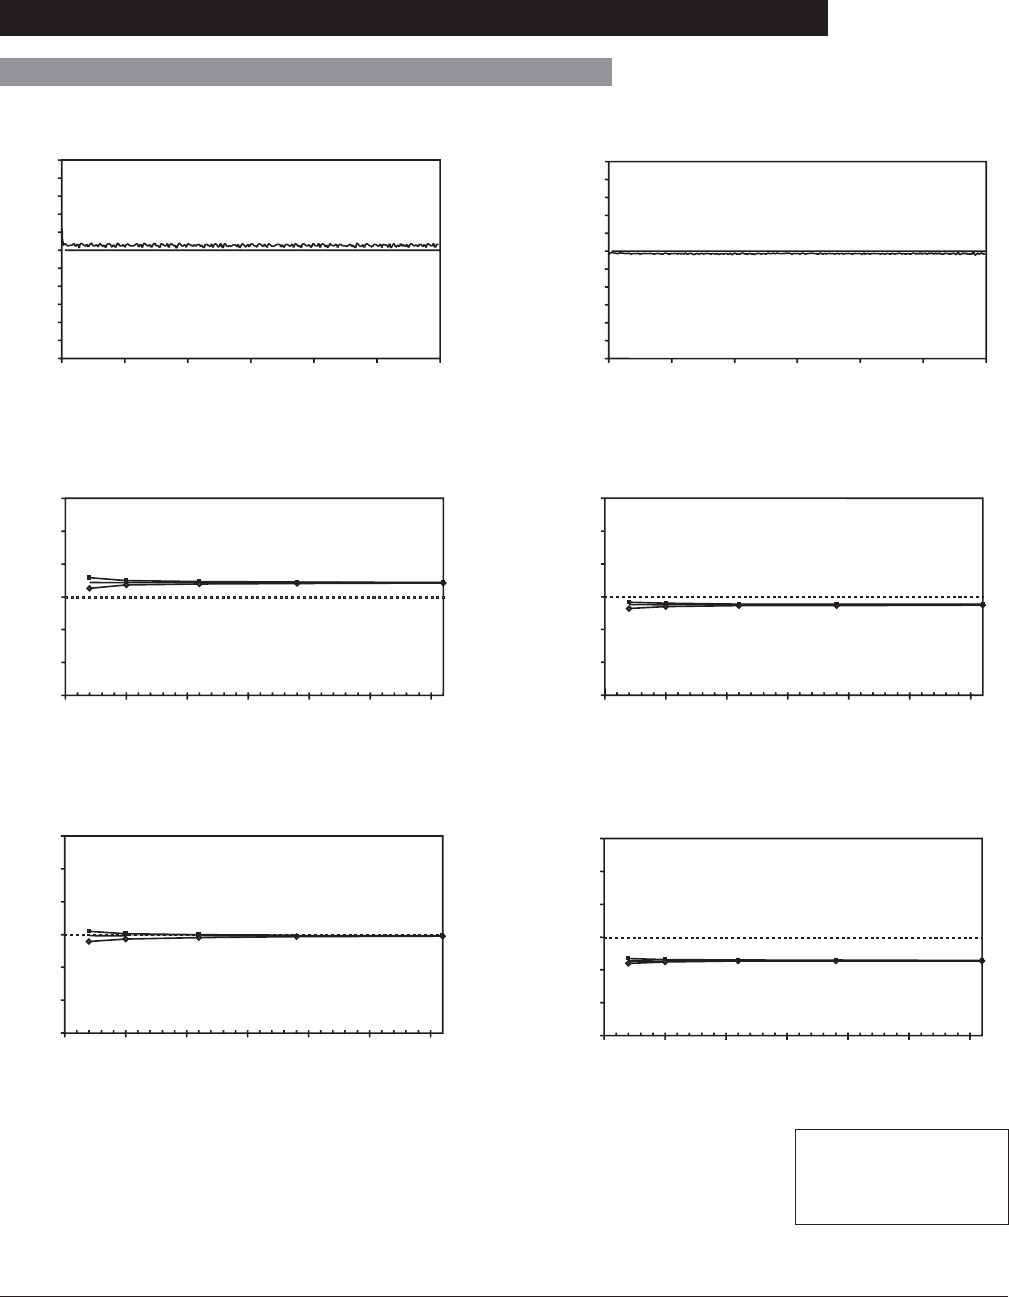
Directions for Use
Alaris® SE Pump
Models 7130/7131, 7230/7231
139
General Information
Trumpet and Start-Up Curves (Continued)
Pressure Mode (Continued)
Pressure Mode Start-up at 25 mL/h (initial)
-5
0
5
10
15
20
25
30
35
40
45
50
0 20 40 60 80 100 120
Time (min)
(mL/h)
Pressure Mode Start-up at 999.9 mL/h (initial)
-200
0
200
400
600
800
1000
1200
1400
1600
1800
2000
0 20 40 60 80 100 120
Time (min)
(mL/h)
Pressure Mode Trumpet Curve at 25 mL/h (initial)
2.3 2.2
1.8 2.1
1.3
2.0 2.1
2.2
2.9 2.5
2.2
-15
-10
-5
0
5
10
15
0 5 10 15 20 25 30
Observation Interval (min)
Flow Rate Error (%)
Pressure Mode Trumpet Curve at 999.9 mL/h (initial)
-1.4 -1.3
-0.9 -1.0 -1.1 -1.1 -1.2
-1.8 -1.3
-1.5
-1.2
-15
-10
-5
0
5
10
15
0 5 10 15 20 25 30
Observation Interval (min)
Flow Rate Error (%)
Pressure Mode Trumpet Curve at 25 mL/h (48 hr)
0.0 -0.1
-0.7 -0.3
-1.1
-0.5 -0.3
-0.10.5 0.1
-0.2
-15
-10
-5
0
5
10
15
0 5 10 15 20 25 30
Observation Interval (min)
Flow Rate Error (%)
Pressure Mode Trumpet Curve at 999.9 mL/h (24 hr)
-3.7 -3.6
-3.3 -3.4 -3.5 -3.5 -3.6
-4.0 -3.6
-3.8
-3.7
-15
-10
-5
0
5
10
15
0 5 10 15 20 25 30
Observation Interval (min)
Flow Rate Error (%)
Legend:
n Maximum rate error
y
Overall rate error
u Minimum rate error
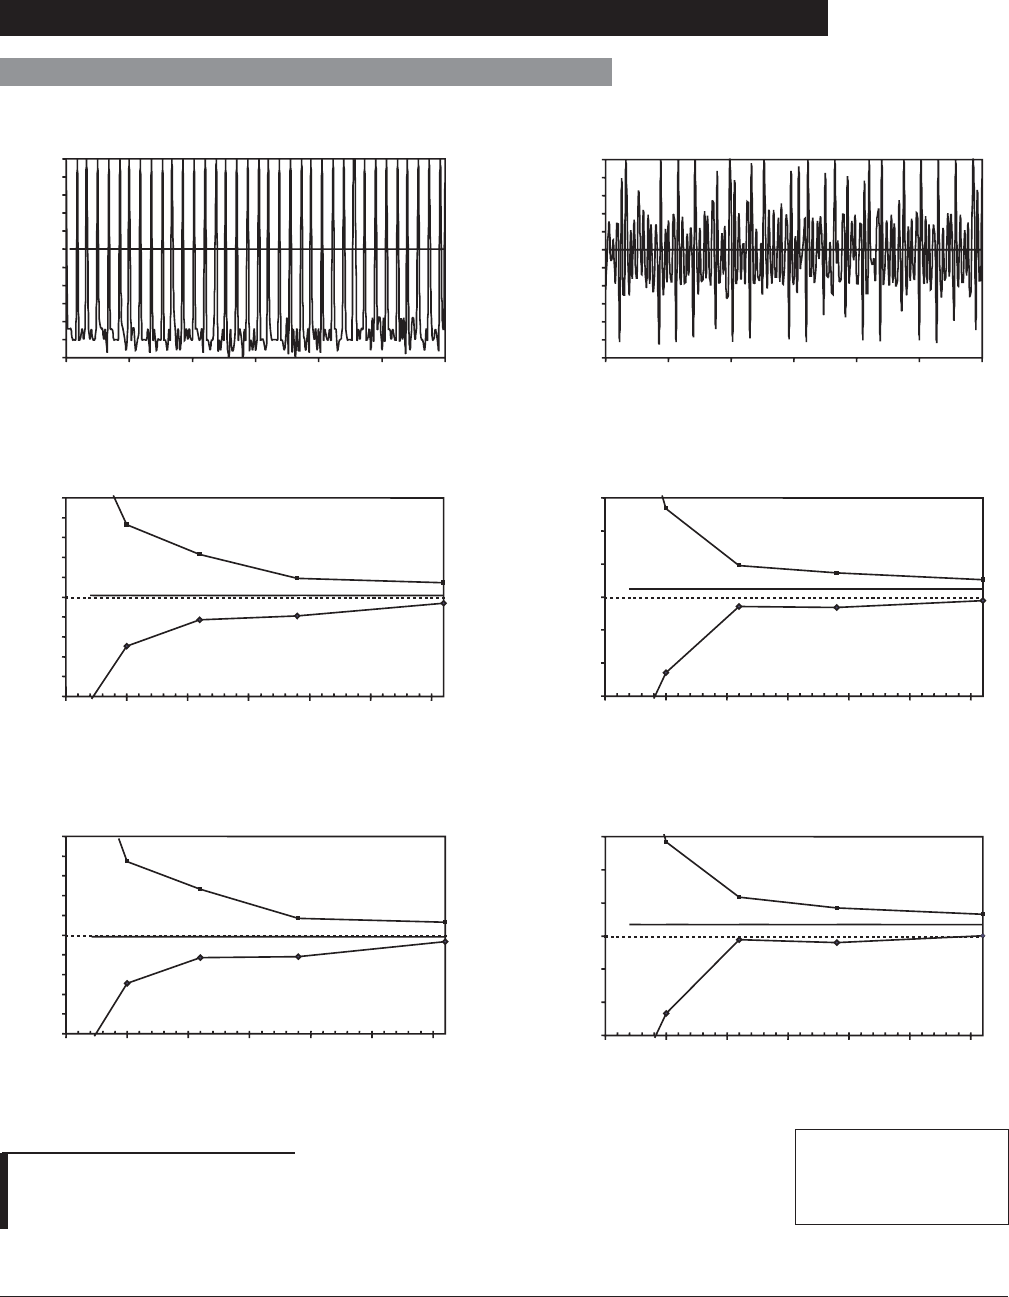
Directions for Use
Alaris® SE Pump
Models 7130/7131, 7230/7231
140 General Information
Trumpet and Start-Up Curves (Continued)
Resistance Mode
Resistance Mode Start-up at 0.1 mL/h (initial)
-0.02
0.00
0.02
0.04
0.06
0.08
0.10
0.12
0.14
0.16
0.18
0.20
0 20 40 60 80 100 120
Time (min)
(mL/h)
Resistance Mode Start-up at 1 mL/h (initial)
-0.2
0.0
0.2
0.4
0.6
0.8
1.0
1.2
1.4
1.6
1.8
2.0
0 20 40 60 80 100 120
Time (min)
(mL/h)
Resistance Mode Trumpet Curve at 0.1 mL/h (initial)
-22.7 -19.0
43.0
18.8
-49.2
-6.3
-104.7
14.6
153.4 73.0
1.8
-100
-80
-60
-40
-20
0
20
40
60
80
100
0 5 10 15 20 25 30
Observation Interval (min)
Flow Rate Error (%)
Resistance Mode Trumpet Curve at 1 mL/h (initial)
-1.4 -1.6
4.8 3.7
-11.5
-0.6
-23.4
2.6
32.6 13.3
1.2
-15
-10
-5
0
5
10
15
0 5 10 15 20 25 30
Observation Interval (min)
Flow Rate Error (%)
Resistance Mode Trumpet Curve at 0.1 mL/h (48 hr)
-22.9 -22.0
46.4
17.2
-48.9
-6.7
-109.5
13.3
173.6 74.6
-1.5
-100
-80
-60
-40
-20
0
20
40
60
80
100
0 5 10 15 20 25 30
Observation Interval (min)
Flow Rate Error (%)
Resistance Mode Trumpet Curve at 1 mL/h (48 hr)
-0.6 -1.0
5.9
4.2
-11.7
0.1
-23.5
3.2
33.1 14.2
1.7
-15
-10
-5
0
5
10
15
0 5 10 15 20 25 30
Observation Interval (min)
Flow Rate Error (%)
NOTE: The plot range has been
increased to ±100%, to allow
visualization of the graph.
Legend:
n Maximum rate error
y
Overall rate error
u Minimum rate error
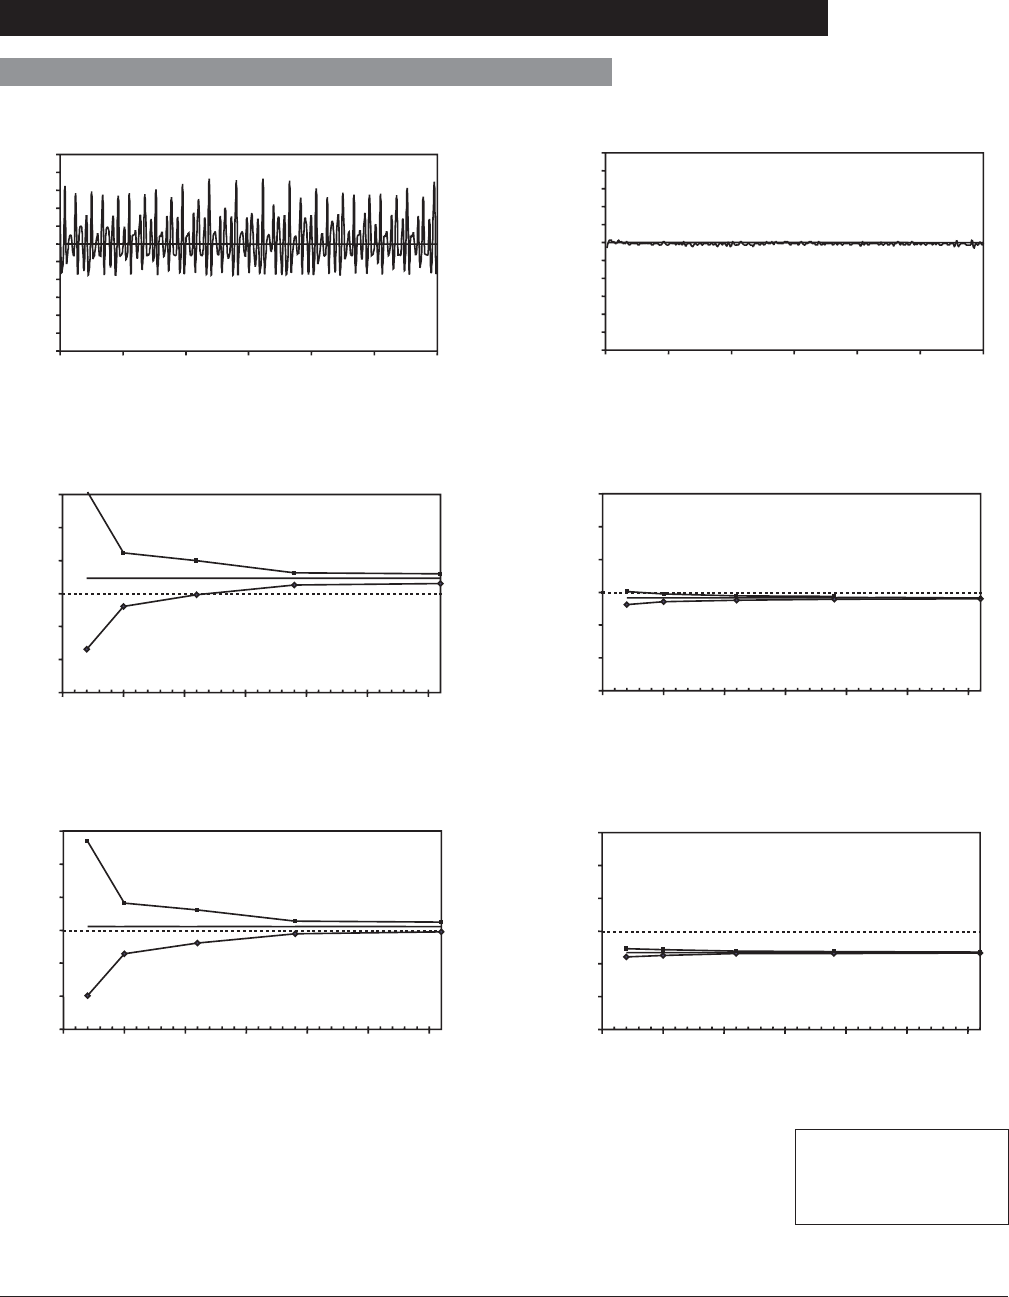
Directions for Use
Alaris® SE Pump
Models 7130/7131, 7230/7231
141
General Information
Trumpet and Start-Up Curves (Continued)
Resistance Mode Start-up at 25 mL/h (initial)
-5
0
5
10
15
20
25
30
35
40
45
50
0 20 40 60 80 100 120
Time (min)
(mL/h)
Resistance Mode Start-up at 999.9 mL/h (initial)
-200
0
200
400
600
800
1000
1200
1400
1600
1800
2000
0 20 40 60 80 100 120
Time (min)
(mL/h)
Resistance Mode Trumpet Curve at 25 mL/h (initial)
5.0
3.2
-2.0
1.5
-8.4
-0.2
1.3
3.0
15.6
6.1
2.3
-15
-10
-5
0
5
10
15
0 5 10 15 20 25 30
Observation Interval (min)
Flow Rate Error (%)
Resistance Mode Trumpet Curve at 999.9 mL/h (initial)
-1.2 -1.1
0.1 -0.3 -0.6 -0.7 -0.7
-1.9 -1.0
-1.5
-0.9
-15
-10
-5
0
5
10
15
0 5 10 15 20 25 30
Observation Interval (min)
Flow Rate Error (%)
Resistance Mode Trumpet Curve at 25 mL/h (48 hr)
3.1
1.4
-3.6
-0.2
-9.9
-2.0
-0.5
1.2
13.4
4.1
0.5
-15
-10
-5
0
5
10
15
0 5 10 15 20 25 30
Observation Interval (min)
Flow Rate Error (%)
Resistance Mode Trumpet Curve at 999.9 mL/h (24 hr)
-3.5 -3.4
-2.7 -2.9 -3.1 -3.1
-3.9 -3.3
-3.7
-3.2
-3.3
-15
-10
-5
0
5
10
15
0 5 10 15 20 25 30
Observation Interval (min)
Flow Rate Error (%)
Resistance Mode (Continued)
Legend:
n Maximum rate error
y
Overall rate error
u Minimum rate error
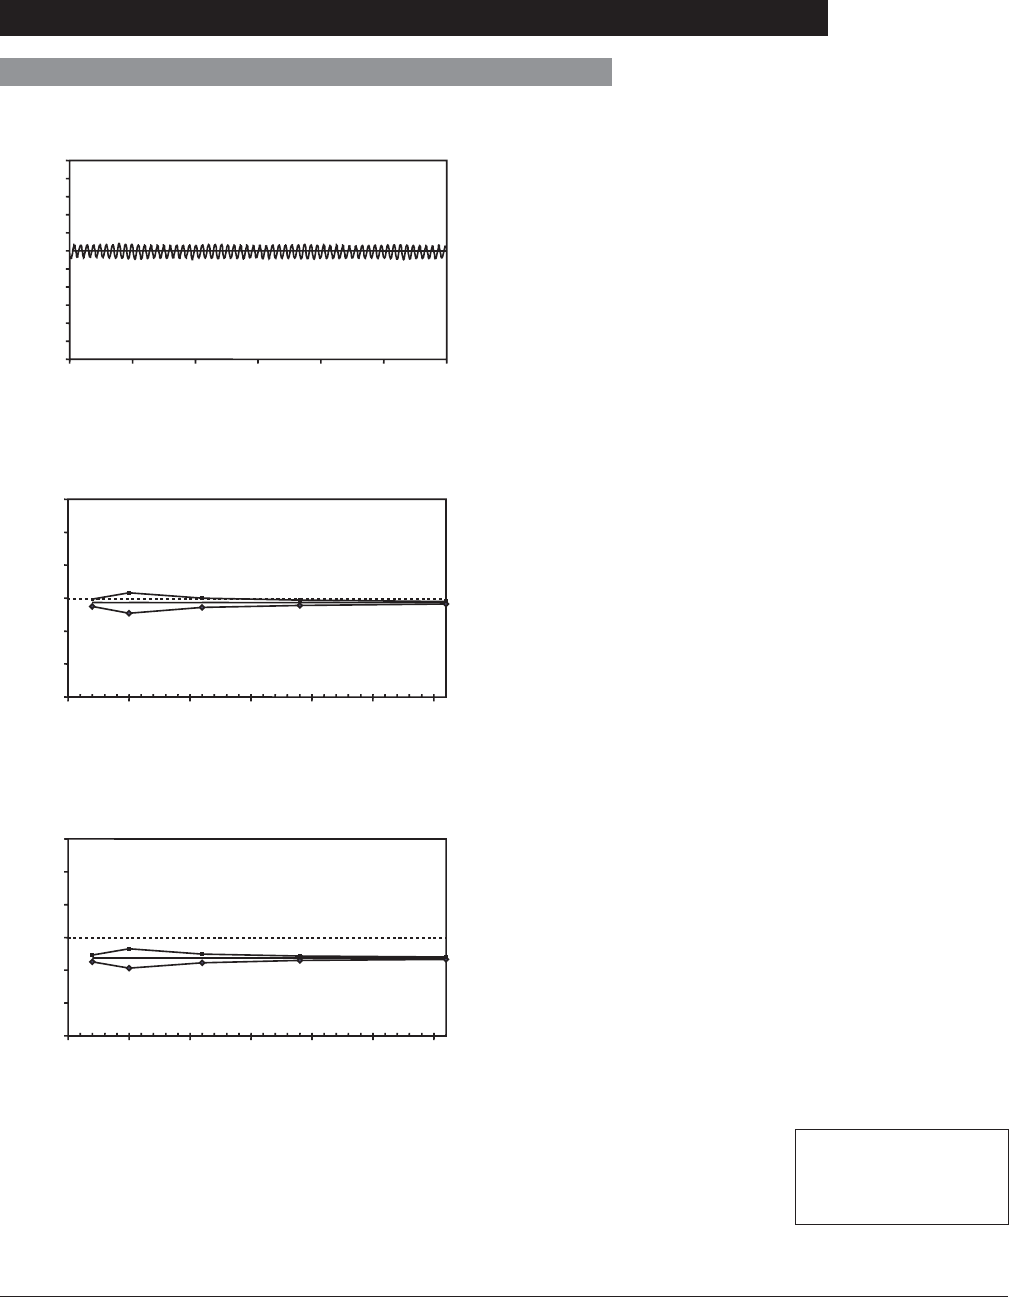
Directions for Use
Alaris® SE Pump
Models 7130/7131, 7230/7231
142 General Information
Trumpet and Start-Up Curves (Continued)
High Resistance Mode
High Resistance Mode Start-up at 999.9 mL/h (initial)
-200
0
200
400
600
800
1000
1200
1400
1600
1800
2000
0 20 40 60 80 100 120
Time (min)
(mL/h)
High Resistance Mode Trumpet Curve at 999.9 mL/h (initial)
-1.4 -1.1
-0.1 0.8 0.0 -0.3
-1.3 -0.9
-2.3
-0.5
-0.7
-15
-10
-5
0
5
10
15
05 1015202530
Observation Interval (min)
Flow Rate Error (%)
High Resistance Mode Trumpet Curve at 999.9 mL/h (24 hr)
-3.9 -3.5
-2.7
-1.7
-2.5 -2.8
-4.7 -3.3
-3.7
-3.0
-3.1
-15
-10
-5
0
5
10
15
0 5 10 15 20 25 30
Observation Interval (min)
Flow Rate Error (%)
Legend:
n Maximum rate error
y
Overall rate error
u Minimum rate error

Directions for Use
Alaris® SE Pump
Models 7130/7131, 7230/7231
143
Troubleshooting and Maintenance
Troubleshooting and Maintenance
General
The SE Pump Technical Service Manual is available from
Cardinal Health. It includes routine service schedules,
interconnect diagrams, component parts lists and descriptions,
test procedures, and other technical information, to assist
qualified service personnel in repair and maintenance of the
instrument’s repairable components. Maintenance procedures
are intended to be performed only by qualified personnel.
Artifacts: It is normal for an infusion device to produce
nonhazardous currents when infusing electrolytes. These
currents vary proportional to the infusion device flow rate.
When an ECG monitoring system is not functioning under
optimal conditions, these currents may appear as artifacts,
simulating actual ECG readings. To determine if ECG
abnormalities are caused by patient condition or the ECG
equipment, place the infusion device on hold. If the ECG
readings become normal, the ECG equipment requires
attention. Proper setup of the ECG equipment should
eliminate these artifacts. Reference the appropriate ECG
monitoring system documentation for instructions on setup and
maintenance.
Air In Line Assembly
The Air-in-Line Detection System provides clinicians the
ability to detect inappropriate amounts of air in the IV line.
The instrument is configurable to allow single bubble and
accumulated air detection. Accumulated air detection is based
on measurement of the average percentage produced by small
air bubbles passing the detector. À
Air is detected by an emitter (Air-in-Line arm) which rotates
into position as the latch is closed. A receiver (Air-in-Line
Detector), opposite the arm and just below the Pumping
Mechanism, sends the Air-in-Line information to the main
processor.
Qualified biomedical personnel may configure 1 of 4 possible
sensitivity levels. The instrument is also configurable to
permit the operator to clear (reset) any air registered in the
instrument’s memory.
Air-in Line Arm
Air-in Line Detector

Directions for Use
Alaris® SE Pump
Models 7130/7131, 7230/7231
144 Troubleshooting and Maintenance
Air In Line Assembly (Continued)
1. To place channel on hold, press hold soft key.
2. Remove air per hospital protocol. À
3. To resume infusion, reinstall set and then press RUN/
HOLD key.
If air volume is clinically insignificant, press reset soft key
or RUN/ HOLD key, followed by run soft key or RUN/
HOLD key to resume infusion.
• Subsequent air bubbles trigger alarm.
NOTE:
À Ensure that the tubing is properly inserted into the air detector
to avoid false alarms. The tubing may be reshaped to ensure
optimum contact with the sensors. Periodically clean the Air-
in-Line Detector to ensure a clear signal can be received (see
“Cleaning”).
Single or Accumulated Air Bubble Detection (NO Reset Feature)
NOTE:
À Opening the latch or turning the channel off clears air
memory.

Directions for Use
Alaris® SE Pump
Models 7130/7131, 7230/7231
145
Troubleshooting and Maintenance
Alarms, Alerts, Prompts
There are 3 types of displayed messages listed on the
following pages with a probable cause and suggested remedy
next to each one. Use this section in conjunction with the
appropriate clinical practice of hospital procedure. Additional
information can be found in other sections of this DFU (see
"Table of Contents"). Use this section in conjunction with the
appropriate clinical practice or hospital procedure.À
ALARM: instrument or channel problem.
• infusion stops
• alarm bell icon illuminates
• alarm tone sounds
• rate LED display flashes
• message appears in Main Display when channel is
selected
ALERT: may indicate a change in infusion status.
• channel continues to operate
• alert tone sounds
• message appears in Main Display
PROMPT: infusion status not changed.
Startup procedures were not completed or an invalid key was
pressed.
NOTE:
À When using the dual channel instrument, some messages
also display Channel A or Channel B, to indicate which
channel is affected. Always verify the channel is selected
before making any changes.

Directions for Use
Alaris® SE Pump
Models 7130/7131, 7230/7231
146 Troubleshooting and Maintenance
BATTERY DEPLETED (Plug In) Battery is too low to operate
instrument.
Plug power cord into an AC
outlet immediately. Press
run soft key or RUN/HOLD to
resume infusion.
Alarms, Alerts, Prompts (Continued)
Alarms
ACCUMULATED AIR IN LINE Air detector has detected
multiple small bubbles.
Press hold soft key. Open
latch to remove set. Clear air
per hospital protocol. Reinstall
set. Press Run/Hold to resume
infusion.
OR
If reset key is active and
air bubbles are clinically
insignificant, press reset soft
key and then press run soft key
to resume infusion.
Ensure air-in-line sensors are
thoroughly cleaned.
AIR IN LINE Air detector has detected an air
bubble larger than configured
threshold tolerance.
Press hold soft key. Open latch
to remove set. Clear air per
hospital protocol. Reinstall set.
Press RUN/HOLD to resume
infusion.
OR
If reset key is active and
air bubbles are clinically
insignificant, press reset soft
key and then press run soft key
to resume infusion.
At flow rates of 1.0 mL/h and
below, verify upstream fluid path
is unobstructed.
Ensure air-in-line sensors are
thoroughly cleaned.
Alarm Meaning Response

Directions for Use
Alaris® SE Pump
Models 7130/7131, 7230/7231
147
Troubleshooting and Maintenance
Alarms, Alerts, Prompts (Continued)
Alarms (Continued)
CHANNEL MALFUNCTION
Dual channel instrument
only.
Channel malfunction. Turn channel off and then on.
If problem persists, do not use
channel. Contact qualified
service personnel.
FLOW SENSOR UNPLUGGED Flow sensor is unplugged from
back of instrument.
Plug flow sensor into flow
sensor receptacle.
COMPUTER LINK FAILURE RS-232 connection to computer
was disrupted.
Computer Link feature is in
monitor mode.
Check RS-232 connections.
Clearing this alarm
automatically puts instrument
in monitor mode. Reestablish
infusion.
HOLD TIME EXCEEDED Channel has been on hold for 2
minutes and no keys have been
pressed (on either channel if
dual channel).
Press hold soft key to return to
hold mode.
INSTRUMENT MALFUNCTION Instrument malfunction. For a
dual channel instrument, neither
channel is functional.
Turn instrument off and then on.
If problem persists, do not use
instrument. Contact qualified
service personnel.
KEY STUCK A key is stuck or was held down
too long.
Release key. Turn instrument
off (both channels if dual
channel instrument) and then
on. If problem persists, do
not use instrument. Contact
qualified service personnel.
LATCH OPEN Latch was opened during an
infusion.
Check for proper set installation.
Close latch fully to the left.
Press run soft key.
Alarm Meaning Response

Directions for Use
Alaris® SE Pump
Models 7130/7131, 7230/7231
148 Troubleshooting and Maintenance
Alarms, Alerts, Prompts (Continued)
Alarms (Continued)
NO UPSTREAM FLOW
DETECTED
Flow has been obstructed
between container and
instrument when using a flow
sensor.
Check to see if container
is empty, flow sensor is
mispositioned or clouded, tubing
is kinked or air vent is closed.
Verify correct set connections
and open fluid path. Press run
soft key to restart infusion. À
OCCLUSION DOWNSTREAM Pressure in IV line has
exceeded a pressure alarm
threshold.
OR
Resistance has reached 100%.
Check administration set for
probable cause (such as kinked
tubing, closed stopcock, high
resistance catheter). Press run
soft key to restart infusion.
OCCLUSION UPSTREAM Flow has been obstructed
between fluid container and
instrument's pressure sensor.
Check administration set for
probable cause (such as kinked
tubing, closed clamp). Verify
that blue thumb clamp on Flow
Regulator has moved to open
(up) position. If not, reload set.
Press run soft key to restart
infusion.
Alarm Meaning Response
NOTE:
À Infusing fluids which form smaller drops through a 60 drops/mL
set at high rates may result in a No Upstream Flow Detected
alarm. (This is because the small, rapidly falling drops form a
continuous stream which does not trigger the flow sensor). In
this event, unplug the flow sensor from the instrument.

Directions for Use
Alaris® SE Pump
Models 7130/7131, 7230/7231
149
Troubleshooting and Maintenance
Alarms, Alerts, Prompts (Continued)
Alarms (Continued)
PRIMARY FLOW DETECTED
DURING SECONDARY
Instrument detected flow
from primary container
during secondary infusion.
NOTE: Alarm can only occur
when using optional flow
sensor.
Verify that flow sensor is on
Primary line and that set up is
correct.
SETUP TIME EXCEEDED Instrument has been turned on
but no keys have been pressed
for 10 minutes.
Press hold soft key to return to
hold mode.
Instrument turns off if left in
alarm more than 5 minutes.
If an audio alarm remains on,
turn instrument on and then off.
SET OUT Set has been removed during
an infusion.
Reinstall set. Press run soft
key to restart infusion
Alarm Meaning Response

Directions for Use
Alaris® SE Pump
Models 7130/7131, 7230/7231
150 Troubleshooting and Maintenance
Alarms, Alerts, Prompts (Continued)
Alerts
Battery Low Battery has 30 minutes or less
of charge remaining.
Plug power cord into an AC
outlet as soon as possible.
Checking Line Flow has been obstructed.
Auto Restart Plus feature is on.
Auto Restart Plus feature must
be on for downstream occlusion
alerts (not required for upstream
occlusion alerts). Check
administration set for probable
cause (such as kinked tubing,
clogged filter, etc.).
Complete Entry ENTER was not pressed to
accept a new value.
Press ENTER to confirm entry
or press CLEAR twice to return
to previous settings.NOTE:
Channel operates as previously
programmed until ENTER is
pressed.
Resistance Alert IV line resistance has reached
preset alert level.
Resistance Alert feature is on.
Check downstream line and
site. Raise resistance alert
level, if appropriate.
Additional Alerts:
Additional alerts provide notification of program completion and/or transition to another mode: Bolus Dose
Complete, Dose Complete (Multi-Dose Mode), Loading Dose Complete, Multi-Step Complete, Secondary
Complete, Infusion in KVO or VTBI = 0.)
Alert Meaning Response

Directions for Use
Alaris® SE Pump
Models 7130/7131, 7230/7231
151
Troubleshooting and Maintenance
Alarms, Alerts, Prompts (Continued)
Prompts
Entry Invalid An invalid value was entered
during programming.
Press CLEAR or 0 key to clear
entry. Enter appropriate value.
Dose Out of Range Calculated dose is outside
allowable range.
Verify and reenter settings.
Invalid Entry Rate Out of
Range
Instrument has calculated a rate
less than 0.1 mL/h.
Verify and reenter settings.
Instrument Self-Check Is Due
Please Eject the Set
Instrument/channel has not
performed self-check within
programmed interval.
If set is loaded: Eject set, wait 5
seconds and then reload set.
If no set is loaded: Load set,
wait 1 minute and then eject
set. Wait 5 seconds and then
reload set.
Maintenance Reminder Periodic maintenance interval
has elapsed.
Maintenance Reminder feature
is on.
Notify Biomedical Engineering
department. If desired, press
continue soft key to temporarily
bypass reminder.
Latch Open Latch is open (prior to starting
an infusion).
Close latch fully to left.
Air In Line Air detector has detected air
prior to starting infusion or is in
poor contact with set.
Press continue soft key to
allow infusion to continue. An
alarm occurs if air detector
detects an air bubble larger
than configured threshold.
Verify set is loaded correctly.
Prime and reload set or remove
air. Reshape tubing to ensure
optimum contact with sensor.
Ensure air-in-line sensors are
thoroughly cleaned.
Prompt Meaning Response

Directions for Use
Alaris® SE Pump
Models 7130/7131, 7230/7231
152 Troubleshooting and Maintenance
Alarms, Alerts, Prompts (Continued)
Prompts (Continued)
New Baseline Set A new Manual Pressure
Baseline was successfully set.
Manual Pressure Baseline
feature is on.
Baseline remains set until a
new manual baseline is set,
instrument is turned off or latch
is opened.
Occlusion Downstream A very high pressure exists in
fluid line while baseline is being
set.
Pressure Baseline feature is on.
Remove source of high
pressure and repeat setting of
pressure baseline.
Panel Locked A key was pressed.
Panel lock feature is on.
Turn panel lock off to access
panel controls. Panel lock key
is located behind handle.
Ok Entry Attempt was made to go to
another page before pressing
ok soft key.
Verify all parameters are correct
and press ok soft key.
Place on Hold to Set Pressure
Baseline
SET PRESSURE BASELINE
function was selected while
running.
Pressure Baseline feature is on.
Place instrument on hold
before performing manual
SET PRESSURE BASELINE
operation.
Press and Hold Key to Turn
Off
POWER was pressed. Press and hold POWER until
display turns off.
Max Rate = XXX.X mL/h
(XXX.X represents maximum
flow rate configured for
instrument or profile.)
An attempt was made to enter
a rate greater than maximum
configured rate or instrument
has calculated a rate greater
than maximum configured
rate. Default maximum rate is
999.9 mL/h in primary mode,
600 mL/h in secondary mode.
Verify and reenter settings.
Prompt Meaning Response
Place on Hold to Change A key was pressed during KVO. Channel must be on hold to
make changes.

Directions for Use
Alaris® SE Pump
Models 7130/7131, 7230/7231
153
Troubleshooting and Maintenance
Alarms, Alerts, Prompts (Continued)
Prompts (Continued)
Pressure Limit XXX mmHg
(XXX represents configured
maximum pressure)
An elevated pressure was
present in fluid path when
pressure baseline was
established. This may reduce
maximum available pressure
range.
Reload administration set and
verify no obstruction exists
which could cause excess
pressure.
• If Pressure Baseline feature
is on, repeat manual setting
of pressure baseline.
OTHERWISE
• Restarting infusion
automatically sets pressure
baseline.
Pressure Limit Must Be Less
Than or Equal to XXX mmHg
(XXX represents configured
maximum pressure)
Attempt was made to increase
pressure alarm limit to a
level higher than configured
maximum pressure.
Choose a pressure alarm limit
that is less than, or equal to,
configured maximum pressure.
Pressure Unstable Cannot
Set Baseline
Excessive variation in pressure
due to motion, flow from other
instruments or blood pressure
prevents accurate setting of
pressure baseline.
Pressure Baseline feature is on.
Reduce or temporarily remove
sources of variation while
performing manual baseline
setting operation.
Program Lost Re-Enter
Settings
Instrument detected a memory
or power failure. Existing
operating parameters were
erased.
Press continue soft key and
reenter all infusion settings.
Configurable options are not
affected.
Rate Out of Range Instrument has calculated a rate
less than 0.1 mL/h.
Verify and reenter settings.
Set Must Be Loaded Flow Regulator segment is not
loaded in selected channel
during a manual pressure
baseline setting operation.
Pressure Baseline feature is on.
Load Flow Regulator segment
in selected channel. Repeat
manual pressure baseline
setting.
Prompt Meaning Response

Directions for Use
Alaris® SE Pump
Models 7130/7131, 7230/7231
154 Troubleshooting and Maintenance
Alarms, Alerts, Prompts (Continued)
Prompts (Continued)
Set Out Flow Regulator segment is not
installed correctly.
Reinstall Flow Regulator
segment.
Set Pri VTBI > Loading Dose
VTBI
Loading Dose VTBI entered is
greater than primary VTBI.
Raise primary VTBI or lower
Loading Dose VTBI, as
appropriate.
Set Pressure Baseline Set Pressure Baseline was
selected in options mode.
Press ok soft key to set
Pressure Baseline or press
return soft key to go to exit.
Set Pri VTBI A primary VTBI was not
programmed.
Enter a primary VTBI.
Stop Timer to Change An invalid key was pressed
while timer was running in Multi-
Dose program.
Wait several seconds for popup
to finish. Press stop timer soft
key to make changes.
Stop Secondary and Infuse
Primary?
Run soft key was pressed
in Primary Mode when a
secondary infusion was on hold.
If return to primary parameters
is appropriate press yes soft
key. If continued secondary
infusion is appropriate, press no
soft key.
The Specified VTBI Will Only
Deliver a Partial Dose
Secondary VTBI value is
significantly less than bag
volume programmed on set up
page.
Verify parameters are correct.
Press yes soft key to proceed
or no soft key to return to
programming.
Time Out of Range Programmed step time exceeds
24 hours and 59 minutes, or is
less than 1 minute.
Verify and reenter settings.
Prompt Meaning Response

Directions for Use
Alaris® SE Pump
Models 7130/7131, 7230/7231
155
Troubleshooting and Maintenance
Alarms, Alerts, Prompts (Continued)
Prompts (Continued)
Invalid Keypress During Programming:
The following Prompts may be seen if an invalid key is pressed during programming: Both A and B not
Running, Channel Not On, Complete or OK Setup, No Numeric Entries, Select Channel.
Invalid Keypress During Infusion:
During an infusion, if an invalid key is pressed, the following prompts may be seen: Dose Rate Running,
Loading Dose Running, Multi-Dose Running, Multi-Step Running, Pri Running, Sec Running, or Timer
Running (Multi-Dose program).
Resuming Previous Programming:
When an instrument has been powered off then on again previous parameters may be preserved if
Current Profile is accepted and New Patient? – No is selected. The following prompts may be seen:
Return to Dose Rate?, Return to Loading Dose?, Return to Multi-Dose?, Return to Multi-Step?, or
Return to Secondary?.

Directions for Use
Alaris® SE Pump
Models 7130/7131, 7230/7231
156 Troubleshooting and Maintenance
Inspection Requirements
To ensure the system remains in good operating condition,
both regular and preventive maintenance inspections are
required.
WARNING
Failure to perform these
inspections may result in improper
instrument operation.
CAUTIONS
• Regular and preventive
maintenance inspections should
only be performed by qualified
service personnel.
• Inspect LCD for anomalies
(improperly lit/unlit pixels).
REGULAR INSPECTIONS
PROCEDURE FREQUENCY
INSPECT FOR DAMAGE:
Case
Connector
Keypad
Each usage
Each usage
Each usage
CLEANING As required
START UP Each usage
Cleaning
DO NOT use solutions containing phosphoric acid (Foamy
Q&A À), aromatic solvents (naphtha, paint thinner,
etc.), chlorinated solvents À (Trichloroethane, MEK,
Toluene, etc.), ammonia, acetone, benzene, xylene
or alcohol, other than as specified below.
DO NOT use hard or pointed objects to clean any part of
instrument.
DO NOT use pressurized sprays on instrument.
Acceptable cleaning solutions are (use per manufacturers’
instructions):
10% bleach solution (1 part bleach to 9 parts water)
Vesphene
Manu-Klenz
Warm water
1. Unplug power cord from AC outlet before cleaning.
2. Verify RS-232 connector is covered. Do not spray fluid
directly into any connector.
Turn the instrument off and unplug
the power cord from AC power
before cleaning. Do not spray
fluids directly onto the instrument.
Do not steam autoclave, EtO
sterilize, immerse the instrument or
allow fluids to enter the instrument
case. Failure to follow these
instructions may result in an
electrical hazard.
WARNING
The solutions/solvents identified
as NOT to be used can damage the
surfaces of the instrument.
CAUTION

Directions for Use
Alaris® SE Pump
Models 7130/7131, 7230/7231
157
Troubleshooting and Maintenance
Cleaning (Continued)
3. Use a soft cloth dampened with warm water and a mild,
nonabrasive cleaning solution.
• A soft-bristled brush may be used to clean narrow
areas.
• Use light pressure when cleaning pressure transducer
and air-in-line detector areas of pumping channels.
4. Flow sensor should be routinely cleaned by running warm
water over it while actuating slider, and then thoroughly
dried.
NOTE:
À Excluding 10% bleach solution in water.

Directions for Use
Alaris® SE Pump
Models 7130/7131, 7230/7231
158 Troubleshooting and Maintenance
If the instrument shows evidence of damage in transit, notify
the carrier’s agent immediately. Do not return damaged
equipment to the factory before the carrier’s agent has
authorized repairs.
If the instrument fails to respond as described in this
document and the cause cannot be determined, do not use
the instrument. Contact qualified Cardinal Health service
personnel.
If it is necessary to return the instrument for service, obtain
a return authorization number prior to shipment. Carefully
package the instrument (preferably in the original packaging),
reference the return authorization information, and return it to
the appropriate service or distribution center. Cardinal Health
does not assume any responsibility for loss of, or damage to,
returned instruments while in transit.
Service Information
• The instrument case should only
be opened by qualified personnel
using proper grounding
techniques. Prior to performing
maintenance, disconnect SE
Pump from AC power.
• During servicing, an instrument’s
configuration settings might
be reset to the factory defaults.
Qualified hospital/facility
personnel are responsible for
checking in the instrument and
ensuring the current hospital-
approved Data Set is loaded
if Guardrails® Suite MX is in
use, or that instrument system
configuration settings are correct
if the Profiles feature is set to
OFF.
WARNINGS
Technical support, service information, applications, and
manuals may be obtained by contacting a Cardinal Health
representative.
When submitting any request for service, include:
• model number
• a description of difficulty experienced
• instrument settings
• administration set/lot number
• solution(s) used
• message displayed at time of difficulty
Technical Support

Directions for Use
Alaris® SE Pump
Models 7130/7131, 7230/7231
159
Troubleshooting and Maintenance
Cardinal Health warrants that:
A. Each new SE Pump is free from defects in material and workmanship under normal use and
service for a period of one (1) year from the date of delivery by Cardinal Health to the original
purchaser.
B. The battery and each new accessory is free from defects in material and workmanship under
normal use and service for a period of ninety (90) days from the date of delivery by Cardinal
Health to the original purchaser.
If any product requires service during the applicable warranty period, the purchaser should
communicate directly with Cardinal Health to determine the appropriate repair facility. Except as
provided otherwise in this warranty, repair or replacement will be carried out at Cardinal Health’s
expense. The product requiring service should be returned promptly, properly packaged and
postage prepaid by purchaser. Loss or damage in return shipment to the repair facility shall be at
purchaser’s risk.
In no event shall Cardinal Health be liable for any incidental, indirect or consequential damages
in connection with the purchase or use of any SE Pump product. This warranty shall apply
solely to the original purchaser. This warranty shall not apply to any subsequent owner or holder
of the product. Furthermore, this warranty shall not apply to, and Cardinal Health shall not be
responsible for, any loss or damage arising in connection with the purchase or use of any SE
Pump product which has been:
1. repaired by anyone other than an authorized Cardinal Health Service Representative;
2. altered in any way so as to affect, in Cardinal Health’s judgment, the product’s stability or
reliability;
3. subjected to misuse or negligence or accident, or which has had the product’s serial or lot
number altered, effaced or removed; or
4. improperly maintained or used in any manner other than in accordance with the written
instructions furnished by Cardinal Health.
This warranty is in lieu of all other warranties, express or implied, and of all other obligations or
liabilities of Cardinal Health, and Cardinal Health does not give or grant, directly or indirectly, the
authority to any representative or other person to assume on behalf of Cardinal Health any other
liability in connection with the sale or use of SE Pump products.
CARDINAL HEALTH DISCLAIMS ALL OTHER WARRANTIES, EXPRESS OR IMPLIED, INCLUDING
ANY WARRANTY OF MERCHANTABILITY OR OF FITNESS FOR A PARTICULAR PURPOSE OR
APPLICATION.
See packing inserts for international warranty, if applicable.
WARRANTY

Directions for Use
Alaris® SE Pump
Models 7130/7131, 7230/7231
160 Troubleshooting and Maintenance
THIS PAGE
INTENTIONALLY
LEFT BLANK

Directions for Use
Alaris® SE Pump
Models 7130/7131, 7230/7231
161
Regulations and Standards
Regulations and Standards
Compliance
This system complies with part 18 of the FCC Rules. Operation
is subject to the following 2 conditions:
• This system may not cause harmful interference.
• This system must accept any interference received,
including interference that may cause undesired operation.
The digital apparatus does not exceed the Class B limits for
radio noise emissions from digital apparatus set out in the
radio interference regulations of the Canadian Department of
Communications (DOC).
Le present appareil numerique n'emet pas de bruits
radiolelectriques depassant les limites applicables aux
appareils numeriques de la Classe A/B prescrites dans le
reglement sur le brouillage radioelectrique edicte par le
Ministere des Communications du Canada.
This system has been tested and found to comply with either
the limits for a Class B digital device (without Model 180 Flow
Sensor), or as a Class A digital device (with Model 180 Flow
Sensor), pursuant to Part 18 of the FCC Rules. These limits
are designed to provide reasonable protection against harmful
interference when the system is operated in a commercial
environment. This system generates, uses, and can radiate
radio frequency energy. If it is not installed and used in
accordance with the applicable directions for use, it may cause
harmful interference to radio communications. Operation
of this system in a residential area is likely to cause harmful
interference, in which case the user will be required to correct
the interference at their own expense.
The authority to operate this system is conditioned by the
requirement that no modifications will be made to the system
unless the changes or modifications are expressly approved by
Cardinal Health, Inc.
This Class A/B digital apparatus meets all requirements of the
Canadian Interference-Causing Equipment Regulation.
Cet appareil numerique de la Classe A/B respecte toutes les
exigences du Reglement sur le materiel brouilleur du Canada.
Electromagnetic Environment
Any changes or modifications not
expressly approved by the personnel
responsible for compliance could
void the user's authority to operate
the system.
CAUTION

Directions for Use
Alaris® SE Pump
Models 7130/7131, 7230/7231
162 Regulations and Standards
Compliance (Continued)
Electromagnetic Environment (Continued)
Tables: The SE Pump is intended for use in the
electromagnetic environments specified in the following tables.
Table 1
Electromagnetic Emissions
Emissions Test Compliance Electromagnetic Environment - Guidance
CISPR 11
RF Emissions
Group 1
Class B
The SE Pump is suitable for use in all establishments, including
domestic establishments and those directly connected to a public
low-voltage power supply network that supplies buildings used for
domestic purposes.
IEC 61000-3-2
Harmonic Emissions Class A
IEC 61000-3-2
Voltage Fluctuations
Flicker Emissions
Complies
Group 1
Class A
The SE Pump is intended for use under the supervision of healthcare
professionals only. This is a CISPR 11 Class A when the Model 180
(Flow Sensor) accessory is used and a CISPR 11 Class B when
the Model 180 is not used. In a domestic environment, this system
may cause radio interference. Reorienting, relocating or shielding
the system, or filtering the connection to the public mains network,
are examples of steps that can be taken to reduce or eliminate
interference.
The SE Pump is suitable for use in all establishments, including
domestic establishments and those directly connected to a public
low-voltage power supply network that supplies buildings used for
domestic purposes, provided the following Caution is heeded:.
CISPR 11
RF Emissions
CAUTION
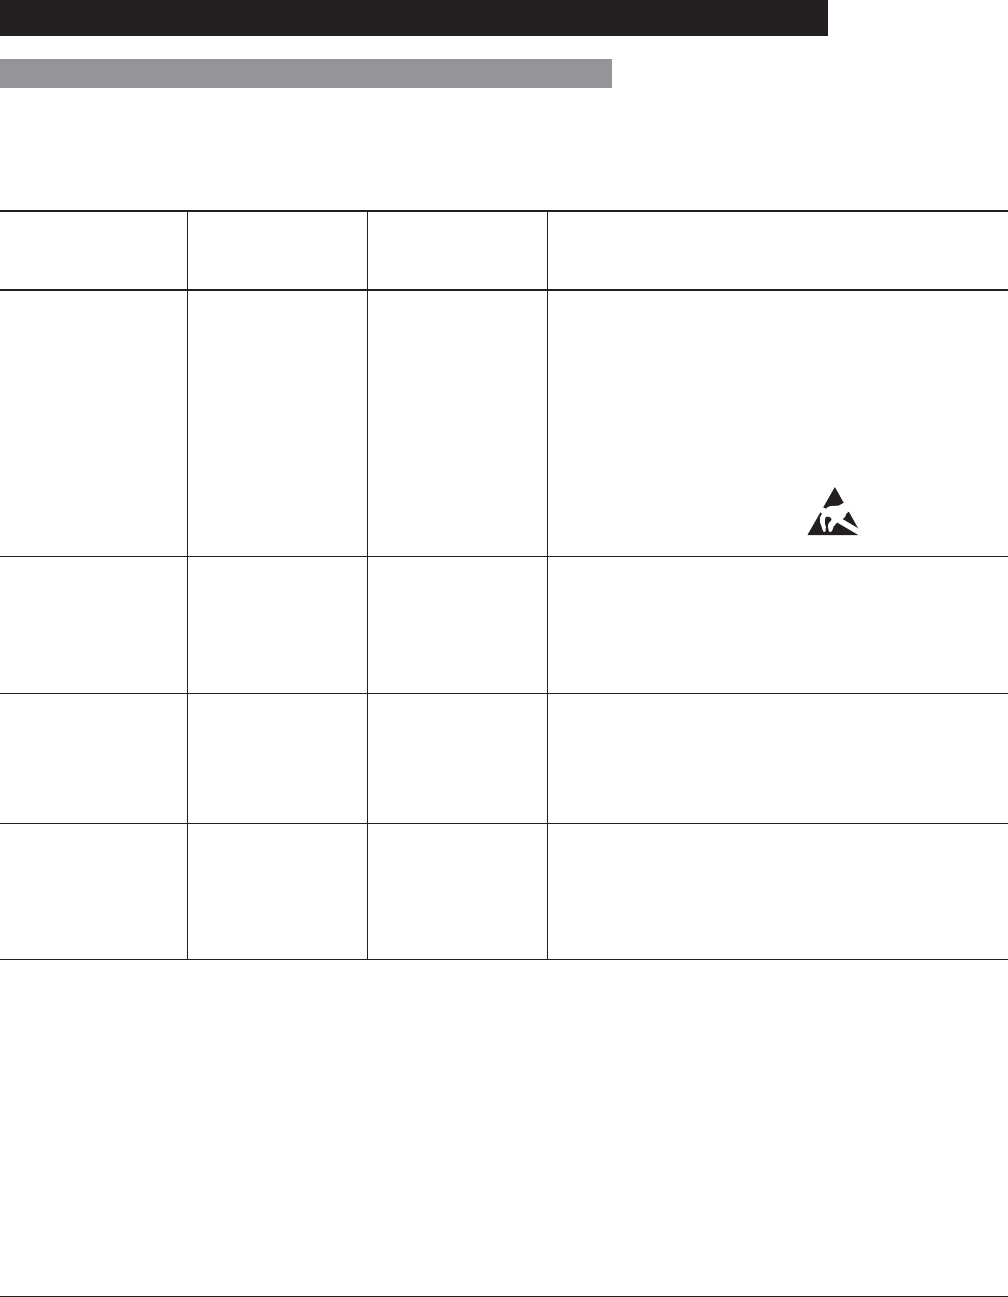
Directions for Use
Alaris® SE Pump
Models 7130/7131, 7230/7231
163
Regulations and Standards
Compliance (Continued)
Table 2
Electromagnetic Immunity
IEC 61000-4-2
Electrostatic
Discharge (ESD)
Floors should be wood, concrete, or ceramic tile.
If floors are covered with synthetic material,
relative humidity should be at least 30%.
If connector testing exemption is used, following
ESD sensitivity symbol appears adjacent to each
connector. " - Do Not Touch"
Emissions Test Electromagnetic Environment - Guidance
±6 kV contact
±8 kV air
IEC 60601-1-2
Test Level
±8 kV contact À
±15 kV air À
Compliance
Level
IEC 61000-4-4
Electrical Fast
Transient, Burst
(EFT) Á
Mains power quality should be that of a typical
commercial or hospital environment.
±2 kV for power
supply lines
±1 kV for input/
output lines
±2 kV for power
supply lines
±1 kV for input/
output lines
IEC 61000-4-5
Power Line Surge Á
Mains power quality should be that of a typical
commercial or hospital environment.
±1 kV differential
mode
±2 kV common
mode
±1 kV differential
mode
±2 kV common
mode
IEC 61000-4-8
Power Frequency
Magnetic Field
(50/60 Hz)
Power frequency magnetic fields should be at
levels characteristic of a typical location in a
typical commercial or hospital environment.
3 A/m 400 A/m 50 Hz À
400 A/m 60 Hz À
Electromagnetic Environment (Continued)

Directions for Use
Alaris® SE Pump
Models 7130/7131, 7230/7231
164 Regulations and Standards
IEC 61000-4-11
Voltage Dips, Short
Interruptions, and
Voltage Variations Á
Mains power quality should be that of a typical
commercial or hospital environment.
If continued operation of the SE Pump is
required during power mains interruptions, it is
recommended that the SE Pump be powered
from an uninterruptible power supply or a battery.
The SE Pump does employ an internal short
duration battery.
<5% UT
(>95% dip in UT)
for 0.5 cycle
40% UT
(60% dip in UT)
for 5 cycles
70% UT
(30% dip in UT)
for 25 cycles
<5% UT
(>95% dip in UT)
for 5 sec
<5% UT
(>95% dip in UT)
for 0.5 cycle
40% UT
(60% dip in UT)
for 5 cycles
70% UT
(30% dip in UT)
for 25 cycles
<5% UT
(>95% dip in UT)
for 5 sec
Table 2 (Continued)
Electromagnetic Immunity
Emissions Test Electromagnetic Environment - Guidance
IEC 60601-1-2
Test Level Â
Compliance
Level Â
Compliance (Continued)
Electromagnetic Environment (Continued)

Directions for Use
Alaris® SE Pump
Models 7130/7131, 7230/7231
165
Regulations and Standards
IEC 61000-4-6
Conducted RF
IEC 61000-4-3
Radiated RF
Portable and mobile RF communications equipment
should be used no closer to the SE Pump (including
cables) than recommended separation distance
calculated from equation applicable to frequency of
transmitter.
Recommended Separation Distance
12
— d = [-----] √P
V
2
12
— d = [-----] √P 80 MHz - 800 MHz
E
1
12
— d = [-----] √P 80 MHz - 2.5 GHz
E
1
d = recommended separation distance in
meters (m). Å
P = maximum output power rating of transmitter in
watts (W) according to transmitter manufacturer.
Field strengths from fixed RF transmitters, as
determined by an electromagnetic site survey,
should be less than compliance level in each
frequency range. Æ Ç
Interference may occur in vicinity of equipment
marked with following symbol:
3 Vrms
150 kHz - 80 MHz
3 V/m
80 MHz - 2.5 GHz
10 Vrms
10 V/m
Table 3
Electromagnetic Immunity - Life Support Equipment
Immunity Test Electromagnetic Environment - Guidance à Ä
IEC 60601-1-2
Test Level
Compliance
Level À
Compliance (Continued)
Electromagnetic Environment (Continued)
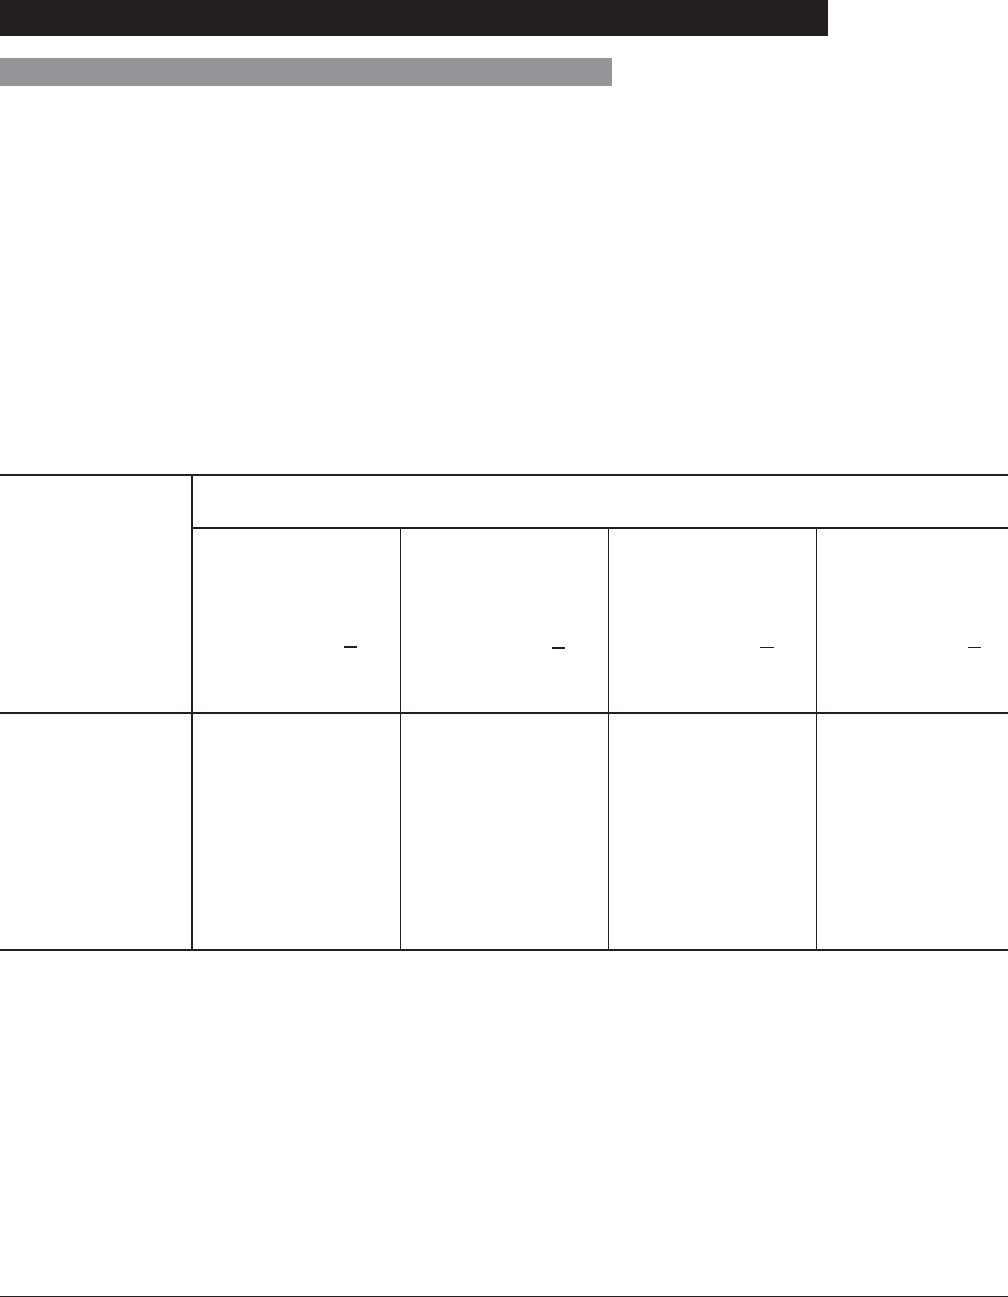
Directions for Use
Alaris® SE Pump
Models 7130/7131, 7230/7231
166 Regulations and Standards
Rated Maximum
Output Power of
Transmitter (W)
150 kHz - 80 MHz
Outside ISM
Bands
3.5
— d = [-----] √P
V
1
150 kHz - 80 MHz
In ISM Bands
12
— d = [-----] √P
V
2
80 MHz - 800 MHz
12
— d = [-----] √P
E
1
800 MHz - 2.5 GHz
23
— d = [-----] √P
E
1
0.01
0.1
1
10
100
0.04
0.11
0.35
1.11
3.5
0.12
0.38
1.2
3.8
12
0.12
0.38
1.2
3.8
12
0.23
0.73
2.3
7.3
23
Separation Distance Based on Transmitter Frequency (m)
Table 4 Ã Ä Å È
Recommended Separation Distances
Reduce the potential for electromagnetic interference by maintaining a minimum distance between
portable and mobile RF communications equipment (transmitters) and the SE Pump as recommended
in this table, based on the maximum output power of the communications equipment.
For transmitters rated at a maximum output power not listed in this table, the recommended separation
distance (d) in meters (m) can be determined using the equation applicable to the frequency of the
transmitter, where P is the maximum output power rating of the transmitter in watts (W) based on the
transmitter manufacturer.
Compliance (Continued)
Electromagnetic Environment (Continued)

Directions for Use
Alaris® SE Pump
Models 7130/7131, 7230/7231
167
Regulations and Standards
NOTES:
À Compliance levels raised by IEC 60601-2-24.
Á Performed at the minimum and maximum rated input voltage.
 UT is the AC mains voltage prior to application of the test level.
à At 80 MHz and 800 MHz, the higher frequency range applies.
Ä These guidelines may not apply in all situations. Electromagnetic propagation is affected by absorption
and reflection from structures, objects and people.
Å The compliance levels in the ISM frequency bands between 150 kHz and 80 MHz, and in the frequency
range 80 MHz - 2.5 GHz, are intended to decrease the likelihood that mobile/portable communications
equipment could cause interference if inadvertently brought into patient areas. For this reason, an
additional factor of 10/3 is used in calculating the recommended separation distance for transmitters in
these frequency ranges.
Æ Field strengths from fixed transmitters [such as base stations for radio (cellular/cordless) telephones and
mobile radios, amateur radio, AM/FM radio broadcast, TV broadcast] cannot be predicted theoretically with
accuracy. To assess the electromagnetic environment due to fixed RF transmitters, an electromagnetic site
survey should be considered. If the measured field strength in the location in which the SE Pump is used
exceeds the applicable RF compliance level, the SE Pump should be observed to verify normal operation.
If abnormal performance is observed, additional measures may be necessary, such as reorienting or
relocating the SE Pump.
Ç Over the frequency range 150 kHz - 80 MHz, field strengths should be less than [V1] V/m.
È The ISM (Industrial, Scientific and Medical) bands between 150 kHz and 80 MHz are 6.765 - 6.795 MHz,
13.553 - 13.567 MHz, 26.957 - 27.283 MHz, and 40.66 - 40.70 MHz.
Compliance (Continued)
Electromagnetic Environment (Continued)

Directions for Use
Alaris® SE Pump
Models 7130/7131, 7230/7231
168 Regulations and Standards
Compliance (Continued)
The SE Pump has been assessed and complies with the
following standards:
IEC EN 60601–1 / BS 5724, including amendments A1 and
A2; IEC EN 60601–2–24; CISPR 11, Group 1, Class A/B
Emissions; IEC EN 60601–1–2, UL 60601-1, CAN/CSA No.
601.1-M90
Standards
Trademarks
Alaris®, AccuSlide®, Guardrails® and SmartSite® are registered
trademarks of Cardinal Health, Inc. or one of its subsidiaries.
All other trademarks belong to their respective owners.

Supplemental Information:
Signature Edition®GOLD Infusion System,
Model 180 Empty Container Detector (ECD)
This document provides supplemental information on emissions testing specifications located in
Specifications section of Maintenance chapter of the Signature Edition® GOLD Infusion System
Directions For Use.
NOTES: The Signature Edition® GOLD infusion system has been assessed and complies with the
following Technical Standards: IEC EN 60601-1 including amendments A1 and A2; IEC EN 60601-
1-2: 2002; IEC EN 60601-2-24; CISPR 11, Group 1. Class A requirements are met with use of
ECD/flow sensor. Class B emissions requirements are met without use of ECD/flow sensor.
Class A Emission Statement:
Instrument used with an ECD/flow sensor, is suitable for use in all establishments other than
domestic and those directly connected to public low-voltage power supply network supplying
buildings used for domestic purposes. However, the Instrument may be used in domestic
establishments with additional necessary (appropriate) measures.
Class B Emission Statement:
Instrument used without an ECD/flow sensor, is suitable for use in all establishments, including
domestic establishments and those directly connected to public low-voltage power supply network
supplying buildings used for domestic purposes.
This Signature Edition® GOLD Infusion System is intended for use by Healthcare Professionals
only. This is a CISPR 11, Class A Medical equipment/system when Model 180 accessory is used.
In a domestic environment this equipment/system may cause radio interference, and may be
necessary to take adequate mitigation measures, such as rearrange, relocate or shield the
Signature Edition® System or filter the connection to public mains network.
ALARIS®, ALARIS Medical Systems®, Signature Edition® are registered trademarks of ALARIS Medical
Systems, Inc. All other trademarks belong to their respective owners.
© 2005 ALARIS Medical Systems, Inc. All Rights Reserved.
P/N 10010613
CAUTION

Models 7130/7131 and 7230/7231
(With Guardrails®Safety Software or
Guardrails®Safety Software Compatible)
OPTIONS
SEC
PRI
POWER
RUN
HOLD
Clear Enter
PRI SEC HLD OPT KVO
HLD PRI SECKVO OPT
23
456
789
•0
1
POWER
RUN
HOLD
AB
A B
ml/hr ml/hr
Directions for Use
SUPPLEMENT
Signature Edition®GOLD Infusion System
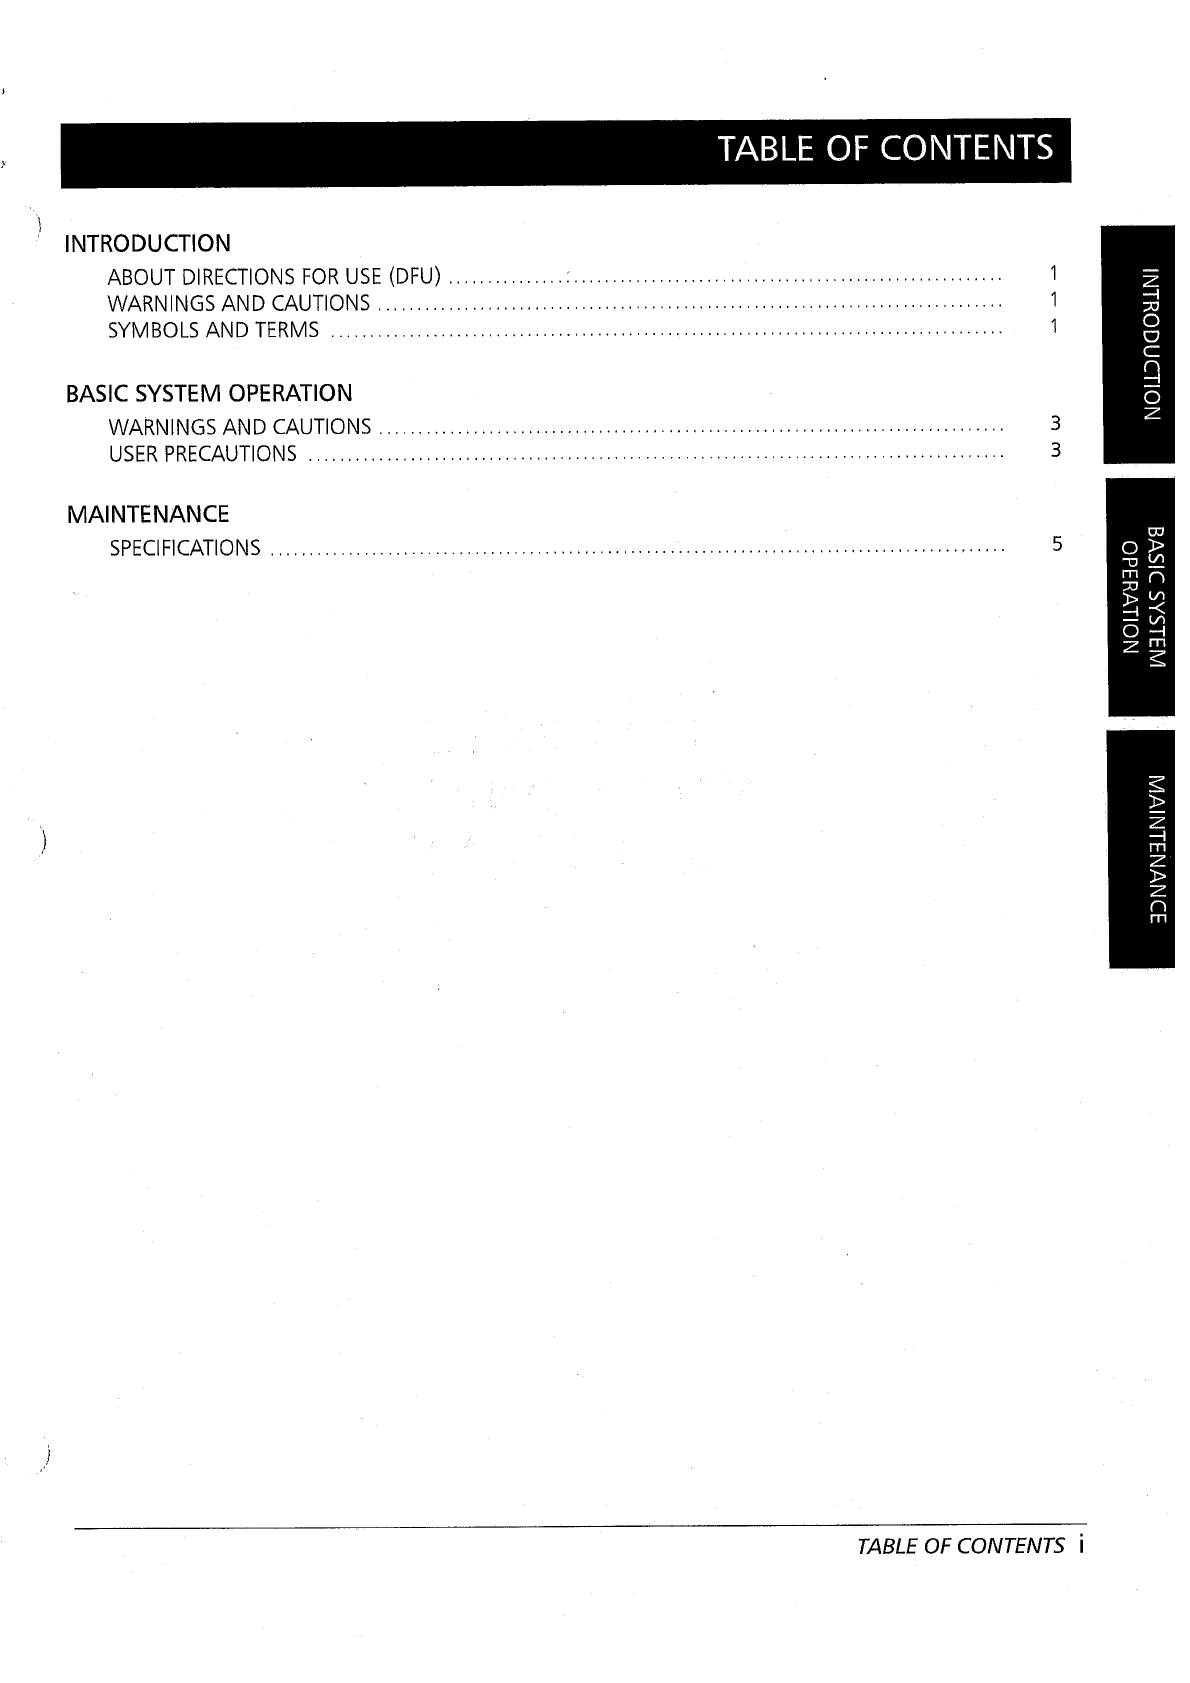


t
Cardinal Health,
1180 Rolle,
Switzerland
www.cardinal.com/uk/alaris
s
Alaris® Products
SEC
PRI
Clear Enter
OPT PRI HLD SEC KVO
1
RUN
HOLD
POWER
OPTIONS
23
456
789
.0
ml/hr
OPTIONS
SEC
PRI
POWER
RUN
HOLD
Clear Enter
PRI SEC HLD OPT KVO
HLD PRI SECKVO OPT
23
456
789
•0
1
POWER
RUN
HOLD
AB
A B
ml/hr ml/hr
Directions for Use
Supplement
Alaris® SE Pump
Models 71XX, 72XX
December 2006

General Contact Information
©2006 Cardinal Health, Inc. or one of its subsidiaries. All rights reserved.
Directions for Use Supplement
Alaris® SE Pump
Models 71XX, 72XX
For service contact your local Affiliate Office or Distributor.
AE
Cardinal Health,
PO Box 5527,
Dubai, United Arab Emirates.
Tel: (971) 4 28 22 842
Fax: (971) 4 28 22 914
DE
Cardinal Health,
Pascalstr. 2,
52499 Baesweiler,
Deutschland.
Tel: (49) 2401 604 0
Fax: (49) 2401 604 121
IT
Cardinal Health,
Via Ticino 4,
50019 Sesto Fiorentino,
Firenze, Italia.
Tél: (39) 055 30 33 93 00
Fax: (39) 055 34 00 24
US
Cardinal Health
10221 Wateridge Circle,
San Diego, CA 92121,
USA.
Tel: (1) 800 854 7128
Fax: (1) 858 458 6179
AU
Cardinal Health,
8/167 Prospect Highway,
Seven Hills, NSW 2147,
Australia.
Tel: (61) 2 9838 0255
Fax: (61) 2 9674 4444
Fax: (61) 2 9624 9030
ES
Cardinal Health,
Avenida Valdeparra 27,
28108 - Alcobendas, Madrid,
España.
Tel: (34) 91 657 20 31
Fax: (34) 91 657 20 42
NL
Cardinal Health,
Kantorenpand “Hoefse Wing”,
Printerweg, 11,
3821 AP Amersfoort,
Nederland.
Tel: (31) 33 455 51 00
Fax: (31) 33 455 51 01
ZA
Cardinal Health,
Unit 2 Oude Molen Business
Park,
Oude Molen Road, Ndabeni,
Cape Town 7405, South Africa.
Tel: (27) (0) 860 597 572
Tel: (27) 21 510 7562
Fax: (27) 21 5107567
BE
Cardinal Health,
Otto De Mentockplein 19,
1853 Strombeek - Bever,
Belgium.
Tel: (32) 2 267 38 99
Fax: (32) 2 267 99 21
FR
Cardinal Health,
Immeuble Antares - Technoparc,
2, rue Charles-Edouard Jeanneret.
78300 POISSY,
France.
Tél: (33) 1 30 06 74 60
Fax: (33) 1 39 11 48 34
NO
Cardinal Health
Solbråveien 10 A,
1383 ASKER,
Norge.
Tel: (47) 66 98 76 00
Fax: (47) 66 98 76 01
CA
Cardinal Health,
235 Shields Court,
Markham,
Ontario L3R 8V2,
Canada.
Tel: (1) 905-752-3333
Fax: (1) 905-752-3343
GB
Cardinal Health,
The Crescent, Jays Close,
Basingstoke,
Hampshire, RG22 4BS,
United Kingdom.
Tel: (44) 0800 917 8776
Fax: (44) 1256 330860
NZ
Cardinal Health,
14 George Bourke Drive
Mt Wellington, Auckland
PO Box 14234
Panmure, Auckland
Tel: 09 270 2420
Freephone: 0508 422734
Fax: 09 270 6285
CN
Cardinal Health,
Shanghai Representative Office,
Suite 9B,
Century Ba-Shi Building,
398 Huai Hai Rd(M.),
Shanghai 200020,
China.
Tel: (56) 8621-63844603
Tel: (56) 8621-63844493
Fax: (56) 8621-6384-4025
HU
Cardinal Health,
Döbrentei tér 1,
H-1013 Budapest,
Magyarország.
Tel: (36) 14 88 0232
Tel: (36) 14 88 0233
Fax: (36) 12 01 5987
SE
Cardinal Health,
Hammarbacken 4B,
191 46 Sollentuna,
Sverige.
Tel: (46) 8 544 43 200
Fax: (46) 8 544 43 225

1
Introduction
Introduction
About This Document
This supplemental Directions for Use (DFU) provides an
update to the Alerts information found in the "Troubleshooting
and Maintenance" chapter in the applicable DFU for each
Alaris® SE single and SE dual channel pump (formerly known
as the Signature Edition® Infusion System).
WARNING
Before using the Alaris® SE pump,
read all instructions in the
applicable DFU.
Alert
The following Alert is in addition to those provided in the
applicable Alaris® SE pump DFU.
Alert Meaning Response
CHECK ENTRY Key press unclear. press Clear key
to continue
• Listen to Audible Tones.
• Verify Screen Displays
Verify prescribed therapy on display screen prior to starting
or restarting an infusion.
• Observe Flow Rate
Observe the IV tubing drip chamber to verify expected flow.
Important Notes
WARNING
Verify all programming parameters
on the display screen are correct
prior to initiating RUN/HOLD.
Directions for Use Supplement
Alaris® SE Pump
Models 71XX, 72XX

2Introduction
Alaris® is a registered trademark of Cardinal Health,Inc. or one of its subsidiaries.
Trademarks
Directions for Use Supplement
Alaris® SE Pump
Models 71XX, 72XX

Direction for Use
Alaris® SE Pump
Models 7130/7131, 7320/7231
t
Cardinal Health,
1180 Rolle,
Switzerland
www.cardinal.com/uk/alaris
s
