Amazon ElastiCache User Guide Elasti Cache
User Manual:
Open the PDF directly: View PDF ![]() .
.
Page Count: 364 [warning: Documents this large are best viewed by clicking the View PDF Link!]
- Amazon ElastiCache
- Table of Contents
- What Is Amazon ElastiCache?
- See Also
- When Should I Use ElastiCache?
- Amazon ElastiCache Resources
- ElastiCache Tutorial Videos
- ElastiCache Components & Features
- Accessing Amazon ElastiCache
- Managing ElastiCache
- Getting Started with Amazon ElastiCache
- Engines and Versions
- Selecting Regions and Availability Zones
- Finding Your ElastiCache Endpoints
- Best Practices for Implementing Amazon ElastiCache
- Amazon ElastiCache Error Messages
- Caching Strategies
- ElastiCache Nodes
- Node Auto Discovery (Memcached)
- Benefits of Auto Discovery
- How Auto Discovery Works
- Using Auto Discovery
- Connecting to Cache Nodes Manually
- Adding Auto Discovery To Your Client Library
- ElastiCache Clients with Auto Discovery
- Installing & Compiling Cluster Clients
- Installing the ElastiCache Cluster Client for .NET
- Installing the ElastiCache Cluster Client for PHP
- Compiling the Source Code for the ElastiCache Cluster Client for PHP
- Configuring ElastiCache Clients
- Installing & Compiling Cluster Clients
- ElastiCache Clusters
- Memcached Versions
- Redis Versions
- Other ElastiCache Cluster Operations
- Creating a Cluster
- Viewing a Cluster's Details
- Modifying an ElastiCache Cache Cluster
- Rebooting a Cluster
- Monitoring a Cluster's Costs
- Adding Nodes to a Cluster
- Removing Nodes from a Cluster
- Canceling Pending Add or Delete Node Operations
- Deleting a Cluster
- Scaling
- ElastiCache Replication (Redis)
- Redis Replication: Differences by Engine Version
- Redis Replication Groups
- Replication with Multi-AZ and Automatic Failover (Redis)
- Automatic Failover Overview
- Notes on Redis Multi-AZ with Automatic Failover
- Failure Scenarios with Multi-AZ and Automatic Failover Responses
- Enabling Multi-AZ with Automatic Failover
- Creating a Redis Replication Group
- Finding Replication Group Endpoints
- Modifying a Replication Group
- Deleting a Replication Group
- Adding a Read Replica to a Replication Group
- Promoting a Read-Replica to Primary
- Deleting a Read Replica
- ElastiCache Backup & Restore (Redis)
- Constraints
- Costs
- Performance Impact of Backups
- Scheduling Automatic Snapshots
- Taking Manual Snapshots
- Taking a Final Snapshot
- Displaying a List of Snapshots
- Copying a Snapshot
- Exporting a Snapshot
- Restoring From a Snapshot
- Using a Snapshot to Seed a Cluster
- Tagging Snapshots
- Deleting a Snapshot
- Redis Append Only Files (AOF)
- Cache Security Groups [EC2-Classic]
- Parameters and Parameter Groups
- Subnets and Subnet Groups
- Amazon Virtual Private Cloud (Amazon VPC) with ElastiCache
- Security for Amazon ElastiCache
- ElastiCache and Security Groups
- Authentication and Access Control for Amazon ElastiCache
- Authentication
- Access Control
- Overview of Managing Access Permissions to Your ElastiCache Resources
- Using Identity-Based Policies (IAM Policies) for Amazon ElastiCache
- ElastiCache API Permissions: Actions, Resources, and Conditions Reference
- Accessing ElastiCache Resources from Outside AWS
- Monitoring Usage, Events, and Costs
- Monitoring Use with CloudWatch Metrics
- Monitoring ElastiCache Events
- Monitoring Costs with Cost Allocation Tags
- Using the ElastiCache API
- ElastiCache Turorials
- Document History
- AWS Glossary

Amazon ElastiCache
User Guide
API Version 2015-02-02

Amazon ElastiCache User Guide
Amazon ElastiCache: User Guide
Copyright © 2016 Amazon Web Services, Inc. and/or its affiliates. All rights reserved.
Amazon's trademarks and trade dress may not be used in connection with any product or service that is not Amazon's, in any
manner that is likely to cause confusion among customers, or in any manner that disparages or discredits Amazon. All other
trademarks not owned by Amazon are the property of their respective owners, who may or may not be affiliated with, connected to,
or sponsored by Amazon.

Amazon ElastiCache User Guide
Table of Contents
What Is Amazon ElastiCache? ........................................................................................................ 1
See Also ............................................................................................................................. 1
When Should I Use ElastiCache? ............................................................................................ 2
In-Memory Data Cache .................................................................................................. 2
Gaming Leaderboards (Redis Sorted Lists) ....................................................................... 3
Messaging (Redis pub/sub) ............................................................................................ 4
Recommendation Data (Redis Counters & Hashes) ............................................................ 5
Other Redis Uses ......................................................................................................... 5
Testimonials ................................................................................................................. 5
ElastiCache Resources .......................................................................................................... 6
Tutorial Videos ..................................................................................................................... 7
Introductory Video Tutorials ............................................................................................ 7
Advanced Video Tutorials ............................................................................................... 8
Components & Features ........................................................................................................ 9
Nodes ......................................................................................................................... 9
Clusters ..................................................................................................................... 10
Replication Groups ...................................................................................................... 11
Regions & Availability Zones ......................................................................................... 12
Endpoints ................................................................................................................... 13
Parameter Groups ....................................................................................................... 13
Security ..................................................................................................................... 13
Security Groups .......................................................................................................... 14
Subnet Groups ........................................................................................................... 14
Backups, a.k.a. Snapshots (Redis) ................................................................................. 14
Events ....................................................................................................................... 15
Accessing ElastiCache ......................................................................................................... 16
Managing ElastiCache ......................................................................................................... 16
Means of Managing ElastiCache ................................................................................... 16
Getting Started ........................................................................................................................... 17
Step 1: Create an AWS Account ........................................................................................... 17
Step 2: Launch a Cluster ..................................................................................................... 18
Step 3: View Cluster Details ................................................................................................. 19
Step 4: Authorize Access ..................................................................................................... 19
You Launched Your Cluster into EC2-VPC ...................................................................... 20
You Launched Your Cluster into EC2-Classic .................................................................. 21
Step 5: Connect to a Cluster's Node ...................................................................................... 21
Step 5.1: Find your Node Endpoints .............................................................................. 21
Step 5.2: Connect to a Memcached Node ....................................................................... 22
Step 5.2: Connect to a Redis Cluster or Replication Group ................................................ 23
Step 6: Delete Your Cluster .................................................................................................. 24
Where Do I Go From Here? ................................................................................................. 26
Engines and Versions .................................................................................................................. 27
Selecting an Engine: Memcached or Redis ............................................................................. 27
Determine Available Engine Versions ..................................................................................... 29
Determine Available Engine Versions (Console) ............................................................... 29
Determine Available Engine Versions (AWS CLI) ............................................................. 29
Determine Available Engine Versions (ElastiCache API) .................................................... 29
Comparing Memcached Versions .......................................................................................... 29
Memcached Version 1.4.24 .......................................................................................... 29
Memcached Version 1.4.14 .......................................................................................... 30
Memcached Version 1.4.5 ............................................................................................ 30
Comparing Redis Versions ................................................................................................... 30
Redis Version 2.8.24 ................................................................................................... 31
Redis Version 2.8.23 ................................................................................................... 31
Redis Version 2.8.22 ................................................................................................... 31
API Version 2015-02-02
iii

Amazon ElastiCache User Guide
Redis Version 2.8.21 ................................................................................................... 32
Redis Version 2.8.19 ................................................................................................... 32
Redis Version 2.8.6 ..................................................................................................... 32
Redis Version 2.6.13 ................................................................................................... 32
Upgrading Cache Engine Versions ......................................................................................... 32
Important Notes on Memcached Engine Upgrades ........................................................... 33
Important Notes on Redis Engine Upgrades .................................................................... 33
How to Upgrade Engine Versions .................................................................................. 34
Maintenance Window ........................................................................................................... 34
Selecting Regions and Availability Zones ........................................................................................ 36
Locating Your Redis Read Replicas and Memcached Nodes ...................................................... 36
Supported Regions & Endpoints ............................................................................................ 37
Finding Endpoints ....................................................................................................................... 39
Finding Memcached Endpoints Using the Console ................................................................... 40
Finding a Redis Cluster's Endpoint Using the Console .............................................................. 42
Finding Replication Group Endpoints Using the Console ........................................................... 43
Finding Endpoints (AWS CLI) ............................................................................................... 45
Finding Endpoints for Nodes and Clusters (AWS CLI) ....................................................... 45
Finding the Endpoints for Replication Groups (AWS CLI) ................................................... 45
Finding the Endpoints (ElastiCache API) ................................................................................. 47
Finding Endpoints for Nodes and Clusters (ElastiCache API) .............................................. 47
Finding Endpoints for Replication Groups (ElastiCache API) ............................................... 47
Best Practices ............................................................................................................................ 49
Ensuring You Have Sufficient Memory to Create a Redis Snapshot ............................................. 49
Background Write Process and Memory Usage ............................................................... 50
Avoiding Running Out of Memory When Executing a Background Write ............................... 50
Mitigating Out-of-Disk-Space Issues When Using Redis AOF ..................................................... 51
Enabling Redis Multi-AZ as a Better Approach to Fault Tolerance ....................................... 51
Mitigating Failures ............................................................................................................... 51
Mitigating Failures when Running Memcached ................................................................. 52
Mitigating Failures when Running Redis ......................................................................... 52
Recommendations ....................................................................................................... 55
Configuring Your ElastiCache Client for Efficient Load Balancing ................................................ 55
Consistent Hashing Using Java ..................................................................................... 56
Consistent Hashing Using PHP ..................................................................................... 56
Consistent Hashing Using .NET ..................................................................................... 56
Error Messages .......................................................................................................................... 57
Caching Strategies ...................................................................................................................... 59
Lazy Loading ...................................................................................................................... 59
Scenario 1: Cache Hit .................................................................................................. 59
Scenario 2: Cache Miss ............................................................................................... 60
Advantages and Disadvantages of Lazy Loading .............................................................. 60
Lazy Loading Code ..................................................................................................... 61
Write Through ..................................................................................................................... 61
Advantages and Disadvantages of Write Through ............................................................ 61
Write Through Code .................................................................................................... 62
Adding TTL ........................................................................................................................ 62
Code Example ............................................................................................................ 62
Related Topics .................................................................................................................... 63
Nodes ........................................................................................................................................ 65
Selecting Your Node Size .................................................................................................... 66
Selecting Your Memcached Node Size ........................................................................... 66
Selecting Your Redis Node Size .................................................................................... 67
Reserved Nodes ................................................................................................................. 68
Reserved Node Offerings ............................................................................................. 68
Describing Your Reserved Nodes .................................................................................. 70
Describing Available Reserved Cache Node Offerings ....................................................... 72
Purchasing a Reserved Node ....................................................................................... 74
API Version 2015-02-02
iv

Amazon ElastiCache User Guide
Supported Node Types ........................................................................................................ 77
Actions You Can Take When a Node is Scheduled for Replacement ........................................... 79
Memcached ................................................................................................................ 79
Redis ......................................................................................................................... 79
Node Auto Discovery (Memcached) ............................................................................................... 82
Benefits of Auto Discovery ................................................................................................... 83
How Auto Discovery Works .................................................................................................. 84
Connecting to Cache Nodes ......................................................................................... 84
Normal Cluster Operations ........................................................................................... 85
Other Operations ......................................................................................................... 86
Using Auto Discovery .......................................................................................................... 88
Step 1: Obtain the Configuration Endpoint ...................................................................... 88
Step 2: Download the ElastiCache Cluster Client ............................................................. 88
Step 3: Modify Your Application Program ........................................................................ 89
Connecting to Cache Nodes Manually .................................................................................... 93
Adding Auto Discovery To Your Client Library ......................................................................... 94
Cache Engine Version 1.4.14 or Higher .......................................................................... 94
Cache Engine Version Lower Than 1.4.14 ...................................................................... 94
Output Format ............................................................................................................ 95
Auto Discovery Clients ......................................................................................................... 95
Installing & Compiling Clients ........................................................................................ 96
Configuring Clients .................................................................................................... 106
Clusters ................................................................................................................................... 110
Memcached Versions ......................................................................................................... 110
Redis Versions .................................................................................................................. 111
Other ElastiCache Cluster Operations ................................................................................... 111
Creating a Cluster ............................................................................................................. 112
Creating a Memcached Cache Cluster (Console) ............................................................ 113
Creating a Redis Cache Cluster (Console) .................................................................... 116
Creating a Cluster Using the AWS CLI ......................................................................... 120
Creating a Cache Cluster (ElastiCache API) .................................................................. 120
Viewing a Cluster's Details .................................................................................................. 122
Viewing a Cluster's Details (Console) ........................................................................... 122
Viewing a Cluster's Details (AWS CLI) .......................................................................... 122
Viewing a Cluster's Details (ElastiCache API) ................................................................ 122
Modifying a Cache Cluster .................................................................................................. 124
Modifying a Cache Cluster (Console) ............................................................................ 124
Modifying a Cache Cluster (AWS CLI) .......................................................................... 125
Modifying a Cache Cluster (ElastiCache API) ................................................................. 125
Rebooting a Cluster ........................................................................................................... 127
Rebooting a Cluster (Console) ..................................................................................... 127
Rebooting a Cluster (AWS CLI) ................................................................................... 127
Rebooting a Cluster (ElastiCache API) .......................................................................... 128
Monitoring a Cluster's Costs ................................................................................................ 129
Adding Nodes to a Cluster .................................................................................................. 129
Adding Nodes to a Cluster (Console) ........................................................................... 129
Adding Nodes to a Cluster (AWS CLI) .......................................................................... 131
Adding Nodes to a Cluster (ElastiCache API) ................................................................. 132
Removing Nodes from a Cluster .......................................................................................... 134
Removing Nodes from a Cluster (Console) .................................................................... 134
Removing Nodes from a Cluster (AWS CLI) .................................................................. 136
Removing Nodes from a Cluster (ElastiCache API) ......................................................... 137
Canceling Pending Add or Delete Node Operations ................................................................ 139
Canceling Pending Add or Delete Node Operations (Console) .......................................... 139
Deleting a Cluster .............................................................................................................. 140
Deleting a Cluster (Console) ....................................................................................... 140
Deleting a Cluster (AWS CLI) ...................................................................................... 140
Deleting a Cluster (ElastiCache API) ............................................................................ 140
API Version 2015-02-02
v

Amazon ElastiCache User Guide
Scaling ..................................................................................................................................... 142
Scaling Memcached ........................................................................................................... 143
Scaling Memcached Horizontally .................................................................................. 143
Scaling Memcached Vertically ..................................................................................... 144
Scaling Redis Cache Clusters ............................................................................................. 146
Scaling Redis Cache Clusters Up ................................................................................ 146
Scaling Redis Cache Clusters Down ............................................................................ 151
Scaling Redis Replication Groups ........................................................................................ 153
Scaling Redis Replication Groups Up ........................................................................... 154
Scaling Redis Replication Groups Down ....................................................................... 159
Increasing Read Capacity ........................................................................................... 161
Decreasing Read Capacity .......................................................................................... 162
Replication (Redis) .................................................................................................................... 163
Redis Replication: Differences by Engine Version ................................................................... 164
Redis Version 2.8.22 and Later ................................................................................... 164
Redis Versions Prior to 2.8.22 ..................................................................................... 164
Redis Replication Groups ................................................................................................... 165
Replication with Multi-AZ and Automatic Failover (Redis) ......................................................... 166
Automatic Failover Overview ....................................................................................... 166
Notes on Multi-AZ with Automatic Failover .................................................................... 166
Failure Scenarios with Multi-AZ and Automatic Failover Responses ................................... 167
Enabling Multi-AZ with Automatic Failover ..................................................................... 170
Creating a Replication Group .............................................................................................. 173
Creating a Replication Group When You Have an Available Redis Cache Cluster ................. 173
Creating a Replication Group Without an Available Redis Cache Cluster ............................. 177
Finding Replication Group Endpoints .................................................................................... 185
Finding Replication Group Endpoints (Console) .............................................................. 185
Finding Replication Group Endpoints (AWS CLI) ............................................................ 186
Finding Replication Group Endpoints (ElastiCache API) ................................................... 186
Modifying a Replication Group ............................................................................................. 189
Modifying a Replication Group (Console) ....................................................................... 189
Modifying a Replication Group (AWS CLI) ..................................................................... 190
Modifying a Replication Group (ElastiCache API) ............................................................ 190
Deleting a Replication Group ............................................................................................... 191
Deleting a Replication Group (Console) ........................................................................ 191
Deleting a Replication Group (AWS CLI) ....................................................................... 191
Deleting a Replication Group (ElastiCache API) ............................................................. 191
Adding a Read Replica ...................................................................................................... 193
Adding a Read Replica to a Replication Group (Console) ................................................. 193
Adding a Read Replica to a Replication Group (AWS CLI) ............................................... 194
Adding a Read Replica to a Replication Group (ElastiCache API) ...................................... 194
Promoting a Read-Replica .................................................................................................. 195
Promoting a Read-Replica to Primary (Console) ............................................................. 195
Promoting a Read-Replica to Primary (AWS CLI) ........................................................... 195
Promoting a Read-Replica to Primary (ElastiCache API) .................................................. 196
Deleting a Read Replica ..................................................................................................... 197
Backup & Restore (Redis) .......................................................................................................... 198
Constraints ....................................................................................................................... 199
Costs ............................................................................................................................... 199
Performance Impact of Backups .......................................................................................... 199
Backups when running Redis 2.8.22 and later ................................................................ 199
Backups when running Redis versions prior to 2.8.22 ...................................................... 199
Scheduling Automatic Snapshots ......................................................................................... 201
Taking Manual Snapshots ................................................................................................... 202
Creating a Manual Backup (Console) ........................................................................... 202
Creating a Manual Backup (AWS CLI) .......................................................................... 202
Creating a Manual Backup (ElastiCache API) ................................................................ 203
Taking a Final Snapshot ..................................................................................................... 204
API Version 2015-02-02
vi

Amazon ElastiCache User Guide
Creating a Final Snapshot (Console) ............................................................................ 204
Taking a Final Snapshot (AWS CLI) ............................................................................. 204
Taking a Final Snapshot (ElastiCache API) ................................................................... 205
Displaying a List of Snapshots ............................................................................................ 207
Displaying a List of Snapshots (Console) ...................................................................... 207
Displaying a List of Snapshots (AWS CLI) ..................................................................... 207
Displaying a List of Snapshots (ElastiCache API) ........................................................... 207
Copying a Snapshot .......................................................................................................... 208
Copying a Snapshot (Console) .................................................................................... 208
Copying a Snapshot (AWS CLI) .................................................................................. 208
Copying a Snapshot (ElastiCache API) ......................................................................... 208
Exporting a Snapshot ......................................................................................................... 210
Step 1: Create an Amazon S3 Bucket .......................................................................... 210
Step 2: Grant ElastiCache Access to Your Amazon S3 Bucket .......................................... 211
Step 3: Export an ElastiCache Snapshot ....................................................................... 212
Restoring From a Snapshot ................................................................................................ 216
Restoring From a Snapshot (Console) .......................................................................... 216
Restoring From a Snapshot (AWS CLI) ........................................................................ 216
Restoring From a Snapshot (ElastiCache API) ............................................................... 217
Using a Snapshot to Seed a Cluster .................................................................................... 218
Step 1: Create a Redis Backup ................................................................................... 218
Step 2: Upload Your Backup to Amazon S3 .................................................................. 218
Step 3: Grant ElastiCache Read Access to the .rdb File ................................................... 219
Step 4: Seed the ElastiCache Cluster With the .rdb File Data ........................................... 219
Tagging Snapshots ............................................................................................................ 221
Deleting a Snapshot .......................................................................................................... 222
Deleting a Snapshot (Console) .................................................................................... 222
Deleting a Snapshot (AWS CLI) .................................................................................. 222
Deleting a Snapshot (ElastiCache API) ......................................................................... 222
Redis Append Only Files (AOF) ........................................................................................... 223
Cache Security Groups [EC2-Classic] ........................................................................................... 224
Creating a Cache Security Group ........................................................................................ 226
Creating a Security Group (Console) ............................................................................ 226
Creating a Security Group (AWS CLI) .......................................................................... 226
Creating a Security Group (ElastiCache API) ................................................................. 226
Listing Available Cache Security Groups ............................................................................... 228
Listing Available Cache Security Groups (Console) ......................................................... 228
Listing Available Cache Security Groups (AWS CLI) ....................................................... 228
Listing Available Cache Security Groups (ElastiCache API) .............................................. 228
Viewing a Cache Security Group ......................................................................................... 229
Viewing a Cache Security Group (Console) ................................................................... 229
Viewing a Cache Security Group (AWS CLI) .................................................................. 229
Viewing a Cache Security Group (ElastiCache API) ........................................................ 229
Authorizing Network Access to an Amazon EC2 Security Group ............................................... 231
Authorizing Network Access to an Amazon EC2 Security Group (Console) .......................... 231
Authorizing Network Access to an Amazon EC2 Security Group (AWS CLI) ........................ 231
Authorizing Network Access to an Amazon EC2 Security Group (ElastiCache API) ............... 232
Parameters and Parameter Groups .............................................................................................. 233
Creating a Parameter Group ............................................................................................... 234
Creating a Parameter Group (Console) ......................................................................... 234
Creating a Parameter Group (AWS CLI) ....................................................................... 235
Creating a Parameter Group (ElastiCache API) .............................................................. 235
Listing Parameter Groups by Name ...................................................................................... 237
Listing Parameter Groups by Name (Console) ............................................................... 237
Listing Parameter Groups by Name (AWS CLI) .............................................................. 237
Listing Parameter Groups by Name (ElastiCache API) ..................................................... 238
Listing a Parameter Group's Values ..................................................................................... 240
Listing a Parameter Group's Values (Console) ............................................................... 240
API Version 2015-02-02
vii

Amazon ElastiCache User Guide
Listing a Parameter Group's Values (AWS CLI) .............................................................. 240
Listing a Parameter Group's Values (ElastiCache API) .................................................... 241
Modifying a Parameter Group .............................................................................................. 243
Modifying a Parameter Group (Console) ....................................................................... 243
Modifying a Parameter Group (AWS CLI) ...................................................................... 243
Modifying a Parameter Group (ElastiCache API) ............................................................ 244
Deleting a Parameter Group ............................................................................................... 245
Deleting a Parameter Group (Console) ......................................................................... 245
Deleting a Parameter Group (AWS CLI) ........................................................................ 245
Deleting a Parameter Group (ElastiCache API) .............................................................. 245
Memcached Specific Parameters ......................................................................................... 247
Memcached 1.4.24 Added Parameters ......................................................................... 247
Memcached 1.4.14 Added Parameters ......................................................................... 248
Memcached 1.4.5 Supported Parameters ...................................................................... 249
Memcached Connection Overhead ............................................................................... 251
Memcached Node-Type Specific Parameters ................................................................. 252
Redis Specific Parameters .................................................................................................. 253
Redis 2.8.24 Added Parameters .................................................................................. 253
Redis 2.8.23 Added Parameters .................................................................................. 253
Redis 2.8.22 Added Parameters .................................................................................. 255
Redis 2.8.21 Added Parameters .................................................................................. 255
Redis 2.8.19 Added Parameters .................................................................................. 256
Redis 2.8.6 Added Parameters .................................................................................... 256
Redis 2.6.13 Parameters ............................................................................................ 258
Redis Node-Type Specific Parameters .......................................................................... 263
Subnets and Subnet Groups ....................................................................................................... 265
Creating a Cache Subnet Group .......................................................................................... 266
Creating a Cache Subnet Group (Console) .................................................................... 266
Creating a Cache Subnet Group (AWS CLI) .................................................................. 267
Creating a Cache Subnet Group (ElastiCache API) ......................................................... 267
Assigning a Cache Subnet Group to a Cache Cluster ............................................................. 269
Modifying a Cache Subnet Group ........................................................................................ 269
Modifying Subnet Groups (Console) ............................................................................. 269
Modifying Subnet Groups (AWS CLI) ............................................................................ 269
Modifying Subnet Groups (ElastiCache API) .................................................................. 270
Deleting a Subnet Group .................................................................................................... 271
Deleting a Subnet Group (Console) .............................................................................. 271
Deleting a Subnet Group (AWS CLI) ............................................................................ 271
Deleting a Subnet Group (ElastiCache API) ................................................................... 271
Amazon VPC with ElastiCache .................................................................................................... 273
ElastiCache and Amazon VPC ............................................................................................ 274
Overview of ElastiCache In an Amazon VPC ................................................................. 274
Why use the Amazon VPC instead of EC2 Classic with your ElastiCache deployment? .......... 276
Prerequisites ............................................................................................................. 276
Routing and Security .................................................................................................. 277
Amazon VPC Documentation ...................................................................................... 277
Creating a Virtual Private Cloud (VPC) ................................................................................. 278
Creating an Amazon VPC (Console) ............................................................................ 278
Creating a Cache Subnet Group .......................................................................................... 280
Creating a Cache Cluster in an Amazon VPC ........................................................................ 281
Creating a Cache Cluster in an Amazon VPC (Console) .................................................. 281
Connecting to a Cache Cluster Running in an Amazon VPC .................................................... 282
1. Create an Amazon EC2 Instance ............................................................................. 282
2. Assign IP Address to Your Amazon EC2 Instance ....................................................... 283
3. Connect to Your Amazon EC2 Instance .................................................................... 284
Security .................................................................................................................................... 287
Security Groups ................................................................................................................ 287
Amazon VPC: Amazon VPC Security Groups ................................................................ 287
API Version 2015-02-02
viii

Amazon ElastiCache User Guide
Amazon EC2-Classic: ElastiCache Security Groups ........................................................ 287
Authentication & Access Control .......................................................................................... 289
Authentication ........................................................................................................... 289
Access Control .......................................................................................................... 290
Overview of Managing Access ..................................................................................... 291
Using Identity-Based Policies (IAM Policies) .................................................................. 295
ElastiCache API Permissions Reference ....................................................................... 300
Accessing ElastiCache Resources from Outside AWS ..................................................................... 304
Requirements .................................................................................................................... 304
Considerations .................................................................................................................. 304
Limitations ........................................................................................................................ 305
How to Access ElastiCache Resources from Outside AWS ...................................................... 305
See also .......................................................................................................................... 307
Monitoring ................................................................................................................................ 308
Monitoring Use .................................................................................................................. 309
Dimensions for ElastiCache Metrics .............................................................................. 309
Host-Level Metrics ..................................................................................................... 309
Metrics for Memcached .............................................................................................. 310
Metrics for Redis ....................................................................................................... 312
Which Metrics Should I Monitor? ................................................................................. 315
Choosing Metric Statistics and Periods ......................................................................... 316
Monitoring CloudWatch Cache Cluster and Cache Node Metrics ....................................... 316
Monitoring Events .............................................................................................................. 319
Managing ElastiCache Amazon SNS Notifications .......................................................... 319
Viewing ElastiCache Events ........................................................................................ 323
Event Notifications and Amazon SNS ........................................................................... 324
Monitoring Costs ............................................................................................................... 329
Adding Tags to Your ElastiCache Resource .................................................................. 331
Listing Your ElastiCache Resource's Tags ..................................................................... 333
Modifying Your ElastiCache Resource's Tags ................................................................ 335
Removing Tags from Your ElastiCache Resource ........................................................... 336
Copying Tags to Your ElastiCache Resource ................................................................. 337
Using the ElastiCache API .......................................................................................................... 339
Using the Query API .......................................................................................................... 339
Query Parameters ..................................................................................................... 339
Query Request Authentication ..................................................................................... 339
Available Libraries ............................................................................................................. 341
Troubleshooting Applications ............................................................................................... 342
Retrieving Errors ....................................................................................................... 342
Troubleshooting Tips .................................................................................................. 342
Logging API Calls .............................................................................................................. 343
ElastiCache Information in CloudTrail ........................................................................... 343
Deciphering ElastiCache Log File Entries ...................................................................... 343
Tutorials ................................................................................................................................... 347
Document History ...................................................................................................................... 348
AWS Glossary .......................................................................................................................... 355
API Version 2015-02-02
ix

Amazon ElastiCache User Guide
See Also
What Is Amazon ElastiCache?
Welcome to the Amazon ElastiCache User Guide. ElastiCache is a web service that makes it easy to
set up, manage, and scale a distributed in-memory cache environment in the cloud. It provides a high-
performance, scalable, and cost-effective caching solution, while removing the complexity associated
with deploying and managing a distributed cache environment.
With ElastiCache, you can quickly deploy your cache environment, without having to provision
hardware or install software. You can choose from Memcached or Redis protocol-compliant cache
engine software, and let ElastiCache perform software upgrades and patch management for you.
For enhanced security, ElastiCache can be run in the Amazon Virtual Private Cloud (Amazon VPC)
environment, giving you complete control over network access to your clusters. With just a few clicks
in the AWS Management Console, you can add or remove resources such as nodes, clusters, or read
replicas to your ElastiCache environment to meet your business needs and application requirements.
Existing applications that use Memcached or Redis can use ElastiCache with almost no modification;
your applications simply need to know the host names and port numbers of the ElastiCache nodes
that you have deployed. The ElastiCache Auto Discovery feature for Memcached lets your applications
identify all of the nodes in a cache cluster and connect to them, rather than having to maintain a list of
available host names and port numbers; in this way, your applications are effectively insulated from
changes to node membership in a cluster.
ElastiCache has multiple features to enhance reliability for critical production deployments:
• Automatic detection and recovery from cache node failures.
• Automatic failover (Multi-AZ) of a failed primary cluster to a read replica in Redis replication groups.
• Flexible Availability Zone placement of nodes and clusters.
• Integration with other Amazon Web Services such as Amazon EC2, CloudWatch, CloudTrail, and
Amazon SNS to provide a secure, high-performance, managed in-memory caching solution.
See Also
Performance at Scale with Amazon ElastiCache
Topics
•When Should I Use ElastiCache? (p. 2)
•Amazon ElastiCache Resources (p. 6)
•ElastiCache Tutorial Videos (p. 7)
•ElastiCache Components & Features (p. 9)
API Version 2015-02-02
1

Amazon ElastiCache User Guide
When Should I Use ElastiCache?
•Accessing Amazon ElastiCache (p. 16)
•Managing ElastiCache (p. 16)
When Should I Use ElastiCache?
Whether serving up the latest news, a Top-10 leaderboard, a product catalog, or selling tickets to
an event, speed is the name of the game. The success of your website and business is significantly
impacted by the speed at which you deliver content. According to research reported by the NY Times
in 2012, "For Impatient Web Users, an Eye Blink Is Just Too Long to Wait," users can register a 250
millisecond (1/4 second) difference between competing sites and will opt out of the slower site in favor
of the faster site. Tests done at Amazon in 2007, cited in How Webpage Load Time Is Related to
Visitor Loss, revealed that for every 100ms (1/10 second) increase in load time, sales would decrease
1%. If someone wants data, whether for a webpage or a report that drives business decisions, you can
deliver that data faster if it is cached, much faster. Can your business afford to not cache your web
pages so as to deliver them with the shortest latency possible?
It may be intuitively obvious that you want to cache your most heavily requested items. But why would
you not want to cache your less frequently requested items? Even the most optimized database query
or remote API call is going to be noticeably slower than retrieving a flat key from an in-memory cache.
Remember, noticeably slower is what sends customers elsewhere.
The following examples illustrate some of the ways using ElastiCache can improve overall performance
of your application.
In-Memory Data Cache
The primary purpose of an in-memory key-value store is to provide ultra-fast (sub-millisecond latency)
and inexpensive access to copies of data. Most data stores have areas of data that are frequently
accessed but seldom updated. Additionally, querying a database will always be slower and more
expensive than locating a key in a key-value pair cache. Some database queries are especially
expensive to perform, for example, queries that involve joins across multiple tables or queries with
intensive calculations. By caching such query results, you pay the price of the query once and then are
able to quickly retrieve the data multiple times without having to re-execute the query.
What Should I Cache?
When deciding what data to cache you should consider these factors.
Speed and Expense It is always slower and more expensive to acquire data from a database than
from a cache. Some database queries are inherently slower and more expensive than others. For
example, queries that perform joins on multiple tables are significantly slower and more expensive than
simple, single table queries. If the interesting data requires a slow and expensive query to acquire, it is
a candidate for caching. If acquiring the data requires a relatively quick and simple query, it may still be
a candidate for caching, depending on other factors.
Data and Access Pattern Determining what to cache also involves understanding the data itself and
its access patterns. For example, it doesn't make sense to cache data that is rapidly changing or is
seldom accessed. For caching to provide a meaningful benefit, the data should be relatively static and
frequently accessed, such as a personal profile on a social media site. Conversely, you don't want to
cache data if caching it provides no speed or cost advantage. For example, it wouldn't make sense to
cache web pages that return the results of a search since such queries and results are almost always
unique.
Staleness By definition, cached data is stale data—even if in certain circumstances it isn't stale, it
should always be considered and treated as stale. In determining whether your data is a candidate
for caching, you need to determine your application's tolerance for stale data. Your application may
API Version 2015-02-02
2

Amazon ElastiCache User Guide
Gaming Leaderboards (Redis Sorted Lists)
be able to tolerate stale data in one context, but not another. For example, when serving up a publicly
traded stock price on a web site, staleness might be quite acceptable, along with a disclaimer that
prices may be up to n minutes delayed. But, when serving up the price for the same stock to a broker
making a sale or purchase you want real-time data.
In summary, consider caching your data if:
• It is slow or expensive to acquire when compared to cache retrieval.
• It is accessed with sufficient frequency.
• It is relatively static, or if rapidly changing, staleness is not a significant issue.
For more information, see Caching Strategies (p. 59).
Gaming Leaderboards (Redis Sorted Lists)
Redis sorted sets move the computational complexity associated with leaderboards from your
application to your Redis cluster.
Leaderboards, such as the Top 10 scores for a game, are computationally complex, especially with a
large number of concurrent players and continually changing scores. Redis sorted sets guarantee both
uniqueness and element ordering. Using Redis sorted sets, each time a new element is added to the
sorted set it is re-ranked in real time and added to the set in its appropriate numeric position.
Example - Redis Leaderboard
In this example four gamers and their scores are entered into a sorted list using ZADD. The command
ZREVRANGEBYSCORE lists the players by their score, high to low. Next, ZADD is used to update June's
score by overwriting the existing entry. Finally ZREVRANGEBYSCORE list the players by their score, high
to low, showing that June has moved up in the rankings.
ZADD leaderboard 132 Robert
ZADD leaderboard 231 Sandra
ZADD leaderboard 32 June
ZADD leaderboard 381 Adam
ZREVRANGEBYSCORE leaderboard +inf -inf
1) Adam
2) Sandra
3) Robert
4) June
ZADD leaderboard 232 June
ZREVRANGEBYSCORE leaderboard +inf -inf
1) Adam
2) June
3) Sandra
4) Robert
The following command lets June know where she ranks among all the players. Since ranking is zero-
based, ZREVRANK returns a 1 for June who is in second position.
ZREVRANK leaderboard June
1
For more information, see the Redis Documentation on sorted sets.
API Version 2015-02-02
3

Amazon ElastiCache User Guide
Messaging (Redis pub/sub)
Messaging (Redis pub/sub)
When you send an email message, you send it to one or more specified recipients. In the pub/sub
paradigm, you send a message to a specific channel not knowing who, if anyone, will receive it.
Recipients of the message are those who are subscribed to the channel. For example, suppose you
subscribe to the news.sports.golf channel. You and all others subscribed to the news.sports.golf
channel will receive any messages published to news.sports.golf.
Redis pub/sub functionality has no relation to any key space. Therefore, it will not interfere on any
level.
Subscribing
To receive messages on a channel you must subscribe to the channel. You may subscribe to a single
channel, multiple specified channels, or all channels that match a pattern. To cancel a subscription you
unsubscribe from the channel specified when you subscribed to it or the same pattern you used if you
subscribed using pattern matching.
Example - Subscription to a Single Channel
To subscribe to a single channel, use the SUBSCRIBE command specifying the channel you want to
subscribe to. In the following example, a client subscribes to the news.sports.golf channel.
SUBSCRIBE news.sports.golf
After a while, the client cancels their subscription to the channel using the UNSUBSCRIBE command
specifying the channel to unsubscribe from.
UNSUBSCRIBE news.sports.golf
Example - Subscriptions to Multiple Specified Channels
To subscribe to multiple specific channels, list the channels with the SUBSCRIBE command. In
the following example, a client subscribes to both the news.sports.golf, news.sports.soccer and
news.sports.skiing channels.
SUBSCRIBE news.sports.golf news.sports.soccer news.sports.skiing
To cancel a subscription to a specific channel, use the UNSUBSCRIBE command specifying the
channel to unsubscribe from.
UNSUBSCRIBE news.sports.golf
To cancel subscriptions to multiple channels, use the UNSUBSCRIBE command specifying the
channels to unsubscribe from.
UNSUBSCRIBE news.sports.golf news.sports.soccer
To cancel all subscriptions, use UNSUBSCRIBE and specify each channel or UNSUBSCRIBE without
specifying any channel.
UNSUBSCRIBE news.sports.golf news.sports.soccer news.sports.skiing
UNSUBSCRIBE
API Version 2015-02-02
4

Amazon ElastiCache User Guide
Recommendation Data (Redis Counters & Hashes)
Example - Subscriptions Using Pattern Matching
Clients can subscribe to all channels that match a pattern by using the PSUBSCRIBE command.
In the following example, a client subscribes to all sports channels. Rather than listing all the sports
channels individually, as would be done using SUBSCRIBE, pattern matching is used with the
PSUBSCRIBE command.
PSUBSCRIBE news.sports.*
To cancel subscriptions to these channels, use the PUNSUBSCRIBE command.
PUNSUBSCRIBE news.sports.*
Note
The channel string sent to a [P]SUBSCRIBE command and to the [P]UNSUBSCRIBE
command must match. You cannot PSUBSCRIBE to news.* and PUNSUBSCRIBE from
news.sports.* or UNSUBSCRIBE from news.sports.golf.
Publishing
To send a message to all subscribers to a channel, use the PUBLISH command, specifying the
channel and the message. The following example publishes the message, “It’s Saturday and sunny.
I’m headed to the links.” to the news.sports.golf channel.
PUBLISH news.sports.golf "It's Saturday and sunny. I'm headed to the links."
A client cannot publish to a channel to which it is subscribed.
For more information, see Pub/Sub in the Redis documentation.
Recommendation Data (Redis Counters & Hashes)
Redis counters and hashes make compiling recommendations simple. Each time a user "likes" a
product, you increment an item:productID:like counter. Each time a user "dislikes" a product, you
increment an item:productID:dislike counter. Using Redis hashes, you can also maintain a list of
everyone who has liked or disliked a product.
Example - Likes & Dislikes
INCR item:38923:likes
HSET item:38923:ratings Susan 1
INCR item:38923:dislikes
HSET item:38923:ratings Tommy -1
Other Redis Uses
An article by Salvatore Sanfilippo (How to take advantage of Redis just adding it to your stack)
discusses a number of common database uses and how they can be easily solved using Redis, thus
removing load from your database and improving performance.
Testimonials
Go to Testimonials to read about how businesses like airbnb, PBS, esri, and others are leveraging
Amazon ElastiCache to grow their businesses with improved customer experience.
API Version 2015-02-02
5

Amazon ElastiCache User Guide
ElastiCache Resources
Amazon ElastiCache Resources
We recommend that you begin by reading the following sections, and refer back to them as you need
them.
•Service Highlights and Pricing – The product detail page provides a general product overview of
ElastiCache, service highlights, and pricing.
•ElastiCache Videos – The ElastiCache Tutorial Videos (p. 7) section has videos that introduce
you to Amazon ElastiCache, cover common use cases for ElastiCache, and demo how to use
ElastiCache to reduce latency and improve throughput of your applications.
•Getting Started – The Getting Started with Amazon ElastiCache (p. 17) section includes an
example that walks you through the process of creating a cache cluster, authorizing access to the
cache cluster, connecting to a cache node, and deleting the cache cluster.
•Performance at Scale – The Performance at Scale with Amazon ElastiCache white paper
addresses caching strategies that enable your application to perform well at scale.
After you complete the preceding sections, read these sections:
•Engines and Versions (p. 27)
ElastiCache supports two engines—Memcached and Redis. This topic helps you determine which
engine is best for your scenario.
•Selecting Your Node Size (p. 66)
You want your cache to be large enough to accommodate all the data you want to cache. At the
same time you don't want to pay for more cache than you need. This topic assists you in selecting
the best node size.
•Best Practices for Implementing Amazon ElastiCache (p. 49)
Identify and address issues that can impact the efficiency of your cluster.
If you want to use the AWS CLI, these documents can help you get started:
•AWS Command Line Interface Documentation
This section provides information on downloading the AWS CLI, getting the CLI working on your
system, and providing your AWS credentials.
•AWS CLI Documentation for ElastiCache
This is a separate document with all of the AWS CLI for ElastiCache commands, including syntax
and examples.
You can write application programs to leverage the ElastiCache API using a variety of popular
programming languages. Here are some resources:
•Tools for Amazon Web Services
Amazon Web Services provides a number of software development kits (SDKs) with support for
ElastiCache. You can code against ElastiCache using Java, .NET, PHP, Ruby, and other languages.
These SDKs can greatly simplify your application development by formatting your requests to
ElastiCache, parsing responses, and providing retry logic and error handling.
•Using the ElastiCache API (p. 339)
API Version 2015-02-02
6

Amazon ElastiCache User Guide
Tutorial Videos
If you don't want to use the AWS SDKs, you can interact with ElastiCache directly using the Query
API. This section provides troubleshooting tips and information on creating and authenticating
requests and handling responses.
•Amazon ElastiCache API Reference
This is a separate document with all of the ElastiCache API operations, including syntax and
examples.
ElastiCache Tutorial Videos
This section contains tutorial videos to help you learn basic and advanced Amazon ElastiCache
concepts. For information about AWS Training, see AWS Training & Certification.
Introductory Video Tutorials
For introductory video tutorials about Amazon ElastiCache, see the following.
Topics
•Introduction to Amazon ElastiCache (p. 7)
•DAT204—Building Scalable Applications on AWS NoSQL Services (re:Invent 2015) (p. 7)
•DAT207—Accelerating Application Performance with Amazon ElastiCache (AWS re:Invent
2013) (p. 7)
Introduction to Amazon ElastiCache
In this tutorial, you learn about key Amazon ElastiCache concepts, watch a demo of creating and
launching an ElastiCache cluster in the Amazon cloud, and then go practice with a free lab at Qwik
Labs.
Introduction to Amazon ElastiCache.
DAT204—Building Scalable Applications on AWS NoSQL
Services (re:Invent 2015)
In this session, we discuss the benefits of NoSQL databases and take a tour of the main NoSQL
services offered by AWS—Amazon DynamoDB and Amazon ElastiCache. Then, we hear from two
leading customers, Expedia and Mapbox, about their use cases and architectural challenges, and
how they addressed them using AWS NoSQL services, including design patterns and best practices.
You will walk out of this session having a better understanding of NoSQL and its powerful capabilities,
ready to tackle your database challenges with confidence.
DAT204—Building Scalable Applications on AWS NoSQL Services (re:Invent 2015)
DAT207—Accelerating Application Performance with Amazon
ElastiCache (AWS re:Invent 2013)
In this tutorial, learn how you can use Amazon ElastiCache to easily deploy a Memcached- or Redis-
compatible in-memory caching system to speed up your application performance. We show you how
to use Amazon ElastiCache to improve your application latency and reduce the load on your database
servers. We'll also show you how to build a caching layer that is easy to manage and scale as your
application grows. During this session, we go over various scenarios and use cases that can benefit by
enabling caching, and discuss the features provided by Amazon ElastiCache.
API Version 2015-02-02
7

Amazon ElastiCache User Guide
Advanced Video Tutorials
DAT207 - Accelerating Application Performance with Amazon ElastiCache (re:Invent 2013)
Advanced Video Tutorials
For advanced tutorials videos about Amazon ElastiCache, see the following.
Topics
•DAT407—Amazon ElastiCache Deep Dive (re:Invent 2015) (p. 8)
•SDD402—Amazon ElastiCache Deep Dive (re:Invent 2014) (p. 8)
•DAT307—Deep Dive into Amazon ElastiCache Architecture and Design Patterns (re:Invent
2013) (p. 8)
DAT407—Amazon ElastiCache Deep Dive (re:Invent 2015)
Peek behind the scenes to learn about Amazon ElastiCache's design and architecture. See common
design patterns of our Memcached and Redis offerings and how customers have used them for
in-memory operations and achieved improved latency and throughput for applications. During this
session, we review best practices, design patterns, and anti-patterns related to Amazon ElastiCache.
DAT407—Amazon ElastiCache Deep Dive (re:Invent 2015)
SDD402—Amazon ElastiCache Deep Dive (re:Invent 2014)
In this tutorial, we examine common caching use cases, the Memcached and Redis engines, patterns
that help you determine which engine is better for your needs, consistent hashing, and more as means
to building fast, scalable applications. Frank Wiebe, Principal Scientist at Adobe, details how Adobe
uses Amazon ElastiCache to improve customer experience and scale their business.
DAT402—Amazon ElastiCache Deep Dive (re:Invent 2014)
DAT307—Deep Dive into Amazon ElastiCache Architecture
and Design Patterns (re:Invent 2013)
In this tutorial, we examine caching, caching strategies, scaling out, monitoring. We also compare the
Memcached and Redis engines. During this session, also we review best practices and design patterns
related to Amazon ElastiCache.
DAT307 - Deep Dive into Amazon ElastiCache Architecture and Design Patterns (AWS re:Invent
2013).
API Version 2015-02-02
8

Amazon ElastiCache User Guide
Components & Features
ElastiCache Components & Features
The topics in this section are an overview of the major components of an Amazon ElastiCache
deployment.
Topics
•ElastiCache Nodes (p. 9)
•ElastiCache Clusters (p. 10)
•ElastiCache Replication Groups (Redis) (p. 11)
•Regions & Availability Zones (p. 12)
•ElastiCache Endpoints (p. 13)
•ElastiCache Parameter Groups (p. 13)
•ElastiCache Security (p. 13)
•ElastiCache Security Groups (p. 14)
•ElastiCache Subnet Groups (p. 14)
•ElastiCache Backups, a.k.a. Snapshots (Redis) (p. 14)
•ElastiCache Events (p. 15)
ElastiCache Nodes
A node is the smallest building block of an ElastiCache deployment. A node can exist in isolation from
or in some relationship to other nodes.
A node is a fixed-size chunk of secure, network-attached RAM. Each node runs an instance of either
Memcached or Redis, depending on which was selected when you created your cluster. If necessary,
you can scale the nodes in a cluster up or down to a different instance type. For more information, see
Scaling (p. 142).
Every node within a cluster is the same instance type and runs the same cache engine. Each cache
node has its own Domain Name Service (DNS) name and port. Multiple types of cache nodes are
supported, each with varying amounts of associated memory. For a list of supported node instance
types, see Supported Node Types (p. 77).
You can purchase nodes on a pay-as-you-go basis, where you only pay for your use of a node, or,
you can purchase reserved nodes at a significantly reduced hourly rate. If your usage rate is high,
purchasing reserved nodes could save you money. If your cluster is almost always in use and you
occasionally add nodes to handle use spikes, you can purchase a number of reserved nodes to run
most of the time, and purchase pay-as-you-go nodes for the times you occasionally need to add nodes.
For more information on reserved nodes, see ElastiCache Reserved Nodes (p. 68).
The Memcached engine supports Auto Discovery–the ability for client programs to automatically
identify all of the nodes in a cache cluster, and to initiate and maintain connections to all of these
nodes. With Auto Discovery, your application does not need to manually connect to individual
nodes; instead, your application connects to a configuration endpoint. The configuration endpoint
DNS entry contains the CNAME entries for each of the cache node endpoints; thus, by connecting
to the configuration endpoint, you application immediately knows about all of the nodes in the
cluster and can connect to all of them. You do not need to hard code the individual cache node
endpoints in your application. For more information on Auto Discovery, see Node Auto Discovery
(Memcached) (p. 82).
For more information on nodes, see ElastiCache Nodes (p. 65).
API Version 2015-02-02
9

Amazon ElastiCache User Guide
Clusters
ElastiCache Clusters
A cluster is a logical grouping of one or more nodes.
If you're running Memcached and your cluster has multiple nodes, you can improve your cluster's fault
tolerance by locating your nodes in multiple Availability Zones.
If you are running Redis, a cluster is always a single node. You can improve your fault tolerance by
creating a multiple cluster replication group, locating the clusters in different Availability Zones.
Many ElastiCache operations are targeted at clusters.
• Creating a cluster
• Modifying a cluster
• Taking snapshots of Redis clusters
• Deleting a cluster
• Viewing the elements in a cluster
• Adding or removing clusters to/from Redis replication groups
• Adding or removing cost allocation tags to/from a cluster
For more detailed information, see the following related topics:
•ElastiCache Clusters (p. 110)
Information about clusters and cluster operations.
•AWS Service Limits: Amazon ElastiCache
Information about ElastiCache limits, such as the maximum number of nodes or clusters.
•Mitigating Failures (p. 51)
Information about improving the fault tolerance of your clusters and replication groups.
Typical Cluster Configurations
Depending on the engine you select, possible cluster configurations differ. Memcached supports up
to 50 nodes per customer per region with clusters having 1 to 20 nodes. You can partition your data
across the nodes in a Memcached cluster. Redis supports up to 50 clusters per customer per region
with each cluster having a single node, and replication groups of 2 to 6 clusters. You cannot partition
your data across multiple Redis clusters. If you need to exceed these limits, make your request using
the Amazon ElastiCache Cache Node request form.
Following are typical cluster configurations for the Memcached and Redis engines.
Memcached Clusters
When you run the Memcached engine, clusters can be made up of 1 to 20 nodes. You can horizontally
partition your database across the nodes. Your application reads and writes to each node. For more
information, see Node Auto Discovery (Memcached) (p. 82).
For improved fault tolerance, locate your Memcached nodes in various Availability Zones. That way,
a failure in one Availability Zone will have minimal impact upon your entire cluster and application. For
more information, see Mitigating Failures (p. 51).
As demand upon your Memcached cluster changes, your scale out or in by adding or removing
nodes and repartitioning your data across the new number of nodes. When you partition your data,
API Version 2015-02-02
10
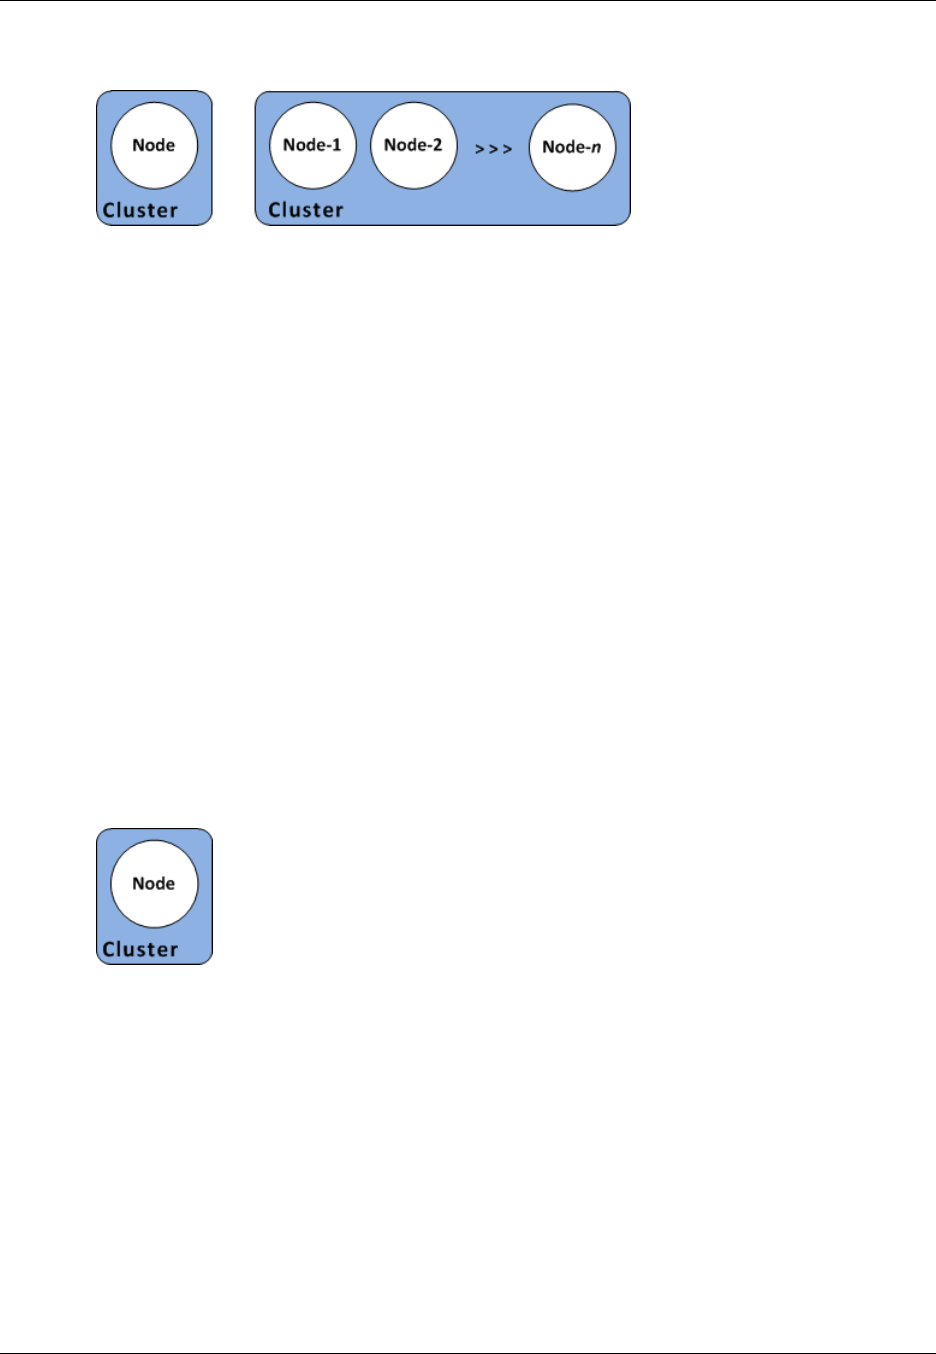
Amazon ElastiCache User Guide
Replication Groups
we recommend using Consistent Hashing. For more information about Consistent Hashing, see
Configuring Your ElastiCache Client for Efficient Load Balancing (p. 55).
The preceding graphic of a Memcached cluster shows a cluster with three nodes. A Memcached
cluster can have from 1 to 20 nodes. For information about ElastiCache limits, see AWS Service Limits
for ElastiCache. If you need to exceed these limits, make your request at Amazon ElastiCache Cache
Node request form.
Note
At this time, partitioning data across multiple nodes is supported only for cache clusters
running Memcached.
Redis Clusters
A Redis cluster is made up of one node. The node in a Redis cluster contains all the cache's data.
Redis does not support horizontal partitioning of your data.
for improved fault tolerance, we recommend using Redis replication groups and enabling Multi-AZ with
Auto Failover. For more information, see Mitigating Failures (p. 51).
As demand upon your Redis cluster changes you can scale up or down by moving your cluster
to a different node instance type. If your application is read intensive, we recommend using a
Redis replication group with multiple read-only replicas so you can spread the reads across a more
appropriate number of clusters.
Note
ElastiCache supports changing a cluster's node type to a larger node type dynamically. For
information on scaling up or down, see Scaling Standalone Redis Cache Clusters (p. 146) or
Scaling Redis Replication Groups (p. 153).
ElastiCache Replication Groups (Redis)
A replication group is a collection of Redis clusters, with one primary read-write cluster and up to
five secondary, read-only clusters, which are called read replicas. Each replica maintains a copy
of the data from the primary cluster and uses asynchronous replication mechanisms to keep itself
synchronized with the primary cluster. Applications can read from any cluster in the replication group
but can write only to the primary cluster. Read replicas enhance scalability by spreading reads across
multiple clusters. Read replicas also improve fault tolerance by maintaining multiple copies of the
cache data. Locating read replicas in multiple Availability Zones further improves fault tolerance. For
more information on fault tolerance, see Mitigating Failures (p. 51).
API Version 2015-02-02
11
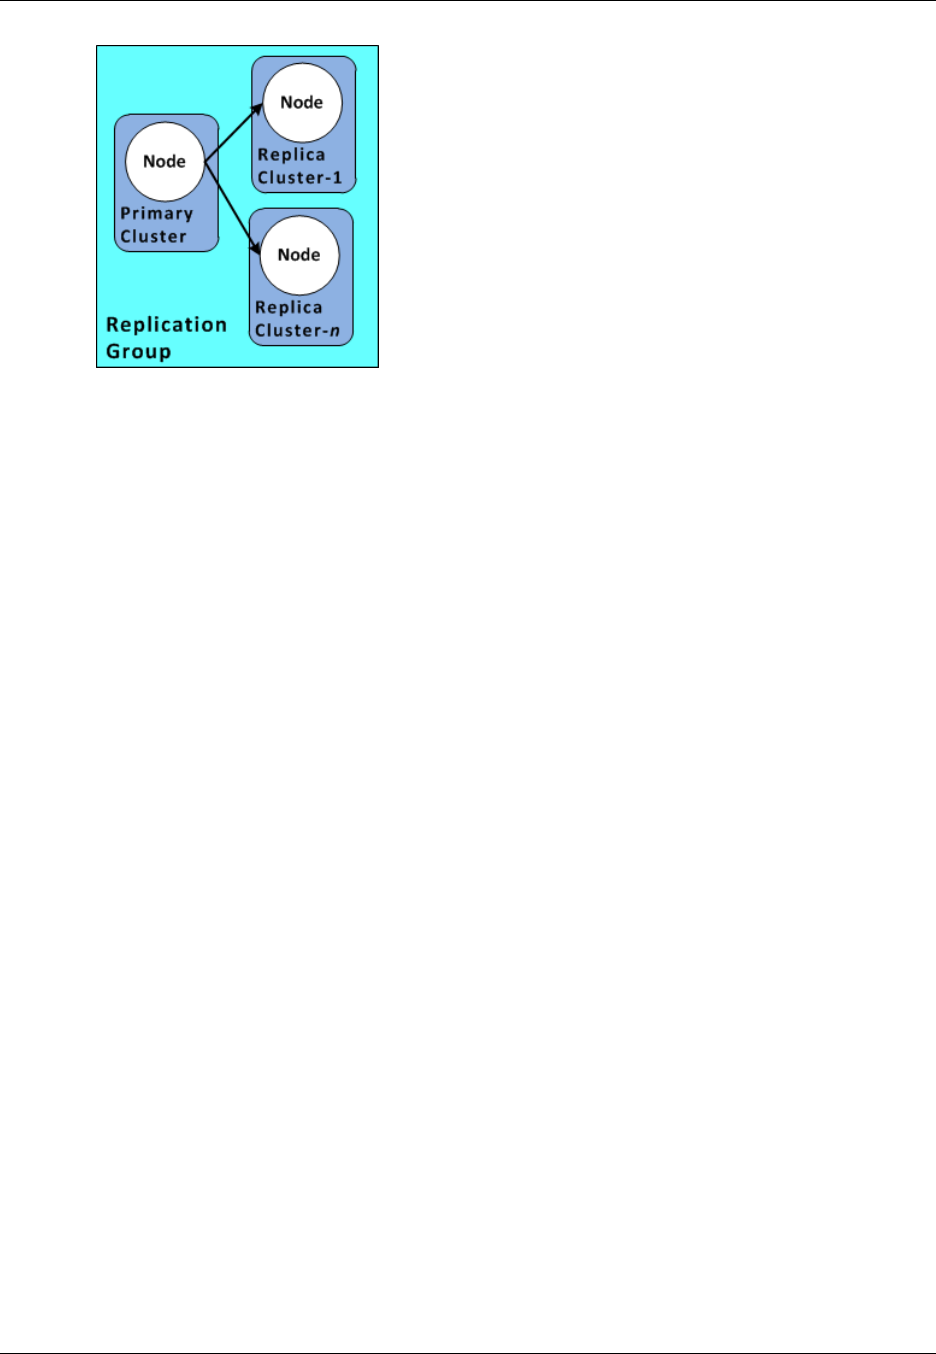
Amazon ElastiCache User Guide
Regions & Availability Zones
The preceding graphic shows a Redis replication group with a read/write primary cluster and two read-
only replicas.
Note
At this time, replication groups are supported only for cache clusters running Redis.
At this time, partitioning data across multiple clusters is not supported when running the Redis
engine.
You can use replication groups to scale your Redis solution for Amazon ElastiCache to handle
applications that are read-intensive or to support large numbers of clients that simultaneously read
from the same cache.
All of the clusters in a replication group must reside in the same region. However, you can provision
read replicas in multiple Availability Zones within that region. When you add a read replica to a
replication group, all of the data from the primary cache cluster is copied to the read replica. From that
point, whenever data is written to the primary, the changes are asynchronously propagated to the read
replicas. Your applications can connect to any read replica to read data in the cache. To write data to
the cache, your application must connect to the read/write primary cluster.
You can change the roles of the nodes within the replication group, with the primary node and one
of the replicas exchanging roles. You might decide to do this for performance tuning reasons. For
example, with a web application that has heavy write activity, you can choose the node that has the
lowest network latency. For more information, see Promoting a Read-Replica to Primary (p. 195).
If a primary or read replica cluster is unexpectedly terminated or fails, replication groups guard against
potential data loss because your data is duplicated over two or more clusters. For greater reliability
and faster recovery, we recommend that you create one or more read replicas in different Availability
Zones for your replication group, and enable Multi-AZ with auto failover on the replication group instead
of using AOF. AOF is disabled for Multi-AZ enabled replication groups. For more information, see
Replication with Multi-AZ and Automatic Failover (Redis) (p. 166).
AOF is not supported for cache nodes of type cache.t1.micro. For more information on AOF and
Multi-AZ, see Mitigating Failures (p. 51).
Multi-AZ with auto failover is only supported on Redis versions 2.6.8 and later. Multi-AZ is not
supported on node types t1 and t2.
Regions & Availability Zones
Amazon ElastiCache is available in multiple regions around the world so that you can launch
ElastiCache clusters in locations that meet your business requirements, such as launching in the
region closest to your customers or to meet certain legal requirements.
API Version 2015-02-02
12

Amazon ElastiCache User Guide
Endpoints
By default, the AWS SDKs, AWS CLI, ElastiCache API, and ElastiCache console reference the US-
West (Oregon) region. As ElastiCache expands availability to new regions, new endpoints for these
regions are also available to use in your HTTP requests, the AWS SDKs, AWS CLI, and the console.
Each region is designed to be completely isolated from the other regions. Within each region are
multiple Availability Zones. By launching your nodes in different Availability Zones you are able to
achieve the greatest possible fault tolerance. For more information about regions and Availability
Zones, see Selecting Regions and Availability Zones (p. 36).
For information on regions supported by ElastiCache and their endpoints, see Supported Regions &
Endpoints (p. 37).
ElastiCache Endpoints
An endpoint is the unique address your application uses to connect to an ElastiCache node or cluster.
Memcached Endpoints
Each node in a Memcached cluster has its own endpoint. The cluster also has an endpoint called the
configuration endpoint. If you enable Auto Discovery and connect to the configuration endpoint, your
application will automatically know each node endpoint, even after adding or removing nodes from the
cluster.
Redis Cluster Endpoints
The endpoint for a stand alone Redis cluster is used to connect to the cluster for both reads and writes.
Redis Replication Group Endpoints
A Redis replication group has two types of endpoints. The Primary Endpoint always connects to the
primary cluster in the replication group, even if the specific cluster in the primary role changes. Use the
primary endpoint for all writes to the replication group.
The Read Endpoint in a replication group always points to a specific cluster in the replication group.
Whenever you add or remove a read replica, you must update the associated read endpoint in your
application.
For more information, see Finding Your ElastiCache Endpoints (p. 39).
ElastiCache Parameter Groups
Cache parameter groups are an easy way to manage runtime settings for supported engine software.
Memcached and Redis have many parameters to control memory usage, eviction policies, item sizes,
and more. An ElastiCache parameter group is a named collection of Memcached- or Redis-specific
parameters that you can apply to a cluster, thereby guaranteeing that all of the nodes in that cluster are
configured in exactly the same way.
For a list of supported parameters, their default values, and which ones can be modified, see
DescribeEngineDefaultParameters (describe-engine-default-parameters).
For more detailed information on ElastiCache parameter groups, see Parameters and Parameter
Groups (p. 233).
ElastiCache Security
For enhanced security, ElastiCache node access is restricted to applications running on whitelisted
Amazon EC2 instances. You can control the Amazon EC2 instances that can access your cluster by
using subnet groups or security groups.
API Version 2015-02-02
13

Amazon ElastiCache User Guide
Security Groups
By default, all new ElastiCache clusters are launched in an Amazon Virtual Private Cloud (Amazon
VPC) environment. You can use subnet groups to grant cluster access from Amazon EC2 instances
running on specific subnets. If you choose to run your cluster outside of Amazon VPC, you can create
security groups to authorize Amazon EC2 instances running within specific Amazon EC2 security
groups.
ElastiCache Security Groups
Note
ElastiCache security groups are only applicable to clusters that are not running in an Amazon
Virtual Private Cloud (Amazon VPC) environment. If you are running your ElastiCache nodes
in an Amazon VPC, you control access to your cache clusters with Amazon VPC security
groups, which are different from ElastiCache security groups.
For more information on using ElastiCache in an Amazon VPC, see Amazon Virtual Private
Cloud (Amazon VPC) with ElastiCache (p. 273).
ElastiCache allows you to control access to your clusters using security groups. A security group acts
like a firewall, controlling network access to your cluster. By default, network access to your clusters is
turned off. If you want your applications to access your cluster, you must explicitly enable access from
hosts in specific Amazon EC2 security groups. Once ingress rules are configured, the same rules apply
to all clusters associated with that security group.
To allow network access to your cluster, create a security group and use the
AuthorizeCacheSecurityGroupIngress API or the authorize-cache-security-group-ingress AWS CLI
command to authorize the desired Amazon EC2 security group (which in turn specifies the Amazon
EC2 instances allowed). The security group can be associated with your cluster at the time of creation,
or by using the ElastiCache management console or the ModifyCacheCluster or (modify-cache-cluster)
AWS CLI for ElastiCache command.
Important
IP-range based access control is currently not enabled for clusters. All clients to a cluster
must be within the Amazon EC2 network, and authorized via security groups as described
previously.
For more information about security groups, see Cache Security Groups [EC2-Classic] (p. 224).
ElastiCache Subnet Groups
A subnet group is a collection of subnets (typically private) that you can designate for your clusters
running in an Amazon Virtual Private Cloud (VPC) environment.
If you create a cluster in an Amazon VPC, then you must specify a cache subnet group. ElastiCache
uses that cache subnet group to select a subnet and IP addresses within that subnet to associate with
your cache nodes.
For more information about cache subnet group usage in an Amazon VPC environment, see Amazon
Virtual Private Cloud (Amazon VPC) with ElastiCache (p. 273), Step 4: Authorize Access (p. 19),
and Subnets and Subnet Groups (p. 265).
ElastiCache Backups, a.k.a. Snapshots (Redis)
A backup is a point-in-time copy of a Redis cluster. Backups can be used to restore an existing cluster
or to seed a new cluster. Backups consist of all the data in a cluster plus some metadata. Backups are
not supported by the Memcached engine.
During the time Redis is creating a backup, to keep it a point-in-time backup, the process forks and
all writes to the cluster are recorded in available memory, apart from the cluster's data that is being
backed up. Because of this, you must have sufficient "extra" memory to accommodate these writes.
API Version 2015-02-02
14

Amazon ElastiCache User Guide
Events
When selecting a node type, keep this in mind if you're using Redis. For more information on selecting
a node type for your Redis deployment, see Ensuring You Have Sufficient Memory to Create a Redis
Snapshot (p. 49).
For more information, see ElastiCache Backup & Restore (Redis) (p. 198).
ElastiCache Events
When significant events happen on a cache cluster, such as a failure to add a node, success in adding
a node, the modification of a security group and others, ElastiCache sends notification to a specific
Amazon SNS topic. By monitoring for key events you can know the current state of your clusters and,
depending upon the event, be able to take corrective action.
For more information on ElastiCache events, see Monitoring ElastiCache Events (p. 319).
API Version 2015-02-02
15

Amazon ElastiCache User Guide
Accessing ElastiCache
Accessing Amazon ElastiCache
Your Amazon ElastiCache instances can only be accessed through an Amazon EC2 instance. If you
launched your ElastiCache instance in an Amazon Virtual Private Cloud (Amazon VPC), the Amazon
EC2 instance and your ElastiCache instance must be in the same Amazon VPC. If you launched your
ElastiCache instance in EC2 Classic, you allow the EC2 instance to access your cluster by granting
the Amazon EC2 security group associated with the instance access to your cache security group. By
default, access to a cluster is restricted to the account that launched the cluster.
For more information on granting Amazon EC2 access to your cluster, see Step 4: Authorize
Access (p. 19) and Accessing ElastiCache Resources from Outside AWS (p. 304).
Managing ElastiCache
Means of Managing ElastiCache
Once you have granted your Amazon EC2 instance access to your ElastiCache cluster, you have four
means by which you can manage your ElastiCache cluster: the AWS Management Console, the AWS
ElastiCache CLI, the AWS SDK for ElastiCache, and the ElastiCache API.
Managing ElastiCache (Console)
The AWS Management Console is the easiest way to manage Amazon ElastiCache. The console
lets you create cache clusters, add and remove cache nodes, and perform other administrative tasks
without having to write any code. The console also provides cache node performance graphs from
CloudWatch, showing cache engine activity, memory and CPU utilization, as well as other metrics. For
more information, see specific topics in this User Guide.
Managing ElastiCache (AWS CLI)
You can also use the AWS ElastiCache command line interface (CLI). The CLI makes it easy to
perform one-at-a-time operations, such as starting or stopping your cache cluster. You can also invoke
AWS CLI for ElastiCache commands from a scripting language of your choice, letting you automate
repeating tasks. For more information about the CLI, see the User Guide and CLI reference at AWS
Command Line Interface Documentation.
Managing ElastiCache (AWS SDK)
If you want to access ElastiCache from an application, you can use one of the AWS software
development kits (SDKs). The SDKs wrap the ElastiCache API calls, and insulate your application
from the low-level details of the ElastiCache API. You provide your credentials, and the SDK libraries
take care of authentication and request signing. For more information about using the AWS SDKs, see
Tools for Amazon Web Services.
Managing ElastiCache (ElastiCache API)
You can also write application code directly against the ElastiCache web service API. When using the
API, you must write the necessary code to construct and authenticate your HTTP requests, parse the
results from ElastiCache, and handle any errors. For more information about the API, see Using the
ElastiCache API (p. 339).
API Version 2015-02-02
16

Amazon ElastiCache User Guide
Step 1: Create an AWS Account
Getting Started with Amazon
ElastiCache
Beginning with creating your own AWS account, the topics in this section walk you through the process
of creating, granting access to, connecting to, and finally deleting an ElastiCache cluster using the
AWS Management Console.
Topics
•Step 1: Create an AWS Account [One time] (p. 17)
•Step 2: Launch a Cluster (p. 18)
•Step 3: View Cluster Details [Optional] (p. 19)
•Step 4: Authorize Access (p. 19)
•Step 5: Connect to a Cluster's Node (p. 21)
•Step 6: Delete Your Cluster [Avoid Additional Charges] (p. 24)
•Where Do I Go From Here? (p. 26)
Step 1: Create an AWS Account [One time]
To use ElastiCache, you need an AWS account. If you don't already have one, you'll be prompted to
create one when you sign up. You're not charged for any AWS services that you sign up for unless you
use them.
To create an AWS account
1. Open http://aws.amazon.com/, and then choose Create an AWS Account.
2. Follow the online instructions.
Part of the sign-up procedure involves receiving a phone call and entering a PIN using the phone
keypad.
API Version 2015-02-02
17

Amazon ElastiCache User Guide
Step 2: Launch a Cluster
Step 2: Launch a Cluster
Before you continue, be sure you have completed Step 1: Create an AWS Account [One
time] (p. 17).
The cluster you're about to launch will be live, and not running in a sandbox. You will incur the
standard ElastiCache usage fees for the instance until you delete it. The total charges will be minimal
(typically less than a dollar) if you complete the exercise described here in one sitting and delete
your cluster when you are finished. For more information about ElastiCache usage rates, go to http://
aws.amazon.com/elasticache/.
Important
If you're going to launch your cluster in an Amazon VPC, you need to create a subnet group
before you start creating a cluster. For more information, see Creating a Cache Subnet
Group (p. 266).
The details in creating an ElastiCache cluster differ depending upon the engine and some options you
choose. In general, the steps are as follows:
1. Select the engine: Memcached or Redis.
If you are unsure as to which engine will work best for you, see Engines and Versions (p. 27) to
compare the engines and versions.
2. Specify cluster details on the Cluster Details page.
3. Specify advanced settings on the Configure Advanced Settings page.
4. Review your selections and launch.
To create a single Redis cluster
1. Sign in to the AWS Management Console and open the Amazon ElastiCache console at https://
console.aws.amazon.com/elasticache/.
2. Click Get Started Now.
If you already have an available cluster, click Launch Cache Cluster.
3.
On the Select Engine screen, click the Redis tab ( ), and then click Next.
4. On the Specify Cluster Details screen, make the following changes. Apart from these changes
accept the default values.
a. Since we are launching a single Redis cluster, uncheck the Enable Replication box.
b. For the cluster's name, type myfirstcluster, and then click Next.
5. On the Configure Advanced Settings screen, accept all the defaults, and then click Next.
6. On the Review screen, check the fields you changed and their values,
•Engine redis.
•Enable Replication No.
•Cluster Name myfirstcluster.
and then click Launch Cache Cluster.
7. On the Success screen, click Close.
The Cache Clusters screen will appear.
8. Wait until your cluster's status is available. This will take several minutes.
API Version 2015-02-02
18
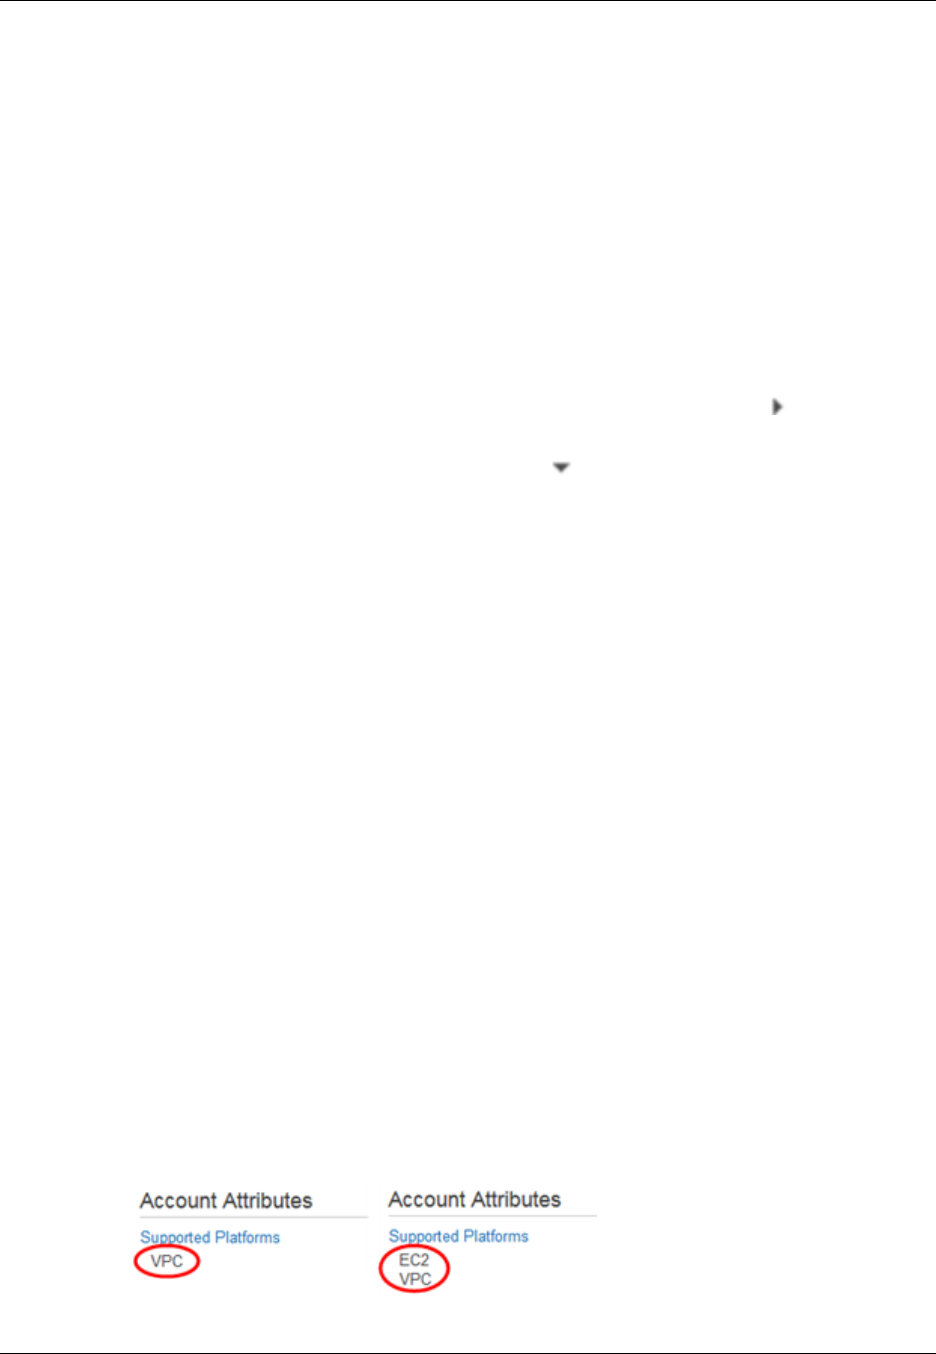
Amazon ElastiCache User Guide
Step 3: View Cluster Details
On the Cache Clusters screen, your cluster, myfirstcluster, will be listed with a status of creating.
After the cluster is created and its status changes to available, you can proceed to either Step
3: View Cluster Details [Optional] (p. 19) or Step 4: Authorize Access (p. 19). Creating the
cluster will take several minutes.
Step 3: View Cluster Details [Optional]
Before you continue, be sure you have completed Step 2: Launch a Cluster (p. 18).
To view a cluster's details
1. Sign in to the AWS Management Console and open the Amazon ElastiCache console at https://
console.aws.amazon.com/elasticache/.
2. In the ElastiCache console dashboard, select Cache Clusters.
3. In the list of clusters, to view a cluster's details, select the right-pointing arrow ( ) to the left of the
cluster's name.
When selected, the arrow becomes down-pointing ( ) and the cluster's details appear. To hide a
cluster's details, select the down-pointing arrow.
Step 4: Authorize Access
This section assumes that you are familiar with launching and connecting to Amazon EC2 instances.
For more information, go to the Amazon EC2 Getting Started Guide.
All ElastiCache clusters are designed to be accessed from an Amazon EC2 instance. A cluster and its
related Amazon EC2 instance must be in the same Amazon Virtual Private Cloud (VPC). If you must
access an ElastiCache cluster from somewhere other than an Amazon EC2 instance in the same VPC,
as a workaround you can set up one or more Amazon EC2 hosts inside the cache's VPC to act as a
proxy for the outside world. Setting up a host adds an extra network hop or extra Secure Sockets Layer
(SSL) overhead and cost, or both. However, those costs are small for many use cases. You must grant
the proxy Amazon EC2 instance access to your cluster. For information on accessing your ElastiCache
resources from outside AWS, go to Accessing ElastiCache Resources from Outside AWS (p. 304).
By default, network access to your cluster is limited to the user account that was used to launch it.
Before you can connect to a cluster from an Amazon EC2 instance, you must authorize the Amazon
EC2 instance to access the cluster. The steps required depend upon whether you launched your
cluster into an Amazon VPC environment.
Before you continue, determine whether you launched your cluster into EC2-VPC or EC2-Classic.
To determine whether you launched your cluster into EC2-VPC or EC2-Classic using the
AWS Management Console
1. Sign in to the AWS Management Console and open the Amazon EC2 console at https://
console.aws.amazon.com/ec2/.
2. Locate Supported Platforms in the upper-right corner.
Under Supported Platforms, you will see either only VPC or both EC2 and VPC.
API Version 2015-02-02
19

Amazon ElastiCache User Guide
You Launched Your Cluster into EC2-VPC
If you see only VPC, continue at You Launched Your Cluster into EC2-VPC (p. 20).
If you see both EC2 and VPC, continue at You Launched Your Cluster into EC2-Classic (p. 21).
For more information, see Detecting Your Supported Platforms and Whether You Have a Default VPC.
To determine whether you launched your cluster into EC2-VPC or EC2-Classic using the
AWS Command Line Interface (CLI)
1. Open a command window.
2. At the command prompt, run the following command.
aws ec2 describe-account-attributes
If you see only VPC in the output, continue at You Launched Your Cluster into EC2-
VPC (p. 20).
If you see both EC2 and VPC in the output, continue at You Launched Your Cluster into EC2-
Classic (p. 21).
You Launched Your Cluster into EC2-VPC
If you launched your cluster into an Amazon Virtual Private Cloud (Amazon VPC), you can connect to
your ElastiCache cluster only from an Amazon EC2 instance that is running in the same Amazon VPC.
In this case, you will need to grant network ingress to the cluster.
To grant network ingress from an Amazon VPC security group to a cluster
1. Sign in to the AWS Management Console and open the Amazon EC2 console at https://
console.aws.amazon.com/ec2/.
2. In the left navigation pane, under Network & Security, click Security Groups.
3. In the list of security groups, click the security group for your Amazon VPC. If you are a new
ElastiCache user, this security group will be named default.
4. Click Inbound tab, and then do the following:
a. Click Edit.
b. Click Add rule.
c. In the Type column, select Custom TCP rule.
d. In the Port range box, type the port number for your cache cluster node. This number must
be the same one that you specified when you launched the cluster. The default ports are as
follows:
• Memcached: port 11211
• Redis: port 6379
e. In the Source box, select Anywhere which has the port range (0.0.0.0/0) so that any Amazon
EC2 instance that you launch within your Amazon VPC can connect to your ElastiCache
nodes.
f. Click Save.
When you launch an Amazon EC2 instance into your Amazon VPC, that instance will be able to
connect to your ElastiCache cluster.
API Version 2015-02-02
20

Amazon ElastiCache User Guide
You Launched Your Cluster into EC2-Classic
You Launched Your Cluster into EC2-Classic
If you launched your cluster into EC2-Classic, to allow an Amazon EC2 instance to access your cluster
you will need to grant the Amazon EC2 security group associated with the instance access to your
cache security group.
To grant an Amazon EC2 security group access to a cluster
1. Sign in to the AWS Management Console and open the ElastiCache console at https://
console.aws.amazon.com/elasticache/.
2. From the left navigation pane, click Cache Security Groups.
A list of cache security groups appears.
3. Click the default security group.
4. From the list at the bottom of the screen, select the EC2 Security Group Name you want to
authorize.
5. Click Add to authorize access.
Amazon EC2 instances that are associated with the security group are now authorized to connect
to your ElastiCache cluster.
To revoke a security group's access, locate the security group in the list of authorized security groups,
and then click Remove.
Step 5: Connect to a Cluster's Node
Before you continue, be sure you have completed Step 4: Authorize Access (p. 19).
This section assumes that you've created an Amazon EC2 instance and can connect to it. For
instructions on how to do this, go to the Amazon EC2 Getting Started Guide.
An Amazon EC2 instance can connect to a cluster node only if you have authorized it to do so. For
more information, see Step 4: Authorize Access (p. 19).
Step 5.1: Find your Node Endpoints
Once your cluster is in the available state and you've authorized access to it, you can log in to an
Amazon EC2 instance and connect to a node in the cluster. To do so, you must first determine the
node endpoint.
To find your node's endpoints, see the relevant topic. When you find the endpoint you need, copy it to
your clipboard for use in Step 5.2.
•Finding Your ElastiCache Endpoints (p. 39)
•Finding the Endpoints for a Memcached Cluster (Console) (p. 40)
•Finding the Endpoint for a Redis Cluster (Console) (p. 42)
•Finding the Endpoints for a Redis Replication Group (Console) (p. 43)
•Finding Endpoints (AWS CLI) (p. 45)
•Finding the Endpoints (ElastiCache API) (p. 47)
API Version 2015-02-02
21

Amazon ElastiCache User Guide
Step 5.2: Connect to a Memcached Node
Step 5.2: Connect to a Memcached Node
Now that you have an endpoint, you can log in to an Amazon EC2 instance and connect to the cache
node. The procedure depends on the engine that you are using:
In the following example, you use the telnet utility to connect to a node that is running Memcached.
Note
For more information about Memcached and available Memcached commands, go to http://
memcached.org.
To connect to a node using telnet
1. Connect to your Amazon EC2 instance by using the connection utility of your choice.
Note
For instructions on how to connect to an Amazon EC2 instance, go to the Amazon EC2
Getting Started Guide.
2. You will need to download and install the telnet utility on your Amazon EC2 instance. At the
command prompt of your Amazon EC2 instance, type the following command. At the confirmation
prompt, type y.
sudo yum install telnet
Loaded plugins: priorities, security, update-motd, upgrade-helper
Setting up Install Process
Resolving Dependencies
--> Running transaction check
...(output omitted)...
Total download size: 63 k
Installed size: 109 k
Is this ok [y/N]: y
Downloading Packages:
telnet-0.17-47.7.amzn1.x86_64.rpm | 63 kB
00:00
...(output omitted)...
Complete!
3. At the command prompt of your Amazon EC2 instance, type the following command, substituting
the endpoint of your node for the one shown in this example.
telnet mycachecluster.eaogs8.0001.usw2.cache.amazonaws.com 11211
You will see output similar to the following.
Trying 128.0.0.1...
Connected to mycachecluster.eaogs8.0001.usw2.cache.amazonaws.com.
Escape character is '^]'.
>
API Version 2015-02-02
22

Amazon ElastiCache User Guide
Step 5.2: Connect to a Redis Cluster or Replication Group
You are now connected to a node, and you can run Memcached commands. The following is an
example.
set a 0 0 5 // Set key "a" with no expiration and 5 byte value
hello // Set value as "hello"
STORED
get a // Get value for key "a"
VALUE a 0 5
hello
END
get b // Get value for key "b" results in miss
END
>
Step 5.2: Connect to a Redis Cluster or Replication
Group
Now that you have the endpoint you need, you can log in to an Amazon EC2 instance and connect to
the cache node. The procedure depends on the engine that you are using:
In the following example, you use the redis-cli utility to connect to a cluster that is running Redis.
Note
For more information about Redis and available Redis commands, go to http://redis.io/
commands.
To connect to a Redis cluster using redis-cli
1. Connect to your Amazon EC2 instance using the connection utility of your choice.
Note
For instructions on how to connect to an Amazon EC2 instance, go to the Amazon EC2
Getting Started Guide.
2. Before you can build redis-cli, you will need to download and install the GNU Compiler Collection
(gcc). At the command prompt of your Amazon EC2 instance, type the following command. At the
confirmation prompt, type y.
sudo yum install gcc
Loaded plugins: priorities, security, update-motd, upgrade-helper
Setting up Install Process
Resolving Dependencies
--> Running transaction check
...(output omitted)...
Total download size: 27 M
Installed size: 53 M
Is this ok [y/N]: y
Downloading Packages:
(1/11): binutils-2.22.52.0.1-10.36.amzn1.x86_64.rpm | 5.2 MB
00:00
(2/11): cpp46-4.6.3-2.67.amzn1.x86_64.rpm | 4.8 MB
00:00
API Version 2015-02-02
23

Amazon ElastiCache User Guide
Step 6: Delete Your Cluster
(3/11): gcc-4.6.3-3.10.amzn1.noarch.rpm | 2.8 kB
00:00
...(output omitted)...
Complete!
3. Now you will need to download and compile the redis-cli utility. This utility is included in the Redis
software distribution. At the command prompt of your Amazon EC2 instance, type the following
commands:
wget http://download.redis.io/redis-stable.tar.gz
tar xvzf redis-stable.tar.gz
cd redis-stable
make
4. At the command prompt of your Amazon EC2 instance, type the following command, substituting
the endpoint of your cluster for the one shown in this example.
src/redis-cli -h mycachecluster.eaogs8.0001.usw2.cache.amazonaws.com -p
6379
You will see a Redis command prompt similar to the following.
redis mycachecluster.eaogs8.0001.usw2.cache.amazonaws.com 6379>
You are now connected to the cluster and can run Redis commands. The following is an example.
set a "hello" // Set key "a" with a string value and no expiration
OK
get a // Get value for key "a"
"hello"
get b // Get value for key "b" results in miss
(nil)
quit // Exit from redis-cli
Step 6: Delete Your Cluster [Avoid Additional
Charges]
Before you continue, be sure you have completed at least as far as Step 2: Launch a
Cluster (p. 18).
Important
It is almost always a good idea to delete clusters that you are not using. Until a cluster's status
is deleted you continue to incur charges for it.
To delete a cluster
1. Sign in to the AWS Management Console and open the Amazon ElastiCache console at https://
console.aws.amazon.com/elasticache/.
2. In the ElastiCache console dashboard, select Cache Clusters.
API Version 2015-02-02
24

Amazon ElastiCache User Guide
Step 6: Delete Your Cluster
The Cache Clusters screen appears
3. In the list of clusters, to select the cluster to delete, select the cluster's name.
You can only delete one cluster at a time from the ElastiCache console. Selecting multiple clusters
disables the Delete button.
4. Select the Delete button.
5. In the Delete Cache Cluster confirmation screen:
a. If this is a Redis cluster, specify whether or not a final snapshot should be made, and, if you
want a final snapshot, the name of the snapshot.
b. Select Delete to delete the cluster, or select Cancel to keep the cluster.
If you selected Delete, the status of the cluster will change to deleting.
As soon as your cluster is no longer listed in the list of clusters, you stop incurring charges for the
cluster.
Congratulations! You have successfully launched, authorized access to, connected to, viewed, and
deleted a Redis cluster.
API Version 2015-02-02
25

Amazon ElastiCache User Guide
Where Do I Go From Here?
Where Do I Go From Here?
Now that you have tried the getting started exercise, you can explore the following sections to learn
more about ElastiCache and available tools.
•Getting Started with AWS
•Tools for Amazon Web Services
•The AWS Command Line Interface
•Amazon ElastiCache API Reference
If you haven't already read them, here are some ElastiCache topics you should become familiar with.
After you complete the Getting Started section, you can read these sections to learn more about
ElastiCache administration:
•Engines and Versions (p. 27)
ElastiCache supports two engines–Memcached and Redis. This topic helps you determine which
engine is best for your scenario.
•Selecting Your Node Size (p. 66)
You want your cache to be large enough to accommodate all the data you want to cache. At the
same time you don't want to pay for more cache than you need. This topic assists you in selecting
the best node size.
•Best Practices for Implementing Amazon ElastiCache (p. 49)
Identify and address issues that can impact the efficiency of your cluster.
API Version 2015-02-02
26

Amazon ElastiCache User Guide
Selecting an Engine: Memcached or Redis
Engines and Versions
Amazon ElastiCache supports these cache engines: Memcached and Redis. Each engine provides
some advantages. Use the information in this topic to help you select the engine and version that best
meets your requirements.
Important
After you create a cache cluster or replication group, you can upgrade to a newer engine
version (see Upgrading Cache Engine Versions (p. 32)), but you cannot downgrade to an
older engine version. If you want to use an older engine version, you must delete the existing
cache cluster or replication group and create it anew with the earlier engine version.
Topics
•Selecting an Engine: Memcached or Redis (p. 27)
•Determine Available Engine Versions (p. 29)
•Comparing Memcached Versions (p. 29)
•Comparing Redis Versions (p. 30)
•Upgrading Cache Engine Versions (p. 32)
•Maintenance Window (p. 34)
Selecting an Engine: Memcached or Redis
On the surface, the engines look similar. Each of them is an in-memory key store. However, in practice
there are significant differences.
Select Memcached if you have these requirements:
• You want the simplest model possible.
• You need to run large nodes with multiple cores or threads.
• You need the ability to scale out/in, adding and removing nodes as demand on your system
increases and decreases.
• You want to partition your data across multiple shards.
• You need to cache objects, such as a database.
Select Redis if you have these requirements:
• You need complex data types, such as strings, hashes, lists, and sets.
API Version 2015-02-02
27

Amazon ElastiCache User Guide
Selecting an Engine: Memcached or Redis
• You need to sort or rank in-memory data-sets.
• You want persistence of your key store.
• You want to replicate your data from the primary to one or more read replicas for read intensive
applications.
• You need automatic failover if your primary node fails.
• You want publish and subscribe (pub/sub) capabilities—to inform clients about events on the server.
• You want backup and restore capabilities.
After you select the engine for your cluster, we recommend that you use the most recent version of that
engine. The following sections highlight major differences between the various versions.
API Version 2015-02-02
28

Amazon ElastiCache User Guide
Determine Available Engine Versions
Determine Available Engine Versions
Not all versions of an engine are available in every region. Therefore, before you create a cluster or
replication group, you should determine which engine versions are supported in your region.
You can determine which engine versions are supported in a region using the ElastiCache console, the
AWS CLI, or the ElastiCache API.
Determine Available Engine Versions (Console)
When creating a cluster or replication group you are asked to select an engine version from a list. The
engine versions in the list are those available in the current region.
For more information, see Creating a Cluster (p. 112) or Creating a Replication Group Without an
Available Redis Cache Cluster (p. 177).
Determine Available Engine Versions (AWS CLI)
To determine which engine versions are available in a region, use the --describe-cache-engine-
versions command.
aws elasticache --describe-cache-engine-versions
For more information, see describe-cache-engine-versions.
Determine Available Engine Versions (ElastiCache
API)
To determine which engine versions are available in a region, use the
DescribeCacheEngineVersions action.
https://elasticache.us-west-2.amazonaws.com/
?Action=DescribeCacheEngineVersions
&Version=2015-02-02
&SignatureVersion=4
&SignatureMethod=HmacSHA256
&Timestamp=20150202T192317Z
&X-Amz-Credential=<credential>
For more information, see DescribeCacheEngineVersions.
Comparing Memcached Versions
ElastiCache supports these versions of Memcached:
Memcached Version 1.4.24
Memcached improvements added since version 1.4.14 include the following:
API Version 2015-02-02
29

Amazon ElastiCache User Guide
Memcached Version 1.4.14
• Least recently used (LRU) management using a background process.
• Added the option of using jenkins or murmur3 as your hash algorithm.
• Some new commands and parameters. For a list, see Memcached 1.4.24 Added
Parameters (p. 247).
• Several bug fixes.
Memcached Version 1.4.14
Memcached improvements added since version 1.4.5 include the following:
• Enhanced slab rebalancing capability.
• Performance and scalability improvement.
• Introduced the touch command to update the expiration time of an existing item without fetching it.
• Auto discovery—the ability for client programs to automatically determine all of the cache nodes in a
cluster, and to initiate and maintain connections to all of these nodes.
Memcached Version 1.4.5
Memcached version 1.4.5 was the initial engine and version supported by Amazon ElastiCache.
Comparing Redis Versions
ElastiCache supports these Redis versions.
Topics
•Redis Version 2.8.24 (p. 31)
•Redis Version 2.8.23 (p. 31)
•Redis Version 2.8.22 (p. 31)
•Redis Version 2.8.21 (p. 32)
•Redis Version 2.8.19 (p. 32)
•Redis Version 2.8.6 (p. 32)
•Redis Version 2.6.13 (p. 32)
Note
Because the newer Redis versions provide a better and more stable user experience,
Redis versions 2.6.13, 2.8.6, and 2.8.19 are deprecated from the ElastiCache Management
Console. While we recommend against it, if you must use one of these older Redis versions,
you can use the AWS CLI or ElastiCache API.
For more information see the following topics:
AWS CLI ElastiCache API
Create Cache Cluster Creating a Cache Cluster
(AWS CLI) (p. 120) Creating a Cache Cluster
(ElastiCache API) (p. 120)
Modify Cache Cluster Modifying a Cache Cluster
(AWS CLI) (p. 125) Modifying a Cache Cluster
(ElastiCache API) (p. 125)
API Version 2015-02-02
30

Amazon ElastiCache User Guide
Redis Version 2.8.24
AWS CLI ElastiCache API
Create Replication Group Creating a Replication
Group Without an Available
Redis Cache Cluster (AWS
CLI) (p. 180)
Creating a Replication Group
Without an Available Redis
Cache Cluster (ElastiCache
API) (p. 182)
Modify Replication Group Modifying a Replication
Group (AWS CLI) (p. 190) Modifying a Replication
Group (ElastiCache
API) (p. 190)
Redis Version 2.8.24
Redis improvements added since version 2.8.23 include bug fixes and logging of bad memory access
addresses. For more information, see Redis 2.8 release notes.
Redis Version 2.8.23
Redis improvements added since version 2.8.22 include bug fixes. For more information, see Redis
2.8 release notes. This release also includes support for the new parameter close-on-slave-write
which, if enabled, disconnects clients who attempt to write to a read-only replica.
For more information on Redis 2.8.23 parameters, see Redis 2.8.23 Added Parameters (p. 253) in
the ElastiCache User Guide.
Redis Version 2.8.22
Redis improvements added since version 2.8.21 include the following:
• Support for forkless backups and synchronizations which allows you to allocate less memory for
backup overhead and more for your application. For more information see Redis Replication:
Differences by Engine Version (p. 164). The forkless process can impact both latency and
throughput. In the case of high write throughput, when a replica re-syncs, it may be unreachable for
the entire time it is syncing.
• In the event of a failover, replication groups now recover faster as replicas will perform partial syncs
with the primary rather than full syncs whenever possible. Additionally, both the primary and replicas
no longer use the disk during syncs, providing further speed gains.
• Support for two new CloudWatch metrics.
•ReplicationBytes: The number of bytes a replication group's primary cluster is sending to the read
replicas.
•SaveInProgress: A binary value that indicates whether or not there is a background save process
running.
For more information, see Metrics for Redis (p. 312).
• A number of critical bug fixes in replication PSYNC behavior. For more information, see Redis 2.8
release notes.
• To maintain enhanced replication performance in Multi-AZ replication groups and for increased
cluster stability, non-ElastiCache replicas are no longer supported.
• To improve data consistency between the primary cluster and replicas in a replication group, the
replicas will no longer evict keys independent of the primary cluster.
• Redis configuration variables appendonly and appendfsync are not supported on Redis version
2.8.22 and later.
• In low-memory situations, clients with a large output buffer may be disconnected from a replica
cluster. If disconnected, the client will need to reconnect. Such situations are most likely to occur for
PUBSUB clients.
API Version 2015-02-02
31

Amazon ElastiCache User Guide
Redis Version 2.8.21
Redis Version 2.8.21
Redis improvements added since version 2.8.19 include a number of bug fixes. For more information,
see Redis 2.8 release notes.
Redis Version 2.8.19
Redis improvements added since version 2.8.6 include the following:
• Support for HyperLogLog. For more information, go to Redis new data structure: HyperLogLog.
• The sorted set data type has now support for lexicographic range queries with the new commands
ZRANGEBYLEX, ZLEXCOUNT, and ZREMRANGEBYLEX.
• To prevent a primary node from sending stale data to replica nodes, the master SYNC fails if a
background save (bgsave) child process is aborted.
• Support for the HyperLogLogBasedCommands CloudWatch metric. For more information, see
Metrics for Redis (p. 312).
Redis Version 2.8.6
Redis improvements added since version 2.6.13 include the following:
• Improved resiliency and fault tolerance for read replicas.
• Support for partial resynchronization.
• Support for user-defined minimum number of read replicas that must be available at all times.
• Full support for pub/sub—notifying clients of events on the server.
• Automatic detection of a primary node failure and failover of your primary node to a secondary node.
Redis Version 2.6.13
Redis version 2.6.13 was the initial version of Redis supported by Amazon ElastiCache. Multi-AZ with
automatic failover is not supported on Redis 2.6.13.
Upgrading Cache Engine Versions
You can control if and when the protocol-compliant software powering your cache cluster is upgraded
to new versions that are supported by ElastiCache. This level of control enables you to maintain
compatibility with specific Memcached or Redis versions, test new versions with your application before
deploying in production, and perform version upgrades on your own terms and timelines.
Because version upgrades might involve some compatibility risk, they will not occur automatically and
must be initiated by you.
You initiate version upgrades to your cluster or replication group by modifying it and specifying a
new engine version. For more information, see Modifying an ElastiCache Cache Cluster (p. 124) or
Modifying a Replication Group (p. 189).
Important
• You can upgrade to a newer engine version, but you can’t downgrade to an older engine
version. If you want to use an older engine version, you must delete the existing cache
cluster or replication group and create it anew with the older engine version.
API Version 2015-02-02
32

Amazon ElastiCache User Guide
Important Notes on Memcached Engine Upgrades
• Although cache engine version management functionality is intended to give you as much
control as possible over how patching occurs, ElastiCache reserves the right to patch your
cluster on your behalf in the unlikely event of a critical security vulnerability in the system or
cache software.
Important Notes on Memcached Engine Upgrades
Because the Memcached engine does not support persistence, Memcached engine version upgrades
are always a disruptive process which clears all cache data in the cluster.
Important Notes on Redis Engine Upgrades
The Amazon ElastiCache engine upgrade process is designed to make a best effort to retain your
existing data and requires successful Redis replication.
• For standalone Redis clusters and primaries of replication groups with Multi-AZ disabled, we
recommend that sufficient memory be made available to Redis as described in Ensuring You Have
Sufficient Memory to Create a Redis Snapshot (p. 49). Please note that in these cases, the
primary will be unavailable to service requests during the upgrade process.
• For replication groups with Multi-AZ enabled, in addition to the above, we also recommend
scheduling engine upgrades during periods of low incoming write traffic. The primary will continue
to be available to service requests during the upgrade process, except for a few minutes when a
failover is initiated.
Blocked Redis Engine Upgrades
As shown in the following table, your Redis engine upgrade operation is blocked if you have a pending
scale up operation.
Pending Operations Blocked Operations
Scale up Immediate engine upgrade
Engine upgrade Immediate scale up
Scale up and engine upgrade Immediate scale up
Scale up and engine upgrade Immediate engine upgrade
To resolve a blocked engine upgrade, do one of the following
• Schedule your Redis engine upgrade operation for the next maintenance window by clearing
the Apply immediately check box (CLI use: --no-apply-immediately, API use:
ApplyImmediately=false).
• Wait until your next maintenance window (or after) to perform your Redis engine upgrade operation.
• Add the Redis scale up operation to this cluster modification with the Apply Immediately check box
selected (CLI use: --apply-immediately, API use: ApplyImmediately=true). (This effectively
cancels the engine upgrade during the next maintenance window by performing it immediately.)
API Version 2015-02-02
33

Amazon ElastiCache User Guide
How to Upgrade Engine Versions
How to Upgrade Engine Versions
You initiate version upgrades to your cluster or replication group by modifying it using the ElastiCache
console, the AWS CLI, or the ElastiCache API and specifying a newer engine version. For more
information, see the following topics.
Clusters Replication Groups
Using the console Modifying a Cache Cluster
(Console) (p. 124) Modifying a Replication Group
(Console) (p. 189)
Using the AWS CLI Modifying a Cache Cluster
(AWS CLI) (p. 125) Modifying a Replication Group
(AWS CLI) (p. 190)
Using the ElastiCache API Modifying a Cache Cluster
(ElastiCache API) (p. 125) Modifying a Replication Group
(ElastiCache API) (p. 190)
Maintenance Window
Every cluster has a weekly maintenance window during which any system changes are applied. If you
don't specify a preferred maintenance window when you create or modify a cache cluster, ElastiCache
assigns a 60-minute maintenance window on a randomly selected day of the week.
The 60-minute maintenance window is selected at random from an 8-hour block of time per region. The
following table lists the time blocks for each region from which the default maintenance windows are
assigned.
Region Code Region Name Maintenance Window
ap-northeast-1 Asia Pacific
(Tokyo) Region 13:00–21:00 UTC
ap-southeast-1 Asia Pacific
(Singapore)
Region
14:00–22:00 UTC
ap-southeast-2 Asia Pacific
(Sydney)
Region
12:00–20:00 UTC
ap-south-1 Asia Pacific
(Mumbai)
Region
17:30–1:30 UTC
cn-north-1 China (Beijing)
region 14:00–22:00 UTC
eu-central-1 EU (Frankfurt)
Region 23:00–07:00 UTC
eu-west-1 EU (Ireland)
Region 22:00–06:00 UTC
sa-east-1 South America
(São Paulo)
Region
01:00–09:00 UTC
API Version 2015-02-02
34

Amazon ElastiCache User Guide
Maintenance Window
Region Code Region Name Maintenance Window
us-east-1 US East
(N. Virginia)
Region
03:00–11:00 UTC
us-gov-west-1 AWS
GovCloud (US)
region
06:00–14:00 UTC
us-west-1 US West (N.
California)
Region
06:00–14:00 UTC
us-west-2 US West
(Oregon)
Region
06:00–14:00 UTC
The maintenance window should fall at the time of lowest usage and thus might need modification from
time to time. You can specify a time range of up to 24 hours in duration during which any maintenance
activities you have requested should occur. Any deferred or pending cluster modifications you have
requested occur during this time.
For more information about how to adjust the preferred maintenance window for your cache clusters,
see Modifying an ElastiCache Cache Cluster (p. 124) or Modifying a Replication Group (p. 189).
API Version 2015-02-02
35

Amazon ElastiCache User Guide
Locating Your Redis Read
Replicas and Memcached Nodes
Selecting Regions and Availability
Zones
AWS cloud computing resources are housed in highly available data center facilities. To provide
additional scalability and reliability, these data center facilities are located in several different physical
locations. These locations are categorized by regions and Availability Zones.
Regions are large and widely dispersed into separate geographic locations. Availability Zones are
distinct locations within a region that are engineered to be isolated from failures in other Availability
Zones and provide inexpensive, low latency network connectivity to other Availability Zones in the
same region.
Important
Each region is completely independent. Any ElastiCache activity you initiate (for example,
creating clusters) runs only in your current default region.
To create or work with a cluster in a specific region, use the corresponding regional service endpoint.
For service endpoints, see Supported Regions & Endpoints (p. 37).
Topics
•Locating Your Redis Read Replicas and Memcached Nodes (p. 36)
•Supported Regions & Endpoints (p. 37)
Locating Your Redis Read Replicas and
Memcached Nodes
Amazon ElastiCache supports specifying in which Availability Zone you create your clusters. If your
Redis replication group will have multiple clusters, or your Memcached cache cluster will have multiple
nodes, you have the option to locate all the clusters (Redis) or nodes (Memcached) in a single
Availability Zone or locate them across different Availability Zones. By locating the clusters or nodes
in different Availability Zones, you eliminate the chance that a failure, such as a power outage, in
one Availability Zone will cause your entire system to fail. Testing has demonstrated that there is no
significant latency difference between locating all nodes in one Availability Zone or spreading them
across multiple Availability Zones.
API Version 2015-02-02
36
Amazon ElastiCache User Guide
Supported Regions & Endpoints
To specify an Availability Zone for your Memcached nodes, create a Memcached cluster as you
normally do. On the Cluster Details page of the Launch Cluster wizard, use the Preferred Zone list to
specify an Availability Zone for this node.
To specify an Availability Zone for your Redis read replica, you first create a replication group and then
add from one to five read replicas to the replication group. You can specify a different Availability Zone
for each read replica. For more information on creating a Redis read replica in an Availability Zone
different from the primary Redis cache cluster, see Creating a Redis Replication Group (p. 173) and
Adding a Read Replica to a Replication Group (p. 193).
Supported Regions & Endpoints
Amazon ElastiCache is available in multiple regions so that you can launch ElastiCache clusters in
locations that meet your requirements, such as launching in the region closest to your customers or to
meet certain legal requirements.
By default, the AWS SDKs, AWS CLI, ElastiCache API, and ElastiCache console reference the US-
West (Oregon) region. As ElastiCache expands availability to new regions, new endpoints for these
regions are also available to use in your HTTP requests, the AWS SDKs, AWS CLI, and the console.
Each region is designed to be completely isolated from the other regions. Within each region are
multiple availability zones (AZ). By launching your nodes in different AZs you are able to achieve
the greatest possible fault tolerance. For more information on regions and availability zones, go to
Selecting Regions and Availability Zones (p. 36) at the top of this topic.
Regions where ElastiCache is supported
Region Name Region Endpoint Protocol
Asia Pacific (Tokyo)
Region ap-northeast-1 elasticache.ap-
northeast-1.amazonaws.com
HTTPS
Asia Pacific (Seoul)
Region ap-northeast-2 elasticache.ap-
northeast-2.amazonaws.com
HTTPS
Asia Pacific
(Singapore) Region ap-southeast-1 elasticache.ap-
southeast-1.amazonaws.com
HTTPS
Asia Pacific (Sydney)
Region ap-southeast-2 elasticache.ap-
southeast-2.amazonaws.com
HTTPS
Asia Pacific (Mumbai)
Region
Only T2, R3, and
M4 node types are
currently supported in
this region.
ap-south-1 elasticache.ap-
south-1.amazonaws.com
HTTPS
China (Beijing) Region
M4 node types are
currently not supported
in this region.
cn-north-1 elasticache.cn-
north-1.amazonaws.com.cn
HTTPS
EU (Frankfurt) Region eu-central-1 elasticache.eu-
central-1.amazonaws.com
HTTPS
API Version 2015-02-02
37

Amazon ElastiCache User Guide
Supported Regions & Endpoints
Region Name Region Endpoint Protocol
EU (Ireland) Region eu-west-1 elasticache.eu-
west-1.amazonaws.com
HTTPS
AWS GovCloud (US)
M4 node types are
currently not supported
in this region.
For information
on using the AWS
GovCloud (US) with
ElastiCache, see
Services in the AWS
GovCloud (US) region:
ElastiCache.
us-gov-west-1 elasticache.us-
gov-
west-1.amazonaws.com
HTTPS
South America (São
Paulo) Region
M4 node types are
currently not supported
in this region.
sa-east-1 elasticache.sa-
east-1.amazonaws.com
HTTPS
US East (N. Virginia)
Region us-east-1 elasticache.us-
east-1.amazonaws.com
HTTPS
US West (N. California)
Region us-west-1 elasticache.us-
west-1.amazonaws.com
HTTPS
US West (Oregon)
Region us-west-2 elasticache.us-
west-2.amazonaws.com
HTTPS
For a table of AWS products and services by region, see Products and Services by Region.
API Version 2015-02-02
38

Amazon ElastiCache User Guide
Finding Your ElastiCache Endpoints
Your application connects to your cluster using endpoints. An endpoint is a node or cluster's unique
address.
To connect to a Memcached cluster, it is best to use the cluster's configuration endpoint with Auto
Discovery enabled. For a Redis stand-alone cluster, use the cluster's endpoint for both read and write
operations. To connect to the clusters in a Redis replication group, use the primary endpoint for all
write operations, and use the individual cluster's read endpoints for read operations.
Endpoint types by engine & configuration
Cluster/Node
endpoint Configuration
endpoint * Primary endpoint Read endpoint
MemcachedRead/Write Read/Write N/A N/A
Redis:
single
cluster
Read/Write N/A N/A N/A
Redis
replication
group:
Primary
Cluster
N/A N/A Read/Write Read only
Redis
replication
group:
Read
Replica
Clusters
N/A N/A N/A Read only
* With Auto Discovery. For more information, see Node Auto Discovery (Memcached) (p. 82).
The following sections guide you through discovering the endpoints you'll need for the engine you're
running.
API Version 2015-02-02
39
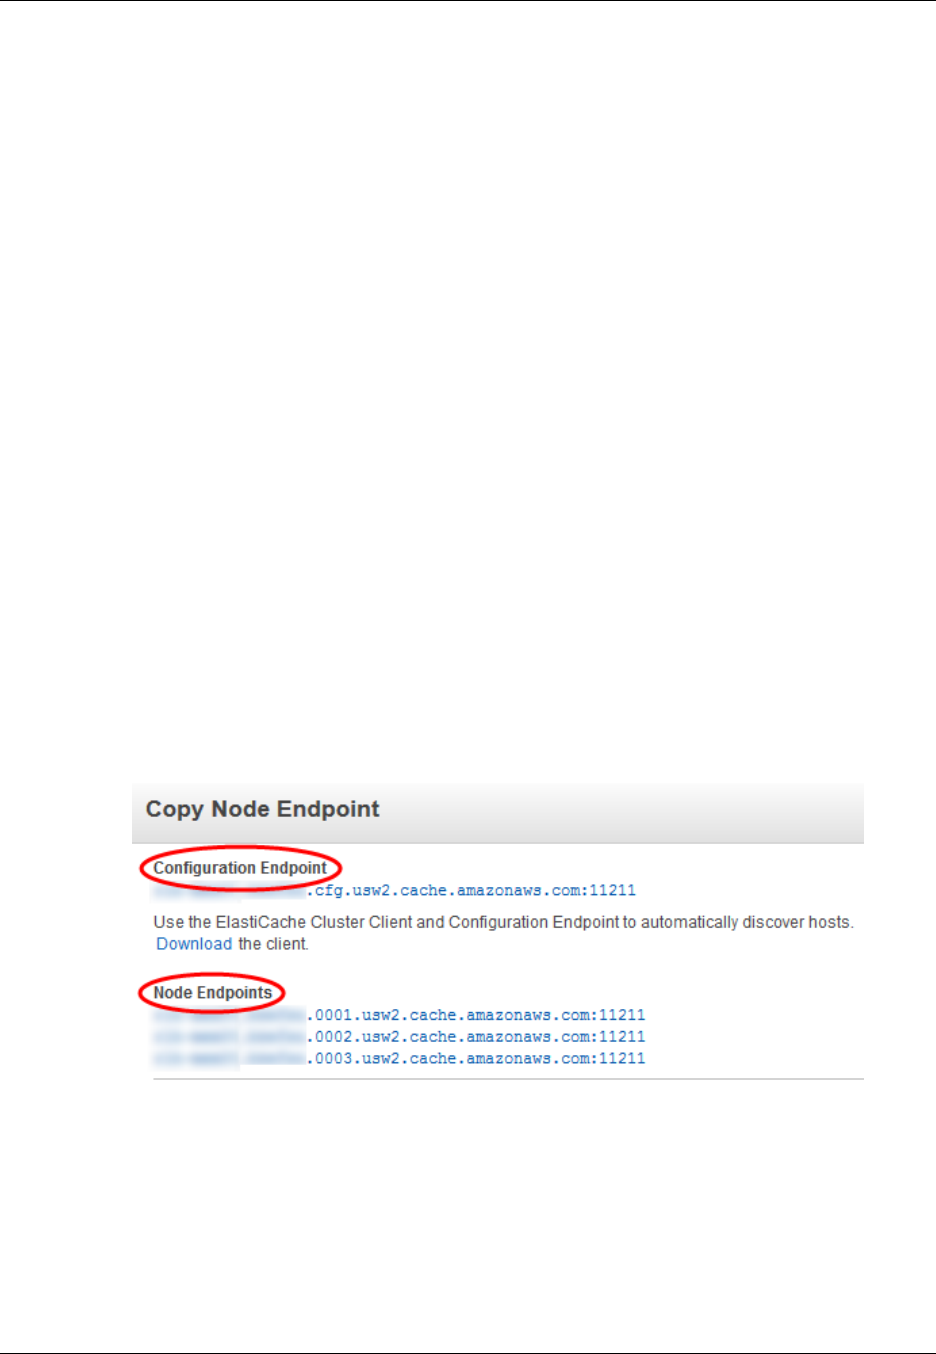
Amazon ElastiCache User Guide
Finding Memcached Endpoints Using the Console
Finding the Endpoints for a Memcached Cluster
(Console)
All Memcached endpoints are read/write endpoints. To connect to nodes in a Memcached cluster your
application can use either the endpoints for each node, or the cluster's configuration endpoint along
with Auto Discovery. When using Auto Discovery, your client application connects to your Memcached
cluster using the configuration endpoint. As you scale your cluster by adding or removing nodes, your
application will automatically "know" all the nodes in the cluster and be able to connect to any of them.
Without Auto Discovery your application would have to do this, or you'd have to manually update
endpoints in your application each time you added or removed a node. For additional information on
Auto Discovery, see Node Auto Discovery (Memcached) (p. 82).
The following procedure demonstrates how to find and copy a cluster's configuration endpoint or any of
the node endpoints.
To find and copy the endpoints for a Memcached cluster
1. Sign in to the AWS Management Console and open the ElastiCache console at https://
console.aws.amazon.com/elasticache/.
2. From the left navigation pane, click Cache Clusters.
The cache clusters screen will appear with a list of clusters.
3. Find the Memcached cluster you want the endpoints for.
If all you want is the configuration endpoint, you're done. The configuration endpoint is
in the Configuration Endpoint (Memcached) column and looks something like this,
clusterName.xxxxxx.cfg.usw2.cache.amazonaws.com:port.
If you want to also see the individual node endpoints or copy any of the endpoints to your
clipboard, click Copy Node Endpoint.
4. To copy an endpoint to your clipboard:
a. On the Copy Node Endpoint screen, highlight the endpoint you want to copy.
b. Right–click the highlighted endpoint, and then select Copy from the context menu.
The highlighted endpoint is now copied to your clipboard.
Configuration and node endpoints look very similar. The differences are highlighted with bold following.
API Version 2015-02-02
40

Amazon ElastiCache User Guide
Finding Memcached Endpoints Using the Console
myclustername.xxxxxx.cfg.usw2.cache.amazonaws.com:port # configuration
endpoint contains "cfg"
myclustername.xxxxxx.0001.usw2.cache.amazonaws.com:port # node endpoint for
node 0001
Important
If you choose to create a CNAME for your Memcached configuration endpoint, in order for
your PHP client to recognize the CNAME as a configuration endpoint, you must include
".cfg." in the CNAME. For example, mycluster.cfg.local in your php.ini file for the
session.save_path parameter.
API Version 2015-02-02
41
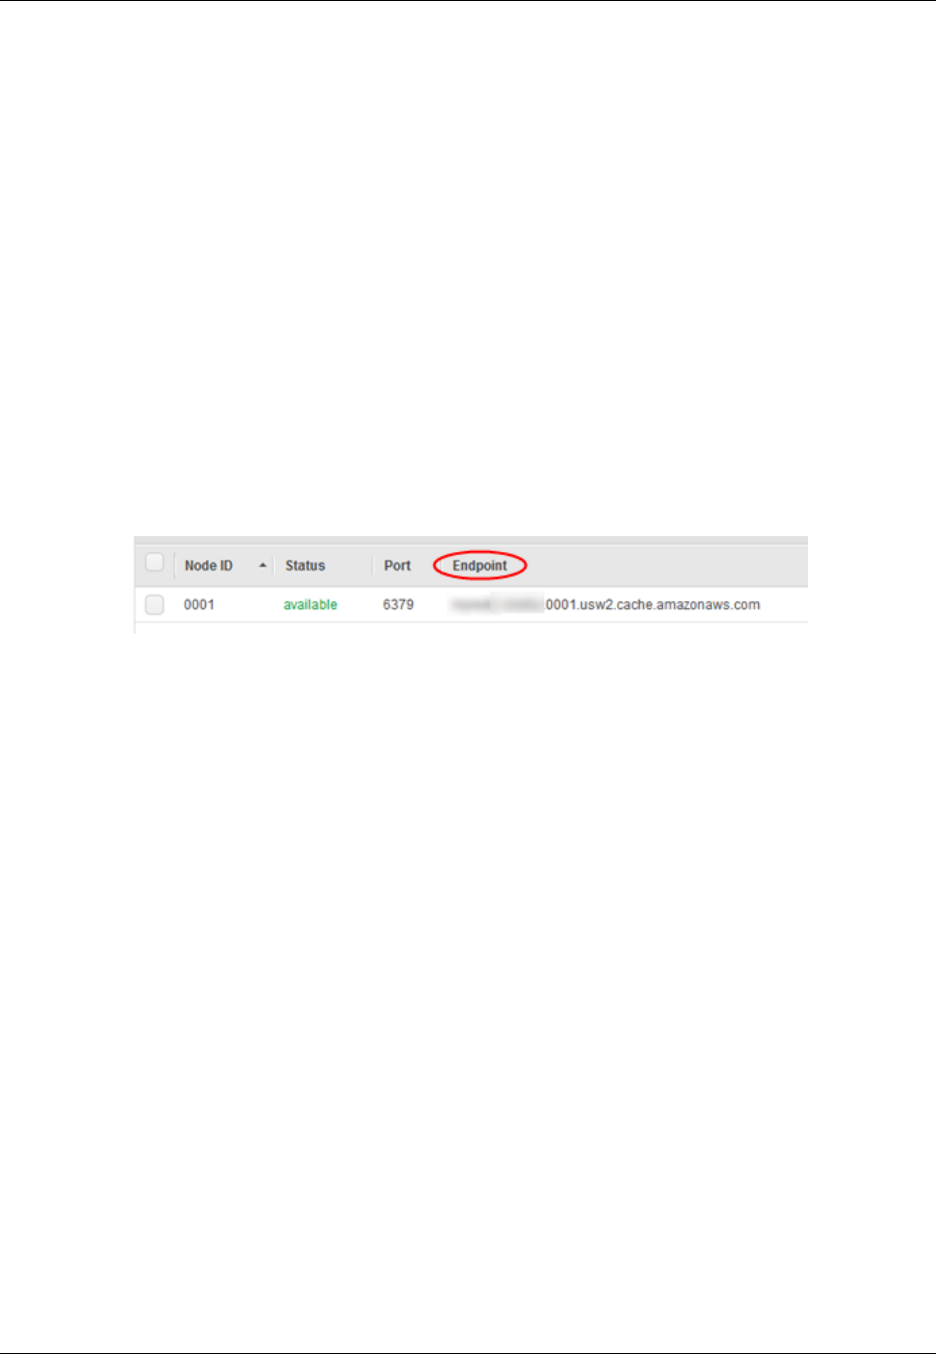
Amazon ElastiCache User Guide
Finding a Redis Cluster's Endpoint Using the Console
Finding the Endpoint for a Redis Cluster
(Console)
Redis clusters always have only one node. If the cluster is a standalone cluster, this endpoint is used
for both reads and writes. If the cluster is a member of a replication group, you can use the following
procedure to find the endpoint for the cluster, or see Finding the Endpoints for a Redis Replication
Group (Console) (p. 43) for how to find all the endpoints in the replication group.
The following procedure demonstrates how to find and copy a Redis cluster endpoint.
To find and copy the endpoint for a Redis cluster
1. Sign in to the AWS Management Console and open the ElastiCache console at https://
console.aws.amazon.com/elasticache/.
2. From the left navigation pane, click Cache Clusters.
The cache clusters screen will appear with a list of clusters.
3. Find the Redis cluster you want the endpoint for and click the "1 node" link in the Nodes column.
The Nodes screen will appear.
4. To copy the endpoint to your clipboard:
a. Find the Endpoint column and then highlight the endpoint.
b. Right–click the highlighted endpoint, and then select Copy from the context menu.
The highlighted endpoint is now copied to your clipboard.
A Redis endpoint looks something like
clusterName.xxxxxx.0001.usw2.cache.amazonaws.com port.
API Version 2015-02-02
42
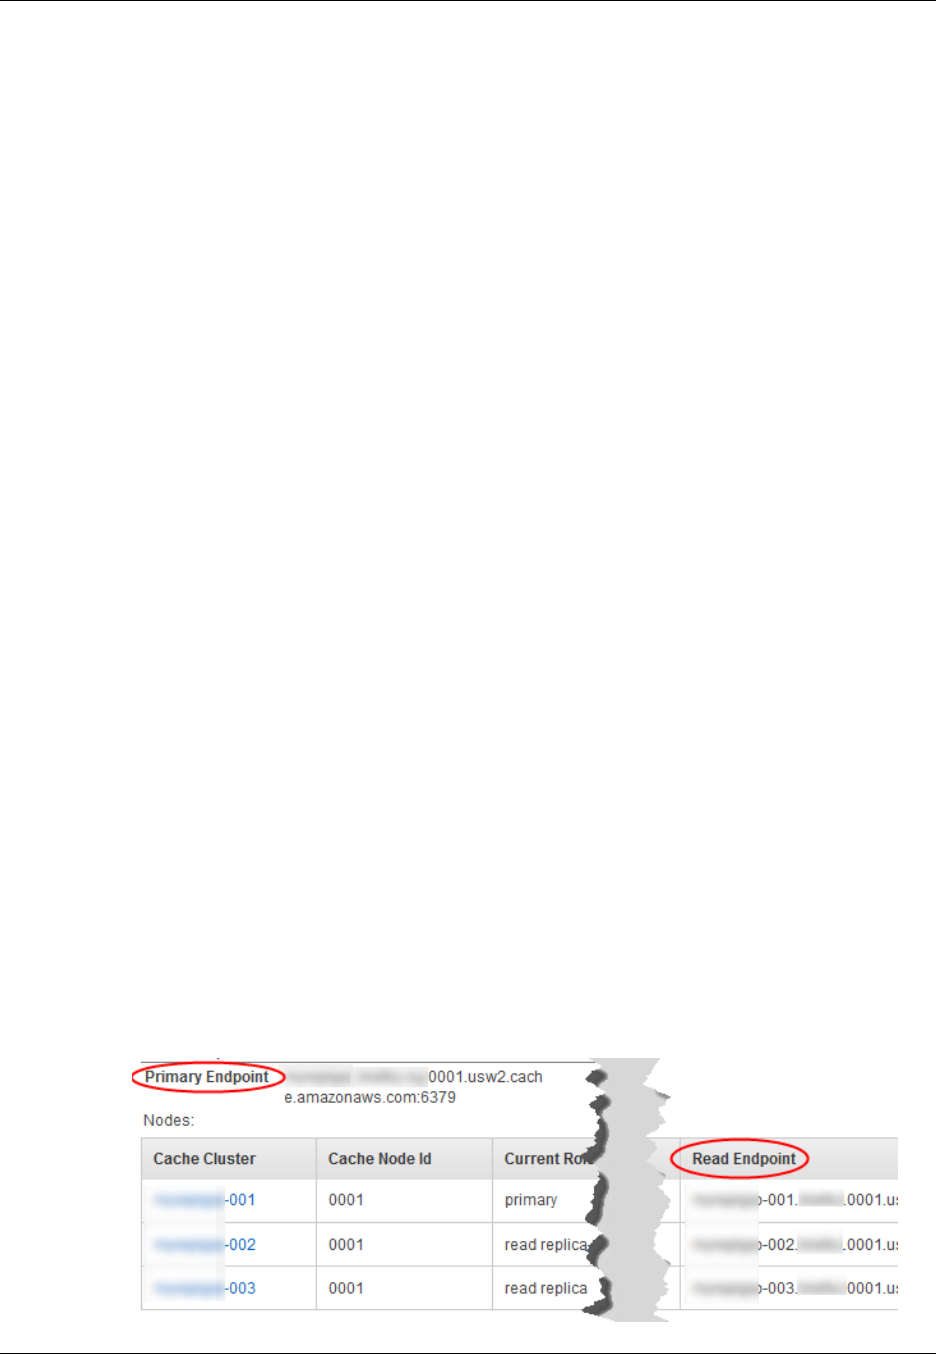
Amazon ElastiCache User Guide
Finding Replication Group Endpoints Using the Console
Finding the Endpoints for a Redis Replication
Group (Console)
There are two types of endpoints for Redis replication groups. A Read Endpoint for each cluster in the
replication group. Read Endpoints are used to read data from the cluster. A Read Endpoint cannot be
used to write data to the cluster, even if you use the Read Endpoint for the Primary Cluster.
The second type of replication group endpoint is the Primary Endpoint. There is only one Primary
Endpoint for a replication group and it is always associated with the Primary Cluster. If, for any reason,
a read replica is promoted to Primary, the Primary Endpoint becomes associated with the new primary
cluster. The Primary Endpoint is used to read to or write to the replication group's Primary Cluster.
For more information, see Replication with Multi-AZ and Automatic Failover (Redis) (p. 166) and
Promoting a Read-Replica to Primary (p. 195).
The following procedure demonstrates how to find and copy Redis replication group endpoints.
To find and copy any endpoint for a Redis replication group
1. Sign in to the AWS Management Console and open the ElastiCache console at https://
console.aws.amazon.com/elasticache/.
2. You can find the primary and read endpoints beginning at either the Cache Clusters or
Replication Groups screen. Depending upon where you want to start, follow one of the following
set of sub-steps.
If you know the Cache Cluster
a. From the left navigation pane, select Cache Clusters.
b. Locate the Redis cluster you want endpoints for and then in the Replication Group (Redis)
column, select the replication group's name.
The Replication Group screen will appear with the replication group's details at the bottom of
the screen.
If you know the Replication Group
a. From the left navigation pane, select Replication Groups.
b. Locate and select the replication group you want the endpoints for.
The replication group's details will appear at the bottom of the screen.
3. Scroll down the details section until you see the Node Group Details. Under Node Group Details
is the Primary Endpoint. Below that is a table of clusters in this replication group with each cluster's
Read Endpoint.
API Version 2015-02-02
43

Amazon ElastiCache User Guide
Finding Replication Group Endpoints Using the Console
4. To copy an endpoint to your clipboard:
a. Highlight the endpoint you want to copy.
b. Right-click the highlighted endpoint and select Copy from the context menu.
The highlighted endpoint is now copied to your clipboard.
Your application should use the Primary Endpoint for all write operations and any of the Read
Endpoints for read operations.
API Version 2015-02-02
44

Amazon ElastiCache User Guide
Finding Endpoints (AWS CLI)
Finding Endpoints (AWS CLI)
You can use the AWS CLI for Amazon ElastiCache to discover the endpoints for nodes, clusters, and
replication groups
Topics
•Finding Endpoints for Nodes and Clusters (AWS CLI) (p. 45)
•Finding the Endpoints for Replication Groups (AWS CLI) (p. 45)
Finding Endpoints for Nodes and Clusters (AWS
CLI)
You can use the AWS CLI to discover the endpoints for a cluster and its nodes with the describe-
cache-clusters command. For Redis clusters, the command returns the cluster endpoint. For
Memcached clusters, the command returns the configuration endpoint. If you include the optional
parameter --show-cache-node-info, the command will also return the endpoints of the individual
nodes in the cluster.
The following command retrieves the configuration endpoint and individual node endpoints for the
Memcached cluster mycluster.
For Linux, OS X, or Unix:
aws elasticache describe-cache-clusters \
--cache-cluster-id mycluster \
--show-cache-node-info
For Windows:
aws elasticache describe-cache-clusters ^
--cache-cluster-id mycluster ^
--show-cache-node-info
Important
If you choose to create a CNAME for your Memcached configuration endpoint, in order for
your PHP client to recognize the CNAME as a configuration endpoint, you must include
".cfg." in the CNAME. For example, mycluster.cfg.local in your php.ini file for the
session.save_path parameter.
For more information, go to the topic describe-cache-clusters.
Finding the Endpoints for Replication Groups (AWS
CLI)
You can use the AWS CLI to discover the endpoints for a replication group and its clusters with the
describe-replication-groups command. The command returns the replication group's primary
endpoint and a list of all the clusters in the replication group with their endpoints.
The following command retrieves the primary endpoint and individual node endpoints for the replication
group myreplgroup.
For Linux, OS X, or Unix:
API Version 2015-02-02
45

Amazon ElastiCache User Guide
Finding the Endpoints for Replication Groups (AWS CLI)
aws elasticache describe-replication-groups \
--replication-group-id mygroup
For Windows:
aws elasticache describe-replication-groups ^
--replication-group-id myreplgroup
For more information, go to the topic describe-replication-groups.
API Version 2015-02-02
46

Amazon ElastiCache User Guide
Finding the Endpoints (ElastiCache API)
Finding the Endpoints (ElastiCache API)
You can use the Amazon ElastiCache API to discover the endpoints for nodes, clusters, and replication
groups
Topics
•Finding Endpoints for Nodes and Clusters (ElastiCache API) (p. 47)
•Finding Endpoints for Replication Groups (ElastiCache API) (p. 47)
Finding Endpoints for Nodes and Clusters
(ElastiCache API)
You can use the ElastiCache API to discover the endpoints for a cluster and its nodes with the
DescribeCacheClusters action. For Redis clusters, the action returns the cluster endpoint.
For Memcached clusters, the action returns the configuration endpoint. If you include the optional
parameter ShowCacheNodeInfo, the action will also return the endpoints of the individual nodes in the
cluster.
The following command retrieves the configuration endpoint and individual node endpoints for the
Memcached cluster mycluster.
https://elasticache.us-west-2.amazonaws.com/
?Action=DescribeCacheClusters
&CacheClusterId=mycluster
&ShowCacheNodeInfo=true
&SignatureVersion=4
&SignatureMethod=HmacSHA256
&Timestamp=20150202T192317Z
&Version=2015-02-02
&X-Amz-Credential=<credential>
Important
If you choose to create a CNAME for your Memcached configuration endpoint, in order for
your PHP client to recognize the CNAME as a configuration endpoint, you must include
".cfg." in the CNAME. For example, mycluster.cfg.local in your php.ini file for the
session.save_path parameter.
Finding Endpoints for Replication Groups
(ElastiCache API)
You can use the ElastiCache API to discover the endpoints for a replication group and its clusters
with the DescribeReplicationGroups action. The action returns the replication group's primary
endpoint and a list of all the clusters in the replication group with their endpoints.
The following command retrieves the primary endpoint and individual node endpoints for the replication
group myreplgroup.
https://elasticache.us-west-2.amazonaws.com/
?Action=DescribeReplicationGroups
&ReplicationGroupId=myreplgroup
&SignatureVersion=4
&SignatureMethod=HmacSHA256
API Version 2015-02-02
47


Amazon ElastiCache User Guide
Ensuring You Have Sufficient
Memory to Create a Redis Snapshot
Best Practices for Implementing
Amazon ElastiCache
This topic identifies best practices for implementing Amazon ElastiCache.
Topics
•Ensuring You Have Sufficient Memory to Create a Redis Snapshot (p. 49)
•Mitigating Out-of-Disk-Space Issues When Using Redis AOF (p. 51)
•Mitigating Failures (p. 51)
•Configuring Your ElastiCache Client for Efficient Load Balancing (p. 55)
Ensuring You Have Sufficient Memory to Create a
Redis Snapshot
Redis snapshots and synchronizations in version 2.8.22 and later
Redis 2.8.22 introduces a forkless save process that allows you to allocate more of your memory to
your application's use without incurring increased swap usage during synchronizations and saves. For
more information, see Redis Replication: Differences by Engine Version (p. 164).
Redis snapshots and synchronizations prior to version 2.8.22
When you work with Redis ElastiCache, Redis calls a background write command in a number of
cases:
• When creating a snapshot for a backup.
• When synchronizing replicas with the primary in a replication group.
• When enabling the append-only file feature (AOF) for Redis.
• When promoting a replica to master (which causes a primary/replica sync).
Whenever Redis executes a background write process, you must have sufficient available memory
to accommodate the process overhead. Failure to have sufficient memory available will cause the
process to fail. Because of this, it is important to select a node instance type that has sufficient memory
when creating your Redis cluster.
API Version 2015-02-02
49
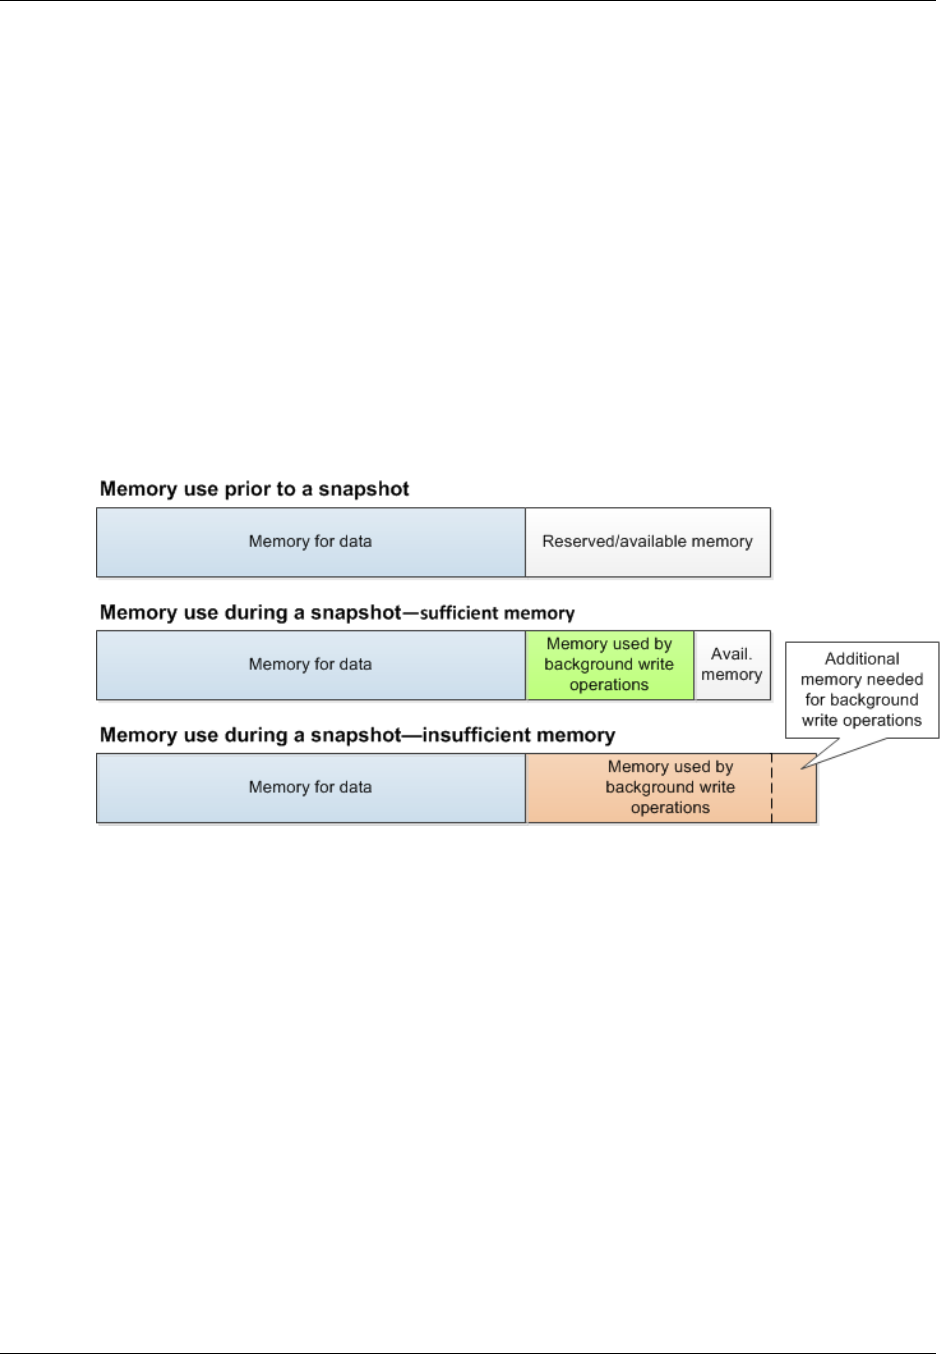
Amazon ElastiCache User Guide
Background Write Process and Memory Usage
Background Write Process and Memory Usage
Whenever a background write process is called, Redis forks its process (remember, Redis is single
threaded). One fork persists your data to disk in a Redis .rdb snapshot file. The other fork services all
read and write operations. In order to ensure that your snapshot is a point-in-time snapshot, all data
updates and additions are written to an area of available memory separate from the data area.
As long as you have sufficient memory available to record all write operations while the data is being
persisted to disk, you will have no insufficient memory issues. You are likely to experience insufficient
memory issues if any of the following are true:
• Your application performs many write operations, thus requiring a large amount of available memory
to accept the new or updated data.
• You have very little memory available in which to write new or updated data.
• You have a large dataset that takes a long time to persist to disk, thus requiring a large number of
write operations.
The following diagram illustrates memory use when executing a background write process.
For information on the impact of doing a backup on performance, see Performance Impact of
Backups (p. 199).
For more information on how Redis performs snapshots, see http://redis.io.
For more information on regions and availability zones, see Selecting Regions and Availability
Zones (p. 36).
Avoiding Running Out of Memory When Executing a
Background Write
Whenever a background write process such as BGSAVE or BGREWRITEAOF is called, to keep the
process from failing, you must have more memory available than will be consumed by write operations
during the process. The worst case scenario is that during the background write operation every Redis
record is updated and some new records are added to the cache. Because of this, we recommend that
you set reserved-memory to at least half of the value of maxmemory. For maxmemory values by node
type, see Redis Node-Type Specific Parameters (p. 263).
The maxmemory value indicates the memory available to you for data and operational overhead.
Because you cannot modify the reserved-memory parameter in the default parameter group, you
must create a custom parameter group for the cluster. The default value for reserved-memory is 0,
API Version 2015-02-02
50

Amazon ElastiCache User Guide
Mitigating Out-of-Disk-Space
Issues When Using Redis AOF
which allows Redis to consume all of maxmemory with data, potentially leaving too little memory for
other uses, such as a background write process. For maxmemory values by node instance type, see
Redis Node-Type Specific Parameters (p. 263).
You can also use reserved-memory parameter to reduce the amount of memory Redis uses on the
box.
For more information on Redis-specific parameters in ElastiCache, see Redis Specific
Parameters (p. 253).
For information on creating and modifying parameter groups, see Creating a Parameter
Group (p. 234) and Modifying a Parameter Group (p. 243).
Mitigating Out-of-Disk-Space Issues When Using
Redis AOF
When planning your Amazon ElastiCache implementation, you should plan so that failures have the
least impact possible.
You enable AOF because an AOF file is useful in recovery scenarios. In case of a node restart or
service crash, Redis will replay the updates from an AOF file, thereby recovering the data lost due to
the restart or crash.
Warning
AOF cannot protect against all failure scenarios. For example, if a node fails due to a
hardware fault in an underlying physical server, ElastiCache will provision a new node on a
different server. In this case, the AOF file will no longer be available and cannot be used to
recover the data. Thus, Redis will restart with a cold cache.
Enabling Redis Multi-AZ as a Better Approach to
Fault Tolerance
If you are enabling AOF to protect against data loss, consider using a replication group with Multi-
AZ enabled instead of AOF. When using a Redis replication group, if a replica fails, it is automatically
replaced and synchronized with the primary cluster. If Multi-AZ is enabled on a Redis replication group
and the primary fails, it fails over to a read replica. Generally, this functionality is much faster than
rebuilding the primary from an AOF file. For greater reliability and faster recovery, we recommend
that you create a replication group with one or more read replicas in different availability zones and
enable Multi-AZ instead of using AOF. Because there is no need for AOF in this scenario, ElastiCache
disables AOF on Multi-AZ replication groups.
For more information, see the following topics:
•Mitigating Failures (p. 51)
•ElastiCache Replication (Redis) (p. 163)
•Replication with Multi-AZ and Automatic Failover (Redis) (p. 166)
Mitigating Failures
When planning your Amazon ElastiCache implementation, you should plan so that failures have a
minimal impact upon your application and data. The topics in this section cover approaches you can
take to protect your application and data from failures.
Topics
API Version 2015-02-02
51

Amazon ElastiCache User Guide
Mitigating Failures when Running Memcached
•Mitigating Failures when Running Memcached (p. 52)
•Mitigating Failures when Running Redis (p. 52)
•Recommendations (p. 55)
Mitigating Failures when Running Memcached
When running the Memcached engine, you have the following options for minimizing the impact of
a failure. There are two types of failures to address in your failure mitigation plans: node failure and
availability zone failure.
Mitigating Node Failures
To mitigate the impact of a node failure, spread your cached data over more nodes. Because
Memcached does not support replication, a node failure will always result in some data loss from your
cluster.
When you create your Memcached cluster you can create it with 1 to 20 nodes, or more by special
request. Partitioning your data across a greater number of nodes means you'll lose less data if a node
fails. For example, if you partition your data across 10 nodes, any single node stores approximately
10% of your cached data. In this case, a node failure loses approximately 10% of your cache which
needs to be replaced when a replacement node is created and provisioned. If the same data were
cached in 3 larger nodes, the failure of a node would lose approximately 33% of your cached data. If
you need more than 20 nodes in a Memcached cluster, or more than 50 nodes total in a region, please
fill out the ElastiCache Limit Increase Request form at http://aws.amazon.com/contact-us/elasticache-
node-limit-request/.
For information on specifying the number of nodes in a Memcached cluster, go to Screen 2: Specify
Cluster Details (p. 113).
Mitigating Availability Zone Failures
To mitigate the impact of an availability zone failure, locate your nodes in as many availability zones
as possible. In the unlikely event of an AZ failure, you will lose only the data cached in that AZ, not the
data cached in the other AZs.
Why so many nodes?
If my region has only 3 availability zones, why do I need more than 3 nodes since if an AZ fails I lose
approximately one-third of my data?
This is an excellent question. Remember that we’re attempting to mitigate two distinct types of failures,
node and availability zone. You’re right, if your data is spread across availability zones and one of the
zones fails, you will lose only the data cached in that AZ, irrespective of the number of nodes you have.
However, if a node fails, having more nodes will reduce the proportion of cache data lost.
There is no "magic formula" for determining how many nodes to have in your cluster. You must weight
the impact of data loss vs. the likelihood of a failure and come to your own conclusion.
For information on specifying the number of nodes in a Memcached cluster, go to Screen 3: Configure
Advanced Settings (p. 114).
For more information on regions and availability zones, go to Selecting Regions and Availability
Zones (p. 36).
Mitigating Failures when Running Redis
When running the Redis engine, you have the following options for minimizing the impact of a cluster or
availability zone failure.
API Version 2015-02-02
52

Amazon ElastiCache User Guide
Mitigating Failures when Running Redis
Mitigating Cluster Failures
To mitigate the impact of Redis cluster failures, you have the following options:
Topics
•Mitigating Cluster Failures: Redis Append Only Files (AOF) (p. 53)
•Mitigating Cluster Failures: Redis Replication Groups (p. 53)
Mitigating Cluster Failures: Redis Append Only Files (AOF)
When AOF is enabled for Redis, whenever data is written to your Redis cluster, a corresponding
transaction record is written to a Redis append only file (AOF). If your Redis process restarts,
ElastiCache creates a replacement cluster and provisions it. You can then run the AOF against the
cluster to repopulate it with data.
Some of the shortcomings of using Redis AOF to mitigate cluster failures are:
• It is time consuming.
Creating and provisioning a cluster can take several minutes. Depending upon the size of the AOF,
running it against the cluster will add even more time during which your application cannot access
your cluster for data, forcing it to hit the database directly.
• The AOF can get big.
Because every write to your cluster is written to a transaction record, AOFs can become very large,
larger than the .rdb file for the dataset in question. Because ElastiCache relies on the local instance
store, which is limited in size, enabling AOF can cause out-of-disk-space issues. You can avoid out-
of-disk-space issues by using a replication group with Multi-AZ enabled.
• Using AOF cannot protect you from all failure scenarios.
For example, if a cluster fails due to a hardware fault in an underlying physical server, ElastiCache
will provision a new cluster on a different server. In this case, the AOF is not available and cannot be
used to recover the data, leaving Redis to start with a cold cache.
For more information, see Redis Append Only Files (AOF) (p. 223).
Mitigating Cluster Failures: Redis Replication Groups
A Redis replication group is comprised of a single primary cluster which your application can both read
from and write to, and from 1 to 5 read-only replica clusters. Whenever data is written to the primary
cluster it is also asynchronously updated on the read replica clusters.
When a read replica fails
1. ElastiCache detects the failed read replica.
2. ElastiCache takes the failed cluster off line.
3. ElastiCache launches and provisions a replacement cluster in the same AZ.
4. The new cluster synchronizes with the Primary cluster.
During this time your application can continue reading and writing using the other clusters.
Redis Multi-AZ with Automatic Failover
API Version 2015-02-02
53

Amazon ElastiCache User Guide
Mitigating Failures when Running Redis
You can enable Multi-AZ with automatic failover on your Redis replication groups. Whether you enable
Multi-AZ with auto failover or not, a failed Primary will be detected and replaced automatically. How this
takes place varies whether or not Multi-AZ is or is not enabled.
When Multi-AZ with auto failover is enabled
1. ElastiCache detects the Primary failure.
2. ElastiCache promotes the read replica with the least replication lag to primary.
3. The other replicas sync with the new primary.
4. ElastiCache spins up a read replica in the failed primary's AZ.
5. The new cluster syncs with the newly promoted primary.
Failing over to a replica cluster is generally faster than creating and provisioning a new cluster. This
means your application can resume writing to your cluster sooner than if Multi-AZ were not enabled.
For more information, see Replication with Multi-AZ and Automatic Failover (Redis) (p. 166).
When Multi-AZ with auto failover is disabled
1. ElastiCache detects Primary failure.
2. ElastiCache promotes a random read replica to primary.
3. The other replicas sync with the new primary.
4. ElastiCache spins up a read replica in the failed primary's AZ.
5. The new cluster syncs with the newly promoted primary.
6. The new cluster is promoted to Primary. This keeps the Primary in the same AZ as before the
failure.
Reads from the primary could fail just before and during a failover since the primary is dead. Failover
relies on DNS which may take some time to update. During this time your application cannot write to
the primary cluster. However, your application can continue reading from your replica clusters.
For added protection, we recommend that you launch the clusters in your replication group in different
availability zones (AZs). If you do this, an AZ failure will only impact the clusters in that AZ and not the
others.
For more information, see ElastiCache Replication (Redis) (p. 163).
Mitigating Availability Zone Failures
To mitigate the impact of an availability zone failure, locate your clusters in as many availability zones
as possible.
No matter how many clusters you have, if they are all located in the same availability zone, a
catastrophic failure of that AZ results in your losing all your cache data. However, if you locate your
clusters in multiple AZs, a failure of any AZ results in your losing only the clusters in that AZ.
Any time you lose a cluster you can experience a performance degradation since read operations
are now shared by fewer clusters. This performance degradation will continue until the clusters are
replaced. Because your data is not partitioned across Redis clusters, you risk some data loss only
when the primary cluster is lost.
For information on specifying the availability zones for Redis clusters, go to Screen 3: Configure
Advanced Settings (p. 118).
For more information on regions and availability zones, go to Selecting Regions and Availability
Zones (p. 36).
API Version 2015-02-02
54

Amazon ElastiCache User Guide
Recommendations
Recommendations
There are two types of failures you need to plan for, individual node or cluster failures and broad
availability zone failures. The best failure mitigation plan will address both kinds of failures.
Minimizing the Impact of Node and Cluster Failures
To minimize the impact of a node or cluster failure, we recommend that your implementation use
multiple nodes or clusters.
If you're running Memcached and partitioning your data across nodes, the more nodes you use the
smaller the data loss if any one node fails.
If you’re running Redis, we also recommend that you enable Multi-AZ on your replication group so that
ElastiCache will automatically fail over to a replica if the primary cluster fails.
Minimizing the Impact of Availability Zone Failures
To minimize the impact of an availability zone failure, we recommend launching your nodes or clusters
in as many different availability zones as are available. Spreading your nodes or clusters evenly across
AZs will minimize the impact in the unlikely event of an AZ failure.
Other precautions
If you're running Redis, then in addition to the above, we recommend that you schedule regular
backups of your cluster. Backups (snapshots) create a .rdb file you can use to restore your
cluster in case of failure or corruption. For more information, see ElastiCache Backup & Restore
(Redis) (p. 198).
Configuring Your ElastiCache Client for Efficient
Load Balancing
Note
This section applies to multi-node Memcached clusters.
To effectively use multiple ElastiCache Memcached nodes, you need to be able to spread your cache
keys across the nodes. A simple way to load balance a cluster with n nodes is to calculate the hash of
the object’s key and mod the result by n - hash(key) mod n. The resulting value (0 through n–1) is
the number of the node where you place the object.
This approach is simple and works well as long as the number of nodes (n) is constant. However,
whenever you add or remove a node from the cluster, the number of keys that need to be moved is (n
- 1) / n (where n is the new number of nodes). Thus, this approach will result in a large number of keys
being moved, which translates to a large number of initial cache misses, especially as the number of
nodes gets large. Scaling from 1 to 2 nodes results in (2-1) / 2 (50 percent) of the keys being moved,
the best case. Scaling from 9 to 10 nodes results in (10–1)/10 (90 percent) of the keys being moved.
If you're scaling up due to a spike in traffic, you don't want to have a large number of cache misses. A
large number of cache misses results in hits to the database, which is already overloaded due to the
spike in traffic.
The solution to this dilemma is consistent hashing. Consistent hashing uses an algorithm such that
whenever a node is added or removed from a cluster, the number of keys that must be moved is
roughly 1 / n (where n is the new number of nodes). Scaling from 1 to 2 nodes results in 1/2 (50
percent) of the keys being moved, the worst case. Scaling from 9 to 10 nodes results in 1/10 (10
percent) of the keys being moved.
API Version 2015-02-02
55

Amazon ElastiCache User Guide
Consistent Hashing Using Java
As the user, you control which hashing algorithm is used for multi-node clusters. We recommend that
you configure your clients to use consistent hashing. Fortunately, there are many Memcached client
libraries in most popular languages that implement consistent hashing. Check the documentation for
the library you are using to see if it supports consistent hashing and how to implement it.
If you are working in Java, PHP, or .NET, we recommend you use one of the Amazon ElastiCache
client libraries.
Consistent Hashing Using Java
The ElastiCache Memcached Java client is based on the open-source spymemcached Java client,
which has consistent hashing capabilities built in. The library includes a KetamaConnectionFactory
class that implements consistent hashing. By default, consistent hashing is turned off in
spymemcached.
For more information, go to the KetamaConnectionFactory documentation at http://dustin.sallings.org/
java-memcached-client/apidocs/net/spy/memcached/KetamaConnectionFactory.html.
Consistent Hashing Using PHP
The ElastiCache Memcached PHP client is a wrapper around the built-in Memcached PHP library. By
default, consistent hashing is turned off by the Memcached PHP library.
Use the following code to turn on consistent hashing.
$m = new Memcached();
$m->setOption(Memcached::OPT_DISTRIBUTION,
Memcached::DISTRIBUTION_CONSISTENT);
In addition to the preceeding code, we recommend that you also turn
memcached.sess_consistent_hash on in your php.ini file.
For more information, go to the run-time configuration documentation for Memcached
PHP at http://php.net/manual/en/memcached.configuration.php. Note specifically the
memcached.sess_consistent_hash parameter.
Consistent Hashing Using .NET
The ElastiCache Memcached .NET client is a wrapper around Enyim Memcached. By default,
consistent hashing is turned on by the Enyim Memcached client.
For more information, go to the memcached/locator documentation at https://github.com/enyim/
EnyimMemcached/wiki/MemcachedClient-Configuration#user-content-memcachedlocator.
API Version 2015-02-02
56

Amazon ElastiCache User Guide
Amazon ElastiCache Error
Messages
The following error messages are returned by Amazon ElastiCache. You may receive other error
messages that are returned by ElastiCache, other AWS services, or by Memcached or Redis. For
descriptions of error messages from sources other than ElastiCache, see the documentation from the
source that is generating the error message.
•Cluster node quota exceeded (p. 57)
•Customer's node quota exceeded (p. 57)
•Manual snapshot quota exceeded (p. 57)
Error Message: Cluster node quota exceeded. Each cluster can have at most %n nodes in this
region.
Cause: You attempted to create or modify a cluster with the result that the cluster would have
more than %n nodes.
Solution: Change your request so that the cluster does not have more than %n nodes. or if you
need more than %n nodes, make your request using the Amazon ElastiCache Node request form.
For more information, see Amazon ElastiCache Limits in Amazon Web Services General
Reference.
Error Messages: Customer node quota exceeded. You can have at most %n nodes in this region
or You have already reached your quota of %s nodes in this region.
Cause: You attempted to create or modify a cluster with the result that your account would have
more than %n nodes across all clusters in this region.
Solution: Change your request so that the total nodes in the region across all clusters for this
account does not exceed %n. Or if you need more than %n nodes, make your request using the
Amazon ElastiCache Node request form.
For more information, see Amazon ElastiCache Limits in Amazon Web Services General
Reference.
Error Messages: The maximum number of manual snapshots for this cluster taken within 24
hours has been reached or The maximum number of manual snapshots for this node taken
within 24 hours has been reached its quota of %n
Cause: You attempted to take a manual snapshot of a cluster when you have already taken the
maximum number of manual snapshots allowed in a 24-hour period.
API Version 2015-02-02
57

Amazon ElastiCache User Guide
Solution: Wait 24 hours to attempt another manual snapshot of the cluster. Or if you need to take
a manual snapshot now, take the snapshot of another cluster that has the same data, such as a
different cluster in a replication group.
API Version 2015-02-02
58

Amazon ElastiCache User Guide
Lazy Loading
Caching Strategies
This topic covers strategies for populating and maintaining your cache.
The strategy or strategies you want to implement for populating and maintaining your cache depend
upon what data you are caching and the access patterns to that data. For example, you likely would
not want to use the same strategy for both a Top-10 leaderboard on a gaming site, Facebook posts,
and trending news stories. In the remainder of this section we discuss common cache maintenance
strategies, their advantages, and their disadvantages.
Topics
•Lazy Loading (p. 59)
•Write Through (p. 61)
•Adding TTL (p. 62)
•Related Topics (p. 63)
Lazy Loading
As the name implies, lazy loading is a caching strategy that loads data into the cache only when
necessary.
How Lazy Loading Works
Amazon ElastiCache is an in-memory key/value store that sits between your application and the data
store (database) that it accesses. Whenever your application requests data, it first makes the request
to the ElastiCache cache. If the data exists in the cache and is current, ElastiCache returns the data
to your application. If the data does not exist in the cache, or the data in the cache has expired, your
application requests the data from your data store which returns the data to your application. Your
application then writes the data received from the store to the cache so it can be more quickly retrieved
next time it is requested.
Scenario 1: Cache Hit
When data is in the cache and isn't expired
1. Application requests data from the cache.
API Version 2015-02-02
59
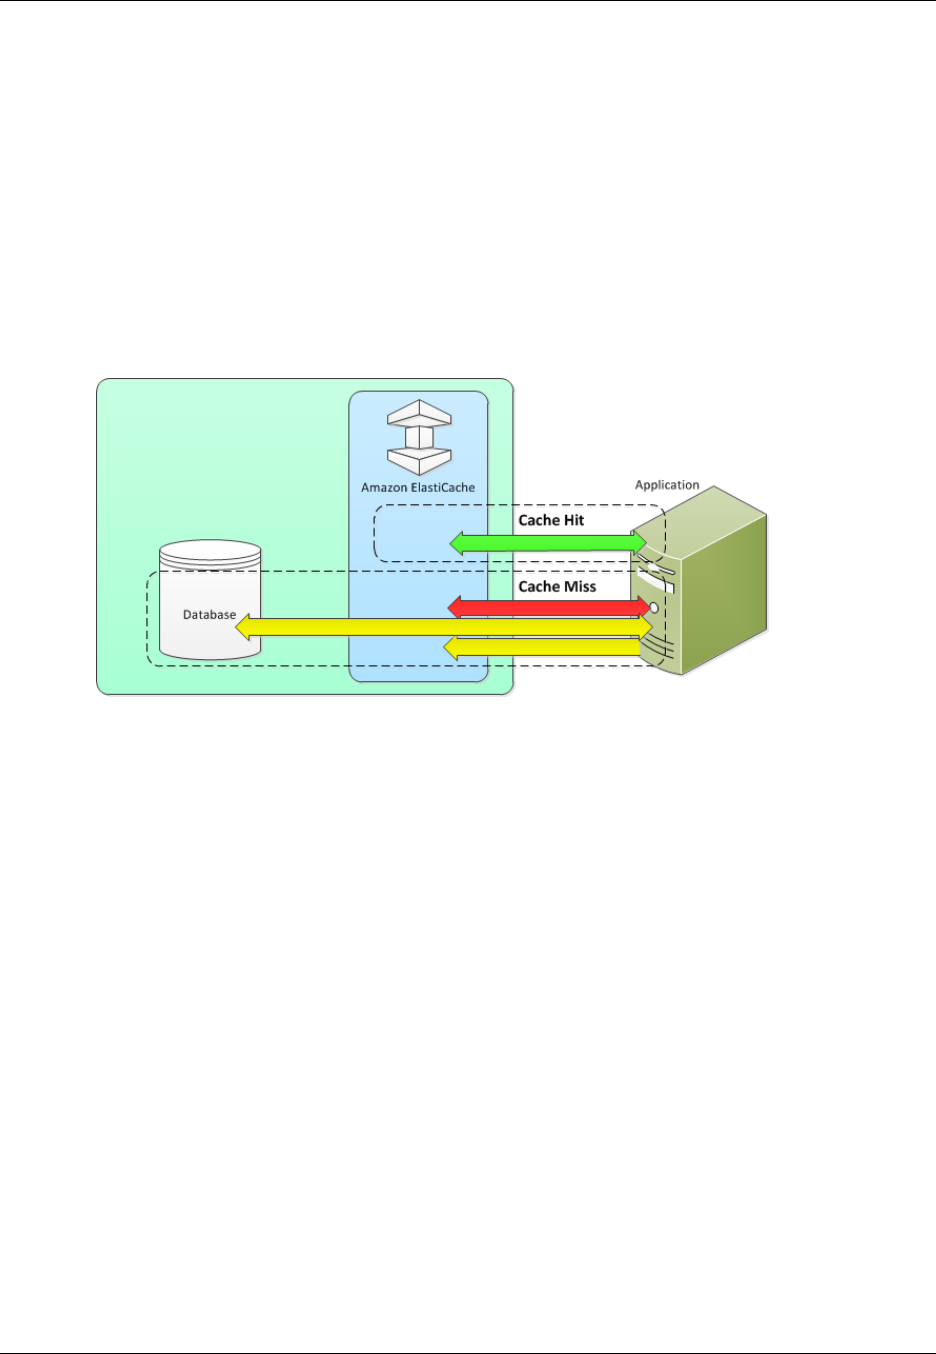
Amazon ElastiCache User Guide
Scenario 2: Cache Miss
2. Cache returns the data to the application.
Scenario 2: Cache Miss
When data isn’t in the cache or is expired
1. Application requests data from the cache.
2. Cache doesn't have the requested data, so returns a null.
3. Application requests and receives the data from the database.
4. Application updates the cache with the new data.
The following diagram illustrates both these processes.
Advantages and Disadvantages of Lazy Loading
Advantages of Lazy Loading
• Only requested data is cached.
Since most data is never requested, lazy loading avoids filling up the cache with data that isn't
requested.
• Node failures are not fatal.
When a node fails and is replaced by a new, empty node the application continues to function,
though with increased latency. As requests are made to the new node each cache miss results in
a query of the database and adding the data copy to the cache so that subsequent requests are
retrieved from the cache.
Disadvantages of Lazy Loading
• There is a cache miss penalty.
Each cache miss results in 3 trips,
1. Initial request for data from the cache
2. Query of the database for the data
3. Writing the data to the cache
which can cause a noticeable delay in data getting to the application.
• Stale data.
API Version 2015-02-02
60

Amazon ElastiCache User Guide
Lazy Loading Code
If data is only written to the cache when there is a cache miss, data in the cache can become
stale since there are no updates to the cache when data is changed in the database. This issue is
addressed by the Write Through (p. 61) and Adding TTL (p. 62) strategies.
Lazy Loading Code
The following code is a pseudo code example of lazy loading logic.
// *****************************************
// function that returns a customer's record.
// Attempts to retrieve the record from the cache.
// If it is retrieved, the record is returned to the application.
// If the record is not retrieved from the cache, it is
// retrieved from the database,
// added to the cache, and
// returned to the application
// *****************************************
get_customer(customer_id)
customer_record = cache.get(customer_id)
if (customer_record == null)
customer_record = db.query("SELECT * FROM Customers WHERE id == {0}",
customer_id)
cache.set(customer_id, customer_record)
return customer_record
The application code that retrieves the data would be:
customer_record = get_customer(12345)
Write Through
The write through strategy adds data or updates data in the cache whenever data is written to the
database.
Advantages and Disadvantages of Write Through
Advantages of Write Through
• Data in the cache is never stale.
Since the data in the cache is updated every time it is written to the database, the data in the cache
is always current.
• Write penalty vs. Read penalty.
Every write involves two trips:
1. A write to the cache
2. A write to the database
API Version 2015-02-02
61

Amazon ElastiCache User Guide
Write Through Code
Which adds latency to the process. That said, end users are generally more tolerant of latency when
updating data than when retrieving data. There is an inherent sense that updates are more work and
thus take longer.
Disadvantages of Write Through
• Missing data.
In the case of spinning up a new node, whether due to a node failure or scaling out, there is missing
data which continues to be missing until it is added or updated on the database. This can be
minimized by implementing Lazy Loading (p. 59) in conjunction with Write Through.
• Cache churn.
Since most data is never read, there can be a lot of data in the cluster that is never read. This is a
waste of resources. By Adding TTL (p. 62) you can minimize wasted space.
Write Through Code
The following code is a pseudo code example of write through logic.
// *****************************************
// function that saves a customer's record.
// *****************************************
save_customer(customer_id, values)
customer_record = db.query("UPDATE Customers WHERE id = {0}",
customer_id, values)
cache.set(customer_id, customer_record)
return success
The application code that updates the data would be:
save_customer(12345,{"address":"123 Main"})
Adding TTL
Lazy loading allows for stale data, but won't fail with empty nodes. Write through ensures that data is
always fresh, but may fail with empty nodes and may populate the cache with superfluous data. By
adding a time to live (TTL) value to each write, we are able to enjoy the advantages of each strategy
and largely avoid cluttering up the cache with superfluous data.
What is TTL?
Time to live (TTL) is an integer value that specifies the number of seconds (Redis can specify seconds
or milliseconds) until the key expires. When an application attempts to read an expired key, it is treated
as though the key is not found, meaning that the database is queried for the key and the cache is
updated. This does not guarantee that a value is not stale, but it keeps data from getting too stale and
requires that values in the cache are occasionally refreshed from the database.
For more information, see the Redis set command or the Memcached set command.
Code Example
The following code is a pseudo code example of write through logic with TTL.
API Version 2015-02-02
62

Amazon ElastiCache User Guide
Related Topics
// *****************************************
// function that saves a customer's record.
// The TTL value of 300 means that the record expires
// 300 seconds (5 minutes) after the set command
// and future reads will have to query the database.
// *****************************************
save_customer(customer_id, values)
customer_record = db.query("UPDATE Customers WHERE id = {0}",
customer_id, values)
cache.set(customer_id, customer_record, 300)
return success
The following code is a pseudo code example of lazy loading logic with TTL.
// *****************************************
// function that returns a customer's record.
// Attempts to retrieve the record from the cache.
// If it is retrieved, the record is returned to the application.
// If the record is not retrieved from the cache, it is
// retrieved from the database,
// added to the cache, and
// returned to the application.
// The TTL value of 300 means that the record expires
// 300 seconds (5 minutes) after the set command
// and subsequent reads will have to query the database.
// *****************************************
get_customer(customer_id)
customer_record = cache.get(customer_id)
if (customer_record != null)
if (customer_record.TTL < 300)
return customer_record // return the record and exit
function
// do this only if the record did not exist in the cache OR
// the TTL was >= 300, i.e., the record in the cache had expired.
customer_record = db.query("SELECT * FROM Customers WHERE id = {0}",
customer_id)
cache.set(customer_id, customer_record, 300) // update the cache
return customer_record // return the newly retrieved
record and exit function
The application code would be:
save_customer(12345,{"address":"123 Main"})
customer_record = get_customer(12345)
Related Topics
•What Should I Cache? (p. 2)
API Version 2015-02-02
63


Amazon ElastiCache User Guide
ElastiCache Nodes
A node is the smallest building block of an ElastiCache deployment. It is a fixed-size chunk of secure,
network-attached RAM. Each node runs either Memcached or Redis, depending on what was selected
when the cluster was created. Each node has its own Domain Name Service (DNS) name and port.
Multiple types of ElastiCache nodes are supported, each with varying amounts of associated memory.
The node instance type you need for your deployment is influenced by both the amount of data you
want in your cluster and the engine you use. Generally speaking, due to its support for sharding,
Memcached deployments will have more and smaller nodes while Redis deployments will use fewer,
larger node types. See Selecting Your Memcached Node Size (p. 66) and Selecting Your Redis
Node Size (p. 67) for a more detailed discussion of which node size to use.
Topics
•Selecting Your Node Size (p. 66)
•ElastiCache Reserved Nodes (p. 68)
•Supported Node Types (p. 77)
•Actions You Can Take When a Node is Scheduled for Replacement (p. 79)
Other ElastiCache Node Operations
Additional operations involving nodes:
•Adding Nodes to a Cluster (p. 129)
•Removing Nodes from a Cluster (p. 134)
•Scaling (p. 142)
•Finding Your ElastiCache Endpoints (p. 39)
•Node Auto Discovery (Memcached) (p. 82)
API Version 2015-02-02
65

Amazon ElastiCache User Guide
Selecting Your Node Size
Selecting Your Node Size
This section helps you determine what node instance type you need for your scenarios. Since the
engines, Memcached and Redis, implement clusters differently, the engine you select will make a
difference in the node size you needed by your application.
Topics
•Selecting Your Memcached Node Size (p. 66)
•Selecting Your Redis Node Size (p. 67)
Selecting Your Memcached Node Size
Memcached clusters contain one or more nodes. Because of this, the memory needs of the cluster
and the memory of a node are related, but not the same. You can attain your needed cluster memory
capacity by having a few large nodes or many smaller nodes. Further, as your needs change, you can
add or remove nodes from the cluster and thus pay only for what you need.
The total memory capacity of your cluster is calculated by multiplying the number of cache nodes in
the cluster by the RAM capacity of each node. The capacity of each cache node is based on the cache
node type.
The number of cache nodes in the cluster is a key factor in the availability of your cluster running
Memcached. The failure of a single cache node can have an impact on the availability of your
application and the load on your back-end database while ElastiCache provisions a replacement for the
failed cache node and it get repopulated. You can reduce this potential availability impact by spreading
your memory and compute capacity over a larger number of cache nodes, each with smaller capacity,
rather than using a fewer number of high capacity nodes.
In a scenario where you want to have 40 GB of cache memory, you can set it up in any of the following
configurations:
• 13 cache.t2.medium nodes with 3.22 GB of memory and 2 threads each = 41.86 GB and 26
threads.
• 7 cache.m3.large nodes with 6.05 GB of memory and 2 threads each = 42.35 GB and 14 threads.
7 cache.m4.large nodes with 6.42 GB of memory and 2 threads each = 44.94 GB and 14 threads.
• 3 cache.r3.large nodes with 13.50 GB of memory and 2 threads each = 40.50 GB and 6 threads.
3 cache.m4.xlarge nodes with 14.28 GB of memory and 4 threads each = 42.84 GB and 12
threads.
These options each provide you with similar memory capacity but different computational capacity for
your cluster. To compare the costs of these options, see Amazon ElastiCache Pricing.
For clusters running Memcached, some of the available memory on each cache node is used for
connection overhead. For more information, see Memcached Connection Overhead (p. 251)
Using multiple nodes will require spreading the keys across them. Each node has its own endpoint. For
easy endpoint management, you can use the ElastiCache the Auto Discovery feature, which enables
client programs to automatically identify all of the nodes in a cache cluster. For more information, see
Node Auto Discovery (Memcached) (p. 82).
API Version 2015-02-02
66

Amazon ElastiCache User Guide
Selecting Your Redis Node Size
If you're unsure about how much capacity you need, for testing we recommend starting with one
cache.m3.medium node and monitoring the memory usage, CPU utilization, and cache hit rate with
the ElastiCache metrics that are published to CloudWatch. For more information on CloudWatch
metrics for ElastiCache, see Monitoring Use with CloudWatch Metrics (p. 309). For production and
larger workloads, the R3 nodes provide the best performance and RAM cost value.
If your cluster does not have the desired hit rate, you can easily add more nodes, thereby increasing
the total available memory in your cluster.
If your cluster turns out to be bound by CPU but it has sufficient hit rate, try setting up a new cluster
with a cache node type that provides more compute power.
Selecting Your Redis Node Size
Redis clusters are single-node clusters. Therefore, the size requirements of the cluster define the size
requirements of the node instance type.
Use the following questions to you determine the appropriate node instance type for your Redis cluster.
• How much total memory do you need for your data?
You can get a general estimate by taking the size of the items you want to cache and multiplying
it by the number of items you want to keep in the cache at the same time. To get a reasonable
estimation of the item size, serialize your cache items then count the characters.
• How write-heavy is your application?
Write heavy applications can require significantly more available memory, memory not used by
Redis data, when taking snapshots or failing over. Whenever the BGSAVE process is performed–
when taking a snapshot, when syncing a primary cluster with a replica in a replication group, when
enabling the append-only file (AOF) feature, or promoting a replica to primary (if you have Multi-AZ
with auto failover enabled)–you must have sufficient memory that is unused by data to accommodate
all the writes that transpire during the BGSAVE process. Worst case would be when all of your Redis
data is rewritten during the process, in which case you would need a node instance size with twice
as much memory as needed for data alone.
For more detailed information, go to Ensuring You Have Sufficient Memory to Create a Redis
Snapshot (p. 49).
For example, if you estimate that the total size of all your items to be 12 GB, you can use a
cache.m3.xlarge node with 13.3 GB of memory or a cache.r3.large node with 13.5 GB of
memory. However, you may need more memory for BGSAVE operations. If your application is write
heavy you should double the memory requirements to at least 24 GB, meaning you should use either
a cache.m3.2xlarge with 27.9 GB of memory or a cache.r3.xlarge with 28.4 GB of memory.
While your cluster is running, you can monitor the memory usage, processor utilization, cache hits, and
cache misses metrics that are published to CloudWatch. If your cluster does not have the desired hit
rate or you notice that keys are being evicted too often, you can choose a different cache node size
with larger CPU and memory specifications.
When monitoring CPU usage, remember that Redis is single-threaded, so you need to multiply the
reported CPU usage by the number of CPU cores to get that actual usage. For example, a four core
CPU reporting a 20% usage rate is actually the one core Redis is using running at 80%.
API Version 2015-02-02
67

Amazon ElastiCache User Guide
Reserved Nodes
ElastiCache Reserved Nodes
Reserved cache nodes let you make a one-time up-front payment for a cache node and reserve the
cache node for a one- or three-year term at significantly lower hourly rates.
For the t2, m3, and r3 families, reserved cache nodes are available as Heavy Utilization offerings.
Reserved cache nodes for older node types are available in three varieties—Heavy Utilization, Medium
Utilization, and Light Utilization—that enable you to optimize your ElastiCache costs based on your
expected utilization.
You can use the command line tools, the API, or the AWS Management Console to list and purchase
available reserved cache node offerings. The three types of reserved cache node offerings are based
on class and duration.
Topics
•Reserved Node Offerings (p. 68)
•Describing Your Reserved Nodes (p. 70)
•Describing Available Reserved Cache Node Offerings (p. 72)
•Purchasing a Reserved Node (p. 74)
Reserved Node Offerings
Heavy Utilization reserved cache nodes enable workloads that have a consistent baseline of capacity
or run steady-state workloads. Heavy Utilization reserved cache nodes require the highest up-front
commitment, but if you plan to run more than 79 percent of the reserved cache node term you can earn
the largest savings (up to 70 percent off of the On-Demand price). Unlike the other reserved cache
nodes, with Heavy Utilization reserved cache nodes you pay a one-time fee, followed by a lower hourly
fee for the duration of the term regardless of whether or not your cache node is running.
Medium Utilization reserved cache nodes are the best option if you plan to leverage your reserved
cache nodes a substantial amount of the time, but you want either a lower one-time fee or the flexibility
to stop paying for your cache node when you shut it off. Medium Utilization reserved cache nodes are
a more cost-effective option when you plan to run more than 40 percent of the reserved cache nodes
term. This option can save you up to 64 percent off of the On-Demand price. With Medium Utilization
reserved cache nodes, you pay a slightly higher one-time fee than with Light Utilization reserved cache
nodes, and you receive lower hourly usage rates when you run a cache node.
Light Utilization reserved cache nodes are ideal for periodic workloads that run only a couple of hours
a day or a few days per week. Using Light Utilization reserved cache nodes, you pay a one-time fee
followed by a discounted hourly usage fee when your cache node is running. You can start saving
when your cache node is running more than 17 percent of the reserved cache node term, and you can
save up to 56 percent off of the On-Demand rates over the entire term of your reserved cache node.
Reserved Cache Node Offerings
Offering Up-Front Cost Usage Fee Advantage
Heavy Utilization Highest Lowest hourly fee.
Applied to the whole
term whether or not
you're using the
reserved cache node.
Lowest overall cost if
you plan to use your
reserved cache nodes
more than 79 percent
of a three-year term.
Medium Utilization Average Hourly usage fee
charged for each hour Suitable for elastic
workloads or when
you expect moderate
API Version 2015-02-02
68

Amazon ElastiCache User Guide
Reserved Node Offerings
Offering Up-Front Cost Usage Fee Advantage
you use the cache
node. usage, more than 40
percent of a three-year
term.
Light Utilization Lowest Hourly usage fee
charged. Highest fees
of all the offering types,
but fees apply only
when you're using the
reserved cache node.
Highest overall cost
if you plan to run all
of the time; however,
lowest overall cost
if you anticipate
you will use your
reserved cache nodes
infrequently, more than
about 15 percent of a
three-year term.
API Version 2015-02-02
69

Amazon ElastiCache User Guide
Describing Your Reserved Nodes
Describing Your Reserved Nodes
You can get information about reserved nodes for your AWS account as described following.
Describing Your Reserved Nodes (Console)
1. Sign in to the AWS Management Console and open the ElastiCache console at https://
console.aws.amazon.com/elasticache/.
2. In the navigation list, click the Reserved Cache Nodes link.
The reserved cache nodes for your account appear in the Reserved Cache Nodes list. You can
click any of the reserved cache nodes in the list to see detailed information about the reserved
cache node in the detail pane at the bottom of the console.
Describing Your Reserved Nodes (AWS CLI)
To get information about reserved nodes for your AWS account, type the following command at a
command prompt:
aws elasticache describe-reserved-cache-nodes --headers
This command should return output similar to the following:
RESERVATION ReservationId Class Start Time
Duration Fixed Price Usage Price Count State Description
Offering Type
RESERVATION ki-real-ri-test5 cache.m1.small 2013-07-09T23:37:44.720Z 1y
455.00 USD 0.092 USD 1 retired memcached Medium
Utilization
Describing Your Reserved Nodes (ElastiCache API)
To get information about reserved nodes for your AWS account, call the
DescribeReservedCacheNodes action.
API Version 2015-02-02
70

Amazon ElastiCache User Guide
Describing Your Reserved Nodes
Example
https://elasticache.us-west-2.amazonaws.com/
?Action=DescribeReservedCacheNodes
&Version=2014-12-01
&SignatureVersion=4
&SignatureMethod=HmacSHA256
&Timestamp=20141201T220302Z
&X-Amz-Algorithm=AWS4-HMAC-SHA256
&X-Amz-Date=20141201T220302Z
&X-Amz-SignedHeaders=Host
&X-Amz-Expires=20141201T220302Z
&X-Amz-Credential=<credential>
&X-Amz-Signature=<signature>
This call returns output similar to the following:
<DescribeReservedCacheNodesResponse xmlns="http://elasticache.us-
west-2.amazonaws.com/doc/2013-06-15/">
<DescribeReservedCacheNodesResult>
<ReservedCacheNodes>
<ReservedCacheNode>
<OfferingType>Medium Utilization</OfferingType>
<CurrencyCode>USD</CurrencyCode>
<RecurringCharges/>
<ProductDescription>memcached</ProductDescription>
<ReservedCacheNodesOfferingId>649fd0c8-cf6d-47a0-bfa6-060f8e75e95f</
ReservedCacheNodesOfferingId>
<State>payment-failed</State>
<ReservedCacheNodeId>myreservationid</ReservedCacheNodeId>
<CacheNodeCount>1</CacheNodeCount>
<StartTime>2010-12-15T00:25:14.131Z</StartTime>
<Duration>31536000</Duration>
<FixedPrice>227.5</FixedPrice>
<UsagePrice>0.046</UsagePrice>
<CacheNodeType>cache.m1.small</CacheNodeType>
</ReservedCacheNode>
<ReservedCacheNode>
(...output omitted...)
</ReservedCacheNode>
</ReservedCacheNodes>
</DescribeReservedCacheNodesResult>
<ResponseMetadata>
<RequestId>23400d50-2978-11e1-9e6d-771388d6ed6b</RequestId>
</ResponseMetadata>
</DescribeReservedCacheNodesResponse>
Some of the output has been omitted for brevity.
API Version 2015-02-02
71

Amazon ElastiCache User Guide
Describing Available Reserved Cache Node Offerings
Describing Available Reserved Cache Node
Offerings
Before you purchase a reserved cluster, you can get information about available reserved cluster
offerings.
The following example shows how to get pricing and information about available reserved cluster
offerings.
Describing Available Reserved Cache Node Offerings
(Console)
1. Sign in to the AWS Management Console and open the ElastiCache console at https://
console.aws.amazon.com/elasticache/.
2. In the navigation list, click the Reserved Cache Nodes link.
3. Click the Purchase Reserved Cache Node button.
4. From the Product Description drop down list box, select the engine - Memcached or Redis.
5. To determine the available offerings, make selections from the next 3 drop down list boxes:
•Cache Node Type
•Term
•Offering Type
After you make these selections, the cost per node and total cost of your selections is shows in the
Purchase Reserved Cache Nodes wizard.
6. Click Cancel to avoid purchasing these nodes and incurring charges.
Describing Available Reserved Cache Node Offerings (AWS
CLI)
To get pricing and information about available reserved cluster offerings, type the following command
at a command prompt:
aws elasticache describe-reserved-cache-nodes-offerings --headers
This call returns output similar to the following:
OFFERING OfferingId Class Duration
Fixed Price Usage Price Description Offering Type
OFFERING 438012d3-4052-4cc7-b2e3-8d3372e0e706 cache.m1.large 1y
1820.00 USD 0.368 USD memcached Medium Utilization
OFFERING 649fd0c8-cf6d-47a0-bfa6-060f8e75e95f cache.m1.small 1y
227.50 USD 0.046 USD memcached Medium Utilization
OFFERING 123456cd-ab1c-47a0-bfa6-12345667232f cache.m1.small 1y
162.00 USD 0.00 USD memcached Heavy Utilization
Recurring Charges: Amount Currency Frequency
Recurring Charges: 0.123 USD Hourly
OFFERING 123456cd-ab1c-37a0-bfa6-12345667232d cache.m1.large 1y
700.00 USD 0.00 USD memcached Heavy Utilization
Recurring Charges: Amount Currency Frequency
API Version 2015-02-02
72

Amazon ElastiCache User Guide
Describing Available Reserved Cache Node Offerings
Recurring Charges: 1.25 USD Hourly
OFFERING 123456cd-ab1c-17d0-bfa6-12345667234e cache.m1.xlarge 1y
4242.00 USD 2.42 USD memcached Light Utilization
Describing Available Reserved Cache Node Offerings
(ElastiCache API)
To get pricing and information about available reserved cluster offerings, call the
DescribeReservedCacheNodesOfferings action.
Example
https://elasticache.us-west-2.amazonaws.com/
?Action=DescribeReservedCacheNodesOfferings
&Version=2014-12-01
&SignatureVersion=4
&SignatureMethod=HmacSHA256
&Timestamp=20141201T220302Z
&X-Amz-Algorithm=AWS4-HMAC-SHA256
&X-Amz-Date=20141201T220302Z
&X-Amz-SignedHeaders=Host
&X-Amz-Expires=20141201T220302Z
&X-Amz-Credential=<credential>
&X-Amz-Signature=<signature>
This call returns output similar to the following:
<DescribeReservedCacheNodesOfferingsResponse xmlns="http://elasticache.us-
west-2.amazonaws.com/doc/2013-06-15/">
<DescribeReservedCacheNodesOfferingsResult>
<ReservedCacheNodesOfferings>
<ReservedCacheNodesOffering>
<Duration>31536000</Duration>
<OfferingType>Medium Utilization</OfferingType>
<CurrencyCode>USD</CurrencyCode>
<RecurringCharges/>
<FixedPrice>1820.0</FixedPrice>
<ProductDescription>memcached</ProductDescription>
<UsagePrice>0.368</UsagePrice>
<ReservedCacheNodesOfferingId>438012d3-4052-4cc7-b2e3-8d3372e0e706</
ReservedCacheNodesOfferingId>
<CacheNodeType>cache.m1.large</CacheNodeType>
</ReservedCacheNodesOffering>
<ReservedCacheNodesOffering>
(...output omitted...)
</ReservedCacheNodesOffering>
</ReservedCacheNodesOfferings>
</DescribeReservedCacheNodesOfferingsResult>
<ResponseMetadata>
<RequestId>5e4ec40b-2978-11e1-9e6d-771388d6ed6b</RequestId>
</ResponseMetadata>
</DescribeReservedCacheNodesOfferingsResponse>
Some of the output has been omitted for brevity.
API Version 2015-02-02
73

Amazon ElastiCache User Guide
Purchasing a Reserved Node
Purchasing a Reserved Node
The following example shows how to purchase a reserved node offering.
Important
Following the examples in this section will incur charges on your AWS account.
Purchasing a Reserved Node (Console)
This example shows purchasing a specific reserved cache node offering, 649fd0c8-cf6d-47a0-
bfa6-060f8e75e95f, with a reserved cache node ID of myreservationID.
1. Sign in to the AWS Management Console and open the ElastiCache console at https://
console.aws.amazon.com/elasticache/.
2. In the navigation list, click the Reserved Cache Nodes link.
3. Click the Purchase Reserved Cache Node button.
4. Select the cache node type from the Product Description drop-down list box.
5. Select the cache node class from the Cache Node Class drop-down list box.
6. Select length of time you want the cache node reserved from the Term drop-down list box.
7. Select the offering type from the Offering Type drop-down list box.
8. You can optionally enter a reserved cache node ID in the Reserved Cache Node ID text box.
Note
The Reserved Cache Node ID is an unique customer-specified identifier to track this
reservation. If this box is left blank, ElastiCache automatically generates an identifier for
the reservation.
9. Click the Next button.
The Purchase Reserved Cache Node dialog box shows a summary of the reserved cache node
attributes that you've selected and the payment due.
10. Click the Yes, Purchase button to proceed and purchase the reserved cache node.
Important
When you click Yes, Purchase you incur the charges for the reserved nodes you
selected. To avoid incurring these charges, click Cancel.
Purchasing a Reserved Node (AWS CLI)
The following example shows purchasing a specific reserved cluster offering, 649fd0c8-cf6d-47a0-
bfa6-060f8e75e95f, with a reserved cluster ID of myreservationID.
Type the following command at a command prompt:
For Linux, OS X, or Unix:
aws elasticache purchase-reserved-cache-nodes-offering \
--reserved-cache-nodes-offering-id 649fd0c8-cf6d-47a0-bfa6-060f8e75e95f \
--reserved-cache-node-id myreservationID
For Windows:
aws elasticache purchase-reserved-cache-nodes-offering ^
API Version 2015-02-02
74

Amazon ElastiCache User Guide
Purchasing a Reserved Node
--reserved-cache-nodes-offering-id 649fd0c8-cf6d-47a0-bfa6-060f8e75e95f ^
--reserved-cache-node-id myreservationID
The command returns output similar to the following:
RESERVATION ReservationId Class Start Time
Duration Fixed Price Usage Price Count State Description
Offering Type
RESERVATION myreservationid cache.m1.small 2013-12-19T00:30:23.247Z 1y
455.00 USD 0.092 USD 1 payment-pending memcached
Medium Utilization
Purchasing a Reserved Node (ElastiCache API)
The following example shows purchasing a specific reserved cluster offering, 649fd0c8-cf6d-47a0-
bfa6-060f8e75e95f, with a reserved cluster ID of myreservationID.
Call the PurchaseReservedCacheNodesOffering action with the following parameters:
•ReservedCacheNodesOfferingId = 649fd0c8-cf6d-47a0-bfa6-060f8e75e95f
•ReservedCacheNodeID = myreservationID
•CacheNodeCount = 1
API Version 2015-02-02
75

Amazon ElastiCache User Guide
Purchasing a Reserved Node
Example
https://elasticache.us-west-2.amazonaws.com/
?Action=PurchaseReservedCacheNodesOffering
&ReservedCacheNodesOfferingId=649fd0c8-cf6d-47a0-bfa6-060f8e75e95f
&ReservedCacheNodeID=myreservationID
&CacheNodeCount=1
&SignatureVersion=4
&SignatureMethod=HmacSHA256
&Timestamp=20141201T220302Z
&X-Amz-Algorithm=AWS4-HMAC-SHA256
&X-Amz-Date=20141201T220302Z
&X-Amz-SignedHeaders=Host
&X-Amz-Expires=20141201T220302Z
&X-Amz-Credential=<credential>
&X-Amz-Signature=<signature>
This call returns output similar to the following:
<PurchaseReservedCacheNodesOfferingResponse xmlns="http://elasticache.us-
west-2.amazonaws.com/doc/2013-06-15/">
<PurchaseReservedCacheNodesOfferingResult>
<ReservedCacheNode>
<OfferingType>Medium Utilization</OfferingType>
<CurrencyCode>USD</CurrencyCode>
<RecurringCharges/>
<ProductDescription>memcached</ProductDescription>
<ReservedCacheNodesOfferingId>649fd0c8-cf6d-47a0-bfa6-060f8e75e95f</
ReservedCacheNodesOfferingId>
<State>payment-pending</State>
<ReservedCacheNodeId>myreservationID</ReservedCacheNodeId>
<CacheNodeCount>10</CacheNodeCount>
<StartTime>2013-07-18T23:24:56.577Z</StartTime>
<Duration>31536000</Duration>
<FixedPrice>123.0</FixedPrice>
<UsagePrice>0.123</UsagePrice>
<CacheNodeType>cache.m1.small</CacheNodeType>
</ReservedCacheNode>
</PurchaseReservedCacheNodesOfferingResult>
<ResponseMetadata>
<RequestId>7f099901-29cf-11e1-bd06-6fe008f046c3</RequestId>
</ResponseMetadata>
</PurchaseReservedCacheNodesOfferingResponse>
For more information on reserved nodes, go to Amazon ElastiCache Reserved Cache Nodes.
API Version 2015-02-02
76

Amazon ElastiCache User Guide
Supported Node Types
Supported Node Types
The following node types are supported by ElastiCache. Generally speaking, the current generations
types provide more memory and computational power at lower cost when compared to their equivalent
previous generation counterparts.
• General purpose:
• Current generation: cache.t2.micro, cache.t2.small, cache.t2.medium,
cache.m3.medium, cache.m3.large, cache.m3.xlarge, cache.m3.2xlarge,
cache.m4.large, cache.m4.xlarge, cache.m4.2xlarge, cache.m4.4xlarge,
cache.m4.10xlarge,
• Previous generation: cache.t1.micro, cache.m1.small, cache.m1.medium,
cache.m1.large, cache.m1.xlarge
• Compute optimized: cache.c1.xlarge
• Memory optimized:
• Current generation: cache.r3.large, cache.r3.xlarge, cache.r3.2xlarge,
cache.r3.4xlarge, cache.r3.8xlarge
• Previous generation: cache.m2.xlarge, cache.m2.2xlarge, cache.m2.4xlarge
Supported node types are available in all regions except as noted in the following table.
Region Name Region Exception
Asia Pacific (Seoul) ap-
northeast-2 Supports only current generation node types.
EU (Frankfurt) eu-central-1 Supports only current generation node types.
AWS GovCloud (US) us-gov-west-1 Supports only current generation node types.
Does not support M4 node types.
South America (São Paulo) sa-east-1 Supports all node types except the following:
•cache.r3.large
•cache.r3.xlarge
•cache.r3.2xlarge
•cache.m4.*
China (Beijing) cn-north-1 Does not support M4 node types.
Note
• All t2 instances are created in an Amazon Virtual Private Cloud (VPC).
• Redis backup and restore is not supported for t2 instances.
• Redis append-only files (AOF) are not supported for t1 or t2 instances.
• Redis Multi-AZ with Auto Failover is not supported on t1 or t2 instances.
• Redis configuration variables appendonly and appendfsync are not supported on Redis
version 2.8.22 and later.
For a complete list of node types and specifications, see the following:
API Version 2015-02-02
77


Amazon ElastiCache User Guide
Actions You Can Take When a
Node is Scheduled for Replacement
Actions You Can Take When a Node is
Scheduled for Replacement
The following sections specify actions you can take when ElastiCache schedules one or more of your
nodes for replacement.
Memcached
The following list identifies actions you can take when ElastiCache schedules one of your Memcached
nodes for replacement.
•Do nothing – If you do nothing, ElastiCache will replace the node as scheduled. When ElastiCache
automatically replaces the node with a new node, the new node is initially empty.
•Change your maintenance window – For scheduled maintenance events where you receive an
email from ElastiCache, if you change your maintenance window before the scheduled replacement
time, your node will now be replaced at the new time. The new maintenance time can be no earlier
than the originally scheduled time, and no later than a week from the originally scheduled time.
For example, suppose your scheduled maintenance is planned for Monday, July 4th and your
maintenance window is set to Mondays, 04:00-05:00 UTC. If you now change the maintenance
window to Monday, 08:00-09:00 UTC, your replacement will occur between 08:00-09:00 UTC on
Monday, July 4th. If you change your maintenance window to Monday, 01:00-02:00 UTC, your
replacement will occur between 01:00-02:00 UTC on Monday, July 11th i.e. the following week. For
instructions, see Maintenance Window (p. 34).
•Manually replace the node – If you need to replace the node before the next maintenance window,
manually replace the node.
If you manually replace the node, keys will be redistributed which will cause cache misses.
To manually replace a Memcached node
1. Delete the node scheduled for replacement. For instructions, see Removing Nodes from a
Cluster (p. 134).
2. Add a new node to the cluster. For instructions, see Adding Nodes to a Cluster (p. 129).
3. If you are not using Node Auto Discovery (Memcached) (p. 82) on this cluster, go to your
application and replace every instance of the old node's endpoint with the new node's endpoint.
Redis
The following list identifies actions you can take when ElastiCache schedules one of your Redis
nodes for replacement. To expedite finding the information you need for your situation, select from the
following menu.
•Do nothing (p. 80) – Let Amazon ElastiCache replace the node as scheduled.
•Change your maintenance window (p. 80) – Change your maintenance window to a better time.
•Replace a read-replica (p. 80) – A procedure to manually replace a read-replica in a Redis
replication group.
•Replace the primary node (p. 80) – A procedure to manually replace the primary node in a Redis
replication group.
•Replace a standalone node (p. 81) – Two different procedures to replace a standalone Redis
node.
API Version 2015-02-02
79

Amazon ElastiCache User Guide
Redis
Redis node replacement options
•Do nothing – If you do nothing, ElastiCache will replace the node as scheduled.
If the node is a member of a replication group, the replacement node will sync with the primary node
of the group.
If the node is standalone and not a part of a replication group, ElastiCache will first launch a
replacement node and then sync from the existing node. The existing node will not be available for
service requests during this time. Once the sync is complete, the existing node is terminated and the
new node takes its place. ElastiCache makes a best effort to retain your data during this operation.
•Change your maintenance window – For scheduled maintenance events where you receive an
email from ElastiCache, if you change your maintenance window before the scheduled replacement
time, your node will now be replaced at the new time. The new maintenance time can be no earlier
than the originally scheduled time, and no later than a week from the originally scheduled time.
For example, suppose your scheduled maintenance is planned for Monday, July 4th and your
maintenance window is set to Mondays, 04:00-05:00 UTC. If you now change the maintenance
window to Monday, 08:00-09:00 UTC, your replacement will occur between 08:00-09:00 UTC on
Monday, July 4th. If you change your maintenance window to Monday, 01:00-02:00 UTC, your
replacement will occur between 01:00-02:00 UTC on Monday, July 11th i.e. the following week. For
instructions, see Maintenance Window (p. 34).
•Replace a read-replica – If the node is a read-replica in a replication group, replace the node.
If your replication group has only 2 nodes and Multi-AZ is enabled, you must disable Multi-AZ before
you can delete the replica. For instructions, see Modifying a Replication Group (p. 189).
To replace a read replica
1. Delete the replica that is scheduled for replacement. For instructions, see Deleting a
Cluster (p. 140).
2. Add a new replica to replace the one that is scheduled for replacement. If you use the same
name as the replica you just deleted, you can skip step 3. For instructions, see Adding a Read
Replica to a Replication Group (p. 193).
3. In your application, replace the old replica's endpoint with the new replica's endpoint.
4. If you disabled Multi-AZ at the start, re-enable it now. For instructions, see Enabling Multi-AZ
with Automatic Failover (p. 170).
•Replace the primary node – If the node is the primary node in a replication group, promote a read-
replica to primary, and then delete the former primary node.
If your replication group has only two nodes and Multi-AZ is enabled, you must disable Multi-
AZ before you can delete the replica in step 2. For instructions, see Modifying a Replication
Group (p. 189).
To replace a primary node
1. Promote a read-replica to primary. For instructions, see Promoting a Read-Replica to
Primary (p. 195).
2. Delete the node that is scheduled for replacement (the old primary). For instructions, see
Deleting a Cluster (p. 140).
3. Add a new replica to replace the one scheduled for replacement. If you use the same name as
the node you just deleted, you can skip step 4.
For instructions, see Adding a Read Replica to a Replication Group (p. 193).
4. In your application, replace the old node's endpoint with the new node's endpoint.
5. If you disabled Multi-AZ at the start, re-enable it now. For instructions, see Enabling Multi-AZ
with Automatic Failover (p. 170).
API Version 2015-02-02
80

Amazon ElastiCache User Guide
Redis
•Replace a standalone node – If the node does not have any read replicas, you have two options to
replace it:
Option 1: Replace the node using backup and restore
1. Create a snapshot of the node. For instructions, see Taking Manual Snapshots (p. 202).
2. Create a new node seeding it from the snapshot. For instructions, see Restoring From a
Snapshot (p. 216).
3. Delete the node scheduled for replacement. For instructions, see Deleting a Cluster (p. 140).
4. In your application, replace the old node's endpoint with the new node's endpoint.
Option 2: Replace the node using replication
1. Create a replication group with the node scheduled for replacement as the primary. Do not
enable Multi-AZ on this replication group. For instructions, see Creating a Replication Group
When You Have an Available Redis Cache Cluster (p. 173).
2. Add a read-replica to the replication group. For instructions, see Adding a Read Replica to a
Replication Group (p. 193).
3. Promote the newly created read-replica to primary. For instructions, see Promoting a Read-
Replica to Primary (p. 195).
4. Delete the node scheduled for replacement. For instructions, see Deleting a Cluster (p. 140).
5. In your application, replace the old node's endpoint with the new node's endpoint.
API Version 2015-02-02
81

Amazon ElastiCache User Guide
Node Auto Discovery (Memcached)
For clusters running the Memcached engine, ElastiCache supports Auto Discovery—the ability for
client programs to automatically identify all of the nodes in a cache cluster, and to initiate and maintain
connections to all of these nodes.
Note
Auto Discovery is only available for cache clusters running the Memcached engine. Redis
cache clusters are single node clusters, thus there is no need to identify and track all the
nodes in a Redis cluster.
With Auto Discovery, your application does not need to manually connect to individual cache nodes;
instead, your application connects to one Memcached node and retrieves the list of nodes. From that
list your application is aware of the rest of the nodes in the cluster and can connect to any of them. You
do not need to hard code the individual cache node endpoints in your application.
All of the cache nodes in the cluster maintain a list of metadata about all of the other nodes. This
metadata is updated whenever nodes are added or removed from the cluster.
Topics
•Benefits of Auto Discovery (p. 83)
•How Auto Discovery Works (p. 84)
•Using Auto Discovery (p. 88)
•Connecting to Cache Nodes Manually (p. 93)
•Adding Auto Discovery To Your Client Library (p. 94)
•ElastiCache Clients with Auto Discovery (p. 95)
API Version 2015-02-02
82

Amazon ElastiCache User Guide
Benefits of Auto Discovery
Benefits of Auto Discovery
Auto Discovery offers the following benefits:
• When you increase the number of nodes in a cache cluster, the new nodes register themselves
with the configuration endpoint and with all of the other nodes. When you remove nodes from the
cache cluster, the departing nodes deregister themselves. In both cases, all of the other nodes in the
cluster are updated with the latest cache node metadata.
• Cache node failures are automatically detected; failed nodes are automatically replaced.
Note
Until node replacement completes, the node will continue to fail.
• A client program only needs to connect to the configuration endpoint. After that, the Auto Discovery
library connects to all of the other nodes in the cluster.
• Client programs poll the cluster once per minute (this interval can be adjusted if necessary). If there
are any changes to the cluster configuration, such as new or deleted nodes, the client receives an
updated list of metadata. Then the client connects to, or disconnects from, these nodes as needed.
Auto Discovery is enabled on all ElastiCache Memcached cache clusters. You do not need to reboot
any of your cache nodes to use this feature.
API Version 2015-02-02
83

Amazon ElastiCache User Guide
How Auto Discovery Works
How Auto Discovery Works
Topics
•Connecting to Cache Nodes (p. 84)
•Normal Cluster Operations (p. 85)
•Other Operations (p. 86)
This section describes how client applications use ElastiCache Cluster Client to manage cache node
connections, and interact with data items in the cache.
Connecting to Cache Nodes
From the application's point of view, connecting to the cluster configuration endpoint is no different
from connecting directly to an individual cache node. The following sequence diagram shows the
process of connecting to cache nodes.
API Version 2015-02-02
84

Amazon ElastiCache User Guide
Normal Cluster Operations
Process of Connecting to Cache Nodes
The application resolves the configuration endpoint's DNS name. Because the configuration
endpoint maintains CNAME entries for all of the cache nodes, the DNS name resolves to one of
the nodes; the client can then connect to that node.
The client requests the configuration information for all of the other nodes. Since each node
maintains configuration information for all of the nodes in the cluster, any node can pass
configuration information to the client upon request.
The client receives the current list of cache node hostnames and IP addresses. It can then
connect to all of the other nodes in the cluster.
Note
The client program refreshes its list of cache node hostnames and IP addresses once per
minute. This polling interval can be adjusted if necessary.
Normal Cluster Operations
When the application has connected to all of the cache nodes, ElastiCache Cluster Client determines
which nodes should store individual data items, and which nodes should be queried for those data
items later. The following sequence diagram shows the process of normal cluster operations.
API Version 2015-02-02
85

Amazon ElastiCache User Guide
Other Operations
Process of Normal Cluster Operations
The application issues a get request for a particular data item, identified by its key.
The client uses a hashing algorithm against the key to determine which cache node contains the
data item.
The data item is requested from the appropriate node.
The data item is returned to the application.
Other Operations
There may arise situations where there is a change in the cluster due to adding an additional node to
accommodate additional demand, deleting a node to save money during periods of reduced demand,
or replacing a node due to a node failure of one sort or another.
API Version 2015-02-02
86

Amazon ElastiCache User Guide
Other Operations
When there is a change in the cluster that requires a metadata update to the cluster's endpoints, that
change is made to all nodes at the same time. Thus the metadata in any given node is consistent with
the metadata in all of the other nodes in the cluster.
Adding a Node
During the time that the node is being spun up, its endpoint is not included in the metadata. As soon
as the node is available, it is added to the metadata of each of the cluster’s nodes. In this scenario,
the metadata is consistent among all the nodes and you will be able to interact with the new node only
after it is available. Prior to the node being available, you will not know about it and will interact with the
nodes in your cluster the same as though the new node does not exist.
Deleting a Node
When a node is removed, its endpoint is first removed from the metadata and then the node is
removed from the cluster. In this scenario the metadata in all the nodes is consistent and there is no
time in which it will contain the endpoint for the node to be removed while the node is not available.
During the node removal time it is not reported in the metadata and so your application will only be
interacting with the n-1 remaining nodes, as though the node does not exist.
Replacing a Node
If a node fails, ElastiCache takes down that node and spins up a replacement. The replacement
process takes a few minutes. During this time the metadata in all the nodes still shows the endpoint for
the failed node, but any attempt to interact with the node will fail. Therefore, your logic should always
include retry logic.
In each of these cases, the metadata is consistent among all the nodes at all times since the metadata
is updated at the same time for all nodes in the cluster. You should always use the configuration
endpoint to obtain the endpoints of the various nodes in the cluster. By using the configuration
endpoint, you ensure that you will not be obtaining endpoint data from a node that “disappears” on you.
API Version 2015-02-02
87

Amazon ElastiCache User Guide
Using Auto Discovery
Using Auto Discovery
To begin using Auto Discovery, follow these steps:
•Step 1: Obtain the Configuration Endpoint (p. 88)
•Step 2: Download the ElastiCache Cluster Client (p. 88)
•Step 3: Modify Your Application Program (p. 89)
Step 1: Obtain the Configuration Endpoint
To connect to a cluster, client programs must know the cluster configuration endpoint. You can obtain
the configuration endpoint using the AWS Management Console.
You can also use the aws elasticache describe-cache-clusters command with the --show-
cache-node-info parameter:
Example
$ aws elasticache describe-cache-clusters --show-cache-node-info
CACHECLUSTER mycluster mycluster.fnjyzo.cfg.use1.cache.amazonaws.com
11211 https://console.aws.amazon.com/elasticache/home#client-
download: 2013-07-30T00:57:50.911Z cache.m1.small memcached available 2 us-
west-2a 1.4.14
SECGROUP default active PARAMGRP default.memcached1.4 in-sync
NOTIFICATION arn:aws:sns:us-west-2:740835402826:autodiscovery active
...
Step 2: Download the ElastiCache Cluster Client
To take advantage of Auto Discovery, client programs must use the ElastiCache Cluster Client. The
ElastiCache Cluster Client is available for Java, PHP, and .NET and contains all of the necessary logic
for discovering and connecting to all of your cache nodes.
API Version 2015-02-02
88

Amazon ElastiCache User Guide
Step 3: Modify Your Application Program
To download the ElastiCache Cluster Client
1. Sign in to the AWS Management Console and open the ElastiCache console at https://
console.aws.amazon.com/elasticache/.
2. From the ElastiCache console, choose ElastiCache Cluster Client then choose Download.
The source code for the ElastiCache Cluster Client for Java is available at https://github.com/
amazonwebservices/aws-elasticache-cluster-client-memcached-for-java. This library is based on the
popular Spymemcached client. The ElastiCache Cluster Client is released under the Amazon Software
License http://aws.amazon.com/asl. You are free to modify the source code as you see fit. You can
even incorporate the code into other open source Memcached libraries, or into your own client code.
Note
To use the ElastiCache Cluster Client for PHP, you will first need to install it on your Amazon
EC2 instance. For more information, see Installing the ElastiCache Cluster Client for
PHP (p. 98).
To use the ElastiCache Cluster Client for .NET, you will first need to install it on your
Amazon EC2 instance. For more information, see Installing the ElastiCache Cluster Client
for .NET (p. 96).
Step 3: Modify Your Application Program
Modify your application program so that it uses Auto Discovery. The following sections show how to
use the ElastiCache Cluster Client for Java, PHP, and .NET.
Topics
•Using the ElastiCache Cluster Client for Java (p. 89)
•Using the ElastiCache Cluster Client for PHP (p. 90)
•Using the ElastiCache Cluster Client for .NET (p. 91)
Using the ElastiCache Cluster Client for Java
The program below demonstrates how to use the ElastiCache Cluster Client to connect to a cluster
configuration endpoint and add a data item to the cache. Using Auto Discovery, the program connects
to all of the nodes in the cluster without any further intervention.
package com.amazon.elasticache;
import java.io.IOException;
import java.net.InetSocketAddress;
// Import the AWS-provided library with Auto Discovery support
import net.spy.memcached.MemcachedClient;
public class AutoDiscoveryDemo {
public static void main(String[] args) throws IOException {
String configEndpoint =
"mycluster.fnjyzo.cfg.use1.cache.amazonaws.com";
Integer clusterPort = 11211;
MemcachedClient client = new MemcachedClient(
new InetSocketAddress(configEndpoint,
clusterPort));
// The client will connect to the other cache nodes automatically.
API Version 2015-02-02
89

Amazon ElastiCache User Guide
Step 3: Modify Your Application Program
// Store a data item for an hour.
// The client will decide which cache host will store this item.
client.set("theKey", 3600, "This is the data value");
}
}
Using the ElastiCache Cluster Client for PHP
The program below demonstrates how to use the ElastiCache Cluster Client to connect to a cluster
configuration endpoint and add a data item to the cache. Using Auto Discovery, the program will
connect to all of the nodes in the cluster without any further intervention.
Note
To use the ElastiCache Cluster Client for PHP, you will first need to install it on your Amazon
EC2 instance. For more information, see Installing the ElastiCache Cluster Client for
PHP (p. 98)
<?php
/**
* Sample PHP code to show how to integrate with the Amazon ElastiCache
* Auto Discovery feature.
*/
/* Configuration endpoint to use to initialize memcached client.
* This is only an example. */
$server_endpoint = "php-autodiscovery.1zvgtq.cfg.use1.cache.amazonaws.com";
/* Port for connecting to the ElastiCache cluster.
* This is only an example */
$server_port = 11211;
/**
* The following will initialize a Memcached client to utilize the Auto
Discovery feature.
*
* By configuring the client with the Dynamic client mode with single
endpoint, the
* client will periodically use the configuration endpoint to retrieve the
current cache
* cluster configuration. This allows scaling the cache cluster up or down
in number of nodes
* without requiring any changes to the PHP application.
*/
$dynamic_client = new Memcached();
$dynamic_client->setOption(Memcached::OPT_CLIENT_MODE,
Memcached::DYNAMIC_CLIENT_MODE);
$dynamic_client->addServer($server_endpoint, $server_port);
// Store the data for 60 seconds in the cluster.
// The client will decide which cache host will store this item.
$dynamic_client->set('key', 'value', 60);
/**
* Configuring the client with Static client mode disables the usage of Auto
Discovery
API Version 2015-02-02
90

Amazon ElastiCache User Guide
Step 3: Modify Your Application Program
* and the client operates as it did before the introduction of Auto
Discovery.
* The user can then add a list of server endpoints.
*/
$static_client = new Memcached();
$static_client->setOption(Memcached::OPT_CLIENT_MODE,
Memcached::STATIC_CLIENT_MODE);
$static_client->addServer($server_endpoint, $server_port);
// Store the data in the cluster without expiration.
// The client will decide which cache host will store this item.
$static_client->set('key', 'value');
?>
Using the ElastiCache Cluster Client for .NET
.NET client for ElastiCache is open source at https://github.com/awslabs/elasticache-cluster-config-net.
.NET applications typically get their configurations from their config file. The following is a sample
application config file.
<?xml version="1.0" encoding="utf-8"?>
<configuration>
<configSections>
<section
name="clusterclient"
type="Amazon.ElastiCacheCluster.ClusterConfigSettings,
Amazon.ElastiCacheCluster" />
</configSections>
<clusterclient>
<!-- the hostname and port values are from step 1 above -->
<endpoint hostname="mycluster.fnjyzo.cfg.use1.cache.amazonaws.com"
port="11211" />
</clusterclient>
</configuration>
The C# program below demonstrates how to use the ElastiCache Cluster Client to connect to a cluster
configuration endpoint and add a data item to the cache. Using Auto Discovery, the program will
connect to all of the nodes in the cluster without any further intervention.
// *****************
// Sample C# code to show how to integrate with the Amazon ElastiCcache Auto
Discovery feature.
using System;
using Amazon.ElastiCacheCluster;
using Enyim.Caching;
using Enyim.Caching.Memcached;
public class DotNetAutoDiscoveryDemo {
public static void Main(String[] args) {
// instantiate a new client.
API Version 2015-02-02
91

Amazon ElastiCache User Guide
Step 3: Modify Your Application Program
ElastiCacheClusterConfig config = new ElastiCacheClusterConfig();
MemcachedClient memClient = new MemcachedClient(config);
// Store the data for 3600 seconds (1hour) in the cluster.
// The client will decide which cache host will store this item.
memClient.Store(StoreMode.Set, 3600, "This is the data value.");
} // end Main
} // end class DotNetAutoDiscoverDemo
API Version 2015-02-02
92

Amazon ElastiCache User Guide
Connecting to Cache Nodes Manually
Connecting to Cache Nodes Manually
If your client program does not use Auto Discovery, it can manually connect to each of the cache
nodes. This is the default behavior for Memcached clients.
You can obtain a list of cache node hostnames and port numbers from the AWS Management
Console. You can also use the AWS CLI aws elasticache describe-cache-clusters
command with the --show-cache-node-info parameter.
Example
The following Java code snippet shows how to connect to all of the nodes in a four-node cache cluster:
...
ArrayList<String> cacheNodes = new ArrayList<String>(
Arrays.asList(
"mycachecluster.fnjyzo.0001.use1.cache.amazonaws.com:11211",
"mycachecluster.fnjyzo.0002.use1.cache.amazonaws.com:11211",
"mycachecluster.fnjyzo.0003.use1.cache.amazonaws.com:11211",
"mycachecluster.fnjyzo.0004.use1.cache.amazonaws.com:11211"));
MemcachedClient cache = new
MemcachedClient(AddrUtil.getAddresses(cacheNodes));
...
Important
If you scale up or scale down your cache cluster by adding or removing nodes, you will need
to update the list of nodes in the client code.
API Version 2015-02-02
93
Amazon ElastiCache User Guide
Adding Auto Discovery To Your Client Library
Adding Auto Discovery To Your Client Library
The configuration information for Auto Discovery is stored redundantly in each cache cluster node.
Client applications can query any cache node and obtain the configuration information for all of the
nodes in the cluster.
The way in which an application does this depends upon the cache engine version:
• If the cache engine version is 1.4.14 or higher, use the config command.
• If the cache engine version is lower than 1.4.14, use the get AmazonElastiCache:cluster
command.
The outputs from these two commands are identical, and are described in the Output Format (p. 95)
section below.
Cache Engine Version 1.4.14 or Higher
For cache engine version 1.4.14 or higher, use the config command. This command has been added
to the Memcached ASCII and binary protocols by ElastiCache, and is implemented in the ElastiCache
Cluster Client. If you want to use Auto Discovery with another client library, then that library will need to
be extended to support the config command.
Note
The following documentation pertains to the ASCII protocol; however, the config command
supports both ASCII and binary. If you want to add Auto Discovery support using the binary
protocol, refer to the source code for the ElastiCache Cluster Client.
Syntax
config [sub-command] [key]
Options
Name Description Required
sub-
command
The sub-command used to interact with a cache node. For Auto
Discovery, this sub-command is get.Yes
key The key under which the cluster configuration is stored. For Auto
Discovery, this key is named cluster.Yes
To get the cluster configuration information, use the following command:
config get cluster
Cache Engine Version Lower Than 1.4.14
To get the cluster configuration information, use the following command:
get AmazonElastiCache:cluster
Note
Do not tamper with the "AmazonElastiCache:cluster" key, since this is where the cluster
configuration information resides. If you do overwrite this key, then the client may be
API Version 2015-02-02
94

Amazon ElastiCache User Guide
Output Format
incorrectly configured for a brief period of time (no more than 15 seconds) before ElastiCache
automatically and correctly updates the configuration information.
Output Format
Whether you use config get cluster or get AmazonElastiCache:cluster, the reply consists
of two lines:
• The version number of the configuration information. Each time a node is added or removed from the
cache cluster, the version number increases by one.
• A list of cache nodes. Each node in the list is represented by a hostname|ip-address|port group, and
each node is delimited by a space.
A carriage return and a linefeed character (CR + LF) appears at the end of each line. The data line
contains a linefeed character (LF) at the end, to which the CR + LF is added. The config version line is
terminated by LF without the CR.
A cache cluster containing three nodes would be represented as follows:
configversion\n
hostname|ip-address|port hostname|ip-address|port hostname|ip-address|port\n
\r\n
Each node is shown with both the CNAME and the private IP address. The CNAME will always be
present; if the private IP address is not available, it will not be shown; however, the pipe characters "|"
will still be printed.
Example
Here is an example of the payload returned when you query the configuration information:
CONFIG cluster 0 147\r\n
12\n
myCluster.pc4ldq.0001.use1.cache.amazonaws.com|10.82.235.120|11211
myCluster.pc4ldq.0002.use1.cache.amazonaws.com|10.80.249.27|11211\n\r\n
END\r\n
Note
• The second line indicates that the configuration information has been modified twelve times
so far.
• In the third line, the list of nodes is in alphabetical order by hostname. This ordering might
be in a different sequence from what you are currently using in your client application.
ElastiCache Clients with Auto Discovery
This section discusses installing and configuring the ElastiCache PHP and .NET clients.
Topics
•Installing & Compiling Cluster Clients (p. 96)
•Configuring ElastiCache Clients (p. 106)
API Version 2015-02-02
95

Amazon ElastiCache User Guide
Installing & Compiling Clients
Installing & Compiling Cluster Clients
This section covers installing, configuring, and compiling the PHP and .NET Amazon ElastiCache auto
discovery cluster clients.
Topics
•Installing the ElastiCache Cluster Client for .NET (p. 96)
•Installing the ElastiCache Cluster Client for PHP (p. 98)
•Compiling the Source Code for the ElastiCache Cluster Client for PHP (p. 104)
Installing the ElastiCache Cluster Client for .NET
You can find the ElastiCache .NET Cluster Client code as open source at https://github.com/awslabs/
elasticache-cluster-config-net.
This section describes how to install, update, and remove the .NET components for the ElastiCache
Cluster Client on Amazon EC2 instances. For more information about auto discovery, see Node Auto
Discovery (Memcached) (p. 82). For sample .NET code to use the client, see Using the ElastiCache
Cluster Client for .NET (p. 91).
Topics
•Installing .NET (p. 96)
•Download the ElastiCache .NET Cluster Client for ElastiCache (p. 96)
•Install AWS Assemblies with NuGet (p. 96)
Installing .NET
You must have .NET 3.5 or later installed to use the AWS .NET SDK for ElastiCache. If you don't
have .NET 3.5 or later, you can download and install the latest version from http://www.microsoft.com/
net.
Download the ElastiCache .NET Cluster Client for ElastiCache
To download the ElastiCache .NET cluster client
1. Sign in to the AWS Management Console and open the ElastiCache console at https://
console.aws.amazon.com/elasticache/.
2. On the left navigation pane, click ElastiCache Cluster Client.
3. In the Download ElastiCache Memcached Cluster Client list, select .NET, and then click
Download.
Install AWS Assemblies with NuGet
NuGet is a package management system for the .NET platform. NuGet is aware of assembly
dependencies and installs all required files automatically. NuGet installed assemblies are stored with
your solution, rather than in a central location such as Program Files, so you can install versions
specific to an application without creating compatibility issues.
Installing NuGet
NuGet can be installed from the Installation Gallery on MSDN; go to https://
visualstudiogallery.msdn.microsoft.com/27077b70-9dad-4c64-adcf-c7cf6bc9970c. If you are using
Visual Studio 2010 or later, NuGet is automatically installed.
API Version 2015-02-02
96

Amazon ElastiCache User Guide
Installing & Compiling Clients
You can use NuGet from either Solution Explorer or Package Manager Console.
Using NuGet from Solution Explorer
To use NuGet from Solution Explorer in Visual Studio 2010
1. From the Tools menu, select Library Package Manager.
2. Click Package Manager Console.
To use NuGet from Solution Explorer in Visual Studio 2012 or Visual Studio 2013
1. From the Tools menu, select NuGet Package Manager.
2. Click Package Manager Console.
From the command line, you can install the assemblies using Install-Package, as shown following.
Install-Package Amazon.ElastiCacheCluster
To see a page for every package that is available through NuGet, such as the AWSSDK and
AWS.Extensions assemblies, go to the NuGet website at http://www.nuget.org. The page for each
package includes a sample command line for installing the package using the console and a list of the
previous versions of the package that are available through NuGet.
For more information on Package Manager Console commands, go to http://nuget.codeplex.com/
wikipage?title=Package%20Manager%20Console%20Command%20Reference%20%28v1.3%29.
API Version 2015-02-02
97

Amazon ElastiCache User Guide
Installing & Compiling Clients
Installing the ElastiCache Cluster Client for PHP
This section describes how to install, update, and remove the PHP components for the ElastiCache
Cluster Client on Amazon EC2 instances. For more information about Auto Discovery, see Node Auto
Discovery (Memcached) (p. 82). For sample PHP code to use the client. see Using the ElastiCache
Cluster Client for PHP (p. 90).
Topics
•Downloading the Installation Package (p. 98)
•Installation Steps for New Users (p. 99)
•For Users Who Already Have php-memcached Extension Installed (p. 102)
•Removing the PHP Cluster Client (p. 102)
Downloading the Installation Package
To ensure that you use the correct version of the ElastiCache Cluster Client for PHP, you will need
to know what version of PHP is installed on your Amazon EC2 instance. You will also need to know
whether your Amazon EC2 instance is running a 64-bit or 32-bit version of Linux.
To determine the PHP version installed on your Amazon EC2 instance
• At the command prompt, run the following command:
$ php -v
The PHP version will be shown in the output, as in this example:
PHP 5.4.10 (cli) (built: Jan 11 2013 14:48:57)
Copyright (c) 1997-2012 The PHP Group
Zend Engine v2.4.0, Copyright (c) 1998-2012 Zend Technologies
Note
If your PHP and Memcached versions are incompatible, you will get an error message
something like the following:
PHP Warning: PHP Startup: memcached: Unable to initialize module
Module compiled with module API=20100525
PHP compiled with module API=20131226
These options need to match
in Unknown on line 0
If this happens, you need to compile the module from the source code. For more
information, see Compiling the Source Code for the ElastiCache Cluster Client for
PHP (p. 104).
To determine your Amazon EC2 AMI architecture (64-bit or 32-bit)
1. Sign in to the AWS Management Console and open the Amazon EC2 console at https://
console.aws.amazon.com/ec2/.
2. In the Instances list, click your Amazon EC2 instance.
3. In the Description tab, look for the AMI: field. A 64-bit instance should have x86_64 as part of the
description; for a 32-bit instance, look for i386 or i686 in this field.
API Version 2015-02-02
98

Amazon ElastiCache User Guide
Installing & Compiling Clients
You are now ready to download the ElastiCache Cluster Client.
To download the ElastiCache Cluster Client for PHP
1. Sign in to the AWS Management Console and open the ElastiCache console at https://
console.aws.amazon.com/elasticache/.
2. From the ElastiCache console, click Download ElastiCache Cluster Client.
3. Choose the ElastiCache Cluster Client that matches your PHP version and AMI architecture, and
click the Download ElastiCache Cluster Client button.
Installation Steps for New Users
Topics
•Installing PHP 7.x for New Users (p. 99)
•Installing PHP 5.x for New Users (p. 100)
Installing PHP 7.x for New Users
To install PHP 7 on a Ubuntu Server 14.04 LTS AMI (64-bit and 32-bit)
1. Launch a new instance from the AMI.
2. Run the following commands:
sudo apt-get update
sudo apt-get install gcc g++
3. Install PHP 7.
4. Download and unzip Amazon ElastiCache Cluster Client.
5. With root permissions, copy the extracted artifact file amazon-elasticache-cluster-
client.so into /usr/lib/php/20151012.
6. Insert the line extension=amazon-elasticache-cluster-client.so into the file /etc/
php/7.0/cli/php.ini.
To install PHP 7 on an Amazon Linux 201509 AMI or Red Hat 7 AMI
1. Launch a new instance from the AMI.
2. Run the following command:
sudo yum install gcc-c++
3. Install PHP 7.
4. Download and unzip Amazon ElastiCache Cluster Client.
5. With root permission, copy the extracted artifact file amazon-elasticache-cluster-
client.so into /usr/lib64/php/modules/.
6. Insert the line extension=amazon-elasticache-cluster-client.so into file /etc/
php.ini.
To install PHP 7 on an SUSE Linux AMI
1. Launch a new instance from the AMI.
API Version 2015-02-02
99

Amazon ElastiCache User Guide
Installing & Compiling Clients
2. Run the following command:
sudo zypper install gcc
3. Install PHP 7.
4. Download and unzip Amazon ElastiCache Cluster Client.
5. With root permission, copy the extracted artifact file amazon-elasticache-cluster-
client.so into /usr/lib64/php7/extensions/.
6. Insert the line extension=amazon-elasticache-cluster-client.so into the file /etc/
php7/cli/php.ini.
Installing PHP 5.x for New Users
To install PHP 5 on an Amazon Linux AMI 2014.03 (64-bit and 32-bit)
1. Launch an Amazon Linux instance (either 64-bit or 32-bit) and log into it.
2. Install PHP dependencies:
$ sudo yum install gcc-c++ php php-pear
3. Download the correct php-memcached package for your Amazon EC2 instance and PHP version.
For more information, see Downloading the Installation Package (p. 98).
4. Install php-memcached. The URI should be the download path for the installation package:
$ sudo pecl install <package download path>
Here is a sample installation command for PHP 5.4, 64-bit Linux. In this sample, replace X.Y.Z
with the actual version number:
$ sudo pecl install /home/AmazonElastiCacheClusterClient-X.Y.Z-
PHP54-64bit.tgz
Note
Please use the latest version of the install artifact.
5. With root/sudo permission, add a new file named memcached.ini in the /etc/php.d directory,
and insert "extension=amazon-elasticache-cluster-client.so" in the file:
$ echo "extension=amazon-elasticache-cluster-client.so" | sudo tee /etc/
php.d/memcached.ini
To install PHP 5 on a Red Hat Enterprise Linux 7.0 AMI (64-bit and 32-bit)
1. Launch a Red Hat Enterprise Linux instance (either 64-bit or 32-bit) and log into it.
2. Install PHP dependencies:
$ sudo yum install gcc-c++ php php-pear
3. Download the correct php-memcached package for your Amazon EC2 instance and PHP version.
For more information, see Downloading the Installation Package (p. 98).
4. Install php-memcached. The URI should be the download path for the installation package:
API Version 2015-02-02
100

Amazon ElastiCache User Guide
Installing & Compiling Clients
$ sudo pecl install <package download path>
5. With root/sudo permission, add a new file named memcached.ini in the /etc/php.d directory,
and insert extension=amazon-elasticache-cluster-client.so in the file.
$ echo "extension=amazon-elasticache-cluster-client.so" | sudo tee /etc/
php.d/memcached.ini
Other Linux distributions
On some systems, notably CentOS7 and Red Hat Enterprise Linux (RHEL) 7.1, libsasl2.so.3
has replaced libsasl2.so.2. On those systems, when you load the ElastiCache cluster client,
it attempts and fails to find and load libsasl2.so.2. To resolve this issue, create a symbolic
link to libsasl2.so.3 so that when the client attempts to load libsasl2.so.2, it is redirected to
libsasl2.so.3. The following code creates this symbolic link.
$ cd /usr/lib64
$ sudo ln libsasl2.so.3 libsasl2.so.2
To install PHP 5 on a Ubuntu Server 14.04 LTS AMI (64-bit and 32-bit)
1. Launch an Ubuntu Linux instance (either 64-bit or 32-bit) and log into it.
2. Install PHP dependencies:
$ sudo apt-get update
sudo apt-get install gcc g++ php5 php-pear
3. Download the correct php-memcached package for your Amazon EC2 instance and PHP version.
For more information, see Downloading the Installation Package (p. 98).
4. Install php-memcached. The URI should be the download path for the installation package.
$ sudo pecl install <package download path>
Note
This installation step installs the build artifact amazon-elasticache-cluster-
client.so into the /usr/lib/php5/20121212* directory. Please verify the absolute
path of the build artifact because it is needed by the next step.
If the previous command doesn't work, you need to manually extract the PHP client artifact
amazon-elasticache-cluster-client.so from the downloaded *.tgz file, and copy it to
the /usr/lib/php5/20121212* directory.
$ tar -xvf <package download path>
cp amazon-elasticache-cluster-client.so /usr/lib/php5/20121212/
5. With root/sudo permission, add a new file named memcached.ini in the /etc/php5/cli/
conf.d directory, and insert "extension=<absolute path to amazon-elasticache-cluster-client.so>"
in the file.
$ echo "extension=<absolute path to amazon-elasticache-cluster-client.so>"
| sudo tee /etc/php5/cli/conf.d/memcached.ini
API Version 2015-02-02
101

Amazon ElastiCache User Guide
Installing & Compiling Clients
To install PHP 5 for SUSE Linux Enterprise Server 11 AMI (64-bit or 32-bit)
1. Launch a SUSE Linux instance (either 64-bit or 32-bit) and log into it.
2. Install PHP dependencies:
$ sudo zypper install gcc php53-devel
3. Download the correct php-memcached package for your Amazon EC2 instance and PHP version.
For more information, see Downloading the Installation Package (p. 98).
4. Install php-memcached. The URI should be the download path for the installation package.
$ sudo pecl install <package download path>
5. With root/sudo permission, add a new file named memcached.ini in the /etc/php5/conf.d
directory, and insert extension=amazon-elasticache-cluster-client.so in the file.
$ echo "extension=amazon-elasticache-cluster-client.so" | sudo tee /etc/
php5/conf.d/memcached.ini
Note
If Step 5 doesn't work for any of the previous platforms, please verify the install path for
amazon-elasticache-cluster-client.so, and specify the full path of the binary in the
extension. Also, verify that the PHP in use is a supported version. We support versions 5.3
through 5.5.
For Users Who Already Have php-memcached Extension Installed
To update the php-memcached installation
1. Remove the previous installation of the Memcached extension for PHP as described by the topic
Removing the PHP Cluster Client (p. 102).
2. Install the new ElastiCache php-memcached extension as described previously in Installation
Steps for New Users (p. 99).
Removing the PHP Cluster Client
Topics
•Removing an earlier version of PHP 7 (p. 102)
•Removing an earlier version of PHP 5 (p. 103)
Removing an earlier version of PHP 7
To remove an earlier version of PHP 7
1. Remove the amazon-elasticache-cluster-client.so file from the appropriate PHP lib
directory as previously indicated in the installation instructions. See the section for your installation
at For Users Who Already Have php-memcached Extension Installed (p. 102).
2. Remove the line extension=amazon-elasticache-cluster-client.so from the php.ini
file.
API Version 2015-02-02
102

Amazon ElastiCache User Guide
Installing & Compiling Clients
Removing an earlier version of PHP 5
To remove an earlier version of PHP 5
1. Remove the php-memcached extension:
$ sudo pecl uninstall __uri/AmazonElastiCacheClusterClient
2. Remove the memcached.ini file added in the appropriate directory as indicated in the previous
installation steps.
API Version 2015-02-02
103

Amazon ElastiCache User Guide
Installing & Compiling Clients
Compiling the Source Code for the ElastiCache Cluster Client
for PHP
This section covers how to obtain and compile the source code for the ElastiCache Cluster Client for
PHP.
There are two packages you need to pull from GitHub and compile; aws-elasticache-cluster-client-
libmemcached and aws-elasticache-cluster-client-memcached-for-php.
Topics
•Compiling the libmemcached Library (p. 104)
•Compiling the ElastiCache Memcached Auto Discovery Client for PHP (p. 104)
Compiling the libmemcached Library
To compile the aws-elasticache-cluster-client-libmemcached library
1. Launch an Amazon EC2 instance.
2. Install the library dependencies.
• On Amazon Linux 201509 AMI
sudo yum install gcc gcc-c++ autoconf libevent-devel
• On Ubuntu 14.04 AMI
sudo apt-get update
sudo apt-get install libevent-dev gcc g++ make autoconf libsasl2-dev
3. Pull the repository and compile the code.
git clone https://github.com/awslabs/aws-elasticache-cluster-client-
libmemcached.git
cd aws-elasticache-cluster-client-libmemcached
mkdir BUILD
cd BUILD
../configure --prefix=<libmemcached-install-directory> --with-pic
make
sudo make install
Compiling the ElastiCache Memcached Auto Discovery Client for PHP
The following sections describe how to compile the ElastiCache Memcached Auto Discovery Client
Topics
•Compiling the ElastiCache Memcached Client for PHP 7 (p. 104)
•Compiling the ElastiCache Memcached Client for PHP 5 (p. 105)
Compiling the ElastiCache Memcached Client for PHP 7
Run the following set of commands under the code directory:
phpize
API Version 2015-02-02
104

Amazon ElastiCache User Guide
Installing & Compiling Clients
./configure --with-libmemcached-dir=<path to libmemcached build directory> --
disable-memcached-sasl
make
make install
Note
You can statically link the libmemcached library into the PHP binary so it can be ported across
various Linux platforms. To do that, run the following command before make:
sed -i "s#-lmemcached#<libmemcached build directory>/lib/libmemcached.a
-lcrypt -lpthread -lm -lstdc++ -lsasl2#" Makefile
Compiling the ElastiCache Memcached Client for PHP 5
Compile the aws-elasticache-cluster-client-memcached-for-php by running the following
commands under the aws-elasticache-cluster-client-memcached-for-php/ folder.
phpize
./configure --with-libmemcached-dir=<path to libmemcached build directory>
make
make install
API Version 2015-02-02
105

Amazon ElastiCache User Guide
Configuring Clients
Configuring ElastiCache Clients
An ElastiCache cluster is protocol-compliant with Memcached or Redis, depending on which cache
engine was selected when the cluster was created. The code, applications, and most popular tools that
you use today with your existing Memcached or Resdis environments will work seamlessly with the
service.
This section discusses specific considerations for connecting to cache nodes in ElastiCache.
Topics
•Restricted Commands (p. 106)
•Finding Cache Node Endpoints and Port Numbers (p. 106)
•Connecting for Using Auto Discovery (p. 107)
•Connecting to Clusters in a Replication Group (p. 108)
•DNS Names and Underlying IP (p. 109)
Restricted Commands
In order to deliver a managed service experience, ElastiCache restricts access to certain cache
engine-specific commands that require advanced privileges.
• For cache clusters running Memcached, there are no restricted commands.
• For cache clusters running Redis, the following commands are unavailable:
•bgrewriteaof
•bgsave
•config
•debug
•migrate
•save
•slaveof
•shutdown
Finding Cache Node Endpoints and Port Numbers
To connect to a cache node, your application needs to know the endpoint and port number for that
node.
Finding Cache Node Endpoints and Port Numbers (Console)
To determine cache node endpoints and port numbers
1. Sign in to the Amazon ElastiCache Management Console and click Cache Clusters.
2. Click the name of your cache cluster.
3. Click the Nodes tab. All of the nodes in the cache cluster are displayed, along with the fully
qualified DNS names and port numbers.
Finding Cache Node Endpoints and Port Numbers (AWS CLI)
To determine cache node endpoints and port numbers, use the command describe-cache-
clusters with the --show-cache-node-info parameter.
API Version 2015-02-02
106

Amazon ElastiCache User Guide
Configuring Clients
aws elasticache describe-cache-clusters --show-cache-node-info
This command should produce output similar to the following:
CACHECLUSTER my-memcached https://console.aws.amazon.com/elasticache/
home#client-download: 2013-07-09T22:12:42.151Z cache.t1.micro memcached
available 1 us-west-2a 1.4.14
CACHESECURITYGROUP default active
CACHEPARAMETERGROUP default.memcached1.4 in-sync
CACHENODE 0001 available my-memcached.f310xz.cache.amazonaws.com
11211 in-sync
CACHECLUSTER my-redis-primary https://console.aws.amazon.com/elasticache/
home#client-download: 2013-07-10T22:47:16.586Z cache.m1.small redis
available 1 us-west-2a 2.6.13 repgroup01
CACHESECURITYGROUP default active
CACHEPARAMETERGROUP default redis2.6 in-sync
CACHENODE 0001 available my-redis-
primary.f310xz.0001.cache.amazonaws.com 6379 in-sync
CACHECLUSTER my-redis-replica-01 https://console.aws.amazon.com/
elasticache/home#client-download: 2013-07-10T23:11:07.704Z cache.m1.small
redis available 1 us-west-2b 2.6.13 repgroup01
CACHESECURITYGROUP default active
CACHEPARAMETERGROUP default redis2.6 in-sync
CACHENODE 0001 available my-redis-
replica-01.f310xz.0001.cache.amazonaws.com 6379 in-sync
The fully qualified DNS names and port numbers are in the CACHENODE lines in the output.
Finding Cache Node Endpoints and Port Numbers (ElastiCache API)
To determine cache node endpoints and port numbers, use the action DescribeCacheClusters with
the ShowCacheNodeInfo=true parameter.
Example
https://elasticache.us-west-2.amazonaws.com /
?Action=DescribeCacheClusters
&ShowCacheNodeInfo=true
&SignatureVersion=4
&SignatureMethod=HmacSHA256
&Timestamp=20140421T220302Z
&Version=2014-09-30
&X-Amz-Algorithm=AWS4-HMAC-SHA256
&X-Amz-Credential=<credential>
&X-Amz-Date=20140421T220302Z
&X-Amz-Expires=20140421T220302Z
&X-Amz-Signature=<signature>
&X-Amz-SignedHeaders=Host
Connecting for Using Auto Discovery
If your applications use Auto Discovery, you only need to know the configuration endpoint for the
cluster, rather than the individual endpoints for each cache node. For more information, see Node Auto
Discovery (Memcached) (p. 82).
API Version 2015-02-02
107

Amazon ElastiCache User Guide
Configuring Clients
Note
At this time, Auto Discovery is only available for cache clusters running Memcached.
Connecting to Clusters in a Replication Group
Note
At this time, replication groups and read replicas are only supported for cache clusters running
Redis.
For replication groups, ElastiCache provides console, CLI, and API interfaces to obtain connection
information for individual nodes.
For read-only activity, applications can connect to any node in the replication group. However, for write
activity, we recommend that your applications connect to the primary endpoint for the replication group
instead of connecting directly to the primary node. This will ensure that your applications can always
find the current primary node, even if you decide to reconfigure your replication group by promoting a
read replica to the primary role.
Connecting to Clusters in a Replication Group (Console)
To determine endpoints and port numbers
1. Sign in to the Amazon ElastiCache Management Console and click Cache Clusters.
2. Click Replication Group and choose your replication group.
3. Click the Node Groups tab. All of the read replicas and the node group endpoint are displayed,
with fully qualified DNS names and port numbers for each.
Connecting to Clusters in a Replication Group (AWS CLI)
To determine cache node endpoints and port numbers
Use the command describe-replication-groups with the name of your replication group:
aws elasticache describe-replication-groups my-repgroup
This command should produce output similar to the following:
REPLICATIONGROUP my-repgroup My replication group available
CLUSTERID my-redis-primary
CLUSTERID my-replica-1
NODEGROUP 0001 my-repgroup.f310xz.ng.0001.cache.amazonaws.com 6379
available
NODEGROUPMEMBER my-redis-primary 0001 my-redis-
primary.f310xz.0001.cache.amazonaws.com 6379 us-west-2a primary
NODEGROUPMEMBER my-replica-1 0001 my-
replica-1.f310xz.0001.cache.amazonaws.com 6379 us-west-2b replica
Connecting to Clusters in a Replication Group (ElastiCache API)
To determine cache node endpoints and port numbers
Call DescribeReplicationGroups with the following parameter:
ReplicationGroupId = the name of your replication group.
API Version 2015-02-02
108

Amazon ElastiCache User Guide
Configuring Clients
Example
https://elasticache.us-west-2.amazonaws.com /
?Action=DescribeCacheClusters
&ReplicationGroupId=repgroup01
&Version=2014-09-30
&SignatureVersion=4
&SignatureMethod=HmacSHA256
&Timestamp=20140421T220302Z
&X-Amz-Algorithm=AWS4-HMAC-SHA256
&X-Amz-Date=20140421T220302Z
&X-Amz-SignedHeaders=Host
&X-Amz-Expires=20140421T220302Z
&X-Amz-Credential=<credential>
&X-Amz-Signature=<signature>
DNS Names and Underlying IP
Memcached and Redis clients maintain a server list containing the addresses and ports of the servers
holding the cache data. When using ElastiCache, the DescribeCacheClusters API (or the describe-
cache-clusters command line utility) returns a fully qualified DNS entry and port number that can be
used for the server list.
Important
It is important that client applications are configured to frequently resolve DNS names of
cache nodes when they attempt to connect to a cache node endpoint.
VPC Installations
ElastiCache ensures that both the DNS name and the IP address of the cache node remain the same
when cache nodes are recovered in case of failure.
Non-VPC Installations
ElastiCache ensures that the DNS name of a cache node is unchanged when cache nodes are
recovered in case of failure; however, the underlying IP address of the cache node can change.
Most Memcached and Redis client libraries support persistent cache node connections by default.
We recommend using persistent cache node connections when using ElastiCache. Client-side DNS
caching can occur in multiple places, including client libraries, the language runtime, or the client
operating system. You should review your application configuration at each layer to ensure that you are
frequently resolving IP addresses for your cache nodes.
API Version 2015-02-02
109

Amazon ElastiCache User Guide
Memcached Versions
ElastiCache Clusters
A cluster is a collection of one or more cache nodes, all of which run an instance of supported cache
engine software, Memcached or Redis. When you create a cache cluster, you specify the cache engine
that all of the nodes will use.
The following diagram illustrates a typical Memcached and a typical Redis cluster. Memcached clusters
contain from 1 to 20 nodes across which you can horizontally partition your data. Redis clusters contain
a single node. You can group up to 6 Redis clusters together in a replication group with one read/write
primary cluster and up to 5 read replica clusters. If you need more than 20 nodes in a Memcached
cluster, or more than 50 nodes total in a region, please fill out the ElastiCache Limit Increase Request
form at http://aws.amazon.com/contact-us/elasticache-node-limit-request/.
Typical Memcached and Redis Clusters
Most ElastiCache operations are performed at the cluster level. You can set up a cache cluster with
a specific number of cache nodes and a cache parameter group that controls the properties for each
cache node. All cache nodes within a cluster are designed to be of the same node type and have the
same parameter and security group settings.
Every cluster must have a cluster identifier. The cluster identifier is a customer-supplied "name" for the
cluster. This identifier specifies a particular cluster when interacting with the ElastiCache API and AWS
CLI commands. The cluster identifier must be unique for that customer in an AWS region.
ElastiCache supports multiple versions of each engine. Unless you have specific reasons, we
recommend always using the your engine's latest version.
Memcached Versions
•Memcached Version 1.4.24 (p. 29)
•Memcached Version 1.4.14 (p. 30)
API Version 2015-02-02
110

Amazon ElastiCache User Guide
Redis Versions
•Memcached Version 1.4.5 (p. 30)
Redis Versions
•Redis Version 2.8.23 (p. 31)
•Redis Version 2.8.22 (p. 31)
•Redis Version 2.8.19 (p. 32)
•Redis Version 2.8.6 (p. 32)
•Redis Version 2.6.13 (p. 32)
Other ElastiCache Cluster Operations
Additional operations involving clusters:
•Finding Your ElastiCache Endpoints (p. 39)
•Accessing ElastiCache Resources from Outside AWS (p. 304)
Topics
•Creating a Cluster (p. 112)
•Viewing a Cluster's Details (p. 122)
•Modifying an ElastiCache Cache Cluster (p. 124)
•Rebooting a Cluster (p. 127)
•Monitoring a Cluster's Costs (p. 129)
•Adding Nodes to a Cluster (p. 129)
•Removing Nodes from a Cluster (p. 134)
•Canceling Pending Add or Delete Node Operations (p. 139)
•Deleting a Cluster (p. 140)
API Version 2015-02-02
111

Amazon ElastiCache User Guide
Creating a Cluster
Creating a Cluster
When you launch an Amazon ElastiCache cluster, you can select to use the Memcached or Redis
engine. To determine which engine will best suit your needs, go to Engines and Versions (p. 27) in this
guide.
In this section you will find instructions on creating a cluster using the ElastiCache console, AWS CLI,
or ElastiCache API.
Knowing the answers to these questions before you begin will expedite creating your cluster.
• Which engine you will use?
For a comparison of engines and engine versions, go to Engines and Versions (p. 27).
• Which node instance type do you need?
For guidance on selecting an instance node type, go to Selecting Your Node Size (p. 66).
• Will you launch your cluster in a VPC or an Amazon VPC?
Important
If you're going to launch your cluster in an Amazon VPC, you need to create a subnet
group before you start creating a cluster. For more information, go to Subnets and Subnet
Groups (p. 265).
Note
ElastiCache is intended to be accessed from within AWS using Amazon EC2 instances.
However, you can provide access to an ElastiCache cluster from outside AWS if the cluster
is hosted inside a VPC. For more information, see Accessing ElastiCache Resources from
Outside AWS (p. 304).
• Do you need to customize any parameter values?
If you do, you need to create a custom Parameter Group. For more information, go to Creating a
Parameter Group (p. 234).
If you're running Redis you may want to consider at least setting reserved-memory. For more
information go to, Ensuring You Have Sufficient Memory to Create a Redis Snapshot (p. 49).
• Do you need to create your own Security Group or VPC Security Group?
For more information, go to Cache Security Groups [EC2-Classic] (p. 224) and Security in Your
VPC.
• How do you intend to implement fault tolerance?
For more information, go to Mitigating Failures (p. 51).
Topics
•Creating a Memcached Cache Cluster (Console) (p. 113)
•Creating a Redis Cache Cluster (Console) (p. 116)
•Creating a Cache Cluster (AWS CLI) (p. 120)
•Creating a Cache Cluster (ElastiCache API) (p. 120)
API Version 2015-02-02
112

Amazon ElastiCache User Guide
Creating a Memcached Cache Cluster (Console)
Creating a Memcached Cache Cluster (Console)
Topics
•Prerequisites (p. 113)
•Screen 1: Select the Memcached Engine (p. 113)
•Screen 2: Specify Cluster Details (p. 113)
•Screen 3: Configure Advanced Settings (p. 114)
•Screen 4: Review and Launch (p. 115)
When you use the Memcached engine, Amazon ElastiCache supports horizontally partitioning your
data over multiple nodes. Memcached enables auto discovery so you don't need to keep track of the
endpoints for each node. Memcached tracks each node's endpoint, updating the endpoint list as nodes
are added and removed. All your application needs to interact with the cluster is the configuration
endpoint. For more information on auto discovery, see Node Auto Discovery (Memcached) (p. 82).
To create a new Memcached cluster using the ElastiCache console, do the following:
Prerequisites
1. Sign in to the AWS Management Console and open the ElastiCache console at https://
console.aws.amazon.com/elasticache/.
2. On the ElastiCache console dashboard, select Launch Cache Cluster to start the Launch Cache
Cluster wizard.
Screen 1: Select the Memcached Engine
Before you proceed, be sure you have completed the Prerequisites section.
To select your cluster's engine:
1.
On the Select Engine screen, select the Memcached tab.
2. Select Next.
Screen 2: Specify Cluster Details
Before you proceed, be sure you have completed Screen 1: Select the Memcached Engine.
To configure your cluster's specifications and details:
1. In the Cluster Specifications section of the Cluster Details page, specify settings as shown
following:
a. Engine: Memcached
b. Engine Version: From the list, select the version of the cache engine to run for this cluster.
Unless you have a specific reason not to, we recommend you select the latest engine version.
Important
You can upgrade to newer engine versions (see Upgrading Cache Engine
Versions (p. 32)), but you cannot downgrade to older engine versions except by
deleting the existing cache cluster and creating it anew.
c. Port: Type a new port number for your cluster, or leave it at its default value. For Memcached,
the default port is 11211.
API Version 2015-02-02
113

Amazon ElastiCache User Guide
Creating a Memcached Cache Cluster (Console)
d. Parameter Group: From the list, select a parameter group for this cluster. Parameter groups
control the run-time parameters of your cluster. For more information on parameter groups,
see Memcached Specific Parameters (p. 247).
2. In the Configuration section of the Specify Cluster Details page, specify settings as shown
following:
a. Cluster Name: Type a meaningful name for this cluster.
Cluster name constraints are as follows:
• A cluster's name must contain from 1 to 20 alphanumeric characters or hyphens.
• The first character must be a letter.
• A name cannot end with a hyphen or contain two consecutive hyphens.
b. Node Type: From the list, select the node type you want to use for this cluster. For
information on node types, see Memcached Specific Parameters (p. 247).
c. Number of Nodes: Type in the number of nodes you want launched for this cluster.
For Memcached, you may have from 1 to 20 nodes in a cluster. If you want to use the
Memcached Flexible Zone Placement functionality, type a value between 2 and 20. You incur
a charge for each node.
3. Select Next.
Screen 3: Configure Advanced Settings
Before you proceed, be sure you have completed Screen 2: Specify Cluster Details.
To configure your cluster's advanced settings:
1. In the Network & Security section of the Configure Advanced Settings page, specify settings
as shown following:
a. Cache Subnet Group: From the dropdown list, select the subnet group you want this cluster
associated with.
• To launch this cluster in a VPC (recommended), select a VPC subnet group.
• To launch this cluster outside a VPC, select Not in VPC. The cluster will be launched in the
AWS public cloud.
b. Availability Zones: From the drop down list, select how you want the availability zones for
the nodes in this cluster determined.
•No Preference: ElastiCache will select the availability zones for your cluster's nodes.
•Spread Nodes Across Zones: ElastiCache will select the availability zones for your
cluster's nodes. The nodes will be distributed as evenly as practical across the availability
zones that support your node type.
•Specify Zones: The console expands to list all the availability zones in your region that
support this cluster's node-type. Behind each zone is a box. Type in the number of nodes
you want launched in that availability zone.
Note
The total of the values you type into these boxes must equal then number of nodes
you specified in the previous screen.
c. Cache Security Groups or VPC Security Groups: Select the security groups for this cluster.
If you selected a VPC, the list is of VPC security groups. If you select Not in VPC, the list is of
cache security groups.
API Version 2015-02-02
114

Amazon ElastiCache User Guide
Creating a Memcached Cache Cluster (Console)
For more information about Amazon VPC security groups, see http://docs.aws.amazon.com/
AmazonVPC/latest/UserGuide/VPC_SecurityGroups.html.
For more information about ElastiCache security groups, see ElastiCache Security (p. 13) and
Cache Security Groups [EC2-Classic] (p. 224).
2. In the Maintenance section of the Configure Advanced Settings page, specify settings as
shown following:
a. Maintenance Window: Select how you want the maintenance window selected.
•Select Window: Specify the day of the week to start maintenance, the UTC time to start
maintenance, and the duration in hours of the maintenance window.
•No Preference: ElastiCache selects the maintenance window. This setting is the default.
We recommend specifying a maintenance window so that downtime for maintenance will have
the least impact upon your business.
b. Topic for SNS Notification: From the list, select an existing Amazon Simple Notification
Service (Amazon SNS) topic, or select Manual ARN input and type in the topic Amazon
Resource Name (ARN). Amazon SNS allows you to push notifications to Internet-connected
smart devices. The default is to disable notifications. For more information, see http://
aws.amazon.com/sns/.
3. Select Next.
Screen 4: Review and Launch
Before you continue, be sure you have completed Screen 3: Configure Advanced Settings.
To review your settings and launch your cluster
1. Review all your settings to ensure each value is what you want.
2. If you need to make changes, select Previous to return to previous screens and make your
changes; otherwise, select Launch Cache Cluster to launch your cluster.
3. To return to the Cache Clusters screen, select Close on the Success screen.
Your cluster will have the status creating while it is being created. When the status changes to
available, it's ready for use.
Important
As soon as your cluster becomes available, you're billed for each hour or partial hour that the
cluster is active, even if you're not using it. To stop incurring charges for this cluster, you must
delete it. See Deleting a Cluster (p. 140).
API Version 2015-02-02
115

Amazon ElastiCache User Guide
Creating a Redis Cache Cluster (Console)
Creating a Redis Cache Cluster (Console)
You can create a Redis cluster using the ElastiCache management console, the AWS Command Line
Interface (CLI), or the ElastiCache API.
Topics
•Prerequisites (p. 116)
•Screen 1: Select the Redis Engine (p. 116)
•Screen 2: Specify Cluster Details (p. 116)
•Screen 3: Configure Advanced Settings (p. 118)
•Screen 4: Review and Launch (p. 119)
ElastiCache supports replication when you use the Redis engine. To monitor the latency
between when data is written to a Redis read/write primary cluster and when it is
propagated to a read-only secondary cluster, ElastiCache adds to the cluster a special key,
ElastiCacheMasterReplicationTimestamp, which is the current Universal Coordinated Time
(UTC) time. Because a Redis cluster might be added to a replication group at a later time, this key is
included in all Redis clusters, even if initially they are not members of a replication group. For more
information on replication groups, see ElastiCache Replication (Redis) (p. 163).
To create a Redis cluster using the ElastiCache console, do the following:
Prerequisites
1. Sign in to the AWS Management Console and open the ElastiCache console at https://
console.aws.amazon.com/elasticache/.
2. On the ElastiCache console dashboard, select Launch Cache Cluster to start the Launch Cache
Cluster wizard.
Screen 1: Select the Redis Engine
Before you proceed, be sure you have completed the Prerequisites section.
To select your cluster's engine:
1.
On the Select Engine screen, select the Redis tab.
2. Select Next.
Screen 2: Specify Cluster Details
Before you proceed, be sure you have completed Screen 1: Select the Redis Engine.
To configure your cluster's specifications and details:
1. In the Cluster Specifications section of the Specify Cluster Details page, specify settings as
shown following:
a. Engine: Redis
b. Engine Version: From the list, select the version of the cache engine to run for this cluster.
Unless you have a specific reason not to, we recommend you select the latest engine version.
API Version 2015-02-02
116

Amazon ElastiCache User Guide
Creating a Redis Cache Cluster (Console)
Important
You can upgrade to newer engine versions (see Upgrading Cache Engine
Versions (p. 32)), but you cannot downgrade to older engine versions except by
deleting the existing cache cluster or replication group and creating it anew.
Because the newer Redis versions provide a better and more stable user experience,
Redis versions 2.6.13, 2.8.6, and 2.8.19 are deprecated from the ElastiCache Management
Console. While we recommend against it, if you must use one of these older Redis versions,
you can use the AWS CLI or ElastiCache API.
For more information see the following topics:
AWS CLI ElastiCache API
Create Cache Cluster Creating a Cache Cluster
(AWS CLI) (p. 120) Creating a Cache Cluster
(ElastiCache API) (p. 120)
Modify Cache Cluster Modifying a Cache Cluster
(AWS CLI) (p. 125) Modifying a Cache Cluster
(ElastiCache API) (p. 125)
Create Replication Group Creating a Replication
Group Without an Available
Redis Cache Cluster (AWS
CLI) (p. 180)
Creating a Replication Group
Without an Available Redis
Cache Cluster (ElastiCache
API) (p. 182)
Modify Replication Group Modifying a Replication
Group (AWS CLI) (p. 190) Modifying a Replication
Group (ElastiCache
API) (p. 190)
c. Cache Port: Type a new port number for your cluster, or leave it at its default value. For
Redis, the default port is 6379.
d. Parameter Group: From the list, select a parameter group for this cluster. Parameter groups
control the run-time parameters of your cluster. For more information on parameter groups,
see Redis Node-Type Specific Parameters (p. 263).
e. Enable Replication:
To create a single Redis cluster, uncheck this box.
To create a Redis replication group, leave this box checked.
f. Multi-AZ: To enable automatic failover of a primary node on this replication group, leave this
box checked.
You are able to locate your Redis clusters in multiple availability zones whether or not this box
is checked.
This option is only available if the Enable Replication box is checked.
For more information on Multi-AZ, go to Replication with Multi-AZ and Automatic Failover
(Redis) (p. 166).
2. In the Configuration section of the Specify Cluster Details page, specify settings as shown
following:
a. Cluster Name/Replication Group Name: Type a meaningful name for this cluster or
replication group.
Cluster name constraints are as follows:
• A cluster's name must contain from 1 to 20 alphanumeric characters or hyphens.
API Version 2015-02-02
117

Amazon ElastiCache User Guide
Creating a Redis Cache Cluster (Console)
• The first character must be a letter.
• A name cannot end with a hyphen or contain two consecutive hyphens.
b. Replication Group Description: If Enable Replication is checked, type a meaningful
description for the replication group in the Replication Group Description box.
c. Node Type: From the list, select the node type you want to use for this cluster. For
information on node types, see Redis Node-Type Specific Parameters (p. 263).
d. Number of Read Replicas: If Enable Replication is checked, from the list, select the
number of read replica clusters you want for this replication group.
e. S3 Location of Redis RDB file: Amazon S3 location of the .rdb file used to seed this cluster.
If this is left blank, this cluster will not be seeded upon creation. For more information on
snapshots and seeding a Redis cluster, see ElastiCache Backup & Restore (Redis) (p. 198)
and Using a Snapshot to Seed a Cluster (p. 218).
3. Select Next.
Screen 3: Configure Advanced Settings
Before you proceed, be sure you have completed Screen 2: Specify Cluster Details.
To configure your cluster's advanced settings:
1. In the Network & Security section of the Configure Advanced Settings page, specify settings
as shown following:
a. Cache Subnet Group: From the dropdown list, select the subnet group you want this cluster
associated with.
• To launch this cluster in a VPC (recommended), select a VPC subnet group.
• To launch this cluster outside a VPC, select Not in VPC. The cluster will be launched in the
AWS public cloud.
b. Availability Zones: From the drop down list, select the availability zone for each cluster.
To have ElastiCache select the zone for you, select No Preference.
c. Cache Security Groups or VPC Security Groups: Select the security groups for this cluster.
If you selected a VPC, the list is of VPC security groups. If you select Not in VPC, the list is of
cache security groups.
For more information about Amazon VPC security groups, see http://docs.aws.amazon.com/
AmazonVPC/latest/UserGuide/VPC_SecurityGroups.html.
For more information about ElastiCache security groups, see ElastiCache Security (p. 13) and
Cache Security Groups [EC2-Classic] (p. 224).
2. In the Backup section of the Configure Advanced Settings page, specify settings as shown
following:
•Enable Automatic Backups: To schedule regular automatic backups of your cluster, check this
box.
•Unchecked: Default. Leaving this unchecked means that ElastiCache will not schedule
automatic backups of this cluster. If you want a backup, you must create a manual backup.
For more information, see Taking Manual Snapshots (p. 202).
•Checked: Checking this box causes ElastiCache to schedule regular automatic backups of
this cluster. You can also perform manual backups if you so choose.
When this box is checked, the console expands so you can specify the number of days a
backup is to be retained before deleting, and, optionally, specify when you want the automatic
API Version 2015-02-02
118

Amazon ElastiCache User Guide
Creating a Redis Cache Cluster (Console)
backups scheduled. If you do not specify the schedule, automatic backups are created on a
schedule set by ElastiCache.
3. In the Maintenance section of the Configure Advanced Settings page, specify settings as
shown following:
•Maintenance Window: Select how you want the maintenance window selected.
•Select Window: The screen expands so you can, specify the day of the week to start
maintenance, the UTC time to start maintenance, and the duration in hours of the
maintenance window.
•No Preference: ElastiCache selects the maintenance window. This setting is the default.
We recommend specifying a maintenance window so that downtime for maintenance will have
the least impact upon your business.
4. Topic for SNS Notification: From the list, select an existing Amazon Simple Notification Service
(Amazon SNS) topic, or select Manual ARN input and type in the topic Amazon Resource Name
(ARN). Amazon SNS allows you to push notifications to Internet-connected smart devices. The
default is to disable notifications. For more information, see http://aws.amazon.com/sns/.
5. Select Next.
Screen 4: Review and Launch
Before you continue, be sure you have completed Screen 3: Configure Advanced Settings.
To review your settings and launch your cluster
1. Review all your settings to ensure each value is what you want.
2. If you need to make changes, select Previous to return to previous screens and make your
changes; otherwise, select Launch Cache Cluster or Launch Replication Group to create your
cluster or replication group.
3. To return to the Cache Clusters screen, select Close on the Success screen.
Your cluster will have the status creating while it is being created. When the status changes to
available, it's ready for use.
Important
As soon as your cluster becomes available, you're billed for each hour or partial hour that the
cluster is active, even if you're not using it. To stop incurring charges for this cluster, you must
delete it. See Deleting a Cluster (p. 140).
API Version 2015-02-02
119

Amazon ElastiCache User Guide
Creating a Cluster Using the AWS CLI
Creating a Cache Cluster (AWS CLI)
To create a cluster using the AWS CLI, use the create-cache-cluster command. The following
example creates a single node Redis cluster named myRedisCluster and seeds it with the snapshot file
snap.rdb that has been copied to Amazon S3.
For Linux, OS X, or Unix:
aws elasticache create-cache-cluster \
--cache-cluster-id myRedisCluster \
--cache-node-type cache.r3.large \
--engine redis \
--num-cache-nodes 1 \
--snapshot-arns arn:aws:s3:myS3Bucket/snap.rdb
For Windows:
aws elasticache create-cache-cluster ^
--cache-cluster-id myRedisCluster ^
--cache-node-type cache.r3.large ^
--engine redis ^
--num-cache-nodes 1 ^
--snapshot-arns arn:aws:s3:myS3Bucket/snap.rdb
Important
As soon as your cluster becomes available, you're billed for each hour or partial hour that the
cluster is active, even if you're not using it. To stop incurring charges for this cluster, you must
delete it. See Deleting a Cluster (p. 140).
For more information, go to the AWS CLI for ElastiCache reference topic create-cache-cluster.
Creating a Cache Cluster (ElastiCache API)
To create a cluster using the ElastiCache API, use the CreateCacheCluster action. The following
example creates a single node Redis cluster named myRedisCluster and seeds it with the snapshot file
dump.rdb that has been copied to Amazon S3.
Line breaks in the following code example are added for ease of reading.
https://elasticache.us-west-2.amazonaws.com/
?Action=CreateCacheCluster
&CacheClusterId=myRedisCluster
&CacheNodeType=cache.r3.large
&Engine=redis
&NumCacheNodes=1
&SignatureVersion=4
&SignatureMethod=HmacSHA256
&SnapshotArns.member.1=arn%3Aaws%3As3%3A%3A%3AmyS3Bucket%2Fdump.rdb
&Timestamp=20150508T220302Z
&Version=2015-02-02
&X-Amz-Algorithm=AWS4-HMAC-SHA256
&X-Amz-Credential=<credential>
&X-Amz-Date=20150508T220302Z
&X-Amz-Expires=20150508T220302Z
&X-Amz-SignedHeaders=Host
API Version 2015-02-02
120

Amazon ElastiCache User Guide
Creating a Cache Cluster (ElastiCache API)
&X-Amz-Signature=<signature>
Important
As soon as your cluster becomes available, you're billed for each hour or partial hour that the
cluster is active, even if you're not using it. To stop incurring charges for this cluster, you must
delete it. See Deleting a Cluster (p. 140).
For more information, go to the ElastiCache API reference topic CreateCacheCluster.
API Version 2015-02-02
121
Amazon ElastiCache User Guide
Viewing a Cluster's Details
Viewing a Cluster's Details
You can view detail information about one or more clusters using the ElastiCache console, AWS CLI,
or ElastiCache API.
Viewing a Cluster's Details (Console)
To view a cluster's details
1. Sign in to the AWS Management Console and open the Amazon ElastiCache console at https://
console.aws.amazon.com/elasticache/.
2. In the ElastiCache console dashboard, select Cache Clusters.
3. In the list of clusters, to view a cluster's details, select the right-pointing arrow ( ) to the left of the
cluster's name.
When selected, the arrow becomes down-pointing ( ) and the cluster's details appear. To hide a
cluster's details, select the down-pointing arrow.
Viewing a Cluster's Details (AWS CLI)
You can view the details for a cluster using the AWS CLI describe-cache-clusters command. If
the --cache-cluster-id parameter is omitted, details for multiple clusters, up to --max-items,
are returned. If the --cache-cluster-id parameter is included, details for the specified cluster are
returned. You can limit the number of records returned with the --max-items parameter.
The following code lists the details for myCluster.
aws elasticache describe-cache-clusters --cache-cluster-id myCluster
The following code list the details for up to 25 clusters.
aws elasticache describe-cache-clusters --max-items 25
For more information, go to the AWS CLI for ElastiCache topic describe-cache-clusters.
Viewing a Cluster's Details (ElastiCache API)
You can view the details for a cluster using the ElastiCache API DescribeCacheClusters action.
If the CacheClusterId parameter is included, details for the specified cluster are returned. If the
CacheClusterId parameter is omitted, details for up to MaxRecords (default 100) clusters are
returned. The value for MaxRecords cannot be less than 20 or greater than 100.
The following code lists the details for myCluster.
https://elasticache.us-west-2.amazonaws.com/
?Action=DescribeCacheClusters
&CacheClusterId=myCluster
&Version=2015-02-02
&SignatureVersion=4
&SignatureMethod=HmacSHA256
&Timestamp=20150202T192317Z
&X-Amz-Credential=<credential>
API Version 2015-02-02
122

Amazon ElastiCache User Guide
Viewing a Cluster's Details (ElastiCache API)
The following code list the details for up to 25 clusters.
https://elasticache.us-west-2.amazonaws.com/
?Action=DescribeCacheClusters
&MaxRecords=25
&Version=2015-02-02
&SignatureVersion=4
&SignatureMethod=HmacSHA256
&Timestamp=20150202T192317Z
&X-Amz-Credential=<credential>
For more information, go to the ElastiCache API reference topic DescribeCacheClusters.
API Version 2015-02-02
123

Amazon ElastiCache User Guide
Modifying a Cache Cluster
Modifying an ElastiCache Cache Cluster
In addition to adding or removing nodes from a cluster, there can be times where you need to make
other changes to an existing cluster, such as, adding a security group, changing the maintenance
window or a parameter group.
We recommend that you have your maintenance window fall at the time of lowest usage. Thus it might
need modification from time to time.
Changes in a cluster's parameters by changing the cluster's parameter group or by changing the value
of a parameter in the cluster's parameter group are applied only after the cluster is rebooted.
Modifying a Cache Cluster (Console)
To modify a cluster (console)
1. Sign in to the AWS Management Console and open the ElastiCache console at https://
console.aws.amazon.com/elasticache/.
2. In the left navigation pane, select Cache Clusters.
A list of clusters appears.
3. In the Cache Clusters list, select the name of the cluster you want to modify.
4. Select Modify.
The Modify Cache Cluster window appears.
5. In the Modify Cache Cluster window, make the modification(s) you want.
Important
You can upgrade to newer engine versions (see Upgrading Cache Engine
Versions (p. 32)), but you cannot downgrade to older engine versions except by deleting
the existing cache cluster or replication group and creating it anew.
Because the newer Redis versions provide a better and more stable user experience, Redis
versions 2.6.13, 2.8.6, and 2.8.19 are deprecated from the ElastiCache Management Console.
While we recommend against it, if you must use one of these older Redis versions, you can use
the AWS CLI or ElastiCache API.
For more information see the following topics:
AWS CLI ElastiCache API
Create Cache Cluster Creating a Cache Cluster
(AWS CLI) (p. 120) Creating a Cache Cluster
(ElastiCache API) (p. 120)
Modify Cache Cluster Modifying a Cache Cluster
(AWS CLI) (p. 125) Modifying a Cache Cluster
(ElastiCache API) (p. 125)
Create Replication Group Creating a Replication
Group Without an Available
Redis Cache Cluster (AWS
CLI) (p. 180)
Creating a Replication Group
Without an Available Redis
Cache Cluster (ElastiCache
API) (p. 182)
Modify Replication Group Modifying a Replication Group
(AWS CLI) (p. 190) Modifying a Replication Group
(ElastiCache API) (p. 190)
API Version 2015-02-02
124

Amazon ElastiCache User Guide
Modifying a Cache Cluster (AWS CLI)
The Apply Immediately box applies only to modifications in node type and engine version. If
you want to apply any of these changes immediately, select the Apply Immediately box. If this
box is not selected, engine version and node type modifications will be applied during the next
maintenance window. Other modifications, such as changing the maintenance window, are applied
immediately by default.
6. Select Modify.
Modifying a Cache Cluster (AWS CLI)
You can modify an existing cluster using the AWS CLI modify-cache-cluster command. To modify
a cluster's configuration value, specify the cluster's ID, the parameter to change and the parameter's
new value. The following example changes the maintenance window for a cluster named myCluster
and applies the change immediately.
Important
You can upgrade to newer engine versions (see Upgrading Cache Engine Versions (p. 32)),
but you cannot downgrade to older engine versions except by deleting the existing cache
cluster or replication group and creating it anew.
For Linux, OS X, or Unix:
aws elasticache modify-cache-cluster \
--cache-cluster-id myCluster \
--preferred-maintenance-window sun:23:00-mon:02:00
For Windows:
aws elasticache modify-cache-cluster ^
--cache-cluster-id myCluster ^
--preferred-maintenance-window sun:23:00-mon:02:00
The --apply-immediately parameter applies only to modifications in node type, engine version,
and changing the number of nodes in a Memcached cluster. If you want to apply any of these changes
immediately, use the --apply-immediately parameter. If you prefer postponing these changes to
your next maintenance window, use the --no-apply-immediately parameter. Other modifications,
such as changing the maintenance window, are applied immediately by default.
For more information, go to the AWS CLI for ElastiCache topic modify-cache-cluster.
Modifying a Cache Cluster (ElastiCache API)
You can modify an existing cluster using the ElastiCache API ModifyCacheCluster action. To
modify a cluster's configuration value, specify the cluster's ID, the parameter to change and the
parameter's new value. The following example changes the maintenance window for a cluster named
myCluster and applies the change immediately.
Important
You can upgrade to newer engine versions (see Upgrading Cache Engine Versions (p. 32)),
but you cannot downgrade to older engine versions except by deleting the existing cache
cluster or replication group and creating it anew.
Line breaks in the following code example are added for ease of reading.
https://elasticache.us-west-2.amazonaws.com/
API Version 2015-02-02
125

Amazon ElastiCache User Guide
Modifying a Cache Cluster (ElastiCache API)
?Action=ModifyCacheCluster
&CacheClusterId=myCluster
&PreferredMaintenanceWindow=sun:23:00-mon:02:00
&SignatureVersion=4
&SignatureMethod=HmacSHA256
&Timestamp=20150901T220302Z
&X-Amz-Algorithm=AWS4-HMAC-SHA256
&X-Amz-Date=20150202T220302Z
&X-Amz-SignedHeaders=Host
&X-Amz-Expires=20150901T220302Z
&X-Amz-Credential=<credential>
&X-Amz-Signature=<signature>
The ApplyImmediately parameter applies only to modifications in node type, engine version,
and changing the number of nodes in a Memcached cluster. If you want to apply any of these
changes immediately, set the ApplyImmediately parameter to true. If you prefer postponing these
changes to your next maintenance window, set the ApplyImmediately parameter to false. Other
modifications, such as changing the maintenance window, are applied immediately by default.
For more information, go to the ElastiCache API reference topic ModifyCacheCluster.
API Version 2015-02-02
126

Amazon ElastiCache User Guide
Rebooting a Cluster
Rebooting a Cluster
Some changes require that the cluster be rebooted for the changes to be applied. For example,
changing a parameter value in a parameter group is only applied to the cluster after the cluster is
rebooted.
When you reboot a cluster, the cluster flushes all its data and restarts its engine. During this process
you cannot access the cluster. Because the cluster flushed all its data, when the cluster is available
again, you are starting with an empty cluster.
You are able to reboot a cluster using the ElastiCache console, the AWS CLI, or the ElastiCache API.
Whether you use the ElastiCache console, the AWS CLI or the ElastiCache API, you can only initiate
rebooting a single cluster. To reboot multiple clusters you must iterate on the process or commands.
Rebooting a Cluster (Console)
You can reboot a cluster using the ElastiCache console.
To reboot a cluster (console)
1. Sign in to the AWS Management Console and open the ElastiCache console at https://
console.aws.amazon.com/elasticache/.
2. In the left navigation pane, select Cache Clusters.
The Cache Clusters page will appear with a list of your cache clusters.
3. Select the cluster to reboot by selecting on the box to the left of the cluster's name.
The Reboot button will become active.
If you select more than one cluster, the Reboot button becomes disabled.
4. Select Reboot.
The reboot cache cluster confirmation screen appears.
5. To reboot the cluster, select Reboot. The status of the cluster will change to rebooting cache
cluster nodes.
To not reboot the cluster, select Cancel.
To reboot multiple clusters, repeat steps 2 through 5 for each cluster you want to reboot.
Rebooting a Cluster (AWS CLI)
To reboot a cluster (AWS CLI), use the reboot-cache-cluster command.
To reboot specific nodes in the cluster, use the --cache-node-ids-to-reboot to list the specific
clusters to reboot. The following command reboots the nodes 0001, 0002, and 0004 of myCluster.
For Linux, OS X, or Unix:
aws elasticache reboot-cache-cluster \
--cache-cluster-id myCluster \
--cache-node-ids-to-reboot 0001 0002 0004
For Windows:
API Version 2015-02-02
127

Amazon ElastiCache User Guide
Rebooting a Cluster (ElastiCache API)
aws elasticache reboot-cache-cluster ^
--cache-cluster-id myCluster ^
--cache-node-ids-to-reboot 0001 0002 0004
To reboot all the nodes in the cluster, use the --cache-node-ids-to-reboot parameter and list all
the cluster's node ids. For more information, go to reboot-cache-cluster.
Rebooting a Cluster (ElastiCache API)
To reboot a cluster using the ElastiCache API, use the RebootCacheCluster action.
To reboot specific nodes in the cluster, use the CacheNodeIdsToReboot to list the specific clusters to
reboot. The following command reboots the nodes 0001, 0002, and 0004 of myCluster.
https://elasticache.us-west-2.amazonaws.com/
?Action=RebootCacheCluster
&CacheClusterId=myCluster
&CacheNodeIdsToReboot.member.1=0001
&CacheNodeIdsToReboot.member.2=0002
&CacheNodeIdsToReboot.member.3=0004
&Version=2015-02-02
&SignatureVersion=4
&SignatureMethod=HmacSHA256
&Timestamp=20150202T192317Z
&X-Amz-Credential=<credential>
To reboot all the nodes in the cluster, use the CacheNodeIdsToReboot parameter and list all the
cluster's node ids. For more information, go to RebootCacheCluster.
API Version 2015-02-02
128
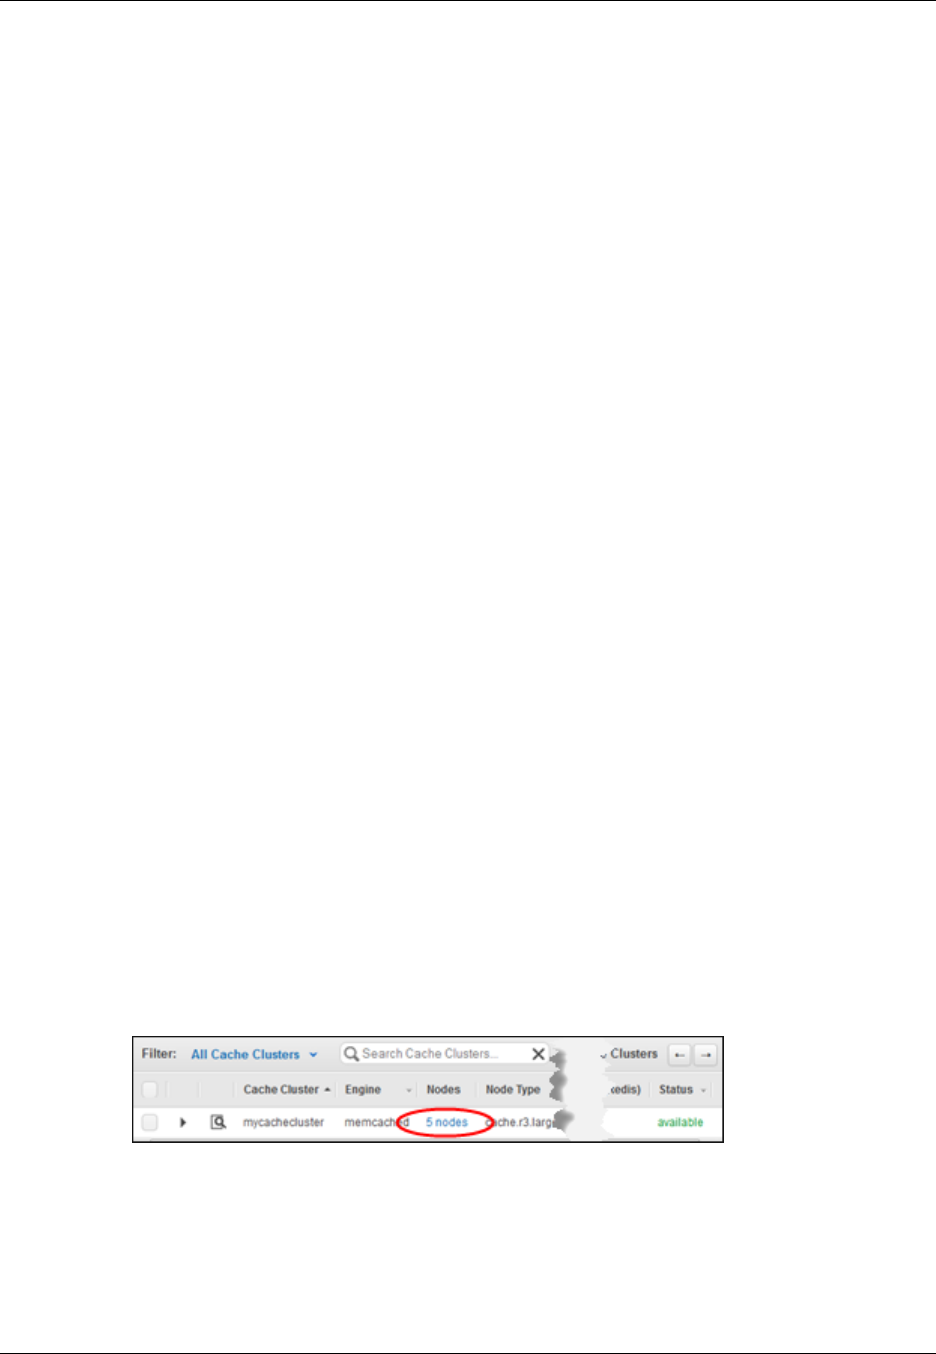
Amazon ElastiCache User Guide
Monitoring a Cluster's Costs
Monitoring a Cluster's Costs
Cost allocation tags are key-value pairs that you can use to track and manage your AWS costs by
grouping expenses on your invoices by the tag values on a resource.
You can use cost allocation tags to organize your AWS bill to reflect your own cost structure. To
do this, sign up to get your AWS account bill with tag key values included. Then, to see the cost
of combined resources, organize your billing information according to resources with the same tag
key values. For example, you can tag several resources with a specific application name, and then
organize your billing information to see the total cost of that application across one or more services.
For more information on Cost Allocation tags and steps to add or remove them from a cluster, go to
Monitoring Costs with Cost Allocation Tags (p. 329).
Adding Nodes to a Cluster
Adding nodes to a cluster applies only if you are running the Memcached engine. Since all Redis
clusters have one node, you cannot add or remove nodes from a Redis cluster. You can, however, add
or remove clusters from a Redis replication group. For more information, see Adding a Read Replica to
a Replication Group (p. 193) and Deleting a Read Replica (p. 197).
By default, Memcached clusters are limited to a maximum of 20 nodes. If you need more than 20
nodes in a Memcached cluster, or more than 50 nodes total in a region, please fill out the ElastiCache
Limit Increase Request form at http://aws.amazon.com/contact-us/elasticache-node-limit-request/.
You can use the ElastiCache Management Console, the AWS CLI or ElastiCache API to add nodes to
your cluster.
Each time you change the number of nodes in your Memcached cluster, you must re-map at least
some of your keyspace so it maps to the correct node. For more detailed information on load balancing
your Memcached cluster, see Configuring Your ElastiCache Client for Efficient Load Balancing (p. 55).
Adding Nodes to a Cluster (Console)
To add nodes to a cluster (console)
1. Sign in to the AWS Management Console and open the ElastiCache console at https://
console.aws.amazon.com/elasticache/.
2. In the left navigation pane, select Cache Clusters.
3. In the Cache Clusters list, locate the Nodes column and select the number of nodes link of the
cluster you want to modify.
The detail panel appears.
4. Select the Nodes tab. A list of nodes for the cluster appears.
5. Select the Add Node button at the top of the list. The Add Node dialog box appears.
6. In the Number of Nodes to Add box, type the number of nodes you want to add.
7. From the Preferred Zones list, select No Preference, Spread Nodes Across Zones, or Specify
Zones.
API Version 2015-02-02
129
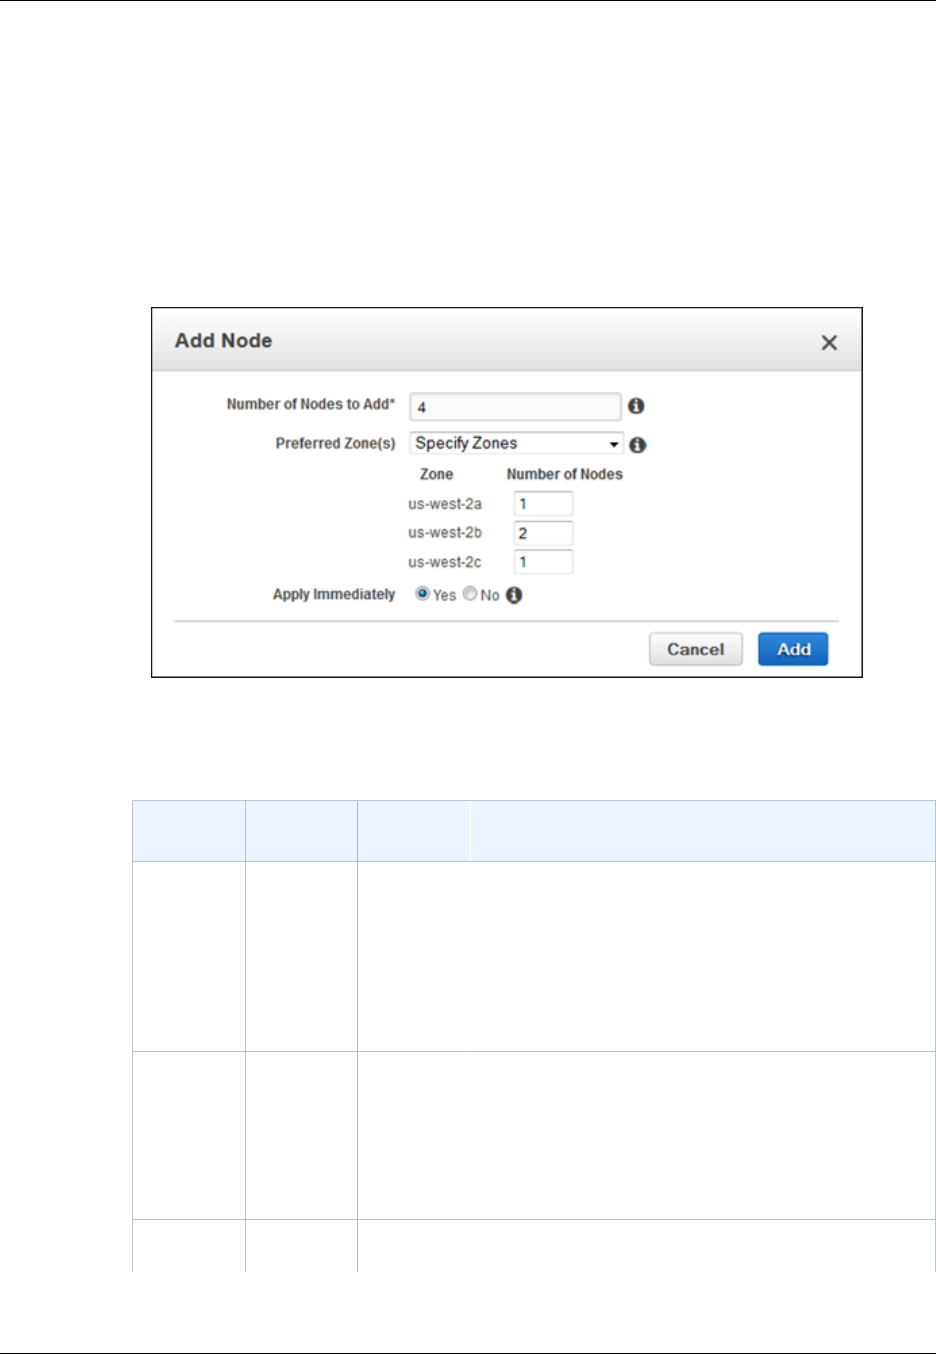
Amazon ElastiCache User Guide
Adding Nodes to a Cluster (Console)
•No Preference: If your existing nodes are all in the same Availability Zone, ElastiCache creates
all new nodes in the same Availability Zone. If your existing nodes are spread across different
Availability Zones, ElastiCache spreads the new nodes across different Availability Zones.
•Spread Nodes Across Zones: ElastiCache selects the Availability Zones in which to launch
your new nodes, but will distribute them over multiple availability zones.
•Specify Zones: For each availability zone, you specify how many new clusters should be
launched in it.
If you select Specify Zones, the wizard expands with a list of usable Availability Zones. Type
the number of new nodes to create in that zone. The sum of these numbers must equal the
value you entered in the Number of Nodes to Add box.
8. Select the Apply Immediately - Yes button to apply this change immediately, or select No to
postpone the change until your next maintenance window.
Impact of New Add and Remove Requests on Pending Requests
Scenarios Pending
Operation New
Request Results
Scenario 1 Delete Delete The new delete request, pending or immediate,
replaces the pending delete request.
For example, if nodes 0001, 0003, and 0007 are
pending deletion and a new request to delete nodes
0002 and 0004 is issued, only nodes 0002 and 0004
will be deleted. Nodes 0001, 0003, and 0007 will not
be deleted.
Scenario 2 Delete Create The new create request, pending or immediate,
replaces the pending delete request.
For example, if nodes 0001, 0003, and 0007 are
pending deletion and a new request to create a node
is issued, a new node will be created and nodes 0001,
0003, and 0007 will not be deleted.
Scenario 3 Create Delete The new delete request, pending or immediate,
replaces the pending create request.
API Version 2015-02-02
130
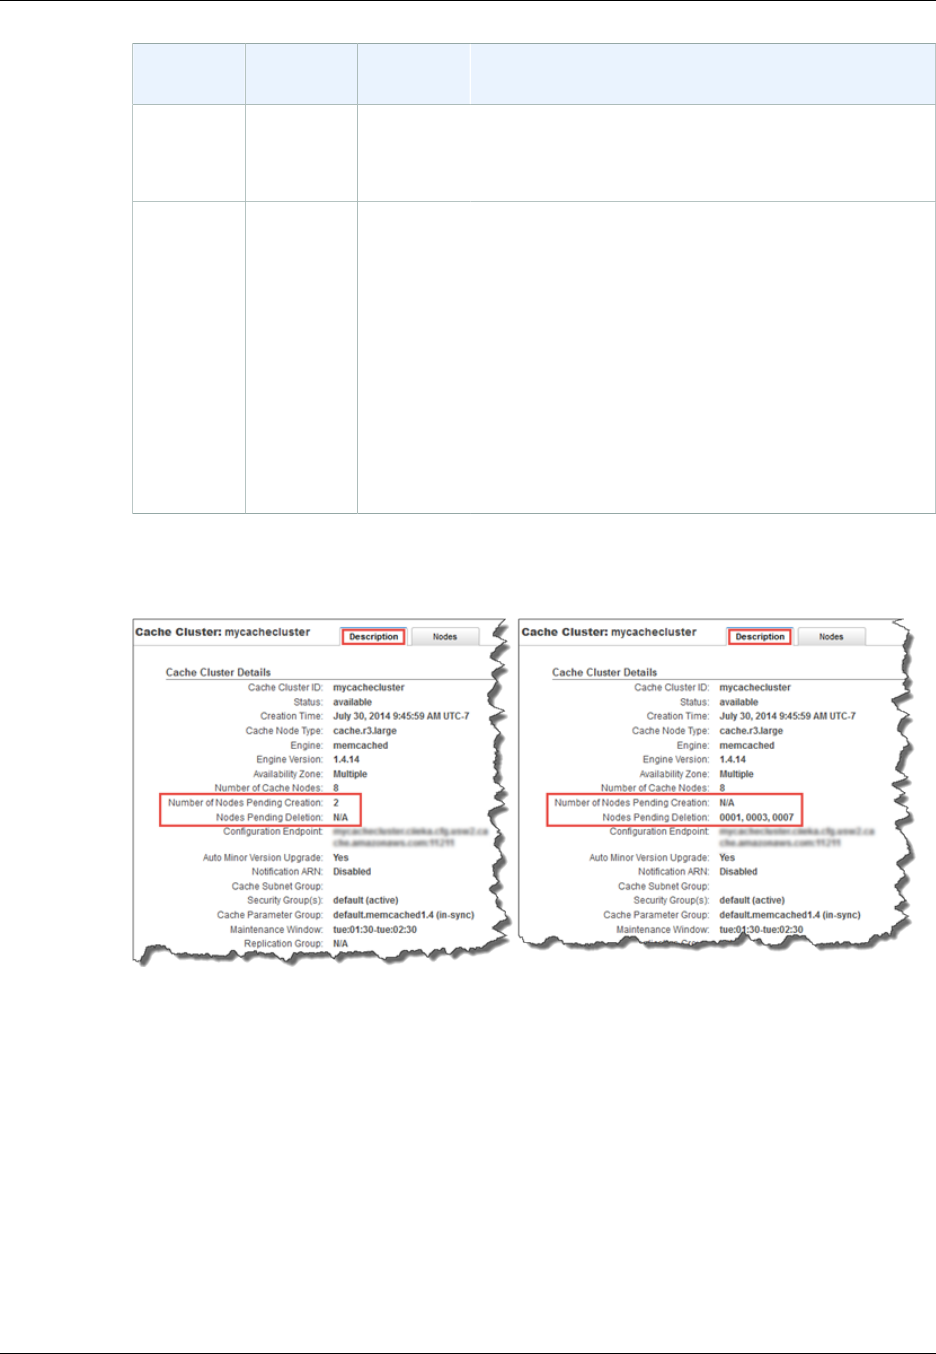
Amazon ElastiCache User Guide
Adding Nodes to a Cluster (AWS CLI)
Scenarios Pending
Operation New
Request Results
For example, if there is a pending request to create
2 nodes and a new request is issued to delete node
0003, then no new nodes will be created and node
0003 will be deleted.
Scenario 4 Create Create The new create request is added to the pending create
request.
For example, if there is a pending request to create 2
nodes and a new request is issued to create 3 nodes,
the new requests is added to the pending request and
5 nodes will be created.
Important
If the new create request is set to Apply
Immediately - Yes, all create requests are
performed immediately. If the new create
request is set to Apply Immediately - No, all
create requests are pending.
To determine what operations are pending, select the Description tab and check to see how
many pending creations or deletions are shown. You cannot have both pending creations and
pending deletions.
9. Select the Add button.
After a few moments, the new nodes will show up in the nodes list with a status of creating. If they
don't, refresh your browser page.
Adding Nodes to a Cluster (AWS CLI)
To add nodes to a cluster using the AWS CLI, use the command modify-cache-cluster with the
following parameters:
•--cache-cluster-id The ID of the cache cluster you want to add nodes to.
•--num-cache-nodes The --num-cache-nodes parameter specifies the number of nodes you
want in this cluster after the modification is applied. To add nodes to this cluster, --num-cache-
API Version 2015-02-02
131

Amazon ElastiCache User Guide
Adding Nodes to a Cluster (ElastiCache API)
nodes must be greater than the current number of nodes in this cluster. If this value is less than the
current number of nodes, ElastiCache expects the parameter cache-node-ids-to-remove and a
list of nodes to remove from the cluster (see Removing Nodes from a Cluster (AWS CLI) (p. 136)).
•--apply-immediately or --no-apply-immediately which specifies whether to add these
nodes immediately or at the next maintenance window.
For Linux, OS X, or Unix:
aws elasticache modify-cache-cluster \
--cache-cluster-id my-cache-cluster \
--num-cache-nodes 5 \
--apply-immediately
For Windows:
aws elasticache modify-cache-cluster ^
--cache-cluster-id my-cache-cluster ^
--num-cache-nodes 5 ^
--apply-immediately
For more information, see the AWS CLI topic modify-cache-cluster.
Adding Nodes to a Cluster (ElastiCache API)
To add nodes to a cluster (ElastiCache API)
• Call the ModifyCacheCluster action with the following parameters:
•CacheClusterId The ID of the cluster you want to add nodes to.
•NumCacheNodes The NumCachNodes parameter specifies the number of nodes you want in
this cluster after the modification is applied. To add nodes to this cluster, NumCacheNodes
must be greater than the current number of nodes in this cluster. If this value is less than the
current number of nodes, ElastiCache expects the parameter CacheNodeIdsToRemove with
a list of nodes to remove from the cluster (see Removing Nodes from a Cluster (ElastiCache
API) (p. 137)).
•ApplyImmediately Specifies whether to add these nodes immediately or at the next
maintenance window.
The following example shows a call to add nodes to a cluster.
API Version 2015-02-02
132

Amazon ElastiCache User Guide
Adding Nodes to a Cluster (ElastiCache API)
Example
https://elasticache.us-west-2.amazonaws.com/
?Action=ModifyCacheCluster
&ApplyImmediately=true
&NumCacheNodes=5
&CacheClusterId=myCacheCluster
&Version=2014-12-01
&SignatureVersion=4
&SignatureMethod=HmacSHA256
&Timestamp=20141201T220302Z
&X-Amz-Algorithm=AWS4-HMAC-SHA256
&X-Amz-Date=20141201T220302Z
&X-Amz-SignedHeaders=Host
&X-Amz-Expires=20141201T220302Z
&X-Amz-Credential=<credential>
&X-Amz-Signature=<signature>
For more information, see ElastiCache API topic ModifyCacheCluster.
API Version 2015-02-02
133
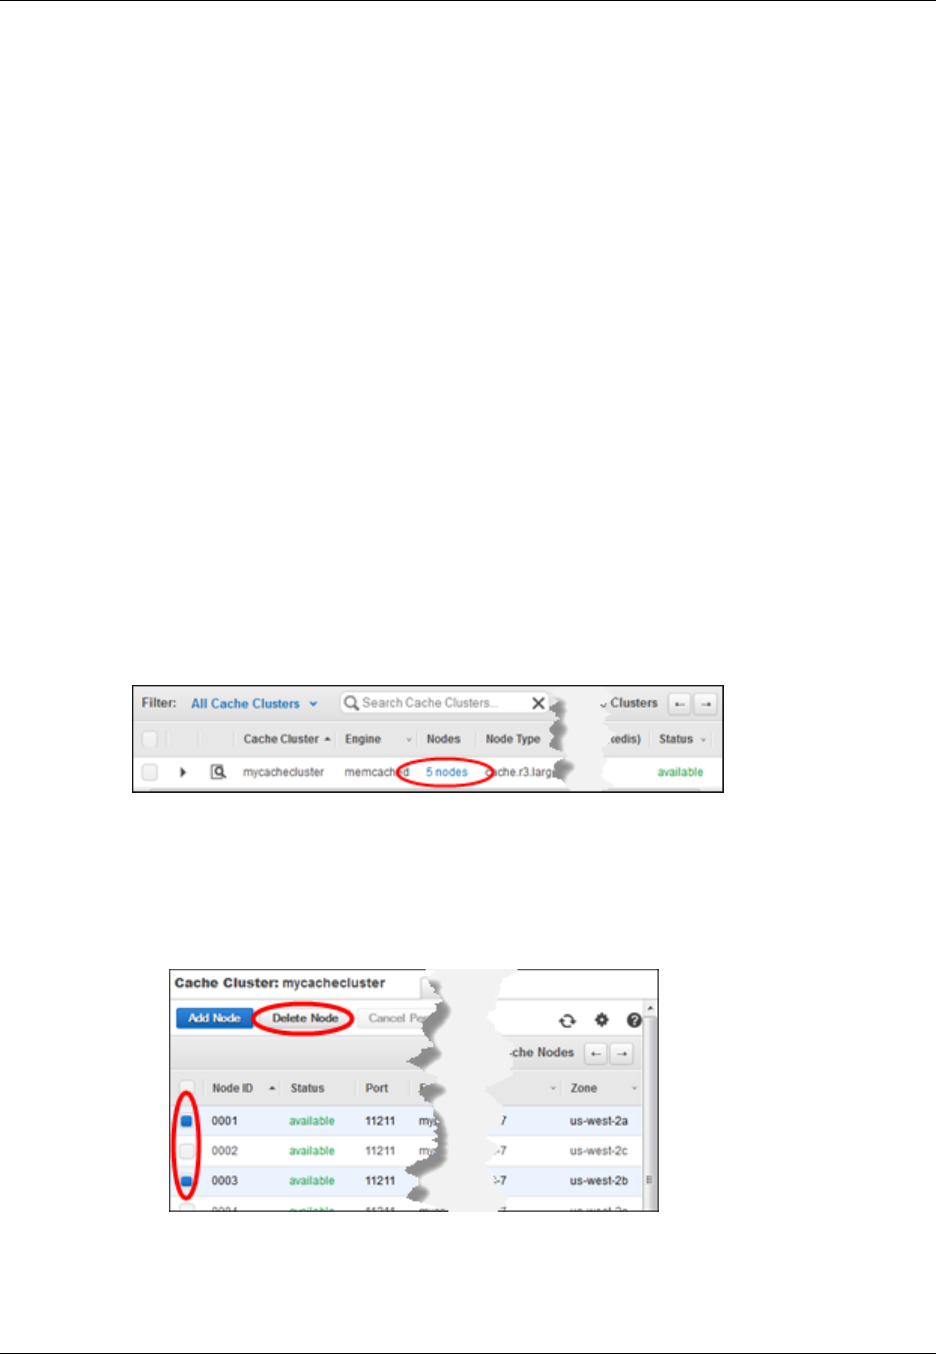
Amazon ElastiCache User Guide
Removing Nodes from a Cluster
Removing Nodes from a Cluster
Removing nodes from a cluster applies only if you are running the Memcached engine. Since all Redis
clusters have one node, you cannot add or remove nodes from a Redis cluster. You can, however,
add or remove clusters from a Redis replication group. For more information, see Deleting a Read
Replica (p. 197).
Each time you change the number of nodes in your Memcached cluster, you must re-map at least
some of your keyspace so it maps to the correct node. For more detailed information on load balancing
your Memcached cluster, see Configuring Your ElastiCache Client for Efficient Load Balancing (p. 55).
Topics
•Removing Nodes from a Cluster (Console) (p. 134)
•Removing Nodes from a Cluster (AWS CLI) (p. 136)
•Removing Nodes from a Cluster (ElastiCache API) (p. 137)
Removing Nodes from a Cluster (Console)
To remove nodes from a cluster (console)
1. Sign in to the AWS Management Console and open the ElastiCache console at https://
console.aws.amazon.com/elasticache/.
2. In the left navigation pane, select Cache Clusters.
3. In the Cache Clusters list, locate the Nodes column and select the number of nodes link of the
cluster you want to modify.
The detail panel appears.
4. Select the Nodes tab. The list of nodes for the cluster appears.
5. In the Nodes list, do the following:
1. Select the box next to the nodes you want to remove from the cluster.
2. Select the Delete Node button.
The Delete Node confirmation dialog box appears.
6. In the Delete Node confirmation dialog box:
1. Verify that the nodes scheduled for deletion are the correct ones.
API Version 2015-02-02
134
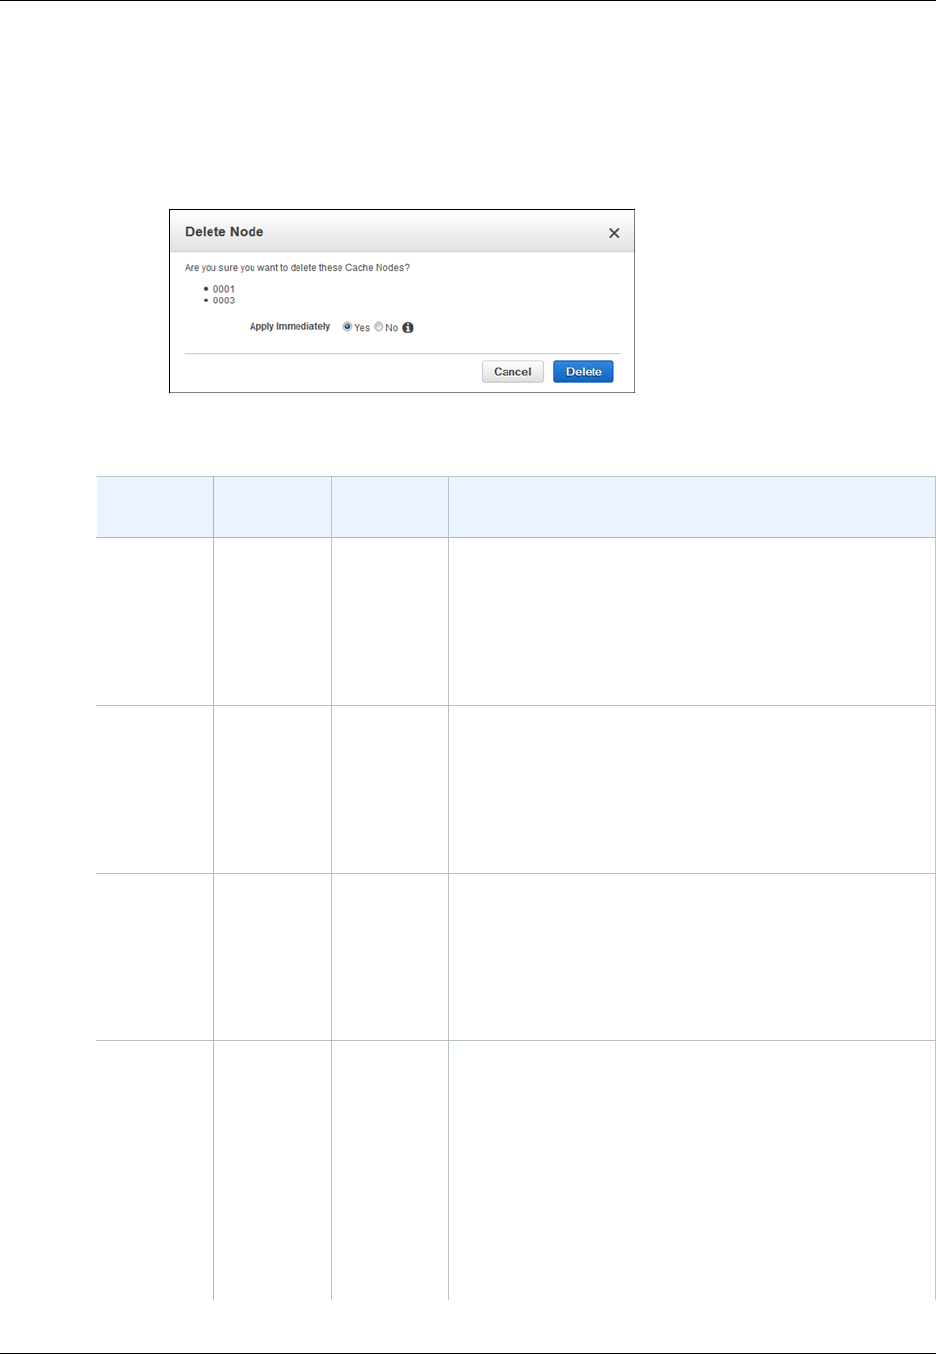
Amazon ElastiCache User Guide
Removing Nodes from a Cluster (Console)
2. Select Apply Immediately - Yes to apply this change immediately, or No to postpone the
change until your next maintenance window.
3. Select the Delete button.
The status of the selected nodes changes to pending delete. If you selected Apply
Immediately - Yes, after a few moments, the status changes to deleting. If it doesn't, refresh
your browser screen.
Impact of New Add and Remove Requests on Pending Requests
Scenarios Pending
Operation New
Request Results
Scenario 1 Delete Delete The new delete request, pending or immediate, replaces
the pending delete request.
For example, if nodes 0001, 0003, and 0007 are pending
deletion and a new request to delete nodes 0002 and
0004 is issued, only nodes 0002 and 0004 will be
deleted. Nodes 0001, 0003, and 0007 will not be deleted.
Scenario 2 Delete Create The new create request, pending or immediate, replaces
the pending delete request.
For example, if nodes 0001, 0003, and 0007 are pending
deletion and a new request to create a node is issued,
a new node will be created and nodes 0001, 0003, and
0007 will not be deleted.
Scenario 3 Create Delete The new delete request, pending or immediate, replaces
the pending create request.
For example, if there is a pending request to create 2
nodes and a new request is issued to delete node 0003,
then no new nodes will be created and node 0003 will be
deleted.
Scenario 4 Create Create The new create request is added to the pending create
request.
For example, if there is a pending request to create 2
nodes and a new request is issued to create 3 nodes,
the new requests is added to the pending request and 5
nodes will be created.
Important
If the new create request is set to Apply
Immediately - Yes, all create requests are
performed immediately. If the new create
API Version 2015-02-02
135
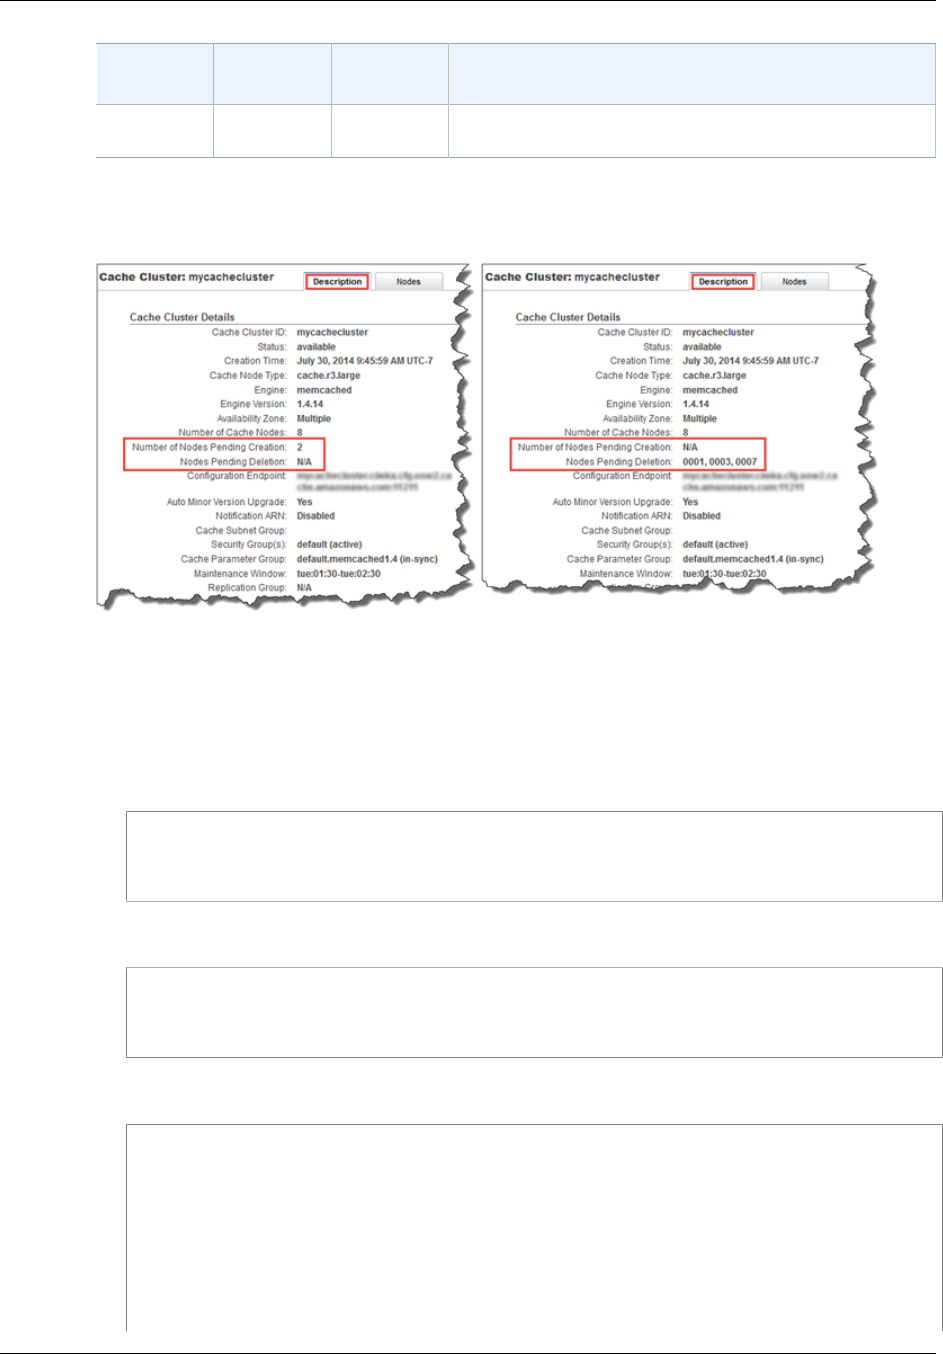
Amazon ElastiCache User Guide
Removing Nodes from a Cluster (AWS CLI)
Scenarios Pending
Operation New
Request Results
request is set to Apply Immediately - No, all
create requests are pending.
To determine what operations are pending, select the Description tab and check to see how many
pending creations or deletions are shown. You cannot have both pending creations and pending
deletions.
Removing Nodes from a Cluster (AWS CLI)
1. Use the command describe-cache-cluster to display a list of nodes for a cluster, as in the
following example, and note the identifiers of the nodes you want to remove.
For Linux, OS X, or Unix:
aws elasticache describe-cache-clusters \
--cache-cluster-id my-cache-cluster \
--show-cache-node-info
For Windows:
aws elasticache describe-cache-clusters ^
--cache-cluster-id my-cache-cluster ^
--show-cache-node-info
This command produces output similar to the following:
CACHECLUSTER my-cache-cluster 2013-07-06T23:34:09.756Z cache.m1.large
memcached
available 5 us-west-2b 1.4.5
SECGROUP default active
PARAMGRP default.memcached1.4 in-sync
CACHENODE 0001 2013-07-14T23:39:51.273Z available my-cache-
cluster.m2st2p.fsw4.use1qa.cache.amazonaws.com 11211 in-sync
CACHENODE 0002 2013-07-14T23:39:51.276Z available my-cache-
cluster.m2st2p.fsw7.use1qa.cache.amazonaws.com 11211 in-sync
API Version 2015-02-02
136

Amazon ElastiCache User Guide
Removing Nodes from a Cluster (ElastiCache API)
CACHENODE 0003 2013-07-06T23:34:09.756Z available my-cache-
cluster.m2st2p.fswc.use1qa.cache.amazonaws.com 11211 in-sync
CACHENODE 0004 2013-07-06T23:34:09.756Z available my-cache-
cluster.m2st2p.fswd.use1qa.cache.amazonaws.com 11211 in-sync
CACHENODE 0005 2013-07-06T23:34:09.756Z available my-cache-
cluster.m2st2p.fswf.use1qa.cache.amazonaws.com 11211 in-sync
2. Use the command modify-cache-cluster with a list of the nodes to remove, as in the following
example.
To remove nodes from a cluster using the command-line interface, use the command modify-
cache-cluster with the following parameters:
•--cache-cluster-id The ID of the cache cluster you want to remove nodes from.
•--num-cache-nodes The --num-cache-nodes parameter specifies the number of nodes you
want in this cluster after the modification is applied.
•--cache-node-ids-to-remove A list of node IDs you want removed from this cluster.
•--apply-immediately or --no-apply-immediately Specifies whether to remove these
nodes immediately or at the next maintenance window.
The following example immediately removes nodes 0004 and 0005 from the cluster my-cache-
cluster.
For Linux, OS X, or Unix:
aws elasticache modify-cache-cluster \
--cache-cluster-id my-cache-cluster \
--num-cache-nodes 3 \
--cache-node-ids-to-remove 0004,0005 \
--apply-immediately
For Windows:
aws elasticache modify-cache-cluster ^
--cache-cluster-id my-cache-cluster ^
--num-cache-nodes 3 ^
--cache-node-ids-to-remove 0004,0005 ^
--apply-immediately
For more information, see the AWS CLI topics describe-cache-cluster and modify-cache-
cluster.
Removing Nodes from a Cluster (ElastiCache API)
To remove nodes using the ElastiCache API, call the ModifyCacheCluster action with the cache
cluster ID and a list of nodes to remove, as shown:
•CacheClusterId The ID of the cache cluster you want to remove nodes from.
•NumCacheNodes The NumCacheNodes parameter specifies the number of nodes you want in this
cluster after the modification is applied.
•CacheNodeIdsToRemove.member.n The list of node IDs to remove from the cluster.
•CacheNodeIdsToRemove.member.1=0004
•CacheNodeIdsToRemove.member.1=0005
API Version 2015-02-02
137

Amazon ElastiCache User Guide
Removing Nodes from a Cluster (ElastiCache API)
•ApplyImmediately Specifies whether to remove these nodes immediately or at the next
maintenance window.
The following example immediately removes nodes 0004 and 0005 from the cluster myCacheCluster.
https://elasticache.us-west-2.amazonaws.com/
?Action=ModifyCacheCluster
&CacheClusterId=myCacheCluster
&ApplyImmediately=true
&CacheNodeIdsToRemove.member.1=0004
&CacheNodeIdsToRemove.member.2=0005
&NumCacheNodes=3
&Version=2014-12-01
&SignatureVersion=4
&SignatureMethod=HmacSHA256
&Timestamp=20141201T220302Z
&X-Amz-Algorithm=AWS4-HMAC-SHA256
&X-Amz-Date=20141201T220302Z
&X-Amz-SignedHeaders=Host
&X-Amz-Expires=20141201T220302Z
&X-Amz-Credential=<credential>
&X-Amz-Signature=<signature>
For more information, see ElastiCache API topic ModifyCacheCluster.
API Version 2015-02-02
138
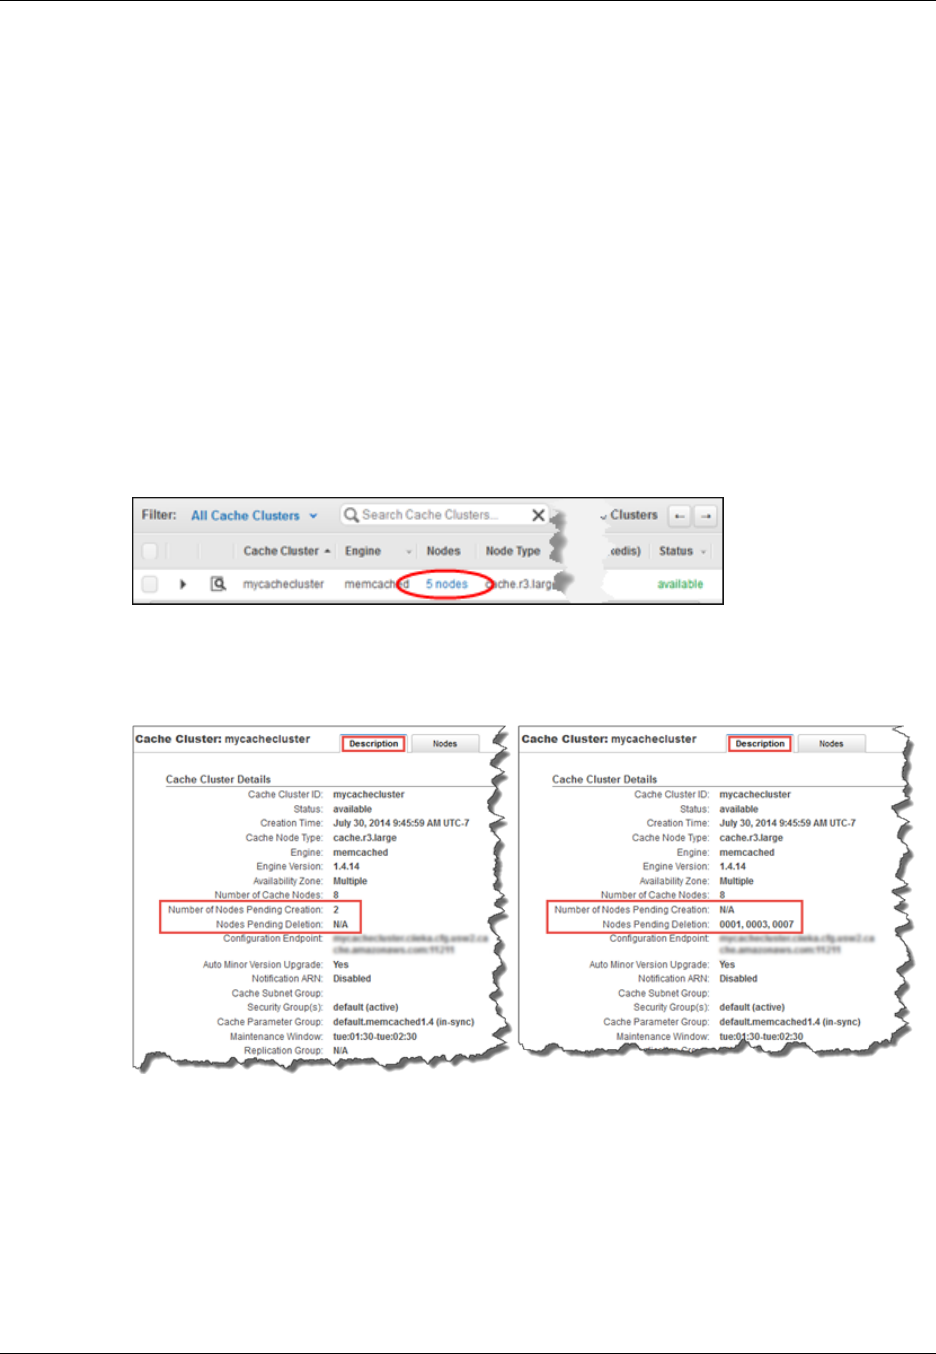
Amazon ElastiCache User Guide
Canceling Pending Add or Delete Node Operations
Canceling Pending Add or Delete Node
Operations
Canceling Pending Add or Delete Node Operations
(Console)
If you elected to not apply a change immediately, the operation has pending status until it is performed
at your next maintenance window. You can cancel any pending operation.
To cancel a pending operation
1. Sign in to the AWS Management Console and open the ElastiCache console at https://
console.aws.amazon.com/elasticache/.
2. In the left navigation pane, click Cache Clusters.
3. In the Cache Clusters list, locate the Nodes column and click the number of nodes link of the
cluster for which you want to cancel pending operations.
The detail panel appears.
4. To determine what operations are pending, select the Description tab and check to see how
many pending creations or deletions are shown. You cannot have both pending creations and
pending deletions.
5. Click the Nodes tab.
6. To cancel all pending operations, click the Cancel Pending button. The Cancel Pending dialog
box appears.
7. Confirm that you want to cancel all pending operations by clicking the Cancel Pending button, or
to keep the operations, click Cancel.
API Version 2015-02-02
139

Amazon ElastiCache User Guide
Deleting a Cluster
Deleting a Cluster
As long as a cluster is in the available state, you are being charged for it, whether or not you are
actively using it. To stop incurring charges, delete the cluster.
Deleting a Cluster (Console)
The following procedure deletes a single cluster from your deployment. To delete multiple clusters,
repeat the procedure for each cluster you want to delete. You do not need to wait for one cluster to
finish deleting before starting the procedure to delete another cluster.
To delete a cluster
1. Sign in to the AWS Management Console and open the Amazon ElastiCache console at https://
console.aws.amazon.com/elasticache/.
2. In the ElastiCache console dashboard, select Cache Clusters.
The Cache Clusters screen appears
3. In the list of clusters, to select the cluster to delete, select the cluster's name.
You can only delete one cluster at a time from the ElastiCache console. Selecting multiple clusters
disables the Delete button.
4. Select the Delete button.
5. In the Delete Cache Cluster confirmation screen:
a. If this is a Redis cluster, specify whether or not a final snapshot should be made, and, if you
want a final snapshot, the name of the snapshot.
b. Select Delete to delete the cluster, or select Cancel to keep the cluster.
If you selected Delete, the status of the cluster will change to deleting.
As soon as your cluster is no longer listed in the list of clusters, you stop incurring charges for the
cluster.
Deleting a Cluster (AWS CLI)
The following code deletes the cluster myCluster.
aws elasticache delete-cache-cluster --cache-cluster-id myCluster
The delete-cache-cluster command only deletes one cluster. To delete multiple clusters, call
delete-cache-cluster for each cluster you want to delete. You do not need to wait for one cluster
to finish deleting before deleting another cluster.
For more information, go to the AWS CLI for ElastiCache topic delete-cache-cluster.
Deleting a Cluster (ElastiCache API)
The following code deletes the cluster myCluster.
https://elasticache.us-west-2.amazonaws.com/
?Action=DeleteCacheCluster
API Version 2015-02-02
140

Amazon ElastiCache User Guide
Deleting a Cluster (ElastiCache API)
&CacheClusterId=myCluster
&SignatureVersion=4
&SignatureMethod=HmacSHA256
&Timestamp=20150202T220302Z
&X-Amz-Algorithm=AWS4-HMAC-SHA256
&X-Amz-Date=20150202T220302Z
&X-Amz-SignedHeaders=Host
&X-Amz-Expires=20150202T220302Z
&X-Amz-Credential=<credential>
&X-Amz-Signature=<signature>
The DeleteCacheCluster action only deletes one cluster. To delete multiple clusters, call
DeleteCacheCluster for each cluster you want to delete. You do not need to wait for one cluster to
finish deleting before deleting another cluster.
For more information, go to the ElastiCache API reference topic DeleteCacheCluster.
API Version 2015-02-02
141

Amazon ElastiCache User Guide
Scaling
The amount of data your application needs to process is seldom static. It increases and decreases
as your business grows or experiences normal fluctuations in demand. If you self-manage your
cache, you need to provision sufficient hardware for your demand peaks, which can be expensive.
By using Amazon ElastiCache you can scale to meet current demand, paying only for what you use.
ElastiCache enables you to scale your cache to match demand.
Topics
•Scaling Memcached (p. 143)
•Scaling Standalone Redis Cache Clusters (p. 146)
•Scaling Redis Replication Groups (p. 153)
API Version 2015-02-02
142

Amazon ElastiCache User Guide
Scaling Memcached
Scaling Memcached
Memcached cache clusters are comprised of from 1 to 20 nodes. Scaling a Memcached cache cluster
out and in is as easy as adding or removing nodes from the cache cluster. If you need more than 20
nodes in a Memcached cluster, or more than 50 nodes total in a region, please fill out the ElastiCache
Limit Increase Request form at http://aws.amazon.com/contact-us/elasticache-node-limit-request/.
Because you can partition your data across all the nodes in a Memcached cache cluster, scaling up to
a node type with greater memory is seldom required. However, because the Memcached engine does
not persist data, if you do scale to a different node type, you must create a new Memcached cluster
which will start out empty unless your application populates it.
Topics
•Scaling Memcached Horizontally (p. 143)
•Scaling Memcached Vertically (p. 144)
Scaling Memcached Horizontally
The Memcached engine supports partitioning your data across multiple nodes. Because of this,
Memcached cache clusters scale horizontally easily. A Memcached cache cluster can have from 1 to
20 nodes. To horizontally scale your Memcached cache cluster, merely add or remove nodes. If you
need more than 20 nodes in a Memcached cluster, or more than 50 nodes total in a region, please fill
out the ElastiCache Limit Increase Request form at http://aws.amazon.com/contact-us/elasticache-
node-limit-request/.
The following topics detail how to scale your Memcached cache cluster out or in by adding or removing
nodes.
•Adding Nodes to a Cluster (p. 129)
•Removing Nodes from a Cluster (p. 134)
Each time you change the number of nodes in your Memcached cache cluster, you must re-map at
least some of your keyspace so it maps to the correct node. For more detailed information on load
balancing your Memcached cache cluster, see Configuring Your ElastiCache Client for Efficient Load
Balancing (p. 55).
If you use auto discovery on your Memcached cache cluster, you do not need to change the endpoints
in your application as you add or remove nodes. For more information on auto discovery see, Node
Auto Discovery (Memcached) (p. 82). If you do not use auto discovery, each time you change the
number of nodes in your Memcached cache cluster you must update the endpoints in your application.
API Version 2015-02-02
143

Amazon ElastiCache User Guide
Scaling Memcached Vertically
Scaling Memcached Vertically
When you scale your Memcached cluster up or down you must create a new cache cluster.
Memcached cache clusters always start out empty unless your application populates it.
Important
If you are scaling down to a smaller node type, be sure that the smaller node type is adequate
for your data and overhead. For more information, see Selecting Your Memcached Node
Size (p. 66).
Topics
•Scaling Memcached Vertically (Console) (p. 144)
•Scaling Memcached Vertically (AWS CLI) (p. 144)
•Scaling Memcached Vertically (ElastiCache API) (p. 144)
Scaling Memcached Vertically (Console)
The following procedure walks you through scaling your Memcached cluster vertically using the
ElastiCache console.
To scale a Memcached cache cluster vertically (console)
1. Create a new cache cluster with the new node type. For more information, see Creating a
Memcached Cache Cluster (Console) (p. 113).
2. In your application, update the endpoints to the new cache cluster's endpoints. For more
information, see Finding the Endpoints for a Memcached Cluster (Console) (p. 40).
3. Delete the old cache cluster. For more information, see Deleting a Cluster (Console) (p. 140)..
Scaling Memcached Vertically (AWS CLI)
The following procedure walks you through scaling your Memcached cache cluster vertically using the
AWS CLI.
To scale a Memcached cache cluster vertically (AWS CLI)
1. Create a new cache cluster with the new node type. For more information, see Creating a Cache
Cluster (AWS CLI) (p. 120).
2. In your application, update the endpoints to the new cache cluster's endpoints. For more
information, see Finding Endpoints (AWS CLI) (p. 45).
3. Delete the old cache cluster. For more information, see Deleting a Cluster (AWS CLI) (p. 140).
Scaling Memcached Vertically (ElastiCache API)
The following procedure walks you through scaling your Memcached cache cluster vertically using the
ElastiCache API.
To scale a Memcached cache cluster vertically (ElastiCache API)
1. Create a new cache cluster with the new node type. For more information, see Creating a Cache
Cluster (ElastiCache API) (p. 120).
2. In your application, update the endpoints to the new cache cluster's endpoints. For more
information, see Finding the Endpoints (ElastiCache API) (p. 47).
API Version 2015-02-02
144


Amazon ElastiCache User Guide
Scaling Redis Cache Clusters
Scaling Standalone Redis Cache Clusters
Redis cache clusters are single node cache clusters. Because you cannot have a multiple node cache
cluster with your data partitioned across the nodes, a Redis cache cluster must be large enough to
contain all the cache's data plus Redis overhead. To change the data capacity of your Redis cache
cluster, you must scale vertically; scaling up to a larger node type to increase data capacity, or scaling
down to a smaller node type to reduce data capacity.
The ElastiCache scaling up process is designed to make a best effort to retain your existing data
and requires successful Redis replication. For standalone Redis cache clusters, we recommend that
sufficient memory be made available to Redis as described in the topic Ensuring You Have Sufficient
Memory to Create a Redis Snapshot (p. 49).
The scaling down process is completely manual and makes no attempt at data retention other than
what you do.
Because you cannot partition your data across multiple Redis cache clusters, horizontal scaling of
Redis cache clusters is not supported. However, if you only need to increase or decrease your Redis
cache cluster's read capacity, you can create a replication group and add or remove read replicas. To
create a Redis replication group using your standalone Redis cache cluster as the primary cluster, see
Creating a Replication Group When You Have an Available Redis Cache Cluster (p. 173).
Once you create the replication group, you can change read capacity by adding, and later, if you
need to, removing read replicas. For more information, see Increasing Read Capacity (p. 161) or
Decreasing Read Capacity (p. 162).
In addition to being able to scale read capacity, Redis replication groups provide other business
advantages. For more information, see ElastiCache Replication (Redis) (p. 163).
Topics
•Scaling Standalone Redis Cache Clusters Up (p. 146)
•Scaling Standalone Redis Cache Clusters Down (p. 151)
Scaling Standalone Redis Cache Clusters Up
When you scale a standalone Redis cache cluster up, ElastiCache performs the following process,
whether you use the ElastiCache console, the AWS CLI, or the ElastiCache API.
1. All reads from and writes to the cache cluster are blocked.
2. A new cache cluster with the new node type is spun up in the same availability zone as the
existing cache cluster.
3. The cache data in the existing cache cluster is copied to the new cache cluster. How long this
process takes depends upon your node type and how much data is in the cache cluster.
4. Reads and writes are resumed using the new cache cluster.
Because the new cache cluster's endpoints are the same as they were for the old cache cluster,
you do not need to update the endpoints in your application.
5. ElastiCache deletes the old cache cluster.
Because writes to and reads from your cache cluster are blocked during the scale up process, you
should schedule the scale up for a time of low demand on your cache cluster.
As shown in the following table, your Redis scale up operation is blocked if you have an engine
upgrade scheduled for the next maintenance window. For more information on Maintenance Windows,
see Maintenance Window (p. 34).
API Version 2015-02-02
146

Amazon ElastiCache User Guide
Scaling Redis Cache Clusters Up
Blocked Redis operations
Pending Operations Blocked Operations
Scale up Immediate engine upgrade
Engine upgrade Immediate scale up
Immediate scale upScale up and engine upgrade
Immediate engine upgrade
If you have a pending operation that is blocking you, you can do one of the following.
• Schedule your Redis scale up operation for the next maintenance window by clearing
the Apply immediately check box (CLI use: --no-apply-immediately, API use:
ApplyImmediately=false).
• Wait until your next maintenance window (or after) to perform your Redis scale up operation.
• Add the Redis engine upgrade to this cache cluster modification with the Apply Immediately check
box selected (CLI use: --apply-immediately, API use: ApplyImmediately=true). This
unblocks your scale up operation by causing the engine upgrade to be performed immediately.
You can scale a standalone Redis cache cluster up using the ElastiCache console, the AWS CLI, or
ElastiCache API.
Scaling Standalone Redis Cache Clusters Up (Console)
The following procedure describes how to scale a standalone Redis cache cluster up using the
ElastiCache Management Console.
To scale a standalone Redis cache cluster up (console)
1. Sign in to the AWS Management Console and open the ElastiCache console at https://
console.aws.amazon.com/elasticache/.
2. From the left navigation pane, choose Cache Clusters.
3. From the list of cache clusters, choose the Redis cache cluster you want to scale up. Be certain
that this is a standalone Redis cache cluster.
4. Choose Modify.
5. In the Modify Cache Cluster wizard, choose the node type you want to scale to from the Node
type list.
The list identifies all the node types you can scale up to.
6. If you want to perform the scale up process right away, select the Apply immediately box. If the
Apply immediately box is left unselected, the scale up process is performed during this cluster's
next maintenance window.
7. Choose Modify.
If you selected Apply immediately in the previous step, the cache cluster's status will change to
modifying. When the status changes to available the modification is complete and you can begin
using the new cache cluster.
Scaling Standalone Redis Cache Clusters Up (AWS CLI)
The following procedure describes how to scale a standalone Redis cache cluster up using the AWS
CLI.
API Version 2015-02-02
147

Amazon ElastiCache User Guide
Scaling Redis Cache Clusters Up
To scale a standalone Redis cache cluster up (AWS CLI)
1. Determine the node types you can scale up to by running the AWS CLI list-allowed-node-
type-modifications command with the following parameter.
•--cache-cluster-id — Name of the standalone Redis cache cluster you want to scale up.
For Linux, OS X, or Unix:
aws elasticache list-allowed-node-type-modifications \
--cache-cluster-id my-cache-cluster-id
For Windows:
aws elasticache list-allowed-node-type-modifications ^
--cache-cluster-id my-cache-cluster-id
For more information, see list-allowed-node-type-modifications in the AWS CLI Reference.
2. Modify your existing cache cluster specifying the cache cluster to scale up and the new, larger
node type, using the AWS CLI modify-cache-cluster command and the following parameters.
•--cache-cluster-id — The name of the cache cluster you are scaling up.
•--cache-node-type — The new node type you want to scale the cache cluster up to.
This value must be one of the node types returned by the list-allowed-node-type-
modifications command in step 1.
•--apply-immediately — Causes the scale up to be applied immediately. To postpone
the scale up to the cluster's next maintenance window, use the --no-apply-immediately
parameter.
For Linux, OS X, or Unix:
aws elasticache modify-cache-cluster \
--cache-cluster-id my-redis-cache-cluster \
--cache-node-type cache.m2.xlarge \
--apply-immediately
For Windows:
aws elasticache modify-cache-cluster ^
--cache-cluster-id my-redis-cache-cluster ^
--cache-node-type cache.m2.xlarge ^
--apply-immediately
For more information, see modify-cache-cluster in the AWS CLI Reference.
3. If you used the --apply-immediately, check the status of the new cache cluster using the
AWS CLI describe-cache-clusters command with the following parameter. When the status
changes to available you can begin using the new, larger cache cluster.
•--cache-cache cluster-id — The name of your standalone Redis cache cluster. Use this
parameter to describe a particular cache cluster rather than all cache clusters.
API Version 2015-02-02
148

Amazon ElastiCache User Guide
Scaling Redis Cache Clusters Up
aws elasticache describe-cache-clusters --cache-cluster-id my-redis-cache-
cluster
For more information, see describe-cache-clusters in the AWS CLI Reference.
Scaling Standalone Redis Cache Clusters Up (ElastiCache
API)
The following procedure describes how to scale a standalone Redis cache cluster up using the
ElastiCache API.
To scale a standalone Redis cache cluster up (ElastiCache API)
1. Determine the node types you can scale up to by running the ElastiCache API
ListAllowedNodeTypeModifications action with the following parameter.
•CacheClusterId — The name of the standalone Redis cache cluster you want to scale up.
https://elasticache.us-west-2.amazonaws.com/
?Action=ListAllowedNodeTypeModifications
&CacheClusterId=MyRedisCacheCluster
&Version=2015-02-02
&SignatureVersion=4
&SignatureMethod=HmacSHA256
&Timestamp=20150202T192317Z
&X-Amz-Credential=<credential>
For more information, see ListAllowedNodeTypeModifications in the Amazon ElastiCache API
Reference.
2. Modify your existing cache cluster specifying the cache cluster to scale up and the new,
larger node type, using the ModifyCacheCluster ElastiCache API action and the following
parameters.
•CacheClusterId — The name of the cache cluster you are scaling up.
•CacheNodeType — The new, larger node type you want to scale the cache cluster up to. This
value must be one of the node types returned by the ListAllowedNodeTypeModifications
action in step 1.
•ApplyImmediately — Set to true to cause the scale up to be performed
immediately. To postpone the scale up to the cluster's next maintenance window, use
ApplyImmediately=false.
https://elasticache.us-west-2.amazonaws.com/
?Action=ModifyCacheCluster
&ApplyImmediately=true
&CacheClusterId=MyRedisCacheCluster
&CacheNodeType=cache.m2.xlarge
&Version=2015-02-02
&SignatureVersion=4
&SignatureMethod=HmacSHA256
&Timestamp=20150202T192317Z
API Version 2015-02-02
149

Amazon ElastiCache User Guide
Scaling Redis Cache Clusters Up
&X-Amz-Credential=<credential>
For more information, see ModifyCacheCluster in the Amazon ElastiCache API Reference.
3. If you used ApplyImmediately=true, check the status of the new cache cluster using the
ElastiCache API DescribeCacheClusters action with the following parameter. When the status
changes to available you can begin using the new, larger cache cluster.
•CacheClusterId — The name of your standalone Redis cache cluster. Use this parameter to
describe a particular cache cluster rather than all cache clusters.
https://elasticache.us-west-2.amazonaws.com/
?Action=DescribeCacheClusters
&CacheClusterId=MyRedisCacheCluster
&Version=2015-02-02
&SignatureVersion=4
&SignatureMethod=HmacSHA256
&Timestamp=20150202T192317Z
&X-Amz-Credential=<credential>
For more information, see DescribeCacheClusters in the Amazon ElastiCache API Reference.
API Version 2015-02-02
150

Amazon ElastiCache User Guide
Scaling Redis Cache Clusters Down
Scaling Standalone Redis Cache Clusters Down
The ElastiCache process for scaling your Redis cluster down is completely manual and makes no
attempt at data retention other than what you do.
The following sections walks you through how to scale a standalone Redis cache cluster down to a
smaller node type. Ensuring that the new, smaller node type is large enough to accommodate all the
data and Redis overhead is important to the long term success of your new Redis cluster. For more
information, see Ensuring You Have Sufficient Memory to Create a Redis Snapshot (p. 49).
Topics
•Scaling a Standalone Redis Cache Cluster Down (Console) (p. 151)
•Scaling a Standalone Redis Cache Cluster Down (AWS CLI) (p. 151)
•Scaling a Standalone Redis Cache Cluster Down (ElastiCache API) (p. 152)
Scaling a Standalone Redis Cache Cluster Down (Console)
The following procedure walks you through scaling your standalone Redis cluster down to a smaller
node type using the ElastiCache console.
To scale your standalone Redis cache cluster down (console)
1. Ensure that the smaller node type is adequate for your data and overhead needs. For more
information, see Ensuring You Have Sufficient Memory to Create a Redis Snapshot (p. 49).
2. Sign in to the AWS Management Console and open the ElastiCache console at https://
console.aws.amazon.com/elasticache/.
3. Take a snapshot of the cache cluster. For details on how to take a snapshot, see Creating a
Manual Backup (Console) (p. 202).
4. Restore from this snapshot specifying the new node type for the new cache cluster. For more
information, see Restoring From a Snapshot (Console) (p. 216).
Alternatively, you can launch a new cache cluster using the new node type and seeding it from the
snapshot. For more information see Using a Snapshot to Seed a Cluster (p. 218).
5. In your application, update the endpoints to the new cache cluster's endpoints. For more
information, see Finding the Endpoint for a Redis Cluster (Console) (p. 42).
6. Delete the old cache cluster. For more information, see Deleting a Cluster (Console) (p. 140).
7. If you no longer need it, delete the snapshot. For more information, see Deleting a Snapshot
(Console) (p. 222).
Tip
If you don't mind your cache cluster being unavailable while it is being created or restored, you
can eliminate the need to update the endpoints in your application by deleting the old cache
cluster right after taking the snapshot and re-using the old cache cluster's name for the new
cache cluster.
Scaling a Standalone Redis Cache Cluster Down (AWS CLI)
The following procedure walks you through scaling your standalone Redis cluster down to a smaller
node type using the AWS CLI.
To your standalone Redis cache cluster down (AWS CLI)
1. Ensure that the smaller node type is adequate for your data and overhead needs. For more
information, see Ensuring You Have Sufficient Memory to Create a Redis Snapshot (p. 49).
API Version 2015-02-02
151

Amazon ElastiCache User Guide
Scaling Redis Cache Clusters Down
2. Create a snapshot of your existing Redis cache cluster. For instructions, see Creating a Manual
Backup (AWS CLI) (p. 202).
3. Restore from the snapshot using the new, smaller node type as the cache cluster's node type. For
more information, see Restoring From a Snapshot (AWS CLI) (p. 216).
4. In your application, update the endpoints to the new cache cluster's endpoints. For more
information, see Finding Endpoints for Nodes and Clusters (AWS CLI) (p. 45).
5. Delete your old cache cluster. For more information, see Deleting a Cluster (AWS CLI) (p. 140).
6. If you no longer need it, delete the snapshot. For more information, see Deleting a Snapshot (AWS
CLI) (p. 222).
Tip
If you don't mind your cache cluster being unavailable while it is being created or restored, you
can eliminate the need to update the endpoints in your application by deleting the old cache
cluster right after taking the snapshot and re-using the old cache cluster's name for the new
cache cluster.
Scaling a Standalone Redis Cache Cluster Down (ElastiCache
API)
The following procedure walks you through scaling your standalone Redis cluster down to a smaller
node type using the ElastiCache API.
To scale a standalone Redis cache cluster down (ElastiCache API)
1. Ensure that the smaller node type is adequate for your data and overhead needs. For more
information, see Ensuring You Have Sufficient Memory to Create a Redis Snapshot (p. 49).
2. Create a snapshot of your existing Redis cache cluster. For instructions, see Creating a Manual
Backup (ElastiCache API) (p. 203).
3. Restore from the snapshot using the new, smaller node type as the cache cluster's node type. For
more information, see Restoring From a Snapshot (ElastiCache API) (p. 217).
4. In your application, update the endpoints to the new cache cluster's endpoints. For more
information, see Finding Endpoints for Nodes and Clusters (ElastiCache API) (p. 47).
5. Delete your old cache cluster. For more information, see Deleting a Cluster (ElastiCache
API) (p. 140).
6. If you no longer need it, delete the snapshot. For more information, see Deleting a Snapshot
(ElastiCache API) (p. 222).
Tip
If you don't mind your cache cluster being unavailable while it is being created or restored, you
can eliminate the need to update the endpoints in your application by deleting the old cache
cluster right after taking the snapshot and re-using the old cache cluster's name for the new
cache cluster.
API Version 2015-02-02
152

Amazon ElastiCache User Guide
Scaling Redis Replication Groups
Scaling Redis Replication Groups
A Redis replication group is a logical collection of up to 6 Redis cache clusters where one cache
cluster, the Primary, is able to serve both read and write requests. All the other cache clusters in the
replication group are read-only replicas of the Primary. Data written to the Primary cache cluster is
asynchronously replicated to all the read replicas in the replication group. Because Redis does not
support sharding your data across multiple cache clusters, each cluster in a replication group contains
the entire cache dataset.
To change the data capacity of your replication group you must scale it up to a larger node type, or
down to a smaller node type.
To change the read capacity of your replication group, add more read replicas, up to a maximum of 5,
or remove read replicas.
The ElastiCache scaling up process is designed to make a best effort to retain your existing data and
requires successful Redis replication. For Redis replication groups, we recommend that sufficient
memory be made available to Redis as described in the topic Ensuring You Have Sufficient Memory to
Create a Redis Snapshot (p. 49).
The scaling down process is completely manual and makes no attempt at data retention other than
what you do.
For more information on Redis replication groups, see ElastiCache Replication (Redis) (p. 163).
Topics
•Scaling Redis Replication Groups Up (p. 154)
•Scaling Redis Replication Groups Down (p. 159)
•Increasing Read Capacity (p. 161)
•Decreasing Read Capacity (p. 162)
API Version 2015-02-02
153
Amazon ElastiCache User Guide
Scaling Redis Replication Groups Up
Scaling Redis Replication Groups Up
Amazon ElastiCache provides console, CLI, and API support for scaling your Redis replication group
up.
When the scale up process is initiated, ElastiCache will:
1. Block all reads from and writes to the primary cache cluster.
2. Launch a new Redis replication group using the new node type.
3. Copy all the data from the primary cache cluster to the new primary cache cluster.
4. Sync the new read replicas with the new primary cache cluster.
5. Update the DNS entries so they point to the new cache clusters. Because of this you don't have to
update the endpoints in your application.
Important
Reads from read replica clusters will be interrupted while ElastiCache switches you from
your current replicas to the new replicas.
6. Reinstate reads from and writes to the new primary cache cluster.
7. Delete the old replication group.
How long this process takes is dependent upon your node type and how much data is in your cache
cluster.
As shown in the following table, your Redis scale up operation is blocked if you have an engine
upgrade scheduled for the replication group's next maintenance window.
Blocked Redis operations
Pending Operations Blocked Operations
Scale up Immediate engine upgrade
Engine upgrade Immediate scale up
Immediate scale upScale up and engine upgrade
Immediate engine upgrade
If you have a pending operation that is blocking you, you can do one of the following.
• Schedule your Redis scale up operation for the next maintenance window by clearing
the Apply immediately check box (CLI use: --no-apply-immediately, API use:
ApplyImmediately=false).
• Wait until your next maintenance window (or after) to perform your Redis scale up operation.
• Add the Redis engine upgrade to this cache cluster modification with the Apply Immediately check
box selected (CLI use: --apply-immediately, API use: ApplyImmediately=true). This
unblocks your scale up operation by causing the engine upgrade to be performed immediately.
The following sections describe how to scale your Redis replication group up using the ElastiCache
console, the AWS CLI, and the ElastiCache API.
(Console)
The following process scales your replication group from its current node type to a new, larger node
type using the ElastiCache console. During this process, until the status changes from modifying to
API Version 2015-02-02
154

Amazon ElastiCache User Guide
Scaling Redis Replication Groups Up
available all reads and writes between your application and the primary cache cluster are blocked.
However, reads from the read replica cache clusters continue uninterrupted.
The amount of time it takes to scale up to a larger node type varies, depending upon the node type and
the amount of data in your current cache cluster.
To scale a Redis Replication Group up (console)
1. Sign in to the AWS Management Console and open the ElastiCache console at https://
console.aws.amazon.com/elasticache/.
2. From the left navigation pane, choose Replication Groups
3. From the list of replication groups, choose the replication group you want to scale up.
4. Choose Modify.
5. From the Node Types list in the Modify Replication Group dialog, choose the node type you
want to scale up to.
6. If you want to perform the scale up process right away, select the Apply immediately box. If
the Apply immediately box is left unselected, the scale up process is performed during this
replication group's next maintenance window.
7. Choose Modify.
8. When the replication group's status changes from modifying to available, your replication has
scaled to the new node type and you may resume using it. There is no need to update the
Endpints in your application.
(AWS CLI)
The following process scales your replication group from its current node type to a new, larger node
type using the AWS CLI. During this process, until the status changes from modifying to available all
reads and writes between your application and the primary cache cluster are blocked. However, reads
from the read replica cache clusters continue uninterrupted.
The amount of time it takes to scale up to a larger node type varies, depending upon your node type
and the amount of data in your current cache cluster.
To scale a Redis Replication Group up (AWS CLI)
1. Determine which node types you can scale up to by running the AWS CLI list-allowed-node-
type-modifications command with the following parameter.
•--replication-group-id — the name of the replication group. Use this parameter to
describe a particular replication group rather than all replication groups.
For Linux, OS X, or Unix:
aws elasticache list-allowed-node-type-modifications \
--replication-group-id my-replication-group
For Windows:
aws elasticache list-allowed-node-type-modifications ^
--replication-group-id my-replication-group
For more information, see list-allowed-node-type-modifications in the AWS CLI Reference.
2. Scale your current replication group up to the new node type using the AWS CLI modify-
replication-group command with the following parameters.
API Version 2015-02-02
155

Amazon ElastiCache User Guide
Scaling Redis Replication Groups Up
•--replication-group-id — the name of the replication group.
•--cache-node-type — the new, larger node type of the cache clusters in this replication
group. This value must be one of the instance types returned by the list-allowed-node-
type-modifications command in step 1.
•--apply-immediately — Causes the scale up to be applied immediately. To postpone the
scale up operation to the next maintenance window, use --no-apply-immediately.
For Linux, OS X, or Unix:
aws elasticache modify-replication-group \
--replication-group-id my-replication-group \
--cache-node-type cache.m3.large \
--apply-immediately
For Windows:
aws elasticache modify-replication-group ^
--replication-group-id my-replication-group ^
--cache-node-type cache.m3.large ^
--apply-immediately
For more information, see modify-replication-group in the AWS CLI Reference.
3. If you used the --apply-immediately parameter, monitor the status of the replication group
using the AWS CLI describe-replication-group command with the following parameter.
When the status changes from modifying to available you can begin writing to your new, scaled up
replication group.
•--replication-group-id — the name of the replication group. Use this parameter to
describe a particular replication group rather than all replication groups.
For Linux, OS X, or Unix:
aws elasticache describe-replication-group \
--replication-group-id my-replication-group
For Windows:
aws elasticache describe-replication-groups ^
--replication-group-id my-replication-group
For more information, see describe-replication-groups in the AWS CLI Reference.
(ElastiCache API)
The following process scales your replication group from its current node type to a new, larger node
type using the ElastiCache API. During this process, until the status changes from modifying to
available all reads and writes between your application and the primary cache cluster are blocked.
However, reads from the read replica cache clusters continue uninterrupted.
The amount of time it takes to scale up to a larger node type varies, depending upon your node type
and the amount of data in your current cache cluster.
API Version 2015-02-02
156

Amazon ElastiCache User Guide
Scaling Redis Replication Groups Up
To scale a Redis Replication Group up (ElastiCache API)
1. Determine which node types you can scale up to using the ElastiCache API
ListAllowedNodeTypeModifications action with the following parameter.
•ReplicationGroupId — the name of the replication group. Use this parameter to describe a
specific replication group rather than all replication groups.
https://elasticache.us-west-2.amazonaws.com/
?Action=ListAllowedNodeTypeModifications
&ReplicationGroupId=MyReplicationGroup
&Version=2015-02-02
&SignatureVersion=4
&SignatureMethod=HmacSHA256
&Timestamp=20150202T192317Z
&X-Amz-Credential=<credential>
For more information, see ListAllowedNodeTypeModifications in the Amazon ElastiCache API
Reference.
2. Scale your current replication group up to the new node type using the
ModifyRedplicationGroup ElastiCache API action and with the following parameters.
•ReplicationGroupId — the name of the replication group.
•CacheNodeType — the new, larger node type of the cache clusters in this
replication group. This value must be one of the instance types returned by the
ListAllowedNodeTypeModifications action in step 1.
•ApplyImmediately — Set to true to causes the scale up to be applied immediately. To
postpone the scale up to the next maintenance window, use ApplyImmediately=false.
https://elasticache.us-west-2.amazonaws.com/
?Action=ModifyReplicationGroup
&ApplyImmediately=true
&CacheNodeType=cache.m3.large
&ReplicationGroupId=myReplicationGroup
&SignatureVersion=4
&SignatureMethod=HmacSHA256
&Timestamp=20141201T220302Z
&Version=2014-12-01
&X-Amz-Algorithm=AWS4-HMAC-SHA256
&X-Amz-Date=20141201T220302Z
&X-Amz-SignedHeaders=Host
&X-Amz-Expires=20141201T220302Z
&X-Amz-Credential=<credential>
&X-Amz-Signature=<signature>
For more information, see ModifyReplicationGroup in the Amazon ElastiCache API Reference.
3. If you used ApplyImmediately=true, monitor the status of the replication group using the
ElastiCache API DescribeReplicationGroups action with the following parameters. When
the status changes from modifying to available you can begin writing to your new, scaled up
replication group.
•ReplicationGroupId — the name of the replication group. Use this parameter to describe a
particular replication group rather than all replication groups.
API Version 2015-02-02
157

Amazon ElastiCache User Guide
Scaling Redis Replication Groups Up
https://elasticache.us-west-2.amazonaws.com/
?Action=DescribeReplicationGroups
&ReplicationGroupId=MyReplicationGroup
&Version=2015-02-02
&SignatureVersion=4
&SignatureMethod=HmacSHA256
&Timestamp=20150202T192317Z
&X-Amz-Credential=<credential>
For more information, see DescribeReplicationGroups in the Amazon ElastiCache API Reference.
API Version 2015-02-02
158

Amazon ElastiCache User Guide
Scaling Redis Replication Groups Down
Scaling Redis Replication Groups Down
The following sections walks you through how to scale a Redis cache cluster or replication group down
to a smaller node type. Ensuring that the new, smaller node type is large enough to accommodate all
the data and overhead is very important to success. For more information, see Ensuring You Have
Sufficient Memory to Create a Redis Snapshot (p. 49).
Topics
•Scaling a Redis Replication Group Down (Console) (p. 159)
•Scaling a Redis Replication Group Down (AWS CLI) (p. 159)
•Scaling a Redis Replication Group Down (ElastiCache API) (p. 160)
Scaling a Redis Replication Group Down (Console)
The following process scales your Redis replication group to a smaller node type using the ElastiCache
console.
To scale your Redis replication group down (console)
1. Ensure that the smaller node type is adequate for your data and overhead needs. For more
information, see Ensuring You Have Sufficient Memory to Create a Redis Snapshot (p. 49).
2. Sign in to the AWS Management Console and open the ElastiCache console at https://
console.aws.amazon.com/elasticache/.
3. Take a snapshot of the replication group's primary cache cluster. For details on how to take a
snapshot, see Creating a Manual Backup (Console) (p. 202).
4. Restore from this snapshot specifying the new node type for the new cache cluster. For more
information, see Restoring From a Snapshot (Console) (p. 216).
Alternatively, you can launch a new replication group with the same number of read replicas using
the new node type and seeding it from the snapshot. For more information see Using a Snapshot
to Seed a Cluster (p. 218).
5. In your application, update the endpoints to the new replication group's endpoints. For more
information, see Finding the Endpoints for a Redis Replication Group (Console) (p. 43).
6. Delete the old replication group. For more information, see Deleting a Replication Group
(Console) (p. 191).
7. If you no longer need it, delete the snapshot. For more information, see Deleting a Snapshot
(Console) (p. 222).
Tip
If you don't mind being unable to use your replication group while it is being created or
restored, you can eliminate the need to update the endpoints in your application by deleting
the old replication group right after taking the snapshot and re-using the old replication group's
name for the new replication group.
Scaling a Redis Replication Group Down (AWS CLI)
The following process scales your Redis replication group to a smaller node type using the AWS CLI.
To scale your Redis replication group down (AWS CLI)
1. Ensure that the smaller node type is adequate for your data and overhead needs. For more
information, see Selecting Your Redis Node Size (p. 67).
API Version 2015-02-02
159

Amazon ElastiCache User Guide
Scaling Redis Replication Groups Down
2. Create a snapshot of your existing Redis node. For instructions, see Creating a Manual Backup
(AWS CLI) (p. 202).
3. Restore from the snapshot using the new, smaller node type as the new node type. For more
information, see Restoring From a Snapshot (AWS CLI) (p. 216).
4. In your application, update the endpoints to the new cache cluster's endpoints. For more
information, see Finding the Endpoints for Replication Groups (AWS CLI) (p. 45).
5. Delete your old replication group. For more information, see Deleting a Replication Group (AWS
CLI) (p. 191).
6. If you no longer need it, delete the snapshot. For more information, see Deleting a Snapshot (AWS
CLI) (p. 222).
Tip
If you don't mind being unable to use your replication group while it is being created or
restored, you can eliminate the need to update the endpoints in your application by deleting
the old replication group right after taking the snapshot and re-using the old replication group's
name for the new replication group.
Scaling a Redis Replication Group Down (ElastiCache API)
The following process scales your Redis replication group to a smaller node type using the ElastiCache
API.
To scale a Redis replication group down (ElastiCache API)
1. Ensure that the smaller node type is adequate for your data and overhead needs. For more
information, see Selecting Your Redis Node Size (p. 67).
2. Create a snapshot of your existing Redis cache cluster. For instructions, see Creating a Manual
Backup (ElastiCache API) (p. 203).
3. Restore from the snapshot using the new, smaller node type as the new node type. For more
information, see Restoring From a Snapshot (ElastiCache API) (p. 217).
4. In your application, update the endpoints to the new cache cluster's endpoints. For more
information, see Finding the Endpoints (ElastiCache API) (p. 47).
5. Delete your old replication group. For more information, see Deleting a Replication Group
(ElastiCache API) (p. 191).
6. If you no longer need it, delete the snapshot. For more information, see Deleting a Snapshot
(ElastiCache API) (p. 222).
Tip
If you don't mind being unable to use your replication group while it is being created or
restored, you can eliminate the need to update the endpoints in your application by deleting
the old replication group right after taking the snapshot and re-using the old replication group's
name for the new replication group.
API Version 2015-02-02
160

Amazon ElastiCache User Guide
Increasing Read Capacity
Increasing Read Capacity
To increase read capacity, add read replicas (up to a maximum of five) to your Redis replication group.
To decrease read capacity, delete read replicas from your Redis replication group.
You can scale your Redis replication group's read capacity using the ElastiCache console, the AWS
CLI, or the ElastiCache API.
Topics
•Increasing Read Capacity (Console) (p. 161)
•Increasing Read Capacity (AWS CLI) (p. 161)
•Increasing Read Capacity (ElastiCache API) (p. 161)
Increasing Read Capacity (Console)
When heavy read demand on your Redis replication group causes performance to degrade, you
can spread the read requests across more cache clusters by adding read replicas to the replication
group. When using the ElastiCache console to add read replicas, you must add them one at a time,
though you do not need to wait for the status of an added read replica to become available before you
add another read replica. For more information, see Adding a Read Replica to a Replication Group
(Console) (p. 193).
Increasing Read Capacity (AWS CLI)
When heavy read demand on your Redis replication group causes performance to degrade, you can
spread the read requests across more cache clusters by adding read replicas to the replication group.
For more information, see Adding a Read Replica to a Replication Group (AWS CLI) (p. 194).
Increasing Read Capacity (ElastiCache API)
When heavy read demand on your Redis replication group causes performance to degrade, you can
spread the read requests across more cache clusters by adding read replicas to the replication group.
For more information, see Adding a Read Replica to a Replication Group (ElastiCache API) (p. 194).
API Version 2015-02-02
161

Amazon ElastiCache User Guide
Decreasing Read Capacity
Decreasing Read Capacity
To decrease read capacity, delete one or more read replicas from your replication group. For more
information, see Deleting a Read Replica (p. 197).
Decreasing Read Capacity (Console)
When read demand on your Redis replication group is so light that you could save money by having
fewer read replicas, you can spread the read requests across fewer cache clusters by removing read
replicas from the replication group. When using the ElastiCache console to remove read replicas to
your Redis replication group, you must remove them one at a time, though you do not need to wait for
a replica to be completely deleted before you remove another read replica. For more information, see
Deleting a Cluster (Console) (p. 140).
Decreasing Read Capacity (AWS CLI)
When read demand on your Redis replication group is so light that you could save money by having
fewer read replicas, you can spread the read requests across fewer cache clusters by removing read
replicas from the replication group. For more information, see Deleting a Cluster (AWS CLI) (p. 140).
Decreasing Read Capacity (ElastiCache API)
When read demand on your Redis replication group is so light that you could save money by having
fewer read replicas, you can spread the read requests across fewer cache clusters by removing
read replicas from the replication group. For more information, see Deleting a Cluster (ElastiCache
API) (p. 140).
API Version 2015-02-02
162

Amazon ElastiCache User Guide
ElastiCache Replication (Redis)
Stand-alone Amazon ElastiCache cache clusters are in-memory entities without any redundant data
protection services. In this scenario, if your cluster fails for any reason, you lose all the cluster's data.
However, if you're running the Redis engine, you can group 2 to 6 nodes into a replication group where
1 to 5 read-only nodes contain replicate data of the group's single read/write primary node. In this
scenario, if one node fails for any reason you do not lose all your data since it is replicated in one or
more other nodes.
If the replication group has Multi-AZ enabled and the primary node fails, the replication group fails
over to a read replica. Because the data is updated on the replica nodes asynchronously, there may
be some data loss due to latency in updating the replica nodes. For more information, see Mitigating
Failures when Running Redis (p. 52).
Topics
•Redis Replication: Differences by Engine Version (p. 164)
•Redis Replication Groups (p. 165)
•Replication with Multi-AZ and Automatic Failover (Redis) (p. 166)
•Creating a Redis Replication Group (p. 173)
•Finding Replication Group Endpoints (p. 185)
•Modifying a Replication Group (p. 189)
•Deleting a Replication Group (p. 191)
•Adding a Read Replica to a Replication Group (p. 193)
•Promoting a Read-Replica to Primary (p. 195)
•Deleting a Read Replica (p. 197)
API Version 2015-02-02
163

Amazon ElastiCache User Guide
Redis Replication: Differences by Engine Version
Redis Replication: Differences by Engine Version
All supported versions of Redis support replication. However, the way that replication is implemented
varies depending on the Redis version.
Redis Version 2.8.22 and Later
Redis replication, in versions 2.8.22 and later, select between two methods. For more information, see
Redis Versions Prior to 2.8.22 (p. 164) and ElastiCache Backup & Restore (Redis) (p. 198).
During the forkless process, if the write loads are heavy, writes to the cache are delayed to ensure that
you don't accumulate too many changes and thus prevent a successful snapshot.
Redis Versions Prior to 2.8.22
Redis replication in versions prior to 2.8.22, is a three-step process.
1. Fork, and in the background process, serialize the cache to disk. This creates a point-in-time
snapshot.
2. In the foreground, accumulate a changelog in the client output buffer.
Important
If the changelog exceeds the client output buffer size, the sync fails. For more
information, see Ensuring You Have Sufficient Memory to Create a Redis
Snapshot (p. 49).
3. Finally, transmit the cache data and then the changelog to the replica cluster.
API Version 2015-02-02
164

Amazon ElastiCache User Guide
Redis Replication Groups
Redis Replication Groups
A replication group is a collection of Redis nodes, with one primary read-write node and up to five
secondary, read-only nodes, which are called read replicas. Each read replica maintains a copy of the
data from the primary node. Asynchronous replication mechanisms are used to keep the read-replicas
synchronized with the primary node. Applications can read from any node in the replication group.
Applications can write only to the primary node. Read replicas enhance scalability and guard against
data loss.
You can use replication groups to scale your Redis solution for ElastiCache to handle applications that
are highly read-intensive or to support large numbers of clients that simultaneously read from the same
cache.
All of the nodes in a replication group must reside in the same region. To improve fault tolerance,
you can provision read replicas in multiple Availability Zones within that region. When you add a read
replica to a replication group, all of the data from the primary node is copied to the read replica. From
that point, whenever data is written to the primary, the changes are asynchronously propagated to
all the read replicas. Your applications can connect to a read replica and access data in the cache,
although they cannot write any data to a replica.
To improve fault tolerance and reduce write down time, implement Multi-AZ with automatic failover
for your Redis replication group. For more information, see Replication with Multi-AZ and Automatic
Failover (Redis) (p. 166).
You can change the roles of the nodes within the replication group, with the primary node and one
of the replicas exchanging roles. You might decide to do this for performance tuning reasons. For
example, with a web application that has heavy write activity, you can choose the node that has the
lowest network latency. For more information, see Promoting a Read-Replica to Primary (p. 195).
API Version 2015-02-02
165

Amazon ElastiCache User Guide
Replication with Multi-AZ and Automatic Failover (Redis)
Replication with Multi-AZ and Automatic Failover
(Redis)
Enabling Amazon ElastiCache's Multi-AZ with automatic failover functionality on your replication group
improves your fault tolerance in those cases where your replication group's read/write primary cluster
becomes unreachable or fails for any reason.
Topics
•Automatic Failover Overview (p. 166)
•Notes on Redis Multi-AZ with Automatic Failover (p. 166)
•Failure Scenarios with Multi-AZ and Automatic Failover Responses (p. 167)
•Enabling Multi-AZ with Automatic Failover (p. 170)
Automatic Failover Overview
An ElastiCache replication group consists of a primary cluster and up to five read replicas. During
certain types of planned maintenance, or in the unlikely event of a primary cluster or Availability Zone
failure, if your replication group is Multi-AZ enabled, ElastiCache will automatically detect the primary
cluster's failure, select a read replica cluster and promote it to primary cluster so that you can resume
writing to the new primary cluster as soon as promotion is complete. ElastiCache also propagates the
DNS of the promoted replica so that if your application is writing to the primary endpoint, no endpoint
change will be required in your application. However, because you read from individual endpoints, you
will need to change the read endpoint of the replica promoted to primary cluster to the new replica's
endpoint.
The promotion process generally takes just a few minutes, which is much faster than recreating and
provisioning a new primary cluster if you do not enable Multi-AZ.
You can enable Multi-AZ with automatic failover using the ElastiCache console, the AWS CLI, or the
ElastiCache API.
Notes on Redis Multi-AZ with Automatic Failover
The following points should be noted:
• Multi-AZ is supported on Redis version 2.8.6 and later.
• Redis Multi-AZ with autofailover is not supported on t1 and t2 cache node types.
• Redis replication is asynchronous. Therefore, when a primary cluster fails over to a replica, a small
amount of data might be lost due to replication lag.
• When selecting the replica to promote to primary cluster, ElastiCache selects the replica with the
least replication lag (that is, the one that is most current).
• When you enable Multi-AZ on a replication group, a replica cluster cannot be manually promoted to
primary cluster. Thus, if the primary in AZ-a fails over to a replica in AZ-b, the primary cluster stays
in AZ-b. To promote the new replica cluster in AZ-a to primary cluster, you must first disable Multi-AZ
on the replication group, do the promotion, and then re-enable Multi-AZ.
• ElastiCache Multi-AZ and append-only file (AOF) are mutually exclusive. If you enable one, you
cannot enable the other.
• In the case where a cluster's failure is caused by the rare event of an entire Availability Zone failing,
the replica replacing the failed primary cluster is created only when the Availability Zone is back
up. For example, consider a replication group with the primary cluster in AZ-a and replicas in AZ-b
and AZ-c. If the primary cluster fails, the replica with the least replication lag is promoted to primary
API Version 2015-02-02
166

Amazon ElastiCache User Guide
Failure Scenarios with Multi-AZ
and Automatic Failover Responses
cluster. Then, ElastiCache creates a new replica in AZ-a (where the failed primary cluster was
located) only when AZ-a is back up and available.
• A customer-initiated reboot of a primary cluster does not trigger automatic failover. Other reboots
and failures do trigger automatic failover.
• Whenever the primary cluster is rebooted, it is cleared of data when it comes back online. When the
read replicas see the cleared primary cluster, they clear their copy of the data, which causes data
loss.
• After a read replica has been promoted, the other replicas sync with the new primary cluster. After
the initial sync, the replicas' content is deleted and they sync the data from the new primary cluster,
causing a brief interruption during which the replicas are not accessible. This sync process also
causes a temporary load increase on the primary while syncing with the replicas. This behavior is
native to Redis and isn’t unique to ElastiCache Multi-AZ. For details regarding this Redis behavior,
see http://redis.io/topics/replication.
Important
•Redis version 2.8.22 and later
External replicas are not permitted.
•Redis versions prior to 2.8.22
We recommend that you do not connect an external Redis replica to an ElastiCache Redis
replication group that is Multi-AZ enabled. This is an unsupported configuration that can
create issues that prevent ElastiCache from properly performing failover and recovery. If
you need to connect an external Redis replica to an ElastiCache replication group, make
sure that Multi-AZ is disabled before you make the connection.
Failure Scenarios with Multi-AZ and Automatic
Failover Responses
Prior to the introduction of Multi-AZ with automatic failover, ElastiCache detected and replaced a
replication group's failed clusters by recreating and re-provisioning the failed cluster. By enabling Multi-
AZ, a failed primary cluster fails over to the replica with the least replication lag. The selected replica
is automatically promoted to primary cluster, which is much faster than creating and reprovisioning a
new primary cluster. This process usually takes just a few minutes until you can write to the replication
group again.
When Multi-AZ is enabled, ElastiCache continually monitors the state of the primary cluster. If the
primary cluster fails, one of the following actions is performed.
When only the primary cluster fails
If only the primary cluster fails, the read replica with the least replication lag is promoted to primary
cluster, and a new read replica is created and provisioned to replace the promoted read replica.
API Version 2015-02-02
167

Amazon ElastiCache User Guide
Failure Scenarios with Multi-AZ
and Automatic Failover Responses
ElastiCache Multi-AZ Actions when only the primary cluster fails
1. The failed primary cluster is taken off line.
2. The read replica with the least replication lag is promoted to primary cluster.
Writes can resume as soon as the promotion process is complete, typically just a few minutes.
There is no need to change the endpoint for writes as ElastiCache propagates the DNS of the
promoted replica.
3. A replacement read replica is launched and provisioned.
The replacement read replica is launched in the Availability Zone that the failed primary cluster
was in so that the distribution of clusters is maintained.
4. The replicas sync with the new primary cluster.
You need to make the following changes to your application after the new replica is
available:
• Primary endpoint–Do not make any changes to your application since the DNS of the new primary
cluster is propagated to the primary endpoint.
• Read endpoint–Replace the read endpoint of the failed primary with the read endpoint of the new
replica.
For information about finding the endpoints of a replication group, see the following topics:
•Finding the Endpoints for a Redis Replication Group (Console) (p. 43)
•Finding the Endpoints for Replication Groups (AWS CLI) (p. 45)
•Finding Endpoints for Replication Groups (ElastiCache API) (p. 47)
When the primary cluster and some read replicas fail
If everything fails except one read replica, the remaining available replica is promoted to primary
cluster and new read replicas are created and provisioned.
API Version 2015-02-02
168
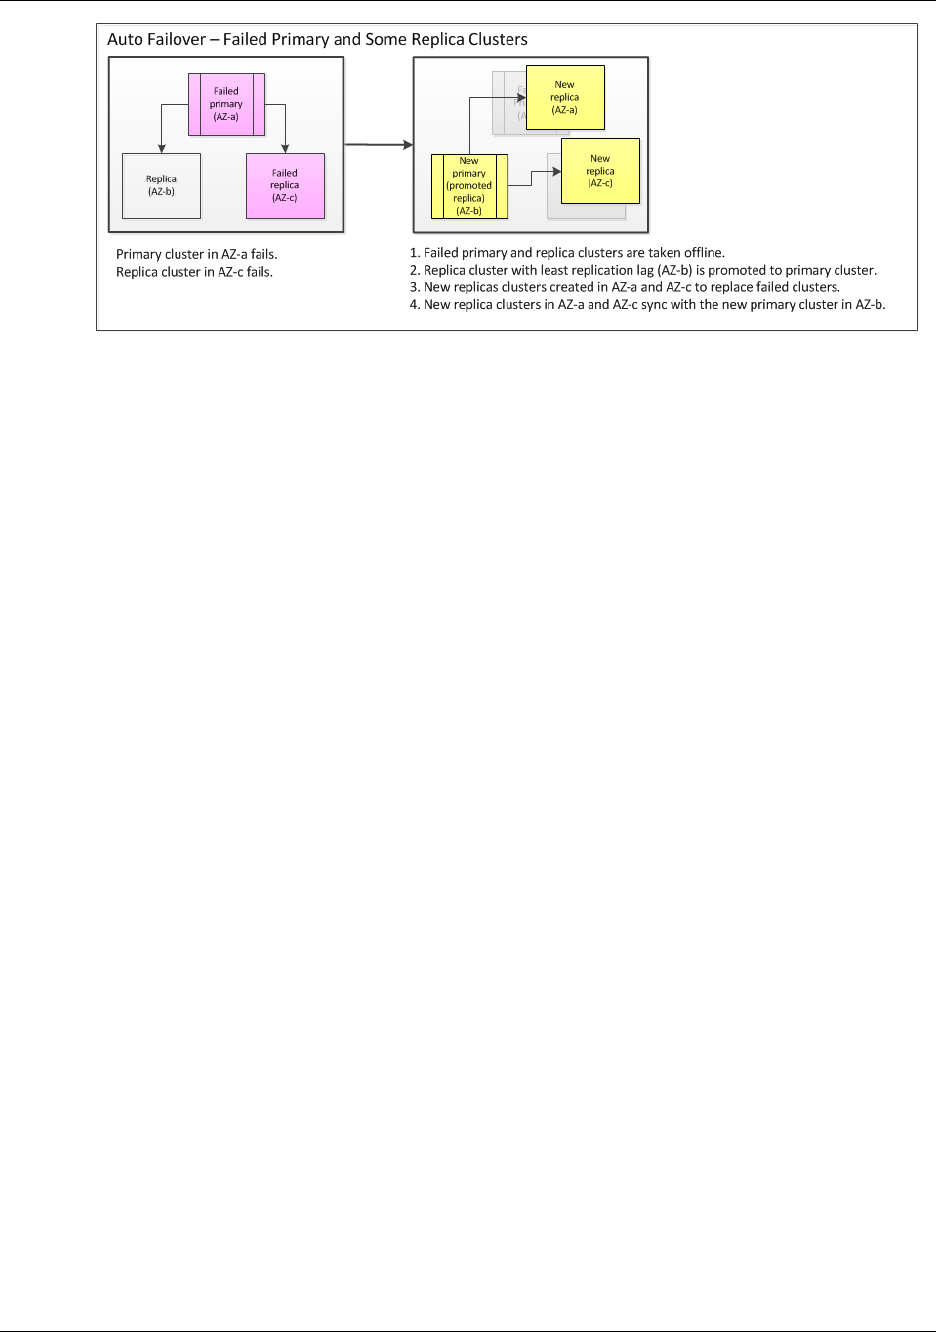
Amazon ElastiCache User Guide
Failure Scenarios with Multi-AZ
and Automatic Failover Responses
ElastiCache Multi-AZ Actions when the primary cluster and some read replicas fail
1. The failed primary cluster and failed read replicas are taken off line.
2. The available replica with the least replication lag is promoted to primary cluster.
Writes can resume as soon as the promotion process is complete, typically just a few minutes.
There is no need to change the endpoint for writes as ElastiCache propagates the DNS of the
promoted replica.
3. Replacement replicas are created and provisioned.
The replacement replicas are created in the Availability Zones of the failed clusters so that the
distribution of clusters is maintained.
4. All clusters sync with the new primary cluster.
You need to make the following changes to your application after the new clusters are
available:
• Primary endpoint–Do not make any changes to your application since the DNS of the new primary
cluster is propagated to the primary endpoint.
• Read endpoint–Replace the read endpoint of the failed primary and failed replicas with the read
endpoints of the new replicas.
For information about finding the endpoints of a replication group, see the following topics:
•Finding the Endpoints for a Redis Replication Group (Console) (p. 43)
•Finding the Endpoints for Replication Groups (AWS CLI) (p. 45)
•Finding Endpoints for Replication Groups (ElastiCache API) (p. 47)
When the entire replication group fails
If everything fails, all the clusters are recreated and provisioned.
In this scenario, all the data in the cache is lost due to the failure of every cluster in the replication
group. This is a rare occurrence.
API Version 2015-02-02
169
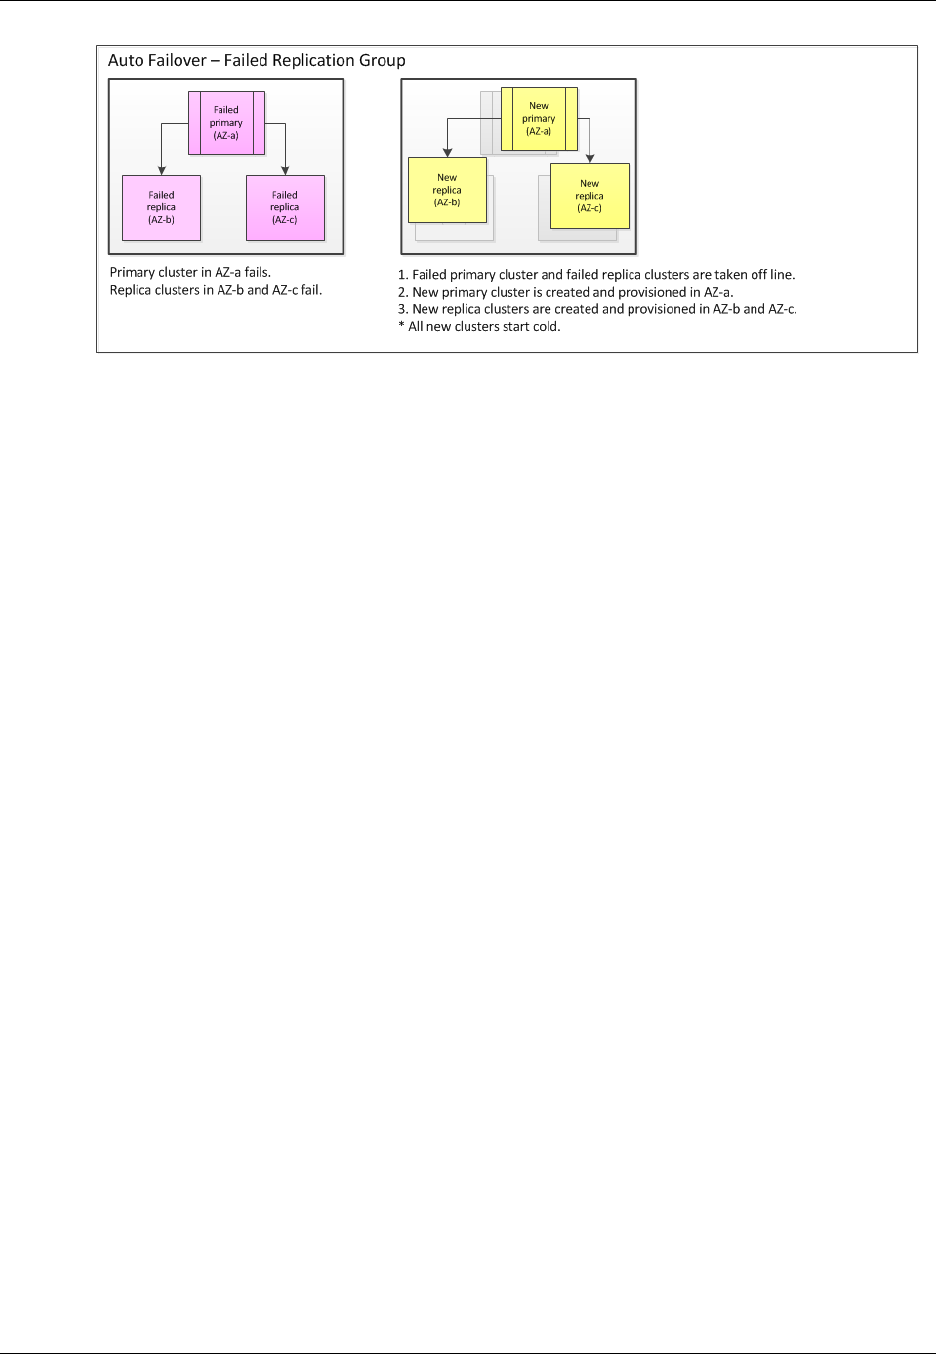
Amazon ElastiCache User Guide
Enabling Multi-AZ with Automatic Failover
ElastiCache Multi-AZ Actions when the entire replication group fails
1. The failed primary cluster and read replicas are taken off line.
2. Replacement primary cluster is created and provisioned.
3. Replacement replicas are created and provisioned.
The replacements are created in the Availability Zones of the failed clusters so that the distribution
of clusters is maintained.
Note
Because the entire replication group failed, data is lost and all the new clusters start cold.
Because each of the replacement clusters will have the same endpoint as the cluster it is replacing,
there is no need for you to make any endpoint changes in your application.
For information about finding the endpoints of a replication group, see the following topics:
•Finding the Endpoints for a Redis Replication Group (Console) (p. 43)
•Finding the Endpoints for Replication Groups (AWS CLI) (p. 45)
•Finding Endpoints for Replication Groups (ElastiCache API) (p. 47)
We recommend that you create the primary cluster and read replicas in different Availability Zones to
raise your fault tolerance level.
Enabling Multi-AZ with Automatic Failover
You can enable Multi-AZ with automatic failover when you create or modify a replication group using
the AWS console, AWS CLI, or the ElastiCache API.
Multi-AZ with automatic failover can only be enabled on Redis replication groups that have at least
one available read replica. For information about creating a replication group, see Creating a Redis
Replication Group (p. 173). For information about adding a read replica to a replication group, see
Adding a Read Replica to a Replication Group (p. 193).
Topics
•Enabling Multi-AZ with Automatic Failover (Console) (p. 171)
•Enabling Multi-AZ with Automatic Failover (AWS CLI) (p. 171)
•Enabling Multi-AZ with Automatic Failover (ElastiCache API) (p. 172)
API Version 2015-02-02
170

Amazon ElastiCache User Guide
Enabling Multi-AZ with Automatic Failover
Enabling Multi-AZ with Automatic Failover (Console)
You can enable Multi-AZ with automatic failover using the ElastiCache console when you create a new
Redis cluster or by modifying an existing Redis replication group.
Enabling Multi-AZ with Automatic Failover When Creating a Cluster Using the
ElastiCache Console
To enable Multi-AZ with automatic failover when creating a cluster (console)
1. Select Redis as your cluster engine.
2. On the Cluster Details screen, in the Cluster Specifications section, do the following:
a. Select Enable Replication (this is the default).
b. Select Multi-AZ (this is the default).
3. Continue creating your cluster.
For more information about creating a Redis cache cluster, see Creating a Redis Cache Cluster
(Console) (p. 116).
Enabling Multi-AZ with Automatic Failover on an Existing Replication Group
(Console)
To enable Multi-AZ with automatic failover on an existing replication group (console)
Note
The replication group must already exist and have at least one available read replica. For
information about creating a replication group using an available cluster, see Creating a Redis
Replication Group (p. 173). For information about adding a cluster to an existing replication
group, see Adding a Read Replica to a Replication Group (p. 193).
1. Sign in to the AWS Management Console and open the Amazon ElastiCache console at https://
console.aws.amazon.com/elasticache/.
2. In the left navigation pane, select Replication Groups.
3. From the list of replication groups, select the name of the replication group on which you want to
enable Multi-AZ with automatic failover.
4. Select Modify.
5. In the Modify Replication Group wizard, select Yes for Enable Multi-AZ, and then select
Modify.
For more information about modifying a cluster, see Modifying an ElastiCache Cache Cluster (p. 124).
Enabling Multi-AZ with Automatic Failover (AWS CLI)
The following code example uses the AWS CLI to enable Multi-AZ with automatic failover for the
replication group myReplGroup.
Important
The replication group myReplGroup must already exist and have at least one available read
replica.
For Linux, OS X, or Unix:
aws elasticache modify-replication-group \
API Version 2015-02-02
171

Amazon ElastiCache User Guide
Enabling Multi-AZ with Automatic Failover
--replication-group-id myReplGroup \
--automatic-failover-enabled
For Windows:
aws elasticache modify-replication-group ^
--replication-group-id myReplGroup ^
--automatic-failover-enabled
For more information, see the AWS CLI topics, create-cache-cluster, create-replication-group, and
modify-replication-group.
Enabling Multi-AZ with Automatic Failover (ElastiCache API)
The following code example uses the ElastiCache API to enable Multi-AZ with automatic failover for the
replication group myReplGroup.
Note
The replication group myReplGroup must already exist and have at least one available read
replica.
https://elasticache.us-west-2.amazonaws.com/
?Action=ModifyReplicationGroup
&AutoFailover=true
&ReplicationGroupId=myReplGroup
&Version=2015-02-02
&SignatureVersion=4
&SignatureMethod=HmacSHA256
&Timestamp=20140401T192317Z
&X-Amz-Credential=<credential>
For more information, see the ElastiCache API reference for CreateCacheCluster,
CreateReplicationGroup, and ModifyReplicationGroup.
API Version 2015-02-02
172

Amazon ElastiCache User Guide
Creating a Replication Group
Creating a Redis Replication Group
You have two options for creating a replication group. Which you use depends on whether you already
have an available Redis cache cluster not associated with any replication group to use as the primary
node in your replication group, or you need to create the primary node in addition to the replication
group, and read replicas.
Option 1: Creating a Replication Group When You Have an Available Redis Cache
Cluster (p. 173)
Use this option to leverage an available Redis cache cluster, making it the primary node. Using
this option you will create a replication group specifying the available cluster as the primary node,
and then individually add each read replica you want to the replication group. If the existing cluster
is active, each read replica will synchronize with it as they are created.
Option 2: Creating a Replication Group Without an Available Redis Cache Cluster (p. 177)
Use this option if you don't already have an available Redis cache cluster to use as the replication
group's primary node. Using this option you create the replication group specifying how many read
replicas you want. The process then creates the replication group, primary node and the specified
number of read replicas in a single action.
Creating a Replication Group When You Have an
Available Redis Cache Cluster
An available cluster is an existing stand-alone Redis cache cluster that is not associated with any
replication group.
The following procedure can only be used if you have a Redis cache cluster that is not a member of
any replication group. This cluster will become the primary node in the replication group. If you do not
have a Redis cache cluster you can use as the replication group's primary, go to Creating a Replication
Group Without an Available Redis Cache Cluster (p. 177).
Topics
•Creating a Replication Group When You Have an Available Redis Cache Cluster
(Console) (p. 173)
•Creating a Replication Group When You Have an Available Redis Cache Cluster (AWS
CLI) (p. 174)
•Creating a Replication Group When You Have an Available Redis Cache Cluster (ElastiCache
API) (p. 176)
Creating a Replication Group When You Have an Available
Redis Cache Cluster (Console)
To create a replication group when you have an existing Redis cache cluster (console)
1. Sign in to the AWS Management Console and open the ElastiCache console at https://
console.aws.amazon.com/elasticache/.
2. Create the replication group
a. From the left navigation pane, click Replication Groups.
The Replication Groups screen appears.
b. Click Create Replication Group.
API Version 2015-02-02
173

Amazon ElastiCache User Guide
Creating a Replication Group When You
Have an Available Redis Cache Cluster
The Create Replication Group wizard appears.
If, instead of the Create Replication Group wizard appearing, a warning that you do not
have any available Redis cache clusters appears, continue at step 2 of Creating a Replication
Group Without an Available Redis Cache Cluster (p. 177).
c. From the Primary Cluster ID list, select the cache cluster you want to use as the primary
node in this replication group.
d. Type an ID (name) for this replication group in the Replication Group ID box.
Replication group name constraints are as follows:
• A replication group's name must contain from 1 to 16 alphanumeric characters or hyphens.
• The first character must be a letter.
• A name cannot end with a hyphen or contain two consecutive hyphens.
e. Type a brief description for the replication group in the Replication Group Description box.
f. Click Create.
Wait until the replication group's status becomes available.
3. Add 1 to 5 read replicas to the replication group.
Repeat the steps at Adding a Read Replica to a Replication Group (p. 193) for each read replica
you want to add to the replication group.
Creating a Replication Group When You Have an Available
Redis Cache Cluster (AWS CLI)
There are two steps to creating a replication group with read replicas when using an available Redis
Cache Cluster for the primary.
First, create the replication group using the available Redis Cache Cluster as primary
To create a replication group when you already have an available Redis Cache Cluster, use the AWS
CLI create-replication-group command, being sure to include the following parameters.
--replication-group-id
The name of the replication group you are creating.
Replication group name constraints are as follows:
• A replication group's name must contain from 1 to 16 alphanumeric characters or hyphens.
• The first character must be a letter.
• A name cannot end with a hyphen or contain two consecutive hyphens.
--replication-group-description
Your description of the replication group.
--primary-cluster-id
The name of the available Redis cache cluster that will be the primary node in this replication
group.
API Version 2015-02-02
174

Amazon ElastiCache User Guide
Creating a Replication Group When You
Have an Available Redis Cache Cluster
The following command creates the replication group my-repl-group using the available Redis
cache cluster my-primary as the replication group's primary node. The settings of my-primary–
parameter group, security group, node type, etc.–will be applied to all nodes in the replication group.
For Linux, OS X, or Unix:
aws elasticache create-replication-group \
--replication-group-id my-repl-group \
--replication-group-description "test group" \
--primary-cluster-id my-primary
For Windows:
aws elasticache create-replication-group ^
--replication-group-id my-repl-group ^
--replication-group-description "test group" ^
--primary-cluster-id my-primary
For additional information and parameters you might want to use, see the AWS CLI topic create-
replication-group.
Next, add read replicas to the replication group
After the replication group is created, add 1 to 5 read replicas to it using the create-cache-cluster
command, being sure to include the following parameters.
--cache-cluster-id
The name of the cluster you are adding to the replication group.
Cluster name constraints are as follows:
• A cluster's name must contain from 1 to 20 alphanumeric characters or hyphens.
• The first character must be a letter.
• A name cannot end with a hyphen or contain two consecutive hyphens.
--replication-group-id
The name of the replication group to which you are adding this cache cluster.
Repeat this command for each read replica you want to add to the replication group, changing only the
value of the --cache-cluster-id parameter.
Note
Remember, a replication group cannot have more than 5 read replicas. Attempting to add a
read replica to a replication group that already has 5 read replicas causes the operation to fail.
The following code adds the read replica my-replica01 to the replication group my-repl-group.
The settings of the primary node–parameter group, security group, node type, etc.–will be applied to
nodes as they are added to the replication group.
For Linux, OS X, or Unix:
aws elasticache create-cache-cluster \
--cache-cluster-id my-replica01 \
--replication-group-id my-repl-group
For Windows:
aws elasticache create-cache-cluster ^
API Version 2015-02-02
175

Amazon ElastiCache User Guide
Creating a Replication Group When You
Have an Available Redis Cache Cluster
--cache-cluster-id my-replica01 ^
--replication-group-id my-repl-group
For additional information and parameters you might want to use, see the AWS CLI topic create-cache-
cluster.
Creating a Replication Group When You Have an Available
Redis Cache Cluster (ElastiCache API)
There are two steps to creating a replication group with read replicas when using an available Redis
cache cluster for the primary.
First, create the replication group using the available Redis cache cluster as the primary node
To create a replication group when you already have an available Redis cache cluster, use the
ElastiCache API CreateReplicationGroup action, being sure to include the following parameters.
ReplicationGroupId
The name of the replication group you are creating.
Replication group name constraints are as follows:
• A replication group's name must contain from 1 to 16 alphanumeric characters or hyphens.
• The first character must be a letter.
• A name cannot end with a hyphen or contain two consecutive hyphens.
ReplicationGroupDescription
Your description of the replication group.
PrimaryClusterId
The name of the available Redis cache cluster that will be the primary node in this replication
group.
The following action creates the replication group myReplGroup using the available Redis cache
cluster myPrimary as the replication group's primary node. The settings of myPrimary–parameter
group, security group, node type, etc.–will be applied to all nodes in the replication group.
https://elasticache.us-west-2.amazonaws.com/
?Action=CreateReplicationGroup
&ReplicationGroupDescription=My%20replication%20group
&ReplicationGroupId=myReplGroup
&PrimaryClusterId=myPrimary
&Version=2015-02-02
&SignatureVersion=4
&SignatureMethod=HmacSHA256
&Timestamp=20150202T192317Z
&X-Amz-Credential=<credential>
For additional information and parameters you might want to use, see the ElastiCache API topic
CreateReplicationGroup.
Next, add read replicas to the replication group
After the replication group is created, add 1 to 5 read replicas to it using the CreateCacheCluster
action, being sure to include the following parameters.
CacheClusterId
The name of the cluster you are adding to the replication group.
API Version 2015-02-02
176

Amazon ElastiCache User Guide
Creating a Replication Group Without
an Available Redis Cache Cluster
Cluster name constraints are as follows:
• A cluster's name must contain from 1 to 20 alphanumeric characters or hyphens.
• The first character must be a letter.
• A name cannot end with a hyphen or contain two consecutive hyphens.
ReplicationGroupId
The name of the replication group to which you are adding this cache cluster.
Repeat this command for each read replica you want to add to the replication group, changing only the
value of the CacheClusterId parameter.
The following code adds the read replica myReplica01 to the replication group myReplGroup The
settings of the primary node–parameter group, security group, node type, etc.–will be applied to nodes
as they are added to the replication group.
https://elasticache.us-west-2.amazonaws.com/
?Action=CreateCacheCluster
&CacheClusterId=myReplica01
&ReplicationGroupId=myReplGroup
&SignatureMethod=HmacSHA256
&SignatureVersion=4
&Version=2015-02-02
&X-Amz-Algorithm=AWS4-HMAC-SHA256
&X-Amz-Credential=[your-access-key-id]/20150202/us-west-2/elasticache/
aws4_request
&X-Amz-Date=20150202T170651Z
&X-Amz-SignedHeaders=content-type;host;user-agent;x-amz-content-sha256;x-
amz-date
&X-Amz-Signature=[signature-value]
For additional information and parameters you might want to use, see the ElastiCache API topic
CreateCacheCluster.
Creating a Replication Group Without an Available
Redis Cache Cluster
An available cache cluster is a stand-alone Redis cache cluster that is not associated with any
replication group.
Topics
•Creating a Replication Group Without an Available Redis Cache Cluster (Console) (p. 177)
•Creating a Replication Group Without an Available Redis Cache Cluster (AWS CLI) (p. 180)
•Creating a Replication Group Without an Available Redis Cache Cluster (ElastiCache
API) (p. 182)
Creating a Replication Group Without an Available Redis
Cache Cluster (Console)
To create a replication group with no pre-existing Redis cache cluster (console)
1. Sign in to the AWS Management Console and open the ElastiCache console at https://
console.aws.amazon.com/elasticache/.
API Version 2015-02-02
177

Amazon ElastiCache User Guide
Creating a Replication Group Without
an Available Redis Cache Cluster
2. Click Cache Clusters.
3. On the Cache Clusters screen, click Launch Cache Cluster.
We will create a replication group as we create the Redis cache cluster that will be the primary
node in the replication group.
4.
On the Select Engine screen, click the Redis icon ( ), and then click Next.
5. On the Specify Cluster Details screen,
a. From the Engine Version list, select the Redis version you want to run on this replication
group. We recommend you select the latest version unless there is a specific reason to use
an earlier version.
Important
After you create a replication group, you can upgrade to newer engine versions (see
Upgrading Cache Engine Versions (p. 32)), but you cannot downgrade to earlier
engine versions without deleting the existing cache cluster or replication group and
creating it anew.
Because the newer Redis versions provide a better and more stable user experience,
Redis versions 2.6.13, 2.8.6, and 2.8.19 are deprecated from the ElastiCache Management
Console. While we recommend against it, if you must use one of these older Redis versions,
you can use the AWS CLI or ElastiCache API.
For more information see the following topics:
AWS CLI ElastiCache API
Create Cache Cluster Creating a Cache Cluster
(AWS CLI) (p. 120) Creating a Cache Cluster
(ElastiCache API) (p. 120)
Modify Cache Cluster Modifying a Cache Cluster
(AWS CLI) (p. 125) Modifying a Cache Cluster
(ElastiCache API) (p. 125)
Create Replication Group Creating a Replication
Group Without an Available
Redis Cache Cluster (AWS
CLI) (p. 180)
Creating a Replication Group
Without an Available Redis
Cache Cluster (ElastiCache
API) (p. 182)
Modify Replication Group Modifying a Replication
Group (AWS CLI) (p. 190) Modifying a Replication
Group (ElastiCache
API) (p. 190)
b. The default port for communicating with Redis cache clusters is 6379. If you want to use a
different port, type the port number in the Port box.
c. From the Parameter Group list, select the parameter group you want to use for this
replication group. For more information, see Parameters and Parameter Groups (p. 233).
d. Leave the Enable Replication box checked.
Deselecting this box will result in creating a stand-alone Redis cache cluster and no
replication group.
e. If you want to enable Multi-AZ with automatic failover, leave the Multi-AZ box checked. If
you don't want Multi-AZ with automatic failover, deselect this check box. You can locate your
Redis clusters in multiple availability zones whether or not this checkbox is checked. For more
information, see Replication with Multi-AZ and Automatic Failover (Redis) (p. 166).
f. In the Replication Group Name box, type in a name for this replication group.
Replication group name constraints are as follows:
API Version 2015-02-02
178

Amazon ElastiCache User Guide
Creating a Replication Group Without
an Available Redis Cache Cluster
• A replication group's name must contain from 1 to 16 alphanumeric characters or hyphens.
• The first character must be a letter.
• A name cannot end with a hyphen or contain two consecutive hyphens.
g. In the Replication Group Description box, type in a description for this replication group.
h. From the Node Type list, select the node type for the nodes in this replication group. For
more information, see Selecting Your Node Size (p. 66).
i. From the Number of Read Replicas list, select the number of read replicas you want for this
replication group.
j. If you have a Redis .rdb file to seed this cluster, type the ARN of the file in the S3
Location of Redis RDB file box. For more information, see Using a Snapshot to Seed a
Cluster (p. 218).
k. Click Next.
6. On the Configure Advanced Settings screen,
a. From the Cache Subnet Group list, select the subnet for this replication group. For more
information, see Subnets and Subnet Groups (p. 265).
b. For the Primary node and for each read replica node, from the list select the availability zone
where you want the node launched.
Note
For improved fault tolerance, as much as possible, launch nodes in different
availability zones.
c. From the VPC Security Group/Security Group list, select the security group for the
nodes in this replication group. For more information, see Cache Security Groups [EC2-
Classic] (p. 224).
d. If you want ElastiCache to backup your cache cluster on a regular basis, select the Enable
Automatic Backup check box, then,
a. From the Backup Retention Period list, select the number of days to keep a backup
before deleting it.
b. Select the Backup Window for your backups.
•Select Window: you specify the UTC time to start the backup and the time span for
making the backup.
•No Preference: ElastiCache randomly selects a UTC start time and time span for
making your automatic backups.
e. On occasion, ElastiCache needs to perform some maintenance on your cache clusters. You
can specify the day of the week, UTC start time, and time span for performing maintenance
(Select Window) or you can let ElastiCache randomly select a day and time to perform
maintenance (No Preference).
We recommend you select a time when business demands upon your cache are low.
f. From the Topic for SNS Notification list, select an SNS topic, or click “Manual ARN Input” to
manually enter an ARN for an existing topic.
g. Click Next.
The Review screen appears.
7. Review all settings. If they are as you want them, click Next, otherwise click Previous to return to
previous screens to correct a setting, or Cancel to not launch the cache clusters and replication
group.
8. To return to the Cache Clusters screen, click Close.
9. When the clusters’ status changes from creating to available they are ready for you to use.
API Version 2015-02-02
179

Amazon ElastiCache User Guide
Creating a Replication Group Without
an Available Redis Cache Cluster
Creating a Replication Group Without an Available Redis
Cache Cluster (AWS CLI)
When you create a replication group without having an available Redis cache cluster to be the primary
node, you can create the replication group and all its nodes with a single call to the AWS CLI create-
replication-group command. You need to include the following parameters.
--replication-group-id
The name of the replication group you are creating.
Replication group name constraints are as follows:
• A replication group's name must contain from 1 to 16 alphanumeric characters or hyphens.
• The first character must be a letter.
• A name cannot end with a hyphen or contain two consecutive hyphens.
--replication-group-description
Your description of the replication group.
--num-cache-clusters
The total number of cache clusters (nodes) you want created with this replication group, primary
and read replicas combined.
If you enable Multi-AZ (--automatic-failover-enabled), the value of --num-cache-
clusters must be at least 2.
--cache-node-type
The node type for each node in the replication group.
The following node types are supported by ElastiCache. Generally speaking, the current
generations types provide more memory and computational power at lower cost when compared
to their equivalent previous generation counterparts.
• General purpose:
• Current generation: cache.t2.micro, cache.t2.small, cache.t2.medium,
cache.m3.medium, cache.m3.large, cache.m3.xlarge, cache.m3.2xlarge,
cache.m4.large, cache.m4.xlarge, cache.m4.2xlarge, cache.m4.4xlarge,
cache.m4.10xlarge,
• Previous generation: cache.t1.micro, cache.m1.small, cache.m1.medium,
cache.m1.large, cache.m1.xlarge
• Compute optimized: cache.c1.xlarge
• Memory optimized:
• Current generation: cache.r3.large, cache.r3.xlarge, cache.r3.2xlarge,
cache.r3.4xlarge, cache.r3.8xlarge
• Previous generation: cache.m2.xlarge, cache.m2.2xlarge, cache.m2.4xlarge
Supported node types are available in all regions except as noted in the following table.
Region Name Region Exception
Asia Pacific (Seoul) ap-
northeast-2 Supports only current generation node types.
EU (Frankfurt) eu-central-1 Supports only current generation node types.
AWS GovCloud (US) us-gov-
west-1 Supports only current generation node types.
Does not support M4 node types.
API Version 2015-02-02
180

Amazon ElastiCache User Guide
Creating a Replication Group Without
an Available Redis Cache Cluster
Region Name Region Exception
South America (São Paulo) sa-east-1 Supports all node types except the following:
•cache.r3.large
•cache.r3.xlarge
•cache.r3.2xlarge
•cache.m4.*
China (Beijing) cn-north-1 Does not support M4 node types.
Note
• All t2 instances are created in an Amazon Virtual Private Cloud (VPC).
• Redis backup and restore is not supported for t2 instances.
• Redis append-only files (AOF) are not supported for t1 or t2 instances.
• Redis Multi-AZ with Auto Failover is not supported on t1 or t2 instances.
• Redis configuration variables appendonly and appendfsync are not supported on
Redis version 2.8.22 and later.
For a complete list of node types and specifications, see the following:
•Amazon ElastiCache Product Features and Details
•Memcached Node-Type Specific Parameters
•Redis Node-Type Specific Parameters
--engine
redis
The names of the nodes will be derived from the replication group name by postpending "-00#"
to the replication group name. For example, using the replication group name myReplGroup, the
name for the primary will be myReplGroup-001 and the read replicas myReplGroup-002 through
myReplGroup-006.
The following command creates the replication group my-repl-group with the following parameter
values.
•--replication-group-id my-repl-group
•--replication-group-description "test group"
•--num-cache-clusters 3
•--cache-node-type cache.m3.large
•--engine redis
For Linux, OS X, or Unix:
aws elasticache create-replication-group \
--replication-group-id my-repl-group \
--replication-group-description "test group" \
--num-cache-clusters 3 \
--cache-node-type cache.m3.large \
--engine redis
For Windows:
API Version 2015-02-02
181

Amazon ElastiCache User Guide
Creating a Replication Group Without
an Available Redis Cache Cluster
aws elasticache create-replication-group ^
--replication-group-id my-repl-group ^
--replication-group-description "test group" ^
--num-cache-clusters 3 ^
--cache-node-type cache.m3.large ^
--engine redis
For additional information and parameters you might want to use, see the AWS CLI topic create-
replication-group.
Creating a Replication Group Without an Available Redis
Cache Cluster (ElastiCache API)
When you create a replication group without having an available Redis cache cluster to be the primary
node, you can create the replication group and all its nodes with a single call to the ElastiCache API
CreateReplicationGroup action. You need to include the following parameters.
ReplicationGroupId
The name of the replication group you are creating.
Replication group name constraints are as follows:
• A replication group's name must contain from 1 to 16 alphanumeric characters or hyphens.
• The first character must be a letter.
• A name cannot end with a hyphen or contain two consecutive hyphens.
ReplicationGroupDescription
Your description of the replication group.
NumCacheClusters
The total number of cache clusters (nodes) you want created with this replication group, primary
and read replicas combined.
If you enable Multi-AZ (AutomaticFailoverEnabled=true), the value of NumCacheClusters
must be at least 2.
CacheNodeType
The node type for each node in the replication group.
The following node types are supported by ElastiCache. Generally speaking, the current
generations types provide more memory and computational power at lower cost when compared
to their equivalent previous generation counterparts.
• General purpose:
• Current generation: cache.t2.micro, cache.t2.small, cache.t2.medium,
cache.m3.medium, cache.m3.large, cache.m3.xlarge, cache.m3.2xlarge,
cache.m4.large, cache.m4.xlarge, cache.m4.2xlarge, cache.m4.4xlarge,
cache.m4.10xlarge,
• Previous generation: cache.t1.micro, cache.m1.small, cache.m1.medium,
cache.m1.large, cache.m1.xlarge
• Compute optimized: cache.c1.xlarge
• Memory optimized:
• Current generation: cache.r3.large, cache.r3.xlarge, cache.r3.2xlarge,
cache.r3.4xlarge, cache.r3.8xlarge
• Previous generation: cache.m2.xlarge, cache.m2.2xlarge, cache.m2.4xlarge
Supported node types are available in all regions except as noted in the following table.
API Version 2015-02-02
182

Amazon ElastiCache User Guide
Creating a Replication Group Without
an Available Redis Cache Cluster
Region Name Region Exception
Asia Pacific (Seoul) ap-
northeast-2 Supports only current generation node types.
EU (Frankfurt) eu-central-1 Supports only current generation node types.
AWS GovCloud (US) us-gov-
west-1 Supports only current generation node types.
Does not support M4 node types.
South America (São Paulo) sa-east-1 Supports all node types except the following:
•cache.r3.large
•cache.r3.xlarge
•cache.r3.2xlarge
•cache.m4.*
China (Beijing) cn-north-1 Does not support M4 node types.
Note
• All t2 instances are created in an Amazon Virtual Private Cloud (VPC).
• Redis backup and restore is not supported for t2 instances.
• Redis append-only files (AOF) are not supported for t1 or t2 instances.
• Redis Multi-AZ with Auto Failover is not supported on t1 or t2 instances.
• Redis configuration variables appendonly and appendfsync are not supported on
Redis version 2.8.22 and later.
For a complete list of node types and specifications, see the following:
•Amazon ElastiCache Product Features and Details
•Memcached Node-Type Specific Parameters
•Redis Node-Type Specific Parameters
Engine
redis
The names of the nodes will be derived from the replication group name by postpending "-00#"
to the replication group name. For example, using the replication group name myReplGroup, the
name for the primary will be myReplGroup-001 and the read replicas myReplGroup-002 through
myReplGroup-006.
The following command creates the replication group myReplGroup with the following parameter
values.
•ReplicationGroupId myReplGroup
•ReplicationGroupDescription "test group"
•NumCacheClusters 3
•CacheNodeType cache.m3.large
•Engine redis
Line breaks are added for readability.
https://elasticache.us-west-2.amazonaws.com/
?Action=CreateReplicationGroup
API Version 2015-02-02
183

Amazon ElastiCache User Guide
Creating a Replication Group Without
an Available Redis Cache Cluster
&CacheNodeType=cache.m3.large
&Engine=redis
&NumCacheClusters=3
&ReplicationGroupDescription=test%20group
&ReplicationGroupId=myReplGroup
&Version=2015-02-02
&SignatureVersion=4
&SignatureMethod=HmacSHA256
&Timestamp=20150202T192317Z
&X-Amz-Credential=<credential>
For additional information and parameters you might want to use, see the ElastiCache API topic
CreateReplicationGroup.
API Version 2015-02-02
184
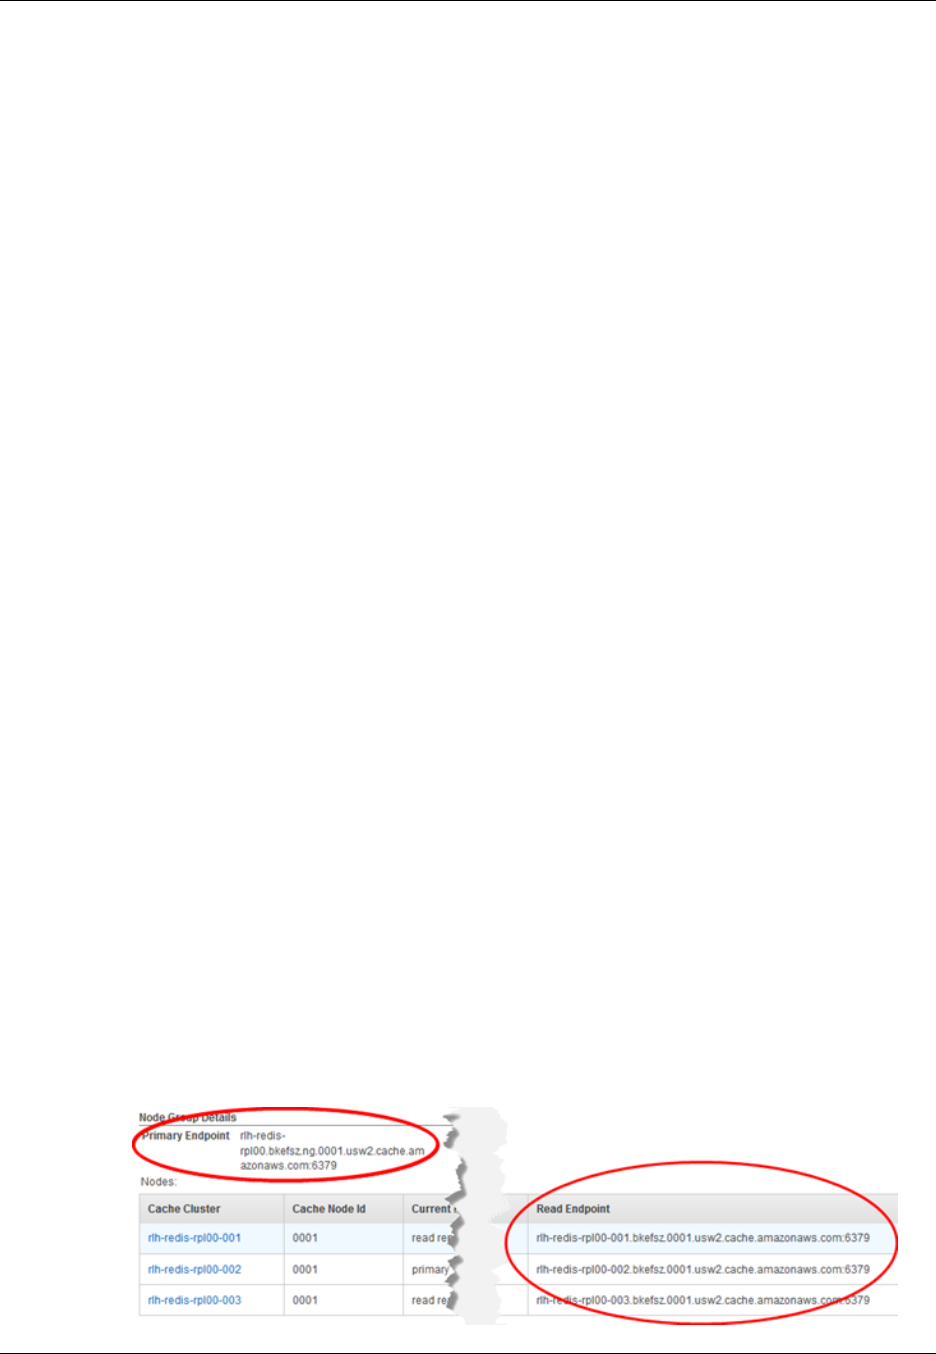
Amazon ElastiCache User Guide
Finding Replication Group Endpoints
Finding Replication Group Endpoints
An application can connect to any node in a replication group, provided that it has the DNS endpoint
and port number for that node. Read-only applications can connect to any node in the replication
group, but all write activity must take place at the primary node.
Every replication group has a primary endpoint, which is a DNS name that always resolves to the
primary node in the replication group. The primary endpoint is immune to changes to your replication
group, such as promoting a read replica to the primary role. For write activity, we recommend that your
applications connect to the primary endpoint instead of connecting directly to the primary node.
For read activity, applications can connect to any node in the replication group. Unlike the primary
endpoint, replica endpoints resolve to specific endpoints. If you make a change in your replication
group, such as adding or deleting a replica, you must update the replica endpoints in your application.
You can find the primary and read endpoints for a replication group using the ElastiCache console, the
AWS CLI, or the ElastiCache API.
Topics
•Finding Replication Group Endpoints (Console) (p. 185)
•Finding Replication Group Endpoints (AWS CLI) (p. 186)
•Finding Replication Group Endpoints (ElastiCache API) (p. 186)
Finding Replication Group Endpoints (Console)
The following procedure walks you through how to find the primary and read endpoints for an
ElastiCache replication group using the ElastiCache console.
To find the endpoints for a replication group using the ElastiCache Console
1. Sign in to the AWS Management Console and open the ElastiCache console at https://
console.aws.amazon.com/elasticache/.
2. In the left navigation pane, click Replication Groups.
The Replication Group window appears with a list of replication groups.
3. From the list of replication groups, click the name of the replication group for which you want to
find the endpoints.
A replication group details section opens.
4. To find the primary endpoint, scroll down the details section until your find Primary Endpoint.
To find the read endpoints, scroll down until you find the list of replication group nodes under
Nodes, then locate the Read Endpoint column and identify the read endpoint for each node in
this replication group.
API Version 2015-02-02
185

Amazon ElastiCache User Guide
Finding Replication Group Endpoints (AWS CLI)
Finding Replication Group Endpoints (AWS CLI)
You can view the details for a replication group using the AWS CLI describe-replication-groups
command with the -replication-group-id parameter to specify a specific replication group.
The following code lists the details, including the replication group's endpoints, for my-repl-group.
aws elasticache describe-replication-group --replication-group-id my-repl-
group
Finding Replication Group Endpoints (ElastiCache
API)
You can view the details for a replication group using the ElastiCache API
DescribeReplicationGroups action with the ReplicationGroupId parameter to specify a
specific replication group.
The following code lists the details for myReplGroup.
https://elasticache.us-west-2.amazonaws.com/
?Action=DescribeReplicationGroups
&MaxRecords=100
&ReplicationGroupId=myReplGrp
&Version=2015-02-02
&SignatureVersion=4
&SignatureMethod=HmacSHA256
&Timestamp=20150202T192317Z
&X-Amz-Credential=<credential>
The preceding action produces output similar to the following.
<DescribeReplicationGroupsResponse xmlns="http://elasticache.amazonaws.com/
doc/2015-02-02/">
<DescribeReplicationGroupsResult>
<ReplicationGroups>
<ReplicationGroup>
<SnapshottingClusterId>myreplgrp</SnapshottingClusterId>
<MemberClusters>
<ClusterId>myreplgrp-001</ClusterId>
</MemberClusters>
<NodeGroups>
<NodeGroup>
<NodeGroupId>0001</NodeGroupId>
<PrimaryEndpoint>
<Port>6379</Port>
<Address>myreplgrp.q68zge.ng.0001.use1devo.elmo-
dev.amazonaws.com</Address>
</PrimaryEndpoint>
<Status>available</Status>
<NodeGroupMembers>
<NodeGroupMember>
<CacheClusterId>myreplgrp-001</CacheClusterId>
<ReadEndpoint>
<Port>6379</Port>
<Address>myreplgrp-001.q68zge.0001.use1devo.elmo-
dev.amazonaws.com</Address>
API Version 2015-02-02
186

Amazon ElastiCache User Guide
Finding Replication Group Endpoints (ElastiCache API)
</ReadEndpoint>
<PreferredAvailabilityZone>us-west-2c</
PreferredAvailabilityZone>
<CacheNodeId>0001</CacheNodeId>
<CurrentRole>primary</CurrentRole>
</NodeGroupMember>
<NodeGroupMember>
<CacheClusterId>myreplgrp-002</CacheClusterId>
<ReadEndpoint>
<Port>6379</Port>
<Address>myreplgrp-002.q68zge.0002.use1devo.elmo-
dev.amazonaws.com</Address>
</ReadEndpoint>
<PreferredAvailabilityZone>us-west-2b</
PreferredAvailabilityZone>
<CacheNodeId>0002</CacheNodeId>
<CurrentRole>replica</CurrentRole>
</NodeGroupMember>
</NodeGroupMembers>
</NodeGroup>
</NodeGroups>
<ReplicationGroupId>myreplgrp</ReplicationGroupId>
<Status>available</Status>
<PendingModifiedValues />
<Description>My replication group</Description>
</ReplicationGroup>
</ReplicationGroups>
</DescribeReplicationGroupsResult>
<ResponseMetadata>
<RequestId>144745b0-b9d3-11e3-8a16-7978bb24ffdf</RequestId>
</ResponseMetadata>
</DescribeReplicationGroupsResponse>
The primary endpoint, including the port, is found between the <PrimaryEndpoint> and </
PrimaryEndpoint> tags.
<CacheClusterId>myreplgrp-001</CacheClusterId>
<PrimaryEndpoint>
<Port>6379</Port>
<Address>myreplgrp-001.q68zge.ng.0001.use1devo.elmo-dev.amazonaws.com</
Address>
</PrimaryEndpoint>
The read endpoints are found between the <ReadEndpoint> and </ReadEndpoint> tags for each
node in the replication group.
<CacheClusterId>myreplgrp-002</CacheClusterId>
<ReadEndpoint>
<Port>6379</Port>
<Address>myreplgrp-002.q68zge.0001.use1devo.elmo-dev.amazonaws.com</
Address>
</ReadEndpoint>
and
<ReadEndpoint>
<Port>6379</Port>
API Version 2015-02-02
187

Amazon ElastiCache User Guide
Finding Replication Group Endpoints (ElastiCache API)
<Address>myreplgrp.q68zge.0002.use1devo.elmo-dev.amazonaws.com</Address>
</ReadEndpoint>
API Version 2015-02-02
188

Amazon ElastiCache User Guide
Modifying a Replication Group
Modifying a Replication Group
You can modify a replication group's settings using the ElastiCache console, the AWS CLI, or the
ElastiCache API.
Topics
•Modifying a Replication Group (Console) (p. 189)
•Modifying a Replication Group (AWS CLI) (p. 190)
•Modifying a Replication Group (ElastiCache API) (p. 190)
Modifying a Replication Group (Console)
The following procedure modifies an existing replication group's settings.
To modify a replication group's settings (console)
1. Sign in to the AWS Management Console and open the ElastiCache console at https://
console.aws.amazon.com/elasticache/.
2. Click Replication Groups.
The Replication Groups screen appears with a list of replication groups.
3. From the list of replication groups, click the name of the replication group you wish to modify.
4. Click Modify.
The Modify Replication Group screen appears.
5. Make the changes you want to make.
Important
You can upgrade to newer engine versions (see Upgrading Cache Engine
Versions (p. 32)), but you cannot downgrade to earlier engine versions except by deleting
the existing cache cluster or replication group and creating it anew.
Because the newer Redis versions provide a better and more stable user experience, Redis
versions 2.6.13, 2.8.6, and 2.8.19 are deprecated from the ElastiCache Management Console.
While we recommend against it, if you must use one of these older Redis versions, you can use
the AWS CLI or ElastiCache API.
For more information see the following topics:
AWS CLI ElastiCache API
Create Cache Cluster Creating a Cache Cluster
(AWS CLI) (p. 120) Creating a Cache Cluster
(ElastiCache API) (p. 120)
Modify Cache Cluster Modifying a Cache Cluster
(AWS CLI) (p. 125) Modifying a Cache Cluster
(ElastiCache API) (p. 125)
Create Replication Group Creating a Replication
Group Without an Available
Redis Cache Cluster (AWS
CLI) (p. 180)
Creating a Replication Group
Without an Available Redis
Cache Cluster (ElastiCache
API) (p. 182)
Modify Replication Group Modifying a Replication Group
(AWS CLI) (p. 190) Modifying a Replication Group
(ElastiCache API) (p. 190)
API Version 2015-02-02
189

Amazon ElastiCache User Guide
Modifying a Replication Group (AWS CLI)
6. To apply the changes, click Modify. To keep the replication group unchanged, click Cancel.
The status of the replication group will change to modifying. The modifications can take several
minutes. When the replication group's status returns to available the modifications are complete and
the replication group is ready to use.
Modifying a Replication Group (AWS CLI)
The following AWS CLI command enables Multi-AZ on an existing Redis replication group. You can
use the same command to make other modifications to a replication group.
For Linux, OS X, or Unix:
aws elasticache modify-replication-group \
--replication-group-id myReplGroup \
--automatic-failover-enabled
For Windows:
aws elasticache modify-replication-group ^
--replication-group-id myReplGroup ^
--automatic-failover-enabled
For more information on the AWS CLI modify-replication-group command, see modify-
replication-group.
Modifying a Replication Group (ElastiCache API)
The following ElastiCache API action enables Multi-AZ on an existing Redis replication group. You can
use the same command to make other modifications to a replication group.
https://elasticache.us-west-2.amazonaws.com/
?Action=ModifyReplicationGroup
&AutomaticFailoverEnabled=true
&ReplicationGroupId=myReplGroup
&SignatureVersion=4
&SignatureMethod=HmacSHA256
&Timestamp=20141201T220302Z
&Version=2014-12-01
&X-Amz-Algorithm=AWS4-HMAC-SHA256
&X-Amz-Date=20141201T220302Z
&X-Amz-SignedHeaders=Host
&X-Amz-Expires=20141201T220302Z
&X-Amz-Credential=<credential>
&X-Amz-Signature=<signature>
For more information on the ElastiCache API ModifyReplicationGroup action, see
ModifyReplicationGroup.
API Version 2015-02-02
190

Amazon ElastiCache User Guide
Deleting a Replication Group
Deleting a Replication Group
If you no longer need a replication group, you can delete it. When you delete a replication group,
ElastiCache deletes all of the nodes in that group, including the primary node and any read replicas.
Once you have begun this operation, it cannot be interrupted.
Deleting a Replication Group (Console)
To delete a replication group (console)
1. Sign in to the AWS Management Console and open the ElastiCache console at https://
console.aws.amazon.com/elasticache/.
2. In the left navigation pane, click Replication Groups.
3. In the Replication Groups list, click the replication group you want to delete.
4. Click Delete.
5. In the Delete Replication Group dialog box, click Yes, Delete.
The status of the replication group will change to deleting. The deleting process can take several
minutes. When the replication group is no longer listed it is deleted and you stop incurring changes for
it and its nodes.
Deleting a Replication Group (AWS CLI)
Use the command delete-replication-group to delete a replication group.
aws elasticache delete-replication-group --replication-group-id my-repgroup
You will be asked to confirm your decision; if you enter y (yes), the operation will begin immediately.
Once the process starts, it is irreversible.
Once you begin deleting this replication group, all of its nodes will be
deleted as well.
Are you sure you want to delete this replication group? [Ny]y
REPLICATIONGROUP my-repgroup My replication group deleting
Deleting a Replication Group (ElastiCache API)
Call DeleteReplicationGroup with the ReplicationGroup parameter.
API Version 2015-02-02
191

Amazon ElastiCache User Guide
Deleting a Replication Group (ElastiCache API)
Example
https://elasticache.us-west-2.amazonaws.com/
?Action=DeleteReplicationGroup
&ReplicationGroupId=my-repgroup
&Version=2014-12-01
&SignatureVersion=4
&SignatureMethod=HmacSHA256
&Timestamp=20141201T220302Z
&X-Amz-Algorithm=AWS4-HMAC-SHA256
&X-Amz-Date=20141201T220302Z
&X-Amz-SignedHeaders=Host
&X-Amz-Expires=20141201T220302Z
&X-Amz-Credential=<credential>
&X-Amz-Signature=<signature>
Note
If you set the RetainPrimaryCluster parameter to true, all of the read replicas will be
deleted, but the primary node will be retained.
API Version 2015-02-02
192

Amazon ElastiCache User Guide
Adding a Read Replica
Adding a Read Replica to a Replication Group
As your read traffic increases, you might want to spread those reads across more nodes thereby
reducing the read pressure on any one node. This topic covers how to add a read replica to a
replication group. You can add a read replica to a replication group using the ElastiCache Console, the
AWS CLI, or the ElastiCache API.
Topics
•Adding a Read Replica to a Replication Group (Console) (p. 193)
•Adding a Read Replica to a Replication Group (AWS CLI) (p. 194)
•Adding a Read Replica to a Replication Group (ElastiCache API) (p. 194)
Adding a Read Replica to a Replication Group
(Console)
The process for adding a Redis read replica node to a replication group is as follows.
To add a read replica to an existing replication group (console)
1. Sign in to the AWS Management Console and open the ElastiCache console at https://
console.aws.amazon.com/elasticache/.
2. From the left navigation pane, select Replication Groups.
3. From the list of replication groups, select the replication group you want to scale out.
4. Add one or more read replicas to the replication group.
For each read replica you want to add to the replication group do the following steps.
a. Select Add Read Replica.
b. Using the Add Read Replica to Replication Group dialog, do the following steps.
i. In the Read Replica ID box, type in a name for the read replica.
Tip: To keep all the nodes for this replication group grouped together on the Cache
Clusters screen, use a name that is similar to the other nodes in this replication group.
Cluster name constraints are as follows:
• A cluster's name must contain from 1 to 20 alphanumeric characters or hyphens.
• The first character must be a letter.
• A name cannot end with a hyphen or contain two consecutive hyphens.
ii. From the Availability Zone list, select an availability zone for this read replica.
iii. Select Add.
5. From the left navigation pane, select Cache Clusters.
6. When the status of the read replicas you just added changes to available, it is ready to use and
you can update the read endpoints in your application. For more information, see Finding the
Endpoints for a Redis Replication Group (Console) (p. 43).
API Version 2015-02-02
193

Amazon ElastiCache User Guide
Adding a Read Replica to a Replication Group (AWS CLI)
Adding a Read Replica to a Replication Group
(AWS CLI)
To add a read replica to a replication group, use the AWS CLI create-cache-cluster command,
with the parameter --replication-group-id to specify which replication group to add the cluster
(node) to.
A replication group can have a maximum of 5 read replicas. If you attempt to add a read replica to a
replication group that already has 5 read replicas, the operation will fail.
The following example creates the cluster my-read-replica and adds it to the replication group my-
replication-group. The node types, parameter groups, security groups, maintenance window and
other settings for my read replica will be the same as the other nodes in my replication group
For Linux, OS X, or Unix:
aws elasticache create-cache-cluster \
--cache-cluster-id my-read-replica \
--replicationgroup-id my-replication-group
For Windows:
aws elasticache create-cache-cluster ^
--cache-cluster-id my-read-replica ^
--replicationgroup-id my-replication-group
For more information, see the AWS CLI topic create-cache-cluster.
Adding a Read Replica to a Replication Group
(ElastiCache API)
To add a read replica to a replication group, use the ElastiCache CreateCacheCluster action, with
the parameter ReplicationGroupId to specify which replication group to add the cluster (node) to.
A replication group can have a maximum of 5 read replicas. If you attempt to add a read replica to a
replication group that already has 5 read replicas, the operation will fail.
The following example creates the cluster myReadReplica and adds it to the replication group
myReplicationGroup. The node types, parameter groups, security groups, maintenance window and
other settings for my read replica will be the same as the other nodes in my replication group
https://elasticache.us-west-2.amazonaws.com/
?Action=CreateCacheCluster
&CacheClusterId=myReadReplica
&ReplicationGroupId=myReplicationGroup
&Version=2015-02-02
&SignatureVersion=4
&SignatureMethod=HmacSHA256
&Timestamp=20150202T192317Z
&X-Amz-Credential=<credential>
For more information, see the ElastiCache API topic CreateCacheCluster.
API Version 2015-02-02
194

Amazon ElastiCache User Guide
Promoting a Read-Replica
Promoting a Read-Replica to Primary
You can promote a read replica to primary using the ElastiCache console, the AWS CLI, or the
ElastiCache API. However, you cannot promote a read replica to primary while Multi-AZ is enabled on
the replication group. If Multi-AZ is enabled you must:
To promote a read replica node to primary node
1. Modify the replication group to disable Multi-AZ (this does not require that all your clusters be in
the same availability zone).
For information on modifying a replication group's settings, see Modifying a Replication
Group (p. 189).
2. Promote the read replica to primary.
3. Modify the replication group to re-enable Multi-AZ.
Multi-AZ with automatic failover is not available on replication groups running Redis 2.6.13.
Topics
•Promoting a Read-Replica to Primary (Console) (p. 195)
•Promoting a Read-Replica to Primary (AWS CLI) (p. 195)
•Promoting a Read-Replica to Primary (ElastiCache API) (p. 196)
Promoting a Read-Replica to Primary (Console)
To promote a read replica to primary (console)
1. If the replica you want to promote is a member of a replication group where Multi-AZ is enabled,
modify the replication group to disable Multi-AZ before you proceed (this does not require that all
your clusters be in the same availability zone). For more information on modifying a replication
group, see Modifying a Replication Group (p. 189).
2. Sign in to the AWS Management Console and open the ElastiCache console at https://
console.aws.amazon.com/elasticache/.
3. Click Replication Groups.
The Replication Groups screen appears with a list of replication groups.
4. From the list of replication groups, click the name of the replication group you wish to modify.
5. In the details pane at the bottom of the screen, scroll down to the list of nodes and click Promote
behind the read replica you want to promote.
6. In the Promote Read Replica dialog box, click Promote to promote this replica to primary, or click
Cancel to keep things as they are.
The replications group's status will change to modifying. When the status returns to available the
former replica is now your primary and you can resume using the replication group.
7. If the replication group had Multi-AZ enabled before you began the promotion process, modify the
replication group to re-enable Multi-AZ. For more information on modifying a replication group, see
Modifying a Replication Group (p. 189)
Promoting a Read-Replica to Primary (AWS CLI)
You cannot promote a read replica to primary if the replication group is Multi-AZ enabled. If the replica
you want to promote is a member of a replication group where Multi-AZ is enabled, you must modify
API Version 2015-02-02
195

Amazon ElastiCache User Guide
Promoting a Read-Replica to Primary (ElastiCache API)
the replication group to disable Multi-AZ before you proceed (this does not require that all your clusters
be in the same availability zone). For more information on modifying a replication group, see Modifying
a Replication Group (p. 189).
The following AWS CLI command modifies the replication group my-repl-group, making the read
replica my-replica-1 the primary node in the replication group.
For Linux, OS X, or Unix:
aws elasticache modify-replication-group \
--replication-group-id my-repl-group \
--primary-cluster-id my-replica-1
For Windows:
aws elasticache modify-replication-group ^
--replication-group-id my-repl-group ^
--primary-cluster-id my-replica-1
For more information on modifying a replication group, see the AWS CLI topic modify-replication-group
Promoting a Read-Replica to Primary (ElastiCache
API)
You cannot promote a read replica to primary if the replication group is Multi-AZ enabled. If the replica
you want to promote is a member of a replication group where Multi-AZ is enabled, you must modify
the replication group to disable Multi-AZ before you proceed (this does not require that all your clusters
be in the same availability zone). For more information on modifying a replication group, see Modifying
a Replication Group (p. 189).
The following ElastiCache API action modifies the replication group myReplGroup, making the read
replica myReplica-1 the primary node in the replication group.
https://elasticache.us-west-2.amazonaws.com/
?Action=ModifyReplicationGroup
&ReplicationGroupId=myReplGroup
&PrimaryClusterId=myReplica-1
&Version=2014-12-01
&SignatureVersion=4
&SignatureMethod=HmacSHA256
&Timestamp=20141201T220302Z
&X-Amz-Algorithm=AWS4-HMAC-SHA256
&X-Amz-Date=20141201T220302Z
&X-Amz-SignedHeaders=Host
&X-Amz-Expires=20141201T220302Z
&X-Amz-Credential=<credential>
&X-Amz-Signature=<signature>
For more information on modifying a replication group, see the ElastiCache API topic
ModifyReplicationGroup
API Version 2015-02-02
196

Amazon ElastiCache User Guide
Deleting a Read Replica
Deleting a Read Replica
As read traffic on your replication group changes you might want to add or remove read replicas.
Removing a node from a replication group is the same as just deleting a cluster, though there are some
restrictions.
Restriction on removing nodes from a replication group
• You cannot remove the primary node from a replication group. If you want to delete the primary you
must do the following:
1. Promote a read replica to primary. For more information on promoting a read replica to primary,
see Promoting a Read-Replica to Primary (p. 195).
2. Delete the old primary. See the next point for a restriction on this method.
• If Multi-AZ is enabled on a replication group, you cannot remove the last read replica from the
replication group. In this case you must:
1. Modify the replication group by disabling Multi-AZ. For more information, see Modifying a
Replication Group (p. 189).
2. Delete the read-replica.
You can remove a read replica from a replication group using the ElastiCache console, the AWS CLI
for ElastiCache, or the ElastiCache API.
For directions on deleting a cluster see:
•Deleting a Cluster (Console) (p. 140)
•Deleting a Cluster (AWS CLI) (p. 140)
•Deleting a Cluster (ElastiCache API) (p. 140)
API Version 2015-02-02
197

Amazon ElastiCache User Guide
ElastiCache Backup & Restore
(Redis)
Amazon ElastiCache clusters running Redis can back up their data. The backup can be used to restore
a cluster or seed a new cluster. A backup is a snapshot of a cluster at a specific moment in time. The
backup consists of the cluster's metadata, along with all of the data in the cluster. All backups are
written to Amazon Simple Storage Service (Amazon S3), which provides durable storage. At any time,
you can restore your data by creating a new Redis cluster and populating it with data from a backup.
ElastiCache lets you manage backups using the AWS Management Console, the AWS command line
interface (AWS CLI), and the ElastiCache application programming interface (API).
Beginning with Redis version 2.8.22, the backup method is selected based upon available memory. If
there is sufficient available memory, a child process is spawned which writes all changes to the cache's
reserved memory while the cache is being backed up. This child process could, depending on the
number of writes to the cache during the backup process, consume all reserved memory, causing
the backup to fail.
If there is insufficient memory available, a forkless, cooperative background process is employed.
The forkless method can impact both latency and throughput. For more information, see ElastiCache
Replication (Redis) (p. 163).
For more information on the performance impact of the backup process, see Performance Impact of
Backups (p. 199).
This section provides an overview of working with backup and restore.
Topics
•Constraints (p. 199)
•Costs (p. 199)
•Performance Impact of Backups (p. 199)
•Scheduling Automatic Snapshots (p. 201)
•Taking Manual Snapshots (p. 202)
•Taking a Final Snapshot (p. 204)
•Displaying a List of Snapshots (p. 207)
•Copying a Snapshot (p. 208)
•Exporting a Snapshot (p. 210)
API Version 2015-02-02
198

Amazon ElastiCache User Guide
Constraints
•Restoring From a Snapshot (p. 216)
•Using a Snapshot to Seed a Cluster (p. 218)
•Tagging Snapshots (p. 221)
•Deleting a Snapshot (p. 222)
•Redis Append Only Files (AOF) (p. 223)
Constraints
At this time, backup and restore is supported only for clusters running on Redis.
Backup and restore is not supported on cache.t1.micro or cache.t2.* cache nodes. All other
cache node types are supported.
During any contiguous 24-hour period, you can create no more than 20 manual backups per cluster.
Costs
ElastiCache allows you to store one backup for each active Redis cluster free of charge. Storage space
for additional backups is charged at a rate of $0.085/GB per month for all regions. There are no data
transfer fees for creating a backup, or for restoring data from a backup to a Redis cluster.
Performance Impact of Backups
The backup process depends upon which Redis version you're running. Beginning with Redis 2.8.22,
the process is forkless.
Backups when running Redis 2.8.22 and later
Redis backups, in versions 2.8.22 and later, choose between two backup methods. If there is
insufficient memory to support a forked backup, ElastiCache use a forkless method that employs
cooperative background processing. If there is sufficient memory to support a forked save process, the
same process as in prior Redis versions is employed.
If the write load is high during a forkless backup, writes to the cache are delayed to ensure that you
don't accumulate too many changes and thus prevent a successful snapshot.
Backups when running Redis versions prior to
2.8.22
Backups are created using Redis' native BGSAVE command: The Redis process on the cache node
spawns a child process to write all the data from the cache to a Redis .rdb file. It can take up to ten
seconds to spawn the child process, and during this time the parent process is unable to accept
incoming application requests. After the child process is running independently, the parent process
resumes normal operations. The child process exits when the backup operation is complete.
While the backup is being written, additional cache node memory is used for new writes. If this
additional memory usage exceeds the node's available memory, processing can become slow due to
excessive paging, or fail.
The following are guidelines for improving snapshotting performance.
API Version 2015-02-02
199

Amazon ElastiCache User Guide
Backups when running Redis versions prior to 2.8.22
• Set the reserved-memory parameter—To mitigate excessive paging, we recommend that you set
the reserved-memory parameter. This parameter prevents Redis from consuming all of the node's
available memory, and can help reduce the amount of paging. You might also see performance
improvements by simply using a larger node. For more information about the reserved-memory
parameter and node memory sizes, see Redis Specific Parameters (p. 253).
• Create backups from a read replica—If you are running Redis in a node group with more than one
node, you can take a backup from the primary node or one of the read replicas. Because of the
system resources required during a BGSAVE, we recommend that you create backups from one of
the read replicas, rather than the primary. While the backup is being created from the replica, the
primary node remains unaffected by BGSAVE resource requirements, and can continue serving
requests without slowing down.
If you delete a replication group and request a final backup, ElastiCache will always take the backup
from the primary node. This ensures that you capture the very latest Redis data, before the replication
group is deleted.
API Version 2015-02-02
200

Amazon ElastiCache User Guide
Scheduling Automatic Snapshots
Scheduling Automatic Snapshots
For any Redis cluster, you can enable automatic backups. When automatic backups are enabled,
ElastiCache creates a backup of the cluster on a daily basis. Automatic backups can help guard
against data loss: In the event of a node failure, you can create a new cluster, restoring all of your data
from the most recent backup. The result is a warm-started cluster, pre-loaded with your data and ready
for use. For more information, go to Restoring From a Snapshot (p. 216).
When you schedule automatic backups, you should plan the following settings:
•Snapshot window—A period during each day when ElastiCache will begin creating a backup. The
minimum length for the backup window is 60 minutes. You can set the backup window for any time
when it's most convenient for you, or for a time of day that avoids doing backups during particularly
high-utilization periods.
If you do not specify a backup window, ElastiCache will assign one automatically.
•Snapshot retention limit—The number of days the backup will be retained in Amazon S3. For
example, if you set the retention limit to 5, then a backup taken today would be retained for 5 days.
When the retention limit expires, the backup is automatically deleted.
The maximum backup retention limit is 35 days. If the backup retention limit is set to 0, automatic
backups are disabled for the cluster.
You can enable or disable automatic backups on an existing Redis cluster or replication group by
modifying it using the ElastiCache console, the AWS CLI, or the ElastiCache API. For more information
on how to enable or disable automatic backups on an existing cluster or replication group, go to
Modifying an ElastiCache Cache Cluster (p. 124) or Modifying a Replication Group (p. 189).
You can enable or disable automatic backups when creating a Redis cluster or replication group
ElastiCache console, the AWS CLI, or the ElastiCache API. You can enable automatic backups
when you create a Redis cluster by checking the Enable Automatic Backups box on the Configure
Advanced Settings page. For more information, see step 2 of Screen 3: Configure Advanced
Settings (p. 118). You can enable automatic backups when you create a Redis replication group if
you are not using an existing cluster as the primary cluster. For more information, see Creating a
Replication Group Without an Available Redis Cache Cluster (p. 177).
API Version 2015-02-02
201

Amazon ElastiCache User Guide
Taking Manual Snapshots
Taking Manual Snapshots
In addition to automatic backups, you can create a manual backup at any time. For example, if an
automatic backup is nearing its retention limit, you can make a copy of that backup and keep the copy
until you decide to delete it.
Manual backups are also useful for archiving purposes. For example, suppose that you've developed
a set of baseline data for testing purposes; you can create a manual backup of the data and restore
it whenever you want. After you test an application that modifies the data, you can reset the data by
creating a new cluster and restoring from your baseline backup. When the cluster is ready, you can test
your applications against the baseline data again—and repeat this process as often as needed.
In addition to creating a manual snapshot, you can create a manual backup in one of the following
ways:
•Copying a Snapshot (p. 208) It does not matter whether the source backup was created
automatically or manually.
•Taking a Final Snapshot (p. 204) Create a backup immediately before deleting a cluster or
replication group.
There is a limit in place on the rate of manual backup creation: During any contiguous 24-hour period,
you can create no more than 20 manual backups per cluster.
Manual backups do not have retention limits, therefore ElastiCache does not automatically delete
them. Even if you delete a cluster, any manual backups from that cluster are retained. If you no longer
want to keep a manual backup, you must explicitly delete it yourself.
You can create a manual backup of a cluster using the ElastiCache console, the AWS CLI, or the
ElastiCache API.
Creating a Manual Backup (Console)
To create a backup of a cluster (console)
1. Sign in to the AWS Management Console and open the ElastiCache console at https://
console.aws.amazon.com/elasticache/.
2. Choose Cache Clusters.
The Cache Clusters screen appears.
3. Choose the name of the cluster you want to backup.
4. Choose Backup.
The Create Cache Snapshot screen appears.
5. Type in a name for your backup in the Snapshot Name box.
6. Choose Create Snapshot.
The status of the cluster changes to snapshotting. When the status returns to available the
snapshot is complete.
Creating a Manual Backup (AWS CLI)
To create a manual backup of a cluster using the AWS CLI, use the create-snapshot AWS CLI
command with the following parameters.
API Version 2015-02-02
202

Amazon ElastiCache User Guide
Creating a Manual Backup (ElastiCache API)
•--cache-cluster-id – Name of the cache cluster.
•--snapshot-name – Name of the snapshot.
The following AWS CLI command creates the snapshot snap-20150515 from the cluster
myRedisCluster.
For Linux, OS X, or Unix:
aws elasticache create-snapshot \
--cache-cluster-id myRedisCluster \
--snapshot-name snap-20150515
For Windows:
aws elasticache create-snapshot ^
--cache-cluster-id myRedisCluster ^
--snapshot-name snap-20150515
For more information, see create-snapshot in the AWS Command Line Interface Reference.
Creating a Manual Backup (ElastiCache API)
To create a manual backup of a cluster using the ElastiCache API, use the CreateSnapshot
ElastiCache API action with the following parameters.
•CacheClusterId – Name of the cache cluster.
•SnapshotName – Name of the snapshot.
To create a manual backup of a cluster using the ElastiCache API, use the CreateSnapshot
ElastiCache API action, specifying the name of the cluster to snapshot (CacheClusterId) and the
name of the snapshot (snap-20150515).
The following ElastiCache API action creates the snapshot snap-20150515 from the cluster
myRedisCluster.
https://elasticache.us-west-2.amazonaws.com/
?Action=CreateSnapshot
&CacheClusterId=myRedisCluster
&SnapshotName=snap-20150515
&Version=2015-02-02
&SignatureVersion=4
&SignatureMethod=HmacSHA256
&Timestamp=20150202T192317Z
&X-Amz-Credential=<credential>
For more information, see CreateSnapshot in the Amazon ElastiCache API Reference.
API Version 2015-02-02
203

Amazon ElastiCache User Guide
Taking a Final Snapshot
Taking a Final Snapshot
You can create a final snapshot when you delete either a Redis cluster or a replication group.
Creating a Final Snapshot (Console)
To take a final snapshot (console)
1. Sign in to the AWS Management Console and open the ElastiCache console at https://
console.aws.amazon.com/elasticache/.
2. To delete a cache cluster, choose Cache Clusters.
To delete a replication group, choose Replication Groups.
Either the Cache Clusters or the Replication Groups screen appears with a list of clusters or
replication groups.
3. Choose the name of the cluster or replication group you want to delete.
4. Choose Delete.
5. In the Delete Cache Cluster or Delete Replication Group screen, choose Yes for Create final
snapshot, and then type a name for the final snapshot in the Final Snapshot Name box.
6. Choose Delete.
Taking a Final Snapshot (AWS CLI)
To create a final snapshot, use the delete-cache-cluster AWS CLI command with the following
parameters.
•--cache-cluster-id – Name of the cluster being deleted.
•--final-snapshot-identifier – Name of the snapshot.
The following code creates the final snapshot snap-20150515-final when deleting the cluster
myRedisCluster.
For Linux, OS X, or Unix:
aws elasticache delete-cache-cluster \
--cache-cluster-id myRedisCluster \
--final-snapshot-identifier snap-20150515-final
For Windows:
aws elasticache delete-cache-cluster ^
--cache-cluster-id myRedisCluster ^
--final-snapshot-identifier snap-20150515-final
For more information, see delete-cache-cluster in the AWS Command Line Interface Reference.
To create a final snapshot when deleting a replication group, use the delete-replication-group
AWS CLI command, with the following parameters.
•--replication-group-id – Name of the replication group being deleted.
•--final-snapshot-identifier – Name of the final snapshot.
API Version 2015-02-02
204

Amazon ElastiCache User Guide
Taking a Final Snapshot (ElastiCache API)
The following code takes the final snapshot snap-20150515-final when deleting the replication
group myReplGroup.
For Linux, OS X, or Unix:
aws elasticache delete-replication-group \
--replication-group-id myReplGroup \
--final-snapshot-identifier snap-20150515-final
For Windows:
aws elasticache delete-replication-group ^
--replication-group-id myReplGroup ^
--final-snapshot-identifier snap-20150515-final
For more information, see delete-replication-group in the AWS Command Line Interface Reference.
Taking a Final Snapshot (ElastiCache API)
To create a final snapshot, use the DeleteCacheCluster ElastiCache API action with the following
parameters.
•CacheClusterId – Name of the cluster being deleted.
•FinalSnapshotIdentifier – Name of the snapshot.
The following ElastiCache API action creates the snapshot snap-20150515-final when deleting the
cluster myRedisCluster.
https://elasticache.us-west-2.amazonaws.com/
?Action=DeleteCacheCluster
&CacheClusterId=myRedisCluster
&FinalSnapshotIdentifier=snap-20150515-final
&Version=2015-02-02
&SignatureVersion=4
&SignatureMethod=HmacSHA256
&Timestamp=20150202T192317Z
&X-Amz-Credential=<credential>
For more information, see DeleteCacheCluster in the Amazon ElastiCache API Reference.
To create a final snapshot when deleting a replication group, use the DeleteReplicationGroup
ElastiCache API action, with the following parameters.
•ReplicationGroupId – Name of the replication group being deleted.
•FinalSnapshotIdentifier – Name of the final snapshot.
The following ElastiCache API action creates the snapshot snap-20150515-final when deleting the
replication group myReplGroup.
https://elasticache.us-west-2.amazonaws.com/
?Action=DeleteReplicationGroup
&FinalSnapshotIdentifier=snap-20150515-final
&ReplicationGroupId=myReplGroup
&Version=2015-02-02
API Version 2015-02-02
205


Amazon ElastiCache User Guide
Displaying a List of Snapshots
Displaying a List of Snapshots
The following procedures show you how to display a list of your snapshots.
Displaying a List of Snapshots (Console)
To display snapshots using the AWS Management Console
1. Sign in to the AWS Management Console and open the ElastiCache console at https://
console.aws.amazon.com/elasticache/.
2. On the ElastiCache console dashboard, choose Snapshots.
3. Use the Filter field to display manual, automatic, or all snapshots.
Displaying a List of Snapshots (AWS CLI)
To display a list of snapshots, use the describe-snapshots command. The following example
displays a list describing all of the snapshots in the current AWS account.
aws elasticache describe-snapshots
For more information, see describe-snapshots in the AWS Command Line Interface Reference.
Displaying a List of Snapshots (ElastiCache API)
To display a list of snapshots, use the DescribeSnapshots action.
The following example displays a list of all of the snapshots in the current AWS account.
Example
https://elasticache.us-west-2.amazonaws.com/
?Action=DescribeSnapshots
&Version=2014-12-01
&SignatureVersion=4
&SignatureMethod=HmacSHA256
&Timestamp=20141201T220302Z
&X-Amz-Algorithm=AWS4-HMAC-SHA256
&X-Amz-Date=20141201T220302Z
&X-Amz-SignedHeaders=Host
&X-Amz-Expires=20141201T220302Z
&X-Amz-Credential=<credential>
&X-Amz-Signature=<signature>
API Version 2015-02-02
207

Amazon ElastiCache User Guide
Copying a Snapshot
Copying a Snapshot
You can make a copy of any snapshot, whether it was created automatically or manually. You can also
export your snapshot so you can access it from outside ElastiCache. For guidance on exporting your
snapshot, see Exporting a Snapshot (p. 210).
The following procedures show you how to copy a snapshot.
Copying a Snapshot (Console)
To copy a snapshot (console)
1. Sign in to the AWS Management Console and open the ElastiCache console at https://
console.aws.amazon.com/elasticache/.
2. On the ElastiCache console dashboard, choose Snapshots.
3. In the list of snapshots, choose the one that you want to copy, and then select Copy Snapshot.
4. In the Create a Copy of the Cache Snapshot? dialog box:
a. In the New Cache Snapshot Identifier box, type a name for your new snapshot.
b. Leave the optional Target S3 Bucket box blank. This field should only be used to export your
snapshot. For information on exporting a snapshot, see Exporting a Snapshot (p. 210).
c. Select Copy.
Copying a Snapshot (AWS CLI)
To copy a snapshot, use the copy-snapshot command.
Parameters
•--source-snapshot-name – Name of the snapshot to be copied.
•--target-snapshot-name – Name of the snapshot's copy.
•--target-bucket – Reserved for exporting a snapshot. Do not use this parameter when making a
copy of a snapshot. For more information, see Exporting a Snapshot (p. 210).
The following example makes a copy of an automatic snapshot.
For Linux, OS X, or Unix:
aws elasticache copy-snapshot \
--source-snapshot-name automatic.my-redis-primary-2014-03-27-03-15 \
--target-snapshot-name my-snapshot-copy
For Windows:
aws elasticache copy-snapshot ^
--source-snapshot-name automatic.my-redis-primary-2014-03-27-03-15 ^
--target-snapshot-name my-snapshot-copy
For more information, see copy-snapshot in the AWS CLI.
Copying a Snapshot (ElastiCache API)
To copy a snapshot, use the CopySnapshot action with the following parameters:
API Version 2015-02-02
208

Amazon ElastiCache User Guide
Copying a Snapshot (ElastiCache API)
Parameters
•SourceSnapshotName – Name of the snapshot to be copied.
•TargetSnapshotName – Name of the snapshot's copy.
•TargetBucket – Reserved for exporting a snapshot. Do not use this parameter when making a
copy of a snapshot. For more information, see Exporting a Snapshot (p. 210).
The following example makes a copy of an automatic snapshot.
Example
https://elasticache.us-west-2.amazonaws.com/
?Action=CopySnapshot
&SourceSnapshotName=automatic.my-redis-primary-2014-03-27-03-15
&TargetSnapshotName=my-snapshot-copy
&SignatureVersion=4
&SignatureMethod=HmacSHA256
&Timestamp=20141201T220302Z
&Version=2014-12-01
&X-Amz-Algorithm=AWS4-HMAC-SHA256
&X-Amz-Date=20141201T220302Z
&X-Amz-SignedHeaders=Host
&X-Amz-Expires=20141201T220302Z
&X-Amz-Credential=<credential>
&X-Amz-Signature=<signature>
For more information, see CopySnapshot in the Amazon ElastiCache API Reference.
API Version 2015-02-02
209

Amazon ElastiCache User Guide
Exporting a Snapshot
Exporting a Snapshot
Amazon ElastiCache supports exporting your ElastiCache snapshot to an Amazon Simple Storage
Service (Amazon S3) bucket, which gives you access to it from outside ElastiCache. You can export a
snapshot using the ElastiCache console, the AWS CLI, or the ElastiCache API.
Exporting a snapshot can be helpful if you need to launch a cluster in a another region. You can export
your data in one region, copy the .rdb file to the new region, and then use that .rdb file to seed the new
cluster instead of waiting for the new cluster to populate through use. For information about seeding
a new cluster, see Using a Snapshot to Seed a Cluster (p. 218). Another reason you might want to
export your cluster's data is to use the .rdb file for offline processing.
Important
• The snapshot and the Amazon S3 bucket that you want to copy it to must be in the same
region. You cannot copy a snapshot to an S3 bucket in a different region.
• Snapshots copied to an Amazon S3 bucket are unencrypted. We strongly recommend that
you do not grant others access to the Amazon S3 bucket where you want to store your
snapshots.
Before you can export a snapshot to an Amazon S3 bucket you must have an Amazon S3 bucket in
the same region as the snapshot, and then grant ElastiCache access to the bucket. The first two steps
show you how to do this.
Important
Protect your data.
There are two scenarios that can expose your data to others:
1. When another person has access to the Amazon S3 bucket you created for your
exported snapshot.
To control access to your snapshots, only allow access to the Amazon S3 bucket to those
who you want to access your data. For information about managing access to an Amazon
S3 bucket, see Managing Access in the Amazon S3 Developer Guide.
2. When another person has permissions to use the CopySnapshot API.
Users or groups that have permissions to use the CopySnapshot API can create their
own Amazon S3 buckets and copy snapshots to it. To control access to your snapshots,
use an IAM policy to control who has the ability to use the CopySnapshot API. For more
information about using IAM to control the use of ElastiCache APIs, seeAuthentication and
Access Control for Amazon ElastiCache (p. 289) in the ElastiCache User Guide.
Topics
•Step 1: Create an Amazon S3 Bucket (p. 210)
•Step 2: Grant ElastiCache Access to Your Amazon S3 Bucket (p. 211)
•Step 3: Export an ElastiCache Snapshot (p. 212)
Step 1: Create an Amazon S3 Bucket
The following procedure creates an Amazon S3 bucket where you can export and store an ElastiCache
snapshot.
1. Sign in to the AWS Management Console and open the Amazon S3 console at https://
console.aws.amazon.com/s3/.
2. Choose Create Bucket.
API Version 2015-02-02
210

Amazon ElastiCache User Guide
Step 2: Grant ElastiCache Access
to Your Amazon S3 Bucket
3. In Create a Bucket - Select a Bucket Name and Region, do the following:
a. In Bucket Name, type a name for your Amazon S3 bucket.
The name of your Amazon S3 bucket must be DNS-compliant; otherwise, ElastiCache will not
be able to access your backup file. The rules for DNS compliance are:
• Names must be at least 3 and no more than 63 characters long.
• Names must be a series of one or more labels separated by a period (.) where each label:
• Starts with a lowercase letter or a number.
• Ends with a lowercase letter or a number.
• Contains only lowercase letters, numbers, and dashes.
• Names cannot be formatted as an IP address (e.g., 192.0.2.0).
b. In Region, choose the same region that your snapshot is in.
c. Choose Create.
For more information about creating an Amazon S3 bucket, see Creating a Bucket in the Amazon
Simple Storage Service Console User Guide.
Step 2: Grant ElastiCache Access to Your Amazon
S3 Bucket
The following procedure grants Amazon ElastiCache access to your S3 bucket so it can copy a
snapshot to the bucket.
Warning
Snapshots copied to an Amazon S3 bucket are unencrypted. Your data may be accessed by
anyone with access to your Amazon S3 bucket. We strongly recommend that you set up IAM
policies to prevent unauthorized access to this Amazon S3 bucket. For more information, see
Managing Access in the Amazon S3 Developer Guide.
1. Sign in to the AWS Management Console and open the Amazon S3 console at https://
console.aws.amazon.com/s3/.
2. Choose All Buckets, and then choose the name of the Amazon S3 bucket that you want the
exported snapshot written to. This should be the S3 bucket you created in Step 1: Create an
Amazon S3 Bucket (p. 210).
3. Choose Properties, and then choose Permissions.
4. Make sure that the bucket's region is the same as your snapshot's region. If it isn't, return to Step
1: Create an Amazon S3 Bucket (p. 210) and create a new bucket in the same region as the
snapshot that you want to export.
5. Choose Add more permissions.
6. In Grantee, type the region's canonical id as shown in the following list:
• China (Beijing) Region –
b14d6a125bdf69854ed8ef2e71d8a20b7c490f252229b806e514966e490b8d83
• Asia Pacific (Seoul) Region –
540804c33a284a299d2547575ce1010f2312ef3da9b3a053c8bc45bf233e4353
• AWS GovCloud (US) Region –
40fa568277ad703bd160f66ae4f83fc9dfdfd06c2f1b5060ca22442ac3ef8be6
Important
The snapshot must be exported to an S3 bucket in AWS GovCloud (US).
• All other regions –
540804c33a284a299d2547575ce1010f2312ef3da9b3a053c8bc45bf233e4353
API Version 2015-02-02
211

Amazon ElastiCache User Guide
Step 3: Export an ElastiCache Snapshot
7. Choose List, Upload/Delete, and View Permissions. ElastiCache must have these permissions
to create an exported snapshot in the S3 bucket.
8. Choose Save.
Your Amazon S3 bucket is now ready for you to export an ElastiCache snapshot to using the
ElastiCache console, the AWS CLI, or the ElastiCache API.
Step 3: Export an ElastiCache Snapshot
Now that you've created your S3 bucket and granted ElastiCache permissions to access it, use one of
the following methods to export your snapshot.
Topics
•Using the AWS Management Console (p. 212)
•Using the AWS CLI (p. 213)
•Using the ElastiCache API (p. 214)
Exporting an ElastiCache Snapshot (Console)
The following process uses the ElastiCache console to export a snapshot to an Amazon S3 bucket so
that you can access it from outside ElastiCache. The Amazon S3 bucket must be in the same region as
the ElastiCache snapshot.
1. Sign in to the AWS Management Console and open the ElastiCache console at https://
console.aws.amazon.com/elasticache/.
2. In the ElastiCache console dashboard, select Snapshots.
3. From the list of snapshots, select the snapshot you want to export and then choose Copy
Snapshot.
4. In Create a Copy of the Snapshot?, do the following:
a. In New Snapshot Identifier, type a name for your new snapshot.
The name must be between 1 and 1,000 characters and able to be UTF-8 encoded.
ElastiCache adds an instance identifier and .rdb to the value that you enter here. For
example, if you enter my-exported-snapshot, ElastiCache creates my-exported-
snapshot-0001.rdb.
b. In Target S3 Location, type the name of the Amazon S3 bucket that you want to copy your
snapshot to (the bucket that you created in Step 1: Create an Amazon S3 Bucket (p. 210)).
The Target S3 Location must be an Amazon S3 bucket in the snapshot's region with List,
Upload/Delete, and View Permissions permissions granted to ElastiCache for the snapshot
export process to succeed. For more information, see Step 2: Grant ElastiCache Access to
Your Amazon S3 Bucket (p. 211).
c. Choose Copy.
Note
If your S3 bucket does not have the permissions needed for ElastiCache to export a snapshot
to it, you will receive one of the following error messages. Add the permissions specified and
retry exporting your snapshot.
• ElastiCache has not been granted READ permissions %s on the S3 Bucket.
Solution: Add List and Read permissions on the bucket.
API Version 2015-02-02
212

Amazon ElastiCache User Guide
Step 3: Export an ElastiCache Snapshot
• ElastiCache has not been granted WRITE permissions %s on the S3 Bucket.
Solution: Add Upload/Delete permissions on the bucket.
• ElastiCache has not been granted READ_ACP permissions %s on the S3 Bucket.
Solution: Add View Permissions on the bucket.
For information on adding permissions, see Step 2: Grant ElastiCache Access to Your
Amazon S3 Bucket (p. 211)
If you want to copy your snapshot to another region, use Amazon S3 to copy it. For more information,
see Copying an Object in the Amazon Simple Storage Service Console User Guide.
Exporting an ElastiCache Snapshot (AWS CLI)
Export the snapshot to an Amazon S3 bucket using the copy-snapshot command with the following
parameters:
Parameters
•--source-snapshot-name – Name of the snapshot to be copied.
•--target-snapshot-name – Name of the snapshot's copy.
The name must be between 1 and 1,000 characters and able to be UTF-8 encoded.
ElastiCache adds an instance identifier and .rdb to the value you enter here. For example, if you
enter my-exported-snapshot, ElastiCache creates my-exported-snapshot-0001.rdb.
•--target-bucket – Name of the Amazon S3 bucket where you want to export the snapshot. A
copy of the snapshot is made in the specified bucket.
The --target-bucket must be an Amazon S3 bucket in the snapshot's region with List, Upload/
Delete, and View Permissions permissions granted to ElastiCache for the snapshot export process
to succeed. For more information, see Step 2: Grant ElastiCache Access to Your Amazon S3
Bucket (p. 211).
The following command copies a snapshot to the my-s3-bucket.
For Linux, OS X, or Unix:
aws elasticache copy-snapshot \
--source-snapshot-name automatic.my-redis-primary-2016-06-27-03-15 \
--target-snapshot-name my-exported-snapshot \
--target-bucket my-s3-bucket
For Windows:
aws elasticache copy-snapshot ^
--source-snapshot-name automatic.my-redis-primary-2016-06-27-03-15 ^
--target-snapshot-name my-exported-snapshot ^
--target-bucket my-s3-bucket
Note
If your S3 bucket does not have the permissions needed for ElastiCache to export a snapshot
to it, you will receive one of the following error messages. Add the permissions specified and
retry exporting your snapshot.
API Version 2015-02-02
213

Amazon ElastiCache User Guide
Step 3: Export an ElastiCache Snapshot
• ElastiCache has not been granted READ permissions %s on the S3 Bucket.
Solution: Add List and Read permissions on the bucket.
• ElastiCache has not been granted WRITE permissions %s on the S3 Bucket.
Solution: Add Upload/Delete permissions on the bucket.
• ElastiCache has not been granted READ_ACP permissions %s on the S3 Bucket.
Solution: Add View Permissions on the bucket.
For information on adding permissions, see Step 2: Grant ElastiCache Access to Your
Amazon S3 Bucket (p. 211)
For more information, see copy-snapshot in the AWS Command Line Interface Reference.
If you want to copy your snapshot to another region, use Amazon S3 copy. For more information, see
Copying an Object in the Amazon Simple Storage Service Console User Guide.
Exporting an ElastiCache Snapshot (ElastiCache API)
Export the snapshot to an Amazon S3 bucket using the CopySnapshot action with these parameters.
Parameters
•SourceSnapshotName – Name of the snapshot to be copied.
•TargetSnapshotName – Name of the snapshot's copy.
The name must be between 1 and 1,000 characters and able to be UTF-8 encoded.
ElastiCache will add an instance identifier and .rdb to the value you enter here. For example, if you
enter my-exported-snapshot, you will get my-exported-snapshot-0001.rdb.
•TargetBucket – Name of the Amazon S3 bucket where you want to export the snapshot. A copy of
the snapshot is made in the specified bucket.
The TargetBucket must be an Amazon S3 bucket in the snapshot's region with List, Upload/
Delete, and View Permissions permissions granted to ElastiCache for the snapshot export process
to succeed. For more information, see Step 2: Grant ElastiCache Access to Your Amazon S3
Bucket (p. 211).
The following example makes a copy of an automatic snapshot to the Amazon S3 bucket my-s3-
bucket.
API Version 2015-02-02
214

Amazon ElastiCache User Guide
Step 3: Export an ElastiCache Snapshot
Example
https://elasticache.us-west-2.amazonaws.com/
?Action=CopySnapshot
&SourceSnapshotName=automatic.my-redis-primary-2016-06-27-03-15
&TargetBucket=my-s3-bucket
&TargetSnapshotName=my-snapshot-copy
&SignatureVersion=4
&SignatureMethod=HmacSHA256
&Timestamp=20141201T220302Z
&Version=2016-01-01
&X-Amz-Algorithm=AWS4-HMAC-SHA256
&X-Amz-Date=20141201T220302Z
&X-Amz-SignedHeaders=Host
&X-Amz-Expires=20141201T220302Z
&X-Amz-Credential=<credential>
&X-Amz-Signature=<signature>
Note
If your S3 bucket does not have the permissions needed for ElastiCache to export a snapshot
to it, you will receive one of the following error messages. Add the permissions specified and
retry exporting your snapshot.
• ElastiCache has not been granted READ permissions %s on the S3 Bucket.
Solution: Add List and Read permissions on the bucket.
• ElastiCache has not been granted WRITE permissions %s on the S3 Bucket.
Solution: Add Upload/Delete permissions on the bucket.
• ElastiCache has not been granted READ_ACP permissions %s on the S3 Bucket.
Solution: Add View Permissions on the bucket.
For information on adding permissions, see Step 2: Grant ElastiCache Access to Your
Amazon S3 Bucket (p. 211)
For more information, see CopySnapshot in the Amazon ElastiCache API Reference.
If you want to copy your snapshot to another region, use Amazon S3 copy to copy the exported
snapshot to the Amazon S3 bucket in another region. For more information, see Copying an Object in
the Amazon Simple Storage Service Console User Guide.
API Version 2015-02-02
215

Amazon ElastiCache User Guide
Restoring From a Snapshot
Restoring From a Snapshot
You can restore the data from a backup into a new cluster at any time. By default, the new cluster will
have the same configuration that the source cluster did when the backup was created; however, you
can override some of the parameters, such as node size.
During the restore operation, ElastiCache creates the new cluster, and then populates the cache with
data from the backup file. When this process is complete, the Redis cache is warmed up and the
cluster is ready to accept requests.
The following procedures show you how to restore a backup to a new cluster.
Restoring From a Snapshot (Console)
To restore a backup to a new cluster (console)
1. Sign in to the AWS Management Console and open the ElastiCache console at https://
console.aws.amazon.com/elasticache/.
2. On the ElastiCache console dashboard, choose Snapshots.
3. In the list of snapshots, select the one you want to restore from, and then choose Restore
Snapshot.
4. In the Restore Cache Cluster window, type a name for the new cluster in the Cache Cluster Id
box.
5. [Optional] You can customize the new cluster by selecting new values for Instance Type, Cache
Port, and other properties.
6. When the settings are as you want them, choose Launch Cache Cluster.
Restoring From a Snapshot (AWS CLI)
To restore data from a backup into a new cluster, use the create-cache-cluster command with the
following parameters:
•--snapshot-name – Name of the snapshot to restore from.
•--cache-cluster-id – Name of the new, restored cache cluster.
The following example creates a new cache cluster named my-restored-redis and restores the data
from my-manual-backup into it.
For Linux, OS X, or Unix:
aws elasticache create-cache-cluster \
--cache-cluster-id my-restored-redis \
--snapshot-name my-manual-backup
For Windows:
aws elasticache create-cache-cluster ^
--cache-cluster-id my-restored-redis ^
--snapshot-name my-manual-backup
For more information, see create-cache-cluster in the AWS Command Line Interface Reference.
API Version 2015-02-02
216

Amazon ElastiCache User Guide
Restoring From a Snapshot (ElastiCache API)
Restoring From a Snapshot (ElastiCache API)
To restore data from a backup into a new cluster, use the CreateCacheCluster action with the following
parameter:
•SnapshotName – Name of the snapshot to restore from.
•CacheClusterId – Name of the new, restored cache cluster.
The following example creates a new cluster named my-restored-redis and restores the data from my-
manual-backup.
Example
https://elasticache.us-west-2.amazonaws.com/
?Action=CreateCacheCluster
&CacheClusterId=my-restored-redis
&SignatureVersion=4
&SignatureMethod=HmacSHA256
&SnapshotName=my-manual-backup
&Timestamp=20141201T220302Z
&Version=2015-02-02
&X-Amz-Algorithm=AWS4-HMAC-SHA256
&X-Amz-Date=20141201T220302Z
&X-Amz-SignedHeaders=Host
&X-Amz-Expires=20141201T220302Z
&X-Amz-Credential=<credential>
&X-Amz-Signature=<signature>
For more information, see CreateCacheCluster in the Amazon ElastiCache API Reference.
API Version 2015-02-02
217

Amazon ElastiCache User Guide
Using a Snapshot to Seed a Cluster
Using a Snapshot to Seed a Cluster
When you create a new Redis cluster, you can seed it with data from a Redis .rdb snapshot file.
Seeding the cluster is useful if you currently manage a Redis instance outside of ElastiCache and want
to populate your new ElastiCache cluster with your existing Redis data.
Important
You must ensure that your Redis snapshot data does not exceed the resources of the node.
For example, you cannot upload an .rdb file with 5 GB of Redis data to a cache.m3.medium
node that has 2.9 GB of memory.
If the snapshot is too large, the resulting cluster will have a status of restore-failed. If this
happens, you must delete the cluster and start over.
For a complete listing of node types and specifications, see Redis Node-Type Specific
Parameters (p. 263) and Amazon ElastiCache Product Features and Details.
The following topics walk you through migrating your non-ElastiCache Redis cluster to Amazon
ElastiCache.
Topics
Step 1: Create a Redis Backup (p. 218)
Step 2: Upload Your Backup to Amazon S3 (p. 218)
Step 3: Grant ElastiCache Read Access to the .rdb File (p. 219)
Step 4: Seed the ElastiCache Cluster With the .rdb File Data (p. 219)
Step 1: Create a Redis Backup
To create the Redis backup from which you will seed your ElastiCache Redis instance
1. Connect to your existing Redis instance.
2. Run either the BGSAVE or SAVE command to create the backup.
BGSAVE is asynchronous and does not block other clients while processing. For more information,
see BGSAVE at the Redis website.
SAVE is synchronous and blocks other processes until finished. For more information, see SAVE at
the Redis website.
For additional information on creating a backup, see Redis Persistence at the Redis website.
Step 2: Upload Your Backup to Amazon S3
Once you have created the backup file, you need to upload it to an Amazon S3 bucket. For more
information on this task, see the Amazon Simple Storage Service Getting Started Guide.
It is important that you note the path to your S3 bucket for the .rdb file. For example, if my bucket name
was myBucket and the path was myFolder/redis.rdb, you would enter myBucket/myFolder/
redis.rdb. You need this path to seed the new cluster with the data in this backup.
The name of your Amazon S3 bucket must be DNS-compliant; otherwise, ElastiCache will not be able
to access your backup file. The rules for DNS compliance are:
• Names must be at least 3 and no more than 63 characters long.
• Names must be a series of one or more labels separated by a period (.) where each label:
API Version 2015-02-02
218

Amazon ElastiCache User Guide
Step 3: Grant ElastiCache Read Access to the .rdb File
• Starts with a lowercase letter or a number.
• Ends with a lowercase letter or a number.
• Contains only lowercase letters, numbers, and dashes.
• Names cannot be formatted as an IP address (e.g., 192.0.2.0).
For additional information, see Bucket Restrictions and Limitations in the Amazon Simple Storage
Service Developer Guide.
We strongly recommend that you use an Amazon S3 bucket that is in the same region as your
ElastiCache cluster. This approach will ensure the highest data transfer speed when ElastiCache reads
your .rdb file from Amazon S3.
Step 3: Grant ElastiCache Read Access to the .rdb
File
To grant ElastiCache read access to the backup file
1. Sign in to the AWS Management Console and open the Amazon S3 console at https://
console.aws.amazon.com/s3/.
2. Choose All Buckets, and then choose the name of the S3 bucket that contains your .rdb file.
3. Choose the name of the folder that contains your .rdb file.
4. Choose the name of your .rdb backup file.
5. Choose the Actions drop-down menu, and then choose Properties.
6. In the Grantee box, type this email address: aws-scs-s3-readonly@amazon.com. The aws-
scs-s3-readonly@amazon.com account is used exclusively for customers uploading Redis
snapshot data from Amazon S3.
Important
For the following regions, connect to the canonical ID rather than aws-scs-s3-
readonly@amazon.com:
• China (Beijing) Region:
b14d6a125bdf69854ed8ef2e71d8a20b7c490f252229b806e514966e490b8d83
• EU (Frankfurt) Region:
540804c33a284a299d2547575ce1010f2312ef3da9b3a053c8bc45bf233e4353
• Asia Pacific (Seoul) Region:
540804c33a284a299d2547575ce1010f2312ef3da9b3a053c8bc45bf233e4353
• AWS GovCloud (US) Region:
40fa568277ad703bd160f66ae4f83fc9dfdfd06c2f1b5060ca22442ac3ef8be6
Note
The snapshot must be located in an S3 bucket in AWS GovCloud (US) for you
to download it to a Redis cluster in AWS GovCloud (US).
7. Choose Open/Download, and then choose Save.
Step 4: Seed the ElastiCache Cluster With the .rdb
File Data
Now you are ready to create an ElastiCache cluster and seed it with the data from the .rdb file. To
create the cluster, follow the directions at Creating a Cluster (p. 112). Be sure to choose Redis as your
cluster engine.
API Version 2015-02-02
219

Amazon ElastiCache User Guide
Step 4: Seed the ElastiCache
Cluster With the .rdb File Data
The method you use to tell ElastiCache where to find the Redis backup you uploaded to Amazon S3
depends on the method you use to create the cluster:
•Seed the ElastiCache Cluster With the .rdb File Data Using the ElastiCache Console
After you choose the Redis engine, on the Specify Cluster Details page, at the bottom of the
Configuration section, locate S3 Location of the Redis .rdb file and type the Amazon S3 path
for the backup you uploaded to your S3 bucket. The Amazon S3 path will look something like
myBucket/myFolder/myBackupFilename.rdb.
•Seed the ElastiCache Cluster With the .rdb File Data Using the AWS CLI
If you use the aws elasticache create-cache-cluster command, use
the --snapshot-arns parameter to specify a fully qualified ARN. For example,
arn:aws:s3:::myBucket/myFolder/myBackupFilename.rdb. The ARN must resolve to the
backup file you stored in Amazon S3.
•Seed the ElastiCache Cluster With the .rdb File Data Using the ElastiCache API
If you use the CreateCacheCluster ElastiCache API, use the
SnapshotArns parameter to specify a fully qualified ARN. For example,
arn:aws:s3:::myBucket/myFolder/myBackupFilename.rdb. The ARN must resolve to the
backup file you stored in Amazon S3.
During the process of creating your cluster, the data in your Redis backup will be written to the cluster.
You can monitor the progress by viewing the ElastiCache event messages. To do this, go to the
ElastiCache console and choose Cache Events. You can also use the AWS ElastiCache command
line interface or ElastiCache API to obtain event messages. For more information, see Viewing
ElastiCache Events (p. 323).
API Version 2015-02-02
220

Amazon ElastiCache User Guide
Tagging Snapshots
Tagging Snapshots
Cost allocation tags are a means of tracking your costs across multiple AWS services by grouping your
expenses on invoices by tag values. To learn more about cost allocation tags, see Use Cost Allocation
Tags and Monitoring Costs with Cost Allocation Tags (p. 329).
Using the ElastiCache console, the AWS CLI, or ElastiCache API you can add, list, modify, remove, or
copy cost allocation tags on your snapshots. For more information, see the following topics.
•Adding Tags to Your ElastiCache Resource (p. 331)
•Listing Your ElastiCache Resource's Tags (p. 333)
•Modifying Your ElastiCache Resource's Tags (p. 335)
•Removing Tags from Your ElastiCache Resource (p. 336)
•Copying Tags to Your ElastiCache Resource (p. 337)
API Version 2015-02-02
221

Amazon ElastiCache User Guide
Deleting a Snapshot
Deleting a Snapshot
An automatic backup is automatically deleted when its retention limit expires. If you delete a cluster, all
of its automatic backups are also deleted. If you delete a replication group, all of the automatic backups
from the clusters in that group are also deleted.
ElastiCache provides a deletion API that lets you delete a backup at any time, regardless of whether
the backup was created automatically or manually. (Since manual backups do not have a retention
limit, manual deletion is the only way to remove them.)
You can delete a snapshot using the ElastiCache console, the AWS CLI, or the ElastiCache API.
Deleting a Snapshot (Console)
The following procedure deletes a snapshot using the ElastiCache console.
To delete a snapshot
1. Sign in to the AWS Management Console and open the ElastiCache console at https://
console.aws.amazon.com/elasticache/.
2. In the left navigation pane, choose Snapshots.
The Snapshots screen appears with a list of your snapshots.
3. Choose the name of the snapshot you want to delete.
4. Choose Delete Snapshot.
The Delete Cache Snapshot confirmation screen appears.
5. If you want to delete this snapshot, choose Delete. The status changes to deleting.
If you want to keep this snapshot, choose Cancel.
Deleting a Snapshot (AWS CLI)
Use the delete-snapshot AWS CLI command to delete a snapshot with the following parameter.
•--snapshot-name – Name of the snapshot to be deleted.
The following code deletes the snapshot mySnapshot.
aws elasticache delete-snapshot --snapshot-name mySnapshot
For more information, see delete-snapshot in the AWS Command Line Interface Reference.
Deleting a Snapshot (ElastiCache API)
Use the delete-snapshot AWS CLI command to delete a snapshot with the following parameter.
•SnapshotName – Name of the snapshot to be deleted.
The following code deletes the snapshot mySnapshot.
https://elasticache.us-west-2.amazonaws.com/
API Version 2015-02-02
222

Amazon ElastiCache User Guide
Redis Append Only Files (AOF)
?Action=DeleteSnapshot
&SignatureVersion=4
&SignatureMethod=HmacSHA256
&SnapshotId=mySnapshot
&Timestamp=20150202T192317Z
&Version=2015-02-02
&X-Amz-Credential=<credential>
For more information, see DeleteSnapshot in the Amazon ElastiCache API Reference.
Redis Append Only Files (AOF)
By default, the data in a Redis node on ElastiCache resides only in memory, and is not persistent. If a
node is rebooted, or if the underlying physical server experiences a hardware failure, the data in the
cache is lost.
If you require data durability, you can enable the Redis append-only file feature (AOF). When this
feature is enabled, the node writes all of the commands that change cache data to an append-only
file. When a node is rebooted and the cache engine starts, the AOF is "replayed"; the result is a warm
Redis cache with all of the data intact.
AOF is disabled by default. To enable AOF for a cluster running Redis, you must create a parameter
group with the appendonly parameter set to yes, and then assign that parameter group to your
cluster. You can also modify the appendfsync parameter to control how often Redis writes to the AOF
file.
Important
Append-only files (AOF) are not supported for cache.t1.micro and cache.t2.* nodes. For nodes
of these types, the appendonly parameter value is ignored.
For Multi-AZ replication groups, AOF is disabled.
AOF is not supported on Redis versions 2.8.22 and later.
Warning
AOF cannot protect against all failure scenarios. For example, if a node fails due to a
hardware fault in an underlying physical server, ElastiCache will provision a new node on a
different server. In this case, the AOF file will no longer be available and cannot be used to
recover the data. Thus, Redis will restart with a cold cache.
For greater reliability and faster recovery, we recommend that you create one or more read
replicas in different availability zones for your cluster, and enable Multi-AZ on the replication
group instead of using AOF. AOF is disabled for Multi-AZ replication groups.
For more information on mitigating failures, see Mitigating Failures when Running
Redis (p. 52).
For more information see:
•Redis Specific Parameters (p. 253)
•Replication with Multi-AZ and Automatic Failover (Redis) (p. 166)
•Mitigating Failures (p. 51)
API Version 2015-02-02
223

Amazon ElastiCache User Guide
Cache Security Groups [EC2-
Classic]
Important
Amazon ElastiCache cache security groups are only applicable to cache clusters that are
not running in an Amazon Virtual Private Cloud environment (VPC). If you are running in
an Amazon Virtual Private Cloud, Cache Security Groups is not available in the console
navigation pane.
If you are running your ElastiCache nodes in an Amazon VPC, you control access to your
cache clusters with Amazon VPC security groups, which are different from ElastiCache
security groups. For more information about using ElastiCache in an Amazon VPC, see
Amazon Virtual Private Cloud (Amazon VPC) with ElastiCache (p. 273)
Amazon ElastiCache allows you to control access to your clusters using ElastiCache cache security
groups. An ElastiCache cache security group acts like a firewall, controlling network access to your
cluster. By default, network access is turned off to your clusters. If you want your applications to access
your cluster, you must explicitly enable access from hosts in specific Amazon EC2 security groups.
Once ingress rules are configured, the same rules apply to all clusters associated with that cache
security group.
To allow network access to your cluster, create a cache security group and use the
AuthorizeCacheSecurityGroupIngress API or authorize-cache-security-group-ingress
AWS CLI for ElastiCache command to authorize the desired Amazon EC2 security group (which in turn
specifies the Amazon EC2 instances allowed). The security group can be associated with your cluster
at the time of creation, or using the ModifyCacheCluster API or the modify-cache-cluster AWS
CLI command.
Important
Access control based on IP range is currently not enabled at the individual cluster level. All
clients to a cluster must be within the EC2 network, and authorized via security groups as
described previously.
For more information about using ElastiCache with Amazon VPCs, see Amazon Virtual Private Cloud
(Amazon VPC) with ElastiCache (p. 273).
Note that Amazon EC2 instances running in an Amazon VPC can't connect to ElastiCache cache
clusters in EC2-Classic.
Topics
•Creating a Cache Security Group (p. 226)
API Version 2015-02-02
224


Amazon ElastiCache User Guide
Creating a Cache Security Group
Creating a Cache Security Group
This topic is relevant to you only if you are not running in an Amazon VPC. If you are running in an
Amazon VPC, please see Amazon Virtual Private Cloud (Amazon VPC) with ElastiCache (p. 273).
To create a cache security group, you need to provide a name and a description.
The following procedures show you how to create a new cache security group.
Creating a Security Group (Console)
1. Sign in to the AWS Management Console and open the ElastiCache console at https://
console.aws.amazon.com/elasticache/.
2. In the left navigation pane, choose Cache Security Groups.
3. Choose Create Cache Security Group.
4. In Create Cache Security Group, type the name of the new cache security group in Cache
Security Group.
5. In Description, type a description for the new cache security group.
6. Choose Create.
Creating a Security Group (AWS CLI)
At a command prompt, use the create-cache-security-group command with the following
parameters:
• --cache-security-group-name
• --description
For Linux, OS X, or Unix:
aws elasticache create-cache-security-group \
--cache-security-group-name mycachesecuritygroup \
--description "My new security group"
For Windows:
aws elasticache create-cache-security-group ^
--cache-security-group-name mycachesecuritygroup ^
--description "My new security group"
For more information, see create-cache-security-group.
Creating a Security Group (ElastiCache API)
Using the ElastiCache API call CreateCacheSecurityGroup with the following parameters:
•CacheSecurityGroupName=mycachesecuritygroup
•Description="My new security group"
API Version 2015-02-02
226

Amazon ElastiCache User Guide
Creating a Security Group (ElastiCache API)
Example
Line breaks in the following code example are added for ease of reading.
https://elasticache.us-west-2.amazonaws.com /
?Action=CreateCacheSecurityGroup
&CacheSecurityGroupName=mycachesecuritygroup
&Description=My%20cache%20security%20group
&Version=2014-12-01
&SignatureVersion=4
&SignatureMethod=HmacSHA256
&Timestamp=20141201T220302Z
&X-Amz-Algorithm=AWS4-HMAC-SHA256
&X-Amz-Date=20141201T220302Z
&X-Amz-SignedHeaders=Host
&X-Amz-Expires=20141201T220302Z
&X-Amz-Credential=<credential>
&X-Amz-Signature=<signature>
API Version 2015-02-02
227

Amazon ElastiCache User Guide
Listing Available Cache Security Groups
Listing Available Cache Security Groups
This topic is relevant to you only if you are not running in an Amazon VPC. If you are running in an
Amazon VPC, please see Amazon Virtual Private Cloud (Amazon VPC) with ElastiCache (p. 273).
You can list which cache security groups have been created for your AWS account.
The following procedures show you how to list the available cache security groups for your AWS
account.
Listing Available Cache Security Groups (Console)
1. Sign in to the AWS Management Console and open the ElastiCache console at https://
console.aws.amazon.com/elasticache/.
2. In the left navigation pane, choose Cache Security Groups.
The available cache security groups appear in the Cache Security Groups list.
Listing Available Cache Security Groups (AWS CLI)
At a command prompt, use the describe-cache-security-groups command to list all available
cache security groups for your AWS account.
aws elasticache describe-cache-security-groups
For more information, see describe-cache-security-groups.
Listing Available Cache Security Groups
(ElastiCache API)
Using the ElastiCache API, call DescribeCacheSecurityGroups.
Example
Line breaks in the following code example are added for ease of reading.
https://elasticache.us-west-2.amazonaws.com/
?Action=DescribeCacheSecurityGroups
&MaxRecords=100
&Version=2014-12-01
&SignatureVersion=4
&SignatureMethod=HmacSHA256
&Timestamp=20141201T220302Z
&X-Amz-Algorithm=AWS4-HMAC-SHA256
&X-Amz-Date=20141201T220302Z
&X-Amz-SignedHeaders=Host
&X-Amz-Expires=20141201T220302Z
&X-Amz-Credential=<credential>
&X-Amz-Signature=<signature>
API Version 2015-02-02
228

Amazon ElastiCache User Guide
Viewing a Cache Security Group
Viewing a Cache Security Group
This topic is relevant to you only if you are not running in an Amazon VPC. If you are running in an
Amazon VPC, please see Amazon Virtual Private Cloud (Amazon VPC) with ElastiCache (p. 273).
You can view detailed information about your cache security group.
The following procedures show you how to view the properties of a cache security group.
Viewing a Cache Security Group (Console)
1. Sign in to the AWS Management Console and open the ElastiCache console at https://
console.aws.amazon.com/elasticache/.
2. In the left navigation pane, choose Cache Security Groups.
The available cache security groups appear in the Cache Security Groups list.
3. Select a cache security group from the Cache Security Groups list.
The list of authorizations defined for the cache security group appears in the detail section at the
bottom of the window.
Viewing a Cache Security Group (AWS CLI)
At the command prompt, use the AWS CLI describe-cache-security-groups command to view
a cache security group.
aws elasticache describe-cache-security-groups mycachesecuritygroup
For more information, see describe-cache-security-groups.
Viewing a Cache Security Group (ElastiCache API)
Using the ElastiCache API, call DescribeCacheSecurityGroups with the following parameter:
•CacheSecurityGroupName=mycachesecuritygroup
Example
Line breaks in the following code example are added for ease of reading.
https://elasticache.amazonaws.com/
?Action=DescribeCacheSecurityGroups
&CacheParameterGroupName=mycachesecuritygroup
&Version=2014-12-01
&SignatureVersion=4
&SignatureMethod=HmacSHA256
&Timestamp=20141201T220302Z
&X-Amz-Algorithm=AWS4-HMAC-SHA256
&X-Amz-Date=20141201T220302Z
&X-Amz-SignedHeaders=Host
&X-Amz-Expires=20141201T220302Z
&X-Amz-Credential=<credential>
&X-Amz-Signature=<signature>
API Version 2015-02-02
229

Amazon ElastiCache User Guide
Viewing a Cache Security Group (ElastiCache API)
API Version 2015-02-02
230

Amazon ElastiCache User Guide
Authorizing Network Access to
an Amazon EC2 Security Group
Authorizing Network Access to an Amazon EC2
Security Group
This topic is relevant to you only if you are not running in an Amazon VPC. If you are running in an
Amazon VPC, please see Amazon Virtual Private Cloud (Amazon VPC) with ElastiCache (p. 273).
If you want to access your cache cluster from an Amazon EC2 instance, you must grant access to the
Amazon EC2 security group that the EC2 instance belongs to. The following procedures show you how
to grant access to an Amazon EC2 Security Group.
Important
Authorizing an Amazon EC2 security group only grants access to your cache clusters from the
EC2 instances belonging to the Amazon EC2 security group.
Authorizing Network Access to an Amazon EC2
Security Group (Console)
1. Sign in to the AWS Management Console and open the ElastiCache console at https://
console.aws.amazon.com/elasticache/.
2. In the left navigation pane, select Cache Security Groups.
3. In the Cache Security Groups list, select the check box next to the cache security group that you
want to grant access to.
4. At the bottom of the window, in the EC2 Security Group Name list, select your Amazon EC2
security group.
5. Choose Add.
Note
It takes approximately one minute for changes to access permissions to take effect.
Authorizing Network Access to an Amazon EC2
Security Group (AWS CLI)
At a command prompt, use the authorize-cache-security-group-ingress command to grant
access to an Amazon EC2 security group
For Linux, OS X, or Unix:
aws elasticache authorize-cache-security-group-ingress \
--cache-security-group-name default \
--ec2-security-group-name myec2group \
--ec2-security-group-owner-id 987654321021
For Windows:
aws elasticache authorize-cache-security-group-ingress ^
--cache-security-group-name default ^
--ec2-security-group-name myec2group ^
--ec2-security-group-owner-id 987654321021
The command should produce output similar to the following:
API Version 2015-02-02
231

Amazon ElastiCache User Guide
Authorizing Network Access to an Amazon
EC2 Security Group (ElastiCache API)
SECGROUP Name Description
SECGROUP default default
EC2-SECGROUP myec2group 987654321021 authorizing
For more information, see authorize-cache-security-group-ingress.
Authorizing Network Access to an Amazon EC2
Security Group (ElastiCache API)
Using the ElastiCache API, call AuthorizeCacheSecurityGroupIngress with the following
parameters:
•EC2SecurityGroupName=myec2group
•EC2SecurityGroupOwnerId=987654321021
Example
https://elasticache.us-west-2.amazonaws.com/
?Action=AuthorizeCacheSecurityGroupIngress
&EC2SecurityGroupOwnerId=987654321021
&EC2SecurityGroupName=myec2group
&Version=2014-12-01
&SignatureVersion=4
&SignatureMethod=HmacSHA256
&Timestamp=20141201T220302Z
&X-Amz-Algorithm=AWS4-HMAC-SHA256
&X-Amz-Date=20141201T220302Z
&X-Amz-SignedHeaders=Host
&X-Amz-Expires=20141201T220302Z
&X-Amz-Credential=<credential>
&X-Amz-Signature=<signature>
API Version 2015-02-02
232

Amazon ElastiCache User Guide
Parameters and Parameter Groups
Amazon ElastiCache uses parameters to control the runtime properties of your nodes and clusters.
Generally, newer engine versions include additional parameters to support the newer functionality. For
tables of parameters by engine and version, see Memcached Specific Parameters (p. 247) and Redis
Specific Parameters (p. 253).
As you would expect, some parameter values, such as max_cache_memory, are determined by the
engine and cache node type. For a table of these parameter values by node type, see Memcached
Node-Type Specific Parameters (p. 252) and Redis Node-Type Specific Parameters (p. 263).
Topics
•Creating a Parameter Group (p. 234)
•Listing Parameter Groups by Name (p. 237)
•Listing a Parameter Group's Values (p. 240)
•Modifying a Parameter Group (p. 243)
•Deleting a Parameter Group (p. 245)
•Memcached Specific Parameters (p. 247)
•Redis Specific Parameters (p. 253)
Parameters are grouped together into named parameter groups for easier parameter management.
A parameter group represents a combination of specific values for the parameters that are passed to
the cache engine software during startup. These values determine how the cache engine processes
on each node will behave at runtime. The parameter values on a specific parameter group apply to all
nodes that are associated with the group, regardless of which cluster they belong to.
To fine tune your cluster's performance, you can modify some parameter values or change the cluster's
parameter group.
• You cannot modify or delete the default parameter groups. If you need custom parameter values,
you must create a custom parameter group.
• The parameter group family and the cluster you're assigning it to must be compatible. For example,
if your cluster is running Redis version 2.8.6, you can only use parameter groups, default or custom,
from the Redis 2.8 family, not the Redis 2.6 parameter group family.
• If you change a cluster's parameter group, the values for any conditionally modifiable parameter
must be the same in both the current and new parameter groups.
API Version 2015-02-02
233

Amazon ElastiCache User Guide
Creating a Parameter Group
• When you make a change to a cluster's parameters, either by changing the cluster's parameter
group or by changing a parameter value in the cluster's parameter group, the changes are applied
to the cluster either immediately or after the cluster is restarted. To determine when a particular
parameter change is applied, see the Changes Take Effect column in the tables for Memcached
Specific Parameters (p. 247) and Redis Specific Parameters (p. 253). For information on
rebooting a cluster, go to Rebooting a Cluster (p. 127).
Creating a Parameter Group
You can create a parameter group using the ElastiCache console, the AWS CLI, or the ElastiCache
API.
Creating a Parameter Group (Console)
The following procedure shows how to create a parameter group using the ElastiCache console.
To create a parameter group using the ElastiCache console
1. Sign in to the AWS Management Console and open the ElastiCache console at https://
console.aws.amazon.com/elasticache/.
2. In the left hand navigation pane, click Cache Parameter Groups.
The Parameter Groups screen will appear with a list of all available parameter groups.
3. To create a parameter group, click Create Cache Parameter Group.
The Create Cache Parameter Group screen will appear.
4. From the Family list, select the parameter group family that will be the template for your parameter
group.
The parameter group family, such as redis2.8, defines the actual parameters in your parameter
group and their initial values. The parameter group family must coincide with the cluster's engine
and version. For example, you cannot create a parameter group with the family redis2.8 and use it
with clusters running Redis version 2.6.
5. In the Name box, type in a unique name for this parameter group.
When creating a cluster or modifying a cluster's parameter group, you will select the parameter
group by its name. Therefore, we recommend that the name be informative and somehow identify
the parameter group's family. For example, Redis2-8-24-Custom.
Parameter Group naming constraints
• Must begin with an ASCII letter.
• Can only contain ASCII letters, digits, and hyphens.
• Must be between 1 and 255 characters long.
• Cannot contain two consecutive hyphens.
• Must not end with a hyphen.
6. In the Description box, type in a description for the parameter group.
7. To create the parameter group, click Create.
To terminate the process without creating the parameter group, click Cancel.
When the parameter group is created, it will have the family's default values. For information on how to
change the default values, see the topic Modifying a Parameter Group (p. 243).
API Version 2015-02-02
234

Amazon ElastiCache User Guide
Creating a Parameter Group (AWS CLI)
Creating a Parameter Group (AWS CLI)
To create a parameter group using the AWS CLI, use the command create-cache-parameter-
group with these parameters.
•--cache-parameter-group-name — The name of the parameter group.
Parameter Group naming constraints
• Must begin with an ASCII letter.
• Can only contain ASCII letters, digits, and hyphens.
• Must be between 1 and 255 characters long.
• Cannot contain two consecutive hyphens.
• Must not end with a hyphen.
•--cache-parameter-group-family — The engine and version family for the parameter group.
For example, redis2.8.
•--description — A user supplied description for the parameter group.
The following example creates a parameter group named myRedis28 using the redis2.8 family as the
template.
For Linux, OS X, or Unix:
aws elasticache create-cache-parameter-group \
--cache-parameter-group-name myRedis28 \
--cache-parameter-group-family redis2.8 \
--description "My first cache parameter group"
For Windows:
aws elasticache create-cache-parameter-group ^
--cache-parameter-group-name myRedis28 ^
--cache-parameter-group-family redis2.8 ^
--description "My first cache parameter group"
The output from this command should look something like this.
CACHEPARAMETERGROUP myRedis28 redis2.8 My first cache
parameter group
For more information, see create-cache-parameter-group.
Creating a Parameter Group (ElastiCache API)
To create a parameter group using the ElastiCache API, use the CreateCacheParameterGroup
action with these parameters.
•CacheParameterGroupName — The name of the parameter group.
Parameter Group naming constraints
• Must begin with an ASCII letter.
• Can only contain ASCII letters, digits, and hyphens.
• Must be between 1 and 255 characters long.
API Version 2015-02-02
235

Amazon ElastiCache User Guide
Creating a Parameter Group (ElastiCache API)
• Cannot contain two consecutive hyphens.
• Must not end with a hyphen.
•CacheParameterGroupFamily — The engine and version family for the parameter group. For
example, redis2.8.
•Description — A user supplied description for the parameter group.
The following example creates a parameter group named myRedis28 using the redis2.8 family as the
template.
https://elasticache.us-west-2.amazonaws.com/
?Action=CreateCacheParameterGroup
&CacheParameterGroupFamily=redis2.8
&CacheParameterGroupName=myRedis28
&Description=My%20first%20cache%20parameter%20group
&SignatureVersion=4
&SignatureMethod=HmacSHA256
&Timestamp=20150202T192317Z
&Version=2015-02-02
&X-Amz-Credential=<credential>
The response from this action should look something like this.
<CreateCacheParameterGroupResponse xmlns="http://elasticache.amazonaws.com/
doc/2013-06-15/">
<CreateCacheParameterGroupResult>
<CacheParameterGroup>
<CacheParameterGroupName>myRedis28</CacheParameterGroupName>
<CacheParameterGroupFamily>redis2.8</CacheParameterGroupFamily>
<Description>My first cache parameter group</Description>
</CacheParameterGroup>
</CreateCacheParameterGroupResult>
<ResponseMetadata>
<RequestId>d8465952-af48-11e0-8d36-859edca6f4b8</RequestId>
</ResponseMetadata>
</CreateCacheParameterGroupResponse>
For more information, see CreateCacheParameterGroup.
API Version 2015-02-02
236

Amazon ElastiCache User Guide
Listing Parameter Groups by Name
Listing Parameter Groups by Name
You can list the parameter groups using the ElastiCache console, the AWS CLI, or the ElastiCache
API.
Listing Parameter Groups by Name (Console)
The following procedure shows how to view a list of the parameter groups using the ElastiCache
console.
To list parameter groups using the ElastiCache console
1. Sign in to the AWS Management Console and open the ElastiCache console at https://
console.aws.amazon.com/elasticache/.
2. In the left hand navigation pane, click Cache Parameter Groups.
The Parameter Groups screen will appear with a list of all available parameter groups. Each row in
the list displays the parameter group's name, family, and description.
Listing Parameter Groups by Name (AWS CLI)
To generate a list of parameter groups using the AWS CLI, use the command describe-cache-
parameter-groups. If you provide a parameter group's name, only that parameter group will be
listed. If you do not provide a parameter group's name, up to --max-records parameter groups will
be listed. In either case, the parameter group's name, family, and description are listed.
The following sample code lists the parameter group myRedis28.
For Linux, OS X, or Unix:
aws elasticache describe-cache-parameter-groups \
--cache-parameter-group-name myRedis28
For Windows:
aws elasticache describe-cache-parameter-groups ^
--cache-parameter-group-name myRedis28
The output of this command will look something like this, listing the name, family, and description for
the parameter group.
CACHEPARAMETERGROUP myRedis28 redis2.8 My Redis 2.8 parameter group
The following sample code lists up to 10 parameter groups.
aws elasticache describe-cache-parameter-groups --max-records 10
The output of this command will look something like this, listing the name, family, and description for
each parameter group.
CACHEPARAMETERGROUP myRedis28 redis2.8 My Redis 2.8 parameter group
CACHEPARAMETERGROUP myMem14 memcached1.4 My Memcached 1.4 parameter group
API Version 2015-02-02
237

Amazon ElastiCache User Guide
Listing Parameter Groups by Name (ElastiCache API)
For more information, see describe-cache-parameter-groups.
Listing Parameter Groups by Name (ElastiCache
API)
To generate a list of parameter groups using the ElastiCache API, use the
DescribeCacheParameterGroups action. If you provide a parameter group's name, only that
parameter group will be listed. If you do not provide a parameter group's name, up to MaxRecords
parameter groups will be listed. In either case, the parameter group's name, family, and description are
listed.
The following sample code lists the parameter group myRedis28.
https://elasticache.us-west-2.amazonaws.com/
?Action=DescribeCacheParameterGroups
&CacheParameterGroupName=myRedis28
&SignatureVersion=4
&SignatureMethod=HmacSHA256
&Timestamp=20150202T192317Z
&Version=2015-02-02
&X-Amz-Credential=<credential>
The response from this action will look something like this, listing the name, family, and description for
each parameter group.
<DescribeCacheParameterGroupsResponse xmlns="http://
elasticache.amazonaws.com/doc/2013-06-15/">
<DescribeCacheParameterGroupsResult>
<CacheParameterGroups>
<CacheParameterGroup>
<CacheParameterGroupName>myRedis28</CacheParameterGroupName>
<CacheParameterGroupFamily>redis 2.8</CacheParameterGroupFamily>
<Description>My Redis 2.8 parameter group</Description>
</CacheParameterGroup>
</CacheParameterGroups>
</DescribeCacheParameterGroupsResult>
<ResponseMetadata>
<RequestId>3540cc3d-af48-11e0-97f9-279771c4477e</RequestId>
</ResponseMetadata>
</DescribeCacheParameterGroupsResponse>
The following sample code lists up to 10 parameter groups.
https://elasticache.us-west-2.amazonaws.com/
?Action=DescribeCacheParameterGroups
&MaxRecords=10
&SignatureVersion=4
&SignatureMethod=HmacSHA256
&Timestamp=20150202T192317Z
&Version=2015-02-02
&X-Amz-Credential=<credential>
The response from this action will look something like this, listing the name, family, and description for
each parameter group.
API Version 2015-02-02
238

Amazon ElastiCache User Guide
Listing Parameter Groups by Name (ElastiCache API)
<DescribeCacheParameterGroupsResponse xmlns="http://
elasticache.amazonaws.com/doc/2013-06-15/">
<DescribeCacheParameterGroupsResult>
<CacheParameterGroups>
<CacheParameterGroup>
<CacheParameterGroupName>myRedis28</CacheParameterGroupName>
<CacheParameterGroupFamily>redis2.8</CacheParameterGroupFamily>
<Description>My Redis 2.8 parameter group</Description>
</CacheParameterGroup>
<CacheParameterGroup>
<CacheParameterGroupName>myMem14</CacheParameterGroupName>
<CacheParameterGroupFamily>memcached1.4</CacheParameterGroupFamily>
<Description>My Memcached 1.4 parameter group</Description>
</CacheParameterGroup>
</CacheParameterGroups>
</DescribeCacheParameterGroupsResult>
<ResponseMetadata>
<RequestId>3540cc3d-af48-11e0-97f9-279771c4477e</RequestId>
</ResponseMetadata>
</DescribeCacheParameterGroupsResponse>
For more information, see DescribeCacheParameterGroups.
API Version 2015-02-02
239

Amazon ElastiCache User Guide
Listing a Parameter Group's Values
Listing a Parameter Group's Values
You can list the parameters and their values for a parameter group using the ElastiCache console, the
AWS CLI, or the ElastiCache API.
Listing a Parameter Group's Values (Console)
The following procedure shows how to list the parameters and their values for a parameter group using
the ElastiCache console.
To list a parameter group's parameters and their values using the ElastiCache console
1. Sign in to the AWS Management Console and open the ElastiCache console at https://
console.aws.amazon.com/elasticache/.
2. In the left hand navigation pane, click Cache Parameter Groups.
The Parameter Groups screen will appear with a list of all available parameter groups.
3. Select the parameter group for which you want to list the parameters and values by clicking the
box to the left of the parameter group's name.
The parameters and their values will be listed at the bottom of the screen. Due to the number of
parameters, you may have to scroll up and down to find the parameter you're interested in.
Listing a Parameter Group's Values (AWS CLI)
To list a parameter group's parameters and their values using the AWS CLI, use the command
describe-cache-parameters.
The following sample code list all the parameters and their values for the parameter group myRedis28.
For Linux, OS X, or Unix:
aws elasticache describe-cache-parameters \
--cache-parameter-group-name myRedis28
For Windows:
aws elasticache describe-cache-parameters ^
--cache-parameter-group-name myRedis28
The output of this command will look something like this.
CACHEPARAMETER Parameter Name Parameter Value Source Data
Type Is Modifiable Minimum Version
CACHEPARAMETER backlog_queue_limit 1024 system
integer false 1.4.5
CACHEPARAMETER binding_protocol auto system
string false 1.4.5
CACHEPARAMETER cas_disabled 0 system
boolean true 1.4.5
CACHEPARAMETER chunk_size 48 system
integer true 1.4.5
CACHEPARAMETER chunk_size_growth_factor 1.25 system
float true 1.4.5
API Version 2015-02-02
240

Amazon ElastiCache User Guide
Listing a Parameter Group's Values (ElastiCache API)
CACHEPARAMETER error_on_memory_exhausted 0 system
boolean true 1.4.5
CACHEPARAMETER large_memory_pages 0 system
boolean false 1.4.5
(...sample truncated...)
For more information, see describe-cache-parameters.
Listing a Parameter Group's Values (ElastiCache
API)
To list a parameter group's parameters and their values using the ElastiCache API, use the
DescribeCacheParameters action.
The following sample code list all the parameters for the parameter group myRedis28.
https://elasticache.us-west-2.amazonaws.com/
?Action=DescribeCacheParameters
&CacheParameterGroupName=myRedis28
&SignatureVersion=4
&SignatureMethod=HmacSHA256
&Timestamp=20150202T192317Z
&Version=2015-02-02
&X-Amz-Credential=<credential>
The response from this action will look something like this. This response has been truncated.
<DescribeCacheParametersResponse xmlns="http://elasticache.amazonaws.com/
doc/2013-06-15/">
<DescribeCacheParametersResult>
<CacheClusterClassSpecificParameters>
<CacheNodeTypeSpecificParameter>
<DataType>integer</DataType>
<Source>system</Source>
<IsModifiable>false</IsModifiable>
<Description>The maximum configurable amount of memory to use to
store items, in megabytes.</Description>
<CacheNodeTypeSpecificValues>
<CacheNodeTypeSpecificValue>
<Value>1000</Value>
<CacheClusterClass>cache.c1.medium</CacheClusterClass>
</CacheNodeTypeSpecificValue>
<CacheNodeTypeSpecificValue>
<Value>6000</Value>
<CacheClusterClass>cache.c1.xlarge</CacheClusterClass>
</CacheNodeTypeSpecificValue>
<CacheNodeTypeSpecificValue>
<Value>7100</Value>
<CacheClusterClass>cache.m1.large</CacheClusterClass>
</CacheNodeTypeSpecificValue>
<CacheNodeTypeSpecificValue>
<Value>1300</Value>
<CacheClusterClass>cache.m1.small</CacheClusterClass>
</CacheNodeTypeSpecificValue>
...output omitted...
API Version 2015-02-02
241

Amazon ElastiCache User Guide
Listing a Parameter Group's Values (ElastiCache API)
</CacheNodeTypeSpecificValues>
<AllowedValues>1-100000</AllowedValues>
<ParameterName>max_cache_memory</ParameterName>
<MinimumEngineVersion>1.4.5</MinimumEngineVersion>
</CacheNodeTypeSpecificParameter>
<CacheNodeTypeSpecificParameter>
<DataType>integer</DataType>
<Source>system</Source>
<IsModifiable>false</IsModifiable>
<Description>The number of memcached threads to use.</Description>
<CacheNodeTypeSpecificValues>
<CacheNodeTypeSpecificValue>
<Value>2</Value>
<CacheClusterClass>cache.c1.medium</CacheClusterClass>
</CacheNodeTypeSpecificValue>
<CacheNodeTypeSpecificValue>
<Value>8</Value>
<CacheClusterClass>cache.c1.xlarge</CacheClusterClass>
</CacheNodeTypeSpecificValue>
...output omitted...
</CacheNodeTypeSpecificValues>
<AllowedValues>1-8</AllowedValues>
<ParameterName>num_threads</ParameterName>
<MinimumEngineVersion>1.4.5</MinimumEngineVersion>
</CacheNodeTypeSpecificParameter>
</CacheClusterClassSpecificParameters>
<Parameters>
<Parameter>
<ParameterValue>1024</ParameterValue>
<DataType>integer</DataType>
<Source>system</Source>
<IsModifiable>false</IsModifiable>
<Description>The backlog queue limit.</Description>
<AllowedValues>1-10000</AllowedValues>
<ParameterName>backlog_queue_limit</ParameterName>
<MinimumEngineVersion>1.4.5</MinimumEngineVersion>
</Parameter>
<Parameter>
<ParameterValue>auto</ParameterValue>
<DataType>string</DataType>
<Source>system</Source>
<IsModifiable>false</IsModifiable>
<Description>Binding protocol.</Description>
<AllowedValues>auto,binary,ascii</AllowedValues>
<ParameterName>binding_protocol</ParameterName>
<MinimumEngineVersion>1.4.5</MinimumEngineVersion>
</Parameter>
...output omitted...
</Parameters>
</DescribeCacheParametersResult>
<ResponseMetadata>
<RequestId>6d355589-af49-11e0-97f9-279771c4477e</RequestId>
</ResponseMetadata>
</DescribeCacheParametersResponse>
API Version 2015-02-02
242

Amazon ElastiCache User Guide
Modifying a Parameter Group
For more information, see DescribeCacheParameters.
Modifying a Parameter Group
Important
You cannot modify any default parameter group.
You can modify some parameter values in a parameter group. These parameter values are applied
to clusters associated with the parameter group. For more information on when a parameter value
change is applied to a parameter group, see Memcached Specific Parameters (p. 247) and Redis
Specific Parameters (p. 253).
Modifying a Parameter Group (Console)
The following procedure shows how to change a parameter's value using the ElastiCache console.
To change a parameter's value using the ElastiCache console
1. Sign in to the AWS Management Console and open the ElastiCache console at https://
console.aws.amazon.com/elasticache/.
2. In the left hand navigation pane, click Cache Parameter Groups.
The Parameter Groups screen will appear with a list of all available parameter groups.
3. Select the parameter group you want to modify by clicking the box to the left of the parameter
group's name.
The parameter group's parameters will be listed at the bottom of the screen. You may need to
page through the list to see all the parameters.
4. To modify one or more parameters, click Edit Parameters.
The Edit Cache Parameter Group: screen appears.
5. In the Edit Cache Parameter Group: screen, scroll using the left and right arrows until you find a
parameter for which you want to change the value, then type the new value in the Value column
for that parameter.
6. To save your changes, click Save Changes.
To revert to the old values, click Cancel.
To reset all parameters to their default values, click Reset to Defaults.
Modifying a Parameter Group (AWS CLI)
To change a parameter's value using the AWS CLI, use the command modify-cache-parameter-
group.
The following sample code sets the value of reserved-memory to 180MB in the myRedis28
parameter group.
For Linux, OS X, or Unix:
aws elasticache modify-cache-parameter-group \
--cache-parameter-group-name myRedis28 \
--parameter-name-values ParameterName=reserved-memory,ParameterValue=180
API Version 2015-02-02
243

Amazon ElastiCache User Guide
Modifying a Parameter Group (ElastiCache API)
For Windows:
aws elasticache modify-cache-parameter-group ^
--cache-parameter-group-name myRedis28 ^
--parameter-name-values ParameterName=reserved-memory,ParameterValue=180
For more information, see modify-cache-parameter-group.
Modifying a Parameter Group (ElastiCache API)
To change a parameter group's parameter values using the ElastiCache API, use the
ModifyCacheParameterGroup action.
The following sample code sets the value of reserved-memory to 180MB in the parameter group
myRedis28.
https://elasticache.us-west-2.amazonaws.com/
?Action=ModifyCacheParameterGroup
&CacheParameterGroupName=myRedis28
&ParameterNameValues.member.1.ParameterName=reserved-memory
&ParameterNameValues.member.1.ParameterValue=180
&SignatureVersion=4
&SignatureMethod=HmacSHA256
&Timestamp=20150202T192317Z
&Version=2015-02-02
&X-Amz-Credential=<credential>
For more information, see ModifyCacheParameterGroup.
API Version 2015-02-02
244

Amazon ElastiCache User Guide
Deleting a Parameter Group
Deleting a Parameter Group
You can delete a custom parameter group using the ElastiCache console, the AWS CLI, or the
ElastiCache API.
You cannot delete a parameter group if it is associated with any cache clusters. Nor can you delete any
of the default parameter groups.
Deleting a Parameter Group (Console)
The following procedure shows how to delete a parameter group using the ElastiCache console.
To delete a parameter group using the ElastiCache console
1. Sign in to the AWS Management Console and open the ElastiCache console at https://
console.aws.amazon.com/elasticache/.
2. In the left hand navigation pane, click Cache Parameter Groups.
The Parameter Groups screen will appear with a list of all available parameter groups.
3. Select the parameter groups you want to delete by clicking the box to the left of the parameter
group's name.
The Delete button will become active.
4. Click Delete.
The Delete Cache Parameter Groups confirmation screen will appear.
5. To delete the parameter groups, click Delete.
To keep the parameter groups, click Cancel.
Deleting a Parameter Group (AWS CLI)
To delete a parameter group using the AWS CLI, use the command delete-cache-parameter-
group. For the parameter group to delete, the parameter group specified by --cache-parameter-
group-name cannot have any clusters associated with it, nor can it be a default parameter group.
The following sample code deletes the myRedis28 parameter group.
For Linux, OS X, or Unix:
aws elasticache delete-cache-parameter-group \
--cache-parameter-group-name myRedis28
For Windows:
aws elasticache delete-cache-parameter-group ^
--cache-parameter-group-name myRedis28
For more information, see delete-cache-parameter-group.
Deleting a Parameter Group (ElastiCache API)
To delete a parameter group using the ElastiCache API, use the DeleteCacheParameterGroup
action. For the parameter group to delete, the parameter group specified by
API Version 2015-02-02
245

Amazon ElastiCache User Guide
Deleting a Parameter Group (ElastiCache API)
CacheParameterGroupName cannot have any clusters associated with it, nor can it be a default
parameter group.
The following sample code deletes the myRedis28 parameter group.
https://elasticache.us-west-2.amazonaws.com/
?Action=DeleteCacheParameterGroup
&CacheParameterGroupName=myRedis28
&SignatureVersion=4
&SignatureMethod=HmacSHA256
&Timestamp=20150202T192317Z
&Version=2015-02-02
&X-Amz-Credential=<credential>
For more information, see DeleteCacheParameterGroup.
API Version 2015-02-02
246

Amazon ElastiCache User Guide
Memcached Specific Parameters
Memcached Specific Parameters
If you do not specify a parameter group for your Memcached cluster, then a default parameter group
(default.memcached1.4) will be used. You cannot change the values of any parameters in a default
parameter group; however, you can create a custom parameter group and assign it to your cluster at
any time.
Topics
•Memcached 1.4.24 Added Parameters (p. 247)
•Memcached 1.4.14 Added Parameters (p. 248)
•Memcached 1.4.5 Supported Parameters (p. 249)
•Memcached Connection Overhead (p. 251)
•Memcached Node-Type Specific Parameters (p. 252)
Memcached 1.4.24 Added Parameters
For Memcached 1.4.24, the following additional parameters are supported.
Name Details Description
disable_flush_all Default: 0 (disabled)
Type: boolean
Modifiable: Yes
Changes Take Effect: At
launch
Add parameter (-F) to disable
flush_all. Useful if you never want to
be able to run a full cache flush on
production instances.
Values: 0, 1 (user can do a
flush_all when the value is 0).
hash_algorithm Default: jenkins
Type: string
Modifiable: Yes
Changes Take Effect: At
launch
The hash algorithm to be used.
Permitted values: murmur3 and
jenkins.
lru_crawler Default: 0 (disabled)
Type: boolean
Modifiable: Yes
Changes Take Effect: After restart
Note
You can
temporarily
enable
lru_crawler
at runtime
from the
command
line. For more
information,
see the
Cleans slab classes of items that
have expired. This is a low impact
process that runs in the background.
Currently requires initiating a crawl
using a manual command.
To temporarily enable, run
lru_crawler enable at the
command line.
lru_crawler 1,3,5 crawls slab
classes 1, 3, and 5 looking for
expired items to add to the freelist.
Values: 0,1
Note
Enabling lru_crawler at
the command line enables
API Version 2015-02-02
247

Amazon ElastiCache User Guide
Memcached 1.4.14 Added Parameters
Name Details Description
Description
column. the crawler until either
disabled at the command
line or the next reboot. To
enable permanently, you
must modify the parameter
value. For more information,
see Modifying a Parameter
Group (p. 243).
lru_maintainer Default: 0 (disabled)
Type: boolean
Modifiable: Yes
Changes Take Effect: At
launch
A background thread that shuffles
items between the LRU's as
capacities are reached. Values: 0, 1.
expirezero_does_not_evict Default: 0 (disabled)
Type: boolean
Modifiable: Yes
Changes Take Effect: At
launch
When used with lru_maintainer,
makes items with an expiration time
of 0 unevictable.
Warning
This can crowd out memory
available for other evictable
items.
Can be set to disregard
lru_maintainer.
Memcached 1.4.14 Added Parameters
For Memcached 1.4.14, the following additional parameters are supported.
Parameters added in Memcached 1.4.14
Name DetailsDescription
config_max Default:
16
Type:
integer
Modifiable:
No
The maximum number of ElastiCache configuration entries.
config_size_max Default:
65536
Type:
integer
Modifiable:
No
The maximum size of the configuration entries, in bytes.
API Version 2015-02-02
248

Amazon ElastiCache User Guide
Memcached 1.4.5 Supported Parameters
Name DetailsDescription
hashpower_init Default:
16
Type:
integer
Modifiable:
No
The initial size of the ElastiCache hash table, expressed as a power of two.
The default is 16 (2^16), or 65536 keys.
maxconns_fast Default:
0 (false)
Type:
Boolean
Modifiable:
Yes
Changes Take Effect: After restart
Changes the way in which new connections requests are handled when
the maximum connection limit is reached. If this parameter is set to 0
(zero), new connections are added to the backlog queue and will wait until
other connections are closed. If the parameter is set to 1, ElastiCache
sends an error to the client and immediately closes the connection.
slab_automove Default:
0
Type:
integer
Modifiable:
Yes
Changes Take Effect: After restart
Adjusts the slab automove algorithm: If this parameter is set to 0 (zero),
the automove algorithm is disabled. If it is set to 1, ElastiCache takes a
slow, conservative approach to automatically moving slabs. If it is set to 2,
ElastiCache aggressively moves slabs whenever there is a cache eviction.
(This mode is not recommended except for testing purposes.)
slab_reassign Default:
0 (false)
Type:
Boolean
Modifiable:
Yes
Changes Take Effect: After restart
Enable or disable slab reassignment. If this parameter is set to 1, you can
use the "slabs reassign" command to manually reassign memory.
Memcached 1.4.5 Supported Parameters
For Memcached 1.4.5, the following parameters are supported.
Parameters added in Memcached 1.4.5
Name Details Description
backlog_queue_limitDefault: 1024
Type: integer
Modifiable: No
The backlog queue limit.
binding_protocolDefault: auto The binding protocol.
API Version 2015-02-02
249

Amazon ElastiCache User Guide
Memcached 1.4.5 Supported Parameters
Name Details Description
Type: string
Modifiable: No
cas_disabled Default: 0 (false)
Type: Boolean
Modifiable: Yes
Changes Take Effect: After restart
If 1 (true), check and set (CAS) operations will be
disabled, and items stored will consume 8 fewer
bytes than with CAS enabled.
chunk_size Default: 48
Type: integer
Modifiable: Yes
Changes Take Effect: After restart
The minimum amount, in bytes, of space to
allocate for the smallest item's key, value, and
flags.
chunk_size_growth_factorDefault: 1.25
Type: float
Modifiable: Yes
Changes Take Effect: After restart
The growth factor that controls the size of each
successive Memcached chunk; each chunk will be
chunk_size_growth_factor times larger than
the previous chunk.
error_on_memory_exhaustedDefault: 0 (false)
Type: Boolean
Modifiable: Yes
Changes Take Effect: After restart
If 1 (true), when there is no more memory to store
items, memcached will return an error rather than
evicting items.
large_memory_pagesDefault: 0 (false)
Type: Boolean
Modifiable: No
If 1 (true), ElastiCache will try to use large
memory pages.
lock_down_paged_memoryDefault: 0 (false)
Type: Boolean
Modifiable: No
If 1 (true), ElastiCache will lock down all paged
memory.
max_item_sizeDefault: 1048576
Type: integer
Modifiable: Yes
Changes Take Effect: After restart
The size, in bytes, of the largest item that can be
stored in the cache.
max_simultaneous_connectionsDefault: 65000
Type: integer
Modifiable: No
The maximum number of simultaneous
connections.
API Version 2015-02-02
250

Amazon ElastiCache User Guide
Memcached Connection Overhead
Name Details Description
maximize_core_file_limitDefault: 0 (false)
Type: Boolean
Modifiable:
Changes Take Effect: No
If 1 (true), ElastiCache will maximize the core file
limit.
memcached_connections_overheadDefault: 100
Type: integer
Modifiable: Yes
Changes Take Effect: After restart
The amount of memory to be reserved for
Memcached connections and other miscellaneous
overhead. For information about this parameter,
see Memcached Connection Overhead (p. 251).
requests_per_eventDefault: 20
Type: integer
Modifiable: No
The maximum number of requests per event for a
given connection. This limit is required to prevent
resource starvation.
Memcached Connection Overhead
On each cache node, the memory made available for storing cache items is the total available memory
on that node (which is stored in the max_cache_memory parameter) minus the memory used for
connections and other overhead (which is stored in the memcached_connections_overhead
parameter). For example, a node of type cache.m1.small has a max_cache_memory of 1300MB.
With the default memcached_connections_overhead value of 100MB, the Memcached process will
have 1200MB available to store cache items.
The default values for the memcached_connections_overhead parameter satisfy most use cases;
however, the required amount of allocation for connection overhead can vary depending on multiple
factors, including request rate, payload size, and the number of connections.
You can change the value of the memcached_connections_overhead to better suit the needs of
your application. For example, increasing the value of the memcached_connections_overhead
parameter will reduce the amount of memory available for storing cache items and provide a larger
buffer for connection overhead. Decreasing the value of the memcached_connections_overhead
parameter will give you more memory to store cache items, but can increase your risk of swap usage
and degraded performance. If you observe swap usage and degraded performance, try increasing the
value of the memcached_connections_overhead parameter.
Important
For the cache.t1.micro node type, the value for memcached_connections_overhead is
determined as follows:
• If you cluster is using the default parameter group, ElastiCache will set the value for
memcached_connections_overhead to 13MB.
• If your cluster is using a parameter group that you have created yourself, you can set the
value of memcached_connections_overhead to a value of your choice.
API Version 2015-02-02
251

Amazon ElastiCache User Guide
Memcached Node-Type Specific Parameters
Memcached Node-Type Specific Parameters
Although most parameters have a single value, some parameters have different values depending on
the node type used. The following table shows the default values for the max_cache_memory and
num_threads parameters for each node type. The values on these parameters cannot be modified.
Node Type-Specific Parameters
Node Type max_cache_memory (MiB) num-threads
cache.t1.micro 213 1
cache.t2.micro 555 1
cache.t2.small 1588 1
cache.t2.medium 3301 2
cache.m1.small 1300 1
cache.m1.medium 3350 1
cache.m1.large 7100 2
cache.m1.xlarge 14600 4
cache.m2.xlarge 16700 2
cache.m2.2xlarge 33800 4
cache.m2.4xlarge 68000 8
cache.m3.medium 2850 1
cache.m3.large 6200 2
cache.m3.xlarge 13600 4
cache.m3.2xlarge 28600 8
cache.m4.large 6573 2
cache.m4.xlarge 14618 4
cache.m4.2xlarge 30412 8
cache.m4.4xlarge 62234 16
cache.m4.10xlarge 158355 40
cache.c1.xlarge 6600 8
cache.r3.large 13800 2
cache.r3.xlarge 29100 4
cache.r3.2xlarge 59600 8
cache.r3.4xlarge 120600 16
cache.r3.8xlarge 242600 32
API Version 2015-02-02
252

Amazon ElastiCache User Guide
Redis Specific Parameters
Redis Specific Parameters
If you do not specify a parameter group for your Redis cluster, then a default parameter group will be
used (either default.redis2.6 or default.redis2.8). You cannot change the values of any
parameters in the default parameter group; however, you can create a custom parameter group and
assign it to your cluster at any time as long as the values of conditionally modifiable parameters are the
same in both parameter groups.
Topics
•Redis 2.8.24 Added Parameters (p. 253)
•Redis 2.8.23 Added Parameters (p. 253)
•Redis 2.8.22 Added Parameters (p. 255)
•Redis 2.8.21 Added Parameters (p. 255)
•Redis 2.8.19 Added Parameters (p. 256)
•Redis 2.8.6 Added Parameters (p. 256)
•Redis 2.6.13 Parameters (p. 258)
•Redis Node-Type Specific Parameters (p. 263)
Note
Because the newer Redis versions provide a better and more stable user experience,
Redis versions 2.6.13, 2.8.6, and 2.8.19 are deprecated from the ElastiCache Management
Console. While we recommend against it, if you must use one of these older Redis versions,
you can use the AWS CLI or ElastiCache API.
For more information see the following topics:
AWS CLI ElastiCache API
Create Cache Cluster Creating a Cache Cluster
(AWS CLI) (p. 120) Creating a Cache Cluster
(ElastiCache API) (p. 120)
Modify Cache Cluster Modifying a Cache Cluster
(AWS CLI) (p. 125) Modifying a Cache Cluster
(ElastiCache API) (p. 125)
Create Replication Group Creating a Replication
Group Without an Available
Redis Cache Cluster (AWS
CLI) (p. 180)
Creating a Replication Group
Without an Available Redis
Cache Cluster (ElastiCache
API) (p. 182)
Modify Replication Group Modifying a Replication
Group (AWS CLI) (p. 190) Modifying a Replication
Group (ElastiCache
API) (p. 190)
Redis 2.8.24 Added Parameters
For Redis 2.8.24, there are no additional parameters supported.
Redis 2.8.23 Added Parameters
For Redis 2.8.23, the following additional parameter is supported.
API Version 2015-02-02
253
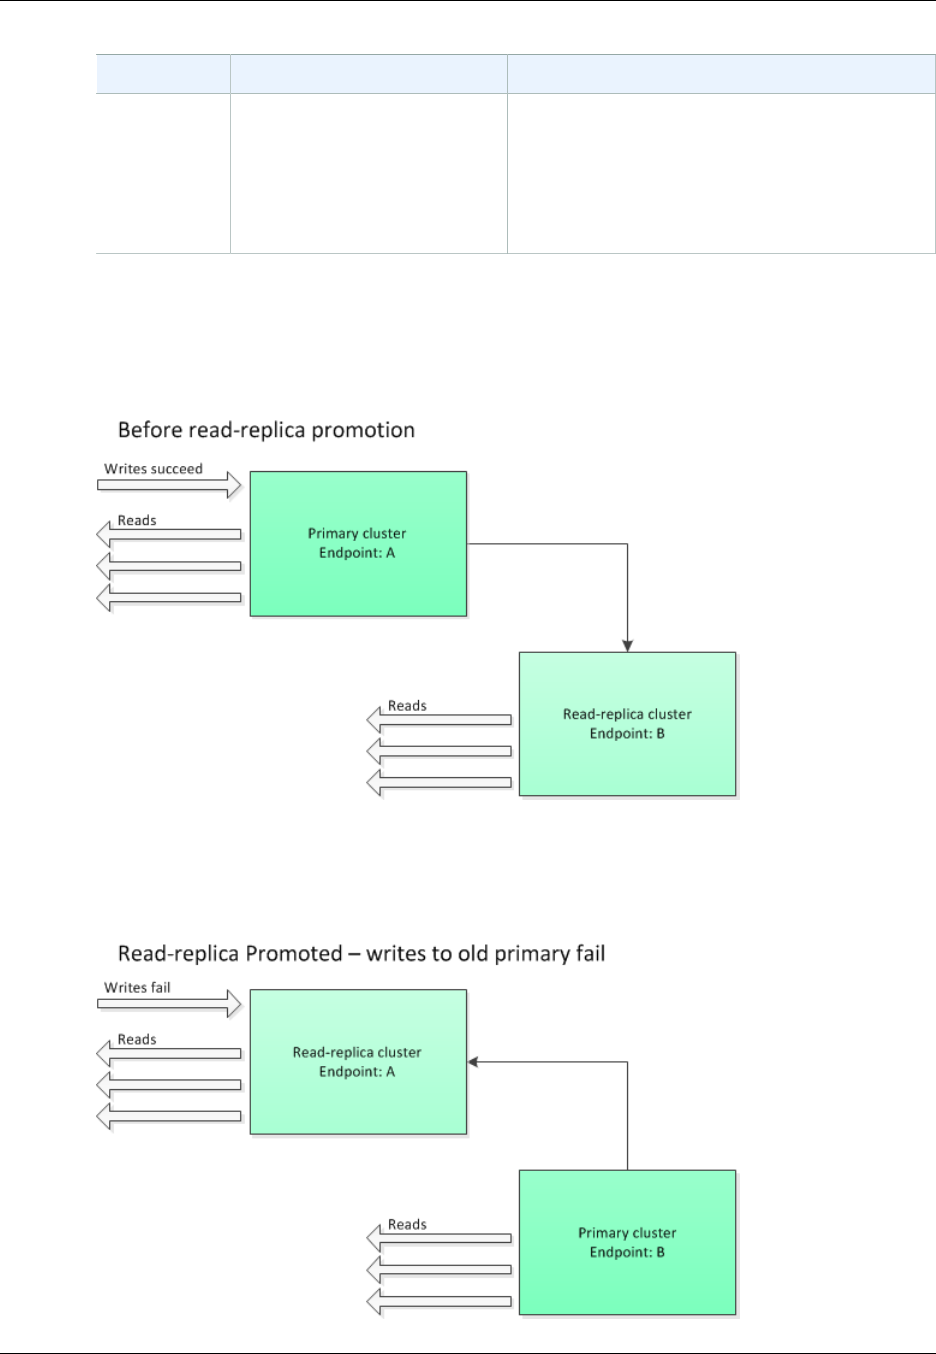
Amazon ElastiCache User Guide
Redis 2.8.23 Added Parameters
Name Details Description
close-
on-slave-
write
Default: yes
Type: string (yes/no)
Modifiable: Yes
Changes Take Effect: Immediately
If enabled, clients who attempt to write to a read-
only replica will be disconnected.
close-on-slave-write
The close-on-slave-write parameter is introduced by ElastiCache to give you more control
over how your cache responds when a primary cluster and a read replica cluster swap roles due to
promoting a read replica to primary.
If the read-replica cluster is promoted to primary for any reason other than a Multi-AZ enabled
replication group failing over, the client will continue trying to write to endpoint A. Because endpoint
A is now the endpoint for a read-replica, these writes will fail. This is the behavior for Redis prior to
ElastiCache introducing close-on-slave-write and the behavior if you disable close-on-slave-
write.
API Version 2015-02-02
254
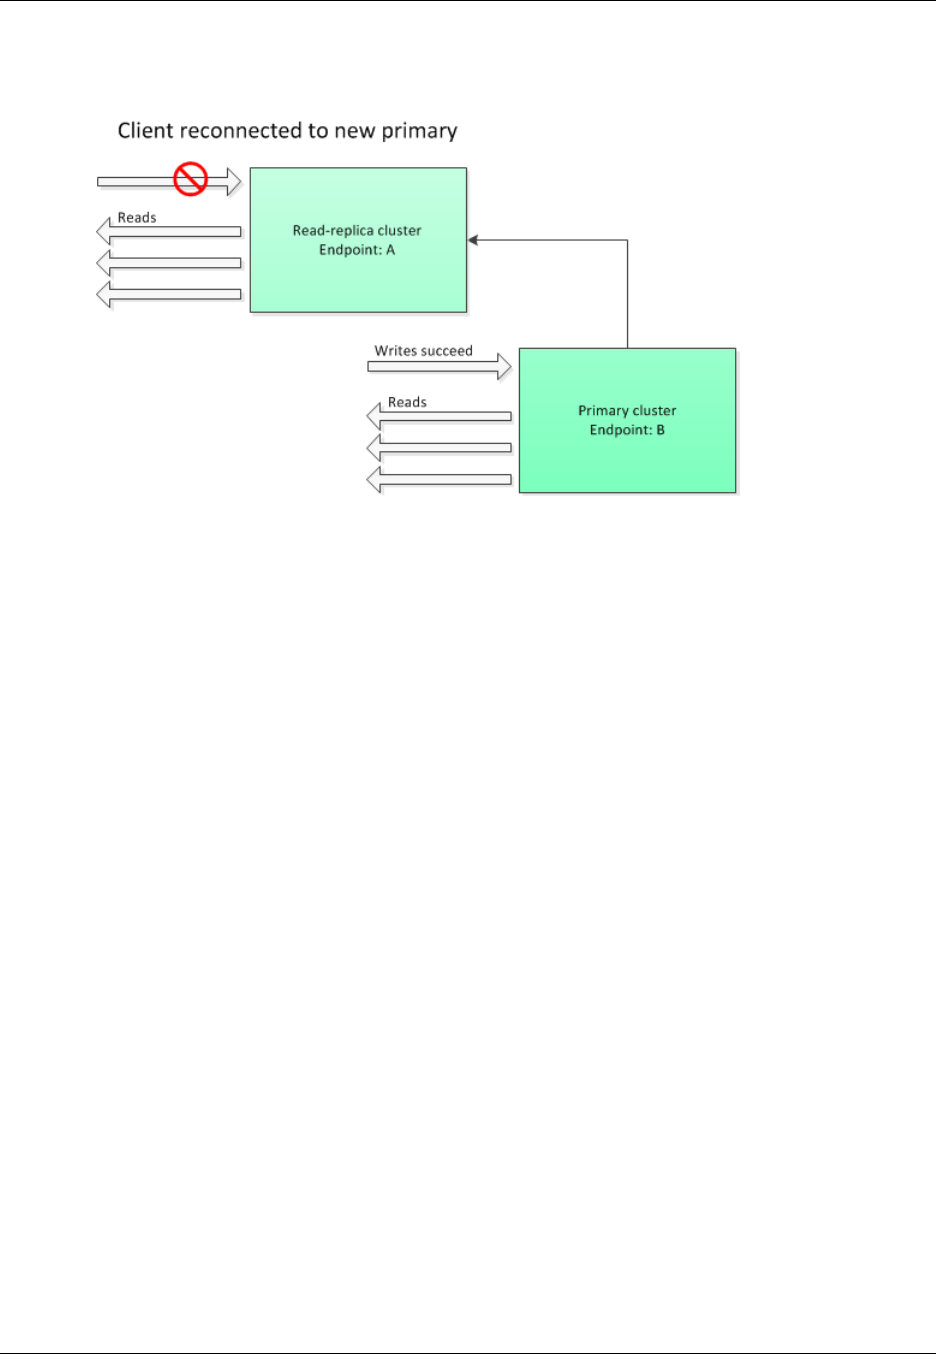
Amazon ElastiCache User Guide
Redis 2.8.22 Added Parameters
With close-on-slave-write enabled, any time a client attempts to write to a read-replica, the client
connection to the cluster is closed. Your application logic should detect the disconnection, check the
DNS table, and reconnect to the primary endpoint, which now would be endpoint B.
Why disable close-on-slave-write?
If disabling close-on-slave-write results in writes to the cluster failing, why would you want to
disable close-on-slave-write?
As previously mentioned, with close-on-slave-write enabled, any time a client attempts to write
to a read-replica the client connection to the cluster is closed. Since establishing a new connection
to the node takes time, disconnecting and reconnecting as a result of a write request to the replica
would also impact the latency of read requests that were served through the same connection, until a
new connection is established. Therefore, if your application is especially read-heavy or very latency-
sensitive, you my prefer to keep your clients connected so as to not degrade read performance.
Redis 2.8.22 Added Parameters
For Redis 2.8.22, there are no additional parameters supported.
Important
• Beginning with Redis version 2.8.22, repl-backlog-size applies to the primary cluster
as well as to replica clusters.
• Beginning with Redis version 2.8.22, the repl-timeout parameter is not supported. If it is
changed, ElastiCache will overwrite with the default (60s), as we do with appendonly.
The following parameters are no longer supported.
•appendonly
•appendfsync
•repl-timeout
Redis 2.8.21 Added Parameters
For Redis 2.8.21, there are no additional parameters supported.
API Version 2015-02-02
255

Amazon ElastiCache User Guide
Redis 2.8.19 Added Parameters
Redis 2.8.19 Added Parameters
For Redis 2.8.19, there are no additional parameters supported.
Redis 2.8.6 Added Parameters
For Redis 2.8.6, the following additional parameters are supported.
Name Details Description
min-slaves-max-lag Default: 10
Type: integer
Modifiable: Yes
Changes Take Effect: Immediately
The number of seconds within which
the primary node must receive a
ping request from a read replica.
If this amount of time passes and
the primary does not receive a
ping, then the replica is no longer
considered available. If the number
of available replicas drops below
min-slaves-to-write, then the primary
will stop accepting writes at that
point.
If either this parameter or min-
slaves-to-write is 0, then the primary
node will always accept writes
requests, even if no replicas are
available.
min-slaves-to-write Default: 0
Type: integer
Modifiable: Yes
Changes Take Effect: Immediately
The minimum number of read
replicas which must be available in
order for the primary node to accept
writes from clients. If the number of
available replicas falls below this
number, then the primary node will
no longer accept write requests.
If either this parameter or min-
slaves-max-lag is 0, then the primary
node will always accept writes
requests, even if no replicas are
available.
notify-keyspace-events Default: (an empty
string)
Type: string
Modifiable: Yes
Changes Take Effect: Immediately
The types of keyspace events that
Redis can notify clients of. Each
event type is represented by a single
letter:
•K — Keyspace events,
published with a prefix of
__keyspace@<db>__
•E — Key-event events,
published with a prefix of
__keyevent@<db>__
•g — Generic, non-specific
commands such as DEL, EXPIRE,
RENAME, etc.
API Version 2015-02-02
256

Amazon ElastiCache User Guide
Redis 2.8.6 Added Parameters
Name Details Description
•$ — String commands
•l — List commands
•s — Set commands
•h — Hash commands
•z — Sorted set commands
•x — Expired events (events
generated every time a key
expires)
•e — Evicted events (events
generated when a key is evicted
for maxmemory)
•A — An alias for g$lshzxe
You can have any combination of
these event types. For example,
AKE means that Redis can publish
notifications of all event types.
Do not use any characters other
than those listed above; attempts to
do so will result in error messages.
By default, this parameter is set
to an empty string, meaning that
keyspace event notification is
disabled.
repl-backlog-size Default: 1048576
Type: integer
Modifiable: Yes
Changes Take Effect: Immediately
The size, in bytes, of the primary
node backlog buffer. The backlog is
used for recording updates to data
at the primary node. When a read
replica connects to the primary, it
attempts to perform a partial sync
(psync), where it applies data from
the backlog to catch up with the
primary node. If the psync fails, then
a full sync is required.
The minimum value for this
parameter is 16384.
Note
Beginning with Redis
2.8.22, this parameter
applies to the primary
cluster as well as the read
replicas.
API Version 2015-02-02
257

Amazon ElastiCache User Guide
Redis 2.6.13 Parameters
Name Details Description
repl-backlog-ttl Default: 3600
Type: integer
Modifiable: Yes
Changes Take Effect: Immediately
The number of seconds that the
primary node will retain the backlog
buffer. Starting from the time the
last replica node disconnected, the
data in the backlog will remain intact
until repl-backlog-ttl expires.
If the replica has not connected to
the primary within this time, then
the primary will release the backlog
buffer. When the replica eventually
reconnects, it will have to perform a
full sync with the primary.
If this parameter is set to 0, then
the backlog buffer will never be
released.
repl-timeout Default: 60
Type: integer
Modifiable: Yes
Changes Take Effect: Immediately
Represents the timeout period, in
seconds, for:
• Bulk data transfer during
synchronization, from the read
replica's perspective
• Primary node timeout from the
replica's perspective
• Replica timeout from the primary
node's perspective
Redis 2.6.13 Parameters
Redis 2.6.13 was the first version of Redis supported by ElastiCache. The following table shows the
Redis 2.6.13 parameters that ElastiCache supports.
Name Details Description
activerehashingDefault: yes
Type: string (yes/no)
Modifiable: At Creation
Determines whether to enable Redis' active
rehashing feature. The main hash table is
rehashed ten times per second; each rehash
operation consumes 1 millisecond of CPU time.
This value is set when you create the parameter
group. When assigning a new parameter group to
a cluster, this value must be the same in both the
old and new parameter groups.
appendonly Default: no
Type: string
Modifiable: Yes
Changes Take Effect: Immediately
Enables or disables Redis' append only file
feature (AOF). AOF captures any Redis
commands that change data in the cache, and is
used to recover from certain node failures.
The default value is no, meaning AOF is turned
off. Set this parameter to yes to enable AOF.
API Version 2015-02-02
258

Amazon ElastiCache User Guide
Redis 2.6.13 Parameters
Name Details Description
For more information, see Mitigating
Failures (p. 51).
Note
Append Only Files (AOF) is not
supported for cache.t1.micro and
cache.t2.* nodes. For nodes of this type,
the appendonly parameter value is
ignored.
Note
For Multi-AZ replication groups, AOF is
not allowed.
appendfsync Default: everysec
Type: string
Modifiable: Yes
Changes Take Effect: Immediately
Controls how often the AOF output buffer is
written to disk:
•no — the buffer is flushed to disk on an as-
needed basis.
•everysec — the buffer is flushed once per
second. This is the default.
•always — the buffer is flushed every time that
data in the cache is modified.
client-
output-
buffer-
limit-
normal-
hard-limit
Default: 0
Type: integer
Modifiable: Yes
Changes Take Effect: Immediately
If a client's output buffer reaches the specified
number of bytes, the client will be disconnected.
The default is zero (no hard limit).
client-
output-
buffer-
limit-
normal-
soft-limit
Default: 0
Type: integer
Modifiable: Yes
Changes Take Effect: Immediately
If a client's output buffer reaches the specified
number of bytes, the client will be disconnected,
but only if this condition persists for client-
output-buffer-limit-normal-soft-
seconds. The default is zero (no soft limit).
client-
output-
buffer-
limit-
normal-
soft-
seconds
Default: 0
Type: integer
Modifiable: Yes
Changes Take Effect: Immediately
If a client's output buffer remains at client-
output-buffer-limit-normal-soft-limit
bytes for longer than this number of seconds, the
client will be disconnected. The default is zero (no
time limit).
client-
output-
buffer-
limit-
pubsub-
hard-limit
Default: 33554432
Type: integer
Modifiable: Yes
Changes Take Effect: Immediately
For Redis publish/subscribe clients: If a client's
output buffer reaches the specified number of
bytes, the client will be disconnected.
API Version 2015-02-02
259

Amazon ElastiCache User Guide
Redis 2.6.13 Parameters
Name Details Description
client-
output-
buffer-
limit-
pubsub-
soft-limit
Default: 8388608
Type: integer
Modifiable: Yes
Changes Take Effect: Immediately
For Redis publish/subscribe clients: If a client's
output buffer reaches the specified number of
bytes, the client will be disconnected, but only
if this condition persists for client-output-
buffer-limit-pubsub-soft-seconds.
client-
output-
buffer-
limit-
pubsub-
soft-
seconds
Default: 60
Type: integer
Modifiable: Yes
Changes Take Effect: Immediately
For Redis publish/subscribe clients: If a client's
output buffer remains at client-output-
buffer-limit-pubsub-soft-limit bytes for
longer than this number of seconds, the client will
be disconnected.
client-
output-
buffer-
limit-
slave-
hard-limit
Default: For values see
Redis Node-Type Specific
Parameters (p. 263)
Type: integer
Modifiable: No
For Redis read replicas: If a client's output buffer
reaches the specified number of bytes, the client
will be disconnected.
client-
output-
buffer-
limit-
slave-
soft-limit
Default: For values see
Redis Node-Type Specific
Parameters (p. 263)
Type: integer
Modifiable: No
For Redis read replicas: If a client's output buffer
reaches the specified number of bytes, the client
will be disconnected, but only if this condition
persists for client-output-buffer-limit-
slave-soft-seconds.
client-
output-
buffer-
limit-
slave-
soft-
seconds
Default: 60
Type: integer
Modifiable: No
For Redis read replicas: If a client's output
buffer remains at client-output-buffer-
limit-slave-soft-limit bytes for longer
than this number of seconds, the client will be
disconnected.
databases Default: 16
Type: integer
Modifiable: At Creation
The number of logical partitions the databases is
split into. We recommend keeping this value low.
This value is set when you create the parameter
group. When assigning a new parameter group to
a cluster, this value must be the same in both the
old and new parameter groups.
hash-max-
ziplist-
entries
Default: 512
Type: integer
Modifiable: Yes
Changes Take Effect: Immediately
Determines the amount of memory used for
hashes. Hashes with fewer than the specified
number of entries are stored using a special
encoding that saves space.
API Version 2015-02-02
260

Amazon ElastiCache User Guide
Redis 2.6.13 Parameters
Name Details Description
hash-max-
ziplist-
value
Default: 64
Type: integer
Modifiable: Yes
Changes Take Effect: Immediately
Determines the amount of memory used for
hashes. Hashes with entries that are smaller than
the specified number of bytes are stored using a
special encoding that saves space.
list-max-
ziplist-
entries
Default: 512
Type: integer
Modifiable: Yes
Changes Take Effect: Immediately
Determines the amount of memory used for lists.
Lists with fewer than the specified number of
entries are stored using a special encoding that
saves space.
list-max-
ziplist-
value
Default: 64
Type: integer
Modifiable: Yes
Changes Take Effect: Immediately
Determines the amount of memory used for
lists. Lists with entries that are smaller than the
specified number of bytes are stored using a
special encoding that saves space.
lua-time-
limit
Default: 5000
Type: integer
Modifiable: No
The maximum execution time for a Lua script, in
milliseconds, before ElastiCache takes action to
stop the script.
If lua-time-limit is exceeded, all Redis
commands will return an error of the form
____-BUSY. Since this state can cause
interference with many essential Redis operations,
ElastiCache will first issue a SCRIPT KILL
command. If this is unsuccessful, ElastiCache will
forcibly restart Redis.
maxclients Default: 65000
Type: integer
Modifiable: No
The maximum number of clients that can be
connected at one time.
maxmemory-
policy
Default: volatile-lru
Type: string
Modifiable: Yes
Changes Take Effect: Immediately
The eviction policy for keys when maximum
memory usage is reached.
Valid values are: volatile-lru | allkeys-
lru | volatile-random | allkeys-random
| volatile-ttl | noeviction
For more information, see What eviction policies
do you support? at RedisLabs.
maxmemory-
samples
Default: 3
Type: integer
Modifiable: Yes
Changes Take Effect: Immediately
For least-recently-used (LRU) and time-to-live
(TTL) calculations, this parameter represents the
sample size of keys to check. By default, Redis
chooses 3 keys and uses the one that was used
least recently.
API Version 2015-02-02
261

Amazon ElastiCache User Guide
Redis 2.6.13 Parameters
Name Details Description
reserved-
memory
Default: 0
Type: integer
Modifiable: Yes
Changes Take Effect: Immediately
The total memory reserved for non-cache usage.
By default, the Redis cache will grow until it
consumes the node's maxmemory (see Redis
Node-Type Specific Parameters (p. 263)). If this
occurs, then node performance will likely suffer
due to excessive memory paging. By reserving
memory you can set aside some of the available
memory for non-Redis purposes to help reduce
the amount of paging.
For example, suppose you have a cache.m1.small
node, with a maxmemory of 900MB bytes. If you
set aside 180 MB, then Redis will never consume
this memory; instead, this 180 MB is reserved
for the operating system and other background
processes on the cache node.
Consider increasing the value of the reserved-
memory parameter if you are using read replicas,
append-only files (AOF), or other Redis features
that consume more memory.
This parameter is specific to ElastiCache, and is
not part of the standard Redis distribution.
For more information, see Ensuring You
Have Sufficient Memory to Create a Redis
Snapshot (p. 49).
set-max-
intset-
entries
Default: 512
Type: integer
Modifiable: Yes
Changes Take Effect: Immediately
Determines the amount of memory used for
certain kinds of sets (strings that are integers in
radix 10 in the range of 64 bit signed integers).
Such sets with fewer than the specified number of
entries are stored using a special encoding that
saves space.
slave-
allow-
chaining
Default: no
Type: string
Modifiable: No
Determines whether a read replica in Redis can
have read replicas of its own.
slowlog-
log-
slower-
than
Default: 10000
Type: integer
Modifiable: Yes
Changes Take Effect: Immediately
The maximum execution time, in microseconds,
for commands to be logged by the Redis Slow Log
feature.
slowlog-
max-len
Default: 128
Type: integer
Modifiable: Yes
Changes Take Effect: Immediately
The maximum length of the Redis Slow Log.
API Version 2015-02-02
262

Amazon ElastiCache User Guide
Redis Node-Type Specific Parameters
Name Details Description
tcp-
keepalive
Default: 0
Type: integer
Modifiable: Yes
Changes Take Effect: Immediately
If this is set to a nonzero value (N), node clients
are polled every N seconds to ensure that they
are still connected. With the default setting of 0,
no such polling occurs.
timeout Default: 0
Type: integer
Modifiable: Yes
Changes Take Effect: Immediately
If this is set to a nonzero value (N), the node
closes a connection if the client is idle for N
seconds. With the default setting of 0, the node
does not disconnect idle clients.
zset-max-
ziplist-
entries
Default: 128
Type: integer
Modifiable: Yes
Changes Take Effect: Immediately
Determines the amount of memory used for sorted
sets. Sorted sets with fewer than the specified
number of elements are stored using a special
encoding that saves space.
zset-max-
ziplist-
value
Default: 64
Type: integer
Modifiable: Yes
Changes Take Effect: Immediately
Determines the amount of memory used for sorted
sets. Sorted sets with entries that are smaller than
the specified number of bytes are stored using a
special encoding that saves space.
Note
If you do not specify a parameter group for your Redis 2.6.13 cluster, then a default parameter
group (default.redis2.6) will be used. You cannot change the values of any parameters
in the default parameter group; however, you can always create a custom parameter group
and assign it to your cluster at any time.
Redis Node-Type Specific Parameters
Although most parameters have a single value, some parameters have different values depending
on the node type used. The following table shows the default values for the maxmemory, client-
output-buffer-limit-slave-hard-limit, and client-output-buffer-limit-slave-
soft-limit parameters for each node type. The value of maxmemory is the maximum number of
bytes available to you for use, data and other uses, on the node.
Note
The maxmemory parameter cannot be modified.
Node Type maxmemory client-output-
buffer-limit-slave-
hard-limit
client-output-buffer-
limit-slave-soft-limit
cache.t1.micro 142606336 14260633 14260633
cache.t2.micro 581959680 58195968 58195968
API Version 2015-02-02
263

Amazon ElastiCache User Guide
Redis Node-Type Specific Parameters
Node Type maxmemory client-output-
buffer-limit-slave-
hard-limit
client-output-buffer-
limit-slave-soft-limit
cache.t2.small 1665138688 166513868 166513868
cache.t2.medium 3461349376 346134937 346134937
cache.m1.small 943718400 943718400 943718400
cache.m1.medium 3093299200 309329920 309329920
cache.m1.large 7025459200 702545920 702545920
cache.m1.xlarge 14889779200 1488977920 1488977920
cache.m2.xlarge 17091788800 1709178880 1709178880
cache.m2.2xlarge 35022438400 3502243840 3502243840
cache.m2.4xlarge 70883737600 7088373760 7088373760
cache.m3.medium 2988441600 309329920 309329920
cache.m3.large 6501171200 650117120 650117120
cache.m3.xlarge 14260633600 1426063360 1426063360
cache.m3.2xlarge 29989273600 2998927360 2998927360
cache.m4.large 6892593152 689259315 689259315
cache.m4.xlarge 15328501760 1532850176 1532850176
cache.m4.2xlarge 31889126359 3188912636 3188912636
cache.m4.4xlarge 65257290629 6525729063 6525729063
cache.m4.10xlarge 166047614239 16604761424 16604761424
cache.c1.xlarge 6501171200 650117120 650117120
cache.r3.large 14470348800 1468006400 1468006400
cache.r3.xlarge 30513561600 3040870400 3040870400
cache.r3.2xlarge 62495129600 6081740800 6081740800
cache.r3.4xlarge 126458265600 12268339200 12268339200
cache.r3.8xlarge 254384537600 24536678400 24536678400
Note
t2 instances do not support Redis backup/restore.
t1 and t2 instances do not support Redis AOF or Multi-AZ.
API Version 2015-02-02
264

Amazon ElastiCache User Guide
Subnets and Subnet Groups
A subnet group is a collection of subnets (typically private) that you can designate for your clusters
running in an Amazon Virtual Private Cloud (VPC) environment.
If you create a cluster in an Amazon VPC, you must specify a cache subnet group. ElastiCache uses
that cache subnet group to select a subnet and IP addresses within that subnet to associate with your
cache nodes.
This section covers how to create and leverage subnets and subnet groups to manage access to your
ElastiCache resources.
For more information about cache subnet group usage in an Amazon VPC environment, see Step 4:
Authorize Access (p. 19).
Topics
•Creating a Cache Subnet Group (p. 266)
•Assigning a Cache Subnet Group to a Cache Cluster (p. 269)
•Modifying a Cache Subnet Group (p. 269)
•Deleting a Subnet Group (p. 271)
API Version 2015-02-02
265

Amazon ElastiCache User Guide
Creating a Cache Subnet Group
Creating a Cache Subnet Group
When you create a new cache subnet group, note the number of available IP addresses. If the subnet
has very few free IP addresses, you might be constrained as to how many more cache nodes you can
add to the cache cluster. To resolve this issue, you can assign one or more subnets to a cache subnet
group so that you have a sufficient number of IP addresses in your cluster's Availability Zone. After
that, you can add more cache nodes to your cluster.
The following procedures show you how to create a cache subnet group called mycachesubnetgroup
(console), the AWS CLI, and the ElastiCache API.
Creating a Cache Subnet Group (Console)
The following procedure shows how to create a cache subnet group (console).
To create a cache subnet group (Console)
1. Sign in to the AWS Management Console, and open the ElastiCache console at https://
console.aws.amazon.com/elasticache/.
2. In the navigation list, choose Cache Subnet Groups.
3. Choose Create Cache Subnet Group.
4. In the Create Cache Subnet Group wizard, do the following. When all the settings are as you
want them, choose Yes, Create.
a. In the Name box, type a name for your cache subnet group.
b. In the Description box, type a description for your cache subnet group.
c. In the VPC ID box, choose the Amazon VPC that you created.
d. In the Availability Zone and Subnet ID lists, choose the Availability Zone and ID of your
private subnet, and then choose Add.
API Version 2015-02-02
266

Amazon ElastiCache User Guide
Creating a Cache Subnet Group (AWS CLI)
5. In the confirmation message that appears, choose Close.
Your new cache subnet group appears in the Cache Subnet Groups list of the ElastiCache console.
At the bottom of the window you can choose the subnet group to see details, such as all of the subnets
associated with this group.
Creating a Cache Subnet Group (AWS CLI)
At a command prompt, use the command create-cache-subnet-group to create a cache subnet
group.
For Linux, OS X, or Unix:
aws elasticache create-cache-subnet-group \
--cache-subnet-group-name mycachesubnetgroup \
--cache-subnet-group-description "Testing" \
--subnet-ids subnet-53df9c3a
For Windows:
aws elasticache create-cache-subnet-group ^
--cache-subnet-group-name mycachesubnetgroup ^
--cache-subnet-group-description "Testing" ^
--subnet-ids subnet-53df9c3a
This command should produce output similar to the following:
SUBNETGROUP mycachesubnetgroup Testing vpc-5a2e4c35
SUBNET subnet-53df9c3a us-west-2b
For more information, see the AWS CLI topic create-cache-subnet-group.
Creating a Cache Subnet Group (ElastiCache API)
Using the ElastiCache API, call CreateCacheSubnetGroup with the following parameters:
•CacheSubnetGroupName=mycachesubnetgroup
•CacheSubnetGroupDescription==Testing
•SubnetIds.member.1=subnet-53df9c3a
API Version 2015-02-02
267

Amazon ElastiCache User Guide
Creating a Cache Subnet Group (ElastiCache API)
Example
https://elasticache.us-west-2.amazonaws.com/
?Action=CreateCacheSubnetGroup
&CacheSubnetGroupDescription=Testing
&CacheSubnetGroupName=mycachesubnetgroup
&SignatureMethod=HmacSHA256
&SignatureVersion=4
&SubnetIds.member.1=subnet-53df9c3a
&Timestamp=20141201T220302Z
&Version=2014-12-01
&X-Amz-Algorithm=AWS4-HMAC-SHA256
&X-Amz-Credential=<credential>
&X-Amz-Date=20141201T220302Z
&X-Amz-Expires=20141201T220302Z
&X-Amz-Signature=<signature>
&X-Amz-SignedHeaders=Host
API Version 2015-02-02
268

Amazon ElastiCache User Guide
Assigning a Cache Subnet Group to a Cache Cluster
Assigning a Cache Subnet Group to a Cache
Cluster
After you have created a cache subnet group, you can launch a cache cluster in an Amazon VPC. For
more information, go to Creating a Cache Cluster in an Amazon VPC (p. 281).
Modifying a Cache Subnet Group
You can modify a cache subnet group's description, or modify the list of subnet IDs associated with the
cache subnet group. You cannot delete a subnet ID from a cache subnet group if a cache cluster is
currently using that subnet.
The following procedures show you how to modify a cache subnet group.
Modifying Subnet Groups (Console)
To modify a subnet group
1. Sign in to the AWS Management Console and open the ElastiCache console at https://
console.aws.amazon.com/elasticache/.
2. In the left navigation pane, choose Cache Subnet Groups.
3. In the list of cache subnet groups, select the one you want to modify.
4. In the lower portion of the ElastiCache console, make any changes to the description or the list of
subnet IDs for the cache subnet group. To save your changes, choose Save.
Modifying Subnet Groups (AWS CLI)
At a command prompt, use the command modify-cache-subnet-group to modify a cache subnet
group.
For Linux, OS X, or Unix:
aws elasticache modify-cache-subnet-group \
--cache-subnet-group-name mycachesubnetgroup \
--cache-subnet-group-description "New description" \
--subnet-ids subnet-42df9c3a,subnet-48fc21a9
For Windows:
aws elasticache modify-cache-subnet-group ^
--cache-subnet-group-name mycachesubnetgroup ^
--cache-subnet-group-description "New description" ^
--subnet-ids subnet-42df9c3a,subnet-48fc21a9
This command should produce output similar to the following:
SUBNETGROUP mycachesubnetgroup Testing vpc-5a2e4c35
SUBNET subnet-42df9c3a us-west-2b
SUBNET subnet-48fc21a9 us-west-2b
API Version 2015-02-02
269

Amazon ElastiCache User Guide
Modifying Subnet Groups (ElastiCache API)
For more information, see the AWS CLI topic modify-cache-subnet-group.
Modifying Subnet Groups (ElastiCache API)
Using the ElastiCache API, call ModifyCacheSubnetGroup with the following parameters:
•CacheSubnetGroupName=mycachesubnetgroup
• Any other parameters whose values you want to change. This example uses
CacheSubnetGroupDescription=New%20description to change the description of the cache
subnet group.
Example
https://elasticache.us-west-2.amazonaws.com/
?Action=ModifyCacheSubnetGroup
&CacheSubnetGroupDescription=New%20description
&CacheSubnetGroupName=mycachesubnetgroup
&SubnetIds.member.1=subnet-42df9c3a
&SubnetIds.member.2=subnet-48fc21a9
&SignatureMethod=HmacSHA256
&SignatureVersion=4
&Timestamp=20141201T220302Z
&Version=2014-12-01
&X-Amz-Algorithm=AWS4-HMAC-SHA256
&X-Amz-Credential=<credential>
&X-Amz-Date=20141201T220302Z
&X-Amz-Expires=20141201T220302Z
&X-Amz-Signature=<signature>
&X-Amz-SignedHeaders=Host
Note
When you create a new cache subnet group, take note the number of available IP addresses.
If the subnet has very few free IP addresses, you might be constrained as to how many more
cache nodes you can add to the cache cluster. To resolve this issue, you can assign one or
more subnets to a cache subnet group so that you have a sufficient number of IP addresses in
your cluster's Availability Zone. After that, you can add more cache nodes to your cluster.
API Version 2015-02-02
270

Amazon ElastiCache User Guide
Deleting a Subnet Group
Deleting a Subnet Group
If you decide that you no longer need your cache subnet group, you can delete it. You cannot delete a
cache subnet group if it is currently in use by a cache cluster.
The following procedures show you how to delete a cache subnet group.
Deleting a Subnet Group (Console)
To delete a subnet group
1. Sign in to the AWS Management Console and open the ElastiCache console at https://
console.aws.amazon.com/elasticache/.
2. In the left navigation pane, choose Cache Subnet Groups.
3. In the list of cache subnet groups, select the one you want to delete and then choose Delete.
4. When you are asked to confirm this operation, choose Yes, Delete.
Deleting a Subnet Group (AWS CLI)
At a command prompt, use the command delete-cache-subnet-group to delete a cache subnet
group.
For Linux, OS X, or Unix:
aws elasticache delete-cache-subnet-group \
--cache-subnet-group-name mycachesubnetgroup
For Windows:
aws elasticache delete-cache-subnet-group ^
--cache-subnet-group-name mycachesubnetgroup
This command produces no output.
For more information, see the AWS CLI topic delete-cache-subnet-group.
Deleting a Subnet Group (ElastiCache API)
Using the ElastiCache API, call DeleteCacheSubnetGroup with the following parameter:
•CacheSubnetGroupName=mycachesubnetgroup
API Version 2015-02-02
271

Amazon ElastiCache User Guide
Deleting a Subnet Group (ElastiCache API)
Example
Line breaks in the following code example are added for ease of reading.
https://elasticache.us-west-2.amazonaws.com/
?Action=DeleteCacheSubnetGroup
&CacheSubnetGroupName=mycachesubnetgroup
&SignatureMethod=HmacSHA256
&SignatureVersion=4
&Timestamp=20141201T220302Z
&Version=2014-12-01
&X-Amz-Algorithm=AWS4-HMAC-SHA256
&X-Amz-Credential=<credential>
&X-Amz-Date=20141201T220302Z
&X-Amz-Expires=20141201T220302Z
&X-Amz-Signature=<signature>
&X-Amz-SignedHeaders=Host
API Version 2015-02-02
272

Amazon ElastiCache User Guide
Amazon Virtual Private Cloud
(Amazon VPC) with ElastiCache
The Amazon Virtual Private Cloud (Amazon VPC) service defines a virtual network that closely
resembles a traditional data center. When you configure your Amazon VPC you can select its IP
address range, create subnets, and configure route tables, network gateways, and security settings.
You can also add a cache cluster to the virtual network, and control access to the cache cluster by
using Amazon VPC security groups.
This section explains how to manually configure an ElastiCache cluster in an Amazon VPC. This
information is intended for users who want a deeper understanding of how ElastiCache and Amazon
VPC work together.
Topics
•ElastiCache and Amazon VPC (p. 274)
•Creating a Virtual Private Cloud (VPC) (p. 278)
•Creating a Cache Subnet Group (p. 280)
•Creating a Cache Cluster in an Amazon VPC (p. 281)
•Connecting to a Cache Cluster Running in an Amazon VPC (p. 282)
API Version 2015-02-02
273

Amazon ElastiCache User Guide
ElastiCache and Amazon VPC
ElastiCache and Amazon VPC
Note
ElastiCache is fully integrated with Amazon Virtual Private Cloud (VPC). For ElastiCache
users, this means the following:
• If your AWS account supports only the EC2-VPC platform, ElastiCache will always launch
your cluster in a VPC.
• If you're new to AWS, your clusters will be deployed into a VPC. A default VPC will be
created for you automatically.
• If you have a default VPC and don't specify a subnet when you launch a cluster, the cluster
launches into your default VPC.
For more information, see Detecting Your Supported Platforms and Whether You Have a
Default VPC.
With Amazon Virtual Private Cloud, you can create a virtual network in the AWS cloud that closely
resembles a traditional data center. You can configure your Amazon VPC, including selecting its
IP address range, creating subnets, and configuring route tables, network gateways, and security
settings.
The basic functionality of ElastiCache is the same in a virtual private cloud; ElastiCache manages
software upgrades, patching, failure detection and recovery whether your clusters are deployed inside
or outside an Amazon VPC.
ElastiCache cache nodes deployed outside an Amazon VPC are assigned an IP address to which
the endpoint/DNS name resolves. This provides connectivity from Amazon Elastic Compute Cloud
(Amazon EC2) instances. When you launch an ElastiCache cluster into an Amazon VPC private
subnet, every cache node is assigned a private IP address within that subnet.
Overview of ElastiCache In an Amazon VPC
The following diagram and table describe the Amazon VPC environment, along with ElastiCache
clusters and Amazon EC2 instances that are launched in the Amazon VPC.
API Version 2015-02-02
274
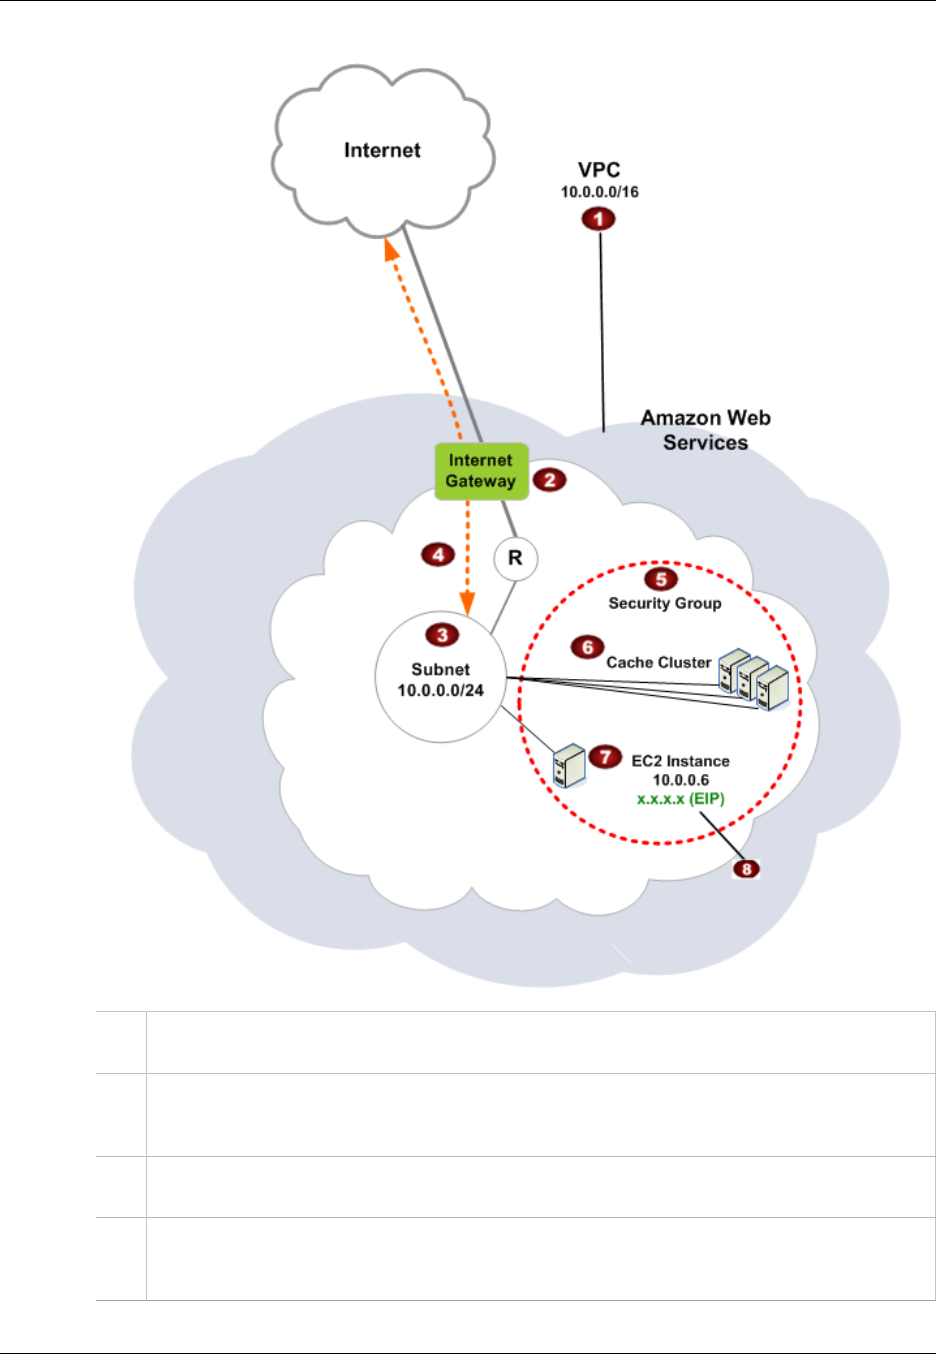
Amazon ElastiCache User Guide
Overview of ElastiCache In an Amazon VPC
The Amazon VPC is an isolated portion of the AWS cloud that is assigned its own block of IP
addresses.
An Internet gateway connects your Amazon VPC directly to the Internet and provides access
to other AWS resources such as Amazon Simple Storage Service (Amazon S3) that are
running outside your Amazon VPC.
An Amazon VPC subnet is a segment of the IP address range of an Amazon VPC where you
can isolate AWS resources according to your security and operational needs.
A routing table in the Amazon VPC directs network traffic between the subnet and the Internet.
The Amazon VPC has an implied router, which is symbolized in this diagram by the circle with
the R.
API Version 2015-02-02
275

Amazon ElastiCache User Guide
Why use the Amazon VPC instead of EC2
Classic with your ElastiCache deployment?
An Amazon VPC security group controls inbound and outbound traffic for your ElastiCache
clusters and Amazon EC2 instances.
You can launch an ElastiCache cluster in the subnet. The cache nodes have private IP
addresses from the subnet's range of addresses.
You can also launch Amazon EC2 instances in the subnet. Each Amazon EC2 instance has
a private IP address from the subnet's range of addresses. The Amazon EC2 instance can
connect to any cache node in the same subnet.
For an Amazon EC2 instance in your Amazon VPC to be reachable from the Internet, you
need to assign a static, public address called an Elastic IP address to the instance.
Why use the Amazon VPC instead of EC2 Classic
with your ElastiCache deployment?
Launching your instances into a VPC allows you to:
• Assign static private IP addresses to your instances that persist across starts and stops.
• Assign multiple IP addresses to your instances.
• Define network interfaces, and attach one or more network interfaces to your instances.
• Change security group membership for your instances while they're running.
• Control the outbound traffic from your instances (egress filtering) in addition to controlling the
inbound traffic to them (ingress filtering).
• Add an additional layer of access control to your instances in the form of network access control lists
(ACL).
• Run your instances on single-tenant hardware.
For a comparison of Amazon EC2 Classic, Default VPC, and Non-default VPC, go to Differences
Between EC2-Classic and EC2-VPC.
The Amazon VPC must allow non-dedicated Amazon EC2 instances. You cannot use ElastiCache in
an Amazon VPC that is configured for dedicated instance tenancy.
Note
ElastiCache is fully integrated with Amazon Virtual Private Cloud (VPC). For ElastiCache
users, this means the following:
• If your AWS account supports only the EC2-VPC platform, ElastiCache will always launch
your cluster in a VPC.
• If you're new to AWS, your clusters will be deployed into a VPC. A default VPC will be
created for you automatically.
• If you have a default VPC and don't specify a subnet when you launch a cluster, the cluster
launches into your default VPC.
For more information, see Detecting Your Supported Platforms and Whether You Have a
Default VPC.
Prerequisites
In order to create an ElastiCache cluster within an Amazon VPC, your Amazon VPC must meet the
following requirements:
API Version 2015-02-02
276

Amazon ElastiCache User Guide
Routing and Security
• The Amazon VPC must allow nondedicated Amazon EC2 instances. You cannot use ElastiCache in
an Amazon VPC that is configured for dedicated instance tenancy.
• A cache subnet group must be defined for your Amazon VPC. ElastiCache uses that cache subnet
group to select a subnet and IP addresses within that subnet to associate with your cache nodes.
• A cache security group must be defined for your Amazon VPC, or you can use the default provided.
• CIDR blocks for each subnet must be large enough to provide spare IP addresses for ElastiCache to
use during maintenance activities.
Routing and Security
You can configure routing in your Amazon VPC to control where traffic flows (for example, to the
Internet gateway or virtual private gateway). With an Internet gateway, your Amazon VPC has direct
access to other AWS resources that are not running in your Amazon VPC. If you choose to have only
a virtual private gateway with a connection to your organization's local network, you can route your
Internet-bound traffic over the VPN and use local security policies and firewall to control egress. In that
case, you incur additional bandwidth charges when you access AWS resources over the Internet.
You can use Amazon VPC security groups to help secure the ElastiCache clusters and Amazon EC2
instances in your Amazon VPC. Security groups act like a firewall at the instance level, not the subnet
level.
Clusters in an Amazon VPC can be accessed by Amazon EC2 instances in the same Amazon VPC.
If these Amazon EC2 instances are deployed in a public subnet with associated Elastic IPs, you can
access the Amazon EC2 instances via the Internet.
Note
We strongly recommend that you use DNS names to connect to your cache nodes, as the
underlying IP address can change if you reboot the cache node.
Amazon VPC Documentation
Amazon VPC has its own set of documentation to describe how to create and use your Amazon VPC.
The following table gives links to the Amazon VPC guides.
Description Documentation
How to get started using Amazon VPC Amazon VPC Getting Started Guide
How to use Amazon VPC through the AWS
Management Console Amazon VPC User Guide
Complete descriptions of all the Amazon VPC
commands Amazon EC2 Command Line Reference
(the Amazon VPC commands are part of the
Amazon EC2 reference)
Complete descriptions of the Amazon VPC API
actions, data types, and errors Amazon EC2 API Reference
(the Amazon VPC API actions are part of the
Amazon EC2 reference)
Information for the network administrator who
needs to configure the gateway at your end of an
optional IPsec VPN connection
Amazon VPC Network Administrator Guide
For more detailed information about Amazon Virtual Private Cloud, go to http://aws.amazon.com/vpc.
API Version 2015-02-02
277

Amazon ElastiCache User Guide
Creating a Virtual Private Cloud (VPC)
Creating a Virtual Private Cloud (VPC)
In this example, you create an Amazon VPC with a private subnet for each Availability Zone.
Creating an Amazon VPC (Console)
To create an ElastiCache cache cluster inside an Amazon Virtual Private Cloud
1. Sign in to the AWS Management Console, and open the Amazon VPC console at https://
console.aws.amazon.com/vpc/.
2. Create a new Amazon VPC by using the Amazon Virtual Private Cloud wizard:
a. In the navigation list, choose VPC Dashboard.
b. Choose Start VPC Wizard.
c. In the Amazon VPC wizard, choose VPC with Public and Private Subnets, and then choose
Next.
d. On the VPC with Public and Private Subnets page, keep the default options, and then
choose Create VPC.
e. In the confirmation message that appears, choose Close.
3. Confirm that there are two subnets in your Amazon VPC, a public subnet and a private subnet.
These subnets are created automatically.
a. In the navigation list, choose Subnets.
b. In the list of subnets, find the two subnets that are in your Amazon VPC:
The public subnet will have one fewer available IP address, because the wizard creates an
Amazon EC2 NAT instance and an Elastic IP address (for which Amazon EC2 rates apply) for
outbound communication to the Internet from your private subnet.
Tip
Make a note of your two subnet identifiers, and which is public and private. You will need
this information later when you launch your cache clusters and add an Amazon EC2
instance to your Amazon VPC.
4. Create an Amazon VPC security group. You will use this group for your cache cluster and your
Amazon EC2 instance.
a. In the left navigation pane of the Amazon VPC Management console, choose Security
Groups.
b. Choose Create Security Group.
c. Type a name and a description for your security group in the corresponding boxes. In the VPC
box, choose the identifier for your Amazon VPC.
API Version 2015-02-02
278
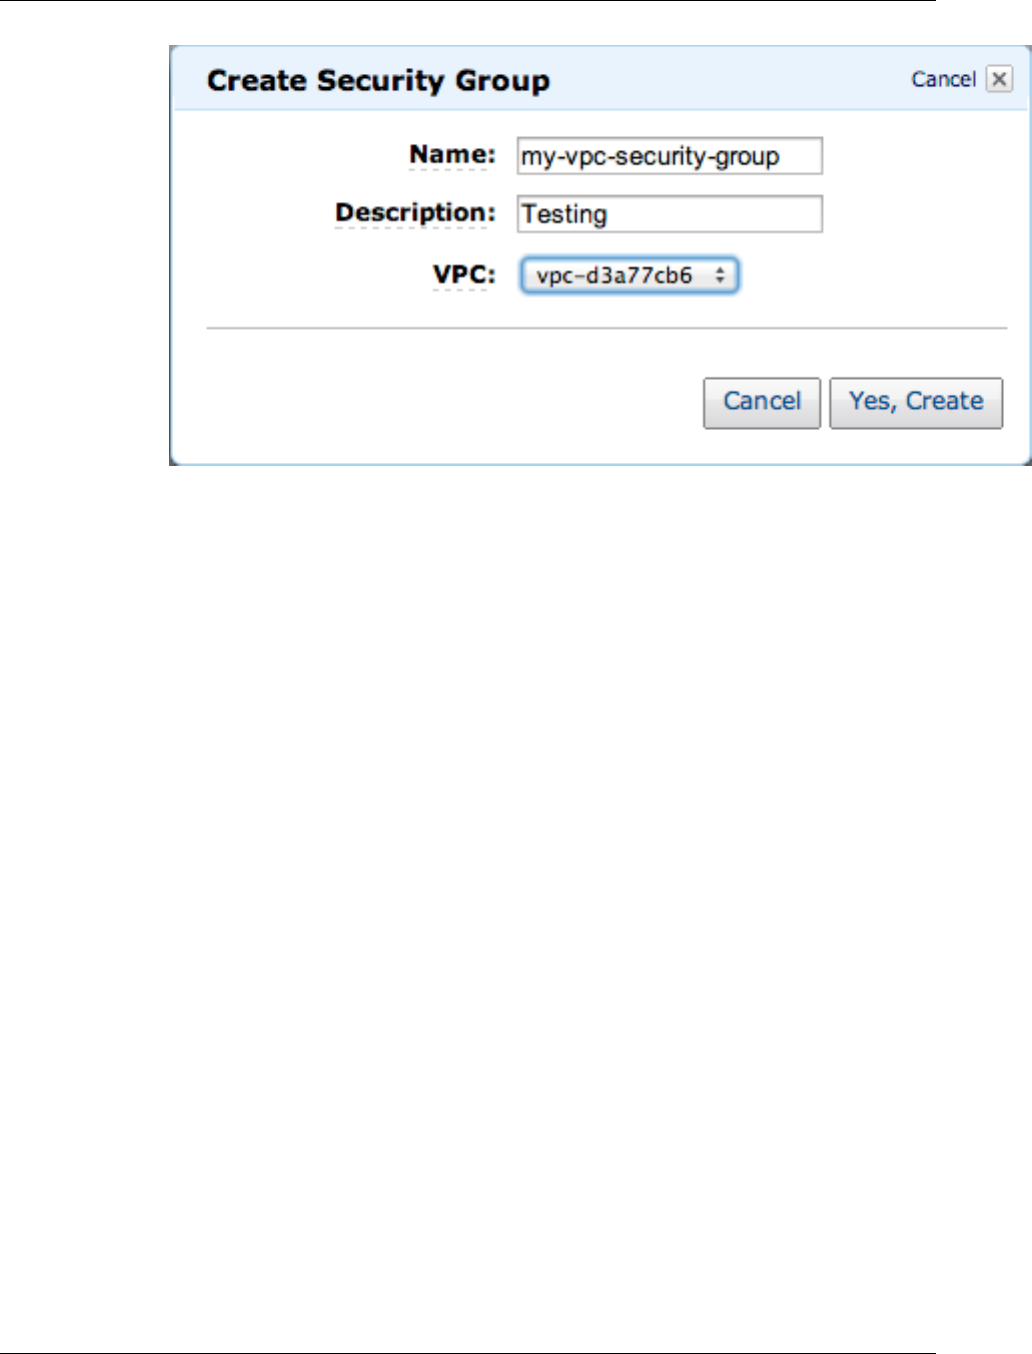
Amazon ElastiCache User Guide
Creating an Amazon VPC (Console)
d. When the settings are as you want them, choose Yes, Create.
5. Define a network ingress rule for your security group. This rule will allow you to connect to your
Amazon EC2 instance using Secure Shell (SSH).
a. In the navigation list, choose Security Groups.
b. Find your security group in the list, and then choose it.
c. Under Security Group, choose the Inbound tab. In the Create a new rule box, choose SSH,
and then choose Add Rule.
d. Choose Apply Rule Changes.
Now you are ready to create a cache subnet group and launch a cache cluster in your Amazon VPC.
API Version 2015-02-02
279

Amazon ElastiCache User Guide
Creating a Cache Subnet Group
Creating a Cache Subnet Group
A cache subnet group is a collection of subnets that you may want to designate for your cache clusters
in an Amazon VPC. When launching a cache cluster in an Amazon VPC, you need to select a cache
subnet group. Then ElastiCache uses that cache subnet group to assign IP addresses within that
subnet to each cache node in the cluster.
For guidance on how to create a subnet group using the ElastiCache Management Console, the AWS
CLI, or the ElastiCache API, go to Creating a Cache Subnet Group (p. 266).
After you create a cache subnet group, you can launch a cache cluster to run in your Amazon VPC.
Continue to the next topic Creating a Cache Cluster in an Amazon VPC (p. 281).
API Version 2015-02-02
280

Amazon ElastiCache User Guide
Creating a Cache Cluster in an Amazon VPC
Creating a Cache Cluster in an Amazon VPC
In this example, you create a cache cluster in your Amazon VPC.
Creating a Cache Cluster in an Amazon VPC
(Console)
• To launch a Redis cache cluster, see Creating a Redis Cache Cluster (Console) (p. 116). On the
Screen 3: Configure Advanced Settings screen, select a VPC subnet group.
• To launch a Memcached cache cluster, see Creating a Memcached Cache Cluster
(Console) (p. 113). On the Screen 3: Configure Advanced Settings screen, select a VPC subnet
group.
You have now launched a cache cluster inside an Amazon VPC. For an example of one way to
connect to your new cache cluster running in the Amazon VPC, continue to Connecting to a Cache
Cluster Running in an Amazon VPC (p. 282).
API Version 2015-02-02
281
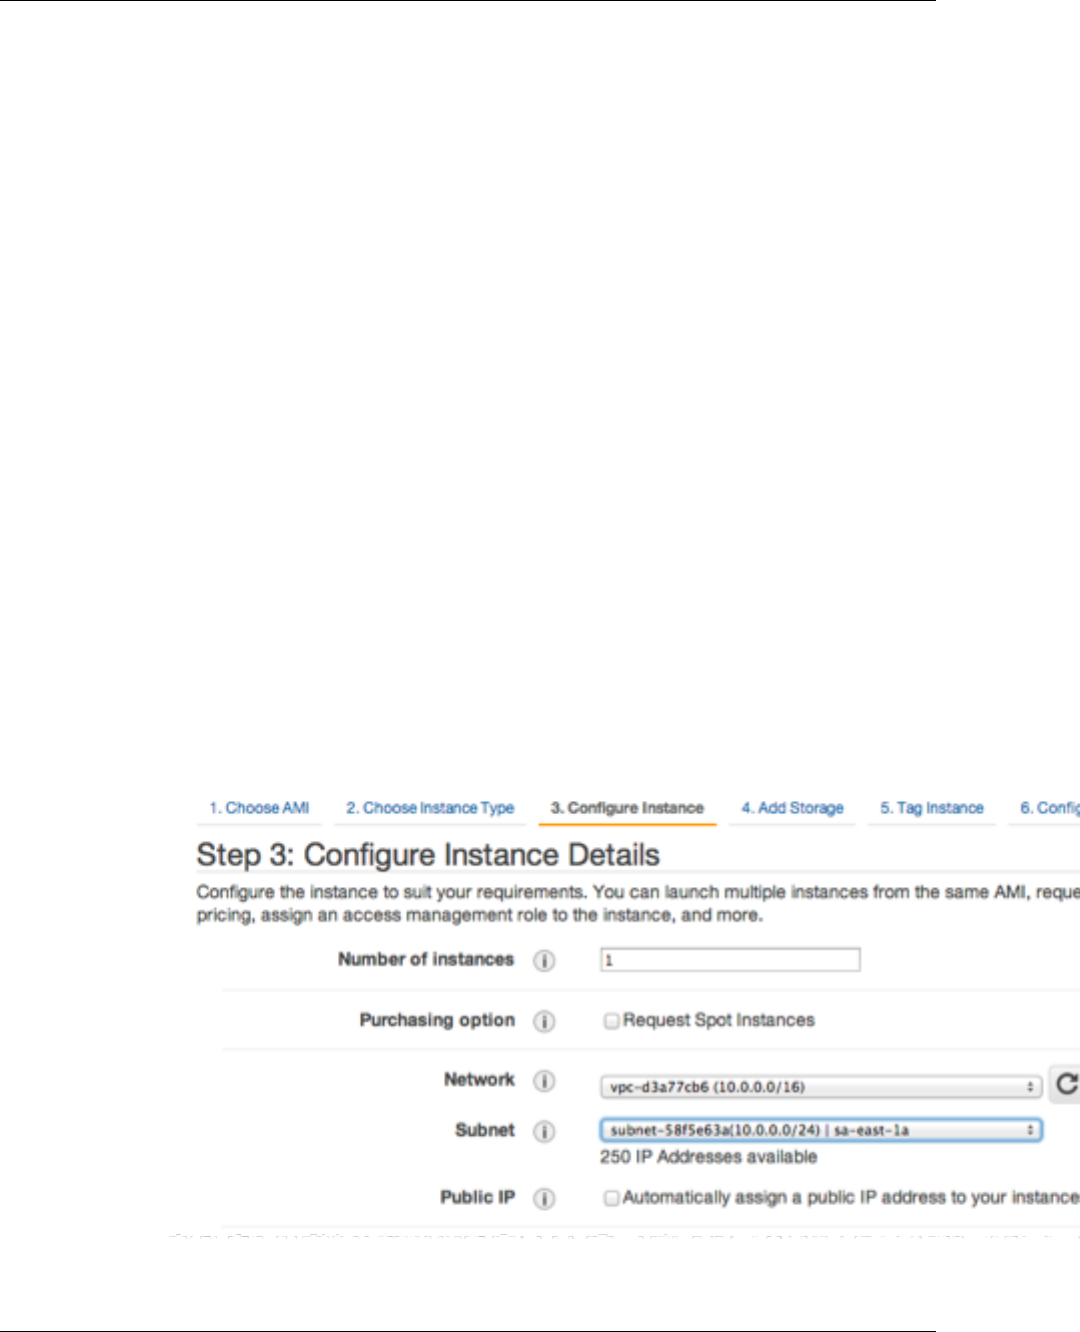
Amazon ElastiCache User Guide
Connecting to a Cache Cluster
Running in an Amazon VPC
Connecting to a Cache Cluster Running in an
Amazon VPC
This example shows how to launch an Amazon EC2 instance in your Amazon VPC. You can then log
in to this instance and access the ElastiCache cluster that is running in the Amazon VPC.
Note
For information about using Amazon EC2, see the Amazon EC2 Getting Started Guide in the
Amazon EC2 documentation.
Topics
•1. Create an Amazon EC2 Instance (p. 282)
•2. Assign IP Address to Your Amazon EC2 Instance (p. 283)
•3. Connect to Your Amazon EC2 Instance (p. 284)
1. Create an Amazon EC2 Instance
The following procedure creates an Amazon EC2 instance in your VPC.
1. Sign in to the AWS Management Console and open the Amazon EC2 console at https://
console.aws.amazon.com/ec2/.
2. In the console, choose Launch Instance and follow these steps:
3. On the Choose an Amazon Machine Image (AMI) page, choose the 64-bit Amazon Linux AMI,
and then choose Select.
4. On the Choose an Instance Type page, choose 3. Configure Instance.
5. On the Configure Instance Details page, make the following selections:
a. In the Network list, choose your Amazon VPC.
b. In the Subnet list, choose your public subnet.
When the settings are as you want them, choose 4. Add Storage.
API Version 2015-02-02
282
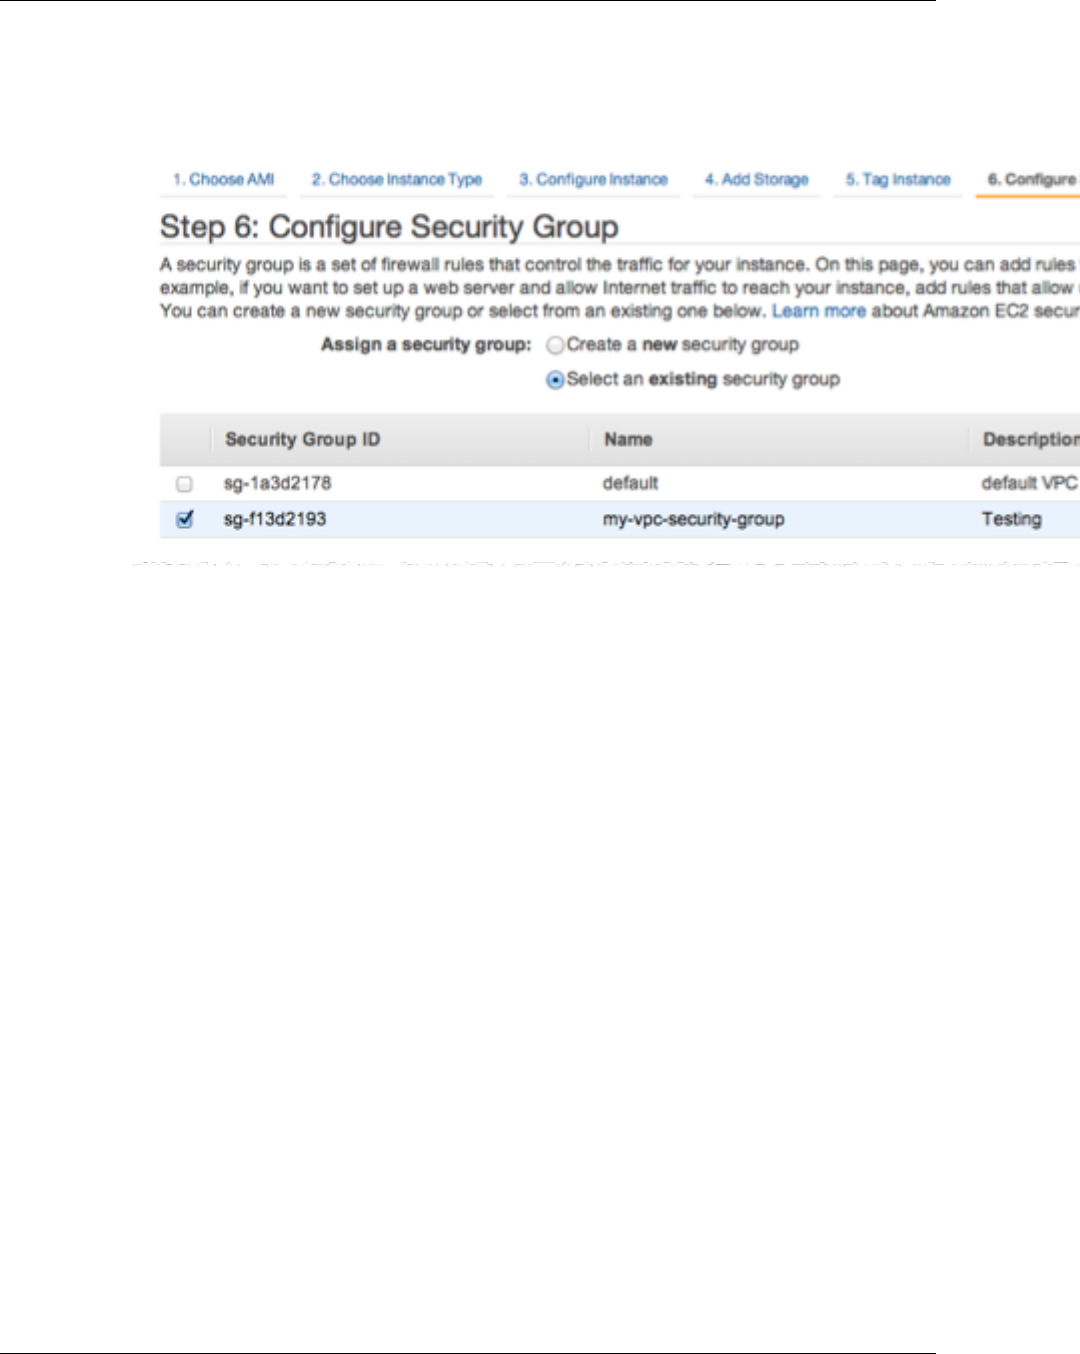
Amazon ElastiCache User Guide
2. Assign IP Address to Your Amazon EC2 Instance
6. On the Add Storage page, choose 5. Tag Instance.
7. On the Tag Instance page, type a name for your Amazon EC2 instance, and then choose 6.
Configure Security Group.
8. On the Configure Security Group page, choose Select an existing security group.
Select the name of your Amazon VPC security group, and then choose Review and Launch.
9. On the Review Instance and Launch page, choose Launch.
In the Select an existing key pair or create a new key pair window, specify a key pair that you
want to use with this instance.
Note
For information about managing key pairs, go to the Amazon EC2 Getting Started Guide.
10. When you are ready to launch your Amazon EC2 instance, choose Launch Instances.
2. Assign IP Address to Your Amazon EC2 Instance
You can now assign an Elastic IP address to the Amazon EC2 instance that you just created. You
need to use this IP address to connect to the Amazon EC2 instance.
1. Open the Amazon VPC console at https://console.aws.amazon.com/vpc/.
2. In the navigation list, choose Elastic IPs.
3. Choose Allocate New Address.
4. In the Allocate New Address dialog box, in the EIP used in box, choose VPC, and then choose
Yes, Allocate.
5. Select the Elastic IP address that you just allocated from the list and choose Associate Address.
6. In the Associate Address dialog box, in the Instance box, choose the ID of the Amazon EC2
instance that you launched, and then choose Yes, Associate.
API Version 2015-02-02
283
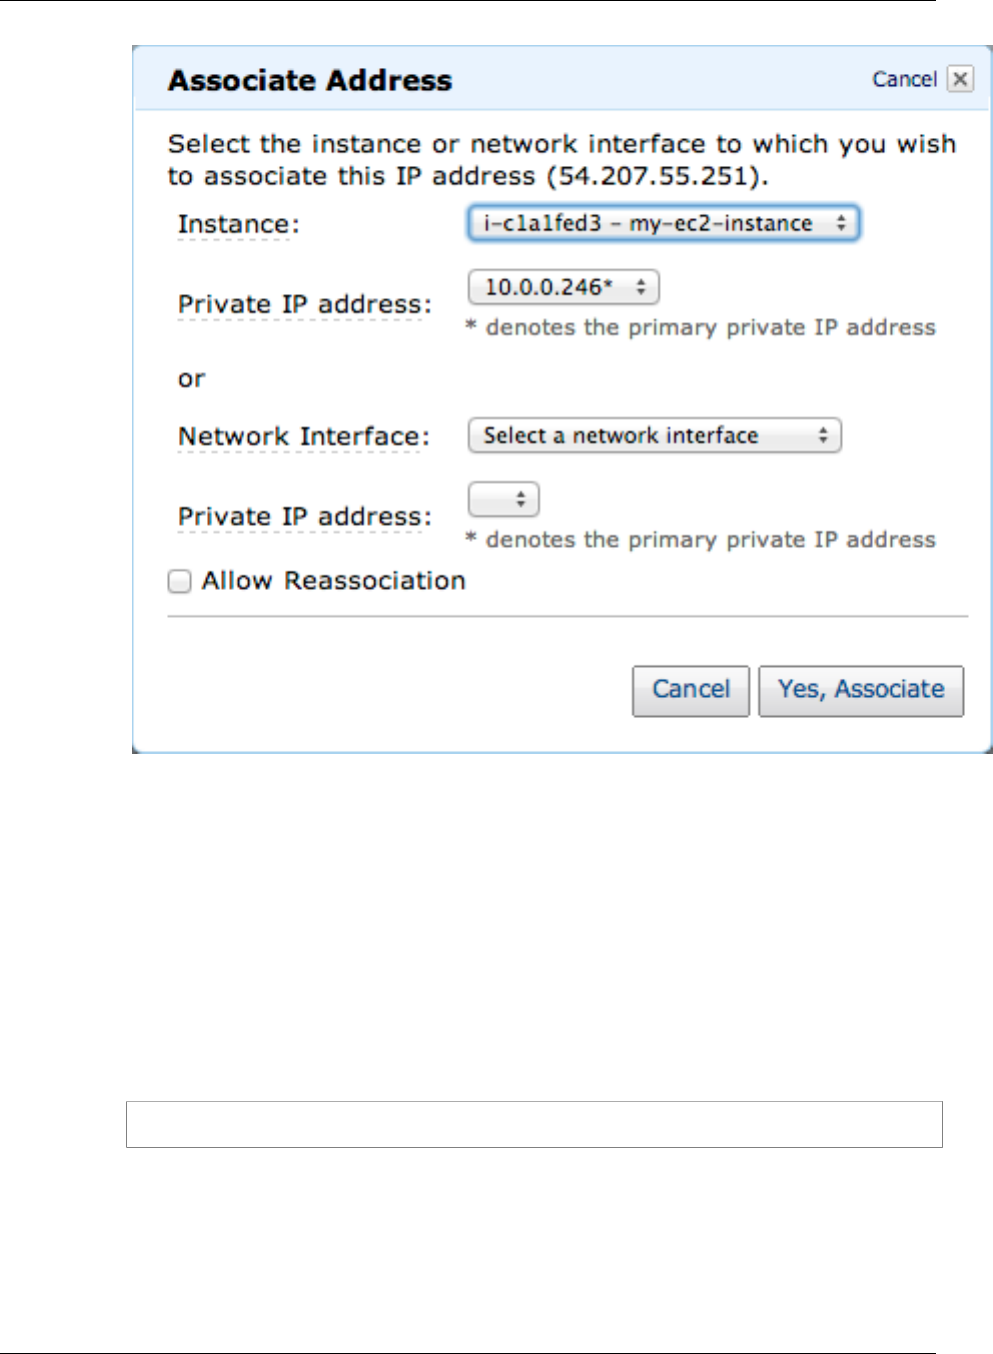
Amazon ElastiCache User Guide
3. Connect to Your Amazon EC2 Instance
You can now use SSH to connect to the Amazon EC2 instance using the Elastic IP address that
you created.
Tip
For instructions about using SSH to connect to a Linux/UNIX instance, see Connect to
Your Linux/UNIX Instance in the Amazon EC2 Getting Started Guide.
3. Connect to Your Amazon EC2 Instance
The following steps connects you to your Amazon EC2 instance.
1. Open a command window. At the command prompt, issue the following command, replacing
mykeypair.pem with the name of your key pair file and 54.207.55.251 with your Elastic IP address.
ssh -i mykeypair.pem ec2-user@54.207.55.251
Important
Do not log out of your Amazon EC2 instance yet.
2. You are now ready to interact with your ElastiCache cluster. Before you can do that, if you haven't
already done so, you need to install the telnet utility.
To install telnet and interact with your cache cluster (AWS CLI)
For Linux, OS X, or Unix:
API Version 2015-02-02
284

Amazon ElastiCache User Guide
3. Connect to Your Amazon EC2 Instance
Open a command window. At the command prompt, issue the following command. At the
confirmation prompt, type y.
sudo yum install telnet
Loaded plugins: priorities, security, update-motd, upgrade-helper
Setting up Install Process
Resolving Dependencies
--> Running transaction check
...(output omitted)...
Total download size: 63 k
Installed size: 109 k
Is this ok [y/N]: y
Downloading Packages:
telnet-0.17-47.7.amzn1.x86_64.rpm | 63 kB
00:00
...(output omitted)...
Complete!
For Windows
Open a command window. At the command prompt, issue the following command. If the User
Account Control dialog box appears, confirm that the action it displays is what you want, and
then click Continue.
pkgmgr /iu:"TelnetClient"
3. Go to the ElastiCache console at https://console.aws.amazon.com/elasticache/ and obtain the
endpoint for one of the nodes in your cache cluster.
4. Use telnet to connect to your cache node endpoint over port 11211. Replace the hostname shown
below with the hostname of your cache node.
telnet my-cache-cluster.7wufxa.0001.use1.cache.amazonaws.com 11211
You are now connected to the cache engine and can issue commands. In this example, you add
a data item to the cache and then get it immediately afterward. Finally, you'll disconnect from the
cache node.
To store a key and a value, type the following two lines:
add mykey 0 3600 28
This is the value for my key
The cache engine responds with the following:
STORED
To retrieve the value for mykey, type the following:
API Version 2015-02-02
285

Amazon ElastiCache User Guide
3. Connect to Your Amazon EC2 Instance
get mykey
The cache engine responds with the following:
VALUE mykey 0 28
This is the value for my key
END
To disconnect from the cache engine, type the following:
quit
Important
To avoid incurring additional charges on your AWS account, be sure to delete any AWS
resources you no longer want after trying these examples.
API Version 2015-02-02
286

Amazon ElastiCache User Guide
Security Groups
Security for Amazon ElastiCache
Amazon ElastiCache uses the following techniques to secure your cache data and protect it from
unauthorized access:
•ElastiCache and Security Groups (p. 287) explains the type of security group you need for your
installation.
•Authentication and Access Control for Amazon ElastiCache (p. 289) for granting and limiting
actions of users, groups, and roles.
ElastiCache and Security Groups
Because data security is important, ElastiCache provides means for you to control who has access to
your data. How you control access to your data is dependent upon whether or not you launched your
clusters in an Amazon Virtual Private Cloud (Amazon VPC) or Amazon EC2-Classic.
Topics
•Amazon Virtual Private Cloud: Amazon VPC Security Groups (p. 287)
•Amazon EC2-Classic: ElastiCache Security Groups (p. 287)
Amazon Virtual Private Cloud: Amazon VPC
Security Groups
When running your clusters in an Amazon Virtual Private Cloud, you configure your Amazon VPC
by selecting its IP address range, creating subnets, and configuring route tables, network gateways,
and security settings. You can also add a cache cluster to the virtual network, and control access to
the cache cluster by using Amazon VPC security groups, which should not be confused with Amazon
ElastiCache security groups. For more information, see Amazon Virtual Private Cloud (Amazon VPC)
with ElastiCache (p. 273).
Amazon EC2-Classic: ElastiCache Security Groups
Amazon ElastiCache allows you to control access to your clusters using ElastiCache cache security
groups. An ElastiCache cache security group acts like a firewall, controlling network access to your
cluster. By default, network access is turned off to your clusters. If you want your applications to access
API Version 2015-02-02
287


Amazon ElastiCache User Guide
Authentication & Access Control
Authentication and Access Control for Amazon
ElastiCache
Access to Amazon ElastiCache requires credentials that AWS can use to authenticate your requests.
Those credentials must have permissions to access AWS resources, such as an ElastiCache cache
cluster or an Amazon Elastic Compute Cloud (Amazon EC2) instance. The following sections provide
details on how you can use AWS Identity and Access Management (IAM) and ElastiCache to help
secure your resources by controlling who can access them.
•Authentication (p. 289)
•Access Control (p. 290)
Authentication
You can access AWS as any of the following types of identities:
•AWS account root user – When you sign up for AWS, you provide an email address and password
that is associated with your AWS account. These are your root credentials and they provide
complete access to all of your AWS resources.
Important
For security reasons, we recommend that you use the root credentials only to create
an administrator user, which is an IAM user with full permissions to your AWS account.
Then, you can use this administrator user to create other IAM users and roles with limited
permissions. For more information, see IAM Best Practices and Creating an Admin User
and Group in the IAM User Guide.
•IAM user – An IAM user is simply an identity within your AWS account that has specific custom
permissions (for example, permissions to create a cluster in ElastiCache). You can use an IAM user
name and password to sign in to secure AWS webpages like the AWS Management Console, AWS
Discussion Forums, or the AWS Support Center.
In addition to a user name and password, you can also generate access keys for each user. You
can use these keys when you access AWS services programmatically, either through one of the
several SDKs or by using the AWS Command Line Interface (CLI). The SDK and CLI tools use the
access keys to cryptographically sign your request. If you don’t use the AWS tools, you must sign
the request yourself. ElastiCache supports Signature Version 4, a protocol for authenticating inbound
API requests. For more information about authenticating requests, see Signature Version 4 Signing
Process in the AWS General Reference.
•IAM role – An IAM role is another IAM identity you can create in your account that has specific
permissions. It is similar to an IAM user, but it is not associated with a specific person. An IAM
role enables you to obtain temporary access keys that can be used to access AWS services and
resources. IAM roles with temporary credentials are useful in the following situations:
•Federated user access – Instead of creating an IAM user, you can use preexisting user identities
from AWS Directory Service, your enterprise user directory, or a web identity provider. These are
known as federated users. AWS assigns a role to a federated user when access is requested
through an identity provider. For more information about federated users, see Federated Users
and Roles in the IAM User Guide.
API Version 2015-02-02
289

Amazon ElastiCache User Guide
Access Control
•Cross-account access – You can use an IAM role in your account to grant another AWS account
permissions to access your account’s resources. For an example, see Tutorial: Delegate Access
Across AWS Accounts Using IAM Roles in the IAM User Guide.
•AWS service access – You can use an IAM role in your account to grant an AWS service
permissions to access your account’s resources. For example, you can create a role that allows
Amazon Redshift to access an Amazon S3 bucket on your behalf and then load data stored in the
bucket into an Amazon Redshift cluster. For more information, see Creating a Role to Delegate
Permissions to an AWS Service in the IAM User Guide.
•Applications running on Amazon EC2 – Instead of storing access keys within the EC2 instance
for use by applications running on the instance and making AWS API requests, you can use an
IAM role to manage temporary credentials for these applications. To assign an AWS role to an
EC2 instance and make it available to all of its applications, you can create an instance profile that
is attached to the instance. An instance profile contains the role and enables programs running
on the EC2 instance to get temporary credentials. For more information, see Using Roles for
Applications on Amazon EC2 in the IAM User Guide.
Access Control
You can have valid credentials to authenticate your requests, but unless you have permissions you
cannot create or access Amazon ElastiCache resources. For example, you must have permissions to
create an ElastiCache cache cluster.
The following sections describe how to manage permissions for Amazon ElastiCache. We recommend
that you read the overview first.
•Overview of Managing Access Permissions to Your ElastiCache Resources (p. 291)
•Using Identity-Based Policies (IAM Policies) for Amazon ElastiCache (p. 295)
API Version 2015-02-02
290

Amazon ElastiCache User Guide
Overview of Managing Access
Overview of Managing Access Permissions to Your
ElastiCache Resources
Every AWS resource is owned by an AWS account, and permissions to create or access a resource
are governed by permissions policies. An account administrator can attach permissions policies to IAM
identities (that is, users, groups, and roles), and some services (such as AWS Lambda) also support
attaching permissions policies to resources.
Note
An account administrator (or administrator user) is a user with administrator privileges. For
more information, see IAM Best Practices in the IAM User Guide.
When granting permissions, you decide who is getting the permissions, the resources they get
permissions for, and the specific actions that you want to allow on those resources.
Topics
•Amazon ElastiCache Resources and Operations (p. 291)
•Understanding Resource Ownership (p. 291)
•Managing Access to Resources (p. 292)
•Specifying Policy Elements: Actions, Effects, Resources, and Principals (p. 293)
•Specifying Conditions in a Policy (p. 293)
Amazon ElastiCache Resources and Operations
In Amazon ElastiCache, the primary resource is a cluster. Amazon ElastiCache also supports an
additional resource type, a snapshot. However, you can create snapshots only in the context of an
existing Redis cache cluster. A snapshot is referred to as subresource.
These resources and subresources have unique Amazon Resource Names (ARNs) associated with
them as shown in the following table.
Resource Type ARN Format
Cache Cluster arn:aws:elasticache:region:account-
id:cluster:resource-name
Snapshot arn:aws:elasticache:region:account-
id:snapshot:resource-name
ElastiCache provides a set of operations to work with ElastiCache resources. For a list of available
operations, see Amazon ElastiCache Actions.
Understanding Resource Ownership
A resource owner is the AWS account that created the resource. That is, the resource owner is the
AWS account of the principal entity (the root account, an IAM user, or an IAM role) that authenticates
the request that creates the resource. The following examples illustrate how this works:
• If you use the root account credentials of your AWS account to create a cache cluster, your AWS
account is the owner of the resource (in ElastiCache, the resource is the cluster).
• If you create an IAM user in your AWS account and grant permissions to create a cache cluster
to that user, the user can create a cache cluster. However, your AWS account, to which the user
belongs, owns the cache cluster resource.
API Version 2015-02-02
291

Amazon ElastiCache User Guide
Overview of Managing Access
• If you create an IAM role in your AWS account with permissions to create a cache cluster, anyone
who can assume the role can create a cache cluster. Your AWS account, to which the role belongs,
owns the cache cluster resource.
Managing Access to Resources
A permissions policy describes who has access to what. The following section explains the available
options for creating permissions policies.
Note
This section discusses using IAM in the context of Amazon ElastiCache. It doesn't provide
detailed information about the IAM service. For complete IAM documentation, see What Is
IAM? in the IAM User Guide. For information about IAM policy syntax and descriptions, see
AWS IAM Policy Reference in the IAM User Guide.
Policies attached to an IAM identity are referred to as identity-based policies (IAM polices) and policies
attached to a resource are referred to as resource-based policies. Amazon ElastiCache supports only
identity-based policies (IAM policies).
Topics
•Identity-Based Policies (IAM Policies) (p. 292)
•Resource-Based Policies (p. 293)
Identity-Based Policies (IAM Policies)
You can attach policies to IAM identities. For example, you can do the following:
•Attach a permissions policy to a user or a group in your account – An account administrator
can use a permissions policy that is associated with a particular user to grant permissions for that
user to create an ElastiCache resource, such as a cache cluster, parameter group, or security group.
•Attach a permissions policy to a role (grant cross-account permissions) – You can attach an
identity-based permissions policy to an IAM role to grant cross-account permissions. For example,
the administrator in Account A can create a role to grant cross-account permissions to another AWS
account (for example, Account B) or an AWS service as follows:
1. Account A administrator creates an IAM role and attaches a permissions policy to the role that
grants permissions on resources in Account A.
2. Account A administrator attaches a trust policy to the role identifying Account B as the principal
who can assume the role.
3. Account B administrator can then delegate permissions to assume the role to any users in
Account B. Doing this allows users in Account B to create or access resources in Account A. The
principal in the trust policy can also be an AWS service principal if you want to grant an AWS
service permissions to assume the role.
For more information about using IAM to delegate permissions, see Access Management in the IAM
User Guide.
The following is an example policy that allows a user to perform the DescribeCacheClusters
action for your AWS account. In the current implementation, ElastiCache doesn't support identifying
specific resources using the resource ARNs (also referred to as resource-level permissions) for any
API actions, so you must specify a wildcard character (*).
{
"Version": "2012-10-17",
"Statement": [{
"Sid": "DescribeCacheClusters",
API Version 2015-02-02
292

Amazon ElastiCache User Guide
Overview of Managing Access
"Effect": "Allow",
"Action": [
"elasticache:DescribeCacheClusters"],
"Resource": "*"
}
]
}
For more information about using identity-based policies with ElastiCache, see Using Identity-Based
Policies (IAM Policies) for Amazon ElastiCache (p. 295). For more information about users, groups,
roles, and permissions, see Identities (Users, Groups, and Roles in the IAM User Guide.
Resource-Based Policies
Other services, such as Amazon S3, also support resource-based permissions policies. For example,
you can attach a policy to an S3 bucket to manage access permissions to that bucket. Amazon
ElastiCache doesn't support resource-based policies.
Specifying Policy Elements: Actions, Effects, Resources, and
Principals
For each Amazon ElastiCache resource (see Amazon ElastiCache Resources and
Operations (p. 291)), the service defines a set of API operations (see Actions). To grant permissions
for these API operations, ElastiCache defines a set of actions that you can specify in a policy. For
example, for the ElastiCache snapshot resource, the following actions are defined: CreateSnapshot,
DeleteSnapshot, and DescribeSnapshots. Note that, performing an API operation can require
permissions for more than one action.
The following are the most basic policy elements:
•Resource – In a policy, you use an Amazon Resource Name (ARN) to identify the resource to which
the policy applies. For ElastiCache resources, you always use the wildcard character (*) in IAM
policies. For more information, see Amazon ElastiCache Resources and Operations (p. 291).
•Action – You use action keywords to identify resource operations that you want to allow or deny.
For example, depending on the specified Effect, the elasticache:CreateCacheCluster
permission allows or denies the user permissions to perform the Amazon ElastiCache
CreateCacheCluster operation.
•Effect – You specify the effect when the user requests the specific action—this can be either allow
or deny. If you don't explicitly grant access to (allow) a resource, access is implicitly denied. You
can also explicitly deny access to a resource, which you might do to make sure that a user cannot
access it, even if a different policy grants access.
•Principal – In identity-based policies (IAM policies), the user that the policy is attached to is the
implicit principal. For resource-based policies, you specify the user, account, service, or other entity
that you want to receive permissions (applies to resource-based policies only). ElastiCache doesn't
support resource-based policies.
To learn more about IAM policy syntax and descriptions, see AWS IAM Policy Reference in the IAM
User Guide.
For a table showing all of the Amazon ElastiCache API actions, see ElastiCache API Permissions:
Actions, Resources, and Conditions Reference (p. 300).
Specifying Conditions in a Policy
When you grant permissions, you can use the IAM policy language to specify the conditions when a
policy should take effect. For example, you might want a policy to be applied only after a specific date.
API Version 2015-02-02
293

Amazon ElastiCache User Guide
Overview of Managing Access
For more information about specifying conditions in a policy language, see Condition in the IAM User
Guide.
To express conditions, you use predefined condition keys. There are no condition keys specific to
Amazon ElastiCache. However, there are AWS-wide condition keys that you can use as appropriate.
For a complete list of AWS-wide keys, see Available Keys for Conditions in the IAM User Guide.
API Version 2015-02-02
294

Amazon ElastiCache User Guide
Using Identity-Based Policies (IAM Policies)
Using Identity-Based Policies (IAM Policies) for
Amazon ElastiCache
This topic provides examples of identity-based policies in which an account administrator can attach
permissions policies to IAM identities (that is, users, groups, and roles).
Important
We recommend that you first review the introductory topics that explain the basic concepts
and options available for you to manage access to your Amazon ElastiCache resources.
For more information, see Overview of Managing Access Permissions to Your ElastiCache
Resources (p. 291).
The sections in this topic cover the following:
•Permissions Required to Use the Amazon ElastiCache Console (p. 296)
•AWS Managed (Predefined) Policies for Amazon ElastiCache (p. 296)
•Customer Managed Policy Examples (p. 297)
The following shows an example of a permissions policy.
{
"Version": "2012-10-17",
"Statement": [{
"Sid": "AllowClusterPermissions",
"Effect": "Allow",
"Action": [
"elasticache:CreateCacheCluster",
"elasticache:CreateReplicationGroup",
"elasticache:DescribeCacheClusters",
"elasticache:ModifyCacheCluster",
"elasticache:RebootCacheCluster"],
"Resource": "*"
},
{
"Effect": "Allow",
"Action": [
"iam:PassRole"],
"Resource": "arn:aws:iam::account-id:role/*"
}
]
}
The policy has two statements:
• The first statement grants permissions for the Amazon ElastiCache actions
(elasticache:CreateCacheCluster, elasticache:DescribeCacheClusters,
elasticache:ModifyCacheCluster, and elasticache:RebootCacheCluster) on any
cache cluster owned by the account. Currently, Amazon ElastiCache doesn't support permissions
for actions at the resource-level. Therefore, the policy specifies a wildcard character (*) as the
Resource value.
• The second statement grants permissions for the IAM action (iam:PassRole) on IAM roles. The
wildcard character (*) at the end of the Resource value means that the statement allows permission
for the iam:PassRole action on any IAM role. To limit this permission to a specific role, replace the
wildcard character (*) in the resource ARN with the specific role name.
API Version 2015-02-02
295

Amazon ElastiCache User Guide
Using Identity-Based Policies (IAM Policies)
The policy doesn't specify the Principal element because in an identity-based policy you don't
specify the principal who gets the permission. When you attach policy to a user, the user is the implicit
principal. When you attach a permissions policy to an IAM role, the principal identified in the role's trust
policy gets the permissions.
For a table showing all of the Amazon ElastiCache API actions and the resources that they apply to,
see ElastiCache API Permissions: Actions, Resources, and Conditions Reference (p. 300).
Permissions Required to Use the Amazon ElastiCache
Console
The permissions reference table lists the Amazon ElastiCache API operations and shows the
required permissions for each operation. For more information about ElastiCache API operations, see
ElastiCache API Permissions: Actions, Resources, and Conditions Reference (p. 300).
To use the Amazon ElastiCache console, you need to grant permissions for additional actions as
shown in the following permissions policy:
{
"Version": "2012-10-17",
"Statement": [{
"Sid": "MinPermsForECConsole",
"Effect": "Allow",
"Action": [
"elasticache:Describe*",
"elasticache:List*",
"ec2:DescribeAvailabilityZones",
"ec2:DescribeVpcs",
"ec2:DescribeAccountAttributes",
"ec2:DescribeSecurityGroups",
"cloudwatch:GetMetricStatistics",
"cloudwatch:DescribeAlarms",
"sns:ListTopics",
"sns:ListSubscriptions" ],
"Resource": "*"
}
]
}
The ElastiCache console needs these additional permissions for the following reasons:
• Permissions for the ElastiCache actions enable the console to display ElastiCache resources in the
account.
• The console needs permissions for the ec2 actions to query Amazon EC2 so it can display
Availability Zones, VPCs, security groups, and account attributes.
• The permissions for cloudwatch actions enable the console to retrieve Amazon CloudWatch
metrics and alarms, and display them in the console.
• The permissions for sns actions enable the console to retrieve Amazon Simple Notification Service
(Amazon SNS) topics and subscriptions, and display them in the console.
AWS Managed (Predefined) Policies for Amazon ElastiCache
AWS addresses many common use cases by providing standalone IAM policies that are created and
administered by AWS. Managed policies grant necessary permissions for common use cases so
you can avoid having to investigate what permissions are needed. For more information, see AWS
Managed Policies in the IAM User Guide.
API Version 2015-02-02
296

Amazon ElastiCache User Guide
Using Identity-Based Policies (IAM Policies)
The following AWS managed policies, which you can attach to users in your account, are specific to
ElastiCache:
•AmazonElastiCacheReadOnlyAccess - Grants read-only access to Amazon ElastiCache
resources.
•AmazonElastiCacheFullAccess - Grants full access to Amazon ElastiCache resources.
Note
You can review these permissions policies by signing in to the IAM console and searching for
specific policies there.
You can also create your own custom IAM policies to allow permissions for Amazon ElastiCache
API actions. You can attach these custom policies to the IAM users or groups that require those
permissions.
Customer Managed Policy Examples
When combined with the minimum permissions needed to use the Amazon ElastiCache console, the
example policies in this section grant additional permissions. The examples are also relevant to the
AWS SDKs and the AWS CLI. For more information about what permissions are needed to use the
ElastiCache console, see Permissions Required to Use the Amazon ElastiCache Console (p. 296).
For instructions on setting up IAM users and groups, see Creating Your First IAM User and
Administrators Group in the IAM User Guide.
Important
Always test your IAM policies thoroughly before using them in production. Some ElastiCache
actions that appear simple can require other actions to support them when you are using
the ElastiCache console. For example, elasticache:CreateCacheCluster grants
permissions to create ElastiCache cache clusters. However, to perform this operation, the
ElastiCache console uses a number of Describe and List actions to populate console lists.
Also, if your users need to create a Redis cache cluster with replication enabled, you need
to grant permissions for them to perform the elasticache:CreateReplicationGroup
action.
Examples
•Example 1: Allow a User to Create and Manage Security Groups (p. 297)
•Example 2: Allow a User Read-Only Access to ElastiCache Resources (p. 298)
•Example 3: Allow a User to Perform Common ElastiCache System Administrator Tasks (p. 298)
•Example 4: Allow a User to Access All ElastiCache API Actions (p. 298)
Example 1: Allow a User to Create and Manage Security Groups
The following policy grants permissions for the security group's specific ElastiCache actions. Typically,
you attach this type of permissions policy to the system administrators group.
{
"Version": "2012-10-17",
"Statement":[{
"Sid": "SecGrpAllows",
"Effect":"Allow",
"Action":[
"elasticache:CreateCacheSecurityGroup",
"elasticache:DeleteCacheSecurityGroup",
"elasticache:DescribeCacheSecurityGroup",
"elasticache:AuthorizeCacheSecurityGroupIngress",
API Version 2015-02-02
297

Amazon ElastiCache User Guide
Using Identity-Based Policies (IAM Policies)
"elasticache:RevokeCacheSecurityGroupIngress"],
"Resource":"*"
}
]
}
Example 2: Allow a User Read-Only Access to ElastiCache Resources
The following policy grants permissions ElastiCache actions that allow a user to list resources.
Typically, you attach this type of permissions policy to a managers group.
{
"Version": "2012-10-17",
"Statement":[{
"Sid": "ECUnrestricted",
"Effect":"Allow",
"Action": [
"elasticache:Describe*",
"elasticache:List*"],
"Resource":"*"
}
]
}
Example 3: Allow a User to Perform Common ElastiCache System
Administrator Tasks
Common system administrator tasks include modifying cache clusters, parameters, and parameter
groups. A system administrator may also want to get information about the ElastiCache events. The
following policy grants a user permissions to perform ElastiCache actions for these common system
administrator tasks. Typically, you attach this type of permissions policy to the system administrators
group.
{
"Version": "2012-10-17",
"Statement":[{
"Sid": "ECAllowSpecific",
"Effect":"Allow",
"Action":[
"elasticache:ModifyCacheCluster",
"elasticache:RebootCacheCluster",
"elasticache:DescribeCacheClusters",
"elasticache:DescribeEvents",
"elasticache:ModifyCacheParameterGroup",
"elasticache:DescribeCacheParameterGroups",
"elasticache:DescribeCacheParameters",
"elasticache:ResetCacheParameterGroup",
"elasticache:DescribeEngineDefaultParameters"],
"Resource":"*"
}
]
}
Example 4: Allow a User to Access All ElastiCache API Actions
The following policy allows a user to access all ElastiCache actions. We recommend that you grant this
type of permissions policy only to an administrator user.
API Version 2015-02-02
298

Amazon ElastiCache User Guide
Using Identity-Based Policies (IAM Policies)
{
"Version": "2012-10-17",
"Statement":[{
"Sid": "ECAllowSpecific",
"Effect":"Allow",
"Action":[
"elasticache:*" ],
"Resource":"*"
}
]
}
API Version 2015-02-02
299

Amazon ElastiCache User Guide
ElastiCache API Permissions Reference
ElastiCache API Permissions: Actions, Resources,
and Conditions Reference
When you are setting up Access Control (p. 290) and writing permissions policies that you can attach
to an IAM identity (identity-based policies), you can use the following table as a reference. The table
lists each Amazon ElastiCache API operation and the corresponding actions for which you can grant
permissions to perform the action. You specify the actions in the policy's Action field, and you specify
a wildcard character (*) as the resource value in the policy's Resource field.
You can use AWS-wide condition keys in your ElastiCache policies to express conditions. For a
complete list of AWS-wide keys, see Available Keys for Conditions in the IAM User Guide.
Note
To specify an action, use the elasticache: prefix followed by the API operation name (for
example, elasticache:DescribeSnapshots). For all ElastiCache actions, specify the
wildcard character (*) as the resource.
Amazon ElastiCache API and Required Permissions for Actions
AddTagsToResource
Action(s): elasticache:AddTagsToResource
Resource: *
AuthorizeCacheSecurityGroupIngress
Action(s): elasticache:AuthorizeCacheSecurityGroupIngress
Resource: *
CopySnapshot
Action(s): elasticache:CopySnapshot
Resource: *
CreateCacheCluster
Action(s): elasticache:CreateCacheCluster
s3:GetObject
Note
If you use the SnapshotArns parameter, each member of the SnapshotArns list
requires its own s3:GetObject permission with the s3 ARN as its resource.
Resource: *
arn:aws:s3:::my_bucket/snapshot1.rdb
Where my_bucket/snapshot1 is an S3 bucket and snapshot that you want to create the cache
cluster from.
CreateCacheParameterGroup
Action(s): elasticache:CreateCacheParameterGroup
Resource: *
CreateCacheSecurityGroup
Action(s): elasticache:CreateCacheSecurityGroup
Resource: *
CreateCacheSubnetGroup
Action(s): elasticache:CreateCacheSubnetGroup
Resource: *
API Version 2015-02-02
300

Amazon ElastiCache User Guide
ElastiCache API Permissions Reference
CreateReplicationGroup
Action(s): elasticache:CreateReplicationGroup
s3:GetObject
Note
If you use the SnapshotArns parameter, each member of the SnapshotArns list
requires its own s3:GetObject permission with the s3 ARN as its resource.
Resource: *
arn:aws:s3:::my_bucket/snapshot1.rdb
Where my_bucket/snapshot1 is an S3 bucket and snapshot that you want to create the cache
cluster from.
CreateSnapshot
Action(s): elasticache:CreateSnapshot
Resource: *
DeleteCacheCluster
Action(s): elasticache:DeleteCacheCluster
Resource: *
DeleteCacheParameterGroup
Action(s): elasticache:DeleteCacheParameterGroup
Resource: *
DeleteCacheSecurityGroup
Action(s): elasticache:DeleteCacheSecurityGroup
Resource: *
DeleteCacheSubnetGroup
Action(s): elasticache:DeleteCacheSubnetGroup
Resource: *
DeleteReplicationGroup
Action(s): elasticache:DeleteReplicationGroup
Resource: *
DeleteSnapshot
Action(s): elasticache:DeleteSnapshot
Resource: *
DescribeCacheClusters
Action(s): elasticache:DescribeCacheClusters
Resource: *
DescribeCacheEngineVersions
Action(s): elasticache:DescribeCacheEngineVersions
Resource: *
DescribeCacheParameterGroups
Action(s): elasticache:DescribeCacheParameterGroups
Resource: *
DescribeCacheParameters
Action(s): elasticache:DescribeCacheParameters
API Version 2015-02-02
301

Amazon ElastiCache User Guide
ElastiCache API Permissions Reference
Resource: *
DescribeCacheSecurityGroups
Action(s): elasticache:DescribeCacheSecurityGroups
Resource: *
DescribeCacheSubnetGroups
Action(s): elasticache:DescribeCacheSubnetGroups
Resource: *
DescribeEngineDefaultParameters
Action(s): elasticache:DescribeEngineDefaultParameters
Resource: *
DescribeEvents
Action(s): elasticache:DescribeEvents
Resource: *
DescribeReplicationGroups
Action(s): elasticache:DescribeReplicationGroups
Resource: *
DescribeReservedCacheNodes
Action(s): elasticache:DescribeReservedCacheNodes
Resource: *
DescribeReservedCacheNodesOfferings
Action(s): elasticache:DescribeReservedCacheNodesOfferings
Resource: *
DescribeSnapshots
Action(s): elasticache:DescribeSnapshots
Resource: *
ListTagsForResource
Action(s): elasticache:ListTagsForResource
Resource: *
ModifyCacheCluster
Action(s): elasticache:ModifyCacheCluster
Resource: *
ModifyCacheParameterGroup
Action(s): elasticache:ModifyCacheParameterGroup
Resource: *
ModifyCacheSubnetGroup
Action(s): elasticache:ModifyCacheSubnetGroup
Resource: *
ModifyReplicationGroup
Action(s): elasticache:ModifyReplicationGroup
Resource: *
PurchaseReservedCacheNodesOffering
Action(s): elasticache:PurchaseReservedCacheNodesOffering
Resource: *
API Version 2015-02-02
302

Amazon ElastiCache User Guide
ElastiCache API Permissions Reference
RebootCacheCluster
Action(s): elasticache:RebootCacheCluster
Resource: *
RemoveTagsFromResource
Action(s): elasticache:RemoveTagsFromResource
Resource: *
ResetCacheParameterGroup
Action(s): elasticache:ResetCacheParameterGroup
Resource: *
RevokeCacheSecurityGroupIngress
Action(s): elasticache:RevokeCacheSecurityGroupIngress
Resource: *
API Version 2015-02-02
303

Amazon ElastiCache User Guide
Requirements
Accessing ElastiCache Resources
from Outside AWS
Amazon ElastiCache is an AWS service that provides cloud-based in-memory key-value store. On
the back end it uses either the Memcached or Redis engine. The service is designed to be accessed
exclusively from within AWS. However, if the ElastiCache cluster is hosted inside a VPC, you can use
a Network Address Translation (NAT) instance to provide outside access.
Topics
•Requirements (p. 304)
•Considerations (p. 304)
•Limitations (p. 305)
•How to Access ElastiCache Resources from Outside AWS (p. 305)
•See also (p. 307)
Requirements
The following requirements must be met for you to access your ElastiCache resources from outside
AWS:
• The cluster must reside within a VPC and be accessed through a Network Address Translation
(NAT) instance. There are no exceptions to this requirement.
• The NAT instance must be launched in the same VPC as the cluster.
• The NAT instance must be launched in a public subnet separate from the cluster.
• An Elastic IP Address (EIP) must be associated with the NAT instance. The port forwarding feature
of iptables is used to forward a port on the NAT instance to the cache node port within the VPC.
Considerations
The following considerations should be kept in mind when accessing your ElastiCache resources from
outside ElastiCache.
API Version 2015-02-02
304

Amazon ElastiCache User Guide
Limitations
• Clients connect to the EIP and cache port of the NAT instance. Port forwarding on the NAT instance
forwards traffic to the appropriate cache cluster node.
• If a cluster node is added or replaced, the iptables rules need to be updated to reflect this change.
Limitations
This approach should be used for testing and development purposes only. It is not recommended for
production use due to the following limitations:
• The NAT instance is acting as a proxy between clients and multiple clusters. The addition of a proxy
impacts the performance of the cache cluster. The impact increases with number of cache clusters
you are accessing through the NAT instance.
• The traffic from clients to the NAT instance is unencrypted. Therefore, you should avoid sending
sensitive data via the NAT instance.
• The NAT instance adds the overhead of maintaining another instance.
• The NAT instance serves as a single point of failure. For information about how to set up high
availability NAT on VPC, see High Availability for Amazon VPC NAT Instances: An Example.
How to Access ElastiCache Resources from
Outside AWS
The following procedure demonstrates how to connect to your ElastiCache resources using a NAT
instance.
These steps assume the following:
• You are accessing a Memcached cluster with the IP address 10.0.1.230, the default Memcached
port 11211, and security group sg-bd56b7da.
• Your trusted client has the IP address 198.51.100.27.
• Your NAT instance has the Elastic IP Address 203.0.113.73.
• Your NAT instance has security group sg-ce56b7a9.
When you finish creating your NAT instance using the following steps, the following should be true.
• IP forwarding is enabled for the NAT instance. The following command can be used to confirm this.
cat /proc/sys/net/ipv4/ip_forward
• Masquerading is enabled. The following command can be used to enable masquerading.
iptables -t nat -A POSTROUTING -o eth0 -j MASQUERADE
To connect to your ElastiCache resources using a NAT instance
1. Create a NAT instance in the same VPC as your cache cluster but in a public subnet.
By default, the VPC wizard will launch a cache.m1.small node type. You should select a node size
based on your needs.
For information about creating a NAT instance, see NAT Instances in the AWS VPC User Guide.
API Version 2015-02-02
305

Amazon ElastiCache User Guide
How to Access ElastiCache Resources from Outside AWS
2. Create security group rules for the cache cluster and NAT instance.
The NAT instance security group should have the following rules:
• Two inbound rules
• One to allow TCP connections from trusted clients to each cache port forwarded from the NAT
instance (11211 - 11213).
• A second to allow SSH access to trusted clients.
NAT Instance Security Group - Inbound Rules
Type Protocol Port Range Source
Custom TCP Rule TCP 11211-11213 198.51.100.27/32
SSH TCP 22 198.51.100.27/32
• An outbound rule to allow TCP connections to each forwarded cache port (11211-11213).
NAT Instance Security Group - Outbound Rule
Type Protocol Port Range Destination
Custom TCP Rule TCP 11211-11213 sg-bd56b7da
(Cache Cluster Security Group)
• An inbound rule for the cluster's security group that allows TCP connections from the NAT
instance to the cache port on each instance in the cluster (11211-11213).
Cache Cluster Security Group - Inbound Rule
Type Protocol Port Range Source
Custom TCP Rule TCP 11211-11213 sg-ce56b7a9
(NAT instance Security Group)
3. Validate the rules.
• Confirm that the trusted client is able to SSH to the NAT instance.
• Confirm that the trusted client is able to connect to the cluster from the NAT instance.
4. Add an iptables rule to the NAT instance.
An iptables rule must be added to the NAT table for each node in the cluster to forward the cache
port from the NAT instance to the cluster node. An example might look like the following:
iptables -t nat -A PREROUTING -i eth0 -p tcp --dport 11211 -j DNAT --to
10.0.1.230:11211
The port number must be unique for each node in the cluster. For example, if working with a three
node Memcached cluster using ports 11211 - 11213, the rules would look like the following:
iptables -t nat -A PREROUTING -i eth0 -p tcp --dport 11211 -j DNAT --to
10.0.1.230:11211
iptables -t nat -A PREROUTING -i eth0 -p tcp --dport 11212 -j DNAT --to
10.0.1.231:11211
iptables -t nat -A PREROUTING -i eth0 -p tcp --dport 11213 -j DNAT --to
10.0.1.232:11211
5. Confirm that the trusted client is able to connect to the cluster.
API Version 2015-02-02
306

Amazon ElastiCache User Guide
See also
The trusted client should connect to the EIP associated with the NAT instance and the cluster port
corresponding to the appropriate cluster node. For example, the connection string for PHP might
look like the following:
$memcached->connect( '203.0.113.73', 11211 );
$memcached->connect( '203.0.113.73', 11212 );
$memcached->connect( '203.0.113.73', 11213 );
A telnet client can also be used to verify the connection. For example:
telnet 203.0.113.73 11211
telnet 203.0.113.73 11212
telnet 203.0.113.73 11213
6. Save the iptables configuration.
Save the rules after you test and verify them. If you are using a Redhat-based Linux distribution
(like Amazon Linux), run the following command:
service iptables save
See also
•NAT Instances
•Configuring ElastiCache Clients
•High Availability for Amazon VPC NAT Instances: An Example
API Version 2015-02-02
307

Amazon ElastiCache User Guide
Monitoring Usage, Events, and
Costs
Knowing how your clusters are performing, the resources they're consuming, the events that are being
generated, and the costs of your deployment are important factors in managing your enterprise caching
solution. CloudWatch provides metrics for monitoring your cache performance. Cost allocation tags
help you monitor and manage costs.
Topics
•Monitoring Use with CloudWatch Metrics (p. 309)
•Monitoring ElastiCache Events (p. 319)
•Monitoring Costs with Cost Allocation Tags (p. 329)
API Version 2015-02-02
308

Amazon ElastiCache User Guide
Monitoring Use
Monitoring Use with CloudWatch Metrics
ElastiCache provides metrics that enable you to monitor your clusters. You can access these metrics
through CloudWatch. For more information on CloudWatch, go to the CloudWatch documentation.
ElastiCache provides both host-level metrics (for example, CPU usage) and metrics that are specific to
the cache engine software (for example, cache gets and cache misses). These metrics are measured
and published for each Cache node in 60-second intervals.
Important
You should consider setting CloudWatch alarms on certain key metrics, so that you will be
notified if your cache cluster's performance starts to degrade. For more information, see
Which Metrics Should I Monitor? (p. 315)
Topics
•Dimensions for ElastiCache Metrics (p. 309)
•Host-Level Metrics (p. 309)
•Metrics for Memcached (p. 310)
•Metrics for Redis (p. 312)
•Which Metrics Should I Monitor? (p. 315)
•Choosing Metric Statistics and Periods (p. 316)
•Monitoring CloudWatch Cache Cluster and Cache Node Metrics (p. 316)
Dimensions for ElastiCache Metrics
All ElastiCache metrics use the AWS/ElastiCache namespace and provide metrics for a single
dimension, the CacheNodeId, which is the automatically-generated identifier for each cache
node in the cache cluster. You can find out what these values are for your cache nodes by using
the DescribeCacheClusters API or describe-cache-clusters command line utility. For more
information, see DescribeCacheClusters in the Amazon ElastiCache API Reference and describe-
cache-clusters in the AWS Command Line Interface Reference.
Each metric is published under a single set of dimensions. When retrieving metrics, you must supply
both the CacheClusterId and CacheNodeId dimensions.
Topics
•Host-Level Metrics (p. 309)
•Metrics for Memcached (p. 310)
•Metrics for Redis (p. 312)
•Which Metrics Should I Monitor?
Host-Level Metrics
The following table lists host-level metrics provided by ElastiCache for individual cache nodes.
See Also
•Metrics for Memcached (p. 310)
•Metrics for Redis (p. 312)
API Version 2015-02-02
309

Amazon ElastiCache User Guide
Metrics for Memcached
Metric Description Unit
CPUUtilization The percentage of CPU utilization. Percent
FreeableMemory The amount of free memory available on the
host. Bytes
NetworkBytesIn The number of bytes the host has read from the
network. Bytes
NetworkBytesOut The number of bytes the host has written to the
network. Bytes
SwapUsage The amount of swap used on the host. Bytes
Metrics for Memcached
The following table lists the metrics provided by ElastiCache that are derived from the Memcached
stats command. Each metric is calculated at the cache node level.
For complete documentation of the Memcached stats command, go to https://github.com/
memcached/memcached/blob/master/doc/protocol.txt.
See Also
•Host-Level Metrics (p. 309)
Metric Description Unit
BytesReadIntoMemcached The number of bytes that have been read from
the network by the cache node. Bytes
BytesUsedForCacheItems The number of bytes used to store cache items. Bytes
BytesWrittenOutFromMemcachedThe number of bytes that have been written to
the network by the cache node. Bytes
CasBadval The number of CAS (check and set) requests the
cache has received where the Cas value did not
match the Cas value stored.
Count
CasHits The number of Cas requests the cache has
received where the requested key was found and
the Cas value matched.
Count
CasMisses The number of Cas requests the cache has
received where the key requested was not found. Count
CmdFlush The number of flush commands the cache has
received. Count
CmdGet The number of get commands the cache has
received. Count
CmdSet The number of set commands the cache has
received. Count
API Version 2015-02-02
310

Amazon ElastiCache User Guide
Metrics for Memcached
Metric Description Unit
CurrConnections A count of the number of connections connected
to the cache at an instant in time. Count
CurrItems A count of the number of items currently stored in
the cache. Count
DecrHits The number of decrement requests the cache
has received where the requested key was
found.
Count
DecrMisses The number of decrement requests the cache
has received where the requested key was not
found.
Count
DeleteHits The number of delete requests the cache has
received where the requested key was found. Count
DeleteMisses The number of delete requests the cache has
received where the requested key was not found. Count
Evictions The number of non-expired items the cache
evicted to allow space for new writes. Count
GetHits The number of get requests the cache has
received where the key requested was found. Count
GetMisses The number of get requests the cache has
received where the key requested was not found. Count
IncrHits The number of increment requests the cache has
received where the key requested was found. Count
IncrMisses The number of increment requests the cache has
received where the key requested was not found. Count
Reclaimed The number of expired items the cache evicted to
allow space for new writes. Count
For Memcached 1.4.14, the following additional metrics are provided.
Metric Description Unit
BytesUsedForHash The number of bytes currently used by hash
tables. Bytes
CmdConfigGet The cumulative number of config get requests. Count
CmdConfigSet The cumulative number of config set requests. Count
CmdTouch The cumulative number of touch requests. Count
CurrConfig The current number of configurations stored. Count
EvictedUnfetched The number of valid items evicted from the least
recently used cache (LRU) which were never
touched after being set.
Count
API Version 2015-02-02
311

Amazon ElastiCache User Guide
Metrics for Redis
Metric Description Unit
ExpiredUnfetched The number of expired items reclaimed from the
LRU which were never touched after being set. Count
SlabsMoved The total number of slab pages that have been
moved. Count
TouchHits The number of keys that have been touched and
were given a new expiration time. Count
TouchMisses The number of items that have been touched, but
were not found. Count
The following table describes the available calculated cache-level metrics.
Metric Description Unit
NewConnections The number of new connections the cache has
received. This is derived from the memcached
total_connections statistic by recording the
change in total_connections across a period
of time. This will always be at least 1, due to a
connection reserved for a ElastiCache.
Count
NewItems The number of new items the cache has
stored. This is derived from the memcached
total_items statistic by recording the change
in total_items across a period of time.
Count
UnusedMemory The amount of memory not used by data.
This is derived from the Memcached statistics
limit_maxbytes and bytes by subtracting
bytes from limit_maxbytes.
Because Memcached overhead uses memory
in addition to that used by data, UnusedMemory
should not be considered to be the amount of
memory available for additional data. You may
experience evictions even though you still have
some unused memory.
For more detailed information, see Memcached
item memory usage.
Bytes
Metrics for Redis
The following table lists the metrics provided by ElastiCache. With the exception of ReplicationLag,
these metrics are derived from the Redis info command. Each metric is calculated at the cache node
level.
For complete documentation of the Redis info command, see http://redis.io/commands/info.
See Also
•Host-Level Metrics (p. 309)
API Version 2015-02-02
312
Amazon ElastiCache User Guide
Metrics for Redis
Metric Description Unit
BytesUsedForCache The total number of bytes allocated by Redis. Bytes
CacheHits The number of successful key lookups. Count
CacheMisses The number of unsuccessful key lookups. Count
CurrConnections The number of client connections, excluding
connections from read replicas. Count
Evictions The number of keys that have been evicted due
to the maxmemory limit. Count
HyperLogLogBasedCmds The total number of HyperLogLog based
commands. This is derived from the Redis
commandstats statistic by summing all of the pf
type of commands (pfadd, pfcount, pfmerge).
Count
NewConnections The total number of connections that have been
accepted by the server during this period. Count
Reclaimed The total number of key expiration events. Count
ReplicationBytes For primaries with attached replicas,
ReplicationBytes reports the number of
bytes that the primary is sending to all of its
replicas. This metric is representative of the write
load on the replication group. For replicas and
standalone primaries, ReplicationBytes is
always 0.
Bytes
ReplicationLag This metric is only applicable for a cache node
running as a read replica. It represents how far
behind, in seconds, the replica is in applying
changes from the primary cache cluster.
Seconds
SaveInProgress This binary metric returns 1 whenever a
background save (forked or forkless) is in
progress, and 0 otherwise. A background save
process is typically used during snapshots and
syncs. These operations can cause degraded
performance. Using the SaveInProgress
metric, you can diagnose whether or not
degraded performance was caused by a
background save process.
Count
These are aggregations of certain kinds of commands, derived from info commandstats:
Metric Description Unit
CurrItems The number of items in the cache. This is derived
from the Redis keyspace statistic, summing all
of the keys in the entire keyspace.
Count
GetTypeCmds The total number of get types of commands.
This is derived from the Redis commandstats
Count
API Version 2015-02-02
313

Amazon ElastiCache User Guide
Metrics for Redis
Metric Description Unit
statistic by summing all of the get types of
commands (get, mget, hget, etc.)
HashBasedCmds The total number of commands that are
hash-based. This is derived from the Redis
commandstats statistic by summing all of the
commands that act upon one or more hashes.
Count
KeyBasedCmds The total number of commands that are
key-based. This is derived from the Redis
commandstats statistic by summing all of the
commands that act upon one or more keys.
Count
ListBasedCmds The total number of commands that are
list-based. This is derived from the Redis
commandstats statistic by summing all of the
commands that act upon one or more lists.
Count
SetBasedCmds The total number of commands that are
set-based. This is derived from the Redis
commandstats statistic by summing all of the
commands that act upon one or more sets.
Count
SetTypeCmds The total number of set types of commands.
This is derived from the Redis commandstats
statistic by summing all of the set types of
commands (set, hset, etc.)
Count
SortedSetBasedCmds The total number of commands that are sorted
set-based. This is derived from the Redis
commandstats statistic by summing all of the
commands that act upon one or more sorted
sets.
Count
StringBasedCmds The total number of commands that are
string-based. This is derived from the Redis
commandstats statistic by summing all of the
commands that act upon one or more strings.
Count
API Version 2015-02-02
314

Amazon ElastiCache User Guide
Which Metrics Should I Monitor?
Which Metrics Should I Monitor?
The following CloudWatch metrics offer good insight into ElastiCache performance. In most cases, we
recommend that you set CloudWatch alarms for these metrics so that you can take corrective action
before performance issues occur.
CPUUtilization
This is a host-level metric reported as a percent. For more information, see Host-Level Metrics (p. 309).
•Memcached: Since Memcached is multi-threaded, this metric can be as high as 90%. If you exceed
this threshold, scale your cache cluster up by using a larger cache node type, or scale out by adding
more cache nodes.
•Redis: Since Redis is single-threaded, the threshold is calculated as (90 / number of processor
cores). For example, suppose you are using a cache.m1.xlarge node, which has four cores. In this
case, the threshold for CPUUtilization would be (90 / 4), or 22.5%.
You will need to determine your own threshold, based on the number of cores in the cache node
that you are using. If you exceed this threshold, and your main workload is from read requests,
scale your cache cluster out by adding read replicas. If the main workload is from write requests, we
recommend scaling up by using a larger cache instance type.
SwapUsage
This is a host-level metric reported in bytes. For more information, see Host-Level Metrics (p. 309).
•Memcached: This metric should not exceed 50 MB. If it does, we recommend that you increase the
ConnectionOverhead parameter value.
•Redis: At this time, we have no recommendation for this parameter; you do not need to set a
CloudWatch alarm for it.
Evictions
This is a cache engine metric, published for both Memcached and Redis cache clusters. We
recommend that you determine your own alarm threshold for this metric based on your application
needs.
•Memcached: If your exceed your chosen threshold, scale you cache cluster up by using a larger
node type, or scale out by adding more nodes.
•Redis: If you exceed your chosen threshold, scale your cluster up by using a larger node type.
CurrConnections
This is a cache engine metric, published for both Memcached and Redis cache clusters. We
recommend that you determine your own alarm threshold for this metric based on your application
needs.
Whether you are running Memcached or Redis, an increasing number of CurrConnections might
indicate a problem with your application; you will need to investigate the application behavior to
address this issue.
API Version 2015-02-02
315

Amazon ElastiCache User Guide
Choosing Metric Statistics and Periods
Choosing Metric Statistics and Periods
While CloudWatch will allow you to choose any statistic and period for each metric, not all
combinations will be useful. For example, the Average, Minimum, and Maximum statistics for
CPUUtilization are useful, but the Sum statistic is not.
All ElastiCache samples are published for a 60 second duration for each individual cache node. For
any 60 second period, a cache node metric will only contain a single sample.
For further information on how to retrieve metrics for your cache nodes, see Monitoring CloudWatch
Cache Cluster and Cache Node Metrics (p. 316).
Monitoring CloudWatch Cache Cluster and Cache
Node Metrics
ElastiCache and CloudWatch are integrated so you can gather a variety of metrics. You can monitor
these metrics using CloudWatch.
Note
The following examples require the CloudWatch command line tools. For more information
about CloudWatch and to download the developer tools, go to the CloudWatch product page.
The following procedures show you how to use CloudWatch to gather storage space statistics for an
cache cluster for the past hour.
Note
The StartTime and EndTime values supplied in the examples below are for illustrative
purposes. You must substitute appropriate start and end time values for your cache nodes.
For information on ElastiCache limits, see AWS Service Limits for ElastiCache.
Monitoring CloudWatch Cache Cluster and Cache Node
Metrics (Console)
To gather CPU utilization statistics for a cache cluster
1. Sign in to the AWS Management Console and open the ElastiCache console at https://
console.aws.amazon.com/elasticache/.
2. Select the cache nodes you want to view metrics for.
Note
Selecting more than 20 nodes disables viewing metrics on the console.
a. On the Cache Clusters page of the AWS Management Console, click the name of one or
more cache clusters.
The detail page for the cache cluster appears.
b. Click the Nodes tab at the top of the window.
c. On the Nodes tab of the detail window, select the cache nodes that you want to view metrics
for.
A list of available CloudWatch Metrics appears at the bottom of the console window.
d. Click on the CPU Utilization metric.
The CloudWatch console will open, displaying your selected metrics. You can use the
Statistic and Period drop-down list boxes and Time Range tab to change the metrics being
displayed.
API Version 2015-02-02
316

Amazon ElastiCache User Guide
Monitoring CloudWatch Cache
Cluster and Cache Node Metrics
Monitoring CloudWatch Cache Cluster and Cache Node
Metrics Using the CloudWatch CLI
To gather CPU utilization statistics for a cache cluster
• Use the CloudWatch command mon-get-stats with the following parameters (note that the start
and end times are shown as examples only; you will need to substitute your own appropriate start
and end times):
For Linux, OS X, or Unix:
mon-get-stats CPUUtilization \
--dimensions="CacheClusterId=mycachecluster,CacheNodeId=0002" \
--statistics=Average \
--namespace="AWS/ElastiCache" \
--start-time 2013-07-05T00:00:00 \
--end-time 2013-07-06T00:00:00 \
--period=60
For Windows:
mon-get-stats CPUUtilization ^
--dimensions="CacheClusterId=mycachecluster,CacheNodeId=0002" ^
--statistics=Average ^
--namespace="AWS/ElastiCache" ^
--start-time 2013-07-05T00:00:00 ^
--end-time 2013-07-06T00:00:00 ^
--period=60
Monitoring CloudWatch Cache Cluster and Cache Node
Metrics Using the CloudWatch API
To gather CPU utilization statistics for a cache cluster
• Call the CloudWatch API GetMetricStatistics with the following parameters (note that the
start and end times are shown as examples only; you will need to substitute your own appropriate
start and end times):
•Statistics.member.1=Average
•Namespace=AWS/ElastiCache
•StartTime=2013-07-05T00:00:00
•EndTime=2013-07-06T00:00:00
•Period=60
•MeasureName=CPUUtilization
•Dimensions=CacheClusterId=mycachecluster,CacheNodeId=0002
API Version 2015-02-02
317

Amazon ElastiCache User Guide
Monitoring CloudWatch Cache
Cluster and Cache Node Metrics
Example
http://monitoring.amazonaws.com/
?SignatureVersion=4
&Action=GetMetricStatistics
&Version=2014-12-01
&StartTime=2013-07-16T00:00:00
&EndTime=2013-07-16T00:02:00
&Period=60
&Statistics.member.1=Average
&Dimensions.member.1="CacheClusterId=mycachecluster"
&Dimensions.member.2="CacheNodeId=0002"
&Namespace=AWS/ElastiCache
&MeasureName=CPUUtilization
&Timestamp=2013-07-07T17%3A48%3A21.746Z
&AWSAccessKeyId=<AWS Access Key ID>
&Signature=<Signature>
API Version 2015-02-02
318

Amazon ElastiCache User Guide
Monitoring Events
Monitoring ElastiCache Events
When significant events happen on a cache cluster, such as a failure to add a node, success in adding
a node, the modification of a security group and others, ElastiCache sends notification to a specific
Amazon SNS topic. By monitoring for key events you can know the current state of your clusters and,
depending upon the event, be able to take corrective action.
Topics
•Managing ElastiCache Amazon SNS Notifications (p. 319)
•Viewing ElastiCache Events (p. 323)
•Event Notifications and Amazon SNS (p. 324)
Managing ElastiCache Amazon SNS Notifications
You can configure ElastiCache to send notifications for important cluster events using Amazon Simple
Notification Service (Amazon SNS). In these examples, you will configure a cluster with the Amazon
Resource Name (ARN) of an Amazon SNS topic to receive notifications.
Note
This topic assumes that you've signed up for Amazon SNS and have set up and subscribed to
an Amazon SNS topic. For information on how to do this, see the Amazon Simple Notification
Service Developer Guide.
Adding an Amazon SNS Topic
The following sections show you how to add an Amazon SNS topic using the AWS Console, the AWS
CLI, or the ElastiCache API.
Adding an Amazon SNS Topic (Console)
The following procedure shows you how to add an Amazon SNS topic for a cluster. To add an Amazon
SNS topic for a replication group, in step 2, instead of selecting a cluster, select a replication group
then follow the same remaining steps.
Note
This process can also be used to modify the Amazon SNS topic.
To add or modify an Amazon SNS topic for a cluster (Console)
1. Sign in to the AWS Management Console and open the ElastiCache console at https://
console.aws.amazon.com/elasticache/.
2. In the Cache Clusters list, select the cluster for which you want to add or modify an Amazon SNS
topic ARN.
3. Select the Modify button.
The Modify Cache Cluster window appears.
4. In the Topic for SNS Notification select the SNS topic you want to add, or select Manual ARN
input and enter the ARN of the Amazon SNS topic.
5. Select the Modify button.
Adding an Amazon SNS Topic (AWS CLI)
To add or modify an Amazon SNS topic for a cluster, use the AWS CLI command modify-cache-
cluster. To add or modify an Amazon SNS topic for a replication group, use the AWS CLI command
modify-replication-group.
API Version 2015-02-02
319

Amazon ElastiCache User Guide
Managing ElastiCache Amazon SNS Notifications
The following code example adds an Amazon SNS topic arn to my-cache-cluster.
For Linux, OS X, or Unix:
aws elasticache modify-cache-cluster \
--cache-cluster-id my-cache-cluster \
--notification-topic-arn arn:aws:sns:us-
west-2:565419523791:ElastiCacheNotifications
For Windows:
aws elasticache modify-cache-cluster ^
--cache-cluster-id my-cache-cluster ^
--notification-topic-arn arn:aws:sns:us-
west-2:565419523791:ElastiCacheNotifications
For more information, see modify-cache-cluster and modify-replication-group.
Adding an Amazon SNS Topic (ElastiCache API)
To add or modify an Amazon SNS topic for a cluster, call the ModifyCacheCluster action with the
following parameters:
•CacheClusterId=my-cache-cluster
•TopicArn=arn%3Aaws%3Asns%3Aus-
west-2%3A565419523791%3AElastiCacheNotifications
To add or modify an Amazon SNS topic for a replication group, call the ModifyReplicationGroup
action.
Example
https://elasticache.amazon.com/
?Action=ModifyCacheCluster
&ApplyImmediately=false
&CacheClusterId=my-cache-cluster
&NotificationTopicArn=arn%3Aaws%3Asns%3Aus-
west-2%3A565419523791%3AElastiCacheNotifications
&Version=2014-12-01
&SignatureVersion=4
&SignatureMethod=HmacSHA256
&Timestamp=20141201T220302Z
&X-Amz-Algorithm=AWS4-HMAC-SHA256
&X-Amz-Date=20141201T220302Z
&X-Amz-SignedHeaders=Host
&X-Amz-Expires=20141201T220302Z
&X-Amz-Credential=<credential>
&X-Amz-Signature=<signature>
For more information, see ModifyCacheCluster and ModifyReplicationGroup.
Enabling and Disabling Amazon SNS Notifications
You can turn notifications on or off for a cluster. The following procedures show you how to disable
Amazon SNS notifications.
API Version 2015-02-02
320

Amazon ElastiCache User Guide
Managing ElastiCache Amazon SNS Notifications
Enabling and Disabling Amazon SNS Notifications (Console)
To disable Amazon SNS notifications using the AWS Management Console
1. Sign in to the AWS Management Console and open the ElastiCache console at https://
console.aws.amazon.com/elasticache/.
2. In the Cache Clusters list, select the Modify link next to the cluster to which you want to disable
an Amazon SNS topic ARN.
The Modify Cache Cluster window appears.
3. In the Topic for SNS Notification list, select Disable Notifications.
4. Select the Modify button.
Enabling and Disabling Amazon SNS Notifications (AWS CLI)
To disable Amazon SNS notifications, use the command modify-cache-cluster with the following
parameters:
For Linux, OS X, or Unix:
aws elasticache modify-cache-cluster \
--cache-cluster-id my-cache-cluster \
--notification-topic-status inactive
For Windows:
aws elasticache modify-cache-cluster ^
--cache-cluster-id my-cache-cluster ^
--notification-topic-status inactive
This command produces output similar to the following:
CACHECLUSTER my-cache-cluster 2013-07-26T01:21:46.607Z cache.m1.large
memcached
available 3 us-west-2c 1.4.5
SECGROUP default active
PARAMGRP default.memcached1.4 in-sync
NOTIFICATION arn:aws:sns:us-west-2:565419523791:ElastiCacheNotifications
inactive
Enabling and Disabling Amazon SNS Notifications (ElastiCache API)
To disable Amazon SNS notifications, call the ModifyCacheCluster action with the following
parameters:
•CacheClusterId=my-cache-cluster
•NotificationTopicStatus=inactive
This call returns output similar to the following:
API Version 2015-02-02
321

Amazon ElastiCache User Guide
Managing ElastiCache Amazon SNS Notifications
Example
https://elasticache.us-west-2.amazonaws.com/
?Action=ModifyCacheCluster
&ApplyImmediately=false
&CacheClusterId=my-cache-cluster
&NotificationTopicStatus=inactive
&Version=2014-12-01
&SignatureVersion=4
&SignatureMethod=HmacSHA256
&Timestamp=20141201T220302Z
&X-Amz-Algorithm=AWS4-HMAC-SHA256
&X-Amz-Date=20141201T220302Z
&X-Amz-SignedHeaders=Host
&X-Amz-Expires=20141201T220302Z
&X-Amz-Credential=<credential>
&X-Amz-Signature=<signature>
API Version 2015-02-02
322

Amazon ElastiCache User Guide
Viewing ElastiCache Events
Viewing ElastiCache Events
ElastiCache logs events that relate to your cache instances, cache security groups, and cache
parameter groups. This information includes the date and time of the event, the source name and
source type of the event, and a description of the event. You can easily retrieve events from the log
using the ElastiCache console, the AWS CLI describe-events command, or the ElastiCache API
action DescribeEvents.
The following procedures show you how to view all ElastiCache events for the past 24 hours (1440
minutes).
Viewing ElastiCache Events (Console)
The following procedure displays events using the ElastiCache console.
To view events using the ElastiCache console
1. Sign in to the AWS Management Console and open the ElastiCache console at https://
console.aws.amazon.com/elasticache/.
2. In the left navigation pane, select Cache Events.
The Cache Events screen appears listing all available events. Each row of the list represents
one event and displays the event source, the event type (cache-cluster, cache-parameter-group,
cache-subnet-group), the GMT time of the event, and the description of the event.
Using the Filter you can specify whether you want to see all events, or just events of a specific
type in the event list.
Viewing ElastiCache Events (AWS CLI)
To generate a list of ElastiCache events using the AWS CLI, use the command describe-events.
You can use optional parameters to control the type of events listed, the time frame of the events
listed, the maximum number of events to list, and more.
The following code lists the 40 most recent cache-cluster events.
aws elasticache describe-events --source-type cache-cluster --max-items 40
The following code lists the cache-cluster events for the past 24 hours (1440 minutes).
aws elasticache describe-events --source-type cache-cluster --duration 1440
For more information, go to describe-events.
Viewing ElastiCache Events (ElastiCache API)
To generate a list of ElastiCache events using the ElastiCache API, use the DescribeEvents action.
You can use optional parameters to control the type of events listed, the time frame of the events
listed, the maximum number of events to list, and more.
The following code lists the 40 most recent cache-cluster events.
https://elasticache.us-west-2.amazonaws.com/
?Action=DescribeEvents
&MaxRecords=40
&SignatureVersion=4
API Version 2015-02-02
323

Amazon ElastiCache User Guide
Event Notifications and Amazon SNS
&SignatureMethod=HmacSHA256
&SourceType=cache-cluster
&Timestamp=20150202T192317Z
&Version=2015-02-02
&X-Amz-Credential=<credential>
The following code lists the cache-cluster events for the past 24 hours (1440 minutes).
https://elasticache.us-west-2.amazonaws.com/
?Action=DescribeEvents
&Duration=1440
&SignatureVersion=4
&SignatureMethod=HmacSHA256
&SourceType=cache-cluster
&Timestamp=20150202T192317Z
&Version=2015-02-02
&X-Amz-Credential=<credential>
The above actions should produce output similar to the following.
<DescribeEventsResponse xmlns="http://elasticache.amazonaws.com/
doc/2015-02-02/">
<DescribeEventsResult>
<Events>
<Event>
<Message>Cache cluster created</Message>
<SourceType>cache-cluster</SourceType>
<Date>2015-02-02T18:22:18.202Z</Date>
<SourceIdentifier>my-redis-primary</SourceIdentifier>
</Event>
(...output omitted...)
</Events>
</DescribeEventsResult>
<ResponseMetadata>
<RequestId>e21c81b4-b9cd-11e3-8a16-7978bb24ffdf</RequestId>
</ResponseMetadata>
</DescribeEventsResponse>
For more information, go to DescribeEvents.
Event Notifications and Amazon SNS
ElastiCache can publish messages using Amazon Simple Notification Service (SNS) when significant
events happen on a cache cluster. This feature can be used to refresh the server-lists on client
machines connected to individual cache node endpoints of a cache cluster.
Note
For more information on Amazon Simple Notification Service (SNS), including information on
pricing and links to the Amazon SNS documentation, go to the Amazon SNS product page.
Notifications are published to a specified Amazon SNS topic. The following are requirements for
notifications:
• Only one topic can be configured for ElastiCache notifications.
• The AWS account that owns the Amazon SNS topic must be the same account that owns the cache
cluster on which notifications are enabled.
API Version 2015-02-02
324

Amazon ElastiCache User Guide
Event Notifications and Amazon SNS
Example ElastiCache SNS Notification
The following example shows an ElastiCache Amazon SNS notification for successfully creating a
cache cluster.
Example
{
"Date": "2015-12-05T01:02:18.336Z",
"Message": "Cache cluster created",
"SourceIdentifier": "memcache-ni",
"SourceType": "cache-cluster"
}
ElastiCache Events
The following ElastiCache events trigger Amazon SNS notifications:
Event Name Message Description
ElastiCache:AddCacheNodeComplete"Finished modifying
number of nodes from %d
to %d"
A cache node has been added
to the cache cluster and is ready
for use.
ElastiCache:AddCacheNodeFailed
due to insufficient free IP
addresses
"Failed to modify number
of nodes from %d to %d
due to insufficient free
IP addresses"
A cache node could not be
added because there are not
enough available IP addresses.
ElastiCache:CacheClusterParametersChanged"Updated parameter %s to
%s"
In case of create, also send
"Updated to use a
CacheParameterGroup %s"
One or more cache cluster
parameters have been changed.
ElastiCache:CacheClusterProvisioningComplete"Cache cluster created" The provisioning of a cache
cluster is completed, and the
cache nodes in the cache cluster
are ready to use.
ElastiCache:CacheClusterProvisioningFailed
due to incompatible network
state
"Failed to create the
cache cluster due to
incompatible network
state"
An attempt was made to launch
a new cache cluster into a
nonexistent virtual private cloud
(VPC).
ElastiCache:CacheClusterRestoreFailed"Restore from %s failed
for node %s"
ElastiCache was unable to
populate the cache cluster
with Redis snapshot data. This
could be due to a nonexistent
snapshot file in Amazon S3,
or incorrect permissions on
that file. If you describe the
cache cluster, the status will
be restore-failed. You will
need to delete the cache cluster
and start over.
API Version 2015-02-02
325

Amazon ElastiCache User Guide
Event Notifications and Amazon SNS
Event Name Message Description
For more information, see
Using a Snapshot to Seed a
Cluster (p. 218).
ElastiCache:CacheClusterSecurityGroupModified"Applied change to
security group"
One of the following events has
occurred:
• The list of cache security
groups authorized for the
cache cluster has been
modified.
• One or more new EC2
security groups have been
authorized on any of the
cache security groups
associated with the cache
cluster.
• One or more EC2 security
groups have been revoked
from any of the cache security
groups associated with the
cache cluster.
ElastiCache:CacheNodeReplaceComplete"Finished recovery for
cache nodes %s"
ElastiCache has detected that
the host running a cache node
is degraded or unreachable and
has completed replacing the
cache node.
Note
The DNS entry for the
replaced cache node is
not changed.
In most instances, you do not
need to refresh the server-
list for your clients when this
event occurs. However, some
cache client libraries may stop
using the cache node even
after ElastiCache has replaced
the cache node; in this case,
the application should refresh
the server-list when this event
occurs.
ElastiCache:CacheNodesRebooted"Cache node %s
restarted"
One or more cache nodes has
been rebooted.
Message (Memcached): "Cache
node %s shutdown" Then a
second message: "Cache node
%s restarted"
ElastiCache:CreateReplicationGroupComplete"Replication group %s
created"
The replication group was
successfully created.
API Version 2015-02-02
326

Amazon ElastiCache User Guide
Event Notifications and Amazon SNS
Event Name Message Description
ElastiCache:CreateReplicationGroupFailed"Failed to create
replication group %s
due to unsuccessful
creation of its cache
cluster(s)." and
"Deleting all cache
clusters belonging to
this replication group."
The replication group was not
created.
ElastiCache:DeleteCacheClusterComplete"Cache cluster deleted" The deletion of a cache cluster
and all associated cache nodes
has completed.
ElastiCache:NodeReplacementCanceled"The replacement for
Cache Cluster ID: %s,
Node ID: %s scheduled
during the maintenance
window from Start Time:
%s, End Time: %s has
been canceled"
A node in your cluster that was
scheduled for replacement
is no longer scheduled for
replacement.
ElastiCache:NodeReplacementRescheduled"The replacement in
maintenance window for
node with Cache Cluster
ID: %s, Node ID: %s
has re-scheduled from
Previous Start Time: %s,
Previous End Time: %s to
New Start Time: %s, New
End Time: %s""
A node in your cluster previously
scheduled for replacement
has been rescheduled for
replacement during the new
window described in the
notification.
For information on what
actions you can take, go to
Actions You Can Take When
a Node is Scheduled for
Replacement (p. 79).
ElastiCache:NodeReplacementScheduled"The node with Cache
Cluster ID: %s, Node
ID: %s is scheduled for
replacement during the
maintenance window from
Start Time: %s, End
Time: %s"
A node in your cluster is
scheduled for replacement
during the window described in
the notification.
For information on what
actions you can take, go to
Actions You Can Take When
a Node is Scheduled for
Replacement (p. 79).
ElastiCache:RemoveCacheNodeComplete"Removed cache nodes %s" A cache node has been
removed from the cache cluster.
ElastiCache:SnapshotComplete "Snapshot succeeded for
snapshot with ID '%s'
of cache cluster with ID
'%s'"
A cache snapshot has
completed successfully.
API Version 2015-02-02
327

Amazon ElastiCache User Guide
Event Notifications and Amazon SNS
Event Name Message Description
ElastiCache:SnapshotFailed "Snapshot failed for
snapshot with ID '%s'
of cache cluster with ID
'%s'"
A cache snapshot has failed.
See the cluster’s cache events
for more a detailed cause.
If you describe the snapshot,
see DescribeSnapshots, the
status will be failed.
For information on viewing ElastiCache events, see Viewing ElastiCache Events (p. 323).
API Version 2015-02-02
328

Amazon ElastiCache User Guide
Monitoring Costs
Monitoring Costs with Cost Allocation Tags
When you add cost allocation tags to your resources in Amazon ElastiCache, you can track costs by
grouping expenses on your invoices by resource tag values.
An ElastiCache cost allocation tag is a key-value pair that you define and associate with an
ElastiCache resource. The key and value are case-sensitive. A tag key can be used to define a
category, and the tag value can be an item in that category. For example, you might define a tag key
of CostCenter and a tag value of 10010, indicating that the resource is assigned to the 10010 cost
center. You can also use tags to designate resources as being used for test or production by using a
key such as Environment and values such as test or production. We recommend that you use a
consistent set of tag keys to make it easier to track costs associated with your resources.
Use cost allocation tags to organize your AWS bill to reflect your own cost structure. To do this, sign
up to get your AWS account bill with tag key values included. Then, to see the cost of combined
resources, organize your billing information according to resources with the same tag key values. For
example, you can tag several resources with a specific application name, and then organize your billing
information to see the total cost of that application across several services.
You can also combine tags to track costs at a greater level of detail. For example, to track your service
costs by region you might use the tag keys Service and Region. On one resource you might have
the values ElastiCache and Asia Pacific (Singapore), and on another resource the values
ElastiCache and EU (Frankfurt). You can then see your total ElastiCache costs, but also see
them broken out by region. For more information, go to Use Cost Allocation Tags in the AWS Billing
and Cost Management User Guide.
You can add ElastiCache cost allocation tags to clusters and snapshots. When you add, list, modify,
copy, or remove a tag, the action is applied only to the specified cluster or snapshot, even if it is a
cluster in a replication group.
Tags added to snapshots are not used for cost allocation reports. Tags on snapshots are used to retain
or restore tags on clusters. When you create a snapshot, the tags on the cluster are copied to the
snapshot. When you restore from a snapshot, the tags on the snapshot are copied to the cluster.
Characteristics of an ElastiCache cost allocation tags
• The tag key is the required name of the tag. The key's string value can be from 1 to 128 Unicode
characters long and cannot be prefixed with "aws:". The string can contain only the set of Unicode
letters, digits, white-space, '_', '.', ':', '/', '=', '+', '-', and '@'.
• The tag value is the optional value of the tag. The value's string value can be from 1 to 256 Unicode
characters in length and cannot be prefixed with "aws:". The string can contain only the set of
Unicode letters, digits, white-space, '_', '.', ':', '/', '=', '+', '-', and '@'.
• A resource can have a maximum of 10 tags.
• Values do not have to be unique in a tag set. For example, you can have a tag set where the keys
Service and Application both have the value ElastiCache.
AWS does not apply any semantic meaning to your tags; tags are interpreted strictly as character
strings. AWS does not automatically set any tags on any ElastiCache resource.
You can add, list, modify, or remove tags from an ElastiCache resource by using the ElastiCache
management console, AWS CLI, or ElastiCache API.
Important
Amazon ElastiCache tagging is not supported by the ElastiCache CLI. Use the AWS CLI for
ElastiCache instead.
Topics
API Version 2015-02-02
329

Amazon ElastiCache User Guide
Monitoring Costs
•Adding Tags to Your ElastiCache Resource (p. 331)
•Listing Your ElastiCache Resource's Tags (p. 333)
•Modifying Your ElastiCache Resource's Tags (p. 335)
•Removing Tags from Your ElastiCache Resource (p. 336)
•Copying Tags to Your ElastiCache Resource (p. 337)
API Version 2015-02-02
330

Amazon ElastiCache User Guide
Adding Tags to Your ElastiCache Resource
Adding Tags to Your ElastiCache Resource
You can add tags to an ElastiCache resource by using the ElastiCache management console, AWS
CLI, or ElastiCache API.
Topics
•Adding Tags to Your ElastiCache Resource (Console) (p. 331)
•Adding Tags to Your ElastiCache Resource (AWS CLI) (p. 332)
•Adding Tags to Your ElastiCache Resource (ElastiCache API) (p. 333)
Adding Tags to Your ElastiCache Resource (Console)
You can use the ElastiCache management console to add tags to an ElastiCache resource. A resource
can have a maximum of 10 tags.
To add a tag to an ElastiCache resource using the ElastiCache management console
1. Sign in to the AWS Management Console and open the Amazon ElastiCache console at https://
console.aws.amazon.com/elasticache/.
2. Depending what ElastiCache resource you want to add a tag to, click Clusters or Snapshots.
3. Select the ElastiCache resource you want to add a tag to.
After you select the resource, you can see the tag names and values currently on this resource at
the bottom of the details area.
4. Click Manage Tags at the top of the screen.
5. To add a tag to this resource, do the following in the Manage Tags dialog box:
1. In the Key column, type a key name in the text box that displays Add key.
2. To add value to this key, type the key's value in the text box in the Value column at the key
name's right.
To add multiple tags to this resource, repeat the preceding procedure for each tag you want to
add.
If you enter a tag key you don't want to add to this resource, click the X to the right of the tag to
delete it.
API Version 2015-02-02
331
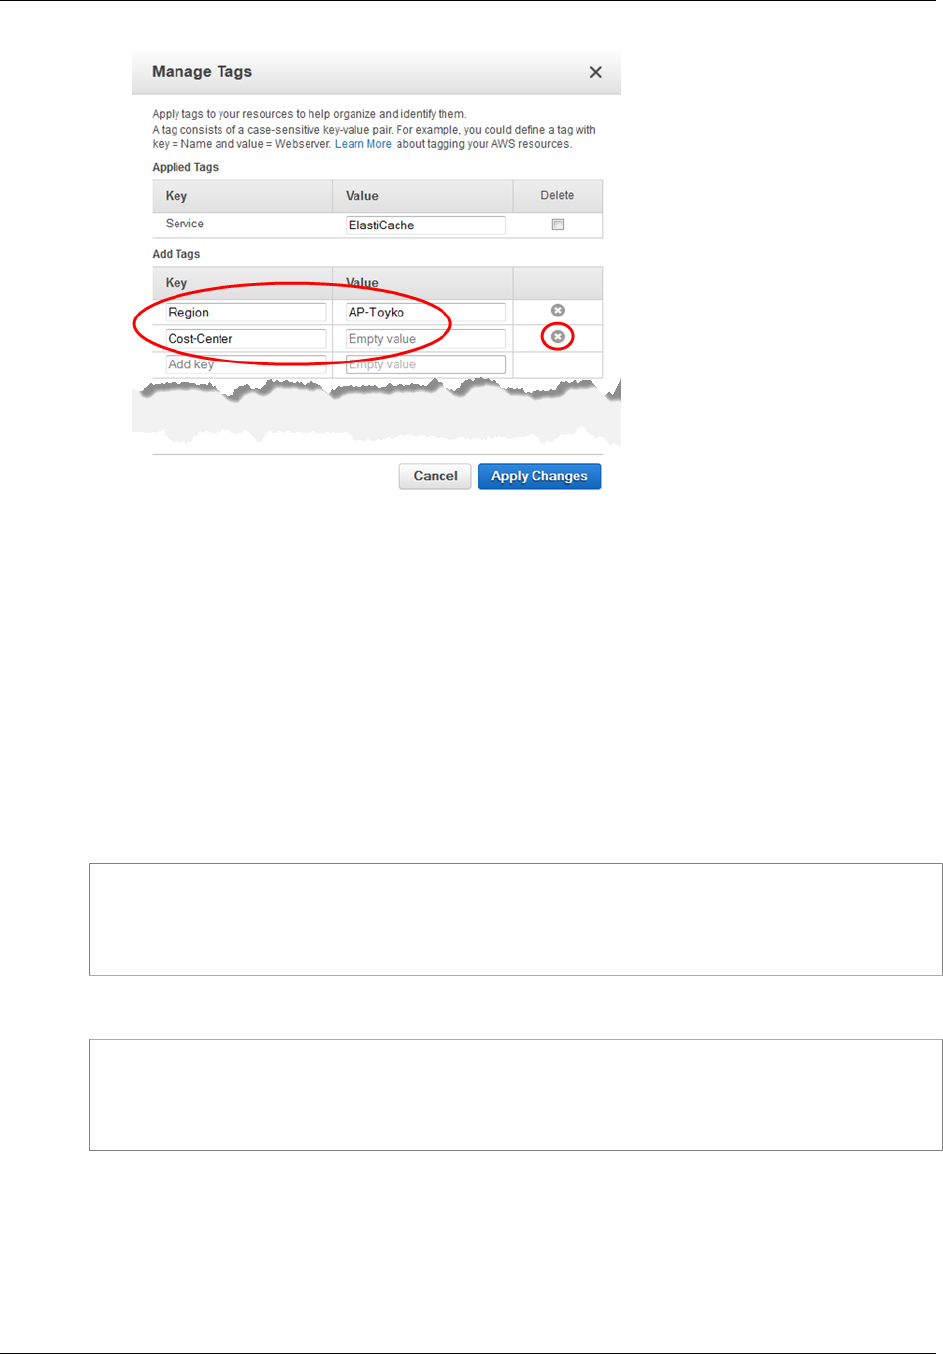
Amazon ElastiCache User Guide
Adding Tags to Your ElastiCache Resource
6. When finished, click Apply Changes to keep your changes, or Cancel to discard your changes.
Adding Tags to Your ElastiCache Resource (AWS CLI)
You can use the AWS CLI to add tags to an existing ElastiCache resource by using the add-tags-
to-resource AWS CLI for ElastiCache command.
The following code uses the AWS CLI to add the keys Service and Region with the values
elasticache and us-west-2 respectively to the resource myCluster in the us-west-2 region.
The resource-name parameter value is in the format of an ARN:
arn:aws:elasticache:<region>:<customer id>:<resource type>:<resource name>
For Linux, OS X, or Unix:
aws elasticache add-tags-to-resource \
--resource-name arn:aws:elasticache:us-west-2:0123456789:cluster:myCluster \
--tags Key=Service,Value=elasticache \
Key=Region,Value=us-west-2
For Windows:
aws elasticache add-tags-to-resource ^
--resource-name arn:aws:elasticache:us-west-2:0123456789:cluster:myCluster ^
--tags Key=Service,Value=elasticache ^
Key=Region,Value=us-west-2
For more information, go to AWS CLI for ElastiCache add-tags-to-resource.
You can also use the AWS CLI to add tags to a cluster when you create a new cluster by using the
command create-cache-cluster, or when you create a new replication group by using the command
create-replication-group. Note that you cannot add tags during resource creation with the ElastiCache
management console. After the cluster or replication group is created, you can then use the console to
add tags to the resource.
API Version 2015-02-02
332

Amazon ElastiCache User Guide
Listing Your ElastiCache Resource's Tags
Adding Tags to Your ElastiCache Resource (ElastiCache API)
You can use the ElastiCache API to add tags to an existing ElastiCache resource by using the
AddTagsToResource action.
The following code uses the ElastiCache API to add the keys Service and Region with the values
elasticache and us-west-2 respectively to the resource myCluster in the us-west-2 region.
The ResourceName parameter value is in the format of an ARN:
arn:aws:elasticache:<region>:<customer id>:<resource type>:<resource name>
https://elasticache.us-west-2.amazonaws.com/
?Action=AddTagsToResource
&ResourceName=arn:aws:elasticache:us-west-2:0123456789:cluster:myCluster
&SignatureVersion=4
&SignatureMethod=HmacSHA256
&Tags.member.1.Key=Service
&Tags.member.1.Value=elasticache
&Tags.member.2.Key=Region
&Tags.member.2.Value=us-west-2
&Version=2015-02-02
&Timestamp=20150202T192317Z
&X-Amz-Credential=<credential>
For more information, go to AddTagsToResource in the ElastiCache API documentation.
Listing Your ElastiCache Resource's Tags
You can use the ElastiCache management console, AWS CLI, or ElastiCache API to list all the tags on
a specified resource.
Topics
•Listing Your ElastiCache Resource's Tags (Console) (p. 333)
•Listing Your ElastiCache Resource's Tags (AWS CLI) (p. 334)
•Listing Your ElastiCache Resource's Tags (ElastiCache API) (p. 334)
Listing Your ElastiCache Resource's Tags (Console)
You can use the ElastiCache management console to view which tags are on a resource.
To view the tags on a resource using the ElastiCache management console
1. Sign in to the AWS Management Console and open the Amazon ElastiCache console at https://
console.aws.amazon.com/elasticache/.
2. Depending on the type of resource for which you want to see the current tags, click Clusters or
Snapshots.
3. Select the ElastiCache resource for which you want to see the tag list.
The tags currently on this resource are listed at the bottom of the details area.
API Version 2015-02-02
333
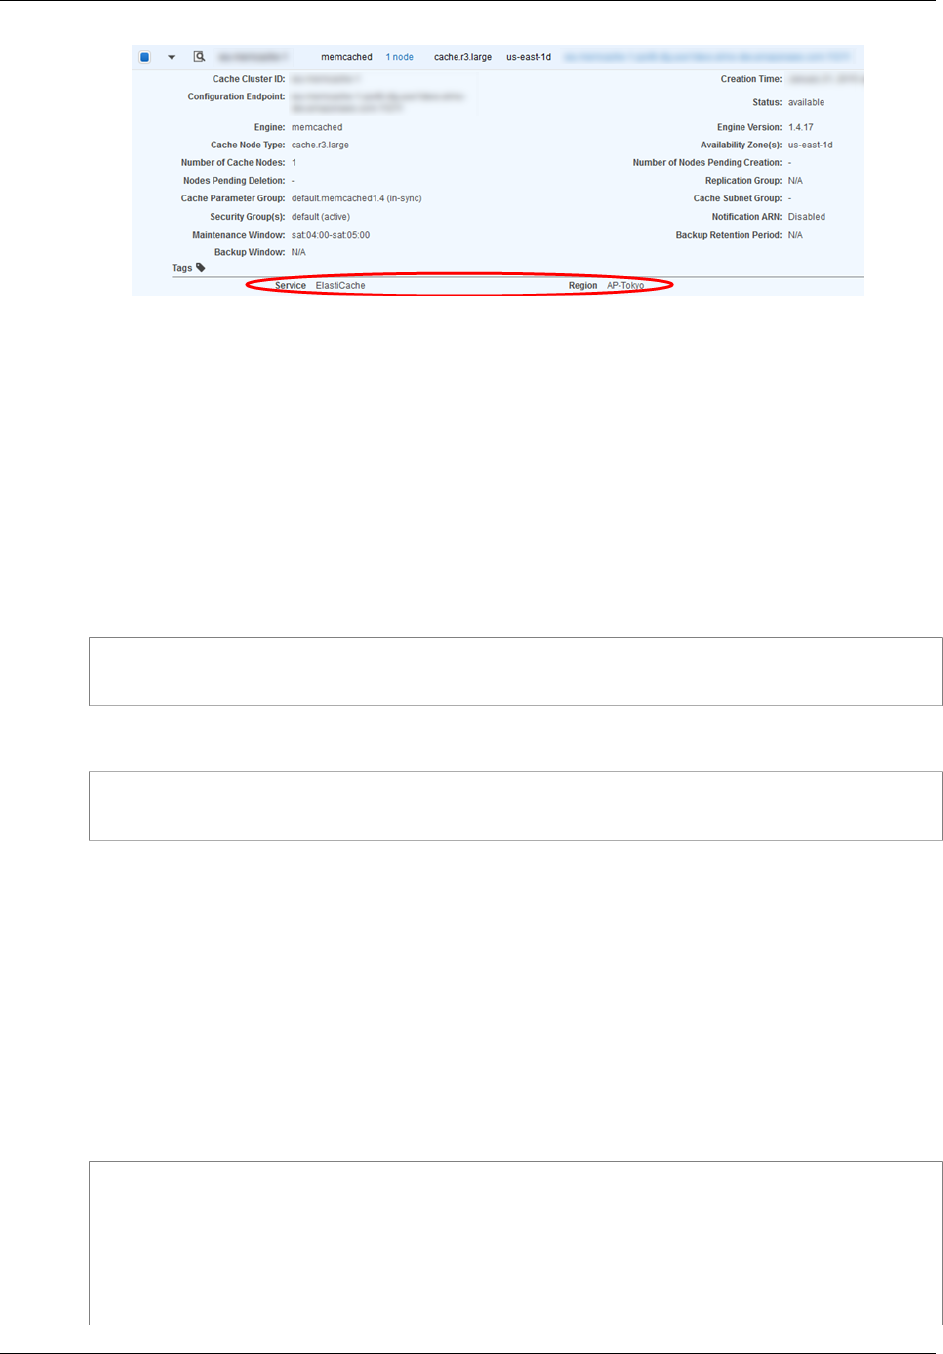
Amazon ElastiCache User Guide
Listing Your ElastiCache Resource's Tags
Listing Your ElastiCache Resource's Tags (AWS CLI)
You can use the AWS CLI to list tags on an existing ElastiCache resource by using the list-tags-for-
resource command.
The following code uses the ElastiCache AWS CLI to list the tags on the resource myCluster in the
us-west-2 region.
The resource-name parameter value is in the format of an ARN:
arn:aws:elasticache:<region>:<customer id>:<resource type>:<resource name>
For Linux, OS X, or Unix:
aws elasticache list-tags-for-resource \
--resource-name arn:aws:elasticache:us-west-2:0123456789:cluster:myCluster
For Windows:
aws elasticache list-tags-for-resource ^
--resource-name arn:aws:elasticache:us-west-2:0123456789:cluster:myCluster
For more information, go to AWS CLI for ElastiCache list-tags-for-resource.
Listing Your ElastiCache Resource's Tags (ElastiCache API)
You can use the ElastiCache API to list tags on an existing resource by using the ListTagsForResource
action.
The following code uses the ElastiCache API to list the tags on the resource myCluster in the us-
west-2 region.
The ResourceName parameter value is in the format of an ARN:
arn:aws:elasticache:<region>:<customer id>:<resource type>:<resource name>
https://elasticache.us-west-2.amazonaws.com/
?Action=ListTagsForResource
&ResourceName=arn:aws:elasticache:us-west-2:0123456789:cluster:myCluster
&SignatureVersion=4
&SignatureMethod=HmacSHA256
&Version=2015-02-02
&Timestamp=20150202T192317Z
API Version 2015-02-02
334
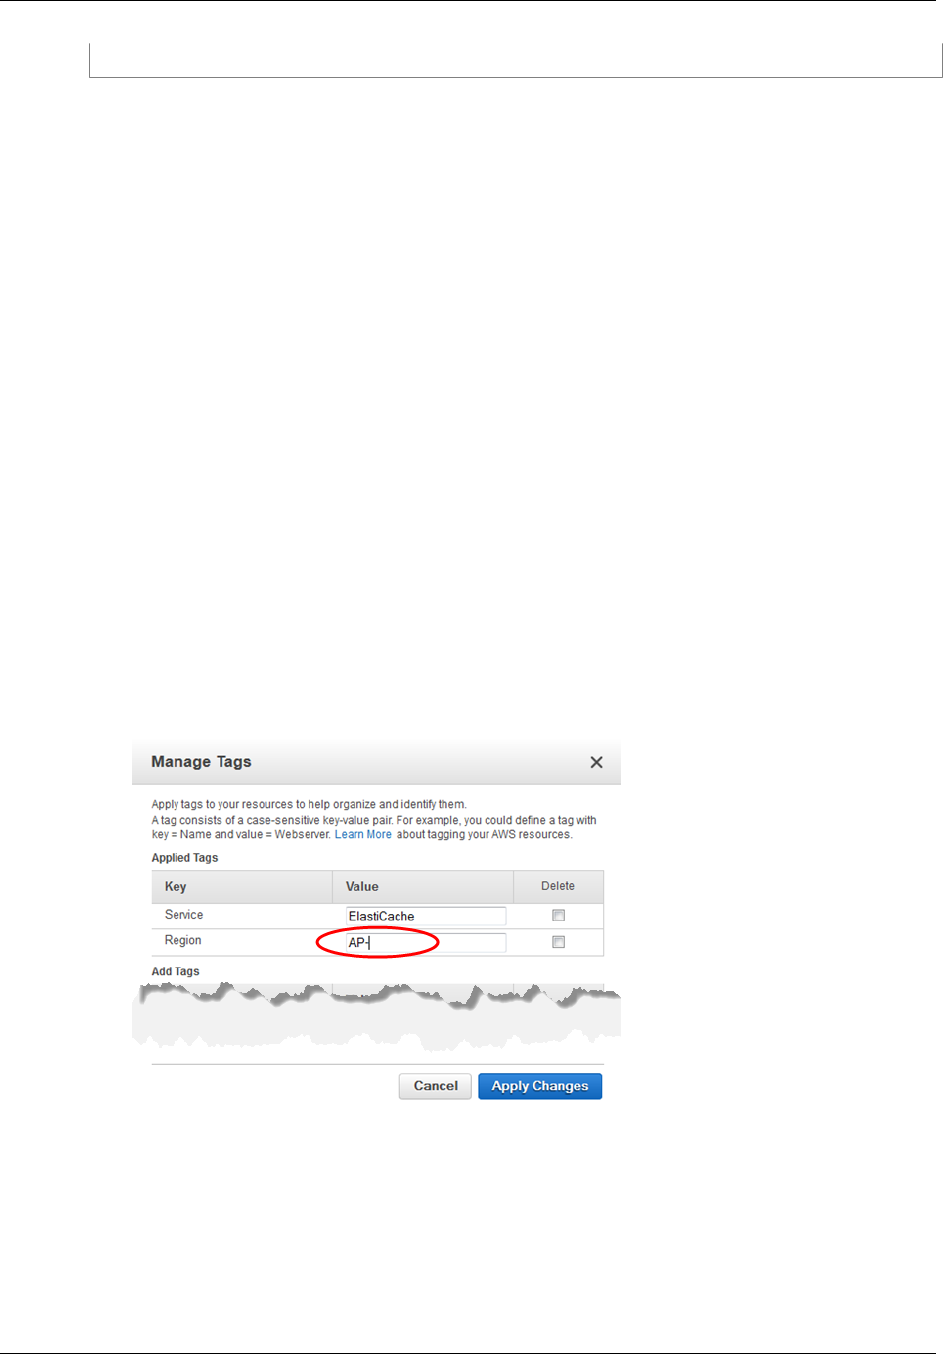
Amazon ElastiCache User Guide
Modifying Your ElastiCache Resource's Tags
&X-Amz-Credential=<credential>
Modifying Your ElastiCache Resource's Tags
You can modify the existing tags on an ElastiCache resource by using the ElastiCache management
console, AWS CLI, or ElastiCache API.
Topics
•Modifying Your ElastiCache Resource's Tags (Console) (p. 335)
•Modifying Your ElastiCache Resource's Tags (AWS CLI) (p. 335)
•Modifying Your ElastiCache Resource's Tags (ElastiCache API) (p. 336)
Modifying Your ElastiCache Resource's Tags (Console)
You can use the ElastiCache management console to modify existing tags on a resource.
To modify a tag on an ElastiCache resource using the ElastiCache management console
1. Sign in to the AWS Management Console and open the Amazon ElastiCache console at https://
console.aws.amazon.com/elasticache/.
2. Depending what ElastiCache resource you want to modify a tag on, click either Clusters or
Snapshots.
3. Select the ElastiCache resource for which you want to modify a tag.
4. Click Manage Tags at the top of the screen.
5. To modify a tag's value, either delete the value in the Value text box to the right of the tag's key
name, or type a value.
6. When finished, click Apply Changes to keep your changes, or Cancel to discard your changes.
Modifying Your ElastiCache Resource's Tags (AWS CLI)
You can use the AWS CLI to modify the tags on an ElastiCache resource.
To modify the value of a tag, use add-tags-to-resource to add the tag with the new value, or use
remove-tags-from-resource to remove specified tags from the resource.
API Version 2015-02-02
335
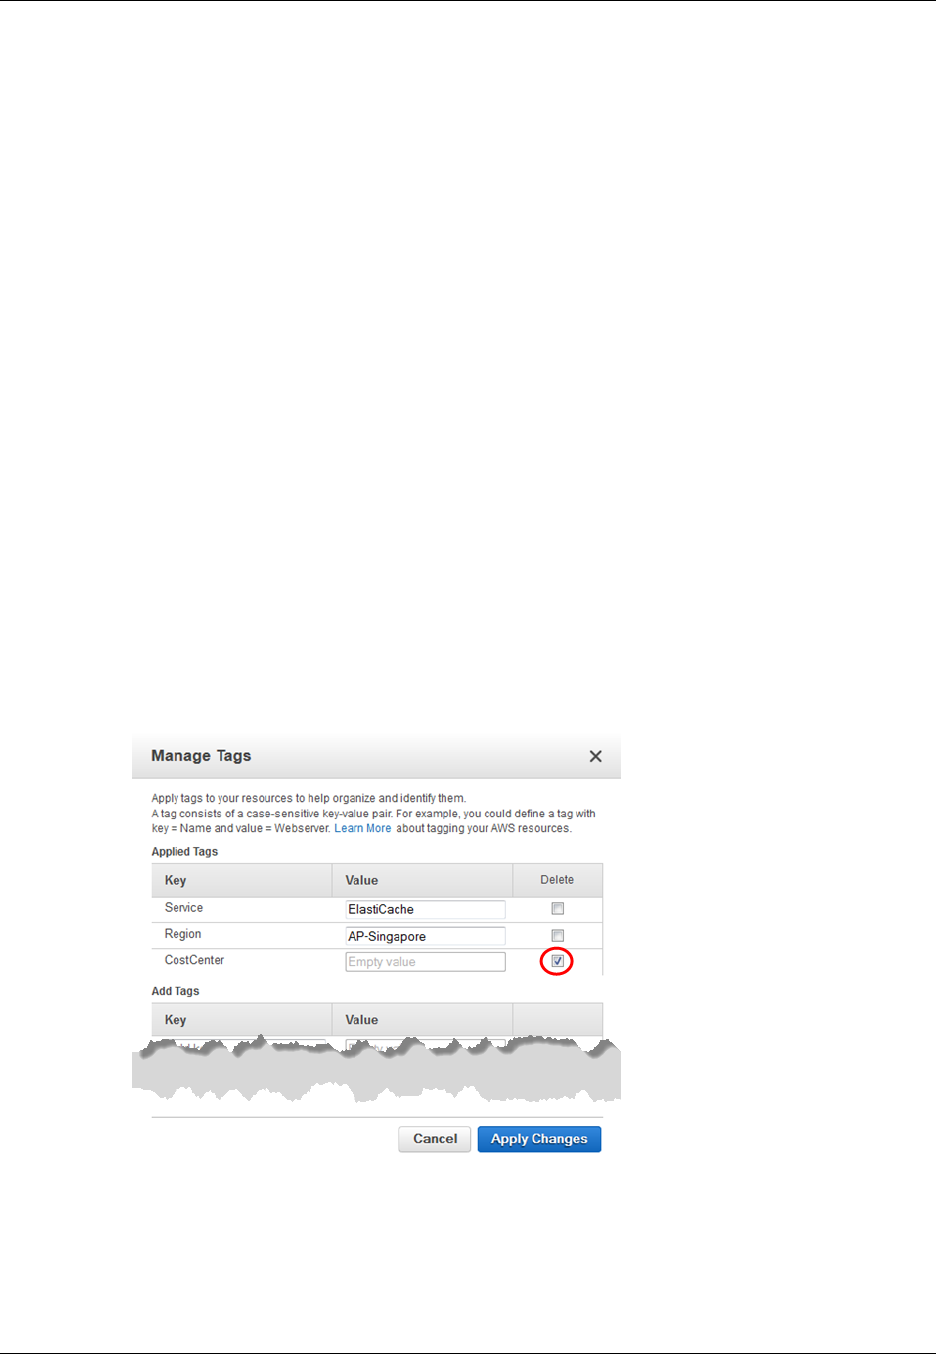
Amazon ElastiCache User Guide
Removing Tags from Your ElastiCache Resource
Modifying Your ElastiCache Resource's Tags (ElastiCache
API)
You can use the ElastiCache API to modify the tags on an ElastiCache resource.
To modify the value of a tag, use AddTagsToResource action to add tags, or use
RemoveTagsFromResource to remove tags from the resource.
Removing Tags from Your ElastiCache Resource
You can remove one or more tags from a resource using the ElastiCache management console, AWS
CLI, or ElastiCache API.
Removing Tags from Your ElastiCache Resource (Console)
You can use the ElastiCache management console to remove tags from an existing ElastiCache
resource.
To remove a tag from an ElastiCache resource using the ElastiCache management
console
1. Sign in to the AWS Management Console and open the Amazon ElastiCache console at https://
console.aws.amazon.com/elasticache/.
2. Depending what ElastiCache resource you want to remove a tag from, click either Clusters or
Snapshots.
3. Select the ElastiCache resource you want to remove a tag from.
4. Click Manage Tags at the top of the screen.
5. For each tag that you want to remove from this resource, click the Delete check box to the right of
the tag.
6. When finished, click Apply Changes to keep your changes, or Cancel to discard your changes.
Removing Tags from Your ElastiCache Resource (AWS CLI)
You can use the AWS CLI to remove tags from an existing ElastiCache resource by using the remove-
tags-from-resource command.
API Version 2015-02-02
336

Amazon ElastiCache User Guide
Copying Tags to Your ElastiCache Resource
The following code uses the AWS CLI to remove the tags with the keys Service and Region from the
resource myCluster in the us-west-2 region.
The resource-name parameter value is in the format of an ARN:
arn:aws:elasticache:<region>:<customer id>:<resource type>:<resource name>
For Linux, OS X, or Unix:
aws elasticache remove-tags-from-resource \
--resource-name arn:aws:elasticache:us-west-2:0123456789:cluster:myCluster \
--tag-keys Service Region
For Windows:
aws elasticache remove-tags-from-resource ^
--resource-name arn:aws:elasticache:us-west-2:0123456789:cluster:myCluster ^
--tag-keys Service Region
For more information, go to AWS CLI for ElastiCache remove-tags-from-resource.
Removing Tags from Your ElastiCache Resource (ElastiCache
API)
You can use the ElastiCache API to remove tags from an existing ElastiCache resource by using the
RemoveTagsFromResource action.
The following code uses the ElastiCache API to remove the tags with the keys Service and Region
from the resource myCluster in the us-west-2 region.
The ResourceName parameter value is in the format of an ARN:
arn:aws:elasticache:<region>:<customer id>:<resource type>:<resource name>
https://elasticache.us-west-2.amazonaws.com/
?Action=RemoveTagsFromResource
&ResourceName=arn:aws:elasticache:us-west-2:0123456789:cluster:myCluster
&SignatureVersion=4
&SignatureMethod=HmacSHA256
&TagKeys.member.1=Service
&TagKeys.member.2=Region
&Version=2015-02-02
&Timestamp=20150202T192317Z
&X-Amz-Credential=<credential>
Copying Tags to Your ElastiCache Resource
When you perform certain operations on your ElastiCache resources using the ElastiCache API or
AWS CLI, if tags exist on the resource the tags are copied. The following list identifies those operations
and what copying occurs.
•CopySnapshot or copy-snapshot – When you make a copy of a snapshot, if there are any tags on
the source snapshot, they are copied to the copy.
•CreateSnapshot or create-snapshot – When you create a snapshot, if there are any tags on the
source cluster, they are copied to the snapshot.
•RestoreFromSnapshot or restore-from-snapshot – When you restore a cluster from a snapshot
created by ElastiCache, if there are any tags on the snapshot, they are copied to the restored
cluster.
API Version 2015-02-02
337

Amazon ElastiCache User Guide
Copying Tags to Your ElastiCache Resource
•DeleteSnapshot or delete-snapshot – When you delete a snapshot, if there are any tags on the
snapshot, they are deleted with the snapshot.
•DeleteCluster or delete-cluster – When you delete a cluster, any tags on the cluster are deleted
with the cluster. However, if you make a final snapshot, the tags are copied to the snapshot.
API Version 2015-02-02
338

Amazon ElastiCache User Guide
Using the Query API
Using the ElastiCache API
This section provides task-oriented descriptions of how to use and implement ElastiCache operations.
For a complete description of these operations, see the Amazon ElastiCache API Reference
Topics
•Using the Query API (p. 339)
•Available Libraries (p. 341)
•Troubleshooting Applications (p. 342)
•Logging Amazon ElastiCache API Calls Using AWS CloudTrail (p. 343)
Using the Query API
Query Parameters
HTTP Query-based requests are HTTP requests that use the HTTP verb GET or POST and a Query
parameter named Action.
Each Query request must include some common parameters to handle authentication and selection of
an action.
Some operations take lists of parameters. These lists are specified using the param.n notation. Values
of n are integers starting from 1.
Query Request Authentication
You can only send Query requests over HTTPS and you must include a signature in every Query
request. This section describes how to create the signature. The method described in the following
procedure is known as signature version 4.
The following are the basic steps used to authenticate requests to AWS. This assumes you are
registered with AWS and have an Access Key ID and Secret Access Key.
Query Authentication Process
1. The sender constructs a request to AWS.
2. The sender calculates the request signature, a Keyed-Hashing for Hash-based Message
Authentication Code (HMAC) with a SHA-1 hash function, as defined in the next section of this
topic.
API Version 2015-02-02
339

Amazon ElastiCache User Guide
Query Request Authentication
3. The sender of the request sends the request data, the signature, and Access Key ID (the key-
identifier of the Secret Access Key used) to AWS.
4. AWS uses the Access Key ID to look up the Secret Access Key.
5. AWS generates a signature from the request data and the Secret Access Key using the same
algorithm used to calculate the signature in the request.
6. If the signatures match, the request is considered to be authentic. If the comparison fails, the
request is discarded, and AWS returns an error response.
Note
If a request contains a Timestamp parameter, the signature calculated for the request expires
15 minutes after its value.
If a request contains an Expires parameter, the signature expires at the time specified by the
Expires parameter.
To calculate the request signature
1. Create the canonicalized query string that you need later in this procedure:
a. Sort the UTF-8 query string components by parameter name with natural byte ordering. The
parameters can come from the GET URI or from the POST body (when Content-Type is
application/x-www-form-urlencoded).
b. URL encode the parameter name and values according to the following rules:
i. Do not URL encode any of the unreserved characters that RFC 3986 defines. These
unreserved characters are A-Z, a-z, 0-9, hyphen ( - ), underscore ( _ ), period ( . ), and
tilde ( ~ ).
ii. Percent encode all other characters with %XY, where X and Y are hex characters 0-9
and uppercase A-F.
iii. Percent encode extended UTF-8 characters in the form %XY%ZA....
iv. Percent encode the space character as %20 (and not +, as common encoding schemes
do).
c. Separate the encoded parameter names from their encoded values with the equals sign ( = )
(ASCII character 61), even if the parameter value is empty.
d. Separate the name-value pairs with an ampersand ( & ) (ASCII code 38).
2. Create the string to sign according to the following pseudo-grammar (the "\n" represents an ASCII
newline).
StringToSign = HTTPVerb + "\n" +
ValueOfHostHeaderInLowercase + "\n" +
HTTPRequestURI + "\n" +
CanonicalizedQueryString <from the preceding step>
The HTTPRequestURI component is the HTTP absolute path component of the URI up to, but not
including, the query string. If the HTTPRequestURI is empty, use a forward slash ( / ).
3. Calculate an RFC 2104-compliant HMAC with the string you just created, your Secret Access Key
as the key, and SHA256 or SHA1 as the hash algorithm.
For more information, go to https://www.ietf.org/rfc/rfc2104.txt.
4. Convert the resulting value to base64.
5. Include the value as the value of the Signature parameter in the request.
For example, the following is a sample request (linebreaks added for clarity).
API Version 2015-02-02
340

Amazon ElastiCache User Guide
Available Libraries
https://elasticache.us-west-2.amazonaws.com/
?Action=DescribeCacheClusters
&CacheClusterIdentifier=myCacheCluster
&SignatureMethod=HmacSHA256
&SignatureVersion=4
&Version=2014-12-01
For the preceding query string, you would calculate the HMAC signature over the following string.
GET\n
elasticache.amazonaws.com\n
Action=DescribeCacheClusters
&CacheClusterIdentifier=myCacheCluster
&SignatureMethod=HmacSHA256
&SignatureVersion=4
&Version=2014-12-01
&X-Amz-Algorithm=AWS4-HMAC-SHA256
&X-Amz-Credential=AKIADQKE4SARGYLE%2F20140523%2Fus-west-2%2Felasticache
%2Faws4_request
&X-Amz-Date=20141201T223649Z
&X-Amz-SignedHeaders=content-type%3Bhost%3Buser-agent%3Bx-amz-content-
sha256%3Bx-amz-date
content-type:
host:elasticache.us-west-2.amazonaws.com
user-agent:CacheServicesAPICommand_Client
x-amz-content-sha256:
x-amz-date:
The result is the following signed request.
https://elasticache.us-west-2.amazonaws.com/
?Action=DescribeCacheClusters
&CacheClusterIdentifier=myCacheCluster
&SignatureMethod=HmacSHA256
&SignatureVersion=4
&Version=2014-12-01
&X-Amz-Algorithm=AWS4-HMAC-SHA256
&X-Amz-Credential=AKIADQKE4SARGYLE/20141201/us-west-2/elasticache/
aws4_request
&X-Amz-Date=20141201T223649Z
&X-Amz-SignedHeaders=content-type;host;user-agent;x-amz-content-sha256;x-
amz-date
&X-Amz-
Signature=2877960fced9040b41b4feaca835fd5cfeb9264f768e6a0236c9143f915ffa56
For detailed information on the signing process and calculating the request signature, see the topic
Signature Version 4 Signing Process and its subtopics.
Available Libraries
AWS provides software development kits (SDKs) for software developers who prefer to build
applications using language-specific APIs instead of the Query API. These SDKs provide basic
API Version 2015-02-02
341

Amazon ElastiCache User Guide
Troubleshooting Applications
functions (not included in the APIs), such as request authentication, request retries, and error handling
so that it is easier to get started. SDKs and additional resources are available for the following
programming languages:
•Java
•Windows and .NET
•PHP
•Python
•Ruby
For information about other languages, go to Sample Code & Libraries.
Troubleshooting Applications
ElastiCache provides specific and descriptive errors to help you troubleshoot problems while
interacting with the ElastiCache API.
Retrieving Errors
Typically, you want your application to check whether a request generated an error before you spend
any time processing results. The easiest way to find out if an error occurred is to look for an Error
node in the response from the ElastiCache API.
XPath syntax provides a simple way to search for the presence of an Error node, as well as an easy
way to retrieve the error code and message. The following code snippet uses Perl and the XML::XPath
module to determine if an error occurred during a request. If an error occurred, the code prints the first
error code and message in the response.
use XML::XPath;
my $xp = XML::XPath->new(xml =>$response);
if ( $xp->find("//Error") )
{print "There was an error processing your request:\n", " Error code: ",
$xp->findvalue("//Error[1]/Code"), "\n", " ",
$xp->findvalue("//Error[1]/Message"), "\n\n"; }
Troubleshooting Tips
We recommend the following processes to diagnose and resolve problems with the ElastiCache API.
• Verify that ElastiCache is running correctly.
To do this, simply open a browser window and submit a query request to the ElastiCache service
(such as https://elasticache.amazonaws.com). A MissingAuthenticationTokenException or 500
Internal Server Error confirms that the service is available and responding to requests.
• Check the structure of your request.
Each ElastiCache operation has a reference page in the ElastiCache API Reference. Double-check
that you are using parameters correctly. In order to give you ideas regarding what might be wrong,
look at the sample requests or user scenarios to see if those examples are doing similar operations.
• Check the forum.
ElastiCache has a discussion forum where you can search for solutions to problems others have
experienced along the way. To view the forum, go to
API Version 2015-02-02
342

Amazon ElastiCache User Guide
Logging API Calls
https://forums.aws.amazon.com/ .
Logging Amazon ElastiCache API Calls Using
AWS CloudTrail
Amazon ElastiCache is integrated with AWS CloudTrail, a service that captures API calls made by or
on behalf of ElastiCache in your AWS account and delivers the log files to an Amazon S3 bucket that
you specify. CloudTrail captures API calls from the ElastiCache console, the ElastiCache API, or the
ElastiCache CLI. Using the information collected by CloudTrail, you can determine what request was
made to ElastiCache, the source IP address from which the request was made, who made the request,
when it was made, and so on.
To learn more about CloudTrail, including how to configure and enable it, go to the AWS CloudTrail
User Guide.
ElastiCache Information in CloudTrail
When CloudTrail logging is enabled in your AWS account, API calls made to ElastiCache actions
are tracked in log files. For example, calls to the CreateCacheCluster, DescribeCacheCluster,
and ModifyCacheCluster APIs generate entries in the CloudTrail log files. All of the ElastiCache
actions are logged. For a full list of ElastiCache actions, go to http://docs.aws.amazon.com/
AmazonElastiCache/latest/APIReference/.
Each log file contains not only ElastiCache records but also other AWS service records. CloudTrail
determines when to create and write to a new log file based on a time period and file size.
Every log entry contains information about who generated the request. The user identity information
in the log helps you determine whether the request was made with root or IAM user credentials, with
temporary security credentials for a role or federated user, or by another AWS service. For more
information, go to the documentation for the userIdentity field in the CloudTrail Event Reference.
You can store your log files in your bucket for as long as you want. You can also define Amazon S3
lifecycle rules to archive or delete log files automatically. By default, your log files are encrypted using
Amazon S3 server-side encryption (SSE).
If you want to take quick action upon log file delivery, you can have CloudTrail publish Amazon SNS
notifications when new log files are delivered. For more information, see Configuring Amazon SNS
Notifications.
You can also aggregate ElastiCache log files from multiple AWS regions and multiple AWS accounts
into a single Amazon S3 bucket. For more information, see Aggregating CloudTrail Log Files to a
Single Amazon S3 Bucket.
Deciphering ElastiCache Log File Entries
CloudTrail log files can contain one or more log entries, where each entry is made up of multiple
JSON-formatted events. A log entry represents a single request from any source and includes
information about the requested action, any parameters, the date and time of the action, and so on.
The log entries are not guaranteed to be in any particular order. That is, they are not an ordered stack
trace of the public API calls.
The following example shows a CloudTrail log entry that records a CreateCacheCluster action.
{
"eventVersion":"1.01",
API Version 2015-02-02
343

Amazon ElastiCache User Guide
Deciphering ElastiCache Log File Entries
"userIdentity":{
"type":"IAMUser",
"principalId":"EXAMPLEEXAMPLEEXAMPLE",
"arn":"arn:aws:iam::123456789012:user/elasticache-allow",
"accountId":"123456789012",
"accessKeyId":"AKIAIOSFODNN7EXAMPLE",
"userName":"elasticache-allow"
},
"eventTime":"2014-12-01T22:00:35Z",
"eventSource":"elasticache.amazonaws.com",
"eventName":"CreateCacheCluster",
"awsRegion":"us-west-2",
"sourceIPAddress":"192.0.2.01",
"userAgent":"Amazon CLI/ElastiCache 1.10 API 2014-12-01",
"requestParameters":{
"numCacheNodes":2,
"cacheClusterId":"test-memcached",
"engine":"memcached",
"aZMode":"cross-az",
"cacheNodeType":"cache.m1.small"
},
"responseElements":{
"engine":"memcached",
"clientDownloadLandingPage":"&url-console-domain;elasticache/
home#client-download:",
"cacheParameterGroup":{
"cacheParameterGroupName":"default.memcached1.4",
"cacheNodeIdsToReboot":{
},
"parameterApplyStatus":"in-sync"
},
"preferredAvailabilityZone":"Multiple",
"numCacheNodes":2,
"cacheNodeType":"cache.m1.small",
"cacheClusterStatus":"creating",
"autoMinorVersionUpgrade":true,
"preferredMaintenanceWindow":"thu:05:00-thu:06:00",
"cacheClusterId":"test-memcached",
"engineVersion":"1.4.14",
"cacheSecurityGroups":[
{
"status":"active",
"cacheSecurityGroupName":"default"
}
],
"pendingModifiedValues":{
}
},
"requestID":"104f30b3-3548-11e4-b7b8-6d79ffe84edd",
"eventID":"92762127-7a68-42ce-8787-927d2174cde1"
}
The following example shows a CloudTrail log entry that records a DescribeCacheCluster action.
Note that for all ElastiCache Describe calls (Describe*), the ResponseElements section is removed
and appears as null.
API Version 2015-02-02
344

Amazon ElastiCache User Guide
Deciphering ElastiCache Log File Entries
{
"eventVersion":"1.01",
"userIdentity":{
"type":"IAMUser",
"principalId":"EXAMPLEEXAMPLEEXAMPLE",
"arn":"arn:aws:iam::123456789012:user/elasticache-allow",
"accountId":"123456789012",
"accessKeyId":"AKIAIOSFODNN7EXAMPLE",
"userName":"elasticache-allow"
},
"eventTime":"2014-12-01T22:01:00Z",
"eventSource":"elasticache.amazonaws.com",
"eventName":"DescribeCacheClusters",
"awsRegion":"us-west-2",
"sourceIPAddress":"192.0.2.01",
"userAgent":"Amazon CLI/ElastiCache 1.10 API 2014-12-01",
"requestParameters":{
"showCacheNodeInfo":false,
"maxRecords":100
},
"responseElements":null,
"requestID":"1f0b5031-3548-11e4-9376-c1d979ba565a",
"eventID":"a58572a8-e81b-4100-8e00-1797ed19d172"
}
The following example shows a CloudTrail log entry that records a ModifyCacheCluster action.
{
"eventVersion":"1.01",
"userIdentity":{
"type":"IAMUser",
"principalId":"EXAMPLEEXAMPLEEXAMPLE",
"arn":"arn:aws:iam::123456789012:user/elasticache-allow",
"accountId":"123456789012",
"accessKeyId":"AKIAIOSFODNN7EXAMPLE",
"userName":"elasticache-allow"
},
"eventTime":"2014-12-01T22:32:21Z",
"eventSource":"elasticache.amazonaws.com",
"eventName":"ModifyCacheCluster",
"awsRegion":"us-west-2",
"sourceIPAddress":"192.0.2.01",
"userAgent":"Amazon CLI/ElastiCache 1.10 API 2014-12-01",
"requestParameters":{
"applyImmediately":true,
"numCacheNodes":3,
"cacheClusterId":"test-memcached"
},
"responseElements":{
"engine":"memcached",
"clientDownloadLandingPage":"&url-console-domain;elasticache/
home#client-download:",
"cacheParameterGroup":{
"cacheParameterGroupName":"default.memcached1.4",
"cacheNodeIdsToReboot":{
},
API Version 2015-02-02
345

Amazon ElastiCache User Guide
Deciphering ElastiCache Log File Entries
"parameterApplyStatus":"in-sync"
},
"cacheClusterCreateTime":"Dec 1, 2014 10:16:06 PM",
"preferredAvailabilityZone":"Multiple",
"numCacheNodes":2,
"cacheNodeType":"cache.m1.small",
"cacheClusterStatus":"modifying",
"autoMinorVersionUpgrade":true,
"preferredMaintenanceWindow":"thu:05:00-thu:06:00",
"cacheClusterId":"test-memcached",
"engineVersion":"1.4.14",
"cacheSecurityGroups":[
{
"status":"active",
"cacheSecurityGroupName":"default"
}
],
"configurationEndpoint":{
"address":"test-
memcached.example.cfg.use1prod.cache.amazonaws.com",
"port":11211
},
"pendingModifiedValues":{
"numCacheNodes":3
}
},
"requestID":"807f4bc3-354c-11e4-9376-c1d979ba565a",
"eventID":"e9163565-376f-4223-96e9-9f50528da645"
}
API Version 2015-02-02
346


Amazon ElastiCache User Guide
Document History
The following table describes the important changes to the documentation since the last release of the
Amazon ElastiCache User Guide.
•API version: 2015-02-02
•Latest documentation update: August 3, 2016
Change Description Date Changed
M4 node type
support ElastiCache added support the M4 family of node types
in most regions supported by ElastiCache. You can
purchase M4 node types as On-Demand or as Reserved
Cache Nodes.
For more information, see Supported Node
Types (p. 77), Memcached Node-Type Specific
Parameters (p. 252), and Redis Node-Type Specific
Parameters (p. 263).
August 3, 2016
Mumbai region
support ElastiCache added support for the Asia Pacific (Mumbai)
Region.
For more information, see Supported Regions &
Endpoints (p. 37).
June 27, 2016
Snapshot export ElastiCache added the ability to export a Redis snapshot
so you can access it from outside ElastiCache.
For more information, see Exporting a Snapshot (p. 210)
in the Amazon ElastiCache User Guide and
CopySnapshot in the Amazon ElastiCache API
Reference.
May 26, 2016
Node type scale up ElastiCache added the ability to scale up your Redis
node type.
For more information, see Scaling (p. 142).
March 24, 2016
Easy engine
upgrade ElastiCache added the ability to easily upgrade your
Redis cache engine. March 22, 2016
API Version 2015-02-02
348

Amazon ElastiCache User Guide
Change Description Date Changed
For more information, see Upgrading Cache Engine
Versions (p. 32).
Support for R3
node types ElastiCache added support for R3 node types in the
China (Beijing) and South America (Sao Paulo) regions.
For more information, see Supported Node
Types (p. 77).
March 16, 2016
Accessing
ElastiCache using
a Lambda function
Added a tutorial on configuring a Lambda function to
access ElastiCache in an Amazon VPC.
For more information, see ElastiCache
Turorials (p. 347).
February 12, 2016
Support for Redis
2.8.24 ElastiCache added support for Redis version 2.8.24 with
improvements added since Redis 2.8.23. Improvements
include bug fixes and support for logging bad memory
access addresses.
For more information, see Redis Version 2.8.24 (p. 31)
and Redis 2.8 Release Notes.
January 20, 2016
Support for Asia
Pacific (Seoul)
region
ElastiCache added support for the Asia Pacific (Seoul)
(ap-northeast-2) region with t2, m3, and r3 node types. January 6, 2016
Amazon
ElastiCache
console change.
Because the newer Redis versions provide a better and
more stable user experience, Redis versions 2.6.13,
2.8.6, and 2.8.19 are no longer listed in the ElastiCache
Management Console.
For other options and more information, see Comparing
Redis Versions (p. 30).
December 15, 2015
Support for Redis
2.8.23. ElastiCache added support for Redis version 2.8.23
with improvements added since Redis 2.8.22.
Improvements include bug fixes and support for the new
parameter close-on-slave-write which, if enabled,
disconnects clients who attempt to write to a read-only
replica.
For more information, see Redis Version 2.8.23 (p. 31).
November 13, 2015
API Version 2015-02-02
349

Amazon ElastiCache User Guide
Change Description Date Changed
Support for Redis
2.8.22. ElastiCache added support for Redis version 2.8.22 with
ElastiCache added enhancements and improvements
since version 2.8.21. Improvements include:
• Implementation of a forkless save process that
enables a successful save when low available
memory could cause a forked save to fail.
• Additional CloudWatch metrics – SaveInProgress and
ReplicationBytes.
• To enable partial synchronizations, the Redis
parameter repl-backlog-size now applies to all
clusters.
For a complete list of changes and more information,
see Redis Version 2.8.22 (p. 31).
This documentation release includes a reorganization
of the documentation and removal of the ElastiCache
command line interface (CLI) documentation. For
command line use, refer to the AWS Command Line for
ElastiCache.
September 28, 2015
Support for
Memcached
1.4.28.
ElastiCache added support for Memcached version
1.4.24 and Memcached improvements since version
1.4.14. This release adds support for least recently used
(LRU) cache management as a background task, choice
of jenkins or murmur3 as your hashing algorithm, new
commands, and miscellaneous bug fixes.
For more information, go to Memcached release notes
and Comparing Memcached Versions (p. 29) in the
ElastiCache User Guide.
August 27, 2015
Support for Redis
2.8.21.
Support for
Memcached Auto
Discovery using
PHP 5.6.
ElastiCache added support for Redis version 2.8.21 and
Redis improvements since version 2.8.19. This Redis
release includes several bug fixes.
For more information, go to Redis 2.8 release notes.
This release of Amazon ElastiCache adds support for
Memcached Auto Discovery client for PHP version 5.6.
For more information, go to Compiling the Source Code
for the ElastiCache Cluster Client for PHP (p. 104).
July 29, 2015
New topic:
Accessing
ElastiCache from
outside AWS
Added new topic on how to access ElastiCache
resources from outside AWS.
For more information , go to ElastiCache's Accessing
ElastiCache Resources from Outside AWS (p. 304).
July 9, 2015
API Version 2015-02-02
350

Amazon ElastiCache User Guide
Change Description Date Changed
Node replacement
messages added ElastiCache added three messages
pertaining to scheduled node replacement.
ElastiCache:NodeReplacementScheduled,
ElastiCache:NodeReplacementRescheduled, and
ElastiCache:NodeReplacementCanceled.
For more information and actions you can take when a
node is scheduled for replacement, go to ElastiCache's
Event Notifications and Amazon SNS (p. 324).
June 11, 2015
Support for Redis
v. 2.8.19. ElastiCache added support for Redis version 2.8.19 and
Redis improvements since version 2.8.6. This support
includes support for:
• The HyperLogLog data structure, with the Redis
commands PFADD, PFCOUNT, and PFMERGE.
• Lexicographic range queries with the new
commands ZRANGEBYLEX, ZLEXCOUNT, and
ZREMRANGEBYLEX.
• Introduced a number of bug fixes, namely preventing
a primary node from sending stale data to replica
nodes by failing the master SYNC when a background
save (bgsave) child process terminates unexpectedly.
For more information on HyperLogLog, go to Redis new
data structure: the HyperLogLog. For more information
on PFADD, PFCOUNT, and PFMERGE, go to the Redis
Documentation and click HyperLogLog.
March 11, 2015
Support for cost
allocation tags ElastiCache added support for cost allocation tags.
For more information, see Monitoring Costs with Cost
Allocation Tags (p. 329).
February 9, 2015
Support for AWS
GovCloud (US)
region
ElastiCache added support for the AWS GovCloud (US)
(us-gov-west-1) region. January 29, 2015
Support for EU
(Frankfurt) region ElastiCache added support for the EU (Frankfurt) (eu-
central-1) region. January 19, 2015
Multi-AZ with auto
failover support for
Redis replication
groups
ElastiCache added support for Multi-AZ with automatic
failover from the primary node to a read replica in a
Redis replication group. ElastiCache monitors the health
of the replication group. If the primary fails, ElastiCache
automatically promotes a replica to primary, then
replaces the replica.
For more information, see Replication with Multi-AZ and
Automatic Failover (Redis) (p. 166).
October 24, 2014
AWS CloudTrail
logging of API calls
supported
ElastiCache added support for using AWS CloudTrail to
log all ElastiCache API calls.
For more information, see Logging Amazon ElastiCache
API Calls Using AWS CloudTrail (p. 343).
September 15, 2014
API Version 2015-02-02
351

Amazon ElastiCache User Guide
Change Description Date Changed
New instance sizes
supported ElastiCache added support for additional General
Purpose (T2) instances.
For more information, see Parameters and Parameter
Groups (p. 233).
September 11, 2014
Flexible node
placement
supported for
Memcached
ElastiCache added support for creating Memcached
nodes across multiple Availability Zones.
For more information, see Step 2: Launch a
Cluster (p. 18).
July 23, 2014
New instance sizes
supported ElastiCache added support for additional General
Purpose (M3) instances and Memory Optimized (R3)
instances.
For more information, see Parameters and Parameter
Groups (p. 233).
July 1, 2014
PHP auto
discovery Added support for PHP version 5.5 auto discovery.
For more information, see Installing the ElastiCache
Cluster Client for PHP (p. 98).
May 13, 2014
Backup and
restore for Redis
clusters
In this release, ElastiCache allows customers to create
snapshots of their Redis clusters, and create new
clusters using these snapshots. A snapshot is a backup
copy of the cluster at a specific moment in time, and
consists of cluster metadata and all of the data in the
Redis cache. Snapshots are stored in Amazon S3, and
customers can restore the data from a snapshot into a
new cluster at any time.
For more information, see ElastiCache Backup &
Restore (Redis) (p. 198).
April 24, 2014
Redis 2.8.6 ElastiCache supports Redis 2.8.6, in addition to Redis
2.6.13. With Redis 2.8.6, customers can improve the
resiliency and fault tolerance of read replicas, with
support for partial resynchronization, and a user-defined
minimum number of read replicas that must be available
at all times. Redis 2.8.6 also offers full support for
publish-and-subscribe, where clients can be notified of
events that occur on the server.
March 13, 2014
API Version 2015-02-02
352

Amazon ElastiCache User Guide
Change Description Date Changed
Redis cache
engine ElastiCache offers Redis cache engine software, in
addition to Memcached. Customers who currently
use Redis can "seed" a new ElastiCache Redis cache
cluster with their existing data from a Redis snapshot
file, easing migration to a managed ElastiCache
environment.
To support Redis replication capabilities, the
ElastiCache API now supports replication groups.
Customers can create a replication group with a primary
Redis cache node, and add one or more read replica
nodes that automatically stay synchronized with cache
data in the primary node. Read-intensive applications
can be offloaded to a read replica, reducing the load on
the primary node. Read replicas can also guard against
data loss in the event of a primary cache node failure.
September 3, 2013
Support for default
Amazon Virtual
Private Cloud
(VPC)
In this release, ElastiCache is fully integrated with
Amazon Virtual Private Cloud (VPC). For new
customers, cache clusters are created in an Amazon
VPC by default.
For more information, see Amazon Virtual Private Cloud
(Amazon VPC) with ElastiCache (p. 273).
January 8, 2013
PHP support for
cache node auto
discovery
The initial release of cache node auto discovery
provided support for Java programs. In this release,
ElastiCache brings cache node auto discovery support
to PHP.
January 2, 2013
Support for
Amazon Virtual
Private Cloud
(VPC)
In this release, ElastiCache clusters can be launched
in Amazon Virtual Private Cloud (VPC). By default, new
customers' cache clusters are created in an Amazon
VPC automatically; existing customers can migrate to
Amazon VPC at their own pace.
For more information, see Amazon Virtual Private Cloud
(Amazon VPC) with ElastiCache (p. 273).
December 20, 2012
Cache node auto
discovery and
new cache engine
version
ElastiCache provides cache node auto discovery—the
ability for client programs to automatically determine
all of the cache nodes in a cluster, and to initiate and
maintain connections to all of these nodes.
This release also offers a new cache engine version:
Memcached version 1.4.14. This new cache engine
provides enhanced slab rebalancing capability,
significant performance and scalability improvements,
and several bug fixes. There are several new cache
parameters that can be configured.
For more information, see Parameters and Parameter
Groups (p. 233).
November 28, 2012
New cache node
types This release provides four additional cache node types. November 13, 2012
API Version 2015-02-02
353

Amazon ElastiCache User Guide
Change Description Date Changed
Reserved cache
nodes This release adds support for reserved cache nodes. April 5, 2012
New guide This is the first release of Amazon ElastiCache User
Guide.August 22, 2011
API Version 2015-02-02
354

