Amazon Connect CTI Adapter For Salesforce Setup And Installation Guide V2.0 September 2018
User Manual:
Open the PDF directly: View PDF ![]() .
.
Page Count: 131 [warning: Documents this large are best viewed by clicking the View PDF Link!]

Amazon Connect CTI
Adapter v2 for Salesforce
Setup and Installation Guide
September 2018

© 2018, Amazon Web Services, Inc. or its affiliates. All rights reserved.
Notices
This document is provided for informational purposes only. It represents AWS’s
current product offerings and practices as of the date of issue of this document,
which are subject to change without notice. Customers are responsible for
making their own independent assessment of the information in this document
and any use of AWS’s products or services, each of which is provided “as is”
without warranty of any kind, whether express or implied. This document does
not create any warranties, representations, contractual commitments,
conditions or assurances from AWS, its affiliates, suppliers or licensors. The
responsibilities and liabilities of AWS to its customers are controlled by AWS
agreements, and this document is not part of, nor does it modify, any agreement
between AWS and its customers.

Contents
Introduction 1
Requirements and Prerequisites 2
Browser Compatibility 2
Lightning Support 2
Package Installation 3
Set Access Permissions 6
Configure Lightning Experience 8
Configure Console Experience 20
Configure Classic Experience 31
Amazon Connect SSO/SAML Support 46
Medialess CCP and VDI support 52
Auto-login feature 53
Enhanced search for screen-pop 54
Installing the Amazon Connect Salesforce Lambda package 56
Prerequisites 57
Install the Amazon Connect Salesforce Lambda package 65
Invoking the Amazon Connect Salesforce Lambda from Contact Flows 74
Salesforce Lookup 74
Salesforce Create 78
Salesforce Update 80
Salesforce Phone Lookup 82
Contact Attributes Display 83
Call Wrap-up and Call Disposition Codes 87
Call Recording Link for Task 91
Call Display on the Account Page 94
Outbound Campaign Calls 100


Abstract
This guide provides the steps to setup the integrations between Amazon
Connect and Salesforce using the Amazon Connect CTI Adapter and Amazon
Connect Lambda for Salesforce.

Page 1
Introduction
The core functionality of the Amazon Connect CTI Adapter provides a WebRTC
browser-based Contact Control Panel (CCP) within Salesforce. The Amazon
Connect CTI integration consists of two components, a managed Salesforce
package and a AWS Serverless application (need link) deployed to your AWS
environment.
With those components, customers can build a deep integration between the
Amazon Connect contact center platform and Salesforce, the leading customer
relationship management (CRM) platform. The collection of pre-build utilities
enables a rapid integration between these two platforms. The AWS Serverless
application package contains a set of common Lambda functions to be used by
Amazon Connect to interact with Salesforce,
The key benefits of the adapter:
Agent state synchronization between Salesforce Omni and Amazon
Connect
Provide valuable information to the agent through configurable view of
call attributes
Utilize the Amazon Connect Call Campaign Object for automated
outbound dialling
Automatically create phone call tasks and relate it to the right Salesforce
object
Embed Amazon Connect Call Recordings in the Salesforce record
Automatically clean-up open tabs to improve agent efficiency
Easily enable lookup, create and update operations for different
Salesforce objects, like Contacts and Cases, within Amazon Connect
contact flows.
Support Salesforce Sales and Service Console in Classic and Lightning
We recommend that you initially install the package into your Salesforce
sandbox. After the package is installed, you can configure your Salesforce Call
Center configuration within Salesforce.

Amazon Web Services – Amazon Connect CTI Adapter for Salesforce
Page 2
The next step is to whitelist your Salesforce Visualforce domain within your
Amazon Connect Application integration. This allows cross-domain access to
your Amazon Connect instance.
We also have a trailhead available https://sfdc.co/Amazon-Connect (note, its
still in process of being updated to support latest CTI Adapter features).
Requirements and Prerequisites
Before the Amazon Connect CTI package can be installed, the following
prerequisites need to be fulfilled:
1. Salesforce Classic, Salesforce Console, or Lightning Experience
2. Create an Amazon Connect instance (https://aws.amazon.com/connect/)
3. Salesforce Omni-Channel must be activated in the Salesforce Org
(https://help.salesforce.com/articleView?id=omnichannel_enable.htm&t
ype=0)
Browser Compatibility
Amazon Connect requires WebRTC to enable soft-phone voice media stream
and Websockets to enable soft-phone signalling. Consequently, users are
required to use the latest version of either Google Chrome or Mozilla Firefox.
For more details, please see the Amazon Connect FAQ page
(https://aws.amazon.com/connect/faqs/)
Lightning Support
Please note that following features are currently not supported in Salesforce
Lightning:
Salesforce Omni Presence Synchronization
Call Wrap-up: The Call Wrap-up page will always open as a primary tab
and will not close after clicking on the “Save” button. The agent will have
to close both tabs manually.
Outbound Campaign Calls using Salesforce Omni can be routed to the
agent, but the automated screen pops and the dialling of the phone
number will not work. The agent will have to click on the record links to

Amazon Web Services – Amazon Connect CTI Adapter for Salesforce
Page 3
open the records and use Salesforce’s Click-to-Dial feature to make the
phone call.
Package Installation
Log in into your Salesforce instance and open Setup:
Open the AmazonConnectCTI Package URL and Install for All Users:
Click Done and Installed Packages page will open.
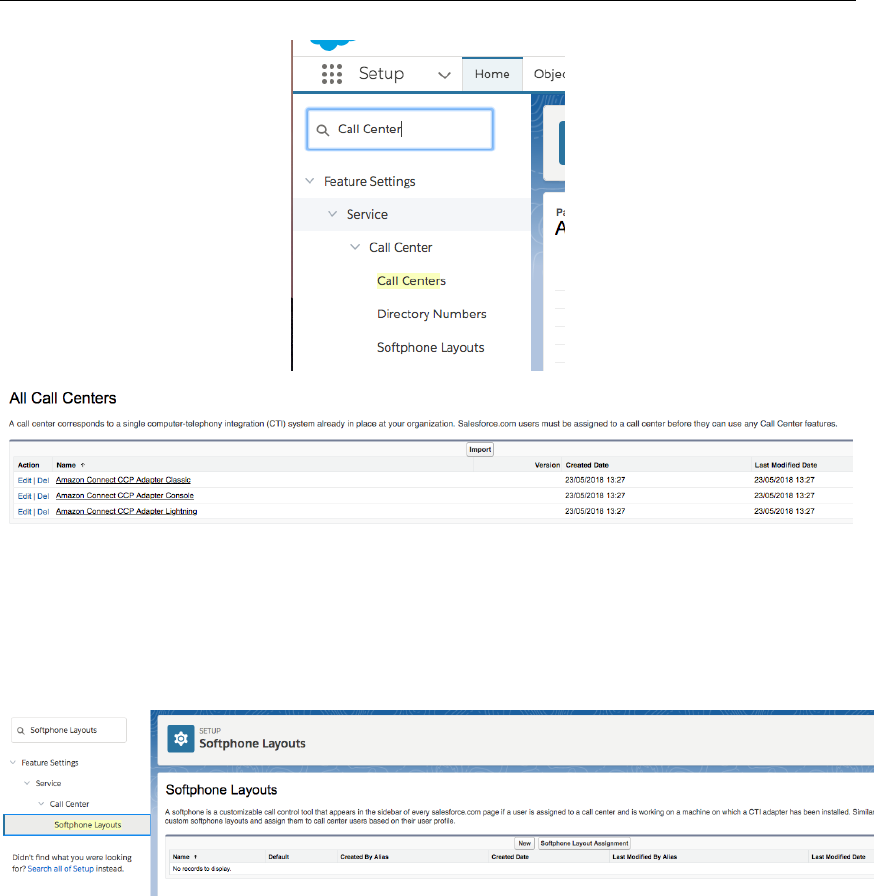
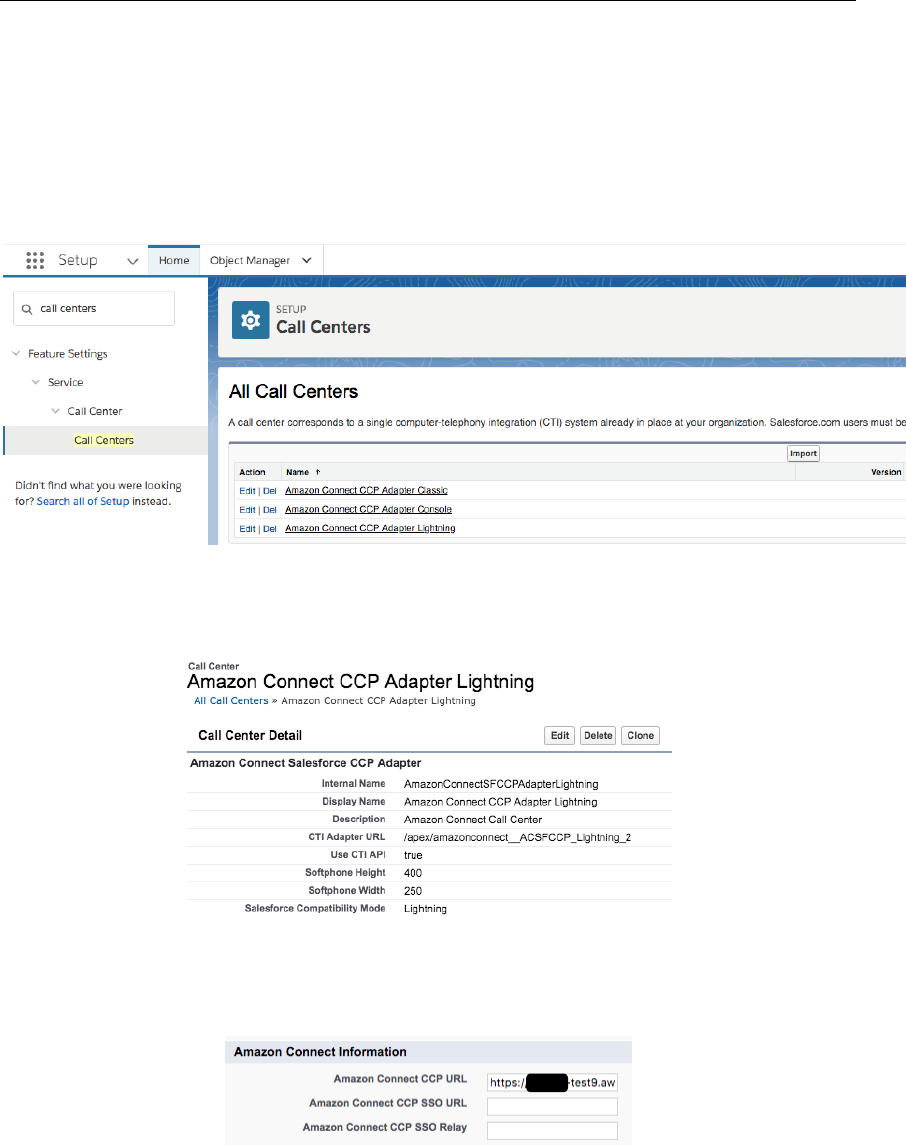
In the Quick Find box, type Call Center, then click on Call Centers:
Amazon Web Services – Amazon Connect CTI Adapter for Salesforce
Page 4
You should be able to see 3 Call Center configurations: Classic, Console and
Lightning.
Next, create a default Softphone Layout:
Click on the New button:
Amazon Web Services – Amazon Connect CTI Adapter for Salesforce
Page 5
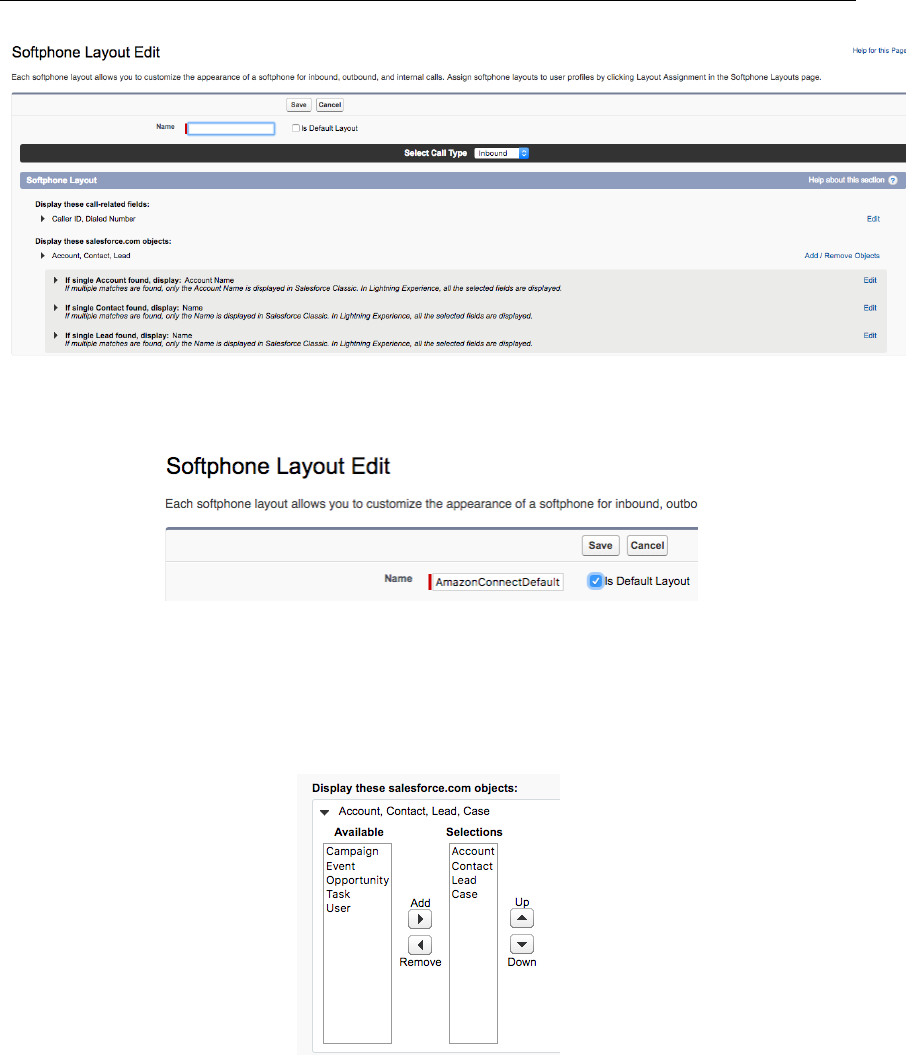
Set Name (for example AmazonConnectDefault) and set Is Default Layout
Expand “Display these salesforce.com objects” and select objects that CTI
Connector would be able to search, for a screen-pop query. In this example,
besides default selection, I’m adding “Case”, as I want to search and screen-pop
by CaseID.
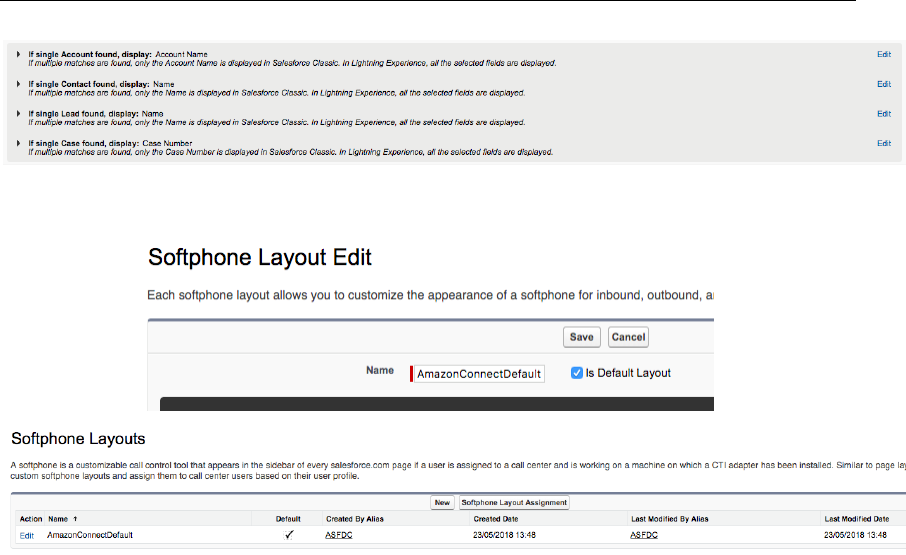
If necessary, configure the search behavior in case one or multiple records are
found:
Amazon Web Services – Amazon Connect CTI Adapter for Salesforce
Page 6
In this example, I’ll keep default configuration. Click on the Save button:
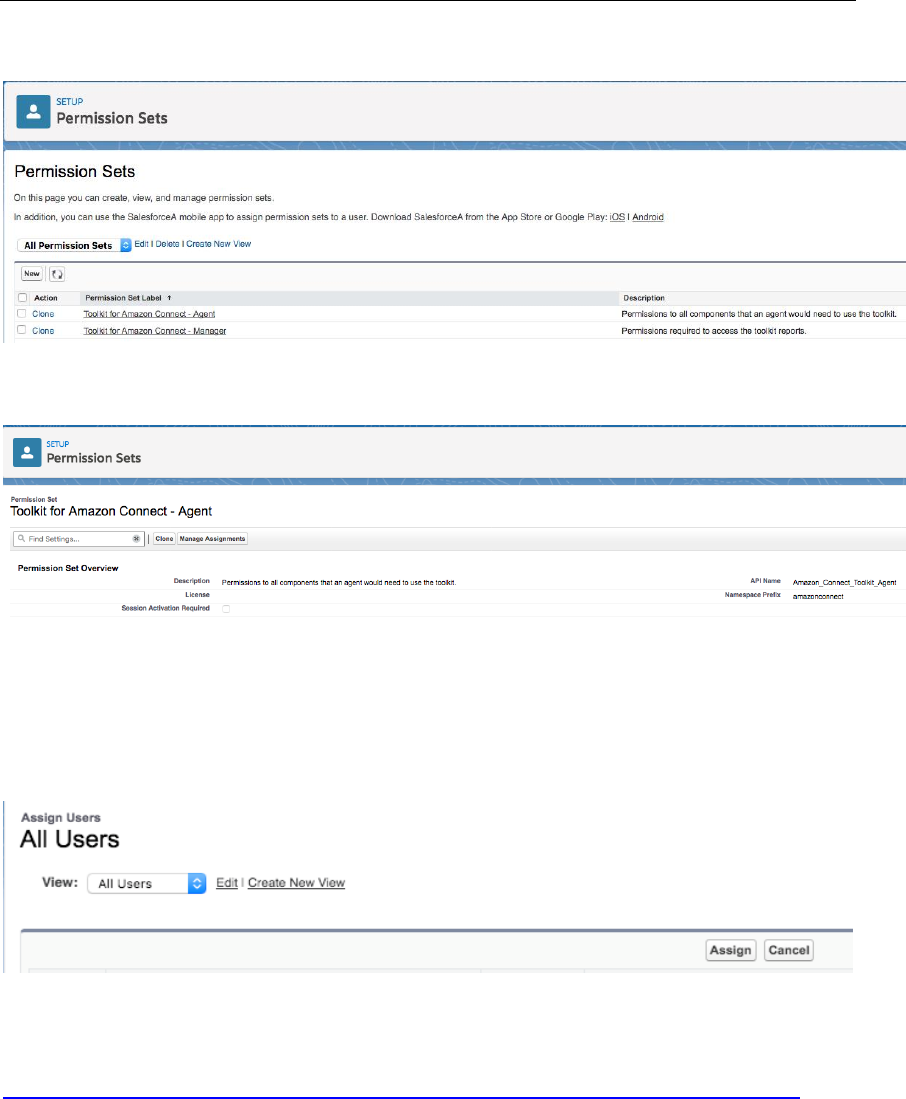
Set Access Permissions
All users must have the permission set to access the Salesforce metadata
included in this package. The Amazon Connect CTI integration package comes
with two Permission Sets, one for agents and one for managers, which grants
the users all necessary access to use the soft-phone.
1. Log in into your Salesforce Org.
Amazon Web Services – Amazon Connect CTI Adapter for Salesforce
Page 7
a. Navigate to Setup > Manage Users > Permission Sets
b. Click “Toolkit for Amazon Connect - Agent”
2. Click “Manage Assignments”
3. Click “Add Assignments”
4. Select the appropriate users and then click “Assign”
More information on assigning user permissions can be found here:
https://help.salesforce.com/articleView?id=perm_sets_mass_assign.htm&type=5
Amazon Web Services – Amazon Connect CTI Adapter for Salesforce
Page 8
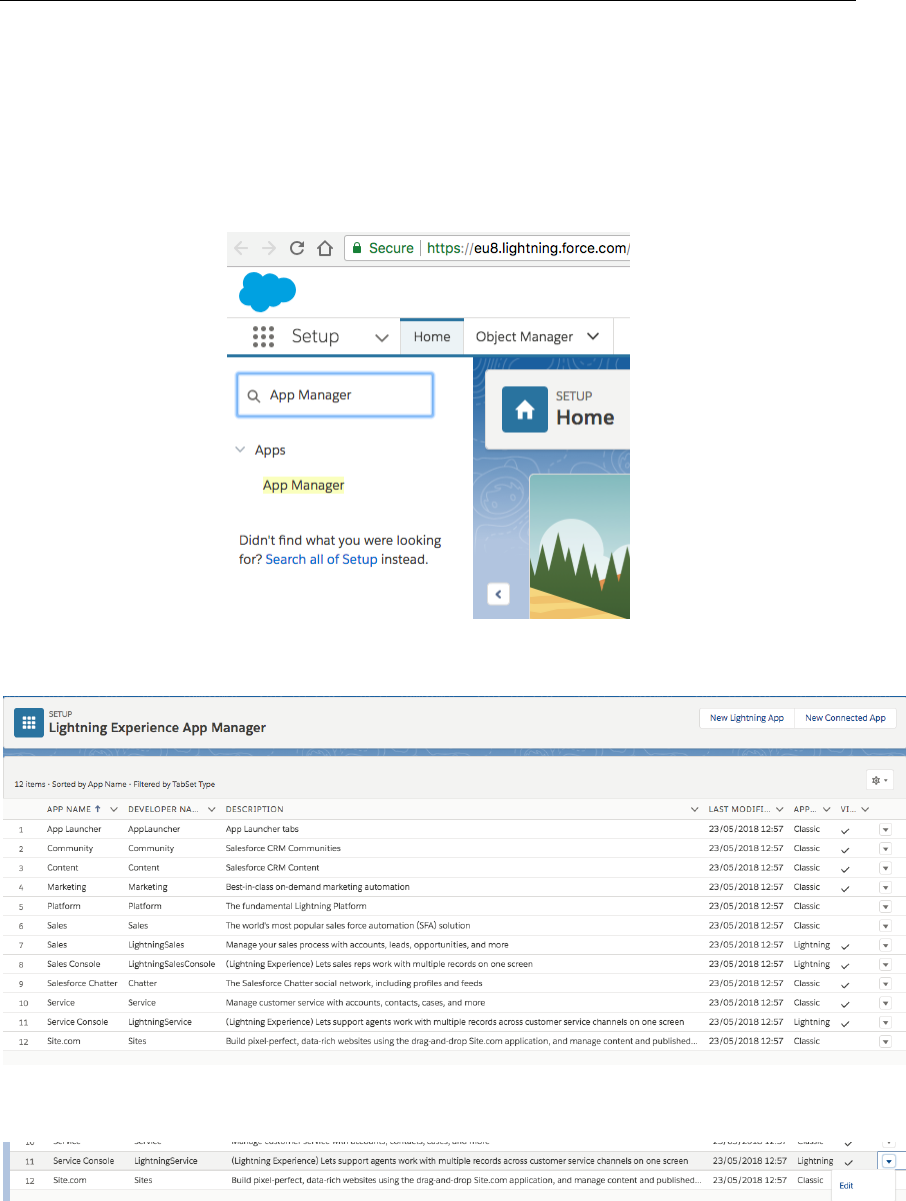
Configure Lightning Experience
For the Lightning experience, we are going to use Service Console application,
but the procedure is the same for other applications. From the Setup screen,
type App Manager in Quick Find filed and select App Manager:
You will be able to see all applications that are available in your account.
Click on drop-down arrow associated to Service Console and select Edit:
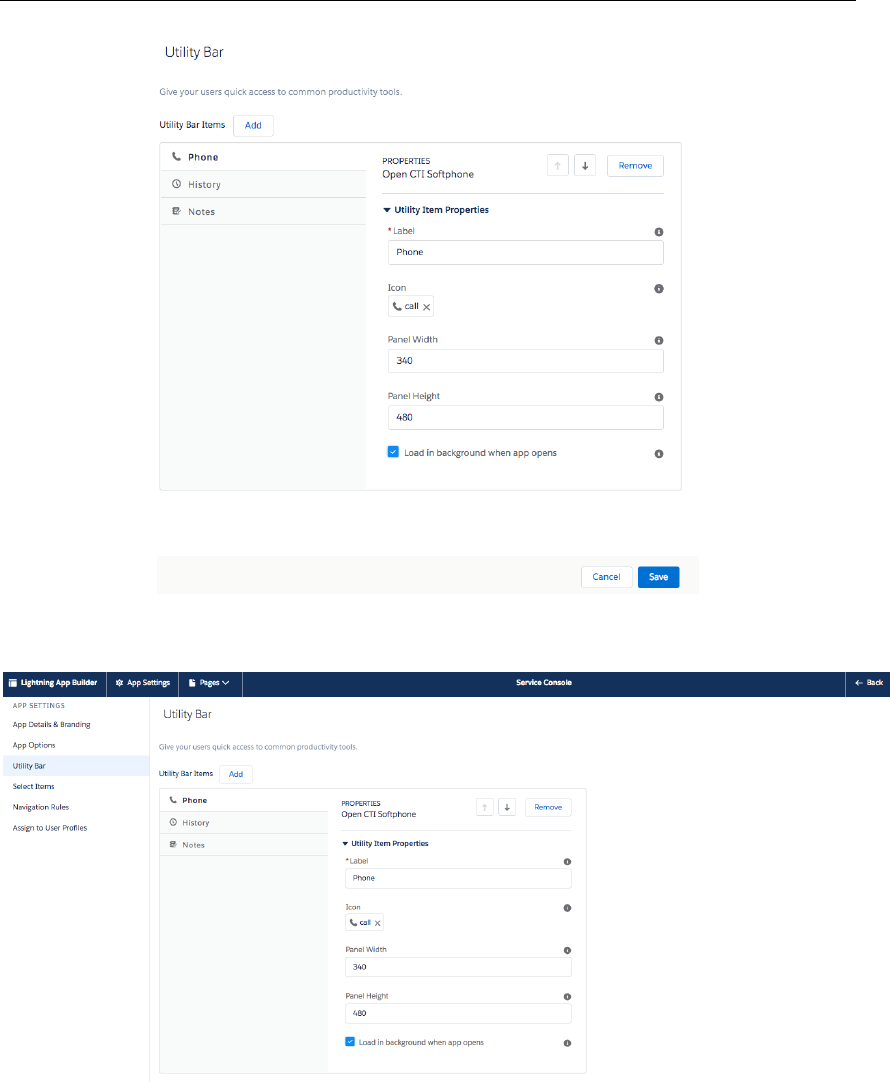
The lightning App Builder opens

Amazon Web Services – Amazon Connect CTI Adapter for Salesforce
Page 9
On the left-hand side, select Utility Bar
Click on the Add button and select Open CTI Softphone
Amazon Web Services – Amazon Connect CTI Adapter for Salesforce
Page 10
Change the Label in necessary and click on the Save button.
Click on the Back button in the top-right corner (not browser’s back button).
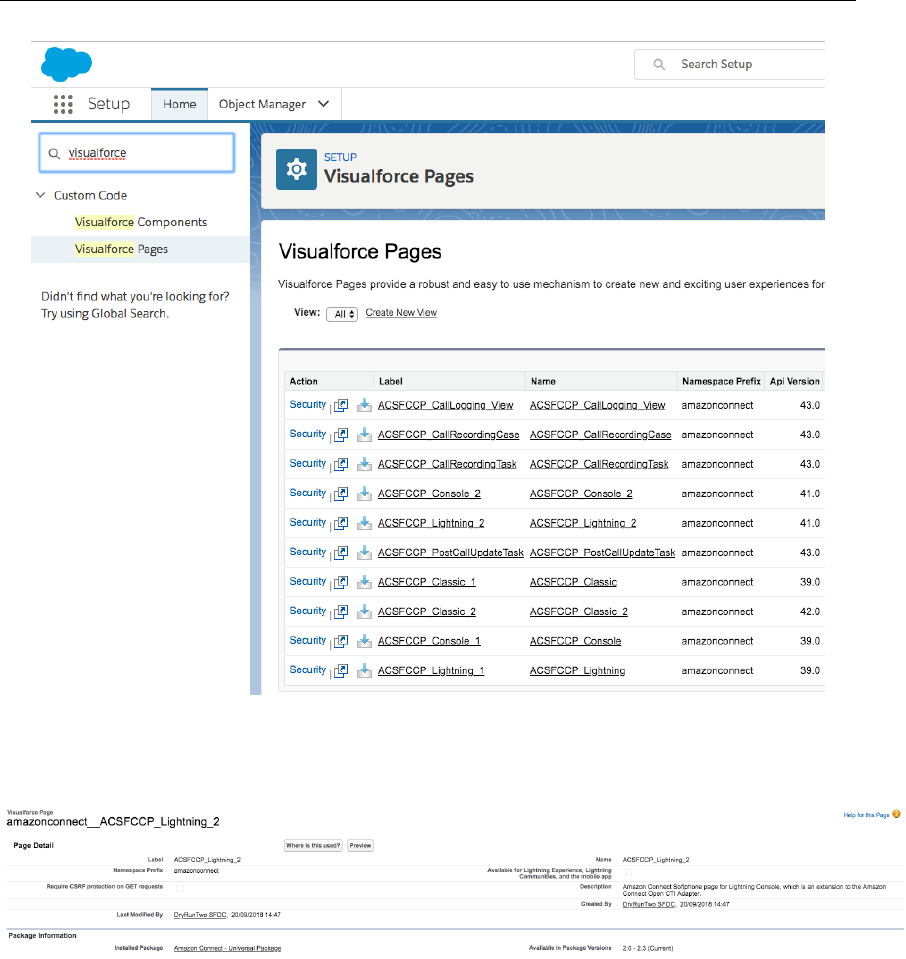
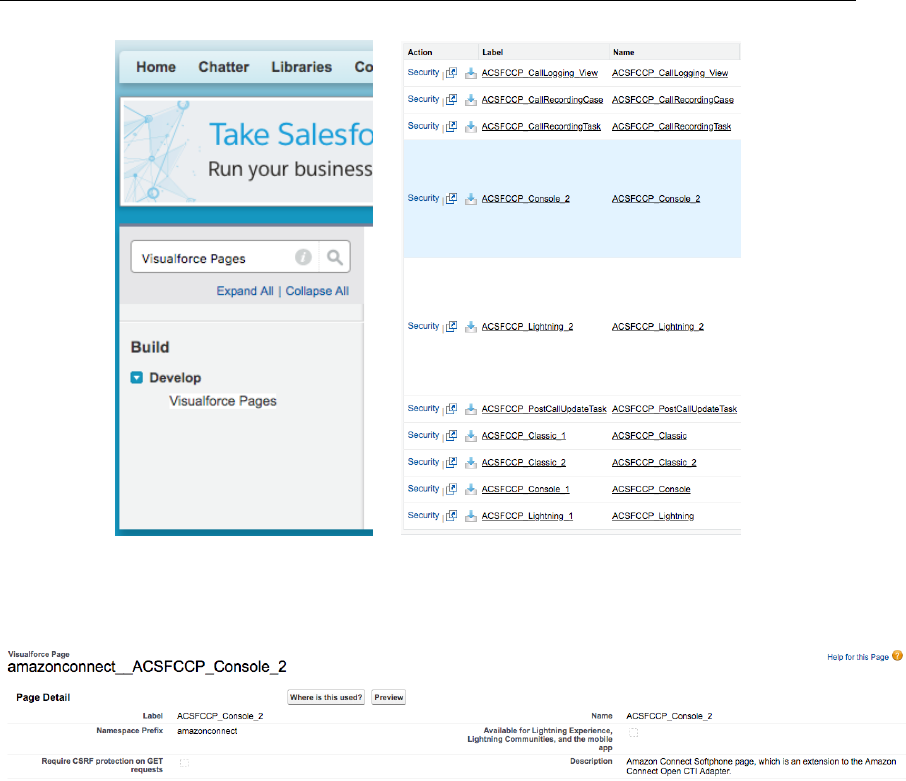
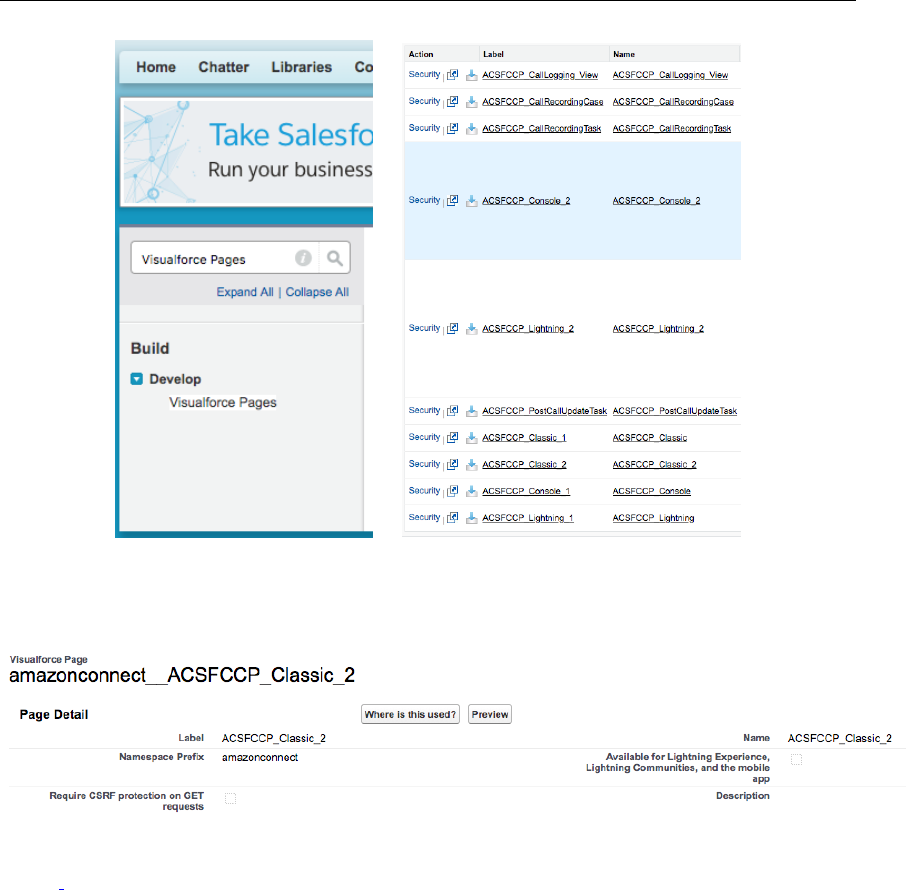
In the Quick Find field, type Visualforce Pages and select Visual Force Pages:
Amazon Web Services – Amazon Connect CTI Adapter for Salesforce
Page 11
As we are currently setting up the Lightning experience, click on
ACSFCCP_Lightning_2 page
Click on the Preview button. New browser tab will open with the URL of this
page. It’s going to be in this format:
https://amazonconnect.sfdcInstance.visual.force.com/apex/ACSFC
CP_Lightning
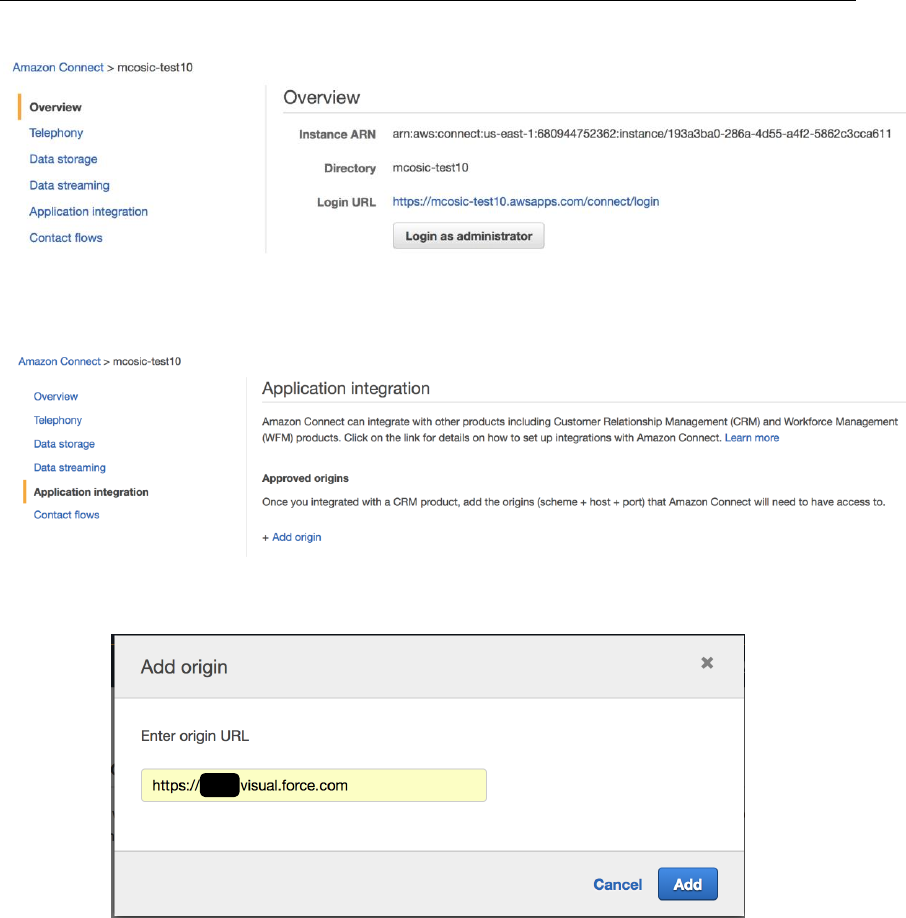
This is what we are going to use as “Origin URL” in our Amazon Connect
configuration. From AWS Console, select Amazon Connect service and then
select your Amazon Connect instance:
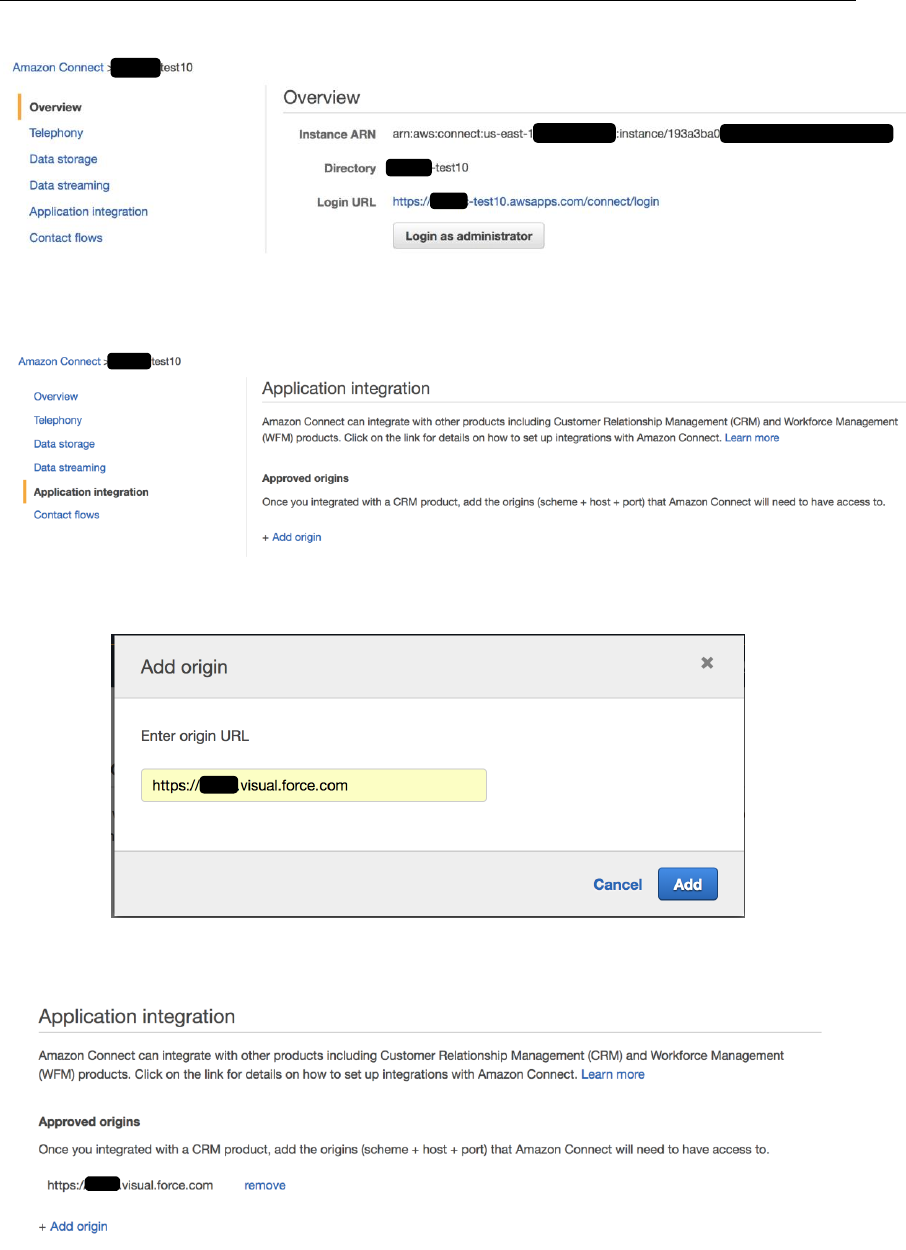
Amazon Web Services – Amazon Connect CTI Adapter for Salesforce
Page 12
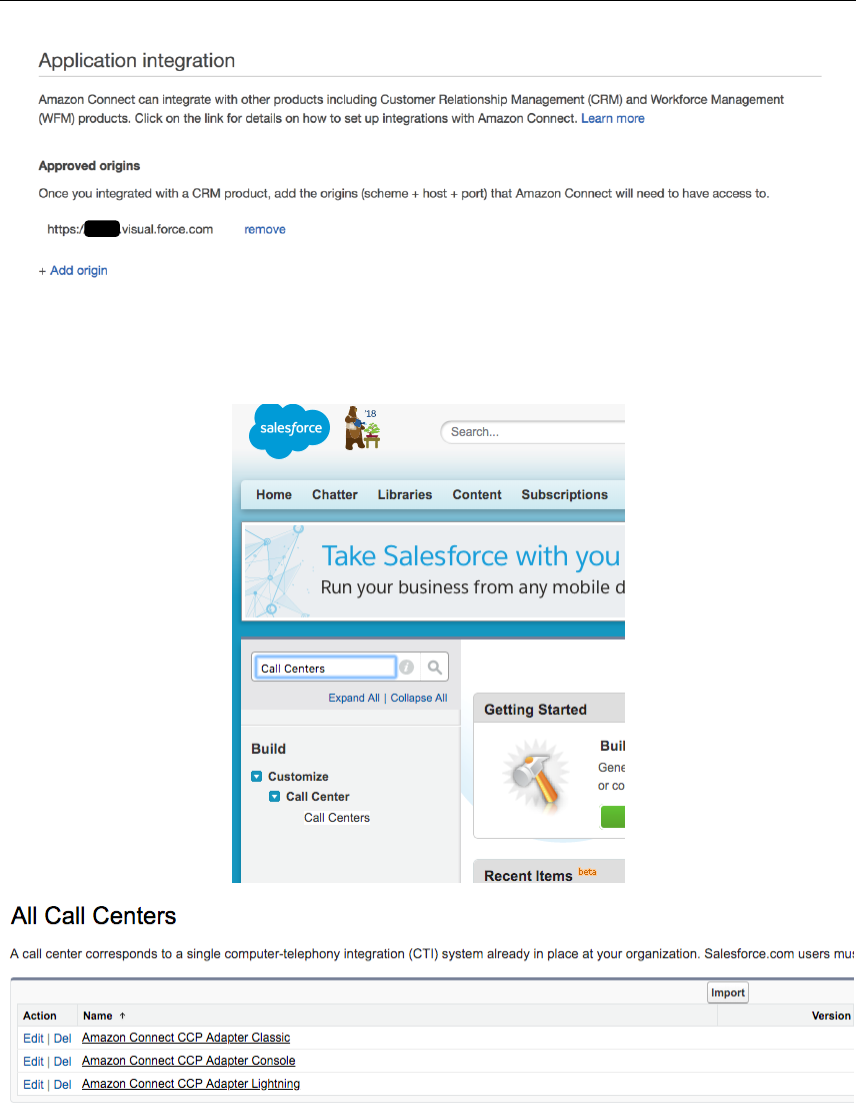
Select “Application Integration” on the left-hand side:
Click on “Add origin” link and enter the origin URL
Click “Add” button
Go to Salesforce and in the Setup page, type Call Center, then select Call Centers
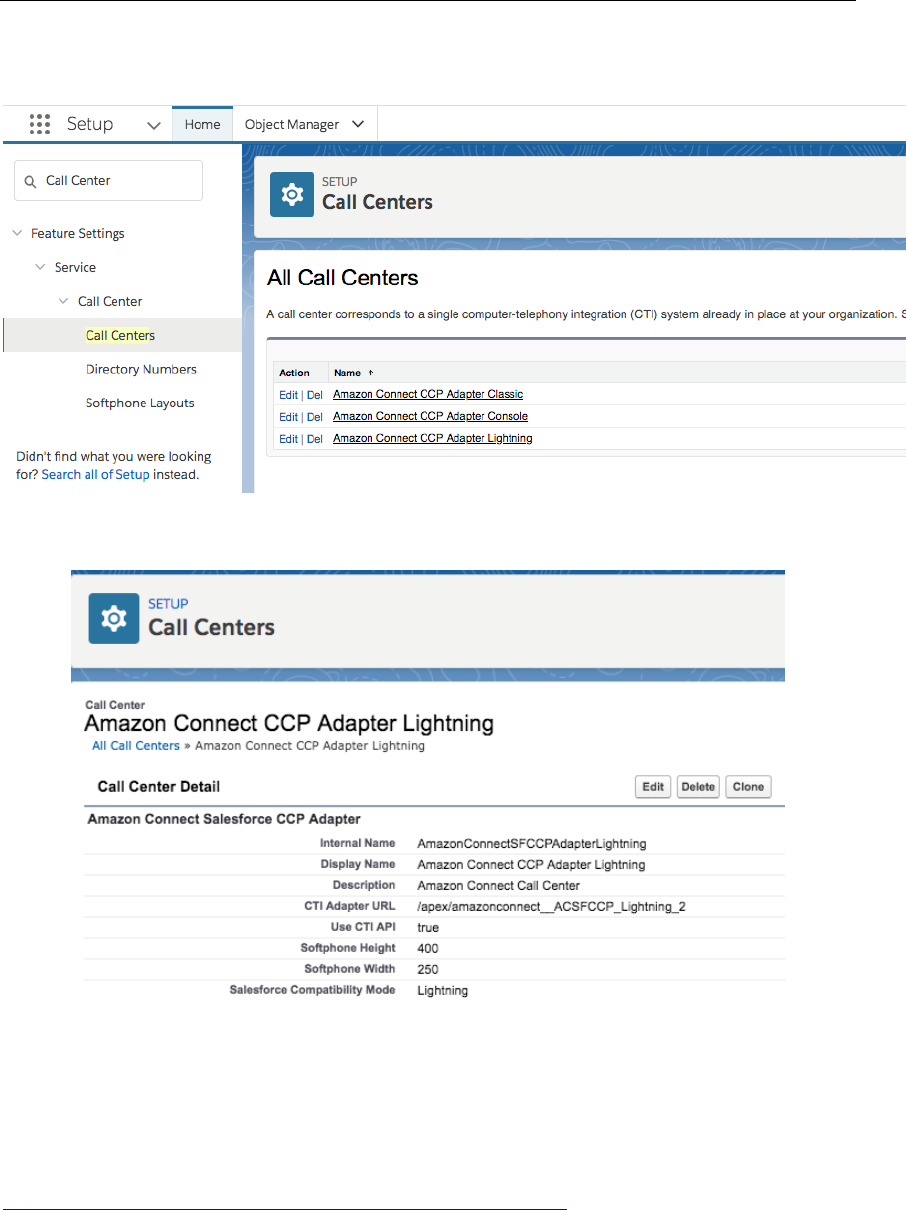
Amazon Web Services – Amazon Connect CTI Adapter for Salesforce
Page 13
Select “Amazon Connect CCP Adapter Lightning”
Click on the Edit button. In the “Amazon Connect CCP URL” filed, enter the
name of your Amazon Connect instance in the following format:
https://yourinstace-name.awsapps.com/connect/ccp
For example:
Amazon Web Services – Amazon Connect CTI Adapter for Salesforce
Page 14
https://test10.awsapps.com/connect/ccp
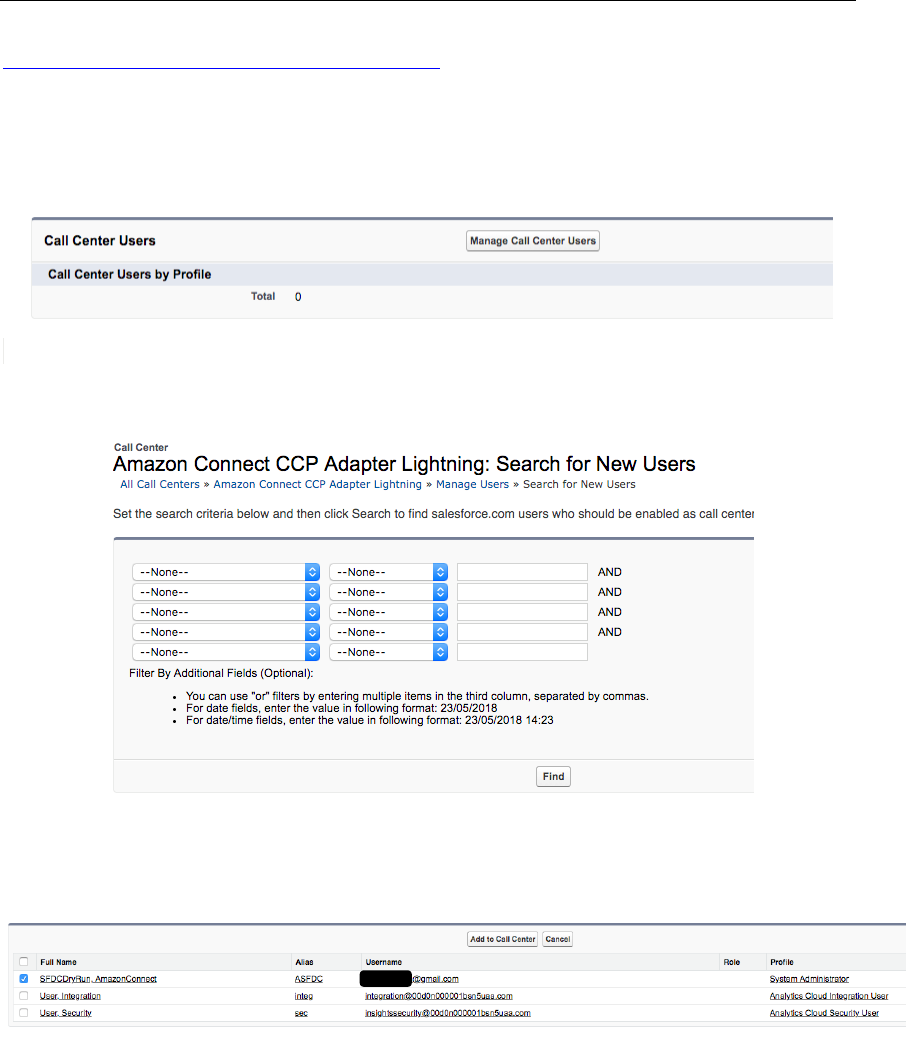
Click on the Save button. Click on the “Manage Call Center Users” button at the
bottom of the page.
Click on the “Add More Users” button.
Set filters and click on the Find button. Select the checkbox next to the user and
click “Add to Call Center” button.
Repeat the steps to add more users.
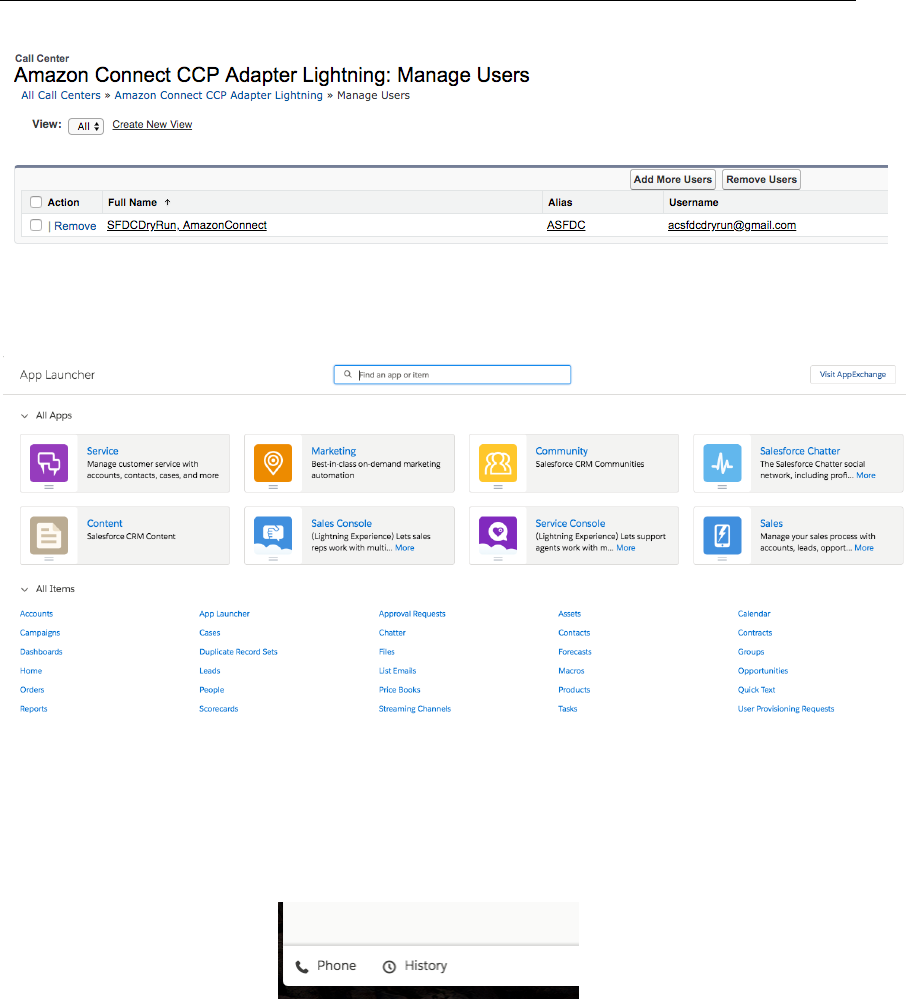
Amazon Web Services – Amazon Connect CTI Adapter for Salesforce
Page 15
In the top-left corner, select the dot-matrix button to open the App Launcher.
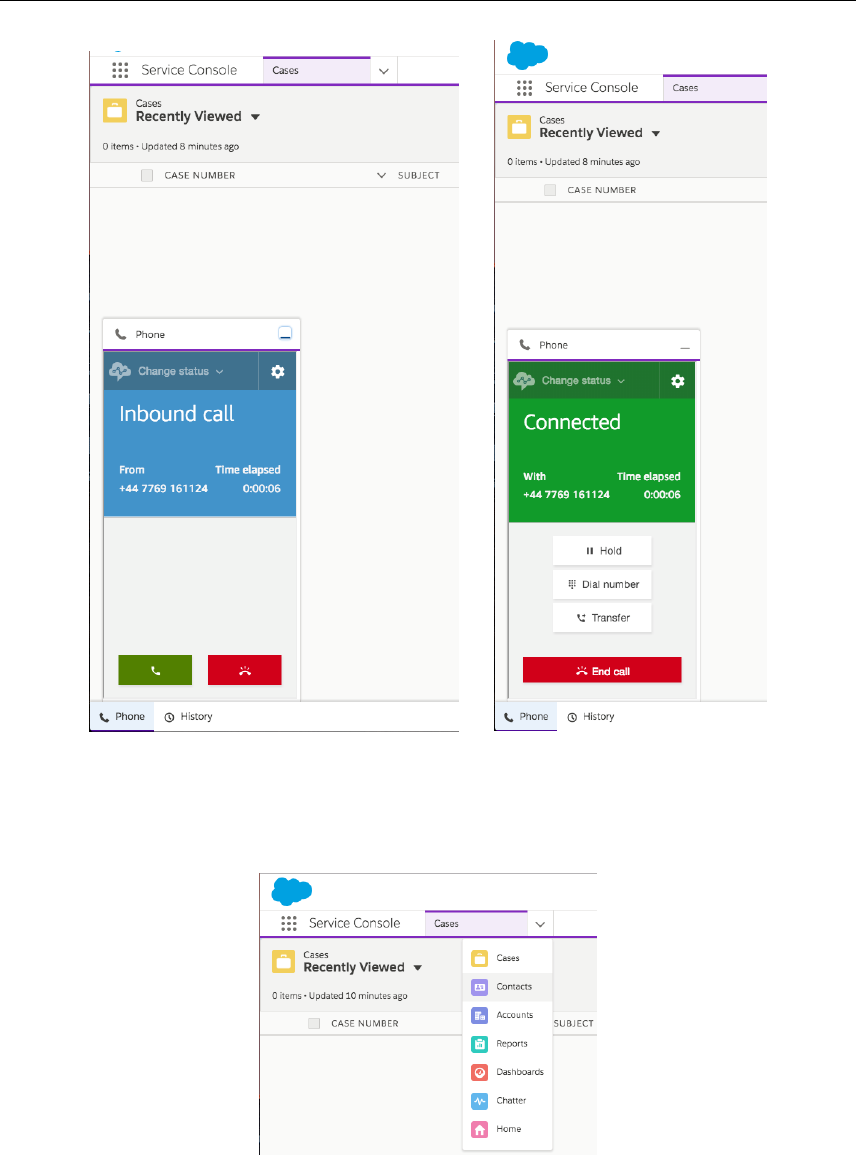
Select the Service Console application. The Phone button should be displayed in
the bottom-right corner.
Click on the Phone button to open the softphone pop-up.

Amazon Web Services – Amazon Connect CTI Adapter for Salesforce
Page 16
You will need to Sign in into your Amazon Connect CCP. Click on the Sign in to
CCP button. A new modal pop-up will show, asking you to enter your
credentials.
Enter your credentials and click Sign in. Allow Microphone access (if asked by
browser). Once Login is successful, the pop-up window will automatically close.

Amazon Web Services – Amazon Connect CTI Adapter for Salesforce
Page 17
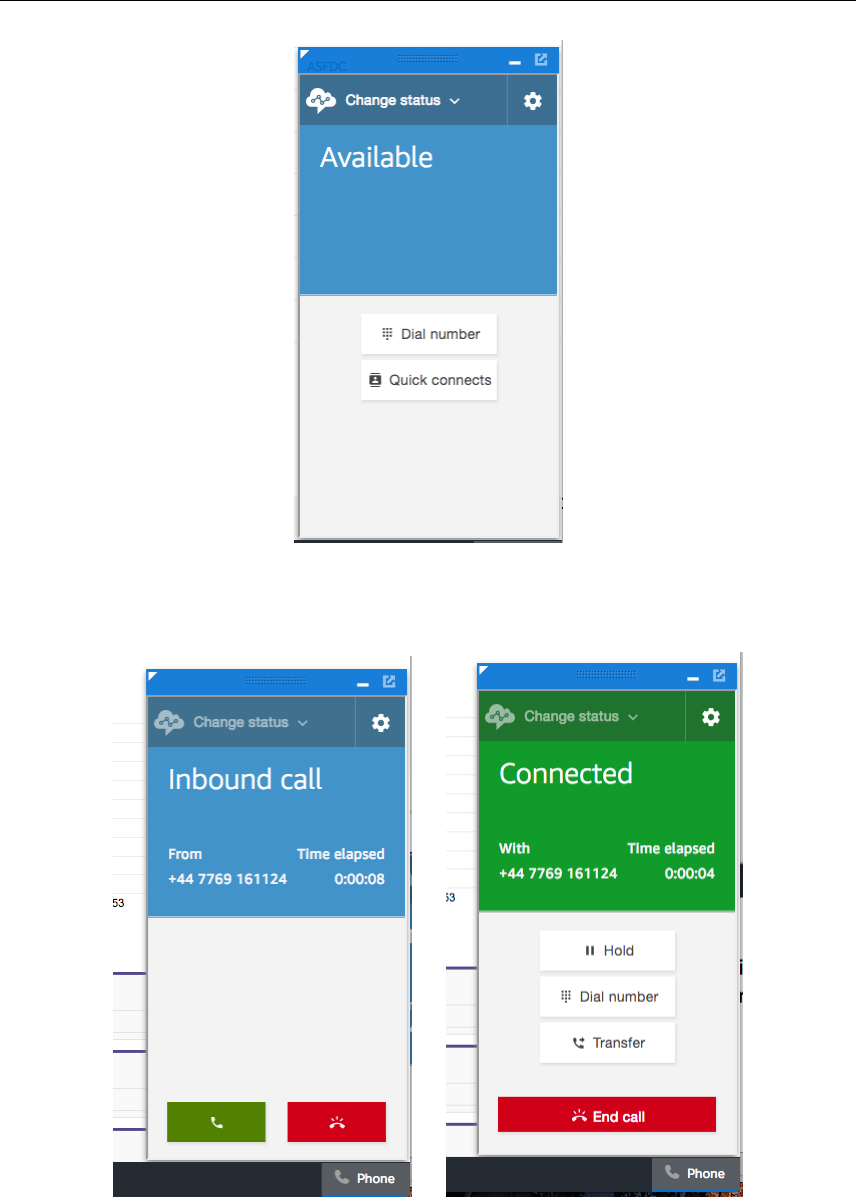
Select “Change status” and select “Available”.
Make an inbound phone call to your Amazon Connect instance. The CCP is
going to “ring” and you can answer the call.
Amazon Web Services – Amazon Connect CTI Adapter for Salesforce
Page 18
At this time, I need to create a new Contact in Salesforce so that I can test a
screen-pop by incoming phone number. Select Contacts from the dropdown
menu:
Select New from top-right corner
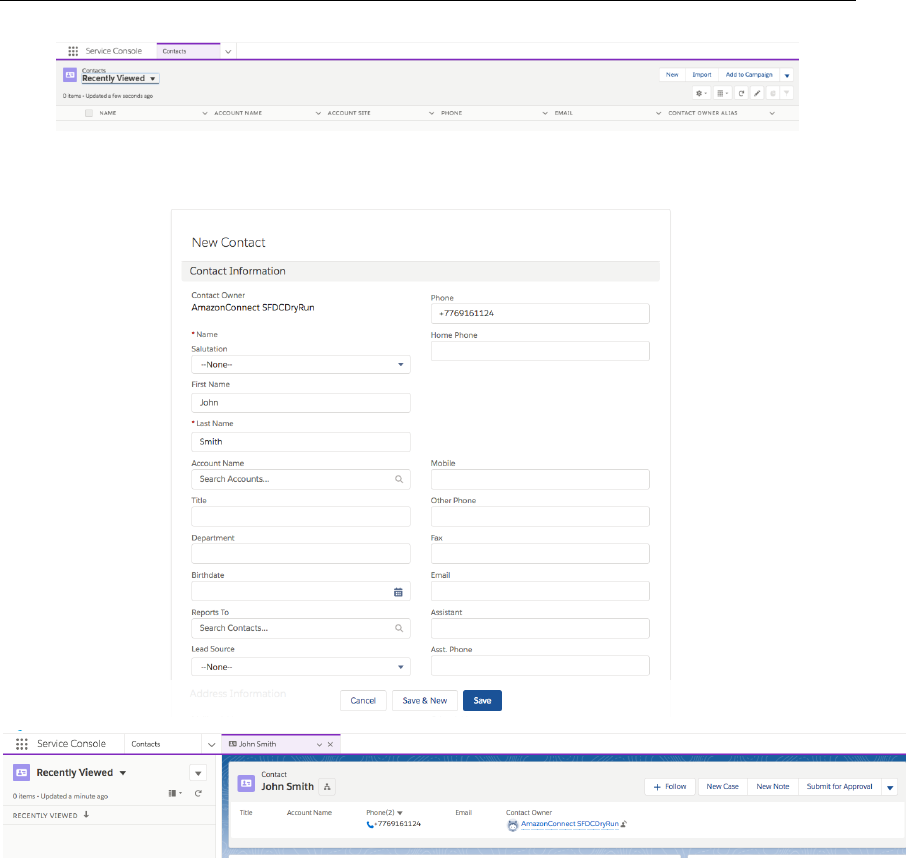
Amazon Web Services – Amazon Connect CTI Adapter for Salesforce
Page 19
Fill in the details and click on the Save button.
Close the Contact tab by clicking on the X next to the Name and drop the phone
call.
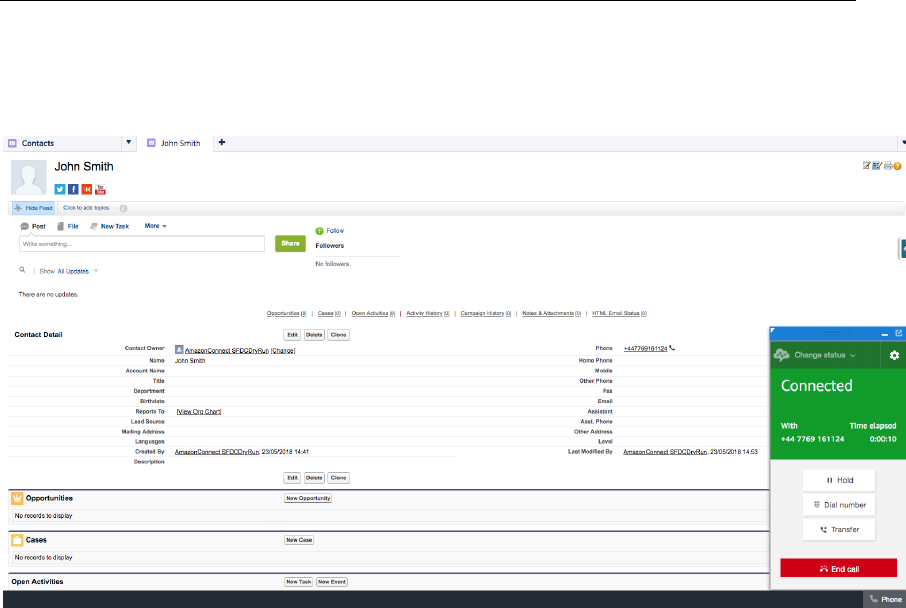
Set your state to Available and make another phone call. The new contact
should automatically pop-up as it has been recognized by incoming phone
number.

Amazon Web Services – Amazon Connect CTI Adapter for Salesforce
Page 20
Configure Console Experience
For the Console experience, we are going to use Sample Console application, but
the procedure is the same for other applications.
From the Setup screen, type Apps in Quick Find filed and select
Build>Create>Apps:
You will be able to see all applications that are available in your account.

Amazon Web Services – Amazon Connect CTI Adapter for Salesforce
Page 21
Click “Edit” next to the Sample Console application.
Scroll to the bottom of the page and “Assign to Profiles”
In this example, I’m assigning Sample console as Visible to System
Administrator.
Click on the Save button. Next, we have to configure Amazon Connect
integration. In the Quick Find field, type Visualforce Pages and select Visual
Force Pages:
Amazon Web Services – Amazon Connect CTI Adapter for Salesforce
Page 22
As we are currently setting up the Console experience, click on
“ACSFCCP_Console_2” page
Click on the Preview button. New browser tab will open with the URL of this
page. It’s going to be in this format:
https://amazonconnect.sfdcInstance.visual.force.com/apex/ACSFC
CP_Console
This is what we are going to use as “Origin URL” in our Amazon Connect
configuration. From AWS Console, select Amazon Connect service and then
select your Amazon Connect instance:
Amazon Web Services – Amazon Connect CTI Adapter for Salesforce
Page 23
Select “Application Integration” on the left-hand side:
Click on “Add origin” link and enter the origin URL
Click “Add” button

Amazon Web Services – Amazon Connect CTI Adapter for Salesforce
Page 24
From the Salesforce Classic layout, select Setup then type Call Centers in the
Quick Find field and select Call Centers.
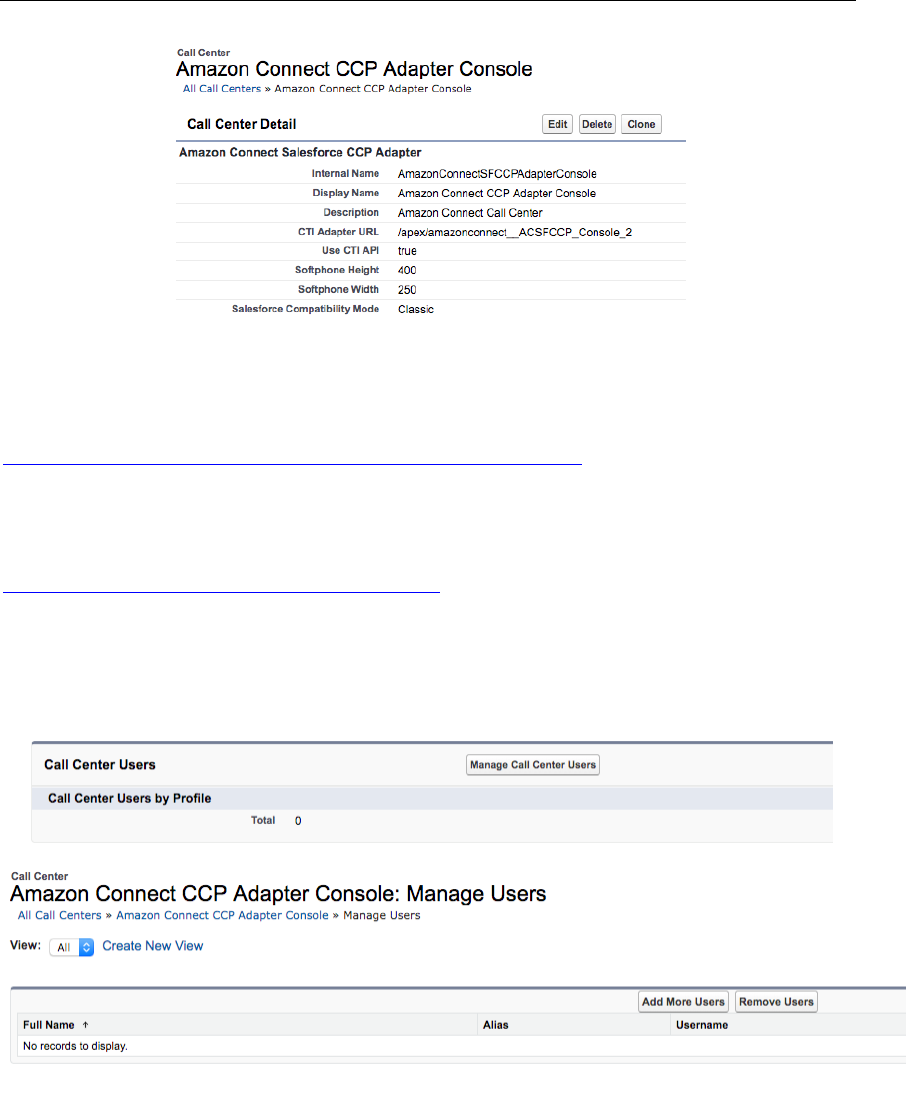
Select “Amazon Connect CCP Adapter Console”
Amazon Web Services – Amazon Connect CTI Adapter for Salesforce
Page 25
Click on the Edit button. In the “Amazon Connect CCP URL” filed, enter the
name of your Amazon Connect instance in the following format:
https://yourinstance-name.awsapps.com/connect/ccp
For example:
https://test10.awsapps.com/connect/ccp
Click on the Save button. Click on the “Manage Call Center Users” button at the
bottom of the page.
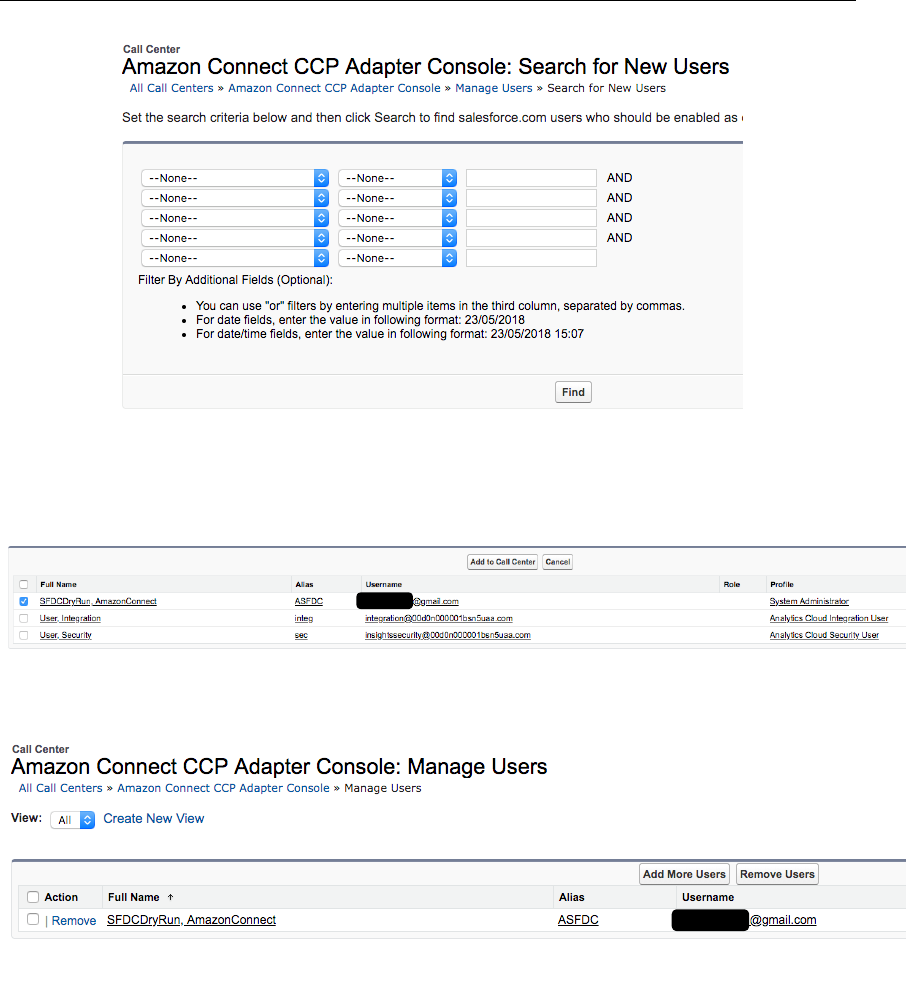
Click on the “Add More Users” button.
Amazon Web Services – Amazon Connect CTI Adapter for Salesforce
Page 26
Set filters and click on the Find button. Select the checkbox next to the user and
click “Add to Call Center” button.
Repeat the steps to add more users.
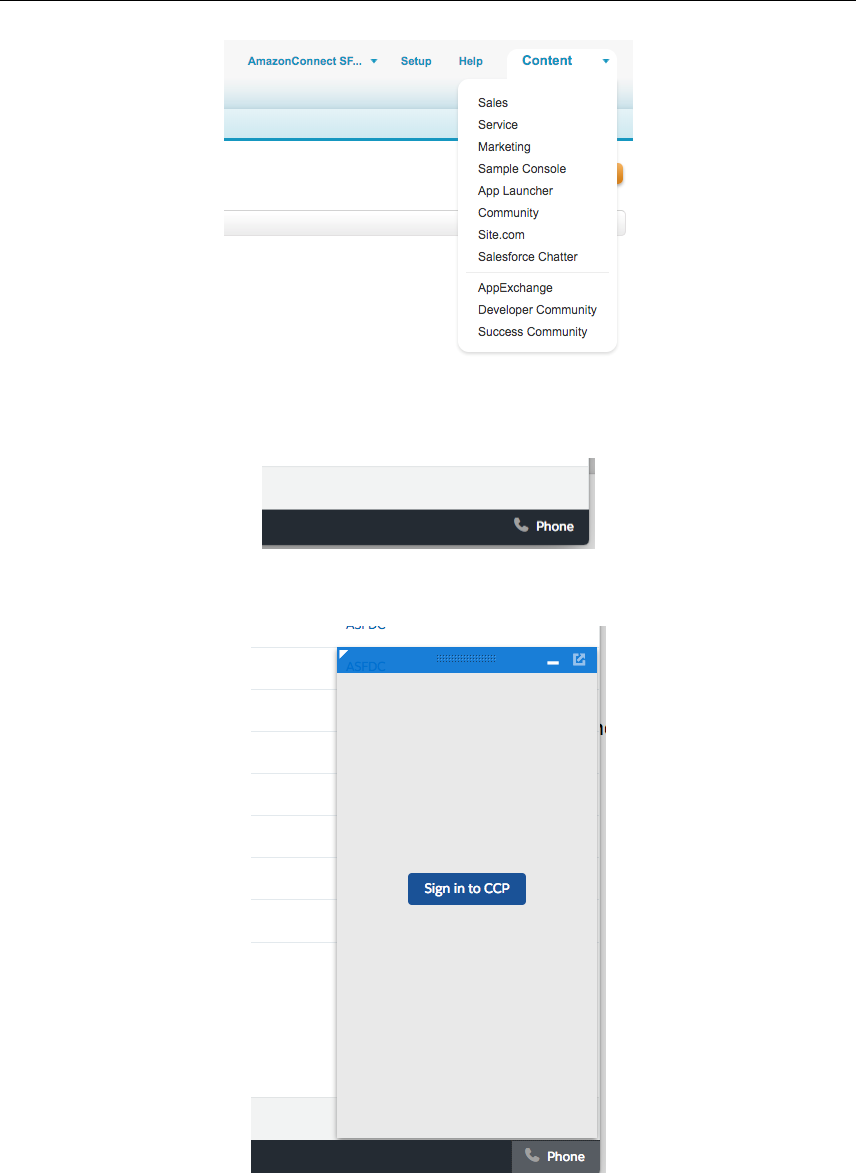
From the top-right corner, select Sample Console application.
Amazon Web Services – Amazon Connect CTI Adapter for Salesforce
Page 27
In the bottom-right corner, you will be able to see the Phone button.
Click on the Phone button to open the softphone pop-up.
You will need to Sign in into your Amazon Connect CCP. Click on the Sign in to
CCP button. A new modal pop-up will show, asking you to enter your
credentials.
Amazon Web Services – Amazon Connect CTI Adapter for Salesforce
Page 28
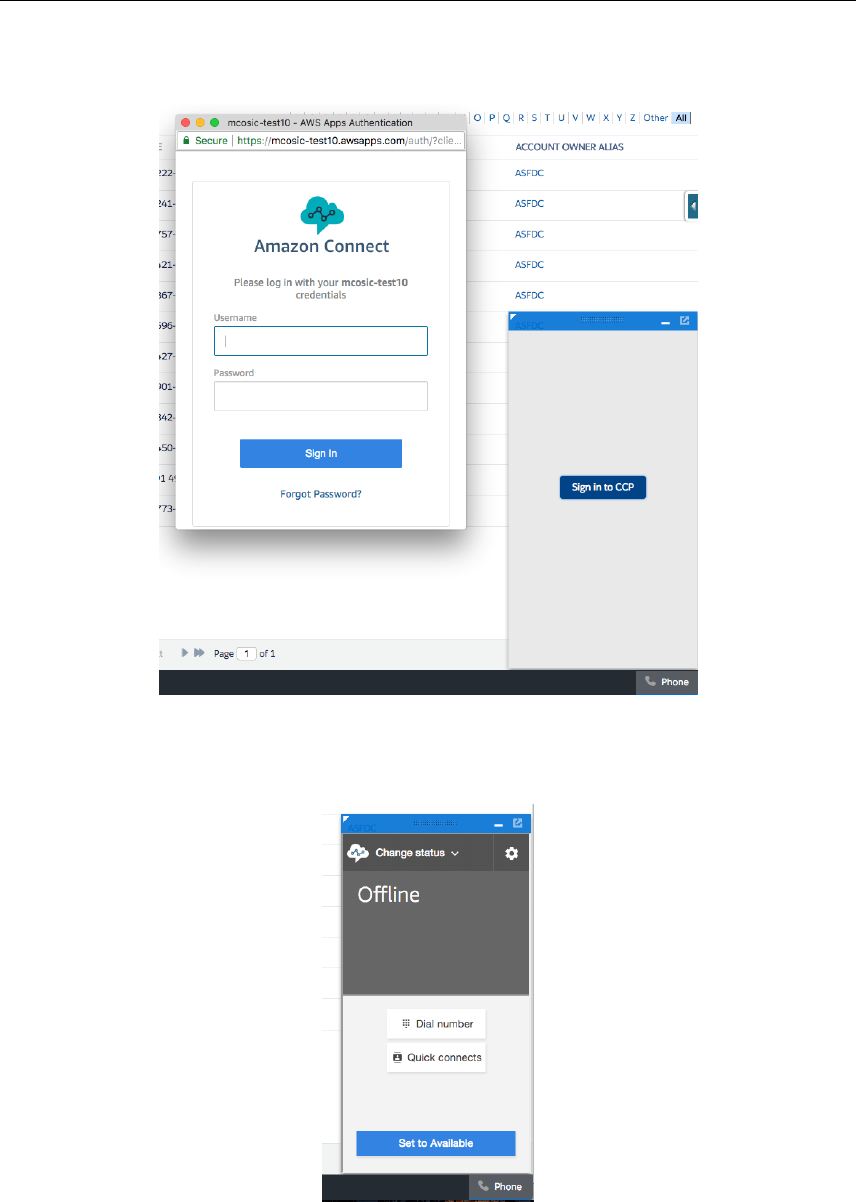
Enter your credentials and click Sign in. Allow Microphone access (if asked by
browser). Once login is successful, the pop-up window will automatically close.
Select “Change status” and select “Available”.
Amazon Web Services – Amazon Connect CTI Adapter for Salesforce
Page 29
Make an inbound phone call to your Amazon Connect instance. The CCP is
going to “ring” and you can answer the call.

Amazon Web Services – Amazon Connect CTI Adapter for Salesforce
Page 30
At this time, I need to create a new Contact in Salesforce so that I can test a
screen-pop by incoming phone number. Select Contacts from the dropdown
menu:
Select New from top-left corner
Fill in the details and click on the Save button.
Close the Contact tab by clicking on the X next to the Name and drop the phone
call. Set your state to Available and make another phone call. This time, the new
Amazon Web Services – Amazon Connect CTI Adapter for Salesforce
Page 31
contact should automatically pop-up as it has been recognized by incoming
phone number.
Configure Classic Experience
The Salesforce Classic is the easiest to configure, but it has some limitations.
Most important limitation is that, with Classic layout, there are no tabs and
modal containers, so each time new object is selected, a full page reload occurs.
This full reload causes softphone to be reloaded too, which could cause an issue
in the voice call audio stream. Because of that, in the Classic environment, we
have to run a separate instance of softphone (CPP) which will carry the audio,
while embedded instance of CCP can be used for call control and screen-pop
functionality.
First, we have to configure Amazon Connect integration.
In the Quick Find field, type Visualforce Pages and select Visual Force Pages:
Amazon Web Services – Amazon Connect CTI Adapter for Salesforce
Page 32
As we are currently setting up the Classic experience, click on
ACSFCCP_Classic_2 page
Click on the Preview button. New browser tab will open with the URL of this
page. It’s going to be in this format:
https://amazonconnect.sfdcInstance.visual.force.com/apex/ACSFC
CP_Classic
This is what we are going to use as “Origin URL” in our Amazon Connect
configuration. From AWS Console, select Amazon Connect service and then
select your Amazon Connect instance:

Amazon Web Services – Amazon Connect CTI Adapter for Salesforce
Page 33
Select “Application Integration” on the left-hand side:
Click on “Add origin” link and enter the origin URL
Click “Add” button
Amazon Web Services – Amazon Connect CTI Adapter for Salesforce
Page 34
From the Salesforce Classic layout, select Setup then type Call Centers in the
Quick Find field and select Call Centers.
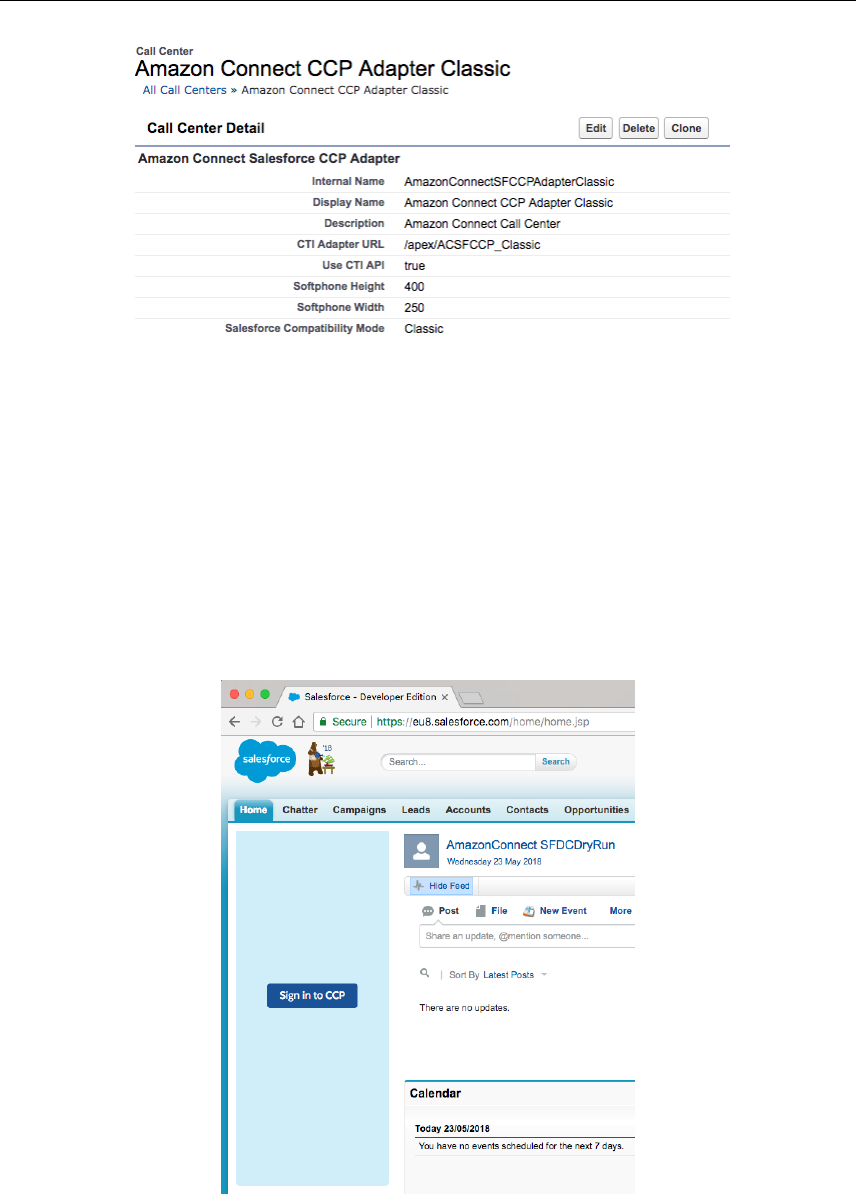
Select “Amazon Connect CCP Adapter Classic”
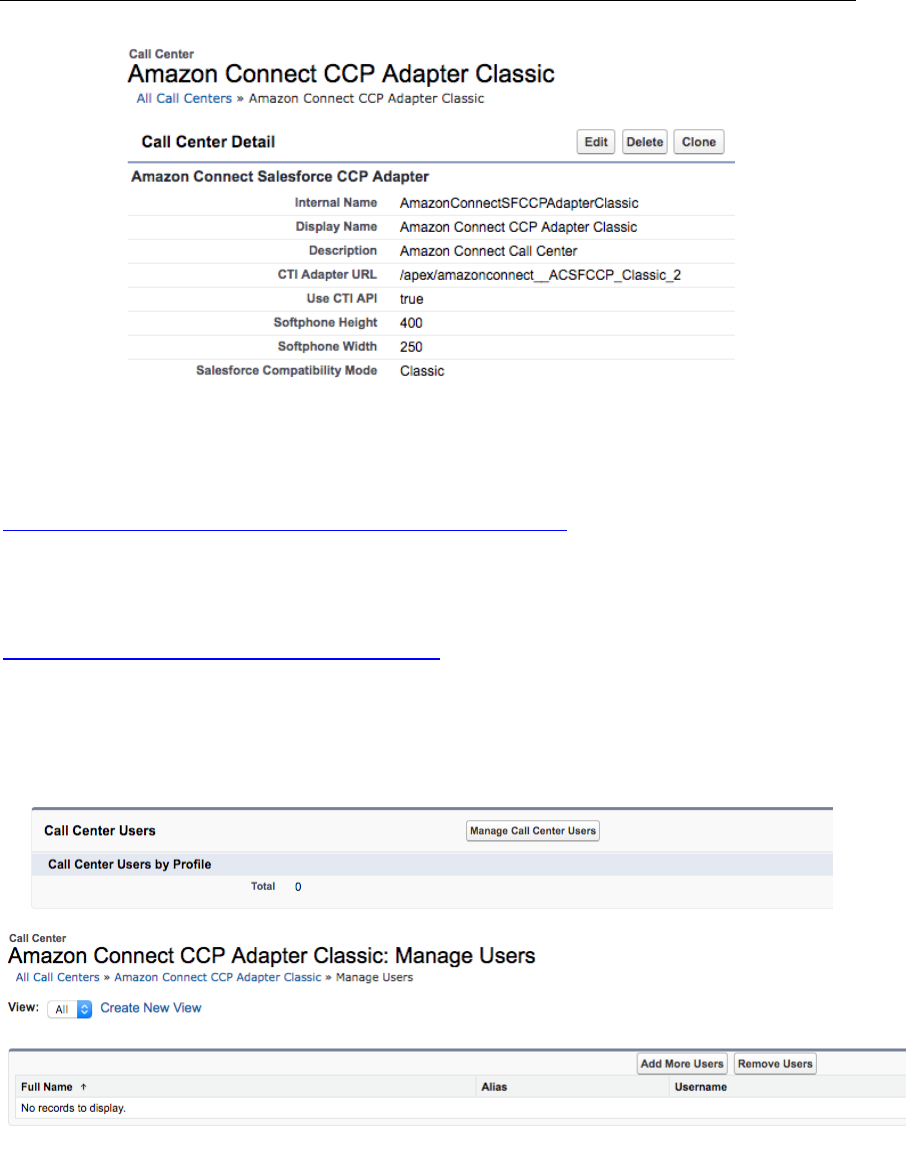
Amazon Web Services – Amazon Connect CTI Adapter for Salesforce
Page 35
Click on the Edit button. In the “Amazon Connect CCP URL” filed, enter the
name of your Amazon Connect instance in the following format:
https://yourinstace-name.awsapps.com/connect/ccp
For example:
https://test10.awsapps.com/connect/ccp
Click on the Save button. Click on the “Manage Call Center Users” button at the
bottom of the page.
Click on the “Add More Users” button.

Amazon Web Services – Amazon Connect CTI Adapter for Salesforce
Page 36
Set filters and click on the Find button. Select the checkbox next to the user and
click “Add to Call Center” button.
Repeat the steps to add more users.
From the top-right corner, select Sales application.
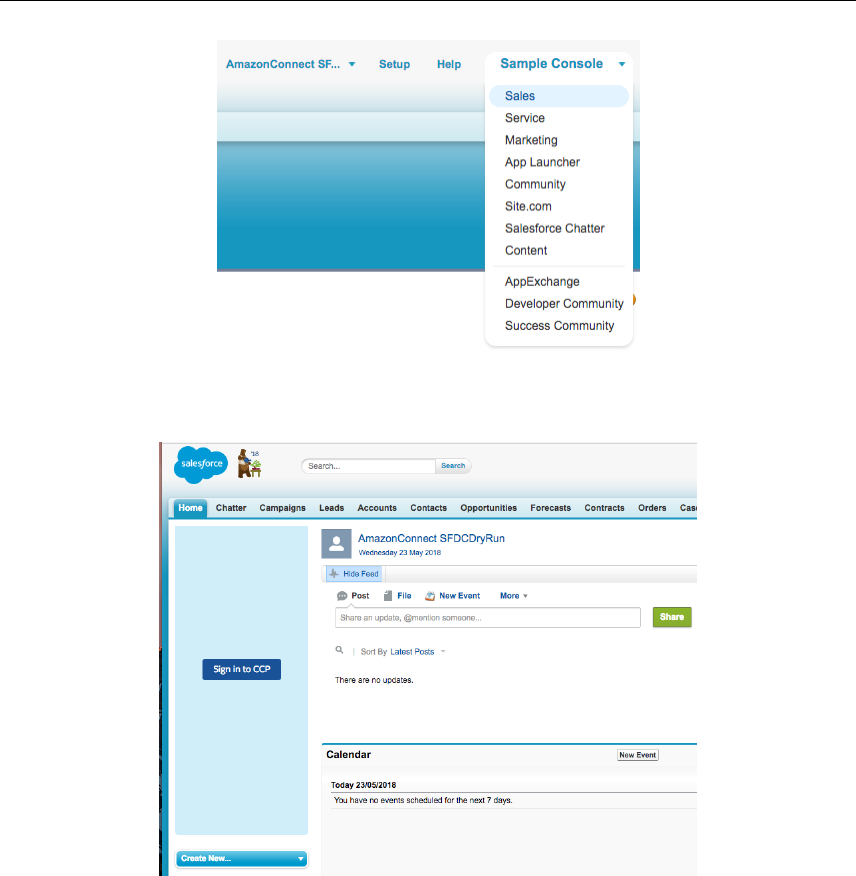
Amazon Web Services – Amazon Connect CTI Adapter for Salesforce
Page 37
On the left-hand side, you will be able to see the Phone container.
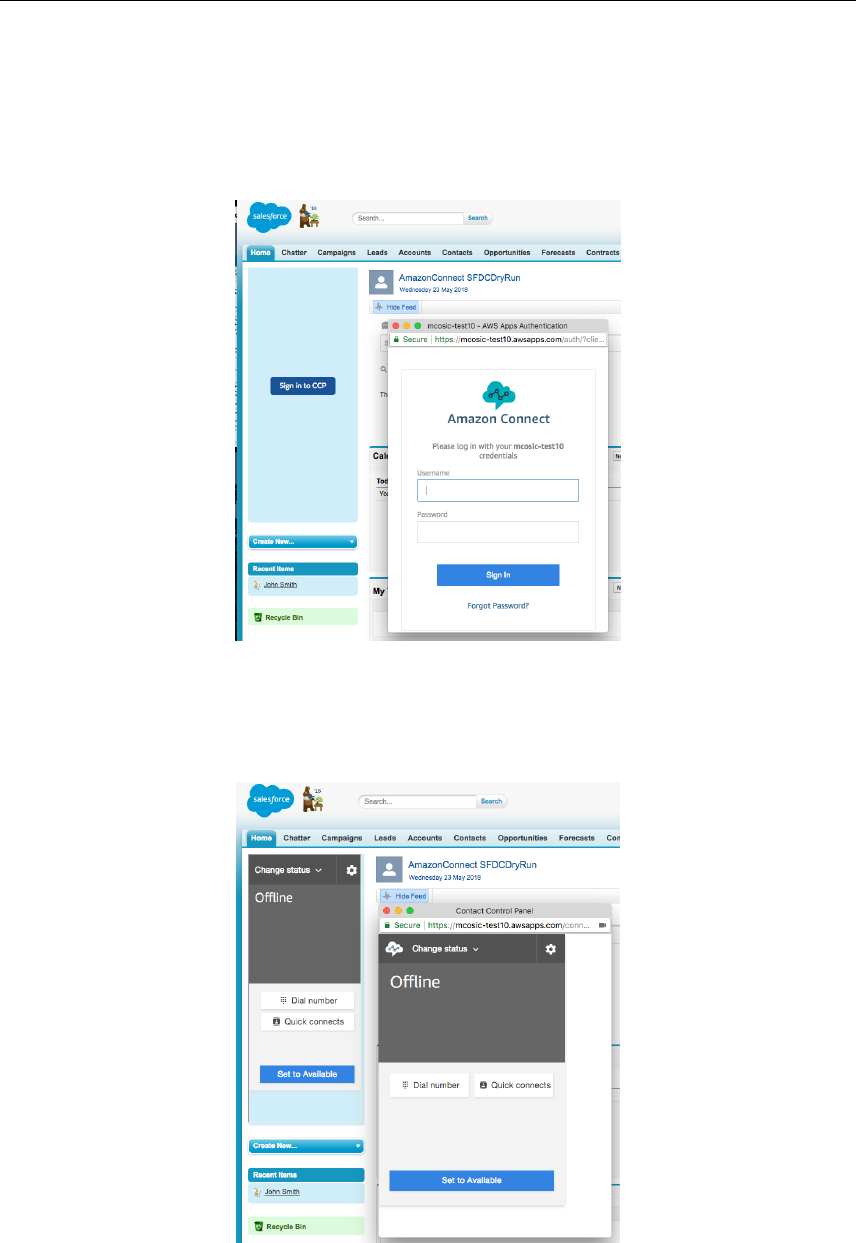
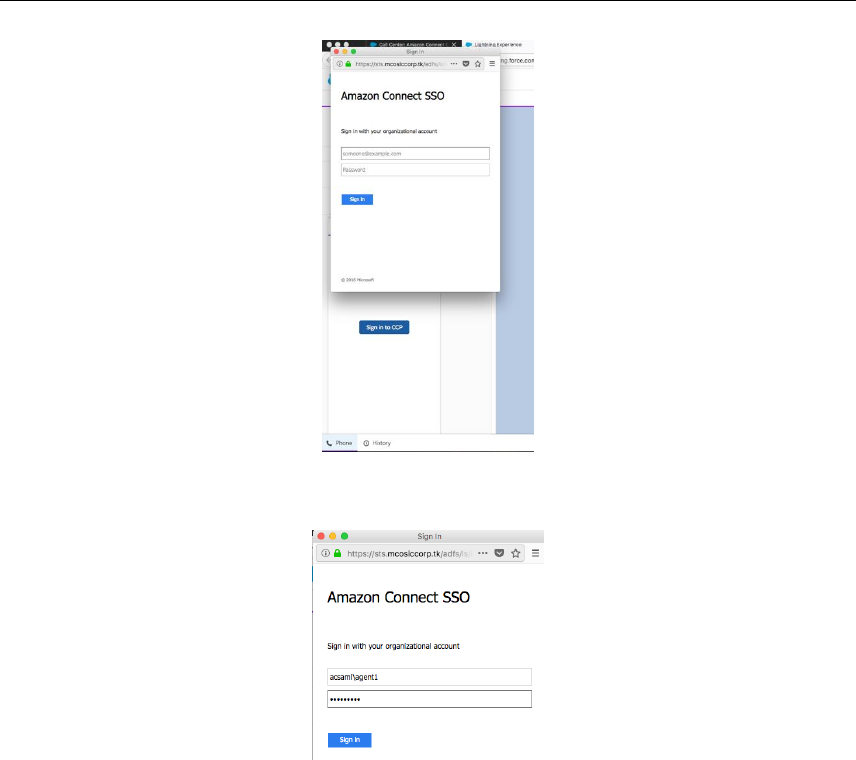
You will need to Sign in into your Amazon Connect CCP. Click on the Sign in to
CCP button. A new browser tab will open, asking you to enter your credentials.

Amazon Web Services – Amazon Connect CTI Adapter for Salesforce
Page 38
Enter your credentials and click Sign in. Allow Microphone access (if asked by
browser). Once Login is successful, the new tab with CCP will stay open, as this
tab is going to carry the audio for voice calls.
Switch back to Salesforce tab in your browser.
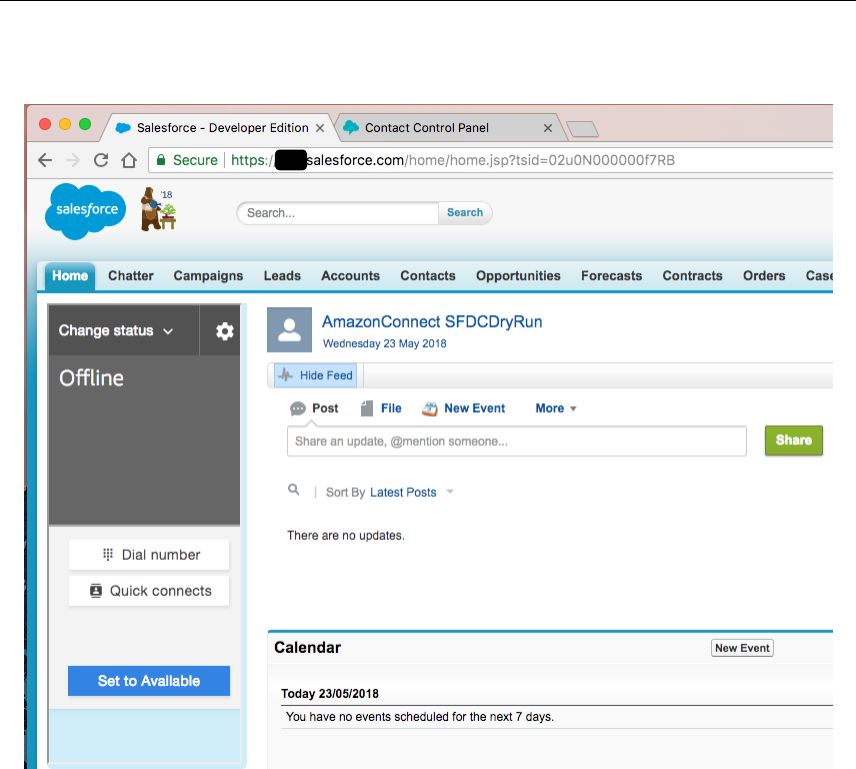
Amazon Web Services – Amazon Connect CTI Adapter for Salesforce
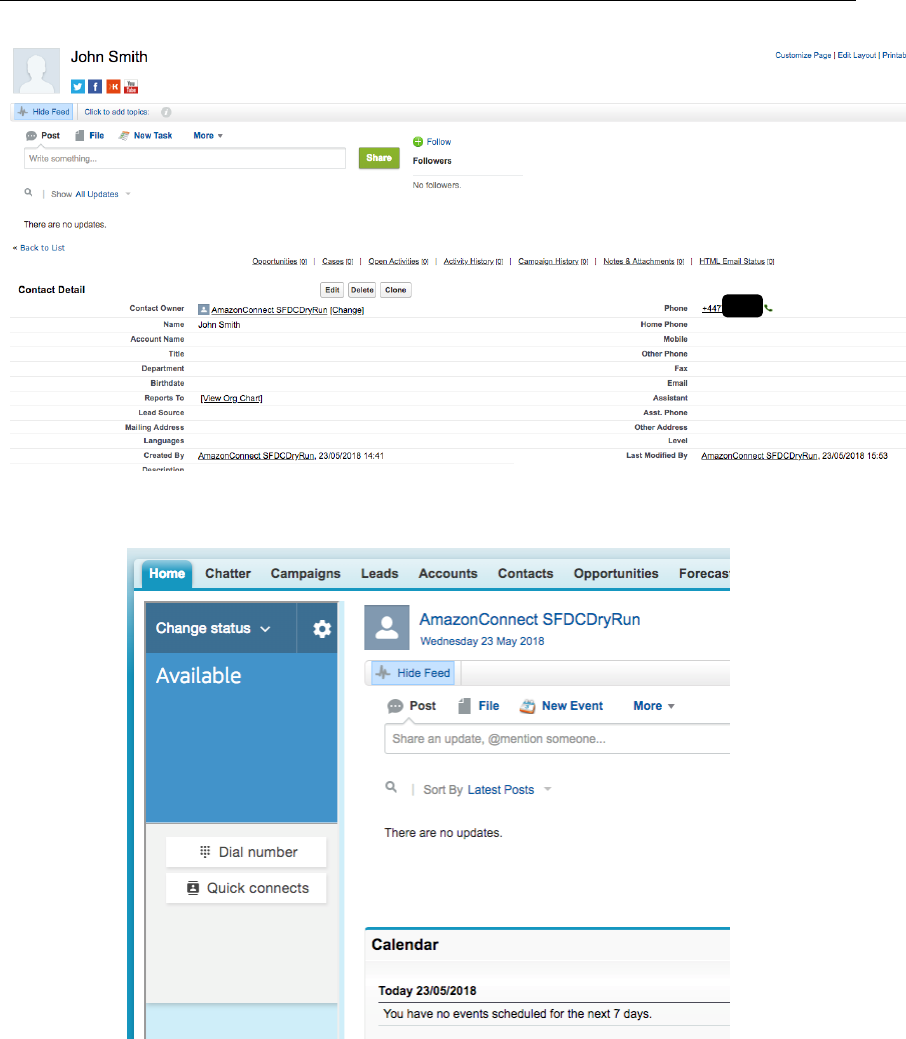
Page 39
Select “Change status” and select “Available”.
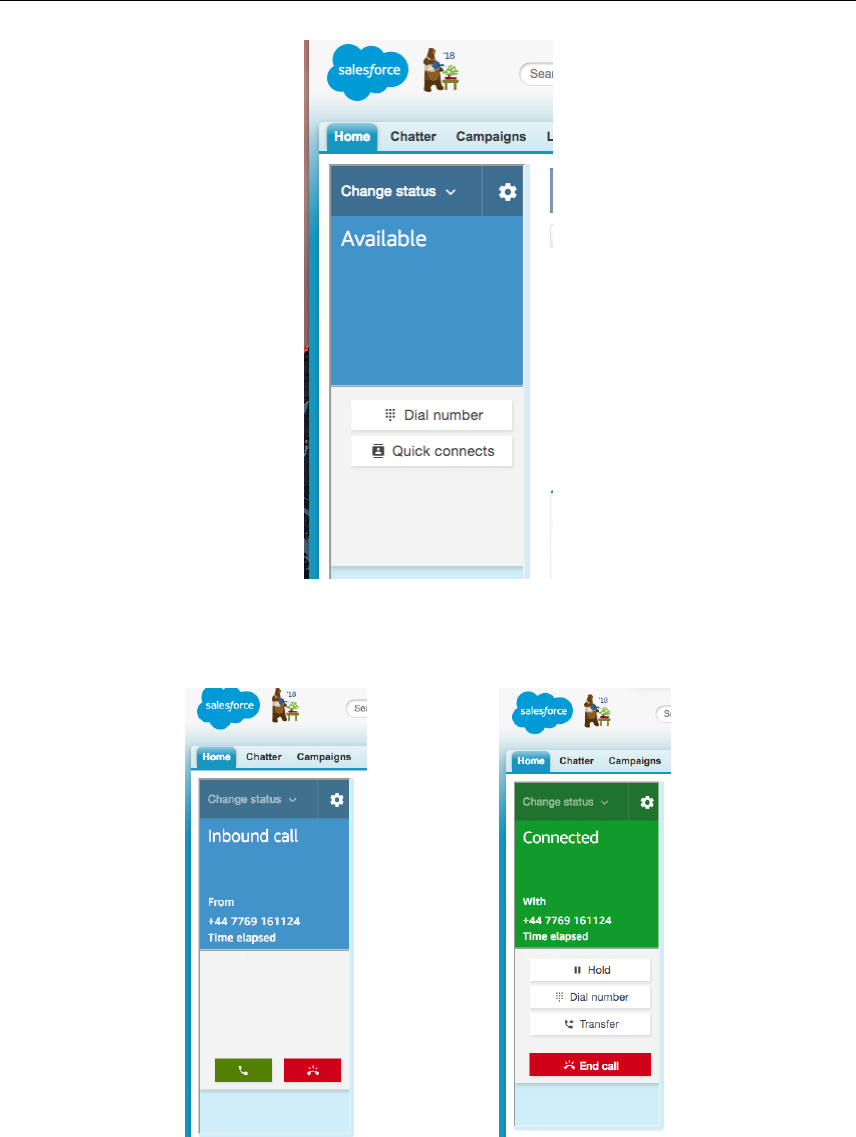
Amazon Web Services – Amazon Connect CTI Adapter for Salesforce
Page 40
Make an inbound phone call to your Amazon Connect instance. The CCP is
going to “ring” and you can answer the call.
At this time, I need to create a new Contact in Salesforce so that I can test a
screen-pop by incoming phone number.
Select Contacts from the main menu bar:
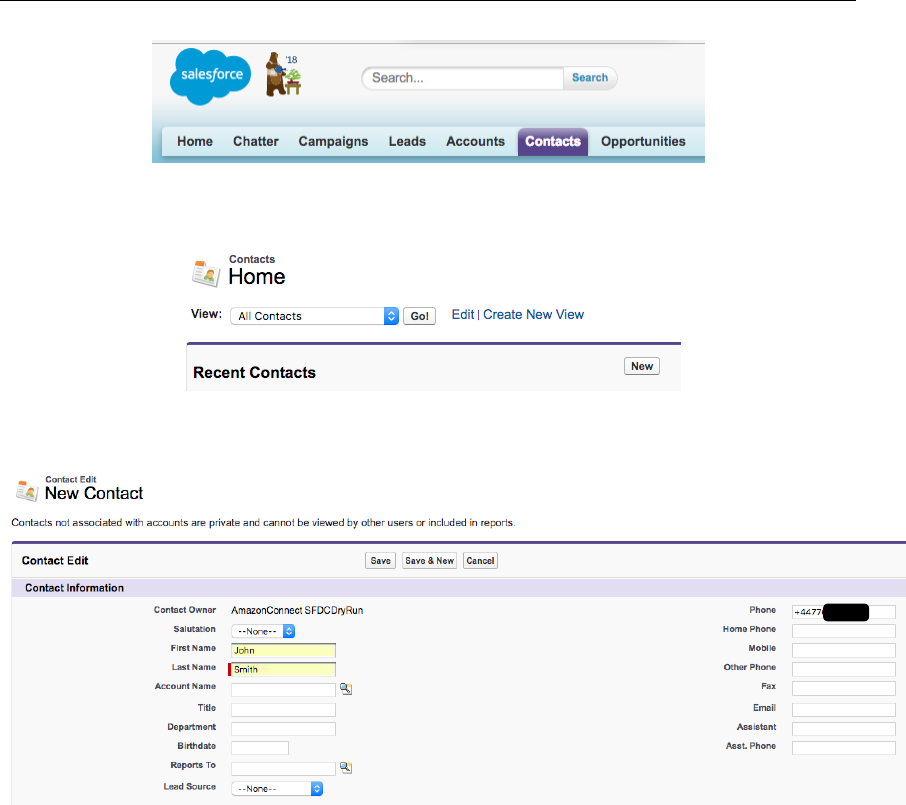
Amazon Web Services – Amazon Connect CTI Adapter for Salesforce
Page 41
Click on the New button
Fill in the details and click on the Save button.
Amazon Web Services – Amazon Connect CTI Adapter for Salesforce
Page 42
Go back to the Home page and drop the phone call.
Set your state to Available and make another phone call. This time, the new
contact should automatically pop-up as it has been recognised by incoming
phone number.
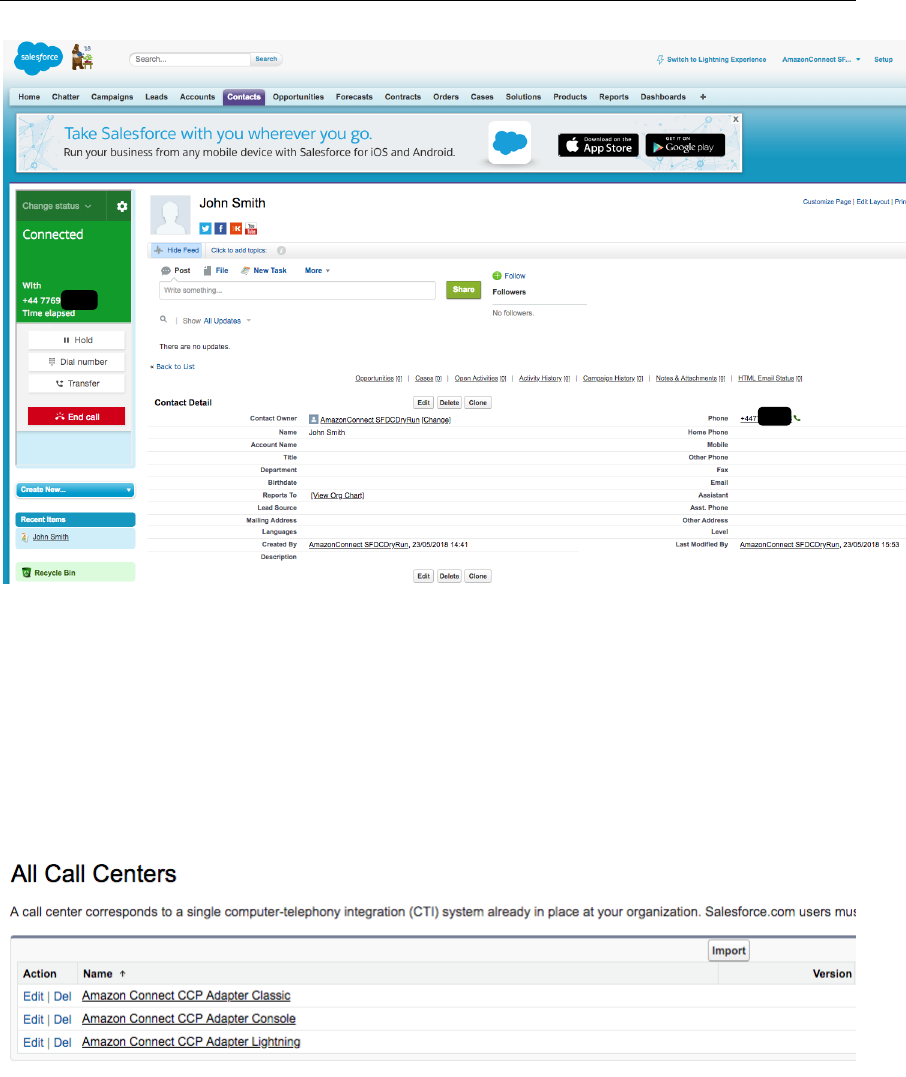
Amazon Web Services – Amazon Connect CTI Adapter for Salesforce
Page 43
The page is fully reloaded, but the softphone preserved the audio stream, as
another instance of CCP was running in the 2nd tab. If the 2nd tab is closed, the
audio will be lost. The 2nd CCP instance can also run in a separate browser
window, if preferred.
Go to Salesforce Setup page and type Call Centers in Quick Find, then select Call
Centers.
Select “Amazon Connect CCP Classic”
Amazon Web Services – Amazon Connect CTI Adapter for Salesforce
Page 44
Click on the Edit button and find the “Amazon Connect CCP Login Popup” filed.
By default, this field is set to “false”, which means that Login Popup will be
opened in a 2nd tab. If we change this value to “true”, then Login Popup will be
opened in a new browser window.
You may also notice that “Amazon Connect CCP Medialess” field is set to “true”.
This basically means that embedded CCP instance will not carry any media. Set
the value to “true” and click on the Save button. Go back to Sales application. If
CCP is already logged in, please log out.
Amazon Web Services – Amazon Connect CTI Adapter for Salesforce
Page 45
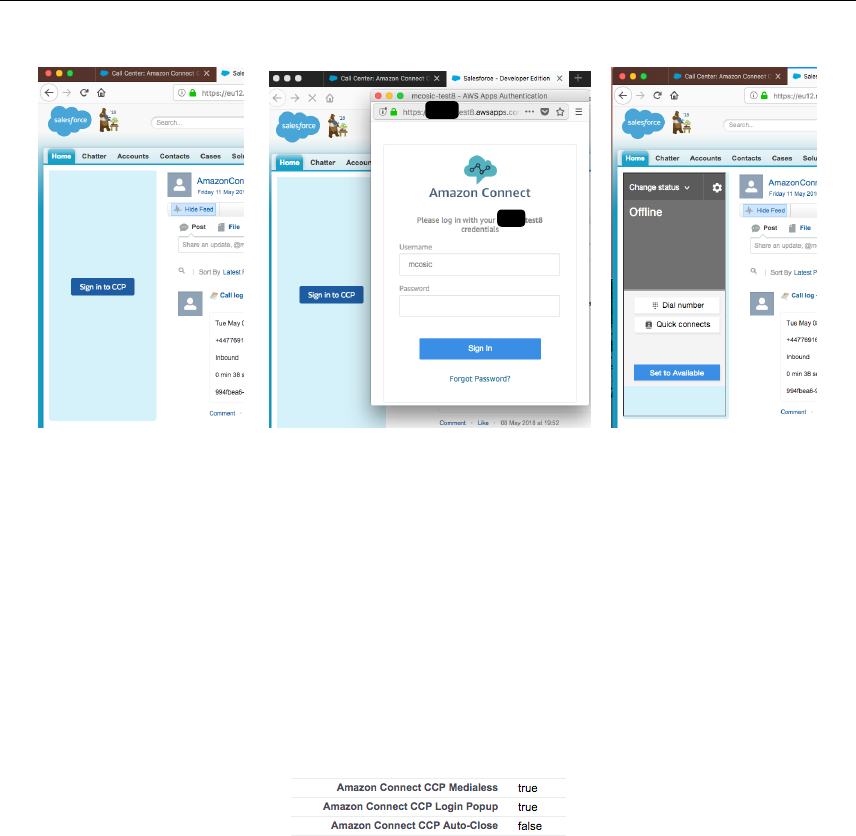
Click on the “Sign in to CCP” button and new browser window will open, asking
you for credentials.
Enter your credentials and click Sign In. The CCP application will log in, but
popup window will stay open and it will host the 2nd CCP which will carry the
audio stream. This window can be minimized or moved to 2nd screen.
Amazon Web Services – Amazon Connect CTI Adapter for Salesforce
Page 46
Amazon Connect SSO/SAML Support
Amazon Connect Salesforce CTI Adapter fully supports SSO/SAML integration.
To configure your SSO integration, open Salesforce Setup page, type Call
Centers in Quick Find and select Call Centers.
Choose one of the Call Center configurations, based on your current
environment. In this case, I’m going to select Lightning.
Click Edit and find Amazon Connect CCP SSO URL and Amazon Connect CCP
SSO Relay fields in the form.
Amazon Connect CCP SSO URL has to be set to your IDP login page. In this
example, I am using Microsoft AD Federation Service (ADFS), so the URL will
be:

Amazon Web Services – Amazon Connect CTI Adapter for Salesforce
Page 47
https://sts.yourcorpdomain.com/adfs/ls/idpinitiatedsignon.aspx
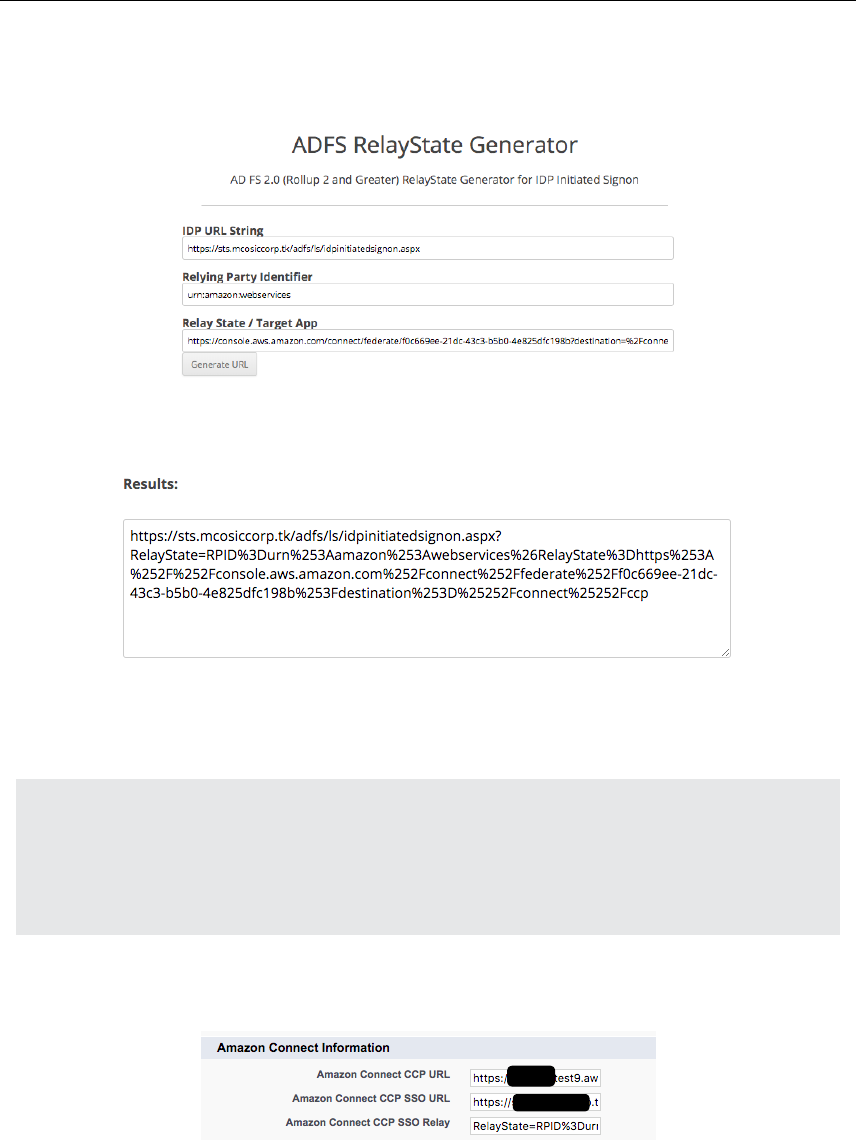
Amazon Connect CCP SSO Relay is used to open CCP automatically after
the login. To create Relay string, you may use an online tool (for example
http://jackstromberg.com/adfs-relay-state-generator/ )
IDP URL String is your IDP login URL
(https://sts.yourcorpdomain.com/adfs/ls/idpinitiatedsignon.aspx)
Relying Party Identifier should be set to: urn:amazon:webservices
Relay State / Target App has to be set to Amazon Connect CCP URL in the
following format:
https://console.aws.amazon.com/connect/federate/instanceId?destination=%2
Fconnect%2Fccp
You Amazon Connect instanceId can be found in the AWS Console:
In my example, the instanceID is f0c669ee-21dc-43c3-b5b0-4e825dfc198b. My
final Target App URL is:
https://console.aws.amazon.com/connect/federate/f0c669ee-21dc-43c3-b5b0-
4e825dfc198b?destination=%2Fconnect%2Fccp
Amazon Web Services – Amazon Connect CTI Adapter for Salesforce
Page 48
Click on the Generate URL:
Amazon Connect CCP SSO Relay is going to be set to everything on the
right side from “?” in the Result that we’ve got. In my example, that is:
RelayState=RPID%3Durn%253Aamazon%253Awebservices%26RelayState%3D
https%253A%252F%252Fconsole.aws.amazon.com%252Fconnect%252Ffeder
ate%252Ff0c669ee-21dc-43c3-b5b0-
4e825dfc198b%253Fdestination%253D%25252Fconnect%25252Fccp
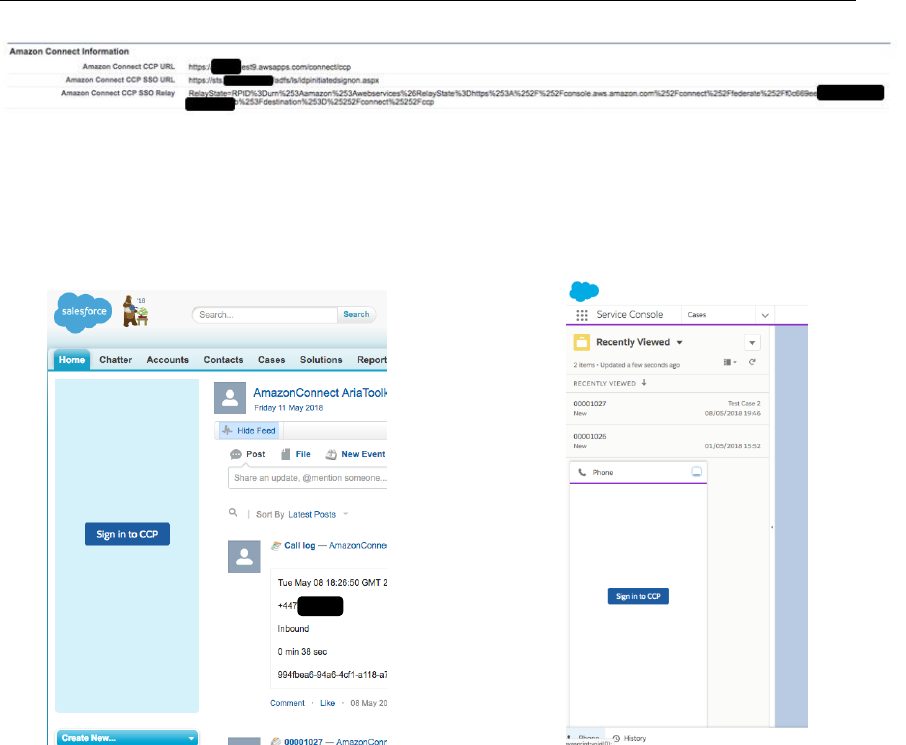
Once both fields are set, Click on the Save button:
The final setup will look like this:
Amazon Web Services – Amazon Connect CTI Adapter for Salesforce
Page 49
From this point, you can go back to your Salesforce application and open
Softphone container. These are examples for Classic and Lightning
environments.
Once you click on “Sign in to CCP” button, a popup is presented, asking for
credentials. This is the login page from your IDP.
Amazon Web Services – Amazon Connect CTI Adapter for Salesforce
Page 50
Enter domain credentials and click Sign in
Once logged in, the login popup disappears and CCP shows up in the SFDC
Phone container:

Amazon Web Services – Amazon Connect CTI Adapter for Salesforce
Page 51
We have similar behaviour with Classic, with only difference that 2nd instance of
CCP (popup window) stays open after login, as that instance will carry the audio
stream from a voice call.
If the Amazon Connect CCP SSO URL filed on the Call Center configuration
for is empty, SSO/SAML will not be enabled and Amazon Connect will use
standard AWS login form.
Amazon Web Services – Amazon Connect CTI Adapter for Salesforce
Page 52
Medialess CCP and VDI support
Amazon Connect CTI Connector supports VDI deployments, by allowing
Medialess CCP instance to be embedded in the Salesforce. This instance will be
used for call control and screen-pop only, while additional CCP instance
carrying audio stream can run locally.
In the Call Center configuration forms, there are 3 parameters which enable a
flexible configuration of embedded CCP (softphone).
Amazon Connect CCP Medialess will support VDI deployments, where the
CCP instance running in Salesforce won’t have voice media in it. It also supports
Salesforce Classic environment.
Amazon Connect CCP Login Popup - when this parameter is set to true, we
will have a login form in a popup window, whilst if it’s set to false, the login
form will be opened in a new tab. It supports both non-SSO and SSO
deployments.
Amazon Connect CCP Auto-Close when this parameter is set to true, the
popup window (or new tab) will be automatically closed upon login, otherwise it
would stay opened.

Amazon Web Services – Amazon Connect CTI Adapter for Salesforce
Page 53
For VDI deployments, we would set Amazon Connect CCP Medialess =
true and Amazon Connect CCP Auto-Close = true while Amazon
Connect CCP Login Popup can be either true or false (probably true).
This way, the browser hosting Salesforce would have a single CCP instance,
without media, while another CCP instance would run locally with voice
enabled.
For Salesforce Classic environments, we would set Amazon Connect CCP
Auto-Close to false, so that we have a CCP instance carrying media, while
agent is browsing through different pages in Salesforce Classic. That CCP
instance can run in a separate tab (Amazon Connect CCP Login Popup =
false) or in a separate popup window (Amazon Connect CCP Login Popup
= true) – depending on the customer preference. Also, we would set Amazon
Connect CCP Medialess=true so that CCP instance running in Salesforce
doesn’t carry voice media. Instead, media will go through CCP instance in new
tab or popup window.
Auto-login feature
Amazon Connect CTI Connector supports the auto-login feature, by simulating
the “Sign in to CCP” button click, upon logging in to the Salesforce. The
behaviour is controlled by “Amazon Connect CCP Auto-login” parameter in the
Call Center adaptor configuration.
The parameter expects a number (integer), which determine the number of
seconds to wait before the auto-login is executed. The default value is set to 5
(seconds), but this value can be increased or decreased, or it can be se to 0,
which disables the auto-login.
The optimal value can be set by examining results from few load tests. The main
idea is to login (simulate the Login button click) as soon as Salesforce page is
loaded when a CCP user was not already logged in, but to prevent Login button
click if a Salesforce page is reloaded when the CCP user is already logged in. In
case when CCP user is already logged in and Salesforce page is refreshed, the
Login button shows up for a couple of seconds and then CCP automatically
loads up, so there is no need to login again.
Amazon Web Services – Amazon Connect CTI Adapter for Salesforce
Page 54
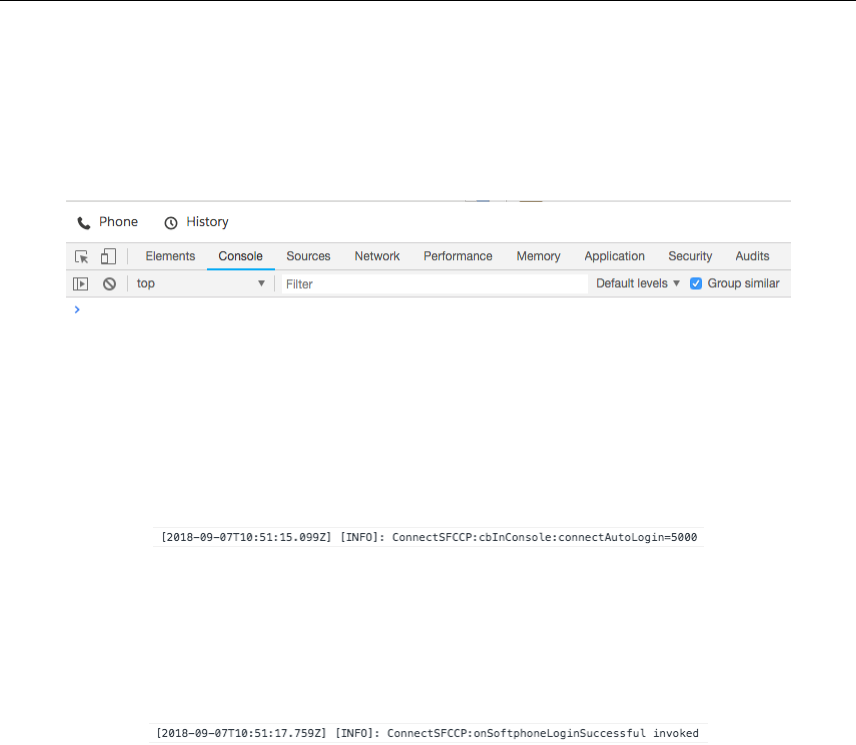
To check how fast CCP loads in your environment, leave the default value of 5
seconds, login into the Salesforce, wait for 5 seconds for CCP to log in (enter the
credentials if/when prompted) and wait for CCP to loads up completely. Open
the Developer Tools in your browser and clean up the Console:
Refresh the page and wait for Salesforce and CCP to fully reload.
First, look for the following log record in you Console:
This is the moment when timer for auto-login is initialised, in this case it’s
10:51:15.099, and the timer value is 5 seconds (5000 ms).
The next message we need to find is:
This indicates the moment when timer is stopped, because the CCP is already
logged in and loaded.
The time difference between the first message (10:51:15.099) and the second
message (10:51:17.759) is just less than 3 seconds. That’s the time needed for an
already logged in CCP to load and the “Amazon Connect CCP Auto-Login” value
should be longer than that. In this case, it would be possible to decrease the
default value of 5 seconds to 4 seconds, but it’s recommended that the test is
repeated few times, on a representative agent’s PC.
Enhanced search for screen-pop
There are a couple of special attributes that can be set to drive the screen pop
behavior for the agent upon ringing of the call. The attributes are exclusive,
meaning that only one attribute will be processed, while the other will be
ignored. The following list describes the attributes in the order there are
evaluated.
Amazon Web Services – Amazon Connect CTI Adapter for Salesforce
Page 55
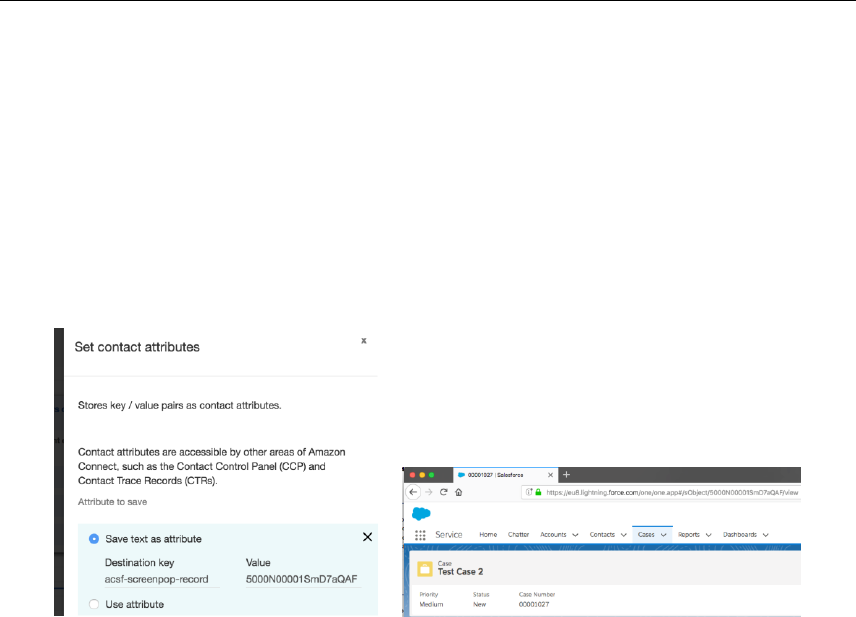
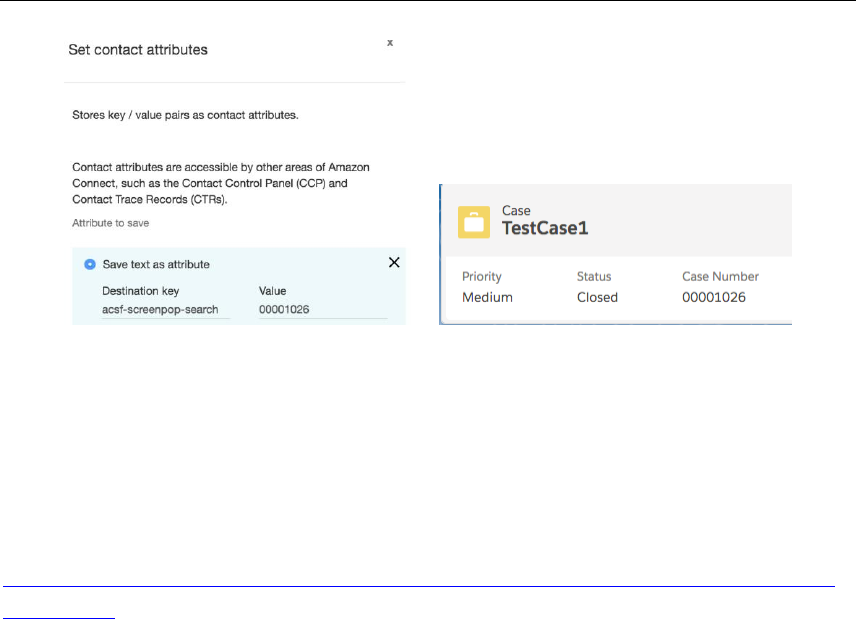
Search specific record: acsf-screenpop-record - To screen pop a specific
Salesforce record, for example a case, the ID of that record needs to be stored in
an attribute called “acsf-screenpop-record”. If present, the Softphone will screen
pop this specific record when the call is assigned to the agent.
Please note that this is an internal object ID, for example internal case ID, not
the Case Number that is displayed in the Salesforce application (internal ID is
displayed in the URL). You can use ‘Set contact attributes’ in the Amazon
Connect Contact Flow to set the value.
Full Search: acsf-screenpop-search - To search for a value other than the
caller’s phone number, set that value in an attribute called “acsf-screenpop-
search”. When the call is assigned to the agent, the Softphone will submit this
value for search. The resulting screen pop will depend on your Softphone
Layout configuration within Salesforce (you have to specify searchable objects
in the Softphone Layout, like described in the first section of this document).
For example, you may search by Case Number that is displayed in the Salesforce
application.
Amazon Web Services – Amazon Connect CTI Adapter for Salesforce
Page 56
If neither of those two contact attributes are present, the Softphone will search
for the caller’s phone number in Salesforce. The resulting screen pop will
depend on your Softphone Layout configuration within Salesforce.
For details on how to configure screen pops using Salesforce’s Softphone Layout
feature, please visit:
https://help.salesforce.com/articleView?id=cti_admin_phonelayoutscreate.ht
m&type=5
Installing the Amazon Connect Salesforce
Lambda package
This section will guide you through the installation process of Amazon Connect
Salesforce Lambda package, which is hosted in AWS Serverless Application
Repository.
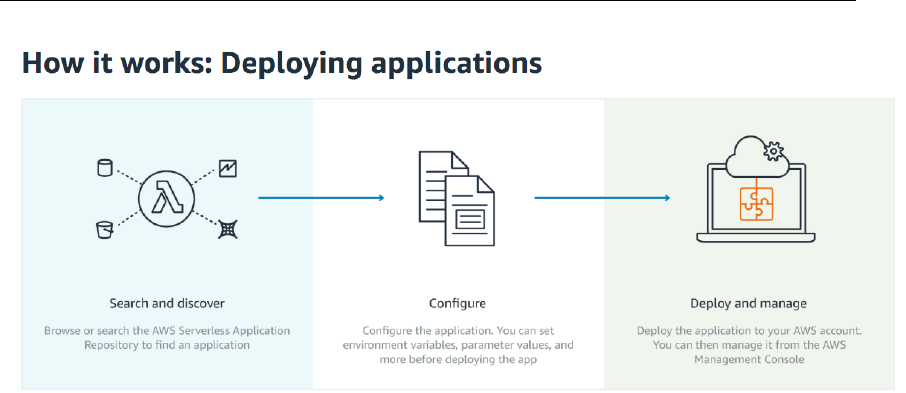
The AWS Serverless Application Repository enables you to quickly deploy code
samples, components, and complete applications. Each application is packaged
with an AWS Serverless Application Model (SAM) template that defines the
AWS resources used. There is no additional charge to use the Serverless
Application Repository - you only pay for the AWS resources used in the
applications you deploy.
Amazon Web Services – Amazon Connect CTI Adapter for Salesforce
Page 57
Prerequisites
Determine your production Environment
In your installation notes, enter the value for “Production Environment” as
“true” or “false”, depending on whether the Salesforce environment that you are
deploying the package into is a production or a sandbox. For Production, enter
“true”. For Sandbox enter “false”.
Determine your Consumer Key and Secret
To leverage the full potential of the integration, Salesforce data needs to be
accessed from AWS environment. The AWS Serverless package comes with a set
of pre-built queries to lookup, update and create Salesforce objects within
Amazon Connect Contact Flows, in form of AWS Lambda functions.
The Lambda function access Salesforce using the Salesforce REST API. To get
access to the environment, a Connected App must be configured with OAuth
settings enabled.
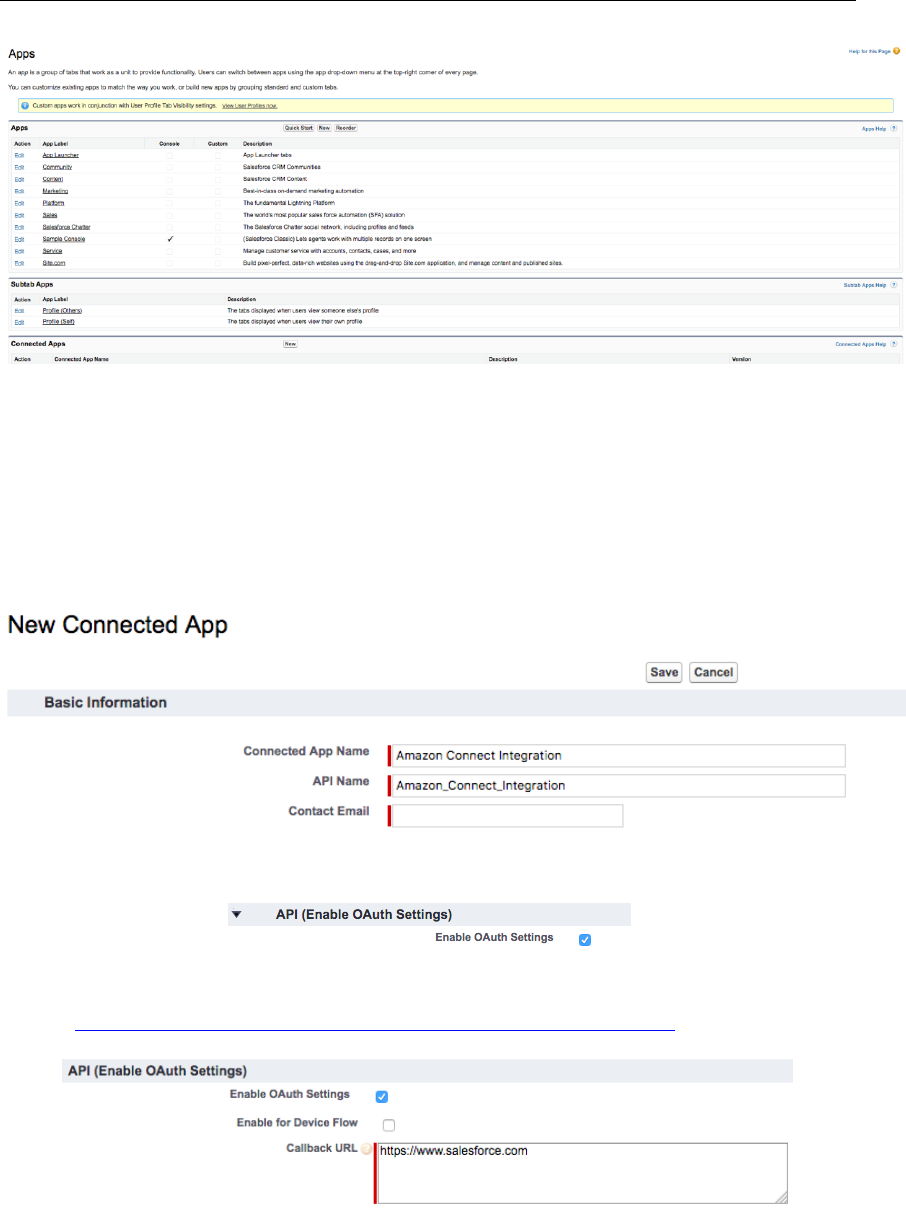
1. Log in to Salesforce
2. Navigate to Setup > Create > Apps
Amazon Web Services – Amazon Connect CTI Adapter for Salesforce
Page 58
3. Click on the “New” button for the Connected Apps at the bottom of the
page
4. In the following form, fill out the Connected App Name, API Name and
Contact Email with values of your choice. We recommend “Amazon
Connect Integration” as the Connected App Name and the default value
for the API name.
5. Select the checkbox next to “Enable OAuth Settings” as shown below.
6. Ensure the Callback URL is set to
https://www.salesforce.comhttps://www.salesforce.com
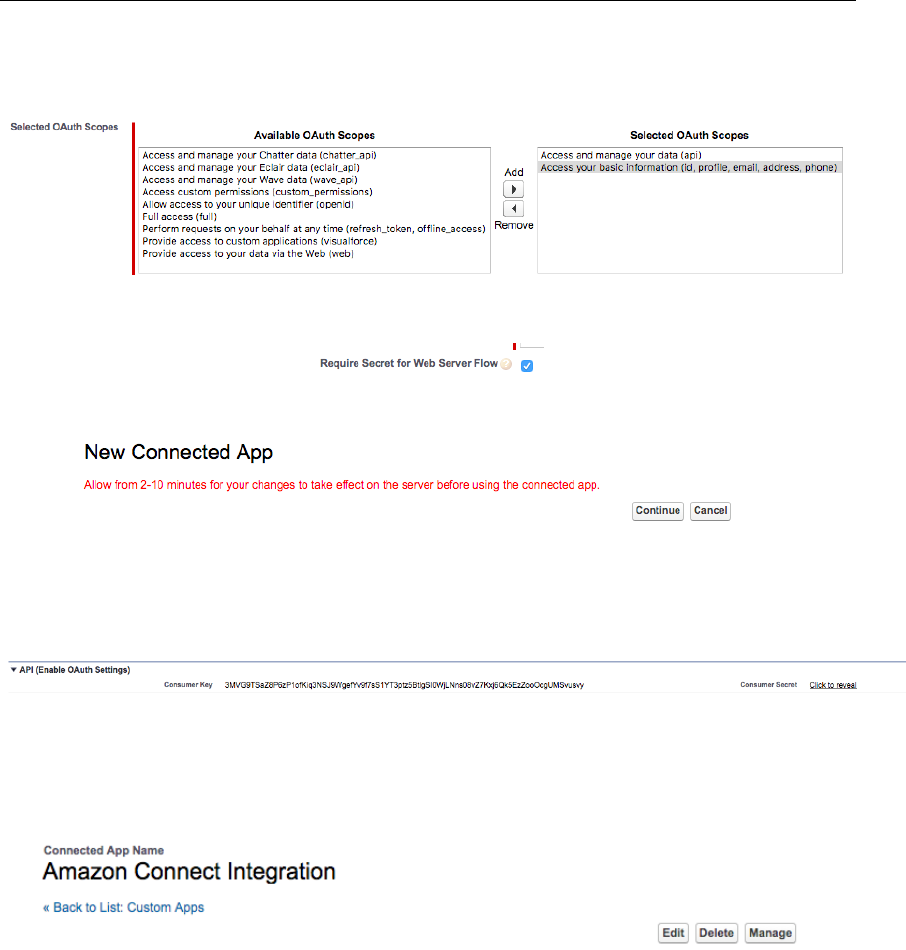
7. Ensure Selected OAuth Scopes has the following values selected:
a. Access and manage your data (api)
Amazon Web Services – Amazon Connect CTI Adapter for Salesforce
Page 59
b. Access your basic information (id, profile, email, address, phone)
8. Select the checkbox “Require Secret for Web Server Flow”
9. Click “Save” at the bottom of the screen.
10. Click “Continue” on the next screen
11. Once the app has been created, on the app’s detail screen, please copy the
“Consumer Key” value to your installation notes
12. Select “Click to reveal” next to Consumer Secret and record this value to
“Consumer Secret” in your installation notes.
13. Click “Manage” at the top of the page
14. On the page that appears, click “Edit Policies”
15. Set “Permitted Users” to “Admin approved users are pre-authorizes”
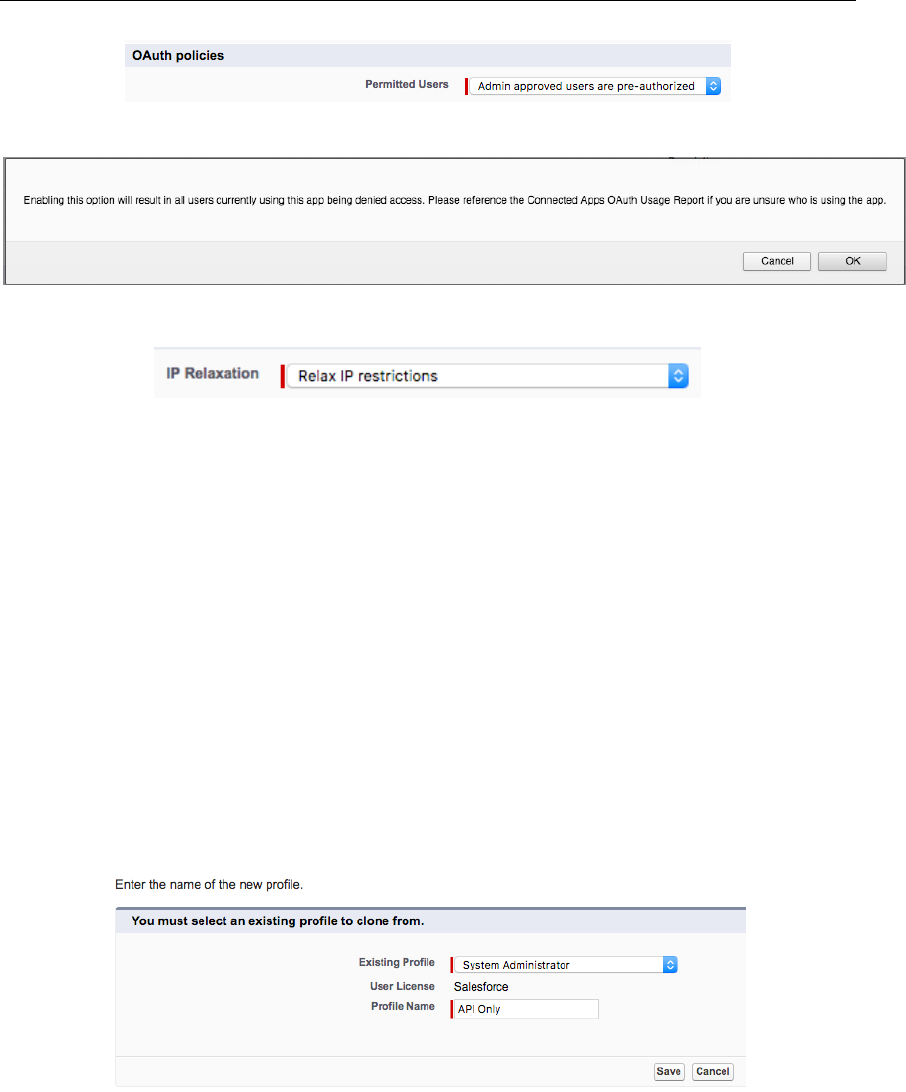
Amazon Web Services – Amazon Connect CTI Adapter for Salesforce
Page 60
16. Click “OK” on the pop-up dialog:
17. Set “IP Relaxation” to “Relax IP restrictions”
18. Click “Save”
Determine your Username, Password and Security Token
The authentication of the Lambda Functions requires valid user credentials. It is
a common practice to create an API user account for this purpose.
1. Log in to Salesforce
2. Navigate to Setup > Manage Users > Profiles
3. Click “New Profile”
4. Enter the Profile Name (i.e. “API Only”)
5. Select the existing profile to clone (The integration user's access to just
those objects required for the integration)
NOTE: You're advised to use a full Salesforce License for the user to be able to
set the below permissions and have full access to avoid any other errors.
6. Click “Save”

Amazon Web Services – Amazon Connect CTI Adapter for Salesforce
Page 61
New Profile is created:
7. Scroll down to “Password Policies” and click Edit:
8. Set User password expire in “Never expires”
Important: Failure to this may lead to production outages.
9. Under Administrative Permissions, please make sure "Lightning
Experience User" is unchecked
10. Click “Save”
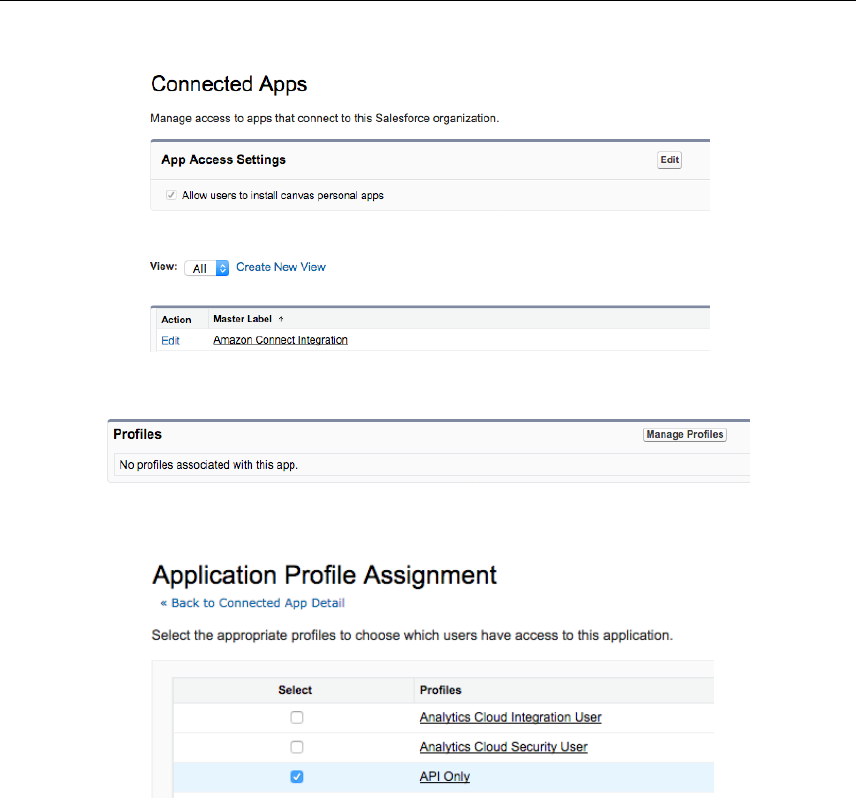
11. Navigate to Setup > Manage Apps > Connected Apps
12. Select the app you have created in the previous step (i.e. Amazon Connect
Integration)
Amazon Web Services – Amazon Connect CTI Adapter for Salesforce
Page 62
13. Click “Manage Profiles”
14. Ensure the “API Only” profile is selected:
15. Click “Save” at the bottom of the page.
16. Navigate to Setup > Manage Users > Users.
17. Click “New User”
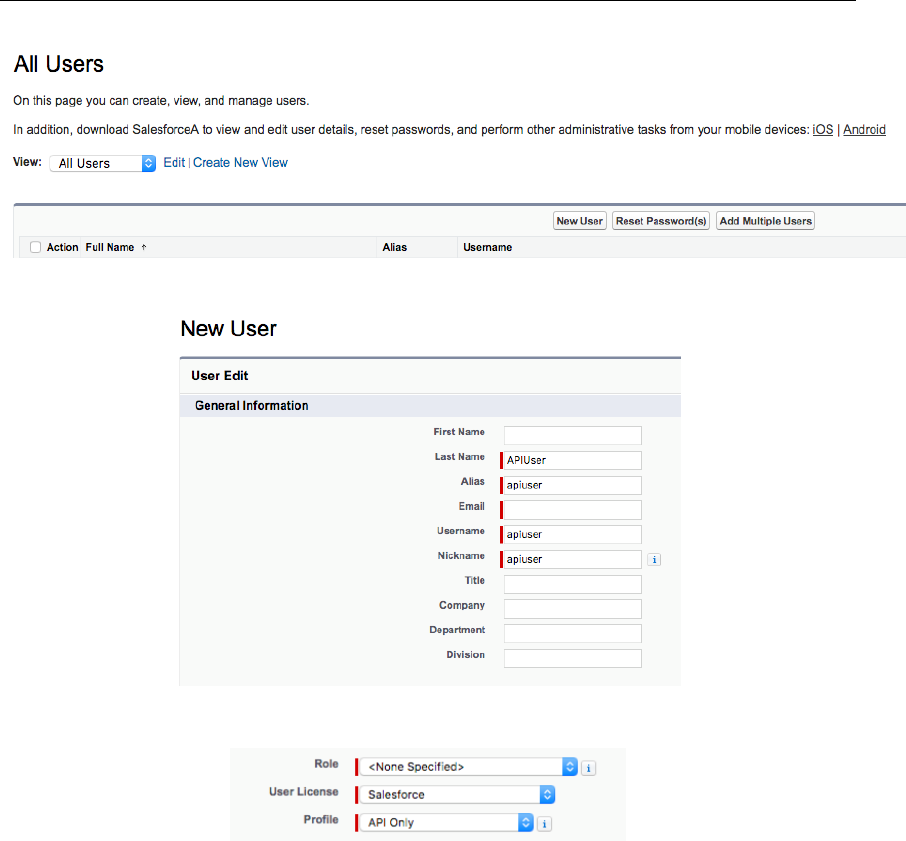
Amazon Web Services – Amazon Connect CTI Adapter for Salesforce
Page 63
18. Set necessary fields: Last Name, Alias, Email, Username, Nickname
19. On the right-hand side, set the User License and Profile
20. Click “Save”
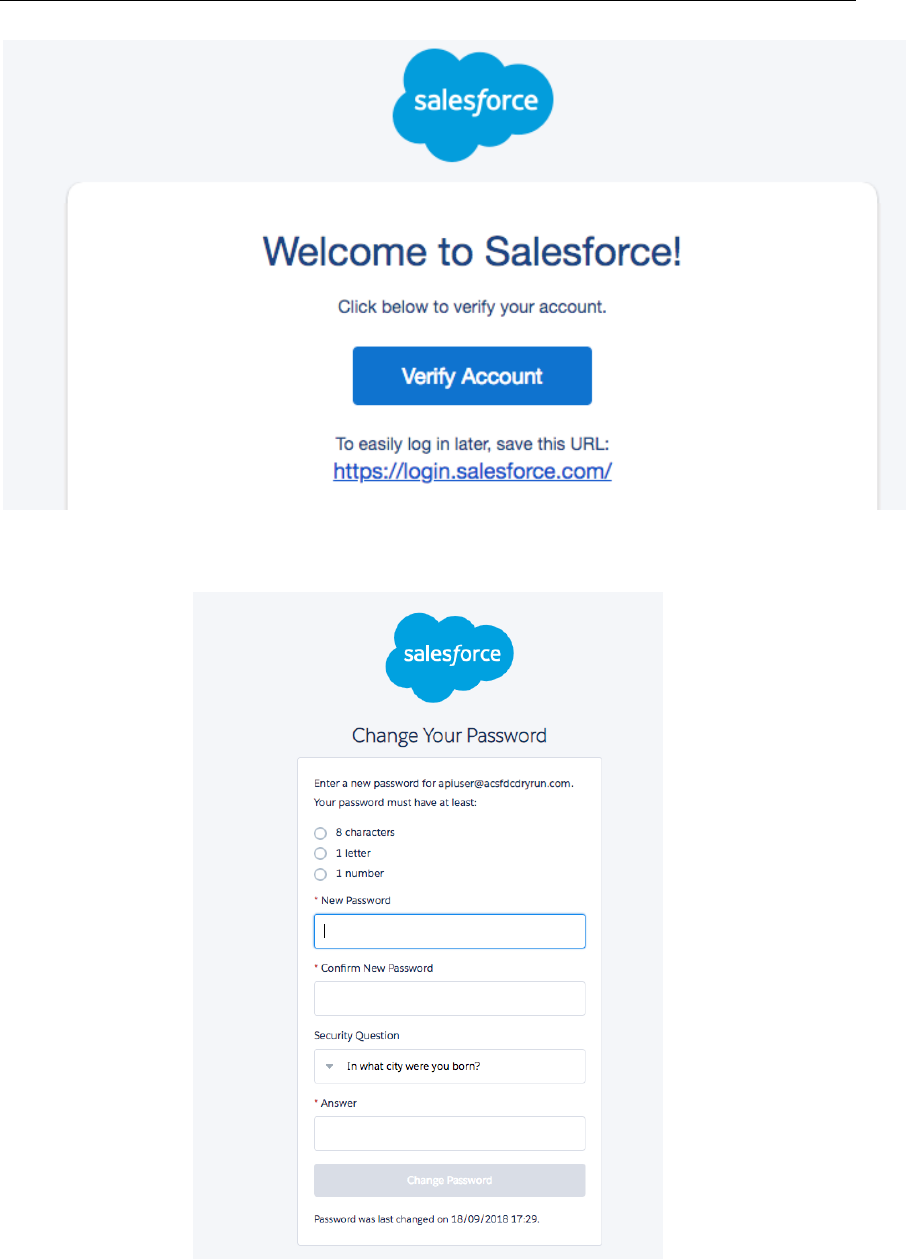
21. A confirmation email will be sent, with an activation link. Click the link to
activate your user.
Amazon Web Services – Amazon Connect CTI Adapter for Salesforce
Page 64
22. Change (set) a password for apiuser (Considered a strong that contains at
least 20 random characters):
23. Click “Change Password”
Amazon Web Services – Amazon Connect CTI Adapter for Salesforce
Page 65
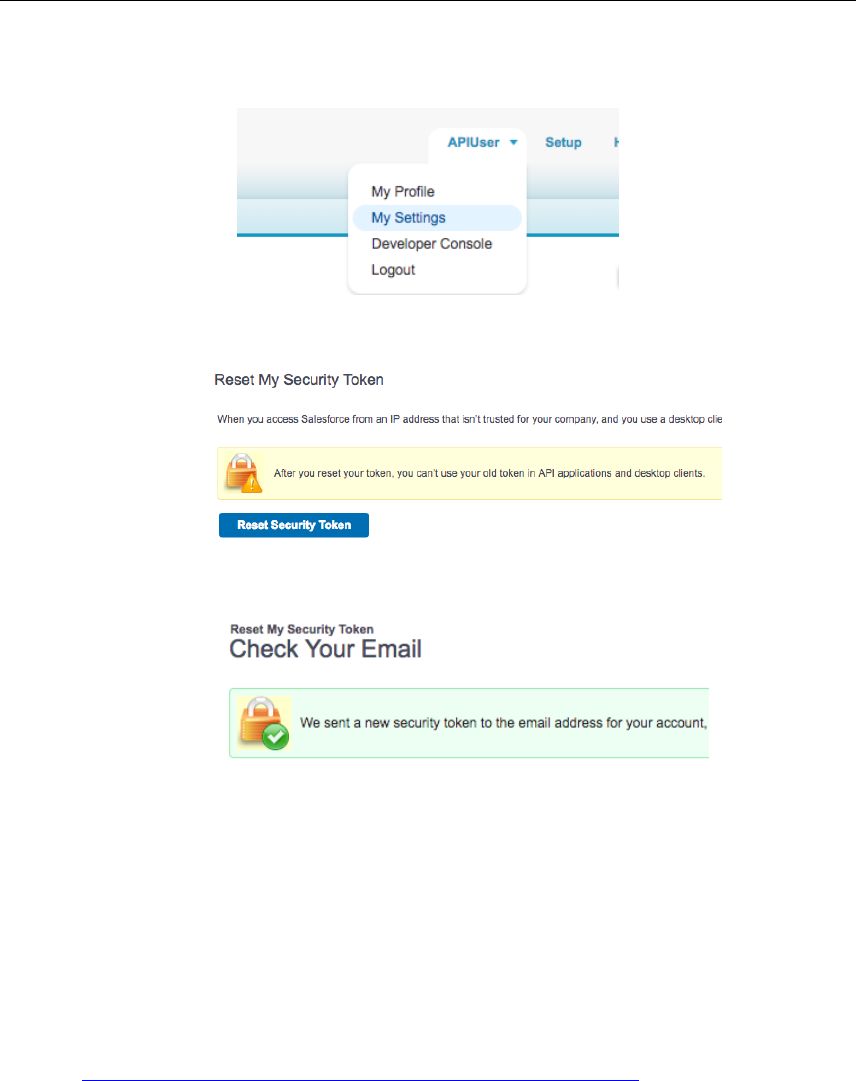
24. Access the apiuser personal settings by selecting the username in the top
right corner, then “My Settings”.
25. Type “Security Token” in the Quick Find box and click “Reset My
Security Token”.
26. Your security token will be emailed to you
27. Copy the security token from the email in to your installation notes for
the “Access Token” value.
Install the Amazon Connect Salesforce Lambda
package
1. Log in into your AWS Account.
2. Navigate AWS Serverless Application Repository
(https://aws.amazon.com/serverless/serverlessrepo/)
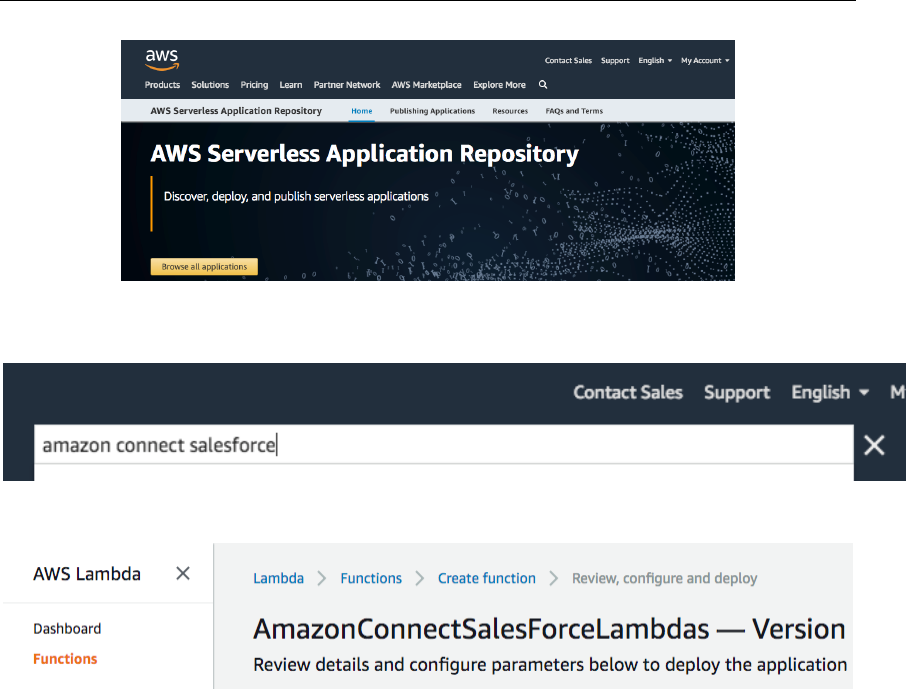
Amazon Web Services – Amazon Connect CTI Adapter for Salesforce
Page 66
3. Click on the Search (magnifying glass) and type in Amazon Connect
Salesforce
4. Select AmazonConnectSalesForceLambdas and click “Deploy”
5. Fill in the fields in “Configure application parameters”. All values should
be available in your installation notes:
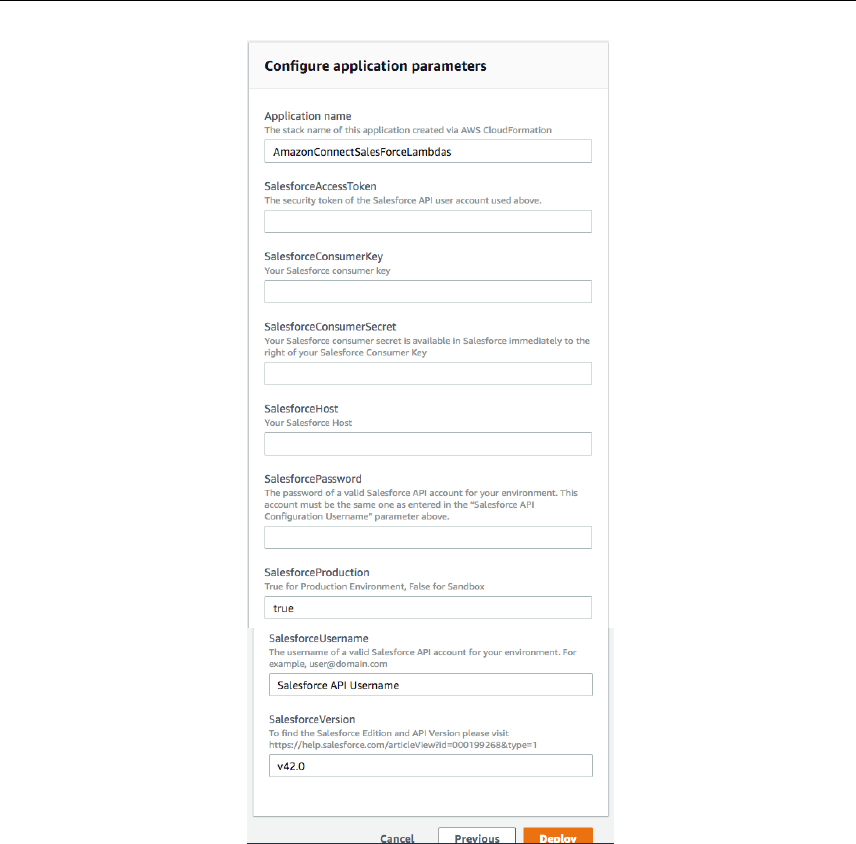
Amazon Web Services – Amazon Connect CTI Adapter for Salesforce
Page 67
6. Once completed, click “Deploy”

Amazon Web Services – Amazon Connect CTI Adapter for Salesforce
Page 68
7. Once completed, you will be able to see the newly created Lambda
function:
8. The package provides a single Lambda function (sfInvokeAPI) that
supports multiple operations, like lookup, create and update. For the
initial validation, sample events are provided within the function. Click
on the function name and check the list of files in the editor.
9. To validate a phone number lookup, double-click on event-
phoneLookup.json file and copy the text in your clipboard.
10. In the top-right corner, click the drop-down arrow next to the “Test”
button and select “Configure test events”
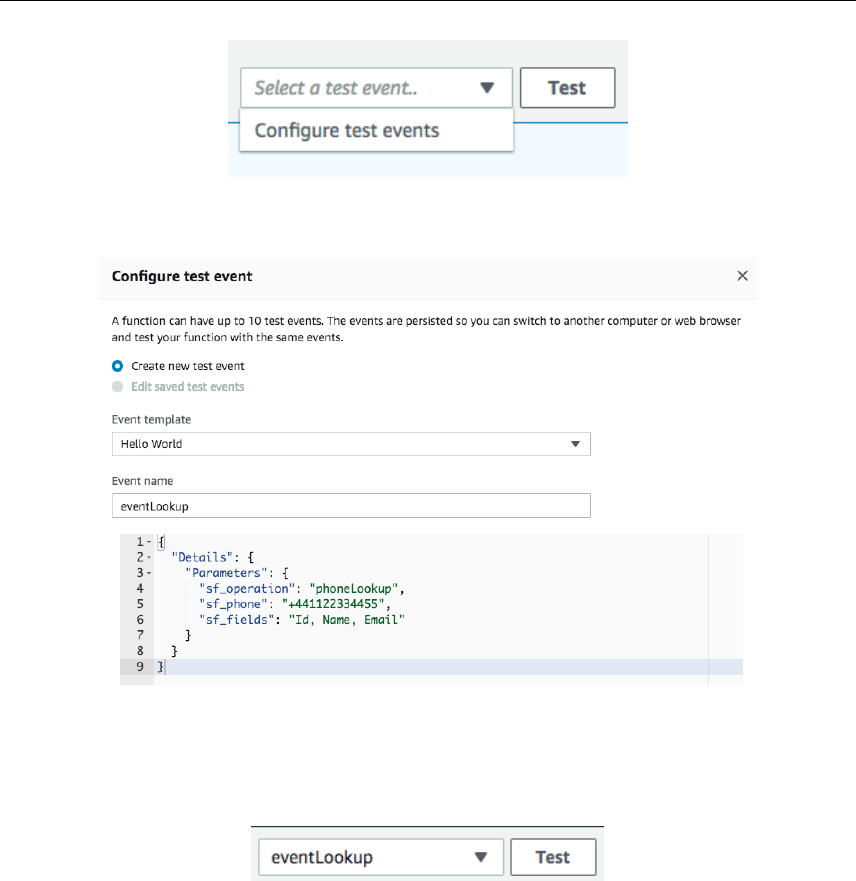
Amazon Web Services – Amazon Connect CTI Adapter for Salesforce
Page 69
11. Select “Create new test event”, set Event name (i.e. phoneLookup) and
paste the JSON payload you’ve copied in the previous step.
12. Click “Create” button
13. From the drop-down list, select your “eventLookup” and click “Test”
button
Amazon Web Services – Amazon Connect CTI Adapter for Salesforce
Page 70
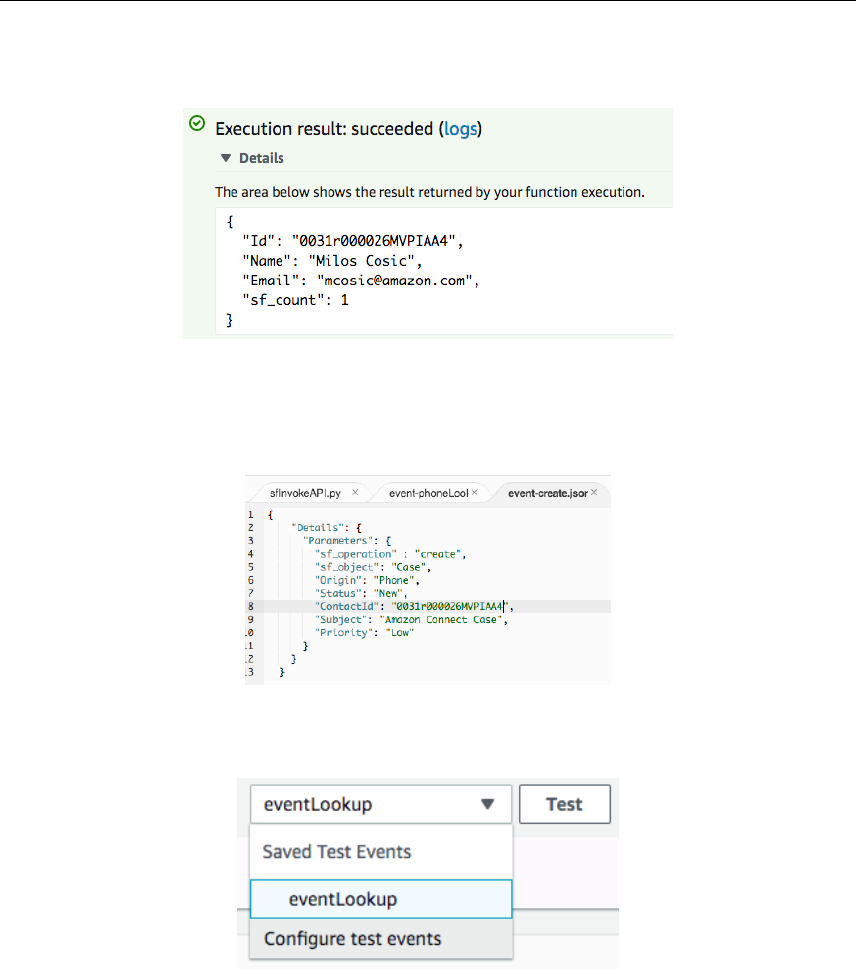
14. If successful, the result will contain fields defined in “sf_fileds”
parameter in the invocation event
15. As a next step, we are going to use the ContactId provided and create a
Case in Salesforce. Double-click on “event-create.json” file and set the
ContactId value from the previous step. Copy the JSON text into your
clipboard.
16. In the top-right corner, click the drop-down arrow next to the “Test”
button and select “Configure test events”
Amazon Web Services – Amazon Connect CTI Adapter for Salesforce
Page 71
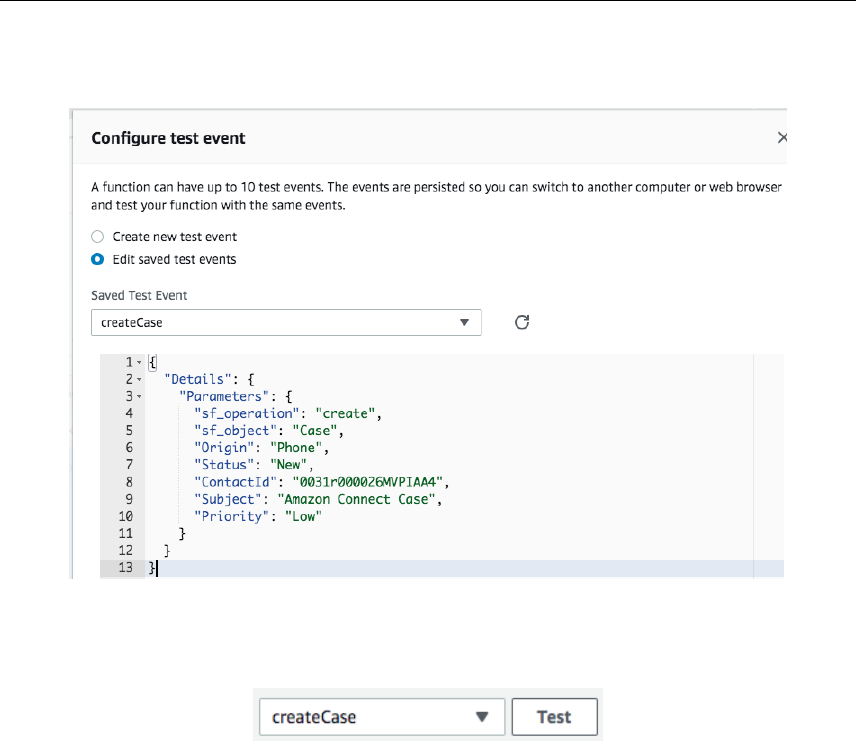
17. Select “Create new test event”, set Event name (i.e. createCase) and paste
the JSON payload you’ve copied in the previous step.
18. Click “Create” button
19. From the drop-down list, select your “createCase” and click “Test” button
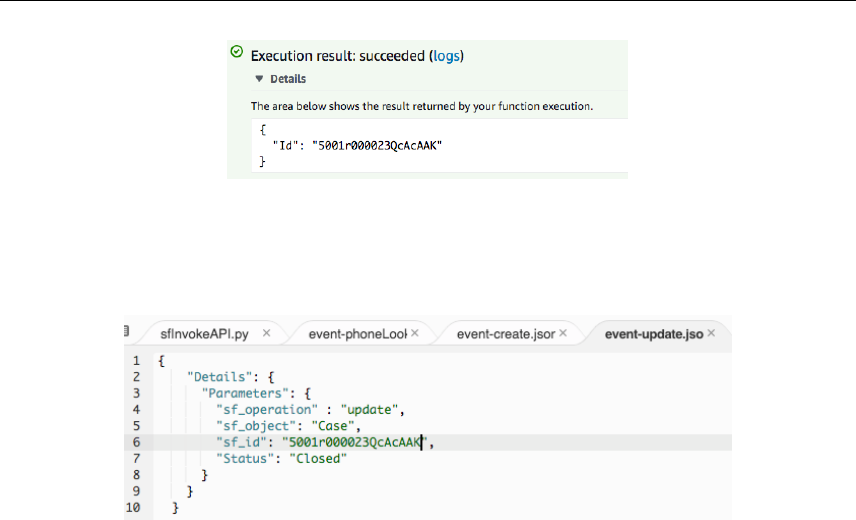
20. If successful, the result will contain a Case Id for newly created case:
Amazon Web Services – Amazon Connect CTI Adapter for Salesforce
Page 72
21. As defined in the event payload, Status is “New” and Priority is “Low”.
We are going to use the update operation to close the case. Copy the Case
Id provided in the previous step, then double-click on “event-
update.json” file and paste the Case Id in “sf_id” parameter:
22. In the top-right corner, click the drop-down arrow next to the “Test”
button and select “Configure test events”
Amazon Web Services – Amazon Connect CTI Adapter for Salesforce
Page 73
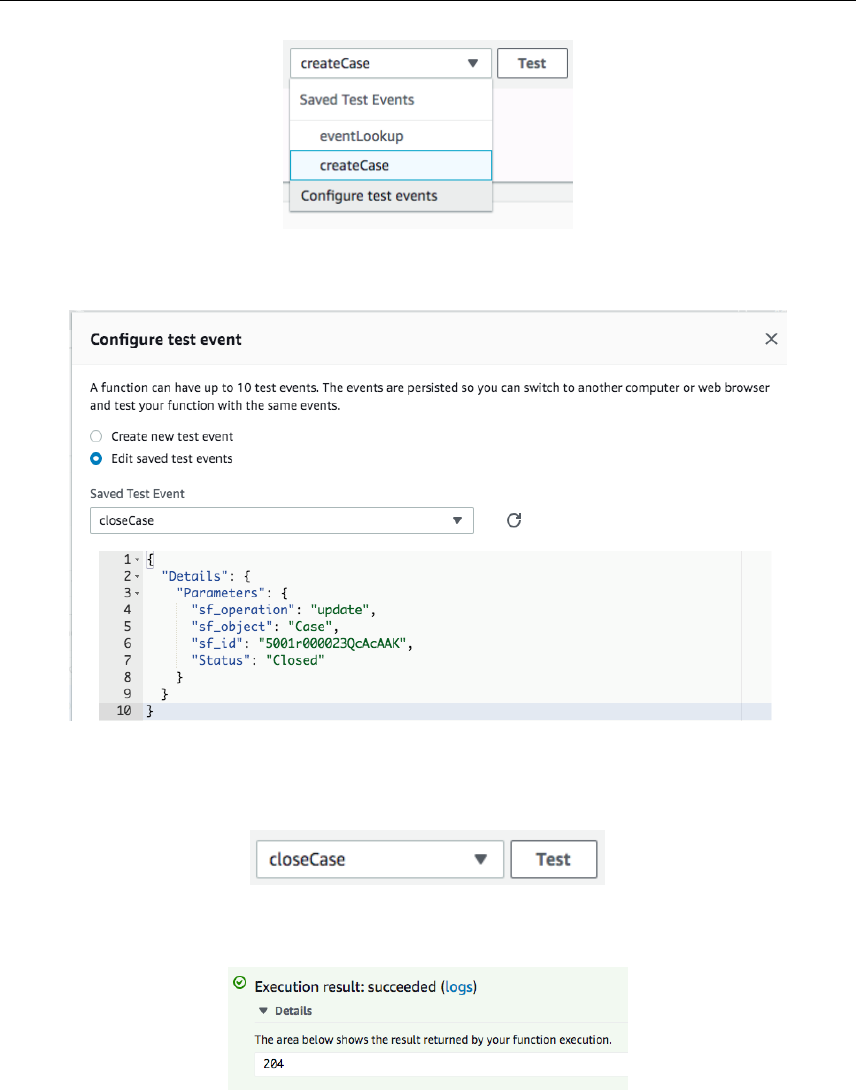
23. Select “Create new test event”, set Event name (i.e. closeCase) and paste
the JSON payload you’ve copied in the previous step.
24. Click “Create” button
25. From the drop-down list, select your “closeCase” and click “Test” button
26. If successful, the result will be HTTP code 204 (“No Content” success
code):
27. Log in to Salesforce and search for Case and it’s details. The Case status
should be “Closed”.

Amazon Web Services – Amazon Connect CTI Adapter for Salesforce
Page 74
Invoking the Amazon Connect Salesforce Lambda
from Contact Flows
The Amazon Connect Contact Flow defines the routing behavior within Amazon
Connect, allowing contact center administrators to customize call flow behavior
such as playing prompts, invoking Lambda functions for data lookup, and
sending the call to different queues based on various conditions. As a result,
Contact Flows are expected to be highly customized for each organization.
While the Adapter package does not provide any Contact Flows, there are some
best practices that are worth highlighting when utilizing the Adapter.
The key element that enables Contact Flow integration is the AWS Lambda
function. A Lambda function is a serverless piece of code that is invoked by the
Contact Flow. Typically, Lambda functions are used to update or retrieve
information from databases or APIs, as well as integrating with other systems.
Lambda function can return any data processed to the Contact Flow where it
can be used for decision making.
Since Salesforce is highly customizable, the same Salesforce object in a different
environment may have different fields associated with it. As a result, we can
expect objects to have different requirements for how they are retrieved,
updated and created. The CTI Adapter was built to be able to query Salesforce
objects regardless of how they have been customized. The user of the Adapter
must therefore ensure they are passing the appropriate parameters to the
Lambda functions provided as part of the Adapter.
The Lambda function supports different operations, based on the mandatory
input parameter “sf_operation”.
Salesforce Lookup
This operation is invoked by setting “sf_operation” to “lookup”. In this case, the
Lambda function queries Salesforce for objects based on the parameters passed
to it.
- “sf_object” parameter contains Salesforce Object, like Case, Contact etc.

Amazon Web Services – Amazon Connect CTI Adapter for Salesforce
Page 75
- “sf_fields” parameter contains a set of fields to be returned in a result. For
example, if we are querying Case, we might specify “Id, IsClosed, Subject”,
or if we are querying Contact, we might specify “Id, Name, Email”
- Specify a conditional parameter, for example “CaseNumber” or
“homephone”. Multiple values may be sent and they will be applied with
“AND” operator.
In the Amazon Connect Contact Flow Designer, add Integrate > Invoke AWS
Lambda function block. Set ‘sfInvokeAPI’ Lambda ARN and make sure you
have granted Amazon Connect to invoke the Lambda Function.
Example for phone number lookup:

Amazon Web Services – Amazon Connect CTI Adapter for Salesforce
Page 76
A result example:
Example for Case lookup:

Amazon Web Services – Amazon Connect CTI Adapter for Salesforce
Page 77
A result example:

Amazon Web Services – Amazon Connect CTI Adapter for Salesforce
Page 78
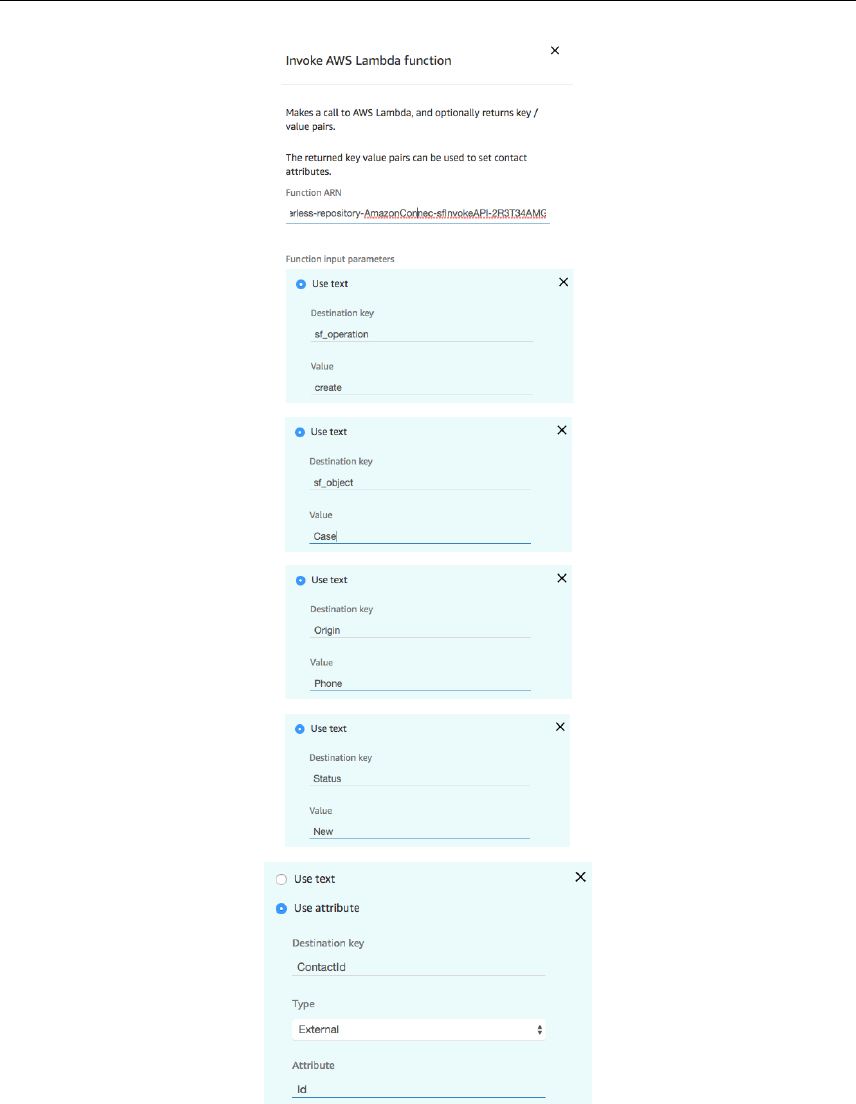
Salesforce Create
This operation is invoked by setting “sf_operation” to “create”. In this case, the
Lambda function creates a Salesforce object based on the parameters passed to
it.
- “sf_object” parameter contains Salesforce to be created, like Case.
- Specify additional parameters for the Salesforce object to be created. Please
be sure to include all parameters required to create the Salesforce object.
In the Amazon Connect Contact Flow Designer, add Integrate > Invoke AWS
Lambda function block. Set ‘sfInvokeAPI’ Lambda ARN and make sure you
have granted Amazon Connect to invoke the Lambda Function.
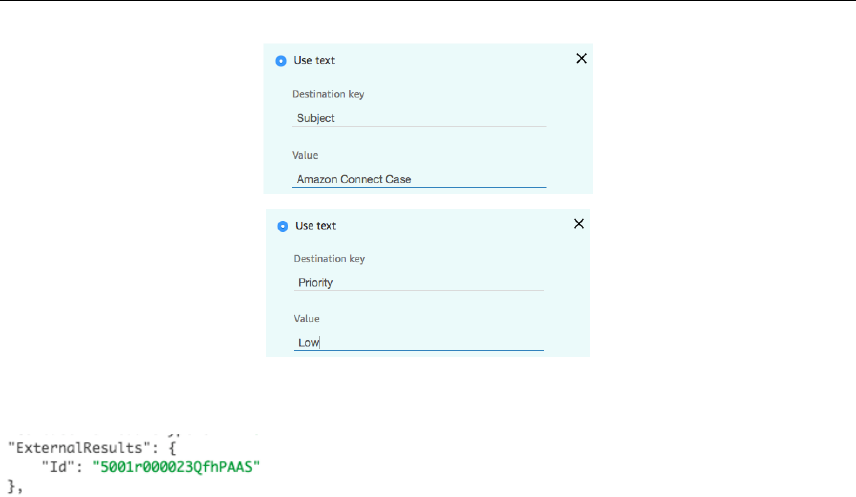
An example for Case creation:
Amazon Web Services – Amazon Connect CTI Adapter for Salesforce
Page 79
Contact Id is usually received as a result of a previous phone lookup, but it can
be also stored as an Attribute (i.e. sf_contact_id)
Amazon Web Services – Amazon Connect CTI Adapter for Salesforce
Page 80
A result example (providing the newly created Case Id):
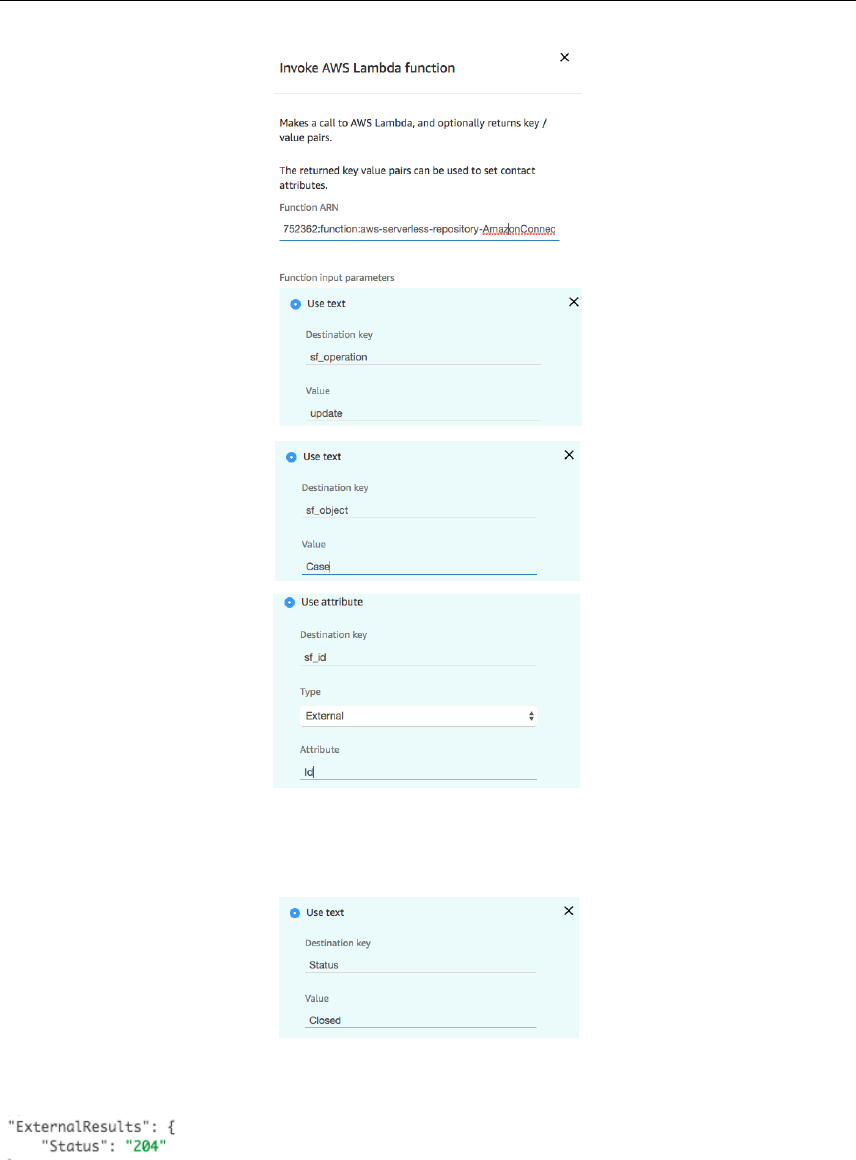
Salesforce Update
This operation is invoked by setting “sf_operation” to “update”. In this case, the
Lambda function updates a Salesforce object based on the parameters passed to
it.
- “sf_object” parameter contains Salesforce to be updated, like Case.
- Specify additional parameters for the Salesforce object to be created.
Parameters must include `sf_object` and `sf_id`.
In the Amazon Connect Contact Flow Designer, add Integrate > Invoke AWS
Lambda function block. Set ‘sfInvokeAPI’ Lambda ARN and make sure you
have granted Amazon Connect to invoke the Lambda Function.
An example for Case update:
Amazon Web Services – Amazon Connect CTI Adapter for Salesforce
Page 81
Case Id is usually received as a result of a previous case lookup, but it can be
also stored as an Attribute (i.e. sf_case_id)
A result example (HTTP Status Code):
204 is “No Content” success code

Amazon Web Services – Amazon Connect CTI Adapter for Salesforce
Page 82
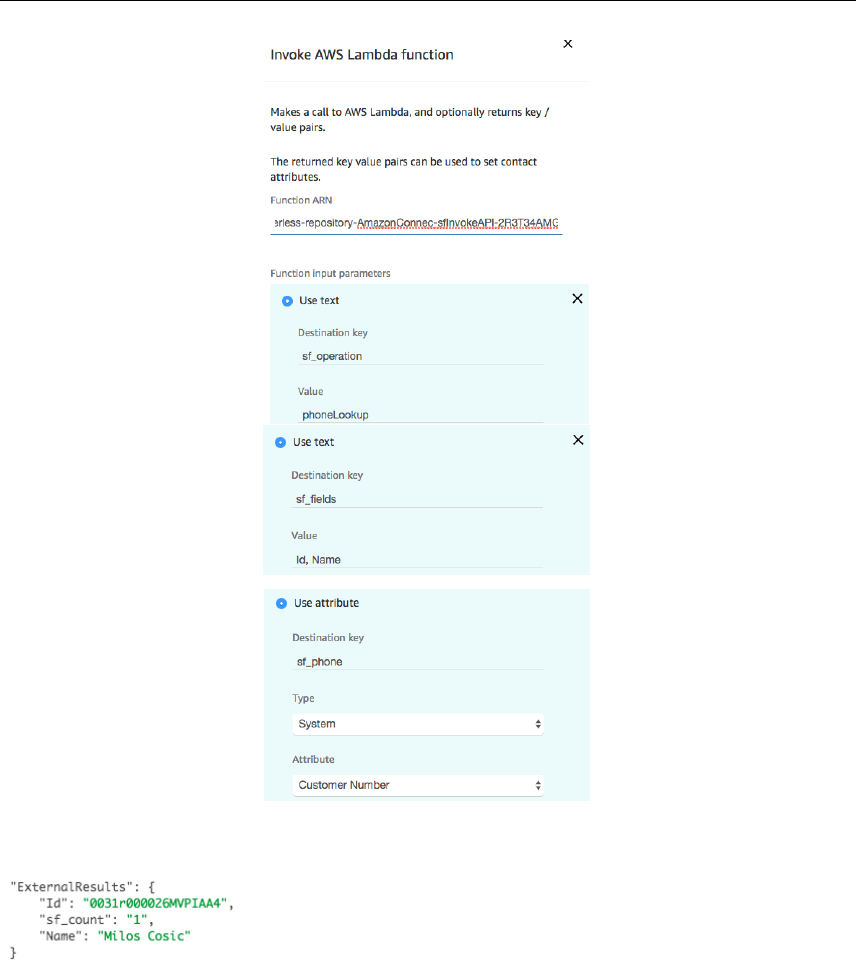
Salesforce Phone Lookup
This operation is invoked by setting “sf_operation” to “phoneLookup”. In this
case, the Lambda function queries Salesforce for Contacts based on the
parameter passed to it.
It uses the Salesforce Object Search Language (SOLS) to construct text-based
search queries against the search index, which gives significant performance
improvement when searching phone number fields.
- “sf_phone” parameter contains the phone number to search.
- “sf_fields” parameter contains a set of fields to be returned in a result. As
it searches for Contacts, we might specify “Id, Name, Email”
In the Amazon Connect Contact Flow Designer, add Integrate > Invoke AWS
Lambda function block. Set ‘sfInvokeAPI’ Lambda ARN and make sure you
have granted Amazon Connect to invoke the Lambda Function.
Example for phone number lookup:
Amazon Web Services – Amazon Connect CTI Adapter for Salesforce
Page 83
A result example:
Contact Attributes Display
Amazon Connect allows for user defined Contact Attributes to be attached to a
phone call within Contact Flows. This can be used to track caller inputs, IVR
selections, outcomes of an interaction with Amazon Lex, or data lookup from
backend systems through Lambda. Some of those values can be useful to be
displayed to the agent to speed up data input or skip processes such as
authenticating the customer.
Amazon Web Services – Amazon Connect CTI Adapter for Salesforce
Page 84
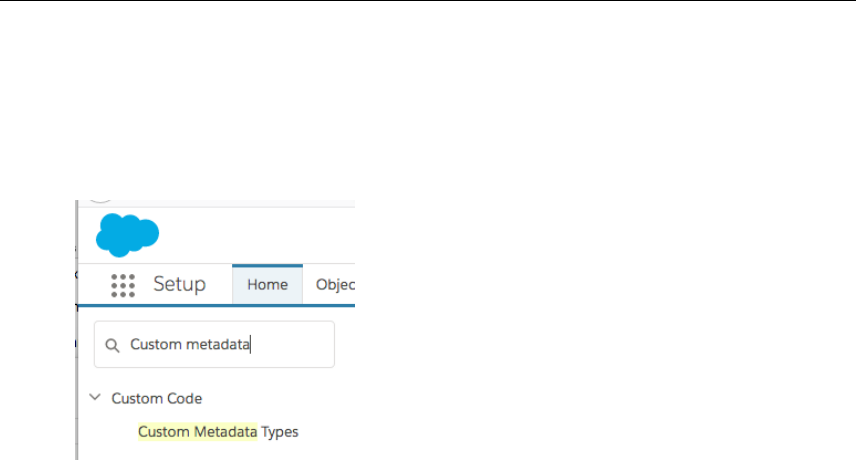
To configure a contact attribute for display within embedded CCP:
1. Log in to your Salesforce Org.
2. Navigate to Setup then in type Custom Metadata in Quick Find
Amazon Web Services – Amazon Connect CTI Adapter for Salesforce
Page 85
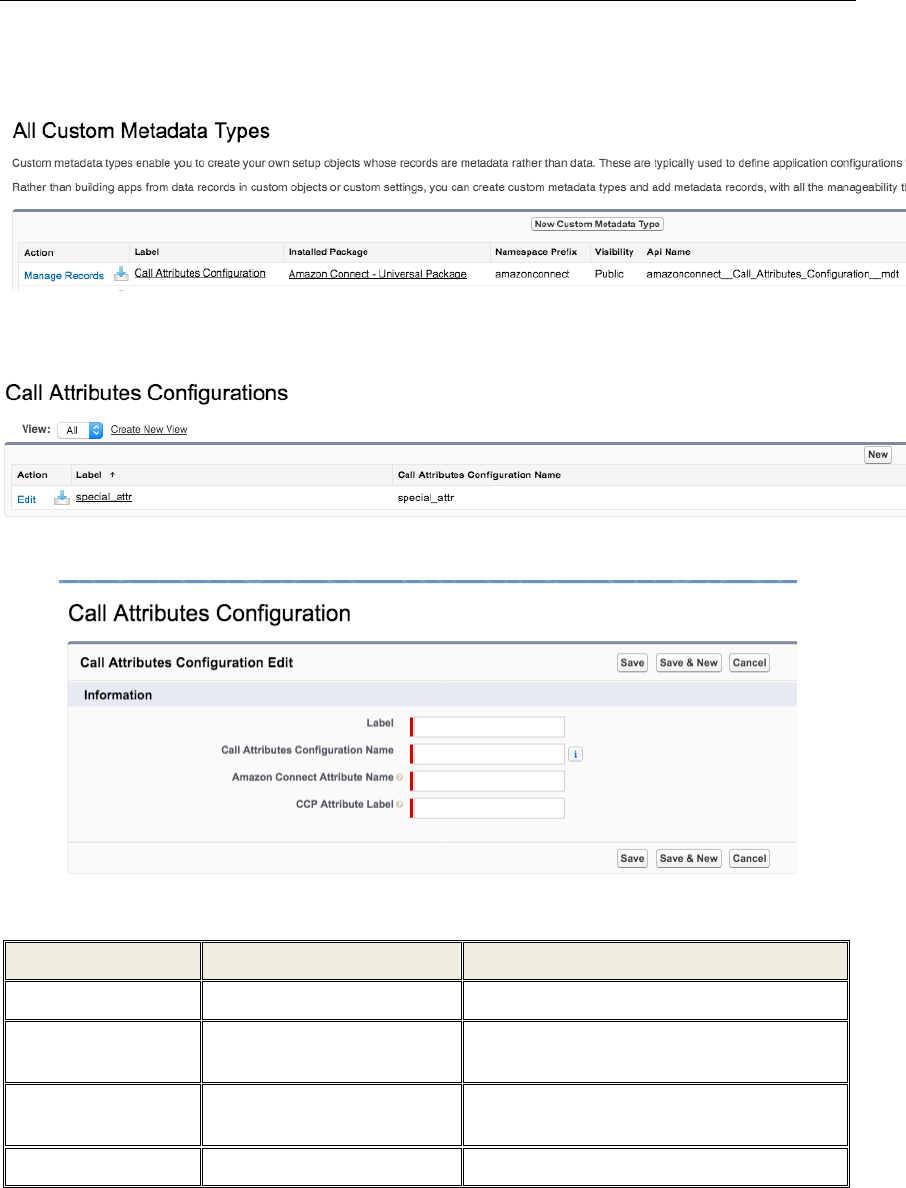
3. Click the “Manage Records” link next to the “Call Attributes
Configuration” label
4. The CTI Adapter contains a sample attribute, “special_attr”. Click the
“New” button on the list view.
5. This will open the “New Call Attribute Configuration” form as seen below
6. The following table describes the fields that are displayed inside the form
Field Name
Valid Values
Description
Label
Any string including spaces
The label of the record
Call Attributes
Configuration Name
Any string following the API
naming guidelines.
The Salesforce API name of the record. This
value must be unique among all records.
Amazon Connect
Attribute Name
Any string including spaces
The name of the attribute as it is defined in
the Amazon Connect Contact Flow.
CCP Attribute Label
Any string including spaces
The label as it will be displayed to the agent.

Amazon Web Services – Amazon Connect CTI Adapter for Salesforce
Page 86
7. An example of attribute is given below:
8. Click the “Save” button
9. Open the Amazon Connect Contact Flow Designer and drop Set > Set
Contact Attributes block to your Contact Flow. Set the attribute based on
your business logic. For example:
Amazon Web Services – Amazon Connect CTI Adapter for Salesforce
Page 87
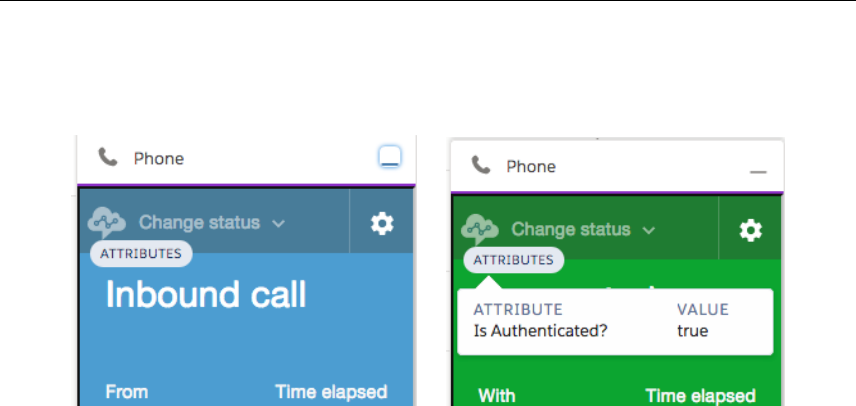
10. Place and inbound call and ask to speak with an agent. Accept the
incoming call and check if Contact Attribute is displayed in the
embedded CCP.
Call Wrap-up and Call Disposition Codes
Upon the completion of a call, Amazon Connect puts the agent into the “After
Call Work” state. As part of the Adapter, a “Call Wrap-Up” screen will be
triggered within Salesforce. The screen requires the user to associate the call
activity with a Contact, or Lead, and then relate it to an Account or alternate
Salesforce Object available in the drop-down list. Once the desired object is
selected, the user clicks on the “Look-up” list icon to find and associate the
desired record to the call. The Comments box allows for free-form text to be
added.
The Call Result field allows the user to specify the result of the call from a drop-
down list. When the user clicks on “Save” the Salesforce tab and sub-tabs
popped with the call and the Wrap-Up screen are closed and the user is
automatically put into an “Available” state (please see the limitations in
Lightning environment).
Salesforce logs phone calls in a Task record. The Task record contains many
standard fields associated to call information, which are not included in the
Task layout by default. One of the fields is called CallDisposition, and the
Adapter will ensure that a value is provided in this field for every call it logs.
The CallDisposition field is a free-form text field, which makes it difficult to
report on the value agents may enter as those are most likely not going to be

Amazon Web Services – Amazon Connect CTI Adapter for Salesforce
Page 88
consistent. For this purpose, the Adapter comes with a way to configure a list of
valid values to be used for the CallDisposition field when wrapping up a call.
To add, update or remove Call Disposition Codes:
1. Log in to your Salesforce Org
2. Navigate to Setup then in type Custom Metadata in Quick Find
3. Click the “Manage Records” link next to the “Call Disposition Codes”
label
4. The CTI Adapter contains a sample code, “Completed”. Click the “New”
button on the list view.
While this code cannot be removed, it can be deactivated by clicking the
“Edit” button and then unselecting the “Active” checkbox. Save the
record to finalize the change.
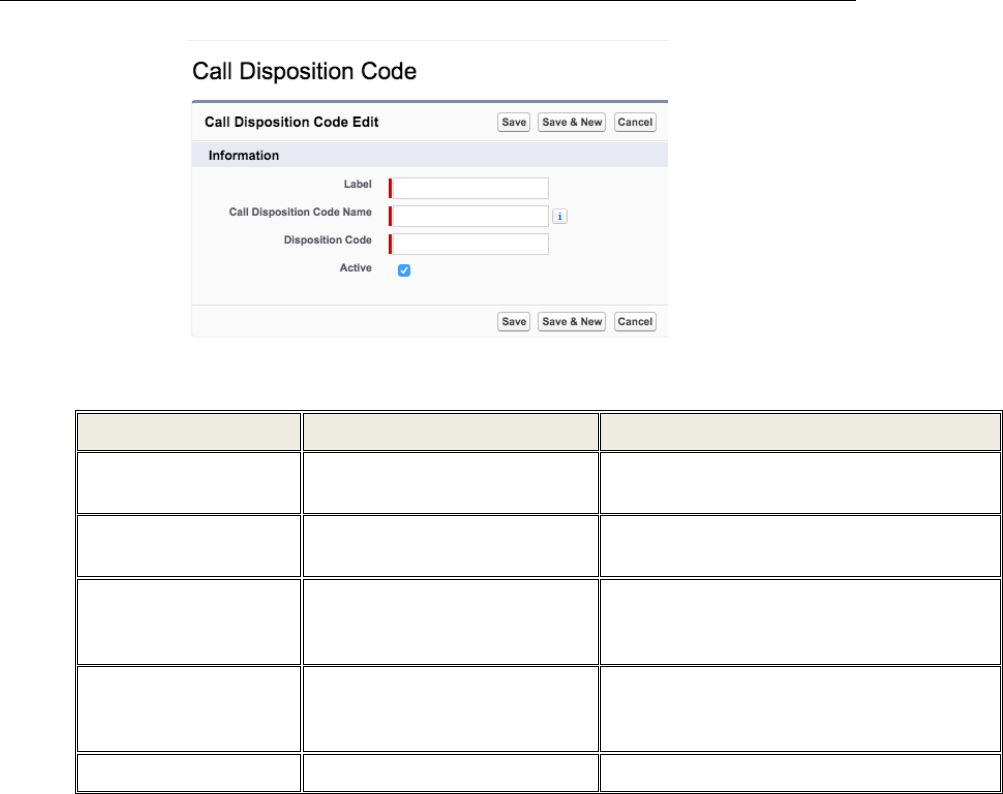
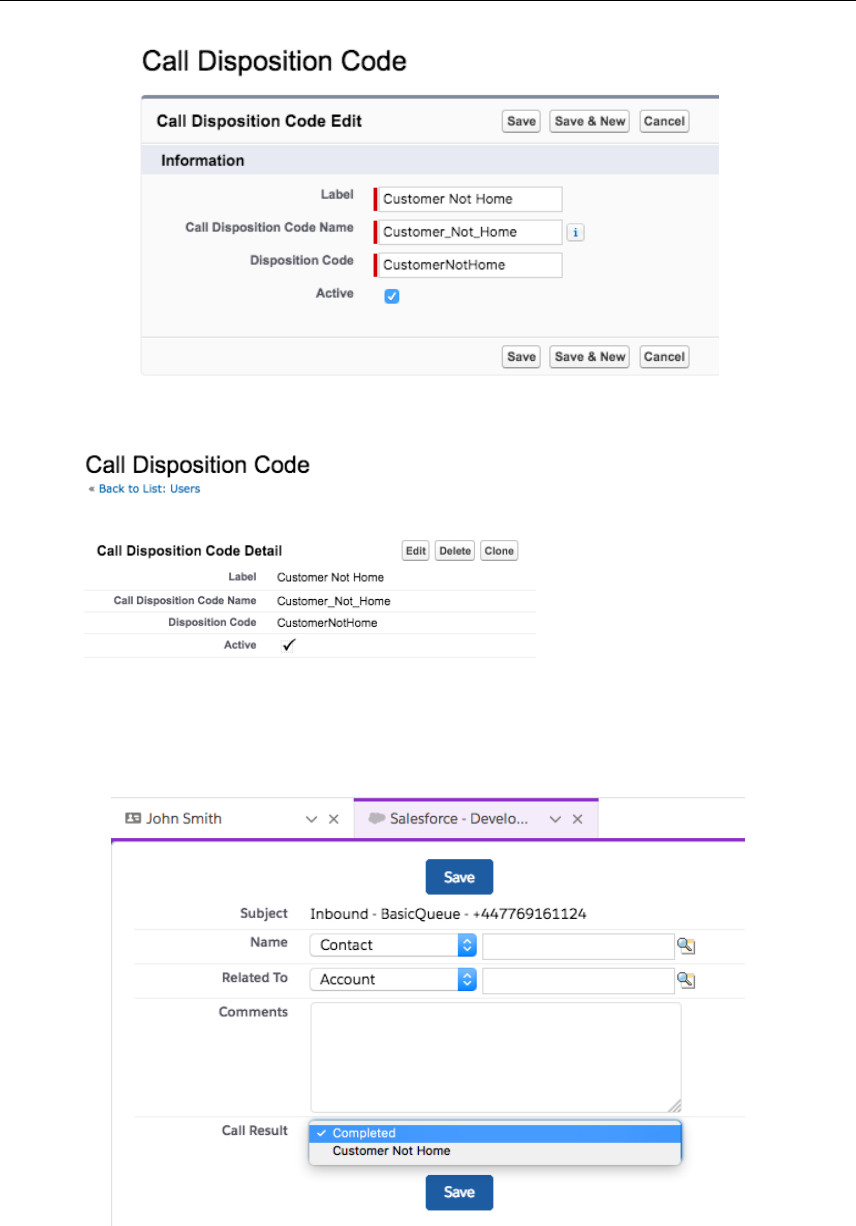
5. To create a new disposition code, click “New” button on the list view.
This will open the New Call Disposition Code form as seen below:
Amazon Web Services – Amazon Connect CTI Adapter for Salesforce
Page 89
6. The following table describes the fields that are displayed inside the form
Field Name
Valid Values
Description
Label
Any string including spaces
The label to be displayed to the agent for
selection on the call wrap-up screen.
Call Disposition Code
Name
Any string following the API
naming guidelines.
The Salesforce API name of the record. This
value must be unique among all records.
Disposition Code
Any string including spaces
The actual value to be added to the
CallDisposition field of the Task record
representing a call.
Active
Checked or unchecked
When unchecked, the disposition code will not
be offered to the agent for selection during a
call wrap-up.
Protected Comment
Checked or unchecked
This field is not used. Please leave unchecked.
7. An example of Call Disposition Code is given below:
Amazon Web Services – Amazon Connect CTI Adapter for Salesforce
Page 90
8. Click the “Save” button
9. Place and inbound call and ask to speak with an agent. Accept the
incoming call and then hang up. The Call Disposition form should be
displayed, allowing you to store the outcome of the call. You are able to
select Contact and Account related to the call.
Amazon Web Services – Amazon Connect CTI Adapter for Salesforce
Page 91
Call Recording Link for Task
The Adapter comes with a Visualforce component that provides users with the
ability to download a call recording created within Amazon Connect from a
Salesforce page.
To configure Call Recording links:
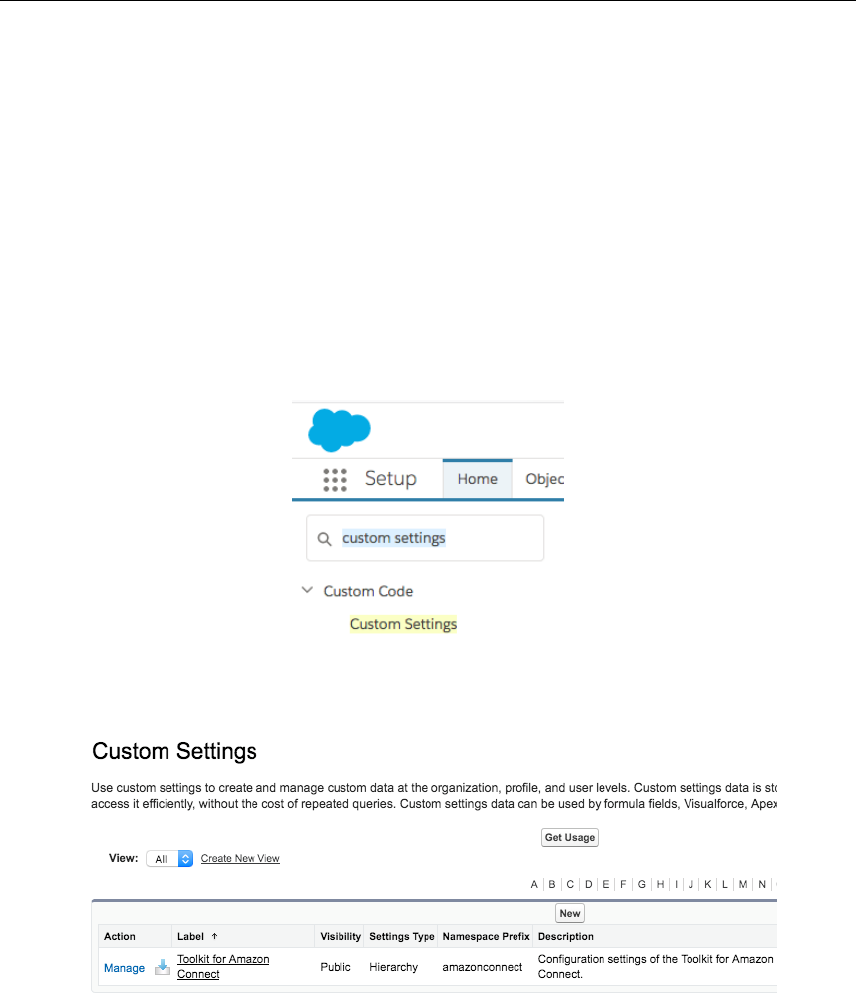
1. Log in to your Salesforce Org
2. Navigate to Setup then in type Custom Settings in Quick Find
3. Click on the “Manage” link next to the “Toolkit for Amazon Connect”
custom setting
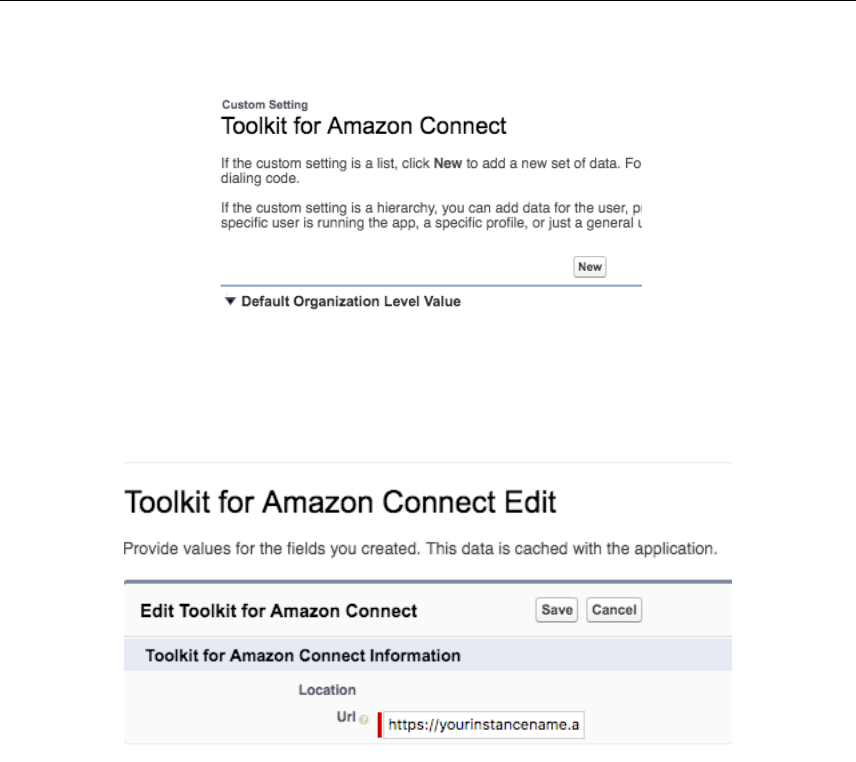
4. Next, click on the “New” button on the top of the page, which will create
the Default Organization values.
Amazon Web Services – Amazon Connect CTI Adapter for Salesforce
Page 92
5. On the following page, provide the URL to your Amazon Connect
instance without path information. The value of the URL field would be
in the form of https://yourinstancename.awsapps.com.
The Adapter creates a Task in Salesforce for every phone interaction received by
an agent. This Task will always be linked to the phone call via the Amazon
Connect Contact ID. If Amazon Connect is configured to record the phone calls,
the recording can be made available on the Task details page.
To illustrate the setup for the Task Page Layout, the Adapter comes with a
sample Task Page Layout called “CTI Adapter for Amazon Connect - Task
Layout”. It is an extension to the default Task Page Layout, which exposes more
fields related to phone calls. Please refer to the Call Details section of the screen
shot below. The Visualforce Page for the call recording is already added to this
Layout. The recommended height is 70px.
To edit the sample Task Page Layout, please follow the steps:
1. Log in to your Salesforce Org
2. Navigate to Setup then in type Object Manager in Quick Find
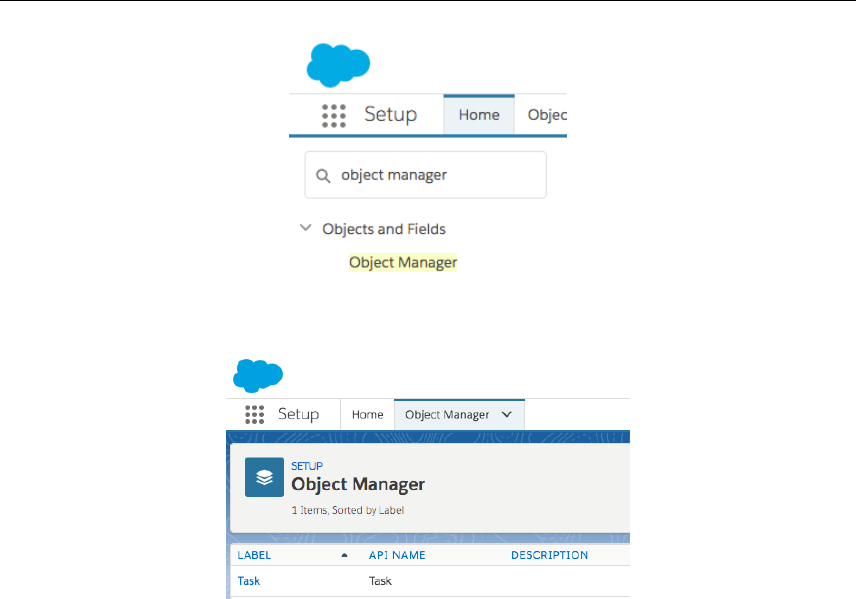
Amazon Web Services – Amazon Connect CTI Adapter for Salesforce
Page 93
3. Click on the “Task” object
4. Click on the “Page Layouts”

Amazon Web Services – Amazon Connect CTI Adapter for Salesforce
Page 94
5. Click on the “CTI Adapter for Amazon Connect - Task Layout” and the
layout designer will open
6. To have that information show up on the agent’s screen, you can either
create a similar configuration in your existing Page Layout or assign the
Page Layout provided by the Adapter to the appropriate Profiles of your
users. The following screenshot shows how the Call Details section looks
when using the “CTI Adapter for Amazon Connect - Task Layout”.
7. To have access to the recording, the user must have an active session with
Amazon Connect. This can be achieved by either logging in to the CCP
softphone, or by logging in to Amazon Connect outside of Salesforce.
After the session is established, a page refresh should make the player
appear.
Call Display on the Account Page
The Adapter comes with a Visualforce Page that displays all phone calls made
using Amazon Connect for an Account. It differs from thee standard Activity
Related List because if filters all other activities out and focuses on the phone
calls only.

Amazon Web Services – Amazon Connect CTI Adapter for Salesforce
Page 95
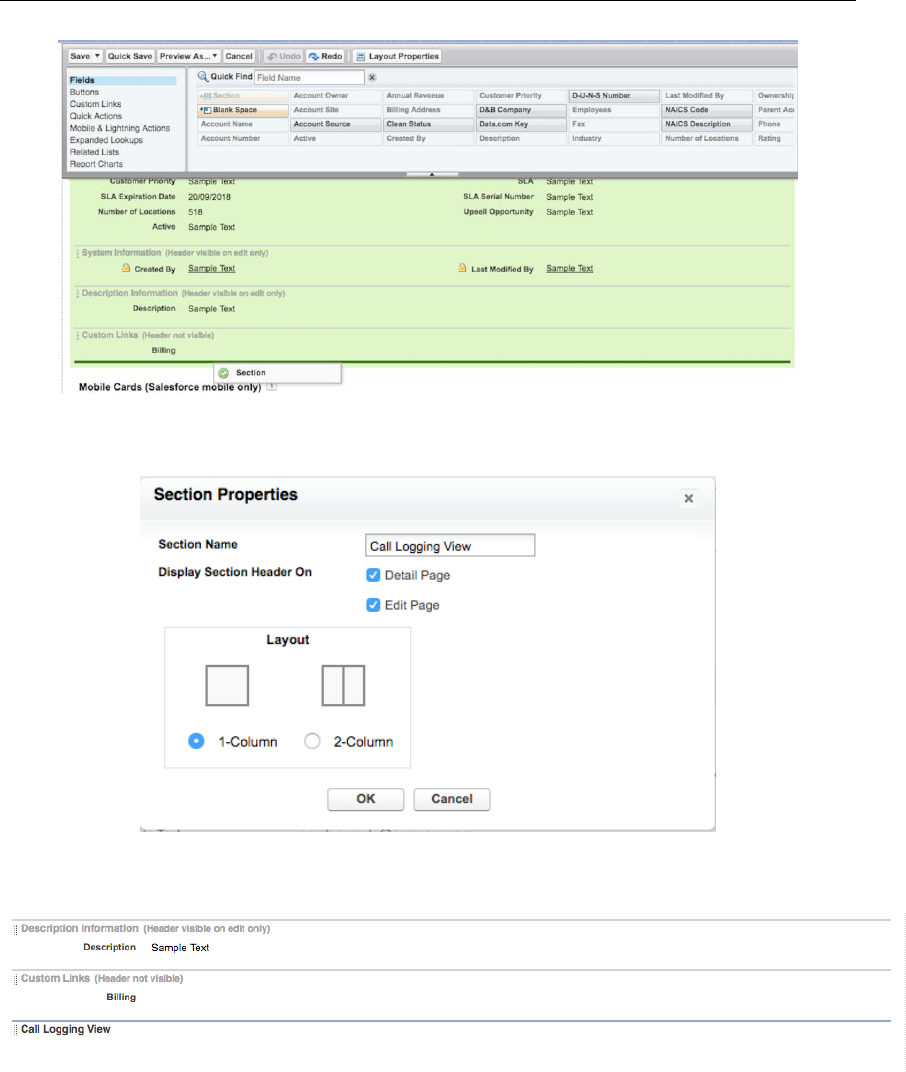
To show the recent calls on the Account details page, add the
“ACSFCCP_CallLogging_View” Visualforce Page to the Account Page layout. It
is recommended to create a dedicated section with a 1-Column layout for this
purpose, and to make the Visualforce Page scrollable.
1. Log in to your Salesforce Org.
2. Navigate to Setup then in type Object Manager in Quick Find.
3. Click on the “Account” object.

Amazon Web Services – Amazon Connect CTI Adapter for Salesforce
Page 96
4. Click on the “Page Layouts”.
5. Click on the “Account layout” and the layout designer will open.
6. From the left-hand side menu, select “Fields”
7. Drag and Drop “Section” item to add a new section on the layout
Amazon Web Services – Amazon Connect CTI Adapter for Salesforce
Page 97
8. On the pop-up form, set Section Name (“Call Logging View”) and 1-
Column Layout
9. Click “OK”
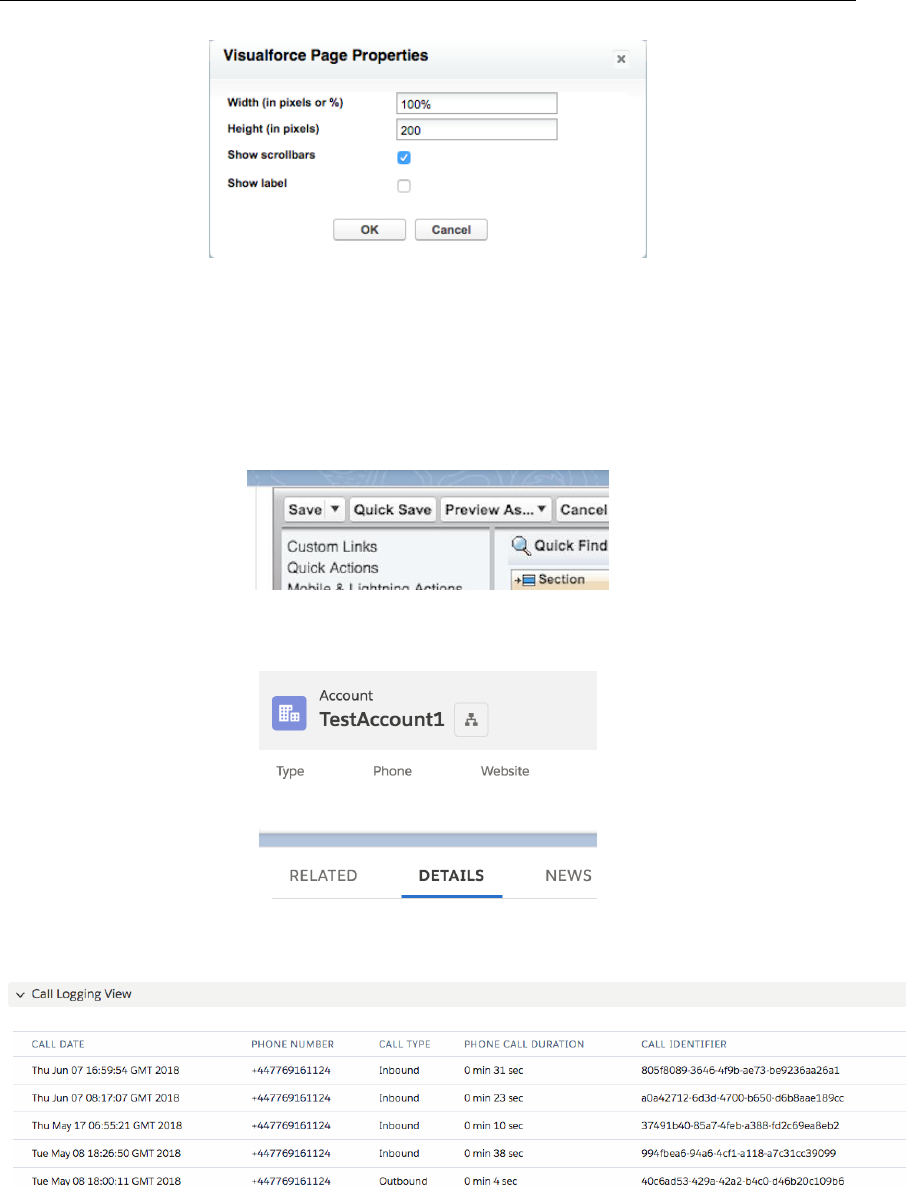
10. From the left-hand side menu, select Visualforce Pages:

Amazon Web Services – Amazon Connect CTI Adapter for Salesforce
Page 98
11. Drag and drop “ACSFCCP_CallLogging_View” item to the “Call Logging
View” section
12. Hover the newly added component and click on the “Setting” icon
13. Check “Show scrollbars” and click “OK”.
Amazon Web Services – Amazon Connect CTI Adapter for Salesforce
Page 99
14. Click the “Save” button in the top-left corner
15. Make some phone calls, ask to speak with an agent. Open the Account,
then select “Details” tab
16. Scroll down the Details page until you see the “Call Logging View” section

Amazon Web Services – Amazon Connect CTI Adapter for Salesforce
Page 100
For more information on how to add a Visualforce Page to a Page layout, please
visit:
https://trailhead.salesforce.com/en/modules/visualforce_mobile_salesforce1/
units/visualforce_mobile _salesforce1_layouts_cards
Outbound Campaign Calls
The package allows for running Outbound Call Campaigns using Salesforce
Omni Channel routing and Amazon Connect. To enable outbound campaigns,
the Custom Object called Amazon Connect Call Campaign, which comes
bundled with the Toolkit, must be configured to be routed by Salesforce Omni.
Outbound call campaigns are a feature of the package that utilizes Omni-
Channel routing and Amazon Connect. To use the Call Campaigns, we must first
configure the following items:
1. Create a Queue for users to manage a workload and configure it for the
custom object.
2. Create a Service Channel and configure it for the custom object.
3. Create a Routing Configuration.
4. Associate the Routing Configuration with the Agents and the Queue.
5. Create a Presence Status and Configuration and assign it to the Users.
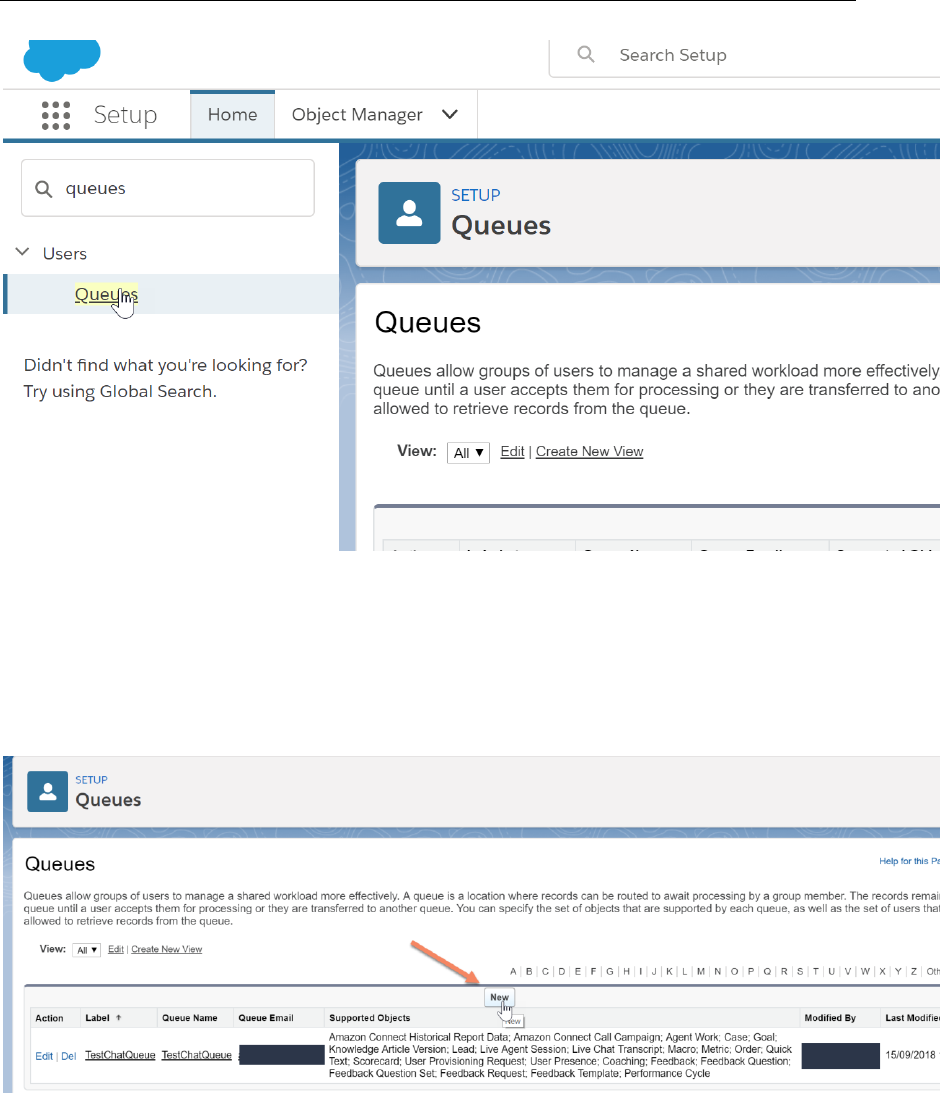
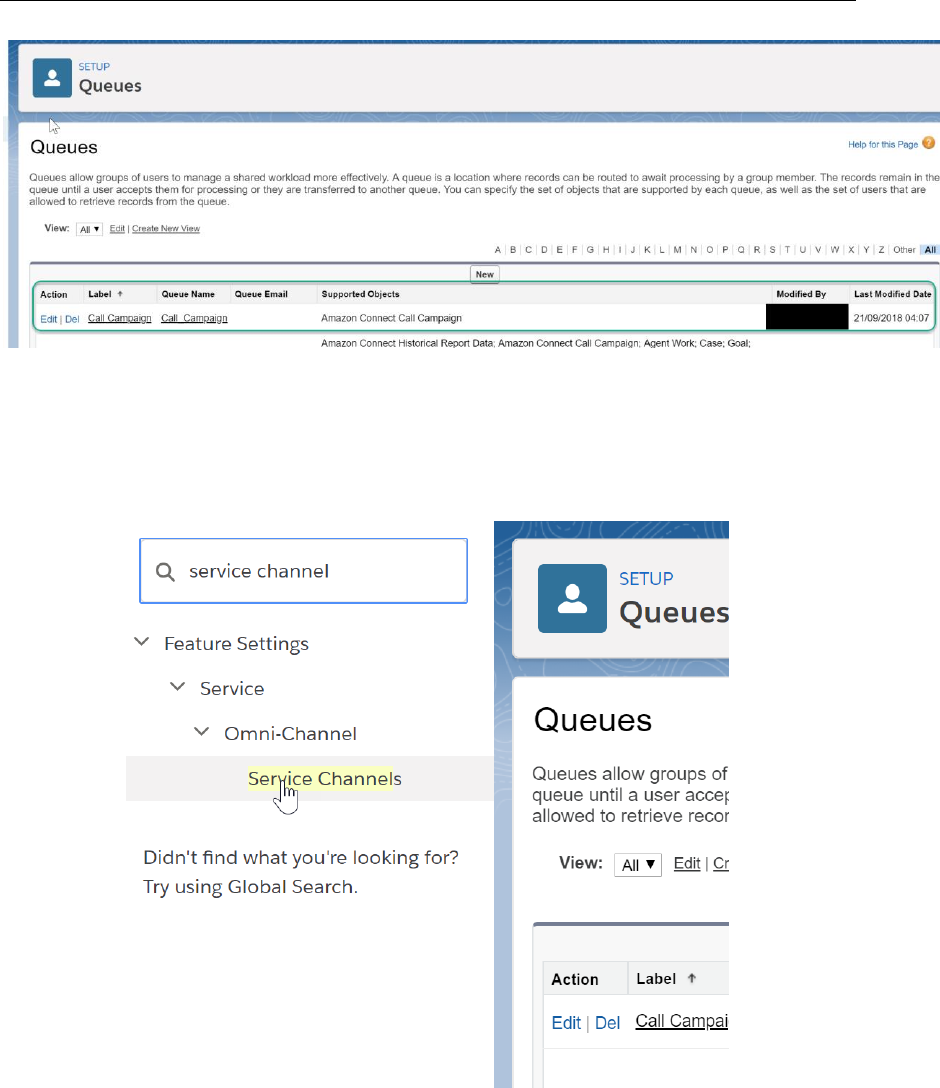
Create a Queue
First, go to Setup in your instance. In the search box, type “queue”. Click on
“Queues”.
Amazon Web Services – Amazon Connect CTI Adapter for Salesforce
Page 101
You may see some entries if you are already using Omni-Channel for other
things in your instance. We want to create a new queue for the purpose of
handling these outbound call campaigns.
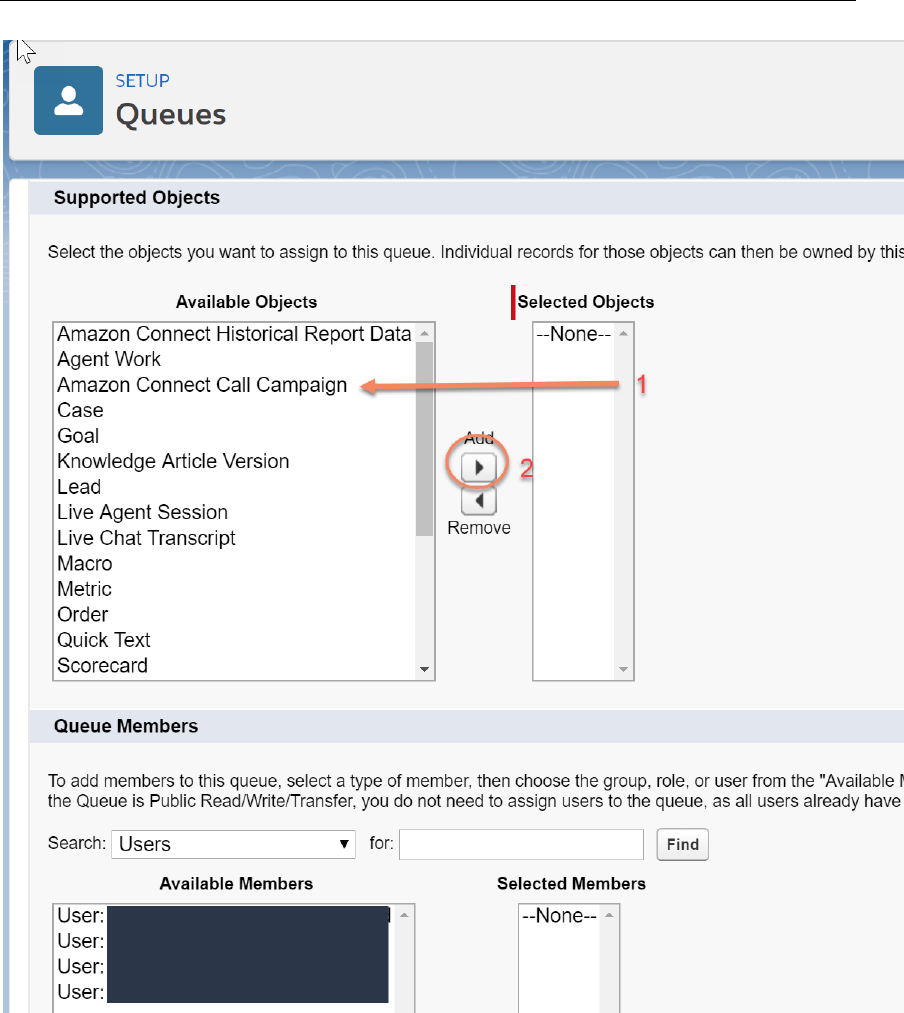
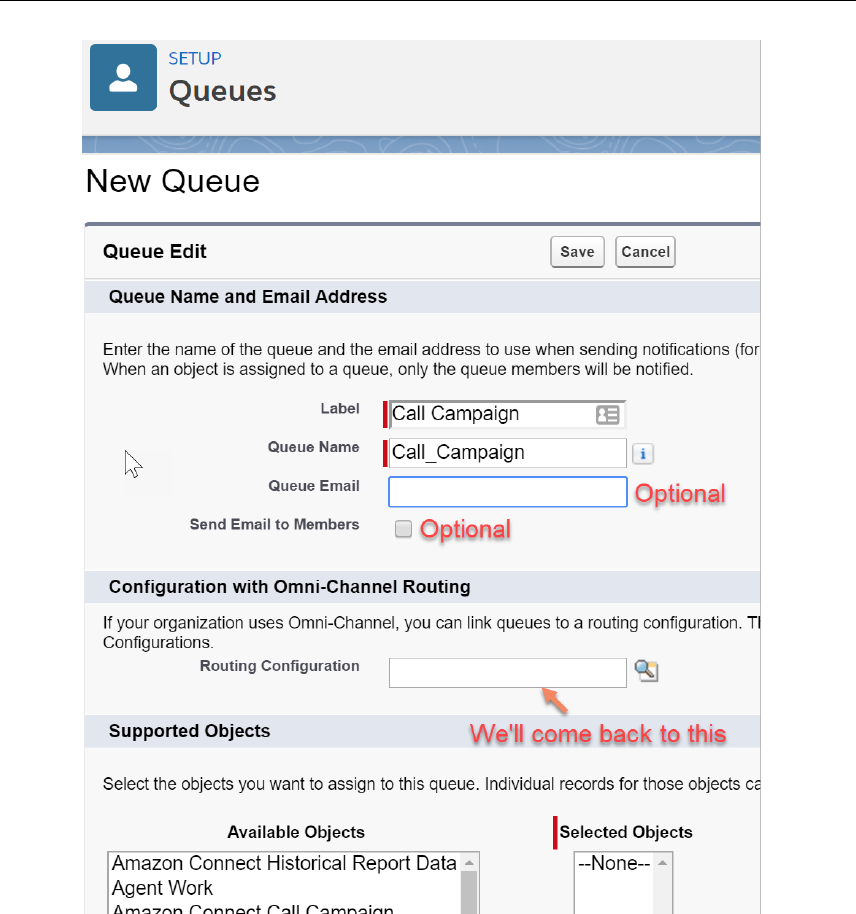
On the Queues screen, we need to click “New”. Complete the required fields for
Label and QueueName will autopopulate. Move down the screen until you see
“Supported Objects”. Select the Amazon Connect Call Campaign object and click
the “Add” button.
Amazon Web Services – Amazon Connect CTI Adapter for Salesforce
Page 102
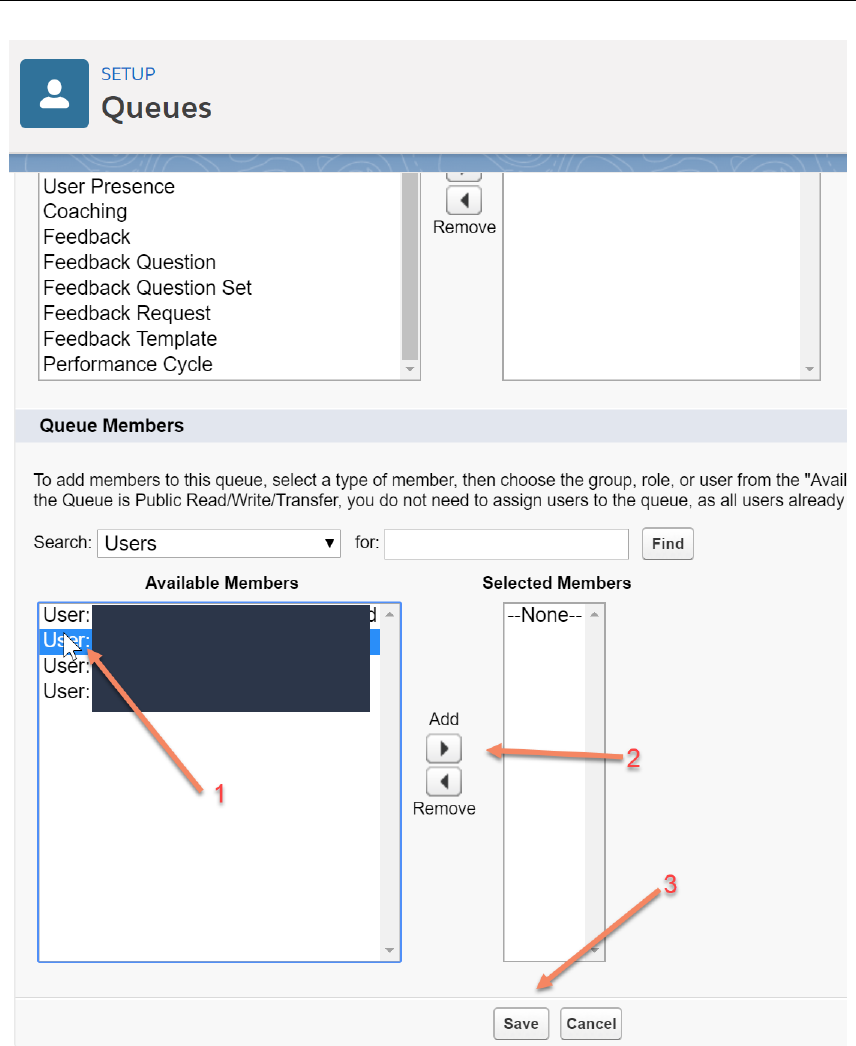
Scroll down to the Queue members to select the members of the queue. You can
assign the queue by Public Groups, Roles, Roles and Subordinates, or Users. If
you need to wade through many users, groups, or roles, feel free to use the
“Find” feature.
Once you have found the entity you’d like to add, select it and click add, just like
we did with the object in the previous step.
Amazon Web Services – Amazon Connect CTI Adapter for Salesforce
Page 103
Now, our queue has been created and assigned to users.
Amazon Web Services – Amazon Connect CTI Adapter for Salesforce
Page 104
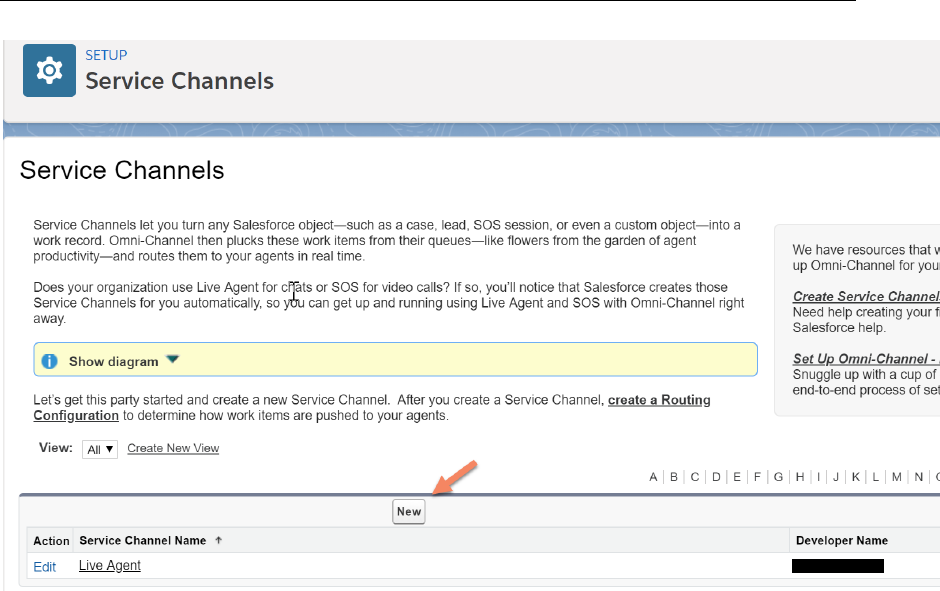
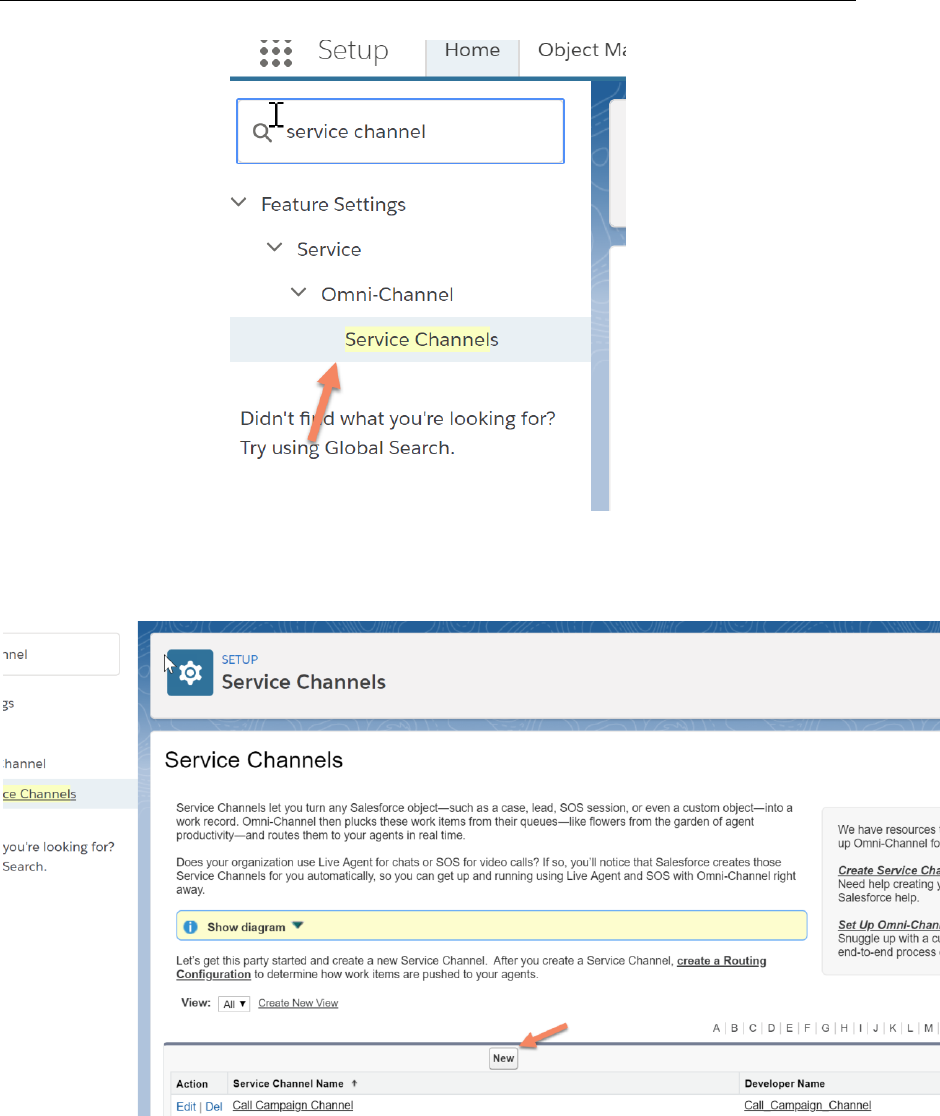
Create a Service Channel
Click into the Setup search box in the left navigation panel and type “Service
Channel”. Then click “Service Channels”.
Click “New” to create our new Service Channel.
Amazon Web Services – Amazon Connect CTI Adapter for Salesforce
Page 105

Amazon Web Services – Amazon Connect CTI Adapter for Salesforce
Page 106
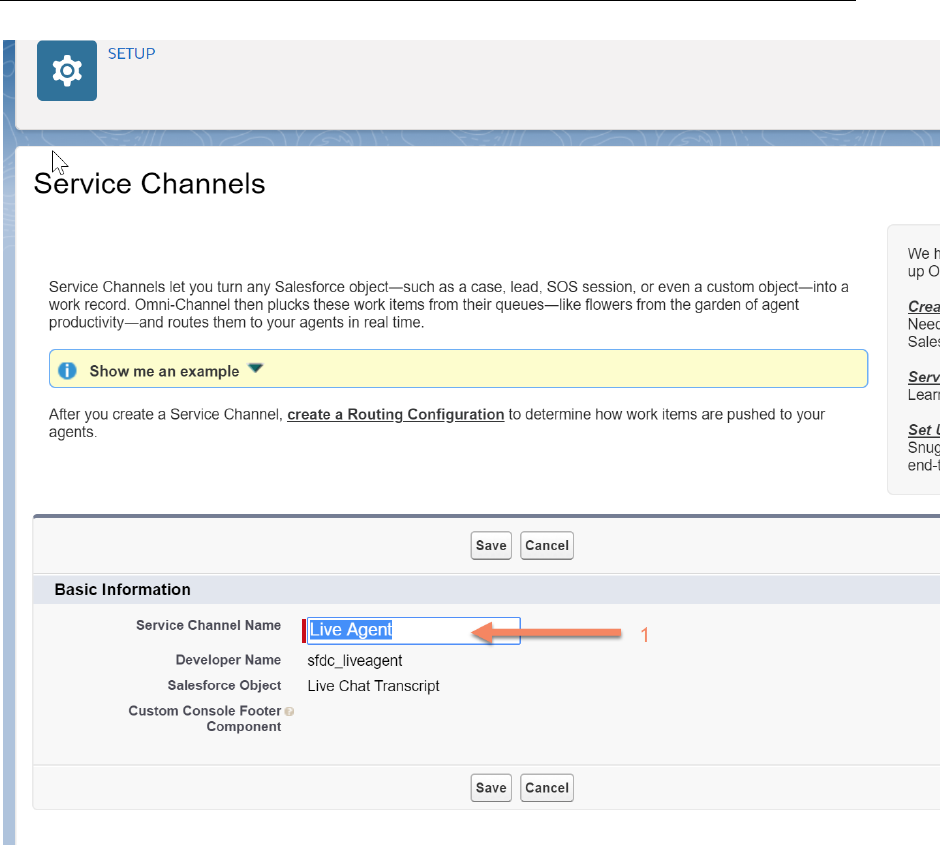
In the new Service Channel form, enter your desired Service Channel Name
(step 1). The Developer Name field will autopopulate based on the Service
Channel Name content. Then, select the Amazon Connect Call Campaign object
(step 2). Finally, save the new Service Channel (step 3).

Amazon Web Services – Amazon Connect CTI Adapter for Salesforce
Page 107
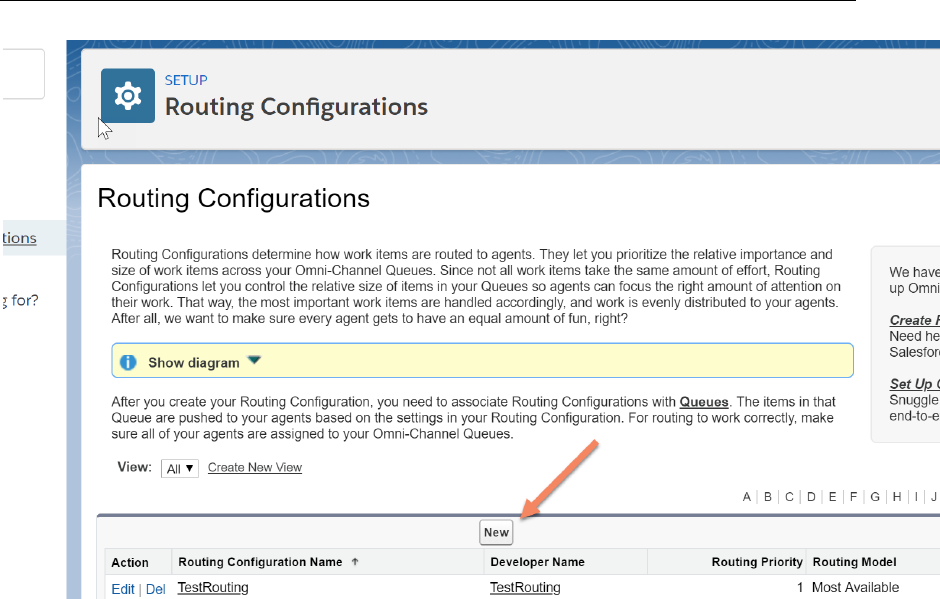
Create a Routing Configuration
Now, we need to create a routing configuration. Enter “routing” into the search
box in the left navigation and click “Routing Configurations”.
Amazon Web Services – Amazon Connect CTI Adapter for Salesforce
Page 108
On the Routing Configurations landing page, click “New”.

Amazon Web Services – Amazon Connect CTI Adapter for Salesforce
Page 109
Enter the Routing Configuration Name (step 1), and the Developer Name will
autopopulate. If you’d like to set an Overflow Assignee, you can optinally do that
at this point. The overflow assignee will receive work if your organization
reaches its Omni-Channel limits. This setting has no effect until the limits are
reached.
Amazon Web Services – Amazon Connect CTI Adapter for Salesforce
Page 110
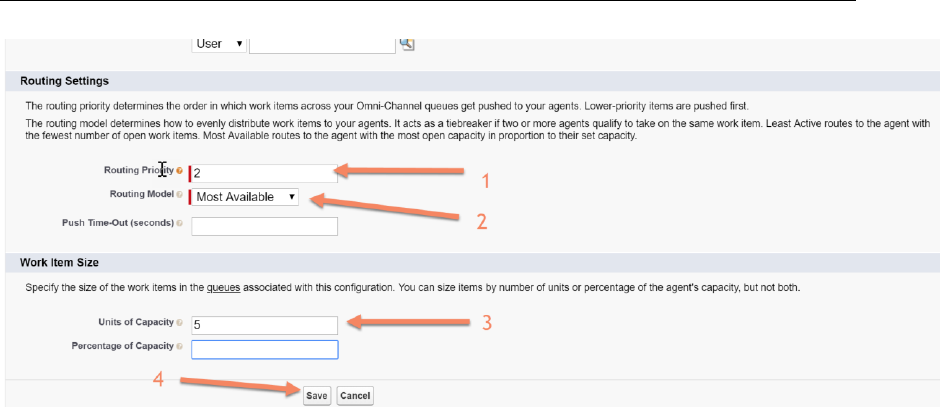
Next, you must configure the Routing Settings. First, (step 1) enter the priority
of the work across the Omni-Channel queues. Second (step 2), select the model
to use to act as the tie-breaker between agents. Third, (step 3) specify the units
of capacity or percentage of capacity of the work items in the queue. Finally,
(step 4), click “Save”.
Amazon Web Services – Amazon Connect CTI Adapter for Salesforce
Page 111
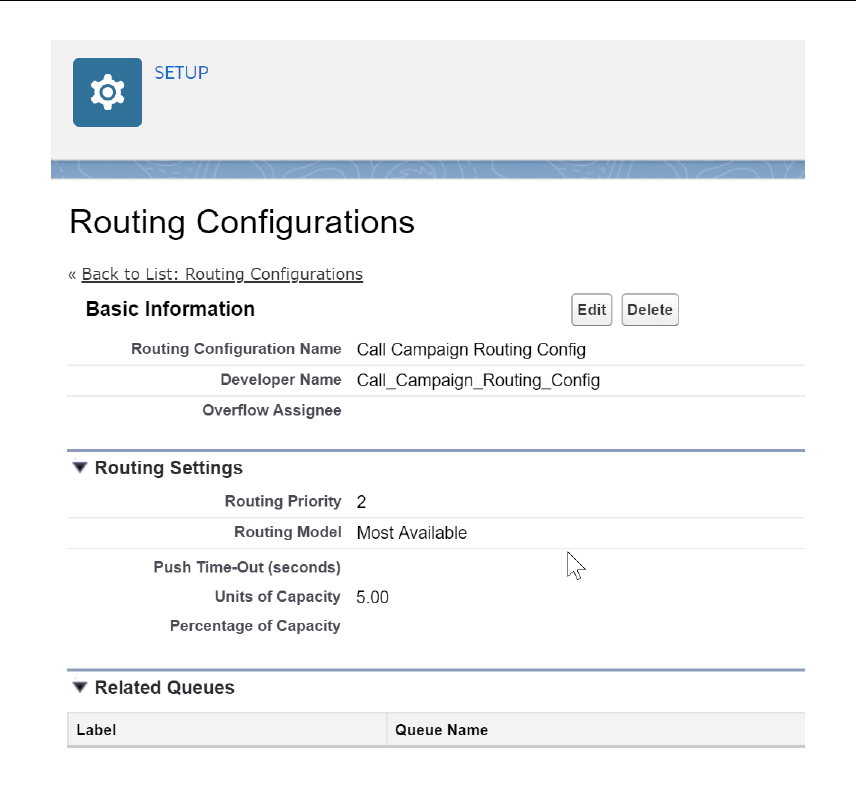
You have created your Routing Configuration.
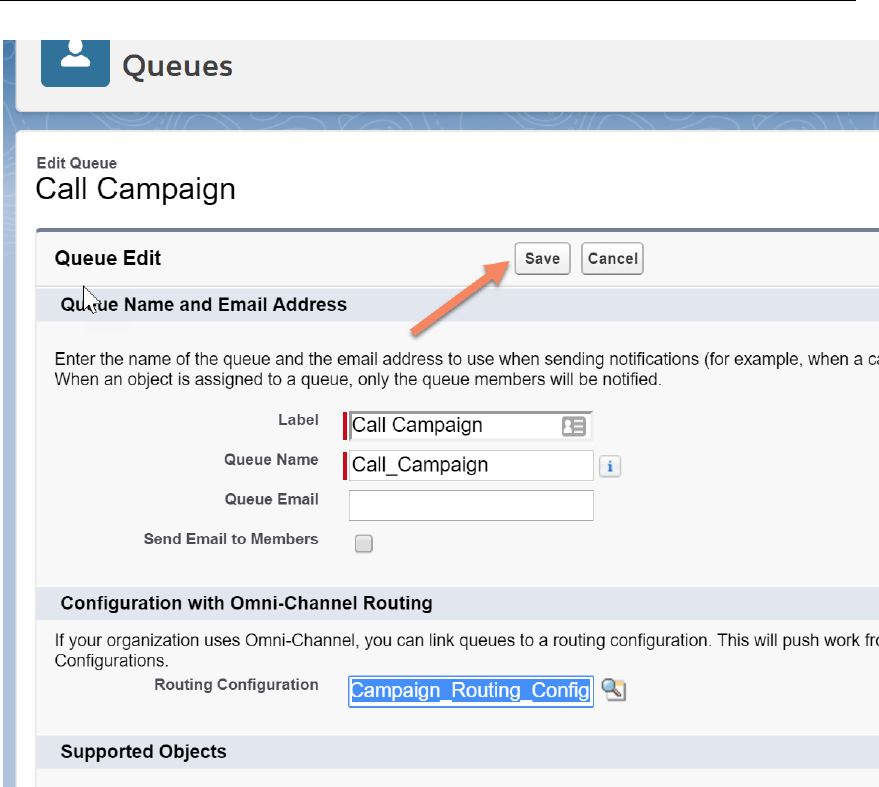
Now, we need to assign the Routing Configuration to our queue.
Amazon Web Services – Amazon Connect CTI Adapter for Salesforce
Page 112
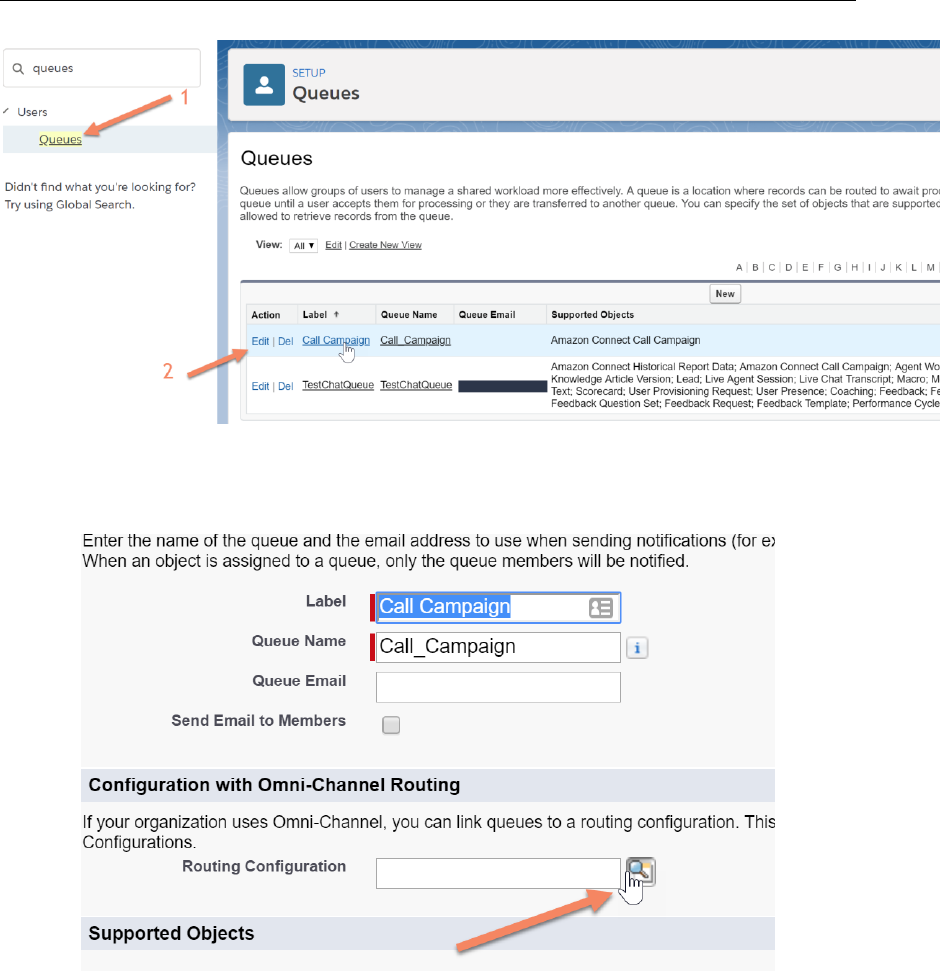
Go to the left nav and search for “queues”. Then, click on “Queues” (step 1).
Finally, click on the “Edit” link next in the row of our Queue (step 2).
Use the magnifying glass button to search for our new Routing Configuration.
Amazon Web Services – Amazon Connect CTI Adapter for Salesforce
Page 113
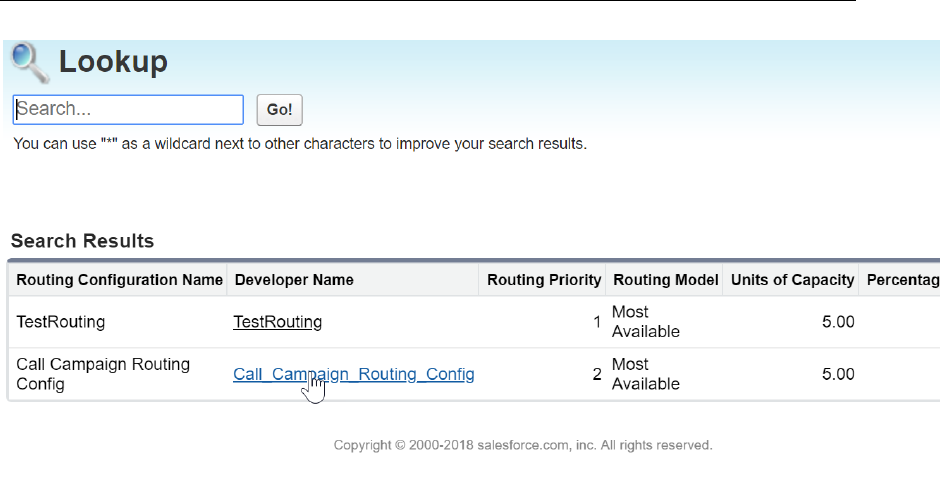
Select our Routing Configuration from the Lookup window.
Amazon Web Services – Amazon Connect CTI Adapter for Salesforce
Page 114
Click “Save” to store our changes.
Omni-Channel Presence Syncing
In order to sync your Connect User status with your Omni-Channel agent status,
you must configure Omni-Channel Presence Syncing. This will make your
Omni-Channel presence status match your Amazon Connect Agent Status and
vice versa.
First, we must enable omni-channel

Amazon Web Services – Amazon Connect CTI Adapter for Salesforce
Page 115
Enter “omni” into the left navigation search box in Setup in your SalesForce
instance.
Select “Omni-Channel Settings” from the menu.

Amazon Web Services – Amazon Connect CTI Adapter for Salesforce
Page 116
Place a check in the checkbox for “Enable Omni-Channel”.
Create a Service Channel
Next, for Omni-Channel (we will use Live Chat), we need to create a Service
Channel.
Amazon Web Services – Amazon Connect CTI Adapter for Salesforce
Page 117
Search in the left navigation for “service channel” and select “Service Channels”
when it appears.
Select new from the Service Channel page
Amazon Web Services – Amazon Connect CTI Adapter for Salesforce
Page 118
Add a name to your Service Channel and select the Saleforce Object that
coincides with your new Service Channel. Life Agent is selected as the default
object when you add the Service Channel. Add a routing config as we did above
for the Outbound Call Campaign. Add Presence Statuses that map to what you
have in Connect.
Amazon Web Services – Amazon Connect CTI Adapter for Salesforce
Page 119
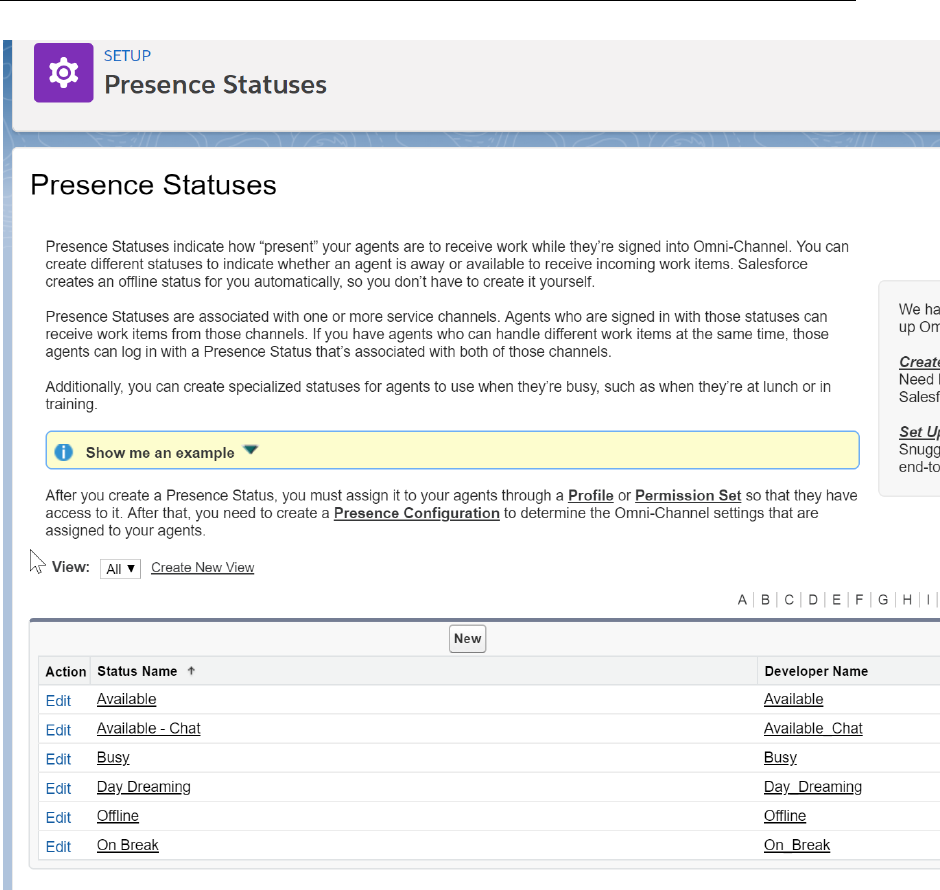
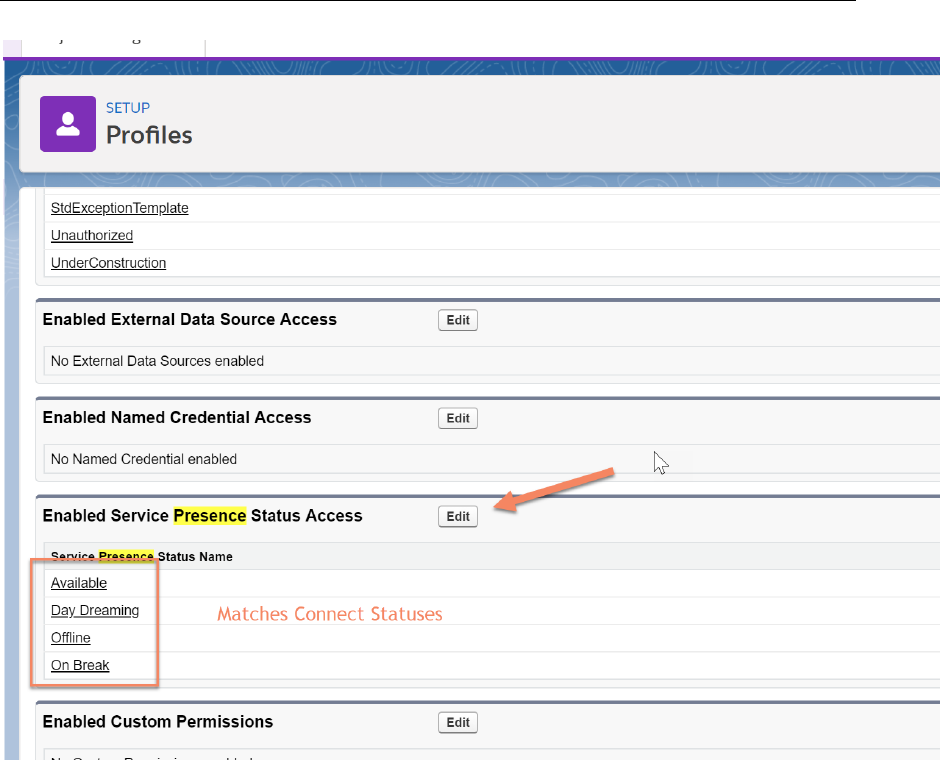
We can assign access to these statuses by going to Profiles in the left navigation
and ensuring that the agent will be able to access the statuses that map to their
Connect statuses.
Amazon Web Services – Amazon Connect CTI Adapter for Salesforce
Page 120
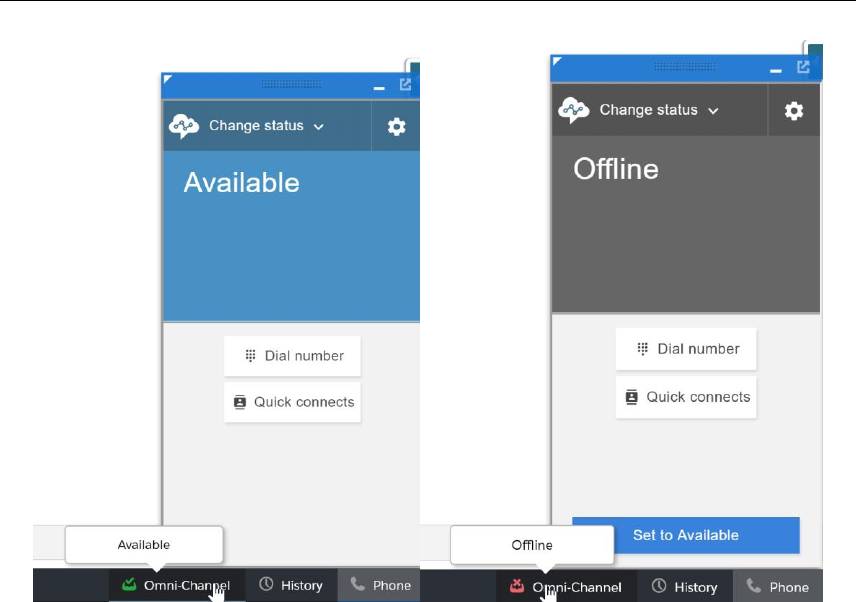
When you are finished, the omni-channel widget and the Phone will
synchronize their statuses, depending on what the user is doing.
Amazon Web Services – Amazon Connect CTI Adapter for Salesforce
Page 121
Amazon Web Services – Amazon Connect CTI Adapter for Salesforce
Page 122
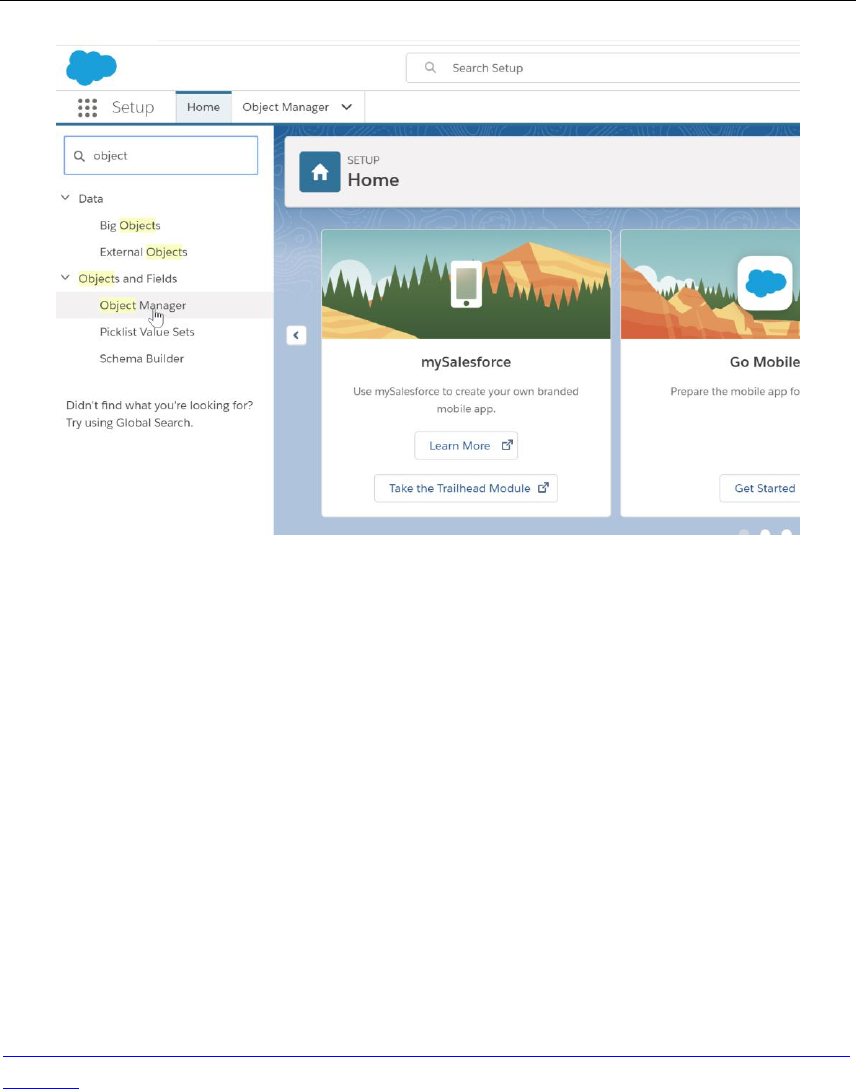
First, go to Setup in our instance. In the search box in the upper left of the
screen, type object.
Amazon Web Services – Amazon Connect CTI Adapter for Salesforce
Page 123
Click on “Object Manager”.
Setting up Salesforce Omni to route the Custom Object requires the following
configurations to be in place:
Create Salesforce Queue for Custom Object and Assign to Users • Create
Service Channel for Custom Object
Create Routing Configuration
Associate Routing Configuration with Agents and Queue
Create Presence Status and Configuration and Assign to Users
More information on how to set up Salesforce Omni can be found at the
following link:
https://help.salesforce.com/articleView?id=omnichannel_create_objects.htm&
type=0
After the configuration is in place to route the Custom Object, a process needs to
be set up to insert records of the “Amazon Connect Call Campaign” object and
assigns those to the queue that was created in the previous steps.
Amazon Web Services – Amazon Connect CTI Adapter for Salesforce
Page 124
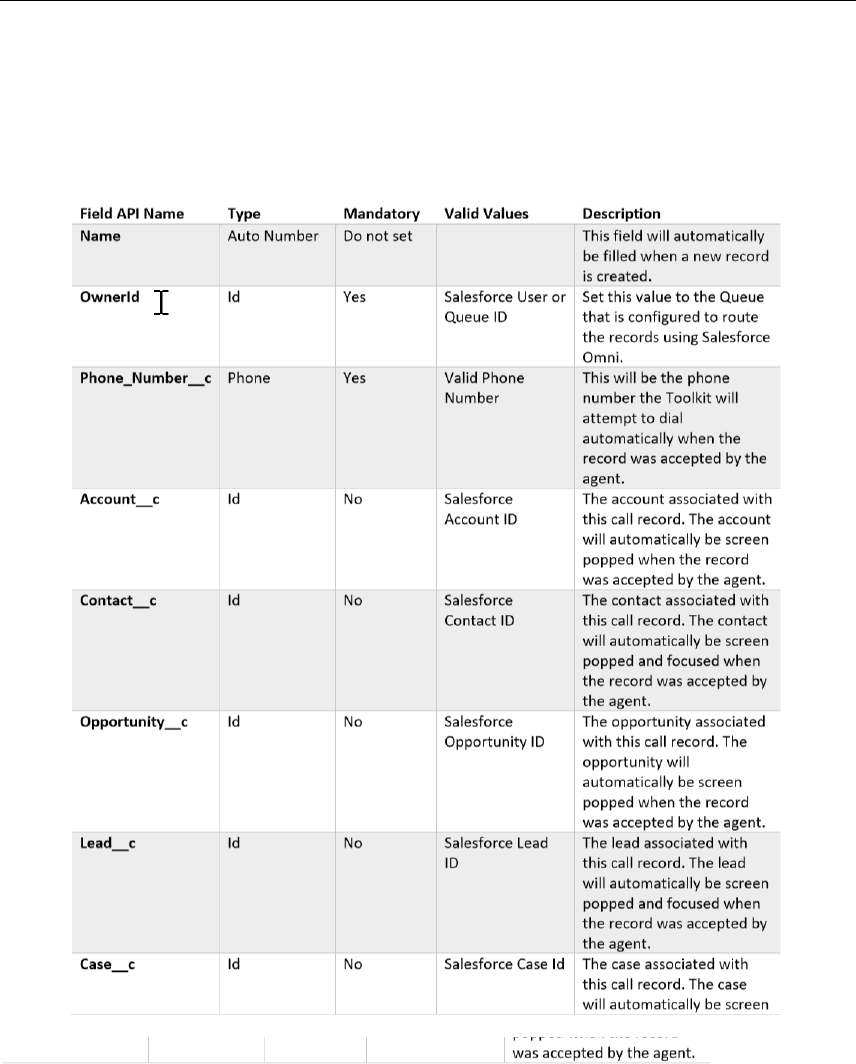
The following table describes all fields of the Custom Object, their possible
values, and the behavior that the agent will experience when receiving a call.
Please note that only the ID/Lookup fields can differ between records, and only
the fields that contain a value will be screen popped. If a Contact is provided,
the Contact Tab will always be in focus. If no Contact, but a Lead is provided,
the Lead Tab will be in focus. If neither a Contact or a Lead will be provided, the
Amazon Connect Call Campaign record details page will remain in focus.

Amazon Web Services – Amazon Connect CTI Adapter for Salesforce
Page 125
Amazon Connect Call Campaign records can be created in various ways.
Following is a list of common methods that can be used to create records for an
outbound call campaign:
A Process Builder Flow can create a campaign either instantly or delayed
based on record changes. This can be useful for follow up calls that are
not required to be done by a specific individual.
Apex Scheduled Job can query records in the Salesforce org on a nightly
basis and create call campaign records for the coming day.
Create a Custom Button to convert a Salesforce Campaign and its
members into call campaign records.
Use Salesforce Data Loader to create call campaign records from a CSV
file
Further Reading
For additional information, see the following:
Amazon Connect CTI Adapter for Salesforce:
https://appexchange.salesforce.com/appxListingDetail?listingId=a0N3A00000EJH4yUA
H
Amazon Connect User Guide:
https://docs.aws.amazon.com/connect/latest/userguide/using-amazon-
connect.html
Amazon Connect Admin Guide:
https://docs.aws.amazon.com/connect/latest/adminguide/what-is-
amazon-connect.html
Amazon Connect API Reference (Outbound, User Management)
https://docs.aws.amazon.com/connect/latest/APIReference/Welcome.h
tml
Amazon Connect Release Notes:
https://docs.aws.amazon.com/connect/latest/adminguide/amazon-
connect-release-notes.html