Android.NDK.Beginner.Guide
User Manual:
Open the PDF directly: View PDF ![]() .
.
Page Count: 436 [warning: Documents this large are best viewed by clicking the View PDF Link!]
- Cover
- Copyright
- Credits
- About the Author
- About the Reviewers
- www.PacktPub.com
- Table of Contents
- Preface
- Chapter 1: Setting Up your Environment
- Getting started with Android development
- Setting up Windows
- Time for action – preparing Windows for Android development
- Installing Android development kits on Windows
- Time for action – installing Android SDK and NDK on Windows
- Setting up Mac OS X
- Time for action – preparing Mac OS X for Android development
- Installing Android development kits on Mac OS X
- Time for action – installing Android SDK and NDK on Mac OS X
- Setting up Linux
- Time for action – preparing Ubuntu Linux for Android development
- Installing Android development kits on Linux
- Time for action – installing Android SDK and NDK on Ubuntu
- Setting up the Eclipse development environment
- Time for action – installing Eclipse
- Emulating Android
- Time for action – creating an Android virtual device
- Developing with an Android device on Windows and Mac OS X
- Time for action – setting up your Android device on Windows and Mac OS X
- Developing with an Android device on Linux
- Time for action – setting up your Android device on Ubuntu
- Troubleshooting a development device
- Summary
- Chapter 2: Creating, Compiling, and
Deploying Native Projects
- Compiling and deploying NDK sample applications
- Time for action – compiling and deploying the hellojni sample
- Exploring Android SDK tools
- Creating your first Android project using eclipse
- Time for action – initiating a Java project
- Interfacing Java with C/C++
- Time for action – calling C code from Java
- Compiling native code from Eclipse
- Time for action – creating a hybrid Java/C/C++ project
- Summary
- Chapter 3: Interfacing Java and C/C++ with JNI
- Working with Java primitives
- Time for action – building a native key/value store
- Referencing Java objects from native code
- Time for action – saving a reference to an object in the Store
- Throwing exceptions from native code
- Time for action – raising exceptions from the Store
- Handling Java arrays
- Time for action – saving a reference to an object in the Store
- Summary
- Chapter 4: Calling Java Back from Native Code
- Chapter 5: Writing a Fully-native Application
- Chapter 6: Rendering Graphics with OpenGL ES
- Initializing OpenGL ES
- Time for action – initializing OpenGL ES
- Reading PNG textures with the asset manager
- Time for action – loading a texture in OpenGL ES
- Drawing a sprite
- Time for action – drawing a Ship sprite
- Rendering a tile map with vertex buffer objects
- Time for action – drawing a tile-based background
- Summary
- Chapter 7: Playing Sound with OpenSL ES
- Chapter 8: Handling Input Devices and Sensors
- Chapter 9: Porting Existing Libraries to Android
- Chapter 10: Towards Professional Gaming
- Chapter 11: Debugging and Troubleshooting
- Index

Android NDK
Beginner's Guide
Discover the nave side of Android and inject the power
of C/C++ in your applicaons
Sylvain Ratabouil
BIRMINGHAM - MUMBAI
Downloa d f r o m W o w ! e B o o k < w w w.woweb o o k . c o m >Downloa d f r o m W o w ! e B o o k < w w w.woweb o o k . c o m >
Android NDK
Beginner's Guide
Copyright © 2012 Packt Publishing
All rights reserved. No part of this book may be reproduced, stored in a retrieval system,
or transmied in any form or by any means, without the prior wrien permission of the
publisher, except in the case of brief quotaons embedded in crical arcles or reviews.
Every eort has been made in the preparaon of this book to ensure the accuracy of the
informaon presented. However, the informaon contained in this book is sold without
warranty, either express or implied. Neither the author nor Packt Publishing, and its dealers
and distributors will be held liable for any damages caused or alleged to be caused directly
or indirectly by this book.
Packt Publishing has endeavored to provide trademark informaon about all of the companies
and products menoned in this book by the appropriate use of capitals. However, Packt
Publishing cannot guarantee the accuracy of this informaon.
First published: January 2012
Producon Reference: 1200112
Published by Packt Publishing Ltd.
Livery Place
35 Livery Street
Birmingham B3 2PB, UK.
ISBN 978-1-84969-152-9
www.packtpub.com
Cover Image by Marcus Grandon (marcusgrandon@mac.com)

Credits
Author
Sylvain Ratabouil
Reviewers
Marko Gargenta
Dr. Frank Grützmacher
Robert Mitchell
Acquision Editor
Sarah Cullington
Lead Technical Editor
Dayan Hyames
Technical Editor
Pramila Balan
Copy Editor
Laxmi Subramanian
Project Coordinator
Jovita Pinto
Proofreader
Lynda Sliwoski
Indexer
Hemangini Bari
Graphics
Valenna D'silva
Producon Coordinators
Prachali Bhiwandkar
Melwyn D'sa
Nilesh Mohite
Cover Work
Alwin Roy

About the Author
Sylvain Ratabouil is a conrmed IT consultant with experience in C++ and Java
technologies. He worked for the space industry and got involved in aeronauc projects at
Valtech Technologies where he now takes part in the Digital Revoluon.
Sylvain earned the master's degree in IT from Paul Sabaer University in Toulouse and did
M.Sc. in Computer Science from Liverpool University.
As a technology lover, he is passionate about mobile technologies and cannot live or sleep
without his Android smartphone.
I would like to thank Steven Wilding for oering me to write this book;
Sneha Harkut and Jovita Pinto for awaing me with so much paence;
Reshma Sundaresan, and Dayan Hyames for pung this book on the
right track; Sarah Cullington for helping me nalizing this book;
Dr. Frank Grützmacher, Marko Gargenta, and Robert Mitchell for
all their helpful comments.
About the Reviewers
Dr. Frank Grützmacher has worked for several major German rms in the area of large
distributed systems. He was an early user of dierent Corba implementaons in the past.
He got his Ph.D. in the eld of electrical engineering, but with the focus on distributed
heterogeneous systems. In 2010, he was involved in a project, which changed parts of the
Android plaorm for a manufacturer. From there, he got his knowledge about the android
NDK and nave processes on this plaorm.
He has already worked as a reviewer for another Android 3.0 book.
Robert Mitchell is an MIT graduate with over 40 years experience in Informaon
Technology and is semirered. He has developed soware for all the big iron companies:
IBM, Amdahl, Fujitsu, Naonal Semiconductor, and Storage Technology. Soware companies
include Veritas and Symantec. Recent languages that he knows are Ruby and Java, with a
long background in C++.

www.PacktPub.com
Support les, eBooks, discount offers and more
You might want to visit www.PacktPub.com for support les and downloads related to
your book.
Did you know that Packt oers eBook versions of every book published, with PDF and ePub
les available? You can upgrade to the eBook version at www.PacktPub.com and as a print
book customer, you are entled to a discount on the eBook copy. Get in touch with us at
service@packtpub.com for more details.
At www.PacktPub.com, you can also read a collecon of free technical arcles, sign up for
a range of free newsleers and receive exclusive discounts and oers on Packt books and
eBooks.
http://PacktLib.PacktPub.com
Do you need instant soluons to your IT quesons? PacktLib is Packt's online digital book
library. Here, you can access, read and search across Packt's enre library of books.
Why Subscribe?
Fully searchable across every book published by Packt
Copy and paste, print and bookmark content
On demand and accessible via web browser
Free Access for Packt account holders
If you have an account with Packt at www.PacktPub.com, you can use this to access
PacktLib today and view nine enrely free books. Simply use your login credenals for
immediate access.

Table of Contents
Preface 1
Chapter 1: Seng Up your Environment 7
Geng started with Android development 7
Seng up Windows 8
Time for acon – preparing Windows for Android development 8
Installing Android development kits on Windows 12
Time for acon – installing Android SDK and NDK on Windows 13
Seng up Mac OS X 18
Time for acon – preparing Mac OS X for Android development 18
Installing Android development kits on Mac OS X 20
Time for acon – installing Android SDK and NDK on Mac OS X 20
Seng up Linux 22
Time for acon – preparing Ubuntu Linux for Android development 22
Installing Android development kits on Linux 27
Time for acon – installing Android SDK and NDK on Ubuntu 27
Seng up the Eclipse development environment 29
Time for acon – installing Eclipse 29
Emulang Android 33
Time for acon – creang an Android virtual device 33
Developing with an Android device on Windows and Mac OS X 37
Time for acon – seng up your Android device on Windows and Mac OS X 37
Developing with an Android device on Linux 39
Time for acon – seng up your Android device on Ubuntu 39
Troubleshoong a development device 42
Summary 43
Chapter 2: Creang, Compiling, and Deploying Nave Projects 45
Compiling and deploying NDK sample applicaons 46
Time for acon – compiling and deploying the hellojni sample 46
Table of Contents
[ ii ]
Exploring Android SDK tools 51
Android debug bridge 51
Project conguraon tool 54
Creang your rst Android project using eclipse 56
Time for acon – iniang a Java project 56
Introducing Dalvik 59
Interfacing Java with C/C++ 60
Time for acon – calling C code from Java 60
More on Makeles 65
Compiling nave code from Eclipse 67
Time for acon – creang a hybrid Java/C/C++ project 67
Summary 72
Chapter 3: Interfacing Java and C/C++ with JNI 73
Working with Java primives 74
Time for acon – building a nave key/value store 75
Referencing Java objects from nave code 85
Time for acon – saving a reference to an object in the Store 85
Local and global JNI references 90
Throwing excepons from nave code 91
Time for acon – raising excepons from the Store 92
JNI in C++ 96
Handling Java arrays 96
Time for acon – saving a reference to an object in the Store 97
Checking JNI excepons 106
Summary 107
Chapter 4: Calling Java Back from Nave Code 109
Synchronizing Java and nave threads 110
Time for acon – running a background thread 111
Aaching and detaching threads 120
More on Java and nave code lifecycles 121
Calling Java back from nave code 122
Time for acon – invoking Java code from a nave thread 122
More on callbacks 133
JNI method denions 134
Processing bitmaps navely 135
Time for acon – decoding camera feed from nave code 136
Summary 146
Chapter 5: Wring a Fully-nave Applicaon 147
Creang a nave acvity 148
Time for acon – creang a basic nave acvity 148
Table of Contents
[ iii ]
Handling acvity events 155
Time for acon – handling acvity events 155
More on Nave App Glue 166
UI thread 167
Nave thread 168
Android_app structure 170
Accessing window and me navely 171
Time for acon – displaying raw graphics and implemenng a mer 172
More on me primives 181
Summary 181
Chapter 6: Rendering Graphics with OpenGL ES 183
Inializing OpenGL ES 184
Time for acon – inializing OpenGL ES 184
Reading PNG textures with the asset manager 193
Time for acon – loading a texture in OpenGL ES 194
Drawing a sprite 208
Time for acon – drawing a Ship sprite 209
Rendering a le map with vertex buer objects 220
Time for acon – drawing a le-based background 221
Summary 238
Chapter 7: Playing Sound with OpenSL ES 239
Inializing OpenSL ES 241
Time for acon – creang OpenSL ES engine and output 241
More on OpenSL ES philosophy 248
Playing music les 249
Time for acon – playing background music 249
Playing sounds 256
Time for acon – creang and playing a sound buer queue 257
Event callback 266
Recording sounds 268
Summary 272
Chapter 8: Handling Input Devices and Sensors 273
Interacng with Android 274
Time for acon – handling touch events 276
Detecng keyboard, D-Pad, and Trackball events 288
Time for acon – handling keyboard, D-Pad, and trackball, navely 289
Probing device sensors 298
Time for acon – turning your device into a joypad 300
Summary 313
Table of Contents
[ iv ]
Chapter 9: Porng Exisng Libraries to Android 315
Developing with the Standard Template Library 316
Time for acon – embedding GNU STL in DroidBlaster 316
Stac versus shared 326
STL performances 327
Compiling Boost on Android 328
Time for acon – embedding Boost in DroidBlaster 328
Porng third-party libraries to Android 338
Time for acon – compiling Box2D and Irrlicht with the NDK 339
GCC opmizaon levels 346
Mastering Makeles 346
Makele variables 347
Makele Instrucons 348
Summary 351
Chapter 10: Towards Professional Gaming 353
Simulang physics with Box2D 353
Time for acon – simulang physics with Box2D 354
More on collision detecon 366
Collision modes 367
Collision ltering 368
More resources about Box2D 369
Running a 3D engine on Android 369
Time for acon – rendring 3D graphics with Irrlicht 370
More on Irrlicht scene management 381
Summary 382
Chapter 11: Debugging and Troubleshoong 383
Debugging with GDB 383
Time for acon – debugging DroidBlaster 384
Stack trace analysis 392
Time for acon – analysing a crash dump 392
More on crash dumps 396
Performance analysis 397
Time for acon – running GProf 398
How it works 403
ARM, thumb, and NEON 403
Summary 405
Index 411
Preface
The short history of compung machines has witnessed some major events, which
forever transformed our usage of technology. From the rst massive main frames to
the democrazaon of personal computers, and then the interconnecon of networks.
Mobility is the next revoluon. Like the primive soup, all the ingredients are now
gathered: an ubiquitous network, new social, professional and industrial usages, a
powerful technology. A new period of innovaon is blooming right now in front of our
eyes. We can fear it or embrace it, but it is here, for good!
The mobile challenge
Today's mobile devices are the product of only a few years of evoluon, from the rst
transportable phones to the new ny high-tech monsters we have in our pocket. The
technological me scale is denitely not the same as the human one.
Only a few years ago, surng on the successful wave of its musical devices, Apple and
its founder Steve Jobs combined the right hardware and the right soware at the right
me not only to sasfy our needs, but to create new ones. We are now facing a new
ecosystem looking for a balance between iOS, Windows Mobile, Blackberry, WebOS, and
more importantly Android! The appete of a new market could not let Google apathec.
Standing on the shoulder of this giant Internet, Android came into the show as the best
alternave to the well established iPhones and other iPads. And it is quickly becoming
the number one.
In this modern Eldorado, new usages or technically speaking, applicaons (acvies, if
you already are an Android adept) sll have to be invented. This is the mobile challenge.
And the dematerialized country of Android is the perfect place to look for. Android is
(mostly) an open source operang system now supported by a large panel of mobile
device manufacturers.

Preface
[ 2 ]
Portability among hardware and adaptability to the constrained resources of mobile devices:
this is the real essence of the mobile challenge from a technical perspecve. With Android,
ones has to deal with mulple screen resoluons, various CPU and GPU speed or capabilies,
memory limitaons, and so on, which are not topics specic to this Linux-based system,
(that is, Android) but can parcularly be incommoding.
To ease portability, Google engineers packaged a virtual machine with a complete framework
(the Android SDK) to run programs wrien in one of the most spread programming language
nowadays: Java. Java, augmented with the Android framework, is really powerful. But rst,
Java is specic to Android. Apple's products are wrien for example in Objecve C and can be
combined with C and C++. And second, a Java virtual machine does not always give you enough
capability to exploit the full power of mobile devices, even with just-in-me compilaon
enabled. Resources are limited on these devices and have to be carefully exploited to oer
the best experience. This is where the Android Nave Development Kit comes into place.
What this book covers
Chapter 1, Seng Up your Environment, covers the tools required to develop an applicaon
with the Android NDK. This chapter also covers how to set up a development environment,
connect your Android device, and congure the Android emulator.
Chapter 2, Creang, Compiling, and Deploying Nave Projects, we will compile, package, and
deploy NDK samples and create our rst Android Java/C hybrid project with NDK and Eclipse.
Chapter 3, Interfacing Java and C/C++ with JNI, presents how Java integrates and
communicates with C/C++ through Java Nave Interface.
Chapter 4, Calling Java Back from Nave Code, we will call Java from C to achieve
bidireconal communicaon and process graphic bitmaps navely.
Chapter 5, Wring a Fully-nave Applicaon, looks into the Android NDK applicaon life-cycle.
We will also write a fully nave applicaon to get rid of Java.
Chapter 6, Rendering Graphics with OpenGL ES, teaches how to display advanced 2D and 3D
graphics at full speed with OpenGL ES. We will inialize display, load textures, draw sprites
and allocate vertex and index buers to display meshes.
Chapter 7, Playing Sound with OpenSL ES, adds a musical dimension to nave applicaons
with OpenSL ES, a unique feature provided only by the Android NDK. We will also record
sounds and reproduce them on the speakers.

Preface
[ 3 ]
Chapter 8, Handling Input Devices and Sensors, covers how to interact with an Android
device through its mul-touch screen. We will also see how to handle keyboard events
navely and apprehend the world through sensors and turn a device into a game controller.
Chapter 9, Porng Exisng Libraries to Android, we will compile the indispensable C/C++
frameworks, STL and Boost. We will also see how to enable excepons and RunTime Type
Informaon. And also port our own or third-party libraries to Android, such as, Irrlicht 3D
engine and Box2D physics engine.
Chapter 10, Towards Professional Gaming, creates a running 3D game controlled with
touches and sensors using Irrlicht and Box2D.
Chapter 11, Debugging and Troubleshoong, provides an in-depth analysis of the running
applicaon with NDK debug ulity. We will also analyze crash dumps and prole the
performance of our applicaon.
What you need for this book
A PC with either Windows or Linux or an Intel-based Mac. As a test machine, an Android device
is highly advisable, although the Android NDK provides an emulator which can sasfy most of
the needs of a hungry developer. But for 2D and 3D graphics, it is sll too limited and slow.
I assume you already understand C and C++ languages, pointers, object-oriented features,
and other modern language concepts. I also assume you have some knowledge about
the Android plaorm and how to create Android Java applicaons. This is not a strong
prerequisite, but preferable. I also guess you are not frighten by command-line terminals.
The version of Eclipse used throughout this book is Helios (3.6).
Finally, bring all your enthusiasm because these lile beasts can become really amazing
when they demonstrate all their potenal and sense of contact.
Who this book is for
Are you an Android Java programmer who needs more performance? Are you a C/C++
developer who doesn't want to bother with Java stu and its out-of-control garbage
collector? Do you want to create fast intensive mulmedia applicaons or games? Answer
yes to any of the above quesons and this book is for you. With some general knowledge
of C/C++ development, you will be able to dive head rst into nave Android development.
Preface
[ 4 ]
Conventions
In this book, you will nd several headings appearing frequently.
To give clear instrucons of how to complete a procedure or task, we use:
Time for action – heading
1. Acon 1
2. Acon 2
3. Acon 3
Instrucons oen need some extra explanaon so that they make sense, so they are
followed with:
What just happened?
This heading explains the working of tasks or instrucons that you have just completed.
You will also nd some other learning aids in the book, including:
Pop quiz – heading
These are short mulple choice quesons intended to help you test your own understanding.
Have a go hero – heading
These set praccal challenges and give you ideas for experimenng with what you
have learned.
You will also nd a number of styles of text that disnguish between dierent kinds of
informaon. Here are some examples of these styles, and an explanaon of their meaning.
Code words in text are shown as follows: "Open a command line window and key in
java –version to check the installaon."
A block of code is set as follows:
export ANT_HOME=`cygpath –u "$ANT_HOME"`
export JAVA_HOME=`cygpath –u "$JAVA_HOME"`
export ANDROID_SDK=`cygpath –u "$ANDROID_SDK"`
export ANDROID_NDK=`cygpath –u "$ANDROID_NDK"`
Preface
[ 5 ]
When we wish to draw your aenon to a parcular part of a code block, the relevant lines
or items are set in bold:
<?xml version="1.0" encoding="utf-8"?>
<manifest xmlns:android="http://schemas.android.com/apk/res/android"
package="com.example.hellojni"
android:versionCode="1"
android:versionName="1.0">
Any command-line input or output is wrien as follows:
$ make –version
New terms and important words are shown in bold. Words that you see on the screen, in
menus or dialog boxes for example, appear in the text like this: "When proposed, include
Devel/make and Shells/bash packages".
Warnings or important notes appear in a box like this.
Tips and tricks appear like this.
Reader feedback
Feedback from our readers is always welcome. Let us know what you think about this
book—what you liked or may have disliked. Reader feedback is important for us to develop
tles that you really get the most out of.
To send us general feedback, simply send an e-mail to feedback@packtpub.com, and
menon the book tle through the subject of your message.
If there is a topic that you have experse in and you are interested in either wring or
contribung to a book, see our author guide on www.packtpub.com/authors.
Customer support
Now that you are the proud owner of a Packt book, we have a number of things to help
you to get the most from your purchase.

Preface
[ 6 ]
Downloading the example code
You can download the example code les for all Packt books you have purchased from your
account at http://www.packtpub.com. If you purchased this book elsewhere, you can
visit http://www.packtpub.com/support and register to have the les e-mailed directly
to you.
Errata
Although we have taken every care to ensure the accuracy of our content, mistakes do
happen. If you nd a mistake in one of our books—maybe a mistake in the text or the
code—we would be grateful if you would report this to us. By doing so, you can save other
readers from frustraon and help us improve subsequent versions of this book. If you
nd any errata, please report them by vising http://www.packtpub.com/support,
selecng your book, clicking on the errata submission form link, and entering the details
of your errata. Once your errata are veried, your submission will be accepted and the
errata will be uploaded to our website, or added to any list of exisng errata, under the
Errata secon of that tle.
Piracy
Piracy of copyright material on the Internet is an ongoing problem across all media. At
Packt, we take the protecon of our copyright and licenses very seriously. If you come
across any illegal copies of our works, in any form, on the Internet, please provide us with
the locaon address or website name immediately so that we can pursue a remedy.
Please contact us at copyright@packtpub.com with a link to the suspected pirated material.
We appreciate your help in protecng our authors, and our ability to bring you
valuable content.
Questions
You can contact us at questions@packtpub.com if you are having a problem with any
aspect of the book, and we will do our best to address it.
Downloa d f r o m W o w ! e B o o k < w w w.woweb o o k . c o m >Downloa d f r o m W o w ! e B o o k < w w w.woweb o o k . c o m >
1
Setting Up your Environment
Are you ready to take up the mobile challenge? Is your computer switched on,
mouse and keyboard plugged in, and screen illuminang your desk? Then let’s
not wait a minute more!
In this rst chapter, we are going to do the following:
Download and install the necessary tools to develop applicaons using Android
Set up a development environment
Connect and prepare an Android device for development
Getting started with Android development
What dierenates mankind from animals is the use of tools. Android developers,
this authenc species you are about to belong to, are no dierent!
To develop applicaons on Android, we can use any of the following three plaorms:
Microso Windows PC
Apple Mac OS X
Linux PC
Windows 7, Vista, Mac OS X, and Linux systems are supported in both 32 and 64-bit versions,
but Windows XP in 32-bit mode only. Only Mac OS X computers of version 10.5.8 or later and
based on Intel architectures are supported (not PowerPC processors). Ubuntu is supported
only from version 8.04 (Hardy Heron).

Seng Up your Environment
[ 8 ]
Right, this is a good start but unless you are able to read and write binary language like English,
having an OS is not enough. We also need soware dedicated to Android development:
The JDK (Java Development Kit)
The Android SDK (Soware Development Kit)
The Android NDK (Nave Development Kit)
An IDE (Integrated Development Environment): Eclipse
Android, and more specically Android NDK compilaon system is heavily based on Linux.
So we also need to set up some ulies by default, and we need to install one environment
that supports them: Cygwin (unl NDK R7). This topic is covered in detail later in the chapter.
Finally, a good old command-line Shell to manipulate all these ulies is essenal: we will
use Bash (the default on Cygwin, Ubuntu, and Mac OS X).
Now that we know what tools are necessary to work with Android, let’s start with the
installaon and setup process.
The following secon is dedicated to Windows. If you are a Mac or Linux
user, you can immediately jump to the Seng up Mac OS X or the
Seng up Linux secon.
Setting up Windows
Before installing the necessary tools, we need to set up Windows to host our Android
development tools properly.
Time for action – preparing Windows for Android development
To work with the Android NDK, we need to set up a Cygwin Linux-like environment
for Windows:
Since NDK R7, Cygwin installaon is not required anymore
(steps 1 to 9). The Android NDK provides addional nave Windows
binaries (for example, ndk-build.cmd).
1. Go to http://cygwin.com/install.html.
2. Download setup.exe and execute it.
3. Select Install from Internet.
Chapter 1
[ 9 ]
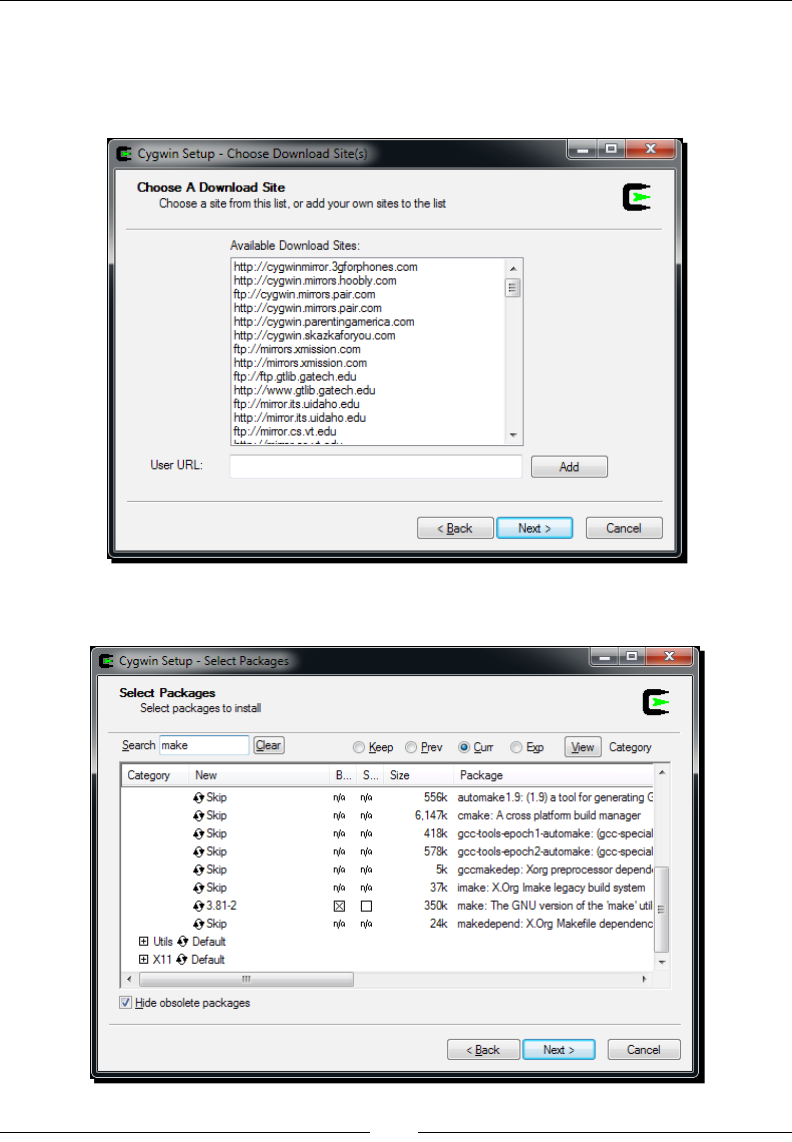
4. Follow the wizard screens.
5. Select a download site from where Cygwin packages are going to be downloaded.
Consider using a server in your country:
6. When proposed, include Devel/make and Shells/bash packages:

Seng Up your Environment
[ 10 ]
7. Follow the installaon wizard unl the end. This may take some me depending
on your Internet connecon.
8. Aer installaon, launch Cygwin. Your prole les get created on rst launch.
9. Enter the following command to check if Cygwin works:
$ make –version
To run Eclipse and allow compilaon of Android Java code to bytecode, a Java Development
Kit is required. On Windows, the obvious choice is the Oracle Sun JDK:
1. Go to the Oracle website and download the latest Java Development Kit: http://
www.oracle.com/technetwork/java/javase/downloads/index.html.
2. Launch the downloaded program and follow the installaon wizard. At the end
of the installaon, a browser is opened asking for JDK registraon. This step is
absolutely not compulsory and can be ignored.
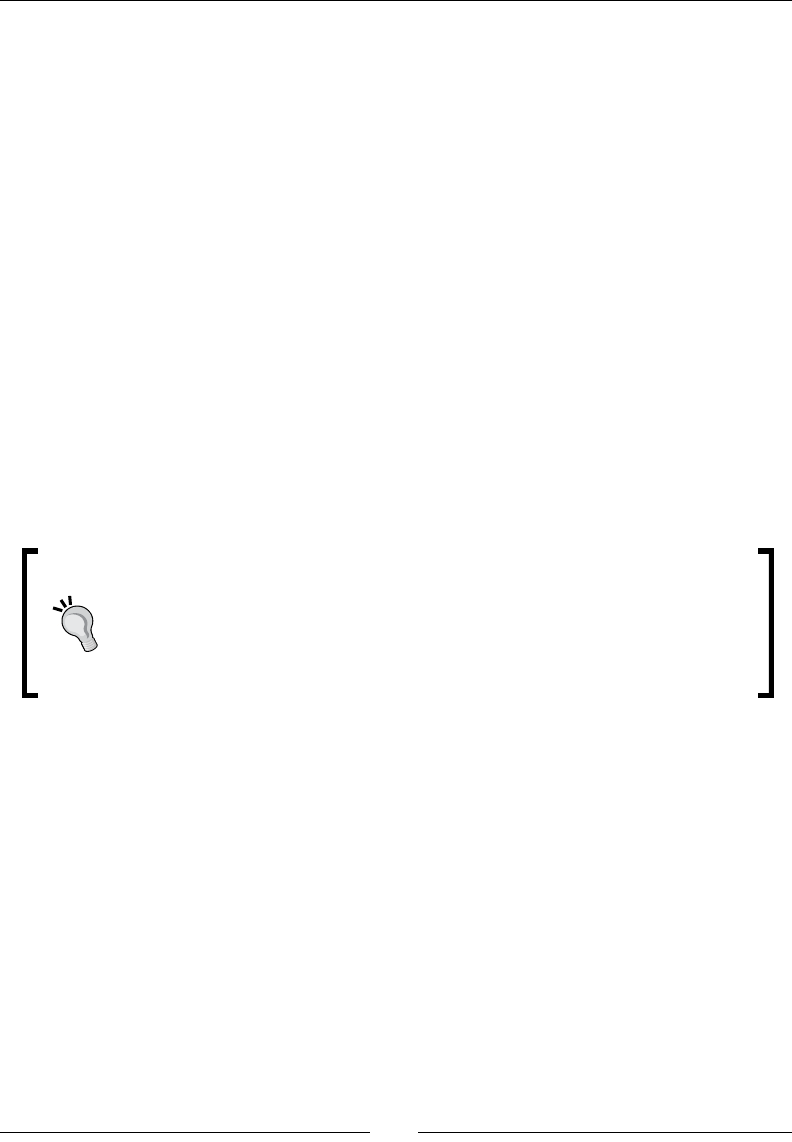
3. To make sure the newly installed JDK is used, let’s dene its locaon in environment
variables. Open the Windows Control panel and go to the System panel (or right-
click on Computer item in the Windows Start menu and select Properes). Then go
to Advanced system sengs. The System Properes window appears. Finally, select
Advanced tab and click on the Environment Variables buon.
4. In the Environment Variables window, inside the System variables list, insert the
JAVA_HOME variable with JDK installaon directory as value and validate. Then
edit PATH (or Path) and insert the %JAVA_HOME%\bin directory before any other
directory and separate it with a semicolon. Validate and close the window.
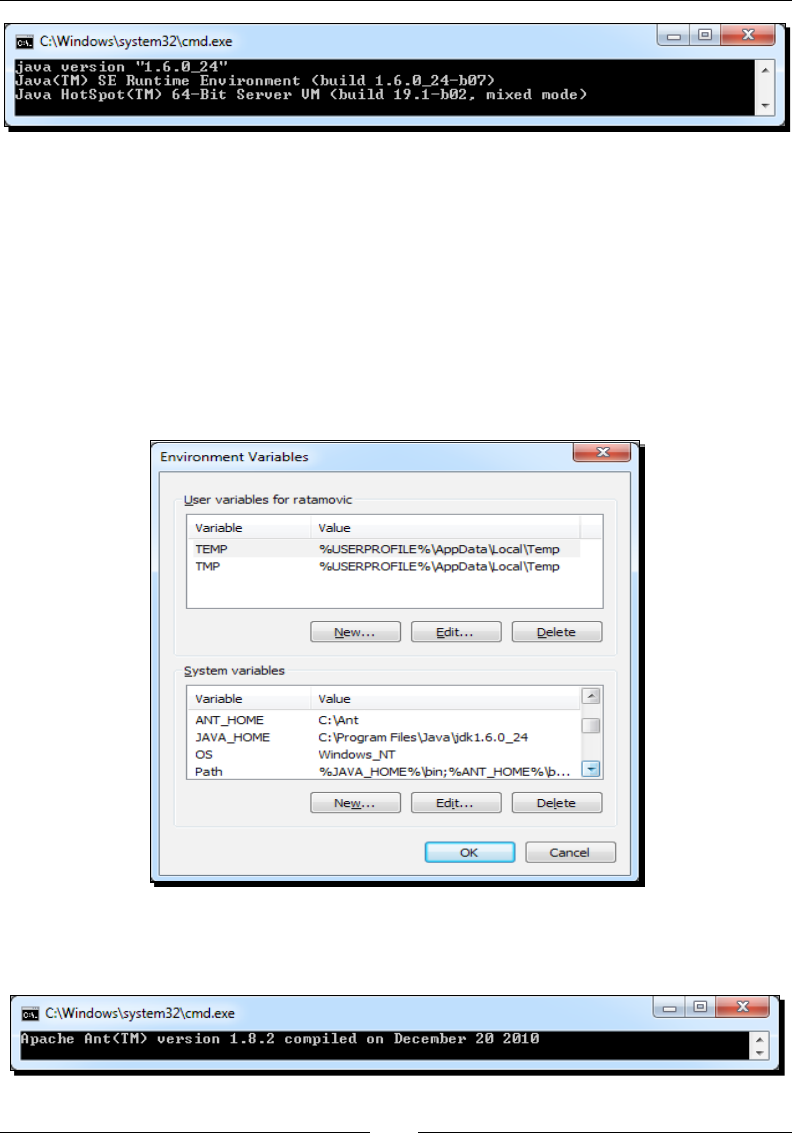
5. Open a command-line window and key in java –version to check the installaon.
The result should be similar to the following screenshot. Check carefully to make
sure that the version number corresponds to the version of the newly installed JDK:
$ java –version
Chapter 1
[ 11 ]
To compile projects from the command line, the Android SDK supports Ant—a Java-based
build automaon ulity. Let’s install it:
1. Go to http://ant.apache.org/bindownload.cgi and download Ant binaries,
packed within a ZIP archive.
2. Unzip Ant in the directory of your choice (for example, C:\Ant).
3. Go back to the Environment Variables window, as in step 12, and create the
ANT_HOME variable with the Ant directory as the value. Append the %ANT_HOME%\
bin directory to PATH:
4. From a classic Windows terminal, check the Ant version to make sure it is
properly working:
Seng Up your Environment
[ 12 ]
What just happened?
We have prepared Windows with the necessary underlying ulies to host Android
development tools: Cygwin and Java Development Kit.
Cygwin is an open source soware collecon that allows the Windows plaorm to emulate
a Unix-like environment. It aims at navely integrang soware based on POSIX standard
(such as Unix, Linux, and so on) into Windows. It can be considered as an intermediate layer
between applicaons originated from Unix/Linux (but navely recompiled on Windows) and
the Windows OS itself.
We have also deployed a Java Development Kit in version 1.6 and checked if it is properly
working from the command line. Because Android SDK uses generics, the JDK in version 1.5
is the least required when developing with Android. JDK is simple to install on Windows but
it is important to make sure a previous installaon, such as JRE (Java Runme Environment,
which aims at execung applicaons but not developing them) is not interfering. This is why
we have dened JAVA_HOME and PATH environment variables to ensure proper JDK is used.
Finally, we have installed Ant ulity that we are going to use in the next chapter to build
projects manually. Ant is not required for Android development but is a very good soluon
to set up a connuous integraon chain.
Where is Java’s home?
Dening the JAVA_HOME environment variable is not required. However,
JAVA_HOME is a popular convenon among Java applicaons, Ant being one
of them. It rst looks for the java command in JAVA_HOME (if dened)
before looking in PATH. If you install an up-to-date JDK in another locaon
later on, do not forget to update JAVA_HOME.
Installing Android development kits on Windows
Once JDK is installed on our system, we can start installing Android SDK and NDK to create,
compile, and debug Android programs.
Chapter 1
[ 13 ]
Time for action – installing Android SDK and NDK on Windows
1. Open your Web browser and go to http://developer.android.com/sdk.
This web page lists all available SDKs, one for each plaorm.
2. Download Android SDK for Windows, packaged as an Exe installer.
3. Then, go to http://developer.android.com/sdk/ndk and download the
Android NDK (not SDK!) for Windows, packaged as a ZIP archive this me.
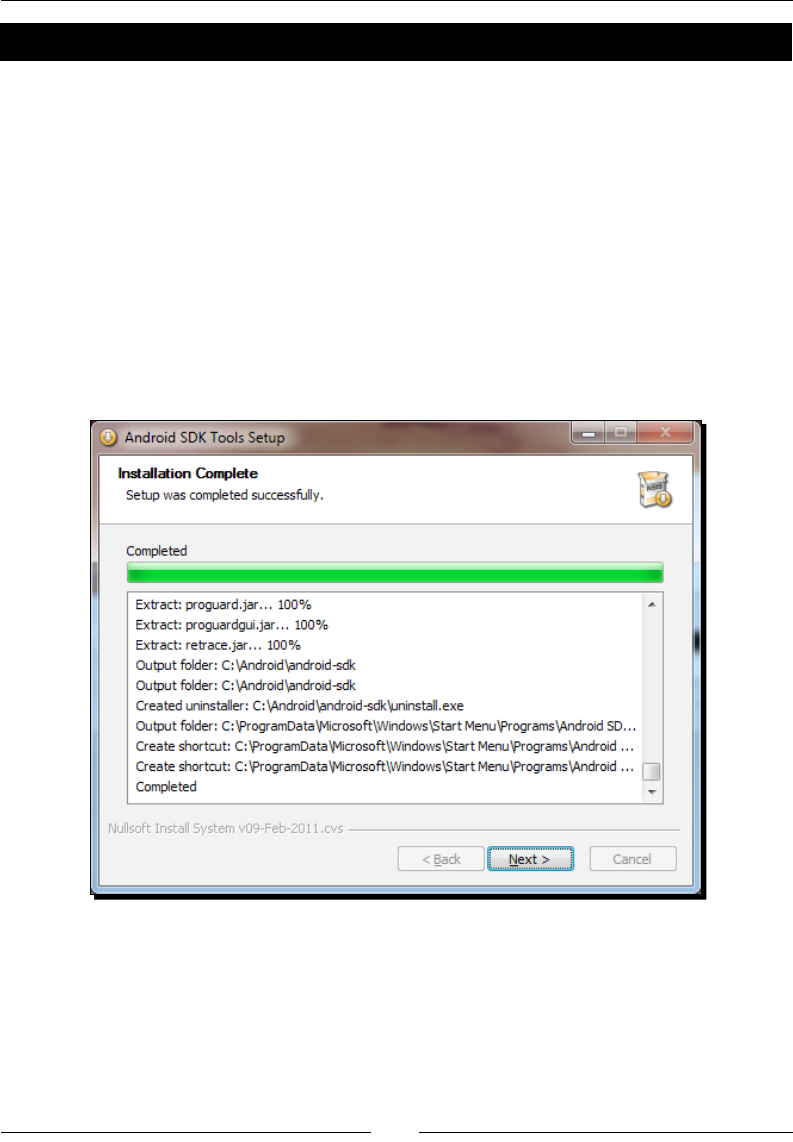
4. Execute Android SDK installer. Select an appropriate installaon locaon (for example,
C:\Android\android-sdk), knowing that Android SDK and NDK together can take
more than 3 GB of disk space (currently!) with all ocial API versions installed. As a
precauon, avoid leaving any space in the target installaon path.
5. Follow the installaon wizard unl the end. Check the Start SDK Manager:
6. The Android SDK and AVD Manager is launched. The Package installaon window
appears automacally.

Seng Up your Environment
[ 14 ]
7. Check the Accept All opon and click on Install to start the installaon of
Android components:
8. Aer a few minutes, all packages get downloaded and a message asking to restart
ADB service (the Android Debug Bridge) appears. Validate by clicking on Yes.
9. Close the applicaon.
10. Now, unzip Android NDK archive into its nal locaon (for example, C:\Android\
android-ndk). Again, avoid leaving any space in the installaon path (or some
problems could be encountered with Make).
To easily access Android ulies from the command line, let’s dene the
environment variables:
11. Open the Environment Variables system window, as we did in the previous part.
Inside the System variables list, insert the ANDROID_SDK and ANDROID_NDK
variables with the corresponding directories as values.
12. Append %ANDROID_SDK%\tools, %ANDROID_SDK%\platform-tools and
%ANDROID_NDK%, all separated by a semicolon, to your PATH.
Chapter 1
[ 15 ]
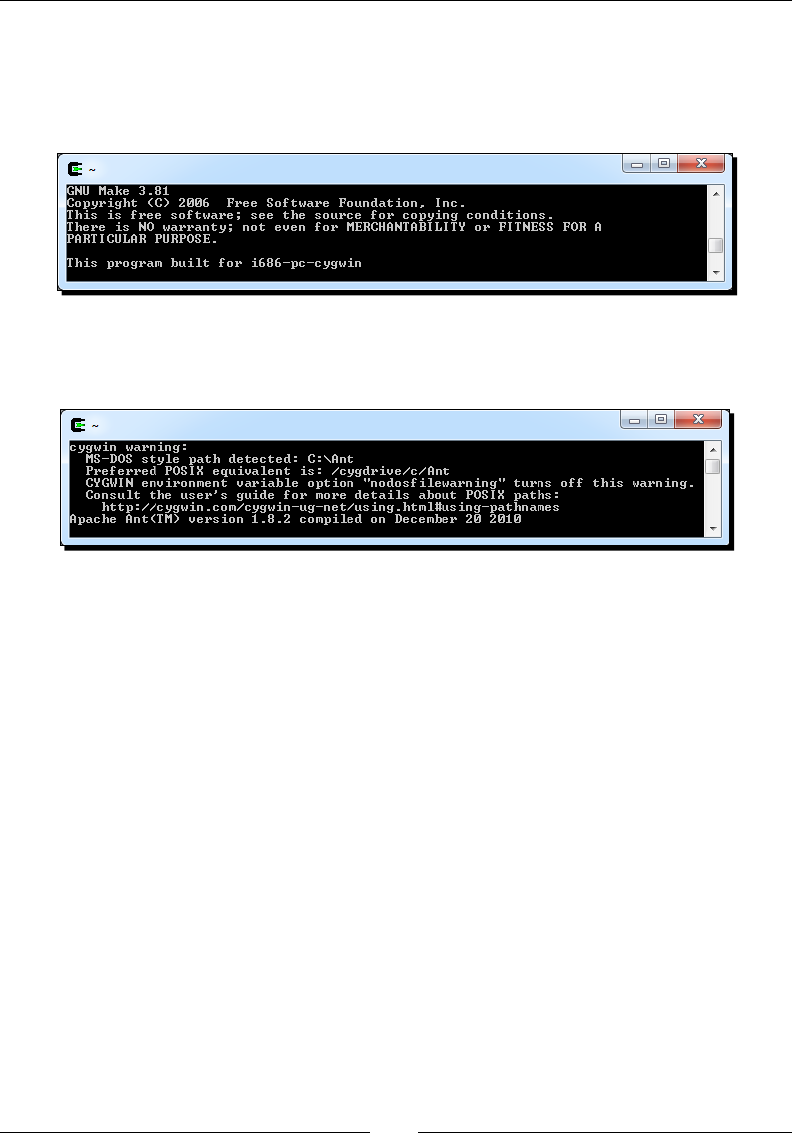
13. All the Windows environment variables should be imported automacally by Cygwin
when launched. Let’s verify this by opening a Cygwin terminal and checking whether
NDK is available:
$ ndk-build –-version
14. Now, check the Ant version to make sure it is properly working on Cygwin:
$ ant -version
The rst me Cygwin should emit a surprising warning: paths are in MS-DOS style
and not POSIX. Indeed, Cygwin paths are emulated and should look similar to /
cygdrive/<Drive letter>/<Path to your directory with forward
slashes>. For example, if Ant is installed in c:\ant, then the path should be
indicated as /cygdrive/c/ant.
15. Let’s x this. Go to your Cygwin directory. There, you should nd a directory named
home/<your user name> containing a .bash_profile. Open it in edion.
16. At the end of the script, translate the Windows environment variables into
Cygwin variables with the cygpath ulity. PATH does not need to be translated as
this essenal variable is processed automacally by Cygwin. Make sure to use the
prime character (`) (to execute a command inside another), which has a dierent
meaning than the apostrophe (‘) (to dene a variable) with Bash. An example
.bash_profile is provided with this book:
export ANT_HOME=`cygpath –u “$ANT_HOME”`
export JAVA_HOME=`cygpath –u “$JAVA_HOME”`
export ANDROID_SDK=`cygpath –u “$ANDROID_SDK”`
export ANDROID_NDK=`cygpath –u “$ANDROID_NDK”`

Seng Up your Environment
[ 16 ]
17. Reopen a Cygwin window and check the Ant version again. No warning is issued
this me:
$ ant -version
What just happened?
We have downloaded and deployed both Android SDK and NDK and made them available
through command line using environment variables.
We have also launched the Android SDK and AVD manager, which aims at managing SDK
components installaon, updates, and emulaon features. This way, new SDK API releases
as well as third-party components (for example, Samsung Galaxy Tablet emulator, and so
on) are made available to your development environment without having to reinstall the
Android SDK.
If you have trouble connecng at step 7, then you may be located behind a proxy. In this
case, Android SDK and AVD manager provide a Sengs secon where you can specify your
proxy sengs.
At step 16, we have converted the Windows paths dened inside the environment variables
into Cygwin paths. This path form, which may look odd at rst, is used by Cygwin to emulate
Windows paths as if they were Unix paths. Cygdrive is similar to a mount or media directory
on Unix and contains every Windows drive as a plugged le system.
Cygwin paths
The rule to remember while using paths with Cygwin is that they must
contain forward slashes only and the drive leer is replaced by /cygdrive/
[Drive Letter]. But beware, le names in Windows and Cygwin are
case-sensive, contrary to real Unix systems.
Chapter 1
[ 17 ]
Like any Unix system, Cygwin has a root directory named slash (/). But since there is no real
root directory in Windows, Cygwin emulates it in its own installaon directory. In a Cygwin
command line, enter the following command to see its content:
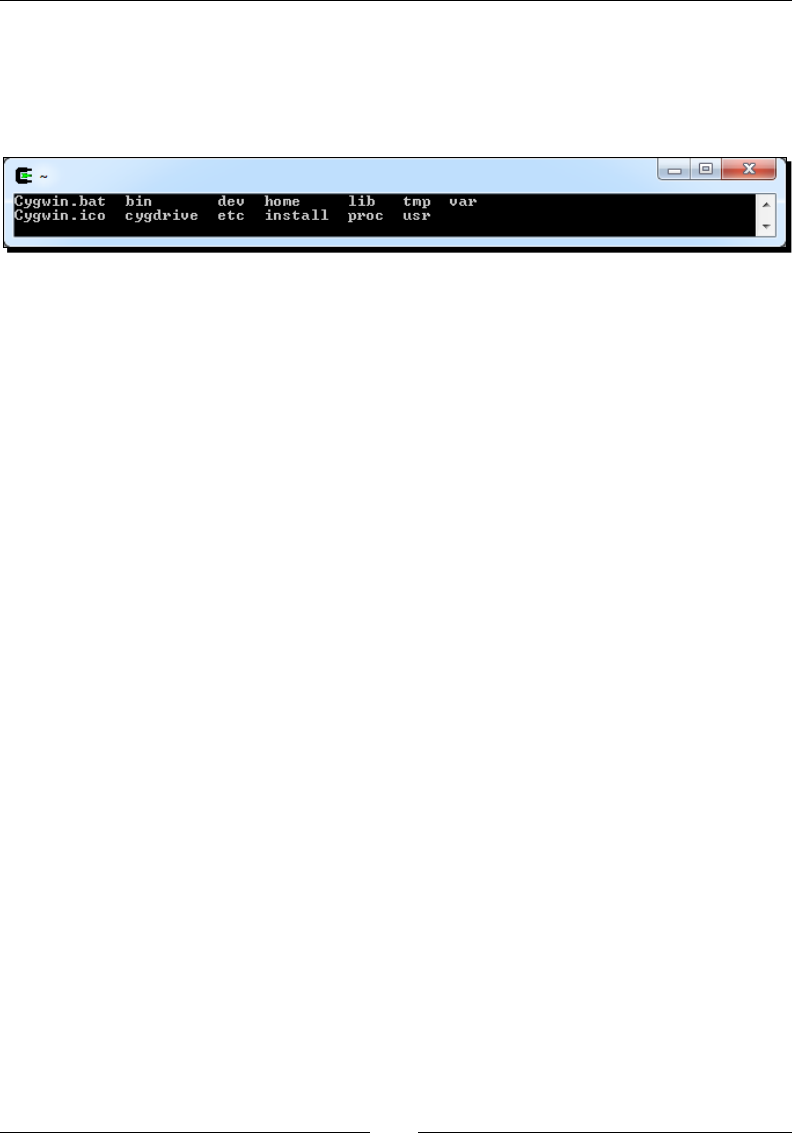
$ ls /
These les are the ones located in your Cygwin directory (except /proc, which is an
in-memory directory). This explains why we updated .bash_profile in the home
directory itself, which is located inside the Cygwin directory.
Ulies packaged with Cygwin usually expect Cygwin-style paths, although Windows-style
paths work most of the me. Thus, although we could have avoided the conversion in
.bash_profile (at the price of a warning), the natural way to work with Cygwin and avoid
future troubles is to use Cygwin paths. However, Windows ulies generally do not support
Cygwin paths (for example, java.exe), in which case, an inverse path conversion is required
when calling them. To perform conversion, cygpath ulity provides the following opons:
-u: To convert Windows paths to Unix paths
-w: To convert Unix paths to Windows paths
-p: To convert a list of paths (separated by ; on Windows and : on Unix)
Sll at step 17, you may have some dicules when eding .bash_profile: some weird
square characters may appear and the enre text is on one very long line! This is because it
is encoded using Unix encoding. So use a Unix compable le editor (such as Eclipse, PSPad,
or Notepad++) when eding Cygwin les. If you already got into trouble, you can use either
your editor End-Of-Line conversion feature (Notepad++ and PSPad provide one) or apply
command-line dos2unix ulity (provided with Cygwin) on the incriminated le.
Seng Up your Environment
[ 18 ]
Char return on Cygwin
Unix les use a simple line-feed character (beer known
as \n) to indicate an end of line whereas Windows uses a
carriage return (CR or \r) plus a line feed. MacOS, on the
other hand, uses a carriage return only. Windows newline
markers can cause lots of trouble in Cygwin Shell scripts,
which should be kept in Unix format.
This is the end of the secon dedicated to Windows setup.
If you are not a Mac or Linux user, you can jump to the
Seng up Eclipse development environment secon.
Setting up Mac OS X
Apple computers and Mac OS X have a reputaon for being simple and easy to use. And
honestly, this adage is rather true when it comes to Android development. Indeed, Mac OS X
is based on Unix, well adapted to run the NDK toolchain, and a recent JDK is already installed
by default. Mac OS X comes with almost anything we need with the excepon of Developer
Tools, which need to be installed separately. These Developer Tools include XCode IDE, many
Mac development ulies, and also some Unix ulies, such as Make and Ant.
Time for action – preparing Mac OS X for Android development
All developer tools are included in XCode installaon package (version 4, at the me this
book was wrien). There exist four soluons to get this package, and they are as follows:
If you have Mac OS X installaon media, open it and look for the XCode installaon
package
XCode is also provided on the AppStore for free (but this has changed recently and
may change in the future too)
XCode can also be downloaded from the Apple website with a paying program
subscripon at the address http://developer.apple.com/xcode/
Older version 3, compable with Android development tools, is available for free
as a disc image from the same page with a free Apple Developer account
Using the most appropriate soluon for your case, let’s install XCode:
1. Find your XCode installaon package and run it. Select the UNIX Development
opon when the customizaon screen appears. Finish installaon. We are done!
Chapter 1
[ 19 ]
2. To develop with Android NDK, we need the Make build tool for nave code. Open a
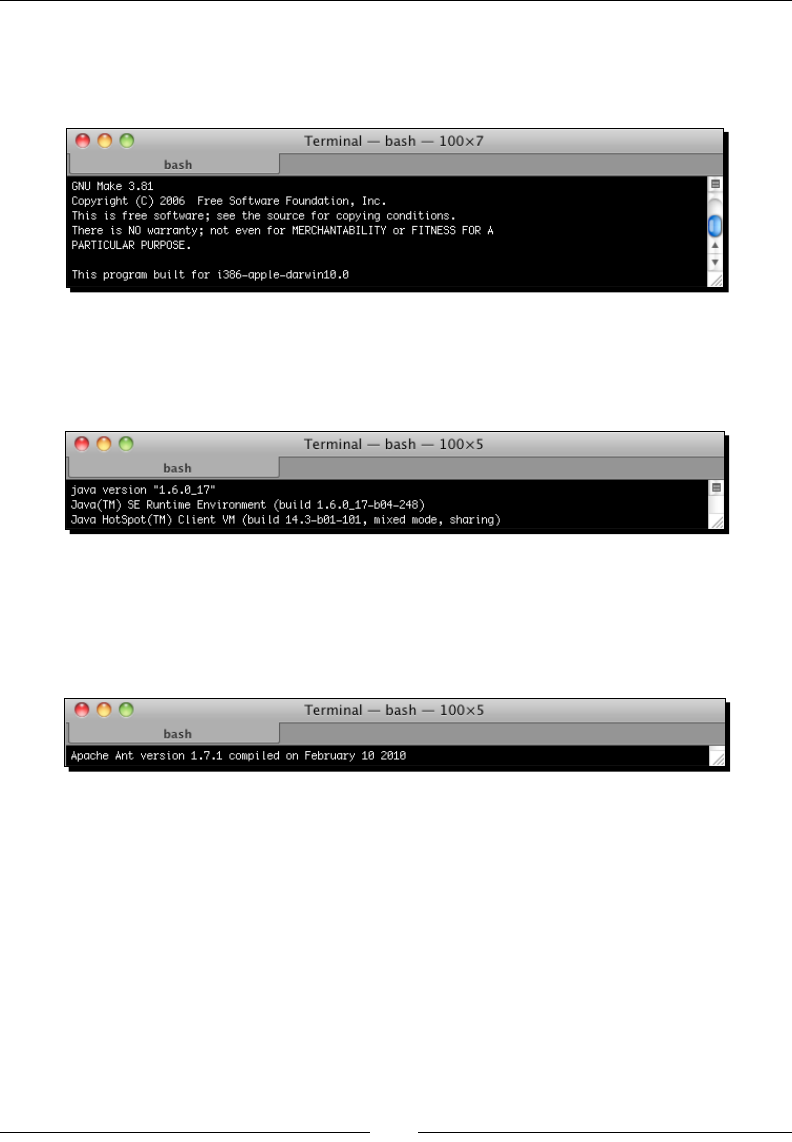
terminal prompt and ensure Make correctly works:
$ make --version
3. To run Eclipse and allow compilaon of Android Java code to bytecode, Java
Development Kit is required. Let’s check if the default Mac OS X JDK works ne:
$ java –version
4. To compile projects from the command line, the Android SDK supports Ant,
a Java-based build automaon ulity. Sll in a terminal, ensure Ant is
correctly installed:
$ ant –version
What just happened?
We have prepared our Mac OS X to host Android development tools. And as usual with
Apple, that was rather easy!
We have checked if Java Development Kit in version 1.6 is properly working from the
command line. Because Android SDK uses generics, a JDK in version 1.5 is the least
required for Android development.
We have installed Developer Tools, which include Make—to run the NDK compiler—and
Ant—that we are going to use in the next chapter to build projects manually. Ant is not
required for Android development but is a very good soluon to set up a connuous
integraon chain.
Seng Up your Environment
[ 20 ]
Installing Android development kits on Mac OS X
Once a JDK is installed on your system, we can start installing Android Development SDK
and NDK to create, compile, and debug Android programs.
Time for action – installing Android SDK and NDK on Mac OS X
1. Open your web browser and go to http://developer.android.com/sdk.
This web page lists all available SDKs, one for each plaorm.
2. Download Android SDK for Mac OS X, which is packaged as a ZIP archive.
3. Then, go to http://developer.android.com/sdk/ndk and download the
Android NDK (not SDK!) for Mac OS X, packaged as a Tar/BZ2 archive this me.
4. Uncompress the downloaded archives separately into the directory of your choice
(for example, /Developer/AndroidSDK and /Developer/AndroidNDK).
5. Let’s declare these two directories as environment variables. From now on, we will
refer to these directories as $ANDROID_SDK and $ANDROID_NDK throughout this
book. Assuming you use the default Bash command-line shell, create or edit your
.prole le (be careful, this is a hidden le!) in your home directory and add the
following variables:
export ANDROID_SDK=”<path to your Android SDK directory>”
export ANDROID_NDK=”<path to your Android NDK directory>”
export PATH=”$PATH:$ANDROID_SDK/tools:$ANDROID_SDK/platform-
tools:$ANDROID_NDK”
Downloading the example code
You can download the example code les for all Packt books you have
purchased from your account at hp://www.PacktPub.com. If you
purchased this book elsewhere, you can visit hp://www.PacktPub.com/
support and register to have the les e-mailed directly to you.
6. Save the le and log out from your current session.
7. Log in again and open a terminal. Enter the following command:
$ android
8. The Android SDK and AVD Manager window shows up.
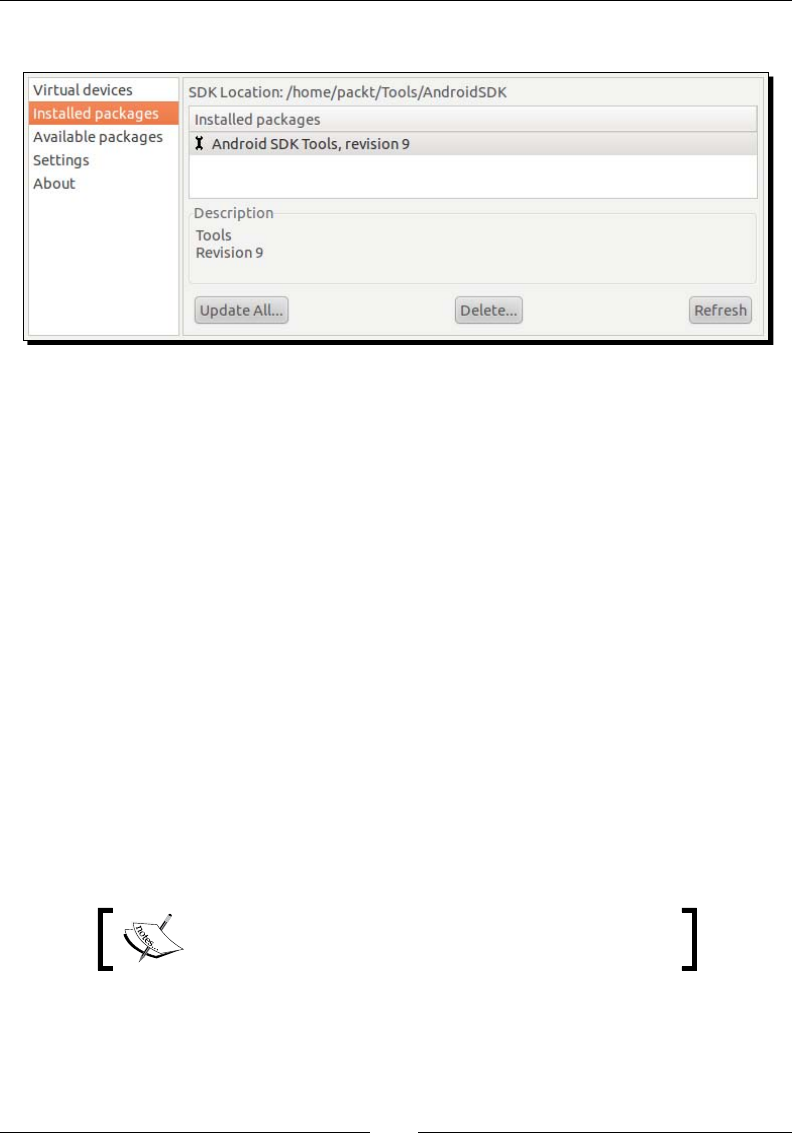
9. Go to the Installed packages secon and click on Update All:
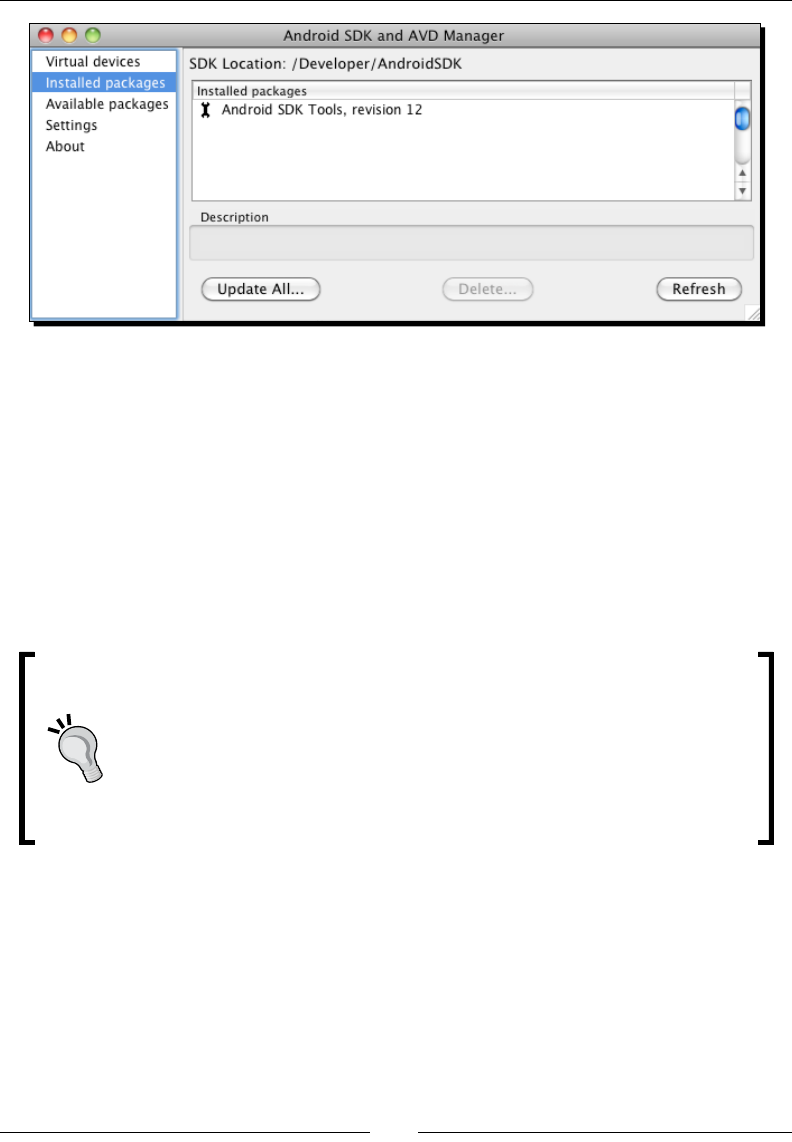
Chapter 1
[ 21 ]
10. A package selecon dialog appears. Select Accept All and then Install.
11. Aer few minutes, all packages get downloaded and a message asking to restart
ADB service (the Android Debug Bridge) appears. Validate by clicking on Yes.
12. You can now close the applicaon.
What just happened?
We have downloaded and deployed both Android SDK and NDK and made them available
through the command line using environment variables.
Mac OS X and environment variables
Mac OS X is tricky when it comes to environment variables. They can be easily
declared in a .profile for applicaons launched from a terminal, as we just
did. They can also be declared using an environment.plist le for GUI
applicaons, which are not launched from Spotlight. A more powerful way to
congure them is to dene or update /etc/launchd.conf system le (see
http://developer.apple.com/).
We have also launched the Android SDK and AVD manager, which aims at managing the
installaon, updates, and emulaon features of the SDK components. This way, new SDK API
releases as well as third-party components (for example, Samsung Galaxy Tablet emulator,
and so on) are made available to your development environment without having to reinstall
the Android SDK.
Seng Up your Environment
[ 22 ]
If you have trouble connecng at step 9, then you may be located behind a proxy. In this
case, Android SDK and AVD manager provide a Sengs secon where you can specify your
proxy sengs.
This is the end of the secon dedicated to Mac OS X setup. If you are
not a Linux user, you can jump to the Seng up Eclipse development
environment secon.
Setting up Linux
Although Linux is more naturally suited for Android development, as the Android toolchain is
Linux-based, some setup is necessary as well.
Time for action – preparing Ubuntu Linux for
Android development
To work with Android NDK, we need to check and install some system packages and ulies:
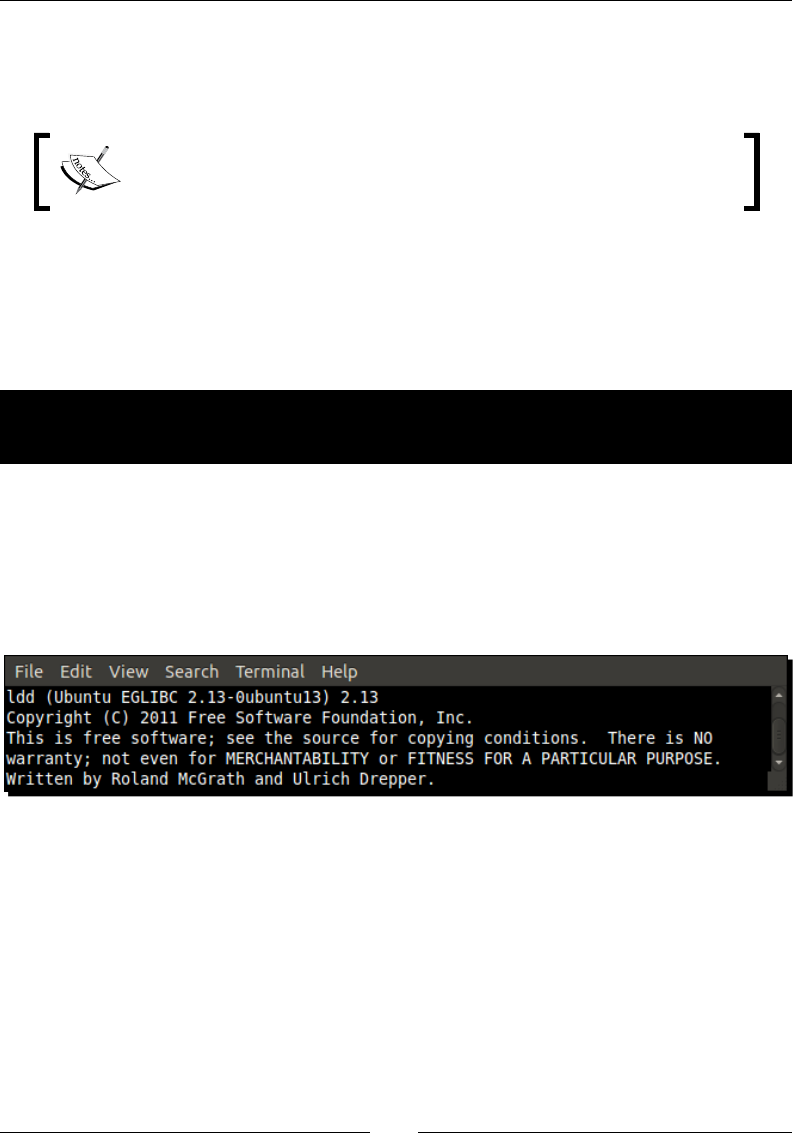
1. First, Glibc (the GNU C standard library, in version 2.7 or later) must be installed. It is
usually shipped with Linux systems by default. Check its version using the following
command:
$ ldd -–version
2. We also need the Make build tool for nave code. Installaon can be performed
using the following command:
$ sudo apt-get install build-essential
Alternavely, Make can be installed through Ubuntu Soware Center. Look for
build-essenal in the dedicated search box and install the packages found:
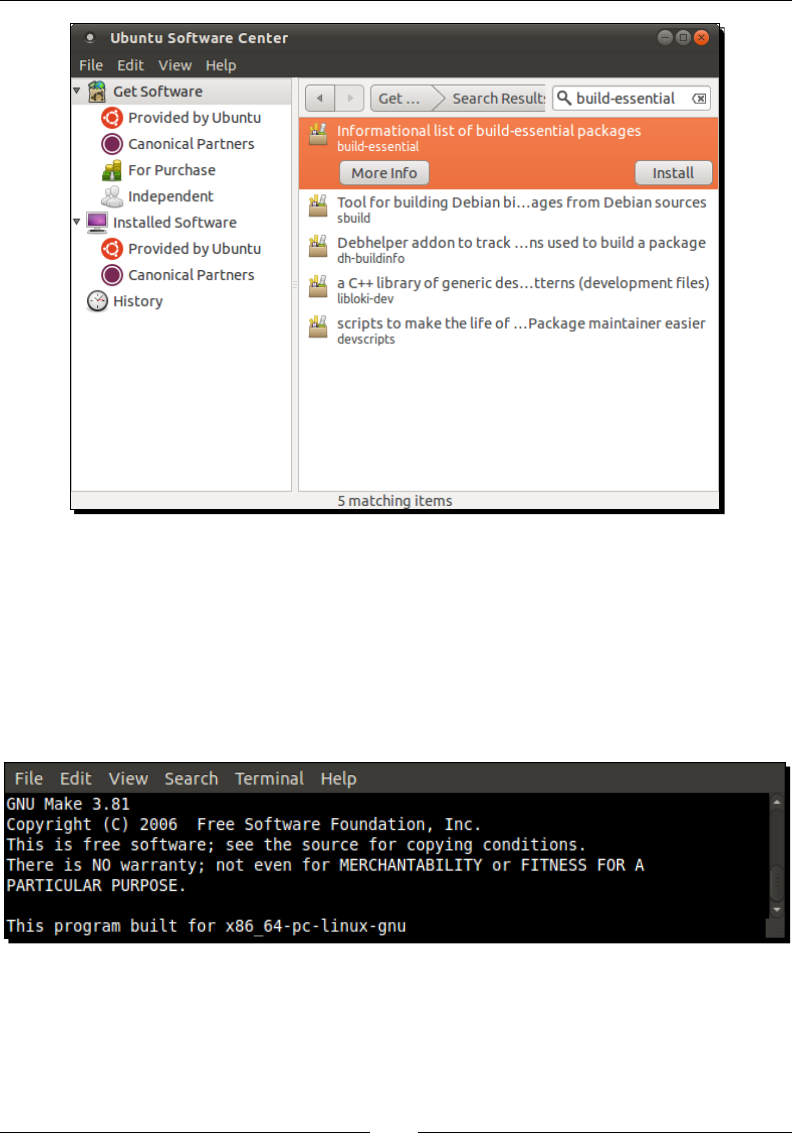
Chapter 1
[ 23 ]
Package build-essential contains a minimal set of tools for compilaon and
packaging on Linux Systems. It also includes GCC (the GNU C Compiler), which is not
required for standard Android development as Android NDK already packages its
own version.
3. To ensure that Make is correctly installed, type the following command. If correctly
installed, the version will be displayed:
$ make --version
Seng Up your Environment
[ 24 ]
Special note for 64-bit Linux owner
We also need 32-bit libraries installed to avoid compability problems. This can
be done using the following command (to execute in a command-line prompt)
or again the Ubuntu Soware Center:
sudo apt-get install ia32-libs
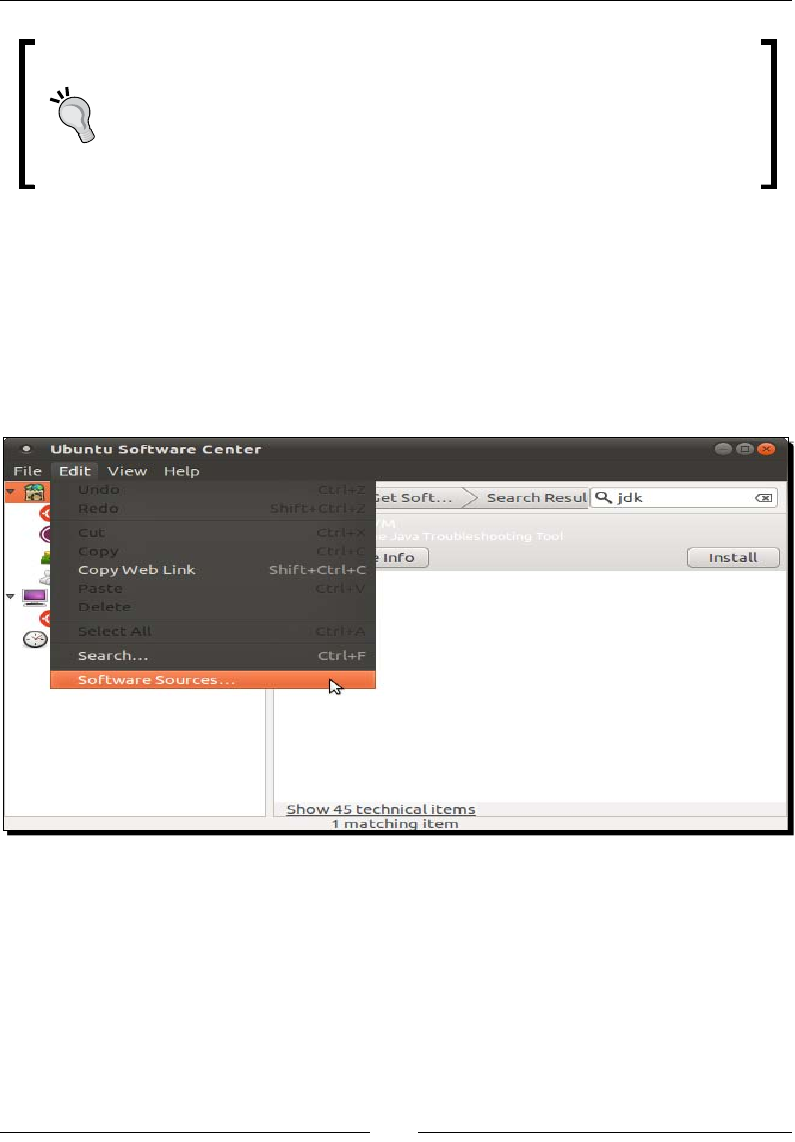
To run Eclipse and allow compilaon of Android Java code to bytecode, Java Development Kit
is required. We need to download and install Oracle Sun Java Development Kit. On Ubuntu,
this can be performed from the Synapc Package Manager:
1. Open Ubuntu System/Administraon menu and select Synapc Package Manager
(or open your Linux package manager if you use another Linux distros).
2. Go to the Edit | Soware Sources menu.
3. In the Soware Sources dialog, open the Other Soware tab.
4. Check the Canonical Partners line and close the dialog:
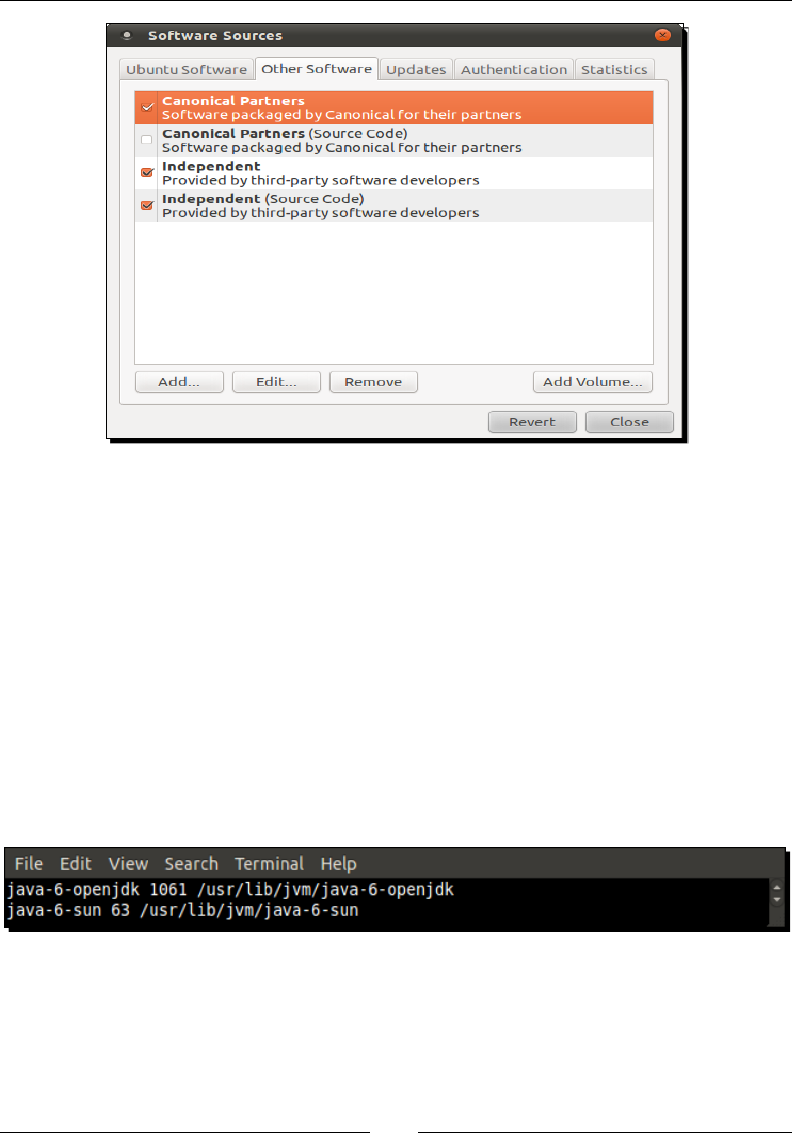
Chapter 1
[ 25 ]
5. Package cache synchronizes automacally with the Internet, and aer a few seconds
or minutes some new soware is made available in the Canonical Partners secon.
6. Find Sun Java™ Development Kit (JDK) 6 (or later) and click on Install. You are
also advised to install Lucida TrueType fonts (from the Sun JRE), the Java(TM)
Plug-in packages.
7. Accept the license (aer reading it carefully of course!). Be careful as it may open
in the background.
8. When installaon is nished, close Ubuntu Soware Center.
9. Although Sun JDK is now installed, it is not yet available. Open JDK is sll used by
default. Let’s acvate Sun JRE through the command line. First, check available JDK:
$ update-java-alternatives –l
10. Then, acvate the Sun JRE using the idener returned previously:
$ sudo update-java-alternatives –s java-6-sun
Downloa d f r o m W o w ! e B o o k < w w w.woweb o o k . c o m >Downloa d f r o m W o w ! e B o o k < w w w.woweb o o k . c o m >
Seng Up your Environment
[ 26 ]
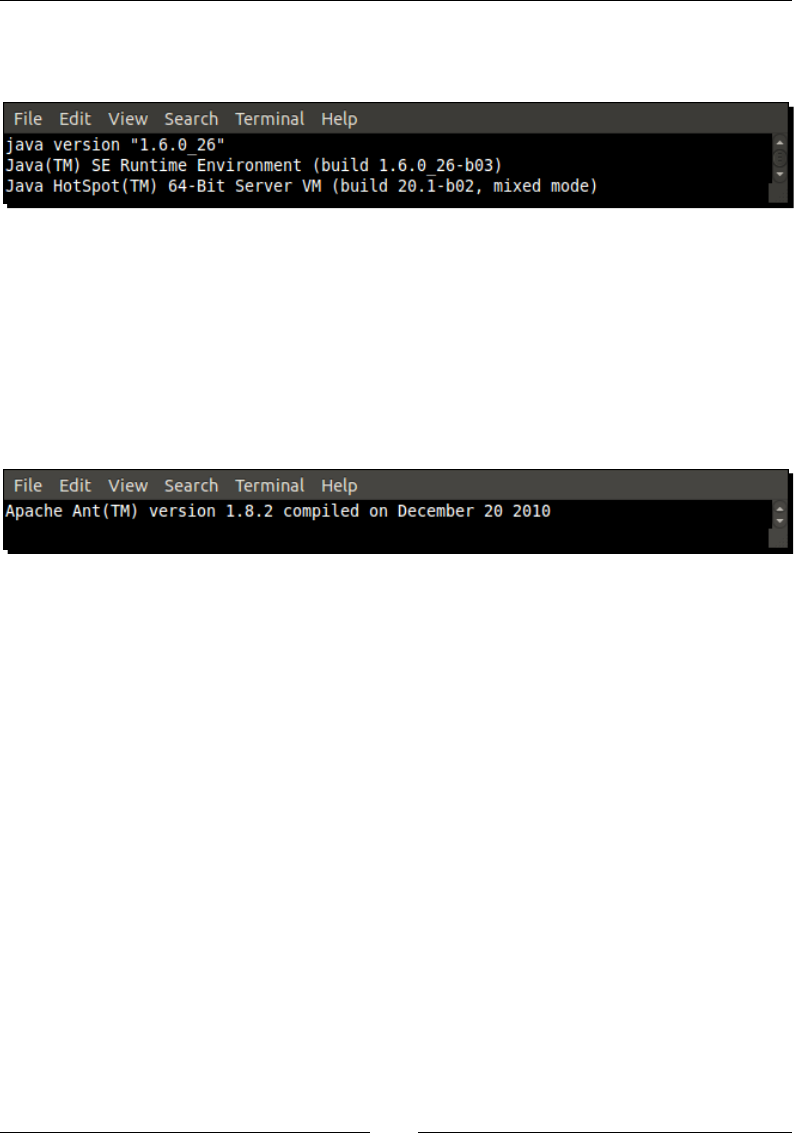
11. Open a terminal and check that installaon is OK by typing:
$ java –version
The Android SDK supports Ant, a Java-based build automaon ulity, to compile projects
from the command line. Let’s install it.
1. Install Ant with the following command or with the Ubuntu Soware Center:
$ sudo apt-get install ant
2. Check whether Ant is properly working:
$ ant --version
What just happened?
We have prepared our Linux operang system with the necessary ulies to host Android
development tools.
We have installed a Java Development Kit in version 1.6 and checked if it is properly working
from the command line. Because Android SDK uses generics, the JDK in version 1.5 is the
least required for Android development.
You may wonder why we bothered with the installaon of Sun JDK while Open JDK is already
ready to use. The reason is simply that Open JDK is not ocially supported by Android SDK.
If you want to avoid any possible interacon with Open JDK, think about removing it enrely
from your system. Go to the Provided by Ubuntu secon in the Ubuntu Soware Center and
click on Remove for each OpenJDK line. For more informaon, look for the ocial Ubuntu
documentaon: http://help.ubuntu.com/community/Java.

Chapter 1
[ 27 ]
Finally, we have installed Ant ulity that we are going to use in the next chapter to build
projects manually. Ant is not required for Android development but is a very good soluon
to set up a connuous integraon chain.
There is no more Sun JDK on Linux repositories since Java 7.
The Open JDK becomes the ocial Java implementaon.
Installing Android development kits on Linux
Once JDK is installed on your system, we can start installing Android Development SDK and
NDK to create, compile, and debug Android programs.
Time for action – installing Android SDK and NDK on Ubuntu
1. Open your web browser and go to http://developer.android.com/sdk.
This web page lists all available SDKs, one for each plaorm.
2. Download Android SDK for Linux, which is packaged as a Tar/GZ archive.
3. Then, go to http://developer.android.com/sdk/ndk and download the
Android NDK (not SDK!) for Linux, packaged as a Tar/BZ2 archive this me.
4. Uncompress the downloaded archives separately into the directories of your choice
(for example, ~/AndroidSDK and ~/AnroidNDK). On Ubuntu, you can use Archive
Manager (right-click on the archive le and Extract Here).
5. Let’s declare these two directories as environment variables. From now on, we
will refer to these directories as $ANDROID_SDK and $ANDROID_NDK throughout
this book. Assuming you use a Bash command-line shell, edit your .prole le
(be careful, this is a hidden le!) in your home directory and add the following
variables:
export ANDROID_SDK=”<path to your Android SDK directory>”
export ANDROID_NDK=”<path to your Android NDK directory>”
export PATH=”$PATH:$ANDROID_SDK/tools:$ANDROID_SDK/platform-
tools:$ANDROID_NDK”
6. Save the le and log out from your current session.
7. Log in again and open a terminal. Enter the following command:
$ android
8. The Android SDK and AVD Manager window shows up.
Seng Up your Environment
[ 28 ]
9. Go to the Installed packages secon and click on Update All:
10. A package selecon dialog appears. Select Accept All and then Install.
11. Aer a few minutes, all packages get downloaded and a message asking to restart
ADB service (the Android Debug Bridge) appears. Validate by clicking on Yes.
12. You can now close the applicaon.
What just happened?
We have downloaded and deployed both Android SDK and NDK and made them available
through the command line using environment variables.
We have also launched the Android SDK and AVD manager, which aims at managing the
installaon, updates, and emulaon features of the SDK components. This way, new SDK API
releases as well as third-party components (for example, Samsung Galaxy Tablet emulator,
and so on) are made available to your development environment without having to reinstall
Android SDK.
If you have trouble connecng at step 9, then you may be located behind a proxy. In this
case, Android SDK and AVD manager provide a Sengs secon where you can specify your
proxy sengs.
This is the end of the secon dedicated to the Linux setup.
The following secon is mixed.

Chapter 1
[ 29 ]
Setting up the Eclipse development environment
Command line lovers, vi fanacs, please go to the next chapter or you may feel sick! For most
humans, having a comfortable and visual-friendly IDE is essenal. And hopefully, Android
works with the greatest of all: Eclipse!
Eclipse is the only ocially supported IDE for Android SDK through the Google ocial plugin
named ADT. But ADT is only for Java. Hopefully, Eclipse supports C/C++ as well through CDT,
a general C/C++ plugin. Although not specic to Android, it works well with the NDK. The
version of Eclipse used throughout this book is Helios (3.6).
Time for action – installing Eclipse
1. Open your web browser and go to http://www.eclipse.org/downloads/.
This web page lists all available Eclipse packages: for Java, J2EE, C++.
2. Download Eclipse IDE for Java Developers.
3. Extract the downloaded Tar/GZ le (on Linux and Mac OS X) or ZIP le (on Windows)
with your archive manager.
4. Once extracted, run Eclipse by double-clicking on the eclipse executable inside its
directory. On Mac OS X, make sure to execute eclipse alias and not Eclipse.app or
else environment variables dened earlier in .profile will not be available
to Eclipse.
5. If Eclipse asks for a workspace, dene a custom workspace directory if you want
to (default workspace is ne) and click OK.
6. Aer Eclipse has started, close the Welcome Page.
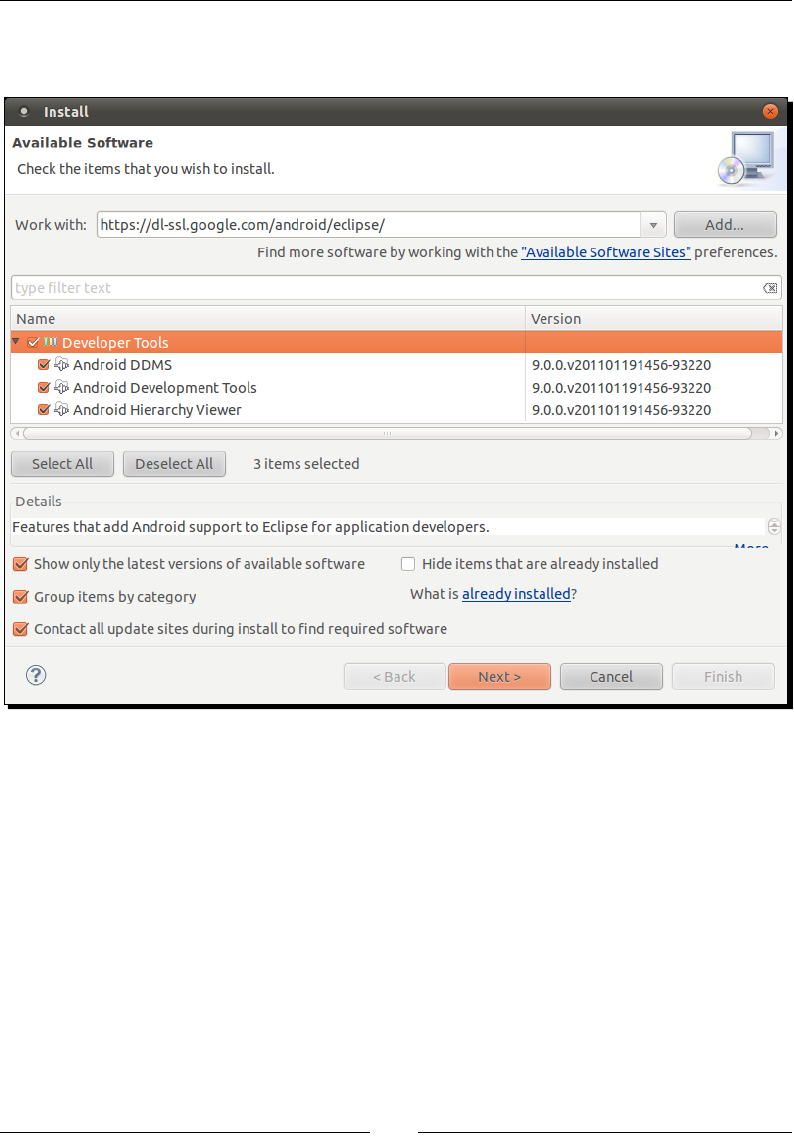
7. Go to the Help | Install New Soware menu.
If a problem occurs in the next steps while accessing update sites, then check
your Internet connecon. You may be either disconnected or your computer
is behind a proxy. In the laer case, it is possible to download ADT plugin as
an archive le from the ADT web page and install it manually (or congure
Eclipse to connect through a proxy but that is another maer).
Seng Up your Environment
[ 30 ]
8. Enter https://dl-ssl.google.com/android/eclipse/ in the Work with
eld and validate.
9. Aer a few seconds, a Developer Tools plugin appears; select it and click on the
Next buon.
10. Follow the wizard and accept condions when asked. On the last wizard page, click
on Finish.
11. ADT gets installed. A warning may appear indicang that plugin content is unsigned.
Ignore it and click on OK.
Chapter 1
[ 31 ]
12. When nished, restart Eclipse as requested.
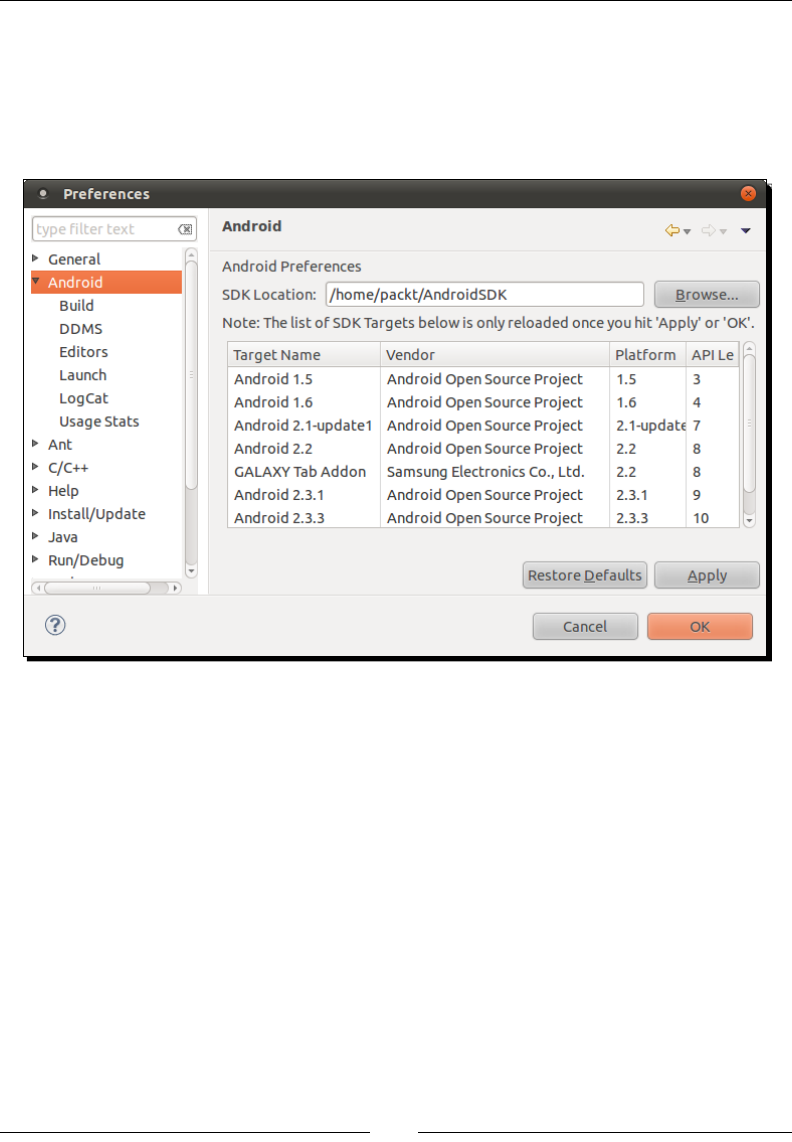
13. When Eclipse is restarted, go to menu Window | Preferences (Eclipse | Preferences
on Mac OS X) and go to the Android secon.
14. Click on Browse and select the path to your Android SDK directory.
15. Validate preferences.
16. Go back to the Help | Install New Soware... menu.
17. Open the Work with combobox and select the item containing Eclipse version name
(here Helios).
18. Find Programming Languages in the plugin tree and open it.
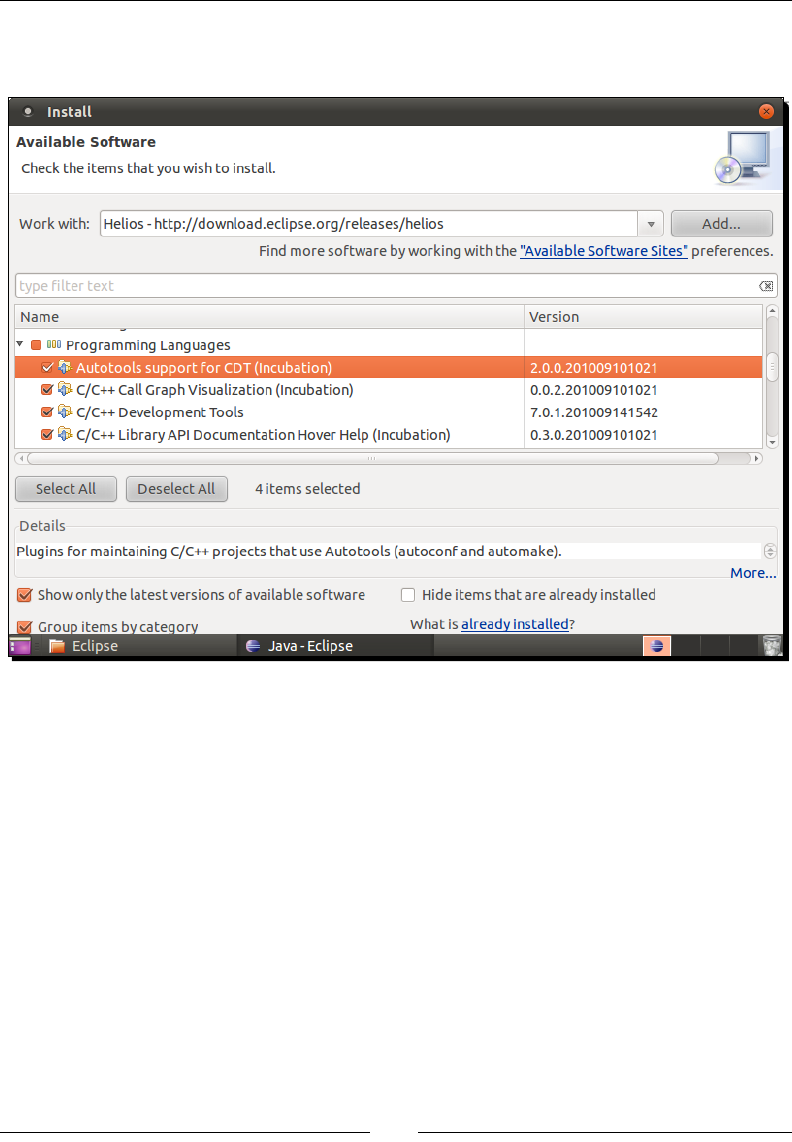
Seng Up your Environment
[ 32 ]
19. Select CDT plugins. Incubaon plugins are not essenal. C/C++ Call Graph
Visualizaon is for Linux only and cannot be installed on Windows or Mac OS X:
20. Follow the wizard and accept condions when asked. On the last wizard page,
click on Finish.
21. When nished, restart Eclipse.
What just happened?
Eclipse is now installed and ocial Android development plugin ADT and C/C++ plugin CDT
are installed. ADT refers to the Android SDK locaon.
The main purpose of ADT is to ease integraon of Eclipse with SDK development tools. It
is perfectly possible to develop in Android without an IDE using command line only. But
automac compilaon, packaging, deployment, and debugging are addicve features, which
are hard to get rid of!
Chapter 1
[ 33 ]
You may have noced that no reference to the Android NDK is given to ADT. This is because
ADT works for Java only. Hopefully, Eclipse is exible enough to handle hybrid Java/C++
projects! We will talk about that further when creang our rst Eclipse project.
In the same way, CDT allows easy integraon of C/C++ compilaon features into Eclipse.
We also “silently” installed JDT, the Java plugin for Eclipse. It is embedded in the Eclipse IDE
for Java Developers package. An Eclipse package including only CDT is also available on the
Eclipse Website.
More on ADT
ADT update site given to Eclipse in step 8 comes from the ocial ADT
documentaon that you can nd at http://developer.android.
com/sdk/eclipse-adt.html. This page is the main informaon point
to visit if new versions of Eclipse or Android are released.
Emulating Android
Android SDK provides an emulator to help developers who do not have a device (or are
impaently waing for a new one!) get started quickly. Let’s now see how to set it up.
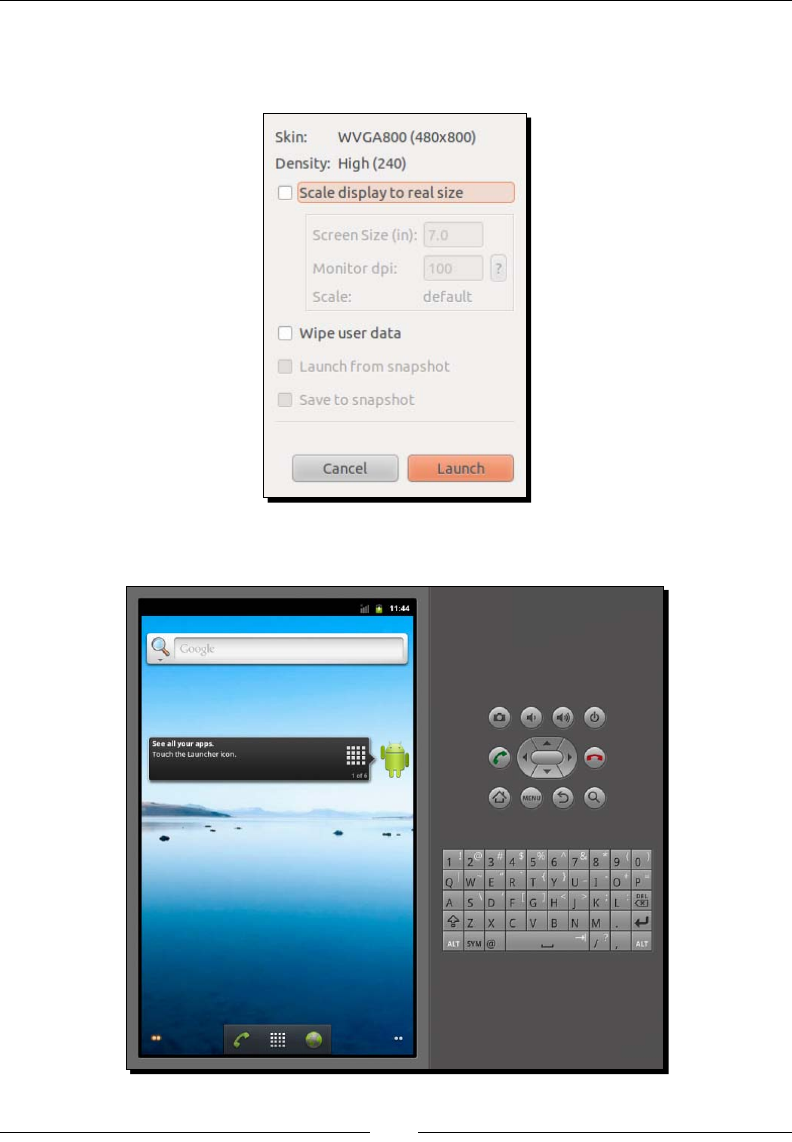
Time for action – creating an Android virtual device
1. Open Android SDK and AVD Manager using either the command line (key in
android) or the Eclipse toolbar buon:
2. Click on the New buon.
3. Give a name to this new emulated device: Nexus_480x800HDPI.
4. Target plaorm is Android 2.3.3.
5. Specify SD card size: 256.
6. Enable snapshot.
7. Set Built-in resoluon WVGA800.
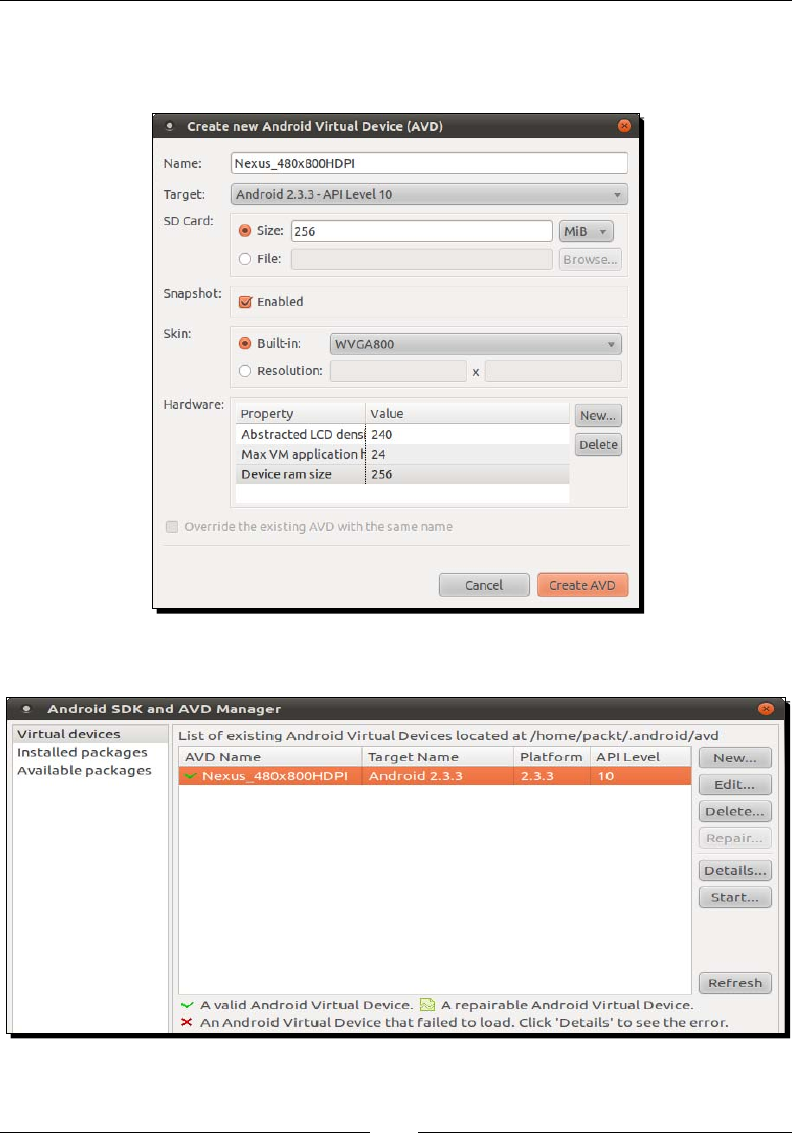
Seng Up your Environment
[ 34 ]
8. Leave the Hardware secon the way it is.
9. Click on Create AVD.
10. The newly created virtual device now appears in the list:
Chapter 1
[ 35 ]
11. Let’s check how it works: click on the Start buon.
12. Click on the Launch buon:
13. The emulator starts up and aer a few minutes, your device is loaded:
Seng Up your Environment
[ 36 ]
What just happened?
We have created our Android Virtual Devices which emulate a Nexus One with an HDPI
(High Density) screen of size 3.7 inches and a resoluon of 480x800 pixels. So we are now
able to test applicaons we are going develop in a representave environment. Even beer,
we are now able to test them in several condions and resoluons (also called skins)
without requiring a costly device.
Although this is out of the scope of this book, customizing addional opons, such as the
presence of a GPS, camera, and so on, is also possible when creang an AVD to test an
applicaon in limited hardware condions. And as a nal note, screen orientaon can be
switched with Ctrl + F11 and Ctrl + F12. Check out the Android website for more informaon
on how to use and congure the emulator (http://developer.android.com/guide/
developing/devices/emulator.html).
Emulaon is not simulaon
Although emulaon is a great tool when developing, there are a few
important points to take into account: emulaon is slow, not always perfectly
representave, and some features such as GPS support may be lacking.
Moreover, and this is probably the biggest drawback: Open GL ES is only
parally supported. More specically, only Open GL ES 1 currently works on
the emulator.
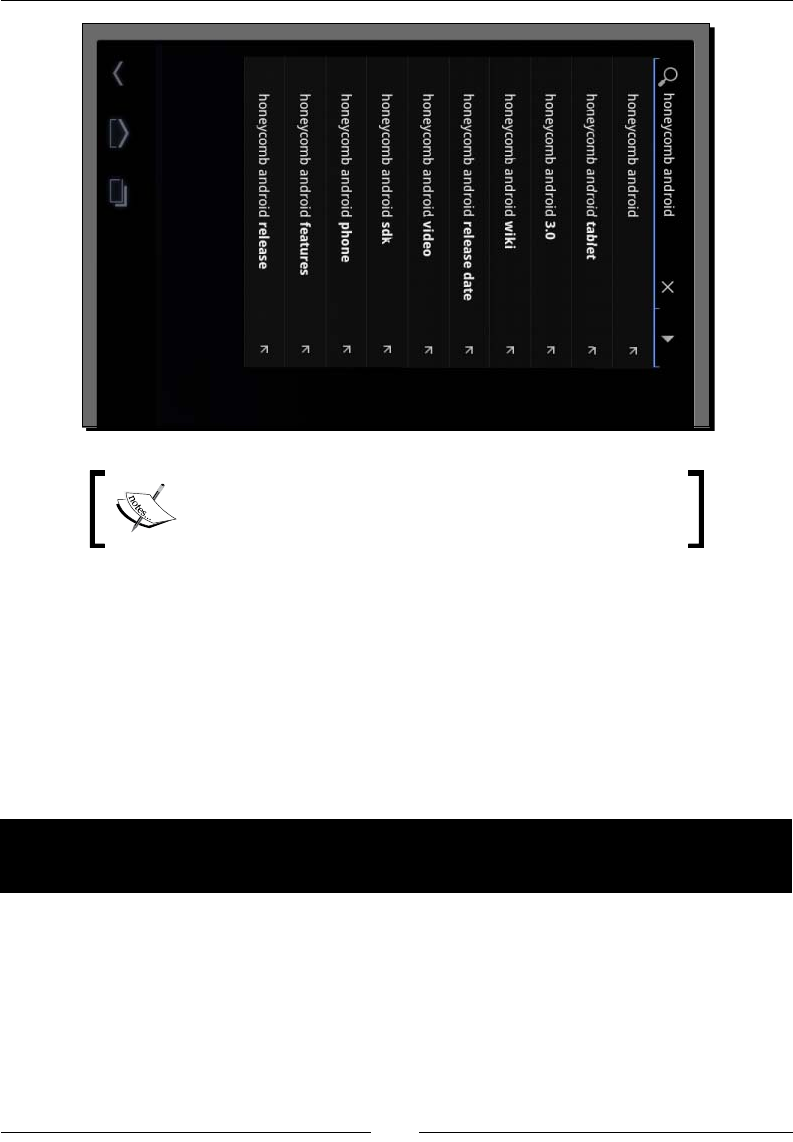
Have a go hero
Now that you know how to install and update Android plaorm components and create an
emulator, try to create an emulator for Android Honeycomb Tablets. Using the Android SDK
and AVD Manager, you will need to do the following:
Install Honeycomb SDK components
Create a new AVD which targets Honeycomb plaorm
Start the emulator and use proper screen scaling to match real tablet scale
Depending on your computer resoluon, you may need to tweak AVD display scale. This
can be done by checking Scale display to real size when starng the emulator and entering
your monitor density (use the ? buon to calculate it). If you perform well, you should obtain
the new Honeycomb interface at its real scale (no worries, it is also in Landscape mode on
my computer):
Chapter 1
[ 37 ]
The following secon is dedicated to Windows and Mac OS
X. If you are a Linux user, you can immediately jump to the
Developing with an Android device on Linux secon.
Developing with an Android device on Windows and
Mac OS X
Emulators can be of really good help, but nothing compared to a real device. Hopefully,
Android provides the sucient connecvity to develop on a real device and make the tesng
cycle more ecient. So take your Android in hand, switch it on and let’s try to connect it to
Windows or Mac OS X.
Time for action – setting up your Android device on
Windows and Mac OS X
Installaon of a device for development on Windows is manufacturer-specic. More
informaon can be found at http://developer.android.com/sdk/oem-usb.html
with a full list of device manufacturers. If you have got a driver CD with your Android device,
you can use it. Note that the Android SDK also contains some Windows drivers under
$ANDROID_SDK\extras\google\usb_driver. Specic instrucons are available for
Google development phones, Nexus One, and Nexus S at http://developer.android.
com/sdk/win-usb.html.
Seng Up your Environment
[ 38 ]
Mac users should also refer to their Manufacturer’s instrucons. However, as Mac’s ease of
use is not only a legend, simply connecng an Android device to a Mac should be enough to
get it working! Your device should be recognized immediately without installing anything.
Once the driver (if applicable) is installed on the system, do the following:
1. Go to the home menu, then go to Sengs | Applicaon | Development on your
mobile device (may change depending on your manufacturer).
2. Enable USB debugging and Stay awake.
3. Plug your device into your computer using a data connecon cable (beware some
cables are alimentaon cables only and will not work!). Depending on your device,
it may appear as a USB disk.
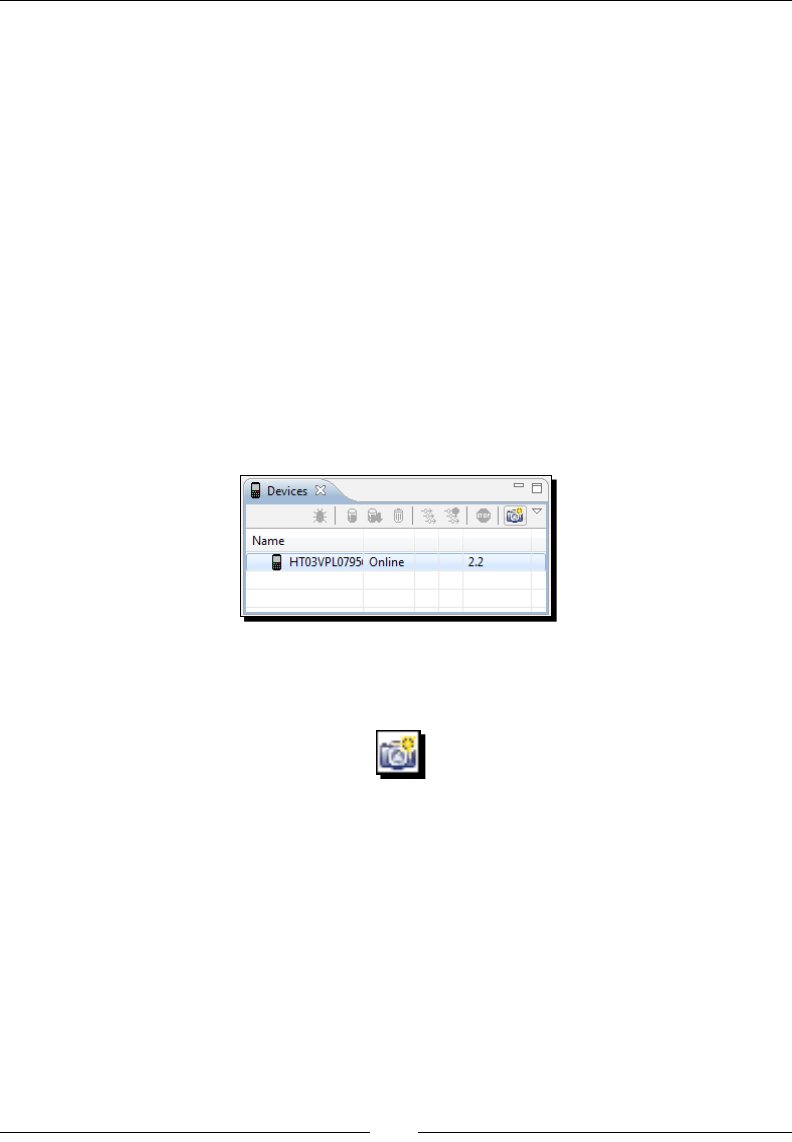
4. Launch Eclipse.
5. Open the DDMS perspecve. If working properly, your phone should be listed in the
Devices view:
6. Say cheese and take a screen capture of your own phone by clicking the
corresponding toolbar buon:
Now you are sure your phone is correctly connected!
What just happened?
We have connected an Android device to a computer in development mode and enabled
the Stay awake opon to stop automac screen shutdown when the phone is charging.
If your device is sll not working, go to the Trouble shoong a device connecon secon.

Chapter 1
[ 39 ]
The device and the computer communicate through an intermediate background service: the
Android Debug Bridge (ADB) (more about it in the next chapter). ADB starts automacally the
rst me it is called, when Eclipse ADT is launched or when invoked from the command line.
This is the end of the secon dedicated to Windows and Mac OS X.
If you are not a Linux user, you can jump to the Trouble shoong a
device connecon or the Summary secon.
Developing with an Android device on Linux
Emulators can be of really good help, but it is nothing compared to a real device.
Hopefully, Android provides the sucient connecvity to develop on a real device and
make the tesng cycle more ecient. So take your Android in hand, switch it on and let’s
try to connect it to Linux.
Time for action – setting up your Android device on Ubuntu
1. Go to Home | Menu | Sengs | Applicaon | Development on your mobile device
(may change depending on your manufacturer).
2. Enable USB debugging and Stay awake.
3. Plugin your device to your computer using a data connecon cable (beware, some
cables are alimentaon cables only and will not work!). Depending on your device, it
may appear as a USB disk.
4. Try to run ADB and list devices. If you are lucky, your device works out of the box
and the list of devices appears. In that case, you can ignore the following steps:
$ adb devices
Seng Up your Environment
[ 40 ]
5. If ????????? appears instead of your device name (which is likely), then ADB does
not have proper access rights. We need to nd your Vendor ID and Product ID.
Because Vendor ID is a xed value for each manufacturer, you can nd it in the
following list:
Manufacturer USB Vendor ID
Acer 0502
Dell 413c
Foxconn 0489
Garmin-Asus 091E
HTC 0bb4
Huawei 12d1
Kyocera 0482
LG 1004
Motorola 22b8
Nvidia 0955
Pantech 10A9
Samsung 04e8
Sharp 04dd
Sony Ericsson 0fce
ZTE 19D2
The current list of Vendor IDs can be found on the Android website at http://
developer.android.com/guide/developing/device.html#VendorIds.
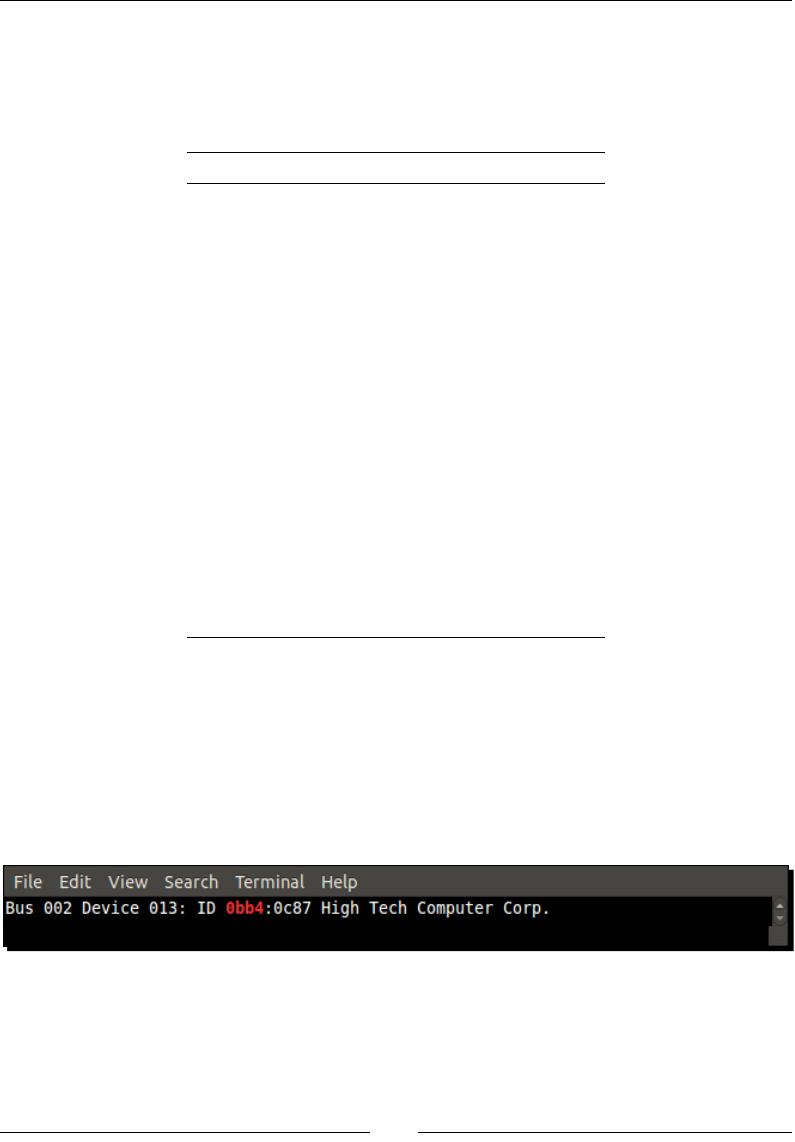
6. The device Product ID can be found using the lsusb command “greped” with Vendor
ID to nd it more easily. In the following example, the value 0bb4 is the HTC Vendor
ID and 0c87 is the HTC Desire product ID:
$ lsusb | grep 0bb4

Chapter 1
[ 41 ]
7. With the root user, create a le /etc/udev/rules.d/52-android.rules with
your Vendor and Product ID:
$ sudo sh -c ‘echo SUBSYSTEM==\”usb\”, SYSFS{idVendor}==\”<Your
Vendor ID>\”, ATTRS{idProduct}=\”<Your Product ID>\”,
MODE=\”0666\” > /etc/udev/rules.d/52-android.rules’
8. Change le rights to 644:
$ sudo chmod 644 /etc/udev/rules.d/52-android.rules
9. Restart the udev service (the Linux device manager):
$ sudo service udev restart
10. Relaunch the ADB server in the root mode this me:
$ sudo $ANDROID_SDK/tools/adb kill-server
$ sudo $ANDROID_SDK/tools/adb start-server
11. Check whether your device works by lisng the devices again. If ????????? appears,
or worse, nothing appears, then something went wrong in the previous steps:
$ adb devices
What just happened?
We have connected an Android device to a computer in development mode and enabled the
Stay awake opon to stop automac screen shutdown when the phone is charging. If your
device is sll not working, go to the Trouble shoong a device connecon secon.
We have also started the Android Debug Bridge (ADB), which is a background service used as
a mediator for computer/device communicaon (more about it in the next chapter). ADB is
started automacally the rst me it is called, when Eclipse ADT is launched or when invoked
from the command line.
And more important than anything, we have discovered that HTC means High Tech
Computer! Jokes apart, the connecon process can become tricky on Linux. If you belong to
the unlucky group of people who need to launch ADB as the root, you are highly advised to
create a startup script similar to the following one, to launch ADB. You can use it from the
command line or add it to your main menu (Menu | Preferences| Main Menu on Ubuntu):
#!bin/sh
stop_command=”$ANDROID_SDK/platform-tools/adb kill-server”
launch_command=”$ANDROID_SDK/platform-tools/adb start-server”
/usr/bin/gksudo “/bin/bash –c ‘$stop_command; $launch_command’” |
zenity –text-info –title Logs

Seng Up your Environment
[ 42 ]
This script displays daemon startup message in a Zenity window (a Shell toolkit to display
graphical windows using GTK+).
At step 6, if 52-android.rules does not work, then try 50-android.rules or
51-android.rules (or all of them). Although udev (the Linux device manager)
should only use the prex number to order rule les lexicographically, that
somemes seems to do the trick. The magic of Linux!
This is the end of the secon dedicated to Linux setup. The following secon
is mixed.
Troubleshooting a development device
Having trouble connecng an Android development device to a computer can mean any of
the following:
Your host system is not properly set up
Your development device is not working properly
The ADB service is malfunconing
If the problem comes from your host system, check your device manufacturer instrucons
carefully to make sure any needed driver is correctly installed. Check the Hardware
properes to see if it is recognized and turn on the USB storage mode (if applicable) to see
if it is working properly. Indeed, aer geng connected, your device may be visible in your
hardware sengs but not as a disk. A device can be congured as a Disk drive (if a SD-card
or similar is included) or in charge-only mode. This is absolutely ne as the development
mode works perfectly in the charge-only mode.
Disk-drive mode is generally acvated from the Android task bar (USB connected item).
Refer to your device documentaon for the specicies of your device.

Chapter 1
[ 43 ]
SD Card access
When the charge-only mode is acvated, SD card les and directories are
visible to the Android applicaons installed on your phone but not to your
computer. On the opposite side, when Disk drive mode is acvated, those
are visible only from your computer. Check your connecon mode when your
applicaon cannot access its resource les on a SD Card.
If problem comes from your Android device, a possible soluon is to deacvate and
reacvate the Debug mode on your device. This opon can be switched from the Home |
Menu | Sengs | Applicaon | Development screen on your mobile device (which may
change depending on your manufacturer) or accessed more quickly from the Android task
bar (USB debugging connected item). As a last measure, reboot your device.
Problem may also come from the ADB. In that case, check whether the ADB is working by
issuing the following command from a terminal prompt:
$ adb devices
If your device is correctly listed, then ADB is working. This command will launch ADB service
if it was not already. You can also restart it with commands:
$ adb kill-server
$ adb start-server
In any case, to solve a specic connecon problem or get up-to-date informaon, visit the
following web page: http://developer.android.com/guide/developing/device.
html. As a feedback from experience, never neglect hardware. Always check with a second
cable or device if you have one at your disposal. I once purchased a bad quality cable, which
performed badly when some contorons occurred...
Summary
Seng up our Android development plaorm is a bit tedious but is hopefully performed
once and for all! We have installed the necessary ulies using the package system on Linux,
Developer Tools on Mac OS X, and Cygwin on Windows. Then we have deployed the Java and
Android development kits and checked if they are working properly. Finally, we have seen how
to create a phone emulator and connect a real phone for test purposes.
We now have the necessary tools in our hands to shape our mobile ideas. In the next chapter,
we are going to handle them to create, compile, and deploy our rst Android projects!
2
Creating, Compiling, and
Deploying Native Projects
A man with the most powerful tools in hand is unarmed without the knowledge
of their usage. Eclipse, GCC, Ant, Bash, Shell, Linux—any new Android
programmer needs to deal with this technologic ecosystem. Depending on your
background, some of these names may sound familiar to your ears. Indeed,
that is a real strength; Android is based on open source bricks which have
matured for years. Theses bricks are cemented by the Android Development
Kits (SDK and NDK) and their set of new tools: Android Debug Bridge (ADB),
Android Asset Packaging Tool (AAPT), Acvity Manager (AM), ndk-build, and so
on. So, since our development environment is set up, we can now get our hands
dirty and start manipulang all these ulies to create, compile, and deploy
projects which include nave code.
In this second chapter, we are going to do the following:
Compile and deploy ocial sample applicaons from the Android NDK
with Ant build tool and nave code compiler ndk-build
Learn in more detail about ADB, the Android Debug Bridge, to control
a development device
Discover addional tools like AM to manage acvies and AAPT to
package applicaons
Create our rst own hybrid mul-language project using Eclipse
Interface Java to C/C++ through Java Nave Interfaces (in short JNI)
By the end of this chapter, you should know how to start up a new Android nave
project on your own.
Downloa d f r o m W o w ! e B o o k < w w w.woweb o o k . c o m >Downloa d f r o m W o w ! e B o o k < w w w.woweb o o k . c o m >

Creang, Compiling, and Deploying Nave Projects
[ 46 ]
Compiling and deploying NDK sample applications
I guess you cannot wait anymore to test your new development environment. So why
not compile and deploy elementary samples provided by the Android NDK rst to see it
in acon? To get started, I propose to run HelloJni, a sample applicaon which retrieves a
character string dened inside a nave C library into a Java acvity (an acvity in Android
being more or less equivalent to an applicaon screen).
Time for action – compiling and deploying the hellojni sample
Let's compile and deploy the HelloJni project from command line using Ant:
1. Open a command-line prompt (or Cygwin prompt on Windows)
2. Go to hello-jni sample directory inside the Android NDK. All the following steps
have to performed from this directory:
$ cd $ANDROID_NDK/samples/hello-jni
3. Create Ant build le and all related conguraon les automacally using android
command (android.bat on Windows). These les describe how to compile and
package an Android applicaon:
android update project –p .
4. Build libhello-jni nave library with ndk-build, which is a wrapper Bash
script around Make. Command ndk-build sets up the compilaon toolchain for
nave C/C++ code and calls automacally GCC version featured with the NDK.
$ ndk-build
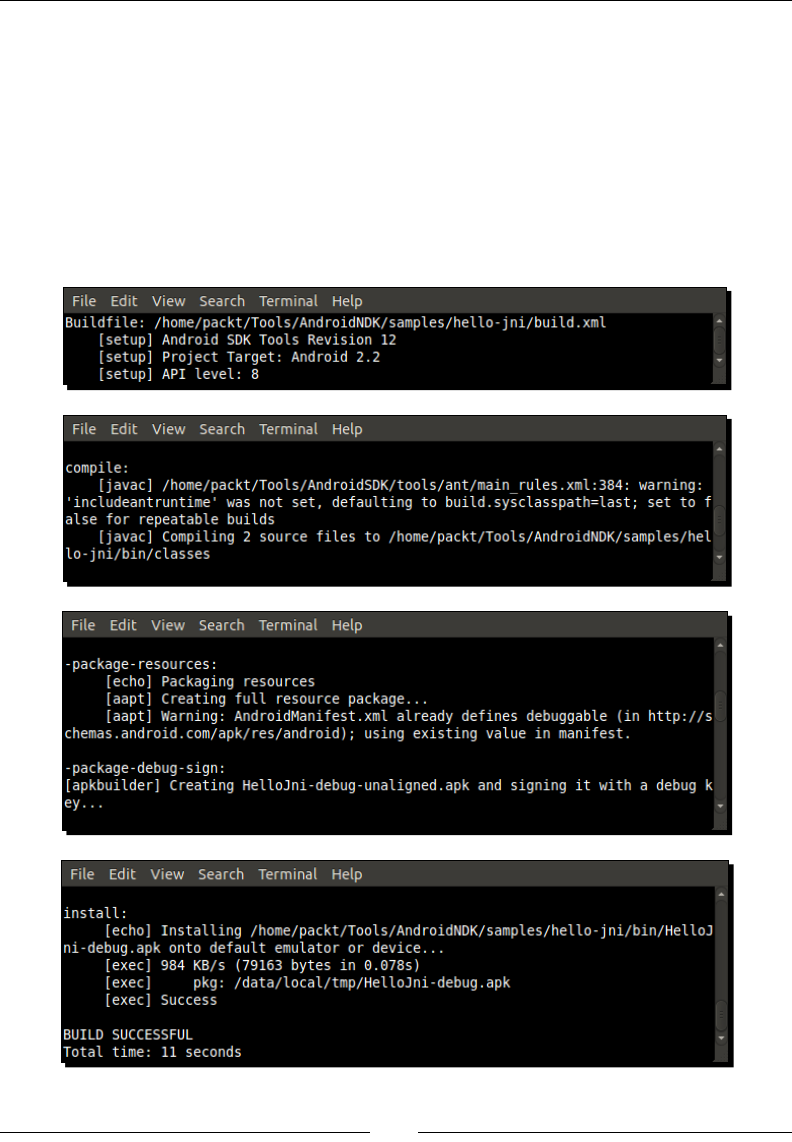
Chapter 2
[ 47 ]
5. Make sure your Android development device or emulator is connected and running.
6. Compile, package, and install the nal HelloJni APK (an Android applicaon
package). All these steps can be performed in one command, thanks to Ant build
automaon tool. Among other things, Ant runs javac to compile Java code, AAPT
to package the applicaon with its resources, and nally ADB to deploy it on the
development device. Following is only a paral extract of the output:
$ ant install
The result should look like the following extract:
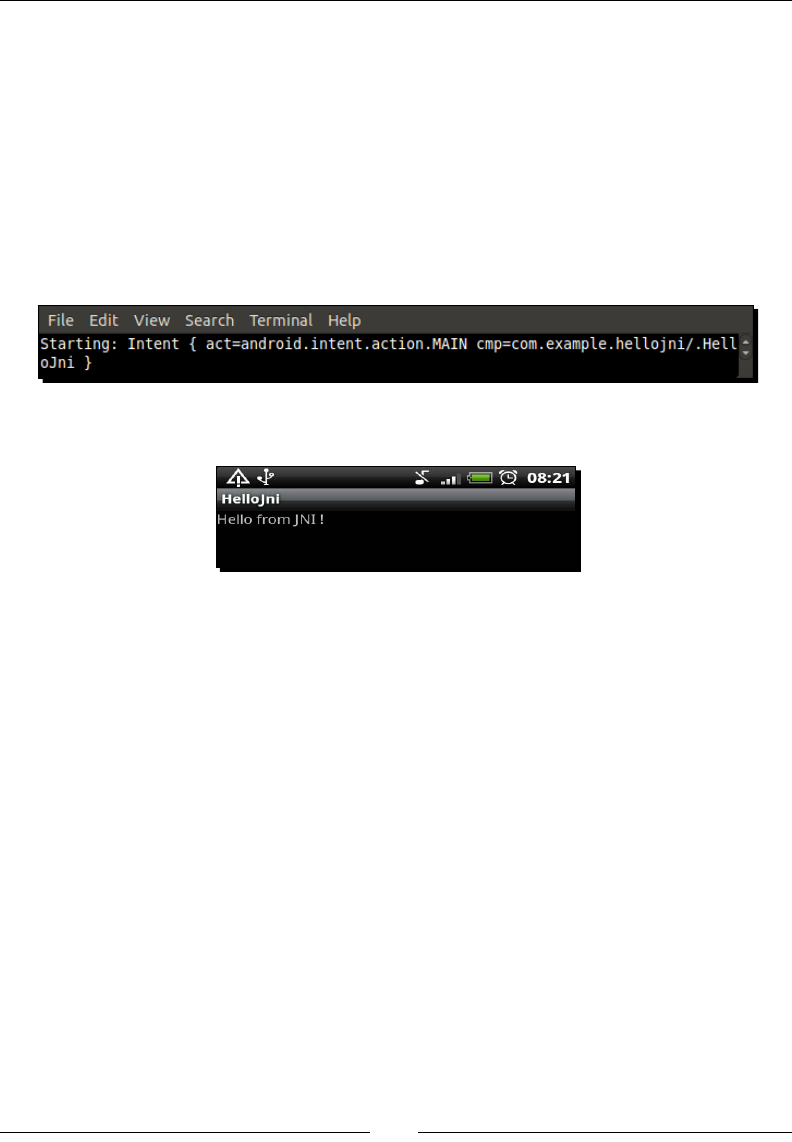
Creang, Compiling, and Deploying Nave Projects
[ 48 ]
7. Launch a shell session using adb (or adb.exe on Windows). ADB shell is similar to
shells that can be found on the Linux systems:
$ adb shell
8. From this shell, launch HelloJni applicaon on your device or emulator. To do so, use
am, the Android Acvity Manager. Command am allows to start Android acvies,
services or sending intents (that is, inter-acvity messages) from command line.
Command parameters come from the Android manifest:
# am start -a android.intent.action.MAIN -n com.example.hellojni/
com.example.hellojni.HelloJni
9. Finally, look at your development device. HelloJni appears on the screen!
What just happened?
We have compiled, packaged, and deployed an ocial NDK sample applicaon with Ant and
SDK command-line tools. We will explore them more in later part. We have also compiled
our rst nave C library (also called module) using the ndk-build command. This library
simply returns a character string to the Java part of the applicaon on request. Both sides
of the applicaon, the nave and the Java one, communicate through Java Nave Interface.
JNI is a standard framework that allows Java code to explicitly call nave C/C++ code with a
dedicated API. We will see more about this at the end of this chapter and in the next one.
Finally, we have launched HelloJni on our device from an Android shell (adb shell) with
the am Acvity Manager command. Command parameters passed in step 8 come from the
Android manifest: com.example.hellojni is the package name and com.example.hellojni.
HelloJni is the main Acvity class name concatenated to the main package.
<?xml version="1.0" encoding="utf-8"?>
<manifest xmlns:android="http://schemas.android.com/apk/res/android"
package="com.example.hellojni"
android:versionCode="1"
android:versionName="1.0">
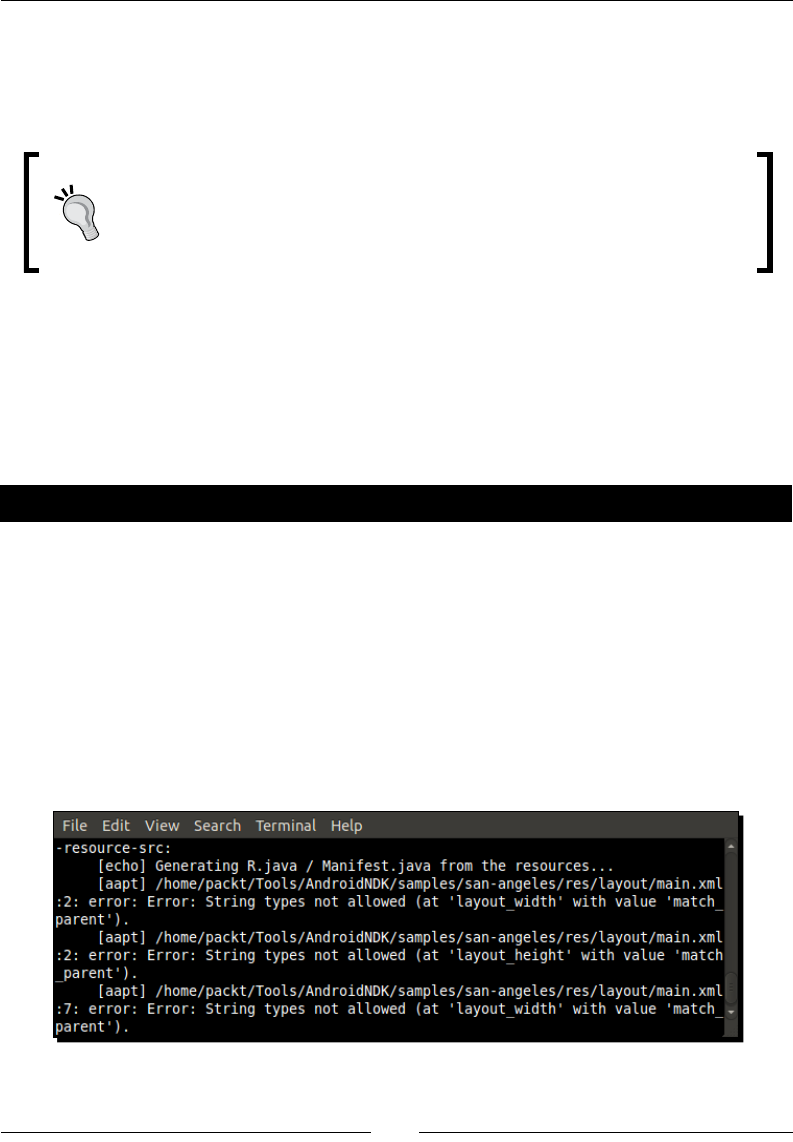
Chapter 2
[ 49 ]
...
<activity android:name=".HelloJni"
android:label="@string/app_name">
...
Automated build
Because Android SDK, NDK, and their open source bricks are not bound to
Eclipse or any specic IDE, creang an automated build chain or seng up a
connuous integraon server becomes possible. A simple bash script with Ant
is enough to make it work!
HelloJni sample is a lile bit... let's say rusc! So what about trying something fancier?
Android NDK provides a sample named San Angeles. San Angeles is a coding demo created in
2004 for the Assembly 2004 compeon. It has been later ported to OpenGL ES and reused
as a sample demonstraon in several languages and systems, including Android. You can
nd more informaon by vising one of the author's page: http://jet.ro/visuals/4k-
intros/san-angeles-observation/.
Have a go hero – compiling san angeles OpenGL demo
To test this demo, you need to follow the same steps:
1. Go to the San Angeles sample directory.
2. Generate project les.
3. Compile and install the nal San Angeles applicaon.
4. Finally run it.
As this applicaon uses OpenGL ES 1, AVD emulaon will work, but may be somewhat slow!
You may encounter some errors while compiling the applicaon with Ant:
Creang, Compiling, and Deploying Nave Projects
[ 50 ]
The reason is simple: in res/layout/ directory, main.xml le is dened. This le usually
denes the main screen layout in Java applicaon—displayed components and how they are
organized. However, when Android 2.2 (API Level 8) was released, the layout_width and
layout_height enumeraons, which describe the way UI components should be sized,
were modied: FILL_PARENT became MATCH_PARENT. But San Angeles uses API Level 4.
There are basically two ways to overcome this problem. The rst one is selecng the right
Android version as the target. To do so, specify the target when creang Ant project les:
$ android update project –p . -–target android-8
This way, build target is set to API Level 8 and MATCH_PARENT is recognized. You can also
change the build target manually by eding default.properties at the project root
and replacing:
target=android-4
with the following line:
target=android-8
The second way is more straighorward: erase the main.xml le! Indeed, this le is in
fact not used by San Angeles demo, as only an OpenGL screen created programmacally
is displayed, without any UI components.
Target right!
When compiling an Android applicaon, always check carefully if you are
using the right target plaorm, as some features are added or updated
between Android versions. A target can also dramacally change your
audience wideness because of the mulple versions of Android in the wild...
Indeed, targets are moving a lot and fast on Android!
All these eorts are not in vain: it is just a pleasure to see this old-school 3D environment
full of at-shaded polygons running for the rst me. So just stop reading and run it!
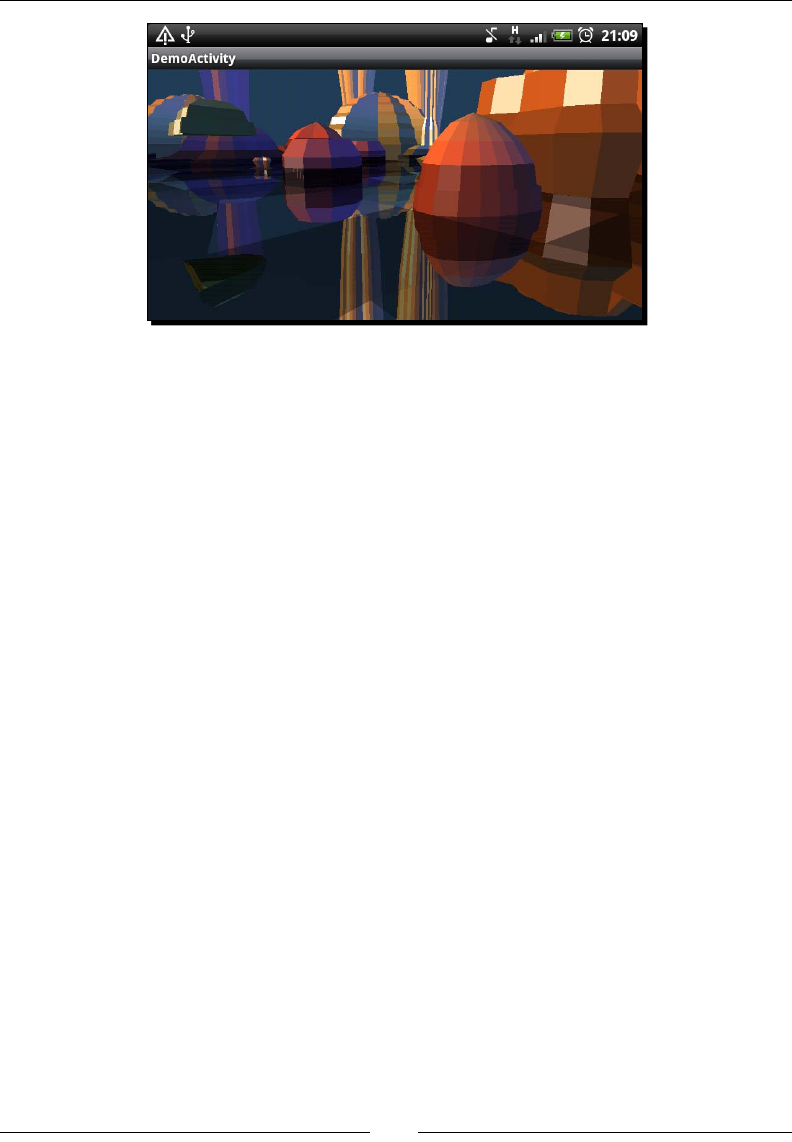
Chapter 2
[ 51 ]
Exploring Android SDK tools
Android SDK includes tools which are quite useful for developers and integrators. We
have already overlooked some of them including the Android Debug Bridge and android
command. Let's explore them deeper.
Android debug bridge
You may have not noced it specically since the beginning but it has always been there,
over your shoulder. The Android Debug Bridge is a mulfaceted tool used as an intermediary
between development environment and emulators/devices. More specically, ADB is:
A background process running on emulators and devices to receive orders or
requests from an external computer.
A background server on your development computer communicang with
connected devices and emulators. When lisng devices, ADB server is involved.
When debugging, ADB server is involved. When any communicaon with a device
happens, ADB server is involved!
A client running on your development computer and communicang with devices
through ADB server. That is what we have done to launch HelloJni: we got connected
to our device using adb shell before issuing the required commands.
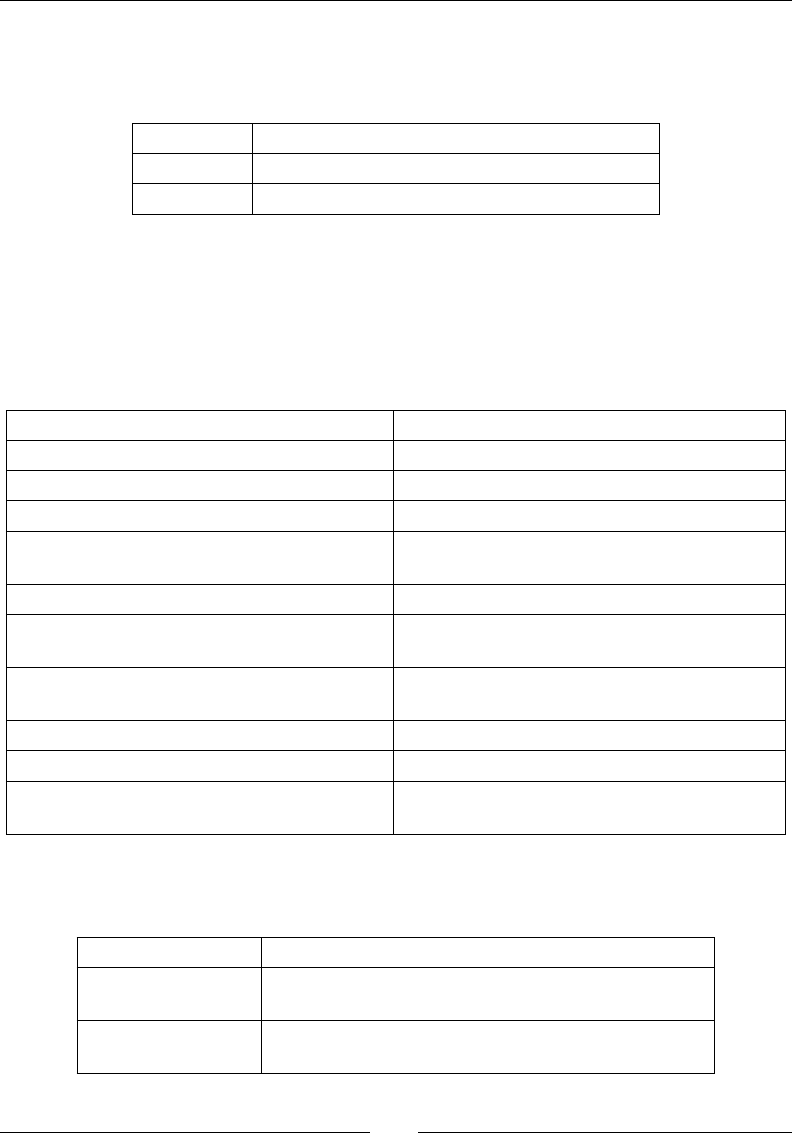
Creang, Compiling, and Deploying Nave Projects
[ 52 ]
ADB shell is a real Linux shell embedded in ADB client. Although not all standard commands
are available, classical commands, such as ls, cd, pwd, cat, chmod, ps, and so on are
executable. A few specic commands are also provided such as:
logcat To display device log messages
dumpsys To dump system state
dmesg To dump kernel messages
ADB shell is a real Swiss Army knife. It also allows manipulang your device in a exible
way, especially with root access. For example, it becomes possible to observe applicaons
deployed in their "sandbox" (see directory /data/data) or to a list and kill currently
running processes.
ADB also oers other interesng opons; some of them are as follows:
pull <device path> <local path> To transfer a le to your computer
push <local path> <device path> To transfer a le to your device or emulator
install <application package> To install an applicaon package
install –r <package to reinstall> To reinstall an applicaon, if already deployed
devices To list all Android devices currently connected,
including emulators
reboot To restart an Android device programmacally
wait-for-device To sleep, unl a device or emulator is connected
to your computer (for example, in a script)
start-server To launch the ADB server communicang with
devices and emulators
kill-server To terminate the ADB server
bugreport To print the whole device state (like dumpsys)
help To get an exhausve help with all opons and
ags available
To ease the wring of issued command, ADB provides facultave ags to specify
before opons:
-s <device id> To target a specic device
-d To target current physical device, if only one is
connected (or an error message is raised)
-e To target currently running emulator, if only one is
connected (or an error message is raised)

Chapter 2
[ 53 ]
ADB client and its shell can be used for advanced manipulaon on the system, but most
of the me, it will not be necessary. ADB itself is generally used transparently. In addion,
without root access to your phone, possible acons are limited. For more informaon,
see http://developer.android.com/guide/developing/tools/adb.html.
Root or not root
If you know the Android ecosystem a bit, you may have heard about rooted
phones and non-rooted phones. Roong a phone means geng root access
to it, either "ocially" while using development phones or using hacks with
an end user phone. The main interest is to upgrade your system before the
manufacturer provides updates (if any!) or to use a custom version (opmized
or modied, for example, CyanogenMod). You can also do any possible
(especially dangerous) manipulaons that an Administrator can do (for
example, deploying a custom kernel).
Roong is not an illegal operaon, as you are modifying YOUR device. But not
all manufacturers appreciate this pracce and usually void the warranty.
Have a go hero – transferring a le to SD card from command line
Using the informaon provided, you should be able to connect to your phone like in the
good old days of computers (I mean a few years ago!) and execute some basic manipulaon
using a shell prompt. I propose you to transfer a resource le by hand, like a music clip or a
resource that you will be reading from a future program of yours.
To do so, you need to open a command-line prompt and perform the following steps:
1. Check if your device is available using adb from command line.
2. Connect to your device using the Android Debug Bridge shell prompt.
3. Check the content of your SD card using standard Unix ls command. Please note
that ls on Android has a specic behavior as it dierenates ls mydir from ls
mydir/, when mydir is a symbolic link.
4. Create a new directory on your SD card using the classic command mkdir.
5. Finally, transfer your le by issuing the appropriate adb command.

Creang, Compiling, and Deploying Nave Projects
[ 54 ]
Project conguration tool
The command named android is the main entry point when manipulang not only projects
but also AVDs and SDK updates (as seen in Chapter 1, Seng Up your Environment). There
are few opons available, which are as follows:
create project: This opon is used to create a new Android project
through command line. A few addional opons must be specied to allow
proper generaon:
-p The project path
-n The project name
-t The Android API target
-k The Java package, which contains applicaon's main class
-a The applicaon's main class name (Acvity in Android terms)
For example:
$ android create project –p ./MyProjectDir –n MyProject –t
android-8 –k com.mypackage –a MyActivity
update project: This is what we use to create Ant project les from an exisng
source. It can also be used to upgrade an exisng project to a new version. Main
parameters are as follows:
-p The project path
-n To change the project name
-l To include an Android library project (that is, reusable code).
The path must be relave to the project directory).
-t To change the Android API target
There are also opons to create library projects (create lib-project, update
lib-project) and test projects (create test-project, update test-project).
I will not go into details here as this is more related to the Java world.
As for ADB, android command is your friend and can give you some help:
$ android create project –help
Chapter 2
[ 55 ]
Command android is a crucial tool to implement a connuous integraon toolchain
in order to compile, package, deploy, and test a project automacally enrely from
command line.
Have a go hero – towards continuous integration
With adb, android, and ant commands, you have enough knowledge to build a minimal
automac compilaon and deployment script to perform some connuous integraon. I
assume here that you have a versioning soware available and you know how to use it.
Subversion (also known as SVN) is a good candidate and can work in local (without a server).
Perform the following operaons:
1. Create a new project by hand using android command.
2. Then, create a Unix or Cygwin shell script and assign it the necessary execuon
rights (chmod command). All the following steps have to be scribbled in it.
3. In the script, check out sources from your versioning system (for example, using
a svn checkout command) on disk. If you do not have a versioning system, you
can sll copy your own project directory using Unix commands.
4. Build the applicaon using ant.
Do not forget to check command results using $?. If the returned value
is dierent from 0, it means an error occurred. Addionally, you can use
grep or some custom tools to check potenal error messages.
5. If needed, you can deploy resources les using adb.
6. Install it on your device or on the emulator (which you can launch from the script)
using ant as shown previously.
7. You can even try to launch your applicaon automacally and check Android logs
(see logcat opon in adb). Of course, your applicaon needs to make use of logs!
A free monkey to test your App!
In order to automate UI tesng on an Android applicaon, an interesng ulity
that is provided with the Android SDK is MonkeyRunner, which can simulate
user acons on a device to perform some automated UI tesng. Have a look at
http://developer.android.com/guide/developing/tools/
monkeyrunner_concepts.html.
Creang, Compiling, and Deploying Nave Projects
[ 56 ]
To favor automaon, a single Android shell statement can be executed from command-line
as follows:
adb shell ls /sdcard/
To execute a command on an Android device and retrieve its result back
on your host shell, execute the following command: adb shell "ls /
notexistingdir/ 1> /dev/null 2>&1; echo \$?"
Redirecon is necessary to avoid pollung the standard output. The
escape character before $? is required to avoid early interpretaon by the
host shell.
Now you are fully prepared to automate your own build toolchain!
Creating your rst Android project using eclipse
In the rst part of the chapter, we have seen how to use Android command-line tools. But
developing with Notepad or VI is not really aracve. Coding should be fun! And to make
it so, we need our preferred IDE to perform boring or unpraccal tasks. So let's see now
how to create an Android project using Eclipse.
Eclipse views and perspecves
Several mes in this book, I have asked you to look at an Eclipse View like the
Package Explorer View, the Debug View, and so on. Usually, most of them are
already visible, but somemes they are not. In that case, open them through
main menu: Window | Show View | Other….
Views in Eclipse are grouped in perspecves, which basically store your
workspace layout. They can be opened through main menu: Window | Open
Perspecve | Other…. Note that some contextual menus are available only in
some perspecves.
Time for action – initiating a Java project
1. Launch Eclipse.
2. In the main menu, select File | New | Project….
3. In the project wizard, select Android | Android Project and then Next.

Chapter 2
[ 57 ]
4. In the next screen, enter project properes:
In Project name, enter MyProject.
Select Create a new project in workspace.
Specify a new locaon if you want to, or keep the default locaon
(that is, your eclipse workspace locaon).
Set Build Target to Android 2.3.3.
In Applicaon name, enter (which can contain spaces): MyProject.
In Package name, enter com.myproject.
Create a new acvity with the name MyAcvity.
Set Min SDK Version to 10:
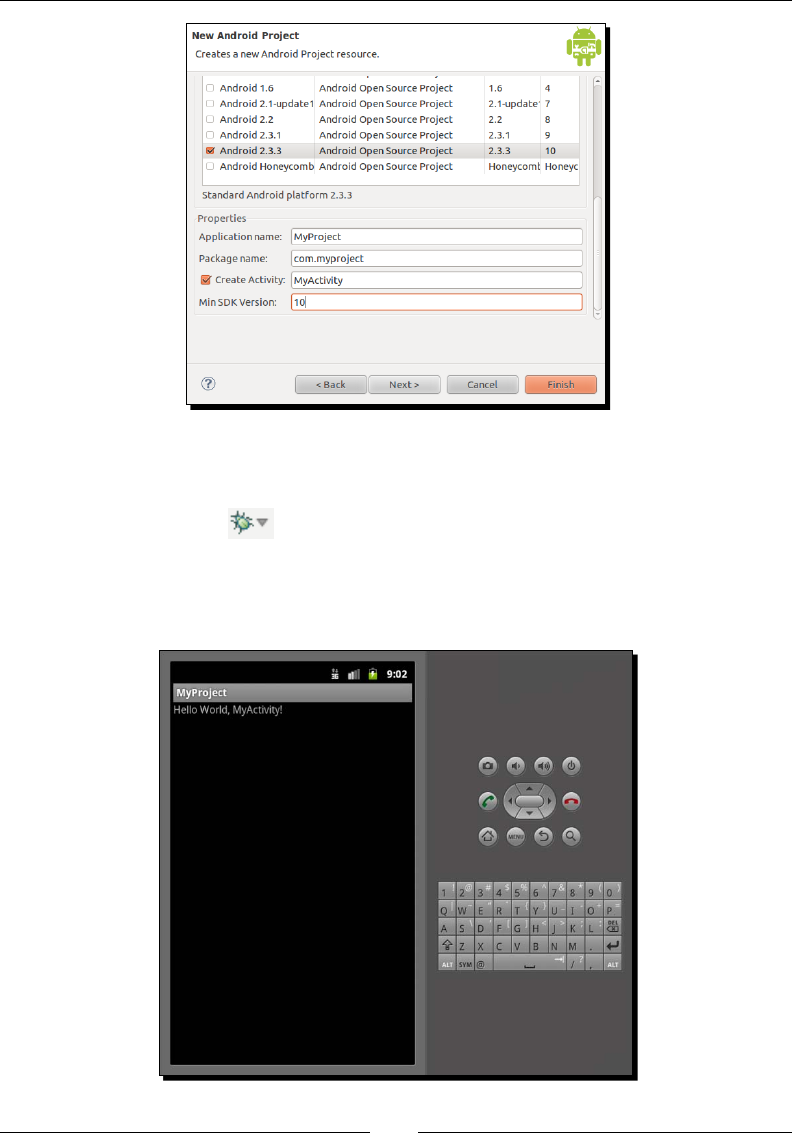
Creang, Compiling, and Deploying Nave Projects
[ 58 ]
5. Click on Finish. The project is created. Select it in Package Explorer view.
6. In the main menu, select Run | Debug As | Android Applicaon or click on
the Debug buon in the toolbar.
7. Select applicaon type Android Applicaon and click OK:
8. Your applicaon is launched, as shown in the following screenshot:
Chapter 2
[ 59 ]
What just happened?
We have created our rst Android project using Eclipse. In a few screens and clicks, we have
been able to launch the applicaon instead of wring long and verbose commands. Working
with an IDE like Eclipse really gives a huge producvity boost and makes programming much
more comfortable!
ADT plugin has an annoying bug that you may have already encountered:
Eclipse complains that your Android project is missing the required source
folder gen whereas this folder is clearly present. Most of the me, just
recompiling the project makes this error disappear. But somemes, Eclipse
is recalcitrant and refuses to recompile projects. In that case, a lile-known
trick, which can be applied in many other cases, is to simply open the
Problems view, select these irritang messages, delete them without
mercy (Delete key or right-click and Delete) and nally recompile the
incriminated project.
As you can see, this project targets Android 2.3 Gingerbread because we will access latest
NDK features in the next chapters. However, you will need a proper device which hosts this
OS version else tesng will not be possible. If you cannot get one, then use the emulator set
up in Chapter 1, Seng Up your Environment.
If you look at the project source code, you will noce a Java le and no C/C++ les. Android
projects created with ADT are always Java projects. But thanks to Eclipse exibility, we can
turn them into C/C++ projects too; we are going to see this at the end of this chapter.
Avoiding space in le paths
When creang a new project, avoid leaving a space in the path where
your project is located. Although Android SDK can handle that without
any problem, Android NDK and more specically GNU Make may not
really like it.
Introducing Dalvik
It is not possible to talk about Android without touching a word about Dalvik. Dalvik, which
is also the name of an Icelandic village, is a Virtual Machine on which Android bytecode is
interpreted (not nave code!). It is at the core of any applicaons running on Android. Dalvik
is conceived to t the constrained requirements of mobile devices. It is specically opmized
to use less memory and CPU. It sits on top of the Android kernel which provides the rst
layer of abstracon over hardware (process management, memory management, and so on).

Creang, Compiling, and Deploying Nave Projects
[ 60 ]
Android has been designed with speed in mind. Because most users do not want to wait for
their applicaon to be loaded while others are sll running, the system is able to instanate
multple Dalvik VMs quickly, thanks to the Zygote process. Zygote, whose name comes from
the very rst biologic cell of an organism from which daughter cells are reproduced, starts
when the system boots up. It preloads (or "warms up") all core libraries shared among
applicaons as well as a Dalvik instance. To launch a new applicaon, Zygote is simply forked
and the inial Dalvik instance is copied. Memory consumpon is lowered by sharing as many
libraries as possible between processes.
Dalvik operates on Android bytecode, which is dierent from Java bytecode. Bytecode is
stored in an opmized format called Dex generated by an Android SDK tool named dx. Dex
les are archived in the nal APK with the applicaon manifest and any nave libraries
or addional resources needed. Note that applicaons can get further opmized during
installaon on end user's device.
Interfacing Java with C/C++
Keep your Eclipse IDE opened as we are not done with it yet. We have a working project
indeed. But wait, that is just a Java project, whereas we want to unleash the power of
Android with nave code! In this part, we are going to create C/C++ source les, compile
them into a nave library named mylib and let Java run this code.
Time for action – calling C code from Java
The nave library mylib that we are going to create will contain one simple nave method
getMyData() that returns a basic character string. First, let's write the Java code to declare
and run this method.
1. Open MyActivity.java. Inside main class, declare the nave method with the
native keyword and no method body:
public class MyActivity extends Activity {
public native String getMyData();
...
2. Then, load the nave library that contains this method within a stac inializaon
block. This block will be called before Activity instance gets inialized:
...
static {
System.loadLibrary("mylib");
}
...
Chapter 2
[ 61 ]
3. Finally, when Activity instance is created, call the nave method and update the
screen content with its return value. You can refer to the source code provided with
this book for the nal lisng:
...
public void onCreate(Bundle savedInstanceState) {
super.onCreate(savedInstanceState);
setContentView(R.layout.main);
setTitle(getMyData());
}
}
Now, let's prepare the project les required to build the nave code.
4. In Eclipse, create a new directory named jni at the project's root using menu
File | New | Folder.
5. Inside the jni directory, create a new le named Android.mk using menu
File | New | File. If CDT is properly installed, the le should have the following
specic icon in the Package Explorer view.
6. Write the following content into this le. Basically, this describes how to
compile our nave library named mylib which is composed of one source
le the com_myproject_MyActivity.c:
LOCAL_PATH := $(call my-dir)
include $(CLEAR_VARS)
LOCAL_MODULE := mylib
LOCAL_SRC_FILES := com_myproject_MyActivity.c
include $(BUILD_SHARED_LIBRARY)
As project les for nave compilaon are ready, we can write the expected nave
source code. Although the C implementaon le must be wrien by hand, the
corresponding header le can be generated with a helper tool provided by the
JDK: javah.
7. In Eclipse, open Run | External Tools | External Tools Conguraons….

Creang, Compiling, and Deploying Nave Projects
[ 62 ]
8. Create a new program conguraon with the following parameters:
Name: MyProject javah.
Locaon refers to javah absolute path, which is OS-specic. In Windows, you
can enter ${env_var:JAVA_HOME}\bin\javah.exe. In Mac OS X and Linux,
it is usually /usr/bin/javah.
Working directory: ${workspace_loc:/MyProject/bin}.
Arguments: –d ${workspace_loc:/MyProject/jni} com.myproject.
MyActivity}.
In Mac OS X, Linux, and Cygwin, you can easily nd the locaon of
an executable available in $PATH, by using the which command.
For example,
$ which javah
9. On the Refresh tab, check Refresh resources upon compleon and select Specic
resources. Using the Specify Resources… buon, select the jni folder.
10. Finally, click on Run to save and execute javah. A new le com_myproject_
MyActivity.h is generated in the jni folder. It contains a prototype for the
method getMyData() expected on the Java side:
/* DO NOT EDIT THIS FILE - it is machine generated */
#include <jni.h>
...
JNIEXPORT jstring JNICALL Java_com_myproject_MyActivity_getMyData
(JNIEnv *, jobject);
...
11. We can now create com_myproject_MyActivity.c implementaon inside the
jni directory to return a raw character string. Method signature originates from the
generated header le:
#include "com_myproject_MyActivity.h"
JNIEXPORT jstring Java_com_myproject_MyActivity_getMyData
(JNIEnv* pEnv, jobject pThis)
{
return (*pEnv)->NewStringUTF(pEnv,
"My native project talks C++");
}
Chapter 2
[ 63 ]
Eclipse is not yet congured to compile nave code, only Java code. Unl we do that in
the last part of this chapter, we can try to build nave code by hand.
12. Open a terminal prompt and go inside the MyProject directory. Launch
compilaon of the nave library with the command ndk-build:
$ cd <your project directory>/MyProject
$ ndk-build
The nave library is compiled in the libs/armeabi directory and is named
libmylib.so. Temporary les generated during compilaon are located
in the obj/local directory.
13. From Eclipse, launch MyProject again. You should obtain following result:
Downloa d f r o m W o w ! e B o o k < w w w.woweb o o k . c o m >Downloa d f r o m W o w ! e B o o k < w w w.woweb o o k . c o m >

Creang, Compiling, and Deploying Nave Projects
[ 64 ]
What just happened?
In the previous part, we created an Android Java project. In this second part, we have
interfaced Java code to a nave library compiled with the Android NDK from a C le. This
binding from Java to C allows retrieving through Java Nave Interfaces a simple Java string
allocated in the nave code. The example applicaon shows how Java and C/C++ can
cooperate together:
1. By creang UI components and code on the Java side and dening nave calls.
2. Using javah to generate header le with corresponding C/C++ prototypes.
3. Wring nave code to perform the expected operaon.
Nave methods are declared on the Java side with the native keyword. These methods
have no body (like an abstract method) as they are implemented on the nave side. Only
their prototype needs to be dened. Nave methods can have parameters, a return value,
any visibility (private, protected, package protected or public) and can be stac, like
classic Java methods. Of course, they require the nave library with method implementaons
to be loaded before they are called. A way to do that is to invoke System.loadLibrary()
in a stac inializaon block, which is inialized when the containing class is loaded. Failure to
do so results in an excepon of type java.lang.UnsatisfiedLinkError, which is raised
when the nave method is invoked for the rst me.
Although it is not compulsory, javah tool provided by the JDK is extremely useful to
generate nave prototypes. Indeed, JNI convenon is tedious and error-prone. With
generated headers, you immediately know if a nave method expected by the Java side is
missing or has an incorrect signature. I encourage you to use javah systemacally in your
projects, more specically, each me nave method's signature is changed. JNI code is
generated from .class les, which means that your Java code must be rst compiled before
going through javah conversion. Implementaon needs to be provided in a separate C/C++
source le.
How to write JNI code on the nave side is explored in more details in the next chapter. But
remember that a very specic naming convenon, which is summarized by the following
paern, must be followed by nave side methods:
<returnType> Java_<com_mypackage>_<class>_<methodName> (JNIEnv* pEnv,
<parameters>...)
Nave method name is prexed with Java_ and the packages/class name (separated by _)
containing it separated. First argument is always of type JNIEnv (more on this in the next
chapter) and the preceding arguments are the actual parameters given to the Java method.

Chapter 2
[ 65 ]
More on Makeles
Nave library building process is orchestrated by a Makele named Android.mk. By
convenon, Android.mk is in folder jni, which is located inside the project's root. That
way, ndk-build command can nd this le automacally when the command is invoked.
Therefore, C/C++ code is by convenon also located in jni directory (but this can be
changed by conguraon).
Android Makeles are an essenal piece of the NDK building process. Thus, it is important
to understand the way they work to manage a project properly. An Android.mk le is
basically a "baking" le, which denes what to compile and how to compile. Conguraon
is performed using predened variables, among which are: LOCAL_PATH, LOCAL_MODULE
and LOCAL_SRC_FILES. See Chapter 9, Porng Exisng Libraries to Android, for more
explanaon on Makeles.
The Android.mk le presented in MyProject is a very simple Makele example. Each
instrucon serves a specic purpose:
LOCAL_PATH := $(call my-dir)
The preceding code indicates nave source les locaon. Instrucon $(call <function>)
allows evaluang a funcon and funcon my-dir returns the directory path of the last
executed Makele. Thus, as Makeles usually share their directory with source les, this line
is systemacally wrien at the beginning of each Android.mk le to nd their locaon.
include $(CLEAR_VARS)
Makes sure no "parasite" conguraon disrupts compilaon. When compiling an applicaon,
a few LOCAL_XXX variables need to be dened. The problem is that one module may dene
addional conguraon sengs (like a compilaon MACRO or a ag) through these variables,
which may not be needed by another module.
Keep your modules clean
To avoid any disrupon, all necessary LOCAL_XXX variables should be cleared
before any module is congured and compiled. Note that LOCAL_PATH is an
excepon to that rule and is never cleared out.
LOCAL_MODULE := mylib
The preceding line of code denes your module name. Aer compilaon, the output library
is named according to the LOCAL_MODULE variable anked by a lib prex and a .so sux.
This LOCAL_MODULE name is also used when a module depends on another module.
LOCAL_SRC_FILES := com_myproject_MyActivity.c

Creang, Compiling, and Deploying Nave Projects
[ 66 ]
The preceding line of code indicates which source les to compile. File path is expressed
relave to the LOCAL_PATH directory.
include $(BUILD_SHARED_LIBRARY)
This last instrucon nally launches the compilaon process and indicates which type of
library to generate.
With Android NDK, it is possible to produce shared libraries (also called dynamic libraries,
like DLL on Windows) as well as stac libraries:
Shared libraries are a piece of executable loaded on demand. These are stored on
disk and loaded to memory as a whole. Only shared libraries can be loaded directly
from Java code.
Stac libraries are embedded in a shared library during compilaon. Binary code
is copied into a nal library, without regards to code duplicaon (if embedded by
several dierent modules).
In contrast with shared libraries, stac libraries can be stripped, which means that
unnecessary symbols (like a funcon which is never called from the embedding library) are
removed from the nal binary. They make shared libraries bigger but "all-inclusive", without
dependencies. This avoids the "DLL not found" syndrome well known on Window.
Shared vs. Stac modules
Whether you should use a stac or shared library depends on the context:
If a library is embedded in several other libraries
If almost all pieces of code are required to run
If a library needs to be selected dynamically at runme
then consider turning it into a shared library because they avoid memory
duplicaon (which is a very sensible issue on mobile devices).
On the other hand:
If it is used in one or only a few places
If only part of its code is necessary to run
If loading it at the beginning of your applicaon is not a concern
then consider turning it into a stac library instead. It can be reduced in size at
compilaon-me at the price of some possible duplicaon.

Chapter 2
[ 67 ]
Compiling native code from Eclipse
You probably agree with me, wring code in Eclipse but compiling it by hand is not very
sasfying. Although the ADT plugin does not provide any C/C++ support, Eclipse does this
through CDT. Let's use it to turn our Android project into a hybrid Java-C/C++ project.
Time for action – creating a hybrid Java/C/C++ project
To check whether Eclipse compilaon works ne, let's introduce surrepously an error
inside the com_myproject_MyActivity.c le. For example:
#include "com_myproject_MyActivity.h"
private static final String = "An error here!";
JNIEXPORT jstring Java_com_myproject_MyActivity_getMyData
...
Now, let's compile MyProject with Eclipse:
1. Open menu File | New | Other....
2. Under C/C++, select Convert to a C/C++ Project and click on Next.
3. Check MyProject, choose MakeFile project and Other Toolchain and
nally click on Finish.
4. Open C/C++ perspecve when requested.
5. Right-click on MyProject in Project explorer view and select Properes.
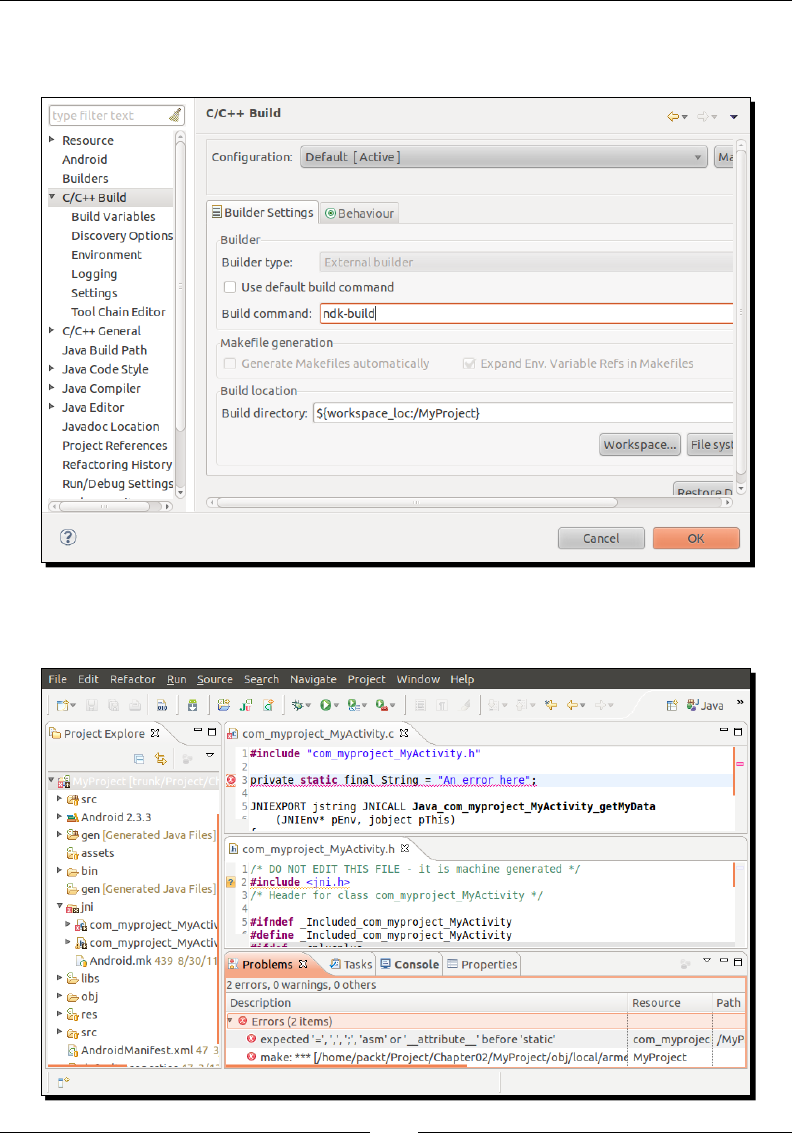
Creang, Compiling, and Deploying Nave Projects
[ 68 ]
6. In the C/C++ Build secon, uncheck Use default build command and enter
ndk-build as a Build command. Validate by clicking on OK:
And... oops! An error got insidiously inside the code. An error? No we are not
dreaming! Our Android project is compiling C/C++ code and parsing errors:

Chapter 2
[ 69 ]
7. Let's x it by removing the incriminated line (underlined in red) and saving the le.
8. Sadly, the error is not gone. This is because auto-build mode does not work. Go back
to project properes, inside C/C++ Sengs and then the Behaviour tab. Check Build
on resource save and leave the value to all.
9. Go to the Builders secon and place CDT Builder right above Android Package
Builder. Validate.
10. Great! Error is gone. If you go to the Console view, you will see the result of
ndk-build execuon like if it was in command line. But now, we noce that
the include statement of jni.h le is underlined in yellow. This is because it
was not found by the CDT Indexer for code compleon. Note that the compiler
itself resolves them since there is no compilaon error. Indeed, the indexer is
not aware of NDK include paths, contrary to the NDK compiler
If warnings about the include le which the CDT Indexer could not nd do not
appear, go to C/C++ perspecve, then right-click on the project name in the
Project Explorer view and select Index/Search for Unresolved Includes item.
The Search view appears with all unresolved inclusions.
11. Let's go back to project properes one last me. Go to secon C/C++ General/Paths
and Symbols and then in Includes tab.
12. Click on Add... and enter the path to the directory containing this include le which
is located inside NDK's platforms directory. In our case, we use Android 2.3.3 (API
level 9), so the path is ${env_var:ANDROID_NDK}/platforms/android-9/
arch-arm/usr/include. Environment variables are authorized and encouraged!
Check Add to all languages and validate:
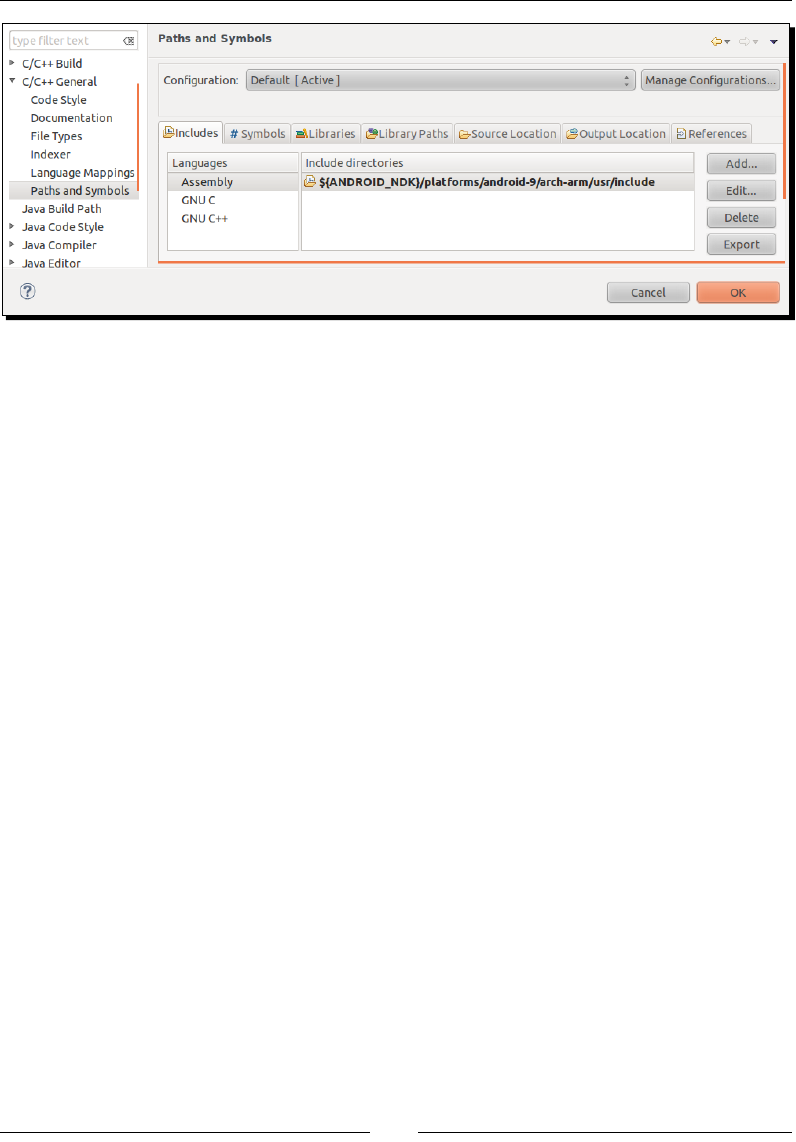
Creang, Compiling, and Deploying Nave Projects
[ 70 ]
13. Because jni.h includes some "core" include les (for example, stdarg.h),
also add ${env_var:ANDROID_NDK}/toolchains/arm-linux-
androideabi-4.4.3/prebuilt/<your OS>/lib/gcc/arm-linux-
androideabi/4.4.3/include path and close the Properes window. When
Eclipse proposes to rebuild its index, say Yes.
14. Yellow lines are now gone. If you press Ctrl and click simultaneously on string.h,
the le gets automacally opened. Your project is now fully integrated in Eclipse.
What just happened?
We managed to integrate Eclipse CDT plugin with an Android project using CDT conversion
wizard. In a few clicks, we have turned a Java project into a hybrid Java/C/C++ project! By
tweaking CDT project properes, we managed to launch ndk-build command to produce
the library mylib dened in Android.mk. Aer geng compiled, this nave library is
packaged automacally into the nal Android applicaon by ADT.
Chapter 2
[ 71 ]
Running javah automacally while building
If you do not want to bother execung manually javah each me nave
methods changes, you can create an Eclipse builder:
1. Open your project Properes window and go to the Builder
secon.
2. Click on New… and create a new builder of type Program.
3. Enter conguraon like done at step 8 with the External tool
conguraon.
4. Validate and posion it aer Java Builder in the list (because
JNI les are generated from Java .class les).
5. Finally, move CDT Builder right aer this new builder (and
before Android Package Builder).
JNI header les will now be generated automacally each a me project is
compiled.
In step 8 and 9, we enabled Building on resource save opon. This allows automac
compilaon to occur without human intervenon, for example, when a save operaon is
triggered. This feature is really nice but can somemes cause a build cycle: Eclipse keeps
compiling code so we moved CDT Builder just before Android Package Builder, in step 9,
to avoid Android Pre Compiler and Java Builder to triggering CDT uselessly. But this is not
always enough and you should be prepared to deacvate it temporarily or denitely as
soon as you are fed up!
Automac building
Build command invocaon is performed automacally when a le is saved.
This is praccal but can be resource and me consuming and can cause some
build cycle. That is why it is somemes appropriate to deacvate the Build
automacally opon from main menu through Project. A new buon:
appears in the toolbar to trigger a build manually. You can then re-enable
automac building.

Creang, Compiling, and Deploying Nave Projects
[ 72 ]
Summary
Although seng up, packaging, and deploying an applicaon project are not the most
excing tasks, but they cannot be avoided. Mastering them will allow being producve
and focused on the real objecve: producing code.
In this chapter, we have seen how to use NDK command tools to compile and deploy Android
projects manually. This experience will be useful to make use of connuous integraon in
your project. We have also seen how to make both Java and C/C++ talk together in a single
applicaon using JNI. Finally we have created a hybrid Java/C/C++ project using Eclipse to
develop more eciently.
With this rst experiment in mind, you got a good overview of how the NDK works. In the
next chapter, we are going to focus on code and discover in more detail the JNI protocol for
bidireconal Java to C/C++ communicaon.

3
Interfacing Java and C/C++ with JNI
Android is inseparable from Java. Although its kernel and its crical libraries
are nave, the Android applicaon framework is almost enrely wrien in Java
or wrapped inside a thin layer of Java. Obviously, a few libraries are directly
accessible from nave code, such as Open GL (as we will see in Chapter 6,
Rendering Graphics with OpenGL ES). However, most APIs are available only
from Java. Do not expect to build your Android GUI directly in C/C++. Technically
speaking, it is not yet possible to completely get rid of Java in an Android
applicaon. At best, we can hide it under the cover!
Thus, nave C/C++ code on Android would be nonsense if it is was not
possible to e Java and C/C++ together. This role is devoted to the Java Nave
Interface framework, which has been introduced in the previous chapter. JNI
is a specicaon standardized by Sun that is implemented by JVMs with two
purposes in mind: allowing Java to call nave code and nave code to call Java.
It is a two-way bridge between the Java and nave side and the only way to
inject the power of C/C++ into your Java applicaon.
Thanks to JNI, one can call C/C++ funcons from Java like any Java method,
passing Java primives or objects as parameters and receiving them as result.
In turn, nave code can access, inspect, modify, and call Java objects or raise
excepons with a reecon-like API. JNI is a subtle framework which requires
care as any misuse can result in a dramac ending…
Interfacing Java and C/C++ with JNI
[ 74 ]
In this chapter, we are going to learn how to do the following:
Pass and return Java primives, objects, and arrays to/from nave code
Handle Java objects references inside nave code
Raise excepons from nave code
JNI is a vast and highly technical subject, which could require a whole book to be covered
exhausvely. Instead, the present chapter focuses on the essenal knowledge to bridge
the gap between Java and C++.
Working with Java primitives
You are probably hungry to see more than the simple MyProject created in previous chapter:
passing parameters, retrieving results, raising excepons... to pursue this objecve, we will
see through this chapter how to implement a basic key/value store with various data types,
starng with primive types and strings.
A simple Java GUI will allow dening an “entry” composed of a key (a character string),
a type (an integer, a string, and so on), and a value related to the selected type. An entry
is inserted or updated inside the data store which will reside on the nave side (actually
a simple xed-size array of entries). Entries can be retrieved back by the Java client.
The following diagram presents an overall view of how the program will be structured:
Store Wrapper
Functions
Java
StoreActivity
<<user>>
int
StoreType
StoreType
StoreValue Internal Store
structure
<<Union>> StoreEntry
String
Store
Internal Store
Structure
1
<<user>>
1
1
1
1
C
*
com_packtpub_Store
Store
Chapter 3
[ 75 ]
The resulng project is provided with this book under the
name Store_Part3-1.
Time for action – building a native key/value store
Let’s take care of the Java side rst:
1. Create a new hybrid Java/C++ project like shown in the previous chapter:
Name it Store.
Its main package is com.packtpub.
Its main acvity is StoreActivity.
Do not forget to create a jni directory at project’s root.
Let’s work on the Java side rst, which is going to contain three source les:
Store.java, StoreType.java, and StoreActivity.java.
2. Create a new class Store which loads the eponym nave library and denes the
funconalies our key/value store provides. Store is a front-end to our nave code.
To get started, it supports only integers and strings:
public class Store {
static {
System.loadLibrary(“store”);
}
public native int getInteger(String pKey);
public native void setInteger(String pKey, int pInt);
public native String getString(String pKey);
public native void setString(String pKey, String pString);
}
3. Create StoreType.java with an enumeraon specifying supported data types:
public enum StoreType {
Integer, String
}
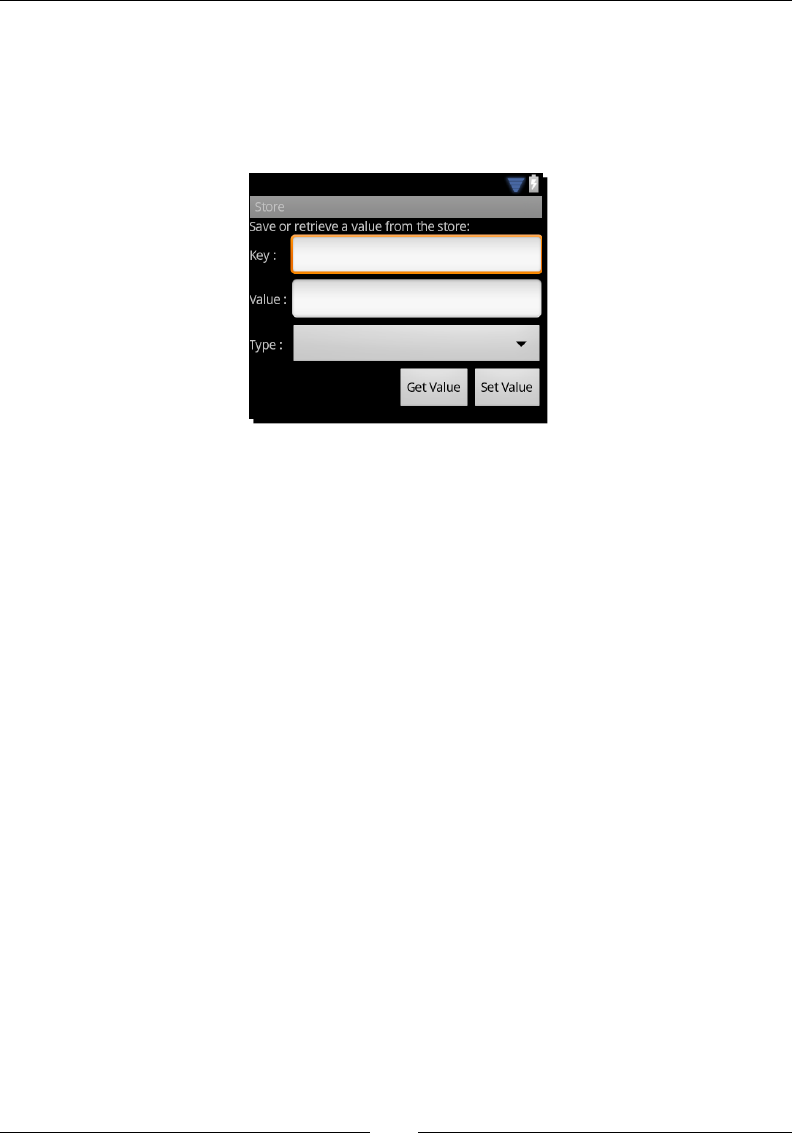
Interfacing Java and C/C++ with JNI
[ 76 ]
4. Design a Java GUI in res/layout/main.xml similar to the following screenshot.
You can make use of the ADT Graphical Layout designer included in ADT or simply
copy it from project Store_Part3-1. GUI must allow dening an entry with a key
(TextView, id uiKeyEdit), a value (TextView, id uiValueEdit) and a type
(Spinner, id uiTypeSpinner). Entries can be saved or retrieved:
5. Applicaon GUI and Store need to be bound together. That is the role devoted to
the StoreActivity class. When acvity is created, set up GUI components: Type
spinner content is bound to the StoreType enum. Get Value and Set Value buons
trigger private methods onGetValue() and onSetValue() dened in the next
steps. Have a look at nal project Store_Part3-1 if you need some help.
Finally, inialize a new instance of the store:
public class StoreActivity extends Activity {
private EditText mUIKeyEdit, mUIValueEdit;
private Spinner mUITypeSpinner;
private Button mUIGetButton, mUISetButton;
private Store mStore;
@Override
public void onCreate(Bundle savedInstanceState) {
super.onCreate(savedInstanceState);
setContentView(R.layout.main);
// Initializes components and binds buttons to handlers.
...
mStore = new Store();
}

Chapter 3
[ 77 ]
6. Dene method onGetValue(), which retrieves an entry from the store according
to type StoreType currently selected in the GUI:
private void onGetValue() {
String lKey = mUIKeyEdit.getText().toString();
StoreType lType = (StoreType) mUITypeSpinner
.getSelectedItem();
switch (lType) {
case Integer:
mUIValueEdit.setText(Integer.toString(mStore
.getInteger(lKey)));
break;
case String:
mUIValueEdit.setText(mStore.getString(lKey));
break;
}
}
7. Add method onSetValue() in StoreActivity to insert or update an entry into
the store. Entry data needs to be parsed according to its type. If value format is
incorrect, an Android Toast message is displayed:
...
private void onSetValue() {
String lKey = mUIKeyEdit.getText().toString();
String lValue = mUIValueEdit.getText().toString();
StoreType lType = (StoreType) mUITypeSpinner
.getSelectedItem();
try {
switch (lType) {
case Integer:
mStore.setInteger(lKey, Integer.parseInt(lValue));
break;
case String:
mStore.setString(lKey, lValue);
break;
}
} catch (NumberFormatException eNumberFormatException) {
displayError(“Incorrect value.”);
}
}
private void displayError(String pError) {
Toast.makeText(getApplicationContext(), pError,
Toast.LENGTH_LONG).show();
}
}

Interfacing Java and C/C++ with JNI
[ 78 ]
The Java side is ready and nave method prototypes dened. We can switch to the
nave side.
8. In the jni directory, create Store.h which denes store data structures. Create a
StoreType enumerate that matches exactly the Java enumeraon. Also create the
main structure Store, which contains a xed size array of entries. A StoreEntry is
composed of a key (a C string), a type, and a value. StoreValue is simply the union
of any of the possible values (that is, an integer or a C string pointer):
#ifndef _STORE_H_
#define _STORE_H_
#include “jni.h”
#include <stdint.h>
#define STORE_MAX_CAPACITY 16
typedef enum {
StoreType_Integer, StoreType_String
} StoreType;
typedef union {
int32_t mInteger;
char* mString;
} StoreValue;
typedef struct {
char* mKey;
StoreType mType;
StoreValue mValue;
} StoreEntry;
typedef struct {
StoreEntry mEntries[STORE_MAX_CAPACITY];
int32_t mLength;
} Store;
...
9. Terminate the Store.h le by declaring ulity methods to create, nd, and destroy
an entry. JNIEnv and jstring types are dened in header jni.h already included
in the previous step:
...
int32_t isEntryValid(JNIEnv* pEnv, StoreEntry* pEntry,
StoreType pType);
StoreEntry* allocateEntry(JNIEnv* pEnv, Store* pStore,
jstring pKey);

Chapter 3
[ 79 ]
StoreEntry* findEntry(JNIEnv* pEnv, Store* pStore, jstring pKey,
int32_t* pError);
void releaseEntryValue(JNIEnv* pEnv, StoreEntry* pEntry);
All these ulity methods are implemented in le jni/Store.c. First,
isEntryValid() simply checks an entry is allocated and has the expected type:
#include “Store.h”
#include <string.h>
int32_t isEntryValid(JNIEnv* pEnv, StoreEntry* pEntry,
StoreType pType) {
if ((pEntry != NULL) && (pEntry->mType == pType)) {
return 1;
}
return 0;
}
...
10. Method findEntry() compares the key passed as parameter with every entry
key currently stored unl it nds a matching one. Instead of working with classic C
strings, it receives directly a jstring parameter, which is the nave representaon
of a Java String.
A jstring cannot be manipulated directly in nave code. Indeed, Java and C
strings are completely dierent beasts. In Java, String is a real object with
member methods whereas in C, strings are raw character arrays.
To recover a C string from a Java String, one can use JNI API method
GetStringUTFChars() to get a temporary character buer. Its content can
then be manipulated using standard C rounes. GetStringUTFChars() must be
systemacally coupled with a call to ReleaseStringUTFChars() to release the
temporary buer:
...
StoreEntry* findEntry(JNIEnv* pEnv, Store* pStore, jstring pKey,
Int32_t* pError) {
StoreEntry* lEntry = pStore->mEntries;
StoreEntry* lEntryEnd = lEntry + pStore->mLength;
const char* lKeyTmp = (*pEnv)->GetStringUTFChars(pEnv, pKey,
NULL);
if (lKeyTmp == NULL) {
if (pError != NULL) {
*pError = 1;
}
Interfacing Java and C/C++ with JNI
[ 80 ]
return;
}
while ((lEntry < lEntryEnd)
&& (strcmp(lEntry->mKey, lKeyTmp) != 0)) {
++lEntry;
}
(*pEnv)->ReleaseStringUTFChars(pEnv, pKey, lKeyTmp);
return (lEntry == lEntryEnd) ? NULL : lEntry;
}
...
11. Sll in Store.c, implement allocateEntry() which either creates a new entry
(that is, increments store length and returns last array element) or returns an
exisng one (aer releasing its previous value) if key already exists. If entry is new,
convert the key to a C string kept in memory outside method scope. Indeed, raw JNI
objects live for the me of a method and cannot be kept outside its scope:
It is a good pracce to check that GetStringUTFChars() does not return
a NULL value which would indicate that the operaon has failed (for example,
if temporary buer cannot be allocated because of memory limitaons). This
should theorecally be checked for malloc too, although not done here for
simplicity purposes.
...
StoreEntry* allocateEntry(JNIEnv* pEnv, Store* pStore, jstring
pKey)
{
Int32_t lError = 0;
StoreEntry* lEntry = findEntry(pEnv, pStore, pKey, &lError);
if (lEntry != NULL) {
releaseEntryValue(pEnv, lEntry);
} else if (!lError) {
if (pStore->mLength >= STORE_MAX_CAPACITY) {
return NULL;
}
lEntry = pStore->mEntries + pStore->mLength;
const char* lKeyTmp = (*pEnv)->GetStringUTFChars
(pEnv, pKey, NULL);
if (lKeyTmp == NULL) {
return;

Chapter 3
[ 81 ]
}
lEntry->mKey = (char*) malloc(strlen(lKeyTmp));
strcpy(lEntry->mKey, lKeyTmp);
(*pEnv)->ReleaseStringUTFChars(pEnv, pKey, lKeyTmp);
++pStore->mLength;
}
return lEntry;
}
...
12. The last method of Store.c is releaseEntryValue(), which frees memory
allocated for a value if needed. Currently, only strings are dynamically allocated
and need to be freed:
...
void releaseEntryValue(JNIEnv* pEnv, StoreEntry* pEntry) {
int i;
switch (pEntry->mType) {
case StoreType_String:
free(pEntry->mValue.mString);
break;
}
}
#endif
13. Generate JNI header le for the class com.packtpub.Store with javah as
seen in Chapter 2, Creang, Compiling, and Deploying Nave Projects. A le jni/
com_packtpub_Store.h should be generated.
14. Now that our ulity methods and JNI header are generated, we need to write the
JNI source le com_packtpub_Store.c. The unique Store instance is saved in
a stac variable which is created when library is loaded:
#include “com_packtpub_Store.h”
#include “Store.h”
#include <stdint.h>
#include <string.h>
static Store gStore = { {}, 0 };
...
15. With the help of the generated JNI header, implement getInteger() and
setInteger() in com_packtpub_Store.c.

Interfacing Java and C/C++ with JNI
[ 82 ]
The rst method looks for the passed key in the store and returns its value (which
needs to be of type integer). If any problem happens, a default value is returned.
The second method allocates an entry (that is, creates a new entry in the store or
reuses an exisng one if it has the same key) and stores the new integer value in it.
Note here how mInteger, which is a C int, can be “casted” directly to a Java jint
primive and vice versa. They are in fact of the same type:
...
JNIEXPORT jint JNICALL Java_com_packtpub_Store_getInteger
(JNIEnv* pEnv, jobject pThis, jstring pKey) {
StoreEntry* lEntry = findEntry(pEnv, &gStore, pKey, NULL);
if (isEntryValid(pEnv, lEntry, StoreType_Integer)) {
return lEntry->mValue.mInteger;
} else {
return 0.0f;
}
}
JNIEXPORT void JNICALL Java_com_packtpub_Store_setInteger
(JNIEnv* pEnv, jobject pThis, jstring pKey, jint pInteger) {
StoreEntry* lEntry = allocateEntry(pEnv, &gStore, pKey);
if (lEntry != NULL) {
lEntry->mType = StoreType_Integer;
lEntry->mValue.mInteger = pInteger;
}
}
...
16. Strings have to be handled with more care. Java strings are not real primives.
Types jstring and char* cannot be used interchangeably as seen in step 11.
To create a Java String object from a C string, use NewStringUTF().
In second method setString(), convert a Java string into a C string with
GetStringUTFChars() and SetStringUTFChars() as seen previously.
...
JNIEXPORT jstring JNICALL Java_com_packtpub_Store_getString
(JNIEnv* pEnv, jobject pThis, jstring pKey) {
StoreEntry* lEntry = findEntry(pEnv, &gStore, pKey, NULL);
if (isEntryValid(pEnv, lEntry, StoreType_String)) {
return (*pEnv)->NewStringUTF(pEnv, lEntry->mValue.mString);
}
else {
return NULL;
}
}

Chapter 3
[ 83 ]
JNIEXPORT void JNICALL Java_com_packtpub_Store_setString
(JNIEnv* pEnv, jobject pThis, jstring pKey, jstring pString) {
const char* lStringTmp = (*pEnv)->GetStringUTFChars(pEnv,
pString, NULL);
if (lStringTmp == NULL) {
return;
}
StoreEntry* lEntry = allocateEntry(pEnv, &gStore, pKey);
if (lEntry != NULL) {
lEntry->mType = StoreType_String;
jsize lStringLength = (*pEnv)->GetStringUTFLength(pEnv,
pString);
lEntry->mValue.mString =
(char*) malloc(sizeof(char) * (lStringLength + 1));
strcpy(lEntry->mValue.mString, lStringTmp);
}
(*pEnv)->ReleaseStringUTFChars(pEnv, pString, lStringTmp);
}
17. Finally, write the Android.mk le as follows. Library name is store and the two C
les are listed. To compile C code, run ndk-build inside project’s root:
LOCAL_PATH := $(call my-dir)
include $(CLEAR_VARS)
LOCAL_CFLAGS := -DHAVE_INTTYPES_H
LOCAL_MODULE := store
LOCAL_SRC_FILES := com_packtpub_Store.c Store.c
include $(BUILD_SHARED_LIBRARY)
What just happened?
Run the applicaon, save a few entries with dierent keys, types, and values and try to get
them back from the nave store. We have managed to pass and retrieve int primives and
strings from Java to C. These values are saved in a data store indexed by a string key. Entries
can be retrieved from the store with respect to their key and type.

Interfacing Java and C/C++ with JNI
[ 84 ]
Integer primives wear several dresses during nave calls: rst an int in Java code, then
a jint during transfer from/to Java code and nally an int/int32_t in nave code.
Obviously, we could have kept the JNI representaon jint in nave code since both types
are equivalent.
Type int32_t is a typedef refering to int introduced by the C99 standard
library with the aim at more portability. More numeric types are available in
stdint.h. to force their use in JNI, declare -DHAVE_INTTYPES_H macro
in Android.mk.
More generally, primive types have all their proper representaons:
Java type JNI type C type Stdint C type
boolean Jboolean unsigned char uint8_t
byte Jbyte signed char int8_t
char Jchar unsigned short uint16_t
double Jdouble double double
oat joat oat oat
int jint Int int32_t
long jlong long long int64_t
short jshort Short int16_t
On the other hand, Java strings need a concrete conversion to C strings to allow processing
using standard C string rounes. Indeed, jstring is not a representaon of a classic char*
array but of a reference to a Java String object, accessible from Java code only.
Conversion is performed with JNI method GetStringUTFChars() which must match with
a call to ReleaseStringUTFChars(). Internally, this conversion allocates a new string
buer. The resulng C string is encoded in modied UTF-8 format (a slightly dierent avor
of UTF-8) that allows processing with standard C roune. Modied UTF-8 can represent
standard ASCII characters (that is, on one byte) and can grow to several bytes for extended
characters. This format is dierent than Java string, which uses an UTF-16 representaon
(which explains why Java characters are 16-bit, as shown in the preceding table). To avoid an
internal conversion when geng nave strings, JNI also provides GetStringChars() and
ReleaseStringChars(), which returns an UTF-16 representaon instead. This format is
not zero-terminated like classic C strings. Thus, it is compulsory to use them in conjuncon
with GetStringLength() (whereas GetStringUTFLength() can be replaced by a classic
strlen() with modied UTF-8).
Chapter 3
[ 85 ]
See JNI specicaon at http://java.sun.com/docs/books/jni/html/jniTOC.
html for more details on the subject. Refer to http://java.sun.com/docs/books/
jni/html/types.html for details to know more about JNI types and to http://java.
sun.com/developer/technicalArticles/Intl/Supplementary for an interesng
discussion about strings in Java.
Have a go hero – passing and returning other primitive types
The current store deals only with integers and strings. Based on this model, try to implement
store methods for other primive types: boolean, byte, char, double, float, long,
and short.
Project Store_Part3-Final provided with this book implements these cases.
Referencing Java objects from native code
We know from a previous part that a string is represented in JNI as a jstring, which is in
fact a Java object which means that it is possible to exchange Java objects through JNI! But
because nave code cannot understand or access Java directly, all Java objects have the
same representaon: a jobject.
In this part, we are going to focus on how to save an object on the nave side and how
to send it back to Java. In the next project, we are going to work with colors, although any
other type of object would work.
Project Store_Part3-1 can be used as a starng point for this part. The
resulng project is provided with this book under the name Store_Part3-2.
Time for action – saving a reference to an object in the Store
First, let’s append the Color data type to the Java client:
1. In package com.packtpub, create a new class Color that contains an integer
representaon of a color. This integer is parsed from a String (HTML codes such
as #FF0000) thanks to the Android android.graphics.Color class:
public class Color {
private int mColor;

Interfacing Java and C/C++ with JNI
[ 86 ]
public Color(String pColor) {
super();
mColor = android.graphics.Color.parseColor(pColor);
}
@Override
public String toString() {
return String.format(“#%06X”, mColor);
}
}
2. Change StoreType enumeraon to include the new Color data type:
public enum StoreType {
Integer, String, Color
}
3. Open the Store.java le created in the previous part and add two new methods
to retrieve and save a Color object in the nave store:
public class Store {
static {
System.loadLibrary(“store”);
}
...
public native Color getColor(String pKey);
public native void setColor(String pKey, Color pColor);
}
4. Open the exisng le StoreActivity.java and update methods onGetValue()
and onSetValue() to display and parse Color instances. Note that color parsing
can generate an IllegalArgumentException if color code is incorrect:
public class StoreActivity extends Activity {
...
private void onGetValue() {
String lKey = mUIKeyEdit.getText().toString();
StoreType lType = (StoreType) mUITypeSpinner
.getSelectedItem();
switch (lType) {
...
case Color:
mUIValueEdit.setText(mStore.getColor(lKey).toString());
break;
}
}
Downloa d f r o m W o w ! e B o o k < w w w.woweb o o k . c o m >Downloa d f r o m W o w ! e B o o k < w w w.woweb o o k . c o m >

Chapter 3
[ 87 ]
private void onSetValue() {
String lKey = mUIKeyEdit.getText().toString();
String lValue = mUIValueEdit.getText().toString();
StoreType lType = (StoreType) mUITypeSpinner
.getSelectedItem();
try {
switch (lType) {
...
case Color:
mStore.setColor(lKey, new Color(lValue));
break;
}
}
catch (NumberFormatException eNumberFormatException) {
displayError(“Incorrect value.”);
} catch (IllegalArgumentException eIllegalArgumentException)
{
displayError(“Incorrect value.”);
}
}
...
}
The Java side is now ready. Let’s write the necessary code to retrieve and store a
Color entry inside nave code.
5. In jni/Store.h, append the new color type to the StoreType enumeraon and
add a new member to the StoreValue union. But what type to use, since Color
is an object known only from Java? In JNI, all java objects have the same type:
jobject, an (indirect) object reference:
...
typedef enum {
StoreType_Integer, StoreType_String, StoreType_Color
} StoreType;
typedef union {
int32_t mInteger;
char* mString;
jobject mColor;
} StoreValue;
...

Interfacing Java and C/C++ with JNI
[ 88 ]
6. Re-generate JNI header le jni/com_packtpub_Store.h with javah.
7. Two new method prototypes getColor() and setColor() have been freshly
generated. We have to implement them. First one simply returns the Java Color
object kept in the store entry. No dicules here.
The real subtlees are introduced in the second method setColor(). Indeed, at
rst sight, simply saving the jobject value in the store entry would seem sucient.
But this assumpon is wrong. Objects passed in parameters or created inside a JNI
method are local references. Local references cannot be kept in nave code outside
method scope.
To be allowed to keep a Java object reference in nave code aer method returns,
they must be turned into global references to inform the Dalvik VM that they
cannot be garbage collected. To do so, JNI API provides NewGlobalRef()and
its counterpart DeleteGlobalRef(). Here, global reference is deleted if entry
allocaon fails:
#include “com_packtpub_Store.h”
#include “Store.h”
...
JNIEXPORT jobject JNICALL Java_com_packtpub_Store_getColor
(JNIEnv* pEnv, jobject pThis, jstring pKey) {
StoreEntry* lEntry = findEntry(pEnv, &gStore, pKey, NULL);
if (isEntryValid(pEnv, lEntry, StoreType_Color)) {
return lEntry->mValue.mColor;
} else {
return NULL;
}
}
JNIEXPORT void JNICALL Java_com_packtpub_Store_setColor
(JNIEnv* pEnv, jobject pThis, jstring pKey, jobject pColor) {
jobject lColor = (*pEnv)->NewGlobalRef(pEnv, pColor);
if (lColor == NULL) {
return;
}
StoreEntry* lEntry = allocateEntry(pEnv, &gStore, pKey);
if (lEntry != NULL) {
lEntry->mType = StoreType_Color;
lEntry->mValue.mColor = lColor;
} else {
(*pEnv)->DeleteGlobalRef(pEnv, lColor);
}
}
...
Chapter 3
[ 89 ]
8. A call to NewGlobalRef() must always match with a call to DeleteGlobalRef().
In our example, global reference should be deleted when entry is replaced
by a new one (removal is not implemented). Do it in Store.c by updang
releaseEntryValue():
...
void releaseEntryValue(JNIEnv* pEnv, StoreEntry* pEntry) {
switch (pEntry->mType) {
...
case StoreType_Color:
(*pEnv)->DeleteGlobalRef(pEnv, pEntry->mValue.mColor);
break;
}
}
What just happened?
Run the applicaon, enter and save a color value such as #FF0000 or red (which is a
predened value allowed by the Android color parser) and get the entry back from the store.
We have managed to store a Java object on the nave side.
All objects coming from Java are represented by a jobject. Even jstring, which is in fact
a typedef over jobject, can be used as such. Because nave code invocaon is limited to
method boundaries, JNI keeps object references local to this method by default. This means
that a jobject can only be used safely inside the method it was transmied to. Indeed, the
Dalvik VM is in charge of invoking nave methods and can manage Java object references
before and aer method is run. But a jobject is just a “pointer” without any smart or
garbage collecon mechanism (aer all, we want to get rid of Java, at least parally). Once
nave method returns, the Dalvik VM has no way to know if nave code sll holds object
references and can decide to collect them at any me.
Global references are also the only way to share variables between threads
because JNI contexts are always thread local.
To be able to use an object reference outside its scope, reference must be made global with
NewGlobalRef() and “unreferenced” with DeleteGlobalRef(). Without the laer, the
Dalvik VM would consider objects to sll be referenced and would never collect them.
Have a look at JNI specicaon at http://java.sun.com/docs/books/jni/html/
jniTOC.html for more informaon on the subject.
Interfacing Java and C/C++ with JNI
[ 90 ]
Local and global JNI references
When geng an object reference from JNI, this reference is said to be Local. It is
automacally freed (the reference not the object) when nave method returns to
allow proper garbage collecon later in the Java code. Thus, by default, an object
reference cannot be kept outside the lifeme of a nave call. For example:
static jobject gMyReference;
JNIEXPORT void JNICALL Java_MyClass_myMethod(JNIEnv* pEnv,
jobject pThis, jobject pRef) {
gMyReference = pRef;
}
The piece of code above should be strictly prohibited. Keeping such a reference outside
JNI method will eventually lead to a disaster (memory corrupon or a crash).
Local references can be deleted when they are no longer used:
pEnv->DeleteLocalRef(lReference);
A JVM is required to store at least 16 references at the same me and can refuse to
create more. To do so, explicitly inform it, for example:
pEnv->EnsureLocalCapacity(30)
It is a rather good pracce to eliminate references when they are no longer
needed. There are two benets to act as such:
Because the number of local references in a method is nite. When a piece
of code contains and manipulates many objects such as an array, keep your
number of simultaneous local references low by deleng them as soon as
possible.
Because released local references can be garbage collected immediately and
memory freed if no other references exist.
To keep object references for a longer period of me, one needs to create a global reference:
JNIEXPORT void JNICALL Java_MyClass_myStartMethod (JNIEnv* pEnv,
jobject pThis, jobject pRef) {
...
gMyReference = pEnv->NewGlobalRef(pEnv, pRef<);
...
}
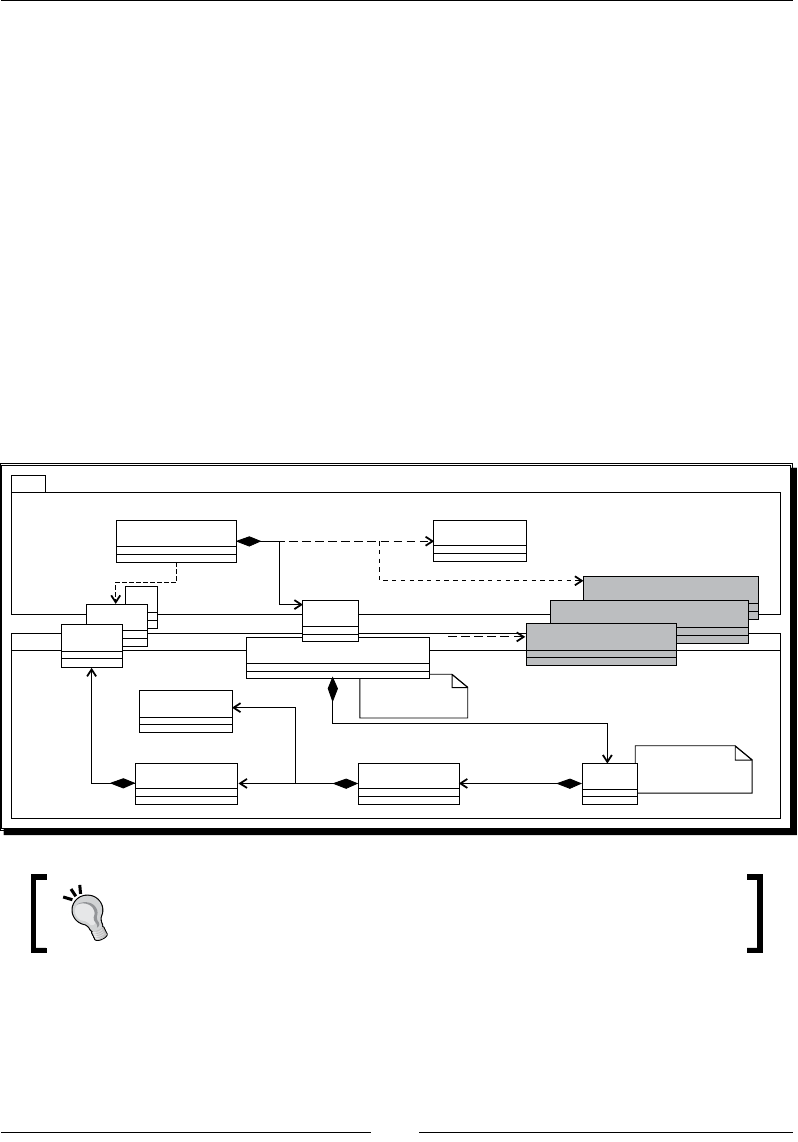
Chapter 3
[ 91 ]
And then delete it for proper garbage collecon:
JNIEXPORT void JNICALL Java_MyClass_myEndMethod (JNIEnv* pEnv,
jobject pThis, jobject pRef) {
...
gMyReference = pEnv->DeleteGlobalRef(gMyReference)
...
}
Global reference can now be safely shared between two dierent JNI calls or threads.
Throwing exceptions from native code
Error handling in the Store project is not really sasfying. If the requested key cannot
be found or if the retrieved value type does not match the requested type, a default
value is returned. We denitely need a way to indicate an error happened! And what
beer (note that I do not say faster...) to indicate an error than an excepon?
Store Wrapper
Functions
int
Color
StoreActivity
<<user>>
StoreType
StoreType
StoreValue Internal Store
structure
<<Union>> StoreEntry
String
Store
Internal Store
Structure
1
<<user>>
1
1
1
1
Java
C
*
com_packtpub_Store
Store
InvalidTypeException
NotExistingKeyException
StoreFullException
<<throws>>
Project Store_Part3-2 can be used as a starng point for this part. The
resulng project is provided with this book under the name Store_Part3-3.

Interfacing Java and C/C++ with JNI
[ 92 ]
Time for action – raising exceptions from the Store
Let’s start by creang and catching excepons on the Java side:
1. Create a new excepon class InvalidTypeException of type Exception in
package com.packtpub.exception as follows:
public class InvalidTypeException extends Exception {
public InvalidTypeException(String pDetailMessage) {
super(pDetailMessage);
}
}
2. Repeat the operaon for two other excepons: NotExistingKeyException of
type Exception and StoreFullException of type RuntimeException instead.
3. Open exisng le Store.java and declare thrown excepons on geer
prototypes only (StoreFullException is a RuntimeException and does
not need declaraon):
public class Store {
static {
System.loadLibrary(“store”);
}
public native int getInteger(String pKey)
throws NotExistingKeyException, InvalidTypeException;
public native void setInteger(String pKey, int pInt);
public native String getString(String pKey)
throws NotExistingKeyException, InvalidTypeException;
public native void setString(String pKey, String pString);
public native Color getColor(String pKey)
throws NotExistingKeyException, InvalidTypeException;
public native void setColor(String pKey, Color pColor);
}
4. Excepons need to be caught. Catch NotExistingKeyException and
InvalidTypeException in onGetValue(). Catch StoreFullException in
onSetValue() in case entry cannot be inserted:
public class StoreActivity extends Activity {
...
private void onGetValue() {

Chapter 3
[ 93 ]
String lKey = mUIKeyEdit.getText().toString();
StoreType lType = (StoreType) mUITypeSpinner
.getSelectedItem();
try {
switch (lType) {
...
}
}
catch (NotExistingKeyException eNotExistingKeyException) {
displayError(“Key does not exist in store”);
} catch (InvalidTypeException eInvalidTypeException) {
displayError(“Incorrect type.”);
}
}
private void onSetValue() {
String lKey = mUIKeyEdit.getText().toString();
String lValue = mUIValueEdit.getText().toString();
StoreType lType = (StoreType) mUITypeSpinner
.getSelectedItem();
try {
switch (lType) {
...
}
}
catch (NumberFormatException eNumberFormatException) {
displayError(“Incorrect value.”);
} catch (IllegalArgumentException eIllegalArgumentException)
{
displayError(“Incorrect value.”);
} catch (StoreFullException eStoreFullException) {
displayError(“Store is full.”);
}
}
...
}
Let’s throw these excepons from nave code. As excepons are not part of the
C language, JNI excepons cannot be declared on C method prototypes (the same
goes for C++ which has a dierent excepon model than Java). Thus, there is no
need to re-generate JNI header.

Interfacing Java and C/C++ with JNI
[ 94 ]
5. Open jni/Store.h created in previous parts and dene three new helper methods
to throw excepons:
#ifndef _STORE_H_
#define _STORE_H_
...
void throwInvalidTypeException(JNIEnv* pEnv);
void throwNotExistingKeyException(JNIEnv* pEnv);
void throwStoreFullException(JNIEnv* pEnv);
#endif
6. NotExistingKeyException and InvalidTypeException are only thrown
when geng a value from the store. A good place to raise them is when checking an
entry with isEntryValid(). Open and change the jni/Store.c le accordingly:
#include “Store.h”
#include <string.h>
int32_t isEntryValid(JNIEnv* pEnv, StoreEntry* pEntry,
StoreType pType) {
if (pEntry == NULL) {
throwNotExistingKeyException(pEnv);
} else if (pEntry->mType != pType) {
throwInvalidTypeException(pEnv);
} else {
return 1;
}
return 0;
}
...
7. StoreFullException is obviously raised when a new entry is inserted. Modify
allocateEntry()in the same le to check entry inserons:
...
StoreEntry* allocateEntry(JNIEnv* pEnv, Store* pStore, jstring
pKey){
StoreEntry* lEntry = findEntry(pEnv, pStore, pKey);
if (lEntry != NULL) {
releaseEntryValue(pEnv, lEntry);
} else {
if (pStore->mLength >= STORE_MAX_CAPACITY) {
throwStoreFullException(pEnv);
return NULL;
}
Chapter 3
[ 95 ]
// Initializes and insert the new entry.
...
}
return lEntry;
}
...
8. We must implement throwNotExistingException(). To throw a Java excepon,
the rst task is to nd the corresponding class (like with the Java Reecon API).
A Java class reference is represented in JNI with the specic type jclass. Then,
raise the excepon with ThrowNew(). Once we no longer need the excepon class
reference, we can get rid of it with DeleteLocalRef():
...
void throwNotExistingKeyException(JNIEnv* pEnv) {
jclass lClass = (*pEnv)->FindClass(pEnv,
“com/packtpub/exception/NotExistingKeyException”);
if (lClass != NULL) {
(*pEnv)->ThrowNew(pEnv, lClass, “Key does not exist.”);
}
(*pEnv)->DeleteLocalRef(pEnv, lClass);
}
9. Repeat the operaon for the two other excepons. The code is idencal (even to
throw a runme excepon), only the class name changes.
What just happened?
Launch the applicaon and try to get an entry with a non-exisng key. Repeat the operaon
with an entry which exists in the store but with a dierent type then the one selected in the
GUI. In both cases, there is an error message because of the raised excepon. Try to save
more than 16 references in the store and you will get an error again.
Raising excepon is a not a complex task. In addion, it is a good introducon to the Java
call-back mechanism provided by JNI. An excepon is instanated with a class descriptor of
type jclass (which is also a jobject behind the scenes). Class descriptor is searched in
the current class loader according to its complete name (package path included).
Do not forget about return codes
FindClass() and JNI methods in general can fail for several reasons (not
enough memory is available, class not found, and so on). Thus checking their
result is highly advised.
Interfacing Java and C/C++ with JNI
[ 96 ]
Once an excepon is raised, do not make further call to JNI except cleaning methods
(DeleteLocalRef(), DeleteGlobalRef(), and so on). Nave code should clean its
resources and give control back to Java, although it is possible to connue “pure” nave
processing if no Java is invoked. When nave method returns, excepon is propagated
by the VM to Java.
We have also deleted a local reference, the one poinng to the class descriptor because
it was not needed any more aer its use (step 8). When JNI lends you something, do not
forget to give it back!
JNI in C++
C is not an object-oriented language but C++ is. This is why you do not write JNI in C like
in C++.
In C, JNIEnv is in fact a structure containing funcon pointer. Of course, when a JNIEnv is
given to you, all these pointers are inialized so that you can call them a bit like an object.
However, the this parameter, which is implicit in an object-oriented language, is given as
rst parameter in C (pJNIEnv in the following code). Also, JNIEnv needs to be dereferenced
the rst me to run a method:
jclass ClassContext = (*pJNIEnv)->FindClass(pJNIEnv,
“android/content/Context”);
C++ code is more natural and simple. The this parameter is implicit and there is no need to
dereference JNIEnv, as methods are not declared as funcon pointer anymore but as real
member methods:
jclass ClassContext = lJNIEnv->FindClass(
“android/content/Context”);
Handling Java arrays
There is one type we have not talked about yet: arrays. Arrays have a specic place in JNI
like in Java. They have their proper types and their proper API, although Java arrays are also
objects at their root. Let’s improve the Store project by leng users enter a set of values
simultaneously in an entry. Then, this set is going to be communicated to the nave backend
in a Java array which is then going to be stored as a classic C array.
Project Store_Part3-3 can be used as a starng point for this part. The
resulng project is provided with this book under the name Store_Part3-4.

Chapter 3
[ 97 ]
Time for action – saving a reference to an object in the Store
Let’s start again with the Java code:
1. To help us handling operaons on arrays, let’s download a helper library: Google
Guava (release r09 in this book) at http://code.google.com/p/guava-
libraries. Guava oers many useful methods to deal primives and arrays and
perform “pseudo-funconal” programming. Copy guava-r09 jar contained in
the downloaded ZIP in libs.
2. Open project Properties and go to the Java Build Path secon. In the
Libraries tab, reference Guava jar by clicking on the Add JARs... buon. Validate.
3. Edit StoreType enumeraon iniated in previous parts and add two new values
the IntegerArray and ColorArray:
public enum StoreType {
Integer, String, Color,
IntegerArray, ColorArray
}
4. Open Store.java and add new methods to retrieve and save int and Color
arrays:
public class Store {
static {
System.loadLibrary(“store”);
}
...
public native int[] getIntegerArray(String pKey)
throws NotExistingKeyException;
public native void setIntegerArray(String pKey,
int[] pIntArray);
public native Color[] getColorArray(String pKey)
throws NotExistingKeyException;
public native void setColorArray(String pKey,
Color[] pColorArray);
}

Interfacing Java and C/C++ with JNI
[ 98 ]
5. Finally, connect nave methods to the GUI in le StoreActivity.java. First,
onGetValue() retrieves an array from the store, concatenates its values with a
semicolon separator thanks to Guava joiners (more informaon can be found in
Guava Javadoc at http://guava-libraries.googlecode.com/svn) and
nally displays them:
public class StoreActivity extends Activity {
...
private void onGetValue() {
String lKey = mUIKeyEdit.getText().toString();
StoreType lType = (StoreType) mUITypeSpinner
.getSelectedItem();
try {
switch (lType) {
...
case IntegerArray:
mUIValueEdit.setText(Ints.join(“;”,
mStore.getIntegerArray(lKey)));
break;
case ColorArray:
mUIValueEdit.setText(Joiner.on(“;”).join(
mStore.getColorArray(lKey)));
break;
}
}
catch (NotExistingKeyException eNotExistingKeyException) {
displayError(“Key does not exist in store”);
} catch (InvalidTypeException eInvalidTypeException) {
displayError(“Incorrect type.”);
}
}
...
6. In StoreActivity.java, improve onSetValue() to convert a list of user
entered values into an array before sending it to the Store. Use the Guava
transformaon feature to accomplish this task: a Function object (or functor)
converng a string value into the target type is passed to the helper method
stringToList(). The laer splits the user string on the semicolon separator
before running transformaons:
...
private void onSetValue() {
String lKey = mUIKeyEdit.getText().toString();

Chapter 3
[ 99 ]
String lValue = mUIValueEdit.getText().toString();
StoreType lType = (StoreType) mUITypeSpinner
.getSelectedItem();
try {
switch (lType) {
...
case IntegerArray:
mStore.setIntegerArray(lKey,
Ints.toArray(stringToList(
new Function<String, Integer>() {
public Integer apply(String pSubValue) {
return Integer.parseInt(pSubValue);
}
}, lValue)));
break;
case ColorArray:
List<Color> lIdList = stringToList(
new Function<String, Color>() {
public Color apply(String pSubValue) {
return new Color(pSubValue);
}
}, lValue);
Color[] lIdArray = lIdList.toArray(
new Color[lIdList.size()]);
mStore.setColorArray(lKey, lIdArray);
break;
}
}
catch (NumberFormatException eNumberFormatException) {
displayError(“Incorrect value.”);
} catch (IllegalArgumentException eIllegalArgumentException)
{
displayError(“Incorrect value.”);
} catch (StoreFullException eStoreFullException) {
displayError(“Store is full.”);
}
}
private <TType> List<TType> stringToList(
Function<String, TType> pConversion,
String pValue) {
String[] lSplitArray = pValue.split(“;”);
List<String> lSplitList = Arrays.asList(lSplitArray);
return Lists.transform(lSplitList, pConversion);
}
}
Switch back to the nave side.

Interfacing Java and C/C++ with JNI
[ 100 ]
7. In jni/Store.h, add the new array types to the enumeraon StoreType.
Also declare two new elds mIntegerArray and mColorArray in StoreValue
union. Store arrays are represented as raw C arrays (that is, a pointer).
We also need to remember the length of these arrays. Put this informaon in a new
eld mLength in StoreEntry.
#ifndef _STORE_H_
#define _STORE_H_
#include “jni.h”
#include <stdint.h>
#define STORE_MAX_CAPACITY 16
typedef enum {
StoreType_Integer, StoreType_String, StoreType_Color,
StoreType_IntegerArray, StoreType_ColorArray
} StoreType;
typedef union {
int32_t mInteger;
char* mString;
jobject mColor;
int32_t* mIntegerArray;
jobject* mColorArray;
} StoreValue;
typedef struct {
char* mKey;
StoreType mType;
StoreValue mValue;
int32_t mLength;
} StoreEntry;
...
8. Open jni/Store.c and insert new cases in releaseEntryValue() for
arrays. Array allocated memory has to be freed when corresponding entry is
released. As colors are Java objects, delete global references or garbage
collecon will never happen:
...
void releaseEntryValue(JNIEnv* pEnv, StoreEntry* pEntry) {
int32_t i;
switch (pEntry->mType) {

Chapter 3
[ 101 ]
...
case StoreType_IntegerArray:
free(pEntry->mValue.mIntegerArray);
break;
case StoreType_ColorArray:
for (i = 0; i < pEntry->mLength; ++i) {
(*pEnv)->DeleteGlobalRef(pEnv,
pEntry->mValue.mColorArray[i]);
}
free(pEntry->mValue.mColorArray);
break;
}
}
...
9. Re-generate JNI header jni/com_packtpub_Store.h.
10. Implement all these new store methods in com_packtpub_Store.c, starng with
getIntegerArray(). A JNI array of integers is represented with type jintArray.
If an int is equivalent to a jint, an int* array is absolutely not equivalent to
a jintArray. The rst is a pointer to a memory buer whereas the second is a
reference to an object.
Thus, to return a jintArray here, instanate a new Java integer array with JNI API
method NewIntArray(). Then, use SetIntArrayRegion() to copy the nave
int buer content into the jintArray.
SetIntArrayRegion() performs bound checking to prevent buer overows
and can return an ArrayIndexOutOfBoundsException(). However, there is no
need to check it since there is no statement further in the method to be executed
(excepons will be propagated automacally by the JNI framework):
#include “com_packtpub_Store.h”
#include “Store.h”
...
JNIEXPORT jintArray JNICALL Java_com_packtpub_Store_
getIntegerArray
(JNIEnv* pEnv, jobject pThis, jstring pKey) {
StoreEntry* lEntry = findEntry(pEnv, &gStore, pKey, NULL);
if (isEntryValid(pEnv, lEntry, StoreType_IntegerArray)) {
jintArray lJavaArray = (*pEnv)->NewIntArray(pEnv,
lEntry->mLength);
if (lJavaArray == NULL) {
return;
}

Interfacing Java and C/C++ with JNI
[ 102 ]
(*pEnv)->SetIntArrayRegion(pEnv, lJavaArray, 0,
lEntry->mLength, lEntry->mValue.mIntegerArray);
return lJavaArray;
} else {
return NULL;
}
}
...
11. To save a Java array in nave code, the inverse operaon GetIntArrayRegion()
exists. The only way to allocate a suitable target memory buer is to measure
array size with GetArrayLength(). GetIntArrayRegion() also performs
bound checking and can raise an excepon. So method ow needs to be
stopped immediately when detecng one with ExceptionCheck(). Although
GetIntArrayRegion() is not the only method to raise excepons, it has the
parcularity with SetIntArrayRegion() to return void. There is no way to check
return code. Hence the excepon check:
...
JNIEXPORT void JNICALL Java_com_packtpub_Store_setIntegerArray
(JNIEnv* pEnv, jobject pThis, jstring pKey, jintArray
pIntegerArray) {
jsize lLength = (*pEnv)->GetArrayLength(pEnv, pIntegerArray);
int32_t* lArray = (int32_t*) malloc(lLength *
sizeof(int32_t));
(*pEnv)->GetIntArrayRegion(pEnv, pIntegerArray, 0, lLength,
lArray);
if ((*pEnv)->ExceptionCheck(pEnv)) {
free(lArray);
return;
}
StoreEntry* lEntry = allocateEntry(pEnv, &gStore, pKey);
if (lEntry != NULL) {
lEntry->mType = StoreType_IntegerArray;
lEntry->mLength = lLength;
lEntry->mValue.mIntegerArray = lArray;
} else {
free(lArray);
return;
}
}
...
Chapter 3
[ 103 ]
12. Object arrays are dierent than primive arrays. They are instanated with a Class
type (here com/packtpub/Color) because Java arrays are mono-type. Object
arrays are represented with type jobjectArray.
On the opposite of primive arrays, it is not possible to work on all elements at the
same me. Instead, objects are set one by one with SetObjectArrayElement().
Here, array is lled with Color objects stored on the nave side, which keeps global
references to them. So there is no need to delete or create any reference here
(except the class descriptor).
Remember that an object array keep references to the objects it holds.
Thus, local as well as global references can be inserted in an array and
deleted safely right aer.
...
JNIEXPORT jobjectArray JNICALL Java_com_packtpub_Store_
getColorArray
(JNIEnv* pEnv, jobject pThis, jstring
pKey) {
StoreEntry* lEntry = findEntry(pEnv, &gStore, pKey, NULL);
if (isEntryValid(pEnv, lEntry, StoreType_ColorArray)) {
jclass lColorClass = (*pEnv)->FindClass(pEnv,
“com/packtpub/Color”);
if (lColorClass == NULL) {
return NULL;
}
jobjectArray lJavaArray = (*pEnv)->NewObjectArray(
pEnv, lEntry->mLength, lColorClass, NULL);
(*pEnv)->DeleteLocalRef(pEnv, lColorClass);
if (lJavaArray == NULL) {
return NULL;
}
int32_t i;
for (i = 0; i < lEntry->mLength; ++i) {
(*pEnv)->SetObjectArrayElement(pEnv, lJavaArray, i,
lEntry->mValue.mColorArray[i]);
if ((*pEnv)->ExceptionCheck(pEnv)) {
return NULL;
}
}
return lJavaArray;
} else {
return NULL;
} }
...

Interfacing Java and C/C++ with JNI
[ 104 ]
13. In setColorArray(), array elements are also retrieved one by one with
GetObjectArrayElement(). Returned references are local and should be
made global to store them safely in a memory buer. If a problem happens,
global references must be carefully destroyed to allow garbage collecon, as
we decide to interrupt processing.
...
JNIEXPORT void JNICALL Java_com_packtpub_Store_setColorArray
(JNIEnv*
pEnv, jobject pThis, jstring pKey, jobjectArray
pColorArray) {
jsize lLength = (*pEnv)->GetArrayLength(pEnv, pColorArray);
jobject* lArray = (jobject*) malloc(lLength *
sizeof(jobject));
int32_t i, j;
for (i = 0; i < lLength; ++i) {
jobject lLocalColor = (*pEnv)->GetObjectArrayElement(pEnv,
pColorArray, i);
if (lLocalColor == NULL) {
for (j = 0; j < i; ++j) {
(*pEnv)->DeleteGlobalRef(pEnv, lArray[j]);
}
free(lArray);
return;
}
lArray[i] = (*pEnv)->NewGlobalRef(pEnv, lLocalColor);
if (lArray[i] == NULL) {
for (j = 0; j < i; ++j) {
(*pEnv)->DeleteGlobalRef(pEnv, lArray[j]);
}
free(lArray);
return;
}
(*pEnv)->DeleteLocalRef(pEnv, lLocalColor);
}
StoreEntry* lEntry = allocateEntry(pEnv, &gStore, pKey);
if (lEntry != NULL) {
lEntry->mType = StoreType_ColorArray;
lEntry->mLength = lLength;
lEntry->mValue.mColorArray = lArray;
} else {
for (j = 0; j < i; ++j) {
Chapter 3
[ 105 ]
(*pEnv)->DeleteGlobalRef(pEnv, lArray[j]);
}
free(lArray);
return;
}
}
What just happened?
We have transmied Java arrays from nave to C code and vice versa. Java arrays are objects
which cannot be manipulated navely in C code but only through a dedicated API.
Primives array types available are jbooleanArray, jbyteArray, jcharArray,
jdoubleArray, jfloatArray, jlongArray, and jshortArray. These arrays are
manipulated “by set”, that is, several elements at a me. There are several ways to
access array content:
Get<Primitive>ArrayRegion() and
Set<Primitive>ArrayRegion()
Copy the content of a Java array into a nave
array or reciprocally. This is the best soluon
when a local copy is necessary to nave code.
Get<Primitive>ArrayElements(),
Set<Primitive>ArrayElements(),
and Release<Primitive>ArrayEle
ments()
These methods are similar but work on a buer
either temporarily allocated by them or poinng
directly on the target array. This buer must be
released aer use. These are interesng to use if
no local data copy is needed.
Get<Primitive>ArrayCritical()
and Release<Primitive>ArrayCri
tical()
These are more likely to provide a direct access
to the target array (instead of a copy). However,
their usage is restricted: JNI funcons and Java
callbacks must not be performed..
The nal project Store provides an example of
Get<Primitives>ArrayElements() usage for setBooleanArray().
Objects arrays are specic because on the opposite of primive arrays each array element
is a reference which can be garbage collected. As a consequence, a new reference is
automacally registered when inserted inside the array. That way, even if calling code
removes its references, array sll references them. Object arrays are manipulated with
GetObjectArrayElement() and SetObjectArrayElement().
See http://download.oracle.com/javase/1.5.0/docs/guide/jni/spec/
functions.html for a more exhausve list of JNI funcons.
Interfacing Java and C/C++ with JNI
[ 106 ]
Checking JNI exceptions
In JNI, methods which can raise an excepon (most of them actually) should be carefully
checked. If a return code or pointer is given back, checking it is sucient to know if something
happened. But somemes, with Java callbacks or methods like GetIntArrayRegion(),
we have no return code. In that case, excepons should be checked systemacally with
ExceptionOccured() or ExceptionCheck(). The rst returns a jthrowable type
containing a reference to the raised excepon whereas the laer just returns a
Boolean indicator.
When an excepon is raised, any subsequent call fails unl either:
method returns and excepon is propagated.
or excepon is cleared. Clearing an excepon mean that the excepon is handled
and thus not propagated to Java. For example:
Jthrowable lException;
pEnv->CallObjectMethod(pJNIEnv, ...);
lException = pEnv->ExceptionOccurred(pEnv);
if (lException) {
// Do something...
pEnv->ExceptionDescribe();
pEnv->ExceptionClear();
(*pEnv)->DeleteLocalRef(pEnv, lException);
}
Here, ExceptionDescribe() is a ulity roune to dump excepon content like done by
printStackTrace() in Java. Only a few JNI methods are sll safe to call when handling
an excepon:
DeleteLocalRef() PushLocalFrame()
DeleteGlobalRef() PopLocalFrame()
ExceptionOccured() ReleaseStringChars()
ExceptionDescribe() ReleaseStringUTFChars()
ExceptionOccured() ReleaseStringCritical()
ExceptionDescribe() Release<Primitive>ArrayElements()
MonitorExit() ReleasePrimitiveArrayCritical()
Chapter 3
[ 107 ]
Have a go hero – handling other array types
With the knowledge freshly acquired, implement store methods for other array types:
jbooleanArray, jbyteArray, jcharArray, jdoubleArray, jfloatArray,
jlongArray, and jshortArray. When you are done, write operaons for string arrays.
The nal project Store implemenng these cases
is provided with this book.
Summary
In this chapter, we have seen how to make Java communicate with C/C++. Android is now
almost bilingual! Java can call C/C++ code with any type of data or objects. More specically,
we have seen how to call nave code with primive types. These primives have their C/
C++ equivalent type they can can be casted to. Then, we have passed objects and handled
their references. References are local to a method by default and should not be shared
outside method scope. They should be managed carefully as their number is limited (this
limit can sll be manually increased). Aer that, we have shared and stored objects with
global references. Global references need to be carefully deleted to ensure proper garbage
collecon. We have also raised excepons from nave code to nofy Java if a problem
occurred and check excepons occurring in JNI. When an excepon occurs, only a few
cleaning JNI methods are safe to call. Finally, we have manipulated primive and objects
arrays. Arrays may or may not be copied by the VM when manipulated in nave code. The
performance penalty has to be taken into account.
But there is sll more to come: how to call Java from C/C++ code. We got a paral overview
with excepons. But actually, any Java object, method, or eld can be handled by nave
code. Let’s see this in the next chapter.

4
Calling Java Back from Native Code
To reach its full potenal, JNI allows calling Java code from C/C++. This is oen
referred to as a callback since nave code is itself invoked from Java. Such calls
are performed through a reecve API, which allows doing almost anything
that can be done directly in Java. Another important maer to consider with
JNI is threading. Nave code can be run on a Java thread, managed by
the Dalvik VM, and also from a nave thread created with standard POSIX
primives. Obviously, a nave thread cannot call JNI code unless it is turned
into a managed thread! Programming with JNI necessitates knowledge of all
these subtlees. This chapter will guide you through the main ones.
Since version R5, the Android NDK also proposes a new API to access navely
an important type of Java objects: bitmaps. This bitmap API is Android-specic
and aims at giving full processing power to graphics applicaons running on
these ny (but powerful) devices. To illustrate this topic, we will see how to
decode a camera feed directly inside nave code.
To summarize, in this chapter, we are going to learn how to:
Aach a JNI context to a nave thread
Handle synchronizaon with Java threads
Call Java back from nave code
Process Java bitmaps in nave code
By the end of the chapter, you should be able to make Java and C/C++ communicate
together in both direcons.

Calling Java Back from Nave Code
[ 110 ]
Synchronizing Java and native threads
In this part, we are going to create a background thread, the watcher, which keeps an eye
constantly on what is inside the data store. It iterates through all entries and then sleeps
for a xed amount of me. When the watcher thread nds a specic key, value, or type
predened in code, it acts accordingly. For this rst part, we are just going to increment a
watcher counter each me the watcher thread iterates over entries. In next part, we will
see how to react by calling back Java.
Of course, threads also needs synchronizaon. The nave thread will be allowed to access
and update the store only when a user (understand the UI thread) is not modifying it. The
nave thread is in C but the UI thread in Java. Thus, we have two opons here:
Use nave mutexes as our UI thread makes nave calls when geng and seng
values anyway
Use Java monitors and synchronize nave thread with JNI
Of course, in a chapter dedicated to JNI, we can only choose the second opon! The nal
applicaon structure will look as follows:
Internal Store
structure
Internal Store
Structure
Store Wrapper
Functions
int
Color
StoreActivity
<<user>>
StoreType
StoreType
StoreValue
<<Union>>
StoreEntry
String
Store
1
<<user>>
1
1
1
1
Java
C
*
com_packtpub_Store
Store InvalidTypeException
NotExistingKeyException
StoreFullException
<<throws>>
StoreWatcher
1
Project Store_Part3-4 can be used as a starng point for this part. The resulng
project is provided with this book under the name Project Store_Part4-1.

Chapter 4
[ 111 ]
Time for action – running a background thread
Let's add some synchronizaon capabilies on the Java rst:
1. Open Store.java created in the previous chapter. Create two new nave methods,
initializeStore() and finalizeStore(), to start/stop the watcher thread and
inialize/destroy the store when acvity is started and stopped, respecvely.
Make every Store class's geer and seer synchronized, as they are not allowed
to access and modify store entries while the watcher thread iterates through them:
public class Store {
static {
System.loadLibrary("store");
}
public native void initializeStore();
public native void finalizeStore();
public native synchronized int getInteger(String pKey)
throws NotExistingKeyException, InvalidTypeException;
public native synchronized void setInteger(String pKey,
int pInt);
// Other getters and setters are synchronized too.
...
}
2. Call inializaon and nalizaon methods when acvity is started and stopped.
Create a watcherCounter entry of type integer when store is inialized.
This entry will be updated automacally by the watcher:
public class StoreActivity extends Activity {
private EditText mUIKeyEdit, mUIValueEdit;
private Spinner mUITypeSpinner;
private Button mUIGetButton, mUISetButton;
private Store mStore;
@Override
public void onCreate(Bundle savedInstanceState) {
super.onCreate(savedInstanceState);
setContentView(R.layout.main);
// Initializes components and binds buttons to handlers.
...
// Initializes the native side store.
Downloa d f r o m W o w ! e B o o k < w w w.woweb o o k . c o m >Downloa d f r o m W o w ! e B o o k < w w w.woweb o o k . c o m >

Calling Java Back from Nave Code
[ 112 ]
mStore = new Store();
}
@Override
protected void onStart() {
super.onStart();
mStore.initializeStore();
mStore.setInteger("watcherCounter", 0);
}
@Override
protected void onStop() {
super.onStop();
mStore.finalizeStore();
}
...
}
The Java side is ready to inialize and destroy the nave thread... Let's switch to the
nave side to implement it:
3. Create a new le StoreWatcher.h in folder jni. Include Store, JNI, and nave
threads headers.
The watcher works on a Store instance updated at regular intervals of me
(three seconds here). It needs:
A JavaVM, which is the only object safely shareable among threads from
which a JNI environment can be safely retrieved.
A Java object to synchronize on, here the Java Store frontend object
because it has synchronized methods.
Variables dedicated to thread management.
4. Finally, dene two methods to start the nave thread aer inializaon and stop it:
#ifndef _STOREWATCHER_H_
#define _STOREWATCHER_H_
#include "Store.h"
#include <jni.h>
#include <stdint.h>
#include <pthread.h>
#define SLEEP_DURATION 5
#define STATE_OK 0

Chapter 4
[ 113 ]
#define STATE_KO 1
typedef struct {
// Native variables.
Store* mStore;
// Cached JNI references.
JavaVM* mJavaVM;
jobject mStoreFront;
// Thread variables.
pthread_t mThread;
int32_t mState;
} StoreWatcher;
void startWatcher(JNIEnv* pEnv, StoreWatcher* pWatcher,
Store* pStore, jobject pStoreFront);
void stopWatcher(JNIEnv* pEnv, StoreWatcher* pWatcher);
#endif
5. Create jni/StoreWatcher.h and declare addional private methods:
runWatcher(): This represents the nave thread main loop.
processEntry(): This is invoked while a watcher iterates through entries.
getJNIEnv(): This retrieves a JNI environment for the current thread.
deleteGlobalRef(): This helps delete global references previously
created.
#include "StoreWatcher.h"
#include <unistd.h>
void deleteGlobalRef(JNIEnv* pEnv, jobject* pRef);
JNIEnv* getJNIEnv(JavaVM* pJavaVM);
void* runWatcher(void* pArgs);
void processEntry(JNIEnv* pEnv, StoreWatcher* pWatcher,
StoreEntry* pEntry);
...
6. In jni/StoreWatcher.c, implement startWatcher(), invoked from the UI
thread, that set up the StoreWatcher structure and starts the watcher thread,
thanks to POSIX primives.
Calling Java Back from Nave Code
[ 114 ]
7. Because the UI thread may access store content at the same me the watcher
thread checks entries, we need to keep an object to synchronize on. Let's use Store
class itself since its geers and seers are synchronized:
In Java, synchronizaon is always performed on an object. When a Java method
is dened with the synchronized keyword, then Java synchronizes on
this (the current object) behind the scene: synchronized(this) {
doSomething(); ... }.
...
void startWatcher(JNIEnv* pEnv, StoreWatcher* pWatcher,
Store* pStore, jobject pStoreFront) {
// Erases the StoreWatcher structure.
memset(pWatcher, 0, sizeof(StoreWatcher));
pWatcher->mState = STATE_OK;
pWatcher->mStore = pStore;
// Caches the VM.
if ((*pEnv)->GetJavaVM(pEnv, &pWatcher->mJavaVM) != JNI_OK) {
goto ERROR;
}
// Caches objects.
pWatcher->mStoreFront = (*pEnv)->NewGlobalRef
(pEnv, pStoreFront);
if (pWatcher->mStoreFront == NULL) goto ERROR;
// Initializes and launches the native thread. For simplicity
// purpose, error results are not checked (but we should...).
pthread_attr_t lAttributes;
int lError = pthread_attr_init(&lAttributes);
if (lError) goto ERROR;
lError = pthread_create(&pWatcher->mThread, &lAttributes,
runWatcher, pWatcher);
if (lError) goto ERROR;
return;
ERROR:
stopWatcher(pEnv, pWatcher);
return;
}
...
Chapter 4
[ 115 ]
8. In StoreWatcher.c, implement helper method getJNIEnv(), which is called
when the thread starts. The watcher thread is nave, which means that:
No JNI environment is aached. Thus, JNI is not acvated by default for the
thread.
It is not instanated by Java and has no "Java root", that is, if you look at the
call stack, you never nd a Java method.
Having no Java root is an important property of nave threads because it
impacts directly the ability of JNI to load Java classes. Indeed, it is not possible
from a nave thread to access the Java applicaon class loader. Only a
bootstrap class loader with system classes is available. A Java thread on the
opposite always has a Java root and thus can access the applicaon class
loader with its applicaon classes.
A soluon to that problem is to load classes in an appropriate Java thread and
to share them later with nave threads.
9. The nave thread is aached to the VM with AttachCurrentThread() in order to
retrieve a JNIEnv. This JNI environment is specic to the current thread and cannot
be shared with others (he opposite of a JavaVM object which can be shared safely).
Internally, the VM builds a new Thread object and adds it to the main thread group,
like any other Java thread:
...
JNIEnv* getJNIEnv(JavaVM* pJavaVM) {
JavaVMAttachArgs lJavaVMAttachArgs;
lJavaVMAttachArgs.version = JNI_VERSION_1_6;
lJavaVMAttachArgs.name = "NativeThread";
lJavaVMAttachArgs.group = NULL;
JNIEnv* lEnv;
if ((*pJavaVM)->AttachCurrentThread(pJavaVM, &lEnv,
&lJavaVMAttachArgs) != JNI_OK) {
lEnv = NULL;
}
return lEnv;
}
...
10. The most important method is runWatcher(), the main thread loop. Here, we are
not anymore on the UI thread but on the watcher thread. Thus we need to aach it
to the VM in order to get a working JNI environment.

Calling Java Back from Nave Code
[ 116 ]
11. The thread works only at regular intervals of me and sleeps meanwhile. When
it leaves its nap, the thread starts looping over each entry individually in a crical
secon (that is, synchronized) to access them safely. Indeed, the UI thread (that is,
the user) may change an entry value at any me.
12. Crical secon is delimited with a JNI monitor which has exactly the same properes
as the synchronized keyword in Java. Obviously, MonitorEnter() and
MonitorExit() have to lock/unlock on the object mStoreFront to synchronize
properly with its geers and seers. These instrucons ensure that the rst thread
to reach a monitor/synchronized block will enter the secon while the other will
wait in front of the door unl the rst has nished.
13. Thread leaves the loop and exits when state variable is changed by the UI thread
(in stopWatcher()). An aached thread which dies must eventually detach from
the VM so that the laer can release resources properly:
...
void* runWatcher(void* pArgs) {
StoreWatcher* lWatcher = (StoreWatcher*) pArgs;
Store* lStore = lWatcher->mStore;
JavaVM* lJavaVM = lWatcher->mJavaVM;
JNIEnv* lEnv = getJNIEnv(lJavaVM);
if (lEnv == NULL) goto ERROR;
int32_t lRunning = 1;
while (lRunning) {
sleep(SLEEP_DURATION);
StoreEntry* lEntry = lWatcher->mStore->mEntries;
int32_t lScanning = 1;
while (lScanning) {
// Critical section begining, one thread at a time.
// Entries cannot be added or modified.
(*lEnv)->MonitorEnter(lEnv, lWatcher->mStoreFront);
lRunning = (lWatcher->mState == STATE_OK);
StoreEntry* lEntryEnd = lWatcher->mStore->mEntries
+ lWatcher->mStore->mLength;
lScanning = (lEntry < lEntryEnd);
if (lRunning && lScanning) {
processEntry(lEnv, lWatcher, lEntry);
}
// Critical section end.

Chapter 4
[ 117 ]
(*lEnv)->MonitorExit(lEnv, lWatcher->mStoreFront);
// Goes to next element.
++lEntry;
}
}
ERROR:
(*lJavaVM)->DetachCurrentThread(lJavaVM);
pthread_exit(NULL);
}
...
14. In StoreWatcher, write processEntry() which detects the watcherCounter
entry and increment its value. Thus, watcherCounter contains how many
iteraons the watcher thread has performed since the beginning:
...
void processEntry(JNIEnv* pEnv, StoreWatcher* pWatcher,
StoreEntry* pEntry) {
if ((pEntry->mType == StoreType_Integer)
&& (strcmp(pEntry->mKey, "watcherCounter") == 0) {
++pEntry->mValue.mInteger;
}
}
...
15. To nish with jni/StoreWatcher.c, write stopWatcher(), also executed on the
UI thread, which terminates the watcher thread and releases all global references.
To help releasing them, implement deleteGlobalRef() helper ulity which will
help us make the code more consise in the next part. Note that mState is a shared
variable among threads and need to be accessed inside a crical secon:
...
void deleteGlobalRef(JNIEnv* pEnv, jobject* pRef) {
if (*pRef != NULL) {
(*pEnv)->DeleteGlobalRef(pEnv, *pRef);
*pRef = NULL;
}
}
void stopWatcher(JNIEnv* pEnv, StoreWatcher* pWatcher) {
if (pWatcher->mState == STATE_OK) {
// Waits for the watcher thread to stop.
(*pEnv)->MonitorEnter(pEnv, pWatcher->mStoreFront);
pWatcher->mState = STATE_KO;

Calling Java Back from Nave Code
[ 118 ]
(*pEnv)->MonitorExit(pEnv, pWatcher->mStoreFront);
pthread_join(pWatcher->mThread, NULL);
deleteGlobalRef(pEnv, &pWatcher->mStoreFront);
}
}
16. Generate JNI header le with javah.
17. Finally, open exisng le jni/com_packtpub_Store.c, declare a stac Store
variable containing store content and dene initializeStore() to create and
run the watcher thread and finalizeStore() to stop it and release entries:
#include "com_packtpub_Store.h"
#include "Store.h"
#include "StoreWatcher.h"
#include <stdint.h>
#include <string.h>
static Store mStore;
static StoreWatcher mStoreWatcher;
JNIEXPORT void JNICALL Java_com_packtpub_Store_initializeStore
(JNIEnv* pEnv, jobject pThis) {
mStore.mLength = 0;
startWatcher(pEnv, &mStoreWatcher, &mStore, pThis);
}
JNIEXPORT void JNICALL Java_com_packtpub_Store_finalizeStore
(JNIEnv* pEnv, jobject pThis) {
stopWatcher(pEnv, &mStoreWatcher);
StoreEntry* lEntry = mStore.mEntries;
StoreEntry* lEntryEnd = lEntry + mStore.mLength;
while (lEntry < lEntryEnd) {
free(lEntry->mKey);
releaseEntryValue(pEnv, lEntry);
++lEntry;
}
mStore.mLength = 0;
}
...

Chapter 4
[ 119 ]
18. Do not forget to add StoreWatcher.c to the Android.mk le as usual.
19. Compile and run the applicaon.
What just happened?
We have created a background nave thread and managed to aach it to the Dalvik VM,
allowing us to get a JNI environment. Then we have synchronized Java and nave threads
together to handle concurrency issues properly. Store is inialized when applicaon starts
and when it stops.
On the nave side, synchronizaon is performed with a JNI monitor equivalent to the
synchronized keyword. Because Java threads are based on POSIX primives internally,
it would also be possible to implement thread synchronizaon completely navely
(that is, without relying on Java primive) with POSIX mutexes:
pthread_mutex_t lMutex;
pthread_cond_t lCond;
// Initializes synchronization variables
pthread_mutex_init(&lMutex, NULL);
pthread_cond_init(&lCond, NULL);
// Enters critical section.
pthread_mutex_lock(&lMutex);
// Waits for a condition
While (needToWait)
pthread_cond_wait(&lCond, &lMutex);
// Does something...
// Wakes-up other threads.
pthread_cond_broadcast(&lCond);
// Leaves critical section.
pthread_mutex_unlock(&lMutex);
Depending on the plaorm, mixing Java thread synchronizaon and nave
synchronizaon based on dierent models is considered as a harmful pracce
(for example, plaorms which implement green threads). Android is not
concerned by this problem but keep it in mind if you plan to write portable
nave code.

Calling Java Back from Nave Code
[ 120 ]
As a last note I would like to point out that Java and C/C++ are dierent languages, with
similar but somewhat dierent semancs. Thus, always be careful not to expect C/C++ to
behave like Java. As an example, the volatile has a dierent semanc in Java and C/C++
since both follow a dierent memory model.
Attaching and detaching threads
A good place to get JavaVM instance is from JNI_OnLoad(), a callback that a nave library
can declare and implement to get noed when library is loaded in memory (when System.
loadLibrary() is called from Java). This is also a good place to do some JNI descriptor
caching as we will see in next part:
JavaVM* myGlobalJavaVM;
jint JNI_OnLoad(JavaVM* pVM, void* reserved) {
myGlobalJavaVM = pVM;
JNIEnv *lEnv;
if (pVM->GetEnv((void**) &lEnv, JNI_VERSION_1_6) != JNI_OK) {
// A problem occured
return -1;
}
return JNI_VERSION_1_6;
}
An aached thread like the watcher thread must be eventually unaached before acvity is
destroyed. Dalvik detects threads which are not detached and reacts by aborng and leaving
a dirty crash dump in your logs! When geng detached, any monitor held is released and
any waing thread is noed.
Since Android 2.0, a technique to make sure a thread is systemacally detached is to
bind a destructor callback to the nave thread with pthread_key_create() and
DetachCurrentThread(). A JNI environment can be saved into thread local storage
with pthread_setspecific() to pass it as an argument to the destructor.
Although aaching/detaching can be performed at any me, these
operaons are expensive and should be performed once or punctually
rather than constantly.
Chapter 4
[ 121 ]
More on Java and native code lifecycles
If you compare Store_Part3-4 and Store_Part4-1, you will discover that values remain
between execuons in the rst one. This is because nave libraries have a dierent lifecycle
than usual Android acvies. When an acvity is destroyed and recreated for any reason
(for example, screen reorientaon), any data is lost in the Java acvity.
But nave library and its global data are likely to remain in memory! Data persists between
execuons. This has implicaons in terms of memory management. Carefully release
memory when an applicaon is destroyed if you do not want to keep it between execuons.
Take care with create and destroy events
In some conguraons, onDestroy() event has the reputaon of
somemes being executed aer an acvity instance is recreated. This means
that destrucon of an acvity may occur unexpectedly aer the second
instance is recreated. Obvisously, this can lead to memory corrupon or leak.
Several strategies exist to overcome this problem:
Create and destroy data in other events if possible (like onStart() and onStop()).
But you will probably need to persist your data somewhere meanwhile (Java le),
which may impact responsiveness.
Destroy data only in onCreate(). This has the major inconvenience of not releasing
memory while an applicaon is running in the background.
Never allocate global data on the nave side (that is, stac variables) but save
the pointer to your nave data on the Java side: allocate memory when acvity is
created and send back your pointer to Java casted as an int (or even beer a long
for future compability reasons). Any futher JNI call must be performed with this
pointer as parameter.
Use a variable on the Java side to detect the case where destrucon of an acvity
(onDestroy()) happens aer a new instance has been recreated (onCreate()).
Do not cache JNIEnv between execuons!
Android applicaons can be destroyed and recreated at any me. If a JNIEnv
is cached on the nave side and the applicaon gets closed meanwhile, then
its reference may become invalid. So get back a new reference each me an
applicaon is recreated.

Calling Java Back from Nave Code
[ 122 ]
Calling Java back from native code
In the previous chapter, we have discovered how to get a Java class descriptor with JNI
method FindClass(). But we can get much more! Actually, if you are a regular Java
developer, this should remind you of something: the Java reecon API. Similarly, JNI can
modify Java object elds, run Java methods, access stac members... but from nave
code. This is oen referred to as a Java callback, because Java code is run from nave code
which descends itself from Java. But this is the simple case. Since JNI is ghtly coupled with
threads, calling Java code from nave threads is slightly more dicult. Aaching a thread
to a VM is only part of the soluon.
For this last part with the Store project, let's enhance the watcher thread so that it warns
the Java acvity when it detects a value it does not like (for example, an integer outside a
dened range). We are going to use JNI callback capabilies to iniate communicaon from
nave code to Java.
Project Store_Part4-1 can be used as a starng point for this part. The resulng
project is provided with this book under the name Project Store_Part4-2.
Time for action – invoking Java code from a native thread
Let's make a few changes on the Java side:
1. Create a StoreListener interface as follows to dene methods through which
nave code is going to communicate with Java code:
public interface StoreListener {
public void onAlert(int pValue);
public void onAlert(String pValue);
public void onAlert(Color pValue);
}
2. Open Store.java and make a few changes:
Declare one Handler member. A Handler is a message queue associated
with the thread it was created on (here, it will be the UI thread). Any message
posted from whatever thread is received in an internal queue processed
magically on the inial thread. Handlers are a popular and easy inter-thread
communicaon technique on Android.

Chapter 4
[ 123 ]
Declare a delegate StoreListener to which messages (that is, a method call)
received from the watcher thread are going to be posted. This will be the
StoreActivity.
Change Store constructor to inject the target delegate listener.
Implement StoreListener interface and its corresponding methods.
Alert messages are recorded as Runnable tasks and posted to the target
thread, on which the nal listener works safely.
public class Store implements StoreListener {
static {
System.loadLibrary("store");
}
private Handler mHandler;
private StoreListener mDelegateListener;
public Store(StoreListener pListener) {
mHandler = new Handler();
mDelegateListener = pListener;
}
public void onAlert(final int pValue) {
mHandler.post(new Runnable() {
public void run() {
mDelegateListener.onAlert(pValue);
}
});
}
public void onAlert(final String pValue) {
mHandler.post(new Runnable() {
public void run() {
mDelegateListener.onAlert(pValue);
}
});
}
public void onAlert(final Color pValue) {
mHandler.post(new Runnable() {
public void run() {
mDelegateListener.onAlert(pValue);
}
});
}
...
}

Calling Java Back from Nave Code
[ 124 ]
3. Update the exisng class Color and add methods to check equality. This will later
allow the watcher thread to compare an entry to a reference color:
public class Color {
private int mColor;
public Color(String pColor) {
super();
mColor = android.graphics.Color.parseColor(pColor);
}
@Override
public String toString() {
return String.format("#%06X", mColor);
}
@Override
public int hashCode() {
return mColor;
}
@Override
public boolean equals(Object pOther) {
if (this == pOther) { return true; }
if (pOther == null) { return false; }
if (getClass() != pOther.getClass()) { return false; }
Color pColor = (Color) pOther;
return (mColor == pColor.mColor);
}
}
4. Open StoreActivity.java and implement StoreListener interface. When
an alert is received, a simple toast message is raised. Change Store constructor
call accordingly. Note that this is the moment where the thread on which the
internal Handler processes messages is determined:
public class StoreActivity extends Activity implements
StoreListener{
private EditText mUIKeyEdit, mUIValueEdit;
private Spinner mUITypeSpinner;
private Button mUIGetButton, mUISetButton;
private Store mStore;
@Override

Chapter 4
[ 125 ]
public void onCreate(Bundle savedInstanceState) {
super.onCreate(savedInstanceState);
setContentView(R.layout.main);
// Initializes components and binds buttons to handlers.
...
// Initializes the native side store.
mStore = new Store(this);
}
...
public void onAlert(int pValue) {
displayError(String.format("%1$d is not an allowed integer",
pValue));
}
public void onAlert(String pValue) {
displayError(String.format("%1$s is not an allowed string",
pValue));
}
public void onAlert(Color pValue) {
displayError(String.format("%1$s is not an allowed color",
pValue.toString()));
}
}
The Java side is ready to receive callbacks. Let's go back to nave code to emit them:
5. Open exisng le jni/StoreWatcher.c. The StoreWatcher structure already
has access to the Java Store frontend. But to call its methods (for example, Store.
onAlert()), we need a few more items: declare the appropriate class and method
descriptors like if you were working with the reecon API. Do the same for Color.
equals().
6. In addion, declare a a reference to a Color object which is going to be used as a
base for color comparison by the watcher. Any idencal color will be considered as
an alert:

Calling Java Back from Nave Code
[ 126 ]
What we do here is cache references so that we do not have to nd
them again for each JNI call. Caching has two main benets: it improves
performances (JNI lookups are quite expensive compare to a cached access)
and readability.
Caching is also the only way to provide JNI references to nave threads as
they do not have access to the applicaon class loader (only the system one).
#ifndef _STOREWATCHER_H_
#define _STOREWATCHER_H_
...
typedef struct {
// Native variables.
Store* mStore;
// Cached JNI references.
JavaVM* mJavaVM;
jobject mStoreFront;
jobject mColor;
// Classes.
jclass ClassStore;
jclass ClassColor;
// Methods.
jmethodID MethodOnAlertInt;
jmethodID MethodOnAlertString;
jmethodID MethodOnAlertColor;
jmethodID MethodColorEquals;
// Thread variables.
pthread_t mThread;
int32_t mState;
} StoreWatcher;
...
7. In jni directory, open implementaon le StoreWatcher.c. Declare helper
methods to create a global reference and process entries.
8. Implement makeGlobalRef(), which turns a local into a global reference. This is
a "shortcut" to ensure proper deleon of local references and NULL value handling
(if an error occurs in a previous instrucon):
#include "StoreWatcher.h"

Chapter 4
[ 127 ]
#include <unistd.h>
void makeGlobalRef(JNIEnv* pEnv, jobject* pRef);
void deleteGlobalRef(JNIEnv* pEnv, jobject* pRef);
JNIEnv* getJNIEnv(JavaVM* pJavaVM);
void* runWatcher(void* pArgs);
void processEntry(JNIEnv* pEnv, StoreWatcher* pWatcher,
StoreEntry* pEntry);
void processEntryInt(JNIEnv* pEnv, StoreWatcher* pWatcher,
StoreEntry* pEntry);
void processEntryString(JNIEnv* pEnv, StoreWatcher* pWatcher,
StoreEntry* pEntry);
void processEntryColor(JNIEnv* pEnv, StoreWatcher* pWatcher,
StoreEntry* pEntry);
void makeGlobalRef(JNIEnv* pEnv, jobject* pRef) {
if (*pRef != NULL) {
jobject lGlobalRef = (*pEnv)->NewGlobalRef(pEnv, *pRef);
// No need for a local reference any more.
(*pEnv)->DeleteLocalRef(pEnv, *pRef);
// Here, lGlobalRef may be null.
*pRef = lGlobalRef;
}
}
void deleteGlobalRef(JNIEnv* pEnv, jobject* pRef) {
if (*pRef != NULL) {
(*pEnv)->DeleteGlobalRef(pEnv, *pRef);
*pRef = NULL;
}
}
...
9. Here is the big piece, sll in StoreWatcher.c. If you remember the previous part,
method startWatcher() is called from the UI thread to inialize and start the
watcher. Thus, this is a perfect place to cache JNI descriptors. Actually, this is almost
one of the only places because as the UI thread is a Java thread, we have total
access to the applicaon class loader. But if we were trying to cache them inside
the nave thread, the laer would have access only to the system class loader and
nothing else!

Calling Java Back from Nave Code
[ 128 ]
10. One can nd a class descriptor thanks to its absolute package path (for example,
com./packtpub/Store). Because classes are objects, the only way to share them
safely with the nave thread is to turn them into global references. This is not the
case for "IDs" such as jmethodID and jfieldID which are in now way references:
...
void startWatcher(JNIEnv* pEnv, StoreWatcher* pWatcher,
Store* pStore, jobject pStoreFront) {
// Erases the StoreWatcher structure.
memset(pWatcher, 0, sizeof(StoreWatcher));
pWatcher->mState = STATE_OK;
pWatcher->mStore = pStore;
// Caches the VM.
if ((*pEnv)->GetJavaVM(pEnv, &pWatcher->mJavaVM) != JNI_OK) {
goto ERROR;
}
// Caches classes.
pWatcher->ClassStore = (*pEnv)->FindClass(pEnv,
"com/packtpub/Store");
makeGlobalRef(pEnv, &pWatcher->ClassStore);
if (pWatcher->ClassStore == NULL) goto ERROR;
pWatcher->ClassColor = (*pEnv)->FindClass(pEnv,
"com/packtpub/Color");
makeGlobalRef(pEnv, &pWatcher->ClassColor);
if (pWatcher->ClassColor == NULL) goto ERROR;
...
11. In start_watcher(), method descriptors are retrieved with JNI from a class
descriptor. To dierenate dierent overloads with the same name, a descripon
of the method with a simple predened formalism is necessary. For example, (I)
V which means an integer is expected and a void returned or (Ljava/lang/
String;)V which means a String is passed in parameter). Constructor descriptors
are retrieved in the same way except that their name is always <init> and they do
not return a value:
...
// Caches Java methods.
pWatcher->MethodOnAlertInt = (*pEnv)->GetMethodID(pEnv,
pWatcher->ClassStore, "onAlert", "(I)V");
if (pWatcher->MethodOnAlertInt == NULL) goto ERROR;
pWatcher->MethodOnAlertString = (*pEnv)->GetMethodID(pEnv,

Chapter 4
[ 129 ]
pWatcher->ClassStore, "onAlert", "(Ljava/lang/String;)V");
if (pWatcher->MethodOnAlertString == NULL) goto ERROR;
pWatcher->MethodOnAlertColor = (*pEnv)->GetMethodID(pEnv,
pWatcher->ClassStore, "onAlert","(Lcom/packtpub/Color;)V");
if (pWatcher->MethodOnAlertColor == NULL) goto ERROR;
pWatcher->MethodColorEquals = (*pEnv)->GetMethodID(pEnv,
pWatcher->ClassColor, "equals", "(Ljava/lang/Object;)Z");
if (pWatcher->MethodColorEquals == NULL) goto ERROR;
jmethodID ConstructorColor = (*pEnv)->GetMethodID(pEnv,
pWatcher->ClassColor, "<init>", "(Ljava/lang/String;)V");
if (ConstructorColor == NULL) goto ERROR;
...
12. Again in the same method start_watcher(), cache object instances with a global
reference. Do not use makeGlobalRef() ulity on the Java store frontend because
local reference is actually a parameter and does not need to be released.
13. The color is not an outside object referenced and cached like others. It is instanated
with JNI by a call to NewObject(), which takes a constructor descriptor in parameter.
...
// Caches objects.
pWatcher->mStoreFront = (*pEnv)->NewGlobalRef(pEnv, pStoreFront);
if (pWatcher->mStoreFront == NULL) goto ERROR;
// Creates a new white color and keeps a global reference.
jstring lColor = (*pEnv)->NewStringUTF(pEnv, "white");
if (lColor == NULL) goto ERROR;
pWatcher->mColor = (*pEnv)->NewObject(pEnv,pWatcher->ClassColor,
ConstructorColor, lColor);
makeGlobalRef(pEnv, &pWatcher->mColor);
if (pWatcher->mColor == NULL) goto ERROR;
// Launches the native thread.
...
return;
ERROR:
stopWatcher(pEnv, pWatcher);
return;
}
...

Calling Java Back from Nave Code
[ 130 ]
14. In the same le, rewrite processEntry() to process each type of entry separately.
Check that integers are in the range [-1000, 1000] and send an alert if that is not
the case. To invoke a Java method on a Java object, simply use CallVoidMethod()
on a JNI environment. This means that the called Java method returns void. If Java
method was returning an int, we would call CallIntMethod(). Like with the
reecon API, invoking a Java method requires:
An object instance (except for stac methods, in which case we would
provide a class instance and use CallStaticVoidMethod()).
A method descriptor.
Parameters (if applicable, here an integer value).
...
void processEntry(JNIEnv* pEnv, StoreWatcher* pWatcher,
StoreEntry* pEntry) {
switch (pEntry->mType) {
case StoreType_Integer:
processEntryInt(pEnv, pWatcher, pEntry);
break;
case StoreType_String:
processEntryString(pEnv, pWatcher, pEntry);
break;
case StoreType_Color:
processEntryColor(pEnv, pWatcher, pEntry);
break;
}
}
void processEntryInt(JNIEnv* pEnv,StoreWatcher* pWatcher,
StoreEntry* pEntry) {
if(strcmp(pEntry->mKey, "watcherCounter") == 0) {
++pEntry->mValue.mInteger;
} else if ((pEntry->mValue.mInteger > 1000) ||
(pEntry->mValue.mInteger < -1000)) {
(*pEnv)->CallVoidMethod(pEnv,
pWatcher->mStoreFront,pWatcher->MethodOnAlertInt,
(jint) pEntry->mValue.mInteger);
}
}
...

Chapter 4
[ 131 ]
15. Repeat the operaon for strings. Strings require allocang a new Java string. We do
not need to generate a global reference as it is used immediately in the Java callback.
But if you have kept in mind previous lessons, you know we can release the local
reference right aer it is used. Indeed, we are in a ulity method and we do not always
know the context they may be used in. In addion, whereas in a classic JNI method,
local references are deleted when method returns, here we are in an aached nave
thread. Thus, local references would get deleted only when thread is detached
(that is, when acvity leaves). JNI memory would leak meanwhile:
...
void processEntryString(JNIEnv* pEnv, StoreWatcher* pWatcher,
StoreEntry* pEntry) {
if (strcmp(pEntry->mValue.mString, "apple")) {
jstring lValue = (*pEnv)->NewStringUTF(
pEnv, pEntry->mValue.mString);
(*pEnv)->CallVoidMethod(pEnv,
pWatcher->mStoreFront, pWatcher->MethodOnAlertString,
lValue);
(*pEnv)->DeleteLocalRef(pEnv, lValue);
}
}
16. Finally, process colors. To check if a color is idencal to the reference color, invoke
the equality method provided by Java and reimplemented in our Color class.
Because it returns a Boolean value, CallVoidMethod() is inappropriate for the
rst test. But CallBooleanMethod() is:
void processEntryColor(JNIEnv* pEnv, StoreWatcher* pWatcher,
StoreEntry* pEntry) {
jboolean lResult = (*pEnv)->CallBooleanMethod(
pEnv, pWatcher->mColor,
pWatcher->MethodColorEquals, pEntry->mValue.mColor);
if (lResult) {
(*pEnv)->CallVoidMethod(pEnv,
pWatcher->mStoreFront, pWatcher->MethodOnAlertColor,
pEntry->mValue.mColor);
}
}
...

Calling Java Back from Nave Code
[ 132 ]
17. We are almost done. Do not forget to release global references when a thread exits!
...
void stopWatcher(JNIEnv* pEnv, StoreWatcher* pWatcher) {
if (pWatcher->mState == STATE_OK) {
// Waits for the watcher thread to stop.
...
deleteGlobalRef(pEnv, &pWatcher->mStoreFront);
deleteGlobalRef(pEnv, &pWatcher->mColor);
deleteGlobalRef(pEnv, &pWatcher->ClassStore);
deleteGlobalRef(pEnv, &pWatcher->ClassColor);
}
}
18. Compile and run.
What just happened?
Launch the applicaon and create a string entry with the value apple. Then try to create
an entry with white color. Finally, enter an integer value outside the [-1000, 1000] range.
In each case, a message should be raised on screen (every me the watcher iterates).
In this part, we have seen how to cache JNI descriptors and perform callbacks to Java. We
have also introduced a way to send messages between threads with handlers, invoked
indirectly in Java. Android features several other communicaon means, such as AsyncTask.
Have a look at http://developer.android.com/resources/articles/painless-
threading.html for more informaon.
Java callbacks are not only useful to execute a Java piece of code, they are also the only way
to analyze jobject parameters passed to a nave method. But if calling C/C++ code from
Java is rather easy, performing Java operaons from C/C++ is bit more involving! Performing
a single Java call that holds in one single line of Java code requires lots of work! Why? Simply
because JNI is a reecve API.
To get a eld value, one needs to get its containing class descriptor and its eld descriptor
before actually retrieving its value. To call a method, one needs to retrieve class descriptor
and method descriptor before calling the method with the necessary parameters. The
process is always the same.
Chapter 4
[ 133 ]
Caching denions
Retrieving all these element denions is not only tedious, it is absolutely not
opmal in terms of performance. Thus, JNI denions used frequently should
be cached for reuse. Cached elements can be kept safely for the lifeme of
an acvity (not of the nave library) and shared between threads with global
references (for example, for class descriptors).
Caching is the only soluon to communicate with nave threads, which do not have access
to the applicaon class loader. But there is a way to limit the amount of denions to
prepare: instead of caching classes, methods, and elds, simply cache the applicaon class
loader itself.
Do not call back in callbacks!
Calling nave code from Java through JNI works perfectly. Calling Java code
from nave works perfect too. However, interleaving several levels of Java and
nave calls should be avoided.
More on callbacks
The central object in JNI is JNIEnv. It is provided systemacally as rst parameter to
JNI C/C++ methods called from Java. We have seen:
jclass FindClass(const char* name);
jclass GetObjectClass(jobject obj);
jmethodID GetMethodID(jclass clazz, const char* name,
const char* sig) ;
jfieldID GetStaticFieldID(jclass clazz, const char* name,
const char* sig);
but also:
jfieldID GetFieldID(jclass clazz, const char* name, const char* sig);
jmethodID GetStaticMethodID(jclass clazz, const char* name,
const char* sig);
These allow retrieving JNI descriptors: classes, methods, and elds, stac and instance
members having dierent accessors. Note that FindClass() and GetObjectClass()
have the same purpose except that FindClass nds class denions according to their
absolute path whereas the other nds the class of an object directly.

Calling Java Back from Nave Code
[ 134 ]
There is a second set of methods to actually execute methods or retrieve eld values.
There is one method per primive types plus one for objects.
jobject GetObjectField(jobject obj, jfieldID fieldID);
jboolean GetBooleanField(jobject obj, jfieldID fieldID);
void SetObjectField(jobject obj, jfieldID fieldID, jobject value);
void SetBooleanField(jobject obj, jfieldID fieldID, jboolean value);
The same goes for methods according to their return values:
jobject CallObjectMethod(JNIEnv*, jobject, jmethodID, ...)
jboolean CallBooleanMethod(JNIEnv*, jobject, jmethodID, ...);
Variants of call methods exist, with an A and V posix. Behavior is idencal except that
arguments are specied using a va_list (that is, variable argument list) or a jvalue array
(jvalue being an union of all JNI types):
jobject CallObjectMethodV(JNIEnv*, jobject, jmethodID, va_list);
jobject CallObjectMethodA(JNIEnv*, jobject, jmethodID, jvalue*);
Parameters passed to a Java method through JNI must use the available JNI type: jobject
for any object, jboolean for a boolean value, and so on. See the following table for a more
detailed list.
Look for jni.h in the Android NDK include directory to feel all the possibilies by JNI
reecve API.
JNI method denitions
Methods in Java can be overloaded. That means that there can be two methods with
the same name but dierent parameters. This is why a signature needs to be passed
to GetMethodID() and GetStaticMethodID().
Formally speaking, a signature is declared in the following way:
(<Parameter 1 Type Code>[<Parameter 1 Class>];...)<Return Type Code>
For example:
(Landroid/view/View;I)Z
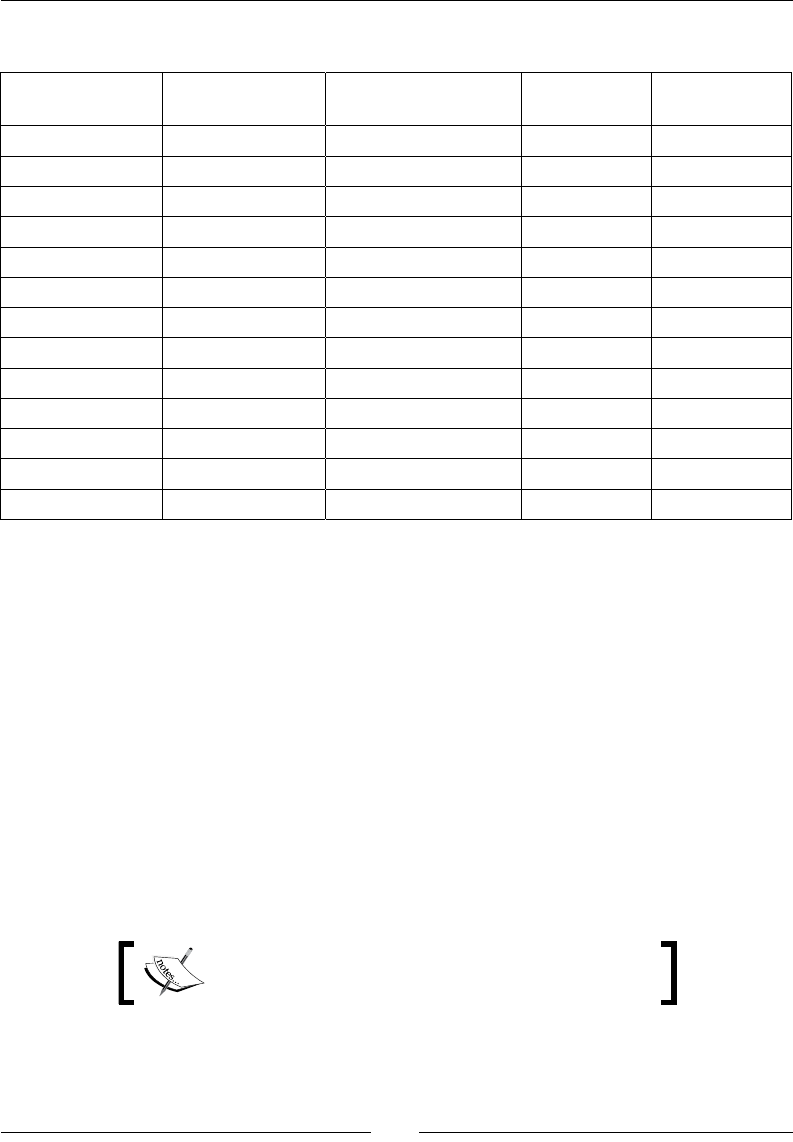
Chapter 4
[ 135 ]
The following table summarizes the various types available in JNI with their code:
Java type Nave type Nave array type Type code Array type
code
boolean jboolean jbooleanArray Z [Z
byte jbyte jbyteArray B[B
char jchar jcharArray C [C
double jdouble jdoubleArray D[D
oat joat joatArray F[F
int jint jintArray I[I
long jlong jlongArray J [J
short jshort jshortArray S [S
Object jobject jobjectArray L [L
String jstring N/A L [L
Class jclass N/A L [L
Throwable jthrowable N/A L [L
void void N/A VN/A
Processing bitmaps natively
Android NDK proposes an API dedicated to bitmap processing which allows accessing
bitmap surface directly. This API is specic to Android and is not related to the JNI
specicaon. However, bitmaps are Java objects and will need to be treated as such
in nave code.
To see more concretely how bitmaps can be modied from nave code, let's try to
decode a camera feed from nave code. Android already features a Camera API on the
Java side to display a video feed. However, there is absolutely no exibility on how the feed is
displayed—it is drawn directly on a GUI component. To overcome this problem, snapshots can
be recorded into a data buer encoded in a specic format, YUV, which is not compable with
classic RGB images! This is a situaon where nave code comes to the rescue and can help us
improve performances.
The nal project is provided with this book under the
name LiveCamera.

Calling Java Back from Nave Code
[ 136 ]
Time for action – decoding camera feed from native code
1. Create a new hybrid Java/C++ project like shown in Chapter 2, Creang, Compiling,
and Deploying Nave Projects:
Name it LiveCamera.
Its main package is com.packtpub.
Its main acvity is LiveCameraActivity.
Get rid of res/main.xml as we will not create a GUI this me.
Do not forget to create a jni directory at project's root.
2. In the applicaon manifest, set the acvity style to fullscreen and its orientaon to
landscape. Landscape orientaon avoids most camera orientaon problems that can
be met on Android devices. Also request acces permission to the Android camera:
<?xml version="1.0" encoding="utf-8"?>
<manifest xmlns:android="http://schemas.android.com/apk/res/
android"
package="com.packtpub" android:versionCode="1"
android:versionName="1.0">
<uses-sdk android:minSdkVersion="10" />
<application android:icon="@drawable/icon"
android:label="@string/app_name">
<activity android:name=".LiveCameraActivity"
android:label="@string/app_name"
android:theme="@android:style/Theme.NoTitleBar.Fullscreen"
android:screenOrientation="landscape">
...
</activity>
</application>
<uses-permission android:name="android.permission.CAMERA" />
</manifest>
Let's take care of the Java side. We need to create a component to display the
camera feed captured from the Android system class android.hardware.Camera.
3. Create a new class CameraView which extends andoid.View.SurfaceView
and implements Camera.PreviewCallback and SurfaceHolder.Callback.
SurfaceView is a visual component provided by Android to perform
custom rendering.
Downloa d f r o m W o w ! e B o o k < w w w.woweb o o k . c o m >Downloa d f r o m W o w ! e B o o k < w w w.woweb o o k . c o m >

Chapter 4
[ 137 ]
Give CameraView the responsibility to load livecamera library, the nave
video decoding library we are about to create. This library will contain one
method decode() which will take raw video feed data in input and decode
it into a target Java bitmap:
public class CameraView extends SurfaceView implements
SurfaceHolder.Callback, Camera.PreviewCallback {
static {
System.loadLibrary("livecamera");
}
public native void decode(Bitmap pTarget, byte[] pSource);
...
4. Inialize CameraView component.
In its constructor, register it as a listener of its own surface events, that is, surface
creaon, destrucon, and change. Disable the willNotDraw ag to ensure its
onDraw() event is triggered as we are going to render the camera feed from the
main UI thread.
Render a SurfaceView from the main UI thread only if a
rendering operaon is not too me consuming or for prototyping
purposes. This can simplify code and avoid synchronizaon
concerns. However, SurfaceView is designed to be rendered
from a separate thread and should be generally used that way.
...
private Camera mCamera;
private byte[] mVideoSource;
private Bitmap mBackBuffer;
private Paint mPaint;
public CameraView(Context context) {
super(context);
getHolder().addCallback(this);
setWillNotDraw(false);
}
...

Calling Java Back from Nave Code
[ 138 ]
5. When surface is created, acquire the default camera (there can be a front
and rear camera, for example) and set its orientaon to landscape (like the
acvity). To draw the camera feed ourself, deacvate automac preview (that is,
setPreviewDisplay(), which causes the video feed to be automacally drawn
into SurfaceView) and request the use of data buers for recording instead:
...
public void surfaceCreated(SurfaceHolder holder) {
try {
mCamera = Camera.open();
mCamera.setDisplayOrientation(0);
mCamera.setPreviewDisplay(null);
mCamera.setPreviewCallbackWithBuffer(this);
} catch (IOException eIOException) {
mCamera.release();
mCamera = null;
throw new IllegalStateException();
}
}
...
6. Method surfaceChanged() is triggered (potenally several mes) aer surface
is created and, of course, before it is destroyed. This is the place where surface
dimensions and pixel format get known.
First, nd the resoluon that is closest to the surface. Then create a byte buer to
capture a raw camera snapshot and a backbuer bitmap to store the conversion
result. Set up camera parameters: the selected resoluon and the video format
(YCbCr_420_SP, which is the default on Android) and nally, start the recording.
Before a frame is recorded, a data buer must be enqueued to capture a snapshot:
...
public void surfaceChanged(SurfaceHolder pHolder, int pFormat,
int pWidth, int pHeight) {
mCamera.stopPreview();
Size lSize = findBestResolution(pWidth, pHeight);
PixelFormat lPixelFormat = new PixelFormat();
PixelFormat.getPixelFormatInfo(mCamera.getParameters()
.getPreviewFormat(), lPixelFormat);
int lSourceSize = lSize.width * lSize.height
* lPixelFormat.bitsPerPixel / 8;
mVideoSource = new byte[lSourceSize];
mBackBuffer = Bitmap.createBitmap(lSize.width,
lSize.height,Bitmap.Config.ARGB_8888);

Chapter 4
[ 139 ]
Camera.Parameters lParameters = mCamera.getParameters();
lParameters.setPreviewSize(lSize.width, lSize.height);
lParameters.setPreviewFormat(PixelFormat.YCbCr_420_SP);
mCamera.setParameters(lParameters);
mCamera.addCallbackBuffer(mVideoSource);
mCamera.startPreview();
}
...
7. An Android camera can support various resoluons which are highly dependent on
the device. As there is no rule on what could be the default resoluon, we need to
look for a suitable one. Here, we select the biggest resoluon that ts the display
surface or the default one if none can be found.
...
private Size findBestResolution(int pWidth, int pHeight) {
List<Size> lSizes = mCamera.getParameters()
.getSupportedPreviewSizes();
Size lSelectedSize = mCamera.new Size(0, 0);
for (Size lSize : lSizes) {
if ((lSize.width <= pWidth)
&& (lSize.height <= pHeight)
&& (lSize.width >= lSelectedSize.width)
&& (lSize.height >= lSelectedSize.height)) {
lSelectedSize = lSize;
}
}
if ((lSelectedSize.width == 0)
|| (lSelectedSize.height == 0)) {
lSelectedSize = lSizes.get(0);
}
return lSelectedSize;
}
...
8. In CameraView.java, release camera when surface is destroyed as it is a
shared resource. In memory, buers can also be nullied to facilitate garbage
collector work:
...
public void surfaceDestroyed(SurfaceHolder holder) {
if (mCamera != null) {
mCamera.stopPreview();
mCamera.release();
Calling Java Back from Nave Code
[ 140 ]
mCamera = null;
mVideoSource = null;
mBackBuffer = null;
}
}
...
9. Now that surface is set up, decode video frames in onPreviewFrame() and store
the result in the backbuer bitmap. This handler is triggered by the Camera class
when a new frame is ready. Once decoded, invalidate the surface to redraw it.
To draw a video frame, override onDraw() and draw the backbuer into the target
canvas. Once done, we can re-enqueue the raw video buer to capture a new image.
The Camera component can enqueue several buers to
process a frame while others are geng captured. Although
this approach is more complex as it implies threading and
synchronizaon, it can achieve beer performance and can
handle punctual slow down. The single-threaded capture
algorithm shown here is simpler but much less ecient since a
new frame can only be recorded aer the previous one is drawn.
...
public void onPreviewFrame(byte[] pData, Camera pCamera) {
decode(mBackBuffer, pData);
invalidate();
}
@Override
protected void onDraw(Canvas pCanvas) {
if (mCamera != null) {
pCanvas.drawBitmap(mBackBuffer, 0, 0, mPaint);
mCamera.addCallbackBuffer(mVideoSource);
}
}
}

Chapter 4
[ 141 ]
10. Open the LiveCameraActivity.java le, which should have been
created by the Android project creaon wizard. Inialize the GUI with
a new CameraView instance.
public class LiveCameraActivity extends Activity {
@Override
protected void onCreate(Bundle savedInstanceState) {
super.onCreate(savedInstanceState);
setContentView(new CameraView(this));
}
}
Now that the Java side is ready, we can write the decode() method on the
nave side.
11. Generate JNI header le with javah.
12. Create corresponding implementaon le com_packtpub_CameraView.c. Include
android/bitmap.h, which denes the NDK bitmap processing API. The following
are a few ulity methods to help decode video:
toInt(): This converts a jbyte to an integer, erasing all useless bits
with a mask.
max(): This gets the maximum between two values.
clamp(): This method is used to clamp a value inside a dened interval.
color(): This method builds an ARGB color from its component.
13. Make them inline to gain a bit of performance:
#include "com_packtpub_CameraView.h"
#include <android/bitmap.h>
inline int32_t toInt(jbyte pValue) {
return (0xff & (int32_t) pValue);
}
inline int32_t max(int32_t pValue1, int32_t pValue2) {
if (pValue1 < pValue2) {
return pValue2;
} else {
return pValue1;
}
}

Calling Java Back from Nave Code
[ 142 ]
inline int32_t clamp(int32_t pValue, int32_t pLowest, int32_t
pHighest) {
if (pValue < 0) {
return pLowest;
} else if (pValue > pHighest) {
return pHighest;
} else {
return pValue;
}
}
inline int32_t color(pColorR, pColorG, pColorB) {
return 0xFF000000 | ((pColorB << 6) & 0x00FF0000)
| ((pColorG >> 2) & 0x0000FF00)
| ((pColorR >> 10) & 0x000000FF);
}
...
14. Sll in the same le, implement decode(). First, retrieve bitmap informaon
and lock it for drawing with the AndroidBitmap_* API.
Then, gain access to the input Java byte array with
GetPrimitiveArrayCritical(). This JNI method is similar to
Get<Primitive>ArrayElements() except that the acquired array is less likely
to be a temporary copy. In return, no JNI or thread-blocking calls can be performed
unl the array is released.
...
JNIEXPORT void JNICALL Java_com_packtpub_CameraView_decode
(JNIEnv * pEnv, jclass pClass, jobject pTarget, jbyteArray
pSource) {
AndroidBitmapInfo lBitmapInfo;
if (AndroidBitmap_getInfo(pEnv, pTarget, &lBitmapInfo) < 0) {
return;
}
if (lBitmapInfo.format != ANDROID_BITMAP_FORMAT_RGBA_8888) {
return;
}
uint32_t* lBitmapContent;
if (AndroidBitmap_lockPixels(pEnv, pTarget,
(void**)&lBitmapContent) < 0) {
return;
}

Chapter 4
[ 143 ]
jbyte* lSource = (*pEnv)->GetPrimitiveArrayCritical(pEnv,
pSource, 0);
if (lSource == NULL) {
return;
}
...
15. Connue decode()method. We have access to the input video buer with a video
frame inside and to the backbuer bitmap surface. So we can decode the video feed
into the output backbuer.
The video frame is encoded in the YUV format, which is quite dierent from RGB.
YUV format encodes a color in three components:
One luminance component, that is, the grayscale representaon of a color.
Two chrominance components which encode the color informaon (also
called Cb and Cr as they represent the blue-dierence and red-dierence).
16. There are many frames available whose format is based on YUV colors. Here,
we convert frames following the YCbCr 420 SP (or NV21) format. This kind of
image frame is composed of a buer of 8 bits Y luminance samples followed by a
second buer of interleaved 8 bits V and U chrominance samples. The VU buer
is subsampled, which means that there are less U and V samples compared to Y
samples (1 U and 1 V for 4 Y). The following algorithm processes each pixel and
converts each YUV pixel to RGB using the appropriate formula (see http://www.
fourcecc.org/fccyvrgb.php for more informaon).
17. Terminate decode() method by unlocking the backbuer bitmap and releasing the
Java array acquired earlier:
...
int32_t lFrameSize = lBitmapInfo.width * lBitmapInfo.height;
int32_t lYIndex, lUVIndex;
int32_t lX, lY;
int32_t lColorY, lColorU, lColorV;
int32_t lColorR, lColorG, lColorB;
int32_t y1192;
// Processes each pixel and converts YUV to RGB color.
for (lY = 0, lYIndex = 0; lY < lBitmapInfo.height; ++lY) {
lColorU = 0; lColorV = 0;
// Y is divided by 2 because UVs are subsampled vertically.
// This means that two consecutives iterations refer to the

Calling Java Back from Nave Code
[ 144 ]
// same UV line (e.g when Y=0 and Y=1).
lUVIndex = lFrameSize + (lY >> 1) * lBitmapInfo.width;
for (lX = 0; lX < lBitmapInfo.width; ++lX, ++lYIndex) {
// Retrieves YUV components. UVs are subsampled
// horizontally too, hence %2 (1 UV for 2 Y).
lColorY = max(toInt(lSource[lYIndex]) - 16, 0);
if (!(lX % 2)) {
lColorV = toInt(lSource[lUVIndex++]) - 128;
lColorU = toInt(lSource[lUVIndex++]) - 128;
}
// Computes R, G and B from Y, U and V.
y1192 = 1192 * lColorY;
lColorR = (y1192 + 1634 * lColorV);
lColorG = (y1192 - 833 * lColorV - 400 * lColorU);
lColorB = (y1192 + 2066 * lColorU);
lColorR = clamp(lColorR, 0, 262143);
lColorG = clamp(lColorG, 0, 262143);
lColorB = clamp(lColorB, 0, 262143);
// Combines R, G, B and A into the final pixel color.
lBitmapContent[lYIndex] = color(lColorR,lColorG,lColorB);
}
}
(*pEnv)-> ReleasePrimitiveArrayCritical(pEnv,pSource,lSource,0);
AndroidBitmap_unlockPixels(pEnv, pTarget);
}
18. Write livecamera library Android.mk. Link it to jnigraphics NDK module:
LOCAL_PATH := $(call my-dir)
include $(CLEAR_VARS)
LOCAL_MODULE := livecamera
LOCAL_SRC_FILES := com_packtpub_CameraView.c
LOCAL_LDLIBS := -ljnigraphics
include $(BUILD_SHARED_LIBRARY)
19. Compile and run the applicaon.
Chapter 4
[ 145 ]
What just happened?
Right aer starng the applicaon, the camera feed should appear on your device screen.
Video is decoded in nave code into a Java bitmap which is then drawn into the display
surface. Accessing the video feed navely allow much faster processing than what could
be done with classic Java code (see Chapter 11, Debugging and Troubleshoong for further
opmizaons with the NEON instrucon set). It opens many new possibilies: image
processing, paern recognion, augmented reality, and so on.
Bitmap surface is accessed directly by nave code thanks to the Android NDK Bitmap library
dened in library in jnigraphics. Drawing occurs in three steps:
1. Bitmap surface is acquired.
2. Video pixels are converted to RGB and wrien to bitmap surface.
3. Bitmap surface is released.
Bitmaps must be systemacally locked and then released to access them
navely. Drawing operaons must occur between a lock/release pair.
Video decoding and rendering is performed with with a non-threaded SurfaceView,
although this process could be made more ecient with a second thread. Multhreading
can be introduced thanks to the buer queue system introduced in latest releases of the
Android Camera component. Do not forget that YUV to RGB is an expensive operaon that is
likely to remain a point of contenon in your program.
Adapt snapshot size to your needs. Indeed, beware of the surface to process
quadruple when snapshot's size doubles. If feedback is not too important,
snapshot size can be parally reduced (for example, for paern recognion in
Augmented Reality). If you can, draw directly to the display window surface
instead of going through a temporary buer.
The video feed is encoded in the YUV NV21 format. YUV is a color format originally invented
in the old days of electronics to make black-and-white video receivers compable with color
transmissions and sll commonly used nowadays. Default frame format is guaranteed by the
Android specicaon to be YCbCr 420 SP (or NV21) on Android. The algorithm used to decode
the YUV frame originates from the Ketai open source project, an image and sensor processing
library for Android. See http://ketai.googlecode.com/ for more informaon.
Calling Java Back from Nave Code
[ 146 ]
Although YCbCr 420 SP is the default video format on Android, the emulator
only supports YCbCr 422 SP. This defect should not cause much trouble as it
basically swaps colors. This problem should not occur on real devices.
Summary
We have seen more in-depth how to make Java and C/C++ communicate together. Android is
now fully bilingual! Java can call C/C++ code with any type of data or object and nave code
can call Java back. We have discovered, in more detail, how to aach and detach a thread to
the VM and synchronize Java and nave threads together with JNI monitors. Then we saw how
to call Java code from nave code with the JNI Reecon API. Praccally any Java operaon
can be performed from nave code thanks to it. However, for best performance, class, method,
or elds descriptor must be cached. Finally, we have processed bitmaps navely thanks to JNI
and decoded a video feed manually. But an expensive conversion is needed from default YUV
format (which should be supported on every device according to Android specicaon) to RGB.
When dealing with nave code on Android, JNI is almost always somewhere in the way.
Sadly, it is a verbose and cumbersome API which requires lot of setup and care. JNI is full of
subtlees and would require a whole book for an in-depth understanding. This chapter gave
you the essenal knowledge to get started. In the next chapter, we are going to see how to
create a fully nave applicaon, which gets completely rid of JNI.
5
Writing a Fully-native Application
In previous chapters, we have breached Android NDK's surface using JNI. But
there is much more to nd inside! NDK R5 is a major release which has seen
several long-awaited features nally delivered, one of them is nave acvies.
Nave acvies allow creang applicaons based only on nave code, without
a single line of Java. No more JNI! No more references! No more Java!
In addion to nave acvies, NDK R5 has brought some APIs for nave
access to some Android resources such as display windows, assets, device
conguraon… These APIs help dismantle the JNI bridge, oen necessary to
develop nave applicaons opened to their host environment. Although sll a
lot is missing and is not likely to be available (Java remains the main plaorm
language for GUIs and most frameworks), mulmedia applicaons are a
perfect target to apply them.
I propose now to enter into the heart of the Android NDK by:
Creang a fully nave acvity
Handling main acvity events
Accessing display window navely
Retrieving me and calculang delays
The present chapter iniates a nave C++ project developed progressively throughout this
book: DroidBlaster. Based on a top-down viewpoint, this sample scrolling shooter will
feature 2D graphics, and later on 3D graphics, sound, input, and sensor management.
In this chapter, we are going to create its base structure.
Wring a Fully-nave Applicaon
[ 148 ]
Creating a native activity
The class NativeActivity provides a facility to minimize the work necessary to create
a nave applicaon. It lets the developer get rid of all the boilerplate code to inialize and
communicate with nave code and concentrate on core funconalies. In this rst part,
we are going to see how to create a minimal nave acvity that runs an event loop.
The resulng project is provided with this book under the
name DroidBlaster_Part5-1.
Time for action – creating a basic native activity
First, let's create DroidBlaster project:
1. In Eclipse, create a new project Android project with the following sengs:
Enter Eclipse project name: DroidBlaster.
Set Build target to Android 2.3.3.
Enter Applicaon name: DroidBlaster.
Enter Package name: com.packtpub.droidblaster.
Uncheck Create Acvity.
Set Min SDK Version to 10.
2. Once the project is created, go to the res/layout directory and remove main.
xml. This UI descripon le is not needed in our nave applicaon. You can also
remove src directory as DroidBlaster will not contain even a piece of Java code.
3. The applicaon is compilable and deployable, but not runnable simply because
we have not created an acvity yet. Let's declare NativeActivity in the
AndroidManifest.xml le at the project's root. The declared nave acvity refers
to a nave module named droidblaster (property android.app.lib_name):
<?xml version="1.0" encoding="utf-8"?>
<manifest xmlns:android="http://schemas.android.com/apk/res/
android"
package="com.packtpub.droidblaster" android:versionCode="1"
android:versionName="1.0">
<uses-sdk android:minSdkVersion="10"/>
<application android:icon="@drawable/icon"
android:label="@string/app_name">

Chapter 5
[ 149 ]
<activity android:name="android.app.NativeActivity"
android:label="@string/app_name">
<meta-data android:name="android.app.lib_name"
android:value="droidblaster"/>
<intent-filter>
<action android:name="android.intent.action.MAIN"/>
<categoryandroid:name="android.intent.category.LAUNCHER"/>
</intent-filter>
</activity>
</application>
</manifest>
Let's set up the Eclipse project to compile nave code:
4. Convert the project to a hybrid C++ project (not C) using Convert C/C++
Project wizard.
5. Then, go to project, select Properes in C/C++ Build secon and change default
build command to ndk-build.
6. In the Path and Symbols/Includes secon, add Android NDK include directories to all
languages as seen in Chapter 2, Creang, Compiling, and Deploying Nave Projects:
${env_var:ANDROID_NDK}/platforms/android-9/arch-arm/usr/include
${env_var:ANDROID_NDK}/toolchains/arm-linux-androideabi-4.4.3/
prebuilt/<your OS>/lib/gcc/arm-linux-androideabi/4.4.3/include
7. Sll in the same secon, add nave app glue directory to all languages. Validate and
close the project Properes dialog:
${env_var:ANDROID_NDK}/sources/android/native_app_glue
8. Create directory jni at the project's root containing the following Android.mk le.
It describes the C++ les to compile and the native_app_glue module to link to.
The nave glue binds together nave code and NativeActivity:
LOCAL_PATH := $(call my-dir)
include $(CLEAR_VARS)
LOCAL_MODULE := droidblaster
LOCAL_SRC_FILES := Main.cpp EventLoop.cpp Log.cpp
LOCAL_LDLIBS := -landroid -llog
LOCAL_STATIC_LIBRARIES := android_native_app_glue

Wring a Fully-nave Applicaon
[ 150 ]
include $(BUILD_SHARED_LIBRARY)
$(call import-module,android/native_app_glue)
Now we can start wring some nave code that runs inside the nave acvity.
Let's begin with some ulity code:
9. In jni directory, create a le Types.hpp. This header will contain common types
and the header stdint.h:
#ifndef _PACKT_TYPES_HPP_
#define _PACKT_TYPES_HPP_
#include <stdint.h>
#endif
10. To sll get some feedback without the ability to input or output anything from or
to the screen, let's write a logging class. Create Log.hpp and declare a new class
Log. You can dene packt_Log_debug macro to acvate debug messages with
a simple ag:
#ifndef PACKT_LOG_HPP
#define PACKT_LOG_HPP
namespace packt {
class Log {
public:
static void error(const char* pMessage, ...);
static void warn(const char* pMessage, ...);
static void info(const char* pMessage, ...);
static void debug(const char* pMessage, ...);
};
}
#ifndef NDEBUG
#define packt_Log_debug(...) packt::Log::debug(__VA_ARGS__)
#else
#define packt_Log_debug(...)
#endif
#endif
Chapter 5
[ 151 ]
By default, NDEBUG macro is dened by the NDK compilaon toolchain.
To undened it, the applicaon has to be made debuggable in its
manifest: <application android:debuggable="true" …>
11. Create Log.cpp le and implement method info(). To write messages to Android
logs, the NDK provides a dedicated logging API in header android/log.h. which
can be used similarly to printf() and vprintf() (with varargs) in C:
#include "Log.hpp"
#include <stdarg.h>
#include <android/log.h>
namespace packt {
void Log::info(const char* pMessage, ...) {
va_list lVarArgs;
va_start(lVarArgs, pMessage);
__android_log_vprint(ANDROID_LOG_INFO, "PACKT", pMessage,
lVarArgs);
__android_log_print(ANDROID_LOG_INFO, "PACKT", "\n");
va_end(lVarArgs);
}
}
12. Other log methods are almost idencal. The only piece of code which changes
between each method is the level macro: ANDROID_LOG_ERROR, ANDROID_LOG_
WARN, and ANDROID_LOG_DEBUG instead.
Finally, we can write the code to poll acvity events:
13. Applicaon events have to be processed in an event loop. To do so, sll in jni
directory, create EventLoop.hpp dening the eponym class with a unique
method run().
Included header android_native_app_glue.h denes android_app structure,
which represents what could be called an "applicave context", with all informaon
related to the nave acvity: its state, its window, its event queue, and so on:
#ifndef _PACKT_EVENTLOOP_HPP_
#define _PACKT_EVENTLOOP_HPP_
#include "Types.hpp"

Wring a Fully-nave Applicaon
[ 152 ]
#include <android_native_app_glue.h>
namespace packt {
class EventLoop {
public:
EventLoop(android_app* pApplication);
void run();
private:
android_app* mApplication;
};
}
#endif
14. Create EventLoop.cpp and implement acvity event loop in method run
()as follows. Include a few log events to get some feedback in Android log.
During the whole acvity lifeme, run() loops connuously over events
unl it is requested to terminate. When an acvity is about to be destroyed,
destroyRequested value in android_app structure is changed internally
to nofy the event loop:
#include "EventLoop.hpp"
#include "Log.hpp"
namespace packt {
EventLoop::EventLoop(android_app* pApplication) :
mApplication(pApplication)
{}
void EventLoop::run() {
int32_t lResult;
int32_t lEvents;
android_poll_source* lSource;
app_dummy();
packt::Log::info("Starting event loop");
while (true) {
while ((lResult = ALooper_pollAll(-1, NULL, &lEvents,
(void**) &lSource)) >= 0)
{
if (lSource != NULL) {
packt::Log::info("Processing an event");
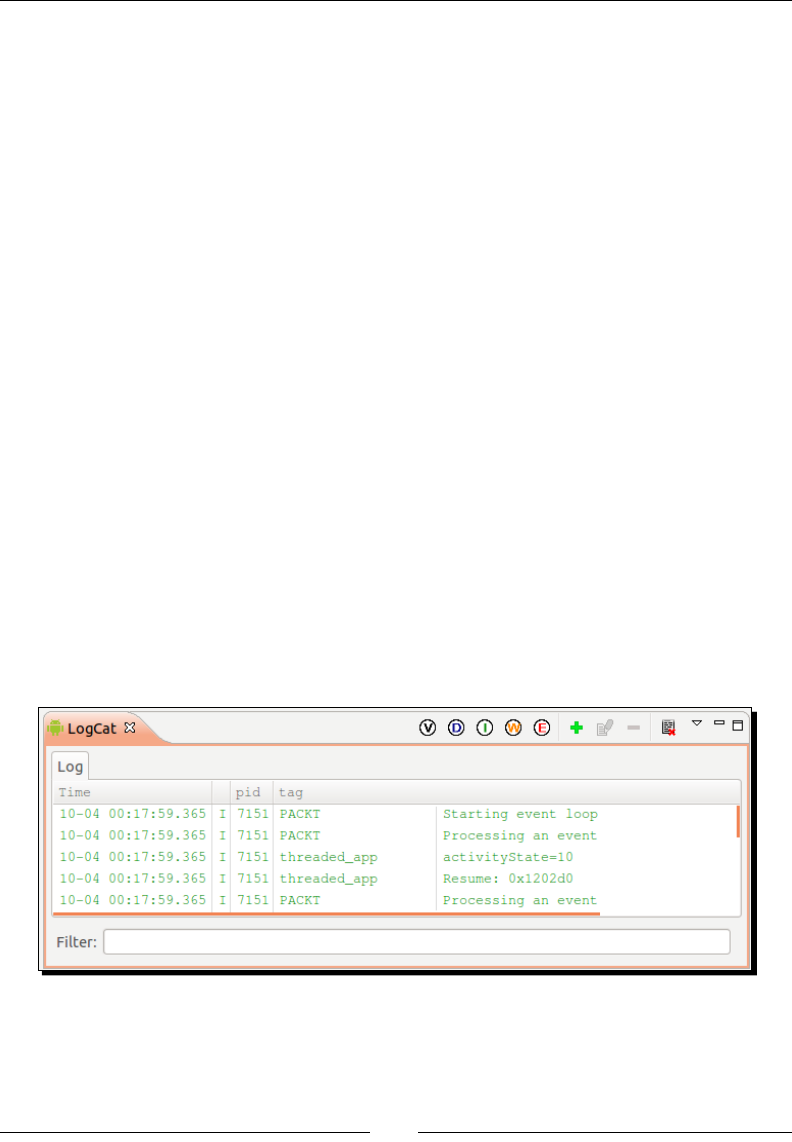
Chapter 5
[ 153 ]
lSource->process(mApplication, lSource);
}
if (mApplication->destroyRequested) {
packt::Log::info("Exiting event loop");
return;
}
}
}
}
}
15. Finally, create the main entry point running the event loop in a new le Main.cpp:
#include "EventLoop.hpp"
void android_main(android_app* pApplication) {
packt::EventLoop lEventLoop(pApplication);
lEventLoop.run();
}
16. Compile and run the applicaon.
What just happened?
Of course, you will not see anything tremendous when starng this applicaon. Actually,
you will just see a black screen! But if you look carefully at the LogCat view in Eclipse
(or command adb logcat), you will discover a few interesng messages that have
been emied by your nave applicaon in reacon to acvity events:
We have iniated a Java Android project without a single line of Java code! Instead of a new
Java Activity child class, in AndroidManifest.xml, we have referenced the android.
app.NativeActivity class, which is launched like any other Android acvity.
Wring a Fully-nave Applicaon
[ 154 ]
NativeActivity is a Java class. Yes, a Java class. But we never confronted to it directly.
NativeActivity is in fact a helper class provided with Android SDK and which contains
all the necessary glue code to handle applicaon lifecycle and events and broadcast them
transparently to nave code. Being a Java class, NativeActivity runs, of course, on the
Dalvik Virtual Machine and is interpreted like any Java class.
A nave acvity does not eliminate the need for JNI. In fact, it just hides it!
Hopefully, we never face NativeActivity directly. Even beer, the C/C++
module run by a NativeActivity runs outside Dalvik boundaries in its
own thread… enrely navely!
NativeActivity and nave code are connected together through the native_app_glue
module. Nave glue has the responsibility of:
launching the nave thread which runs our own nave code
receiving events from NativeActivity
roung these events to the nave thread event loop for further processing
Our own nave code entry point is declared at step 15 with an android_main() method
similar to main methods in desktop applicaons. It is called once when a nave applicaon
is launched and loops over applicaon events unl NativeActivity is terminated by user
(for example, when pressing device back buon). The android_main() method runs the
nave event loop, which is itself composed of two nested while loops. The outer one is an
innite loop, terminated only when applicaon destrucon is requested. Destrucon request
ag can be found in android_app "applicaon context" provided as an argument to the
android_main() method by the nave glue.
Inside the main loop is an inner loop which processes all pending events with a call to
ALooper_pollAll(). This method is part of the ALooper API which is a general-purpose
event loop manager provided by Android. When meout is -1 like at step 14, ALooper_
pollAll() remains blocked while waing for events. When at least one is received,
ALooper_pollAll() returns and code ow connues. The android_poll_source
structure describing the event is lled and used for further processing.
If an event loop was a heart, then event polling would be a heartbeat. In
other words, polling makes your applicaon alive and reacve to the outside
world. It is not even possible to leave a nave acvity without polling events;
destrucon is itself an event!
Chapter 5
[ 155 ]
Handling activity events
In the rst part, we have run a nave event loop which ushes events without really
processing them. In this second part, we are going to discover more about these events
occurring during acvity lifecycle. Let's extend the previous example to log all events
that a nave acvity is confronted to.
EventLoop DroidBlaster
ActivityHandler
Log
Project DroidBlaster_Part5-1 can be used as a starng point for this
part. The resulng project is provided with this book under the name
DroidBlaster_Part5-2.
Time for action – handling activity events
Let's improve the code created in the previous part:
1. Open Types.hpp and dene a new type status to represent return codes:
#ifndef _PACKT_TYPES_HPP_
#define _PACKT_TYPES_HPP_
#include <stdint.h>
typedef int32_t status;
const status STATUS_OK = 0;
const status STATUS_KO = -1;
const status STATUS_EXIT = -2;
#endif
2. Create ActivityHandler.hpp in jni directory. This header denes an interface
to observe nave acvity events. Each possible event has its own handler method:
onStart(), onResume(), onPause(), onStop(), onDestroy(), and so on.
However, we are generally interested in three specic moments in the acvity lifecycle:
onActivate(): This method is invoked when acvity is resumed and its
window is available and focused.

Wring a Fully-nave Applicaon
[ 156 ]
onDeactivate(): This acvity is invoked when acvity is paused or the
display window loses its focus or is destroyed.
onStep(): This acvity is invoked when no event has to be processed
and computaons can take place.
#ifndef _PACKT_EVENTHANDLER_HPP_
#define _PACKT_EVENTHANDLER_HPP_
#include "Types.hpp"
namespace packt {
class EventHandler {
public:
virtual status onActivate() = 0;
virtual void onDeactivate() = 0;
virtual status onStep() = 0;
virtual void onStart() {};
virtual void onResume() {};
virtual void onPause() {};
virtual void onStop() {};
virtual void onDestroy() {};
virtual void onSaveState(void** pData,
int32_t* pSize) {};
virtual void onConfigurationChanged() {};
virtual void onLowMemory() {};
virtual void onCreateWindow() {};
virtual void onDestroyWindow() {};
virtual void onGainFocus() {};
virtual void onLostFocus() {};
};
}
#endif
All these events have to be triggered from the acvity event loop.
3. Open exisng le EventLoop.hpp. Although its public face is conserved,
EventLoop class is enhanced with two internal methods (activate() and
deactivate()) and two state variables (mEnabled and mQuit) to save acvity
acvaon state. Real acvity events are handled in processActivityEvent()
and its corresponding callback activityCallback(). These events are routed
to mActivityHandler event observer:

Chapter 5
[ 157 ]
#ifndef _PACKT_EVENTLOOP_HPP_
#define _PACKT_EVENTLOOP_HPP_
#include "EventHandler.hpp"
#include "Types.hpp"
#include <android_native_app_glue.h>
namespace packt {
class EventLoop {
public:
EventLoop(android_app* pApplication);
void run(EventHandler& pEventHandler);
protected:
void activate();
void deactivate();
void processActivityEvent(int32_t pCommand);
private:
static void activityCallback(android_app* pApplication,
int32_t pCommand);
private:
bool mEnabled; bool mQuit;
ActivityHandler* mActivityHandler;
android_app* mApplication;
};
}
#endif
4. Open and edit EventLoop.cpp. Constructor inializaon list is trivial to implement.
However, the android_app applicaon context needs to be lled with some
addional informaon:
onAppCmd: This points to an internal callback triggered each me an
event occurs. In our case, this is the role devoted to the stac method
activityCallback.
userData: This is a pointer in which you can assign any data you want.
This piece of data is the only informaon accessible from the callback
declared previously (except global variables). In our case, this is the
EventLoop instance (this).

Wring a Fully-nave Applicaon
[ 158 ]
#include "EventLoop.hpp"
#include "Log.hpp"
namespace packt {
EventLoop::EventLoop(android_app* pApplication) :
mEnabled(false), mQuit(false),
mApplication(pApplication),
mActivityHandler(NULL) {
mApplication->onAppCmd = activityCallback;
mApplication->userData = this;
}
...
5. Update the run() main event loop to stop blocking while polling events. Indeed,
ALooper_pollAll() behavior is dened by its rst parameter, meout:
When meout is -1 like at step 14, call is blocking unl events are received.
When meout is 0, call is non-blocking so that if nothing remains in the
queue, program ow connues (inner while loop is terminated) and makes
it possible to perform recurrent processing.
When meout is greater than 0, then we have a blocking call which remains
unl an event is received or the duraon is elapsed.
Here, we want to step the acvity (that is, perform computaons)
when it is in acve state (mEnabled is true): in that case, meout is 0.
When acvity is in deacvated state (mEnabled is false), events are sll
processed (for example, to resurrect the acvity) but nothing needs to
get computed. The thread has to be blocked to avoid consuming baery
and processor me uselessly: meout is -1.
To leave the applicaon programmacally, NDK API provides
ANativeActivity_finish()method to request acvity terminaon.
Terminaon does not occur immediately but aer a few events (pause,
stop, and so on)!
...
void EventLoop::run(ActivityHandler& pActivityHandler)
{
int32_t lResult;
int32_t lEvents;
android_poll_source* lSource;
app_dummy();
mActivityHandler = &pActivityHandler;

Chapter 5
[ 159 ]
packt::Log::info("Starting event loop");
while (true) {
while ((lResult = ALooper_pollAll(mEnabled ? 0 : -1,
NULL, &lEvents, (void**) &lSource)) >= 0) {
if (lSource != NULL) {
packt::Log::info("Processing an event");
lSource->process(mApplication, lSource);
}
if (mApplication->destroyRequested) {
packt::Log::info("Exiting event loop");
return;
}
}
if ((mEnabled) && (!mQuit)) {
if (mActivityHandler->onStep() != STATUS_OK) {
mQuit = true;
ANativeActivity_finish(mApplication->activity);
}
}
}
}
...
6. Sll in EventLoop.cpp, implement activate() and deactivate(). Both check
acvity state before nofying the observer (to avoid unmely triggering). As stated
earlier, acvaon requires a window to be available before going further:
...
void EventLoop::activate() {
if ((!mEnabled) && (mApplication->window != NULL)) {
mQuit = false; mEnabled = true;
if (mActivityHandler->onActivate() != STATUS_OK) {
mQuit = true;
ANativeActivity_finish(mApplication->activity);
}
}
}
void EventLoop::deactivate()
{
if (mEnabled) {
mActivityHandler->onDeactivate();
mEnabled = false;
}
}
...

Wring a Fully-nave Applicaon
[ 160 ]
7. Finally, implement processActivityEvent() and its companion callback
activityCallback(). Do you remember the onAppCmd and userData elds
from android_app structure that we inialized in the constructor? They are used
internally by the nave glue to trigger the right callback (here activityCallback())
when an event occurs. The EventLoop object is goen back thanks to the userData
pointer (this being unavailable from a stac method). Eecve event processing is
then delegated to processActivityEvent(), which brings us back into the
object-oriented world.
Parameter pCommand contains an enumeraon value (APP_CMD_*) which describes
the occurring event (APP_CMD_START, APP_CMD_GAINED_FOCUS, and so on). Once
an event is analyzed, acvity is acvated or deacvated depending on the event and
the observer is noed.
A few events such as APP_CMD_WINDOW_RESIZED are available but never
triggered. Do not listen to them unless you are ready to sck your hands in
the glue…
Acvaon occurs when acvity gains focus. This event is always the last event that
occurs aer acvity is resumed and window is created. Geng focus means that
acvity can receive input events. Thus, it would be possible to acvate the event
loop as soon as window is created.
Deacvaon occurs when window loses focus or applicaon is paused (both can occur
rst). By security, deacvaon is also performed when window is destroyed although
this should always occur aer focus is lost. Losing focus means that applicaon does
not receive input events anymore. Thus, it would also be possible to deacvate the
event loop only when window is destroyed instead:
To make your acvity lose and gain focus easily, just press your device
home buon to display the Recent applicaons pop up (which may be
manufacturer specic). If acvaon and deacvaon occur on a focus
change, acvity pauses immediately. Otherwise, it would keep working in the
background unl another acvity is selected (which could be desirable).
...
void EventLoop::processActivityEvent(int32_t pCommand) {
switch (pCommand) {
case APP_CMD_CONFIG_CHANGED:
mActivityHandler->onConfigurationChanged();
break;
case APP_CMD_INIT_WINDOW:
Downloa d f r o m W o w ! e B o o k < w w w.woweb o o k . c o m >Downloa d f r o m W o w ! e B o o k < w w w.woweb o o k . c o m >

Chapter 5
[ 161 ]
mActivityHandler->onCreateWindow();
break;
case APP_CMD_DESTROY:
mActivityHandler->onDestroy();
break;
case APP_CMD_GAINED_FOCUS:
activate();
mActivityHandler->onGainFocus();
break;
case APP_CMD_LOST_FOCUS:
mActivityHandler->onLostFocus();
deactivate();
break;
case APP_CMD_LOW_MEMORY:
mActivityHandler->onLowMemory();
break;
case APP_CMD_PAUSE:
mActivityHandler->onPause();
deactivate();
break;
case APP_CMD_RESUME:
mActivityHandler->onResume();
break;
case APP_CMD_SAVE_STATE:
mActivityHandler->onSaveState(&mApplication->savedState,
&mApplication->savedStateSize);
break;
case APP_CMD_START:
mActivityHandler->onStart();
break;
case APP_CMD_STOP:
mActivityHandler->onStop();
break;
case APP_CMD_TERM_WINDOW:
mActivityHandler->onDestroyWindow();
deactivate();
break;
default:
break;
}
}
void EventLoop::activityCallback(android_app* pApplication,
int32_t pCommand)

Wring a Fully-nave Applicaon
[ 162 ]
{
EventLoop& lEventLoop = *(EventLoop*) pApplication->userData;
lEventLoop.processActivityEvent(pCommand);
}
}
Finally, we can implement applicaon-specic code.
8. Create a DroidBlaster.hpp le which implements ActivityHandler interface:
#ifndef _PACKT_DROIDBLASTER_HPP_
#define _PACKT_DROIDBLASTER_HPP_
#include "ActivityHandler.hpp"
#include "Types.hpp"
namespace dbs {
class DroidBlaster : public packt::ActivityHandler {
public:
DroidBlaster();
virtual ~DroidBlaster();
protected:
status onActivate();
void onDeactivate();
status onStep();
void onStart();
void onResume();
void onPause();
void onStop();
void onDestroy();
void onSaveState(void** pData; int32_t* pSize);
void onConfigurationChanged();
void onLowMemory();
void onCreateWindow();
void onDestroyWindow();
void onGainFocus();
void onLostFocus();
};
}
#endif

Chapter 5
[ 163 ]
9. Create DroidBlaster.cpp implementaon. To keep this introducon to the
acvity lifecycle simple, we are just going to log events for each occurring event.
Computaons are limited to a simple thread sleep:
#include "DroidBlaster.hpp"
#include "DroidBlaster.hpp"
#include "Log.hpp"
#include <unistd.h>
namespace dbs {
DroidBlaster::DroidBlaster() {
packt::Log::info("Creating DroidBlaster");
}
DroidBlaster::~DroidBlaster() {
packt::Log::info("Destructing DroidBlaster");
}
status DroidBlaster::onActivate() {
packt::Log::info("Activating DroidBlaster");
return STATUS_OK;
}
void DroidBlaster::onDeactivate() {
packt::Log::info("Deactivating DroidBlaster");
}
status DroidBlaster::onStep() {
packt::Log::info("Starting step");
usleep(300000);
packt::Log::info("Stepping done");
return STATUS_OK;
}
void DroidBlaster::onStart() {
packt::Log::info("onStart");
}
...
}

Wring a Fully-nave Applicaon
[ 164 ]
10. Let's not forget to inialize our acvity and its new event handler DroidBlaster:
#include "DroidBlaster.hpp"
#include "EventLoop.hpp"
void android_main(android_app* pApplication) {
packt::EventLoop lEventLoop(pApplication);
dbs::DroidBlaster lDroidBlaster;
lEventLoop.run(lDroidBlaster);
}
11. Update the Android.mk Makele to include all the new .cpp les created
in the present part. Then compile and run the applicaon.
What just happened?
If you like black screen, you are served! Again, everything happens in the Eclipse LogCat
view. All messages that have been emied by your nave applicaon in reacon to
applicaon events are displayed there:
We have created a minimalist framework which handles applicaon events in the nave
thread using an event-driven approach. These events are redirected to an observer object
which performs its own specic computaons. Nave acvity events correspond mostly
to Java acvity events. Following is an important schemac inspired from ocial Android
documentaon showing events that can happen during an acvity lifecycle:
Chapter 5
[ 165 ]
Activity is running
Another activity comes
in front of the activity
Other applications
need memory
Activity is shut down
User navigates
back to the
activity
Process is killed
The activity
comes to the
foreground
The activity
comes to the
foreground
onRestart()
onCreate()
onStart()
onResume()
onCreatewindow()
onGainFocus()
onSaveInstanceState()
onLoseFocus()
onDestroyWindow()
onPause()
The activity
in no longer visible
onStop()
onDestroy()
Activity starts
See http://developer.android.com/reference/android/app/Activity.
html for more informaon.
Wring a Fully-nave Applicaon
[ 166 ]
Events are a crical point that any applicaon needs to handle properly. Although event
pairs, that is, start/stop, resume/pause, create/destroy window, and gain/lose focus occur
most of the me in a predetermined order, some specic cases generate dierent behaviors,
for example:
Pressing for a long me the device home buon and then geng back should cause
a loss and gain of focus only
Shung down phone screen and switching it back on should cause window to
be terminated and reinialized immediately right aer acvity is resumed
When changing screen orientaon, the whole acvity may not lose its focus
although it will regain it aer acvity is recreated
Choice has been made to use a simplied event handling model in
DroidBlaster, with only three main events occurring in the applicaon
lifecycle (acvaon, deacvaon, and stepping). However, an applicaon can be
made more ecient by performing more subtle event handling. For example,
pausing an acvity may not release resources whereas a stop event should.
Have a look at the NVIDIA developer site where you will nd interesng documents
about Android events and even more: http://developer.nvidia.com/content/
resources-android-native-game-development-available.
More on Native App Glue
You may sll wonder what the nave glue framework does exactly behind your back and
how. The truth is android_main() is not the real nave applicaon entry point. The real
entry point is ANativeActivity_onCreate() method hidden in the android_native_
app_glue module. The event loop we have seen unl now is in fact a delegate event loop
launched in its own nave thread by the glue code so that your android_main() is not
correlated anymore to NativeActivity on the Java side. Thus, even if your code takes a
long me to handle an event, NativeActivity is not blocked and your Android device sll
remains responsive. Nave glue module code is located in ${ANDROID_NDK}/sources/
android/native_app_glue and can be modied or forked at will (see Chapter 9, Porng
Exisng Libraries to Android).
android_nave_app_glue ease your life
The nave glue really simplies code by handling inializaon and
system-related stu that most applicaons do not need to worry about
(synchronizaon with mutexes, pipe communicaon, and so on). It frees
the UI thread from its load to keep device ability to handle unexpected events
such as a sudden phone call.
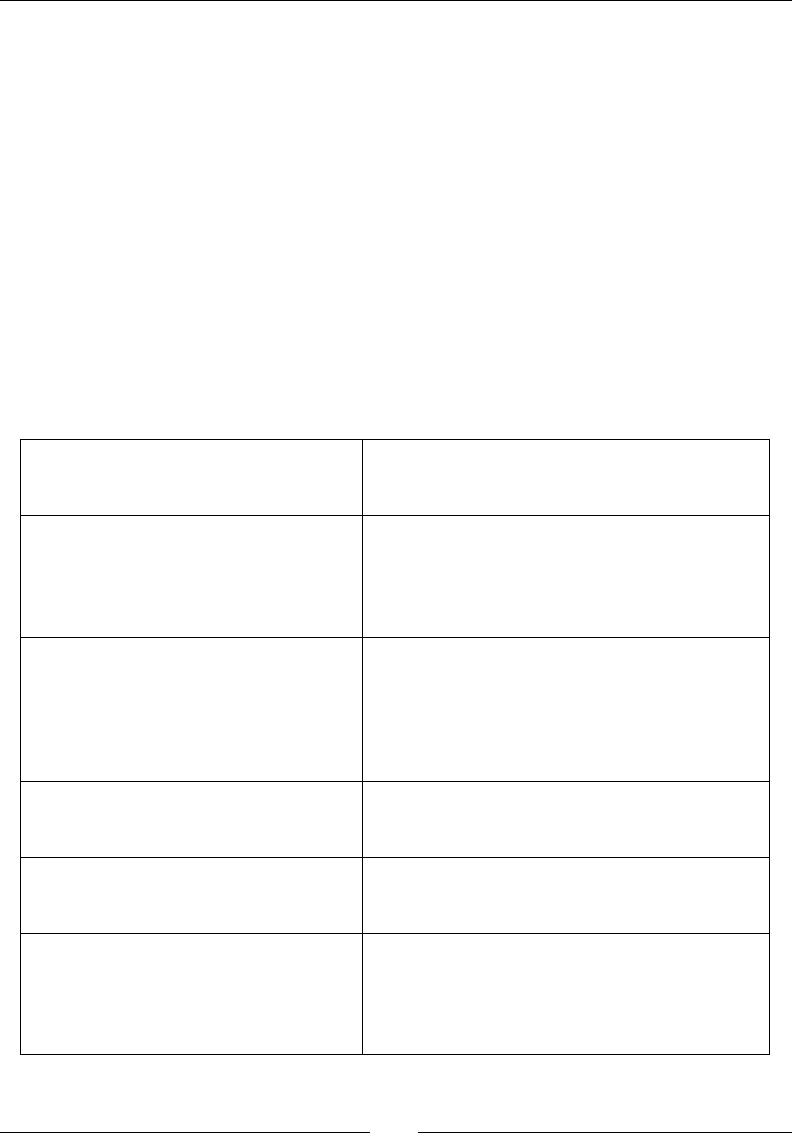
Chapter 5
[ 167 ]
UI thread
The following call hierarchy is an overview of how Nave App Glue proceeds internally
on the UI thread (that is, on the Java side):
Main Thread
NativeActivity
+___ANativeActivity_onCreate(ANativeActivity, void*, size_t)
+___android_app_create(ANativeActivity*, void*, size_t)
ANativeActivity_onCreate() is the real nave-side entry point and is executed on
the UI thread. The given ANativeActivity structure is lled with event callbacks used in
the nave glue code: onDestroy, onStart, onResume, and so on. So when something
happens in NativeActivity on the Java side, callback handlers are immediately triggered
on the nave side but sll on the UI thread. Processing performed by these handlers is very
simple: they nofy the nave thread by calling internal method android_app_write_
cmd(). Here is a list of some of the occurring events:
onStart, onResume,
onPause, onStop
changes the applicaon state by seng
android_app.activityState with the
appropriate APP_CMD_* value.
onSaveInstance sets the applicaon state to APP_CMD_SAVE_
STATE and waits for the nave applicaon
to save its state. Custom saving has to be
implemented by Nave App Glue client in its own
command callback.
onDestroy noes the nave thread that destrucon is
pending, and then frees memory when nave
thread acknowledges (and does what it needs
to frees resources!). Structure android_app
is not useable anymore and applicaon itself
terminates.
onConfigurationChanged,
onWindowFocusedChanged,
onLowMemory
noes the nave-side thread of the event (APP_
CMD_GAINED_FOCUS, APP_CMD_LOST_
FOCUS, and so on).
onNativeWindowCreated and
onNativeWindowDestroyed
calls funcon android_app_set_window()
which provides and requests the nave thread to
change its display window.
onInputQueueCreated and
onInputQueueDestoyed
uses a specc method android_app_set_
input() to register an input queue. Input
queue comes from NativeActivity and is
usually provided aer nave thread loop has
started.

Wring a Fully-nave Applicaon
[ 168 ]
ANativeActivity_onCreate() also allocates memory and inializes the applicaon
context android_app and all the synchronizaon stu. Then the nave thread itself is
"forked", so that it can live its life. Thread is created with entry point android_app_entry.
Main UI thread and nave thread communicates via Unix pipes and mutexes to ensure
proper synchronizaon.
Native thread
The nave thread call tree is a bit harsher! If you plan to create your own glue code,
you will probably need to implement something similar:
+___android_app_entry(void*)
+___AConfiguration_new()
+___AConfiguration_fromAssetManager(AConfiguration*,
| AAssetManager*)
+___print_cur_config(android_app*)
+___process_cmd(android_app*, android_poll_source*)
| +___android_app_read_cmd(android_app*)
| +___android_app_pre_exec_cmd(android_app*, int8_t)
| | +___AInputQueue_detachLooper(AInputQueue*)
| | +___AInputQueue_attachLooper(AInputQueue*,
| | | ALooper*, int, ALooper_callbackFunc, void*)
| | +___AConfiguration_fromAssetManager(AConfiguration*,
| | | AAssetManager*)
| | +___print_cur_config(android_app*)
| +___android_app_post_exec_cmd(android_app*, int8_t)
+___process_input(android_app*, android_poll_source*)
| +___AInputQueue_getEvent(AInputQueue*, AInputEvent**)
| +___AInputEvent_getType(const AInputEvent*)
| +___AInputQueue_preDispatchEvent(AInputQueue*,
| | AInputEvent*)
| +___AInputQueue_finishEvent(AInputQueue*,
| AInputEvent*, int)
+___ALooper_prepare(int)
+___ALooper_addFd(ALooper*, int, int, int,
| ALooper_callbackFunc, void*)
+___android_main(android_app*)
+___android_app_destroy(android_app*)
+___AInputQueue_detachLooper(AInputQueue*)
+___AConfiguration_delete(AConfiguration*)

Chapter 5
[ 169 ]
Let's see in detail what this means. Method android_app_entry() is executed exclusively
on the nave thread and performs several tasks. First, it creates the Looper, which processes
the event queue by reading data coming into the pipe (idened by a Unix File Descriptor).
Creaon of the command queue Looper is performed by ALooper_prepare() when nave
thread starts (something similar exists in Java in the equivalent class Looper). Aachment of
the Looper to the pipe is performed by ALooper_addFd().
Queues are processed by Nave App Glue internal methods process_cmd() and
process_input() for the command and input queue, respecvely. However both
are triggered by your own code when you write lSource->process() in your
android_main(). Then, internally, process_cmd() and process_input() calls
itself your own callback, the one we created in Activity.cpp. So nally we know
what is happening when we receive an event in our main loop!
The input queue is also aached to the looper, but not immediately inside thread entry
point. Instead, it is sent in diered-me from the main UI thread to the nave thread using
the pipe mechanism explained before. That explains why command queue is aached to the
looper and not the input queue. Input queue is aached to the looper through a specic API:
AInputQueue_attachLooper() and AInputQueue_detachLooper().
We have not talked about it yet but a third queue, the user queue, can be aached to the
looper. This queue is a custom one, unused by default and which can be used for your own
purpose. More generally, your applicaon can use the same ALooper to listen to addional
le-descriptors.
Now, the big part: android_main(). Our method! Our code! As you now know, it is
executed on the nave thread and loops innitely unl destrucon is requested. Destrucon
requests as well as all others events are detected by polling them, hence the method
ALooper_pollAll()used in DroidBlaster. We need to check each event that happens
unl nothing remains in the queue, then we can do whatever we want, like redrawing the
window surface, and then we go back to the wait state unl new events arrive.

Wring a Fully-nave Applicaon
[ 170 ]
Android_app structure
The nave event loop receives an android_app structure in parameter. This structure,
described in android_native_app_glue.h, contains some contextual informaon
such as:
void* userData: This is a pointer to any data you want. This is essenal to give
some contextual informaon to the acvity event callback.
void (*pnAppCmd)(…) int32_t (*onInputEvent)(…): These are callbacks
triggered respecvely when an acvity and an input event occur. We will see input
events in Chapter 8, Handling Input Devices and Sensors.
ANativeActivity* activity: This describes the Java nave acvity (its class as
a JNI object, its data directories, and so on) and gives the necessary informaon to
retrieve a JNI context.
AConfiguration* config: This contains informaon about current hardware
and system state, such as the current language and country, the current screen
orientaon, density, size, and so on This is a place of choice to learn more about
the host device.
void* savedState size_t savedStateSize: This is used to save a buer of
data when an acvity (and thus its nave thread) is destroyed and restored later.
AInputQueue* inputQueue: This handles input events (used internally by the
nave glue). We will see input events in Chapter 8.
ALooper* looper: This allows aaching and detaching event listeners (used
internally by the nave glue). The listeners poll and wait for events represented as
data on a Unix le descriptor.
ANativeWindow* window ARect contentRect: This represents the "drawable"
area, in which graphics can be drawn. The ANativeWindow API declared in
native_window.h allows retrieving window width, height and pixel format and
changing these sengs.
int activityState: This describes the current acvity state, that is, APP_CMD_
START, APP_CMD_RESUME, APP_CMD_PAUSE, and so on.
int destroyRequested: This is a ag when equals to 1, indicates that
applicaon is about to be destroyed and nave thread must be terminated
immediately. This ag has to be checked in the event loop.
The android_app structure also contains some internal data that should not be changed.
Chapter 5
[ 171 ]
Have a go hero – saving activity state
It is very surprising for many new Android developers, but when screen orientaon changes,
an Android acvity needs to be completely recreated. Nave acvies and their nave
thread are no excepon. To handle this case properly, the nave glue triggers an APP_CMD_
SAVE_STATE event to leave you a chance to save your acvity state before it is destroyed.
Based on DroidBlaster current code, the challenge is to track the number of mes acvity
is recreated by:
1. Creang a state structure to save the acvaon counter.
2. Saving the counter when acvity requests it. A new state structure will need
to be allocated each me with malloc() (memory is released with free())
and returned via savedState and savedStateSize elds in the
android_app structure.
3. Restoring the counter when acvity is recreated. State will need to be checked:
if it is NULL, then the acvity is created for the rst me. If it is not, then acvity
is recreated.
Because the state structure is copied and freed internally by the nave glue, no pointers can
be saved in the structure.
Project DroidBlaster_Part5-2 can be used as a starng point for this part.
The resulng project project is provided with this book under the name
DroidBlaster_Part5-SaveState.
Accessing window and time natively
Applicaon events are essenal to understand. But they are only a part of the puzzle and
will not get your users much excited. An interesng feature of the Android NDK is the ability
to access display window navely to draw graphics. But who talks about graphics talks also
about ming. Indeed, Android devices have dierent capabilies. Animaons should be
adapted to their speed. To help us in this task, Android gives access to me primives thanks
to its good support of Posix APIs.
Wring a Fully-nave Applicaon
[ 172 ]
We are now going to exploit these features to get a graphic feedback in our applicaon: a red
square moving on the screen. This square is going to be animated according to me to get a
reproducible result.
EventLoop DroidBlaster
ActivityHandler
Log
TimeService
Project DroidBlaster_Part5-2 can be used as a starng point for this
part. The resulng project project is provided with this book under
the name DroidBlaster_Part5-3.
Time for action – displaying raw graphics and
implementing a timer
First, let's implement a mer in a dedicated module:
Throughout this book, we will implement several modules named with the
posix Service. These services are purely design concepts and are not
related to Android services.
1. In the jni directory, create TimeService.hpp which includes time.h
Posix header.
It contains methods reset() and update() to manage mer state and two
interrogaon methods to read current me (method now()) and the me
elapsed in seconds between the last two updates (method elapsed()):
#ifndef _PACKT_TIMESERVICE_HPP_
#define _PACKT_TIMESERVICE_HPP_
#include "Types.hpp"
#include <time.h>
namespace packt {
class TimeService {
public:

Chapter 5
[ 173 ]
TimeService();
void reset();
void update();
double now();
float elapsed();
private:
float mElapsed;
double mLastTime;
};
}
#endif
2. Create a new TimeService.cpp le in jni. Use Posix primive clock_gettime()
to retrieve current me in now() method implementaon. A monotonic clock is
essenal to ensure me always goes forward and is not subject to system changes
(for example, if user change its sengs).
To accommodate the need of graphics applicaons, dene method elapsed()
to check elapsed me since last update. This allows adapng applicaon behavior
according to device speed. It is important to work on doubles when manipulang
absolute me to avoid losing accuracy. Then the resulng delay can be converted
back to oat:
#include "TimeService.hpp"
#include "Log.hpp"
namespace packt {
TimeService::TimeService() :
mElapsed(0.0f),
mLastTime(0.0f)
{}
void TimeService::reset() {
Log::info("Resetting TimeService.");
mElapsed = 0.0f;
mLastTime = now();
}
void TimeService::update() {
double lCurrentTime = now();
mElapsed = (lCurrentTime - mLastTime);
mLastTime = lCurrentTime;

Wring a Fully-nave Applicaon
[ 174 ]
}
double TimeService::now() {
timespec lTimeVal;
clock_gettime(CLOCK_MONOTONIC, &lTimeVal);
return lTimeVal.tv_sec + (lTimeVal.tv_nsec * 1.0e-9);
}
float TimeService::elapsed() {
return mElapsed;
}
}
3. Create a new header le Context.hpp. Dene Context helper structure to hold
and share all DroidBlaster modules, starng with TimeService. This structure
is going to be enhanced throughout the next chapters:
#ifndef _PACKT_CONTEXT_HPP_
#define _PACKT_CONTEXT_HPP_
#include "Types.hpp"
namespace packt
{
class TimeService;
struct Context {
TimeService* mTimeService;
};
}
#endif
The me module can now be embedded in the applicaon code:
4. Open already exisng le DroidBlaster.hpp. Dene two internal methods
clear() and draw() to erase the screen and draw the square cursor on it.
Declare a few member variables to store acvity and display state as well as
cursor posion, size, and speed:
#ifndef _PACKT_DROIDBLASTER_HPP_
#define _PACKT_DROIDBLASTER_HPP_
#include "ActivityHandler.hpp"
#include "Context.hpp"
#include "TimeService.hpp"
#include "Types.hpp"

Chapter 5
[ 175 ]
#include <android_native_app_glue.h>
namespace dbs {
class DroidBlaster : public packt::ActivityHandler {
public:
DroidBlaster(packt::Context& pContext,
android_app* pApplication);
~DroidBlaster();
protected:
status onActivate();
void onDeactivate();
status onStep();
...
private:
void clear();
void drawCursor(int pSize, int pX, int pY);
private:
android_app* mApplication;
ANativeWindow_Buffer mWindowBuffer;
packt::TimeService* mTimeService;
bool mInitialized;
float mPosX;
float mPosY;
const int32_t mSize;
const float mSpeed;
};
}
#endif
5. Now, open DroidBlaster.cpp implementaon le. Update its constructor
and destructor. Cursor is 24 pixels large and moves at 100 pixels per second.
TimeService (and in near future all other services) is transmied in the
Context structure:
#include "DroidBlaster.hpp"
#include "Log.hpp"
#include <math.h>

Wring a Fully-nave Applicaon
[ 176 ]
namespace dbs {
DroidBlaster::DroidBlaster(packt::Context& pContext,
android_app* pApplication) :
mApplication(pApplication),
mTimeService(pContext.mTimeService),
mInitialized(false),
mPosX(0), mPosY(0), mSize(24), mSpeed(100.0f) {
packt::Log::info("Creating DroidBlaster");
}
DroidBlaster::~DroidBlaster() {
packt::Log::info("Destructing DroidBlaster");
}
...
6. Sll in DroidBlaster.cpp, re-implement acvaon handler to:
Inialize the mer.
Force the window format in 32-bit with ANativeWindow_
setBuffersGeometry(). The two zeros passed in parameters are the
wanted window width and height. They are ignored unless inialized with
a posive value. Note that window area dened by width and height is
scaled to match screen size.
Retrieve all the necessary window informaon in an ANativeWindow_
Buffer structure to allow drawing. To ll this structure, window must
be locked.
Inialize cursor posion the rst me acvity is launched.
...
status DroidBlaster::onActivate() {
packt::Log::info("Activating DroidBlaster");
mTimeService->reset();
// Forces 32 bits format.
ANativeWindow* lWindow = mApplication->window;
if (ANativeWindow_setBuffersGeometry(lWindow, 0,
0,
WINDOW_FORMAT_RGBX_8888) < 0) {
return STATUS_KO;
}
// Needs to lock the window buffer to get its
properties.

Chapter 5
[ 177 ]
if (ANativeWindow_lock
(lWindow, &mWindowBuffer, NULL) >= 0) {
ANativeWindow_unlockAndPost(lWindow);
} else {
return STATUS_KO;
}
// Position the mark in the center.
if (!mInitialized) {
mPosX = mWindowBuffer.width / 2;
mPosY = mWindowBuffer.height / 2;
mInitialized = true;
}
return STATUS_OK;
}
...
7. Connue with DroidBlaster.cpp and step the applicaon by moving the cursor
at a constant rate (here 100 pixels per second). The window buer has to be locked
to draw on it (method ANativeWindow_lock()) and unlocked when drawing is
nished (method ANativeWindow_unlockAndPost()):
...
status DroidBlaster::onStep() {
mTimeService->update();
// Moves the mark at 100 pixels per second.
mPosX = fmod(mPosX + mSpeed * mTimeService->elapsed(),
mWindowBuffer.width);
// Locks the window buffer and draws on it.
ANativeWindow* lWindow = mApplication->window;
if (ANativeWindow_lock(lWindow, &mWindowBuffer, NULL) >= 0) {
clear();
drawCursor(mSize, mPosX, mPosY);
ANativeWindow_unlockAndPost(lWindow);
return STATUS_OK;
} else {
return STATUS_KO;
}
}
...
Wring a Fully-nave Applicaon
[ 178 ]
8. Finally, implement the drawing methods. Clear the screen with a brute-force
approach using memset(). This operaon is supported by display window surface
which is in fact just a big connuous memory buer.
Drawing the cursor is not much more dicult Like for bitmaps processed navely,
display window surface is directly accessible via the bits eld (only when surface
is locked!) and can be modied pixel by pixel. Here, a red square is rendered line by
line at the requested posion. The stride allows jumping directly from one line
to another.
Note that no boundary check is performed. This is not a
problem for such a simple example but a memory overow
can happen really quickly and cause a violent crash.
...
void DroidBlaster::clear() {
memset(mWindowBuffer.bits, 0, mWindowBuffer.stride
* mWindowBuffer.height * sizeof(uint32_t*));
}
void DroidBlaster::drawCursor(int pSize, int pX, int pY) {
const int lHalfSize = pSize / 2;
const int lUpLeftX = pX - lHalfSize;
const int lUpLeftY = pY - lHalfSize;
const int lDownRightX = pX + lHalfSize;
const int lDownRightY = pY + lHalfSize;
uint32_t* lLine =
reinterpret_cast<uint32_t*> (mWindowBuffer.bits)
+ (mWindowBuffer.stride * lUpLeftY);
for (int iY = lUpLeftY; iY <= lDownRightY; iY++) {
for (int iX = lUpLeftX; iX <= lDownRightX; iX++) {
lLine[iX] = 255;
}
lLine = lLine + mWindowBuffer.stride;
}
}
}
The test code must be launched from the main entry point.

Chapter 5
[ 179 ]
9. Update android_main in le Main.cpp to launch the DroidBlaster acvity
handler. You can temporarily comment DroidBlaster declaraon:
#include "Context.hpp"
#include "DroidBlaster.hpp"
#include "EventLoop.hpp"
#include "TimeService.hpp"
void android_main(android_app* pApplication) {
packt::TimeService lTimeService;
packt::Context lContext = { &lTimeService };
packt::EventLoop lEventLoop(pApplication);
dbs::DroidBlaster lDroidBlaster(lContext, pApplication);
lEventLoop.run(lDroidBlaster);
}
10. Are you fed up with adding new .cpp les each me you create a new one? Then
change the Android.mk le to dene a Make macro LS_CPP that lists all .cpp
les in jni directory automacally. This macro is invoked when LOCAL_SRC_FILES
variable is inialized. Please refer to Chapter 9, Porng Exisng Libraries to Android
for more informaon on the Makele language:
LOCAL_PATH := $(call my-dir)
include $(CLEAR_VARS)
LS_CPP=$(subst $(1)/,,$(wildcard $(1)/*.cpp))
LOCAL_MODULE := droidblaster
LOCAL_SRC_FILES := $(call LS_CPP,$(LOCAL_PATH))
LOCAL_LDLIBS := -landroid -llog
LOCAL_STATIC_LIBRARIES := android_native_app_glue
include $(BUILD_SHARED_LIBRARY)
$(call import-module,android/native_app_glue)
11. Compile and run the applicaon.
Wring a Fully-nave Applicaon
[ 180 ]
What just happened?
If you run DroidBlaster, you will discover the following result. The red square crosses
the screen at a constant rhythm. Result should be reproducible among each run:
Graphic feedback is performed through the ANativeWindow_* API which gives nave access
to the display window and allow manipulang its surface like a bitmap. Like with bitmaps,
accessing window surface requires locking and unlocking before and aer processing.
Be safe!
Nave applicaons can crash. They can crash badly and although there are
means to detect where an applicaon crashed (like core dumps in Android
logs, see Chapter 11, Debugging and Troubleshoong), it is always beer
to develop carefully and protect your program code. Here, if the cursor was
drawn outside surface memory buer, a sudden crash would be very likely
to happen.
You can start experimenng more concretely with applicaon events by pressing the power
buon, leaving to the home screen. Several situaons can occur and should be systemacally
tested carefully:
Leaving the applicaon using the Back buon (which destroys the nave thread)
Leaving the applicaon using the Home buon (does not destroy the nave thread
but stops the applicaon and releases the window)
Long press on the power buon to open the Power menu (applicaon loses focus)
Long press on the Home buon to show applicaon switching menu (loses focus)
An unexpected phone call
Leaving the applicaon using the Back buon, reinializes the mark in the middle;
this is because the nave thread gets destructed. This is not the case in other scenarios
(for example, pressing the Home buon).

Chapter 5
[ 181 ]
More on time primitives
Timers are essenal to display animaons and movement at correct speed. They can be
implemented with the POSIX method clock_gettime() which retrieves me with a high
precision, theorecally unl the nanosecond.
Clock has been congured with the opon CLOCK_MONOTONIC. A monotonic mer gives the
elapsed clock me since an arbitrary starng point in the past. It is unaected by potenal
system date change and thus cannot go back in the past compared to other opons. The
downside with CLOCK_MONOTONIC is that it is system specic and it is not guaranteed to be
supported. Hopefully, Android supports it but care should be taken when porng Android
code to other plaorms.
An alternave, less precise but which is aected by changes in the system me, is
gettimeofday(), also provided in time.h. Usage is similar but precision is in microseconds
instead of nanoseconds. Here could be an usage example that could replace the current now()
implementaon in TimeService:
double TimeService::now() {
timeval lTimeVal;
gettimeofday(&lTimeVal, NULL);
return (lTimeVal.tv_sec * 1000.0) + (lTimeVal.tv_usec / 1000.0);
}
Summary
In this chapter, we created our rst fully nave applicaon without a line of Java code
and started to implement the skeleton of an event loop which processes events. More
specically, we have seen how to poll events accordingly and make an applicaon alive.
We have also handled events occurring during acvity lifecycle to acvate and deacvate
acvity as soon as it is idling.
We have locked and unlocked navely the display window to display raw graphics. We can
now draw graphics directly without a temporary back buer. Finally, we have retrieved me
to make the applicaon adapt to device speed, thanks to a monotonic clock.
The basic framework iniated here will form the base of the 2D/3D game that we will
develop throughout this book. However, although nowadays simplicity is fashion, we need
something a bit fancier than just a red square! Follow me into the next chapter and discover
how to render advanced graphics with OpenGL ES for Android.

6
Rendering Graphics with OpenGL ES
Let's face it: one of the main interests of the Android NDK is to write mulmedia
applicaons and games. Indeed, these programs consume lots of resources and
need responsiveness. That is why one of the rst available APIs (and almost
the only one unl recently) in Android NDK is an API for graphics: the Open
Graphics Library for Embedded Systems (abbreviated OpenGL ES).
OpenGL is a standard API created by Silicon Graphics and now managed by the
Khronos Group (see http://www.khronos.org/). OpenGL ES derivave is
available on many plaorms such as iOS or Blackberry OS and is the best hope
for wring portable and ecient graphics code. OpenGL can do both 2D and 3D
graphics with programmable shaders (if hardware supports it). There are two
main releases of OpenGL ES currently supported by Android:
OpenGL ES 1.1: This is the most supported API on Android devices.
It oers an old school graphic API with a xed pipeline (that is, a xed
set of congurable operaons to transform and render geometry).
Although specicaon is not fully implemented, its current
implementaon is perfectly sucient. This is a good choice to
write 2D games or 3D games targeng older devices.
OpenGL ES 2: This is not supported on old phones (like the anc HTC G1)
but more recent ones (at least not so old like the Nexus One… me goes
fast in the mobile world) support it. OpenGL ES 2 replaces the xed
pipeline with a modern programmable pipeline with vertex and pixel
shaders. This is the best choice for advanced 3D games. Note that
OpenGL ES 1.X is frequently emulated by an OpenGL 2 implementaon
behind the scene.
Rendering Graphics with OpenGL ES
[ 184 ]
This chapter teaches how to create 2D graphics. More specically, it shows how to
do the following:
Inialize OpenGL ES and bind it to an Android window
Load a texture from a PNG le
Draw sprites using OpenGL ES 1.1 extensions
Display a le map using vertex and index buers
OpenGL ES and graphics in general is a wide subject. This chapter covers the essenal basics
to get started with OpenGL ES 1.1, largely enough to create the next mind-blowing app!
Initializing OpenGL ES
The rst step to create awesome graphics is to inialize OpenGL ES. Although not terribly
complex, this task is a lile bit involving when binding to an Android window (that is,
aaching a rendering context to a window). These pieces are glued together with the help
of the Embedded-System Graphics Library (or EGL), a companion API of OpenGL ES.
For this rst part, I propose to replace the raw drawing system implemented in a previous
chapter with OpenGL ES. We are going to take care of EGL inializaon and nalizaon and
try to fade screen color from black to white to ensure everything works properly.
Project DroidBlaster_Part5-3 can be used as a starng point for this part. The
resulng project is provided with this book under the name DroidBlaster_Part6-1.
Time for action – initializing OpenGL ES
First, let's encapsulate OpenGL ES inializaon code in a dedicated C++ class:
1. Create header le GraphicsService.hpp in jni folder. It needs to include EGL/
egl.h which denes EGL API to bind OpenGL ES to the Android plaorm. This
header declares among others EGLDisplay, EGLSurface, and EGLContext
types which are handles to system resources.
Our GrapicsService lifecycle is composed of three main steps:
start(): This binds an OpenGL rendering context to the Android
nave window and loads graphic resources (textures and meshes later
in this chapter).

Chapter 6
[ 185 ]
stop(): This unbinds rendering context from Android window and frees
allocated graphic resources.
update(): This performs rendering operaons during each
refresh iteraon.
#define _PACKT_GRAPHICSSERVICE_HPP_
#include "TimeService.hpp"
#include "Types.hpp"
#include <android_native_app_glue.h>
#include <EGL/egl.h>
namespace packt {
class GraphicsService {
public:
GraphicsService(android_app* pApplication,
TimeService* pTimeService);
const char* getPath();
const int32_t& getHeight();
const int32_t& getWidth();
status start();
void stop();
status update();
private:
android_app* mApplication;
TimeService* mTimeService;
int32_t mWidth, mHeight;
EGLDisplay mDisplay;
EGLSurface mSurface;
EGLContext mContext;
};
}
#endif

Rendering Graphics with OpenGL ES
[ 186 ]
2. Create jni/Graphics.Service.cpp. Include GLES/gl.h and GLES/glext.h,
which are the ocial OpenGL include les for Android. Write constructor, destructor,
and geer methods:
#include "GraphicsService.hpp"
#include "Log.hpp"
#include <GLES/gl.h>
#include <GLES/glext.h>
namespace packt
{
GraphicsService::GraphicsService(android_app* pApplication,
TimeService* pTimeService) :
mApplication(pApplication),
mTimeService(pTimeService),
mWidth(0), mHeight(0),
mDisplay(EGL_NO_DISPLAY),
mSurface(EGL_NO_CONTEXT),
mContext(EGL_NO_SURFACE)
{}
int32_t GraphicsService::getPath() {
return mResource.getPath();
}
const int32_t& GraphicsService::getHeight() {
return mHeight;
}
const int32_t& GraphicsService::getWidth() {
return mWidth;
}
...
3. In the same le, carry out the bulk of the work by wring start(). The rst
inializaon steps consist of the following:
Connecng to a display, that is, an Android window, with
eglGetDisplay() and eglInitialize().
Downloa d f r o m W o w ! e B o o k < w w w.woweb o o k . c o m >Downloa d f r o m W o w ! e B o o k < w w w.woweb o o k . c o m >

Chapter 6
[ 187 ]
Finding an appropriate framebuer conguraon with
eglChooseConfig() for the display. Framebuer is an OpenGL term
referring to a rendering surface (including addional elements like a
Z-buer). Conguraons are selected according to requested aributes:
OpenGL ES 1 and a 16 bits surface (5 bits for red, 6 for green, and 5 for
blue). The aribute list is terminated by EGL_NONE sennel. Here, we
choose the default conguraon.
Re-conguring the Android window according to selected conguraon
aributes (retrieved with eglGetConfigAttrib()). This operaon is
Android-specic and is performed with Android ANativeWindow API.
A list of all available framebuer conguraons is also available through
eglGetConfigs() which can then be parsed with eglGetConfigAttrib().
Note how EGL denes its own types and re-declares primive types EGLint
and EGLBoolean to favor plaorm independence:
...
status GraphicsService::start() {
EGLint lFormat, lNumConfigs, lErrorResult;
EGLConfig lConfig;
const EGLint lAttributes[] = {
EGL_RENDERABLE_TYPE, EGL_OPENGL_ES_BIT,
EGL_BLUE_SIZE, 5, EGL_GREEN_SIZE, 6, EGL_RED_SIZE, 5,
EGL_SURFACE_TYPE, EGL_WINDOW_BIT,
EGL_NONE
};
mDisplay = eglGetDisplay(EGL_DEFAULT_DISPLAY);
if (mDisplay == EGL_NO_DISPLAY) goto ERROR;
if (!eglInitialize(mDisplay, NULL, NULL)) goto ERROR;
if(!eglChooseConfig(mDisplay, lAttributes, &lConfig, 1,
&lNumConfigs) || (lNumConfigs <= 0)) goto ERROR;
if (!eglGetConfigAttrib(mDisplay, lConfig,
EGL_NATIVE_VISUAL_ID, &lFormat)) goto ERROR;
ANativeWindow_setBuffersGeometry(mApplication->window, 0, 0,
lFormat);
...
Rendering Graphics with OpenGL ES
[ 188 ]
4. Connue start() method to create the display surface according to the
conguraon selected previously and context. A context contains all data
related to OpenGL state (enabled and disabled sengs, matrix stack, and so on).
OpenGL ES supports the creaon of mulple contexts for one
display surface. This allows dividing rendering operaons among
threads or rendering to several windows. However, it is not well
supported on Android hardware and should be avoided.
Finally, acvate the created rendering context (eglMakeCurrent()) and
dene the display viewport according to surface aributes (retrieved with
eglQuerySurface()).
...
mSurface = eglCreateWindowSurface(mDisplay, lConfig,
mApplication->window, NULL);
if (mSurface == EGL_NO_SURFACE) goto ERROR;
mContext = eglCreateContext(mDisplay, lConfig,
EGL_NO_CONTEXT, NULL);
if (mContext == EGL_NO_CONTEXT) goto ERROR;
if (!eglMakeCurrent (mDisplay, mSurface, mSurface, mContext)
|| !eglQuerySurface(mDisplay, mSurface, EGL_WIDTH, &mWidth)
|| !eglQuerySurface(mDisplay, mSurface, EGL_HEIGHT, &mHeight)
|| (mWidth <= 0) || (mHeight <= 0)) goto ERROR;
glViewport(0, 0, mWidth, mHeight);
return STATUS_OK;
ERROR:
Log::error("Error while starting GraphicsService");
stop();
return STATUS_KO;
}
...
Chapter 6
[ 189 ]
5. In GraphicsService.cpp, unbind the applicaon from the android window
and release EGL resources when the applicaon stops running:
OpenGL contexts are lost frequently on Android applicaons (when
leaving or going back to the home screen, when a call is received,
when devices go to sleep, and so on). As a lost context becomes
unusable, it is important to release resources as soon as possible.
...
void GraphicsService::stop() {
if (mDisplay != EGL_NO_DISPLAY) {
eglMakeCurrent(mDisplay, EGL_NO_SURFACE, EGL_NO_
SURFACE,
EGL_NO_CONTEXT);
if (mContext != EGL_NO_CONTEXT) {
eglDestroyContext(mDisplay, mContext);
mContext = EGL_NO_CONTEXT;
}
if (mSurface != EGL_NO_SURFACE) {
eglDestroySurface(mDisplay, mSurface);
mSurface = EGL_NO_SURFACE;
}
eglTerminate(mDisplay);
mDisplay = EGL_NO_DISPLAY;
}
}
...
6. Finally, implement the last method update() to refresh the screen during each step
with eglSwapBuffers(). To have a concrete visual feedback, change the display
background color gradually according to the me step with glClearColor() and
erase the framebuer with glClear(). Internally, rendering is performed on a back
buer which is swapped with the front buer shown to the user meanwhile. The
front buer becomes the back buer and vice versa (pointers are switched):
This technique is more commonly referred to as page ipping.
Front and back buers form a swap chain. According to driver
implementaon, they can be extended with a third buer, in which
case we talk about triple buering. Swapping is oen synchronized
with the screen refresh rate to avoid image tearing: this is a VSync.

Rendering Graphics with OpenGL ES
[ 190 ]
...
status GraphicsService::update() {
float lTimeStep = mTimeService->elapsed();
static float lClearColor = 0.0f;
lClearColor += lTimeStep * 0.01f;
glClearColor(lClearColor, lClearColor, lClearColor, 1.0f);
glClear(GL_COLOR_BUFFER_BIT);
if (eglSwapBuffers(mDisplay, mSurface) != EGL_TRUE) {
Log::error("Error %d swapping buffers.", eglGetError());
return STATUS_KO;
}
return STATUS_OK;
}
}
We are done with GraphicsService. Let's use it in the nal applicaon.
7. Add GraphicsService to the Context structure in exisng le
jni/Context.hpp:
...
namespace packt
{
class GraphicsService;
class TimeService;
struct Context
{
GraphicsService* mGraphicsService;
TimeService* mTimeService;
};
}
...
8. Now, modify DroidBlaster.hpp to include GraphicsService as a member
variable. You can get rid of previous members mApplication, mPosX, mPosY,
mSize, mSpeed, and methods clear() and drawCursor() created in the
previous chapter:
#ifndef _PACKT_DROIDBLASTER_HPP_
#define _PACKT_DROIDBLASTER_HPP_
#include "ActivityHandler.hpp"

Chapter 6
[ 191 ]
#include "Context.hpp"
#include "GraphicsService.hpp"
#include "TimeService.hpp"
#include "Types.hpp"
namespace dbs {
class DroidBlaster : public packt::ActivityHandler {
public:
DroidBlaster(packt::Context* pContext);
...
private:
packt::GraphicsService* mGraphicsService;
packt::TimeService* mTimeService;
};
}
#endif
9. And obviously, rewrite jni/DroidBlaster.cpp. Method onStep() is completely
rewrien and do not make use of DrawingUtil or ANativeWindow locking and
unlocking features anymore. This is completely replaced by GraphicsService,
which is started when the applicaon is made available. The same goes for
TimeService:
#include "DroidBlaster.hpp"
#include "Log.hpp"
namespace dbs {
DroidBlaster::DroidBlaster(packt::Context* pContext) :
mGraphicsService(pContext->mGraphicsService),
mTimeService(pContext->mTimeService)
{}
packt::status DroidBlaster::onActivate() {
if (mGraphicsService->start() != packt::STATUS_OK) {
return packt::STATUS_KO;
}
mTimeService->reset();
return packt::STATUS_OK;
}
void DroidBlaster::onDeactivate() {
mGraphicsService->stop();
}

Rendering Graphics with OpenGL ES
[ 192 ]
packt::status DroidBlaster::onStep() {
mTimeService->update();
if (mGraphicsService->update() != packt::STATUS_OK) {
return packt::STATUS_KO;
}
return packt::STATUS_OK;
}
...
}
10. Finally, update the main loop in exisng le Main.cpp to instanate
GraphicsService:
#include "Context.hpp"
#include "DroidBlaster.hpp"
#include "EventLoop.hpp"
#include "GraphicsService.hpp"
#include "TimeService.hpp"
void android_main(android_app* pApplication) {
packt::TimeService lTimeService;
packt::GraphicsService lGraphicsService(pApplication,
&lTimeService);
packt::Context lContext = { &lGraphicsService, &lTimeService
};
packt::EventLoop lEventLoop(pApplication);
dbs::DroidBlaster lDroidBlaster(&lContext);
lEventLoop.run(&lDroidBlaster);
}
11. Let's not forget compilaon. OpenGL ES 1.x libraries need to be included: libEGL
for device inializaon and libGLESv1_CM for drawing calls:
LOCAL_PATH := $(call my-dir)
include $(CLEAR_VARS)
LS_CPP=$(subst $(1)/,,$(wildcard $(1)/*.cpp))
LOCAL_MODULE := droidblaster
LOCAL_SRC_FILES := $(call LS_CPP,$(LOCAL_PATH))
LOCAL_LDLIBS := -landroid -llog -lEGL -lGLESv1_CM

Chapter 6
[ 193 ]
LOCAL_STATIC_LIBRARIES := android_native_app_glue
include $(BUILD_SHARED_LIBRARY)
$(call import-module,android/native_app_glue)
What just happened?
Launch the applicaon. If everything works ne, your device screen will progressively fade
from black to white. But instead of clearing display with a raw memset()or seng pixels
one by one like seen in previous chapter, ecient OpenGL ES drawing primives are invoked
instead. Note that the eect appears only the rst me the applicaon is started because
the clear color is stored in a stac variable, which has a dierent lifecycle than local and Java
variables on Android (see Chapter 4, Calling Back Java from Nave Code ). To make it appear
again, kill the applicaon or relaunch it in Debug mode.
We have inialized and connected OpenGL ES and the Android nave window system
together with EGL. Thanks to this API, we have queried a display conguraon that matches
our expectaons and created a framebuer to render our scene on. We have taken care
of releasing resources when the applicaon is deacvated, as OpenGL contexts are lost
frequently on mobile systems. Although EGL is a standard API, specied by the Khronos
group like OpenGL, plaorms oen implement their own variant (haphazardly, EAGL on
iOS). Portability is also limited by the fact that display window inializaon remains the
responsibility of client applicaon.
Reading PNG textures with the asset manager
I guess you need something more consistent than just changing the screen color! But before
showing awesome graphics in our applicaon, we need to load some external resources.
In this second part, we are going to load a texture into OpenGL ES thanks to the Android asset
manager, an API provided since NDK R5. It allows programmers to access any resources stored
in the assets folder of their project folder. Assets stored there are then packaged into the
nal APK archive during applicaon compilaon. Asset resources are considered as raw binary
les that your applicaon needs to interpret and access using their lename relave to the
assets folder (a le assets/mydir/myfile can be accessed with mydir/myfile path).
Files are read-only and likely to be compressed.
If you have already wrien some Java Android applicaon, then you know that Android also
provides resources accessible through compile-me generated IDs inside the res project
folder. This is not directly available on the Android NDK and unless you are ready to use a JNI
bridge, assets are the only way to package resources in your APK.
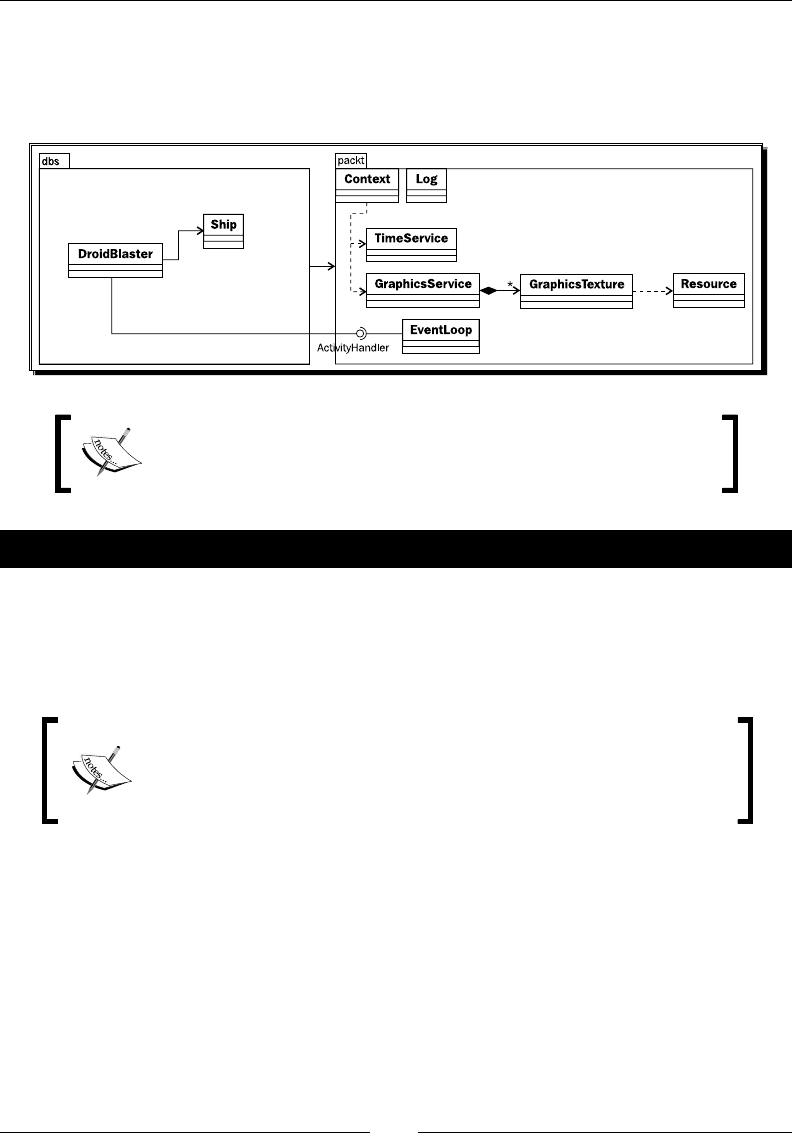
Rendering Graphics with OpenGL ES
[ 194 ]
In the current part, we are going to load a texture encoded in one of the most popular
picture formats used nowadays: Portable Network Graphics or more commonly known
as PNG. To help us in this task, we are going to integrate libpng NDK to interpret a PNG
le added to our assets. The resulng applicaon will look like the following diagram:
Project DroidBlaster_Part6-1 can be used as a starng point for this
part. The resulng project is provided with this book under the name
DroidBlaster_Part6-2.
Time for action – loading a texture in OpenGL ES
PNG is a complex format to read. So let's embed libpng third-party library:
1. Go to the libpng website at http://www.libpng.org/pub/png/libpng.html
and download the libpng source package (version 1.5.2 in this book).
Original libpng 1.5.2 archive is provided with this book in Chapter6/
Resource folder under the name lpng152.zip. A second archive
lpng152_ndk.zip with the modicaons made in the following steps
is also available.
2. Create a folder libpng inside $ANDROID_NDK/sources/. Move all les from the
libpng package in it.
3. Copy le libpng/scripts/pnglibconf.h.prebuilt into root folder libpng
with other source les. Rename it pnglibconf.h.

Chapter 6
[ 195 ]
4. Write an Android.mk le inside $ANDROID_NDK/sources with the content as
follows. This Makele compiles all C les (macro LS_C called from LOCAL_SRC_
FILES direcve) inside libpng folder, excluding example.c and pngtest.c.
The library is linked with prerequisite library libzip (opon -lz) and packaged as a
stac library. All include les are made available with direcve LOCAL_EXPORT_C_
INCLUDES to clients.
Folder $ANDROID_NDK/sources is a special folder considered
by default as a module folder (which contains reusable libraries. See
Chapter 9, Porng Exisng Libraries to Android for more informaon).
LOCAL_PATH:= $(call my-dir)
include $(CLEAR_VARS)
LS_C=$(subst $(1)/,,$(wildcard $(1)/*.c))
LOCAL_MODULE := png
LOCAL_SRC_FILES := \
$(filter-out example.c pngtest.c,$(call LS_C,$(LOCAL_PATH)))
LOCAL_EXPORT_C_INCLUDES := $(LOCAL_PATH)
LOCAL_EXPORT_LDLIBS := -lz
include $(BUILD_STATIC_LIBRARY)
5. Now, open jni/Android.mk in DroidBlaster. Link and import libpng thanks
to the LOCAL_STATIC_LIBRARIES and import-module direcves:
LOCAL_PATH := $(call my-dir)
include $(CLEAR_VARS)
LS_CPP=$(subst $(1)/,,$(wildcard $(1)/*.cpp))
LOCAL_MODULE := droidblaster
LOCAL_SRC_FILES := $(call LS_CPP,$(LOCAL_PATH))
LOCAL_LDLIBS := -landroid -llog -lEGL -lGLESv1_CM
LOCAL_STATIC_LIBRARIES := android_native_app_glue png
include $(BUILD_SHARED_LIBRARY)
$(call import-module,android/native_app_glue)
$(call import-module,libpng)
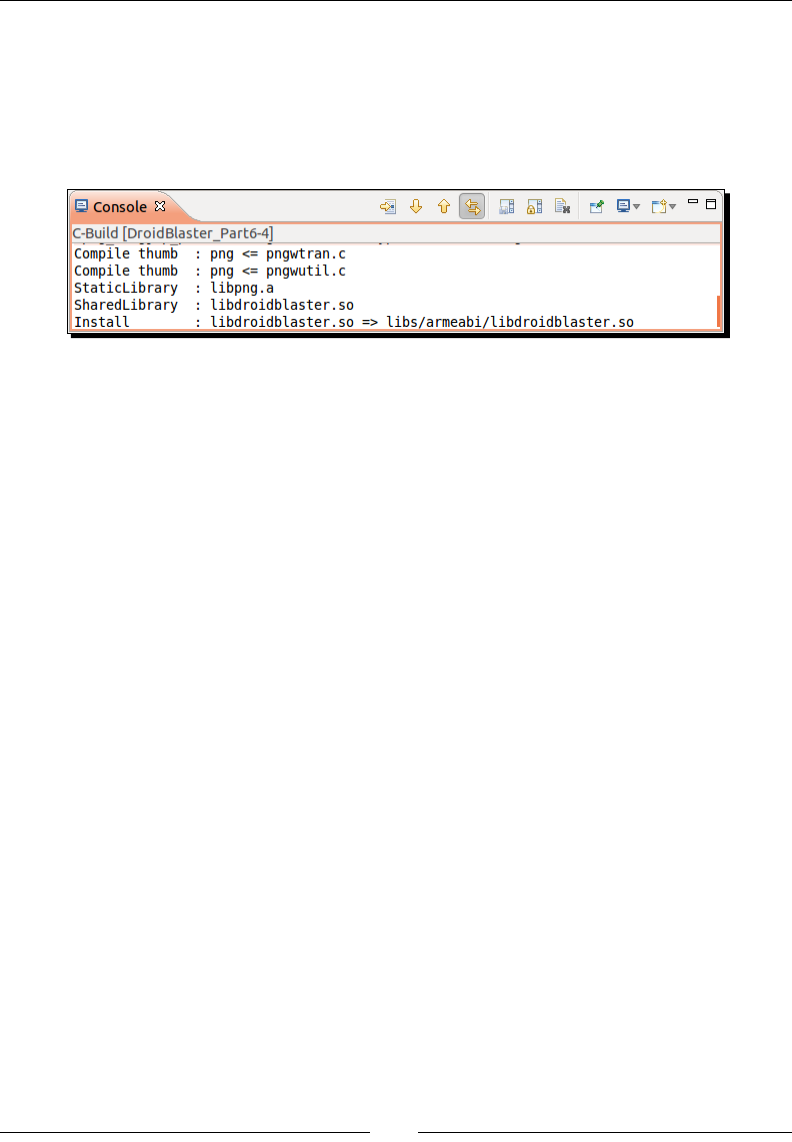
Rendering Graphics with OpenGL ES
[ 196 ]
6. Add libpng folder (${env_var:ANDROID_NDK}/sources/libpng) to your
project paths in the Project | Properes | Path and Symbols | Includes tab.
7. Ensure your module works by compiling DroidBlaster. If everything works ne,
libpng source les should get compiled (note that NDK will not recompile already
compiled sources). Some warnings are likely to appear. You can safely ignore them:
Library libpng is now included in our project. So let's now try to read a PNG
image le.
8. First, create in jni/Resource.hpp a new class Resource to access asset les.
We need three simple operaons: open(), close(), and read().
Resource will encapsulate calls to the nave Android asset management API.
This API is dened in android/asset_manager.hpp which is already included in
header android_native_app_glue.h. Its main entry point is an AAsetMAnager
opaque pointer, from which we can access an asset le represented by an AAsset:
#ifndef _PACKT_RESOURCE_HPP_
#define _PACKT_RESOURCE_HPP_
#include "Types.hpp"
#include <android_native_app_glue.h>
namespace packt {
class Resource {
public:
Resource(android_app* pApplication, const char* pPath);
const char* getPath();
status open();
void close();
status read(void* pBuffer, size_t pCount);
private:
const char* mPath;

Chapter 6
[ 197 ]
AAssetManager* mAssetManager;
AAsset* mAsset;
};
}
#endif
Implement class Resource in jni/Resource.cpp. The asset manager opens
assets with AAssetManager_open(). This is its sole responsibility apart from
lisng folders. Assets are opened in default AASSET_MODE_UNKNOWN mode.
Other possibilies are:
AASSET_MODE_BUFFER: This performs fast small reads
AASSET_MODE_RANDOM: This reads chunks of data forward and backward
AASSET_MODE_STREAMING: This reads data sequenally with occasional
forward seeks
Then, code operates on asset les with AAsset_read() to read data and
AAsset_close() to close the asset:
#include "Resource.hpp"
#include "Log.hpp"
namespace packt {
Resource::Resource(android_app* pApplication, const char*
pPath):
mPath(pPath),
mAssetManager(pApplication->activity->assetManager),
mAsset(NULL)
{}
const char* Resource::getPath() {
return mPath;
}
status Resource::open() {
mAsset = AAssetManager_open(mAssetManager, mPath,
AASSET_MODE_UNKNOWN);
return (mAsset != NULL) ? STATUS_OK : STATUS_KO;
}
void Resource::close() {
if (mAsset != NULL) {
AAsset_close(mAsset);
mAsset = NULL;
}

Rendering Graphics with OpenGL ES
[ 198 ]
}
status Resource::read(void* pBuffer, size_t pCount) {
int32_t lReadCount = AAsset_read(mAsset, pBuffer, pCount);
return (lReadCount == pCount) ? STATUS_OK : STATUS_KO;
}
}
9. Create jni/GraphicsTexture.hpp as follows. Include OpenGL and PNG header
GLES/gl.h and png.h. A texture is loaded from a PNG le with loadImage() and
callback_read(), pushed into OpenGL with load() and released in unload().
A texture is accessible through a simple idener and has a format (RGB, RGBA, and
so on). Texture width and height have to be stored when as image is loaded from le:
#ifndef _PACKT_GRAPHICSTEXTURE_HPP_
#define _PACKT_GRAPHICSTEXTURE_HPP_
#include "Context.hpp"
#include "Resource.hpp"
#include "Types.hpp"
#include <android_native_app_glue.h>
#include <GLES/gl.h>
#include <png.h>
namespace packt {
class GraphicsTexture {
public:
GraphicsTexture(android_app* pApplication, const char*
pPath);
~GraphicsTexture();
int32_t getHeight();
int32_t getWidth();
status load();
void unload();
void apply();
protected:
uint8_t* loadImage();
private:
static void callback_read(png_structp pStruct,

Chapter 6
[ 199 ]
png_bytep pData, png_size_t pSize);
private:
Resource mResource;
GLuint mTextureId;
int32_t mWidth, mHeight;
GLint mFormat;
};
}
#endif
10. Create the C++ source counterpart jni/GraphicsTexture.cpp with a constructor,
a destructor, and geers:
#include "Log.hpp"
#include "GraphicsTexture.hpp"
namespace packt {
GraphicsTexture::GraphicsTexture(android_app* pApplication,
const char* pPath) :
mResource(pApplication, pPath),
mTextureId(0),
mWidth(0), mHeight(0)
{}
int32_t GraphicsTexture::getHeight() {
return mHeight;
}
int32_t GraphicsTexture::getWidth() {
return mWidth;
}
...
11. Then, in the same le, implement loadImage() method to load a PNG le. File
is rst opened through our Resource class and then its signature (the rst 8 bytes)
is checked to ensure le is a PNG (note that it can sll be corrupted):
...
uint8_t* GraphicsTexture::loadImage() {
png_byte lHeader[8];
png_structp lPngPtr = NULL; png_infop lInfoPtr = NULL;
png_byte* lImageBuffer = NULL; png_bytep* lRowPtrs = NULL;
png_int_32 lRowSize; bool lTransparency;

Rendering Graphics with OpenGL ES
[ 200 ]
if (mResource.open() != STATUS_OK) goto ERROR;
if (mResource.read(lHeader, sizeof(lHeader)) != STATUS_OK)
goto ERROR;
if (png_sig_cmp(lHeader, 0, 8) != 0) goto ERROR;
...
12. In the same method, create all structures necessary to read a PNG image.
Aer that, prepare reading operaons by giving our callback_read()
(implemented later in this tutorial) to libpng with our Resource reader.
Set up error management with setjmp(). This mechanism allows jumping like a
goto but through the call stack. If an error occurs, control ow comes back at the
point where setjmp() has been called rst, but enters the if block instead (here
goto ERROR):
...
lPngPtr = png_create_read_struct(PNG_LIBPNG_VER_STRING,
NULL, NULL, NULL);
if (!lPngPtr) goto ERROR;
lInfoPtr = png_create_info_struct(lPngPtr);
if (!lInfoPtr) goto ERROR;
png_set_read_fn(lPngPtr, &mResource, callback_read);
if (setjmp(png_jmpbuf(lPngPtr))) goto ERROR;
...
13. In loadImage(), start reading PNG le header with png_read_info(), ignoring
the rst 8 bytes read for le signature with png_set_sig_bytes().
PNG les can be encoded in several formats: RGB, RGBA, 256 colors with a palee,
grayscale… R,G, and B color channels can be encoded on up to 16 bits. Hopefully,
libpng provides transformaon funcons to decode unusual formats to more
classical RGB and luminance formats with 8 bits per channel with or without an
alpha channel. Transformaons are validated with png_read_update_info():
...
png_set_sig_bytes(lPngPtr, 8);
png_read_info(lPngPtr, lInfoPtr);
png_int_32 lDepth, lColorType;
png_uint_32 lWidth, lHeight;
png_get_IHDR(lPngPtr, lInfoPtr, &lWidth, &lHeight,
&lDepth, &lColorType, NULL, NULL, NULL);
mWidth = lWidth; mHeight = lHeight;

Chapter 6
[ 201 ]
// Creates a full alpha channel if transparency is encoded as
// an array of palette entries or a single transparent color.
lTransparency = false;
if (png_get_valid(lPngPtr, lInfoPtr, PNG_INFO_tRNS)) {
png_set_tRNS_to_alpha(lPngPtr);
lTransparency = true;
goto ERROR;
}
// Expands PNG with less than 8bits per channel to 8bits.
if (lDepth < 8) {
png_set_packing (lPngPtr);
// Shrinks PNG with 16bits per color channel down to
8bits.
} else if (lDepth == 16) {
png_set_strip_16(lPngPtr);
}
// Indicates that image needs conversion to RGBA if
needed.
switch (lColorType) {
case PNG_COLOR_TYPE_PALETTE:
png_set_palette_to_rgb(lPngPtr);
mFormat = lTransparency ? GL_RGBA : GL_RGB;
break;
case PNG_COLOR_TYPE_RGB:
mFormat = lTransparency ? GL_RGBA : GL_RGB;
break;
case PNG_COLOR_TYPE_RGBA:
mFormat = GL_RGBA;
break;
case PNG_COLOR_TYPE_GRAY:
png_set_expand_gray_1_2_4_to_8(lPngPtr);
mFormat = lTransparency ? GL_LUMINANCE_ALPHA:GL_
LUMINANCE;
break;
case PNG_COLOR_TYPE_GA:
png_set_expand_gray_1_2_4_to_8(lPngPtr);
mFormat = GL_LUMINANCE_ALPHA;
break;
}
png_read_update_info(lPngPtr, lInfoPtr);
...

Rendering Graphics with OpenGL ES
[ 202 ]
14. Allocate the necessary temporary buer to hold image data and a second one with
the address of each output image row for libpng. Note that row order is inverted
because OpenGL uses a dierent coordinate system (rst pixel is at boom-le)
then PNG (rst pixel at top-le). Then start reading eecvely image content with
png_read_image().
...
lRowSize = png_get_rowbytes(lPngPtr, lInfoPtr);
if (lRowSize <= 0) goto ERROR;
lImageBuffer = new png_byte[lRowSize * lHeight];
if (!lImageBuffer) goto ERROR;
lRowPtrs = new png_bytep[lHeight];
if (!lRowPtrs) goto ERROR;
for (int32_t i = 0; i < lHeight; ++i) {
lRowPtrs[lHeight - (i + 1)] = lImageBuffer + i * lRowSize;
}
png_read_image(lPngPtr, lRowPtrs);
...
15. Finally, release resources(whether an error occurs or not) and return loaded data.
...
mResource.close();
png_destroy_read_struct(&lPngPtr, &lInfoPtr, NULL);
delete[] lRowPtrs;
return lImageBuffer;
ERROR:
Log::error("Error while reading PNG file");
mResource.close();
delete[] lRowPtrs; delete[] lImageBuffer;
if (lPngPtr != NULL) {
png_infop* lInfoPtrP = lInfoPtr != NULL ? &lInfoPtr: NULL;
png_destroy_read_struct(&lPngPtr, lInfoPtrP, NULL);
}
return NULL;
}
...

Chapter 6
[ 203 ]
16. We are almost done with loadImage()… almost because libpng sll requires
callback_read() to be implemented. This callback method, passed to libpng
at step 11, is a mechanism designed to integrate custom read operaons… like the
Android asset management API! The asset le is read through Resource instance
transmied as an untyped pointer at step 11:
...
void png_read_callback(png_structp png, png_bytep data,
png_size_t size) {
ResourceReader& lReader =
*((ResourceReader*) png_get_io_ptr(png));
if (lReader.read(data, size) != STATUS_OK) {
lReader.close();
png_error(png, "Error while reading PNG file");
}
}
...
17. We are done with PNG loading! In GraphicsTexture.hpp, get the temporary
image buer loaded in loadImage() back in method load(). Creang a texture
once image data is in memory is easy:
Generate a new texture ID with glGenTextures().
Tell OpenGL we are working on a new texture with glBindTexture().
Congure texture parameters, which need to be set only when texture
is created. GL_LINEAR smooths textures drawn on screen. This is not
essenal for a 2D game which does not scale textures but the smallest
zoom eect will require it. Texture repeon is prevented with GL_CLAMP_
TO_EDGE.
Push image data into current OpenGL texture with glTexImage2D().
And, of course, do not forget to free the temporary image buer!
...
status GraphicsTexture::load() {
uint8_t* lImageBuffer = loadImage();
if (lImageBuffer == NULL) {
return STATUS_KO;
}
// Creates a new OpenGL texture.
GLenum lErrorResult;
glGenTextures(1, &mTextureId);
glBindTexture(GL_TEXTURE_2D, mTextureId);

Rendering Graphics with OpenGL ES
[ 204 ]
// Set-up texture properties.
glTexParameteri(GL_TEXTURE_2D, GL_TEXTURE_MIN_FILTER,
GL_NEAREST);
glTexParameteri(GL_TEXTURE_2D, GL_TEXTURE_MAG_FILTER,
GL_NEAREST);
glTexParameteri(GL_TEXTURE_2D, GL_TEXTURE_WRAP_S,
GL_CLAMP_TO_EDGE);
glTexParameteri(GL_TEXTURE_2D, GL_TEXTURE_WRAP_T,
GL_CLAMP_TO_EDGE);
// Loads image data into OpenGL.
glTexImage2D(GL_TEXTURE_2D, 0, mFormat, mWidth, mHeight,
0,
mFormat, GL_UNSIGNED_BYTE, lImageBuffer);
delete[] lImageBuffer;
if (glGetError() != GL_NO_ERROR) {
Log::error("Error loading texture into OpenGL.");
unload();
return STATUS_KO;
}
return STATUS_OK;
}
...
18. The rest of the code is much simpler. Method unload() releases Open GL texture
resources when applicaon exits with glDeleteTextures():
...
void GraphicsTexture::unload() {
if (mTextureId != 0) {
glDeleteTextures(1, &mTextureId);
mTextureId = 0;
}
mWidth = 0; mHeight = 0; mFormat = 0;
}
...
19. Finally, implement method apply() to indicate to OpenGL ES which texture
to draw on screen when refreshing the scene:
...
void GraphicsTexture::apply() {
glActiveTexture( GL_TEXTURE0);
glBindTexture(GL_TEXTURE_2D, mTextureId);
}
}

Chapter 6
[ 205 ]
Code to properly load textures is ready. Let's manage them in GraphicsService:
20. Open jni/GraphicsService.hpp. Add a destructor and create a method
registerTexture() to allow clients to create new textures by passing an asset
path. Textures are stored in a C++ array. They are loaded when GraphicsService
starts (with loadResources()) and unloaded when it stops (with
unloadResources()):
#ifndef _PACKT_GRAPHICSSERVICE_HPP_
#define _PACKT_GRAPHICSSERVICE_HPP_
#include "GraphicsTexture.hpp"
#include "TimeService.hpp"
#include "Types.hpp"
...
namespace packt {
class GraphicsService
{
public:
GraphicsService(android_app* pApplication,
TimeService* pTimeService);
~GraphicsService();
...
status start();
void stop();
status update();
GraphicsTexture* registerTexture(const char* pPath);
protected:
status loadResources();
status unloadResources();
private:
...
GraphicsTexture* mTextures[32]; int32_t mTextureCount;
};
}
#endif

Rendering Graphics with OpenGL ES
[ 206 ]
21. In jni/GraphicsService.cpp, implementaon of the constructor, destructor,
start() and stop() is rather trivial:
...
namespace packt
{
GraphicsService::GraphicsService(android_app* pApplication,
TimeService* pTimeService) :
...,
mTextures(), mTextureCount(0)
{}
GraphicsService::~GraphicsService() {
for (int32_t i = 0; i < mTextureCount; ++i) {
delete mTextures[i];
mTextures[i] = NULL;
}
mTextureCount = 0;
}
...
status GraphicsService::start() {
...
glViewport(0, 0, mWidth, mHeight);
if (loadResources() != STATUS_OK) goto ERROR;
return STATUS_OK;
ERROR:
Log::error("Error while starting GraphicsService");
stop();
return STATUS_KO;
}
void GraphicsService::stop() {
unloadResources();
if (mDisplay != EGL_NO_DISPLAY) {
...
}
...

Chapter 6
[ 207 ]
22. To nish with jni/GraphicsService.cpp, append new methods for texture
resource management. There is no specic diculty here. A lookup is performed
when registering a texture to prevent duplicaon:
...
status GraphicsService::loadResources() {
for (int32_t i = 0; i < mTextureCount; ++i) {
if (mTextures[i]->load() != STATUS_OK) {
return STATUS_KO;
}
}
return STATUS_OK;
}
status GraphicsService::unloadResources() {
for (int32_t i = 0; i < mTextureCount; ++i) {
mTextures[i]->unload();
}
return STATUS_OK;
}
GraphicsTexture* GraphicsService::registerTexture(
const char* pPath) {
for (int32_t i = 0; i < mTextureCount; ++i) {
if (strcmp(pPath, mTextures[i]->getPath()) == 0) {
return mTextures[i];
}
}
GraphicsTexture* lTexture = new GraphicsTexture(
mApplication, pPath);
mTextures[mTextureCount++] = lTexture;
return lTexture;
}
}
What just happened?
In the previous chapter, we have just embedded exisng module NativeAppGlue to create
a fully nave applicaon. This me, we have created our rst reusable module to integrate
libpng. Combined with the Android asset manager, we are now able to create an OpenGL
texture from a PNG le packaged as an asset. The only drawback is that PNG does not
support 16 bits RGB.
Rendering Graphics with OpenGL ES
[ 208 ]
Do not be greedy with assets
Assets take space, lots of space. Installing large APK size can be problemac,
even when they are deployed on a SD Card (see the installLocation
opon in the Android manifest). Moreover, opening assets of more than 1 MB
or which were compressed was problemac in OS prior to version 2.3. Thus, a
good strategy to deal with tons of megabytes of resources is to keep essenal
assets in your APK and download remaining les to SD Card at runme the rst
me applicaon is launched.
To test if code loads textures without error, you can insert the following lines in
jni/DroidBlaster.cpp. Texture must be located in the assets project folder:
File ship.png loaded is provided with this book in Chapter6/Resource.
...
packt::GraphicsTexture* lShipTex =
mGraphicsService->registerTexture("ship.png");
...
When dealing with textures, an important requirement to remember is that OpenGL
textures must have a power of two dimensions (for example, 128 or 256 pixels). This allows,
for example, the generaon of mipmaps, that is, smaller versions of the same texture, to
increase performance and reduce aliasing arfacts when rendered object distance changes.
Other dimensions will fail on most devices. In addion, textures consume a lot of memory
and bandwidth. So consider using a compressed texture format such as ETC1 which is geng
wider support (but cannot handle alpha channels navely). Have a look at http://blog.
tewdew.com/post/7362195285/the-android-texture-decision for an interesng
arcle about texture compression.
Drawing a sprite
The base of 2D games is sprites, pieces of images composited (or blied) on screen and
which represent an object, character, or anything else animated or not. Sprites can be
displayed with a transparency eect using the Alpha channel of an image. Typically, an
image will contain several frames for a sprite, each frame represenng a dierent
animaon step or dierent objects.

Chapter 6
[ 209 ]
Eding sprite images
If you need a powerful mulplaorm image editor, consider using
GIMP, the GNU Image Manipulaon Program. This program available
on Windows, Linux and Mac OS X is really powerful and open source.
You can download it at http://www.gimp.org/.
To implement sprites, we are going to rely on an OpenGL ES extension generally supported
on Android devices : GL_OES_draw_texture. It allows drawing pictures directly onto the
screen from an texture. This is one of the most ecient technique when creang a 2D game.
Project DroidBlaster_Part6-2 can be used as a starng point for
this part. The resulng project is provided with this book under the
name DroidBlaster_Part6-3.
Time for action – drawing a Ship sprite
Let's write the necessary code to handle a sprite rst:
1. First, we need a class to contain sprites coordinates. Update jni/Types.hpp
to dene a new structure Location:
...
namespace packt {
typedef int32_t status;
const status STATUS_OK = 0;
const status STATUS_KO = -1;
const status STATUS_EXIT = -2;
struct Location {
Location(): mPosX(0), mPosY(0) {};
void setPosition(float pPosX, float pPosY)
{ mPosX = pPosX; mPosY = pPosY; }
void translate(float pAmountX, float pAmountY)
{ mPosX += pAmountX; mPosY += pAmountY; }
float mPosX; float mPosY;
};
}
...

Rendering Graphics with OpenGL ES
[ 210 ]
2. Create GraphicsSprite.hpp in folder jni. A sprite is loaded when
GraphicsService starts with load() and rendered when screen is refreshed
with draw(). It is possible to set an animaon with setAnimation() and play
it innitely or not by drawing sprite frames consecuvely in me.
A sprite requires several properes:
A texture containing the sprite sheet (mTexture).
A locaon to draw on screen (mLocation).
Informaon about sprite frames: mWidth and mHeight, horizontal,
vercal, and total number of frames in mFrameXCount, mFrameYCount,
and mFrameCount.
Animaon informaon: rst and total number of frames of an animaon
in mAnimStartFrame and mAnimFrameCount, animaon speed in
mAnimSpeed, currently shown frame in mAnimFrame, and a looping
indicator in mAnimLoop.
#ifndef _PACKT_GRAPHICSSPRITE_HPP_
#define _PACKT_GRAPHICSSPRITE_HPP_
#include "GraphicsTexture.hpp"
#include "TimeService.hpp"
#include "Types.hpp"
namespace packt {
class GraphicsSprite {
public:
GraphicsSprite(GraphicsTexture* pTexture,
int32_t pHeight, int32_t pWidth, Location*
pLocation);
void load();
void draw(float pTimeStep);
void setAnimation(int32_t pStartFrame, int32_t
pFrameCount,
float pSpeed, bool pLoop);
bool animationEnded();
private:
GraphicsTexture* mTexture;
Location* mLocation;
// Frame.
int32_t mHeight, mWidth;

Chapter 6
[ 211 ]
int32_t mFrameXCount, mFrameYCount, mFrameCount;
// Animation.
int32_t mAnimStartFrame, mAnimFrameCount;
float mAnimSpeed, mAnimFrame;
bool mAnimLoop;
};
}
#endif
3. Write GraphicsSprite.cpp in jni folder. Frame informaon (horizontal,
vercal, and total number of frames) needs to be recomputed in load()
as texture dimensions are known only at load me.
When seng up an animaon with setAnimation(), compute the rst frame index
mAnimStartFrame inside the sprite sheet and the number of images composing the
animaon, mAnimFrameCount. The animaon speed is set through mAnimSpeed and
current animaon frame (updated at each step) is saved in mAnimFrame:
include "GraphicsSprite.hpp"
#include "Log.hpp"
#include <GLES/gl.h>
#include <GLES/glext.h>
namespace packt {
GraphicsSprite::GraphicsSprite(GraphicsTexture* pTexture,
int32_t pHeight, int32_t pWidth, Location* pLocation) :
mTexture(pTexture), mLocation(pLocation),
mHeight(pHeight), mWidth(pWidth),
mFrameCount(0), mFrameXCount(0), mFrameYCount(0),
mAnimStartFrame(0), mAnimFrameCount(0),
mAnimSpeed(0), mAnimFrame(0), mAnimLoop(false)
{}
void GraphicsSprite::load() {
mFrameXCount = mTexture->getWidth() / mWidth;
mFrameYCount = mTexture->getHeight() / mHeight;
mFrameCount = (mTexture->getHeight() / mHeight)
* (mTexture->getWidth() / mWidth);
}
void GraphicsSprite::setAnimation(int32_t pStartFrame,
int32_t pFrameCount, float pSpeed, bool pLoop) {
mAnimStartFrame = pStartFrame;
mAnimFrame = 0.0f, mAnimSpeed = pSpeed, mAnimLoop = pLoop;
Downloa d f r o m W o w ! e B o o k < w w w.woweb o o k . c o m >Downloa d f r o m W o w ! e B o o k < w w w.woweb o o k . c o m >

Rendering Graphics with OpenGL ES
[ 212 ]
int32_t lMaxFrameCount = mFrameCount - pStartFrame;
if ((pFrameCount > -1) && (pFrameCount <= lMaxFrameCount))
{
mAnimFrameCount = pFrameCount;
} else {
mAnimFrameCount = lMaxFrameCount;
}
}
bool GraphicsSprite::animationEnded() {
return mAnimFrame > (mAnimFrameCount - 1);
}
...
4. In GraphicsSprite.cpp, implement last method draw(). First, compute the
current frame to display depending on the animaon state and then draw it with
OpenGL. They are three main steps involved to draw a sprite:
Ensure OpenGL draws the right texture with apply() (that is,
glBindTexture()).
Crop texture to draw only the required sprite frame with
glTexParameteriv() and GL_TEXTURE_CROP_RECT_OES.
Finally send a draw order to OpenGL ES with glDrawTexfOES().
...
void GraphicsSprite::draw(float pTimeStep) {
int32_t lCurrentFrame, lCurrentFrameX,
lCurrentFrameY;
// Updates animation in loop mode.
mAnimFrame += pTimeStep * mAnimSpeed;
if (mAnimLoop) {
lCurrentFrame = (mAnimStartFrame +
int32_t(mAnimFrame) %
mAnimFrameCount);
}
// Updates animation in one-shot mode.
else {
// If animation ended.
if (animationEnded()) {
lCurrentFrame = mAnimStartFrame +
(mAnimFrameCount-1);
} else {
lCurrentFrame = mAnimStartFrame +
int32_t(mAnimFrame);

Chapter 6
[ 213 ]
}
}
// Computes frame X and Y indexes from its id.
lCurrentFrameX = lCurrentFrame % mFrameXCount;
// lCurrentFrameY is converted from OpenGL
coordinates
// to top-left coordinates.
lCurrentFrameY = mFrameYCount - 1
- (lCurrentFrame /
mFrameXCount);
// Draws selected sprite frame.
mTexture->apply();
int32_t lCrop[] = { lCurrentFrameX * mWidth,
lCurrentFrameY * mHeight,
mWidth, mHeight };
glTexParameteriv(GL_TEXTURE_2D,
GL_TEXTURE_CROP_RECT_OES,
lCrop);
glDrawTexfOES(mLocation->mPosX - (mWidth / 2),
mLocation->mPosY - (mHeight / 2),
0.0f, mWidth, mHeight);
}
}
Code to render sprites is ready. Let's make use of it:
5. Modify GraphicsService to manage sprite resources (like textures in the
previous part):
#ifndef _PACKT_GRAPHICSSERVICE_HPP_
#define _PACKT_GRAPHICSSERVICE_HPP_
#include "GraphicsSprite.hpp"
#include "GraphicsTexture.hpp"
...
namespace packt {
class GraphicsService {
public:
...
GraphicsTexture* registerTexture(const char* pPath);
GraphicsSprite* registerSprite(GraphicsTexture* pTexture,
int32_t pHeight, int32_t pWidth, Location* pLocation);

Rendering Graphics with OpenGL ES
[ 214 ]
protected:
status loadResources();
status unloadResources();
void setup();
private:
...
GraphicsTexture* mTextures[32]; int32_t mTextureCount;
GraphicsSprite* mSprites[256]; int32_t mSpriteCount;
};
}
#endif
6. Modify GraphicsService.cpp so that it creates a buer of sprite to draw
while operang. We dene a method registerSprite for this purpose:
...
namespace packt {
GraphicsService::GraphicsService(android_app* pApplication,
TimeService* pTimeService) :
...,
mTextures(), mTextureCount(0),
mSprites(), mSpriteCount(0)
{}
GraphicsService::~GraphicsService() {
for (int32_t i = 0; i < mSpriteCount; ++i) {
delete mSprites[i];
mSprites[i] = NULL;
}
mSpriteCount = 0;
for (int32_t i = 0; i < mTextureCount; ++i) {
delete mTextures[i];
mTextures[i] = NULL;
}
mTextureCount = 0;
}
...
status GraphicsService::start() {
...

Chapter 6
[ 215 ]
if (loadResources() != STATUS_OK) goto ERROR;
setup();
return STATUS_OK;
ERROR:
Log::error("Error while starting GraphicsService");
stop();
return STATUS_KO;
}
...
7. Erase screen with black and draw sprites over using the method update().
Transparency is enabled with glBlendFunc() which blends source texture pixel
with nal framebuer according to the specied formula. Here, source pixel aects
desnaon pixel according to its alpha channel (GL_SRC_ALPHA/GL_ONE_MINUS_
SRC_ALPHA). This is commonly referred to as alpha blending:
...
status GraphicsService::update() {
float lTimeStep = mTimeService->elapsed();
glClearColor(0.0f, 0.0f, 0.0f, 1.0f);
glClear(GL_COLOR_BUFFER_BIT);
glEnable(GL_BLEND);
glBlendFunc(GL_SRC_ALPHA, GL_ONE_MINUS_SRC_ALPHA);
for (int32_t i = 0; i < mSpriteCount; ++i) {
mSprites[i]->draw(lTimeStep);
}
glDisable(GL_BLEND);
if (eglSwapBuffers(mDisplay, mSurface) != EGL_TRUE) {
Log::error("Error %d swapping buffers.", eglGetError());
return STATUS_KO;
}
return STATUS_OK;
}
status GraphicsService::loadResources() {
for (int32_t i = 0; i < mTextureCount; ++i) {
if (mTextures[i]->load() != STATUS_OK) {
return STATUS_KO;
}
}

Rendering Graphics with OpenGL ES
[ 216 ]
for (int32_t i = 0; i < mSpriteCount; ++i) {
mSprites[i]->load();
}
return STATUS_OK;
}
...
8. To nish with jni/GraphicsService.cpp, implement setup() to inialize
main OpenGL sengs. Here, enable texturing but disable the Z-buer which is
not needed in a simple 2D game. Ensure sprites are rendered (for the emulator)
with glColor4f():
...
void GraphicsService::setup() {
glEnable(GL_TEXTURE_2D);
glDisable(GL_DEPTH_TEST);
glColor4f(1.0f, 1.0f, 1.0f, 1.0f);
}
...
GraphicsSprite* GraphicsService::registerSprite(
GraphicsTexture* pTexture, int32_t pHeight,
int32_t pWidth, Location* pLocation) {
GraphicsSprite* lSprite = new GraphicsSprite(pTexture,
pHeight, pWidth, pLocation);
mSprites[mSpriteCount++] = lSprite;
return lSprite;
}
}
We are almost done! Let's use our engine drawing capabilies to render a spaceship:
9. Create a Ship game object in jni/Ship.hpp le:
#ifndef _DBS_SHIP_HPP_
#define _DBS_SHIP_HPP_
#include "Context.hpp"
#include "GraphicsService.hpp"
#include "GraphicsSprite.hpp"
#include "Types.hpp"
namespace dbs {
class Ship {
Chapter 6
[ 217 ]
public:
Ship(packt::Context* pContext);
void spawn();
private:
packt::GraphicsService* mGraphicsService;
packt::GraphicsSprite* mSprite;
packt::Location mLocation;
float mAnimSpeed;
};
}
#endif
10. The Ship class registers the resource it needs when it is created, here
ship.png sprite (which must be located in the assets folder) contains
64x64 pixel frames. It is inialized in spawn() in the lower quarter of the
screen and uses an 8-frame animaon:
File ship.png is provided with this book in the Chapter6/
Resource folder.
#include "Ship.hpp"
#include "Log.hpp"
namespace dbs {
Ship::Ship(packt::Context* pContext) :
mGraphicsService(pContext->mGraphicsService),
mLocation(), mAnimSpeed(8.0f) {
mSprite = pContext->mGraphicsService->registerSprite(
mGraphicsService->registerTexture("ship.png"), 64, 64,
&mLocation);
}
void Ship::spawn() {
const int32_t FRAME_1 = 0; const int32_t FRAME_NB = 8;
mSprite->setAnimation(FRAME_1, FRAME_NB, mAnimSpeed, true);
mLocation.setPosition(mGraphicsService->getWidth() * 1 / 2,

Rendering Graphics with OpenGL ES
[ 218 ]
mGraphicsService->getHeight() * 1 / 4);
}
}
11. Include the new Ship class in jni/DroidBlaster.hpp:
#ifndef _PACKT_DROIDBLASTER_HPP_
#define _PACKT_DROIDBLASTER_HPP_
#include "ActivityHandler.hpp"
#include "Context.hpp"
#include "GraphicsService.hpp"
#include "Ship.hpp"
#include "TimeService.hpp"
#include "Types.hpp"
namespace dbs {
class DroidBlaster : public packt::ActivityHandler {
...
private:
packt::GraphicsService* mGraphicsService;
packt::TimeService* mTimeService;
Ship mShip;
};
}
#endif
12. Modify jni/DroidBlaster.cpp accordingly. Implementaon is trivial:
#include "DroidBlaster.hpp"
#include "Log.hpp"
namespace dbs {
DroidBlaster::DroidBlaster(packt::Context* pContext) :
mGraphicsService(pContext->mGraphicsService),
mTimeService(pContext->mTimeService),
mShip(pContext)
{}
...
packt::status DroidBlaster::onActivate() {
Chapter 6
[ 219 ]
if (mGraphicsService->start() != packt::STATUS_OK) {
return packt::STATUS_KO;
}
mShip.spawn();
mTimeService->reset();
return packt::STATUS_OK;
}
...
}
What just happened?
Launch DroidBlaster now to see the following screen with the ship animated at a rate
of 8 FPS:
In this part, we have seen how to draw a sprite eciently with a common OpenGL ES
extension GL_OES_draw_texture. This technique is simple to use and is generally the
way to go to render sprites. However, it suers from a few caveats that can be solved only
by going back to polygons:
glDrawTexOES() is available on OpenGL ES 1.1! OpenGL ES 2.0 and some old
devices do not support it.
Sprite cannot be rotated.
This technique may cause lots of state changes when drawing many dierent sprites
(like a background) which could impact performance.
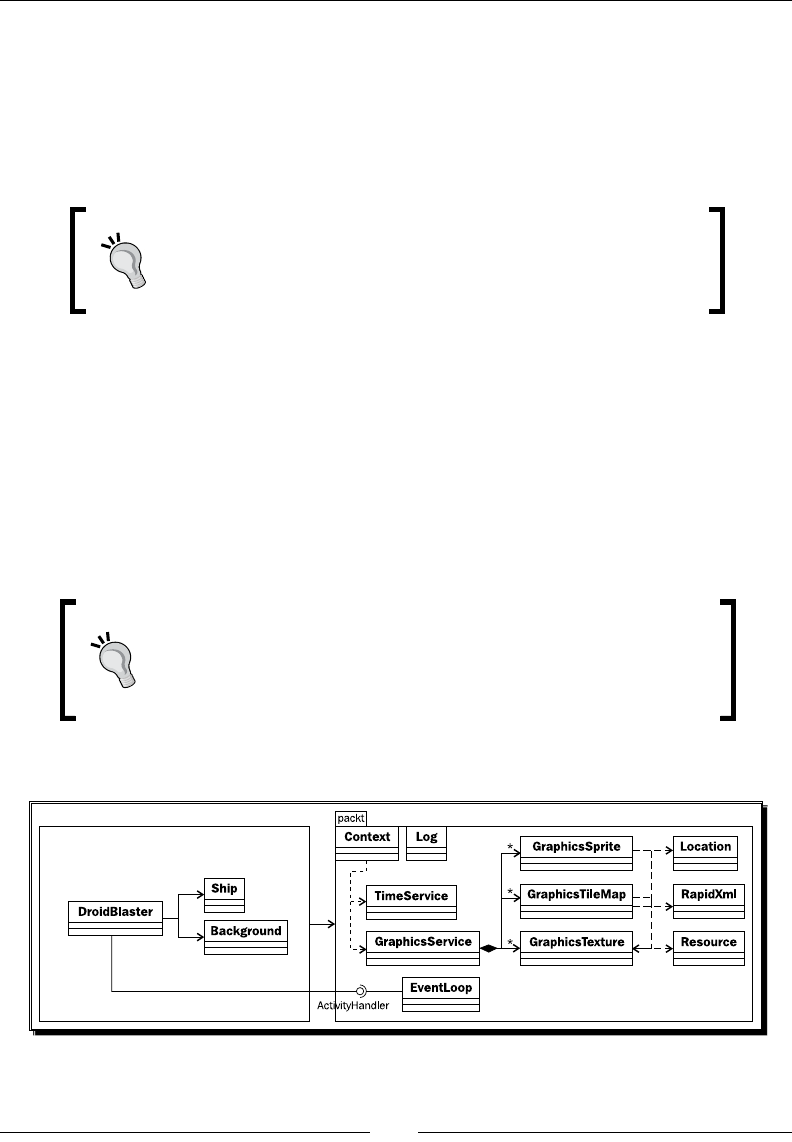
Rendering Graphics with OpenGL ES
[ 220 ]
A common cause of bad performance in OpenGL programs relies in state changes. Changing
OpenGL device state (for example, binding a new buer or texture, changing an opon with
glEnable(), and so on) is a costly operaon and should be avoided as much as possible,
for example, by sorng draw calls and changing only the needed states. For example,
we could improve our Texture::apply() method by checking the texture currently
set before binding it.
One of the best OpenGL ES documentaon is available, well…
from the Apple developer site: http://developer.apple.
com/library/IOS/#documentation/3DDrawing/
Conceptual/OpenGLES_ProgrammingGuide/.
Rendering a tile map with vertex buffer objects
What would a 2D game be without a map; more precisely a le map. A le map is a full-size
map composed of small quad polygons or les mapped with a piece of image. These les
are made so that they can be pasted beside, repeatedly. We are now going to implement a
le map to draw a background. The rendering technique is inspired from the Android game
Replica Island (see http://replicaisland.net). It is based on vertex and index buer
to batch le rendering in a few OpenGL calls (thus minimizing state changes).
Tiled map editor
Tiled is an open source program available on Windows, Linux, and
Mac OS X to create your own custom le maps with a friendly editor.
Tiled exports XML-based les with the TMX extension. Download it
from http://www.mapeditor.org/.
Let's now implement our own le map. The nal applicaon should look like the following:
Chapter 6
[ 221 ]
Project DroidBlaster_Part6-3 can be used as a starng point for
this part. The resulng project is provided with this book under
the name DroidBlaster_Part6-4.
Time for action – drawing a tile-based background
First, let's embed RapidXml library to read XML les:
1. Download RapidXml (version 1.1.13 in this book) at http://rapidxml.
sourceforge.net/.
RapidXml archive is provided with this book in the Chapter6/
Resource folder.
2. Find rapidxml.hpp in the downloaded archive and copy it into your jni folder.
3. RapidXml works with excepons by default. As we will study excepon handling
later in this book, deacvate them in jni/Android.mk with a predened macro:
...
LS_CPP=$(subst $(1)/,,$(wildcard $(1)/*.cpp))
LOCAL_CFLAGS := -DRAPIDXML_NO_EXCEPTIONS
LOCAL_MODULE := droidblaster
LOCAL_SRC_FILES := $(call LS_CPP,$(LOCAL_PATH))
LOCAL_LDLIBS := -landroid -llog -lEGL -lGLESv1_CM
...
4. For eciency reasons, RapidXml read XML les directly from a memory buer
containing the whole le. So open Resource.hpp and add a new method to get
a full buer from an asset (bufferize()) and retrieve its length (getLength()):
...
namespace packt {
class Resource {
public:
...
off_t getLength();
const void* bufferize();
private:
...

Rendering Graphics with OpenGL ES
[ 222 ]
};
}
...
5. The asset management API oers all the required stu to implement
these methods:
...
namespace packt {
...
off_t Resource::getLength() {
return AAsset_getLength(mAsset);
}
const void* Resource::bufferize() {
return AAsset_getBuffer(mAsset);
}
}
Now, let's write the code necessary to handle a simple TMX le map:
6. Create a new header le jni/GraphicsTileMap.hpp as follows.
A GraphicsTileMap is rst loaded, then drawn when the screen
refreshes and nally unloaded. Loading itself occurs in three steps:
loadFile(): This loads a Tiled TMX le with RapidXml
loadVertices(): This sets up an OpenGL Vertex Buer Object
and generate verces from le data
loadIndexes(): This generates an index buer with indexes delimitang
two triangle polygons for each le
A le map requires the following:
A texture containing the sprite sheet.
Two resource handles (mVertexBuffer, mIndexBuffer) poinng
to OpenGL vertex and index buers, the number of elements they
contain (mVertexCount, mIndexCount) and the number of coordinate
components (X/Y/Z and U/V coordinates in mVertexComponent).
Informaon about the number of les in the nal map (mWidth and
mHeight).
A descripon of le width and height in pixels (mTileHeight and
mTileHeight) and count (mTileCount and mTileXCount).

Chapter 6
[ 223 ]
#ifndef _PACKT_GRAPHICSTILEMAP_HPP_
#define _PACKT_GRAPHICSTILEMAP_HPP_
#include "GraphicsTexture.hpp"
#include "Types.hpp"
#include <android_native_app_glue.h>
namespace packt {
class GraphicsTileMap {
public:
GraphicsTileMap(android_app* pApplication, const
char* pPath,
GraphicsTexture* pTexture, Location*
pLocation);
status load();
void unload();
void draw();
private:
int32_t* loadFile();
void loadVertices(int32_t* pTiles, uint8_t**
pVertexBuffer,
uint32_t* pVertexBufferSize);
void loadIndexes(uint8_t** pIndexBuffer,
uint32_t* pIndexBufferSize);
private:
Resource mResource;
Location* mLocation;
// OpenGL resources.
GraphicsTexture* mTexture;
GLuint mVertexBuffer, mIndexBuffer;
int32_t mVertexCount, mIndexCount;
const int32_t mVertexComponents;
// Tile map description.
int32_t mHeight, mWidth;
int32_t mTileHeight, mTileWidth;
int32_t mTileCount, mTileXCount;
};
}
#endif

Rendering Graphics with OpenGL ES
[ 224 ]
7. Start implemenng GraphicsTileMap in jni/GraphicsTileMap.cpp. Because
excepons are not supported in the current project, dene parse_error_
handler() method to handle parsing problems. By design, result of this handler is
undened (that is, a crash). So implement a non-local jump instead, similar to what
we have done for libpng:
#include "GraphicsTileMap.hpp"
#include "Log.hpp"
#include <GLES/gl.h>
#include <GLES/glext.h>
#include "rapidxml.hpp"
namespace rapidxml {
static jmp_buf sJmpBuffer;
void parse_error_handler(const char* pWhat, void* pWhere) {
packt::Log::error("Error while parsing TMX file.");
packt::Log::error(pWhat);
longjmp(sJmpBuffer, 0);
}
}
namespace packt {
GraphicsTileMap::GraphicsTileMap(android_app* pApplication,
const char* pPath, GraphicsTexture* pTexture,
Location* pLocation) :
mResource(pApplication, pPath), mLocation(pLocation),
mTexture(pTexture), mVertexBuffer(0), mIndexBuffer(0),
mVertexCount(0), mIndexCount(0), mVertexComponents(5),
mHeight(0), mWidth(0),
mTileHeight(0), mTileWidth(0), mTileCount(0),
mTileXCount(0)
{}
...
8. Let's write the code necessary to read a TMX le exported by Tiled. Asset le is
read with resource and copied into a temporary buer which is not modiable
(the opposite of the buer returned by bufferize(), which is agged
with const).
RapidXml parses XML les through an xml_document instance. It works directly
on the provided buer, which it may modify to normalize space, translate character
enes, or terminate strings with zero. A non-destrucve mode without these
features is also available. XML nodes and aributes can then be retrieved easily:

Chapter 6
[ 225 ]
...
int32_t* GraphicsTileMap::loadFile() {
using namespace rapidxml;
xml_document<> lXmlDocument;
xml_node<>* lXmlMap, *lXmlTileset, *lXmlLayer;
xml_node<>* lXmlTile, *lXmlData;
xml_attribute<>* lXmlTileWidth, *lXmlTileHeight;
xml_attribute<>* lXmlWidth, *lXmlHeight, *lXmlGID;
char* lFileBuffer = NULL; int32_t* lTiles = NULL;
if (mResource.open() != STATUS_OK) goto ERROR;
{
int32_t lLength = mResource.getLength();
if (lLength <= 0) goto ERROR;
const void* lFileBufferTmp = mResource.bufferize();
if (lFileBufferTmp == NULL) goto ERROR;
lFileBuffer = new char[mResource.getLength() + 1];
memcpy(lFileBuffer, lFileBufferTmp,mResource.getLength());
lFileBuffer[mResource.getLength()] = '\0';
mResource.close();
}
// Parses the document. Jumps back here if an error occurs
if (setjmp(sJmpBuffer)) goto ERROR;
lXmlDocument.parse<parse_default>(lFileBuffer);
// Reads XML tags.
lXmlMap = lXmlDocument.first_node("map");
if (lXmlMap == NULL) goto ERROR;
lXmlTileset = lXmlMap->first_node("tileset");
if (lXmlTileset == NULL) goto ERROR;
lXmlTileWidth = lXmlTileset->first_attribute("tilewidth");
if (lXmlTileWidth == NULL) goto ERROR;
lXmlTileHeight = lXmlTileset->first_attribute("tileheight");
if (lXmlTileHeight == NULL) goto ERROR;
lXmlLayer = lXmlMap->first_node("layer");
if (lXmlLayer == NULL) goto ERROR;
lXmlWidth = lXmlLayer->first_attribute("width");
if (lXmlWidth == NULL) goto ERROR;
lXmlHeight = lXmlLayer->first_attribute("height");
if (lXmlHeight == NULL) goto ERROR;

Rendering Graphics with OpenGL ES
[ 226 ]
lXmlData = lXmlLayer->first_node("data");
if (lXmlData == NULL) goto ERROR;
...
9. Connue implemenng loadFile() by inializing member data. Aer that, load
each le index into a new memory buer that we will use later to create a vertex
buer. Note that vercal coordinates are reversed between TMX and OpenGL
coordinates and that TMX les rst le index is 1 instead of 0 (hence -1 when
seng lTiles[] value):
...
mWidth = atoi(lXmlWidth->value());
mHeight = atoi(lXmlHeight->value());
mTileWidth = atoi(lXmlTileWidth->value());
mTileHeight = atoi(lXmlTileHeight->value());
if ((mWidth <= 0) || (mHeight <= 0)
|| (mTileWidth <= 0) || (mTileHeight <= 0)) goto ERROR;
mTileXCount = mTexture->getWidth()/mTileWidth;
mTileCount = mTexture->getHeight()/mTileHeight * mTileXCount;
lTiles = new int32_t[mWidth * mHeight];
lXmlTile = lXmlData->first_node("tile");
for (int32_t lY = mHeight - 1; lY >= 0; --lY) {
for (int32_t lX = 0; lX < mWidth; ++lX) {
if (lXmlTile == NULL) goto ERROR;
lXmlGID = lXmlTile->first_attribute("gid");
lTiles[lX + (lY * mWidth)] = atoi(lXmlGID->value())-1;
if (lTiles[lX + (lY * mWidth)] < 0) goto ERROR;
lXmlTile = lXmlTile->next_sibling("tile");
}
}
delete[] lFileBuffer;
return lTiles;
ERROR:
mResource.close();
delete[] lFileBuffer; delete[] lTiles;
mHeight = 0; mWidth = 0;
mTileHeight = 0; mTileWidth = 0;
return NULL;
}
...

Chapter 6
[ 227 ]
10. Now the big piece: loadVertices(), populang a temporary memory buer with
verces. First we need to compute some informaon such as the total number of
verces and allocate the buer accordingly, knowing that it contains four verces
composed of ve oat components (X/Y/Z and U/V) per le. We also need to know
the size of a texel, that is, the size of one pixel in UV coordinates. UV coordinates are
bound to [0,1] where 0 means texture le or boom and 1 texture right or boom.
Then, we basically loop over each le and compute vertex coordinates (X/Y
posion and UV coordinates) at the right oset (that is, locaon) in the buer. UV
coordinates are slightly shied to avoid seams at le edges especially when using
bilinear ltering which can cause adjacent le textures to be blended:
...
void GraphicsTileMap::loadVertices(int32_t* pTiles,
uint8_t** pVertexBuffer, uint32_t*
pVertexBufferSize) {
mVertexCount = mHeight * mWidth * 4;
*pVertexBufferSize = mVertexCount * mVertexComponents;
GLfloat* lVBuffer = new GLfloat[*pVertexBufferSize];
*pVertexBuffer = reinterpret_cast<uint8_t*>(lVBuffer);
int32_t lRowStride = mWidth * 2;
GLfloat lTexelWidth = 1.0f / mTexture->getWidth();
GLfloat lTexelHeight = 1.0f / mTexture->getHeight();
int32_t i;
for (int32_t tileY = 0; tileY < mHeight; ++tileY) {
for (int32_t tileX = 0; tileX < mWidth; ++tileX) {
// Finds current tile index (0 for 1st tile, 1...).
int32_t lTileSprite = pTiles[tileY * mWidth + tileX]
% mTileCount;
int32_t lTileSpriteX = (lTileSprite % mTileXCount)
* mTileWidth;
int32_t lTileSpriteY = (lTileSprite / mTileXCount)
* mTileHeight;
// Values to compute vertex offsets in the buffer.
int32_t lOffsetX1 = tileX * 2;
int32_t lOffsetX2 = tileX * 2 + 1;
int32_t lOffsetY1 = (tileY * 2) * (mWidth * 2);
int32_t lOffsetY2 = (tileY * 2 + 1) * (mWidth * 2);
// Vertex positions in the scene.
GLfloat lPosX1 = tileX * mTileWidth;

Rendering Graphics with OpenGL ES
[ 228 ]
GLfloat lPosX2 = (tileX + 1) * mTileWidth;
GLfloat lPosY1 = tileY * mTileHeight;
GLfloat lPosY2 = (tileY + 1) * mTileHeight;
// Tile UV coordinates (coordinates origin needs to be
// translated from top-left to bottom-left origin).
GLfloat lU1 = (lTileSpriteX) * lTexelWidth;
GLfloat lU2 = lU1 + (mTileWidth * lTexelWidth);
GLfloat lV2 = 1.0f - (lTileSpriteY) * lTexelHeight;
GLfloat lV1 = lV2 - (mTileHeight * lTexelHeight);
// Small shift to limit edge artifacts (1/4 of texel).
lU1 += lTexelWidth/4.0f; lU2 -= lTexelWidth/4.0f;
lV1 += lTexelHeight/4.0f; lV2 -=
lTexelHeight/4.0f;
// 4 vertices per tile in the vertex buffer.
i = mVertexComponents * (lOffsetY1 + lOffsetX1);
lVBuffer[i++] = lPosX1; lVBuffer[i++] = lPosY1;
lVBuffer[i++] = 0.0f;
lVBuffer[i++] = lU1; lVBuffer[i++] = lV1;
i = mVertexComponents * (lOffsetY1 + lOffsetX2);
lVBuffer[i++] = lPosX2; lVBuffer[i++] = lPosY1;
lVBuffer[i++] = 0.0f;
lVBuffer[i++] = lU2; lVBuffer[i++] = lV1;
i = mVertexComponents * (lOffsetY2 + lOffsetX1);
lVBuffer[i++] = lPosX1; lVBuffer[i++] = lPosY2;
lVBuffer[i++] = 0.0f;
lVBuffer[i++] = lU1; lVBuffer[i++] = lV2;
i = mVertexComponents * (lOffsetY2 + lOffsetX2);
lVBuffer[i++] = lPosX2; lVBuffer[i++] = lPosY2;
lVBuffer[i++] = 0.0f;
lVBuffer[i++] = lU2; lVBuffer[i++] = lV2;
}
}
}
...
11. Our vertex buer is prey useless without its index buer companion. Populate it
with two triangle polygons per le (that is, 6 indexes) to form quad:
...
void GraphicsTileMap::loadIndexes(uint8_t** pIndexBuffer,
uint32_t* pIndexBufferSize)
{
mIndexCount = mHeight * mWidth * 6;
*pIndexBufferSize = mIndexCount;
GLushort* lIBuffer = new GLushort[*pIndexBufferSize];

Chapter 6
[ 229 ]
*pIndexBuffer = reinterpret_cast<uint8_t*>(lIBuffer);
int32_t lRowStride = mWidth * 2;
int32_t i = 0;
for (int32_t tileY = 0; tileY < mHeight; tileY++) {
int32_t lIndexY = tileY * 2;
for (int32_t tileX = 0; tileX < mWidth; tileX++) {
int32_t lIndexX = tileX * 2;
// Values to compute vertex offsets in the buffer.
GLshort lVertIndexY1 = lIndexY * lRowStride;
GLshort lVertIndexY2 = (lIndexY + 1) * lRowStride;
GLshort lVertIndexX1 = lIndexX;
GLshort lVertIndexX2 = lIndexX + 1;
// 2 triangles per tile in the index buffer.
lIBuffer[i++] = lVertIndexY1 + lVertIndexX1;
lIBuffer[i++] = lVertIndexY1 + lVertIndexX2;
lIBuffer[i++] = lVertIndexY2 + lVertIndexX1;
lIBuffer[i++] = lVertIndexY2 + lVertIndexX1;
lIBuffer[i++] = lVertIndexY1 + lVertIndexX2;
lIBuffer[i++] = lVertIndexY2 + lVertIndexX2;
}
}
}
...
12. In GraphicsTileMap.cpp, terminate loading code by generang nal buers with
glGenBuffers() and binding them (to indicate we are working on them) with
glBindBuffer(). Then, push vertex and index buer data into graphics memory
through glBufferData(). Our temporary buers can then be discarded:
status GraphicsTileMap::load() {
GLenum lErrorResult;
uint8_t* lVertexBuffer = NULL, *lIndexBuffer = NULL;
uint32_t lVertexBufferSize, lIndexBufferSize;
// Loads tiles and creates temporary vertex/index buffers.
int32_t* lTiles = loadFile();

Rendering Graphics with OpenGL ES
[ 230 ]
if (lTiles == NULL) goto ERROR;
loadVertices(lTiles, &lVertexBuffer, &lVertexBufferSize);
if (lVertexBuffer == NULL) goto ERROR;
loadIndexes(&lIndexBuffer, &lIndexBufferSize);
if (lIndexBuffer == NULL) goto ERROR;
// Generates new buffer names.
glGenBuffers(1, &mVertexBuffer);
glGenBuffers(1, &mIndexBuffer);
glBindBuffer(GL_ARRAY_BUFFER, mVertexBuffer);
glBindBuffer(GL_ELEMENT_ARRAY_BUFFER, mIndexBuffer);
// Loads buffers into OpenGL.
glBufferData(GL_ARRAY_BUFFER, lVertexBufferSize *
sizeof(GLfloat), lVertexBuffer, GL_STATIC_DRAW);
lErrorResult = glGetError();
if (lErrorResult != GL_NO_ERROR) goto ERROR;
glBufferData(GL_ELEMENT_ARRAY_BUFFER, lIndexBufferSize *
sizeof(GLushort), lIndexBuffer, GL_STATIC_DRAW);
lErrorResult = glGetError();
if (lErrorResult != GL_NO_ERROR) goto ERROR;
// Unbinds buffers.
glBindBuffer(GL_ARRAY_BUFFER, 0);
glBindBuffer(GL_ELEMENT_ARRAY_BUFFER, 0);
delete[] lTiles; delete[] lVertexBuffer;
delete[] lIndexBuffer;
return STATUS_OK;
ERROR:
Log::error("Error loading tilemap");
unload();
delete[] lTiles; delete[] lVertexBuffer;
delete[] lIndexBuffer;
return STATUS_KO;
}
...

Chapter 6
[ 231 ]
13. We are done with resource loading. Take care of unloading them in unload():
...
void GraphicsTileMap::unload() {
mHeight = 0, mWidth = 0;
mTileHeight = 0, mTileWidth = 0;
mTileCount = 0, mTileXCount = 0;
if (mVertexBuffer != 0) {
glDeleteBuffers(1, &mVertexBuffer);
mVertexBuffer = 0; mVertexCount = 0;
}
if (mIndexBuffer != 0) {
glDeleteBuffers(1, &mIndexBuffer);
mIndexBuffer = 0; mIndexCount = 0;
}
}
...
14. To nish with GraphicsTileMap.cpp, write draw() method to render the
le map:
Bind the le sheet texture for rendering.
Set up geometry transformaons with glTranslatef() to posion
the map to its nal coordinates in the scene. Note that matrices are
hierarchical, hence the preliminary call to glPushMatrix() to stack
le map matrix on top of the projecon and world matrices. Posion
coordinates are rounded to prevent seams from appearing between les
because of rendering interpolaon.
Enable, bind, and describe vertex and index buer contents
with glEnableClientState(), glVertexPointer(), and
glTexCoordPointer().
Issue a rendering call to draw the whole map mesh with
glDrawElements().
Reset OpenGL machine state when done.
...
void GraphicsTileMap::draw() {
int32_t lVertexSize = mVertexComponents *
sizeof(GLfloat);
GLvoid* lVertexOffset = (GLvoid*) 0;
GLvoid* lTexCoordOffset = (GLvoid*)
(sizeof(GLfloat) * 3);
mTexture->apply();

Rendering Graphics with OpenGL ES
[ 232 ]
glPushMatrix();
glTranslatef(int32_t(mLocation->mPosX + 0.5f),
int32_t(mLocation->mPosY + 0.5f),
0.0f);
// Draws using hardware buffers
glEnableClientState(GL_VERTEX_ARRAY);
glEnableClientState(GL_TEXTURE_COORD_ARRAY);
glBindBuffer(GL_ARRAY_BUFFER, mVertexBuffer);
glBindBuffer(GL_ELEMENT_ARRAY_BUFFER,
mIndexBuffer);
glVertexPointer(3, GL_FLOAT, lVertexSize,
lVertexOffset);
glTexCoordPointer(2, GL_FLOAT, lVertexSize,
lTexCoordOffset);
glDrawElements(GL_TRIANGLES, mIndexCount,
GL_UNSIGNED_SHORT, 0 * sizeof(GLushort));
glBindBuffer(GL_ARRAY_BUFFER, 0);
glBindBuffer(GL_ELEMENT_ARRAY_BUFFER, 0);
glPopMatrix();
glDisableClientState(GL_VERTEX_ARRAY);
glDisableClientState(GL_TEXTURE_COORD_ARRAY);
}
}
Let's append our new le map module to the applicaon:
15. Like for textures and sprites, let GraphicsService manage le maps:
#ifndef _PACKT_GRAPHICSSERVICE_HPP_
#define _PACKT_GRAPHICSSERVICE_HPP_
#include "GraphicsSprite.hpp"
#include "GraphicsTexture.hpp"
#include "GraphicsTileMap.hpp"
#include "TimeService.hpp"
#include "Types.hpp"
#include <android_native_app_glue.h>
#include <EGL/egl.h>
namespace packt {
class GraphicsService {

Chapter 6
[ 233 ]
public:
...
GraphicsTexture* registerTexture(const char* pPath);
GraphicsSprite* registerSprite(GraphicsTexture* pTexture,
int32_t pHeight, int32_t pWidth, Location* pLocation);
GraphicsTileMap* registerTileMap(const char* pPath,
GraphicsTexture* pTexture, Location* pLocation);
...
private:
...
GraphicsTexture* mTextures[32]; int32_t mTextureCount;
GraphicsSprite* mSprites[256]; int32_t mSpriteCount;
GraphicsTileMap* mTileMaps[8]; int32_t mTileMapCount;
};
}
#endif
16. In jni/GraphicsService.cpp, implement registerTileMap() and update
load(), unload(), and class destructor like for sprites previous tutorial.
Change setup() to push a projecon and ModelView matrix in the matrix stack:
Projecon is orthographic since 2D games do not need a perspecve eect.
ModelView matrix describes basically the posion and orientaon of the
camera. Here, camera (that is, the whole scene) does not move; only the
background le map moves to simulate a scrolling eect. Thus, a simple
identy matrix is sucient.
Then, modify update() to eecvely draw le maps:
...
namespace packt {
...
void GraphicsService::setup() {
glEnable(GL_TEXTURE_2D);
glDisable(GL_DEPTH_TEST);
glColor4f(1.0f, 1.0f, 1.0f, 1.0f);
glMatrixMode(GL_PROJECTION);
glLoadIdentity();
glOrthof(0.0f, mWidth, 0.0f, mHeight, 0.0f, 1.0f);
glMatrixMode( GL_MODELVIEW);
glLoadIdentity();
}

Rendering Graphics with OpenGL ES
[ 234 ]
status GraphicsService::update() {
float lTimeStep = mTimeService->elapsed();
for (int32_t i = 0; i < mTileMapCount; ++i) {
mTileMaps[i]->draw();
}
glEnable(GL_BLEND);
glBlendFunc(GL_SRC_ALPHA, GL_ONE_MINUS_SRC_ALPHA);
for (int32_t i = 0; i < mSpriteCount; ++i) {
mSprites[i]->draw(lTimeStep);
}
glDisable(GL_BLEND);
if (eglSwapBuffers(mDisplay, mSurface) != EGL_TRUE) {
Log::error("Error %d swapping buffers.", eglGetError());
return STATUS_KO;
}
return STATUS_OK;
}
}
17. Write jni/Background.hpp to declare a game object drawing a background
le map:
#ifndef _DBS_BACKGROUND_HPP_
#define _DBS_BACKGROUND_HPP_
#include "Context.hpp"
#include "GraphicsService.hpp"
#include "GraphicsTileMap.hpp"
#include "Types.hpp"
namespace dbs {
class Background {
public:
Background(packt::Context* pContext);
void spawn();
void update();
private:
Chapter 6
[ 235 ]
packt::TimeService* mTimeService;
packt::GraphicsService* mGraphicsService;
packt::GraphicsTileMap* mTileMap;
packt::Location mLocation; float mAnimSpeed;
};
}
#endif
18. Then implement this class in jni/Background.cpp. Register a le map tilemap.
tmx which must be copied in asset project folder:
File tilemap.tmx is provided with this book
in the Chapter6/Resource folder.
#include "Background.hpp"
#include "Log.hpp"
namespace dbs {
Background::Background(packt::Context* pContext) :
mTimeService(pContext->mTimeService),
mGraphicsService(pContext->mGraphicsService),
mLocation(), mAnimSpeed(8.0f) {
mTileMap = mGraphicsService->registerTileMap("tilemap.
tmx",
mGraphicsService->registerTexture("tilemap.png"),
&mLocation);
}
void Background::update() {
const float SCROLL_PER_SEC = -64.0f;
float lScrolling = mTimeService->elapsed() * SCROLL_PER_
SEC;
mLocation.translate(0.0f, lScrolling);
}
}
19. We are close to the end. Add a Background object in jni/DroidBlaster.hpp:
#ifndef _PACKT_DROIDBLASTER_HPP_
#define _PACKT_DROIDBLASTER_HPP_
#include "ActivityHandler.hpp"
Downloa d f r o m W o w ! e B o o k < w w w.woweb o o k . c o m >Downloa d f r o m W o w ! e B o o k < w w w.woweb o o k . c o m >

Rendering Graphics with OpenGL ES
[ 236 ]
#include "Background.hpp"
#include "Context.hpp"
#include "GraphicsService.hpp"
#include "Ship.hpp"
#include "TimeService.hpp"
#include "Types.hpp"
namespace dbs {
class DroidBlaster : public packt::ActivityHandler {
...
Background mBackground;
Ship mShip;
};
}
#endif
20. Finally, inialize, and update this Background object in jni/DroidBlaster.cpp:
#include "DroidBlaster.hpp"
#include "Log.hpp"
namespace dbs {
DroidBlaster::DroidBlaster(packt::Context* pContext) :
mGraphicsService(pContext->mGraphicsService),
mTimeService(pContext->mTimeService),
mBackground(pContext), mShip(pContext)
{}
packt::status DroidBlaster::onActivate() {
if (mGraphicsService->start() != packt::STATUS_OK) {
return packt::STATUS_KO;
}
mBackground.spawn();
mShip.spawn();
mTimeService->reset();
return packt::STATUS_OK;
}
status DroidBlaster::onStep() {
mTimeService->update();
mBackground.update();
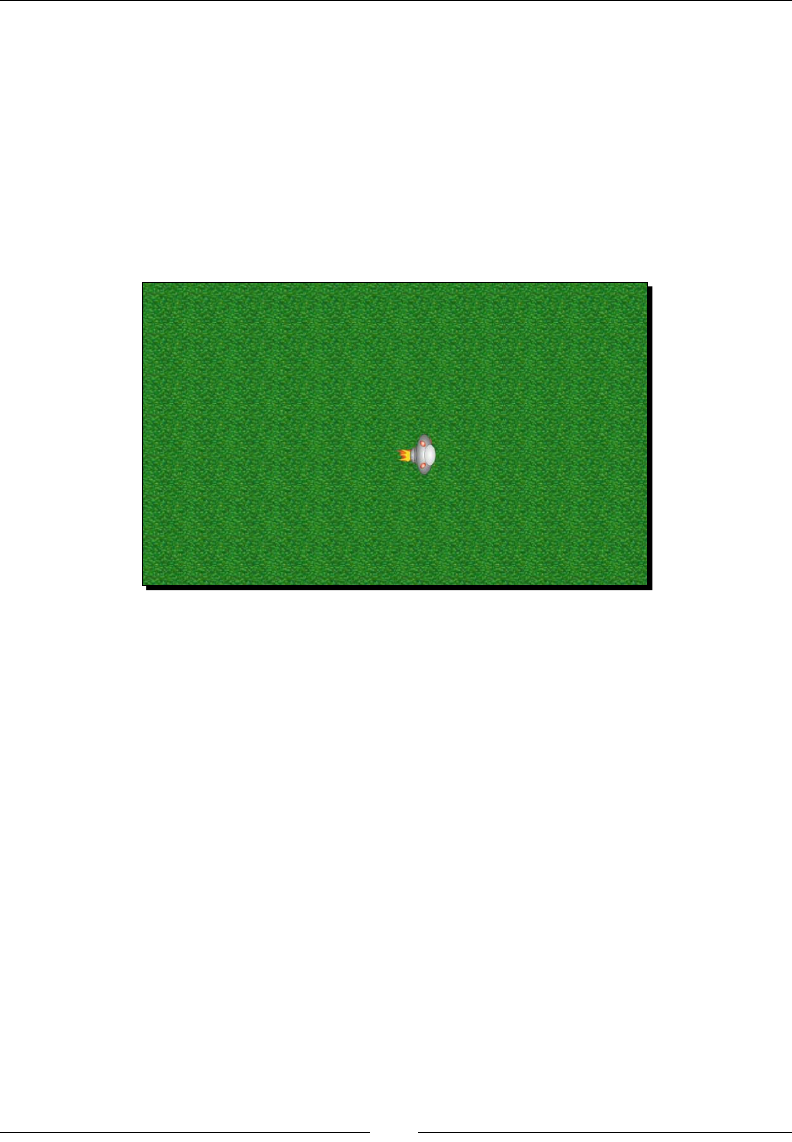
Chapter 6
[ 237 ]
if (mGraphicsService->update() != packt::STATUS_OK) {
return packt::STATUS_KO;
}
return packt::STATUS_OK;
}
}
What just happened?
The nal result should look like the following. The terrain is scrolling below the ship:
Vertex Buer Objects, coupled with index buers, are a really ecient way to render lots
of polygons in a single call, by pre-compung verces and textures coordinates in advance.
They largely minimize the number of necessary state changes. Buer objects are also
denitely the way to go for 3D rendering. Note however that if this technique is ecient
when many les are rendered, it will be much less interesng if your background is only
composed of only a few les, in which case sprites may be more appropriate.
However, the work done in this part can sll be vastly improved. The le map rendering
method here is inecient: it draws the whole vertex buer systemacally. Hopefully, today's
graphic drivers are opmized to clip invisible verces, which sll gives us good performance.
But an algorithm could, for example, issue draw calls only for the visible porons of the
vertex buer.
This le map technique also allows mulple extensions. For example, several le maps
scrolled at dierent speeds can be superposed to create a parallax eect. Of course, one
would need to enable alpha blending (at step 16 in GraphicsService::update()) to
properly blend layers. Let your imaginaon do the rest!

Rendering Graphics with OpenGL ES
[ 238 ]
Summary
OpenGL and graphics, in general, is a really vast domain. One book is not enough to cover it
enrely. But drawing 2D graphics with textures and buer objects opens the door to much
more advanced stu! In more detail, we have learned how to inialize and bind OpenGL ES
to the Android windows with EGL. We have also loaded a PNG texture packaged as assets
with an external library. Then, we have drawn sprites eciently with OpenGL ES extensions.
This technique should not be overused as it can impact performance when many sprites are
blied. Finally, we have rendered a le map eciently by pre-compung rendered les in
vertex and index buers.
With the knowledge acquired here, the road to OpenGL ES 2 is at a perfectly walkable
distance! But if you cannot wait to see 3D graphics, Chapter 9, Porng Exisng Libraries to
Android and Chapter 10, Towards Professional Gaming, are your next desnaon to discover
how to embed a 3D engine. But if you are a bit more paent, let's discover how to reach the
fourth dimension, the musical one, with OpenSL ES.

7
Playing Sound with OpenSL ES
Mulmedia is not only about graphics; it is also about sound and music.
Applicaons in this domain are among the most popular in the Android market.
Indeed, music has always been a strong engine for mobile devices sales
and music lovers are a target of choice. This is why an OS like Android could
probably not go far without some musical talent!
When talking about sound on Android, we should disnguish Java from the
nave world. Indeed, both sides feature completely dierent APIs: MediaPlayer,
SoundPool, AudioTrack, and JetPlayer on one hand, Open SL for Embedded
Systems (also abbreviated OpenSL ES) on the other hand:
MediaPlayer is more high-level and easy to use. It handles not only
music but also video. It is the way to go when simple le playback
is sucient.
SoundPool and AudioTrack are more low-level and closer to low
latency when playing sound. AudioTrack is the most exible but
also complex to use and allows sound buer modicaons on the
y (by hand!).
JetPlayer is more dedicated to the playback of MIDI les. This API
can be interesng for dynamic musing synthesis in a mulmedia
applicaon or game (the see JetBoy example provided with Android SDK).
OpenSL ES which aims at oering a cross-plaorm API to manage audio
on embedded systems. In other words, the OpenGL ES for audio. Like
GLES, its specicaon is led by the Khronos Group. On Android,
OpenSL ES is in fact implemented on top of AudioTrack API.
OpenSL ES was rst released on Android 2.3 Gingerbread and is not available
on previous releases (Android 2.2 and lower). While there is a profusion of APIs
in Java, OpenSL ES is the only one provided on the nave side and is exclusively
available on it.

Playing Sound with OpenSL ES
[ 240 ]
However, OpenSL ES is sll immature. The OpenSL specicaon is sll
incompletely supported and several limitaons shall be expected. In addion,
OpenSL specicaon is implemented in its version 1.0.1 on Android although
version 1.1 is already out. Thus, OpenSL ES implementaon is not frozen yet
and should connue evolving. Some subsequent change may have to be
expected in the future.
For this reason, 3D Audio features are available starng from Android 2.3
through OpenSL ES, but only for devices whose system is compiled with the
appropriate prole. Indeed, current OpenSL ES specicaon provides three
dierent proles, Game, Music, and Phone for dierent types of devices.
At the me this book is wrien, none of these proles are supported.
Another important point to consider is that Android is currently not suited for
low latency! OpenSL ES API does not improve this situaon. This issue is not only
related to the system itself but also to the hardware. And if latency is becoming
a concern for the Android development team and manufacturers, months will be
needed to see decent progress. Anyway, expect OpenSL ES and low-level Java APIs
SoundPool and AudioTrack to support low latency sooner or later.
But OpenSL ES has qualies. First, it may be easier to integrate in the
architecture of a nave applicaon, since it is itself wrien in C/C++. It does not
have to carry a garbage collector on its back. Nave code is not interpreted and
can be opmized in-depth through assembly code (and the NEON instrucon
set). These are some of the many reasons to consider it.
The OpenMAX AL low-level mulmedia API is also available since NDK R7
(although not fully supported). This API is, however, more related to video/
sound playback and is less powerful than Open SL ES for sound and music.
It is somewhat similar to the android.media.MediaPlayer on the
Java side. Have a look at http://www.khronos.org/openmax/ for
more informaon.
Chapter 7
[ 241 ]
This chapter is an introducon to the musical capabilies of OpenSL ES on the Android NDK.
We are about to discover how to do the following:
Inialize OpenSL ES on Android
Play background music
Play sounds with a sound buer queue
Record sounds and play them
Initializing OpenSL ES
Let’s start this chapter smoothly by inializing OpenSL ES inside a new service, which we
are going to call SoundService (the term service is just a design choice and should not
be confused with Android Java services).
Project DroidBlaster_Part6-4 can be used as a starng point for
this part. The resulng project is provided with this book under the
name DroidBlaster_Part7-1.
Time for action – creating OpenSL ES engine and output
First, let’s create this new class to manage sounds:
1. Open project DroidBlaster and create a new le jni/SoundService.hpp.
First, include OpenSL ES headers: the standard header OpenSLES.h, OpenSLES_
Android.h, and OpenSLES_AndroidConfiguration.h. The two laer dene
objects and methods , and are specically created for Android. Then create
SoundService class to do the following:
Inialize OpenSL ES with the method start()
Stop the sound and release OpenSL ES with the method stop()
There are two main kinds of pseudo-object structures (that is, containing funcon
pointers applied on the structure itself like a C++ object with this) in OpenSL ES:
Objects: These are represented by a SLObjectItf, which provides a few
common methods to get allocated resources and get object interfaces. This
could be roughly compared to an Object in Java.
Interfaces: These give access to object features. There can be several
interfaces for an object. Depending on the host device, some interfaces
may or may not be available. These are very roughly comparable to
interfaces in Java.

Playing Sound with OpenSL ES
[ 242 ]
In SoundService, declare two SLObjectItf instances, one for the
OpenSL ES engine and other for the speakers. Engines are available through
an SLEngineItf interface:
#ifndef _PACKT_SOUNDSERVICE_HPP_
#define _PACKT_SOUNDSERVICE_HPP_
#include “Types.hpp”
#include <android_native_app_glue.h>
#include <SLES/OpenSLES.h>
#include <SLES/OpenSLES_Android.h>
#include <SLES/OpenSLES_AndroidConfiguration.h>
namespace packt {
class SoundService {
public:
SoundService(android_app* pApplication);
status start();
void stop();
private:
android_app* mApplication;
SLObjectItf mEngineObj; SLEngineItf mEngine;
SLObjectItf mOutputMixObj;
};
}
#endif
2. Implement SoundService in jni/SoundService.cpp. Write method start():
Inialize OpenSL ES engine object (that is, the basic type SLObjectItf)
with method slCreateEngine(). When we create an OpenSL ES object,
the specic interfaces we are going to use have to be indicated. Here, we
request (as compulsory) the SL_IID_ENGINE interface to create other
OpenSL ES objects, the engine being the central object of the OpenSL ES API.
Android OpenSL ES implementaon is not really strict. Forgeng to declare
some required interfaces does not mean you will not be allowed to access
them later.

Chapter 7
[ 243 ]
Then, invoke Realize() on the engine object. Any OpenSL ES object needs
to be realized to allocate required internal resources before use.
Finally, retrieve SLEngineItf-specic interface.
The engine interface gives us the possibility to instanate an audio output
mix with the method CreateOutputMix(). The audio output mix dened
here delivers sound to default speakers. It is rather autonomous (played
sound is sent automacally to the speaker), so there is no need to request
any specic interface here.
#include “SoundService.hpp”
#include “Log.hpp”
namespace packt {
SoundService::SoundService(android_app* pApplication):
mApplication(pApplication),
mEngineObj(NULL), mEngine(NULL),
mOutputMixObj(NULL)
{}
status SoundService::start() {
Log::info(“Starting SoundService.”);
SLresult lRes;
const SLuint32 lEngineMixIIDCount = 1;
const SLInterfaceID lEngineMixIIDs[]={SL_IID_ENGINE};
const SLboolean lEngineMixReqs[]={SL_BOOLEAN_TRUE};
const SLuint32 lOutputMixIIDCount=0;
const SLInterfaceID lOutputMixIIDs[]={};
const SLboolean lOutputMixReqs[]={};
lRes = slCreateEngine(&mEngineObj, 0, NULL,
lEngineMixIIDCount, lEngineMixIIDs, lEngineMixReqs);
if (lRes != SL_RESULT_SUCCESS) goto ERROR;
lRes=(*mEngineObj)->Realize(mEngineObj,SL_BOOLEAN_FALSE);
if (lRes != SL_RESULT_SUCCESS) goto ERROR;
lRes=(*mEngineObj)->GetInterface(mEngineObj,
SL_IID_ENGINE, &mEngine);
if (lRes != SL_RESULT_SUCCESS) goto ERROR;
lRes=(*mEngine)->CreateOutputMix(mEngine,
&mOutputMixObj,lOutputMixIIDCount,lOutputMixIIDs,
lOutputMixReqs);

Playing Sound with OpenSL ES
[ 244 ]
lRes=(*mOutputMixObj)->Realize(mOutputMixObj,
SL_BOOLEAN_FALSE);
return STATUS_OK;
ERROR:
Packt::Log::error(“Error while starting SoundService.”);
stop();
return STATUS_KO;
}
...
3. Write the stop() method to destroy what has been created in start():
...
void SoundService::stop() {
if (mOutputMixObj != NULL) {
(*mOutputMixObj)->Destroy(mOutputMixObj);
mOutputMixObj = NULL;
}
if (mEngineObj != NULL) {
(*mEngineObj)->Destroy(mEngineObj);
mEngineObj = NULL; mEngine = NULL;
}
}
}
Now, we can embed our new service:
4. Open exisng le jni/Context.hpp and dene a new entry for
SoundService:
#ifndef _PACKT_CONTEXT_HPP_
#define _PACKT_CONTEXT_HPP_
#include “Types.hpp”
namespace packt {
class GraphicsService;
class SoundService;
class TimeService;
struct Context {
GraphicsService* mGraphicsService;

Chapter 7
[ 245 ]
SoundService* mSoundService;
TimeService* mTimeService;
};
}
#endif
5. Then, append SoundService inside jni/DroidBlaster.hpp:
#ifndef _PACKT_DROIDBLASTER_HPP_
#define _PACKT_DROIDBLASTER_HPP_
#include “ActivityHandler.hpp”
#include “Background.hpp”
#include “Context.hpp”
#include “GraphicsService.hpp”
#include “Ship.hpp”
#include “SoundService.hpp”
#include “TimeService.hpp”
#include “Types.hpp”
namespace dbs {
class DroidBlaster : public packt::ActivityHandler {
...
private:
packt::GraphicsService* mGraphicsService;
packt::SoundService* mSoundService;
packt::TimeService* mTimeService;
Background mBackground;
Ship mShip;
};
}
#endif
6. Create, start, and stop the sound service in jni/DroidBlaster.cpp source le.
Code implementaon should be trivial:
#include “DroidBlaster.hpp”
#include “Log.hpp”
namespace dbs {
DroidBlaster::DroidBlaster(packt::Context* pContext) :
mGraphicsService(pContext->mGraphicsService),
mSoundService(pContext->mSoundService),

Playing Sound with OpenSL ES
[ 246 ]
mTimeService(pContext->mTimeService),
mBackground(pContext), mShip(pContext)
{}
packt::status DroidBlaster::onActivate() {
if (mGraphicsService->start() != packt::STATUS_OK) {
return packt::STATUS_KO;
}
if (mSoundService->start() != packt::STATUS_OK) {
return packt::STATUS_KO;
}
mBackground.spawn();
mShip.spawn();
mTimeService->reset();
return packt::STATUS_OK;
}
void DroidBlaster::onDeactivate() {
mGraphicsService->stop();
mSoundService->stop();
}
...
}
7. Finally, instanate the sound service in jni/Main.cpp:
#include “Context.hpp”
#include “DroidBlaster.hpp”
#include “EventLoop.hpp”
#include “GraphicsService.hpp”
#include “SoundService.hpp”
#include “TimeService.hpp”
void android_main(android_app* pApplication) {
packt::TimeService lTimeService;
packt::GraphicsService lGraphicsService(pApplication,
&lTimeService);
packt::SoundService lSoundService(pApplication);
packt::Context lContext = { &lGraphicsService, &lSoundService,

Chapter 7
[ 247 ]
&lTimeService };
packt::EventLoop lEventLoop(pApplication);
dbs::DroidBlaster lDroidBlaster(&lContext);
lEventLoop.run(&lDroidBlaster);
}
Link to libOpenSLES.so in the jni/Android.mk file:
LOCAL_PATH := $(call my-dir)
include $(CLEAR_VARS)
LS_CPP=$(subst $(1)/,,$(wildcard $(1)/*.cpp))
LOCAL_CFLAGS := -DRAPIDXML_NO_EXCEPTIONS
LOCAL_MODULE := droidblaster
LOCAL_SRC_FILES := $(call LS_CPP,$(LOCAL_PATH))
LOCAL_LDLIBS := -landroid -llog -lEGL -lGLESv1_CM -lOpenSLES
LOCAL_STATIC_LIBRARIES := android_native_app_glue png
include $(BUILD_SHARED_LIBRARY)
$(call import-module,android/native_app_glue)
$(call import-module,libpng)
What just happened?
Run the applicaon and check that no error is logged. We have inialized OpenSL ES library
which gives us access to ecient sound handling primives directly from nave code. The
current code does not perform anything apart from inializaon. No sound comes out from
the speakers yet.
The entry point to OpenSL ES here is the SLEngineItf, which is mainly an OpenSL ES object
factory. It can create a channel to an output device (a speaker or anything else) as well as
sound players or recorders (and even more!), as we will see later in this chapter.
The SLOutputMixItf is the object represenng the audio output. Generally, this will be
the device speaker or headset. Although OpenSL ES specicaon allows enumerang
available output (and also input) devices, NDK implementaon is not mature enough to
obtain or select proper one (SLAudioIODeviceCapabilitiesItf, the ocial interface
to obtain such an informaon). So when dealing with output and input device selecon
(only input device for recorders needs to be specied currently), prefer scking to default
values: SL_DEFAULTDEVICEID_AUDIOINPUT and SL_DEFAULTDEVICEID_AUDIOOUTPUT
dened in OpenSLES.h.

Playing Sound with OpenSL ES
[ 248 ]
Current Android NDK implementaon allows only one engine per applicaon (this should not
be an issue) and at most 32 created objects. Beware however that creaon of any object can
fail as this is dependent on available system resources.
More on OpenSL ES philosophy
OpenSL ES is dierent from its graphics compatriot GLES, partly because it does not have a
long history to carry. It is constructed on an (more or less...) object-oriented principle based
on Objects and Interfaces. The following denions come from the ocial specicaon:
An object is an abstracon of a set of resources, assigned for a well-dened set
of tasks, and the state of these resources. An object has a type determined on its
creaon. The object type determines the set of tasks that an object can perform.
This can be considered similar to a class in C++.
An interface is an abstracon of a set of related features that a certain object
provides. An interface includes a set of methods, which are funcons of the
interface. An interface also has a type which determines the exact set of methods
of the interface. We can dene the interface itself as a combinaon of its type and
the object to which it is related.
An interface ID idenes an interface type. This idener is used within the source
code to refer to the interface type.
An OpenSL ES object is set up in few steps as follows:
1. Instanang it through a build method (belonging usually to the engine).
2. Realizing it to allocate necessary resources.
3. Retrieving object interfaces. A basic object only has a very limited set of operaons
(Realize(), Resume(), Destroy(), and so on). Interfaces give access to real
object features and describes what operaons can be performed on an object,
for example, a Play interface to play or pause a sound.
Any interfaces can be requested but only the one supported by the object is going to be
successfully retrieved. You cannot retrieve the record interface for an audio player because
it returns (somemes it is annoying!) SL_RESULT_FEATURE_UNSUPPORTED (error code 12).
In technical terms, an OpenSL ES interface is a structure containing funcon pointers
(inialized by OpenSL ES implementaon) with a self parameter to simulate C++ objects
and this , for example:
struct SLObjectItf_ {
SLresult (*Realize) (SLObjectItf self, SLboolean async);
SLresult (*Resume) ( SLObjectItf self, SLboolean async);
...
}
Chapter 7
[ 249 ]
Here, Realize(), Resume(), and so on are object methods that can be applied on an
SLObjectItf object. The approach is idencal for interfaces.
For more detailed informaon on what OpenSL ES can provide, refer to the specicaon
on Khronos web site: http://www.khronos.org/opensles as well as the OpenSL ES
documentaon in Android NDK docs directory. Android implementaon does not fully
respect the specicaon, at least for now. So do not be disappointed when discovering
that only a limited subset of the specicaon (especially sample codes) works on Android.
Playing music les
OpenSL ES is inialized, but the only thing coming out of speakers yet is silence! So what
about nding a nice piece of music (somemes abbreviated BGM) and playing it navely
with Android NDK? OpenSL ES provides the necessary stu to read music les such as MP3s.
Project DroidBlaster_Part7-1 can be used as a starng point
for this part. The resulng project is provided with this book
under the name DroidBlaster_Part7-2.
Time for action – playing background music
Let’s improve the code wrien in the previous part to read and play an MP3 le:
1. MP3 les are opened by OpenSL ES using a POSIX le descriptor, poinng to the
le. Improve jni/ResourceManager.cpp created in the previous chapters by
injecng a new structure ResourceDescriptor and appending a new method
descript():
#ifndef _PACKT_RESOURCE_HPP_
#define _PACKT_RESOURCE_HPP_
#include “Types.hpp”
#include <android_native_app_glue.h>
namespace packt {
struct ResourceDescriptor {
int32_t mDescriptor;
off_t mStart;
off_t mLength;
};

Playing Sound with OpenSL ES
[ 250 ]
class Resource {
public:
...
off_t getLength();
const void* bufferize();
ResourceDescriptor descript();
private:
...
};
}
#endif
2. Implementaon in ResourceManager.cpp, of course, makes use of the asset
manager API to open the descriptor and ll a ResourceDescriptor structure:
...
namespace packt {
...
ResourceDescriptor Resource::descript() {
ResourceDescriptor lDescriptor = { -1, 0, 0 };
AAsset* lAsset = AAssetManager_open(mAssetManager, mPath,
AASSET_MODE_UNKNOWN);
if (lAsset != NULL) {
lDescriptor.mDescriptor = AAsset_openFileDescriptor(
lAsset, &lDescriptor.mStart, &lDescriptor.
mLength);
AAsset_close(lAsset);
}
return lDescriptor;
}
}
3. Go back to jni/SoundService.hpp and dene two methods, playBGM()
and stopBGM(), to play a background music.
Also declare an OpenSL ES object for the music player along with the
following interfaces:
SLPlayItf: This plays and stops music les
SLSeekItf: This controls posion and looping

Chapter 7
[ 251 ]
...
namespace packt
{
class SoundService {
public:
...
status playBGM(const char* pPath);
void stopBGM();
...
private:
...
SLObjectItf mBGMPlayerObj; SLPlayItf mBGMPlayer;
SLSeekItf mBGMPlayerSeek;
};
}
#endif
4. Start implemenng jni/SoundService.cpp. Include Resource.hpp to get
access to asset le descriptors. Inialize new members in constructor and update
stop() to stop the background music automacally (or some users are not going
to be happy!):
#include “SoundService.hpp”
#include “Resource.hpp”
#include “Log.hpp”
namespace packt {
SoundService::SoundService(android_app* pApplication) :
mApplication(pApplication),
mEngineObj(NULL), mEngine(NULL),
mOutputMixObj(NULL),
mBGMPlayerObj(NULL), mBGMPlayer(NULL), mBGMPlayerSeek(NULL)
{}
...
void SoundService::stop() {
stopBGM();

Playing Sound with OpenSL ES
[ 252 ]
if (mOutputMixObj != NULL) {
(*mOutputMixObj)->Destroy(mOutputMixObj);
mOutputMixObj = NULL;
}
if (mEngineObj != NULL) {
(*mEngineObj)->Destroy(mEngineObj);
mEngineObj = NULL; mEngine = NULL;
}
}
...
5. Enrich SoundService.cpp with playback features by implemenng playBGM().
First we need to describe our audio setup through two main structures:
SLDataSource and SLDataSink. The rst describes the audio input channel
and the second, the audio output channel.
Here, we congure the data source as a MIME source so that le type gets detected
automacally from le descriptor. File descriptor is, of course, opened with a call to
ResourceManager::descript().
Data sink (that is, desnaon channel) is congured with the OutputMix object
created in the rst part of this chapter while inializing OpenSL ES engine
(and which refers to default audio output, that is, speakers or headset):
...
status SoundService::playBGM(const char* pPath) {
SLresult lRes;
Resource lResource(mApplication, pPath);
ResourceDescriptor lDescriptor = lResource.descript();
if (lDescriptor.mDescriptor < 0) {
Log::info(“Could not open BGM file”);
return STATUS_KO;
}
SLDataLocator_AndroidFD lDataLocatorIn;
lDataLocatorIn.locatorType = SL_DATALOCATOR_ANDROIDFD;
lDataLocatorIn.fd = lDescriptor.mDescriptor;
lDataLocatorIn.offset = lDescriptor.mStart;
lDataLocatorIn.length = lDescriptor.mLength;
SLDataFormat_MIME lDataFormat;
lDataFormat.formatType = SL_DATAFORMAT_MIME;

Chapter 7
[ 253 ]
lDataFormat.mimeType = NULL;
lDataFormat.containerType = SL_CONTAINERTYPE_UNSPECIFIED;
SLDataSource lDataSource;
lDataSource.pLocator = &lDataLocatorIn;
lDataSource.pFormat = &lDataFormat;
SLDataLocator_OutputMix lDataLocatorOut;
lDataLocatorOut.locatorType = SL_DATALOCATOR_OUTPUTMIX;
lDataLocatorOut.outputMix = mOutputMixObj;
SLDataSink lDataSink;
lDataSink.pLocator = &lDataLocatorOut;
lDataSink.pFormat = NULL;
...
6. Then create the OpenSL ES audio player. As always with OpenSL ES objects,
instanate it through the engine rst and then realize it. Two interfaces
SL_IID_PLAY and SL_IID_SEEK are imperavely required:
...
const SLuint32 lBGMPlayerIIDCount = 2;
const SLInterfaceID lBGMPlayerIIDs[] =
{ SL_IID_PLAY, SL_IID_SEEK };
const SLboolean lBGMPlayerReqs[] =
{ SL_BOOLEAN_TRUE, SL_BOOLEAN_TRUE };
lRes = (*mEngine)->CreateAudioPlayer(mEngine,
&mBGMPlayerObj, &lDataSource, &lDataSink,
lBGMPlayerIIDCount, lBGMPlayerIIDs, lBGMPlayerReqs);
if (lRes != SL_RESULT_SUCCESS) goto ERROR;
lRes = (*mBGMPlayerObj)->Realize(mBGMPlayerObj,
SL_BOOLEAN_FALSE);
if (lRes != SL_RESULT_SUCCESS) goto ERROR;
lRes = (*mBGMPlayerObj)->GetInterface(mBGMPlayerObj,
SL_IID_PLAY, &mBGMPlayer);
if (lRes != SL_RESULT_SUCCESS) goto ERROR;
lRes = (*mBGMPlayerObj)->GetInterface(mBGMPlayerObj,
SL_IID_SEEK, &mBGMPlayerSeek);
if (lRes != SL_RESULT_SUCCESS) goto ERROR;
...

Playing Sound with OpenSL ES
[ 254 ]
7. Finally, using the play and seek interfaces, switch the playback in loop mode
(that is, music keeps playing) from the track beginning (that is, 0 ms) unl its
end (SL_TIME_UNKNOWN) and then start playing (SetPlayState() with
SL_PLAYSTATE_PLAYING).
...
lRes = (*mBGMPlayerSeek)->SetLoop(mBGMPlayerSeek,
SL_BOOLEAN_TRUE, 0, SL_TIME_UNKNOWN);
if (lRes != SL_RESULT_SUCCESS) goto ERROR;
lRes = (*mBGMPlayer)->SetPlayState(mBGMPlayer,
SL_PLAYSTATE_PLAYING);
if (lRes != SL_RESULT_SUCCESS) goto ERROR;
return STATUS_OK;
ERROR:
return STATUS_KO;
}
...
8. The last method stopBGM() is shorter. It stops and then destroys the player:
...
void SoundService::stopBGM() {
if (mBGMPlayer != NULL) {
SLuint32 lBGMPlayerState;
(*mBGMPlayerObj)->GetState(mBGMPlayerObj,
&lBGMPlayerState);
if (lBGMPlayerState == SL_OBJECT_STATE_REALIZED) {
(*mBGMPlayer)->SetPlayState(mBGMPlayer,
SL_PLAYSTATE_PAUSED);
(*mBGMPlayerObj)->Destroy(mBGMPlayerObj);
mBGMPlayerObj = NULL;
mBGMPlayer = NULL;
mBGMPlayerSeek = NULL;
}
}
}
}

Chapter 7
[ 255 ]
9. Copy an MP3 le into the assets directory and name it bgm.mp3.
File bgm.mp3 is provided with this book in Chapter7/Resource.
10. Finally, in jni/DroidBlaster.cpp, start music playback right aer
SoundService is started:
#include “DroidBlaster.hpp”
#include “Log.hpp”
namespace dbs {
...
packt::status DroidBlaster::onActivate() {
packt::Log::info(“Activating DroidBlaster”);
if (mGraphicsService->start() != packt::STATUS_OK) {
return packt::STATUS_KO;
}
if (mSoundService->start() != packt::STATUS_OK) {
return packt::STATUS_KO;
}
mSoundService->playBGM
mBackground.spawn();
mShip.spawn();
mTimeService->reset();
return packt::STATUS_OK;
}
void DroidBlaster::onDeactivate() {
mGraphicsService->stop();
mSoundService->stop();
}
...
}

Playing Sound with OpenSL ES
[ 256 ]
What just happened?
We have discovered how to play a music clip from an MP3 le. Playback loops unl the
game is terminated. When using a MIME data source, the le type is auto-detected. Several
formats are currently supported format in Gingerbread including Wave PCM, Wave alaw,
Wave ulaw, MP3, Ogg Vorbis and so on. MIDI playback is currently not supported.
You may be surprised to see that, in the example, startBGM() and stopBGM() recreates
and destroys the audio player, respecvely. The reason is that there is currently no way to
change a MIME data source without completely recreang the OpenSL ES AudioPlayer
object. So although this technique is ne to play a long clip, it is not adapted for playing
short sound dynamically.
The way the sample code is presented here is typical of how OpenSL ES works. The OpenSL
ES engine object, that kind of object factory, creates an AudioPlayer object which cannot
do much in that state. First, it needs to be realized to allocate necessary resources. But that
is not enough. It needs to retrieve the right interfaces, like the SL_IID_PLAY interface to
change audio player state to playing/stopped. Then OpenSL API can be eecvely used.
That is quite some work, taking into account result vericaon (as any call is suscepble to
fail), which kind of cluers the code. Geng inside this API can take a lile bit more me
than usual, but once understood, these concepts become rather easy to deal with.
Playing sounds
The technique presented to play BGM from a MIME source is very praccal but sadly, not
exible enough. Recreang an AudioPlayer object is not necessary and accessing asset
les each me is not good in term of eciency.
So when it comes to playing sounds quickly in response to an event and generang them
dynamically, we need to use a sound buer queue. Each sound is preloaded or even
generated into a memory buer, and placed into a queue when playback is requested. No
need to access a le at runme!
A sound buer, in current OpenSL ES Android implementaon, can contain PCM data. PCM,
which stands for Pulse Code Modulaon, is a data format dedicated to the representaon of
digital sounds. It is the format used in CD and in some Wave les. A PCM can be Mono (same
sound on all speakers) or Stereo (dierent sound for le and right speakers if available).
PCM is not compressed and is not ecient in terms of storage (just compare a musical CD
with a data CD full of MP3). But this format is lossless and oers the best quality. Quality
depends on the sampling rate: analog sounds are represented digitally as a series of measure
(that is, sample) of the sound signal.
Chapter 7
[ 257 ]
A sound sample at 44100 Hz (that is 44100 measures per second) has a beer quality
but also takes more place than a sound sampled at 16000 Hz. Also, each measure can
be represented with a more or less ne degree of precision (the encoding). On current
Android implementaon:
A sound can use 8000 Hz, 11025 Hz, 12000 Hz, 16000 Hz, 22050 Hz, 24000 Hz,
32000 Hz, 44100 Hz, or 48000 Hz sampling,
A sample can be encoded on 8-bit unsigned or 16-bit signed (ner precision) in
lile-endian or big-endian.
In the following step-by-step tutorial, we are going to use a raw PCM le encoded over
16-bit in lile-endian.
Project DroidBlaster_Part7-2 can be used as a starng point for
this part. The resulng project is provided with this book under the
name DroidBlaster_Part7-3.
Time for action – creating and playing a sound buffer queue
First, let’s create a new object to hold sound buers:
1. In jni/Sound.hpp, create a new class Sound to manage a sound buer. It features
a method load() to load a PCM le and unload() to release it:
#ifndef _PACKT_SOUND_HPP_
#define _PACKT_SOUND_HPP_
class SoundService;
#include “Context.hpp”
#include “Resource.hpp”
#include “Types.hpp”
namespace packt {
class Sound {
public:
Sound(android_app* pApplication, const char* pPath);
const char* getPath();
status load();
status unload();
Downloa d f r o m W o w ! e B o o k < w w w.woweb o o k . c o m >Downloa d f r o m W o w ! e B o o k < w w w.woweb o o k . c o m >

Playing Sound with OpenSL ES
[ 258 ]
private:
friend class SoundService;
private:
Resource mResource;
uint8_t* mBuffer; off_t mLength;
};
}
#endif
2. Sound loading implementaon is quite simple: it creates a buer with the same
size as the PCM le and loads all le content in it:
#include “Sound.hpp”
#include “Log.hpp”
#include <png.h>
#include <SLES/OpenSLES.h>
#include <SLES/OpenSLES_Android.h>
#include <SLES/OpenSLES_AndroidConfiguration.h>
namespace packt {
Sound::Sound(android_app* pApplication, const char* pPath) :
mResource(pApplication, pPath),
mBuffer(NULL), mLength(0)
{}
const char* Sound::getPath() {
return mResource.getPath();
}
status Sound::load() {
status lRes;
if (mResource.open() != STATUS_OK) {
return STATUS_KO;
}
mLength = mResource.getLength();
mBuffer = new uint8_t[mLength];
lRes = mResource.read(mBuffer, mLength);
mResource.close();
if (lRes != STATUS_OK) {
Log::error(“Error while reading PCM sound.”);

Chapter 7
[ 259 ]
return STATUS_KO;
} else {
return STATUS_OK;
}
}
status Sound::unload() {
delete[] mBuffer;
mBuffer = NULL; mLength = 0;
return STATUS_OK;
}
}
We can manage sound buers in the dedicated sound service.
3. Open SoudService.hpp and create a few new methods:
registerSound() to load and manage a new sound buer
playSound() to send a sound buer to the sound play queue
startSoundPlayer() to inialize the sound queue when
SoundService starts
A sound queue can be manipulated through SLPlayItf and SLBufferQueueItf
interfaces. Sound buers are stored in xed-size C++ array:
#ifndef _PACKT_SOUNDSERVICE_HPP_
#define _PACKT_SOUNDSERVICE_HPP_
#include “Sound.hpp”
#include “Types.hpp”
...
namespace packt {
class SoundService {
public:
...
Sound* registerSound(const char* pPath);
void playSound(Sound* pSound);
private:
status startSoundPlayer();
private:

Playing Sound with OpenSL ES
[ 260 ]
...
SLObjectItf mPlayerObj; SLPlayItf mPlayer;
SLBufferQueueItf mPlayerQueue;
Sound* mSounds[32]; int32_t mSoundCount;
};
}
#endif
4. Now, open jni/SoundService.cpp implementaon le. Update start()
to call startSoundPlayer() and load sound resources registered with
registerSound(). Also create a destructor to release these resources
when applicaon exits:
...
namespace packt {
SoundService::SoundService(android_app* pApplication) :
...,
mPlayerObj(NULL), mPlayer(NULL), mPlayerQueue(NULL),
mSounds(), mSoundCount(0)
{}
SoundService::~SoundService() {
for (int32_t i = 0; i < mSoundCount; ++i) {
delete mSounds[i];
mSoundCount = 0;
}
}
status SoundService::start() {
...
if (startSoundPlayer() != STATUS_OK) goto ERROR;
for (int32_t i = 0; i < mSoundCount; ++i) {
if (mSounds[i]->load() != STATUS_OK) goto ERROR;
}
return STATUS_OK;
ERROR:
packt::Log::error(“Error while starting SoundService”);
stop();
return STATUS_KO;
}
...

Chapter 7
[ 261 ]
Sound* SoundService::registerSound(const char* pPath) {
for (int32_t i = 0; i < mSoundCount; ++i) {
if (strcmp(pPath, mSounds[i]->getPath()) == 0) {
return mSounds[i];
}
}
Sound* lSound = new Sound(mApplication, pPath);
mSounds[mSoundCount++] = lSound;
return lSound;
}
...
5. Write startSoundPlayer(), beginning with the SLDataSource and
SLDataSink to describe the input and output channel. On the opposite to the BGM
player, the data format structure is not SLDataFormat_MIME (to open an MP3 le)
but a SLDataFormat_PCM with sampling, encoding, and endianness informaon.
Sounds need to be Mono (that is, only one sound channel for both le and right
speakers when available). The queue is created with the Android-specic extension
SLDataLocator_AndroidSimpleBufferQueue():
...
status SoundService::startSoundPlayer() {
SLresult lRes;
// Set-up sound audio source.
SLDataLocator_AndroidSimpleBufferQueue lDataLocatorIn;
lDataLocatorIn.locatorType =
SL_DATALOCATOR_ANDROIDSIMPLEBUFFERQUEUE;
// At most one buffer in the queue.
lDataLocatorIn.numBuffers = 1;
SLDataFormat_PCM lDataFormat;
lDataFormat.formatType = SL_DATAFORMAT_PCM;
lDataFormat.numChannels = 1; // Mono sound.
lDataFormat.samplesPerSec = SL_SAMPLINGRATE_44_1;
lDataFormat.bitsPerSample = SL_PCMSAMPLEFORMAT_FIXED_16;
lDataFormat.containerSize = SL_PCMSAMPLEFORMAT_FIXED_16;
lDataFormat.channelMask = SL_SPEAKER_FRONT_CENTER;
lDataFormat.endianness = SL_BYTEORDER_LITTLEENDIAN;
SLDataSource lDataSource;
lDataSource.pLocator = &lDataLocatorIn;
lDataSource.pFormat = &lDataFormat;

Playing Sound with OpenSL ES
[ 262 ]
SLDataLocator_OutputMix lDataLocatorOut;
lDataLocatorOut.locatorType = SL_DATALOCATOR_OUTPUTMIX;
lDataLocatorOut.outputMix = mOutputMixObj;
SLDataSink lDataSink;
lDataSink.pLocator = &lDataLocatorOut;
lDataSink.pFormat = NULL;
...
6. Then, in startSoundPlayer(), create and realize the sound player. We are going
to need its SL_IID_PLAY and also SL_IID_BUFFERQUEUE interface now available
thanks to the data locator congured in previous step:
...
const SLuint32 lSoundPlayerIIDCount = 2;
const SLInterfaceID lSoundPlayerIIDs[] =
{ SL_IID_PLAY, SL_IID_BUFFERQUEUE };
const SLboolean lSoundPlayerReqs[] =
{ SL_BOOLEAN_TRUE, SL_BOOLEAN_TRUE };
lRes = (*mEngine)->CreateAudioPlayer(mEngine, &mPlayerObj,
&lDataSource, &lDataSink, lSoundPlayerIIDCount,
lSoundPlayerIIDs, lSoundPlayerReqs);
if (lRes != SL_RESULT_SUCCESS) goto ERROR;
lRes = (*mPlayerObj)->Realize(mPlayerObj, SL_BOOLEAN_FALSE);
if (lRes != SL_RESULT_SUCCESS) goto ERROR;
lRes = (*mPlayerObj)->GetInterface(mPlayerObj, SL_IID_PLAY,
&mPlayer);
if (lRes != SL_RESULT_SUCCESS) goto ERROR;
lRes = (*mPlayerObj)->GetInterface(mPlayerObj,
SL_IID_BUFFERQUEUE, &mPlayerQueue);
if (lRes != SL_RESULT_SUCCESS) goto ERROR;
...
7. To nish with startSoundPlayer(), start the queue by seng it in the playing
state. This does not actually mean that a sound is played. The queue is empty so that
would not be possible. But if a sound gets enqueued, then it is automacally played:
...
lRes = (*mPlayer)->SetPlayState(mPlayer,
SL_PLAYSTATE_PLAYING);
if (lRes != SL_RESULT_SUCCESS) goto ERROR;

Chapter 7
[ 263 ]
return STATUS_OK;
ERROR:
packt::Log::error(“Error while starting SoundPlayer”);
return STATUS_KO;
}
...
8. Update method stop() to destroy the sound player and free sound buers:
...
void SoundService::stop() {
stopBGM();
if (mOutputMixObj != NULL) {
(*mOutputMixObj)->Destroy(mOutputMixObj);
mOutputMixObj = NULL;
}
if (mEngineObj != NULL) {
(*mEngineObj)->Destroy(mEngineObj);
mEngineObj = NULL; mEngine = NULL;
}
if (mPlayerObj != NULL) {
(*mPlayerObj)->Destroy(mPlayerObj);
mPlayerObj = NULL; mPlayer = NULL; mPlayerQueue = NULL;
}
for (int32_t i = 0; i < mSoundCount; ++i) {
mSounds[i]->unload();
}
}
...
9. Terminate SoundService by wring playSound(), which rst stops any sound
being played and then enqueue the new sound buer to play:
...
void SoundService::playSound(Sound* pSound) {
SLresult lRes;
SLuint32 lPlayerState;
(*mPlayerObj)->GetState(mPlayerObj, &lPlayerState);
if (lPlayerState == SL_OBJECT_STATE_REALIZED) {
int16_t* lBuffer = (int16_t*) pSound->mBuffer;
off_t lLength = pSound->mLength;

Playing Sound with OpenSL ES
[ 264 ]
// Removes any sound from the queue.
lRes = (*mPlayerQueue)->Clear(mPlayerQueue);
if (lRes != SL_RESULT_SUCCESS) goto ERROR;
// Plays the new sound.
lRes = (*mPlayerQueue)->Enqueue(mPlayerQueue, lBuffer,
lLength);
if (lRes != SL_RESULT_SUCCESS) goto ERROR;
}
return;
ERROR:
packt::Log::error(“Error trying to play sound”);
}
}
Let’s play a sound le when the game starts:
10. Store a reference to sound buer in le jni/DroidBlaster.hpp:
#ifndef _PACKT_DROIDBLASTER_HPP_
#define _PACKT_DROIDBLASTER_HPP_
#include “ActivityHandler.hpp”
#include “Background.hpp”
#include “Context.hpp”
#include “GraphicsService.hpp”
#include “Ship.hpp”
#include “Sound.hpp”
#include “SoundService.hpp”
#include “TimeService.hpp”
#include “Types.hpp”
namespace dbs {
class DroidBlaster : public packt::ActivityHandler {
...
private:
...
Background mBackground;
Ship mShip;
packt::Sound* mStartSound;
};
}
#endif

Chapter 7
[ 265 ]
11. Finally, play the sound in jni/DroidBlaster.cpp when the applicaon
is acvated:
#include “DroidBlaster.hpp”
#include “Log.hpp”
namespace dbs {
DroidBlaster::DroidBlaster(packt::Context* pContext) :
mGraphicsService(pContext->mGraphicsService),
mSoundService(pContext->mSoundService),
mTimeService(pContext->mTimeService),
mBackground(pContext), mShip(pContext),
mStartSound(mSoundService->registerSound(“start.pcm”))
{}
packt::status DroidBlaster::onActivate() {
...
mSoundService->playBGM(“bgm.mp3”);
mSoundService->playSound(mStartSound);
mBackground.spawn();
mShip.spawn();
...
}
}
What just happened?
We have discovered how to preload sounds in a buer and play them as needed. What
dierenates the sound playing technique from the BGM one showed earlier is the use of
a buer queue. A buer queue is exactly what its name reveals: a FIFO (First In, First Out)
collecon of sound buers played one aer the other. Buers are enqueued for playback
when all previous buers are played.
Buers can be recycled. This technique is essenal in combinaon with streaming les: two
or more buers are lled and sent to the queue. When rst buer has nished playing, the
second one starts while the rst buer is lled with new data. As soon as possible, the rst
buer is enqueued before the queue gets empty. This process repeats forever unl playback
is over. In addion, buers are raw data and can thus be processed or ltered on the y.
Playing Sound with OpenSL ES
[ 266 ]
In the present tutorial, because DroidBlaster does not need to play more than one sound
at once and no form of streaming is necessary, the buer queue size is simply set to one
buer (step 5, lDataLocatorIn.numBuffers = 1;). In addion, we want new sounds
to pre-empt older ones, which explains why queue is systemacally cleared. Your OpenSL
ES architecture should be of course adapted to your needs. If it becomes necessary to play
several sounds simultaneously, then several audio players (and therefore buer queues)
should be created.
Sound buers are stored in the PCM format, which does not self-describe its internal format.
Sampling, encoding, and other format informaon needs to be selected in the applicaon
code. Although this is ne for most of them, a soluon, if that is not exible enough, can be
to load a Wave le which contains all the necessary header informaon.
If you have read carefully the second part of this chapter about playing BGM, you will
remember that we have used a MIME data source to load dierent kind of sound les,
Waves included. So why not use a MIME source instead of a PCM source? Well, this is
because a buer queue works only with PCM data. Although improvements can be expected
in the future, audio le decoding sll need to be performed by hand. Trying to connect a
MIME source to a buer queue (like we are going to do with the recorder) will cause an
SL_RESULT_FEATURE_UNSUPPORTED error.
OpenSL ES has been updated in NDK R7 and now allows decoding
compressed les such as MP3 les to PCM buers.
Exporng PCM sounds with Audacity
A great open source tool to lter and sequence sounds is Audacity. It
allows altering sampling rate and modifying channels (Mono/Stereo).
Audacity is able to export as well as import sound as raw PCM data.
Event callback
It is possible to detect when a sound has nished playing using callbacks. A callback can be
set up by calling the RegisterCallback() method on a queue (but other type of objects
can also register callbacks) like in the following example:
...
namespace packt {
class SoundService {
...

Chapter 7
[ 267 ]
private:
static void callback_sound(SLBufferQueueItf pObject,
void* pContext);
...
};
}
#endif
For example, the callback can receive this, that is, a SoundService self reference, to allow
processing with any contextual informaon, if needed. Although this is facultave, an event
mask is set up to ensure callback is called only when event SL_PLAYEVENT_HEADATEND
(player has nished playing the buer) is triggered. A few others play events are available
in OpenSLES.h:
...
namespace packt {
...
status SoundService::startSoundPlayer() {
...
// Registers a callback called when sound is finished.
lResult = (*mPlayerQueue)->RegisterCallback(mPlayerQueue,
callback_sound, this);
slCheckErrorWithStatus(lResult, “Problem registering player
callback (Error %d).”, lResult);
lResult = (*mPlayer)->SetCallbackEventsMask(mPlayer, SL_
PLAYEVENT_HEADATEND);
slCheckErrorWithStatus(lResult, “Problem registering player
callback mask (Error %d).”, lResult);
// Starts the sound player
...
}
void callback_sound(SLBufferQueueItf pBufferQueue, void *context)
{
// Context can be casted back to the original type.
SoundService& lService = *(SoundService*) context;
...
Log::info(“Ended playing sound.”);
}
...
}
Playing Sound with OpenSL ES
[ 268 ]
Now, when a buer ends playing, a message is logged. Operaons like, for example,
enqueuing a new buer (to handle streaming for example) can be performed.
Callback and threading
Callbacks are like system interrupons or applicaon events:
their processing must be short and fast. If advanced processing
is necessary, it should not be performed inside the callback but
on another thread, nave threads being perfect candidates.
Indeed, callbacks are emied on a system thread, dierent than the one requesng OpenSL
ES services (that is, the nave thread in our case). Of course, with threads rise the problem
of thread-safety when accessing your own variables from the callback. Although protecng
code with mutexes is tempng, they are not always compable with real-me audio as their
eect on scheduling (inversion of priority issues) can disturb playback. Prefer using thread
safe technique like a lock-free queue to communicate with callbacks.
Recording sounds
Android devices are all about interacons. And interacons can come not only from touches
and sensors, but also from audio input. Most Android devices provide a micro to record
sound and allow an applicaon such as the Android desktop search to oer vocal features
to record queries.
If sound input is available, OpenSL ES gives access to the sound recorder navely. It
collaborates with a buer queue to take data from the input device and ll an output sound
buer from it. Setup is prey similar to what has been done with the AudioPlayer except
that data source and data sink are permuted.
To discover how this works, next the challenge consists in recording a sound when an
applicaon starts and playing it when it has nished recording.
Project DroidBlaster_Part7-3 can be used as a starng point for
this part. The resulng project is provided with this book under the
name DroidBlaster_Part7-Recorder.

Chapter 7
[ 269 ]
Have a go hero – recording and playing a sound
Turning SoundService into a recorder can be done in four steps:
1. Using status startSoundRecorder() inialize the sound recorder. Invoke it
right aer startSoundPlayer().
2. With void recordSound() start recording a sound buer with device micro.
Invoke this method at instances such as when the applicaon is acvated in
onActivate() aer background music playback starts.
3. A new callback static void callback_recorder(SLAndroidSimpleBuffe
rQueueItf, void*) to be noed of record queue events. You have to register
this callback so that it is triggered when a recorder event happens. Here, we are
interested in buer full events, that is, when the sound recording is nished.
4. void playRecordedSound() to play a sound once recorded. Play it at instances
such as when sound has nished being recorded in callback_recorder().
This is not technically correct because of potenal race condions but is ne for
an illustraon.
Before going any further, recording requires a specic authorizaon and, of course,
an appropriate Android device (you would not like an applicaon to record your
secret conversaons behind your back!). This authorizaon has to be requested in
Android manifest:
<?xml version=”1.0” encoding=”utf-8”?>
<manifest xmlns:android=”http://schemas.android.com/apk/res/android”
package=”com.packtpub.droidblaster” android:versionCode=”1”
android:versionName=”1.0”>
...
<uses-permission android:name=”android.permission.RECORD_AUDIO”/>
</manifest>
Sounds are recorded with a recorder object created from the OpenSL ES engine, as usual.
The recorder oers two interesng interfaces:
SLRecordItf: This interface is to start and stop recording. The idener is
SL_IID_RECORD.
SLAndroidSImpleBufferQueueItf: This manages a sound queue for the
recorder. This is an Android extension provided by NDK because current OpenSL
ES 1.0.1 specicaon does not support recording to a queue. The idener is
SL_IID_ANDROIDSIMPLEBUFFERQUEUE.
const SLuint32 lSoundRecorderIIDCount = 2;
const SLInterfaceID lSoundRecorderIIDs[] =
{ SL_IID_RECORD, SL_IID_ANDROIDSIMPLEBUFFERQUEUE };

Playing Sound with OpenSL ES
[ 270 ]
const SLboolean lSoundRecorderReqs[] =
{ SL_BOOLEAN_TRUE, SL_BOOLEAN_TRUE };
SLObjectItf mRecorderObj;
(*mEngine)->CreateAudioRecorder(mEngine, &mRecorderObj,
&lDataSource, &lDataSink,
lSoundRecorderIIDCount, lSoundRecorderIIDs,
lSoundRecorderReqs);
To create the recorder, you will need to declare your audio source and sink similar to the
following one. The data source is not a sound but a default recorder device (like a microphone).
On the other hand, the data sink (that is, the output channel) is not a speaker but a sound
buer in PCM format (with the requested sampling, encoding, and endianness). The Android
extension SLDataLocator_AndroidSimpleBufferQueue must be used to work with
a recorder since standard OpenSL buer queues cannot be used as with a recorder:
SLDataLocator_AndroidSimpleBufferQueue lDataLocatorOut;
lDataLocatorOut.locatorType =
SL_DATALOCATOR_ANDROIDSIMPLEBUFFERQUEUE;
lDataLocatorOut.numBuffers = 1;
SLDataFormat_PCM lDataFormat;
lDataFormat.formatType = SL_DATAFORMAT_PCM;
lDataFormat.numChannels = 1;
lDataFormat.samplesPerSec = SL_SAMPLINGRATE_44_1;
lDataFormat.bitsPerSample = SL_PCMSAMPLEFORMAT_FIXED_16;
lDataFormat.containerSize = SL_PCMSAMPLEFORMAT_FIXED_16;
lDataFormat.channelMask = SL_SPEAKER_FRONT_CENTER;
lDataFormat.endianness = SL_BYTEORDER_LITTLEENDIAN;
SLDataSink lDataSink;
lDataSink.pLocator = &lDataLocatorOut;
lDataSink.pFormat = &lDataFormat;
SLDataLocator_IODevice lDataLocatorIn;
lDataLocatorIn.locatorType = SL_DATALOCATOR_IODEVICE;
lDataLocatorIn.deviceType = SL_IODEVICE_AUDIOINPUT;
lDataLocatorIn.deviceID = SL_DEFAULTDEVICEID_AUDIOINPUT;
lDataLocatorIn.device = NULL;
SLDataSource lDataSource;
lDataSource.pLocator = &lDataLocatorIn;
lDataSource.pFormat = NULL;

Chapter 7
[ 271 ]
To record a sound, you also need to create a sound buer with an appropriate size according
to the duraon of your recording. Size depends on the sampling rate. For example, for a
record of 2 s with a sampling rate of 44100 Hz and 16-bit quality, sound buer size would
look like the following:
mRecordSize = 44100 * 2
mRecordBuffer = new int16_t[mRecordSize];
In recordSound(), you can stop the recorder thanks to SLRecordItf to ensure it is not
already recording and clear the queue. The same process applies to destroy the recorder
when applicaon exits.
(*mRecorder)->SetRecordState(mRecorder, SL_RECORDSTATE_STOPPED);
(*mRecorderQueue)->Clear(mRecorderQueue);
Then you can enqueue a new buer and start recording:
(*mRecorderQueue)->Enqueue(mRecorderQueue, mRecordBuffer,
mRecordSize * sizeof(int16_t));
(*mRecorder)->SetRecordState(mRecorder,SL_RECORDSTATE_RECORDING);
Of course, it would be perfectly possible to just enqueue a new sound so that any current
recording is processed to its end (for example, to create a connuous chain of recording).
The sound being enqueued would be processed potenally later in that case. All depends
on your needs.
You eventually need to know when your sound buer has nished recording. To do so,
register a callback triggered when a recorder event happens (for example, a buer has been
lled). An event mask should be set to ensure callback is called only when a buer has been
lled (SL_RECORDEVENT_BUFFER_FULL). A few others are available in OpenSLES.h but
not all are supported (SL_RECORDEVENT_HEADATLIMIT, and so on):
(*mRecorderQueue)->RegisterCallback(mRecorderQueue,
callback_recorder, this);
(*mRecorder)->SetCallbackEventMask(mRecorder,
SL_RECORDEVENT_BUFFER_FULL);
Finally, when callback_recorder() is triggered, just stop recording and play the recorded
buer with playRecordedSound(). The recorded buer needs to be enqueued in the
audio player’s queue for playback:
(*mPlayerQueue)->Enqueue(mPlayerQueue, mRecordBuffer,
mRecordSize * sizeof(int16_t));
Playing Sound with OpenSL ES
[ 272 ]
Playing recorded sound directly from a callback is nice to perform quick
and simple tests. But to implement such a mechanism properly, more
advanced thread-safe technique (preferably lock-free) is required.
Indeed, in this example, there is a risk of race condion with SoundService destructor
(which destroys the queue used in the callback).
Summary
In this chapter, we saw how to create and realize an OpenSL ES engine connected to
an output channel. We played music from an encoded le and saw that an encoded le
cannot be loaded in a buer.
We also played sound buers in a sound queue. Buers can either be appended to a queue,
in which case they are played with delay, or inserted in replacement of previous sounds,
in which case they are played immediately. Finally, we have recorded sound in buers and
played them back.
Should you prefer OpenSL ES over Java APIs? There is no denite answer. Devices evolve
at much quieter pace than Android itself. So if your applicaon aims at a large compability,
that is, Android 2.2 or less, Java APIs are the only soluon. On the other hand, if it is planned
for later releases, then OpenSL ES is an opon to consider, praying that most devices will
be migrated to Gingerbread! But you have to be ready to support the cost of possible
future evoluons.
If all you need is a nice high-level API, then Java APIs may suit your requirements beer. If
you need ner playback or recording control, then there is no signicant dierence between
low-level Java APIs and OpenSL ES. In that case, choice should be architectural: if your code
is mainly Java, then you should probably go with Java and reciprocally. If you need to reuse
an exisng sound-related library, opmize performance or perform intense computaons,
like sound ltering on the y, then OpenSL ES is probably the right choice. There is no
garbage collector overhead and aggressive opmizaon is favored in the nave code.
Whatever choice you make, know that Android NDK has a lot more to oer. Aer rendering
graphics with Open GL ES and playing sound with OpenSL ES, the next chapter will take care
of handling input navely: keyboard, touches, and sensors.
8
Handling Input Devices and Sensors
Android is all about interacon. Admiedly, that means feedback, through
graphics, audio, vibraons, and so on. But there is no interacon without input!
The success of today's smart-phones takes its root in their mulple and modern
input possibilies: touch screens, keyboard, mouse, GPS, accelerometer, light
detector, sound recorder, and so on. Handling and combining them properly is a
key to enrich your applicaon and and to make it successful.
Although Android handles many input peripherals, the Android NDK has long been very
limited in their support, not to say good for nothing, unl the release of R5! We can now
access them directly through a nave API. Examples of available devices are:
Keyboard, either physical (with a slide-out keyboard) or virtual (which appears
on screen)
Direconal pad (up, down, le, right, and acon buons), oen
abbreviated D-Pad
Trackball (opcal ones included)
Touch screen, which has made the success of modern smart-phones
Mouse or Track Pad (since NDK R5, but available on Honeycomb devices only)
We can also access hardware sensors, for example:
Accelerometer, which measures linear acceleraon applied to a device.
Gyroscope, which measures angular velocity. It is oen combined with the
magnetometer to compute orientaon accurately and quickly. Gyroscope has
been introduced recently and is not available on most devices yet.

Handling Input Devices and Sensors
[ 274 ]
Magnetometer, which gives the ambient magnec eld and thus (if not perturbed)
cardinal direcon.
Light sensor, for example, to automacally adapt screen luminosity.
Proximity sensor, for example, to detect ear distance during a call.
In addion to hardware sensors, "soware sensors" have been introduced with Gingerbread.
These sensors are derived from hardware sensor's data:
Gravity sensor, to measure the gravity direcon and magnitude
Linear acceleraon sensor, which measures device "movement" excluding gravity
Rotaon vector, which indicates device orientaon in space
Gravity sensor and linear acceleraon sensor are derived from the accelerometer. On the
other hand, rotaon vector is derived from the magnetometer and the accelerometer.
Because these sensors are generally computed over me, they usually incur a slight delay
to get up-to-date values.
To familiarize more deeply with input devices and sensors, this chapter teaches how to:
Handle screen touches
Detect keyboard, D-Pad, and trackball events
Turn the accelerometer sensor into a joypad
Interacting with Android
The most emblemac innovaon of today's smart phones is the touch screen, which has
replaced the now anque mice. A touch screen detects, as its name suggests, touches
made with ngers or styluses. Depending on the quality of the screen, several touches
(also referred as cursors in Android) can be handled, de-mulplying interacon possibilies.
So let's start this chapter by handling touch events in DroidBlaster. To keep the example
simple, we will only handle one touch. The goal is to move the ship in the direcon of a
touch. The farther the touch is, the faster goes the ship. Beyond a pre-dened range, ship
speed reaches a top limit.
Chapter 8
[ 275 ]
The nal project structure will look as shown in the following diagram:
DroidBlaster
Ship
LogContext
TimeService
GraphicsService
EventLoop
GraphicsTexture Resource
packt
ActivityHandler
*
Background
GraphicsTileMap
GraphicsSprite Location
*
*
dbsdbs
RapidXml
SoundService
InputService
*Sound
InputHandler
Project DroidBlaster_Part7-3 can be used as a starng
point for this part. The resulng project is provided with this
book under the name DroidBlaster_Part8-1.
Handling Input Devices and Sensors
[ 276 ]
Time for action – handling touch events
Let's begin with the plumber to connect Android input event queue to our applicaon.
1. In the same way we created an ActivityHandler to process applicaon events
in Chapter 5, Wring a Nave Applicaon, create a class InputHandler, in a new
le jni/InputHandler.hpp to process the input events. Input API is declared in
android/input.h.
2. Create a onTouchEvent() to handle touch events. These events are packaged in
an AInputEvent structure dened in Android include les. Other input peripherals
will be added later in this chapter:
#ifndef _PACKT_INPUTHANDLER_HPP_
#define _PACKT_INPUTHANDLER_HPP_
#include <android/input.h>
namespace packt {
class InputHandler {
public:
virtual ~InputHandler() {};
virtual bool onTouchEvent(AInputEvent* pEvent) = 0;
};
}
#endif
3. Modify jni/EventLoop.hpp header le to include and handle an
InputHandler instance. Like with acvity event, dene an internal method
processInputEvent() triggering a stac callback callback_input():
#ifndef _PACKT_EVENTLOOP_HPP_
#define _PACKT_EVENTLOOP_HPP_
#include "ActivityHandler.hpp"
#include "InputHandler.hpp"
#include "Types.hpp"
#include <android_native_app_glue.h>
namespace packt {
class EventLoop {
public:
EventLoop(android_app* pApplication);

Chapter 8
[ 277 ]
void run(ActivityHandler* pActivityHandler,
InputHandler* pInputHandler);
protected:
...
void processAppEvent(int32_t pCommand);
int32_t processInputEvent(AInputEvent* pEvent);
void processSensorEvent();
private:
...
static void callback_event(android_app* pApplication,
int32_t pCommand);
static int32_t callback_input(android_app* pApplication,
AInputEvent* pEvent);
private:
...
android_app* mApplication;
ActivityHandler* mActivityHandler;
InputHandler* mInputHandler;
};
}
#endif
4. We need to process input events in jni/EventLoop.cpp source le and nofy
the associated InputHandler.
First, connect the Android input queue to our callback_input(). The
EventLoop itself (that is, this) is passed anonymously through the userData
member of the android_app structure. That way, callback is able to delegate
input processing back to our own object, that is, to processInputEvent().
Touch screen events are of the type MotionEvent (as opposed to key events). They
can be discriminated according to their source (AINPUT_SOURCE_TOUCHSCREEN)
thanks to Android nave input API (here, AInputEvent_getSource()):
Note how callback_input() and by extension processInputEvent()
return an integer value (which is in fact a Boolean). This value indicates that
an input event (for example, a pressed buon) has been processed by the
applicaon and does not need to be processed further by the system. For
example, return 1 when the back buon is pressed to stop event processing and
prevent acvity from geng terminated.

Handling Input Devices and Sensors
[ 278 ]
#include "EventLoop.hpp"
#include "Log.hpp"
namespace packt {
EventLoop::EventLoop(android_app* pApplication) :
mEnabled(false), mQuit(false),
mApplication(pApplication),
mActivityHandler(NULL), mInputHandler(NULL) {
mApplication->userData = this;
mApplication->onAppCmd = callback_event;
mApplication->onInputEvent = callback_input;
}
void EventLoop::run(ActivityHandler* pActivityHandler,
InputHandler* pInputHandler) {
int32_t lResult;
int32_t lEvents;
android_poll_source* lSource;
// Makes sure native glue is not stripped by the linker.
app_dummy();
mActivityHandler = pActivityHandler;
mInputHandler = pInputHandler;
packt::Log::info("Starting event loop");
while (true) {
// Event processing loop.
...
}
...
int32_t EventLoop::processInputEvent(AInputEvent* pEvent) {
int32_t lEventType = AInputEvent_getType(pEvent);
switch (lEventType) {
case AINPUT_EVENT_TYPE_MOTION:
switch (AInputEvent_getSource(pEvent)) {
case AINPUT_SOURCE_TOUCHSCREEN:
return mInputHandler->onTouchEvent(pEvent);
break;
}
break;
}

Chapter 8
[ 279 ]
return 0;
}
int32_t EventLoop::callback_input(android_app* pApplication,
AInputEvent* pEvent) {
EventLoop& lEventLoop = *(EventLoop*) pApplication->userData;
return lEventLoop.processInputEvent(pEvent);
}
}
Plumber is ready. Let's handle these events concretely.
5. To analyze touch events, create a InputService class in jni/InputService.
hpp implemenng our InputHandler. It contains a start() method to realize
necessary inializaons and implements onTouchEvent().
More interesngly, InputService provides getHorizontal() and
getVertical() methods, which indicate the virtual joypad direcon. Direcon
is dened between the touch point and a reference point (which will be the ship).
We also need to know window height and width (reference values, which come
from GraphicsService) to handle coordinate conversions:
#ifndef _PACKT_INPUTSERVICE_HPP_
#define _PACKT_INPUTSERVICE_HPP_
#include "Context.hpp"
#include "InputHandler.hpp"
#include "Types.hpp"
#include <android_native_app_glue.h>
namespace packt {
class InputService : public InputHandler {
public:
InputService(android_app* pApplication,
const int32_t& pWidth, const int32_t& pHeight);
float getHorizontal();
float getVertical();
void setRefPoint(Location* pTouchReference);
status start();
public:

Handling Input Devices and Sensors
[ 280 ]
bool onTouchEvent(AInputEvent* pEvent);
private:
android_app* mApplication;
float mHorizontal, mVertical;
Location* mRefPoint;
const int32_t& mWidth, &mHeight;
};
}
#endif
6. Now, the interesng part: jni/InputService.cpp. First, dene the constructor,
destructor, geers, and seers.
Input service needs a start() method to clear state members:
#include "InputService.hpp"
#include "Log.hpp"
#include <android_native_app_glue.h>
#include <cmath>
namespace packt {
InputService::InputService(android_app* pApplication,
const int32_t& pWidth, const int32_t& pHeight) :
mApplication(pApplication),
mHorizontal(0.0f), mVertical(0.0f),
mRefPoint(NULL), mWidth(pWidth), mHeight(pHeight)
{}
float InputService::getHorizontal() {
return mHorizontal;
}
float InputService::getVertical() {
return mVertical;
}
void InputService::setRefPoint(Location* pTouchReference) {
mRefPoint = pTouchReference;
}
status InputService::start() {
Chapter 8
[ 281 ]
mHorizontal = 0.0f, mVertical = 0.0f;
if ((mWidth == 0) || (mHeight == 0)) {
return STATUS_KO;
}
return STATUS_OK;
}
The eecve event processing comes in onTouchEvent(). Horizontal and vercal
direcons are computed according to the distance between the reference point and
the touch point. This distance is restricted by TOUCH_MAX_RANGE to an arbitrary
range of 65 pixels. Thus, ship max speed is reached when reference-to-touch point
distance is beyond TOUCH_MAX_RANGE pixels. Touch coordinates are retrieved
thanks to AMotionEvent_getX() and AMotionEvent_getY() when nger
moves. Direcon vector is reset to 0 when no more touch is detected:
Beware that the way touch events are red is not homogeneous among
devices. For example, some devices emit events connuously while
nger is down whereas others only emit them when nger moves. In
our case, we could re-compute movement each frame instead of when
an event is triggered to get a more predictable behavior.
...
bool InputService::onTouchEvent(AInputEvent* pEvent) {
const float TOUCH_MAX_RANGE = 65.0f; // In pixels.
if (mRefPoint != NULL) {
if (AMotionEvent_getAction(pEvent)
== AMOTION_EVENT_ACTION_MOVE) {
// Needs a conversion to proper coordinates
// (origin at bottom/left). Only lMoveY needs it.
float lMoveX = AMotionEvent_getX(pEvent, 0)
- mRefPoint->mPosX;
float lMoveY = mHeight - AMotionEvent_getY(pEvent, 0)
- mRefPoint->mPosY;
float lMoveRange = sqrt((lMoveX * lMoveX)
+ (lMoveY * lMoveY));
if (lMoveRange > TOUCH_MAX_RANGE) {
float lCropFactor = TOUCH_MAX_RANGE / lMoveRange;
lMoveX *= lCropFactor; lMoveY *= lCropFactor;
}
mHorizontal = lMoveX / TOUCH_MAX_RANGE;

Handling Input Devices and Sensors
[ 282 ]
mVertical = lMoveY / TOUCH_MAX_RANGE;
} else {
mHorizontal = 0.0f; mVertical = 0.0f;
}
}
return true;
}
}
7. Insert InputService into the Context structure in jni/Context.hpp.
#ifndef _PACKT_CONTEXT_HPP_
#define _PACKT_CONTEXT_HPP_
#include "Types.hpp"
namespace packt {
class GraphicsService;
class InputService;
class SoundService;
class TimeService;
struct Context {
GraphicsService* mGraphicsService;
InputService* mInputService;
SoundService* mSoundService;
TimeService* mTimeService;
};
}
#endif
Finally, let's react to touch events in the game itself.
8. Get the InputService back in jni/DroidBlaster.hpp:
#ifndef _PACKT_DROIDBLASTER_HPP_
#define _PACKT_DROIDBLASTER_HPP_
#include "ActivityHandler.hpp"
#include "Background.hpp"
#include "Context.hpp"
#include "InputService.hpp"
#include "GraphicsService.hpp"
#include "Ship.hpp"
...
Downloa d f r o m W o w ! e B o o k < w w w.woweb o o k . c o m >Downloa d f r o m W o w ! e B o o k < w w w.woweb o o k . c o m >

Chapter 8
[ 283 ]
namespace dbs {
class DroidBlaster : public packt::ActivityHandler {
public:
...
private:
packt::InputService* mInputService;
packt::GraphicsService* mGraphicsService;
packt::SoundService* mSoundService;
packt::TimeService* mTimeService;
...
};
}
#endif
9. InputService is started in jni/DroidBlaster.cpp when the acvity is
acvated. Because it calls ANativeWindow_lock() to retrieve window height
and width, InputService needs to be started before GraphicsService to
avoid a deadlock:
#include "DroidBlaster.hpp"
#include "Log.hpp"
namespace dbs {
DroidBlaster::DroidBlaster(packt::Context* pContext) :
mInputService(pContext->mInputService),
mGraphicsService(pContext->mGraphicsService),
mSoundService(pContext->mSoundService),
...
{}
packt::status DroidBlaster::onActivate() {
if (mGraphicsService->start() != packt::STATUS_OK) {
return packt::STATUS_KO;
}
if (mInputService->start() != packt::STATUS_OK) {
return packt::STATUS_KO;
}
...
}
...
packt::status DroidBlaster::onStep() {

Handling Input Devices and Sensors
[ 284 ]
mTimeService->update();
mBackground.update();
mShip.update();
// Updates services.
if (mGraphicsService->update() != packt::STATUS_OK) {
...
}
}
10. The InputService is used by the Ship class to reposion. Open jni/Ship.hpp
and associate it with the InputService and TimeService. The ship posion is
moved according to user input and me step in a new method update():
#ifndef _DBS_SHIP_HPP_
#define _DBS_SHIP_HPP_
#include "Context.hpp"
#include "InputService.hpp"
#include "GraphicsService.hpp"
#include "GraphicsSprite.hpp"
#include "Types.hpp"
namespace dbs {
class Ship {
public:
Ship(packt::Context* pContext);
void spawn();
void update();
private:
packt::InputService* mInputService;
packt::GraphicsService* mGraphicsService;
packt::TimeService* mTimeService;
packt::GraphicsSprite* mSprite;
packt::Location mLocation;
float mAnimSpeed;
};
}
#endif

Chapter 8
[ 285 ]
11. The reference point from which distance to the touch is computed is inialized with
the ship posion. During update, ship is moved toward the touch point according to
the me step and the direcon calculated in InputService class:
#include "Ship.hpp"
#include "Log.hpp"
namespace dbs {
Ship::Ship(packt::Context* pContext) :
mInputService(pContext->mInputService),
mGraphicsService(pContext->mGraphicsService),
mTimeService(pContext->mTimeService),
mLocation(), mAnimSpeed(8.0f) {
mSprite = pContext->mGraphicsService->registerSprite(
mGraphicsService->registerTexture("ship.png"), 64, 64,
&mLocation);
mInputService->setRefPoint(&mLocation);
}
...
void Ship::update() {
const float SPEED_PERSEC = 400.0f;
float lSpeed = SPEED_PERSEC * mTimeService->elapsed();
mLocation.translate(mInputService->getHorizontal() * lSpeed,
mInputService->getVertical() * lSpeed);
}
}
12. Finally, update the android_main() method in jni/Main.cpp to build
an instance of InputService and pass it to the event processing loop:
#include "Context.hpp"
#include "DroidBlaster.hpp"
#include "EventLoop.hpp"
#include "InputService.hpp"
#include "GraphicsService.hpp"
#include "SoundService.hpp"
#include "TimeService.hpp"
void android_main(android_app* pApplication) {
packt::TimeService lTimeService;
packt::GraphicsService lGraphicsService(pApplication,
&lTimeService);

Handling Input Devices and Sensors
[ 286 ]
packt::InputService lInputService(pApplication,
lGraphicsService.getWidth(),lGraphicsService.getHeight());
packt::SoundService lSoundService(pApplication);
packt::Context lContext = { &lInputService, &lGraphicsService,
&lSoundService, &lTimeService };
packt::EventLoop lEventLoop(pApplication);
dbs::DroidBlaster lDroidBlaster(&lContext);
lEventLoop.run(&lDroidBlaster, &lInputService);
}
What just happened?
We have created a simple example of an input system based on touch events. The ship
ies toward the touch point at a speed dependent on the touch distance. Yet, many
improvements are possible such as taking into account screen density and size, following
one specic pointer…
Touch screen event coordinates are absolute. Their origin is in the upper-le corner of the
screen (on the opposite of OpenGL which is on the lower-le corner). If screen rotaon is
authorized by an applicaon, the origin will stay on the upper, le whether the screen is in
portrait or landscape mode.
To implement it, we have connected our event loop to the input event queue provided
by the native_app_glue module. This queue is internally represented as an Unix pipe,
like the acvity event queue. Touch screen events are embedded in an AInputEvent
structure, which stores also other kind of input events. Input events can be handled with
the funcons declared in android/input.h. Input event types can be discriminated
using AInputEvent_getType() and AInputEvent_getSource() methods (note the
AInputEvent_ prex). Methods related to touch events are prexed by AMotionEvent_.
Chapter 8
[ 287 ]
The touch API is rather rich. Many details can be requested such as (non-exhausvely):
AMotionEvent_getAction() To detect whether a nger is entering in contact with
the screen, leaving it, or moving over the surface.
The result is an integer value composed of the event
type (on byte 1, for example, AMOTION_EVENT_
ACTION_DOWN) and a pointer index (on byte 2, to
know which nger the event refers to).
AMotionEvent_getX()
AMotionEvent_getY()
To retrieve touch coordinates on screen, expressed in
pixels as a oat (sub-pixel values are possible).
AMotionEvent_getDownTime()
AMotionEvent_getEventTime()
To retrieve how much me nger has been sliding
over the screen and when the event has been
generated in nanoseconds.
AMotionEvent_getPressure()
AMotionEvent_getSize()
To detect how careful users are with their device.
Values usually range between 0.0 and 1.0 (but may
exceed it). Size and pressure are generally closely
related. Behavior can vary greatly and be noisy
depending on hardware.
AMotionEvent_
getHistorySize()
AMotionEvent_
getHistoricalX()
AMotionEvent_
getHistoricalY()
...
Touch events of type AMOTION_EVENT_ACTION_
MOVE can be grouped together for eciency purpose.
These methods give access to these "historical points"
that occurred between previous and current events.
Have a look at android/input.h for an exhausve list of methods.
If you look more deeply at AMotionEvent API, you will noce that some events have a
second parameter pointer_index, which ranges between 0 and the number of acve
pointers. Indeed, most touch screens today are mul-touch! Two or more ngers on a screen
(if hardware supports it) are translated in Android by two or more pointers. To manipulate
them, look at:
AMotionEvent_
getPointerCount()
To know how many ngers touch the screen.
AMotionEvent_getPointerId() To get a pointer unique idener from a pointer
index. This is the only way to track a parcular
pointer (that is, nger) over me, as its index may
change when ngers touch or leave the screen.
Handling Input Devices and Sensors
[ 288 ]
Do not rely on hardware
If you followed the story of the (now prehistoric!) Nexus One, then you know
that it came out with an hardware defect. Pointers were oen geng mixed
up, two of them exchanging one of their coordinates. So be always prepared
to handle hardware specicies or hardware that behaves incorrectly!
Detecting keyboard, D-Pad, and Trackball events
The most common input device among all is the keyboard. This is true for Android too. An
Android keyboard can be physical: in the device front face (like tradional blackberries) or
on a slide-out screen. But a keyboard can also be virtual, that is, emulated on the screen at
the cost of a large poron of space taken. In addion to the keyboard itself, every Android
device should include a few physical buons (somemes emulated on screen) such as Menu,
Home, Search, and so on.
A much less common type of input device is the Direconal-Pad. A D-Pad is a set of physical
buons to move up, down, le, or right and a specic acon/conrmaon buon. Although
they oen disappear from recent phones and tablets, D-Pads remain one of the most
convenient ways to move across text or UI widgets. D-Pads are oen replaced by trackballs.
Trackballs behave similarly to a mouse (the one with a ball inside) that would be upside-down.
Some trackballs are analogical, but others (for example, opcal ones) behave as a D-Pad
(that is, all or nothing).
To see how they work, let's use these peripherals to move our space ship in DroidBlaster.
The Android NDK now allows handling all these input peripherals on the nave side. So let's
try them!
Chapter 8
[ 289 ]
Project DroidBlaster_Part8-1 can be used as a starng
point for this part. The resulng project is provided with this
book under the name DroidBlaster_Part8-2.
Time for action – handling keyboard, D-Pad, and
trackball, natively
First, let's handle keyboard and trackball events.
1. Open jni/InputHandler.hpp and add keyboard and trackball event handlers:
#ifndef _PACKT_INPUTHANDLER_HPP_
#define _PACKT_INPUTHANDLER_HPP_
#include <android/input.h>
namespace packt {
class InputHandler {
public:
virtual ~InputHandler() {};
virtual bool onTouchEvent(AInputEvent* pEvent) = 0;
virtual bool onKeyboardEvent(AInputEvent* pEvent) = 0;
virtual bool onTrackballEvent(AInputEvent* pEvent) = 0;
};
}
#endif
2. Update method processInputEvent() inside the exisng le jni/EventLoop.
cpp to redirect keyboard and trackball events to InputHandler.
Trackballs and touch events are assimilated to moon events and can be
discriminated according to their source. On the opposite side, key events are
discriminated according to their type. Indeed, there exist two dedicated APIs for
MotionEvents (the same for trackballs and touch events) and for KeyEvents
(idencal for keyboard, D-Pad, and so on):
#include "EventLoop.hpp"
#include "Log.hpp"
namespace packt {
...
int32_t EventLoop::processInputEvent(AInputEvent* pEvent) {

Handling Input Devices and Sensors
[ 290 ]
int32_t lEventType = AInputEvent_getType(pEvent);
switch (lEventType) {
case AINPUT_EVENT_TYPE_MOTION:
switch (AInputEvent_getSource(pEvent)) {
case AINPUT_SOURCE_TOUCHSCREEN:
return mInputHandler->onTouchEvent(pEvent);
break;
case AINPUT_SOURCE_TRACKBALL:
return mInputHandler->onTrackballEvent(pEvent);
break;
}
break;
case AINPUT_EVENT_TYPE_KEY:
return mInputHandler->onKeyboardEvent(pEvent);
break;
}
return 0;
}
...
}
3. Now, modify the jni/InputService.hpp le to override these new methods…
also dene an update() method to react to pressed keys. We are interested in
the menu buon that is going to cause the applicaon to exit:
#ifndef _PACKT_INPUTSERVICE_HPP_
#define _PACKT_INPUTSERVICE_HPP_
...
namespace packt {
class InputService : public InputHandler {
public:
...
status start();
status update();
public:
bool onTouchEvent(AInputEvent* pEvent);
bool onKeyboardEvent(AInputEvent* pEvent);
bool onTrackballEvent(AInputEvent* pEvent);

Chapter 8
[ 291 ]
private:
...
Location* mRefPoint;
int32_t mWidth, mHeight;
bool mMenuKey;
};
}
#endif
4. Now, update the class constructor jni/InputService.cpp and implement
method update() to exit when the menu buon is pressed:
#include "InputService.hpp"
#include "Log.hpp"
#include <android_native_app_glue.h>
#include <cmath>
namespace packt {
InputService::InputService(android_app* pApplication,
const int32_t& pWidth, const int32_t& pHeight) :
mApplication(pApplication),
mHorizontal(0.0f), mVertical(0.0f),
mRefPoint(NULL), mWidth(pWidth), mHeight(pHeight),
mMenuKey(false)
{}
...
status InputService::update() {
if (mMenuKey) {
return STATUS_EXIT;
}
return STATUS_OK;
}
...
5. Sll in InputService.cpp, process keyboard events in onKeyboardEvent(). Use:
AKeyEvent_getAction() to get event type (that is, pressed or not).
AKeyEvent_getKeyCode() to get the buon identy.
Handling Input Devices and Sensors
[ 292 ]
In the following code, when le, right, up, or down buons are pressed,
InputService compute corresponding direcon into elds mHorizontal
and mVertical dened in previous part. Movement starts when buon is
down and stops when it is up.
We also process the Menu buon here, when it gets unpressed:
This code works only on devices with a D-Pad, which is the
case of the emulator. Note however that due to Android
fragmentaon, reacon may dier according to hardware.
...
bool InputService::onKeyboardEvent(AInputEvent* pEvent) {
const float ORTHOGONAL_MOVE = 1.0f;
if(AKeyEvent_getAction(pEvent)== AKEY_EVENT_ACTION_DOWN) {
switch (AKeyEvent_getKeyCode(pEvent)) {
case AKEYCODE_DPAD_LEFT:
mHorizontal = -ORTHOGONAL_MOVE;
break;
case AKEYCODE_DPAD_RIGHT:
mHorizontal = ORTHOGONAL_MOVE;
break;
case AKEYCODE_DPAD_DOWN:
mVertical = -ORTHOGONAL_MOVE;
break;
case AKEYCODE_DPAD_UP:
mVertical = ORTHOGONAL_MOVE;
break;
case AKEYCODE_BACK:
return false;
}
} else {
switch (AKeyEvent_getKeyCode(pEvent)) {
case AKEYCODE_DPAD_LEFT:
case AKEYCODE_DPAD_RIGHT:
mHorizontal = 0.0f;
break;
case AKEYCODE_DPAD_DOWN:
case AKEYCODE_DPAD_UP:
mVertical = 0.0f;
break;
case AKEYCODE_MENU:
Chapter 8
[ 293 ]
mMenuKey = true;
break;
case AKEYCODE_BACK:
return false;
}
}
return true;
}
...
6. Similarly, process trackball events in a new method onTrackballEvent(). Retrieve
trackball magnitude with AMotionEvent_getX() and AMotionEvent_getY().
Because some trackballs do not oer a gradated magnitude, the movement is
quaned with plain constants. Possible noise is ignored with an arbitrary
trigger threshold:
When using trackball that way, the ship moves unl a "counter-movement"
(for example, requesng to go to the right when going le) or acon buon
is pressed (last else secon):
For a wide audience applicaon, code should be adapted
to handle hardware capabilies and specicies such as
gradated values of analogical trackballs.
...
bool InputService::onTrackballEvent(AInputEvent* pEvent) {
const float ORTHOGONAL_MOVE = 1.0f;
const float DIAGONAL_MOVE = 0.707f;
const float THRESHOLD = (1/100.0f);
if (AMotionEvent_getAction(pEvent)
== AMOTION_EVENT_ACTION_MOVE) {
float lDirectionX = AMotionEvent_getX(pEvent, 0);
float lDirectionY = AMotionEvent_getY(pEvent, 0);
float lHorizontal, lVertical;
if (lDirectionX < -THRESHOLD) {
if (lDirectionY < -THRESHOLD) {
lHorizontal = -DIAGONAL_MOVE;
lVertical = DIAGONAL_MOVE;
} else if (lDirectionY > THRESHOLD) {
lHorizontal = -DIAGONAL_MOVE;
lVertical = -DIAGONAL_MOVE;

Handling Input Devices and Sensors
[ 294 ]
} else {
lHorizontal = -ORTHOGONAL_MOVE;
lVertical = 0.0f;
}
} else if (lDirectionX > THRESHOLD) {
if (lDirectionY < -THRESHOLD) {
lHorizontal = DIAGONAL_MOVE;
lVertical = DIAGONAL_MOVE;
} else if (lDirectionY > THRESHOLD) {
lHorizontal = DIAGONAL_MOVE;
lVertical = -DIAGONAL_MOVE;
} else {
lHorizontal = ORTHOGONAL_MOVE;
lVertical = 0.0f;
}
} else if (lDirectionY < -THRESHOLD) {
lHorizontal = 0.0f;
lVertical = ORTHOGONAL_MOVE;
} else if (lDirectionY > THRESHOLD) {
lHorizontal = 0.0f;
lVertical = -ORTHOGONAL_MOVE;
}
// Ends movement if there is a counter movement.
if ((lHorizontal < 0.0f) && (mHorizontal > 0.0f)) {
mHorizontal = 0.0f;
} else if((lHorizontal > 0.0f)&&(mHorizontal < 0.0f)){
mHorizontal = 0.0f;
} else {
mHorizontal = lHorizontal;
}
if ((lVertical < 0.0f) && (mVertical > 0.0f)) {
mVertical = 0.0f;
} else if ((lVertical > 0.0f) && (mVertical < 0.0f)) {
mVertical = 0.0f;
} else {
mVertical = lVertical;
}
} else {
mHorizontal = 0.0f; mVertical = 0.0f;
}
return true;
}
}
Let's nish by making a slight modicaon to the game itself.

Chapter 8
[ 295 ]
7. Finally, edit DroidBlaster.cpp and update InputService at each iteraon:
#include "DroidBlaster.hpp"
#include "Log.hpp"
namespace dbs {
...
packt::status DroidBlaster::onStep() {
mTimeService->update();
mBackground.update();
mShip.update();
if (mInputService->update() != packt::STATUS_OK) {
return packt::STATUS_KO;
}
if (mGraphicsService->update() != packt::STATUS_OK) {
return packt::STATUS_KO;
}
return packt::STATUS_OK;
}
...
}
What just happened?
We have extended our input system to handle the keyboard, D-Pad, and trackball events.
D-Pad can be considered as a keyboard extension and is processed the same way. Indeed,
D-Pad and keyboard events are transported in the same structure (AInputEvent) and
handled by the same API (prexed with AKeyEvent). The following table lists the main key
event methods:

Handling Input Devices and Sensors
[ 296 ]
AKeyEvent_getAction() Indicate if buon is down (AKEY_EVENT_ACTION_
DOWN) or released (AKEY_EVENT_ACTION_UP). Note
that mulple key acons can be emied in batch (AKEY_
EVENT_ACTION_MULTIPLE).
AKeyEvent_getKeyCode() To retrieve the actual buon being pressed (dened in
android/keycodes.h), for example, AKEYCODE_
DPAD_LEFT for the le buon.
AKeyEvent_getFlags() Key events can be associated with one or more ags
that give various informaon on the event like AKEY_
EVENT_LONG_PRESS, AKEY_EVENT_FLAG_SOFT_
KEYBOARD for event originated from an emulated
keyboard.
AKeyEvent_getScanCode() Is similar to a key code except that this is the raw key ID,
dependent and dierent from device to device.
AKeyEvent_getMetaState() Meta states are ags that indicate if some modier keys
like Alt or Shi are pressed simultaneously (for example,
AMETA_SHIFT_ON, AMETA_NONE, and so on).
AKeyEvent_
getRepeatCount()
Indicates how many mes the buon event occurred,
usually when you leave buon down.
AKeyEvent_getDownTime() To know when a buon was pressed.
Although some of them (especially opcal ones) behave like a D-Pad, trackballs are not using
the same API. Actually, trackballs are handled through the AMotionEvent API (like touch
events). Of course, some informaon provided for touch events is not always available on
trackballs. The most important funcons to look at are:
AMotionEvent_getAction() To know if an event represents a move acon (as opposed
to a press acon).
AMotionEvent_getX()
AMotionEvent_getY()
To get trackball movement.
AKeyEvent_getDownTime() To know if trackball is pressed (like D-Pad acon buon).
Currently, most trackballs use an all-or-nothing pressure
to indicate the press event.
Something tricky with trackballs, that may not be obvious at rst, is that no event up is
generated to indicate that trackball has nished moving. Moreover, trackball events are
generated as a series (as a burst) which makes it harder to detect when movement is
nished. There is no easy way to handle this except using a manual mer and checking
regularly that no event has happened for a sucient amount of me.
Chapter 8
[ 297 ]
Again, do not rely on an expected behaviour
Never expect peripherals to behave exactly the same on all phones.
Trackballs are a very good example: they can either indicate a direcon like
an analogical pad or a straight direcon like a D-Pad (for example, opcal
trackballs). There is currently no way to dierenate device characteriscs
from the available APIs. The only soluons are to either calibrate device
and congure it at runme or save a kind of device database.
Have a go hero – displaying software keyboard
An annoying problem with the Android NDK and NativeActivity is that there is no easy
way to display a virtual keyboard. And of course, without a virtual keyboard, nothing can
be keyed in. This is where the JNI skills you have gained by reading Chapter 3 and Chapter 4
come to the rescue.
The piece of Java code to show or hide the keyboard is rather concise:
InputMethodManager mgr = (InputMethodManager)
myActivity.getSystemService(Context.INPUT_METHOD_SERVICE);
mgr.showSoftInput(pActivity.getWindow().getDecorView(), 0);
...
mgr.hideSoftInput(pActivity.getWindow().getDecorView(), 0);
Write the equivalent JNI code in four steps:
1. First, create a JNI helper class which:
Takes an android_app instance and aaches the JavaVM during
construcon. The JavaVM is provided in member activity->vm
of android_app.
Detaches the JavaVM when class gets destroyed.
Oers helper methods to create and delete global references like
implemented in Chapter 4, Calling Back Java from Nave Code
(makeGlobalRef() and deleteGlobalRef()).
Provides geers to a JNIEnv cached on VM aachment and the
NativeActivity instance provided in member activity->clazz
of android_app.
Handling Input Devices and Sensors
[ 298 ]
2. Then, write a Keyboard class which receives a JNI instance in parameter and cache
all the necessary jclass, jmethodID, and jfieldID to execute the piece of Java
code presented above. This is similar to the StoreWatcher in Chapter 4, Calling
Back Java from Nave Code, but in C++ this me.
Dene methods to:
Cache JNI elements. Call it when InputService is inialized to handle
error cases properly and report a status.
Release global references when applicaon is deacvated.
Show and hide the keyboard by execung the JNI methods cached earlier.
3. Instanate both the JNI and the Keyboard classes in your android_main()
method and pass the laer to your InputService.
4. Open the virtual keyboard when the menu key is pressed instead of leaving the
game. Finally, detect keys that are pressed on the virtual keyboard. For example,
try to detect the key AKEYCODE_E to exit the game.
The nal project is provided with this book in
DroidBlaster_Part8-2-Keyboard.
Probing device sensors
Handling input devices is essenal to any applicaon, but probing sensors is important
for the smartest one! The most spread sensor among Android game applicaons is
the accelerometer.
An accelerometer, as its name suggests, measures the linear acceleraon applied to a
device. When moving a device up, down, le, or right, the accelerometer gets excited and
indicates an acceleraon vector in 3D space. Vector is expressed relave to screen default
orientaon. Coordinates system is relave to device natural orientaon:
X axis points le
Y points up
Z points from back to front
Axes become inverted if device is rotated (for example, Y points le if the device is rotated
90 degrees clockwise).

Chapter 8
[ 299 ]
A very interesng feature of accelerometers is that they undergo a constant acceleraon:
gravity, around 9.8m/s2 on earth. For example, when lying at on a table, acceleraon vector
indicates -9.8 on the Z-axis. When straight, it indicates the same value on Y axis. So assuming
device posion is xed, device orientaon on two axes in space can be deduced from the
gravity acceleraon vector. Magnetometer is sll required to get full device orientaon in
3D space.
Remember that accelerometers work with linear acceleraon.
They allow detecng translaon when device is not rotang and
paral orientaon when device is xed. But both movements
cannot be combined without a magnetometer and/or gyroscope.
The nal project structure will look as shown in the following diagram:
DroidBlaster
Ship
LogContext
TimeService
GraphicsService
EventLoop
GraphicsTexture Resource
packt
ActivityHandler
*
Background
GraphicsTileMap
GraphicsSprite Location
*
*
dbsdbs
RapidXml
SoundService
InputService
*Sound
InputHandler
Sensor
*
*
Handling Input Devices and Sensors
[ 300 ]
Project DroidBlaster_Part8-2 can be used as a
starng point for this part. The resulng project is provided
with this book under the name DroidBlaster_Part8-3.
Time for action – turning your device into a joypad
First, we need to handle sensor events in the event loop.
1. Open InputHandler.hpp and add a new method onAccelerometerEvent().
Include android/sensor.h ocial header for sensors.
#ifndef _PACKT_INPUTHANDLER_HPP_
#define _PACKT_INPUTHANDLER_HPP_
#include <android/input.h>
#include <android/sensor.h>
namespace packt {
class InputHandler {
public:
virtual ~InputHandler() {};
virtual bool onTouchEvent(AInputEvent* pEvent) = 0;
virtual bool onKeyboardEvent(AInputEvent* pEvent) = 0;
virtual bool onTrackballEvent(AInputEvent* pEvent) = 0;
virtual bool onAccelerometerEvent(ASensorEvent* pEvent) = 0;
};
}
#endif
2. Update jni/EventLoop.hpp class by adding a stac callback dedicated to
sensors named callback_sensor(). This method delegates processing to
member method processSensorEvent(), which redistributes events to
InputHandler instance.
A sensor event queue is represented by an ASensorManager opaque structure.
On the opposite of the acvity and input event queues, the sensor queue is not
managed by the native_app_glue module (as seen in Chapter 5, Wring a Fully
Nave Applicaon). We need to set it up ourselves with an ASensorEventQueue
and an android_poll_source:
#ifndef _PACKT_EVENTLOOP_HPP_
#define _PACKT_EVENTLOOP_HPP_

Chapter 8
[ 301 ]
...
namespace packt {
class EventLoop {
...
protected:
...
void processAppEvent(int32_t pCommand);
int32_t processInputEvent(AInputEvent* pEvent);
void processSensorEvent();
private:
friend class Sensor;
static void callback_event(android_app* pApplication,
int32_t pCommand);
static int32_t callback_input(android_app* pApplication,
AInputEvent* pEvent);
static void callback_sensor(android_app* pApplication,
android_poll_source* pSource);
private:
...
ActivityHandler* mActivityHandler;
InputHandler* mInputHandler;
ASensorManager* mSensorManager;
ASensorEventQueue* mSensorEventQueue;
android_poll_source mSensorPollSource;
};
}
#endif
3. Modify le jni/EventLoop.cpp, starng with its constructor:
#include "EventLoop.hpp"
#include "Log.hpp"
namespace packt {
EventLoop::EventLoop(android_app* pApplication) :
mEnabled(false), mQuit(false),
mApplication(pApplication),
mActivityHandler(NULL), mInputHandler(NULL),

Handling Input Devices and Sensors
[ 302 ]
mSensorPollSource(), mSensorManager(NULL),
mSensorEventQueue(NULL) {
mApplication->userData = this;
mApplication->onAppCmd = callback_event;
mApplication->onInputEvent = callback_input;
}
...
4. When starng an EventLoop in activate(), create a new sensor queue and
aach it with ASensorManager_createEventQueue() so that it gets polled
with the acvity and input event queues. LOOPER_ID_USER is a slot dened
inside native_app_glue to aach a custom queue to the internal glue Looper
(see Chapter 5, Wring a Fully Nave Applicaon. The glue Looper already has
two internal slots (LOOPER_ID_MAIN and LOOPER_ID_INPUT handled
transparently). Sensors are managed through a central manager ASensorManager
which can be retrieved using ASensorManager_getInstance().
In the deactivate() method, destroy the sensor event queue without mercy
with method ASensorManager_destroyEventQueue():
...
void EventLoop::activate() {
if ((!mEnabled) && (mApplication->window != NULL)) {
mSensorPollSource.id = LOOPER_ID_USER;
mSensorPollSource.app = mApplication;
mSensorPollSource.process = callback_sensor;
mSensorManager = ASensorManager_getInstance();
if (mSensorManager != NULL) {
mSensorEventQueue = ASensorManager_createEventQueue(
mSensorManager, mApplication->looper,
LOOPER_ID_USER, NULL, &mSensorPollSource);
if (mSensorEventQueue == NULL) goto ERROR;
}
mQuit = false; mEnabled = true;
if (mActivityHandler->onActivate() != STATUS_OK) {
goto ERROR;
}
}
return;
ERROR:
mQuit = true;

Chapter 8
[ 303 ]
deactivate();
ANativeActivity_finish(mApplication->activity);
}
void EventLoop::deactivate() {
if (mEnabled) {
mActivityHandler->onDeactivate();
mEnabled = false;
if (mSensorEventQueue != NULL) {
ASensorManager_destroyEventQueue(mSensorManager,
mSensorEventQueue);
mSensorEventQueue = NULL;
}
mSensorManager = NULL;
}
}
...
5. Finally, redirect sensor events to the handler in processSensorEvent().
Sensor events are wrapped in an ASensorEvent structure. This structure
contains a type eld to idenfy the sensor the event originates from
(here, to keep accelerometer events):
...
void EventLoop::processSensorEvent() {
ASensorEvent lEvent;
while (ASensorEventQueue_getEvents(mSensorEventQueue,
&lEvent, 1) > 0) {
switch (lEvent.type) {
case ASENSOR_TYPE_ACCELEROMETER:
mInputHandler->onAccelerometerEvent(&lEvent);
break;
}
}
}
void EventLoop::callback_sensor(android_app* pApplication,
android_poll_source* pSource) {
EventLoop& lEventLoop = *(EventLoop*) pApplication->userData;
lEventLoop.processSensorEvent();
}
}

Handling Input Devices and Sensors
[ 304 ]
6. Create a new le jni/Sensor.hpp as follows. The Sensor class is responsible for
the acvaon (with enable()) and deacvaon (with disable()) of the sensor.
Method toggle() is a wrapper to switch the sensor state.
This class works closely with EventLoop to process sensor messages (actually,
this code could have been integrated in EventLoop itself). Sensors themselves
are wrapped in an ASensor opaque structure and have a type (a constant dened
in android/sensor.h idencal to the ones in android.hardware.Sensor):
#ifndef _PACKT_SENSOR_HPP_
#define _PACKT_SENSOR_HPP_
#include "Types.hpp"
#include <android/sensor.h>
namespace packt {
class EventLoop;
class Sensor {
public:
Sensor(EventLoop& pEventLoop, int32_t pSensorType);
status toggle();
status enable();
status disable();
private:
EventLoop& mEventLoop;
const ASensor* mSensor;
int32_t mSensorType;
};
}
#endif
7. Implement Sensor in jni/Sensor.cpp le and write enable() in three steps:
Get a sensor of a specic type with ASensorManager_
getDefaultSensor().
Then, enable it with ASensorEventQueue_enableSensor() so that the
event queue receives related events.

Chapter 8
[ 305 ]
Set the desired event rate with ASensorEventQueue_setEventRate().
For a game, we typically want measures close to real me. The minimum
delay is queried with ASensor_getMinDelay() and seng it to a lower
value results in failure.
Obviously, we should perform this setup only when the sensor event queue
is ready. Sensor is deacvated in disable() with ASensorEventQueue_
disableSensor() thanks to the sensor instance retrieved previously.
#include "Sensor.hpp"
#include "EventLoop.hpp"
#include "Log.hpp"
namespace packt {
Sensor::Sensor(EventLoop& pEventLoop, int32_t pSensorType):
mEventLoop(pEventLoop),
mSensor(NULL),
mSensorType(pSensorType)
{}
status Sensor::toggle() {
return (mSensor != NULL) ? disable() : enable();
}
status Sensor::enable() {
if (mEventLoop.mEnabled) {
mSensor = ASensorManager_getDefaultSensor(
mEventLoop.mSensorManager, mSensorType);
if (mSensor != NULL) {
if (ASensorEventQueue_enableSensor(
mEventLoop.mSensorEventQueue, mSensor) < 0) {
goto ERROR;
}
int32_t lMinDelay = ASensor_getMinDelay(mSensor);
if (ASensorEventQueue_setEventRate(mEventLoop
.mSensorEventQueue, mSensor, lMinDelay) < 0) {
goto ERROR;
}
} else {
packt::Log::error("No sensor type %d", mSensorType);
}
}
Downloa d f r o m W o w ! e B o o k < w w w.woweb o o k . c o m >Downloa d f r o m W o w ! e B o o k < w w w.woweb o o k . c o m >

Handling Input Devices and Sensors
[ 306 ]
return STATUS_OK;
ERROR:
Log::error("Error while activating sensor.");
disable();
return STATUS_KO;
}
status Sensor::disable() {
if ((mEventLoop.mEnabled) && (mSensor != NULL)) {
if (ASensorEventQueue_disableSensor(
mEventLoop.mSensorEventQueue, mSensor) < 0) {
goto ERROR;
}
mSensor = NULL;
}
return STATUS_OK;
ERROR:
Log::error("Error while deactivating sensor.");
return STATUS_KO;
}
}
Sensors are connected to our event loop. Let's handle sensor events in our
input service.
8. Manage the accelerometer sensor in jni/InputService.hpp. Add a method
stop() to disable sensors when service stops:
#ifndef _PACKT_INPUTSERVICE_HPP_
#define _PACKT_INPUTSERVICE_HPP_
#include "Context.hpp"
#include "InputHandler.hpp"
#include "Sensor.hpp"
#include "Types.hpp"
#include <android_native_app_glue.h>
namespace packt {
class InputService : public InputHandler {
public:
InputService(android_app* pApplication,

Chapter 8
[ 307 ]
Sensor* pAccelerometer,
const int32_t& pWidth, const int32_t& pHeight);
status start();
status update();
void stop();
...
public:
bool onTouchEvent(AInputEvent* pEvent);
bool onKeyboardEvent(AInputEvent* pEvent);
bool onTrackballEvent(AInputEvent* pEvent);
bool onAccelerometerEvent(ASensorEvent* pEvent);
private:
...
bool mMenuKey;
Sensor* mAccelerometer;
};
}
#endif
9. Rewrite update() to toggle the accelerometer when the menu buon is pressed
(instead of leaving the applicaon). Implement stop() to disable sensors when
applicaon is stopped (and save baery):
...
namespace packt {
InputService::InputService(android_app* pApplication,
Sensor* pAccelerometer,
const int32_t& pWidth, const int32_t& pHeight) :
mApplication(pApplication),
mHorizontal(0.0f), mVertical(0.0f),
mRefPoint(NULL), mWidth(pWidth), mHeight(pHeight),
mMenuKey(false),
mAccelerometer(pAccelerometer)
{}
...
status InputService::update() {
if (mMenuKey) {
if (mAccelerometer->toggle() != STATUS_OK) {
Handling Input Devices and Sensors
[ 308 ]
return STATUS_KO;
}
}
mMenuKey = false;
return STATUS_OK;
}
void InputService::stop() {
mAccelerometer->disable();
}
...
10. Here is the core code which computes direcon from the accelerometer captured
values. In the following code, X and Z axis express the roll and the pitch respecvely.
We check for both, the roll and the pitch, whether the device is in a neutral
orientaon (that is, CENTER_*) or sloping to the extreme (MIN_* and (MAX_*). Z
values need to be inverted:
Android devices can be naturally portrait-oriented (most smart-phones
if not all) or landscape-oriented (mostly tablets). This has an impact on
applicaons which require portrait or landscape mode: axes are not
aligned the same way. Use y-axis (that is, vector.y) instead of x axis in
the following piece for landscape oriented devices.
...
bool InputService::onAccelerometerEvent(ASensorEvent* pEvent) {
const float GRAVITY = ASENSOR_STANDARD_GRAVITY / 2.0f;
const float MIN_X = -1.0f; const float MAX_X = 1.0f;
const float MIN_Y = 0.0f; const float MAX_Y = 2.0f;
const float CENTER_X = (MAX_X + MIN_X) / 2.0f;
const float CENTER_Y = (MAX_Y + MIN_Y) / 2.0f;
float lRawHorizontal = pEvent->vector.x / GRAVITY;
if (lRawHorizontal > MAX_X) {
lRawHorizontal = MAX_X;
} else if (lRawHorizontal < MIN_X) {
lRawHorizontal = MIN_X;
}
mHorizontal = CENTER_X - lRawHorizontal;
float lRawVertical = pEvent->vector.z / GRAVITY;

Chapter 8
[ 309 ]
if (lRawVertical > MAX_Y) {
lRawVertical = MAX_Y;
} else if (lRawVertical < MIN_Y) {
lRawVertical = MIN_Y;
}
mVertical = lRawVertical - CENTER_Y;
return true;
}
}
11. In jni/DroidBlaster.cpp, call stop() to ensure sensors get disabled:
#include "DroidBlaster.hpp"
#include "Log.hpp"
namespace dbs {
...
void DroidBlaster::onDeactivate() {
packt::Log::info("Deactivating DroidBlaster");
mGraphicsService->stop();
mInputService->stop();
mSoundService->stop();
}
...
}
Let's terminate by inializing the input service properly aer all the
modicaons are done.
12. Finally, inialize the accelerometer in jni/Main.hpp. Because they are closely
related, move the EventLoop inializaon line on top:
...
#include "GraphicsService.hpp"
#include "InputService.hpp"
#include "Sensor.hpp"
#include "SoundService.hpp"
#include "TimeService.hpp"
#include "Log.hpp"
void android_main(android_app* pApplication) {
packt::EventLoop lEventLoop(pApplication);
packt::Sensor lAccelerometer(lEventLoop,
ASENSOR_TYPE_ACCELEROMETER);

Handling Input Devices and Sensors
[ 310 ]
packt::TimeService lTimeService;
packt::GraphicsService lGraphicsService(pApplication,
&lTimeService);
packt::InputService lInputService(pApplication,
&lAccelerometer,
lGraphicsService.getWidth(),lGraphicsService.getHeight());
packt::SoundService lSoundService(pApplication);
packt::Context lContext = { &lGraphicsService, &lInputService,
&lSoundService, &lTimeService };
dbs::DroidBlaster lDroidBlaster(&lContext);
lEventLoop.run(&lDroidBlaster, &lInputService);
}
What just happened?
We have created an event queue to listen to sensor events. Events are wrapped in an
ASensorEvent structure, dened in android/sensor.h. This structure provides the:
Sensor event origin, that is, which sensor produced this event.
Sensor event occurrence me.
Sensor output value. This value is stored in a union structure, that is, you
can use either one of the inside structures (here, we are interested in the
acceleration vector).
The same ASensorEvent structure is used for any Android sensor:
typedef struct ASensorEvent {
int32_t version;
int32_t sensor;
int32_t type;
int32_t reserved0;
int64_t timestamp;
union {
float data[16];
ASensorVector vector;
ASensorVector acceleration;
ASensorVector magnetic;
float temperature;
float distance;
float light;
float pressure;
};
Chapter 8
[ 311 ]
int32_t reserved1[4];
} ASensorEvent;
typedef struct ASensorVector {
union {
float v[3];
struct {
float x;
float y;
float z;
};
struct {
float azimuth;
float pitch;
float roll;
};
};
int8_t status;
uint8_t reserved[3];
} ASensorVector;
In our example, the accelerometer is set up with the lowest event rate possible, which may
vary between devices. It is important to note that sensor event rate has a direct impact on
baery saving! So use a rate that is sucient for your applicaon. ASensor_ API oers
some method to query available sensors and their capabilies: ASensor_getName(),
ASensor_getVendor(), ASensor_getMinDelay(), and so on.
Sensors have a unique idener, dened in android/sensor.h, which is the same on all
Android devices: ASENSOR_TYPE_ACCELEROMETER, ASENSOR_TYPE_MAGNETIC_FIELD,
ASENSOR_TYPE_GYRISCOPE ASENSOR_TYPE_LIGHT, ASENSOR_TYPE_PROXIMITY.
Addional sensors may exist and be available even if they are not named in android/
sensor.h header. On Gingerbread, this is the case of the gravity sensor (idener 9),
the linear acceleraon sensor (idener 10) and the rotaon vector (idener 11).
The sense of orientaon
The rotaon vector sensor, successor of the now deprecated orientaon
vector, is essenal in Augmented Reality applicaon. It gives you device
orientaon in 3D space. Combined with the GPS, it allows locang any object
through the eye of your device. The rotaon sensor provides a data vector,
which can be translated to an OpenGL view matrix thanks to the android.
hardware.SensorManager class (see its source code). An example is
provided with this book in DroidBlaster_Part8-3-Orientation.

Handling Input Devices and Sensors
[ 312 ]
Have a go hero – Handling screen rotation
There is sadly no way to get device rotaon relave to screen natural orientaon with nave
APIs. Thus, we need to rely on JNI to get current rotaon properly. The piece of Java code to
detect screen rotaon is the following:
WindowManager mgr = (InputMethodManager)
myActivity.getSystemService(Context.WINDOW_SERVICE);
int rotation = mgr.getDefaultDisplay().getRotation();
Rotaon values are can be ROTATION_0, ROTATION_90, ROTATION_180, or ROTATION_270
(provided in the Java class Surface). Write the equivalent JNI code in four steps:
1. Create a Configuration class which takes an android_app as constructor
parameter and whose only purpose is to provide the rotaon value.
2. In Configuration constructor, aach the JavaVM, retrieve the rotaon,
and nally detach the VM.
3. Instanate both the Configuration class in your android_main() method
and pass it to your InputService to get rotaon value.
4. Write a ulity method toScreenCoord() to convert canonical sensor coordinates
(that is, in the natural orientaon referenal) to screen coordinates:
void InputService::toScreenCoord(screen_rot pRotation,
ASensorVector* pCanonical, ASensorVector* pScreen) {
struct AxisSwap {
int8_t mNegX; int8_t mNegY;
int8_t mXSrc; int8_t mYSrc;
};
static const AxisSwap lAxisSwaps[] = {
{ 1, -1, 0, 1}, // ROTATION_0
{ -1, -1, 1, 0}, // ROTATION_90
{ -1, 1, 0, 1}, // ROTATION_180
{ 1, 1, 1, 0}}; // ROTATION_270
const AxisSwap& lSwap = lAxisSwaps[pRotation];
pScreen->v[0] = lSwap.mNegX * pCanonical->v[lSwap.mXSrc];
pScreen->v[1] = lSwap.mNegY * pCanonical->v[lSwap.mYSrc];
pScreen->v[2] = pCanonical->v[2];
}
This piece of code comes from an interesng document about sensors on the NVidia
developer site at http://developer.download.nvidia.com/tegra/docs/
tegra_android_accelerometer_v5f.pdf.
Chapter 8
[ 313 ]
5. Finally, x onAccelerometerEvent() to reverse accelerometer axis according
to the current screen rotaon. Just call the ulity method and use resulng X
and Z axes.
The nal project is provided with this book
in DroidBlaster_Part8-3-Keyboard.
Summary
In this chapter, we learnt dierent ways to interact with Android navely using input
and sensors. We discovered how to handle touch events. We also read key events from
keyboard and D-Pad and processed trackballs moon events. Finally, we have turned the
accelerometer into a Joypad. Because of Android fragmentaon, expect specicies in
input device's behavior and be prepared to adapt your code.
We have already been far in the capabilies of Android NDK in terms of applicaon structure,
graphics, sound, input, and sensors. But reinvenng the wheel is not a soluon! In the next
chapter, we are going to unleash the real power of Android by porng exisng libraries.
9
Porting Existing Libraries to Android
There are two main reasons why one would be interested in the Android NDK:
rst, for performance, and second, for portability. In the previous chapters,
we have seen how to access main nave Android APIs from nave code for
eciency purposes. In this chapter, we are going to bring the whole C/C++
ecosystem to Android. Well, at least discovering the path, as decades of C/
C++ development would be dicult to t the limited memory of mobile devices
anyway! Indeed, C and C++ are sll some of the most widely used programming
languages nowadays.
In previous NDK releases, portability was limited due to the paral support of
C++, especially Excepons and Run-Time Type informaon (or RTTI, a basic C++
reecon mechanism to get data types at runme such as instanceof in Java).
Any library requiring them could not be ported without modifying their code or
installing a custom NDK (the Crystax NDK, rebuilt by the community from ocial
sources and available at http://www.crystax.net/). Hopefully, many of
these restricons have been lied in NDK R5 (except wide character support).
In this chapter, in order to port exisng code to Android, we are going to learn how to:
Acvate the Standard Template Library and Boost framework
Enable excepons and Run Time Type Informaon (or RTTI)
Compile two open source libraries: Box2D and Irrlicht
Write Makeles to compile modules
By the end of this chapter, you should understand the nave building process and know
how to use Makeles appropriately.
Porng exisng libraries to Android
[ 316 ]
Developing with the Standard Template Library
The Standard Template Library (or STL) is a normalized library of containers, iterators,
algorithms, and helper classes, to ease most common programming operaons: dynamic
arrays, associave arrays, strings, sorng, and so on. This library gained reconnaissance
among developers over years and is widely spread. Developing in C++ without the STL
is like coding with one hand behind to the back!
Unl NDK R5, no STL was included. The whole C++ ecosystem was only one step ahead,
but not yet reachable. With some eorts, compiling an STL implementaon (for example,
STLport), for which excepons and RTTI were oponal, was possible, but only if the code
built upon did not require these features (unless building with the Crystax NDK). Anyway,
this nightmare is over, as STL and excepons are now ocially included. Two
implementaons can be chosen:
STLport, a mulplaorm STL, which is probably one of the most portable
implementaons, well accepted among open source projects
GNU STL (more commonly libstdc++), the ocial GCC STL
The STLport version included in the NDK R5 does not support excepons (RTTI being
supported from NDK R7) but can be used either as a shared or a stac library. On the
other hand, GNU STL supports excepons but is currently available as a stac library only.
In this rst part, let's embed STLport in DroidBlaster to ease collecon management.
Project DroidBlaster_Part8-3 can be used as a starng point
for this part. The resulng project is provided with this book under the
name DroidBlaster_Part9-1.
Time for action – embedding GNU STL in DroidBlaster
1. Create a jni/Application.mk le beside jni/Android.mk and write the
following content. That's it! Your applicaon is now STL-enabled, thanks to this
single line:
APP_STL = stlport_static
Of course, enabling the STL is useless, if we do not acvely use it in our code.
Let's take advantage of this opportunity to switch from asset les to external
les (on a sdcard or internal memory).

Chapter 9
[ 317 ]
2. Open the exisng le, jni/Resource.hpp, and:
Include the fstream stl header to read les.
Replace the Asset management members with an ifstream object
(that is, an input le stream). We are also going to need a buer for the
bufferize() method.
Remove the descript() method and the ResourceDescriptor class.
Descriptors work with the Asset API only.
#ifndef _PACKT_RESOURCE_HPP_
#define _PACKT_RESOURCE_HPP_
#include "Types.hpp"
#include <fstream>
namespace packt {
...
class Resource {
...
private:
const char* mPath;
std::ifstream mInputStream;
char* mBuffer;
};
}
#endif
3. Open the corresponding implementaon le jni/Resource.cpp. Replace the
previous implementaon, based on the asset management API with STL streams.
Files will be opened in binary mode (even the le map XML le that is going to be
directly buered in memory). To read the le length, we can use the stat() POSIX
primive. Method bufferize() is emulated with a temporary buer:
#include "Resource.hpp"
#include "Log.hpp"
#include <sys/stat.h>
namespace packt {
Resource::Resource(android_app* pApplication, const char*
pPath):

Porng exisng libraries to Android
[ 318 ]
mPath(pPath), mInputStream(), mBuffer(NULL)
{}
status Resource::open() {
mInputStream.open(mPath, std::ios::in | std::ios::binary);
return mInputStream ? STATUS_OK : STATUS_KO;
}
void Resource::close() {
mInputStream.close();
delete[] mBuffer; mBuffer = NULL;
}
status Resource::read(void* pBuffer, size_t pCount) {
mInputStream.read((char*)pBuffer, pCount);
return (!mInputStream.fail()) ? STATUS_OK : STATUS_KO;
}
const char* Resource::getPath() {
return mPath;
}
off_t Resource::getLength() {
struct stat filestatus;
if (stat(mPath, &filestatus) >= 0) {
return filestatus.st_size;
} else {
return -1;
}
}
const void* Resource::bufferize() {
off_t lSize = getLength();
if (lSize <= 0) return NULL;
mBuffer = new char[lSize];
mInputStream.read(mBuffer, lSize);
if (!mInputStream.fail()) {
return mBuffer;
} else {
return NULL;
}
}
}
These changes to the reading system should all be transparent. Except one.

Chapter 9
[ 319 ]
4. Background music was previously played through an asset descriptor. Now, we
provide a real le. So, in jni/SoundService.cpp, change the data source by
replacing the SLDataLocator_AndroidFD structure with SLDataLocation_URI.
The le locaon has to be prexed with file://, when it comes from the sdcard
(it could also be, for example, http://, if the le was coming from a server). To
help building the nal URI, concatenate the prex and the path using STL strings.
The le is sll an MP3, so the data format does not change:
#include "SoundService.hpp"
#include "Resource.hpp"
#include "Log.hpp"
#include <string>
namespace packt {
...
status SoundService::playBGM(const char* pPath) {
SLresult lRes;
Log::info("Opening BGM %s", pPath);
SLDataLocator_URI lDataLocatorIn;
std::string lPath = std::string("file://") + pPath;
lDataLocatorIn.locatorType = SL_DATALOCATOR_URI;
lDataLocatorIn.URI = (SLchar*) lPath.c_str();
SLDataFormat_MIME lDataFormat;
lDataFormat.formatType = SL_DATAFORMAT_MIME;
...
return STATUS_OK;
ERROR:
return STATUS_KO;
}
...
}
Porng exisng libraries to Android
[ 320 ]
5. Copy resources in your asset directory to your sdcard (or internal memory,
depending on your device) in the directory droidblaster (for example,
/sdcard/droidblaster).
Almost all Android devices can store les in an addional storage locaon
mounted in directory /sdcard. "Almost" is the important word here… Since
the rst Android G1, the meaning of "sdcard" has changed. Some recent
devices have an external storage that is in fact internal (e.g. ash memory
on some tablets), and some others have a second storage locaon at their
disposal (although in most cases, the second storage is mounted inside /
sdcard). Moreover, path /sdcard is not engraved into the marble…
To detect safely the addional storage locaon, the only soluon
is to rely on JNI, by calling android.os.Environment.
getExternalStorageDirectory(). You can also check that storage
is available with getExternalStorageState(). Note that the word
"External" in API method names is here for historical reasons only.
Replace paths to resources in each le that needs one (change the path
if necessary):
/sdcard/droidblaster/tilemap.png in jni/Background.cpp.
/sdcard/droidblaster/tilemap.tmx in jni/Background.cpp.
/sdcard/droidblaster/start.pcm in jni/DroidBlaster.cpp.
/sdcard/droidblaster/bgm.mp3 in jni/DroidBlaster.cpp.
/sdcard/droidblaster/ship.png in jni/Ship.cpp.
6. Run the applicaon. Noced it? Everything runs like before!
Now, let's take advantage of the STL to give some company to our lonely ship.
7. First, let's create a lile randomizaon helper macro in exisng le jni/Type.hpp:
#ifndef _PACKT_TYPES_HPP_
#define _PACKT_TYPES_HPP_
#include <stdint.h>
#include <cstdlib>
namespace packt {
...
}
#define RAND(pMax) (float(pMax) * float(rand()) / float(RAND_MAX))
#endif

Chapter 9
[ 321 ]
8. The random value generator has to be inialized rst, with a seed. A possible
soluon is to set the seed value to the current me in jni/TimeService.cpp:
#include "TimeService.hpp"
#include "Log.hpp"
#include <cstdlib>
namespace packt {
TimeService::TimeService() :
mElapsed(0.0f),
mLastTime(0.0f) {
srand(time(NULL));
}
...
}
9. Create a new header le jni/Asteroid.hpp, similar to the one used for the
Ship game object, to represent a dangerous and frightening asteroid:
#ifndef _DBS_ASTEROID_HPP_
#define _DBS_ASTEROID_HPP_
#include "Context.hpp"
#include "GraphicsService.hpp"
#include "GraphicsSprite.hpp"
#include "Types.hpp"
namespace dbs {
class Asteroid {
public:
Asteroid(packt::Context* pContext);
void spawn();
void update();
private:
packt::GraphicsService* mGraphicsService;
packt::TimeService* mTimeService;
packt::GraphicsSprite* mSprite;
packt::Location mLocation;
float mSpeed;
};
}
#endif

Porng exisng libraries to Android
[ 322 ]
10. Implement the Asteroid class in jni/Asteroid.cpp. An asteroid is represented
with a sprite loaded at construcon me.
The Asteroid game object itself is inialized in spawn(), above the top of the
screen (that is, they are inially hidden). Asteroids are distributed randomly over
screen width and have a random animaon and movement speed.
During frame processing in update(), asteroids fall from top to boom, according
to their speed. When they reach the boom, they are recreated.
#include "Asteroid.hpp"
#include "Log.hpp"
namespace dbs {
Asteroid::Asteroid(packt::Context* pContext) :
mTimeService(pContext->mTimeService),
mGraphicsService(pContext->mGraphicsService),
mLocation(), mSpeed(0.0f) {
mSprite = pContext->mGraphicsService->registerSprite(
mGraphicsService->registerTexture(
"/sdcard/droidblaster/asteroid.png"),
64, 64, &mLocation);
}
void Asteroid::spawn() {
const float MIN_SPEED = 4.0f;
const float MIN_ANIM_SPEED = 8.0f, ANIM_SPEED_RANGE = 16.0f;
mSpeed = -RAND(mGraphicsService->getHeight()) - MIN_SPEED;
float lPosX = RAND(mGraphicsService->getWidth());
float lPosY = RAND(mGraphicsService->getHeight())
+ mGraphicsService->getHeight();
mLocation.setPosition(lPosX, lPosY);
float lAnimSpeed = MIN_ANIM_SPEED + RAND(ANIM_SPEED_RANGE);
mSprite->setAnimation(8, -1, lAnimSpeed, true);
}
void Asteroid::update() {
mLocation.translate(0.0f, mTimeService->elapsed() * mSpeed);
if (mLocation.mPosY <= 0) {
spawn();
}
}
}

Chapter 9
[ 323 ]
11. Open the jni/DroidBlaster.hpp header and include the vector header, the
most common STL container that encapsulates C arrays. Then, declare a vector of
asteroid pointers (prexed with the std namespace):
#ifndef _PACKT_DROIDBLASTER_HPP_
#define _PACKT_DROIDBLASTER_HPP_
#include "ActivityHandler.hpp"
#include "Asteroid.hpp"
#include "Background.hpp"
#include "Context.hpp"
...
#include "Types.hpp"
#include <vector>
namespace dbs {
class DroidBlaster : public packt::ActivityHandler
{
...
private:
...
Background mBackground;
Ship mShip;
std::vector<Asteroid*> mAsteroids;
packt::Sound* mStartSound;
};
}
#endif
12. Finally, open jni/DroidBlaster.cpp. Include this new container in the
constructor inializaon list and insert Asteroid instances with method
push_back().
Then, in the destructor, we can iterate through the vector using an iterator to
release every vector entry. Syntax is a bit more tedious, but gives more exibility:
#include "DroidBlaster.hpp"
#include "Log.hpp"
namespace dbs {
DroidBlaster::DroidBlaster(packt::Context* pContext) :

Porng exisng libraries to Android
[ 324 ]
mGraphicsService(pContext->mGraphicsService),
mInputService(pContext->mInputService),
mSoundService(pContext->mSoundService),
mTimeService(pContext->mTimeService),
mBackground(pContext), mShip(pContext), mAsteroids(),
mStartSound(mSoundService->registerSound(
"/sdcard/droidblaster/start.pcm")) {
for (int i = 0; i < 16; ++i) {
mAsteroids.push_back(new Asteroid(pContext));
}
}
DroidBlaster::~DroidBlaster() {
std::vector<Asteroid*>::iterator iAsteroid =
mAsteroids.begin();
for (; iAsteroid < mAsteroids.end() ; ++iAsteroid) {
delete *iAsteroid;
}
mAsteroids.clear();
}
...
13. Sll in jni/DroidBlaster.cpp, apply the same iteraon technique to inialize
asteroid game objects (in onActivate()) and iterate each frame (in onStep()):
...
packt::status DroidBlaster::onActivate() {
...
mBackground.spawn();
mShip.spawn();
std::vector<Asteroid*>::iterator iAsteroid =
mAsteroids.begin();
for (; iAsteroid < mAsteroids.end() ; ++iAsteroid) {
(*iAsteroid)->spawn();
}
mTimeService->reset();
return packt::STATUS_OK;
}
...
Chapter 9
[ 325 ]
packt::status DroidBlaster::onStep() {
mTimeService->update();
mBackground.update();
mShip.update();
std::vector<Asteroid*>::iterator iAsteroid =
mAsteroids.begin();
for (; iAsteroid < mAsteroids.end(); ++iAsteroid) {
(*iAsteroid)->update();
}
// Updates services.
...
return packt::STATUS_OK;
}
...
}
14. Copy the asteroid.png sprite sheet to your droidblaster storage directory.
File asteroid.png is provided with this book in Chapter9/Resource.
What just happened?
We have seen how to access a binary le located on the SD-Card through STL streams. All
asset les became simple les on the addional storage. This change can be made almost
transparent at the excepon of OpenSL ES MIME player, which needs a dierent locator.
We have also seen how to manipulate STL strings and avoid using the complex C string
manipulaon primives.
Finally, we have implemented a set of Asteroid game objects managed inside an STL
container vector, instead of a raw C array. STL containers automacally handle memory
management (array resizing operaons and so on). File access happens like on any Unix
le systems, SD-Card being available from a mount point (located generally, but not always,
in /sdcard).
SD-card storage should always be considered for applicaons with heavy resource
les. Indeed, installing heavy APK causes trouble on memory-limited devices.
Porng exisng libraries to Android
[ 326 ]
Android and endianness
Beware of plaorm and le endianness with external les. Although all
ocial Android devices are lile-endian, there is no guarantee this will
remain true (for example, there exist some unocial ports for Android on
other CPU architectures). ARM supports both lile-and big-endian encoding,
whereas x86 (available since NDK R6) are lile-endian only. Endian encoding
is converble, thanks to POSIX primives declared in endian.h.
We have linked STLport as a stac library. But, we could have linked it dynamically, or linked
to the GNU STL. Which choice to make depends on your needs:
No excepons or RTTI needed, but STL required by several libraries: In that case, if a
consequent subset of STL features is necessary, stlport_shared should be used.
No excepons or RTTI needed and STL used by a single library or only a small subset
required: Consider using stlport_static instead, as memory usage may be
lower.
Excepon handling or RTTI are needed: Link against gnustl_static.
Since NDK R7, RTTI are supported by STLport, but not excepons.
STL is denitely a huge improvement that avoids repeve and error-prone code. Many
open source libraries require it and can now be ported without much trouble. More
documentaon about it can be found at http://www.cplusplus.com/reference/stl
and on SGI's website (publisher of the rst STL), at http://www.sgi.com/tech/stl.
Static versus shared
Remember that shared libraries need to be loaded manually at runme. If you forget to
load one of them, an error is raised, as soon as dependent libraries (or the applicaon)
are loaded. As it is not possible to predict in advance which funcons are going to be
called, they are loaded enrely in memory, even if most of their contents remain unused.
On the other hand, stac libraries are de facto loaded with dependent libraries. Indeed, stac
libraries do not really exist as such. They are copied into dependent libraries during linking.
The drawback is that binary code may get duplicated in each library, and memory is thus
wasted. However, since the linker knows precisely which part of the library gets called from the
embedding code, it can copy only what is needed, resulng in a limited size aer compilaon.

Chapter 9
[ 327 ]
Also remember that a Java applicaon can load shared libraries only (which can be
themselves linked against either shared or stac libraries). With a nave acvity, the main
shared library is specied through the android.app.lib_name property, in the applicaon
manifest. Libraries referenced from another library must be loaded manually before. The
NDK does not do this itself.
Shared libraries can be loaded easily, using System.loadLibrary() in a JNI applicaon.
But, a NativeActivity is transparent. So, if you decide to use shared libraries, then
the only soluon is to write your own Java acvity, inhering from NativeActivity
and invoking the appropriate loadLibrary() direcves. For instance, below is what
DroidBlaster acvity would look like, if we were using stlport_shared instead:
package com.packtpub.droidblaster
import android.app.NativeActivity
public class MyNativeActivity extends NativeActivity {
static {
System.loadLibrary("stlport_shared");
System.loadLibrary("droidblaster");
}
}
STL performances
When developing for performance, a standard STL container is not always the best
choice, especially in terms of memory management and allocaon. Indeed, STL is an
all-purpose library, wrien for common cases. Alternave libraries should be considered
for performance-crical code. A few examples are:
EASTL: An STL replacement library, developed by Electronic Arts, and developed
with gaming in mind. Only 50 percent of the projects have been released (as part
of the EA open source program), which are nevertheless highly interesng. An
extract is available in the repository https://github.com/paulhodge/EASTL.
A must-read paper detailing EASTL technical details can be found on the Open
Standards website at http://www.open-std.org/jtc1/sc22/wg21/docs/
papers/2007/n2271.html.
RDESTL: It is an open source subset of the STL, based on the EASTL technical paper,
which was published several years before EASTL code release. The code repository
can be found at http://code.google.com/p/rdestl/.
Google SparseHash: For a high performance associave array library (note that
RDESTL is also quite good at that).
This is far from exhausve. Just dene your exact needs to make the most appropriate choice.
Porng exisng libraries to Android
[ 328 ]
Compiling Boost on Android
If STL is the most common framework among C++ programs, Boost probably comes right
aer. A real Swiss army knife, this toolkit contains a profusion of ulies to handle most
common needs, and even more! The most popular features of Boost are smart pointers, an
encapsulaon of raw pointers in a reference-counng class to handle memory allocaon, and
deallocaon automacally. They avoid most memory leaks or pointer misuse for almost free.
Boost, like STL, is mainly a template library, which means that no compilaon is needed for
most of its modules. For instance, including the smart pointer header le is enough to use
them. However, a few of its modules need to be compiled as a library rst (for example, the
threading module).
We are now going to see how to build Boost on the Android NDK and replace raw,
unmanaged pointers with smarter ones.
Project DroidBlaster_Part9-1 can be used as a starng
point for this part. The resulng project is provided with this book,
under the name DroidBlaster_Part9-2.
Time for action – embedding Boost in DroidBlaster
1. Download Boost from http://www.boost.org/ (version 1.47.0, in this book).
The Boost 1.47.0 archive is provided with this book in
directory Chapter09/Library.
2. Uncompress the archive into ${ANDROID_NDK}/sources. Name the
directory boost.
3. Open a command line window and go to the boost directory. Launch bootstrap.
bat on Windows or the ./bootstrap.sh script on Linux and Mac OS X, to build
b2. This program, previously named BJam, is a custom building tool similar to Make.
4. Open the le boost/tools/build/v2/user-config.jam. This le is, like
its name suggests, a conguraon le that can be set up to customize Boost
compilaon.
Update user-config.jam. Initial content contains only comments
and can be erased:
import os ;

Chapter 9
[ 329 ]
if [ os.name ] = CYGWIN || [ os.name ] = NT {
androidPlatform = windows ;
}
else if [ os.name ] = LINUX {
androidPlatform = linux-x86 ;
}
else if [ os.name ] = MACOSX {
androidPlatform = darwin-x86 ;
}
...
5. Compilaon is performed stacally. BZip is deacvated, because it is unavailable,
by default, on Android (we could however compile it separately):
...
modules.poke : NO_BZIP2 : 1 ;
...
6. Compiler is recongured to use the NDK GCC toolchain (g++, ar, and ranlib) in
stac mode (the ar archiver being in charge of creang the stac library). Direcve
sysroot indicates which Android API release to compile and link against. The
specied directory is located in the NDK and contains include les and libraries
specic to this release:
...
ANDROID_NDK = ../.. ;
using gcc : android4.4.3 :
$(ANDROID_NDK)/toolchains/arm-linux-androideabi-4.4.3/
prebuilt/$(androidPlatform)/bin/arm-linux-androideabi-g++ :
<archiver>$(ANDROID_NDK)/toolchains/arm-linux-
androideabi-4.4.3/prebuilt/$(androidPlatform)/bin/arm-linux-
androideabi-ar
<ranlib>$(ANDROID_NDK)/toolchains/arm-linux-androideabi-4.4.3/
prebuilt/$(androidPlatform)/bin/arm-linux-androideabi-ranlib
<compileflags>--sysroot=$(ANDROID_NDK)/platforms/android-9/
arch-arm
<compileflags>-I$(ANDROID_NDK)/sources/cxx-stl/gnu-libstdc++/
include
<compileflags>-I$(ANDROID_NDK)/sources/cxx-stl/gnu-libstdc++/
libs/armeabi/include
...

Porng exisng libraries to Android
[ 330 ]
7. A few opons have to be dened to tweak Boost compilaon:
NDEBUG to deacvate debug mode
BOOST_NO_INTRINSIC_WCHAR_T to indicate the lack of support for wide
chars
BOOST_FILESYSTEM_VERSION is set to 2, because the latest version of
Boost FileSystem module (version 3) brings incompable changes related
to wide chars
no-strict-aliasing to disable opmizaons related to type aliasing
-02 to specify opmizaon level
...
<compileflags>-DNDEBUG
<compileflags>-D__GLIBC__
<compileflags>-DBOOST_NO_INTRINSIC_WCHAR_T
<compileflags>-DBOOST_FILESYSTEM_VERSION=2
<compileflags>-lstdc++
<compileflags>-mthumb
<compileflags>-fno-strict-aliasing
<compileflags>-O2
;
8. With the previously opened terminal, sll in the boost directory, launch
compilaon using the command line below. We need to exclude two modules
not working with the NDK:
The Serializaon module, which requires wide characters (not supported
by the ocial NDK yet)
Python, which requires addional libraries not available on the NDK
by default
b2 --without-python --without-serialization toolset=gcc-
android4.4.3 link=static runtime-link=static target-os=linux
--stagedir=android
9. Compilaon should take quite some me, but eventually it will fail! Launch
compilaon a second me to nd the error message hidden inside thousands of
lines the rst me. You should get a ::statvfs has not been declared... This problem
is related to boost/libs/filesystem/v2/src/v2_operations.cpp. This
le, normally at line 62, includes the sys/statvfs.h system header. However,
the Android NDK provides sys/vfs.h instead. We have to include it in v2_
operations.cpp:
Chapter 9
[ 331 ]
Android is (more or less) a Linux with its own specicies. If a library does
not take them into account (yet!), expect to encounter these kinds of
annoyances frequently.
...
# else // BOOST_POSIX_API
# include <sys/types.h>
# if !defined(__APPLE__) && !defined(__OpenBSD__) \
&& !defined(__ANDROID__)
# include <sys/statvfs.h>
# define BOOST_STATVFS statvfs
# define BOOST_STATVFS_F_FRSIZE vfs.f_frsize
# else
#ifdef __OpenBSD__
# include <sys/param.h>
#elif defined(__ANDROID__)
# include <sys/vfs.h>
#endif
# include <sys/mount.h>
# define BOOST_STATVFS statfs
...
10. Compile again. No message …failed updang X targets… should appear this me.
Libraries are compiled in ${ANDROID_NDK}/boost/android/lib/.
11. Several other incompabilies may appear when using the various modules of
Boost. For example, if you prefer to generate a random number with Boost and
decide to include boost/random.hpp, you will encounter a compilaon error
related to endianness. To x it, add a denion for Android in boost/boost/
detail/endian.hpp, at line 34:
...
#if defined (__GLIBC__) || defined(__ANDROID__)
# include <endian.h>
# if (__BYTE_ORDER == __LITTLE_ENDIAN)
# define BOOST_LITTLE_ENDIAN
...
The patches applied in previous steps are provided with this
book in directory Chapter09/Library/boost_1_47_0_
android, along with compiled binaries.

Porng exisng libraries to Android
[ 332 ]
12. Sll in the boost directory, create a new Android.mk le to declare the newly
compiled libraries as Android modules. It needs to contain one module declaraon
per module. For example, dene one library boost_thread, referencing the
stac library android/lib/libboost_thread.a. Variable LOCAL_EXPORT_C_
INCLUDES is important to automacally append boost includes when referenced
from a program:
LOCAL_PATH:= $(call my-dir)
include $(CLEAR_VARS)
LOCAL_MODULE:= boost_thread
LOCAL_SRC_FILES:= android/lib/libboost_thread.a
LOCAL_EXPORT_C_INCLUDES := $(LOCAL_PATH)
include $(PREBUILT_STATIC_LIBRARY)
More modules can be declared in the same le with the same set of lines (for
example, boost_iostreams, etc.).
Android.mk is provided in Chapter09/Library/
boost_1_47_0_android.
Now, let's use Boost in our own project.
13. Go back to the DroidBlaster project. To include Boost in an applicaon, we need to
link with an STL implementaon supporng excepons. Thus, we need to replace
STLport with GNU STL (available as a stac library only) and acvate excepons:
APP_STL := gnustl_static
APP_CPPFLAGS := -fexceptions
14. Finally, open your Android.mk le and include a Boost module to check that
everything works. For example, try the Boost thread module:
LOCAL_PATH := $(call my-dir)
include $(CLEAR_VARS)
LS_CPP=$(subst $(1)/,,$(wildcard $(1)/*.cpp))
LOCAL_MODULE := droidblaster
LOCAL_SRC_FILES := $(call LS_CPP,$(LOCAL_PATH))
LOCAL_LDLIBS := -landroid -llog -lEGL -lGLESv1_CM -lOpenSLES
Downloa d f r o m W o w ! e B o o k < w w w.woweb o o k . c o m >Downloa d f r o m W o w ! e B o o k < w w w.woweb o o k . c o m >

Chapter 9
[ 333 ]
LOCAL_STATIC_LIBRARIES := android_native_app_glue png boost_thread
include $(BUILD_SHARED_LIBRARY)
$(call import-module,android/native_app_glue)
$(call import-module,libpng)
$(call import-module,boost)
DroidBlaster is now Boost-enabled! First, let's see if excepons work.
15. Edit jni/GraphicsTilemap.cpp. Remove the RapidXML error handling block
and replace the call to setjmp() with a C++ try/catch. Catch a parse_error
excepon:
...
namespace packt {
...
int32_t* GraphicsTileMap::loadFile() {
...
mResource.close();
}
try {
lXmlDocument.parse<parse_default>(lFileBuffer);
} catch (rapidxml::parse_error& parseException) {
packt::Log::error("Error while parsing TMX file.");
packt::Log::error(parseException.what());
goto ERROR;
}
...
}
}
Now, we could use smart pointers to manage memory allocaon and deallocaon
automacally.
16. Boost and STL tends to cause a proliferaon of unreadable denions. Let's simplify
their use by dening custom smart pointer and vector types with the typedef
keyword in jni/Asteroid.hpp. The vector type contains smart pointers instead
of raw pointers:
#ifndef _DBS_ASTEROID_HPP_
#define _DBS_ASTEROID_HPP_
#include "Context.hpp"
#include "GraphicsService.hpp"

Porng exisng libraries to Android
[ 334 ]
#include "GraphicsSprite.hpp"
#include "Types.hpp"
#include <boost/shared_ptr.hpp>
#include <vector>
namespace dbs {
class Asteroid {
...
public:
typedef boost::ptr <Asteroid> ptr;
typedef std::vector<shared> vec;
typedef vec::iterator vec_it;
}
}
#endif
17. Open jni/DroidBlaster.hpp and remove the vector header inclusion (now
included in jni/Asteroid.hpp). Use the newly dened type Android::vec:
...
namespace dbs {
class DroidBlaster : public packt::ActivityHandler {
...
private:
...
Background mBackground;
Ship mShip;
Asteroid::vec mAsteroids;
packt::Sound* mStartSound;
};
}
#endif
18. Every iterator declaraon involving asteroids now needs to be switched with the
new 'typedefed" types. Code is not much dierent except one thing… Look carefully:
the destructor is now empty! All pointers are deallocated automacally by Boost:
#include "DroidBlaster.hpp"
#include "Log.hpp"
namespace dbs {
DroidBlaster::DroidBlaster(packt::Context* pContext) :

Chapter 9
[ 335 ]
... {
for (int i = 0; i < 16; ++i) {
Asteroid::ptr lAsteroid(new Asteroid(pContext));
mAsteroids.push_back(lAsteroid);
}
}
DroidBlaster::~DroidBlaster()
{}
packt::status DroidBlaster::onActivate() {
...
mBackground.spawn();
mShip.spawn();
Asteroid::vec_it iAsteroid = mAsteroids.begin();
for (; iAsteroid < mAsteroids.end() ; ++iAsteroid) {
(*iAsteroid)->spawn();
}
mTimeService->reset();
return packt::STATUS_OK;
}
...
packt::status DroidBlaster::onStep() {
mTimeService->update();
mShip.update();
Asteroid::vec_it iAsteroid = mAsteroids.begin();
for (; iAsteroid < mAsteroids.end(); ++iAsteroid) {
(*iAsteroid)->update();
}
if (mGraphicsService->update() != packt::STATUS_OK) {
...
return packt::STATUS_OK;
}
}

Porng exisng libraries to Android
[ 336 ]
What just happened?
We have xed a minor issue with Boost code and wrien the proper conguraon to compile
it. Finally, we have discovered one of Boost's most famous (and helpful!) features: smart
pointers. But Boost provides much more. See its documentaon, located at http://www.
boost.org/doc/libs, to discover its full richness. You can nd informaon about Android
issues on the bug tracker.
We have compiled Boost manually, using its dedicated building tool b2, customized to use
the NDK tool chain. Then, prebuilt stac libraries have been published using an Android.
mk and imported into a nal applicaon with NDK import-module direcve. Every me
Boost is updated or a modicaon is made, code has to be manually compiled again with b2.
Only the nal prebuilt library is imported into client applicaon with PREBUILT_STATIC_
LIBRARY direcve (and the shared library equivalent PREBUILT_SHARED_LIBRARY). On the
other hand, BUILD_STATIC_LIBRARY and BUILD_SHARED_LIBRARY would recompile the
whole module each me a new client applicaon imports it or changes its own compilaon
sengs (for example, when switching APP_OPTIM from debug to release in Application.
mk).
To make Boost work, we have switched from STLport to GNU STL, which is currently the
only one to support excepons. This replacement occurs in the Application.mk le,
by replacing stlport_static with gnustl_static. Excepons and RTTI are acvated
very easily by appending -fexceptions and -frtti, respecvely, to the APP_CPPFLAGS
direcve in the same le, or the LOCAL_CPPFLAGS of the concerned library. By default,
Android compiles with -fno-exceptions and -fno-rtti ags.
A problem? Clean!
It happens oen, especially when switching from one STL to another, that
libraries do not get recompiled well. Sadly, this results in rather weird and
obscure undened link errors. If you have a doubt, just clean your project from
the Eclipse menu | Project/Clean... or the command ndk-build clean, in
your applicaon root directory.
Excepons have the reputaon of making the compiled code bigger and less ecient.
They prevent the compiler from performing some clever opmizaons. However, whether
excepons are worse than error checking or even no check at all is a highly debatable queson.
In fact, Google's engineers dropped them in rst releases because GCC 3.x generated poor
excepon handling code for ARM processors. However, the build chain now uses GCC 4.x,
which does not suer from this aw. Compared to manual error checking and handling of
exceponal cases, penalty should not be signicant most of the me, assuming excepons
are used for exceponal cases only. Thus, the choice of excepons or not is up to you
(and your embedded libraries)!
Chapter 9
[ 337 ]
Excepon handling in C++ is not easy and imposes a strict discipline!
They must be used strictly for exceponal cases and require carefully
designed code. Have a look at the Resource Acquision Is
Inializaon (abbreviated RAII) idiom to properly handle them.
Have a go hero – threading with Boost
DroidBlaster is now a bit safer, thanks to smart pointers. However, smart pointers are
based on template les. There is no need to link against Boost modules to use them. So,
to check if this works, modify the DroidBlaster class to launch a Boost thread updates
asteroids in the background. The thread must be run in a separate method (for example,
updateBackground()). You can launch the thread itself from onStep() and join it (that is,
wait for the thread to terminate its task) before the GraphicsService draws its content:
...
#include <boost/thread.hpp>
...
void DroidBlaster::updateThread() {
Asteroid::vec_it iAsteroid = mAsteroids.begin();
for (; iAsteroid < mAsteroids.end(); ++iAsteroid) {
(*iAsteroid)->update();
}
}
packt::status DroidBlaster::onStep() {
mTimeService->update();
boost::thread lThread(&DroidBlaster::updateThread, this);
mBackground.update();
mShip.update();
lThread.join();
if (mGraphicsService->update() != packt::STATUS_OK) {
...
}
...
The nal result is available in project DroidBlaster_Part9-2-Thread,
provided with this book.

Porng exisng libraries to Android
[ 338 ]
If you have experience with threads, this piece of code will probably make you jump out of
your chair. Indeed, this is the best example of what should not be done with threads because:
Funconal division (for example, one service in its own thread) is generally not the
best way to achieve threading eciently.
Only a few mobile processors are mul-cores (but this fact is changing really fast).
Thus, creang a thread on a single processor will not improve performance, except
for blocking operaons such as I/O.
Mul-cores can have more than just 2 cores! Depending on the problem to solve,
it can be a good idea to have as many threads as cores.
Creang threads on demand is not ecient. Thread pools are a beer approach.
Threading is a really complex maer and should be taken it into account
early in your design. The Intel developer website (http://software.
intel.com/) provides lots of interesng resources about threading and
a library named Threading Building Block, which is a good reference in
design terms (but not ported on Android, yet, despite some progress).
Porting third-party libraries to Android
With the Standard Template Library and Boost in our basket, we are ready to port almost any
library to Android. Actually, many third-party libraries have been already ported and many
more are coming. But when nothing is available, we have to rely on our own skills to port
them. In this nal part, we are going to compile two of them:
Box2D: It is a highly popular open source physics simulaon engine, embedded
in many 2D games such as Angry Birds (quite a good reference!). It is available in
several languages, Java included. But, its primary language is C++.
Irrlicht: It is a real-me open source 3D engine. It is cross-plaorm and oers
DirectX, OpenGL, and GLES bindings.
We are going to use them in the next chapter to implement the DroidBlaster physics layer
and brings graphics to the third dimension.
Project DroidBlaster_Part9-2 can be used as a starng point for
this part. The resulng project is provided with this book, under
the name DroidBlaster_Part9-3.
Chapter 9
[ 339 ]
Time for action – compiling Box2D and Irrlicht with the NDK
First, let's try to port Box2D on the Android NDK.
The Box2D 2.2.1 archive is provided with this book, in
directory Chapter09/Library.
1. Go to http://www.box2d.org/ and download the Box2D source archive (2.2.1
in this book). Uncompress it into ${ANDROID_NDK}/sources/ and name the
directory box2d.
2. Create and open an Android.mk le in the root of the box2d directory.
Save the current directory inside the LOCAL_PATH variable. This step is always
necessary, because an NDK build system may switch to another directory at
any me during compilaon.
LOCAL_PATH:= $(call my-dir)
...
3. Then, list all Box2D source les to compile. We are interested in source le name
only, which can be found in ${ANDROID_NDK}/sources/box2d/Box2D/Box2D.
Use the LS_CPP helper funcon to avoid copying each lename.
...
LS_CPP=$(subst $(1)/,,$(wildcard $(1)/$(2)/*.cpp))
BOX2D_CPP:= $(call LS_CPP,$(LOCAL_PATH),Box2D/Collision) \
$(call LS_CPP,$(LOCAL_PATH),Box2D/Collision/Shapes) \
$(call LS_CPP,$(LOCAL_PATH),Box2D/Common) \
$(call LS_CPP,$(LOCAL_PATH),Box2D/Dynamics) \
$(call LS_CPP,$(LOCAL_PATH),Box2D/Dynamics/Contacts) \
$(call LS_CPP,$(LOCAL_PATH),Box2D/Dynamics/Joints) \
$(call LS_CPP,$(LOCAL_PATH),Box2D/Rope)
...
4. Then, write the Box2D module denion for a stac library. First, call the $
(CLEAR_VARS) script. This script has to be included before any module denion,
to remove any potenal change made by other modules and avoid any unwanted
side eects. Then, dene the following sengs:
Module name in LOCAL_MODULE: Module name is suxed with
_static to avoid a name clash with the shared version we are going
to dene right aer.
Module source les in LOCAL_SRC_FILES (using BOX2D_CPP dened
previously).
Porng exisng libraries to Android
[ 340 ]
Include le directory provided to clients in LOCAL_EXPORT_C_INCLUDES.
Include le used internally for module compilaon in LOCAL_C_INCLUDES.
Here, client include les and compilaon include les are the same (and are
oen the same in other libraries), so reuse LOCAL_EXPORT_C_INCLUDES,
dened previously:
...
include $(CLEAR_VARS)
LOCAL_MODULE:= box2d_static
LOCAL_SRC_FILES:= $(BOX2D_CPP)
LOCAL_EXPORT_C_INCLUDES := $(LOCAL_PATH)
LOCAL_C_INCLUDES := $(LOCAL_EXPORT_C_INCLUDES)
...
5. Finally, request Box2D module compilaon as a stac library, as follows:
...
include $(BUILD_STATIC_LIBRARY)
...
6. The same process can be repeated to build a shared library by selecng
a dierent module name and invoking $(BUILD_SHARED_LIBRARY), instead:
...
include $(CLEAR_VARS)
LOCAL_MODULE:= box2d_shared
LOCAL_SRC_FILES:= $(BOX2D_CPP)
LOCAL_EXPORT_C_INCLUDES := $(LOCAL_PATH)
LOCAL_C_INCLUDES := $(LOCAL_EXPORT_C_INCLUDES)
include $(BUILD_SHARED_LIBRARY)
Android.mk is provided in Chapter09/Library/
Box2D_v2.2.1_android.
7. Open DroidBlaster Android.mk and link against box2d_static, by appending it to
LOCAL_STATIC_LIBRARIES. Provide its directory with direcve import-module.
Remember that modules are found, thanks to the NDK_MODULE_PATH variable,
which points by default to ${ANDROID_NDK}/sources:
LOCAL_PATH := $(call my-dir)
include $(CLEAR_VARS)
Chapter 9
[ 341 ]
LS_CPP=$(subst $(1)/,,$(wildcard $(1)/*.cpp))
LOCAL_MODULE := droidblaster
LOCAL_SRC_FILES := $(call LS_CPP,$(LOCAL_PATH))
LOCAL_LDLIBS := -landroid -llog -lEGL -lGLESv1_CM -lOpenSLES
LOCAL_STATIC_LIBRARIES:=android_native_app_glue png boost_thread \
box2d_static
include $(BUILD_SHARED_LIBRARY)
$(call import-module,android/native_app_glue)
$(call import-module,libpng)
$(call import-module,boost)
$(call import-module,box2d)
8. Oponally, acvate include le resoluon for Box2D (as seen in Chapter 2, Creang,
Compiling, and Deploying Nave Projects). To do so, in Eclipse Project properes,
go to secon C/C++ General/Paths and Symbols and then the Includes tab, and
add Box2d directory ${env_var:ANDROID_NDK}/sources/box2d.
9. Launch DroidBlaster compilaon. Box2D gets compiled without errors.
Now, let's compile Irrlicht. Irrlicht is currently not supporng Android in its ocial branch.
The iPhone version, which implements an OpenGL ES driver, is sll on a separate branch
(and does not include Android support). However, it is possible to adapt this branch to
make it work with Android (let's say, in a few hours, for experienced programmers).
But there is another soluon: an Android fork iniated by developers from IOPixels (see
http://www.iopixels.com/). It is ready to compile with the NDK and takes advantage
of a few opmizaons. It works quite well, but is not as up-to-date as the iPhone branch.
10. Check out the Irrlicht for Android repository, from Gitorious. This repository can
be found at http://girotious.org/irrlichtandroid/irrlichtandroid.
To do so, install GIT (git package, on Linux) and execute the following command:
> git clone git://gitorious.org/irrlichtandroid/irrlichtandroid.git
The Irrlicht archive is provided with this book, in
directory Chapter09/Library.
11. The repository is on the disk. Move it to ${ANDROID_NDK}/sources and name
it irrlicht.

Porng exisng libraries to Android
[ 342 ]
12. The main directory contains a ready-to-use Android project that makes use of JNI
to communicate with Irrlicht on the nave side. Instead, we are going to adapt this
package to make use of NDK R5 nave acvies.
13. Go to ${ANDROID_NDK}/sources/irrlicht/project/jni and open
Android.mk.
14. Again, makele starts with a $(call my-dir) direcve, to save the current path,
and $(CLEAR_VARS), to erase any pre-exisng values:
LOCAL_PATH := $(call my-dir)
include $(CLEAR_VARS)
...
15. Aer that, we dene all the source les to compile. And there are lots of them!
Nothing needs to be changed, apart from the Android variable. Indeed, this port
of Irrlicht communicates with a Java applicaon through JNI and gives you some
places to append your own simulaon code.
But, what we want is to compile Irrlicht as a module. So, let's get rid of the useless
JNI binding and rely on the client applicaon for EGL inializaon. Update the
ANDROID direcve to keep only:
importgl.cpp, which gives the opon to bind dynamically to GLES runme.
CIrrDeviceAndroid.cpp, which is an empty stub. It delegates EGL
inializaon to the client. In our case, it is going to be performed by our
GraphicsService:
...
IRRMESHLOADER = CBSPMeshFileLoader.cpp CMD2MeshFileLoader.cpp ...
...
ANDROID = importgl.cpp CIrrDeviceAndroid.cpp
...
16. Then comes the module denion. Variable LOCAL_ARM_MODE can be removed, as
these sengs will be set globally, in our own applicaon, with the Application.
mk le. Of course, it is not forbidden to use a custom seng when needed:
...
LOCAL_MODULE := irrlicht
#LOCAL_ARM_MODE := arm
...
Chapter 9
[ 343 ]
17. Remove the -03 ag from LOCAL_CFLAGS, in the original le. This opon species
the level of opmizaon (here, aggressive). However, it can be set up at applicaon
level too.
ANDROID_NDK ag is specic to this Irrlicht port and is necessary to set up OpenGL.
It works in conjuncon with DISABLE_IMPORTGL, which disables the dynamic
loading of the OpenGL ES system library, at runme. This would be useful if we
wanted to let users choose the renderer at runme (for example, to allow
selecng GLES 2.0 renderer). In that case, the GLES 1 system library would
not be loaded uselessly:
...
LOCAL_CFLAGS := -DANDROID_NDK -DDISABLE_IMPORTGL
LOCAL_SRC_FILES := $(IRRLICHT_CPP)
...
18. Insert LOCAL_EXPORT_C_INCLUDES and LOCAL_C_INCLUDES, to indicate
which include directory to use for library compilaon and which one client
applicaons need. The same goes for linked libraries (LOCAL_EXPORT_LDLIBS
and LOCAL_LDLIBS). Keep only GLESv1_CM. The Irrlicht source folder, which
contains include les needed during Irrlicht compilaon only, is not appended
to the export ags:
...
LOCAL_EXPORT_C_INCLUDES := $(LOCAL_PATH)/../include \
$(LOCAL_PATH)/libpng
LOCAL_C_INCLUDES := $(LOCAL_EXPORT_C_INCLUDES) $(LOCAL_PATH)
LOCAL_EXPORT_LDLIBS := -lGLESv1_CM -lz -ldl –llog
LOCAL_LDLIBS := $(LOCAL_EXPORT_LDLIBS)
...
19. Finally, modify Irrlicht to compile as a stac library. We could also compile it as a
shared library. But, because of Irrlicht's size aer compilaon, stac mode is advised.
In addion, it is going to be linked with DroidBlaster.so only:
...
include $(BUILD_STATIC_LIBRARY)
Android.mk is provided in Chapter09/Library/
irrlicht_android.
20. Now, we need to congure what parts of Irrlicht we want to keep and which part we
are not interested in. Indeed, size is an important maer with mobile development,
and the raw Irrlicht library is actually more than 30mb.
Porng exisng libraries to Android
[ 344 ]
As we are basically going to read OBJ meshes and PNG les and display them with
GLES 1.1, everything else can be deacvated. To do so, use #undef direcves in
${ANDROID_NDK}/irrlicht/project/include/IrrCompileConfig.h,
and keep only a few #define where needed:
Target Android with GLES1 only (no GLES 2 or soware renderer).
DroidBlaster requires only non-compressed les read from the le system:
#define _IRR_COMPILE_WITH_ANDROID_DEVICE_
#define _IRR_COMPILE_WITH_OGLES1_
#define _IRR_OGLES1_USE_EXTPOINTER_
#define _IRR_MATERIAL_MAX_TEXTURES_ 4
#define __IRR_COMPILE_WITH_MOUNT_ARCHIVE_LOADER_
Irrlicht embeds a few libraries of its own, such as, libpng, lijpeg,
and so on:
#define _IRR_COMPILE_WITH_OBJ_WRITER_
#define _IRR_COMPILE_WITH_OBJ_LOADER_
#define _IRR_COMPILE_WITH_PNG_LOADER_
#define _IRR_COMPILE_WITH_PNG_WRITER_
#define _IRR_COMPILE_WITH_LIBPNG_
#define _IRR_USE_NON_SYSTEM_LIB_PNG_
#define _IRR_COMPILE_WITH_ZLIB_
#define _IRR_USE_NON_SYSTEM_ZLIB_
#define _IRR_COMPILE_WITH_ZIP_ENCRYPTION_
#define _IRR_COMPILE_WITH_BZIP2_
#define _IRR_USE_NON_SYSTEM_BZLIB_
#define _IRR_COMPILE_WITH_LZMA_
Debug mode can be undef when a applicaon gets released:
#define _DEBUG
The modied IrrCompileConfig.h is provided with this book,
in directory Chapter09/Library/irrlicht_android.
21. Finally, append Irrlicht library to DroidBlaster. We need to remove libpng from
LOCAL_LDLIBS because, from now, DroidBlaster is going to use Irrlicht's libpng,
instead of the one we compiled (which is too recent for Irrlicht):
...
LOCAL_STATIC_LIBRARIES:=android_native_app_glue png boost_thread \
box2d_static irrlicht

Chapter 9
[ 345 ]
include $(BUILD_SHARED_LIBRARY)
$(call import-module,android/native_app_glue)
$(call import-module,libpng)
$(call import-module,boost)
$(call import-module,box2d)
$(call import-module,irrlicht/project/jni)
22. Oponally, acvate include le resoluon for Irrlicht (as done with Box2D
previously). The directory is ${env_var:ANDROID_NDK}/sources/irrlicht.
23. Launch compilaon and watch Irrlicht geng compiled. It may take quite some me!
What just happened?
We have compiled two open source libraries with the Android NDK, thus reusing the many
wheels already created by the community! We will see, in next chapter, how to develop code
with them. There are two main steps involved when porng a library to Android:
1. Adapng library code to Android if necessary.
2. Wring build scripts (that is, makeles) to compile code with the NDK toolchain.
The rst task is generally necessary for libraries accessing system libraries, such as Irrlicht with
OpenGL ES. It is obviously the hardest and most non-trivial task. In that case, always consider:
Making sure required libraries exist. If not, port them before. For instance, the main
Irrlicht branch cannot be used on Android because renderers are only DirectX and
OpenGL (not ES). Only the iPhone branch provides a GLES renderer.
Looking for the main conguraon include le. One is oen provided (such as
IrrCompileConfig.h for Irrlicht) and is a good place to tweak enabled/disabled
features or remove unwanted dependencies.
Giving aenon to system-related macros (that is, #ifdef _LINUX ...), which
are one of the rst places to change in code. Generally, one will need to dene
macros such as _ANDROID_ and insert them where appropriate.
Commenng non-essenal code, at least to check if the library can compile and its
core features work.
The second task, building scripts, is easier, although tedious. You should choose building the
import module dynamically, when compiling your applicaon, as opposed to a prebuilt library,
like we did with Boost. Indeed, on-demand compilaon allows tweaking compilaon ags on
all included libraries (like opmizaon ags or ARM mode) from your main Application.mk
project le.

Porng exisng libraries to Android
[ 346 ]
Prebuilt libraries are only interesng to redistribute binaries, without delivering code, or
to use a custom build system. In the laer case, the NDK toolchain is used in the so-called
standalone mode (that is, Do It Yourself mode!) detailed in the Android NDK documentaon.
But, the default ndk-build command is, of course, considered a beer pracce, to make
future evoluons simpler.
Libraries are produced in <PROJECT_DIR>/libs. Intermediate binary les are available in
<PROJECT_DIR>/obj. Module size in the laer place is quite impressive. That would not
be viable if NDK toolchain was not stripping them when producing nal APK. Stripping is the
process of discarding unnecessary symbols from binaries. Combined with stac linking, this
reduces the size of DroidBlaster binaries from 60 MB to just 3 MB.
GCC optimization levels
There are 5 main opmizaon levels in GCC:
1. -O0: It disables any opmizaon. This is automacally set by the NDK when
APP_OPTIM is set to debug.
2. -O1: It allows basic opmizaons without increasing compilaon me too much.
These opmizaons do not require any speed-space tradeos, which mean that
they produce faster code without increasing executable size.
3. -O2: It allows advanced opmizaon (including -O1), but at the expense of
compilaon me. Like –O1, these opmizaons do not require speed-space
tradeos. This is the default level when APP_OPTIM is set to the release opon,
when releasing an applicaon.
4. -O3: To perform aggressive opmizaons (including -O2), which can increase
executable size, such as funcon inlining. This is generally protable, but
somemes, counterproducve (for example, increasing memory usage can also
increase cache misses).
5. -Os: To opmize compiled code size (a subset of –O2) before speed.
Although -O2 is generally the way to go for release mode, -O3 should also be considered
for performance crical code. -0 ags being just shortcuts for the various GCC opmizaon
ags, enabling –O2 and with addional ne-grain ags (for example, -finline-
functions) is an opon. Anyway, the best way to nd the best choice is sll performing
benchmarking! To get more informaon about the numerous GCC opmizaon opons,
have a look at http://gcc.gnu.org/.
Mastering Makeles
Android makeles are an essenal piece of the NDK building process. Thus, it is important
to understand the way they work, to build and manage a project properly.
Chapter 9
[ 347 ]
Makele variables
Compilaon sengs are dened though a set of predened NDK variables. We have already
seen the three most important ones: LOCAL_PATH, LOCAL_MODULE, and LOCAL_SRC_FILES.
But many others exist. We can dierenate four types of variables, each with a dierent prex:
LOCAL_, APP_, NDK_, and PRIVATE_.
APP_ variables refer to applicaon-wide opons and are set in Application.mk
LOCAL_ variables are dedicated to individual module compilaon and are dened
in Android.mk les
NDK_ are internal variables that usually refer to environment variables (for example,
NDK_ROOT, NDK_APP_CFLAGS or NDK_APP_CPPFLAGS)
PRIVATE_ prexed variables are for NDK internal use only
Here is an almost exhausve list:
LOCAL_PATH To specify the source les, root locaon. Must be
dened before include $(CLEAR_VARS).
LOCAL_MODULE To dene module name.
LOCAL_MODULE_FILENAME
To override default name of the compiled module,
that is,
lib<module name>.so for shared libraries
lib<module name>.a for stac libraries.
No custom le extensions can be specied, so that .so
or.a remains appended.
LOCAL_SRC_FILES To dene source les to compile, each separated by a
space and relave to LOCAL_PATH.
LOCAL_C_INCLUDES
To specify header le directories for both C and
C++ languages. The directory can be relave to the
${ANDROID_NDK} directory, but unless you need
to include a specic NDK le, you are advised to use
absolute path (which can be built from Makele
variables such as $(LOCAL_PATH)).
LOCAL_CPP_EXTENSION
To change default C++ le extension that is.cpp (for
example, cc or cxx). Extension is necessary for GCC to
discriminate between les, according to their language.
LOCAL_CFLAGS,
LOCAL_CPPFLAGS,
LOCAL_LDLIBS
To specify any opons, ags, or macro denions, for
compilaon and linking. The rst one works for both
C and C++, the second one is for C++ only, and the last
one is for the linker.

Porng exisng libraries to Android
[ 348 ]
LOCAL_SHARED_LIBRARIES,
LOCAL_STATIC_LIBRARIES
To declare a dependency with other modules
(not system libraries), shared and stac modules,
respecvely.
LOCAL_ARM_MODE,
LOCAL_ARM_NEON,
LOCAL_DISABLE_NO_
EXECUTE,
LOCAL_FILTER_ASM
Advanced variables dealings with processors and
assembler/binary code generaon. They are not
necessary for most programs.
LOCAL_EXPORT_CFLAGS,
LOCAL_EXPORT_CPPFLAGS,
LOCAL_EXPORT_LDLIBS
To dene addional opons or ags in import modules
that should be appended to clients opons. For
example, if a module A denes
LOCAL_EXPORT_LDLIBS := -llog
because it needs an Android logging module, then
a module B that depends on A will be automacally
linked to –llog.
LOCAL_EXPORT_ variables are not used when
compiling the module that exports them. If required,
they also need to be specied in their LOCAL
counterpart.
Makele Instructions
Although these advanced features are marginally needed, Makele is a real language with
programming instrucons and funcons. First, know that makeles can be broken down into
several sub-makeles, included with the instrucon include.
Variable inializaon comes in two avours:
Simple aectaon: This expands variables at the me that they are inialised.
Recursive aectaon: This re-evaluates the aected expression, each me it is
called.
The following condional and loop instrucons are available: ifdef/endif, ifeq/endif,
ifndef/endif, for…in/do/done. For example, to display a message only when a variable
is dened, do:
ifdef my_var
# Do something...
endif
Chapter 9
[ 349 ]
More advanced stu, such as funconal if, and, or, are at your disposal, but are rarely
used. Make also provides some useful built-in funcons:
$(info <message>)
Allows prinng messages to the standard output. This is the
most essenal tool when wring makeles! Variables inside
informaon messages are allowed.
$(warning <message>),
$(error <message>)
Allows prinng a warning or a fatal error that stops
compilaon. These messages can be parsed by Eclipse.
$(foreach <variable>,
<list>, <operation>)
To perform an operaon on a list of variables. Each element
of the list is expanded in the rst argument variable, before
the operaon is applied on it.
$(shell <command>)
To execute a command outside of Make. This brings all the
power of Unix Shell into Makeles but is heavily system-
dependent. Avoid it if possible.
$(wildcard <pattern>) Select les and directory names according to a paern.
$(call <function>)
Allows evaluang a funcon or macro. One macro we
have seen is my-dir, which returns the directory path
of the last executed Makele. This is why LOCAL_PATH
:= $(call my-dir) is systemacally wrien at the
beginning of each Android.mk le, to save in the current
Makele directory.
With the call direcve, custom funcons can easily be wrien. These funcons look
somewhat similar to recursively aected variables, except that arguments can be dened:
$(1) for rst argument, $(2) for second argument, and so on. A call to a funcon can be
performed in a single line:
my_function=$(<do_something> ${1},${2})
$(call my_function,myparam)
Strings and les manipulaon funcons are available too:
$(join <str1>, <str2>) Concatenates two strings.
$(subst <from>,
<replacement>,<string>),
$(patsubst <pattern>,
<replacement>,<string>)
Replaces each occurrence of a substring by another.
The second one is more powerful, because it allows
using paerns (which must start with "%").
Porng exisng libraries to Android
[ 350 ]
$(filter <patterns>,
<text>)
$(filter-out <patterns>,
<text>)
Filter strings from a text matching paerns. This is
useful for ltering les. For example, the following
line lters any C le:
$(lter %.c, $(my_source_list))
$(strip <string>) Removes any unnecessary whitespace.
$(addprefix
<prefix>,<list>),
$(addsuffix <suffix>,
<list>)
Append a prex and sux, respecvely, to each
element of the list, each element being separated by
a space.
$(basename <path1>,
<path2>, ...)
Returns a string from which le extensions are
removed.
$(dir <path1>, <path2>),
$(notdir <path1>,
<path2>)
Extracts respecvely the directory and the lename
in a path, respecvely
$(realpath <path1>,
<path2>, ...),
$(abspath <path1>,
<path2>, ...)
Return both canonical paths of each path argument,
except that the second one does not evaluate
symbolic links.
This is just really an overview of what Makeles are capable of. For more informaon, refer
to the full Makele documentaon, available at http://www.gnu.org/software/make/
manual/make.html. If you are allergic to Makeles, have a look at CMake. CMake is a
simplied Make system, already building many open source libraries on the market. A port
of CMake on Android is available at http://code.google.com/p/android-cmake.
Have a go hero – mastering Makeles
We can play in a variety of ways with Makeles:
Try the aectaon operator. For example, write down the following piece of code
which uses the = operator in your Android.mk le:
my_value := Android
my_message := I am an $(my_value)
$(info $(my_message))
my_value := Android eating an apple
$(info $(my_message))

Chapter 9
[ 351 ]
Watch the result when launching compilaon. Then do the same using =.Print
current opmizaon mode. Use APP_OPTIM and internal variable, NDK_APP_
CFLAGS, and observe the dierence between release and debug modes:
$(info Optimization level: $(APP_OPTIM) $(NDK_APP_CFLAGS))
Check that variables are properly dened, for example:
ifndef LOCAL_PATH
$(error What a terrible failure! LOCAL_PATH not defined...)
endif
Try to use the foreach instrucon to print the list of les and directories
inside the project's root directory and its jni folder (and make sure to use
recursive aectaon):
ls = $(wildcard $(var_dir))
dir_list := . ./jni
files := $(foreach var_dir, $(dir_list), $(ls))
Try to create a macro to log a message to the standard output and its me:
log=$(info $(shell date +'%D %R'): $(1))
$(call log,My message)
Finally, test the my-dir macro behaviour, to understand why LOCAL_PATH :=
$(call my-dir) is systemacally wrien at the beginning of each Android.mk:
$(info MY_DIR =$(call my-dir))
include $(CLEAR_VARS)
$(info MY_DIR =$(call my-dir))
Summary
The present chapter introduced a fundamental aspect of the NDK: portability. Thanks to the
recent improvements in the building toolchain, the Android NDK can now take advantage
of the vast C/C++ ecosystem. It unlocks the door of a producve environment where code is
shared with other plaorms with the aim of creang new cung-edge applicaons eciently.
More specically, we learnt how to enable, include, and compile STL and Boost and use them
in our own code. We also enabled excepons and RTTI, and selected the appropriate STL
implementaon. Then, we ported Open Source libraries to Android. Finally, we discovered
how to write makeles with advanced instrucons and features.
In the next chapter, these foundaons will allow us to integrate a collision system and to
develop a new 3D graphics system.

10
Towards Professional Gaming
We have seen in the previous chapter how to port third-party libraries to
Android. More specically, we have compiled two of them: Box2D and Irrlicht.
In this chapter, we are going one step further by implemenng them concretely
in our sample applicaon DroidBlaster. This is the outcome of all the eort
made and all the stu learned unl now. This chapter highlights the path
toward the concrete realizaon of your own applicaon. Of course, there
is sll a very long way to go… but if the slope is steep, the road is straight!
By the end of this chapter, you should be able to do the following:
Simulate physics and handle collisions with Box2D
Display 3D graphics with Irrlicht
Simulating physics with Box2D
We have handled collisions or physics and with good cause! This is a rather complex subject,
involving maths, numerical integraon, soware opmizaon, and so on. To answer these
dicules, physics engine have been invented on the model of 3D engine, and Box2D is one
of them. This open source engine, iniated by Erin Cao in 2006, can simulate rigid body
movements and collisions in a 2D environment. Bodies are the essenal element of Box2D
and are characterized by:
A geometrical shape (polygons, circles, and so on)
Physics properes (such as density, fricon, restuon, and so on)
Movement constraints and joints (to link bodies together and restrict
their movement)

Towards Professional Gaming
[ 354 ]
All these bodies are orchestrated inside a World, which steps simulaon according to me.
In previous chapters, we have created GraphicsService, a SoundService, and
InputService. This me, let's implement PhysicsService with Box2D.
Project DroidBlaster_Part9-3 can be used as a starng point for
this part. The resulng project is provided with this book under
the name DroidBlaster_Part10-Box2D.
Time for action – simulating physics with Box2D
Let's encapsulate Box2D simulaon in a dedicated service rst:
1. First, create jni/PhysicsObject.hpp and insert Box2D main include le. Class
PhysicsObject exposes a locaon and a collision ag publicly. It holds various
Box2D properes dening a physical enty:
A reusable body denion to dene how to simulate a body
(stac, with rotaons).
A body to represent a body instance in the simulated world.
A shape to detect collisions. Here use a circle shape.
A xture to bind a shape to a body and dene a few physics properes.
The class PhysicsObject is set up with initialize() and refreshed with
update() aer each simulaon step. Method createTarget() will help us create
a joint for the ship.
#ifndef PACKT_PHYSICSOBJECT_HPP
#define PACKT_PHYSICSOBJECT_HPP
#include "PhysicsTarget.hpp"
#include "Types.hpp"
#include <boost/smart_ptr.hpp>
#include <Box2D/Box2D.h>
#include <vector>
namespace packt {
class PhysicsObject {
public:
typedef boost::shared_ptr<PhysicsObject> ptr;
typedef std::vector<ptr> vec; typedef vec::iterator vec_it;
public:
PhysicsObject(uint16 pCategory, uint16 pMask,
Downloa d f r o m W o w ! e B o o k < w w w.woweb o o k . c o m >Downloa d f r o m W o w ! e B o o k < w w w.woweb o o k . c o m >

Chapter 10
[ 355 ]
int32_t pDiameter, float pRestitution, b2World* pWorld);
PhysicsTarget::ptr createTarget(float pFactor);
void initialize(float pX, float pY,
float pVelocityX, float pVelocityY);
void update();
bool mCollide;
Location mLocation;
private:
b2World* mWorld;
b2BodyDef mBodyDef; b2Body* mBodyObj;
b2CircleShape mShapeDef; b2FixtureDef mFixtureDef;
};
}
#endif
2. Implement jni/PhysicsObject.cpp constructor to inialize all Box2D properes.
The body denion describes a dynamic body (as opposed to stac), awake (that
is, acvely simulated by Box2D), and which cannot rotate (a property especially
important for polygon shapes, meaning that it is always poinng upward).
Also note how we save a PhysicsObject self reference in userData eld, in order
to access it later inside Box2D callbacks
3. Dene body shape, which we approximate to a box. Box2D requires half dimension,
from object's center to its borders.
#include "PhysicsObject.hpp"
#include "Log.hpp"
namespace packt {
PhysicsObject::PhysicsObject(uint16 pCategory, uint16 pMask,
int32_t pDiameter, float pRestitution, b2World* pWorld) :
mLocation(), mCollide(false), mWorld(pWorld),
mBodyDef(), mBodyObj(NULL), mShapeDef(), mFixtureDef() {
mBodyDef.type = b2_dynamicBody;
mBodyDef.userData = this;
mBodyDef.awake = true;
mBodyDef.fixedRotation = true;
mShapeDef.m_p = b2Vec2_zero;
mShapeDef.m_radius = pDiameter / (2.0f * SCALE_FACTOR);
...

Towards Professional Gaming
[ 356 ]
4. Body xture is the glue which brings together body denion, shape, and also physical
properes. We also use it to set body category and mask. This allows us to lter
collisions between objects according to their category (for instance, asteroids must
collide with the ship but not between themselves). There is one category per bit.
Finally, eecvely instanate your body inside the Box2D physical world:
...
mFixtureDef.shape = &mShapeDef;
mFixtureDef.density = 1.0f;
mFixtureDef.friction = 0.0f;
mFixtureDef.restitution = pRestitution;
mFixtureDef.filter.categoryBits = pCategory;
mFixtureDef.filter.maskBits = pMask;
mFixtureDef.userData = this;
mBodyObj = mWorld->CreateBody(&mBodyDef);
mBodyObj->CreateFixture(&mFixtureDef);
mBodyObj->SetUserData(this);
}
...
5. Then take care of mouse joint creaon in createTarget().
When PhysicsObject is inialized, coordinates are converted from DroidBlaster
referenal to Box2D one. Indeed, Box2D performs beer with smaller coordinates.
When Box2D has nished simulang, each PhysicsObject instance converts
coordinates computed by Box2D back into DroidBlaster coordinates referenal:
...
PhysicsTarget::ptr PhysicsObject::createTarget(float pFactor)
{
return PhysicsTarget::ptr(
new PhysicsTarget(mWorld, mBodyObj, mLocation,
pFactor));
}
void PhysicsObject::initialize(float pX, float pY,
float pVelocityX, float pVelocityY) {
mLocation.setPosition(pX, pY);
b2Vec2 lPosition(pX / SCALE_FACTOR, pY / SCALE_FACTOR);
mBodyObj->SetTransform(lPosition, 0.0f);
mBodyObj->SetLinearVelocity(b2Vec2(pVelocityX,
pVelocityY));
}

Chapter 10
[ 357 ]
void PhysicsObject::update() {
mLocation.setPosition(
mBodyObj->GetPosition().x * SCALE_FACTOR,
mBodyObj->GetPosition().y * SCALE_FACTOR);
}
}
6. Now, create jni/PhysicsService.hpp header and again insert the Box2D
include le. Make PhysicsService inherit from b2ContactListener. A contact
listener gets noed about new collisions each me the simulaon is updated. Our
PhysicsService inherits one of its method named BeginContact().
Dene constants and member variables. Iteraon constants determine the
simulaon accuracy. Variable mWorld represents the whole Box2D simulaon
which contains all the physical bodies we are going to create:
#ifndef PACKT_PHYSICSSERVICE_HPP
#define PACKT_PHYSICSSERVICE_HPP
#include "PhysicsObject.hpp"
#include "TimeService.hpp"
#include "Types.hpp"
#include <Box2D/Box2D.h>
namespace packt {
class PhysicsService : private b2ContactListener {
public:
PhysicsService(TimeService* pTimeService);
status update();
PhysicsObject::ptr registerEntity(uint16 pCategory,
uint16 pMask, int32_t pDiameter, float pRestitution);
private:
void BeginContact(b2Contact* pContact);
private:
TimeService* mTimeService;
PhysicsObject::vec mColliders;
b2World mWorld;
static const int32_t VELOCITY_ITER = 6;
static const int32_t POSITION_ITER = 2;
};
}
#endif

Towards Professional Gaming
[ 358 ]
7. In the jni/PhysicsService.cpp source le, write PhysicsService constructor.
Inialize the world, seng the rst parameter to a zero vector (type b2vec). This
vector represents the gravity force, which is not necessary in DroidBlaster. Finally,
register the service as a listener of contact/collision event. This way, each me
simulaon is stepped, PhysicsService gets noed through callbacks.
Destroy Box2D resources in the destructor. Box2D uses its own internal (de)allocator.
Also implement registerEntity() to encapsulate physics object creaon:
#include "PhysicsService.hpp"
#include "Log.hpp"
namespace packt {
PhysicsService::PhysicsService(TimeService* pTimeService) :
mTimeService(pTimeService),
mColliders(), mWorld(b2Vec2_zero) {
mWorld.SetContactListener(this);
}
PhysicsObject::ptr PhysicsService::registerEntity(
uint16 pCategory, uint16 pMask, int32_t pDiameter,
float pRestitution) {
PhysicsObject::ptr lCollider(new PhysicsObject(pCategory,
pMask, pDiameter, pRestitution, &mWorld));
mColliders.push_back(lCollider);
return mColliders.back();
}
...
8. Write the update() method. First, it clears collision ags buered in
BeginContact() during previous iteraon. Then simulaon is performed by calling
Step() with a me period and iteraons constants dene simulaon accuracy. Finally,
PhysicsObject is updated (that is, locaon extracted from Box2D into our own
Location object) according to simulaon results. Box2D is going to handle mainly
collisions and simple movements. So xing velocity and posion iteraons to 6 and 2,
respecvely, is sucient.
...
status PhysicsService::update() {
PhysicsObject::vec_it iCollider = mColliders.begin();
for (; iCollider < mColliders.end() ; ++iCollider) {
(*iCollider)->mCollide = false;
}
Chapter 10
[ 359 ]
// Updates simulation.
float lTimeStep = mTimeService->elapsed();
mWorld.Step(lTimeStep, VELOCITY_ITER, POSITION_ITER);
// Caches the new state.
iCollider = mColliders.begin();
for (; iCollider < mColliders.end() ; ++iCollider) {
(*iCollider)->update();
}
return STATUS_OK;
}
...
9. The method BeginContact() is a callback inherited by b2ContactListener
to nofy about new collisions between bodies, two at a me (named A and B).
Event informaon is stored in a b2contact structure, which contains various
properes, such as fricon and restuon, and the two bodies involved through
their xture, which themselves contain a reference to our own PhysicsObject
(the UserData property set in GraphicsObject). We can use this link to switch
the PhysicsObject collision ag when Box2D detects one:
...
void PhysicsService::BeginContact(b2Contact* pContact) {
void* lUserDataA = pContact->GetFixtureA()->GetUserData();
if (lUserDataA != NULL) {
((PhysicsObject*)(lUserDataA))->mCollide = true;
}
void* lUserDataB = pContact->GetFixtureB()->GetUserData();
if (lUserDataB != NULL) {
((PhysicsObject*)(lUserDataB))->mCollide = true;
}
}
}
10. Finally, create jni/PhysicsTarget.hpp to encapsulate Box2D mouse joints.
The ship will follow the direcon specied in setTarget(). To do so, we need a
mulplier (mFactor) to simulate a target point from the input service output vector.
Mouse joints are usually good to simulate dragging eects or for
test purposes. They are easy to use but implemenng a precise
behavior with them is dicult.
#ifndef PACKT_PHYSICSTARGET_HPP
#define PACKT_PHYSICSTARGET_HPP

Towards Professional Gaming
[ 360 ]
#include "Types.hpp"
#include <boost/smart_ptr.hpp>
#include <Box2D/Box2D.h>
namespace packt {
class PhysicsTarget {
public:
typedef boost::shared_ptr<PhysicsTarget> ptr;
public:
PhysicsTarget(b2World* pWorld, b2Body* pBodyObj,
Location& pTarget, float pFactor);
void setTarget(float pX, float pY);
private:
b2MouseJoint* mMouseJoint;
float mFactor; Location& mTarget;
};
}
#endif
11. The source counterpart is jni/PhysicsTarget.cpp to encapsulate a
Box2D mouse joint. The ship will follow the direcon specied in setTarget()
each frame.
#include "PhysicsTarget.hpp"
#include "Log.hpp"
namespace packt {
PhysicsTarget::PhysicsTarget(b2World* pWorld, b2Body* pBodyObj,
Location& pTarget, float pFactor):
mFactor(pFactor), mTarget(pTarget) {
b2BodyDef lEmptyBodyDef;
b2Body* lEmptyBody = pWorld->CreateBody(&lEmptyBodyDef);
b2MouseJointDef lMouseJointDef;
lMouseJointDef.bodyA = lEmptyBody;
lMouseJointDef.bodyB = pBodyObj;
lMouseJointDef.target = b2Vec2(0.0f, 0.0f);
lMouseJointDef.maxForce = 50.0f * pBodyObj->GetMass();
lMouseJointDef.dampingRatio = 1.0f;
lMouseJointDef.frequencyHz = 3.5f;
mMouseJoint = (b2MouseJoint*)
pWorld->CreateJoint(&lMouseJointDef);
}

Chapter 10
[ 361 ]
void PhysicsTarget::setTarget(float pX, float pY) {
b2Vec2 lTarget((mTarget.mPosX + pX * mFactor) / SCALE_FACTOR,
(mTarget.mPosY + pY * mFactor) / SCALE_FACTOR);
mMouseJoint->SetTarget(lTarget);
}
}
12. Finally, add the PhysicsService to jni/Context.hpp like all the other
services created in previous chapters.
We can now go back to our asteroids and simulate them with our new
physics service.
13. In jni/Asteroid.hpp, replace locaon and speed by PhysicsObject instance:
...
#include "PhysicsService.hpp"
#include "PhysicsObject.hpp"
...
namespace dbs {
class Asteroid {
...
private:
...
packt::GraphicsSprite* mSprite;
packt::PhysicsObject::ptr mPhysics;
};
}
14. Makes use of this new physics object in jni/Asteroid.cpp source le. Physics
properes are registered with a category and mask. Here, Asteroids are declared
as belonging to category 1 (0X1 in hexadecimal notaon) and only bodies in
group 2 (0X2 in hexadecimal) are considered when evaluang collisions.
To spawn an asteroid, replace speed with the noon of velocity (expressed in m/s).
Because asteroid direcon will change when a collision occurs, asteroids are spawn
when they go outside the main area in update():
#include "Asteroid.hpp"
#include "Log.hpp"
namespace dbs {
Asteroid::Asteroid(packt::Context* pContext) :
mTimeService(pContext->mTimeService),
mGraphicsService(pContext->mGraphicsService) {
mPhysics = pContext->mPhysicsService->registerEntity(

Towards Professional Gaming
[ 362 ]
0X1, 0x2, 64, 1.0f);
mSprite = pContext->mGraphicsService->registerSprite(
mGraphicsService->registerTexture(
"/sdcard/droidblaster/asteroid.png"),
64, 64, &mPhysics->mLocation);
}
void Asteroid::spawn() {
const float MIN_VELOCITY = 1.0f, VELOCITY_RANGE=19.0f;
const float MIN_ANIM_SPEED = 8.0f, ANIM_SPEED_RANGE=16.0f;
float lVelocity = -(RAND(VELOCITY_RANGE) + MIN_VELOCITY);
float lPosX = RAND(mGraphicsService->getWidth());
float lPosY = RAND(mGraphicsService->getHeight())
+ mGraphicsService->getHeight();
mPhysics->initialize(lPosX, lPosY, 0.0f, lVelocity);
float lAnimSpeed = MIN_ANIM_SPEED + RAND(ANIM_SPEED_RANGE);
mSprite->setAnimation(8, -1, lAnimSpeed, true);
}
void Asteroid::update() {
if ((mPhysics->mLocation.mPosX < 0.0f) ||
(mPhysics->mLocation.mPosX > mGraphicsService->getWidth())||
(mPhysics->mLocation.mPosY < 0.0f) ||
(mPhysics->mLocation.mPosY > mGraphicsService->getHeight()*2)){
spawn();
}
}
}
15. Modify the jni/Ship.hpp header le in the same way as asteroids:
...
#include "PhysicsService.hpp"
#include "PhysicsObject.hpp"
#include "PhysicsTarget.hpp"
...
namespace dbs {
class Ship {
...

Chapter 10
[ 363 ]
private:
...
packt::GraphicsSprite* mSprite;
packt::PhysicsObject::ptr mPhysics;
packt::PhysicsTarget::ptr mTarget;
};
}
16. Rewrite jni/Ship.cpp with the new PhysicsObject. Ship is added to category
2 and is marked as colliding with category 1 only (that is, asteroids). Velocity and
movement is enrely managed by Box2D. We can now check in update() if an
asteroid collided:
#include "Ship.hpp"
#include "Log.hpp"
namespace dbs {
Ship::Ship(packt::Context* pContext) :
mInputService(pContext->mInputService),
mGraphicsService(pContext->mGraphicsService),
mTimeService(pContext->mTimeService) {
mPhysics = pContext->mPhysicsService->registerEntity(
0x2, 0x1, 64, 0.0f);
mTarget = mPhysics->createTarget(50.0f);
mSprite = pContext->mGraphicsService->registerSprite(
mGraphicsService->registerTexture(
"/sdcard/droidblaster/ship.png"),
64, 64, &mPhysics->mLocation);
mInputService->setRefPoint(&mPhysics->mLocation);
}
void Ship::spawn() {
mSprite->setAnimation(0, 8, 8.0f, true);
mPhysics->initialize(mGraphicsService->getWidth() * 1 / 2,
mGraphicsService->getHeight() * 1 / 4, 0.0f, 0.0f);
}
void Ship::update() {
mTarget->setTarget(mInputService->getHorizontal(),
mInputService->getVertical());
if (mPhysics->mCollide) {
packt::Log::info("Ship has been touched");
}
}
}

Towards Professional Gaming
[ 364 ]
Finally, let's instanate and run our physics service.
17. Modify jni/DroidBlaster.hpp to hold PhysicsService instance:
...
#include "PhysicsService.hpp"
...
namespace dbs {
class DroidBlaster : public packt::ActivityHandler {
...
private:
packt::GraphicsService* mGraphicsService;
packt::InputService* mInputService;
packt::PhysicsService* mPhysicsService;
packt::SoundService* mSoundService;
...
};
}
18. Update PhysicsService each me the game is stepped:
namespace dbs {
...
packt::status DroidBlaster::onStep()
{
...
if (mInputService->update() != packt::STATUS_OK) {
return packt::STATUS_KO;
}
if (mPhysicsService->update() != packt::STATUS_OK) {
return packt::STATUS_KO;
}
return packt::STATUS_OK;
}
...
}
19. Finally, instanate PhysicsService in the applicaon's main method:
...
#include "PhysicsService.hpp"
...
void android_main(android_app* pApplication) {
...

Chapter 10
[ 365 ]
packt::PhysicsService lPhysicsService(&lTimeService);
packt::SoundService lSoundService(pApplication);
packt::Context lContext = { &lGraphicsService, &lInputService,
&lPhysicsService, &lSoundService, &lTimeService };
...
}
What just happened?
We have created a physical simulaon using Box2D physics engine. We have seen how to do
the following:
Dene a physical representaon of enes (ships and asteroids)
Step a simulaon and detect/lter collisions between enes
Extracted simulaon state (that is, coordinates) to feed graphics representaon
The central point of access in Box2D is b2World, which stores a collecon of bodies to
simulate. A Box2D body is composed of the following:
b2BodyDef: This denes the body type (b2_staticBody, b2_dynamicBody, and
so on) and inial properes like its posion, angle (in radians), and so on.
b2Shape: This is used for collision detecon and to derive body mass from its
density and can be a b2PolygonShape, b2CircleShape, and so on
b2FixtureDef: This links together a body shape, a body denion, and its physical
properes, such as density
b2Body: This is a body instance in the world (that is, on per game object), created
from a body denion, a shape, and a xture
Bodies are characterized by a few physical properes:
Shape: This represents a circle in DroidBlaster, although a polygon or box could
also be used.
Density: This is in kg/m2, to compute body mass depending on its shape and size.
Value should be greater or equal to 0.0. A bowling ball has a bigger density than a
soccer ball.
Fricon: This property shows how much a body slides on another (for example, a car
on a road or on an icy path). Values are typically in the range 0.0 to 1.0, where 0.0
implies no fricon and 1.0 means strong fricon.
Restuon: This property shows how much a body reacts to a collision, for example,
a bouncing ball. Value 0.0 means no restuon and 1.0 full restuon.
Towards Professional Gaming
[ 366 ]
When running, bodies are subject to the following:
Forces: This make bodies move linearly.
Torques: This represents rotaonal force applied on a body.
Damping: This is similar to fricon but it does not occur only when a body is in contact
with another. It can be considered as the eect of air fricon slowing down a body.
Box2D is tuned for worlds containing objects at a scale from 0.1 to 10 (unit in meters). When
used outside this range, again numerical approximaon can make simulaon inaccurate.
Thus, it is very necessary to scale coordinates from the Box2D referenal, where object
should to be kept in the (rough) range [0.1, 10] and, to the game or directly to the graphics
referenal. This is where SCALE_FACTOR is used for coordinate transformaon.
Box2D memory management
Box2D uses its own allocators to opmize memory management. So to create
and destroy Box2D objects, one needs to systemacally use the provided
factory methods (CreateX(), DestroyX()). Most of the me, Box2D
will manage memory automacally for you. When an object is destroyed, all
related child objects get destroyed (for instance, the bodies are destroyed
when the world is destroyed). But if you need to get rid of your objects earlier,
and thus manually, then always destroy them.
More on collision detection
Several ways of detecng and handling collisions exist in Box2D. The most basic one consists
in checking all contacts stored in the world or in a body aer they are updated. But this can
result in missed contacts that happen surrepously during Box2D internal iteraons.
A beer way we have seen to detect contacts is the b2ContactListener, which can be
registered on the world object. Four callbacks can be overridden:
BeginContact(b2Contact): This is to detect when two bodies enter in collision.
EndContact(b2Contact): This is the counterpart of BeginContact(), which
indicates when bodies are not in collision any more. A call to BeginContact() is
always followed by a matching EndContact().
PreSolve(b2Contact, b2Manifold): This is called aer a collision is detected
but before collision resoluon, that is, before impulse resulng from the collision
is computed. The b2Manifold structure holds informaon about contact points,
normals, and so on in a single place.
PostSolve(b2Contact, b2ContactImpulse): This is called aer actual
impulse (that is, physical reacon) has been computed by Box2D.
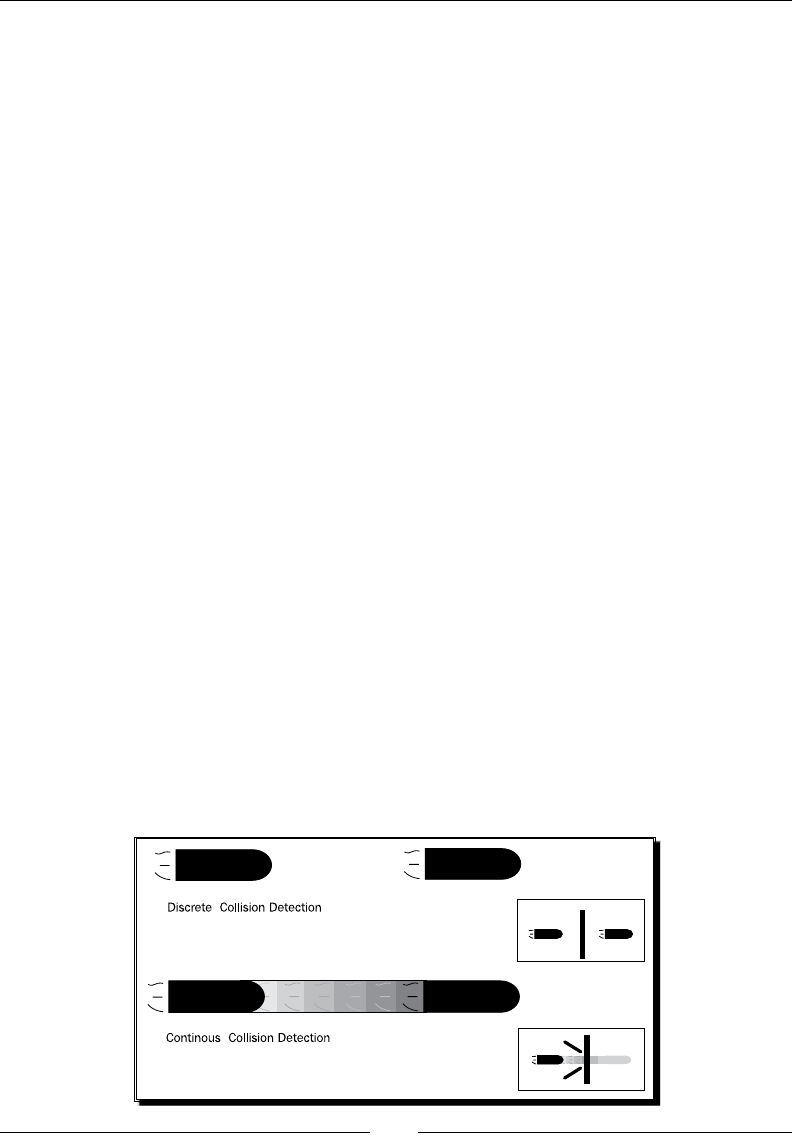
Chapter 10
[ 367 ]
The rst two callbacks are interesng to trigger game logic (for example, enty destrucon).
The last two are interesng to alter physics simulaon (more specically to ignore some
collisions by disabling a contact) while it is being computed or to get more accurate details
about it. For instance, use PreSolve() to create a one-sided plaorm to which an enty
collides only when it falls from above (not when it jumps from below). Use PostSolve()
to detect collision strength and calculate damages accordingly.
Methods PreSolve() and PostSolve() can be called several mes between
BeginContact() and EndContact(), which can be called themselves from zero to
several mes during one world update. A contact can begin during one simulaon step
and terminate several steps aer. In that case, event solving callbacks will be occurring
connuously during in-between steps. As many collisions can occur while stepping
simulaon, callbacks can be called lot of mes and should be as ecient as possible.
When analyzing collisions inside BeginContact() callback, we have buered a collision
ag. This is necessary because Box2D reuses the b2Contact parameter passed when a
callback is triggered. In addion, as these callbacks are called while simulaon is computed,
physics bodies cannot be destroyed at that instance but only aer simulaon stepping is
over. Thus, it is highly advised to copy any informaon gathered there for post-processing
(for example, to destroy enes).
Collision modes
I would like to point out that Box2D oers a so-called bullet mode that can be acvated
on a body denion using corresponding Boolean member:
mBodyDef.bullet = true;
This mode is necessary for fast moving objects like bullets! By default, Box2D uses Discrete
Collision Detecon, which considers bodies at their nal posion for collision detecon,
missing any body located between inial and nal posions. But for a fast moving body, the
whole path followed should be considered. This is more formally called Connuous Collision
Detecon. Obviously, CCD is expensive and should be used with parsimony:
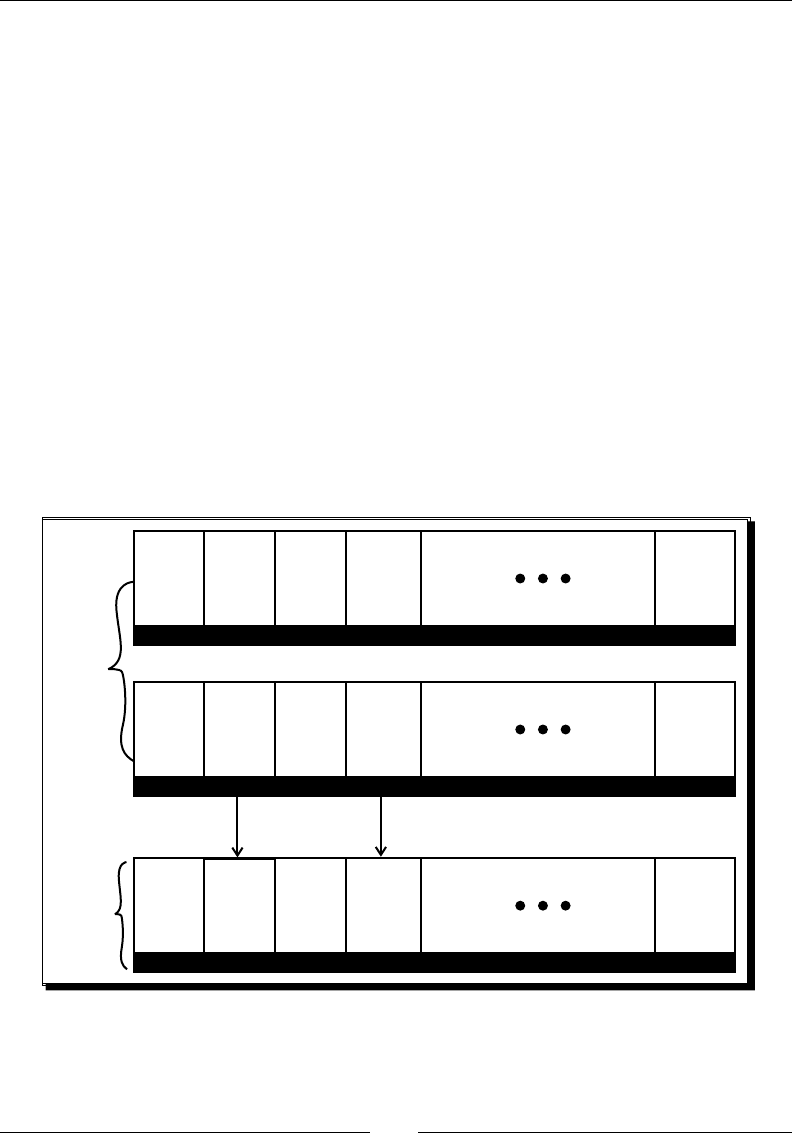
Towards Professional Gaming
[ 368 ]
We somemes want to detect when bodies overlap without generang collisions (like a
car reaching the nish line): this is called a sensor. A sensor can be easily set by seng
isSensor Boolean member to true in the xture:
mFixtureDef.isSensor = true;
A sensor can be queried with a listener through BeginContact() and EndContact()
or by using IsTouching() shortcut on a b2Contact class.
Collision ltering
Another important aspect of collision is about... not colliding! Or more precisely about
ltering collisions… A kind of ltering can be performed in PreSolve() by disabling
contacts. This is the most exible and powerful soluon but also the most complex.
But as we have seen it, ltering can be performed in a more simple way by using categories
and masks technique. Each body is assigned one or more category (each being represented
by one bit in a short integer, the categoryBits member) and a mask describing categories
of body they can collide with (each ltered category being represented by a bit set to 0, the
maskBits member):
Body A
Category
16
0
Category Category Category Category
1
234
0 1 0
1
Category
16
0
Mask Mask Mask Mask
1
234
0
1
01
Category
16
0
Category Category Category Category
0
234
1 0 0
1
Body B
In the preceding gure, Body A is in category 1 and 3 and collide with bodies in categories
2 and 4, which is the case for this poor body B unless its mask lters collision with body A
categories (that is, 1 and 3). In other words, both the bodies A and B must agree to collide!

Chapter 10
[ 369 ]
Box2D also has a noon of collision groups. A body has a collision group set to any
of the following:
Posive integer: This means others bodies with the same collision group value
can collide
Negave integer: This means others bodies with the same collision group value
are ltered
This could have been a soluon, although less exible than categories and masks, to avoid
collision between asteroids in DroidBlaster. Note that groups are ltered before categories.
A more exible soluon than category/group lters is the class b2ContactFilter. This
class has a method ShouldCollide(b2Fixture, b2Fixture) that you can customize to
perform your own ltering. Actually, category/group ltering are themselves implemented
that way.
More resources about Box2D
This was a short introducon to Box2D, which is capable of much more! We have le
the following in the shadow:
Joints: two bodies linked together
Raycasng: to query a physics world (for example, which locaon is a gun
poinng toward).
Contact properes: normals, impulses, manifolds, and so on
Box2D has a really nice documentaon with much useful informaon that can be found at
http://www.box2d.org/manual.html. Moreover, Box2D is packaged with a test bed
directory (in Box2D/Testbed/Tests) featuring many use cases. Have a look to get a beer
understanding of its capabilies. Because physics simulaons can someme be rather tricky,
I also encourage you to visit Box2D forum, which is quite acve, at http://www.box2d.
org/forum/.
Running a 3D engine on Android
DroidBlaster now includes a nice and shiny physics engine. Now, let's run the Irrlicht
engine, created by a game developer Nikolaus Gebhardt in 2002. This engine supports
many features:
OpenGL ES 1 and (parally) Open GL ES 2 support
2D graphics capabilies
Support many images and mesh les formats (PNG, JPEG, OBJ, 3DS, and so on)
Towards Professional Gaming
[ 370 ]
Import Quake levels in BSP format
Skinning to deform and animate meshes with bones
Terrain rendering
Collision handling
GUI system
And even much more. Now, let's add a new dimension to DroidBlaster by running Irrlicht
GLES 1.1 renderer with the xed rendering pipeline.
Project DroidBlaster_Part10-Box2D can be used as a starng point
for this part. The resulng project is provided with this book under
the name DroidBlaster_Part10-Irrlicht.
Time for action – rendring 3D graphics with Irrlicht
1. First, let's get rid of all unnecessary stu. Remove GraphicsSprite,
GraphicsTexture, and GraphicsTileMap and Background header and source
les in the jni folder.
First, we need to clean up the code and rewrite the graphics service.
2. Create a new le jni/GraphicsObject.hpp, which includes Irrlicht.h
header.
GraphicsObject encapsulates an Irrlicht scene node, that is, an object in the 3D
world. Nodes can form a hierarchy, child nodes moving accordingly to their parent
(for example, a turret on a tank) and inhering some of their properes
(for example, visibility).
We also need a reference to a locaon in our own coordinate format (coming from
our Box2D PhysicsService) and the name of the mesh, and texture resources
we need:
#ifndef PACKT_GRAPHICSOBJECT_HPP
#define PACKT_GRAPHICSOBJECT_HPP
#include "Types.hpp"
#include <boost/shared_ptr.hpp>
#include <irrlicht.h>
#include <vector>
namespace packt {
class GraphicsObject {
public:

Chapter 10
[ 371 ]
typedef boost::shared_ptr<GraphicsObject> ptr;
typedef std::vector<ptr> vec;
typedef vec::iterator vec_it;
public:
GraphicsObject(const char* pTexture, const char* pMesh,
Location* pLocation);
void spin(float pX, float pY, float pZ);
void initialize(irr::scene::ISceneManager* pSceneManager);
void update();
private:
Location* mLocation;
irr::scene::ISceneNode* mNode;
irr::io::path mTexture; irr::io::path mMesh;
};
}
#endif
3. In jni/GraphicsObject.cpp, write the class constructor.
Create a spin() method that will be used to animate asteroids with a connuous
rotaon. First, remove any previous animaon potenally set. Then, create a rotaon
animator applied to the Irrlicht node. Finally, free animator resources (with Drop()):
#include "GraphicsObject.hpp"
#include "Log.hpp"
namespace packt {
GraphicsObject::GraphicsObject(const char* pTexture,
const char* pMesh, Location* pLocation) :
mLocation(pLocation), mNode(NULL),
mTexture(pTexture), mMesh(pMesh)
{}
void GraphicsObject::spin(float pX, float pY, float pZ) {
mNode->removeAnimators();
irr::scene::ISceneNodeAnimator* lAnimator =
mNode->getSceneManager()->createRotationAnimator(
irr::core::vector3df(pX, pY, pZ));
mNode->addAnimator(lAnimator);
lAnimator->drop();
}
...

Towards Professional Gaming
[ 372 ]
4. Inialize Irrlicht resources in the corresponding method initialize(). First, load
the requested 3D mesh and its texture according to their path on disk. If resources
are already loaded, Irrlicht takes care of reusing them. Then, create a scene node
aached to the 3D world. It must contain the newly loaded 3D mesh with the newly
loaded texture applied on its surface. Although this is not compulsory, meshes are
going to be lighted dynamically (EMF_LIGHTING ag). Lights will be set up later.
Finally, we need an update() method whose only purpose is to convert coordinates
from DroidBlaster referenal to Irrlicht referenal, which are almost idencal (both
indicate the object center with the same scale), almost because Irrlicht needs a third
dimension. Obviously, it will be possible to use Irrlicht coordinates everywhere:
...
void GraphicsObject::initialize(
irr::scene::ISceneManager* pSceneManager) {
irr::scene::IAnimatedMesh* lMesh =
pSceneManager->getMesh(mMesh);
irr::video::ITexture* lTexture = pSceneManager->
getVideoDriver()->getTexture(mTexture);
mNode = pSceneManager->addMeshSceneNode(lMesh);
mNode->setMaterialTexture(0, lTexture);
mNode->setMaterialFlag(irr::video::EMF_LIGHTING, true);
}
void GraphicsObject::update() {
mNode->setPosition(irr::core::vector3df(
mLocation->mPosX, 0.0f, mLocation->mPosY));
}
}
5. Open exisng le jni/GraphicsService.hpp to replace the older code with
Irrlicht. GraphicsService requires quite some change! Clean up all the stu about
GraphicsSprite, GraphicsTexture, GraphicsTileMap, and TimeService.
Then, insert Irrlicht main include le in place of previous graphics headers.
Replace previous registraon methods with a registerObject() similar to
the one we created in PhysicsService. It takes a mesh and texture le path in
parameters and returns a GraphicsObject dened as follows:
#ifndef _PACKT_GRAPHICSSERVICE_HPP_
#define _PACKT_GRAPHICSSERVICE_HPP_
#include "GraphicsObject.hpp"
#include "TimeService.hpp"
#include "Types.hpp"
#include <android_native_app_glue.h>

Chapter 10
[ 373 ]
#include <irrlicht.h>
#include <EGL/egl.h>
namespace packt {
class GraphicsService {
public:
...
GraphicsObject::ptr registerObject(const char* pTexture,
const char* pMesh, Location* pLocation);
protected:
...
...
6. Declare Irrlicht-related member variables and a vector to store all GraphicsObject
that will be displayed on screen. Irrlicht central class is IrrlichtDevice, which
gives access to any Irrlicht features. IvideoDriver is also an important class which
abstracts 2D/3D graphical operaons and resource management. ISceneManager
handles the simulated 3D world:
...
private:
...
EGLContext mContext;
irr::IrrlichtDevice* mDevice;
irr::video::IVideoDriver* mDriver;
irr::scene::ISceneManager* mSceneManager;
GraphicsObject::vec mObjects;
};
}
#endif
7. In jni/GraphicsService.cpp source le and update class constructor, EGL setup
remains as before. Indeed, the Irrlicht-to-Android glue code (CirrDeviceAndroid)
is an empty stub. Inializaon is le to the client (originally on the Java side) which
is performed by our own code navely in start().
So this part does not change much: just request a depth buer to blend 3D objects
properly and remove loadResources() as Irrlicht now takes care of that.
When applicaon stops, releases Irrlicht resources with a call to Drop():
...
namespace packt {
GraphicsService::GraphicsService(android_app* pApplication,
TimeService* pTimeService) :
...

Towards Professional Gaming
[ 374 ]
mContext(EGL_NO_SURFACE),
mDevice(NULL), mObjects()
{}
...
status GraphicsService::start() {
...
const EGLint lAttributes[] = {
EGL_RENDERABLE_TYPE, EGL_OPENGL_ES_BIT,
EGL_BLUE_SIZE, 5, EGL_GREEN_SIZE, 6, EGL_RED_SIZE, 5,
EGL_DEPTH_SIZE, 16, EGL_SURFACE_TYPE, EGL_WINDOW_BIT,
EGL_NONE
};
...
}
void GraphicsService::stop() {
mDevice->drop();
if (mDisplay != EGL_NO_DISPLAY) {
...
}
...
8. Now comes the interesng part: setup(). First, inialize Irrlicht by invoking
createDevice() factory method. The important parameter is EDT_OGLES1 which
indicates which renderer to use for rendering. The addional parameters describe
window properes (dimensions, bit depth, and so on).
Then, set up Irrlicht so that it accesses resources through les (resources could also
be compressed in an archive) relave to /sdcard/droidblaster directory. Finally,
retrieve the video driver and the scene manager that we are oen going to use:
void GraphicsService::setup() {
mDevice = irr::createDevice(irr::video::EDT_OGLES1,
irr::core::dimension2d<irr::u32>(mWidth, mHeight), 32,
false, false, false, 0);
mDevice->getFileSystem()->addFolderFileArchive(
"/sdcard/droidblaster/");
mDriver = mDevice->getVideoDriver();
mSceneManager = mDevice->getSceneManager();
...

Chapter 10
[ 375 ]
9. In setup(), prepare the scene with a light for dynamic mesh lighng (the last
parameter being the light range) and a camera posioned to simulate a top view
(values are empirical). As you can see, every object of a 3D world is considered
as a node in the scene manager, a light as well as a camera, or anything else:
...
mSceneManager->setAmbientLight(
irr::video::SColorf(0.85f,0.85f,0.85f));
mSceneManager->addLightSceneNode(NULL,
irr::core::vector3df(-150, 200, -50),
irr::video::SColorf(1.0f, 1.0f, 1.0f), 4000.0f);
irr::scene::ICameraSceneNode* lCamera =
mSceneManager->addCameraSceneNode();
lCamera->setTarget(
irr::core::vector3df(mWidth/2, 0.0f, mHeight/2));
lCamera->setUpVector(irr::core::vector3df(0.0f, 0.0f, 1.0f));
lCamera->setPosition(
irr::core::vector3df(mWidth/2, mHeight*3/4, mHeight/2));
...
10. Instead of a le map, we are going to create parcles to simulate a background star
eld. To do so, create a new parcle system node, eming parcles randomly from
a virtual box located on top of the screen. Depending on the rate chosen, more or
less parcles are emied. The lifeme leaves enough me for parcles to cross the
screen from their emission point from the top to the boom. Parcles can have
dierent sizes (from 1.0 to 8.0). When we are done seng up the parcle emier,
we can release it with drop():
...
irr::scene::IParticleSystemSceneNode* lParticleSystem =
mSceneManager->addParticleSystemSceneNode(false);
irr::scene::IParticleEmitter* lEmitter =
lParticleSystem->createBoxEmitter(
// X, Y, Z of first and second corner.
irr::core::aabbox3d<irr::f32>(
-mWidth * 0.1f, -300, mHeight * 1.2f,
mWidth * 1.1f, -100, mHeight * 1.1f),
// Direction and emit rate.
irr::core::vector3df(0.0f,0.0f,-0.25f), 10.0f, 40.0f,
// darkest and brightest color
Downloa d f r o m W o w ! e B o o k < w w w.woweb o o k . c o m >Downloa d f r o m W o w ! e B o o k < w w w.woweb o o k . c o m >

Towards Professional Gaming
[ 376 ]
irr::video::SColor(0,255,255,255),
irr::video::SColor(0,255,255,255),
// min and max age, angle
8000.0f, 8000.0f, 0.0f,
// min and max size.
irr::core::dimension2df(1.f,1.f),
irr::core::dimension2df(8.f,8.f));
lParticleSystem->setEmitter(lEmitter);
lEmitter->drop();
...
11. To nish with the star eld, set up parcle texture (here star.png) and graphical
properes (transparency is needed but not the Z-buer nor lighng). When everything
is ready, you can inialize all GraphicsObjects referenced by game objects:
...
lParticleSystem->setMaterialTexture(0,
mDriver->getTexture("star.png"));
lParticleSystem->setMaterialType(
irr::video::EMT_TRANSPARENT_VERTEX_ALPHA);
lParticleSystem->setMaterialFlag(
irr::video::EMF_LIGHTING, false);
lParticleSystem->setMaterialFlag(
irr::video::EMF_ZWRITE_ENABLE, false);
GraphicsObject::vec_it iObject = mObjects.begin();
for (; iObject < mObjects.end() ; ++iObject) {
(*iObject)->initialize(mSceneManager);
}
}
...
12. The important method of GraphicsService is update(). First, update each
GraphicsObject to refresh its posion in the Irrlicht referenal.
Then, run the device to process nodes (for example, to emit parcles). Then draw
the scene between a call to beingScene() (with a background color set to black
here) and endScene(). Scene drawing is delegated to the scene manager and its
internal nodes.
Finally, rendered scene can be displayed on screen as usual:
...
status GraphicsService::update() {
GraphicsObject::vec_it iObject = mObjects.begin();
for (; iObject < mObjects.end() ; ++iObject) {
(*iObject)->update();
}

Chapter 10
[ 377 ]
if (!mDevice->run()) return STATUS_KO;
mDriver->beginScene(true, true,
irr::video::SColor(0,0,0,0));
mSceneManager->drawAll();
mDriver->endScene();
if (eglSwapBuffers(mDisplay, mSurface) != EGL_TRUE) {
...
}
...
To nish with GraphicsService, implement registerObject() method:
...
GraphicsObject::ptr GraphicsService::registerObject(
const char* pTexture, const char* pMesh, Location* pLocation) {
GraphicsObject::ptr lObject(new GraphicsObject(mSceneManager,
pTexture, pMesh, pLocation));
mObjects.push_back(lObject);
return mObjects.back();
}
}
The graphics module now renders scene with Irrlicht. So let's update game
enes accordingly.
13. Modify jni/Asteroid.hpp to reference a GraphicsObject instead of a sprite:
...
#include "GraphicsService.hpp"
#include "GraphicsObject.hpp"
#include "PhysicsService.hpp"
...
namespace dbs {
class Asteroid {
...
private:
packt::GraphicsService* mGraphicsService;
packt::TimeService* mTimeService;
packt::GraphicsObject::ptr mMesh;
packt::PhysicsObject::ptr mPhysics;
};
}
#endif

Towards Professional Gaming
[ 378 ]
14. Edit jni/Asteroid.cpp counterpart to register a GraphicsObject.
When an asteroid is recreated, its spin is updated with the corresponding method.
We do not need an animaon speed anymore:
...
namespace dbs {
Asteroid::Asteroid(packt::Context* pContext) :
mTimeService(pContext->mTimeService),
mGraphicsService(pContext->mGraphicsService) {
mPhysics = pContext->mPhysicsService->registerEntity(
0X1, 0x2, 64, 1.0f);
mMesh = pContext->mGraphicsService->registerObject(
"rock.png", "asteroid.obj", &mPhysics->mLocation);
}
void Asteroid::spawn() {
...
mPhysics->initialize(lPosX, lPosY, 0.0f, lVelocity);
float lSpinSpeed = MIN_SPIN_SPEED + RAND(SPIN_SPEED_RANGE);
mMesh->spin(0.0f, lSpinSpeed, 0.0f);
}
...
}
15. Also update jni/Ship.hpp header le, as done for asteroids:
...
#include "GraphicsService.hpp"
#include "GraphicsObject.hpp"
#include "PhysicsService.hpp"
...
namespace dbs {
class Ship {
...
private:
...
packt::TimeService* mTimeService;
Chapter 10
[ 379 ]
packt::GraphicsObject::ptr mMesh;
packt::PhysicsObject::ptr mPhysics;
packt::PhysicsTarget::ptr mTarget;
};
}
#endif
16. Change Ship.cpp to register a stac mesh. Remove animaon stu in spawn():
...
namespace dbs {
Ship::Ship(packt::Context* pContext) :
... {
mPhysics = pContext->mPhysicsService->registerEntity(
0x2, 0x1, 64, 0.0f);
mTarget = mPhysics->createTarget(50.0f);
mMesh = pContext->mGraphicsService->registerObject(
"metal.png", "ship.obj", &mPhysics->mLocation);
mInputService->setRefPoint(&mPhysics->mLocation);
}
void Ship::spawn() {
mPhysics->initialize(mGraphicsService->getWidth() * 1 / 2,
mGraphicsService->getHeight() * 1 / 4, 0.0f, 0.0f);
}
...
}
We are almost done. Do not forget to remove references to Background in the
DroidBlaster class.
17. Before running the applicaon, 3D meshes and textures need to be copied on the SD
Card, in /sdcard/droidblaster directory given to Irrlicht at step 8. This path may
have to be adapted depending on your device SD Card mount point (like explained
in Chapter 9, Porng Exisng Libraries to Android).
Resource les are provided with this book in Chapter10/Resource.
Towards Professional Gaming
[ 380 ]
What just happened?
We have seen how to embed and reuse a 3D engine in an Android applicaon to display 3D
graphics. If you run DroidBlaster on your Android device, you should obtain the following
result. Asteroids look nicer in 3D and the star eld gives a simple and nice depth impression:
Irrlicht main entry point is the IrrlichtDevice class, from which we have been able to
access anything in the engine, few of them are as follows:
IVideoDriver, which is a shell around the graphics renderer, managing graphics
resources, such as textures
ISceneManager, which manages the scene through a hierarchical tree of nodes
In other words, you draw a scene using the video driver and indicate the enes to display,
their posion, and properes through the scene manager (which manages a 3D world
through nodes).
Memory management in Irrlicht
Internally, Irrlicht uses reference counng to manage object lifeme
properly. The rule of thumb is simple: when a factory method contains
create (for example, createDevice()) in its name, then there
must be a matching call to drop() to release resources.
Chapter 10
[ 381 ]
More specically, we have used mesh nodes to display ship and asteroids, the later being
animated through an animator. We have used a simple rotaon animator but more are
provided (to animate objects over a path, for collisions, and so on).
3D modeling with Blender
The best open source 3D authoring tool nowadays is Blender.
Blender can model meshes, texture them, export them, generate
lightmaps, and many other things. More informaon and the
program itself can be found at http://www.blender.org/.
More on Irrlicht scene management
Let's linger a bit on the scene manager which is an important aspect of Irrlicht. As exposed
during the step-by-step tutorial, a node basically represents an object in the 3D world, but
not always a visible one. Irrlicht features many kinds of custom nodes:
IAnimatedMeshSceneNode: This is the most basic node. It renders a 3D mesh to
which one or more textures (for mul-texturing) can be aached. As it is stated by
its name, such a node can be animated with key frames and bones (for example,
when using Quake .md2 format).
IBillboardSceneNode: This displays a sprite inside a 3D world (that is, a textured
plane which always faces the camera).
ICameraSceneNode: This is the node through which you can see the 3D world.
Thus, this is a non-visible node.
ILightSceneNode: This illuminates world objects. We are talking here about
dynamic lighng, calculated on meshes per frames. This can be expensive and
should be acvated only if necessary. Light-mapping, which can be described as,
an interesng technique to avoid expensive light calculaon.
IParticleSceneNode: This emits parcles like we have done to simulate a
star eld.
ITerrainSceneNode: This renders an outdoor terrain (with hills, moutains, …)
from an heightmap. It provides automac Level of Detail (or LOD) handling for
depending on the distance of the terrain chunk.
Nodes have a hierarchical structure and can be aached to a parent. Irrlicht also provides
some spaal indexing (to cull meshes quickly) such as Octree or BSP to cull meshes
in complex scenes. Irrlicht is a rich engine and I encourage you to have a look at its
documentaon available at http://irrlicht.sourceforge.net/. Its forum is
also quite acve and helpful.

Towards Professional Gaming
[ 382 ]
Summary
This chapter demonstrated the re-usability possibilies oered by the Android NDK. It
is a step forward to the creaon of the professional applicaons with an emphasize on
something essenal in this fast-moving mobile world: producvity.
More specically, we saw how to simulate a physical world by porng Box2D and how to
display 3D graphics with the exisng engine, Irrlicht. We highlighted the path towards the
creaon of professional applicaons using the NDK as a leverage. But do not expect all
C/C++ libraries to be ported so easily.
Talking about paths, we are almost at the end. The next, and last, chapter introduces
advanced techniques to debug and troubleshoot NDK applicaons and make you fully
prepared for Android development.
11
Debugging and Troubleshooting
This introducon to the Android NDK would not be complete without approaching
some more advanced topics: debugging and troubleshoong code. Indeed, C/C++
are complex languages that can fail in many ways.
I will not lie to you: NDK debugging features are rather rubbish yet. It is oen
more praccal and fast to rely on simple log messages. This is why debugging
is presented in this last chapter. But sll, a debugger can save quite some me
in complex programs or even worse... crashing programs! But even in that case,
there exist alternave soluons.
More specically, we are going to discover how to do the following:
Debug nave code with GDB
Interpret a stack trace dump
Analyze program performances with GProf
Debugging with GDB
Because Android NDK is based on the GCC toolchain, Android NDK includes GDB, the GNU
Debugger, to allow starng, pausing, examining, and altering a program. On Android and
more generally on embedded devices, GDB is congured in client/server mode. The program
runs on a device as a server and a remote client, the developer's workstaon connects to it
and sends debugging commands as for a local applicaon.
GDB itself is a command-line ulity and can be cumbersome to use manually. Hopefully,
GDB is handled by most IDE and especially CDT. Thus, Eclipse can be used directly to add
breakpoints and inspect a program, only if it has been properly congured before!
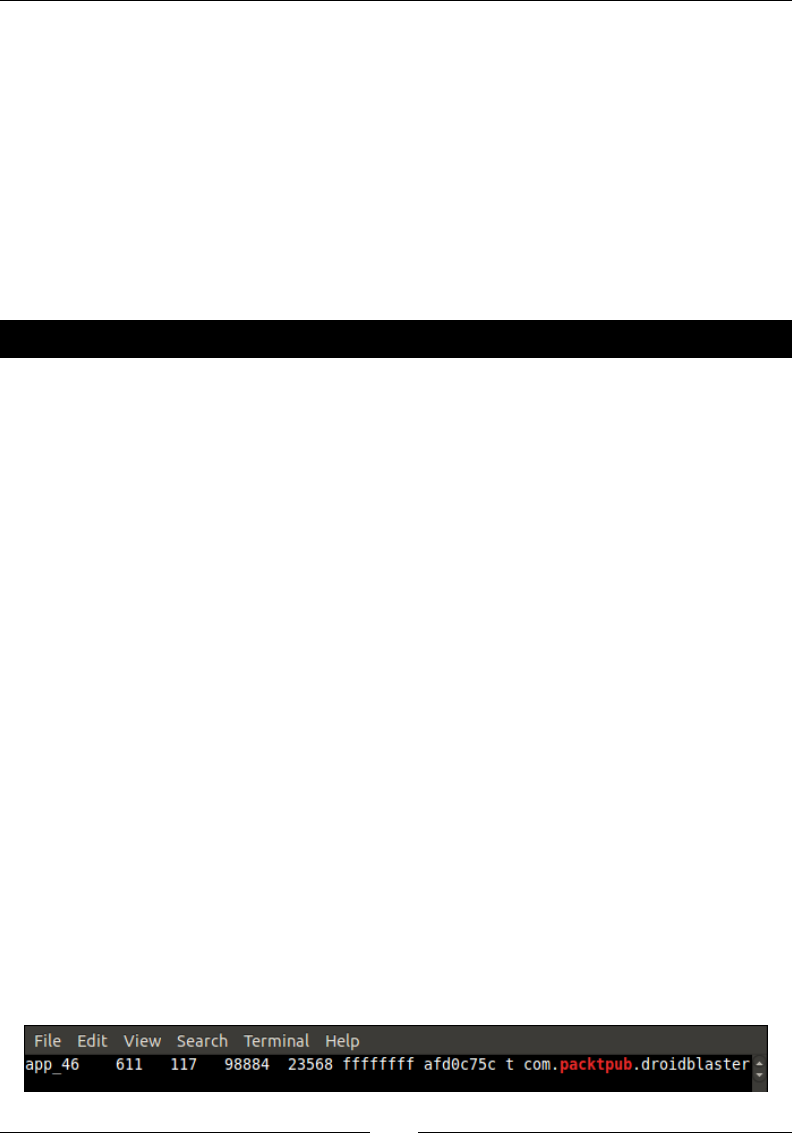
Debugging and Troubleshoong
[ 384 ]
Indeed, Eclipse can insert breakpoints easily in Java as well as C/C++ source les by clicking
in the guer, to the text editor's le. Java breakpoints work out of the box thanks to the ADT
plugin, which manages debugging through the Android Debug Bridge. This is not true for CDT
which is naturally not Android-aware. Thus, inserng a breakpoint will just do nothing unless
we manage to congure CDT to use the NDK's GDB, which itself needs to be bound to the
nave Android applicaon to debug.
Debugger support has improved among NDK releases (for example, debugging purely nave
threads was not working before). Although it is geng more usable, in NDK R5 (and even
R7), situaon is far from perfect . But, it can sll help! Let's see now concretely how to debug
a nave applicaon.
Time for action – debugging DroidBlaster
Let's enable debugging mode in our applicaon rst:
1. The rst important thing to do but really easy to forget is to acvate the
debugging ag in your Android project. This is done in the applicaon manifest
AndroidManifest.xml. Do not forget to use the appropriate SDK version for
nave code:
<?xml version="1.0" encoding="utf-8"?>
<manifest ...>
<uses-sdk android:minSdkVersion="10"/>
<application ...
android:debuggable="true">
...
2. Enabling debug ag in manifest automacally acvates debug mode in nave code.
However, APP_OPTIM ag also controls debug mode. If it has been manually set in
Android.mk, then check that its value is set to debug (and not release) or simply
remove it:
APP_OPTIM := debug
First, let's congure the GDB client that will connect to the device:
3. Recompile the project. Plug your device in or launch the emulator. Run and leave your
applicaon. Ensure the applicaon is loaded and its PID available. You can check it by
lisng processes using the following command. One line should be returned:
$ adb shell ps |grep packtpub
Chapter 11
[ 385 ]
4. Open a terminal window and go to your project directory. Run the ndk-gdb command
(located in $ANDROID_NDK folder, which should already be in your $PATH):
$ ndk-gdb
This command should return no message and create three les in obj/local/
armeabi:
gdb.setup: This is a conguraon le generated for GDB client.
app_process: This le is retrieved directly from your device. It is a system
executable le (that is, Zygote, see Chapter 2, Creang, Compiling, and
Deploying Nave Projects), launched when system starts up and forked to
start a new applicaon. GBD needs this reference le to nd its marks. It is
in some way the binary entry point of your app.
libc.so: This is also retrieved from your device. It is the Android standard
C library (commonly referred as bionic) used by GDB to keep track of all the
nave threads created during runme.
Append –verbose ag to have a detailed feedback on what
ndk-gdb does. If ndk-gdb complains about an already running
debug session, then re-execute ndk-gdb with the –force ag.
Beware, some devices (especially HTC ones) do not work in debug
mode unless they are rooted with a custom ROM (for example,
they return a corrupt installaon error).
5. In your project directory, copy obj/local/armeabi/gdb.setup and name it
gdb2.setup. Open it and remove the following line which requests GDB client to
connect to the GDB server running on the device (to be performed by Eclipse itself):
target remote :5039
6. In the Eclipse main menu, go to Run | Debug Conguraons... and create a new
Debug conguraon in the C/C++ Applicaon item called DroidBlaster_JNI. This
conguraon will start GDB client on your computer and connect to the GDB Server
running on the device.
7. In the Main tab, set:
Project to your own project directory (for example, DroidBlaster_
Part8-3).
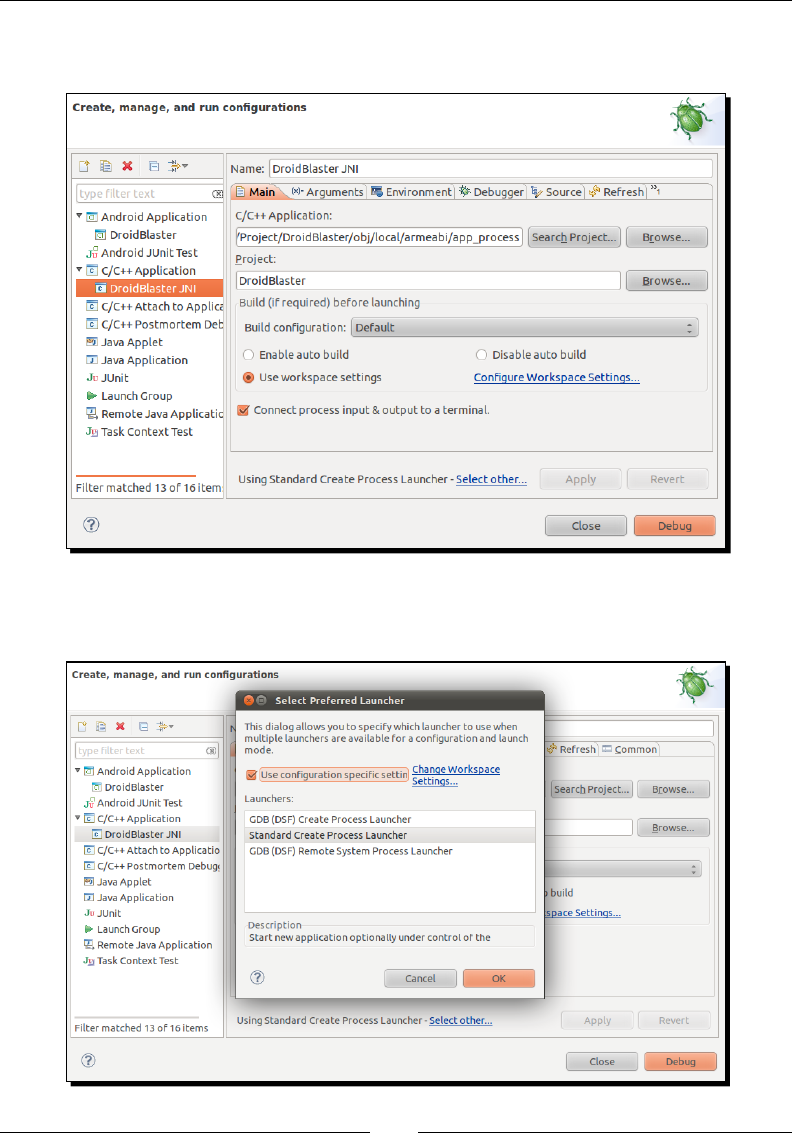
Debugging and Troubleshoong
[ 386 ]
C/C++ Applicaon to point to obj/local/armeabi/app_process using
the Browse buon (you can use either an absolute or a relave path).
8. Switch launcher type to Standard Create Process Launcher using the link Select
other... at the boom of the window:
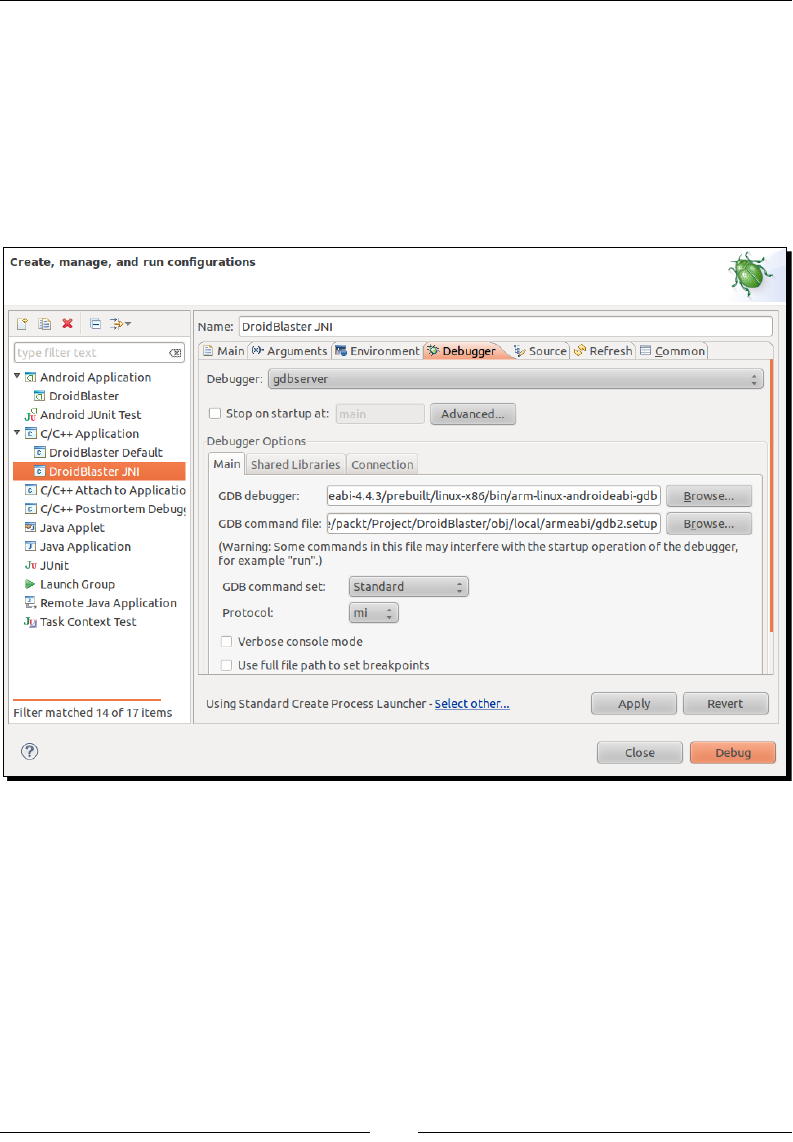
Chapter 11
[ 387 ]
9. Go to the debugger le and set:
Debugger type to gdbserver.
GDB debugger to ${ANDROID_NDK}/toolchains/arm-linux-
androideabi-4.4.3/prebuilt/linux-x86/bin/arm-linux-
androideabi-gdb.
GDB command le to point to the gdb2.setup le located in obj/
local/armeabi/ (you can use either an absolute or a relave path).
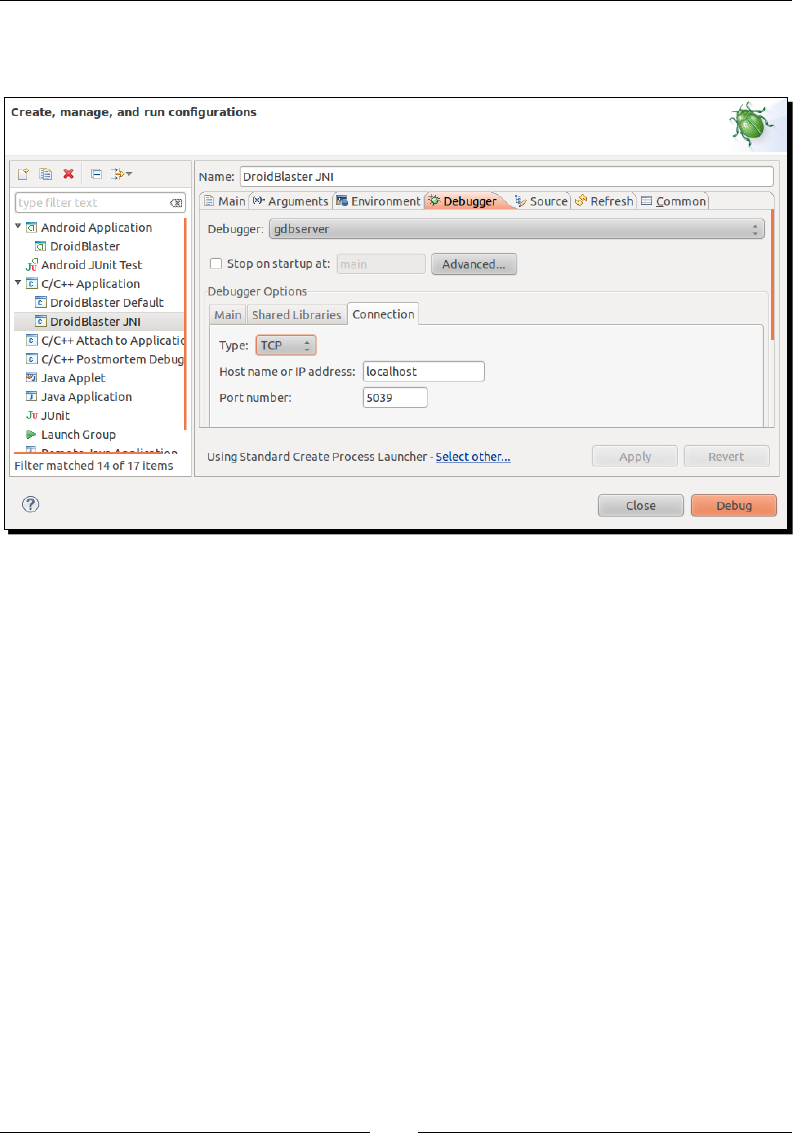
Debugging and Troubleshoong
[ 388 ]
10. Go to the Connecon tab and set Type to TCP. Default value for Host name or IP
address and Port number can be kept (localhost d 5039).
Now, let's congure Eclipse to run GDB server on the device:
11. Make a copy of $ANDROID_NDK/ndk-gdb and open it with a text editor.
Find the following line:
$GDBCLIENT -x `native_path $GDBSETUP`
Comment it because GDB client is going to be run by Eclipse itself:
#$GDBCLIENT -x `native_path $GDBSETUP`
12. In the Eclipse main menu, go to Run | External Tools | External Tools
Conguraons... and create a new conguraon DroidBlaster_GDB.
This conguraon will launch GDB server on the device.
13. In the Main tab, set:
Locaon poinng to our modied ndk-gdb in $ANDROID_NDK. You can use
Variables... buon to dene Android NDK locaon in a more generic way
(that is, ${env_var:ANDROID_NDK}/ndk-gdb).
Working directory to your applicaon directory locaon (for example,
${workspace_loc:/DroidBlaster_Part8-3})
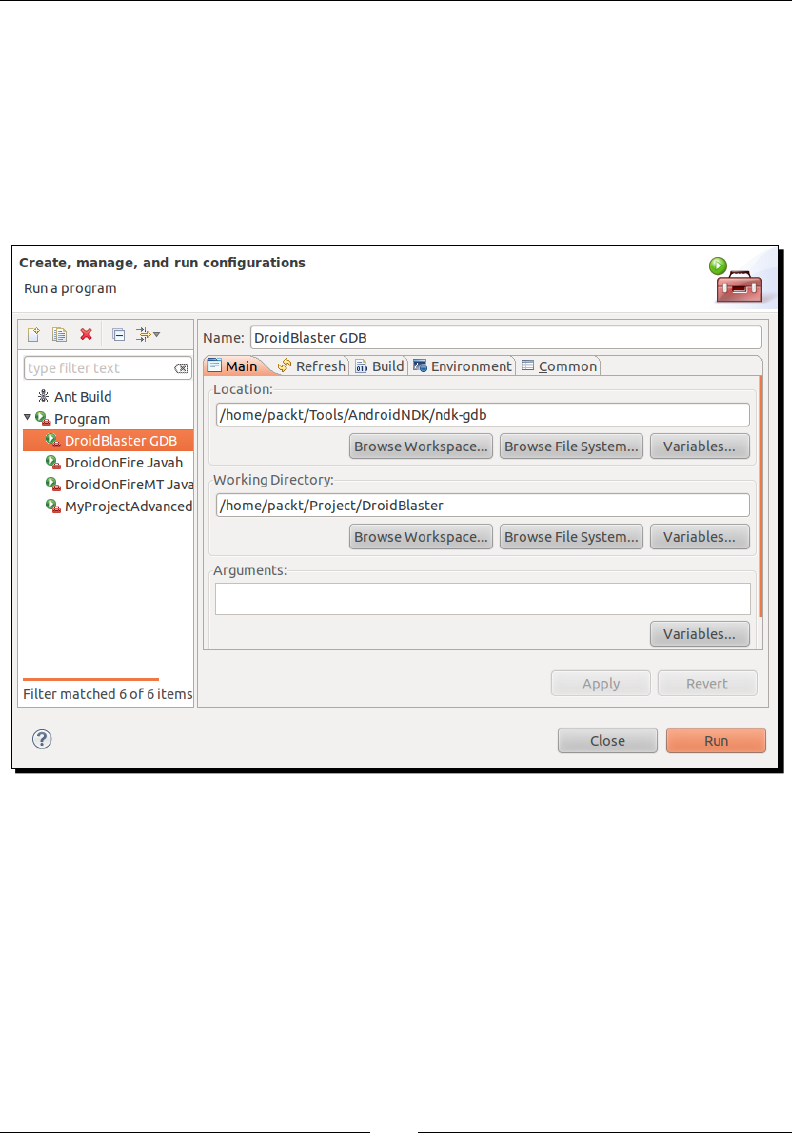
Chapter 11
[ 389 ]
Oponally, set the Arguments textbox:
–-verbose: To see in details what happens in the Eclipse console.
–force: To kill automacally any previous session.
–start: To let GDB Server start the applicaon instead of geng aached
to the applicaon aer it has been started. This opon is interesng if you
debug nave code only and not Java but it can cause troubles with the
emulator (such as to leave the back buon).
We are done with conguraon.
14. Now, launch your applicaon as usual (as shown in Chapter 2, Creang, Compiling,
and Deploying Nave Projects).
15. Once applicaon is started, launch the external tool conguraon DroidBlaster
GDB which is going to start GDB server on the device. GDB server receives debug
commands sent by the remote GDB client and debugs your applicaon locally.
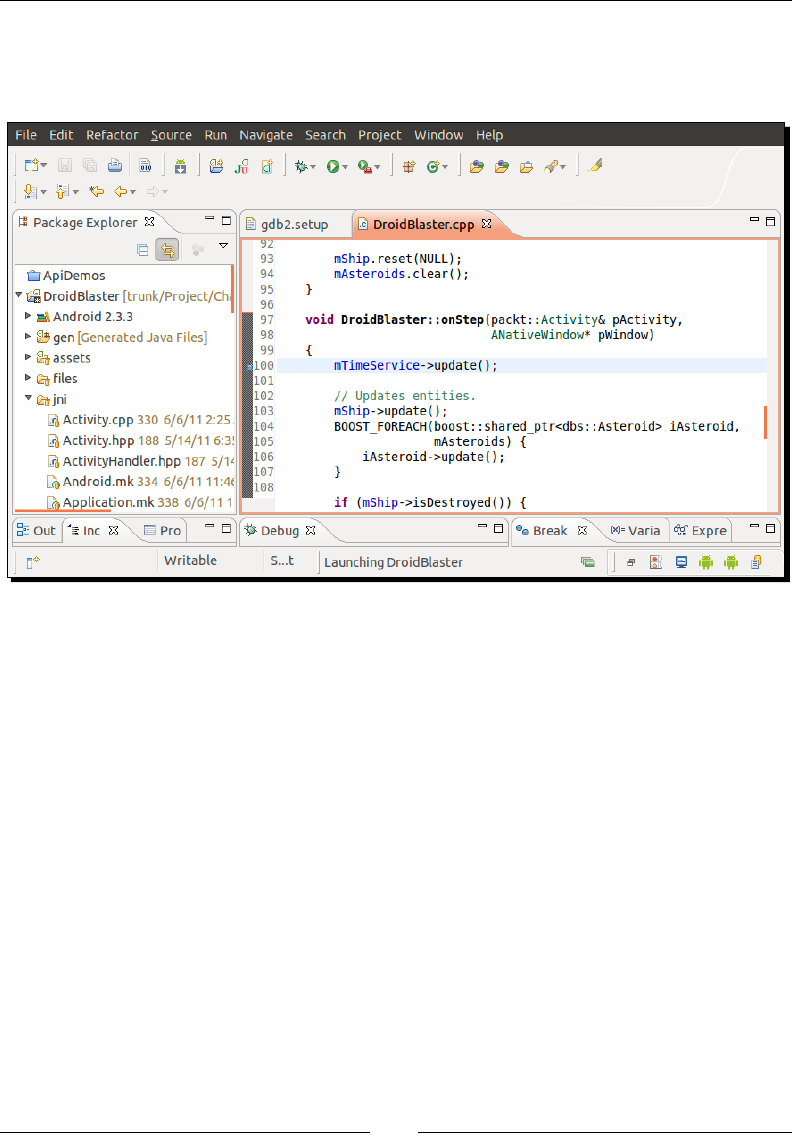
Debugging and Troubleshoong
[ 390 ]
16. Open jni/DroidBlaster.cpp and set a breakpoint on the rst line of onStep()
(mTimeService->update()) by double-clicking on the guer on the text editor's
le (or right-clicking and selecng Toggle breakpoint).
17. Finally, launch DroidBlaster JNI C/C++ applicaon conguraon to start GDB client.
It relays debug commands from Eclipse CDT to GDB server over a socket connecon.
From the developer's point of view, this is almost like debugging a local applicaon.
What just happened?
If set up properly, applicaon freezes aer a few seconds and Eclipse focuses into the break-
pointed line. It is now possible to step into, step out, step over a line of code or resume
applicaon. For assembly-addict, an instrucon stepping mode can also be acvated.
Now, enjoy the benet of this modern producvity tool, that is, a debugger. However, as you
are going or maybe are already experiencing, beware that debugging on Android is rather
slow (because it needs to communicate with the remote Android device) and somewhat
unstable though it works well most of the me.
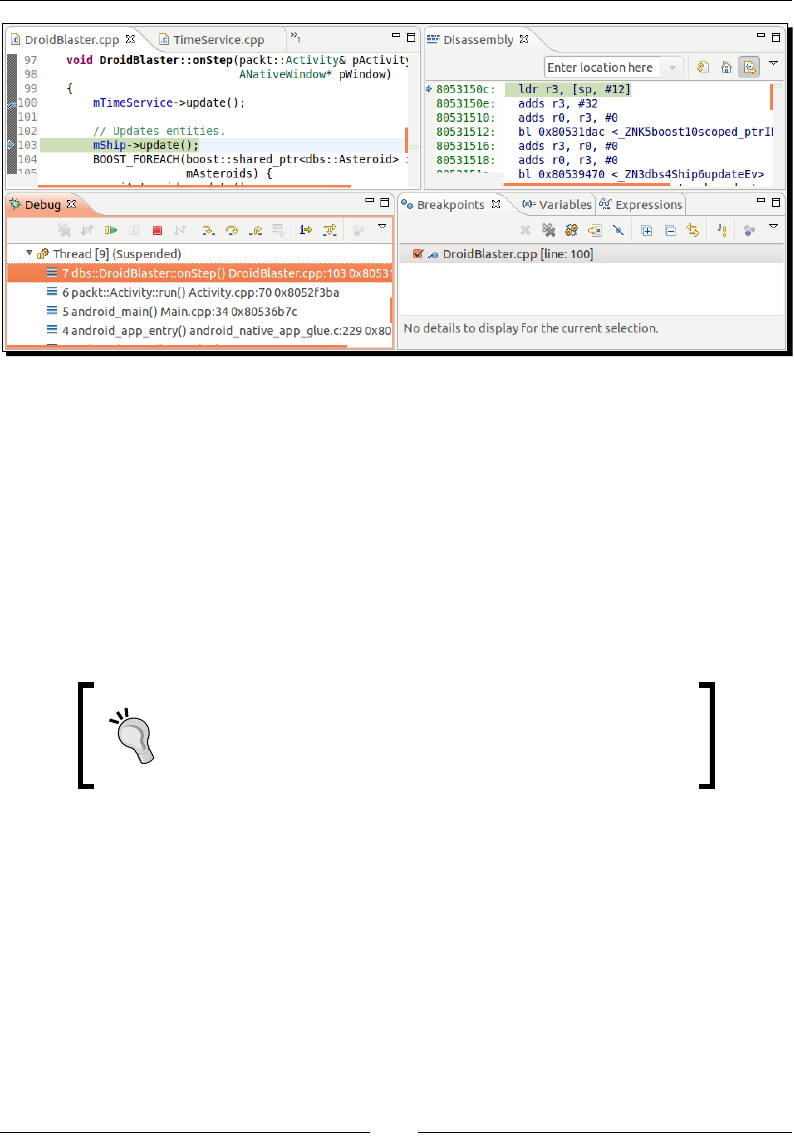
Chapter 11
[ 391 ]
If the conguraon process is a bit complicated and tricky, the same goes for the launch of
a debug session. Remember the three necessary steps:
1. Start the Android applicaon (whether from Eclipse or your device).
2. Then, launch GDB server on the device (that is, the DroidBlaster_GDB conguraon
here) to aach it to the applicaon locally.
3. Finally, start GDB client on your computer (that is, the DroidBlaster_JNI
conguraon here) to allow CDT to communicate with the GDB server.
4. Oponally, start the GDB server with the –start ag to make it launch the
applicaon itself and omit the rst step.
Beware gdb2.setup may be removed while cleaning your
project directory. When debugging stops working, this should
be the second thing to check, aer making sure that ndk-gdb
is up and running.
However, there is an annoying limitaon about this procedure: we are interrupng the
program while it is already running. So how to stop on a breakpoint in inializaon code
and debug it (for example in jni/DroidBlaster.cpp on onActivate())? There are
two soluons:
Leave your applicaon and launch the GDB client. Android does not manage
memory as it is in Windows, Linux, or Mac OS X: it kills applicaons only when
memory is needed. Processes are kept in memory even aer user leaves. As your
applicaon is sll running, GDB server remains started and you can quietly start
your client debugger. Then, just start your applicaon from your device (not from
Eclipse, which would kill it).

Debugging and Troubleshoong
[ 392 ]
Take a pause when the applicaon starts... in the Java code! However, from a fully
nave applicaon, you will need to create a src folder for Java sources and add a
new Activity class extending NativeActivity. Then you can put a breakpoint
on a stac inializer block.
Stack trace analysis
No need to lie. I know it happened. Do not be ashamed, it happened to all of us... your
program crashed, without a reason! You think probably the device is geng old or Android
is broken. We all made that reecon but ninety-nine percent of the me, we are the ones
to blame!
Debuggers are the tremendous tool to look for problems in your code. But they work in real
me when programs run. They assume you know where to look for. With problems that
cannot be reproduced easily or that already happened, debuggers become sterile.
Hopefully, there is a soluon: a few ulies embedded in the NDK help to analyse ARM stack
traces. Let's see how they work.
Time for action – analysing a crash dump
1. Let's introduce a fatal bug in the code. Open jni/DroidBlaster.cpp and modify
method onActivate() as follows:
...
void DroidBlaster::onActivate() {
...
mTimeService = NULL;
return packt::STATUS_KO;
}
...
2. Open the LogCat view (from Window | Show View | Other...) in Eclipse and then
run the applicaon. Not prey for a candid Android developer! A crash dump
appeared in the logs:
...
*** *** *** *** *** *** *** *** *** *** *** *** *** *** *** ***
Build fingerprint: 'htc_wwe/htc_bravo/bravo:2.3.3/...
pid: 1723, tid: 1743 >>> com.packtpub.droidblaster <<<
signal 11 (SIGSEGV), code 1 (SEGV_MAPERR), fault addr 0000000c
r0 a9df2e71 r1 40815c8d r2 7cb9c28d r3 00000000
...
Downloa d f r o m W o w ! e B o o k < w w w.woweb o o k . c o m >Downloa d f r o m W o w ! e B o o k < w w w.woweb o o k . c o m >

Chapter 11
[ 393 ]
ip a3400000 sp 45102830 lr 00000016 pc 80410a2c cpsr 00000030
d0 6f466e6961476e6f d1 0000000400000390
...
scr 20000012
#00 pc 00010a2c /data/data/com.packtpub.droidblaster/
lib/libdroidblaster.so
#01 pc 00009fcc /data/data/com.packtpub.droidblaster/
lib/libdroidblaster.so
...
#06 pc 00011618 /system/lib/libc.so
code around pc:
80410a0c 00017ad4 00000000 b084b510 9b019001
...
code around lr:
stack:
451027f0 00000000
451027f4 45102870
451027f8 804110f5 /data/data/com.packtpub.droidblaster/lib/
libdroidblaster.so
...
This dump contains useful informaon about the current program state. First it
describes the error that happened: a SIGSEGV, also known as a segmentaon fault.
If you look at the faulty address, that is, 0000000c, you will see that it is close to
NULL. This is an important hint!
Then we have informaon about ARM register states (rX, dX, ip, sp, lr, pc, and so
on). But what we are interested in comes right aer this: informaon about where
the program was when it got interrupted. These lines are highlighted in the extract
above and can be idened by the words pc wrien on the line and an hexadecimal
number aer it. The laer expresses the Program Counter locaon, that is, which
instrucon was executed when problem occurred. Note that this memory address is
relave to the containing library. With this piece of informaon, we know exactly on
which instrucon problem occurred... in the binary code!
3. We need somehow to translate this binary address into something understandable to
a normal human being. The rst soluon is to disassemble completely the .so library.
Open a terminal window and go to your project directory. Then execute the
objdump command located in the executable directory of the NDK toolchain:
$ $ANDROID_NDK/toolchains/arm-linux-androideabi-4.4.3/prebuilt/
linux-x86/bin/arm-linux-androideabi-objdump -S
./obj/local/armeabi/libdroidblaster.so > ~/disassembler.dump

Debugging and Troubleshoong
[ 394 ]
4. This command disassembles the library and outputs each assembler instrucon and
locaon accompanied with the source C/C++ code. Open the output le with a text
editor and if you look carefully, you will nd the same address than the one in the
crash dump, next to pc:
...
void TimeService::update()
{
10a14: b510 push {r4, lr}
10a16: b084 sub sp, #16
10a18: 9001 str r0, [sp, #4]
double lCurrentTime = now();
10a1a: 9b01 ldr r3, [sp, #4]
10a1c: 1c18 adds r0, r3, #0
10a1e: f000 f81f bl 10a60 <_
ZN5packt11TimeService3nowEv>
10a22: 1c03 adds r3, r0, #0
10a24: 1c0c adds r4, r1, #0
10a26: 9302 str r3, [sp, #8]
10a28: 9403 str r4, [sp, #12]
mElapsed = (lCurrentTime - mLastTime);
10a2a: 9b01 ldr r3, [sp, #4]
10a2c: 68dc ldr r4, [r3, #12]
10a2e: 689b ldr r3, [r3, #8]
10a30: 9802 ldr r0, [sp, #8]
10a32: 9903 ldr r1, [sp, #12]
...
5. As you can see, problem seems to occur when execung mService->update() in
jni/TimeService.cpp instrucon because of the wrong object address inserted
in step 1.
6. Disassembled dump le can become quite big. For this version of droidblaster.
so, it should be around 3 MB. But it could become tenth MB, especially when
libraries such as Irrlicht are involved! In addion, it needs to be regenerated each
me library is updated.
Hoperfully, another ulity named addr2line, located in the same directory as
objdump, is available. Execute the following command with the pc address at the
end, where -f shows funcon names, -C demangles them and -e indicates the
input library:
$ $ANDROID_NDK/toolchains/arm-linux-androideabi-4.4.3/prebuilt/
linux-x86/bin/arm-linux-androideabi-addr2line -f –C
-e ./obj/local/armeabi/libdroidblaster.so 00010a2c

Chapter 11
[ 395 ]
This gives immediately the corresponding C/C++ instrucon and its locaon in its
source le:
7. Since version R6, Android NDK provides ndk-stack in its root directory. This ulity
does what we have done manually using an Android log dump. Coupled with the
ADB, which is able to display Android logs while in real me, crashes can be analyzed
without a move (except your eyes!).
Simply run the following command from a terminal window to decipher crash
dumps automacally:
$ adb logcat | ndk-stack -sym ./obj/local/armeabi
********** Crash dump: **********
Build fingerprint: 'htc_wwe/htc_bravo/bravo:2.3.3/
GRI40/96875.1:user/release-keys'
pid: 1723, tid: 1743 >>> com.packtpub.droidblaster <<<
signal 11 (SIGSEGV), code 1 (SEGV_MAPERR), fault addr 0000000c
Stack frame #00 pc 00010a2c /data/data/com.packtpub.
droidblaster/lib/libdroidblaster.so: Routine update in /home/
packt/Project/Chapter11/DroidBlaster_Part11/jni/TimeService.cpp:25
Stack frame #01 pc 00009fcc /data/data/com.packtpub.
droidblaster/lib/libdroidblaster.so: Routine onStep in /home/
packt/Project/Chapter11/DroidBlaster_Part11/jni/DroidBlaster.
cpp:53
Stack frame #02 pc 0000a348 /data/data/com.packtpub.
droidblaster/lib/libdroidblaster.so: Routine run in /home/packt/
Project/Chapter11/DroidBlaster_Part11/jni/EventLoop.cpp:49
Stack frame #03 pc 0000f994 /data/data/com.packtpub.
droidblaster/lib/libdroidblaster.so: Routine android_main in /
home/packt/Project/Chapter11/DroidBlaster_Part11/jni/Main.cpp:31
...
What just happened?
We have used ARM ulies embedded in the Android NDK to locate the origin of an
applicaon crash. These ulies constute an inesmable help and should be considered
as your rst-aid kit when a bad crash happens.

Debugging and Troubleshoong
[ 396 ]
However, if they can help you nding the "where", it is another kele of sh to nd the
"why". As you can see in the piece of code at step 4, understanding why LDR instrucon
(whose goal is to load in a register, some data from memory, constants, or other registers)
fails is not trivial. This is where your programmer intuion (and possibly knowledge of
assembly code) comes into play.
More on crash dumps
For general culture, let's linger briey on what is provided in the LogCat crash dump. A crash
dump is not dedicated only to overly talented developers or people seeing red-dressed girl in
binary code, but also to those who have a minimum knowledge of assemblers and the way
ARM processors work. The goal of this trace is to give as much informaon as possible on the
current state of the program at the me it crashed:
The rst line gives the build ngerprint, which is a kind of an idener indicang
the device/Android release currently running. This informaon is interesng when
analyzing dumps from various origins.
The second line indicates the PID, process idener, which uniquely idenfy an
applicaon on Unix system, and the TID, which is the thread idener. It can be
the same as the process idener when crash occurs on the main thread.
The third line shows the crash origin represented as a signal, here a classic
segmentaon fault (SIGSEGV).
Then, processor's register values are dumped, where:
rX: This is an integer register.
dX: This is a oang point register.
fp (or r11): The Frame Pointer holds a xed locaon on the stack during
a roune call (in conjuncon with the Stack Pointer).
ip (or r12): The intra procedure call scratch register may be used with
some subroune calls, for example, when the linker needs a veneer (a small
piece of code) to aim at a dierent memory area when branching (a branch
instrucon to jump somewhere else in the memory requires an oset
argument relave to current locaon, allowing a branching range of a few
MB only, not the full memory).
sp (or r13): This is the stack pointer, which saves locaon of the top of
the stack.
lr (or r14): The link register generally saves program counter's value
temporarily to restore it later. A typical example of its use is a funcon
call which jumps somewhere in the code and then go back to its previous
locaon. Of course, several chained subroune calls requires the link
register to be stacked.
Chapter 11
[ 397 ]
pc (or r15): This represents the program counter which holds the address
of next instrucon to execute. Program counter is just incremented when
execung a sequenal code to fetch next instrucon but is altered by
branching instrucons (if/else, a C/C++ funcon calls, and so on).
cpsr: The Current Program Status Register contains a few ags about the
current processor working mode and some addional bit ags for condion
codes (such as N for an operaon which resulted in a negave value, Z for a 0
or equality result, and so on), interrupts, and instrucon set (Thumb or ARM).
Crash dump also contains a few memory words around PC (that is, the block of
instrucons around) and LR (for previous locaon).
Finally, a dump of the raw call stack is logged.
Just a convenon
Remember that the use of registers is mainly a convenon. For
example, Apple iOS uses r7 as a frame pointer instead of r12...
So always be very careful when reusing exisng code!
Performance analysis
If debugging tools are sll imperfect, I have to advise you that proling tools are rather
immature... when they even work! Actually, there is no real ocial support from Google
for memory or performance proler, except in the emulator. This may change soon or later.
But right now, those who like to tweak code and analyse each instrucon may starve. This
is parcularly true when developing with a non-developer or non-rooted phone.
Hopefully, a few soluons exist and some are coming. Let's cite the following one:
Valgrind: This is probably the most famous open source proler which can monitor
not only performance but also memory and cache usage. This ulity is currently
being ported to Android. With some tweaking, it is possible to make it work on a
developer or rooted phone in ArmV7 mode. It is one of the best hopes for Android.
Android-NDK-Proler: This is a port of Gprof on Android. It is a simple and basic
proler which works by instrumenng and sampling code at runme. It is the
simplest soluon to prole performance and does not require any specic hardware.
OProle is a system-wide proler which inserts its code in the system kernel (which
thus needs to be updated) to collect proling data with a low overhead. It is more
complicated to install and requires a developer or rooted phone to work but works
quite well and does instrument code. It is a much beer soluon to prole code for
free if you have proper hardware at your disposal.
Debugging and Troubleshoong
[ 398 ]
The commercial development suite ARM DS-5 and its StreamLine performance
analyzer may become an interesng opon.
Open GL ES Prolers from manufacturers: Adreno Proler for Qualcomm, PerfHUD
ES for NVidia and PVRTune for PowerVR. These prolers are hardware-specic. The
choice depends on your phone. These tools are however essenal to see what is
happening under the GLES hood.
We are not going to evoke the emulator proler here because of its inability to emulate
programs properly at an eecve speed (especially when using GLES). But know that it exists.
Instead, we are now going to discover the interesng Android-NDK-Proler, an alternave
Gprof-based proler ported on Android by Richard Quirk (see http://quirkygba.
blogspot.com/ for more informaon). Android-NDK-Proler requires a device running
at least Android Gingerbread.
Project DroidBlaster_Part8-3 can be used as a starng point for
this part. The resulng project is provided with this book under
the name DroidBlaster_Part11.
Time for action – running GProf
Let's try to prole our own applicaon code:
1. Open a browser window and navigate to the Android-NDK-Proler homepage at
http://code.google.com/p/android-ndk-profiler/. Go to the Downloads
secon and save the latest release (3.1 at the me of wring) on your computer.
2. Unzip archive in $ANDROID_NDK/sources/android-ndk-profiler. This archive
contains an Android Makele and two libraries: one for Arm V5 and one for Arm V7.
3. Turn Android-NDK-Proler into a full android module (see highlighted lines). The main
missing point is the export of prof.h le that we are going to include in our code.
This Makele uses the $TARGET_ARCH_ABI variable to select the right library
version (Arm V5/V7) automacally according to what is dened in Application.
mk (APP_ABI= armeabi, armeabi-v7a). It also lters some opmizaon opons
which could interfere with it (for Thumb as well as ARM code):
LOCAL_PATH:= $(call my-dir)
TARGET_thumb_release_CFLAGS := $(filter-out -ffunction-
sections,$(TARGET_thumb_release_CFLAGS))

Chapter 11
[ 399 ]
TARGET_thumb_release_CFLAGS := $(filter-out -fomit-frame-
pointer,$(TARGET_thumb_release_CFLAGS))
TARGET_CFLAGS := $(filter-out -ffunction-sections,$(TARGET_
CFLAGS))
# include libandprof.a in the build
include $(CLEAR_VARS)
LOCAL_MODULE := andprof
LOCAL_SRC_FILES := $(TARGET_ARCH_ABI)/libandprof.a
LOCAL_EXPORT_C_INCLUDES := $(LOCAL_PATH)/
include $(PREBUILT_STATIC_LIBRARY)
4. Android-NDK-Proler can now be included in a normal nave library. Let's append
it to DroidBlaster_Part8-3 (you can use any other version you want).
Add the opmizaon lter like done in proler's own Makele. Since compilaon
is done in thumb mode by default, keep only related lines. Then include -pg
parameter which inserts addional instrucon necessary to the proler. Finally,
include proler module as usual:
LOCAL_PATH := $(call my-dir)
TARGET_thumb_release_CFLAGS := $(filter-out -ffunction-
sections,$(TARGET_thumb_release_CFLAGS))
TARGET_thumb_release_CFLAGS := $(filter-out -fomit-frame-
pointer,$(TARGET_thumb_release_CFLAGS))
TARGET_CFLAGS := $(filter-out -ffunction-sections,$(TARGET_
CFLAGS))
include $(CLEAR_VARS)
LS_CPP=$(subst $(1)/,,$(wildcard $(1)/*.cpp))
LOCAL_CFLAGS := -DRAPIDXML_NO_EXCEPTIONS -pg
LOCAL_MODULE := droidblaster
LOCAL_SRC_FILES := $(call LS_CPP,$(LOCAL_PATH))
LOCAL_LDLIBS := -landroid -llog -lEGL -lGLESv1_CM -lOpenSLES
LOCAL_STATIC_LIBRARIES := android_native_app_glue png andprof
include $(BUILD_SHARED_LIBRARY)
$(call import-module,android/native_app_glue)
$(call import-module,libpng)
$(call import-module,android-ndk-profiler)

Debugging and Troubleshoong
[ 400 ]
5. To run the proler, we need to include a proler start up and shut down funcon
in the code. Open jni/Main.cpp and insert them at the beginning and end
of android_main(). Set sample frequency to 6000 thanks to a predened
environment variable CPUPROFILE_FREQUENCY:
...
#include <cstdlib>
#include <prof.h>
void android_main(struct android_app* pApplication)
{
setenv("CPUPROFILE_FREQUENCY", "60000", 1);
monstartup("droidblaster.so");
// Run game services and event loop.
...
lEventLoop.run(&lDroidBlaster, &lInputService);
moncleanup();
}
6. Finally, allow applicaon to write on a storage in AndroidManifest.xml:
<?xml xmlns:android="http://schemas.android.com/apk/res/android"
package="com.packtpub.droidblaster" android:versionCode="1"
android:versionName="1.0">
...
<uses-permission
android:name="android.permission.WRITE_EXTERNAL_
STORAGE"/>
</manifest>
7. Recompile DroidBlaster project. It now includes all the necessary instrucons
to start proler and generate proling informaon.
8. Run project on a device. Log messages are generated between proler startup
and shutdown. Make sure applicaon completely dies by pressing the back buon,
a pause being not sucient:
INFO/threaded_app(3553): Start: 0x97270
INFO/PROFILING(3553): Profile droidblaster.so 80400000-8043d000: 0
INFO/PROFILING(3553): 0: parent: carrying on
INFO/PACKT(3553): Creating GraphicsService
…

Chapter 11
[ 401 ]
INFO/PACKT(3553): Exiting event loop
INFO/PROFILING(3553): parent: moncleanup called
INFO/PROFILING(3553): 1: parent: done profiling
INFO/PROFILING(3553): writing gmon.out
INFO/PROFILING(3598): child: finished monitoring
INFO/PACKT(3553): Destructing DroidBlaster
9. Aer applicaon is terminated, retrieve le gmon.out generated in the /sdcard
folder of your device (depending on your device, storage may be mounted in
another directory) and save it in your project directory. Do not forget to acvate
USB Mass Storage mode to see les from your computer.
10. From a terminal window located in your project directory where gmon.out
is saved, open a terminal and run gprof analyser located beside NDK ARM
toolchain binaries:
$ ANDROID_NDK/toolchains/arm-linux-androideabi-4.4.3/prebuilt/
linux-x86/bin/arm-linux-androideabi-gprof obj/local/armeabi/
libdroidblaster.so
This command generates a textual output that you can redirect to a le. It contains
all proling results. The rst part (at prole) is the consolidated result with top
funcons which seem to take me. The second part is the raw index from which the
rst part is calculated:
Flat profile:
Each sample counts as 1.66667e-05 seconds.
% cumulative self self total
time seconds seconds calls us/call us/call name
18.64 0.00 0.00 png_read_
filter_row
13.56 0.00 0.00 15847 0.01 0.02 packt::Graph
icsService::update()
10.17 0.00 0.00 15847 0.01 0.01 packt::Graph
icsSprite::draw(float)
10.17 0.00 0.00 1 100.00 566.67
packt::EventLoop::run(...)
8.47 0.00 0.00 15847 0.01 0.03
dbs::DroidBlaster::onStep()
5.08 0.00 0.00 15847 0.00 0.00
packt::GraphicsTileMap::draw()
...

Debugging and Troubleshoong
[ 402 ]
index % time self children called name
<spontaneous>
[1] 57.6 0.00 0.00 android_main [1]
0.00 0.00 1/1
packt::EventLoop::run(...) [2]
0.00 0.00 1/1 packt::EventLoop:
:EventLoop(android_app*) [469]
0.00 0.00 1/1 packt::Sensor::Se
nsor(packt::EventLoop&, int) [466]
0.00 0.00 1/1 packt::TimeServic
e::TimeService() [433]
0.00 0.00 1/1 packt::GraphicsSe
rvice::GraphicsService(...) [456]
...
What just happened?
We have compiled Android-NDK-Proler project as an NDK module and appended it to our
own project. We turned proling on with the help of two exported methods monstartup()
and moncleanup(). The proling result is wrien to gmon.out le on the SD Card (thus
requiring write access) that can be parsed by the NDK gprof ulity.
The output le contains a summary for each funcon hit by the sampler: the at prole.
More specically, it indicates the following:
index: This idenes an entry in the index computed from and wrien aer the
at prole.
% time: This represents the fragment of me spent in the funcon compared to
the total program execuon mes.
cumulative seconds: This is the accumulated total me spent in the funcon
and all the funcon above in the table (using self seconds).
self seconds: This is the accumulated total me spent in the funcon itself
over its mulple execuon.
calls: This represents the total number of calls to a funcon. This is the only
informaon which is really accurate.
self s/call: This is the average me spent in one execuon of the funcon.
This column depends on sample hits and is not reliable.
total s/call: This is the same as self s/call but cumulated with the me
spent in sub-funcons too. This column is also depends on sample hits.
Note that funcons in which no apparent me is spent (which does not mean they are
never called) are not menoned unless -z is appended to command-line opons.

Chapter 11
[ 403 ]
How it works
To prole a piece code, GCC compiler instruments your code when opon -pg is
appended to compilaon opons. Instrumentaon relies on a roune named mcount()
(more formerly __gnu_mcount_nc()) which is inserted at the beginning of each funcon
to gather informaon about its caller and compute call count indicator. The role of
Android-NDK-Proler here is to implement this roune which is not provided by the
Android NDK.
More advanced proling informaon is extracted by sampling the PC counter at constant
intervals (100hz by default), in order to detect which funcon the program is currently
running (and derive the call stack). From a theorecal point of view, the more a funcon
takes me to run, the bigger is the probability that a sample hits it.
To do so, Android-NDK-Proler creates a separate thread to collect ming informaon
and a new fork process to interrupt nave code and record samples. To do so, it requires
the ability to aach to a parent process which only works from Android 2.3 Gingerbread.
Thus, if you see the following message in Android logs, proling informaon will not get
collected accurately:
INFO/PROFILING(3588): child: could not attach 3584
GProf is a mature (not to say anc) tool which has limitaons. First, GProf instrumentaon
is intrusive. It aects performance and potenally cache usage which result in perturbaons.
Moreover, it does not measure me spent in I/O which is oen a good place to look for
bolenecks and does not handle recursion. Finally, because it uses sampling and makes
some assumpon about code (for example, a funcon is assumed to use more or less the
same me to run for each call), GProf does not give very accurate results and needs many
samples to increase accuracy. This makes it dicult to analyze results properly, when they
are not misleading.
Although it is far from perfect, GProf is sll easy to set up and can be a good start in proling.
ARM, thumb, and NEON
Compiled nave C/C++ code on current Android ARM devices follows an Applicaon Binary
Interface (ABI). An ABI species the binary code format (instrucon set, calling convenons,
and so on). GCC translates code into this binary format. ABIs are thus strongly related to
processors. The target ABI can be selected in the Application.mk le with the property
APP_ABI. There exist four main ABIs supported on Android:
thumb: This is the default opon which should be compable with all ARM devices.
Thumb is a special instrucon set which encodes instrucons on 16-bit instead of 32
to improve code size (useful for devices with constrained memory). The instrucon
set is severely restricted compared to ArmEABI.
Debugging and Troubleshoong
[ 404 ]
armeabi (Or Arm v5): This should run on all ARM devices. Instrucons are encoded
on 32-bit but may be more concise than Thumb code. Arm v5 does not support
advanced extensions like oang point acceleraon and is thus slower than Arm v7.
armeabi-v7a: This supports extensions such as Thumb-2 (similar to Thumb but with
addional 32-bit instrucons) and VFP plus some oponal extensions such as NEON.
Code compiled for Arm V7 will not run on Arm V5 processors.
x86: This is for PC-like architectures (that is, Intel/AMD). There is no ocial
device that existed at the me this book was wrien but an unocial open
source iniave exists.
It is possible to compile code, for example, for Arm V5 and V7 at the same me, the most
appropriate binaries are selected at installaon me.
Android provides a cpu-features.h API (with android_
getCpuFamily() and android_getCpuFeatures()
methods) to detect available features on the host device at
runme. It helps in detecng the CPU (ARM, X86) and its
capabilies (ArmV7 support, NEON, VFP).
Performance is one of the main criteria to develop with the Android NDK. To achieve this,
ARM created a SIMD instrucon set (acronym Single Instrucon Mulple Data, that is, process
several data in parallel with one instrucon) called NEON which has been introduced along
with the VFP (the oang point accelerated unit).
NEON is not available on all chips (for example, Nvidia Tegra 2 does not support it) but is
quite popular in intensive mulmedia applicaon. They are also a good way to compensate
the weak VFP unit of some processors (for example, Cortex-A8).
NEON code can be wrien in a separate assembler le, in a
dedicated asm volatile block with assembler instrucons or
in a C/C++ le or as intrinsics (NEON instrucons encapsulated in a
GCC C roune). Intrinsics should be used with much care as GCC is
oen unable to generate ecient machine code (or requires lots of
tricky hints). Wring real assembler code is generally advised.
NEON and modern processors are not easy to master. The Internet is full of examples to get
inspiraon from. For example, have a look at code.google.com/p/math-neon/ for an
example of math library implemented with NEON. Reference technical documentaon can
be found on the ARM website at http://infocenter.arm.com/.

Chapter 11
[ 405 ]
Summary
In this last chapter, we have seen advanced techniques to troubleshoot bugs and performance
issues. More specically, we have debugged our code with the nave code debugger, which is
slow and complex to set up but is a real life saver.
We have also executed NDK Arm ulies to decipher crash dumps. They are the ulmate
soluon when a crash already occurred.
Finally, we have proled our code to analyze performances with GProf. This soluon is
limited but can give an interesng overview.
With these tools in hand, you are now ready to venture out into the NDK jungle. And if
you are adventurous, you can dive head rst in ARM assembler to improve performances
drascally . However, beware this is useful only when targeng the right pieces of code
(the famous 20%!). Do not forget that opmizing a bad algorithm will never make it good,
and a good algorithm even without opmizaon can make a huge dierence.
Afterword
Throughout this book, you have learnt the essenals to get started and overlooked the paths
to follow to go further. You now know the key elements to tame these lile powerful monsters
and start exploing their full power. However, there is sll a lot to learn, but the me and space
lacks. Anyway, the only way to master a technology is to pracce and pracce again. I hope you
enjoy the journey and that you feel armed up for the mobile challenge. So my best advice now
is to gather your fresh knowledge and all your amazing ideas, beat them up in your mind and
bake them with your keyboard!
Where we have been
We have seen concretely how to create nave projects with Eclipse and the NDK. We have
learnt how to embed a C/C++ library in Java applicaons through JNI and how to run nave
code without wring a line of Java.
We have tested mulmedia capabilies of the Android NDK with OpenGL ES and OpenSL ES,
which are becoming a standard in mobility (of course, aer oming Windows Mobile). We
have even interacted with our phone input peripherals and apprehended the world through
its sensors.
Moreover, the Android NDK is not only related to performance but also to portability. Thus,
we have reused the STL framework, its best companion Boost, and ported third-party libraries
almost seamlessly. We now have powerful 3D and physics engines in our hands!
Finally, we have seen how to debug nave code (and that was not so simple) and analyze
program crashes and performance.

Aerword
[ 408 ]
Where you can go
Eclipse with ADT and CDT plugins is great. But their integraon is not absolutely natural.
Debugging operaons are a bit complex and not everybody will be sased with the lack
of advanced proling tools. But some alternaves are emerging, such as the Nvidia Tegra
Development Pack (http://developer.nvidia.com/tegra-android-development-
pack) for glad Tegra device owners. ARM DS-5 (http://www.arm.com/products/
tools/software-tools/ds-5/) can also become an interesng opon for professional
development. An open source iniave exists to bring Android features to Visual Studio
(http://code.google.com/p/vs-android/). The Android ecosystem is full of life and
quickly evolving.
A subject that is parally outside the scope of this book is the emulaon of applicaon on a
PC. Here I am not talking about the Android emulator, which runs an Android OS image on a
system virtualizer, I am talking about nave emulaon, that is, running an applicaon directly
on your Linux, Mac, or Windows computer. This is the best soluon to make all your usual
programming tools available, Valgrind (to analyze memory leaks) being probably the most
useful example. Have a look at the PowerVR SDK (http://www.imgtec.com/powervr/
insider/) to emulate OpenGL ES on your PC. Obviously, there is no real alternave to
emulate the nave Android framework. This approach works quite well but requires a real
design eort to keep apart common code from OS-specic code. But this is worth the eort
as you can denitely gain some producvity and, even beer, ease the porng of your C/C++
to other OS (you know what I am talking about!).
We have ported a few libraries, but a lot more are out there and waing to get ported.
Actually, many of them work without the need of a code revamp. They just need to be
recompiled. For those interested in 3D physics, Bullet (http://bulletphysics.org/)
is an example of the engine that can be ported right away in a few minutes. The C/C++
ecosystem has existed for several decades now and is full of richness. Some libraries have
been specically designed for mobile devices. A great framework that you should denitely
have a look at if you want to write mobile games, is Unity (http://unity3d.com/).
And if you really want to get your hand dirty in the guts of Android, I encourage you to have
a look at the Android plaorm code itself, available at http://source.android.com/.
It is not a piece of cake to download, compile, or even deploy it, but this is the only way to
get an in-depth understanding of Android internals and somemes the only way to nd out
where these annoying bugs are coming from!
Downloa d f r o m W o w ! e B o o k < w w w.woweb o o k . c o m >Downloa d f r o m W o w ! e B o o k < w w w.woweb o o k . c o m >

Aerword
[ 409 ]
Where to nd help
The Android community is really acve and following are the places to nd useful informaon:
The Android Google group (http://groups.google.com/group/android-
developers) and the Android NDK group (http://groups.google.com/
group/android-ndk) where you can get some help, somemes from the Android
team member.
The Android Developer BlogSpot (http://android-developers.blogspot.
com/) where you can nd fresh and ocial informaon about Android development.
Google IO (http://www.google.com/events/io/2011, 2009 and 2010 sessions
are also available) for great Android video talks performed by Google's engineers.
Google Code (http://code.google.com/hosting/) for lots of NDK example
applicaons. Just type NDK in the search engine and let Google be your friend.
The NVidia Developer Centre (http://developer.nvidia.com/category/
zone/mobile-development) for Tegra but also general resources about Android
and the NDK.
The Qualcomm Developer Network (https://developer.qualcomm.com/) to
nd informaon about the NVidia main competor. The Qualcomm's Augmented
Reality SDK is especially promising.
Anddev (http://www.anddev.org/) is an acve Android forum with an
NDK secon.
Stack Overow (http://stackoverflow.com/) is not dedicated to Android but
here you can ask quesons and get accurate answers.
Marakana Website (http://marakana.com/tutorials.html) provides many
interesng resources about Android and especially video talks.
Packt Website (http://www.packtpub.com/), a bit of self-promoon for the
many resources available there about Android, Irrlicht, and open source soware.

Aerword
[ 410 ]
This is just the beginning
Creang an applicaon is only part of the path. Publishing and selling is another. This is, of
course, outside the scope of this book but handling fragmentaon and tesng compability
with various target devices can be a real diculty that needs to be taken seriously. Beware,
problems start occurring when you start dealing with hardware specicies (and there are
lots of them) like we have seen with input devices. These issues are, however, not specic
to the NDK. If incompabilies exist in a Java applicaon, then nave code will not do
beer. Handling various screen sizes, loading appropriately sized resources, and adapng
to device capabilies are things that you will eventually need to deal with. But that should
be manageable.
In few words, there are a lot of marvellous but also painful surprises to discover. But Android
and mobility is sll a fallow land that needs to be modelled. Look at the evoluon of Android
from its earliest version to the latest one to be convinced. Revoluon does not take place
every day so do not miss it!
Good luck.
Index
Symbols
-02 opon 330
3D engine
about 353
features 369, 370
running, on Android 369, 370
3D graphics
rendering, with Irrlicht 370-381
3D modeling, Blender 381
3DS 369
-force ag 385
-verbose ag 385
A
AAsetMAnager opaque pointer 196
AAsset_close() 197
AAssetManager_open() 197
AASSET_MODE_BUFFER 197
AASSET_MODE_RANDOM 197
AASSET_MODE_STREAMING 197
AASSET_MODE_UNKNOWN mode 197
AAsset_read() 197
ABI
about 403
armeabi 404
armeabi-v7a 404
thumb 403
x86 404
accelerometer 273
acvate() method 159
acvityCallback() 156, 160
acvity events
handling 155-166
AcvityHandler interface 162
Acvity Manager 48
acvity state
saving 171
ADB shell
about 52
ags 52
opons 52
addr2line ulity 394
Adreno Proler 398
ADT plugin 33, 59
AInputEvent_getSource() method 286
AInputEvent_getType() method 286
AInputEvent structure 276
AInputQueue_aachLooper() 169
AInputQueue_detachLooper() 169
AKeyEvent_getAcon() 291, 296
AKeyEvent_getDownTime() 296
AKeyEvent_getFlags() 296
AKeyEvent_getKeyCode() 291, 296
AKeyEvent_getMetaState() 296
AKeyEvent_getRepeatCount() 296
AKeyEvent_getScanCode() 296
allocateEntry() 80, 94
ALooper_addFd() 169
ALooper_pollAll() behavior 158
ALooper_pollAll() method 154, 169
ALooper_prepare() 169
am command 48
AMoonEvent_getAcon() 287, 296
AMoonEvent_getDownTime() 287

[ 412 ]
AMoonEvent_getEventTime() 287
AMoonEvent_getHistoricalX() 287
AMoonEvent_getHistoricalY() 287
AMoonEvent_getHistorySize() 287
AMoonEvent_getPointerCount() 287
AMoonEvent_getPointerId() 287
AMoonEvent_getPressure() 287
AMoonEvent_getSize() 287
AMoonEvent_getX() 281, 287, 296
AMoonEvent_getY() 281, 287, 296
ANaveAcvity_nish() method 158
ANaveAcvity_onCreate() method 166-168
ANaveAcvity structure 167
ANaveWindow_Buer structure 176
ANaveWindow_lock() 177
ANaveWindow_setBuersGeometry() 176
ANaveWindow_unlockAndPost() method 177
Android
3D engine, running 369, 370
Boost, compiling on 328
device sensors, probing 298, 299
hardware sensors 273
input peripherals 273
interacng with 274
soware keyboard, displaying 297, 298
third-party libraries, porng to 338
touch events, handling 276-286
android_app_entry() method 169
about 170, 277
contextual informaon 170
android_app_write_cmd() method 167
Android debug bridge
about 51-53
le, transfering SD card from command line 53
Android Debug Bridge (ADB) 39
Android development
device, troubleshoong 42, 43
geng started 7
kit, installing, on Linux 27, 28
kit, installing on Mac OS X 20
kit, installing on Windows 12
Mac OS X, seng up 18, 19
plaorms 7
soware requisites 8
Ubuntu Linux, installing 22-26
Windows, seng up 8-12
Android development kits
installing, on Linux 27
installing, on Mac OS X 20
installing, on Windows 12
Android device
seng up, on Mac OS X 37-39
seng up, on Ubuntu 42
seng up, on Ubuntu Linux 39-41
seng up, on Windows 37-39
android_getCpuFamily() method 404
android_getCpuFeatures() method 404
Android Gingerbread 398
ANDROID_LOG_DEBUG 151
ANDROID_LOG_ERROR 151
ANDROID_LOG_WARN 151
android_main() method 154
Android Makeles 65, 66, 346
AndroidManifest.xml le 384
Android.mk le 83
android_nave_app_glue module 166
Android NDK
about 171, 383
Box2D, compiling 339-345
installing, on Ubuntu 28
installing, on Windows 13-16
Irrlicht, compiling 339-345
Android-NDK-Proler 397
android_poll_source 300
android_poll_source structure 154
android project
creang, eclipse used 56
java project, iniang 56-58
Android SDK
Android virtual device, creang 33-36
emulang 33
installing, on Mac OS X 20
installing, on Ubuntu 27
installing, on Windows 13
Android SDK tools
Android debug bridge 51
exploring 51
project conguraon tool 54
Applicaon Binary Interface. See ABI
apply() method 204
APP_OPTIM ag 384
app_process le 385

[ 413 ]
ARM DS-5 398
armeabi 404
armeabi-v7a 404
ArmV7 mode 397
ArrayIndexOutOfBoundsExcepon() 101
array types
handling 107
ASensorEventQueue_disableSensor() 305
ASensorEventQueue_enableSensor() 304
ASensorEventQueue_setEventRate() 305
ASensor_getMinDelay() 305, 311
ASensor_getName() 311
ASensor_getVendor() 311
ASensorManager_createEventQueue() 302
ASensorManager_destroyEventQueue() 302
ASensorManager_getDefaultSensor() 304
ASensorManager_getInstance() 302
asset manager 193
AachCurrentThread() 115
AudioPlayer object 256
AudioTrack 239
B
back buer 189
background music
playing 249
background thread
running 111-118
BeginContact() method 357-359, 366
beingScene() method 376
bionic 385
bitmaps
processing from nave code 135
bitmaps, processing from nave code
camera feed, decoding 136-145
BJam 328
Blender
3D modeling 381
about 381
bodies
about 353, 354
characteriscs 353, 365
body denion 354
body xture 356
Boost
about 328
compiling, on Android 328
embedding, in DroidBlaster 328-336
threading with 337, 338
URL, for documentaon 336
URL, for downloading 328
boost directory 330, 332
BOOST_FILESYSTEM_VERSION opon 330
BOOST_NO_INTRINSIC_WCHAR_T opon 330
Box2D
about 338, 353
Box2Dresources 369
collision detecon 366, 367
collision ltering 368, 369
collision modes 367, 368
compiling, with Android NDK 339-345
memory management 366
physics, simulang with 354-366
URL 339
Box2D 2.2.1 archive 339
Box2D body
about 365
b2Body 365
b2BodyDef 365
b2CircleShape 365
b2FixtureDef 365
b2PolygonShape 365
b2Shape 365
BSP 381
BSP format 370
buerize() method 224, 317
bullet mode 367
C
C 96, 315
C++ 96, 315
C99 standard library 84
callback_input() 276
callback_read() 198, 200, 203
callback_recorder() 269
callbacks 133, 134, 268
callback_sensor() 300
CallBooleanMethod() 131

[ 414 ]
CallIntMethod() 130
CallStacVoidMethod(). 130
CallVoidMethod() 130
camera feed
decoding, from nave code 136-144
cat command 52
C/C++
java, interfacing with 60
C++ class 184
C code
calling, from java 60
cd command 52
CDT 383
chmod command 52
chrominance components 143
clamp() method 141
class loader 115
clear() method 190
clock_geme() 173, 181
CLOCK_MONOTONIC 181
CMake 350
collision detecon 366, 367
collision ltering 368, 369
collision groups 369
collision modes 367, 368
Color data type 85
Color() method 141
com.example.hellojni 48
command
execung 56
com_myproject_MyAcvity.c 62
Connuous Collision Detecon (CCD) 367
connuous integraon 55
Cortex-A8 404
crash dump
about 396, 397
analysing 392-395
createDevice() method 374
CreateOutputMix() method 243
createTarget() method 354, 356
Crystax NDK
about 315
URL 315
Current Program Status Register 397
Cygwin
about 17
char return 18
D
Dalvik
introducing 59
damping 366
deacvate() method 159, 302
debuggers 392
decode() method 141
DeleteGlobalRef() 88, 106, 117
DeleteLocalRef() 95, 106
density property 353, 365
descript() method 249, 317
DetachCurrentThread() 120
device
turning, into joypad 300-308
device sensors
probing 298, 299
Dex 60
DirectX 338
Discrete Collision Detecon 367
display
connecng 186
dmesg command 52
D-Pad
about 288
detecng 288
drawCursor() method 190
DroidBlaster
about 147, 274
Boost, embedding 328-336
debugging 384-392
Gnu STL, embedding 316-326
launching 219
project structure 275
DroidBlaster.hpp le
creang 162
DroidBlaster project
creang 148
drop() method 375
dumpsys command 52
dx tool 60
E
EASTL 327
Eclipse
about 384
conguring 388, 389

[ 415 ]
installing 29-32
nave code, compiling from 67
seng up 29
Eclipse perspecves 56
Eclipse project
seng up 149
Eclipse views 56
EGL 184
eglChooseCong() 187
eglGetCongArib() 187
eglGetCongs() 187
eglGetDisplay() 186
eglInialize() 186
eglSwapBuers() 189
elapsed() method 173
Embedded-System Graphics Library. See EGL
EMF_LIGHTING ag 372
EndContact() method 366
endianness 326
endScene() method 376
event callback 266-268
EventLoop class 156
EventLoop.cpp 157
EventLoop object 160
ExceponCheck() 102, 106
ExceponDescribe() 106
ExceponOccured() 106
excepons
raising, from store 92-94
throwing, from nave code 91
F
features, 3D engine 369, 370
nalizeStore() method 111, 118
FindClass() method 122, 133
ndEntry() method 79
xed pipeline 183
xture 354
forces 366
framebuer 187
fricon property 353, 365
front buer 189
funcon inlining 346
Funcon object 98
G
GCC
about 404
opmizaon levels 346
URL, for opmizaon opons 346
GCC 3.x 336
GCC 4.x 336
GCC, opmizaon levels
-O0 346
-O1 346
-O2 346
-O3 346
-Os 346
GCC toolchain 383
GDB
about 383
nave code, debugging 384-392
gdb.setup le 385
geometrical shape 353
GetArrayLength() 102
getColor() method 88
getExternalStorageState() method 320
getHorizontal() method 279
GetIntArrayRegion() 102, 106
getInteger() 81
getJNIEnv() method 113, 115
getMyData() 60
GetObjectArrayElement() 104, 105
GetObjectClass() method 133
GetPrimiveArrayCrical() 142
GetStringUTFChars() method 79, 82, 84
gemeofday() 181
getVercal() method 279
glBindBuer() 229
glBindTexture() 203, 212
glBuerData() 229
glClear() 189
glClearColor() 189
glColor4f() 216
glDeleteTextures() 204
glDrawElements() 231
glDrawTexfOES() 212
glDrawTexOES() 219
glEnable() 220

[ 416 ]
glEnableClientState() 231
glGenBuers() 229
glGenTextures() 203
GL_LINEAR 203
global references 88
GL_OES_draw_texture 209
glPushMatrix() 231
glTexCoordPointer() 231
glTexParameteriv() 212
GL_TEXTURE_CROP_RECT_OES 212
glTranslatef() 231
glVertexPointer() 231
GNU Debugger 383
GNU STL
about 316
embedding, in DroidBlaster 316-326
Google Guava 97
Google SparseHash 327
Gprof
about 397
running 398-402
working 403
gprof ulity 402
GraphicsObject 370
GraphicsService 232
GraphicsSprite.cpp 212
GrapicsService lifecycle
about 184
start() 184
stop() 185
update() 185
gravity sensor 274
gyroscope 273
H
HDPI (High Density) screen 36
hellojni sample
compiling 46-49
deploying 46-49
hybrid java/C/C++ project
creang 67-70
I
IAnimatedMeshSceneNode 381
IBillboardSceneNode 381
ICameraSceneNode 381
ILightSceneNode 381
import-module direcve 336
index buer 220
info() method 151
inialize() method 354
inializeStore() method 111
int32_t 84
interface 248
interface ID 248
interfaces 241
intra procedure call scratch register 396
IParcleSceneNode 381
Irrlicht
about 338
compiling, with Android NDK 339-345
3D graphics, rendering with 370-381
memory management 380
scene management 381
IrrlichtDevice class 380
ISceneManager 380
isEntryValid() 79, 94
IsTouching() method 368
ITerrainSceneNode 381
IVideoDriver 380
J
Java
calling back, from nave code 122, 127-132
interfacing, with C/C++ 60
Java and nave code lifecycles
about 121
strategies, for overcoming issues 121
Java and nave threads
aaching 120
background thread, running 111-119
detaching 120
synchronizing 110
Java arrays
handling 96
object reference, saving 97-105
Java code
invoking, from nave thread 122-124
JAVA_HOME environment variable 12
javah tool
about 64
running 71

[ 417 ]
java, interfacing with C/C++
Android Makeles 65, 66
C code, calling from java 60-64
java.lang.UnsasedLinkError 64
Java objects
global reference 90, 91
local reference 90, 91
reference, saving 85-89
referencing, from nave code 85
Java primives
nave key/value store, building 75-84
primive types, passing 85
primive types, returning 85
working with 74
java project
iniang 56-58
JavaVM 112
jbooleanArray 105
jbyteArray 105
jcharArray 105
jdoubleArray 105
JetPlayer 239
joatArray 105
jintArray 101
jlongArray 105
JNIEnv 133
JNI excepons
checking 106
JNI, in C++ 96
JNI method denions 134
JNI methods
DeleteGlobalRef() 106
DeleteLocalRef() 106
ExceponDescribe() 106
ExceponOccured() 106
MonitorExit() 106
PopLocalFrame() 106
PushLocalFrame() 106
ReleasePrimiveArrayCrical() 106
Release<Primive>ArrayElements() 106
ReleaseStringChars() 106
ReleaseStringCrical() 106
ReleaseStringUTFChars() 106
JNI_OnLoad() 120
jobject parameter 85, 132
joints 353
JPEG 369
jshortArray 105
jstring parameter 79, 85
jvalue array 134
K
keyboard
detecng 288
handling 289
L
layout_height 50
layout_width 50
LDR instrucon 396
Level of Detail (LOD) 381
libc.so le 385
libpng NDK
integrang 194
libstdc++ 316
libzip 195
light sensor 274
linear acceleraon sensor 274
link register 396
linux
Android development kit, installing 27
Linux
Android device, seng up 39-41
Android NDK, installing 28
Android SDK, installing 27
seng up 22-26
loadFile() 222, 226
loadImage() method 198, 199, 203
loadIndexes() 222
loadLibrary() method 327
loadVerces() 222, 227
LOCAL_ARM_MODE variable 348
LOCAL_ARM_NEON variable 348
LOCAL_CFLAGS variable 347
LOCAL_C_INCLUDES variable 347
LOCAL_CPP_EXTENSION variable 347
LOCAL_CPPFLAGS variable 347
LOCAL_DISABLE_NO_EXECUTE variable 348
LOCAL_EXPORT_CFLAGS variable 348
LOCAL_EXPORT_C_INCLUDES 340
LOCAL_EXPORT_CPPFLAGS variable 348
LOCAL_EXPORT_LDLIBS variable 348
LOCAL_LDLIBS variable 347
Downloa d f r o m W o w ! e B o o k < w w w.woweb o o k . c o m >Downloa d f r o m W o w ! e B o o k < w w w.woweb o o k . c o m >

[ 418 ]
LOCAL_MODULE_FILENAME variable 347
LOCAL_MODULE variable 65, 347
LOCAL_PATH variable 347
local references 88
LOCAL_SHARED_LIBRARIES variable 348
LOCAL_SRC_FILES variable 179, 347
LOCAL_STATIC_LIBRARIES variable 348
LOCLOCAL_FILTER_ASM variable 348
logcat command 52
LogCat crash dump 396
Looper 169
ls command 52
luminance component 143
M
Mac OS X
and environment variables 21
Android development kit, installing 20
Android device, seng up 37-39
Android SDK, installing 20
seng up, for Android development 18, 19
mAcvityHandler event 156
magnetometer 274
Make 328
makeles
built-in funcons 349
les manipulaon funcons 349
instrucons 348
mastering 346, 350
strings manipulaon funcons 349
variables 347, 348
makeGlobalRef() ulity 126, 129
mAnimFrameCount 211
mAnimSpeed 211
max() method 141
mcount() method 403
MediaPlayer 239
memory management, Box2D 366
memory management, Irrlicht 380
memset() 178
MIME player 325
MIME source 252
mInteger 82
moncleanup() method 402
MonitorEnter() method 116
MonitorExit() method 106, 116
MonkeyRunner 55
monotonic clock 173
monotonic mer 181
monstartup() method 402
MoonEvent 277
movement constraints 353
music les
background music, playing 249-255
playing 249
N
nave acvity
about 147
basic nave acvity, creang 148-154
creang 148
NaveAcvity class 148, 154
Nave App Glue
about 166
acvity state, saving 171
Android_app structure 170
nave thread 168, 169
UI thread 167, 168
nave_app_glue module 286
nave code
compiling, from eclipse 67
Java, calling back from 122-132
debugging, with GDB 384-392
Nave glue module code
locaon 166
nave key/value store
building 75-83
NDEBUG opon 330
ndk-build command 46
ndk-gdb command 385
NDK sample applicaons
compiling 46
deploying 46
hellojni sample, compiling 46-49
hellojni sample, deploying 46-49
ndk-stack- 395
NEON 404
NewGlobalRef() 88
NewIntArray() 101
NewObject() 129
NewStringUTF() 82
nodes 381

[ 419 ]
no-strict-aliasing opon 330
now() method 173
NVidia 398
Nvidia Tegra 2 404
O
OBJ 369
objdump command 393
object 241, 248
Octree 381
onAccelerometerEvent() 313
onAcvate() method 155, 392
onAppCmd 157
onConguraonChanged event 167
onDeacvate() method 156
onDestroy event 167
onDestroy() method 155
onGetValue() method 86
onInputQueueCreated event 167
onInputQueueDestoyed event 167
onKeyboardEvent() 291
onLowMemory event 167
onNaveWindowCreated event 167
onNaveWindowDestroyed event 167
onPause event 167
onPause() method 155
onPreviewFrame() 140
onResume event 167
onResume() method 155
onSaveInstance event 167
onStart event 167
onStart() method 155
onStep() method 156, 191
onStop event 167
onStop() method 155
onTouchEvent() 276, 281
onWindowFocusedChanged event 167
OpenGL 183
OpenGL ES
about 49, 183
inializing 184-192
texture, loading 194--207
OpenGL ES 1 369
OpenGL ES 1.1 183
OpenGL ES 2 183, 369
OpenGL ES inializaon code 184
Open Graphics Library for Embedded Systems.
See OpenGL ES
OpenMAX AL low-level mulmedia API 240
OpenSL ES
about 239, 248
inializing 241
interface 248
interface ID 248
object 248
OpenSL ES engine
creang 241-247
OpenSL ES inializaon
engine, creang 241
OpenSL ES object
seng up 248
OpenSL for Embedded System. See OpenSL ES
OProle 397
opmizaon levels, GCC
-O0 346
-O1 346
-O2 346
-O3 346
-Os 346
OutputMix object 252
P
packt_Log_debug macro 150
page ipping 189
parallax eect 237
parse_error_handler() method 224
pCommand 160
PerfHUD ES 398
performance 404
performance analysis 397, 398
physics
simulang, with Box2D 354-366
PhysicsObject class 354
PID 396
playBGM() method 250, 252
playRecordedSound() 271
playSound() method 259
PNG 194, 369
png_read_image() 202
png_read_update_info() 200

[ 420 ]
PNG textures
loading, in OpenGL ES 194-208
reading, asset manager used 193
PopLocalFrame() 106
Portable Network Graphics. See PNG
Posix APIs 171
PostSolve() method 366
PowerVR 398
PREBUILT_STATIC_LIBRARY direcve 336
PreSolve() method 366
primives array types
jbooleanArray 105
jbyteArray 105
jcharArray 105
jdoubleArray 105
joatArray 105
jlongArray 105
jshortArray 105
prin() method 151
processAcvityEvent() 156, 160
process_cmd() method 169
processEntry() method 113, 117, 130
process idener. See PID
processInputEvent() method 276, 289
process_input() method 169
Program Counter 393, 397
project conguraon tool
about 54
connuous integraon 55
create project opon 54
update project opon 54
proximity sensor 274
ps command 52
pthread_key_create() 120
pthread_setspecic() 120
PushLocalFrame() 106
PVRTune 398
pwd command 52
Python 330
Q
Quake levels 370
Qualcomm 398
R
RAII 337
RapidXml library 221
RDESTL 327
Realize() method 243
recordSound() 271
RegisterCallback() method 266 266
registerEnty() method 358
registerObject() method 372
registerSound() method 259
registerTexture() 205
registerTileMap() 233
releaseEntryValue() 81, 100
ReleasePrimiveArrayCrical() 106
Release<Primive>ArrayElements() 106
ReleaseStringChars() 106
ReleaseStringUTFChars() method 79, 84, 106
Resource Acquision Is Inializaon. See RAII
Resource class 199
ResourceDescriptor class 317
ResourceDescriptor structure 250
restuon property 353, 365
rotaon vector 274
RTTI 315
run() method 152
runWatcher() method 113, 115
S
San Angeles 49
san angeles OpenGL demo
compiling 49
tesng 49, 50
scene management, Irrlicht 381
screen rotaon
handling 312
SD-Card access 43
segmentaon fault 393
sensor 368
Serializaon module 330
setAnimaon() 210, 211
setColorArray() 104
setColor() method 88
SetIntArrayRegion() 101, 102

[ 421 ]
setInteger() 81
setjmp() 200
SetObjectArrayElement() 103, 105
SetStringUTFChars() method 82
setTarget() method 359
setup() method 375
shape 354, 365
shared libraries
versus stac libraries 326
Ship class 217
ship.png sprite 217
SIMD instrucon set 404
simple Java GUI 74
Single Instrucon Mulple Data (SIMD) 404
skinning 370
SLAndroidSImpleBuerQueueI interface 269
slCreateEngine() method 242
SLDataLocator_AndroidSimple
BuerQueue() 261, 270
SLDataSink structure 252
SLDataSource structure 252
SL_IID_PLAY interface 253
SL_IID_SEEK interfaces 253
SLObjectI instance 242
SLObjectI object 249
SLPlayI interface 250
SLRecordI interface 269
SLSeekI interface 250
soware keyboard
displaying 297, 298
SoudService.hpp 259
sound buer queue
creang 257-259
playing 260-265
SoundPool 239
sounds
playing 256, 257
recorded buer, playing 271
recording 268-271
sound buer queue, creang 257-266
sound buer queue, playing 260-265
spawn() method 322
spin() method 371
sprite
drawing 208
Ship sprite, drawing 209-219
sprite images
eding 209
stack pointer 396
stack trace analysis 392
Standard Template Library (STL)
about 316
performances 327
start() method 279, 280
startSoundPlayer() method 259, 260
startWatcher() method 113, 127
stac libraries
versus shared libraries 326
status startSoundRecorder() 269
stay awake opon 38
Step() method 358
STLport 316
stopBGM() method 250, 254
stopWatcher() method 116
StoreAcvity class 76
StoreListener interface 122
StreamLine 398
stringToList () 98
Subversion(SVN) 55
surfaceChanged() method 138
System.loadLibrary() 120
T
terrain rendering 370
texel 227
texture
loading, in OpenGL ES 194-207
third-party libraries
porng, to Android 338
thread idener. See TID
threading 268, 338
Threading Building Block library 338
ThrowNew() 95
throwNotExisngExcepon() 95
thumb 403
TID 396
led map editor 220
le map
about 220
rendering, vertex buer objects used 220
le-based background, drawing 221-237

[ 422 ]
le map technique 237
mer
about 181
implemenng 172-179
toInt() method 141
torques 366
touch events
analyzing 279
handling 276-291
trackball
detecng 288
handling 289
triple buering 189
U
UI thread 167
Unix File Descriptor 169
unload() method 204
update() method 189, 290, 322, 354, 358, 372
userData 157
userData eld 355
UV coordinates 227
V
Valgrind 397
vertex 220
Virtual Machine 59
void playRecordedSound() 269
void recordSound() 269
VSync 189
W
watcherCounter 111
window and me
accessing, navely 171
raw graphics, displaying 172-179
Windows
Android development kit, installing 12
Android device, seng up 37-39
Android NDK, installing 14, 15
Android SDK, installing 13, 15
Ant, installing 11
environment variables 14-16
seng up, for Android development 8-12
X
x86 404
xml_document instance 224
Y
YCbCr 420 SP (or NV21) format 143
Z
Zygote 385
Zygote process 60

Thank you for buying
Android NDK Beginner’s Guide
About Packt Publishing
Packt, pronounced 'packed', published its rst book "Mastering phpMyAdmin for Eecve MySQL
Management" in April 2004 and subsequently connued to specialize in publishing highly focused
books on specic technologies and soluons.
Our books and publicaons share the experiences of your fellow IT professionals in adapng and
customizing today's systems, applicaons, and frameworks. Our soluon-based books give you the
knowledge and power to customize the soware and technologies you're using to get the job done.
Packt books are more specic and less general than the IT books you have seen in the past. Our unique
business model allows us to bring you more focused informaon, giving you more of what you need to
know, and less of what you don't.
Packt is a modern, yet unique publishing company, which focuses on producing quality, cung-edge
books for communies of developers, administrators, and newbies alike. For more informaon, please
visit our website: www.PacktPub.com.
Wring for Packt
We welcome all inquiries from people who are interested in authoring. Book proposals should be sent
to author@packtpub.com. If your book idea is sll at an early stage and you would like to discuss
it rst before wring a formal book proposal, contact us; one of our commissioning editors will get in
touch with you.
We're not just looking for published authors; if you have strong technical skills but no wring
experience, our experienced editors can help you develop a wring career, or simply get some
addional reward for your experse.
Android User Interface Development
ISBN: 978-1-84951-448-4 Paperback:304 pages
Quickly design and develop compelling user interfaces for
your Android applicaons
1. Leverage the Android plaorm's exibility and
power to design impacul user-interfaces
2. Build compelling, user-friendly applicaons that
will look great on any Android device
3. Make your applicaon stand out from the rest
with styles and themes
4. A praccal Beginner's Guide to take you
step-by-step through the process of developing
user interfaces to get your applicaons noced!
Android Applicaon Tesng Guide
ISBN: 978-1-84951-350-0 Paperback: 332 pages
Build intensively tested and bug free Android applicaons
1. The rst and only book that focuses on tesng
Android applicaons
2. Step-by-step approach clearly explaining the most
ecient tesng methodologies
3. Real world examples with praccal test cases that
you can reuse
Please check www.PacktPub.com for information on our titles
Android 3.0 Animaons
ISBN: 978-1-84951-528-3 Paperback:304 pages
Bring your Android applicaons to life with stunning
animaons
1. The rst and only book dedicated to creang
animaons for Android apps.
2. Covers all of the commonly used animaon
techniques for Android 3.0 and lower versions.
3. Create stunning animaons to give your Android
apps a fun and intuive user experience.
4. A step-by-step guide for learning animaon by
building fun example applicaons and games.
Android 3.0 Applicaon Development
Cookbook
ISBN: 978-1-84951-294-7 Paperback: 272 pages
Over 70 working recipes covering every aspect of Android
development
1. Wrien for Android 3.0 but also applicable to lower
versions
2. Quickly develop applicaons that take advantage of
the very latest mobile technologies, including web
apps, sensors, and touch screens
3. Part of Packt's Cookbook series: Discover ps and
tricks for varied and imaginave uses of the latest
Android features
Please check www.PacktPub.com for information on our titles
Downloa d f r o m W o w ! e B o o k < w w w.woweb o o k . c o m >Downloa d f r o m W o w ! e B o o k < w w w.woweb o o k . c o m >
