Antilles Installation Guide (For EL7)
User Manual:
Open the PDF directly: View PDF ![]() .
.
Page Count: 28

AntillesInstallationGuide(For
EL7)1.0.0
1.Overview
IntroductiontoAntilles
Typicalclusterdeployment
Operatingenvironment
Supportedserversandchassismodels
2.Preparetheclusterenvironment
PrepareclusterOSandnetworkenviroment
Prepareinfrastructuresoftwarefornodes
PrepareAntillesRepo
PreparepythonmodulesAntillesrequires
3.InstallAntillesdependencies
Checkinfrastructureenvironment
Configureenvironmentvariables
Precheck
ListofAntillesdependenciestobeinstalled
InstallAntillesdependencies
InstallRabbitMQ
InstallPostgreSQL
InstallInfluxDB
InstallConfluent
Configureuserauthentication
InstallOpenLDAPserver
Installlibuser
InstallOpenLDAPclient
Installnsspamldapd
InstallGmondGPUplugin
4.InstallAntilles
ListofAntillescomponentstobeinstalled
InstallAntillesonthemanagementnode
InstallAntillesontheloginnode
InstallAntillesonthecomputenode
5.ConfigureAntilles
Configuretheserviceaccount
Configureclusternodes
Roominformation
Logicgroupinformation
Roomrowinformation

Rackinformation
Chassisinformation
Nodeinformation
ConfigureAntillesservices
Infrastructureconfiguration
Databaseconfiguration
Loginconfiguration
Storageconfiguration
Schedulerconfiguration
Alertconfiguration
Confluentconfiguration
Userconfiguration
ConfigureAntillescomponents
antillesvncmond
antillesportal
antillesgangliamond
antillesicingamond
antillesicingaplugin
antillesconfluentproxy
antillesconfluentmond
Initializethesystem
Initializeusers
6.StartandlogintoAntilles
StartAntilles
LogintoAntilles
TroubleShooting
Changeauser’srole
Resumeauser
1.Overview
IntroductiontoAntilles
Antillesisaninfrastructuremanagementsoftwareforhighperformancecomputing(HPC).It
providesfeatureslikeclustermanagementandmonitoring,jobschedulingandmanagement,
clusterusermanagement,accountmanagement,andfilesystemmanagement.
WithAntilles,userscancentralizeresourceallocationinonesupercomputingclusterandcarry
outHPCjobs.Userscanperformoperationsbyloggingintothemanagementsysteminterface
withabrowser,orbyusingcommandlinesafterloggingintoaclusterloginnodewithanother
Linuxshell.
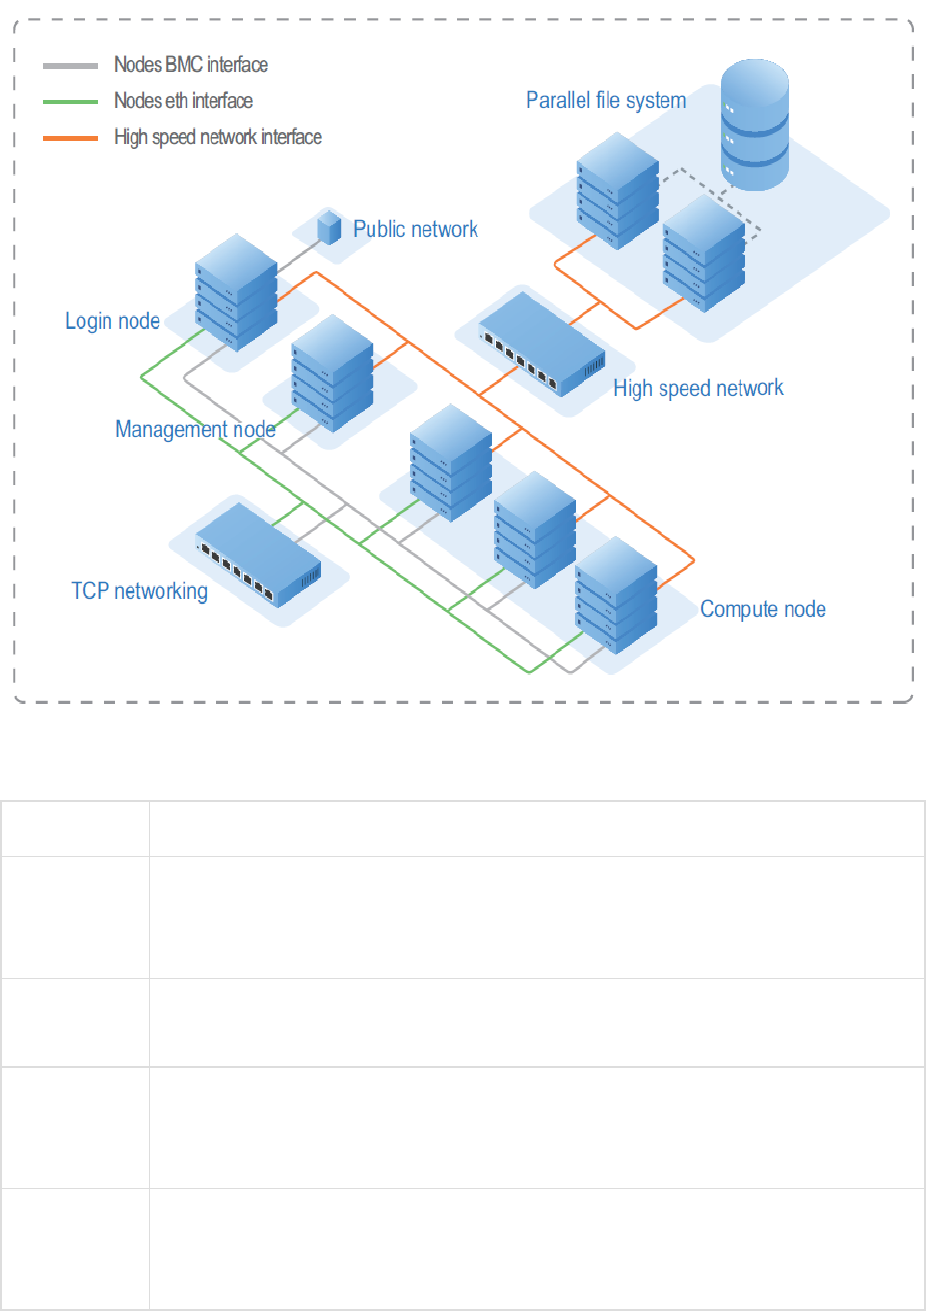
Typicalclusterdeployment
ThisGuideisbasedonthetypicalclusterdeploymentthatcontainsmanagement,login,and
computenodes.
Elementsintheclusteraredescribedinthetablebelow.
Element Description
Management
node
CoreoftheHPCcluster,undertakingprimaryfunctionssuchascluster
management,monitoring,scheduling,strategymanagement,anduser&
accountmanagement.
Compute
node
Completescomputingtasks.
Loginnode Connectstheclustertotheexternalnetworkorcluster.Usersmustusethe
loginnodetologinanduploadapplicationdata,developcompilers,andsubmit
scheduledtasks.
Parallelfile
system
Providesasharedstoragefunction.Itisconnectedtotheclusternodes
throughahighspeednetwork.Parallelfilesystemsetupisbeyondthescope
ofthisGuide.AsimpleNFSsetupisusedinstead.
NodesBMC
interface
Usedtoaccessthenode’sBMCsystem.
Nodeseth
interface
Usedtomanagenodesincluster.Itcanalsobeusedtotransfercomputing
data.
Highspeed
network
interface
Optional.Usedtosupporttheparallelfilesystem.Itcanalsobeusedto
transfercomputingdata.
Note:Antillesalsosupportstheclusterdeploymentthatonlycontainsthemanagementand
computenodes.Inthiscase,allAntillesmodulesinstalledontheloginnodeneedtobeinstalled
onthemanagementnode.
Operatingenvironment
Clusterserver:
LenovoThinkSystemservers
Operatingsystem:
CentOS/RedHatEnterpriseLinux(RHEL)7.5
Clientrequirements:
Hardware:CPUof2.0GHzorabove,memoryof8GBorabove
Browser:Chrome(V62.0orhigher)orFirefox(V56.0orhigher)recommended
Displayresolution:1280x800orabove
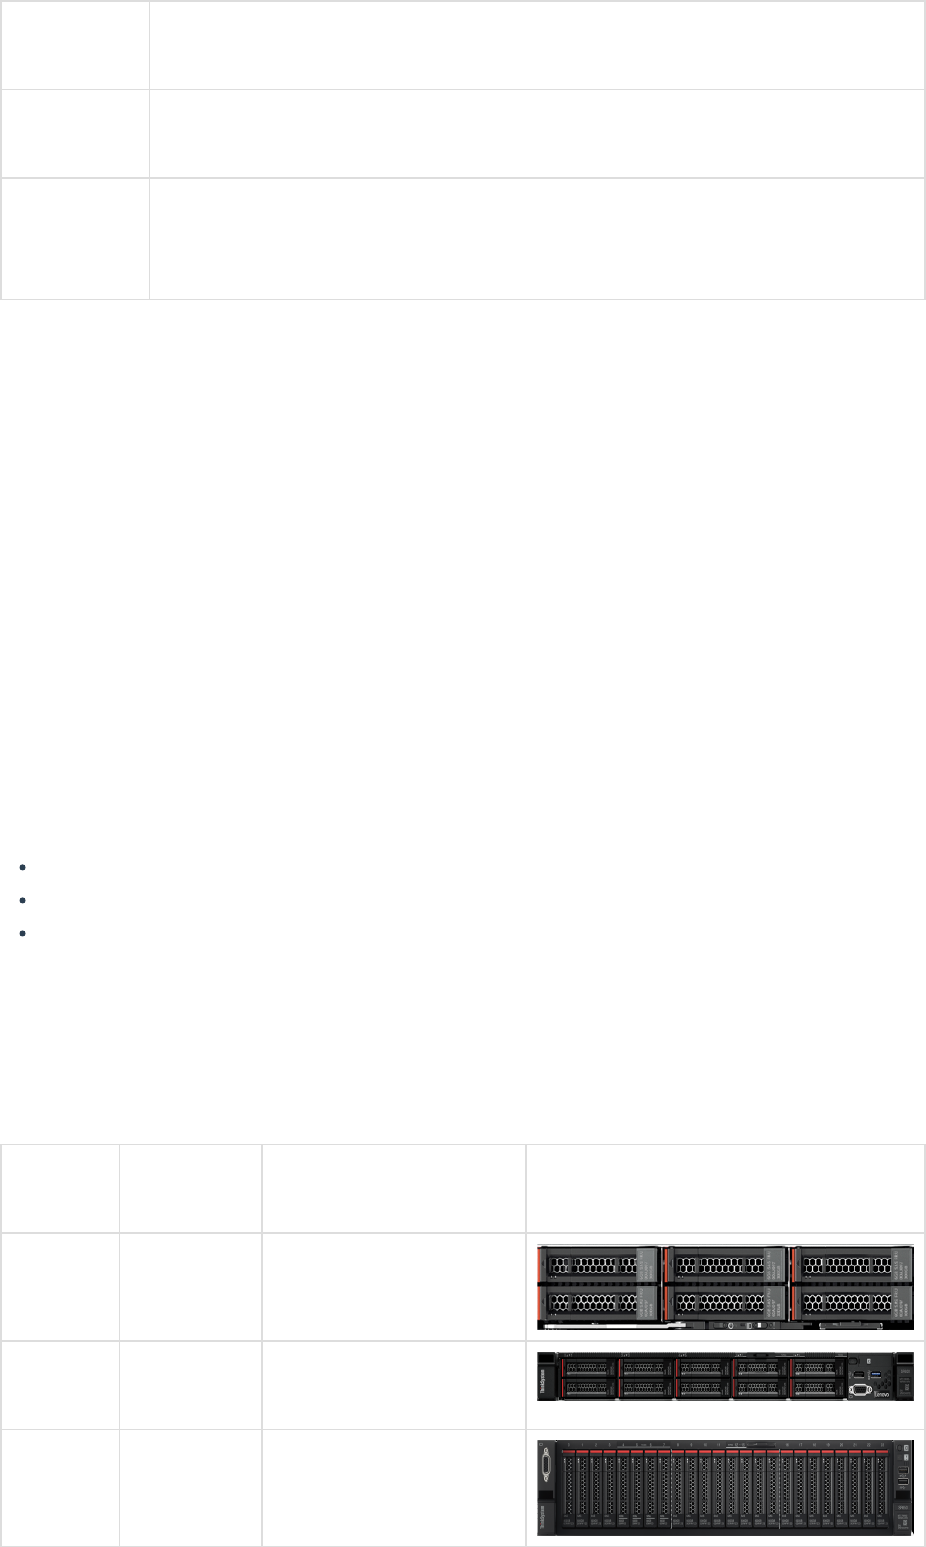
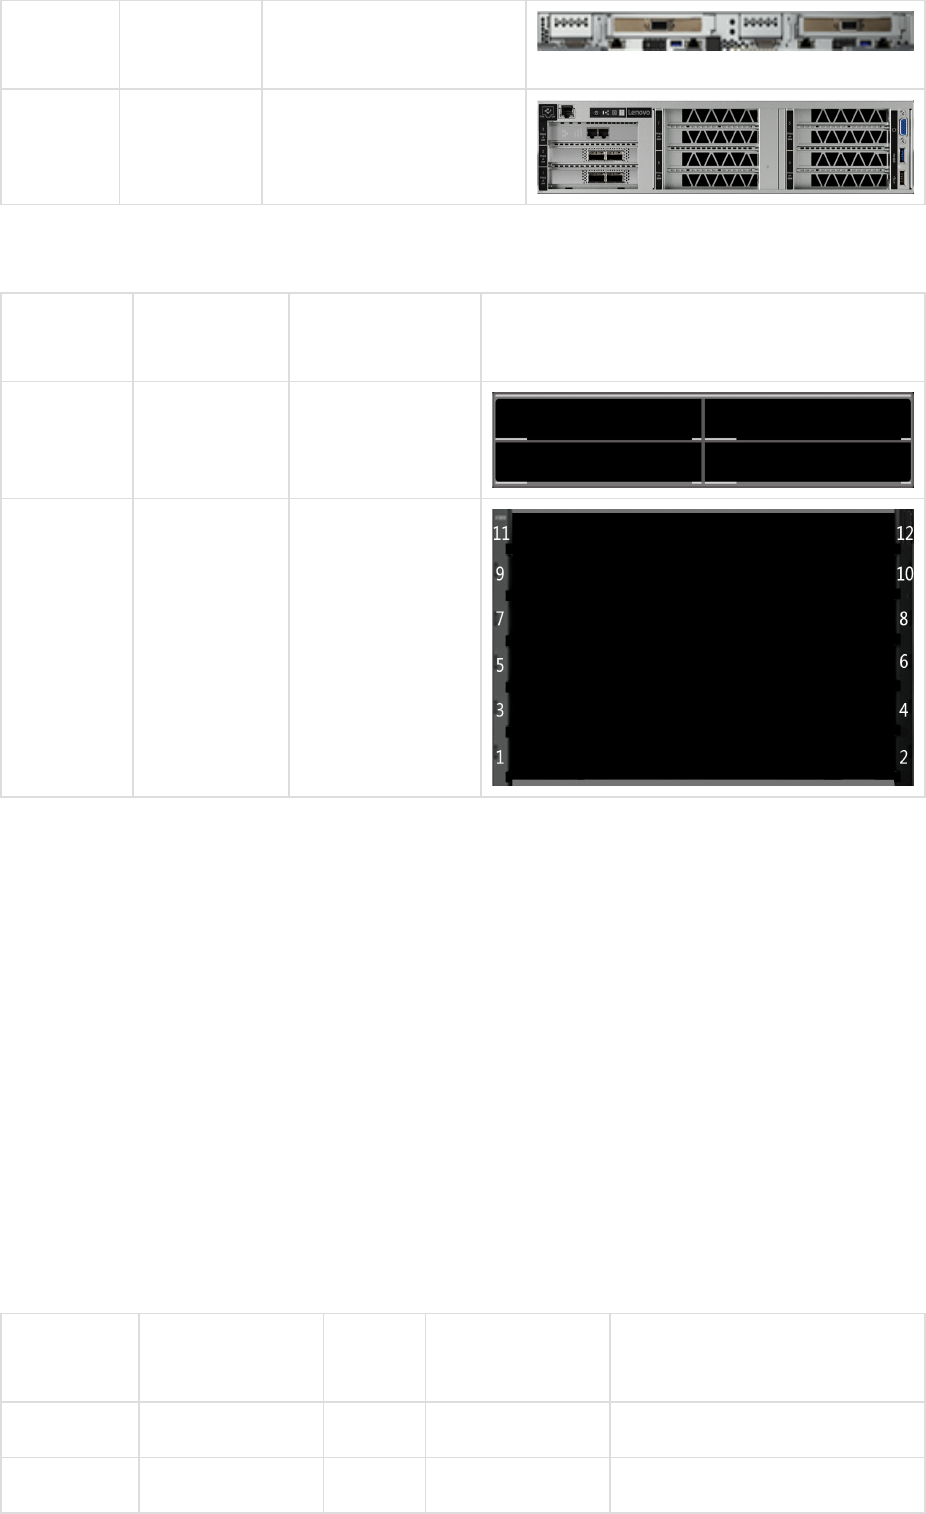
Supportedserversandchassismodels
Antillescanbeinstalledoncertainservers,aslistedinthetablebelow.
Product
code
Machine
type
Productname Appearance
sd530 7X21 LenovoThinkSystem
SD530(0.5U)
sr630 7X01,7X02 LenovoThinkSystem
SR630(1U)
sr650 7X05,7X06 LenovoThinkSystem
SR650(2U)
sd650 7X58 LenovoThinkSystem
SD650(1U)
sr670 7Y36,7Y37,
7Y38
LenovoThinkSystem
SR670(2U)
Antillescanbeinstalledoncertainchassismodels,aslistedinthetablebelow.
Product
code
Machine
type
Modelname Appearance
d2 7X20 D2Enclosure
(2U)
n1200 5456,5468,
5469
NeXtScalen1200
(6U)
2.Preparetheclusterenvironment
PrepareclusterOSandnetworkenviroment
ClusterOSandnetworkshouldbeready.
Prepareinfrastructuresoftwarefornodes
InstalltheclusterinfrastructureinaccordancewiththeOHPCinstallationmanual.Necessary
softwarearelistedinthetablebelow.
Software
name
Component
name
Version Servicename Notes
nfs nfsutils 1.3.0 nfsserver
ntp ntp 4.2.6 ntpd

slurm ohpcslurm
server
1.3.4 munge,
slurmctld
ohpcslurm
client
1.3.4 munge,slurmd
ganglia gangliagmond
ohpc
3.7.2 gmond
mpi openmpi3gnu7
ohpc
3.0.0 AtleastoneMPItype
required.Makesurecompute
nodescanusecommand
mpirun directlyinsteadof
specifyingpathtocommand
mpirun
mpichgnu7
ohpc
3.2.1
mvapich2gnu7
ohpc
2.2
IfGPUnode(s)isincludedinthecluster,CUDAshouldalsobeinstalledontheGPUnode(s).
RecommendedCUDAversionis9.1.Installationreference:https://developer.nvidia.com
PrepareAntillesRepo
PackagingAntillesintoRPMsandcreaterepoforinstallingantillesmodules.
Step1.DownloadAntillescodefromgithub.
Step2.RunthefollowingcommandstopackagingAntillesandcreateAntillesRepo:
cd /path/to/antilles
./packaging_antilles_el7.sh
Note: /path/to/antilles shouldbereplacedbytherealpathwhereantillescodelocate.
AftercreateAntillesrepo,distributetheantillesrepofiletoallnodeswhichwouldinstallantilles.
PreparepythonmodulesAntillesrequires
BeforeinstallingAntillespackagesyoushouldpreinstallpythonmodulesthatAntillespackages
require.EachofAntillesmodulehas requirements.txt files,youshouldmakesureallthe
pythonmodulesinstalledandthemodule’sversionisconformingtotherequirementsfile.
3.InstallAntillesdependencies

Checkinfrastructureenvironment
Makesurethattheclusterenvironmentisready.
Configureenvironmentvariables
Step1.Logintothemanagementnode.
Step2.Runthefollowingcommandstoconfigureenvironmentvariablesfortheentireinstallation
process:
su root
cd ~
vi antilles_env.local
Step3.Runthefollowingcommandstoeditthe antilles_env.local file:
# Management node hostname
sms_name="head"
# IP address of management node in the cluster intranet
sms_ip="192.168.0.1"
# Set the domain name
domain_name="hpc.com"
# Set OpenLDAP domain name
antilles_ldap_domain_name="dc=hpc,dc=com"
# set OpenLDAP domain component
antilles_ldap_domain_component="hpc"
Step4.Savethechangesto antilles_env.local .
Step5.Runthefollowingcommandstomaketheconfigurationfiletakeeffect:
chmod 600 antilles_env.local
source antilles_env.local
Precheck
Makesureservicesbelowalreadyprepared.
InfrastructureSoftware CheckCommand Notes

nfs showmount -e ${sms_ip}
slurm sinfo
ganglia gstat -a
mpi module list
cuda nvidia-smi requiredbyGPUnode
OpenHPC yum repolist
ListofAntillesdependenciestobeinstalled
Note:IntheInstallationnodecolumn,Mstandsfor“Managementnode”,Lstandsfor“Login
node”,andCstandsfor“Computenode”.
Software
name
Component
name
Version Service
name
Installation
node
Notes
rabbitmq rabbitmqserver 3.6.15 rabbitmq
server
M
postgresql postgresqlserver 9.2.23 postgresql M
influxdb influxdb 1.5.4 influxdb M
confluent confluent 2.0.2 confluent M
openldap slapdsslconfig 1.0.0 slapd M
nsspamldapd 0.8.13 nslcd M,C,L
libuser 0.60 M
libuserpython 0.60 M
gmondgpu
plugin
gmondohpcgpu
module
1.0.0 C Requiredonlyonthe
GPUnode
InstallAntillesdependencies
InstallRabbitMQ
AntillesusesRabbitMQasamessagebroker.

InstallationReference:http://www.rabbitmq.com/
InstallPostgreSQL
AntillesusesPostgreSQLasanobjectrelateddatabasefordatastorage.
InstallationReference:https://www.postgresql.org/
Afterinstallation,runthefollowingcommandstoconfigurePostgreSQL:
# Stop PostgreSQL on the management node
systemctl stop postgresql
# Initialization and passwords can be changed as needed.
su - postgres
echo <PG_PASSWORD> > /var/tmp/pwfile
# The value for the -U switch on the initdb command ("postgres") is the p
ostgres username.
# Make sure to make note of this, as well as the other usernames and pass
words used during this
# setup as they will be needed during the ico-passwd-tool step later in t
he installation process.
initdb -U postgres --pwfile /var/tmp/pwfile /var/lib/pgsql/data
rm /var/tmp/pwfile
exit
# Starting PostgreSQL
systemctl enable postgresql
systemctl start postgresql
# Create Antilles database
psql -U postgres -c "CREATE DATABASE antilles;"
InstallInfluxDB
AntillesusesInfluxDBasatimeseriesdatabaseforstoragemonitoring.
InstallationReference:https://www.influxdata.com/
Afterinstallation,runthefollowingcommandstocreateInfluxDBusers:
# Start InfluxDB
systemctl enable influxdb
systemctl start influxdb

# Enter the InfluxDB shell
# To create an administrator user, please note that the password must be
a string, otherwise the error is reported.
influx
> create database antilles
> use antilles
> create user <INFLUX_USERNAME> with password '<INFLUX_PASSWORD>' with al
l privileges
> exit
# configuration
sed -i '/auth-enabled = false/a\ auth-enabled = true' /etc/influxdb/confi
g.toml
# restart InfluxDB
systemctl restart influxdb
InstallConfluent
InstalltionReference:https://hpc.lenovo.com/yum/latest/
RunthefollowingcommandstoconfigureConfluent:
# Start confluent
systemctl enable confluent
systemctl start confluent
# Create confluent count
source /etc/profile
confetty create /users/<CONFLUENT_USERNAME> password=<CONFLUENT_PASSWORD>
Configureuserauthentication
Note:IfyouhavealreadyconfiguredOpenLDAPforthecluster.
InstallOpenLDAPserver
OpenLDAPisanopensourceversionofthelightweightdirectoryaccessprotocol.Antilles
recommendsusingOpenLDAPtomanageusers;however,italsosupportsotherauthentication
servicescompatiblewithLinuxPAM.
RunthefollowingcommandstoinstallOpenLDAP:
# Install OpenLDAP

yum install -y slapd-ssl-config
# Run the following commands to modify the configuration file
sed -i "s/dc=hpc,dc=com/${antilles_ldap_domain_name}/" /usr/share/openlda
p-servers/antilles.ldif
sed -i "/dc:/s/hpc/${antilles_ldap_domain_component}/" /usr/share/openlda
p-servers/antilles.ldif
sed -i "s/dc=hpc,dc=com/${antilles_ldap_domain_name}/" /etc/openldap/slap
d.conf
slapadd -v -l /usr/share/openldap-servers/antilles.ldif -f /etc/openldap/
slapd.conf -b ${antilles_ldap_domain_name}
# set password
# Get the key using the following command and enter <LDAP_PASSWORD> when
prompted.
slappasswd
# Edit the file /etc/openldap/slapd.conf to cover the contents of the roo
tpw with the key obtained.
rootpw <ENCRYPT_LDAP_PASSWORD>
chown -R ldap:ldap /var/lib/ldap
chown ldap:ldap /etc/openldap/slapd.conf
# Edit configuration files
vi /etc/sysconfig/slapd
# Please make sure the next two lines are uncommented
SLAPD_URLS="ldapi:/// ldap:/// ldaps:///"
SLAPD_OPTIONS="-f /etc/openldap/slapd.conf"
# Start OpenLDAP service
systemctl enable slapd
systemctl start slapd
# check service
systemctl status slapd
Installlibuser
ThelibusermoduleisarecommendedtoolkitforOpenLDAP.Theinstallationofthismoduleis
optional.
Step1.Runthefollowingcommandtoinstalllibuser:
yum install -y libuser libuser-python
Step2.Runthefollowingcommandstoconfigurelibuser:
vi /etc/libuser.conf

[import]
login_defs = /etc/login.defs
default_useradd = /etc/default/useradd
[defaults]
crypt_style = sha512
modules = ldap
create_modules = ldap
[userdefaults]
LU_USERNAME = %n
LU_GIDNUMBER = %u
LU_GECOS = %n
# Pay attention to modify option below
LU_HOMEDIRECTORY = /home/%n
LU_SHADOWNAME = %n
LU_SHADOWMIN = 0
LU_SHADOWMAX = 99999
[groupdefaults]
LU_GROUPNAME = %n
[files]
[shadow]
[ldap]
# Modify <LDAP_ADDRESS> to management node IP
server = ldap://<LDAP_ADDRESS>
# Pay attention to modify option below
# Make sure <DOMAIN> should be the same with ${antilles_ldap_domain_name}
defined in antilles_env.local
basedn = <DOMAIN>
userBranch = ou=People
groupBranch = ou=Group
binddn = uid=admin,<DOMAIN>
bindtype = simple
[sasl]
InstallOpenLDAPclient
RunthefollowingcommandstoinstallOpenLDAPclient:
echo "TLS_REQCERT never" >> /etc/openldap/ldap.conf
Thendistribute /etc/openldap/ldap.conf toallothernodes.
Installnsspamldapd
nsspamldapdisanameserviceswitchingmoduleandpluggableauthenticationmodule.Antilles
usesthismoduleforuserauthentication.
Runthefollowingcommandstoinstallnsspamldapdonallnodes:
yum install -y nss-pam-ldapd authconfig

authconfig --useshadow --usemd5 --enablemkhomedir --disablecache --enable
locauthorize --disablesssd --disablesssdauth --enableforcelegacy --enable
ldap --enableldapauth --disableldaptls --ldapbasedn=${antilles_ldap_domai
n_name} --ldapserver="ldap://${sms_name}" --updateall
echo "rootpwmoddn uid=admin,${antilles_ldap_domain_name}" >> /etc/nslcd.c
onf
# Start management node service
systemctl enable nslcd
systemctl start nslcd
InstallGmondGPUplugin
OnallGPUnodes,runthefollowingcommandstoinstallGmondGPUplugin:
yum install -y gmond-ohpc-gpu-module
ls /etc/ganglia/conf.d/*.pyconf|grep -v nvidia|xargs rm
# Start gmond
systemctl restart gmond
4.InstallAntilles
ListofAntillescomponentstobeinstalled
Note:IntheInstallationnodecolumn,Mstandsfor“Managementnode”,Lstandsfor“Login
node”,andCstandsfor“Computenode”.
Software
name
Component
name
Version Servicename Installation
node
Notes
antillescore antillescore 1.0.0 antilles M
antillesportal antillesportal 1.0.0 M,L
antillescore
extend
antilles
confluentproxy
1.0.0 M
antillesvnc
proxy
1.0.0 M
antillesenv antillesenv 1.0.0 M,L

antilles
monitor
antillesganglia
mond
1.0.0 antillesganglia
mond
M Cannotinstall
thissoftwareif
youinstall
antillesicinga
mond
antillesicinga
mond
1.0.0 antillesicinga
mond
M Cannotinstall
thissoftwareif
youinstall
antilles
gangliamond
antillesicinga
plugin
1.0.0 M,C,L Requiredif
youneedto
installantilles
icingamond
antilles
confluentmond
1.0.0 antilles
confluentmond
M
antillesvnc
mond
1.0.0 antillesvnc
mond
C Requiredif
youneedto
runVNC
antillesalarm
notification
antillessms
agent
1.0.0 antillessms
agent
L Requiredif
youneedto
sendalerts
viaSMS
antilleswechat
agent
1.0.0 antilleswechat
agent
L Requiredif
youneedto
sendalerts
viaWeChat
antillesmail
agent
1.0.0 antillesmail
agent
L Requiredif
youneedto
sendalerts
viaemails
InstallAntillesonthemanagementnode
Step1.RunthefollowingcommandtoinstalltheAntillesmoduleonthemanagementnode:
yum install -y antilles-core antilles-confluent-mond antilles-confluent-p
roxy antilles-env
Step2.Performthefollowingoptionalstepsasrequired:

Ifyouneedto… Runthefollowingcommands:
UseGangliaforAntillesmonitoring(provided
thatGangliaisinstalledonthemanagement
node)
Note:Antillescanbemonitoredbyeither
GangliaorIcinga2.OnlyoneofGangliaor
Icinga2canbeinstalled.
yum install -y antilles-ganglia-mond
UseIcinga2forAntillesmonitoring(provided
thatIcinga2isinstalledonthemanagement
node)
yum install -y antilles-icinga-mond
antilles-icinga-plugin
ProvideWebserviceonthemanagement
node
yum install -y antilles-portal
UsetheVNCcomponent yum install -y antilles-vnc-proxy
Step3.Runthefollowingcommandtorestartservices:
systemctl restart confluent
InstallAntillesontheloginnode
Step1.RunthefollowingcommandstoinstalltheAntillesmoduleontheloginnode:
yum install -y antilles-env
Step2.Performthefollowingstepsontheloginnodeasrequired:
Ifyouneedto… Runthefollowingcommands:
ProvideWebserviceontheloginnode yum install -y antilles-portal
UseIcinga2forAntillesmonitoring(provided
thatIcinga2isinstalledontheloginnode)
yum install -y antilles-icinga-plugin
Provideemail,SMS,andWeChatserviceson
theloginnode
# Install email module
yum install -y antilles-mail-agent
# Install SMS module
yum install -y antilles-sms-agent
# Install WeChat module
yum install -y antilles-wechat-agent

InstallAntillesonthecomputenode
RunthefollowingcommandtoinstalltheAntillesmoduleonallcomputenodes:
yum install -y antilles-env
IfIcinga2isinstalledonallcomputenodes,runthefollowingcommand:
yum install -y antilles-icinga-plugin
5.ConfigureAntilles
Configuretheserviceaccount
Onthemanagementnode,usethetoolantillespasswdtool.
IfIcinga2isnotinstalled,followthepromptbelowtoentertheusernameandpasswordfor
PostgreSQL,InfluxDBandConfluent:
antilles-passwd-tool
IfIcinga2isinstalled,followthepromptbelowtoentertheusernameandpasswordfor
PostgreSQL,InfluxDB,ConfluentandIcinga2API:
antilles-passwd-tool --icinga
Configureclusternodes
Step1.Runthefollowingcommandtoimporttheclusterinformationtothesystem:
cp /etc/antilles/nodes.csv.example /etc/antilles/nodes.csv
Step2.Runthefollowingcommandtoedittheclusterinformationfile:
vi /etc/antilles/nodes.csv

Roominformation
Belowisanexampleoftheroominformationtable.
room name location_description
ShanghaiSolutionRoom ShanghaiZhangjiang
Enteroneentryofinformationforthefieldsnameandlocation_description.
Logicgroupinformation
Managerscanuselogicgroupstodividenodesintheclusterintogroups.Thelogicgroupsdonot
impacttheuseofcomputerresourcesorpermissionsconfigurations.
Belowisanexampleofthelogicgroupinformationtable.
group name
login
Youneedtoenteratleastonelogicgroupnameinthenamefield.
Roomrowinformation
Roomrowreferstotherackorderintheroom.Entertheinformationabouttherackrowwhere
theclusternodeislocated.
Belowisanexampleoftheroomrowinformationtable.
row name index belonging_room
row1 1 ShanghaiSolutionRoom
Enteratleastoneentryofrowinformationinthefieldsbelow:
name:rowname(mustbeuniqueinthesameroom)
index:roworder(mustbeapositiveintegerandbeuniqueinthesameroom)
belonging_room:nameoftheroomwheretherowbelongs
Rackinformation
Belowisanexampleoftherackinformationtable.
rack name column belonging_row
rack1 1 row1

Enteratleastoneentryofrackinformationinthefieldsbelow:
name:rackname(mustbeuniqueinthesameroom)
column:racklocationcolumn(mustbeapositiveintegerandbeuniqueinthesamerow)
belonging_row:nameoftherowwheretherackbelongs
Chassisinformation
Ifthereisachassisinthecluster,enterthechassisinformation.
Belowisanexampleofthechassisinformationtable.
chassis name belonging_rack location_u_in_rack machine_type
chassis1 rack1 7 7X20
Thefieldsinthistablearedescribedasfollows:
name:chassisname(mustbeuniqueinthesameroom)
belonging_rack:racklocationname(mustusethenameconfiguredintherackinformation
table)
location_u_in_rack:locationofthechassisbaseintherack(Unit:U).Inastandardcabinet,
thevalueshouldbebetween1and42.Forexample,achassisbaseislocatedat5U.
machine_type:chassistype(seeSupportedserversandchassismodels)
Nodeinformation
Entertheinformationaboutallnodesintheclusterintothenodeinformationtable.Duetoits
width,theexamplenodeinformationtableisdisplayedintwosplitparts.
Part1:
node name nodetype immip hostip machine_type ipmi_user ipmi_pwd
head head 10.240.212.13 127.0.0.1 7X58
Part2:
belonging_service_node belonging_rack belonging_chassis location_u groups
rack1 2 login
Thefieldsaredescribedasfollows:
name:nodehostname(domainnamenotneeded)
nodetype:headmeansmanagementnode;loginmeansloginnode;computemeans
computenode
immip:IPaddressofthenode’sBMCsystem

hostip:IPaddressofthenodeonthehostnetwork
machine_type:productnameforthenode(seeSupportedserversandchassismodels)
ipmi_user:XCC(BMC)accountforthenode
ipmi_pwd:XCC(BMC)passwordforthenode
belonging_service_node:largeclustersrequiresettingupaservicenodetowhichthe
nodebelongs.Ifthereisnoservicenode,leavethefieldblank
belonging_rack:nameofthenodelocationrack(needtoaddtheconfigurednametothe
rackinformationtable)
belonging_chassis:nameofthenodelocationchassis(leavethisfieldblankifitcanbe
locatedinanychassis).Configurethechassisnameinthechassisinformationtable
location_u:nodelocation.Ifthenodeislocatedinthechassis,entertheslotinthechassis
inwhichthenodeislocated.Ifthenodeislocatedinarack,enterthelocationofthenode
baseintherack(Unit:U)
groups:nameofthenodelocationlogicgroup.Onenodecanbelongtomultiplelogic
groups.Groupnamesshouldbeseparatedby“;”.Configurethelogicgroupnameinthe
logicgroupinformationtable
ConfigureAntillesservices
TheAntillesserviceconfigurationfileislocatedin /etc/antilles/antilles.ini .This
configurationfilecontrolstheoperatingparametersforvariousAntillesbackgroundservice
components.Youcanmodifythisconfigurationfileasneeded.
IfyouhavechangedtheconfigurationwhileAntillesisrunning,runthefollowingcommandto
restartAntillesbeforetheconfigurationtakeseffect:
systemctl restart antilles
Note:Configurationsnotmentionedintheinstructionsinthissectioncanbemodifiedafter
consultingwithservicestaff.Modificationsmadewithoutaserviceconsultationcouldresultina
systemfailure.
Infrastructureconfiguration
Thefollowingpartoftheinfrastructureconfigurationismodifiable:
domain = hpc.com # Cluster domain settings
Databaseconfiguration
Thefollowingpartsofthedatabaseconfigurationaremodifiable:
db_host = 127.0.0.1 # PostgreSQL address
db_port = 5432 # PostgreSQL port

db_name = antilles # PostgreSQL database name
influx_host = 127.0.0.1 # InfluxDB address
influx_port = 8086 # InfluxDB port
influx_database = antilles # InfluxDB database name
Loginconfiguration
Thefollowingpartoftheloginconfigurationismodifiable:
login_fail_max_chance = 3 # Maximum number of login password error att
empts
Attention:Ifuserloginfailuresexceedlogin_fail_max_chance,thesystemwillsuspendthisuser
for45minutes.Suspendeduserscannotlogintothesystemevenwiththevalidauthentication
information.Administrators,however,canresumeasuspendeduserwithacommandlineorWeb
portal.SeeResumeauser.
Storageconfiguration
Thefollowingpartofthestorageconfigurationismodifiable:
# Shared storage directory
# If strictly adhering to the shared directory configurations in this doc
ument,
# change to: share_dir = /home
share_dir = /home
Schedulerconfiguration
Thefollowingpartoftheschedulerconfigurationismodifiable:
# The scheduler configuration currently supports Slurm, LSF, and Torque.
Slurm is the default.
scheduler_software = slurm
Alertconfiguration
Note:TheconfigurationinthissectionisneededonlywhenWeChat,SMS,andemailproxy
modulesareinstalledforthecluster.Youcanobtainfromhttps://mp.weixin.qq.com/wiki?
t=resource/res_main&id=mp1445241432.Thefollowingpartofthealertconfigurationis
modifiable:
wechat_agent_url = http://127.0.0.1:18090 # WeChat proxy server address

wechat_template_id = <WECHAT_TEMPLATE_ID> # WeChat notification templat
e ID
sms_agent_url = http://127.0.0.1:18092 # SMS proxy server address
mail_agent_url = http://127.0.0.1:18091 # Email proxy server address
Confluentconfiguration
Thefollowingpartoftheconfluentconfigurationismodifiable:
confluent_port = 4005 # Confluent port
Userconfiguration
Thefollowingpartoftheuserconfigurationismodifiable:
# user
use_libuser = false
Thedefaultconfigurationforuser_libuseris“false”.Tochangethisvalue,runthefollowing
commandtosettheldappassword:
# The command prompts you to enter the LDAP administrator password
# Use the LDAP_PASSWORD you configured in "Install OpenLDAP-server".
antilles setldappasswd
Please input your ldap password:
Please confirm the ldap password:
ConfigureAntillescomponents
antillesvncmond
Step1.Createafilenamed/var/tmp/vncmond.iniandrunthefollowingcommands:
[vnc]
url=http://127.0.0.1:18083/session
timeout=30
Note:Replace127.0.0.1withtheactualIPaddressofthemanagementnode.
Step2.Distributetheconfigurationfile /var/tmp/vnc-mond.ini toallcomputenodes,putthe
filein /etc/antilles/vnc-mond.ini .

antillesportal
Topreventconflictions,youmayneedtomodifysomepathwayfilesfornodesinstalledwiththe
antillesportalmodule,whichprovidesexternalWebserviceswithdifferentports.
/etc/nginx/nginx.conf
Youcanedit /etc/nginx/nginx.conf bychangingtheportto8080:
listen 8080 default_server;
listen [::]:8080 default_server;
Ifyouwanttohidetheserverversioninformation,modify /etc/nginx/nginx.conf byturning
offserver_tokens:
http{
......
sendfile on;
server_tokens off;
......
}
/etc/nginx/conf.d/https.conf
Youcanedit /etc/nginx/conf.d/https.conf bychangingthehttpsdefaultport443toother
ports:
listen <port> ssl http2;
Note:Ensurethattheportisnotusedbyotherapplicationsandisnotblockedbythefirewall.
/etc/nginx/conf.d/sites-available/antilles.conf
Youcanedit /etc/nginx/conf.d/sites-available/antilles.conf byreplacingthefirstline
tothefollowingcontent:
set $antilles_host 127.0.0.1;
Note:Ifantillesportaldoesnotrunonthemanagementnode,youcanchange127.0.0.1tothe
IPaddressofthemanagementnode.
/etc/antilles/portal.conf
Youcanedit /etc/antilles/portal.conf byaddingcustomshortcutlinks.Referto
/etc/antilles/portal.conf.example fortheconfigurationformat.

antillesgangliamond
Note:SkipthissectionifGangliaisnotdeployedinthecluster.
Onthemanagementnodewiththedefaultport,the /etc/antilles/ganglia-mond.conf file
showsasfollows:
influxdb {
cfg_db_host 127.0.0.1
cfg_db_port 5432
cfg_db_name antilles
host 127.0.0.1
port 8086
database antilles
timeout 10
}
Makethefollowingchangestothefile:
Change cfg_db_host 127.0.0.1 and cfg_db_port 5432 totheactualIPaddressand
portnumberofthePostgreSQLservice.
Changethe host 127.0.0.1 and port 8086 totheactualIPaddressandportnumberof
theInfluxDBservice.
antillesicingamond
Note:SkipthissectionifIcinga2isnotdeployedinthecluster.
Editthefile /etc/antilles/icinga-mond.ini :
Section [base]
Change service = antilles totheactualservicenamedefinedinIcinga2forAntilles.
Section [icinga]
Change host = 127.0.0.1 and port = 5665 totheactualIcinga2APIservice.
Section [postgresql]
Change host = 127.0.0.1 and port = 5432 totheactualPostgreSQLservice.
Section [influxdb]
Change host = 127.0.0.1 and port = 8086 totheactualInfluxDBservice.
Seetheexamplebelow:
[base]
service = antilles
sample_interval = 15
domain_filter =
[icinga]
host = 127.0.0.1
port = 5665

timeout = 30
[postgresql]
host = 127.0.0.1
port = 5432
database = antilles
[influxdb]
host = 127.0.0.1
port = 8086
database = antilles
timeout = 30
antillesicingaplugin
Note:SkipthissectionifIcinga2isnotinstalledinthecluster.
Ifantillesicingapluginisinstalledinthecluster,Icinga2shouldbeconfiguredtoenablethe
plugin.BelowareexamplesforhowtoconfigureIcinga2:
DefineanewcommandinthecommandconfigurationfileofIcinga2:
object CheckCommand "antilles-monitor" {
command = [PluginDir + "/antilles-icinga-plugin"]
arguments = {
"-a" = ""
}
}
DefineanewserviceintheserviceconfigurationfileofIcinga2:
apply Service "antilles" {
display_name = "antilles"
check_command = "antilles-monitor"
assign where host.address
}
Notes:
FordetailsabouthowtodefinetheIcinga2commandandservice,referto
https://www.icinga.com/docs/icinga2/latest/.
The“display_name”oftheIcinga2servicemustbethesameasthe“service”inthe
configurationfileofantillesicingamond.
antillesconfluentproxy
The /etc/antilles/confluent-proxy.ini fileshowsasfollowsonthemanagementnode
withthedefaultport:

[DEFAULT]
# database
db_host = 127.0.0.1
db_port = 5432
db_name = antilles
Makethefollowingchangestothefile:
Change db_host 127.0.0.1 and db_port 5432 totheactualIPaddressandport
numberofthePostgreSQLservice.
Change host 127.0.0.1 and port 8086 totheactualIPaddressandportnumberofthe
InfluxDBservice.
IftherearemultipleConfluentsinthecluster,configurethe [app:main] sectionasfollows:
[app:main]
use = cluster-confluent-proxy
Note:TochangetheinformationabouttheConfluentuser,seeInstallConfluent.Tocreateor
updatetheuserinformation,seeConfiguretheserviceaccount.
antillesconfluentmond
The /etc/antilles/confluent-mond.ini fileshowsasfollowsonthemanagementnodewith
thedefaultport:
[database]
db_host = 127.0.0.1
db_port = 5432
db_name = antilles
[influxdb]
host = 127.0.0.1
port = 8086
database = antilles
timeout = 10
Makethefollowingchangestothefile:
Change db_host 127.0.0.1 and db_port 5432 totheactualIPaddressandport
numberofthePostgreSQLservice.
Change host 127.0.0.1 and port 8086 totheactualIPaddressandportnumberofthe
InfluxDBservice.
antilleswechatagent
Editthefile /etc/antilles/wechat-agent asfollows:

#The configurations below should be changed based on the specific environ
ment
appid = <APPID> secret = <SECRET>
Note:Formoreinformationabout <APPID> and <SECRET> ,referto
https://mp.weixin.qq.com/wiki?t=resource/res_main&id=mp1445241432.
Initializethesystem
RunthefollowingcommandtoinitializeAntilles:
antilles init
Initializeusers
Step1.(Optional)RunthefollowingcommandstoaddanLDAPuserwithusernameand
password:
luseradd <HPC_ADMIN_USERNAME> -P <HPC_ADMIN_PASSWORD>
UsetheLDAP_PASSWORDyouconfiguredinInstallOpenLDAPserver.
Step2.RunthefollowingcommandtoimporttheusertoAntilles:
#Import user into Antilles and as admin
antilles user_import -u <HPC_ADMIN_USERNAME> -r admin
6.StartandlogintoAntilles
StartAntilles
IfGangliaisinstalled,runthefollowingcommands:
# If the management node has to provide web service, start Nginx on the m
anagement node.
systemctl enable nginx
systemctl start nginx

# If the login node has to provide web service, start Nginx on the login
node.
systemctl enable nginx
systemctl start nginx
# Start Antilles-related services
systemctl start antilles-ganglia-mond
systemctl start antilles-confluent-mond
# Start Antilles
systemctl start antilles
IfIcinga2isinstalled,runthefollowingcommands:
# If the management node has to provide web service, start Nginx on the m
anagement node.
systemctl enable nginx
systemctl start nginx
# If the login node has to provide web service, start Nginx on the login
node.
systemctl enable nginx
systemctl start nginx
# Start Antilles-related services
systemctl start antilles-icinga-mond
systemctl start antilles-confluent-mond
# Start Antilles
systemctl start antilles
LogintoAntilles
AftertheAntillesserviceisstarted,youcanaccessAntillesbyopening https://<ip of login
node>:<port>/ inaWebbrowser.
Note:Replaceportwiththeportnumberyousetin /etc/nginx/conf.d/https.conf which
describedinsection“antillesportal”.
Iftheinstallationiscorrect,theAntillesloginpageopens.YoucanloginusingtheLDAPaccount
setin“Initializeusers”.
TroubleShooting
Ifyouforgetthepassword,youmayusethecommandwhichantillessupported.

Changeauser’srole
Runthefollowingcommandstochangeauser’srole:
antilles user_changerole -u <ROLE_USERNAME> -r admin
Parameterinterpretation:
-u Specifytheusernametomodify
-r Specifytheroletobeset(admin/operator/user)
Resumeauser
Runthefollowingcommandtoresumeauser:
antilles user_resume <SUSPENDED_USERNAME>
Parameterinterpretation:
Directlyspecifyuserswhoneedtoberesumed
