Application Instructions
User Manual:
Open the PDF directly: View PDF ![]() .
.
Page Count: 11

Data Updates & Sharing
Application
Instruction Manual
TPP, Data Management Section

1
Table of Contents
Purpose ........................................................................................................................... 2
Browser Information ........................................................................................................ 2
Logging In ....................................................................................................................... 2
The Application ............................................................................................................... 4
Resources Menu Section ................................................................................................ 8
How to Complete the Markup .......................................................................................... 8
Completion & Contact Info ............................................................................................ 10

2
Purpose
Welcome to the Data Updates & Sharing Application!
This document serves as a how-to guide and reference for reviewing and submitting
changes to the Texas Department of Transportation’s geospatial road inventory. The
Data Updates & Sharing Application (DUSA) application serves as a communication
tool for local, subject matter experts to review and acquire the GIS road network TxDOT
currently has on file under their jurisdiction. The application provides multiple tools for
the user to interact with the GIS inventory such as downloading a copy, uploading bulk
changes to be implemented by TxDOT, or by directly marking up changes within the
application to be implemented by TxDOT.
Browser Information
DUSA is accessed through an internet browser. It is highly suggested to use Google
Chrome to receive the highest performance while working within a WebMap. Mozilla
Firefox will also provide acceptable performance. TxDOT advises against using Internet
Explorer.
Logging In
To access the Data Updates & Sharing Application, you must first establish a username
and password. Follow the steps outlined below to obtain this information. You will only
have to do this one time. If you already have a username and password, skip to step
#3.
1) Fill out the Registration form at the following website address:
https://www.dot.state.tx.us/apps-cg/contact_us/form/dusa-form.htm
2) Within 24 hours after submitting the Registration form, you will receive an email
from ArcGIS Notifications providing your unique username and inviting you to
join the ArcGIS Online Organization, Texas Department of Transportation.
Follow the link within this email to finish setting up your account and establish
your own password.
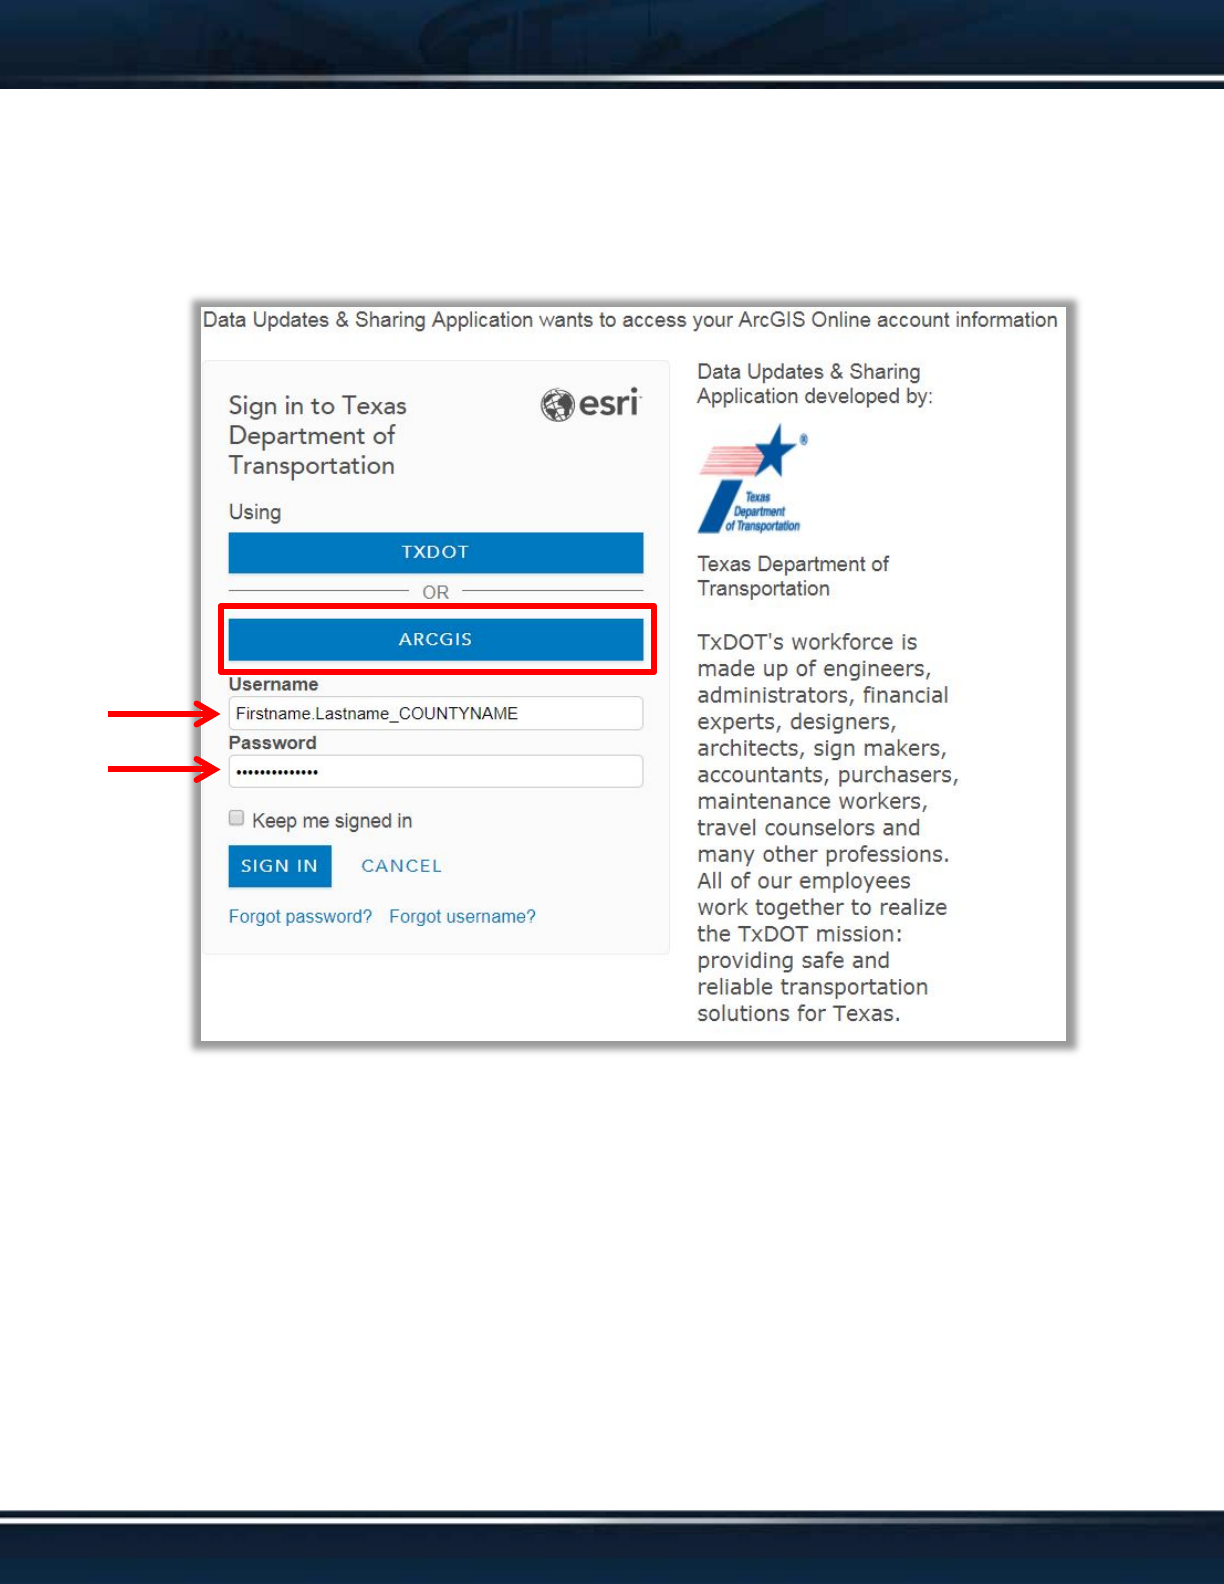
3) Once you receive a unique username and password, you will then sign-in to
DUSA at the following website address:
https://www.txdot.gov/apps/statewide_mapping/dusa/index.html
3
4) Select the ‘ARCGIS’ option to sign into the Data Updates & Sharing Application
with your new ArcGIS Online username and password. DO NOT attempt to sign-
in using the ‘TXDOT’ option, as it will prove to be unsuccessful.
5) Once you have successfully signed in, select your county from the dropdown list
and click ‘Go’. DUSA will open and automatically zoom to your county.
4
The Application
The DUSA Application is a large interactive map which you can navigate and has tools
for completing various interactive tasks. The application is specifically oriented for
reviewing and updating the TxDOT inventory. Therefore, you will only be able to view
the inventory for your organization.
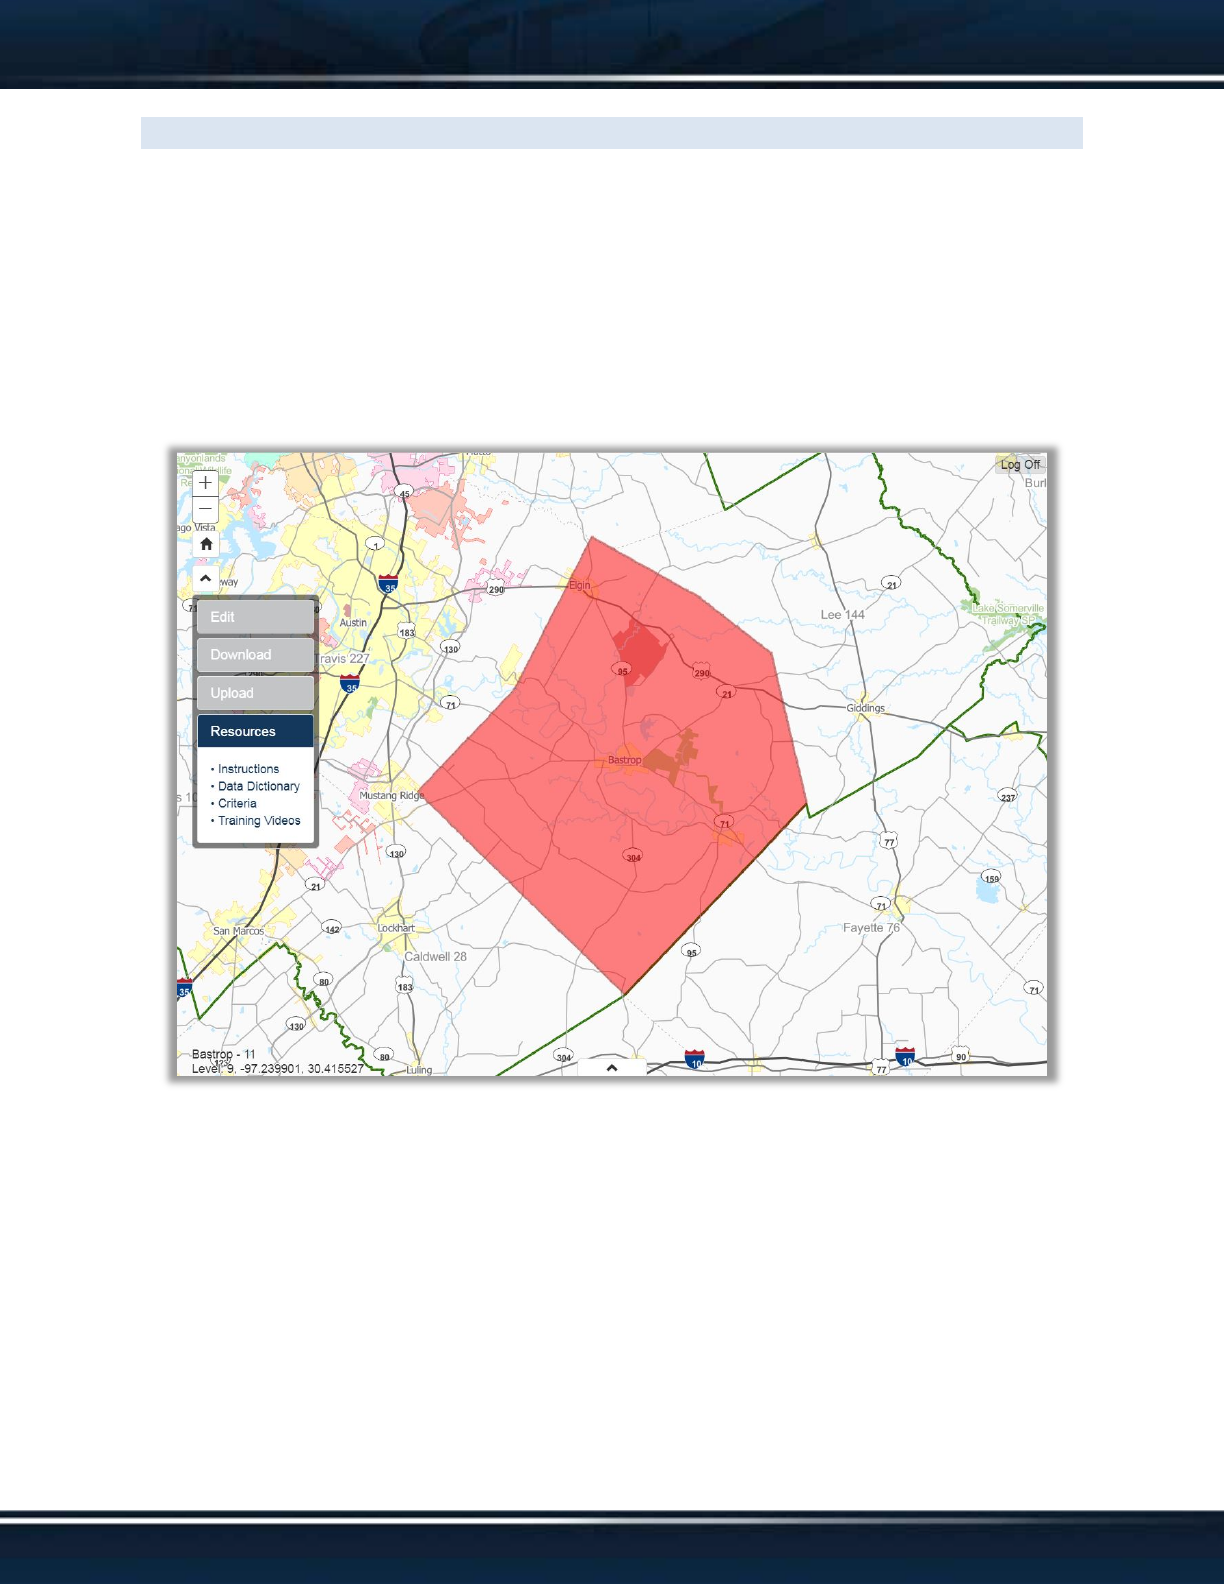
To ensure a quality review and mark up, you must be zoomed in for the inventory to
appear (Level 11 for County Roads). If you are zoomed out too far, the inventory will
disappear and your organization’s jurisdiction will appear in red.
Click and drag anywhere on the map to pan around the map.
5
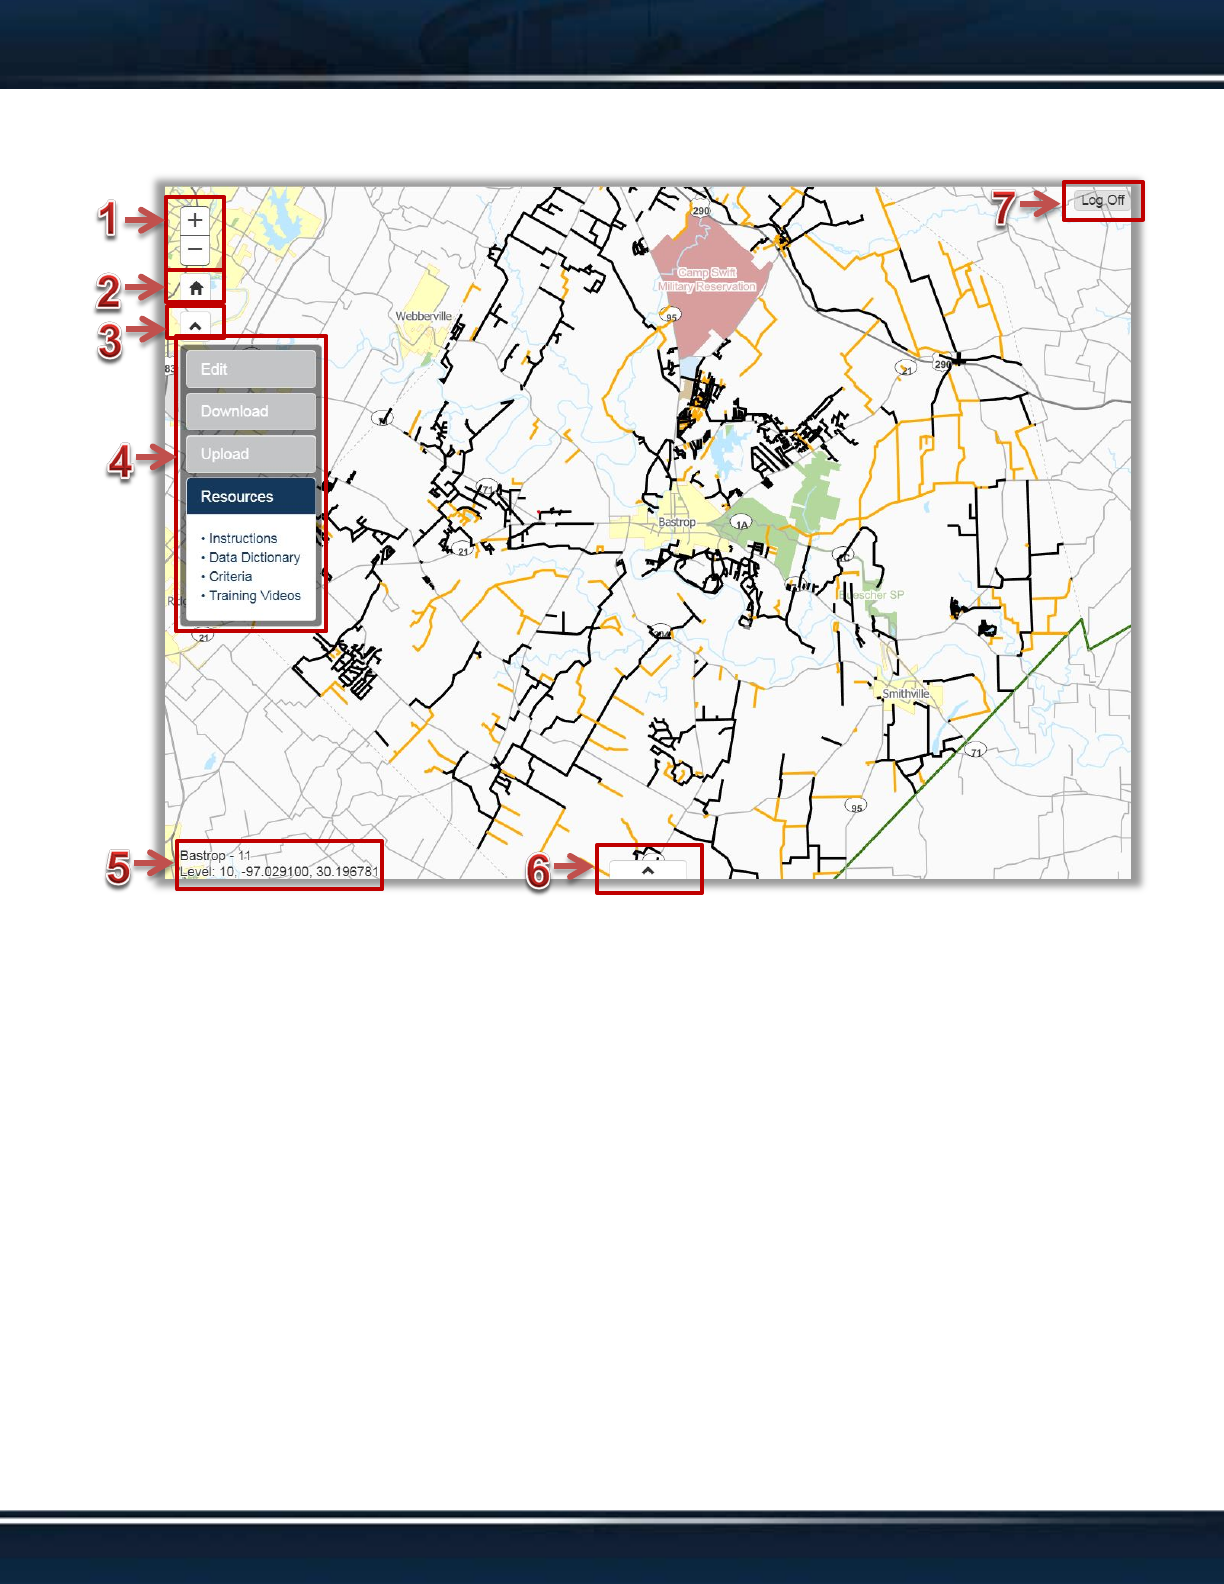
The application contains many components, each with a specific functionality.
1. Zoom Buttons. Click the + (plus) button to zoom in and the – (minus) button to
zoom out of the map. Alternatively, you can double click a location on the map to
zoom in or use the scroll wheel on the mouse to zoom in and out.
2. Home Button. Click the Home button to return the map to the original zoom level
and location as when you initially logged in. This will be the default extent for
your organization.
3. Menu Button. Click the Menu button to toggle showing and hiding the menu.
4. Menu. The Menu contains 4 sections: Edit, Download, Upload, and Resources.
Each section name can be clicked to open the options/tools for that section while
simultaneously hiding the other sections. Detailed instructions for each section
can be found through links within this document.
5. Map Information. This text displays the name of the organization you logged in
with, the current zoom level of the map, and the current latitude and longitude
coordinates of the mouse cursor.
6
6. Basemap Button. Click the basemap button to display the Basemap Menu
(described below). The Basemap Menu provides options for changing the
background (basemap) image on the map.
7. Log Off Button. Click the Log Off button to exit the current session and return to
the Sign-In screen.
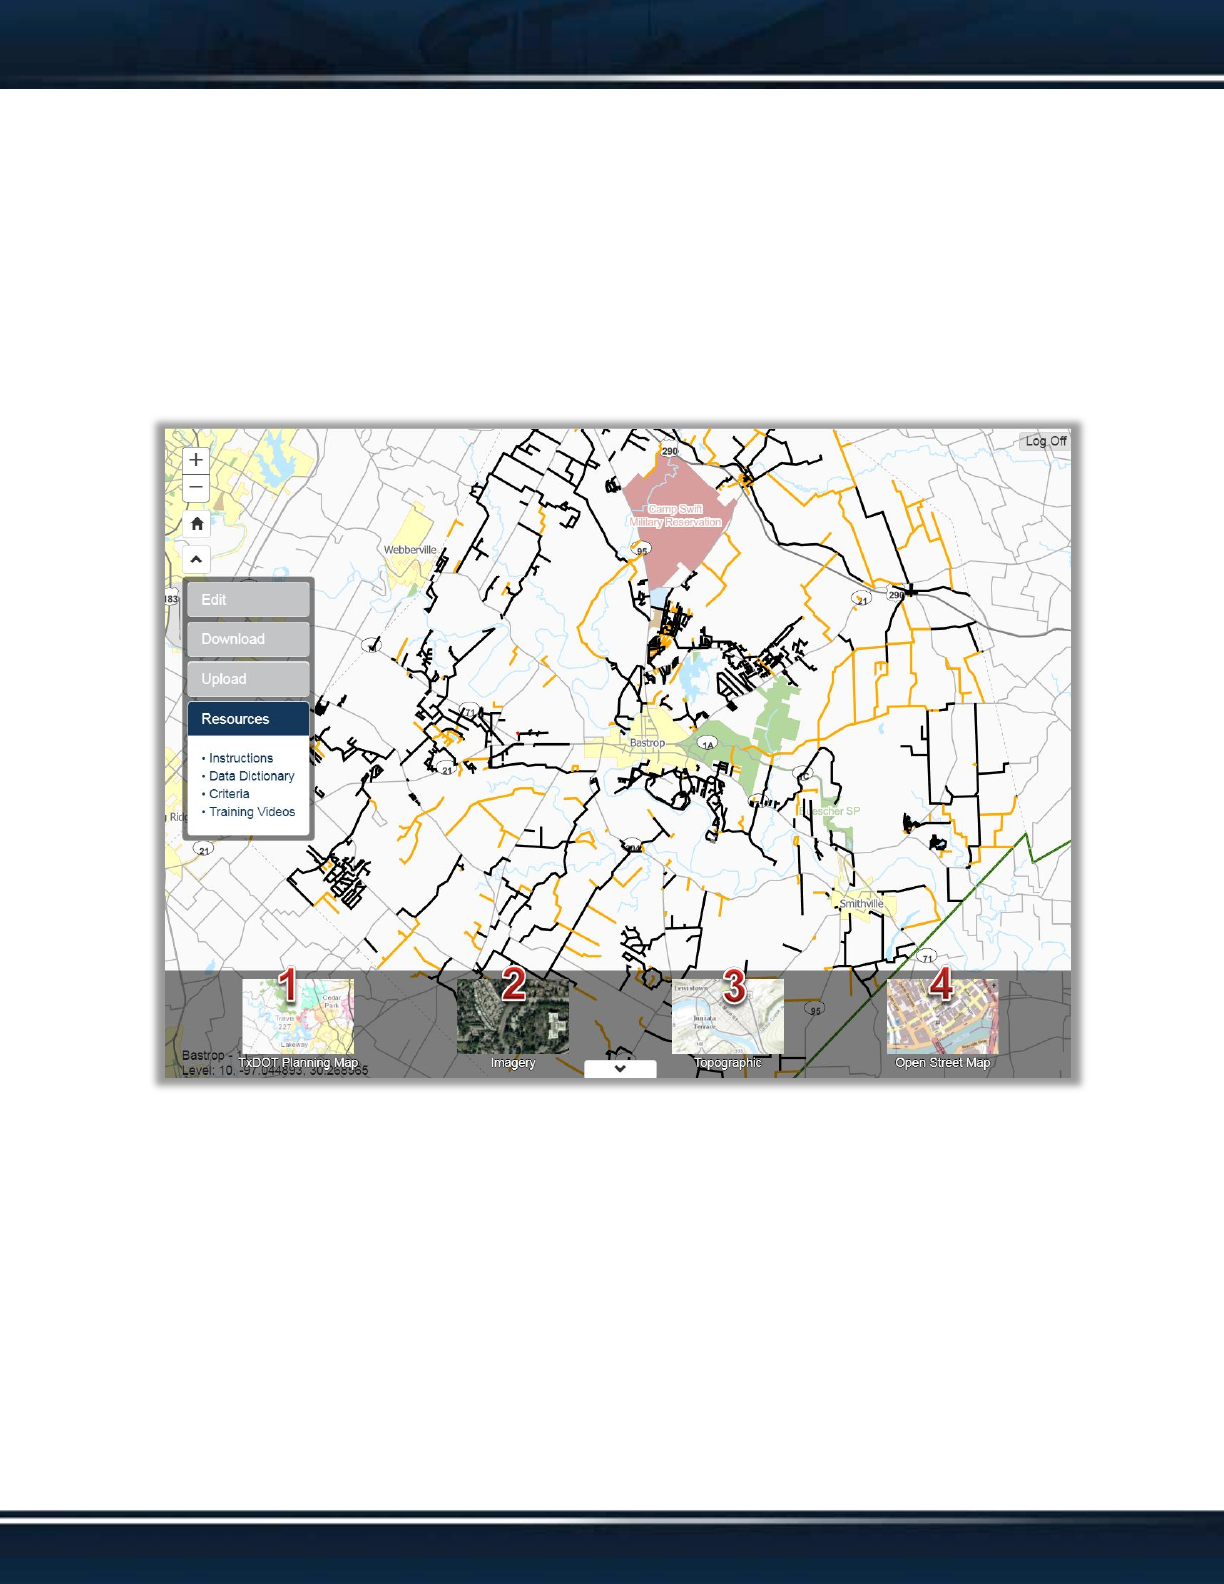
The Basemap Menu displays four options for changing the background (basemap)
image of the map. With the Basemap Menu open, click any of the options to make a
change. Re-click the Basemap Button to then close/hide the Basemap Menu.
1. TxDOT Planning Map. The default basemap, this is the standard basemap for
TxDOT products as it displays the full range of necessary reference information
TxDOT currently has within its GIS inventory. This basemap automatically
switches to Imagery when zoomed in past level 16.
2. Imagery. Standard aerial photography. This basemap contains no reference
information aside from the imagery itself.
3. Topographic. Similar to the TxDOT Planning Map, this basemap display a full
range of reference information sourced from a variety of sources including
USGS, Texas Parks & Wildlife, HERE, and more. This basemap also contains
topographic contour information.
7
4. Open Street Map. Oriented toward the road inventory, this basemap displays the
open source road inventory of the Open Street Map Foundation.
The Menu is broken down into four sections. Each has a purpose which provides an
alternative method for reviewing the inventory and submitting changes.
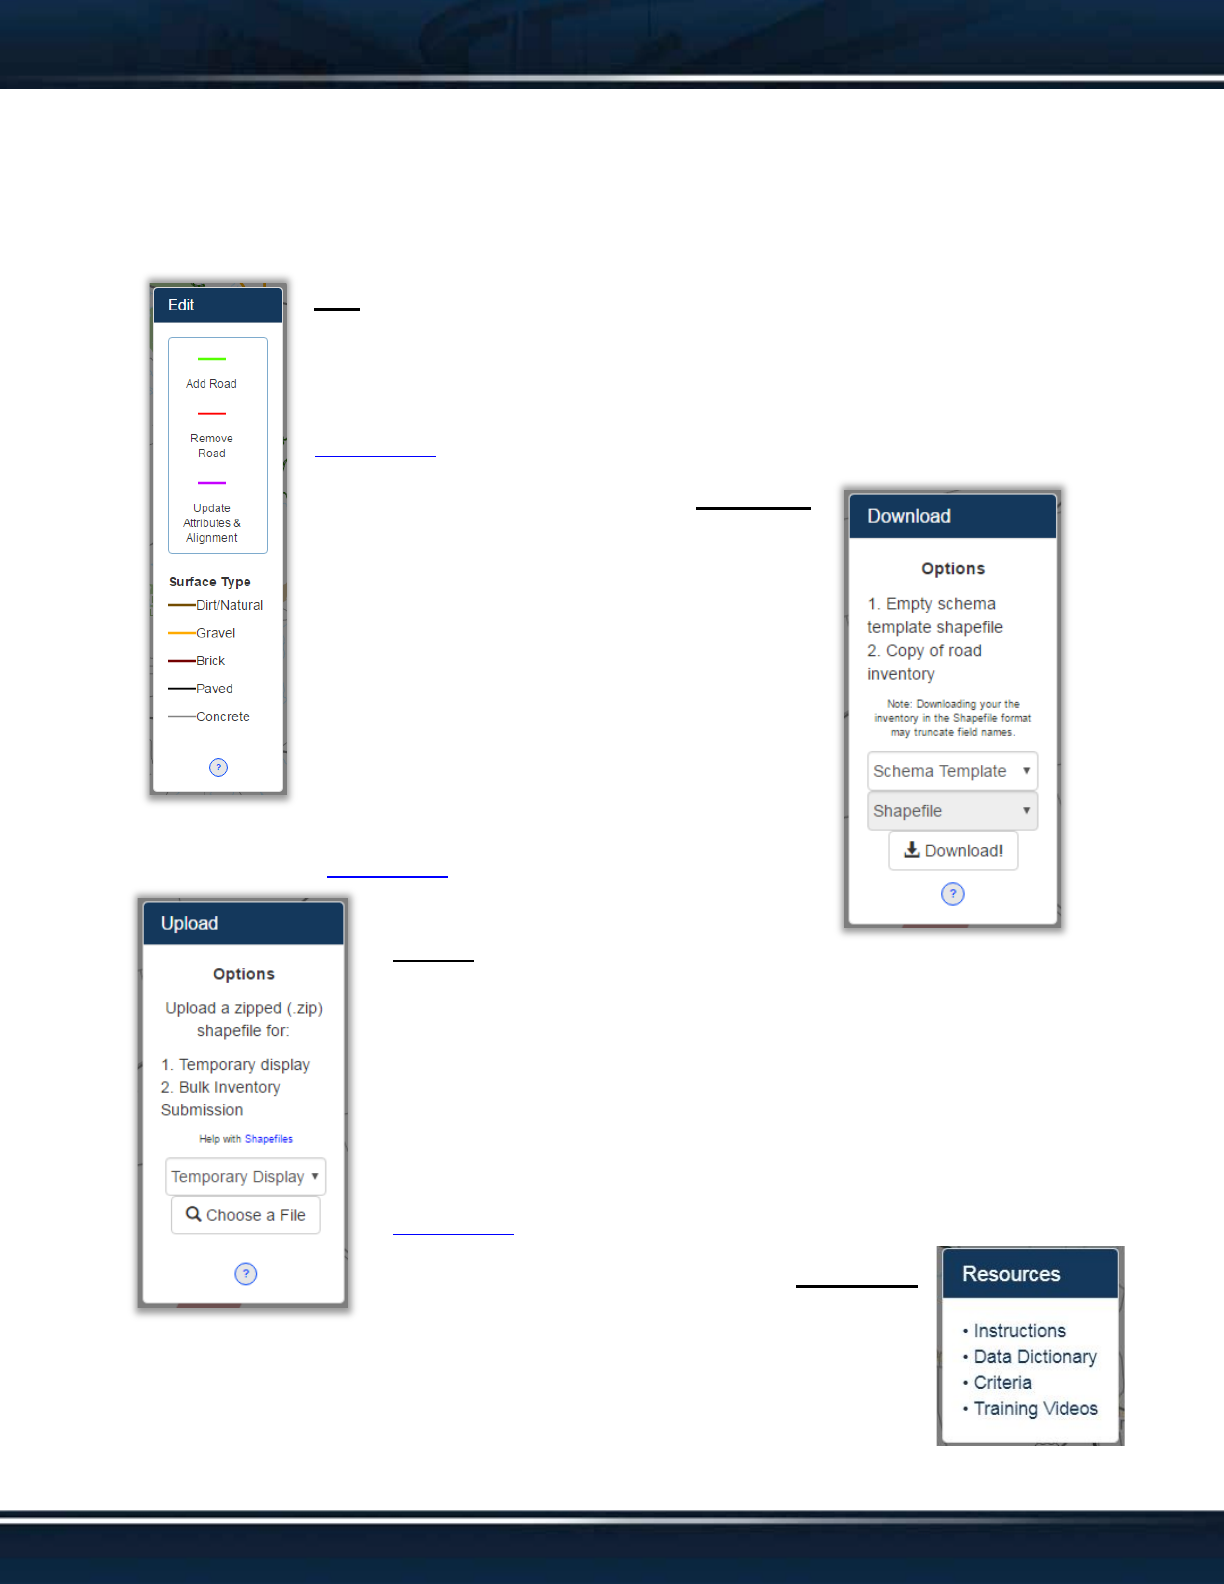
Edit
The Edit section provides 3 drawing template options for you to mark up
the map. Also provided is a Legend for the current inventory as it is
displayed in the map. Finally, the “?” button can be clicked to open
instructions specific to editing within the application.
Download
The Download section offers 2 options. First is
the ability to download an empty template
shapefile to be used when marking up
changes to the current TxDOT inventory within
ArcMap on your local computer. This template
shapefile is required to submit bulk updates in
the Upload section. Secondly, you can
download a GIS copy of the current TxDOT
inventory. Choose between the option in the
dropdowns and click ‘Download!’. Finally, the “?” button can be
clicked to open instructions specific to downloading within the
application.
Upload
The Upload section offers 2 options. First is the ability to upload
a shapefile for temporarily displaying within the map. Your
shapefile will draw and can be used for reference during your
update. The shapefile will be cleared automatically when you log
off. Secondly, if you have marked up changes within the
downloaded schema template shapefile, you can submit those
changes in bulk. Finally, the “?” button can be clicked to open
instructions specific to uploading within the application.
Resources
The Resources section offers reference material
for use during your update.

8
Resources Menu Section
The Resources Menu Section contains a variety of reference materials
which may serve as helpful information when reviewing the current
inventory and marking up changes. At minimum, available resources
include:
1. Instructions. This is a link to this document with descriptions on the application
and its functions and links to specific instructions for Editing, Downloading, and
Uploading (page 7).
2. Data Dictionary. A document which interprets the data schema fields within all
the datasets used in the DUSA application. Each field is described with listed
acceptable values for said field.
3. Criteria. A document which outlines the mandated definition of the road
classification being updated. This document will list specific requirements for
roads to be added to the TxDOT road inventory and reported to dependent
agencies.
4. Training Videos. Instructional videos of DUSA for an overview and editing.
How to Complete the Markup
The markup is a multistep process involving a review of the current TxDOT inventory
and identifying changes which need to be made. Complete the markup using one of the
following two options:
Option 1: Draw changes directly into the Updates Layer within the application using
the Edit tools in the Edit section of the menu. The general steps for this method
are as follows:
a. Log into the DUSA application. Review the documentation available
within the ‘Resources’ section of the menu for comprehension of the
application and markup process.
b. Open the ‘Edit’ section of the menu. Click the “?” button at the bottom
to access the Edit section instructions for detailed directions about
editing within the application.
c. Review the current TxDOT inventory by panning and zooming within
the web map. Observe the current existence and alignment of the
roads in the inventory. Click roads to review their attributes (descriptive
details).
d. Markup changes to identify inaccuracies in the current road inventory
by drawing in the Updates Layer using the Edit tools. Specific details

9
and examples demonstrating how to draw changes within the Updates
Layer are shown in the Edit section instructions.
Option 2: Draw changes in ArcMap using the ‘Schema Template’ shapefile and
upload them to the Updates Layer. The general steps for this method are as
follows:
a. Log into the DUSA application. Review the documentation available
within the ‘Resources’ section of the menu for comprehension of the
application and markup process.
b. Open the ‘Download’ section of the menu. Click the “?” button at the
bottom to access the Download section instructions for detailed
directions about the download process. Download the ‘Schema
Template’ shapefile for markup changes. Optionally, download the
current TxDOT road inventory for the county for reviewing and
identifying changes to be marked up.
c. Review the Edit instructions for detailed directions and examples how
to markup changes in the ‘Schema Template’ shapefile (use the same
methods as the instructions outline for working within the application).
Review the current TxDOT inventory and edit the ‘Schema Template’
shapefile by drawing changes in ArcMap.
d. Open the ‘Upload’ section of the menu. Click the “?” button at the
bottom to access the Upload section instructions for detailed directions
about the upload process. Upload the edited ‘Schema Template’
shapefile into the Updates Layer in bulk via the Upload section of the
menu.

10
Completion & Contact Info
The deadline for completing the present year’s review and markup is August 31. Any
markups submitted after August 31 will be applied towards next year’s submission. At
the time of completion, the updates will be reviewed and the changes which meet the
inventory criteria will be implemented to update the TxDOT Road Inventory.
Thank you for using the Data Updates & Sharing Application to submit changes to the
TxDOT Road Inventory. If you would like to report any bugs or issues, or have any
questions which need clarification of the procedures, please contact the Transportation,
Programming, and Planning Division’s Data Management staff at:
TPP-GIS@txdot.gov
(512) 486-5052
