Arc Reactor Manual
User Manual:
Open the PDF directly: View PDF ![]() .
.
Page Count: 24
1
ArcReactor v1.8 manual
Table of contents.
ArcReactor_Arc script.................................................................................................................................... 2
General notes: ........................................................................................................................................... 3
Playback settings: ...................................................................................................................................... 3
Shape and size settings: ............................................................................................................................ 4
Global oscillation parameters: .................................................................................................................. 5
Miscellaneous settings: ............................................................................................................................. 6
Arcs settings .............................................................................................................................................. 7
Color options: ............................................................................................................................................ 8
Size options ............................................................................................................................................... 9
Propagation options .................................................................................................................................. 9
Emission options ..................................................................................................................................... 10
Spatial noise ............................................................................................................................................ 11
Texture options ....................................................................................................................................... 12
Lights options .......................................................................................................................................... 12
Flares Options ......................................................................................................................................... 13
Nesting .................................................................................................................................................... 14
Oscillations .............................................................................................................................................. 15
Shape curves ........................................................................................................................................... 16
ArcReactor_Manager performance manager script. .................................................................................. 17
Pool manager. ............................................................................................................................................. 18
ArcReactor_Launcher helper script ............................................................................................................. 19
ArcReactor_Launcher reflection setup ................................................................................................... 21
ArcReactor_Trail helper script .................................................................................................................... 22
Script reference ........................................................................................................................................... 23
ArcReactor_Arc: ...................................................................................................................................... 23
ArcReactor_Launcher: ............................................................................................................................. 24
Hit, touch and reflect messages: ............................................................................................................. 24
2
ArcReactor_Arc script
This is the main component of ArcReactor system that controls appearance of the
rays.
To create your first arc, create empty game object (“Game object” -> “Create
empty”) and drag “ArcReactor\Scripts\ArcReactor_Arc” script to it. Alternatively,
you can add “Rays system” component from “Arc Reactor Rays” menu.
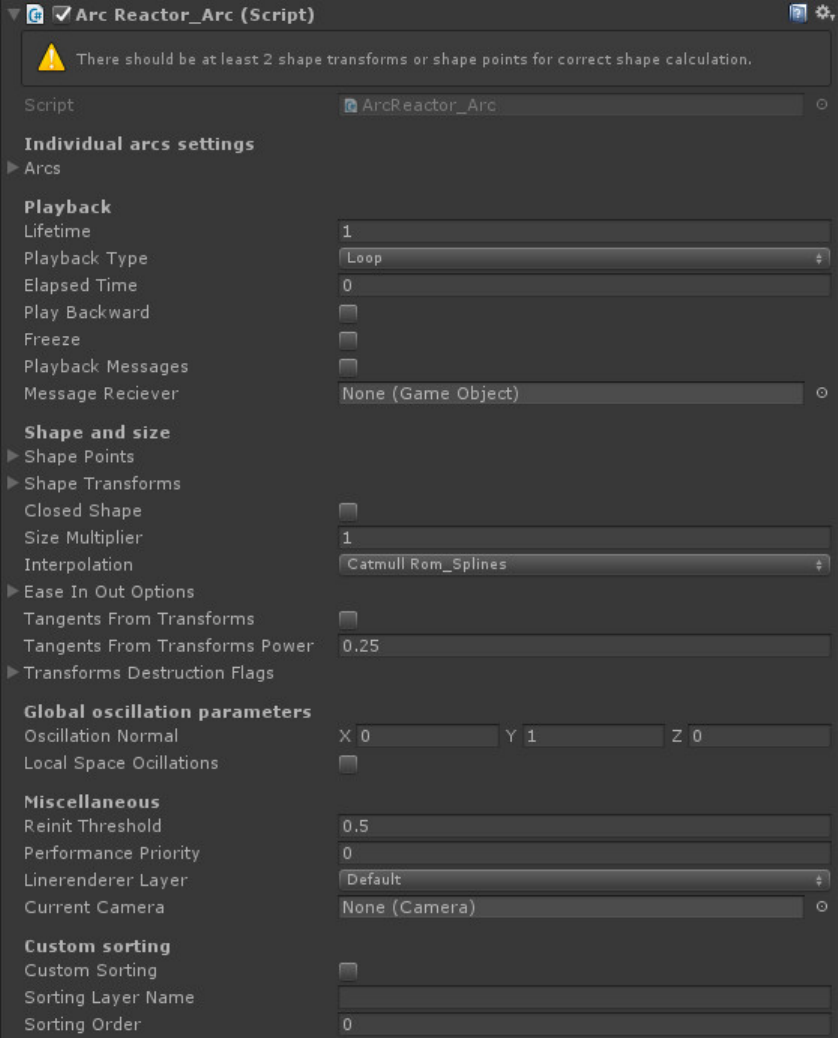
You should see ArcReactor inspector (component will show you warning if some
settings are incorrect, unoptimal or will result in zero visuals):
3
General notes:
ArcReactor component main function is to visualize a system of rays/beams that
change and evolve overtime (although you can also easily make static system).
Each individual ray/beam is called arc, and arcs can have completely different
settings. Arcs settings mostly affect visual side of things, while general system
settings affect things like lifetime and general shape. When you create new
component from Unity Editor, it will fill component settings to make a very simple
1-second long red laser. You can also use ready prefabs (located in prefab folder
of ArcReactor folder) as examples of multi-arcs system.
If you want to use ArcReactor for beam weapons and reflections, read chapter
about ArcReactor_Launcher. For trails, go to ArcReactor_Trail.
Playback settings:
These settings determine how ray system will behave through time. Many color
gradients and curves in options are relative to system “cycle”, which mean one
full playback.
Lifetime: how long 1 cycle of system takes. System will begin playback
automatically on start unless Freeze option is toggled. Behavior upon reaching
end of lifetime depends on playback type.
Playback types:
Once: system will play 1 cycle and destroy itself after that.
Loop: system will jump to start of the cycle after finishing it.
Pingpong: system will bounce between forward and backward playing of
cycles
Clamp: system will play 1 cycle and then toggle “freeze” option on
Pingpong_once: system will play forward then backward once, after which
it will destroy itself.
Pingpong_clamp_once: sytem will play forward and then toggle “freeze”
option on. When you undo “freeze” manually (through inspector or script),
it will play backward and then destroy itself. This playback type made
specifically for continuous rays.
Elapsed time: At what point on lifetime this system is. Can be manipulated
through editor or scripts at runtime if you need more complex playbacks.
4
Playback messages: if toggled on, ArcReactor will send “ArcReactorPlayback”
message to Message Reciever with arcreactor component as parameter when
events related to playback happens – specifically, when system reach either end
of its lifetime or zero lifetime(when playing backwards).
Freeze: If toggled on, system will stop progressing along lifetime. All other effects
will still be active (such as randomizations and oscillations). Use this to achieve
continuous rays.
Shape and size settings:
These settings will determine overall shape of ray system. Specific shape of
individual rays/arcs are
Shape Transforms & Shape point: Transforms and Vector3’s that define shape of
the system. If there are less than 2 transforms or Vector3, system will disable
itself at start and generate error message. Transforms have higher priority than
Vector3, so if there’s both Transform and Vector3 with index=3 in their respective
arrays, Transform will define 3rd point of system shape.
Closed shape: If checked, system shape will be looped from last transform to first.
Size multiplier: This number will affect all variables of your system that affect
perceived size of your rays. Use it to fine-tune size of prefabs to your game scale.
Interpolation: How general shape of system interpolated. CatmullRom_Splines
look much better that Linear, but require a bit more CPU time.
Transform Destruction Flags: If flag with index N set to true, then Shape
Transform with index N will be destroyed at the end of system lifetime. It should
be used when you create temporary transforms to define specific shape.

5
Ease In Out options:
This option enables smooth transition of noise and oscillations from point source
to full amplitude.
Ease In Out disabled:
Ease In Out enabled:
Tangents from transforms:
This option works only when splines interpolation is selected. If enabled, instead
of calculating shape tangents based solely on points position, Shape Transforms
orientation is also included. This can be used for more control over complex
shapes, or for making proton pack-like(Ghostbusters) inertia on weapon effects.
Global oscillation parameters:
Oscillation Normal and Local space oscillations:
If your arcs use oscillation(like in the picture of EaseInOut), you should define
normal to the default oscillation plane. For games like shooters etc. vector of
(0,1,0) should be enough. For more complex systems you should minimize
occurrences of your arc direction being parallel to the oscillation normal. Local
space oscillation defines whether defined oscillation normal calculated in global
or local(current gameObject’s transform) space.
6
Miscellaneous settings:
Reinit threshold:
If your shape changes during lifetime of the system (for example you are moving
your shape transforms through scripts or physics), this threshold defines at what
stretch or shrink point should system recalculate number of segments and other
parameters that depend on length of the system shape.
Performance priority:
Affects some parameters that can be disabled if priority is low. By default filled by
performance manager. Read chapter on performance manager for more info.
Linerenderer layer:
Created linerenderers will be placed on this layer.
Current camera:
Used for calculating flares parameters. If null, main camera is used.
7
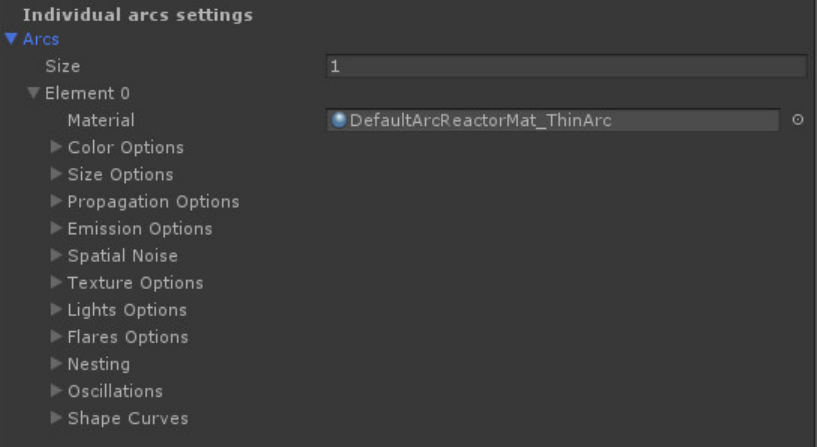
Arcs settings
Arcs define visualization of your system.
System can contain any number of arcs, limited only by how good your hardware
is.
By default, freshly created component contains one arc – simple static red laser.
You can increase arcs array size and set up individual arc parameters as you
please.
Material: defines material used to render this arc. Default material is selected on
component creation. ArcReactor comes with custom shader for rendering
additive rays and 2 materials using that shader(folder “ArcReactor\Materials”).
Although you can use your own materials, some functionality such as core
highlight and texture noise will be unavailable.

8
Color options:
Start & end colors: color gradient defining colors at the beginning and end of the
arc. Colors in-between will be interpolated. X axis of the gradient matches lifetime
of the system.
Core highlight:
Core highlight simulates bright core of the beam. Although you can use any color
as core color, it’s recommended to use white. Core curve defines core highlight
power during lifetime of the system. Core Jitter defines random oscillations of
core highlight power.
Fade:
Fade options allow rays to smoothly fade out to transparency.
Fade types:
RelativePoint – fade point is calculated as a fraction of total ray length. E.g.,
with fade point = 0.12, last 12% of ray length will be faded.
WorldspacePoint – fade point is calculated as absolute length of faded
segment. E.g., with fade point = 1.4, last 1.4 meters of ray will be faded.
9
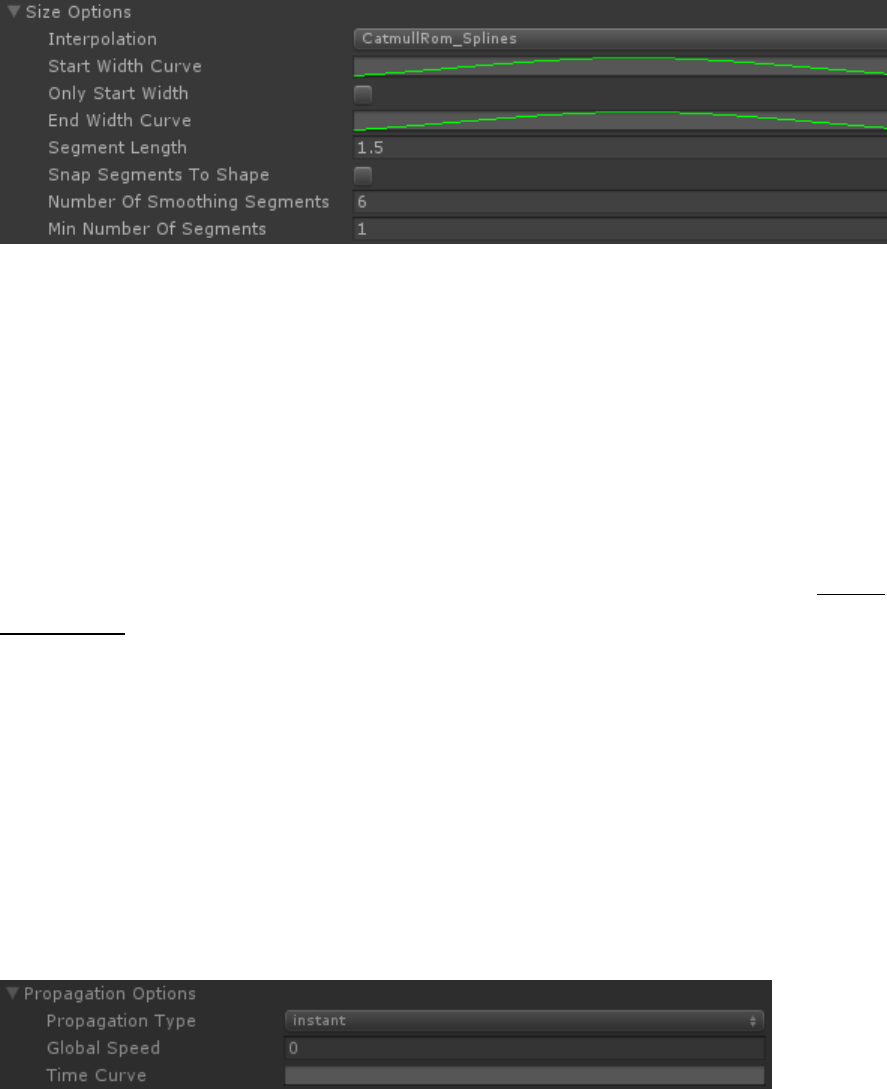
Size options
Although arc follows system shape defined by shape transforms, size options give
more control of the size and shape of arc.
Interpolation defines interpolation used for smoothing vertices of the arc.
Width curves define width of the beam. Time axis corresponds to lifetime of the
system.
Segment length defines length of arc segments. It’s mainly used in spatial noise
generating (noise affects first and last vertices of segments).
Snap segments to shape – if enabled, the vertexes of this ray closest to shape
transforms will snap to transforms exact positions. Use it to make good-looking
reflective rays.
Number of smoothing segments defines number of vertices in segments. These
smoothing vertices affected only by oscillations but not by spatial noise.
Min number of segments defines minimum number of main segments that arc
will consist of. Note that no matter what arc will always consist of minimum 2
segments.
Propagation options
Propagation defines how this arc will move along system shape.
Instant – arc will always at full length
GlobalSpaceSpeed – Global Speed parameter will be used to define speed
of the arc’s end point along shape.
LocalTimeCurve – Time Curve will be used to calculate arc’s end point
along shape. Y-axis of curve corresponds to lifetime of system.
10
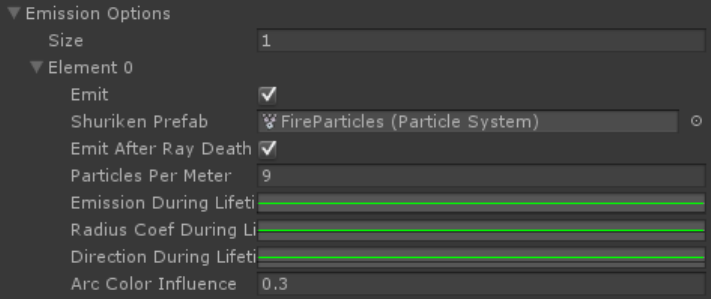
Emission options
ArcReactor can emit particles from ray shape. To do that, you need to prepare
prefab that contains Particle System. Note that emission shape and emission rate
of particle system will not affect results since emission is handled by ArcReactor.
All other particle system settings will work.
Emit – Boolean variable that control emission. You can access it at runtime to
enable and disable particle emitting.
Shuriken Prefab – prefab containing Particle System.
Emit after ray death – if disabled, particle system will be destroyed as soon as ray
is destroyed, regardless if there’s still particles playing. Generally good idea to
enable this option (it comes at slight CPU performance cost)
Particles Per Meter - how many particles will be generated per meter of shape
length (per second).
Emission during lifetime – Curve that manages emission during lifetime of ray.
Radius coef during lifetime – usually particles are emitted from within ray width.
This curve allows affecting emitter width in regards to ray width.
Arc Color Influence – blend coefficient for determining resulting color of particle.
Blended colors are native color of particle as determined by particle system and
color of the arc.
11
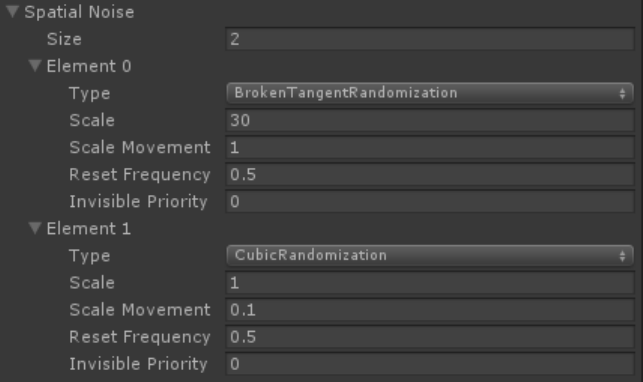
Spatial noise
Spatial noise options are used to randomize position of arc segments.
You can set up multiple spatial noises in single arc, they will add up to a final
noise.
Reset frequency defines how many times per seconds on average randomization
begins anew.
TangentRandomization: Tangents used for smoothing according to splines
algorithm will be randomized for up to Scale degrees. During lifetime they will
shift randomly up to Scale movement degrees per frame.
BrokenTangentRandomization: Same as TangentRandomization, but two tangets
in the same point will not have to be aligned with each other. (It will make your
arc look “zigzagged”)
CubicRandomization: arc segment will be placed randomly inside cubes with
center at corresponding shape position and size of Scale * 2. During lifetime this
position will shift randomly up to Scale movement per frame.
12
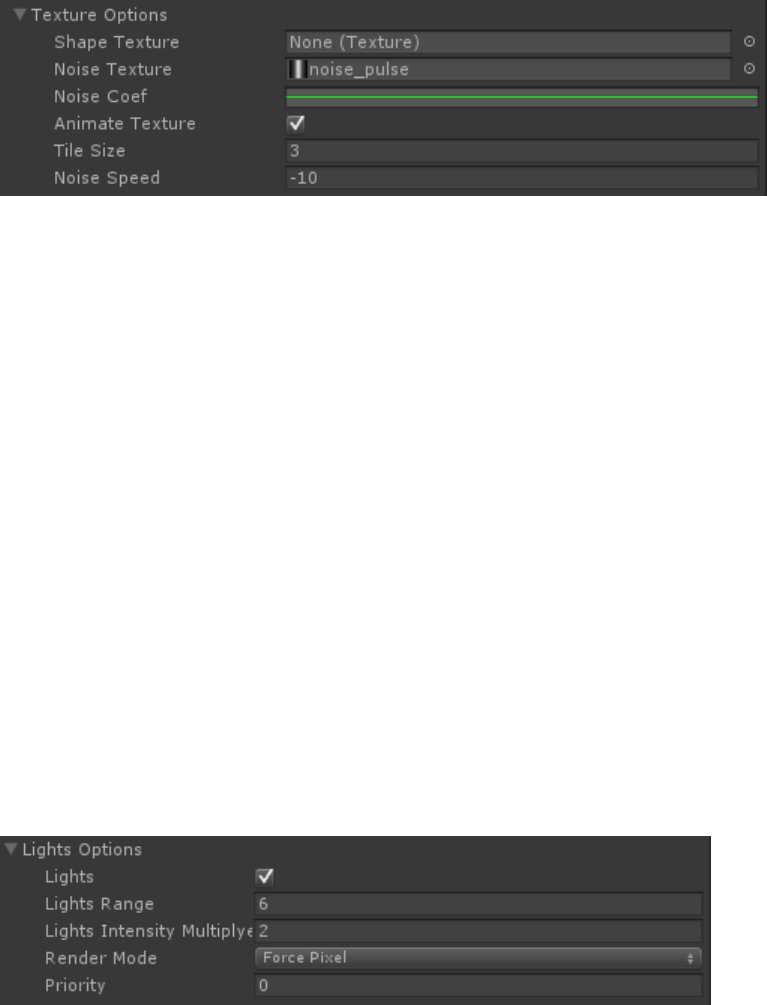
Texture options
Texture option allows control of noise mask that’s applied to main ray texture.
Shape texture – main ray texture. If none selected, main texture of material will
be used.
Noise texture – noise texture that will be added to the shape texture.
Noise coef – curve that defines multiplier of noise along system lifetime. For
example, if multiplier = -1, noise texture will be substracted from shape texture.
Tile size defines what length along system shape one instance of noise mask
takes.
Animate texture allows moving noise along ray with speed defined by Noise
Speed.
Lights options
Arcs can generate point lights along its way to simulate single shaped light source.
Lights range defines range of the point lights and frequency of placement along
system shape. Light intensity modifier sets lights intensity. Render mode
13
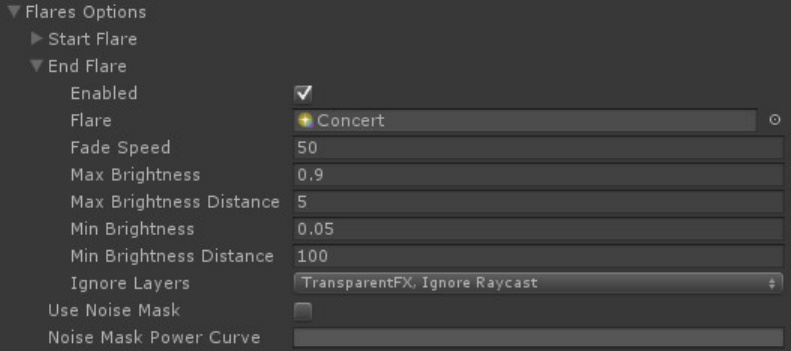
Flares Options
ArcReactor can generate standard Unity flares at each end of your arc, and
manage its intensity and color depending on status of the arc and viewing
distance.
Fade Speed – how fast flare will disappear after being blocked from view by
collider. Usage of high values (around 50) is recommended.
Max Brightness – brightness of the flare when it’s viewed from Max Brightness
Distance or closer.
Min Brightness – brightness of the flare when it’s viewed from Min Brightness
Distance or farther.
Ignore layers – colliders from what layers considered transparent.
Use Noise Mask – if enabled, flare will change its intensity according to Noise
Mask Power Curve and texture animation options (see SimplePulseLaser prefab
for example of how it works)
14
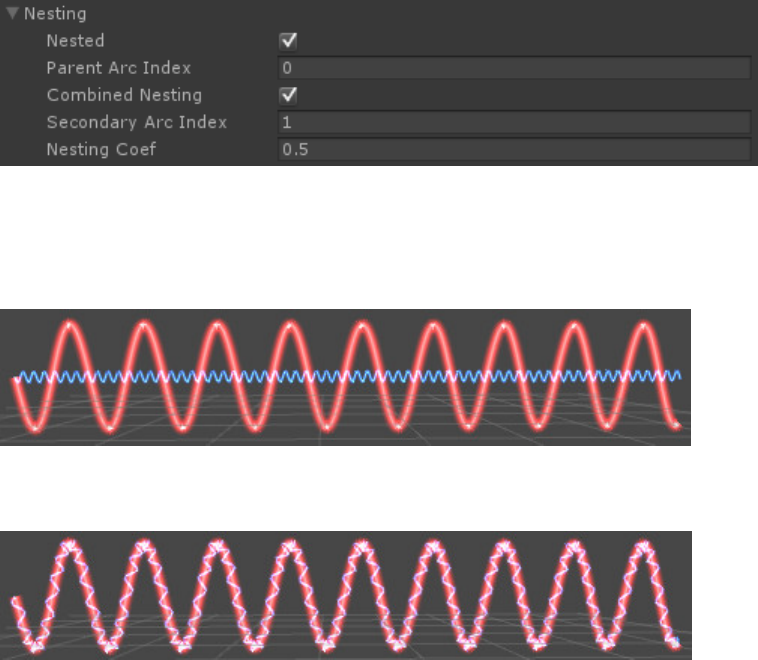
Nesting
Nesting allows this arc to follow not the system shape, but shape of the other arc.
2 non-nested arcs with oscillations:
Blue arc nested to red arc:
Note that oscillation wavelength calculated based on system shape length, and
parent arc length can vary greatly from it, so set wavelength of child arc
accordingly.
Also note that it’s recommended that parent arc index will be lower than child arc
index due to vertex caching algorithm.
Combined nesting allows arc to follow 2 arcs instead of one, with Nesting Coef
defining in what proportion each parent arc influence resulting shape.
NestingCoef = 0.5 makes child arc place itself in between parent arcs.
15
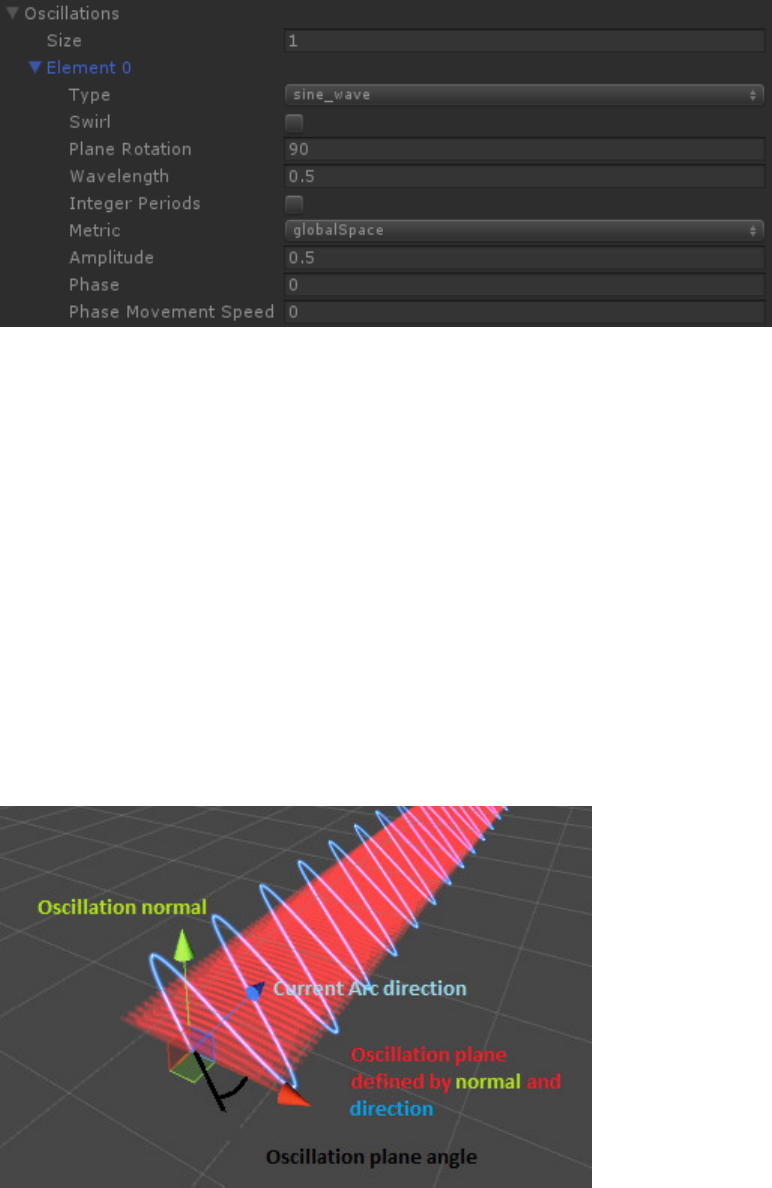
Oscillations
Periodic oscillations are a great way to liven your system. One arc can contain any
number of oscillations, every one of them will be added to final complex wave.
Note that all angles are set in degrees , NOT radians.
Type defines waveform. Sine wave, rectangular and zigzag available at the time.
Swirl allows 3-dimensional spiral to form based on oscillation parameters. In fact,
all it does is duplicates current oscillation with phase and plane rotation rotated
90 degrees. Only sine_wave gives spiral effect.
Plane Rotation defines rotation of arc oscillation plane around default oscillation
plane(red on illustration)
Wavelength – length of oscillation period along system shape
Integer periods – wavelength will be changed to closest wavelength that allows
for whole number of periods along system shape. This comes in handy on closed-
shape systems.
16
Metric defines units in which wavelength is set
globalSpace – wavelength set in unity units
localSpace – wavelength set in parts of system shape length(for example,
wavelength = 0.2 will set wavelength to 1/5 of overall system length)
Amplitude defines maximum deviation of oscillating arc from its original shape.
Phase defines period shift of oscillation.
Phase movement speed lets you animate oscillation by moving wave periods
along arc.
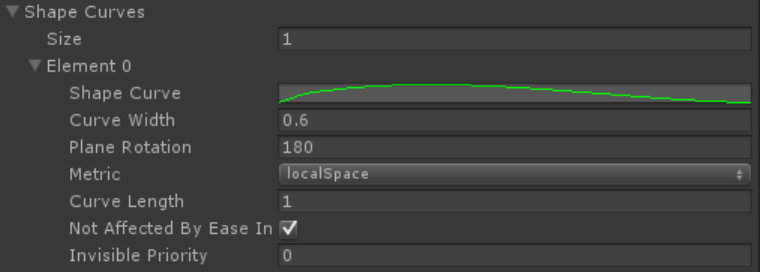
Shape curves
Shape curves behave much like oscillations, except shape of the ray shift is
defined by Shape Curve.
Curve width – Curve will be multiplied by this number before being applied to the
final ray shape.
Plane Rotation – see Oscillations above.
Metric – see Oscillations above. (Curve length is defined depending on this)
Curve Length – Length of [0,1] x-axis segment of the curve on final ray shape,
counting from start of the ray.
Not affected by Ease In Out – If toggled on, “Ease In Out” options will not affect
final curve shift.
17
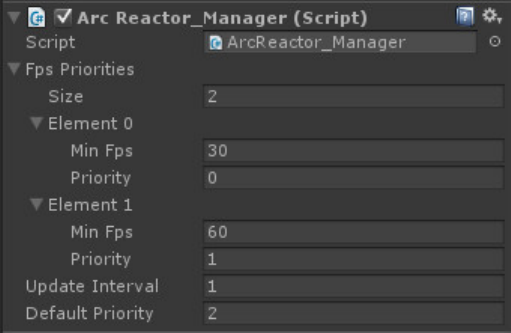
ArcReactor_Manager performance manager script.
To enable performance manager simply put one instance of this script onto any
object on your scene.
Then you have to set up a table of priorities. Manager will set global priority
according to this table, using lowest fps setting in table that’s higher that current
FPS. If no priorities table record satisfies that requirement, Default Priority will be
used.
(In the above example screenshot, priority will be set to 0 when FPS in the 0-30
range, to 1 in 30-60 range and to 2 in 60+ range).
If you want your manager affecting your arcs, you will need to set up priorities in
the part of the arc you want to be affected by FPS. For example, if you put Lights
Priority = 2 in your arc, and global priority according to manager becomes lower
than 2, your lights will be turned off.
For now SpatialNoise (when not visible), Lights and Oscillations (when not visible)
are available for performance managing.
Note that you can disable performance manager and set Performance Priority of
each arc by your own script.
18
Pool manager.
Pooling of ArcReactor systems allows you to reuse already instantiated ray
systems, improving performance and reducing GC amount.
To enable pooling of ArcReactor systems, drop “ArcReactor/Pool manager”
component on any gameobject on your scene.
Launcher components will automatically use pooling if pool manager is present.
If you’re instantiating ArcReactor_Arc systems manually, use following methods:
ArcReactor_PoolManager.Instance.GetFreeEntity(GameObject originalPrefab)
ArcReactor_PoolManager.Instance.SetEntityAsFree(ArcReactor_Arc arc)
Pool manager identifies arcs systems by original prefabs. If you changed
instantiated instance of arc system in the way that prevents it from being reused
(for example, you changed system lifetime), call this method of your
ArcReactor_Arc component:
ExcludeFromPool()
19
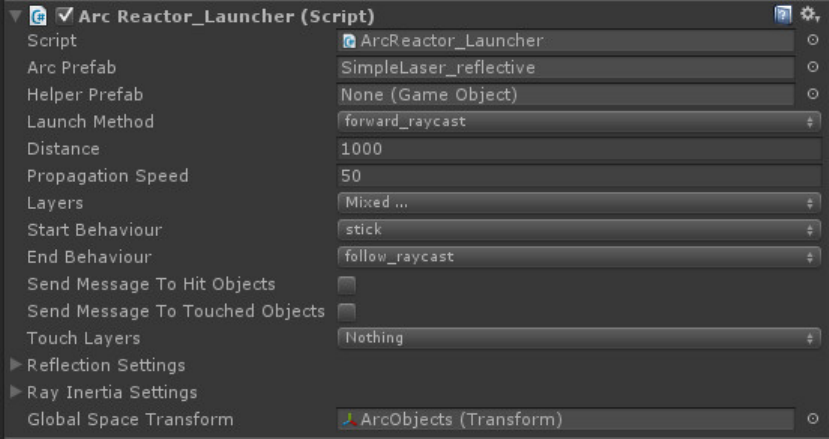
ArcReactor_Launcher helper script
This script provides simple interface for integrating ArcReactor in your project as a
weapon-type effect. It handles generation of shape points, raycasting, calculating
reflections and sending messages to objects that was hit, touched or reflected off
by your ray.
To use it, prepare prefab with ArcReactor_Arc component that you need (for
example, laser ray or lighting arc) and place it into “Arc prefab” parameter. You
can use one of the default prefabs that come with the package.
By invoking “Launch” method (either by direct access or SendMessage method),
Launcher component will create needed shape, instantiate prefab and will control
its shape through its lifetime.
It can be used by parenting it to a gun in a shooter game and adding invoking
“Launch” method of ArcReactor_Launcher in your shooting script.
Additional settings:
Helper prefab – this prefab will be instantiated with arc system prefab and will be
aligned along it. Use it, for example, to generate particles along your rays.
Launch method – defines how start and end point of arc system will be
determined at the moment of launch.
Distance – defines maximum raycasting distance
20
Propagation speed – defines speed at which raycasting distance increases (per
second). Can be used if you want propagation to handle events correctly. Set to a
really big number if you want your rays to raycast instantly to Distance.
Layers – defines raycasting layers (objects in these layers will block your rays).
Start and end behaviors – defines behavior of start and end points of arc system
shape. For guns, use StartBehavior = “stick” and EndBehavior = “follow_raycast”.
Send message to hit objects – Launcher will invoke a “ArcReactorHit” function in
objects hit by rays. This is done via SendMessage method. Note that reflectors are
processed separately; this message goes only to the object that blocked the ray.
Send message to touched objects – Same as hit objects, except touched objects
don’t block the ray. Set up touch layers beforehand. It invokes “ArcReactorTouch”.
Ray inertia setting allows generating additional shape transforms and applying
crude inertia algorithm to arc. For smoother results, use transforms with physics
enabled(rigidbodies, colliders and joints).
Global space transform will be parent for all generated transforms except those
that stuck to surfaces according to behavior settings.
21
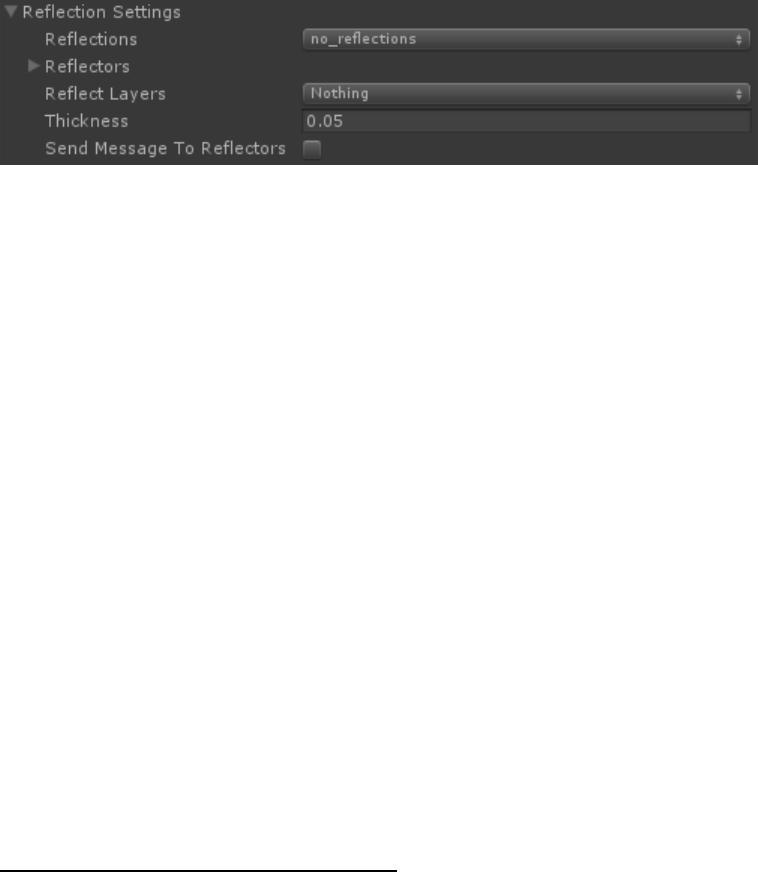
ArcReactor_Launcher reflection setup
Any launcher can launch rays that will reflect off surfaces, and any ray system can
be made reflective.
To do so, you must switch Reflections parameter to the “reflect_by_layer” or
“reflect_specified_objects” mode. The difference between them is what objects
will reflect rays launched by this launcher.
reflect_by_layer: any objects with colliders within “reflect_layers” will reflect
your rays.
reflect_specified_objects: only objects placed in “reflectors” array will reflect
your rays. Note that they still need to be within “reflect_layers”.
“Thickness” determines the distance of reflection point from the reflective
surface.
Send message to reflectors – similar to hit objects, this parameter enables
SendMessage to the objects that reflected ray. It invokes “ArcReactorReflection”
function.
Recommendations for ray systems:
Systems with big spatial randomization usually look bad reflecting. If you use a
bunch of rays “dancing” randomly around main ray, use the max random distance
as reflection thickness.
For hard reflections (such as laser beams), check “snap segments to shape”
option for better results.
22
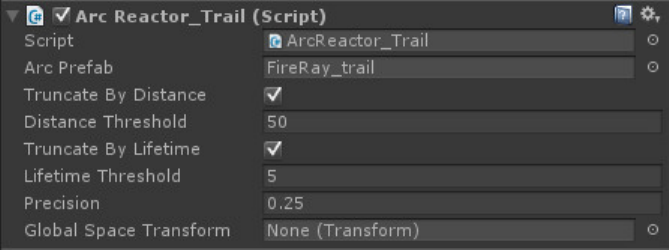
ArcReactor_Trail helper script
This script provides simple interface for integrating ArcReactor in your project as a
trail-type effect. It generates shape points and handle their lifetime. Overall, its
principle are close to standard Trail_Renderer, although with much more control
and with better visual results.
To use it, place this component on GameObject you need your trail attached to,
and prepare prefab with ArcReactor_Arc component that you need (for example,
fire or lighting arc), then place it into “Arc prefab” slot. You can use one of the
default prefabs that come with the package.
Trail component will automatically monitor position changes of GameObject it’s
attached to, and will create and delete control points on the fly.
Truncate By Distance – when length of trail will exceed Distance Threshold,
oldest control points will start to disappear.
Truncate By Lifetime – when life time of control point will exceed Lifetime
Threshold, it will disappear.
Precision – minimum distance between control points.
Global Space Transform – all calculations will be performed in that objects space.
If you have an environment that’s moving and you need to prevent trails being
drawn from that movement, place that environment transform here. If null,
global worldspace will be used.
23
Script reference
If you want to further integrate ArcReactor to your scripts, this information will
help you understand public properties of ArcReactor components.
ArcReactor_Arc:
float ArcReactor_Arc.ShapeLength
Returns length of system shape defined by shape transforms. Note that length
calculated using Linear interpolation regardless of interpolation settings due to
performance optimization.
Vector3 ArcReactor_Arc.CalcShapePoint(float point)
Returns global coordinates of point on system shape. Point=0 corresponds to start
point of shape, Point = 1 – to end point.
You can use this propery to, for example, move some object along arcs.
Vector3 ArcReactor_Arc.GetArcPoint (float point,int arcIndex)
Returns global coordinates of point on arc. This method is faster than
CalcShapePoint due to vertex caching, but it could cause errors if you provide
point that arc hasn’t reached yet(if arc propagation options not set to instant).
Vector3 ArcReactor_Arc.GetArcEndPosition (int arcIndex)
returns global coordinates of last vertex of arc.
Vector3 ArcReactor_Arc. GetArcEndPoint (int arcIndex)
returns relative point of arc’s end point. 0 corresponds to start point of system
shape, 1 – to end point of system shape. Use in conjunction with GetArcPoint.
void ArcReactor_Arc.ResetArc(int arcIndex)
recalculates shape of the arc and re-randomizes spatial noise if enabled.
24
ArcReactor_Launcher:
public class RayInfo
{
public ArcReactor_Arc arc;
public Transform[] shape;
public GameObject startObject;
public GameObject endObject;
}
Contains information about ray launched by component that’s currently active.
To get list of current rays, use
RayInfo[] ArcReactor_Launcher.Rays
Hit, touch and reflect messages:
Launcher can send messages to objects that’s been hit by rays it launched. It also
provides hit info by this class:
class ArcReactorHitInfo
{
ArcReactor_Launcher launcher;
ArcReactor_Launcher.RayInfo rayInfo;
RaycastHit raycastHit;
}
Examples of usage in your scripts:
public void ArcReactorReflection(ArcReactorHit hit)
{
//Do something
}
public void ArcReactorHit(ArcReactorHit hit)
{
//Do something
}
public void ArcReactorTouch(ArcReactorHit hit)
{
//Do something
}
For example of generating particle system on hit, see ArcReactorDemo3Mirror script in
Demo folder.
