Zenfone 3 Laser E12078_ZC551KL_EM_V2_WEB Asus Zen Fone 5.5 ZC551KL User Guide
User Manual: Asus-ZenFone-3-Laser-5.5-ZC551KL-Asus-ZenFone-3-Laser-5.5-ZC551KL-User-Guide
Open the PDF directly: View PDF ![]() .
.
Page Count: 117 [warning: Documents this large are best viewed by clicking the View PDF Link!]
ZC551KL
User Guide

2
Care and safety
Guidelines
Road safety comes first. We strongly recommend not to use your device when
driving or operating any type of vehicle.
This device should only be used in environments with ambient temperatures
between 0°C (32°F) and 35°C (95°F).
Turn off your device in restricted areas where the use of mobile devices is prohibited.
Always obey rules and regulations when in restricted areas, such as, in aircraft, movie
theater, in hospitals or near medical equipment, near gas or fuel, construction sites,
blasting sites and other areas.
Use only AC adapters and cables approved by ASUS for use with this device. Refer to
the rating label on the bottom of your device and ensure that your power adapter
complies with this rating.
Do not use damaged power cables, accessories, and other peripherals with your
device.
Keep your device dry. Do not use or expose your device near liquids, rain, or
moisture.
You can put your device through x-ray machines (such as those used in conveyor
belts for airport security), but do not expose the device to magnetic detectors and
wands.
The device screen is made of glass. If the glass gets broken, stop using the device
and do not touch the broken glass parts. Immediately send device for repair to
ASUS-qualified service personnel.
Do not listen at high volume levels for long periods to prevent possible hearing
damage.
Disconnect the AC power before cleaning your device. Use only a clean cellulose
sponge or chamois cloth when cleaning your device screen.
Send device for repair to ASUS-qualified service personnel only.
E12078
September 2016
Second Edition
3
Proper disposal
Risk of explosion if battery is replaced by an incorrect type. Dispose of used batteries
according to the instructions.
DO NOT throw the battery in municipal waste. The symbol of the crossed out
wheeled bin indicates that the battery should not be placed in municipal waste.
DO NOT throw this product in municipal waste. This product has been designed to
enable proper reuse of parts and recycling. The symbol of the crossed out wheeled
bin indicates that the product (electrical, electronic equipment and mercury-
containing button cell battery) should not be placed in municipal waste. Check local
regulations for disposal of electronic products.
DO NOT throw this product in fire. DO NOT short circuit the contacts. DO NOT
disassemble this product.
ZenTalk Fans Forum
(http://www.asus.com/zentalk/global_forward.php)
California Proposition 65
WARNING! This product may contain chemicals known to the State of California to cause cancer, birth
defects, or other reproductive harm. Wash hands after handling.
4
1 Basics
Welcome! .................................................................................................................................................. 7
Get your ASUS Phone ready! ............................................................................................................. 8
Starting for the first time ..................................................................................................................18
Using the touchscreen.......................................................................................................................20
2 There’s no place like Home
Zen Home features .....................................................................................................23
Home screen .........................................................................................................................................23
Quick settings .......................................................................................................................................25
System notifications ...........................................................................................................................26
Personalizing your Home screen ...............................................................................27
App & Widgets .....................................................................................................................................27
Wallpapers .............................................................................................................................................28
Easy Mode ..............................................................................................................................................29
Setting up the date and time ..........................................................................................................32
Setting up your ringtone and alert sounds................................................................................32
Lock Screen .................................................................................................................33
Customizing your lock screen .........................................................................................................33
Customizing the quick access buttons ........................................................................................34
Fingerprint ID sensor ..................................................................................................35
Starting your ASUS phone for the first time ..............................................................................35
Setting up fingerprint ID from Settings ......................................................................................36
3 Work hard, play harder
Chrome ........................................................................................................................38
Launching Chrome .............................................................................................................................38
Sharing pages .......................................................................................................................................39
Bookmarking pages ...........................................................................................................................39
Clearing the browsing data .............................................................................................................39
Gmail ............................................................................................................................40
Google Calendar .........................................................................................................41
Creating events ....................................................................................................................................41
Editing or removing events .............................................................................................................41
Creating reminders .............................................................................................................................42
Editing or removing reminders ......................................................................................................42
Do It Later ....................................................................................................................43
Calling later ............................................................................................................................................43
Messaging later ....................................................................................................................................43
Adding to-do tasks .............................................................................................................................43
Deleting to-do tasks ...........................................................................................................................44
File Manager................................................................................................................44
The Cloud ....................................................................................................................45
ASUS WebStorage ...............................................................................................................................45
ZenFone Care ..............................................................................................................46
Contents
5
4 Keeping in touch
Call in style ..................................................................................................................47
Dual SIM feature ...................................................................................................................................47
Making calls ...........................................................................................................................................49
Receiving calls ......................................................................................................................................51
Other call options ................................................................................................................................52
Managing multiple calls ....................................................................................................................53
Recording calls .....................................................................................................................................53
Managing contacts .....................................................................................................54
Contacts Settings ................................................................................................................................54
Setting up your profile ......................................................................................................................54
Adding contacts ...................................................................................................................................55
Setting up your VIPs ...........................................................................................................................56
Marking your favorite contacts ......................................................................................................58
Importing contacts .............................................................................................................................58
Exporting contacts ..............................................................................................................................59
Social networking with your contacts .........................................................................................60
Send messages and more ..........................................................................................61
Google Messenger ..............................................................................................................................61
5 Fun and entertainment
Using a headset ...........................................................................................................62
Connecting the audio jack ...............................................................................................................62
Google Play Music ......................................................................................................63
6 Your precious moments
Capture moments .......................................................................................................64
Launching the Camera app .............................................................................................................64
Using Camera for the first time.......................................................................................................64
Advanced camera features ..............................................................................................................68
Using the Gallery ........................................................................................................73
Viewing files from your social network or cloud storage ......................................................73
Viewing the photo location .............................................................................................................74
Sharing files from the Gallery ..........................................................................................................75
Deleting files from the Gallery ........................................................................................................75
Editing images ......................................................................................................................................75
Using MiniMovie ..................................................................................................................................77
PhotoCollage...............................................................................................................78
7 Staying connected
Mobile network ...........................................................................................................79
Enabling the mobile network .........................................................................................................79
Wi-Fi .............................................................................................................................79
Enabling Wi-Fi .......................................................................................................................................79
Connecting to a Wi-Fi network .......................................................................................................80
Disabling Wi-Fi ......................................................................................................................................80
Bluetooth® ................................................................................................................... 80
Enabling Bluetooth® ...........................................................................................................................80
6
Pairing your ASUS Phone to a Bluetooth® device ....................................................................81
Unpairing your ASUS Phone from the Bluetooth® device ....................................................81
Tethering .....................................................................................................................82
Wi-Fi Hotspot ........................................................................................................................................82
Bluetooth Tethering ............................................................................................................................83
8 Travel and Maps
Weather .......................................................................................................................84
Launching the Weather app ............................................................................................................84
Weather home screen ........................................................................................................................85
Clock ............................................................................................................................86
World Clock ............................................................................................................................................86
Alarm clock ............................................................................................................................................87
Stopwatch ..............................................................................................................................................87
Timer ........................................................................................................................................................88
9 ZenLink
Knowing ZenLink ........................................................................................................89
Share Link ...............................................................................................................................................89
10 Zen Everywhere
Special Zen Tools .........................................................................................................91
Flashlight ................................................................................................................................................91
Calculator ...............................................................................................................................................93
Quick memo ..........................................................................................................................................94
Sound Recorder ...................................................................................................................................96
Splendid ..................................................................................................................................................98
Mobile Manager ................................................................................................................................ 101
11 Maintain your Zen
Keeping your device up-to-date ..............................................................................102
Updating your system .................................................................................................................... 102
Storage ................................................................................................................................................. 102
Backup and reset .............................................................................................................................. 102
Securing your ASUS Phone ........................................................................................................... 103
Appendix
Notices .......................................................................................................................106
Index
7
Chapter 1: Basics
Basics 1
1 Basics
Welcome!
Explore the intuitive simplicity of ASUS Zen UI!
ASUS Zen UI is a charming and intuitive interface exclusively for ASUS Phones. It provides you with
special apps, which are integrated in or with other apps, to fit your unique individual needs and
make your life easier while letting you have fun with your ASUS Phone.
ZenFone Care
Find answers from FAQs (Frequently Asked Questions) or provide your feedbacks in the
user forum.
Camera
With PixelMaster technology, capture those precious moments in vivid and high-quality
photos and videos.
Do It Later
Get hold and act on your important emails, SMS messages, interesting websites, or other
important tasks when it is more convenient for you to do so.
Share Link
Quickly share and receive files, apps, or media contents with other Android devices or
PCs.
PhotoCollage
Spice up your photo with stickers, or get creative with effects, using this free collage
maker.
NOTE: Availability of ASUS Zen UI apps vary per region and ASUS Phone model. Tap from your
Home screen to check the apps available on your ASUS Phone.
8
Chapter 1: Basics
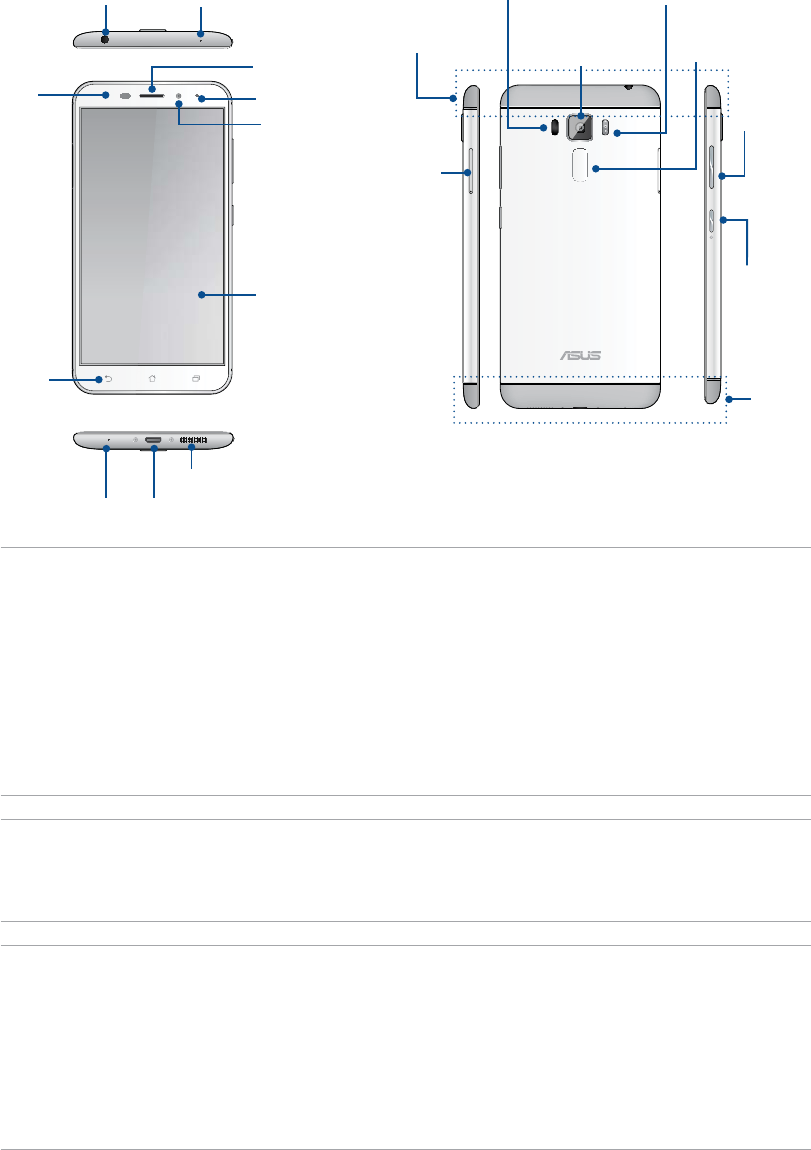
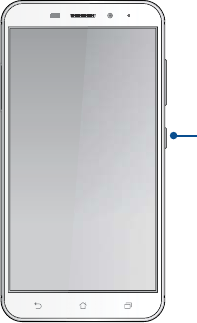
Get your ASUS Phone ready!
Parts and features
Take a hold of your device and have it running in a jiffy.
Micro USB port
Speaker
LED indicator
Touch screen
display
Front camera
Touch keys
Audio jack
Receiver
Power key
Volume key
Rear camera
Laser focus
Fingerprint
sensor
Micro SIM,
Nano SIM/
MicroSD
combo
card slot
Proximity
Sensor and
light sensor
Camera flash / RGB sensor
WARNING!
t 5PBWPJEOFUXPSLDPOOFDUJPOBOECBUUFSZJTTVFT
t %0/05QMBDFBNFUBMMJDTUJDLFSPOUIFBOUFOOBBSFB
t %0/05VTFBNFUBMMJDQSPUFDUJWFGSBNFDBTFPOZPVS"4641IPOF
t %0/05DPWFSUIFBOUFOOBBSFBXJUIZPVSIBOETPSPUIFSPCKFDUTXIJMFVTJOHTPNFGVODUJPOTTVDI
as making calls or using the mobile data connection.
t 8FSFDPNNFOEUIBUZPVVTF"464DPNQBUJCMFTDSFFOQSPUFDUPST6TJOHOPO"464DPNQBUJCMF
screen protectors may cause your ASUS Phone's sensor to malfunction.
NOTES:
t 5IF.JDSP4*./BOP4*.DBSETMPUTTVQQPSU-5&8$%."BOE(4.&%(&OFUXPSLCBOET
t 5IFNJDSP4%DBSETMPUTVQQPSUTNJDSP4%BOENJDSP4%)$DBSEGPSNBUT
IMPORTANT!
t 8FEPOPUSFDPNNFOEVTJOHBTDSFFOQSPUFDUPSBTJUDBOJOUFSGFSFXJUIUIFQSPYJNJUZTFOTPS*GZPV
want to use a screen protector, ensure that it does not block the proximity sensor.
t ,FFQUIFEFWJDFQBSUJDVMBSMZUIFUPVDITDSFFOESZBMMUIFUJNF8BUFSPSPUIFSMJRVJETDBODBVTFUIF
touch screen to malfunction.
t &OTVSFUIBUUIF.JDSP4*./BOP4*.NFNPSZDBSEDPNQBSUNFOUDPWFSJTBMXBZTDMPTFEXIFO
operating or carrying the device.
Primary
antenna
WIFI BT GPS(Diversity)
Microphone
Microphone
9
Chapter 1: Basics
Installing a Micro SIM card
A micro-subscriber identity module (Micro SIM) card stores information, such as your mobile phone
number, contacts, messages and other data that gives you access to a mobile network.
Your ASUS Phone comes with two SIM card slots that allows you to setup and use two mobile
network services without having to carry two mobile devices at the same time.
CAUTION!
t 5IJTEFWJDFJTEFTJHOFEGPSVTFXJUIBNPCJMFDBSSJFSBQQSPWFE.JDSP4*.DBSEPOMZ
t 8FEPOPUSFDPNNFOEUIFVTFPGUSJNNFE4*.DBSETJOUIF.JDSP4*.DBSETMPU
t 5VSOPGGZPVSEFWJDFCFGPSFJOTFSUJOHB.JDSP4*.DBSE
t #FFYUSBDBSFGVMXIFOIBOEMJOHB.JDSP4*.DBSE"464JTOPUSFTQPOTJCMFGPSBOZMPTTPSEBNBHF
incurred to your Micro SIM card.
t %POPUJOTFSUBNFNPSZDBSEJOUPUIF.JDSP4*.DBSETMPU*GBNFNPSZDBSEIBQQFOTUPCFJOTFSUFE
into the Micro SIM slot, send your device to an ASUS-qualified service personnel.
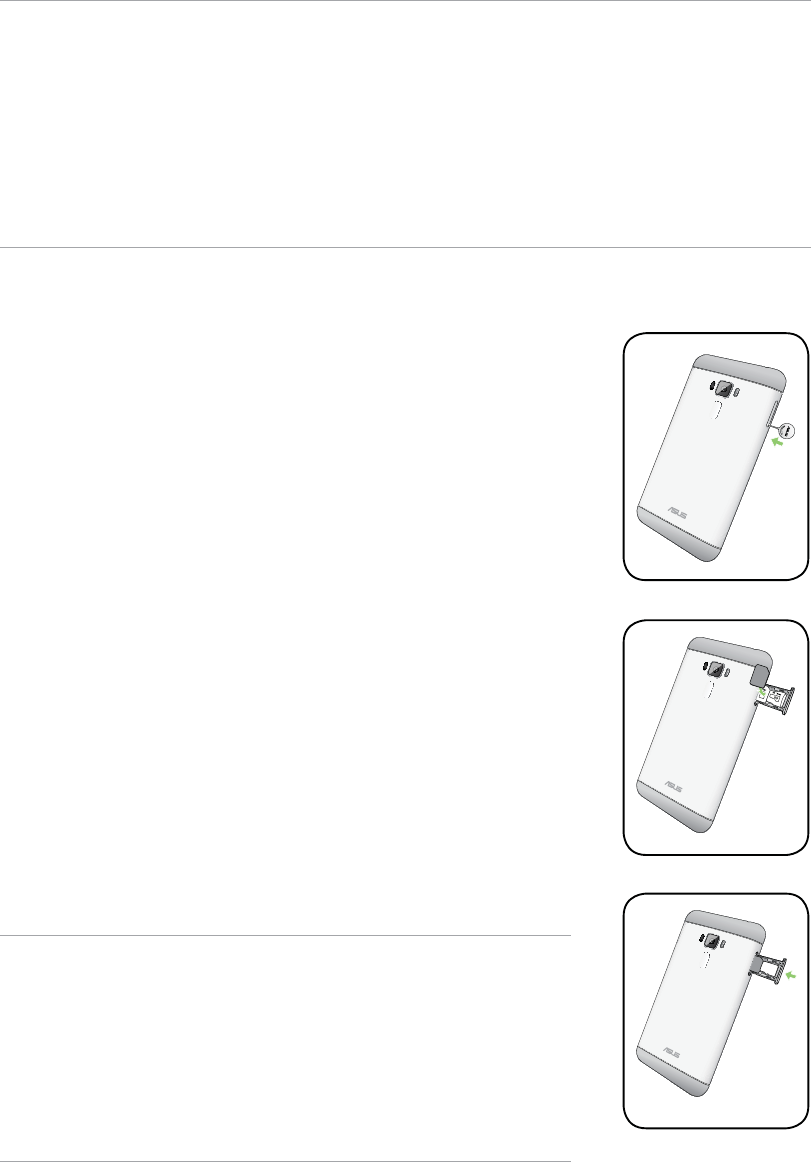
5PJOTUBMMB.JDSP4*.DBSE
1. Turn off your device.
2. Push a pin into the hole on the Micro SIM/ Nano SIM/ MicroSD card slot
to eject the tray out.
3. Insert the Micro SIM card into the Micro SIM card slot.
4. Push the tray to close it.
CAUTION!
t %POPUVTFTIBSQUPPMTPSTPMWFOUPOZPVSEFWJDFUPBWPJETDSBUDIFT
on it.
t 6TFPOMZBTUBOEBSE.JDSP4*.DBSEPOZPVS"4641IPOF"/BOPUP
Micro SIM adapter or a trimmed SIM card may not properly fit into
and may not be detected by your ASUS Phone.
t %0/05JOTUBMMBOFNQUZ/BOPUP.JDSP4*.BEBQUFSJOUPUIF
Micro SIM card slot to avoid irreversible damage.

10
Chapter 1: Basics
Removing a Micro SIM card
CAUTION: Be extra careful when handling a Micro SIM card. ASUS is not responsible for any loss or
damage incurred to your Micro SIM card.
5PSFNPWFB.JDSP4*.DBSE
1. Turn off your device.
2. Push a pin into the hole on the Micro SIM/ Nano SIM/ MicroSD card slot
to eject the tray out.
3. Remove the Micro SIM card from the Micro SIM card slot.
4. Push the tray to close it.

11
Chapter 1: Basics
Installing a Nano SIM card
A Nano subscriber identity module (Nano SIM) card stores information, such as your mobile phone
number, contacts, messages and other data that gives you access to a mobile network.
Your ASUS Phone comes with two SIM card slots that allow you to set up and use two mobile
network services without having to carry two mobile devices at the same time.
CAUTION!
t 5IJTEFWJDFJTEFTJHOFEGPSVTFXJUIBNPCJMFDBSSJFSBQQSPWFE/BOP4*.DBSEPOMZ
t 8FEPOPUSFDPNNFOEUIFVTFPGUSJNNFE4*.DBSETJOUIF/BOP4*.DBSETMPU
t 5VSOPGGZPVSEFWJDFCFGPSFJOTFSUJOHB/BOP4*.DBSE
t #FFYUSBDBSFGVMXIFOIBOEMJOHB/BOP4*.DBSE"464JTOPUSFTQPOTJCMFGPSBOZMPTTPSEBNBHF
incurred to your Nano SIM card.
t %POPUJOTFSUBNFNPSZDBSEJOUPUIF/BOP4*.DBSETMPU*GBNFNPSZDBSEIBQQFOTUPCFJOTFSUFE
into the Nano SIM slot, send your device to an ASUS-qualified service personnel.
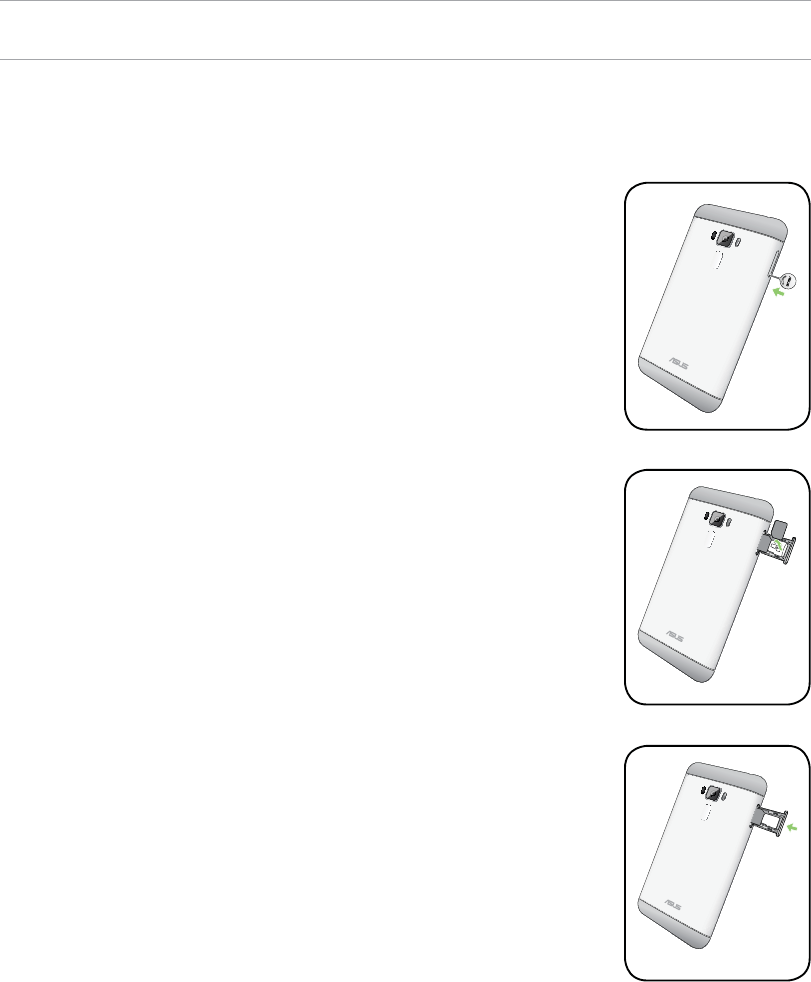
5PJOTUBMMB/BOP4*.DBSE
1. Turn off your device.
2. Push a pin into the hole on the Micro SIM/ Nano SIM/ MicroSD card slot
to eject the tray out.
3. Insert the Nano SIM card into the Nano SIM/MicroSD combo card slot.
4. Push the tray to close it.
CAUTION!
t %POPUVTFTIBSQUPPMTPSTPMWFOUPOZPVSEFWJDFUPBWPJE
scratches on it.
t 6TFPOMZBTUBOEBSE/BOP4*.DBSEPOZPVS"4641IPOF
IMPORTANT! You can only use the Nano SIM card or the MicroSD card
at a time.
12
Chapter 1: Basics
Removing a Nano SIM card
CAUTION: Be extra careful when handling a Nano SIM card. ASUS is not responsible for any loss or
damage incurred to your Nano SIM card.
5PSFNPWFB/BOP4*.DBSE
1. Turn off your device.
2. Push a pin into the hole on the Micro SIM/ Nano SIM/ MicroSD card slot
to eject the tray out.
3. Remove the Nano SIM card from the Nano SIM/MicroSD combo card slot.
4. Push the tray to close it.

13
Chapter 1: Basics
4. Push the tray to close it.
CAUTION! Do not use sharp tools or solvent on your device to
protect it from scratches.
Installing a memory card
Your ASUS Phone supports a MicroSD™ and MicroSDHC™ memory card with up to 128 GB capacity.
NOTE: Some memory cards may not be compatible with your ASUS Phone. Ensure that you use only
compatible memory cards to prevent loss of data, damage to your device or memory card, or both.
CAUTION!
t #FFYUSBDBSFGVMXIFOIBOEMJOHBNFNPSZDBSE"464JTOPUSFTQPOTJCMFGPSBOZEBUBMPTTPSEBNBHF
incurred to your memory card.
t %POPUJOTFSUB.JDSP4*.DBSEJOUPUIFNFNPSZDBSETMPU*GB.JDSP4*.DBSEIBQQFOTUPCFJOTFSUFE
into the memory card slot, bring your device to an ASUS-qualified service personnel.
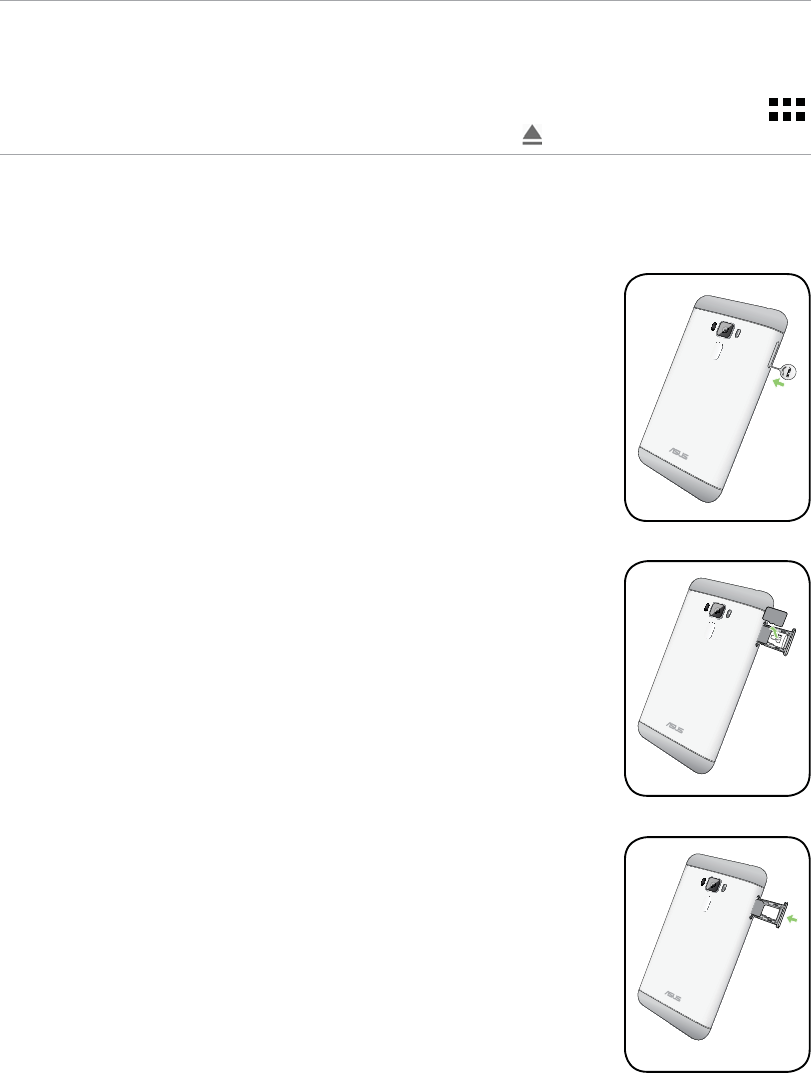
5PJOTUBMMBNFNPSZDBSE
1. Turn off your device.
2. Push a pin into the hole on the Micro SIM/ Nano SIM/ MicroSD card slot
to eject the tray out.
3. Insert the MicroSD card into the Nano SIM/MicroSD combo card slot.
IMPORTANT! You can only use the Nano SIM card or the MicroSD card
at a time.
14
Chapter 1: Basics
Removing a memory card
CAUTION!
t #FFYUSBDBSFGVMXIFOIBOEMJOHBNFNPSZDBSE"464JTOPUSFTQPOTJCMFGPSBOZEBUBMPTTPSEBNBHF
incurred to your memory card.
t &KFDUUIFNFNPSZDBSEQSPQFSMZUPTBGFMZSFNPWFJUGSPNEFWJDF5PFKFDUUIFNFNPSZDBSEUBQ
> Settings > Storage&USB, then under Portable storage, click beside SD card.
5PSFNPWFBNFNPSZDBSE
1. Turn off your device.
2. Push a pin into the hole on the Micro SIM/ Nano SIM/ MicroSD card slot
to eject the tray out.
3. Remove the MicroSD card from the Nano SIM/MicroSD combo card slot.
4. Push the tray to close it.

15
Chapter 1: Basics
Charging your ASUS Phone
Your ASUS Phone comes partially charged but you must charge it fully before using it for the first
time. Read the following important notices and cautions before charging your device.
IMPORTANT!
t 6TFPOMZUIFCVOEMFE"$QPXFSBEBQUFSBOENJDSP64#DBCMFUPDIBSHFZPVS"4641IPOF6TJOHB
different AC power adapter and cable may damage your device.
t 1FFMPGGUIFQSPUFDUJWFGJMNPOUIF"$QPXFSBEBQUFSBOENJDSP64#DBCMFCFGPSFVTJOHJUXJUIZPVS
device.
t &OTVSFUPQMVHUIF"$QPXFSBEBQUFSUPBDPNQBUJCMFQPXFSPVUMFU:PVDBOQMVHUIF"$QPXFS
adapter to any compatible 100~240 V outlet.
t 5IFPVUQVUWPMUBHFPGUIF"$QPXFSBEBQUFSGPSUIJTEFWJDFJT7 1A, 5W.
t 8IFOVTJOHZPVS"4641IPOFXIJMFQMVHHFEJOUPBQPXFSPVUMFUUIFQPXFSPVUMFUNVTUCFOFBS
your device and easily accessible.
t 5PDPOTFSWFFMFDUSJDJUZVOQMVHUIF"$QPXFSBEBQUFSGSPNUIFQPXFSPVUMFUXIFOOPUJOVTF
t %POPUQMBDFIFBWZPCKFDUTPOUPQPGZPVS"4641IPOF
CAUTION!
t 8IJMFDIBSHJOHZPVS"4641IPOFDBOCFDPNFXBSN5IJTJTOPSNBMIPXFWFSJGZPVSEFWJDF
becomes unusually hot, disconnect the micro-USB cable from your device and send the device,
including the AC power adapter and cable to an ASUS-qualified service personnel.
t 5PQSFWFOUBOZEBNBHFUPZPVS"4641IPOF"$BEBQUFSPSNJDSP64#DBCMF&OTVSFUIBUUIF
micro-USB cable, AC adapter, and your device are connected properly before charging.
5PDIBSHFZPVS"4641IPOF
1. Connect the micro USB cable to the power adapter.
2. Connect the micro USB cable to your ASUS Phone.
3. Plug the AC power adapter to a grounded power outlet.
3
1
2
16
Chapter 1: Basics
IMPORTANT!
t 8IFOVTJOHZPVS"4641IPOFXIJMFJUJTQMVHHFEUPBQPXFSPVUMFUUIFHSPVOEFEQPXFSPVUMFU
must be near to the unit and easily accessible.
t 8IFODIBSHJOHZPVS"4641IPOFUISPVHIZPVSDPNQVUFSFOTVSFUIBUZPVQMVHUIFNJDSP64#DBCMF
to your computer’s USB 2.0 / USB 3.0 port.
t "WPJEDIBSHJOHZPVS"4641IPOFJOBOFOWJSPONFOUXJUIBNCJFOUUFNQFSBUVSFPGBCPWFoC
(95oF).
t $IBSHFZPVS"4641IPOFGPSFJHIUIPVSTCFGPSFVTJOHJUJOCBUUFSZNPEFGPSUIFGJSTUUJNF
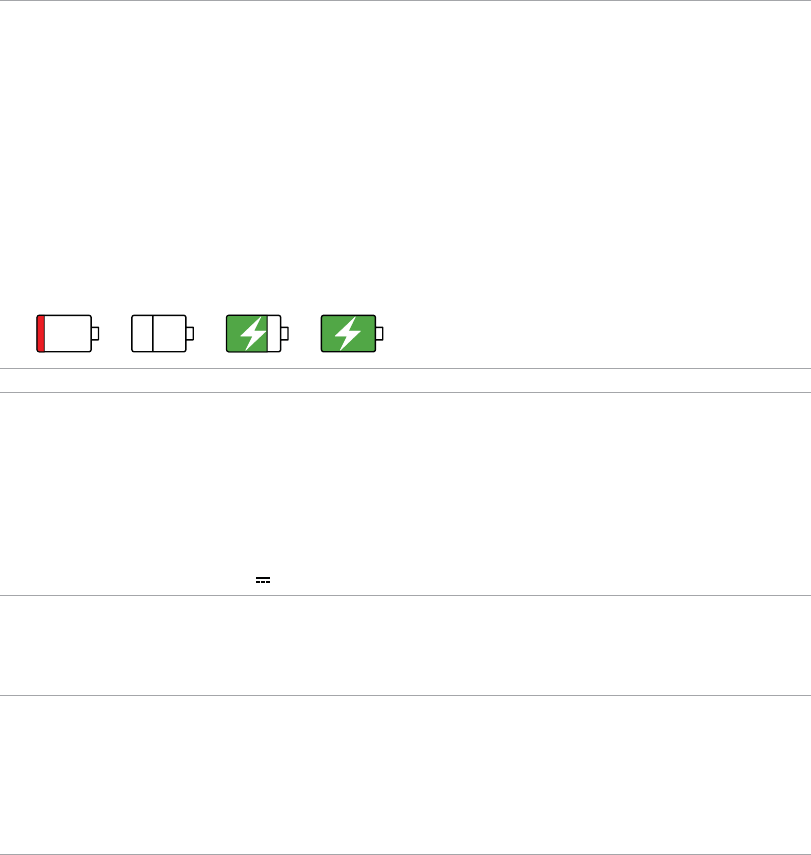
t 5IFTUBUVTPGCBUUFSZDIBSHFJTJOEJDBUFECZUIFGPMMPXJOHJDPOT
Low Not Charging Charging Full
NOTES:
t 6TFPOMZUIFQPXFSBEBQUFSUIBUDBNFXJUIZPVSEFWJDF6TJOHBEJGGFSFOUQPXFSBEBQUFSNBZ
damage your device.
t 6TJOHUIFCVOEMFEQPXFSBEBQUFSBOE"4641IPOFTJHOBMDBCMFUPDPOOFDUZPVS"4641IPOFUPB
power outlet is the best way to charge your ASUS Phone.
t 5IFJOQVUWPMUBHFSBOHFCFUXFFOUIFXBMMPVUMFUBOEUIJTBEBQUFSJT"$775IFPVUQVU
WPMUBHFPGUIFEFWJDFJT7 1A, 5W.
4. When fully-charged, disconnect the USB cable from your ASUS Phone first before unplugging
the AC power adapter from the power outlet.
NOTES:
t :PVDBOVTFZPVSEFWJDFXIJMFDIBSHJOHCVUJUNBZUBLFMPOHFSUPGVMMZDIBSHFUIFEFWJDF
t $IBSHJOHZPVSEFWJDFWJB64#QPSUPGBDPNQVUFSNBZUBLFMPOHFSUPGVMMZDIBSHFUIFEFWJDF
t *GZPVSDPNQVUFSEPFTOPUQSPWJEFFOPVHIQPXFSGPSDIBSHJOHWJB64#QPSUDIBSHFZPVS"464
Phone using the AC power adapter plugged to a power outlet instead.
17
Chapter 1: Basics
Turning your ASUS Phone on or off
Turning your device on
To turn your device on, press and hold the power button until your device vibrates and starts up.
Turning your device off
5PUVSOZPVSEFWJDFPõ
1. If your screen is turned off, press the power button to turn it on. If your screen is locked, unlock
the device screen.
2. Press and hold the power button, then when prompted, tap Power off then tap OK.
Sleep mode
To put your device in sleep mode, press the power button once until the screen turns off.
Power key
18
Chapter 1: Basics
Starting for the first time
When you turn your ASUS Phone on for the first time, Setup Wizard will guide you through the
setup process. Follow the onscreen instructions to select your language, select input methods, set
up your mobile network, Wi-Fi and security features, sync accounts, and configure your location
services.
Use your Google or ASUS account to set up your device, if you do not have a Google or ASUS
account yet, go ahead and create one.
Google Account
6TJOHB(PPHMF"DDPVOUBMMPXTZPVUPGVMMZVUJMJ[FUIFTF"OESPJE04GFBUVSFT
t 0SHBOJ[FBOETFFBMMZPVSJOGPSNBUJPOGSPNBOZXIFSF
t "VUPNBUJDBMMZCBDLVQBMMZPVSEBUB
t -FWFSBHF(PPHMFTFSWJDFTDPOWFOJFOUMZGSPNBOZXIFSF
ASUS Account
)BWJOHBO"464"DDPVOUHFUTZPVUPFOKPZUIFGPMMPXJOHQFSLT
t 1FSTPOBMJ[FE"464TVQQPSUTFSWJDFBOEXBSSBOUZFYUFOTJPOGPSSFHJTUFSFEQSPEVDUT
t 'SFF(#PG$MPVETUPSBHFTQBDF
t 3FDFJWFUIFMBUFTUEFWJDFBOEmSNXBSFVQEBUFT
19
Chapter 1: Basics
Battery power conservation tips
The battery charge is the lifeline of your ASUS Phone. Here are some battery power conservation
tips that helps preserve the power of your ASUS Phone battery.
– Close all running apps that are not in use.
– When not in use, press the power button to put the device in sleep mode.
– Activate Smart switch in Power Saver which is integrated in Mobile Manager app.
– Set audio to Smart Mode.
– Decrease brightness of display.
– Keep the speaker volume to a low level.
– Disable Wi-Fi feature.
– Disable Bluetooth feature.
– Disable the screen auto-rotate feature.
– Disable all auto-sync features in your device.
20
Chapter 1: Basics
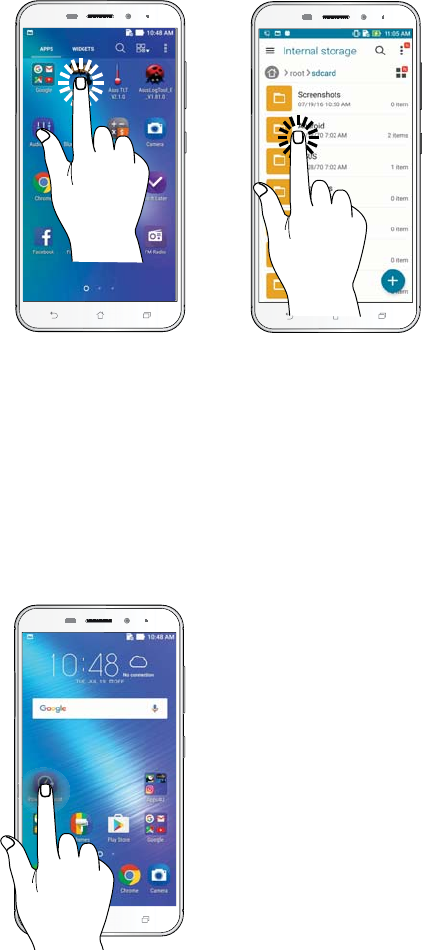
Using the touchscreen
Use these gestures on the touchscreen to launch apps, access some settings, and navigate your
ASUS Phone.
Launching apps or selecting items
%PBOZPGUIFGPMMPXJOH
t 5PMBVODIBOBQQTJNQMZUBQPOJU
t 5PTFMFDUBOJUFNTVDIBTJO'JMF.BOBHFSBQQTJNQMZUBQPOJU
Moving or deleting items
%PBOZPGUIFGPMMPXJOH
t 5PNPWFBOBQQPSXJEHFUUBQBOEIPMEUIFOESBHJUUPUIFMPDBUJPOXIFSFZPVXBOUJUUPCF
t 5PEFMFUFBOBQQPSXJEHFUGSPNUIF)PNFTDSFFOUBQBOEIPMEUIFOESBHJUVQUPRemove.

21
Chapter 1: Basics
Moving through pages or screens
%PBOZPGUIFGPMMPXJOH
t 4XJQFZPVSmOHFSUPUIFMFGUPSUPUIFSJHIUUPTXJUDICFUXFFOTDSFFOTPSUPnJQUISPVHIB(BMMFSZ
of images.
t 4DSPMMZPVSmOHFSVQPSEPXOUPHPUISPVHIXFCQBHFTPSMJTUPGJUFNT
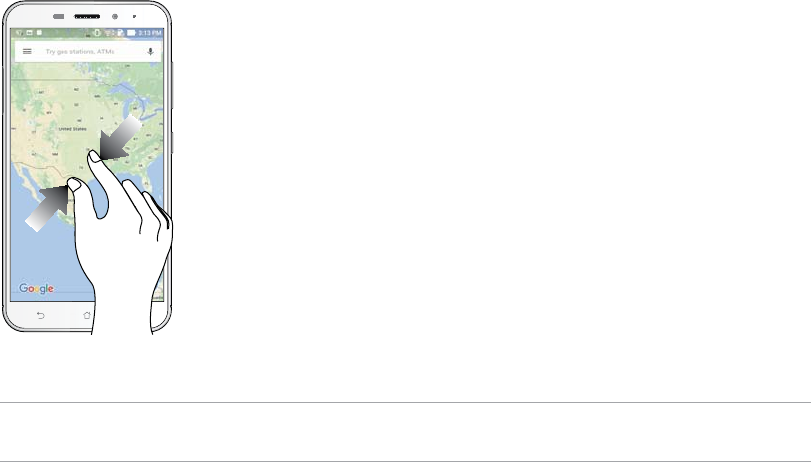
Zooming in
Spread apart your two fingers on the touch panel to zoom in an image in Gallery or Maps, or zoom
in a web page.
22
Chapter 1: Basics
Zooming out
Bring together your two fingers on the touch panel to zoom out an image in Gallery or Maps, or
zoom out of a web page.
NOTE: You may not be able to zoom in/out of some web pages as these pages may have been
designed specifically to fit your mobile screen.

23
Chapter 2: There’s no place like Home
There’s no place like Home 2
2 There’s no place like Home
Zen Home features
Home screen
Get reminders of important events, app and system updates, weather forecasts, and text messages
from people who really matter to you, right from your Home screen.
Swipe down this area once to display System notifications
Swipe down this area twice to display Quick settings
Tap to display Time and Weather settings
Tap to open All Apps screen
Tap to open an app
Tap to open Google Search page
Tap to open Voice Search

24
Chapter 2: There’s no place like Home
Understanding notification icons
These icons are shown on the status bar and will guide you of the current status of your ASUS
Phone.
Mobile network
Shows the signal strength of your mobile network.
2Micro SIM card
Shows that a Micro SIM card is inserted in Micro SIM card slot.
3Nano SIM card
Shows that a Nano SIM card is inserted in Nano SIM card slot.
NOTE: If the SIM card icon is displayed in green, it indicates that it is set as the preferred
network.
Messages
Shows that you have an unread message.
Wi-Fi
Shows the signal strength of your Wi-Fi connection.
Bluetooth
Shows that Bluetooth is turned on.
Auto-sync
Shows that auto-sync is enabled.
Battery life
Shows the battery status of your ASUS Phone.
MicroSD card
Shows that a MicroSD card is inserted in your ASUS Phone.
Screenshots
Shows that you took screenshots of your ASUS Phone.
Airplane mode
Shows that your ASUS Phone is on Airplane mode.
Wi-Fi Hotspot
Shows that Wi-Fi hotspot of your ASUS Phone is enabled.
Mute mode
Shows that Mute mode is enabled.
Vibrate mode
Shows that Vibrate mode is enabled.
Download status
Shows the download status of an app or file.

25
Chapter 2: There’s no place like Home
Quick settings
The Quick settings panel provides a one-tap access to some of the wireless features and settings of
your ASUS Phone. Each of these features are represented by a button.
To launch the Quick settings panel, swipe down twice from the top of your screen.
NOTE: A blue button indicates that the feature is currently enabled while a gray button indicates a
disabled feature. The green buttons refer to individual utilities that you can quickly access via the Quick
Settings Notification Panel.
Tap these buttons to enable or disable their functions.
Slide left or right to adjust the screen’s brightness
Tap to open Settings
Tap to select/deselect items to display in Quick settings
Swipe up to switch to System notifications panel
Tap to launch the Display settings screen
Adding or removing buttons
5PBEEPSSFNPWFFYJTUJOHCVUUPOTGSPNUIF"4642VJDL4FUUJOHTOPUJmDBUJPOQBOFM
1. Launch Quick settings then tap .
2. Tap the box beside the feature to add or remove it from the ASUS Quick Setting Notification
Panel.
NOTE: A checked box indicates that the feature's button is accessible via the ASUS Quick Settings
Notification Panel while an unchecked box means the opposite.
3. Tap to go back and view the current ASUS Quick Settings notification panel.
26
Chapter 2: There’s no place like Home
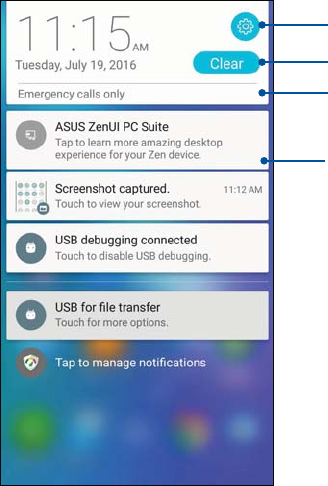
System notifications
From System notifications, you can see the latest updates done and system changes made on your
ASUS Phone. Most of these changes are data and system-related.
To launch the System notifications panel, swipe down from the top of your screen.
Tap this to delete all of the listed notifications
t4XJQFUIFOPUJmDBUJPOUPUIFMFGUPSSJHIUUP
remove it from the list
t5BQPOUIFOPUJmDBUJPOUPWJFXJUTEFUBJMT
Tap to open Settings
Swipe down to switch to Quick settings panel
27
Chapter 2: There’s no place like Home
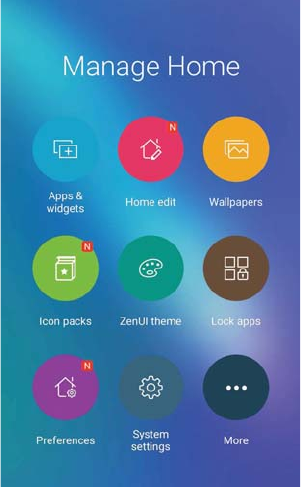
Personalizing your Home screen
Stamp your own personality on your Home screen. Select an attractive design as your wallpaper,
add shortcuts for quick access to your favorite apps, and add widgets for a quick review of
important info. You can also add more pages so you can add and quickly access or view more apps
or widgets on your Home screen.
5PMBVODIUIF.BOBHF)PNFTDSFFO
t 5BQBOEIPMEBOFNQUZBSFBPOZPVS)PNFTDSFFO
t 4XJQFVQGSPNUIFCPUUPNPGZPVS)PNFTDSFFO
App & Widgets
App shortcuts make it easier to quickly-access your often-used or favorite apps from your Home
screen. You can add, remove, or group your apps into one folder.
You can put widgets, which are small dynamic apps, on your Home screen. Widgets provide you
with quick-views of the weather forecast, calendar events information, battery status, and more.
Adding app shortcuts or widgets
5PBEEBOBQQTIPSUDVUPSBXJEHFU
1. Tap and hold an empty area on your Home screen and select Apps & Widgets.
2. From the All Apps list or the Widgets screen, tap and hold an app or a widget, then drag it to an
empty area on your Home screen.
Removing app shortcuts or widgets
From your Home screen, tap and hold an app or widget, then drag it to Remove on top of your
screen. The app that you’ve removed from your Home screen will remain in the All Apps screen.

28
Chapter 2: There’s no place like Home
Grouping your app shortcuts in a folder
Create folders to organize your app shortcuts on your Home screen.
1. On your Home screen, tap and drag an app onto another app and a folder will appear with an
automatically assigned name.
2. If you want to change the folder name, tap the folder and tap the folder name to assign a new
name to this folder.
Wallpapers
Let your apps, icons, and other Zen elements sit on an attractively designed wallpaper. You may
add a translucent background tint to your wallpaper for readability and clarity. You can also select
an animated wallpaper to make your screen come alive.
Applying wallpaper
5PBQQMZXBMMQBQFS
1. Tap and hold an empty area on your Home screen and select Wallpapers.
2. Tap then select a wallpaper.
3. Tap Download and then tap Apply.
4. Select to set wallpaper to Home screen, Lock screen or Home and lock screen.
Tap to view the online icon packs
Tap to select wallpaper
Tap to view the online wallpapers
Tap to add more icon packs and wallpapers to My collection
Tap to download the wallpapers or icon packs
29
Chapter 2: There’s no place like Home
Applying an animated wallpaper
5PBQQMZBOBOJNBUFEXBMMQBQFS
1. Tap and hold an empty area on your Home screen and select Wallpapers.
2. Tap then select Live Wallpaper.
3. Select an animated wallpaper, then tap Set Wallpaper.
/05& :PVDBOBMTPTFUVQZPVSXBMMQBQFSTFUUJOHTGSPN > Settings > Display > Wallpaper.
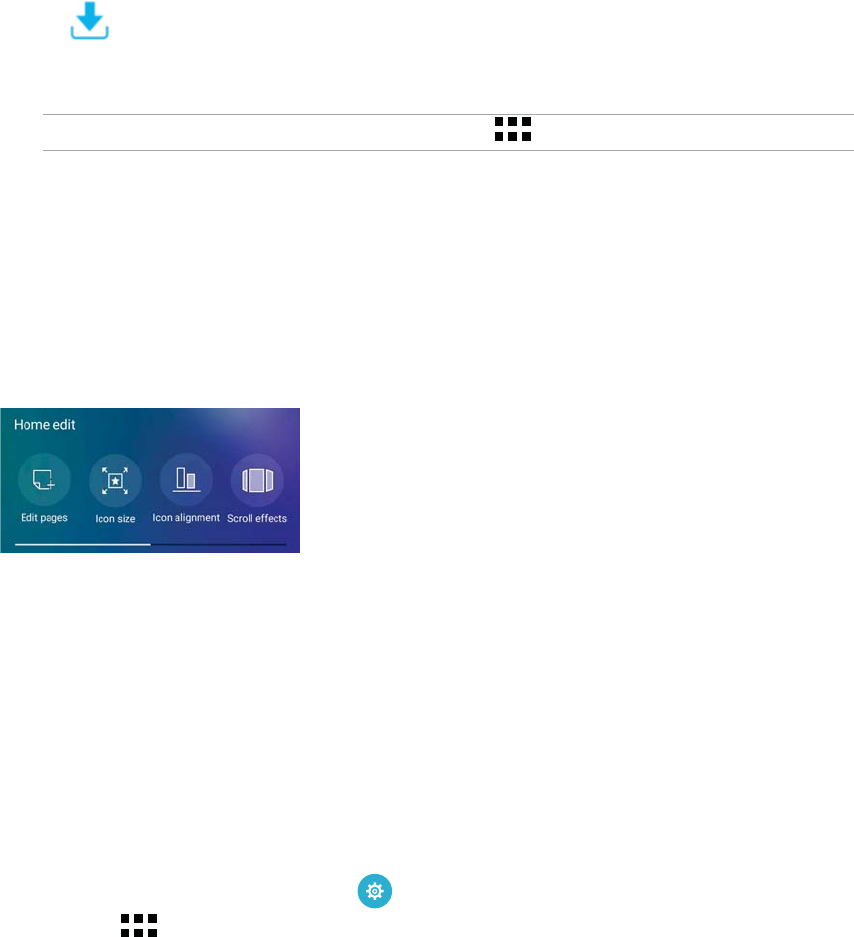
Editing your Home screen
You can extend your Home screen, select a scroll effect, change the icon and font, adjust the size
and color of the icon and font, and align the icons to the top or bottom of your screen.
1. Tap and hold an empty area on your Home screen and select Home edit.
2. Tap a feature to edit your Home screen.
Easy Mode
Navigate your ASUS Phone better with Easy Mode, an intuitive interface with large icons, buttons,
and font size for better readability and easier user experience. You can also quickly do your core
tasks such as making calls, sending messages, and more in Easy Mode.
Enabling Easy Mode
5PFOBCMF&BTZ.PEF
-BVODIUIF4FUUJOHTTDSFFOCZEPJOHBOZPGUIFGPMMPXJOH
tLaunch Quick settings then tap .
tTap > Settings.
2. Scroll down the Settings screen and select Easy Mode.
3. Slide Easy Mode to ON.

30
Chapter 2: There’s no place like Home
Adding shortcuts
In Easy Mode, you can add up to thirty-six (36) app shortcuts on the Home screen.
1. Swipe to the right of the Home screen, then tap .
2. From the All apps screen, select the app that you want to add to the list.
Removing shortcuts
%PUIFGPMMPXJOH
1. Tap .
2. Select the app or apps that you want to remove from the list, then tap Delete.

31
Chapter 2: There’s no place like Home
Adding contacts
In Easy Mode, you can add your frequently contacts on the Home screen.
1. Swipe to the left of the Home screen, then tap .
2. From the Contacts screen, select the contact that you want to add to the list.
Removing contacts
%PUIFGPMMPXJOH
1. Swipe to the left of the Home screen, then tap Edit contacts.
2. Select the contact or contacts that you want to remove from the list, then tap Delete.
Disabling Easy Mode
5PEJTBCMF&BTZ.PEF
1. Swipe down from the top of your screen then tap .
2. Select Easy Mode from the Settings screen.
3. Slide Easy Mode to OFF.

32
Chapter 2: There’s no place like Home
Setting up the date and time
By default, the date and time displayed on your Home screen automatically syncs with your mobile
provider’s settings.
5PDIBOHFUIFEBUFBOEUJNFTFUUJOHT
-BVODIUIF4FUUJOHTTDSFFOCZEPJOHBOZPGUIFGPMMPXJOH
tLaunch Quick settings then tap .
tTap > Settings.
2. Scroll down the Settings screen and select Date & time.
3. Slide Automatic date & time and Automatic time zone to OFF.
4. Adjust the date and time.
5. Select the time zone and manually set the date and time.
6. You can opt to use the 24-hour format, if you prefer.
NOTE: See also Clock.
Setting up your ringtone and alert sounds
Set up the sound for your phone ringtone, notifications such as text messages, emails, and event
alerts. You can also choose to enable or disable the dial pad touch tones, touch sounds, screen lock
sound, or you can choose to have your ASUS Phone vibrate when you tap on it.
5PTFUVQUIFTPVOETFUUJOHT
-BVODIUIF4FUUJOHTTDSFFOCZEPJOHBOZPGUIFGPMMPXJOH
tLaunch Quick settings then tap .
tTap > Settings.
2. Scroll down the Settings screen and select Sound & Vibration.
3. Set up your preferred sound settings.

33
Chapter 2: There’s no place like Home
Lock Screen
By default, the lock screen appears after turning on your device and while waking it up from sleep
mode. From the lock screen, you can proceed to your device’s Android® system by swiping on your
touch screen panel.
Your device’s lock screen can also be customized to regulate access to your mobile data and apps.
Customizing your lock screen
If you want to change your lock screen settings from the default Swipe option, refer to the
GPMMPXJOHTUFQT
1. Launch Quick settings then tap .
2. Scroll down the Settings screen and select Lock screen.
3. In the next screen, tap Screen lock.
4. Tap the screen lock option you would like to use.
NOTE: For more details, see Securing your ASUS Phone.
34
Chapter 2: There’s no place like Home
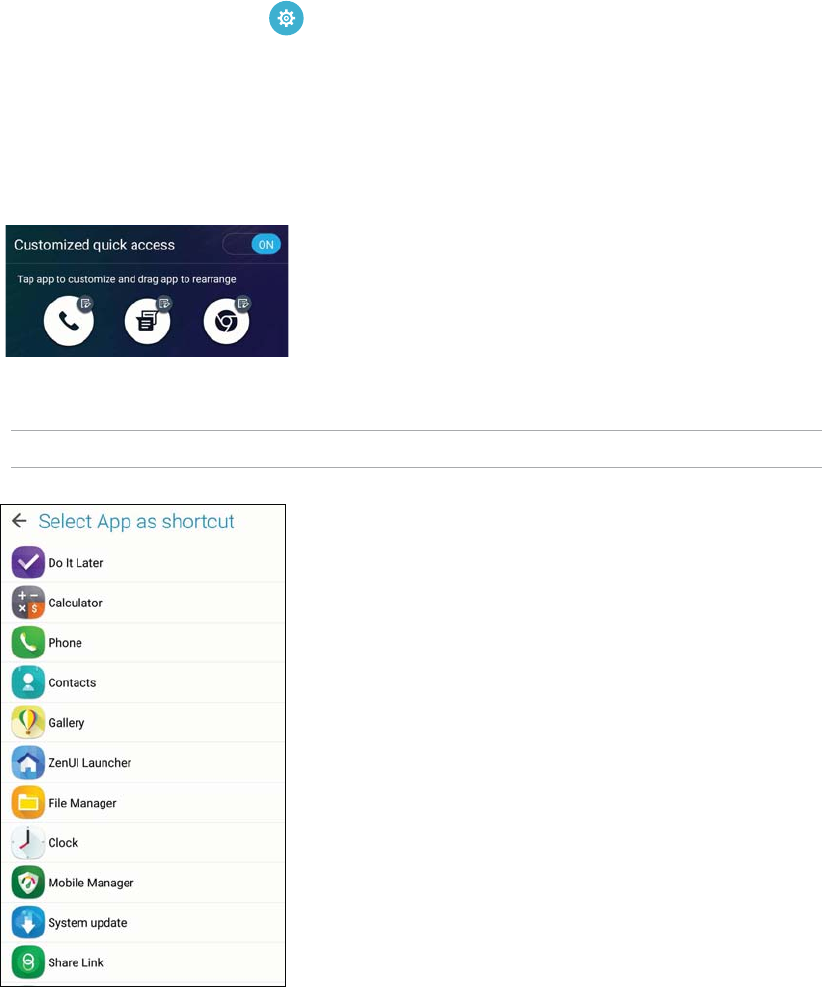
Customizing the quick access buttons
#ZEFGBVMUZPVSMPDLTDSFFOJODMVEFTRVJDLBDDFTTCVUUPOTGPSUIFTFBQQT1IPOF.FTTFOHFSBOE
Camera. Change this default settings and customize these buttons to launch other apps on the lock
TDSFFOVTJOHUIFGPMMPXJOHTUFQT
1. Launch Quick settings then tap .
2. Scroll down the Settings screen and select Lock screen.
3. Under Display, tap Quick access.
4. Select which button you would like to customize.
5. Tap the app you would like to preset on the quick access button you chose to configure.
NOTE: Scroll up or down to view the current list of apps you can preset.
35
Chapter 2: There’s no place like Home
Fingerprint ID sensor
Fingerprint ID sensor prevents others from using your ASUS phone without your permission. You
can use your fingerprint to unlock your device, access your phone calls and data. When you set up
your fingerprint ID, you also need to set up your screen lock method for device startup.
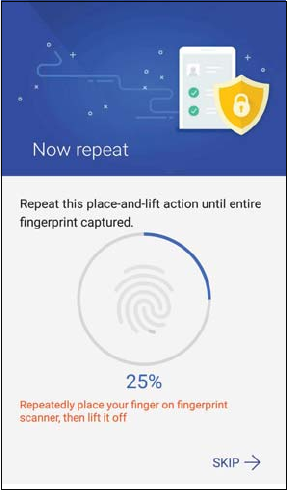
Starting your ASUS phone for the first time
5PTFUVQZPVSmOHFSQSJOU*%XIFOVTJOHZPVS"4641IPOFGPSUIFmSTUUJNF
1. Ensure that the fingerprint identification module and your finger are clean and dry.
2. From the Welcome page, follow the on-screen instructions to the Protect your phone page and
tick Set up fingerprint.
3. Click NEXT to choose a screen lock method, and then follow the instructions to the Locate
finger print scanner page, and click NEXT.
4. Find the fingerprint scanner on the rear cover of your device, adjust your finger and try to cover
different areas of your finger repeatedly until your fingerprint is captured, then click NEXT.
5. Click NEXT to complete the setup.

36
Chapter 2: There’s no place like Home
4. Tap the controls that you want to enable or disable.
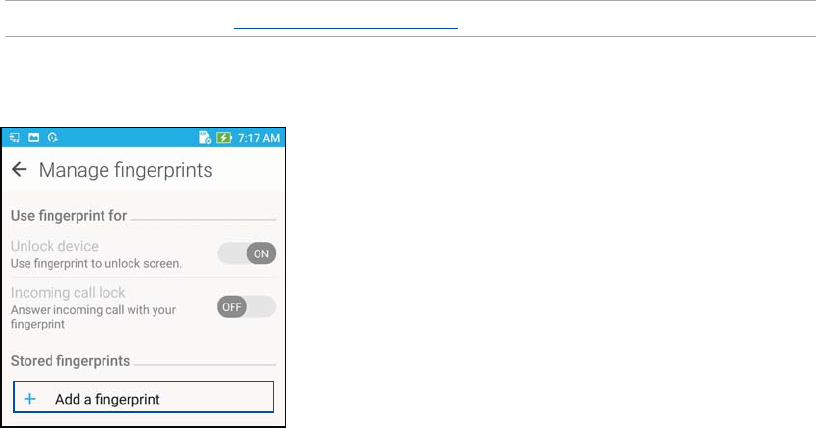
Setting up fingerprint ID from Settings
To set up your fingerprint ID from Settings
1. Ensure that the fingerprint scanner and your finger are clean and dry.
-BVODIUIF4FUUJOHTTDSFFOCZEPJOHBOZPGUIFGPMMPXJOH
tLaunch Quick settings then tap .
tTap > Settings.
3. Scroll down the Settings screen and select Fingerprint.
37
Chapter 2: There’s no place like Home
5. Tap Manage Fingerprints and select the screen lock option you would like to use, and follow
the on-screen instructions to set up the screen lock function.
NOTE: For more details, see Securing your ASUS Phone.
6. Click Add a fingerprint.
6. Click NEXT on the Locate finger print scanner page.
7. Repeatedly place-and-lift your finger on the scanner until your fingerprint is captured.
8. Click NEXT to complete the setup.
38
Chapter 3: Work hard, play harder
Work hard, play harder 3
3 Work hard, play harder
Chrome
Chrome for Android` lets you enjoy the same fast, secure and stable web browsing experience
as that on the desktop Chrome. Sign in to your Google account to sync tabs, bookmarks, and
browsing history across all your devices. If you don’t have a Google account, register for one.
NOTE: For details on creating a Google account, see Gmail.
IMPORTANT! Before doing any Internet surfing or Internet-related activities, ensure that your ASUS
Phone is connected to a Wi-Fi or mobile network. For more details, see Staying connected.
Launching Chrome
'SPNZPVS)PNFTDSFFOEPBOZPGUIFGPMMPXJOHUPMBVODI$ISPNF
t 5BQChrome.
t 5BQ > Chrome.

39
Chapter 3: Work hard, play harder
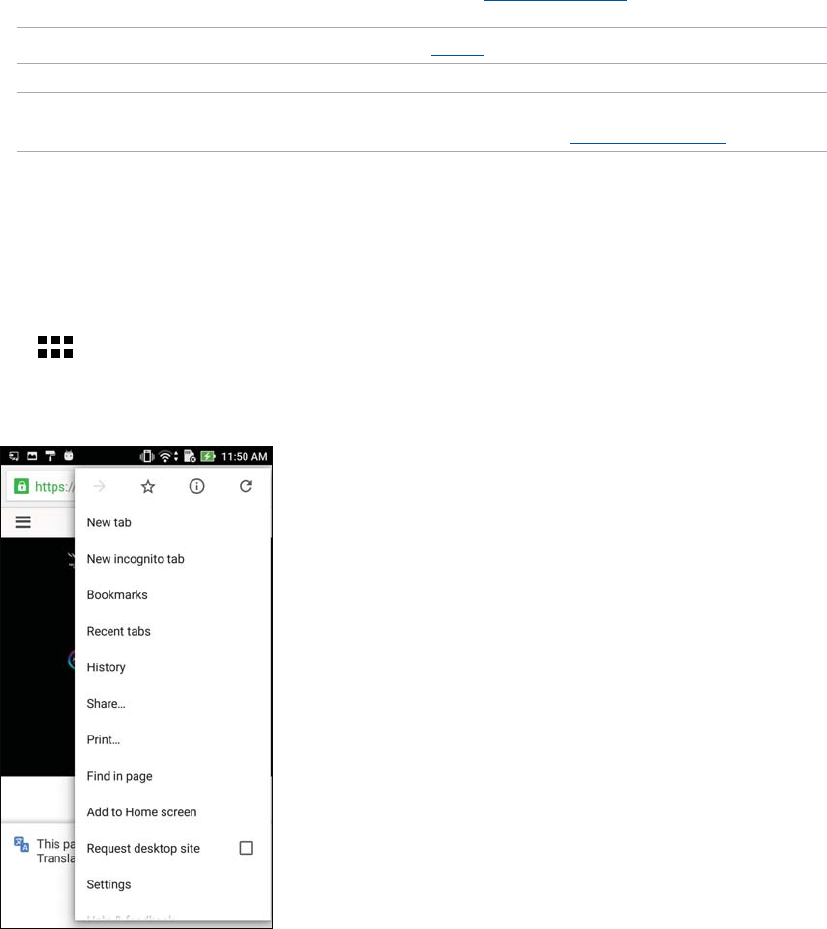
Sharing pages
Share interesting pages from your ASUS Phone to others via an email account, cloud storage
account, Bluetooth, or other ASUS Phone apps.
1. Launch Chrome.
2. From a web page, tap > Share...
3. Tap the account or app that you want to use as medium in sharing the page.
Bookmarking pages
Bookmark your favorite pages or websites so you can go back and browse them again.
5PCPPLNBSLBQBHF
From the page, tap > . To view your favorite pages, tap > Bookmarks, then select the
page you want to view or access.
Clearing the browsing data
Clear the browsing data that are temporarily stored in your ASUS Phone to improve the loading
performance of your Chrome browser. The browsing data includes browsing history, cache,
cookies/site data, saved passwords, and autofill data.
1. Launch the browser.
2. Tap > Settings > Privacy > Clear browsing data.
3. Select the browsing data that you want to delete.
4. When done, click CLEAR DATA.
40
Chapter 3: Work hard, play harder
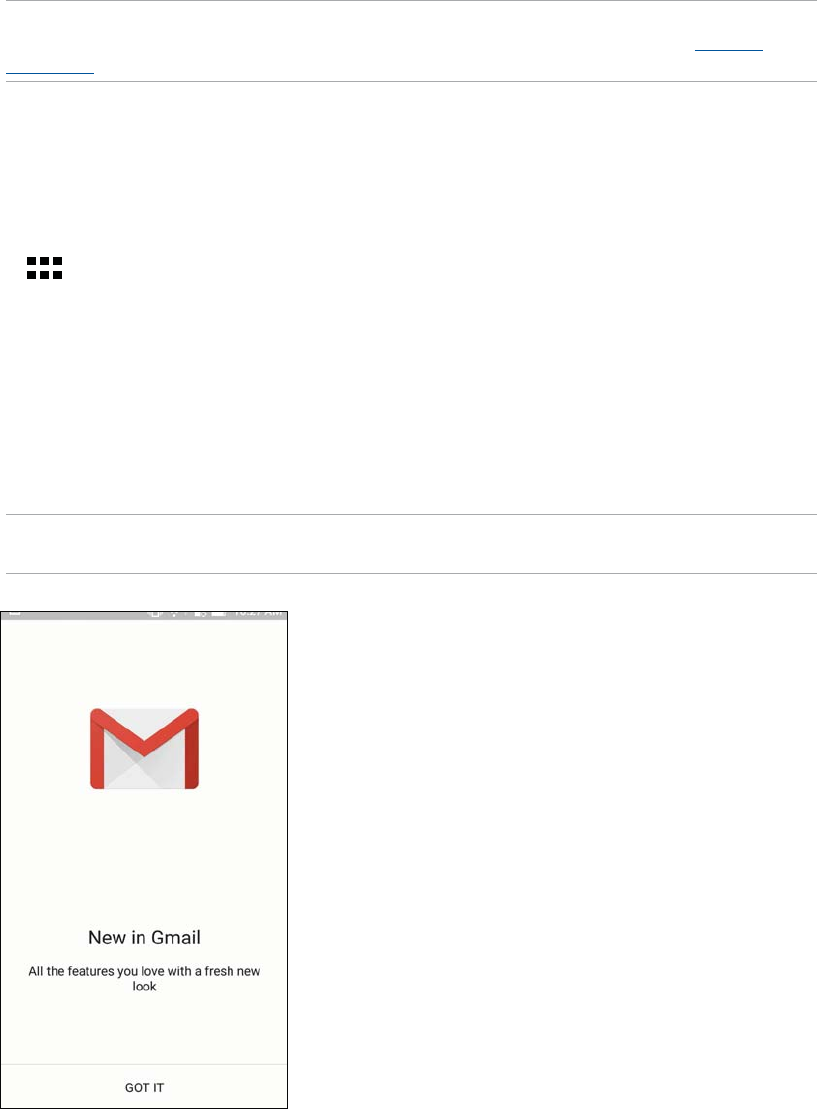
Gmail
Use Gmail to set up your Google account to get into Google-related services and apps as well as
receive, send, and browse emails right from your ASUS Phone. You can also set up other email
accounts such as Yahoo or your work email account via Gmail.
IMPORTANT! Your ASUS Phone must be connected to a Wi-Fi or mobile network so you can add
an email account or send and receive emails from added accounts. For more details, see Staying
connected.
5PTFUVQZPVS(PPHMFBDDPVOU
'SPNZPVS)PNFTDSFFOEPBOZPGUIFGPMMPXJOHUPMBVODI(NBJM
t 5BQGoogle > Gmail.
t 5BQ > Google > Gmail.
2. Tap Add an email address.
3. Select Google, then tap Next.
4. Enter your email address. To create a new Google account, tap Or create a new account.
5. Follow the next steps to sign in to your Google account.
NOTE: If you want to set up your work account on your ASUS Phone, ask for the email settings from
your network administrator.

41
Chapter 3: Work hard, play harder
Google Calendar
Bring your schedule to life and keep track of all your important events or reminders. Events that you
create or edit will automatically sync with all Google Calendar versions that you’ve logged into.
Creating events
5PDSFBUFBOFWFOU
1. From the Home screen, tap Google > Calendar.
2. Tap then tap Event.
3. Enter your event name, and select the date and time for the event. You may set the event as an
all-day or recurring event.
t "MMEBZFWFOU'SPNUIFAll day field, move the slider to the right.
t 3FDVSSJOHFWFOU5BQ , then select how often you want the event to recur or repeat.
4. To set the time zone, tap , then enter the country whose time zone you want displayed.
5. From the Add location field, enter the venue or location of the event.
6. Tap , then you may select or set the time or day to get a notification or reminder about the
event.
7. From the Invite people field, enter the email addresses of your guests to the event.
8. You may also add note or attachment from the Add note or Add attachment field.
9. Once finished, tap SAVE.
Editing or removing events
5PFEJUPSSFNPWFBOFWFOU
1. From the Home screen, tap Google > Calendar.
2. Tap the event that you want to edit or delete.
3. To edit the event, tap and make the necessary changes. To remove the event, tap >
Delete, then tap OK to confirm the deletion.

42
Chapter 3: Work hard, play harder
Creating reminders
5PDSFBUFBSFNJOEFS
1. From the Home screen, Google > Calendar.
2. Tap then tap Reminder.
3. Enter your reminder name and tap DONE.
4. Set the date and time for the reminder. You may set the reminder as an all-day or recurring
reminder.
t "MMEBZSFNJOEFS'SPNUIFAll day field, move the slider to the right.
t 3FDVSSJOHSFNJOEFS5BQ , then select how often you want the reminder to recur or
repeat.
4. Once finished, tap SAVE.
Editing or removing reminders
5PFEJUPSSFNPWFBSFNJOEFS
1. Tap Google > Calendar.
2. Tap the reminder that you want to edit or delete.
3. To edit the reminder, tap and make the necessary changes. To remove the reminder, tap
> Delete, then tap OK to confirm the deletion.
43
Chapter 3: Work hard, play harder
Do It Later
Get hold of even the most trivial things in your busy life. Even when you’re too busy, reply to your
emails or add other important to-do tasks at your convenience.
NOTES:
t 1PQVMBSUIJSEQBSUZBQQTUIBUTVQQPSU%P*U-BUFS include Google Maps, Google Play, YouTube, and
iMDb.
t /PUBMMBQQTDBOTIBSFBOEBEEUBTLTUP%P*U-BUFS
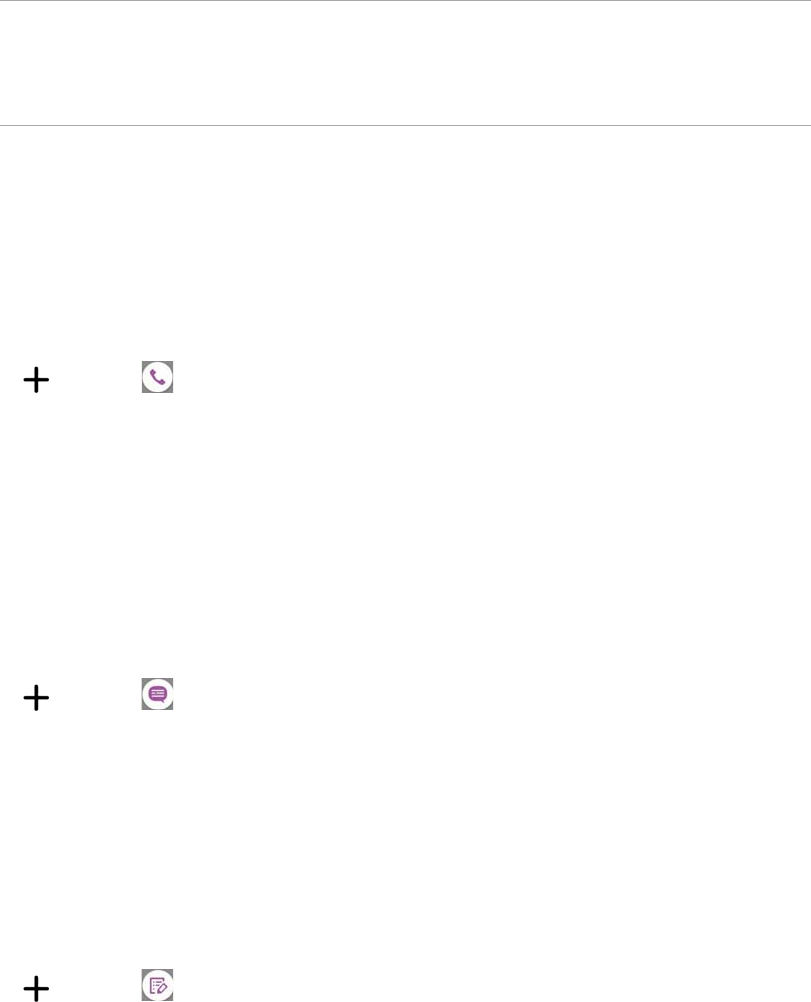
Calling later
You can set a task to call someone at your convenient time from the Do It Later.
5PDBMMMBUFS
1. From the Home screen, tap ASUS > Do It Later.
2. Tap then tap .
3. Find the contact that you want to call later.
Messaging later
You can set a task to send a text message at a later time from Do It Later.
5PTFOEBUFYUNFTTBHFMBUFS
1. From the Home screen, tap ASUS > Do It Later.
2. Tap then tap .
3. Find the contact that you want to send a text message later.
Adding to-do tasks
Create important to-do tasks to organize your work or social activities in your professional or social
life.
1. From the Home screen, tap ASUS > Do It Later.
2. Tap then tap .
3. Fill in the necessary information. If you want to set the importance level, select High in the
Importance field.
4. When you’re done, tap Done.
44
Chapter 3: Work hard, play harder
Deleting to-do tasks
You can delete any completed, overdue, or unnecessary to-do tasks from the Do It Later app.
1. From the Home screen, tap ASUS > Do It Later.
2. Tap and hold the task you want to remove from the list.
3. Tap and tap OK to confirm the deletion.
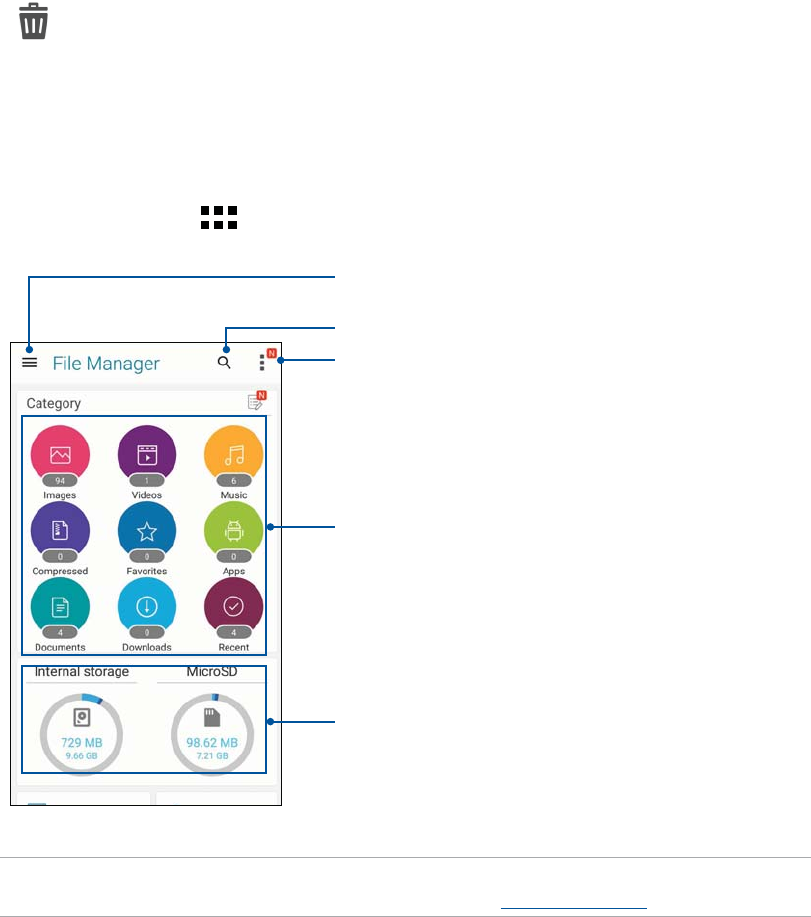
File Manager
Using File Manager allows you to easily locate and manage your data on the internal storage of
your ASUS Phone and its connected external storage devices.
To launch File Manager, tap > File Manager.
IMPORTANT! Before accessing files saved on the network and cloud storage, ensure that Wi-Fi or
mobile network is enabled on your ASUS Phone. For details, see Staying connected.
Tap to display the files under the category
Displays the usage of the internal and external storage
Tap to search for a file
Tap to access the internal, external, network,
and cloud storage
Tap to clear search history, invite a friend, view ZenUI instant
updates, and more

45
Chapter 3: Work hard, play harder
The Cloud
Back up your data, sync files among different devices, and share files securely and privately via a
Cloud account such as ASUS WebStorage, Drive, OneDrive, and Dropbox.
ASUS WebStorage
Register for or sign in to ASUS WebStorage and get free cloud storage. Automatically upload newly
captured photos for instant sharing, sync files among different devices, or share files via your ASUS
WebStorage account.
IMPORTANT! Ensure that Wi-Fi or mobile network is enabled on your ASUS Phone. For details, see
Staying connected.

46
Chapter 3: Work hard, play harder
ZenFone Care
Find answers from FAQs (Frequently Asked Questions) or directly interact with other Zen UI users to
find and share solutions about ZenUI 3.0 apps.
5PBDDFTT;FO'POF$BSF
1. Tap > ZenFone Care
2. Tap ZenUI FAQs, then select the app that you want to find answers for.
47
Chapter 4: Keeping in touch
Keeping in touch 4
4 Keeping in touch
Call in style
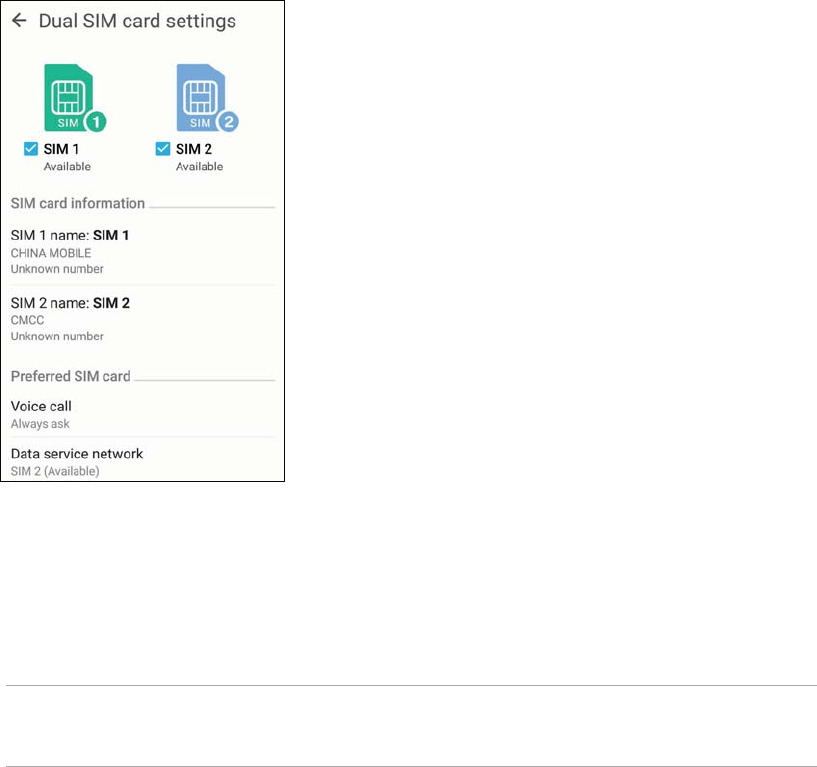
Dual SIM feature
The dual SIM feature of your ASUS Phone lets you manage the settings of the installed Micro SIM
and Nano SIM cards. With this feature, you can enable/disable the Micro SIM and Nano SIM cards,
assign SIM names, or set one as a preferred network.
Renaming your Micro SIM and Nano SIM cards
Change the names of your Micro SIM and Nano SIM cards on your ASUS Phone so that you can
identify them easily.
To change the names of your Micro SIM and Nano SIM cards, tap SIM1 name: SIM1 or SIM2 name:
SIM2 then key in the names for your Micro SIM and Nano SIM cards.
NOTE: If your SIMs have different mobile service providers, we recommend you to use the names
of these providers for your SIM names. If both SIMs have the same mobile service provider, we
recommend you to use the mobile numbers for your SIM names.
48
Chapter 4: Keeping in touch
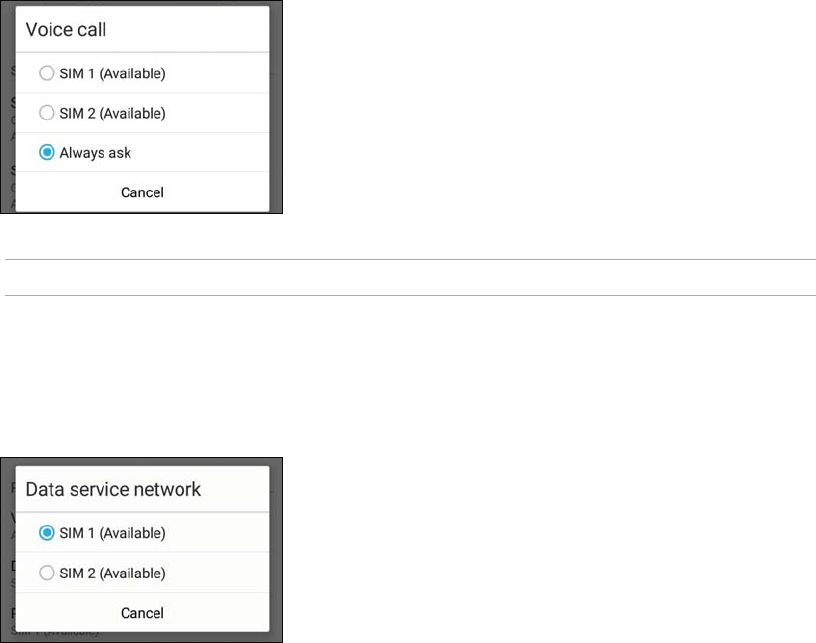
Assigning a preferred SIM card
Assign a SIM card as your preferred SIM for voice calls and data services.
SIM card for voice calls
When you make a call, your ASUS Phone automatically uses the preferred SIM card to connect the
call.
To assign a SIM card for voice calls, tap Voice call then tap the SIM that you want to use.
IMPORTANT! You can only use this feature if you make a call from your contacts list.
SIM card for data service
To assign a SIM card for data service, tap Data service network then select from SIM1 or SIM2.

49
Chapter 4: Keeping in touch
Making calls
Your ASUS Phone offers you many ways to make a call. Call your friends from your contacts list,
smart dial to quickly place a call, or enter a speed-dial number to call your frequently-called
contact.
NOTE: Organize your contacts in the Contacts app. For details, see Managing contacts.
Launching the Phone app
'SPNZPVS)PNFTDSFFOEPBOZPGUIFGPMMPXJOHUPMBVODIUIF1IPOFBQQ
t 5BQ .
t 5BQ > Phone.
Dialing a phone number
Use the Phone app to directly dial a phone number.
1. From your Home screen, tap > Contacts then tap the number keys.
2. Select from call buttons SIM1 or SIM2 to dial the number.
NOTE: The labels of the call buttons may vary depending on the setting that you made to your SIM
cards. For more details, see Dual SIM feature.
Dialing an extension number
When you need to call an extension number, you can do any of these steps to skip the voice
prompts.
Prompting for confirmation of an extension number
You can insert a confirmation prompt for the extension number after dialing the main number.
1. From the Phone app, enter the main number.
2. To insert a confirmation prompt, tap and hold # until a semi-colon (;) appears.
3. Select from call buttons SIM1 or SIM2 to make the call.
4. When prompted, tap Yes to confirm the extension number.
5. Tap to end the call.

50
Chapter 4: Keeping in touch
Auto-dialing an extension number
You can insert a short or long pause after dialing the main number, then the extension number is
dialed automatically.
1. From the Phone app, enter the main number.
2. To insert a pause, tap and hold * until a comma (,) appears.
3. Enter the extension number.
4. Select from call buttons SIM1 or SIM2 to place the call.
5. Tap to end the call.
Smart dialing your contacts
As you enter the first few numbers or letters of your contact’s name, Smart Dial filters through your
contacts list or call logs and provide you with possible matches. You can check if the contact you’re
trying to reach is on the list of possible matches, then you can quickly place that call.
1. Launch the Phone app then enter the number or name of the contact.
2. From the list of possible matches, tap the contact you wish to call. If the contact is not on list,
enter the complete number or name of the contact.
3. Select from call buttons SIM1 or SIM2 to make the call.
NOTE: The labels of the call buttons may vary depending on the setting that you made to your SIM
cards. For more details, see also Dual SIM feature.
Calling from Contacts app
Use the Contacts app to make a call from your contacts list.
1. Launch the Contacts app.
2. Tap the contact name then tap the number that you wish to dial.
3. If there are two SIM cards installed, tap the SIM card from which you want to make the call.
4. Tap to end the call.
NOTE: To view all contacts from all contact accounts, tap Contacts to display dropdown list then tick
all accounts.

51
Chapter 4: Keeping in touch
Calling your favorite contacts
When you add a contact to your Favorites list, you can quickly call the contact from the Phone app.
1. Launch the Contacts app.
2. Tap to display your Favorites list, then tap your favorite contact whom you want to call.
3. Tap to end the call.
Receiving calls
The touch screen of your ASUS Phone lights up when there is an incoming call. The display of the
incoming call also varies, depending on the status of your ASUS Phone.
Answering calls
5IFSFBSFUXPXBZTUPBOTXFSBDBMMEFQFOEJOHPOUIFTUBUVTPGZPVS"4641IPOF
t *GZPVSEFWJDFJTBDUJWFUBQAnswer or to reject a call, tap Dismiss.
t *GZPVSEFWJDFJTMPDLFEESBH to to answer or to to reject the call.
Managing your call logs
From your call logs, you can call back your missed calls, save calls to your contacts list, or redial your
recently-called number or contact.
Saving calls to Contacts
You can add a call/number from your call logs to your contacts list.
1. From the Phone app, tap to display your call logs.
2. Tap the number that you want to add to your contacts list.
3. Tap beside the number.
4. Tap Create new contact to add a new entry to your contacts list.
Tap Add to existing contact, select a contact, then tap OK if you want to overwrite the contact’s
number with this new one.
52
Chapter 4: Keeping in touch
Redialing your last-called number
ToSFEJBMZPVSMBTUDBMMFEOVNCFS
1. From the Phone app, tap to display your call logs.
2. Tap Call to display your last-called number, then tap Call again to redial the number.
3. Tap to end the call.
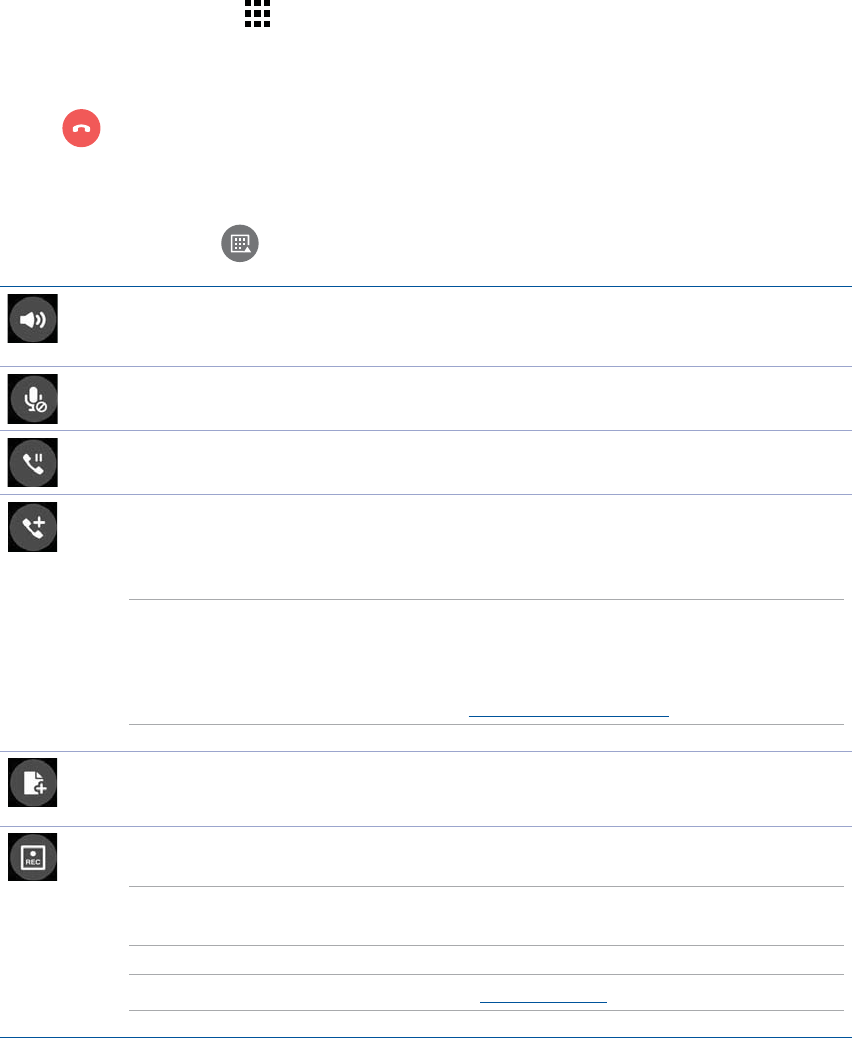
Other call options
During an active call, tap and tap any of the possible call options for when a call is in progress.
Microphone
Turns the microphone for the active call on or off. When the microphone is off or in
mute mode, you can hear the caller but the caller can’t hear you.
Speakerphone
Turns the speakerphone on or off.
Call on hold
Puts an active call on hold.
Conference call
When you have subscribed to a conference call service with your mobile service
provider, this icon allows you to add a contact or contacts in an active call.
NOTES:
t 5IFOVNCFSPGQBSUJDJQBOUTJOUIFDPOGFSFODFDBMMEFQFOEPOZPVSDPOGFSFODFDBMM
subscription. You can inquire from your mobile service provider about this service.
t 'PSNPSFEFUBJMTPODPOGFSFODFDBMMTFFManaging multiple calls.
SuperNote
Launches the SuperNote app, letting you take down notes during an active call.
Record
Records an active call.
IMPORTANT! Before recording an active call, it is dictated by most local laws to ask
permission from the other person or persons on the other line.
NOTE: For more details, refer to the section Recording calls.

53
Chapter 4: Keeping in touch
Managing multiple calls
Your ASUS Phone provides you the convenience of making or taking two calls.
Answering another call
While you are talking on your ASUS Phone, you can hear a beeping sound, indicating of another
incoming call. Tap Answer on the touch screen to receive an incoming call while on an active call.
Recording calls
Your ASUS Phone allows you to record a conversation for future reference or information.
1. Call a contact or dial a number.
2. Tap to record the call.
IMPORTANT! Before recording a call, ensure that you ask for permission from the other party or
parties.
3. To stop recording, tap . This icon appears on the system notification bar.
4. Swipe down from the top of the screen, then tap Call recording saved notification to view the
recorded conversation.

54
Chapter 4: Keeping in touch
Managing contacts
Organize your contacts and easily stay in touch with them via calls, SMS messages, emails, or social
networks. Group your contacts as Favorites to quickly get in touch with them, or group them as
VIPs to get notified about any upcoming events, missed calls, or unread messages.
You can also sync your contacts with your email or social network accounts, link contacts’ info for
easy access in one place, or filter the contacts you want to keep in touch with.
To launch the Contacts app, tap > Contacts.
Contacts Settings
Select how you would want to display your contacts from the Contacts settings. Such display
options include displaying only those contacts with phones, sorting list by first/last name, or
viewing contact names as first/last names first. You can also choose which of these tabs to display
POZPVS$POUBDUTTDSFFOFavorites, Groups, VIP, and Blocked calls.
To set up your Contacts settings, tap > Settings from the Contacts app.
Setting up your profile
Make your ASUS Phone truly your own and set up your profile info.
1. Launch the Contacts app then tap Set up my profile or ME.
NOTE: ME appears when you’ve set up your Google account on your ASUS Phone.
2. Fill in your info such as mobile or home number. To add other info, tap Add another field.
3. When you’ve completed your info, tap Done.

55
Chapter 4: Keeping in touch
Adding contacts
Add contacts to your device, corporate, Google, or other email accounts and fill in more important
contact information such as contact numbers, email addresses, special events for VIPs, and more.
1. Launch the Contacts app then tap .
2. Select Device.
NOTES:
t :PVDBOBMTPTBWFUIFDPOUBDUUPZPVS4*.DBSEPSBOFNBJMBDDPVOU
t *GZPVEPOhUIBWFBOFNBJMBDDPVOUUBQAdd account then create one.
3. Fill in the neccessary information such as mobile or home number, email address, or group
where you want to put the contact in.
4. After filling in the information and you want to add more contact numbers or email addresses,
tap Add new.
5. If you want to add other contact information, tap Add another field.
6. When you’ve completed the info, tap Done.
Adding an extension number to a contact number
You can add a contact’s extension number to skip the voice prompts when making a call.
1. In the contact’s information screen, enter the contact’s main number and extension number in
FJUIFSPGUIFTFUXPXBZT
tInsert a comma (,) after the main number, then enter the contact’s extension number.
There’ll be a short pause before the extension number is dialed automatically. To extend
the pause, tap Pause to insert another comma.
tInsert a semi-colon (;) after the main number, then enter the contact’s extension number.
When dialing the contact number, you’ll be prompted to confirm the extension number.
Tap Yes on the confirmation message.
2. When you’ve completed the info, tap Done.

56
Chapter 4: Keeping in touch
Customizing your contact’s profile
Edit your contact’s info, add a photo, set a ringtone, or take a photo as a cover for your contact’s
profile.
1. Launch the Contacts app then select the contact whose info or profile you want to edit or
customize.
2. Make the changes from the contact’s profile page.
Tap to add your contact’s photo from Gallery or by capturing a
photo
Tap to edit your contact’s info
Tap to add your contact’s profile cover from Gallery or by
capturing a photo
You can display a Facebook profile cover as the theme cover for a
Facebook contact
Setting up your VIPs
Group your contacts as VIPs to get notified about upcoming anniversaries, birthdays, and other
important events. You’ll also get alerts about any unread messages or emails, or any missed calls
from your VIPs.
Setting up your VIP from the contact’s info screen
5PTFUVQZPVS7*1GSPNUIFDPOUBDUTJOGPTDSFFO
1. Launch the Contacts app then tap the contact you want to set up as a VIP.
2. Tap to display the contact’s info screen.
3. In your selected contact’s screen, select VIP under the Group field.
4. When finished, tap Done. The contact is added to your VIP list.

57
Chapter 4: Keeping in touch
Setting up your VIP from the VIP screen
5PTFUVQZPVS7*1GSPNUIF7*1TDSFFO
1. Launch the Contacts app.
2. Tap > VIP.
3. In the VIP screen, tap .
4. Select the contact or contacts you want to group as VIPs, then tap Add. The contact or contacts
are added to your VIP list.
Adding an event to a VIP contact
You can add an event to a VIP contact such as anniversary, birthday, and other important events.
1. Launch the Contacts app, tap the contact you want to add an event detail to, then tap .
2. In the contact’s info screen, tap Add another field > Events.
3. Select the date for the event, then tap Set.
4. Ensure that you select VIP under the Group field. When finished, tap Done.
5. The contact’s special event will appear in your calendar of events. If you want to get an event
alert, set the reminder time in the Calendar app.
58
Chapter 4: Keeping in touch
Marking your favorite contacts
Set your frequently-called contacts as your favorites to be able to call them quickly from the Phone
app.
1. From the Home screen, tap > Contacts.
2. Select the contact that you want to mark as a favorite.
3. Tap . The contact is added to your Favorites List in the Phone app.
NOTES:
t 5PWJFXZPVS'BWPSJUFTMJTUUBQ from the Home screen, then tap .
t 'PSNPSFEFUBJMTSFGFSUPUIFTFDUJPOCalling your favorite contacts.
t :PVDBOBMTPTFUBGBWPSJUFDPOUBDUBTB7*1'PSNPSFEFUBJMTSFGFSUPUIFTFDUJPOSetting up your
VIPs.
Importing contacts
Import your contacts and their respective data from one contact source to your ASUS Phone, email
account, or a SIM card.
1. Tap > Contacts then tap > Manage contacts.
2. Tap Import/export UIFOTFMFDUGSPNUIFGPMMPXJOHJNQPSUJOHPQUJPOT
a. Import from SIM 1 card/Import from SIM 2 card
b. Import from storage
4FMFDUGSPNUIFGPMMPXJOHBDDPVOUTUPTBWFUIFDPOUBDU
a. Device
b. SIM1/SIM2
4. Tick to select the contacts that you wish to import and when done, tap Import.

59
Chapter 4: Keeping in touch
Exporting contacts
Export your contacts to any of the storage accounts in your ASUS Phone.
1. Tap > Contacts then tap > Manage contacts.
2. Tap Import/export UIFOTFMFDUGSPNUIFGPMMPXJOHFYQPSUJOHPQUJPOT
a. Export to SIM 1 card/Export to SIM 2 card
b. Export to storage
5BQUPTFMFDUUIFDPOUBDUTGSPNUIFGPMMPXJOHBDDPVOUT
a. All contacts
b. Device
c. SIM1/SIM2
4. Tick the contacts that you want to export.
5. When done, tap Export.
Managing your block list
Blocking contacts or numbers
Create your list of blocked contacts or numbers to avoid receiving any unwanted calls or messages.
Your blocked calls and messages will be saved to the Block List archive.
1. Tap > Contacts then tap > Manage contacts > Block list.
2. Tap UIFOEPBOZPGUIFGPMMPXJOH
tTo block a contact, tap Choose from contacts, then select the contact you want to block
from your contacts list.
tTo block a number from the recent call logs, tap Choose from recent call logs, then
select the contact you want to block from your contacts list.
tTo block a number, tap Enter a number then enter the number that you want to block.
tTo block a SIP number, tap Enter a SIP number then enter the number that you want to
block.
3. When done, tap Ok.
60
Chapter 4: Keeping in touch
Unblocking contacts or numbers
You may remove a blocked contact or number from your list and receive calls or messages from the
contact or number again.
1. Tap > Contacts then tap > Manage contacts > Block list.
2. Tap and hold on the contact or number that you want to unblock then tap Remove from block
list.
Social networking with your contacts
Integrating the social network accounts of your contacts makes it easier for you to view their
profiles, news, and social feeds. Stay updated with the activities of your contacts in real time.
IMPORTANT! Before you can integrate social network accounts of your contacts, you need to log in to
your social network account and sync its settings.
Syncing your social network account
Sync your social network account to add the social network accounts of your contacts to your ASUS
Phone.
%PBOZPGUIFGPMMPXJOHUPMBVODIUIF4FUUJOHTBQQ
tLaunch Quick settings then tap .
tTap > Settings.
2. From the Settings screen, tap your social network account under Accounts section.
3. Slide Contacts to ON to sync the social network accounts of your contacts.
4. Launch the Contacts app to view your contacts list.
5. To view only your contacts with social network accounts, tap Contacts to display then untick
the other contact sources, leaving the social network name checked.
6. When done, tap
.

61
Chapter 4: Keeping in touch
Send messages and more
Google Messenger
Google Messenger, an intuitive and delightful app, lets you send/receive SMS/MMS messages,
as well as send group texts, photos, or audio messages. You can add emojis or stickers to your
messages, share your location, archive your messages, and easily block SMS senders. You can also
take photos or record videos and easily share these files.
Sending messages
1. From the Home screen, tap
2. Tap , tap FREQUENTS or ALL CONTACTS, then select the contact you want to send a
message to.
3. Start composing your message in the message field.
4. When you’re done, select the SIM account where you’re going to send your message from.
Replying to messages
1. Tap your message alert from your Home screen or Lock screen.
2. Start composing your reply in the message field.
3. When you’re done, select the SIM account where you’re going to send your reply from.
62
Chapter 5: Fun and entertainment
Fun and entertainment 5
5 Fun and entertainment
Using a headset
Have the freedom to do other things while you’re in a call or enjoy listening to your favorite music,
using a headset.
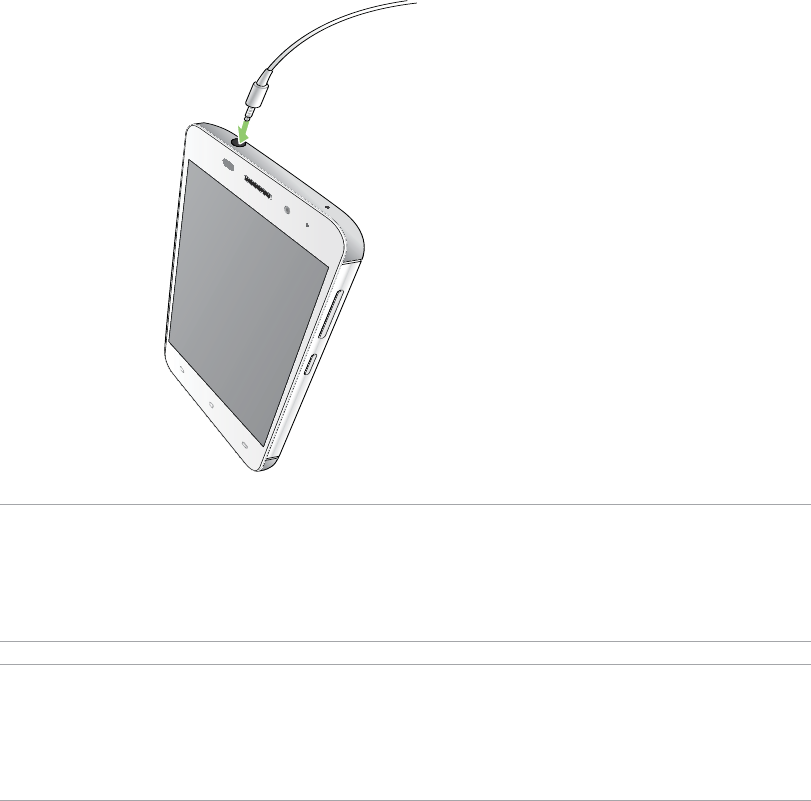
Connecting the audio jack
Insert the 3.5mm headset jack into the audio port of your device.
WARNING!
t %POPUJOTFSUPUIFSPCKFDUTJOUPUIFBVEJPKBDLQPSU
t %POPUJOTFSUBDBCMFXJUIFMFDUSJDQPXFSPVUQVUJOUPUIFBVEJPKBDLQPSU
t -JTUFOJOHBUBIJHIWPMVNFGPSMPOHQFSJPETDBOEBNBHFZPVSIFBSJOH
NOTES:
t 8FIJHIMZSFDPNNFOEUPVTFPOMZDPNQBUJCMFIFBETFUTPSUIFCVOEMFEIFBETFUXJUIUIJTEFWJDF
t 6OQMVHHJOHUIFBVEJPKBDLXIJMFMJTUFOJOHUPNVTJDBVUPNBUJDBMMZQBVTFTUIFNVTJDQMBZFE
t 6OQMVHHJOHUIFBVEJPKBDLXIJMFXBUDIJOHBWJEFPBVUPNBUJDBMMZQBVTFTUIFWJEFPQMBZCBDL

63
Chapter 5: Fun and entertainment
Google Play Music
With Google Play Music, you can stream your favorite music, create playlists, or listen to the radio.
You can also store up to 50,000 music files to the cloud for free. You can also subscribe to Google
Play Music for unlimited and ad-free access to millions of music files that you can add to your own
music library.
Setting up your Google Play Music
Sign in to your Google or Gmail account to be able to use Google Play Music. Once you've signed
in to your acccount, all music files on your ASUS Phone, including the uploaded or purchased ones
from Google Play, are added to your library.
5PTFUVQZPVS(PPHMF1MBZ.VTJD
1. From the Home screen, Google > Play Music.
2. Tap then tap Settings > Tap to choose account.
3. Enter your account, then tap ADD ACCOUNT.
4. Follow the next instructions to sign in to your account.
NOTES:
t (PPHMF1MBZ.VTJDTVCTDSJQUJPOJTPOMZBWBJMBCMFJOTPNFDPVOUSJFTPSSFHJPO
t 'PSNPSFEFUBJMTPOVTJOH(PPHMF1MBZ.VTJDWJTJUhttps://support.google.com

64
Chapter 6: Your precious moments
Your precious moments 6
6 Your precious moments
Capture moments
Launching the Camera app
Capture images and record videos using your ASUS Phone’s Camera app. Refer to any of the steps
below to open the Camera app.
From the lock screen
Drag down until the camera app is launched.
NOTE: Before using this function , go to Settings > Lock screen > Quick access, slide Customized
quick access to ON, and tap a default app to replace with the camera app.
From the home screen
Tap
Using Camera for the first time
After launching the Camera for the first time, two consecutive features appear to help you get
TUBSUFE5VUPSJBMBOE*NBHFMPDBUJPOT
Tutorial
If it is your first time to use your ASUS Phone’s camera, you will encounter the following tutorial
screen after launching the Camera app. Refer to the following steps to proceed from this screen.
1. On the Tutorial screen, tap Skip if you want to skip viewing or Start to view the basic tutorial
about using Camera.
2. After tapping either of these options, you will then proceed to the Remember Photo Locations
screen.
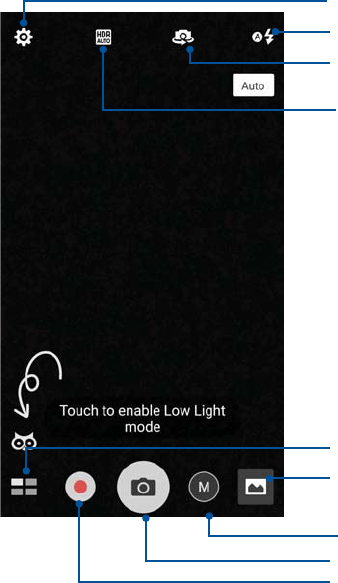
65
Chapter 6: Your precious moments
Adjust settings
Switch between the front and rear cameras
See the Gallery
Record videos
Take photos
Use advanced camera settings
Enable or disable the flash function
Photo Locations
After going through the Tutorial screen, the Remember Photo Locations screen appears to help you
create automatic location tags for your images. Refer to the following steps to proceed from this
TDSFFO
1. On the Remember Photo Locations screen, tap No thanks to proceed to the camera screen or
Yes to set up location tagging for your captured images.
2. Slide Location to ON to enable the location tagging feature.
3. Tap Agree on the next screen to fully enable the feature and proceed to the Camera screen.
Camera home screen
Your ASUS Phone’s camera is equipped with auto-scene detection and auto-image stabilizer
features. It also features a video stabilization function that helps prevent shakiness while video
recording.
Tap the icons to start using your camera and explore the image and video features of your ASUS
Phone.
Enable or disable HDR
Touch to switch between Auto mode and Manual mode

66
Chapter 6: Your precious moments
Image settings
Adjust the appearance of your captured images by configuring your camera’s settings using the
steps below.
IMPORTANT! Apply the settings first before taking images.
1. On the camera’s home screen, tap > .
2. Scroll down and configure the available options.
Image
Configure the image quality using these options.
Shoot mode
Set your shutter speed to Timer mode.
Focus & exposure
Enable Touch auto-exposure or Face detection under this option.

67
Chapter 6: Your precious moments
Video settings
Adjust the appearance of your recorded videos by configuring your camera’s settings using the
steps below.
IMPORTANT! Apply the settings first before taking images.
1. On the camera’s home screen, tap > .
2. Scroll down and configure the available options.
Image
Configure the video quality using these options.
Focus & exposure
Enable Touch auto-exposure under this option.

68
Chapter 6: Your precious moments
Advanced camera features
Explore new ways of capturing images or videos and make captured extra special moments using
the advanced camera features of your ASUS Phone.
IMPORTANT! Apply the settings first before taking images. Available features may vary per model.
Time Rewind
After selecting Time Rewind, your shutter starts taking burst shots two seconds before you
actually press the shutter button. As a result, you get a timeline of images where you can choose
the best image to save on your Gallery.
NOTE: The Time Rewind feature can only be used on the rear camera.
Capturing Time Rewind photos
1. From the Camera app’s home screen, tap > Time Rewind.
2. Tap to start capturing photos.
3. Adjust the time (in seconds) that you want your captured photo to play in reverse or rewind
mode.
4. Tap when finished.
Using the Time Rewind viewer
1. After pressing the shutter, the Time Rewind viewer appears onscreen on top of a captured
photo. Rotate the button on the viewer to browse through the photos you just took.
NOTE: Tap Best to view the best photo suggestion from the timeline.
2. Select a photo then tap Done to save it to Gallery.
Low light
Using PixelMaster, your camera’s light sensitivity is increased by up to 400% to enhance noise
reduction and boost color contrast by up to 200%. Use this mode to transform any subject into a
great photo or video with or without ample natural lighting.
Capturing Low light photos
1. From the Camera app’s home screen, tap > Low light.
2. Tap to start capturing photos.

69
Chapter 6: Your precious moments
Capturing Low light videos
1. From the Camera app’s home screen, tap > Low light.
2. Tap to start recording a video.
HDR Pro
The High-dynamic-range (HDR) feature allows you to take more detailed images for low-light
and highly contrasting scenes. HDR is recommended for use when taking images on brightly lit
locations, helping balance out the colors produced on your image.
Capturing HDR photos
1. From the Camera app’s home screen, tap > HDR.
2. Tap to start capturing HDR photos.
Panorama
Capture images from various angles using Panorama. Images captured from a wide angle
perspective are automatically stitched together using this feature.
Capturing panoramic photos
1. From the Camera app’s home screen, tap > Panorama.
2. Tap then pan your ASUS Phone to the left or right to capture the scenery.
NOTE 8IJMFQBOOJOHZPVS"4641IPOFBUJNFMJOFPGUIVNCOBJMTBQQFBSTPOUIFMPXFSQBSUPGZPVS
screen as it captures the scenery.
3. Tap when finished.
Selfie
Take advantage of your rear camera’s high megapixel specs without worrying about pressing the
shutter button. Using face-detection, you can set your ASUS Phone to detect up to four faces using
the rear camera then automatically capture your selfie or group selfie.

70
Chapter 6: Your precious moments
Capturing Selfie photos
1. From the Camera app screen, tap > Selfie.
2. Tap to choose how many people should be included in the photo.
3. Use the rear camera to detect faces and wait for your ASUS Phone to start beeping, counting
down until it captures the photo.
4. Tap to save the photo.
Depth of field
Take macro shots with a soft background using the Depth of field. This feature suits close up photos
of subjects for a more defined and dramatic result.
Capturing photos with depth of fields
1. From the Camera app screen, tap > Depth of field.
2. Tap to start capturing macro photos.
Miniature
Simulate the tilt-shift effect of DSLR lenses via the Miniature feature. Using this feature allows you
to focus on specific areas of your subject, adding a bokeh effect that can be used on both photos
and video using your ASUS Phone.
Capturing Miniature photos
1. From the Camera app screen, tap > Miniature.
2. Tap or to select your focus area, then use your two fingers to adjust the focus area’s
size and position.
3. Tap or to increase or decrease the background blur. Tap or t o increase or
decrease saturation.
4. Tap to capture Miniature photos.
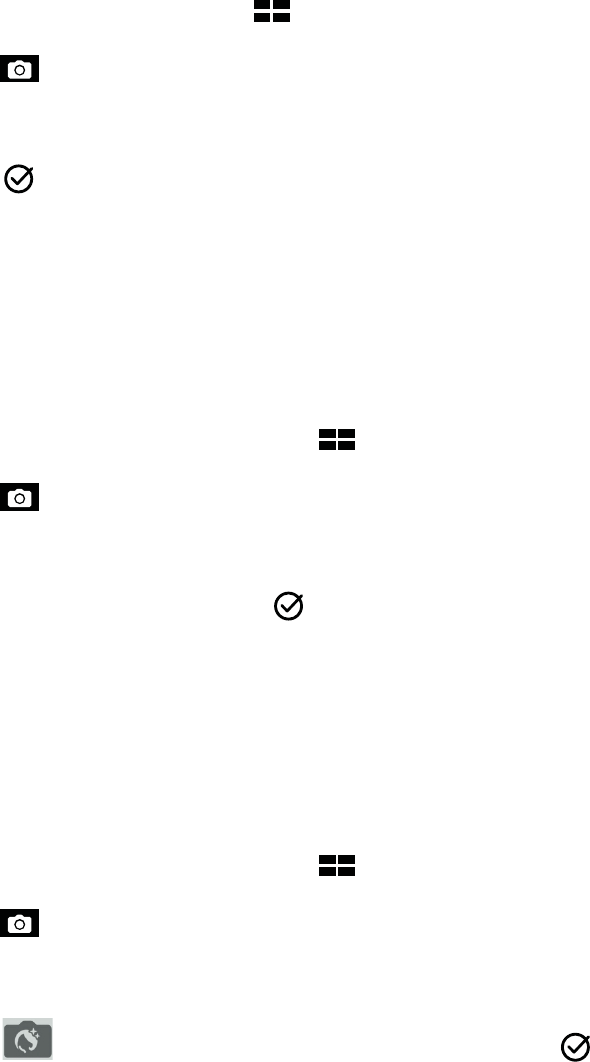
71
Chapter 6: Your precious moments
Smart remove
Eliminate unwanted details immediately after capturing the image using the Smart remove feature.
Capturing Smart remove photos
1. From the Camera app screen, tap > Smart remove.
2. Tap capturing photos that can be edited using Smart remove.
3. On the captured photo, tap the outline around the detected moving object to delete it.
4. Tap to save the photo.
All Smiles
Capture the perfect smile or the wackiest facial expression from a range of photos using the All
Smiles feature. This feature lets you take five consecutive photos after pressing the shutter button,
automatically detecting faces on the image for comparison.
Capturing All smiles photos
1. From the Camera app’s home screen, tap > All smiles.
2. Tap to start capturing photos that can be edited using All Smiles.
3. Touch the subject’s face, then select the subject’s best facial expression.
4. Swipe down from the top, then tap to save the photo.
Beautification
Have fun during and after taking photos of your family and friends using the Beautification feature
of your ASUS Phone. When enabled, this feature allows you to make live beauty enhancements on
your subject’s face before you press the shutter button.
Capturing Beautification photos
1. From the Camera app’s home screen, tap > Beautification.
2. Tap to start capturing the photo.
3. Tap the thumbnail to preview the photo and display the Beautification settings.
4. Tap and select your preferred Beautification feature, then tap to save the photo.

72
Chapter 6: Your precious moments
GIF animation
Create GIF (Graphics Interchange Format) images straight from your ASUS Phone’s camera using
the GIF animation feature.
Capturing GIF animation photos
1. From the Camera app’s home screen, tap > GIF Animation.
2. Long press to start capturing burst photo for GIF animation.
3. Make your preferred adjustments to the GIF animation settings.
4. Tap when finished.
Time lapse
The time lapse video feature of your ASUS Phone allows you to capture stills for automatic time
lapse playback. In effect, events seem to move in a fast-forward manner though they actually
occured and were recorded between long intervals.
Recording Time lapse videos
1. From the Camera app’s home screen, tap > Time lapse.
2. Tap then select the time lapse interval.
3. Tap to start taking Time lapse videos.
Night
Take well-lit photos even on night time or on low-light situations using the Night feature of your
ASUS Phone.
NOTE: Keep your hands steady while before and while the ASUS Phone is capturing the image to
prevent blurry results.
Capturing Night photos
1. From the Camera app’s home screen, tap > Night.
2. Tap to start capturing Night photos.
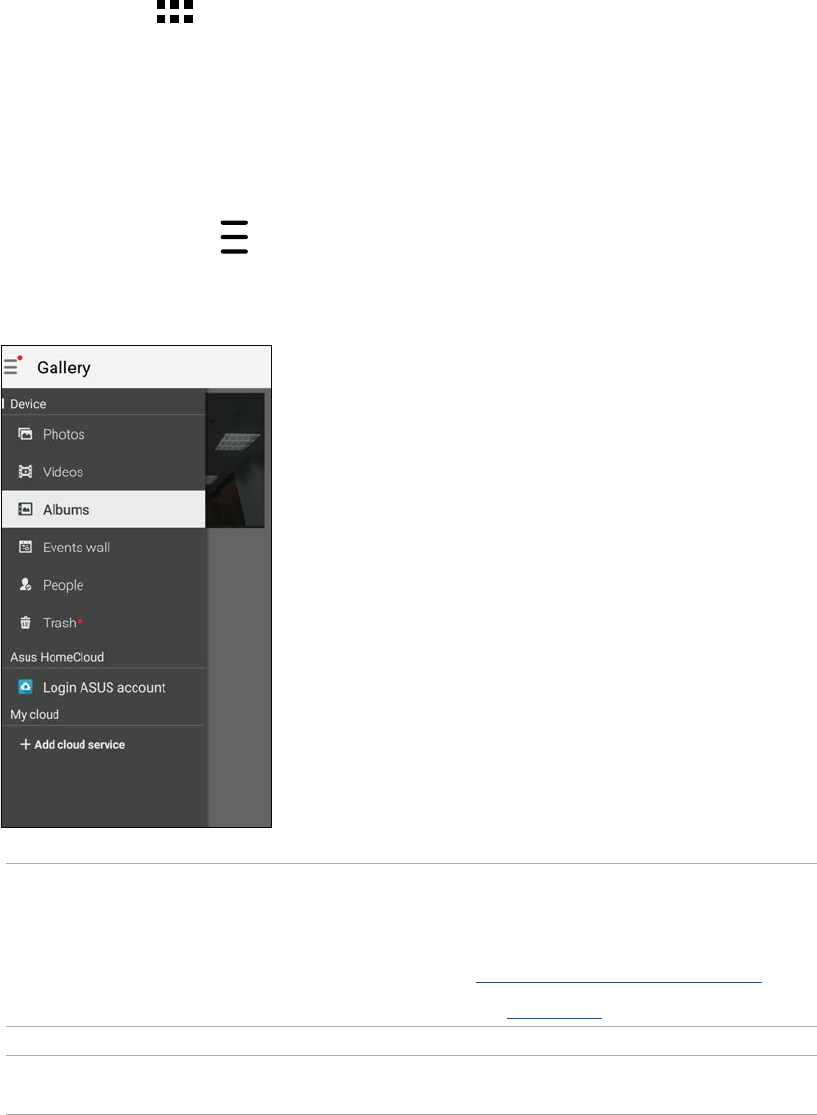
73
Chapter 6: Your precious moments
NOTES:
t :PVDBOEPXOMPBEQIPUPTUPZPVS"4641IPOFGSPNZPVSDMPVEBDDPVOUBOEVTFUIFNBTZPVS
wallpaper or a contact's cover image.
t 'PSEFUBJMTPOBEEJOHDPWFSJNBHFTUPZPVSDPOUBDUTTFFCustomizing your contact's profile.
t 'PSEFUBJMTPOVTJOHQIPUPTPSJNBHFTBTZPVSXBMMQBQFSTFFWallpapers.
IMPORTANT! Internet connection is required for viewing photos and videos under ASUS HomeCloud
and My cloud.
Using the Gallery
View images and play videos on your ASUS Phone using the Gallery app.
This app also allows you to edit, share, or delete image and video files stored in your ASUS Phone.
From Gallery, you can display images in a slideshow or tap to view the selected image or video file.
To launch Gallery, tap > Gallery.
Viewing files from your social network or cloud storage
By default, your Gallery displays all the media files on your ASUS Phone according to their album
folders.
5PWJFXUIFNFEJBmMFTGSPNPUIFSMPDBUJPOTBDDFTTJCMFWJBZPVS"4641IPOF
1. From the main screen, tap .
2. Tap any of the following source locations to view their respective media files.
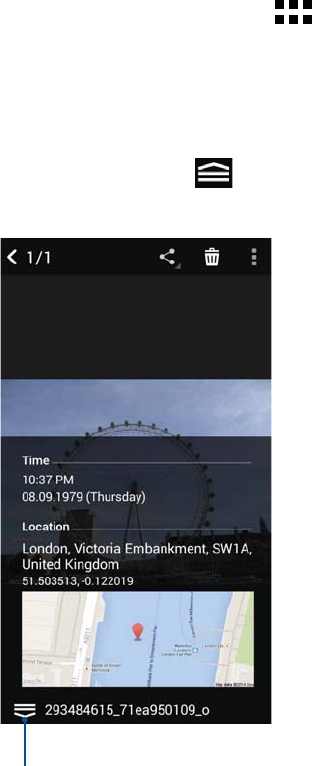
74
Chapter 6: Your precious moments
Viewing the photo location
Enable the location access on your ASUS Phone, and get the location details on your photos. Your
photos’ location details include the area where the photos are taken, as well a map of the location
via Google Map or Baidu (in China only).
5PWJFXUIFEFUBJMTPGBQIPUP
1. Turn on the location access from > Settings > Location.
2. Ensure that you have shared your location to Google Map or Baidu.
3. Launch the Gallery app, and select the photo whose photo details you want to view.
4. Tap the photo then tap .
Tap to show the photo location details

75
Chapter 6: Your precious moments
Sharing files from the Gallery
1. From the Gallery screen, tap the folder where the files you want to share are located.
2. After opening the folder, tap to activate file selection.
3. Tap the files you want to share. A check mark appears on top of the image you select.
4. Tap then select from the list where you want to share the images.
Deleting files from the Gallery
1. From the Gallery screen, tap the folder where the files you want to delete are located.
2. After opening the folder, tap to activate file selection.
3. Tap the files you want to delete. A check mark appears on top of the image you select.
4. Tap .
Editing images
The Gallery also features its own image editing tools that you can use to enhance images saved on
your ASUS Phone.
1. From the Gallery screen, tap the folder where the files are located.
2. After opening the folder, tap the image you want to edit.
3. Once the image is opened, tap it again to show its functions.
4. Tap to open the image editing toolbar.
5. Tap any of the icons on the editing toolbar to apply changes to the image.

76
Chapter 6: Your precious moments
Posting photos to your Calendar event wall
Enabling this feature in your Gallery allows you to view photos straight from your Calendar events.
This way, you can immediately group captured photos according to their specific event name.
1. After taking photos from your ASUS Phone, launch Gallery.
2. Tap > Events wall.
3. Tap Turn on in System settings in the pop-up window.
4. Tap Permissions from the App info screen.
5. Slide the switch beside Calendar to the right side to allow Gallery to access the Calendar app.
6. Tap on the upper right corner of the folder containing the photos taken during an event.
7. Select the Calendar event you would like to integrate with the photo folder.
8. The icon appears on the upper right corner of the photo folder indicating that the photos
are successfully posted on the event wall.
9. To view the event photos, open the event from the Calendar app, then tap .
IMPORTANT!
t This feature is only enabled after setting events on the Calendar. For more details on how to set
events, see Calendar.
t Only photos taken with your ASUS Phone's camera on the same date and time as a Calendar event
can use this feature.

77
Chapter 6: Your precious moments
Using MiniMovie
Turn photos into a creative slideshow using the MiniMovie feature of the Gallery. MiniMovie
contains a theme of slideshow presentations which you can immediately apply to selected photos.
5PDSFBUFB.JOJ.PWJFGSPNBQIPUPGPMEFS
1. Launch Gallery then tap to select the location of your photo folder.
2. Select the photo folder then tap > Auto MiniMovie.
3. Select the MiniMovie theme you would like to use for your photo slideshow.
Tap any of these themes
to see its preview.
4. After selecting a theme, tap to save the slideshow. You can access your saved slideshows
from ASUS > File Manager > Videos > MiniMovie.
5. You can then share the slideshow to social network sites or instant messaging apps such as
Facebook, Google Plus, or Omlet Chat.
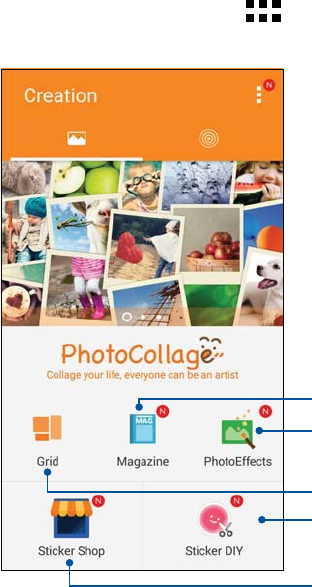
78
Chapter 6: Your precious moments
PhotoCollage
Use the PhotoCollage app to create a collage from your collection of photos.
To launch the PhotoCollage app, tap from your Home screen then tap PhotoCollage.
Tap to create collages with differents grids
Tap to use more photo effects
Tap to get more stickers
Tap to create magazine-style collages
Tap to design your own stickers

79
Chapter 7: Staying connected
Staying connected 7
7 Staying connected
Mobile network
When there’s no available Wi-Fi network that you can connect to, you can enable your mobile
network’s data access for Internet connection.
Enabling the mobile network
%PBOZPGUIFGPMMPXJOHUPMBVODIUIF4FUUJOHTTDSFFO
tLaunch Quick settings then tap .
tTap > Settings.
2. Tap More > Cellular networks.
3. Slide Data enabled to ON, and configure the other mobile network settings, if necessary.
NOTES:
t *GZPVBDDFTTUIF*OUFSOFUWJBZPVSNPCJMFOFUXPSLBEEJUJPOBMDIBSHFTXJMMCFJODVSSFEEFQFOEJOHPO
your data plan.
t 'PSNPSFEFUBJMTPOZPVSNPCJMFOFUXPSLDIBSHFTGFFTBOETFUUJOHTDPOUBDUZPVSNPCJMFTFSWJDF
provider.
Wi-Fi
The Wi-Fi technology of your ASUS Phone gets you connected to the wireless world. Update your
social media accounts, browse the Internet, or exchange data and messages wirelessly from your
ASUS Phone.
Enabling Wi-Fi
-BVODIUIF4FUUJOHTTDSFFOCZEPJOHBOZPGUIFGPMMPXJOH
tLaunch Quick settings then tap .
tTap > Settings.
2. Slide the Wi-Fi switch to the right to turn on the Wi-Fi.
NOTE: You can also enable the Wi-Fi from Quick Settings screen. Refer to section Quick Settings on
how to launch Quick Settings screen.

80
Chapter 7: Staying connected
Connecting to a Wi-Fi network
1. On the Settings screen, tap Wi-Fi to display all detected Wi-Fi networks.
2. Tap a network name to connect to it. For a secured network, you may be prompted to key in a
password or other security credentials.
NOTES:
t :PVS"4641IPOFBVUPNBUJDBMMZSFDPOOFDUTUPUIFOFUXPSLUIBUZPVDPOOFDUFEXJUIQSFWJPVTMZ
t Turn off the Wi-Fi feature when you're not using it to help save battery power.
Disabling Wi-Fi
5PEJTBCMF8J'J
-BVODIUIF4FUUJOHTTDSFFOCZEPJOHBOZPGUIFGPMMPXJOH
tLaunch Quick settings then tap .
tTap > Settings.
2. Slide the Wi-Fi switch to the left to turn off the Wi-Fi.
NOTE: You can also disable the Wi-Fi from Quick Settings screen. See Quick Settings on how to
launch Quick Settings screen.
Bluetooth®
Use the Bluetooth feature of your ASUS Phone to send or receive files and stream multimedia files
with other smart devices over short distances. With Bluetooth, you can share your media files with
your friends’ smart devices, send data for print with a Bluetooh printer, or play music files with a
Bluetooth speaker.
Enabling Bluetooth®
%PBOZPGUIFGPMMPXJOHUPMBVODIUIF4FUUJOHTTDSFFO
tLaunch Quick settings then tap .
tTap > Settings.
2. Slide the Bluetooth switch to the right to turn on the Bluetooth.
NOTE: You can also enable the Bluetooth from Quick Settings screen. See Quick Settings on how to
launch Quick Settings screen.

81
Chapter 7: Staying connected
Pairing your ASUS Phone to a Bluetooth® device
Before using the Bluetooth feature of your ASUS Phone in full scale, you have to pair it first with the
Bluetooth device. The ASUS Phone automatically stores the pairing connection of the Bluetooth
device.
1. On the Settings screen, tap Bluetooth to display all available devices.
IMPORTANT!
t *GUIFEFWJDFUIBUZPVXBOUUPQBJSJTOPUJOUIFMJTUFOTVSFUPFOBCMFJUT#MVFUPPUIGFBUVSFBOEJT
discoverable.
t 4FFUIFVTFSHVJEFUIBUDBNFXJUIZPVSEFWJDFUPMFBSOIPXUPFOBCMFJUT#MVFUPPUIBOEBOETFUJUUP
discoverable.
2. Tap > Refresh to scan for more Bluetooth devices.
3. In the list of available devices, tap the Bluetooth device that you want to pair with.
4. Ensure that the same passkey show on both devices, then tap Pair.
NOTE: Turn off the Bluetooth feature when you're not using it to help save battery power.
Unpairing your ASUS Phone from the Bluetooth® device
1. On the Settings screen, tap Bluetooth to display all available and paired devices.
2. In the list of paired devices, tap of Bluetooth device that you want to unpair, then tap
FORGET.

82
Chapter 7: Staying connected
Tethering
When Wi-Fi service is not available, you can use your ASUS Phone as a modem or turn it into a Wi-Fi
hotspot to get Internet access on your laptop, tablet, and other mobile devices.
IMPORTANT! Most mobile service providers may require a data plan for you to be able to use the
tethering function. Contact your mobile service provider about availing of this data plan.
NOTES:
t Internet access via tethering may be slower than the standard Wi-Fi or mobile connection.
t Only a limited number of mobile devices can tether to your ASUS Phone for Internet access.
t Turn off the tethering feature when you're not using it to help save battery power.
Wi-Fi Hotspot
Turn your ASUS Phone into a Wi-Fi Hotspot to share Internet connection with other devices.
%PBOZPGUIFGPMMPXJOHUPMBVODIUIF4FUUJOHTTDSFFO
tLaunch Quick settings then tap .
tTap > Settings.
2. Tap More > Tethering > Set up Wi-Fi hotspot.
3. Assign a unique SSID or network name and a strong 8-character password for your Wi-Fi hotspot.
When done, tap Save.

83
Chapter 7: Staying connected
4. From the Tethering screen, slide Portable Wi-Fi hotspot to ON.
5. Connect other devices to your ASUS Phone’s hotspot connection the same way you connect to a
Wi-Fi network.
Bluetooth Tethering
Enable Bluetooth on your ASUS Phone and use it as a modem for Internet access on your
Bluetooth-enabled mobile devices such as a laptop or a tablet.
1. Enable Bluetooth on your ASUS Phone and the other device.
2. Pair both devices.
NOTE: For details, see Pairing your ASUS Phone to a Bluetooth® device.
3. From the Settings screen, tap More > Tethering, then silde Bluetooth tethering to ON. You can
now surf the Internet or do Internet-related activities on your ASUS Phone.
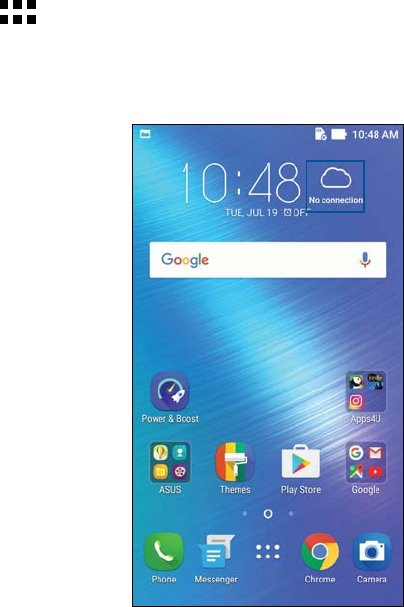
84
Chapter 8: Travel and Maps
Travel and Maps 8
8 Travel and Maps
Weather
Get real-time weather updates straight from your ASUS Phone using the weather app. Using
Weather, you can also check other weather details from around the world.
Launching the Weather app
'SPNZPVS)PNFTDSFFOMBVODIUIF8FBUIFSBQQVTJOHFJUIFSPGUIFGPMMPXJOHPQUJPOT
tTap > Weather.
tFrom your ASUS Phone’s home screen, tap the weather icon.
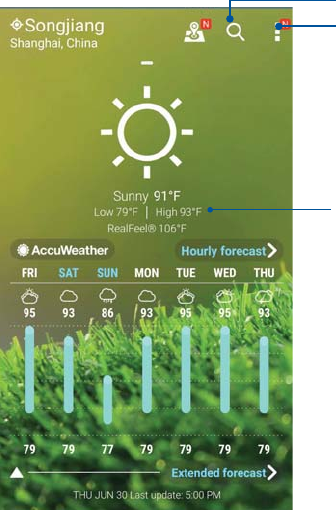
85
Chapter 8: Travel and Maps
Weather home screen
Set up and get your current location’s weather updates as well as other parts of the world. You can
display the weather updates or daily weather forecast on the Calendar app.
Tap to search for a city’s weather info
Tap to get the area’s current weather info, refresh the
weather info, edit the location list, or configure the
weather settings
Swipe up to see other weather information.
Swipe to the left or right to see the weather information
of other cities in your location list.
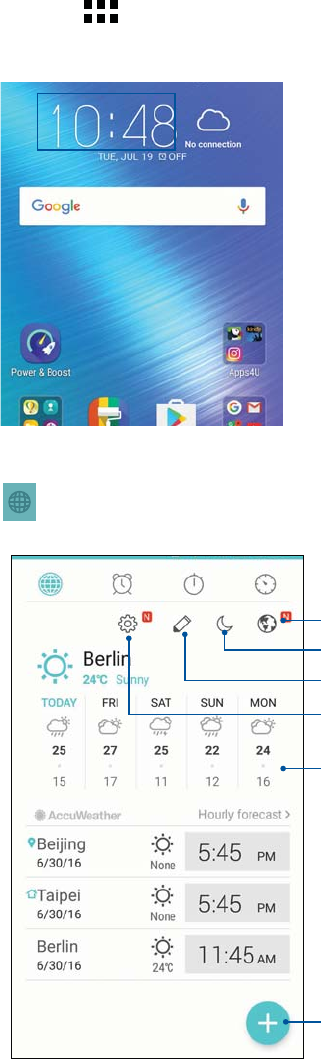
86
Chapter 8: Travel and Maps
World Clock
Tap to access the world clock settings of your ASUS Phone.
Tap this to set your clock on night mode.
Tap this to edit the cities marked on your world clock.
Tap this to toggle between the weather forecast and
the world clock’s map.
Tap this to view detailed weather forecast and
change the weather forecast settings.
Tap this to add a new city to mark on your world clock’s map.
Tap this to access the Clock app settings.
Clock
Customize the time zone settings of your ASUS Phone, set alarms, and use your ASUS Phone as a
stop watch using the Clock app.
Launching Clock
-BVODIUIF$MPDLBQQVTJOHFJUIFSPGUIFGPMMPXJOHPQUJPOT
tTap > Clock.
tFrom your ASUS Phone’s home screen, tap the digital clock display.

87
Chapter 8: Travel and Maps
Alarm clock
Tap to access the alarm clock settings of your ASUS Phone.
Stopwatch
Tap to use your ASUS Phone as a stopwatch.
Tap this button to start running the stopwatch feature.
Tap this to access the settings of the alarm clock feature.
Tap this to delete any of the previously set alarms.
Tap this to set a new alarm time.

88
Chapter 8: Travel and Maps
Timer
:PVNBZTFUNVMUJQMFUJNFSPQUJPOTGPSZPVS"4641IPOF5PEPUIJTGPMMPXUIFTUFQTCFMPX
Setting the timer
1. Tap to access the timer feature of your ASUS Phone.
Tap this to set a new timer
Tap this to delete the preset timer.
Tap this to access the settings of the timer feature.
Tap to set the ringtone for the timer.
Tap this to edit the preset timer.
Tap this button to start running the timer.
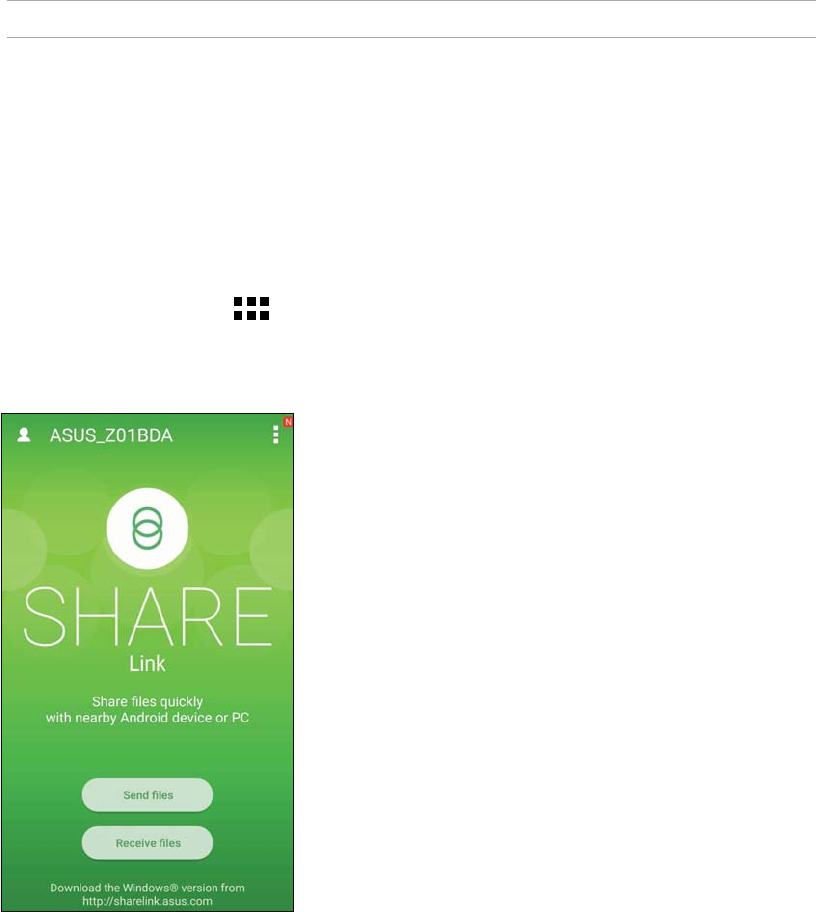
89
Chapter 9: ZenLink
ZenLink 9
9 ZenLink
Knowing ZenLink
Stay connected with the ASUS-exclusive ZenLink for maximum productivity. With these ZenLink
apps, you can connect with other devices to share and receive files.
:PVS;FO-JOLDPNQSJTFTPGUIFGPMMPXJOHBQQT4IBSF-JOLBOE3FNPUF-JOL
NOTE: Some of these ZenLink apps may not be available in your ASUS Phone.
Share Link
Share and receive files, apps, or media contents with Android mobile devices using Share Link app
(for ASUS mobile devices) or SHAREit app (for other mobile devices) via a Wi-Fi hotspot. With this
app, you can send or receive files that are larger than 100 MB and lets you share or receive multiple
files at the same time. Share Link app sends and receives files faster than using Bluetooth.
Sharing files
1. From your Home screen, tap > Share Link.
2. Tap Send file then select from the options that appear on your screen.
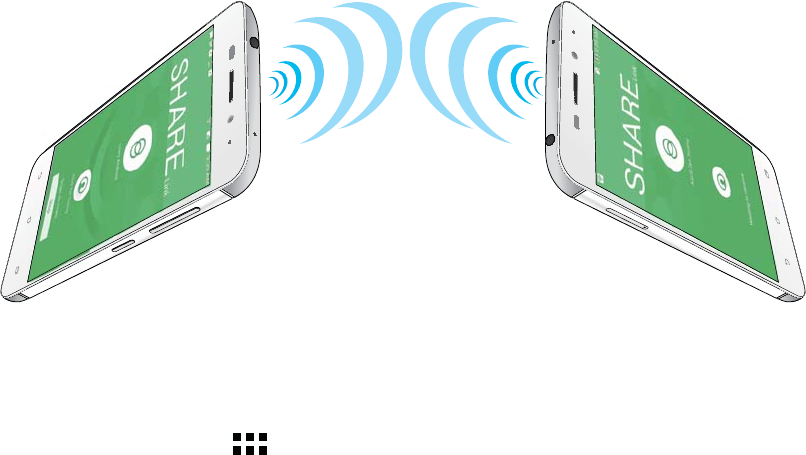
90
Chapter 9: ZenLink
3. Tap the files that you want to send then tap Share selected files.
4. Tap Add to select more files or tap Send to share the selected files.
5. After your ASUS Phone detects the other devices, tap the device that you want to share your files
with.
Receiving files
5PSFDFJWFmMFT
1. From your Home screen, tap then tap Share Link.
2. Tap Receive files to receive the files from the sender.
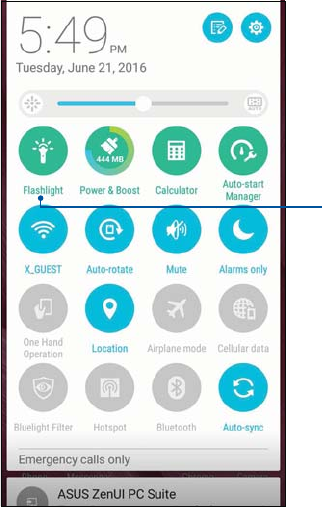
91
Chapter 10: Zen Everywhere
Special Zen Tools
Flashlight
You can turn your ASUS Phone to an instant flashlight by launching your Quick settings panel from
any screen or any open app. From the Quick settings panel, simply tap on the Flashlight icon to
activate its function.
Zen Everywhere 10
10 Zen Everywhere
Tap this to enable the flashlight.

92
Chapter 10: Zen Everywhere
Flashlight menu options
Tap this to enable or disable the flashlight
mode.
Tap this to enable or disable the SOS mode.
Tap any of these icons to toggle between the
flashlight’s speed while blinking.
Tap this to turn on or turn off the light.
Tap this to use the rear camera flash as the flashlight.
Tap this to use your phone screen as the flashlight.
Move this to adjust the screen brightness.
Tap this to spread the color to full screen.
Tap this to change your screen color.
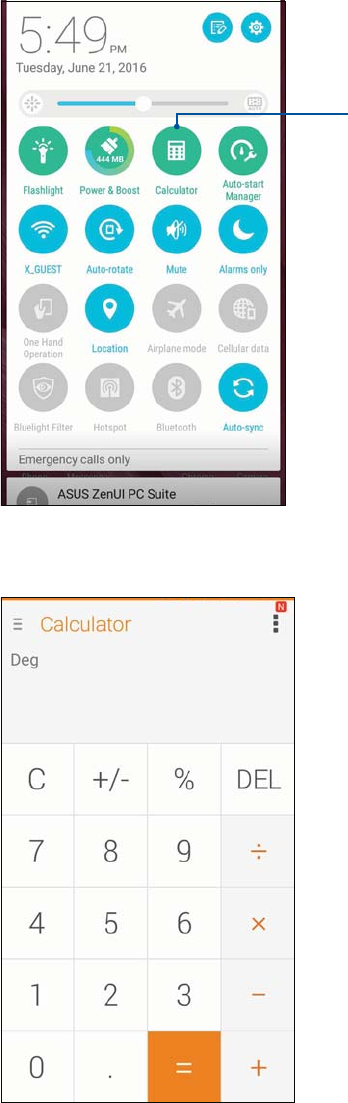
93
Chapter 10: Zen Everywhere
Calculator
One-swipe and a tap is all it takes to launch your Calculator. When you open the Quick settings
panel, the Calculator icon is there visibly on top of the list. Tap it to get started with your
computations.
Tap this to enable the calculator
Calculator screen
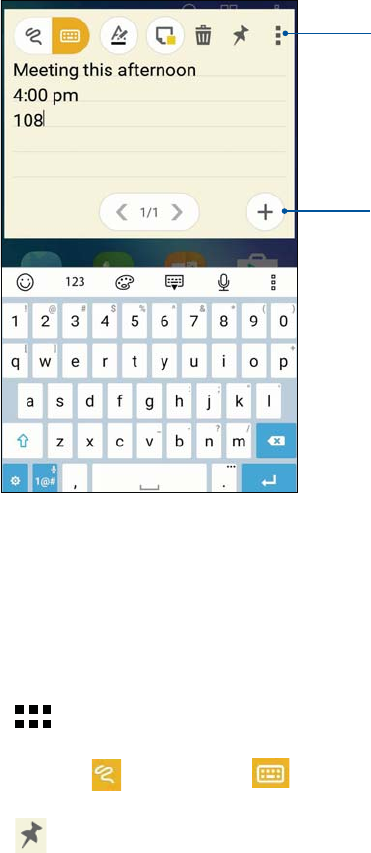
94
Chapter 10: Zen Everywhere
Quick memo
Quick memo is a note-taking tool that gives you the freedom to either scribble or type down
important notes you need to remember. After creating notes, you can share them via Share Link
and social media sites or turn them into a task inside Do It Later.
Creating a sticky note
You can turn Quick memo notes into a sticky note so you can view them wherever, on your ASUS
Phone.
5PDSFBUFBTUJDLZOPUF
1. Tap > Quick Memo.
2. Select either to scribble or to type down your note.
3. Tap to pin your note to the Home screen.
Tap this share or set a memo as a memo-it-later task
Tap to add a new page
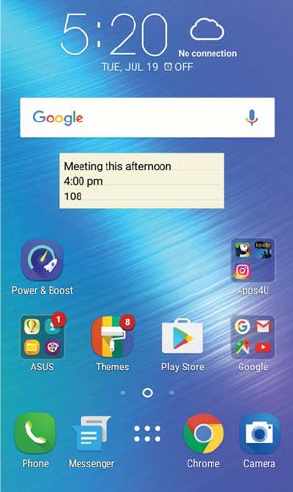
95
Chapter 10: Zen Everywhere
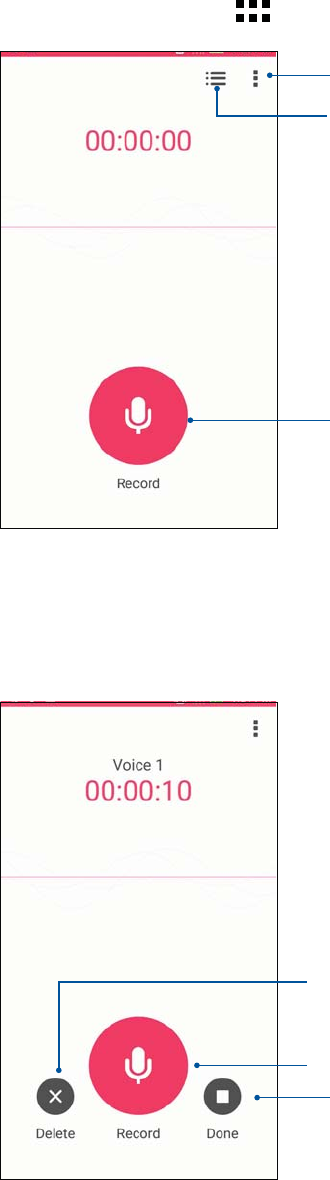
96
Chapter 10: Zen Everywhere
Sound Recorder
Record audio files using your ASUS Phone by enabling the Sound Recorder app.
Launching Sound Recorder
To launch Sound Recorder, tap > Sound Recorder.
Tap to start audio recording
Tap to customize the Sound Recorder settings
Tap to view the list of saved audio recording files
Pausing a recording
During a paused recording, you can choose to resume, delete, or save the recording.
Tap to resume the recording
Tap to save the recording
Tap to delete the recording
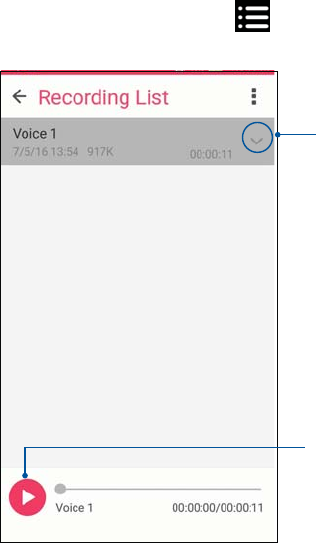
97
Chapter 10: Zen Everywhere
Recording List
From the Recording List, you can play, rename, share, or delete a saved audio recording file.
To view your recording list, tap from the Sound Recorder main screen.
Tap to play/pause your selected recording
Tap to share, rename, or delete your selected
recording
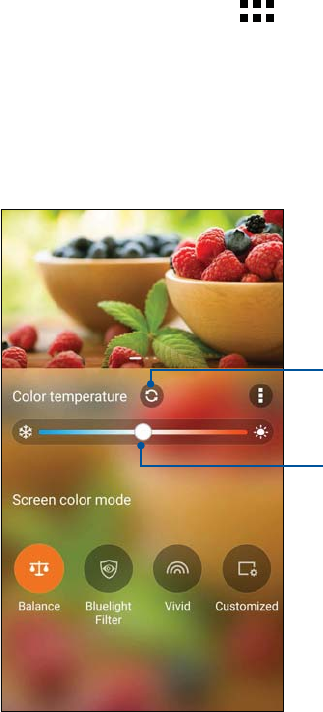
98
Chapter 10: Zen Everywhere
Splendid
ASUS Splendid allows you to easily adjust the display settings. It enriches the color of your screen
with its preset screen color modes.
Using Splendid
5PVTF4QMFOEJE
1. From your Home screen, tap > Splendid.
4FMFDUBOZPGUIFTFTDSFFODPMPSNPEFTBalance, Bluelight Filter, Vivid, and Customized.
Balance mode
This mode provides a balanced display of color on your ASUS Phone.
Move to adjust the color temperature
Tap to reset to factory defaults

99
Chapter 10: Zen Everywhere
Bluelight Filter mode
This mode provides a mild paper-like display that reduces eye strain for a comfortable reading
experience on your ASUS Phone.
Tap to reset to factory defaults
Move to adjust the yellow tint
Vivid mode
This mode provides a fine-tuned color preset that enriches the screen color of your ASUS Phone.
Tap to reset to factory defaults
Move to adjust the color temperature

100
Chapter 10: Zen Everywhere
Customized mode
This mode allows you to adjust the screen display based on your preferred color temperature, hue,
and saturation.
Move to adjust the color temperature
Tap to reset to factory defaults
Move to adjust hue
Move to adjust saturation
NOTE: You can also quickly set the Splendid screen mode from the Quick settings panel.
Tap until you’ve selected your preferred
screen color mode
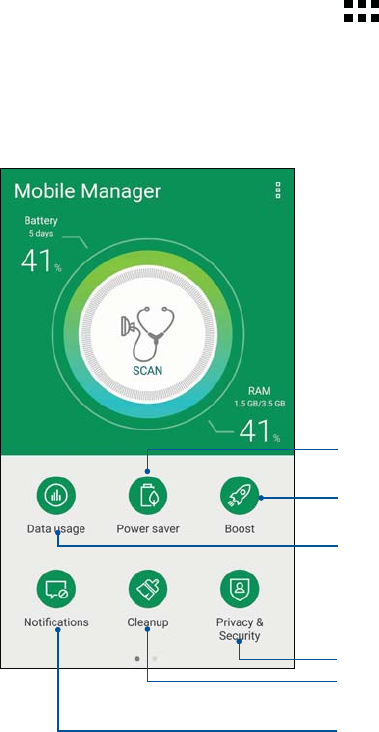
101
Chapter 10: Zen Everywhere
Mobile Manager
Mobile Manager provides an integrated interface for several apps that are designed to optimize
device performance, manage the phone power, storage usage and system notifications.
To launch the ASUS Mobile Manager app, tap from your Home screen then tap Mobile
Manager.
Tap this to launch the Power saver app
Tap this to allow or block notifications from an individual app
Tap this to run privacy and security scan
Tap this to view the mobile data usage, set a monthly limit for
mobile data use, and control apps to access the Internet only
over Wi-Fi, only over mobile network, neither or both.
Tap this to uninstall the selected unused apps to free up some
storage
Tap this to boost system memory

102
Chapter 11: Maintain your Zen
Keeping your device up-to-date
Keep your ASUS Phone in the loop of Android system updates and upgraded apps and features.
Updating your system
1. Tap then tap Settings.
2. On the Settings screen, slide down to display other items then tap About.
3. Tap System update then tap Check Update.
:PVDBOBMTPVQEBUFZPVSTZTUFNVTJOHUIF4ZTUFNVQEBUFBQQ
1. From your Home screen, tap > System update.
2. Tap Check Update.
NOTE: You can preview the last time your ASUS Phone’s system was updated at the Last update
DIFDLPGUIF4ZTUFNVQEBUFXJOEPX
Storage
You can store data, apps, or files on your ASUS Phone (internal storage), on an external storage,
or on an online storage. You need an internet connection to transfer or download your files on
an online storage. Use the bundled USB cable to copy files to or from the computer to your ASUS
Phone.
Backup and reset
Back up data, Wi-Fi passwords, and other settings to Google servers using your ASUS Phone.
1. Tap then tap Settings > Backup & reset.
'SPNUIF#BDLVQSFTFUXJOEPXZPVDBO
tBack up my data: This feature backs up your data, Wif-Fi passwords, and other settings to
Google servers when enabled.
tBackup account: Allows you to specify the account you to be associated when you save
your backup.
tAutomatic restore: This feature facilitates restoration of backed up settings and data
when you reinstall an app.
tNetwork settings reset: This will reset all network settings including Wi-Fi, Cellular
network and Bluetooth settings.
tFactory data reset: Erases all data on phone.
Maintain your Zen 11
11 Maintain your Zen

103
Chapter 11: Maintain your Zen
Securing your ASUS Phone
Use the security features of your ASUS Phone to prevent unauthorized calls or access of
information.
Unlocking your screen
When the screen is locked, you can open it with the security unlocking options that the ASUS
Phone offers you.
1. Tap then tap Settings > Lock screen.
2. Tap Screen lock then select an option to unlock your ASUS Phone.
NOTES:
t 3FGFSUPTFDUJPO Unlock screen options for more information.
t 5PEFBDUJWBUFUIFVOMPDLTDSFFOPQUJPOUIBUZPVTFUUBQNone on Choose screen lock screen.
Unlock screen options
Choose from these options to lock your ASUS Phone.
Swipe
Swipe up to unlock your ASUS Phone.

104
Chapter 11: Maintain your Zen
PIN
Key in at least four numbers to set a PIN.
IMPORTANT! Ensure to remember the PIN that you created to unlock your device.
Pattern
Slide your finger on the dots and create a pattern.
IMPORTANT! You can create a pattern with a minimum of four dots. Ensure to remember the pattern
that you created to unlock your device.
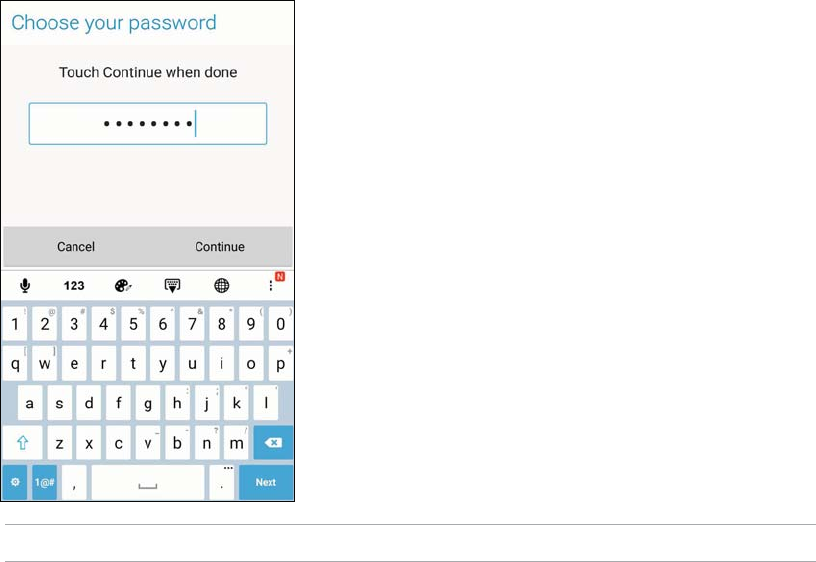
105
Chapter 11: Maintain your Zen
Password
Key in at least four characters to create a password.
IMPORTANT! Ensure to remember the password that you created to unlock your device.
Configuring the other screen security features
"TJEFGSPNUIFNPEFPGTDSFFOMPDLZPVDBOBMTPEPUIFGPMMPXJOHPOUIF4DSFFOTFDVSJUZXJOEPX
t Quick Access: Slide the Quick Access switch to ON to launch apps on the lock screen.
Setting your ASUS Phone identity
Know your ASUS Phone’s identity such as serial number, IMEI (International Mobile Equipment
Identity) number, or model number.
This is important, as when you may lose your ASUS Phone, you can contact your mobile carrier and
provide the information to blacklist the unauthorized use of your ASUS Phone.
5PEJTQMBZZPVS"4641IPOFTJEFOUJUZ
1. Tap All Apps then tap Settings.
2. On the Settings screen, slide down to display other items then tap About. The About screen
displays the status, legal information, model number, operating system version, hardware, and
software information of your ASUS Phone.
3. To see the serial number, SIM contact number, and IMEI of your ASUS Phone, tap Status.
106
Appendix
Appendix
Notices
Federal Communications Commission Statement
This device complies with part 15 of the FCC Rules. Operation is subject to the following two
DPOEJUJPOT5IJTEFWJDFNBZOPUDBVTFIBSNGVMJOUFSGFSFODFBOEUIJTEFWJDFNVTUBDDFQUBOZ
interference received, including interference that may cause undesired operation.
Changes or modifications not expressly approved by the party responsible for compliance could
void the user‘s authority to operate the equipment.
This equipment has been tested and found to comply with the limits for a Class B digital device,
pursuant to part 15 of the FCC Rules. These limits are designed to provide reasonable protection
against harmful interference in a residential installation. This equipment generates, uses and can
radiate radio frequency energy and, if not installed and used in accordance with the instructions,
may cause harmful interference to radio communications. However, there is no guarantee that
interference will not occur in a particular installation. If this equipment does cause harmful
interference to radio or television reception, which can be determined by turning the equipment
off and on, the user is encouraged to try to correct the interference by one or more of the following
NFBTVSFT
- Reorient or relocate the receiving antenna.
- Increase the separation between the equipment and receiver.
- Connect the equipment into an outlet on a circuit different from that to which the receiver is
connected.
- Consult the dealer or an experienced radio/TV technician for help.
The country code selection is for non-US models only and is not available to all US models. Per FCC
regulation, all WiFi products that are marketed in US must be fixed to US operation channels only.
5IF'$$*%GPSUIJTEFWJDFJT.42;#%$
The antenna(s) used for this transmitter must not be co-located or operated in conjunction with
any other antenna or transmitter.
107
Canada, Industry Canada (IC) Notices
This device complies with Industry Canada’s licence-exempt RSS standard(s). Operation is subject
UPUIFGPMMPXJOHUXPDPOEJUJPOT
(1) This device may not cause interference; and
(2) This device must accept any interference, including interference that may cause undesired
operation of the device.
Le présent appareil est conforme aux CNR d’Industrie Canada applicables aux appareils radio
FYFNQUTEFMJDFODF-FYQMPJUBUJPOFTUBVUPSJTÏFBVYEFVYDPOEJUJPOTTVJWBOUFT
(1) l’appareil ne doit pas produire de brouillage, et
(2) l’utilisateur de l’appareil doit accepter tout brouillage radioélectrique subi, même si le brouillage
est susceptible d’en compromettre le fonctionnement.
CAN ICES-3(B)/NMB-3(B)
This Class B digital apparatus complies with Canadian ICES-003.
Cet appareil numérique de la classe B est conforme à la norme NMB-003 du Canada.
The IC ID for this device is 3568A-Z01BDC.
-JEFOUJmBOU*OEVTUSJF$BOBEBEFDFUBQQBSFJMFTU";#%$
This device and its antenna(s) must not be co-located or operated in conjunction with any other
antenna or transmitter, except tested built-in radios.
Cet appareil et son antenne ne doivent pas être situés ou fonctionner en conjonction avec une
autre antenne ou un autre émetteur, exception faites des radios intégrées qui ont été testées.
The County Code Selection feature is disabled for products marketed in the US/ Canada.
La fonction de sélection de l’indicatif du pays est désactivée pour les produits commercialisés aux
États-Unis et au Canada.
FOR PORTABLE DEVICE (<20cm from body / SAR needed)
3BEJBUJPO&YQPTVSF4UBUFNFOU
The product complies with the Canada portable RF exposure limit set forth for an uncontrolled
environment and is safe for intended operation as described in this manual. RF exposure can be
reduced further if the product can be kept as far as possible from the user body or if it is set to a
lower output power, if such function is available.
"EEJUJPOBMTUBUFNFOUGPSQIPOFT
This device has been tested for compliance with IC SAR values at a typical operating near the body.
To ensure that RF exposure levels are below the levels tested, use accessories with this equipment
to maintain a minimum separation distance of 1 cm between the body of the user and the device.
These accessories should not contain metallic components. It is possible that the accessories used
close to the body that do not meet these requirements are not consistent with the SAR limits and it
is advisable to avoid using them.

108
RF Exposure Information (SAR)
This device has been tested and meets applicable limits for Radio Frequency (RF) exposure.
Specific Absorption Rate (SAR) refers to the rate at which the body absorbs RF energy. SAR limits
are 1.6 Watts per kilogram (over a volume containing a mass of 1 gram of tissue) in countries that
follow the United States FCC limit and 2.0 W/kg (averaged over 10 grams of tissue) in countries
that follow the Council of the European Union limit. Tests for SAR are conducted using standard
operating positions with the device transmitting at its highest certified power level in all tested
frequency bands.
To reduce exposure to RF energy, use a hands-free accessory or other similar option to keep this
device from your head and body. Carry this device at least 10 mm away from your body to ensure
exposure levels remain at or below the as-tested levels. Choose the belt clips, holsters, or other
similar body-worn accessories which do not contain metallic components to support operation in
this manner. Cases with metal parts may change the RF performance of the device, including its
compliance with RF exposure guidelines, in a manner that has not been tested or certified, and use
such accessories should be avoided.
The highest FCC SAR value for the device is 1.19W/Kg @ 1g
The FCC has granted an Equipment Authorization for this device with all reported SAR levels
evaluated as in compliance with the FCC RF exposure guidelines. SAR information on this device is
on file with the FCC and can be found under the Display Grant section of www.fcc.gov/oet/ea/fccid
BGUFSTFBSDIJOHPO'$$*%.42;#%$
%ÏDMBSBUJPOEFYQPTJUJPOBVYSBEJBUJPOT
Le produit est conforme aux limites d’exposition pour les appareils portables RF pour les Etats-Unis
et le Canada établies pour un environnement non contrôlé.
Le produit est sûr pour un fonctionnement tel que décrit dans ce manuel. La réduction aux
expositions RF peut être augmentée si l’appareil peut être conservé aussi loin que possible du
corps de l’utilisateur ou que le dispositif est réglé sur la puissance de sortie la plus faible si une telle
fonction est disponible.
"EEJUJPOBMTUBUFNFOUGPSQIPOFT
Ce dispositif a été testé pour la conformité avec les valeurs SAR à un fonctionnement typique près
du corps . Pour assurer que les niveaux d’exposition aux radiofréquences en deçà des niveaux testés
, utiliser des accessoires avec cet équipement pour maintenir une distance de séparation minimale
de 1 cm entre le corps de l’utilisateur et l’appareil. Ces accessoires ne doivent pas contenir des
composants métalliques . Il est possible que les accessoires utilisés près du corps qui ne répondent
pas à ces exigences ne sont pas compatibles avec les limites SAR et il est conseillé d’éviter de les
utiliser.

109
CE RF Exposure Compliance
This device meets the EU requirements (1999/519/EC) on the limitation of exposure of the general
public to electromagnetic fields by way of health protection.
For body-worn operation, this device has been tested and meets the ICNIRP guidelines and the
European Standard EN 62209-2, for use with dedicated accessories. SAR is measured with this
device at a separation of 0.5 cm to the body, while transmitting at the highest certified output
power level in all frequency bands of this device. Use of other accessories which contain metals
may not ensure compliance with ICNIRP exposure guidelines.
CE Mark Warning
56
CE marking for devices with wireless LAN/ Bluetooth
This equipment complies with the requirements of Directive 1999/5/EC of the European Parliament
and Commission from 9 March, 1999 governing Radio and Telecommunications Equipment and
NVUVBMSFDPHOJUJPOPGDPOGPSNJUZ5IFIJHIFTU$&4"3WBMVFTGPSUIFEFWJDFBSFBTGPMMPXT
5IFIJHIFTU$&4"3WBMVFTGPSUIJTEFWJDFBSFBTGPMMPXT
t0.430 W/Kg @ 10g (Head)
t0.898 W/Kg @ 10g (Body)
Using GPS (Global Positioning System) on your ASUS Phone
5PVTFUIF(14QPTJUJPOJOHGFBUVSFPOZPVS"4641IPOF
t &OTVSFUIBUZPVSEFWJDFJTDPOOFDUFEUPUIF*OUFSOFUCFGPSFVTJOH(PPHMF.BQPSBOZ(14
enabled apps.
t 'PSmSTUUJNFVTFPGB(14FOBCMFEBQQPOZPVSEFWJDFFOTVSFUIBUZPVBSFPVUEPPSTUPHFUUIF
best positioning data.
t 8IFOVTJOHB(14FOBCMFEBQQPOZPVSEFWJDFJOTJEFBWFIJDMFUIFNFUBMMJDDPNQPOFOUPGUIF
car window and other electronic devices might affect the GPS performance.

110
À pleine puissance, l’écoute prolongée du baladeur peut endommager
l’oreille de l’utilisateur.
For France, headphones/earphones for this device are compliant with the sound pressure level
SFRVJSFNFOUMBJEEPXOJOUIFBQQMJDBCMF&/BOEPS&/TUBOEBSE
required by French Article L.5232-1.
Prevention of Hearing Loss
To prevent possible hearing damage, do not listen at high volume levels for long periods.
ASUS Recycling/Takeback Services
ASUS recycling and takeback programs come from our commitment to the highest standards for
protecting our environment. We believe in providing solutions for you to be able to responsibly
recycle our products, batteries, other components as well as the packaging materials. Please go to
IUUQDTSBTVTDPNFOHMJTI5BLFCBDLIUN for detailed recycling information in different regions.
Laser safety information
CLASS 1 LASER PRODUCT
Regional notice for Singapore
This ASUS product complies with IDA Standards.
Manufacturer: ASUSTeK Computer Inc.
Address: 4F, No.150, LI-TE RD., PEITOU, TAIPEI 112, TAIWAN
Authorised representative in Europe: ASUS Computer GmbH
Address: HARKORT STR. 21-23, 40880 RATINGEN, GERMANY
.PEFMOBNF"464@;#%;$,-
"464@;#%";$,-GPS58+1),1)
"464@;#%#;$,-GPS*%*/5)
"464@;#%$;$,-GPS64#3
"464@;#4GPS4JOHMF4*.
ZC551KL for RU
Index
A
Advanced camera features 68
All Smiles 71
- see also Advanced camera features 68
App shortcuts 27
- adding 27
- removing 27, 28
ASUS Phone 8
- chargiing 15
-MicroSD card 13
- installing 13
- removing 14
- Micro SIM card 9
- Installing 9
- Removing 10
- Nano SIM card 11
- Installing 11
- Removing 12
- Parts and features 8
- turning on/off 17
B
Backup and reset 102
Beautification 71
- see also Advanced camera features 68
block list 59
- blocking 59
- unblocking 60
Bluetooth 80
- enabling 80
- pairing 81
- see also Bluetooth Tethering 83
- unpairing 81
Bluetooth Tethering 83
- see also Tethering 82
C
Calculator 93
Call logs 51
- redial your last-called number 52
- saving calls to Contacts 51
Calls 49
- answering 51
- calling from Contacts 50
- calling your favorite contacts 51
- dialing a phone number 49
- launching the Phone app 49
- other call options 52
- receiving 51
Index
- recording 53
- see also Contacts 54
- see Call logs 51
- see Extension number 49
- see Multiple calls 53
- see Smart Dialing 50
Camera 64
- Camera home screen 65
- first-time use 64
- Image settings 66
Focus & exposure 66
Image 66
Shoot mode 66
- launching 64
- see Advanced camera features 68
- Video settings 67
Chrome 38
- bookmarking pages 39
- clearing the browser cache 39
- launching 38
- reading the pages later 39
- sharing pages 39
Clock 86
- alarm clock 87
- launching 86
- stopwatch 87
- timer 88
- world clock 86
Cloud 45
Contacts 54
- adding 55
- adding an extension number 55
- Contacts Settings 54
- customizing your contact’s profile 56
- exporting 59
- importing 58
- see also Block list 59
- see also Social networking 60
- setting up your profile 54
D
Date and time 32
- setting up 32
Depth of field 70
- see also Advanced camera features 68
Do It Later 43
- adding to-do tasks 43
- Calling later 43
- deleting to-do tasks 44
- Messaging later 43
Dual SIM feature 47
- assigning 48
- renaming 47
E
Easy Mode 29
- adding shortcuts 30, 31
- enabling 29, 31
- removing shortcuts 30, 31
Extension number 49
- auto dialing 50
- confirmation prompt 49
- dialing 49
F
Favorite contacts 51
- calling 51
- marking 58
File Manager 44
- accessing the internal storage 44
Fingerprint 35
- Setting up fingerprint ID from Settings 36
- add a fingerprint 37
- manage Fingerprints 37
- Starting your ASUS phone for the first time
35
- locate finger print scanner 35
- protect your phone 35
First-time startup 18
Flashlight 91
G
Gallery 73
-deleting files 75
- editing images 75
- posting photos to Calendar event wall 76
- sharing files 75
- viewing files from social network or cloud
storage 73
- viewing the photo location 74
GIF animation 72
- see also Advanced camera features 68
Gmail 40
Google Calendar 41
- Creating events 41
- Creating reminders 42
- Editing or removing events 41
- Editing or removing reminders 42
Google Messenger 61
- Replying to messages 61
- Sending messages 61
Google Play Music 63
- Setting up your Google Play Music 63
H
HDR 69
- see also Advanced camera features 68
Headset 62
- connecting 62
Home screen 23
- notification icons 24
- personalizing 27
- see also App shortcuts 27
- see also Easy Mode 29
- see also Wallpapers 28
- see also Widgets 27
L
Lock screen 33
- customizing 33
- customizing the quick access buttons 34
- see also Securing your ASUS phone 103
Low light 68
- see also Advanced camera features 68
M
Managing your call logs 51
- blocking 51
- Redialing your last-called number 52
- saving to Contacts 51
Micro SIM cards 47
- assigning a preferred micro SIM card 48
- data service 48
- renaming 47
- voice calls 48
Miniature 70
- see also Advanced camera features 68
MiniMovie 77
Mobile Manager 101
Mobile network 79
- enabling 79
Multiple calls 53
- answering another call 53
N
Night 72
- see also Advanced camera features 68
P
Panorama 69
- see also Advanced camera features 68
PhotoCollage 78
Q
Quick Memo 94
- Creating a sticky note 94
Quick settings 25
- adding or removing buttons 25
R
Ringtone 32
- setting up 32
- Sound & Vibration 32
S
Security 103
Selfie 69
- see also Advanced camera features 68
Share Link 89
- receiving files 90
- sharing files 89
Smart Dialing 50
Smart remove 71
- see also Advanced camera features 68
Social networking 60
- syncing 60
Sound Recorder 96
- Pausing a recording 96
- Recording List 97
Splendid 98
- Balance mode 98
- Bluelight Filter mode 99
- Customized mode 100
- Vivid mode 99
Storage 102
System 102
- updating 102
System notifications 26
T
Tethering 82
- Bluetooth Tethering 83
- Wi-Fi Hotspot 82
Time lapse 72
- see also Advanced camera features 68
Time Rewind 68
- see also Advanced camera features 68
Touchscreen 20
- launching apps or selecting items 20
- moving or deleting items 20
- moving through pages or screens 21
- zooming in 21
- zooming out 22
V
VIPs 56
- adding an event 57
- setting up from the contact’s screen 56
- setting up from the VIP screen 57
W
Wallpapers 28
- animated wallpaper 29
- wallpaper and background tint 28
Weather 84
- launching 84
- Weather home screen 85
WebStorage 45
Widgets 27
Wi-Fi 79
- connecting 80
- disabling 80
- enabling 79
- see also Wi-Fi Hotspot tethering 82
Z
ZenLink 89
- see Share Link 89
Zen UI 7
ZenUI Help 46
EU Declaration of Conformity
We, the undersigned,
Manufacturer: ASUSTeK COMPUTER INC.
Address: 4F, No. 150, LI-TE Rd., PEITOU, TAIPEI 112, TAIWAN
Authorized representative in Europe: ASUS COMPUTER GmbH
Address, City: HARKORT STR. 21-23, 40880 RATINGEN
Country: GERMANY
declare the following apparatus:
Product name :
ASUS Phone
Model name :
ASUS_Z01BD, ASUS_Z01BDB,
ASUS_Z01BDA, ASUS_Z01BS
The object of the declaration described above is in conformity with the relevant Union harmonisation legislation:
EMC – Directive 2004/108/EC (until April 19th, 2016) and Directive 2014/30/EU (from April 20th, 2016)
EN 55022:2010+AC:2011
EN 61000-3-2:2006+A2:2009
EN 55013:2001+A1:2003+A2:2006
EN 55024:2010
EN 61000-3-3:2013
EN 55020:2007+A11:2011
R&TTE – Directive 1999/5/EC
EN 300 328 V1.9.1(2015-02)
EN 300 440-1 V1.6.1(2010-08)
EN 300 440-2 V1.4.1(2010-08)
EN 301 511 V9.0.2(2003-03)
EN 301 908-1 V7.1.1
EN 301 908-2 V6.2.1(2013-10)
EN 301 908-13 V6.2.1(2013-10)
EN 50360:2001/A1:2012
EN 62479:2010
EN 62209-1:2006
EN 62209-2:2010
EN 301 489-1 V1.9.2(2011-09)
EN 301 489-3 V1.6.1(2013-12)
EN 301 489-4 V2.1.1(2013-12)
EN 301 489-7 V1.3.1(2005-11)
EN 301 489-9 V1.4.1(2007-11)
EN 301 489-17 V2.2.1(2012-09)
EN 301 489-24 V1.5.1(2010-10)
EN 302 291-2 V1.1.1(2005-07)
EN 50385:2002
EN 50566:2013/AC:2014
EN 62311:2008
LVD – Directive 2006/95/EC (until April 19th, 2016) and Directive 2014/35/EU (from April 20th, 2016)
EN 60950-1: 2006 / A12: 2011
EN 60950-1: 2006 / A2: 2013
EN 60950-1: 2006 / A11: 2009
EN 60950-1: 2006 / A1: 2010
Ecodesign – Directive 2009/125/EC
Regulation (EC) No. 1275/2008
Regulation (EC) No. 642/2009
Regulation (EC) No. 278/2009
Regulation (EU) No. 617/2013
RoHS – Directive 2011/65/EU
Ver. 160217
CE marking
Equipment Class 1
0560
Signature
Jerry Shen
Printed Name
CEO
Position
Taipei, Taiwan
Place of issue
31/8/2016
Date of issue
2016
Year CE marking was first affixed
(EU conformity marking)
Declaração CE de Conformidade
Nós, os abaixo-assinados,
Fabricante: ASUSTeK COMPUTER INC.
Endereço: 4F, No. 150, LI-TE Rd., PEITOU, TAIPEI 112, TAIWAN
Representante autorizado na Europa: ASUS COMPUTER GmbH
Endereço, cidade: HARKORT STR. 21-23, 40880 RATINGEN
País: GERMANY
declaramos o seguinte aparelho:
Nome do produto:
ASUS Phone
Nome do modelo:
ASUS_Z01BD, ASUS_Z01BDB,
ASUS_Z01BDAASUS_Z01BS
O objeto da declaração acima descrito está em conformidade com a legislação de harmonização da União aplicável:
EMC Diretiva 2004/108/CE (até 19 de abril de 2016) e Diretiva 2014/30/UE (a partir de 20 de abril de 2016)
EN 55022:2010+AC:2011
EN 61000-3-2:2006+A2:2009
EN 55013:2001+A1:2003+A2:2006
EN 55024:2010
EN 61000-3-3:2013
EN 55020:2007+A11:2011
R&TTE – Diretiva 1999/5/CE
EN 300 328 V1.9.1(2015-02)
EN 300 440-1 V1.6.1(2010-08)
EN 300 440-2 V1.4.1(2010-08)
EN 301 511 V9.0.2(2003-03)
EN 301 908-1 V7.1.1
EN 301 908-2 V6.2.1(2013-10)
EN 301 908-13 V6.2.1(2013-10)
EN 50360:2001/A1:2012
EN 62479:2010
EN 62209-1:2006
EN 62209-2:2010
EN 301 489-1 V1.9.2(2011-09)
EN 301 489-3 V1.6.1(2013-12)
EN 301 489-4 V2.1.1(2013-12)
EN 301 489-7 V1.3.1(2005-11)
EN 301 489-9 V1.4.1(2007-11)
EN 301 489-17 V2.2.1(2012-09)
EN 301 489-24 V1.5.1(2010-10)
EN 302 291-2 V1.1.1(2005-07)
EN 50385:2002
EN 50566:2013/AC:2014
EN 62311:2008
LVD Diretiva 2006/95/CE (até 19 de abril de 2016) and Diretiva 2014/35/UE (a partir de 20 de abril de 2016)
EN 60950-1: 2006 / A12: 2011
EN 60950-1: 2006 / A2: 2013
EN 60950-1: 2006 / A11: 2009
EN 60950-1: 2006 / A1: 2010
EcoEcodesign – Diretiva 2009/125/CE
Regulation (EC) No. 1275/2008
Regulation (EC) No. 642/2009
Regulation (EC) No. 278/2009
Regulation (EU) No. 617/2013
RoHS – Diretiva 2011/65/UE
Ver. 160217
Marcação CE
Classe de equipamento 1
0560
Assinatura
Jerry Shen
Nome impresso
CEO
Posição
Taipei, Taiwan
Local de emissão
1/8/2016
Data de emissão
2016
Ano marcação CE foi aposta por primeira vez
(Marcação CE de conformidade)

Declara
Subsemnatul,
ASUSTeK COMPUTER INC.
Adres: 4F, No. 150, LI-TE Rd., PEITOU, TAIPEI 112, TAIWAN
Reprezentant autorizat în Europa: ASUS COMPUTER GmbH
Adres, : HARKORT STR. 21-23, 40880 RATINGEN
: GERMANIA
aparat:
Nume Produs :
ASUS Phone
Nume Model :
ASUS_Z01BD, ASUS_Z01BDB,
ASUS_Z01BDA,ASUS_Z01BS
CEM – Directiva
EN 55022:2010+AC:2011
EN 61000-3-2:2006+A2:2009
EN 55013:2001+A1:2003+A2:2006
EN 55024:2010
EN 61000-3-3:2013
EN 55020:2007+A11:2011
R&TTE – Directiva 1999/5/CE
EN 300 328 V1.9.1(2015-02)
EN 300 440-1 V1.6.1(2010-08)
EN 300 440-2 V1.4.1(2010-08)
EN 301 511 V9.0.2(2003-03)
EN 301 908-1 V7.1.1
EN 301 908-2 V6.2.1(2013-10)
EN 301 908-13 V6.2.1(2013-10)
EN 50360:2001/A1:2012
EN 62479:2010
EN 62209-1:2006
EN 62209-2:2010
EN 301 489-1 V1.9.2(2011-09)
EN 301 489-3 V1.6.1(2013-12)
EN 301 489-4 V2.1.1(2013-12)
EN 301 489-7 V1.3.1(2005-11)
EN 301 489-9 V1.4.1(2007-11)
EN 301 489-17 V2.2.1(2012-09)
EN 301 489-24 V1.5.1(2010-10)
EN 302 291-2 V1.1.1(2005-07)
EN 50385:2002
EN 50566:2013/AC:2014
EN 62311:2008
LVD –
EN 60950-1: 2006 / A12: 2011
EN 60950-1: 2006 / A2: 2013
EN 60950-1: 2006 / A11: 2009
EN 60950-1: 2006 / A1: 2010
Ecodesign – Directiva 2009/125/CE
Regulation (EC) No. 1275/2008
Regulation (EC) No. 642/2009
Regulation (EC) No. 278/2009
Regulation (EU) No. 617/2013
RoHS – Directiva 2011/65/UE
Ver. 160217
Marcajul CE
Echipament Clasa 1
0560
Jerry Shen
Nume
CEO
e
Taipei, Taiwan
Locul emiterii
31/8/2016
Data emiterii
2016
Anul în care Marcajul CE a fost aplicat pentru
(Marcaj de conformitate UE )
EU
Biz,
Üretici: ASUSTeK COMPUTER INC.
Adres: 4F, No. 150, LI-TE Rd., PEITOU, TAIPEI 112, TAIWAN
: ASUS COMPUTER GmbH
: HARKORT STR. 21-23, 40880 RATINGEN
Ülke: ALMANYA
ürünleri beyan ediyoruz :
:
ASUS Phone
:
ASUS_Z01BD
:
EMC –
EN 55022:2010+AC:2011
EN 61000-3-2:2006+A2:2009
EN 55013:2001+A1:2003+A2:2006
EN 55024:2010
EN 61000-3-3:2013
EN 55020:2007+A11:2011
R&TTE – Direktifi 1999/5/EC
EN 300 328 V1.9.1(2015-02)
EN 300 440-1 V1.6.1(2010-08)
EN 300 440-2 V1.4.1(2010-08)
EN 301 511 V9.0.2(2003-03)
EN 301 908-1 V7.1.1
EN 301 908-2 V6.2.1(2013-10)
EN 301 908-13 V6.2.1(2013-10)
EN 300 330-2 V1.5.1(2010-02)
EN 50360:2001/A1:2012
EN 62479:2010
EN 62209-1:2006
EN 62209-2:2010
EN 301 489-1 V1.9.2(2011-09)
EN 301 489-3 V1.6.1(2013-12)
EN 301 489-4 V2.1.1(2013-12)
EN 301 489-7 V1.3.1(2005-11)
EN 301 489-9 V1.4.1(2007-11)
EN 301 489-17 V2.2.1(2012-09)
EN 301 489-24 V1.5.1(2010-10)
EN 301 357-2 V1.4.1(2008-11)
EN 302 291-2 V1.1.1(2005-07)
EN 50385:2002
EN 50566:2013/AC:2014
EN 62311:2008
LVD – Direktifi ve Direktif 2014/35/EU 20 Nisan 2016
EN 60950-1: 2006 / A12: 2011
EN 60950-1: 2006 / A2: 2013
EN 60950-1: 2006 / A11: 2009
EN 60950-1: 2006 / A1: 2010
Ecodesign – Direktif 2009/125/EC
Regulation (EC) No. 1275/2008
Regulation (EC) No. 642/2009
Regulation (EC) No. 278/2009
Regulation (EU) No. 617/2013
RoHS – Direktifi 2011/65/EU
Ver. 160217
0560
Jerry Shen
CEO
Pozisyonu
Taipei, Taiwan
Sürüm yeri
1/8/2016
Sürüm tarihi
2016
(EU )
DECLARATION UE DE CONFORMITE
Nous, soussignés
Fabricant: ASUSTeK COMPUTER INC.
Adresse: 4F, No. 150, LI-TE Rd., PEITOU, TAIPEI 112, TAIWAN
Représentant autorisé en Europe: ASUS COMPUTER GmbH
Adresse, ville: HARKORT STR. 21-23, 40880 RATINGEN
Pays: GERMANY
Déclarons l’appareil suivant:
Nom du produit :
ASUS Phone
Nom du modèle :
ASUS_Z01BD, ASUS_Z01BDB,
ASUS_Z01BDAASUS_Z01BS
L’objet de la déclaration décrit ci-dessus est conforme avec la législation d’harmonisation de l’Union applicable
Directive CEM 2004/108/CE (jusqu’au 19 avril 2016) et la directive 2014/30/UE (à partir du 20 avril 2016)
EN 55022:2010+AC:2011
EN 61000-3-2:2006+A2:2009
EN 55013:2001+A1:2003+A2:2006
EN 55024:2010
EN 61000-3-3:2013
EN 55020:2007+A11:2011
Directive R&TTE 1999/5/CE
EN 300 328 V1.9.1(2015-02)
EN 300 440-1 V1.6.1(2010-08)
EN 300 440-2 V1.4.1(2010-08)
EN 301 511 V9.0.2(2003-03)
EN 301 908-1 V7.1.1
EN 301 908-2 V6.2.1(2013-10)
EN 301 908-13 V6.2.1(2013-10)
EN 50360:2001/A1:2012
EN 62479:2010
EN 62209-1:2006
EN 62209-2:2010
EN 301 489-1 V1.9.2(2011-09)
EN 301 489-3 V1.6.1(2013-12)
EN 301 489-4 V2.1.1(2013-12)
EN 301 489-7 V1.3.1(2005-11)
EN 301 489-9 V1.4.1(2007-11)
EN 301 489-17 V2.2.1(2012-09)
EN 301 489-24 V1.5.1(2010-10)
EN 302 291-2 V1.1.1(2005-07)
EN 50385:2002
EN 50566:2013/AC:2014
EN 62311:2008
Directive LVD 2006//125/CE (jusqu’au 19 avril 2016) et la directive 2014/34/UE (à partir du 20 avril 2016)
EN 60950-1: 2006 / A12: 2011
EN 60950-1: 2006 / A2: 2013
EN 60950-1: 2006 / A11: 2009
EN 60950-1: 2006 / A1: 2010
Directive écoconception 2009/125/CE
Regulation (CE) No. 1275/2008
Regulation (CE) No. 642/2009
Regulation (CE) No. 278/2009
Regulation (UE) No. 617/2013
Directive RoHS 2011/65/UE
Ver. 160217
Marquage CE
Equipement de classe 1
0560
Signature
Jerry Shen
Nom en caractères d’imprimerie
CEO
Position
Taipei, Taiwan
Lieu de délivrance
31/8/2016
Date d'Emission
2016
Année où commence l’apposition
du marquage CE
(Marquage UE de conformité)
EU Konformitätserklärung
Hiermit erklären wir,
Hersteller: ASUSTeK COMPUTER INC.
Anschrift: 4F, No. 150, LI-TE Rd., PEITOU, TAIPEI 112, TAIWAN
Bevollmächtigter: ASUS COMPUTER GmbH
Anschrift des Bevollmächtigten: HARKORT STR. 21-23, 40880 RATINGEN
Land: GERMANY
dass nachstehend bezeichnete Produkte
Produktbezeichnung
ASUS Phone
Modellbezeichnung:
ASUS_Z01BD, ASUS_Z01BDB,
ASUS_Z01BDA,ASUS_Z01BS,
mit den nachstehend angegebenen, für das Produkt geltenden Richtlinien/Bestimmungen übereinstimmen:
EMV – Richtlinie 2004/108/EG (bis 19. April 2016) und Richtlinie 2014/30/EU (ab 20. April 2016)
EN 55022:2010+AC:2011
EN 61000-3-2:2006+A2:2009
EN 55013:2001+A1:2003+A2:2006
EN 55024:2010
EN 61000-3-3:2013
EN 55020:2007+A11:2011
R&TTE – Richtlinie 1999/5/EG
EN 300 328 V1.9.1(2015-02)
EN 300 440-1 V1.6.1(2010-08)
EN 300 440-2 V1.4.1(2010-08)
EN 301 511 V9.0.2(2003-03)
EN 301 908-1 V7.1.1
EN 301 908-2 V6.2.1(2013-10)
EN 301 908-13 V6.2.1(2013-10)
EN 50360:2001/A1:2012
EN 62479:2010
EN 62209-1:2006
EN 62209-2:2010
EN 301 489-1 V1.9.2(2011-09)
EN 301 489-3 V1.6.1(2013-12)
EN 301 489-4 V2.1.1(2013-12)
EN 301 489-7 V1.3.1(2005-11)
EN 301 489-9 V1.4.1(2007-11)
EN 301 489-17 V2.2.1(2012-09)
EN 301 489-24 V1.5.1(2010-10)
EN 302 291-2 V1.1.1(2005-07)
EN 50385:2002
EN 50566:2013/AC:2014
EN 62311:2008
LVD – Richtlinie 2006/95/EG (bis 19. April 2016) und Richtlinie 2014/35/EU (ab 20. April 2016)
EN 60950-1: 2006 / A12: 2011
EN 60950-1: 2006 / A2: 2013
EN 60950-1: 2006 / A11: 2009
EN 60950-1: 2006 / A1: 2010
Ökodesign – Richtlinie 2009/125/EG
Verordnung (EG) No. 1275/2008
Verordnung (EG) No. 642/2009
Verordnung (EG) No. 278/2009
Verordnung (EU) No. 617/2013
RoHS – Richtlinie 2011/65/EU
Ver. 160217
CE Kennzeichen
Geräteklasse 1
0560
Unterschrift
Jerry Shen
Name
CEO
Position
Taipei, Taiwan
Ort
31/8/2016
Datum
2016
Jahr der Kennzeichenvergabe
(EU Konformitätszeichen)
DECLARATION OF CONFORMITY
Per FCC Part 2 Section 2. 1077(a)
Responsible Party Name:
Asus Computer International
Address: 800 Corporate Way, Fremont
, CA 94539.
Phone/Fax No: (510)739-3777/(510)608-4555
hereby declares that the product
Product Name : ASUS Phone
Model Number : ASUS_Z01BDC
Conforms to the following specifications:
FCC Part 15, Subpart B, Unintentional Radiators
Supplementary Information:
This device complies with part 15 of the FCC Rules. Operation is subject to the
following two conditions: (1) This device may not cause harmful interference,
and (2) this device must accept any interference received, including interference
that may cause undesired operation.
5HSUHVHQWDWLYH3HUVRQ¶V1Dme : Steve Chang / President
Signature :
Date : Jul. 21, 2016
Ver. 140331
UE Declaración de Conformidad
Nosotros, los abajo firmantes,
Fabricante: ASUSTeK COMPUTER INC.
Dirección: 4F, No. 150, LI-TE Rd., PEITOU, TAIPEI 112, TAIWAN
Representante autorizado en Europa: ASUS COMPUTER GmbH
Dirección, Ciudad: HARKORT STR. 21-23, 40880 RATINGEN
País: GERMANY
Declaramos el siguiente producto:
Nombre del aparato :
ASUS Phone
Nombre del modelo :
ASUS_Z01BD, ASUS_Z01BDB,
ASUS_Z01BDA,ASUS_Z01BS
El objeto de la declaración descrita anteriormente es conforme con la legislación de armonización pertinente de la Unión:
EMC Directiva 2004/108/CE (hasta el 19 de abril, 2016) y Directiva 2014/30/UE (desde el 20 de abril, 2016)
EN 55022:2010+AC:2011
EN 61000-3-2:2006+A2:2009
EN 55013:2001+A1:2003+A2:2006
EN 55024:2010
EN 61000-3-3:2013
EN 55020:2007+A11:2011
R&TTE – Directiva 1999/5/CE
EN 300 328 V1.9.1(2015-02)
EN 300 440-1 V1.6.1(2010-08)
EN 300 440-2 V1.4.1(2010-08)
EN 301 511 V9.0.2(2003-03)
EN 301 908-1 V7.1.1
EN 301 908-2 V6.2.1(2013-10)
EN 301 908-13 V6.2.1(2013-10)
EN 50360:2001/A1:2012
EN 62479:2010
EN 62209-1:2006
EN 62209-2:2010
EN 301 489-1 V1.9.2(2011-09)
EN 301 489-3 V1.6.1(2013-12)
EN 301 489-4 V2.1.1(2013-12)
EN 301 489-7 V1.3.1(2005-11)
EN 301 489-9 V1.4.1(2007-11)
EN 301 489-17 V2.2.1(2012-09)
EN 301 489-24 V1.5.1(2010-10)
EN 301 357-2 V1.4.1(2008-11)
EN 50385:2002
EN 50566:2013/AC:2014
EN 62311:2008
LVD Directiva 2006/95/CE (hasta el 19 de abril, 2016) y Directiva 2014/35/UE (desde el 20 de abril, 2016)
EN 60950-1: 2006 / A12: 2011
EN 60950-1: 2006 / A2: 2013
EN 60950-1: 2006 / A11: 2009
EN 60950-1: 2006 / A1: 2010
Diseño Ecológico – Directiva 2009/125/CE
Regulation (EC) No. 1275/2008
Regulation (EC) No. 642/2009
Regulation (EC) No. 278/2009
Regulation (EU) No. 617/2013
RoHS – Directiva 2011/65/UE
Ver. 160217
Marcado CE
Clase de equipo 1
0560
Firma
Jerry Shen
Nombre impreso
CEO
Posición
Taipei, Taiwan
Lugar de emisión
31/8/2016
Fecha de emisión
2016
Año en que se colocó
el marcado CE
p
or
p
rimera vez
(marcado CE de conformidad)
