ECognition Developer SDK Automation API User Guide
User Manual:
Open the PDF directly: View PDF ![]() .
.
Page Count: 50
- 1 Overview SDK - Automation API
- 2 Installation and Setup
- 3 Introduction to Local Automation
- 4 Introduction to Remote Automation
- 5 Background Information
- 6 Use Case Sample and Troubleshooting
- 7 Acknowledgments

SDK - AUTOMATIONAPI
TrimbleeCognition Suite
for Windows operating system
Version 9.3.1
Revision 1.0
March 2018
Trimble Documentation
eCognition 9.3 SDK
Automation API
Imprint and Version
Document Version 9.3.1
Copyright © 2018 Trimble Germany GmbH. All
rights reserved. This document may be copied
and printed only in accordance with the terms
of the Frame License Agreement for End Users
of the related eCognition software.
Published by:
Trimble Germany GmbH, Arnulfstrasse 126,
D-80636 Munich, Germany
Phone: +49–89–8905–710;
Fax: +49–89–8905–71411
Web: www.eCognition.com
Dear User,
Thank you for using eCognition software. We
appreciate being of service to you with image
analysis solutions. At Trimble we constantly
strive to improve our products. We therefore
appreciate all comments and suggestions for
improvements concerning our software,
training, and documentation. Feel free to
contact us via the web form on
www.eCognition.com/support. Thank you.
Legal Notes
Trimble® and eCognition® are registered
trademarks of Trimble Germany GmbH in
Germany and other countries. All other
product names, company names, and brand
names mentioned in this document may be
trademark properties of their respective
holders.
Protected by patents EP0858051; WO0145033;
WO2004036337; US 6,832,002; US 7,437,004; US
7,574,053 B2; US 7,146,380; US 7,467,159 B; US
7,873,223; US 7,801,361 B2.
Acknowledgments
Portions of this product are based in part on
third-party software components.
eCognition Developer © 2018 Trimble
Germany GmbH, Arnulfstrasse 126, 80636
Munich, Germany. All rights reserved. © 2018
Trimble Documentation, Munich, Germany.
Last updated: March 14th, 2018

Contents
1 Overview SDK- Automation API 1
1.1 Related Reference 1
1.2 Requirements for the SDK 1
2 Installation and Setup 2
2.1 Compatibility 2
3 Introduction to Local Automation 3
3.1 Relevant Files for Local Automation 3
3.1.1 Help Files 3
3.1.2 API Header Files 3
3.1.3 API Library Files 3
3.1.4 Samples 3
3.2 The eCognition Local Automation API 4
3.2.1 Integration of Local Automation Applications with eCognition Software 4
3.2.2 Dependencies 4
3.3 Building a Local Automation Application 5
3.3.1 Anatomy of an Automation Application 5
3.3.2 Step by Step Sample of Local Automation 6
4 Introduction to Remote Automation 10
4.1 Relevant Files for Remote Automation 10
4.1.1 Help Files 10
4.1.2 API Header Files 10
4.1.3 API Library Files 10
4.1.4 Samples 11
4.2 The eCognition Remote Automation API 11
4.2.1 Integration of Remote Automation Applications with eCognition Software 11
4.3 Building a Remote Automation Application 22
4.3.1 Automating in Script 22
4.3.2 Set up the Environment 23
4.3.3 Perl Script Example 23
4.3.4 Building a SOAP Application 25
4.3.5 Step by Step Sample of Remote Automation 27
eCognition Documentation | i

5 Background Information 35
5.1 Coordinate Systems Used in eCognition Software 35
5.1.1 Pixel Coordinate System 35
5.1.2 User Coordinate System 36
5.1.3 Internal Pixel Coordinate System 37
5.1.4 Conversions of Feature Values 38
6 Use Case Sample and Troubleshooting 39
6.1 Use Case Samples 39
6.1.1 Send a Process Task to eCognition Servers 39
6.2 Debugging Techniques and Troubleshooting 39
6.2.1 Symptoms and Possible Causes 39
7 Acknowledgments 41
7.1 Geospatial Data Abstraction Library (GDAL) Copyright 41
7.1.1 gcore/Verson.rc 41
7.1.2 frmts/gtiff/gt_wkt_srs.cpp 41
7.2 Freetype Project License 42
7.2.1 Introduction 42
7.2.2 Legal Terms 43
7.3 Libjpg License 44
eCognition Documentation | ii
Overview SDK- Automation API
The Automation API (application programming interfaces) is a component of the eCognition
Developer software development kit (SDK). The Automation API can be used for automation of
Trimble software and orchestrating the different processes.
This Automation API User Guide provides general instruction about the automation of Trimble
software:
lLocal automation of the Analysis Engine Software via the AMIEngine Interface. This allows you
to embed the Analysis Engine Software into other software.
lRemote Processing via SOAP Interface. This enables you to provide functionality that can be,
for instance, used in a script, in order to automate eCognition Server®.
1.1 Related Reference
In the related Automation API reference help file you find detailed information about the about
classes and functions that make up automation applications, including some guidance.
Go to the folder SDK, which is installed in the eCognition Developer installation directory. The
default path is C:\Program Files\Trimble\eCognition Developer [Version
Number]\SDK\Automation\Help\Automation_Help.chm.
1.2 Requirements for the SDK
The requirements of starting programming with the Automation API are as follows:
lA licensed version of eCognition Developer
lMicrosoft Visual Studio 2015
lThe eCognition Automation Application Programming Interface (DAMI-API) headers and .lib
files.
1
eCognition Documentation | 1
Installation and Setup
This API is a component of the eCognition Software Development Kit (SDK). The SDK installation is
an optional part of the eCognition 9.3 installation.
If the SDK is not yet installed on your machine, rerun the eCognition Developer installation. During
the installation sequence on the Choose Components dialog box, you have to select the SDK
checkbox only.
2.1 Compatibility
Any application that uses the SDK will need to be recompiled or rebuilt when every SDK upgrade.
2
eCognition Documentation | 2
Introduction to Local Automation
3.1 Relevant Files for Local Automation
Below are listed the files included in the eCognition Developer installation that are relevant to use
of the Automation API for local automation.
Go to the folder SDK, which is installed in the eCognition 9.3 installation directory. The default path
is C:\Program Files\Trimble\eCognition Developer [Version Number]\SDK
3.1.1 Help Files
l.\Automation\Help\AutomationAPI_Help.chm
3.1.2 API Header Files
l.\Automation\Include\AMIEngine.h
l.\Automation\Include\DMIExports.h
l.\Automation\Include\DataIO\*.h
l.\Automation\Include\Dbase\*.h
3.1.3 API Library Files
l.\Automation\Lib\DRPCom.lib
l.\Automation\Lib\DataIO.lib
l.\Automation\Lib\Engine.lib
3.1.4 Samples
l.\Automation\Samples\AMI\SampleAMIEngine
3
eCognition Documentation | 3
3 Introduction to Local Automation
3.2 The eCognition Local Automation API
3.2.1 Integration of Local Automation Applications with eCognition
Software
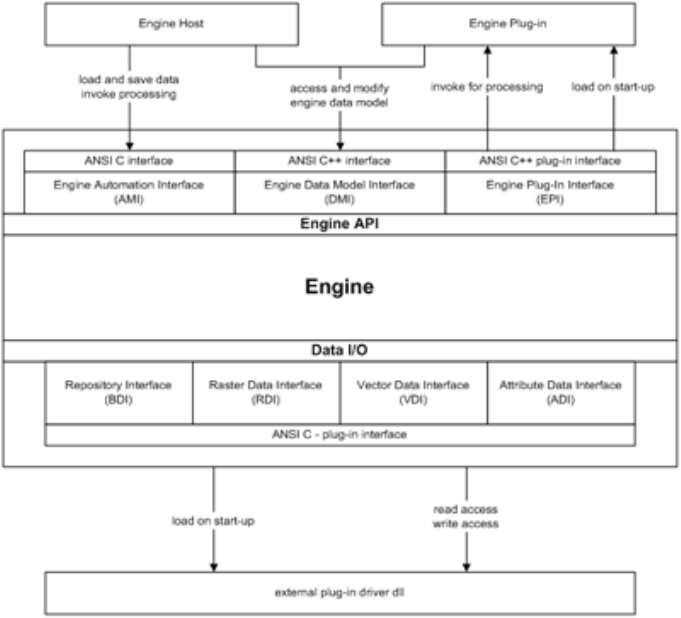
The AMIEngine Interface unlike the Remote Automation API allows us to directly access the
Analysis Engine Software modules. This allows the possibility of an embedded eCognition system.
In other words, it is possible to fully integrate the Analysis Engine Software into your own software.
This is possible through a simple class interface which provides links into the Analysis Engine
Software, and opens up the functionality to do image analysis with the Analysis Engine Software.
Figure 3.1. Overview of the API
3.2.2 Dependencies
eCognition software need not be running for your application to function. However, as your
application has a number of dependencies to the eCognition software, your custom application
should reside in the same directory as the engine.dll.
In the case where this is not possible, here is a list of dependencies that must be carried with your
application.
eCognition Documentation | 4
3 Introduction to Local Automation
Binaries
Below is a list of the DLLs usually found in the bin directory of the eCognition software. These are
required to be at the same path as your custom application.
lVDI.dll
lsqlite3.dll
lregex.dll
lRDI.dll
lProdCnfg.dll
lEngine.dll
lDBase.dll
lDataIO.dll
lBDI.dll
lADI.dll
lAddinMngr.dll
Configurations and Add-ins
Below is a list of directories containing plug-ins, drivers, and configurations. These files are looked
for by the engine and should reside as is in the same path where you locate the engine.dll file.
As many drivers and plug-ins as necessary in your case may be included in their respective
directories.
lPlugins/
lPcf/
lLic/
lDrivers/
lConfig/
3.3 Building a Local Automation Application
3.3.1 Anatomy of an Automation Application
An automation application API simply provides methods by which to link into the main dll
components of eCognition software, in order to control the processing of images. In this way, the
AMIEngine Interface can be used to create tools which can automate you image processing work,
or link eCognition software in with your applications.
eCognition Documentation | 5
3 Introduction to Local Automation
The functionality is provided via a class hierarchy. Important classes used are class AMIEngine,
class Project, class StitchInfo, and class ImgLayer. For details please see the Automation API help
reference.
The use of the AMIEngine Interface is centered around the AMIEngine class. This is the interface to
the Analysis Engine Software itself. All other items are used within the AMIEngine. In the end, the
aim is to analyze your images with the Analysis Engine Software. This is done, naturally, through
the AMIEngine::Analyze() function. But first you have to load your images and the rule set you are
using to analyze them.
3.3.2 Step by Step Sample of Local Automation
In this section, we go step by step through the process of creating a simple automation
application.
This example can be found in the Samples folder.
This step by step sample shows the basic steps required in creating an automation application.
Most steps must be done in a certain order. For example, a project object cannot be used within
the Analysis Engine Software until it has been set-up.
Includes
Our sample uses standard C++ and should compile and run on all environments supported by
eCognition. Here aside from including our own headers, we have to include windows.h if we are
building on windows. We manage this with a simple pre-processor command.
#ifdef WIN32
#define WIN32_LEAN_AND_MEAN // Exclude rarely-used stuff
#include <windows.h>
#endif//WIN32
#include "AMIEngine.h"
#include "DBase/DASCIIFile.h"
#include "DataIO/Project.h"
#include "DataIO/ImgLayer.h"
#include "DataIO/GeoInfo.h"
#include "DataIO/ExportTmpl.h"
The Main Application
Because our application is quite small and simple, we keep all the code in the main function.
It starts with it accepting a simple set of command arguments. If the app is incorrectly invoked, the
usage is printed to standard out. Otherwise, we assign the command arguments to strings which
the application uses later on.
int main(int argc, char* argv[])
{
eCognition Documentation | 6
3 Introduction to Local Automation
if (argc < 3 || argc > 4)
{
printf ("usage: SampleAMIEngine.exe image_file
ruleset_file <start>");
return 0;
}
DString sImg = argv[1],
sRlst =argv[2],
sStartProcessName =(argc == 4)?argv[3]:"",Err;
As we need the contents of the rule file – which is a standard XML format ASCII file – we can use the
provided DASCIIFile class to simplify the file access work for us. Here we simply assign the file name
to an object created on the stack. Our DASCIIFile guarantees that our File Handle and memory
allocation are cleaned up after the object is removed from the stack – at the end of the main
function scope.
Then, before we can do any work with the Analysis Engine Software, we need to create it. This is
done simply by creating an AMIEngine object, and calling its Create function.
// set the filename and path of the ruleset we are using DASCIIFile
RuleFile(sRlst);
printf("Starting up the engine...\n");
// Creating the engine
AMIEngine ami;
if (!ami.Create())
{
printf ("Error setting up the scene: %s",
ami.GetErrorMsg(true));
ami.CleanUp();
return -1;
}
Once we have our Analysis Engine Software Software object instantiated and created, we can
setup the work we want it to do. The work being done is done within a project. First we have to
setup this project for use. That is, we need to add the images to be analyzed to the project, and if
we are exporting data, we need to set the export specification. This is done through the RuleFile.
// creating Project
Project project;
project.AddImgLayerReadData(sImg, sErr);
if (!sErr.IsEmpty())
{
eCognition Documentation | 7
3 Introduction to Local Automation
printf("Failed to read image layers: %s", sErr);
return -1;
}
// disable geo information, then set unit to pixels
{
Project::ChldItr layer(&project, DataIO::IMG_LAYER);
for_all(layer)
{
ImgLayer* imgLayer = static_cast<ImgLayer*>(*layer);
// setting geo info to 0
imgLayer->ChngGeoInfo().SetGeoOff(0,0);
imgLayer->ChngGeoInfo().SetGeoRes(1);
imgLayer->ChngGeoInfo().SetGeoSrc(GeoInfo::USER);
}
}
// setting geo info to 0
project.ChngGeoInfo().SetGeoOff(0,0);
project.ChngGeoInfo().SetGeoRes(1);
project.ChngGeoInfo().SetGeoSrc(GeoInfo::USER);
// manually modified geo information
project.SetUnit(DUnitInfo::S_PIXEL_GUI);
// set the export path to use
project.UpdateExprtSpec(RuleFile);
We already have a project in which to do the work, and we have a rule set that tells the Analysis
Engine Software what work to do. Next, we need to give all the work to the Analysis Engine
Software.
// setting up the engine
if (!ami.SetupProject(&project))
{
printf ("Error setting up the project: %s",ami.GetErrorMsg(true));
return -1;
}
Our DASCIIFile as a casting operator for char* so we can later simply pass the file through to those
functions requiring the content of the file.
eCognition Documentation | 8
3 Introduction to Local Automation
// setting rule set
if (!ami.SetRuleSet(RuleFile, sStartProcessName.GetStr()))
{
printf("Error setting rule set: %s", ami.GetErrorMsg(true));
return -1;
}
Now there is nothing left to do besides start the action. Tell the Analysis Engine Software to start
analyzing. The function returns when the job is finished.
// starting analysis
printf("Starting image analysis...\n");
if (!ami.Analyze())
{
printf("Error during analysis: %s", ami.GetErrorMsg(true));
return -1;
}
eCognition Documentation | 9
Introduction to Remote Automation
This chapter discusses the remote automation of processes in the eCognition Server®via the
eCognition SOAP protocol interface.
Provided is also the DIACmdClient and DIAMkWksp tools. While these are not a programming
interfaces, but command line tools, they do utilize the SOAP protocol interface to provide
functionality that can be, for instance, used in a script, in order to automate eCognition Server®.
4.1 Relevant Files for Remote Automation
Below are listed the files included in the eCognition Developer installation that are relevant to use
of the Automation API for remote automation.
The lib files provided in the Automation installation are not required for DSOAP to build or run.
These are provided for the use of the Automation DAMI-API. Go to the folder SDK, which is
installed in the eCognition 9.3 installation directory. The default path is C:\Program
Files\Trimble\eCognition 9.3\SDK
4.1.1 Help Files
l.\Automation\Help\AutomationAPI_Help.chm
4.1.2 API Header Files
l.\Automation\Include\dataio.h
l.\Automation\Include\DiaJS.h
l.\Automation\Include\SVector.h
l.\Automation\Include\DataIO\*.h
l.\Automation\Include\DBase\*.h
l.\Automation\Include\soap\*.h
4.1.3 API Library Files
Not applicable
4
eCognition Documentation | 10
4 Introduction to Remote Automation
4.1.4 Samples
l.\Automation\Samples\DSoap
4.2 The eCognition Remote Automation API
There are two ways sending a job to the eCognition Server®:
lThe eCognition SOAP Interface
lThe command line client.
Both methods have advantages and disadvantages. The main advantage of SOAP Interface is its
high volume of functionality. More or less, the SOAP Interface can do everything related to
eCognition Server®. In contrast, the DIA Command Line Client is fixed to send and wait and also
the creation of a workspace file is required. However, the DIA Command Line Client is easier to use
and in most cases way more than enough for script solutions.
4.2.1 Integration of Remote Automation Applications with eCognition
Software
Starting a Client with a Preloaded Element
For integration projects you may want to start a client with project, image or rule set loaded. The
following parameters are available:
/image - image file
/ruleset - rule-set file
/project - dpr to be loaded
/product - product to be started
/portal - portal to be started
/workspace - dpj to be loaded
For example, you can open the Life portal using:
DIAClient.exe /product "Definiens Developer XD" /portal "Life"
Command Line Tools
DIA Command Line Client
The DIA Command Line Client is designed to submit analysis jobs to the DIA Job Scheduler and to
monitor the submitted jobs. A job is represented by a list of projects stored in a workspace file. The
workspace files can be created using DIA Command Line Client. The workspace file can also point
to a rule-set file that it will be used for the analysis of the projects. However, you have the ability to
provide a different rule set file for an image analysis.
eCognition Documentation | 11
4 Introduction to Remote Automation
When you start up the DIA Command Line Client a list of commands and their definitions is
displayed:
DIA Command Line Client.
Usage: DIACmdClient action [options]
workspace_file [ruleset_file] [scene_name]
or: DIACmdClient action [options] -db user[:pwd]@storage
workspace_id [ruleset_id]
actions:
s - submit the workspace to analysis
p - submit the workspace for stitching
w - wait for the workspace to finish
t - test the state of the analysis
r - rollback the workspace and delete results
d - delete single run (with results)
sw - submit to analysis and wait
pw - submit for stitching and wait
options:
-p - analyse tiles only
-top - analyse top scenes only
-u url - use specified URL to access the Job Scheduler
-t sec - maximum wait time for the Job Scheduler to start up
-run name - specifies the run name
-fsr - force submit even if other runs are not finished yet
-pkg name - specifies package to use on the Grid
-scn file - submit only scenes listed in the given file
-ro - read only; do not modify the workspace
-db - open workspace from Data Management storage
-auth url - use specified URL to access the Authentication Server
For example, when you only want to submit an image analysis job you need to use the (s)
command. The DIA Command Line Client will perform the command and when the submission is
completed the control returns to you, whereas when you want to submit and monitor the job
(sw) or just monitor it (w) then the command is blocked until the job is finished.
When a job is monitored, it is identified in the Job Scheduler using the workspace GUID stored in
the workspace file. When several jobs are submitted from the same workspace, then only the last
job is monitored.
eCognition Documentation | 12
4 Introduction to Remote Automation
The (-t sec) command displays on the screen the maximum waiting time (in seconds) for the
DIA Job Scheduler to start up. This is useful when for instance DIA Job Scheduler is started in the
background and then immediately the DIA Command Line Client is started from the same batch
script. DIA Job Scheduler needs some time for initialization and connecting to the license server.
The (-ro) option leaves the content of the workspace unchanged. Otherwise new operation
(“Analyze”) with current user name and time stamp is added to the operation history and new
versions for all submitted project are created. Also if (w) command is used then the resulting
status after analysis is stored in the workspace.
The (-db) option allows to open workspace from Data Management storage instead of a file. In
this case also the rule set is taken from the storage, consequently IDs should be used instead of
file names. The user name and password are checked in the Authentication Server, which can be
specified by using the (-auth) option. Otherwise the default Authentication Server URL is taken
from the configuration file.
The (-fsr) option forces the processing of a job even if other jobs are running. If (-fsr) is not
included, submitting an action from the command line, while another run is being processed, will
return the −2 error code.
If you want to change the delimiter, which are used in exported .csv files, you can do this by using
the XML node ahead in the eCognition.cfg file stored in the config folder.
The eCognition.cfg file stored in the config folder is the configuration file used by the DIA
Command Line Client.
<eCognition config-ver="2.0" >
<general>
<key name="temp path" string="" />
<key name="license check timeout" integer="60" />
<key name="default server configuration" string="eCognition"/>
</general>
<logging>
<key comment="0 means no logging, any greater value is time in milliseconds to
check for new loaded modules" integer="0" name="log loaded modules"></key>
</logging>
<storage>
<key name="authentication server" string="http://localhost:4002/" />
</storage>
<ODBC>
<key name="oracle dsn" string="Definiens Oracle" />
</ODBC>
<CSV-settings>
<key name="decimal separator" string="." />
<key name="column delimiter" string=";" />
</CSV-settings>
<default-config>
<plugins>
<key string="eCognition Basic Process Algorithms v0.1" name="plugin1"></key>
eCognition Documentation | 13
4 Introduction to Remote Automation
<key string="eCognition Internal Process Algorithms v0.1" name="plugin2"></key>
<key string="eCognition Thematic Layer Algorithms v0.1" name="plugin3"></key>
<key string="eCognition Basic Features v0.1" name="plugin4"></key>
<key string="eCognition Vector Features v0.1" name="plugin5"></key>
<key string="eCognition Internal Export Process Algorithms v0.1"
name="plugin6"></key>
</plugins>
</eCognition>
Starting with version 7.0, all submitted jobs contain configuration requirement information. You
cannot set this information with command options, for this purposes you should use the
eCognition.cfg file:
lThe entry default server configuration contains server product name. The default value is
eCognition. That means, all server products with name starting with eCognition (for example ,
eCognitionEarthServer) comply to this requirement. If there are several configurations
installed that comply to this requirement, configuration server will pick up one of them, but
you cannot be sure which one. Thus, if you want a job to run on a specific configuration you
should supply the full product name
lThe entry plugins allow you to add some specific plug-in requirements as the presence of a
special plug-in. If you add a record to the plug in list, the configuration server searches for a
configuration with the plug-in. If the service could not find such configuration the job will fail
lThe entry authentication server contains the URL of the authentication server.
Example 1
D:\test>\DIA\bin\DIACmdClient -sw test1.dpj fastrule.dcp
DIA Command Line Client.
[Wed Sep 28 15:26:31 2005] : The job was submitted.
[Wed Sep 28 15:26:31 2005] : Waiting for results...
[Wed Sep 28 15:26:32 2005] : A1: processing: : lcn001 / 2696 / 5.0.3 Build 367
[Wed Sep 28 15:26:33 2005] : A1: done: 1 s: lcn001 / 2696 / 5.0.3 Build 367
[Wed Sep 28 15:26:33 2005] : A2: processing: : lcn001 / 2696 / 5.0.3 Build 367
[Wed Sep 28 15:26:34 2005] : A2: done: 1 s: lcn001 / 2696 / 5.0.3 Build 367
[Wed Sep 28 15:26:36 2005] : A3: done: 1 s: lcn001 / 2696 / 5.0.3 Build 367
[Wed Sep 28 15:26:36 2005] : A4: done: 0 s: lcn001 / 2696 / 5.0.3 Build 367
[Wed Sep 28 15:26:36 2005] : A5: done: 1 s: lcn001 / 2696 / 5.0.3 Build 367
[Wed Sep 28 15:26:36 2005] : A6: processing: : lcn001 / 2696 / 5.0.3 Build 367
[Wed Sep 28 15:26:37 2005] : A6: done: 1 s: lcn001 / 2696 / 5.0.3 Build 367
[Wed Sep 28 15:26:37 2005] : A7: done: 0 s: lcn001 / 2696 / 5.0.3 Build 367
eCognition Documentation | 14

4 Introduction to Remote Automation
[Wed Sep 28 15:26:37 2005] : A8: processing: : lcn001 / 2696 / 5.0.3 Build 367
[Wed Sep 28 15:26:38 2005] : A8: done: 1 s: lcn001 / 2696 / 5.0.3 Build 367
[Wed Sep 28 15:26:38 2005] : A9: done: 0 s: lcn001 / 2696 / 5.0.3 Build 367
[Wed Sep 28 15:26:38 2005] : A10: processing: : lcn001 / 2696 / 5.0.3 Build 367
[Wed Sep 28 15:26:39 2005] : A10: done: 1 s: lcn001 / 2696 / 5.0.3 Build 367
[Wed Sep 28 15:26:40 2005] : A11: done: 1 s: lcn001 / 2696 / 5.0.3 Build 367
[Wed Sep 28 15:26:40 2005] : A12: done: 0 s: lcn001 / 2696 / 5.0.3 Build 367
[Wed Sep 28 15:26:41 2005] : Total: done: 8 s
Example 2
D:\test>\DIA\bin\DIACmdClient -sw test2.dpj fastrule.dcp
DIA Command Line Client.
[Wed Sep 28 15:31:48 2005] : The job was submitted.
[Wed Sep 28 15:31:48 2005] : Waiting for results...
[Wed Sep 28 15:31:51 2005] : New Project: failed: 0 s: Error accessing image
data: File '\Home\Exp\image_pw.tif' not found or not accessible / lcn001 /
2696 / 5.0.3 Build 367
[Wed Sep 28 15:31:52 2005] : Total: failed: 0 s
DIA Workspace File Creator
DIA Workspace File Creator is designed to simplify creating workspace files. It can be used to
automatically import all image files from specified folder recursively into the workspace. DIA
Workspace File Creator is a command line tool and it has the following syntax:
DIAMkWksp wksp_file [input_fldr] [import_tmplt_name] [export_tmplt_
file][add_tmplt_fldr]
Attribute Description
wksp_file Output workspace (.dpj) file to be created
input_fldr Optional folder which will be search recursively for
image files
import_tmplt_name
Optional name of import template to be used; if not
given then default template is used; import templates
are defined in Default.scm configuration file
eCognition Documentation | 15

4 Introduction to Remote Automation
export_tmplt_file Optional path to the file containing an export template
to be saved the new workspace file
add_tmplt_fldr Optional folder containing import template files to be
used
Example 3
To open the Rule Set Mode portal from the command line, use:
"C:\Program Files\Trimble\eCognition Developer 9.3\bin\DIAClient.exe"
/product "eCognition Developer" /portal "Rule Set Mode"
In this example, the new workspace file myWksp.dpj will be created. The folder
\\srvr\imgs\myImgs\ will be scanned recursively and all image files found in it will be imported to
the workspace; one file per scene. Additionally the export template found in the myOldWksp.dpj
file will be added to the new workspace.
DIAMkWksp myWksp.dpj \\srvr\imgs\myImgs\ "Generic – one file per scene"
myOldWksp.dpj
About Importing Data
The description of the input data (Input Data Specification), starting with Definiens product line
version 7.0, is kept in the workspace file in an SQLite3 database format. The workspace file (.dpj) is
saved by Definiens GUI client. But it can also be created and edited manually or using for instance
Perl script, in XML format of Definiens product line 5.0. When opened in GUI client 7.0 or later, it will
be automatically converted to the SQLite3 database format. Here is the example of a workspace
file containing one folder with one project with two image layers in XML format:
<data-inst name="myWorkspace" scheme="High Content Analysis" guid=
"74D6C48C-C708-4CC1-A66A-3368987A8C26">
<data-inst name="myFolder" type="Folder">
<data-inst name="myProject" type="Project" oper-id="1" ver="1"
status="1" scene-id="1">
<data-inst name="Layer 1" type="Image Layer" file="D:\Home\Exp\
image.frm" channel="0" raster-data-type="1">
<geo-info lower-left-x="0." lower-left-y="0." resolution="1."
source="0" size-x="640" size-y="640" />
</data-inst>
<data-inst name="Layer 2" type="Image Layer" file="D:\Home\Exp\
image.frm" channel="1" raster-data-type="1">
<geo-info lower-left-x="0." lower-left-y="0." resolution="1."
source="0" size-x="640" size-y="640" />
</data-inst>
<geo-info lower-left-x="0." lower-left-y="0." resolution="1."
source="2" size-x="640" size-y="640" />
</data-inst>
</data-inst>
<export-tmpl>
eCognition Documentation | 16

4 Introduction to Remote Automation
..........................
</export-tmpl>
<oper-history>
<operation type="0" time="1128411820" user="somebody" />
</oper-history>
</data-inst>
The workspace is organized in a hierarchical structure of data objects. Each data object is
represented as data-inst node. The types of data objects are defined in the Default.scm schema
configuration file. The parent (top root) object is the workspace itself. The following attributes have
to be provided:
Attribute Description
name Workspace name.
scheme Name of the scheme. It has to match the scheme defined in the Default.scm
configuration file.
guid Global unique identifier of the workspace.
The workspace can contain folders or projects. The workspace includes also an export-tmpl node
and an oper-history node, which is the list of operations performed on the workspace. Each
operation is represented by operation node containing the following attributes:
Attribute Description
type
0 means Create
1 means Edit
2 means Analyze.
time Timestamp when the operation was performed (number of seconds since
01.01.1970).
user Name of the user who performed the operation.
The folder can contain projects or other folders. The folder node has two attributes:
Attribute Description
name Folder name.
type
It usually equals Folder. More instances of data types exist and can be used for
grouping. These data types are defined in the Default.scm schema configuration
file.
The project node requires the following attributes:
eCognition Documentation | 17

4 Introduction to Remote Automation
Attribute Description
name Project name.
type It usually equals Project.
scene-id Scene/project identifier, it has to be unique within the workspace file.
ver Project version, it can always be 1, if we don’t want to keep history of changes.
opder-id One-based index of the operation which created this project in the oper-history
node.
status Status of the project, 1 means Created.
The project consists of image layers. It also includes a geo-info node with geocoding information
for the entire scene. The geo-info node has the following attributes:
Attribute Description
lower-left-x, lower-left-y Coordinates of the lower left corner in units.
resolution Unit to pixel ratio, so 1 means that unit = pixel.
size-x, size-y Size of the image in pixels.
source
0 means no geo-coding
1 means geo-coding retrieved from data file
2 means geo-coding edited by user.
The image layers have their own geo info node which can be used to align the layers towards each
other. The image layer node requires the following attributes:
Attribute Description
name Image layer name.
type It has to be equal Image Layer.
file Path to the file containing image data.
channel Zero-based index of the channel in the file to be used.
raster-data-type
Data-type of the pixels in the image.
1: unsigned 8-bit
2: unsigned 16-bit
4: signed 16-bit
8: unsigned 32-bit
16: signed 32-bit
32: floating point 32-bit.
eCognition Documentation | 18

4 Introduction to Remote Automation
About the Export Specification List
The Export Specification List defines exported data from a project. It is simply a list of exported
items. Each item has a name, type, driver code and path.
Example of export specification in XML code:
<export-spec>
<item name="ProjectFile" type="Scene" driver="DPR" path="\\ourSrvr\
Projects\myWksp\dpr\myProject.v2.dpr" />
<item name="MyStatsA" type="Table" driver="CSV"
path="\\ourSrvr\Projects\
myWksp\results\MyStatsA\myProject.v2.csv" />
<item name="ProtocolExport" type="Path"
path="\\ourSrvr\Projects\myWksp\
results\ProtocolExport\myProject.v2\" />
</export-spec
The item name is used as an identifier for connecting the item with the rule-set. So it means that
the rule-set has to use the same item name. There are two special item names: ProjectFile and
ProtocolExport. The ProjectFile item name, which is not used in a rule-set, identifies the binary
project file, containing image object data and classification results, and it can also be used by the
engine as an input for the next analysis. The ProtocolExport item name is used to define the
output folder for deprecated protocol operations. All protocol operations used in the rule-set will
store any exported files in the folder defined by this export item.
The item type and driver code define the format of exported item. Currently supported (type,
driver) pairs are:
Attribute Description
("Scene","DPR") Complete binary project file containing image objects and the rule
set.
("Scene","DPR_
MIN")
Minimized binary project file without the rule set and unused
classes.
("Table","CSV") Comma separated values text file.
("Table","ODBC") Database accessed via ODBC driver.
("Raster","TIF") Tagged image files.
("Raster","JPG") JPEG JFIF files.
("Raster","JP2") JPEG 2000 files.
("Raster","PNG") Portable network graphics.
eCognition Documentation | 19

4 Introduction to Remote Automation
("Raster","BMP") Windows or OS/2 Bitmaps.
("Raster","PIX") PCIDSK.
("Raster","ASC") ESRI ASCII GRID files.
("Raster","IMG") Erdas Imagine Images.
("Raster","NTF") National Imagery Transmission (NITF).
("Raster","SAR") ProSmart SAR-files.
("Vector","SHP") Shapefile.
("Path","") Used for ProtocolExport item.
The item path is the complete path with the file name, where the exported data should be stored.
The exception is the ProtocolExport item. In this case only the folder should be given. There are
two more item attributes for the ODBC driver: insert and select. Also the path has a little bit
different meaning.
About Export Templates
The Export Template enables definition of the Export Specifications for all projects in the
workspace in general form. It can be achieved by using special variables which are substituted
with proper values for particular projects.
Example of export template in XML code:
<export-tmpl>
<item name="ProjectFile" type="Scene" driver="DPR" path= "
{:Workspc.Dir}\
dpr\{:Project.Name}.v{:Project.Ver}.dpr" />
<item name="MyStatsA" type="Table" driver="CSV" ext="csv" path=
"{:Workspc.Dir}\results\{:Item.Name}\{:Project.Name}.v
{:Project.Ver}.{:Ext}" />
<item name="ProtocolExport" type="Path" path= "{:Workspc.Dir}\results\
{:Item.Name}\{:Project.Name}.v{:Project.Ver}\" />
</export-tmpl>
Possible special variables are:
Attribute Description
{:Workspc.Name} Name of the workspace.
{:Workspc.Name} Path of the workspace file.
{:Project.Name} Name of the scene (absolute in the workspace).
{:Project.Ver} Scene state version number.
eCognition Documentation | 20

4 Introduction to Remote Automation
{:ImgLayer(n).Dir} Path to the input image layer n.
{:Item.Name} Name of the export item itself.
{:Ext} File format extension for the item’s driver.
The export item in the export template has an additional attribute, ext, which will be substituted
under the {:Ext} variable.
About the ODBC Driver
The ODBC driver in the export item enables the to export of statistical data into database and
loading it back for viewing in DIA Command Line Client.
Example of using ODBC driver in the export template:
<export-tmpl>
<item name="MyStatsB" type="Table" driver="ODBC" path="DSN=MS
Access Database;DBQ={:Workspc.Dir}\DIA.mdb" insert="INSERT INTO
statistics VALUES (%scene_id%,%scene_ver%,%feature%,%value%)"
select="SELECT * FROM statistics_cross_view" />
</export-tmpl>
The path attribute in the export item using ODBC driver contains the ODBC Connect String. In the
example above, the Connect String uses the default ODBC Data Source for accessing Microsoft
Access database files.
The insert attribute defines an SQL statement to be used for inserting a statistical value into the
database. The statement contains special variables which will be substituted with proper values
while exporting the data. The special variables are:
Attribute Description
%scene_id% ID of the scene.
%scene_
ver% Scene state version number.
%feature% Name of the exported statistical feature.
%value% Value of the exported statistical feature.
%row% When exported feature has multiple values per scene, this variable will be
incremented.
The select attribute defines an SQL statement to be used for selecting the results from the
database. The returned record-set should have some layout as exported CSV files. In the example
above it is cross query from the statistics table.
eCognition Documentation | 21
4 Introduction to Remote Automation
The eCognition SOAP Interface
The eCognition SOAP Interface allows the sending of commands and retrieval of information from
the Job Scheduler. The Job Scheduler is a web service which is used for submitting and monitoring
user jobs. It is also used by the analysis engines for requesting jobs to processing.
The Job Scheduler web service can be accessed from any application using SOAP protocol. The
service is described using WSDL (Web Service Description Language). The description can be
found in the DiaJS.wsdl file. The client applications can be developed using WSDL parser and SOAP
tools for particular programming language. For example, eCognition is using gSOAP for C++
The gSOAP compiler generates the DiaJS.wsdl file from a DiaJS.h include file. It also generates .cpp
files with necessary stub classes for accessing the web service. The workflow with other SOAP
tools and/or other programming languages may vary a little bit. In this case please refer to the
documentation of the appropriate SOAP tool.
There are two most important service methods for remote job processing. To submit a user job
use the js__SubmitJob() service method. To monitor submitted jobs use the js__
RequestStatusInfo() service method.
4.3 Building a Remote Automation Application
4.3.1 Automating in Script
When automating eCognition software in script, you are most likely using the provided tools
DIACmdClient and/or DIAMkWksp. The example code provided below in this section is written in
the Perl scripting language. However, an adaptation of this code into another scripting language
can be easily achieved.
The DIA Command Line Client is provided with the eCognition Server®package and it can be
found in the bin folder under the eCognition Server Version number, the complete file path is:
C:\Program Files\eCognition Server Version number\bin\DIACmdClient.exe.
Getting the Images from a Repository
Your image files need to be stored in a location where you can access them by using Microsoft
Network (for example \\image-server\repositroy\input…).
Let’s consider as an example the folder mentioned above as a drop an analyze folder. If files or
folders are dropped into this folder they should be analyzed. A script should detect if there is a
new image and send it to be processed. Find a proper solution in step 1 of the example script.
Import Images and Analyze them using a Specified Rule Set
The DIA Command Line Client can provide the eCognition Server®with workspace files.
If a workspace file does not already exist on your machine you should create one.
eCognition Documentation | 22
4 Introduction to Remote Automation
Exporting the Results into a CSV File or a Database
This is covered by the workspace file. You can decide if you want to write the data into a database
(DB) or a CSV file. For the DB solution there is a need to establish an ODBC connection between
eCognition software and the DB server.
Removing Image Reference Files
The image reference files are not included any longer within the database. The removal of the files
can be done by the script.
4.3.2 Set up the Environment
1. Install the eCognition Server®on a computer of your choice. You can allocate as many
instances of Analysis Engine Software as you want to be connected to the eCognition Server®
while the installation is running.
2. If the automation scripts will be executed on the eCognition Server®make sure you can
access the binary folder with your scripts. (C:\Program Files\eCognition Server Version
number\bin).
3. If a different machine is used, please copy the binary folder to the local disk of this machine.
And make sure that you can access the binary folder with your scripts. In addition the
eCognition Server®must be declared within the DIA Command Line Client. Therefore the
configuration file (C:\Program Files\eCognition Server Version
number\bin\config\eCognition.cfg) must be edited. Open the eCognition.cfg file, find the entry
<js-server ip=“localhost” port=“8184”/> and replace “localhost” with the IP or the DNS name of
your eCognition Server®.
4. Create an export template file.
5. Run your scripts on an endless loop.
4.3.3 Perl Script Example
The following Perl Script example illustrates the steps that need to be followed when you use
eCognition Server®with DIA Command Line Client.
1. Detect the new files.
2. Create a workspace file.
3. Send the workspace file to the processing system.
4. Wait until job is completed.
5. Delete all input files.
Step 1: Detect the New Files
#!/usr/bin/perl
eCognition Documentation | 23
4 Introduction to Remote Automation
$input = "\\\\server\\Test\\input";
$output = "\\\\server\\Test\\output";
loop:
@dir= `dir /b \"$input\"`;
if (! $dir[0]) {
print "Directory empty. Go for loop.\n";
sleep 1;
goto loop;
} else {
print "Image(s) or folder(s) found in the input directory.
Go for analysis\n";
Step 2: Create a Workspace File
print "Creating the workspace file(s)\n";
system "if exist \"$output\\myWorkspace1.dpj\"
del \"$output\\myWorkspace1.dpj\"";
$command = "c:\\bin\\DIAMkWksp.exe $output\\myWorkspace1.dpj
\"$input\" \
"Generic - one file per scene\" C:\\Example\\ExportTemplate.dpj";
print "$command\n";
system $command;
system "if exist \"$output\\myWorkspace2.dpj\" del
\"$output\\myWorkspace2.dpj\"";
$command = "c:\\bin\\DIAMkWksp.exe $output\\myWorkspace2.dpj
\"$input\" \
"Generic - one file per scene\" C:\\Example\\ExportTemplate.dpj";
print "$command\n";
system $command;
Step 3: Send the Workspace File to the Processing System
print "Sending the job(s) to be analyzed\n";
$command = "c:\\bin\\DIACmdClient.exe
-s $output\\myWorkspace1.dpj ruleset1.dcp"; # analyze with RuleSet1
print "$command\n";
system $command;
$command = "c:\\bin\\DIACmdClient.exe
-s $output\\myWorkspace2.dpj ruleset2.dcp"; # analyze with RuleSet2
print "$command\n";
system $command;
Step 4: Wait Until Job Is Completed
print "Waiting for job(s) finish\n";
$command = "c:\\bin\\DIACmdClient.exe -w $output\\myWorkspace1.dpj";
# Wait for Workspace 1
eCognition Documentation | 24
4 Introduction to Remote Automation
print "$command\n";
system $command;
$command = "c:\\bin\\DIACmdClient.exe -w $output\\myWorkspace2.dpj";
# Wait for Workspace 2
print "$command\n";
system $command;
Step 5: Delete All Input Files
print "Delete the image(s) input files\n";
$command = "del /q $input\\*.*";
# delete all files in the input directory
print "$command\n";
system $command;
@dir= `dir /b \"$input\"`;
# delete all folders in the input directory
for $i (@dir){
chomp $i;
print "Deleting directory \"$input\\$i\"";
system "rmdir /s /q \"$input\\$i\"";
}
print "Go for loop\n";
goto loop; }
4.3.4 Building a SOAP Application
Submitting a Job
The js__SubmitJob() service method should be used to submit a job. It takes js__UserJob
as the input parameter.
The js__UserJob contains the list of jobs to be executed. It’s stored in the vJobs member of its
base js__JobList. So if a user wants to analyze a single scene, he has to put a single element
into vJobs array. js__UserJob has one more important member, strWkspGUID, which contains
the GUID which is used to identify a submitted job if it has to be monitored later. Because there
may be more jobs sent with the same GUID, the Job Scheduler assigns new integer id to each job it
receives. This jobID is returned as the output parameter of js__SubmitJob() method.
The vJobs array is a member of js__JobList, which is the base for js__UserJob. Each element
of vJobs can be either js__UserJob or js__JobList, because both of them derive from js__
JobBase. In this way the user can build nested lists of jobs which form a tree structure.
The js__UserJob describes a single scene to be analyzed. It has mScene member which
describes the input and mExportSpec member which describes the output. It also has eTask
member which should be set to EAnalyse. See “Automation API Reference” HTML Help for
details.
eCognition Documentation | 25
4 Introduction to Remote Automation
The js__JobList has EOrderType member. It can be set to either EParallel or ESerial.
ESerial means that the list of jobs should be executed in a sequence and EParallel means
the list of jobs can be executed simultaneously.
The js__JobBase has another important member which is strRuleSet. It contains the rule-set
in XML form to be used for analysis of a job. In case of job list, the rule-set should be applied to all
elements of the list which have empty rule-sets. So it means that the rule-set can be empty and in
this case the rule-set from “parent” job will be derived.
Starting with version 7.0 all submitted jobs contain configuration requirement information. This
information can be set with oCnfg member of js__UserJob class object. oCnfg member is an
object of class js__JobConfig. The class is intended for providing job configuration information.
The class has strConfig member that contains required server product name and versions.
Normally you fill it with a string like eCognition.9.3.1.last which says that the job has to be executed
on a server product with the name starting with eCognition version 9.3.1 of the last installed build.
Other members of the class are optional and intended for advanced users:
lvPlugins member (optional) contains a list of specific plugins required for the job execution.
lvRDIDrivers member (optional) contains a list of specific rdi drivers required for the job
execution.
lvLicenses member (optional) contains a list of licenses consumed by the job.
Monitoring a Job
The js__RequestStatusInfo() service method can be used to monitor a job. The job is
identified by wkspGUID and jobID.
Theoretically, it would be enough to provide the jobID, because it is unique in the Job Scheduler,
however due to security reasons it is necessary to provide wkspGUID, the same that was used to
submit the job.
The service method returns an array of js__StatusInfo messages via a vector output
parameter. If since is greater than 1, then it represents a timestamp. For each scene (job node if
we see the job structure as a tree), that has changed its status after the given timestamp. The first
member of the array (index is 0) contains some information about the Job Scheduler and normally
should not be of interest for you.
js__StatusInfo is added to the returned array. This allows the retrieval of the status only of
scenes that recently changed. This reduces network load when pooling information about scenes
(sub-jobs) from jobs containing significant amount of them. The js__StatusInfo contains a
status (waiting, processing, done, etc.) of a job or a job list. In case of a single job, the scene id can
be found in iSceneID member. The js__StatusInfo also contains submitting, starting, finishing
timestamps and additionally the timestamp of fetching the status by the service method, which
eCognition Documentation | 26
4 Introduction to Remote Automation
can be then used for the since parameter for subsequent calls to js__RequestStatusInfo().
If a job has failed,then some failure description can be found in strRemarks member.
Cancel a Job
To cancel a job the js__CancelJob() service method has to be used. The job is identified by
wkspGUID and jobID.
Like in case of monitoring a job, the wkspGUID is used for security reasons. If only analysis of
particular scenes is to be cancelled, then the list of scene ids has to be provided in the last input
array parameter: sceneIDs.
4.3.5 Step by Step Sample of Remote Automation
Submitting a Job
This example project for Monitoring a Job submitted to the eCognition Server®can be found in
the Samples folder.
The code is provided here below for your convenience to cross check against the instructions
how to build a SOAP application.
Includes
#include <sys/stat.h>
#include "soap/DiaJS.nsmap"
#include "soap/soapClient.cpp"
#pragma warning( push, 0 )
#include "soap/jsSrvcC.cpp"
#include "soap/stdsoap2.cpp"
#pragma warning( pop )
#include "soap/jsSrvcDiaJSProxy.h"
using namespace jsSrvc;
Helper Functions
const char *GetFullPath(const char* szPath)
{
static char szBuffer[_MAX_PATH];
if(bLocal)
{
char* pPart = NULL;
GetFullPathName(szPath,_MAX_PATH,szBuffer,&pPart);
return szBuffer;
}
else
{
return szPath;
}
}
eCognition Documentation | 27
4 Introduction to Remote Automation
The Main Application
int main(int argc, char* argv[])
{
//---------------------------------------------------------------
// load ruleset
//---------------------------------------------------------------
char* ruleset = NULL;
{
FILE* rlstfile = fopen(szRullsetPath, "rb");
if(!rlstfile)
{
fprintf(stderr,"Can't load ruleset");
exit(-1);
}
struct stat st;
fstat(fileno(rlstfile), &st);
size_t length = st.st_size;
ruleset = new char[length+1];
fread(ruleset, 1, length, rlstfile);
ruleset[length] = '\0';
}
//---------------------------------------------------------------
// Job creation
//---------------------------------------------------------------
js__UserJob userjob;
userjob.strWkspGUID = szGuid;
userjob.strWkspName = "test workspace";
userjob.strUserName = "john";
userjob.eOrderType = EParallel;
userjob.strRuleSet.str = ruleset;
//-------------------------------------------------------------
// add a scene to the job
//-------------------------------------------------------------
{
js__Job* scene = new js__Job;
scene->eTask = EAnalyse;
scene->mScene.iID = "1";
scene->mScene.iVer = 1;
scene->mScene.strName = "test scene 1";
scene->mScene.strFilePath = "";
scene->mScene.dPxlRes = 1;
scene->mScene.dXPos = 0;
scene->mScene.dYPos = 0;
scene->mScene.iSrc = 0;
scene->mScene.iSizeX = 890;
scene->mScene.iSizeY = 600;
scene->mScene.iCSType = 0;
scene->mScene.iUnit = 1;
eCognition Documentation | 28
4 Introduction to Remote Automation
//-----------------------------------------------------
// image layers
//-----------------------------------------------------
js__ImgLayer layer;
layer.dPxlRes = 1;
layer.dXPos = 0;
layer.dYPos = 0;
layer.iSrc = 0;
layer.iSizeX = 890;
layer.iSizeY = 600;
layer.iCSType = 0;
layer.iNoDataType = 0;
layer.dNoDataVal = 0;
layer.iDataType = 1;
//-----------------------------------------------------
// image layer 1
//-----------------------------------------------------
layer.strAlias = "Layer 1";
layer.strFilePath = GetFullPath(szLayer1ImgPath);
layer.iIndx = 0;
scene->mScene.vImgLayers.AddTail(layer);
//-----------------------------------------------------
// image layer 2
//-----------------------------------------------------
layer.strAlias = "Layer 2";
layer.strFilePath = GetFullPath(szLayer1ImgPath);
layer.iIndx = 1;
scene->mScene.vImgLayers.AddTail(layer);
//-----------------------------------------------------
// export spec
//-----------------------------------------------------
js__ExportItem expitem;
expitem.strName = "MyStats1";
expitem.strPath = GetFullPath(szExpItem1);
expitem.strDriver = "CSV";
expitem.iType = 1; /* TABLE */
scene->mExportSpec.vExportItems.AddTail(expitem);
expitem.strName = "ProjectFile";
expitem.strPath = GetFullPath(szExpItem2);
expitem.strDriver = "DPR";
expitem.iType = 0; /* PROJECT */
scene->mExportSpec.vExportItems.AddTail(expitem);
//-----------------------------------------------------
// add the scene
//-----------------------------------------------------
eCognition Documentation | 29
4 Introduction to Remote Automation
userjob.vJobs.AddTail(scene);
}
userjob.oCnfg.strConfig = "eCognition.9.3.1.last";
//-----------------------------------------------------
// add a scene to the job
//-----------------------------------------------------
{
js__Job* scene = new js__Job;
scene->eTask = EAnalyse;
scene->mScene.iID = "2";
scene->mScene.iVer = 1;
scene->mScene.strName = "test scene 2";
scene->mScene.strFilePath = "";
scene->mScene.dPxlRes = 1;
scene->mScene.dXPos = 0;
scene->mScene.dYPos = 0;
scene->mScene.iSrc = 0;
scene->mScene.iSizeX = 890;
scene->mScene.iSizeY = 600;
scene->mScene.iCSType = 0;
scene->mScene.iUnit = 1;
//-----------------------------------------------------
// image layers
//-----------------------------------------------------
js__ImgLayer layer;
layer.dPxlRes = 1;
layer.dXPos = 0;
layer.dYPos = 0;
layer.iSrc = 0;
layer.iSizeX = 890;
layer.iSizeY = 600;
layer.iCSType = 0;
layer.iNoDataType = 0;
layer.dNoDataVal = 0;
layer.iDataType = 1;
//-----------------------------------------------------
// image layer 1
//-----------------------------------------------------
layer.strAlias = "Layer 1";
layer.strFilePath = GetFullPath(szLayer2ImgPath);
layer.iIndx = 0;
scene->mScene.vImgLayers.AddTail(layer);
//-----------------------------------------------------
// image layer 2
//-----------------------------------------------------
layer.strAlias = "Layer 2";
eCognition Documentation | 30
4 Introduction to Remote Automation
layer.strFilePath = GetFullPath(szLayer2ImgPath);
layer.iIndx = 1;
scene->mScene.vImgLayers.AddTail(layer);
//-----------------------------------------------------
// export spec
//-----------------------------------------------------
js__ExportItem expitem;
expitem.strName = "MyStats1";
expitem.strPath = GetFullPath(szExpItem1);
expitem.strDriver = "CSV";
expitem.iType = 1; /* TABLE */
scene->mExportSpec.vExportItems.AddTail(expitem);
expitem.strName = "ProjectFile";
expitem.strPath = GetFullPath(szExpItem3);
expitem.strDriver = "DPR";
expitem.iType = 0; /* PROJECT */
scene->mExportSpec.vExportItems.AddTail(expitem);
// add the scene
userjob.vJobs.AddTail(scene);
}
userjob.oCnfg.strConfig = "eCognition.9.3.1.last";
//-------------------------------------------------------------
// submit the job
//-------------------------------------------------------------
DiaJS proxy;
proxy.endpoint = szServer; // set URL
int job_id;
if(proxy.js__SubmitJob(&userjob, job_id) != SOAP_OK)
{
fprintf(stderr,"Can't submit job to %s."
" Make sure JobScheduler is running.", szServer);
exit(-1);
}
return 0;
}
Monitoring a Job
This example project for Monitoring a Job submitted to the eCognition Server®can be found in
the Samples folder.
The code is provided here below for your convenience to cross check against the instructions
how to build a SOAP application.
Includes
#include <assert.h>
#define ASSERT assert
#include "soap/jsSrvc.nsmap"
eCognition Documentation | 31
4 Introduction to Remote Automation
#include "soap/jsSrvcClient.cpp"
#pragma warning( push, 0 )
#include "soap/jsSrvcC.cpp"
#include "soap/stdsoap2.cpp"
#pragma warning( pop )
#include "soap/jsSrvcDiaJSProxy.h"
using namespace jsSrvc;
Helper Functions
// --------------------------------------------------------------
// GetElapsedTime
// --------------------------------------------------------------
// --------------------------------------------------------------
// Sample data
// --------------------------------------------------------------
const char* szServer = "http://localhost:8184"; // server url
char* guid = "81B9641D-6671-4979-9224-F1E4AC4AD553";
int GetElapsedTime(js__StatusInfo& s)
{
if(s.timeStop) {
// job stopped; return total processing time
return s.timeStart? int(s.timeStop - s.timeStart) : 0;
}
if(s.timeStart) {
// job started; return current processing time
return int(time(NULL) - s.timeStart);
}
// job is still waiting; return waiting time
return int(time(NULL) - s.timeSubmit);
}
// --------------------------------------------------------------
// GetStatusString
// --------------------------------------------------------------
const char* GetStatusString(js__StatusInfo& s)
{
switch(s.eStatus)
{
case EWaiting: return "waiting";
case EWorking: return "processing";
case EJobDone: return "done";
case EJobFailed: return "failed";
case ETimeout: return "timeout";
case ECrashed: return "crashed";
case ECancelled: return "cancelled";
};
return NULL;
}
The Main Application
//---------------------------------------------------------------
// data
//---------------------------------------------------------------
const char* szServer = "http://localhost:8182"; // server url
char* guid = "81B9641D-6671-4979-9224-F1E4AC4AD553"; // job guid
//---------------------------------------------------------------
//!tmain
//---------------------------------------------------------------
eCognition Documentation | 32
4 Introduction to Remote Automation
int main(int argc, char* argv[])
{
DiaJS proxy;
proxy.endpoint = szServer; // set URL
//---------------------------------------------------------------
// get maximum job id
//---------------------------------------------------------------
SVector<int> ids;
if(proxy.js__RequestJobIDs(guid, ids) != SOAP_OK)
{
fprintf(stderr,"Can't monitor the job");
exit(-1);
}
if(ids.IsEmpty())
{
fprintf(stderr,"There is no jobs in the Job Scheduler"
" for the given workspace");
exit(-1);
}
printf("Waiting for results...\n");
long long last_status_time = 1;
for(;;)
{
//---------------------------------------------------------------
// request overall status
//---------------------------------------------------------------
SVector<js__StatusInfo> infos;
if (proxy.js__RequestStatusInfo(guid, ids.Last(), 0, infos) !=
SOAP_OK || infos.GetSize() <= 1)
{
fprintf(stderr,"Can't monitor the job");
exit(-1);
}
js__StatusInfo overall = infos[1];
//---------------------------------------------------------------
// wait a bit
//---------------------------------------------------------------
Sleep(1100);
//---------------------------------------------------------------
// request detailed statuses
//---------------------------------------------------------------
infos.clear();
if(proxy.js__RequestStatusInfo (guid,
ids.Last(),
last_status_time,
infos) != SOAP_OK)
{
fprintf(stderr,"Can't monitor the job");
exit(-1);
}
if(infos.IsEmpty())
{
eCognition Documentation | 33
4 Introduction to Remote Automation
//-------------------------------------------------------
// detail statuses are empty; show the overall status
//-------------------------------------------------------
if (overall.eStatus == EWaiting || overall.eStatus ==
EWorking)
{
continue;
}
//------------------------------------------------
// job finished
//------------------------------------------------
printf ("Total: %s: %d s\n", GetStatusString(overall),
GetElapsedTime(overall));
break;
}
last_status_time = infos[0].timeStatus;
//--------------------------------------------------------
// go thru all detailed statuses and print them
//--------------------------------------------------------
for(int i = 1; i < infos.GetSize(); i++)
{
if(infos[i].eStatus != EWaiting)
{
if(!infos[i].iSceneID)
{
continue;
}
if(infos[i].eStatus == EWorking)
{
printf("Scene (ID=%d): %s: : %s\n",
infos[i].iSceneID, GetStatusString(infos[i]),
(const char*)infos[i].strRemarks);
} else
{
printf("Scene (ID=%d): %s: %d s: %s\n",
infos[i].iSceneID, GetStatusString(infos[i]),
GetElapsedTime(infos[i]),
(const char*)infos[i].strRemarks);
}
}
}
}
return 0;
}
eCognition Documentation | 34
Background Information
5.1 Coordinate Systems Used in eCognition Software
eCognition software uses three coordinate systems:
lThe pixel coordinate system is used for identifying pixel positions within a map
lThe user coordinate system allows the use of geocoding information within a map
lThe internal pixel coordinate system is used only for internal calculations by the Analysis
Engine software.
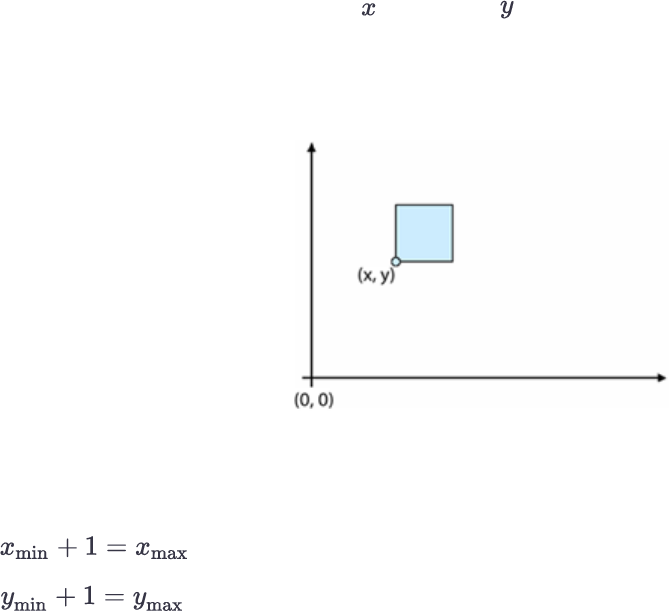
5.1.1 Pixel Coordinate System
The pixel coordinate system is used to identify pixel position within an image. It is used for
calculating position features such as -center and -center.
This coordinate system is oriented from bottom to top and from left to right. The origin position is
(0, 0), which is at the bottom-left corner of the image. The coordinate is defined by the offset of the
bottom-left corner of the pixel from the origin.
Figure 5.1. The pixel coordinate system
Pixel Coordinate Definition
5
eCognition Documentation | 35
5 Background Information
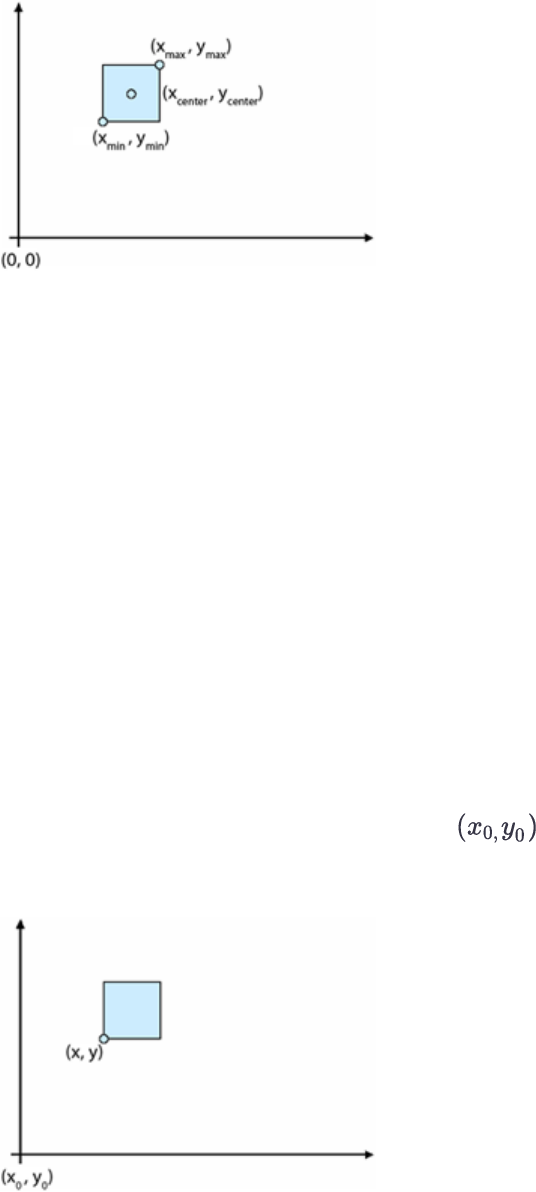
Figure 5.2. Coordinates of a pixel
5.1.2 User Coordinate System
The user coordinate system enables the use of geocoding information within a scene. The values
of the separate user coordinate system are calculated from the pixel coordinate system. In the
user interface, the user coordinate system is referred to as the coordinate system.
This coordinate system is defined by geocoding information:
lThe bottom-left X position
lThe bottom-left Y position
lResolution – the size of a pixel in coordinate system unit. For example, if the coordinate system
is metric, the resolution is the size of a pixel in meters. If the coordinate system is lat/long, then
the resolution is the size of a pixel in degrees
lCoordinate system name
lCoordinate system type.
The origin of the coordinate system is at the bottom-left corner of the image . The
coordinate defines the position of the bottom-left corner of the pixel within the user coordinate
system.
Figure 5.3. The user coordinate system
eCognition Documentation | 36
5 Background Information
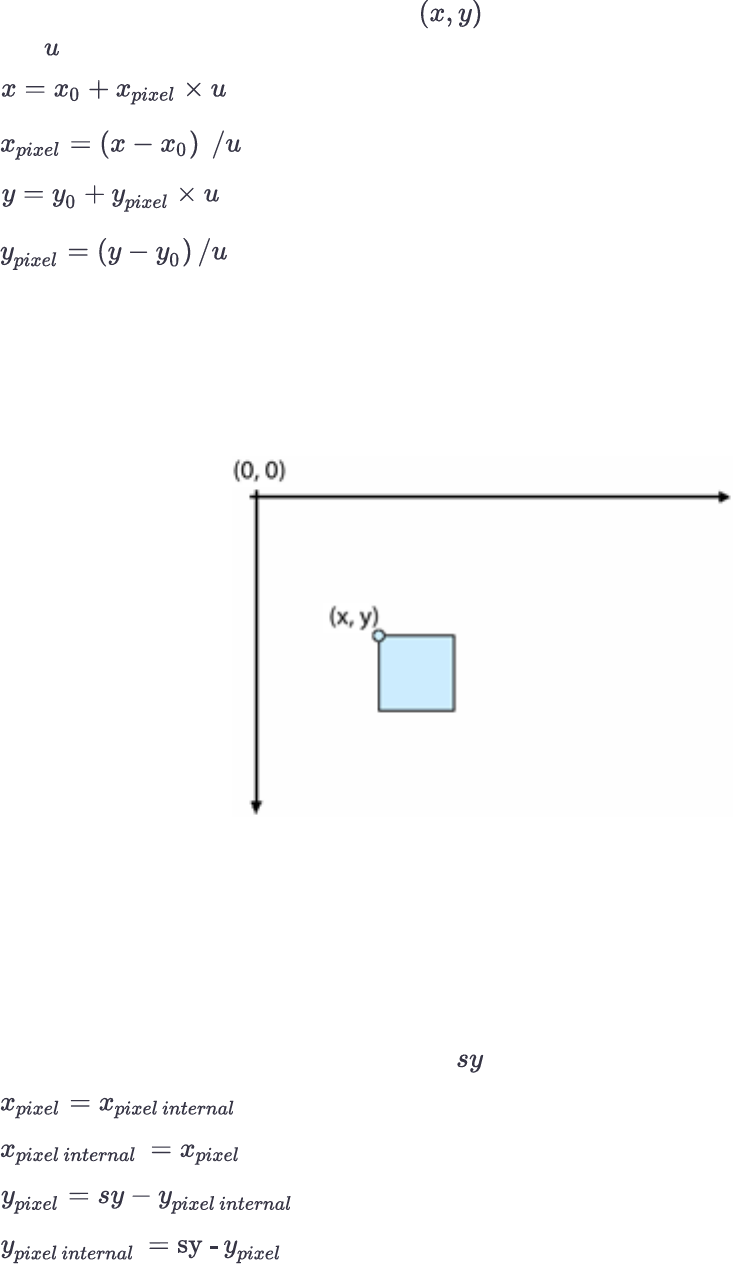
To convert a value from the pixel coordinate system to the user coordinate system and back, the
following transformations are valid, where are the coordinates in user coordinate system
and is the pixel size in units:
5.1.3 Internal Pixel Coordinate System
Internal engine calculations are using the internal coordinate system to identify position of certain
pixel. The coordinate system is oriented from top to bottom. The position at the top left corner of
the image is (0, 0).
Figure 5.4. The internal pixel coordinate system
All values coming from API functions, which identify any kind position and don not have explicit
unit information, are assumed to be in internal pixel coordinates. For example, the bounding box
of the image object (DMIImageObjHndl:: GetBoundingBox()) or a feature value calculated
by plug-in (EPIPropDscr::Calc).
To convert value from internal pixel coordinate system to user pixel coordinate system and back,
the following transformations are valid, where is the size of the image:
eCognition Documentation | 37

5 Background Information
5.1.4 Conversions of Feature Values
The conversion of feature values is handled differently, depending on the value type:
lValues identifying a position (position values)
lValues identifying certain distance measurements such as length or are (unit values).
Conversion of Position Values
Position values can be converted from one co-ordinate system to another. The following position
conversions are available:
lIf the unit is a pixel, a position within the pixel co-ordinate system is identified
lIf the unit is a co-ordinate, a position within the user co-ordinate system is identified
The position conversion is applied for image object features such as Y center, Y max and X center.
Conversion of Unit Values
Distance values such as length and area are initially calculated in pixels. They can be converted to a
distance unit. To convert a pixel value to a unit, the following information is needed:
lPixel size in meters
lValue dimension, for example 1 for length and 2 for area
lUnit factor, relative to the meter, for example 1 for meter, 100 for centimeter and 0.001 for
kilometer
The following formula is valid for converting value from pixel to a unit:
(Where is pixel size in units, is the unit factor and the dimension.)
eCognition Documentation | 38
Use Case Sample and
Troubleshooting
6.1 Use Case Samples
6.1.1 Send a Process Task to eCognition Servers
This example can be found in the Samples folder. Use the command line tools to operate the
server environment either manually or from a script.
6.2 Debugging Techniques and Troubleshooting
Implementing automation applications can be a rewarding experience. However, when things go
wrong one can be often completely in the dark as to why. Here are some tips and helpful hints on
how to go about debugging your application problems.
6.2.1 Symptoms and Possible Causes
Check the following symptoms to learn about possible causes:
Application Crashes in Strange Ways
lYou are developing on Microsoft Windows. It is probably Microsoft Visual Studio which is not
updating your project correctly. You probably need to rebuild your project.
lIf the previous step did not work, it is probably need to reboot the machine.
Export Image View Exports to Unexpected Location, usually \results\ExportView
lExport specification is not synchronized with the rule set. Use the function
Scene::UpdateExprtSpec in your application before setting up the scene in the
AMIEngine object. (see samples).
lThe path attribute of the ExportedItems/Item XML Tag in the rule set must hold the full
path (path and file name with extension) of the desired export file. This is not saved
automatically within the eCognition client software but must be manually added using an
editor).
6
eCognition Documentation | 39
6 Use Case Sample and Troubleshooting
Exported Image Does not Show the Classification View as Expected
The Save current view settings button of the export view algorithm must be used before saving
the rule set. Without this, the export algorithm will use the default view.
Application Fails at Function AMIEngine::Create – Cannot Find License File
Application must be at a path with it can find the eCognition license directory. This can be achieved
by copying the required files or moving your application to the bin directory of the eCognition
software.
eCognition Documentation | 40
Acknowledgments
Portions of this product are based in part on the third-party software components. Trimble is
required to include the following text, with software and distributions.
7.1 Geospatial Data Abstraction Library (GDAL) Copyright
7.1.1 gcore/Verson.rc
Copyright © 2005, Frank Warmerdam, warmerdam@pobox.com
All rights reserved.
Permission is hereby granted, free of charge, to any person obtaining a copy of this software and
associated documentation files (the “Software”), to deal in the Software without restriction,
including without limitation the rights to use, copy, modify, merge, publish, distribute, sublicense,
and/or sell copies of the Software, and to permit persons to whom the Software is furnished to do
so, subject to the following conditions:
The above copyright notice and this permission notice shall be included in all copies or substantial
portions of the Software.
THE SOFTWARE IS PROVIDED “AS IS”, WITHOUT WARRANTY OF ANY KIND, EXPRESS OR IMPLIED,
INCLUDING BUT NOT LIMITED TO THE WARRANTIES OF MERCHANTABILITY, FITNESS FOR A
PARTICULAR PURPOSE AND NON-INFRINGEMENT. IN NO EVENT SHALL THE AUTHORS OR
COPYRIGHT HOLDERS BE LIABLE FOR ANY CLAIM, DAMAGES OR OTHER LIABILITY, WHETHER IN
AN ACTION OF CONTRACT, TORT OR OTHERWISE, ARISING FROM, OUT OF OR IN CONNECTION
WITH THE SOFTWARE OR THE USE OR OTHER
7.1.2 frmts/gtiff/gt_wkt_srs.cpp
Copyright © 1999, Frank Warmerdam, warmerdam@pobox.com
Permission is hereby granted, free of charge, to any person obtaining a copy of this software and
associated documentation files (the “Software”), to deal in the Software without restriction,
including without limitation the rights to use, copy, modify, merge, publish, distribute, sublicense,
and/or sell copies of the Software, and to permit persons to whom the Software is furnished to do
so, subject to the following conditions:
7
eCognition Documentation | 41
7 Acknowledgments
The above copyright notice and this permission notice shall be included in all copies or substantial
portions of the Software.
THE SOFTWARE IS PROVIDED “AS IS”, WITHOUT WARRANTY OF ANY KIND, EXPRESS OR IMPLIED,
INCLUDING BUT NOT LIMITED TO THE WARRANTIES OF MERCHANTABILITY, FITNESS FOR A
PARTICULAR PURPOSE AND NON-INFRINGEMENT. IN NO EVENT SHALL THE AUTHORS OR
COPYRIGHT HOLDERS BE LIABLE FOR ANY CLAIM, DAMAGES OR OTHER LIABILITY, WHETHER IN
AN ACTION OF CONTRACT, TORT OR OTHERWISE, ARISING FROM, OUT OF OR IN CONNECTION
WITH THE SOFTWARE OR THE USE OR OTHER DEALINGS IN THE SOFTWARE.
7.2 Freetype Project License
Portions of this software are copyright © 2009 The FreeType Project (www.freetype.org). All rights
reserved. Copyright 1996-2008, 2009 by David Turner, Robert Wilhelm, and Werner Lemberg
7.2.1 Introduction
The FreeType Project is distributed in several archive packages; some of them may contain, in
addition to the FreeType font engine, various tools and contributions which rely on, or relate to,
the FreeType Project. This license applies to all files found in such packages, and which do not fall
under their own explicit license. The license affects thus the FreeType font engine, the test
programs, documentation and makefiles, at the very least. This license was inspired by the BSD,
Artistic, and IJG (Independent JPEG Group) licenses, which all encourage inclusion and use of free
software in commercial and freeware products alike. As a consequence, its main points are that:
o We don't promise that this software works. However, we will be interested in any kind of bug
reports. (`as is' distribution)
o You can use this software for whatever you want, in parts or full form, without having to pay us.
(`royalty-free' usage)
o You may not pretend that you wrote this software. If you use it, or only parts of it, in a program,
you must acknowledge somewhere in your documentation that you have used the FreeType
code. (`credits')
We specifically permit and encourage the inclusion of this software, with or without modifications,
in commercial products.
We disclaim all warranties covering The FreeType Project and assume no liability related to The
FreeType Project. Finally, many people asked us for a preferred form for a credit/disclaimer to use
in compliance with this license. We thus encourage you to use the following text:
Portions of this software are copyright © 2009 The FreeType Project (www.freetype.org). All rights
reserved.
eCognition Documentation | 42
7 Acknowledgments
7.2.2 Legal Terms
Definitions
Throughout this license, the terms `package', `FreeType Project', and `FreeType archive' refer to
the set of files originally distributed by the authors (David Turner, Robert Wilhelm, and Werner
Lemberg) as the `FreeType Project', be they named as alpha, beta or final release.
`You' refers to the licensee, or person using the project, where `using' is a generic term including
compiling the project's source code as well as linking it to form a `program' or `executable'.
This program is referred to as `a program using the FreeType engine'. This license applies to all
files distributed in the original FreeType Project, including all source code, binaries and
documentation, unless otherwise stated in the file in its original, unmodified form as distributed in
the original archive. If you are unsure whether or not a particular file is covered by this license, you
must contact us to verify this.
The FreeType Project is copyright (C) 1996-2009 by David Turner, Robert Wilhelm, and Werner
Lemberg. All rights reserved except as specified below.
No Warranty
--------------
THE FREETYPE PROJECT IS PROVIDED `AS IS' WITHOUT WARRANTY OF ANY KIND, EITHER EXPRESS
OR IMPLIED, INCLUDING, BUT NOT LIMITED TO, WARRANTIES OF MERCHANTABILITY AND
FITNESS FOR A PARTICULAR PURPOSE. IN NO EVENT WILL ANY OF THE AUTHORS OR COPYRIGHT
HOLDERS BE LIABLE FOR ANY DAMAGES CAUSED BY THE USE OR THE INABILITY TO USE, OF THE
FREETYPE PROJECT.
Redistribution
This license grants a worldwide, royalty-free, perpetual and irrevocable right and license to use,
execute, perform, compile, display, copy, create derivative works of, distribute and sublicense the
FreeType Project (in both source and object code forms) and derivative works thereof for any
purpose; and to authorize others to exercise some or all of the rights granted herein, subject to
the following conditions:
o Redistribution of source code must retain this license file (`FTL.TXT') unaltered; any additions,
deletions or changes to the original files must be clearly indicated in accompanying
documentation. The copyright notices of the unaltered, original files must be preserved in all
copies of source files.
o Redistribution in binary form must provide a disclaimer that states that the software is based in
part of the work of the FreeType Team, in the distribution documentation. We also encourage you
to put an URL to the FreeType web page in your documentation, though this isn't mandatory.
eCognition Documentation | 43
7 Acknowledgments
These conditions apply to any software derived from or based on the FreeType Project, not just
the unmodified files. If you use our work, you must acknowledge us. However, no fee need be paid
to us.
Advertising
Neither the FreeType authors and contributors nor you shall use the name of the other for
commercial, advertising, or promotional purposes without specific prior written permission.
We suggest, but do not require, that you use one or more of the following phrases to refer to this
software in your documentation or advertising materials: `FreeType Project', `FreeType Engine',
`FreeType library', or `FreeType Distribution'.
As you have not signed this license, you are not required to accept it. However, as the FreeType
Project is copyrighted material, only this license, or another one contracted with the authors,
grants you the right to use, distribute, and modify it.
Therefore, by using, distributing, or modifying the FreeType Project, you indicate that you
understand and accept all the terms of this license.
Contacts
There are two mailing lists related to FreeType:
o freetype@nongnu.org
Discusses general use and applications of FreeType, as well as future and wanted additions to the
library and distribution. If you are looking for support, start in this list if you haven't found anything
to help you in the documentation.
o freetype-devel@nongnu.org
Discusses bugs, as well as engine internals, design issues, specific licenses, porting, etc. Our home
page can be found at http://www.freetype.org
7.3 Libjpg License
The authors make NO WARRANTY or representation, either express or implied, with respect to
this software, its quality, accuracy, merchantability, or fitness for a particular purpose. This
software is provided "AS IS", and you, its user, assume the entire risk as to its quality and accuracy.
This software is copyright (C) 1991-1998, Thomas G. Lane.
All Rights Reserved except as specified below.
Permission is hereby granted to use, copy, modify, and distribute this software (or portions
thereof) for any purpose, without fee, subject to these conditions:
eCognition Documentation | 44
7 Acknowledgments
(1) If any part of the source code for this software is distributed, then this README file must be
included, with this copyright and no-warranty notice unaltered; and any additions, deletions, or
changes to the original files must be clearly indicated in accompanying documentation.
(2) If only executable code is distributed, then the accompanying documentation must state that
"this software is based in part on the work of the Independent JPEG Group".
(3) Permission for use of this software is granted only if the user accepts full responsibility for any
undesirable consequences; the authors accept NO LIABILITY for damages of any kind.
These conditions apply to any software derived from or based on the IJG code, not just to the
unmodified library. If you use our work, you ought to acknowledge us.
Permission is NOT granted for the use of any IJG author's name or company name in advertising
or publicity relating to this software or products derived from it. This software may be referred to
only as "the Independent JPEG Group's software".
We specifically permit and encourage the use of this software as the basis of commercial products,
provided that all warranty or liability claims are assumed by the product vendor.
ansi2knr.c is included in this distribution by permission of L. Peter Deutsch, sole proprietor of its
copyright holder, Aladdin Enterprises of Menlo Park, CA.
ansi2knr.c is NOT covered by the above copyright and conditions, but instead by the usual
distribution terms of the Free Software Foundation; principally, that you must include source code
if you redistribute it. (See the file ansi2knr.c for full details.) However, since ansi2knr.c is not needed
as part of any program generated from the IJG code, this does not limit you more than the
foregoing paragraphs do.
The Unix configuration script "configure" was produced with GNU Autoconf.
It is copyright by the Free Software Foundation but is freely distributable.
The same holds for its supporting scripts (config.guess, config.sub, ltconfig, ltmain.sh). Another
support script, install-sh, is copyright by M.I.T. but is also freely distributable.
It appears that the arithmetic coding option of the JPEG spec is covered by patents owned by IBM,
AT&T, and Mitsubishi. Hence arithmetic coding cannot legally be used without obtaining one or
more licenses. For this reason, support for arithmetic coding has been removed from the free
JPEG software. (Since arithmetic coding provides only a marginal gain over the unpatented
Huffman mode, it is unlikely that very many implementations will support it.)
So far as we are aware, there are no patent restrictions on the remaining code.
The IJG distribution formerly included code to read and write GIF files.
To avoid entanglement with the Unisys LZW patent, GIF reading support has been removed
altogether, and the GIF writer has been simplified to produce "uncompressed GIFs". This
technique does not use the LZW algorithm; the resulting GIF files are larger than usual, but are
readable by all standard GIF decoders.
eCognition Documentation | 45
7 Acknowledgments
We are required to state that "The Graphics Interchange Format(c) is the Copyright property of
CompuServe Incorporated. GIF(sm) is a Service Mark property of CompuServe Incorporated."
eCognition Documentation | 46
