Autoware Users Manual V1.1
Autoware_UsersManual_v1.1
User Manual:
Open the PDF directly: View PDF ![]() .
.
Page Count: 77

NAGOYA UNIVERSITY
Autoware User’s Manual
Autoware ver.2016.Sep.12
Version
1.1

Table of contents
1. About This Document ....................................................... 4
2. ROS and Autoware .......................................................... 5
Robot middleware - ROS ...................................................... 5
ROS Features ......................................................................................... 6
Autoware ............................................................................... 7
3-D Map Generation and Sharing ........................................................... 8
Localization(NDT:Normal Distributions Transform) .............................. 8
Object Detection ...................................................................................... 8
Route Generation .................................................................................... 8
Autonomous Driving ................................................................................ 9
User Interface .......................................................................................... 9
Platform structure for Autoware .......................................... 10
Perception/Recognition ......................................................................... 11
Judgement/Operation/Localization........................................................ 12
Path Planning ........................................................................................ 13
Data Loading (3-D Map, Database, Files) ............................................ 14
Device Drivers and Sensor Fusion........................................................ 15
Interface for Smart Phone Applications ................................................ 16
Utilities and Others ................................................................................ 16
3. Operating Autoware ..................................................... 17
Preparations ....................................................................... 17
Demo Data ............................................................................................ 17
Runtime Manager Launching ................................................................ 18
RViz Configuration ................................................................................ 19
Operating Quick Start ......................................................... 19
Load map(Quick Start) .......................................................................... 19
Load driver(Quick Start) ........................................................................ 19
Autoware Main Functions ................................................... 20
Localization(NDT:Normal Distributions Transform) ............................ 20
Object Detection .................................................................................... 22
Path Planning ........................................................................................ 23
Path Following ....................................................................................... 23
Dynamic Map ........................................................................................ 24
AutowareRider .................................................................... 27
AutowareRoute...................................................................................... 27
Features ................................................................................................ 27
AutowareRider Launching ..................................................................... 27
Path Planning Application Usage .......................................................... 30
Send Path data to ROS PC ................................................................... 30
CAN Collection Application Usage Data ............................................... 30
Send CAN Data to a ROS PC ............................................................... 31
Start Launch File ................................................................................... 32

4. Autoware User Interface Details ................................... 33
Runtime Manager ............................................................... 33
Runtime Manager – Quick Start Tab................................... 34
Runtime Manager – Setup Tab ........................................... 36
Runtime Manager – Map Tab ............................................. 38
Runtime Manager – Sensing Tab ....................................... 40
Runtime Manager – Computing Tab ................................... 43
Runtime Manager – Interface Tab ...................................... 48
Runtime Manager – Database Tab ..................................... 50
Runtime Manager – Simulation Tab.................................... 52
Runtime Manager – Status Tab .......................................... 54
Runtime Manager - Topics Tab .......................................... 55
ROSBAG Record Dialog ..................................................... 56
RViz ...................... エラー! ブックマークが定義されていません。
AutowareRider .................................................................... 59
AutowareRoute ................................................................... 64
5. System Setup ............................................................... 66
Installation ........................................................................... 66
OS ......................................................................................................... 66
ROS ....................................................................................................... 67
OpenCV ................................................................................................. 68
CUDA(if necessary) .............................................................................. 69
FlyCapture(if necessary) ....................................................................... 69
Autoware ............................................................................................... 70
AutowareRider(if necessary) ................................................................. 71
canlib(if necessary) ............................................................................... 72
SSH Public Key Generation(if necessary) ............................................ 72
6. Terminology ................................................................. 73
7. Related Documents ...................................................... 76

A U T O W A R E - U S E R S - M A N U A L
Page 4
1. About This Document
This chapter describes the purpose of this document.
There are following two documents provided by Nagoya University.
- Autoware User’s Manual
- Autoware Developer’s Manual
Chapter
1

A U T O W A R E - U S E R S - M A N U A L
Page 5
2. ROS and Autoware
Before operating Autoware, ROS and Autoware are described in this chapter.
Robot middleware - ROS
ecently, the wide range potential of robotics has been focused by not only robotics
experts but also non-robotics experts to join robot development. It is believed that
this trend leads robotics to advancement and developments to other domains.
However, robot development is getting harder because the advancement and the complexity
of robot functions have been increased. Unlike PCs and smartphones, robotic development
has considered various hardware, OS, programming languages. Hence, the differences have
mainly been obstructed for robotic developers as well as robotics experts to join robot
development.
To solve the problem, the demand of making common platforms has been increased, and
some platforms have been published. Within a common platform, developers can combine
various software published by other developers, and speed up development by reusing them.
Therefore, it is expected that developers can more focus on fields of interest.
ROS (Robot Operating System) is a framework1 for robotic software development. It was
developed by Willow Garage in U.S. OSFR (Open Source Robotics Foundation) has currently
maintained it. The open sourced ROS has mainly been used by communities in U.S. and
Europe as well as communities in Japan.
Note that ROS has “OS” in its name, however, it is not “OS” like Windows or Linux. It is a
middleware that runs on UNIX based OS.
1
https://en.wikipedia.org/wiki/Willow_Garage
Chapter
2
R

A U T O W A R E - U S E R S - M A N U A L
Page 6
ROS Features
① Library and tools
ROS provides library and tools for robotic software development. The primary libraries
and tools are listed as follows:
Original build system (Catkin)
Image processing library (OpenCV)
Data logging tool (ROSBAG)
Visualization tools for data and software state (RViz)
Coordinate transformation library (TF)
Qt based GUI development tool (RQT)
② Inter-process communication
ROS uses message passing with topics of publish/subscribe form for inter-module
connection/cooperation frameworks. Here, message passing is an inter-process
communication mechanism in which a sender can send data to one or more receivers. This
feature enables us to design distribution systems. In ROS, processes called node are
launched and each node is run independently. In communication between nodes, by
following the publish/subscribe scheme, a node writes messages (publish) into a topic and
another node reads the messages (subscribe) of the topic.
③ File components
・bag file (ROSBAG)
In ROS, all the messages of topics are recorded and time-stamped into a .bag file
called ROSBAG. This file can be used for replaying the messages on RViz as
same timing as recording. In robotic development, it is difficult to synchronize and
analyze the interactions with multiple sensors at the same time, but ROS enables
efficient analysis and debugging robotic systems. In addition, since the recorded
messages can be replayed repeatedly, this feature allows developers to debug
their systems without actual sensors.
・Launch file
A “Launch” file is used to start multiple nodes at the same time. The launch file
contains the nodes to be started and their parameters written in XML format.
A U T O W A R E - U S E R S - M A N U A L
Page 7
Autoware
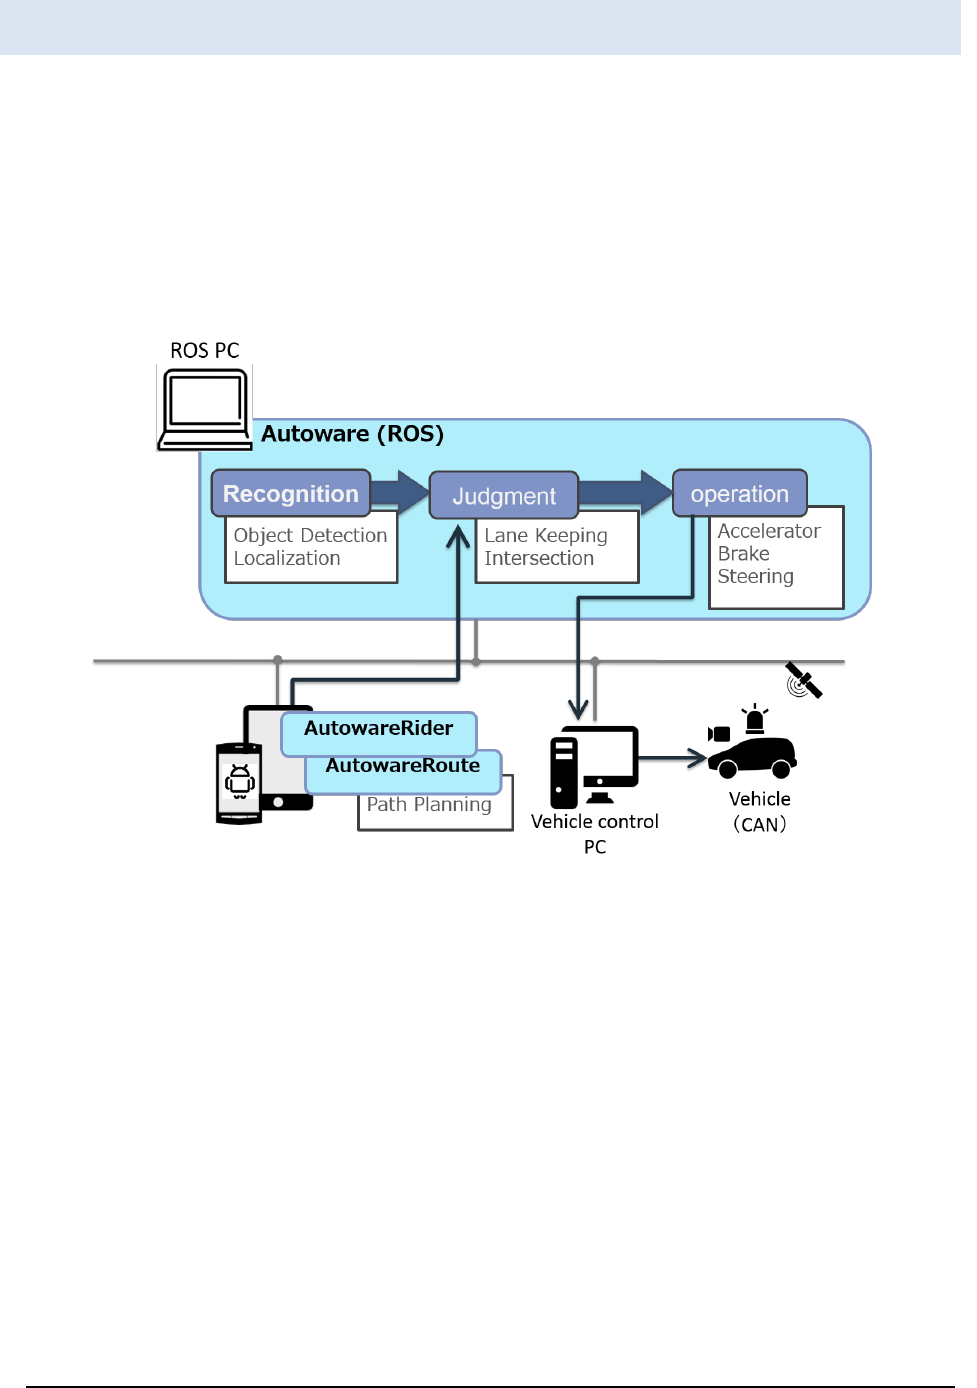
utoware is open source software based on ROS. Autoware is pushed on Github for
autonomous driving research and development. Most of autonomous driving
system consist of recognition, judgment, and operation. Autoware provides
necessary functions, such as 3-D map generation, localization, object recognition, and
vehicle control, for autonomous driving.
Autoware uses LIDAR (Light Detection and Ranging) and on-vehicle cameras to localize the
ego-car position. In addition, Autoware can detect surrounding objects, such as pedestrians,
vehicles, traffic lights etc., by using LIDAR and GNSS (Global Navigation Satellite System).
The making judgments of driving/stopping at lanes or intersections are performed with an
embedded multi-core CPU. Operations of controlling vehicle behaviors utilize conventional
on-vehicle control mechanism, while support systems such as driving assistance and safety
diagnosis support, use multi-core CPU.
A
Figure 1 Autoware overview

A U T O W A R E - U S E R S - M A N U A L
Page 8
3-D Map Generation and Sharing
The most notable feature of Autoware is the fact that the autonomous driving of Autoware
uses a 3-D map. The 3-D map, unlike 2-D maps used in car navigation system, is a map
including various information, such as roads and all the still objects around the roads. The
3-D map will play a critical role in deploying autonomous driving into the real world.
Autoware localizes the position of the ego-vehicle by matching the 3-D map loaded into the
PC with the surrounding information captured by the LIDAR on the roof. The precision of
localization is approximately 10cm, which number indicates far higher precision than GPS.
As of Sep. 2015, the 3-D map covers the only limited area. If the ego-vehicle with Autoware
enters into the area without the 3-D map, Autoware can generate a 3-D map in real-time
from the information captured by LIDAR.The generated 3-D map in this way not only can be
utilized for the developers using Autoware, but also it can be uploaded and shared on the
Nagoya University servers. The feature enables online updating of the 3-D map. This
mechanism allows for creating the 3-D map including every nook and corner of the city, such
as tiny alleys that the specialized vehicles for 3-D mapping can not enter. In addition, the
geographic data from the 3-D map can generate a 3-D map of vector format.
Localization (NDT:Normal Distributions Transform)
The position of the ego-vehicle can be located by scan matching based on the NDT
algorithm with the 3-D map of PCD (Point Cloud Data) format and LIDAR data. The position
error of localization is around 10cm.
Object Detection
DPM (Deformable Part Models) algorithms can detect cars, pedestrians and traffic lights
from camera images. Tracking using Kalman filter can be implemented and it improves
detection accuracy. Fusing 3-D LIDAR data can obtain the distances of the detected objects.
Traffic lights detection is conducted as following steps. First, the 3-D positions of traffic lights
are calculated by using the localization result and the high-definition 3-D map. Next, the 3-D
positions of traffic lights are projected on camera images by sensor fusion. Then, traffic light
colors are recognized by image processing.
Path Generation
AutowareRoute (a route data generation application using MapFan) generates a path to the
selected destination. Then, autonomous driving system determines the lanes on the path.
The path data generation application is provided as a car navigation of smartphone. The
trajectories in the lanes are calculated kinematically.
A U T O W A R E - U S E R S - M A N U A L
Page 9
Autonomous Driving
The generated path includes appropriate speed information. Autonomous driving system
uses it as the target speed. In addition, the route includes landmarks, “way point”, set at 1m
intervals. The autonomous driving system operates “path following” by following the way
points. Referring near way points on curves and distant way points on straights stabilizes
autonomous driving. If ego-vehicle deviates from the route, the system aims to the vicinity
point and back to the target route. Note that the safest path is selected by the driving system.
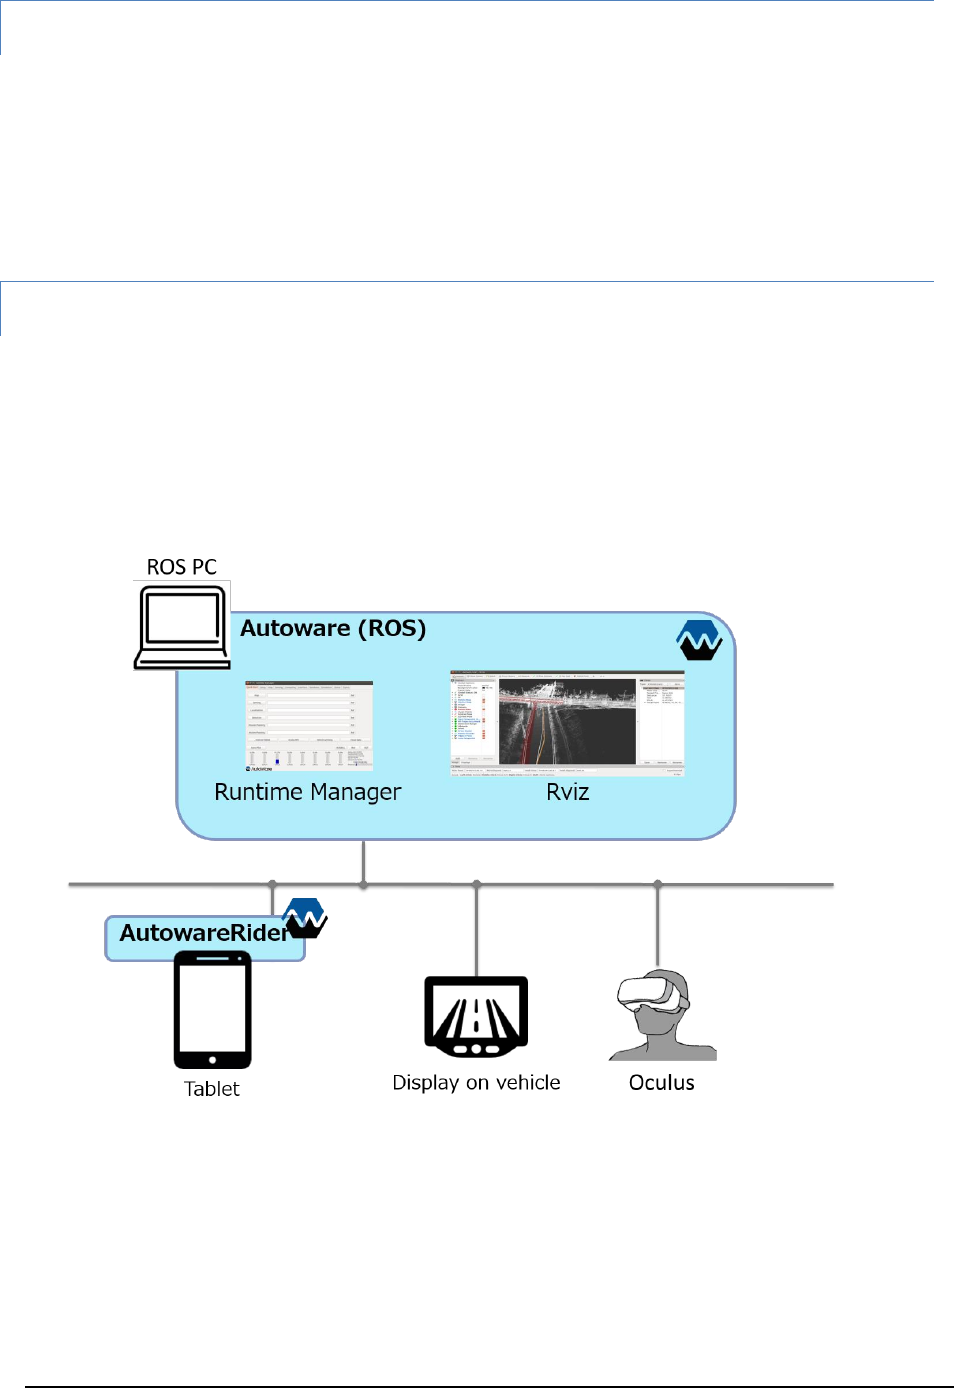
User Interface
A user interface called “Runtime Manager” of Autoware enables developers to operate
functions, such as localization, object detection, and path following, easily. In addition, RViz
can integrate and visualize localization on 3-D map, object detection, path planning, and
path following. Furthermore, a tablet user interface, “AutowareRider”, of Autoware enables
navigation, path planning, transition to autonomous driving mode and etc., on tables, easily.
Moreover, Autoware can visualize 3-D map used in autonomous driving system and project
it on on-vehicle displays and Oculus devices.
Figure 2 User interface
A U T O W A R E - U S E R S - M A N U A L
Page 10
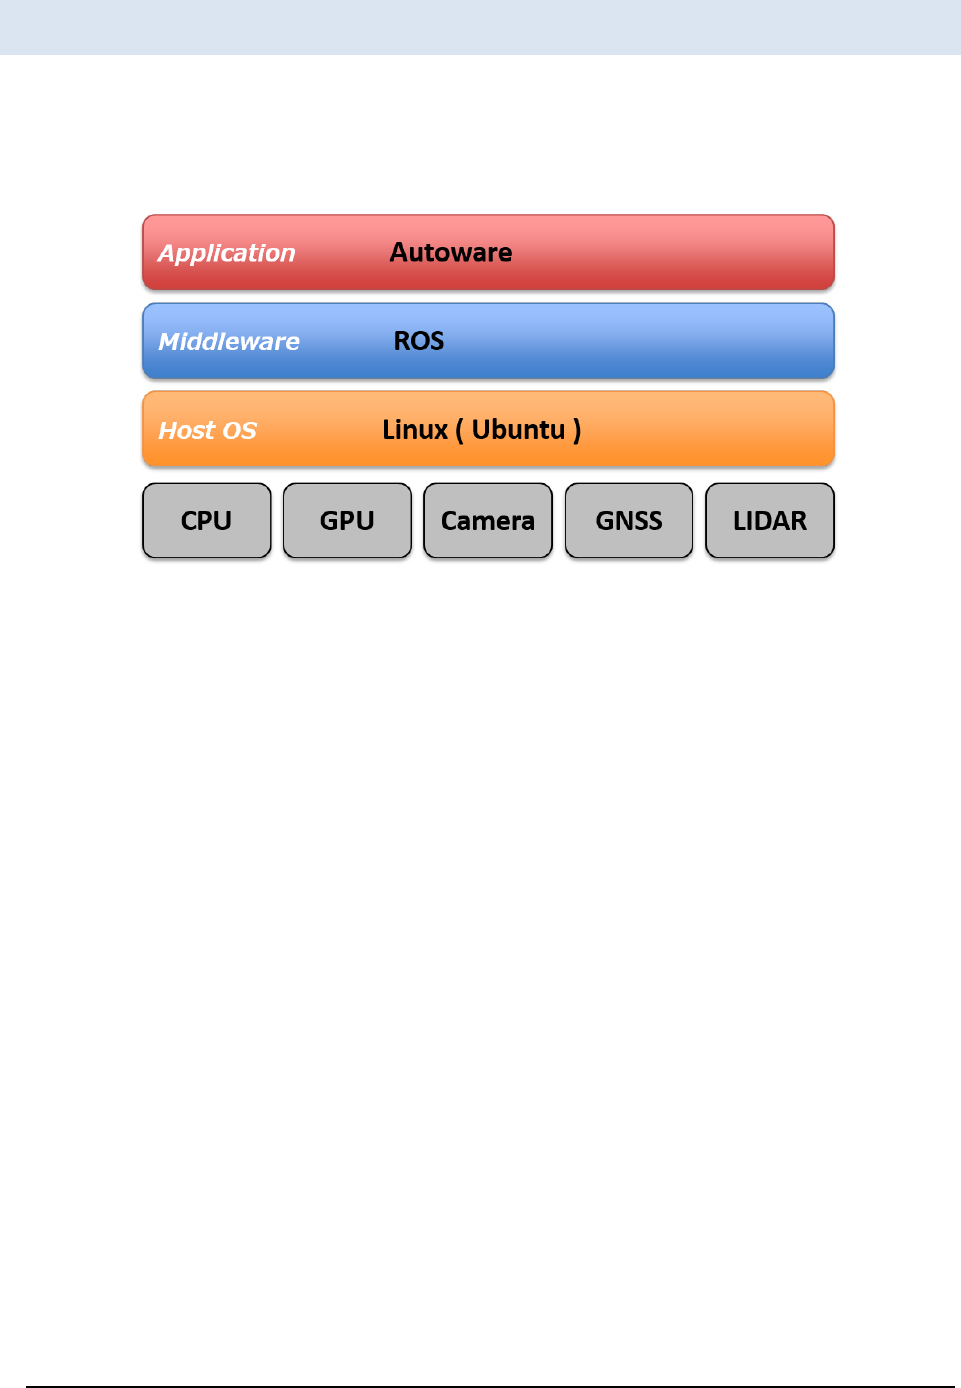
Platform structure for Autoware
utoware is an application using ROS and ROS only works on Unix-based platforms.
Figure 3 illustrates the overall system structure for Autoware.
A
Figure 3 Platform structure for Autoware
A U T O W A R E - U S E R S - M A N U A L
Page 11
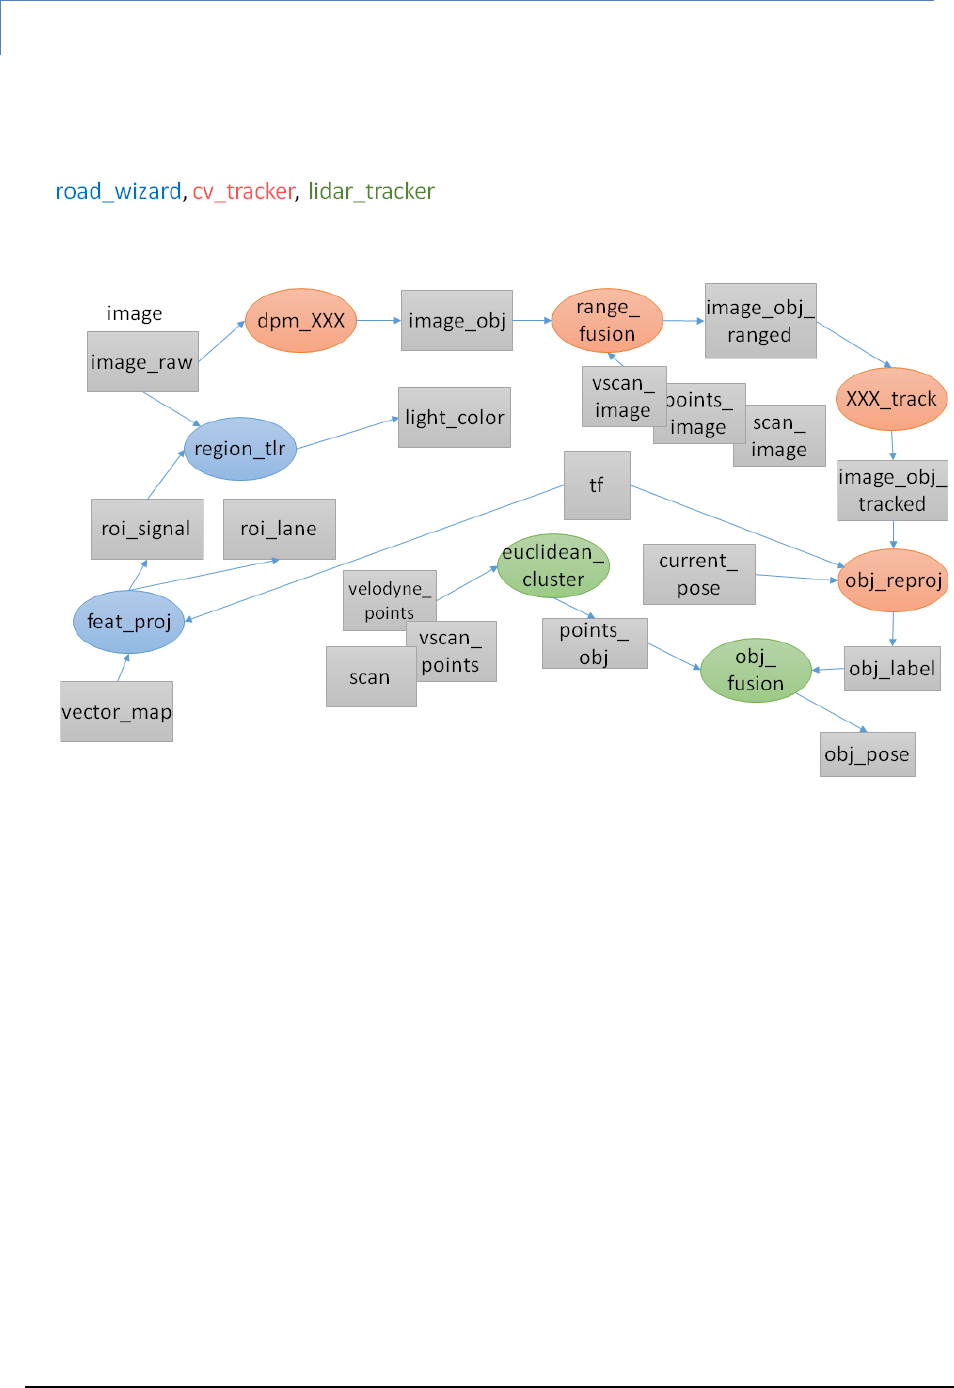
Perception/Recognition
ros/src/computing/perception/detection
The figure to be updated (tmp)
Figure 4 Perception and recognition
A U T O W A R E - U S E R S - M A N U A L
Page 12
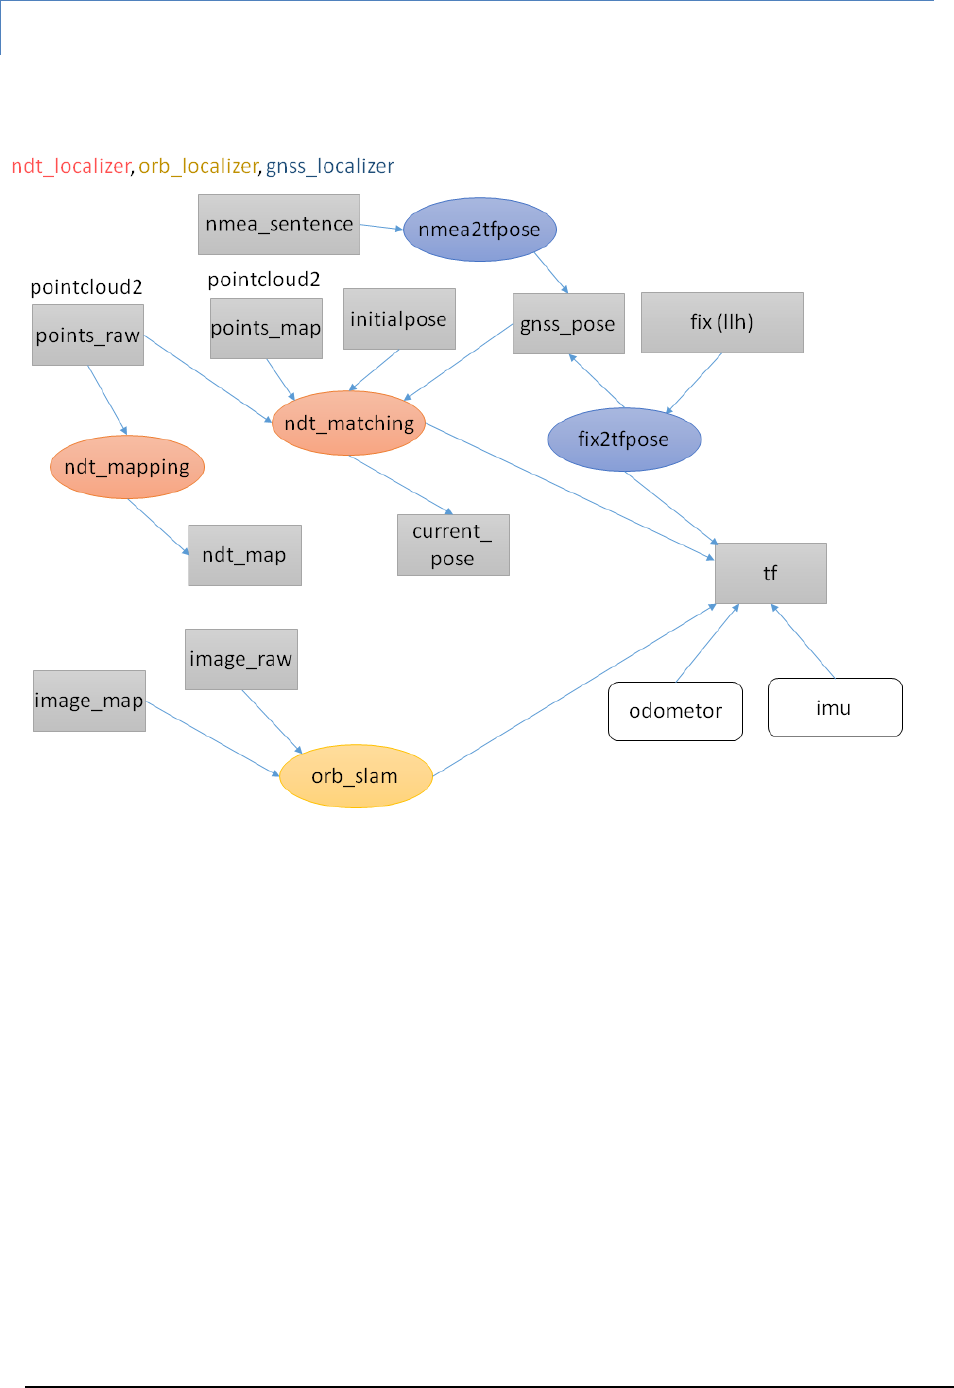
Judgement/Operation/Localization
ros/src/computing/perception/localization
Figure 5 Judgment, operation and localization
A U T O W A R E - U S E R S - M A N U A L
Page 13
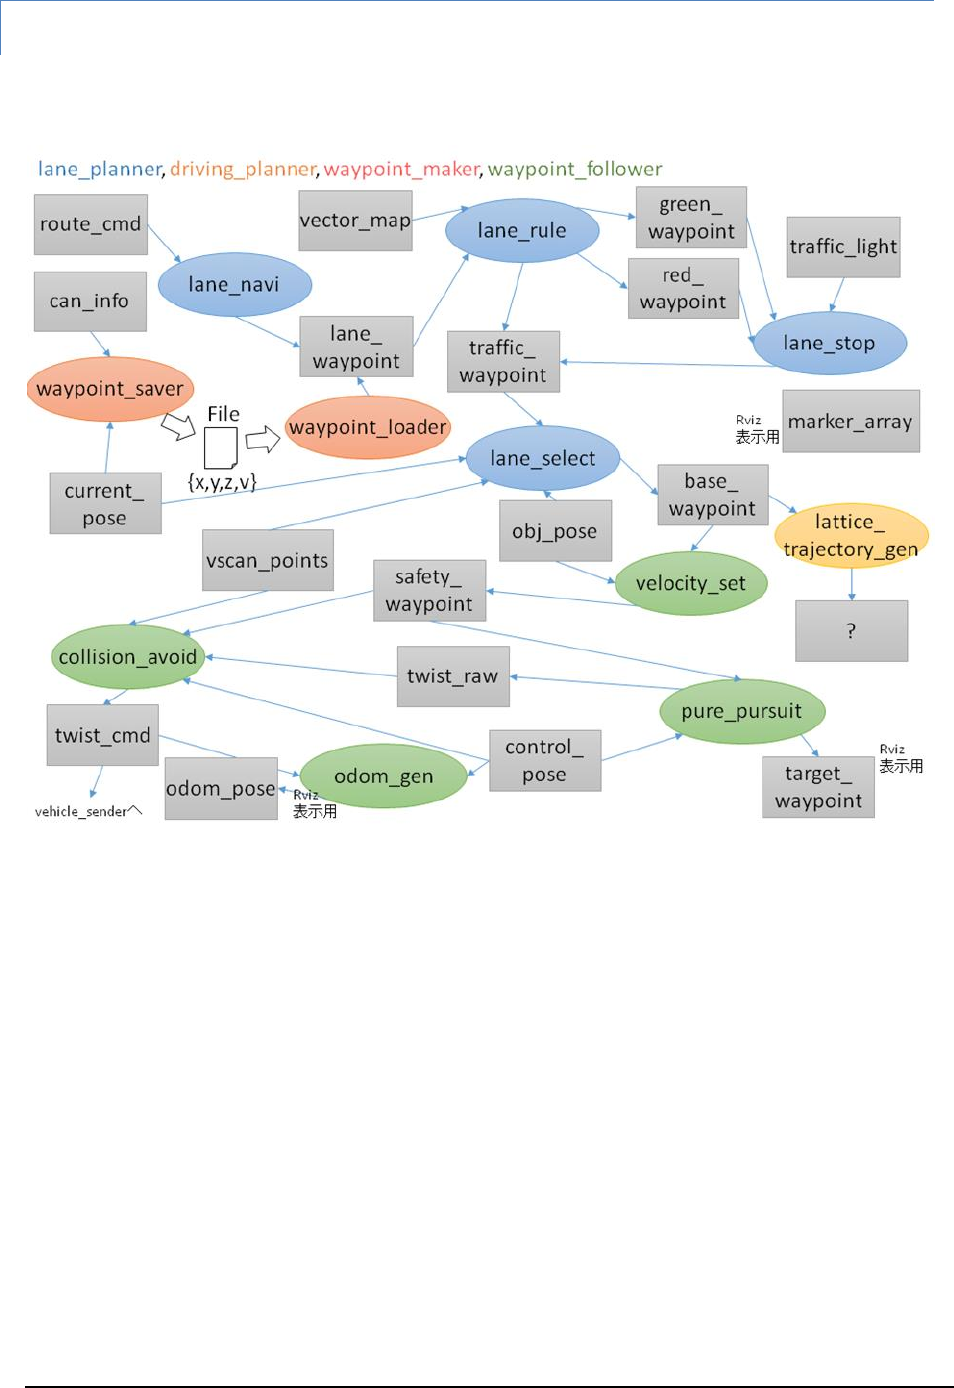
Path Planning
ros/src/computing/planning
The figure to be updated (tmp)
Figure 6 Path planning
A U T O W A R E - U S E R S - M A N U A L
Page 14
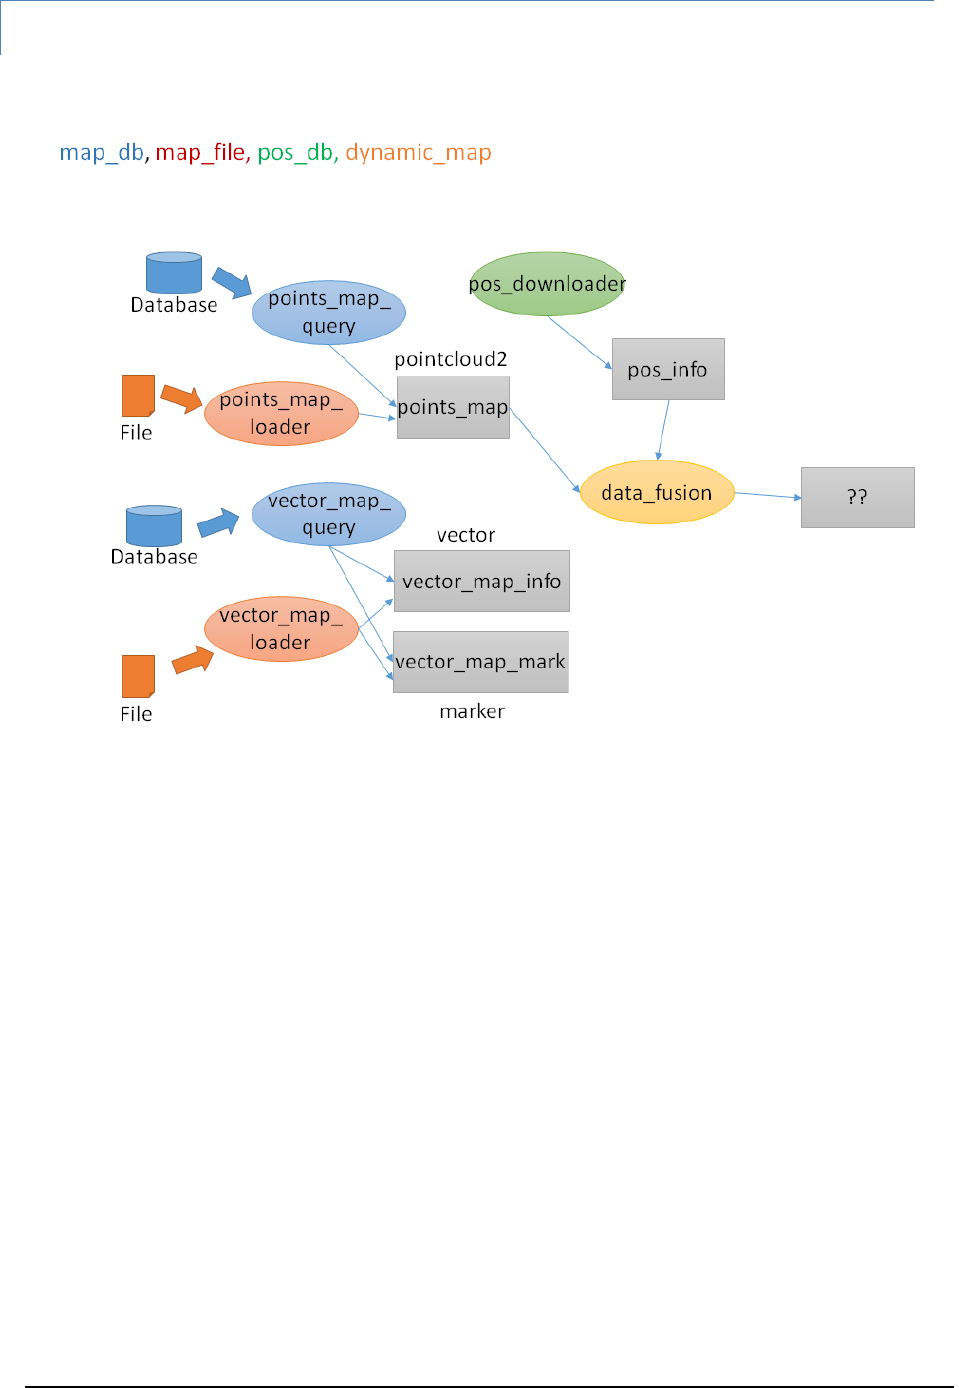
Data Loading (3-D Map, Database, Files)
ros/src/data
The figure to be updated (tmp)
Figure 7 Data loading
A U T O W A R E - U S E R S - M A N U A L
Page 15
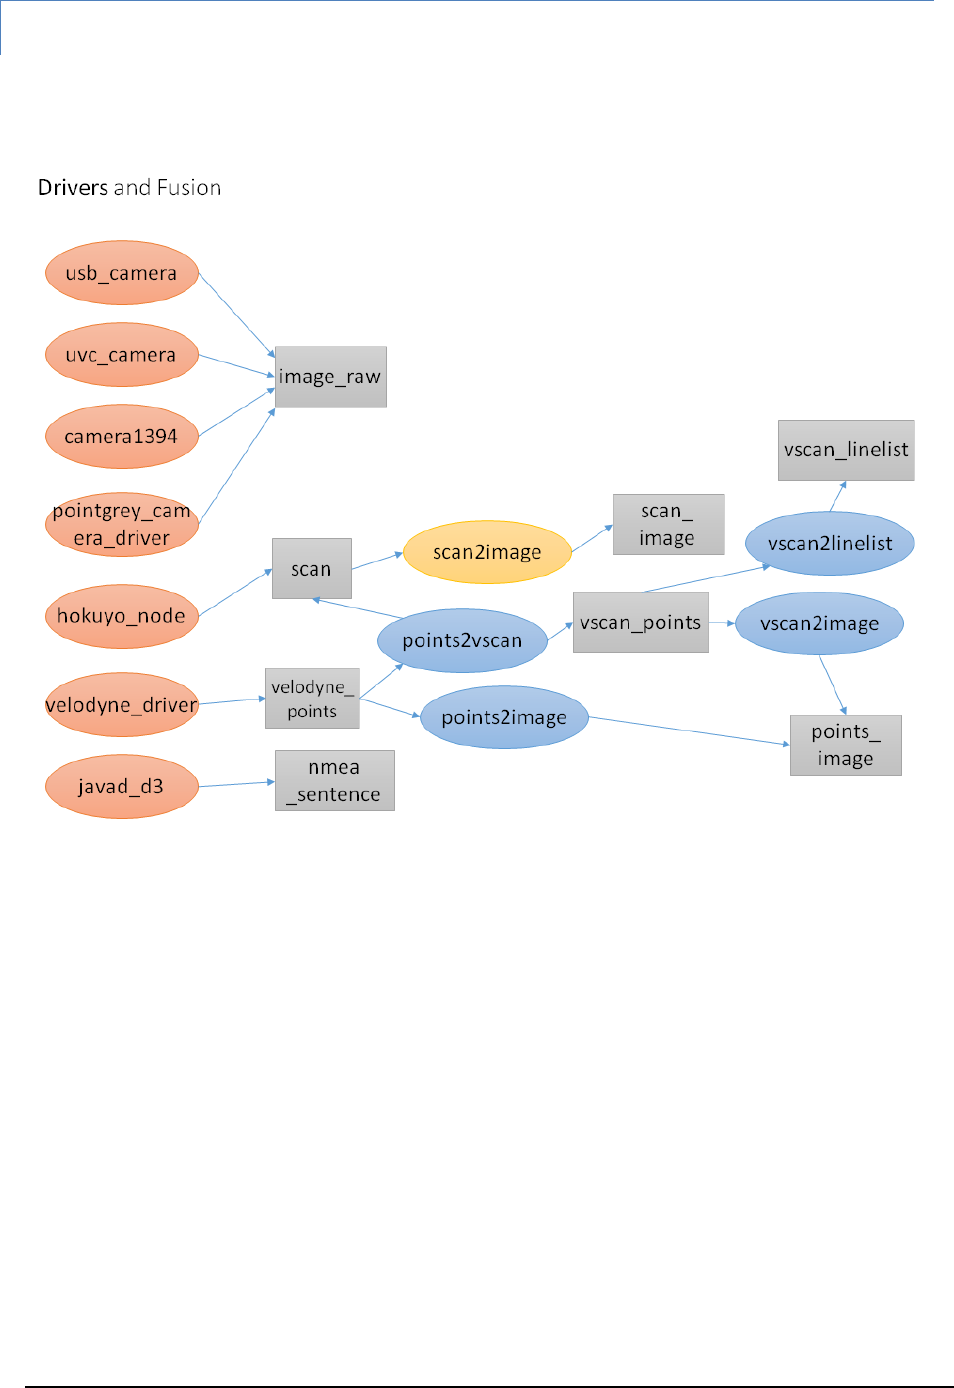
Device Drivers and Sensor Fusion
ros/src/sensing/drivers & ros/src/sensing/fusion
The figure to be updated (tmp)
Figure 8 Device drivers and sensor fusion
A U T O W A R E - U S E R S - M A N U A L
Page 16
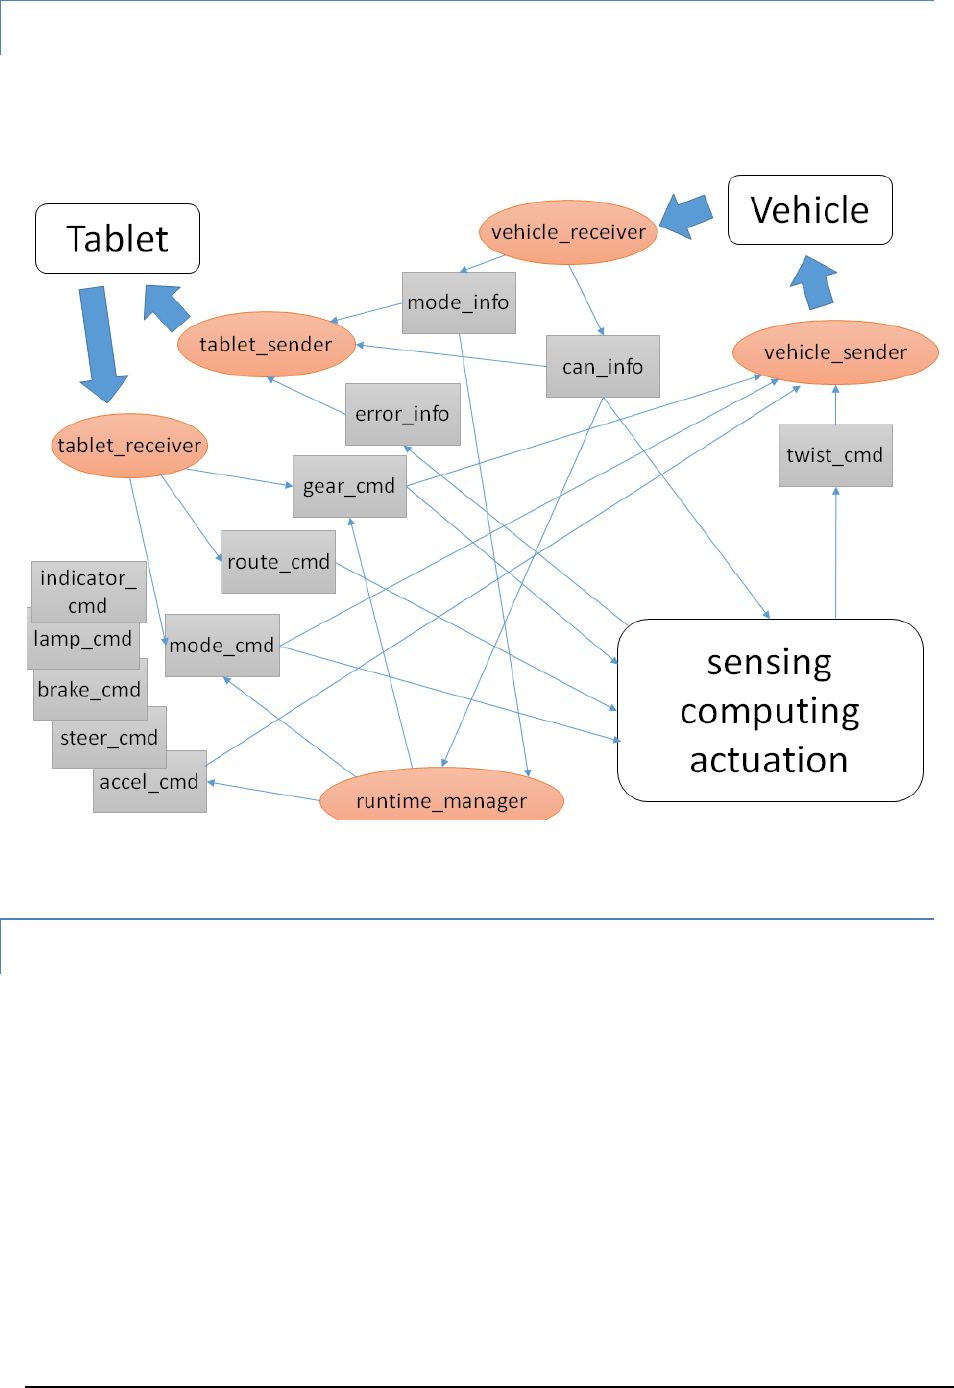
Interface for Smart Phone Applications
ros/src/socket
The figure to be updated (tmp)
Utilities and Others
ros/src/util/
Runtime Manager, sample data, pseudo-drivers
ui/tablet/
Smart phone applications
vehicle/
Vehicle control, vehicle data acquisition
Figure 9 Interface for smart phone applications

A U T O W A R E - U S E R S - M A N U A L
Page 17
3. Operating Autoware
The main function operations of Autoware are described in this chapter. This
description assumes operating by Runtime Manager. Please refer Chapter 4 for
user inter face details.
Preparations
ain functions of Autoware can easily be operated by Quick Start tab in Runtime
Manager. Nagoya University has provided sample demo data for Quick Start.
Preparation for the demo is described in the following sections.
Demo Data
Operations by Quick Start tab in Runtime Manager are described in this section.
Here, it is assumed that the required data is put in ~/.autoware/data.
① Download
Download the demo data from the following sites, and put them in ~/.autoware/data
Script for generating launch files
http://db3.ertl.jp/autoware/sample_data/my_launch.sh
Data of map (Moriyama area), calibration and route
http://db3.ertl.jp/autoware/sample_data/sample_moriyama_data.tar.gz
ROSBAG data
http://db3.ertl.jp/autoware/sample_data/sample_moriyama_150324.tar.gz
ROSBAG data does not contain video data for object detection.
② Extraction
Extract the downloaded data to ~/.autoware/ by the following command:
$ tar xfz sample_moriyama_data.tar.gz -C ~/.autoware/
Chapter
3
M
A U T O W A R E - U S E R S - M A N U A L
Page 18
③ Launch script
Run the following script to generate lacunh files for playing demo by Qutick Start tab.
$ sh my_launch.sh
④ Launch files to be generated
my_map.launch # Load maps
my_sensing.launch # Load drivers
my_localization.launch # Localization
my_detection.launch # Object detection
my_mission_planning.launch # Path planning
my_motion_planning.launch # Path following
⑤ If you want to generate launch files to other directories
If you want to generate launch files in other directories, specify the path as an argument
for launching the script.
Example: if you put the data in ~/.autoware/data/quick_start/ROSBAG_sample/
Runtime Manager Launching
① Runtime Manager can be launched by double-clicking Autoware/ros/run in ROS PC.
Alternatively, it can be launched by “./run” on a terminal.
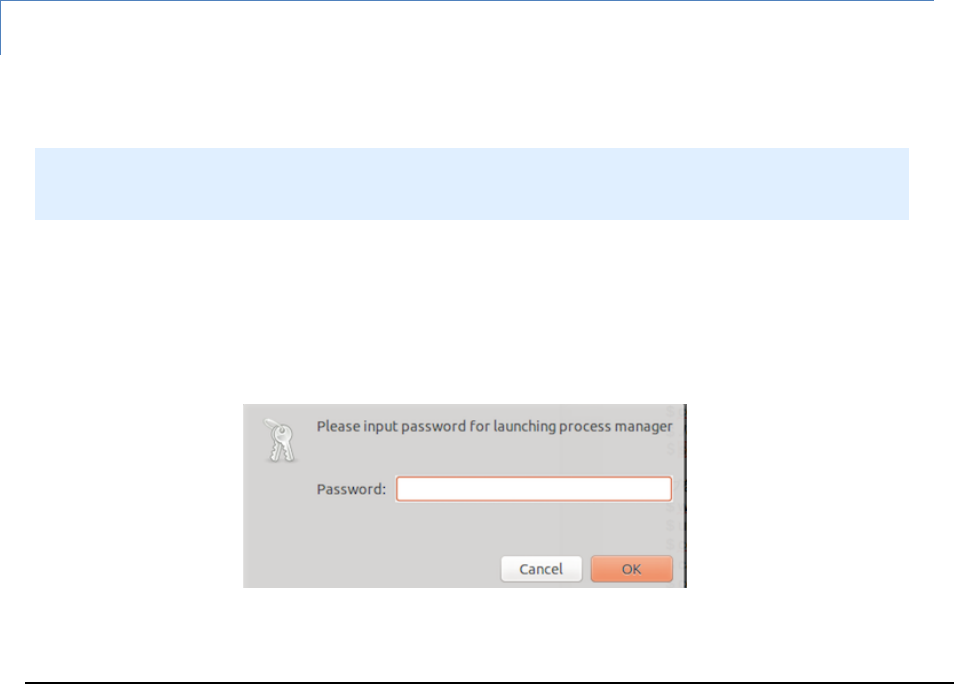
② Enter login password and press [OK] on the displayed password dialog.
The run file contains shell scripts.
Starting run, two terminals are launched.
The one is for roscore, the other is for the output of runtime manager.
Figure 10 Password dialog for administrative privileges

A U T O W A R E - U S E R S - M A N U A L
Page 19
RViz Configuration
① Launch RViz by pressing [RViz] on the right-bottom in Runtime Manager.
Select [File] - [Open Config] in the [RViz] menu.
Select the following Config file and press [Open] on the dialog displayed by pressing
[Choose a file to open].
Autoware/ros/src/.config/RViz/default.RViz
Operating Quick Start
Steps of main function operations of Autoware by Quick Start in Runtime Manager are
described in the following sections.
Load map (Quick Start)
① Load 3-D map (Point Cloud) and Vector map (Vector Map)
Specify the my_map.launch generated in the Demo Data section to the file selection
dialog of [Map] in the [Quick Start] tab and press Map.
Load driver (Quick Start)
① Specify the my_sensing.launch generated in the Demo Data section to the file
selection dialog of [Sensing] in the [Quick Start] tab and press Sensing.
A U T O W A R E - U S E R S - M A N U A L
Page 20
Autoware Main Functions
Localization (NDT:Normal Distributions Transform)
How to use a ROSBAG is described in this section.
① Specify the following ROSBAG by the file selection dialog in [Simulation] tab, and
press [Play]. Press [Pause] to suspend ROSBAG immediately.
~/.autoware/sample_moriyama_150324.bag
② Specify the my_map.launch generated in the Demo Data section to the file selection
dialog of [Map] in the [Quick Start] tab, and press Map.
③ Specify the my_localization.launch generated in the Demo Data section to the file
selection dialog of [Localization] in the [Quick Start] tab, and press [Localization].
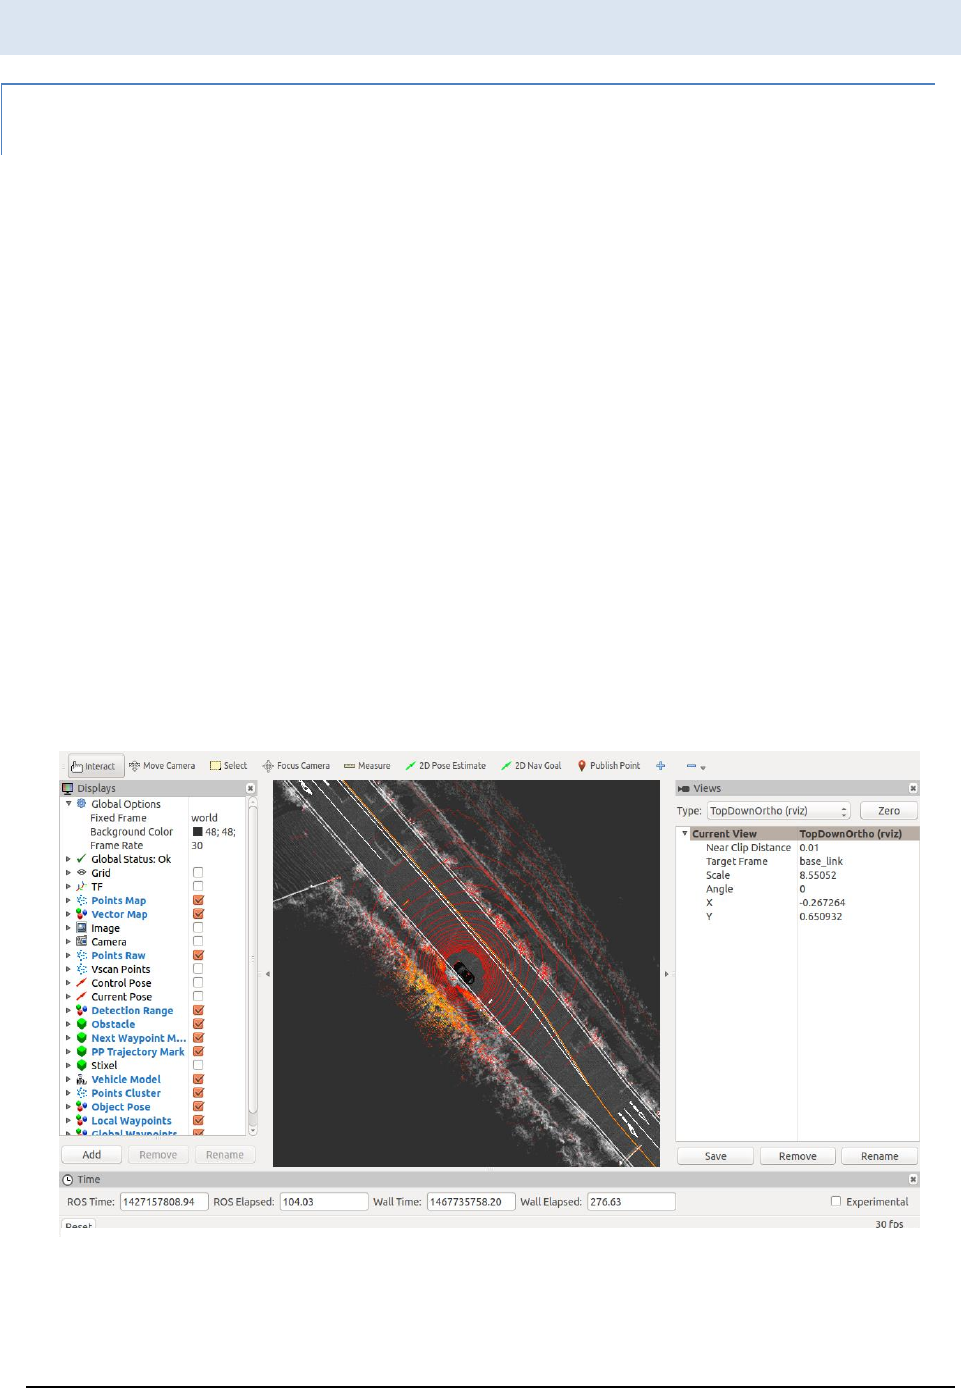
④ Pressing [Pause] in the [Simulation] tab to resume the ROSBAG, a map is displayed.
If NDT is run, the results are also displayed. If nothing is displayed, press [Reset] in the
RViz, or remove and set checks of [Points Map] and [Vector Map] in the Display.
Figure 12 shows the loaded map and the localized vehicle on RViz.
Note: Localization is not stable until 23% (110/479 second) of the progress bar
displayed in the Simulation tab, because the demo ROSBAG does not include maps.
Figure 11 Localization
A U T O W A R E - U S E R S - M A N U A L
Page 21
⑤ If the results of localization do not follow the GNSS arrow, press [2D Pose Estimate] in
the top of RViz, move the mouse cursor and click the GNSS arrow.
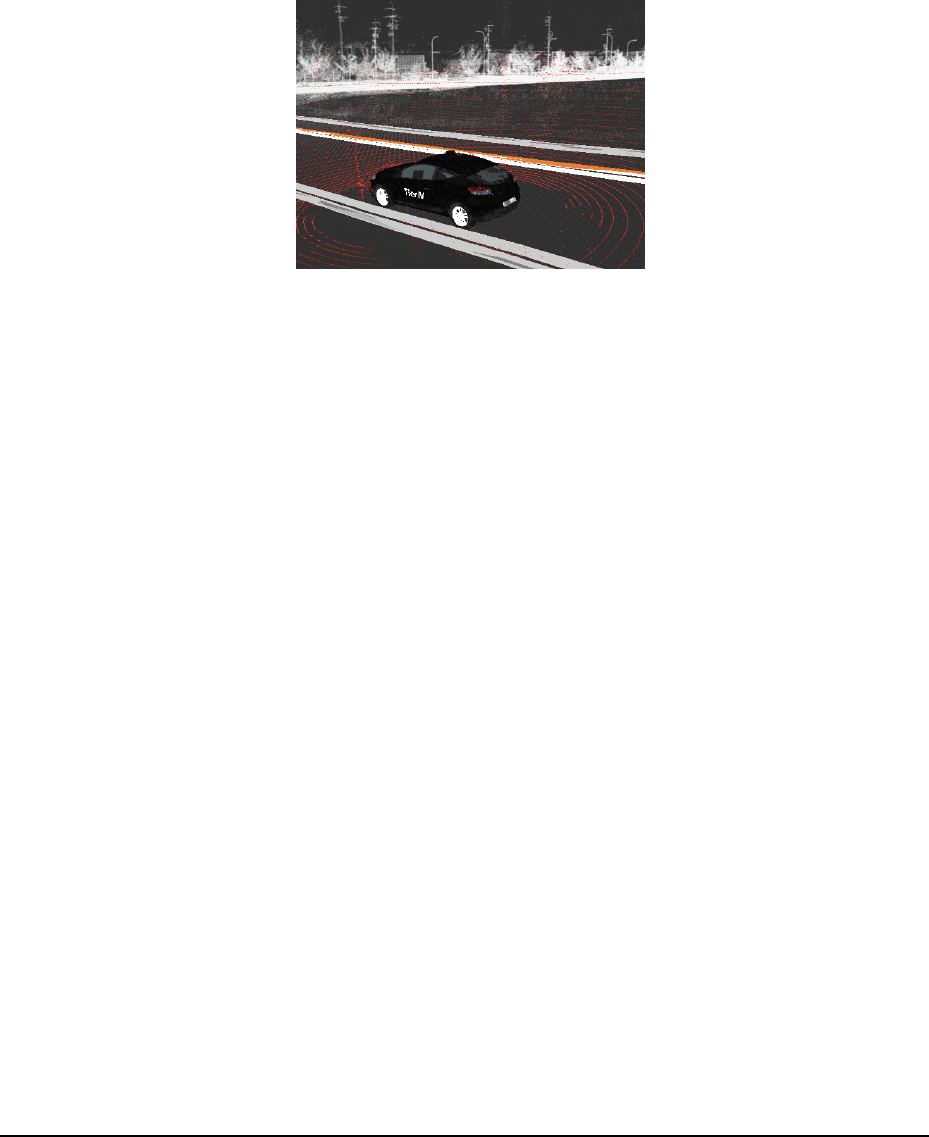
⑥ Selecting [ThirdPersonFollower(RViz)] in the [TopDownOrtho(RViz)] on the right
pane in RViz, Figure 12 view can be obtained.
Figure 12 ThirdPersonFollwer
A U T O W A R E - U S E R S - M A N U A L
Page 22
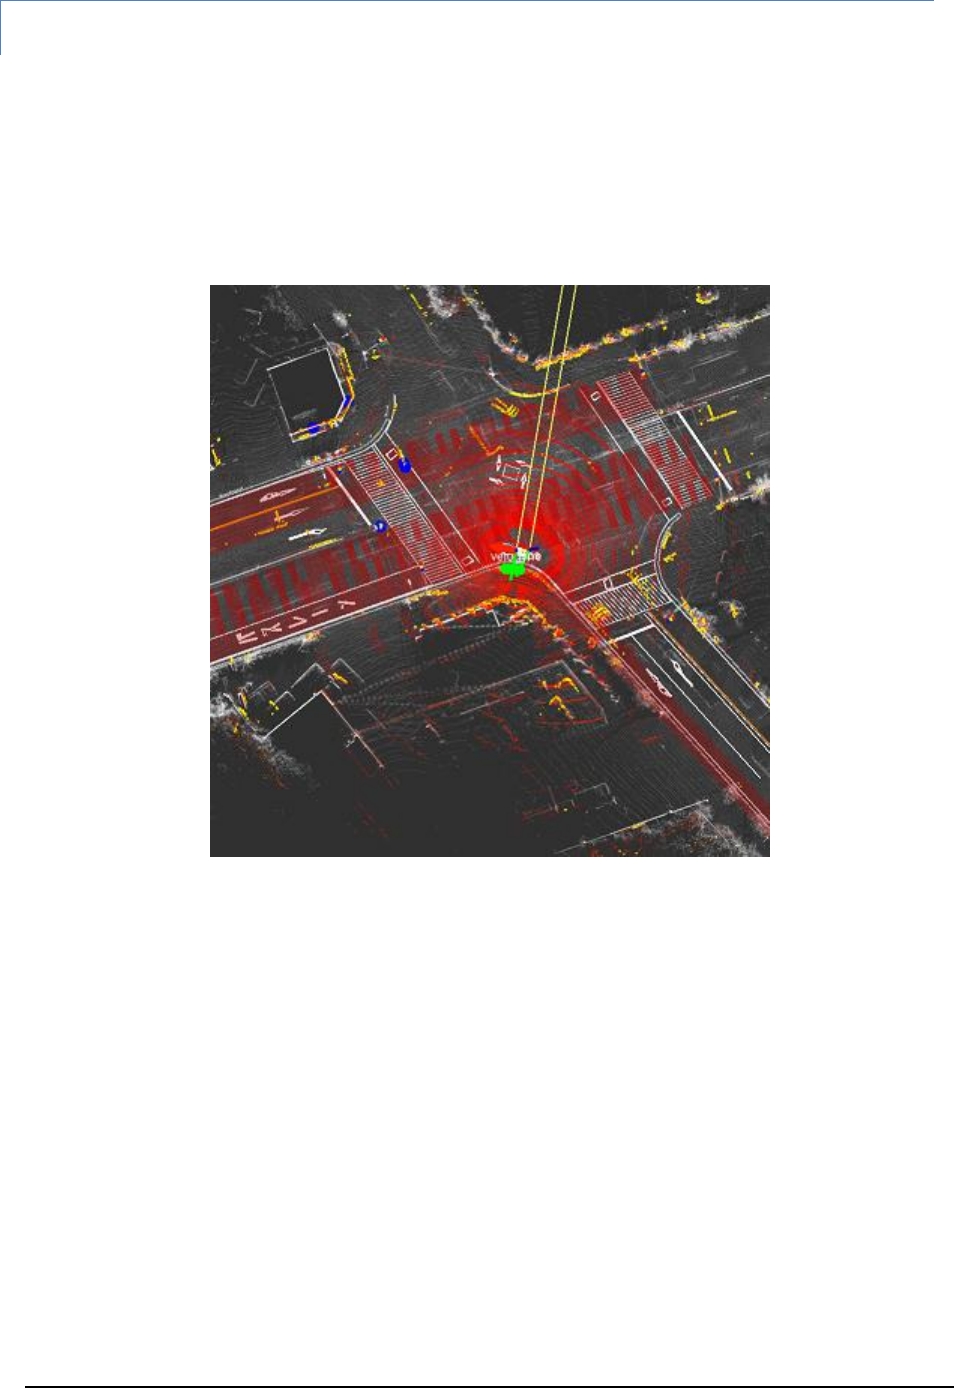
Object Detection
① Specify the my_detection.launch generated in the Demo Data section to the file
selection dialog of [Detection] in the [Qutick Start] tab, and press [Detection].
② If object detection succeeds in running NDT, vehicles will be displayed as blue
spheres, and pedestrians will be green spheres.
NOTE: the demo ROSBAG data does not contain video data for object detection.
Figure 13 Object detection
A U T O W A R E - U S E R S - M A N U A L
Page 23
Path Planning
① Specify the my_mission_planning.lauch generated in the Demo Data section to the
file selection dialog of [Mission Planning] in the [Quick Start] tab and press [Mission
Planning].
② The path and the target speed are displayed in blue line.
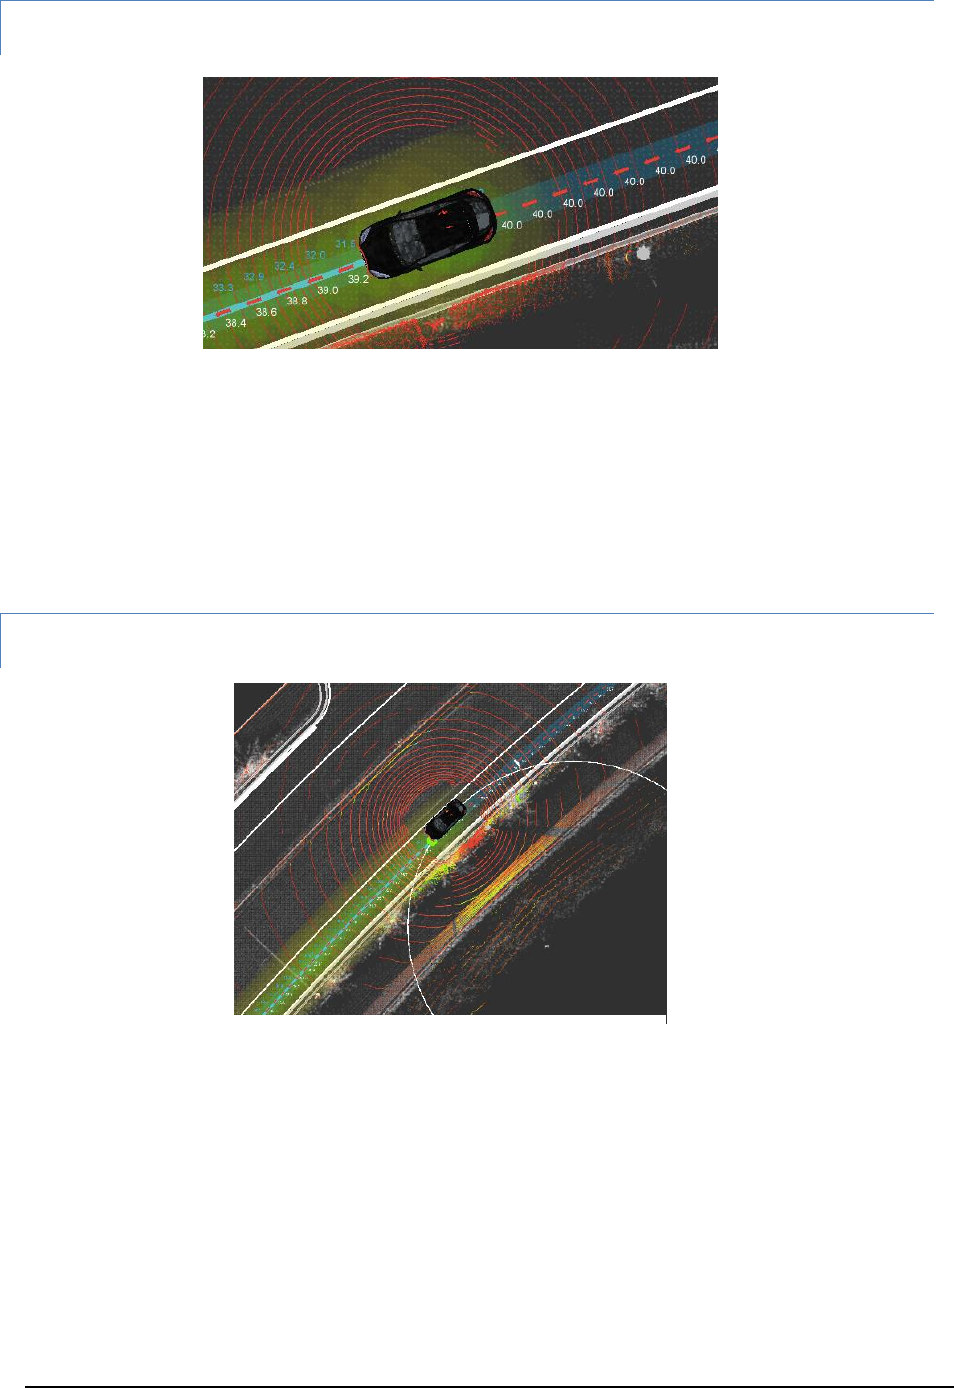
Path Following
① Specify the “my_motion_planning.launch” generated in the Demo data section to the
file selection dialog of Motion Planning in the Quick Start tab, and press [Motion
Planning].
② If the specified path by path planning is coming in the displaying window, blue spheres
on the path, and red circles calculated by Pure Pursuit are displayed.
Figure 14 Path planning
Figure 15 Path following
A U T O W A R E - U S E R S - M A N U A L
Page 24
Dynamic Map
Dynamic map is a method of sharing car and pedestrian information, which is recognized
by the ego vehicle or other vehicles, through Nagoya University database server.
① Ensure the following topics are in Publish
All are not necessary. If the following topics are published, register their information to
the database.
/current_pose (ego vehicle, /vel_pose_mux in Publish)
/obj_car_pose (other vehicles, /obj_fusion in Publish)
/obj_person_pose (pedestrains, /obj_fusion in Publish)
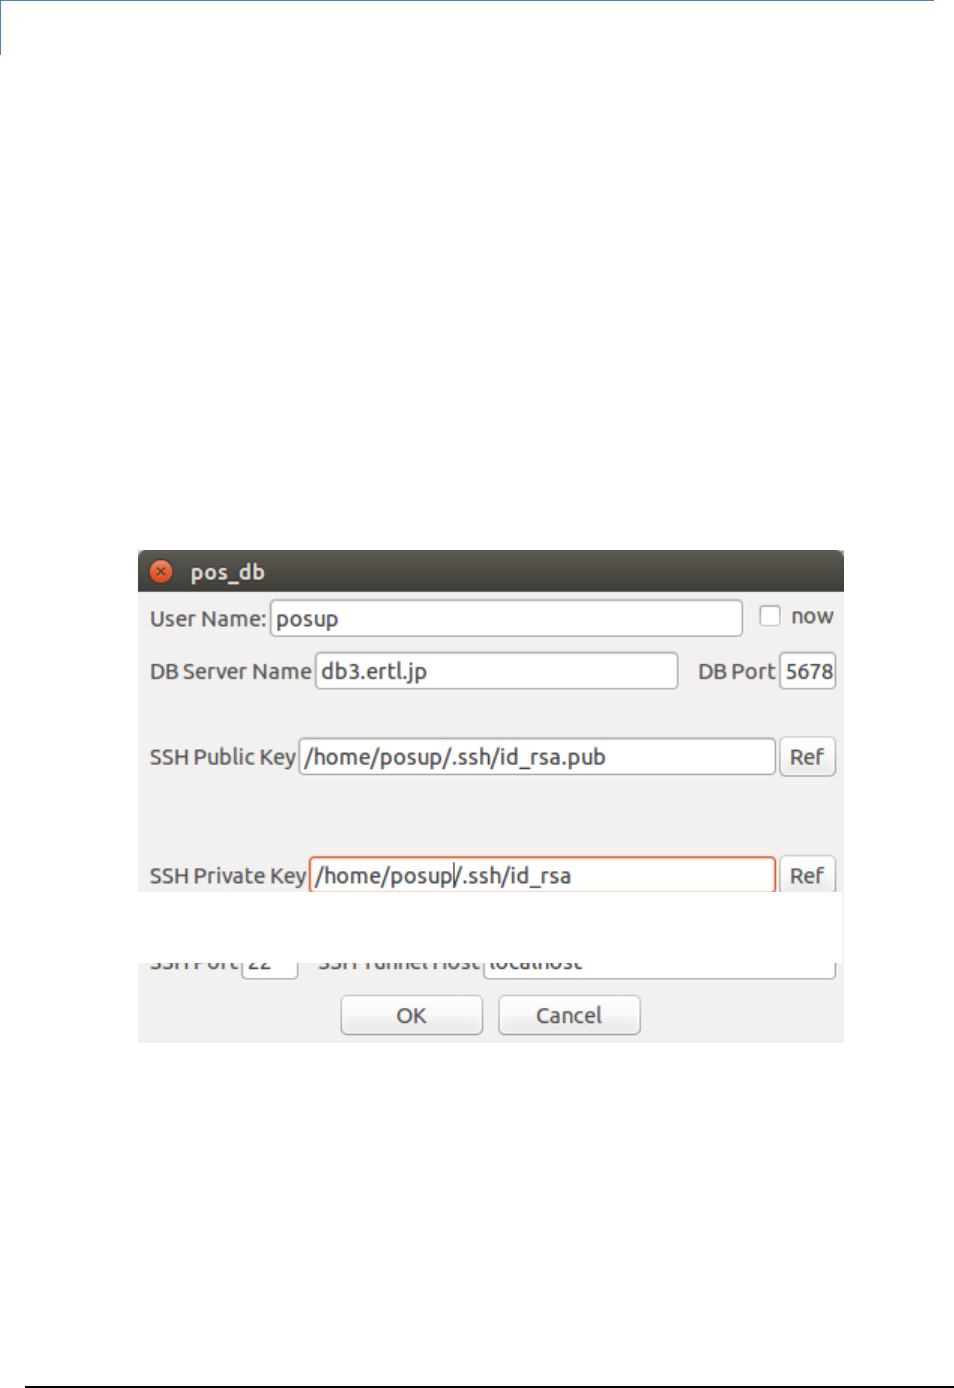
② Click [Position] -> [pos_uploader] -> [app] in the [Database] tab on the providing
information side, enter information to access database server by SSH, and press
[OK].
(Generating SSH key is described in the generating SSH public key section)
Figure 15 pos_uploader app dialog
Figure 16 pos_uploader app dialog
A U T O W A R E - U S E R S - M A N U A L
Page 25
③ Check [Position] -> [pos_uploader] (launch nodes) in the [Database] tab on the
sending information side.
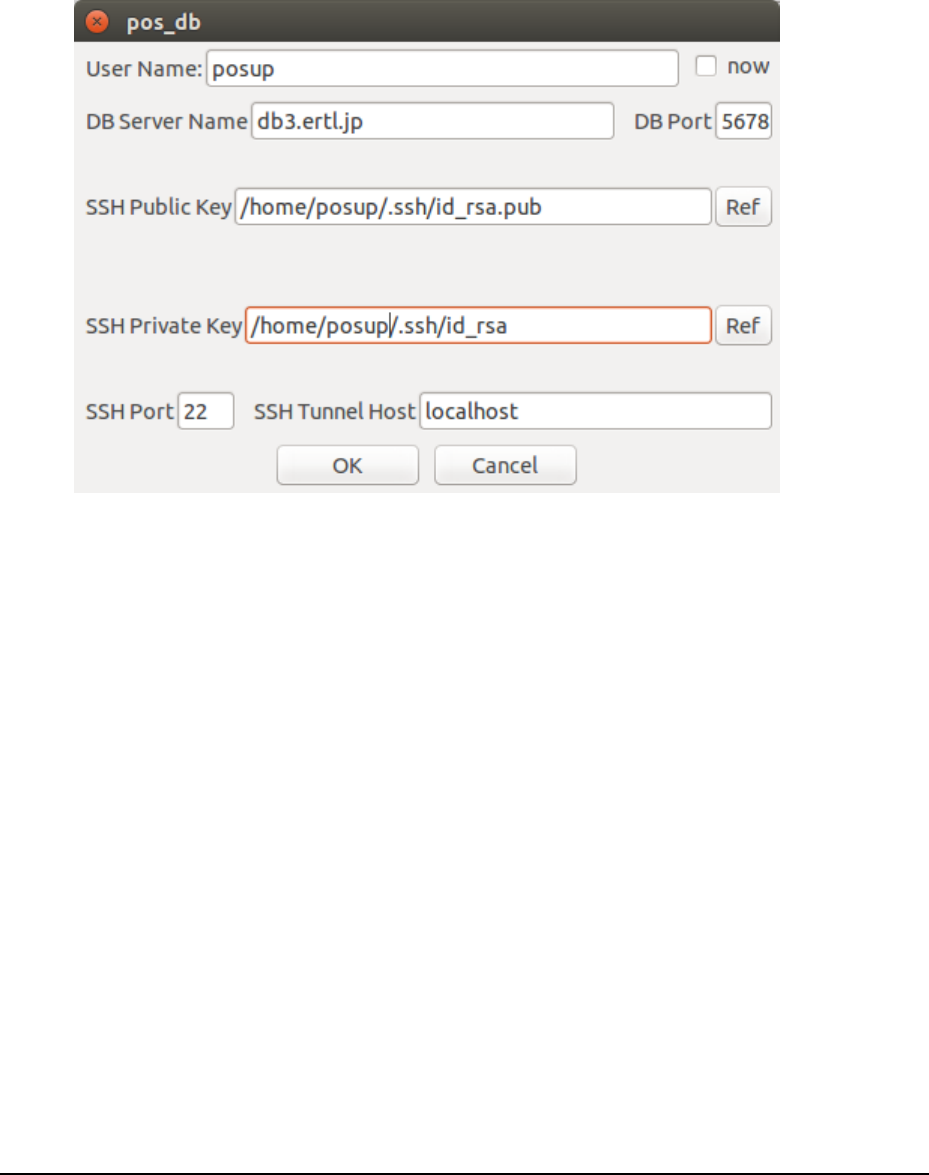
④ Click [Position] -> [pos_uploader] -> [app] in the [Databse] tab on the reviewing
information side, enter information to access database server by SSH, and press
[OK]. Checking [show my pose], the ego vehicle position is published.
⑤ Check [Position] -> [pos_downloader] in the [Database] tab on “RViz” in the reviewing
information side.
⑥ Adding a topic of “Marker” of “/mo marker” on the reviewing information side, the
recognized ego vehicle and other vehicles are displayed.
⑦ The table, “can”, of the Nagoya university database (“VoltDB”) is defined as follows:
Figure 17 pos_downloader app dialog

A U T O W A R E - U S E R S - M A N U A L
Page 26
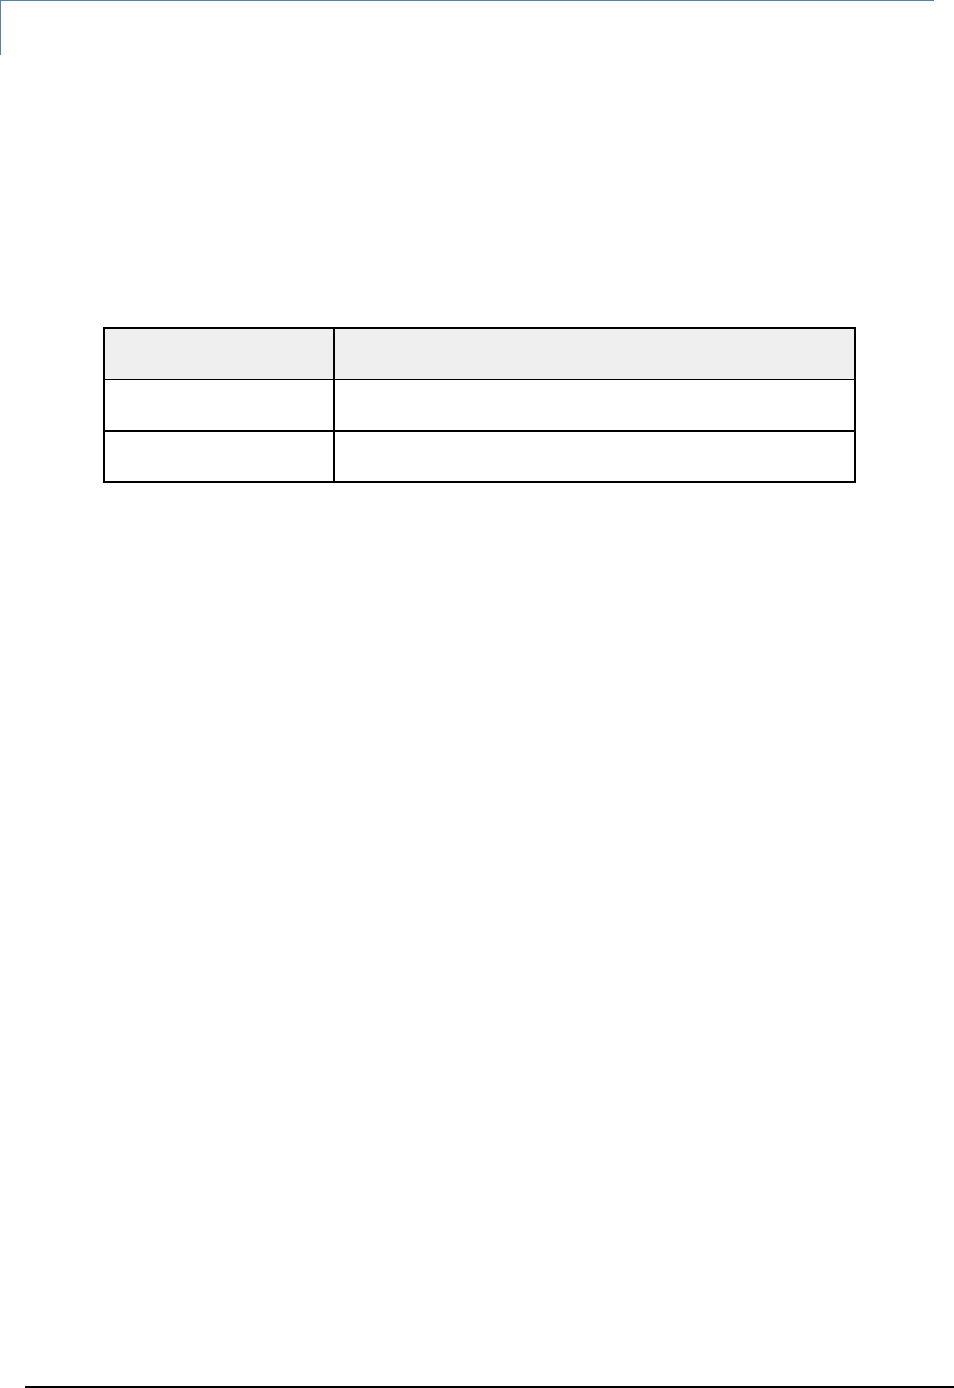
Table 1 Can
Name
Type
Description
id
varchar(32)
MAC address and terminal-specific information
lon
Float
Latitude (Android terminal)
lat
Float
Longitude (Android terminal)
H
Float
Not used
X
Float
Horizontal perpendicular x-axis (pos_uploader)
Y
Float
Horizontal perpendicular y-axis (pos_uploader)
Z
Float
Horizontal perpendicular z-axis (pos_uploader)
area
Float
Horizontal perpendicular axis area number (pos_uploader,
fixed at 7)
dir
Float
direction (Android terminal)
acct_x
Float
Acceleration x (pos_uploader)
acct_y
Float
Acceleration y (pos_uploader)
acct_z
Float
Acceleration z (pos_uploader)
vec
Float
Not used
type
Smallint
1=ego vehicle, 2=Detected vehicle, 3=Detected pedestrian,
0=Position of Android terminal
self
Smallint
Not used
tm
timestamp
Time stamp (GMT)

A U T O W A R E - U S E R S - M A N U A L
Page 27
AutowareRider
AutowareRider is an Android application to operate Autoware, which runs on ROS PCs,
from tablet terminals. The UI is similar to Night Rider, which is a TV series.
AutowareRoute
AutowareRoute is another Android application implemented with MapFan SDK for planning
route data from a departure point to a destination point.
Features
AutowareRider provides the following functions.
Send the route data generated by AutowareRoute to ROS PCs
Launch CAN data collection application
Start a launch file of ROS PC by pressing buttons
Update UI according to CAN data received from ROS PCs.
AutowareRider Launching
① Launch Runtime Manager on an ROS PC.
② Press [Active] in [Network Connection] -> [Tablet UI] on the Main Tab to launch the
following nodes:
tablet_receiver
tablet_sender
③ Specify the following parameters in each [app] of [Planning] -> [Path] in the
[Computing] tab.
[lane_navi]
vector_map_directory
A directory path of a high definition map
[lane_rule]
vector_map_directory
A directory path of a high definition map
ruled_waypoint_csv
A path of a file saved waypoints

A U T O W A R E - U S E R S - M A N U A L
Page 28
Velocity
Speed (unit: km/h, default: 40, range: 0~200)
Difference around Signal
Acceleration around traffic lights (unit: km/h, default: 2, range: 0~20)
[lane_stop]
Red Light
Change to the velocity of red light
Blue Light
Change to the velocity of blue light
④ Launch the followings by turning on the checkbox of [Planning] -> [Path] on the
[Computing] tab.
[lane_navi]
[lane_rule]
[lane_stop]
⑤ Launch AutowareRider from the list of Android tablet applications.
⑥ Specify the following parameters in the [右上メニュー] (left-top menu) -> [設定]
(setting).
ROS PC
IP address
ROS PC IPv4 address
Receiver port number
tablet_receiver port number (default: 5666)
Sender port number
tablet_sender port number (default: 5777)
⑦ Press [OK] to access to the ROS PC.
Here, the configuration is saved into a file automatically, and the file is used from next
connection as default setting.
⑧ If the central bar on the window is light red, the connection is success.

A U T O W A R E - U S E R S - M A N U A L
Page 29
Table 2 Bar color and connection status
Bar color
Connection status
Dark red
Not connected to ROS PC
Light red
Connected to ROS PC
Light blue
Autonomous driving (mode_info: 1)
Light yellow
Error (error_info: 1)

A U T O W A R E - U S E R S - M A N U A L
Page 30
Path Planning Application Usage
① Press [NAVI] on “AutowareRider” to launch path planning.
② Press and hold a point on the map in order of the followings:
a. 出発地に設定 (set departure point)
b. 目的地に設定 (set destination point)
c. ルート探索実行 (run route planning)
③ Path planning after route planning is done, path data is sent to an ROS PC. The path
data is saved automatically, and route planning is omitted from the next time.
④ AutowareRider window is displayed after sending the path data.
Send Path data to ROS PC
Refer the step ③ above for path planning application usage.
CAN Collection Application Usage Data
① Specify the following parameters in [右上メニュー] (right top menu) -> [設定] (setting)
on the AutowareRider (tmp).
データ収集 (data collection)
Table name
Destination table name
SSH Hostname
SSH destination hostname
Port number
SSH destination port number (default: 22)
Username
SSH login username
Password
SSH login password
ポートフォワーディング (port forwarding)
Local port number
Port number of local machine source (default: 5558)
A U T O W A R E - U S E R S - M A N U A L
Page 31
Remote host name
Remote machine host name (default: 127.0.0.1)
Remote port number
Port number of a remote machine (default: 5555)
② The configuration is saved by pressing [OK].
Note: SSH password is not saved in the configuration file. The password is
saved on the memory during running AutowareRider.
③ Launch any one of the followings in [右上メニュー] (right top menu) -> [データ収集]
(data collection)
CanGather
CarLink (Bluetooth)
CarLink (USB)
④ The usages after launching applications are same as launching applications
individually. Refer the below URL.
https://github.com/CPFL/Autoware/blob/master/vehicle/general/android/README.
md
Send CAN Data to a ROS PC
Refer the step ④ in CAN Data Collection Usage (tmp).
A U T O W A R E - U S E R S - M A N U A L
Page 32
Start Launch File
① [S1] and [S2] of AutowareRider starts the following launch files, respectively (tmp).
check.launch
set.launch
Pressing each button, the corresponding launch file is started on an ROS PC.
Table 2 Buttons and launch file status
Button
Launch file status
Pressed (black)
Start ({ndt,if}_stat: false)
Pressed (red)
Start ({ndt,if}_stat: true)

A U T O W A R E - U S E R S - M A N U A L
Page 33
4. Autoware User Interface Details
Runtime Manager
untime Manager is a Python script (scripts/runtime_manager_dalog.py) included in
the runtime_manager package. It can be launched by the following command:
$ rosrun runtime_manager runtime_manager_dialog.py
Runtime Manager dialog composes of multiple tabs. Operating Runtime Manager dialog
enables processes of starting/ending ROS nodes used in Autoware, and publishing topics for
parameters of the launched ROS. The buttons to start/end ROS nodes are classified into
functionalities and placed in different tabs. Each Tab window can be switched by pressing
each Tab on the top of the Runtime Manager dialog.
Chapter
4
R
A U T O W A R E - U S E R S - M A N U A L
Page 34
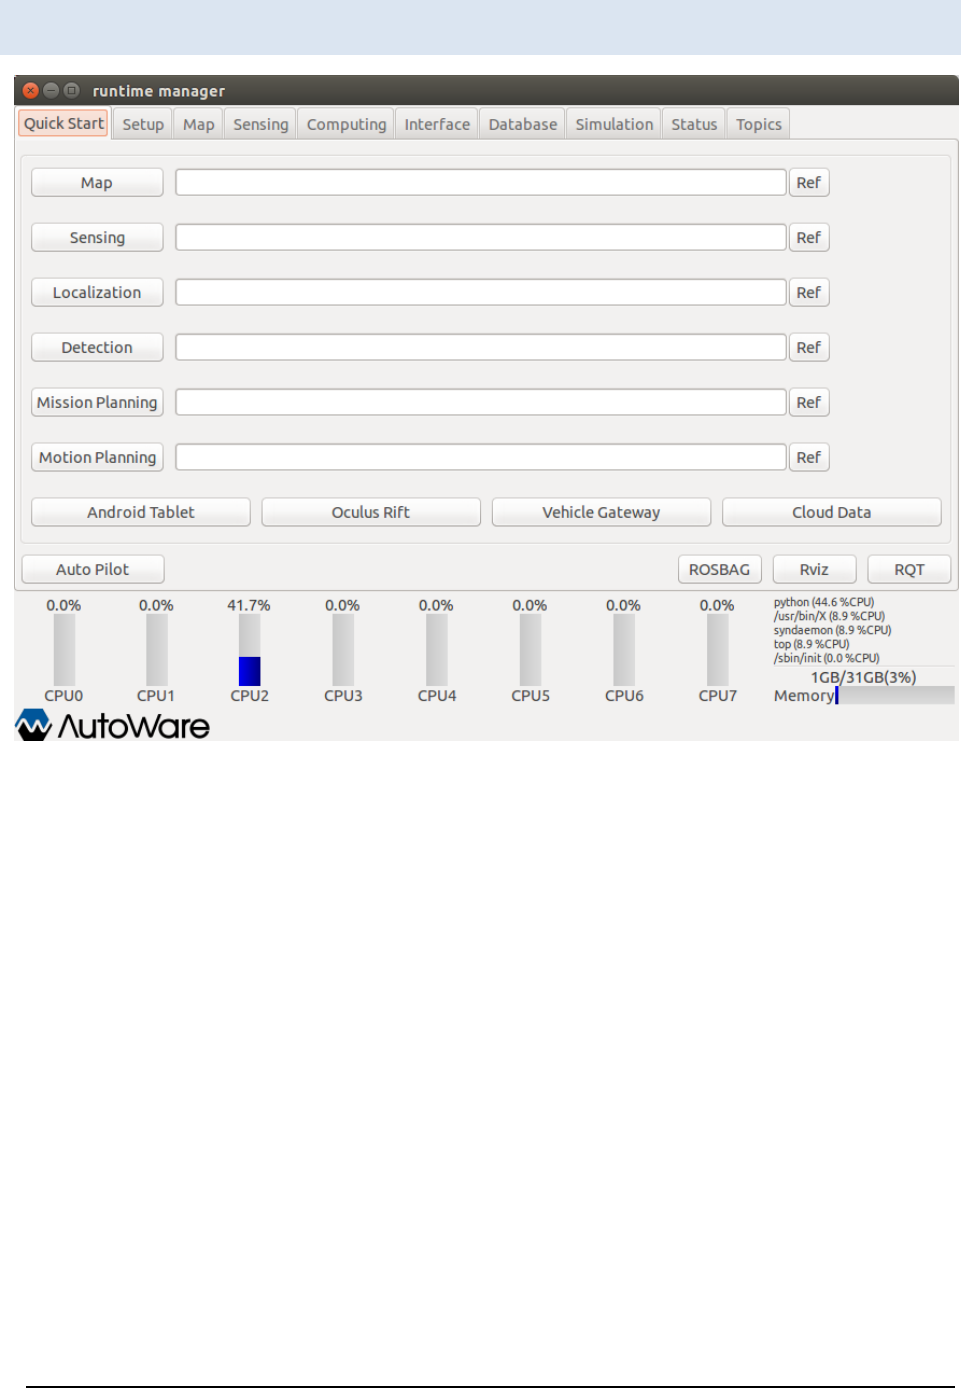
Runtime Manager – Quick Start Tab
Figure 18 Runtime Manager - Quick Start Tab
[Map] … Start/end a launch script specified by full path in the [Map] text box.
Alternatively, a script can be selected from the file selection dialog displayed by pressing
the [Ref] button.
[Sensing] … Start/end a launch script specified by full path in the [Sensing] text box.
Alternatively, a script can be selected from the file selection dialog displayed by pressing
the [Ref] button.
[Localization] … Start/end a launch script specified by full path in the [Localization] text
box. Alternatively, a script can be selected from the file selection dialog displayed by
pressing the [Ref] button.
[Detection] … Start/end a launch script specified by full path in the [Detection] text box.
Alternatively, a script can be selected from the file selection dialog displayed by pressing
the [Ref] button.

A U T O W A R E - U S E R S - M A N U A L
Page 35
[Mission Planning] … Start/end a launch script specified by full path in the [Mission
Planning] text box. Alternatively, a script can be selected from the file selection dialog
displayed by pressing the [Ref] button.
[Motion Planning] … Start/end a launch script specified by full path in the [Motion
Planning] text box. Alternatively, a script can be selected from the file selection dialog
displayed by pressing the [Ref] button.
[Android Tablet] … Start/end the script runtime_manager/tablet_socket.launch for
communicating with Tablets.
[Oculus Rift] … <Unimplemented>
[Vehicle Gateway] … Start/end the script runtime_manager/vehicle_socket.launch for
communicating with ZMP Robocar.
[Cloud Data] … Start/end obj_db/obj_downloader nodes.
[Auto Pilot] … Publish /mode_cmd topics according to the status of buttons.
[ROSBAG] … Display ROSBAG Record dialogs for ROSBAG.
[RViz] … Start/end RViz.
[RQT] … Start/end RQT.
A U T O W A R E - U S E R S - M A N U A L
Page 36
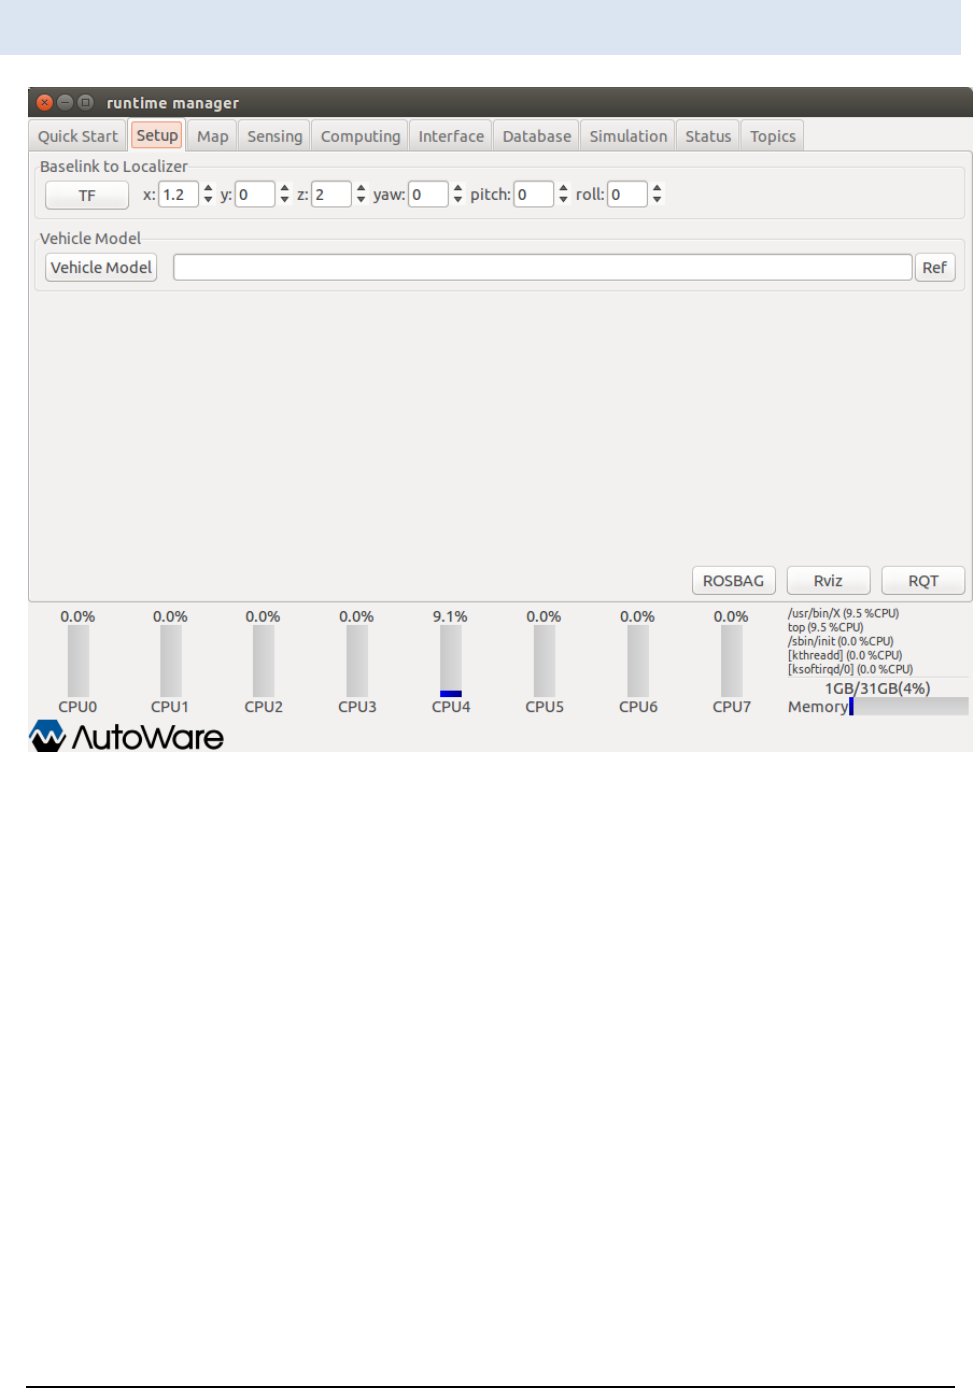
Runtime Manager – Setup Tab
Figure 19 Runtime Manager - Setup Tab
[Baselink to Localizer]
[TF] … Pressing [TF], a topic of Vehicle control position (base_link → Velodyne
position(velodyne)is published.
[x], [y], [z], [yaw], [pitch], [roll] … Enter the relative position of velodyne to base_link.
[Vehicle Model]
[Vehicle Model] … Start/end a script model_publisher/vehicle_model.launch with the
argument, which is the full path of URDF(Unified Robot Description Format)file(a vehicle
model displayed on RViz)specified in the text box. Alternatively, a URDF file can be
selected from a file selection dialog displayed by pressing [Ref]. If a URDF file is not
specified in the [Vehicle Model] text box, Autoware/ros/src/.config/model/default.urdf is
used.

A U T O W A R E - U S E R S - M A N U A L
Page 37
[ROSBAG] … Display a ROSBAG Record dialog.
[RViz] … Start/end RViz.
[RQT] … Start/end RQT.
A U T O W A R E - U S E R S - M A N U A L
Page 38
Runtime Manager – Map Tab
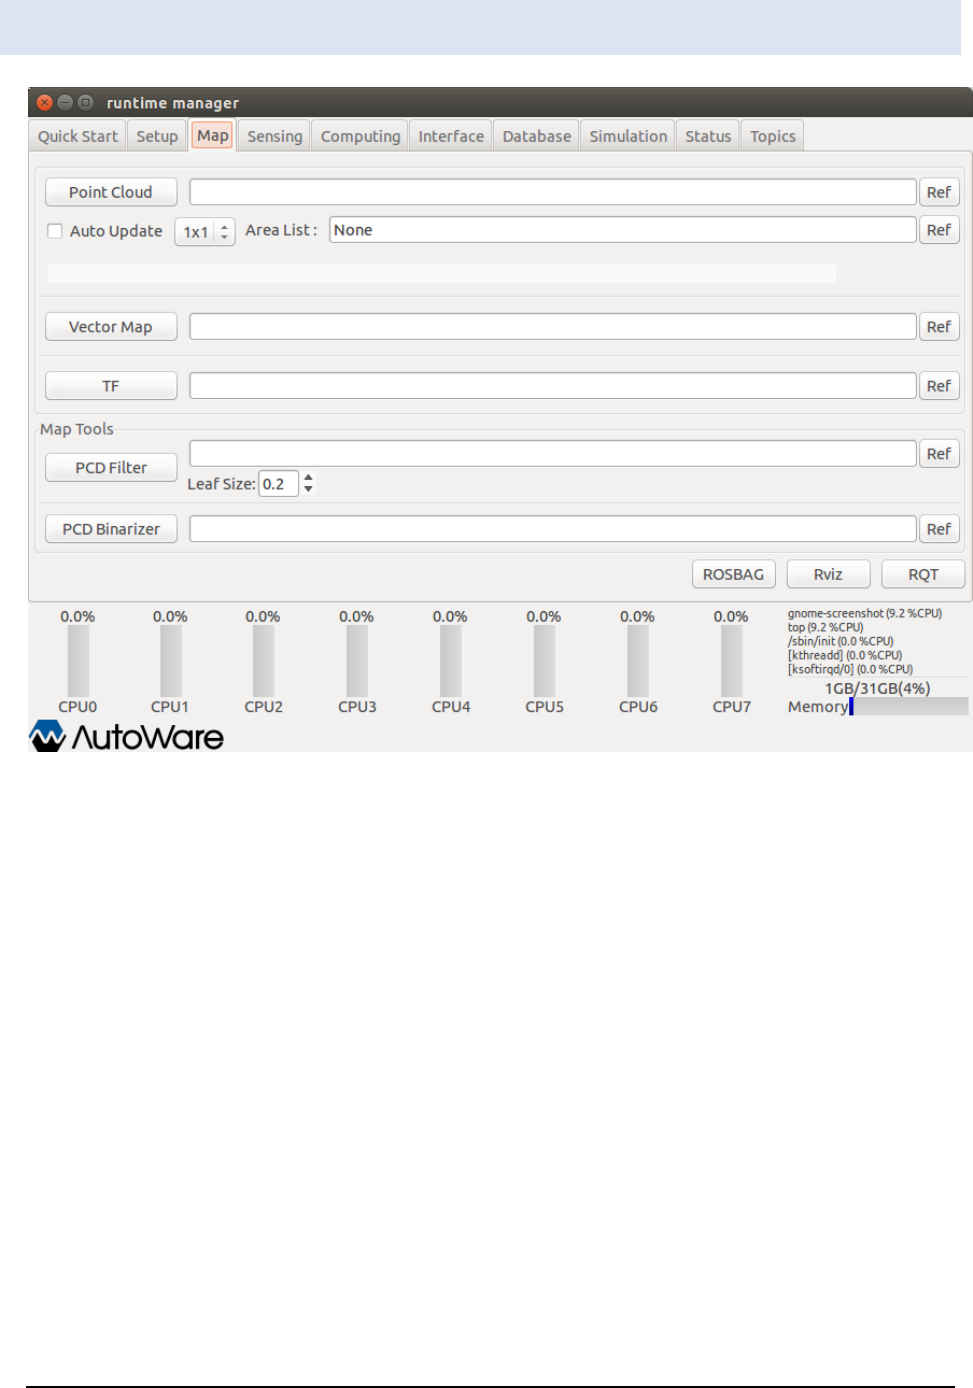
Figure 20 Runtime Manager - Map Tab
[Point Cloud] … Start/end the map_file/points_map_loader nodes with the argument,
which is the full path of 3-D map (PCD files) specified in the text box. Alternatively, a 3-D
map can be selected by the file selection dialog displayed by pressing [Ref].
[Auto Update] … Specify automatic update status (enable or not) at launching
map_file/points_map_loader. The number of scenes on automatic update can be
specified by selecting an item in the drop-down box. This configuration is effective only
if the check box of Auto Update is on. Specify the full path of an area list file in the Area
List text box, which is used as an argument when launching map_file/point_map_loader.
Alternatively, an area list file can be selected by file selection dialog displayed by
pressing [Ref].

A U T O W A R E - U S E R S - M A N U A L
Page 39
[Vector Map] … Start/end the map_file/vector_map_loader nodes with an argument,
which is the full path of Vector map (csv files) specified in the text box. Alternatively, a
Vector map can be selected by file selection dialog displayed by pressing Ref.
[TF] … Start/end the launch file specified in full path in the text box. If launch file is not
specified, the launch file ~/.autoware/data/tf/tf.launch is started/ended. Alternatively, a
launch file can be selected by file selection dialog displayed by pressing Ref.
[Map Tools]
[PCD Filter] …Start/end map_tools/pcd_filter nodes with an argument, which is the full
path of 3-D map (PCD files) specified in the text box. Alternatively, a 3-D map can be
selected by file selection dialog displayed by pressing Ref.
[PCD Binarizer] …Start/end map_tools/pcd_binalizer nodes with an argument, which is
the full path of ASCII format PCD file specified in the text box. Alternatively, a PCD file
can be selected by file selection dialog displayed by pressing Ref.
[ROSBAG] … Display a ROSBAG Record dialog.
[RViz] … Start/end RViz.
[RQT] … Start/end RQT.
A U T O W A R E - U S E R S - M A N U A L
Page 40
Runtime Manager – Sensing Tab
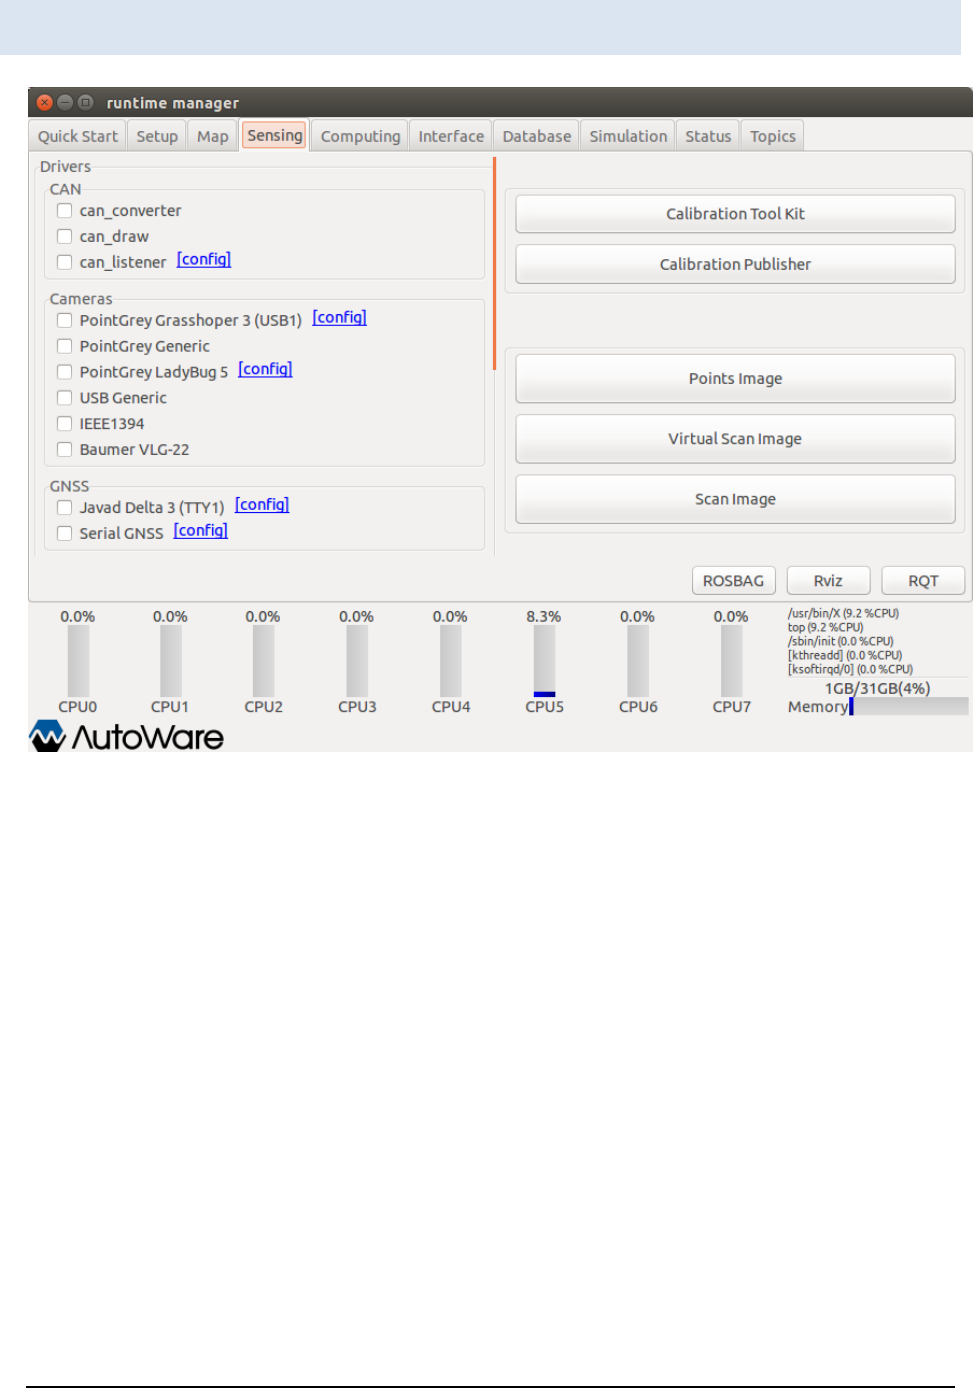
Figure 21 Runtime Manager - Sensing Tab
[Drivers]
-[CAN]
[can_converter] check box … Start/end kvaser/can_converter nodes.
[can_draw] check box … Start/end kvaser/can_draw nodes.
[can_listener] check box … Start/end kvaser/can_listener nodes.
[can_listener]-[config] … Display a can_listener dialog. Specify channels to be selected
at launching nodes.

A U T O W A R E - U S E R S - M A N U A L
Page 41
-[Cameras]
[PointGrey Grasshoper 3 (USB1)] check box … Start/end a
pointgrey/grasshopper3.launch script.
[PointGrey Grasshoper 3 (USB1)] - [config] … Display a
calibration_path_grasshopper3 dialog. Specify a CalibrationFile path to be selected at
launching scripts.
[PointGrey Generic] check box … Start/end a pointgrey_camera_driver/camera.launch
script.
[PointGrey PointGray LadyBug 5] check box… Start/end a pointgrey/ladybug.launch
script.
[PointGrey PointGray LadyBug 5] -[config] … Display a calibration_path_ladybug
dialog. Specify a CalibrationFile path to be selected at launching scripts.
[USB Generic] check box … Start/end runtime_manager/uvc_camera_node nodes.
[IEEE1394] check box … <Unimplemented>
[Baumer VLG-22] check box … Start/end a vlg22c_cam/baumer.launch script.
-[GNSS]
[Javad Delta 3(TTY1)] check box … Start/end a javad_navsat_driver/gnss.sh script.
[Javad Delta 3(TTY1)]-[config] … Display a serial dialog. Specify parameters related to
RS232C.
[Serial GNSS] check box … Start/end a nmea_navsat/nmea_navsat.launch script.
[Serial GNSS]-[config] … Display a serial dialog. Specify parameters related to RS232C.
-[IMU]
[Crossbow vg440] check box … <Unimplemented>
-[LIDARs]
[Velodyne HDL-64e-S2] check box … Start/end a
velodyne_pointcloud/velodyne_hdl64e_s2.launch script.

A U T O W A R E - U S E R S - M A N U A L
Page 42
[Velodyne HDL-64e-S2]-[config] … Display a calibration_path dialog. Specifya
CalibrationFile path to be selected at launching scripts.
[Velodyne HDL-64e-S3] check box … Start/end a
velodyne_pointcloud/velodyne_hdl64e_s3.launch script.
[Velodyne HDL-64e-S3]-[config] … Display a calibration_path dialog. Specify a
CalibrationFile path to be selected at launching scripts.
[Velodyne HDL-32e] check box … Start/end a
velodyne_pointcloud/velodyne_hdl32e.launch script.
[Velodyne HDL-32e]-[config] … Display a calibration_path dialog. Specify a
CalibrationFile path to be selected at launching scripts.
[Velodyne VLP-16] check box … Start/end a
velodyne_pointcloud/velodyne_vlp16.launch scripts.
[Velodyne VLP-16]-[config] … Display a calibration_path dislog. Specify a
CalibrationFile path to be selected at launching script.
[Hokuyo TOP-URG] check box … Start/end a hokuyo/top_urg.launch script.
[Hokuyo 3D-URG] check box … Start/end a hokuyo/hokuyo_3d_urg.launch script.
[SICK LMS511] check box … <Unimplemented>
[IBEO 8L Single] check box … <Unimplemented>
-[Points Filter]
A chapter image and the description to be updated (tmp)
[Calibration Tool Kit] … Start/end Calibration_camera_lidar/calibration_toolkit nodes
[Calibration Publisher] … Start/end a runtime_manager calibration_publisher.launch
script. Specify the full path of a YAML file to be selected at launching nodes by a
launched calibration_publiher dialog.
[Points Image] … Start/end a runtime_manager/points2image.launch script.
[Virtual Scan Image] … Start/end a runtime_manager/vscan.launch script.
[Scan Image] … Start/end scan2image/scan2image nodes
[ROSBAG] … Display a ROSBAG Record dialog.
A U T O W A R E - U S E R S - M A N U A L
Page 43
[RViz] … Start/end RViz.
[RQT] … Start/end RQT.
Runtime Manager – Computing Tab
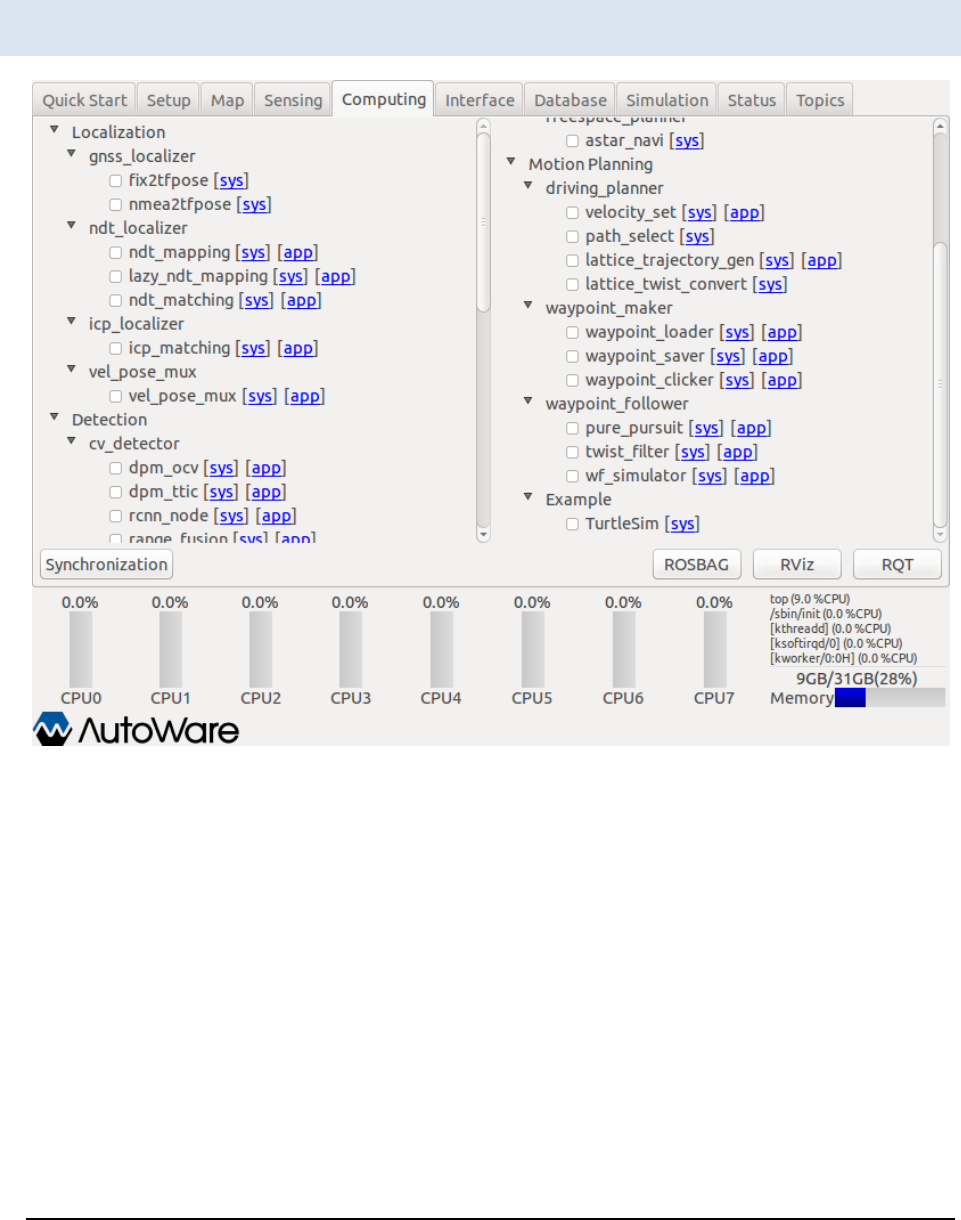
Figure 22 Runtime Manager - Computing Tab
[Localication]
-[gnss_lozalizer]
[fix2tfpose] check box … Start/end gnss_localizer/fix2tfpose nodes
[nmea2tfpose] check box … Start/end a gnss_localizer/nmea2tfpose.launch script.

A U T O W A R E - U S E R S - M A N U A L
Page 44
-[ndt_lozalizer]
[ndt_mapping] check box … Start/end a ndt_localizer/ndt_mapping.launch script.
Clicking [app], ndt_mapping dialog is displayed.
[ndt_matching] check box … Start/end a ndt_localizer/ndt_matching.launch script.
Clicking [app], ndt dialog is displayed.
-[vel_pose_mux]
[vel_pose_mux] check box … Start/end a vel_pose_mux/vel_pose_mux.launch script.
Clicking [app], a vel_pose_mux dialog is displayed.
[Detection]
-[cv_detector]
[dpm_ocv] check box … Start/end a cv_tracker/dpm_ocv.launch script. A dpm_ocv dialog
is displayed. After specifying parameters, launch the script by pressing [Detection Start].
Clicking [app], a dialog is displayed. Selecting a turning parameter class (Car or
Pedestrian), either a car_dpm or a pedestrian_dpm dialog is displayed. Setting parameters,
a topic of either /config/car_dpm or /config/pedestrian_dpm is published.
[dpm_ttic] check box … Start/end a cv_tracker/dpm_ttic.launch script. A dpm_ttic is
displayed. After specifying parameters, launch the script by pressing [Detection Start].
Clicking [app], a dialog is displayed.
[rcnn_node] check box … Start/end a cv_tracker/rcnn.launch script. Clicking [app], a
dialog is displayed.
[range_fusion] check box … Start/end a cv_tracker/ranging.launch script. A car_fusion
dialog is displayed at launching the script. Clicking [app], a dialog is displayed.
[klt_track] check box … Start/end a cv_tracker/klt_tracking.launch script. Clicking [app], a
dialog is displayed.
[kf_track] check box … Start/end a cv_tracker/kf_tracking.launch script. A dialog is
displayed at launching the script. Clicking [app], a dialog is displayed.
[obj_reproj] check box … Start/end a cv_tracker/reprojection.launch script. An obj_reproj
dialog is displayed. Clicking [app], a dialog is displayed.

A U T O W A R E - U S E R S - M A N U A L
Page 45
-[lidar_detector]
[euclidean_cluster] check box … Start/end a lidar_tracker/euclidean_clustering.launch
scritp. Clicking [app], a dialog is displayed.
[obj_fusion] check box … Start/end a lidar_tracker/obj_fusion.launch script. An
obj_fusion dialog is displayed at launching the script. Clicking [app], a dialog is displayed.
-[road_wizard]
[feat_proj] check box … Start/end a road_wizard/feat_proj.launch script. Clicking [app], a
dialog is displayed.
[region_tlr] check box … Start/end a road_wizard/traffic_light_recognition.launch script.
Clicking [app], a dialog is displayed.
-[viewers]
[image_viewer] check box … Start/end a viewers/viewers.launch script. image_viewer is
specified as a script parameter viewer_type. Clicking [app], a dialog is displayed.
[image_d_viewer] check box …Start/end a viewers/viewers.launch script. image_viewer
is specified as a script parameter viewer_type. Clicking [app], a dialog is displayed.
[points_image_viewer] check box …Start/end a viewers/viewers.launch script.
points_image_viewer is specified as a script parameter viewer_type. Clicking [app], a
dialog is displayed.
[points_image_d_viewer] check box …Start/end a viewers/viewers.launch script.
points_image_d_viewer is specified as a script parameter viewer_type. Clicking [app], a
dialog is displayed.
[vscan_image_viewer] check box …Start/end a viewers/viewers.launch script.
vscan_image_viewer is specified as a script parameter viewer_type. Clicking [app], a dialog
is displayed.
[vscan_image_d_viewer] check box …Start/end a viewers/viewers.launch script.
vscan_image_d_viewer is specified as a script parameter viewer_type. Clicking [app], a
dialog is displayed.
[traffic_light_viewer] check box …Start/end a viewers/viewers.launch script.
traffic_light_viewer is specified as a script parameter viewer_type. Clicking [app], a dialog
is displayed.

A U T O W A R E - U S E R S - M A N U A L
Page 46
[Semantics]
[laserscan2costmap] check box … Start/end an object_map/laserscan2costmap.launch
script. Clicking [app], a dialog is displayed.
[points2costmap] check box … Start/end an object_map/points2costmap.launch script.
Clicking [app], a dialog is displayed.
[Mission Planning]
-[lane_planner]
[lane_navi] check box … Start/end a lane_planner/lane_navi.launch script. Clicking [app],
a dialog is displayed.
[lane_rule] check box … Start/end a lane_planner/lane_rule script. Clicking [app], a
dialog is displayed.
[lane_stop] check box … Start/end a lane_planner/lane_stop script. Clicking [app], a
dialog is displayed.
[lane_select] check box … Start/end a lane_planner/lane_script. Clicking [app], a dialog
is displayed.
-[freespace_planner]
[astar_navi] check box … Start/end a freespace_planner/astar_navi script. Clicking [app],
a dialog is displayed.
[Motion Planning]
-[driving_planner]
[velocity_set] check box … Start/end a driving_planner/velocity_set.launch script.
Clicking [app], a dialog is displayed.
[path_select] check box … Start/end a driving_planner/path_select script. Clicking [app],
a dialog is displayed.
[lattice_trajectory_gen] check box … Start/end a
driving_planner/lattice_trajectory_gen.launch script. Clicking [app], a dialog is displayed.
[lattice_twist_convert] check box … Start/end a driving_planner/lattice_twist_convert
nodes. Clicking [app], a dialog is displayed.

A U T O W A R E - U S E R S - M A N U A L
Page 47
-[waypoint_marker]
[waypoint_loader] check box … Start/end a waypoint_maker/waypoint_loader.launch
script. Clicking [app], a dialog is displayed.
[waypoint_saver] check box … Start/end a waypoint_maker/waypoint_saver.launch
script. Clicking [app], a dialog is displayed.
[waypoint_clicker] check box … Start/end a waypoint_maker/waypoint_clicker nodes.
Clicking [app], a dialog is displayed.
-[waypoint_follower]
[pure_pursuit] check box … Start/end a waypoint_follower/pure_pursuit.launch script.
Clicking [app], a dialog is displayed.
[twist_filter] check box … Start/end a waypoint_follower/twist_filter.launch script.
Clicking [app], a dialog is displayed.
[wf_simulator] check box … Start/end a waypoint_follower/wf_simulator.launch script.
Clicking [app], a dialog is displayed.
[ROSBAG] … Dislpay ROSBAG Record Dialog.
[RViz] … Start/end RViz.
[RQT] … Start/end RQT.
A U T O W A R E - U S E R S - M A N U A L
Page 48
Runtime Manager – Interface Tab
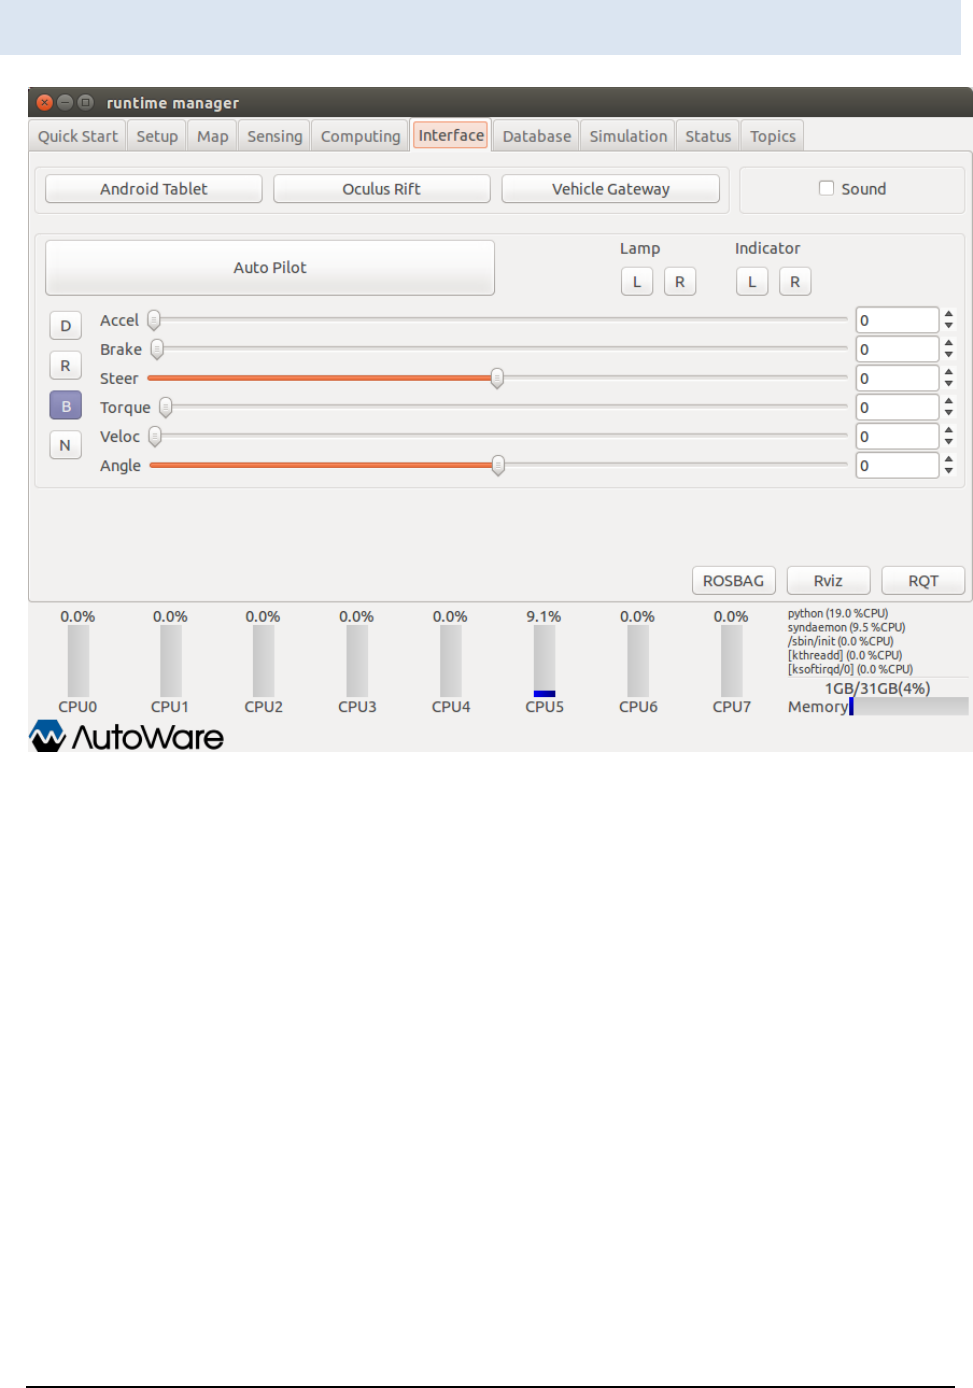
Figure 23 Runtime Manager - Interface Tab
[Android Tablet] … Start/end runtime_manager/tablet_socket.launch for communicating
with Tablets.
[Oculus Rift] … <Unimplemented>
[Vehicle Gateway] … Start/end runtime_manager/vehicle_socket.launch for
communicating with ZMP Robocar.
[Sound] check box … Start/end a sound_player/sound_player.py.
[Auto Pilot] … Publish a topic (/mode_cmd) according the button status.
[Lamp] … Publish a topic (/lamp_cmd) according to the button status.
[Indicator] … Publish a topic (/indicator_cmd) according to the button status.
[D] toggle switch … Publish a topic (/gear_cmd) of buttons turning ON.

A U T O W A R E - U S E R S - M A N U A L
Page 49
[R] toggle switch … Publish a topic (/gear_cmd) of buttons turning ON.
[B] toggle switch … Publish a topic (/gear_cmd) of buttons turning ON.
[N] toggle switch … Publish a topic (/gear_cmd) of buttons turning ON.
[Accel] slider … Publish a topic (/accel_cmd) of the slider status.
[Brake] slider … Publish a topic (/brake_cmd) of the slider status.
[Steer] slider … Publish a topic (/steer_cmd) of the slider status.
[Torque] slider …<Unimplemented>
[Veloc] slider … Publish a topic (/twist_cmd) of the slider status.
[Angle] slider … Publish a topic (/twist_cmd) of the slider status.
[ROSBAG] … Display a ROSBAG Record dialog.
[RViz] … Start/end RViz.
[RQT] … Start/end RQT.
A U T O W A R E - U S E R S - M A N U A L
Page 50
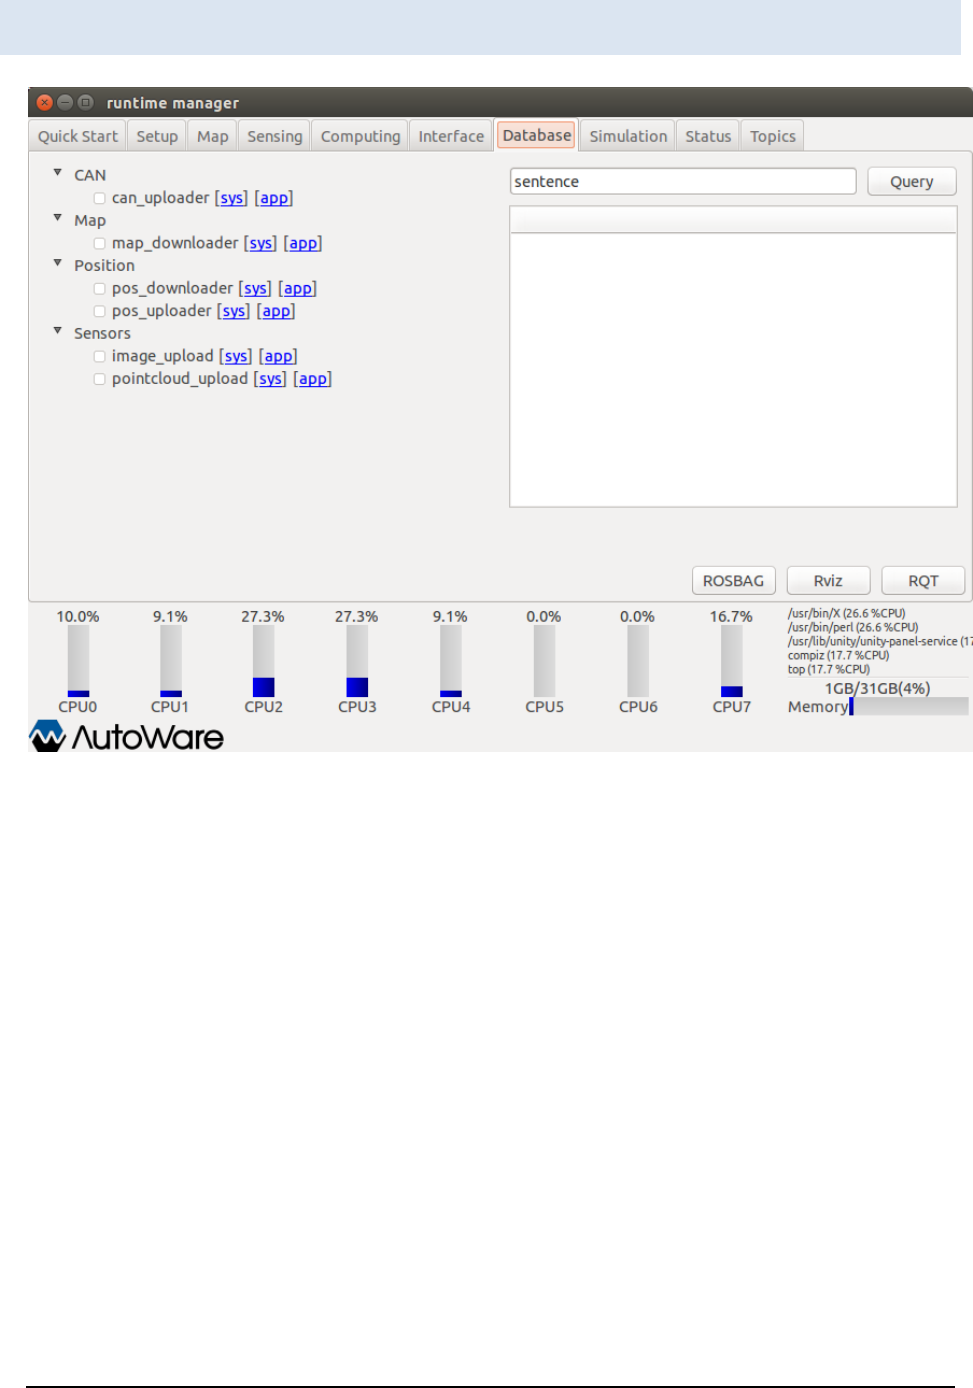
Runtime Manager – Database Tab
Figure 24 Runtime Manager - Database Tab
[CAN]
[can_uploder] check box … Start/end obj_db/can_uploader nodes. Clicking [app], an
other dialog is displayed.
[Map]
[map_downloader] check box … Start/end the map_file/map_downloader.launch scripts.
Clicking [app], a map_downloader dialog is displayed.
[Position]
[pos_downloader] check box … Start/end pos_db/pos_downloader nodes. Clicking [app],
a pos_db dialog is displayed.
[pos_uploder] check box … Start/end pos_db/pos_uploader nodes. Clicking [app], a
pos_db dialog is displayed.

A U T O W A R E - U S E R S - M A N U A L
Page 51
[Sensors]
[image_upload] check box … <Unimplemented>
[pointcloud_uplod] check box …<Unimplemented>
[Query] … <Unimplemented>
[ROSBAG]… Display a ROSBAG Record dialog to recode a ROSBAG.
[RViz] … Start/end RViz.
[RQT] … Start/end RQT.
A U T O W A R E - U S E R S - M A N U A L
Page 52
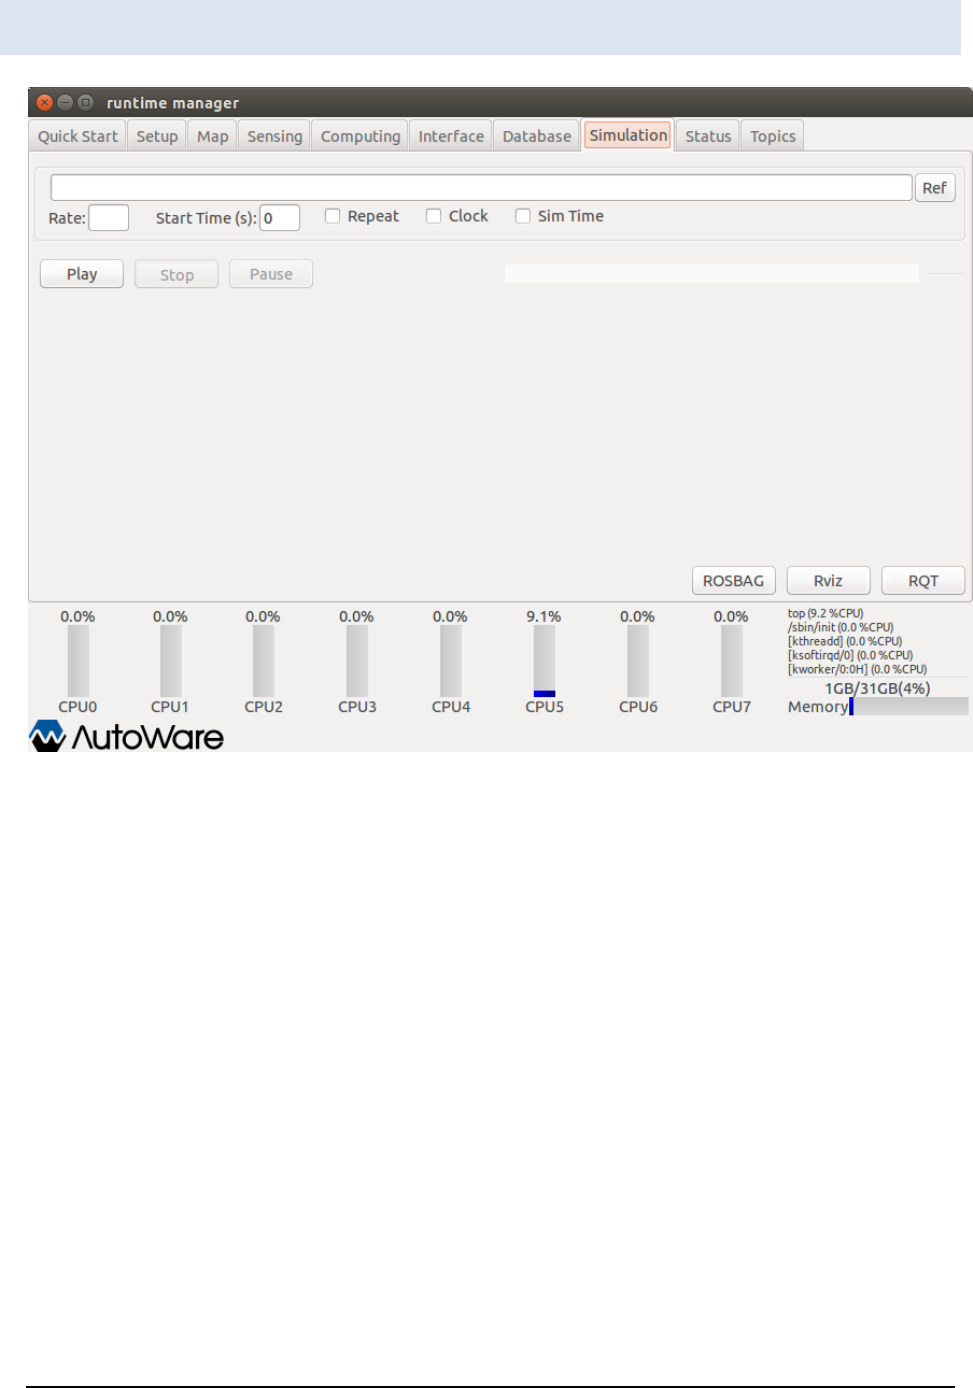
Runtime Manager – Simulation Tab
Figure 25 Runtime Manager - Simulation Tab
* A capture and the description to be updated (tmp), /use_sim_time
[ROSBAG] text box … Start a ROSBAG with an argument specified full path of a bag file
in the text box by pressing [Play]. Alternatively, a bag file can be specified by the file
selection dialog displayed by pressing [Ref].
[Rate]… Specify a numerical value for the ROSBAG play command with –r option. If it is
not specified, -r option is not used.
[State Time(s)] … Specify a numerical value for the ROSBAG play command with –start
option. If it is not specified, -start option is not used.
[Repeat] check box … If this is ON, --loop option is specified at launching the ROSBAG
play command.
[Play] … Start the ROSBAG play command with a bag specified in the ROSBAG text box.
[Stop] … End the running ROSBAG play command.

A U T O W A R E - U S E R S - M A N U A L
Page 53
[Pause] … Suspend the running ROSBAG play command.
[ROSBAG] … Display a ROSBAG Record dialog to record a ROSBAG.
[RViz] … Start/end RViz.
[RQT] … Start/end RQT.
A U T O W A R E - U S E R S - M A N U A L
Page 54
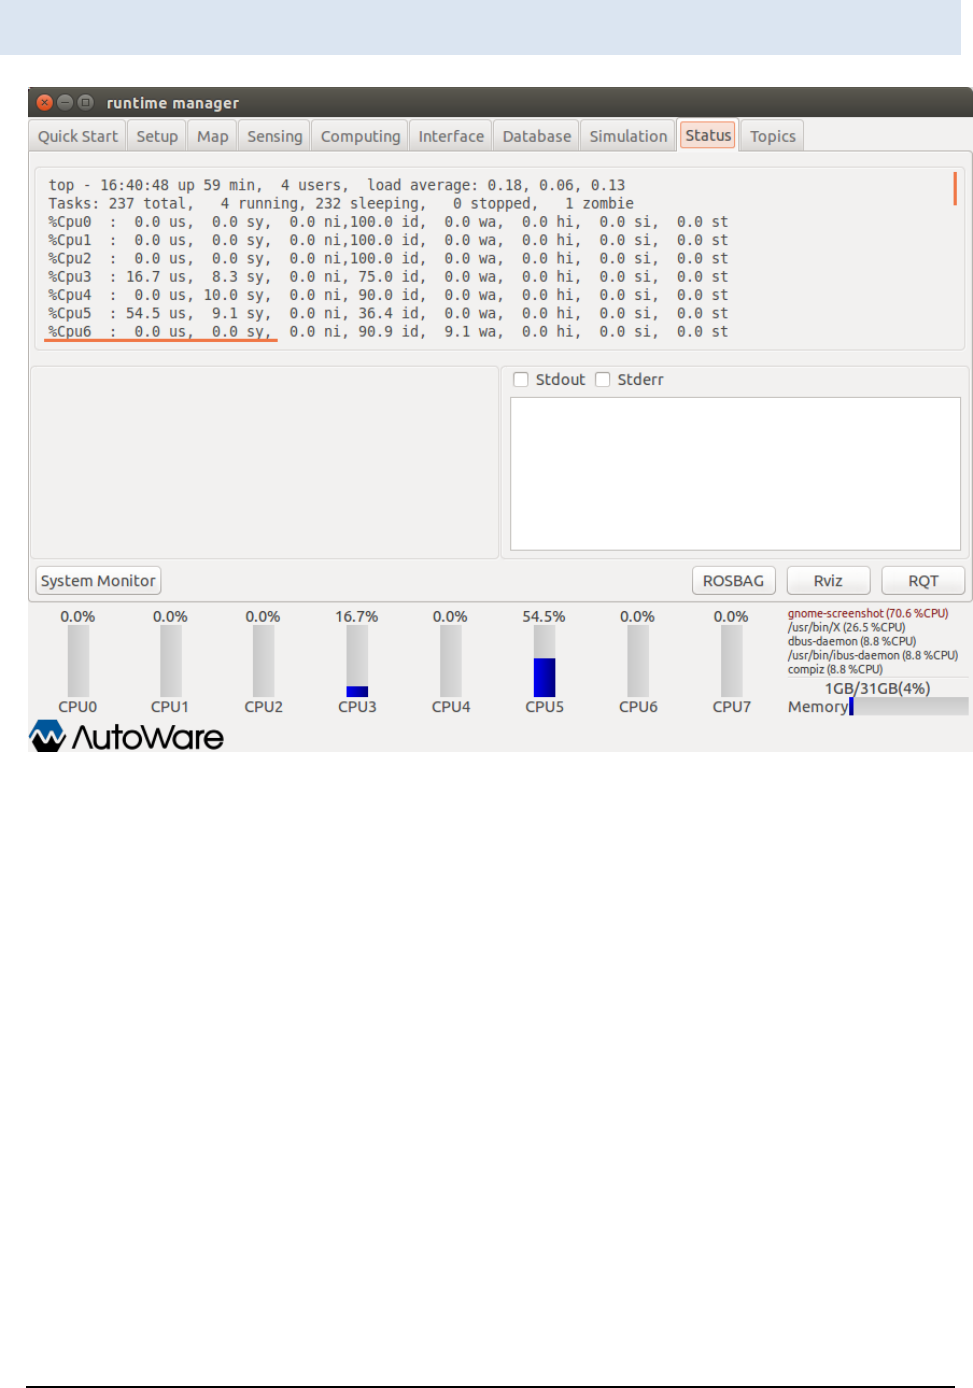
Runtime Manager – Status Tab
Figure 26 Runtime Manager - Status Tab
Top window … Display the execution results of the running top command.
Left-bottom window … Display the periodic execution time published by related node.
Right-bottom window … Display launched nodes, standard outputs and standard error
outputs of scripts. Some nodes displaying progress bars can not show information.
Bottom window … Display CPU (core) load and memory usage.
[System Monitor] … Start/end the gnome-system-monitor command.
[ROSBAG] … Display a ROSBAG Record dialog to record a ROSBAG.
[RViz] … Start/end RViz.
[RQT] … Start/end RQT.
A U T O W A R E - U S E R S - M A N U A L
Page 55
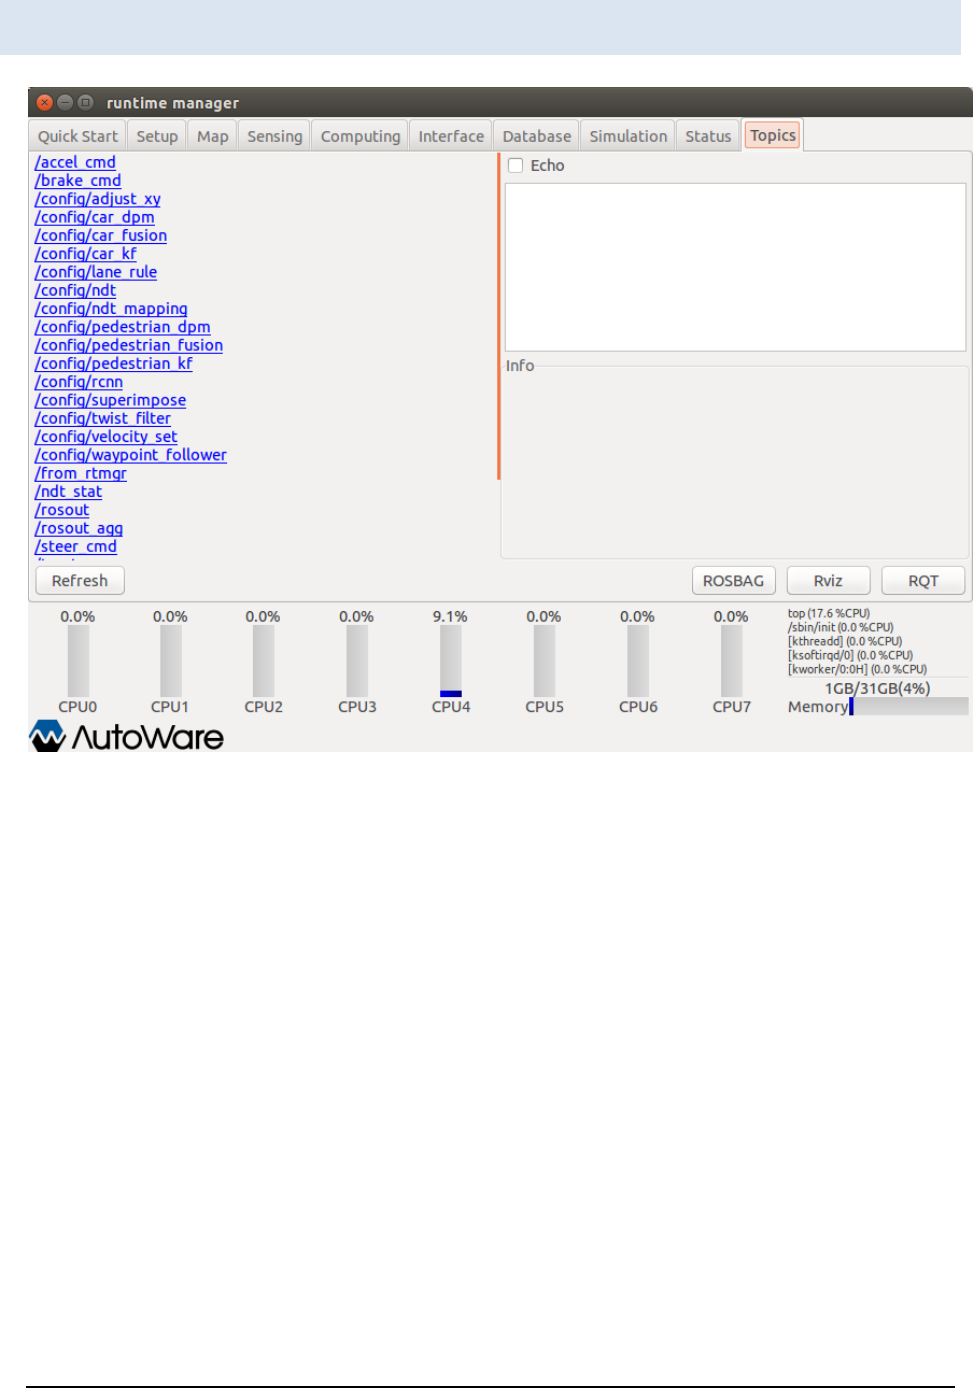
Runtime Manager - Topics Tab
Figure 27 Runtime manager - Topics Tab
Left window … Display the list of topics. Launch a rostopic info <target topic> command
and display the result of the command on the right bottom window by clicking links. If
the Echo check box is ON, rostopic echo <target topic> is launched and the results are
displayed on the right-top window.
[Refresh] … Update the list of topics displayed on the left window using the obtained
topic list by running rostopic list command.
[ROSBAG] … Display a ROSBAG Record dialog to record a ROSBAG.
[RViz] … Start/end RViz.
[RQT] … Start/end RQT.
A U T O W A R E - U S E R S - M A N U A L
Page 56
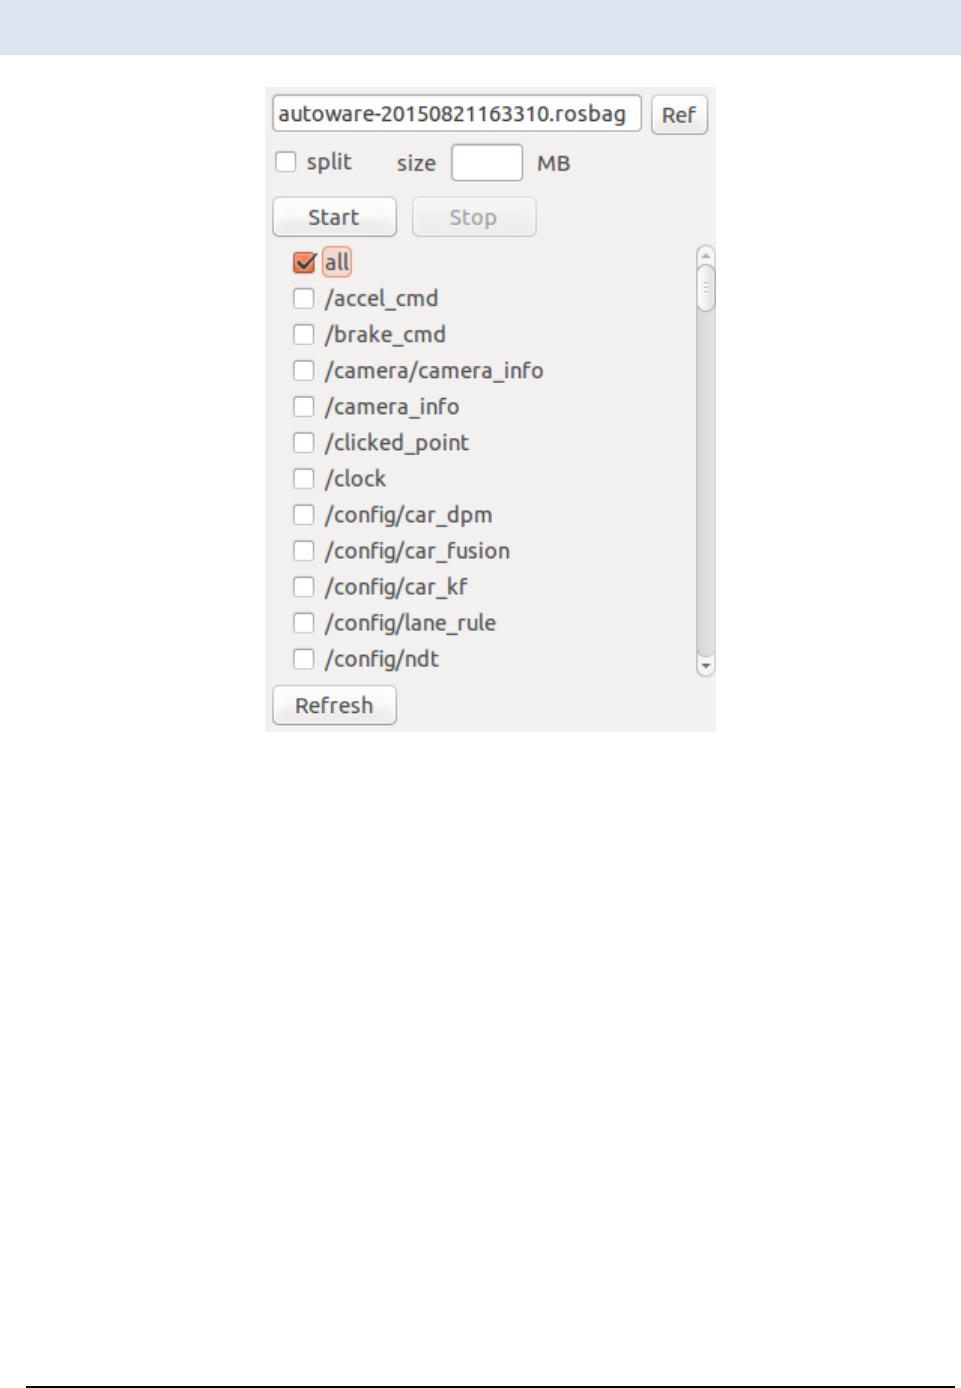
ROSBAG Record Dialog
Figure 28 ROSBAG Record Dialog
Text box … Specify the full path of a bag file for the ROSBAG record command.
Alternatively, a bag file can be selected by the file selection dialog displayed by pressing
[Ref].
[split] check box … If the check box is ON and a numerical values is set in the size text
box, --split and –size=<target size> options for launching ROSBAG record command by
pressing [Start] are specified.
[size] text box … If split check box is ON, specify split file size in megabytes.
[Start] … Start the ROSBAG record command with a bag file specified in the top text
box.
[Stop] … End the running ROSBAG record command.
[All] check box… If check box is ON, -a option is specified for launching the ROSBAG
record command.

A U T O W A R E - U S E R S - M A N U A L
Page 57
(Other check boxes) … Specify topics whom check boxes are ON for launching the
ROSBAG record command. Only if all check box is OFF, they are enable.
[Refresh] … Starting the rostopic list command and searching running topics, update
the other check boxes.
A U T O W A R E - U S E R S - M A N U A L
Page 58
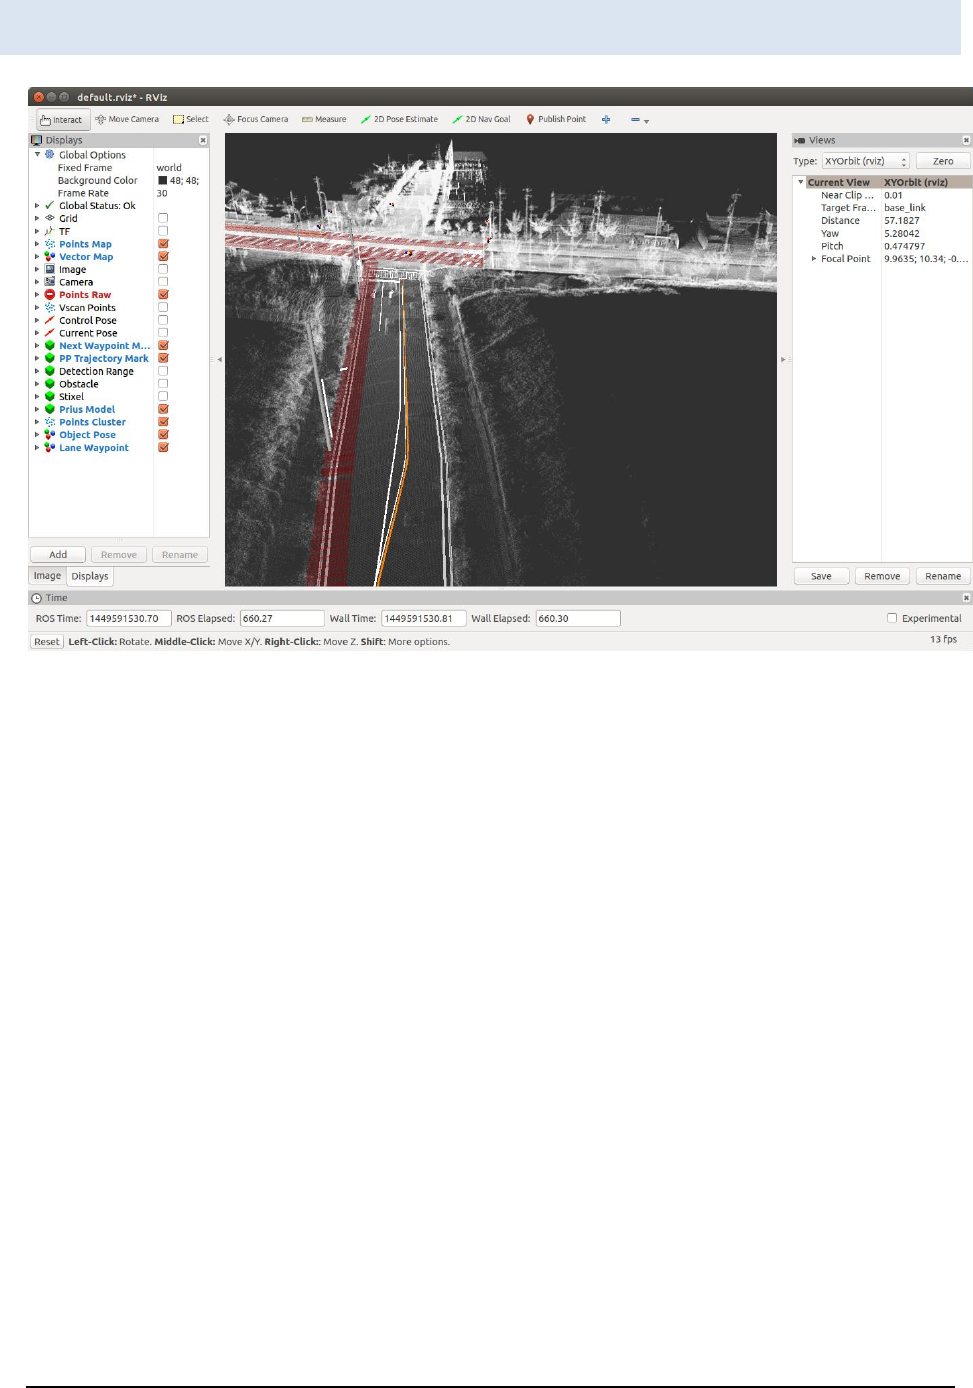
RViz
Figure 29 RViz
* the description to be updated (tmp)
A U T O W A R E - U S E R S - M A N U A L
Page 59
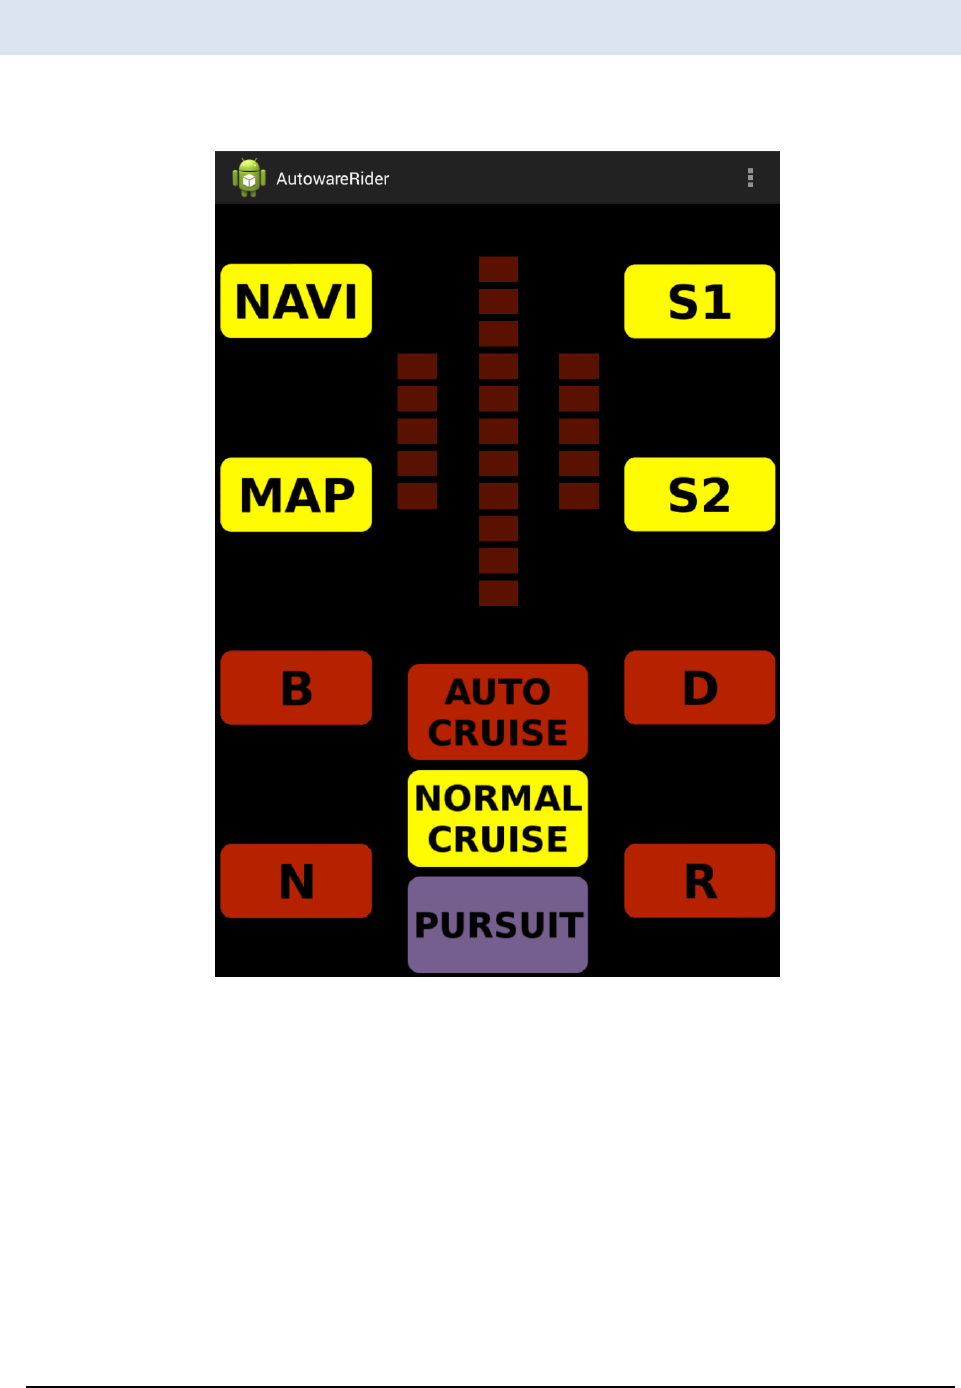
AutowareRider
This is an android application which has a UI similar to Knight Rider.
The running window is as follows:
Figure 30 AutowareRider

A U T O W A R E - U S E R S - M A N U A L
Page 60
[Navi] … Start AutowareRoute.apk.
[MAP] … <Unimplemented>
[S1] … Start check.launch by ROS PC.
[S2] … Start set.launch by ROS PC.
[B] … Send gear B information to ROS PC.
[N] …Send gear N information to ROS PC.
[D] …Send gear D information to ROS PC.
[R] …Send gear R information to ROS PC.
[AUTO CRUISE] … <Unimplemented>
[NORMAL CRUISE] … <Unimplemented>
[PURSUIT] … <Unimplemented>(End the application)
A U T O W A R E - U S E R S - M A N U A L
Page 61
The following items can be selected on the right-top menu.
[設定] (configuration)
[データ収集] (data collection)
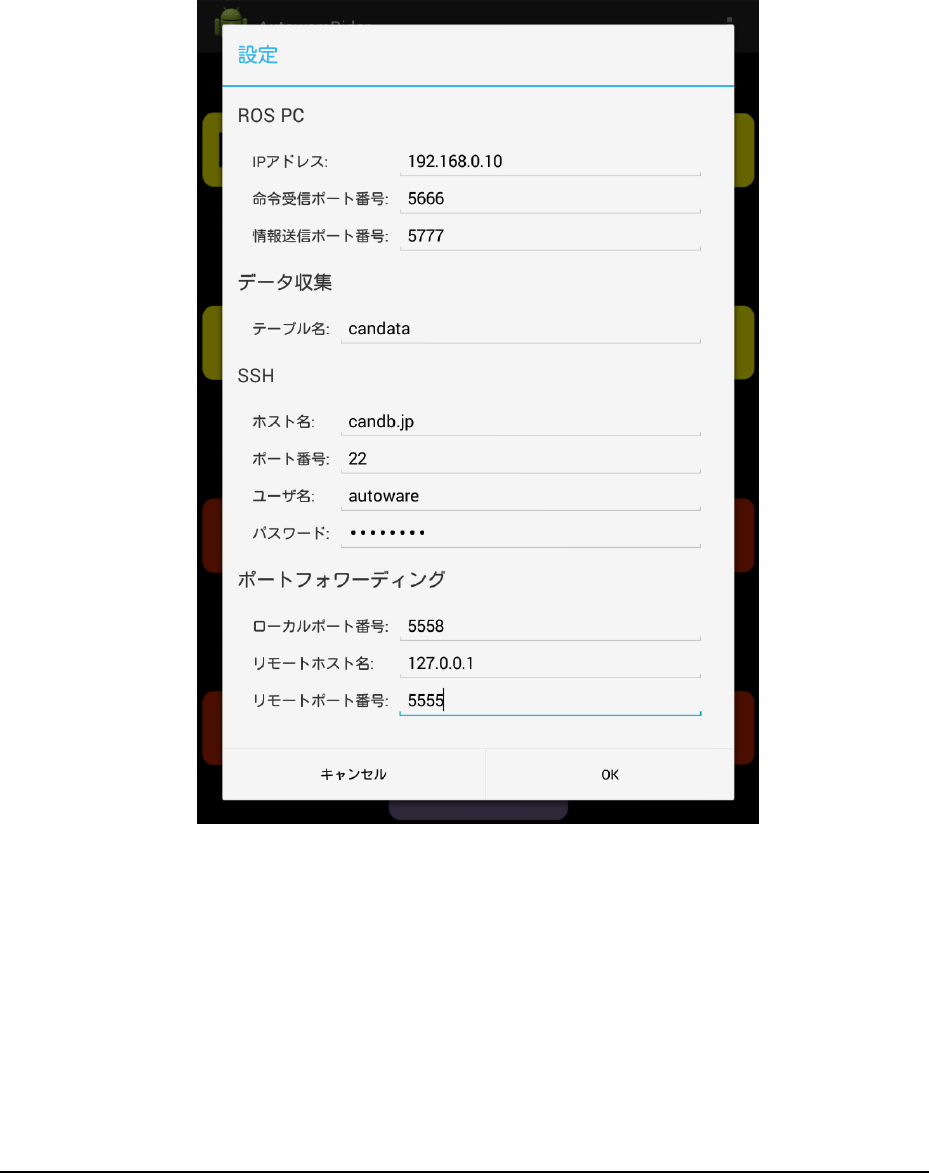
The 設定 (configuration) window is shown in Figure 31.
Figure 31 AutowareRider configuration window

A U T O W A R E - U S E R S - M A N U A L
Page 62
[ROS PC]
IP アドレス … ROS PC IPv4 address
命令受信ポート番号 … tablet_receiver port number (default: 5666)
情報送信ポート番号 … tablet_sender port number (default: 5777)
[データ収集] (data collection)
テーブル名 … Data transfer destination table name
[SSH]
ホスト名 …SSH destination hostname
ポート番号 …SSH destination port number (default: 22)
ユーザ名 … SSH login username
パスワード … SSH login password
[ポートフォワーディング] (port forwarding)
ローカルポート番号 … port number of local machine source (default: 5558)
リモートホスト名 … remote machine host name (default: 127.0.0.1)
リモートポート番号 … remote machine destination port number (default: 5555)
A U T O W A R E - U S E R S - M A N U A L
Page 63
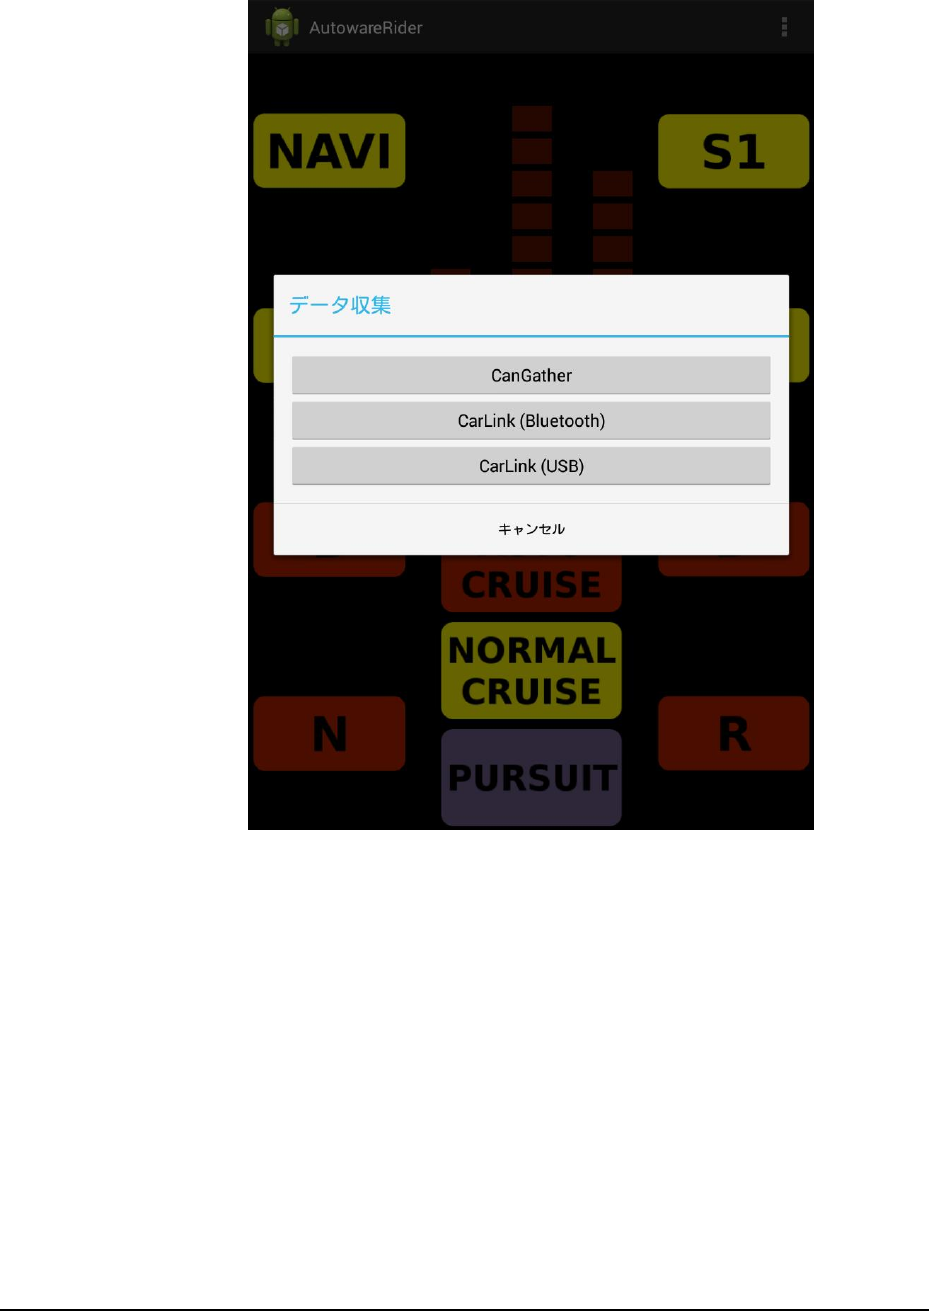
[データ収集] (data collection) window is as follows:
Figure 32 AutowareRider data collecion window
[CanGather] … Start CanGather.apk.
[CarLink (Bluetooth)] … Start CarLink_CAN-BT_LS.apk.
[CarLink (USB)] … Start CarLink_CANusbAccessory_LS.apk.
A U T O W A R E - U S E R S - M A N U A L
Page 64
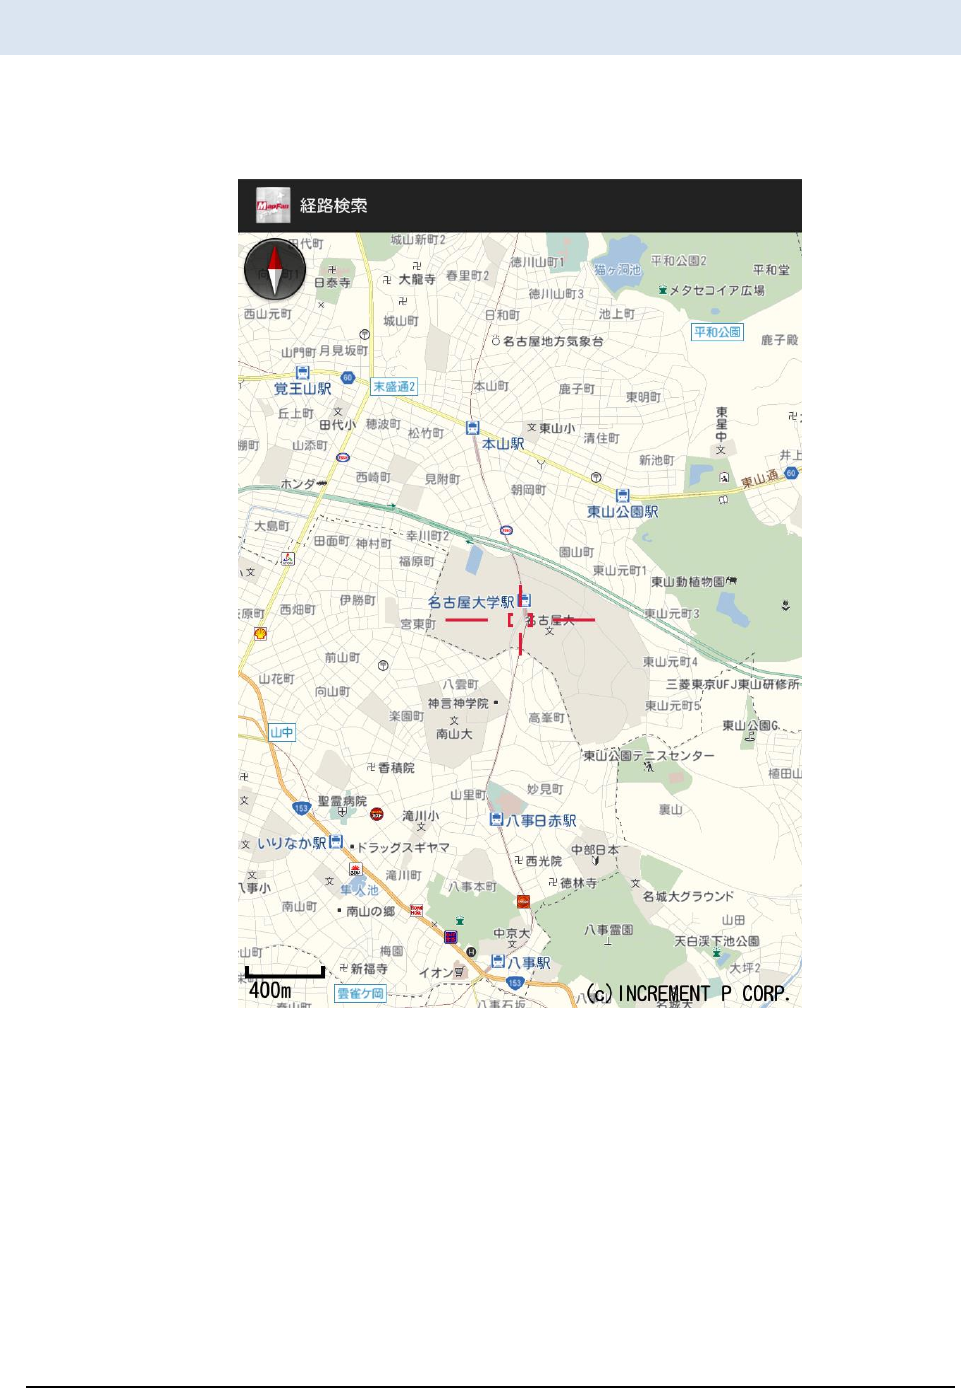
AutowareRoute
AutowareRoute is an Android application implemented by MapFan SDK for path planning.
The start window is as follows:
Figure 33 AutowareRoute
A U T O W A R E - U S E R S - M A N U A L
Page 65
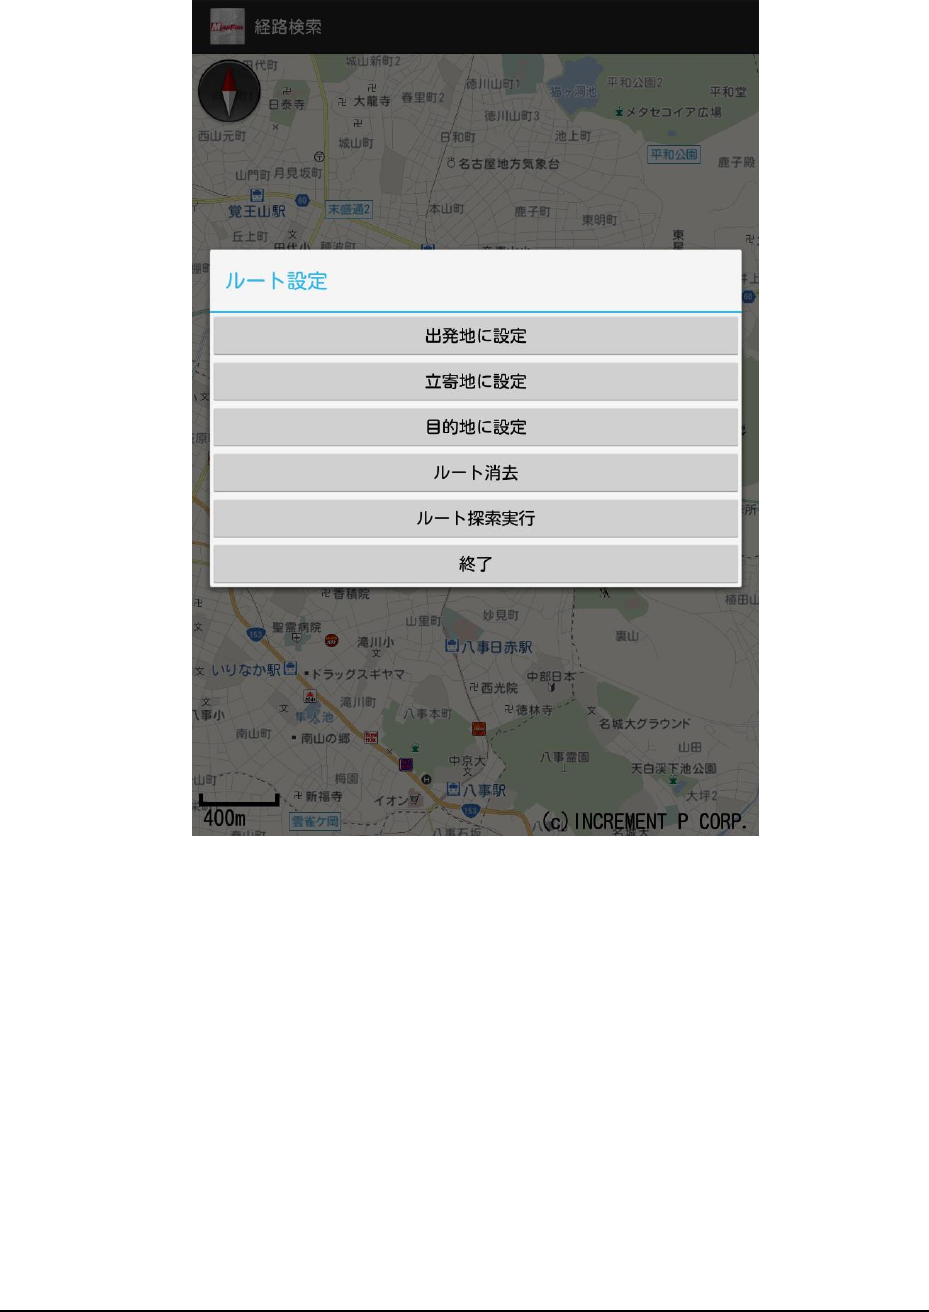
Pressing and holding the map, the following dialog is displayed.
Figure 34 AutowareRoute window
[出発地に設定] … Specify the departure point by pressing and holding a point.
[立寄地に設定] … Specify the way-stop point by pressing and holding a point.
[目的地に設定] … Specify the destination point by pressing and holding a point.
[ルート消去] … Delete path data generated by path planning.
[ルート探索実行] … Generate path data considering points of departure, way-stop and
destination.
[終了] … (no description (tmp))

A U T O W A R E - U S E R S - M A N U A L
Page 66
5. System Setup
The supported OS distributions and the required software are described in
this chapter.
Installation
nstall OS (Linux), ROS, Autoware, etc., into PC as the following procedural steps.
OS
The Linux distributions supported by Autoware at Sep. 2016 are as follows:
Ubuntu 14.04 LTS x86_64 (Recommended)
Ubuntu 15.04 x86_64
Refer the below URLs about install media and installation steps.
Ubuntu Japanese Team
https://www.ubuntulinux.jp/
Ubuntu
http://www.ubuntu.com/
Chapter
5
I

A U T O W A R E - U S E R S - M A N U A L
Page 67
ROS
If you use Ubuntu14.04, install ROS and the required packages by the following steps:
$ sudo sh -c 'echo "deb http://packages.ros.org/ros/ubuntu trusty main" > \
/etc/apt/sources.list.d/ros-latest.list'
$ wget http://packages.ros.org/ros.key -O - | sudo apt-key add -
$ sudo apt-get update
$ sudo apt-get install ros-indigo-desktop-full ros-indigo-nmea-msgs \
ros-indigo-nmea-navsat-driver ros-indigo-sound-play ros-indigo-jdk-visualization
$ sudo apt-get install libnlopt-dev freeglut3-dev qtbase5-dev libqt5opengl5-dev \
libssh2-1-dev libarmadillo-dev libpcap-dev gksu
Add below path to ~/.bashrc etc.
[ -f /opt/ros/indigo/setup.bash ] && . /opt/ros/indigo/setup.bash
If you use Ubuntu15.04, install ROS and the required packages as the following steps:
$ sudo sh -c 'echo "deb http://packages.ros.org/ros/ubuntu $(lsb_release -sc) main"
> \
/etc/apt/sources.list.d/ros-latest.list'
$ sudo apt-key adv --keyserver hkp://pool.sks-keyservers.net:80 \
--recv-key 0xB01FA116
$ sudo apt-get install ros-jade-desktop-full ros-jade-nmea-msgs \
ros-jade-nmea-navsat-driver ros-jade-sound-play
$ sudo apt-get install libnlopt-dev freeglut3-dev qt5-default libqt5opengl5-dev \
libssh2-1-dev libarmadillo-dev libpcap-dev gksu
Add below path to ~/.bashrc etc.
[ -f /opt/ros/jade/setup.bash ] && . /opt/ros/jade/setup.bash

A U T O W A R E - U S E R S - M A N U A L
Page 68
OpenCV
① Install the following packages:
$ sudo apt-get -y install libopencv-dev build-essential cmake git \
libgtk2.0-dev pkg-config python-dev python-numpy libdc1394-22 \
libdc1394-22-dev libjpeg-dev libpng12-dev libtiff4-dev libjasper-dev \
libavcodec-dev libavformat-dev libswscale-dev libxine-dev \
libgstreamer0.10-dev libgstreamer-plugins-base0.10-dev libv4l-dev \
libtbb-dev libqt4-dev libfaac-dev libmp3lame-dev libopencore-amrnb-dev \
libopencore-amrwb-dev libtheora-dev libvorbis-dev libxvidcore-dev \
x264 v4l-utils unzip
② Get OpenCV source code of the version 2.4.11 or later, install it as follows:
$ wget https://github.com/Itseez/opencv/archive/2.4.11.zip
$ unzip 2.4.11.zip
$ cd opencv-2.4.11/
$ mkdir build && cd build/
$ cmake -D CMAKE_BUILD_TYPE=RELEASE \
-D CMAKE_INSTALL_PREFIX=/usr/local \
-D WITH_TBB=ON -D BUILD_NEW_PYTHON_SUPPORT=ON \
-D WITH_V4L=ON -D INSTALL_C_EXAMPLES=ON \
-D INSTALL_PYTHON_EXAMPLES=ON -D BUILD_EXAMPLES=ON \
-D WITH_OPENGL=ON -D WITH_VTK=ON -D CUDA_GENERATION=Auto ..
$ make -j4
unzip opencv-2.4.11.zip
$ cd opencv-2.4.11
$ cmake .
$ make
$ sudo make install
$ sudo ldconfig

A U T O W A R E - U S E R S - M A N U A L
Page 69
CUDA(if necessary)
If you use GPU on NVIDIA graphic board for conducting calculations, CUDA is required.
Refer the website http://docs.nvidia.com/cuda/cuda-getting-started-guide-for-linux/ and
install as follows:
① Check environment
$ lspci | grep -i nvidia
(ensure the NVIDIA board information is output)
$ uname -m
(ensure x86_64 is used)
$ gcc --version
(ensure gcc installation is completed)
Install CUDA
Download CUDA from http://developer.nvidia.com/cuda-downloads.
(hereinafter, installing cuda-repo-ubuntu1404_7.0-28_amd64.deb is assumed)
$ sudo dpkg -i cuda-repo-ubuntu1404_7.0-28_amd64.deb
$ sudo apt-get update
$ sudo apt-get install cuda
Restart OS
$ lsmod | grep nouveau
(ensure nouveau driver is not loaded)
Check CUDA
$ cat /proc/driver/nvidia/version
(kernel module and gcc version are displayed)
$ cuda-install-samples-7.0.sh ~
$ cd ~/NVIDIA_CUDA-7.0_Samples/1_Utilities/deviceQuery/
$ make
$ ./deviceQuery
If necessary, add below path to .bashrc etc.
export PATH=”/usr/local/cuda:$PATH”
export LD_LIBRARY_PATH=”/usr/local/cuda/lib:$LD_LIBRARY_PATH”
FlyCapture(if necessary)
If you use PointGray cameras, install FlyCapture SDK as follows:
① Download FlyCapture SDK from PointGrey website (http://www.ptgrey.com/).
User registration is required before download.
② Install packages

A U T O W A R E - U S E R S - M A N U A L
Page 70
$ sudo apt-get install libglademm-2.4-1c2a libgtkglextmm-x11-1.2-dev
libserial-dev
③ Extract the archives of the downloaded file
$ tar xvfz flycapture2-2.6.3.4-amd64-pkg.tgz
④ Launch installer
$ cd flycapture2-2.6.3.4-amd64/
$ sudo sh install_flycapture.sh
Enter y after the below texts are displayed.
This is a script to assist with installation of the FlyCapture2 SDK.
Would you like to continue and install all the FlyCapture2 SDK packages?
(y/n)$ y
Enter y after the below texts are displayed.
...
Preparing to unpack updatorgui-2.6.3.4_amd64.deb ...
Unpacking updatorgui (2.6.3.4) ...
updatorgui (2.6.3.4) を設定しています ...
Processing triggers for man-db (2.6.7.1-1ubuntu1) ...
Would you like to add a udev entry to allow access to IEEE-1394 and USB
hardware?
If this is not ran then your cameras may be only accessible by running flycap as
sudo.
(y/n)$ y
Autoware
Get Autoware by following steps. Then build and install it.
If you get the latest autoware form github
$ git clone https://github.com/CPFL/Autoware.git
$ cd Autoware/ros/src
$ catkin_init_workspace
$ cd ../
$ ./catkin_make_release
$ source devel/setup.bash

A U T O W A R E - U S E R S - M A N U A L
Page 71
If you use archives
$ wget http://www.pdsl.jp/app/download/10394444574/Autoware-beta.zip
$ unzip Autoware-beta.zip
$ cd Autoware-beta/ros/src
$ catkin_init_workspace
$ cd ../
$ ./catkin_make_release
$ source devel/setup.bash
AutowareRider (if necessary)
AutowareRider is an Android application, which has similar UI as Knight Rider, for operating
Autoware running on ROS PC from tablet devices.
Get APK from below URLs and install them.
Main
AutowareRider.apk
https://github.com/CPFL/Autoware/blob/master/ui/tablet/AutowareRider/AutowareRi
der.apk
Path data planning apllication
AutowareRoute.apk
https://github.com/CPFL/Autoware/blob/master/ui/tablet/AutowareRoute/AutowareR
oute.apk
CAN data collection application
CanDataSender.apk
https://github.com/CPFL/Autoware/blob/master/vehicle/android/CanDataS
ender/bin/CanDataSender.apk

A U T O W A R E - U S E R S - M A N U A L
Page 72
canlib(if necessary)
Get linuxcan.tar.gz from Kvaser LINUX Driver and SDK in the kvaser website
(http://www.kvaser.com/downloads/) and install it as the following steps:
$ tar xzf linuxcan.tar.gz
$ cd linuxcan
$ make
$ sudo make install
SSH Public Key Generation(if necessary)
When pos_db access database via SSH, it uses SSH key without pass phrase.
Therefore, generating the SSH key of the database server and registering it to the server are
required.
① Generating SSH Key
Run the following commands.
$ ssh-keygen -t rsa
(Press Enter key without strings.)
If you use DSA, specify -t dsa.
Registering the SSH key to the database server
Copy the generated SSH key to the server as follows:
$ ssh-copy-id -i ~/.ssh/id_rsa.pub posup@db3.ertl.jp
(”posup” indicates user name and ”db3.ertl.jp” denotes database server name.)
Enter passwords if necessary.

A U T O W A R E - U S E R S - M A N U A L
Page 73
6. Terminology
Term
Description
3-D map
3-Dimension Map:
This type maps is different from 2-D maps that are used in car
navigation systems, and include various information, such as
three-dimensional objects built around the roads, while 2-D map is
used for the car navigation systems. PCD (point cloud data) type of
3-D map is used in Autoware.
Autoware
[Autoware] This is an open source software running on ROS for
autonomous driving.
AutowareRider
[Autoware] This is an Android application for operating Autoware
running on ROS PC by tablet terminal. This application has similar UI
(user interface) as Knight Rider, which is a TV series.
AutowareRoute
[Autoware] This is an Android application implemented with MapFan
SDK for planning path data.
CAN
Controller Area Network:
This is a standard for data transfer between interconnected devices.
This standard has been proposed by BOSCH Ltd. in Germany as an
inter-vehicle network, and standardized as ISO11898 and ISO 11519.
Currently, CAN is the inter-vehicle network standard.
Catkin
[ROS] The original building system
CUDA
Compute Unified Device Architecture:
A parallel computing platform and programming model with GPU
provided by NVIDIA corporation.
DMI
Distance Measuring Instrument
DPM
Deformable Part Model: an object detection method
FlyCapture SDK
A SDK to Control Point Grey Camera
Chapter
6

A U T O W A R E - U S E R S - M A N U A L
Page 74
FOT
Field Operational Tests:
A statistical verification by observing traffic environment, driver’s
operations, and vehicle behavior under real driving environment
GNSS
Global Navigation Satellite System
IMU
Inertial Measurement Unit: Devices measuring the angular velocity
and acceleration
KF
Kalman Filter: This is an estimation method for future states of the
target objects using observed values.
LIDAR
Laser Imaging Detection and Ranging/Laser Scanner/Laser Rader:
This device emits laser pulse and measures the scattered light of
them. The distance between the LIDAR and the objects can be
calculated by the measured results.
Message
[ROS] Data structure used in communication among nodes
NDT
Normal Distributions Transform: A localization method
Node
[ROS] A process to operate single function
Odometry
A position estimation method using calculated the rotation angle
velocity of the wheel.
OpenCV
Open source Computer Vision library
Point Cloud
A data set of points in 3-D space
These points are represented in Cartesian coordinate space (x, y, z).
Publish
[ROS] Sending a Message (called broadcasting or publication)
Qt
Application user interface framework
ROS
ROS is a software framework for robot software development. This
framework provides hardware abstraction, low-level device control,
well-used functions, inter-process communication, package
management tool and etc.
ROS PC
Computers installed ROS and Autoware
ROSBAG
[ROS] A data logging tool
The extension is bag.
RQT
[ROS] A software development tool base on Qt
RViz
[ROS] Visualization tool for data and software status
SLAM
Simultaneous Localization and Mapping

A U T O W A R E - U S E R S - M A N U A L
Page 75
Subscribe
[ROS] Receiving Message (called subscription)
TF
[ROS] A coordinate transformation library
Topic
[ROS] A path with a name for sending/receiving Message
Sending Message is called Publish and receiving Message is called
Subscribe.
way point
A set of coordinate pairs
Calibration
A processing to calculate camera parameters for adjusting the points
projected on camera images to the positions in 3-D space
Sensor fusion
A method to achieve high recognition function by integrating
multiple sensor information for calculating more accurate position,
posture, etc.
Vector map
GIS (Global Information System) data representing geometric
information of the roads in vector
Message passing
Inter-process communication that a sender transmits data to one or
more receivers

A U T O W A R E - U S E R S - M A N U A L
Page 76
7. Related Documents
Autoware
http://www.pdsl.jp/fot/autoware/
AutowareRider
Main
AutowareRider.apk
https://github.com/CPFL/Autoware/blob/master/ui/tablet/AutowareRider/AutowareRi
der.apk
Path data planning application
AutowareRoute.apk
https://github.com/CPFL/Autoware/blob/master/ui/tablet/AutowareRoute/AutowareR
oute.apk
CAN data collection appllication
CanDataSender.apk
https://github.com/CPFL/Autoware/blob/master/vehicle/android/CanDataSender/bin/
CanDataSender.apk
CUDA
http://www.nvidia.com/object/cuda_home_new.html
http://www.nvidia.co.jp/object/cuda-jp.html
http://docs.nvidia.com/cuda/cuda-getting-started-guide-for-linux/
http://developer.nvidia.com/cuda-downloads
FlyCapture SDK
http://www.ptgrey.com/flycapture-sdk
OpenCV
http://opencv.org/
http://opencv.jp/
http://sourceforge.net/projects/opencvlibrary/
Qt
http://www.qt.io/
http://qt-users.jp/
Chapter
7

A U T O W A R E - U S E R S - M A N U A L
Page 77
ROS
http://www.ros.org/
Ubuntu Japanese Team
https://www.ubuntulinux.jp/
Ubuntu
http://www.ubuntu.com/
Velodyne Drivers
https://github.com/ros-drivers/velodyne
Demo Files
Script for generating demo launch file
http://db3.ertl.jp/autoware/sample_data/my_launch.sh
Data for demo (Moriyama map, Calibration, Path data)
http://db3.ertl.jp/autoware/sample_data/sample_moriyama_data.tar.gz
ROSBAG data
http://db3.ertl.jp/autoware/sample_data/sample_moriyama_150324.tar.gz
Note: this ROSBAG data doesn’t include image information for object detection.
