BI User Guide (4.0), Version 1.1 4.0
User Manual:
Open the PDF directly: View PDF ![]() .
.
Page Count: 69

BI User Guide
Release 2014, Version 1.1
March 1, 2014
NEWSCYCLE Solutions – Confidential & Proprietary

newscyclesolutions.com BI User Guide (4.0), Version 1.1 ii
NEWSCYCLE Solutions Confidential & Proprietary
Copyright
© 2014 NEWSCYCLE Solutions. All rights reserved. All brands and their products are trademarks or
registered trademarks of their respective holders and should be noted as such.

newscyclesolutions.com BI User Guide (4.0), Version 1.1 iii
NEWSCYCLE Solutions Confidential & Proprietary
Contents
Getting Started --------------------------------------------------------------------------------------------------------- 1
BI Architecture Scenarios 1
BI Database Sizing 3
Oracle® Database Specific Recommendations 4
Setting up the BI Database ------------------------------------------------------------------------------------------ 5
Identify Data Sources 5
Create BI Database Tables 7
Log in to the Database Table Utility 7
Create tablespaces and ADBASE_BI user for Oracle® databases 8
Create a blank BI database 11
Initialize BI 11
Import Data into BI 13
Importing Ad Order Records 14
Importing Insertion Records 17
Importing GL Records 21
Using BI Importer Arguments 23
Reading the Log File 23
Populate the BI Database (Initial Load) 23
Loading Customer Accounts 24
Loading Contracts 24
Loading Orders 24
Loading GL 25
Audit the Initial BI Load 27
Enable BI Feeder Table Processing 27
Updating the BI Database ----------------------------------------------------------------------------------------- 29
Running the BI Populator 29
Updating BI Manually 29
Updating BI Periodically 30
Scheduling BI Updates 30
Using Execution Criteria 31
Using the Object ID Filters 35
Running the BI Interface App 37
How to Balance Orders in AdBase and BI 40
How to Balance AR in AdBase and BI 46
Checking Balances 50

newscyclesolutions.com BI User Guide (4.0), Version 1.1 iv
NEWSCYCLE Solutions Confidential & Proprietary
Using the BI Utility 51
Using the Execution Criteria Dates 52
Viewing Unpopulated Items 53
Balancing Ad Orders 55
Viewing User Entries 57
Purging the BI Database-------------------------------------------------------------------------------------------- 58
Dropping the BI Database Tables -------------------------------------------------------------------------------- 59
FAQ ---------------------------------------------------------------------------------------------------------------------- 60

newscyclesolutions.com BI User Guide (4.0), Version 1.1 v
NEWSCYCLE Solutions Confidential & Proprietary
newscyclesolutions.com BI User Guide (4.0), Version 1.1 1
NEWSCYCLE Solutions Confidential & Proprietary
Getting Started
This document explains how to use Mactive’s Business Intelligence (BI) database and software
applications. This chapter discusses some of the preparation that needs to be completed before
beginning set up of your BI system.
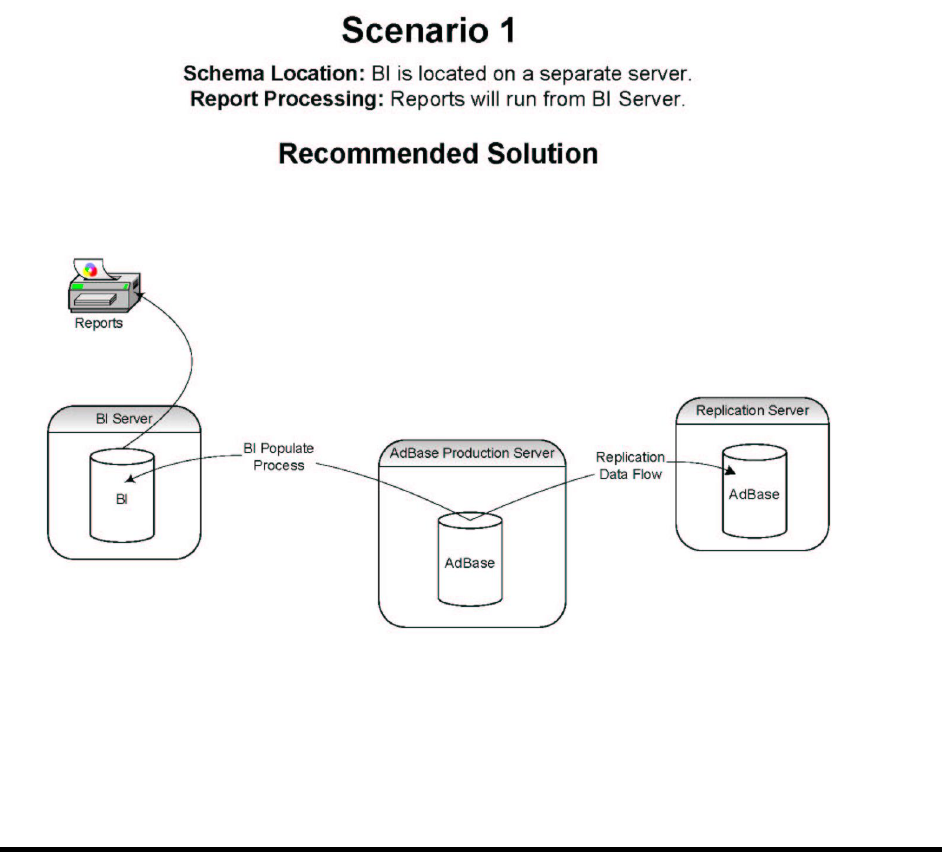
BI Architecture Scenarios
Before beginning, you must first designate a machine that will house the BI database. This document
describes three scenarios for housing the BI database. The samples provided are Mactive’s
recommended scenarios for setting up your site’s BI architecture.
Scenario 1 allocates a separate piece of hardware for the BI database. The BI database resides on a
stand-alone database server. Using this solution the server can also serve as the machine that runs the
BI Populator and BI Interface App. See the database sizing information on page 3 to determine the
potential size of the BI database. This information will also help you decide the type of hardware to
purchase as far as CPU power and RAM.
newscyclesolutions.com BI User Guide (4.0), Version 1.1 2
NEWSCYCLE Solutions Confidential & Proprietary
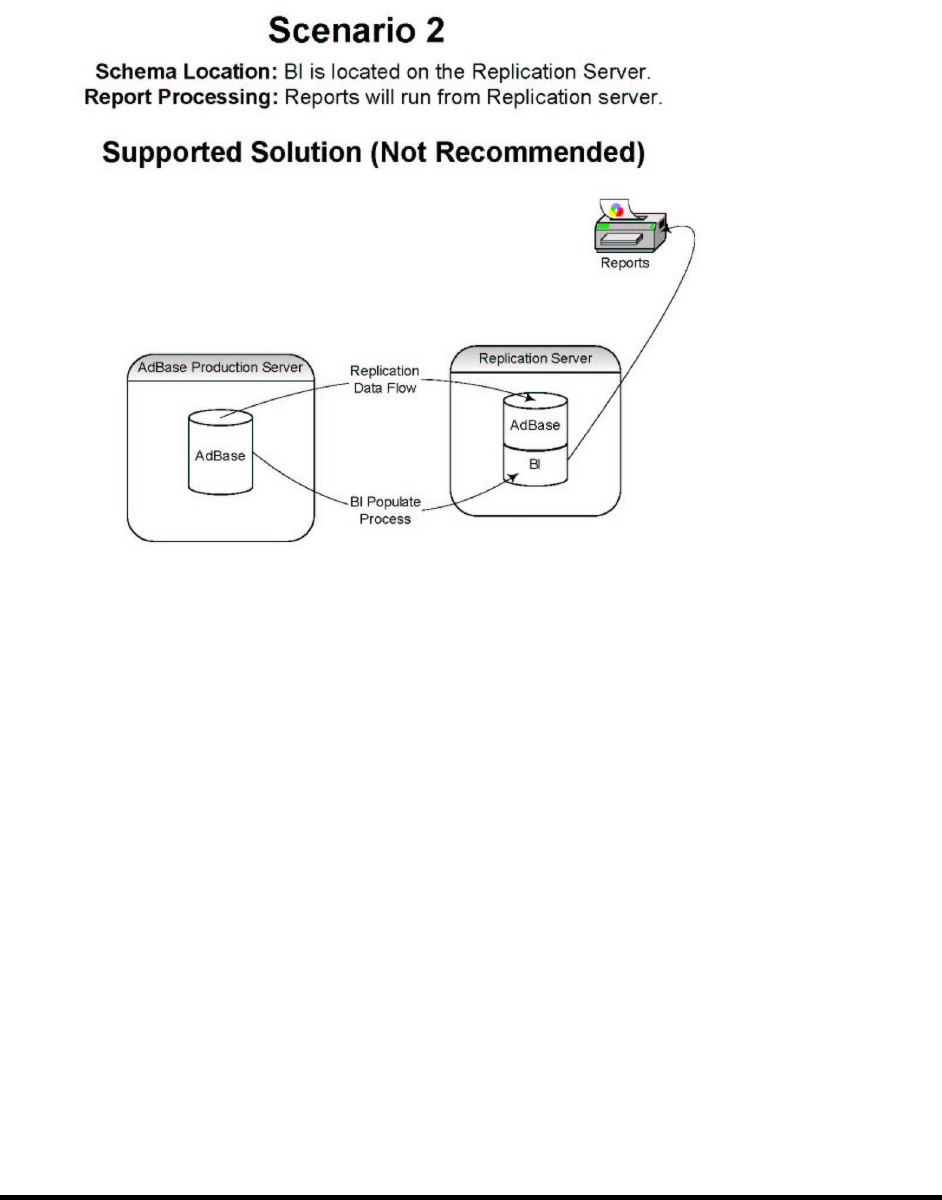
In Scenario 2 , the BI database resides on the replication server. The replication server houses two
databases, one dedicated to the replication process of production and the other for BI. The BI Populator
and BI Interface App run on a stand-alone PC connected to the replicated server. With this solution, you
may still need to purchase additional database licenses.

newscyclesolutions.com BI User Guide (4.0), Version 1.1 3
NEWSCYCLE Solutions Confidential & Proprietary
For sites that are smaller (i.e., 10 seats or less), Scenario 3 may be considered. In this scenario, both the
AdBase production database and the BI database are housed on the same server. If your site chooses
this scenario, Mactive recommends that you ensure the BI database is located on a different disk than
the production database. This arrangement will help with database performance.
Scenarios 2 and 3 require that you have the BI Populator and BI Interface App running on a dedicated
Microsoft® Windows machine. Mactive recommends using a system with a Intel® Pentium® 4 2.8 GHz
processor or greater with at least 2 GB of RAM.
BI Database Sizing
Once a scenario is decided upon, the next step is to determine the size of the BI database, using the BI
Database Sizing Workbook (BI_Database_Sizing_Workbook.xls). This spreadsheet provides an estimate
for the size of the BI database using information from your production database. The data is only an
estimate. Like the AdBase database, you must configure the BI database to grow each year. The BI
Database Sizing Workbook has three tabs, including:
The Total Size Requirement tab, which provides the total size after you have entered your site’s
numbers.
The Questions tab, which allows you to enter results for the database queries.
The SizingCalcs tab, which provides information on how the database sizing is calculated.

newscyclesolutions.com BI User Guide (4.0), Version 1.1 4
NEWSCYCLE Solutions Confidential & Proprietary
Use the following queries to complete the Questions tab.
Customers:
Select count (*) from customers;
GL:
Select count (*) from fntranslinedist;
Select count (*) from aotransactionacctmap;
Orders:
Select count (*) from aoadorder;
Insertions:
Select count (*) from aoadrundates;
Contracts:
Select count (*) from cocontractinstance;
Also on the Questions tab, you must set a range for the number of years you anticipate storing BI data.
The default value in the spreadsheet is 45 years (e.g., 1/1/1980 to 1/1/2025).
Oracle® Database Specific Recommendations
Refer to the General Recommended Settings for Installation of Oracle 9i R2 on Sun Solaris
(Oracle_9iR2_Mactive_Recommended_Settings_V2.pdf) for information on creating the BI database and
tablespaces.
Mactive offers two recommendations for sites using Oracle-based BI databases. For optimal
performance, if your BI database is an Oracle® database and on a different server, you should set the
star_transformation_enabled parameter in the INIT.ORA file to true. Also, if you are using scenario 2 or
3 described earlier in this document, Mactive recommends that you create a new database on the
server so that the BI database will reside in its own database with its own INIT.ORA settings. If the BI
tables are on the same database as the AdBase data and on a single instance, do not change the
INIT.ORA parameters for the database.
NOTE: At this time, there are no specific recommendations for sites using Microsoft® SQL Server
databases for BI.

newscyclesolutions.com BI User Guide (4.0), Version 1.1 5
NEWSCYCLE Solutions Confidential & Proprietary
Setting up the BI Database
The previous sections discussed your options for BI database configurations as well as Mactive’s
recommendations for setting up your BI database. Once you have selected a server and created the
necessary database and tablespaces for BI (Oracle databases), you must complete the following steps in
the given order.
1. Create the AdBase and BI ODBC connections on the PC where the BI Populator resides. Depending
on the type of database you are running, Oracle® or Microsoft® SQL Server, the steps to setup ODBC
connections are different. For that reason, this process is not detailed in this document. For
instructions, see the online document How to Setup ODBC Connections on your customer pages.
2. Identify the AdBase and BI data sources.
3. Create the BI database tables (see page 7).
4. Initialize the BI database (see page 11).
5. Import data into the BI database (see page 13).
6. Complete the Initial Load of data into the BI database (see page 23).
7. Audit the Initial BI Load using Mactive’s BI Auditor applications (see page 27).
8. Check the Enable BI Feeder Table Processing box in System Admin (see page 27).
NOTE: Before continuing, make sure you have a current backup of your AdBase database. If any
problems should arise, the database backup can be restored and you will not lose information.
Identify Data Sources
You must run Configure AdBase to point the AdBase software to the correct production AdBase schema
and BI reports schema data sources as established in your ODBC connections. The ODBC connections
must be created prior to beginning the following steps.
To identify the AdBase and BI data sources:
1. Launch Configure AdBase from the Mactive\bin folder. For instructions, see the Configure AdBase
Utility Guide.
The Mactive Configure AdBase window displays. Using Configure AdBase, you will select a data
source for the production and BI databases and then indicate the database type. The remaining
settings are optional and depend on your site’s practices.
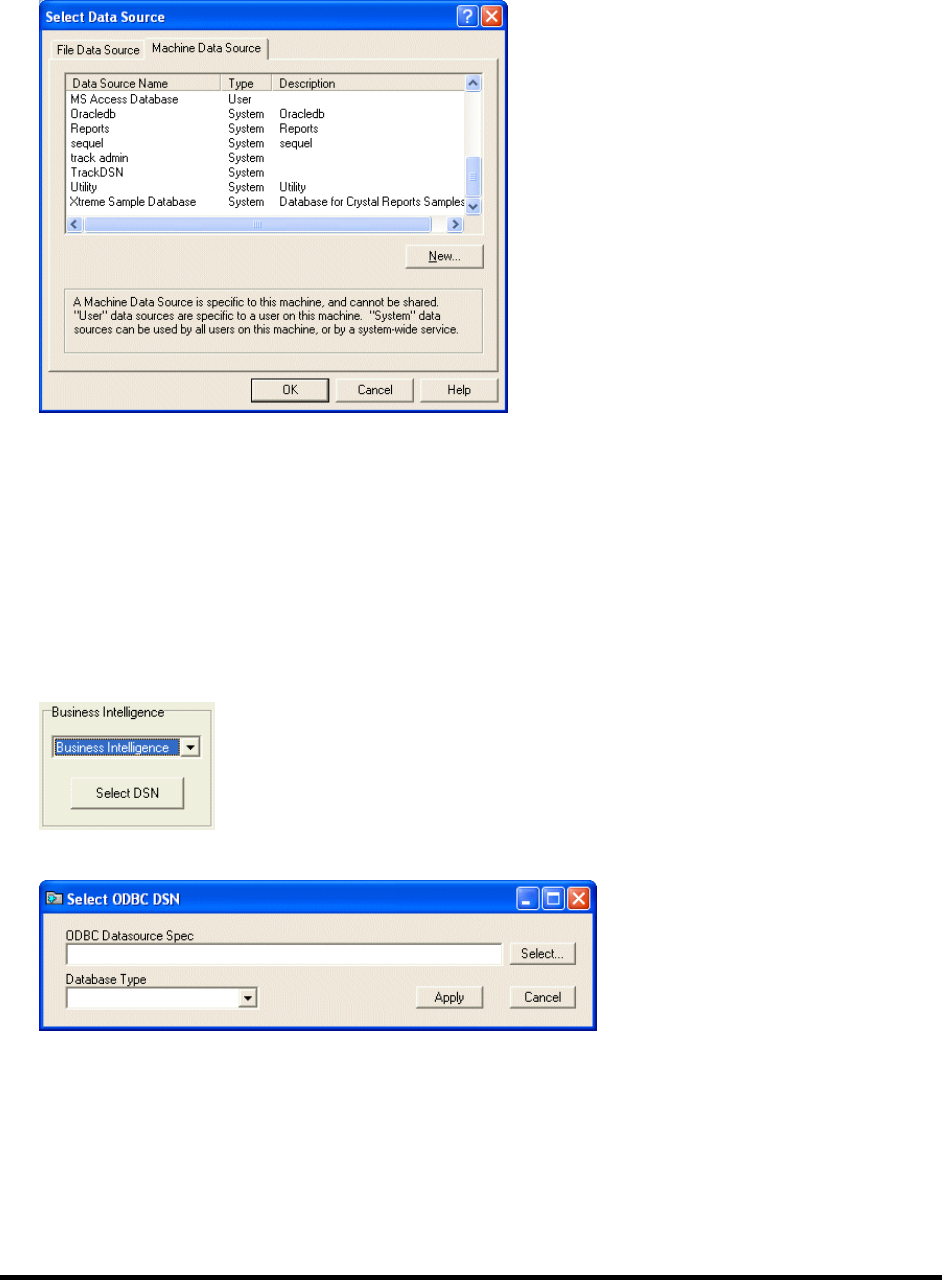
2. Click the Select DSN button under the Data Source Name field. This DSN will point to the AdBase
schema.
The Select Data Source window displays.
newscyclesolutions.com BI User Guide (4.0), Version 1.1 6
NEWSCYCLE Solutions Confidential & Proprietary
3. Click the Machine Data Source tab.
4. Highlight the desired Data Source Name for the core AdBase schema and click OK.
If your site uses a trusted connection, you will not be prompted for a User name and Password.
However, if you are prompted for your login information, enter your database User name and
Password. For more information, see your System Administrator. The data source name, user ID,
workstation ID, database name, and other flags are displayed in the Data Source Name field.
5. Select the Database Type. Your options include MS Access, MS SQL Server, and Oracle.
6. Select Business Intelligence from the Business Intelligence list. This DSN will point to the BI reports
schema.
7. Click the Select DSN button in the Business Intelligence box.
The Select ODBC DSN window displays:
8. Click Select to locate and select the BI data source.
9. Select the Database Type and click Apply.
10. Click Apply and then click Done.

newscyclesolutions.com BI User Guide (4.0), Version 1.1 7
NEWSCYCLE Solutions Confidential & Proprietary
Create BI Database Tables
After creating the ODBC connections and identifying the data sources in Configure AdBase, you will
create the BI database tables using the Database Table Utility. The following instructions explain how to
log in to the utility, create tablespaces for Oracle® databases, and create the BI database tables. For
more information on the options available, see the Database Table Utility Guide.
Log in to the Database Table Utility
You will find the Database Table Utility in the Microsoft® Windows Start menu or the Mactive\bin folder.
To log in to the Database Table Utility:
1. Select Start > Programs > Atex Applications > Database Table Utility.
The Login window displays:
2. Enter your User name and Password and click OK.
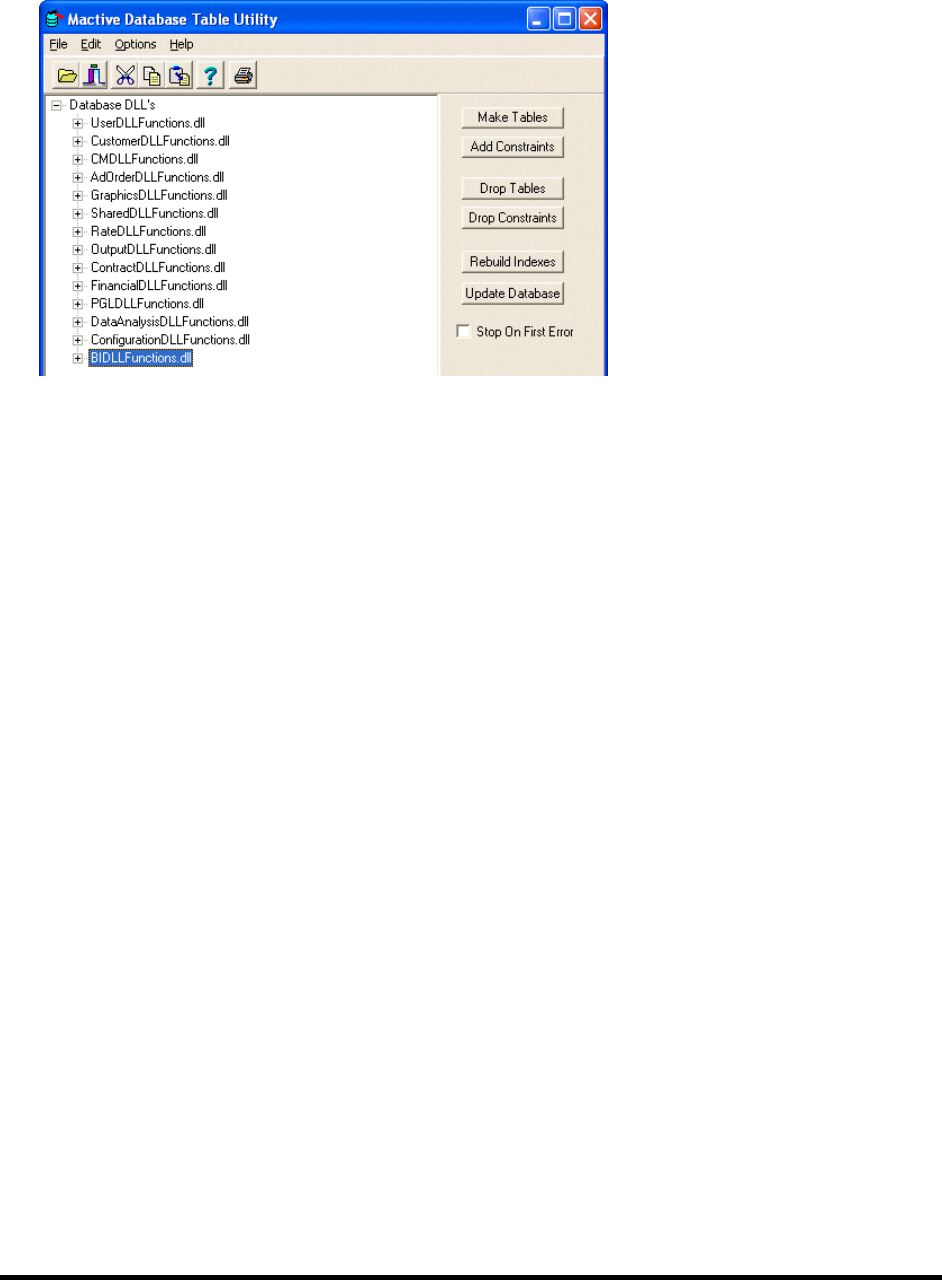
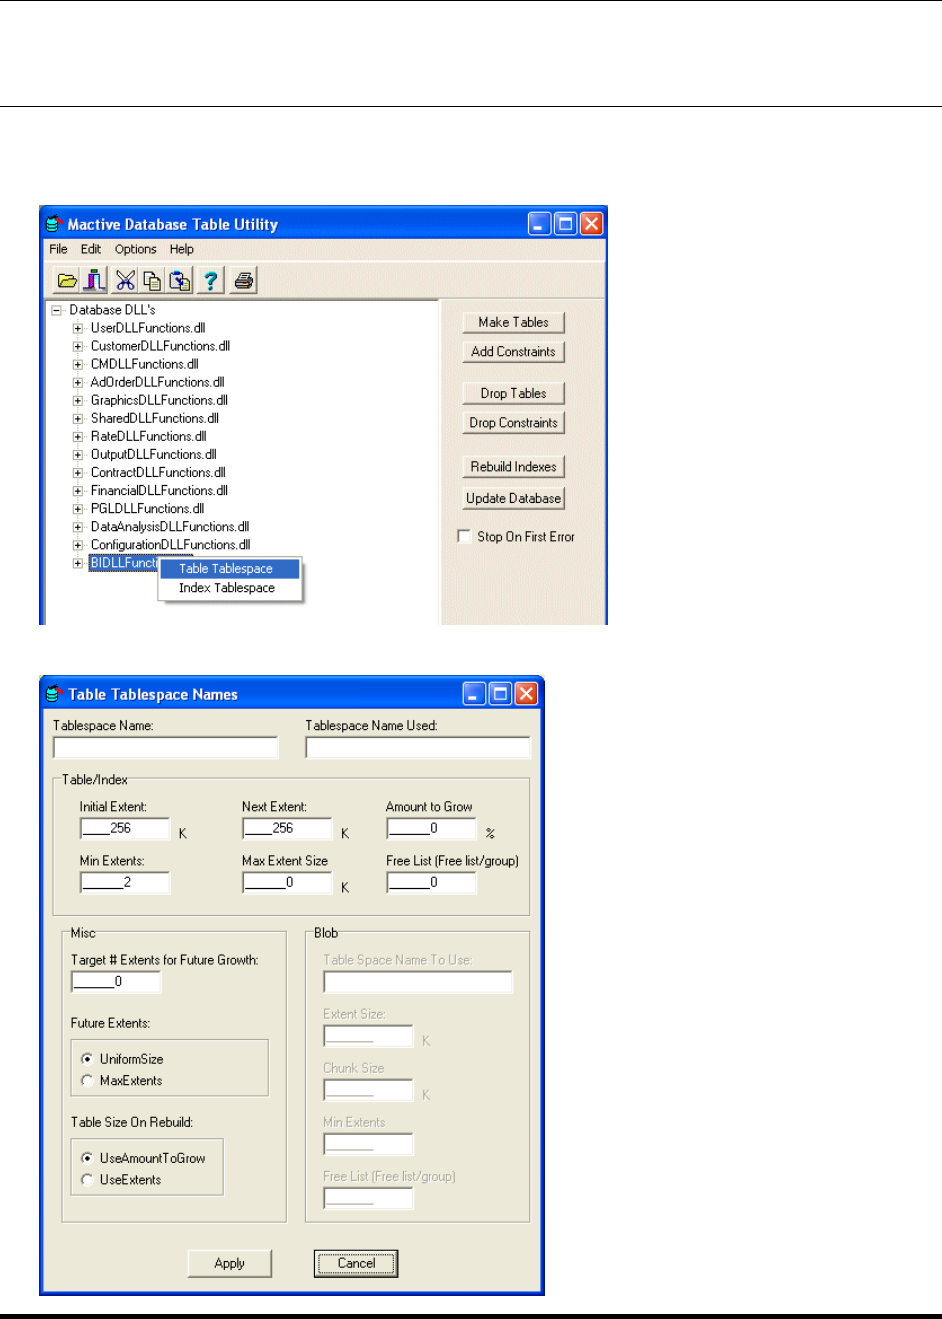
The Mactive Database Table Utility window displays.
3. Click the expand button (+) next to Database DLLs to view all of the database functions.
newscyclesolutions.com BI User Guide (4.0), Version 1.1 8
NEWSCYCLE Solutions Confidential & Proprietary
4. Select the BIDLLFunctions.dll.
The BIDLLFunctions.dll node is highlighted in blue when selected. This node must be selected when
performing functions on the BI database. If this node is not selected, you could cause serious damage to
your production database. By keeping the BIDLLFunctions.dll node selected, you are telling the Database
Table Utility to make changes to the BI database only.
Create tablespaces and ADBASE_BI user for Oracle® databases
When you create a new database in Oracle, you must also create two tablespaces to house the BI data
and the BI indexes. Use the following names to identify these tablespaces.
Main tablespace – ADBASE_BI
Index tablespace – ADBASE_BI_IDX
These tablespaces can be created using the following create-tablespace scripts. Change the path name
to the appropriate UNIX path name for the data files for the tablespaces.
CREATE SMALLFILE TABLESPACE "ADBASE_BI" DATAFILE
'C:\ORACLE\PRODUCT\10.2.0\ORADATA\SERV\adbase_bi01.dbf' SIZE 204864K AUTOEXTEND ON
NEXT 100M MAXSIZE UNLIMITED LOGGING EXTENT MANAGEMENT LOCAL UNIFORM SIZE 5M SEGMENT
SPACE MANAGEMENT AUTO;
CREATE SMALLFILE TABLESPACE "ADBASE_BI_IDX" DATAFILE
'C:\ORACLE\PRODUCT\10.2.0\ORADATA\SERV\adbase_bi_idx01.dbf' SIZE 204864K AUTOEXTEND ON
NEXT 100M MAXSIZE UNLIMITED LOGGING EXTENT MANAGEMENT LOCAL UNIFORM SIZE 5M SEGMENT
SPACE MANAGEMENT AUTO;
To create the ADBASE_BI database user, use this script.
CREATE USER "ADBASE_BI" PROFILE "DEFAULT" IDENTIFIED BY
"ADBASE_BI" DEFAULT TABLESPACE "ADBASE_BI" TEMPORARY TABLESPACE
"TEMP" ACCOUNT UNLOCK;
GRANT "CONNECT" TO "ADBASE_BI";
GRANT "DBA" TO "ADBASE_BI";
The following instructions explain how to configure the tablespaces using Database Table Utility.
newscyclesolutions.com BI User Guide (4.0), Version 1.1 9
NEWSCYCLE Solutions Confidential & Proprietary
NOTE: The following instructions are for Oracle® databases only. If you are running a Microsoft® SQL
Server database, you do not need to complete the following steps. If you are unsure which type of
database you are running, see your System Administrator
To associate tablespaces created by Oracle Enterprise Manager:
1. Right-click on the BIDLLFunctions.dll and select Table Tablespace.
The Table Tablespace Names window displays:
newscyclesolutions.com BI User Guide (4.0), Version 1.1 10
NEWSCYCLE Solutions Confidential & Proprietary
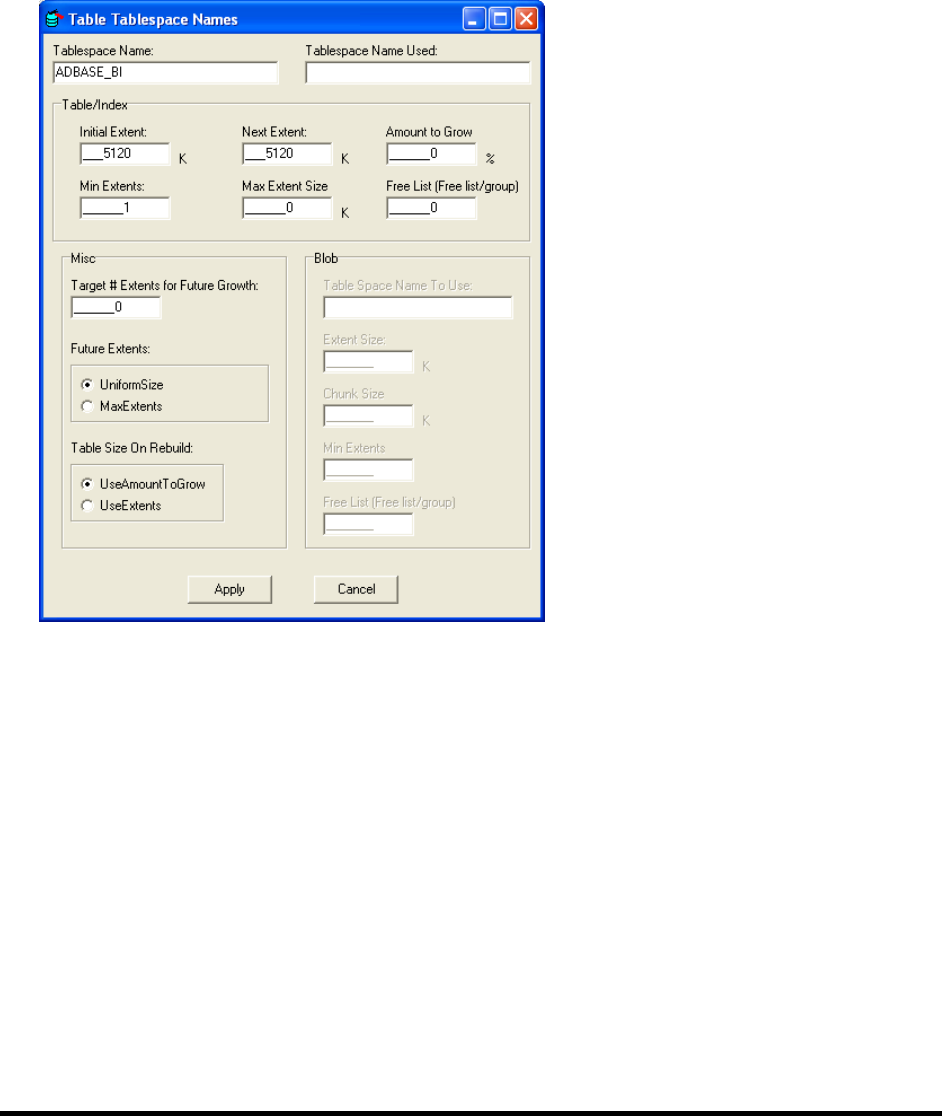
2. Enter ADBASE_BI as the Tablespace Name.
3. Make sure the value of the Initial Extent and Next Extent fields are both 5120 K.
4. Enter 1 in the Min Extents fields.
5. Select UniformSize as the Future Extents option.
6. Select UseExtents as the Table Size On Rebuild option.
The following window illustrates how the Table Tablespace Names window should appear.
7. Click Apply to write the settings to the tablespacenames table in AdBase.
8. Right-click on the BIDLLFunctions.dll and select Index Tablespace.
The Index Tablespace Names window displays.
9. Enter ADBASE_BI_IDX as the Tablespace Name.
10. Repeat steps 3-7 for the index tablespace.

newscyclesolutions.com BI User Guide (4.0), Version 1.1 11
NEWSCYCLE Solutions Confidential & Proprietary
Create a blank BI database
The following steps explain how to create the empty BI database tables using Database Table Utility.
To create the blank BI database:
1. Click on the BIDLLFunctions.dll node. Make sure the BIDLLFunctions.dll node is highlighted in blue.
2. Click the Make Tables button.
3. Click the Add Constraints button.
You now have a new, empty BI database. However, you must initialize the database before you can
populate the database with information.
Initialize BI
Once you have created the BI tables and added the constraints successfully in the Database Table Utility,
you will run the BI Populator to insert information in the BI database tables. This step is referred to as
initial processing because you are populating the BI database.
To initialize the BI database, you will use the BI Populator. The BI Populator, which is located in the
Mactive\bin folder, is controlled by the Run Utilities privilege. You must have this privilege to login to
the Populator. If you have any questions about your privileges, see your System Administrator.
Before beginning the initial population of the BI database, you must first prepare the server that is to
hold the BI database. Do not use the BI Importer to populate the BI database. The BI Importer should
not be run until after Initial Processing and the Initial Load of BI data is complete.
NOTE: Make sure the BI Feeder Table Processing box is not checked on the Other Settings tab in System
Admin. This box should not be checked until after the Initial Processing is complete. Before proceeding,
verify the BI Feeder Table Processing box is not checked.
To complete the initial processing of the BI database:
1. Double-click the BIPopulator.exe icon in the Mactive\bin folder.
2. The Login window displays.
3. Enter your User name and Password and click OK.
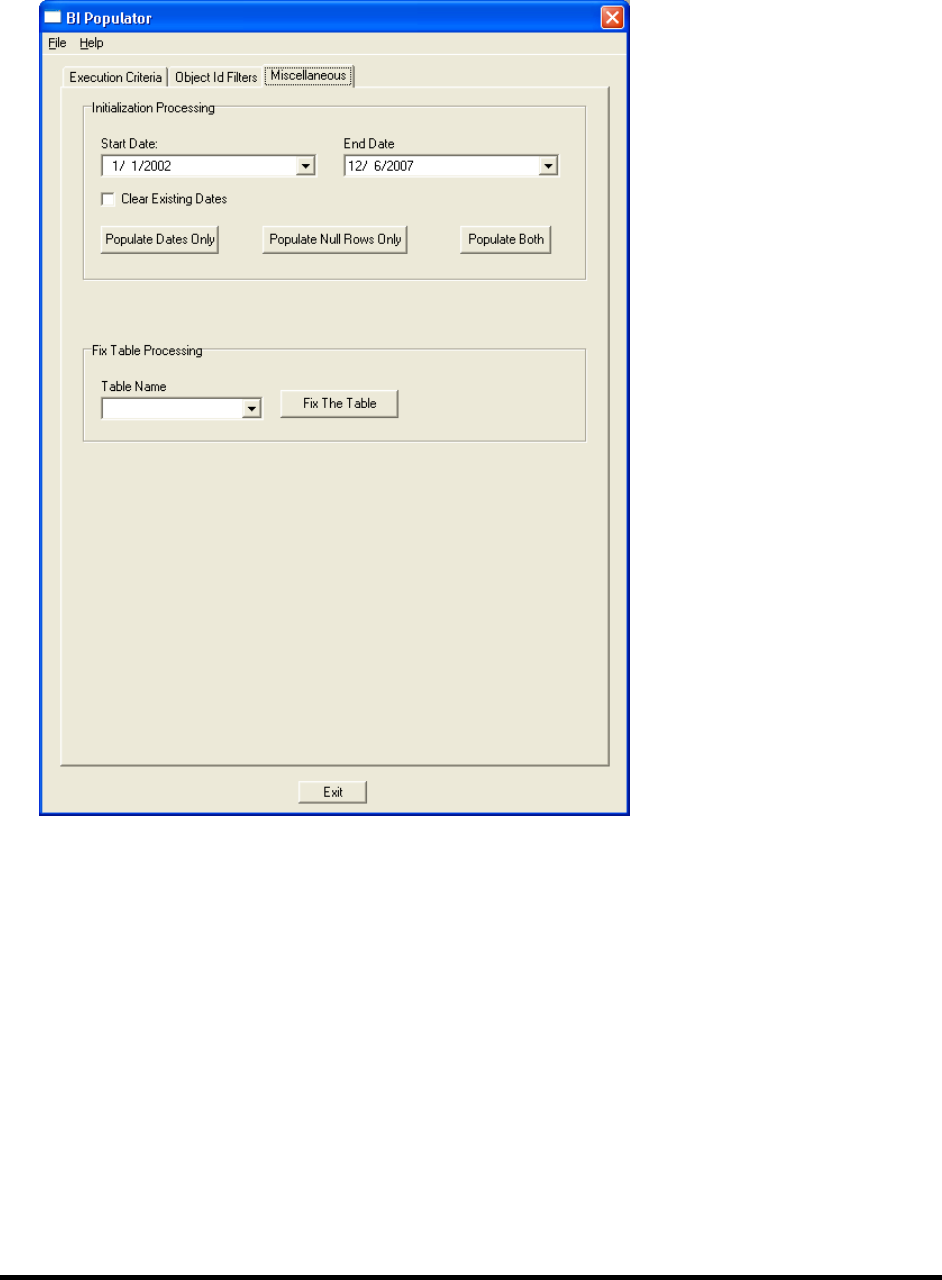
4. The BI Populator window displays.
newscyclesolutions.com BI User Guide (4.0), Version 1.1 12
NEWSCYCLE Solutions Confidential & Proprietary
5. Click the Miscellaneous tab.
6. Enter the appropriate Start Date and End Date and click Populate Both.
To make sure all of the information in the core database is populated to the BI database, the date
range must include any dates appearing in your database. For example, if your database contains
orders from 1999, enter a Start Date of at least 01/01/1999. The end date is not as important
because it is easier to update later. However, to be safe, you might enter and End Date of
01/01/2015.
You also have the option to Populate Date Only and Populate Null Rows Only. The Populate Date
Only button can be used with the Clear Existing Dates option to rewrite information to the dmDate
table in the BI database. When clicked, the Populate Null Rows Only button creates the null rows in
all of the BI tables. The BI database uses the null rows to link tables with foreign keys. Both of these
actions are accomplished when you click the Populate Both button.
7. Click the Exit button to close the BI Populator.
newscyclesolutions.com BI User Guide (4.0), Version 1.1 13
NEWSCYCLE Solutions Confidential & Proprietary
Import Data into BI
The purpose of the BI importer is to directly populate the BI tables with historical data from an external
system. The data may consist of both ad order and revenue information. Imported records are
segmented into three different types: ad orders, insertion records, and GL records (i.e., invoices, credits,
debits, and payments). Each record type is defined in a unique file and each imported record will have a
list of required fields and an assigned length for each field. There is no known import file size limit.
This document explains how to run the BI Importer for ad order, insertion, and GL records as well as the
field formats for import files. Before importing BI information, at a minimum, the BI tables must be
populated with customer account data (dmClient) and other data referenced by the importer (dmUser
and dmAdOrderBools, etc.).
Prior to running the importer, make sure AdBase is pointed to the right BI database. You must run
Configure AdBase and select the Business Intelligence ODBC Connection. For more information, see
page 5.
The BI Importer is located in the Mactive/bin folder. There are no field translations required for this
import. The import may be run from multiple workstations simultaneously. Do not use the BI Importer
to populate the BI database. The BI Importer should not be run until after Initial Processing and the
Initial Load of BI data is complete.
To import data into the BI database:
1. Double-click the BIImporter.exe icon.
The Login window displays.
2. Enter your User name and Password and click OK.
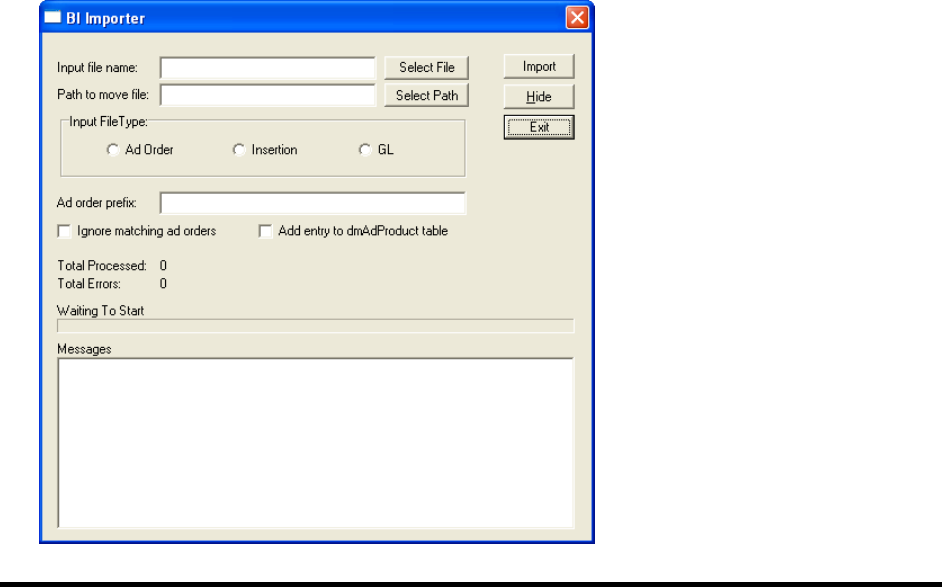
The BI Importer window displays:

newscyclesolutions.com BI User Guide (4.0), Version 1.1 14
NEWSCYCLE Solutions Confidential & Proprietary
3. Click the Select File button to select the input file containing records to be imported.
4. Click the Select Path button to select the path and folder in which the importer will save the input
file once the import is complete.
5. Select the Input File Type. Your options include Ad Order (see page 14), Insertion (see page 17), and
GL (see page 21).
6. Enter an Ad order prefix to define leading characters for imported ad order numbers. For example, if
you enter L in the Ad order prefix field, and if the imported ad order number is 123456, the number
will be saved in the BI database as L123456.
7. Check the Ignore matching ad orders box to bypass an ad order record that has a matching ad order
number in the BI database. If this box is not checked and an imported ad order record matches an
existing number in the BI database, the imported record replaces the data in the BI database.
8. Check the Add entry dmAdProduct table box.
9. Click Import.
10. Click Exit to close the BI Importer.
The status bar indicates the progress of the import. The results are written to the Messages window.
When the import is complete, the results are also written to the BIImporter.txt file in the Temp
Directory specified in Configure AdBase. For more information, see page 23.
Importing Ad Order Records
Ad order records require a customer account number field. This field must exist in the dmClient table. If
the account number does not exist, the record will be rejected. When importing ad order records, the BI
Importer checks for a unique ad order number. If the Ignore matching ad orders box is checked, any ad
order number that already exists in the database will be rejected. If the Ignore matching ad orders box is
not checked, and the BI Importer finds a matching ad order, the ad order data is updated and all
insertions previously defined for the replaced ad order are deleted. New insertion records must be
imported (see page 17).
An ad order record may be re-imported if missing accounts have been added. If the Ignore matching ad
orders box is checked, all previously imported ad orders are ignored. Ad orders not imported on the
previous pass are imported if the matching account numbers exist.
The primary function of this import is to populate entries in the fctAdOrder table. The following table
lists the import fields. When importing ad order records, the following rules apply.
All date definitions must be formatted using 10 characters (e.g., 01/05/2004).
All alphanumeric fields are left-aligned.
All numeric fields are right-aligned.
All error and warning messages written to the log include the ad order number and error/warning
information (e.g., Sales Rep not found).
TABLE 1. AD ORDER RECORD FIELD DETAILS

newscyclesolutions.com BI User Guide (4.0), Version 1.1 15
NEWSCYCLE Solutions Confidential & Proprietary
Field #/
Position
Import Field
Length
BI Table Name
Miscellaneous
Information
1/1
BI_ADORDER_ORDERERACCOUNT
18
Link to dmClient
PrimaryOrderer_Client_ID
AccountNumber_Adbase
Required
Test to match account
number. Number must
exist.
2/19
BI_ADORDER_NUMBER
10
AdOrderNumber
Required
Test match to
AdOrderNumber.
Number must NOT
exist.
3/29
BI_ADORDER_CREATEDATE
10
Link to dmDate
OrderTaken_Date_ID
Date order taken in
mm/dd/yyyy format.
4/39
BI_ADORDER_FIRSTINSERTDATE
10
Link to dmDate
FirstInsert_Date_ID
Required
Date of first insert in
mm/dd/yyyy format.
5/49
BI_ADORDER_LASTINSERTDATE
10
Link to dmDate
LastInsert_Date_ID
Required
Date of last insert in
mm/dd/yyyy format.
6/59
BI_ADORDER_TOTALINSERTIONS
3
TotalInsertions
Required
7/62
BI_ADORDER_TAKER
20
Link to dmUser
OrderTaker_User_ID
UserLoginName
Login name. If no
match, then leave
blank.
8/82
BI_ADORDER_COMMISSIONEDREP
20
Link to dmUser
CommissionedRep_User_ID
UserLoginName
Required
Login name. If no
match, then leave
blank, and write a
warning message to the
log.
9/102
BI_ADORDER_COMPANY
48
Link to dmCompany
Company_ID
CompanyName
If not defined, the first
company listed is used
by default.
10/150
BI_ADORDER_PONUMBER
25
PONumber
Purchase order number
11/175
BI_ADORDER_TOTALADAMOUNT
18
TotalAdAmount
(Numeric field)
Required
Amount is defined in
dollars and cents, using
no punctuation (e.g.,
$1234.56 is defined as
123456).
A negative value is
defined as
-123456.
12/193
BI_ADORDER_TOTALDISCOUNTAMOUNT
10
TotalDiscountAmount
(Numeric field)
Format as in field 11
If blank, then zero
13/203
BI_ADORDER_TOTALPREMIUMAMOUNT
10
TotalPremiumAmount
(Numeric field)
Format same as field
11. If blank, then zero.

newscyclesolutions.com BI User Guide (4.0), Version 1.1 16
NEWSCYCLE Solutions Confidential & Proprietary
Field #/
Position
Import Field
Length
BI Table Name
Miscellaneous
Information
14/213
BI_ADORDER_AGYCOMMISSIONAMOUNT
10
TotalAgyCommissionAmount
(Numeric field)
Format same as field
11. If blank, then zero.
15/223
BI_ADORDER_TOTALMATERIALAMOUNT
10
TotalMaterialAmount
(Numeric field)
Format same as field
11. If blank, then zero.
16/233
BI_ADORDER_TOTALCOLORAMOUNT
10
TotalColorAmount
(Numeric field)
Format same as field
11. If blank, then zero.
17/243
BI_ADORDER_TOTALTAXAMOUNT
10
TotalTaxAmount
(Numeric field)
Format same as field
11. If blank, then zero.
18/253
BI_ADORDER_TOTALCREDITDEBITAMOUNT
10
TotalCreditDeditAmount
(Numeric field)
Format same as field
11. If blank, then zero.
19/263
BI_ADORDER_TOTALTYPOGRAPHICALAMOU
NT
10
TotalTypographical Amount
(Numeric field)
Format same as field
11. If blank, then zero.
20/273
BI_ADORDER_TOTALNETAMOUNT
18
TotalNetAmount
(Numeric field)
Required
Format same as field
11.
21/291
BI_ADORDER_TOTALPREPRINTAMOUNT
10
TotalPreprintAmount
(Numeric field)
Format same as field
11.
22/301
BI_ADORDER_PAYORACCOUNT
18
Link to dmClient
PrimaryPayer_Client_ID
AccountNumber_Adbase
Test to match account
number. If number
does not exist, then
leave blank.
23/319
BI_ADORDER_DONOTBILLFLAG
1
Link to dmAdOrderBools
AdOrderBools_ID
Do Not Bill Flag
If blank, then F.
T = true, F = false
24/320
BI_ADORDER_DONOTPRODUCEFLAG
1
Link to dmAdOrderBools
AdOrderBools_ID
Do Not Produce Flag
If blank, then F.
T = true, F = false
25/321
BI_ADORDER_DONOTPAGINATEFLAG
1
Link to dmAdOrderBools
AdOrderBools_ID
Do Not Paginate Flag
If blank, then F.
T = true, F = false
26/322
BI_ADORDER_INVOICEDALREADYFLAG
1
Link to dmAdOrderBools
AdOrderBools_ID
Invoiced Already Flag
If blank, then F.
T = true, F = false
27/323
BI_ADORDER_PROMOTIONNAME
20
Link to dmAdPromotion
Promotion Name
The Total Ad Amount, Total Net Amount, and Total Preprint Amount fields are imported as follows.
Total Ad Amount fctAdOrder.totaladamount
The Total Ad Amount is equal to the sum of all the ad insert charges (i.e., charges with a CategoryCode =
0, CategorySubCode = 1). These charges do not include color, typography, or any other charges that do
not meet these specifications.

newscyclesolutions.com BI User Guide (4.0), Version 1.1 17
NEWSCYCLE Solutions Confidential & Proprietary
Total Net Amount fctAdOrder.totalnetamount
The Total Preprint Amount is equal to the sum of all the preprint insertion charges.
Total Preprint Amount fctAdOrder.totalpreprintamount
The Total Net Amount is the sum of the Total Ad Amount (or Total Preprint Amount) and all other
charges (discount, premiums, color, etc).
The Total Ad Amount is required in the Ad Order Import specifications. If you have a preprint ad, you can
put a 0 in the Total Ad Amount field.
Importing Insertion Records
When importing insertion records, the ad order number must already exist in the BI tables. In other
words, the ad order record must have been previously imported. If the BI Importer finds an insertion
record that does not have a matching ad order number in the database, the insertion record is rejected.
Insertion records are dependent on matching ad order numbers to the dmAdProduct table in seven
fields, including: product, ad type, edition, zone, placement, position, and category. If a match is found,
then the date field is checked. If a matching date is found, the insertion record is replaced with the
imported data, and the fulfillment amount is replaced. If no matching date is found, the defined
insertion entry is added.
The Add entry to dmAdProduct table option is used for insertion records that do not have a match in
the dmAdProduct table. If a match is not found, and if the box is checked, the insertion record is added
and a new entry is written to the dmAdProduct table. All remaining fields not defined in dmAdProduct
(e.g., ProductDescription) are left blank. This process allows legacy imports that do not have core-based
definitions to be imported. If a match is not found and the Add entry to dmAdProduct table box is not
checked, the insert record is rejected.
The primary function of this import is to populate entries in the fctInsertion and
fctInsertChargeSummary tables. The following table lists the import fields.
TABLE 2. INSERTION RECORD FIELD DETAILS
Field #/
Position
Import Field
Length
BI Table Name
Miscellaneous Information
1/1
BI_INSERTION_ADORDERNUMBER
10
AdOrderNumber
Test match to Ad Order
Number. Number must exist.
2/11
BI_INSERTION_INVOICENUMBER
18
InvoiceNumber in
fctInsertChargeSummary
Invoice Number
3/29
BI_INSERTION_PRODUCT
60
Link to dmAdProduct
AdProduct_ID
Product Name (See Note 1)
4/89
BI_INSERTION_ADTYPE
30
Link to dmAdProduct
AdProuct_ID
Ad Type (See Note 1)
5/119
BI_INSERTION_EDITION
20
Link to dmAdProduct
AdProduct_ID
Edition (See Note 1)
6/139
BI_INSERTION_ZONE
20
Link to dmAdProduct
AdProduct_ID
Zone (See Note 1)
7/159
BI_INSERTION_PLACEMENT
20
Link to dmAdProduct
AdProduct_ID
Placement Name (See Note 1)

newscyclesolutions.com BI User Guide (4.0), Version 1.1 18
NEWSCYCLE Solutions Confidential & Proprietary
Field #/
Position
Import Field
Length
BI Table Name
Miscellaneous Information
8/179
BI_INSERTION_POSITION
20
Link to dmAdProduct
AdProduct_ID
Position Name (See Note 1)
9/199
BI_INSERTION_DATE
10
Link to dmDate
Insert_Date_ID
Calendar Date in mm/dd/yyyy
format.
10/209
BI_INSERTION_PRODUCTCATEGORY
20
Link to dmAdProduct
AdProduct_ID
Product Category: Classified,
ROP, Preprint. (See Note 1)
11/229
BI_INSERTION_SORTTEXT
40
Link to dmAdDetail
AdDetail_ID
Sort Text (See Note 2)
12/269
BI_INSERTION_COLORCOUNT
10
Link to dmAdDetail
AdDetail_ID
Color Count (See Note 2)
13/279
BI_INSERTION_COLORNAME
12
Link to dmAdDetail
AdDetail_ID
Color Name (See Note 2)
14/291
BI_INSERTION_COLORTYPE
20
Link to dmAdDetail
AdDetail_ID
Color Type (See Note 2)
15/311
BI_INSERTION_INSTANCENAME
48
Link to dmContractDetails
Instance Name
16/359
BI_INSERTION_FULFILLMENTAMT
10
Link to dmContractDetails to
FctContractFulfillment
AppliedFulfillmentUnits1
17/369
BI_INSERTION_NUMCOLUMNS
7
AdWidth
Column count (and fraction)
Converted to twips
Assume 3 decimal positions
6 columns = 06000
2 ½ = 02500
18/376
BI_INSERTION_ADDEPTH
7
AdDepth
Inches (and fraction)
Converted to twips
Assume 3 decimal positions
10 inches = 10000
2 ¼ = 02250
19/383
BI_INSERTION_JOINTADNUMBER
10
JointAdNumber
This in the ad number that this
insert is placed into
20/393
BI_INSERTION_NUMTEARSHEETCOUNT
3
NumberOfTearSheets
Number of Tear Sheets
21/396
BI_INSERTION_BASECHARGE
10
Link to
FctInsertChargeSummary
Amount_InsertSummary
AdInsertCharge (See Note 3)
22/406
BI_INSERTION_COLORCHARGE
10
Link to
FctInsertChargeSummary
Amount_InsertSummary
Color Item (See Note 3)
23/416
BI_INSERTION_TYPOGRAPHICALCHARGE
10
Link to
FctInsertChargeSummary
Amount_InsertSummary
Typographical Item (See Note
3)
24/426
BI_INSERTION_MATERIALCHARGE
10
Link to
FctInsertChargeSummary
Amount_InsertSummary
Material Item (See Note 3)
25/436
BI_INSERTION_AGENCYDISCOUNT
10
Link to
FctInsertChargeSummary
Amount_InsertSummary
Discount (See Note 3)

newscyclesolutions.com BI User Guide (4.0), Version 1.1 19
NEWSCYCLE Solutions Confidential & Proprietary
Field #/
Position
Import Field
Length
BI Table Name
Miscellaneous Information
26/446
BI_INSERTION_MAKEGOOD
10
Link to
FctInsertChargeSummary
Amount_InsertSummary
Credit (See Note 3)
27/456
BI_INSERTION_GENERALDISCOUNT
10
Link to
FctInsertChargeSummary
Amount_InsertSummary
Discount (See Note 3)
28/466
BI_INSERTION_GENERALPREMIUM
10
Link to
FctInsertChargeSummary
Amount_InsertSummary
Premium (See Note 3)
29/476
BI_INSERTION_PAGENUMBER
3
Link to dmLayoutInfo_ID
PageNumber (See Note 4)
30/479
BI_INSERTION_SECTIONNUMBER
20
Link to dmLayoutInfo_ID
Section (See Note 4)
31/499
BI_INSERTION_COUPONFLAG
1
Link to AdInsertBools
IsCouponAd_Flag
Blank=F, T=True (See Note 5)
32/500
BI_INSERTION_OVERRIDEFLAG
1
Link to AdInsertBools
RateOverride_Flag
Blank=F, T=True (See Note 5)
33/501
BI_INSERTION_DOUBLETRUCK
1
Link to AdInsertBools
IsDoubleTruck_Flag
Blank=F, T=True (See Note 5)
34/502
BI_INSERTION_REVERSE
1
Link to AdInsertBools
IsReverse_Flag
Blank=F, T=True (See Note 5)
35/503
BI_INSERTION_INVOICED
1
Link to AdInsertBools
IsInvoicedAlready_Flag
Blank=F, T=True (See Note 5)
36/504
BI_INSERTION_SCHEDTYPE
1
N/A
Indicates print ad, preprint,
internet, or broadcast
37/505
BI_INSERTION_ONLINE_PRODUCT
1
Link to AdInsertBools
OnLineProduct_Flag
Blank=F T=True (See Note 5)
38/506
BI_INSERTION_COLOR_PREPRINT
20
Link to dmAdContent
Link to AoPreprintColors
39/526
BI_INSERTION_PAPER_PREPRINT
20
Link to dmAdContent
Link to AoPreprintPaperTypes
40/546
BI_INSERTION_SIDES_PREPRINT
3
Link to dmAdContent
From AoPreprintInfo.Sides
41/549
BI_INSERTION_PAGECOUNT_PREPRINT
3
Link to dmAdContent
AoPreprintInfo.PageCount
42/552
BI_INSERTION_WEIGHT_PREPRINT
3
Link to dmAdContent
From AoPreprintInfo.Weight
43/555
BI_INSERTION_LOCATION_PREPRINT
20
Link to dmAdContent
Link to
ShPreprintLocationName
44/575
BI_INSERTION_SCHEDATTRIBUTENAME
20
Link to dmAdDetail
Run schedule attribute
45/595
BI_INSERTION_REVENUE
10
Link to fctInsertion
Revenue for the insertion
46/605
BI_INSERTION_CAMPAIGNNAME
30
dmDigitalMediaCampaign
Internet campaign name
47/635
BI_INSERTION_CAMPAIGNTYPE
40
dmDigitalMediaCampaign
Campaign type
48/675
BI_INSERTION_CAMPAIGNCAT
40
dmDigitalMediaCampaign
Campaign category
49/715
BI_INSERTION_FLIGHTGROUPNAME
20
Link to dmDigitalMediaFlight
Flight group name

newscyclesolutions.com BI User Guide (4.0), Version 1.1 20
NEWSCYCLE Solutions Confidential & Proprietary
Field #/
Position
Import Field
Length
BI Table Name
Miscellaneous Information
50/735
BI_INSERTION_SITE
60
Link to dmDigitalMediaFlight
Internet site
51/795
BI_INSERTION_SECTION
60
Link to dmDigitalMediaFlight
Internet section
52/855
BI_INSERTION_PAGE
60
Link to dmDigitalMediaFlight
Internet page
53/915
BI_INSERTION_FLIGHTSTARTDATE
10
Link to dmDigitalMediaFlight
Start date
54/925
BI_INSERTION_FLIGHTENDDATE
10
Link to dmDigitalMediaFlight
End date
55/935
BI_INSERTION_QUATITYREQUESTED
10
Link to dmDigitalMediaFlight
Quantity requested
56/945
BI_INSERTION_UNITNAME
40
Link to dmDigitalMediaUnit
Unit name
57/985
BI_INSERTION_WIDTH
10
Link to dmDigitalMediaUnit
Width
58/995
BI_INSERTION_HEIGHT
10
Link to dmDigitalMediaUnit
Height
59/1005
BI_INSERTION_QUANTITYDELIVERED
10
Link to fctInsertion
Quantity delivered
60/1015
BI_INSERTION_SPOTCOUNT
10
Link to fctInsertion
Spot count
61/1025
BI_INSERTION_SPOTCOUNTRAN
10
Link to fctInsertion
Spot count ran
62/1035
BI_INSERTION_SPOTTYPE
20
Link to dmBcSpot
Spot type
63/1055
BI_INSERTION_SPOTGROUP
20
Link to dmBcSpot
Spot group
64/1075
BI_INSERTION_DURATION
20
Link to dmBcSpot
Duration
65/1095
BI_INSERTION_CHANNEL
20
Link to dmBcChannel
Channel name
66/1115
BI_INSERTION_CHANNELIDENT
20
Link to dmBcChannel
Channel identifier
67/1135
BI_INSERTION_PROGRAM
20
Link to dmBcChannel
Broadcast program
68/1155
BI_INSERTION_DAYPART
20
Link to dmBcChannel
Broadcast day part
69/1175
BI_INSERTION_BCPOSITION
20
Link to dmBcChannel
Broadcast position
70/1195
BI_INSERTION_BCZONE
20
Link to dmBcChannel
Broadcast zone
NOTE 1: Fields 3, 4, 5, 6, 7, 8, and 10 look for a matching entry in the dmAdProduct table. When a match
is found, the index is placed in AdProduct_ID. If a match is not found, the record is ignored if the Add
entry to dmAdProduct table box is not checked.
NOTE 2: Fields 11, 12, 13, and 14 are the only fields defined in the dmAdDetail table. All other fields are
blank.
NOTE 3: For fields 21 through 28, for each field defined, a row is created in the fctInsertChargeSummary
table. The ChargeCategory field is defined by the charge definition (e.g., color item, material item, etc).
The Amount_InsertSummary is the amount in the field. The ChargeType is either charge or discount. The
Posting_Date_ID is the date field (field number 8). The invoice number (field number 2) is placed in the
InvoiceNumber field for all entries. The Special_ChargeCategory field is blank.
NOTE 4: Fields 29 and 30 are the only fields defined in dmLayoutInfo. All other fields are blank.

newscyclesolutions.com BI User Guide (4.0), Version 1.1 21
NEWSCYCLE Solutions Confidential & Proprietary
NOTE 5: Fields 31 through 37 are the only fields defined in dmAdInsertBools. All other fields in this table
default to false.
Importing GL Records
An invoice record must be defined before a payment or credit record is defined. Invoice imports are only
for fully paid (closed) invoices. Manual invoice imports are allowed since there maybe no matching ad
order number. A typical credit or payment record contains the invoice number field. This is the
transaction number from the invoice (I) record. A credit or payment may be applied to more than one
invoice.
The primary function of this import is to populate entries in the fctARSummary, fctGL, and fctApply (if
payment or credit) tables. This file defines records for invoice, credit, debit, and payment records. The
following table lists the import fields.
TABLE 3. G/L RECORD FIELD DETAILS
Field #/
Position
Import Field
Length
BI Table Name
Miscellaneous Information
1/1
BI_ARSUMMARY_TRANSTYPE
1
dmGLTransaction
I = invoice
C = credit
D = debit
P = payment
(Required)
2/2
BI_ARSUMMARY_ACCOUNTNUMBER
18
Link to dmClient
AROrderer_Client_ID and
ARPayer_Client_ID
AccountNumber_Adbase
Test to match account numbers.
Number must exist.
Order and Payer Account
Numbers (one field used for both
entries) (Required)
3/20
BI_ARSUMMARY_TRANSNUMBER
18
TransactionNumber
For I record, this is the invoice
number
Test match to
TransactionNumber.
Number must NOT exist.
(Required)
4/38
BI_ARSUMMARY_INVOICENUMBER
18
fctApply
If a credit or payment, then
invoice number is placed here.
(See Note 1)
5/56
BI_ARSUMMARY_TRANSDATE
10
Link to dmDate
Realize_Date_ID
CalendarDate. Transaction date in
mm/dd/ccyy format.
(Required)
6/66
BI_ARSUMMARY_AMOUNT
10
TotalAmountApplied and
Amount_ARSummary
(Required)
7/76
BI_ARSUMMARY_GLACCOUNT
80
Link to dmGLAccounts from
GLTrans_ID
GLNumber
If no match, reject record.
(Required)
8/156
BI_ARSUMMARY_COMMISSIONEDRE
P
20
Link to dmUser
CommissionedRep_User_ID
UserLoginName
Login Name. If no match, then
leave blank, and write a warning
message in log.

newscyclesolutions.com BI User Guide (4.0), Version 1.1 22
NEWSCYCLE Solutions Confidential & Proprietary
Field #/
Position
Import Field
Length
BI Table Name
Miscellaneous Information
9/176
BI_ARSUMMARY_STATEMENTNUMB
ER
20
fctARSummary
StatementNumber
10/196
BI_ARSUMMARY_INVOICENOTE
50
dmGLInvoiceDetail
InvoiceNote
11/246
BI_ARSUMMARY_APPLIEDAMOUNT
10
fctApply. AmountApplied
Used if loading a credit or a
payment. Shows how much of
credit/payment applied to
invoice.
12/256
BI_ARSUMMARY_ADORDERNUMBER
10
fctARSummary.AdOrderNumb
er
13/266
BI_ARSUMMARY_MULTIPLEFLAG
1
N/A
Indicates, for Invoices, if GL
records should be deleted.
(See Note 2)
If blank, then F.
T = true, F = false
14/267
BI_ARSUMMARY_PRODUCT
60
Link to dmAdProduct
AdProuct_ID
ProductName (See Note 3)
15/327
BI_ARSUMMARY_ADTYPE
30
Link to dmAdProduct
AdProuct_ID
AdType (See Note 3)
16/357
BI_ARSUMMARY_EDITION
20
Link to dmAdProduct
AdProuct_ID
Edition (See Note 3)
17/377
BI_ARSUMMARY_ZONE
20
Link to dmAdProduct
AdProuct_ID
Zone (See Note 3)
18/397
BI_ARSUMMARY_PLACEMENT
20
Link to dmAdProduct
AdProuct_ID
Placement (See Note 3)
19/417
BI_ARSUMMARY_POSITION
20
Link to dmAdProduct
AdProuct_ID
Position (See Note 3)
20/437
BI_ARSUMMARY_PRODUCTCATEGO
RY
20
Link to dmAdProduct
AdProuct_ID
ProductCategory (See Note 3)
21/457
BI_ARSUMMARY_NUMCOLUMNS
7
Link to fctGL
Number of Columns
22/464
BI_ARSUMMARY_ADDEPTH
7
Link to fctGL
Ad Depth
NOTE 1: Field number 4, if the invoice number does not exist in the fctARSummary table, the import
record is ignored and the record is flagged with an error in the log.
NOTE 2: Field number 13, the Multiple GL Flag is used to indicate that no records in fctGL are to be
deleted for this transaction, but instead add this to the fctGL table. This will allow one transaction to
appear in the input file multiple times; and thus, split it between G/L accounts, if needed.
NOTE 3: Fields 14 though 20 look for a matching entry in the dmAdProduct table. When a match is
found, the ID is placed in fctGL.AdProduct_ID. If a match is not found, the record is ignored if the Add
entry to dmAdProduct table box is not checked.
newscyclesolutions.com BI User Guide (4.0), Version 1.1 23
NEWSCYCLE Solutions Confidential & Proprietary
Using BI Importer Arguments
The following command line arguments may be used to run BI Importer from the command line prompt.
The arguments are case sensitive so it is important to use In the table, parameters are enclosed to
indicate information that needs to be supplied by the user. When entering the actual parameter (e.g.,
the user name), do not use the <> symbols. For example, to enter the user name and password for a
particular user and schedule an automatic run, you would type the following.
-U username -P password –auto –date 01/01/2006
Argument
Description
-U <login>
Identifies the user for automatic login. Enter the AdBase User name to login.
-P <password>
Provides the password for automatic login. Enter the AdBase password to login.
-File <import file>
Imports the file. Enter the file to import.
-Path <path to move file to>
Specifies the path field. Enter the path to that you would like to move the file to.
-Type <import file type>
Specifies one of the type options. Your options are AdOrder, Insertion, and GL.
-Prefix <ad order prefix>
Specifies the prefix field. Enter the prefix of the ad order.
-Ignore <for ignoring matching ad
orders>
Populates the Ignore Matching Ad Order checkbox.
-AddEntry <add entry to dmAdProduct
table>
Populates the Add Entry to dmAdProduct table checkbox.
-auto <for auto execute>
Runs the BI Importer in automatic mode. This means that the BI Importer executes
automatically without a user having to click the Populate button. Once processing is
complete, the BI Populator will automatically exit. This argument is primarily for use
in Schedule Admin.
-AutoExit <for automatic exit after auto
execute>
Closes the application automatically after the import is complete.
Reading the Log File
The BI Importer writes a log file to the C:\Temp folder on the local workstation. The BIImporter.txt file
includes the following items.
Start time of program
Rejected records and reasons
Invalid fields and reasons
Correct import count
Error import count
End time of program
Each time the importer runs, a number is appended to the end of the file name. Each day a new file is
created and the old file is saved. Seven days of log files are maintained.
Populate the BI Database (Initial Load)
The BI Populator is the software application that will initially populate the BI database and update the
database with changes that occur in the core database. The BI Populator is able to discern changes on
the AdBase database by checking the last edit date on key tables as well as using a "feeder" table, to

newscyclesolutions.com BI User Guide (4.0), Version 1.1 24
NEWSCYCLE Solutions Confidential & Proprietary
which certain AdBase utilities will write records. Therefore, any direct updates, inserts, or deletes to the
AdBase tables via SQL Statements will throw AdBase and BI out of balance. If you feel you need to
execute SQL statements against the AdBase database, please contact Mactive’s Support Services first.
While the information on page 11 explained how to initialize the BI database, this section explains how
to use the BI Populator for manual population. This method allows you to populate specific information
in the database using the Object Id Filters. You will use manual population to perform the initial load of
data into the BI database. When loading information, data must be loaded in the following order.
Customers
Contracts
Orders
GL
NOTE: Make sure the Enable BI Feeder Table Processing box is not checked on the Other Settings tab in
System Admin. This box should not be checked until after the initial load of data is complete.
When populating BI the first time, Mactive recommends creating a copy of your production database on
a test server. This configuration allows you to load all of the legacy data onto the future production BI
system in a static environment. Once you have completed the initial load from this database, change the
settings in Configure Adbase on the BI machine to point to the core production database and the
production BI database you just populated.
Loading Customer Accounts
You must load the customer accounts into the database prior to loading contracts, GL, or orders.
To load customers into the BI database:
1. Obtain the earliest date a customer was created in the AdBase system by running the following SQL
query.
Select min(creationdate) from customer;
2. Log in to the BI Populator. For instructions, see page 11.
3. Check the Process Customers box on the Execution Criteria tab.
4. Check the Use Create Date box and enter the date obtained in step 1.
5. Click the Populate button.
Loading Contracts
After customer accounts have been loaded into the database, you can proceed with loading contracts.
To load contracts into the BI database:
1. Check the Process Contracts box on the Execution Criteria tab.
2. Check the Use Create Date box and enter the same date used to populate the customers.
3. Click Populate.
Loading Orders
After the contracts are loaded successfully, you can load ad order data.

newscyclesolutions.com BI User Guide (4.0), Version 1.1 25
NEWSCYCLE Solutions Confidential & Proprietary
To load orders into the BI database:
1. Obtain the earliest date an order was created in the AdBase system by running the following SQL
query.
Select min(createdate) from aoadorder;
2. Check the Process ad orders box on the Execution Criteria tab.
3. Check the Use Create Date box and enter the date obtained in step 1.
4. Click Populate.
Loading GL
When loading GL information, it is very important that you follow the order of transactions precisely.
You must load the different transaction types (transtypes) in a specific manner. The GL load will be run
four times, once for each transaction type. You should load all invoices first, then debits, then payments,
and finally credits.
To isolate a transaction type and ignore others (i.e., only run the Populator for invoices), you can set the
range for debits, credits, and payments to be 0 to 0 on the Object Id Filters tab. Running the Populator
in this configuration will resolve the following problems.
Credits and payments exist in the system to pay off debits and invoices. In order to pay them off, you
must apply the credit or payment. You cannot apply against an invoice that has not been created yet.
For example, suppose you accept a payment on 1/1/2003 but leave the payment unapplied. On
5/5/2004, the customer runs an order and on 5/7/2004 the Balance Utility auto applies the payment to
the order from 5/5. When you load the 1/1 payment, it has a apply entry to pay off the 5/6 invoice, but
that invoice might not exist yet in BI when doing the initial load. For this reason, you must load debits
and invoices first.
You may receive the following error message when populating BI.
"An error occurred while processing credit id: 55314 (see sql log)
Error: fctApply not stored, no record for InvoiceId 43864
An error occurred while processing credit id: 55314 (see sql log)"
This error message is referring to a credit created in AdBase that is being loaded into the BI database. In
AdBase, this credit is associated with an invoice. When you try to load this credit into BI, the BI
Populator first inserts a record into fctARSummary, and then the Populator looks for the invoice record
associated with the credit in the fctARSummary table. If it does not find this invoice record, you will get
the error stated above.
newscyclesolutions.com BI User Guide (4.0), Version 1.1 26
NEWSCYCLE Solutions Confidential & Proprietary
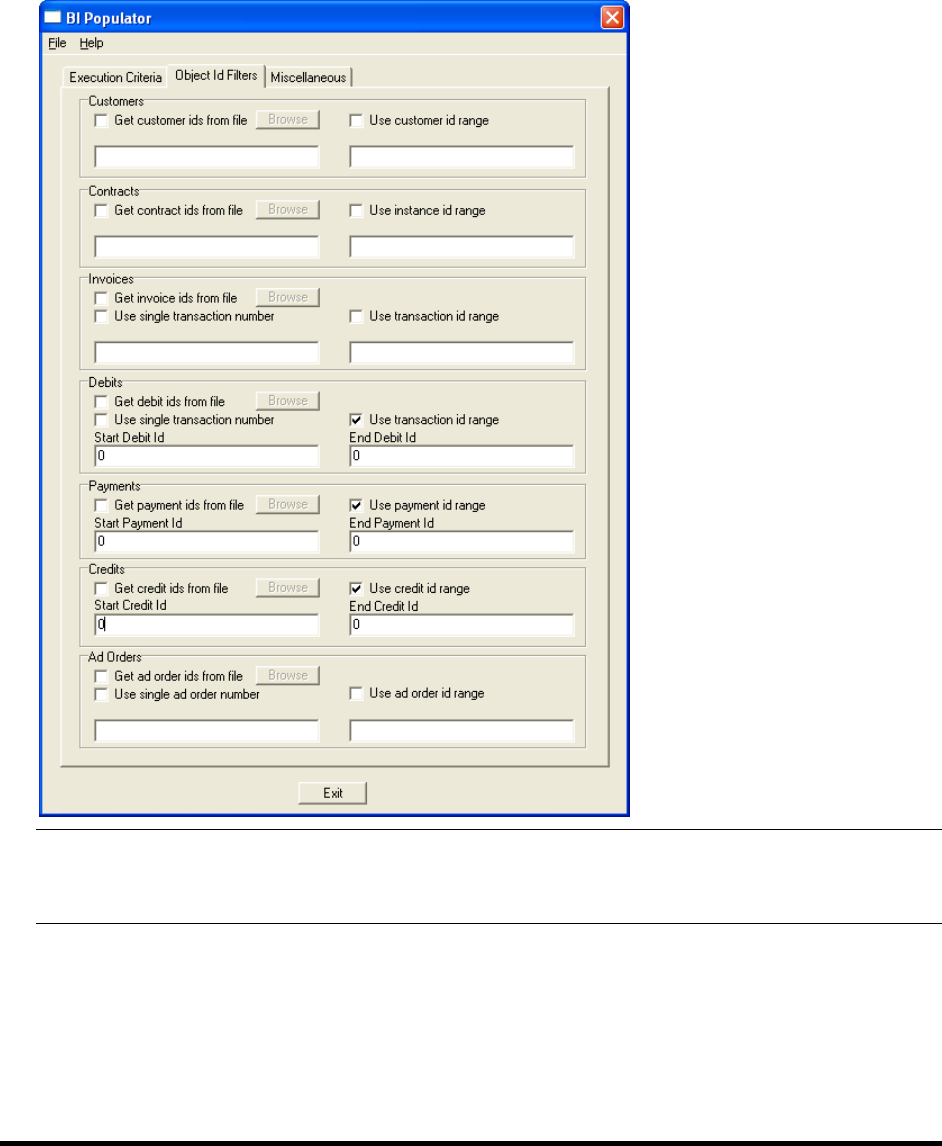
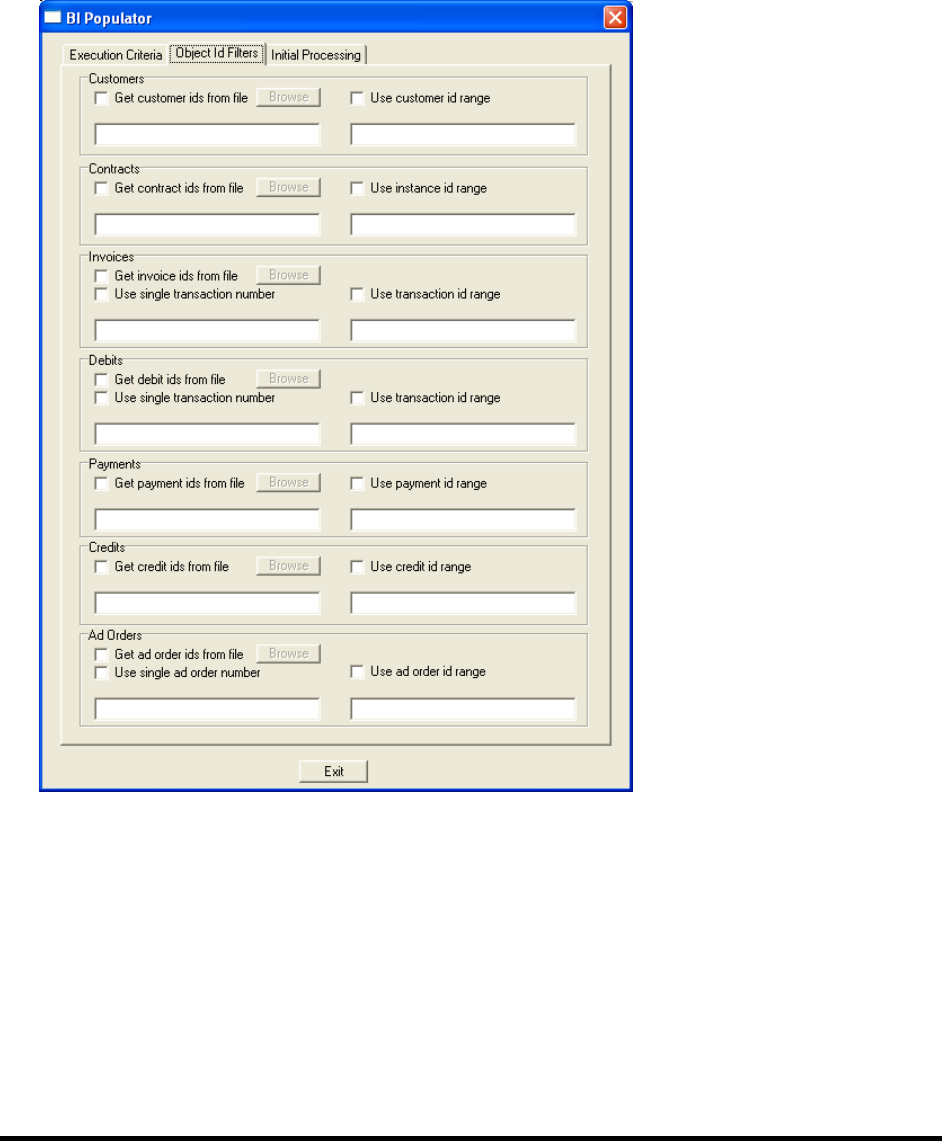
To load GL information into the BI database:
1. Check the Process GL info box on the Execution Criteria tab.
2. Check the Use transaction id range box for Debits, the Use payment id range box for Payments,
and the Use credit id range box for Credits and enter 0 in the Start and End Id fields on the Object Id
Filters tab. The following screen shot shows how the window should look at this point.
TIP: Instead of using the Use transaction id range to exclude transaction types, you can
also check the Get ids from file box for the remaining transaction types, but do not specify
a file.
3. Return to the Execution Criteria tab and check the Use Create Date box and set the date to the
earliest transaction created in the system. To obtain the earliest dates, run the following SQL
queries.
For invoices and debits:
Select min(creationdate) from fntransactions;

newscyclesolutions.com BI User Guide (4.0), Version 1.1 27
NEWSCYCLE Solutions Confidential & Proprietary
For credits:
Select min(creationdate) from aocustomercd;
For payments:
Select min(creationdate) from aopayments; (for payments)
4. Click Populate.
5. Repeat steps 1-4 for Debits. Remember to enter 0 in the Start and End ranges for Invoices,
Payments, and Credits.
6. Repeat steps 1-4 for Payments. Remember to enter 0 in the Start and End ranges for Invoices,
Debits, and Credits.
7. Repeat steps 1-4 for Credits. Remember to enter 0 in the Start and End ranges for Invoices, Debits,
and Payments.
Audit the Initial BI Load
When all of these processes are complete, the initial data load of BI is finished. Mactive recommends
that you balance between the BI and the AdBase core databases after all the initial data is loaded. To do
this you will use the BI Auditor and the BI AR Auditor. For instructions, see page 40. After the initial loads
have been audited, you can then move on to having BI populated on a regular basis.
Enable BI Feeder Table Processing
In order to setup the workstation for BI, you must check the Enable BI Feeder Table Processing box in
System Admin. The feeder table ensures BI is current with all data in the core database. This table
accounts for tools that do not update the LastEditDate in AdBase tables due to avoid sending data to
PageLayout. An example would be Invoice Generator updating the Invoiced Already flag or Contract
Renew Utility issuing a short rate or rebate. This information should be passed to BI, but is not needed in
PageLayout.
To get around this issue, tools now write a record into a feeder table in the AdBase schema called
shBIInterface. When the Process Data from AdBase Tools box is checked, the BI Populator reads the
shBIInterface table and populates the BI database with any information that tools and utilities might
have changed.
NOTE: The option should not be checked during the initial population of the BI database.
To enable the BI feeder table:
1. Log in to System Admin. See the System Admin User Guide for instructions.
2. Select Tools > System Level Information.
newscyclesolutions.com BI User Guide (4.0), Version 1.1 28
NEWSCYCLE Solutions Confidential & Proprietary
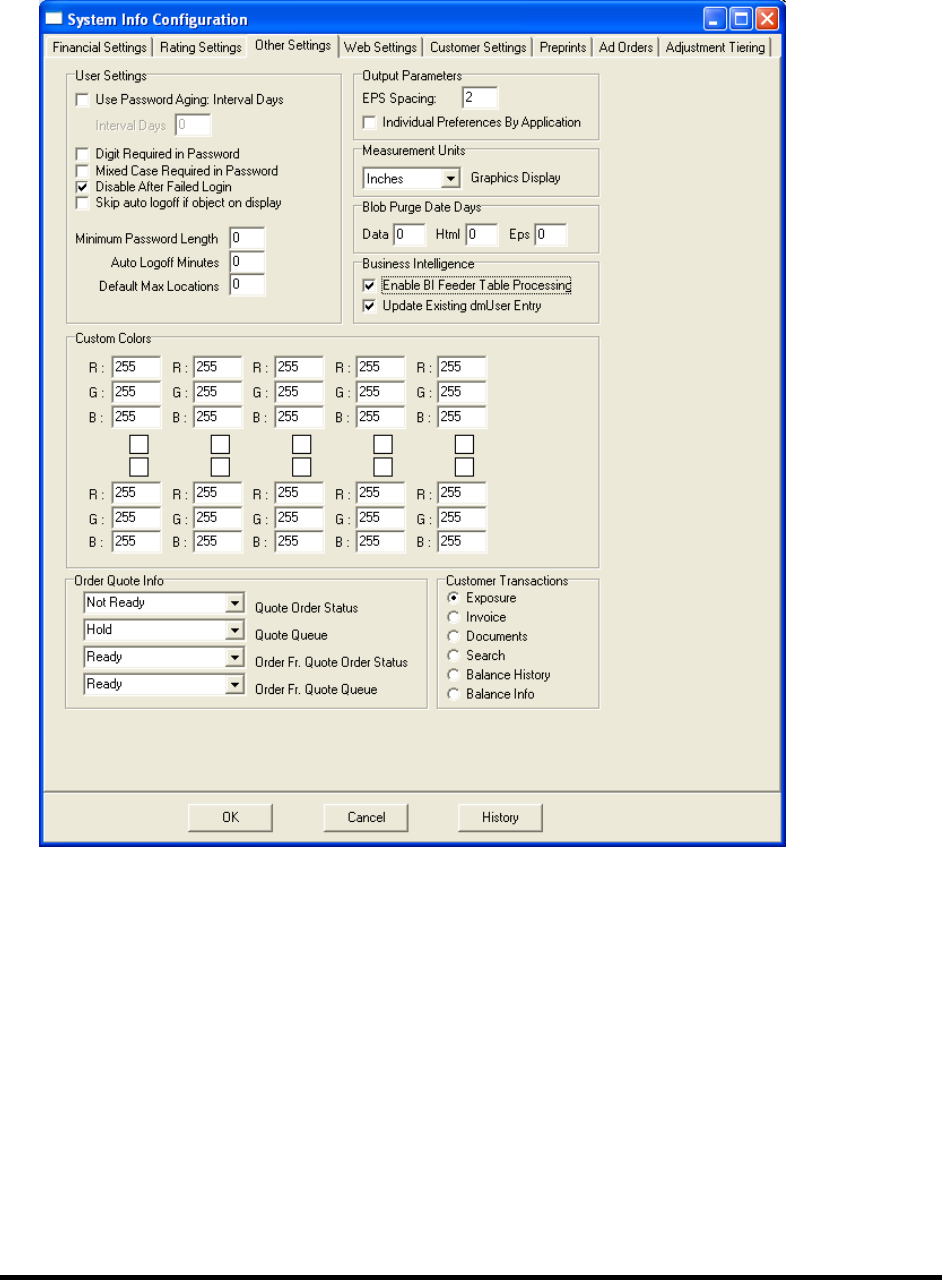
3. Click the Other Settings tab and check the Enable BI Feeder Table Processing box.
4. Click OK to close the System Info Configuration window.
newscyclesolutions.com BI User Guide (4.0), Version 1.1 29
NEWSCYCLE Solutions Confidential & Proprietary
Updating the BI Database
Once the BI database is configured and initialized with data, you must decide how you want to perform
updates to the database. You will use two applications to update the data in BI. The BI process pulls
information from two areas in the production database to populate the BI database. The BI Populator
looks at orders, GL information, customers, and contracts that are created or modified by users. The BI
Interface App reads the ShBIInterface table in production and populates BI with data from this table.
These entries come from processes that change data in production, such as Invoice Generator.
Running the BI Populator
The BI Populator offers three options for performing updates. At any time, you can run the BI Populator
manually to update the database for specific orders, customers, and so on. For periodic updates, you
can set up the BI Populator to run at regular intervals using defined criteria. In addition, you can
schedule BI Populator by entering arguments in Schedule Admin.
Updating BI Manually
Using the Execution Criteria options and the Object Id Filters, you can setup the BI Populator to search
for specific ad order, GL, and contract information and populate that information in the BI database.
To run the Populator for the selected information:
1. Log in to the BI Populator. For instructions, see page 11.
2. Select the desired Execution Criteria. For an explanation of each field, see page 31.
3. Select the desired Object Id Filters options and enter the required information. See page 35.
4. Click the Populate button on the Execution Criteria tab.
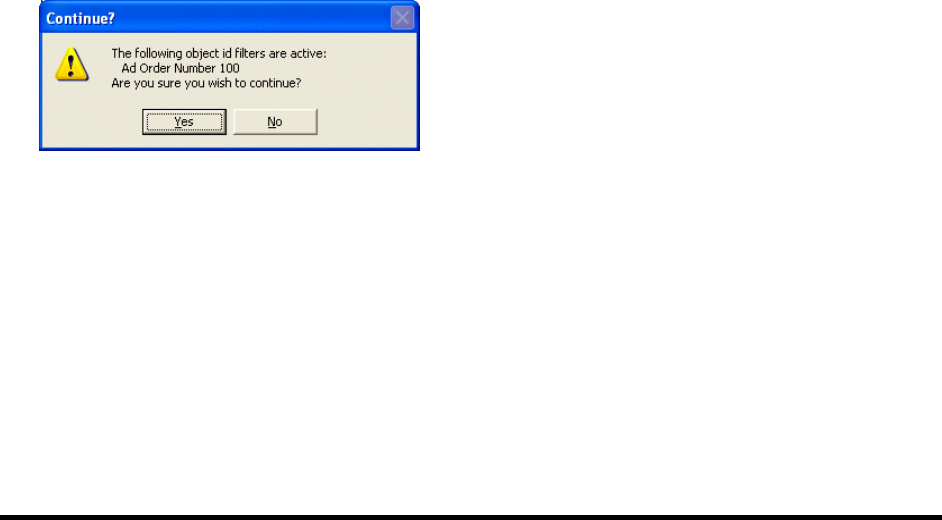
If you are using one of the Object Id Filters, you will receive a message prompting you to confirm the
action.
If the Populator inserts more than one record, the status bar will indicate the progress of the action.
When the action is complete, the “BI Populator End” line displays in the Messages box. If the
Populator encounters any errors, you are instructed to see the SQL log.
newscyclesolutions.com BI User Guide (4.0), Version 1.1 30
NEWSCYCLE Solutions Confidential & Proprietary
Updating BI Periodically
Once you have fully populated the BI database with historical data, you are able to execute the BI
Populator in periodic mode. You will remain logged in to the Populator, which will search for and insert
information based on the interval you enter.
To update the BI database periodically:
1. Log in to the BI Populator.
2. Check the Execute Periodically box and set the interval that BI will check the AdBase database for
changes. Enter the interval in the Auto mode minutes field.
3. Check the Process data from adbase tools box when you are running in periodic mode.
When this box is checked, the BI Populator checks the feeder table, which holds records generated
by the AdBase tools, such as Invoice Generator or Balance Utility. You may also enter a time
constraint, if necessary. For instructions, see page 31.
4. Click the Hide button to minimize the window to the system tray. Right-click the utility icon in the
tray and select Show to view the window.
NOTE: To auto start and continuously run the BI Popoulator, use the -u -p -continuous command
sequence. To auto start, run once, and then shut down the BI Populator, use the -u -p -auto
command sequence.
Scheduling BI Updates
The following command line arguments may be used to run BI Populator from the command line prompt
or schedule BI Populator to run using Schedule Admin. In the table, parameters are enclosed to indicate
information that needs to be supplied by the user. When entering the actual parameter (e.g., the user
name), do not use the <> symbols. For example, to enter the user name and password for a particular
user and schedule an automatic run, you would type the following.
-U username -P password –auto –date 01/01/2006
Argument
Description
-U user name
Identifies the user for automatic login. Enter the AdBase User name to login.
-P password
Provides the password for automatic login. Enter the AdBase password to login.
-auto
Runs the BI Populator in automatic mode. This means that the BI Populator executes
automatically without a user having to click the Populate button. Once processing is complete,
the BI Populator will automatically exit. This argument is primarily for use in Schedule Admin.
-continuous
Runs the BI Populator in automatic mode. This means that the BI Populator executes
automatically without a user having to click the Populate button. Unlike the -auto argument,
once the process is complete, the BI Populator continues to run.
-date start date
Specifies the start date in the absolute date format (mm/dd/yyyy).
-D # days in future
Specifies the start date as the number of days from the current date.
-duration # days
Specifies the end date as the number of days after the start date.

newscyclesolutions.com BI User Guide (4.0), Version 1.1 31
NEWSCYCLE Solutions Confidential & Proprietary
Argument
Description
-crdate
Specifies selection by the create date, rather than the last edit date. Using this argument is
essentially the same as checking the Use create date box in the BI Populator window. When using
this argument, do not specify a date.
NOTE: If you do not use the crdate or ledate argument in the command line, BI Populator will run
using whichever setting was selected the last time the utility was exited.
-ledate
Specifies selection by the last edit date, rather than the create date. Using this argument is
essentially the same as checking the Use last edit date box in the BI Populator window. When
using this argument, do not specify a date.
-customer
Specifies customer population will be performed.
-customerfile file path
Specifies a file containing a list of customer IDs to be populated. Note that if you use this
argument, you do not have to use the -customer argument. The presence of the -customerfile
argument specifies customer population will be performed.
-contract
Specifies contract population will be performed.
-contractfile file path
Specifies a file containing a list of contract IDs to be populated. Note that if you use this
argument, you do not have to use the -contract argument. The presence of the -contractfile
argument specifies that contract population will be performed.
-gl
Specifies GL population will be performed.
-invoicefile file path
Specifies a file containing a list of invoice IDs to be populated. Note that if you use this argument,
you do not have to use the -gl argument. The presence of the -invoicefile argument specifies that
invoice population will be performed.
-debitfile file path
Specifies a file containing a list of debit IDs to be populated. Note that if you use this argument,
you do not have to use the -gl argument. The presence of the -debitfile argument specifies that
debit population will be performed.
-paymentfile file path
Specifies a file containing a list of payment IDs to be populated. Note that if you use this
argument, you do not have to use the -gl argument. The presence of the -paymentfile argument
specifies that payment population will be performed.
-creditfile file path
Specifies a file containing a list of credit IDs to be populated. Note that if you use this argument,
you do not have to use the -gl argument. The presence of the -creditfile argument specifies that
credit population will be performed.
-adorder
Specifies ad order population will be performed.
-adorderfile file path
Specifies a file containing a list of ad order IDs to be populated. Note that if you use this
argument, you do not have to use the -adorder argument. The presence of the -adorderfile
argument specifies that credit population will be performed.
-leavesettings
If you run two copies of the BI Populator, they interfere with each other’s settings. A copy of the
BI Populator called with this argument will avoid updating the settings, leaving the original copy
of the BI Populator alone.
Using Execution Criteria
Use the Execution Criteria tab to indicate how information should be selected from the core database.
You have the option of populating data based on a date range. When determining the range, you choose
to base the date on either the create date or the last edit date in the database.
Use last edit date
Check this box to search the core database for orders, GL information, and contracts based on the last
date that data was edited by a user. The date shown in the Last Edit/Create Date Info box defaults to

newscyclesolutions.com BI User Guide (4.0), Version 1.1 32
NEWSCYCLE Solutions Confidential & Proprietary
today’s date. However, you can select a different date on which to search for data. The following steps
illustrate how to use these options.
To search for ad orders edited on or after to 1/01/2004:
1. Check the Use last edit date box.
2. Check the Process ad orders box.
3. Select 1/01/2004 from the first date field in the Last Edit/Create Date Info.
4. Enter 12:00:00 AM in the time field.
TIP: You are also able to enter a date range to search for the last edit date during a date range. For
information, see page 34.
Use create date
Check this box to search the core database for orders, GL information, and contracts based on the date
the data was entered in the system. Like the Use last edit date option, you are able to use the Use create
date option with the Last Edit/Create Date Info fields to further restrict how the Populator searches for
data.
This option can only be used during initial processing or when the Populator is run manually. You cannot
use this option when running period updates automatically.
Log timing info
Check this box to write debug information to the BiPopulatorLog.txt file located in the C:\Temp folder.
Even when this box is not checked, the Populator writes some cursory information to the log file on any
execution. Use this option when you are troubleshooting a problem, or trying to figure out which phase
of the Populator is taking a long time to complete its task. However, be aware that the log file ends up
growing to an extreme size on a large populate.
NOTE: The location of the BiPopulatorLog.txt file is determined in the Configure AdBase Utility. For more
information, see your System Administrator.
Process ad orders
Check this box to include ad orders in the information populated to the BI database. If you check the Use
last edit date box, the Populator will search for orders based on the last date the orders were edited. If
you check Use create date, the Populator will search for orders based on the date they were originally
saved in the core database. Order based charges are spread proportionally across the insertion days
within an order.
If the order is a Till Forbid (TF), then the process gets a bit more complicated. To spread an order based
charge or credit across a TF order, the BI Populator must first determine if accounting periods are set up
in the fnAccountingPeriods table. If the accounting periods are set up, the utility will use those defined.
If not, the utility will use months as the accounting period. Mactive defines the current accounting
period as that period or month that the credit or order based charges falls into, and the previous
accounting period as the period before the current accounting period.

newscyclesolutions.com BI User Guide (4.0), Version 1.1 33
NEWSCYCLE Solutions Confidential & Proprietary
Next, BI Populator will determine if the TF order has any run dates in the previous accounting period. If
so, the credit or order based charge is proportionately spread across all the run dates within the
previous accounting period. If there are no run dates in the previous accounting period, then the credit
or order based charge will be spread across all run dates from the beginning of the current accounting
period up to the effective date of the credit or order-based charge.
Process GL info
Check this box to include GL information to be populated to the BI database. When this box is checked,
the Populator searches for all credit, debit, invoice, and payment transactions. Like the Process ad
orders option, you can search for GL information based on the edit date or the create date.
You must use this option, along with the Object Id Filters, during initial processing to populate the BI
database with transaction information. For instructions, see page 25. BI saves invoices, debits,
payments, and credits based on the transaction creation date. This criteria is different than AdBase,
which relies on the transaction date to identify invoices and debits, and effective date to identify
payments and credits.
Process contracts
Check this box to include all contracts and contract fulfillment statistics in the information populated to
the BI database. You can also use the edit date and create date to distinguish how contract information
is selected by the Populator.
Process customers
Check this box to update the dmCustomers table with all new or modified customer records whether
the record has an associated transaction or not. The BI Populator filters the customers based on the last
modified date on the record.
Process data from adbase tools
Check this box when running in Period Execution Mode to check the feeder table for information
generated using the AdBase tools. For more on the feeder table, see page 27. For more information on
running in Period Execution Mode, see page 30.
When you check the Process data from adbase tools box, the Use time constraint option is enabled. By
checking the Use time constraint box, you are able to enter a Start time and End time to limit the
window for processing data generated from the AdBase tools.
Execute periodically
Check this box to setup a time interval during which the Populator will run automatically. Use the up and
down arrows to enter the Auto mode minutes and then click the Set button. For example, if you check
the Execute periodically box and enter 30 in the Auto mode minutes field, the Populator will run
automatically every 30 minutes as long as the application is open on the system.
TIP: To leave the Populator open on the system, but work in other applications, click the Hide button. Use
the utility icon in the System Tray to show the hidden window.
newscyclesolutions.com BI User Guide (4.0), Version 1.1 34
NEWSCYCLE Solutions Confidential & Proprietary
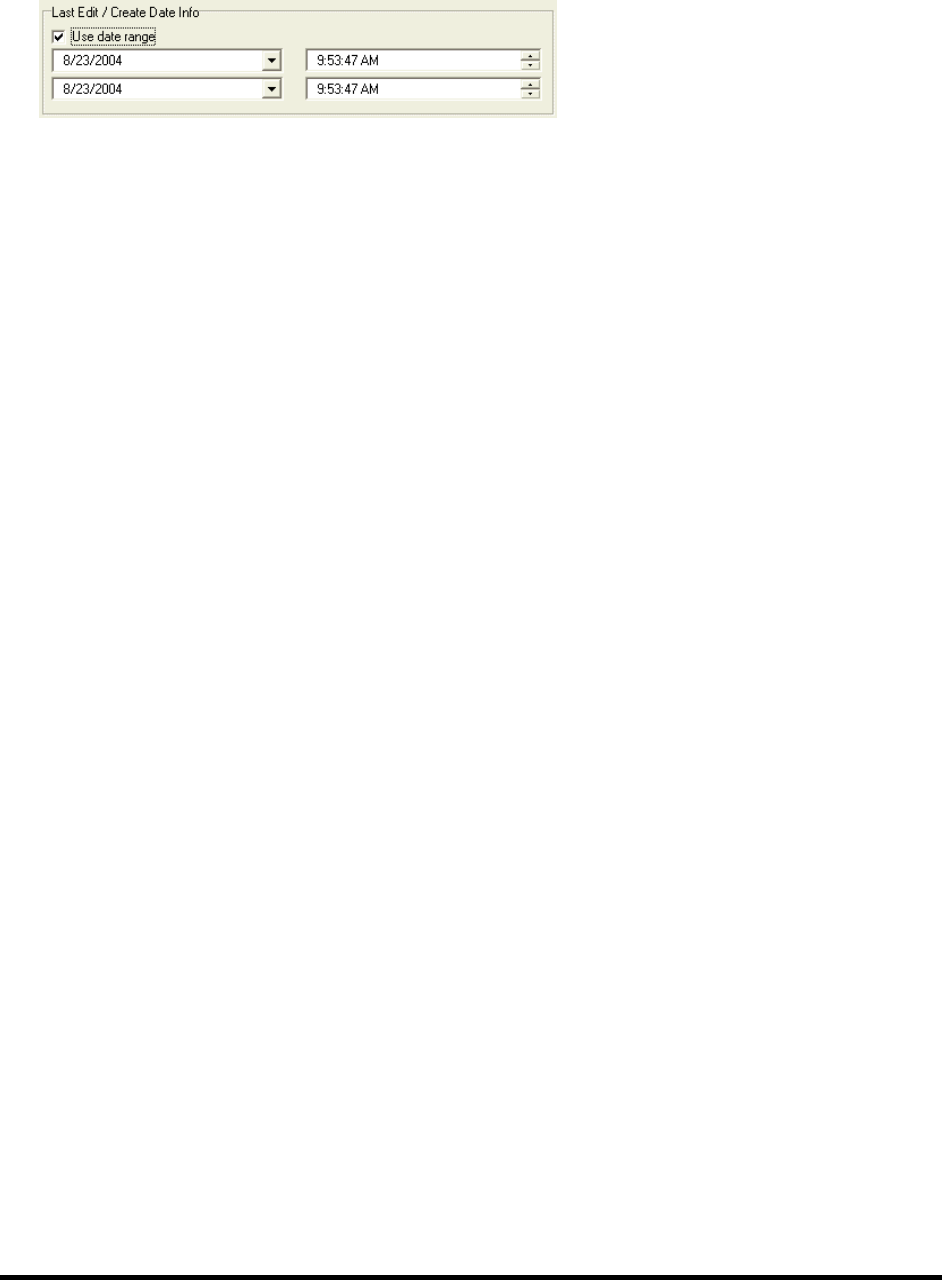
Last Edit/Create Date Info
Depending on which option you use to search for information, you are able to enter a date range to
restrict the time in which the Populator will find data based on the create date or the last edit date.
To enter a date range:
1. Check the Use last edit date or Use create date box to determine how the Populator should search
for data.
2. Check the Use date range box.
The end date field is enabled.
3. Select the start date and time in the top fields.
4. Select the end date and time in the bottom fields.
newscyclesolutions.com BI User Guide (4.0), Version 1.1 35
NEWSCYCLE Solutions Confidential & Proprietary
Using the Object ID Filters
In the initial populate mode, you also are able to control what items are loaded into BI using the Object
ID Filters tab. If you enter information on the Object Id Filters tab, that object (i.e., ad order, contract,
etc.) is populated to the BI database using the selected filter. Otherwise, the last edit date or create date
is used, depending on which option you are using.
When you select GL information to populate, the Populator will attempt to insert all of the GL
information associated with the selected transaction type unless you indicate otherwise. If you only
want to populate invoices within a selected range using the Use transaction id range option, you must
point the other GL fields in another direction. In this case, the easiest way to make sure that you only
include invoices in the GL information would be to check the Get ids from file box for debits, payments,
and credits, but do not select a file. The following sections explain how to use these fields. For
instructions on populating GL information during initial processing, see page 25.

newscyclesolutions.com BI User Guide (4.0), Version 1.1 36
NEWSCYCLE Solutions Confidential & Proprietary
Get IDs from file
This option is available for customers, contracts, invoices, debits, payments, credits, and ad orders. If
you want to populate a bunch of ad order IDs that do not fall within a certain range, you save the IDs in
a text file and populate them to the BI database. When entering information in the file, only enter the ID
numbers. The Populator will not read text and will stop each line when it reaches a space. For example,
to populate ad order IDs 1, 101, and 10101, you could create a file containing the following entries.
1
101
10101
To select the file containing the ad order IDs:
1. Check the Get ad order ids from file box and click the Browse button.
Notice that the field name changes to Ad Order ID File Name.
2. Highlight the desired file and click Open.
The name of the file displays in the Ad Order Id File Name.
This method may be useful when you receive errors after a long execution, allowing you to “clean up”
IDs that were not successfully populated in the BI database.
Use id range
This option allows you to enter a range of database IDs when searching for customers, contracts,
invoices, debits, payments, credits, and ad orders. Do not confuse the database ID with a text field that
is displayed in one of the AdBase GUIs. The ad order ID is different than the ad order number issued in
AdBooker.
To select search for a range of ad order IDs:
1. Check the Use ad order id range box.
The field names change to Start Ad Order Id and End Ad Order Id.
2. Enter the beginning and ending ad order IDs to define the range.
TIP: You can also search for a single ad order ID by entering that number in the Start field and leaving the
End Ad Order Id field empty.

newscyclesolutions.com BI User Guide (4.0), Version 1.1 37
NEWSCYCLE Solutions Confidential & Proprietary
Use single ad order/transaction number
While the previous option allowed you to search for data by the ID, you are able to use the invoice
number, debit number, and ad order number to find information. Since these numbers are text fields,
you cannot use a range of numbers. For example, you can search for ad order number 0000000010.
To search for a single ad order number:
1. Check the Use single ad order number box.
The field name changes to Single Ad Order Number.
2. Enter the desired ad order, invoice, or debit number. For this example, you would enter
0000000010.
TIP: If you are entering a single transaction number for invoices or debits, enter the entire transaction
number used at your site. Sites use different formats for numbering their invoices and debits, so make
sure to enter the number using the correct format according to your site’s rules.
Running the BI Interface App
In order to use the BI Interface App, you must check the Enable BI Feeder Table Processing box in
System Admin. The feeder table ensures BI is current with all data in the core database. This table
accounts for tools that do not update the LastEditDate in AdBase tables due to not wanting to send
information to PageLayout. An example would be Invoice Generator updating the Invoiced Already flag
or Contract Renew Utility issuing a short rate or rebate. This information should be passed to BI, but is
not needed in PageLayout.
To get around this issue, tools write a record into a feeder table in the AdBase schema called
ShBIInterface. The BI Interface Application then reads the ShBIInterface table and populates the BI
database with any information that tools and utilities might have changed.
Mactive strongly recommends running the BI Interface Application on the same machine that is running
the BI Populator. When using the BI Interface Application, make sure you Process BI Interface data box is
not checked in the BI Populator. This checkbox does the exact same processing as the BI Interface
Application.
The BI Interface Application is located in the Mactive\bin folder. You must be assigned the Run Utilities
privilege to log in to the application. If you have any questions about your privileges, see your System
Administrator.
To run the application:
1. Double-click the BIInterfaceApp.exe icon.
The Login window displays.
2. Enter your User name and Password and click OK.
The BI Interface App window displays.
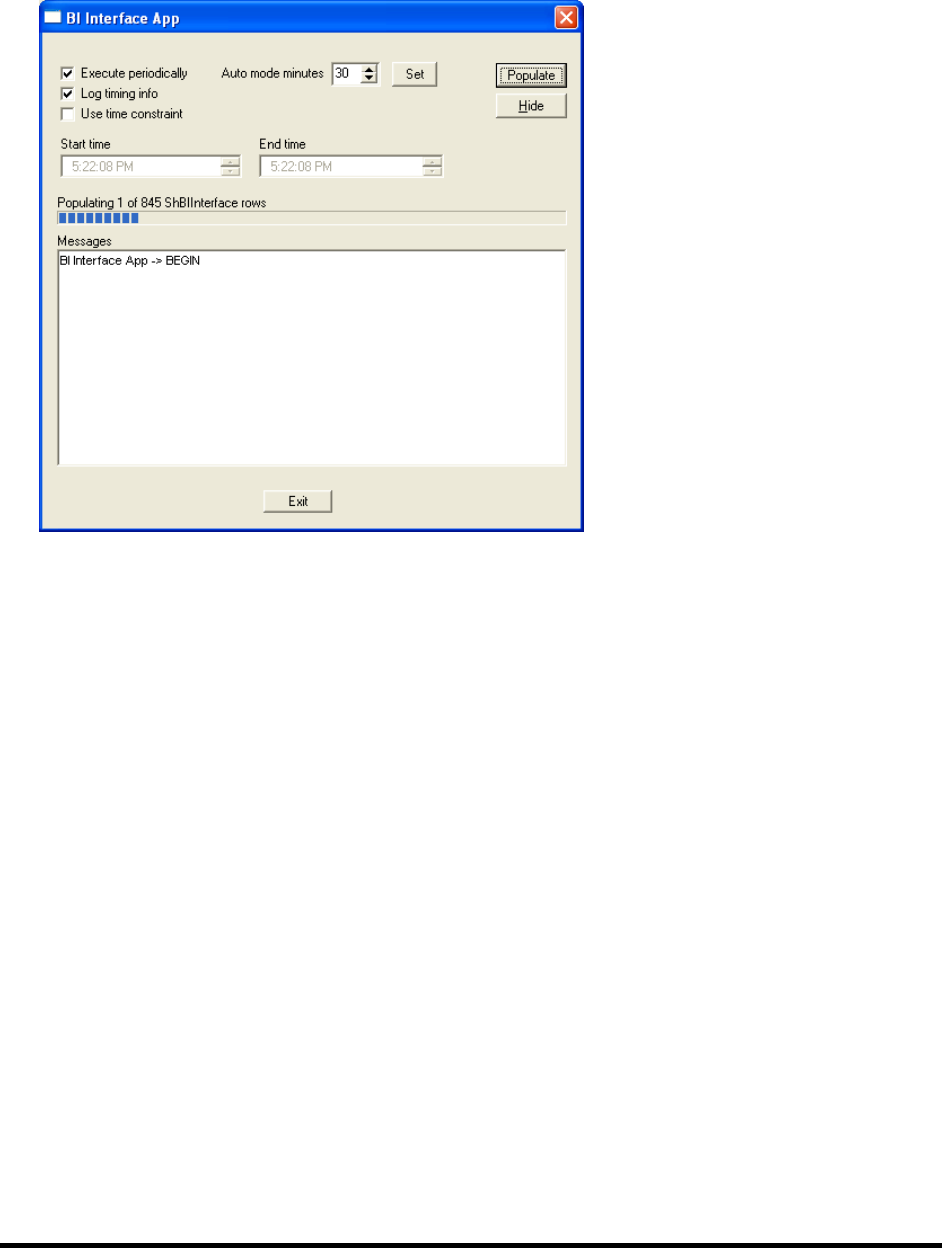
newscyclesolutions.com BI User Guide (4.0), Version 1.1 38
NEWSCYCLE Solutions Confidential & Proprietary
3. Click Populate.
The application begins processing information from the ShBIInterface table:
The line above the status bar indicates how many rows are in the ShBIInterface table. When all of
the rows have been populated in the BI database, the “Populate Complete” message displays above
the status bar.
4. Click Exit to close the application.
The Log timing info checkbox is used to troubleshoot errors that occur when running the BI Interface
Application. When this box is checked, additional information is written for every row in the
ShBIInterface table that is processed. The information is written to the BIInterfaceAppLog.txt file in the
Temp Directory specified in Configure AdBase. However, writing this extra information will slow down
the process, so the Log timing info checkbox should only be used in troubleshooting situations.
You have two options for scheduling the BI Interface Application. You can schedule the BI Interface
Application to run on a regular time interval using the Execute periodically option; or, you can use time
constraints to run the application during certain slow hours.
To schedule the application to run at a regular interval:
1. Check the Execute periodically box.
2. Use the up and down arrows to enter a value in the Auto mode minutes field. For example, if you
enter 30, the application will populate data every 30 minutes.
3. Click Set.
4. Click Populate.
5. Click Hide to minimize the BI Interface App on the server.
To schedule the application to run during specific hours:
1. Check the Use time constraint box.
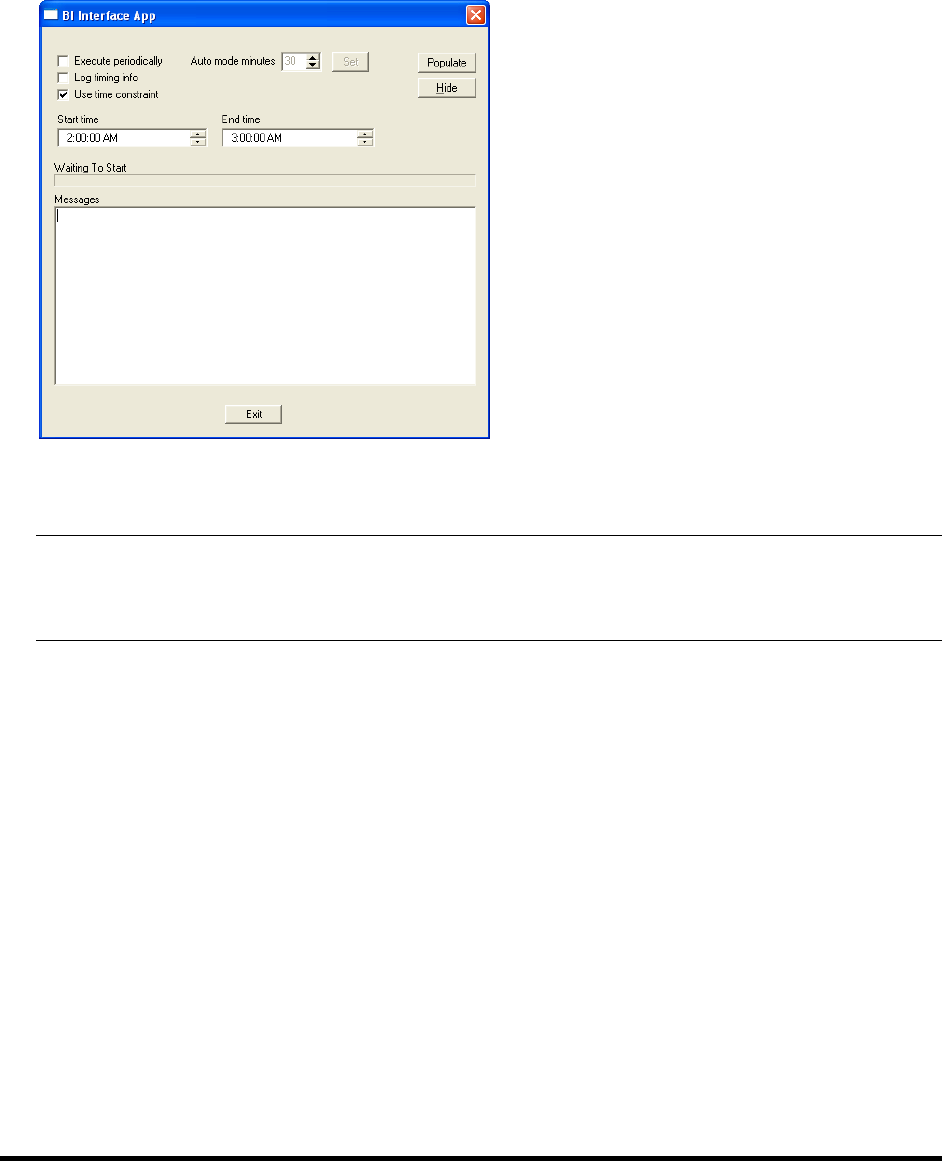
newscyclesolutions.com BI User Guide (4.0), Version 1.1 39
NEWSCYCLE Solutions Confidential & Proprietary
The Start time and End time fields become active.
2. Enter the Start time and End time manually or use the up and down arrows to change the time.
Remember to also adjust the AM to PM, as necessary.
In the following example, the Start time is 2:00 AM and the End time is 3:00 AM. This means that the
BI Interface Application will run every morning between these hours.
3. Click Populate.
4. Click Hide to minimize the BI Interface App on the server.
NOTE: To auto start and continuously run the BI Interface Application, use the -u -p -continuous
command sequence. To auto start, run once, and then shut down the BI Interface Application, use
the -u -p -auto command sequence.
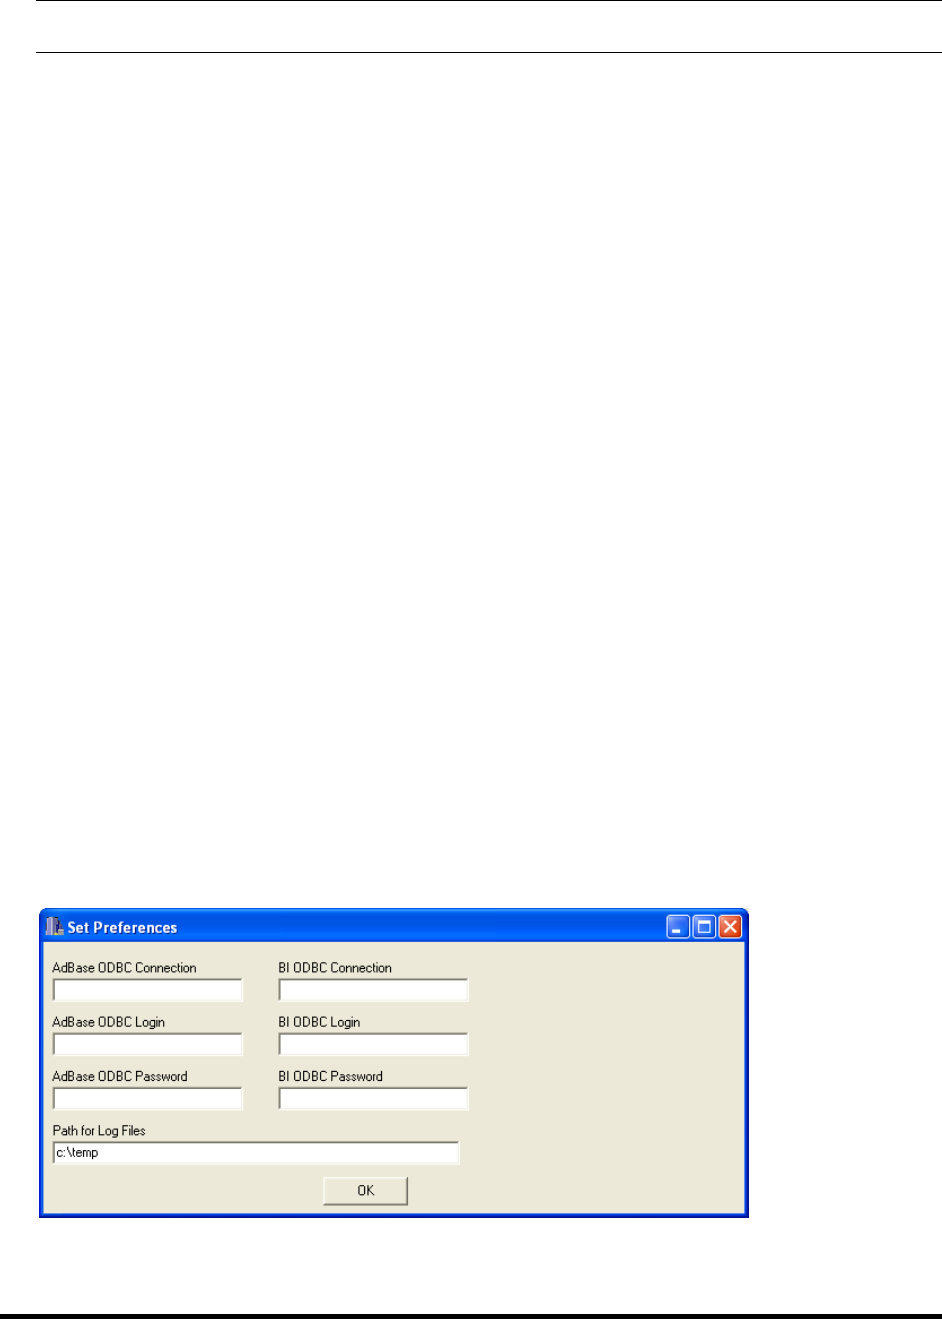
newscyclesolutions.com BI User Guide (4.0), Version 1.1 40
NEWSCYCLE Solutions Confidential & Proprietary
Balancing BI
This section explains how to balance the BI and AdBase database for orders and AR data. This section
also explains how to use the BI Utility to search for discrepencies in the BI database.
How to Balance Orders in AdBase and BI
This section explains how to find discrepancies between the AdBase database and the BI database for
orders. This process will allow you to audit all orders in the system and resolve all issues to get in
balance.
This process can be run at any time and multiple times to check the database. The process is quick
enough that you can find issues with order balancing if you think you have differences. To summarize,
the process can be completed in four steps.
1. Make sure BI Populator and BI Interface App are current with populating BI.
2. Complete the initial BI query by running BI Auditor in commit mode.
If you do not check the Commit Core Transactions box when running BI Auditor, you must run the
BISQLFILE.txt in SQLPlus and commit changes. If you do NOT Commit Core Transactions OR run it
through the BISQLFILE.txt file in SQLPlus, BI Auditor will continue to report the same issues.
3. Run BIFIXFILE.txt and BIFIXCONTRACTFILE.txt in BI Populator for the found ad orders or contract
instances.
4. Run BI Auditor again and verify results.
The first step is to configure the BI Auditor to point to your production and BI databases. The BI Auditor
is not part of the standard Mactive installation. You must contact Mactive Support Services to request
the executable. When you receive the file, unzip the executable and save it to a location on the PC that
is currently performing BI processing. You may also want to save a backup copy to another location for
sake keeping. Once saved, configure the BI Auditor.
To configure the BI Auditor:
1. Double-click the executable.
The Set Preferences window displays:
2. Enter the AdBase ODBC Connection name, Login name, and Password.
3. Enter the BI ODBC Connection name, Login name, and Password.
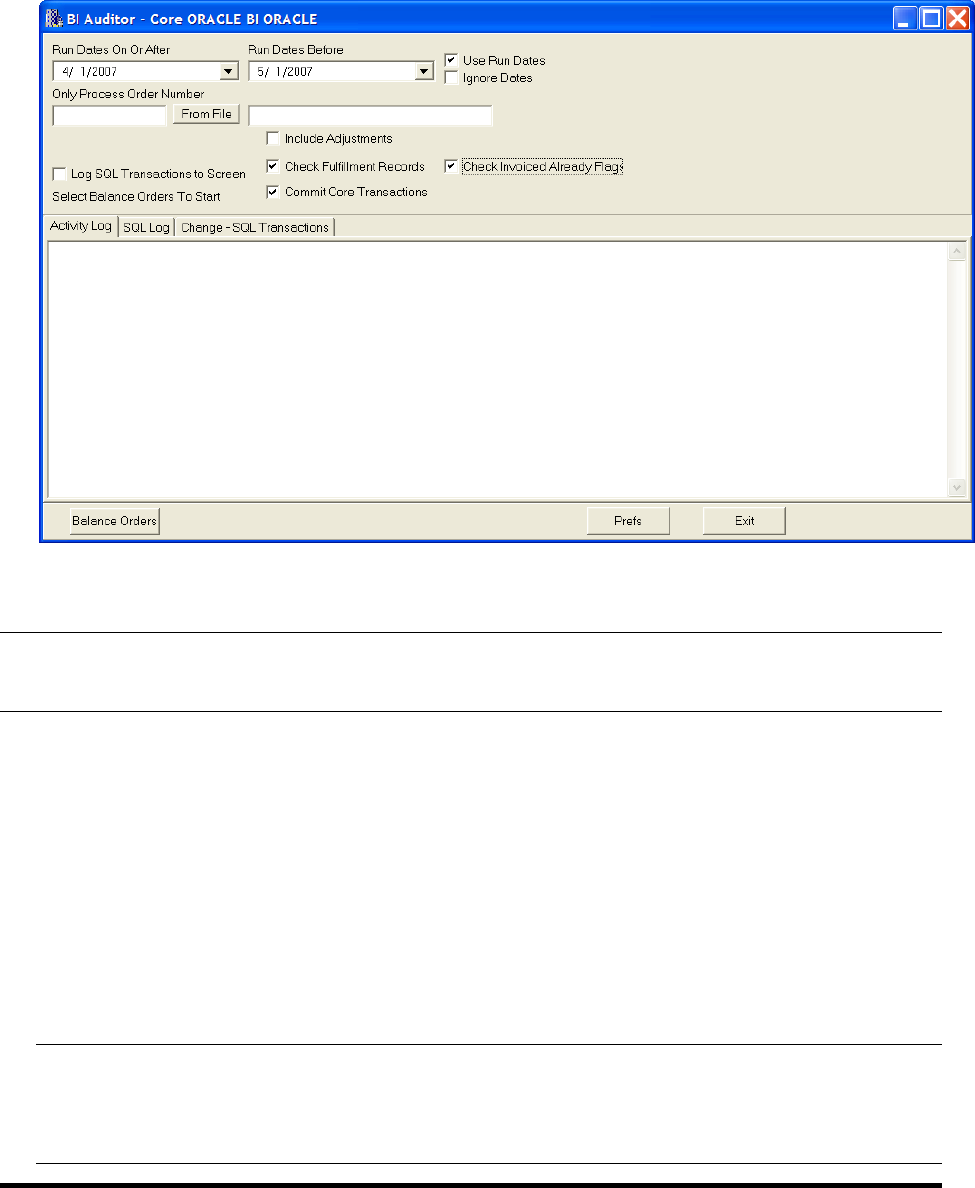
newscyclesolutions.com BI User Guide (4.0), Version 1.1 41
NEWSCYCLE Solutions Confidential & Proprietary
4. Enter the Path for Log Files, which identifies the location where log files and discrepancy files will be
saved.
5. Click OK.
The BI Auditor window displays:
Once you have configured the BI Auditor to point to the correct datasources, you must complete the
initial query to get the count of orders to process.
NOTE: If you do more than one run in the same day the files will be overwritten. If you want to save the
files, simply rename them before running another audit.
To complete the initial query of the BI Auditor:
1. Enter the Created On or After date and the Created Before date to the appropriate range.
2. Check the Use Run Dates box to find all orders to audit by looking at the run day or days in the order
instead of the order creation date. This box should be checked if your BI reports use the run day.
When the Use Run Dates box is checked, you can verify that all orders running in a given date range
are up to date. When you initially populate the BI database, it is better to remove the check from
the Use Run Dates box and use the creation date instead.
3. Check the Commit Core Transactions box to make changes to the core (production) database. The
changes are logged to the Temp folder in the BISQLFILE.txt file. Keep this file as a record of the
changes made to core.
NOTE: If you do not check the Commit Core Transactions box when running BI Auditor, you
must run the BISQLFILE.txt in SQLPlus and commit changes. If you do NOT Commit Core
Transactions OR run it through the BISQLFILE.txt file in SQLPlus, BI Auditor will continue
to report the same issues.

newscyclesolutions.com BI User Guide (4.0), Version 1.1 42
NEWSCYCLE Solutions Confidential & Proprietary
4. Check the Include Adjustments box to verify adjustments linked to orders in core balance with
adjustments linked to orders in BI. If the BI Auditor finds any discrepencies, it will generate a file
containing the ad order IDs.
Mactive does not recommended using this option every time you run the auditor; it will take longer
to run and most sites will not have an issue with this data.
5. Check the Check Fulfillment Records box to verify contract fulfillment in core balances with
contract fulfillment in BI. If the BI Auditor finds any discrepancies, it will generate a file containing
the contract instance IDs.
6. Check the Check Invoiced Already Flag box to verify invoiced insertions in core balances with
invoiced insertions in BI. If the BI Auditor finds any discrepencies, it will generate a file containing
the ad order IDs.
7. Click Balance Orders.
The progress of the audit displays in the line above the Activity Log tab and shows a count of processed
orders, the time it has taken to process the orders, and the time remaining until completion. As issues
are found, the Activity Log will display information about the discrepencies.
When the process is complete, the last entry in the Activity Log provides a total count of orders with
issues. The order IDs are written to a file in the directory indicated in the Set Preferences window. If
you did not change the location, the file is written to the default C:\Temp folder. The name of the file
will be BIFIXFILE20051130.txt or BIFIXCONTRACTFILE20051130.TXT. The date on the file is today’s date.
TIP: You can use the From File button to run the BI Auditor for a specific set of transactions. This feature
should be used if you are running the BI Auditor after populating transactions from a fix file. Use the
same fix file from the first run of the BI Auditor to verify the data has been corrected.
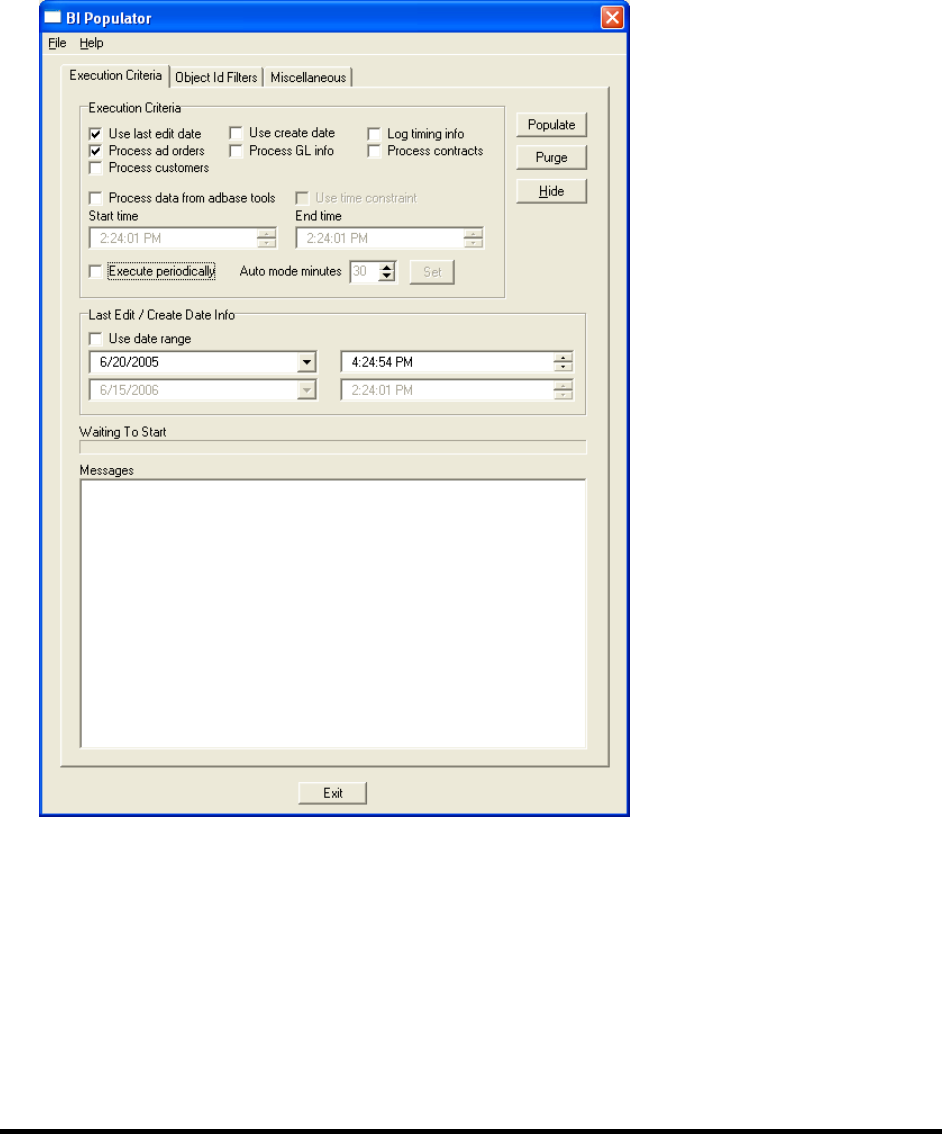
newscyclesolutions.com BI User Guide (4.0), Version 1.1 43
NEWSCYCLE Solutions Confidential & Proprietary
Once the file is created, the next step is to process the Fix files using BI Populator. Launch a new copy of
BI Populator and leave your current daily BI Populator and BI Interface App processes running.
To process Fix files using BI Populator:
1. Launch the BI Populator. For instructions, see page 11.
2. Check the Process ad orders box on the Execution Criteria tab.

newscyclesolutions.com BI User Guide (4.0), Version 1.1 44
NEWSCYCLE Solutions Confidential & Proprietary
3. Check the Get ad order ids from file box on the Object ID Filters tab, and click the Browse button to
locate the files generated during the BI Auditor run. Select the file so that the path and file name
display in the field.
4. Click the Populate button on the Execution Criteria tab.
A message similar to the following example displays the active object ide filters and prompts you to
continue:
5. Click OK when you will be notified that the object id filters are active.
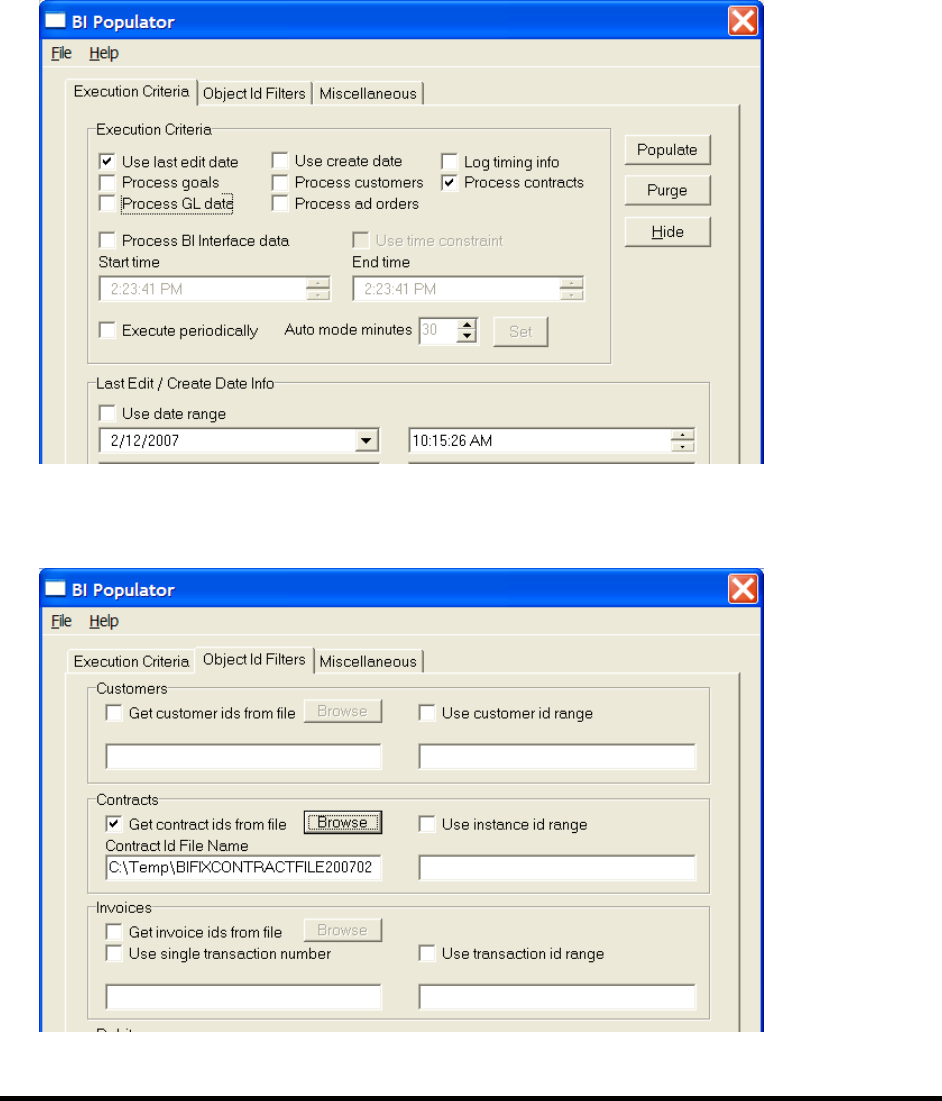
newscyclesolutions.com BI User Guide (4.0), Version 1.1 45
NEWSCYCLE Solutions Confidential & Proprietary
Once the BI Populator has completed processing ad orders, then go back to the BI Auditor and re-run
the process. This time, the BI Auditor should return 0 orders or note unpopulated orders and a few
balance items, which are caused by the live environment where BI and core are constantly changing.
Since the daily BI Populator is running, you will see a disconnect of x minutes between core and BI. Thus,
you should expect the BI Auditor to report a few items; but, not nearly as many as during the initial run.
If the BI Auditor generated a Fix file for contracts, run BI Populator with the following options selected
on the Execution Criteria.
Check the Get contract ids from file box on the Object Id Filters tab, and click the Browse button to
locate the BIFIXCONTRACTFILE generated by the BI Auditor. Select the file so that the path and file name
display in the field.
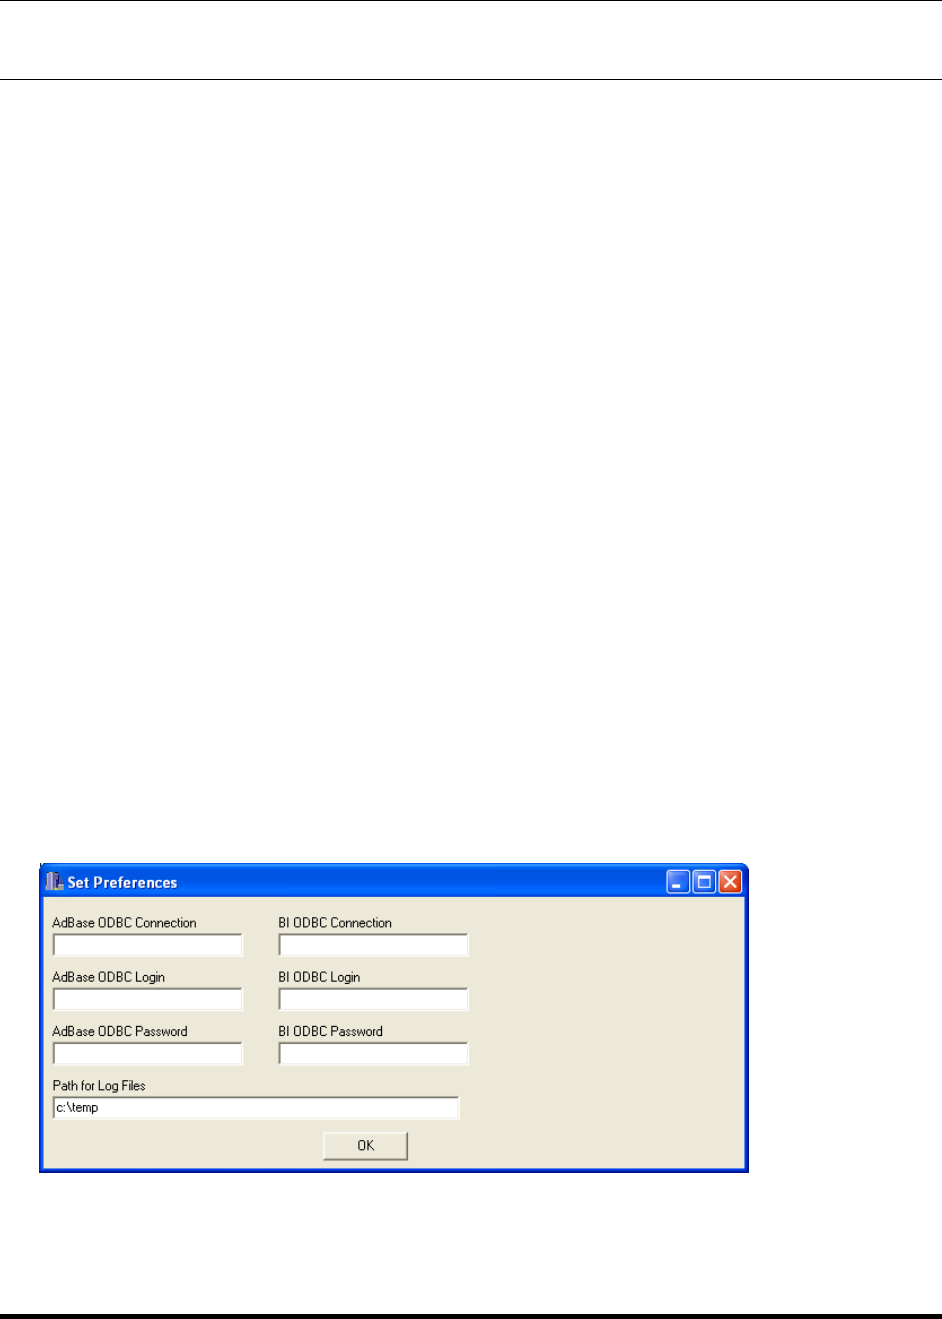
newscyclesolutions.com BI User Guide (4.0), Version 1.1 46
NEWSCYCLE Solutions Confidential & Proprietary
TIP: You can run the BI Populator for both Fix files at the same time by checking the Process Ad Orders
box and Process Contracts box and selecting the Fix files on the Object Id Filters tab.
Once you have completed all of the processing, re-run all of the Crystal® Reports. By running the
reports again, you will see the data changes and you can verify that BI and production are now in sync.
Once the reports are re-run, save the data in the report. However, make sure you do a Save As and
name the reports BIRevenuepost.rpt, CoreRevenuepost.rpt, etc.
How to Balance AR in AdBase and BI
The BI AR Auditor tool verifies AR transactions between the AdBase core and the BI databases. This
process can be run at any time and multiple times to check the database. The process is quick enough
that you can find issues with order balancing if you think you have differences. To summarize, the
process can be completed in four steps.
1. Make sure BI Populator and BI Interface App are current with populating BI.
2. Complete the initial query by running BI AR Auditor in commit mode.
3. Run BI Fix File in BI Populator for the found transactions. The files are written to the directory
specified in the Preferences. For example, if discrepancies are found for payments, a
BIPAYMENTFIXFILE20060320.txt file is created.
4. Run BI AR Auditor again and verify results.
The first step is to configure the BI AR Auditor to point to your production and BI databases. The BI AR
Auditor is not part of the standard Mactive installation. You must contact Mactive Support Services to
request the executable. When you receive the file, unzip the executable and save it to a location on the
PC that is currently performing BI processing. You may also want to save a backup copy to another
location for sake keeping. Once saved, configure the BI AR Auditor.
To configure the BI AR Auditor:
1. Double-click the executable.
The Set Preferences window displays:
2. Enter the AdBase ODBC Connection name, Login name, and Password.
3. Enter the BI ODBC Connection name, Login name, and Password.
4. Enter the Path for Log Files, which identifies the location where log files and discrepancy files will be
saved.
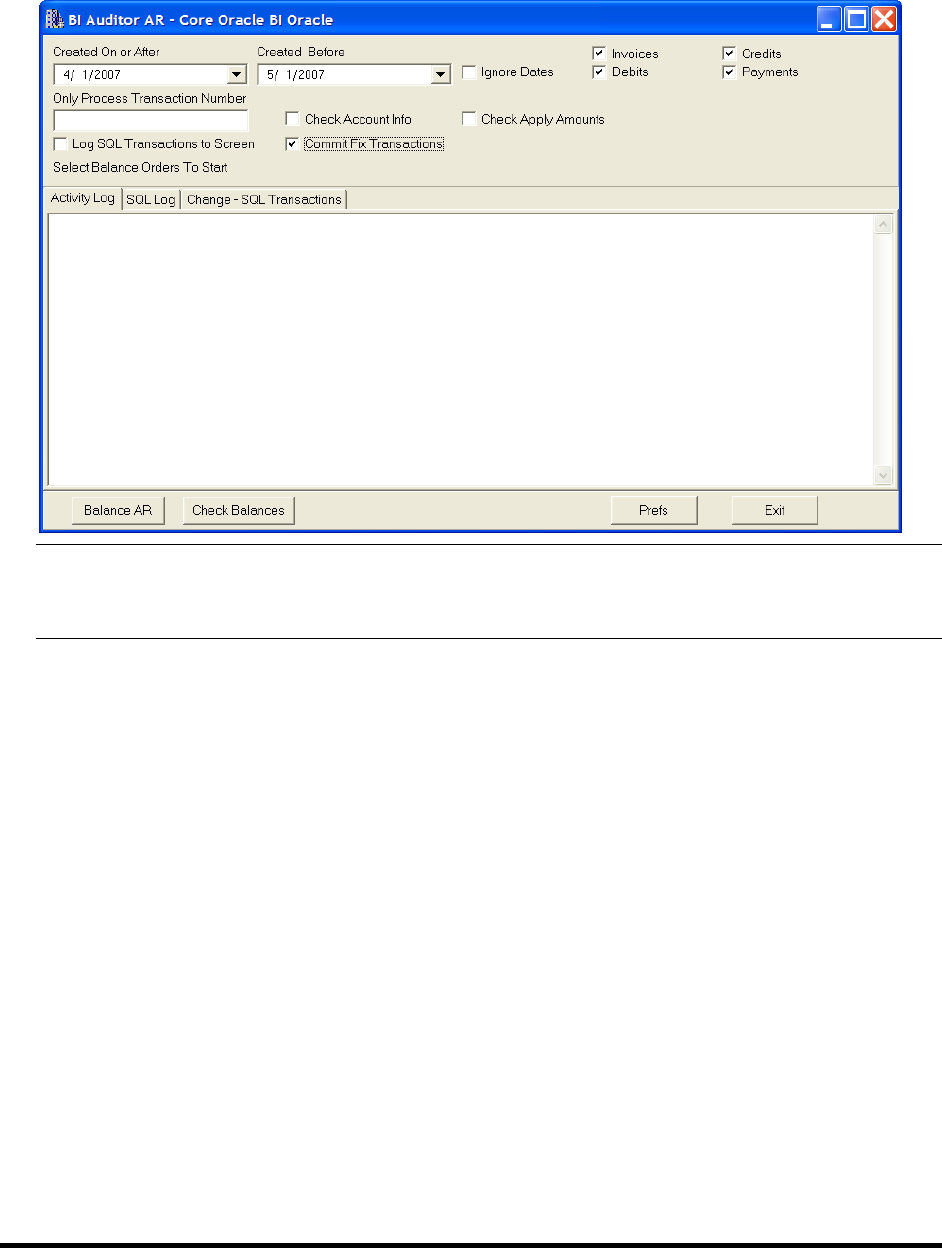
newscyclesolutions.com BI User Guide (4.0), Version 1.1 47
NEWSCYCLE Solutions Confidential & Proprietary
5. Click OK.
The BI Auditor AR window displays:
NOTE: The current version does not filter out transactions that were imported via BI
Importer. Since the transactions do not exist in core, there is nothing to use for balancing .
In the future, the BI Auditor will be enhanced to ignore these transactions.
To complete the initial query of the BI Auditor:
1. Enter a Created On or After date and a Created Before date to limit the transactions to a date range.
If you do not want to limit the transactions to a date range, check the Ignore Dates box.
For example, you can enter a date range that matches a fiscal period. If you have a lot of
transactions to verify, you should start in the past and audit one period at a time.
2. Check the boxes next to the transaction types (i.e., Invoices, Debits, Credits, and Payments) you
want to include in the query. For example, if want to limit the number of transactions to audit to
payments, check the Payments box and remove the check from all others.
You do not have to run the BI AR Auditor separately for all transactions. The four checkboxes simply
allow you to restrict processing to one transaction type.
3. Check the Check Account Info box to verify the GL account is the same in core as it is in BI for each
AR transaction. If someone changes a GL account on a transaction in core, this checkbox will validate
that the same GL account information is changed in BI.
4. Check the Check Apply Amounts box to verify the applied amounts are the same in BI as they are in
the Core system. Do not check this box if you do not have any BI reports that use the Apply Amount
option.
5. Check the Commit Fix Transactions box to make changes to the BI database. If you do not check this
box, any discrepencies found will not be corrected in the database.

newscyclesolutions.com BI User Guide (4.0), Version 1.1 48
NEWSCYCLE Solutions Confidential & Proprietary
Mactive has found issues where transactions were duplicated in BI. In these cases, the transactions
need to be deleted from BI. If you check the Commit Fix Transactions box, the duplicate
transactions will be deleted. The next time you run the application, it should not find the same
issues. In the window, the message will read “Resolve issue of debit populating as credit.”
6. Click the Balance AR button to audit all of the transaction types that are selected in the window for
the given date range.
As the BI AR Auditor finds discrepancies, they are listed in the window. For each transaction type, two
files are written to the directory specified in the INI file. For example, if discrepancies are found for
payments, the following two files are written.
BIPAYMENTFIXFILE20060320.txt – This file contains IDs for any transactions that need to be re-
populated in BI Populator.
BIPAYMENTExceptionFile20060320.txt – This file contains a row for each transaction that the
application finds. You can open this file in Microsoft® Excel and it will show what value this
transaction has in core and the value it currently is in BI. This file provides more information on what
it wants to correct.
The BI AR Auditor might also produce a file named CORECREDITGLFIXFILE20060619.txt. This file is
produced when BI AR Auditor finds GL issues on the core side. This file must be run through GL
Remapper on the core database. For instructions, see the Money Manager User Guide.
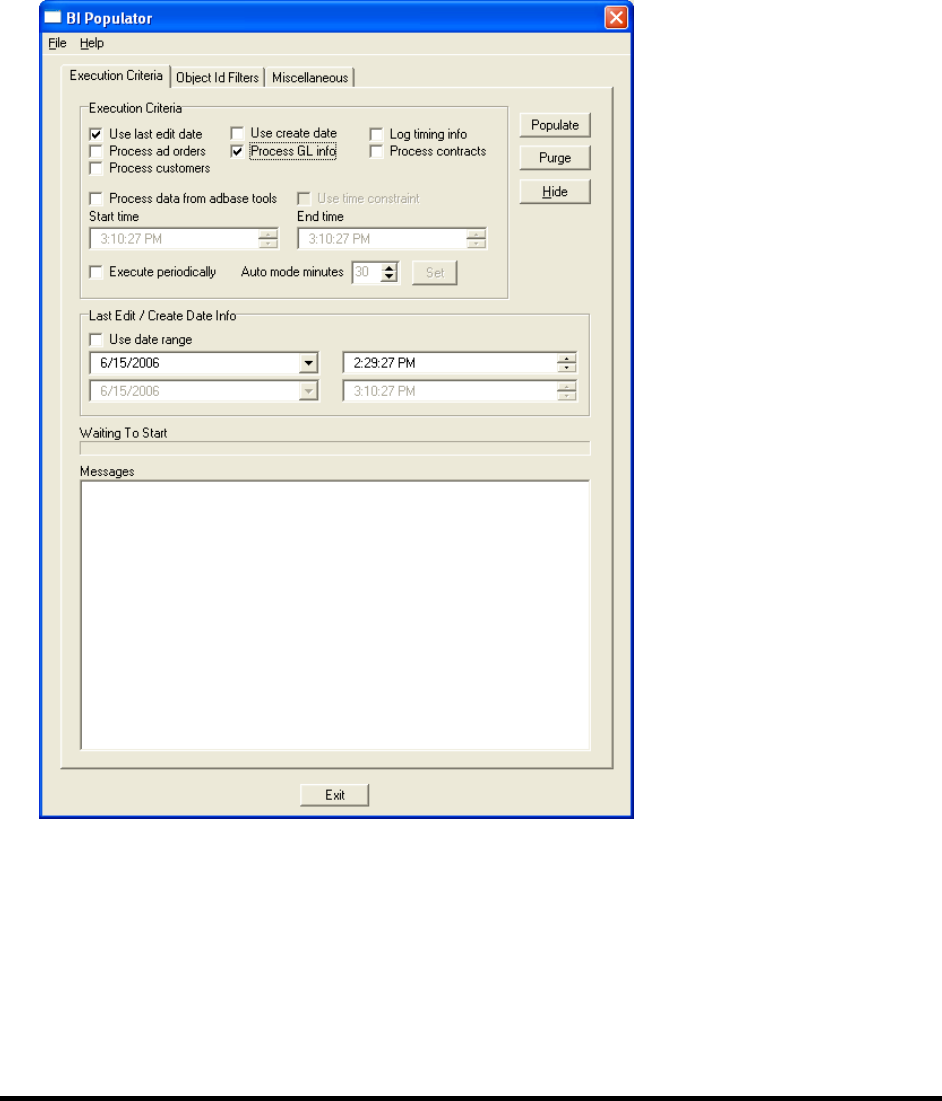
newscyclesolutions.com BI User Guide (4.0), Version 1.1 49
NEWSCYCLE Solutions Confidential & Proprietary
After the BI AR Auditor has completed the transactions, run the BIPAYMENTFIXFILE20060320.txt file in
BI Populator using the following steps.
To process Fix files using BI Populator:
1. Launch the BI Populator. For instructions, see page 11.
The BI Populator window displays.
2. Check the Process GL info box on the Execution Criteria tab.
3. Click the Object Id Filters tab.
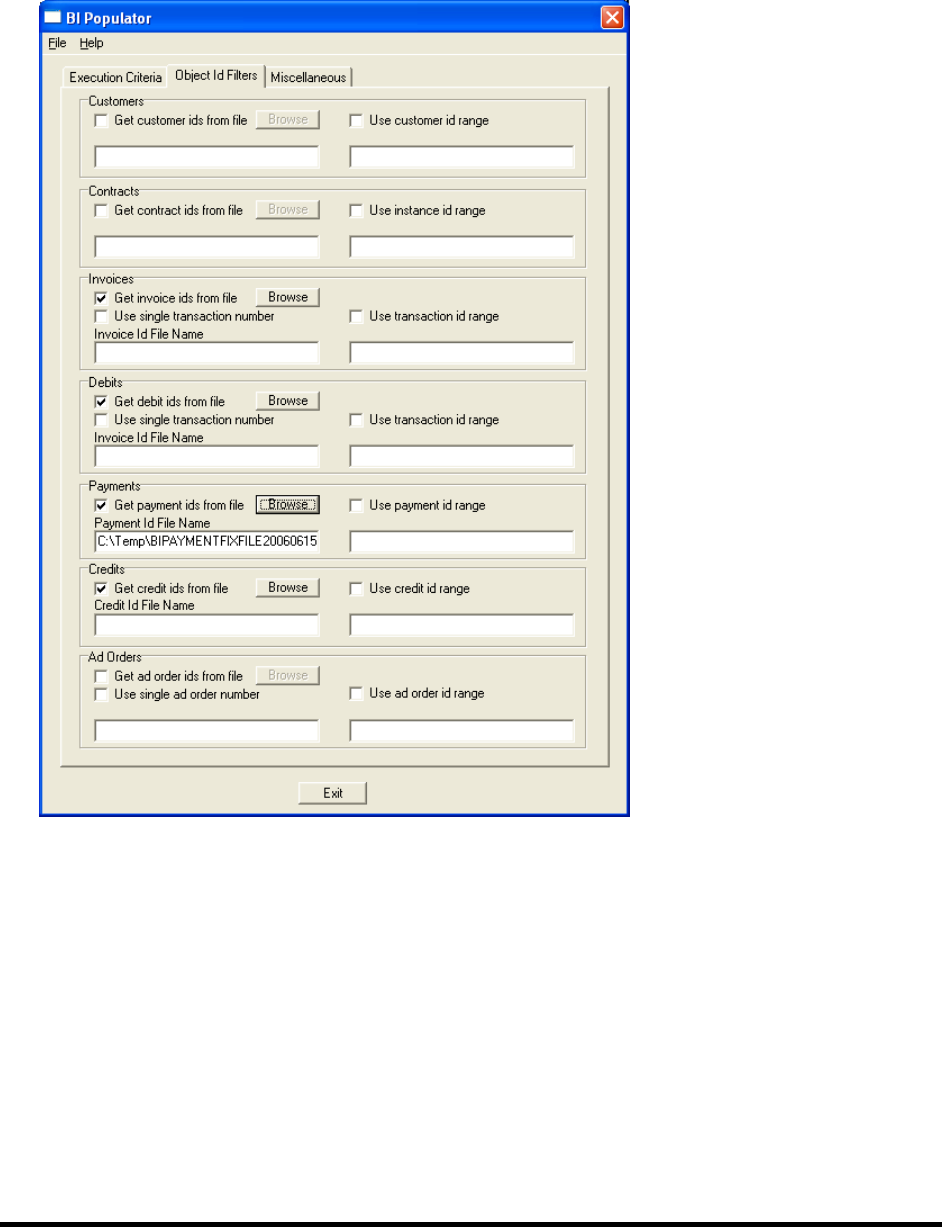
newscyclesolutions.com BI User Guide (4.0), Version 1.1 50
NEWSCYCLE Solutions Confidential & Proprietary
4. Check the box or boxes to retrieve the file for the appropriate transaction type. For example, to
process a file for payments, check the Get payment ids from file box as shown in the following
screen shot.
You can run all files at the same time if you want, or do them one at a time.
5. Click the Browse button to locate the file generated by the BI AR Auditor. Select the file so that the
path and file name display in the field.
6. Click the Populate button on the Execution Criteria tab.
After all files have been run through BI Populator, run Balance AR again in BI Auditor and the same
period should not show any errors.
Checking Balances
The BI AR Auditor also contains a Check Balances button, which checks the database for discrepencies,
but does not update any records or create any files. When you click Check Balances, the BI AR Auditor
displays a sum of each transaction type and a sum for GL by transaction type. The results can be
compared to the Balance Forward Report for the same date range. You must run the Balance Forward
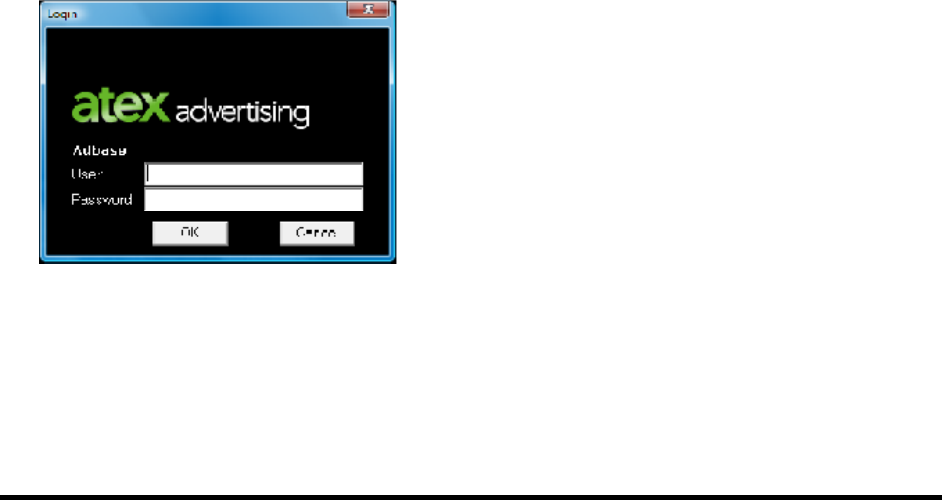
newscyclesolutions.com BI User Guide (4.0), Version 1.1 51
NEWSCYCLE Solutions Confidential & Proprietary
Report to include bad debt payments and credits. See the Mactive Standard Reports User Guide for
instructions.
The Check Balances button also indicates if you have any rows in the ShBiInterface table, since this will
affect your AR transactions. For the best results, you should run BI Auditor when the interface table is
empty (0 rows).
If you check the Log SQL Transactions to Screen box when you use the Check Balances button, the BI
Auditor will show the actual queries it performs to compare the total sum on the SQL Log tab.
Using the BI Utility
The BI Utility is designed to find and resolve any discrepancies between the AdBase and BI databases.
The BI Utility will also help you determine if these issues are occurring regularly. The BI Utility has three
functions. First, the BI Utility locates unpopulated items, including customers, contracts, invoices, debits,
payments, credits, and ad orders. Second, the utility checks the balance of ad orders in BI. Third, the
utility allows you to view dmUser entry(s) for each AdBase user. To accomplish each of these tasks, the
BI Utility compares information in the AdBase database to the BI database to determine what
information is missing from the BI database.
A record of processes completed in the BI Utility is written to the BIUtilityLog.txt in the C:\Temp folder,
or the Temp Directory specified in Configure AdBase. You should refer to this log file when
troubleshooting the BI Utility.
The BI Utility is located in the Mactive/bin folder. The ability to run the BI Utility is controlled by the Run
Utilities privilege. If you do not have this privilege, you will receive a “Permission Refused” message
when you try to login to the BI Utility. For more information on your privileges, see your System
Administrator.
To start the utility:
1. Double-click the BIUtility.exe icon.
The Login window displays:
2. Enter your User name and Password and click OK.
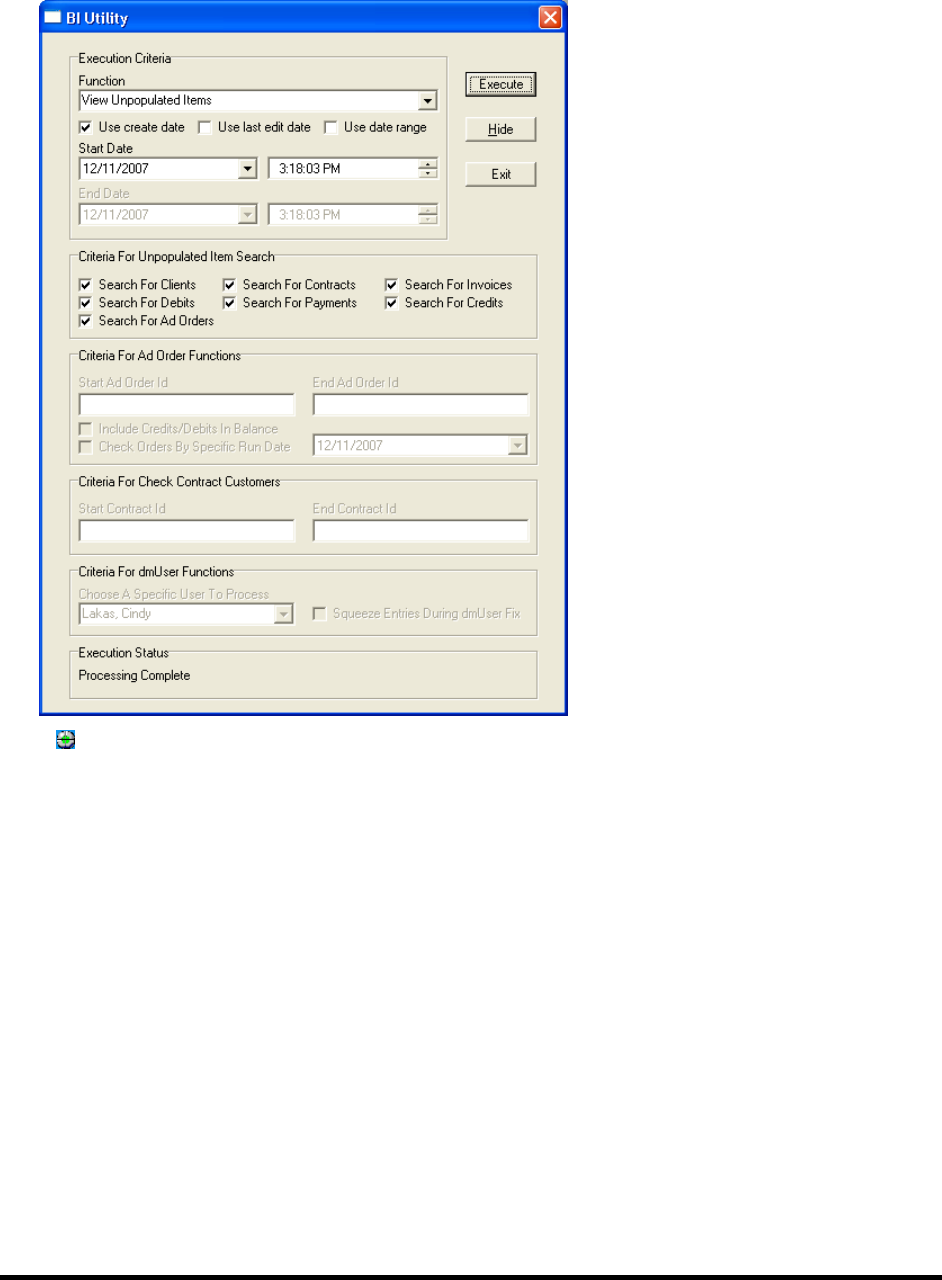
newscyclesolutions.com BI User Guide (4.0), Version 1.1 52
NEWSCYCLE Solutions Confidential & Proprietary
The BI Utility window displays:
A utility icon displays in the System Tray next to the clock. You can hide the BI Utility window by
clicking the Hide button. To display the window, right-click the utility icon in the System Tray and
select Show.
3. Click the Exit button, or right-click the utility icon in the System Tray and select Exit when you are
ready to close the utility.
Using the Execution Criteria Dates
When selecting the Execution Criteria, you have two options for specifying dates.
Check the Use create date box to search based on the date the item was entered into AdBase; for
example, the date on which an order was booked or a payment was entered.
Check the Use last edit date box to search based on the last time an item was modified; for
example, if an order was booked on 6/1, but a run date was added on 6/2, 6/2 would be the date
used to search.
The Start Date is automatically set to today’s date. However, you can change the Start Date to search on
that date and then forward. For example, if you check the Use create date box and enter 1/1/2005 in
the Start Date field, the BI Utility will begin searching for information (e.g., ad orders) entered in AdBase
on or after the first of January in 2005.
newscyclesolutions.com BI User Guide (4.0), Version 1.1 53
NEWSCYCLE Solutions Confidential & Proprietary
You may also specify an End Date to limit the search for entries. Check the Use date range box to enter
a Start Date and End Date to search. The utility will search for all items that fall within this date range.
Viewing Unpopulated Items
Generally, the BI database is populated during the initial processing and load of information. For
instructions, see page 11. Then, based on your site’s practices, the BI Populator is run periodically to
update information. The View Unpopulated Items function compares the AdBase and BI databases to
locate any BI database tables that contain empty rows to ensure that all of the entries are being
updated. The following instructions explain how to run the BI Utility using this function.
To view unpopulated items:
1. Select View Unpopulated Items from the list of Functions.
2. Select the date criteria. For more information on each option, see page 52.
3. Select the Criteria For Unpopulated Item Search. Check the boxes next to the items you want to
include. If none of the boxes are checked, the BI Utility will search on all of the criteria. The following
options are offered.
Search for Clients (customer accounts)
Search for Debits
Search for Ad Orders
Search for Contracts
Search for Payments
Search for Invoices
Search for Credits
4. Click Execute.
The Execution Status window indicates which criteria are currently being searched. For instance,
when searching for contracts, the status reads, “Checking core database for contracts.” If the utility
does not locate any unpopulated items, an Error message displays for each criteria. Click OK to close
the Error message.

newscyclesolutions.com BI User Guide (4.0), Version 1.1 54
NEWSCYCLE Solutions Confidential & Proprietary
When execution is complete, a “Processing Completed” message displays in the Execution Status. If
the utility locates any unpopulated items, the items are listed in a window similar to the following
example. While this window contains invoices, a different would display for each search criteria
used. From this window you have three options.
5. Click Apply Unpopulate Ids to File to save the ids to a text file. The file can then be selected on the
Object Id Filters tab in BI Populator.
The Open window displays:
6. Enter the File Name, select the destination folder, and click Open.
7. Click Apply Unpopulate Ids to ShBIInterface to save the unpopulated items to the ShBIInterface
table, or feeder table. You can then run the BI Populator using the Process data from adbase tools
option to populate the entries in the BI table.
8. Click Close Form Without Applying if you do not want to save the unpopulated items.
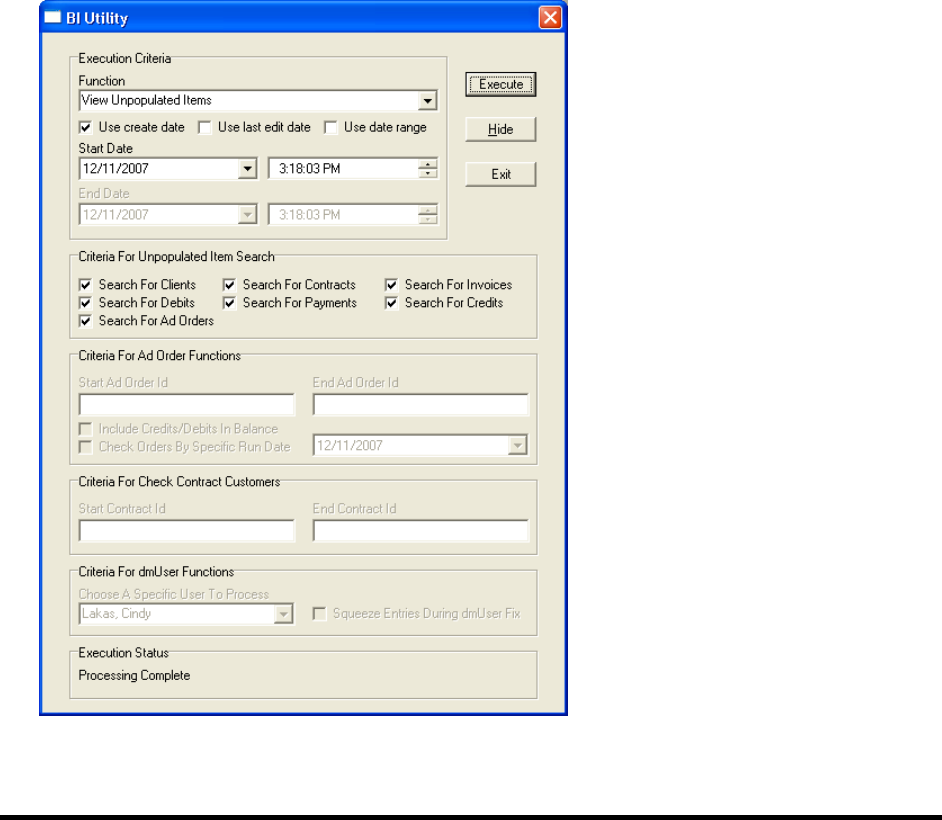
newscyclesolutions.com BI User Guide (4.0), Version 1.1 55
NEWSCYCLE Solutions Confidential & Proprietary
Balancing Ad Orders
The second function of the BI Utility is to balance ad orders between the AdBase and BI databases. This
function will make sure the balances for ad orders match in both databases. You may specify a range of
order Ids to search for or leave the range fields empty to search all orders in the databases.
To balance ad orders:
1. Select Balance Ad Orders from the Function list.
2. Select the date criteria. For more information on each option, see page 52.
3. Enter the Start Ad Order Id. The BI Utility will begin with the specified order. Based on the date
criteria, the utility will check all orders after the specified order.
4. Enter the End Ad Order Id to limit the BI Utility’s search. If you enter an End Ad Order Id, the utility
will stop searching ad orders when it reaches this Id.
5. Check the Include Credit And Debits in Ad Order Balance box to search for any credits or debits
applied to orders within the date range or Id range specified.
6. Click Execute.
The Execution Status shows the number of orders to process.
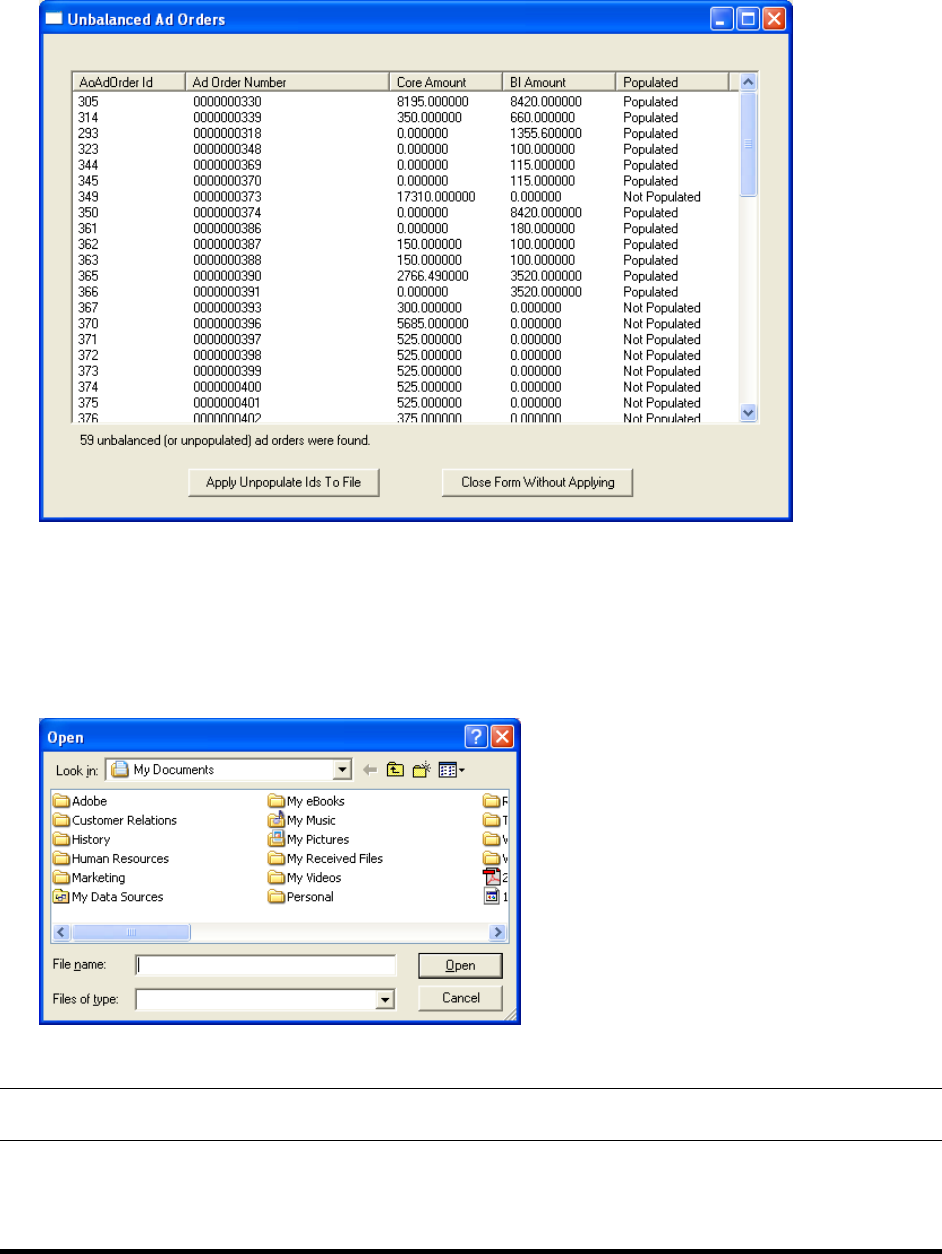
newscyclesolutions.com BI User Guide (4.0), Version 1.1 56
NEWSCYCLE Solutions Confidential & Proprietary
When the BI Utility locates any orders that are not balanced, the Unbalanced Ad Orders window
displays:
This window lists each of the orders that do not match between the AdBase and BI database. The
database Id and the order number are listed as well as the amount currently showing in each
database. From this window you have two options.
7. Click Apply Unpopulate Ids to File to save the ids to a text file. The file can then be selected on the
Object Id Filters tab in BI Populator.
The Open window displays:
8. Enter the File Name, select the destination folder, and click Open.
TIP: Click Close Form Without Applying if you do not want to save the unpopulated items.
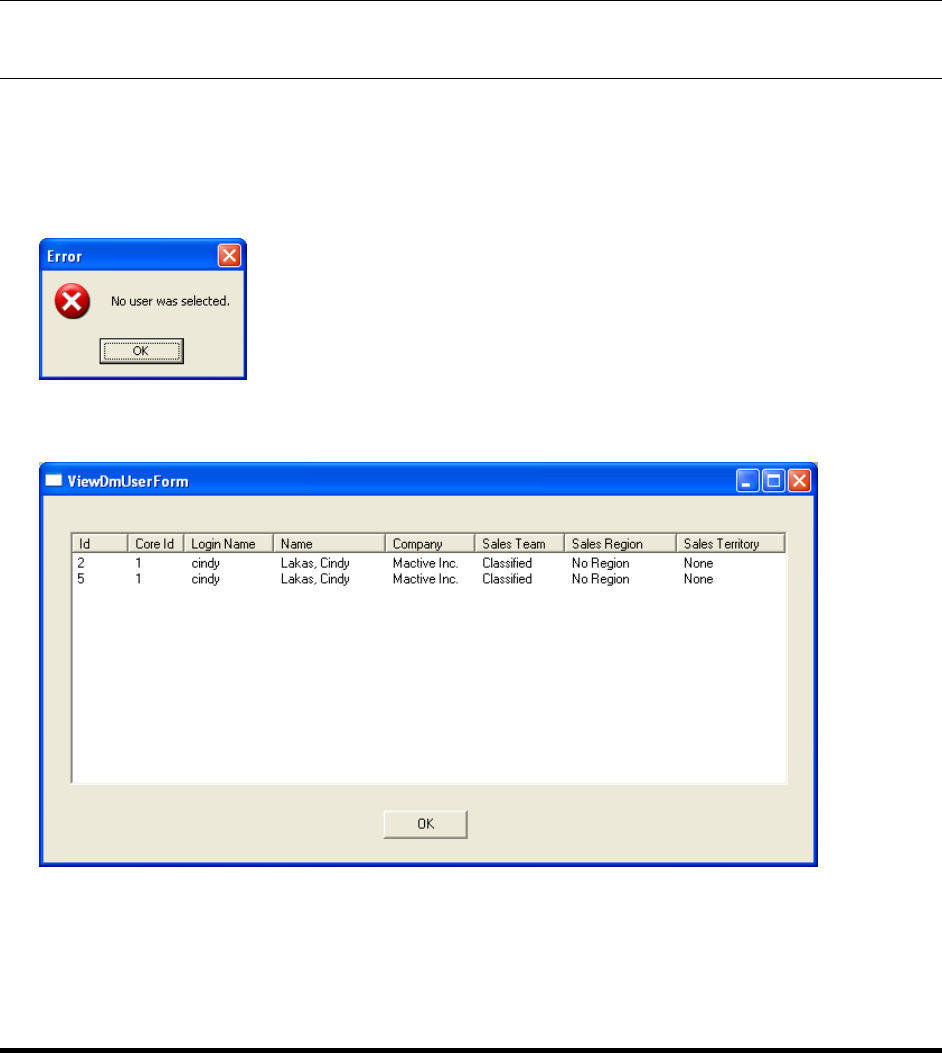
newscyclesolutions.com BI User Guide (4.0), Version 1.1 57
NEWSCYCLE Solutions Confidential & Proprietary
Viewing User Entries
The dmUser table stores information about the AdBase users saved in System Admin. The View dmUser
Entry function allows you to search for user profiles that have not been populated or are not current in
the BI database.
Also in System Admin, you will find an option to Update Existing dmUser Entry. If this box is checked, all
modifications to a user profile are saved to a single entry in the dmUser table. If the Update Existing
dmUser Entry box is not checked, every time a user profile is modified, a new entry is written to the
dmUser table in BI.
NOTE: The Squeeze Entries During dmUser Fix option is still in development. This document will be
updated as soon as the feature is completed.
To view the user entries in BI:
1. Select View dmUser Entry(s) from the list of Functions.
Choose A Specific User to Process from the list of names. If you do not select a name, the following
Error message will display:
2. Click Execute.
The View DmUser Form displays the entries for the selected user:
3. Click OK to close the form.

newscyclesolutions.com BI User Guide (4.0), Version 1.1 58
NEWSCYCLE Solutions Confidential & Proprietary
Purging the BI Database
The BI Populator allows you to purge data from the BI database. The Purge button on the Execution
Criteria tab may be used to clear some of the upper level information from tables. However, keep in
mind that any ad order, GL, or contract information that is linked to other transactions in the database
will not be purged.
To purge information from the BI database:
1. Log in to the BI Populator. For instructions, see page 11.
2. Select the desired Object Id Filters and click the Purge button.
You must select information from the Object Id Filters to complete the purge or you will receive the
following message.
3. Click No when you receive this message and select the desired criteria from the Object Id Filters tab.
The Purge Complete message displays when the information has been successfully purged from the
database.

newscyclesolutions.com BI User Guide (4.0), Version 1.1 59
NEWSCYCLE Solutions Confidential & Proprietary
Dropping the BI Database Tables
Dropping tables will result in removing the tables and the data that resides in those tables from the
database. Do not drop tables unless you are sure that you do not need the data that is stored in them. If
you know that there is no data in any existing BI tables that you want to keep, drop all the BI tables
before creating them again. Also, if you are unsure if there are existing tables in your BI database and
you know that you want to delete all the data, you should first try and drop all the tables in the BI
schema so that you can start with a blank database.
To drop the BI database tables:
1. Click on the BIDLLFunctions.dll node.
CAUTION! Make sure the BIDLLFunctions.dll node is highlighted in blue before proceeding. If this node
is not selected, the Database Table Utility will drop all tables in your production database as
well. Dropping tables can cause serious damage, especially if you have not recently performed
a backup of your database.
2. Click the Drop Constraints button.
3. Click the Drop Tables button.

newscyclesolutions.com BI User Guide (4.0), Version 1.1 60
NEWSCYCLE Solutions Confidential & Proprietary
FAQ
What is BI?
BI is a separate database designed to make reporting more intuitive for Mactive’s users. BI is short for
Business Intelligence. The BI database was designed using dimensional modeling techniques to obtain
the following benefits.
An easy to understand schema layout
A database that is easy to query
A database that is adaptive and resilient to change
High performance access
How will reporting off BI be easier than production?
BI has about 60 tables compared to the over 400 tables in the production database. Also, a consistent
naming scheme has been used, making it very easy to know which fields join to each other.
How often can I update BI?
The BI tables are updated using the BI Populator Utility in the Mactive\bin folder. The BI Populator can
be set to run at any interval your site chooses. For more information, see page 29.
Can I purge AdBase and retain the reporting data?
Yes. Purging AdBase does not affect the data in BI. See page 58.
Does BI have to exist in the same DB and schema as AdBase?
No. It is probably better to have the BI database located on its own server.
Can I load legacy data directly into BI and bypass AdBase?
Yes. To do import legacy data directly into the BI database, you must supply Mactive with detailed
specifications of the data that you will be importing, and then an importer will be created for your site.
Will I need complicated formulas to report linage in agate line measurements like in production?
No. The BI database contains fields that have calculated many linage measurements, which are stored in
the fctInsertion table.
NumColumns
AdWidth (Twips)
AdDepth (Twips)
AdDepthAgates
AdDepthMillimeters
AdDepthInches
ColumnAgates
ColumnMillimeters
ColumnAgates
NumLines

newscyclesolutions.com BI User Guide (4.0), Version 1.1 61
NEWSCYCLE Solutions Confidential & Proprietary
How will order based charges be reflected in BI?
Order-based charges are spread proportionally across the insertion days within an order.
If the order is a Till Forbid (TF), then the process gets a bit more complicated. To spread an order based
charge or credit across a TF order, the BI Populator must first determine if accounting periods are set up
in the fnAccountingPeriods table. If the accounting periods are set up, the utility will use those defined.
If not, the utility will use months as the accounting period. Mactive defines the current accounting
period as that period or month that the credit or order based charges falls into, and the previous
accounting period as the period before the current accounting period.
Next, BI Populator will determine if the TF order has any run dates in the previous accounting period. If
so, the credit or order based charge is proportionately spread across all the run dates within the
previous accounting period. If there are no run dates in the previous accounting period, then the credit
or order based charge will be spread across all run dates from the beginning of the current accounting
period up to the effective date of the credit or order based charge.
How does the feeder table and the Process Data from AdBase Tools option work?
The feeder table ensures the BI database does not miss any changes that tools and utilities make to
AdBase. Some tools and utilities do not update the LastEditDate in AdBase tables due to not wanting to
send orders to PageLayout. An example would be Invoice Generator updating the Invoiced Already flag
or Contract Renew Utility issuing a short rate or rebate. This information should be passed to BI, but is
not needed in PageLayout. To get around this issue, tools now write a record into a feeder table in the
AdBase schema called shBIInterface. When the Process Data from AdBase Tools box is checked, the BI
Populator reads the shBIInterface table and populates the BI database with any information that tools
and utilities might have changed.
I am receiving an error during the initial load when processing a credit. What does this error message
mean?
"An error occurred while processing credit id: 55314 (see sql log)
Error: fctApply not stored, no record for InvoiceId 43864
An error occurred while processing credit id: 55314 (see sql log)"
This error message is referring to a credit created in AdBase that is being loaded into the BI database. In
AdBase, this credit is associated with an invoice. When you try to load this credit into BI, the BI
Populator first inserts a record into fctARSummary, then the Populator looks for the invoice record
associated with the credit in the fctARSummary table. If it does not find this invoice record, you will get
the error stated above.
When loading GL, you should load all invoices and debits first, then load the credits and payments. To
ignore credits and payments, you can set the range for credit and payments to be 0 to 0 on the Object Id
Filters tab.

newscyclesolutions.com BI User Guide (4.0), Version 1.1 62
NEWSCYCLE Solutions Confidential & Proprietary
Index
Activity Log, 38
Ad order prefix, 14
Ad order records, 14
Ad Orders, 22
AdBase ODBC Connection, 36, 42
ADBASE_BI, 8
ADBASE_BI_IDX, 8
Add Constraints, 11
Add entry dmAdProduct table, 14
Add entry to dmAdProduct table, 16
Apply Unpopulate Ids to File, 50, 52
Apply Unpopulate Ids to ShBIInterface, 50
AR, 42
Architecture Scenarios, 1
Balance Ad Orders, 51
Balance AR, 44
Balance Orders, 36, 38
BI, 56
BI AR Auditor, 42
BI Auditor, 36
BI feeder table, 25
BI Feeder Table Processing, 11
BI Importer, 13
BI Interface App, 33
BI ODBC Connection, 36, 42
BI Populator, 11, 26, 39, 45
BI Utility, 47
BIDLLFunctions.dll, 8
BIFIXCONTRACTFILE.txt, 36
BIFIXFILE.txt, 36
BiPopulatorLog.txt, 29
BISQLFILE.txt, 37
BIUtilityLog.txt, 47
Browse, 32
Check Balances, 46
Check Fulfillment Records, 38
Close Form Without Applying, 50, 52
Commit Core Transactions, 36, 37
Commit Fix Transactions, 43
Configure AdBase, 5
Contracts, 22
Created Before date, 37, 43
Created On or After date, 37, 43
Creating BI Database Tables, 7
Credits, 23, 43
Criteria For Unpopulated Item Search, 49
Current accounting period, 29
Customers, 22
Data Source Name, 5
Database DLLs, 7
Database Sizing Workbook, 3
Database Table Utility, 7
Database Type, 6
Debits, 23, 43
dmAdOrderBools, 13
dmClient, 13
dmUser, 13
Drop Constraints, 55
Drop Tables, 55
Enable BI Feeder Table Processing, 24
End Ad Order Id, 51
Execute periodically, 30, 35
Execute Periodically, 27
Execution Criteria, 23
fctAdOrder table, 14
fctApply, 19
fctARSummary, 19, 23
fctGL, 19
fctInsertChargeSummary tables, 16
fctInsertion, 56
Get ad order ids from file, 40
Get contract ids from file, 41
Get IDs from file, 31
GL, 22
GL Remapper, 44
Ignore Dates, 43
Ignore matching ad orders, 14
Import legacy data, 56
Include Credit And Debits in Ad Order Balance, 51
Index tablespace, 8
Initial processing, 11
Input File Type, 14
Insertion records, 16
Invoices, 43
Last Edit/Create Date Info, 30
Log timing info, 29, 34
Main tablespace, 8
Make Tables, 11
Object Id Filters, 45
Object ID Filters, 31
Oracle® Database, 4
Order-based charges, 57
Path for Log Files, 36, 42
Payments, 23, 43
Populate Both, 12
Populate Date Only, 12
Populate Null Rows Only, 12
Previous accounting period, 29
Process ad orders, 22, 28, 29, 39
Process contracts, 29
Process Contracts, 22, 41
Process customers, 29
Process Customers, 22
Process data from adbase tools, 27, 30, 50
Process Data from AdBase Tools, 24
Process GL info, 23, 29, 45
Purge, 54, 56
Questions, 3
Scenario 1, 1
Scenario 2, 2
Scenario 3, 3
Schedule Admin, 27

newscyclesolutions.com BI User Guide (4.0), Version 1.1 63
NEWSCYCLE Solutions Confidential & Proprietary
ShBiInterface, 47
ShBIInterface, 34
SizingCalcs, 3
Squeeze Entries During dmUser Fix, 53
Start Ad Order Id, 51
System Admin, 25
System Level Information, 25
Tablespaces, 8
Till Forbid, 29, 57
Total Size Requirement, 3
Unbalanced Ad Orders, 52
Unpopulated Items, 49
Update Existing dmUser Entry, 53
Use create date, 28, 30, 48
Use Create Date, 22
Use credit id range, 23
Use date range, 30, 48
Use id range, 32
Use last edit date, 28, 30, 48
Use payment id range, 23
Use single ad order/transaction number, 33
Use time constraint, 30, 35
Use transaction id range, 23
User, 53
View dmUser Entry, 53
View Unpopulated Items, 49
