Bauke Scholtz, Arjan Tijms The Definitive Guide To JSF In Java EE 8 Apress (2018)
User Manual:
Open the PDF directly: View PDF ![]() .
.
Page Count: 516 [warning: Documents this large are best viewed by clicking the View PDF Link!]
- Table of Contents
- About the Authors
- About the Technical Reviewer
- Chapter 1: History
- Chapter 2: From Zero to Hello World
- Chapter 3: Components
- Chapter 4: Form Components
- Chapter 5: Conversion and Validation
- Chapter 6: Output Components
- Chapter 7: Facelets Templating
- Chapter 8: Backing Beans
- Chapter 9: Exception Handling
- Chapter 10: WebSocket Push
- Chapter 11: Custom Components
- Chapter 12: Search Expressions
- Chapter 13: Security
- Java EE Security Overview and History
- Protect Access to Resources
- Setting the Authentication Mechanism
- Setting the Identity Store
- Providing Our Custom JSF Code
- Caller-Initiated Authentication
- Remember Me
- Logging Out
- Custom Principals
- Conditionally Rendering Based on Access
- Cross-Site Request Forgery Protection
- Web Parameter Tampering Protection
- Cross-Site Scripting Protection
- Source Exposure Protection
- Chapter 14: Localization
- Hello World, Olá mundo, नमस्ते दुनिया
- Configuration
- Referencing Bundle in JSF Page
- Changing the Active Locale
- Organizing Bundle Keys
- Localizing Conversion/Validation Messages
- Obtaining Localized Message in a Custom Converter/Validator
- Localizing Enums
- Parameterized Resource Bundle Values
- Database-Based ResourceBundle
- HTML in ResourceBundle
- Chapter 15: Extensions
- Index

The Definitive
Guide to JSF in
Java EE 8
Building Web Applications with
JavaServer Faces
—
Bauke Scholtz
Arjan Tijms

The Definitive Guide to
JSF in Java EE 8
Building Web Applications with
JavaServer Faces
BaukeScholtz
ArjanTijms
e Denitive Guide to JSF in Java EE 8: Building Web Applications with
JavaServer Faces
ISBN-13 (pbk): 978-1-4842-3386-3 ISBN-13 (electronic): 978-1-4842-3387-0
https://doi.org/10.1007/978-1-4842-3387-0
Library of Congress Control Number: 2018942178
Copyright © 2018 by Bauke Scholtz, Arjan Tijms
is work is subject to copyright. All rights are reserved by the Publisher, whether the whole or part of the
material is concerned, specically the rights of translation, reprinting, reuse of illustrations, recitation,
broadcasting, reproduction on microlms or in any other physical way, and transmission or information
storage and retrieval, electronic adaptation, computer software, or by similar or dissimilar methodology now
known or hereafter developed.
Trademarked names, logos, and images may appear in this book. Rather than use a trademark symbol with
every occurrence of a trademarked name, logo, or image we use the names, logos, and images only in an
editorial fashion and to the benet of the trademark owner, with no intention of infringement of the
trademark.
e use in this publication of trade names, trademarks, service marks, and similar terms, even if they are not
identied as such, is not to be taken as an expression of opinion as to whether or not they are subject to
proprietary rights.
While the advice and information in this book are believed to be true and accurate at the date of publication,
neither the authors nor the editors nor the publisher can accept any legal responsibility for any errors or
omissions that may be made. e publisher makes no warranty, express or implied, with respect to the
material contained herein.
Managing Director, Apress Media LLC: Welmoed Spahr
Acquisitions Editor: Steve Anglin
Development Editor: Matthew Moodie
Coordinating Editor: Mark Powers
Cover designed by eStudioCalamar
Cover image designed by Freepik (www.freepik.com)
Distributed to the book trade worldwide by Springer Science+Business Media NewYork, 233 Spring Street,
6th Floor, NewYork, NY 10013. Phone 1-800-SPRINGER, fax (201) 348-4505, e-mail orders-ny@springer-
sbm.com, or visit www.springeronline.com. Apress Media, LLC is a California LLC and the sole member
(owner) is Springer Science + Business Media Finance Inc (SSBM Finance Inc). SSBM Finance Inc is a
Delaware corporation.
For information on translations, please e-mail editorial@apress.com; for reprint, paperback, or audio rights,
please email bookpermissions@springernature.com.
Apress titles may be purchased in bulk for academic, corporate, or promotional use. eBook versions and
licenses are also available for most titles. For more information, reference our Print and eBook Bulk Sales
web page at http://www.apress.com/bulk-sales.
Any source code or other supplementary material referenced by the author in this book is available to
readers on GitHub via the book’s product page, located at www.apress.com/9781484233863. For more
detailed information, please visit http://www.apress.com/source-code.
Printed on acid-free paper
BaukeScholtz
Willemstad, Curaçao
ArjanTijms
Amsterdam, Noord-Holland, e Netherlands
To caeine and our (not so) patient wives.
v
About the Authors �������������������������������������������������������������������������������������������������� xiii
About the Technical Reviewer ���������������������������������������������������������������������������������xv
Table of Contents
Chapter 1: History ����������������������������������������������������������������������������������������������������� 1
In theBeginning . . . ...................................................................................................................... 1
The Adolescent Years .................................................................................................................... 4
On toMaturity ............................................................................................................................... 7
Rejuvenation ............................................................................................................................... 11
Chapter 2: From Zero toHello World ���������������������������������������������������������������������� 13
Installing Java SE JDK ................................................................................................................ 13
What About Java EE? ............................................................................................................. 13
Installing Payara ......................................................................................................................... 14
How About Other Servers? .................................................................................................... 14
Installing Eclipse ......................................................................................................................... 15
Conguring Eclipse ................................................................................................................ 16
Installing JBoss Tools Plug-in ................................................................................................ 17
Integrating New Server inEclipse ......................................................................................... 19
Creating New Project inEclipse .................................................................................................. 22
Creating theBacking Bean Class .......................................................................................... 35
Creating theFacelets File ...................................................................................................... 38
Deploying theProject ............................................................................................................ 41
Installing H2 ................................................................................................................................ 46
Conguring DataSource......................................................................................................... 46
Conguring JPA ..................................................................................................................... 47
vi
Creating theJPA Entity .......................................................................................................... 48
Creating theEJB Service ....................................................................................................... 50
Adjusting theHello World ...................................................................................................... 52
Chapter 3: Components ������������������������������������������������������������������������������������������ 55
Standard HTML Components ...................................................................................................... 58
Standard Core Tags ..................................................................................................................... 62
Life Cycle .................................................................................................................................... 65
Restore View Phase (First Phase) .......................................................................................... 66
Apply Request Values Phase (Second Phase) ........................................................................ 66
Process Validations Phase (Third Phase) ............................................................................... 67
Update Model Values Phase (Fourth Phase) .......................................................................... 68
Invoke Application Phase (Fifth Phase) .................................................................................. 68
Render Response Phase (Sixth Phase) .................................................................................. 68
Ajax Life Cycle ............................................................................................................................. 69
View Build Time .......................................................................................................................... 70
View Render Time ....................................................................................................................... 71
View State ................................................................................................................................... 72
View Scope ................................................................................................................................. 74
Phase Events ............................................................................................................................... 75
Component System Events ......................................................................................................... 76
Custom Component System Events ............................................................................................ 82
JSTL Core Tags ............................................................................................................................ 83
Manipulating theComponent Tree .............................................................................................. 89
Chapter 4: Form Components ��������������������������������������������������������������������������������� 95
Input, Select, andCommand Components .................................................................................. 95
Text-Based Input Components .................................................................................................... 96
File-Based Input Component ..................................................................................................... 103
Selection Components .............................................................................................................. 105
SelectItem Tags ......................................................................................................................... 114
SelectItemGroup ....................................................................................................................... 118
Table of ConTenTs
vii
Label andMessage Components .............................................................................................. 120
Command Components ............................................................................................................. 123
Navigation ................................................................................................................................. 133
Ajaxifying Components ............................................................................................................. 136
Navigation inAjax ..................................................................................................................... 143
GET forms ................................................................................................................................. 144
Stateless Forms ........................................................................................................................ 147
Chapter 5: Conversion andValidation ������������������������������������������������������������������ 149
Standard Converters ................................................................................................................. 150
<f:convertNumber> ............................................................................................................. 153
<f:convertDateTime> .......................................................................................................... 156
Standard Validators ................................................................................................................... 160
<f:validateLongRange>/<f:validateDoubleRange> ............................................................. 162
<f:validateLength>/<f:validateRegex> ............................................................................... 163
<f:validateRequired> .......................................................................................................... 164
<f:validateBean>/<f:validateWholeBean> .......................................................................... 165
Immediate Attribute .................................................................................................................. 171
Custom Converters .................................................................................................................... 172
Custom Validators ..................................................................................................................... 183
Custom Constraints ................................................................................................................... 186
Custom Messages ..................................................................................................................... 187
Chapter 6: Output Components ����������������������������������������������������������������������������� 191
Document-Based Output Components ...................................................................................... 191
Text-Based Output Components................................................................................................ 193
Navigation-Based Output Components ..................................................................................... 198
Panel-Based Output Components ............................................................................................. 199
Data Iteration Component ......................................................................................................... 204
Editable <h:dataTable> ....................................................................................................... 210
Add/Remove Rows in<h:dataTable> .................................................................................. 215
Table of ConTenTs
viii
Select Rows in<h:dataTable> ............................................................................................ 218
Dynamic Columns in<h:dataTable> ................................................................................... 220
Resource Components .............................................................................................................. 221
Pass-Through Elements ............................................................................................................ 230
Chapter 7: Facelets Templating ���������������������������������������������������������������������������� 235
XHTML ....................................................................................................................................... 237
Template Compositions ............................................................................................................. 238
Single Page Application ............................................................................................................ 242
Template Decorations ............................................................................................................... 246
Tag Files .................................................................................................................................... 248
Composite Components ............................................................................................................ 256
Recursive Composite Component ........................................................................................ 266
Implicit EL Objects .................................................................................................................... 270
Chapter 8: Backing Beans ������������������������������������������������������������������������������������ 275
Model, View, or Controller? ....................................................................................................... 275
Managed Beans ........................................................................................................................ 279
Scopes ...................................................................................................................................... 281
@ApplicationScoped ........................................................................................................... 282
@SessionScoped ................................................................................................................. 284
@ConversationScoped ........................................................................................................ 286
@FlowScoped ...................................................................................................................... 289
@ViewScoped...................................................................................................................... 293
@RequestScoped ................................................................................................................ 300
@Dependent ........................................................................................................................ 303
Which scope tochoose? ........................................................................................................... 304
Where Is @FlashScoped? ......................................................................................................... 305
Managed bean initialization anddestruction ............................................................................ 308
Injecting JSF vended types ....................................................................................................... 309
Eager Initialization .................................................................................................................... 311
Table of ConTenTs
ix
Layers ....................................................................................................................................... 314
Naming Conventions ................................................................................................................. 316
Chapter 9: Exception Handling ����������������������������������������������������������������������������� 319
Custom Error Pages .................................................................................................................. 320
Ajax Exception Handling ........................................................................................................... 322
ViewExpiredException Handling ................................................................................................ 328
IOException Handling ................................................................................................................ 332
EJBException Handling ............................................................................................................. 333
Chapter 10: WebSocket Push �������������������������������������������������������������������������������� 341
Conguration............................................................................................................................. 341
Usage ........................................................................................................................................ 343
Scopes andUsers ..................................................................................................................... 344
Channel Design Hints ................................................................................................................ 346
One-Time Push .......................................................................................................................... 347
Stateful UI Updates ................................................................................................................... 349
Site-Wide Push Notications .................................................................................................... 351
Keeping Track ofActive Sockets ............................................................................................... 353
Detecting Session andView Expiration ..................................................................................... 355
Breaking DownMojarra’s f:websocket Implementation ........................................................... 356
Chapter 11: Custom Components ������������������������������������������������������������������������� 359
Component Type, Family, andRenderer Type ............................................................................ 359
Creating New Component andRenderer ................................................................................... 367
Extending Existing Component ................................................................................................. 375
Extending Existing Renderer ..................................................................................................... 381
Custom Tag Handlers ................................................................................................................ 385
Packaging inaDistributable JAR .............................................................................................. 389
Resource Dependencies ........................................................................................................... 392
Table of ConTenTs
x
Chapter 12: Search Expressions ��������������������������������������������������������������������������� 393
Relative Local IDs ...................................................................................................................... 394
Absolute Hierarchical IDs .......................................................................................................... 396
Standard Search Keywords ....................................................................................................... 400
Custom Search Keywords ......................................................................................................... 403
Chapter 13: Security ��������������������������������������������������������������������������������������������� 409
Java EE Security Overview andHistory .................................................................................... 409
Protect Access toResources..................................................................................................... 411
Excluded .............................................................................................................................. 412
Unchecked ........................................................................................................................... 413
By Role ................................................................................................................................ 413
Setting theAuthentication Mechanism ..................................................................................... 415
Setting theIdentity Store .......................................................................................................... 417
Providing Our Custom JSF Code ............................................................................................... 422
Caller-Initiated Authentication ................................................................................................... 428
Remember Me .......................................................................................................................... 431
Activating Remember-Me Service ....................................................................................... 433
Logging Out ............................................................................................................................... 436
Custom Principals ..................................................................................................................... 437
Conditionally Rendering Based onAccess ................................................................................ 439
Cross-Site Request Forgery Protection ..................................................................................... 444
Web Parameter Tampering Protection ...................................................................................... 448
Cross-Site Scripting Protection ................................................................................................. 450
Source Exposure Protection ...................................................................................................... 453
Chapter 14: Localization ��������������������������������������������������������������������������������������� 459
Hello World, Olá mundo, .................................................................................... 459
Conguration............................................................................................................................. 461
Referencing Bundle inJSF Page ............................................................................................... 461
Changing theActive Locale ....................................................................................................... 463
Organizing Bundle Keys ............................................................................................................ 467
Table of ConTenTs
xi
Localizing Conversion/Validation Messages ............................................................................. 471
Obtaining Localized Message inaCustom Converter/Validator................................................ 472
Localizing Enums ...................................................................................................................... 474
Parameterized Resource Bundle Values ................................................................................... 475
Database-Based ResourceBundle ............................................................................................. 475
HTML inResourceBundle .......................................................................................................... 480
Chapter 15: Extensions ����������������������������������������������������������������������������������������� 481
Extension Types ........................................................................................................................ 481
Extending CDI Artifacts ............................................................................................................. 482
Extending Classical Artifacts ..................................................................................................... 485
Plug-ins ..................................................................................................................................... 488
Dynamic Extensions .................................................................................................................. 492
Application Conguration Populator .................................................................................... 492
The Application Main Class ................................................................................................. 493
Local Extension andWrapping .................................................................................................. 496
Introspection ............................................................................................................................. 498
Index ��������������������������������������������������������������������������������������������������������������������� 501
Table of ConTenTs

xiii
About the Authors
BaukeScholtzis an Oracle Java Champion, a member
of the JSF 2.3 Expert Group, and the main creator of the
JSF helper library OmniFaces. On the Internet, he is more
commonly known as BalusC, who is among the top users
and contributors on Stack Overflow. Bauke has integrated
several OmniFaces solutions into JSF 2.3. He is a web
application specialist and consults or has consulted for
Mercury1 Limited, MyTutor, Nava Finance, LinkPizza, ZEEF,
M4N/Zanox, ITCA, RDC, and more clients from fintech,
affiliate marketing, social media, and more as part of his 17
years of experience. This book offers Bauke the opportunity
to go into depth to answer most frequently asked questions and correctly solve most
commonly encountered problems while using JSF.
ArjanTijmsworks for Payara Services Ltd and is a JSF (JSR
372) and Security API (JSR 375) Expert Group member. He
is the co-creator of the popular OmniFaces library for JSF,
which was a 2015 Duke’s Choice Award winner, and is the
main creator of a set of tests for the Java EE authentication SPI
(JASPIC) used by various Java EE vendors. Arjan holds an MSc
degree in Computer Science from the University of Leiden,
The Netherlands. Writing about this topic was a natural
choice for Arjan; He has already written much about it on his
blog and wanted to expand that by contributing to a book.
xv
About the Technical Reviewer
Chád(“Shod”)Darbyis an author, instructor, and speaker
in the Java development world. As a recognized authority
on Java applications and architectures, he has presented
technical sessions at software development conferences
worldwide (in the United States, UK, India, Russia, and
Australia). In his 15 years as a professional software architect,
he’s had the opportunity to work for Blue Cross/Blue Shield,
Merck, Boeing, Red Hat, and a handful of startup companies.
Chád is a contributing author to several Java books,
including Professional Java E-Commerce (Wrox Press),
Beginning Java Networking (Wrox Press), and XML and
Web Services Unleashed (Sams Publishing). Chád has Java certifications from Sun
Microsystems and IBM.He holds a BS in computer science from Carnegie Mellon
University. You can visit Chád’s blog at www.luv2code.com to view his free video tutorials
on Java. You can also follow him on Twitter at @darbyluvs2code.
1
© Bauke Scholtz, Arjan Tijms 2018
B. Scholtz and A. Tijms, The Definitive Guide to JSF in Java EE 8, https://doi.org/10.1007/978-1-4842-3387-0_1
CHAPTER 1
History
This chapter describes the history of JSF, starting from its early conception and ending
where we are today at the moment of writing. We’ll discuss how the JSF API (application
programming interface) itself evolved, which important events took place during that
evolution, and who some of the people were that were involved in all of this.
This is in no way a complete description of the history and the reader should
take notice of the fact that many more events took place and many more people were
involved than we were able to mention here.
In theBeginning . . .
JSF goes back a long time. Its initial JSR, JSR 127, started in 2001. At that time the
Struts web framework was wildly popular, although it wasn’t that long ago that it was
released itself (around 2000). Despite Struts’ popularity, a large number of other web
frameworks were in use in the Java space, and new ones were popping up all the time.
JavaServer Faces (JSF) was conceived as an attempt to bring a standardized MVC
(model-view-controller) web framework base into the overall Java EE platform.
Controversies are quite common in the web framework space, and JSF is no
exception here. Right at the start of its inception there was a big controversy where
Apache opposed the creation of JSF on the bases that Apache Struts already existed and
a closed source alternative would have little value. Apache therefore voted against the
creation of JSF with the following comment:
is JSR conicts with the Apache open source project Struts. Considering
Sun’s current position that JSRs may not be independently implemented
under an open source license, we see little value in recreating a technology
in a closed environment that is already available in an open environment.
2
To the extent that this JSR extends beyond Struts today, we would encourage
the Sun developers proposing this JSR to join the Sun developers already
leading Struts to create an open solution at Apache, something which when
nished would be assured of being able to be implemented as open source.
Eventually the conflict was resolved when after about a year into the process spec
lead Amy Fowler (from Swing fame) was replaced by Craig McClanahan, the very
father of the Struts project that JSF was said to be competing with. The open source
restriction was lifted as well, and the open source JSF implementation, called MyFaces,
was developed in parallel with the (then nameless) RI and hence the specification itself.
MyFaces initially started as an LGPL licensed project at sourceforge.net in December
2002 and had an initial 0.1 release conforming to what was then called an “Early Access
Specification” in January 2003.
Open source implementations are the most common implementations in Java
EE8, and there’s barely any EE specification at the time of this writing (2018) that’s still
implemented as closed source. In 2001, however, this was not just uncommon; it was
actually not allowed for new JSRs. Allowing for an open source implementation was
therefore quite a change, and the honor fell to JSF to be the first of its kind for which this
was allowed.
Despite the open source implementation being allowed, the actual development of
the spec was still done in secret and behind closed doors. There was no public mailing
list, and no tracker (e.g., a JIRA instance) for the public to create issues or express wishes.
Occasionally interviews were being done, and in the fall of 2002 by then former spec lead
Amy Fowler did reveal quite a few details about JSF, but largely the project was shrouded
in mystery for the general public.
The team behind JSF was, however, hard at work. The first e-mail to the internal
JSR-127 list was sent on August 17, 2001. As with most projects, the team spent the initial
months on gathering requirements and looking at the existing competing products. A
package name was chosen as well. The initial placeholder package, which was "javax.
servlet.ui", now "javax.faces", was chosen as the package to use. The very first
technical architecture to be considered was the component model. For a component-
based MVC framework this is obviously one of the most important aspects. During the
last month of 2001 and the first two months of 2002 the team looked at what is now known
as the Managed Bean (called “Object Manager” then). Managed beans with their scopes,
names, and dependency injection are clearly another cornerstone of the JSF framework.
Events and the model behind it were being looked at as well during that time frame.
Chapter 1 history
3
In the second quarter of 2002 two other cornerstones of JSF were discussed: the
Expression Language (inspired by JSTL), which is instrumental for the so-called bindings
of beans from a template to backing code, and the factory finder, which allowed key
parts of JSF to be replaced and although perhaps not fully realized at the time may have
contributed greatly to JSF still being relevant some 16 years later.
It was in this same quarter that Craig McClanahan took over as spec lead, father of
Struts and architect of Tomcat’s Servlet container, took over. Not long after the discussion
about using JSP started, a discussion, perhaps unbeknownst to the team at the time, that
would, unfortunately, have a rather negative impact on JSF later on. Around the end
of the year 2002, Ed Burns, who like McClanahan had also worked on Tomcat before,
joined the team as co-spec lead. Burns is the person who would eventually become the
main spec lead of JSF for well over a decade.
While the team continued to work on things like the aforementioned managed
beans and the so-called value binding, which is the Java representation of the also
aforementioned expression language binding, the first dark cloud appeared when in the
spring of 2003 team member Hans Bergsten realized that there were very real and major
issues with using JSP as the templating language for JSF.He brought these concerns to
the team, but ultimately they weren’t addressed and instead the following months were
spent, among other things, on a variant of the value binding; it later on became clear that
the method binding and the state saving mechanism were another of JSF’s less than ideal
implementations.
JSF 1.0 and its still nameless RI were eventually released on March 11, 2004—
coincidentally, a mere two weeks before the release of another framework that’s still
strong today, Spring 1.0. MyFaces released its 1.0.0 alpha version only days later, on
March 19. It’s perhaps an interesting observation that JSF went final with a full-fledged
XML-based dependency injection (DI) framework just before Spring, which is largely
known for its DI, went final.
JSF 1.0 was generally well received; despite a rather crowded market with
competitors such as Tapestry, WebObjects, Velocity, and Cocoon operating, not less than
three books from writers such as Horst Caymann and Hans Bergsten appeared in the
months after, and the eXo platform (a Digital Collaboration Platform) started using JSF
right away.
Hans Bergsten’s earlier concerns, however, become painfully clear almost just
as quickly; the JSP technology is based on processing a template from start to end,
immediately writing to the response as tags are encountered. JSF, however, requires
a phased approach where components need to be able to inspect and act on the
Chapter 1 history
4
component tree, which is built from the tags on the page, before starting to write
anything to the response. This mismatch led to many strange issues, such as content
disappearing or being rendered out of order.
Only three months after the introduction of JSF, Hans Bergsten made a strong case
of dropping JSP in his legendary article “Improving JSF by Dumping JSP.” There Bergsten
explains how ill-suited JSP is for use a template language in JSF, but he also presents
a glimmer of hope; because of JSF’s great support for extendibility, it’s relatively easy
to introduce alternative templating simply by replacing the so-called view handler,
something which JSF explicitly allows. It would, however, take five long years until JSF
would indeed ship with a more suitable view templating language, and even though JSP
had been essentially deprecated at that point it’s still present in JSF at the time of writing.
The Adolescent Years
Back in 2004 another first befell JSF; on June 28 Ed Burns announced that the source
of the RI was released by Sun. This represented a major milestone as before that date
most technology in active use by Sun was closed source. Initially the source was licensed
under the somewhat exotic JRL, but later this would be changed to dual licenses, GPL
with classpath exception and CDDL.At the same time as this announcement, the
tradition was established that every new feature or bug fix should be accompanied by a
test, and that all existing tests should be executed before committing the change. Some
14 years later there’s a largely different set of people working on the RI source, and
the project structure and code conventions have changed as well, but the test-driven
tradition is still being uphold in its original form.
At that point Ed Burns decided to focus more on the specification aspects of JSF as
the JSF 1.2 spec work had started right away, and Jayashri Visvanathan, one of the early
team members, took on the lead role concerning the implementation aspects, with Ryan
Lubke, working as the TCK (testing) engineer.
Still only a few months old, a variety of component libraries for JSF had already
started to pop up, although all of them commercial. Among those was the one from
Oracle, ADF Faces. ADF Faces was put on Oracle’s roadmap well before JSF 1.0 went final,
and the first early access release was presented on August 17, 2004. Its lead was Adam
Winer, who represented Oracle in the team that created JSF 1.0. ADF Faces primarily
contained a set of rich components, but also a dialog framework, and remarkably
already featured partial page rendering (PPR), quite a bit ahead of the later crop of AJAX
Chapter 1 history
5
solutions. ADF Faces also contained a “for each” tag (af:forEach) that actually worked.
Adam Winer explained in these early days that such tag is not quite trivial to build but
promised that Oracle would contribute the knowledge back to JSF itself.
The ADF Faces components originated mostly from the earlier User Interface XML
(UIX) framework, of which Adam Winer was the lead architect as well. Earlier versions
of UIX used the names “Cabo,” “Baja,” and “Marlin.” UIX was a rich client framework
for use in the browser. With JSF sharing more than a few similarities to UIX, and with its
lead, Adam Winer, being part of the original JSF team, it’s perhaps not unreasonable to
surmise that UIX influenced JSF.Such similarities include the concept of components
with separate renderers, JSP tag handlers and declarative options to compose a page,
and the ability to instantiate those same components programmatically in Java. There
was even a conceptually similar data binding, although with a less elegant syntax.
Instead of, say, value="#{user.age}", UIX would use data:value="age@user" but also
required a kind of producer to be defined on each page to declare where “user” comes
from, and then nest the page’s content within that declaration. By contrast, JSF and EL
have always used global definitions and left it up to the user to avoid name clashes.
One of the first, if not the first open source component library in 2004 was
Matthias Unverzagt’s OurFaces. As JSF did not had its own resource API (application
programming interface) at the time to serve up things like images, OurFaces required a
Servlet to be added to web.xml, the so-called SkinServlet (ourfaces.common.webapp.
SkinServlet). The significance of this is that it became a rather common thing for JSF
libraries in those days to ask their users: add something manually to web.xml before the
component library can be used.
Most of the last months of 2004 and early months of 2005 were spent by the
JSF 1.2 expert group (EG) working on various JSP and EL issues, such as the JSTL
<c:forEach> support and the generation of IDs in JSP, as well as on the dreaded “content
interweaving” issue, which refers to the aforementioned content that appears at wrong
places in the response when rendering.
While OurFaces may have been one of the first component libraries, it didn’t last
and few will remember it or have even heard about it today. This is not quite the same
for another framework that has its roots in early 2005, namely, Alexander Smirnov’s
Telamon framework, later renamed Ajax4jsf. This framework was one of the first of its
kind that combined JSF and the then new and fresh AJAX technology. The beauty of
Ajax4Jsf was that it could add AJAX support to existing components, which weren’t built
with AJAX support in mind at all by enclosing them among others in the <a4j:region>
Chapter 1 history
6
tag. This technology was incorporated in the Exadel Visual Component Platform, which
was released in March 2006 and would later be renamed RichFaces, and would become
one of the most memorable JSF component libraries.
At around the same time Alexander Smirnov started work on what eventually would
become RichFaces, a company called ICEsoft started working on a JSF component
library. ICEsoft had been in business for a couple of years and had been working on
a product called ICEbrowser, a Java-based browser, and a product called ICEbrowser
beans, which were “lightweight, configurable Javabean components that can be rapidly
integrated into Java client applications.” During JavaOne 2005 of that year, on 27 June,
ICEsoft announced their its component library for JSF—ICEfaces. This was based
on AJAX as well but incorporated AJAX directly into the components. ICEsoft called
its specific technique “patent pending Direct-to-DOM™,” which basically meant that
changes coming from the server were directly injected into the DOM tree structure of a
web page. A final version wasn’t available right away though, but an early access release
was provided. This was closed source but cost-free.
Meanwhile, JSF EG member Jacob Hookom, inspired by Hans Bergsten’s concerns
about the unsuitability of JSP, grabbed the bull by the horns and started working himself
on that alternative templating language envisioned by Bergsten. In August 2005 this
work had progressed into a usable initial version. The name of this templating language?
Facelets! It immediately took the JSF world by storm. Kito Mann published the first part
of a series of articles about it on JSFCentral the very first month, and Richard Hightower
published the famous article “Facelets fits JSF like a glove” several months later.
Oracle had not been sitting still either in 2005, and after about 16(!) early access releases
it announced in late 2005 at the JavaPolis conference in Antwerpen (nowadays called
Devoxx) that ADF Faces would be donated to MyFaces and thus become open source.
In the first month of 2006, Jacob Hookom and Adam Winer contemplated the terrible
implementation of JSF’s state save mechanism. This worked by first creating a component
tree from a template and then, near the end of the request, blindly serializing the entire
tree with all data that may have been put there during the request. During a postback the
tree is restored from this serialized form (hence the name of the phase “restore view”).
This is a tremendous waste, as the majority of this information is already available in the
template. Especially when doing AJAX requests with client-side state saving this poses
a very big burden, but it is also a problem when storing this state on the server as it
massively increases JSF’s memory usage. One of the main reasons for doing state saving
in such terrible way again has to do with that one decision: to support JSP.With JSF 1.2
about to go final, there was unfortunately no time left to fix this for version 1.2.
Chapter 1 history
7
Even though it was clear at this point that Facelets was the future of JSF, when
JSF1.2 was eventually released in May 2006 it still contained only JSP.Not all was bad
though. Thanks to a cooperation between the JSF and JSP EGs, a revision of JSP was
released, JSP 2.1, which was much better aligned with the demands of JSF.On top of
that, JSP’s expression language and JSF’s expression language were merged. The result
was UEL (Unified Expression Language). A very practical advantage of UEL is that JSF
components no longer have to convert Strings manually into expressions but directly
receive a ValueExpression from the templating language. Both JSP 2.1 and JSF 1.2
became part of Java EE 5, which was released at the same time.
On June 13, 2006, the MyFaces community announced that the donated project
would have its name changed to Trinidad. ADF Faces kept existing at Oracle, though,
but was based on Trinidad with some extra features (such as support for Portals, JSR 227,
etc.). Just two weeks prior to that, on May 31, 2006, ICEsoft announced its free, although
still closed source, community edition. A few months later, on November 14, 2006,
ICEsoft would fully open source ICEfaces under the MPL license. RichFaces, still closed
source at that point and being sold by Exadel, would not stay behind for long though,
and some four months later, on March 29, 2007, Exadel announced a partnership with
Red Hat that made RichFaces available under an open source license and available and
supported via its JBoss group.
On toMaturity
On May 22, 2007, the specification work for JSF 2.0 began. The scope was hugely
ambitious and promised not only to fix many of the issues that people had been
complaining about but also to introduce quite a bunch of new features. Mentioned
among the many goals in the JSR was a particularly interesting one when looking at the
bigger picture—extracting the managed bean facility from JSF and making it available for
the entire platform.
During the fall of 2007 the community was polled for a name for the JSF RI.Four
names rose to the top, but as is often the case none of these names could be approved by
Sun’s legal department. Eventually Mojarra was proposed, and perhaps to the surprise
of some this one did pass legal’s scrutiny. Ryan Lubke, one of the main JSF committers
then, made the official announcement on December 5, 2007.
A little under a year later, on October 29, 2008, Çağatay Çivici started a new library,
PrimeFaces. The name derives from Çağatay’s nickname, which is Optimus Prime, the
Chapter 1 history
8
courageous leader of the heroic autobots in the fictional Transformers universe. Çağatay
had been involved with JSF development for a long time and had worked on the YUI4JSF
JSF component library before. PrimeFaces was initially based on JSF 1.x, but with JSF 2.x
looming and the project still young it would soon after switch to JSF 2.x.
On July 1, 2009, the long-awaited JSF 2.0 finally arrived. JSF 2.0 indeed fixed nearly
every problem that the industry had with JSF; finally, Facelets was included as the
default view templating language. JSP was effectively deprecated. The state saving
concerns that Hookom and Winer brought forward more than three years earlier were
addressed as well; from then on JSF only saved delta state (state changes), and in restore
view the component tree was reloaded from the template, instead of actually restored.
Another big concern brought forward by the JSF community over the years, JSF’s
over-the-top emphasis on postbacks, was addressed too; GET requests became a first-
class citizen in JSF 2.0. A well-known usability problem with JSF, sometimes called “The
Trap,” was that for a number of operations the data involved needed to be the same
during both the original request and the postback. This is not entirely trivial to guarantee
in JSF 1.x. JSF 2.0 introduced the so-called view scope for this, which elegantly solved the
problem. The creation of custom components, yet another problem area of JSF 1.x, was
made much simpler as well. JSF 2.0 also introduced core support for AJAX, modeled after
the way Ajax4Jsf worked, a resource API, system events, and quite a few other things.
One of JSF 2.0’s goals, making its managed bean facility usable outside JSF, was
implicitly reached by the CDI spec, which was introduced together with JSF 2.0in Java EE 6.
The CDI spec itself has a long history too, but one of its defining characteristics is that CDI
Beans are strongly based on JSF Managed Beans and are essentially a super set of those.
Altogether the impact of all those fixes and new features was such that it split the
community essentially in two; those who had used JSF 1.x and never looked at it again
and those who switched to JSF 2.x or, specifically, the ones who started using JSF with2.0
and never saw 1.x. This often led to heated debates, with the 1.x side arguing that JSF
is horrible, and the 2.x side not understanding at all why that would be the case. Even
at the time of this writing, which is almost nine years after JSF 2.0 was released, and a
longer period than JSF 1.x ever existed, these sentiments still remain to some degree.
Despite the many things that JSF 2.0 did right, there was one missed opportunity;
even though CDI was now available and superseded JSF’s Managed Beans, JSF chose
not to deprecate its managed bean facility right away. Even worse, it introduced an
annotation-based alternative to the XML-based system JSF 1.x used to define managed
beans. With CDI already out there having annotations like javax.enterprise.context.
RequestScoped, simultaneously introducing a javax.faces.bean.RequestScoped
Chapter 1 history
9
annotation that did exactly the same thing seems debatable as best. The EG seemed to
be aware of this conflict, as a warning was put in place that these new annotations would
possibly be superseded by platform functionality before long.
On December 23, Cay Horstmann raised his concerns about this very unwanted
situation in an article titled “Is @javax.faces.bean.ManagedBean Dead on Arrival?” The
response was quite clear; people, including Java EE book writer Antonio Goncalves, asked for
this huge mistake that JSF 2.0 had made to be corrected as soon as possible and to deprecate
javax.faces.bean.ManagedBean right away in the upcoming JSF 2.1 maintenance release
which was called for, among other things, to rectify another mistake (namely, the problem
JSF 2.0 introduced that in addition to a custom ResourceResolver it was also necessary to
provide a custom ExternalContext, which was very unclear). Why javax.faces.bean.
ManagedBean indeed wasn’t deprecated in the JSF 2.1 MR remains a mystery to this day.
While applications written against the JSF 1.x APIs would mostly run unchanged
on JSF 2.0, or only needed a few small changes, the component libraries had a much
harder time. Specifically, the platform-provided AJAX support meant that the existing
component libraries would have to forego their own AJAX implementations and
rebase on the standard APIs. Clearly that was no small feat, and it took a long time for
component libraries to migrate, with some never really making the switch at all.
Here PrimeFaces was clearly at an advantage. Being a relatively new library without
much legacy, it made the switch relative easy. Be it a coincidence or not, PrimeFaces’
ascension in popularity seemed to start right after JSF 2.0 was released, which was also
the exact same time that both ICEfaces and RichFaces seemed to become less popular.
Although it must be noted that hard statistics are difficult to obtain and contain many
facets (downloads, deployments, book, questions asked, available jobs, taking different
industries into account, etc.), somewhere around 2012 PrimeFaces had seemingly
become the more popular JSF component library.
In the beginning of that same year, February 19, 2012, Arjan Tijms and Bauke Scholtz
(by coincidence also the authors of this book) started the OmniFaces library for JSF. The
goal of OmniFaces was to be a utility library for JSF, essentially what Apache Commons
and Google Guava are to Java SE.Tijms and Scholtz had worked on a JSF-based web site
together and found that they both had a collection of private JSF utilities that they reused
for different projects, and also that a great number of similar utilities were essentially
rewritten again and again for many JSF projects and were partially floating around in
places like forum messages and blog posts. OmniFaces was set up in particular not to not
compete component libraries like PrimeFaces but to work together with those. Hence,
visual-oriented components were largely out of scope for OmniFaces.
Chapter 1 history
10
In 2012 the specification process for JSF 2.2 was also in full swing. JSF 2.2 was
eventually released on the May 21, the next year. JSF 2.2 specifically came up with a
formal version of the alternative mode in which Facelets could operate; instead of
putting component tags on a view, plain HTML was put on it, with a special ID linking
the tag to a component. Such a mode is generally speaking somewhat less interesting
to JSF developers but appeals specifically to web designers who can more easily use
plain HTML tools for such views. JSF 2.2 also introduced a CDI compatible @ViewScoped
annotation, which removed one of the last reasons to still use the JSF managed bean
facility in JSF 2.1, namely, that in that version @ViewScoped only worked on those beans.
JSF 2.2 also introduced two new big features, Faces Flow and Resource Contracts, but
these seem to have seen little uptake in practice.
Just prior to the start of JSF 2.3, on July 20, 2014, RichFaces lead Brian Leathem
announced on his blog that RichFaces 5, the next-generation version of RichFaces,
would be canceled. Instead, RichFaces would “pursue a path of stability over
innovation,” which means that JBoss will make RichFaces 4.x compatible with JSF 2.2
and port back a few things that were in development for RichFaces 5. While the post was
somewhat optimistic, it strongly looked like the writing was on the wall for RichFaces.
On August 26, 2014, the specification work for JSF 2.3 started. A new co-spec lead
was introduced—Manfred Riem, who up to then had been working mostly on the
implementation side of Mojarra, doing such things as migrating hundreds of the tests
for which JSF is famous away from the ancient and retired Cactus framework to a more
modern Maven-based one, and making sure the gazillions of open Mojarra issues
were reduced to a manageable number. JSF 2.3 started off with a perhaps somewhat
remarkable message that Oracle had only a few resources available. During the
specification process those few resources dropped to a number that few would have
expected—absolutely zero. Basically, after JavaOne 2015, nearly all of the spec leads
just vanished and most specs as a result abruptly ground to a halt. Josh Juneau reported
about this in his famous study, “Java EE 8, What Is the Current Status: Case Study for
Completed Work Since Late 2015,” which undeniable makes it clear by showing graphs
of e-mails, commits, and issues resolved that Oracle had just walked away.
The openness of the JSF and its RI Mojarra were fortunately such that the
specification work and implementation thereof in Mojarra can largely be carried on by
the other EG members, which indeed happens.
Chapter 1 history
11
Meanwhile on February 12, 2016, Red Hat announced that RichFaces would be
end of lived (EOL) later that year, namely, in June 2016. One of the most popular JSF
component libraries at some point, often named something like “One of the big three,”
effectively was no more. On June 20, 2016, the last real commit to the project was done,
“RF-14279: update JSDoc.” Two days later Red Hat released RichFaces 4.5.17 and the
GitHub repos were put into archived (read only) mode. Brian Leathem, who is still a
JSF2.3 EG member, announced a few days later on February 18 that he would no longer
be doing any JSF-related work.
Rejuvenation
In late 2016 the JSF spec leads briefly returned, but with the message that the spec must
be completed in only a few weeks, so the (somewhat) lengthy finalization process could
start. On March 28, 2017, JSF 2.3 was then eventually released, bringing with it the start
of replacing JSF native artifacts with CDI versions, and finally something which should
have happened years ago: the deprecation of the JSF managed bean facility in favor of
using CDI beans. Other features are support for WebSocket using the Java EE WebSocket
APIs donated by OmniFaces, the introspection of available view resources in the system,
and a search expression framework donated by PrimeFaces.
Following the somewhat turbulent development of the JSF 2.3 spec is the even more
turbulent announcement by Oracle in 2017 that Java EE, thus including JSF, would be
transferred to the Eclipse foundation. Oracle would stop leading the specs it owned
before, which again includes JSF.This would mean that Mojarra would be re-licensed,
and JSF would be evolved by a new process with likely different leads. At the time of
writing, this transfer is in full swing.
Chapter 1 history
13
© Bauke Scholtz, Arjan Tijms 2018
B. Scholtz and A. Tijms, The Definitive Guide to JSF in Java EE 8, https://doi.org/10.1007/978-1-4842-3387-0_2
CHAPTER 2
From Zero toHello World
In this chapter you will learn how to set up a JSF (JavaServer Faces) development
environment with the Eclipse IDE (integrated development environment), the Payara
application server, and H2 database from scratch.
Installing Java SE JDK
You probably already know that Java SE is available as JRE for end users and as JDK
for software developers. Eclipse itself does not strictly require a JDK as it has its own
compiler. JSF being a software library does not require a JDK to run either. Payara,
however, does require a JDK to run, primarily in order to be able to compile JSP files,
even though JSP has been deprecated as JSF view technology since JSF 2.0.
Therefore, you need to make sure that you already have a JDK installed as per
Oracle’s instructions. The current Java SE version is 9, but as Java EE 8 was designed
for Java SE 8 which is currently more mature, JDK 8 is recommended: https://docs.
oracle.com/javase/8/docs/technotes/guides/install/install_overview.html.
The most important parts are that the PATH environment variable covers the /bin
folder containing the Java executables (e.g., "/path/to/jdk/bin"), and that the JAVA_HOME
environment variable is set to the JDK root folder (e.g., "/path/to/jdk"). This is not strictly
required by JSF, but Eclipse and Payara need this. Eclipse will need the PATH in order to
find the Java executables. Payara will need the JAVA_HOME in order to find the JDK tools.
What About Java EE?
Note that you do not need to download and install Java EE from Oracle.com even though
JSF itself is part of Java EE. Java EE is basically an abstract specification of which the
so- called application servers represent the concrete implementations. Examples of
those application servers are Payara, WildFly, TomEE, GlassFish, and Liberty. It is exactly
those application servers that actually provide among others JSF (JavaServer Faces),
14
EL (Expression Language), CDI (Contexts and Dependency Injection), EJB (Enterprise
JavaBeans), JPA (Java Persistence API), Servlet, WebSocket, and JSON-P (JavaScript
Object Notation Processing), APIs (application programming interfaces) out of the box.
There also exist so-called servlet containers which provide basically only the Servlet,
JASPIC (Java Authentication Service Provider Interface for Containers), JSP (JavaServer
Pages), EL, and WebSocket APIs out of the box, such as Tomcat and Jetty. However, it
would require some work to manually install and configure, among others, JSF, JSTL
(JSP Standard Tag Library), CDI, EJB, and JPA on such a servlet container. It is not even
trivial in the case of EJB as it requires modifying the servlet container’s internals. That is,
by the way, exactly why TomEE exists. It’s a Java EE application server built on top of the
barebones Tomcat servlet container engine.
Coming back to the Java EE download at Oracle.com, it would give you basically the
GlassFish server, along with a bunch of documentation and optionally the Netbeans
IDE.We do not need it as we are already using Payara as the Java EE application server,
and are targeting Eclipse as IDE.Therefore, the Java SE JDK is sufficient.
Installing Payara
Payara is an open source Java EE application server which is in 2014 forked from
GlassFish. It is basically a response to Oracle’s announcement to stop its commercial
support for GlassFish, so companies previously using GlassFish commercially could
effortlessly switch to Payara and continue enjoying commercial support. Thanks to
commercial support for business customers previously using GlassFish, the Payara
application server software can continuously be bug-fixed and improved.
The first Payara version with JSF 2.3 integrated is 5. You can download it from https://
payara.fish. Make sure you choose either the “Payara Server Full” or “Payara Server Web
Profile” download and not, for example, the “Payara Micro” or “Payara Embedded,” as they
have other purposes. Installing is basically a matter of unzipping the downloaded file and
putting it somewhere in your home folder. We’ll leave it there until we have Eclipse up and
running, so that we can then integrate Payara in Eclipse and let it manage the server.
How About Other Servers?
The choice for Payara in this book is primarily because it is at time of this writing
one of the very few available Java EE application servers with JSF 2.3 integrated.
The other one is GlassFish, but we would rather not advocate it as it would basically
Chapter 2 From Zero tohello World
15
offer no commercial support or bug fixes. GlassFish must be seen as a true reference
implementation for other application server vendors so they can, if necessary, build their
application server implementation by example.
WildFly, TomEE, and Liberty did not, at the time of writing, have a version available
with JSF 2.3 integrated.
Installing Eclipse
Eclipse is an open source IDE written in Java. It is basically like notepad but with
thousands if not millions of extra features, such as automatically compiling class files,
building a WAR file with them, and deploying it to an application server without the
need to manually fiddle around with javac in a command console.
Eclipse is available in a lot of flavors. As we’re going to develop with Java EE, we need
the one saying “Eclipse IDE for Java EE developers.” It’s usually the top-ranked download
link at http://eclipse.org/downloads/eclipse-packages/. Also here, installing is
basically a matter of unzipping the downloaded file and putting it somewhere in your
home folder.
In Windows and Linux you’ll find the eclipse.ini configuration file in the unzipped
folder. In Mac OS this configuration file is located in Eclipse.app/Contents/Eclipse.
Open this file for editing. We want to increase the allocated memory for Eclipse. At the
bottom of eclipse.ini, you’ll find the following lines:
-Xms256m
-Xmx1024m
This sets, respectively, the initial and maximum memory size pool which Eclipse
may use. This is a bit too low when you want to develop a bit of a decent Java EE
application. Let’s at least double both the values.
-Xms512m
-Xmx2g
Watch out that you don’t declare more than the available physical memory. When
the actual memory usage exceeds the available physical memory, it will continue into
virtual memory, usually in a swap file on disk. This will greatly decrease performance
and result in major hiccups and slowdowns.
Chapter 2 From Zero tohello World
16
Now you can start Eclipse by executing the eclipse executable in the unzipped
folder. You will be asked to select a directory as workspace. This is the directory where
Eclipse will save all workspace projects and metadata.
After that, Eclipse will show a welcome screen. This is not interesting for now. You
can click the Workbench button on the right top to close the welcome screen. Untick if
necessary “Always show Welcome at start up” on the bottom right. After that, you will
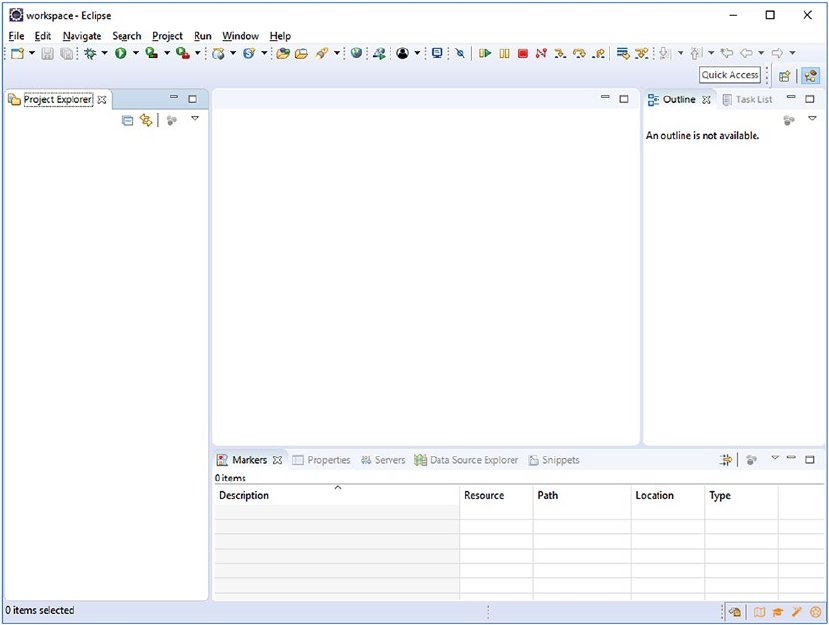
enter the workbench. By default, it looks like the screenshot in Figure2-1.
Configuring Eclipse
Before we can start writing code, we would like to fine-tune Eclipse a bit so that we don’t
eventually end up in trouble or with annoyances. Eclipse has an enormous amount of
settings, and some of its default values should not have been the default values. You can
verify and configure the settings via Window ➤ Preferences.
Figure 2-1. Eclipse workbench
Chapter 2 From Zero tohello World

17
• General ➤ Workspace ➤ Text file encoding must be set to UTF- 8.
Particularly in Windows this might otherwise default to the proprietary
encoding CP-1252 which does not support any characters beyond the
Latin range. When reading and saving Unicode files with CP-1252, you
risk seeing unintelligible sequences of characters. This is also called
“mojibake.”.1
• General ➤ Workspace ➤ New text le line delimiter must be set to
Unix. It works just ne on Windows as well. is will particularly
keep version control systems happy. Otherwise, developers pulling
code on dierent operating systems might face confusing conicts or
dis caused by dierent line endings.
• General ➤ Editors ➤ Text editors ➤ Spelling should preferably
be disabled. is will save you from a potentially big annoyance,
because it unnecessarily also spellchecks XML conguration les
such as faces-config.xml and web.xml, causing confusing errors and
warnings in those les.
• Java ➤ Compiler ➤ Compiler compliance level must be set to 1.8. is
is the minimum required Java version for Java EE 8.
• Java ➤ Installed JREs must be set to the JDK, not to the JRE.is
setting will normally also be used to execute the integrated
application server which usually requires the JDK.
Installing JBoss Tools Plug-in
Standard Eclipse for Java EE in its current version does not support any CDI tools. It
has no wizards to create CDI managed beans, or autocompletion and hyperlinking for
CDI managed beans in JSF pages. The JBoss Tools plug-in is an extensive plug-in which
offers among others the CDI tools.2 This is very useful when developing a Java EE web
application.
1 https://en.wikipedia.org/wiki/Mojibake.
2 http://tools.jboss.org/features/cdi.html.
Chapter 2 From Zero tohello World
18
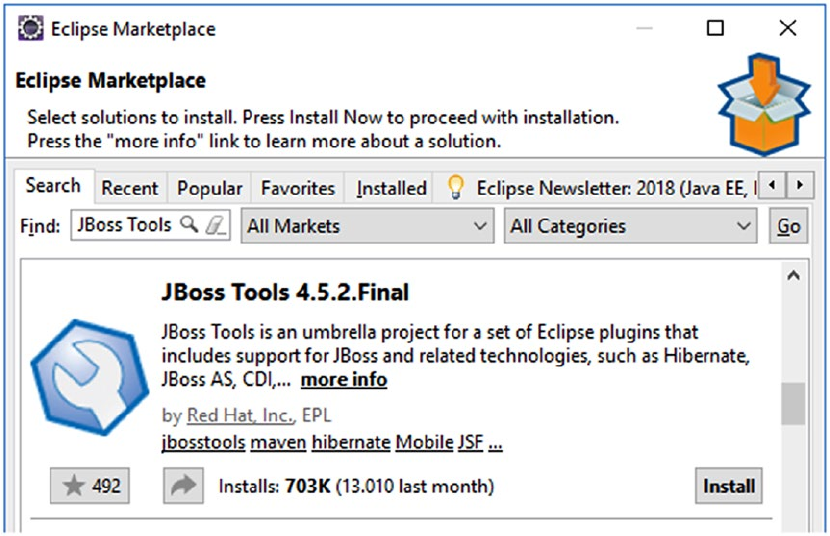
In order to install it, go to Help ➤ Eclipse Marketplace. Enter in the search field “JBoss
Tools” and click Go. Scroll a bit through the results until you see JBoss Tools Final and
then click Install (see Figure2-2).
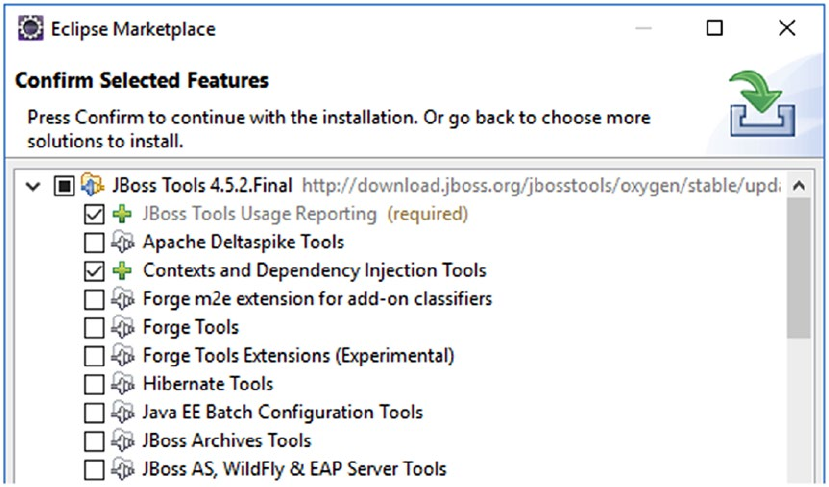
In the next step, you’ll see a fairly large list of all JBoss Tools’ offerings. We don’t need
all of them. The list indeed also includes some JSF-related tools, but they are not terribly
useful. The Visual Page Editor is not at all useful. Dragging and dropping together a JSF
page doesn’t make you a good JSF developer. That can only be achieved by just writing
code yourself. Moreover, having too many unused features installed and even implicitly
enabled may make Eclipse terribly slow. The fewer features you select, the less chance
that you will be surprised about changes in the IDE behavior. So, untick the top check
box and then tick only the check box which says “Context and Dependency Injection
Tools” (see Figure2-3).
Figure 2-2. JBoss Tools in the Eclipse Marketplace
Chapter 2 From Zero tohello World
19
Next, accept the terms of the license agreement and complete the wizard until
Eclipse is restarted.
Integrating New Server inEclipse
We need to familarize Eclipse with any installed application servers so that Eclipse can
seamlessly link its Java EE API libraries in the project’s build path (read: the compile time
classpath of the project). This is mandatory in order to be able to import classes from
the Java EE API in your project. You know, the application server itself represents the
concrete implementation of the abstract Java EE API.
In order to integrate a new application server in Eclipse, first check the bottom
section of the workbench with several tabs representing several Views (you can add
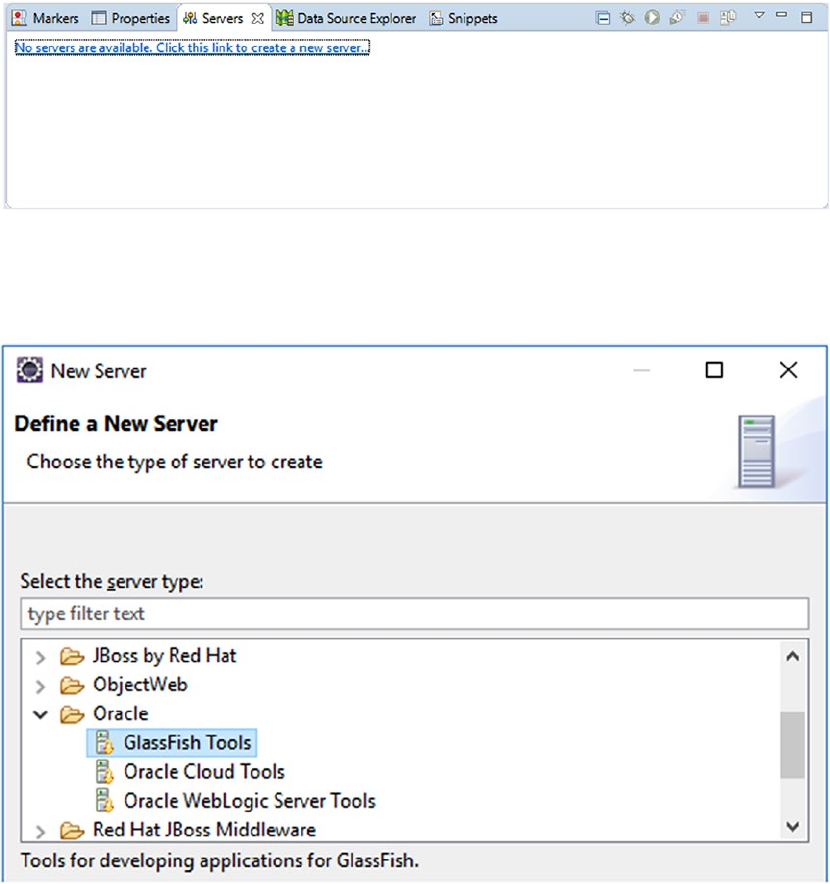
new ones via Window ➤ Show View). Click the Servers tab to open the servers view
(see Figure2-4). Click the link which says “No servers are available. Click this link to
create a new server. . . .”
Figure 2-3. Select only the CDI tools for now
Chapter 2 From Zero tohello World
20
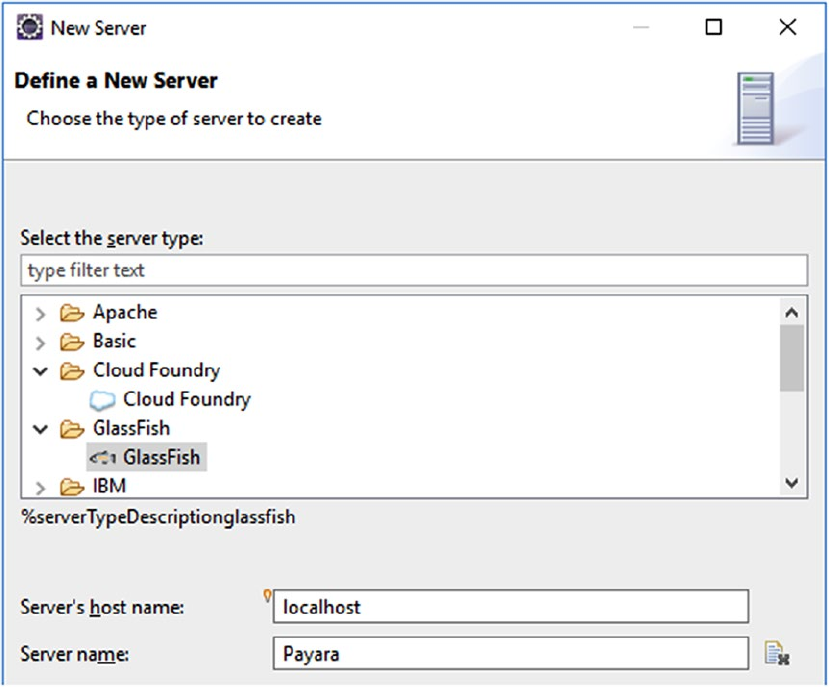
From the list of available server tools, select Oracle ➤ GlassFish Tools (see Figure2-5).
After clicking Next for the first time, it will download the plug-in in the background
and request you to accept the license agreement before installing the plug-in. This
plug-in is mandatory in order to manage any GlassFish-based server from inside the
workbench—among others, adding and removing Eclipse projects to the deployments
folder, starting and stopping the server, and running the server in debug mode. Once it’s
finished installing, it will request you to restart Eclipse. Take action accordingly.
Figure 2-4. Servers view of Eclipse Workbench
Figure 2-5. Selecting GlassFish Tools in New Server wizard
Chapter 2 From Zero tohello World
21
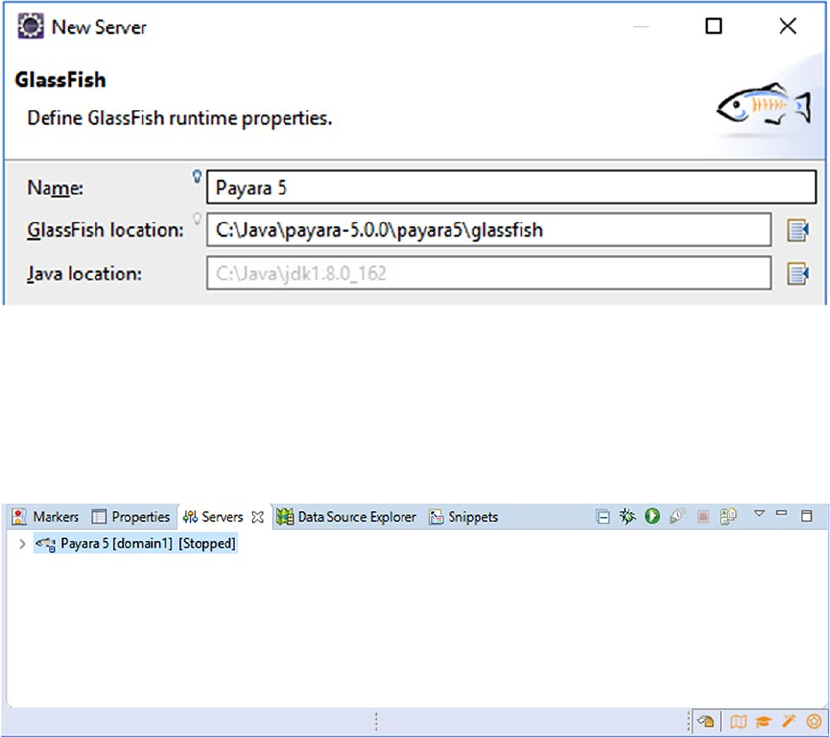
Once returned into the workspace, click the same link in the Servers view again.
You’ll now see a GlassFish ➤ GlassFish option. Select this and set the Server name field to
“Payara” (see Figure2-6).
Advance to the next step. Here, you should point the GlassFish location field to the
glassfish subfolder of the Payara installation, there where you have unzipped it after
downloading (see Figure2-7).
Figure 2-6. Selecting GlassFish server in New Server wizard and naming it Payara
Chapter 2 From Zero tohello World
22
Complete the remainder of the New Server wizard with default settings. You don’t
need to edit any other fields. The newly added server will now appear in the Servers view
(see Figure2-8).
Creating New Project inEclipse
We're now ready to create a new project for our JSF application in Eclipse. This can
be done via the left section of the workbench which by default shows only one tab
representing the Project Explorer view (also here, you can add new views via Window ➤
Show View). Right-click anywhere in this view and select New ➤ Project. It’ll show the
New Project wizard which may have a bit too many options.
Figure 2-7. Specifying GlassFish location in New Server wizard
Figure 2-8. The Payara server in Servers view
Chapter 2 From Zero tohello World
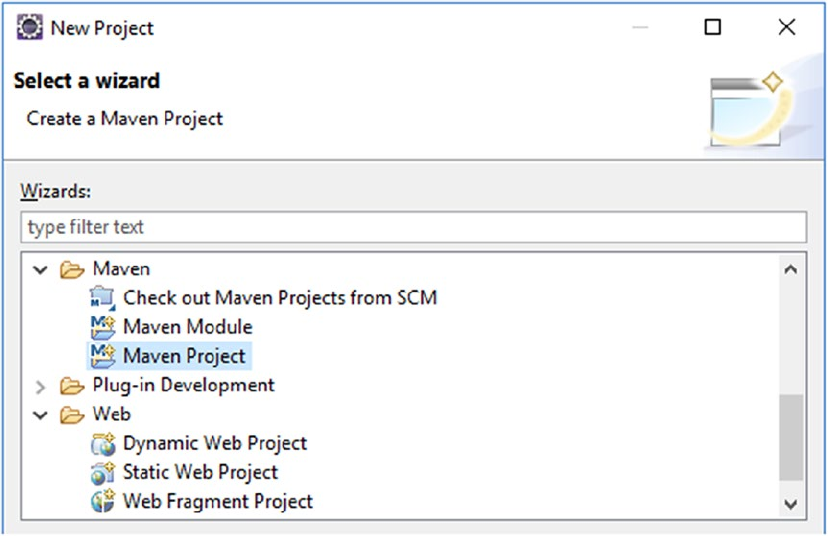
23
Eclipse, being an IDE for many different project tasks, offers a bewildering amount
of different project types from which to choose. For a Java EE-based application which is
going to be deployed as a simple WAR file, there are basically two project types that we
could choose from: Web ➤ Dynamic Web Project and Maven ➤ Maven Project.
The difference is that the first is an Eclipse native project that really only works on
Eclipse, while the latter is a universal type of project that can be built by any IDE, as well
as easily on the command line and by various CI servers such as Travis and Jenkins. For
this reason, the Maven project type is really the only viable choice (see Figure2-9).
In the next step, make sure that the option Create a simple project (skip archetype
selection) is checked (see Figure2-10). This will let us start with a really empty Maven
project so that we can configure and populate it ourselves. Of course, you could also
choose from an archetype, which is basically a template project with several already
prepared files and configurations. But we don’t need any for now.
Figure 2-9. Selecting Maven Project in New Project wizard (note the Dynamic
Web Project as another but non-viable option)
Chapter 2 From Zero tohello World
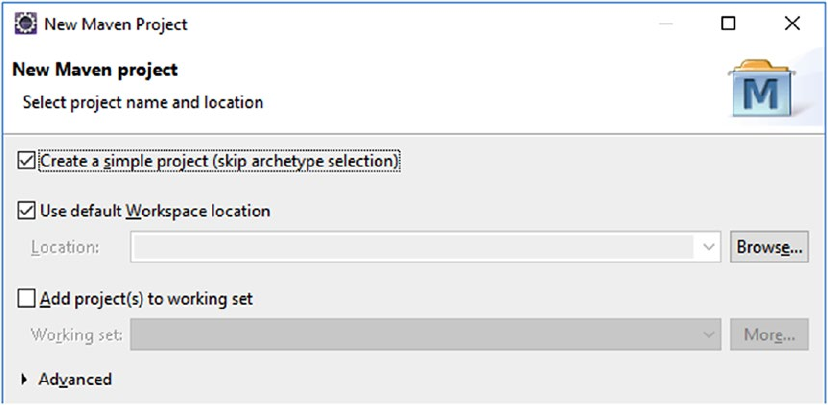
24
In the next step, we can specify our own Maven coordinates of the project. The
Maven coordinates consist of, among others, Group Id, Artifact Id, and Version, also
known as GAV in the Maven world. The Group Id usually matches the root package name
you’re going to use, such as com.example. The Artifact Id usually represents the project
name you’re going to use. For simplicity and in order to be consistent in the rest of the
book, we’ll use project. The Version can be kept default at 0.0.1-SNAPSHOT. Finally the
Packaging should be set to war.
Complete the remainder of the New Maven Project wizard (see Figure2-11). You
don’t need to edit any other fields. Once you’ve finished the wizard, you’ll get to see the
project structure in the Project Explorer view (see Figure2-12).
Figure 2-10. Checking “Create a simple project” in New Maven Project wizard
Chapter 2 From Zero tohello World
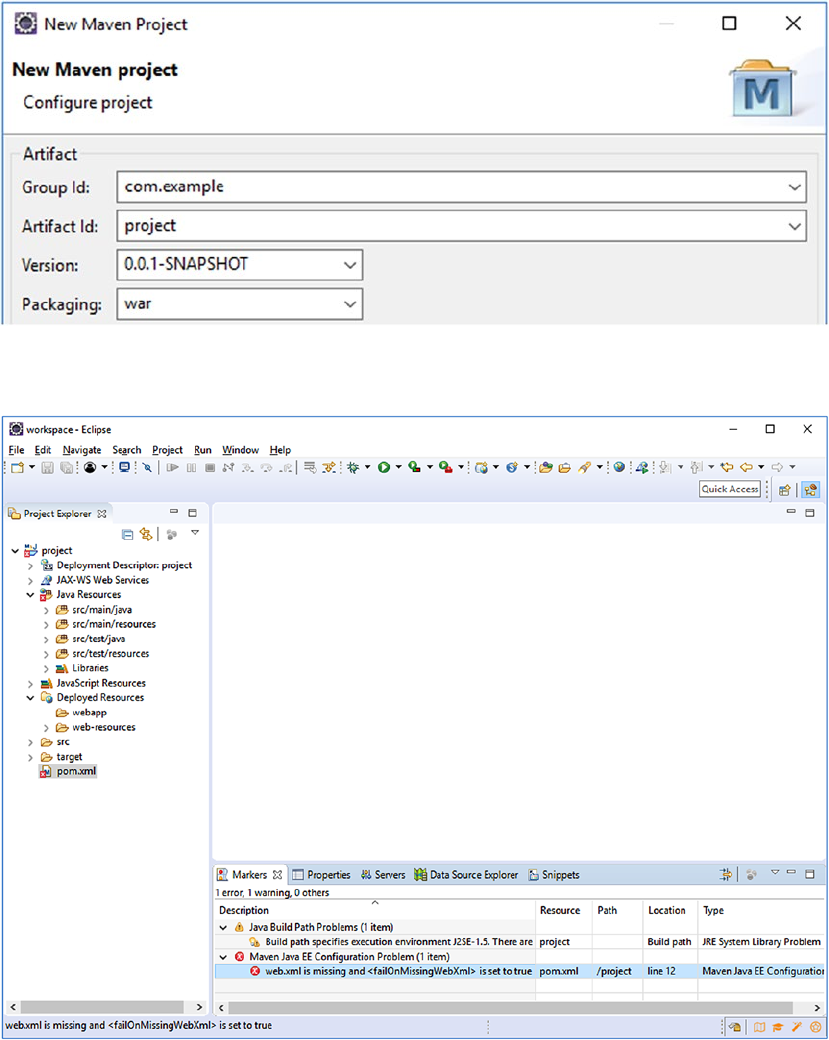
25
Figure 2-11. Filling out the Maven GAV in new Maven Project wizard
Figure 2-12. The newly created Maven project in Eclipse
Chapter 2 From Zero tohello World
26
Unfortunately, the Eclipse-generated pom.xml, which is the main indicator of the
project being a Maven project and containing its configuration, is less than ideal. It’s not
current any more, even when generated by the latest Eclipse, the Oxygen 2 (December
2017). You can already see that by the pom.xml file which is marked with an alarming
red cross and an error message in the Markers view. Any project that has at least one
such red cross cannot be built and won’t be deployable. The error message literally says
“web.xml is missing and <failOnMissingWebXml> is set to true.” In other words, Maven
somehow thinks that it’s still a pre-Java EE 6 project, when this was indeed disallowed.
In order to solve this problem and to catch up the Eclipse-generated pom.xml with
the current standards, we need to open pom.xml for editing and adjust it as shown in the
following code:
<project
xmlns="http://maven.apache.org/POM/4.0.0"
xmlns:xsi="http://www.w3.org/2001/XMLSchema-instance"
xsi:schemaLocation="http://maven.apache.org/POM/4.0.0
http://maven.apache.org/xsd/maven-4.0.0.xsd"
>
<modelVersion>4.0.0</modelVersion>
<groupId>com.example</groupId>
<artifactId>project</artifactId>
<version>0.0.1-SNAPSHOT</version>
<packaging>war</packaging>
<properties>
<project.build.sourceEncoding>
UTF-8
</project.build.sourceEncoding>
<project.reporting.outputEncoding>
UTF-8
</project.reporting.outputEncoding>
<maven.compiler.source>1.8</maven.compiler.source>
<maven.compiler.target>1.8</maven.compiler.target>
<failOnMissingWebXml>false</failOnMissingWebXml>
</properties>
Chapter 2 From Zero tohello World
27
<dependencies>
<dependency>
<groupId>javax</groupId>
<artifactId>javaee-api</artifactId>
<version>8.0</version>
<scope>provided</scope>
</dependency>
</dependencies>
</project>
Once you save this file, Eclipse will automatically sort it out by itself and clear out
the alarming red cross. Now that looks much better. We'll briefly go through the most
important settings here.
• Packaging war—indicates the project is a “web” project, and that the
project’s contents will be assembled into a web archive.
• Encoding UTF-8—sets the encoding that the source les are in and
with which the (reporting) output les should be generated. is
makes the build repeatable, as it otherwise would default to the
system default encoding (again, a rather bad default).
• Compiler 1.8—sets both the version of Java used in the .java source
les as well as the byte code output in the .class les. Without
setting this, Maven defaults to the oldest version possible, and
sometimes even a lower version than that.
• failOnMissingWebXml false—older versions of Java EE required
the /WEB-INF/web.xml to be present. Even though this has not been
required any more since Java EE 6, which was released in 2009,
Maven still checks for this le to be present. Setting this to false
prevents this unnecessary check.
• Dependency javax:javaee-api:8.0 provided—this declares a
dependency on the Java EE 8 API, and makes sure all the Java EE
types like @Named are known to the compiler. This dependency
is set to provided" since those types are already provided by the
target runtime, which is in our case Payara. They will then only be
used to compile the source code against and won’t be included
Chapter 2 From Zero tohello World

28
in the generated .war. You need to make absolutely sure that any
compile time dependency which is already provided by the target
runtime is set to provided; otherwise it will eventually end up in the
generated .war and you may run into class loading trouble wherein
duplicate different versioned libraries are conflicting with each other.
In case you’re actually not targeting a full-fledged Java EE server
but a barebones servlet container, you would need to adjust the
dependencies as instructed in the README of Mojarra,3 one of the
available JSF implementations and actually the one used under the
cover of Payara.
Now, in Eclipse’s Markers view, there’s only one warning left which says “Build path
specifies execution environment J2SE-1.5. There are no JREs installed in the workspace
that are strictly compatible with this environment.” Well, that basically means that
Eclipse recognizes this Maven project as a Java 1.5-only project while we don’t actually
have Java SE 5 installed, and in spite of the compiler version in pom.xml being set to 1.8.
In order to tell Eclipse that this is really a Java 1.8 project, we need to right-click
the project in Project Explorer view and choose Properties. In the Project Facets section
you should change the version of the Java facet from 1.5 to 1.8 (or 9 if you have JDK 9
installed) (see Figure2-13). While at it, we also need to update the Servlet API version
and add the CDI, JSF, and JPA facets. The Servlet API is represented by the “Dynamic
Web Module” entry. This needs to be set to version 4.0, which matches Java EE 8.
Further the “CDI,” “JavaServer Faces,” and “JPA” entries need to be selected. The “CDI”
facet is, by the way, only available after having installed the JBoss Tools as instructed in
the section “Installing JBoss Tools Plug-in.”
3 https://github.com/javaserverfaces/mojarra/blob/master/README.md.
Chapter 2 From Zero tohello World
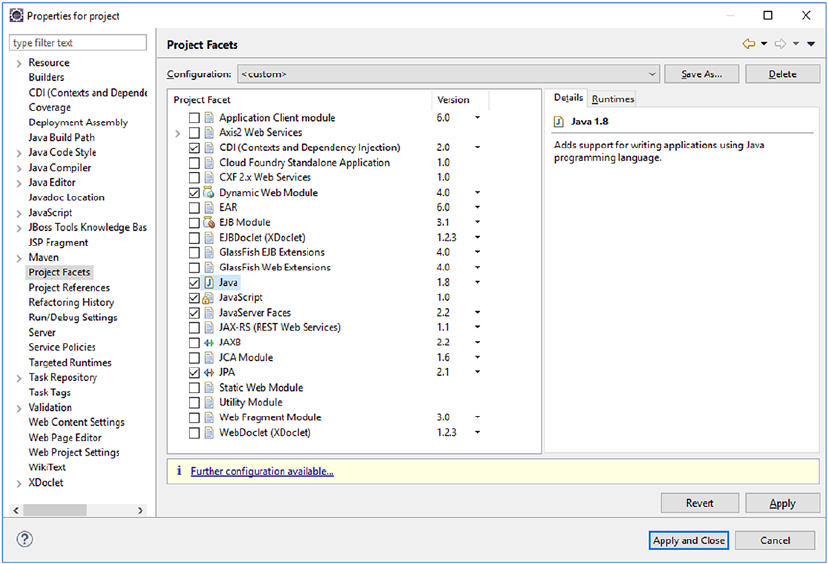
29
Unfortunately, in the latest available Eclipse version, Oxygen 2 from December
2017, there isn’t a JSF 2.3 or JPA 2.2 version available yet in the dropdown. The highest
available versions are JSF 2.2 and JPA 2.1. This is not a big problem. Its only influence
is on the available code generators and wizards. We can always adjust the Eclipse-
generated faces-config.xml and persistence.xml files afterward to match the Java EE
8 compatible versions.
As you can see in the yellow warning bar, only Eclipse requires further configuration.
This concerns the newly selected JSF and JPA facets. When clicking the link, we get to see
the Modify Faceted Project wizard (see Figure2-14).
Figure 2-13. The Project Facets section of the project properties (note that the
Servlet API version is represented by “Dynamic Web Module”)
Chapter 2 From Zero tohello World
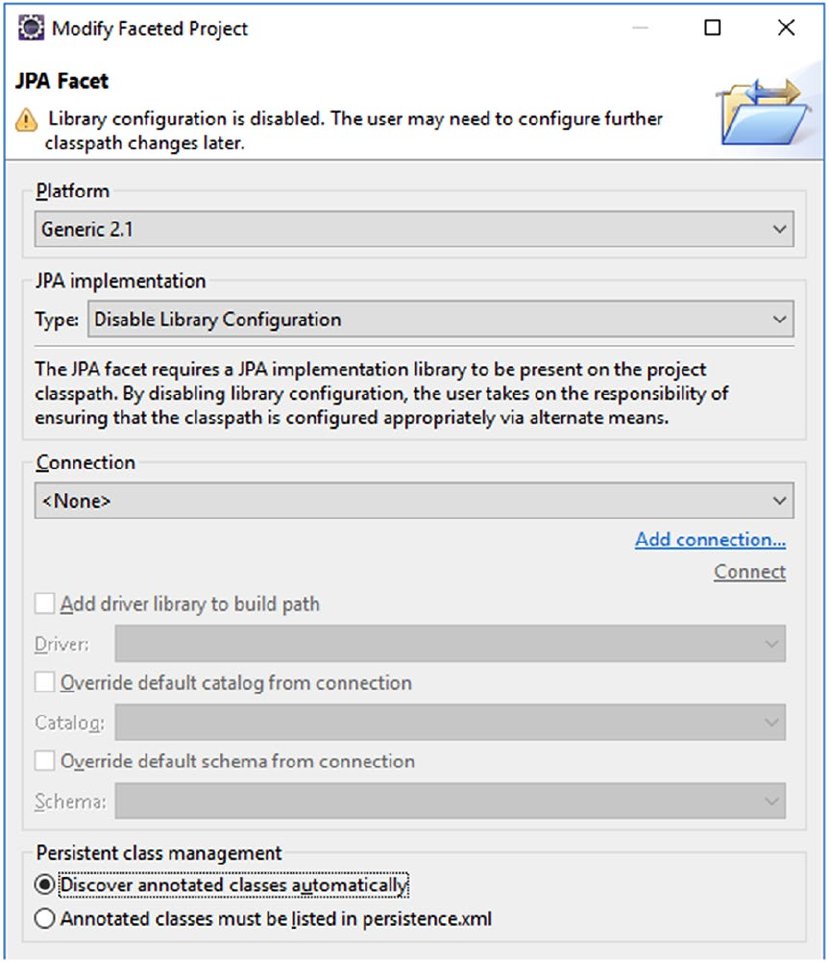
30
Figure 2-14. The JPA Facet configuration
Chapter 2 From Zero tohello World
31
The first step of the Modify Faceted Project wizard allows us to configure the JPA
facet. We need to make sure that Eclipse is being instructed that the JPA implementation
is already provided by the target runtime and thus Eclipse doesn’t need to include any
libraries. This can be achieved by choosing the “Disable Library Configuration” option
in the JPA implementation field. As we’re going to use the Payara-provided Hibernate as
the actual JPA implementation, which automatically supports discovering of @Entity
annotated classes, we’d like to instruct Eclipse to do the same; otherwise it would
automatically add entities to the persistence.xml when going through the entity code
generation wizard, or show warnings when we create one manually and don’t add it to
the persistence.xml.
Note that configuring a database connection is not necessary for now as we’re going
to use an embedded database.
In the next step of the Modify Faceted Project wizard, we can configure the JSF
capabilities (see Figure2-15). Also here, we need to make sure that Eclipse is being
instructed that the JSF implementation is already provided by the target runtime and
thus Eclipse doesn’t need to include any libraries. This can be achieved by choosing the
“Disable Library Configuration” option in the JSF Implementation Library field. Further,
we need to rename the servlet name of the FacesServlet to match the fictive instance
variable name: facesServlet. Last but not least, we need to change the URL mapping
pattern from the Jurassic /faces/* to the modern *.xhtml.
Chapter 2 From Zero tohello World
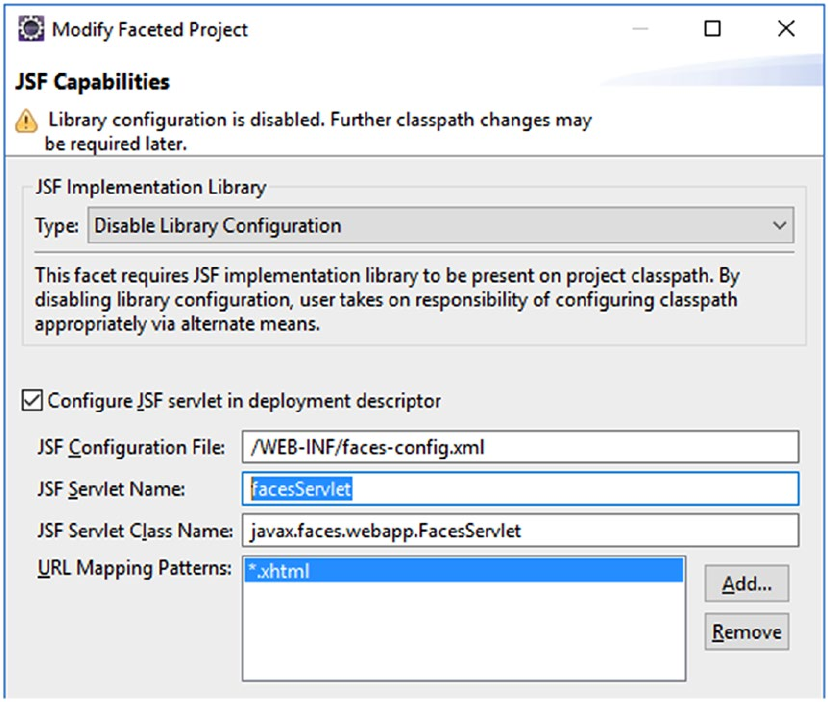
32
Actually, the entire registration of the FacesServlet in web.xml is, since JSF 2.2,
not strictly necessary any more; you could even uncheck the Configure JSF servlet in
deployment descriptor option and rely on the default auto-registered mappings of /
faces/*, *.faces, *.jsf and *.xhtml. However, as this allows end users and even search
bots to open the very same JSF page by different URLs, and thus causes confusion among
end users and duplicate content penalties among search bots, we’d better restrict to only
one explicitly configured URL pattern.
Now, finish and apply all the wizards and dialogs. The JPA plug-in only puts the
generated persistence.xml at the wrong place. You need to manually move it into src/
main/resources/META-INF. Figure2-16 shows us how the workbench looks now.
Figure 2-15. The JSF Capabilities configuration
Chapter 2 From Zero tohello World
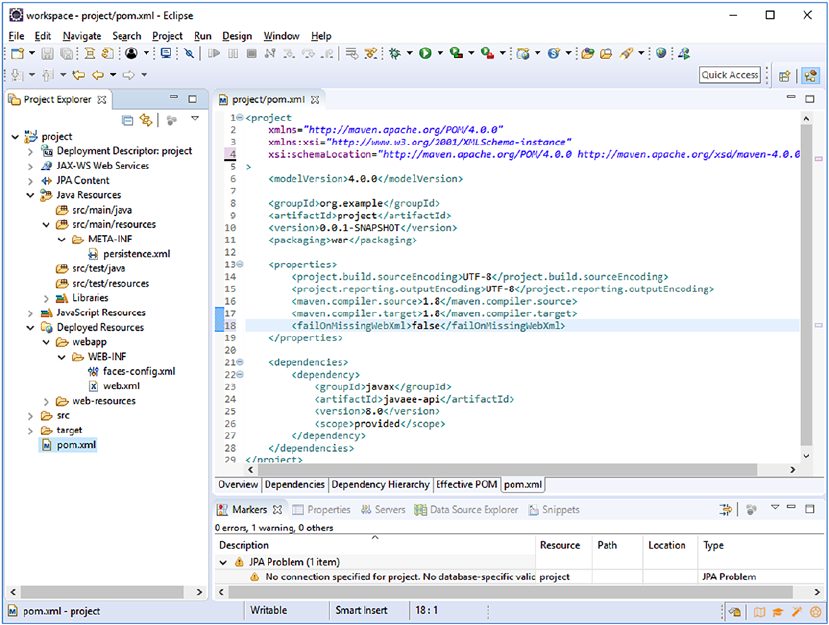
33
We only need to adjust all the deployment descriptors to catch up to the actually used
Servlet, JSF, JPA, and CDI versions. This is normally done by adjusting the root element of
the deployment descriptor XML file to set the desired XML schemas and the version.
You can find all Java EE 8 schemas at http://xmlns.jcp.org/xml/ns/javaee, which
is an actual web page which currently redirects to some landing page at Oracle.com. This
may change in the future given that Java EE 8 is currently in the process of being transferred
from Oracle to Eclipse. You can open the deployment descriptor XML file for editing by
double-clicking it and then selecting the Source tab in the editor. The correct root element
declarations for Java EE 8 compatible deployment descriptors are thus as follows:
src/main/webapp/WEB-INF/web.xml for Servlet 4.0:
<?xml version="1.0" encoding="UTF-8"?>
<web-app
xmlns="http://xmlns.jcp.org/xml/ns/javaee"
Figure 2-16. Correctly configured Java EE 8 Maven project in Eclipse
Chapter 2 From Zero tohello World
34
xmlns:xsi="http://www.w3.org/2001/XMLSchema-instance"
xsi:schemaLocation="http://xmlns.jcp.org/xml/ns/javaee
http://xmlns.jcp.org/xml/ns/javaee/web-app_4_0.xsd"
version="4.0"
>
<!-- Servlet configuration here. -->
</web-app>
src/main/webapp/WEB-INF/faces-config.xml for JSF 2.3:
<?xml version="1.0" encoding="UTF-8"?>
<faces-config
xmlns="http://xmlns.jcp.org/xml/ns/javaee"
xmlns:xsi="http://www.w3.org/2001/XMLSchema-instance"
xsi:schemaLocation="http://xmlns.jcp.org/xml/ns/javaee
http://xmlns.jcp.org/xml/ns/javaee/web-facesconfig_2_3.xsd"
version="2.3"
>
<!-- JSF configuration here. -->
</faces-config>
src/main/resources/META-INF/persistence.xml for JPA 2.2:
<?xml version="1.0" encoding="UTF-8"?>
<persistence
xmlns="http://xmlns.jcp.org/xml/ns/persistence"
xmlns:xsi="http://www.w3.org/2001/XMLSchema-instance"
xsi:schemaLocation="http://xmlns.jcp.org/xml/ns/persistence
http://xmlns.jcp.org/xml/ns/persistence/persistence_2_2.xsd"
version="2.2"
>
<!-- JPA configuration here. -->
</persistence>
Only the currently available JPA plug-in of Eclipse will show an error on this. You
could ignore this by disabling the JPA validator in the project’s properties, but you can
also just step back to a JPA 2.1 compatible persistence.xml for the time being.
Finally, for sake of completeness we need to create one more deployment descriptor
file, the one for CDI 2.0. This isn’t automatically generated as it’s not required. CDI
is by default always enabled in any Java EE 8 compatible web application. It’s even
Chapter 2 From Zero tohello World
35
mandatory for the functioning of JSF.Among others the new <f:websocket> relies fully
on CDI.Right-click the /WEB-INF folder of the project and choose New ➤ beans.xml File.
The New beans.xml File wizard which appears now is part of the JBoss Tools plug-in. Just
keep all options default and finish the wizard. It’ll generate the file as follows:
src/main/webapp/WEB-INF/beans.xml for CDI 2.0:
<?xml version="1.0" encoding="UTF-8"?>
<beans
xmlns="http://xmlns.jcp.org/xml/ns/javaee"
xmlns:xsi="http://www.w3.org/2001/XMLSchema-instance"
xsi:schemaLocation="http://xmlns.jcp.org/xml/ns/javaee
http://xmlns.jcp.org/xml/ns/javaee/beans_2_0.xsd"
version="2.0" bean-discovery-mode="annotated"
>
<!-- CDI configuration here. -->
</beans>
Creating theBacking Bean Class
With the project now correctly configured we can start with developing the actual MVC
application. The Controller part of MVC is already configured as FacesServlet in web.xml.
The Model part of MVC is what we’re going to create now. It’s basically just a simple Java
class which is by JSF convention called a Backing Bean since it “backs” a View.
Right-click the src/main/java folder of the project and choose New ➤ Bean.
The New CDI Bean wizard which appears now is also part of the JBoss Tools plug-in
(see Figure2-17). In this wizard, set the Package to com.example.project.view, set the
Name to HelloWorld, tick the Add @Named chec kbox, and finally set the Scope to
@RequestScoped. The rest of the fields can be kept default or empty.
Chapter 2 From Zero tohello World
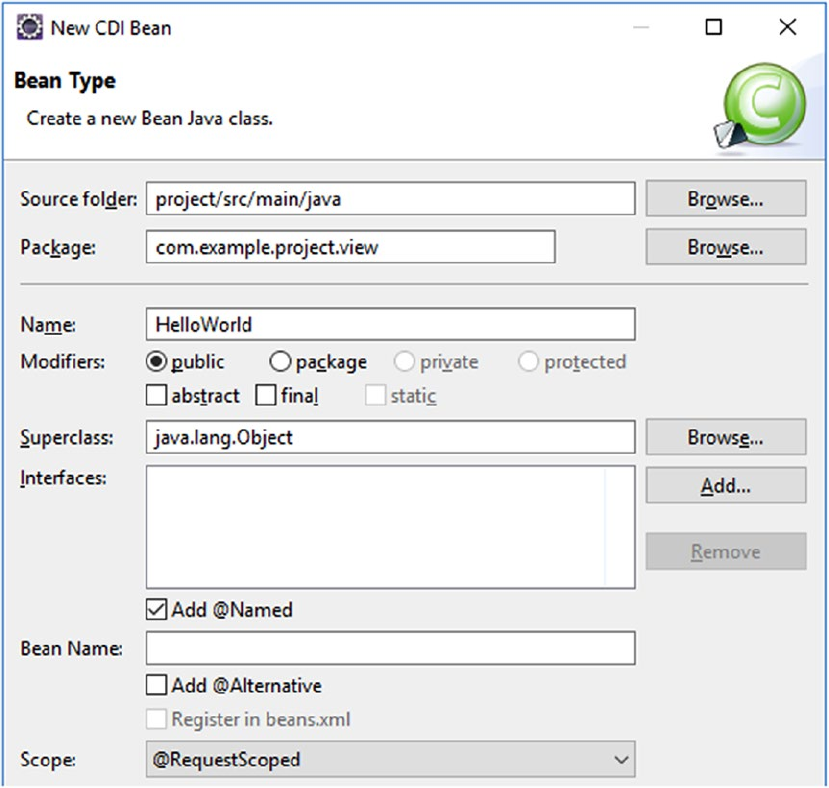
36
The class editor will now open with the newly created backing bean class. We’ll
modify it to get rid of the useless constructor; add two properties, input and output; and
accompany the input property with a getter and setter pair, the output property with only
a getter, and a submit() action method which prepares the output property based on
the input property. As a hint, in Eclipse after entering the properties, you can right- click
Figure 2-17. The JBoss Tools-provided New CDI Bean wizard in Eclipse
Chapter 2 From Zero tohello World
37
anywhere in the class editor and choose Source ➤ Generate Getters and Setters to have the
IDE to generate them. In its entirety, the edited backing bean class should look as follows:
package com.example.project.view;
import javax.enterprise.context.RequestScoped;
import javax.inject.Named;
@Named @RequestScoped
public class HelloWorld {
private String input;
private String output;
public void submit() {
output = "Hello World! You have typed: " + input;
}
public String getInput() {
return input;
}
public void setInput(String input) {
this.input = input;
}
public String getOutput() {
return output;
}
}
Chapter 2 From Zero tohello World
38
We'll briefly go through the annotations that are used here.
• @Named—gives the bean a name, which is primarily used to reference
it via EL.Without any attributes this name defaults to the simple class
name with the first letter in lowercase, thus "helloWorld" here. It will
be available by #{helloWorld} in EL. This can be used in JSF pages.
• @RequestScoped—gives the bean a scope, which means the same
instance of the bean is used within a given lifespan. In this case that
lifespan is the duration of an HTTP request. When the scope ends,
the bean is automatically destroyed. You can read more about scopes
in Chapter 8.
Creating theFacelets File
Next, we'll create the View part of MVC.It’s basically just a XHTML file which is by JSF
interpreted as a Facelets file or just Facelet. This Facelets file will ultimately generate the
HTML markup that is sent to the browser in response to a request. With help of EL, it can
reference a bean property and invoke a bean action.
Right-click the webapp folder of the project and choose New ➤ XHTML Page
(see Figure2-18). The New XHTML Page wizard which appears now is also part of the
JBoss Tools plug-in. In this wizard, set the File name to hello.xhtml and finish the wizard.
Chapter 2 From Zero tohello World
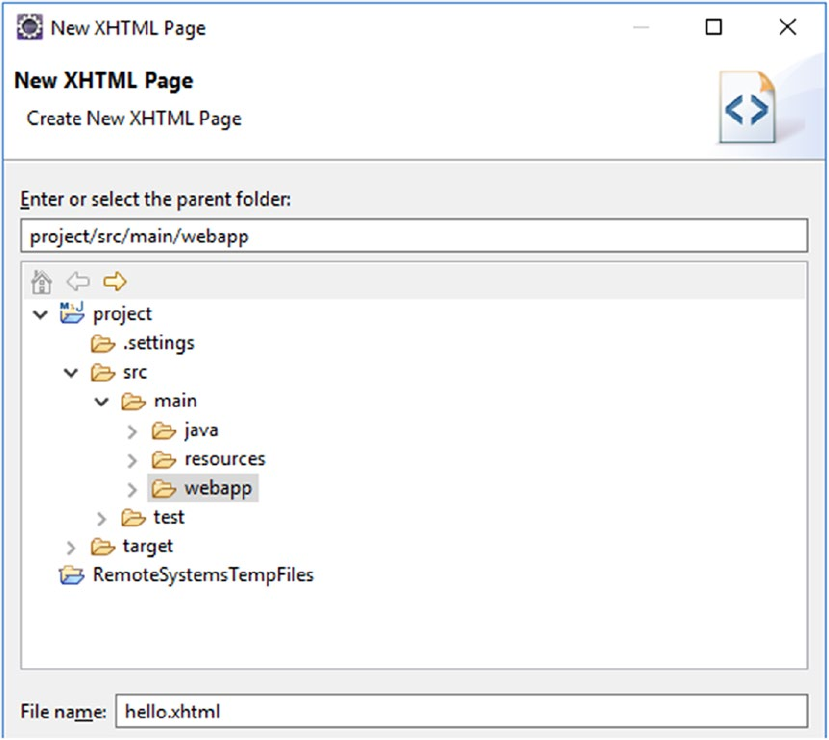
39
The XHTML editor will now open with the newly created Facelets file. You’ll also
notice that the Palette view shows up in bottom box. This is essentially not useful for
JSF- based web development. So let’s close it. Coming back to the newly created Facelets
file, it’s initially empty. Fill it with the following content:
<!DOCTYPE html>
<html lang="en"
xmlns="http://www.w3.org/1999/xhtml"
xmlns:f="http://xmlns.jcp.org/jsf/core"
xmlns:h="http://xmlns.jcp.org/jsf/html"
>
Figure 2-18. The JBoss Tools-provided New XHTML Page wizard in Eclipse
Chapter 2 From Zero tohello World
40
<h:head>
<title>Hello World</title>
</h:head>
<h:body>
<h1>Hello World</h1>
<h:form>
<h:outputLabel for="input" value="Input" />
<h:inputText id="input" value="#{helloWorld.input}" />
<h:commandButton value="Submit"
action="#{helloWorld.submit}">
<f:ajax execute="@form" render=":output" />
</h:commandButton>
</h:form>
<h:outputText id="output" value="#{helloWorld.output}" />
</h:body>
</html>
We'll briefly go through the JSF-specific XHTML tags that are used here.
• <h:head>—generates the HTML <head>. It gives JSF the opportunity
to automatically include any necessary JavaScript files, such as the
one containing the necessary logic for <f:ajax>.
• <h:body>—generates the HTML <body>. You can also use a plain
HTML <body> in this specic Facelet, but then it doesn’t give any
other JSF tag the opportunity to automatically include any necessary
JavaScript in the end of the HTML <body>.
• <h:form>—generates the HTML <form>. JSF will automatically
include the view state in a hidden input eld.
• <h:outputLabel>—generates the HTML <label>. You can also use
a plain HTML <label> in this specic Facelet, but then you’d have
to manually take care of guring out the actual ID of the target input
element.
• <h:inputText>—generates the HTML <input type="text">. JSF will
automatically get and set the value in the bean property specied in
the value attribute.
Chapter 2 From Zero tohello World
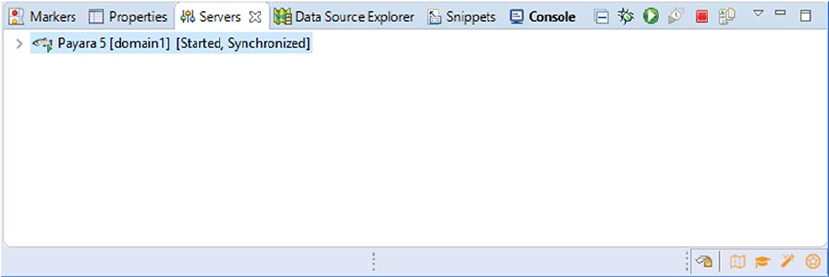
41
• <h:commandButton>—generates the HTML <input type="submit">.
JSF will automatically invoke the bean method specied in the
action attribute.
• <f:ajax>—generates the necessary JavaScript code for Ajax behavior.
You can also do as well without it, but then the form submit won’t
be performed asynchronously. e execute attribute indicates that
the entire <h:form> must be processed on submit and the render
attribute indicates that the tag identied by id="output" must be
updated on complete of the Ajax submit.
• <h:outputText>—generates the HTML <span>. This is the one being
updated on completion of the Ajax submit. It will merely print the
bean property specified in the value attribute.
Those JSF-specific XHTML tags are also called JSF Components. There will be more
on Facelets files and JSF components in the upcoming chapters. Note that you can also
perfectly embed plain vanilla HTML in a Facelets file. JSF components should only be
used when the functionality requires so, or is easily achievable with them.
Deploying theProject
In the Servers view, first start the Payara server. You can do so by selecting it and then
clicking the green arrow icon whose tool tip says “Start the server.” You can, of course,
also use the bug icon whose tool tip says “Start the server in debug mode.” The Console
view will briefly show the server startup log. Wait until the server starts up and has, in the
Servers view, gained the status Started (see Figure2-19).
Figure 2-19. The Payara server in Servers view with the status Started (note that
the Console view is highlighted as it has unread server logs)
Chapter 2 From Zero tohello World
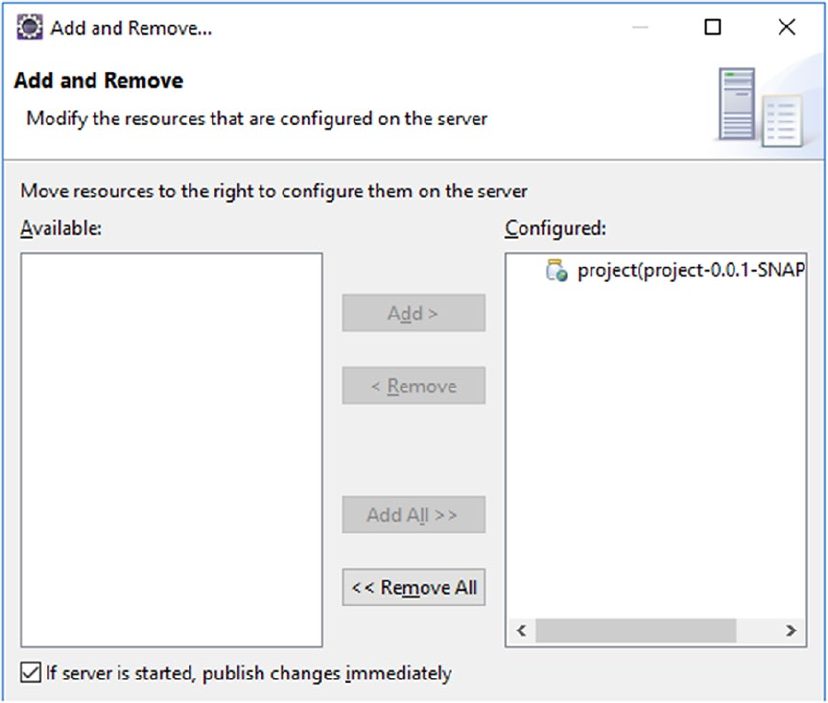
42
Now right-click the Payara server entry and choose Add and Remove. It will show the
Add and Remove wizard (see Figure2-20) which gives you the opportunity to add and
remove WAR projects to the server. Do so for our newly created project and finish the
wizard.
It must be explicitly mentioned that in case of Payara and GlassFish servers this is
best to be done while the server is already started. When removing a project while the
server is shut down, it may still linger around in the server’s deployment folder. That’s
just GlassFish’s own quirk. For example, in the case of WildFly and Tomcat servers, this is
not necessary.
Figure 2-20. The Add and Remove wizard wherein the project has been deployed
to the server by moving it to the right
Chapter 2 From Zero tohello World
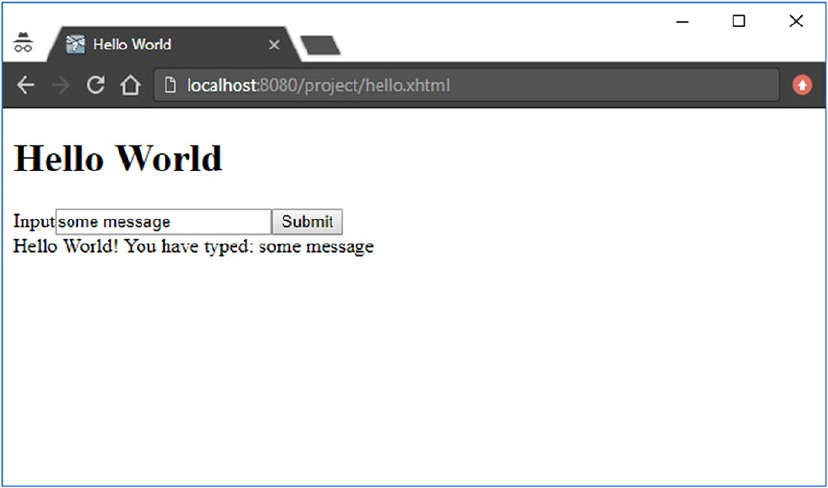
43
Now, open a tab in your favorite web browser (see Figure2-21) and enter the address
http://localhost:8080/project/hello.xhtml in order to open the newly created JSF
page.
Coming back to the URL, the "localhost:8080" part is by convention the default
domain of any Java EE server which is running in development mode. The same
address is also used by, among others, WildFly and TomEE.The "/project" part is by
convention the name of the Eclipse project. This is in Servlet terms called the “context
path” and obtainable by HttpServletRequest#getContextPath() and in JSF delegated
by ExternalContext#getRequestContextPath().
The context path part can also be set to an empty string; the deployed web
application will then end up in the domain root. In Eclipse, this can be set in the project’s
properties as well. First remove the project from the deployment using the Add and
Remove wizard. Then right-click the project, choose Properties, and select Web Project
Settings. Then set the Context root field to a forward slash “/” and close the properties.
Finally, add the project back to the deployment using Add and Remove wizard. Now
Figure 2-21. The Hello World page in Chrome browser wherein the input field is
filled with the text “some message” and the submit button has been pressed
Chapter 2 From Zero tohello World
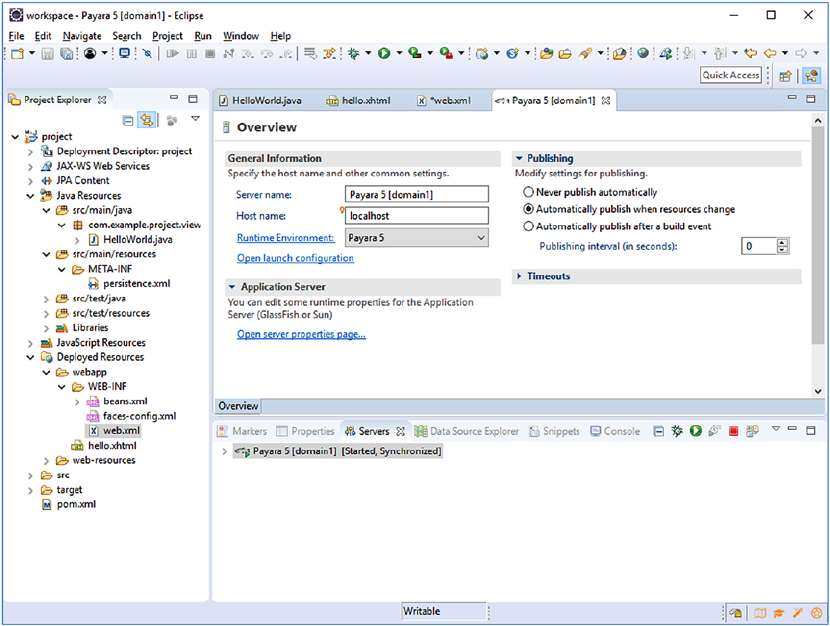
44
it will be deployed to the domain root and you can access the JSF page by http://
localhost:8080/hello.xhtml. We can even get a step further by making hello.xhtml
the default landing file so that this also doesn’t need to be specified in the URL.This can
be achieved by adding the following entry to the web.xml:
<welcome-file-list>
<welcome-file>hello.xhtml</welcome-file>
</welcome-file-list>
Note that Payara can be configured to automatically publish changes to the
deployment whenever a resource is changed in the project. Before saving the edited
web.xml, double-click the Payara server in Servers view, unfold the Publishing section,
and select Automatically publish when resource change along with a low interval of like 0
seconds (see Figure2-22).
Figure 2-22. Payara server configuration in Eclipse with automatic publishing
enabled and interval set to 0 seconds
Chapter 2 From Zero tohello World

45
Now, save the web.xml and you’ll notice that Eclipse will immediately trigger Payara
to publish the changes while still running. Coming back to the web browser, you’ll notice
that the JSF page is now also accessible by just http://localhost:8080 (see Figure2-23).
Figure 2-23. The Hello World page is now at the root
Chapter 2 From Zero tohello World

46
Installing H2
H24 is an in-memory SQL database. It’s an embedded database useful for quickly
modeling and testing JPA entities, certainly in combination with autogenerated SQL
tables based on JPA entities. Adding H2 to your web application project is a matter of
adding the following dependency to the <dependencies> section of the pom.xml:
<dependency>
<groupId>com.h2database</groupId>
<artifactId>h2</artifactId>
<version>1.4.196</version>
</dependency>
That’s basically it. The JDBC (Java Database Connectivity) driver is already built in.
Configuring DataSource
In order to be able to interact with a SQL database, we need to configure a so-called data
source in the web application project. This can be done by adding the following section
to the web.xml:
<data-source>
<name>java:global/DataSourceName</name>
<class-name>org.h2.jdbcx.JdbcDataSource</class-name>
<url>jdbc:h2:mem:test;DB_CLOSE_DELAY=-1</url>
</data-source>
The data source name represents the JNDI (Java Naming and Directory Interface)
name. The class name represents the fully qualified name of the javax.sql.DataSource
implementation of the JDBC driver being used. The URL represents the JDBC driver-
specific URL format. The syntax is dependent on the JDBC driver being used. For an in-
memory H2 database with a database name of “test,” that’s thus jdbc:h2:mem:test. The
H2-specific DB_CLOSE_DELAY=-1 path parameter basically instructs its JDBC driver not to
automatically shut down the database when it hasn’t been accessed for some time, even
though the application server is still running.
4 http://www.h2database.com.
Chapter 2 From Zero tohello World
47
A concrete instance of the DataSource can now be injected in any servlet container
managed artifact such as a servlet or filter as follows:
@Resource
private DataSource dataSource;
You could get a SQL connection from it via DataSource#getConnection() for the
plain old JDBC work. However, as we’re going to use Java EE, it’s better to use Java EE’s
own JPA for this instead.
Configuring JPA
In order to familiarize JPA with the newly added data source, we need to add a new
persistence unit to the persistence.xml which uses the data source as a JTA data source.
<persistence-unit name="PersistenceUnitName" transaction-type="JTA">
<jta-data-source>java:global/DataSourceName</jta-data-source>
<properties>
<property
name="javax.persistence.schema-generation.database.action"
value="drop-and-create" />
</properties>
</persistence-unit>
You see, the data source is identified by its JNDI name. You’ll also notice a JPA-
specific javax.persistence.schema-generation.database.action property with a
value of “drop-and-create” which basically means that the web application should
automatically drop and create all SQL tables based on JPA entities. This is, of course,
only useful for prototyping purposes, as we’re going to do with this project in the rest
of the book. For real-world applications, you’d better pick either “create” or “none”
(which is the default). The transaction type being set to “JTA” basically means that the
application server should automatically manage database transactions. This way every
method invocation on an EJB from its client (usually, a JSF backing bean) transparently
starts a new transaction and when the EJB method returns to the client (usually, the
calling backing bean), the transaction is automatically committed and flushed. And, any
runtime exception from an EJB method automatically rolls back the transaction.
Chapter 2 From Zero tohello World
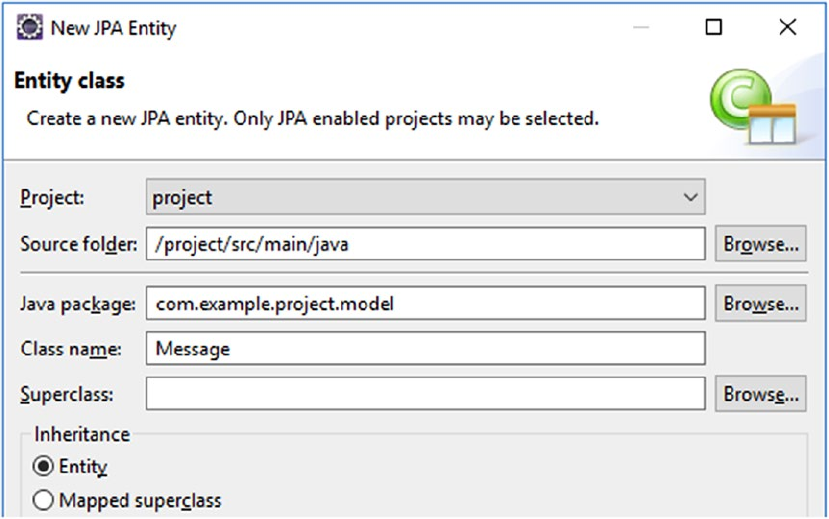
48
Creating theJPA Entity
Now we’re going to create a JPA entityc. Basically, it’s a JavaBean class which represents
a single record of a database table. Each bean property is mapped to a particular
column of the database table. Normally, JPA entities are modeled against existing
database tables. But, as you’ve read in the previous section, “Configuring JPA,” about
the persistence.xml, it’s also possible to do it the other way round: database tables are
generated based on JPA entities.
Right-click the src/main/java folder of the project and choose New ➤ JPA Entity.
In the wizard, set the Package to com.example.project.model and set the Name to
Message. The rest of the fields can be kept default or empty (see Figure2-24).
Modify the new entity class as follows:
package com.example.project.model;
import java.io.Serializable;
import javax.persistence.Column;
Figure 2-24. The New JPA Entity wizard in Eclipse
Chapter 2 From Zero tohello World
49
import javax.persistence.Entity;
import javax.persistence.GeneratedValue;
import javax.persistence.GenerationType;
import javax.persistence.Id;
import javax.persistence.Lob;
import javax.validation.constraints.NotNull;
@Entity
public class Message implements Serializable {
private static final long serialVersionUID = 1L;
@Id @GeneratedValue(strategy=GenerationType.IDENTITY)
private Long id;
@Column(nullable = false) @Lob
private @NotNull String text;
// Add/generate getters and setters.
}
As a reminder, you can let Eclipse generate getters and setters by right-clicking
anywhere in the class editor and choosing Source ➤ Generate Getters and Setters.
We'll briefly go through the annotations that are used here.
• @Entity—marks the bean as a JPA entity, so that the JPA
implementation will automatically collect database-related metadata
based on all its properties.
• @Id @GeneratedValue(strategy=IDENTITY)—marks a property to
be mapped to a database column of SQL “IDENTITY” type. In MySQL
terms, that’s the equivalent of “AUTO_INCREMENT”. In PostgreSQL
terms, that’s the equivalent of “BIGSERIAL”.
• @Column—marks a property to be mapped to a regular database column.
e actual database column type depends on the Java type being used.
Without the additional @Lob annotation, that’s a VARCHAR(255) whose
length can be manipulated by @Column(length=n). With the @Lob
annotation, however, the column type becomes TEXT.
• @Lob—marks a String property to be mapped to a database column
of type TEXT instead of a limited VARCHAR.
Chapter 2 From Zero tohello World

50
• @NotNull—this is actually not part of JPA but of “Bean Validation.”
To the point, it ensures that the bean property is being validated
never to be null when submitting a JSF form and when persisting the
JPA entity. (See Chapter 5.) Also note that this basically replicates
the @Column(nullable=false), but that’s only because JPA doesn’t
consider any Bean Validation annotations as valid database metadata
in order to generate appropriate SQL tables.
Creating theEJB Service
Next, we need to create an EJB in order to be able to save an instance of the
aforementioned JPA entity in the database, and to obtain a list of JPA entities.
Right-click the src/main/java folder of the project and choose New ➤ Class. In
the wizard, set the Package to com.example.project.service and set the Name to
MessageService (see Figure2-25). The rest of the fields can be kept default or empty.
Modify the new service class as follows:
package com.example.project.service;
import java.util.List;
Figure 2-25. The New Java Class wizard in Eclipse
Chapter 2 From Zero tohello World
51
import javax.ejb.Stateless;
import javax.persistence.EntityManager;
import javax.persistence.PersistenceContext;
@Stateless
public class MessageService {
@PersistenceContext
private EntityManager entityManager;
public void create(Message message) {
entityManager.persist(message);
}
public List<Message> list() {
return entityManager
.createQuery("FROM Message m", Message.class)
.getResultList();
}
}
That’s basically it. Let’s briefly go through the annotations.
• @Stateless—marks the bean as a stateless EJB service, so that the
application server knows whether it should pool them and when to
start and stop database transactions. The alternative annotations are
@Stateful and @Singleton. Note that a @Stateless does not mean
that the container will make sure that the class itself is stateless. You as
developer are still responsible to ensure that the class doesn’t contain
any shared and mutable instance variables. Otherwise, you’d better
mark it as either @Stateful or @Singleton, depending on its purpose.
• @PersistenceContext—basically injects the JPA entity manager
from the persistence unit as congured in the project’s persistence.
xml. e entity manager is, in turn, responsible for mapping all JPA
entities against a SQL database. It will, under cover, do all the hard
JDBC work.
Chapter 2 From Zero tohello World
52
Adjusting theHello World
Now we’re going to adjust the earlier created HelloWorld backing bean in order to save
the messages in the database and display all of them in a table.
@Named @RequestScoped
public class HelloWorld {
private Message message = new Message();
private List<Message> messages;
@Inject
private MessageService messageService;
@PostConstruct
public void init() {
messages = messageService.list();
}
public void submit() {
messageService.create(message);
messages.add(message);
}
public Message getMessage() {
return message;
}
public List<Message> getMessages() {
return messages;
}
}
Note that you don’t need setters for message and messages. We’re going to use the
getters and setters of the Message entity itself.
Chapter 2 From Zero tohello World
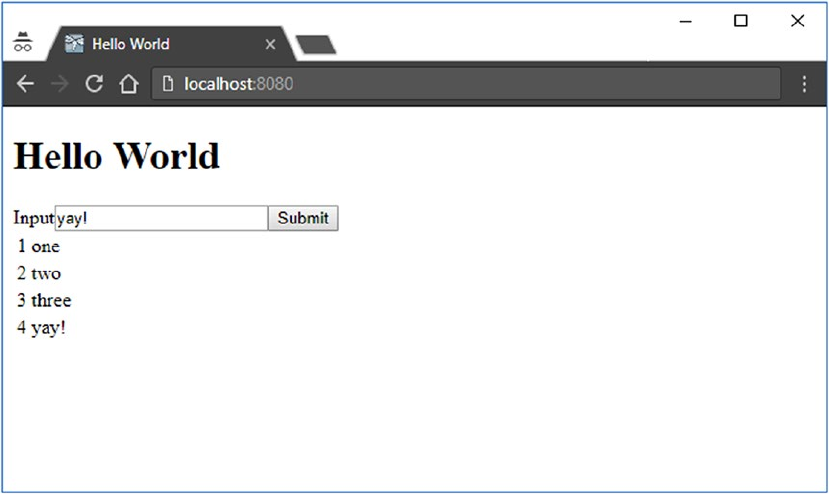
53
Finally, adjust the <h:body> of hello.xhtml as follows:
<h1>Hello World</h1>
<h:form>
<h:outputLabel for="input" value="Input" />
<h:inputText id="input" value="#{helloWorld.message.text}" />
<h:commandButton value="Submit"
action="#{helloWorld.submit}">
<f:ajax execute="@form" render=":table" />
</h:commandButton>
</h:form>
<h:dataTable id="table" value="#{helloWorld.messages}" var="message">
<h:column>#{message.id}</h:column>
<h:column>#{message.text}</h:column>
</h:dataTable>
Now reload the page in your favorite web browser and create some messages (see
Figure2-26).
Figure 2-26. The Hello World using JSF, CDI, EJB, and JPA
Chapter 2 From Zero tohello World
55
© Bauke Scholtz, Arjan Tijms 2018
B. Scholtz and A. Tijms, The Definitive Guide to JSF in Java EE 8, https://doi.org/10.1007/978-1-4842-3387-0_3
CHAPTER 3
Components
JSF (JavaServer Faces) is a component-based MVC (Model-View-Controller) framework.
In essence, JSF parses the view definition into a “component tree.” The root of this tree is
represented by the “view root” instance associated with the current instance of the faces
context.
UIComponent tree = FacesContext.getCurrentInstance().getViewRoot();
The view is usually defined using XHTML+XML markup in a Facelets file. XML is a
markup language which is very suitable for defining a tree hierarchy using a minimum
of code. The component tree can also be created and manipulated using Java code in a
Java class, but this generally ends up in very verbose code in order to declare value or
method expressions and to correlate parents and children with each other. Frequently,
developers who do so aren’t aware of how tag handlers such as JSTL (JavaServer Pages
Standard Tag Library) can be used to manipulate the component tree using just XML.
The component tree basically defines how JSF should consume the HTTP request
in order to apply request values coming from input components, convert and validate
them, update the managed bean model values, and invoke the managed bean action.
It also defines how JSF should produce the HTTP response by generating the necessary
HTML output using renderers tied to the components whose attributes can in turn
reference managed bean properties. In other words, the component tree defines how the
phases of the JSF life cycle should be processed. The diagram in Figure3-1 shows how a
HTTP postback request is usually being processed by JSF.
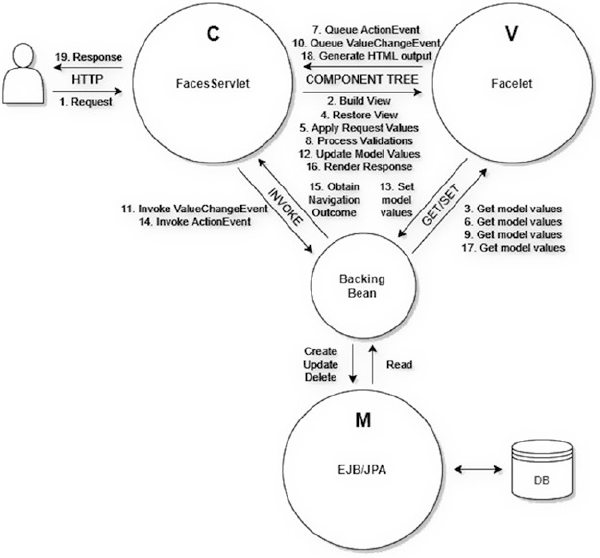
56
Following is a brief description of each step:
1. End user sends a HTTP request which matches the mapping of the
FacesServlet and thus invokes it.
2. e FacesServlet will build the component tree based on the
Facelet le identied by the HTTP request path.
3. e component tree will if necessary get the current model values
from the backing bean during building the view. Any attribute of
a Facelets template tag and a JSTL core tag and only the "id" and
"binding" attributes of a JSF component will get executed.
4. e FacesServlet will restore the JSF view state on the
component tree.
Figure 3-1. How JSF processes the HTTP postback request within the MVC
architecture (the numbers represent the ordering)
CHAPTER 3 COMPONENTS
57
5. e FacesServlet will let the component tree apply the HTTP
request parameters and input components will store them as
“submitted value.”
6. e input and command components will if necessary get the
current model values from the backing bean during consulting the
"rendered", "disabled", and "readonly" attributes in order to
check whether they are allowed to apply the request parameters.
7. e command components will queue the ActionEvent when
it detects, based on HTTP request parameters, that it was being
invoked in the client side.
8. e FacesServlet will let the component tree process all
registered converters and validators on the submitted values and
input components will store the newly converted and validated
value as “local value.”
9. e input components will get the old model value from the
backing bean and compare them with the new value.
10. If the new value is dierent from the old model value, then the
input component will queue the ValueChangeEvent.
11. When all conversion and validation are nished, the
FacesServlet will invoke the listener methods of any queued
ValueChangeEvent on the backing bean.
12. e FacesServlet will let the component tree update all model
values.
13. e input components will set the new model values in the
backing bean.
14. e FacesServlet will invoke the listener methods of any queued
ActionEvent on the backing bean.
15. e nal action method of the backing bean will if necessary
return a non-null String outcome referring the target view.
16. e FacesServlet will let the component tree render the
response.
CHAPTER 3 COMPONENTS
58
17. e component tree will if necessary get the current model values
from the backing bean during generating the HTML output.
Practically any attribute of a Facelet component and a JSF component
which is involved in generating the HTML output will get executed.
18. e component tree will write the HTML output to the HTTP
response.
19. The FacesServlet will return the HTTP response to the end user.
This is different from a request-based MVC framework wherein the developer needs
to write more boilerplate code in the “controller” class associated with the view in order to
define which request parameters need to be applied, and/or how they should be converted
and validated before populating the entity. The developer also often needs to manually
populate the entity by manually invoking a bunch of getters and setters before passing the
entity to the service layer while invoking the action. This all is unnecessary in JSF.
It should be noted that the backing bean has a rather unique position in the MVC
paradigm. It can act as a Model, a View, and the Controller, depending on the point of
view. This is detailed in Chapter 8.
Standard HTML Components
The default JSF implementation already provides an extensive set of components for
authoring HTML pages with the help of Facelets view technology. Those HTML components
are available under the http://xmlns.jcp.org/jsf/html XML namespace URI (Uniform
Resource Identifier) which should be assigned to the "h" XML namespace prefix.
xmlns:h="http://xmlns.jcp.org/jsf/html"
The most important HTML components which should always be present in your JSF
page are the <h:head> and <h:body>. Without them, JSF won’t be able to auto- include
any script or stylesheet resources associated with a particular component. For example,
the <h:commandButton>, which generates a HTML submit button, requires for its Ajax
functionality the jsf.js script file to be included in the HTML document.
- <h:commandButton>, generates a HTML submit button.
- <h:commandButton>, can optionally contain Ajax functionality.
- The Ajax functionality requires a jsf.js script file in the HTML
document.
CHAPTER 3 COMPONENTS
59
The renderer of that component will automatically take care of that, but that would
only work if <h:head> is present. The <h:body> is slightly less important here, but there
may exist components which need to add a script to the end of the HTML body, such as
the <f:websocket>. In other words, the most minimal and HTML5-valid JSF page would
look as follows:
<!DOCTYPE html>
<html lang="en"
xmlns="http://www.w3.org/1999/xhtml"
xmlns:h="http://xmlns.jcp.org/jsf/html"
>
<h:head>
<title>Title</title>
</h:head>
<h:body>
...
</h:body>
</html>
The generated HTML response, as you can inspect by right- clicking View page
source in the average web browser, should look as follows:
<!DOCTYPE html>
<html lang="en" xmlns="http://www.w3.org/1999/xhtml">
<head>
<title>Title</title>
</head>
<body>
...
</body>
</html>
You see, JSF basically replaces all components in the page by their generated HTML
output. As discussed previously, JSF provides an extensive set of standard HTML
components. Table3-1 provides an overview.
CHAPTER 3 COMPONENTS

60
Table 3-1. Standard HTML Components Provided by JSF
Component tag Component
superclass
Value
type
HTML output Since
<h:body> UIOutput - <body> 2.0
<h:button> UIOutcomeTarget String <button onclick=window.
location>
2.0
<h:column> UIColumn - <td> (for h:dataTable) 1.0
<h:commandButton> UICommand String <input type=submit> 1.0
<h:commandLink> UICommand String <a onclick=form.submit()> 1.0
<h:commandScript> UICommand - <script> (function to submit
a form)
2.3
<h:dataTable> UIData Object[] <table> (dynamic) 1.0
<h:doctype> UIOutput - <!DOCTYPE> 2.0
<h:form> UIForm - <form method=post> 1.0
<h:graphicImage> UIGraphic - <img src> 1.0
<h:head> UIOutput - <head> 2.0
<h:inputFile> UIInput Part <input type=le> 2.2
<h:inputHidden> UIInput Object <input type=hidden> 1.0
<h:inputSecret> UIInput Object <input type=password> 1.0
<h:inputText> UIInput Object <input type=text> 1.0
<h:inputTextarea> UIInput Object <textarea> 1.0
<h:link> UIOutcomeTarget String <a href> 2.0
<h:message> UIMessage - <span> (if necessary) 1.0
<h:messages> UIMessages - <ul> 1.0
<h:messages layout=table> UIMessages - <table> 1.0
<h:outputFormat> UIOutput Object <span> (if necessary) 1.0
<h:outputLabel> UIOutput String <label> 1.0
<h:outputText> UIOutput Object <span> (if necessary) 1.0
(continued)
CHAPTER 3 COMPONENTS

61
The “Component superclass” column specifies the most important UIComponent
superclass the component extends from. You must interpret the specified class to be
from the javax.faces.component package.
The “Value type” column specifies the supported type of the model value behind the
component’s value attribute, if it has any. If the value type is String, it means that only
the model value’s toString() outcome will be used as value of the component, generally
in components which would render it as some sort of label. If it’s Object, it means that
it supports any kind of value, generally in components which would render it as text or
parse it as input value, if necessary with help of an implicit or explicit Converter. If the
value type is Object[],it means that it requires an array or collection of objects as model
Table 3-1. (continued)
Component tag Component
superclass
Value
type
HTML output Since
<h:outputScript> UIOutput - <script> 2.0
<h:outputStylesheet> UIOutput - <link rel=stylesheet> 2.0
<h:panelGrid> UIPanel - <table> (static) 1.0
<h:panelGroup> UIPanel - <span> 1.0
<h:panelGroup layout=block> UIPanel - <div> 1.2
<h:selectBooleanCheckbox> UIInput Boolean <input type=checkbox> 1.0
<h:selectManyCheckbox> UIInput Object[] <table><input
type=checkbox>*
1.0
<h:selectManyListbox> UIInput Object[] <select multiple
size=n><option>*
1.0
<h:selectManyMenu> UIInput Object[] <select multiple
size=1><option>*
1.0
<h:selectOneListbox> UIInput Object <select size=n><option>* 1.0
<h:selectOneMenu> UIInput Object <select size=1><option>* 1.0
<h:selectOneRadio> UIInput Object <table><input type=radio>* 1.0
<h:selectOneRadio group> UIInput Object <input type=radio
name=group>
2.3
CHAPTER 3 COMPONENTS
62
value, generally in data and multi-selection input components, if necessary with an
implicit or explicit Converter.
There are two specialized input components. The <h:inputFile> binds the
uploaded file to a javax.servlet.http.Part property and doesn’t support outputting
it—for security reasons—and the <h:selectBooleanCheckbox> which binds the checked
value to a boolean property. Those two input components don’t support a Converter
and therefore don’t support any other model value type.
The “HTML output” column specifies the minimum generated HTML output. If the
HTML output says “if necessary,” then it means that the specified HTML element is only
emitted when the component has any attribute specified that requires being outputted
as a HTML element attribute, such as id, styleClass, onclick, etc. That is, a component
can have attributes that don’t end up in the generated HTML output at all, such as
binding, rendered, converter, etc. If a component can have multiple HTML element
representations, then that’s usually controlled by the layout attribute as you can see with
<h:messages> and <h:panelGroup>. If the HTML output contains “*” (an asterisk), then it
means that the component may emit zero or more of the specified nested HTML elements.
The “Since” column indicates the first JSF version the HTML component was
available in. At the time this book was written, the following JSF versions were available:
1.0 (March 2004), 1.1 (May 2004), 1.2 (May 2006), 2.0 (July 2009), 2.1 (November 2010),
2.2 (March 2013), and 2.3 (March 2017).
The individual HTML components are detailed in Chapters 4 and 6.
Standard Core Tags
Next to the standard HTML components, JSF also provides a set of “core” tags. Those are
essentially “helper” tags which allow you to declaratively configure one or more target
HTML components by either nesting in them or wrapping around them. Those core tags
are available under the http://xmlns.jcp.org/jsf/core XML namespace URI which
should be assigned to the "f" XML namespace prefix.
xmlns:f="http://xmlns.jcp.org/jsf/core"
Technically, those tags are intended to be reusable on non-HTML components.
JSF offers the possibility of attaching a different render kit to the component tree which
doesn’t generate HTML output but a different markup—hence the different XML
namespace. Table3-2 provides an overview.
CHAPTER 3 COMPONENTS

63
Table 3-2. Standard Core Tags Provided by JSF
Core tag Creates/handles Target component Since
<f:actionListener> javax.faces.event.ActionListener ActionSource 1.0
<f:ajax> javax.faces.component.behavior.AjaxBehavior ClientBehaviorHolder(s) 2.0
<f:attribute> UIComponent#getAttributes() UIComponent 1.0
<f:attributes> UIComponent#getAttributes() UIComponent 2.2
<f:convertDateTime> javax.faces.convert.DateTimeConverter (Editable)ValueHolder 1.0
<f:convertNumber> javax.faces.convert.NumberConverter (Editable)ValueHolder 1.0
<f:converter> javax.faces.convert.Converter (Editable)ValueHolder 1.0
<f:event> javax.faces.event.ComponentSystemEvent UIComponent 2.0
<f:facet> UIComponent#getFacets() UIComponent 1.0
<f:importConstants> javax.faces.component.UIImportConstants UIViewRoot (metadata) 2.3
<f:loadBundle> java.util.ResourceBundle UIViewRoot 1.0
<f:metadata> javax.faces.view.ViewMetadata UIViewRoot 2.0
<f:param> javax.faces.component.UIParameter UIComponent 1.0
<f:passthroughAttribute> UIComponent#getPassthroughAttributes() UIComponent 2.2
<f:passthroughAttributes> UIComponent#getPassthroughAttributes() UIComponent 2.2
<f:phaseListener> javax.faces.event.PhaseListener UIViewRoot 1.0
<f:selectItem> javax.faces.component.UISelectItem UISelectOne/UISelectMany 1.0
<f:selectItems> javax.faces.component.UISelectItems UISelectOne/UISelectMany 1.0
(continued)
CHAPTER 3 COMPONENTS

64
Table 3-2. (continued)
Core tag Creates/handles Target component Since
<f:setPropertyActionListener> javax.faces.event.ActionListener ActionSource 1.0
<f:subview> javax.faces.component.NamingContainer UIComponents 1.0
<f:validateBean> javax.faces.validator.BeanValidator UIForm 2.0
<f:validateDoubleRange> javax.faces.validator.DoubleRangeValidator EditableValueHolder 1.0
<f:validateLength> javax.faces.validator.LengthValidator EditableValueHolder 1.0
<f:validateLongRange> javax.faces.validator.LongRangeValidator EditableValueHolder 1.0
<f:validateRegex> javax.faces.validator.RegexValidator EditableValueHolder 2.0
<f:validateRequired> javax.faces.validator.RequiredValidator EditableValueHolder 2.0
<f:validateWholeBean> javax.faces.validator.BeanValidator UIForm 2.3
<f:validator> javax.faces.validator.Validator EditableValueHolder 1.0
<f:valueChangeListener> javax.faces.event.ValueChangeListener EditableValueHolder 1.0
<f:view> javax.faces.component.UIViewRoot UIComponents 1.0
<f:viewAction> javax.faces.component.UIViewAction UIViewRoot (metadata) 2.2
<f:viewParam> javax.faces.component.UIViewParameter UIViewRoot (metadata) 2.0
<f:websocket> javax.faces.component.UIWebsocket UIViewRoot (body resource) 2.3
CHAPTER 3 COMPONENTS
65
Historically, there’s one more, the <f:verbatim>, but this was targeted to the since
JSF 2.0 deprecated JSP (Java Server Pages) view technology and is hence also deprecated
since JSF 2.0.
The “Creates/handles” column specifies the thing which the core tag creates or
handles on the specified target component.
The “Target component” column specifies the target component superclass or
interface supported by the core tag. You must interpret the specified class or interface
to be from the javax.faces.component package. If the target component is optionally
pluralized as in UIComponent(s), then it means that the core tag can either be nested
in the target component or wrapped in one or more target components. If the target
component is explicitly pluralized as in UIComponents, then it means that the core tag
can only wrap one or more target components and thus not be nested.
As to target component interfaces, the ActionSource interface is implemented
by UICommand components. The ClientBehaviorHolder interface is implemented
by UIForm, UIInput, UICommand, UIData, UIOutput, UIPanel, and UIOutcomeTarget
components. The ValueHolder interface is implemented by UIOutput and UIInput
components. The EditableValueHolder interface is implemented by UIInput
components. Based on Table3-1 you should be able to derive the actual HTML
components from them.
The “Since” column indicates the first JSF version the core tag was available in. At the
time this book was written, the following JSF versions were available: 1.0 (March 2004),
1.1 (May 2004), 1.2 (May 2006), 2.0 (July 2009), 2.1 (November 2010), 2.2 (March 2013),
and 2.3 (March 2017).
Most of the individual core tags are detailed in separate chapters.
Life Cycle
JSF has a very well defined life cycle. It is broken down into six phases. Each of those
phases runs the HTTP request through the component tree, performs operations on
it, and fires component system events. A brief description was already given in the
introduction of this chapter, along with a diagram (Figure3-1). The following sections
describe each of the phases of the life cycle.
CHAPTER 3 COMPONENTS
66
Restore View Phase (First Phase)
First create the UIViewRoot instance and set its properties such as locale from any
<f:view> tag. The component tree is at that moment still empty. Only when the
current request is a postback request, or when the view has a <f:metadata> with
children, then build the full component tree based on the view definition. Basically,
a specific UIComponent subclass will be instantiated based on the component tag
defined in the view and populated with all attributes defined in the view and then
UIComponent#setParent() will be invoked, passing the actual parent component.
The UIComponent#setParent() method will first check if there isn’t already an
existing parent, and if so, it will fire the PreRemoveFromViewEvent on the old parent. Then,
when the new parent has been set, and thus the current component has become part of
the component tree, it will fire the PostAddToViewEvent with the current component.
If the current request is a postback request, then it will restore the “view state”
identified by the javax.faces.ViewState request parameter into the freshly built
component tree. After that, the PostRestoreStateEvent is explicitly fired for each
component in the tree, even when the component tree has actually not been built
or restored. In other words, even when it’s not a postback request, that event is fired.
You’d better reinterpret that event as “PostRestoreViewPhase”. In case, during the
PostRestoreStateEvent, you’re actually interested in whether it’s a postback request,
you should consult the FacesContext#isPostback() as well.
By the end of the phase, if the full component tree has actually not been built, then
immediately advance to the render response phase (sixth phase), thereby skipping any
phase in between.
Apply Request Values Phase (Second Phase)
The UIComponent#processDecodes() will be invoked on UIViewRoot. The
processDecodes() method will first invoke processDecodes() on each child
and facet and then invoke UIComponent#decode() on itself. Finally, invoke
UIViewRoot#broadCastEvents() to fire any FacesEvent queued for the current phase.
The default JSF API (application programming interface) doesn’t offer such events, but
developers can create and queue their own.
The default implementation of the decode() method will delegate to the
Renderer#decode() method. In the decode() method of either the component or
the renderer, the implementation has the opportunity to extract the submitted value
CHAPTER 3 COMPONENTS
67
from the request parameter and set it as an internal property. From the standard
HTML component set, the only components that do that are the HTML form-based
components deriving from UIForm, UIInput, and UICommand. The UIForm component
will invoke UIForm#setSubmitted() with true. The UIInput component will invoke
UIInput#setSubmittedValue() with the request parameter value. The UICommand
component will queue the ActionEvent for the invoke application phase (fifth phase).
Process Validations Phase (Third Phase)
The UIComponent#processValidators() will be invoked on UIViewRoot. The
processValidators() method will basically first fire PreValidateEvent for the
current component, then invoke processValidators() on each child and facet, and
then invoke PostValidateEvent for the current component. Finally, it will invoke
UIViewRoot#broadCastEvents() to fire any FacesEvent queued for the current phase,
which is usually an instance of ValueChangeEvent.
From the standard HTML component set, only UIInput components behave
differently here. Right before calling processValidators() on each child and
facet, they will first invoke UIInput#validate() on itself. If there’s a submitted
value set during the apply request values phase (second phase), then they will first
invoke Converter#getAsObject() on any attached Converter. When it doesn’t
throw ConverterException, then they will invoke Validator#validate() on
all attached Validator instances, regardless of whether any of them has thrown
ValidatorException.
When no ConverterException or ValidatorException was thrown, then
UIInput#setValue() will be invoked with the converted and validated value and the
UIInput#isLocalValueSet() flag will return true and UIInput#setSubmittedValue()
will be invoked with null.
When any ConverterException or ValidatorException was thrown, then
UIInput#setValid() will be invoked with false and the message of the exception
will be added to the faces context via FacesContext#addMessage(). Finally, when
UIInput#isValid() returns false, then FacesContext#setValidationFailed() will be
invoked with true.
By the end of the phase, when FacesContext#isValidationFailed() returns true,
immediately advance to the render response phase (sixth phase), thereby skipping any
phase in between.
CHAPTER 3 COMPONENTS
68
Update Model Values Phase (Fourth Phase)
UIComponent#processUpdates() will be invoked on UIViewRoot. The processUpdates()
method will in turn invoke the processUpdates() method on each child and facet.
Finally, it will invoke UIViewRoot#broadCastEvents() to fire any FacesEvent queued
for the current phase. The default JSF API doesn’t offer such events, but developers can
create and queue their own.
Also during this phase, from the standard HTML component set, only UIInput
components have a hook here. After calling processUpdates() on each child and facet,
they will invoke UIInput#updateModel() on itself. When both the UIInput#isValid()
and UIInput#isLocalValueSet() return true, they will invoke the setter method
behind the value attribute with getLocalValue() as argument and immediately invoke
UIInput#setValue() with null and clear out the UIInput#isLocalValueSet() flag.
When a RuntimeException is thrown here, usually caused by a bug in the
setter method itself, it will invoke UIInput#setValid() with false and queue the
UpdateModelException and immediately advance to the render response phase (sixth
phase), thereby skipping any phase in between.
Invoke Application Phase (Fifth Phase)
The UIViewRoot#processApplication() will be invoked. This method will in turn
invoke the UIViewRoot#broadCastEvents() to fire any FacesEvent queued for the
current phase, which is usually an instance of AjaxBehaviorEvent or ActionEvent.
Note that the processApplication() method is only defined on the UIViewRoot class
and does not traverse the component tree.
Render Response Phase (Sixth Phase)
When the component tree is still empty, i.e., when the request is not a postback request,
or when the view has no <f:metadata> with children, or when the developer has in
the meanwhile explicitly invoked FacesContext#setViewRoot() with its own instance,
then build the full component tree based on the view definition. When the component
tree is present, first fire the PreRenderViewEvent for the UIViewRoot, then invoke
UIComponent#encodeAll() on the UIViewRoot, and then invoke PostRenderViewEvent
for the UIViewRoot.
CHAPTER 3 COMPONENTS

69
The UIComponent#encodeAll() method will basically first invoke encodeBegin()
on itself, then if UIComponent#getRendersChildren() returns true, it will invoke
encodeChildren() on itself, or else invoke UIComponent#encodeAll() on each child, and
then invoke encodeEnd() on itself. This all happens only if UIComponent#isRendered()
returns true—that is, when the rendered attribute of the component tag doesn’t
evaluate to false.
The default implementation of the encodeBegin() method will first fire the
PreRenderComponentEvent for the current component and then delegate to
Renderer#encodeBegin(). The default implementation of the encodeChildren()
method will delegate to Renderer#encodeChildren(). The default implementation of
the encodeEnd() method will delegate to Renderer#encodeEnd(). If the component has
no renderer attached, that is, when UIComponent#getRendererType() returns null, then
no HTML output will be rendered to the response.
In the encodeBegin() method, the component or the renderer implementation
has the opportunity to write the opening HTML element and all of its attributes to
the response. In the encodeChildren() method the component or the renderer
implementation has the opportunity to decorate or override the rendering of the children
if necessary. In the encodeEnd() method the component or the renderer implementation
has the opportunity to write the closing HTML tag. Writing to the response happens with
the response writer as available by FacesContext#getResponseWriter().
For any mentioned XxxEvent class which has been fired in any phase, if any listener
method throws javax.faces.event.AbortProcessingException,1 then the currently
running phase will be immediately aborted and the life cycle will immediately advance
to the render response phase (sixth phase), thereby skipping any phase in between.
Ajax Life Cycle
The life cycle is almost identical during Ajax requests. Only the second, third, fourth,
and sixth phases are slightly different. The processDecodes(), processValidators(),
and processUpdates() methods will only be invoked on the UIViewRoot itself and
any component covered by the component search expression specified in <f:ajax
execute>. And, the encodeAll() method will only be invoked on the UIViewRoot itself
1 https://javaee.github.io/javaee-spec/javadocs/javax/faces/event/
AbortProcessingException.html.
CHAPTER 3 COMPONENTS
70
and any component covered by the component search expression specified in <f:ajax
render>. Read more on search expressions in Chapter 12.
Note thus that there would be no difference in the Ajax life cycle when the component
search expression contains the "@all" keyword. In other words, use "@all" with care. There
are no sensible real-world use cases for <f:ajax execute="@all">. On the HTML side,
it’s not possible to submit multiple forms at once. Only the enclosing form is submitted.
The biggest value is thus <f:ajax execute="@form">. However, there is one sensible real-
world use case for <f:ajax render="@all">, namely, rendering a full error page in case an
exception is thrown during an Ajax request. Even then, this can only be programmatically
triggered via PartialViewContext#setRenderAll(). For more detail, see Chapter 9.
View Build Time
The “view build time” is not tied to a particular phase of the JSF life cycle. The view build
time is that moment when the physical UIViewRoot instance is populated with all of its
children based on the view definition.
When JSF is about to create an UIComponent instance based on the view definition, it
will first check whether the binding attribute of the component representation returns
a concrete UIComponent instance and, if so, then continue using it instead, or else create
the UIComponent instance based on the “component type” associated with it and then
invoke the setter behind the binding attribute, if any, with it. If the id attribute of the
component representation in the view definition is specified, then UIComponent#setId()
will be invoked with it. Finally, UIComponent#setParent() will be invoked with the parent
component and then the component instance becomes physically part of the component
tree. This tree will exist until the end of the render response phase (sixth phase). Then it
becomes eligible for the garbage collector, along with the released faces context instance.
Effectively, UIComponent instances are thus request scoped. The binding attribute
can refer a managed bean property, but as UIComponent instances are inherently request
scoped, the target managed bean must be request scoped and may not be in a broader
scope. This won’t be checked by the JSF API, so you as the developer should make
absolutely sure that you don’t reference a broader scoped managed bean in the binding
attribute of any component.
However, when the binding attribute references a managed bean in a broader scope
than the request scope, then you’re not only basically saving the entire component tree
in the HTTP session in case the bean is view or session scoped, but you’re also essentially
CHAPTER 3 COMPONENTS
71
sharing the entire component tree across multiple HTTP requests which are concurrently
accessing the very same managed bean instance—very inefficient and thus dangerous.
The view build time can technically happen during any JSF life cycle phase.
Generally, that’s the restore view phase (first phase), particularly during a postback
request, or when the view has <f:metadata> with children. It can also happen during the
render response phase (sixth phase), particularly during a GET request when the view
has no <f:metadata> with children, or when a non-redirect navigation has taken place
during a postback. It will also happen when the developer programmatically invokes Vi
ewDeclarationLanguage#buildView(), which can be implicitly done via, among others,
ViewHandler#createView() as shown in the following action method code example
which forces us to fully rebuild the current view from scratch:
public void rebuildCurrentView() {
FacesContext context = FacesContext.getCurrentInstance();
UIViewRoot currentView = context.getViewRoot();
String viewId = currentView.getViewId();
ViewHandler viewHandler = context.getApplication.getViewHandler();
UIViewRoot newView = viewHandler.createView(context, viewId);
context.setViewRoot(newView);
}
Do note that the view state is not per definition during the view build time restored
into the component tree. The view state is only restored into the component tree during
the restore view phase (first phase), and that happens after it has executed the view build
time by itself. In other words, the above shown rebuildCurrentView() method does not
restore the current view state into the newly created component tree. Programmatically
restoring the view state is generally not recommended when programmatically rebuilding
the view as above, as in a real-world JSF application the sole reason to rebuild the current
view is usually to get rid of any changes caused by the persistent view state, and/or to
re-execute any JSTL tags based on the freshly changed values in the managed bean.
View Render Time
The “view render time” is also not tied to a particular phase of the JSF life cycle. The view
render time is that moment when UIComponent#encodeAll() of a particular component
is invoked.
CHAPTER 3 COMPONENTS
72
True, it’s by default always executed on the UIViewRoot during the render response
phase (sixth phase), but this doesn’t stop you from programmatically invoking it during a
different phase, such as the invoke application phase (fifth phase), for example, in order
to obtain the generated HTML output of an arbitrary component as a String variable.
View State
As explained in the section “View Build Time,” the UIComponent instances resembling
the component tree are inherently request scoped. They are created during the view
build time and they are destroyed right after the render response phase (sixth phase).
Any changes to properties of the UIComponent instances, which are not referenced by an
EL (Expression Language) expression, and are different from the default values, will be
saved as “view state.” In other words, the “view state” is very definitely not the same as
the “component tree.” Moreover, if the entire component tree itself would be saved in the
view state, then this would result in not only an unnecessarily bloated view state but also
bad application behavior as UIComponent instances are inherently not thread safe and
may therefore absolutely not be shared across multiple HTTP requests.
Saving the view state happens during the view render time. Therein JSF will write out
the view state to a javax.faces.ViewState hidden input field of the generated HTML
representation of every JSF form. When the JSF state saving method has the default
setting “server,” then the hidden input value represents a unique identifier referring
the serialized view state object which is stored in the HTTP session. When the JSF state
saving method is explicitly set to “client” using the following web.xml context parameter,
then the hidden input value itself represents the encrypted form of the serialized view
state object.
<context-param>
<param-name>javax.faces.STATE_SAVING_METHOD</param-name>
<param-value>client</param-value>
</context-param>
<env-entry>
<env-entry-name>jsf/ClientSideSecretKey</env-entry-name>
<env-entry-type>java.lang.String</env-entry-type>
<env-entry-value>[AES key in Base64 format]</env-entry-value>
</env-entry>
CHAPTER 3 COMPONENTS

73
Note that explicitly specifying the jsf/ClientSideSecretKey environment entry
with a fixed AES (Advanced Encryption Standard) key is mandatory in case you’re
running the JSF application on a cluster of servers (“cloud”), or when you’d like the view
state still to be valid after a server restart. You can generate a Base64-encoded AES key
yourself using the following plain Java snippet:
KeyGenerator keyGen = KeyGenerator.getInstance("AES");
keyGen.init(256); // Or 128 in case you don't have JCE.
byte[] rawKey = keyGen.generateKey().getEncoded();
String key = Base64.getEncoder().encodeToString(rawKey);
System.out.println(key); // Prints AES key in Base64 format.
The standard JSF form, as represented by <h:form>, submits by default using the POST
method to the very same requested URI as where the JSF page containing the form is
being requested. In other words, when you request a JSF page by http://example.com/
project/page.xhtml, then it will submit to the very same http://example.com/project/
page.xhtml URI.This is in web development terms known as “postback.” When JSF
needs to process an incoming postback request, then the restore view phase (first phase)
will, after the view build time, extract the view state from the javax.faces.ViewState
parameter and restore all changed properties into the newly created UIComponent
instances of the current request so that the component tree ultimately reflects exactly the
same state as it had during the view render time of the previous request.
On an average JSF web application, the majority of the saved view state is
represented by internal properties of UIComponent instances implementing the
javax.faces.component.EditableValueHolder interface,2 which covers all UIInput
components such as <h:inputText>. When submitting a JSF form fails with a conversion
or validation error, then all changed “is valid?” states and “local value” states, which
can be either the submitted string value or the already converted and validated value,
will for all involved UIInput components be saved in the view state. This has the major
advantage that that the developer doesn’t need to worry about manually keeping track
of them in order to re-present the submitted form with all valid and invalid values
preserved to the web site user while keeping the model (the managed bean properties)
completely free of those values. This is a major usability advantage for both the JSF
developer and the web site user.
2 https://javaee.github.io/javaee-spec/javadocs/javax/faces/component/
EditableValueHolder.html.
CHAPTER 3 COMPONENTS
74
The minority of the saved view state is represented by programmatic changes to the
component tree hierarchy, or to component attributes. Among others, any programmatic
changes to readonly, disabled, and rendered attributes are tracked in the view state
so that a hacker doesn’t have any chance to spoof the request in such way that those
attributes flip to the wrong side so that the hacker could do potentially hazardous things.
This is a major security advantage.
View Scope
The Servlet API, which JSF, among others, is built on top of, offers three well-defined
scopes: the request scope, the session scope, and the application scope. Basically,
the request scope is established by storing the object of interest as an attribute of the
HttpServletRequest. Equivalently, the session scope is established by storing the object
of interest as an attribute of the HttpSession and the application scope is established by
storing the object of interest as an attribute of the ServletContext.
JSF adds one more scope to this, the view scope. This must not be confused with the
component tree itself. The component tree (the physical UIViewRoot instance) is created
and destroyed during the very same HTTP request and is therefore clearly request
scoped. This must also not be confused with the view state, although they are closely
related.
When the end user fires a postback request on a JSF form, and the application
doesn’t perform any kind of navigation (i.e., the action method returns null or void),
then the view state identifier will stay the same and the view scope will be prolonged
to the next postback request, until the application performs an explicit navigation, or
when the HTTP session expires. You can establish the view scope by storing the object
of interest as an entry of UIViewRoot#getViewMap(). This is exactly where JSF stores its @
ViewScoped managed beans. No, this map is not in turn stored in the view state, not even
when the JSF state saving method is explicitly set to “client.” The view scope is stored in
the HTTP session, separate from the view state. Only the view scope identifier is stored in
the view state. Only the changed attributes of the UIViewRoot instance are stored in the
view state.
CHAPTER 3 COMPONENTS

75
Phase Events
The javax.faces.event.PhaseListener interface3 can be used to listen on any phase
of the JSF life cycle. This interface defines three methods: getPhaseId(), which should
return the phase you’re interested in; beforePhase(), which will be invoked right before
the specified phase is executed; and afterPhase(), which will be invoked right after
the specified phase is executed. In the beforePhase() and afterPhase() methods
you thus have the opportunity to run some code before or after the phase specified by
getPhaseId().
The javax.faces.event.PhaseId class4 defines a set of public constants. It still dates
from JSF 1.0 which was released only a few months before Java 1.5 and hence was too
late in the game in order to become a real enum. The constants are listed below with their
ordinal values.
• PhaseId.ANY_PHASE (0)
• PhaseId.RESTORE_VIEW (1)
• PhaseId.APPLY_REQUEST_VALUES (2)
• PhaseId.PROCESS_VALIDATIONS (3)
• PhaseId.UPDATE_MODEL_VALUES (4)
• PhaseId.INVOKE_APPLICATION (5)
• PhaseId.RENDER_RESPONSE (6)
Phase listener instances can be registered in various ways. Declaratively, they can be
registered application-wide via faces-config.xml.
<lifecycle>
<phase-listener>com.example.project.YourListener</phase-listener>
</lifecycle>
3 https://javaee.github.io/javaee-spec/javadocs/javax/faces/event/PhaseListener.
html.
4 https://javaee.github.io/javaee-spec/javadocs/javax/faces/event/PhaseId.html.
CHAPTER 3 COMPONENTS

76
Or view-wide via <f:phaseListener> tag enclosed in <f:view>.
<f:view>
<f:phaseListener type="com.example.project.YourListener" />
...
</f:view>
Programmatically, they can be added and removed application-wide via the
addPhaseListener() and removePhaseListener() methods of javax.faces.
lifecycle.Lifecycle instance.5 However, obtaining the current Lifecycle instance is
slightly convoluted as there’s no direct getter method for that in the public JSF API (yet).
FacesContext context = FacesContext.getCurrentInstance();
String lifecycleId = context.getExternalContext()
.getInitParameter(FacesServlet.LIFECYCLE_ID_ATTR);
if (lifecycleId == null) {
lifecycleId = LifecycleFactory.DEFAULT_LIFECYCLE;
}
LifecycleFactory lifecycleFactory = (LifecycleFactory)
FactoryFinder.getFactory(FactoryFinder.LIFECYCLE_FACTORY);
Lifecycle lifecycle = lifecycleFactory.getLifecycle(lifecycleId);
And they can be added and removed view-wide via the addPhaseListener()
and removePhaseListener() methods of UIViewRoot. A concrete example of a
PhaseListener is given in the section “Custom Component System Events.”
Component System Events
As noted in the section “Life Cycle,” a bunch of component system events are fired
during the life cycle. They extend from the javax.faces.event.ComponentSystemEvent
abstract class.6 In summary, those are
5 https://javaee.github.io/javaee-spec/javadocs/javax/faces/lifecycle/Lifecycle.
html.
6 https://javaee.github.io/javaee-spec/javadocs/javax/faces/event/
ComponentSystemEvent.html.
CHAPTER 3 COMPONENTS
77
• PreRemoveFromViewEvent: fired when a component is about to be
removed from the component tree.
• PostAddToViewEvent: red when a component has been added to the
component tree.
• PostRestoreStateEvent (read: "PostRestoreViewEvent"): red for
each component when the restore view phase ends. Note that this
event is only red for UIViewRoot when the view build time hasn’t yet
taken place during this phase. If the view build time has taken place
during this phase, then this event is red for any component in the tree.
• PreValidateEvent: red when a component is about to process its
converter and validators, and also when there are actually none.
• PostValidateEvent: red when a component is nished processing
its converter and validators, and also when there are actually none.
• PreRenderViewEvent: red when the UIViewRoot is about to write
HTML output to the HTTP response. Note that this is the latest
possible safe moment to change the destination of the HTTP
response, or to programmatically manipulate the component tree.
When doing so after this moment, there’s no guarantee that any
programmatic changes to the response or the component tree will
take place as intended, because by then the response may already be
committed, or the view state may already be saved.
• PreRenderComponentEvent: red when a component is about to write
its HTML output to the HTTP response.
• PostRenderViewEvent: fired when the UIViewRoot is finished writing
the HTML output to the HTTP response. Note that this event is new
since JSF 2.3. All others are from JSF 2.0.
There are two more component system events that were left unmentioned in the
section “Life Cycle.”
• PostConstructViewMapEvent: fired when the UIViewRoot has just
started the view scope.
• PreDestroyViewMapEvent: fired when the UIViewRoot is about to
destroy the view scope.
CHAPTER 3 COMPONENTS

78
These two are not strictly tied to the six-phase component-based life cycle and can
happen basically any time during the life cycle. The PostConstructViewMapEvent is fired
when the application invokes UIViewRoot#getViewMap() for the first time. By default,
this happens only when the first @ViewScoped managed bean of the current view state
has been created. The PreDestroyViewMapEvent is fired when the application invokes
Map#clear() on the UIViewRoot#getViewMap(), which usually only happens when
FacesContext#setViewRoot() is invoked while there is already an existing instance set.
This will end the view scope and destroy any active @ViewScoped managed bean. Normally,
this happens only when the action method has returned a non-null navigation outcome.
You can listen on any of those component system events using the javax.faces.
event.ComponentSystemEventListener interface.7 In the JSF API, the UIComponent class
itself already implements ComponentSystemEventListener. This interface provides a
processEvent() method with a ComponentSystemEvent argument which in turn has
among others a getComponent() method returning the concrete UIComponent instance
the event was fired on. The default implementation of UIComponent#processEvent()
basically checks if the current event is an instance of PostRestoreStateEvent and if
the binding attribute is specified, and if so, then invokes the setter method with the
component instance itself as argument.
There are three ways to subscribe listeners to those component system events. The first
is to declaratively use the <f:event> tag in the view. This can be attached to any component
tag. One example you’ll see in relatively a lot of JSF 2.0/2.1 targeted resources is the following:
<f:metadata>
<f:viewParam name="id" value="#{bean.id}" />
<f:event type="preRenderView" listener="#{bean.onload()}" />
</f:metadata>
where in the onload() method is often implemented as follows:
public void onload() {
FacesContext context = FacesContext.getCurrentInstance();
if (!context.isPostback() && !context.isValidationFailed()) {
// ...
}
}
7 https://javaee.github.io/javaee-spec/javadocs/javax/faces/event/
ComponentSystemEventListener.html.
CHAPTER 3 COMPONENTS
79
Note that the <f:event listener="#{bean.onload}"> by default expects a method
with ComponentSystemEvent argument, but if you don’t need it, it can be omitted
for brevity and the method expression should be parenthesized, although the EL
implementation may be forgiving in this.
The <f:event type="preRenderView"> is in essence a work-around in order to be
able to perform the invoke application phase upon a GET request based on model values
set by the <f:viewParam>. This was needed because the @PostConstruct was unsuitable
as it was invoked directly after bean’s construction but far before the model values were
updated. Since JSF 2.2 with its new <f:viewAction>, this <f:event> trick is not needed
any more:
<f:metadata>
<f:viewParam name="id" value="#{bean.id}" />
<f:viewAction action="#{bean.onload}" />
</f:metadata>
where in the onload() method is just implemented as follows:
public void onload() {
// ...
}
Another real-world example of <f:event> is to have a @PostConstruct-like behavior
in the backing component of a composite component wherein you can safely perform
any necessary initialization based on its attributes.
<cc:interface componentType="someComposite">
...
</cc:interface>
<cc:implementation>
<f:event type="postAddToView" listener="#{cc.init()}" />
...
#{cc.someInitializedValue}
</cc:implementation>
CHAPTER 3 COMPONENTS
80
and wherein the init() method of the SomeComposite class looks as follows:
private Object someInitializedValue; // +getter
public void init() {
Map<String, Object> attributes = getAttributes();
someInitializedValue = initializeItBasedOn(attributes);
}
The second way is to programmatically use UIComponent#subscribeToEvent() in
Java code. This allows you to conditionally subscribe a component system event listener
on an existing component. It is important to keep in mind that a component system
event listener is saved in the view state. In other words, it’s restored in the component
instance during the restore view phase of the subsequent postback request. Keep this
in mind when using UIComponent#ubscribeToEvent(); otherwise you may end up
subscribing the very same listener multiple times. The JSF implementation Mojarra
has an internal guard against it, provided that the equals() method of the listener
implementation is correctly implemented, but MyFaces doesn’t have a guard here
because the JSF specification doesn’t say so (yet).
This all makes it a little complicated to correctly register a component system event
listener programmatically for a specific component. If it’s an existing component,
you’d better use <f:event> instead, or if it’s a custom component, you’d better use
@ListenerFor annotation, which is actually the third way. Below is a kickoff example of
correctly registering a component system event listener programmatically, provided that
YourListener class has its equals() and hashCode() methods correctly implemented,
and that it implements Serializable or Externalizable or javax.faces.component.
StateHolder so that it can be saved correctly in view state.
Class<PreRenderViewEvent> event = PreRenderViewEvent.class;
ComponentSystemEventListener listener = new YourListener();
List<SystemEventListener> existingListeners =
component.getListenersForEventClass(event);
if (existingListeners != null && !existingListeners.contains(listener)) {
component.subscribeToEvent(event, listener);
}
CHAPTER 3 COMPONENTS
81
Yes, that null check is necessary. The UIComponent#getListenersForEventClass()
isn’t specified to return an empty list instead. All in all, this is clearly not a carefully
thought out API.You’d better use <f:event> or @ListenerFor instead to avoid dirty code
and confusion.
As previously stated, the third way is declaratively to use the @ListenerFor
annotation. You can put this annotation only on a UIComponent or Renderer class.
You can’t put this annotation on a backing bean class. For that, you should use
<f:event> instead. The @ListenerFor annotation takes the target event(s) as value.
The concrete ComponentSystemEventListener instance is the UIComponent instance
itself. If the annotation is declared on a Renderer class, then the target component is
the UIComponent instance whose UIComponent#getRendererType() refers the particular
Renderer class. The following example shows it for a custom component YourComponent:
@FacesComponent("project.YourComponent")
@ListenerFor(systemEventClass=PostAddToViewEvent.class)
public class YourComponent extends UIComponentBase {
@Override
public void processEvent(ComponentSystemEvent event) {
if (event instanceof PostAddToViewEvent) {
// ...
}
else {
super.processEvent(event);
}
}
// ...
}
Yes, that instanceof check is necessary. As noted in the section “Life Cycle,” the
PostRestoreStateEvent is by default explicitly fired for any component in the tree. The
super.processEvent(event) call is necessary in case this component has the binding
attribute specified; that is, the default UIComponent#processEvent() implementation
calls during PostRestoreStateEvent the setter method behind the binding attribute.
CHAPTER 3 COMPONENTS
82
Custom Component System Events
You can create your own ComponentSystemEvent types. Basically all you need to do is
to extend from the ComponentSystemEvent abstract class and declare the @NamedEvent
annotation on it and finally invoke Application#publishEvent() at the desired moment.
Imagine that you want to create a custom component system event which is fired
before the invoke application phase (fifth phase), a PreInvokeApplicationEvent. The
custom event looks as follows:
@NamedEvent(shortName="preInvokeApplication")
public class PreInvokeApplicationEvent extends ComponentSystemEvent {
public PreInvokeApplicationEvent(UIComponent component) {
super(component);
}
}
And here’s how you can use a PhaseListener to publish it.
public class PreInvokeApplicationListener implements PhaseListener {
@Override
public PhaseId getPhaseId() {
return PhaseId.INVOKE_APPLICATION;
}
@Override
public void beforePhase(PhaseEvent event) {
FacesContext context = FacesContext.getCurrentInstance();
context.getApplication().publishEvent(context,
PreInvokeApplicationEvent.class, context.getViewRoot());
}
@Override
public void afterPhase(PhaseEvent event) {
// NOOP.
}
}
CHAPTER 3 COMPONENTS

83
After registering this phase listener in faces-config.xml, you can use <f:event> or
@ListenerFor to listen on this event. One real-world example would be nested in the
<f:view> or a master template, or in a particular <h:form>, so that you don’t need to
copy/paste the very same <f:actionListener> over multiple UICommand components in
template clients or forms.
<f:event type="preInvokeApplication"
listener="#{bean.prepareInvokeApplication}" />
JSTL Core Tags
If you have ever developed with JSP, then you’ll most likely have stumbled upon JSTL
tags. In Facelets, however, only a limited subset of JSTL tags is reincarnated. They are
<c:if>, <c:choose><c:when><c:otherwise>, <c:forEach>, <c:set>, and <c:catch>.
Essentially, the XML namespace and tag names are identical to those from JSP, but they
are completely rewritten for Facelets.
This group of tags is formally called “JSTL core Facelets tag library” instead of “JSTL
core JSP tag library” and is also documented separately from JSP.8 Those JSTL tags are
available under the http://xmlns.jcp.org/jsp/jstl/core XML namespace URI which
should be assigned to the "c" XML namespace prefix.
xmlns:c="http://xmlns.jcp.org/jsp/jstl/core"
Yes, astonishingly with "/jsp" path in the URI.Historically, the predecessor
of Facelets in JSF 2.0 had those JSTL tags also implemented, but it didn’t use the
namespace URI as in the more recent JSTL 1.1 specification. Instead, it used the
namespace URI as in the JSTL 1.0 specification: http://java.sun.com/jstl/core.
However, this was “rectified” for Facelets in JSF 2.0. In my humble opinion, this is
outright confusing as the JSTL 1.1 XML namespace URI suggests that those are actually
JSP tags and not Facelets tags. But it is what it is.
The technical reason behind the original change of the JSTL namespace URI is
the migration of EL from JSTL to JSP.It was introduced in JSTL 1.0 and worked only in
JSTL tags and thus not outside JSTL tags. JSP 2.0 wanted to make use of the potential
of EL as well and so it was migrated from JSTL to JSP.JSTL 1.1 thus shipped without EL
8 https://javaserverfaces.github.io/docs/2.3/vdldocs/facelets/c/tld-summary.html.
CHAPTER 3 COMPONENTS
84
and wasn’t backward- compatible with JSTL 1.0 any more—hence the namespace URI
change to distinguish this.
JSTL tags have a different life cycle than JSF’s standard HTML components. JSTL tags
already run directly during the view build time while JSF is busy building the component
tree based on the view definition. JSTL tags don’t end up in the JSF component tree. In
other words, you can use JSTL tags to control the flow of building of the JSF component tree.
Note that using JSTL to control the component tree building isn’t as easily possible
as using JSF on JSP instead of Facelets. That is, JSTL tags for JSP can only recognize
JSP-specific ${} expressions and not JSF-specific #{} expressions. This means that JSTL
tags in JSP can’t recognize JSF managed beans if they aren’t yet created by JSF at that
moment, and that JSF components can’t access the var attribute of a <c:forEach>. In
Facelets, the JSTL tags are thus retrofitted so that they support the #{} expressions. This
makes them very powerful.
When developing JSF pages with JSTL tags the most important thing that you need to
keep in mind is that they run during the view build time and that they don’t participate
in the JSF life cycle. Below I have demonstrated the most important differences between
a JSTL tag and its JSF/Facelets counterpart.
<c:forEach> versus <ui:repeat>
Following is a <c:forEach> example iterating over a List<Item> with three instances
of an example Item entity having id and value properties:
<c:forEach items="#{bean.items}" var="item">
<h:outputText id="item_#{item.id}" value="#{item.value}" />
</c:forEach>
During the view build time, this creates three separate <h:outputText> components
in the component tree, roughly represented as follows:
<h:outputText id="item_1" value="#{bean.items[0].value}" />
<h:outputText id="item_2" value="#{bean.items[1].value}" />
<h:outputText id="item_3" value="#{bean.items[2].value}" />
In turn, they individually generate their HTML output during view render time,
as follows:
<span id="item_1">one</span>
<span id="item_2">two</span>
<span id="item_3">three</span>
CHAPTER 3 COMPONENTS
85
Do note that the id attribute of a JSF component is also evaluated during the view build
time and thus you need to manually ensure the uniqueness of the resulting component
ID.Otherwise JSF will throw an IllegalStateException with a message which goes like
this: “Duplicate component ID found in view.” The only other JSF component attribute
which is also evaluated during the view build time is the binding attribute. If you
absolutely need to bind a JSTL-generated component to a backing bean property, which
is rare, then you should be specifying a unique array index, collection index, or map key.
Following is an example provided that #{bean.components} refers an already prepared
UIComponent[], List<UIComponent>, or Map<Long, UIComponent> property.
<c:forEach items="#{bean.items}" var="item">
<h:outputText binding="#{bean.components[item.id]}"
id="item_#{item.id}" value="#{item.value}" />
</c:forEach>
The Facelets counterpart of the <c:forEach> is the <ui:repeat>. This is in essence
a UIComponent which doesn’t generate any HTML output by itself. In other words, the
<ui:repeat> itself also ends up in the JSF component tree during the view build time,
and only runs during the view render time. It basically re-renders its children during
every iteration round against the currently iterated item as var attribute.
<ui:repeat id="items" value="#{bean.items}" var="item">
<h:outputText id="item" value="#{item.value}" />
</ui:repeat>
During the view build time the above ends up exactly as is in the JSF component
tree: a single UIRepeat instance with one nested HtmlOutputText instance whereas the
<c:forEach> creates here three HtmlOutputText instances. Then, during the view render
time, the very same <h:outputText> component is being reused to generate its HTML
output based on current iteration round.
<span id="items:0:item">one</span>
<span id="items:1:item">two</span>
<span id="items:2:item">three</span>
Do note that the <ui:repeat> as a NamingContainer component already ensured the
uniqueness of the client ID based on the iteration index. It's technically also not possible
to reference its var attribute in the id attribute of any child component as the var
CHAPTER 3 COMPONENTS
86
attribute is only set during view render time while the id attribute is already set during
view build time.
<c:if>/<c:choose> versus rendered
Imagine that we have a custom tag file which can be used as follows:
<t:input type="email" id="email" label="Email" value="#{bean.email}" />
And the input.xhtml tag file contains the following Facelets markup conditionally
adding different tags using a <c:choose> (you can also use <c:if> for this):
<c:choose>
<c:when test="#{type eq 'password'}">
<h:inputSecret id="#{id}" label="#{label}" value="#{value}" />
</c:when>
<c:when test="#{type eq 'textarea'}">
<h:inputTextarea id="#{id}" label="#{label}" value="#{value}" />
</c:when>
<c:otherwise>
<h:inputText id="#{id}" label="#{label}" value="#{value}"
a:type="#{type}">
</h:inputText>
</c:otherwise>
</c:choose>
Note that a more elaborate example can be found in the section “Tag Files” in
Chapter 7. This construct will then only create the <h:inputText> component in the
component tree, roughly represented as follows:
<h:inputText id="email" label="Email" value="#{bean.email}"
a:type="email">
</h:inputText>
and when using the rendered attribute instead of <c:choose> as follows:
<h:inputSecret id="#{id}_password" rendered="#{type eq 'password'}"
label="#{label}" value="#{value}">
</h:inputSecret>
CHAPTER 3 COMPONENTS
87
<h:inputTextarea id="#{id}_textarea" rendered="#{type eq 'textarea'}"
label="#{label}" value="#{value}">
</h:inputTextarea>
<h:inputText id="#{id}_text"
rendered="#{type ne 'password' and type ne 'textarea'}"
label="#{label}" value="#{value}">
</h:inputText>
Then they will all end up in the component tree roughly as follows:
<h:inputSecret id="email_password" rendered="#{type eq 'password'}"
label="Email" value="#{bean.email}">
</h:inputSecret>
<h:inputTextarea id="email_textarea" rendered="#{type eq 'textarea'}"
label="Email" value="#{bean.email}">
</h:inputTextarea>
<h:inputText id="email_text"
rendered="#{type ne 'password' and type ne 'textarea'}"
label="Email" value="#{bean.email}">
</h:inputText>
You see, this will thus end up in an unnecessarily bloated component tree with a
lot of unused components when you have many of them, particularly when the type
attribute is actually static (i.e., it does not ever change, at least during the view scope).
Also note that the id attribute of each component has a static suffix so that you don’t end
up with “Duplicate component ID found in view” exceptions.
<c:set> versus <ui:param>
They are not interchangeable. The <c:set> sets a variable in the EL scope, which
is accessible only after the tag location during the view build time, but anywhere else
in the view during the view render time. The <ui:param> should only be nested in
<ui:include>, <ui:decorate template>, or <ui:composition template> and sets a
variable in the EL scope of the Facelets template, which is accessible only in the template
itself. Older JSF versions had bugs whereby the <ui:param> variable was also available
outside the Facelets template in question. This should never be relied upon.
CHAPTER 3 COMPONENTS
88
The <c:set> without a scope attribute will behave like an alias. It does not cache
the result of the EL expression in any scope. Its primary purpose is to be able to have
a shortcut to a relatively long EL expression which is repeated several times in the
same Facelets file. It can thus be used perfectly well inside, for example, iterating JSF
components.
<ui:repeat value="#{bean.products}" var="product">
<c:set var="price" value="#{product.price}" />
#{price}
</ui:repeat>
It's only not suitable, for example, for calculating the sum in a loop. The following
construct will never work:
<c:set var="total" value="#{0}" />
<ui:repeat value="#{bean.products}" var="product">
<c:set var="total" value="#{total = total + product.price}" />
#{product.price}
</ui:repeat>
Total price: #{total}
For that, use EL 3.0 stream API instead.
<ui:repeat value="#{bean.products}" var="product">
#{product.price}
</ui:repeat>
Total price: #{bean.products.stream().map(product->product.price).sum()}
However, when you set the scope attribute with one of allowable values request,
view, session, or application, then it will be evaluated immediately during the view
build time and stored in the specified scope.
<c:set var="DEV"
value="#{facesContext.application.projectStage eq 'Development'}"
scope="application" />
This will be evaluated only once during the first time this view is being built and
available as an EL variable #{DEV} throughout the entire application. You’d best declare
such <c:set> in the master template file which is used by every single Facelets file in
CHAPTER 3 COMPONENTS
89
the entire application. Note that the EL variable is capitalized to conform to Java naming
conventions for constants.
CAVEATS
Using JSTL tags will only lead to unexpected results when a JSTL tag attribute references
an EL variable which is not available during view build time. Examples of such EL variables
are those defined by var attribute of iterating components such as <h:dataTable> and
<ui:repeat>, and those set in model by <f:viewParam>, <f:viewAction>, and
<f:event type="preRenderView">.
In a nutshell, use JSTL tags only to control flow of JSF component tree building and use JSF
UI components only to control flow of HTML output generation. In JSTL tags, do not rely on EL
variables which are not available during view build time.
Manipulating theComponent Tree
This can be done declaratively using JSTL tags as well as programmatically using Java
code. The JSTL approach has already been elaborated in the previous section. It’s also
possible to use Java code instead. As a precaution, this generally ends up in very verbose
and hard-to-maintain code. Tree-based hierarchies in code are best readable and
maintainable when using a hierarchical markup language such as XML.Facelets itself
is already XML based. JSTL is also XML based and therefore seamlessly integrates in a
Facelets file. JSTL is therefore the recommended approach to dynamically manipulate
the component tree, rather than Java code.
The Javadoc of javax.faces.component.UIComponent9 specifies when you could
safely manipulate the component tree:
Dynamically modifying the component tree can happen at any time,
during and after restoring the view, but not during state saving and needs
to function properly with respect to rendering and state saving.
9 https://javaee.github.io/javaee-spec/javadocs/javax/faces/component/UIComponent.
html.
CHAPTER 3 COMPONENTS
90
In other words, the earliest moment when you can guarantee safely modifying the
component tree is during the PostAddToViewEvent and the latest moment when you can
guarantee safely modifying the component tree is during the PreRenderViewEvent. Any
moment in between is thus also possible. Before the PostAddToViewEvent there’s not
necessarily a means of a concrete UIViewRoot instance. After the PreRenderViewEvent
there’s a risk that the state is already saved and you’d rather not get trapped here. In
other words, manipulating the component tree during the render response phase (sixth
phase) is a bad idea.
When you intend to manipulate the component tree by means of adding new
components based on a Java model which is at least view scoped, then listen on
the PostAddToViewEvent of the parent component of interest. When you intend to
manipulate the component tree based on the fully built component tree by means of
adding/moving/removing components, then listen on the PreRenderViewEvent of the
UIViewRoot.
The following example programmatically populates a dynamic form based on a Java
model during the PostAddToViewEvent:
<h:form id="dynamicFormId">
<f:event type="postAddToView" listener="#{dynamicForm.populate}" />
</h:form>
wherein the #{dynamicForm} looks something like the following:
@Named @RequestScoped
public class DynamicForm {
private transient UIForm form;
private Map<String, Object> values = new HashMap<>();
@Inject
private FieldService fieldService;
public void populate(ComponentSystemEvent event) {
form = (UIForm) event.getComponent();
List<Field> fields = fieldService.list(form.getId());
fields.forEach(field -> field.populate(this));
}
CHAPTER 3 COMPONENTS
91
public void createOutputLabel(Field field) {
HtmlOutputLabel label = new HtmlOutputLabel();
label.setId(field.getName() + "_l");
label.setFor(field.getName());
label.setValue(field.getLabel());
form.getChildren().add(label);
}
public void createInputText(Field field) {
HtmlInputText text = new HtmlInputText();
text.setId(field.getName()); // Explicit ID is required!
text.setLabel(field.getLabel());
text.setValueExpression("value", createValueExpression(field));
form.getChildren().add(text);
}
public void createMessage(Field field) {
HtmlMessage message = new HtmlMessage();
message.setId(field.getName() + "_m");
message.setFor(field.getName());
form.getChildren().add(message);
}
public static ValueExpression createValueExpression(Field field) {
String el = "#{dynamicForm.values['" + field.getName() + "']}"
FacesContext context = FacesContext.getCurrentInstance();
ELContext elContext = context.getELContext();
return context.getApplication().getExpressionFactory()
.createValueExpression(elContext, el, Object.class);
}
public Map<String, Object> getValues() {
return values;
}
}
CHAPTER 3 COMPONENTS
92
and wherein the abstract class Field represents your custom model of a form field
with at least type, name, and label properties and the concrete implementation of a
TextField#populate() looks something like the following:
public void populate(DynamicFormBean form) {
form.createOutputLabel(this);
form.createInputText(this);
form.createMessage(this);
}
Note the naming pattern of concrete UIComponent classes. For HTML components
they follow exactly the convention “Html[TagName]”. For the <h:inputText> that’s thus
HtmlInputText, and so on. The above Java example will basically create the following
XML representation:
<h:outputLabel id="name_l" for="name" value="Label" />
<h:inputText id="name" value="#{dynamicForm.values['name']}" />
<h:message id="name_m" for="name" />
It only does that quite verbosely. Essentially, you’re here reinventing the job of
Facelets. There’s really nothing which is impossible using XML and only possible in Java.
As long as you understand how you can use JSTL for this:
<h:form id="dynamicFormId">
<c:forEach items="#{dynamicForm.fields}" var="field">
<t:field type="#{field.type}"
id="#{field.name}" label="#{field.label}"
value="#{dynamicForm.values[field.name]}">
</t:field>
</c:forEach>
</h:form>
wherein the #{dynamicForm} instead looks something like the following:
@Named @RequestScoped
public class DynamicForm {
private List<Field> fields;
private Map<String, Object> values = new HashMap<>();
CHAPTER 3 COMPONENTS
93
@Inject
public FieldService fieldService;
public List<Field> getFields() {
if (fields = null) {
FacesContext context = FacesContext.getCurrentInstance();
UIComponent form = UIComponent.getCurrentComponent(context);
fields = fieldService.list(form.getId());
}
return fields;
}
public Map<String, Object> getValues() {
return values;
}
}
You see, there is no need to mess with manually creating and populating
UIComponent instances. Facelets does that all for you based on simple XML.The
<t:field> can be found in the section “Tag Files” in Chapter 7.
CHAPTER 3 COMPONENTS
95
© Bauke Scholtz, Arjan Tijms 2018
B. Scholtz and A. Tijms, The Definitive Guide to JSF in Java EE 8, https://doi.org/10.1007/978-1-4842-3387-0_4
CHAPTER 4
Form Components
These are the most important components of the standard JSF (JavaServer Faces)
component set. Without them, JSF wouldn’t have been very useful in the first place.
When using plain HTML elements instead of JSF components, you’d end up polluting
the controller with code to manually apply, convert, and validate submitted values; to
update the model with those values; and to figure out the action method to be invoked.
That’s exactly the hard work JSF should take off your hands as being a component-based
MVC (Model-View-Controller) framework for HTML form-based web applications.
Input, Select, andCommand Components
All input components extend from the UIInput superclass. All selection components
extend from a subclass thereof, which can be UISelectBoolean, UISelectOne, or
UISelectMany. (See Chapter 3, Table3-1, for a comprehensive list of standard JSF
components.) All input and select components implement the EditableValueHolder
interface which allows attaching a Converter, Validator, and ValueChangeListener.
All command components extend from the UICommand superclass and implement the
ActionSource interface which allows defining one or more managed bean methods
which should be invoked during the invoke application phase (fifth phase). They can
have only one “action” method and multiple “action listener” methods.
HTML requires all input, select, and command elements to be nested in a form
element. The standard JSF component set offers only one such component, the
<h:form>, which is from the UIForm superclass. You could also use a plain HTML
<form> element, but that wouldn’t automatically include the mandatory javax.
faces.ViewState hidden input field in the form which represents the JSF view state.
The renderer of the <h:form> is the one responsible for automatically including
it in every generated HTML representation of the JSF form. Without it, JSF won’t
recognize the request as a valid postback request. In other words, the FacesContext.
96
getCurrentInstance().isPostback() would return false and then JSF wouldn’t
even process the submitted values, let alone invoke the action method. A plain HTML
<form> element in a JSF page is only useful for GET requests in combination with
<f:viewParam> tags which should take care of processing the submitted input values.
This will be detailed later in the section “GET Forms.”
All command components have an action attribute which can be bound to a
managed bean method. This method will be invoked during the invoke application
phase (fifth phase), as long as there’s no conversion or validation error. Conversion and
validation are covered in Chapter 5, so we’ll skip detailing this step here.
Text-Based Input Components
All text-based input components have a value attribute which can be bound to a
managed bean property. The getter of this property will, during the view render time, be
consulted to retrieve and display any preset value. And, the setter of this property will,
during the update model values phase (fourth phase) of the postback request, be invoked
with the submitted and already converted and validated value, if applicable. Following is
a basic usage example which demonstrates all text-based input components.
Facelets file /test.xhtml:
<h:form>
<h:inputText value="#{bean.text}" />
<h:inputSecret value="#{bean.password}" />
<h:inputTextarea value="#{bean.message}" />
<h:inputHidden value="#{bean.hidden}" />
<h:commandButton value="Submit" action="#{bean.submit}" />
</h:form>
Backing bean class com.example.project.view.Bean:
@Named @RequestScoped
public class Bean {
private String text;
private String password;
private String message;
private String hidden;
Chapter 4 Form Components
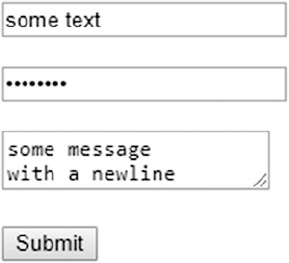
97
public void submit() {
System.out.println("Form has been submitted!");
System.out.println("text: " + text);
System.out.println("password: " + password);
System.out.println("message: " + message);
System.out.println("hidden: " + hidden);
}
// Add/generate getters and setters for every property here.
}
Generated HTML output:
<form id="j_idt4" name="j_idt4" method="post"
action="/project/test.xhtml"
enctype="application/x-www-form-urlencoded">
<input type="hidden" name="j_idt4" value="j_idt4" />
<input type="text" name="j_idt4:j_idt5" />
<input type="password" name="j_idt4:j_idt6" />
<textarea name="j_idt4:j_idt7"></textarea>
<input type="hidden" name="j_idt4:j_idt8" />
<input type="submit" name="j_idt4:j_idt9" value="Submit" />
<input type="hidden" name="javax.faces.ViewState"
id="j_id1:javax.faces.ViewState:0"
value="-4091383829147627416:3884402765892734278"
autocomplete="off" />
</form>
Rendering in Chrome browser (with newlines added):
Chapter 4 Form Components
98
You’ll notice several things in the generated HTML output. Undoubtedly the first
thing noticeable is that JSF has also automatically generated id and name attributes of the
HTML elements, all with a j_id prefix which is defined by the public API (application
programming interface) constant UIViewRoot.UNIQUE_ID_PREFIX. The “t” basically
stands for “tree” and the number basically represents the position of the component
in the component tree. This is thus prone to be changed whenever you add, remove,
or move around components in the Facelets file. This is thus also subject to headaches
when QA (quality assurance) needs to write integration tests for the web application
wherein more than often the HTML element IDs need to be used.
JSF will use an autogenerated ID when it’s mandatory for the functionality in order
to have an id and/or a name attribute in the generated HTML output. The id attribute is
mandatory in order to be able to find the HTML element by any JavaScript code which
can also be autogenerated by JSF, such as functions responsible for the Ajax works. As
this makes the generated HTML code rather hard to read and, frankly, ugly, we’d like
to just explicitly specify the id attribute of any JSF form, input, select, and command
component. This way JSF will just use it for the id and name attributes of the HTML
elements instead of autogenerating one. Now, let’s rewrite the Facelets file /test.
xhtml for that. A good practice is to let the ID attribute of the input component match
exactly the bean property name, and the ID attribute of the command component match
exactly the bean method name. This would end up in more self-documenting code and
generated HTML output.
<h:form id="form">
<h:inputText id="text" value="#{bean.text}" />
<h:inputSecret id="password" value="#{bean.password}" />
<h:inputTextarea id="message" value="#{bean.message}" />
<h:inputHidden id="hidden" value="#{bean.hidden}" />
<h:commandButton id="submit" value="Submit"
action="#{bean.submit}" />
</h:form>
Now, the generated HTML output looks as follows:
<form id="form" name="form" method="post" action="/project/test.xhtml"
enctype="application/x-www-form-urlencoded">
<input type="hidden" name="form" value="form" />
<input id="form:text" type="text" name="form:text" />
Chapter 4 Form Components
99
<input id="form:password" type="password" name="form:password" />
<textarea id="form:message" name="form:message"></textarea>
<input id="form:hidden" type="hidden" name="form:hidden" />
<input id="form:submit" type="submit" name="form:submit"
value="Submit" />
<input type="hidden" name="javax.faces.ViewState"
id="j_id1:javax.faces.ViewState:0"
value="-7192066430460949081:-3987350607752016894"
autocomplete="off" />
</form>
That’s already clearer. Note that when you explicitly set a component ID, it will
always end up in the generated HTML output. The generated HTML element ID, then,
represents the “client ID” which may be different from the component ID, depending on
its parents. If the component has any parent which is an instance of NamingContainer
interface, then the ID of the NamingContainer parent will be prepended to the client
ID of the component. From the standard JSF HTML component set, only the <h:form>
and <h:dataTable> are instances of NamingContainer. Others are <ui:repeat> and
<f:subview>.
If you look closer at the generated HTML output, there’s only one generated ID left.
It’s the one of the view state hidden input field, which is always j_id1. It represents
the ID of the UIViewRoot instance, which by default cannot be set from a Facelets file
on. When using JSF in Portlet-based web applications instead of Servlet-based web
applications, it is overridable and would represent the unique name of the Portlet. In
a Portlet-based web application it is possible to have multiple Portlet views in a single
JSF page. In other words, a single JSF page in a Portlet-based web application can have
multiple UIViewRoot instances.
Coming back to the generated HTML output, the name attribute of the HTML input
element is mandatory for HTML in order to be able to send the submitted values as
request parameters via HTTP.It will become the request parameter name. In any decent
web browser you can inspect the request parameters in the “Network” section of the web
developer’s toolset, which is accessible by pressing F12in the web browser. Figure4-1
shows how Chrome presents the postback request after submitting the form with some
values filled out, as you can see in the “Form Data” section of the figure.
Chapter 4 Form Components
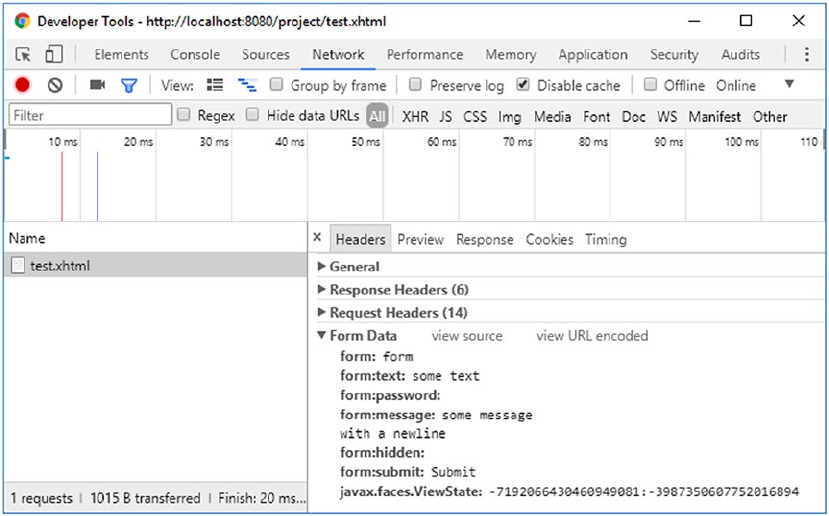
100
The hidden input field with the name representing the ID of the <h:form> will signal
JSF which form exactly was submitted during the postback request. That is, a single
HTML document can have multiple form elements. This way JSF can, during the apply
request values phase (second phase), determine whether the current form component
was actually submitted. It will cause the UIForm#isSubmitted() of the form component
to return true. The hidden input field with the name javax.faces.ViewState represents
the unique identifier referring the serialized view state object which is stored in the
session. Both hidden input fields are automatically included by the renderer associated
with the UIForm component. The autocomplete="off" on the view state hidden input
field is, by the way, not a technical requirement but just a work-around against some
browsers overriding it with the last known value when the back button is pressed, which
may not be the correct value per se.
Our example hidden input field has an empty value. It’s effectively useless in this
form. Such a hidden input field is generally only useful when its value is being set by
some JavaScript code which you’d like to capture in the managed bean. There’s generally
no point to “transferring” managed bean properties from one to the next request using
hidden input fields. Instead, such properties should be assigned to a managed bean
Figure 4-1. Chrome Developer Tools—Network—Headers—Form Data
Chapter 4 Form Components
101
which is declared to be in a broader scope than the request scope, such as the view, flow,
or session scope. This saves the effort of hassling with hidden input fields. The bean
scopes will be detailed in Chapter 8.
The other request parameters should speak for themselves if you’re familiar with
basic HTML.They represent the name/value pairs of the involved input elements. You
should be able to determine which values were actually entered in the form prior to
submitting. JSF will also be able to do the same. It will traverse the component tree and
use the “client ID” of the component as request parameter name to obtain the value
from the request parameter map. Basically, the following code will under the hood be
executed for each input component during apply request values phase (second phase).
This happens in the UIInput#decode() method.
FacesContext context = FacesContext.getCurrentInstance();
ExternalContext externalContext = context.getExternalContext();
Map<String, String> formData = externalContext.getRequestParameterMap();
String clientId = component.getClientId(context);
String submittedValue = formData.get(clientId);
component.setSubmittedValue(submittedValue);
And, during the same phase, the following code is basically executed for each command
component in the decode method of the renderer associated with the component:
if (formData.get(clientId) != null) {
component.queueEvent(new ActionEvent(context, component));
}
During the process validations phase (third phase), JSF will set the submitted value
of every involved input component as “local value” after performing the necessary
conversion and validation if any converter or validator is registered on the component
or associated bean property and has executed without errors. This happens in the
UIInput#validate() method whose core logic is shown in the following code in a (very!)
simplified form:
String submittedValue = component.getSubmittedValue();
try {
Converter converter = component.getConverter();
Object newValue = component.getConvertedValue(submittedValue);
for (Validator validator : component.getValidators()) {
Chapter 4 Form Components
102
validator.validate(context, component, newValue);
}
component.setValue(newValue);
component.setSubmittedValue(null);
}
catch (ConverterException | ValidatorException e) {
context.addMessage(clientId, e.getFacesMessage());
context.validationFailed(); // Skips phases 4 and 5.
component.setValid(false);
}
When there are no validation errors and the FacesContext#isValidationFailed()
thus returns false, then JSF will advance to the update model values phase (fourth
phase). During this phase, the “local value” of the input components will ultimately
be set as managed bean properties associated with the value attribute of the input
components. This will happen in the UIInput#updateModel() method which is
simplified as follows:
ValueExpression el = component.getValueExpression("value");
if (el != null) {
el.setValue(context.getELContext(), component.getValue());
component.setValue(null);
}
The el variable basically represents the Expression Language (EL) statement as
defined in the value attribute, which is, in case of our <h:inputText> example, thus
#{bean.text}. The ValueExpression#setValue() will basically trigger the setter
method behind this expression with the component’s value. So, effectively it will execute
bean.setText(component.getValue()).
Once all model values have been updated, JSF will advance to the invoke application
phase (fifth phase). Any ActionEvent which is, during the apply request values phase
(second phase), queued in a command component will be broadcasted. It will ultimately
invoke all methods associated with the command component. In the case of our
<h:commandButton> example, which has #{bean.submit} defined as an action attribute,
it will invoke the Bean#submit() method. Finally, JSF will advance to the last phase, the
render response phase (sixth phase), generating the HTML output and thereby invoking the
getter methods in order to obtain the model values to be embedded in the HTML output.
Chapter 4 Form Components
103
File-Based Input Component
Yes, there is only one file-based input component. That’s the <h:inputFile>. It has only
one additional requirement on the <h:form> it is being placed in, its enctype attribute
has to be explicitly set to multipart/form-data to conform the HTML specification. This
has no effect on other input components; they will continue to work just fine. It’s just
that the default form encoding application/x-www-form-urlencoded doesn’t support
embedding binary data. The multipart/form-data encoding supports this, but it is only
slightly more verbose. Every request parameter value is preceded by a boundary line, a
Content-Disposition header with the request parameter name, a Content Type header
with the content type of the value, and two newlines. It is very inefficient compared to
the default encoding wherein the URL-encoded request parameter name/value pairs
are just concatenated by the & character, but it’s actually the only reliable way to be able
to embed files in a HTTP POST request without inducing ambiguity, particularly when
uploading text files whose content coincidentally resembles name/value pairs.
The value attribute of the <h:inputFile> should be bound to a bean property of the
javax.servlet.http.Part interface.
Facelets file /test.xhtml:
<h:form id="form" enctype="multipart/form-data">
<h:inputFile id="file" value="#{bean.file}" />
<h:commandButton id="submit" value="Submit"
action="#{bean.submit}" />
</h:form>
Backing bean class com.example.project.view.Bean:
@Named @RequestScoped
public class Bean {
private Part file;
public void submit() throws IOException {
System.out.println("Form has been submitted!");
System.out.println("file: " + file);
if (file != null) {
System.out.println("name: " + file.getSubmittedFileName());
System.out.println("type: " + file.getContentType());
Chapter 4 Form Components
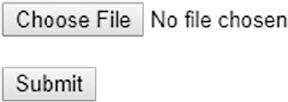
104
System.out.println("size: " + file.getSize());
InputStream content = file.getInputStream();
// Write content to disk or DB.
}
}
// Add/generate getters and setters for every property here.
}
Generated HTML output:
<form id="form" name="form" method="post" action="/project/test.xhtml"
enctype="multipart/form-data">
<input type="hidden" name="form" value="form" />
<input id="form:file" type="file" name="form:file" />
<input id="form:submit" type="submit" name="form:submit"
value="Submit" />
<input type="hidden" name="javax.faces.ViewState"
id="j_id1:javax.faces.ViewState:0"
value="6034213708100805615:8835868421785849982"
autocomplete="off" />
</form>
Rendering in Chrome browser (with newlines added):
The request processing life cycle is the same as for text-based input components,
except for the apply request values phase (second phase). Instead of extracting the
submitted file as a request parameter in the UIInput#decode() method, the submitted
file is being extracted as a request part in the renderer associated with the file input
component. The default implementation basically looks as follows:
FacesContext context = FacesContext.getCurrentInstance();
ExternalContext ec = context.getExternalContext();
HttpServletRequest request = (HttpServletRequest) ec.getRequest();
Chapter 4 Form Components
105
String clientId = component.getClientId(context);
Part submittedValue = request.getPart(clientId);
component.setSubmittedValue(submittedValue);
Selection Components
JSF offers a bunch of selection components of the UISelectBoolean, UISelectOne,
and UISelectMany component families which all extend from UIInput. Except for the
UISelectBoolean, they all expect the available items for selection to be provided via
<f:selectItems> or <f:selectItem> tags nested in the selection component. The
value attribute of a UISelectBoolean component can only be bound to a bean property
of boolean or Boolean type and doesn’t support a converter, while others support a
converter. The value attribute of a UISelectOne component has to be bound to a single-
value property such as String, and the value attribute of a UISelectMany component
can only be bound to a multi-value property such as Collection<String> or String[].
In real-world HTML-based web applications, the <h:selectOneListbox>
(single-select list box) and <h:selectManyMenu> (multi-select drop-down) aren’t
terribly useful. Generally the <h:selectOneMenu> (single-select drop-down) and
<h:selectManyListBox> (multi-select list box) are preferred as they are more user
friendly. Following is a basic usage example which demonstrates all selection
components except for the aforementioned least useful ones. In case you want to use
them anyway, just follow the demonstrated approach with a different tag name.
Facelets file /test.xhtml:
<h:form id="form">
<h:selectBooleanCheckbox id="checked" value="#{bean.checked}" />
<h:selectOneMenu id="oneMenu" value="#{bean.oneMenu}">
<f:selectItems value="#{bean.availableItems}" />
</h:selectOneMenu>
<h:selectOneRadio id="oneRadio" value="#{bean.oneRadio}">
<f:selectItems value="#{bean.availableItems}" />
</h:selectOneRadio>
<h:selectManyListbox id="manyListbox" value="#{bean.manyListbox}">
<f:selectItems value="#{bean.availableItems}" />
</h:selectManyListbox>
<h:selectManyCheckbox id="manyCheckbox" value="#{bean.manyCheckbox}">
Chapter 4 Form Components
106
<f:selectItems value="#{bean.availableItems}" />
</h:selectManyCheckbox>
<h:commandButton id="submit" value="Submit"
action="#{bean.submit}" />
</h:form>
Backing bean class com.example.project.view.Bean:
@Named @RequestScoped
public class Bean {
private boolean checked;
private String oneMenu;
private String oneRadio;
private List<String> manyListbox;
private List<String> manyCheckbox;
private List<String> availableItems;
@PostConstruct
public void init() {
availableItems = Arrays.asList("one", "two", "three");
}
public void submit() {
System.out.println("Form has been submitted!");
System.out.println("checked: " + checked);
System.out.println("oneMenu: " + oneMenu);
System.out.println("oneRadio: " + oneRadio);
System.out.println("manyListbox: " + manyListbox);
System.out.println("manyCheckbox: " + manyCheckbox);
}
// Add/generate getters and setters for every property here.
// Note that availableItems property doesn’t need a setter.
}
Chapter 4 Form Components
107
Generated HTML output:
<form id="form" name="form" method="post" action="/project/test.xhtml"
enctype="application/x-www-form-urlencoded">
<input type="hidden" name="form" value="form" />
<input id="form:checked" type="checkbox" name="form:checked" />
<select id="form:oneMenu" name="form:oneMenu" size="1">
<option value="one">one</option>
<option value="two">two</option>
<option value="three">three</option>
</select>
<table id="form:oneRadio">
<tr>
<td>
<input id="form:oneRadio:0" type="radio"
name="form:oneRadio" value="one" />
<label for="form:oneRadio:0"> one</label>
</td>
<td>
<input id="form:oneRadio:1" type="radio"
name="form:oneRadio" value="two" />
<label for="form:oneRadio:1"> two</label>
</td>
<td>
<input id="form:oneRadio:2" type="radio"
name="form:oneRadio" value="three" />
<label for="form:oneRadio:2"> three</label>
</td>
</tr>
</table>
<select id="form:manyListbox" name="form:manyListbox"
multiple="multiple" size="3">
<option value="one">one</option>
<option value="two">two</option>
<option value="three">three</option>
</select>
Chapter 4 Form Components
108
<table id="form:manyCheckbox">
<tr>
<td>
<input id="form:manyCheckbox:0" type="checkbox"
name="form:manyCheckbox" value="one" />
<label for="form:manyCheckbox:0"> one</label>
</td>
<td>
<input id="form:manyCheckbox:1" type="checkbox"
name="form:manyCheckbox" value="two" />
<label for="form:manyCheckbox:1"> two</label>
</td>
<td>
<input id="form:manyCheckbox:2" type="checkbox"
name="form:manyCheckbox" value="three" />
<label for="form:manyCheckbox:2"> three</label>
</td>
</tr>
</table>
<input id="form:submit" type="submit" name="form:submit"
value="Submit" />
<input type="hidden" name="javax.faces.ViewState"
id="j_id1:javax.faces.ViewState:0"
value="403461711995663039:117935361680169981"
autocomplete="off" />
</form>
Chapter 4 Form Components
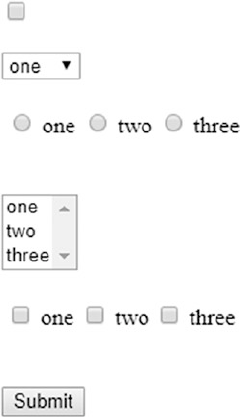
109
Rendering in Chrome browser (with newlines added):
In the generated HTML output, you’ll immediately notice that <h:selectOneRadio>
and <h:selectManyCheckbox> generate an HTML table around the inputs. Such a
markup is indeed frowned upon since Web 2.0. This is somewhat a leftover of JSF 1.0,
when Web 2.0 didn’t exist yet. For the <h:selectManyCheckbox> this could easily be
worked around by using a bunch of <h:selectBooleanCheckbox> components in the
desired HTML markup which are bound against a slightly adjusted model.
Facelets file /test.xhtml:
<h:form id="form">
<ul>
<ui:repeat id="many" value="#{bean.availableItems}" var="item">
<li>
<h:selectBooleanCheckbox id="checkbox"
value="#{bean.manyCheckboxMap[item]}" />
<h:outputLabel for="checkbox" value="#{item}" />
</li>
</ui:repeat>
</ul>
Chapter 4 Form Components
110
<h:commandButton id="submit" value="Submit"
actionListener="#{bean.collectCheckedValues}"
action="#{bean.submit}" />
</h:form>
Backing bean class com.example.project.view.Bean:
@Named @RequestScoped
public class Bean {
private List<String> manyCheckbox;
private List<String> availableItems;
private Map<String, Boolean> manyCheckboxMap = new LinkedHashMap<>();
@PostConstruct
public void init() {
availableItems = Arrays.asList("one", "two", "three");
}
public void collectCheckedValues() {
manyCheckbox = manyCheckboxMap.entrySet().stream()
.filter(e -> e.getValue())
.map(Map.Entry::getKey)
.collect(Collectors.toList());
}
public void submit() {
System.out.println("Form has been submitted!");
System.out.println("manyCheckbox: " + manyCheckbox);
}
// Add/generate getters for availableItems and manyCheckboxMap.
// Note that setters are not necessary for them.
}
Generated HTML output:
<form id="form" name="form" method="post" action="/project/test.xhtml"
enctype="application/x-www-form-urlencoded">
<input type="hidden" name="form" value="form" />
Chapter 4 Form Components

111
<ul>
<li>
<input id="form:many:0:checkbox" type="checkbox"
name="form:many:0:checkbox" />
<label for="form:many:0:checkbox">one</label>
</li>
<li>
<input id="form:many:1:checkbox" type="checkbox"
name="form:many:1:checkbox" />
<label for="form:many:1:checkbox">two</label>
</li>
<li>
<input id="form:many:2:checkbox" type="checkbox"
name="form:many:2:checkbox" />
<label for="form:many:2:checkbox">three</label>
</li>
</ul>
<input id="form:submit" type="submit" name="form:submit"
value="Submit" />
<input type="hidden" name="javax.faces.ViewState"
id="j_id1:javax.faces.ViewState:0"
value="-2278907496447873737:-4769857814543424434"
autocomplete="off" />
</form>
Rendering in Chrome browser:
That’s already more Web 2.0 friendly. The bullets of the <ul> can of course be hidden
by setting the CSS (Cascading Style Sheets) list-style-type property to none. Note that
the actionListener attribute of the <h:commandButton> always runs before the action
attribute. The same approach was not possible for <h:selectOneRadio> for a long time.
Chapter 4 Form Components

112
There’s no such component as <h:radioButton> or anything like that. Solutions were
sought in third-party component libraries such as PrimeFaces. Since JSF 2.2 this could
be tricked with the new “pass-through elements” and “pass-through attributes” feature
on plain HTML <input type="radio"> elements.1 Only since JSF 2.3 has it been natively
possible with help of the new group attribute which basically represents the same as the
name attribute of the plain HTML <input type="radio"> element.
Facelets file /test.xhtml:
<h:form id="form">
<ul>
<ui:repeat id="one" value="#{bean.availableItems}" var="item">
<li>
<h:selectOneRadio id="radio" group="groupName"
value="#{bean.oneRadio}">
<f:selectItem itemValue="#{item}" />
</h:selectOneRadio>
<h:outputLabel for="radio" value="#{item}" />
</li>
</ui:repeat>
</ul>
<h:commandButton id="submit" value="Submit"
action="#{bean.submit}" />
</h:form>
Backing bean class com.example.project.view.Bean:
@Named @RequestScoped
public class Bean {
private String oneRadio;
private List<String> availableItems;
@PostConstruct
public void init() {
availableItems = Arrays.asList("one", "two", "three");
}
1 http://balusc.omnifaces.org/2015/10/custom-layout-with-hselectoneradio-in.html.
Chapter 4 Form Components
113
public void submit() {
System.out.println("Form has been submitted!");
System.out.println("oneRadio: " + oneRadio);
}
// Add/generate getters and setters for every property here.
// Note that availableItems property doesn’t need a setter.
}
Generated HTML output:
<form id="form" name="form" method="post" action="/project/test.xhtml"
enctype="application/x-www-form-urlencoded">
<input type="hidden" name="form" value="form" />
<ul>
<li>
<input type="radio" id="form:one:0:radio"
name="form:groupName" value="form:one:0:radio:one" />
<label for="form:one:0:radio">one</label>
</li>
<li>
<input type="radio" id="form:one:1:radio"
name="form:groupName" value="form:one:1:radio:two" />
<label for="form:one:1:radio">two</label>
</li>
<li>
<input type="radio" id="form:one:2:radio"
name="form:groupName" value="form:one:2:radio:three" />
<label for="form:one:2:radio">three</label>
</li>
</ul>
<input id="form:submit" type="submit" name="form:submit"
value="Submit" />
<input type="hidden" name="javax.faces.ViewState"
id="j_id1:javax.faces.ViewState:0"
value="3336433674711048358:164229014603307903"
autocomplete="off" />
</form>
Chapter 4 Form Components
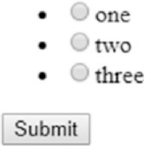
114
Rendering in Chrome browser:
Technically, the <h:selectManyCheckbox> could support the group attribute too, but
this hasn’t yet been implemented. Perhaps it will be in JSF.next.
SelectItem Tags
Providing available items for UISelectOne and UISelectMany components can be
done in several ways. As demonstrated in the previous section, you can use the
<f:selectItems> and <f:selectItem> tags nested in the selection component for this.
You can use the <f:selectItem> tag to define the available items entirely on the view
side. Following is an example using <h:selectOneMenu>, but you can use it the same way
in any other UISelectOne and UISelectMany component:
<h:selectOneMenu id="selectedItem" value="#{bean.selectedItem}">
<f:selectItem itemValue="#{null}" itemLabel="-- select one --" />
<f:selectItem itemValue="one" itemLabel="First item" />
<f:selectItem itemValue="two" itemLabel="Second item" />
<f:selectItem itemValue="three" itemLabel="Third item" />
</h:selectOneMenu>
Note that a select item with value of #{null} can be used to present the default
selection in case the bean property associated with selection component’s value
attribute is null. If you have consulted the tag documentation of <f:selectItem>,
then you’ll perhaps have noticed the noSelectionOption attribute and have thought
that it was intended to represent a “no selection option.” Actually, this isn’t true.
Many starters indeed think so, as you can see in many forums, Q&A sites, and poor-
quality tutorials on the Internet. In spite of the misleading attribute name, it does
not represent a “no selection option.” A better attribute name would have been
Chapter 4 Form Components
115
hideWhenOtherOptionIsSelected, and even then it works only when the parent
selection component has explicitly a hideNoSelectionOption="true" attribute set like
the one that follows:
<h:selectOneMenu id="selectedItem" value="#{bean.selectedItem}"
hideNoSelectionOption="true">
<f:selectItem itemValue="#{null}" itemLabel="-- select one --"
noSelectionOption="true" />
<f:selectItem itemValue="one" itemLabel="First item" />
<f:selectItem itemValue="two" itemLabel="Second item" />
<f:selectItem itemValue="three" itemLabel="Third item" />
</h:selectOneMenu>
So, hideWhenOtherOptionIsSelectedAndHideNoSelectionOptionIsTrue would
ultimately have been the most self-explanatory attribute name. Unfortunately, this
wasn’t very well thought out when the noSelectionOption was implemented in JSF 1.2.
Requiring two attributes for this attribute to function shouldn’t have been necessary. The
primary purpose of this attribute pair is to prevent the web site user from being able to
re-select the “no selection option” when the component has already a non-null value—
for example, by having it prepared in a @PostConstruct method, or by re-rendering the
component after a form submit with a non-null value.
That said, the itemValue attribute of the <f:selectItem> represents the value
that will be set as bean property when the form is submitted, and the value that will be
preselected from any non-null bean property when the HTML output is to be generated.
The itemLabel attribute represents the label that will be displayed to the web site user.
When the itemLabel attribute is absent, JSF will default to itemValue. Note that the label
is in no way submitted back to the server. That is, in the generated HTML output, the
<option> label is not part of the <option> value.
You can use the <f:selectItems> tag to reference a Collection, Map, or array of
available items in the backing bean. You can even mix this with <f:selectItem> tags.
<h:selectOneMenu id="selectedItem" value="#{bean.selectedItem}">
<f:selectItem itemValue="#{null}" itemLabel="-- select one --" />
<f:selectItems value="#{bean.availableItems}" />
</h:selectOneMenu>
Chapter 4 Form Components
116
They will be rendered in the same order as they are declared in the view. Only when
you use an unordered Map implementation as value, such as HashMap, the order of items
provided by <f:selectItems> will be undefined. It’s therefore better to use an ordered
Map implementation, such as TreeMap or LinkedHashMap. When populating the available
items as a Map, keep in mind that the map key represents the item label and the map
value represents the item value. You’d perhaps intuitively expect it to be the other way
around, but this was a technical limitation. That is, on the Java side, the map key enforces
uniqueness while the map value doesn’t. And on the HTML side, the option label is
supposed to be unique while the option value doesn’t need to be. Following is how you
can populate such a map:
private Map<String, String> availableItems;
@PostConstruct
public void init() {
availableItems = new LinkedHashMap<>();
availableItems.put("First item", "one");
availableItems.put("Second item", "two");
availableItems.put("Third item", "three");
}
// Add/generate getter. Note that a setter is unnecessary.
As said, you can also use a TreeMap or HashMap, but then the item labels will become,
respectively, sorted or unsorted, regardless of the insertion order.
In case you’d really like to swap the map keys and values around on the view side,
you can always do so by manually assigning the map entry value as an item label and
the map entry key as an item value. You can do that with help of the var attribute of the
<f:selectItems> by which you can declare the EL variable name of the currently iterated
item. This can, in turn, be accessed in the itemValue and itemLabel attributes of the
same tag. When you pass Map#entrySet() to the value attribute of the <f:selectItems>,
then each iterated item will represent a Map.Entry instance. This has, in turn, getKey()
and getValue() methods which are thus perfectly usable as EL properties.
<f:selectItems value="#{bean.availableItems.entrySet()}" var="entry"
itemValue="#{entry.key}" itemLabel="#{entry.value}">
</f:selectItems>
Chapter 4 Form Components
117
This also works when using a Collection or array as available items. You don’t
explicitly need to first convert it to a Set (more specifically, Iterable), as demonstrated
above. This is particularly useful when you have a Collection or an array of complex
objects as available items, such as model entities.
Model entity representing a “country”:
public class Country {
private Long id;
private String code;
private String name;
// Add/generate getters and setters.
}
Backing bean:
@Named @RequestScoped
public class Bean {
private String countryCode;
private List<Country> availableCountries;
@Inject
private CountryService countryService;
@PostConstruct
public void init() {
availableCountries = countryService.getAll();
}
// Add/generate getters and setters.
// Note that a setter is unnecessary for availableCountries.
}
View:
<h:selectOneMenu id="countryCode" value="#{bean.countryCode}">
<f:selectItem itemValue="#{null}" itemLabel="-- select one --" />
<f:selectItems value="#{bean.availableCountries}" var="country">
Chapter 4 Form Components
118
itemValue="#{country.code}" itemLabel="#{country.name}"
</f:selectItems>
</h:selectOneMenu>
Note that any persistence framework-specific annotations, such as JPA’s @Entity and
@Id, and the actual implementation of CountryService, are omitted for clarity. Those are
irrelevant to any front-end framework, such as JSF.
With the above construct, the value as obtained from Country#getCode() will end
up as value of the generated HTML <option> element. Now, when the form is submitted,
it will become the submitted value of the selection component, which will in turn invoke
the setter method behind the #{bean.countryCode} property with exactly that value. Of
course, you can also use the whole Country object as the property value of the selection
component, but that would require a converter which can convert between the complex
object and a unique string suitable to be embedded in HTML output and sent as an
HTTP request parameter. You can read more in Chapter 5.
SelectItemGroup
In case you’d like to group a bunch of options under a common label, you can use
the javax.faces.model.SelectItemGroup, which you in turn reference in the value
attribute of the <f:selectItems>. Unfortunately, this cannot be done declaratively in the
Facelets file on a custom nested model. You really have to map your model into the JSF-
provided javax.faces.model.SelectItem for this. Following is a kickoff example:
private List<SelectItem> availableItems;
@PostConstruct
public void init() {
SelectItemGroup group1 = new SelectItemGroup("Group 1");
group1.setSelectItems(new SelectItem[] {
new SelectItem("Group 1 Value 1", "Group 1 Label 1"),
new SelectItem("Group 1 Value 2", "Group 1 Label 2"),
new SelectItem("Group 1 Value 3", "Group 1 Label 3")
});
Chapter 4 Form Components
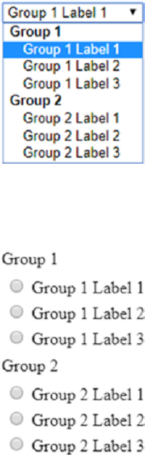
119
SelectItemGroup group2 = new SelectItemGroup("Group 2");
group2.setSelectItems(new SelectItem[] {
new SelectItem("Group 2 Value 1", "Group 2 Label 1"),
new SelectItem("Group 2 Value 2", "Group 2 Label 2"),
new SelectItem("Group 2 Value 3", "Group 2 Label 3")
});
availableItems = Arrays.asList(group1, group2);
// Add/generate getter for availableItems.
// Note that a setter is unnecessary.
}
Noted that both model APIs have basically not changed since JSF 1.0 (2004)
and that’s why you still see a SelectItemGroup#setSelectItems() method taking a
SelectItem[] array instead of a SelectItem… varargs argument. This will certainly
be worked on for JSF.next. When referencing it as <f:selectItems value="#{bean.
availableItems}" /> in any selection component, below is how it would look for each
of them.
The <h:selectOneMenu> will render each group as HTML <optgroup>:
The <h:selectOneRadio layout="pageDirection"> will render it as a nested table:
Chapter 4 Form Components
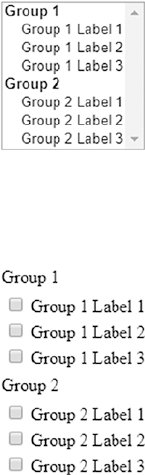
120
The <h:selectManyListbox> will render each group as HTML <optgroup>:
The <h:selectManyCheckbox layout="pageDirection"> will render it as a nested
table:
Note the importance of the layout="pageDirection" attribute in <h:selectOneRadio>
and <h:selectManyCheckbox>. This will look much better than the default of
layout="lineDirection" which would render everything in a big single table row.
Label andMessage Components
In an average well-designed form, input elements are usually accompanied with
a label element and a message element targeting the input field. In HTML, labels
are represented by the <label> element. In JSF, you can use the <h:outputLabel>
component to generate an HTML <label> element. HTML does not have a dedicated
element to represent a message. In JSF, the <h:message> component generates a HTML
<span> element and the <h:messages> component generates either a <ul> element or a
<table> element, depending on the value of the layout attribute.
The label element has various SEO (search engine optimization) and usability
advantages. It tells in text about the associated input element. Screen readers, like those
used by people with visual disabilities, will find the label and tell its contents by sound.
Search bots will find the label and index the associated input element as such. And, the
label will focus and activate the associated input element when being clicked itself.
Chapter 4 Form Components
121
Text- based input elements will then show the text cursor. Check box and radio input
elements will then be toggled. List box and drop-down input elements will then be focused.
File input elements will then open the browse dialog. Submit buttons will then be invoked.
The message element is usually to be used to display conversion and validation error
messages coming from the server side. This way, the end user is informed about the state
of the form and can act accordingly, usually by correcting the input values. You can also
use it to display warning or informal messages.
In JSF, the <h:outputLabel>, <h:message> and <h:messages> components have a
for attribute wherein you normally define the ID of the associated UIInput component.
Following is an example in the flavor of a login form:
<h:form id="login">
<fieldset>
<legend>Login</legend>
<section>
<h:outputLabel for="email" value="Email address" />
<h:inputText id="email" value="#{login.email}"
required="true" />
<h:message id="m_email" for="email" />
</section>
<section>
<h:outputLabel for="password" value="Password" />
<h:inputSecret id="password" value="#{login.password}"
required="true" />
<h:message id="m_password" for="password" />
</section>
<footer>
<h:commandButton id="submit" value="Login"
action="#{login.submit}" />
</footer>
</fieldset>
</h:form>
You can actually use any arbitrary component search expression in the for
attribute. For the <h:outputLabel> component, this doesn’t make much sense. For
the <h:message> and <h:messages> components, referring the ID of a non-UIInput
component would only make sense when you want to programmatically add a faces
Chapter 4 Form Components
122
message from the managed bean on. But you would then need to know the client ID of
the target component.
<h:form id="login">
...
<h:commandButton id="submit" value="Login"
action="#{login.submit}" />
<h:message id="m_submit" for="submit" />
...
</h:form>
The above <h:commandButton> will generate a client ID of "login:submit" in the
HTML output. You can then programmatically add a faces message as follows:
public String submit() {
try {
yourAuthenticator.authenticate(email, password);
return "/user/home.xhtml?faces-redirect=true";
}
catch (YourAuthenticationException e) {
FacesContext context = FacesContext.getCurrentInstance();
FacesMessage message = new FacesMessage("Authentication failed");
context.addMessage("login:submit", message);
return null;
}
}
A better practice, however, is to add the faces message as a global message by
passing null as the client ID.
context.addMessage(null, message);
Such a message will then only end up in a <h:messages globalOnly="true">.
<h:commandButton id="submit" value="Login"
action="#{login.submit}" />
<h:messages id="messages" globalOnly="true"
rendered="#{component.namingContainer.submitted}" />
Chapter 4 Form Components
123
Note the logic in the rendered attribute of the messages component. It will thus only
be rendered when the submitted property of the NamingContainer parent evaluates to
true. In this specific case, it’s consulting the UIForm#isSubmitted(). This is very useful
in case you have multiple non-Ajax forms each with its own global messages component
and/or a “catch-all” <h:messages redisplay="false"> component somewhere near the
bottom of the JSF page, which is then using CSS fixed positioned on top. Otherwise the
global message would unintentionally show up over there as well.
This message-rendering logic is not necessary in Ajax forms as you could just
fine- tune the message rendering by simply explicitly specifying the message(s)
component(s) in the render attribute of <f:ajax>. Moreover, the UIForm#isSubmitted()
would unexpectedly return false when the execute attribute of the <f:ajax> does not
explicitly target the form as in execute="@form".
Command Components
You’ll have noticed examples of the <h:commandButton> in the previous sections about
input and select components. This thus generates an HTML <input type="submit">
element, which is the HTML way to send all input values of the <form> element it is
sitting in to the server. On the server side, this component is also capable of invoking
one or more Java methods, which are usually defined in the action or actionListener
attribute, or via a <f:actionListener> tag nested in the command component. You’ll
also have read that the action listener method always runs before the method associated
with the action attribute.
You can use the <f:actionListener> tag to register one or more additional action
listeners on the very same command component. All those action listeners are invoked
in the same order as they’re declared in the view and attached to the component. The
target method can be declared in three ways on the <f:actionListener> tag. One way is
via the type attribute and the other two ways are via the binding attribute.
<h:commandButton ...>
<f:actionListener type="com.example.project.SomeActionListener" />
<f:actionListener binding="#{beanImplementingActionListener}" />
<f:actionListener binding="#{bean.someActionListenerMethod()}" />
<h:commandButton>
Chapter 4 Form Components
124
The type attribute in the first way must basically represent the fully qualified name of
the class implementing the ActionListener interface.
package com.example.project;
import javax.faces.event.ActionListener;
import javax.faces.event.ActionEvent;
public class SomeActionListener implements ActionListener {
@Override
public void processAction(ActionEvent event) {
// ...
}
}
The binding attribute in the second way must basically reference a managed bean
instance implementing the ActionListener interface.
@Named @RequestScoped
public class BeanImplementingActionListener implements ActionListener {
@Override
public void processAction(ActionEvent event) {
// ...
}
}
And the binding attribute in the third way can basically reference any arbitrary
managed bean method which is declared void.
@Named @RequestScoped
public class Bean {
public void someActionListenerMethod() {
// ...
}
}
Chapter 4 Form Components
125
Note that the third way is more or less undocumented. It has only been possible since
the introduction of EL 2.2 (2009), wherein developers could start explicitly declaring
method expressions by simply adding the parenthesis, if necessary with arguments.
Coincidentally, the binding attribute of the <f:actionListener> could deal with
them. Under the hood of the binding attribute is treated as a ValueExpression and the
logic expected to obtain a managed bean instance implementing the ActionListener
interface when invoking ValueExpression#getValue(). However, instead of a getter,
a void method was invoked and returned nothing which is interpreted as null. So, the
logic continued silently as if there were simply no bean instance available.
The action listeners have an additional feature on top of the action attribute. When
a javax.faces.event.AbortProcessingException is explicitly thrown from an action
listener, then JSF will swallow the exception and abort processing the invoke application
phase (fifth phase) and immediately advance to the render response phase (sixth
phase). All remaining action listeners and the action method, if any, will be skipped. The
swallowed exception won’t end up in any error response. Given this fact, and the fact
that action listeners are always invoked before the action method, you could (ab)use it to
perform some conversion and validation based on already updated model values before
the action method is invoked.
public void someActionListenerMethod() {
try {
convertOrValidate(this);
} catch (SomeConversionOrValidationException e) {
FacesContext context = FacesContext.getCurrentInstance()
context.addMessage(null, new FacesMessage(e.getMessage()));
throw new AbortProcessingException(e);
}
}
public void someActionMethod() {
// Won't be invoked when AbortProcessingException is thrown.
}
I’m saying “(ab)use” because it is essentially the responsibility of a normal
Converter or Validator implementation to perform such task, so that the model values
are not polluted with invalid values. However, for a long time in JSF it was not possible
to perform conversion or validation based on multiple fields. Hence developers started
using the action (listener) methods, which is essentially a violation of the JSF life cycle.
Chapter 4 Form Components
126
Only in JSF 2.3 was a new <f:validateWholeBean> tag introduced to perform
validation on multiple fields. You can read more about this in Chapter 5. So this
leaves only one reasonable real-world use case open for action listener methods:
performing conversion based on one or more model values. One example has
already been demonstrated in the section “Selection Components” (the case of using
multiple <h:selectBooleanCheckbox> in <ui:repeat> to work around the fact that
the <h:selectManyCheckbox> generates an HTML table). Another example would be
invoking an external web service with the supplied model values and obtaining its result
as a “converted” value. The action method should then still be used to execute business
service logic. When the action method throws an exception, the request will end up as an
HTTP 500 error response. You can find more about this in Chapter 9.
Apart from the <h:commandButton>, JSF offers two more command components:
the <h:commandLink> and the <h:commandScript>. The <h:commandLink> has basically
an identical life cycle as the <h:commandButton>, except that it generates an HTML <a>
element which submits the enclosed form with the help of JavaScript. Everywhere where
you use <h:commandButton>, it could be substituted with <h:commandLink>.
<h:form id="form">
...
<h:commandLink id="submit" value="Submit" action="#{bean.submit}" />
</h:form>
Whereby the generated HTML output looks as follows:
<form id="form" name="form" method="post" action="/project/test.xhtml"
enctype="application/x-www-form-urlencoded">
<input type="hidden" name="form" value="form" />
...
<script type="text/javascript"
src="/project/javax.faces.resource/jsf.js.xhtml?ln=javax.faces">
</script>
<a id="form:submit" href="#" onclick="
mojarra.jsfcljs(
document.getElementById('form'),
{'form:submit':'form:submit'},
''
); return false;">Submit</a>
Chapter 4 Form Components

127
<input type="hidden" name="javax.faces.ViewState"
id="j_id1:javax.faces.ViewState:0"
value="-6936791897896630173:-5064219023156239099"
autocomplete="off" />
</form>
And the rendering in Chrome browser:
In the generated HTML output, you’ll notice that it auto-includes the jsf.js
JavaScript file. This contains, among other things, the jsf object and the JSF
implementation-specific helper functions which are in case of the Mojarra
implementation put in the mojarra object. In plain HTML, there’s no way to submit a
<form> using an <a> element. Hence, some JavaScript has to be thrown into the game.
In Mojarra’s specific case, the mojarra.jsfcljs() function will be invoked with
the parent form as the first argument, the command component’s client ID as a
request parameter name and value as the second argument, and the target attribute
of the <h:commandLink> as the third argument, if any. Under the hood of the mojarra.
jsfcljs() function will create <input type="hidden"> elements for each name/value
pair in the second argument and add them to the form provided as the first argument,
making sure that those parameters end up a postback request. Then it will create a
temporary <input type="submit"> button, add it to the form, and invoke the click()
function on it, as if you would be using a regular submit button. Finally, it will remove all
of those dynamically created elements from the form.
This function is actually also used by the <h:commandButton>, but only when you
need to pass additional request parameters via one or more <f:param> tags nested in the
command component.
<h:form id="form">
...
<h:commandButton id="submit" value="Submit" action="#{bean.submit}">
<f:param name="id" value="#{otherBean.id}" />
</h:commandButton>
</h:form>
Chapter 4 Form Components

128
Generated HTML output:
<form id="form" name="form" method="post" action="/project/test.xhtml"
enctype="application/x-www-form-urlencoded">
<input type="hidden" name="form" value="form" />
<script type="text/javascript"
src="/project/javax.faces.resource/jsf.js.xhtml?ln=javax.faces">
</script>
<input id="form:submit" type="submit" name="form:submit"
value="Submit" onclick="mojarra.jsfcljs(
document.getElementById('form'),
{'form:submit':'form:submit','id':'42'},
'');return false" />
<input type="hidden" name="javax.faces.ViewState"
id="j_id1:javax.faces.ViewState:0"
value="886811437739939021:6102567809374231851"
autocomplete="off" />
</form>
Rendering in Chrome browser:
You can obtain them in the managed bean via @Inject @ManagedProperty.
@Inject @ManagedProperty("#{param.id}")
private Integer id;
public void submit() {
System.out.println("Submitted ID: " + id);
}
Make sure that you import the @ManagedProperty from the right package. JSF offers
two, one from the javax.faces.bean package which is deprecated since JSF 2.3 and
another one from javax.faces.annotation package which you should be using for
CDI.You also need to make sure that you explicitly activate the JSF 2.3-specific
feature of CDI-aware EL resolvers by having at least one managed bean in the web
application explicitly annotated with @FacesConfig; otherwise the CDI-aware
Chapter 4 Form Components
129
@ManagedProperty would fail to find the current instance of FacesContext via CDI.Also
here, <h:commandButton> is substitutable with <h:commandLink>.
There’s another way of passing parameters around via command components—that
is, by simply passing them as an action method argument.
<h:form id="form">
...
<h:commandButton id="submit" value="Submit"
action="#{bean.submit(otherBean.id)}">
</h:commandButton>
</h:form>
Whereby the modified action method looks as follows:
public void submit(Integer id) {
System.out.println("Submitted ID: " + id);
}
In case of the <h:commandButton>, this won’t generate any JavaScript and it thus looks
identical as when you aren’t using any action method arguments. This thus also means
that the #{otherBean.id} value isn’t passed via HTML source code back to the server as a
request parameter. This in turn means that it’s only evaluated during the postback request
when JSF is about to invoke the action method. This in turn means that the #{otherBean.
id} must at least be @ViewScoped in order to be still available in the postback request.
In other words, this argument passing approach is definitely not exchangeable with the
<f:param> tag approach whereby both beans can be just @RequestScoped.
The last command component offered by the standard JSF component set is
<h:commandScript>. This is new since JSF 2.3. It allows you to invoke a managed bean
action method by just calling a named JavaScript function from your own script. The
postback request will always be performed via Ajax.
<h:form id="form">
<h:commandScript id="submit" name="invokeBeanSubmit"
action="#{bean.submit}">
</h:commandScript>
</h:form>
Chapter 4 Form Components
130
Generated HTML output:
<form id="form" name="form" method="post" action="/project/test.xhtml"
enctype="application/x-www-form-urlencoded">
<input type="hidden" name="form" value="form" />
<script type="text/javascript"
src="/project/javax.faces.resource/jsf.js.xhtml?ln=javax.faces">
</script>
<span id="form:submit">
<script type="text/javascript">
var invokeBeanSubmit = function(o) {
var o = (typeof o==='object') && o ? o : {};
mojarra.ab('form:submit',null,'action',0,0,{'params':o});
}
</script>
</span>
<input type="hidden" name="javax.faces.ViewState"
id="j_id1:javax.faces.ViewState:0"
value="3568384626727188032:3956762118801488231"
autocomplete="off" />
</form>
It has no visible HTML rendering in web browsers. In the generated script, you’ll see
that it has generated a function variable with the same name as specified in the name
attribute. In this example, it’s indeed in the global scope. As this is considered poor
practice in the JavaScript context (“global namespace pollution”), you’d better provide
a namespaced function name. This only pre-requires that you’ve already declared your
own namespace somewhere before in the HTML document, usually via a JavaScript file
in the <head> element. The following example simplifies it with an inline script:
<h:head>
...
<script>var mynamespace = mynamespace || {};</script>
</h:head>
<h:body>
<h:form id="form">
<h:commandScript id="submit" name="mynamespace.invokeBeanSubmit"
Chapter 4 Form Components
131
action="#{bean.submit}">
</h:commandScript>
</h:form>
</h:body>
Coming back to the generated function variable, you’ll also see that it accepts an
object argument and passes it through as “params” property of the last object argument
of the Mojarra-specific mojarra.ab() function. That helper function will, under the hood
of the mojarra.ab() function, prepare and invoke the jsf.ajax.request() function
of the standard JSF JavaScript API.In other words, you can pass JavaScript variables to
a managed bean action method this way. They are injectable via @ManagedProperty
the same way as if you were using <f:param>. The following example demonstrates the
JavaScript call with hard-coded variables in a JavaScript object, but you can of course
obtain those variables from anywhere else in JavaScript context:
var params = {
id: 42,
name: "John Doe",
email: "john.doe@example.com"
};
invokeBeanSubmit(params);
Backing bean class:
@Inject @ManagedProperty("#{param.id}")
private Integer id;
@Inject @ManagedProperty("#{param.name}")
private String name;
@Inject @ManagedProperty("#{param.email}")
private String email;
public void submit() {
System.out.println("Submitted ID: " + id);
System.out.println("Submitted name: " + name);
System.out.println("Submitted email: " + email);
}
Chapter 4 Form Components
132
The <h:commandScript> can also be used to defer the partial rendering of an HTML
document to the window load event. To achieve this, simply set the autorun attribute
to true and specify the client ID of the target component in the render attribute. The
following example loads and renders a data table only when the page has finished
loading in the client side:
<h:panelGroup layout="block" id="lazyPersonsPanel">
<h:dataTable rendered="#{not empty bean.lazyPersons}"
value="#{bean.lazyPersons}" var="person">
<h:column>#{person.id}</h:column>
<h:column>#{person.name}</h:column>
<h:column>#{person.email}</h:column>
</h:dataTable>
</h:panelGroup>
<h:form id="form">
<h:commandScript id="loadLazyPersons" name="loadLazyPersons"
autorun="true" action="#{bean.loadLazyPersons}"
render=":lazyPersonsPanel">
</h:commandScript>
</h:form>
Whereby the backing bean looks as follows:
@Named @RequestScoped
public class Bean {
private List<Person> lazyPersons;
@Inject
private PersonService personService;
public void loadLazyPersons() {
lazyPersons = personService.getAll();
}
public List<Person> getLazyPersons() {
return lazyPersons;
}
}
Chapter 4 Form Components
133
And the Person entity looks as follows:
public class Person {
private Long id;
private String name;
private String email;
// Add/generate getters and setters.
}
Note that any persistence framework-specific annotations, such as JPA’s @Entity and
@Id, and the actual implementation of PersonService, are omitted for clarity. Those are,
namely, irrelevant to any front-end framework, such as JSF.
Coming back to the available command components, it may speak for itself
that <h:commandScript> is only useful in order to be able to invoke a JSF managed
bean action method using native JavaScript, generally during a specific HTML
DOM (Document Object Model) event. However, both <h:commandLink> and
<h:commandButton> seem to do exactly the same thing; only the visual presentation is
different. One renders a link and the other renders a button. The user experience (UX)
consensus is that a button must be used to submit a form, and a link must be used to
navigate to another page or jump to an anchor. Using a link to submit a form is therefore
not always considered the best practice. It’s only useful when you’d like to submit
an HTML form using an icon or image. For all other cases, use a normal button. The
following example shows how a command link can be used on a Font Awesome icon:
<h:commandLink id="delete" action="#{bean.delete}">
<i class="fa fa-trash" />
</h:commandLink>
Navigation
Sometimes, you’d like to navigate to a different JSF page when a certain form has been
successfully submitted—for example, from the login page to the user home page, as
demonstrated in the section “Label and Message Components,” or from the detail page
back to the master page.
Chapter 4 Form Components
134
Historically, navigation targets must be defined separately in <navigation-rule>
entries in the faces-config.xml which then does the job based on the String return
value from the action method of UICommand components. This approach turns out to
be quite cumbersome in the long term, and not terribly useful for HTML-based web
applications. This idea was more or less derived from desktop-oriented applications.
Hence, JSF 2.0 introduced the “Implicit navigation” feature, which allows you to define
the navigation target directly in the String return value itself. In other words, instead of
the following action method:
public String someActionMethod() {
// ...
return "someOutcome";
}
And the following faces-config.xml entry:
<navigation-rule>
<navigation-case>
<from-outcome>someOutcome</from-outcome>
<to-view-id>/otherview.xhtml</to-view-id>
</navigation-case>
</navigation-rule>
you could just do as follows in the action method:
public String someActionMethod() {
// ...
return "/otherview.xhtml";
}
You could even leave out the default suffix of the view technology you’re using.
public String someActionMethod() {
// ...
return "/otherview";
}
Chapter 4 Form Components

135
You can force a redirect by appending a faces-redirect=true query parameter.
public String someActionMethod() {
// ...
return "/otherview?faces-redirect=true";
}
Returning null would return to the very same view from where the form was
submitted. In other words, the end user would stay in the same page. It is cleaner,
however, to declare the action method as void.
public void someActionMethod() {
// ...
}
Coming back to the redirect approach, this is also known as “Post-Redirect-Get”
pattern2 and makes a major difference with regard to bookmarkability and avoiding
double submits. Without a redirect after a POST request on a JSF form, the URL (uniform
resource locator) in the web browser’s address bar wouldn’t change to the URL of the
target page but would just stay the same. That’s caused by the nature of the “postback”:
submitting the form back to the very same URL from which the page with the form was
served. When JSF is instructed to navigate to a different view without a redirect, then
it will basically build and render the target page directly to the response of the current
postback request.
This approach has disadvantages. One is that refreshing the page in the web
browser would cause the POST request to be re-executed, and thus perform a so-called
double submit. This would potentially pollute the data store in the back end with
duplicate entries, particularly if the involved relational table doesn’t have proper unique
constraints defined. Another disadvantage is that the target page isn’t bookmarkable.
The URL currently in the browser’s address bar basically represents the previous page.
You won’t get the target page back by bookmarking, copy/pasting, and/or sharing the
URL and then opening it in a new browser window.
When JSF is instead instructed to navigate to a different view with a redirect, then
it will basically return a very small HTTP response with a status of 302 and a Location
header with the URL of the target page therein. When the web browser retrieves such
2 https://en.wikipedia.org/wiki/Post/Redirect/Get.
Chapter 4 Form Components

136
a response, it will immediately fire a brand-new GET request on the URL specified in
the Location header. This URL is reflected in the web browser’s address bar and is
thus bookmarkable. Also, refreshing the page would only refresh the GET request and
therefore not cause a double submit.
Ajaxifying Components
As you have noticed in <h:commandScript> in the section “Command Components,”
JSF is capable of firing Ajax requests and performing partial rendering as well. This
capability was introduced in JSF 2.0 for the first time with the <f:ajax> tag. This tag can
be nested in any component implementing ClientBehaviorHolder interface, or it can be
wrapped around a group of components implementing this interface. In the standard JSF
component set, almost all HTML components implement ClientBehaviorHolder as well.
If you consult the ClientBehaviorHolder Javadoc,3 then you’ll find the following list:
All Known Implementing Classes:
HtmlBody, HtmlCommandButton, HtmlCommandLink, HtmlDataTable, HtmlForm,
HtmlGraphicImage, HtmlInputFile, HtmlInputSecret, HtmlInputText,
HtmlInputTextarea, HtmlOutcomeTargetButton, HtmlOutcomeTargetLink,
HtmlOutputLabel, HtmlOutputLink, HtmlPanelGrid, HtmlPanelGroup,
HtmlSelectBooleanCheckbox, HtmlSelectManyCheckbox,
HtmlSelectManyListbox, HtmlSelectManyMenu, HtmlSelectOneListbox,
HtmlSelectOneMenu, HtmlSelectOneRadio, UIWebsocket
That are thus the <h:body>, <h:commandButton>, <h:commandLink>,
<h:dataTable>, <h:form>, <h:graphicImage>, <h:inputFile>, <h:inputSecret>,
<h:inputText>, <h:inputTextarea>, <h:button>, <h:link>, <h:outputLabel>,
<h:outputLink>, <h:panelGrid>, <h:panelGroup>, <h:selectBooleanCheckbox>,
<h:selectManyCheckbox>, <h:selectManyListbox>, <h:selectManyMenu>,
<h:selectOneListbox>, <h:selectOneMenu>, <h:selectOneRadio> and <f:websocket>.
You’ll see that all visible input, select, and command components are covered as
well.
3 https://javaee.github.io/javaee-spec/javadocs/javax/faces/component/behavior/
ClientBehaviorHolder.html.
Chapter 4 Form Components
137
A requirement of the <f:ajax> is that the ClientBehaviorHolder component is
nested in <h:form>, and that <h:head> is being used in the template. The <h:form>
basically enables JavaScript to perform a postback request with the right JSF view state
associated. The <h:head> basically enables <f:ajax> to automatically include the
necessary jsf.js JavaScript file which contains, among others, the mandatory jsf.
ajax.request() function.
<h:head id="head">
<title>f:ajax demo</title>
</h:head>
<h:body>
<h:form id="form">
<h:inputText id="text" value="#{bean.text}">
<f:ajax />
</h:inputText>
<h:commandButton id="submit" value="Submit"
action="#{bean.submit}">
<f:ajax execute="@form" />
</h:commandButton>
</h:form>
</h:body>
Generated HTML output:
<head id="head">
<title>f:ajax demo</title>
<script type="text/javascript"
src="/project/javax.faces.resource/jsf.js.xhtml?ln=javax.faces">
</script>
</head>
<body>
<form id="form" name="form" method="post"
action="/project/test.xhtml"
enctype="application/x-www-form-urlencoded">
<input type="hidden" name="form" value="form" />
<input id="form:text" type="text" name="form:text"
onchange="mojarra.ab(this,event,'valueChange',0,0)" />
Chapter 4 Form Components

138
<input id="form:submit" type="submit" name="form:submit"
value="Submit" onclick="mojarra.ab(
this,event,'action','@form',0);return false;" />
<input type="hidden" name="javax.faces.ViewState"
id="j_id1:javax.faces.ViewState:0"
value="6345708413515990903:-8460061657159853996"
autocomplete="off" />
</form>
</body>
Rendering in Chrome browser (with newlines added) is identical as without Ajax:
In the generated HTML output, you’ll see that the jsf.js JavaScript file containing
the necessary JSF Ajax API is auto-included in the HTML head. You’ll also notice
that <f:ajax> in <h:inputText> has generated an additional onchange attribute,
and in <h:commandButton> an additional onclick attribute, both defining some JSF
implementation-specific JavaScript code responsible for performing the Ajax request.
JSF specifies two internal Ajax event types: valueChange and action. Those are the
default event types in case <f:ajax> doesn’t have the event attribute specified. When
<f:ajax> is attached to a component implementing the EditableValueHolder interface,
then the default event type becomes valueChange. For components implementing
the ActionSource interface, this is action. For all other ClientBehaviorHolder
components, the default event is click. The actual generated HTML DOM event type for
those internal event types depends on the component and the associated renderer.
In case of text-based input components and drop-down- and list box-based selection
components, the default HTML DOM event type for <f:ajax> is "change". In case of
radio- and check box-based selection components and command components, this is
"click". You can see this in the generated HTML output, which can be overridden by
explicitly specifying the event attribute on the <f:ajax> tag.
<h:inputText ...>
<f:ajax event="blur" />
</h:inputText>
Chapter 4 Form Components

139
The above example will generate the JavaScript code in the onblur attribute
instead of the onclick attribute. The supported values for the event attribute depend
on the target ClientBehaviorHolder component. They can be found in the VDL
documentation of the component of interest. All on[event] attributes are defined over
there. When you remove the “on” prefix on them, then you have a list of supported
event types. For example, the VDL documentation of <h:inputText>4 indicates that the
following event types are supported:
blur, change, click, dblclick, focus, keydown, keypress, keyup,
mousedown, mousemove, mouseout, mouseover, mouseup, select
When the desired DOM event type occurs on the client side and triggers the
associated JSF implementation-specific JavaScript code defined in the on[event]
attribute, then ultimately the jsf.ajax.request() function of the standard JSF
JavaScript API will be invoked. It will prepare a bunch of predefined postback
parameters of which javax.faces.source and javax.faces.behavior.event are
the most important ones. The former specifies the client ID of the source component,
essentially the value of this.id in JavaScript context. The latter specifies the event type,
essentially the value of event.type in JavaScript context. You’ll have guessed that they
are derived from the first two arguments passed to the Mojarra-specific mojarra.ab()
function as visible in the generated HTML output.
Once fired, the Ajax request will run through the JSF life cycle almost the same
way as a non-Ajax request. The restore view phase (first phase), process validations
phase (third phase), update model values phase (fourth phase), and invoke application
phase (fifth phase) are identical. The apply request values phase (second phase) is
slightly different. It will only decode the components that are covered by the execute
attribute of the <f:ajax> tag, which defaults to @this (“the current component”). The
render response phase (sixth phase) is completely different. Instead of generating a
whole HTML document, it generates a special XML document which contains only the
generated HTML output of components which are covered by the render attribute of the
<f:ajax> tag, which defaults to @none (“no one component”).
The execute and render attributes accept a space-separated collection of component
search expressions. This can represent a client ID relative to the closest NamingContainer
parent, or an absolute client ID which is always relative to the UIViewRoot, or standard
or custom search keywords, or chained combinations thereof. See Chapter 12 for an
4 https://javaserverfaces.github.io/docs/2.3/vdldocs/facelets/h/inputText.html.
Chapter 4 Form Components
140
in-depth explanation of them. For now, we only need to know about the standard search
keywords @this, @form, and @none. As its name suggests, the @form keyword refers to the
closest parent component of the UIForm type, such as <h:form>.
During the apply request values phase (second phase) of the Ajax request, JSF
will, for each component covered by the execute attribute of the <f:ajax> tag in
addition to the default decode process, also check if the javax.faces.source request
parameter equals the current component’s client ID.If so, then JSF will queue the
AjaxBehaviorEvent for the invoke application phase (fifth phase). Under the hood of
queueing the AjaxBehaviorEvent, it boils down to the following logic:
FacesContext context = FacesContext.getCurrentInstance();
ExternalContext externalContext = context.getExternalContext();
Map<String, String> formData = externalContext.getRequestParameterMap();
String clientId = component.getClientId(context);
String source = formData.get("javax.faces.source");
String event = formData.get("javax.faces.behavior.event");
if (clientId.equals(source)) {
component.getClientBehaviors().get(event)
.forEach(behavior -> component.queueEvent(
new AjaxBehaviorEvent(context, component, behavior)));
}
Here, the ClientBehavior basically represents the definition of the <f:ajax> tag.
Based on this logic, you will conclude that you can have multiple <f:ajax> tags attached
in the very same component, even on same event types. The advantage is that you can, if
necessary, register multiple Ajax behavior listeners on the very same event type.
<h:inputText id="foo" ...>
<f:ajax listener="#{bean.onchangeFoo}" />
<f:ajax listener="#{otherBean.onchangeFoo}" />
</h:inputText>
Those Ajax behavior listener methods will thus be invoked during the invoke
application phase (fifth phase); of course, only when there’s no conversion or validation
error during the process validations phase (third phase). In case of command
components, those Ajax behavior listener methods will always be invoked before the
Chapter 4 Form Components
141
action listener methods and the action method. Regardless of the target component, the
Ajax behavior listener method must be a public void method which can optionally take
the AjaxBehaviorEvent argument.
public void onchangeFoo(AjaxBehaviorEvent event) {
// ...
}
This gives you, in input and select components, the opportunity to perform some
business task on a specific Ajax event. Most occurring real-world examples involve
preparing another bean property which in turn gets rendered in another component.
Think of cascading drop-down menus wherein the available items of the child
drop-down menu depend on the selected item of the parent drop-down. In action
components, <f:ajax listener> isn’t terribly useful. You already have the possibility to
perform the business task in action listener and/or action method. You can just continue
using them even when having <f:ajax> attached.
During the render response phase (sixth phase) of the Ajax request, JSF will for
each component covered by the render attribute of the <f:ajax> tag generate a XML
<update> element which contains the generated HTML output of only the particular
component and all of its children, if any. The jsf.ajax.response() function of
the standard JSF JavaScript API, which is by the jsf.ajax.request() registered as
Ajax callback function, will extract the id attribute of the <update> element, which
represents the client ID of the target component, and obtain via JavaScript’s document.
getElementById() on the client ID the concrete HTML element and replace it in the
HTML DOM tree with the contents of the <update> element.
Following is an example of a form with one required input field having a message
attached, and a command button which explicitly targets the message component:
<h:form id="form">
<h:inputText id="text" value="#{bean.text}" required="true" />
<h:message id="m_text" for="text" />
<br />
<h:commandButton id="submit" value="Submit" action="#{bean.submit}">
<f:ajax execute="@form" render="m_text" />
</h:commandButton>
</h:form>
Chapter 4 Form Components
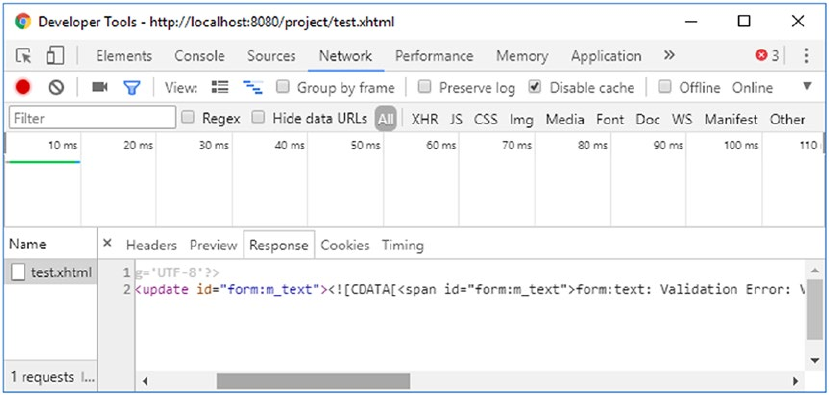
142
Figure4-2 shows how Chrome presents the Ajax response after submitting the form
with the input field not filled out. It’s a big one-liner, so it’s scrolled a bit so it starts at the
<update> element of interest. It contains the generated HTML output of the <h:message
id="m_text"> component.
If you scroll further in the XML response, then you’ll also notice an <update
id="j_id1:javax.faces.ViewState:0"> element containing the value of the javax.
faces.ViewState hidden input element. This is important for JSF in order to maintain
the view state across Ajax requests. When the render attribute happens to cover a UIForm
component, then the javax.faces.ViewState hidden input element currently in the HTML
document will basically be completely wiped out during the replacement of the element in
the HTML DOM tree with contents of the <update> element of the Ajax response.
The missing javax.faces.ViewState hidden input element will eventually be
appended to every <form method="post"> of the current UIViewRoot. This approach is
actually by design for two reasons: (1) because the view state value could change across
Ajax requests and therefore the existing forms currently in the HTML document have
to be updated to catch up this change, just in case those forms are not covered by the
render attribute; and (2) because the value of the javax.faces.ViewState hidden input
field can get quite large when the JSF state saving method is explicitly set to “client” and
thus otherwise render an inefficient Ajax response when the render attribute happens to
cover multiple forms.
Figure 4-2. Chrome Developer Tools—Network—Response
Chapter 4 Form Components

143
Navigation inAjax
In UICommand components with a properly defined action method, it’s not different.
However, sometimes you’d like to perform navigation in an Ajax listener attached to
n UIInput component. There are reasonable real-world use cases for this. However,
the UIInput class doesn’t support defining an action method and <f:ajax listener>
doesn’t support returning a navigation outcome. Therefore, your only option is to
perform the navigation programmatically. This can be done in two ways. The first way is
to use the javax.faces.application.NavigationHandler.5
public void ajaxListener(AjaxBehaviorEvent event) {
// ...
String outcome = "/otherview?faces-redirect=true";
FacesContext context = FacesContext.getCurrentInstance();
Application application = context.getApplication();
NavigationHandler handler = application.getNavigationHandler();
handler.handleNavigation(context, null, outcome);
}
The second way is to use the javax.faces.context.ExternalContext#redirect().6
public void ajaxListener(AjaxBehaviorEvent event) throws IOException {
// ...
String path = "/otherview.xhtml";
FacesContext context = FacesContext.getCurrentInstance();
ExternalContext externalContext = context.getExternalContext();
String uri = externalContext.getRequestContextPath() + path;
externalContext.redirect(uri);
}
There are several differences. Most important, the NavigationHandler can deal
with implicit navigation outcome values, but ExternalContext#redirect() can only
5 https://javaee.github.io/javaee-spec/javadocs/javax/faces/application/
NavigationHandler.html.
6 https://javaee.github.io/javaee-spec/javadocs/javax/faces/context/ExternalContext.
html#redirect-java.lang.String-.
Chapter 4 Form Components
144
deal with actual paths and requires manual prefixing of the request context path when it
concerns a web application resource. However, it can take basically any URI, such as an
external URL as in externalContext.redirect("http://example.com"), whereas the
NavigationHandler can’t deal with them.
GET forms
JSF has no concept of “GET forms,” but you can just use plain HTML for this. JSF supports
processing GET request parameters and invoking managed bean actions on GET
requests. For this, <f:viewParam> and <f:viewAction> can be used. They must be placed
in <f:metadata> which in turn can only be declared in the top-level page. So, when using
templating, it must be declared in the template client and you can’t declare it in the
master template. In other words, <f:metadata> cannot be shared across template clients.
Technically, the location of <f:metadata> in the view doesn’t matter, as long as it’s in
the top-level page. Most self-documenting would be to put it in the very top of the view,
directly after the root tag.
<!DOCTYPE html>
<html lang="en"
xmlns="http://www.w3.org/1999/xhtml"
xmlns:f="http://xmlns.jcp.org/jsf/core"
xmlns:h="http://xmlns.jcp.org/jsf/html"
>
<f:metadata>
...
</f:metadata>
<h:head>
...
</h:head>
<h:body>
...
</h:body>
</html>
Chapter 4 Form Components
145
When using templating, give it its own template definition.
<ui:composition template="/WEB-INF/templates/layout.xhtml"
xmlns="http://www.w3.org/1999/xhtml"
xmlns:f="http://xmlns.jcp.org/jsf/core "
xmlns:h="http://xmlns.jcp.org/jsf/html"
>
<ui:define name="metadata">
<f:metadata>
...
</f:metadata>
</ui:define>
<ui:define name="content">
...
</ui:define>
</ui:composition>
No, you can’t put <f:metadata> in the master template and keep <f:viewParam> and
<f:viewAction> in the template client. This is a technical limitation. The best you can do
is to create a custom <f:event> type which runs after the invoke application phase (fifth
phase) and then declare it in the master template. An example is given in the section
“Create Custom Component Event” in Chapter 3.
The <f:viewParam> tag is backed by the UIViewParameter component which in
turn extends from UIInput superclass. This means that it behaves almost exactly like
<h:inputText>, but then for GET parameters. The subtle differences are found in the
process validations phase (third phase). By default, an empty parameter would skip
any custom validators and bean validation. For example, the @NotNull bean validation
annotation will only work when the context parameter javax.faces.INTERPRET_EMPTY_
STRING_SUBMITTED_VALUES_AS_NULL is explicitly set to true in web.xml. The other difference
is in the render response phase (sixth phase). Basically, it renders absolutely nothing.
The <f:viewAction> tag is backed by the UIViewAction component which in turn
implements the ActionSource interface. This means that it behaves almost exactly
like <h:commandButton>, but then for GET requests. Of course, you could also use a
@PostConstruct annotated method on a @ViewScoped managed bean for performing
logic on GET requests, but the problem is that it would run directly after the managed
bean instance is created, when <f:viewParam> hasn’t even had a chance to run.
Chapter 4 Form Components
146
<f:viewAction> will be invoked during the invoke application phase (fifth phase),
after the model values are updated. It even supports returning a String representing a
navigation outcome, which will then behave as a redirect.
Following is an example of a search form:
Facelets file /search.xhtml:
<f:metadata>
<f:viewParam id="query" name="query" value="#{search.query}" />
<f:viewAction action="#{search.onload}" />
</f:metadata>
<h:body>
<form>
<label for="query">Query</label>
<input type="text" name="query"
value="#{empty search.query ? param.query : search.query}">
</input>
<input type="submit" value="Search" />
<h:message for="query" />
</form>
<h:dataTable id="results" rendered="#{not empty search.results}"
value="#{search.results}" var="result">
<h:column>#{result.name}</h:column>
<h:column>#{result.description}</h:column>
</h:dataTable>
</h:body>
Backing bean class com.example.project.view.Search:
@Named @RequestScoped
public class Search {
private String query;
private List<Result> results;
@Inject
private SearchService searchService;
public void onload() {
Chapter 4 Form Components
147
results = searchService.getResults(query);
}
// Add/generate getters and setters here.
// Note that results doesn't need a setter.
}
In the Facelets file there are a couple of things to notice apart from the plain HTML
form approach. The value attribute of the text input displays #{param.query} when
#{search.query} is empty, because the submitted value would otherwise not show up at
all when there's a conversion or validation error on <f:viewParam>. #{param} is actually
an implicit EL object referring the request parameter map. #{param.query} basically prints
the value of the request parameter with the name “query”. Please note that this construct
of the value attribute is invalid for JSF input components. It would throw a javax.el.Pro
pertyNotWritableException during the update model values phase (fourth phase), and,
moreover, it is already doing the very same logic under the hood of the <f:viewParam>.
<h:message> can be attached to <f:viewParam>. In this specific construct, however,
it’s not really used. Only when you add a converter or validator to <f:viewParam>, for
example, by <f:viewParam ... required="true"> would you see the error message in
<h:message>, and then <f:viewAction> won’t be invoked.
Now, when you open the page and submit the form, the submitted value will appear
as a query string in the URL as in /search.xhtml?query=jsf. This is bookmarkable and
re-executable every time you open the URL.
Stateless Forms
State saving is particularly helpful in dynamically manipulated forms which use Ajax
to conditionally render parts of the form, such as cascading drop-down menus and
secondary input fields. JSF remembers the state of the form across Ajax postbacks on
the same view. Generally, it is those forms where you absolutely need a view-scoped
managed bean instead of a request-scoped managed bean.
When your web site has "public" and "private" sections, you'd like to postpone the
HTTP session creation as much as possible until the end user has actually logged in. This
way robots won’t trigger the unnecessary creation of the HTTP session. However, if you
have a standard JSF login form in the public section, the HTTP session would already be
created by just accessing that page. This is an unnecessary cost in terms of server memory
Chapter 4 Form Components
148
if the form has basically no dynamic state of its own and is tied to a request- scoped
managed bean. You could consider using client-side state saving instead, but this will
affect the entire web site and it has a cost in terms of network bandwidth and CPU (central
procession unit) power. True, the cost is negligible if you have state-of- the-art hardware,
but it's not negligible if you have a lot of visitors and/or relatively poor hardware.
In case of static forms tied to a request-scoped bean, such as a simple two-field
login form which can theoretically safely be entirely cleared out on every postback, then
the view state doesn’t necessarily need to be saved. This can be achieved by setting the
transient attribute of <f:view> to true.
<f:view transient="true">
<h:form id="login">
...
</h:form>
</f:view>
This way JSF won’t create any view state and the javax.faces.ViewState hidden
input field will receive a fixed value of “stateless”. Note that this affects the entire
view and there’s no way to toggle this for only a specific form. JSF currently does not
support configuring the state saving method on a per-form basis. Also, statelessness
has an additional disadvantage in that it's theoretically easier to perform a CSRF (cross
site request forgery) attack if there's an open XSS hole. (See also the section “Cross
Site Request Forgery Protection” in Chapter 13.) Fortunately, with JSF it's already very
hard to accidentally introduce a XSS hole. The only way to get a XSS hole is to use
<h:outputText escape="false"> to redisplay user-controlled data.
Chapter 4 Form Components
149
© Bauke Scholtz, Arjan Tijms 2018
B. Scholtz and A. Tijms, The Definitive Guide to JSF in Java EE 8, https://doi.org/10.1007/978-1-4842-3387-0_5
CHAPTER 5
Conversion andValidation
At its core, JSF (JavaServer Faces) as an HTML form-based MVC (Model-View- Controller)
framework basically needs to convert between Java objects (entities, beans, value
objects, data transfer objects, and what not) and character sequences (strings) all the
time. The HTTP request is basically broken down into plain vanilla strings representing
headers and parameters, not as Java objects. The HTTP response is basically written
as one big sequence of characters representing HTML or XML, not as some sort of
serialized form of a Java object. However, the average Java model behind a JSF page
doesn’t necessarily contain String properties everywhere. That would defeat the strong
typed nature of Java. This is where Converters come into the picture: converting between
objects in model and strings in view.
Before updating the model values with freshly submitted and, if necessary, converted
values, you would of course like to validate whether they conform to the business rules of
the web application and, if necessary, present end users an informative error message so
that they can fix any errors themselves. Usually, the business rules are already very well
defined in the data store, such as a relational database management system. A decently
designed database table already has strict constraints on the data type, maximum size,
nullability, and uniqueness. You as a front-end developer should make absolutely sure
that the submitted and converted values can be inserted in the database without errors.
If, for example, the e-mail address column is constrained as a unique and
non- nullable column with a maximum size of 254 characters, then you should make
sure that the submitted value is validated as such before inserting it in the database.
Otherwise, the database insert would throw some exception which is generally
cumbersome to break down into detailed information in order to tell the end user about
the exact mistake. This is where Validators come into the picture: validating submitted
(and converted) values before updating the model.

150
Standard Converters
JSF has, from the beginning, provided a bunch of standard converters out the box.
Most of them even do their job fully transparently based on the Java type of the model
property. They are all available in the javax.faces.convert package1 and they all
implement the Converter<T> interface. Table5-1 provides an overview of them.
1 https://javaee.github.io/javaee-spec/javadocs/javax/faces/convert/package-summary.
html.
Table 5-1. Standard Converters Provided by JSF
Converter class Converter ID Converter tag Value type Since
BigDecimalConverter javax.faces.
BigDecimal
n/a java.math.BigDecimal 1.0
BigIntegerConverter javax.faces.
BigInteger
n/a java.math.BigInteger 1.0
BooleanConverter javax.faces.Boolean n/a boolean/java.lang.
Boolean
1.0
ByteConverter javax.faces.Byte n/a byte/java.lang.Byte 1.0
CharacterConverter javax.faces.
Character
n/a char/java.lang.Character 1.0
DateTimeConverter javax.faces.DateTime <f:convertDateTime> java.util.Date
java.time.LocalDate
java.time.LocalTime
java.time.OffsetTime
java.time.LocalDateTime
java.time.
OffsetDateTime
java.time.
ZonedDateTime
1.0
2.3
2.3
2.3
2.3
2.3
2.3
DoubleConverter javax.faces.Double n/a double/java.lang.Double 1.0
(continued)
CHAPTER 5 CONVERSION ANDVALIDATION

151
Converter class Converter ID Converter tag Value type Since
EnumConverter javax.faces.Enum n/a enum/java.lang.Enum 1.0
FloatConverter javax.faces.Float n/a oat/java.lang.Float 1.0
IntegerConverter javax.faces.Integer n/a int/java.lang.Integer 1.0
LongConverter javax.faces.Long n/a long/java.lang.Long 1.0
NumberConverter javax.faces.Number <f:convertNumber> java.lang.Number 1.0
ShortConverter javax.faces.Short n/a short/java.lang.Short 1.0
Table 5-1. (continued)
The “Converter ID” column basically specifies the converter identifier as you
could specify in the converter attribute of any ValueHolder component, or the
converterId attribute of any nested <f:converter> tag in order to activate the
specific converter. All UIOutput and UIInput components implement the ValueHolder
interface. The converters which say “n/a” in the “Converter tag” column are implicit
converters. In other words, you can just bind any bean property of type BigDecimal,
BigInteger, boolean/Boolean, byte/Byte, char/Character, double/Double, enum/Enum,
float/Float, int/Integer, long/Long, and short/Short to the value attribute of any
ValueHolder component and have JSF to automatically convert it without any additional
configuration. Only <f:convertDateTime> and <f:convertNumber> require explicit
registration, because the desired conversion algorithm isn’t necessarily obvious from the
model value alone.
In all ValueHolder components, the converter will be invoked during the render
response phase (sixth phase), converting the non-String-based model value to a
String suitable for embedding in HTML.And in EditableValueHolder components,
the converter will also be invoked during the process validations phase (third phase),
converting the submitted String request parameter to the non-String-based model
value. The EditableValueHolder interface extends the ValueHolder interface and is
implemented by all UIInput components.
CHAPTER 5 CONVERSION ANDVALIDATION
152
However, this implicit conversion doesn’t work on bean properties where those types
are parameterized. Imagine that you have a List<Integer> in the model and you’d like
to be able to edit it as follows:
<ui:repeat value="#{bean.integers}" varStatus="loop">
<h:inputText value="#{bean.integers[loop.index]}" />
</ui:repeat>
Then, after submitting, you would end up with unconverted String values in the
list and get baffled by class cast exceptions when attempting to iterate over the list. The
reason is that the EL (Expression Language) API (application programming interface),
which is responsible for processing those #{...} things that are, behind the scenes,
represented by javax.el.ValueExpression instances, is in its current version not
capable of detecting the parameterized type of a generic collection and just returns
Object.class on ValueExpression#getType(). JSF can’t do much about that limitation
of EL.All you can do is explicitly specify the desired converter on the input component.
<ui:repeat value="#{bean.integers}" varStatus="loop">
<h:inputText value="#{bean.integers[loop.index]}"
converter="javax.faces.Integer">
</h:inputText>
</ui:repeat>
An alternative is to replace the List<Integer> by Integer[] or even int[]. EL will
then be able to recognize the value expression as an integer type and hence JSF will be
able to locate the desired converter for it. However, plain arrays instead of collections in
the model are a “no-no” these days.
Coming back to the explicit standard converters <f:convertNumber> and
<f:convertDateTime>, those can also be nested in any ValueHolder component. The
difference between <f:convertNumber> and the implicit number-based converters is
that the tags allow more fine-grained setting of conversion options, such as the number
type or pattern, the amount of integer and/or fraction digits, whether grouping is used,
and the locale.
CHAPTER 5 CONVERSION ANDVALIDATION

153
<f:convertNumber>
<f:convertNumber>2 uses under the hood java.text.NumberFormat.3 The type attribute
specifies which instance will be obtained and defaults to number. Other allowable values
are currency and percent. In other words, the following tags,
<f:convertNumber type="number" />
<f:convertNumber type="currency" />
<f:convertNumber type="percent" />
will under the hood obtain the NumberFormat instance as follows:
NumberFormat numberFormat = NumberFormat.getNumberInstance(locale);
NumberFormat currencyFormat = NumberFormat.getCurrencyInstance(locale);
NumberFormat percentFormat = NumberFormat.getPercentInstance(locale);
where the locale argument can be specified by the locale attribute of the
<f:convertNumber> tag and defaults to UIViewRoot#getLocale() which in turn can
be specified by the locale attribute of <f:view>. In other words, those instances will
automatically apply the standard number format pattern based on the number type and
the specified locale. The following example,
<f:view locale="pt_BR">
...
<h:outputText value="#{product.price}">
<f:convertNumber type="currency" locale="en_US" />
</h:outputText>
</f:view>
will not format the price (a BigDecimal property) as R$ 12,34 (Brazilian real), but
instead as $12.34 (US dollar). Note that the locale attribute of the <f:convertNumber>
tag does not necessarily need to be specified as supported locale in faces-config.
xml. Also noted should be that the value attribute doesn’t necessarily need to refer a
BigDecimal; any other java.lang.Number type is also supported, but for prices we’d of
2 https://javaserverfaces.github.io/docs/2.3/vdldoc/f/convertNumber.html.
3 https://docs.oracle.com/javase/8/docs/api/java/text/NumberFormat.html.
CHAPTER 5 CONVERSION ANDVALIDATION

154
course like to store the value in a BigDecimal instead of, for example, a Double or Float
to avoid arithmetic errors due to the floating nature of floating point numbers.4
In case you need to change the standard number format pattern for some
reason—for example, because you’re working on a banking application which stores
financial data with five fractions—and you’d like to present the full value in some back-
end admin screen so that humans can if necessary verify them, then you can use the
pattern attribute of the <f:convertNumber> tag to override the standard number format
pattern conform the rules of java.text.DecimalFormat.5
<f:convertNumber pattern="¤ #,##0.00000" locale="pt_BR" />
Note that when the pattern attribute is specified, the type attribute is ignored. The
“currency sign” pattern character “¤” specifies where the actual currency symbol must
be inserted. The actual currency symbol depends on the specified locale. The “comma”
pattern character “,” specifies when the grouping separator must be inserted, which is
relative to the decimal separator or the end of the value. The actual inserted grouping
separator symbol is coincidentally also a comma in US dollar format but is a period
in Brazilian real format. The “period” pattern character “.” specifies the location of the
decimal separator. The actual inserted decimal separator symbol is coincidentally also
a period in US dollar format but is a comma in Brazilian real format. The “optional
digit” pattern character “#” is in this pattern merely used to indicate when the grouping
separator symbol should be inserted and won’t show anything when the actual digit is
absent. The “required digit” pattern character “0” specifies the minimum format which
will show zero when the actual digit is absent. Following is an exercise code which
should give insight into how <f:convertNumber> works under the hood:
Locale locale = new Locale("pt", "BR");
DecimalFormatSymbols symbols = new DecimalFormatSymbols(locale);
System.out.println("Currency symbol: " + symbols.getCurrencySymbol());
System.out.println("Grouping symbol: " + symbols.getGroupingSeparator());
System.out.println("Decimal symbol: " + symbols.getDecimalSeparator());
DecimalFormat formatter = new DecimalFormat("¤ #,##0.00000", symbols);
4 http://floating-point-gui.de.
5 https://docs.oracle.com/javase/8/docs/api/java/text/DecimalFormat.html.
CHAPTER 5 CONVERSION ANDVALIDATION
155
System.out.println(formatter.format(new BigDecimal("12.34")));
System.out.println(formatter.format(new BigDecimal(".1234")));
System.out.println(formatter.format(new BigDecimal("1234")));
System.out.println(formatter.format(new BigDecimal("1234567.1234567")));
The output should look as follows:
Currency symbol: R$
Grouping symbol: .
Decimal symbol: ,
R$ 12,34000
R$ 0,12340
R$ 1.234,00000
R$ 1.234.567,12346
<f:convertNumber> will also render exactly those values. Apart from the pattern
attribute, you can also fine-grain the type attribute with additional attributes such as
currencySymbol, integerOnly, groupingUsed, minIntegerDigits, maxIntegerDigits,
minFractionDigits, and maxFractionDigits. You can basically achieve the same
formatting pattern “¤ #,##0.00000” as follows:
<f:convertNumber type="currency" locale="pt_BR"
minFractionDigits="5" maxFractionDigits="5" />
This is actually more readable and more convenient in case you have a hard time
getting out the currency sign placeholder from your keyboard. The pattern attribute is
rarely more useful than fine-graining the type attribute with additional attributes.
In case you’re using <f:convertNumber> in a UIInput component and thus require
the end user to enter the value, you should keep in mind that currency and percent types
explicitly require the end user to enter the currency or percent symbol as well. For the
currency input, you can easily disable this by specifying an empty string as a currency
symbol so that you can put it outside the input component.
<span class="currency">
<span class="symbol">$</span>
<h:inputText ...>
<f:convertNumber type="currency" currencySymbol="" />
</h:inputText>
</span>
For the percent type this is, unfortunately, not possible.
CHAPTER 5 CONVERSION ANDVALIDATION

156
<f:convertDateTime>
<f:convertDateTime>6 uses under the hood java.text.DateFormat,7 and, since
JSF2.3, also java.time.formatter.DateTimeFormatter.8 In other words, you can use
basically any kind of date for this. Also, this tag has a type attribute which must actually
correspond to the actual type of the model value. Historically, it was not possible to
programmatically detect the desired type based on a java.util.Date instance. This has
changed since the new java.time API which offers distinct classes for each date time
type. However, in order to be able to reuse the existing <f:convertDateTime> API for the
new java.time API, new types had to be added. Table5-2 provides an overview.
6 https://javaserverfaces.github.io/docs/2.3/vdldoc/f/convertDateTime.html.
7 https://docs.oracle.com/javase/8/docs/api/java/text/DateFormat.html.
8 https://docs.oracle.com/javase/8/docs/api/java/time/format/DateTimeFormatter.html.
Table 5-2. <f:convertDateTime type> Supported Values
Tag attribute Value type Actual formatter Since
date (default) java.util.Date (with zero
time)
DateFormat#getDateInstance() 1.0
time java.util.Date (with zero
date)
DateFormat#getTimeInstance() 1.0
both java.util.Date DateFormat#getDateTimeInstance() 1.0
localDate java.time.LocalDate DateTimeFormatter#ofLocalizedDate() 2.3
localTime java.time.LocalTime DateTimeFormatter#ofLocalizedTime() 2.3
localDateTime java.time.LocalDateTime DateTimeFormatter#ofLocalizedDateTime() 2.3
offsetTime java.time.OffsetTime DateTimeFormatter#ISO_OFFSET_TIME 2.3
offsetDateTime java.time.OffsetDateTime DateTimeFormatter#ISO_OFFSET_DATE_TIME 2.3
zonedDateTime java.time.ZonedDateTime DateTimeFormatter#ISO_ZONED_DATE_TIME 2.3
CHAPTER 5 CONVERSION ANDVALIDATION

157
Along with the type attribute, you should preferably also specify the pattern
attribute, particularly when requesting the end user to enter a java.util.Date or java.
time.LocalXxx value via a UIInput component, because the actual pattern may vary
in a not so self-documenting way across various locales. java.time.OffSetXxx and
ZonedDateTime don’t have that problem because they default to the universal ISO 8601
format.9
The pattern attribute of <f:convertDateTime> follows, for java.util.Date, the
same rules as specified in the java.text.SimpleDateFormat Javadoc,10 and for the
java.time API, the same rules as specified in java.time.format.DateTimeFormatter
Javadoc.11 They are for the most part the same, but the java.time format supports
more patterns. For both APIs, the “day of month” pattern character is “d”, the “month of
year” pattern character is “M”, the “year” pattern character is “y”, the “24h hour” pattern
character is “H”, the “minute” pattern is “m” , and the “second” pattern is “s”. The ISO
8601 date format is “yyyy-MM-dd” and the ISO 8601 time format is “HH:mm:ss”. The offset
and zoned times require an additional offset after the time part, which is represented
by the ISO 8601 time zone pattern character “X”. Examples of valid values are “+01:00”
for CET (Central European Time), “-03:00” for BRT (Brasilia Time), and “+5:30” for
IST (Indian Standard Time). As before, the offset and zoned date and time need to be
separated by the “T” character instead of a space. Following is an overview of all possible
<f:convertDateTime> types whereby the localized ones have an explicitly specified
pattern:
<h:form id="form">
<h:inputText id="date" value="#{bean.date}">
<f:convertDateTime type="date" pattern="yyyy-MM-dd" />
</h:inputText>
<h:inputText id="time" value="#{bean.time}">
<f:convertDateTime type="time" pattern="HH:mm:ss" />
</h:inputText>
<h:inputText id="both" value="#{bean.both}">
<f:convertDateTime type="both" pattern="yyyy-MM-dd HH:mm:ss" />
</h:inputText>
9 https://en.wikipedia.org/wiki/ISO_8601.
10 https://docs.oracle.com/javase/8/docs/api/java/text/SimpleDateFormat.html.
11 https://docs.oracle.com/javase/8/docs/api/java/time/format/DateTimeFormatter.html.
CHAPTER 5 CONVERSION ANDVALIDATION
158
<h:inputText id="localDate" value="#{bean.localDate}">
<f:convertDateTime type="localDate" pattern="yyyy-MM-dd" />
</h:inputText>
<h:inputText id="localTime" value="#{bean.localTime}">
<f:convertDateTime type="localTime" pattern="HH:mm:ss" />
</h:inputText>
<h:inputText id="localDateTime" value="#{bean.localDateTime}">
<f:convertDateTime type="localDateTime"
pattern="yyyy-MM-dd HH:mm:ss">
</f:convertDateTime>
</h:inputText>
<h:inputText id="offsetTime" value="#{bean.offsetTime}">
<f:convertDateTime type="offsetTime" />
</h:inputText>
<h:inputText id="offsetDateTime" value="#{bean.offsetDateTime}">
<f:convertDateTime type="offsetDateTime" />
</h:inputText>
<h:inputText id="zonedDateTime" value="#{bean.zonedDateTime}">
<f:convertDateTime type="zonedDateTime" />
</h:inputText>
<h:commandButton value="submit" action="#{bean.submit}" />
<h:messages showSummary="false" showDetail="true"/>
</h:form>
Note that <h:messages> is here reconfigured to show the detail instead of just
the summary, because the detail message of a date time conversion error includes
in standard JSF an example value which is more useful for the end user in order to
understand the required format. Following is what the associated backing bean looks like:
@Named @RequestScoped
public class Bean {
private Date date;
private Date time;
private Date both;
private LocalDate localDate;
private LocalTime localTime;
CHAPTER 5 CONVERSION ANDVALIDATION

159
private LocalDateTime localDateTime;
private OffsetTime offsetTime;
private OffsetDateTime offsetDateTime;
private ZonedDateTime zonedDateTime;
public void submit() {
System.out.println("date: " + date);
System.out.println("time: " + time);
System.out.println("both: " + both);
System.out.println("localDate: " + localDate);
System.out.println("localTime: " + localTime);
System.out.println("localDateTime: " + localDateTime);
System.out.println("offsetTime: " + offsetTime);
System.out.println("offsetDateTime: " + offsetDateTime);
System.out.println("zonedDateTime: " + zonedDateTime);
}
// Add/generate getters and setters.
}
Now that HTML5 has been out for some time and more and more browsers support
the new HTML5 date and time inputs,12 you’d better activate it by default, because it
comes with a very useful built-in date picker. The web browser may show the date pattern
in the date picker in a localized format, but it will always submit the value in ISO 8601
format. This is thus very useful. The HTML5 date and time inputs can be activated by
setting the type attribute of the input text field to “date”, 13 “time”, 14 or “datetime-local”15
(and thus not “datetime” because it has been dropped). With the JSF <h:inputText>,
you’d need to set it as a pass-through attribute. Following are some examples:
<h:form id="form">
<h:inputText id="localDate" a:type="date" value="#{bean.localDate}">
<f:convertDateTime type="localDate" pattern="yyyy-MM-dd" />
</h:inputText>
12 https://developer.mozilla.org/en-US/docs/Web/HTML/Element/input/date.
13 https://developer.mozilla.org/en-US/docs/Web/HTML/Element/input/date.
14 https://developer.mozilla.org/en-US/docs/Web/HTML/Element/input/time.
15 https://developer.mozilla.org/en-US/docs/Web/HTML/Element/input/datetime-local.
CHAPTER 5 CONVERSION ANDVALIDATION
160
<h:inputText id="localTime" a:type="time" value="#{bean.localTime}">
<f:convertDateTime type="localTime" pattern="HH:mm" />
</h:inputText>
<h:inputText id="localDateTime" a:type="datetime-local"
value="#{bean.localDateTime}">
<f:convertDateTime type="localDateTime"
pattern="yyyy-MM-dd'T'HH:mm">
</f:convertDateTime>
</h:inputText>
<h:commandButton value="submit" action="#{bean.submit}" />
<h:messages showSummary="false" showDetail="true"/>
</h:form>
Following is how they’re rendered in Chrome browser (with newlines added):
Standard Validators
When the submitted value is successfully converted during the process validations
phase (third phase), then JSF will immediately advance to perform validation on the
converted value. JSF already provides a handful of standard validators out of the box.
They are all available in the javax.faces.validator package16 and they all implement
the Validator<T> interface. Table5-3 provides an overview of them.
16 https://javaee.github.io/javaee-spec/javadocs/javax/faces/validator/package-
summary.html.
CHAPTER 5 CONVERSION ANDVALIDATION

161
Table 5-3. Standard Validators Provided by JSF
Validator class Validator ID Validator tag Value type Since
LongRangeValidator javax.faces.LongRange <f:validateLongRange> java.lang.Number 1.0
DoubleRangeValidator javax.faces.DoubleRange <f:validateDoubleRange> java.lang.Number 1.0
LengthValidator javax.faces.Length <f:validateLength> java.lang.Object 1.0
RegexValidator javax.faces.RegularExpression <f:validateRegex> java.lang.String 2.0
RequiredValidator javax.faces.Required <f:validateRequired> java.lang.Object 2.0
BeanValidator javax.faces.Bean <f:validateBean> java.lang.Object 2.0
n/a n/a <f:validateWholeBean> java.lang.Object 2.3
CHAPTER 5 CONVERSION ANDVALIDATION
162
The “Validator ID” column basically specifies the validator identifier as you could
specify in the validator attribute of any EditableValueHolder component, or the
validatorId attribute of any nested <f:validator> tag in order to activate the specific
validator. Contrary to the converter, a single EditableValueHolder component can
have multiple validators attached. They will all be executed regardless of each other’s
outcome.
<f:validateLongRange>/<f:validateDoubleRange>
These validators allow you to specify a minimum and/or maximum allowed number
value for an input component tied to a java.lang.Number-based property. Those can be
specified with the minimum and maximum attributes.
<h:inputText value="#{bean.quantity}">
<f:validateLongRange minimum="1" maximum="10" />
</h:inputText>
This is, via pass-through attributes, also combinable with the HTML5 input types
“number” (spinner) and “range” (slider), which in turn require min, max, and optionally
step as pass-through attributes. In this example, #{bean.quantity} is just an Integer
and #{bean.volume} is a BigDecimal.
<h:inputText value="#{bean.quantity}"
a:type="number" a:min="1" a:max="10">
<f:validateLongRange minimum="1" maximum="10" />
</h:inputText>
<h:inputText value="#{bean.volume}"
a:type="range" a:min="1" a:max="10" a:step="0.1">
<f:validateLongRange minimum="1" maximum="10" />
</h:inputText>
Do note that you can just use <f:validateLongRange> on a BigDecimal property.
It doesn’t care about the actual java.lang.Number type of the property being a Long
or not, but only the specified minimum and maximum attributes being a Long. In case you
want to specify a fractional-based number as minimum and/or maximum, then use
<f:validateDoubleRange> instead.
CHAPTER 5 CONVERSION ANDVALIDATION

163
<h:inputText value="#{bean.volume}"
a:type="range" a:min="0.1" a:max="10.0" a:step="0.1">
<f:validateDoubleRange minimum="0.1" maximum="10.0" />
</h:inputText>
<f:validateLength>/<f:validateRegex>
These validators are primarily designed for java.lang.String-based properties.
<f:validateLength> will first convert the submitted value to string by calling
Object#toString() on it and then validate the String#length() result based on the
specified minimum and/or maximum attributes. <f:validateRegex> will cast the submitted
value to String and then check if String#matches() returns true for the specified
pattern attribute. In other words, it doesn’t accept any other property type than
java.lang.String. Imagine that you want to validate a value to be always three digits;
thus there are three possible ways:
<h:inputText value="#{bean.someStringOrInteger}" maxlength="3">
<f:validateLength minimum="3" maximum="3" />
</h:inputText>
<h:inputText value="#{bean.someString}" maxlength="3">
<f:validateRegex pattern="[0-9]{3}" />
</h:inputText>
<h:inputText value="#{bean.someInteger}" maxlength="3">
<f:validateLongRange minimum="100" maximum="999" />
</h:inputText>
The maxlength="3" attribute is just there so that the end user can’t enter more
than three characters on the client side anyway. Storing numbers as strings is plain
nonsense, so the second way is scratched. That leaves us with the first or third way.
Technically it does not really matter which one you pick. The first way is arguably more
self- documenting because you actually want to validate the length, not the range.
Coming back to <f:validateRegex>, the pattern attribute follows exactly the same
regular expression rules as specified in java.util.regex.Pattern.17
17 https://docs.oracle.com/javase/8/docs/api/java/util/regex/Pattern.html.
CHAPTER 5 CONVERSION ANDVALIDATION
164
However, there’s one potential caveat: the necessary amount of escape backslashes
depends on the currently used EL implementation. In Oracle’s EL implementation (com.
sun.el.*), you need two backslashes, exactly as in a regular Java String, but in Apache’s
EL implementation (org.apache.el.*), you must use one backslash, otherwise it will
error out or it won’t match as you’d expect. As of now, Payara, WildFly, Liberty, and
WebLogic use Oracle’s EL implementation, and TomEE and Tomcat use Apache’s EL
implementation. In other words, the following example will work on servers using Oracle
EL but won’t work on servers using Apache EL.
<h:inputText value="#{bean.someString}" maxlength="3">
<f:validateRegex pattern="\\d{3}" />
</h:inputText>
When using Apache EL, you need pattern="\d{3}" instead. On the other hand, the
regular expression pattern \d actually means “any digit” and thus matches not only the
Latin digits but also the Hebrew, Cyrillic, Arabic, Chinese, etc. If that was not your intent,
you’d better use the [0-9] pattern.
<f:validateRequired>
This is a slightly odd beast. That is, all UIInput components already have a required
attribute offering exactly the desired functionality. Why would you then use a whole
<f:validateRequired> tag instead? It was added in JSF 2.0 specifically for “Composite
Components” (more on this later, in Chapter 7). More to the point, in some composite
component compositions the template client is given the opportunity to attach
converters and validators to a specific EditableValueHolder interface exposed by the
composite component, which in turn references one or more UIInput components
enclosed in the composite component implementation. Following is an example of such
a composite component:
<cc:interface>
...
<cc:editableValueHolder
name="inputs" targets="input1 input3">
</cc:editableValueHolder>
</cc:interface>
CHAPTER 5 CONVERSION ANDVALIDATION

165
<cc:implementation>
...
<h:inputText id="input1" ... />
<h:inputText id="input2" ... />
<h:inputText id="input3" ... />
...
</cc:implementation>
And following is an example of the template client:
<my:compositeComponent ...>
<f:validateRequired for="inputs" />
</my:compositeComponent>
As you might have guessed, the for attribute must exactly match the name attribute of
exposed <cc:editableValueHolder> and this validator will basically target the enclosed
input components identified by input1 and input3 (and thus not input2) and thus
effectively make them required="true". This for attribute is, by the way, also present
on all other converter and validator tags.
<f:validateBean>/<f:validateWholeBean>
When used, these tags have a required dependency on the Bean Validation API
(application programming interface), previously more commonly known as “JSR
303.” Like JSF, Bean Validation is part of the Java EE API, already included in any
Java EE application server. In Tomcat and other servlet containers, you’d need to
install it separately. In Java code, Bean Validation is represented by annotations and
interfaces of the javax.validation.* package, such as @NotNull, @Size, @Pattern,
ConstraintValidator, etc. Currently the most popular implementation is Hibernate
Validator.18
JSF automatically detects the presence of Bean Validation and will in such a case
transparently process all Bean Validation constraints during the end of the process
validations phase (third phase), regardless of the outcome of JSF’s own validators.
If desired, this can be disabled application-wide with the following context parameter in
web.xml:
18 http://hibernate.org/validator/
CHAPTER 5 CONVERSION ANDVALIDATION
166
<context-param>
<param-name>
javax.faces.validator.DISABLE_DEFAULT_BEAN_VALIDATOR
</param-name>
<param-value>true</param-value>
</context-param>
Or, if this is a little too rough, you can fine-grain it with help of the <f:validateBean>
tag wrapping a group of UIInput components, or nested in them. When the disabled
attribute of the <f:validateBean> tag is set to true, then any Bean Validation will be
disabled on the target UIInput components. The following code will disable any Bean
Validation only on the parent UIInput component.
<h:inputText ...>
<f:validateBean disabled="true" />
</h:inputText>
And the following code will disable any Bean Validation only on UIInput
components identified by input3, input4, and input5:
<h:inputText id="input1" ... />
<h:inputText id="input2" ... />
<f:validateBean disabled="true">
<h:inputText id="input3" ... />
<h:inputText id="input4" ... />
<h:inputText id="input5" ... />
<f:validateBean>
It is important to keep in mind is that this will only disable JSF-managed Bean
Validation and thus not, for example, JPA-managed Bean Validation. So, if you happen
to use JPA (Java Persistence API) to persist your entities which are filled out by JSF
components with Bean Validation disabled, then JPA would still perform Bean Validation
on its behalf, fully independently from JSF.In case you want to disable Bean Validation on
CHAPTER 5 CONVERSION ANDVALIDATION

167
the JPA side as well, you need to set the property javax.persistence.validation.mode to
NONE in persistence.xml (see also the javax.persistence.ValidationMode Javadoc).19
<property name="javax.persistence.validation.mode">NONE</property>
With the validationGroups attribute of the <f:validateBean> tag you can
if necessary declare one or more validation groups. In such a case, only the Bean
Validation constraints which are registered on the same group will be processed.
Imagine the following model:
@NotNull
private String value1;
@NotNull(groups=NotNull.class)
private String value2;
@NotNull(groups={NotNull.class, Default.class})
private String value3;
Note that the groups attribute of any Bean Validation constraint must reference an
interface, but it may be any one you want. For simplicity, in the above example we’re just
reusing the javax.validation.constraints.NotNull interface as a group identifier. The
common practice is, however, to create your own marker interface for the desired group.
Also not unimportant is that the @NotNull would only work when you’ve configured
JSF to interpret empty string submitted values as null; otherwise it would pollute the
model with empty strings instead of nulls and cause the @NotNull not to be able to do its
job because an empty string is not null. As a reminder, the web.xml context parameter of
interest is as follows:
<context-param>
<param-name>
javax.faces.INTERPRET_EMPTY_STRING_SUBMITTED_VALUES_AS_NULL
</param-name>
<param-value>true</param-value>
</context-param>
19 https://javaee.github.io/javaee-spec/javadocs/javax/persistence/ValidationMode.html.
CHAPTER 5 CONVERSION ANDVALIDATION
168
Now, when submitting an empty form while having those model properties
referenced in the following input components, without any <f:validateBean> on them:
<h:inputText value="#{bean.value1}" />
<h:inputText value="#{bean.value2}" />
<h:inputText value="#{bean.value3}" />
you will receive a validation error on Bean Validation constraints belonging to the
javax.validation.groups.Default group, which are thus the groupless value1 and the
explicitly grouped value3. The value2 won’t be Bean-Validated as it doesn’t have the
default group explicitly declared.
And, when submitting an empty form while having <f:validateBean> with
validationGroups set to NotNull.class:
<f:validateBean validationGroups="javax.validation.constraints.NotNull">
<h:inputText value="#{bean.value1}" />
<h:inputText value="#{bean.value2}" />
<h:inputText value="#{bean.value3}" />
</f:validateBean>
you will receive a validation error on Bean Validation constraints belonging to the
javax.validation.constraints.NotNull group, which are thus the value2 and value3,
which explicitly have this group declared. The groupless value1 won’t be Bean-Validated
as it only implies the default group.
Finally, when submitting an empty form while having a <f:validateBean> with both
groups specified in validationGroups attribute as a comma separated string:
<f:validateBean validationGroups="javax.validation.groups.Default,
javax.validation.constraints.NotNull">
<h:inputText value="#{bean.value1}" />
<h:inputText value="#{bean.value2}" />
<h:inputText value="#{bean.value3}" />
</f:validateBean>
you will receive a validation error on all inputs, because they all match at least one of
the specified groups. In real-world applications, however, this grouping feature has very
little use. It’s only really useful when the grouped fields can be validated at the same
time by the same validator. With Bean Validation, the only way to achieve that is to put a
custom Constraint annotation on the bean class itself, get an instance of that bean with
CHAPTER 5 CONVERSION ANDVALIDATION
169
the values populated, and then pass it to the custom ConstraintValidator associated
with the custom Constraint annotation. Imagine a “period” entity having a “start
date” property which should always be before the “end date” property. It would look
something like the following:
@PeriodConstraint
public class Period implements Serializable {
@NotNull
private LocalDate startDate;
@NotNull
private LocalDate endDate;
// Add/generate getters and setters.
}
With the following custom constraint annotation:
@Constraint(validatedBy=PeriodValidator.class)
@Target(TYPE)
@Retention(RUNTIME)
public @interface PeriodConstraint {
String message() default "Start date must be before end date";
Class<?>[] groups() default {};
Class<?>[] payload() default {};
}
And the following custom constraint validator:
public class PeriodValidator
implements ConstraintValidator<PeriodConstraint, Period>
{
@Override
public boolean isValid
(Period period, ConstraintValidatorContext context)
{
return period.getStartDate().isBefore(period.getEndDate());
}
}
CHAPTER 5 CONVERSION ANDVALIDATION
170
You see, Bean Validation expects that the model values are present when performing
the validation. In the JSF perspective, this means that the model values must be updated
before processing the validations. However, this doesn’t fit into the JSF life cycle wherein
the model values are only updated after the validations are successfully processed.
Essentially, JSF would need to clone the bean instance, populate it with the desired
model values, invoke Bean Validation on it, collect any validation errors, and then
discard the cloned bean instance.
This is exactly what the <f:validateWholeBean> tag, introduced with JSF 2.3, is
doing under the hood. Following is an example form wherein this code is being used:
<h:form>
<h:inputText a:type="date" value="#{booking.period.startDate}">
<f:convertDateTime type="localDate" pattern="yyyy-MM-dd" />
</h:inputText>
<h:inputText a:type="date" value="#{booking.period.endDate}">
<f:convertDateTime type="localDate" pattern="yyyy-MM-dd" />
</h:inputText>
<h:commandButton value="Submit" />
<h:messages />
<f:validateWholeBean value="#{booking.period}" />
</h:form>
With this backing bean:
@Named @ViewScoped
public class Booking implements Serializable {
private Period period = new Period();
// Add/generate getter.
}
Do note that <f:validateWholeBean> is explicitly placed as the last child of the
parent <h:form>, which ensures that the validation is performed as the last thing after all
individual input components in the same form. This is as per the specification; the JSF
implementation may throw a runtime exception when the tag is misplaced.
CHAPTER 5 CONVERSION ANDVALIDATION
171
Immediate Attribute
The EditableValueHolder, ActionSource, and AjaxBehavior interfaces also specify
an immediate property which basically maps to the immediate attribute of all
UIInput and UICommand components and the <f:ajax> tag. When set to true on an
EditableValueHolder component, then anything that normally takes place during
the process validations phase (third phase) as well as the update model values phase
(fourth phase) will be performed during the apply request values phase (second phase).
When conversion or validation fails on them, then the life cycle will also skip the process
validations phase (third phase). When set to true on an ActionSource component or
AjaxBehavior tag, then anything that normally takes place during the invoke application
phase (fifth phase) will be performed during the apply request values phase (second
phase) and then only if conversion and validation haven’t failed.
Historically, this attribute was mainly used to be able to perform an “inner” action
on the form, usually to load a child input component depending on the submitted value
of the parent input component, without being blocked by conversion or validation
errors coming from other input components in the same form. A common use case was
populating a child drop-down on the change of a parent drop-down.
<h:selectOneMenu value="#{bean.country}" required="true" immediate="true"
onchange="submit()" valueChangeListener="#{bean.loadCities}">
<f:selectItems value="#{bean.countries}" />
</h:selectOneMenu>
<h:selectOneMenu value="#{bean.city}" required="true">
<f:selectItems value="#{bean.cities}" />
</h:selectOneMenu>
This approach obviously predates the Web 2.0 era wherein you’d just use Ajax for
this. Understand that the immediate attribute has essentially become useless for this
purpose since the introduction of <f:ajax> in JSF 2.0. Exactly the same use case can be
achieved in a much cleaner way as follows:
<h:selectOneMenu value="#{bean.country}" required="true">
<f:selectItems value="#{bean.countries}" />
<f:ajax listener="#{bean.loadCities}" render="city" />
</h:selectOneMenu>
CHAPTER 5 CONVERSION ANDVALIDATION
172
<h:selectOneMenu id="city" value="#{bean.city}" required="true">
<f:selectItems value="#{bean.cities}" />
</h:selectOneMenu>
As you learned in Chapter 4, the execute attribute of <f:ajax> already defaults
to @this, so it’s just omitted. This also means that all other EditableValueHolder
components in the same form won’t be processed and thus won’t cause #{bean.
loadCities} ever to be blocked by conversion or validation errors coming from other
inputs.
These days, with Ajax magic and all, the immediate attribute has thus lost its main
use case. JSF could do as well without it. Due to its historic use case, many starters may
mistake its primary purpose to be “skip all validation.” This is, however, not true. For
that, you’d need to fine-tune the execute attribute of <f:ajax> so that it only covers
the input components that really need to be validated. In case you want to actually
“skip all validation” while submitting the entire form, you’d best use Bean Validation
constraints instead (the @NotNull and friends) and simply have <f:validateBean
disabled="true"> wrapping the entire form.
Custom Converters
From the beginning JSF has supported custom converters. The main use case is to be
able to convert a non-standard model value, such as a persistence entity specific to the
web application. The less common use case is to extend an existing standard converter
and set some commonly used defaults in its constructor so that you can get away with
less code in order to declare the desired standard converter configuration in the view.
Imagine that you want to be able to create master-detail pages on your persistence
entities wherein you’d like to pass the ID of the entity around as a request parameter
from the master page to the detail page. Following is an example data table in the master
page /products/list.xhtml based on a fictive Product entity:
<h:dataTable value="#{listProducts.products}" var="product">
<h:column>#{product.id}</h:column>
<h:column>#{product.name}</h:column>
<h:column>#{product.description}</h:column>
CHAPTER 5 CONVERSION ANDVALIDATION
173
<h:column>
<h:link value="Edit" outcome="edit">
<f:param name="id" value="#{product.id}" />
</h:link>
</h:column>
</h:dataTable>
Note the last column of the table. It generates a link to the detail page /products/
edit.xhtml whereby the ID of the entity is passed as a GET request parameter as in
/product.xhtml?id=42. In the detail page, you can use <f:viewParam> to set the GET
request parameter in the backing bean.
<f:metadata>
<f:viewParam name="id" value="#{editProduct.product}"
required="true" requiredMessage="Bad request">
</f:viewParam>
</f:metadata>
...
<h:form>
<h1>Edit product #{editProduct.product.id}</h1>
<h:inputText value="#{editProduct.product.name}" />
<h:inputText value="#{editProduct.product.description}" />
...
</h:form>
However, there’s one small problem: the GET request parameter is in Java
perspective basically a String representing the product ID while the product property of
the EditProduct backing bean actually expects a whole Product entity identified by the
passed-in ID.
@Named @ViewScoped
public class EditProduct implements Serializable {
private Product product;
// Getter+setter.
}
CHAPTER 5 CONVERSION ANDVALIDATION

174
For exactly this conversion step, a custom converter has to be created which is
capable of converting between a String representing the product ID and an Object
representing the Product entity. JSF offers the javax.faces.convert.Converter
interface20 to get started. Following is a concrete example of such a ProductConverter:
@FacesConverter(forClass=Product.class, managed=true)
public class ProductConverter implements Converter<Product> {
@Inject
private ProductService productService;
@Override
public String getAsString
(FacesContext context, UIComponent component, Product product)
{
if (product == null) {
return "";
}
if (product.getId() != null) {
return product.getId().toString();
}
else {
throw new ConverterException(
new FacesMessage("Invalid product ID"), e);
}
}
@Override
public Product getAsObject
(FacesContext context, UIComponent component, String id)
{
if (id == null || id.isEmpty()) {
return null;
}
20 https://javaee.github.io/javaee-spec/javadocs/javax/faces/convert/Converter.html.
CHAPTER 5 CONVERSION ANDVALIDATION
175
try {
return productService.getById(Long.valueOf(id));
}
catch (NumberFormatException e) {
throw new ConverterException(
new FacesMessage("Invalid product ID"), e);
}
}
}
There are several important things to note here in the @FacesConverter annotation.
First, the forClass attribute basically specifies the target entity type for which this
converter should automatically run during the process validations phase (third
phase) and the render response phase (sixth phase). This way you don’t need to
explicitly register the converter in the view. In case you wanted to do so, you’d replace
the forClass attribute by the value attribute specifying the unique identifier of the
converter, for example:
@FacesConverter(value="project.ProductConverter", managed=true)
Then you can specify exactly that converter ID in the converter attribute of any
ValueHolder component, or the converterId attribute of any nested <f:converter> tag.
<f:viewParam name="id" value="#{editProduct.product}"
converter="project.ProductConverter"
required="true" requiredMessage="Bad request">
</f:viewParam>
But this is not necessary when you just keep using the forClass attribute. Note that
you can’t specify both. It’s one or the other where the value attribute takes precedence
over the forClass. So, if you specify both, the forClass attribute is essentially ignored.
We don’t want to have that as it’s much more powerful for this particular purpose of
transparently converting whole entities.
The second thing to note in the annotation is the managed attribute. This is new since
JSF 2.3. Essentially, this manages the converter instance in the CDI context. Setting the
managed attribute to true is mandatory in order to get dependency injection to work
CHAPTER 5 CONVERSION ANDVALIDATION

176
in the converter. Previously, this was worked around by making the converter itself a
managed bean.21
If you have worked with JSF converters before, you’ll also notice the interface
now finally being parameterized. The interface predates Java 1.5 and was hence not
parameterized from the beginning. With a Converter<T>, the getAsObject() now
returns a T instead of Object and the getAsString() now takes a T as value argument
instead of Object. This saves unnecessary instanceof checks and/or casts.
Note that JSF’s own standard converters which predate JSF 2.3 (currently, basically
all of them thus) are frozen in time and cannot take advantage of this as they would
otherwise no longer be backward compatible. In other words, they are still raw types.
That is, there’s a small but not unavoidable chance that someone is programmatically
using JSF converters in plain Java code instead of letting JSF deal with them. That plain
Java code would no longer compile if the standard converters were parameterized. It’s
essentially the same reason that the Map#get() explicitly takes Object instead of K as
argument. Further there’s a yet smaller but still not unavoidable chance that someone
has created a custom converter which extends a standard converter, but also explicitly
redeclares the interface. Something like the following:
public class ExtendedNumberConverter
extends NumberConverter implements Converter
{
// ...
}
Such an obscure converter would no longer compile if NumberConverter
was parameterized in some way. Even if we parameterize NumberConverter as a
Converter<Object>, the compiler would error on ExtendedNumberConverter as follows
and hence break backward compatibility:
e interface Converter cannot be implemented more than once with
dierent arguments: Converter<Object> and Converter
21 https://stackoverflow.com/q/7665673/157882.
CHAPTER 5 CONVERSION ANDVALIDATION

177
Coming back to our ProductConverter implementation, in the getAsString()
you’ll notice that the converter explicitly returns an empty string when the model value
is null. This is as per the Javadoc.22 The technical reason is that JSF won’t render the
associated HTML attribute when the evaluated value is null. In general, this is not a
big problem. The fewer unused attributes in the generated HTML output, the better it is.
Only, this won’t work as expected for the <option> of a <select> element. If the custom
converter would return null instead of an empty string, then the <option> element would
be rendered without any value attribute and thus fall back to submitting its text content
instead. Awkward indeed, but this is literally specified in the HTML specification.23 In other
words, if you have a converter that incorrectly returns null instead of an empty string, and
you have a drop-down list with the associated entities along with a default option as follows:
<h:selectOneMenu value="#{bean.product}">
<f:selectItem itemValue="#{null}" itemLabel="Please select ..." />
<f:selectItems value="#{bean.products}"
var="product" itemLabel="#{product.name}">
</f:selectItems>
</h:selectOneMenu>
then the web browser would, during submitting the default option, send the literal
string “Please select …” to the server instead of an empty string. This would cause a
NumberFormatException in ProductConverter#getAsObject() while we intend to
return null here. The correct solution is thus to let the getAsString() return an empty
string in case the model value is null.
In case you have more persistence entities for which you need a JSF converter,
and want to avoid repeating essentially the same ProductConverter logic for all other
persistence entities, you can create a generic JSF converter for them. This works only if all
your persistence entities extend from the same base class wherein the getId() is defined.
@MappedSuperClass
public abstract class BaseEntity implements Serializable {
@Id @GeneratedValue(strategy=IDENTITY)
private Long id;
22 https://javaee.github.io/javaee-spec/javadocs/javax/faces/convert/Converter.html.
23 https://html.spec.whatwg.org/multipage/form-elements.html#attr-option-value.
CHAPTER 5 CONVERSION ANDVALIDATION
178
public Long getId() {
return id;
}
}
And if you have a base entity service for all of them:
@Stateless
public class BaseEntityService {
@PersistenceContext
private EntityManager entityManager;
@TransactionAttribute(SUPPORTS)
public <E extends BaseEntity> E getById(Class<E> type, Long id) {
return entityManager.find(type, id);
}
}
the generic converter can then look as follows:
@FacesConverter(forClass=BaseEntity.class, managed=true)
public class BaseEntityConverter implements Converter<BaseEntity> {
@Inject
private BaseEntityService baseEntityService;
@Override
public String getAsString
(FacesContext context, UIComponent component, BaseEntity entity)
{
if (entity == null) {
return "";
}
if (entity.getId() != null) {
return entity.getId().toString();
}
CHAPTER 5 CONVERSION ANDVALIDATION
179
else {
throw new ConverterException(
new FacesMessage("Invalid entity ID"), e);
}
}
@Override
public BaseEntity getAsObject
(FacesContext context, UIComponent component, String id)
{
if (id == null || id.isEmpty()) {
return null;
}
ValueExpression value = component.getValueExpression("value");
Class<? extends BaseEntity> type = (Class<? extends BaseEntity>)
value.getType(context.getELContext());
try {
return baseEntityService.getById(type, Long.valueOf(id));
}
catch (NumberFormatException e) {
throw new ConverterException(
new FacesMessage("Invalid entity ID"), e);
}
}
}
The key here is thus the ValueExpression#getType() call. This returns the actual
type of the property behind the EL expression associated with the component’s value
attribute. In case of <f:viewParam value="#{editProduct.product}"> this would thus
return Product.class, which fits Class<? extends BaseEntity>.
Coming back to the less common use case of a custom converter, extending a
standard converter, imagine that you have a <f:convertDateTime> configuration which
is repeated everywhere in your web application:
<f:convertDateTime type="localDate" pattern="yyyy-MM-dd" />
CHAPTER 5 CONVERSION ANDVALIDATION
180
And you’d like to replace it with something like the following:
<t:convertLocalDate />
Then one way is to just extend it, set the defaults in the constructor, register it in
the *.taglib.xml file, and that’s it. Following is what such a LocalDateConverter can
look like:
@FacesConverter("project.ConvertLocalDate")
public class LocalDateConverter extends DateTimeConverter {
public LocalDateConverter() {
setType("localDate");
setPattern("yyyy-MM-dd");
}
}
And here’s the /WEB-INF/example.taglib.xml entry.
<tag>
<tag-name>convertLocalDate</tag-name>
<converter>
<converter-id>project.ConvertLocalDate</converter-id>
</converter>
</tag>
Alternatively, you can also make it an implicit converter by getting rid of the
converter ID and making it a forClass converter.
@FacesConverter(forClass=LocalDate.class)
This way you don’t even need any <t:convertLocalDate> tag. Don’t forget to
remove the <tag> entry in example.taglib.xml. They cannot be used simultaneously.
If you need such case, for example, because you want to able to change the LocalDate
pattern, create another subclass.
You can even have a forClass converter for java.lang.String typed properties.
This is very useful when you want have an automatic application-wide string-trimming
CHAPTER 5 CONVERSION ANDVALIDATION
181
strategy which should prevent the model from being polluted with leading or trailing
whitespace on user-submitted values. Following is what such a converter can look like:
@FacesConverter(forClass=String.class)
public class TrimConverter implements Converter<String> {
@Override
public String getAsString
(FacesContext context, UIComponent component, String modelValue)
{
return modelValue == null ? "" : modelValue;
}
@Override
public String getAsObject(FacesContext context,
UIComponent component, String submittedValue)
{
if (submittedValue == null || submittedValue.isEmpty()) {
return null;
}
String trimmed = submittedValue.trim();
return trimmed.isEmpty() ? null : trimmed;
}
}
Last but not least, when you need to provide whole entities as SelectItem values of
a selection component as below (see also Chapter 4), along with a custom converter for
Country.class:
<h:selectOneMenu value="#{bean.country}">
<f:selectItem itemValue="#{null}" itemLabel="-- select one --" />
<f:selectItems value="#{bean.availableCountries}" var="country">
itemValue="#{country}" itemLabel="#{country.name}"
</f:selectItems>
</h:selectOneMenu>
CHAPTER 5 CONVERSION ANDVALIDATION
182
where the associated backing bean properties are declared as follows:
private Country country;
private List<Country> availableCountries;
then you need to keep in mind that the entity has its equals() and hashCode() properly
implemented. Otherwise JSF may throw a confusing validation error when submitting
the form.
Validation Error: Value is not valid
This may happen when the bean is request scoped instead of view scoped and thus
recreates the list of available countries during every postback. As part of safeguard against
tampered requests, JSF will reiterate over the available options in order to validate if the
selected option is indeed among them. JSF will use the Object#equals() method to test
the selected option against each available option. If this hasn’t returned true for any of
the available options, then the above-mentioned validation error will be thrown.
Continuing with the BaseEntity example, here’s how you’d best implement its
equals() and hashCode() methods.
@Override
public boolean equals(Object other) {
if (getId() != null
&& getClass().isInstance(other)
&& other.getClass().isInstance(this))
{
return getId().equals(((BaseEntity) other).getId());
}
else {
return (other == this);
}
}
@Override
public int hashCode() {
if (getId() != null) {
return Objects.hash(getId());
}
CHAPTER 5 CONVERSION ANDVALIDATION

183
else {
return super.hashCode();
}
}
Note the bidirectional Class#isInstance() test in the equals() method. This is
done instead of getClass() == other.getClass(), because that would return false
when your persistence framework uses proxies, such as Hibernate.
Custom Validators
Also, validators can be customized in JSF from the beginning. As almost every every
basic use case is already covered by standard JSF validators and even Bean Validation
constraints, such as length, range, and pattern validation, the most common use case left
to a custom JSF validator is validating the data integrity by testing the submitted value
against database-based constraints. Generally, those concern unique constraints.
A good real-world example is validating during e-mail-based signup or while
changing the e-mail address in the user account management page when the specified
e-mail address is not already in use. Particularly, the change event can’t be tested with
a Bean Validation constraint in a simple way, because Bean Validation doesn’t offer the
opportunity to compare the old value with the new value without re-obtaining the entity
from the database. To start, just implement the javax.faces.validator.Validator
interface24 accordingly.
@FacesValidator(value="project.UniqueEmailValidator", managed=true)
public class UniqueEmailValidator implements Validator<String> {
@Inject
private UserService userService;
@Override
public void validate
(FacesContext context, UIComponent component, String email)
throws ValidatorException
24 https://javaee.github.io/javaee-spec/javadocs/javax/faces/validator/Validator.html.
CHAPTER 5 CONVERSION ANDVALIDATION
184
{
if (email == null || email.isEmpty()) {
return; // Let @NotNull or required=true handle this.
}
String oldEmail = (String) ((UIInput) component).getValue();
if (!email.equals(oldEmail) && userService.exist(email)) {
throw new ValidatorException(
new FacesMessage("Email already in use"));
}
}
}
In order to get it to run, just specify exactly the declared validator ID in the
validator attribute of any EditableValueHolder component, or the validatorId
attribute of any nested <f:validator> tag.
<h:inputText value="#{signup.user.email}"
validator="project.UniqueEmailValidator">
</h:inputText>
When looking at the UniqueEmailValidator class, you’ll notice that the annotation
and the interface also got the same JSF 2.3 changes as the converter. Like the
@FacesConverter, the @FacesValidator annotation, since JSF 2.3, also got a new
managed attribute which should enable dependency injection in the validator
implementation. And, like the Converter<T>, the Validator<T> also got parameterized
whereby the validate() method now takes a T instead of Object as a value argument.
You also need to make sure that your validators are implemented so that they
skip validation when the value argument is null or empty. Historically, in JSF 1.x, the
validate() method would always be skipped when the value argument is null. However,
this has changed since the integration of Bean Validation in JSF 2.0, thereby breaking
backward compatibility on existing JSF 1.x-based custom validators. This breaking
change could be turned off by explicitly setting the following web.xml context parameter:
<context-param>
<param-name>javax.faces.VALIDATE_EMPTY_FIELDS</param-name>
<param-value>false</param-value>
</context-param>
CHAPTER 5 CONVERSION ANDVALIDATION

185
The disadvantage of this is that the @NotNull of Bean Validation won’t be triggered
by JSF and you’d basically need to repeat this constraint for all JSF input components
by explicitly setting their required attribute to true. You’d better not do this and just
keep performing the null and empty check in your custom validator. Having validation
constraints at a single place in the model with help of Bean Validation is more Don’t
Repeat Yourself (DRY) than repeating the validation constraints across different layers
using the very same model.
Finally, the old value can simply be obtained from UIInput#getValue() which
basically returns the current value attribute of the UIInput component.
Coming back to the use case of validating the uniqueness of the submitted value,
of course you could also skip this and insert the data anyway and catch any constraint
violation exception coming from the persistence layer and display a faces message
accordingly. However, this doesn’t go well with the current trend of immediate feedback
directly after changing the input field in the user interface.
In this specific use case of validating a unique e-mail address during signup,
however, there may be another reason not to give away too much detail about the
uniqueness of the specified e-mail address: security. In such a case, you’d best let the
signup complete exactly the same way as if it was successful whereby you tell the user to
check the mailbox, but behind the scenes actually send a different e-mail to the target
recipient, rather than an activation e-mail, preferably not more than once daily. The
e-mail would be similar to the following:
Dear user,
It looks like you or someone else tried to sign up on our web site using your
email address foo@example.com while it is already associated with an
existing account. Perhaps you actually wanted to log in or to reset your
password? If it actually wasn’t you, please let us know by replying to this
email and we’ll investigate this.
Sincerely, Example Company
Finally, you might also want to consider invalidating or deduplicating e-mails that
contain the “+” character in the username part, followed by a sequence of characters,
representing an e-mail alias. For a lot of e-mail providers, notably Gmail, e-mail
addresses foo@gmail.com and foo+bar@gmail.com refer to exactly the same e-mail
account, thereby basically allowing the end user to create a nearly unlimited amount of
accounts.
CHAPTER 5 CONVERSION ANDVALIDATION

186
Custom Constraints
While not part of the JSF, for the sake of completeness we’d like to show another example
of a custom Bean Validation constraint. An earlier example was already given in the
section about <f:validateWholeBean>. The Bean Validation API already offers a lot
of existing constraints out of the box which you can find in the javax.validation.
constraints package.25 A lot of new constraints have been added in Bean Validation 2.0,
also part of Java EE 8 like JSF 2.3, such as @Email.
Most common use cases for a custom Bean Validation constraint are related to
localized patterns. Think of phone numbers, zip codes, bank account numbers, and
passwords. Of course, most of those could be done with just a @Pattern, but this may
end up in less self-documenting code, particularly if the desired pattern is relatively
complex.
Following is an example of a custom @Phone constraint which should match as many
as possible internationally known phone numbers:
@Constraint(validatedBy=PhoneValidator.class)
@Target(FIELD)
@Retention(RUNTIME)
public @interface Phone {
String message() default "Invalid phone number";
Class<?>[] groups() default {};
Class<?>[] payload() default {};
}
And here’s the associated PhoneValidator:
public class PhoneValidator
implements ConstraintValidator<Phone, String>
{
private static final Pattern SPECIAL_CHARS =
Pattern.compile("[\\s().+-]|ext", Pattern.CASE_INSENSITIVE);
private static final Pattern DIGITS =
Pattern.compile("[0-9]{7,15}");
25 https://javaee.github.io/javaee-spec/javadocs/javax/validation/constraints/
package-summary.html.
CHAPTER 5 CONVERSION ANDVALIDATION

187
@Override
public boolean isValid
(String phone, ConstraintValidatorContext context)
{
if (phone == null || phone.isEmpty()) {
return true; // Let @NotNull/@NotEmpty handle this.
}
return isValid(phone);
}
public static boolean isValid(String phone) {
String digits = SPECIAL_CHARS.matcher(phone).replaceAll("");
return DIGITS.matcher(digits).matches();
}
}
In order to activate it, simply annotate the associated entity property.
@Phone
private String phone;
This will be triggered on both the JSF and JPA sides: in JSF, during the process
validations phase (third phase); in JPA during the persist and merge. As noted in the
<f:validateBean>/<f:validateWholeBean> section, it can be disabled on both sides.
Custom Messages
Conversion and validation error messages coming from JSF as well as Bean Validation
are fully customizable. Application-wide, they can be customized by supplying a
properties file which specifies the desired message as the value of a predefined key. You
can find predefined keys for JSF conversion and validation messages in Chapter 2.5.2.4,
“Localized Application Messages,” of the JSF 2.3 specification.26 You can find predefined
keys for Bean Validation messages in Appendix B, “Standard ResourceBundle Messages,”
of the Bean Validation 2.0 specification.27 For JSF, the fully qualified name of the
26 http://download.oracle.com/otn-pub/jcp/jsf-2_3-final-eval-spec/JSF_2.3.pdf.
27 http://beanvalidation.org/2.0/spec/#standard-resolver-messages.
CHAPTER 5 CONVERSION ANDVALIDATION
188
properties file must be registered as <message-bundle> in faces-config.xml. For Bean
Validation, the exact fully qualified name of the properties file is ValidationMessages.
As an example, we’re going to modify the default message of the JSF
required="true" validation and the Bean Validation @NotNull constraint.
main/java/resources/com/example/project/i18n/messages.properties
javax.faces.component.UIInput.REQUIRED = {0} is required.
javax.faces.validator.BeanValidator.MESSAGE = {1} {0}
main/java/resources/ValidationMessages.properties
javax.validation.constraints.NotNull.message = is required.
Note the absence of the label placeholder in the Bean Validation message. Instead,
the {1} of the javax.faces.validator.BeanValidator.MESSAGE represents the label
associated with the JSF component and {0} represents the Bean Validation message.
The custom Bean Validation message bundle file is already automatically picked up. The
custom JSF message bundle file needs to be explicitly registered in the faces-config.
xml first.
<application>
<message-bundle>com.example.project.i18n.messages</message-bundle>
</application>
With those properties files in place, the following input components will thus show
exactly the same validation error message:
<h:inputText id="field" label="First input"
value="#{bean.field}" required="true">
</h:inputText>
<h:message for="field" />
<h:inputText id="notNullField" label="Second input"
value="#{bean.notNullField}">
</h:inputText>
<h:message for="notNullField" />
CHAPTER 5 CONVERSION ANDVALIDATION
189
In case you want to fine-grain the message on a per-component basis, you can use
the converterMessage, validatorMessage, and/or requiredMessage attribute of the
UIInput component. The converterMessage will be displayed on any conversion error.
<h:inputText value="#{bean.localDate}"
converterMessage="Please enter date in pattern YYYY-MM-DD.">
<f:convertLocalDate type="localDate" pattern="yyyy-MM-dd" />
</h:inputText>
The validatorMessage will be displayed on any validation error, as well as those
triggered by Bean Validation.
<h:inputText value="#{bean.dutchZipCode}" required="true"
validatorMessage="Please enter zip code in pattern 1234AB.">
<f:validateRegex pattern="[0-9]{4}[A-Z]{2}" />
</h:inputText>
Note that this won’t be shown when required="true" isn’t satisfied. For that, you
need to use requiredMessage instead.
<h:inputText value="#{bean.dutchZipCode}" required="true"
requiredMessage="Please enter zip code."
validatorMessage="Please enter zip code in pattern 1234AB.">
<f:validateRegex pattern="[0-9]{4}[A-Z]{2}" />
</h:inputText>
Note that this won’t be shown for any Bean Validation @NotNull. You should then
use validatorMessage instead.
CHAPTER 5 CONVERSION ANDVALIDATION
191
© Bauke Scholtz, Arjan Tijms 2018
B. Scholtz and A. Tijms, The Definitive Guide to JSF in Java EE 8, https://doi.org/10.1007/978-1-4842-3387-0_6
CHAPTER 6
Output Components
Technically, the input components as described in Chapter 4 are also output
components. They are not only capable of processing any submitted input values but
also capable of outputting the model value during the render response phase (sixth
phase). This is also visible in the JSF (JavaServer Faces) API (application programming
interface): the UIInput superclass extends from the UIOutput superclass.
There are also a bunch of components that merely output their model value or even
just an HTML element. Those are the pure output components. They don’t participate in
all phases of the JSF life cycle. Sometimes they participate during the restore view phase
(first phase), in case they are dynamically created or manipulated, but the majority of
their job is executed during the render response phase (sixth phase), while generating
the HTML output. During the other phases, they don’t do many additional tasks.
Document-Based Output Components
These components are <h:doctype>, <h:head>, and <h:body>. Note that there’s no such
component as <h:html>. <h:doctype> is arguably the least used HTML component
of the entire standard JSF HTML component set. You could get away with just a plain
<!DOCTYPE html> element. <h:doctype> is only useful when you want to have a pure
XML representation of the <!DOCTYPE> element, which is generally only the case when
you need to store entire JSF views as part of another XML structure of some higher-level
abstract layer around JSF.
<h:head> and <h:body> are, since JSF 2.0, the most important tags after <f:view>
became optional in Facelets. Historically, <f:view> was mandatory in JSP in order to
declare the JSP page being a JSF view. While generating the <head> and <body> elements
of the HTML document doesn’t require any special logic, and <h:head> and <h:body>

192
aren’t mandatory for a Facelets page in order to be recognized as a JSF view, those tags
are mandatory for the proper automatic handling of JavaScript and CSS (Cascading Style
Sheets) resource dependencies, also introduced in JSF 2.0.
<h:head> and <h:body> allow JSF to automatically relocate JavaScript and
CSS resource dependencies to the right places in the component tree so that they
ultimately end up in the right place in the generated HTML output. From the standard
JSF component set only <h:commandLink>, <h:commandScript>, <f:ajax>, and
<f:websocket> utilize this facility. They all require the jsf.js JavaScript file being
included in the final HTML document. During the view build time, they will basically use
UIViewRoot#addComponentResource()1 to register the component resource dependency
at the specified target component, which can be either <h:head> or <h:body>. During the
view render time, the renderer associated with the <h:head> and <h:body> component
will obtain all so far registered component resource dependencies by UIViewRoot#g
etComponentResources()2 and generate the appropriate <link rel="stylesheet">
and <script> elements with a URL (uniform resource locator) referring the associated
resource dependency.
As shown in the section “Standard HTML Components” in Chapter 3, the following
code is what the most minimal and HTML5-valid JSF page looks like:
<!DOCTYPE html>
<html lang="en"
xmlns="http://www.w3.org/1999/xhtml"
xmlns:h="http://xmlns.jcp.org/jsf/html"
>
<h:head>
<title>Title</title>
</h:head>
<h:body>
...
</h:body>
</html>
1 https://javaee.github.io/javaee-spec/javadocs/javax/faces/component/UIViewRoot.
html#addComponentResource-javax.faces.context.FacesContext-javax.faces.component.
UIComponent-java.lang.String-.
2 https://javaee.github.io/javaee-spec/javadocs/javax/faces/component/UIViewRoot.
html#getComponentResources-javax.faces.context.FacesContext-java.lang.String-.
CHAPTER 6 OUTPUT COMPONENTS
193
Text-Based Output Components
These components are <h:outputText>, <h:outputFormat>, <h:outputLabel>, and
<h:outputLink>. They all extend from the UIOutput superclass and have a value
attribute which can be bound to a managed bean property. During the view render time,
the getter will be consulted to retrieve and display any preset value. These components
will never invoke the setter method and therefore it could be safely left out of the
managed bean class in order to reduce unused code.
Historically, in JSF 1.x on JSP (Java Server Pages), <h:outputText> was mandatory
in order to output a bean property as text. JSP didn’t support JSF-style EL (Expression
Language) #{...} in template text. Facelets supported JSF-style EL #{...} in template
text and hence bean properties could be outputted directly in Facelets without the need
for a whole JSF component. In other words, the following codes are equivalent in JSF on
Facelets, <h:outputText>:
<p>Welcome, <h:outputText value="#{user.name}" />!</p>
And EL in template text:
<p>Welcome, #{user.name}!</p>
It doesn’t need explanation that the latter code snippet is more terse and readable.
<h:outputText> has, however, not become useless in Facelets. It’s still useful for the
following purposes:
• Disabling implicit HTML escaping.
• Attaching an explicit converter.
• Referencing in <f:ajax render>.
JSF has implicit HTML escaping everywhere. Anything outputted to the HTML
response is checked on the HTML special characters “<”, “ >”, “ &”, and optionally also
“"” when outputted within an attribute of an HTML element. Those HTML special
characters will be replaced by “<”, “ >”, “ &”, and “"”, respectively. The web browser
will then not interpret those characters as part of the generated HTML output but as
plain text and, ultimately, will present them as literal characters to the end user.
CHAPTER 6 OUTPUT COMPONENTS

194
Imagine that a user chooses <script>alert('xss')</script> as a username, and
it’s emitted via #{user.name} through either one of the above shown code snippets; then
JSF will render it as follows in the generated HTML output:
<p>Welcome, <script>alert('xss')</script>!</p>
And the web browser will display it literally as “Welcome, <script>alert('xss')</script>!”
instead of only “Welcome, !” along with a JavaScript alert with the text “xss” whereby the
user-controlled JavaScript is unintentionally actually executed. The end user being able to
execute arbitrary JavaScript code is dangerous. It would allow the malicious user to execute
specific code which transfers information about session cookies to an external host when
someone else logs in and views a page wherein the username of the malicious user is being
rendered. (See also the section “Cross-Site Scripting Protection” in Chapter 13.)
On the other hand, there may also be cases whereby you’d like to embed safe HTML
code in the generated HTML output. Most common use cases are related to posting
messages for other users on a web site, whereby a limited subset of formatting is allowed,
such as bold, italics, links, lists, headings, etc. Generally, those are to be entered in a text
area element using a predefined human-friendly markup format, such as Markdown, or
the lesser known Wikicode, or the ancient BBCode. They are all capable of parsing the
raw text with the markup and converting it to safe HTML code whereby any malicious
HTML code is already escaped or stripped out.
<h:inputTextarea value="#{message.text}" />
The raw text is at least always saved in the database for the record, and the resulting
safe HTML code, along with the version of the parser used, can also be saved in the
database for performance, so that the parser doesn’t need to be unnecessarily re-
executed for the same piece of raw text. Given that we’re going to use Markdown with
CommonMark3 and having the following Markdown interface,
private interface Markdown {
public String getText();
public void setHtml(String html);
public String getVersion();
public void setVersion(String version);
}
3 https://github.com/atlassian/commonmark-java.
CHAPTER 6 OUTPUT COMPONENTS
195
And the following MarkdownListener entity listener,
public class MarkdownListener {
private static final Parser PARSER = Parser.builder().build();
private static final HtmlRenderer RENDERER =
HtmlRenderer.builder().escapeHtml(true).build();
private static final String VERSION = getCommonMarkVersion();
@PrePersist
public void parseMarkdown(Markdown markdown) {
String html = RENDERER.render(PARSER.parse(markdown.getText()));
markdown.setHtml(html);
markdown.setVersion(VERSION);
}
@PreUpdate
public void parseMarkdownIfNecessary(Markdown markdown) {
if (markdown.getVersion() == null) {
parseMarkdown(markdown);
}
}
@PostLoad
public void updateMarkdownIfNecessary(Markdown markdown) {
if (!VERSION.equals(markdown.getVersion())) {
parseMarkdown(markdown);
}
}
private static String getCommonMarkVersion() {
try {
Properties properties = new Properties();
properties.load(Parser.class.getResourceAsStream(
"/META-INF/maven/com.atlassian.commonmark"
+ "/commonmark/pom.properties"));
return properties.getProperty("version");
}
CHAPTER 6 OUTPUT COMPONENTS
196
catch (IOException e) {
throw new UncheckedIOException(e);
}
}
}
then the Message entity implementing the Markdown interface and registered with the
MarkdownListener entity listener can look as follows:
@Entity @EntityListeners(MarkdownListener.class)
public class Message implements Markdown, Serializable {
@Id @GeneratedValue(strategy=IDENTITY)
private Long id;
@Column(nullable = false) @Lob
private @NotNull String text;
@Column(nullable = false) @Lob
private String html;
@Column(nullable = false, length = 8)
private String version;
@Override
public void setText(String text) {
if (!text.equals(this.text)) {
this.text = text;
setVersion(null); // Trigger for MarkdownListener @PreUpdate.
}
}
// Add/generate remaining getters and setters.
}
Finally, in order to present the safe HTML code to the end user, you can use
<h:outputText> with the escape attribute set to false, whereby you thus instruct JSF
that it doesn’t need to implicitly HTML-escape the value.
<h:outputText value="#{message.html}" escape="false" />
CHAPTER 6 OUTPUT COMPONENTS

197
Next to implicit HTML escaping, JSF also supports implicit conversion. For any
property type which is emitted via <h:outputText> or even EL in template text, JSF will
look up the converter by class, invoke its Converter#getAsString() method, and render
the result. In case you want to explicitly use a specific or a different converter, you have to
replace any EL in template text by <h:outputText> and explicitly register the converter
on it. Generally, it is those kinds of number- or datetime-related properties that need to
be formatted in a locale-specific pattern.
<h:outputText value="#{product.price}">
<f:convertNumber type="currency" locale="en_US" />
</h:outputText>
The last purpose of <h:outputText> is being able to reference a piece of inline text in
<f:ajax render>. By default, <h:outputText> doesn’t generate any HTML code. But if it
has at least an attribute specified which must end up in the generated HTML output, such
as id or styleClass, then it will generate an HTML <span> element. This is referenceable
via JavaScript and thus useful for Ajax-updating specific parts of text. Of course, you
could also opt for Ajax-updating some common container component, but this is far less
efficient than Ajax-updating only specific parts which really need to be updated.
<h:outputFormat> is an extension of <h:outputText> which parses the value using
java.text.MessageFormat API4 beforehand. This is particularly useful in combination
with localized resource bundles. An example can be found in the section “Parameterized
Resource Bundle Values” in Chapter 14.
<h:outputLabel> basically generates the HTML <label> element, which is an
essential part of HTML forms. This was already described in the section “Label and
Message Components” in Chapter 4. It is important to note that <h:outputLabel>
and <h:outputText> are, in HTML perspective, absolutely not interchangeable. In
a relatively recent burst of low-quality programming tutorial sites on the Internet
which basically show code snippets without any technical explanation for the sake of
advertisement incomes, <h:outputLabel> is often incorrectly being used to output a
piece of text in a Hello World JSF page. Such tutorial sites can better be ignored entirely.
<h:outputLink> generates an HTML <a> element. It’s somewhat a leftover of JSF
1.x and isn’t terribly useful since the introduction of the much more useful <h:link>
in JSF 2.0. When you don’t need to reference a JSF view with a link, for which you’d
4 https://docs.oracle.com/javase/8/docs/api/java/text/MessageFormat.html.
CHAPTER 6 OUTPUT COMPONENTS
198
use <h:link> instead, you could as well just use a plain HTML <a> element instead of
<h:outputLink>. The following tags generate exactly the same HTML.
<h:outputLink value="http://google.com">Google</h:outputLink>
<a href="http://google.com">Google</a>
The plain HTML equivalent is terser.
Navigation-Based Output Components
These components are <h:link> and <h:button>, both extending from the
UIOutcomeTarget superclass. They have an outcome attribute which accepts a logical
path to a JSF view. The path will actually be validated if it’s a valid JSF view; otherwise,
the link or button will be rendered as disabled. In other words, they don’t accept a path
to a non-JSF resource, let alone an external URL.For this, you’d need <h:outputLink> or
plain HTML instead.
<h:link> will generate an HTML <a> element with the URL of the target JSF
view specified as an href attribute. <h:button> will generate an HTML <input
type="button"> element with an onclick attribute which assigns, with help of
JavaScript, the URL of the target JSF view to window.location.href property. This
is indeed somewhat awkward, but that’s just a limitation of HTML.Neither <input
type="button"> nor <button> supports an href-like attribute.
Given the following folder structure in a Maven WAR project in Eclipse,
CHAPTER 6 OUTPUT COMPONENTS
199
The following <h:link> and <a> pairs enclosed in /folder1/page1.xhtml will all
generate exactly the same links.
<h:link outcome="page2" value="link1" />
<a href="#{request.contextPath}/folder1/page2.xhtml">link1</a>
<h:link outcome="/folder2/page1" value="link2" />
<a href="#{request.contextPath}/folder2/page1.xhtml">link2</a>
<h:link outcome="/folder2/page2" value="link3" />
<a href="#{request.contextPath}/folder2/page2.xhtml">link3</a>
<h:link outcome="/page1" value="link4" />
<a href="#{request.contextPath}/page1.xhtml">link4</a>
<h:link outcome="/page2" value="link5" />
<a href="#{request.contextPath}/page2.xhtml">link5</a>
Note thus that <h:link> already automatically prepends any context path of the web
application project and appends the currently active URL pattern of the FacesServlet
mapping. Also note that without the leading slash, the outcome is interpreted relative
to the current folder, and with a leading slash, the outcome is interpreted relative to the
context path.
Panel-Based Output Components
These components are <h:panelGroup> and <h:panelGrid>, both extending from the
UIPanel superclass. <h:panelGroup> has multiple responsibilities. It can generate an
HTML <span>, or <div>, or even <td>, depending on the layout attribute and whether
it’s enclosed in a <h:panelGrid>.
By default, <h:panelGroup> generates just an HTML <span> element, like
<h:outputText>. The main difference is that <h:panelGroup> doesn’t have a value
attribute. Instead, the content is represented by its children. It also doesn’t support
disabling HTML escaping or attaching a converter. That’s up to any <h:outputText>
child. In this context, it’s not terribly useful. <h:panelGroup> is only more useful than
<h:outputText> when you need to be able to reference using <f:ajax render> an inline
element which in turn groups a bunch of closely related inline elements. Something like
the following represents the “user profile,” which should be Ajax-updatable from within
some sort of user profile edit page.
CHAPTER 6 OUTPUT COMPONENTS

200
<p>
Welcome,
<h:panelGroup id="userProfile">
<img src="#{user.imageUrl}" />
#{user.name}
</h:panelGroup>
</p>
...
<h:form>
...
<f:ajax ... render=":userProfile" />
...
</h:form>
When setting the layout attribute of <h:panelGroup> to block, then it will generate
an HTML <div> element. In standard HTML, “inline elements”5 don’t start at a new line
by default and don’t allow block element children. And, “block-level elements”6 always
start at a new line by default and allow inline as well as block elements as children.
Hence the supported values of the layout attribute of <h:panelGroup> are “inline”
and “block”. Historically, the layout attribute was only added in JSF 1.2 after complaints
from JSF developers about a missing JSF component to represent an HTML <div>
element. (See also Chapter 7.) This could be used to wrap larger sections which need to
be Ajax-updatable; otherwise a plain HTML <div> is also sufficient.
<h:panelGroup layout="block" id="userProfile">
<p>
Welcome,
<img src="#{user.imageUrl}" />
#{user.name}
</p>
</h:panelGroup>
Note that it’s illegal in HTML to have a block element nested in an inline element.
The <p> is a block element and hence the layout="block" is absolutely mandatory in
5 https://developer.mozilla.org/en-US/docs/Web/HTML/Inline_elements.
6 https://developer.mozilla.org/en-US/docs/Web/HTML/Block-level_elements.
CHAPTER 6 OUTPUT COMPONENTS
201
the above construct. If you don’t specify this attribute and thus effectively let JSF render
an HTML <span> element, then the web browser behavior is unspecified. The average
web browser will render the block element children outside the inline element and even
possibly error out when this construct is manipulated by JavaScript, such as during a JSF
Ajax update action.
Also keep in mind that in the above construct, the <p> tags and the “Welcome” text
are also updated during any JSF Ajax update action on the <h:panelGroup>. This is
essentially a waste of hardware resources, on both the server side and the client side, as
those are static and never subject to changes. When Ajax-updating things, you should
preferably ensure that <f:ajax render> only references components that absolutely
need to be Ajax-updated and thus not an unnecessarily large section.
When <h:panelGroup> is being nested in a <h:panelGrid> component, which
generates an HTML <table> element, then the layout attribute of <h:panelGroup>
is ignored and the component will basically act as a container of components which
should ultimately end up in the very same cell of the table. That is, the renderer of
<h:panelGrid> considers every direct child component as an individual table cell.
Given the following two-column <h:panelGrid>, which should generate a two-
column HTML table, what would you guess the actual generated HTML output should
look like?
<h:panelGrid columns="2">
one
<h:outputText value="two" />
three
four
<h:panelGroup>five</h:panelGroup>
six
seven
<h:panelGroup>
eight
nine
</h:panelGroup>
</h:panelGrid>
CHAPTER 6 OUTPUT COMPONENTS

202
Hint Each section of template text between two JSF components is internally
considered a single JSF component. In Mojarra, it’s represented by the internal
UIInstructions component. The actual component tree hierarchy is thus
roughly represented as below.
<h:panelGrid columns="2">
<ui:instructions>one</ui:instructions>
<h:outputText value="two" />
<ui:instructions>
three
four
</ui:instructions>
<h:panelGroup>five</h:panelGroup>
<ui:instructions>
six
seven
</ui:instructions>
<h:panelGroup>
eight
nine
</h:panelGroup>
</h:panelGrid>
Note again that there’s no such component as <ui:instructions> in Facelets. The
above markup is purely for visualization so that your brain can better process it. This
<h:panelGrid> has thus effectively six direct children which will each end up in their
own table cell. With two columns, this will thus effectively generate three rows. Here’s
the actual generated HTML output (reformatted for readability).
<table>
<tbody>
<tr>
<td>one</td>
<td>two</td>
</tr>
CHAPTER 6 OUTPUT COMPONENTS
203
<tr>
<td>three four</td>
<td>five</td>
</tr>
<tr>
<td>six seven</td>
<td>eight nine</td>
</tr>
</tbody>
</table>
Rendering in Chrome browser:
You see, <h:panelGroup> makes sure that “five” and “eight nine” don’t end up in
the very same table cell as “six seven.” Also note that it’s unnecessary to wrap any JSF
component in <h:panelGroup> if it should represent a single cell already. Therefore,
<h:outputText> behind “two” doesn’t need to be wrapped in <h:panelGroup>. You can,
of course, do so for better source code readability, but this is technically unnecessary.
If you happen to have a dynamic amount of cells based on a view-scoped model,
then you can nest a JSTL (JSP Standard Tag Library) <c:forEach> in <h:panelGrid> to
have it generate them as a data grid with a fixed amount of columns.
<h:panelGrid columns="3">
<c:forEach items="#{viewProducts.products}" var="product">
<h:panelGroup>
<h3>#{product.name}</h3>
<p>#{product.description}</p>
</h:panelGroup>
</c:forEach>
</h:panelGrid>
Note thus that <ui:repeat> is unsuitable here as compared to <c:forEach>, as
explained in the section “JSTL Core Tags” in Chapter 3. It will technically work just fine,
but the renderer of <h:panelGrid> will interpret it as a single table cell.
CHAPTER 6 OUTPUT COMPONENTS
204
Also note that it’s very important for the model to be view scoped, particularly if you
have JSF form components inside <h:panelGrid>. The technical reason is that during
processing the postback request, JSF expects the model item behind the iteration index
to be exactly the same as it was when the page was presented to the end user. In other
words, when JSF is about to process a form submit, and an item has been added or
removed or even reordered in the meanwhile, causing the iteration index to be changed,
the submitted values and/or the invoked action would possibly be performed against
the wrong item currently at the initially known index. This is dangerous for the integrity
of the model. If you don’t have any JSF form components inside <h:panelGrid>, or if the
model isn’t subject to changes during the view scope, e.g., because it’s only created or
updated during application startup, then the backing bean behind #{viewProducts} can
safely be request scoped.
Data Iteration Component
Yes, there’s only one, <h:dataTable>, which extends from the UIData superclass and
generates an HTML <table> based on an iterable data model whereby each item is
represented as a single row. The other data iteration component available in JSF, the
Facelets <ui:repeat>, doesn’t extend from the UIData superclass and doesn’t emit any
HTML output and therefore doesn’t technically count as an “output component.” Also,
in the standard JSF component set no such component generates an HTML <ul>, <ol>,
or <dl>, but this can relatively easily be created as a custom component extending from
UIData. (See also the section “Creating New Component and Renderer” in Chapter 11.)
The value attribute of UIData supports java.lang.Iterable. In other words, you
can supply any Java collection as a model value. As index-based access is most used in
UIData, most efficient is the java.util.ArrayList as it offers O(1) access by index. The
renderer of the <h:dataTable> component supports only <h:column> as a direct child
component. Anything else is ignored. As its name hints, <h:column> represents a single
column. Each iteration round over the value of <h:dataTable> will basically re-render
all columns against the currently iterated item. As with <c:forEach> and <ui:repeat>,
the currently iterated item is exposed in EL scope by the var attribute. Following is a
basic example which iterates over a List<String>.
<h:dataTable id="strings" value="#{bean.strings}" var="string">
<h:column>#{string}</h:column>
</h:dataTable>
CHAPTER 6 OUTPUT COMPONENTS
205
Backing bean class com.example.project.view.Bean:
@Named @RequestScoped
public class Bean {
private List<String> strings;
@PostConstruct
public void init() {
strings = Arrays.asList("one", "two", "three");
}
public List<String> getStrings() {
return strings;
}
}
Generated HTML output:
<table>
<tbody>
<tr><td>one</td></tr>
<tr><td>two</td></tr>
<tr><td>three</td></tr>
</tbody>
</table>
Rendering in Chrome browser:
It is important to note that the variable name as specified by the var attribute shouldn’t
clash with existing managed bean names or even with implicit EL objects. Implicit EL objects
have higher precedence in EL resolving. One example of an implicit EL object is #{header}
which refers to ExternalContext#getRequestHeaderMap().7 So when you happen to have
7 https://javaee.github.io/javaee-spec/javadocs/javax/faces/context/ExternalContext.
html#getRequestHeaderMap--.
CHAPTER 6 OUTPUT COMPONENTS
206
#{bean.headers} and you’d like to present it in an iterating component, then you can’t use
var="header" and you’d better think of a different name, such as var="head".
Following is a more elaborate example which shows a list of products. A similar table
was shown earlier in Chapter 5.
<h:dataTable id="products" value="#{products.list}" var="product">
<h:column>
<f:facet name="header">ID</f:facet>
#{product.id}
</h:column>
<h:column>
<f:facet name="header">Name</f:facet>
#{product.name}
</h:column>
<h:column>
<f:facet name="header">Description</f:facet>
#{product.description}
</h:column>
</h:dataTable>
Backing bean class com.example.project.view.Products:
@Named @RequestScoped
public class Products {
private List<Product> list;
@Inject
private ProductService productService;
@PostConstruct
public void init() {
list = productService.list();
}
public List<Product> getList() {
return list;
}
}
CHAPTER 6 OUTPUT COMPONENTS
207
Product entity: com.example.project.model.Product:
@Entity
public class Product {
@Id @GeneratedValue(strategy=IDENTITY)
private Long id;
@Column(nullable = false)
private @NotNull String name;
@Column(nullable = false)
private @NotNull String description;
// Add/generate getters+setters.
}
Product service: com.example.project.service.ProductService:
@Stateless
public class ProductService {
@PersistenceContext
private EntityManager entityManager;
@TransactionAttribute(SUPPORTS)
public List<Product> list() {
return entityManager
.createQuery("FROM Product ORDER BY id DESC", Product.class)
.getResultList();
}
}
Generated HTML output:
<table>
<thead>
<tr>
<th scope="col">ID</th>
CHAPTER 6 OUTPUT COMPONENTS
208
<th scope="col">Name</th>
<th scope="col">Description</th>
</tr>
</thead>
<tbody>
<tr>
<td>3</td>
<td>Three</td>
<td>The third product</td>
</tr>
<tr>
<td>2</td>
<td>Two</td>
<td>The second product</td>
</tr>
<tr>
<td>1</td>
<td>One</td>
<td>The first product</td>
</tr>
</tbody>
</table>
Rendering in Chrome browser:
It is important to note that the model behind the value attribute of <h:dataTable>
must refer a bean property which is already prepared beforehand in a one-time life cycle
event, such as @PostConstruct or <f:viewAction>. This doesn’t apply specifically to
UIData components but to basically every JSF component. That is, the getter method
may be invoked multiple times during the JSF life cycle, especially when referenced in
the value attribute of an iteration component or in the rendered attribute of any JSF
component.
CHAPTER 6 OUTPUT COMPONENTS

209
The technical reason is that any EL value expression is, behind the scenes, created as
a javax.el.ValueExpression instance which internally basically just holds the literal EL
string such as #{products.list} and any ValueExpression#getValue() call on it would
simply re-evaluate the expression against the provided EL context. This is normally a
very cheap operation, done in nanoseconds, but it may slow down drastically when the
getter method in turn performs a relatively expensive database query which may take
tens or even hundreds of milliseconds.
Iteration components may invoke the getter method during every phase of the JSF
life cycle when the iteration component happens to have form components nested.
When you prepare the model by obtaining a list from the database in the getter method,
this would cause the database to be queried on every single getter method call, which
is plainly inefficient. Moreover, the same problems with regard to resolving the iterated
item of interest based on the iteration index may occur as described in the last paragraph
of the previous section about <h:panelGrid> with <c:forEach>.
Another thing to note is <f:facet name="header">. This generates basically <thead>
with the content in <th>. <h:dataTable> also supports <f:facet name="footer">
which will then generate the <tfoot> with the content in <td>. You can usually find all
supported <f:facet> names in the tag documentation, as well as in the <h:dataTable>
tag documentation.8
Basically, you can put anything inside <h:column> to represent the cell content.
Even form components or a nested <h:dataTable> or <ui:repeat>. Following is a small
example which shows a fictive Set<Tag> tags property of Product entity in a nested
<ui:repeat>.
<h:dataTable id="products" value="#{products.list}" var="product">
...
<h:column>
<ui:repeat value="#{product.tags}" var="tag">
#{tag.name}<br/>
</ui:repeat>
</h:column>
</h:dataTable>
8 https://javaserverfaces.github.io/docs/2.3/vdldocs/facelets/h/dataTable.html.
CHAPTER 6 OUTPUT COMPONENTS
210
Editable <h:dataTable>
As to form components nested inside <h:column>, you can substitute EL in template text
with input components as follows:
<h:form id="list">
<h:dataTable id="products" value="#{products.list}" var="product">
<h:column>
<f:facet name="header">ID</f:facet>
#{product.id}
</h:column>
<h:column>
<f:facet name="header">Name</f:facet>
<h:inputText id="name" value="#{product.name}" />
<h:message for="name" />
</h:column>
<h:column>
<f:facet name="header">Description</f:facet>
<h:inputTextarea id="description"
value="#{product.description}">
</h:inputTextarea>
<h:message for="description" />
</h:column>
</h:dataTable>
<h:commandButton id="save" value="Save" action="#{products.save}">
<f:ajax execute="@form" render="@form" />
</h:commandButton>
</h:form>
Whereby the save() method of the backing bean class basically looks as follows,
after having changed the backing bean class to be a @ViewScoped one instead of a
@RequestScoped one:
public void save() {
productService.update(products);
}
CHAPTER 6 OUTPUT COMPONENTS
211
And the update() method of the service class in turn looks as follows:
@TransactionAttribute(REQUIRED)
public void update(Iterable<Product> products) {
products.forEach(entityManager::merge);
}
Note that you don’t need to worry at all about collecting the submitted values.
JSF has already done that task for you. Also note that you don’t need to worry about
uniqueness of the component IDs within <h:dataTable>, as that component already
implements the NamingContainer interface and prepends its own client ID and the
iteration index to the client ID of the child components, as you can see in the following
generated HTML output:
<table id="list:products">
<thead>
<tr>
<th scope="col">ID</th>
<th scope="col">Name</th>
<th scope="col">Description</th>
</tr>
</thead>
<tbody>
<tr>
<td>3</td>
<td>
<input id="list:products:0:name" type="text"
name="list:products:0:name" value="Three">
</input>
</td>
<td>
<textarea id="list:products:0:description"
name="list:products:0:description"
>The third product</textarea>
</td>
</tr>
CHAPTER 6 OUTPUT COMPONENTS
212
<tr>
<td>2</td>
<td>
<input id="list:products:1:name" type="text"
name="list:products:1:name" value="Two">
</input>
</td>
<td>
<textarea id="list:products:1:description"
name="list:products:1:description"
>The second product</textarea>
</td>
</tr>
<tr>
<td>1</td>
<td>
<input id="list:products:2:name" type="text"
name="list:products:2:name" value="One">
</input>
</td>
<td>
<textarea id="list:products:2:description"
name="list:products:2:description"
>The first product</textarea>
</td>
</tr>
</tbody>
</table>
It must be said that having an editable table like this is not terribly efficient, certainly
not when the table contains a lot of columns and rows. JSF can handle it pretty well; only
the average web browser will have a hard time handling it, certainly when the number of
rows exceeds a few thousand. And then I’m not speaking about the end user potentially
going crazy from scrolling through the whole page all the time and basically having
no clear overview. There are several solutions to this: first and foremost is pagination;
second is filtering; third is row-based inline editing and updating; and fourth is external
editing in a dialog or detail page.
CHAPTER 6 OUTPUT COMPONENTS

213
All the mentioned table-specific performance and usability solutions are not offered
by the standard <h:dataTable> and therefore require quite an amount of custom code.
It’s strongly recommended that you look for an existing JSF component library supporting
these features in order to make your JSF life easier without the need to reinvent the
wheel. Currently the most widely used one is PrimeFaces with its <p:dataTable>.9 This
can even be further simplified with <op:dataTable> of OptimusFaces,10 which is in turn
based on <p:dataTable>. Editing in a detail page is only doable with standard JSF, and it’s
demonstrated in the “Custom Converters” section of Chapter 5.
It should be said that in the specific case of the previously shown List<String>
example, turning the column from output to input isn’t as easily done as with the
List<Product> example. In other words, the following example won’t work at all.
<h:form>
<h:dataTable value="#{bean.strings}" var="string">
<h:column>
<h:inputText value="#{string}" />
</h:column>
</h:dataTable>
<h:commandButton value="Save" action="#{bean.save}">
<f:ajax execute="@form" />
</h:commandButton>
</h:form>
The technical problem is that java.lang.String is immutable and doesn’t have a
public setter method for its internal value. True, it indeed also doesn’t have a getter, but
EL already defaults to Object#toString() which in case of String just returns the very
string itself. This can be solved by referencing the model value by an index as follows:
<h:form>
<h:dataTable binding="#{table}" value="#{bean.strings}" var="string">
<h:column>
<h:inputText value="#{bean.strings[table.rowIndex]}" />
</h:column>
</h:dataTable>
9 https://www.primefaces.org/showcase/ui/data/datatable/basic.xhtml.
10 https://github.com/omnifaces/optimusfaces.
CHAPTER 6 OUTPUT COMPONENTS

214
<h:commandButton value="Save" action="#{bean.save}">
<f:ajax execute="@form" />
</h:commandButton>
</h:form>
Note the binding attribute. Basically, during the view build time, this sets the current
UIComponent instance as an EL variable identified by the given name. In this particular
snippet, it will thus make the #{table} variable to reference the concrete HtmlDataTable
instance behind the <h:dataTable> tag. The #{table} variable is, then during the view
build time, referenceable only after the tag location in the view and during the view
render time anywhere in the view. In this way, you can access its properties as if it were a
bean. #{table.rowIndex} basically thus refers to the UIData#getRowIndex() method,11
which returns the current iteration index. And, finally, this is used to reference the item
of interest in the list. During the update model values phase (fourth phase) JSF will
simply replace the item at the specified index.
Also for the binding attribute it’s very important that the variable name shouldn’t
clash with existing managed bean names or implicit EL objects and for sure not with
other components in the same view. You can alternatively let the binding attribute
reference a backing bean property as follows:
<h:dataTable binding="#{bean.table}" ...>
With:
private UIData table; // +getter +setter
But this is fairly useless if it isn’t used anywhere else in the backing bean. Moreover,
this is dangerous when the managed bean scope is wider than request (see also the
section “View Build Time” in Chapter 3. It is better not to bind component instances to a
backing bean at all; it might indicate a poor practice. The only reasonable real-world use
case in JSF 2.x is binding composite component children to a backing component (see
also the section “Composite Components” in Chapter 7).
In case you’re using <ui:repeat> or <c:forEach> instead of <h:dataTable> on
something like a List<String>, then you can obtain the iteration index in a much
simpler way, via the varStatus attribute.
11 https://javaee.github.io/javaee-spec/javadocs/javax/faces/component/UIData.
html#getRowIndex--.
CHAPTER 6 OUTPUT COMPONENTS
215
<h:form>
<ui:repeat value="#{bean.strings}" var="string" varStatus="loop">
<h:inputText value="#{bean.strings[loop.index]}" /><br/>
</ui:repeat>
<h:commandButton value="Save" action="#{bean.save}">
<f:ajax execute="@form" />
</h:commandButton>
</h:form>
Add/Remove Rows in<h:dataTable>
Coming back to the <h:dataTable> with List<Product>, there may be cases in which
you’d like to be able to add or remove items while staying in the same view, usually in
some sort of an admin page. In order to add a new Product, we need to prepare a new
instance in the managed bean, fill it in a separate form, persist it, and then refresh the
table.
<h:form id="list">
<h:dataTable id="products" value="#{products.list}" ...>
...
</h:dataTable>
</h:form>
<h:form id="add">
<h:outputLabel for="name" value="Name" />
<h:inputText id="name" value="#{products.product.name}" />
<h:message for="name" />
<h:outputLabel for="description" value="Description" />
<h:inputTextarea id="description"
value="#{products.product.description}">
</h:inputTextarea>
<h:message for="description" />
<h:commandButton id="add" value="Add" action="#{products.add}">
<f:ajax execute="@form" render="@form :list:products" />
</h:commandButton>
</h:form>
CHAPTER 6 OUTPUT COMPONENTS
216
Whereby the relevant backing bean code looks as follows:
private List<Product> list; // +getter
private Product product = new Product(); // +getter
@PostConstruct
public void init() {
list = productService.list();
}
public void add() {
productService.create(product);
list.add(0, product);
product = new Product();
}
With this create() method in service class:
@TransactionAttribute(REQUIRED);
public Long create(Product product) {
entityManager.persist(product);
return product.getId();
}
Removing could be done in several ways. In any case, you may need an additional
column to hold the submit buttons or radio buttons or check boxes. The easiest way is
a column with a command button which deletes the currently iterated item and then
refreshes the table.
<h:form id="list">
<h:dataTable id="products" value="#{products.list}" var="product">
...
<h:column>
<h:commandButton id="delete" value="Delete"
action="#{products.delete(product)}">
<f:ajax render="@namingcontainer" />
CHAPTER 6 OUTPUT COMPONENTS
217
</h:commandButton>
</h:column>
</h:dataTable>
</h:form>
With this delete(Product) method in a @ViewScoped backing bean class:
public void delete(Product product) {
productService.delete(product);
list.remove(product);
}
And this delete() method in service class:
@TransactionAttribute(REQUIRED)
public void delete(Product product) {
if (entityManager.contains(product)) {
entityManager.remove(product);
}
else {
Product managedProduct = getById(product.getId());
if (managedProduct != null) {
entityManager.remove(managedProduct);
}
}
}
Note the render attribute of <f:ajax>. It specifies @namingcontainer, which
basically references the closest parent NamingContainer component. From the
standard JSF HTML component set, only <h:form> and <h:dataTable> are instances
of NamingContainer. In this specific construct, @namingcontainer thus references the
<h:dataTable>. You could also have used <f:ajax render=":list:products"> instead;
it’s only slightly verbose. The <f:ajax render="products"> wouldn’t work, because it
will try to find it within the context of the currently iterated row, which is basically within
all <h:column> components.
CHAPTER 6 OUTPUT COMPONENTS
218
Select Rows in<h:dataTable>
Having a radio button column in a <h:dataTable> is natively possible since JSF 2.3
thanks to the new group attribute of the <h:selectOneRadio> (see also the section
“Selection Components” in Chapter 4).
<h:form id="list">
<h:dataTable id="products" value="#{products.list}" var="product">
<h:column>
<h:selectOneRadio id="selected" group="selected"
value="#{products.selected}">
<f:selectItem itemValue="#{product}" />
</h:selectOneRadio>
</h:column>
...
</h:dataTable>
<h:commandButton id="deleteSelected" value="Delete selected product"
action="#{products.deleteSelected}">
<f:ajax execute="@form" render="products" />
</h:commandButton>
</h:form>
With this deleteSelected() method in a @ViewScoped backing bean class:
private Product selected; // +getter +setter
public void deleteSelected() {
productService.delete(selected);
list.remove(selected);
}
Note that you need a ProductConverter or BaseEntityConverter here as well.
Those are elaborated in the section “Custom Converters” in Chapter 5.
The check box selection is a little more convoluted. You’d intuitively grab
<h:selectManyCheckbox>, but this doesn’t yet support the group attribute as
<h:selectOneRadio> does. You’d need to fall back to <h:selectBooleanCheckbox> with
a Map<Product, Boolean> whereby the map key represents the currently iterated product
and the map value represents the check box value.
CHAPTER 6 OUTPUT COMPONENTS
219
<h:form id="list">
<h:dataTable id="products" value="#{products.list}" var="product">
<h:column>
<h:selectBooleanCheckbox id="selection"
value="#{products.selection[product]}">
</h:selectBooleanCheckbox>
</h:column>
...
</h:dataTable>
<h:commandButton id="deleteSelected" value="Delete selected products"
action="#{products.deleteSelected}">
<f:ajax execute="@form" render="products" />
</h:commandButton>
</h:form>
The modified deleteSelected() method in the @ViewScoped backing bean looks as
follows:
private Map<Product, Boolean> selection = new HashMap<>(); // +getter
public void deleteSelected() {
List<Product> selected = selection.entrySet().stream()
.filter(Entry::getValue)
.map(Entry::getKey)
.collect(Collectors.toList());
productService.delete(selected);
selected.forEach(list::remove);
selection.clear();
}
The overloaded ProductService#delete(Iterable) method looks as follows:
@TransactionAttribute(REQUIRED)
public void delete(Iterable<Product> products) {
products.forEach(this::delete);
}
CHAPTER 6 OUTPUT COMPONENTS
220
Dynamic Columns in<h:dataTable>
With <h:dataTable>, with the help of JSTL <c:forEach>, it is also possible to
dynamically create multiple <h:column> instances based on a Java model which is at
least view scoped. A request-scoped model can also, but this doesn’t guarantee that
during a postback request it is exactly the same as it was during the preceding request,
and therefore there is a risk of the dynamic <h:column> composition being off.
The value of the <c:forEach> should reference a collection including at least the
entity property names or even map keys. You can then use the brace notation in EL as
in #{entity[propertyName]} or #{map[key]} to reference the actual value. This works
for both UIOutput and UIInput components. The following example illustrates how you
could achieve this for a List<Product>.
Backing bean:
@Named @RequestScoped
public class Products {
private List<Product> list;
private List<String> properties;
@Inject
private ProductService productService;
@PostConstruct
public void init() {
list = productService.list();
properties = Arrays.asList("id", "name", "description");
}
// Add/generate getters (setters not needed here).
}
Facelets file:
<h:dataTable value="#{products.list}" var="product">
<c:forEach items="#{products.properties}" var="property">
<h:column>#{product[property]}</h:column>
</c:forEach>
</h:dataTable>
CHAPTER 6 OUTPUT COMPONENTS
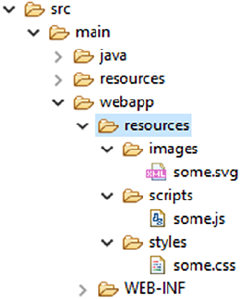
221
You could even generalize this further for other entities of a common superclass, such
as BaseEntity, whereby you obtain the relevant property names from the entity service.
Resource Components
JSF offers three resource components, <h:graphicImage>, <h:outputScript>, and
<h:outputStylesheet>, for image resources, JavaScript resources, and CSS resources,
respectively. They can reference physical resource files as well as dynamic resource
files. The physical resource files themselves must be placed in the /resources subfolder
of the main web folder. The dynamic resource files can be handled with a custom
ResourceHandler which intercepts on a specific library name and/or resource name.
Given the following folder structure in a Maven WAR project in Eclipse,
the resources are referenceable as follows:
<h:graphicImage name="images/some.svg" />
<h:outputScript name="scripts/some.js" />
<h:outputStylesheet name="styles/some.css" />
The generated HTML output looks as follows, provided that /project is the context
path of the web application:
<img src="/project/javax.faces.resource/images/some.svg.xhtml" />
<script type="text/javascript"
src="/project/javax.faces.resource/scripts/some.js.xhtml"></script>
<link type="text/css" rel="stylesheet"
href="/project/javax.faces.resource/styles/some.css.xhtml" />
CHAPTER 6 OUTPUT COMPONENTS

222
You’ll see that it’s prefixed with /javax.faces.resource path and suffixed with
the currently active URL pattern of the FacesServlet. The /javax.faces.resource
is represented by the constant ResourceHandler#RESOURCE_IDENTIFIER.12 That the
resource URL matches the URL pattern of the FacesServlet ensures that it will actually
invoke the FacesServlet which in turn knows how to handle the resource. It will
first invoke ResourceHandler#isResourceRequest(), which by default determines if
the URL prefix starts with the known RESOURCE_IDENTIFIER constant, and if so then
delegates to ResourceHandler#handleResourceRequest() instead of going through the
JSF life cycle.
Also note that the web resources are not placed in the src/main/resources
folder but in the src/main/webapp/resources folder. The src/main/resources
folder is only for non-class resources which must end up in the classpath, such
as resource bundle files. These classpath resources are then obtainable by
ClassLoader#getResource().13 src/main/webapp/resources doesn’t end up in
the classpath; instead, it ends up in the web content. These web resources are then
obtainable by ExternalContext#getResource(),14 which delegates under the hood to
ServletContext#getResource().15
The name attribute thus basically represents the path to the resource relative to
the src/main/webapp/resources folder. These components also support a library
attribute. The library attribute must represent the unique resource library name of a JSF
library. For standard JSF, the resource library name is “javax.faces”, for PrimeFaces,16
the resource library name is “primefaces”, for OmniFaces,17 the resource library name
is “omnifaces”, for BootsFaces,18 the resource library name is “bsf”, and so on. Normally,
these library-specific resources are already automatically included by the JSF library
in question, usually declaratively via the @ResourceDependency annotation on the
12 https://javaee.github.io/javaee-spec/javadocs/javax/faces/application/
ResourceHandler.html#RESOURCE_IDENTIFIER.
13 https://docs.oracle.com/javase/8/docs/api/java/lang/ClassLoader.html#getResource-
java.lang.String-.
14 https://javaee.github.io/javaee-spec/javadocs/javax/faces/context/
ExternalContext.html#getResource-java.lang.String-.
15 https://javaee.github.io/javaee-spec/javadocs/javax/servlet/ServletContext.
html#getResource-java.lang.String-.
16 http://www.primefaces.org.
17 http://omnifaces.org.
18 http://bootsfaces.net.
CHAPTER 6 OUTPUT COMPONENTS
223
UIComponent or Renderer class, and sometimes programmatically via UIViewRoot#add
ComponentResource(). This is elaborated in the section “Resource Dependencies” in
Chapter 11. Those resources can if necessary be referenced using a resource component
whereby you thus explicitly specify the library attribute.
The following example explicitly includes the standard JSF jsf.js file:
<h:head>
...
<h:outputScript library="javax.faces" name="jsf.js" />
</h:head>
This is usually unnecessary as the JSF components depending on this script, such as
<h:commandLink>, <f:ajax>, and <f:websocket> already automatically include it. Here’s
another example which explicitly includes the jquery.js file from PrimeFaces library —
this works of course only if you have PrimeFaces installed.
<h:head>
...
<h:outputScript library="primefaces" name="jquery/jquery.js" />
</h:head>
This can be useful when you’d like to reuse the PrimeFaces-provided jQuery library
on a page that doesn’t necessarily contain PrimeFaces components. That is, this script
won’t be automatically included when the page doesn’t contain any PrimeFaces
component, but you might happen to have some web project-specific scripts which
in turn depend on jQuery. JSF resource management will already make sure that both
automatically included and explicitly included JavaScript and CSS resources don’t
get duplicated in the generated HTML output. In other words, the above line which
explicitly includes jQuery can safely be used on a page that does contain a PrimeFaces
component.
Note that there are currently a relatively large number of poor-quality JSF tutorials
on the Internet which don’t correctly use the library attribute. Instead, those tutorials
incorrectly demonstrate the library attribute to represent the subfolder within the src/
main/webapp/resources folder—something like the following:
<h:graphicImage library="images" name="some.svg" />
<h:outputScript library="scripts" name="some.js" />
<h:outputStylesheet library="styles" name="some.css" />
CHAPTER 6 OUTPUT COMPONENTS
224
This is outright wrong. It doesn’t offer any custom resource handler to distinguish
library-specific resources from each other. In the above example, you’d basically need
to check three different resource libraries even though all those resources belong to the
very same library—the web project itself.
Talking about custom resource handlers, imagine that you want to compel the
web browser to forcibly reload the image, JavaScript, and/or CSS resource when
it has changed in the server side instead. This can be achieved by adding a query
string parameter to the resource URL whose value represents the version of the
resource. This is also called “cache busting.” In JSF, this can be achieved with a custom
ResourceHandler which decorates the Resource to return its last modified timestamp as
a query string parameter.
public class VersionResourceHandler extends ResourceHandlerWrapper {
public VersionResourceHandler(ResourceHandler wrapped) {
super(wrapped);
}
@Override
public Resource createResource(String name, String library) {
Resource resource = super.createResource(name, library);
if (resource == null || library != null) {
return resource;
}
return new ResourceWrapper(resource) {
@Override
public String getRequestPath() {
String url = super.getRequestPath();
return url
+ (url.contains("?") ? "&" : "?")
+ "v=" + getLastModified();
}
private long getLastModified() {
try {
return getWrapped().getURL()
CHAPTER 6 OUTPUT COMPONENTS
225
.openConnection().getLastModified();
}
catch (IOException ignore) {
return 0;
}
}
};
}
}
In order to activate it, register it in the faces-config.xml as follows:
<application>
<resource-handler>
com.example.project.resourcehandler.VersionResourceHandler
</resource-handler>
</application>
Note that the createResource() method returns the created resource unmodified
when it’s null or when the library is not null. The resource itself is null when the
name is unknown. The library is null when it’s unspecified and thus specific to the web
project. You could of course also apply this logic to all resources of other libraries, but
they usually already have their own version of a resource handler.
Coming back to the resource components, you can place <h:graphicImage>
only inside the body, which can be both the plain HTML <body> or the JSF <h:body>.
Obviously, in an HTML document, you can have an <img> element only inside the
document body. You can place <h:outputScript> and <h:outputStylesheet> basically
anywhere in the JSF page. The <h:outputScript> will by default generate the HTML
<script> element at exactly the declared location, regardless of being in the head or
the body of the document. <h:outputStylesheet>, however, will by default be moved
to the end of <h:head> when declared inside <h:body>. That is, in HTML it’s illegal to
have a <link rel="stylesheet"> outside <head>. The <h:outputScript> can also
be automatically moved to end of document head when declared inside <h:body>
CHAPTER 6 OUTPUT COMPONENTS
226
with the target attribute set to head. When the target attribute of <h:outputScript>
is set to body, then it will be automatically moved to end of the document body.
<h:outputStylesheet> doesn’t support it. In other words, the following test Facelet,
<h:head>
<title>Resource component relocation demo.</title>
<h:outputStylesheet name="style1.css" />
<h:outputScript name="script1.js" />
<h:outputScript name="script2.js" target="head" />
<h:outputScript name="script3.js" target="body" />
</h:head>
<h:body>
<p>Paragraph 1</p>
<h:outputStylesheet name="style2.css" />
<h:outputScript name="script4.js" />
<h:outputScript name="script5.js" target="head" />
<h:outputScript name="script6.js" target="body" />
<p>Paragraph 2</p>
</h:body>
will basically generate the following HTML output (URLs simplified for brevity).
<head>
<title>Resource component relocation demo.</title>
<script type="text/javascript" src="script1.js"></script>
<link type="text/css" rel="stylesheet" href="style1.css" />
<script type="text/javascript" src="script2.js"></script>
<link type="text/css" rel="stylesheet" href="style2.css" />
<script type="text/javascript" src="script5.js"></script>
</head>
<body>
<p>Paragraph 1</p>
<script type="text/javascript" src="script4.js"></script>
<p>Paragraph 2</p>
<script type="text/javascript" src="script3.js"></script>
<script type="text/javascript" src="script6.js"></script>
</body>
CHAPTER 6 OUTPUT COMPONENTS
227
In other words, the resource rendering order in the document head is:
1. <h:outputScript> from <h:head> without target.
2. <h:outputStylesheet> from <h:head>.
3. <h:outputScript> from <h:head> with target="head".
4. <h:outputStylesheet> from <h:body>.
5. <h:outputScript> from <h:body> with target="head".
Note that <h:outputStylesheet> implicitly infers target="head" and is therefore
rendered after <h:outputScript> without any target. All JavaScript and CSS resources
which are automatically included via the @ResourceDependency annotation of
components will end up between the resources declared in <h:head> and those declared
in <h:body>. So if you happen to use a JSF library which automatically includes a
bunch of CSS resources, and you’d like to override some of them, you’d best put such
<h:outputStylesheet> in <h:body> so that you can guarantee that it’s loaded after the
library’s.
Beware though, some JSF libraries will automatically override the default renderer
of <h:head> which may mess up the default resource ordering. In such a case, you’d best
consult the documentation of the JSF library in question for new ordering rules, or to
restore the default renderer of <h:head> via the web project’s faces-config.xml.
<render-kit>
<renderer>
<component-family>javax.faces.Output</component-family>
<renderer-type>javax.faces.Head</renderer-type>
<renderer-class>
com.sun.faces.renderkit.html_basic.HeadRenderer
</renderer-class>
</renderer>
</render-kit>
In case you’re using MyFaces instead of Mojarra as JSF implementation, use org.
apache.myfaces.renderkit.html.HtmlHeadRenderer instead as the renderer class.
In case you intend to develop such a JSF library which automatically includes
specific resources, keep in mind to use @ResourceDependency or UIViewRoot#addCompon
entResource() instead of replacing the default renderer of <h:head> for the purpose.
CHAPTER 6 OUTPUT COMPONENTS
228
As annotations don’t allow specifying dynamic values, any dynamic resources can
best be added during the PostAddToView event of <h:head>. This can be achieved
application- wide with a SystemEventListener as follows assuming that the JSF library’s
resource library name is “foo”:
public class DynamicResourceListener implements SystemEventListener {
private static final String LIBRARY = "foo";
@Override
public boolean isListenerForSource(Object source) {
UIOutput output = (UIOutput) source;
return "javax.faces.Head".equals(output.getRendererType());
}
@Override
public void processEvent(SystemEvent event) {
FacesContext context = event.getFacesContext();
String scriptName = "foo.js"; // Can be dynamic.
addResource(context, scriptName);
String stylesheetName = "foo.css"; // Can be dynamic.
addResource(context, stylesheetName);
}
private void addResource(FacesContext context, String name) {
UIComponent resource = new UIOutput();
resource.getAttributes().put("library", LIBRARY);
resource.getAttributes().put("name", name);
resource.setRendererType(context.getApplication()
.getResourceHandler().getRendererTypeForResourceName(name));
context.getViewRoot()
.addComponentResource(context, resource, "head");
}
}
CHAPTER 6 OUTPUT COMPONENTS
229
which is registered in faces-config.xml as follows:
<system-event-listener>
<system-event-listener-class>
com.example.project.listener.DynamicResourceListener
</system-event-listener-class>
<system-event-class>
javax.faces.event.PostAddToViewEvent
</system-event-class>
<source-class>javax.faces.component.UIOutput</source-class>
</system-event-listener>
Note that <source-class> could better have been a javax.faces.component.
html.HtmlHead, but this doesn’t necessarily work across all JSF implementations. In,
for example, Mojarra, <h:head> implicitly creates an instance of UIOutput instead of
HtmlHead.
Once installed, this DynamicResourceListener will result in the following HTML
output for exactly the last shown test Facelet with style1.css, script1.js, script2.js,
etc. (also here, URLs are simplified for brevity).
<head>
<title>Resource component relocation demo.</title>
<script type="text/javascript" src="script1.js"></script>
<script type="text/javascript" src="foo.js"></script>
<link type="text/css" rel="stylesheet" href="foo.css" />
<link type="text/css" rel="stylesheet" href="style1.css" />
<script type="text/javascript" src="script2.js"></script>
<link type="text/css" rel="stylesheet" href="style2.css" />
<script type="text/javascript" src="script5.js"></script>
</head>
<body>
<p>Paragraph 1</p>
<script type="text/javascript" src="script4.js"></script>
<p>Paragraph 2</p>
<script type="text/javascript" src="script3.js"></script>
<script type="text/javascript" src="script6.js"></script>
</body>
CHAPTER 6 OUTPUT COMPONENTS

230
The resource rendering order in the document head is thus
6. <h:outputScript> from <h:head> without target.
7. Dynamic script added to head during PostAddToView.
8. Dynamic stylesheet added to head during PostAddToView.
9. <h:outputStylesheet> from <h:head>.
10. <h:outputScript> from <h:head> with target="head".
11. <h:outputStylesheet> from <h:body>.
12. <h:outputScript> from <h:body> with target="head".
You see, the ordering is quite predictable. It shouldn’t have been necessary to override
the renderer of <h:head>. Moreover, overriding the renderer of <h:head> from a JSF
library risks the possibility that it becomes incompatible with any other JSF library which
coincidentally also overrides the renderer of <h:head>. You’d really want to avoid that.
Another advantage of using resource components is that JSF will automatically push
all resources associated with the document to the client, so that the client will be able to
retrieve them sooner than the time needed to parse the HTML document and locate all
<link>, <script>, and <img> elements. This is new since JSF 2.3. This only requires that
the JSF 2.3 web application is deployed to a Servlet 4.0-compatible container (Payara
5, GlassFish 5, Tomcat 9, WildFly 12, etc.), and that HTTPS is being used instead of
HTTP, and that the client supports HTTP/2 protocol.19 This does not require additional
configuration from the JSF side on.
Pass-Through Elements
JSF also supports implicitly interpreting any arbitrary HTML element as a full-fledged
JSF component. This feature was introduced in JSF 2.2 and is formally known as “pass-
through elements.” This is particularly useful when you want to use HTML5 elements
such as <main>, <article>, <section>, <aside>, <nav>, <header>, <footer>, etc. and
want to be able to reference them in <f:ajax render>. Previously, before JSF 2.2, those
elements didn’t have a JSF component equivalent and you’re therefore forced to wrap
them in <h:panelGroup layout="block"> which only makes the HTML less semantic.
19 https://caniuse.com/#feat=http2.
CHAPTER 6 OUTPUT COMPONENTS
231
The pass-through element trigger is available by the http://xmlns.jcp.org/jsf
namespace. All you need to do is to specify at least one attribute on this namespace. The
default namespace prefix is just “jsf”.
<!DOCTYPE html>
<html lang="en"
xmlns="http://www.w3.org/1999/xhtml"
xmlns:jsf="http://xmlns.jcp.org/jsf"
xmlns:h="http://xmlns.jcp.org/jsf/html"
>
<h:head>
<title>Title</title>
</h:head>
<h:body>
<header>
...
<nav jsf:id="menu">
...
</nav>
</header>
<main jsf:id="main">
...
</main>
<footer>
...
</footer>
</h:body>
</html>
Under the hood, in the JSF component tree, those HTML5 elements are turned into a
UIPanel component and are treated in the JSF component tree exactly like <h:panelGroup>.
This way you can cleanly keep using semantic HTML5 markup while still being able to
reference them via <f:ajax render>. In other words, the following construct won’t work:
<main id="main">
...
<h:form id="form">
...
CHAPTER 6 OUTPUT COMPONENTS
232
<h:commandButton id="submit" ...>
<f:ajax render=":main" />
</h:commandButton>
</h:form>
</main>
It fails because UIViewRoot#findComponent() doesn’t return anything when passing
“main”. JSF can’t find any component with the given ID.The <main> element is here
basically interpreted as template text. But the following construct will work:
<main jsf:id="main">
...
<h:form id="form">
...
<h:commandButton id="submit" ...>
<f:ajax render=":main" />
</h:commandButton>
</h:form>
</main>
UIViewRoot#findComponent() on “main” will then return a UIPanel instance
representing the <main> element. JSF will then be able to render it into the Ajax response.
The pass-through element feature also works on other HTML elements, only they
don’t necessarily turn into a UIPanel instance. Instead, they will be turned into a JSF
component whose generated HTML output matches the very HTML element
(see Table 6-1). The following construct is, under the hood, identical to the previous one:
<main jsf:id="main">
...
<form jsf:id="form">
...
<input type="submit" jsf:id="submit" ...>
<f:ajax render=":main" />
</input>
</form>
</main>
CHAPTER 6 OUTPUT COMPONENTS

233
Table 6-1. Passthrough Elements Recognized by JSF
Passthrough HTML element Implied JSF component
<a jsf:action="…"> <h:commandLink>
<a jsf:actionListener="…"> <h:commandLink>
<a jsf:value="…"> <h:outputLink>
<a jsf:outcome="…"> <h:link>
<body jsf:id="…"> <h:body>
<button jsf:id="…"> <h:commandButton type="button">
<button jsf:outcome="…"> <h:button>
<form jsf:id="…"> <h:form>
<head jsf:id="…"> <h:head>
<img jsf:id="…"> <h:graphicImage>
<input jsf:id="…" type="button"> <h:commandButton type="button">
<input jsf:id="…" type="checkbox"> <h:selectBooleanCheckbox>
<input jsf:id="…" type="le"> <h:inputFile>
<input jsf:id="…" type="hidden"> <h:inputHidden>
<input jsf:id="…" type="password"> <h:inputSecret>
<input jsf:id="…" type="reset"> <h:commandButton type="reset">
<input jsf:id="…" type="submit"> <h:commandButton type="submit">
<input jsf:id="…" type="*"> <h:inputText>
<label jsf:id="…"> <h:outputLabel>
<link jsf:id="…"> <h:outputStylesheet>
<script jsf:id="…"> <h:outputScript>
<select jsf:id="…"> <h:selectOneListbox>
<select jsf:id="…" multiple="*"> <h:selectManyListbox>
<* jsf:id="…"> <h:panelGroup>
CHAPTER 6 OUTPUT COMPONENTS
234
Any attribute specified on such a pass-through element is implicitly mapped to
the corresponding attribute of the JSF component. In the following example, the JSF
component and pass-through element pairs are equivalent.
<h:graphicImage library="common" name="some.svg" />
<img jsf:library="common" name="some.svg" />
<h:inputText value="#{bean.name}" />
<input type="text" jsf:value="#{bean.name}" />
<h:inputText a:type="email" value="#{bean.email}" />
<input type="email" jsf:value="#{bean.email}" />
<h:link outcome="contact" value="Contact" />
<a jsf:outcome="contact">Contact</a>
Note that you don’t necessarily need to register every single attribute of a pass-
through element on the “jsf” namespace. Only one is sufficient to trigger the pass-
through element feature, preferably the first one. This keeps the code concise.
CHAPTER 6 OUTPUT COMPONENTS

235
© Bauke Scholtz, Arjan Tijms 2018
B. Scholtz and A. Tijms, The Definitive Guide to JSF in Java EE 8, https://doi.org/10.1007/978-1-4842-3387-0_7
CHAPTER 7
Facelets Templating
When JSF (JavaServer Faces) came out for first time in 2004, only JSP (Java Server Pages)
had view technology. It was immediately clear that it was an ill-suited view technology for
web development with JSF.The problem with JSP is that it writes to the HTTP response as
soon as it encounters template text, while JSF would like to first create a component tree
based on the view declaration in order to be able to perform the life cycle processing on
it. For example, the following JSF 1.0/1.1 page using JSP view technology,
<h:commandLink action="...">
<strong>strong link text</strong>
</h:commandLink>
would produce the following HTML output, with template text emitted by JSP before the
generated HTML output of JSF components1:
<strong>strong link text</strong>
<a href="..." onclick="..."></a>
The “correct approach” would be to wrap template text in <f:verbatim> tags,
<h:commandLink action="...">
<f:verbatim><strong>strong link text</strong><f:verbatim>
</h:commandLink>
which would produce the following HTML output:
<a href="..." onclick="...">
<strong>strong link text</strong>
</a>
This has obviously received a lot of criticism, and the general recommendation now
is that people should not be mixing JSF with HTML.Another problem with JSF 1.0/1.1
was that there was no component to represent an HTML <div>. That was around the
1 www.onjava.com/pub/a/onjava/2004/06/09/jsf.html.

236
time “web 2.0” had just started, and people also started to discommend the use of HTML
tables to lay out a web page. The prevailing view was that only divs should be used,
which made people dislike JSF 1.0/1.1 even more.
The peculiar JSP behavior of causing a disorganized HTML output was worked
around in JSF 1.2 which was released only two years later in 2006, and the missing
component to represent an HTML <div> was solved by giving the <h:panelGroup>
component a new layout="block" attribute so that it renders a <div> instead of <span>.
So, already, since JSF 1.2, people can safely mix plain HTML with JSF components in
a JSP page and continue using divs in both plain HTML and JSF ways. However, the
recommended plan to avoid plain HTML while authoring JSF 1.0/1.1 pages turned into a
persistent myth which is even today still alive among some people.
Another problem with JSP is that existing JSP taglibs such as JSTL (JSP Standard Tag
Library) and existing JSP expressions in the form of ${…} didn’t integrate at all into the JSF life
cycle and therefore mixing existing JSP taglibs and JSP expressions with JSF components in a
JSP page would result in confusing and unintuitive behavior. People couldn’t use <c:forEach>
to render a list of JSF components as those components wouldn’t see the variable declared by
<c:forEach var>. There was no dedicated JSF component to loop over a list other than
<h:dataTable> and ultimately people are stuck with tables while creating lists in the JSF page.
Finally, JSP also offers very limited templating capabilities with actually only one
“templating” tag, <jsp:include>; therefore, templating with JSP would require a fairly
complicated approach of creating a bunch of custom tags for every definition of a
reusable template section.2 This contradicts the philosophy of JSF, to have reusable
components to minimize code duplication. With JSP, you would end up duplicating JSF
components themselves. Existing templating frameworks such as Tiles and Thymeleaf
are either JSP centric or don’t support JSF at all and thus cannot be used.
There was clearly a strong need for a new-JSF oriented view technology which should
supplant JSP and solve all of its problems with the JSF life cycle. And then Facelets was
introduced in 2006. It could be installed separately for JSF 1.1 and 1.2, and it shipped built-in
with JSF 2.0. It became the default view technology for JSF and JSP was deprecated as view
technology for JSF.New tags introduced in JSF 2.0, such as <f:ajax>, <h:head>, <h:body>,
<h:outputScript>, and <h:outputStylesheet>, are only available for Facelets and not for
JSP.JSF 2.0 also introduced a new interface to more easily plug a custom view declaration
language (VDL) as alternative to JSP and even Facelets, the ViewDeclarationLanguage
API.This way, one could create, for example, a pure Java- based VDL for JSF.3
2 https://stackoverflow.com/q/1296235/157882.
3 http://arjan-tijms.omnifaces.org/2011/09/authoring-jsf-pages-in-pure-java.html.
CHAPTER 7 FACELETS TEMPLATING
237
XHTML
The Facelets VDL specifies that the views are defined in XML-based files which are
compiled using a SAX parser and kept around in memory. This memory cache is, since
JSF 2.1, configurable using a custom FaceletCacheFactory. When the JSF project stage
is set to Development, the SAX-compiled representations of Facelets files are by default
not cached. This allows easier development against an already running server by just
editing the Facelets files from inside an IDE (integrated development environment)
which supports hot-publishing the local changes to the target runtime.
The Facelets files themselves usually use the .xhtml extension and therefore starters
often call them “XHTML” instead of “Facelets.” This is okay when talking in the context
of JSF, but the term “XHTML” has another side in the web development world. At its
core, XHTML is a markup language for HTML pages which need to be compiled using
an XML-based tool. In other words, developers basically create XML files with HTML
markup mixed with web framework-specific XML tags, after which the web framework
will parse them into an XML tree, generate some web framework-specific representation
of the XML tree (which is in JSF the UIViewRoot), and ultimately generate the desired
HTML output based on the framework’s internal representation of the XML tree.
But around the time of Facelets’ introduction in 2006, XHTML was being overhyped
by another group of web developers who were basically disappointed by seeing the
W3 validator invalidate their HTML4 documents—generally because of the desire
to explicitly close all tags for consistency, including those which should actually not
be closed as per HTML4 specification, such as <link>, <meta>, <br>, and <hr>—and
sometimes because of the desire to specify custom tag attributes in order to have some
JavaScript plug-ins to interact more cleanly with the HTML document, which is also
disallowed by the HTML4 specification.
Even though basically every single web browser in the world leniently accepted that,
including Jurassic IE6, those developers didn’t want to see their carefully crafted HTML4
documents being invalidated by the W3 validator and changed their HTML doctype
declaration to use the XHTML DTD, an extension to HTML which requires every tag to
be closed and allows custom attributes to be specified on existing tags. However, this is
essentially abuse of XHTML as they didn’t at all actually use any XML tool to compile
the document and generate the desired HTML output. It was merely to keep the W3
validator happy.
CHAPTER 7 FACELETS TEMPLATING
238
Coincidentally, also around that time, HTML5 was just started in draft. Essentially,
developers could just strip out any DTD from the HTML doctype declaration in order
to get an HTML document which allows XML-based syntax wherein all tags are always
closed and custom elements and attributes are allowed and, importantly, validated
correctly in the W3 validator. In other words, <!DOCTYPE html> was been sufficient for
those developers, even in IE6. Unfortunately, it took ages before HTML5 was officially
finished, so developers kept abusing the XHTML doctype before they could switch back
to the HTML doctype. When talking about Facelets to those group of developers, don’t
call it “XHTML” but just “Facelets”; otherwise it will generate confusion.
Template Compositions
Facelets provides tags for easily creating template compositions based on a single
master template file. This should reduce code duplication for site-wide sections which
are repeated across all web pages, such as header, navigation menu, and footer. The
master template file should represent a full-blown web page layout with all site-wide
sections and use <ui:insert> tags to represent places where the page-specific sections
can be inserted. Following is a basic example of such a master template file, /WEB-INF/
templates/layout.xhtml:
<!DOCTYPE html>
<html lang="en"
xmlns="http://www.w3.org/1999/xhtml"
xmlns:h="http://xmlns.jcp.org/jsf/html"
xmlns:ui="http://xmlns.jcp.org/jsf/facelets"
>
<h:head>
<title>#{title}</title>
</h:head>
<h:body>
<header>
<ui:include src="/WEB-INF/includes/layout/header.xhtml" />
</header>
<main>
<ui:insert name="content" />
</main>
CHAPTER 7 FACELETS TEMPLATING
239
<footer>
<ui:include src="/WEB-INF/includes/layout/footer.xhtml" />
</footer>
</h:body>
</html>
Note that the master template file and include files are explicitly placed in the
/WEB-INF folder. This is done in order to prevent direct access by users who are guessing
the path in URL.Also note that the page title is declared as a simple EL (Expression
Language) expression #{title} instead of <ui:insert>. It is not allowed to have any
markup in the <title> element.
The xmlns attribute basically defines, via a URI (uniform resource identifier), which
tags can be used in the declared XML namespace. The root XML namespace specifies
the URI of the W3 XHTML standard http://www.w3.org/1999/xhtml which thus
defines “any XHTML and HTML5+ tag,” such as <html>, <title>, <header>, <main>,
and <footer> in above example. The Facelets compiler is aware of this standard XML
namespace and will pass through all elements as “general UI instructions.” The “h” XML
namespace specifies the JSF HTML taglib URI and the “ui” XML namespace specifies
the JSF Facelets taglib URI, which are both present in the JSF implementation JAR file
and registered to Facelets during the web application’s startup. The Facelets compiler
can this way find the associated tag handlers, components, and composite components,
which in turn do the hard work of building the view, decoding the HTTP request, and
encoding the HTTP response. Those URIs are thus not per definition live Internet
addresses. You can even specify your own via a *.taglib.xml file. This will be expanded
later in the section “Tag Files.”
Following is what the include file /WEB-INF/includes/layout/header.xhtml
looks like:
<ui:composition
xmlns="http://www.w3.org/1999/xhtml"
xmlns:h="http://xmlns.jcp.org/jsf/html"
xmlns:ui="http://xmlns.jcp.org/jsf/facelets"
>
<a href="#{request.contextPath}/">
<h:graphicImage name="images/layout/logo.svg" />
</a>
CHAPTER 7 FACELETS TEMPLATING
240
<nav>
<ul>
<li><h:link outcome="/about" value="About" /></li>
<li><h:link outcome="/help" value="Help" /></li>
<li><h:link outcome="/contact" value="Contact" /></li>
</ul>
</nav>
</ui:composition>
Note the link around the logo. It points to #{request.contextPath}/. This basically
prints the domain-relative URL to the application’s root. #{request} is an implicit EL
object referring the current HttpServletRequest instance. contextPath refers to one of
its properties, implied by the getContextPath() method.
Following is what the include file /WEB-INF/includes/layout/footer.xhtml looks
like:
<ui:composition
xmlns="http://www.w3.org/1999/xhtml"
xmlns:h="http://xmlns.jcp.org/jsf/html"
xmlns:ui="http://xmlns.jcp.org/jsf/facelets"
>
<nav>
<ul>
<li><h:link outcome="/terms-of-service"
value="Terms of Service" /></li>
<li><h:link outcome="/privacy-policy"
value="Privacy Policy" /></li>
<li><h:link outcome="/cookie-policy"
value="Cookie Policy" /></li>
</ul>
</nav>
<small>© Example Company</small>
</ui:composition>
CHAPTER 7 FACELETS TEMPLATING
241
Finally, here’s how the template client can look, e.g., /home.xhtml:
<ui:composition template="/WEB-INF/templates/layout.xhtml"
xmlns="http://www.w3.org/1999/xhtml"
xmlns:h="http://xmlns.jcp.org/jsf/html"
xmlns:ui="http://xmlns.jcp.org/jsf/facelets"
>
<ui:param name="title" value="Welcome!" />
<ui:define name="content">
<h1>Welcome to Example Company!</h1>
<p>Lorem ipsum dolor sit amet.</p>
</ui:define>
</ui:composition>
Note the template attribute of the <ui:composition>. This must represent the
server-side path to the master template, preferably as an absolute path, thus starting
with “/”.
In a template client, <ui:param> lets you define a simple parameter specific for the
master template. Basically, you can use any parameter name, as long as it is supported
by the master template and doesn’t clash with an existing managed bean name. In this
specific case, the value for the EL variable #{title} is specified as “Welcome!”. This will
ultimately end up inside the <title> element of the master template.
And the <ui:define> lets you define a block of markup specific for the master
template. It will ultimately end up in the place where the <ui:insert> with exactly the
same name is declared in the master template. Figure7-1 gives a clear overview of how
this all fits together.
CHAPTER 7 FACELETS TEMPLATING
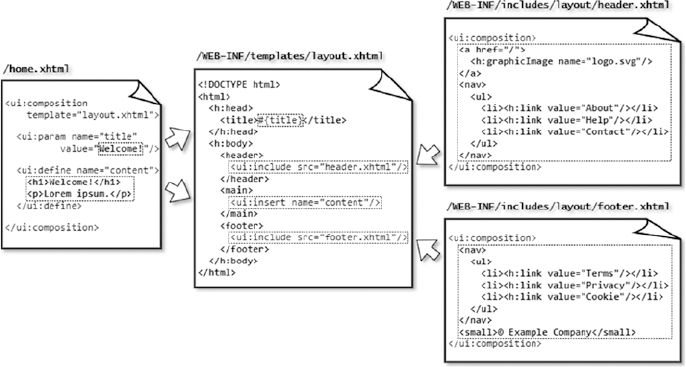
242
Finally, opening /home.xhtml should produce the final HTML output which you can
inspect by right-clicking View page source in the average web browser.
Single Page Application
A recent trend is the so-called Single Page Application (SPA). This concept is on its own
not so new; in fact, it is older than JSF itself, but it was heavily popularized during
“web 2.0” with JavaScript-based frameworks such as Angular. Basically, an SPA lets the
web application behave like a desktop-oriented application by dynamically changing the
main content with an Ajax request when navigating to a different page instead of loading
the entire page via a GET request. Gmail is one such known example of an SPA.
Such an SPA is also achievable with JSF by simply using <ui:include> whose src
attribute is dynamically updated by Ajax. Following is an example utilizing the same
master template as shown in the previous section, /spa.xhtml:
<ui:composition template="/WEB-INF/templates/layout.xhtml"
xmlns="http://www.w3.org/1999/xhtml"
xmlns:jsf="http://xmlns.jcp.org/jsf"
xmlns:f="http://xmlns.jcp.org/jsf/core"
Figure 7-1. The relationship between the master template layout.xhtml, include
files header.xhtml, and footer.xhtml, and the template client home.xhtml. Note
that template file paths and some tag attributes are omitted for brevity. Refer the
previously shown code snippets for the actual coding.
CHAPTER 7 FACELETS TEMPLATING
243
xmlns:h="http://xmlns.jcp.org/jsf/html"
xmlns:ui="http://xmlns.jcp.org/jsf/facelets"
>
<ui:param name="title" value="Single Page Application" />
<ui:define name="content">
<aside>
<nav>
<h:form>
<f:ajax render=":content">
<ul>
<li><h:commandLink value="page1"
action="#{spa.set('page1')}" /></li>
<li><h:commandLink value="page2"
action="#{spa.set('page2')}" /></li>
<li><h:commandLink value="page3"
action="#{spa.set('page3')}" /></li>
</ul>
</f:ajax>
</h:form>
</nav>
</aside>
<article jsf:id="content" data-page="#{spa.page}">
<ui:include src="/WEB-INF/includes/spa/#{spa.page}.xhtml" />
</article>
</ui:define>
</ui:composition>
Do note that the <article> element is declared as a so-called pass-through element
by explicitly specifying a JSF identifier via jsf:id="…". This feature was introduced in
JSF 2.2. Under the hood, when declaring an HTML element which has no JSF component
equivalent, such as <header>, <footer>, <main>, <article>, <section>, etc. as a pass-
through element this way, it is turned into a UIPanel component and is treated in
the JSF component tree exactly like <h:panelGroup>. This way you can cleanly keep
using semantic HTML5 markup while still being able to reference it as if it were a JSF
component and thus be able to Ajax-update it.
CHAPTER 7 FACELETS TEMPLATING
244
As you might have deciphered in the above /spa.xhtml example, there’s a side
navigation menu which sets the current page in the managed bean identified by #{spa}
and Ajax-updates the component identified by id="content" which in turn contains a
dynamic include. The above example excepts the following include files to be present in
the /WEB-INF/includes/spa folder: page1.xhtml, page2.xhtml, and page3.xhtml. Each
of them is a simple include file which looks as follows:
<ui:composition
xmlns="http://www.w3.org/1999/xhtml"
xmlns:h="http://xmlns.jcp.org/jsf/html"
xmlns:ui="http://xmlns.jcp.org/jsf/facelets"
>
<h1>First page</h1>
<p>Lorem ipsum dolor sit amet.</p>
</ui:composition>
The backing bean associated with the #{spa} managed bean is fairly simple; it looks
as follows:
@Named @ViewScoped
public class Spa implements Serializable {
private String page;
@PostConstruct
public void init() {
page = "page1";
}
public void set(String page) {
this.page = page;
}
public String getPage() {
return page;
}
}
CHAPTER 7 FACELETS TEMPLATING

245
The default page is defined in @PostConstruct. Otherwise, the user might face an
error page with the message “Invalid path : /WEB-INF/includes/spa/.xhtml”.
Note that the backing bean is declared @ViewScoped. This is important in order to
remember across postbacks which page is currently being opened. If it were
@RequestScoped, and the user navigates to, e.g., page2 and submits a form therein,
which creates a new HTTP request, then the @RequestScoped managed bean would be
recreated again, with page1 as page value and thus not page2. This has the consequence
that <ui:include> won’t reference page2.xhtml when JSF is about to decode any input
components in order to process the form submit during the postback request, and
therefore JSF would fail to find the input components declared in page2.xhtml.
A @ViewScoped bean lives as long as the user postbacks to the very same view, in this
case /spa.xhtml, and therefore correctly remembers the currently selected page.
When playing around with this SPA example, you might have noticed one
disadvantage: the pages are not bookmarkable. This is caused by the fact that the
pages are not opened by an idempotent GET request. You can solve that by utilizing
the HTML5 history.pushState API.4 Basically, on completion of the Ajax request you
should push the intended URL to the browser history, which will be reflected in the
browser’s address bar. And, you should modify the Spa backing bean to check if any
specific page has been opened and then prepare the page variable accordingly.
Following is a kickoff example which just appends the ?page=xxx query string
parameter. First adjust the <f:ajax> of the spa.xhtml to specify the onevent attribute as
follows:
<f:ajax ... onevent="pageChangeListener">
And create the following JavaScript function:
function pageChangeListener(event) {
if (event.status == "success") {
var page = document.getElementById("content").dataset.page;
var url = location.pathname + "?page=" + page;
history.pushState(null, document.title, url);
}
}
4 https://developer.mozilla.org/en-US/docs/Web/API/History_API#Adding_and_
modifying_history_entries.
CHAPTER 7 FACELETS TEMPLATING

246
And, finally, adjust the Spa backing bean as follows:
@Inject @ManagedProperty("#{param.page}")
Private String page;
public void init() {
if (page == null) {
page = "page1";
}
}
Note The @ManagedProperty is currently available in two flavors: the
deprecated one from the javax.faces.bean package and the JSF 2.3
introduced one from the javax.faces.annotation package.
You need the latter one. Also, note that you might want to validate the provided page
parameter. Path probing by hackers is innocent, by the way, as JSF already doesn’t allow
traversing into the parent path as in /spa.xhtml?page=../../templates/layout.
Template Decorations
In case you would like to have a reusable include file which is capable of inserting
template definitions as if you would be using <ui:include> to reference an include file
with one or more <ui:insert> sections, then you can use <ui:decorate>. Following is
one such example, the /WEB-INF/decorations/contact.xhtml:
<ui:composition
xmlns="http://www.w3.org/1999/xhtml"
xmlns:ui="http://xmlns.jcp.org/jsf/facelets"
>
<section class="contact">
<header><ui:insert /></header>
<nav>
<ul>
<li>✆ <a href="tel:+31612345678"
title="Phone">+31 (0)6 1234 5678</a></li>
CHAPTER 7 FACELETS TEMPLATING
247
<li>✉ <a href="mailto:info@example.com"
title="Email">info@example.com</a></li>
</ul>
</nav>
</section>
</ui:composition>
Here is how it can be used, you can put the <ui:decorate> anywhere in your
template client, as a <ui:include>:
<ui:decorate template="/WEB-INF/decorations/contact.xhtml">
<h2>Questions? Contact us!</h2>
</ui:decorate>
Note that the contact.xhtml has only one <ui:insert> and that it has no name.
This will insert the entire <ui:decorate> tag body at the declared place of <ui:insert>.
You can, of course, specify a name, but then you would need to explicitly specify
<ui:define> with a name for that. That would be only useful if you have more than one
insert sections.
You can, if necessary, use <ui:param> to pass parameters. This works the same way
as with <ui:composition template>. The following example parameterizes the e-mail
user name /WEB-INF/decorations/contact.xhtml with a default value of “info.”
...
<li>✉ <a href="mailto: #{empty mailto ? 'info' : mailto}@example.com"
title="Email">#{empty mailto ? 'info' : mailto}@example.com</a></li>
...
This can then be used as follows:
<ui:decorate template="/WEB-INF/decorations/contact.xhtml">
<ui:param name="mailto" value="press" />
<h3>Contact us</h3>
<p>
For press inquiries you can contact us by the below
phone number and email address.
</p>
</ui:decorate>
CHAPTER 7 FACELETS TEMPLATING
248
Tag Files
As with <ui:composition template> and <ui:decorate>, you can also use <ui:param>
in <ui:include>. However, watch out that you don’t go overboard.
<ui:include src="/WEB-INF/includes/field.xhtml">
<ui:param name="id" value="firstName" />
<ui:param name="label" value="First Name" />
<ui:param name="value" value="#{profile.user.firstName}" />
</ui:include>
Wherein the /WEB-INF/includes/field.xhtml looks something like the following:
<ui:composition
xmlns="http://www.w3.org/1999/xhtml"
xmlns:jsf="http://xmlns.jcp.org/jsf "
xmlns:h="http://xmlns.jcp.org/jsf/html"
xmlns:ui="http://xmlns.jcp.org/jsf/facelets"
xmlns:a="http://xmlns.jcp.org/jsf/passthrough"
xmlns:c="http://xmlns.jcp.org/jsp/jstl/core"
>
<div class="field" jsf:rendered="#{rendered ne false}">
<h:outputLabel id="#{id}_l" for="#{id}" value="#{label}" />
<c:choose>
<c:when test="#{type eq 'password'}">
<h:inputSecret id="#{id}" label="#{label}"
value="#{value}">
</h:inputSecret>
</c:when>
<c:when test="#{type eq 'textarea'}">
<h:inputTextarea id="#{id}" label="#{label}"
value="#{value}">
</h:inputTextarea>
</c:when>
<!-- More types can be added as c:when here -->
<c:otherwise>
<h:inputText id="#{id}" label="#{label}"
CHAPTER 7 FACELETS TEMPLATING
249
value="#{value}" a:type="#{type}">
</h:inputText>
</c:otherwise>
</c:choose>
<h:messages id="#{id}_m" for="#{id}" styleClass="messages" />
</div>
</ui:composition>
In such a case, you would prefer to have something more concise, like the following,
instead:
<t:field id="firstName" label="First Name"
value="#{profile.user.firstName}">
</t:field>
Having <ui:include> with two or more <ui:param> is a strong sign that the include
file can better be registered as a tag file so that it can be used with less boilerplate code in
the Facelet.
First move the include file into a different subfolder, /WEB-INF/tags/field.xhtml.
This is not a technical requirement. It will work just fine wherever you put it, but we
just want to organize the files clearly. Master template files go in /WEB-INF/templates,
include files go there in /WEB-INF/includes, decorate files go in /WEB-INF/decorations,
and tag files go in /WEB-INF/tags.
Then, create the following /WEB-INF/example.taglib.xml:
<?xml version="1.0" encoding="UTF-8"?>
<facelet-taglib
xmlns="http://xmlns.jcp.org/xml/ns/javaee"
xmlns:xsi="http://www.w3.org/2001/XMLSchema-instance"
xsi:schemaLocation="http://xmlns.jcp.org/xml/ns/javaee
http://xmlns.jcp.org/xml/ns/javaee/web-facelettaglibrary_2_3.xsd"
version="2.3"
>
<namespace>http://example.com/tags</namespace>
<short-name>t</short-name>
CHAPTER 7 FACELETS TEMPLATING
250
<tag>
<description>Renders label + input + message field.</description>
<tag-name>field</tag-name>
<source>tags/field.xhtml</source>
<attribute>
<description>The type of the input component.</description>
<name>type</name>
<required>false</required>
<type>java.lang.String</type>
</attribute>
<attribute>
<description>The ID of the input component.</description>
<name>id</name>
<required>true</required>
<type>java.lang.String</type>
</attribute>
<attribute>
<description>The label of the input component.</description>
<name>label</name>
<required>true</required>
<type>java.lang.String</type>
</attribute>
<attribute>
<description>The value of the input component.</description>
<name>value</name>
<required>false</required>
<type>java.lang.Object</type>
</attribute>
<attribute>
<description>Whether the field is rendered.</description>
<name>rendered</name>
<required>false</required>
<type>boolean</type>
</attribute>
</tag>
</facelet-taglib>
CHAPTER 7 FACELETS TEMPLATING
251
That’s admittedly quite some boilerplate code. It is good to know that the
<attribute> elements aren’t mandatory for the technical functioning of the tag file.
You could even omit them altogether. But then the IDE won’t be able to load them
into autosuggest boxes while attempting to autocomplete the custom tag. This is not
really developer-friendly. So you’d better keep them in. The <required> property of
the tag attribute, by the way, only results in a runtime error when the JSF project stage
is set to Development. In other JSF project stages, it’s ignored. And the average IDE will
immediately prompt those required attributes during autocompleting the tag.
The file name, example.taglib.xml, is free to your choice. In order for JSF to
automatically pick up a taglib file during the application’s startup, there are only two
requirements: it must have a .taglib.xml extension and it must be placed in /WEB-INF
folder (or in case of a JAR file which ends up in /WEB-INF/lib, then in /META-INF folder
of that JAR file). Unfortunately, placing the file in /WEB-INF doesn’t always work quite
well in some servers, such as GlassFish/Payara. In that case, you’d have to explicitly
register it via the following context parameter in web.xml whose value represents the full
path to the *.taglib.xml file from the web root on.
<context-param>
<param-name>javax.faces.FACELETS_LIBRARIES</param-name>
<param-value>/WEB-INF/example.taglib.xml</param-value>
</context-param>
In order to use any tag defined in the *.taglib.xml, you first have to declare
exactly the <namespace> URI of the taglib in your Facelet, along with an arbitrary XML
namespace prefix. For better maintainability of the code it’s recommended to pick the
taglib’s preferred XML namespace prefix as specified in its <short-name>, which is “t” in
case of our example.taglib.xml.
<ui:composition template="/WEB-INF/templates/layout.xhtml"
xmlns="http://www.w3.org/1999/xhtml"
xmlns:h="http://xmlns.jcp.org/jsf/html"
xmlns:ui="http://xmlns.jcp.org/jsf/facelets"
xmlns:t="http://example.com/tags"
>
<ui:param name="title" value="Log In" />
<ui:define name="content">
CHAPTER 7 FACELETS TEMPLATING
252
<h:form>
<fieldset>
<header>
<h1>Log In</h1>
</header>
<t:field type="email" id="email" label="Email"
value="#{login.email}">
</t:field>
<t:field type="password" id="password" label="Password"
value="#{login.password}">
</t:field>
<footer>
<t:button id="submit" label="Log In"
action="#{login.submit()}">
</t:button>
</footer>
</fieldset>
</h:form>
</ui:define>
</ui:composition>
Do note that the type="email" of the e-mail field thus ends up in <c:otherwise>
of the tag file implementation wherein it gets passed through the a:type="#{type}"
attribute of <h:inputText>. This allows you to easily use HTML5 input fields, such as
type="email", type="number", type="tel", etc. The type attribute being defined as
a pass-through attribute a:type is mandatory, because the <h:inputText> by default
ignores any custom type attribute and stubbornly renders type="text".
You might also have noticed another custom tag, <t:button>. Here’s how it is
implemented in /WEB-INF/tags/button.xhtml.
<ui:composition
xmlns="http://www.w3.org/1999/xhtml"
xmlns:jsf="http://xmlns.jcp.org/jsf"
xmlns:f="http://xmlns.jcp.org/jsf/core"
xmlns:h="http://xmlns.jcp.org/jsf/html"
xmlns:ui="http://xmlns.jcp.org/jsf/facelets"
>
CHAPTER 7 FACELETS TEMPLATING
253
<div class="button" jsf:rendered="#{rendered ne false}">
<h:commandButton id="#{id}" value="#{label}">
<f:actionListener binding="#{action}" />
<f:ajax execute="@form" render="@form" />
</h:commandButton>
<h:messages id="#{id}_m" globalOnly="true" redisplay="false" />
</div>
</ui:composition>
It’s registered in example.taglib.xml nearly the same way as <t:field>, with
one exception for the action attribute. Technically, you need to specify a <method-
signature> instead of a (property) <type>:
<attribute>
<description>
Action method of the button.
NOTE: must include method parenthesis.
</description>
<name>action</name>
<required>true</required>
<method-signature>void action()</method-signature>
</attribute>
You might have noticed that the actual tag implementation uses <f:actionListener
binding="#{action}"> instead of action="#{action}". This is actually a necessary
trick in order to get it to properly invoke the method. That is, the <method-signature>
was initially intended for UI components, not for tag files. It’s ignored in tag files. This
may be worked on for JSF.next. For now, you can get away with the <f:actionListener
binding> trick. This has only one additional requirement: you need to explicitly include
the method parenthesis in the tag file client as in <t:button action="#{login.
submit()}">.<t:button action="{login.submit}"> will otherwise fail with javax.
el.PropertyNotFoundException: The class ‘com.example.project.view.Login’ does not have
the property ‘submit’.
In case you would like to customize tag files from the tag file client side on, e.g., by
adding more specific input attributes, or nesting core tags, or by prepending or appending
content to the label or message, then you can use <ui:define> and <ui:insert> the same
way you’re used to doing with master template files and decorate files. The following
CHAPTER 7 FACELETS TEMPLATING
254
example demonstrates how you can enhance the /WEB-INF/tags/field.xhtml on this
with a bunch of new <ui:insert> tags:
<ui:composition
xmlns="http://www.w3.org/1999/xhtml"
xmlns:jsf="http://xmlns.jcp.org/jsf "
xmlns:h="http://xmlns.jcp.org/jsf/html"
xmlns:ui="http://xmlns.jcp.org/jsf/facelets"
xmlns:a="http://xmlns.jcp.org/jsf/passthrough"
xmlns:c="http://xmlns.jcp.org/jsp/jstl/core"
>
<div class="field" jsf:rendered="#{rendered ne false}">
<ui:insert name="beforeLabel" />
<ui:insert name="label">
<h:outputLabel id="#{id}_l" for="#{id}" value="#{label}">
<span><ui:insert name="insideLabel" /></span>
</h:outputLabel>
</ui:insert>
<ui:insert name="beforeInput" />
<ui:insert name="input">
<c:choose>
<c:when test="#{type eq 'password'}">
<h:inputSecret id="#{id}" label="#{label}"
value="#{value}">
<ui:insert />
</h:inputSecret>
</c:when>
<c:when test="#{type eq 'textarea'}">
<h:inputTextarea id="#{id}" label="#{label}"
value="#{value}">
<ui:insert />
</h:inputTextarea>
</c:when>
<!-- More types can be added as c:when here -->
<c:otherwise>
<h:inputText id="#{id}" label="#{label}"
CHAPTER 7 FACELETS TEMPLATING
255
value="#{value}" a:type="#{type}">
<ui:insert />
</h:inputText>
</c:otherwise>
</c:choose>
</ui:insert>
<ui:insert name="beforeMessages" />
<ui:insert name="messages">
<h:messages id="#{id}_m" for="#{id}" styleClass="messages" />
</ui:insert>
</div>
</ui:composition>
Now, that’s a lot of flexibility! In the tag file client you can use <ui:define
name="beforeLabel"> to define some content which should appear before the label of
the field. And you can use <ui:define name="label"> to override the label altogether.
And you can use <ui:define name="insideLabel"> to append some (HTML) content
inside the label, and so forth. The following example demonstrates how insideLabel
can be used to append a “Forgot password?” link to the label of the password field:
<t:field ...>
<ui:define name="insideLabel">
<h:link outcome="/reset-password" value="Forgot password?" />
</ui:define>
</t:field>
Note that <ui:insert name="insideLabel"> is wrapped in an HTML <span>. This
allows you to more easily select “anything” that ends up in there via CSS, so that you can,
for example, let it float to the right using just .field label > span { float: right; }.
Anything else in the tag file client which is not <ui:define> will end up inside the
nameless <ui:insert> tag nested in the chosen input component. This allows you to
easily nest any <f:xxx> core tag specifically for the input component:
<t:field ...>
<f:attribute name="onkeypress" value="return event.key != 'Enter'" />
<f:validateRegex pattern="[0-9]{4}" />
<f:ajax render="otherField" />
</t:field>
CHAPTER 7 FACELETS TEMPLATING
256
This specific example prevents the form from submitting when the Enter key is
pressed by returning false when the KeyBoardEvent.key equals “Enter”, and registers
a regex validator to accept only a value of four digits by matching against a regular
expression pattern of “[0-9]{4}”, and instructs JSF to update the component identified
by “otherField” by Ajax when the value change event has occurred.
Coming back to the tag file implementation in /WEB-INF/tags/field.xhtml, you
might have noticed that good old JSTL is being used there instead of JSF’s own rendered
attribute. This has advantages as JSTL has a different life cycle than JSF UI components.
JSTL is executed when the JSF component tree is about to be built, during the view build
time. JSF components are executed when HTML output is about to be generated, during
the view render time. Moreover, if you were using JSF’s own rendered attribute, then you
would face “duplicate component ID” errors because of multiple components with the
same ID physically ending up in the JSF component tree.
Might it happen that you are considering the use of plain Java code to dynamically
create the component tree based on at least a view-scoped model, you should absolutely
reconsider using JSTL instead. As JSTL itself is also XML-based and you can thus just put
together everything in an XHTML file, you will end up with much better readable and
maintainable code for a “dynamic” component.
Composite Components
Sometimes, you would like to have a group of related input components to represent
a single model value. A classic example is having three <h:selectOneMenu> drop-
downs representing day, month, and year which are ultimately bound to a single
java.time.LocalDate property in the backing bean. This is not trivial to implement with
just an include file or a tag file. You would need some additional Java-based logic which
makes sure that, e.g., the day drop-down doesn’t show the values 29, 30, or 31 depending
on the currently selected month, and that it converts the submitted values to a full-
fledged LocalDate instance, and vice versa. But you can’t and shouldn’t put any Java
code in any Facelet.
You’ll perhaps think of just creating a dedicated backing bean for this case. But
this is not sufficient either. It doesn’t allow you to cleanly hook on the component’s
life cycle through the JSF phases: collecting the individual submitted values from
multiple components, converting them into a single LocalDate instance, if necessary
CHAPTER 7 FACELETS TEMPLATING
257
throwing a converter exception during the validations phase, and letting the JSF life
cycle automatically skip the remaining phases. A backing bean’s setter method or action
method is far from the right place for that logic. It would be invoked too late anyway.
And, it would feel strange to be able to reference and potentially manipulate the very
same backing bean via an EL expression on an arbitrary place in the Facelet.
This is exactly where composite components come into the picture: composing
a bunch of existing JSF components into virtually a single component tied to a single
model value and ultimately using it exactly the same way as you would be using a plain
<h:inputText>. Imagine a <t:inputLocalTime> composite component composed of
two <h:selectOneMenu> components tied to a single java.time.LocalTime model value.
Instead of a backing bean, you can use a full-fledged UIComponent instance as a so-called
backing component.
First create a dedicated subfolder in main/webapp/resources folder (and thus not
main/java/resources!), for example, main/webapp/resources/components. There you can
put Facelets files representing composite components. The subfolder is then to be used in
the XML namespace URI after http://xmlns.jcp.org/jsf/composite as shown next.
xmlns:t="http://xmlns.jcp.org/jsf/composite/components"
Note that the XML namespace prefix of “t” clashes with one which we already
defined before for tag files. This is of course not the intent. You may choose a different
XML namespace for composite components. It’s, however, also possible to let them
share the same custom XML namespace URI http://example.com.tags. This can be
achieved by adding a <composite-library-name> to the *.taglib.xml which in turn
must represent the name of the dedicated subfolder.
<composite-library-name>components</composite-library-name>
This way all composite components are also available by the same XML namespace
as tag files.
<... xmlns:t="http://example.com/tags">
...
<t:inputLocalTime ... />
CHAPTER 7 FACELETS TEMPLATING
258
The file name of the Facelets file representing the composite component will become
the tag name. So, in order to have a <t:inputLocalTime>, we need an inputLocalTime.
xhtml file in the main/webapp/resources/components folder. Following is a kickoff
example of what it can look like:
<ui:component
xmlns="http://www.w3.org/1999/xhtml"
xmlns:f="http://xmlns.jcp.org/jsf/core"
xmlns:h="http://xmlns.jcp.org/jsf/html"
xmlns:ui="http://xmlns.jcp.org/jsf/facelets"
xmlns:cc="http://xmlns.jcp.org/jsf/composite"
>
<cc:interface componentType="inputLocalTime">
<cc:attribute name="value" type="java.time.LocalTime"
shortDescription="Selected time. Defaults to 00:00.">
</cc:attribute>
<cc:attribute name="required" type="boolean"
shortDescription="Required state. Defaults to false.">
</cc:attribute>
</cc:interface>
<cc:implementation>
<span id="#{cc.clientId}" class="inputLocalTime">
<h:selectOneMenu id="hour" binding="#{cc.hour}"
required="#{cc.attrs.required}">
<f:selectItem itemValue="#{null}" />
<f:selectItems value="#{cc.hours}" />
</h:selectOneMenu>
:
<h:selectOneMenu id="minute" binding="#{cc.minute}"
required="#{cc.attrs.required}">
<f:selectItem itemValue="#{null}" />
<f:selectItems value="#{cc.minutes}" />
</h:selectOneMenu>
</span>
</cc:implementation>
</ui:component>
CHAPTER 7 FACELETS TEMPLATING
259
There are several things to notice here which makes a composite component
different from a tag file. First, the composite component’s body is always divided into two
sections: an interface and an implementation.
The interface declares a componentType attribute which should reference the value of
either the @FacesComponent annotation on a UIComponent subclass or the <component-
type> entry of a <component> as declared in either faces-config.xml or *taglib.xml.
When the componentType attribute is absent, it defaults to UINamingContainer. The
interface also declares the supported attributes. To keep it simple, we restrict to only two:
value and required. There are also implicitly inherited attributes from the UIComponent
superclass, which we don’t need to explicitly define as <cc:attribute>: id, binding, and
rendered. That makes it a total of five attributes which you can use in the implementation.
The implementation defines the actual markup of the composite component.
There you can find the two <h:selectOneMenu> drop-downs wrapped in a <span>
element. There you can also find several occurrences of the special EL variable #{cc}
which refers to the current UIComponent instance behind the composite component,
which is thus one of the type as declared in the componentType attribute, or, if absent,
a UINamingContainer. #{cc.attrs} is a shortcut to the component attribute map
as available by UIComponent#getAttributes(). #{cc.attrs.required} as used in
<t:inputLocalTime> thus refers to <cc:attribute name="required">.
#{cc.clientId} in the <span> element just prints the composite component’s client
ID as the id attribute of <span>. This is actually a trick in order to be able to reference the
“whole” composite component using a client ID search expression from the template
client on. Imagine the following case:
<h:inputText ...>
<f:ajax render="time" />
</h:inputText>
<t:inputLocalTime id="time" ... />
This case wouldn’t have worked without the #{cc.clientId} being rendered as an
ID of any plain HTML element which wraps the entire body of <cc:implementation>,
usually a <span> or <div>. The technical problem is, while the composite component
itself is findable in the JSF component tree by the component ID search expression,
the HTML representation of the composite component is by default not available by
document.getElementById(clientId) in JavaScript. In other words, JSF Ajax wouldn’t
be able to update it. Explicitly adding a plain HTML element with the composite
component’s client ID thus solves that.
CHAPTER 7 FACELETS TEMPLATING
260
Finally, there are a bunch of #{cc} expressions which don’t reference the attributes
directly. Both of the <h:selectOneMenu> drop-downs are directly bound as properties
of the so-called backing component, the concrete UIComponent instance behind the
composite component. And, both <f:selectItems> options obtain their values directly
from the backing component as well. Here’s the backing component class, com.example.
project.composite.InputLocalTime.
@FacesComponent("inputLocalTime")
public class InputLocalTime extends UIInput implements NamingContainer {
private static final List<String> HOURS =
IntStream.rangeClosed(0, 23).boxed()
.map(InputLocalTime::pad).collect(Collectors.toList());
private static final List<String> MINUTES =
IntStream.rangeClosed(0, 59).boxed()
.map(InputLocalTime::pad).collect(Collectors.toList());
private UIInput hour;
private UIInput minute;
@Override
public String getFamily() {
return UINamingContainer.COMPONENT_FAMILY;
}
@Override
public void encodeBegin(FacesContext context) throws IOException {
LocalTime localTime = (LocalTime) getValue();
if (localTime != null) {
hour.setValue(pad(localTime.getHour()));
minute.setValue(pad(localTime.getMinute()));
}
super.encodeBegin(context);
}
CHAPTER 7 FACELETS TEMPLATING
261
@Override
public Object getSubmittedValue() {
String submittedHour = (String) hour.getSubmittedValue();
String submittedMinute = (String) minute.getSubmittedValue();
if (submittedHour == null || submittedMinute == null) {
return null;
}
else if (submittedHour.isEmpty() || submittedMinute.isEmpty()) {
return "";
}
else {
return submittedHour + ":" + submittedMinute;
}
}
@Override
protected Object getConvertedValue
(FacesContext context, Object submittedValue)
{
String submittedTime = (String) submittedValue;
if (submittedTime == null || submittedTime.isEmpty()) {
return null;
}
try {
return LocalTime.parse(submittedTime,
DateTimeFormatter.ISO_LOCAL_TIME);
}
catch (DateTimeParseException e) {
throw new ConverterException(e);
}
}
private static String pad(Integer value) {
return String.format("%02d", value);
}
CHAPTER 7 FACELETS TEMPLATING
262
public UIInput getHour() { return hour; }
public void setHour(UIInput hour) { this.hour = hour; }
public UIInput getMinute() { return minute; }
public void setMinute(UIInput minute) { this.minute = minute; }
public List<String> getHours() { return HOURS; }
public List<String> getMinutes() { return MINUTES; }
}
Now, that was a bit of code. Not only will you see that the getters and setters are
collapsed for brevity, but you’ll also see that our composite extends UIInput and
implements NamingContainer. Extending from UIInput gives us the benefit that we
don’t need to repeat most of the default encoding and decoding behavior of UIInput
in our backing component, so we only need to override a few methods. Implementing
NamingContainer is a technical requirement of <cc:interface>. This enables you to
use multiple instances of the composite component in the same context without facing
“duplicate component ID” errors. This requirement is also reflected by the overridden
getFamily() method, which must as per the composite component’s contract return the
UINamingContainer.COMPONENT_FAMILY constant.
The actual UIInput components composing the composite component are declared
as properties of the backing component. In this case they are both <h:selectOneMenu>
drop-downs which are, via the binding attribute, tied to those properties. This
enables us to easily set their values during encoding (read: processing the HTTP
response), and to obtain the submitted values during decoding (read: processing the
HTTP request). You can find the logic for that in the overridden encodeBegin() and
getSubmittedValue() methods, respectively.
In the encodeBegin() method you thus have the opportunity to prepare the
displayed values based on the model value, if any. The getValue() method is inherited
from the UIInput superclass and is tied to the value attribute. You can break down the
model value and set the desired values in the individual UIInput components of the
composite component. The pad() helper method just pads the digit with a leading zero
so that, e.g., the “1” gets displayed as “01”. This helper method is also used during static
initialization of the lists of available hours and minutes specifically for <f:selectItems>.
In the getSubmittedValue() method you should compose the submitted values of
the individual UIInput components together to a single String. In the specific case of
<t:inputLocalTime>, we compose a String following the ISO local time pattern HH:mm.
In turn, the UIInput superclass passes this value through the getConvertedValue()
CHAPTER 7 FACELETS TEMPLATING
263
wherein we thus have the opportunity to convert the composed String to the concrete
model value, which is in our case the LocalTime. Ultimately the UIInput superclass will
make sure that this gets set in the backing bean during the update model values phase.
Now you can use it as follows:
<ui:composition template="/WEB-INF/templates/layout.xhtml"
xmlns="http://www.w3.org/1999/xhtml"
xmlns:f="http://xmlns.jcp.org/jsf/core"
xmlns:h="http://xmlns.jcp.org/jsf/html"
xmlns:ui="http://xmlns.jcp.org/jsf/facelets"
xmlns:cc="http://xmlns.jcp.org/jsf/composite/components"
>
<ui:define name="content">
<h:form>
<h:outputLabel for="time:hour" value="Time" />
<t:inputLocalTime id="time" value="#{bean.time}" />
<h:commandButton value="Submit" action="#{bean.submit}">
<f:ajax execute="@form" />
</h:commandButton>
</h:form>
</ui:define>
</ui:composition>
where the backing bean represented by #{bean} looks as follows:
@Named @RequestScoped
public class Bean {
private LocalTime time;
public void submit() {
System.out.println("Submitted local time: " + time);
}
public LocalTime getTime() {
return time;
}
CHAPTER 7 FACELETS TEMPLATING
264
public void setTime(LocalTime time) {
this.time = time;
}
}
Might it happen that you need to nest <f:ajax> inside the composite component
in order to run some Ajax during the change event of any of the individual drop-downs,
then you can achieve that by adding <cc:clientBehavior> targeting both drop-downs
as follows:
<cc:interface ...>
...
<cc:clientBehavior name="change" default="true"
targets="hour minute" event="change">
</cc:clientBehavior>
</cc:interface>
The name attribute represents the event name which you should declare in template
client in order to trigger it.
<t:inputLocalTime id="time" ...>
<f:ajax event="change" execute="time" ... />
</t:inputLocalTime>
The default="true" indicates that this is the default event, which means that you
could just omit it, as you could do with event="change" for existing input text and drop-
down components, and with event="click" for existing check box and radio button
components, and with event="action" for existing command components.
<t:inputLocalTime id="time" ...>
<f:ajax execute="time" ... />
</t:inputLocalTime>
The targets attribute must define a space-separated collection of IDs of target
UIInput components resembling the composite component on which you would like
to trigger the Ajax event, and the event attribute must define the desired event name
to be actually triggered on the target UIInput components. In other words, this does,
under the hood, effectively the same as if the following is implemented in the composite
component:
CHAPTER 7 FACELETS TEMPLATING
265
<h:selectOneMenu id="hour" ...>
<f:ajax event="change" ... />
</h:selectOneMenu>
<h:selectOneMenu id="minute" ...>
<f:ajax event="change" ... />
</h:selectOneMenu>
In this specific example, the event attribute coincidentally has just the same value
as the name attribute. This is perhaps confusing at first, but it allows you to easily define a
custom event name. For example, following is the code to use when you want to trigger
an event solely on the change of the hour drop-down:
<cc:interface ...>
...
<cc:clientBehavior name="hourChange"
targets="hour" event="change">
</cc:clientBehavior>
</cc:interface>
With this, the following Ajax listener will thus be fired only when the hour drop-down
is changed and not when the minute drop-down is changed.
<t:inputLocalTime id="time" ...>
<f:ajax event="hourChange" execute="time"
listener="#{bean.hourChanged}">
</f:ajax>
</t:inputLocalTime>
Note that execute="time" is consistently explicitly specified in the given examples.
This is because the default of execute="@this" still does not, in the current JSF 2.3
version, work correctly within the context of the composite component implementation.
JSF could have derived the target components from any <cc:clientBehavior
default="true">, but it isn’t specified as such yet.
CHAPTER 7 FACELETS TEMPLATING

266
All in all, it must be said that composite components have been overhyped
after they were first introduced in JSF 2.0. People started using them to “composite”
whole templates, includes, decorations, and even multiple tags, without using any
backing component. That is, the zero-configuration nature as compared to tag files
is very attractive. Everything is declared in the composite component file itself via
<cc:interface>. And they can be directly used in the template client just by following a
convention without the need to configure it in some XML file.
The caveat is that composite components are, due to their internal design, relatively
expensive during building and restoring the view as compared to plain include
files, decorate files, and tag files, especially when deeply nested. The best practice is
therefore to use them only if you actually need a backing component via <cc:interface
componentType>. For any other case, just use an include, a decorate, or a tag file instead.
In the previous section you may already have learned that tag files can be quite powerful
with help of JSTL.
Recursive Composite Component
You can safely nest composite components in each other. However, when you nest the
very same composite component recursively in itself, then it would fail with a stack
overflow error when EL attempts to resolve the concrete composite component instance
behind #{cc}.5
Imagine that you’ve got a recursive tree model which represents some sort of
discussion thread, such as e-mail messages and all their replies, or blog comments and
all their replies, whereby each reply can in turn have another set of replies. This can be
represented as a single JPA entity as follows:
@Entity
public class Message {
@Id @GeneratedValue(strategy=IDENTITY)
private Long id;
@Lob
@Column(nullable = false)
private @NotNull String text;
5 http://balusc.omnifaces.org/2016/02/recursive-tree-of-composite-components.html.
CHAPTER 7 FACELETS TEMPLATING
267
@ManyToOne
private Message replyTo;
@OneToMany(mappedBy = "replyTo")
private List<Message> replies = Collections.emptyList();
// Add/generate remaining getters and setters.
}
Note that the replyTo property represents the parent message which the current
message is a reply to, and that the replies property represents all replies to the current
message. The tree structure can then be queried as follows in a MessageService:
public List<Message> tree() {
return entityManager.createQuery(
"SELECT DISTINCT m FROM Message m"
+ " LEFT JOIN FETCH m.replies r"
+ " ORDER BY m.id ASC", Message.class)
.getResultList().stream()
.filter(m -> m.getReplyTo() == null)
.collect(toList());
}
Note that the filtering of the result list afterward is at first glance inefficient, but in
reality every single message is retrieved only once and simply referenced in the replies
property.
Now, you’d intuitively implement the <t:message> composite component as
something like the following:
<cc:interface>
<cc:attribute name="value" type="com.example.Message" />
</cc:interface>
<cc:implementation>
#{cc.attrs.value.text}
<c:if test="#{not empty cc.attrs.value.replies}">
<ul>
<c:forEach items="#{cc.attrs.value.replies}" var="reply">
<li>
CHAPTER 7 FACELETS TEMPLATING
268
<t:message value="#{reply}" />
</li>
</c:forEach>
</ul>
</c:if>
</cc:implementation>
which is in turn used as follows:
<c:forEach items="#{messages.tree}" var="message">
<t:message value="#{message}" />
</c:forEach>
You’ll perhaps only wonder why <c:forEach> is being used instead of <ui:repeat>.
The explanation is relatively simple: <ui:repeat> is ignored during view build time.
In other words, <t:message> would include itself in an infinite loop. If you need to
remember the why and how, head back to the section “JSTL Core Tags” in Chapter 3.
But even with the above implementation you would still run into an infinite loop.
You know that #{cc} references the current instance of the composite component.
Under the hood, when #{reply} is passed to the nested composite, then in reality a
reference to #{cc.attrs.value.replies[index]} is being passed. This is, on its own, no
problem. But when the nested composite in turn evaluates the #{cc} part from this alias,
then it would reference itself instead of the parent composite. Hence, the infinite loop.
Theoretically, you could solve this by replacing #{cc} with #{cc.parent} which
returns UIComponent#getParent().
<c:forEach items="#{cc.attrs.value.replies}" varStatus="loop">
...
<t:message value="#{cc.parent.attrs.value.replies[loop.index]}" />
...
</c:forEach>
However, it still doesn’t work. Under the hood, inside the nested composite, when
the EL evaluator comes to #{cc.parent} and attempts to evaluate “attrs.value” on it,
then the parent composite component would return yet another EL expression in form
of #{cc.attrs.value} which ultimately gets evaluated. However, the #{cc} part still gets
interpreted as “current composite component,” which is inside the nested composite
component and thus the nested composite itself.
CHAPTER 7 FACELETS TEMPLATING
269
We could only solve it to let the parent composite component not return yet
another EL expression but instead the already-evaluated value. This can be achieved
by overriding UIComponent#setValueExpression() in the backing component where
you check whether the ValueExpression representing #{cc.attrs.value} is about to
be set on the component and then immediately evaluate it and store the result as a local
variable of the composite component. This shouldn’t cause harm as it’s supposed to be a
read-only attribute.
@FacesComponent("messageComposite")
public class MessageComposite extends UINamingContainer {
private Message message;
@Override
public void setValueExpression
(String attributeName, ValueExpression expression)
{
if ("value".equals(attributeName)) {
ELContext elContext = getFacesContext().getELContext();
message = (Message) expression.getValue(elContext);
}
else {
super.setValueExpression(attributeName, expression);
}
}
public Message getMessage() {
return message;
}
}
With this backing component in place, and replacing “attrs.value” by “message”, it
finally works.
<cc:interface componentType="messageComposite">
<cc:attribute name="value" type="com.example.Message" />
</cc:interface>
<cc:implementation>
CHAPTER 7 FACELETS TEMPLATING

270
#{cc.message.text}
<c:if test="#{not empty cc.message.replies}">
<ul>
<c:forEach items="#{cc.message.replies}" varStatus="loop">
<li>
<t:message
value="#{cc.parent.message.replies[loop.index]}">
</t:message>
</li>
</c:forEach>
</ul>
</c:if>
</cc:implementation>
Implicit EL Objects
In Facelets files a bunch of implicit EL objects available. They are mainly shortcuts
to important artifacts, scopes, maps, and components available in the current faces
context. Table7-1 provides an overview of them.
Table 7-1. Implicit EL Objects Available in EL Context of JSF
Implicit EL object Resolves to Returns Since
#{facesContext} FacesContext#getCurrentInstance() FacesContext 2.0
#{externalContext} FacesContext#getExternalContext() ExternalContext 2.3
#{view} FacesContext#getViewRoot() UIViewRoot 2.0
#{component} UIComponent#getCurrentComponent() UIComponent 2.0
#{cc} UIComponent#getCurrentComposite
Component()
UIComponent 2.0
#{request} ExternalContext#getRequest() HttpServletRequest 1.0
#{session} ExternalContext#getSession() HttpSession 1.0
#{application} ExternalContext#getContext() ServletContext 1.0
(continued)
CHAPTER 7 FACELETS TEMPLATING

271
Implicit EL object Resolves to Returns Since
#{ash} ExternalContext#getFlash() Flash 2.0
#{requestScope} ExternalContext#getRequestMap() Map<String, Object> 1.0
#{viewScope} UIViewRoot#getViewMap() Map<String, Object> 2.0
#{owScope} FlowHandler#getCurrentFlowScope() Map<Object, Object> 2.2
#{sessionScope} ExternalContext#getSessionMap() Map<String, Object> 1.0
#{applicationScope} ExternalContext#getApplicationMap() Map<String, Object> 1.0
#{initParam} ExternalContext#getInitParameterMap() Map<String, String> 1.0
#{param} ExternalContext#getRequestParameterMap() Map<String, String> 1.0
#{paramValues} ExternalContext#getRequestParameter
ValuesMap()
Map<String, String[]> 1.0
#{header} ExternalContext#getRequestHeaderMap() Map<String, String> 1.0
#{headerValues} ExternalContext#getRequestHeader
ValuesMap()
Map<String, String[]> 1.0
#{cookie} ExternalContext#getRequestCookieMap() Map<String, Cookie> 1.0
#{resource} ResourceHandler#createResource() Resource 2.0
Table 7-1. (continued)
For the JSF artifacts and components, if the class in turn specifies a getter method
somewhere, such as HttpServletRequest#getContextPath(), then you can of course
access it in EL the usual way as in #{request.contextPath}.
For scoped maps, any property will be interpreted as the map key. If the property
happens to contain period characters, then you can use the brace notation as in
#{map['key.with.periods']} in order to access the map value. Note that #{flash}
essentially extends from Map<String, Object>, so it could be treated as such. It should
also be said that #{flowScope} indeed deviates from other scoped maps by accepting
Object instead of String as a map key. This is most likely a historical mistake. The
canonical approach to access scoped maps is to use a String-based key.
#{cookie} is mapped by the cookie name and the value actually returns a javax.
servlet.http.Cookie which in turn has a getValue() property. So, in order to access
the JSESSIONID cookie, you basically need #{cookie.JSESSIONID.value}. Of course, you
can also just use #{session.id} instead.
CHAPTER 7 FACELETS TEMPLATING
272
#{resource} actually has its own EL resolver which interprets any property
as a resource identifier in “library:name” format and then passes it to Resour
ceHandler#createResource() and finally returns the URL of the resource via
Resource#getRequestPath(). This is very useful in CSS resources in order to reference
a JSF image resource as a CSS background image. The following example will actually
render the URL of src/main/webapp/resources/images/background.svg.
body {
background-image: url("#{resource['images/background.svg']}");
background-size: cover;
}
Note that resolving EL expressions in CSS resources only works when the CSS
resource itself is included via <h:outputStylesheet> instead of <link>. Also noted
should be that JSF remembers by default only on the very first request of the CSS
resource whether it contains EL expressions or not. If it didn’t, then JSF won’t recheck
it on a later request, even not in the development stage. So if you notice that your first
EL expression in an existing CSS resource doesn’t seem to work, you’d better restart the
web application. This feature of EL resolving in CSS resources is actually pretty useful. If
SCSS (Sassy CSS) is a step too far for you, then you could use EL to parameterize some
repeated CSS properties, such as colors.
.color-gray {
color: #{applicationScope['gray']='#B8B8B8'};
}
...
.someSelector {
border: 1px solid #{gray};
}
.otherSelector {
color: #{gray};
}
...
CHAPTER 7 FACELETS TEMPLATING
273
No, this feature of EL resolving in CSS resources isn’t available in JS resources. For
that, you’d instead need to print a JS object in the global scope and let your JS resources
intercept it if necessary. For example,
<h:outputScript>var config = #{configuration.script};</h:outputScript>
<h:outputScript name="scripts/some.js" />
whereby the #{configuration.script} just returns a JSON object as string from your
managed bean. Or, you could let EL print it as a data attribute of an HTML element
<html lang="en" data-baseuri="#{request.contextPath}/">
...
</html>
which is in turn accessible in JS as follows:
var baseuri = document.documentElement.dataset.baseuri;
or if you’re a jQuery fan:
var baseuri = $("html").data("baseuri");
That said, when creating managed beans on the Java side, or when declaring custom
EL variables on the Facelets side, such as <h:dataTable var="foo">, <ui:repeat
var="foo">, or <c:set var="foo">, you need to make absolutely sure that you don’t
explicitly or implicitly choose a managed bean name or EL variable name which
clashes with one of the previously listed implicit EL objects, because implicit EL objects
have higher precedence in EL resolving than user defined names. So, for example, the
following construct wouldn’t work as you might expect:
<ui:repeat value="#{bean.parameters}" var="param">
#{param}<br />
</ui:repeat>
It would print literally “{}” for each iteration round, which is basically the default
Map#toString() format of an empty Map. When you reopen the same page with a query
string like ?foo=bar, then it would print literally “{foo=bar}” for each iteration round.
You’d better rename the var="param" to something else then.
CHAPTER 7 FACELETS TEMPLATING

275
© Bauke Scholtz, Arjan Tijms 2018
B. Scholtz and A. Tijms, The Definitive Guide to JSF in Java EE 8, https://doi.org/10.1007/978-1-4842-3387-0_8
CHAPTER 8
Backing Beans
The “backing bean” is a JSF-specific concept. It represents the sole JavaBean class which
is ultimately used as a “managed bean” responsible for providing data, actions, and/or
UI (User Interface) components in a JSF page.
Model, View, or Controller?
JSF (JavaServer Faces) is a MVC (model-view-controller) framework. It’s a widely used
architectural design pattern for software applications which has its roots in desktop
application development.1
In a JSF framework’s point of view, the model is represented by the backing bean, the
view is represented by the component tree, which in turn is usually defined in a Facelets
file, and the controller is represented by the FacesServlet which is already provided by
JSF.From a Java EE application server’s point of view, however, the model is represented
by the service layer which in turn is usually defined in EJB (Enterprise JavaBeans) classes
and JPA (Java Persistence API) entities, the view is represented by all your JSF-based
code, and the controller is the FacesServlet. In a JSF developer’s point of view, the
model is represented by the service layer, the view is represented by the Facelets file, and
the controller is represented by the backing bean.
The backing bean class can thus be either the model, view, or controller, depending
on your point of view, while the service layer is always the model, and the Facelets file is
always the view, and the FacesServlet is always the controller. Note that in this context,
the “JSF developer” is you, who develops a web application using the JSF framework for
a Java EE application server.
1 https://en.wikipedia.org/wiki/Model%E2%80%93view%E2%80%93controller.
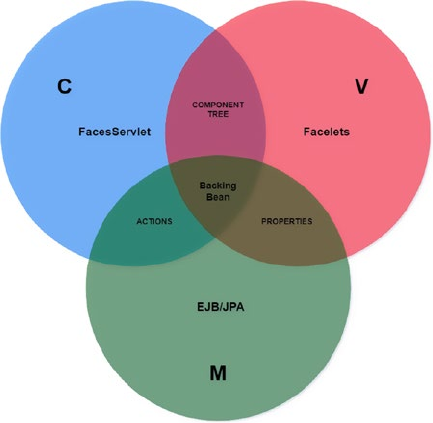
276
Figure8-1 illustrates the position of the backing bean in JSF’s MVC paradigm. It’s a
Venn diagram where the intersection of the controller and the view is represented by the
JSF component tree which could be bound to a backing bean via the component’s binding
attribute. The intersection of the view and the model is represented by property getters and
setters of EL (Expression Language) value expressions which could be bound to a backing
bean, usually via the component’s value attribute. The intersection of the controller and
the model is represented by action method invocations of EL method expressions which
could be bound to a backing bean via the component’s action attribute. Finally, the
intersection of all intersections is represented by the backing bean itself.
In this MVC paradigm the backing bean has thus a rather unique position. Note that
the backing bean doesn’t necessarily need to be represented by a single class. It can
even be represented by multiple classes, each with its own managed bean scope, like the
view can be represented by multiple Facelets files and the model can be represented by
multiple EJB/JPA classes.
Figure 8-1. The position of the backing bean in JSF’s MVC paradigm
CHAPTER 8 BACKING BEANS
277
Coming back to the JSF developer’s point of view, we can even get a step further with
considering whether the backing bean is a model or a controller, depending on how you
code the backing bean class. Following is one way:
@Named @RequestScoped @Stateful
public class ProductBacking {
private String productName;
private String productDescription;
@Inject
private ActiveUser activeUser;
@PersistenceContext
private EntityManager entityManager;
public void save() {
Product product = new Product();
product.setName(productName);
product.setDescription(productDescription);
product.setCreatedBy(activeUser.get());
entityManager.persist(product);
FacesContext.getCurrentInstance().addMessage(null,
new FacesMessage("Product created!"));
}
// Add/generate getters and setters for product name and description.
}
In this rather naïve way, the entity’s properties are essentially duplicated in the
backing bean class and the business logic is tightly coupled in the backing bean class. In
other words, the backing bean class has incorrectly taken over the responsibilities of the
real model. One would misinterpret such backing bean class as being the sole model.
When we eliminate this duplication and unreusability, we find another way:
@Named @RequestScoped
public class ProductBacking {
private Product product = new Product();
CHAPTER 8 BACKING BEANS
278
@Inject
private ProductService productService;
public void save() {
productService.create(product);
FacesContext.getCurrentInstance().addMessage(null,
new FacesMessage("Product created!"));
}
public Product getProduct() {
return product;
}
}
whereby the ProductService looks as follows:
@Stateless
public class ProductService {
@PersistenceContext
private EntityManager entityManager;
@Inject
private ActiveUser activeUser;
public Long create(Product product) {
product.setCreatedBy(activeUser.get());
entityManager.persist(product);
return product.getId();
}
}
This is actually the correct way of authoring backing beans. When comparing it to
the first way, you could argue that the backing bean has, in the JSF developer’s point of
view, become a controller for the EJB/JPA model. The backing bean being a controller
is not wrong from the JSF developer’s point of view, but this is not actually correct from
the JSF framework’s point of view where the FacesServlet is the real controller. The
FacesServlet treats the backing bean as a model, because the FacesServlet doesn’t
have direct access to the real model, the service layer. You as the JSF developer can, of
course, in your context treat the backing bean as a controller, because you can easily
CHAPTER 8 BACKING BEANS

279
ignore all duties of the FacesServlet as you don’t need to worry about its job while
writing JSF code. All you need to worry about while writing JSF code is the view, the
model, and the backing bean. The rest is done transparently by JSF.
Managed Beans
The conceptual difference between a “backing bean” and a “managed bean” can
be represented by the following lines of code executed under the hood of the bean
management facility:
BackingBeanClass managedBeanInstance = new BackingBeanClass();
someContext.put("managedBeanName", managedBeanInstance, someScope);
In other words, the backing bean is the concrete class created by you, the JSF
developer, and registered into some bean management facility, such as CDI.The bean
management facility will automatically manage the bean’s life cycle by performing
construction, dependency injection, and destruction when necessary, without you
having to do it manually. If you’ve ever developed with JSP/Servlets, this basically
removes the need to manually instantiate beans and put them as an attribute of the
ServletContext, HttpSession, or ServletRequest.2 To register a backing bean class as
a CDI managed bean for JSF views, simply put the @javax.inject.Named annotation3 on
the class signature.
@Named
public class BackingBeanClass {
// ...
}
It will then immediately be available in EL context by #{backingBeanClass} and in
all other managed beans via @Inject. The EL context is directly available in Facelets files.
By default, the managed bean name is derived from the backing bean’s class name by
lowercasing the first character. This can optionally be overridden by specifying the value
of the @Named annotation.
2 https://stackoverflow.com/q/3106452/157882.
3 https://javaee.github.io/javaee-spec/javadocs/javax/inject/Named.html.
CHAPTER 8 BACKING BEANS
280
@Named("managedBeanName")
public class BackingBeanClass {
// ...
}
This is now in EL context available by #{managedBeanName}. Nothing has changed
for the @Inject approach. Once a JSF backing bean becomes a managed bean, it will be
automatically instantiated and initialized whenever it’s accessed for the first time in the
context associated with the bean’s scope. It will be automatically destroyed when the life
cycle associated with the bean’s scope has ended. More about managed bean scopes in
the next section.
Historically, JSF provided a native way to register backing bean classes as
managed beans: first, in JSF 1.x via <managed-bean> entries in faces-config.xml,
and since JSF 2.0 via @javax.faces.bean.ManagedBean annotation, which is, since
JSF 2.3, officially deprecated in favor of CDI @Named. CDI was introduced for first time
in Java EE 6, at the same time as JSF 2.0, with the aim of unifying the management
of context-sensitive instances and injecting the currently available instances in each
other. Unfortunately, the JSF 2.0 @ManagedBean was already set in stone long before
CDI was finished, so those two ways of managing beans did exist in parallel for some
time. The CDI bean management facility has several advantages on top of JSF bean
management facility.
First, injecting one managed bean in another managed bean using CDI’s @Inject
doesn’t require a getter/setter pair in the parent backing bean class, while JSF’s @javax.
faces.bean.ManagedProperty requires a getter/setter pair, which is considered poor
practice as this exposes too much information to the outside, which is potentially
confusing. Should we access the injected bean via #{bean} or #{parentBean.bean}?
Second, the injected CDI managed bean can be of a narrower scope than the parent
managed bean. This is possible because CDI @Inject actually injects a proxy instance
which in turn delegates to the currently available instance, while JSF @ManagedProperty
“injects” the actual instance by invoking the setter method directly after the construction
of the parent bean.
Third, CDI managed beans are accessible in all other Java EE artifacts which are
not directly managed by JSF, such as web servlets, web filters, web listeners, socket end
points, web service end points, enterprise beans, etc. This allows a very easy way of
exchanging data across various layers within the same application, particularly within
the same HTTP session.
CHAPTER 8 BACKING BEANS

281
Once again, the JSF bean management facility is officially deprecated since JSF 2.3.
You should absolutely not use it any more in new JSF applications. It will still be there
in the JSF API for backward compatibility, but chances are that the javax.faces.bean
package will be removed altogether in a future JSF version. Existing JSF applications
should be migrated to CDI as soon as possible. CDI is natively available in normal Java
EE application servers and relatively easy to install in barebones servlet containers.
For example, JBoss Weld, one of the CDI implementations, can already be installed
in Tomcat by simply adding the single dependency org.jboss.weld.servlet:weld-
servlet- shaded to the project4 without any further effort.
Scopes
The managed bean scope basically represents the lifetime of the managed bean.
As hinted in the previous section, in plain JSP/Servlet perspective the scopes are
represented by the object being put as an attribute of the ServletContext, HttpSession,
or ServletRequest. Those objects will then become application scoped, session scoped,
and request scoped, respectively. This is still how it works with CDI and all; it only adds
an extra abstract layer over it so that you don’t any more need to manually create and put
the objects in a certain scope.
In standard JSF, the following CDI managed bean scopes are available for JSF
backing beans, ordered from the longest living to the shortest living.
1. @javax.enterprise.context.ApplicationScoped
2. @javax.enterprise.context.SessionScoped
3. @javax.enterprise.context.ConversationScoped
4. @javax.faces.flow.FlowScoped
5. @javax.faces.view.ViewScoped
6. @javax.enterprise.context.RequestScoped
7. @javax.enterprise.context.Dependent
Note that the javax.faces.bean package also defines a set of scopes, but they are
only applicable on the beans managed by JSF’s @ManagedBean, not on beans managed by
CDI.Moreover, the javax.faces.bean package is deprecated since JSF 2.3in favor of CDI.
4 http://balusc.omnifaces.org/2013/10/how-to-install-cdi-in-tomcat.html.
CHAPTER 8 BACKING BEANS

282
@ApplicationScoped
An application-scoped managed bean instance is tied to the lifetime of the web
application itself. It’s under the hood represented as an attribute of the ServletContext
which is created on the web application’s deployment and destroyed on the web
application’s undeployment. Note that this is not equal to the server’s startup and
shutdown. Web applications can be deployed and undeployed on a running server.
In other words, there’s only one instance of an application-scoped managed bean
throughout the web application’s lifetime which is shared across all requests and
sessions. You could argue that it behaves like a singleton. However, it doesn’t actually
follow the singleton design pattern. It follows the “just create one” design pattern.5 A real
singleton doesn’t have any public constructor but only a static method which returns a
statically initialized lazy loaded instance. A real JavaBean, on the other hand, requires
the presence of a default constructor.
By default, an application-scoped bean managed instance is created for the
first time when the web application’s code accesses it for the first time during
the web application’s lifetime. It’s thus not, per definition, immediately created
when the ServletContext instance is created. It is, however, guaranteed when the
ServletContext instance is destroyed.
Application-scoped managed beans are useful for application-wide data which
needs to be initialized only once in the application’s lifetime, or needs to provide non-
static getters which delegate to static variables, or needs to provide functions for usage
in EL.The following example makes sure that application settings stored in the database
are loaded only once and provided as a Map by #{settings} during the rest of the
application’s lifetime.
@ApplicationScoped
public class ApplicationSettingsProducer {
private Map<String, String> settings;
@Inject
private ApplicationSettingsService applicationSettingsService;
@PostConstruct
5 http://butunclebob.com/ArticleS.UncleBob.SingletonVsJustCreateOne.
CHAPTER 8 BACKING BEANS
283
public void init() {
settings = applicationSettingsService.getAll();
}
@Produces @Named
public Map<String, String> getSettings() {
return settings;
}
}
Note that the @Named annotation is placed on the getter, which implies a managed
bean name matching the property name: #{settings}. Also note that the getter in turn
needs the @Produces annotation in order to be recognized as a managed bean producer.
Following is another example which offers text formatting functions.
@Named @ApplicationScoped
public class Format {
public String date(LocalDate localDate) {
if (localDate != null) {
return localDate.format(DateTimeFormatter.ISO_LOCAL_DATE);
}
else {
return "n/a";
}
}
public String currency(BigDecimal amount) {
if (amount != null) {
return NumberFormat.getCurrencyInstance(Locale.US)
.format(amount);
}
else {
return "n/a";
}
}
}
CHAPTER 8 BACKING BEANS
284
This could be useful in, for example, a data table to keep the Facelets code terse.
<h:dataTable value="#{cart.products}" var="product">
<h:column>#{format.date(product.lastModified)}</h:column>
<h:column>#{format.currency(product.discount)}</h:column>
</h:dataTable>
It’s also useful in case you need a formatted value in an attribute which doesn’t allow
a nested <h:outputText><f:convertXxx>.
<h:commandLink ... title="Last visited #{format.date(user.lastVisited)}">
@SessionScoped
A session-scoped managed bean instance is tied to the lifetime of the established HTTP
session. It’s under the hood represented as an attribute of the HttpSession which is
created for every unique client on demand of the web application’s code. When the web
application’s code directly or indirectly pokes the HttpSession for the first time via Ht
tpServletRequest#getSession(),the servlet container will create a new HttpSession
instance, generate a long and unique ID, and store it in server’s memory. The servlet
container will also set a session cookie on the HTTP response with “JSESSIONID” as
the cookie name and the unique session ID as the cookie value. A “session cookie” is
identified by the absence of the “maximum age” attribute.
As per the HTTP cookie specification, the client (the web browser) is required to send
this cookie back in the header of the subsequent requests as long as the cookie is valid.
In any decent web browser you can inspect the request and response headers in the
“Network” section of the web developer’s toolset which is accessible by pressing F12in
the web browser. The servlet container will check every incoming HTTP request for the
presence of the cookie with the name “JSESSIONID” and use its value (the session ID) to
get the associated HttpSession instance from server’s memory.
On the server side, the HttpSession instance stays alive until it has not been accessed
for more than the timeout value as specified in the <session-timeout> setting of web.xml,
which defaults to 30 minutes on most if not all servlet containers. So, when the client doesn’t
visit the web application for longer than the time specified, the servlet container will destroy
the HttpSession instance. Every subsequent HTTP request, even with the cookie specified,
will not have access to the HttpSession instance anymore; the servlet container will create a
new HttpSession instance and overwrite the cookie value with the new session ID.
CHAPTER 8 BACKING BEANS
285
On the client side, by default, all session cookies stay alive for as long as the browser
instance is running. So, when the client shut downs the browser instance, all session
cookies are destroyed on the client side. In a new browser instance, the session cookies
from a previous browser session are not available any more, so the browser won’t send
any JSESSIONID cookie. The server will then interpret it as a brand-new session. The
HttpSession instance associated with the previous browser session will silently expire
on the server side.
By default, a session-scoped managed bean instance is created for the first time
when the web application’s code accesses it for the first time during the HTTP session’s
lifetime. It’s thus not, per definition, immediately created when the HttpSession
instance is created. It is, however, guaranteed to be destroyed when the HttpSession
instance is destroyed. Session-scoped managed beans are effectively shared across all
browser tabs within the same browser session.
Session-scoped managed beans are useful for keeping track of client-specific data,
such as the entity representing the currently logged-in user, the selected language, and
other user-related preferences. The following example calculates the current locale and
provides a getter/setter for it so that it can be obtained in the view and modified by an
UIInput component.
@Named @SessionScoped
public class ActiveLocale implements Serializable {
private Locale current;
@PostConstruct
public void init() {
FacesContext context = FacesContext.getCurrentInstance();
current = context.getApplication()
.getViewHandler().calculateLocale(context);
}
// Getter+setter.
}
A more elaborate example can be found in the section “Changing the Active
Locale” in Chapter 14. Do note that session-scoped managed beans must implement
Serializable because the HttpSession instance itself, where those beans are being
CHAPTER 8 BACKING BEANS

286
stored, is subject to being written to disk in case of a server restart or even to being
transferred over the network to a different server in case of a server cluster configuration
with a distributable session.
Another classic example is a “shopping cart.”
@Named @SessionScoped
public class Cart implements Serializable {
private List<Product> products = new ArrayList<>();
public void addProduct(Product product) {
products.add(product);
}
// ...
}
@ConversationScoped
A conversation-scoped managed bean is tied to the lifetime of the injected javax.
enterprise.context.Conversation instance which offers begin() and end() methods
which must be explicitly invoked by the web application’s code in order to indicate the
start and end of the conversation scope. The conversation scope is represented by a
predefined HTTP request parameter with a default name of “cid” (“Conversation ID”)
whose value references represents the conversation ID.The conversation ID in turn
references an isolated mapping in the current HTTP session where the conversation-
scoped managed bean instances will be stored.
As long as the conversation scope has not started, the conversation-scoped managed
bean will behave like a request-scoped managed bean. When the application code
explicitly invokes Conversation#begin(), then the conversation scope will start and a
custom javax.faces.application.ViewHandler provided by the CDI implementation
will make sure that all its getXxxURL() methods such as getActionURL() and
getBookmarkableURL() return a URL (uniform resource locator) with the conversation
ID parameter included. In case of Weld, that’s the ConversationAwareViewHandler.6
6 https://github.com/weld/core/blob/master/modules/jsf/src/main/java/org/jboss/weld/
module/jsf/ ConversationAwareViewHandler.java.
CHAPTER 8 BACKING BEANS
287
All JSF UIForm and UIOutcomeTarget components derive their action and target
URLs from those methods of the ViewHandler. The generated HTML output of those
components will thus ultimately include the conversation ID in the target URL.
On an incoming HTTP request, when the conversation ID parameter is present
in the request, and it is still valid, the CDI implementation will obtain the associated
conversation scope from the HTTP session and make sure that all conversation-scoped
managed beans are obtained from exactly this conversation scope identified by the
conversation ID.This works on both GET and POST requests. Any form submit or
any link/navigation to a URL with the conversation ID included will provide access
to the very same conversation scope, as long as it’s still valid. The conversation
scope ends when the application code explicitly invokes Conversation#end().
When the end user reuses the “cid” request parameter later, or manipulates its
value to one which isn’t started in its own browser session, or when the underlying
HttpSession instance is destroyed, then CDI will throw a javax.enterprise.context.
NonexistentConversationException.
Conversation-scoped managed beans are particularly useful in order to be able
to return to a particular stateful page within the same browser session after being
redirected elsewhere. A classic example is a third-party web service which is included
in an HTML <iframe> or opened in a new browser tab or even targeted in the action
attribute of a plain HTML <form>, and can, via a specific request parameter, be
configured to redirect back to your web application after completing the service. When
you include the conversation ID in the redirect URL, then you will in the redirected page
be able to resume with exactly the same conversation-scoped managed bean instance
as it was before the redirect. This allows you the opportunity to finalize and unlock any
pending transactions and, of course, end the conversation.
Given a checkout button which looks as follows,
<h:form>
...
<ui:fragment rendered="#{empty payment.url}">
...
<h:commandButton value="Checkout" action="#{payment.checkout}">
<f:ajax render="@form" />
</h:commandButton>
</ui:fragment>
<ui:fragment rendered="#{not empty payment.url}">
CHAPTER 8 BACKING BEANS
288
<iframe src="#{payment.url}"></iframe>
</ui:fragment>
</h:form>
here’s what the associated conversation-scoped bean behind #{payment} looks like:
@Named @ConversationScoped
public class Payment implements Serializable {
private Order order;
private String url;
@Inject
private Cart cart;
@Inject
private OrderService orderService;
@Inject
private Conversation conversation;
public void checkout() {
conversation.begin();
order = orderService.lockProductsAndPrepareOrder(cart);
url = "http://third.party.com/pay?returnurl="
+ URLEncoder.encode("http://my.site.com/paid?cid="
+ conversation.getId(), "UTF-8");
}
public void confirm() {
orderService.saveOrderAndCreateInvoice(order);
conversation.end();
}
@PreDestroy
public void destroy() {
orderService.unlockProductsIfNecessary(order);
}
CHAPTER 8 BACKING BEANS
289
public String getUrl() {
return url;
}
}
Basically, the checkout button is only rendered when there’s no payment URL set.
Once the button is pressed, all products of the shopping cart are locked and the order is
prepared. Also, depending on the third-party payment service, the URL referring it must
be prepared whereby you include the return URL as some query parameter in the URL of
the payment service. The return URL should in turn include the “cid” request parameter
representing the conversation ID.In the redirected page which will actually be loaded in
the <iframe>, you can just mark the conversation complete with <f:viewAction>.
<f:metadata>
<f:viewAction action="#{payment.confirm}" />
</f:metadata>
Of course, the average third-party payment service should have a more elaborate
Java or even JavaScript API instead of <iframe>; also, it should be possible to provide
different return pages for each payment outcome such as payment failed and payment
aborted. The above example is just to give the general idea.
@FlowScoped
A flow-scoped managed bean is tied to the lifetime of a JSF flow. It uses the same
principle as conversation scope, only the conversation is further narrowed down to a
specific set of JSF views in an isolated subfolder. Once the end user clicks a JSF link or
button component which navigates to a specific entry page of a JSF flow, then the flow
scope will automatically start. The flow scope cannot be started when you open the
entry page without navigating via a JSF component. That is, JSF will, with help of the
ViewHandler, automatically append the predefined HTTP request parameter “jfwid”
(“javax.faces Window ID”) to the outcome URL whose value represents the JSF client
window ID.The JSF client window ID in turn references an isolated mapping in the
current HTTP session where the flow-scoped managed beans are stored.
Additionally, particularly when using a UIOutcomeTarget component instead
of a UICommand component to navigate, the query string may be accompanied with
“jffi” (javax.faces Flow ID) and “jftfdi” (javax.faces To Flow Document ID) request
CHAPTER 8 BACKING BEANS
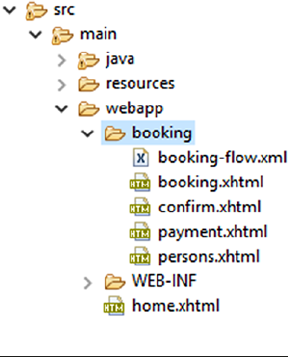
290
parameters. Those are actually only mandatory for starting a JSF flow using a GET
request. Technically, for the rest of the JSF flow, “jfwid” is sufficient. As long as the
“jfwid” parameter is present, and is still valid, then the JSF flow is idempotent and
can be resumed using a GET request. When you open a new browser tab and navigate
into the JSF flow, then actually a new flow scope will be started, independent of the
JSF flow in other tab. Once a postback request within the JSF flow navigates to a page
outside the JSF flow, then the flow scope will automatically end. When the end user
reuses the “jfwid” request parameter later, or manipulates its value to one which isn’t
started in its own browser session, or enters the flow directly, or when the underlying
HttpSession instance is destroyed, then CDI will throw a javax.enterprise.context.
ContextNotActiveException.
The major difference between the flow scope and the conversation scope is thus
that the pages within a JSF flow cannot be entered directly. They will automatically start
when the end user navigates to the entry page of the JSF flow and they will automatically
end when a postback navigates outside the JSF flow. Flow-scoped managed beans are
useful in order to isolate a conversation to a specific set of JSF pages. A classic real-world
example is a booking application which is spread over multiple forms in physically
different pages.
There are various ways to define a JSF flow. One way is by convention, another way is
by declarative configuration in the /[flowId]/[flowId]-flow.xml file, and yet another
way is by programmatic configuration using javax.faces.flow.FlowBuilder API.7
In this book we’ll restrict ourselves to convention over configuration. First, create the
following folder structure:
7 https://javaee.github.io/javaee-spec/javadocs/javax/faces/flow/builder/
FlowBuilder.html.
CHAPTER 8 BACKING BEANS
291
The first convention is that the flow entry page must have exactly the same name
as the subfolder it is sitting in. In this case, that’s “booking”. This is considered the Flow
ID.The second convention is that there must be a *-flow.xml file in the subfolder whose
name is prefixed with the Flow ID, i.e., booking-flow.xml. This XML configuration file
can be kept empty for now. It’s only useful when you want to fine-grain the JSF flow
configuration, e.g., by specifying a different entry page. Without this file, the JSF flow
scope won’t be activated. One disadvantage of at least one activated JSF flow in the
web application, however, is that the JSF client Window ID parameter “jfwid” will be
appended to every single navigation URL, even when it doesn’t target a JSF flow. This URL
pollution may for some developers be the main reason to not use the JSF flow scope at all.
The navigation component in order to enter a JSF flow must be placed in a JSF page
outside the flow subfolder. The navigation outcome must reference the subfolder name,
which is the Flow ID.Here’s an example in /home.xhtml.
<h:button value="Start booking" outcome="booking" />
Of course, this can be substituted with <h:link>. It’s recommended to use GET just
for this so that the booking page’s URL reflects in the browser’s address bar. Then, in all
pages within the subfolder, you can reference a flow-scoped managed bean which will
be shared across all these pages. You can navigate back and forth between these pages as
well while retaining the flow-scoped managed bean instance. We recommend that you
use Ajax with redirect for this. The Ajax submits will improve the user experience. The
redirects will make sure that the individual pages are still bookmarkable.
/booking/booking.xhtml:
<h:form>
<h:inputText value="#{booking.startDate}" />
...
<h:commandButton value="Next" action="persons?faces-redirect=true">
<f:ajax execute="@form" render="@form" />
</h:commandButton>
</h:form>
/booking/persons.xhtml:
<h:form>
<ui:repeat value="#{booking.persons}" var="person">
<h:inputText value="#{person.name}" />
...
CHAPTER 8 BACKING BEANS
292
</ui:repeat>
...
<h:commandButton value="Back" action="booking?faces-redirect=true">
<f:ajax execute="@form" render="@form" />
</h:commandButton>
<h:commandButton value="Next" action="confirm?faces-redirect=true">
<f:ajax execute="@form" render="@form" />
</h:commandButton>
</h:form>
/booking/confirm.xhtml:
<h:form>
<h:outputText value="#{booking.startDate}" />
...
<h:commandButton value="Back" action="persons?faces-redirect=true">
<f:ajax execute="@form" render="@form" />
</h:commandButton>
<h:commandButton value="Next" action="payment?faces-redirect=true">
<f:ajax execute="@form" render="@form" />
</h:commandButton>
</h:form>
/booking/payment.xhtml:
<h:form>
<h:selectOneMenu value="#{booking.paymentMethod}">
...
</h:selectOneMenu
...
<h:commandButton value="Back" action="confirm?faces-redirect=true">
<f:ajax execute="@form" render="@form" />
</h:commandButton>
<h:commandButton value="Submit" actionListener="#{booking.submit()}"
action="/home?faces-redirect=true">
<f:ajax execute="@form" render="@form" />
</h:commandButton>
</h:form>
CHAPTER 8 BACKING BEANS
293
And, finally, the flow-scoped bean behind #{booking}:
@Named @FlowScoped("booking")
public class Booking implements Serializable {
private LocalDate startDate;
private List<Person> persons;
private PaymentMethod paymentMethod;
// ...
public void submit() {
// ...
}
}
You see, the most of navigation task is done by the action attribute of the command
components.?faces-redirect=true is a special request parameter which is internally
recognized by JSF as an instruction to perform a redirect after postback and of course
strip off from the target URL before performing the actual redirect. Once the postback
leaves the flow, the flow-scoped managed bean is destroyed and the previously
presented page URLs are not reusable anymore.
@ViewScoped
A view-scoped managed bean is tied to the lifetime of the JSF view state. The JSF view
state is elaborated in the section “View State” in Chapter 3. In a nutshell, a view-scoped
managed bean lives as long as the end user is performing postback requests on the very
same JSF view and the invoked action methods keep returning null or void. Once the
action method returns non-null, even if it’s an empty string or represents the same
view, then the view scope will end. View-scoped managed beans are not shared across
browser tabs within the same browser session. Each one gets its own unique instance.
Effectively, they are indirectly identified by the javax.faces.ViewState hidden input
field in the generated HTML representation of a JSF form.
However, view-scoped managed beans are not stored in the JSF view state, not even
when client-side state saving is enabled. They are actually stored in the HTTP session,
regardless of the JSF state saving method. They are not immediately destroyed when
the end user unloads the web page either by performing a GET request via a link or
CHAPTER 8 BACKING BEANS

294
bookmark or editing the URL in browser’s address bar, or by closing the browser tab.
They will stick around in the HTTP session and only get destroyed when the HTTP
session expires.
As an end user can in theory spawn an unlimited amount of browser tabs within the
same session, and thus also as many JSF view states and view-scoped managed beans,
there’s a configurable maximum limit on the amount of JSF view states and view-scoped
managed beans which will be stored in the HTTP session. Once this limit is reached, the
least recently used JSF view state and view-scoped managed bean will be expired and
destroyed. When the end user actually goes back to the tab that originally referenced
the now expired JSF view state, and performs a postback request on it, JSF will throw a
ViewExpiredException. The limit on the amount of JSF view states is dependent on the
JSF implementation used. In Mojarra, this limit is configurable by the com.sun.faces.
numberOfLogicalViews context parameter in web.xml whose default value is 15.8
<context-param>
<param-name>com.sun.faces.numberOfLogicalViews</param-name>
<param-value>25</param-value>
</context-param>
If your web application, however, invites being opened in many more browser tabs,
such as a discussion forum or a Q&A site, then you’d better switch to client-side state
saving. This way the JSF view states are no longer stored in the HTTP session and will
therefore also never expire. However, the associated view-scoped managed beans are
still stored in the HTTP session and expirable. When the end user actually goes back
to the tab that originally referenced the now expired view scoped-managed bean,
and performs a postback request on it, JSF will not throw a ViewExpiredException
but instead will create a new one from scratch, thereby losing all the state changes
to the original managed bean instance. The limit on the amount of view-scoped
managed beans is also dependent on the JSF implementation used. In Mojarra, this
limit is not yet configurable by a web.xml context parameter. It’s only configurable by
explicitly setting the session attribute with the name com.sun.faces.application.
view.activeViewMapsSize whose default value is 25. This can be achieved with an
application-scoped managed bean as follows, which observes the initialization of the
session scope.
8 https://stackoverflow.com/q/4105439/157882.
CHAPTER 8 BACKING BEANS
295
@ApplicationScoped
public class Config {
public void sessionCreated
(@Observes @Initialized(SessionScoped.class) HttpSession session)
{
session.setAttribute
("com.sun.faces.application.view.activeViewMapsSize", 15);
}
}
This configuration actually decreases the default value to be equal to default
maximum amount of JSF view states in session. This is fine when you’re using server-
side state saving and all your JSF views effectively reference only one view-scoped
managed bean instance. However, in a decently developed and refactored JSF web
application, the average JSF page usually references multiple view-scoped managed
beans. If you have, for example, a maximum amount of three different view-scoped
managed beans per JSF view, then you’d best set the limit to three times the value of
com.sun.faces.numberOfLogicalViews. You only need to take into account the possible
memory consumption. It will quickly go overboard when the view-scoped managed
beans in turn hold, relatively, a lot of data.
View-scoped managed beans are very useful for retaining state across Ajax-based
postbacks on the same JSF view, particularly if those postbacks result in changes in
the value of the rendered attribute of any UIComponent, or the disabled or readonly
attribute of an UIInput component, or the disabled attribute of any UICommand
component within the same JSF view. That is, on a subsequent postback, JSF will, as part
of a safeguard against a tampered request, recheck them before actually processing the
component. If the managed bean holding the state was request scoped instead of view
scoped, then those changes in the conditions would get lost in a subsequent postback
and the postback wouldn’t get processed as intuitively expected. In other words, view-
scoped managed beans are particularly useful in dynamic forms.
One example is a drop-down which conditionally renders a free text field when the
“other” option is chosen.
<f:metadata>
<f:importConstants type="com.example.project.model.Title" />
</f:metadata>
CHAPTER 8 BACKING BEANS
296
...
<h:form>
<h:selectOneMenu value="#{bean.customer.title}">
<f:selectItems value="#{Title}" />
<f:ajax render="other" />
</h:selectOneMenu>
<h:panelGroup id="other">
<h:inputText rendered="#{bean.customer.title eq 'OTHER'}"
value="#{bean.customer.titleOther}" required="true" />
</h:panelGroup>
...
<h:commandButton value="Save" action="#{bean.save}" />
</h:form>
This construct won’t work when the managed bean is request scoped and is thus
recreated on every request. When the drop-down changes, it creates a new instance of
the request-scoped bean, sets the title there, and renders the free text field and finally
the request-scoped bean instance gets destroyed. When the form submits, it creates a
new instance of the request-scoped bean, thus without the customer title, and when JSF
checks the rendered attribute during the apply request values phase (second phase) of
the free text field and notices it’s false, ultimately it won’t process the free text field at
all. It will only work when the managed bean is view scoped because the customer title
set during the drop-down change is still available during the apply request values phase
(second phase) of the form submit.
There is, however, a work-around. You could let the rendered attribute check the
HTTP request parameter instead of the model value. As explained in Chapter 4, the
HTTP request parameter name is specified by the component’s client ID.You could bind
the drop-down component to the view and then use its client ID to obtain the HTTP
request parameter value.
<h:selectOneMenu binding="#{title}" value="#{bean.customer.title}">
<f:selectItems value="#{Title}" />
<f:ajax render="other" />
</h:selectOneMenu>
<h:panelGroup id="other">
CHAPTER 8 BACKING BEANS
297
<h:inputText rendered="#{param[title.clientId] eq 'OTHER'}"
value="#{bean.customer.titleOther}" required="true" />
</h:panelGroup>
This way, when JSF checks the rendered attribute during the apply request values
phase (second phase) of the form submit, it will notice it’s true and continue processing
the free text field, even when the managed bean is request scoped and thus #{bean.
customer.title} is still null at that point. Note that the binding attribute doesn’t
reference a managed bean property. This is unnecessary as it wouldn’t be used over
there. All of this is also applicable on the readonly attribute of any UIInput component
and the disabled attribute of any UIInput and UICommand component.
There may also be cases wherein a request-scoped managed bean will work just
fine but imposes a risk of a corrupted state as compared to a view-scoped managed
bean, certainly when relying on data coming from a shared database which could be
mutated by other users. This affects primarily use cases whereby UIInput or UICommand
components are nested in an iterating component such as <h:dataTable>, <ui:repeat>
and <c:forEach> which iterates over a model coming from the database. This was
explained previously in Chapter 6, but for the sake of refreshment, we will explain it once
more. Imagine a table of products with a delete button in a column.
<f:form id="list">
<h:dataTable id="products" value="#{products.list}" var="product">
...
<h:column>
<h:commandButton id="delete" value="Delete"
action="#{products.delete(product)}">
<f:ajax render="@namingcontainer" />
</h:commandButton>
</h:column>
</h:dataTable>
</h:form>
With this backing bean:
@Named @ViewScoped
public class Products implements Serializable {
private List<Product> list;
CHAPTER 8 BACKING BEANS
298
@Inject
private ProductService productService;
@PostConstruct
public void init() {
list = productService.list();
}
public void delete(Product product) {
productService.delete(product);
list.remove(product);
}
public List<Product> getList() {
return list;
}
}
The submitted button is under the hood identified by the iteration index. When JSF
is about to process the form submit, and a product has been added or removed or even
reordered in the meanwhile, causing the iteration index to be changed, then the invoked
action would possibly be performed against the wrong item currently at the initially
known index. This is dangerous for the integrity of the model. In such a case the value of
the iteration component must refer a view-scoped model.
Also here, there is a work-around. Instead of relying on the iteration index, you can
also rely on the unique identifier of the iterated object which must be passed as an HTTP
request parameter instead of as an EL method argument.
<f:form id="list">
<h:dataTable id="products" value="#{products.list}" var="product">
...
<h:column>
<h:commandButton id="delete" value="Delete"
action="#{products.delete}">
<f:param name="id" value="#{product.id}" />
<f:ajax render="@namingcontainer" />
</h:commandButton>
CHAPTER 8 BACKING BEANS
299
</h:column>
</h:dataTable>
</h:form>
Whereby the backing bean is adjusted as follows:
@Named @RequestScoped
public class Products {
private List<Product> list;
@Inject @ManagedProperty("#{param.id}")
private Long id;
@Inject
private ProductService productService;
@PostConstruct
public void init() {
list = productService.list();
}
public void delete() {
productService.delete(id);
list.removeIf(product -> product.getId().equals(id));
}
public List<Product> getList() {
return list;
}
}
No, the action="#{products.delete(product.id)}" instead of using <f:param>
won’t work. The technical reason is that <f:param> is executed immediately during the
render response phase of the form, long before the end user presses the delete button.
Thus, at the moment the end user presses the delete button, it’s guaranteed to have the
correct value. The EL method argument, on the contrary, is only evaluated after the end
user has pressed the delete button. When the model has changed in the meanwhile, it
would thus evaluate to the wrong ID when the iteration index of the particular product
has changed.
CHAPTER 8 BACKING BEANS

300
As explained in the beginning of this section, the standard JSF view-scoped bean
management facility has thus two major disadvantages: first, the instances don’t
immediately expire when the end user unloads the web page and stick around in the
HTTP session; second, even with client-side state saving enabled they are stored in the
HTTP session. Those problems are currently not yet solved in the standard JSF API.
For now, the JSF utility library OmniFaces offers an enhanced @ViewScoped
annotation which solves those two disadvantages.9 View-scoped managed beans
annotated with @org.omnifaces.cdi.ViewScoped will actually get destroyed when
the end user unloads the page. This is under the hood done with help of Navigator.
sendBeacon API10 in JavaScript, and a specialized ViewHandler implementation provided
by OmniFaces which listens on those unload requests. There have been production
applications making heavy use of view-scoped managed beans whereby the memory
usage has reduced for up to 80% after switching from standard JSF @ViewScoped to
OmniFaces @ViewScoped. This makes the destroy-on-unload feature a major candidate
to be added to the future version of the standard JSF API.
In order to save the physical view-scoped managed bean in the JSF view state when
client-side state saving is enabled, the saveInViewState attribute of the OmniFaces @
ViewScoped annotation must be set to true. You only need to keep in mind that those
beans will never expire, not even when the page gets unloaded, or when the HTTP
session expires. In fact, the entire bean has physically become part of the generated
HTML output, in the javax.faces.ViewState hidden input field. There have been
community requests to make JSF state management more flexible, such as toggling
between client- and server-side state saving on a per-view (per UIViewRoot) or even
per-form (per UIForm) basis, and being able to store view-scoped managed beans in
the actual view state instead of in the HTTP session. This may also be reconsidered in a
future version of the standard JSF API.
@RequestScoped
A request-scoped managed bean is among others tied to the lifetime of the HTTP
request, which is for JSF the most important case. Other cases include the lifetimes of a
call to an EJB asynchronous method invocation (method annotated by @Asynchronous),
9 http://showcase.omnifaces.org/cdi/ViewScoped.
10 https://developer.mozilla.org/en-US/docs/Web/API/Navigator/sendBeacon.
CHAPTER 8 BACKING BEANS

301
an EJB timer timeout method, or when a message-driven bean (MDB) processes a
message. Note that an Ajax request also counts as a single HTTP request.
When the client sends an HTTP request to the server, the servlet container will
create HttpServletRequest and HttpServletResponse instances representing the HTTP
request and response, and pass them through the authentication modules, filters, and
servlets. They will be destroyed immediately after all authentication modules, filters, and
servlets are finished processing the request and response. In other words, every HTTP
request creates a new instance of a request-scoped managed bean which is available
only during that request and not in other requests.
Request-scoped managed beans are useful for simple and static forms which don’t
have any dynamic Ajax-based updates, for which you would rather use a view-scoped
managed bean. Think of a login form or a contact form.
@Named @RequestScoped
public class Login {
private String username;
private String password;
// ...
}
Sure, those forms can be tied to a view-scoped managed bean as well without
problems, but that’s a waste of memory space. Note that you should absolutely not make
the JPA entity itself a managed bean. In other words, the following approach is factually
wrong:
@Named @RequestScoped
@Entity
public class Product {
// ...
}
Not only does this violate the Law of Demeter,11 but it also risks that JPA won’t be
able to persist it, because CDI actually wraps the managed bean in a proxy class and JPA
would then not be able to obtain the entity information from it when you’re about to
11 https://en.wikipedia.org/wiki/Law_of_Demeter.
CHAPTER 8 BACKING BEANS
302
pass an injected instance to JPA.Hibernate would in such case throw “Unknown entity:
com.example.Entity$Proxy$_$$_WeldClientProxy”, which thus actually represents the
CDI proxy class.
You might at this point wonder how exactly CDI actually works. First, it will during
the web application’s startup collect all classes that are annotated with a CDI-compatible
scope annotation. Then, it will generate proxy classes for all of them. Ultimately
instances of those proxy classes are being injected. Given an example bean class com.
example.Bean, the generated CDI proxy class may look as follows:
public class Bean$Proxy$_$$_CDI extends Bean implements Serializable {
public String getSomeProperty() {
Bean actualInstance = CDI.resolveItSomehow();
return actualInstance.getSomeProperty();
}
public void setSomeProperty(String someProperty) {
Bean actualInstance = CDI.resolveItSomehow();
actualInstance.setSomeProperty(someProperty);
}
}
You see, it extends the bean class, makes it serializable, and uses an “impossible
to clash” class name and lets all methods delegate to the actual instance obtained
from the CDI context. You’ll probably also immediately understand why the CDI bean
management facility requires the bean classes to be public and have a public default
constructor. You’ll also see that when such a proxy class is created and injected, the
underlying actual instance is not necessarily created. It’s only automatically created
when the fictive CDI.resolveItSomehow() method is invoked. Under the hood, it will
obtain the context from a thread local variable, exactly how FacesContext#getCurrentI
nstance() works.
By the way, EJB also works with serializable proxies this way. That’s why it could
seemingly magically perform all the heavy lifting of starting or joining a transaction and
use pooled instances. The legacy JSF @ManagedBean facility, however, did not use proxies
at all. That’s exactly why it was impossible to inject a JSF managed bean of a narrower
scope in a JSF managed bean of a broader scope. With CDI bean management facility
this is just possible.
CHAPTER 8 BACKING BEANS
303
Note that CDI has also a @javax.enterprise.inject.Model stereotype annotation
which basically bundles both @Named and @RequestScoped into a single annotation.
This is in no way different from a request-scoped managed bean. Unfortunately, it does
not represent a non-proxy instance; otherwise it would be nice to put it on an @Entity.
The @Model annotation exists just for convenience.
@Dependent
A dependent-scoped managed bean is tied to the lifetime of the scope wherein it’s being
created for the first time. So, if you inject it into an @ApplicationScoped, then it will
become application scoped too. And if you inject it into a @ViewScoped, it will become
view scoped too. And so on. This is the default CDI scope.
This has, however, a caveat. When you forget to declare the CDI scope
annotation on your backing bean, or import a scope with exactly the same name
from the wrong package, e.g., javax.faces.bean.RequestScoped instead of javax.
enterprise.context.RequestScoped, and you reference it directly in EL, as in
#{dependentScopedBean}, instead of referencing it via another managed bean, as
in #{requestScopedBean.dependentScopedBean}, then every EL evaluation will
basically create a brand-new instance which exists only within that EL context. In other
words, imagine a JSF form with two input fields and a submit button, each bound to a
dependent-scoped managed bean, then you will effectively end up with three separate
instances. One wherein the first input field is set, one wherein the second input field is
set, and one wherein the action method is invoked. So, if you ever observe odd behavior
of null submitted values in the action method even though the required validation has
passed, the first thing to check is the actually used CDI managed bean scope.
The major technical difference with other scopes is that dependent-scoped managed
beans are not proxied. In other words, what’s being injected is the actual instance.
@Dependent
public class Entities {
@Produces
public Product getProduct() {
return new Product();
}
}
CHAPTER 8 BACKING BEANS
304
@Named @RequestScoped
public class Products {
@Inject
private Product product;
@Inject
Private ProductService productService;
public void add() {
productService.create(product);
}
public Product getProduct() {
return product;
}
}
Note that you still can’t use <h:inputText value="#{product.name}">, because it
would get its own instance. You still need to use #{products.product.name}. For exactly
this reason, the producer isn’t @Named. Also note that in case of a view-scoped managed
bean, you’d need to force JSF to restart the view scope by returning a non-null outcome
from action method; otherwise the injected Product instance would be reused for the
next view.
Which scope tochoose?
Which scope to choose depends solely on the data (instance variables aka the state) the
bean holds and represents. You should strive to put the state in the shortest possible
acceptable scope. Start with a @RequestScoped bean. Once you notice that some state
needs to be retained after a postback on the same view, split that state exactly into a new
@ViewScoped bean which you, in turn, @Inject in the @RequestScoped bean. Once you
notice that some state needs to be retained on another GET request within the same
session, split that state exactly into a new @ConversationScoped bean which you in turn
@Inject in the @RequestScoped bean. And so on.
CHAPTER 8 BACKING BEANS
305
Abusing an @ApplicationScoped bean for session-, conversation-, flow-, view-,
or request-scoped data would make it to be shared among all users, so anyone else
can see each other’s data, which is just plain wrong. Abusing a @SessionScoped
bean for conversation-, flow-, view-, or request-scoped data would make it to be
shared among all browser tabs in the same session, so the end user may experience
inconsistencies when interacting with every view after switching between tabs,
which is bad for user experience. Abusing a @RequestScoped bean for view-, flow-, or
conversation-scoped data would make view-, flow-, or conversation-scoped data be
reinitialized to default on every single (Ajax) postback, causing possibly non-working
forms. Abusing a @ViewScoped, @FlowScoped, or @ConversationScoped bean for
request-, session-, or application-scoped data, and abusing a @SessionScoped bean
for application-scoped data doesn’t affect the end user, but it unnecessarily occupies
server memory and is plain inefficient.
Note that the scope should rather not be chosen based on performance implications,
unless you really have a low memory footprint and want to go completely stateless. You’d
then need to exclusively use stateless forms with @RequestScoped beans and fiddle with
request parameters to maintain any client’s state. In other words, you would possibly
need to reinvent whatever already is being done by the javax.faces.ViewState hidden
input field.
Where Is @FlashScoped?
At last, JSF also supports the flash scope. It is backed by a short living cookie which is
associated with a data entry in the session scope. Before the redirect, a cookie will be
set on the HTTP response with a value which is uniquely associated with the data entry
in the session scope. After the redirect, the presence of the flash scope cookie will be
checked and the data entry associated with the cookie will be removed from the session
scope and be put in the request scope of the redirected request. Finally the cookie will be
removed from the HTTP response. This way the redirected request has access to request-
scoped data which was been prepared in the initial request.
This is actually not available as a managed bean scope by standard JSF API.In other
words, there is no such thing as @FlashScoped. The flash scope is only available as a map
via ExternalContext#getFlash() in managed beans and #{flash} in EL.Historically,
the flash scope was primarily introduced in order to be able to show a faces message set
in the action method in the redirected page. Imagine the use case of saving an edited
product in a detail page and redirecting back to the master page.
CHAPTER 8 BACKING BEANS

306
public String save() {
FacesContext context = FacesContext.getCurrentInstance();
try {
productService.update(product);
context.addMessage(null, new FacesMessage("Product saved!"));
return "/products?faces-redrect=true";
}
catch (Exception e) {
context.addMessage(null, new FacesMessage(
"Cannot save product. Error: " + e.getMessage()));
return null;
}
}
The faces message “Product saved!” wouldn’t show up in the <h:messages
globalOnly> of the redirected page because faces messages are inherently request
scoped (actually, “faces context scoped”). Historically, during the JSF 1.x era, this
problem was solved with a phase listener which copies after the render response phase
all undisplayed faces messages into the HTTP session and re-adds after the restore
view phase any of them back into the faces context. Since the introduction of the flash
scope in JSF 2.0, this problem could be solved in an easier way by simply invoking
Flash#setKeepMessages()12.
productService.update(product);
context.addMessage(null, new FacesMessage("Product saved!"));
context.getExternalContext().getFlash().setKeepMessages(true);
return "/products?faces-redrect=true";
This way, the faces messages are before redirect automatically stored in the flash
scope and restored after redirect.
The flash scope is not only useful for faces messages. It’s also useful for passing entire
objects while redirecting from one view to another view, without needing to pass some
object identifier as a request parameter. Following is an example which prepares an
entity for the next step without needing to save it in the database first:
12 https://javaee.github.io/javaee-spec/javadocs/javax/faces/context/Flash.
html#setKeepMessages-boolean-.
CHAPTER 8 BACKING BEANS
307
@Named @RequestScoped // or @ViewScoped
public class Home {
private Product product = new Product();
public String prepareProduct() {
FacesContext context = FacesContext.getCurrentInstance();
context.getExternalContext().getFlash().put("product", product);
return "/next?faces-redirect=true";
}
public Product getProduct() {
return product;
}
}
Whereby the bean of the next step looks as follows:
@Named @ViewScoped
public class Next implements Serializable {
@Inject @ManagedProperty("#{flash.product}")
private Product product;
public void save() {
// ...
}
public Product getProduct() {
return product;
}
}
And the /next.xhtml redirects back to /home.xhtml when the entity is absent in the
flash scope.
<f:metadata>
<f:viewAction action="/home" if="#{empty flash.product}" />
</f:metadata>
CHAPTER 8 BACKING BEANS
308
Note that this redirect will take place when you open /next.xhtml directly, or when
you refresh the page in the web browser. In case you’d like to avoid that, you can instruct
the flash scope to keep the entry value in the flash scope by prefixing the entry key with
the predefined “keep” key on the #{flash} map.
@Named @RequestScoped
public class Next {
@Inject @ManagedProperty("#{flash.keep.product}")
private Product product;
// ...
}
This way, the lifetime of the flash scope will expand until the end user closes the browser
window, or when the application navigates to a different view, or when the underlying HTTP
session expires. This way you can even make the managed bean request scoped instead
of view scoped and not lose the entity while submitting a form in the /next.xhtml page or
even refreshing the page. This is a relatively powerful feature of the flash scope.
Managed bean initialization anddestruction
Managed bean instances can be initialized based on injected dependencies in a
@PostConstruct annotated method. Managed bean instances can hook on destroy
event in a @PreDestroy annotated method.
@Named
public class Bean {
@PostConstruct
public void init() {
// ...
}
@PreDestroy
public void destroy() {
// ...
}
}
CHAPTER 8 BACKING BEANS
309
The method names are not predefined. The method names init() and destroy()
are basically taken over from the HttpServlet. You can of course choose your own, such
as onload() and cleanup(). It’s useful to know that those annotations are inheritable. In
other words, you could put those methods and annotations in an abstract base class.
In the postconstruct method you have the opportunity to perform initialization
based on injected dependencies. They are not available in the constructor yet. The bean
management facility can only inject the dependencies after having constructed the
managed bean instance. It will then immediately invoke the @PostConstruct annotated
method. In the pre-destroy method you have the opportunity to perform any necessary
cleanup, such as closing resources, deleting files, etc.
Injecting JSF vended types
Backing beans can obviously be injected as demonstrated many times over in the
examples above. Next to injecting your own types, a variety of JSF vended types can be
injected via CDI as well. These types largely correspond to the implicit EL objects we saw
in Table 7-1 in Chapter 7. This is no coincidence. Internally implicit objects in JSF are
implemented by so-called Bean<T> instances from CDI.These CDI Bean<T> instances
are effectively the factory objects that know how to generate beans, with what type and
optional qualifier and/or with what name.
When the name of an implicit object is used in expression language, the CDI EL
resolver does a lookup for that object by name, which results in a call to a certain
Bean<T> instance. When we’re injecting, the type into which we inject, together with any
explicit or implicit qualifiers, forms an alternative key that’s being used for this lookup.
Both types of keys will result in the exact same CDI Bean<T> instance being used.
It should be noted that compared to the implicit EL objects mentioned in Table8-1 a
few are missing for CDI-injectable JSF vended types, namely:
• #{component}
• #{cc}
• #{request}
• #{session}
• #{application}
CHAPTER 8 BACKING BEANS

310
Both #{component} and #{cc} resolve to UIComponent which is not injectable, since
this would require a special proxy or custom scope that’s narrow enough to resolve the
“current” instance of those at the time the injected type is accessed. Since such scope is
not available in JSF yet, and there was only a little time and few resources remaining to
finish the JSF 2.3 spec, these had been excluded from CDI injection.
The #{request}, #{session}, and #{application}, respectively, representing
HttpServletRequest, HttpSession, and ServletContext in a Servlet container have
been omitted since these types are not owned by JSF and therefore JSF should not
provide CDI injection capabilities for those. The fact that JSF does provide implicit EL
objects for those is mostly historical. The only specification that should provide injection
for those types is the Servlet API, which owns those types directly.
Table8-1 shows the JSF vended types that are injectable via CDI.
Table 8-1. Injectable JSF Vended types, All Since 2.3
Injectable JSF type Resolves to
javax.faces.context.FacesContext FacesContext#getCurrentInstance( )
javax.faces.context.ExternalContext FacesContext#getExternalContext( )
javax.faces.component.UIViewRoot FacesContext#getViewRoot( )
javax.faces.context.Flash ExternalContext#getFlash( )
@RequestMap Map<String, Object> ExternalContext#getRequestMap( )
@ViewMap Map<String, Object> UIViewRoot#getViewMap( )
@FlowMap Map<Object, Object> FlowHandler#getCurrentFlo wScope( )
@SessionMap Map<String, Object> ExternalContext#getSessionMa p( )
@ApplicationMap Map<String, Object> ExternalContext#getApplicationMap( )
@InitParameterMap Map<String, String> ExternalContext#getInitParameterMap( )
@RequestParameterMap Map<String, String> ExternalContext#getRequestParameterMap( )
@RequestParameterValuesMap Map<String, String[]> ExternalContext#getRequestParameterValuesMap( )
@HeaderMap Map<String, String> ExternalContext#getRequestHeaderMap( )
@HeaderValuesMap Map<String, String[]> ExternalContext#getRequestHeaderValuesMa p( )
@RequestCookieMap Map<String, Cookie> ExternalContext#getRequestCookieMap( )
javax.faces.application.ResourceHandler Application#getResourceHandler( )
CHAPTER 8 BACKING BEANS

311
As can be seen from Table8-1, for objects for which there is only one instance
and that instance is vended (owned) by JSF, no qualifier is needed. When it concerns
more general types, such as the various maps, a qualifier is needed. All these qualifier
annotations are available from the javax.faces.annotation package.13
A caveat is that all of the above types are request scoped, but the time during which
they are valid is actually smaller, namely, from shortly after the moment the service()
method of the FacesServlet is called until shortly before the moment that method is
exited. Care should be taken not to inject and access these types outside that time. It’s
expected that a future revision of the JSF spec will address this problem.
The following shows an example of injecting two of the JSF vended types:
@Named @RequestScoped
public class Bean {
@Inject
private Flash flash;
@Inject @RequestParameterMap
private Map<String, String> requestParameterMap;
public void someMethod() {
if (requestParameterMap.containsKey("something")) {
flash.put("aKey", "aValue");
}
}
}
Eager Initialization
Managed beans are by default lazily initialized whenever they are, for the first time,
referenced in an EL expression or as an injected dependency. Managed beans can be
eagerly initialized on the start of any scope by an observer method which observes
the initialization of the scope of interest. One example was previously given in the
“@ViewScoped” section. The method pattern is as follows:
13 https://javaee.github.io/javaee-spec/javadocs/javax/faces/annotation/package-
summary.html.
CHAPTER 8 BACKING BEANS
312
public void startup(@Observes @Initialized(XxxScoped.class) S scope) {
// ...
}
Where XxxScoped.class can be any CDI-compatible scope and the S represents the
owner of the scope. For the following scopes that are thus:
• ApplicationScoped.class– javax.servlet.ServletContext
• SessionScoped.class– javax.servlet.http.HttpSession
• ConversationScoped.class– javax.servlet.ServletRequest
• FlowScoped.class– javax.faces.flow.Flow
• ViewScoped.class– javax.faces.component.UIViewRoot
• RequestScoped.class- javax.servlet.ServletRequest
Note that the containing bean must be of at least the same scope in order to have @
Observes @Initialized take effect. Eager initialization has for an application-scoped
managed bean the advantage that you can configure it as a “startup” bean without
needing to reference it in some other bean in order to get it initialized.
@ApplicationScoped
public class Startup {
public void contextInitialized
(@Observes @Initialized(ApplicationScoped.class)
ServletContext context)
{
// ...
}
}
Eager initialization has for a request-scoped bean the advantage that you can if
necessary invoke an asynchronous DB query long before the FacesServlet is invoked.
@Named @RequestScoped
public class EagerProducts {
private Future<List<Product>> list;
CHAPTER 8 BACKING BEANS
313
@Inject
private ProductService productService;
public void requestInitialized
(@Observes @Initialized(RequestScoped.class)
HttpServletRequest request)
{
if ("/products.xhtml".equals(request.getServletPath())) {
list = productService.asyncList();
}
}
public List<Product> getList() {
try {
return list.get();
}
catch (InterruptedException e) {
Thread.currentThread().interrupt();
throw new FacesException(e);
}
catch (ExecutionException e) {
throw new FacesException(e);
}
}
}
Where the ProductService looks like this:
@Stateless
public class ProductService {
@TransactionAttribute(SUPPORTS)
public List<Product> list() {
return entityManager
.createQuery("FROM Product ORDER BY id DESC", Product.class)
.getResultList();
}
CHAPTER 8 BACKING BEANS
314
@Asynchronous
public Future<List<Product>> asyncList() {
return new AsyncResult<>(list());
}
}
Note particularly the requestInitialized() method which observes the start of any
request scope and thus needs to determine the actual path beforehand so that it doesn’t
unnecessarily hit the business service. In this specific example, that will only happen
once the request hits /products.xhtml. That JSF page can in turn just reference the
product list as usual.
<h:dataTable value="#{eagerProducts.list}" var="product">
...
</h:dataTable>
When opening this JSF page, the request scoped bean will be initialized before
the FacesServlet is invoked and asynchronously fetch the List<Products> from the
database. Depending on the server hardware used, the available server resources and
all code running between the invocation of the first servlet filter and entering the JSF
render response, this approach may give you a time space of 10ms ~ 500ms (or perhaps
even more when there’s some inefficient code in the pipeline) to fetch data from DB
in a different thread parallel with the HTTP request, and thus a speed improvement
equivalent to the time the DB needs to fetch the data (which thus doesn’t need to be
done in the same thread as the HTTP request).
Layers
While implementing backing beans, it’s very important to understand the importance of
the separation of the JSF backing bean from the JPA entity and the EJB service. In other
words, when developing backing beans, you should make sure that your backing beans
are as slick as possible and that they delegate as much as possible model properties to
JPA entities and business logic to EJB services. You should realize that JPA entities and
EJB services should be fully reusable on a completely different front end than JSF, such as
JAX-RS or even plain JSP/Servlet.
CHAPTER 8 BACKING BEANS
315
This thus also means that you should make sure that you don’t directly or indirectly
include a JSF-specific dependency in a JPA entity or an EJB service. For example, the
following approach is factually wrong:
@Entity
public class Product {
private String name;
private String description;
public static Product of(ProductBacking backingBean) {
Product product = new Product();
product.setName(backingBean.getName());
product.setDescription(backingBean.getDescription());
return product;
}
// ...
}
Here, the JPA entity is tightly coupled to a JSF backing bean. Not only are the entity
properties reused in the backing bean, but also the entity has a dependency on the
backing bean. It wouldn’t be possible to extract the entity into a JAR module which is
reusable across different JSF web applications.
And the following approach is also factually wrong:
@Stateless
public class ProductService {
@Inject
private EntityManager entityManager;
public void create(Product product) {
entityManager.persist(product);
FacesContext.getCurrentInstance().addMessage(null,
new FacesMessage("Product created!"));
}
}
CHAPTER 8 BACKING BEANS
316
Here, the EJB pokes the faces context and sets a message there. This would fail with
a NullPointerException when the EJB method is being invoked from, e.g., a JAX-RS
service or a Servlet, because there’s no instance of the faces context anywhere over there.
This UI messaging task is not the responsibility of the back-end code but of the front-
end code. In other words, adding a faces message should only happen in the JSF artifact,
such as a backing bean.
The correct approach is as follows, as demonstrated previously in the section
“Model, View, or Controller?”:
@Named @RequestScoped
public class ProductBacking {
private Product product = new Product();
@Inject
private ProductService productService;
public void save() {
productService.create(product);
FacesContext.getCurrentInstance().addMessage(null,
new FacesMessage("Product created!"));
}
public Product getProduct() {
return product;
}
}
Naming Conventions
There is no strict convention specified by JSF itself. I’ve seen the following conventions
across various JSF projects:
• Foo
• FooBean
• FooBacking
• FooBackingBean
CHAPTER 8 BACKING BEANS
317
• FooManager
• FooManagedBean
• FooController
whereby Foo can in turn represent one of the following:
• JSF view ID,
e.g., EditProduct for /edit/product.xhtml
• JSF view name,
e.g., Products for /view/products.xhtml
• JPA entity name,
e.g., Product for @Entity class Product
• JSF form ID,
e.g., EditProduct for <h:form id="editProduct">
First and foremost, names ending with Bean like FooBean, FooBackingBean, and
FooManagedBean must be avoided to all extent. The “bean” suffix is superfluous and
too ambiguous as practically any class in Java can be marked as a JavaBean. You don’t
immediately use “ProductBean” for your JPA entity or “ProductServiceBean” or
even “ProductServiceEnterpriseBean” for your EJB service, right? True, #{bean} or
#{myBean} or even #{yourBean} to indicate a JSF or CDI managed bean is very often
used across generic code examples in blogs, forums, Q&A sites, and even this book. But
this is merely done for clarity and simplicity of the code snippets.
That leaves us with Foo, FooBacking, FooManager, and FooController. All are
equally acceptable. Personally, I tend to use FooBacking for request-, view-, flow-, and
conversation-scoped beans, and FooManager for session- and application-scoped beans.
As to the naming convention of Foo part, that generally depends on whether the backing
bean is tightly tied to a particular JSF view or a JSF form, or generally reusable across
multiple JSF views or forms referring a particular entity.
In any case, this is a pretty subjective item which can hardly be answered objectively
with “the One and Correct” answer. It really doesn’t matter that much to me or anyone
else what you make of it, as long as you’re consistent with it throughout the entire
project.
CHAPTER 8 BACKING BEANS
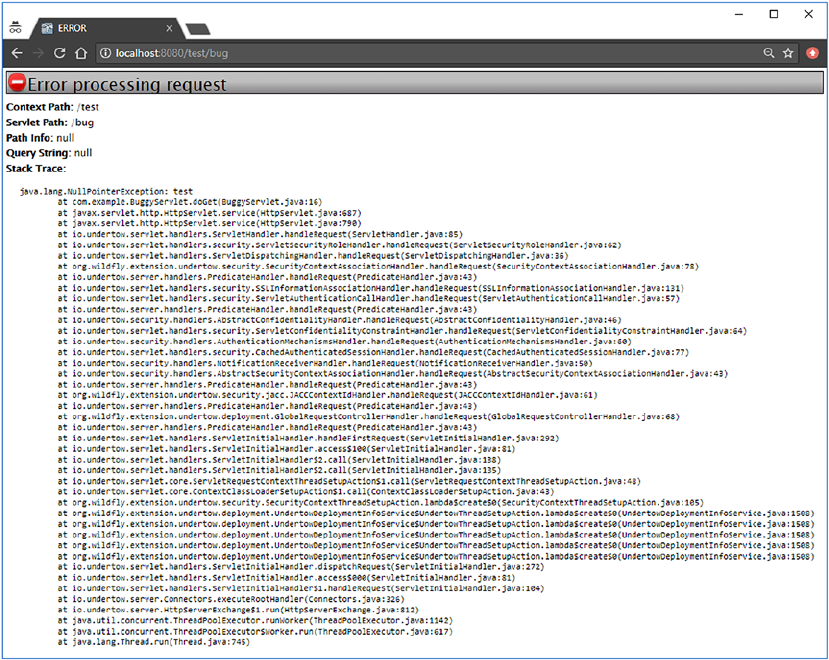
319
© Bauke Scholtz, Arjan Tijms 2018
B. Scholtz and A. Tijms, The Definitive Guide to JSF in Java EE 8, https://doi.org/10.1007/978-1-4842-3387-0_9
CHAPTER 9
Exception Handling
Sometimes things can unexpectedly go wrong. In Java, that usually manifests as an
Exception being thrown. In Java EE, it’s basically no different. The issue is how and when
to properly handle them. By default, any uncaught exception during an HTTP request
will end up in a default error page provided by the application server. Figure9-1 shows
what WildFly’s default HTTP 500 error page looks like:
Figure 9-1. The default HTTP 500 error page of WildFly 11.0.0
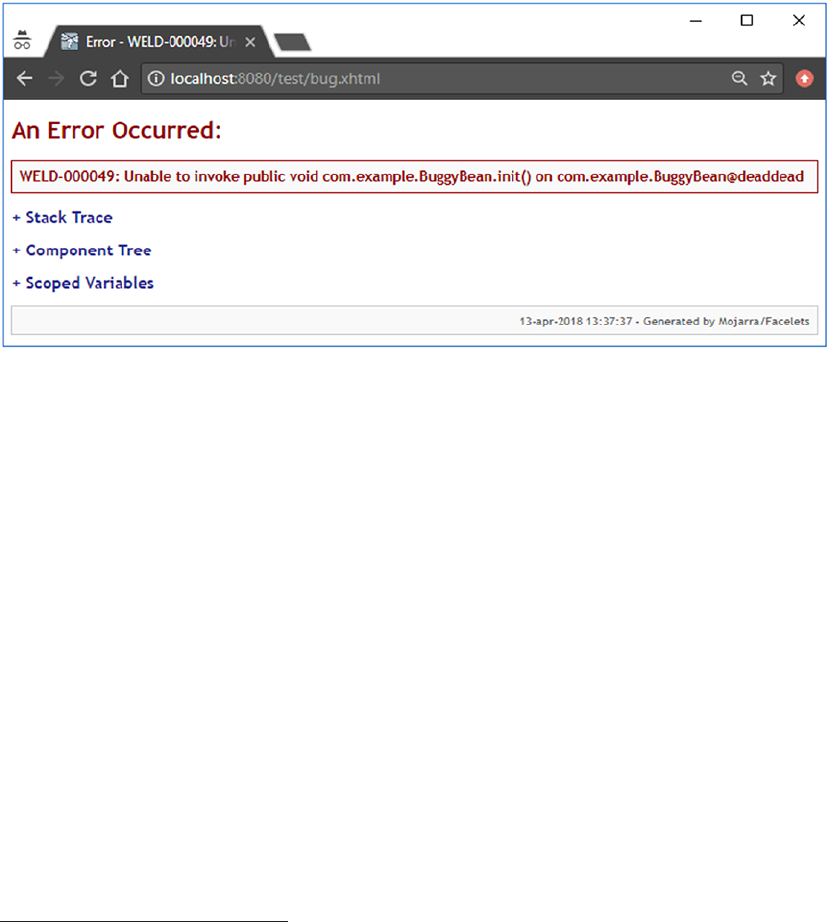
320
The JSF (JavaServer Faces) implementation being used may even provide its
own default error page. Both Mojarra and MyFaces provide an internal default
implementation based on the javax.faces.context.ExceptionHandler API,1 which is
only shown when the JSF project stage is set to Development. Figure9-2 shows how that
page looks for Mojarra.
It not only includes the stack trace but also the textual representation of the JSF
component tree and any scoped variables, which might be helpful in nailing down the
root cause, although, in reality, the stack trace alone and re-executing the use case with a
debugger is much more helpful than that.
Custom Error Pages
While useful to the average web developer, those default error pages are, quite frankly,
scary to the average end user. The “look ’n’ feel” is completely off from the rest of the site
and the text is like abracadabra to the average end user. Such an error page doesn’t even
provide escape points for the end user. The disgruntled end user cannot quickly find its
way to the home or contact page. Fortunately for the end user, you can override those
default error pages by including an error page in the web application and registering its
location in an <error-page> entry in web.xml.
1 https://javaee.github.io/javaee-spec/javadocs/javax/faces/context/
ExceptionHandler.html.
Figure 9-2. The default HTTP 500 error page of Mojarra 2.3.3in development stage
Chapter 9 exCeption handling

321
<error-page>
<error-code>500</error-code>
<location>/WEB-INF/errorpages/500.xhtml</location>
</error-page>
The custom error page is purposefully being placed in a /WEB-INF folder so that
end users can’t access or bookmark them directly. By default, the servlet container will
set error page related attributes in the request scope whose keys are defined as javax.
servlet.RequestDispatcher.ERROR_XXX constants.2 This way you can, if necessary,
include them in the custom error page. Following is an example:
<dl>
<dt>Request URI</dt>
<dd>#{requestScope['javax.servlet.error.request_uri']}</dd>
<dt>Exception type</dt>
<dd>#{requestScope['javax.servlet.error.exception']['class']}</dd>
<dt>Exception message</dt>
<dd>#{requestScope['javax.servlet.error.exception'].message}</dd>
<dt>Stack trace</dt>
<dd><pre>#{
facesContext.externalContext.response.writer.flush()
}#{
requestScope['javax.servlet.error.exception'].printStackTrace
(facesContext.externalContext.response.writer)
}</pre></dd>
</dl>
Note the trick to print the stack trace. It’s important that the response writer is
flushed before printing the stack trace, and that there’s no whitespace in template text
outside the EL (Expression Language) expressions within the <pre> element, otherwise
it would be appended to the stack trace.
2 https://javaee.github.io/javaee-spec/javadocs/javax/servlet/RequestDispatcher.
html#ERROR_EXCEPTION.
Chapter 9 exCeption handling
322
Coming back to the scariness of such an error page, you’d better hide away all the
error detail behind a condition that evaluates only true when the JSF project stage equals
Development. First set an application-scoped shortcut variable in some master template:
<c:set var="DEV" scope="application"
value="#{facesContext.application.projectStage eq 'Development'}">
</c:set>
Now you can conditionally display technical information in the error page when the
JSF project stage equals Development.
<c:if test="#{DEV}">
<h3>Error detail for developer</h3>
<dl>
...
</dl>
</c:if>
In any case, it’s very important that the error page is entirely stateless. In other words,
a decent error page may not contain any JSF forms, not even a logout form. Not only will
you avoid the risk that the form submit fails because the initial exception was actually
caused by a corrupted JSF state, but those forms will actually submit to the wrong URL
(uniform resource locator), namely, the one of the error page itself. As the error page is
hidden in the /WEB-INF folder, the form submit would only result in a 404 error. Instead
of moving the error page outside the /WEB-INF folder, you could work around the logout
case by using a plain HTML form which submits to a plain Servlet. The SecurityContext
is also just injectable over there, as are session-scoped managed beans, if any.
Ajax Exception Handling
By default, when an exception occurs during a JSF Ajax request, the end user would
not get any form of feedback whether or not the action was successfully performed. In
Mojarra, only when the JSF project stage is set to Development, the end user would see a
bare JavaScript alert with only the exception type and message (see Figure9-3).
Chapter 9 exCeption handling
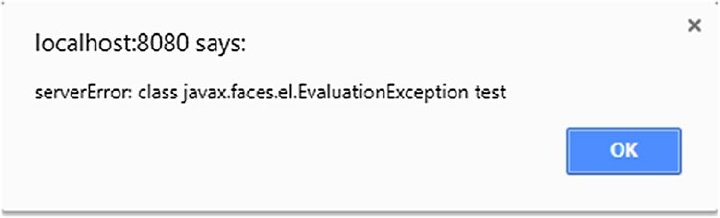
323
This isn’t terribly useful. And in the Production stage the end user wouldn’t even
get any feedback. The web application would fail silently, leaving the end user behind
as if nothing had happened, which is just confusing and bad for user experience. It
would make more sense if exceptions during JSF Ajax requests are handled the same
way as exceptions during synchronous requests, which reuse exactly the same error
page as the one declared as <error-page> in web.xml. In other words, the end user
should be able to see the error page in full glory. This can be achieved by creating a
custom ExceptionHandler implementation which basically instructs JSF to create a new
UIViewRoot based on the error page and then build and render it. It’s only quite a bit of
code. At its simplest it can look as follows:
public class AjaxExceptionHandler extends ExceptionHandlerWrapper {
public AjaxExceptionHandler(ExceptionHandler wrapped) {
super(wrapped);
}
@Override
public void handle() {
handleAjaxException(FacesContext.getCurrentInstance());
getWrapped().handle();
}
protected void handleAjaxException(FacesContext context) {
Iterator<ExceptionQueuedEvent> unhandledExceptionQueuedEvents =
getUnhandledExceptionQueuedEvents().iterator();
Figure 9-3. The JavaScript alert when an exception is thrown during an Ajax
request in Mojarra 2.3.3in Development stage
Chapter 9 exCeption handling
324
if (context == null
|| context.getExternalContext().isResponseCommitted()
|| !context.getPartialViewContext().isAjaxRequest()
|| !unhandledExceptionQueuedEvents.hasNext()
) {
return;
}
Throwable exception = unhandledExceptionQueuedEvents
.next().getContext().getException();
while (exception.getCause() != null
&& (exception instanceof FacesException
|| exception instanceof ELException)
) {
exception = exception.getCause();
}
ExternalContext external = context.getExternalContext();
String uri = external.getRequestContextPath()
+ external.getRequestServletPath();
Map<String, Object> requestScope = external.getRequestMap();
requestScope.put(RequestDispatcher.ERROR_REQUEST_URI, uri);
requestScope.put(RequestDispatcher.ERROR_EXCEPTION, exception);
String viewId = "/WEB-INF/errorpages/500.xhtml";
Application application = context.getApplication();
ViewHandler viewHandler = application.getViewHandler();
UIViewRoot viewRoot = viewHandler.createView(context, viewId);
context.setViewRoot(viewRoot);
try {
external.responseReset();
ViewDeclarationLanguage viewDeclarationLanguage =
viewHandler.getViewDeclarationLanguage(context, viewId);
viewDeclarationLanguage.buildView(context, viewRoot);
context.getPartialViewContext().setRenderAll(true);
viewDeclarationLanguage.renderView(context, viewRoot);
Chapter 9 exCeption handling
325
context.responseComplete();
}
catch (IOException e) {
throw new FacesException(e);
}
finally {
requestScope.remove(RequestDispatcher.ERROR_EXCEPTION);
}
unhandledExceptionQueuedEvents.remove();
while (unhandledExceptionQueuedEvents.hasNext()) {
unhandledExceptionQueuedEvents.next();
unhandledExceptionQueuedEvents.remove();
}
}
public static class Factory extends ExceptionHandlerFactory {
public Factory(ExceptionHandlerFactory wrapped) {
super(wrapped);
}
@Override
public ExceptionHandler getExceptionHandler() {
return new AjaxExceptionHandler
(getWrapped().getExceptionHandler());
}
}
}
The handleAjaxException() will first check if there is a faces context, if the response
isn’t yet committed, if the request is an Ajax request, and if there’s any unhandled
exception event in the queue. If none of those conditions matches, it will return and let
JSF continue as usual.
Chapter 9 exCeption handling
326
The HTTP response is considered committed when the response or a part thereof has
physically already been sent to the client. This is a point of no return. You can’t take the
already sent bytes back. This may happen when the exception occurs halfway during the
render response phase. The first half of the HTTP response may already have been sent to the
client. Also the default exception handler of JSF and the server can’t deal with it. Effectively,
the client gets a half-baked HTML page. Best what you could do to avoid this is to make
sure that you aren’t performing business logic in getter methods of backing beans, which
on its own is always a bad idea, and that backing beans are initialized as soon as possible.
That could be achieved by executing exception- sensitive business logic in <f:viewAction>
instead of @PostConstruct. Another option is to increase the HTTP response buffer size
to match the size of the generated HTML response of the largest exception-sensitive page.
Assuming that it’s 100 kB, the following web.xml context parameter can be used.
<context-param>
<param-name>javax.faces.FACELETS_BUFFER_SIZE</param-name>
<param-value>102400</param-value> <!-- 100 kB. -->
</context-param>
The next step in handleAjaxException() is extracting the root cause of interest from
the unhandled exception events queue. Any exception that occurs during the processing
of the JSF life cycle will be wrapped in javax.faces.FacesException. Any exception
that occurs during the evaluation of an EL expression will be wrapped in javax.
el.ELException. Those are not our interest.
Next, the #{requestScope['javax.servlet.error.request_uri']} and
#{requestScope['javax.servlet.error.exception']} variables will be set so that the
error page can access them. Also the UIViewRoot instance representing the error page
will be created with help of the ViewHandler and set in the JSF context. You could, if
necessary, conditionally prepare the view ID of the error page based on the actual root
cause of the exception. For example:
String viewId;
if (exception instanceof ViewExpiredException) {
viewId = "/WEB-INF/errorpages/expired.xhtml";
}
else {
viewId = "/WEB-INF/errorpages/500.xhtml";
}
Chapter 9 exCeption handling

327
Coming back to the handleAjaxException(), in the try block, the HTTP response
buffer will be cleared, the UIViewRoot will be populated with components, the Ajax
context will be instructed to render the entire view, the UIViewRoot will be rendered,
the JSF context will be instructed that the response is already manually taken care of so
that it won’t perform any navigation, and finally the exception will be removed from the
request scope. The removal of the exception in the finally block is not mandatory, but
servlet containers exist which consider this a trigger to write an internal error page to the
response, such as Tomcat.
Finally, the queue of unhandled exception events will be drained. This is also not
mandatory but done on purpose so that it matches the default behavior of web.xml-
configured error pages, and also to prevent any next ExceptionHandler in the chain
from handling any remaining exception events.
In order to get it to run, you actually need to create a factory as well. As many
other application-wide customizations in JSF, custom exception handlers can only be
registered through a factory. It might look verbose, but that’s just part of the design. In
this specific case, it allows you to return a different exception handler implementation
depending on some global configuration setting. You can find the Factory as a nested
class in the bottom of the previously shown AjaxExceptionHandler class. It extends from
javax.faces.context.ExceptionHandlerFactory3 and can be registered in faces-
config.xml as follows:
<factory>
<exception-handler-factory>
com.example.project.exceptionhandler.AjaxExceptionHandler$Factory
</exception-handler-factory>
</factory>
By the way, it must be said that such an exception handler is also suitable on non-
Ajax requests. You just have to remove the PartialViewContext#isAjaxRequest()
check. You only need to keep in mind to manually set the HTTP response status code to
500 depending on whether or not it’s an Ajax request. Do this after the ExternalContext
#responseReset() line.
3 https://javaee.github.io/javaee-spec/javadocs/javax/faces/context/
ExceptionHandlerFactory.html.
Chapter 9 exCeption handling
328
if (!context.getPartialViewContext().isAjaxRequest()) {
external.setResponseStatus
(HttpServletResponse.SC_INTERNAL_SERVER_ERROR);
}
When you do so on an Ajax request, the JSF Ajax script won’t process the Ajax
response as you’d expect. Instead of displaying the error page, it will trigger the onerror
handler.
ViewExpiredException Handling
If you’ve worked with JSF before, then the chance is great that you’ve seen or heard
about a ViewExpiredException. To the point, it will be thrown when the JSF view state
associated with the postback cannot be found in the HTTP session any more—in other
words, when the javax.faces.STATE_SAVING_METHOD context parameter is set to its
default value of “server”, and the end user submits a JSF form whose view state cannot
be found any more on the server side. Note that when the context parameter is set to
“client”, you still need a “jsf/ClientSideSecretKey” environment entry in order to
avoid expired views when the server restarts. This all is elaborated in the section “View
State” in Chapter 3. Also, in the section “@ViewScoped” in Chapter 8, you can find how to
configure the amount of views and managed beans JSF will save in the HTTP session.
There are several circumstances where a ViewExpiredException may unexpectedly
occur. All of them are related to page navigation and the browser cache while the end
user has recently logged out from the web application. Normally, the HTTP session is,
during logout, invalidated as a security measure, and the end user is redirected to some
landing page. When the previously visited web page is cacheable, and the end user
presses the browser’s back button after logout, then the end user may successfully get to
see the previously visited web page from the browser cache. If it contains any JSF form,
then its javax.faces.ViewState hidden input field will actually refer a view state which
does not exist in the current session any more. When the end user submits such JSF
form, then JSF will inevitably throw a ViewExpiredException.
Although this is an excellent security measure, the end user may get confused as the
previously visited web page actually got successfully loaded in end user’s experience.
This is not good for user experience. You’d therefore best make sure that stateful JSF
pages are not cacheable, so that the web browser is forced to actually hit the web server
when the end user presses the back button and thus load a fresh new page with a view
Chapter 9 exCeption handling
329
state which is actually valid in the current HTTP session. This can be achieved with a
servlet filter which sets specific response headers which instruct the client not to cache
the HTTP response. Following is an example of such a servlet filter:
@WebFilter(servletNames="facesServlet")
public class NoCacheFilter implements Filter {
@Override
public void doFilter
(ServletRequest req, ServletResponse res, FilterChain chain)
throws IOException, ServletException
{
HttpServletRequest request = (HttpServletRequest) req;
HttpServletResponse response = (HttpServletResponse) res;
String resourcePath = request.getContextPath()
+ ResourceHandler.RESOURCE_IDENTIFIER;
if (!request.getRequestURI().startsWith(resourcePath)) {
response.setHeader
("Cache-Control", "no-store, must-revalidate");
}
chain.doFilter(request, response);
}
}
Basically, it hooks on all requests which are going to hit the FacesServlet, provided
that it’s configured on a servlet name of “facesServlet” in web.xml as follows:
<servlet>
<servlet-name>facesServlet</servlet-name>
<servlet-class>javax.faces.webapp.FacesServlet</servlet-class>
</servlet>
Alternatively, if you have divided your web application into a public area with only
stateless JSF pages and a restricted area with only stateful JSF pages, then you could also
map this filter on a specific URL pattern which matches only the stateful section, such as
/admin/*.
@WebFilter("/admin/*")
Chapter 9 exCeption handling
330
The filter example checks first if the HTTP request doesn’t represent a JSF resource
request before setting the cache control header. Those requests are identified by
the /javax.faces.resource path after the context path, which is available by the
ResourceHandler#RESOURCE_IDENTIFIER constant. This is automatically used when
you use a JSF resource component, such as <h:graphicImage>, <h:outputScript>, or
<h:outputstyleSheet>. (See also the section “Resource Components” in Chapter 6.)
You don’t want to disable the browser cache on them as that would otherwise impact the
page loading performance.
The cache control header being set is actually only recognized by HTTP 1.1-capable
clients. HTTP 1.1 was introduced in 1997. In case you would like to cover HTTP 1.0
clients as well, which these days are generally only ancient proxies or poor users who
can’t get something better than Internet Explorer 6.0, then you’d best add two more
response headers.
response.setHeader("Pragma", "no-cache"); // HTTP 1.0.
response.setDateHeader("Expires", 0); // Proxies.
Now, with this filter in place, the end user won’t any more get to see any JSF page
from the browser cache and thus can no longer get a ViewExpiredException on them.
However, there are still cases where a ViewExpiredException is unavoidable. One such
case is an end user who has several JSF pages open in different browser tabs and logs out
in one of them and then performs an action in another tab without refreshing the page
beforehand. For such a case, you’d really need a “Sorry, your session has timed out” error
page. This can easily be configured as another error page in web.xml as follows:
<error-page>
<exception-type>
javax.faces.application.ViewExpiredException
</exception-type>
<location>/WEB-INF/errorpages/expired.xhtml</location>
</error-page>
Do not let it point to a public JSF page, such as a login page. In case you really need
it to be a public JSF page, use a meta refresh header in the error page which redirects the
end user further to a public JSF page.
Chapter 9 exCeption handling
331
<!DOCTYPE html>
<html lang="en">
<head>
<title>Session expired</title>
<meta http-equiv="refresh"
content="0;url=#{request.contextPath}/login.xhtml" />
</head>
<body>
<h1>Sorry, your session has timed out</h1>
<h3>You will be redirected to login page</h3>
<p>
<a href="#{request.contextPath}/login.xhtml">
Click here if the redirect didn't work,
or when you’re impatient.
</a>
</p>
</body>
</html>
Note that the “0” in the meta refresh content represents the amount of seconds
before redirect. Thus, “0” means “redirect immediately.” You can use, for example, “3” to
let the browser wait 3 seconds before the redirect.
Keep in mind also to configure this location in any custom exception handler
such as the AjaxExceptionHandler demonstrated in the previous section. You also
need to make sure that your “general” error page is mapped on an error code of 500
instead of an exception type of, e.g., java.lang.Exception or java.lang.Throwable;
otherwise all exceptions wrapped in ServletException would still end up in the
general error page. JSF will wrap any exception in a ServletException when it’s
thrown during a synchronous (non-Ajax) postback instead of an asynchronous (Ajax)
postback. The web.xml error page mechanism will only extract the root cause from the
ServletException for a second pass through error pages by exception type when no
matching error page by exception type is found.
A completely different alternative to avoid ViewExpiredException is to use stateless
JSF views. This way nothing of the JSF view state will be saved and the JSF views will
never expire but will just be rebuilt from scratch on every request. You can turn on
stateless views by setting the transient attribute of <f:view> to true. This is elaborated
in the section “Stateless Forms” in Chapter 4.
Chapter 9 exCeption handling
332
Regardless of the solution, make sure you do not use the Mojarra-specific
com.sun.faces.enableRestoreView11Compatibility context parameter. This will
basically turn on JSF 1.0/1.1 behavior with regard to expired views. It won’t throw
the ViewExpiredException any more, but neither does it actually restore the original
view state at all. It basically recreates the view and all associated view scoped beans
from scratch and hereby thus loses all of original state. As the application will
behave in a confusing way (“Hey, where are my input values..??”), this is bad for
user experience. Better use stateless JSF views instead so that you can manage the
application in specific views only instead of for all views.
IOException Handling
Some methods of the underlying HttpServletRequest and HttpServletResponse objects
may throw an IOException. Usually, that only happens when the network connection
unexpectedly breaks: for example, when the end user abruptly stops the HTTP request
by pressing the Esc button in the web browser, or the end user abruptly navigates to a
different web page while the current page is still loading, or even when the end user’s
computer or network cable catches fire. Those circumstances are really unavoidable. For
you, as web application developer, it’s best to let any IOException bubble up into the
servlet container. In other words, there’s absolutely no need to catch it as follows:
public void someAjaxListener() {
try {
FacesContext.getCurrentInstance()
.getExternalContext().redirect(url);
}
catch (IOException e) {
throw new UncheckedIOException(e);
}
}
Instead, just let it go.
public void someAjaxListener() throws IOException {
FacesContext.getCurrentInstance()
.getExternalContext().redirect(url);
}
Chapter 9 exCeption handling
333
EJBException Handling
Sometimes, invoking service methods may also cause an exception. Generally, those
are on purpose, such as “entity not found,” “unique constraint violation,” “invalid user
credentials”, “entity is in meanwhile modified by another user,” etc. By default, any non-
application- specific RuntimeException, such as NullPointerException and even JPA’s
PersistenceException which is thrown from an EJB service method, is wrapped in an
EJBException. This makes it clumsy to nail down the actual root cause in the JSF action
method.
public void addProduct() {
FacesMessage message;
try {
Long id = productService.create(product);
message = new FacesMessage(FacesMessage.SEVERITY_INFO,
"Product successfully saved", "ID is " + id);
}
catch (EJBException e) {
if (e.getCause() instanceof ConstraintViolationException) {
message = new FacesMessage(FacesMessage.SEVERITY_ERROR,
"Duplicate product!", e.getMessage());
context.validationFailed();
}
else {
throw e;
}
}
context.addMessage(null, message);
}
This is not the best practice. Not only would you need to determine the root cause
of the EJB exception by inspecting Exception#getCause(), the web.xml error page
mechanism would also not be able to show a specific error page for, for example, a
Chapter 9 exCeption handling

334
ConstraintViolationException, because it’s wrapped in an EJBException. In order to
get EJB to throw it unwrapped, you need to create a custom exception superclass first
which you then annotate with @javax.ejb.ApplicationException.4
@ApplicationException(rollback=true)
public abstract class BusinessException extends RuntimeException {
public BusinessException() {
super();
}
public BusinessException(Exception cause) {
super(cause);
}
}
Note the rollback=true attribute on the annotation. This is very important in case you’d
like the EJB container to roll back any active transaction from where this exception is being
thrown. Following are some examples of subclasses of this custom business exception.
public abstract class QueryException extends BusinessException {}
public class EntityNotFoundException extends QueryException {}
public class DuplicateEntityException extends QueryException {}
public abstract class CredentialsException extends BusinessException {}
public class InvalidUsernameException extends CredentialsException {}
public class InvalidPasswordException extends CredentialsException {}
Note that you don’t necessarily need to repeat the @ApplicationException over all
subclasses as it’s already @Inherited. Following are some concrete use cases on which
those exceptions could be thrown:
public User getById(Long id) {
try {
return entityManager
.createQuery("FROM User u WHERE u.id = :id", User.class)
.setParameter("id", id)
.getSingleResult();
}
4 https://javaee.github.io/javaee-spec/javadocs/javax/ejb/ApplicationException.html.
Chapter 9 exCeption handling
335
catch (NoResultException e) {
throw new EntityNotFoundException(e);
}
}
public Optional<User> findByEmail(String email) {
try {
return Optional.of(entityManager
.createQuery("FROM User u"
+ " WHERE u.email = :email", User.class)
.setParameter("email", email)
.getSingleResult());
}
catch (NoResultException e) {
return Optional.empty();
}
}
public User getByEmailAndPassword(String email, String password) {
User user = findByEmail(email)
.orElseThrow(InvalidUsernameException::new);
Credentials credentials = user.getCredentials();
byte[] passwordHash = digest(password, credentials.getSalt());
if (!Arrays.equals(passwordHash, credentials.getPasswordHash())) {
throw new InvalidPasswordException();
}
return user;
}
public Long create(User user) {
if (findByEmail(user.getEmail()).isPresent()) {
throw new DuplicateEntityException();
}
entityManager.persist(user);
return user.getId();
}
Chapter 9 exCeption handling
336
In the JSF backing bean action methods, you could then handle them accordingly.
public void signup() {
FacesMessage message;
try {
userService.create(product);
message = new FacesMessage("You are successfully signed up!");
}
catch (DuplicateEntityException e) {
message = new FacesMessage(FacesMessage.SEVERITY_ERROR,
"Sorry, username already taken!", e.getMessage());
context.validationFailed();
}
context.addMessage(null, message);
}
In order to further reduce the boilerplate code, you could even let all business
exceptions go and have a custom exception handler to handle them.
public class BusinessExceptionHandler extends ExceptionHandlerWrapper {
public BusinessExceptionHandler(ExceptionHandler wrapped) {
super(wrapped);
}
@Override
public void handle() {
handleBusinessException(FacesContext.getCurrentInstance());
getWrapped().handle();
}
protected void handleBusinessException(FacesContext context) {
Iterator<ExceptionQueuedEvent> unhandledExceptionQueuedEvents =
getUnhandledExceptionQueuedEvents().iterator();
if (context == null
|| !unhandledExceptionQueuedEvents.hasNext()
) {
return;
}
Chapter 9 exCeption handling
337
Throwable exception = unhandledExceptionQueuedEvents
.next().getContext().getException();
while (exception.getCause() != null
&& (exception instanceof FacesException
|| exception instanceof ELException)
) {
exception = exception.getCause();
}
if (!(exception instanceof BusinessException)) {
return;
}
context.addMessage(null, new FacesMessage(
FacesMessage.SEVERITY_FATAL,
exception.toString(),
exception.getMessage()));
context.validationFailed();
context.getPartialViewContext()
.getRenderIds().add("globalMessages");
unhandledExceptionQueuedEvents.remove();
while (unhandledExceptionQueuedEvents.hasNext()) {
unhandledExceptionQueuedEvents.next();
unhandledExceptionQueuedEvents.remove();
}
}
public static class Factory extends ExceptionHandlerFactory {
public Factory(ExceptionHandlerFactory wrapped) {
super(wrapped);
}
Chapter 9 exCeption handling
338
@Override
public ExceptionHandler getExceptionHandler() {
return new BusinessExceptionHandler
(getWrapped().getExceptionHandler());
}
}
}
Yes, it’s indeed similar to the AjaxExceptionHandler as shown in the earlier section
“Ajax Exception Handler.” However, the first difference is that it doesn’t skip handling
the exception when the response is already committed or when it’s not an Ajax request.
The second difference is the logic between extracting the root cause of the exception and
draining the remaining unhandled exception events. This BusinessExceptionHandler
will instead check if the root cause is an instance of BusinessException and if so, it will
add a faces message and instruct JSF to explicitly update the component identified by
“globalMessages”, which should refer to a global messages component in your master
template something like the following:
<h:messages id="globalMessages" globalOnly="true" />
Ultimately, all business exception-related faces messages will end up there. You
might have noticed that the faces context is explicitly marked as “validation failed”
via the FacesContext#validationFailed() call. This is generally useful in case any
code in the Facelet template is relying on it. If you would like to run it together with the
AjaxExceptionHandler for non-business exceptions, then you need to register it in the
faces-config.xml after the AjaxExceptionHandler. Anything that is declared later in
the faces-config.xml will effectively wrap the previously declared one. This also
applies to custom exception handler factories. When the BusinessExceptionHandler
confirms that the exception is not an instance of BusinessException, then it will
leave the unhandled exception in the queue and return from the method and finally
delegate to the handle() method of the wrapped ExceptionHandler, which shall be the
AjaxExceptionHandler.
Chapter 9 exCeption handling
339
<factory>
<exception-handler-factory>
com.example.project.AjaxExceptionHandler$Factory
</exception-handler-factory>
<exception-handler-factory>
com.example.project.BusinessExceptionHandler$Factory
</exception-handler-factory>
</factory>
With the BusinessExceptionHandler in place, you could further reduce the backing
bean action method as follows:
public void signup() {
userService.create(product);
context.addMessage(null,
new FacesMessage("You are successfully signed up!");
}
Chapter 9 exCeption handling
341
© Bauke Scholtz, Arjan Tijms 2018
B. Scholtz and A. Tijms, The Definitive Guide to JSF in Java EE 8, https://doi.org/10.1007/978-1-4842-3387-0_10
CHAPTER 10
WebSocket Push
JSF 1.0 introduced HTML form-based POST action support. JSF 2.0 introduced AJAX- based
POST support. JSF 2.0 introduced GET query string parameter mapping support. JSF 2.2
introduced GET-based action support. JSF 2.3 introduces WebSocket support.
JSF’s WebSocket support is represented by the new <f:websocket> tag, the
PushContext interface, and the @Push annotation. It is built on top of the JSR-356
WebSockets specification, introduced in Java EE 7. Therefore, it is technically possible to
use it in a Java EE 7 environment as well. JSR-356 is even natively supported in Tomcat
since 7.0.27 and in Jetty since 9.1.0.
In Mojarra, the <f:websocket> has an additional Java EE 7 dependency: JSON-P
(JSR-353). In case you’re targeting Tomcat or Jetty instead of a Java EE application server,
you might need to install it separately. JSON-P is internally used to convert Java objects
to a JSON string so that it can, without much hassle, be transferred to the client side and
be provided as an argument of JavaScript listener function attached to <f:websocket>.
Configuration
The JSR-356 WebSocket specification does not officially support programmatic
initialization of the socket end point during runtime. So we cannot initialize it by simply
declaring <f:websocket> in the view and wait until a JSF page referencing it is being
opened for the first time. We really need to initialize it explicitly during deployment time.
We could do that by default, but having an unused WebSocket end point open forever
is not really nice if it’s never used by the web application. So we cannot avoid having a
context parameter to explicitly initialize it during deployment time.
<context-param>
<param-name>javax.faces.ENABLE_WEBSOCKET_ENDPOINT</param-name>
<param-value>true</param-value>
</context-param>

342
If you prefer programmatic initialization over declarative initialization, then you can
always use ServletContext#setInitParameter() in a ServletContainerInitializer
of your web fragment library as follows:
public class YourInitializer implements ServletContainerInitializer {
@Override
public void onStartup(Set<Class<?>> types, ServletContext context) {
context.setInitParameter(
PushContext.ENABLE_WEBSOCKET_ENDPOINT_PARAM_NAME, "true");
}
}
Note that it is not possible to perform this task in a ServletContextListener as JSF
will actually register the WebSocket end point in its own ServletContainerInitializer
implementation which always runs before any ServletContextListener.
Once the WebSocket end point is enabled and successfully initialized during
deployment, it will listen for WebSocket handshake requests on the URL (uniform
resource locator) pattern /javax.faces.push/*. The first path element will represent
the WebSocket channel name.
Coming back to “officially,” some WebSocket implementations do, however, support
programmatic initialization, such as the one provided by Undertow, which is in turn
used in WildFly. Unfortunately, the spec doesn’t say so, and there may be WebSocket
implementations that simply do not support programmatic initialization, such as Tyrus
as used in Payara.1
The WebSocket container will, by default, listen for handshake requests on the same
port as the application server is listening for HTTP requests. You can optionally change
the port with another web.xml context parameter,
<context-param>
<param-name>javax.faces.WEBSOCKET_ENDPOINT_PORT</param-name>
<param-value>8000</param-value>
</context-param>
1 https://github.com/javaee/websocket-spec/issues/211.
Chapter 10 WebSoCket puSh
343
or programmatically in a ServletContainerInitializer:
context.setInitParameter(
PushContext.WEBSOCKET_ENDPOINT_PORT_PARAM_NAME, "8000");
Usage
In your JSF page, just declare the <f:websocket> tag along with the required channel
attribute representing the channel name and the optional onmessage attribute
representing a reference to a JavaScript function.
<f:websocket channel="test" onmessage="logMessage" />
<script>
function logMessage(message, channel, event) {
console.log(message);
}
</script>
The JavaScript function will be invoked with three arguments.
1. message: the push message as JSON object.
2. channel: the WebSocket channel name. is may be useful in case
you intend to have a global listener, or want to manually control
the close of the WebSocket.
3. event: the original MessageEvent object. This may be useful in
case you intend to inspect it in the JavaScript function.
On the WAR side, you can inject the PushContext via the @Push annotation in any
web artifact that supports CDI injection. This can be a simple CDI managed bean, but it
can also be a @WebServlet, @WebFilter or @WebListener.
import javax.inject.Named;
import javax.enterprise.context.RequestScoped;
import javax.inject.Inject;
import javax.faces.push.Push;
import javax.faces.push.PushContext;
Chapter 10 WebSoCket puSh
344
@Named @RequestScoped
public class Bean {
@Inject @Push
private PushContext test;
public void submit() {
test.send("Hello World!");
}
}
The PushContext variable name test must match the channel name declared in the
JSF page. In case you cannot match the variable name with the channel name, you can
always specify the channel name in the optional channel attribute of the @Push annotation.
@Inject @Push(channel="test")
private PushContext foo;
Once the submit() method of the bean shown before is invoked by some JSF
command component, even in a different JSF page, the push message “Hello World!” will
be sent to all opened sockets on the very same channel name, application wide.
Scopes andUsers
As you may have realized, <f:websocket> is thus, by default, application scoped. You
can control the scope by the optional scope attribute. Allowed values are application,
session, and view.
When set to session, the message will be sent to all opened sockets on the very same
channel in the current session only.
<f:websocket channel="progress" scope="session" />
This is particularly useful for progress messages coming from long-running session-
scoped background tasks initiated by the user itself. This way the user can just continue
browsing the site without the need to wait for the result on the very same page.
Chapter 10 WebSoCket puSh
345
Alternatively, you can also set the optional user attribute to a serializable value
representing the unique user identifier, which can be a String representing the user
login name or a Long representing the user ID.When this attribute is set, the scope of the
socket will automatically default to session and it cannot be set to application.
<f:websocket channel="chat" user="#{loggedInUser.id}" />
This offers the opportunity to send a message to a specific user as follows:
private String message;
private User recipient;
@Inject @Push
private PushContext chat;
public void sendMessage() {
Long recipientId = recipient.getId();
chat.send(message, recipientId);
}
You can even send it to multiple users by providing a Set argument.
private String message;
private Set<User> recipients;
@Inject @Push
private PushContext chat;
public void sendMessage() {
Set<Long> recipientIds = recipients.stream()
.map(User::getId)
.collect(Collectors.toSet());
chat.send(message, recipientIds);
}
In other words, you can easily implement a chat box this way. Incidentally, real-time
user targeted notifications at, for example, Stack Overflow and Facebook work this way.
Chapter 10 WebSoCket puSh
346
When the scope is set to view, the message will be sent to the opened socket on the
specified channel in the current view only. This won’t affect any sockets on the same
channel in all other views throughout the application.
<f:websocket channel="push" scope="view" />
This is also supported in combination with the user attribute.
<f:websocket channel="chat" user="#{user.id}" scope="view" />
This construct is somewhat unusual though and should only be used if the logged-
in user represented by user attribute can have a shorter lifetime than the HTTP
session. This is, however, in turn considered a poor security practice. The best security
practice is, namely, that the HTTP session is invalidated during login and during
logout. Invalidating the HTTP session during login prevents session fixation attacks and
invalidating the session during logout prevents dirty user-specific data lingering around
in HTTP session.
Channel Design Hints
You can declare multiple push channels on different scopes with or without user target
throughout the application. However, be aware that the same channel name can easily
be reused across multiple views, even if it is view scoped. It’s more efficient if you use
as few different channel names as possible and tie the channel name to a specific push
socket scope/user combination, not to a specific JSF view. In case you intend to have
multiple view-scoped channels for different purposes, it is best to use only one view-
scoped channel and have a global JavaScript listener which can distinguish its task based
on the delivered message, for example, by sending the message in a server as follows,
Map<String, Object> message = new HashMap<>();
message.put("functionName", "someFunction");
message.put("functionData", functionData); // Can be Map or Bean.
someChannel.send(message);
which is then processed in the onmessage JavaScript listener function as follows:
function someSocketListener(message) {
window[message.functionName](message.functionData);
}
Chapter 10 WebSoCket puSh

347
function someFunction(data) {
// ...
}
function otherFunction(data) {
// ...
}
// ...
One-Time Push
You can use the connected attribute to prevent the socket from automatically connecting
during page load.
<f:websocket ... connected="false" />
This is particularly useful when you want to perform a one-time push of the result
after invoking a view-scoped Ajax action method which might take a bit more time to
complete, and you’d like the user to immediately continue using the very same page
without being annoyed about a “slow web site” experience. This approach only requires
a bit of additional work with the jsf.push JavaScript API (application programming
interface).2 It has three functions, but only two are of interest to us: jsf.push.open(...)
and jsf.push.close(...). The third one, jsf.push.init(...), basically initializes the
socket and that’s up to the renderer of the <f:websocket> tag.
Right before invoking the Ajax action method, you’d need to explicitly open the
socket by invoking the jsf.push.open(...) function with the socket client ID as
argument. And right after the push message arrives, you’d need to explicitly close the
socket by invoking the jsf.push.close(...) function with the socket client ID as
argument. The following example demonstrates this approach:
<script>
function startLongRunningProcess() {
jsf.push.open("push");
document.getElementById("status").innerHTML =
2 https://javaserverfaces.github.io/docs/2.3/jsdocs/symbols/jsf.push.html.
Chapter 10 WebSoCket puSh
348
"Long running process has started ...";
}
function endLongRunningProcess(result) {
jsf.push.close("push");
document.getElementById("status").innerHTML = result;
}
</script>
<h:form>
<h:commandButton value="submit"
onclick="startLongRunningProcess()"
action="#{longRunningProcess.submit}">
<f:ajax />
</h:commandButton>
</h:form>
<div id="status" />
<f:websocket id="push" channel="push" scope="view"
connected="false" onmessage="endLongRunningProcess">
</f:websocket>
It must be said that it’s a poor practice to put JavaScript code right in the HTML
source as shown above. It’s, of course, for demonstration purposes only. For better
maintenance, performance, and tooling support, you should, in real-world code, put
JavaScript code in a JS file and include it via <h:outputScript>. And then I’m not talking
about the lack of jQuery magic for demonstration purposes.
In the example, opening the socket is performed during the onclick of the command
button. The onmessage listener function in turn closes the socket. Of course, you can also
keep the socket open all the time without fiddling with JavaScript, but it may be a waste
of resources if the socket isn’t used for purposes other than presenting the result of a
view-scoped Ajax action method. Here is what the associated backing bean looks like.
@Named @RequestScoped
public class LongRunningProcess {
@Inject
private LongRunningProcessService service;
@Inject @Push
private PushContext push;
Chapter 10 WebSoCket puSh
349
public void submit() {
service.asyncSubmit(result -> push.send(result));
}
}
And here is what the service class looks like.
@Stateless
public class LongRunningProcessService {
@Asynchronous
public void asyncSubmit(Consumer<String> callback) {
String result = someLongRunningProcess();
callback.accept(result);
}
}
Note the EJB @Asynchronous annotation. This is very important in this construct. It
will ensure that the EJB (Enterprise Java Bean) method is executed in a separate thread.
This allows the backing bean method to return immediately without waiting for the EJB
method to complete.
Stateful UI Updates
As you may have noticed, the onmessage JavaScript listener function is generally only
useful for small stateless tasks, such as displaying a feedback message or adding a new
item to some stateless list using JavaScript. It isn’t terribly useful when you want to
update a stateful UI (user interface) represented by another JSF component. Think of
replacing a trivial loading image with a whole JSF table.
For that you’d better nest <f:ajax> listening on a specific push message. Via its
render attribute you have the opportunity to automatically update an arbitrary JSF
component in an incoming push message. Following is an example which initially shows
a loading image and then the table when it’s ready to load:
<h:form>
<f:websocket channel="push" scope="view">
<f:ajax event="loaded" render=":results" />
</f:websocket>
Chapter 10 WebSoCket puSh
350
</h:form>
<h:panelGroup id="results" layout="block">
<h:graphicImage name="images/loading.gif"
rendered="#{empty longRunningSearch.results}">
</h:graphicImage>
<h:dataTable value="#{longRunningSearch.results}" var="result"
rendered="#{not empty longRunningSearch.results}">
<h:column>#{result.id}</h:column>
<h:column>#{result.name}</h:column>
<h:column>#{result.value}</h:column>
</h:dataTable>
</h:panelGroup>
Note that <f:websocket> is placed in <h:form>. This is mandatory when it has
<f:ajax> nested. Normally this is not required. Here is what the backing bean looks like.
@Named @ViewScoped
public class LongRunningSearch implements Serializable {
private List<Result> results;
@Inject
private LongRunningSearchService service;
@Inject @Push
private PushContext push;
@PostConstruct
public void init() {
service.asyncLoadResults(results -> {
this.results = results;
push.send("loaded");
});
}
public List<Result> getResults() {
return results;
}
}
Chapter 10 WebSoCket puSh
351
Note that the push message "loaded" matches exactly the <f:ajax event> value.
You can use any value you want and you can nest as many <f:ajax> tags as you need. It’s
important that the managed bean is @ViewScoped as the Ajax call is basically performed
in a different request within the same view. Finally the service class looks as follows:
@Stateless
public class LongRunningSearchService {
@Asynchronous
public void asyncLoadResults(Consumer<List<Result>> callback) {
List<Result> results = someLongRunningProcess();
callback.accept(results);
}
}
The someLongRunningProcess() method represents your implementation of some
long-running process (e.g., calling a third-party web service API).
Site-Wide Push Notifications
For this, you can use an application-scoped socket. Such a socket is particularly useful
for application-wide feedback messages triggered by the web application itself on
a particular event which may be interest to all application users. Think of site-wide
statistics, real-time lists, stock updates, etc. The following example shows the case of a
real-time top 10 list:
<h:dataTable id="top10" value="#{bean.top10}" var="item">
<h:column>#{item.ranking}</h:column>
<h:column>#{item.name}</h:column>
<h:column>#{item.score}</h:column>
</h:dataTable>
<h:form>
<f:websocket channel="top10Observer">
<f:ajax event="updated" render=":top10" />
</f:websocket>
</h:form>
Chapter 10 WebSoCket puSh
352
Here is what the service class looks like, with a little help from CDI events.
@Stateless
public class ItemService {
@Inject
private EntityManager entityManager;
@Inject
private BeanManager beanManager;
public void update(Item item) {
List<Item> previousTop10 = getTop10();
entityManager.merge(item);
List<Item> currentTop10 = getTop10();
if (!currentTop10.equals(previousTop10)) {
beanManager.fireEvent(new Top10UpdatedEvent());
}
}
pulic List<Item> getTop10() {
return entityManager
.createNamedQuery("Item.top10", Item.class)
.getResultList();
}
}
Note that the Top10UpdatedEvent is, in this specific example, basically just an empty
class like public class Top10UpdatedEvent {}. Also note that we’re not injecting the
PushContext here. This is otherwise considered tight coupling of layers. All JSF-related
code belongs in the front end, not in the back end. This way the back-end service classes
are better reusable across all kinds of front-end frameworks other than JSF, such as JAX-
RS or even plain vanilla JSP/Servlet. In other words, you should ensure that none of your
back-end classes directly or indirectly use any front-end-specific classes such as those
from javax.faces.*, javax.ws.*, and javax.servlet.* packages.
Any event fired with the BeanManager#fireEvent() method can be observed using
CDI @Observes annotation. This works across all layers. In other words, even when it’s
fired in the back end, you can observe it in the front end. The only requirement is that
Chapter 10 WebSoCket puSh
353
the backing bean must be @ApplicationScoped. That is, there’s not necessarily any
means of an HTTP request, HTTP session, or JSF view anywhere at that moment.
@Named @ApplicationScoped
public class Bean {
private List<Item> top10;
@Inject
private ItemService service;
@Inject @Push
private PushContext top10Observer;
@PostConstruct
public void load() {
top10 = service.getTop10();
}
public void onTop10Updated(@Observes Top10UpdatedEvent event) {
load();
top10Observer.send("updated");
}
public List<Item> getTop10() {
return top10;
}
}
Keeping Track ofActive Sockets
In order to keep track of active sockets, you can in an application-scoped bean observe
@WebsocketEvent.Opened and @WebsocketEvent.Closed events. The following example
assumes that you have <f:websocket channel="chat" user="..."> and that you
intend to collect “active chat users”:
@ApplicationScoped
public class WebsocketEventObserver {
private Map<Serializable, AtomicInteger> users;
Chapter 10 WebSoCket puSh
354
@PostConstruct
public void init() {
users = new ConcurrentHashMap<>();
}
public void onopen(@Observes @Opened WebsocketEvent event) {
if ("chat".equals(event.getChannel())) {
getCounter(event.getUser()).incrementAndGet();
}
}
public void onclose(@Observes @Closed WebsocketEvent event) {
if ("chat".equals(event.getChannel())) {
getCounter(event.getUser()).decrementAndGet();
}
}
private AtomicInteger getCounter(Serializable user) {
return users.computeIfAbsent(user, k -> new AtomicInteger());
}
public Set<Serializable> getActiveUsers() {
return users.entrySet().stream()
.filter(entry -> entry.getValue().intValue() > 0)
.map(entry -> entry.getKey())
.collect(Collectors.toSet());
}
}
You can use the above getActiveUsers() method to obtain a set of “active chat
users.” Do note that a single user can open the same web page multiple times within
the same session (e.g., multiple browser tabs) and that’s exactly why a counter is used
instead simply adding and removing users from a Set.
Chapter 10 WebSoCket puSh

355
Detecting Session andView Expiration
The <f:websocket> tag will by default keep the connection open forever, as long as
the document is open—as long as there’s no connected="false" being set, or jsf.
push.close(clientId) being invoked, of course. When the first connection attempt
fails, it will immediately report an error. You can optionally use the onclose attribute to
reference a JavaScript function which acts as a close listener.
<f:websocket ... onclose="logClose" />
<script>
function logClose(code, channel, event) {
if (code == -1) {
// WebSocket API not supported by client. E.g. IE9.
}
else if (code == 1000) {
// Normal close as result of expired view or session.
}
else {
// Abnormal close as result of a client or server error.
}
}
</script>
The JavaScript function will be invoked with three arguments.
1. code: the close reason code as integer. If this is -1, then the
WebSocket JavaScript API is simply not supported3 by the client. If
this is 1000, then a normal closure has occurred as consequence
of an expired view or session in the server side.
2. channel: the WebSocket channel name. is may be useful in case
you intend to have a global listener.
3. event: the original CloseEvent object. This may be useful in case
you intend to inspect it in the JavaScript function.
3 http://caniuse.com/#feat=websockets.
Chapter 10 WebSoCket puSh
356
When the first connection attempt succeeds but it later gets disconnected for some
reason (e.g., because the server is restarting), then it will by default keep trying to
reconnect. In the case of Mojarra, it will keep retrying up to 25 times, with an interval
which is incremented 500ms each time, and it will eventually report an error.
As you might have noticed in the aforementioned onclose listener function
example, you could just check if the close code of a <f:websocket> equals 1000 in order
to perform some client-side action via JavaScript (e.g., displaying a warning message
and/or redirecting to some “Session expired” page).
<f:websocket channel="push" scope="session" onclose="closeListener" />
<script>
function closeListener(code) {
if (code == 1000) {
window.location = jsf.contextPath + "/expired.xhtml";
}
}
</script>
This works for both view- and session-scoped sockets. Application-scoped sockets,
however, remain open forever as long as the document is still open on client side, even
when the underlying view or session has expired.
Breaking DownMojarra’s f:websocket
Implementation
The <f:websocket> API specifies the following classes and methods:
• javax.faces.push.Push, a CDI qualifier to for @Inject. With help of
this qualifier the socket channel name can be specified.
• javax.faces.push.PushContext, an interface with three send()
methods: send(String message), send(String message, S user),
and send(String message, Collection<S> users). All those
methods accept the push message as Object and will for JavaScript
convert it to a JSON string. All those methods return Future<Void>
for each message. If it returns null, then the target socket isn’t open at
all. If it doesn’t throw ExecutionException on Future#get() method
call, then the message was successfully delivered.
Chapter 10 WebSoCket puSh

357
• javax.faces.component.UIWebsocket, a component which
implements ClientBehaviorHolder in order to support nested
<f:ajax>. Historically, the prototype tag used a TagHandler instead of
UIComponent. It was later decided to let the tag support <f:ajax> as that
would make complex and stateful UI updates much easier. However, it
isn’t possible to let a TagHandler implement ClientBehaviorHolder and
benet all of built-in Ajax magic, hence the conversion to UIComponent.
• ViewHandler#getWebsocketURL() method which takes a channel
name and returns the absolute WebSocket URL in form of
ws://host:port/context/javax.faces.push/channel with help of
ExternalContext#encodeWebsocketURL().
• ExternalContext#encodeWebsocketURL() method which basically
takes a relative WebSocket URI in form of /context/javax.faces.
push/channel and returns the absolute WebSocket URL.
The actual implementation is fairly extensive. It’s directly based on OmniFaces
<o:socket>4 with, here and there, a few adjustments such as using a component’s client
ID instead of a channel name in JavaScript API functions.
• com.sun.faces.renderkit.html_basic.WebsocketRenderer, a
faces renderer class which registers during encoding the socket
channel, scope and user in WebsocketChannelManager and retrieves
the WebSocket URL from it. Then it auto-includes the jsf.js script
containing the necessary javax.push.* functions, and renders the
jsf.push.init(...) inline script function call with among others
the WebSocket URL as an argument. This function should in turn in
JavaScript create a new WebSocket(url). The WebsocketRenderer
will also subscribe the WebsocketFacesListener to the current view.
• com.sun.faces.push.WebsocketChannelManager, a session-
scoped CDI managed bean which keeps track of all so far registered
<f:websocket> channels, scopes, and users and ensures that each
socket gets its own unique channel identier. It will register every
channel identier in WebsocketSessionManager and those of user-
targeted sockets in WebsocketUserManager.
4 http://showcase.omnifaces.org/push/socket.
Chapter 10 WebSoCket puSh
358
• com.sun.faces.push.WebsocketFacesListener, a system event
listener which listens on PreRenderViewEvent and renders if necessary
the jsf.push.open(...) or jsf.push.close(...) inline script
function calls depending on whether the connected attribute represents
a dynamic EL expression which got changed during an Ajax request.
• com.sun.faces.push.WebsocketEndpoint, a class which
implements JSR-356 javax.websocket.Endpoint and listens
on the URI template /javax.faces.push/{channel}. When
a new WebSocket(url) is created and opened on client-side
JavaScript, then a new javax.websocket.Session is created
on server-side Java and the WebsocketEndpoint will add this
Session to WebsocketSessionManager. Equivalently, when a
socket is closed, then the WebsocketEndpoint will remove it from
WebsocketSessionManager.
• com.sun.faces.push.WebsocketSessionManager, an application-
scoped CDI managed bean which collects all so far opened socket
sessions and validates that their unique WebSocket URL has been
registered by WebsocketChannelManager.
• com.sun.faces.push.WebsocketUserManager, an application-scoped
CDI managed bean which collects the channel identiers of all so far
opened user-targeted sockets.
• com.sun.faces.push.WebsocketPushContext, the concrete
implementation of the PushContext interface. It will send the push
message via WebsocketSessionManager and if necessary obtain the
user-targeted channels via WebsocketUserManager.
• com.sun.faces.push.WebsocketPushContextProducer, the CDI
producer which creates the WebsocketPushContext instance
based on channel name as obtained from @Push qualifier, the
WebsocketSessionManager and WebsocketUserManager.
Chapter 10 WebSoCket puSh
359
© Bauke Scholtz, Arjan Tijms 2018
B. Scholtz and A. Tijms, The Definitive Guide to JSF in Java EE 8, https://doi.org/10.1007/978-1-4842-3387-0_11
CHAPTER 11
Custom Components
In Chapter 7 you should have learned that Facelet templates as in <ui:composition>,
<ui:include>, and <ui:decorate> are useful when you want to split main page layout
fragments into reusable templates, such as header, menu, main content, and footer. And
that Facelet tag files such as <t:field> are useful when you want to have a reusable group
of components in order to minimize code duplication. And that composite components
such as <t:inputLocalTime> are useful when you want to create a custom component with
a single responsibility based on existing components and, if necessary, a bunch of HTML.
However, there may be cases in which no single component exists for the purpose you
had in mind, even not when composed of existing components and a bunch of HTML.
Or, perhaps the component does exist, but its renderer is not doing things you had in
mind. At this point, you would need to create a custom component or a custom renderer.
JSF (JavaServer Faces) has since the beginning offered a high degree of abstraction
around the UIComponent API (application programming interface). You can customize
components by creating a brand-new custom UIComponent, or by extending an existing
component from the standard HTML component set, or by plugging a custom Renderer
for an existing component.
Component Type, Family, andRenderer Type
Each UIComponent instance has “component type,” “component family,” and “renderer
type” associated with it. The component type basically represents the unique component
identifier associated with the component tag. It can be registered into JSF via either the
@FacesComponent annotation or the <component> entry in faces-config.xml. The following
example demonstrates the usage of the annotation on a minimal component class:
@FacesComponent(SomeComponent.COMPONENT_TYPE)
public class SomeComponent extends UIComponentBase {
public static final String COMPONENT_TYPE = "project.SomeComponent";
360
public static final String COMPONENT_FAMILY = "project.SomeFamily";
public SomeComponent() {
setRendererType(SomeRenderer.RENDERER_TYPE);
}
@Override
public String getFamily() {
return COMPONENT_FAMILY;
}
}
And the following example demonstrates the usage with the entry in faces-config.xml:
<component>
<component-type>project.SomeComponent</component-type>
<component-class>
com.example.project.component.SomeComponent
</component-class>
</component>
Note that when you register a Java EE artifact via both the annotation and the XML
ways using the same identifier, then the XML declaration will always get precedence over
the annotation declaration. The same holds true for all JSF annotations.
The public constants COMPONENT_TYPE and COMPONENT_FAMILY in the component
class are not mandatory, but they follow the same convention as the standard JSF
component set does and therefore give more consistency in developing with JSF.The
public constant COMPONENT_TYPE allows the developer to programmatically create the
component without needing to hard-code the component type.
UIComponent component = FacesContext.getCurrentInstance()
.getApplication().createComponent(SomeComponent.COMPONENT_TYPE);
Note that programmatically creating UIComponent instances this way is generally
not the normal practice in an average JSF web application. Instead, you normally define
the components in the view and leave the job of creating UIComponent instances up to
JSF or any pluggable component library. In the case of Facelets view technology, the
component tags can be registered into JSF via either @FacesComponent(createTag=true)
or a <tag> entry in a *.taglib.xml file along with the component type as follows:
CHAPTER 11 CUSTOM COMPONENTS
361
<tag>
<tag-name>someComponent</tag-name>
<component>
<component-type>project.SomeComponent</component-type>
</component>
</tag>
As said, the standard JSF component set has the component type also defined in the
concrete UIComponent classes behind the component tags. Those UIComponent classes are
all located in the javax.faces.component.html package. The UIComponent class name can
be derived from the component tag name by prefixing it with “Html”. So is the component
tag <h:outputText> backed by the HtmlOutputText component. JSF can, via either the
@FacesComponent annotation or the <component> entry in faces-config.xml, figure out
which component class exactly is associated with the component tag, so JSF knows that,
for the <h:outputText> tag, it should create a concrete HtmlOutputText instance.
Once JSF has the concrete UIComponent instance at hand, it can figure out
the component family as well as the renderer type by invoking the methods
UIComponent#getFamily() and UIComponent#getRendererType(), respectively. This
information is mandatory in order to create a concrete Renderer instance for the given
UIComponent instance, as you can see in the following snippet:
Renderer renderer = FacesContext.getCurrentInstance().getRenderKit()
.getRenderer(component.getFamily(), component.getRendererType());
The component family is basically a “hard-coded” constant which can be shared
across multiple component types. It’s “hard-coded” in such way that there’s no setter for
it. This is needed in order to get the concrete Renderer instances as they are not registered
into JSF by component type but rather by component family. This allows the developer
of the pluggable render kit to register the renderer type just once instead of multiple
times for each known standard component type and unknown custom component type.
Normally, the component family and renderer type are registered into JSF via either the
@FacesRenderer annotation or the <renderer> entry in faces-config.xml. The following
example demonstrates the usage with the annotation on a minimal renderer class.
CHAPTER 11 CUSTOM COMPONENTS
362
@FacesRenderer(
componentFamily=SomeComponent.COMPONENT_FAMILY,
rendererType=SomeRenderer.RENDERER_TYPE)
public class SomeRenderer extends Renderer {
public static final String RENDERER_TYPE = "project.SomeRenderer";
}
And the following example demonstrates the usage with the entry in faces-config.xml:
<render-kit>
<renderer>
<component-family>project.SomeFamily</component-family>
<renderer-type>project.SomeRenderer</renderer-type>
<renderer-class>
com.example.project.renderer.SomeRenderer
</renderer-class>
</renderer>
</render-kit>
The renderer type is by default defined in the constructor of the concrete component
class, as you might already have noticed in the code snippet of the SomeComponent class
as shown previously. In case it’s needed, the component subclass developer or even
yourself as component end user can always override the default renderer instance of
a component with the desired renderer instance. This can be done in various ways, all
via XML.The first way is via the <tag> entry associated with the component tag in the
*.taglib.xml file.
<tag>
<tag-name>someComponent</tag-name>
<component>
<component-type>project.SomeComponent</component-type>
<renderer-type>custom.OtherRenderer</renderer-type>
</component>
</tag>
CHAPTER 11 CUSTOM COMPONENTS
363
This affects application-wide and targets only the specific component tag. The
second way is via a new <renderer> entry in faces-config.xml which targets exactly the
desired component family and its default renderer type.
<render-kit>
<renderer>
<component-family>project.SomeFamily</component-family>
<renderer-type>project.SomeRenderer</renderer-type>
<renderer-class>
com.example.custom.renderers.OtherRenderer
</renderer-class>
</renderer>
</render-kit>
This affects application-wide and targets every component tag associated with the
given component family currently associated with the given renderer type. The third way
is via the rendererType attribute of the component tag.
<x:someComponent ... rendererType="custom.OtherRenderer" />
This affects only the declared component tag and not others. Table11-1 provides
an overview of all component types, families, and renderer types of the standard JSF
component set.
CHAPTER 11 CUSTOM COMPONENTS

364
Table 11-1. Component class, component type, component family and renderer type of standard JSF HTML
component set
Component tag Component class Component type Component family Renderer type
<h:body> HtmlBody javax.faces.OutputBody javax.faces.Output javax.faces.Body
<h:button> HtmlOutcomeTargetButton javax.faces.
HtmlOutcomeTargetButton
javax.faces.
OutcomeTarget
javax.faces.Button
<h:column> HtmlColumn javax.faces.HtmlColumn javax.faces.Column null
<h:commandButton> HtmlCommandButton javax.faces.HtmlCommandButton javax.faces.
Command
javax.faces.Button
<h:commandLink> HtmlCommandLink javax.faces.HtmlCommandLink javax.faces.
Command
javax.faces.Link
<h:commandScript> HtmlCommandScript javax.faces.HtmlCommandScript javax.faces.
Command
javax.faces.Script
<h:dataTable> HtmlDataTable javax.faces.HtmlDataTable javax.faces.Data javax.faces.Table
<h:doctype> HtmlDoctype javax.faces.OutputDoctype javax.faces.Output javax.faces.Doctype
<h:form> HtmlForm javax.faces.HtmlForm javax.faces.Form javax.faces.Form
<h:graphicImage> HtmlGraphicImage javax.faces.HtmlGraphicImage javax.faces.Graphic javax.faces.Image
<h:head> HtmlHead javax.faces.OutputHead javax.faces.Output javax.faces.Head
<h:inputFile> HtmlInputFile javax.faces.HtmlInputFile javax.faces.Input javax.faces.File
<h:inputHidden> HtmlInputHidden javax.faces.HtmlInputHidden javax.faces.Input javax.faces.Hidden
<h:inputSecret> HtmlInputSecret javax.faces.HtmlInputSecret javax.faces.Input javax.faces.Secret
CHAPTER 11 CUSTOM COMPONENTS

365
Component tag Component class Component type Component family Renderer type
<h:inputText> HtmlInputText javax.faces.HtmlInputText javax.faces.Input javax.faces.Text
<h:inputTextarea> HtmlInputTextarea javax.faces.HtmlInputTextarea javax.faces.Input javax.faces.Textarea
<h:link> HtmlOutcomeTargetLink javax.faces.
HtmlOutcomeTargetLink
javax.faces.
OutcomeTarget
javax.faces.Link
<h:message> HtmlMessage javax.faces.HtmlMessage javax.faces.
Message
javax.faces.Message
<h:messages> HtmlMessages javax.faces.HtmlMessages javax.faces.
Messages
javax.faces.
Messages
<h:outputFormat> HtmlOutputFormat javax.faces.HtmlOutputFormat javax.faces.Output javax.faces.Format
<h:outputLabel> HtmlOutputLabel javax.faces.HtmlOutputLabel javax.faces.Output javax.faces.Label
<h:outputText> HtmlOutputText javax.faces.HtmlOutputText javax.faces.Output javax.faces.Text
<h:outputScript> UIOutput javax.faces.Output javax.faces.Output javax.faces.Script
<h:outputStylesheet> UIOutput javax.faces.Output javax.faces.Output javax.faces.
resource.Stylesheet
<h:panelGrid> HtmlPanelGrid javax.faces.HtmlPanelGrid javax.faces.Panel javax.faces.Grid
<h:panelGroup> HtmlPanelGroup javax.faces.HtmlPanelGroup javax.faces.Panel javax.faces.Group
<h:selectBooleanCheckbox> HtmlSelectBooleanCheckbox javax.faces.
HtmlSelectBooleanCheckbox
javax.faces.
SelectBoolean
javax.faces.
Checkbox
(continued)
CHAPTER 11 CUSTOM COMPONENTS

366
Table 11-1. (continued)
Component tag Component class Component type Component family Renderer type
<h:selectManyCheckbox> HtmlSelectManyCheckbox javax.faces.
HtmlSelectManyCheckbox
javax.faces.
SelectMany
javax.faces.
Checkbox
<h:selectManyListbox> HtmlSelectManyListbox javax.faces.
HtmlSelectManyListbox
javax.faces.
SelectMany
javax.faces.Listbox
<h:selectManyMenu> HtmlSelectManyMenu javax.faces.
HtmlSelectManyMenu
javax.faces.
SelectMany
javax.faces.Menu
<h:selectOneListbox> HtmlSelectOneListbox javax.faces.
HtmlSelectOneListbox
javax.faces.
SelectOne
javax.faces.Listbox
<h:selectOneMenu> HtmlSelectOneMenu javax.faces.HtmlSelectOneMenu javax.faces.
SelectOne
javax.faces.Menu
<h:selectOneRadio> HtmlSelectOneRadio javax.faces.HtmlSelectOneRadio javax.faces.
SelectOne
javax.faces.Radio
CHAPTER 11 CUSTOM COMPONENTS
367
If you carefully inspect the table, you’ll see a certain pattern in the component family
and renderer type, particularly with input, select, and command components. You’ll notice
that a renderer type can be shared across multiple components, even of a different family.
You’ll also notice that there’s one HTML component without a renderer type,
<h:column>. This is a special component which cannot be used stand-alone but can only
be used when nested in a specific parent component. From the standard JSF component
set, that’s so far only <h:dataTable>. Its renderer recognizes children of the type
UIColumn and can act on them accordingly.
Creating New Component andRenderer
If you paid closer attention to Table 3-1 in Chapter 3, you might have noticed that
JSF doesn’t provide any component to render a dynamic <ul> or <ol> or even <dl>
element based on a provided array or collection value. It only supports that for the
<table> element. True, the same could be achieved with Facelets <ui:repeat> and a
bit of custom HTML code, but we’ll take this as an opportunity to create a new custom
component which renders an <ul> or <ol>.
The first step is to check which UIComponent subclass is suitable for the task we
have in mind, so that we can reduce the custom code logic to a minimum. In the javax.
faces.component package you can find a bunch of UIXxx component subclasses. If you
want to create a new form component, extend from UIForm. If you want to create a new
input component, extend from UIInput. If you want to create a new output component,
extend from UIOutput. If you want to create a new data iterator component, extend from
UIData. There is rarely any need to extend from UIComponent directly. We’d like to be
able to iterate over a collection in order to generate <li> elements inside the <ul>, so
we’ll pick UIData. It has a lot of iteration and state saving logic already implemented.
Following is the custom component class com.example.project.component.DataList:
@FacesComponent(createTag=true)
public class DataList extends UIData {
public DataList() {
setRendererType(DataListRenderer.RENDERER_TYPE);
}
}
CHAPTER 11 CUSTOM COMPONENTS
368
Is that really all? Yes, the UIData superclass already hsd everything we need and all
the HTML producing code just goes into the DataListRenderer which will be shown
shortly. You’ll notice that the @FacesComponent annotation declares a createTag=true
attribute. This basically instructs JSF that it should automatically create a component
tag the predefined XML namespace http://xmlns.jcp.org/jsf/component. In other
words, the above tag is available in the Facelets file as follows:
< ... xmlns:my="http://xmlns.jcp.org/jsf/component">
...
<my:dataList ...>
...
</my:dataList>
The XML namespace prefix “my” is of course your choice. Generally, you’d like to
pick some sort of abbreviation of your company name here. You can also override the
predefined XML namespace with the namespace attribute.
@FacesComponent(createTag=true, namespace="http://example.com/ui")
This will then be available as follows:
< ... xmlns:ex="http://example.com/ui">
...
<ex:dataList ...>
...
</ex:dataList>
This namespace is unfortunately not unifiable with the <namespace> of a custom
*.taglib.xml file. If you use the same namespace for both, then JSF will prefer the
*.taglib.xml one over the @FacesComponent one and hence be unable to find the
custom component tag. That is, in practically anything Java EE related, any XML-based
registration of a thing has higher precedence than Java annotation-based registration of
the very same thing.
You’d basically need to explicitly register the custom component over there in the
*.taglib.xml file as well. Here’s how the /WEB-INF/example.taglib.xml as created in
the section “Tag Files” in Chapter 7 could be extended with the registration of the custom
component, which is essentially the same as what the @FacesComponent is doing for you.
CHAPTER 11 CUSTOM COMPONENTS
369
<?xml version="1.0" encoding="UTF-8"?>
<facelet-taglib
xmlns="http://xmlns.jcp.org/xml/ns/javaee"
xmlns:xsi="http://www.w3.org/2001/XMLSchema-instance"
xsi:schemaLocation="http://xmlns.jcp.org/xml/ns/javaee
http://xmlns.jcp.org/xml/ns/javaee/web-facelettaglibrary_2_3.xsd"
version="2.3"
>
<namespace>http://example.com/tags</namespace>
<short-name>t</short-name>
<!-- Other tags here -->
<tag>
<description>Renders a HTML list.</description>
<tag-name>dataList</tag-name>
<component>
<component-type>dataList</component-type>
</component>
</tag>
</facelet-taglib>
This way the custom component is available in the same namespace as the other
tags.
< ... xmlns:t="http://example.com/tags">
...
<t:dataList ...>
...
</t:dataList>
Now, you can essentially remove all attributes of the @FacesComponent so that it
becomes just @FacesComponent. Yes, as you have seen in the example.taglib.xml, the
component type defaults to the class name with the first character lowercased. You
can always override it by explicitly specifying it as the value of the @FacesComponent
annotation. Generally, you’d like to prefix it with the name of the company. It’s a good
practice to define it as a public constant so that others could, if necessary, look it up in
the Javadoc and/or use it for Application#createComponent().
CHAPTER 11 CUSTOM COMPONENTS
370
@FacesComponent(DataList.COMPONENT_TYPE)
public class DataList extends UIData {
public static final String COMPONENT_TYPE = "example.DataList";
public DataList() {
setRendererType(DataListRenderer.RENDERER_TYPE);
}
}
Now adjust the component type in the example.taglib.xml accordingly.
<component>
<component-type>example.DataList</component-type>
</component>
The *.taglib.xml also gives you room to register the attributes via <attribute>
entries, although that may end up in some verbose code. You should already have seen
that in the section “Tag files” in Chapter 7. Unfortunately, the current JSF version doesn’t
offer an annotation to declaratively declare an “official” component attribute. There’s
no such thing as @FacesAttribute private Iterable value. Yet. This may come in a
JSF.next. The non-official way, without any <attribute>, also works just fine. You can
declare any attribute you want on the component tag in the view.
<t:dataList foo="bar" bar="foo" />
That’s just the freedom of XML.Whether the actual component or renderer
implementation actually does something with it is another story. You could even declare
a custom attribute on an existing component and just plug an extended Renderer in order
to process that attribute. More later in the section “Extending Existing Renderer.” Talking
about renderers, our <t:dataList> still needs its renderer as registered in its constructor.
Here’s what the com.example.project.renderer.DataListRenderer looks like.
@FacesRenderer(
componentFamily=UIData.COMPONENT_FAMILY,
rendererType=DataListRenderer.RENDERER_TYPE)
public class DataListRenderer extends Renderer {
public static final String RENDERER_TYPE = "example.List";
CHAPTER 11 CUSTOM COMPONENTS
371
@Override
public void encodeBegin
(FacesContext context, UIComponent component)
throws IOException
{
ResponseWriter writer = context.getResponseWriter();
UIData data = (UIData) component;
if (data.getRowCount() > 0) {
writer.startElement("ul", component);
}
}
@Override
public void encodeChildren
(FacesContext context, UIComponent component)
throws IOException
{
ResponseWriter writer = context.getResponseWriter();
UIData data = (UIData) component;
for (int i = 0; i < data.getRowCount(); i++) {
data.setRowIndex(i);
writer.startElement("li", component);
if (component.getChildCount() > 0) {
for (UIComponent child : component.getChildren()) {
child.encodeAll(context);
}
}
writer.endElement("li");
}
data.setRowIndex(-1);
}
@Override
public void encodeEnd
CHAPTER 11 CUSTOM COMPONENTS

372
(FacesContext context, UIComponent component)
throws IOException
{
ResponseWriter writer = context.getResponseWriter();
UIData data = (UIData) component;
if (data.getRowCount() > 0) {
writer.endElement("ul");
}
}
}
In hindsight, it’s relatively simple. We’re delegating as much as possible of the hard
work to the JSF-provided UIData superclass. In the encodeBegin() you start the <ul>
element when the data model is not empty. This is to be checked by examining the result
of UIData#getRowCount(). Its Javadoc1 basically says:
Return the number of rows in the underlying data model. If the number of
available rows is unknown, return -1.
The term “rows” is indeed strongly related to tables. This is also what this superclass
is originally designed for: <h:dataTable>. The term “item” would have been more
general, but it is what it is.
Then, in the encodeChildren() method, we set the current row index via the
UIData#setRowIndex() method, start the <li> element, encode all children as is via
UIComponent#encodeAll() on each of them, and finally end the <li> element. Once
the loop is done, we explicitly make it clear to the UIData superclass by invoking
UIData#setRowIndex() with a value of -1. Its Javadoc2 says:
If the new rowIndex value is -1: If the var property is not null, remove the
corresponding request scope attribute (if any). Reset the state information
for all descendant components.
1 https://javaee.github.io/javaee-spec/javadocs/javax/faces/component/UIData.
html#getRowCount--.
2 https://javaee.github.io/javaee-spec/javadocs/javax/faces/component/UIData.
html#setRowIndex-int-.
CHAPTER 11 CUSTOM COMPONENTS

373
It thus clears out any state related to the iteration. This is very important;z otherwise
it might cause side effects further down in the component tree or even cause a corrupted
view state when it by itself needs to traverse the data model. Finally, in the encodeEnd()
method, it will end the <ul> element based on same conditions as in encodeBegin().
The UIData#setRowIndex() call in the encodeChildren() method will under
the hood extract the data model from the value attribute and wrap it in a suitable
implementation of the javax.faces.model.DataModel abstract class.3 So far, as per
the Javadoc of UIData#getValue(),4 the following types of the object behind the value
attribute are supported, in this scanning order:
1. java.util.List (since 1.0)
2. Arrays (since 1.0)
3. java.sql.ResultSet (since 1.0)
4. javax.servlet.jsp.jstl.sql.Result (since 1.0)
5. java.util.Collection (since 2.2)
6. java.lang.Iterable (since 2.3)
7. java.util.Map (since 2.3)
8. Types for which a suitable DataModel has been registered via
@FacesDataModel (since 2.3)
9. All other types will be adapted using the ScalarDataModel class,
which will treat the object as a single row of data (since 1.0)
You would indeed not expect to see anyone passing around a plain java.sql.
ResultSet in a modern Java EE application, let alone see JSP pages with JSTL <sql:xxx>
tags. But this all is for backward compatibility. Remember, JSF was introduced in 2004.
Backward compatibility was one of its strongest keys in surviving up to today. They’re
certainly candidates to be removed, but not now.
And, there’s indeed an overlap between some types; List and Collection could
easily be covered by Iterable as they both implement this interface. But this has
a performance reason. For a List, the items are accessed directly by index by the
3 https://javaee.github.io/javaee-spec/javadocs/javax/faces/model/DataModel.html.
4 https://javaee.github.io/javaee-spec/javadocs/javax/faces/component/UIData.
html#getValue--.
CHAPTER 11 CUSTOM COMPONENTS
374
ListDataModel; for a Collection, the items are extracted first via Collection#toArray()
and then accessed by index by the CollectionDataModel; and for an Iterable, the items
are simply iterated and collected into a new List first by the IterableDataModel. It may
make a difference.
You’ll also see that JSF 2.3 has not only added two new data models but even
introduces a new annotation to register a custom one. Previously, you’d need to
manually wrap the custom collection in the custom data model every time before
passing to a UIData component. The DataModel abstract class has the disadvantage of
not being Serializable itself which more or less forces you to make a @ViewScoped
bean holding such a data model to have a lazy loading getter on a transient data model
property as follows:
private YourCollection yourCollection;
private transient YourDataModel dataModel;
public DataModel getDataModel() {
if (dataModel == null) {
dataModel = new YourDataModel(yourCollection);
}
return dataModel;
}
Ideally, the UIData should by itself recognize YourCollection type and automatically
wrap it in a YourDataModel. The new @FacesDataModel annotation does exactly that.
@FacesDataModel(forClass=YourCollection.class)
public class YourDataModel<E> extends DataModel<E> {}
Coming back to the custom renderer, there’s one method left unexplained: the
getRendersChildren(). It’s been overridden to explicitly return true. You’ll probably
ask yourself, why was it initially false? Why not just let it be the default behavior of
encodeChildren() and rely on any overridden encodeChildren() method whether it
wants to invoke encodeAll() on the children? This was actually an historic oversight
in the specification. Originally, the encodeAll() method didn’t exist. It was only added
in JSF 1.2 and it basically made the getRendersChildren() obsolete. But for backward
compatibility this complexity was introduced.
CHAPTER 11 CUSTOM COMPONENTS

375
In a nutshell, always let getRendersChildren() return true if you have overridden
the encodeChildren() method. Otherwise the children won’t be encoded at all.
Last but not least, you’ll probably also wonder why we don’t “simply”
override the encodeBegin(), encodeChildren(), (and getRendersChildren()),
and encodeEnd() of the DataList component but instead create a “whole”
renderer implementation. The main reason is: simplicity and extensibility. Those
methods are on UIComponent specified to do more than only rendering. They also
check if the UIComponent#isRendered() returns true. encodeBegin() also fires
PreRenderComponentEvent and pushes the current component into the EL (Expression
Language) scope as #{component}. encodeEnd() pops #{component} out of the EL
scope. And they also check if there’s a renderer attached and, if so, delegate to it. That’s
all specified in their Javadoc. You’d need to manually take care of them yourself when
you override those methods. That’s unnecessarily repeated work. And, when someone in
the future wants to adjust the rendering of the component, they won’t be able to plug a
custom renderer if your component doesn’t check for it.
Extending Existing Component
Imagine that there’s an existing component whose behavior you’d like to adjust, usually
by adding one or more new custom attributes. If those attributes are purely output-
only, then you could just make use of the pass-through attributes feature which was
introduced in JSF 2.2. Previously, any custom attribute which wasn’t officially supported
by the component was simply ignored during view render time. For example, when you’d
like to add the missing accept attribute5 to the existing <h:inputFile> component,6
simply adding the attribute as follows won’t work.
<h:inputFile id="photo" value="#{editProfile.photo}" accept="image/*" />
With the pass-through attributes feature you could explicitly instruct JSF to render
the custom attribute anyway. This can be done in two ways. The first way is registering it
via the http://xmlns.jcp.org/jsf/passthrough XML namespace.
< ... xmlns:h="http://xmlns.jcp.org/jsf/html"
xmlns:a="http://xmlns.jcp.org/jsf/passthrough">
5 https://developer.mozilla.org/en-US/docs/Web/HTML/Element/input/file.
6 https://javaserverfaces.github.io/docs/2.3/vdldocs/facelets/h/inputFile.html.
CHAPTER 11 CUSTOM COMPONENTS

376
...
<h:form enctype="multipart/form-data">
<h:inputFile ... a:accept="image/*" />
</h:form>
Another way is declaring it via the <f:passThroughAttribute> tag.
< ... xmlns:f="http://xmlns.jcp.org/jsf/core"
xmlns:h="http://xmlns.jcp.org/jsf/html">
...
<h:form enctype="multipart/form-data">
<h:inputFile ...>
<f:passThroughAttribute name="accept" value="image/*" />
</h:inputFile>
</h:form>
It’ll just work fine on the client side either way. On the browsers supporting this
attribute, the file browse dialog will only show the files matching the comma separated
IANA (Internet Assigned Numbers Authority) media types7 specified in the accept
attribute. However, this won’t work in browsers not supporting this attribute,8 nor will
it validate anything on the server side. Even if the browser supports it, any malicious-
minded end user can easily manipulate the retrieved HTML document and remove the
accept attribute and hence be able to upload a different file type.
For exactly that server-side work, you’d like to extend the <h:inputFile> component
to perform validation based on the accept attribute. The first step is looking at which
UIComponent class exactly is represented by <h:inputFile>. As you can see in Table11- 1,
that’s javax.faces.component.html.HtmlInputFile. Let’s start by extending it and adding
the new accept attribute.
@FacesComponent(createTag=true)
public class InputFile extends HtmlInputFile {
@Override
public void encodeBegin(FacesContext context) throws IOException {
String accept = getAccept();
7 www.iana.org/assignments/media-types/media-types.xhtml.
8 https://caniuse.com/#feat=input-file-accept.
CHAPTER 11 CUSTOM COMPONENTS
377
if (accept != null) {
getPassThroughAttributes().put("accept", accept);
}
super.encodeBegin(context);
}
public String getAccept() {
return (String) getStateHelper().eval("accept");
}
public void setAccept(String accept) {
getStateHelper().put("accept", accept);
}
}
Note that there’s no property for the accept attribute. Any public component
attribute must be represented by a getter/setter pair which delegates further to
UIComponent#getStateHelper(). Basically, you must delegate all view-scoped
component attributes to the StateHelper. This will in turn take care that the right deltas
end up in the JSF view state. This is of course optional, but not doing so will make the
component instance not programmatically manipulatable. Any changes performed
during a previous HTTP request would get lost during the subsequent HTTP postback
request for the very simple reason that the UIComponent instance is recreated from scratch.
Also note that the new accept attribute is simply added as a pass-through attribute
in the encodeBegin() method before delegating to the superclass method where the
actual rendering job takes place. This removes the need to create a whole custom
renderer for the particular purpose of rendering a new attribute. Let’s test it now.
< ... xmlns:h="http://xmlns.jcp.org/jsf/html"
xmlns:my="http://xmlns.jcp.org/jsf/component">
...
<h:form enctype="multipart/form-data">
<my:inputFile id="photo" value="#{editProfile.photo}"
accept="image/*" required="true">
<f:ajax listener="#{editProfile.upload}" render="photo_m" />
</my:inputFile>
<h:message id="photo_m" for="photo" />
</h:form>
CHAPTER 11 CUSTOM COMPONENTS
378
For the sake of completeness, here’s what the backing bean looks like.
@Named @RequestScoped
public class EditProfile {
private Part photo;
public void upload() {
String fileName = photo.getSubmittedFileName();
String fileType = photo.getContentType();
long fileSize = photo.getSize();
System.out.println("File name: " + fileName);
System.out.println("File type: " + fileType);
System.out.println("File size: " + fileSize);
}
// Add/generate getter and setter.
}
Now we have basically created the UIComponent equivalent of <h:inputFile> with a
pass-through accept attribute. The next step is implementing server-side validation of
whether the media type of the uploaded file matches the specified accept attribute. For
this, we’d like to override UIInput#validateValue() in our InputFile class as below.
This runs during the process validations phase (third phase).
@Override
protected void validateValue(FacesContext context, Object newValue) {
String accept = getAccept();
if (accept != null && newValue instanceof Part) {
Part part = (Part) newValue;
String contentType = context.getExternalContext()
.getMimeType(part.getSubmittedFileName());
String acceptPattern = accept.trim()
.replace("*", ".*").replaceAll("\\s*,\\s*", "|");
if (contentType == null || !contentType.matches(acceptPattern)) {
String message = "Unacceptable file type";
context.addMessage(getClientId(context), new FacesMessage(
CHAPTER 11 CUSTOM COMPONENTS
379
FacesMessage.SEVERITY_ERROR, message, null));
setValid(false);
}
}
if (isValid()) {
super.validateValue(context, newValue);
}
}
As you see, it will basically check if the accept attribute is specified and if there’s
a submitted file, and if so then convert the accept attribute to a regular expression
pattern and match the content type of the submitted file against it. The accept attribute
represents a comma separated string of IANA media types wherein the asterisk is used
as a wildcard and the comma is used as a disjunction operator. An example accept
value of "image/*,application/pdf" is this way converted to a regular expression
of "image/.*|application/pdf". If it doesn’t match, then it will add a faces message
associated with the component to the faces context and mark the component as invalid
by calling UIInput#setValid() with false. In the end, if the component is valid, it will
continue the validation call to the superclass.
Further there’s another thing to mention: the content type is not obtained from
Part#getContentType() but from ExternalContext#getMimeType() based on
the submitted file name. This is just to cover the corner case that the client doesn’t
send a content type along, or even sends one which is not understood by the server.
ExternalContext#getMimeType() basically obtains the list of known content types from
<mime-mapping> entries in web.xml. The server itself has some default values and you
can override or extend them in the web application’s own web.xml.
Now the file’s content type attribute is filtered on the client side and validated on
the server side. All good and well, but this of course only validates the file’s content type
based on the file name and not the file’s actual content. Imagine that one creates a ZIP
file and simply renames the file extension to become an image file, or even an executable
file with malware. It would still pass through the file type validation on both the client
and server side. Frankly, this responsibility is not up to the component itself, but to
you, the JSF developer. The correct solution would be to create a custom validator and
attach it to the component. Here’s what such an image file validator can look like, with
a little help from the Java2D API which is capable of parsing image files. If it throws an
exception or returns null, then it’s very definitely not an image file.
CHAPTER 11 CUSTOM COMPONENTS
380
@FacesValidator("project.ImageFileValidator")
public class ImageFileValidator implements Validator<Part> {
@Override
public void validate
(FacesContext context, UIComponent component, Part value)
throws ValidatorException
{
if (value == null) {
return; // Let @NotNull or required="true" handle.
}
try {
ImageIO.read(value.getInputStream()).toString();
}
catch (Exception e) {
String message = "Not an image file";
throw new ValidatorException(new FacesMessage(message), e);
}
}
}
In order to get it to run, declare it as validator attribute of the component tag.
<my:inputFile ... validator="project.ImageFileValidator" />
It works beautifully. Now, when validation passes as well, the backing bean action
method is invoked wherein you can save the uploaded file to the desired location. This
could be implemented as follows:
public void upload() {
Path folder = Paths.get("/path/to/uploads");
String fileName = Paths.get(photo.getSubmittedFileName())
.getFileName().toString();
int indexOfLastDot = fileName.lastIndexOf('.');
String name = fileName.substring(0, indexOfLastDot);
String extension = fileName.substring(indexOfLastDot);
FacesMessage message = new FacesMessage();
CHAPTER 11 CUSTOM COMPONENTS
381
try (InputStream contents = photo.getInputStream()) {
Path file = Files.createTempFile(folder, name + "-", extension);
Files.copy(contents, file, StandardCopyOption.REPLACE_EXISTING);
message.setSummary("Uploaded file successfully saved.");
}
catch (IOException e) {
message.setSummary("Could not save uploaded file, try again.");
message.setSeverity(FacesMessage.SEVERITY_ERROR);
e.printStackTrace();
}
FacesContext.getCurrentInstance().addMessage(null, message);
}
You might wonder why it seems to save the uploaded file as a temporary file. This
is actually not true. We’re just utilizing the Files#createTempFile() facility in order to
guarantee the uniqueness of the file name of the saved file. It will automatically include
a unique random string between the file name and the file extension. Otherwise, when
multiple people upload different files with coincidentally the same name, they may
overwrite each other and we’d lose information.
Extending Existing Renderer
Imagine that there’s an existing renderer which has logic bugs or shortcomings and you’d
like to quickly patch it by extending it instead of rewriting from scratch. Unfortunately, it
sounds far easier than it actually is. That is, standard renderer implementations are not
part of the standard JSF API, contrary to standard HTML component implementations
which are available in the javax.faces.component.html package. The actual standard
HTML renderer implementations are provided by the JSF implementation itself. Mojarra
has them in the com.sun.faces.renderkit.html_basic package and MyFaces has them
in the org.apache.myfaces.renderkit.html package.
Another problem with those standard HTML renderers is relatively poor abstraction
of the code. Basically all those standard HTML renderers don’t have abstracted-out
pieces of code which solely emit HTML markup in such way that it’s fully separated from
the logic. In other words, when you need to fix some logic, you’d almost always also have
to write or copy/paste all the code responsible for emitting HTML.
CHAPTER 11 CUSTOM COMPONENTS

382
A common real-world example is the desire to let <h:message> or <h:messages>
render the faces message unescaped, so that you can embed some HTML code in
a faces message, more than often to provide a link to the desired target page (e.g.,
“Unknown user, perhaps you want to <a href="login">Log in</a>?”). The
standard <h:message> component doesn’t support such facility and the HTML-escaping
is controlled by its renderer which in turn is thus JSF implementation dependent. This
JSF built-in HTML escaping is found over all place and is a very important guard against
possible XSS attack holes when you’re about to embed user-controlled data in the web
page. There are a handful of components which have an explicit attribute to turn off this
HTML-escaping, such as <h:outputText> with its escape attribute, <f:selectItem> with
its itemEscaped attribute, and <f:selectItems> with its itemLabelEscaped attributes.
Such an attribute is, however, absent in <h:message> and <h:messages>. See also JSF
spec issue 634.9 Perhaps it will be added in JSF.next, but for now you can’t go around a
third-party component library or extending the existing standard HTML renderer.
We’ll take that as an example to extend an existing standard HTML renderer for
<h:message>. The first step is looking at which renderer exactly is currently used by the
<h:message> component. In Table11-1 you will see that this component is backed by the
HtmlMessage class. The currently used renderer implementation is programmatically as
follows:
String componentFamily = HtmlMessage.COMPONENT_FAMILY;
String rendererType = new HtmlMessage().getRendererType();
Renderer renderer = FacesContext.getCurrentInstance().getRenderKit()
.getRenderer(componentFamily, rendererType);
System.out.println(renderer.getClass());
In case you’re using Mojarra as JSF implementation, it’ll print as follows:
class com.sun.faces.renderkit.html_basic.MessageRenderer
That’s thus exactly the renderer class we’d like to extend. Mojarra is open source
and its source code is currently available at https://github.com/javaserverfaces/
mojarra. Once you’ve gotten the MessageRenderer source code at hands, the next step
is to figure out where exactly the summary and detail of the FacesMessage is being
rendered and how exactly we can override it with a minimum of code. We can see in the
source code that it takes place in the encodeEnd() method which, in the current Mojarra
9 https://github.com/javaee/javaserverfaces-spec/issues/634.
CHAPTER 11 CUSTOM COMPONENTS

383
2.3.3 version, is already 182 lines of code. It’s using ResponseWriter#writeText()10 to
render the summary and detail. We’d like to replace this by ResponseWriter#write() so
that it doesn’t perform any escaping.
We can of course extend the class, copy/paste all the 182 lines of the encodeEnd()
method, and adjust the writeText() calls for the summary as well as detail variables
as follows:
Object escape = component.getAttributes().get("escape");
if (escape == null || Boolean.parseBoolean(escape.toString())) {
writer.writeText(summary, component, null);
}
else {
writer.write(summary);
}
However, this is not terribly elegant. What if we were to capture all writeText() calls
during the encodeEnd() method and transparently delegate to write()? That would look
much better. You can achieve this by wrapping the ResponseWriter, setting it on the
faces context, and passing it through the superclass. Almost any public JSF API artifact
has an equivalent XxxWrapper class as well in the API.You can find them all in the “All
known implementing classes” section of the javax.faces.FacesWrapper Javadoc.11 All
those wrapper classes make JSF very easily customizable and extensible. All of them
have a constructor taking the to-be-wrapped class and you basically just need to pick
one or more of the methods you’d like to decorate.
All in all, here’s how we could extend the MessageRenderer to delegate all
writeText() calls during the encodeEnd() method to write().
public class EscapableMessageRenderer extends MessageRenderer {
@Override
public void encodeEnd
(FacesContext context, UIComponent component)
throws IOException
10 https://javaee.github.io/javaee-spec/javadocs/javax/faces/context/ResponseWriter.
html#writeText-java.lang.Object-javax.faces.component.UIComponent-java.lang.
String-.
11 https://javaee.github.io/javaee-spec/javadocs/javax/faces/FacesWrapper.html.
CHAPTER 11 CUSTOM COMPONENTS
384
{
ResponseWriter writer = context.getResponseWriter();
try {
context.setResponseWriter(new ResponseWriterWrapper(writer) {
@Override
public void writeText
(Object text, UIComponent component, String property)
throws IOException
{
String string = text.toString();
Object escape = component.getAttributes()
.get("escape");
if (escape == null
|| Boolean.parseBoolean(escape.toString()))
{
super.writeText(string, component, property);
}
else {
super.write(string);
}
}
});
super.encodeEnd(context, component);
}
finally {
context.setResponseWriter(writer);
}
}
}
CHAPTER 11 CUSTOM COMPONENTS
385
Do note that it’s very important to restore the original response writer in the finally
of the try block wherein the wrapped response writer is being used. In order to get it to
run, register it as follows in faces-config.xml on the component family and renderer
type as associated with the <h:message> component:
<render-kit>
<renderer>
<component-family>javax.faces.Message</component-family>
<renderer-type>javax.faces.Message</renderer-type>
<renderer-class>
com.example.project.renderer.EscapableMessageRenderer
</renderer-class>
</renderer>
</render-kit>
No, you cannot use the @FacesRenderer annotation for this. This won’t work
when extending an existing renderer. The original renderers are by themselves already
registered on the very same component family and renderer type, somewhere in an XML
file. And you know, an XML-based configuration always gets higher precedence over an
annotation-based configuration when both are discovered.
Now you can just set the escape attribute of the existing <h:message> component to
false in order to get the extended renderer to do its job.
<h:message ... escape="false" />
Beware that you don’t embed user-controlled input in any faces message which gets
displayed in there, or you’ll open up a potential XSS attack hole.
Custom Tag Handlers
In Chapter 3, you learned about the difference between the view build time and the view
render time, and that tag handlers such as JSTL run while building the JSF component
tree while JSF components run while processing the HTTP request and response through
the JSF life cycle. Not only can JSF components be customized but also tag handlers. This
is particularly useful when you want to control the building of the JSF component tree
instead of processing the HTTP request and response.
CHAPTER 11 CUSTOM COMPONENTS
386
<f:viewParam> is useful on master-detail pages. From the master page, you can link
to the detail page with the entity ID as the parameter. In the detail page, you can load the
entity by ID via <f:viewParam>. It goes as follows:
<f:metadata>
<f:viewParam name="id" value="#{editItem.item}"
converter="project.ItemConverter" converterMessage="Unknown item"
required="true" requiredMessage="Bad request">
</f:viewParam>
</f:metadata>
When conversion or validation fails, a faces message will be added to the faces
context of the current page. However, more often you’d just like to directly redirect the
user back to the master page. This is relatively trivial to implement with <f:event> on
PostValidateEvent. No, <f:viewAction> won’t work as that wouldn’t be invoked in first
place when there’s a conversion or validation error.
<f:metadata>
...
<f:event type="postValidate" listener="#{editItem.onload()}" />
</f:metadata>
Wherein the onload() method looks as follows:
public void onload() throws IOException {
FacesContext context = FacesContext.getCurrentInstance();
if (context.isValidationFailed()) {
ExternalContext ec = context.getExternalContext();
ec.redirect(ec.getRequestContextPath() + "/items.xhtml");
}
}
Okay, that works, but this will end up in boilerplate code when you have more of
such pages. Ideally, you’d like to be able to declaratively register an event listener on
<f:viewParam> itself in a self-documenting way like below so that you can keep the
backing bean code free of manual request-response processing clutter.
CHAPTER 11 CUSTOM COMPONENTS
387
<f:metadata>
<f:viewParam ...>
<t:viewParamValidationFailed redirect="/items.xhtml" />
</f:viewParam>
</f:metadata>
This can be achieved with a tag handler which basically registers a new system event
listener on the UIViewParameter component represented by the <f:viewParam> tag. The
tag handler class must extend from javax.faces.view.facelets.TagHandler.
public class ViewParamValidationFailed extends TagHandler
implements ComponentSystemEventListener
{
private String redirect;
public ViewParamValidationFailed(TagConfig config) {
super(config);
redirect = getRequiredAttribute("redirect").getValue();
}
@Override
public void apply(FaceletContext context, UIComponent parent)
throws IOException
{
if (parent instanceof UIViewParameter
&& !context.getFacesContext().isPostback())
{
parent.subscribeToEvent(PostValidateEvent.class, this);
}
}
@Override
public void processEvent(ComponentSystemEvent event)
throws AbortProcessingException
{
UIComponent parent = event.getComponent();
parent.unsubscribeFromEvent(PostValidateEvent.class, this);
FacesContext context = event.getFacesContext();
CHAPTER 11 CUSTOM COMPONENTS
388
if (context.isValidationFailed()) {
try {
ExternalContext ec = context.getExternalContext();
ec.redirect(ec.getRequestContextPath() + redirect);
}
catch (IOException e) {
throw new AbortProcessingException(e);
}
}
}
}
Indeed, this also implements javax.faces.event.ComponentSystemEventListener.
This is not strictly required for a tag handler; it’s just done for code convenience in this
specific example. The overridden apply() method is for TagHandler and the overridden
processEvent() method is for ComponentSystemEventListener. In the apply() method
we have the opportunity to programmatically manipulate the parent component, before
it’s being added to the component tree.
We can programmatically achieve the same behavior as <f:event> by calling UICo
mponent#subscribeToEvent(), passing the component system event type and listener
instance of interest. The listener instance of interest happens to be just the current tag
handler instance. When the component system event of interest has been published
by the application, then the processEvent() method of the listener instance will be
invoked.
The first thing we do in processEvent() is to unsubscribe the listener instance.
This is done on purpose because component system event listeners are considered
stateful and therefore are inherently saved in the JSF view state. An easy way to observe
this is to reconfigure JSF to save the view state on the client side by explicitly setting
the javax.faces.STATE_SAVING_METHOD context parameter to client in web.xml and
inspecting the size of the javax.faces.ViewState hidden input field in the generated
HTML output of any JSF form. Every time you add <f:event>, or don’t unsubscribe
ComponentSystemEventListener after it has done its job, the size of the JSF view state
grows with the serialized form of the listener instance. In this specific use case of a
listener which should only run during a non-postback, that’s just unnecessary; hence the
explicit unsubscribe.
CHAPTER 11 CUSTOM COMPONENTS
389
Now, in order to get it to run, register it in /WEB-INF/example.taglib.xml as follows:
<tag>
<tag-name>viewParamValidationFailed</tag-name>
<handler-class>
com.example.project.taghandler.ViewParamValidationFailed
</handler-class>
</tag>
Packaging inaDistributable JAR
In case you have developed a bunch of reusable components, renderers, tag handlers,
tag files, composite components, and what not, and you’d like to package it in a JAR file
for inclusion in /WEB-INF/lib of a web application, then you need to create a so-called
web fragment project. Basically all JSF-oriented components and utility libraries such
as OmniFaces, PrimeFaces, OptimusFaces, BootsFaces, ButterFaces, and DeltaSpike are
built like this. In Maven perspective, it’s merely a JAR project. The key is to put files which
you normally put in the src/main/webapp folder of a Maven WAR project in the src/
main/resources/META-INF/resources/[libraryName] folder of the Maven JAR project.
There is one main exception, all deployment descriptor files which you normally put in
src/main/webapp/WEB-INF, such as web.xml, faces-config.xml, *.taglib.xml, and
beans.xml go directly in the src/main/resources/META-INF folder. Another exception is
that the web.xml file is to be replaced by web-fragment.xml.
The [libraryName] subfolder in the resources folder represents the “library name”
which is generally the URL-friendly form of the project name. For example, “omnifaces”,
“primefaces”, “ optimusfaces”, “ bsf”, “ butterfaces”, etc. Exactly this library name is then
usable in the library attribute of resource components such as <h:outputScript>,
<h:outputStylesheet>, and <h:graphicImage>. Below is what such a Maven JAR project
looks like in Eclipse when organized to conform to the “web fragment” rules. Note
particularly the structure of the src/main/resources folder. Of course, any Java classes
can go inside the src/main/java folder in the usual way.
CHAPTER 11 CUSTOM COMPONENTS
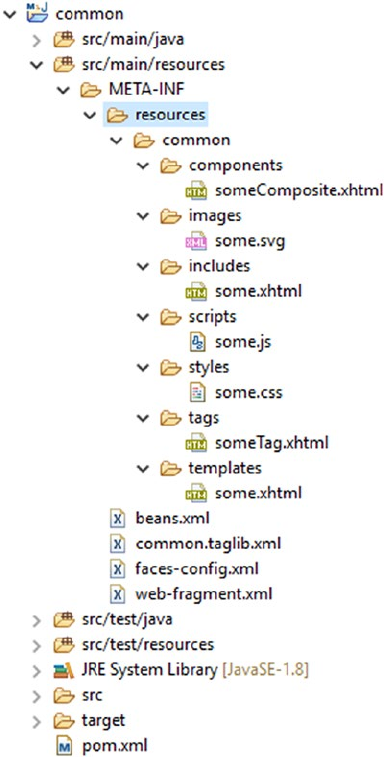
390
Whereby the common.taglib.xml looks like the following, with the composite library
name set to a path relative to src/main/resources/META-INF/resources and the tag file
source set to a path relative to the location of the *.taglib.xml file itself.
<?xml version="1.0" encoding="UTF-8"?>
<facelet-taglib
xmlns="http://xmlns.jcp.org/xml/ns/javaee"
xmlns:xsi="http://www.w3.org/2001/XMLSchema-instance"
xsi:schemaLocation="http://xmlns.jcp.org/xml/ns/javaee
http://xmlns.jcp.org/xml/ns/javaee/web-facelettaglibrary_2_3.xsd"
version="2.3"
>
CHAPTER 11 CUSTOM COMPONENTS
391
<namespace>http://example.com/common</namespace>
<short-name>common</short-name>
<composite-library-name>common/components</composite-library-name>
<tag>
<tag-name>someTag</tag-name>
<source>resources/common/tags/someTag.xhtml</source>
</tag>
</facelet-taglib>
And whereby the web-fragment.xml looks as follows, nearly identical to web.xml,
only with a different root element, <web-fragment> instead of <web-app>.
<?xml version="1.0" encoding="UTF-8"?>
<web-fragment
xmlns="http://xmlns.jcp.org/xml/ns/javaee"
xmlns:xsi="http://www.w3.org/2001/XMLSchema-instance"
xsi:schemaLocation="http://xmlns.jcp.org/xml/ns/javaee
http://xmlns.jcp.org/xml/ns/javaee/web-fragment_4_0.xsd"
version="4.0"
>
<name>common</name>
</web-fragment>
Once such a web fragment project is built as a JAR file and included in /WEB-INF/lib
of the main web application project, then the resources of the JAR are available in the
Facelets files of the main web application project via the library name “common” as follows:
<ui:composition template="/common/templates/some.xhtml"
xmlns="http://www.w3.org/1999/xhtml"
xmlns:h="http://xmlns.jcp.org/jsf/html"
xmlns:ui="http://xmlns.jcp.org/jsf/facelets"
xmlns:common="http://example.com/common"
>
<ui:define name="content">
<common:someComposite />
<h:graphicImage library="common" name="js/some.svg" />
<ui:include src="/common/includes/some.xhtml" />
<h:outputScript library="common" name="scripts/some.js" />
CHAPTER 11 CUSTOM COMPONENTS

392
<h:outputStylesheet library="common" name="styles/some.css" />
<common:someTag />
</ui:define>
</ui:composition>
Resource Dependencies
There may be cases whereby your custom component or renderer depends on a specific
JavaScript or Stylesheet resource, for which you would like to avoid the end user having
to manually include it via <h:outputScript> or <h:outputStylesheet>. In such cases,
you may find the @javax.faces.application.ResourceDependency annotation12 useful.
Imagine that you would like to automatically include common:scripts/some.js and
common:styles/some.css along with a particular custom component; then you can do
so as follows:
@ResourceDependency(library="common", name="some.css", target="head")
@ResourceDependency(library="common", name="some.js", target="head")
public class SomeCustomComponent extends UIComponent {
// ...
}
You can of course also include JSF’s own javax.faces:jsf.js when necessary, i.e.,
when your custom component happens to rely on, for example, the jsf.ajax.request()
or other functions provided by the standard JSF JavaScript API. javax.faces:jsf.js
can be included as follows, with the script library and name available as constants of
ResourceHandler.
@ResourceDependency(
library=ResourceHandler.JSF_SCRIPT_LIBRARY_NAME,
name=ResourceHandler.JSF_SCRIPT_RESOURCE_NAME,
target="head")
public class SomeCustomComponent extends UIComponent {
// ...
}
12 https://javaee.github.io/javaee-spec/javadocs/javax/faces/application/
ResourceDependency.html.
CHAPTER 11 CUSTOM COMPONENTS

393
© Bauke Scholtz, Arjan Tijms 2018
B. Scholtz and A. Tijms, The Definitive Guide to JSF in Java EE 8, https://doi.org/10.1007/978-1-4842-3387-0_12
CHAPTER 12
Search Expressions
As stated in the sections “Ajax Life Cycle” in Chapter 3 and “Ajaxifying Components” in
Chapter 4, the execute and render attributes of <f:ajax> tag take a space-separated
collection of so-called component search expressions.
The search expressions have always been part of JSF (JavaServer Faces) since the
beginning as this is used in the for attribute of <h:outputLabel>, <h:message>, and
<h:messages>, but they have only become essential knowledge for the JSF developer
since the introduction of <f:ajax> in JSF 2.0. Namely, labels and messages are in
almost any case already within the very same naming container parent as the target
input component, so simply specifying the ID of the target input component in the for
attribute already suffices, but this is not necessarily true for the execute and render
attributes of <f:ajax> as the target component may sit in a different naming container
context or even in a physically different Facelets file.
To overcome these difficulties, JSF 2.0 introduced a few more abstract search
expressions: "@this", "@form", "@all", and "@none". Something like "@form" is particularly
easy to use, as it just means target whatever the current form is. If that current form is
defined two parent templates up from the page where it’s referenced, this really makes
referencing it much easier.
Although they made things much easier, these keywords were quite limited. Not only
are there just four of them, but they're also not extensible and the default JSF component
set only uses them internally in the <f:ajax> tag. Using them in other components, even
in JSF’s own <h:outputLabel>, <h:message>, and <h:messages>, as well as using them
programmatically, was left out. Therefore, in JSF 2.3 a "Component Search Expression
Framework" was at the last moment introduced that greatly expands upon those four
keywords. It was largely based on a proven API (application programming interface) of
PrimeFaces.1
1 https://www.primefaces.org/search-expression-framework/.

394
Relative Local IDs
This is the simplest form of a component search expression. The most common
use cases are found in the for attribute of <h:outputLabel>, <h:message>, and
<h:messages> components. It simply references the sole ID of the target UIInput
component.
<h:outputLabel for="email" value="Email address" />
<h:inputText id="email" value="#{login.email}" required="true" />
<h:message for="email" />
This only prerequires that the target component is also sitting within the very same
naming container parent. A naming container parent is a component that implements
the NamingContainer interface.2 In standard JSF, only <h:form>, <h:dataTable>,
<ui:repeat>, and <f:subview> are an instance of NamingContainer. All composite
components are also an instance of NamingContainer, but tag files are not.
In case you need to reference a specific UIInput component within a naming
container from <h:outputLabel> on, then you need to append the so-called naming
container separator character to the ID of the naming container component and then the
ID of the target UIInput component. The default naming container separator character
is a colon “:”. The currently configured separator character is programmatically available
by UINamingContainer#getSeparatorCharacter().3
char separatorCharacter = UINamingContainer
.getSeparatorCharacter(FacesContext.getCurrentInstance);
This is configurable via the javax.faces.SEPARATOR_CHAR context parameter in
web.xml.
<context-param>
<param-name>javax.faces.SEPARATOR_CHAR</param-name>
<param-value>-</param-value>
</context-param>
2 https://javaee.github.io/javaee-spec/javadocs/javax/faces/component/
NamingContainer.html.
3 https://javaee.github.io/javaee-spec/javadocs/javax/faces/component/
UINamingContainer.html#getSeparatorChar-javax.faces.context.FacesContext-.
CHAPTER 12 SEARCH EXPRESSIONS

395
Caution Changing this to something else like a hyphen “-” or even an
underscore “_” is not recommended.4
In the long term, it is confusing and brittle as those characters are also allowed in
the ID attribute itself. JSF does not validate the component ID against the currently
configured naming container separator character and thus it may easily slip through and
cause trouble while referencing such a component in a search expression.
Coming back to referencing a specific UIInput component within a naming
container from <h:outputLabel> on, in the example composite component
<t:inputLocalTime> as demonstrated in the section “Composite Components”
in Chapter 7, the hour drop-down component has an ID of “hour”. Thus, for
<h:outputLabel>, when using the default naming container separator character, the
relative local ID of the hour dropdown inside the composite component is “time:hour”.
<h:outputLabel id="l_time" for="time:hour" value="Time" />
<t:inputLocalTime id="time" value="#{schedule.time}" required="true" />
<h:message id="m_time" for="time" />
Note that this is not necessary for <h:message> as faces messages are under the hood
already added to the faces context with the client ID of the composite component itself.
Using relative local IDs also works within the context of <h:column> of
<h:dataTable>. It’s then interpreted in the context of the currently iterated row, even
when the target component is sitting in another column. The following example
demonstrates that:
<h:dataTable id="users" value="#{admin.users}" var="user">
...
<h:column>
<f:facet name="header">Country</f:facet>
<h:selectOneMenu id="country" value="#{user.address.country}">
<f:selectItems value="#{data.countries}" />
<f:ajax render="city" />
</h:selectOneMenu>
</h:column>
4 https://stackoverflow.com/q/10726653/157882.
CHAPTER 12 SEARCH EXPRESSIONS

396
<h:column>
<f:facet name="header">City</f:facet>
<h:selectOneMenu id="city" value="#{user.address.city}">
<f:selectItems value="#{user.address.country.cities}" />
</h:selectOneMenu>
</h:column>
...
</h:dataTable>
Under the hood, relative local IDs are resolved using the algorithm as described in
the UIComponent#findComponent() API.5 This means that you can also resolve them
programmatically. You only need to ensure that the findComponent() method is invoked
on the correct base component, not on, for example, UIViewRoot.
Absolute Hierarchical IDs
In case the target component is not within the same naming container parent as the
current component, then you need an absolute hierarchical ID instead of a local
relative ID.The key difference is that an absolute hierarchical ID starts with the naming
container separator character. It will then search for the target component from the
UIViewRoot on. Such construct is often used in the render attribute of <f:ajax> when it
needs to reference a component that is not located inside the same form.
<h:form id="search">
...
<h:commandButton id="submit" ...>
<f:ajax execute="@form" render=":results" />
</h:commandButton>
</h:form>
<h:panelGroup id="results" layout="block">
...
</h:panelGroup>
5 https://javaee.github.io/javaee-spec/javadocs/javax/faces/component/UIComponent.
html#findComponent-java.lang.String-.
CHAPTER 12 SEARCH EXPRESSIONS
397
A less common use case where an absolute hierarchical ID is needed is when you
need to reference a component that is in turn nested in another naming container—
for example, when you want to update <h:message> associated with a composite
component during a <cc:clientBehavior> event inside the composite component.
<h:form id="form">
<h:outputLabel id="l_time" for="time:hour" value="Time" />
<t:inputLocalTime id="time" value="#{schedule.time}" required="true">
<f:ajax render=":form:m_time" />
<h:message id="m_time" for="time" />
</h:form>
You could argue that this is a bug or an oversight in the JSF specification. This is very
true and should be worked on for a next version of JSF.Another yet less common use
case is when you need to update a specific iteration round of an iteration component,
such as <h:dataTable> and <ui:repeat>.
<h:form id="form">
<h:dataTable id="table" value="#{bean.items}" var="item">
<h:column>
<h:panelGroup id="column1" layout="block">
...
</h:panelGroup>
</h:column>
<h:column>
<h:panelGroup id="column2" layout="block">
...
</h:panelGroup>
</h:column>
</h:dataTable>
<h:commandButton value="Update second row">
<f:ajax render=":form:table:1:column1
:form:table:1:column2">
</f:ajax>
</h:commandButton>
</h:form>
CHAPTER 12 SEARCH EXPRESSIONS
398
Note that the iteration index is zero-based as with normal Java collections and
arrays. Also note that you basically need to wrap the cell’s content in another component
in order to properly reference the cell’s content, and that you need to explicitly specify
every column in order to update the entire row, as demonstrated above. Updating the
entire column is also possible, but less convenient because you basically need to specify
the search expression for every single row. Fortunately, the render attribute can take an
EL (Expression Language) expression and the EL stream API can be used to concatenate
a bunch of strings in the :form:table:[i]:column format depending on the amount of
items in the table.
<h:commandButton value="Update second column">
<f:ajax render="#{bean.items.stream()
.map(i -> ' :form:list:' += bean.items.indexOf(i) += ':column2')
.reduce((l, r) -> (l += r)).get()}">
</f:ajax>
</h:commandButton>
Admittedly, this is not the most elegant approach. You’d better delegate to a custom
function in an application-scoped bean. It could look something like the following:
<h:commandButton value="Update second column">
<f:ajax
render="#{ajax.columnIds(bean.items, ':form:table::column2')}"
</f:ajax>
</h:commandButton>
Whereby the #{ajax} application-scoped bean looks something like the following:
@Named @ApplicationScoped
public class Ajax {
public String columnIds(List<?> list, String idTemplate) {
return IntStream.range(0, list.size()).boxed()
.map(i -> idTemplate.replace("::", ":" + i + ":"))
.collect(Collectors.joining(" "));
}
}
CHAPTER 12 SEARCH EXPRESSIONS

399
That’s already something better, but still boilerplate-ish. If necessary, you
can also programmatically add Ajax render IDs from a backing bean on. You can
use the PartialViewContext#getRenderIds()6 for this. The returned collection
is, namely, mutable and only consulted during the render response phase (sixth
phase). You also need to specify an absolute hierarchical ID here, but with only one
important difference: it cannot start with the naming container separator character.
In other words, “:form:table:0:column2” isn’t going to work; you need to specify
“form:table:0:column2” instead. It’s always resolved relative to UIViewRoot.
FacesContext context = FacesContext.getCurrentInstance();
PartialViewContext ajaxContext = context.getPartialViewContext();
ajaxContext.getRenderIds().add("form:table:0:column2");
As a tip, in case you’re having a hard time figuring out the absolute hierarchical ID
and/or memorizing which components exactly are naming containers, then you can
always look in the generated HTML output. Open the JSF page in your favorite web
browser, do a View Page Source, locate the HTML element representation of the JSF
component of interest, take the value of its ID attribute, and finally prefix it with the
naming container separator character.
Also, in case you encounter an autogenerated ID prefixed with j_id, then you
absolutely need to give the associated JSF component a fixed ID; otherwise its value
would be off when the component’s position in the component tree is subject to be
changed because of, for example, a conditionally included component somewhere
before the position of the component of interest. (See also the section “Text-Based Input
Components” in Chapter 4.)
Like relative local IDs, absolute hierarchical IDs can be programmatically resolved
using the algorithm as described in the UIComponent#findComponent() API.7 The
following example demonstrates how to get hold of the UIData component representing
<h:form id="form"><h:dataTable id="table">.
UIViewRoot root = FacesContext.getCurrentInstance().getViewRoot();
UIData table = (UIData) root.findComponent("form:table");
6 https://javaee.github.io/javaee-spec/javadocs/javax/faces/context/
PartialViewContext.html#getRenderIds--.
7 https://javaee.github.io/javaee-spec/javadocs/javax/faces/component/UIComponent.
html#findComponent-java.lang.String-.
CHAPTER 12 SEARCH EXPRESSIONS

400
Standard Search Keywords
JSF provides a set of more abstract search expressions, known as “search keywords.”
They all start with the “@” character. They can be used to substitute a fixed component ID
in the search expression. Table12-1 provides an overview of them.
In a standard JSF component set, all search keywords, including custom ones, can be
used in the following component attributes:
• <f:ajax execute>—Specifies components which must be processed
during the apply request values, process validations, update model
values, and invoke application phases (second, third, fourth, and fifth
phases) of the Ajax postback request. Defaults to @this.
Table 12-1. Standard Search Keywords Provided by JSF
Keyword Resolves to Since
@this UIComponent#getCurrentComponent() 2.0
@form UIComponent#getNamingContainer() until an UIForm is encountered 2.0
@all Everything 2.0
@none Nothing 2.0
@parent UIComponent#getParent() 2.3
@child(index) UIComponent#getChildren() at given index 2.3
@next UIComponent#getParent() and then UIComponent#getChildren() at next
index
2.3
@previous UIComponent#getParent() and then UIComponent#getChildren() at
previous index
2.3
@namingcontainer UIComponent#getNamingContainer() 2.3
@composite UIComponent#getCompositeComponentParent() 2.3
@id(id) UIComponent#ndComponent() with given ID. 2.3
@root FacesContext#getViewRoot() 2.3
CHAPTER 12 SEARCH EXPRESSIONS
401
• <f:ajax render>—Species components which must be processed
during the render response phase (sixth phase) of the Ajax postback
request. Defaults to @none.
• <h:outputLabel for>—Species the target component of the
generated HTML <label> element. Defaults to @none.
• <h:message for>—Species the target component for which the rst
faces message must be rendered. Defaults to @none.
• <h:messages for>—Specifies the target component for which all
faces messages must be rendered. Defaults to @none.
Note that using search keywords is, for the for attribute of <h:outputLabel>,
<h:message>, and <h:messages>, has only been possible since JSF 2.3. In older versions,
only relative and absolute IDs were supported.
The most commonly used search keyword is undoubtedly @form. You have basically
no other choice when using <f:ajax> in a UICommand component which is supposed to
process the entire form.
<h:form>
...
<h:commandButton value="Submit" ...>
<f:ajax execute="@form" />
</h:commandButton>
</h:form>
Also new since JSF 2.3 is that search keywords can be chained with regular
component IDs. Following is an example which expands on the example given before in
the section “Absolute Hierarchical IDs.”
<h:form>
<h:outputLabel id="l_time" for="time:hour" value="Time" />
<t:inputLocalTime id="time" value="#{schedule.time}" required="true">
<f:ajax render="@form:m_time" />
<h:message id="m_time" for="time" />
</h:form>
And following is an example that updates the entire table when a row is deleted.
CHAPTER 12 SEARCH EXPRESSIONS

402
<h:form>
<h:dataTable value="#{products.list}" var="product">
...
<h:column>
<h:commandButton id="delete" value="Delete"
action="#{products.delete(product)}">
<f:ajax render="@namingcontainer" />
</h:commandButton>
</h:column>
</h:dataTable>
</h:form>
Note particularly that it thus references the closest component implementing the
NamingContainer interface, which, in this context, is <h:dataTable> and thus not <h:form>.
As to programmatic resolution, search expressions with keywords cannot be
programmatically resolved using UIComponent#findComponent(). For that, you need
SearchExpressionHandler#resolveComponent() or resolveComponents()8 instead.
SearchExpressionHandler is in turn available by Application#getSearchExpressionH
andler(). You also need to create SearchExpressionContext9 beforehand which wraps
the component to start searching from.
FacesContext context = FacesContext.getCurrentInstance();
UIComponent base = context.getViewRoot(); // Can be any component.
String expression = "@namingcontainer";
SearchExpressionContext searchContext = SearchExpressionContext
.createSearchExpressionContext(context, base);
SearchExpressionHandler searchHandler = context.getApplication()
.getSearchExpressionHandler();
handler.resolveComponent(searchContext, expression, (ctx, found) -> {
System.out.println(found);
});
8 https://javaee.github.io/javaee-spec/javadocs/javax/faces/component/search/
SearchExpressionHandler.html#resolveComponent-javax.faces.component.search.
SearchExpressionContext-java.lang.String-javax.faces.component.ContextCallback-.
9 https://javaee.github.io/javaee-spec/javadocs/javax/faces/component/search/
SearchExpressionContext.html.
CHAPTER 12 SEARCH EXPRESSIONS
403
Frankly, it’s quite verbose, but it’s JSF API’s own. Fortunately, utility libraries such as
OmniFaces exist.
Custom Search Keywords
The Component Search Expression Framework introduced in JSF 2.3 also comes with
an API which allows us to create custom search keywords. Imagine that you have a form
with multiple <h:message> components, and that you’d like to re-render them all when
submitting the form. Then you’d be tempted also to use @form in the render attribute of
<f:ajax>.
<h:form>
<h:outputLabel for="input1" ... />
<h:inputText id="input1" ... />
<h:message for="input1" />
<h:outputLabel for="input2" ... />
<h:inputText id="input2" ... />
<h:message for="input2" />
<h:outputLabel for="input3" ... />
<h:inputText id="input3" ... />
<h:message for="input3" />
<h:commandButton value="Submit" ...>
<f:ajax execute="@form" render="@form" />
</h:commandButton>
</h:form>
But this is not terribly efficient. In fact, it also unnecessarily re-renders all label and
input components and any other static content inside the very same form which doesn’t
at all change during the Ajax postback request. This is a waste of resources. Ideally, we
should have a search keyword like “@messages” which basically references all message
components within the same form.
<h:form>
<h:outputLabel for="input1" ... />
<h:inputText id="input1" ... />
<h:message id="m_input1" for="input1" />
CHAPTER 12 SEARCH EXPRESSIONS

404
<h:outputLabel for="input2" ... />
<h:inputText id="input2" ... />
<h:message id="m_input2" for="input2" />
<h:outputLabel for="input3" ... />
<h:inputText id="input3" ... />
<h:message id="m_input3" for="input3" />
<h:commandButton value="Submit" ...>
<f:ajax execute="@form" render="@messages" />
</h:commandButton>
</h:form>
Note that each <h:message> component has an explicit ID set, because without an
explicit ID, they will by default render nothing to the HTML output, and then the JSF
Ajax API JavaScript wouldn’t be able to find them in order to update its content based on
the Ajax response.
In order to get JSF to recognize the new search keyword @messages, first extend the
javax.faces.component.search.SearchKeywordResolver10 as follows:
public class MessagesKeywordResolver extends SearchKeywordResolver {
@Override
public boolean isResolverForKeyword
(SearchExpressionContext context, String keyword)
{
return "messages".equals(keyword);
}
@Override
public void resolve
(SearchKeywordContext context, UIComponent base, String keyword)
{
UIComponent form = base.getNamingContainer();
10 https://javaee.github.io/javaee-spec/javadocs/javax/faces/component/search/
SearchKeywordResolver.html.
CHAPTER 12 SEARCH EXPRESSIONS
405
while (!(form instanceof UIForm) && form != null) {
form = form.getNamingContainer();
}
if (form != null) {
Set<String> messageClientIds = new HashSet<>();
VisitContext visitContext = VisitContext.createVisitContext
(context.getSearchExpressionContext().getFacesContext());
form.visitTree(visitContext, (visit, child) -> {
if (child instanceof UIMessage) {
messageClientIds.add(child.getClientId());
}
return VisitResult.ACCEPT;
});
if (!messageClientIds.isEmpty()) {
context.invokeContextCallback(new UIMessage() {
@Override
public String getClientId(FacesContext context) {
return String.join(" ", messageClientIds);
}
});
}
}
context.setKeywordResolved(true);
}
}
It should be noted that this approach is already slightly hacky. Namely, the intent of
the SearchKeywordResolver is to resolve a keyword to exactly one component whose
client ID will then be used to substitute the keyword. This component will then be
passed to SearchKeywordContext#invokeContextCallback(). In the above approach,
we instead collect the client IDs of all UIMessage components found within the parent
UIForm and then supply a fake UIMessage component to invokeContextCallback() who
will in turn call the getClientId() of the fake UIMessage component which actually
returns the desired collection of client IDs.
CHAPTER 12 SEARCH EXPRESSIONS

406
It should also be noted that UIComponent#visitTree()11 is being used instead
of recursing over UIComponent#getChildren() in order to collect the client IDs
of any UIMessage component. Namely, when plain iterating over children, you
may sooner or later come across an iterator component such as <h:dataTable> or
<ui:repeat>, and if it happens to have only one UIMessage component nested, then
you’ll effectively end up with only one client ID, namely, the one without the iteration
index. UIComponent#visitTree() doesn’t do that; any iterator component in the path
will actually iterate over its model value and visually give back multiple UIMessage
components, each with the correct client ID with the iteration index included.
In the end, SearchKeywordContext#setKeywordResolved() must be called with true
in order to inform the search context that the keyword has successfully been resolved, even
if it actually resolved to nothing. It doesn’t actually do any harm if you forgot this, but if you
don’t mark the search keyword resolved this way, then the search context will continue
consulting all other search keyword resolvers, which might end up being less efficient.
Finally, in order to get the new MessagesKeywordResolver to run, register it in
faces-config.xml as follows:
<application>
<search-keyword-resolver>
com.example.project.MessagesKeywordResolver
</search-keyword-resolver>
</application>
Or, programmatically in a @WebListener as follows:
@WebListener
public class ApplicationConfig implements ServletContextListener {
@Override
public void contextInitialized(ServletContextEvent event) {
FacesContext.getCurrentInstance().getApplication()
.addSearchKeywordResolver(new MessagesKeywordResolver());
}
}
11 https://javaee.github.io/javaee-spec/javadocs/javax/faces/component/UIComponent.
html#visitTree-javax.faces.component.visit.VisitContext-javax.faces.component.
visit.VisitCallback-.
CHAPTER 12 SEARCH EXPRESSIONS
407
Note that the FacesContext must be available at this point and hence a
ServletContainerInitializer won't necessarily work, and that the FacesServlet may
not have serviced a request yet and hence registration in some managed bean won't
necessarily work.
CHAPTER 12 SEARCH EXPRESSIONS
409
© Bauke Scholtz, Arjan Tijms 2018
B. Scholtz and A. Tijms, The Definitive Guide to JSF in Java EE 8, https://doi.org/10.1007/978-1-4842-3387-0_13
CHAPTER 13
Security
Security for web applications is a broad field and includes a number of topics such
as protecting access to resources, shielding against injection attacks of various kinds,
and preventing users from being tricked into doing malicious actions on behalf of an
attacker.
JSF (JavaServer Faces) supports these topics in various ways, either by providing
native solutions or by integrating with the Java EE platform’s facilities. For access to
resources, which includes both authentication (the caller proving its identity) and
authorization (the system determining to which resources the caller has access) JSF
(JavaServer Faces) integrates with the Java EE Security machinery, which in turn is
defined by, among others, the Servlet spec and the Java EE Security spec.
Java EE Security (JSR 375) is supported by both the Web- and Full profile in Java EE 8.
Additionally, the reference implementation Soteria works on Java EE 7 servers, and because
it’s built on JASPIC (Java EE authentication SPI) (JSR 196), it also works on Servlet containers
that support JASPIC (such as Tomcat since 8.5 and Jetty since 7.0).
Java EE Security Overview andHistory
In Java EE, security is not specified in a single specification but is in fact spread over
multiple specifications that integrate with each other in various ways. While this allows
for different aspects of security to be evolved at their own pace, and practically speaking
even allows some to be replaced by non-spec implementations, it does muddy the
waters of what spec is responsible for what.
In this introductory section we'll start off with providing a somewhat broad overview
of what some of the pieces are and how they fit together. We'll focus on the web aspects
of security. Security is also present in things like EJB (Enterprise JavaBeans) and JCA
(Java Connector Architecture) connectors, but these are outside the scope of this book.
410
Historically, security in Java EE is mostly based on the security model introduced
by the Servlet spec. That is, a model where the core elements are an "authentication
mechanism" (FORM, BASIC, ...), a set of security constraints in web.xml where a
specific pattern (the URL pattern) is combined with a collection of roles (including the
empty collection), and a few ways to programmatically test the caller's details, such as
HttpServletRequest.isUserInRole.
While effective, many details were left out in the early days. The Servlet spec did
ask for implementations (Servlet containers) to be extendible with respect to the
authentication mechanisms but did not specify how exactly this should be done.
Likewise, the Servlet spec implicitly requires an "identity store" (File, Database, LDAP, …)
that holds the caller details such as credentials, name, and roles but left all details about
how to configure these to the Servlet container.
The Servlet spec did not define any way to access the security constraints defined in
web.xml in a programmatic way, or to programmatically influence their execution (e.g.,
to make certain constraints time based). Furthermore, the very early versions of the
Servlet spec did not specify the constraint resolution in the strictest way, which allowed
for some small differences in interpretation between various Servlet containers.
The first additional spec to address these concerns was JACC (JSR 115), which,
simply stated, deals with authorization concerns. JACC specifies how the web.xml
security constraints should be represented in code, namely, as a collection of Permission
instances. JACC also specifies how these can be accessed (queried) by code, and
finally allows for custom authorization modules that can replace or augment the logic
that the container executes to determine its access decision. A perhaps somewhat
difficult thing to understand about JACC is that it's not so much something that can be
implemented on its own and then added to a Servlet container (as we can do with JSF),
but it standardizes and more concisely specifies what all Servlet containers internally are
already doing.
The second additional spec to address the above-mentioned concerns was JASPIC
(JSR 196), which deals with authentication concerns. JASPIC specifies at what moments
the Servlet container should call the authentication mechanism and defines an
explicit interface type for these authentication mechanisms, so custom authentication
mechanisms can use this interface instead of the Servlet container's proprietary one
and thus be portable. JASPIC says a few things about the identity store, but too little to
be really usable in practice. Like JACC, JASPIC isn't something that can be implemented
independently, but it standardizes something that all Servlet containers are already
doing.
CHAPTER 13 SECURITY
411
Both JACC and JASPIC define low-level SPIs (server provider interfaces) that are
mainly intended to be implemented and used by vendors to provide extension products.
They are quite bare and fairly abstract. As such they are not (rich) APIs (application
programming interfaces) that are targeted at application developers. Here is where
the Java EE Security API (JSR 375) comes in. Java EE Security offers a higher-level and
easier-to-register (just implement the interface) and easier-to-use (CDI based) version
of the JASPIC authentication module. The Java EE Security API also fully defines the
identity store artifact, but perhaps most important it provides a number of concrete
implementations of all of these, among which is a FORM-based authentication
mechanism optimized for use with JSF and several identity stores such as a JDBC (Java
Database Connectivify) store and an LDAP (Lightweight Directory Access Protocol)
store.
The RI (reference implementation) of the Java EE Security API is called Soteria. This
implementation is of course provided by the Java EE 8 RI GlassFish and its derivative
Payara. Soteria, like Mojarra and MyFaces, has been designed to run independently on
basically every Servlet container provided that it adheres to the JASPIC specs (which
both Tomcat and Jetty do as mentioned in the chapter's introduction). Its dependencies
(at the time of writing, for Soteria 1.0) are CDI 1.2 and Expression Language 3.0. These
two dependencies are provided by all Java EE 7 implementations. Servlet containers
typically provide EL (Expression Language) support while CDI can be added separately,
for instance, using the RI Weld. For a few optional features Soteria takes advantage of
Servlet containers that adhere to the JACC spec.
Protect Access toResources
In JSF the main resources to protect are views, which are accessed via URL patterns. It's
therefore these URL patterns we need to define security constraints. These constraints
are primarily defined in web.xml. In fact, as of Java EE 8, web.xml is pretty much the only
viable place to define security constraints for JSF views.
Java EE has three kinds of security constraints:
• Excluded
• Unchecked
• By role
CHAPTER 13 SECURITY
412
Excluded
“Excluded,” aka “deny all,” means that no external caller will be granted access to
the resources covered by this constraint. One might ask what the purpose of such a
constraint is. If the resources can never be accessed, why are those resources there in the
first place?
The answer is twofold. For one, a single application may be configured for different
purposes. An excluded security constraint is an easy way then to quickly disable a
number of resources that are not applicable to a certain configuration of the application.
A more important use case is to be able to make a distinction between external use
and internal use of a resource. The key insight here is that security constraints are
only applied to external requests for that resource, i.e., to a caller requesting https://
example.com/resources/template.xhtml, but not to internal requests such as includes,
forwards, and any of the methods to load a resource from the classpath or file system.
This is specifically important for JSF because of a somewhat unfortunate design
choice regarding composite components. Composite components are components that
are implemented via a Facelet instead of a Java class. By convention, they have to be
placed in a directory inside a directory named /resources that resides in the web root.
For instance, /resources/bar/foo.xhtml. This will make a composite component “foo”
available in the namespace http://xmlns.jcp.org/jsf/composite/bar.
Components are of course not views and the caller should not be able to request
those directly. Unfortunately, /resources is not in any way a special directory to Java
EE.JSF assigns a special meaning to it by convention, but to the Servlet container it’s
a directory like any other. This specifically means there’s no protection applied to it
and any caller can directly request resources from it. In other words, this directory is
“unchecked,” aka “world readable.” Even with an *.xhtml mapping, this not only allows
the user to guess which components we have but lets the user attempt to execute those
as well. Clearly this is not what we want. There are two solutions for this:
• Configure another directory to be the JSF resources directory
• Add the mentioned security constraint to web.xml
Via the javax.faces.WEBAPP_RESOURCES_DIRECTORY context parameter another
directory can be configured to be the JSF resources directory instead of /resources. For
example,
CHAPTER 13 SECURITY
413
<context-param>
<param-name>javax.faces.WEBAPP_RESOURCES_DIRECTORY</param-name>
<param-value>WEB-INF/resources</param-value>
</context-param>
Note that the path is relative to the web root and must not begin with a “/.”
While this is a good default for our own applications, it still doesn’t totally protect
us. Namely, third-party jars can still provide their resources via /resources and aren’t
affected by that context parameter. For that reason, the aforementioned “Excluded”
constraint is needed. It looks as follows:
<security-constraint>
<web-resource-collection>
<web-resource-name>The /resources folder</web-resource-name>
<url-pattern>/resources/*</url-pattern>
</web-resource-collection>
</security-constraint>
As can be seen, defining an excluded constraint boils down to defining the URL
pattern that we wish to constrain, without defining any specific constraints.
Unchecked
“Unchecked,” aka “permit all,” “public,” and “world readable,” means that all callers,
independent of whether or not they are authenticated, have access to the resources
covered by the “constraint.” Internally an explicit constraint may exist for this, but in
web.xml this “constraint” is defined simply by not defining any constraint at all for a URL
pattern. In other words, every URL that’s not covered explicitly by any other pattern is
“unchecked.”
By Role
“By role” means a so-called role is associated with a URL pattern, and the authenticated
caller must have that role in order to access the resource. A role itself is frequently seen
as a concept with strict semantics, but it’s essentially little more than just an opaque
string that needs to match from the set of such strings associated with an authenticated
caller, and the set of strings associated with a URL pattern. The content of that string
CHAPTER 13 SECURITY
414
is completely up to the application, meaning it could be a “type of caller,” like “admin”,
“user”, etc., but also something fine-grained as “may_add_item”, or even tokens such as
“AYUDE-OPWR-BM1OP”.
The following gives an example:
<security-constraint>
<web-resource-collection>
<web-resource-name>User pages</web-resource-name>
<url-pattern>/user/*</url-pattern>
</web-resource-collection>
<auth-constraint>
<role-name>VIEW_USER_PAGES</role-name>
</auth-constraint>
</security-constraint>
<security-constraint>
<web-resource-collection>
<web-resource-name>Admin pages</web-resource-name>
<url-pattern>/admin/*</url-pattern>
</web-resource-collection>
<auth-constraint>
<role-name>VIEW_ADMIN_PAGES</role-name>
</auth-constraint>
</security-constraint>
<security-role>
<role-name>VIEW_USER_PAGES</role-name>
</security-role>
<security-role>
<role-name>VIEW_ADMIN_PAGES</role-name>
</security-role>
In the above fragment we define two security constraints—one for the /user/*
pattern, for which the caller needs to have the role “VIEW_USER_PAGES”, and one for
the /admin/* pattern, for which the caller needs the role “VIEW_ADMIN_PAGES”. With
the above constraints in place, a caller accessing, say, /user/account.xhtml has to be
authenticated and has to have the mentioned role.
CHAPTER 13 SECURITY
415
An auth-constraint can contain multiple roles, for which OR semantics are applied.
This means the authenticated caller only needs to have one of the roles in that constraint
in order to be granted access. Constraints can additionally be restricted to a specific
HTTP method (such as GET or POST). This does come with a caveat, since by default
all methods that are not specified will be unchecked (public). This can be countered
by using the top-level <deny-uncovered-http-methods/> tag. The following gives an
example of this:
<deny-uncovered-http-methods />
<security-constraint>
<web-resource-collection>
<web-resource-name>User pages</web-resource-name>
<url-pattern>/user/*</url-pattern>
<http-method>GET</http-method>
<http-method>POST</http-method>
</web-resource-collection>
<auth-constraint>
<role-name>VIEW_USER_PAGES</role-name>
</auth-constraint>
</security-constraint>
Setting theAuthentication Mechanism
After the security constraints have been defined, we need to set how the caller will
authenticate. The artifact that handles the interaction with the caller (i.e., asks the
caller for credentials in a certain way) is called an “authentication mechanism.” Java EE
provides a number of these out of the box. The Servlet spec provides four, namely, FORM,
BASIC, DIGEST, and CERT, while Java EE Security provides FORM and BASIC as well (with
the difference that these correspond to CDI beans), but also a variant of FORM called
“Custom FORM”.
FORM and Custom FORM are both suitable for interactive web applications, such as the
ones we would build primarily with JSF.Contrary to, say, BASIC, the FORM authentication
mechanisms call back into the application and let it render the form that asks the caller
for credentials, hence, the name of these mechanisms.
CHAPTER 13 SECURITY
416
The difference between the two is mainly in how the mechanism requires the
application to continue the so-called authentication dialog after it has rendered the form. In
FORM this is done by letting the caller post the filled-out form to the virtual URL j_security_
check, while in Custom FORM this is done programmatically via a call to the injected
SecurityContext. This small difference makes all the difference for JSF though. In JSF, a form
view by default submits to the same URL it was requested from, so posting back to a single
mechanism mandated URL is not at all natural. In addition to that, in JSF we often need to
have server-side code running after a postback; just think about converters and validators
and the ability to emit a faces message. We can’t really do any of this if we have to post back
to the virtual non-faces j_security_check URL, but it’s quite doable when we can continue
the authentication dialog programmatically from the backing bean’s action method.
We’ll first show you how to configure a web application to use the Custom FORM
authentication mechanism. Later on, we’ll explain how to actually use JSF to fulfill the
requirements this mechanism imposes on the application.
All of the authentication mechanisms provided by Java EE Security are installed
and configured via its own AuthenticationMechanismDefinition annotation. This
annotation tells the container which type of authentication mechanism to install, and
with which configuration. The annotation can be placed on pretty much every class
on the classpath. Logically it fits in quite well with the @FacesConfig annotation. The
following shows an example:
@CustomFormAuthenticationMechanismDefinition(
loginToContinue = @LoginToContinue(
loginPage = "/login.xhtml",
errorPage = ""
)
)
@FacesConfig @ApplicationScoped
public class ApplicationConfig {
// ...
}
A perhaps somewhat unfortunate requirement here is that the errorPage
attribute has to be specified and set to the empty string. This is needed since the
@LoginToContinue element has a default value for an actual error page. In JSF we rarely
use an explicit error page to display errors but instead redisplay the original page with
the error messages rendered on it via faces messages.
CHAPTER 13 SECURITY
417
Do note that the current version of Java EE Security only allows one authentication
mechanism to be active at the same time. Technically what happens when the container
encounters the @CustomFormAuthenticationMechanismDefinition annotation is that it
adds an enabled CDI bean to the system of type HttpAuthenticationMechanism. This is
important to know, since its being a regular CDI bean means we can inject it, decorate it,
intercept it, and basically do everything with it that we can normally do with CDI beans.
The loginToContinue attribute is used to configure the view that the container
forwards to whenever the caller tries to access a protected view. This is called “container
initiated authentication”; the container starts the authentication dialog as opposed to
the application.
Note that the default is to forward to the login page, meaning that if the caller tries
to access https://example.com/foo.xhtml, and /foo.xhtml is protected, the caller will
still see /foo.xhtml in the address bar and not /login.xhtml. However, the postback
is to /login.xhtml, so after entering credentials the caller would get to see this in the
address bar. Alternatively we can configure the loginToContinue attribute to use a
redirect instead.
@CustomFormAuthenticationMechanismDefinition(
loginToContinue = @LoginToContinue(
loginPage = "/login.xhtml",
useForwardToLogin = false,
errorPage = ""
)
)
@FacesConfig @ApplicationScoped
public class ApplicationConfig {
// ...
}
Setting theIdentity Store
After having declared the security constraints and setting the mechanism that we’d like
to use to authenticate, there’s one final piece of the puzzle remaining: setting the artifact
that contains the caller’s data, such as credentials, name, and roles. In Java EE Security
this artifact is called an identity store.
CHAPTER 13 SECURITY
418
Java EE provides two of these out of the box; one to connect to a database and one
to connect to LDAP (Lightweight Directory Access Protocol). The Java EE Security RI
(Soteria) additionally ships with an embedded identity store. Most application servers
provide additional ones of their own, which are often configured outside the application
(e.g., via an admin console, CLI, or XML configuration file that’s stored inside the server).
Setting and configuring the Java EE Security-provided identity stores and the one
provided by the RI happens in a similar fashion as the authentication mechanisms:
via an IdentityStoreAnnotation. Just like the authentication mechanism version,
this will cause the container to add an enabled CDI bean to the system, this time one
implementing the IdentityStore interface.
The following shows an example together with our earlier definition of the
authentication mechanism:
@CustomFormAuthenticationMechanismDefinition(
loginToContinue = @LoginToContinue(
loginPage = "/login.xhtml",
useForwardToLogin = false,
errorPage = ""
)
)
@EmbeddedIdentityStoreDefinition({
@Credentials(
callerName = "admin@example.com",
password = "secret1",
groups = { "VIEW_USER_PAGES", "VIEW_ADMIN_PAGES" }
),
@Credentials(
callerName = "user@example.com",
password = "secret2",
groups = { "VIEW_USER_PAGES" })
)
})
@FacesConfig @ApplicationScoped
public class ApplicationConfig {
// ...
}
CHAPTER 13 SECURITY
419
The above causes an embedded (in-memory) store to be created, with two callers
(users), the first one being in the groups “VIEW_USER_PAGES” and “VIEW_ADMIN_PAGES”
and the second one only in the group “VIEW_USER_PAGES”. The authentication
mechanism will use this identity store to validate that the credentials (caller name and
password) match and, if they do, to get the correct groups from the identity store.
The observant reader may notice that the terminology has changed. Before we were
talking about “roles,” while all of a sudden this has changed to “groups.” Is this a mistake?
Well, not really. Groups and roles are subtly different. Both are just opaque strings to the
container, but groups can be optionally mapped to roles. We won’t elaborate on this
process further here, but suffice it to say that by default, Java EE mandates a so-called 1:1
group-to-role mapping, which simply means groups and roles are the same.
To better understand identity stores we’ll give two more examples here. For the first
example we’ll look at one of the identity stores that’s provided by the Java EE Security
API—the database identity store. This store is activated and configured using the @
DatabaseIdentityStoreDefinition annotation. The three most important attributes
to configure are the data source (which represents the SQL data base), the SQL query to
obtain the (hashed!) password given a caller name, and the SQL query to identify which
groups a caller is in given the caller name. The following gives an example:
@CustomFormAuthenticationMechanismDefinition(
loginToContinue = @LoginToContinue(
loginPage = "/login.xhtml",
errorPage = ""
)
)
@DatabaseIdentityStoreDefinition(
dataSourceLookup = "java:app/MyDataSource",
callerQuery = "SELECT password FROM caller WHERE name = ?",
groupsQuery = "SELECT name FROM groups WHERE caller_name = ?"
)
@DataSourceDefinition(
name = "java:app/MyDataSource",
className = "org.h2.jdbcx.JdbcDataSource",
url="jdbc:h2:~/test;DB_CLOSE_ON_EXIT=FALSE"
)
CHAPTER 13 SECURITY
420
@FacesConfig @ApplicationScoped
public class ApplicationConfig {
// ...
}
In this example, a data source is defined for the H2 database using the org.h2.jdbcx.
JdbcDataSource driver. Naturally this can be done in a similar way for any other database
that has a JDBC driver. Alternatively, the data source can be defined externally to the
application. The caller query that we used is “select password from caller where
name = ?”, which means we assume a table with at least two columns—one holding the
caller name, and the other the hashed password. Such table could be created by, for
example, the following SQL statement:
CREATE TABLE caller(
name VARCHAR(32) PRIMARY KEY,
password VARCHAR(255)
)
The query that we used for the groups is “select name from groups where
caller_name = ?”, which assumes a table with at least two columns—the caller name,
and the group name, with one row for each group the caller is in. Such a table could be
created by, for example, the following SQL statement:
CREATE TABLE caller_groups(
caller_name VARCHAR(32),
name VARCHAR(32)
)
When populating the caller table, it must be noted that a default hash algorithm is
assumed for the password column, namely, PBKDF2WithHmacSHA256. This algorithm can
(should) be customized by setting the number of iterations, the key size, and the salt size.
Instead of using an identity store that's provided by the Java EE Security API we also
have the option of providing our own custom one. A common use case for that is using
the application's own services to load the application-specific user data.
CHAPTER 13 SECURITY
421
The following shows an example of such an identity store:
@ApplicationScoped
public class UserServiceIdentityStore implements IdentityStore {
@Inject
private UserService userService;
@Override
public CredentialValidationResult validate(Credential credential) {
UsernamePasswordCredential login =
(UserNamePasswordCredential) credential;
String email = login.getCaller();
String password = login.getPasswordAsString();
Optional<User> optionalUser =
userService.findByEmailAndPassword(email, password);
if (optionalUser.isPresent()) {
User user = optionalUser.get();
return new CredentialValidationResult(
user.getEmail(),
user.getRolesAsStrings()
);
}
else {
return CredentialValidationResult.INVALID_RESULT;
}
}
}
There is no specific registration needed; the above given class simply needs to be
present in the application (be on its classpath). With such custom identity store present
the ApplicationConfig class therefore doesn’t need any config for the identity store.
CHAPTER 13 SECURITY
422
@CustomFormAuthenticationMechanismDefinition(
loginToContinue = @LoginToContinue(
loginPage = "/login.xhtml",
errorPage = ""
)
)
@FacesConfig @ApplicationScoped
public class ApplicationConfig {
// ...
}
The UserServiceIdentityStore as given above delegates most of the work to a
UserService, which would be responsible for handling User entities in the application.
Fully discussing such service is outside the scope of this book, but we can imagine it
could use, for example, JPA to persist and load User entities. Our custom identity store
uses the service to try to find a User based on the user name and the password that's
being passed in via the credentials. If a User instance is returned, it means the name
referred to an existing user, and the password was the correct one. In that case the
identity store in turn returns CredentialValidationResult which does two things: it
indicates that authentication was successful, and it provides the container with the data
that will eventually be used to set the authenticated identity for the current request. If the
service couldn’t find the user, then either the name or the password was wrong. In that
case the store returns INVALID_RESULT to indicate that authentication was not successful.
Providing Our Custom JSF Code
In the sections above, we first defined our security constraints (which views are
protected), then we set up the authentication mechanism (how do our callers interact
with our application in order to authenticate), and finally we set up the identity store
(where the caller data resides).
It’s now time to plug our own custom code into the authentication process. This
primarily happens by providing the view that the authentication mechanism directs to
when it needs to collect the caller’s credentials (e-mail and password in this case).
The login page can be kept relative simple—a standard form page, with two inputs
bound to our backing bean, and a button to submit.
CHAPTER 13 SECURITY
423
<!DOCTYPE html>
<html lang="en"
xmlns="http://www.w3.org/1999/xhtml"
xmlns:h="http://xmlns.jcp.org/jsf/html"
>
<h:head>
<title>Log In</title>
</h:head>
<h:body>
<h1>Log In</h1>
<h:form>
<h:outputLabel for="email" value="Email" />
<h:inputText id="email" value="#{login.email}" />
<br />
<h:outputLabel for="password" value="Password" />
<h:inputSecret id="password" value="#{login.password}" />
<br />
<h:commandButton value="Login" action="#{login.submit}" />
<h:messages />
</h:form>
</h:body>
</html>
The page above is a totally normal JSF view. This specifically means that contrary
to classical HTML <form method="post" action="j_security_check"> of FORM
authentication the authentication mechanism does not monitor the postback URL in any
way and therefore there aren’t any constraints being placed on the input elements that
collect the credentials.
Instead, the JSF backing bean has to collect these credentials and then
programmatically pass these along and signal the authentication mechanism to continue
the dialog. Before passing the credentials along, JSF is free to do its own validation and
engage in its own dialog with the caller without the authentication mechanism having
to be involved with this. Note that the command button explicitly doesn’t use Ajax to
submit. You can do so, but then the average web browser won’t suggest the end user to
remember the login credentials on its behalf.
CHAPTER 13 SECURITY
424
The following shows a full example of the backing bean handling the login call. We’ll
discuss the parts individually below.
@Named @RequestScoped
public class Login {
@NotNull
@Email
private String email;
@NotNull
@Size(min = 8, message = "Password must be at least 8 characters")
private String password;
@Inject
private SecurityContext securityContext;
@Inject
private ExternalContext externalContext;
@Inject
private FacesContext facesContext;
public void submit() {
switch (continueAuthentication()) {
case SEND_CONTINUE:
facesContext.responseComplete();
break;
case SEND_FAILURE:
facesContext.addMessage(null, new FacesMessage(
FacesMessage.SEVERITY_ERROR, "Login failed", null));
break;
case SUCCESS:
facesContext.addMessage(null, new FacesMessage(
FacesMessage.SEVERITY_INFO, "Login succeed", null));
break;
CHAPTER 13 SECURITY
425
case NOT_DONE:
// Doesn’t happen here
}
}
private AuthenticationStatus continueAuthentication() {
return securityContext.authenticate(
(HttpServletRequest) externalContext.getRequest(),
(HttpServletResponse) externalContext.getResponse(),
AuthenticationParameters.withParams().credential(
new UsernamePasswordCredential(email, password))
);
}
public String getEmail() {
return email;
}
public void setEmail(String email) {
this.email = email;
}
public String getPassword() {
return password;
}
public void setPassword(String password) {
this.password = password;
}
}
We start the backing bean with two instance variables corresponding with the
credentials we collect.
@NotNull
@Email
private String email;
CHAPTER 13 SECURITY
426
@NotNull
@Size(min = 8, message = "Password must be at least 8 characters")
private String password;
This clearly shows the advantage over the FORM authentication mechanism in that
we can easily pre-validate the user’s input using bean validation. Because of JSF’s built-
in integration with bean validation a standard faces message will be made available for
rendering should the input not pass validation.
Next, we defined injecting the contextual objects it needs. These are
@Inject
private SecurityContext securityContext;
@Inject
private ExternalContext externalContext;
@Inject
private FacesContext facesContext;
The observant reader will recognize ExternalContext and FacesContext as being
two well-known native JSF classes, with the SecurityContext being the odd one out.
This class is from Java EE Security and we’ll use that here to communicate with the
authentication mechanism.
Continuing the dialog happens in the continueAuthentication() method as follows:
private AuthenticationStatus continueAuthentication() {
return securityContext.authenticate(
(HttpServletRequest) externalContext.getRequest(),
(HttpServletResponse) externalContext.getResponse(),
AuthenticationParameters.withParams().credential(
new UsernamePasswordCredential(email, password))
);
}
The call to SecurityContext#authenticate() will trigger the authentication
mechanism again. Since that mechanism will be a state where it waits for credentials to
be passed, it will indeed look for the credentials we pass in, and use those to continue.
As we’ll later see, we can also request that any potentially existing state is discarded and
a new dialog is started. Note that we have to cast the request and response objects to
CHAPTER 13 SECURITY
427
HttpServletRequest and HttpServletResponse. Unfortunately, this is needed since
ExternalContext abstracts over Servlet and Portlet requests and only returns Object for
those two.
The SecurityContext#authenticate() method returns a status that indicates in
broad lines what the authentication mechanism did. The action method of our JSF
backing bean has to handle the following:
switch (continueAuthentication()) {
case SEND_CONTINUE:
facesContext.responseComplete();
break;
case SEND_FAILURE:
facesContext.addMessage(null, new FacesMessage(
FacesMessage.SEVERITY_ERROR, "Login failed", null));
break;
case SUCCESS:
facesContext.addMessage(null, new FacesMessage(
FacesMessage.SEVERITY_INFO, "Login succeed", null));
break;
case NOT_DONE:
// Doesn't happen here
}
As can be seen, there are four possible outcomes.
The first one is SEND_CONTINUE, which basically means “authentication in progress.”
The authentication mechanism returned that status when it took over the dialog again
(e.g., by rendering its own response or, more likely, by redirecting the caller to a new
location). A JSF backing bean should make sure the JSF life cycle is ended by calling
FacesContext#responseComplete() and furthermore refrain from interacting with the
response itself in any way.
The second one is SEND_FAILURE, which basically means “authentication failed.”
This status is returned when the authentication mechanism wasn’t able to validate the
credentials that were provided. In most cases this is when the caller provided the wrong
credentials. A JSF backing bean can respond to this by setting a faces message and
re- display the login form.
CHAPTER 13 SECURITY
428
The third status is SUCCESS, which means “authentication succeeded.” This is returned
when the authentication mechanism successfully validated the credentials provided. It’s
only after this status is returned that HttpServletRequest#getUserPrincipal(), Securi
tyContext#getCallerPrincipal(), etc., return non-null values to indicate the current
caller is authenticated. A JSF backing bean can respond to this in various ways (e.g., by
setting a faces message and continuing to render the view, or issuing a redirect of itself).
The fourth and final status is NOT_DONE, which is returned when the authentication
mechanism chooses to not authenticate at all. This happens, for instance, when the
authentication mechanism is pre-emptively called but authentication appeared not to be
necessary. Typically, a JSF backing bean would not need to take any special action here.
Caller-Initiated Authentication
The previous code discussed the situation where an unauthenticated caller tries to
access a protected resource (URL/page) and the authentication dialog is automatically
started. Since this authentication dialog is started by the container, we call this
“container-initiated authentication.”
Another case is where a caller explicitly starts the authentication dialog (e.g., by
clicking on a “login” button). Because the caller starts this dialog we call it “caller-
initiated authentication.”
In case of caller-initiated authentication, the core authentication mechanism is
effectively directly invoked and the platform-provided login-to-continue functionality
is skipped. This means that if an authentication mechanism depends on login-to-
continue to redirect to a login page and after authentication to redirect back to the
protected resource, neither of these two actions will happen when the application
programmatically triggers authentication.
The CustomFormAuthenticationMechanism that we defined earlier via an annotation
is indeed a mechanism that uses the platform’s login-to-continue service, so we’ll start
the authentication dialog by directing to the same login view we used before. To indicate
this is a new login, an extra request parameter is provided. The view from which we start
looks as follows:
<!DOCTYPE html>
<html lang="en"
xmlns="http://www.w3.org/1999/xhtml"
xmlns:f="http://xmlns.jcp.org/jsf/core"
CHAPTER 13 SECURITY
429
xmlns:h="http://xmlns.jcp.org/jsf/html"
xmlns:c="http://xmlns.jcp.org/jsp/jstl/core"
>
<h:head>
<title>Welcome</title>
<h:head>
<h:body>
<c:if test="#{not empty request.userPrincipal}">
<p>Logged-in as #{request.userPrincipal}</p>
</c:if>
<c:if test="#{empty request.userPrincipal}">
<h:form>
<h:button value="Login" outcome="/login">
<f:param name="new" value="true" />
</h:button>
</h:form>
</c:if>
</h:body>
</html>
In the backing bean we’ll inject two additional objects: an instance to obtain and
store the mentioned request parameter and a reference to the Flash, which we’ll use
later.
@Inject
private Flash flash;
@Inject @ManagedProperty("#{param.new}")
private boolean isNew;
The managed bean’s scope needs to be changed to @ViewScoped, so we can retain
the value of the isNew instance variable after the login form’s postback.
An important addition is to the SecurityContext#authenticate() method
where we’ll now provide an extra parameter: newAuthentication. The authentication
mechanism does not strictly need this though, and it’s just smart enough to distinguish
between an initial new authentication and continuing an authentication dialog
that’s in progress. However, things get more difficult when a caller is in the midst
CHAPTER 13 SECURITY
430
of an authentication dialog and then navigates away, only to explicitly click a login
button later. If the state associated with said dialog hasn’t expired at that point, the
authentication mechanism doesn’t know a new authentication is required and will likely
continue the aborted but still valid dialog.
To prevent this, we can force a new authentication by setting newAuthentication
to true. This will discard all existing states. The modified continueAuthentication()
method looks as follows:
private AuthenticationStatus continueAuthentication() {
return securityContext.authenticate(
(HttpServletRequest) externalContext.getRequest(),
(HttpServletResponse) externalContext.getResponse(),
AuthenticationParameters.withParams()
.newAuthentication(isNew).credential(
new UsernamePasswordCredential(email, password))
);
}
Note that this version can be used for the case where we continue the dialog as well
as to start a new one. When we continue the dialog, isNew will simply be false, which
also happens to be the default when the parameter is not specified at all.
When using the CustomFormAuthenticationMechanism we know there will not be
any redirects or other writes to the response after we provide the credentials in caller-
initiated authentication, so that gives us a convenient location to handle the redirect to a
landing page after the caller authenticates: the SUCCESS case.
case SUCCESS:
flash.setKeepMessages(true);
facesContext.addMessage(null, new FacesMessage(
FacesMessage.SEVERITY_INFO, "Login succeed", null));
externalContext.redirect(
externalContext.getRequestContextPath() + "/index.xhtml");
break;
CHAPTER 13 SECURITY
431
We’re redirecting the caller here to the index.xhtml landing page. Note that this
is also the view where the caller initiated the authentication dialog, but that’s just a
coincidence in this example. In general, the view or even URL where we redirect the
caller to is completely free for the application developer to choose. Typically, a landing
page of some sort is chosen, which could be the index of the application or a dashboard
corresponding to the main role the caller is in. As we mentioned above, when SUCCESS is
returned the caller is fully authenticated. This means we can query the caller’s roles and
use these in our decision where to redirect to.
Outlook: a future version of Java EE Security may introduce a hybrid option where
caller-initiated authentication can still start with the same redirect as container-initiated
authentication and allows for the redirect-back URL to be provided by the application.
Remember Me
Once a caller has been authenticated for a JSF (web) application, we naturally don’t
want to ask the caller to re-authenticate with every request. To prevent this, the result
of a successful authentication is typically coupled in some way to the caller’s HTTP
session. In fact, the CustomFormAuthenticationMechanism internally uses the Java
EE Security’s provided “auto-apply-session” service to do just this. This service stores
the data associated with said successful authentication (at least the caller name plus
any groups the caller is in). Although implementation ultimately depends on where
this data exactly lives and with what lifetime, in practice it’s typically in a special
section of the server’s memory associated with the HTTP session. This section is
special in the way that it’s typically session scoped, but the data is not accessible via
HttpSession#getAttribute().
In order to not exhaust the server’s memory, an HTTP session expires after a certain
amount of time. Typical expiration times are between 10 minutes and an hour. If the caller
accesses the application after this time, authentication is required to be performed again.
CHAPTER 13 SECURITY
432
Often though even re-authenticating after a period of inactivity as long as an hour
is undesirable. But extending the HTTP session to a longer period is undoable for the
aforementioned reasons of server resource exhaustion.
Here’s where “Remember Me” (remember-me) comes in. Remember-me is a
somewhat playful term for a process where the caller’s credentials are exchanged for a
token, and where this token is typically stored in a cookie that’s distinct from the HTTP
session cookie and has a longer time to live.
A remember-me token effectively functions as a new credential for the caller, without
exposing the caller’s original password. A remember-me token can basically be vended
multiple times, for instance, once per device or IP (Internet protocol) that the caller uses
to connect to the application. Care must be taken that while the token does not expose
the caller’s original credentials, it still functions as the key to a caller’s account and
therefore should be treated with the same precautions as one would apply to any other
type of credential. Specifically, cookies containing the remember-me token should be
sent over HTTPS/SSL only, and applications should not store the actual token verbatim
but a strong hash of it.
As the primary reason for having remember-me is to not exhaust server memory and
to be long-lived, the remember-me token is almost always stored in stable storage (e.g., a
database). As such, a lookup from such storage is costlier than a lookup from the server’s
memory, and this could seriously affect performance when required to be done for every
request, especially when many Ajax requests are being done all the time.
For this reason, remember-me is almost always used in combination
with some kind of cache. The modular nature of the services that the
CustomFormAuthenticationMechanism uses makes it possible for remember-me to
be inserted between the auto-apply-session service mentioned above and the actual
authentication mechanism. That way we effectively get a kind of memory hierarchy; the
authentication data is first attempted to be found in the HTTP session storage, if it’s not
there the remember-me service is attempted, and if that one doesn’t contain the data
then finally the authentication mechanism is tried.
To make use of remember-me, two things have to be done.
1. Activating the remember-me service for the installed
authentication mechanism
2. Providing a special identity store that’s capable of vending and
validating the remember-me token
CHAPTER 13 SECURITY
433
Activating Remember-Me Service
The remember-me service in Java EE Security is represented by an Interceptor.
Via the interceptor binding annotation @RememberMe [the remember-me service] is
easily applied to our own custom authentication mechanism, one for which we have the
source code. Unfortunately, it isn’t as easy when these have to be applied to a bean for
which we don’t have the source code and in fact for which we don’t even know the exact
implementation type.
As the CustomFormAuthenticationMechanism that we’ve been using for the examples
above is indeed of the latter type, there’s a bit more work to do. Essentially, we need to
obtain a reference of the actual CustomFormAuthenticationMechanism implementation
that the container makes available and then use the CDI 2.0 InterceptionFactory to
programmatically add the @RememberMe annotation. The result is then to be returned
from an alternative producer method.
This is demonstrated in the following code via the new method
produceAuthenticationMechanism() in the ApplicationConfig bean which we showed
before:
@CustomFormAuthenticationMechanismDefinition(
loginToContinue = @LoginToContinue(
loginPage = "/login.xhtml",
useForwardToLogin = false,
errorPage = ""
)
)
@FacesConfig @ApplicationScoped
@Alternative @Priority(500)
public class ApplicationConfig {
@Produces
public HttpAuthenticationMechanism produceAuthenticationMechanism(
InterceptionFactory<HttpAuthenticationMechanismWrapper>
interceptionFactory, BeanManager beanManager
) {
@RememberMe
class RememberMeClass {};
interceptionFactory.configure().add(
CHAPTER 13 SECURITY
434
RememberMeClass.class.getAnnotation(RememberMe.class));
return interceptionFactory.createInterceptedInstance(
new HttpAuthenticationMechanismWrapper(
(HttpAuthenticationMechanism) beanManager
.getReference(beanManager
.resolve(beanManager
.getBeans((HttpAuthenticationMechanism.class).stream()
.filter(b -> b.getBeanClass() != ApplicationConfig.class)
.collect(Collectors.toSet())),
HttpAuthenticationMechanism.class,
beanManager.createCreationalContext(null))));
}
}
The ApplicationConfig bean is annotated with the @Alternative and @Priority
annotations. @Alternative is used here to indicate that the producer is not just any
regular producer but one that should be called instead of any existing producer or bean.
That is, the bean we are producing here is an alternative for the bean with the same
type that would otherwise be selected by CDI for injection. @Priority is used to enable
(activate) our alternative producer. Without this annotation the producer is present but
not enabled, meaning that CDI won’t call it. Another way of enabling an alternative is
using beans.xml. The number 500 here is used to select between various alternatives
if multiple alternatives are enabled. In that case the one with the highest number is
selected.
The code shown above uses the somewhat well-known CDI pattern
BeanManager#getBeans()/resolve()/getReference() to obtain the
CustomFormAuthenticationMechanism that the container makes available. This pattern
is more verbose than the simpler CDI.current().select(...) variant, but it allows
us to filter out the Bean<T> that represents the producer method. Getting a reference
from that Bean<T> from within the producer method would invoke that same producer
method again, and thus would cause a recursive series of calls eventually leading to a
stack overflow. It goes without saying this is unwanted, hence the reason we filter that
particular Bean<T> out.
CHAPTER 13 SECURITY
435
The bean instance that is returned from the BeanManager#getReference() is
almost certainly a proxy; CustomFormAuthenticationMechanism is specified to be
application scoped, and it implicitly makes use of an interceptor. Due to the technical
difficulty of proxying an existing proxy (think of generated proxies often being final
and proxy caches being used) CDI 2.0 imposes a limitation on what types of objects
it can create an intercepted instance from. To work around this limitation, we
have little choice but to insert an extra manually created “pass-through wrapper”
HttpAuthenticationMechanismWrapper instance as shown in the code above. The code
of this wrapper is as follows:
public class HttpAuthenticationMechanismWrapper
implements HttpAuthenticationMechanism
{
private HttpAuthenticationMechanism wrapped;
public HttpAuthenticationMechanismWrapper() {
//
}
public HttpAuthenticationMechanismWrapper
(HttpAuthenticationMechanism httpAuthenticationMechanism)
{
this.wrapped = httpAuthenticationMechanism;
}
public HttpAuthenticationMechanism getWrapped() {
return wrapped;
}
@Override
public AuthenticationStatus validateRequest(
HttpServletRequest request,
HttpServletResponse response,
HttpMessageContext context) throws AuthenticationException
{
return getWrapped().validateRequest(request, response, context);
}
CHAPTER 13 SECURITY
436
@Override
public AuthenticationStatus secureResponse(
HttpServletRequest request,
HttpServletResponse response,
HttpMessageContext context) throws AuthenticationException
{
return getWrapped().secureResponse(request, response, context);
}
@Override
public void cleanSubject(
HttpServletRequest request,
HttpServletResponse response,
HttpMessageContext context)
{
getWrapped().cleanSubject(request, response, context);
}
}
Outlook: it’s expected that a convenience method for the above task will be added to
a future version of Java EE Security, thereby greatly simplifying this task.
Logging Out
Regardless of which method to login has been used, at some point the caller may wish to
explicitly log out. A normal login (authentication) in Java EE is always primarily valid per
request only, but various authentication mechanisms or the services they’re using (such
as @AutoApplySession and @RememberMe) may keep the state beyond a single request
and automatically re-authenticate the caller at every next request.
This state may be kept at various places: in cookies, in the HTTP session, in client
storage, etc. In order to log out we have to make sure all this state is cleared. In JSF we
can do this simply by calling the HttpServletRequest#logout() method. This will
immediately remove the authenticated identity from the current request and call the
cleanSubject() method of the authentication mechanism, which in turn will remove
any session data, cookies, etc., that it used.
CHAPTER 13 SECURITY
437
The following gives an example:
@Named @RequestScoped
public class Logout {
@Inject
private HttpServletRequest request;
public void submit() throws ServletException {
request.logout();
request.getSession().invalidate();
}
}
Note that for a full logout it's typically good practice to invalidate the session as well.
The call to HttpServletRequest#logout() should only remove the session state used
by the authentication mechanism (if any), while after a full logout we often don’t want
any other session state lingering around either. Depending on the application design it's
typical to redirect the caller to the home page of the application after a logout as well.
Custom Principals
The default principal that we can obtain from the security context contains very little
other than just the name or, more exactly, the caller principal name (also known as the
user principal name). This is typically a unique name and often, but not necessarily, the
name the caller used to authenticate with.
In practice, a web application almost always needs more information than just this
name, and a richer application-specific model object representing the user is often
desired. The lifetime of this model object does need to be very tightly coupled to that of
the principal. For example, if the caller is logged out mid-request, the associated model
object must disappear right away, and if the caller is logged in again right after (possibly
still in the same request) a new model object must become available.
There are various patterns to realize this, some of them including Servlet filters and
others containing CDI producers. The pattern we're going to show here, though, involves
a custom principal.
CHAPTER 13 SECURITY
438
A custom principal means that a specific Principal type is returned from the
identity store, instead of just providing a String and letting the container decide
the type. This specific Principal type can then either contain our model object
(aggregation) or be the model object (inheritance). We'll give an example of the
aggregation approach here.
First consider the following custom Principal:
public class UserPrincipal extends CallerPrincipal {
private final User user;
public UserPrincipal(User user) {
super(user.getEmail());
this.user = user;
}
public User getUser() {
return user;
}
}
This principal extends from javax.security.enterprise.CallerPrincipal which
is the Java EE Security API-specific caller principal representation.
With this Principal implementation we can now adjust the identity store that we
presented earlier to return our custom principal instead.
@ApplicationScoped
public class UserServiceIdentityStore implements IdentityStore {
@Inject
private UserService userService;
@Override
public CredentialValidationResult validate(Credential credential) {
UsernamePasswordCredential login =
(UserNamePasswordCredential) credential;
String email = login.getCaller();
String password = login.getPasswordAsString();
CHAPTER 13 SECURITY
439
Optional<User> optionalUser =
userService.findByEmailAndPassword(email, password);
if (optionalUser.isPresent()) {
User user = optionalUser.get();
return new CredentialValidationResult(
new UserPrincipal(user), // Principal instead of String.
user.getRolesAsStrings()
);
}
else {
return CredentialValidationResult.INVALID_RESULT;
}
}
}
Subsequently, we can access our model object again from an injected security
context.
@Inject
private SecurityContext securityContext;
[...]
Optional<User> OptionalUser =
securityContext.getPrincipalsByType(UserPrincipal.class)
.stream()
.map(e -> e.getUser())
.findAny();
Conditionally Rendering Based onAccess
In web applications one often wants to render parts of a view differently based on
whether a caller is authenticated or not, and if so based on what roles this caller is in.
JSF component tags don’t really need special attributes for this, as the existing
implicit objects combined with expression language are powerful enough to do most of
the checks needed for this.
CHAPTER 13 SECURITY
440
One of the most common checks is determining whether the user is authenticated.
This was briefly shown in the index.xhtml view above:
<c:if test="#{not empty request.userPrincipal}">
<p>Logged-in as #{request.userPrincipal}</p>
</c:if>
You can, of course, also use the rendered attribute of any JSF component here.
<ui:fragment rendered="#{not empty request.userPrincipal}">
<p>Logged-in as #{request.userPrincipal}</p>
</ui:fragment>
However, as you learned in the section “JSTL Core Tags” in Chapter 3, this will only
end up in a slightly more verbose component tree. Moreover, the rendered attribute
checks will be done throughout the JSF life cycle over and over while JSTL tags are
executed only once during view build time.
Note that we’re using the implicit object #{request} here instead of the more
general SecurityContext. This is because in Java EE 8 there’s no implicit EL object
available corresponding to this SecurityContext. In Java EE Security, as well as in the
Servlet API (from which the request, which is of type HttpServletRequest originates)
it’s defined that a null return from getUserPrincipal() means the user is not
authenticated. A better alignment between Java EE Security and Expression Language is
planned for a future version of Java EE.
Another common check as mentioned is to test for the caller being in a specific role.
Here too we can use the implicit object #{request}, as shown in the following:
<c:if test="#{request.isUserInRole('foo')}">
<!-- foo specific things here -->
</c:if>
It’s good to remember that as explained in the beginning of this chapter, the role
“foo” doesn’t have to be something that we would call a role in our normal usage of
the word. That its, it doesn’t have to be something like “admin”, or “manager”. In fact, for
such very local usage as in a fragment on a view it’s often preferred to use a finer-grained
name (e.g., “CAN_UPDATE_SALARY”). A common technique is to map fine-grained roles
to more coarse-grained roles, such as, indeed, “ADMIN”. Via this technique a user is given
these more coarse-grained roles, and the data store that stores the authentication data
CHAPTER 13 SECURITY
441
then only contains these coarse-grained roles as well. When an identity store such as we
saw above retrieves this authentication data for a certain caller and sees “ADMIN” it would
return a collection of roles to which “ADMIN” is mapped (e.g., {"CAN_UPDATE_SALARY",
"CAN_ADJUST_MARGINS", ...}).
A special role that we can test for is the “**” role which is an alternative for the
#{not empty request.userPrincipal} check. This role is implicitly assigned to any
authenticated caller, but with the caveat that the application has not declared this in any
way. If it has done so, “**” loses its special meaning and is just another opaque string for
which the security system explicitly tests. Using the “**” check, the first fragment that we
showed in this section looks as follows:
<c:if test="#{request.isUserInRole('**')}">
<p>Logged-in as #{request.userPrincipal}</p>
</c:if>
In the standard Java EE programmatic APIs there are no methods available to test
whether the caller is in any of two or more roles, or in all of two or more roles. If this is
required, utility methods such as shown in the following code can be used:
public static boolean isInAnyRole(HttpServletRequest request, String...
roles) {
for (String roles : roles) {
if (request.isUserInRole(role)) {
return true;
}
}
return false;
}
public static boolean isInAllRoles(HttpServletRequest request, String...
roles) {
for (String roles : roles) {
if (!request.isUserInRole(role)) {
return false;
}
}
return true;
}
CHAPTER 13 SECURITY
442
Sometimes it’s necessary not only to render content on a view differently,
depending on what roles a caller is in, but also to take into account what other views
(web resources) a caller is allowed to access. This comes into play, for instance, when
rendering navigation menus (omitting the entries for views a caller does not have access
to), or rendering links or buttons that navigate to views to which the caller does not have
access in a special way (e.g., in red or with a lock icon next to it).
A traditional way to implement this is to test for the roles that the programmer
knows give access to the given view. While this may seem to work well, it’s often brittle in
practice as it lets the code work under the assumption of a specific role/view relationship
without any strong guarantees that this relationship actually holds.
A more stable way to test whether a caller has access to a given view is quite
simply to test directly for exactly that; does the caller have access to this view (web
resource). The SecurityContext has a method that can be used for almost exactly this:
SecurityContext#hasAccessToWebResource(). Since the SecurityContext is not a
named bean or implicit object, we have to create a small helper bean in order to use this
in EL.This is shown as follows:
@Named @ApplicationScoped
public class Security {
@Inject
private SecurityContext securityContext;
public boolean hasAccessToWebResource(String resource) {
return securityContext.hasAccessToWebResource(resource, "GET");
}
}
There are two things to be aware of here.
First, the hasAccessToWebResource() method takes a web resource pattern, which
is the same pattern as used for the url-pattern in the web.xml fragment we looked at
earlier. This is close to, but not exactly the same as, the JSF view. The JSF view is often
specified in a mapping independent way (e.g., /foo instead of /faces/foo or /foo.xhtml).
The web resource pattern, however, has to be the URL itself, with the mapping included.
Second, hasAccessToWebResource() requires us to specify the HTTP method for
which we test the access. This is required since in Java EE Security constraints actually
apply per URL and per HTTP method. For instance, a caller can have access to POST
CHAPTER 13 SECURITY
443
to /foo.xhtml but not to GET /foo.xhtml. As we’re going to use our utility method for
navigation tests, GET is typically the right HTTP method to use, but we should be aware
that sometimes we may need to test for another HTTP method.
With the helper bean in place, we can now easily check for access to a target resource
on a view and alter the rendering based on that. To demonstrate this, we’ll first define
three new web resource constraints in web.xml.
<security-constraint>
<web-resource-collection>
<web-resource-name>Bar</web-resource-name>
<url-pattern>/bar.xhtml</url-pattern>
</web-resource-collection>
<auth-constraint>
<role-name>bar</role-name>
</auth-constraint>
</security-constraint>
<security-constraint>
<web-resource-collection>
<web-resource-name>Foo</web-resource-name>
<url-pattern>/foo.xhtml</url-pattern>
</web-resource-collection>
<auth-constraint>
<role-name>foo</role-name>
</auth-constraint>
</security-constraint>
<security-constraint>
<web-resource-collection>
<web-resource-name>Baz</web-resource-name>
<url-pattern>/baz.xhtml</url-pattern>
</web-resource-collection>
<auth-constraint>
<role-name>baz</role-name>
</auth-constraint>
</security-constraint>
CHAPTER 13 SECURITY
444
After these constraints have been defined we can render links to them with access
checks on the enabled attribute.
<h:link value="Go to Bar" outcome="/bar"
disabled="#{not security.hasAccessToWebResource('/bar.xhtml')}" />
<h:link value="Go to Foo" outcome="/foo"
disabled="#{not security.hasAccessToWebResource('/foo.xhtml')}" />
<h:link value="Go to Baz" outcome="/baz"
disabled="#{not security.hasAccessToWebResource('/baz.xhtml')}" />
Authenticating with a caller having, for instance, the roles “bar” and “foo”, but not
“baz”, will result in the link to /baz being rendered as disabled.
Cross-Site Request Forgery Protection
Cross-site request forgery (CSRF) is an attack that lets users without their consent or
even knowledge do a request to a site where they may possibly be logged in. Such request
then has some side effect that in some particular way may be beneficial to the attacker.
For instance, suppose your bank has a URL of the form https:/example.com/tr
ansferAmount=4000&targetAccount=7836 which means “transfer 4000 euros from
my account to the account with ID 7836.” In this statement the “my account” is being
determined via the logged-in session (typically a cookie) that you have with your
bank. Now an attacker might not be able to capture your session cookie, but that’s not
necessary in this example if only your browser can be tricked into sending the https:/
example.com/transferAmount=4000&targetAccount=7836 request from any other web
site that you visit while you’re logged in to your bank in another tab or window, with
the targetAccount parameter set to an ID of an account that the attacker controls. Note
that in practice a GET request and request parameters would not likely be used, but
POST and POST parameters would be used instead. However, for both the same basic
vulnerability holds.
If we want to protect our application against receiving such malicious requests, then
one of the ways to do so is including “something” (i.e., a token) in the request that is
1. Specific to a certain caller.
2. Expires after some time.
3. Can’t be easily guessed.
CHAPTER 13 SECURITY

445
As it happens JSF already has something that fulfills all these three requirements,
and that’s the javax.faces.ViewState hidden parameter that one finds within JSF
forms.
Caution There’s a caveat though, and that’s that this parameter only fully fulfills
those requirements when using postbacks, state saving on server is used, and
the view in question is not stateless. Only in that case is the value of javax.
faces.ViewState effectively a token. Since this is the default, JSF is relatively
safe out of the box here, but this protection is compromised as soon as we deviate
from these defaults, for instance, by using stateless views. See also the section
“Stateless Forms” in Chapter 4.
Next to this implicit CSRF protection, JSF also has explicit CSRF protection. This
explicit CSRF protection adds a token for all cases, and additionally adds checks for the
“referer” and “origin” HTTP headers. Note that HTTP headers should normally not
be trusted for incoming requests, as they can be very easily spoofed. However, for this
particular attack we’re not trying to defend against just any random HTTP request but
specifically against requests sent from a trusted browser. The header checks are also in
addition to the token check, and the token check must always pass first.
Defining which views should be protected by a CSRF token and the additional
header checks happens in a way that’s somewhat similar to how we defined roles
for views—a collection of URL patterns in a deployment descriptor. This time the
deployment descriptor is faces-config.xml instead of web.xml though. The following
gives an example for these entries in faces-config.xml:
<protected-views>
<url-pattern>/bar.xhtml</url-pattern>
<url-pattern>/foo.xhtml</url-pattern>
<url-pattern>/baz.xhtml</url-pattern>
</protected-views>
Note that the url-pattern here is the exact same pattern that is used in web.xml.
One thing to be aware of here is that despite faces-config.xml being a JSF-specific
deployment descriptor, the url-pattern here is again for the full URL relative to the
application root which means it has to include all mappings used such as /faces/
and .xhtml.
CHAPTER 13 SECURITY
446
Adding a faces-config.xml with the above shown protected-views fragment to the
example application code we’ve been working on in this chapter will render the link on
index.xhtml to, for example, /bar.xhtml in the following way:
/bar.xhtml?javax.faces.Token=gdMoNbfOycv2v80gr
As can be seen, the javax.faces.Token request parameter has been added by
JSF.The token is tied to the user’s HTTP session, so if the HTTP session expires, the
token also expires. The token is cryptographically strong, meaning that it fulfills all three
requirements for a CSRF protection token as stated above.
If the token is tampered (e.g., we use xxMoNbfOycv2v80gr instead of
gdMoNbfOycv2v80gr), or is missing altogether (i.e., we request /bar.xhtml) JSF will throw
a javax.faces.application.ProtectedViewException. In case the link originated from
a stateless page, JSF applications can handle this exception by notifying the user and
allowing to re-render the original page again. In the example above that would mean re-
rendering index.xhtml. The genuine user would get a new CSRF protection token then,
while an attacker will not get the expected side effect from the original request.
As mentioned, there’s a referer and origin header check as well. For this check, JSF
checks whether the referer header, if available, is set to a URL that originates from the
same application. To demonstrate this, consider a second JSF application with only an
empty faces-config.xml and the following view:
<!DOCTYPE html>
<html lang="en"
xmlns="http://www.w3.org/1999/xhtml"
xmlns:h="http://xmlns.jcp.org/jsf/html"
>
<h:head />
<h:body>
<h:outputLink value="http://localhost:8080/project/bar.xhtml?javax.
faces.Token=gdMhNbfOycv2v80gr">
test
</h:outputLink>
</h:body>
</html>
CHAPTER 13 SECURITY
447
Assuming our first application with the CSRF-protected bar.xhtml is deployed to
http://localhost:8080/project, clicking the output link from this second application
will cause the javax.faces.application.ProtectedViewException to be thrown again
in the first application. Note that the referer is an optional check that’s only done
when the referer header is actually present, as is the case with the link in the second
application.
If we enter http://localhost:8080/project/bar.xhtml?javax.faces.
Token=gdMhNbfOycv2v80gr directly into the address bar of a browser, or request it
directly via a command-line utility such as wget or curl, there won’t be a referer and
the request will be accepted.
In practice, a GET request has less value of being protected against CSRF attacks
since these actually should be idempotent (should not have side effects and should
only display data). Instead of shielding GET requests with CSRF protection tokens, it’s
probably a far better idea to refactor an application to not have non-idempotent GET
requests.
For postbacks the CSRF protection token works in much the same way though.
To demonstrate, consider changing the /bar.xhtml view into the following:
<!DOCTYPE html>
<html lang="en"
xmlns="http://www.w3.org/1999/xhtml"
xmlns:h="http://xmlns.jcp.org/jsf/html"
>
<h:head />
<h:body>
<h:form>
<h:commandButton value="Test" action="#{bar.submit}" />
</h:form>
</h:body>
</html>
Rendering this page will result in the form target URL having the CSRF protection
token applied to it in the same way as we saw for the GET requests—for example,
<form method="post"
action="/project/bar.xhtml?javax.faces.Token=gdMhNbfOycv2v80gr" ...>
CHAPTER 13 SECURITY
448
This is thus another difference with the implicit javax.faces.ViewState token,
which is always a POST parameter.
Web Parameter Tampering Protection
Web parameter tampering is an attack against an application where an attacker modifies
parameter values that are sent (back) to the server hosting the application. If the
application doesn’t validate those values correctly, an attacker could gain more benefits
than entitled to, or may get the opportunity to carry out additional attacks.
For example, suppose a web application renders a list of roles that can be assigned
to another user, say “user,” “manager,” and “sales.” An attacker could attempt to modify
the data posted back and change the selection of “user” into “admin.” If the server
blindly accepts the input and “admin” is an existing value, this allows the attacker to give
another user the “admin” role, even when the attacker is not privileged to do that.
JSF has an implicit protection against a subset of this attack; namely, against values
being posted back from a selection (specifically, from UISelectOne- and UISelectMany-
based components). This works by JSF either restoring the view from javax.faces.
ViewState after a postback (when full state saving is used) or re-creating it (when
partial state saving is used). Only values that were also rendered are accepted. The usual
caveat applies though, and that’s that with partial state saving, the data bound to the
component needs to be identical before and after the postback. This, however, can easily
be accomplished by using the view scope.
To demonstrate, consider the following view:
<!DOCTYPE html>
<html lang="en"
xmlns="http://www.w3.org/1999/xhtml"
xmlns:h="http://xmlns.jcp.org/jsf/html"
xmlns:f="http://xmlns.jcp.org/jsf/core"
>
<h:head />
<h:body>
<h:form>
<h:selectOneMenu value="#{bean.selected}">
CHAPTER 13 SECURITY
449
<f:selectItems value="#{bean.available}" />
</h:selectOneMenu>
<h:commandButton value="Select" />
</h:form>
<p>Chosen value: #{bean.selected}</p>
</h:body>
</html>
And the following backing bean:
@Named @RequestScoped
public class Bean {
private List<String> available = Arrays.asList("foo", "bar", "kaz");
private String selected;
public List<String> getAvailable() {
return available;
}
public String getSelected() {
return selected;
}
public void setSelected (String selected) {
this.selected = selected;
}
}
Choosing, for example, “bar” and clicking “select” will render “Chosen value: bar,”
as expected. Changing the value being sent can be done in various ways, for instance via
an intercepting proxy like Burp Proxy or by editing the live source via the developer tools
from a browser such as Chrome.
Selecting the “foo” entry after the change as shown in Figure13-1 and clicking the
select button again will cause the “foox” value to be sent to the application. This value
will be rejected by JSF and as a result “Chosen value:” will be rendered, indicating that
our tampered value indeed has not been accepted.
CHAPTER 13 SECURITY
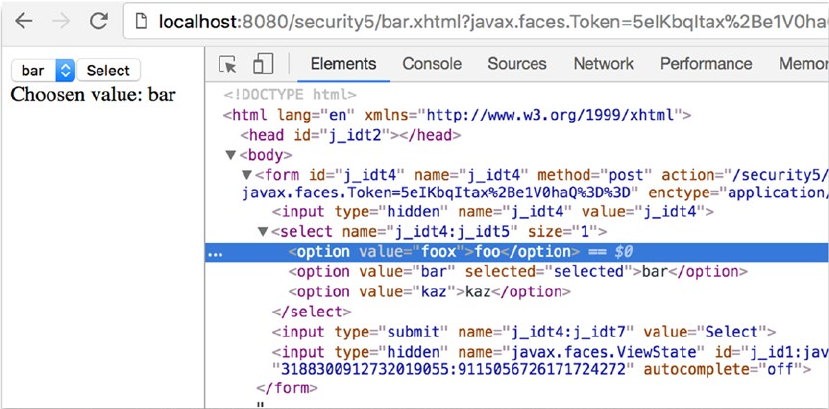
450
Cross-Site Scripting Protection
Cross-site scripting or XSS is an attack that has a couple of variations, but practically it
boils down to a web application rendering data that it got from (other) users directly as
part of the markup sent to the client. If this data itself contains scripting code (typically
JavaScript), the browser may execute it blindly, allowing the attacker to read, for
example, cookie data and to send that over to a server controlled by the attacker.
JSF provides protection against this type of attack by having contextual output
escaping enabled for many common contexts. The most common context is writing out
HTML, where all JSF’s output writers by default XML escape their output.
To demonstrate, consider the following backing bean:
@Named @RequestScoped
public class Bean {
private String value = "<script>alert('hi')</script>";
public String getValue() {
return value;
}
}
Figure 13-1. Tampering the selected value in HTML source code
CHAPTER 13 SECURITY
451
The value instance variable contains a script that we don’t want the browser to
execute. In this example it’s hard-coded, but in practice it could come from stored data
in, for example, a database.
Now we’ll render this value using two simple default constructs of JSF: a direct
expression language expression on a Facelet and the <h:outputText> component.
<!DOCTYPE html>
<html lang="en"
xmlns="http://www.w3.org/1999/xhtml"
xmlns:h="http://xmlns.jcp.org/jsf/html"
xmlns:f="http://xmlns.jcp.org/jsf/core"
>
<h:head />
<h:body>
<p>#{bean.value}</p>
<p><h:outputText value="#{bean.value}" /></p>
</h:body>
</html>
When requesting this view and looking at the HTML source, we’ll see that both times
the value has been rendered as “<script>alert('hi')</script>” (i.e., in an escaped
form that the browser won’t execute).
In case we explicitly don’t want this escaping to be done, the escape attribute of
<h:outputText> can be set to false. For example,
<h:outputText value="#{bean.value}" escape="false" />
Requesting the view again with the above component on it will cause a JavaScript
alert to appear to be saying “hi.” Had this been malicious code being input by an attacker,
the security of the client’s system would have been compromised. The escape attribute
should therefore only be used with the utmost care.
Output for usage in URLs is escaped as well, but there it’s escaped differently, since it’s
a different context. To demonstrate, consider adding the following component to the view:
<h:link outcome="/foo">
Go to foo
<f:param name="param" value="#{bean.value}" />
</h:link>
CHAPTER 13 SECURITY
452
After requesting this view, we’ll see the link has been rendered as
<a href="/project/foo.xhtml?param=%3Cscript%3Ealert%28%27hi%27%29%3C%2F
script%3E">
Go to foo
</a>
What has happened here is that our original value has been escaped for usage as
a URL parameter using URL encoding, which as can be seen is different from XML
escaping, hence the term "contextual output escaping."
Related to XSS protection, sensitive cookies that the application uses should be set
to HttpOnly, meaning they’ll be sent to the server with each request but can’t be read by
scripts on the client. For the session ID cookie this can be done in web.xml as follows:
<session-config>
<cookie-config>
<http-only>true</http-only>
<secure>true</secure>
</cookie-config>
</session-config>
Note that the cookie is set to "secure" as well here. This is not related to XSS, but
sets that the cookie is to be sent only when HTTPS/SSL is used. This protects the cookie
from being eavesdropped (e.g., on a shared WiFi network). Since development often
happens over HTTP using localhost, such a setting may be problematic for development
purposes. If this is the case, then alternatively the cookie can be set to secure or not using
ServletContext#getSessionCookieConfig() in a ServletContextListener
@WebListener
public class ApplicationConfig implements ServletContextListener {
@Override
public void contextInitialized(ServletContextEvent event) {
if (...) {
event.getServletContext()
CHAPTER 13 SECURITY
453
.getSessionCookieConfig()
.setSecure(false);
}
}
}
where “...” is an application-specific check to see if it’s running in “dev mode.”
You could even use JSF’s own Application#getProjectStage() for this.
Source Exposure Protection
Source exposure in the context of server-side web applications refers to the unwanted
disclosure of parts of the web application’s source. This is a security risk, not only
because of the exposure of the source itself (which may be a trade secret) but also
because it may give an attacker insight on which to base follow-up attacks (the source
may contain references to other systems, beans, or even comments with passwords,
although those kinds of comments should of course not be there to begin with).
Due to a number of somewhat perhaps unfortunate design choices in the past, JSF
has some specific vulnerabilities here, which mostly concern how URL mapping is done
but also concern the location of resource files. To understand this vulnerability we first
explain how JSF mapping and the FacesServlet work.
The main entry into every JSF application is the FacesServlet. This is a Servlet
provided by the JSF framework that acts as a so-called front controller through which all
JSF requests are routed.
A request to a JSF view such as foo.jsf will thus first need to go through this
Servlet, which will then in some way locate the definition of the tree of components that
represent the view foo.jsf. We’ll call this actual definition the “physical resource.” Out
of the box, JSF supports two types of physical resources: Facelets and JSP files with the
extension .xhtml, .view.xml, and .jsp. Note that JSP files are largely deprecated.
In order for the FacesServlet to be able to handle all these requests it has to be
mapped to one or more URL patterns that capture them. To be able to do this, JSF
supports prefix, suffix, and exact mapping.
CHAPTER 13 SECURITY
454
If no explicit mapping in web.xml is specified and a recognized JSF artifact is
found in the application (such as an empty faces-config,xml or the @FacesConfig
annotation) then the FacesServlet is automatically mapped. Since JSF 2.1 and Servlet
3.0 this automatic mapping is to the following patterns:
• /faces/* (prefix mapping)
• *.jsf (sux mapping)
• *.faces (suffix mapping)
Since JSF 2.3 this also includes:
• *.xhtml (suffix mapping)
Especially older (existing) JSF applications still explicitly map the FacesServlet in
web.xml, which then looks for example as follows:
<servlet>
<servlet-name>facesServlet</servlet-name>
<servlet-class>javax.faces.webapp.FacesServlet</servlet-class>
</servlet>
<servlet-mapping>
<servlet-name>facesServlet</servlet-name>
<url-pattern>/faces/*</url-pattern>
<url-pattern>*.jsf</url-pattern>
</servlet-mapping>
In suffix mapping and when using Facelets, the FacesServlet will first try to locate
the physical resource with the same path and name as the requested resource, but with
the suffix replaced by .xhtml. For example, a request for /path/foo.jsf will result in a
lookup for the file /path/foo.xhtml.
With prefix mapping, the FacesServlet will try to locate the physical resource with
the same name and path as the requested resource, but minus the prefix path. For
example, a request for /faces/path/foo.xhtml will result in a lookup for the file /path/
foo.xhtml.
CHAPTER 13 SECURITY
455
This, however, may introduce a security issue that will result in exposure of the
Facelet source code. Namely, the lookup for /path/foo.xhtml is done in the web root
of the WAR in which the FacesServlet resides. Unless otherwise (implicitly) mapped,
every file in the web root is directly accessible for download. In this case, if /path/foo.
xhtml is directly requested instead of /path/foo.jsf or /faces/path/foo.xhtml this
request will not go through the FacesServlet and returns the bare Facelets source code
of that page instead of the rendered markup.
There are two ways to prevent this exposure of source code.
1. Map the FacesServlet directly to *.xhtml
2. Add a security constraint to web.xml
Mapping the FacesServlet directly to *.xhtml may be the most natural solution.
With this mapping, the requested resource is identical to the physical resource. If /path/
foo.xhtml is requested, then the FacesServlet will try to locate /path/foo.xhtml. Via
this mapping, there is no second path to reach the Facelets source and hence no risk of
exposing it.
Side note: being able to use *.xhtml mapping was a new feature in JSF 2.0. Doing
this in JSF 1.x resulted in an infinite loop.
To map the FacesServlet to *.xhtml, the easiest way is to rely on the default
mapping of JSF 2.3 as explained above. If this is not possible for some reason, add the
mapping to the FacesServlet mapping in web.xml as shown in the following code:
<servlet-mapping>
<servlet-name>facesServlet</servlet-name>
<url-pattern>/faces/*</url-pattern
<url-pattern>*.jsf</url-pattern>
<url-pattern>*.xhtml</url-pattern>
</servlet-mapping>
As an alternative, a security constraint can be defined that prevents access to
*.xhtml resources. There is rarely a good reason to prefer this over the simpler *.xhtml
to *.xhtml mapping, but for completeness, this can be done as follows:
<security-constraint>
<display-name>No access to Facelets source</display-name>
<web-resource-collection>
<web-resource-name>XHTML</web-resource-name>
CHAPTER 13 SECURITY
456
<url-pattern>*.xhtml</url-pattern>
</web-resource-collection>
<auth-constraint />
</security-constraint>
A special case of exposing Facelets source code happens with composite
components. Composite components are components that are implemented via a
Facelet instead of a Java class. By convention, they have to be placed in a directory
inside a directory named /resources that resides in the web root—for instance,
/resources/bar/foo.xhtml. This will make a component “foo” available in the
namespace “http://xmlns.jcp.org/jsf/composite/bar”.
Components are of course not views and the user should not be able to request
those directly. Unfortunately, /resources is not in any way a special directory to
Java EE.JSF assigns a special meaning to it by convention, but to the Servlet container
it’s a directory like any other. This specifically means there’s no protection applied to
this and any user can directly request resources from it. In other words, this directory
is “world readable.” Even with an *.xhtml mapping, this not only allows the user to
guess which components we have but lets the user attempt to execute those as well.
Clearly this is not what we want.
There are again two solutions for this:
1. Configure another directory to be the JSF resources directory
2. Add a security constraint to web.xml
In JSF 2.2 a method was introduced to address this security vulnerability. Namely, via
the javax.faces.WEBAPP_RESOURCES_DIRECTORY context parameter another directory
can be configured to be the JSF resources directory instead of /resources. For example,
<context-param>
<param-name>javax.faces.WEBAPP_RESOURCES_DIRECTORY</param-name>
<param-value>WEB-INF/resources</param-value>
</context-param>
Note that the path is relative to the web root and may not begin with a “/”.
CHAPTER 13 SECURITY
457
Alternatively, or for JSF 2.0/2.1, a security constraint can be configured in web.xml
again that prohibits caller access to /resources. This can be done in a similar way as
protecting for *.xhtml access.
<security-constraint>
<web-resource-collection>
<web-resource-name>resources</web-resource-name>
<description>The resources directory</description>
<url-pattern>/resources/*</url-pattern>
</web-resource-collection>
<auth-constraint />
</security-constraint>
CHAPTER 13 SECURITY
459
© Bauke Scholtz, Arjan Tijms 2018
B. Scholtz and A. Tijms, The Definitive Guide to JSF in Java EE 8, https://doi.org/10.1007/978-1-4842-3387-0_14
CHAPTER 14
Localization
JSF has always had decent internationalization support. Since JSF 1.0 you can supply
java.util.ResourceBundle-based bundle files in different locales, which in turn
get dynamically included as text in the web page at the declared places. Also, all JSF
converters and validators have their own set of localized default messages which you
can easily customize via a message bundle or, since JSF 1.2, via new requiredMessage,
converterMessage, and validatorMessage attributes. JSF 2.0 adds, via the new
javax.faces.application.ResourceHandler, API (application programing interface)
support for localizable assets such as stylesheets, scripts, and images.
The act of internationalization, “I18N,” is distinct from the act of localization, “L10N.”
The internationalization part is basically already done by JSF (JavaServer Faces) itself
as being a MVC (model-view-controller) framework. All you need to do is to take care
of the localization part. Basically, you need to specify the “active locale” in the view,
supply the desired resource bundle files, if necessary translated with help of a third-party
translation service, and declare references to the bundle file in your JSF page.
In this chapter you will learn how to prepare a JSF web application for different
languages and how to develop it in order to make localization easier for yourself as to
maintenance.
Hello World, Olá mundo,
To start off, create a bunch of new bundle files in main/java/resources folder of
the project. The main/java/resources folder of a Maven WAR project is intended
for non- class files which are supposed to end up in the /WEB-INF/classes folder of
the final build. The bundle files can be in java.util.Properties format, with the
.properties extension.

460
The filename of those files must have a common prefix (e.g., “text”), followed by an
underscore and the two-letter ISO 639-1-Alpha-21 language code (e.g., “en” for English,
“pt” for Portuguese, and “hi” for Hindi). It can optionally be followed by another
underscore and the two-letter ISO 3166-1-Alpha-22 country code (e.g., “GB” for Great
Britain, “US” for United States, “BR” for Brazil, “PT” for Portugal).
main/java/resources/com/example/project/i18n/text.properties
title = Localization example
heading = Hello World
paragraph = Welcome to my website!
main/java/resources/com/example/project/i18n/text_pt_BR.properties
title = Exemplo de localização
heading = Olá mundo
paragraph = Bem-vindo ao meu site!
main/java/resources/com/example/project/i18n/text_hi.properties
title =
heading =
paragraph = !
Do note that all those bundle files have common keys “title”, “ heading”, and
“paragraph”, which are usually in English. It’s basically the lingua franca of the Internet
and web developers. It’s considered the best practice to keep the source code entirely in
English, particularly if it is open source.
Also note that the English bundle file doesn’t have the “en” language code in the
filename as in text_en.properties but is just text.properties. Basically, it has
become the fallback bundle file which is supposed to contain every single bundle key
used in the entire web application. This way, when a bundle file with a specific language
code doesn’t contain the desired bundle entry, then the value will be looked up from the
fallback bundle file. This is useful for situations wherein you’d like to gradually upgrade
the bundle files, or when you have certain sections in the web application which don’t
necessarily need to be localized, such as back-end admin pages.
1 https://en.wikipedia.org/wiki/List_of_ISO_639-1_codes.
2 https://en.wikipedia.org/wiki/ISO_3166-1_alpha-2.
Chapter 14 LoCaLization
461
Configuration
In order to familiarize the JSF application with those bundle files and the desired
locales, we need to edit its faces-config.xml file to add the following entries to the
<application> element:
<application>
<locale-config>
<default-locale>en</default-locale>
<supported-locale>pt_BR</supported-locale>
<supported-locale>hi</supported-locale>
</locale-config>
<resource-bundle>
<base-name>com.example.project.i18n.text</base-name>
<var>text</var>
</resource-bundle>
</application>
The <base-name> must specify the fully qualified name (FQN) following the same
convention as for Java classes and that it doesn’t include the file extension. The <var>
basically declares the EL (Expression Language) variable name of the bundle file. This
will make the currently loaded resource bundle available as a Map-like object in EL via
#{text}. To avoid conflicts, you only need to make sure that this name isn’t already
possessed by any managed bean or any implicit EL objects.
Referencing Bundle inJSF Page
It’s relatively simple, just treat #{text} as a Map with the bundle keys as map keys.
<!DOCTYPE html>
<html lang="#{view.locale.toLanguageTag()}"
xmlns="http://www.w3.org/1999/xhtml"
xmlns:h="http://xmlns.jcp.org/jsf/html">
<h:head>
<title>#{text['title']}</title>
</h:head>
Chapter 14 LoCaLization

462
<h:body>
<h1>#{text['heading']}</h1>
<p>#{text['paragraph']}</p>
</h:body>
</html>
JSF will already automatically determine the closest matching active locale based
on the HTTP Accept-Language header3 and set it as locale property of UIViewRoot. The
Accept-Language header is configurable in browser’s settings. In, for example, Chrome,
you can configure it via chrome://settings/languages. If you play around with it,
for example, by switching between English, Portuguese, and Hindi as the top-ranked
language setting in browser and refresh the JSF page, then you’ll notice that it changes
the text to conform the browser-specified language setting. If you check the browser’s
developer tools—usually accessible by pressing F12—and inspect the HTTP request
headers in the network monitor, then you’ll also notice that the Accept-Language header
changes accordingly.
You might have noticed that the lang attribute of the <html> tag references #{view.
locale.toLanguageTag()}. Basically, this will print the IETF BCP 47 language tag4 of
the locale property of the current UIViewRoot, which is in turn available as an implicit
EL object #{view}. The locale property is an instance of java.util.Locale which has
actually no getter method for the language tag such as getLanguageTag(), but only
a toLanguageTag() method, hence the direct method reference in EL instead of the
expected property reference.
The lang attribute of the <html> tag is not mandatory for the functioning of JSF
localization feature. Moreover, JSF treats it as template text and does nothing special
with it. You can safely leave out it. It is, however, important for search engines. This
way a search engine like Google will be informed which language the page’s copy is in.
This is not only important in order to end up correctly inlocalized search results, but
also important in case you serve the very same page in different languages. This would
otherwise by the average search engine algorithm be penalized as “duplicate content,”
which is thus bad for SEO (search engine optimization) ranking.
3 https://www.w3.org/Protocols/rfc2616/rfc2616-sec14.html#sec14.4.
4 https://en.wikipedia.org/wiki/IETF_language_tag.
Chapter 14 LoCaLization
463
You’ll also have noticed that the bundle keys are specified in the so-called brace
notation #{text['...']}. The string between single quotes basically represents the
bundle key. In this specific case you could also have used #{text.title}, #{text.
heading}, and #{text.paragraph} instead. This is, however, not the common practice.
Using the brace notation not only gives a generally clear meaning to what the EL variable
represents (a resource bundle), but it also allows you to use dots in the bundle key name
such as #{text['meta.description']}. The EL expression #{text.meta.description}
has, namely, an entirely different meaning: “get the description property of the nested
meta property of the text object,” which is incorrect.
Changing theActive Locale
You can also change the active locale on the server side. This is best to be done in a
single place in a site-wide master template which contains the <f:view> tag. The active
locale can be set in the locale attribute of the <f:view> which can accept either a static
string representing the language tag or a concrete java.util.Locale instance. The
locale attribute accepts an EL expression and can be changed programmatically via
a managed bean. This offers you the opportunity to let the user change it via the web
page without fiddling around in the browser’s language settings. You could present the
available language options to the user in a JSF page and let each selection change the
active locale. This can be achieved with the following JSF page:
<!DOCTYPE html>
<html lang="#{activeLocale.languageTag}"
xmlns="http://www.w3.org/1999/xhtml"
xmlns:f="http://xmlns.jcp.org/jsf/core"
xmlns:h="http://xmlns.jcp.org/jsf/html">
<f:view locale="#{activeLocale.current}">
<h:head>
<title>#{text['title']}</title>
</h:head>
<h:body>
<h1>#{text['heading']}</h1>
<p>#{text['paragraph']}</p>
Chapter 14 LoCaLization
464
<h:form>
<h:selectOneMenu value="#{activeLocale.languageTag}">
<f:selectItems
value="#{activeLocale.available}" var="l"
itemValue="#{l.toLanguageTag()}"
itemLabel="#{l.getDisplayLanguage(l)}">
</f:selectItems>
<f:ajax listener="#{activeLocale.reload()}" />
</h:selectOneMenu>
</h:form>
</h:body>
</f:view>
</html>
It is slightly adjusted from the previous example; there is now <f:view> around
<h:head> and <h:body>. The locale attribute of <f:view> references the currently active
locale via the #{activeLocale} managed bean, which is as follows:
@Named @SessionScoped
public class ActiveLocale implements Serializable {
private Locale current;
private List<Locale> available;
@Inject
private FacesContext context;
@PostConstruct
public void init() {
Application app = context.getApplication();
current = app.getViewHandler().calculateLocale(context);
available = new ArrayList<>();
available.add(app.getDefaultLocale());
app.getSupportedLocales().forEachRemaining(available::add);
}
Chapter 14 LoCaLization
465
public void reload() {
context.getPartialViewContext().getEvalScripts()
.add("location.replace(location)");
}
public Locale getCurrent() {
return current;
}
public String getLanguageTag() {
return current.toLanguageTag();
}
public void setLanguageTag(String languageTag) {
current = Locale.forLanguageTag(languageTag);
}
public List<Locale> getAvailable() {
return available;
}
}
To reiterate, @Inject FacesContext works only if you have placed @FacesConfig on
an arbitrary CDI bean somewhere in the web application. Otherwise you have to replace
it by inline FacesContext.getCurrentInstance() calls. There’s only one caveat with
those inline calls: you need to make absolutely sure that you don’t assign it as a field in,
for example, @PostConstruct, because the actual instance is subject to being changed
across method calls on the very same bean instance. Injecting as a field via CDI takes
transparently care of this, and is therefore safe, but manually assigning is not.
In @PostConstruct, ViewHandler#calculateLocale() is used to calculate the
current locale based on Accept-Language header and the default and supported
locales as configured in faces-config.xml. This follows exactly the same JSF-internal
behavior as if when there’s no <f:view locale> defined. Finally, the available locales are
collected based on the configured default and supported locales.
The available locales are, via <f:selectItems> of <h:selectOneMenu>, presented to
the user as drop-down options (see Figure14-1). The nested <f:ajax> makes sure that
the selected option is set in the managed bean as soon as the user changes the option.
Chapter 14 LoCaLization
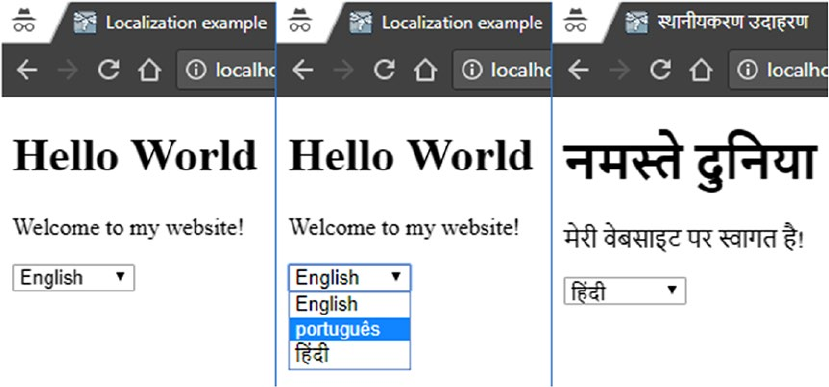
466
The #{activeLocale.languageTag} property delegates internally to the current
java.util.Locale instance. This is basically done for convenience so that we don’t
necessarily need to add a converter for #{activeLocale.current} in case we want to
use it in <h:selectOneMenu>.
<f:ajax listener> basically performs a full page reload with the help of a piece
of JavaScript which is executed on completion of the Ajax request. This is done by
adding a script to the PartialViewContext#getEvalScripts() method, which is new
since JSF 2.3. Any added script will end up ordered in the <eval> section of the JSF Ajax
response, which in turn gets executed after JSF Ajax engine has updated the HTML
DOM (Document Object Model) tree.
The script itself, location.replace(location), basically instructs JavaScript to
reload the current document without keeping the previous document in history. This
means that the back button won’t redisplay the same page. You can also use location.
reload(true) instead, but this won’t work nicely if a synchronous (non-Ajax) POST
request has been fired on the same document beforehand. It would be re-executed
and cause a double submit. And, it unnecessarily remembers the previous page in the
history. This may end up in confusing behavior, because the back button would then
seem to have no effect as it would redisplay exactly the same page as the active locale is
stored in the session, not in the request.
Figure 14-1. Changing the active locale
Chapter 14 LoCaLization

467
Alternatively, instead of invoking <f:ajax listener>, you can in this specific use
case also use just <f:ajax render="@all"> without any listener. It has at least one
disadvantage: the document’s title won’t be updated. In any case, using @all is generally
considered a bad practice. There’s only one legitimate real-world use case for it:
displaying a full error page on an Ajax request.
As a completely different alternative, you could make the active locale request
scoped instead of session scoped by including the language tag in the URL as in http://
example.com/en/page.xhtml, http://example.com/pt/page.xhtml, http://example.
com/hi/page.xhtml. This way you can change the active locale by simply following a
link. This only involves a servlet filter which extracts the java.util.Locale instance
from the URL and forwards it to the desired JSF page, and a custom view handler
which includes the language tag in the generated URL of any <h:form>, <h:link>,
and <h:button> component. You can find a kickoff example in the Java EE Kickoff
Application.5
Organizing Bundle Keys
When the web application grows, you may notice that bundle files start to become
unmaintainable. The key is to organize the bundle keys following a very strict
convention. Reusable site-wide entries, usually those used as input labels, button labels,
link labels, table header labels, etc., should be keyed using a general prefix (e.g., “label.
save=Save”). Page-specific entries should be keyed using a page-specific prefix (e.g.,
“foldername_pagename.title=Some Page Title”). Following is an elaborate example
of a localized Facelets template, /WEB-INF/templates/page.xhtml:
<!DOCTYPE html>
<html lang="#{activeLocale.language}"
xmlns="http://www.w3.org/1999/xhtml"
xmlns:f="http://xmlns.jcp.org/jsf/core"
xmlns:h="http://xmlns.jcp.org/jsf/html"
xmlns:ui="http://xmlns.jcp.org/jsf/facelets"
xmlns:c="http://xmlns.jcp.org/jsp/jstl/core"
xmlns:fn="http://xmlns.jcp.org/jsp/jstl/functions"
>
5 https://github.com/javaeekickoff/java-ee-kickoff-app.
Chapter 14 LoCaLization
468
<c:set var="page" value="page#{fn:replace(
fn:split(view.viewId, '.')[0], '/', '_')}" scope="view" />
<f:view locale="#{activeLocale.current}">
<h:head>
<title>#{text[page += '.title']}</title>
<meta name="description"
content="#{text[page += '.meta.description']}" />
</h:head>
<h:body id="#{page}">
<header>
<nav>
<h:link outcome="/home"
value="#{text['label.home']}" />
<h:link outcome="/login"
value="#{text['label.login']}" />
<h:link outcome="/signup"
value="#{text['label.signup']}" />
</nav>
<h:form>
<h:selectOneMenu
value="#{activeLocale.languageTag}">
<f:selectItems
value="#{activeLocale.available}" var="l"
itemValue="#{l.toLanguageTag()}"
itemLabel="#{l.getDisplayLanguage(l)}">
</f:selectItems>
<f:ajax listener="#{activeLocale.reload()}" />
</h:selectOneMenu>
</h:form>
</header>
<main>
<h1>#{text[page += '.title']}</h1>
<ui:insert name="content" />
</main>
Chapter 14 LoCaLization
469
<footer>
© #{text['page_home.title']}
</footer>
</h:body>
</f:view>
</html>
The JSTL <c:set> basically converts the UIViewRoot#getViewId() to a string which
is suitable as a page-specific prefix. The JSF view ID basically represents the absolute
server-side path to the physical file representing the JSF page (e.g., “/user/account.
xhtml”). This needs to be manipulated to a format suitable as a resource bundle key. The
fn:split() call extracts the part “/user/account” from it and the fn:replace() call
converts the forward slash to underscore so that it becomes “_user_account”. Finally,
<c:set> stores it as “page_user_account” in the view scope under the name “page” so
that it’s available as #{page} elsewhere in the same view.
You’ll notice that #{page} is in turn being used as, among others, the ID of <h:body>.
This makes it easier to select a specific page from a general CSS (Cascading Style Sheets)
file just in case that’s needed. #{page} is also being used in several resource bundle
references, such as #{text[page += '.title']} which ultimately references in case
of “/home.xhtml” the key “page_home.title”. With such a template you can have the
following page-specific resource bundle entries:
page_home.title = My Website
page_home.meta.description = A Hello World JSF application.
page_login.title = Log In
page_login.meta.description = Log in to My Website.
page_signup.title = Sign Up
page_signup.meta.description = Sign up to My Website.
Following is an example of a template client which utilizes the previously shown
template /WEB-INF/templates/page.xhtml, the /login.xhtml:
<ui:composition template="/WEB-INF/templates/page.xhtml"
xmlns="http://www.w3.org/1999/xhtml"
xmlns:f="http://xmlns.jcp.org/jsf/core"
Chapter 14 LoCaLization
470
xmlns:h="http://xmlns.jcp.org/jsf/html"
xmlns:ui="http://xmlns.jcp.org/jsf/facelets"
>
<ui:define name="content">
<h:form id="login">
<fieldset>
<h:outputLabel for="email"
value="#{text['label.email']}" />
<h:inputText id="email" required="true"
value="#{login.email}" />
<h:message for="email" styleClass="message" />
<h:outputLabel for="password"
value="#{text['label.password']}" />
<h:inputSecret id="password" required="true"
value="#{login.password}" />
<h:message for="password" styleClass="message" />
<h:commandButton id="submit" action="#{login.submit}"
value="#{text['label.login']}" />
<h:message for="login" styleClass="message" />
</fieldset>
</h:form>
</ui:define>
</ui:composition>
Following is what the associated resource bundle entries look like:
label.email = Email
label.password = Password
label.login = Log In
Note: in case you find that the page looks crippled, simply add a CSS file with the
following rule to start with:
nav a, fieldset label, fieldset input {
display: block;
}
Chapter 14 LoCaLization

471
Localizing Conversion/Validation Messages
In case you have prepared a simple backing bean class Login with two string properties
email and password and a method submit(), and submit the above shown login
page without filling out the e-mail input field, then you’ll face a validation error in the
following format:
login:email: Validation Error: Value is required.
When you switch the language to Portuguese and resubmit the empty form, then
you’ll see that it’s also localized. However, when you switch the language further to Hindi,
then you’ll notice that there’s no standard Hindi message bundle in the standard JSF
implementation. You’d need to provide your own. There are several ways to achieve this.
First, JSF input and select components support three attributes to override the
default message: requiredMessage, validatorMessage, and converterMessage. The
following example shows how to override the default required message:
<h:inputText ... requiredMessage="#{text['message.required']}" />
This is arguably the easiest approach. The major caveat is that you have to
copy/paste it everywhere in case you haven’t wrapped it in a reusable tag file like
<my:inputText>. This is not DRY.6
Another way is to supply a custom message bundle which overrides all predefined
bundle keys specific for JSF conversion/validation messages and register it as <message-
bundle> in faces-config.xml. You can find the predefined bundle keys in chapter
2.5.2.4 “Localized Application Messages” of the JSF specification.7 The bundle key of the
default required message “Validation Error: Value is Required” is thus javax.faces.
component.UIInput.REQUIRED. We can adjust it in new message bundle files as follows:
main/java/resources/com/example/project/i18n/messages.properties
javax.faces.component.UIInput.REQUIRED = {0} is required.
main/java/resources/com/example/project/i18n/messages_pt_BR.properties
javax.faces.component.UIInput.REQUIRED = {0} é obrigatório.
main/java/resources/com/example/project/i18n/messages_hi.properties
javax.faces.component.UIInput.REQUIRED = {0} .
6 https://en.wikipedia.org/wiki/Don%27t_repeat_yourself.
7 http://download.oracle.com/otn-pub/jcp/jsf-2_3-final-eval-spec/JSF_2.3.pdf.
Chapter 14 LoCaLization
472
Finally, configure it in the <application> element of the faces-config.xml file:
<application>
...
<message-bundle>com.example.project.i18n.messages</message-bundle>
</application>
You’ll perhaps have noticed the {0} placeholders in the messages. They represent
the labels of the associated input and select components. The labels default to the
component’s client ID, which is basically the ID of the JSF-generated HTML element as
you can find in the browser’s page source. You can override it by explicitly setting the
label attribute of the component.
<h:inputText id="email" ... label="#{text['label.email']}" />
<h:inputSecret id="password" ... label="#{text['label.password']}" />
Note that putting the message bundle in a different file than the resource bundle
is not strictly necessary. You can also just put the message bundle entries in text.
properties files and adjust the <message-bundle> entry to point to the same FQN as
<resource-bundle>.
Obtaining Localized Message inaCustom
Converter/Validator
The value of the <message-bundle> entry can be obtained programmatically via Applicat
ion#getMessageBundle(). You can in turn use it to obtain the actual bundle via the java.
util.ResourceBundle API, along with UIViewRoot#getLocale(). This allows you to obtain
a localized message in a custom converter and validator. Following is an example of such a
validator, which checks if the specified e-mail address is already in use:
@FacesValidator(value = "duplicateEmailValidator", managed = true)
public class DuplicateEmailValidator implements Validator<String> {
@Inject
private UserService userService;
Chapter 14 LoCaLization
473
@Override
public void validate
(FacesContext context, UIComponent component, String value)
throws ValidatorException
{
if (value == null) {
return;
}
Optional<User> user = userService.findByEmail(value);
if (user.isPresent()) {
throw new ValidatorException(new FacesMessage(getMessage(
context, "message.duplicateEmailValidator")));
}
}
public static String getMessage(FacesContext context, String key) {
return ResourceBundle.getBundle(
context.getApplication().getMessageBundle(),
context.getViewRoot().getLocale()).getString(key);
}
}
You might have noticed the new managed attribute of the @FacesValidator
annotation. This will basically turn on CDI support on the validator instance and hence
allow you to inject a business service into a validator. The same attribute is also available
for @FacesConverter.
The shown validator example assumes that the following entry is present in the
resource bundle files as identified by <message-bundle>:
message.duplicateEmailValidator = Email is already in use.
Chapter 14 LoCaLization
474
Localizing Enums
The cleanest approach to localize enums is to simply use their own identity as a bundle
key. This keeps the enum class free of potential UI-specific clutter such as hard-coded
bundle keys. Generally, the combination of the enum’s simple name and the enum value
should suffice to represent a site-wide unique identifier (UI). Given the following com.
example.project.model.Group enum representing a user group:
public enum Group {
USER,
MANAGER,
ADMINISTRATOR,
DEVELOPER;
}
and the following resource bundle entries in text.properties:
Group.USER = User
Group.MANAGER = Manager
Group.ADMINISTRATOR = Administrator
Group.DEVELOPER = Developer
you can easily localize them as follows:
<f:metadata>
<f:importConstants type="com.example.project.model.Group" />
</f:metadata>
...
<h:selectManyCheckbox value="#{editUserBacking.user.groups}">
<f:selectItems value="#{Group.values()}" var="group"
itemLabel="#{text['Group.' += group]}" />
</h:selectManyCheckbox>
Note that the <f:importConstants> is new since JSF 2.3. It is required to be placed
inside <f:metadata>. Its type attribute must represent the fully qualified name of the
enum or any class or interface which contains public constants in flavor of public
static final fields. <f:importConstants> will automatically import them into the
EL scope as a Map<String, Object> wherein the map key represents the name of the
constant as string and the map value represents the actual value of the constant.
Chapter 14 LoCaLization

475
With #{Group.values()} you can thus obtain a collection of all constant values
and each value is then localized in itemLabel. Also note that itemValue is omitted as it
defaults to the value of the var attribute which is already sufficient.
Parameterized Resource Bundle Values
You can also parameterize your resource bundle entries using the {0} placeholders of
the java.text.MessageFormat API.8 They can on the JSF side only be substituted with
<h:outputFormat> whereby the parameters are provided as <f:param> children, in the
same order as the placeholders. Given the following entry:
page_products.table.header = There {0, choice, 0#are no products
| 1#is one product
| 1<are {0} products}.
it can be substituted using <h:outputFormat> as follows:
<h:outputFormat value="#{text['page_products.table.header']}">
<f:param value="#{bean.products.size()}" />
</h:outputFormat>
Database-Based ResourceBundle
JSF also supports specifying a custom ResourceBundle implementation as <base-name>.
This allows you to programmatically fill and supply the desired bundles, for example, from
multiple bundle files, or even from a database. In this example we’ll replace the default
properties file-based resource bundle by one which loads the entries from a database. This
takes us a step further as to organizing the resource bundle keys. This way, you can even
edit them via a web-based interface. Following is what the JPA entity looks like:
@Entity
@Table(uniqueConstraints = {
@UniqueConstraint(columnNames = { "locale", "key" })
})
8 https://docs.oracle.com/javase/8/docs/api/java/text/MessageFormat.html.
Chapter 14 LoCaLization
476
public class Translation {
@Id @GeneratedValue(strategy = GenerationType.IDENTITY)
private Long id;
@Column(length = 5, nullable = false)
private @NotNull Locale locale;
@Column(length = 255, nullable = false)
private @NotNull String key;
@Lob @Column(nullable = false)
private @NotNull String value;
// Add/generate getters and setters here.
}
Note that the JPA (Java Persistence API) annotations provide sufficient hints as to
what the DDL (Data Definition Language) of the table should look like. When having
the property javax.persistence.schema-generation.database.action set to create
or drop-and-create in persistence.xml, then it will automatically generate the proper
DDL.For sake of completeness, here it is in HSQL/pgSQL flavor.
CREATE TABLE Translation (
id BIGINT GENERATED BY DEFAULT AS IDENTITY PRIMARY KEY,
locale VARCHAR(5) NOT NULL,
key VARCHAR(255) NOT NULL,
value CLOB NOT NULL
);
ALTER TABLE Translation
ADD CONSTRAINT UK_Translation_locale_key
UNIQUE (locale, key);
And here’s what the EJB (Enterprise JavaBeans) service looks like.
@Stateless
public class TranslationService {
@PersistenceContext
private EntityManager entityManager;
Chapter 14 LoCaLization
477
@TransactionAttribute(value = REQUIRES_NEW)
@SuppressWarnings("unchecked")
public Object[][] getContent
(Locale locale, Locale fallback)
{
List<Object[]> resultList = entityManager.createQuery(
"SELECT t1.key, COALESCE(t2.value, t1.value)"
+ " FROM Translation t1"
+ " LEFT OUTER JOIN Translation t2"
+ " ON t2.key = t1.key"
+ " AND t2.locale = :locale"
+ " WHERE t1.locale = :fallback")
.setParameter("locale", locale)
.setParameter("fallback", fallback)
.getResultList();
return resultList.toArray(new Object[resultList.size()][]);
}
}
For JPA we only need an additional converter which converts between
java.util.Locale in the model and VARCHAR in the database, which is represented
by java.lang.String. You can use the JPA 2.0 AttributeConverter for this. It’s much
like a JSF converter but for JPA entities. It’s relatively simple; there’s no additional
configuration necessary. See the following:
public class LocaleConverter
implements AttributeConverter<Locale, String>
{
@Override
public String convertToDatabaseColumn(Locale locale) {
return locale.toLanguageTag();
}
@Override
public Locale convertToEntityAttribute(String languageTag) {
return Locale.forLanguageTag(languageTag);
}
}
Chapter 14 LoCaLization
478
Now we have the custom ResourceBundle; it’s called DatabaseResourceBundle.
Put it in the package com.example.project.i18n.
public class DatabaseResourceBundle extends ResourceBundle {
private static final Control CONTROL = new DatabaseControl();
@Override
public Object handleGetObject(String key) {
return getCurrentInstance().getObject(key);
}
@Override
public Enumeration<String> getKeys() {
return getCurrentInstance().getKeys();
}
private ResourceBundle getCurrentInstance() {
FacesContext context = FacesContext.getCurrentInstance();
String key = CONTROL.getClass().getName();
return (ResourceBundle) context.getAttributes()
.computeIfAbsent(key, k -> ResourceBundle.getBundle(key,
context.getViewRoot().getLocale(),
Thread.currentThread().getContextClassLoader(),
CONTROL));
}
private static class DatabaseControl extends Control {
@Override
public ResourceBundle newBundle
(String baseName, Locale locale, String format,
ClassLoader loader, boolean reload)
throws IllegalAccessException, InstantiationException,
IOException
{
FacesContext context = FacesContext.getCurrentInstance();
final Object[][] contents = CDI.current()
.select(TranslationService.class).get()
.getContent(
Chapter 14 LoCaLization

479
locale,
context.getApplication().getDefaultLocale());
return new ListResourceBundle() {
@Override
protected Object[][] getContents() {
return contents;
}
};
}
}
}
Finally, adjust the <resource-bundle><base-name> entry in faces-config.xml to
specify the fully qualified name of the custom ResourceBundle as follows:
<base-name>com.example.project.i18n.DatabaseResourceBundle</base-name>
The actual implementation of this ResourceBundle is frankly somewhat hacky, only
and only because of the following limitations:
1. JSF doesn’t allow defining a custom ResourceBundle.Control via
faces-config.xml.
2. Providing a custom ResourceBundle.Control via
SPI (Serial Peripheral Interface) as java.util.spi.
ResourceBundleControlProvider doesn’t work from WAR on.
3. Create multiple separate DatabaseResourceBundle subclasses for
each single locale registered in faces-config.xml, such as
DatabaseResourceBundle_en, DatabaseResourceBundle_pt_BR,
and DataBaseResourceBundle_hi, in order to satisfy the default
ResourceBundle.Control behavior is not maintenance friendly in
long term.
An additional advantage of this approach is that it allows you to programmatically clear
out any database bundles in the cache by simply calling ResourceBundle#clearCache().
Namely, the JSF implementation may in turn cache it in its Application implementation,
causing the ResourceBundle#clearCache() to seem to have no effect at all. Mojarra is
known to do that.9
9 https://stackoverflow.com/q/4325164/157882.
Chapter 14 LoCaLization

480
HTML inResourceBundle
This is a bad practice. It adds a maintenance burden. For large sections of content you’d
better pick a more lightweight markup language than HTML, such as Markdown.10
This is not only safer as to XSS (cross-site scripting) risks but also easier for the user to
edit via a text area in some Content Management System (CMS) screens. This is best to
implement in combination with a database-based resource bundle. You could add an
extra boolean flag to the Translation model indicating whether the value should be
parsed as Markdown.
@Column(nullable = false)
private boolean markdown;
Then, inside TranslationService#getContents(), select it as the third column.
"SELECT t1.key, COALESCE(t2.value, t1.value), t1.markdown"
And, finally, in the DatabaseControl#newBundle() method, after retrieving the
contents, you could postprocess them based on the boolean. You could use any Java-
based Markdown library for this, such as CommonMark.11
static final Parser PARSER = Parser.builder().build();
static final HtmlRenderer RENDERER = HtmlRenderer.builder().build();
...
for (Object[] translation : contents) {
if ((boolean) translation[2]) {
translation[1] = RENDERER.render(PARSER.parse(translation[1]));
}
}
10 https://en.wikipedia.org/wiki/Markdown.
11 https://github.com/atlassian/commonmark-java.
Chapter 14 LoCaLization
481
© Bauke Scholtz, Arjan Tijms 2018
B. Scholtz and A. Tijms, The Definitive Guide to JSF in Java EE 8, https://doi.org/10.1007/978-1-4842-3387-0_15
CHAPTER 15
Extensions
If there is one single element or virtue of JSF (JavaServer Faces) to which we can
attribute its lasting for so long, it’s probably its ability to be extended in a large variety
of ways. From the onset JSF made it possibly to have most of its core elements replaced,
decorated, or augmented.
This gave rise to a large number of extension libraries and projects. In the very early
days these were A4J (Ajax4JSF), Tomahawk, RichFaces, the stand-alone Facelets project,
PrettyFaces, and many, many more. A4J was merged into RichFaces, and RichFaces itself
was eventually sunset in 2016. Facelets was incorporated into JSF itself, while PrettyFaces
became part of the Rewrite framework. These days well-known and active extension
libraries are PrimeFaces, OmniFaces, and BootsFaces, among others. While individual
libraries have come and gone, the main constant is the extensibility of JSF from its first
days until the present.
It’s sometimes said that all those libraries address defects or omissions in JSF, but
this is not entirely accurate. In fact, JSF was explicitly designed to make such extensions
possible and therefore to allow, even stimulate, such extension libraries to appear. For
instance, a contemporary peer technology of JSF, EJB (Enterprise JavaBeans), had few to
no extension points and, thus, despite its many shortcomings, we never saw much of an
ecosystem flourish around it.
Extension Types
There are a couple of different ways by which to use the various extension points in JSF.
A major distinction is between the “classical” approach and the “CDI-centric approach.”
In the latter approach there’s very little to nothing that JSF has to explicitly support
extensibillity, as CDI has a number of mechanisms built in to support extending or
replacing CDI artifacts. This is the planned future for JSF (making most if not everything
a CDI artifact), but for the moment JSF 2.3 is in an early transitional phase and only a few
artifacts are vended via CDI.Table 8-1 in Chapter 8 showed these artifacts.
482
Extending CDI Artifacts
One of the ways CDI augments or replaces a type fully is to provide an alternative
producer. We already saw this technique being used in Chapter 13, albeit for a slightly
different use case.
The easiest way is if you need to fully replace the type. If augmenting is needed, some
code is necessary to obtain the previous type, which with the current version of CDI (2.0)
is slightly verbose.
The following shows an example where we replace the request parameter map with a
new map that has all the values of the original map, plus an additional value that we add
ourselves:
@Dependent @Alternative @Priority(APPLICATION)
public class RequestParameterMapProducer {
@Produces @RequestScoped @RequestParameterMap
public Map<String, String> producer(BeanManager beanManager) {
Map<String, String> previousMap = getPreviousMap(beanManager);
Map<String, String> newMap = new HashMap<>(previousMap);
newMap.put("test", "myTestValue");
return newMap;
}
}
The getPreviousMap() method is, as mentioned, somewhat verbose. It’s defined as
follows:
private Map<String, String> getPreviousMap(BeanManager beanManager) {
class RequestParameterMapAnnotationLiteral
extends AnnotationLiteral<RequestParameterMap>
implements RequestParameterMap
{
private static final long serialVersionUID = 1L;
}
Chapter 15 extensions
483
Type MAP_TYPE = new ParameterizedType() {
@Override
public Type getRawType() {
return Map.class;
}
@Override
public Type[] getActualTypeArguments() {
return new Type[] {String.class, String.class};
}
@Override
public Type getOwnerType() {
return null;
}
};
return (Map<String, String>) beanManager
.getReference(beanManager
.resolve(beanManager
.getBeans(MAP_TYPE, new RequestParameterMapAnnotationLiteral())
.stream()
.filter(bean -> bean
.getBeanClass() != RequestParameterMapProducer.class)
.collect(Collectors.toSet())),
MAP_TYPE,
beanManager.createCreationalContext(null));
}
}
It’s expected that the task of obtaining this “previous” or “original” type will be made
easier in a future revision of any of the specs involved. For instance, a future version of
JSF will likely introduce ready-to-use annotation literals for its (CDI) annotations, such
as the RequestParameterMapAnnotationLiteral shown here.
Chapter 15 extensions
484
In order to test that this alternative producer works, consider the following
backing bean:
@Named @RequestScoped
public class TestBean {
@Inject @RequestParameterMap
private Map<String, String> requestParameterMap;
public String getTest() {
return requestParameterMap.get("test");
}
public String getFoo() {
return requestParameterMap.get("foo");
}
}
And the following Facelet:
<!DOCTYPE html>
<html lang="en"
xmlns="http://www.w3.org/1999/xhtml"
xmlns:h="http://xmlns.jcp.org/jsf/html"
>
<h:head/>
<h:body>
<p>Test: #{testBean.test}</p>
<p>Foo: #{testBean.foo}</p>
</h:body>
</html>
Deploying an application containing these artifacts with a request parameter of, say,
“foo=bar”, will reveal that the new map indeed contains the original request parameters
as well as the value that we added ourselves.
Chapter 15 extensions
485
Extending Classical Artifacts
The classical approach to augment or fully replace a type in JSF is by installing a factory
for that type. The basic way such a factory works is in broad lines identical to the CDI
approach demonstrated above; the factory returns an implementation of the requested
type and obtains a reference to the “previous” or “original” type.
Being classical in Java EE typically means XML, and indeed the classical factory
involves XML.Specifically, registering a factory entails using the <factory> element in
faces-config.xml and a specific element per type for which a factory is to be provided.
As of JSF 2.3 the following factories are supported:
• <application-factory>
• <exception-handler-factory>
• <external-context-factory>
• <faces-context-factory>
• <facelet-cache-factory>
• <partial-view-context-factory>
• <lifecycle-factory>
• <view-declaration-language-factory>
• <tag-handler-delegate-factory>
• <render-kit-factory>
• <visit-context-factory>
• <flash-factory>
• <flow-handler-factory>
• <client-window-factory>
• <search-expression-context-factory>
Next to these, there are another number of artifacts that can be replaced/augmented
in a somewhat similar but still different way; here there’s no factory returning the type,
but an implementation of the type is specified directly. This variant is specified using the
<application> element in faces-config.xml. As of JSF 2.3 the following types can be
replaced/augmented directly:
Chapter 15 extensions
486
• <navigation-handler>
• <view-handler>
• <resource-handler>
• <search-expression-handler>
• <flow-handler>
• <state-manager>
• <action-listener>
Note that all of these are singletons. From the JSF runtime point of view there’s
only one of each, but multiple implementations each adding something are supported
by means of wrapping, which therefore forms a chain (implementation A wrapping
implementation B, wrapping implementation C, etc.).
The above specific elements used for each type immediately highlight an issue with
the classical approach; JSF has to provide explicit support for each specific type to be
replaced/augmented in this way. By contrast, the CDI approach allows us to pretty much
replace/augment any type without requiring any special support from JSF other than
that JSF uses CDI for that artifact.
On the bright side, the factory implementation is currently somewhat simpler
compared to the CDI version, as the “previous” or “original” type is simply being passed
to it in its constructor instead of having to be looked up using verbose code.
As an example, we’ll show how to augment the external context factory. For this we
start with the mentioned registration in faces-config.xml.
<factory>
<external-context-factory>
com.example.project.ExternalContextProducer
</external-context-factory>
</factory>
Chapter 15 extensions
487
The implementation then looks as follows:
public class ExternalContextProducer extends ExternalContextFactory {
public ExternalContextProducer(ExternalContextFactory wrapped) {
super(wrapped);
}
@Override
public ExternalContext getExternalContext
(Object context, Object request, Object response)
{
ExternalContext previousExternalContext =
getWrapped().getExternalContext(context, request, response);
ExternalContext newExternalContext =
new ExternalContextWrapper(previousExternalContext) {
@Override
public String getAuthType() {
return "OurOwnAuthType";
}
};
return newExternalContext;
}
}
There are a few things to observe here. First of all, every factory of this kind has to inherit
from a pre-described parent factory, which in this case is ExternalContextFactory. Second,
there’s an implicit contract that must be followed, and that’s implementing the constructor
exactly as shown in the example. That is, add a public constructor with a single parameter
the exact same type as the superclass, and pass this parameter on to the super constructor.
This instance is then available in other methods using the getWrapped() method.
Testing that this indeed works is relatively easy. We use a similar backing bean as
with the CDI version:
@Named @RequestScoped
public class TestBean {
@Inject
private ExternalContext externalContext;
Chapter 15 extensions
488
public String getAuth() {
return externalContext.getAuthType();
}
}
And the following Facelet:
<!DOCTYPE html>
<html lang="en"
xmlns="http://www.w3.org/1999/xhtml"
xmlns:h="http://xmlns.jcp.org/jsf/html"
>
<h:head />
<h:body>
<p>Test: #{testBean.auth}</p>
</h:body>
</html>
As the external context is also a type that’s injectable via CDI, the observant reader
may wonder what happens when both a CDI alternative producer and a classic factory
are provided for that type. The answer is that this is strictly speaking not specified (thus
undefined behavior), yet in practice it’s strongly implied that the classic factory is used
as the source to ultimately get the external context from. This means that an alternative
producer for ExternalContext will only affect the direct injection of ExternalContext,
and not any situation when this type is obtained in any other way, for instance, by calling
FacesContext#getExternalContext(). This is something users should clearly be aware
of. The expectation is, though, that a future revision of the spec will make a CDI producer
the initial source.
Plug-ins
A different type of extending that JSF offers next to the alternative producers and
factories is what’s essentially a plug-in. Here, no core JSF type is replaced or augmented,
but an additional functionality is added to some part of the runtime. Most of these
additions, therefore, have to declare in some way what it is they are exactly adding, which
is different from the factories which just provided an implementation of type X or Y.
Chapter 15 extensions
489
Plug-ins are added as elements of the <application> element in faces-config.xml,
just as some of the factory-like types mentioned above. The following are supported:
• <el-resolver>
• <property-resolver> (deprecated)
• <variable-resolver> (deprecated)
• <search-keyword-resolver>
We already saw an example of the Search Keyword Resolver in the section “Custom
Search Keywords” in Chapter 12. Characteristic for that one being a plug-in was the
method isResolverForKeyWord(), by which the plug-in could indicate for which
keyword, or keyword pattern, it would operate.
We’ll take a look at one other example here, namely, the EL resolver. The property
resolver and variable resolver are both deprecated and have been replaced by the
EL resolver. The EL resolver itself is not a JSF-specific type but originates from the
Expression Language (EL) spec. This spec does, however, have important parts of its
origins in JSF.
The EL resolver allows us to interpret the so-called base and property of an
expression in a custom way. Considering the expression #{foo.bar.kaz}, then “foo”
is the base and “bar” is the property when resolving “bar”, while “bar” is the base and
“kaz” is the property when resolving “kaz”. Perhaps somewhat surprising at first is that
when “foo” is being resolved, the base is null and “foo” is the property.
In practice, adding a custom EL resolver is not often needed, and we can often get by
with simply defining a named CDI bean that does what we require. Custom EL resolvers
could come into play when JSF is integrated in a completely different environment
though, one where we’d like expressions to resolve to a completely different (managed)
bean system. Even so, a CDI-to-other-beans-bridge might be a better option even there,
but it’s perhaps good to know a custom EL resolver is one other tool we have in our
arsenal.
Anyway, to demonstrate what an EL resolver can do we’ll show an example where
the base of an EL expression is interpreted as a pattern, something we can’t do directly
with a named CDI bean.
Chapter 15 extensions
490
The following shows an example EL resolver:
public class CustomELResolver extends ELResolver {
protected boolean isResolverFor(Object base, Object property) {
return base == null
&& property instanceof String
&& ((String) property).startsWith("dev");
}
@Override
public Object getValue
(ELContext context, Object base, Object property)
{
if (isResolverFor(base, property)) {
context.setPropertyResolved(true);
return property.toString().substring(3);
}
return null;
}
@Override
public Class<?> getType
(ELContext context, Object base, Object property)
{
if (isResolverFor(base, property)) {
context.setPropertyResolved(true);
return String.class;
}
return null;
}
@Override
public Class<?> getCommonPropertyType
(ELContext context, Object base)
{
return base == null ? getType(context, base, null) : null;
}
Chapter 15 extensions
491
@Override
public boolean isReadOnly
(ELContext context, Object base, Object property)
{
return true;
}
@Override
public void setValue
(ELContext context, Object base, Object property, Object value)
{
// NOOP;
}
@Override
public Iterator<FeatureDescriptor> getFeatureDescriptors
(ELContext context, Object base)
{
return null;
}
}
If we now use the following Facelet
<!DOCTYPE html>
<html lang="en"
xmlns="http://www.w3.org/1999/xhtml"
xmlns:h="http://xmlns.jcp.org/jsf/html"
>
<h:head />
<h:body>
<p>Test: #{devThisIsDev}</p>
</h:body>
</html>
we’ll see “Test: ThisIsDev” being printed when requesting it. What’s happening here
is that the custom EL resolver handles every name that starts with “dev.”
Chapter 15 extensions
492
Dynamic Extensions
The previous examples were mostly about registering the extensions that we needed
statically, e.g., by registering a factory or the type directly in faces-config.xml. Factories
give us an opportunity for some dynamic behavior. That is, at the point the factory is
called we can decide what new type (if any) to return.
For even more dynamic behavior it’s frequently required to be able to dynamically
add the factories, or in CDI to dynamically add the producers. CDI has an elaborate SPI
(server provider interface) for this (simply called “CDI Extensions”) which are, however,
somewhat outside the scope of this book.
For classic factories and actually everything that’s in faces-config.xml, there’s a
somewhat low-level method to add these dynamically: the Application Configuration
Populator, which we’ll discuss next.
Application Configuration Populator
The Application Configuration Populator is a mechanism to programmatically provide an
additional faces-config.xml file, albeit by using the XML DOM (Document Object Model)
API (application programming interface). This DOM API can be slightly obscure to use,
and the power of the Application Configuration Populator is limited by its ability to only
configure. There’s no SPI in JSF to directly modify other faces-config.xml at this level.
The mechanism works by implementing the abstract class javax.faces.
application.ApplicationConfigurationPopulator and putting the fully
qualified class name of this in a META-INF/services/javax.faces.application.
ApplicationConfigurationPopulator file of a JAR library.
To demonstrate this, we’ll create another version of the ExternalContextProducer
that we demonstrated earlier, this time using the mentioned
ApplicationConfigurationPopulator. For this we take the same code, remove the
faces-config.xml file, and add the META-INF/services entry as well as the following
Java class:
public class ConfigurationProvider
extends ApplicationConfigurationPopulator
{
@Override
public void populateApplicationConfiguration(Document document) {
Chapter 15 extensions
493
String ns = document.getDocumentElement().getNamespaceURI();
Element factory = document.createElementNS(ns, "factory");
Element externalContextFactory =
document.createElementNS(ns, "external-context-factory");
externalContextFactory.appendChild(
document.createTextNode(
ExternalContextProducer.class.getName()));
factory.appendChild(externalContextFactory);
document.getDocumentElement().appendChild(factory);
}
}
A caveat is that since this uses the java.util.ServiceLoader under the hood, it
really only works when ConfigurationProvider and ExternalContextProducer are
packaged together in an actual JAR library placed in the /WEB-INF/lib of the WAR,
instead of just being put directly in the WAR.
The Application Main Class
Above we discussed the Application Configuration Populator, which as we saw is actually
a faces-config.xml provider of sorts. This means it works with fully qualified class
names and elements that are still text in nature.
JSF features a variety of somewhat more traditional programmatic APIs as well,
with perhaps the most well-known of them being the javax.faces.application.
Application main class, which is among others a holder for the same singletons that we
mentioned previously in the section “Extending Classical Artifacts.” For completeness
we’ll repeat this list here.
• javax.faces.application.NavigationHandler
• javax.faces.application.ViewHandler
• javax.faces.application.ResourceHandler
• javax.faces.component.search.SearchExpressionHandler
• javax.faces.flow.FlowHandler
• javax.faces.application.StateManager
• javax.faces.event.ActionListener
Chapter 15 extensions
494
All of these have corresponding setters on the Application class. For instance, the
following shows the Javadoc and method declaration for ActionListener:
/**
* <p>
* Set the default {@link ActionListener} to be registered for all
* {@link javax.faces.component.ActionSource} components.
* </p>
*
* @param listener The new default {@link ActionListener}
*
* @throws NullPointerException
* if <code>listener</code> is <code>null</code>
*/
public abstract void setActionListener(ActionListener listener);
Likewise, the Application class also has “add” methods for the plug-in types we
mentioned in the section “Plug-ins.”
• javax.el.ELResolver
• javax.faces.el.PropertyResolver (deprecated)
• javax.faces.el.VariableResolver (deprecated)
• javax.faces.component.serarch.SearchKeywordResolver
A difficulty with using the Application class to set these singletons is, first of all, that
it’s timing sensitive. This means we can only set such classes from a certain point, which
is obviously not before the point that the Application itself is available, and for some
singletons not until the first request is serviced. This first request is a somewhat difficult
point to track.
Specifically, the resource handler, view handler, flow handler, and state handler,
uhhh, state manager, can’t be set anymore after the first request, while the EL resolver
and search keyword resolver can’t be added either after said first request.
Chapter 15 extensions
495
To demonstrate this we’ll add the custom EL resolver again that we demonstrated
above, but in a more dynamic way now. To do this, we remove the EL resolver from our
faces-config.xml file and add a system listener instead. Our faces-config.xml file
then looks as follows:
<application>
<system-event-listener>
<system-event-listener-class>
com.example.project.ELResolverInstaller
</system-event-listener-class>
<system-event-class>
javax.faces.event.PostConstructApplicationEvent
</system-event-class>
</system-event-listener>
</application>
Indeed, this doesn’t get rid of the XML and, in fact, it’s even more XML, but reducing
or getting rid of XML is not the main point here, which is the ability to register the EL
resolver in a more dynamic way.
The system event listener that we just registered here looks as follows:
public class ELResolverInstaller implements SystemEventListener {
@Override
public boolean isListenerForSource(Object source) {
return source instanceof Application;
}
@Override
public void processEvent(SystemEvent event) {
Application application = (Application) event.getSource();
application.addELResolver(new CustomELResolver());
}
}
Chapter 15 extensions
496
What we have here is a system event listener that listens to the
PostConstructApplicationEvent. This is generally a good moment to add plug-ins like
the EL resolver. The Application instance is guaranteed to be available at this point, and
request processing hasn’t started yet, so we’re surely in time before the first request has
been handled.
Local Extension andWrapping
In some cases, we don’t want to override, say, a view handler globally, but only for a local
invocation of, typically, a method in a component. JSF gathers for this by passing on
the FacesContext, which components to use as the main entry point from which to get
pretty much all other things. Components are for JSF 2.3 not CDI artifacts or otherwise
injectable, so the CDI approach for the moment doesn’t hold for them.
Local extension can then be done by wrapping the faces context and passing that
wrapped context to the next layer. Note that the Servlet spec uses the same pattern where
the HttpServletRequest and HttpServletResponse can be wrapped by a filter and
passed on to the next filter, which can wrap it again and pass it to its next filter, etc.
To illustrate this, suppose that for a certain component we’d like to augment the
action URL generation used by, among others, form components in such a way that
“?foo=bar” is added to this URL.If we do this by globally overriding the view handler all
components and other code using the view handler would get to see this URL, while here
we’d only want this for this very specific component.
To achieve just this, we use wrapping here as illustrated in the following component:
@FacesComponent(createTag = true)
public class CustomForm extends HtmlForm {
@Override
public void encodeBegin(FacesContext context) throws IOException {
super.encodeBegin(new ActionURLDecorator(context));
}
}
Implementing the wrapper without support from JSF would be a somewhat tedious
task, to say the least, as the path from FacesContext to ViewHandler is a few calls deep and
the classes involved have a large amount of methods. Luckily JSF greatly eases this task by
providing wrappers for most of its important artifacts, with an easy-to-use constructor.
Chapter 15 extensions
497
The pattern used here is that the top-level class (ActionURLDecorator from the
example above) inherits from FacesContextWrapper and pushes the original faces
context to its superclass. Then the path of intermediate objects is implemented by
overriding the initial method in the chain (getApplication() here), and returning a
wrapper for the return type of that method, with the super version of it passed into its
constructor. This wrapper then does the same thing for the next method in the chain,
until the final method is reached for which custom behavior is required.
The following gives an example of this:
public class ActionURLDecorator extends FacesContextWrapper {
public ActionURLDecorator(FacesContext context) {
super(context);
}
@Override
public Application getApplication() {
return new ApplicationWrapper(super.getApplication()) {
@Override
public ViewHandler getViewHandler() {
return new ViewHandlerWrapper(super.getViewHandler()) {
@Override
public String getActionURL
(FacesContext context, String viewId)
{
String url = super.getActionURL(context, viewId);
return url + "?foo=bar";
}
};
}
};
}
}
Chapter 15 extensions
498
With these two classes present in the JSF application, now consider the following
Facelet that makes use of our custom form component:
<!DOCTYPE html>
<html lang="en"
xmlns="http://www.w3.org/1999/xhtml"
xmlns:h="http://xmlns.jcp.org/jsf/html"
xmlns:test="http://xmlns.jcp.org/jsf/component"
>
<h:head />
<h:body>
<test:customForm action="index">
<h:commandButton action="index" value="Go Index" />
</test:customForm>
</h:body>
</html>
Remember that no XML registration is needed for the custom component when
it’s annotated with @FacesComponent(createTag=true), and that its XML namespace
defaults to http://xmlns.jcp.org/jsf/component and its component tag name to the
simple class name. (See also Chapter 11.)
If we request the view corresponding to this Facelet and press the button, we’d
indeed see “?foo=bar” appearing after the URL, meaning that our local extension of the
view handler via a chain of wrappers has worked correctly.
Introspection
An important aspect of being able to extend a framework correctly is not only to be able
to utilize extension points but also to be able to introspect the framework and query it for
what artifacts or resources it has available.
One of the places where JSF provides support for introspection is its ability to reveal
which view resources are present in the system. Remember that in JSF, views like, for
example, Facelets are abstracted behind the view handler, which in turn manages one
or more view declaration language (VDL) instances. A VDL, also called a templating
engine, has the ability to read its views via the resource handler. As we’ve seen in this
chapter, all these things can be augmented or even fully replaced.
Chapter 15 extensions
499
This specifically means that views can come from anywhere (e.g., from the filesystem
(most typical)) but can also be generated in memory, be loaded from a database or
fetched over the network, and much more. Also, the simple physical file to logically
view name mapping such as that used by Facelets doesn’t have to hold for other view
declaration languages at all.
Together this means that without an explicit introspection mechanism where the
view handler, VDL, and resource handler can be asked which views/resources they have
available, we would not be able to reliably obtain a full list of views.
Such list of views is needed, for example, when we want to utilize so-called
extensionless URLs, which are URLs without any extension such as .xhtml or .jsf, and
without any extra path mapping present such as /faces/*. Lacking any hint inside the
URL itself, the Servlet container on top of which JSF works has to have some other way of
knowing that a certain request has to be routed to the faces servlet.
A particularly elegant way to do this is by utilizing Servlet’s “exact mapping” feature,
which is a variant of URL mapping where an exact name instead of a pattern is mapped
to a given servlet, which in this case would be the faces servlet. Since the Servlet spec
has an API for dynamically adding Servlet mappings, and JSF has an API to dynamical
introspect which views are available, we pretty much only have to combine these two to
implement extensionless URLs.
The following shows an example of how to do this:
@WebListener
public class ExtensionLessURLs implements ServletContextListener {
@Override
public void contextInitialized(ServletContextEvent event) {
FacesContext facesContext = FacesContext.getCurrentInstance();
event.getServletContext()
.getServletRegistrations()
.values()
.stream()
.filter(servlet -> servlet
.getClassName().equals(FacesServlet.class.getName()))
.findAny()
.ifPresent(facesServlet -> facesContext
.getApplication()
.getViewHandler()
Chapter 15 extensions
500
.getViews(facesContext, "/",
ViewVisitOption.RETURN_AS_MINIMAL_IMPLICIT_OUTCOME)
.forEach(view -> facesServlet.addMapping(view)));
}
}
What happens here is that we first try to find the faces servlet, which incidentally is
another example of introspection, this time in the Servlet spec. If found, we ask the view
handler for all views. As mentioned above, this will internally introspect all the available
view declaration instances, which in turn may introspect the resource handler. The
“RETURN_AS_MINIMAL_IMPLICIT_OUTCOME” parameter is used to make sure all views are
returned in their minimal form without any file extensions or other markers appended.
This is the same form that can be returned from, for example, action methods or used
with the action attribute of command components.
Having obtained the stream of views in the right format, we directly add each of them
as exact mapping to the faces servlet that we found earlier.
For example, suppose we have a Facelet view in the web root in a folder /foo named
bar.xhtml. Then getViews() will return a stream with the string “/foo/bar”. When the
faces servlet is mapped to this “/foo/bar”, and assuming the JSF application is
deployed to the context path /test on domain localhost port 8080, we can request
http://localhost:8080/test/foo/bar to see the rendered response of that Facelet.
Note that even though it’s relatively simple to achieve extensionless URLs in JSF this
way, it’s still somewhat tedious to have to do this for every application. It’s expected that
a next revision of JSF will support this via a single setting.
Chapter 15 extensions
501
© Bauke Scholtz, Arjan Tijms 2018
B. Scholtz and A. Tijms, The Definitive Guide to JSF in Java EE 8, https://doi.org/10.1007/978-1-4842-3387-0
Index
A
Action listener method, 123, 125–126
ADF Faces, 4
Ajax
action, 138
apply request values phase, 140
behavior listener methods, 140
ClientBehaviorHolder, 136–137
execute and render attributes, 139
<f:ajax> tag, 138
@form keyword, 140
<h:form>, 137–138
implementing class, 136
invoke application phase, 140
javax.faces.ViewState, 142
JSF life cycle, 139
life cycle, 69–70
message component, 141
navigation in, 143
on[event] attributes, 139
render response phase, 141
supporting event types, 139
valueChange, 138
Ajax exception handling, 338
Ajax request, 328
application-wide customizations, 327
business logic, 326
ExceptionHandler, 323–325
handleAjaxException(), 325–326
HTTP response, 326
JavaScript alert, 322
Production stage, 323
UIViewRoot instance, 326
unhandled exception events, 327
Alexander Smirnov’s Telamon
framework, 5
Application programming interface (API),
191, 359, 393, 411
Application servers, 13
Authentication mechanism
AuthenticationMechanismDenition
annotation, 416
caller-initiated authentication (see
Caller-initiated authentication)
Custom FORM, 415–416
@CustomFormAuthentication
MechanismDenition
annotation, 417
@FacesCong annotation, 416
FORM, 415
custom JSF code
action method, 427
backing bean, 424–426
continueAuthentication()
method, 426
login page, 422–423
loginToContinue attribute, 417
502
B
Backing beans
class
editing, 37–38
JBoss Tools plug-in, 35–36
JSF vended types, injecting, 309–311
layers, 314–316
managed bean (see Managed beans)
MVC framework, 275–279
naming conventions, 316–317
BeanManager#reEvent() method, 352
Bean Validation API
comma separated string, 168
context parameter, 167
custom constraint annotation, 168,
170, 186–187
custom messages, 187–189
groups attribute, 167
in Java code, 165
JPA-managed, 166
NotNull.class, 168
UIInput components, 166
validation error, 168
validationGroups attribute, 167
web.xml, 165
Binding attribute, 123–124
By role security constraints, 413–415
C
Cache busting, 224
Caller-initiated authentication
continueAuthentication() method, 430
Flash, 429
login-to-continue service, 428–429
SecurityContext#authenticate()
method, 429–430
SUCCESS case, 430–431
CDI-centric approach
backing bean, 484
getPreviousMap() method, 482–483
RequestParameterMapProducer
class, 482
Classical approach
CDI version, 487–488
external context factory, 486–487
Facelet, 488
factories, 485
replace/augment, 485–486
Command components, 96
action listener method, 123,
125–126, 129
argument passing approach, 129
binding attribute, 123–124
Font Awesome icon, 133
JavaScript with hard-coded
variables, 131
loads and renders data table, 132
managed bean action method, 129
Mojarra specic case, 127
namespaced function, 130
params property, 131
pass additional request, 127–128
target method, 123
UX consensus, 133
Component system events
javax.faces.event.
ComponentSystemEvent abstract
class, 76–77
javax.faces.event.
ComponentSystemEventListener
interface, 78
onload() method, 79
@PostConstruct-like behavior, 79
PostConstructViewMapEvent, 77–78
PreDestroyViewMapEvent, 77
Index
503
PreInvokeApplicationEvent, 82–83
Renderer class, 81
subscribe listeners, 78
UIComponent#subscribeToEvent(), 80
YourComponent, 81
YourListener class, 80
Component tree
core tags, 62, 65
#{dynamicForm}, 90, 92–93
HTML (see HTML components)
HTTP request, 55
JSTL Core Tags, 86–87
life cycle
invoke application phase, 68
process validations phase, 67
request values phase, 66–67
restore view phase, 66
model values phase, 68
phase events, 75–76
PostAddToViewEvent, 90
PreRenderViewEvent, 90
render response phase, 68–69
steps, 56–57
TextField#populate(), 92
XML, 55, 92
Composite components
Ajax listener, 265
backing bean, 263
backing component, 260–261
caveat, 266
client ID, 259
default event, 264
encodeBegin() method, 262
event attribute, 265
getSubmittedValue() method, 262
implementation, 259
interface, 259
JSF 2.0, 266
JSF phases, 256–257
LocalDate property, 256
NamingContainer, 262
recursive, 266–269
space-separated collection, 264
UIComponent instance, 257
UIInput superclass, 262, 263
XML namespace, 257
Container-initiated
authentication, 428
Context path, 43
Converters
bean property, 151
custom
base entity service, 178
converterId attribute, 175
empty string, 177
equals() and hashCode()
methods, 182–183
forClass converter for java.lang.
String, 180–181
generic converter, 178–179
getId(), 177
GET request parameter, 173
LocalDateConverter, 180
managed attribute, 175
NumberConverter, 176
Object#equals() method, 182
plain Java code, 176
ProductConverter, 174–175
Product entity, 172–173
product ID, 173–174
use case, 172
web application, 179
EL, 152
<f:convertDateTime>
backing bean, 158–159
Chrome browser, 160
Index
504
HTML5 date and time
inputs, 158–159
ISO 8601 format, 157
supported values, 156
<f:convertNumber>
currency sign pattern, 154–155
NumberFormat instance, 153
standard number format
pattern, 153–154
tags, 153
interface, 150–151
ValueHolder components, 151
Core tags
JSTL (see JSTL Core Tags)
standardize, 62–65
Cross-site request forgery (CSRF)
bank URL, 444
bar.xhtml, 447
faces-cong.xml, 445–447
HTTP headers, 445
malicious requests, 444
protection, 445
Cross-site scripting (XSS)
backing bean, 450
common context, 450
Facelet and <h:outputText>
component, 451
ServletContextListener, 452–453
session ID cookie, 452
URLs, 451–452
Custom components
component family, 361–366
component type, 359–361, 364–366
custom tag handlers, 385–389
distributable JAR, packaging, 389–392
existing component, extending,
375–381
existing renderer, extending,
381–383, 385
new component and renderer
backward compatibility, 373
DataModel abstract class, 374
EL, 375
encodeBegin() method, 372
encodeChildren() method, 372
encodeEnd() method, 373
@FacesComponent, 368–369
@FacesDataModel annotation, 374
ocial component attribute, 370
UIComponent subclass, 367
UIData subclass, 368
value attribute, 373
XML namespace, 368
renderer type, 361–362, 364, 366–367
resource dependencies, 392
D
Database identity store, 419–420
Data source, 46
Double submit, 135
E
Early Access Specication, 2
Eclipse
congure settings, 16
Facelets le, 38–41
GlassFish
location, 21–22
Payara server name, 21
select tools, 20
install, 15–16
install JBoss Tools, 17–18
Java EE API, 19
Converters (cont.)
Index
505
Maven project
create simple project, 23–24
GAV in, 24
Java EE 8, 32–34
JBoss Tools plug-in, 35
JPA facet conguration, 31
JSF capabilities conguration, 32
Markers view, 28
Modify Faceted Project wizard, 31
Oxygen 2, 29
pom.xml le, 26
Project Explorer view, 24
selecting, 23
Servlet API, 28
settings, 27
yellow warning bar, 29
PATH, 13
Project Explorer view, 22
servers view of, 19
workbench, 16
EJBException handling, 333–338
E-mail address column, 149
E-mail-based signup, 183–185
Enterprise JavaBeans (EJB), 50–51, 275
Exadel, 7
Exadel Visual Component Platform, 6
Expression Language (EL), 3, 276, 375
Extensions
Application Conguration Populator, 492
application main class
ActionListener, 494
event listener, 495
faces-cong.xml, 495
plug-ins, 494
CDI-centric approach (see CDI- centric
approach)
classical approach (see Classical
approach)
custom form component, 498
dynamic, 492
introspection
extensionless URLs, 499–500
VDL, 498–499
local extension, 496
plug-ins
EL resolver, 489–491
factory-like types, 489
wrapping, 496–497
ExternalContext#encodeWebsocketURL()
method, 357
F
Facelets, 7–8, 38–41
Facelets ts JSF like a glove (article), 6
Facelets templating
composite components (see
Composite components)
implicit EL objects, 270–273
SPA, 242–246
tag les
boilerplate code, 251
client, 253
customizing, 253
duplicate component ID, 256
HTML5 input elds, 252
implementation, 256
insideLabel, 255
master template les, 249
<method-signature>, 253
<required> property, 251
taglib le, 251
<ui:include>, 248–249
view-scoped model, 256
template compositions
client, 241
Index
506
compiler, 239
nal HTML output, 242
getContextPath() method, 240
master template le, 238–239
xmlns attribute, 239
template decorations, 246–247
XHTML
HTML5, 238
Jurassic IE6, 237
SAX parser, 237
web developers, 237
FacesServlet, 275, 311
File-based input component, 103–104
FORM authentication mechanism, 415
G
GET forms
<f:metadata>, 144–145
invoke application phase, 146
request parameter map, 147
search form, 146–147
submitted value, 147
UIViewAction, 145
UIViewParameter, 145
using templating, 144
GlassFish, 14
location, 21–22
Payara server name, 21
select tools, 20
H
H2 database
congure data source, 46
create EJB service, 50–51
Hello World
getters and setters, 52
save message, 52
JPA
conguration, 47
create entity, 49
pom.xml, 46
Hello World
<application> element, 472
brace notation, 463
change active locale, 463–467
common keys, 460
common prex, 460
cong.xml le, 461
create backing bean class, 35–38
Facelets le, 38–41
Facelets template, 467, 469
getters and setters, 52
HTTP Accept-Language header, 462
label attribute, 472
lang attribute, 462
locale property, 462
localize enums, 474
map keys, 461
<message-bundle> entry, 472–473
new message, 471
override default message, 471
page-specic entries, 469–470
parameters resource, 475
Payara server
Add and Remove wizard, 42
automatic publish, 44–45
in Chrome browser, 43
context path, 43
root, 45
start server, 41
web.xml, 44
ResourceBundle
database-based, 475–479
Facelets templating (cont.)
Index
507
HTML in, 480
save message, 52
XHTML tags, 40
Hidden input eld, 100
HTML components
input, 62
JSF page, 58
output, 62
Since column, 62
tag, 59–61
UIComponent superclass, 61
value type column, 61
View page source, 59
I
ICEbrowser beans, 6
ICEsoft, 6–7
Identity store
application-specic user data, 420–421
authentication mechanism, 418–419
database, 419–420
groups and roles, 419
SQL statement, 420
Immediate attribute, 171–172
Implicit navigation, 134
Improving JSF by Dumping JSP
(article), 4
Input components
le-based (see File-based input
component)
HTML, 95
text-based (see Text-based input
components)
Internet Assigned Numbers Authority
(IANA), 376
Invoke application phase, 68
IOException handling, 332
J, K
JACC, 410
JASPIC, 410–411
Java EE 8, 13, 32–33
Java EE API, 19
Java EE Security
API, 411
custom principal, 437–439
excluded constraints, 412
identity store (see Identity store)
JACC, 410
JASPIC, 410–411
log out, 436
remember me service, 433
rendered attribute
ner-grained name, 440
hasAccessToWebResource(), 442
implicit object #{request}, 440
“**” role, 441
SecurityContext, 442
utility methods, 441
web.xml, 443–444
by role constraints, 413, 415
Servlet spec, 410
source exposure protection
composite components, 456
Facelets and JSP
les, 453–454
FacesServlet, 453
front controller, 453
prevention methods, 455
*.xhtml, 455–456
SPIs, 411
unchecked constraints, 413
Java Naming and Directory
Interface (JNDI), 46
Index
508
JavaOne 2015, 10
Java Persistence API (JPA), 275
conguration, 47
create entity, 48–50
entities, 46
facet conguration, 31
implementation, 31
Java SE JDK, 13
JavaServer Faces (JSF), 191, 235,
275, 320, 359, 393
Apache Struts, 1
conicts, 2
developer, 275
1.2 EG, 5
Expression Language, 3
ICEsoft, 6
managed beans, 2
OmniFaces library, 9
OurFaces, 5
PrimeFaces, 7
view handler, 4
Java Server Pages (JSP), 193, 235
JBoss Tools, 17–18, 35–36
JSF 2.0
CDI spec, 8
Facelets, 8
goals, 8
javax.faces.bean.RequestScoped
annotation, 8
PrimeFaces, 7, 9
e Trap, 8
view scope, 8
JSF 2.2, 10
JSF 2.3, 10–11
JSP Standard Tag Library (JSTL), 203, 236
JSR-127, 2
JSTL Core Tags
backing bean property, 85
calculate sum in loop, 88
component tree, 86–87
EL scope, 87
Facelets, 83–84
IllegalStateException, 85
input.xhtml tag le, 86
item entity, 84
namespace URI, 83
specication, 83
view build time, 84–86
view render time, 84, 86
L
Label component, 120–123
M
Managed beans, 2, 275
CDI, 280–281
eager initialization, 311–312, 314
EL context, 279–280
initialization and
destruction, 308–309
Java EE 6, 280
JSF 2.0, 280
JSF developer, 279
scopes
@ApplicationScoped, 282–284
to choose, 304–305
@Conversation
Scoped, 286–289
@Dependent, 303–304
@FlashScoped, 305–306, 308
@FlowScoped, 289–291, 293
@RequestScoped, 300–302
@SessionScoped, 284–286
@ViewScoped, 293–300
Index
509
Message components, 120–123
Message-driven bean (MDB), 301
Model entity, 117–118
Model values phase, 68
Model-view-controller (MVC), 275
Mojarra, 320, 322
<f:websocket>, 341
specic case, 127
MyFaces, 2, 7, 320
N
Navigation, 133–136
O
OmniFaces library, 9
Open source implementations, 2
OurFaces library, 5
Output components
data iteration
component, 204
add/remove rows, 215, 217
dynamic columns, 220–221
editable, 210–214
EL value expression, 209
list of products, 206–207
Product entity, 209
select rows in <h:dataTable>,
218–219
value attribute of UIData, 204
var attribute, 205
document-based, 191–192
navigation-based, 198–199
panel-based
<h:panelGrid>, 199, 201–202
inline elements, 200
iteration index, 204
JSF component, 203
JSTL, 203
<ui:instructions>, 202
user prole, 199
pass-through elements, 230–232, 234
resource components (see Resource
components)
text-based
Facelets, 193
<h:outputText>, 197
JSF, 193, 197
malicious user, 194
managed bean property, 193
Markdown interface, 194–196
MarkdownListener entity
listener, 196
Message entity, 196
predened human-friendly
markup format, 194
Oxygen 2, 29
P, Q
Pass-through element, 243
Patent pending Direct-to-DOM™, 6
Payara
GlassFish, 14
installing, 14
JAVA_HOME, 13
version, 14
@Phone constraint,
custom, 186–187
Portlet-based web
applications, 99
Post-Redirect-Get pattern, 135
PrimeFaces library, 7, 9
Process validations phase, 67
PushContext interface, 341
Index
510
R
Reference implementation (RI), 4
Remember me service
authentication mechanism, 432
CustomFormAuthentication
Mechanism, 433–434
HttpAuthenticationMechanism
Wrapper, 435–436
@RememberMe annotation, 433
token, 432
Rendered attribute
ner-grained name, 440
hasAccessToWebResource(), 442
implicit object #{request}, 440
“**” role, 441
SecurityContext, 442
utility methods, 441
web.xml, 443–444
Render response phase, 68–69, 71
Request scope, 74
Request values phase, 66–67
Resource components, 221
advantages, 230
bsf, 222
cache busting, 224
classpath, 222
createResource() method, 225
DynamicResourceListener, 229
FacesServlet, 222
<h:outputScript>, 225, 227
JSF components, 223
JSF 2.3 web application, 230
name attribute, 222
OmniFaces, 222
physical resource les, 221
PrimeFaces, 222, 223
renderer class, 227
rendering order, 230
@ResourceDependency
annotation, 227
ResourceHandler, 224–225
SystemEventListener, 228–229
web application, 221
Restore view phase, 66
RichFaces, 10
S
Search expressions, 393
absolute hierarchical IDs, 396–399
relative local IDs, 394–396
search keywords (see Search keywords)
Search form, 146–147
Search keywords
custom, 403–407
standard, 400–403
Selection components
demonstrated approach, 105
HTML markup, 109
JSF 2.2, 112
JSF 2.3, 112
new group attribute, 112
UISelectBoolean
component, 105
UISelectMany component, 105
SelectItem tags
country model entities, 117–118
EL properties, 116
<f:selectItem>, 115
<h:selectOneMenu>, 114
itemLabel attribute, 115
itemValue attribute, 115
map key, 116
noSelectionOption
attribute, 114
Index
511
SelectItemGroup, 118–120
Server provider interfaces
(SPIs), 411
Servlet containers, 14
Servlet spec, 410
Session scope, 74
Single Page Application (SPA), 242–243,
245–246
SkinServlet, 5
someLongRunningProcess()
method, 351
Soteria, 411
Spring 1.0. MyFaces, 3
Stateless forms, 147–148
Struts web framework, 1
T
Text-based input components
basic usage example, 96–98
Chrome, 99–100
hidden input eld, 100
id attribute, 98–99
invoke application phase, 102
Portlet-based web applications, 99
process validations phase, 101
UIInput#decode() method, 101
UIInput#updateModel()
method, 102
UIInput#validate() method, 101
e Trap, 8
U
UIInput superclass, 191
Unied Expression Language (UEL), 7
User interface (UI), 275
User Interface XML (UIX), 5
V
Validators
Bean Validation API
comma separated string, 168
context parameter, 167
custom constraint
annotation, 168, 170
groups attribute, 167
in Java code, 165
JPA-managed, 166
NotNull.class, 168
UIInput components, 166
validation error, 168
validationGroups attribute, 167
web.xml, 165
convert submitted value to string, 163
e-mail-based signup, 183–185
minimum and maximum
attributes, 162
provided by JSF, 161–162
required attribute, 164–165
View build time, 70–71
View declaration language (VDL),
498–499
ViewExpiredException handling, 328–331
ViewHandler#getWebsocketURL()
method, 357
View render time, 71
View scope, 74
View state, 72–74
W
Web fragment, 389
Web parameter tampering, 448–449
WebSocket push
channel design hints, 346–347
conguration, 341–342
Index
512
f:websocket implementation,
356–358
one-time push, 347–349
scopes and users, 344–346
session and view expiration,
detecting, 355–356
site-wide push notications, 351–353
stateful UI updates, 349, 351
track of active sockets, 353–354
usage, 343–344
X, Y, Z
XHTML, 39–40
XSS, see Cross-site scripting (XSS)
WebSocket push (cont.)
Index
