323629_Print Beginners Guide To Scala
User Manual:
Open the PDF directly: View PDF ![]() .
.
Page Count: 530 [warning: Documents this large are best viewed by clicking the View PDF Link!]
- Contents
- 1 Introduction
- 2 Elements of Object Orientation
- 3 Why Object Orientation?
- 4 Constructing an Object-Oriented System
- 5 Functional Programming
- 6 Scala Background
- 7 A Little Scala
- 8 Scala Building Blocks
- 9 Scala Classes
- 9.1 Introduction
- 9.2 Classes
- 9.3 Case Classes
- 10 Scala Methods
- 11 Packages and Encapsulation
- 12 Building a Class
- 13 Classes, Inheritance and Abstraction
- 14 Objects and Instances
- 15 Value Classes
- 16 Scala Constructs
- 17 Control and Iteration
- 18 Traits
- 19 Further Traits
- 20 Arrays
- 21 Tuples
- 22 Functional Programming in Scala
- 23 Higher-Order Functions
- 24 Partially Applied Functions and Currying
- 25 Scala Collections Framework
- 26 Immutable Lists and Maps
- 27 Immutable and Mutable Collection Packages
- 28 Type Parameterisation
- 29 Further Language Constructs
- 30 Exception Handling
- 31 Akka Actors
- 32 Further Akka Actors
- 33 Scala and JDBC Database Access
- 33.1 Introduction
- 33.2 Why JDBC?
- 33.3 What Is JDBC?
- 33.4 Working with JDBC
- 33.5 The Database Driver
- 33.6 Registering Drivers
- 33.7 Setting Up MySQL
- 33.8 Setting Up the Database
- 33.9 Creating a Database
- 33.10 Opening a Connection
- 33.11 Inserting into a Table
- 33.12 Obtaining Data from a Database
- 33.13 Update an Existing Row
- 33.14 Deleting from a Table
- 33.15 Creating a Table
- 33.16 Stored Procedures
- 33.17 JDBC Data Sources
- 33.18 Connection Pooling
- 33.19 JDBC Metadata
- 34 Scala Style Database Access
- 35 Slick: Functional Relational Mapping for Scala
- 35.1 Introduction
- 35.2 Obtaining Slick
- 35.3 Connecting to a Database
- 35.4 Mapping Tables to Scala Types
- 35.5 Table Query Interface
- 35.6 Creating Tables
- 35.7 Inserting Data
- 35.8 Composing Database I/O Actions
- 35.9 Example Setting Up a Database
- 35.10 Querying for Data
- 35.11 Updating, Upserting and Deleting Data
- 36 Testing
- 37 Scala Testing
- 38 Play Framework
- 39 RESTful Services
- 40 Scalaz
- 41 GUIs in Scala Swing
- 42 User Input in Scala Swing
- 43 Scala Build Tools
- 44 Scala & Java Interoperability

JohnHunt
A Beginner’s
Guide to Scala,
Object Orientation
and Functional
Programming
Second Edition
A Beginner’s Guide to Scala, Object Orientation
and Functional Programming
John Hunt
A Beginner’s Guide
to Scala, Object Orientation
and Functional Programming
Second Edition
123
John Hunt
Midmarsh Technology Ltd
Bath, Wiltshire
UK
ISBN 978-3-319-75770-4 ISBN 978-3-319-75771-1 (eBook)
https://doi.org/10.1007/978-3-319-75771-1
Library of Congress Control Number: 2018932535
1st edition: ©Springer International Publishing Switzerland 2014
2nd edition: ©Springer International Publishing AG 2018
This work is subject to copyright. All rights are reserved by the Publisher, whether the whole or part
of the material is concerned, specifically the rights of translation, reprinting, reuse of illustrations,
recitation, broadcasting, reproduction on microfilms or in any other physical way, and transmission
or information storage and retrieval, electronic adaptation, computer software, or by similar or dissimilar
methodology now known or hereafter developed.
The use of general descriptive names, registered names, trademarks, service marks, etc. in this
publication does not imply, even in the absence of a specific statement, that such names are exempt from
the relevant protective laws and regulations and therefore free for general use.
The publisher, the authors and the editors are safe to assume that the advice and information in this
book are believed to be true and accurate at the date of publication. Neither the publisher nor the
authors or the editors give a warranty, express or implied, with respect to the material contained herein or
for any errors or omissions that may have been made. The publisher remains neutral with regard to
jurisdictional claims in published maps and institutional affiliations.
Printed on acid-free paper
This Springer imprint is published by Springer Nature
The registered company is Springer International Publishing AG
The registered company address is: Gewerbestrasse 11, 6330 Cham, Switzerland
This book is dedicated to my wife Denise; you
are a constant source of inspiration to me.
Contents
1 Introduction .......................................... 1
1.1 Introduction ..................................... 1
1.2 What Is Scala? ................................... 1
1.3 Why Scala? ..................................... 2
1.4 Java to Scala Quick Comparison ...................... 3
1.5 Scala Versions ................................... 5
1.6 Is This Book for You? ............................. 5
1.7 Approach Taken by This Book ....................... 5
2 Elements of Object Orientation ............................ 7
2.1 Introduction ..................................... 7
2.2 Terminology ..................................... 7
2.3 Types of Hierarchy ................................ 9
2.4 The Move to Object Technology ...................... 12
2.5 Summary ....................................... 12
2.6 Exercises ....................................... 13
2.7 Further Reading .................................. 13
3 Why Object Orientation? ................................. 15
3.1 Introduction ..................................... 15
3.2 The Procedural Approach ........................... 15
3.2.1 A Naked Data Structure ..................... 16
3.2.2 Procedures for the Data Structure .............. 16
3.2.3 Packages ................................ 17
3.3 Does Object Orientation Do Better? .................... 17
3.3.1 Packages Versus Classes ..................... 17
3.3.2 Inheritance ............................... 19
3.4 Summary ....................................... 20
vii
4 Constructing an Object-Oriented System .................... 21
4.1 Introduction ..................................... 21
4.2 The Application: Windscreen Wipe Simulation ............ 21
4.3 Where Do We Start? ............................... 22
4.4 Identifying the Objects ............................. 23
4.5 Identifying the Services or Methods .................... 24
4.6 Refining the Objects ............................... 26
4.7 Bringing It All Together ............................ 26
4.8 Where Is the Structure? ............................. 29
4.9 Summary ....................................... 31
4.10 Exercises ....................................... 31
4.11 Further Reading .................................. 32
References ............................................ 33
5 Functional Programming ................................ 35
5.1 Introduction ..................................... 35
5.2 What Is Functional Programming? ..................... 35
5.3 Advantages to Functional Programming ................. 37
5.4 Disadvantages of Functional Programming ............... 39
5.5 Scala and Functional Programming .................... 40
6 Scala Background ...................................... 41
6.1 Introduction ..................................... 41
6.2 The Class Person ................................. 41
6.3 Functional Programming ............................ 43
6.4 A Hybrid Language ............................... 44
7 A Little Scala ......................................... 47
7.1 Introduction ..................................... 47
7.2 The Scala Environment ............................. 47
7.3 The Scala Shell ................................... 48
7.4 The Scala IDE ................................... 49
7.4.1 Creating an IntelliJ Project ................... 52
7.4.2 Inside IntelliJ ............................. 53
7.4.3 Creating a Module ......................... 53
7.5 Implementing the Object ............................ 56
7.6 Running the Application ............................ 56
7.6.1 Scala Interpreter Console ..................... 57
7.7 Scala Classpath ................................... 58
7.8 Compiling and Executing Scala ....................... 58
7.9 Memory Management .............................. 60
7.9.1 Why Have Automatic Memory Management? ..... 60
7.9.2 Memory Management in Scala ................ 61
viii Contents
7.9.3 When Is Garbage Collection Performed? ......... 61
7.9.4 Checking the Available Memory ............... 61
8 Scala Building Blocks ................................... 65
8.1 Introduction ..................................... 65
8.2 Apps and Applications ............................. 65
8.3 The Basics of the Language .......................... 67
8.3.1 Some Terminology ......................... 67
8.3.2 The Message Passing Mechanism .............. 68
8.3.3 The Statement Terminator .................... 68
9 Scala Classes .......................................... 69
9.1 Introduction ..................................... 69
9.2 Classes ......................................... 69
9.2.1 Class Definitions ........................... 69
9.2.2 Developing a Class Definition ................. 70
9.2.3 Classes and Messages ....................... 72
9.2.4 Instances and Instance Variables ............... 72
9.2.5 Classes and Inheritance ...................... 73
9.2.6 Instance Creation .......................... 76
9.2.7 Constructors .............................. 77
9.2.8 Auxiliary Constructors ...................... 79
9.2.9 Class Initialisation Behaviour ................. 80
9.2.10 Review of Classes and Constructors............. 81
9.3 Case Classes ..................................... 82
9.3.1 A Sample Class ........................... 83
10 Scala Methods ......................................... 87
10.1 Introduction ..................................... 87
10.2 Method Definitions ................................ 87
10.2.1 Method Parameters ......................... 89
10.2.2 Comments ............................... 91
10.2.3 The Local Variables Section .................. 93
10.2.4 The Statements Section ...................... 94
10.2.5 The Return Operator ........................ 94
10.2.6 An Example Method ........................ 95
10.2.7 Overriding toString ......................... 96
10.2.8 Defining Property Methods ................... 98
10.3 Named Parameters ................................ 100
11 Packages and Encapsulation .............................. 103
11.1 Introduction ..................................... 103
11.2 Packages ....................................... 103
Contents ix
11.2.1 Declaring a Package ........................ 104
11.2.2 Additional Package Definitions Options .......... 104
11.2.3 An Example Package ....................... 109
11.2.4 Accessing Package Elements .................. 110
11.2.5 An Example of Using a Package ............... 111
11.3 Import Options ................................... 112
11.4 Additional Import Features .......................... 113
11.5 Package Objects .................................. 114
11.6 Key Scala Packages ............................... 115
11.7 Default Imports ................................... 115
11.8 Encapsulation .................................... 116
11.8.1 Scala Visibility Modifiers .................... 116
11.8.2 Private Modified ........................... 117
11.8.3 Protected Modifier ......................... 118
12 Building a Class ....................................... 121
12.1 Introduction ..................................... 121
12.2 Create a New Module .............................. 121
12.3 Create a New Package .............................. 123
12.4 Create a New Class ................................ 124
12.5 Defining the Class ................................. 125
12.6 Adding Behaviour ................................. 126
12.7 Test Application .................................. 126
12.8 Override Tostring ................................. 128
12.9 Extras .......................................... 130
13 Classes, Inheritance and Abstraction ....................... 131
13.1 Introduction ..................................... 131
13.1.1 What Are Classes for? ...................... 131
13.2 Inheritance Between Types .......................... 132
13.3 Inheritance Between Classes ......................... 133
13.3.1 The Role of a Subclass ...................... 134
13.3.2 Capabilities of Classes ...................... 135
13.3.3 Overriding Behaviour ....................... 136
13.3.4 Protected Members ......................... 137
13.4 Restricting a Subclass .............................. 138
13.5 Abstract Classes .................................. 139
13.6 The Super Keyword ............................... 142
13.7 Scala Type Hierarchy .............................. 143
13.8 Polymorphism .................................... 144
14 Objects and Instances ................................... 147
14.1 Introduction ..................................... 147
14.2 Singleton Objects ................................. 147
x Contents
14.3 Companion Objects ................................ 149
14.3.1 Companion Object Behaviour ................. 151
14.3.2 A Object or an Instance ..................... 152
15 Value Classes ......................................... 155
15.1 Introduction ..................................... 155
15.2 Value Classes .................................... 155
15.3 Simple Value Type Example ......................... 156
15.4 Additional Value Class Concepts ...................... 157
15.5 Negating Value Classes ............................. 158
16 Scala Constructs ....................................... 159
16.1 Introduction ..................................... 159
16.2 Numbers and Numeric Operators ...................... 159
16.2.1 Numeric Values ........................... 159
16.2.2 Arithmetic Operators ........................ 160
16.3 Characters and Strings .............................. 161
16.3.1 Characters ............................... 161
16.3.2 Strings .................................. 161
16.4 Assignments ..................................... 162
16.5 Variables ....................................... 164
16.5.1 Temporary Variables ........................ 164
16.5.2 Pseudo-Variables .......................... 165
16.5.3 Variable Scope ............................ 165
16.5.4 Option, Some and None ..................... 165
16.5.5 Boolean Values ........................... 167
16.5.6 Literals .................................. 167
16.6 Messages and Message Selectors ...................... 168
16.6.1 Invoking Methods .......................... 168
16.6.2 Precedence ............................... 168
16.7 Summary ....................................... 169
17 Control and Iteration ................................... 171
17.1 Introduction ..................................... 171
17.2 Control Structures ................................. 171
17.2.1 The if Statement ........................... 171
17.2.2 If Returns a Value ......................... 173
17.3 Iteration ........................................ 174
17.3.1 For Loops ............................... 174
17.3.2 For Until ................................ 175
17.3.3 For Loop with a Filter ...................... 175
17.3.4 Longhand for Loop ......................... 176
Contents xi
17.3.5 For-Yield Loop ............................ 176
17.3.6 While Loops.............................. 177
17.3.7 Do Loops ................................ 178
17.3.8 An Example of Loops ....................... 179
17.4 Equality ........................................ 180
17.5 Recursion ....................................... 180
17.5.1 The Match Expression ...................... 183
18 Traits ............................................... 187
18.1 Introduction ..................................... 187
18.2 What Are Traits? ................................. 187
18.3 Defining a Trait .................................. 189
18.4 Using a Trait .................................... 190
18.5 Abstract Trait Members ............................. 193
18.6 Dynamic Binding of Traits .......................... 193
18.7 Sealed Traits ..................................... 195
18.8 Marker Traits .................................... 195
18.9 Trait Dependencies ................................ 196
18.10 To Trait or not to Trait ............................. 198
19 Further Traits ......................................... 199
19.1 Introduction ..................................... 199
19.2 Stackable Modifications ............................. 199
19.3 Fat Versus Thin Traits .............................. 204
19.4 Universal Traits .................................. 205
19.5 Traits for a Data Type .............................. 207
19.6 Single Abstract Method (SAM) Traits .................. 208
20 Arrays ............................................... 211
20.1 Introduction ..................................... 211
20.2 Arrays ......................................... 211
20.2.1 Arrays of Objects .......................... 213
20.2.2 Ragged Arrays ............................ 215
20.3 Creating Square Arrays ............................. 217
20.4 Looping Through Arrays ............................ 218
20.5 The Main Method Revisited ......................... 219
21 Tuples ............................................... 223
21.1 Introduction ..................................... 223
21.2 Tuples ......................................... 223
21.3 Tuple Characteristics ............................... 224
21.4 Tuple Classes .................................... 224
21.5 Creating a Tuple .................................. 224
xii Contents
21.6 Working with Tuples ............................... 225
21.7 Iterating Over a Tuple .............................. 226
21.8 Element Extraction ................................ 227
22 Functional Programming in Scala .......................... 229
22.1 Introduction ..................................... 229
22.2 Scala as a Functional Language ....................... 229
22.3 Defining Scala Functions ............................ 230
22.4 Class, Objects, Methods and Functions .................. 233
22.5 Lifting a Method .................................. 235
22.6 Single Abstract Method Traits ........................ 235
22.7 Closure ......................................... 237
22.8 Referential Transparency ............................ 239
23 Higher-Order Functions ................................. 241
23.1 Introduction ..................................... 241
23.2 Higher-Order Function Concepts ...................... 241
23.3 Scala Higher-Order Functions ........................ 242
23.4 Using Higher-Order Functions ........................ 244
23.5 Higher-Order Functions in Scala Collections .............. 245
24 Partially Applied Functions and Currying ................... 247
24.1 Introduction ..................................... 247
24.2 Partially Applied Functions .......................... 248
24.3 Currying ........................................ 250
24.3.1 Introduction to Currying ..................... 250
24.3.2 Defining Multiple Parameter List Functions ....... 250
24.3.3 Using Curried Functions ..................... 251
24.3.4 Building Domain-Specific Languages ............ 252
25 Scala Collections Framework ............................. 255
25.1 Introduction ..................................... 255
25.2 What Are Collections? ............................. 255
25.3 Scala Collections .................................. 256
25.3.1 Package Scala.Collection ..................... 258
25.3.2 Common Seq Behaviour ..................... 259
25.3.3 Common Set Behaviour ..................... 260
25.3.4 Common Map Behaviour .................... 260
26 Immutable Lists and Maps ............................... 261
26.1 Introduction ..................................... 261
26.2 The Immutable List Collection ........................ 261
26.2.1 List Creation ............................. 261
26.2.2 List Concatenation ......................... 262
Contents xiii
26.2.3 List Operations ............................ 264
26.2.4 List Processing ............................ 265
26.2.5 Further List Processing ...................... 265
26.2.6 Pattern Matching .......................... 269
26.2.7 Converting to a List ........................ 270
26.2.8 Lists of User Defined Types .................. 270
26.3 The Immutable Map Type ........................... 272
27 Immutable and Mutable Collection Packages ................. 275
27.1 Introduction ..................................... 275
27.2 Package Scala.Collection.Immutable .................... 275
27.2.1 Sequences ............................... 275
27.2.2 Sets .................................... 278
27.2.3 Maps ................................... 279
27.3 Package Scala.Collection.Mutable ..................... 279
27.3.1 ArrayBuffer .............................. 280
27.3.2 ListBuffer ................................ 281
27.3.3 LinkedList ............................... 282
27.3.4 Stack ................................... 282
27.3.5 HashMap ................................ 283
27.4 Generic Collections ................................ 284
27.5 Summary ....................................... 285
28 Type Parameterisation .................................. 287
28.1 Introduction ..................................... 287
28.2 The Set Class .................................... 287
28.3 Adding Type Parameterisation ........................ 288
28.3.1 The MyQueue Mutable Class ................. 288
28.3.2 The Immutable Queue Class .................. 290
28.4 Variance ........................................ 292
28.5 Lower and Upper Bounds ........................... 293
28.6 Combining Variance and Bounds ...................... 293
29 Further Language Constructs ............................. 295
29.1 Introduction ..................................... 295
29.2 Implicit Conversions ............................... 295
29.3 Implicit Parameters ................................ 297
29.4 Implicit Objects .................................. 299
29.5 Implicit Classes ................................... 301
29.6 Scala Annotations ................................. 303
29.7 Type Declarations ................................. 305
29.8 Enumerations .................................... 306
29.9 Lazy Evaluation .................................. 311
xiv Contents
30 Exception Handling ..................................... 313
30.1 Introduction ..................................... 313
30.2 What Is an Exception? ............................. 313
30.3 What Is Exception Handling? ........................ 315
30.4 Throwing an Exception ............................. 316
30.5 Catching an Exception .............................. 317
30.6 Try Block Returns a Value .......................... 320
30.7 Defining an Exception .............................. 321
30.8 A More Functional Approach ........................ 322
30.9 The Try Type .................................... 325
31 Akka Actors .......................................... 327
31.1 Introduction ..................................... 327
31.2 The Actor Model ................................. 327
31.3 Some Terminology ................................ 328
31.4 Scala Threads .................................... 329
31.5 Akka Scala Actor Library ........................... 330
31.6 Concurrent Hello World ............................ 332
31.7 Concurrent Actors ................................. 335
31.8 The Akka Actor API ............................... 336
31.9 Actor Lifecycle ................................... 337
31.10 Akka Configuration ................................ 339
31.11 Actor DSL ...................................... 343
32 Further Akka Actors ................................... 345
32.1 Introduction ..................................... 345
32.2 Generating a Result from an Actor ..................... 345
32.3 Futures ......................................... 348
32.4 Dispatchers ...................................... 351
32.5 Actor Hierarchies ................................. 354
32.6 Actor Supervision ................................. 355
32.7 Good Practices ................................... 360
33 Scala and JDBC Database Access .......................... 361
33.1 Introduction ..................................... 361
33.2 Why JDBC? ..................................... 361
33.3 What Is JDBC? ................................... 362
33.4 Working with JDBC ............................... 364
33.5 The Database Driver ............................... 365
33.6 Registering Drivers ................................ 366
33.7 Setting Up MySQL ................................ 367
33.8 Setting Up the Database ............................ 368
33.8.1 Starting/Stopping/Connecting to MySQL ......... 368
33.9 Creating a Database ............................... 369
Contents xv
33.9.1 Adding a User ............................ 369
33.9.2 Selecting to Work with a Database ............. 370
33.9.3 Creating a Table ........................... 370
33.9.4 Adding Data to a Table ...................... 371
33.10 Opening a Connection .............................. 372
33.11 Inserting into a Table .............................. 374
33.12 Obtaining Data from a Database ...................... 376
33.13 Update an Existing Row ............................ 378
33.14 Deleting from a Table .............................. 379
33.15 Creating a Table .................................. 379
33.16 Stored Procedures ................................. 381
33.17 JDBC Data Sources................................ 381
33.18 Connection Pooling ................................ 384
33.19 JDBC Metadata .................................. 386
33.19.1 DatabaseMetaData ......................... 387
33.19.2 ResultSetMetaData ......................... 388
34 Scala Style Database Access .............................. 389
34.1 Introduction ..................................... 389
34.2 Slick .......................................... 389
34.3 Querulus ........................................ 390
34.4 Squeryl ......................................... 391
34.5 O/R Broker ...................................... 392
35 Slick: Functional Relational Mapping for Scala ............... 395
35.1 Introduction ..................................... 395
35.2 Obtaining Slick ................................... 395
35.3 Connecting to a Database ........................... 397
35.4 Mapping Tables to Scala Types ....................... 398
35.5 Table Query Interface .............................. 400
35.6 Creating Tables ................................... 401
35.7 Inserting Data .................................... 401
35.8 Composing Database I/O Actions ...................... 402
35.9 Example Setting Up a Database ....................... 402
35.10 Querying for Data ................................. 404
35.11 Updating, Upserting and Deleting Data ................. 407
36 Testing .............................................. 409
36.1 Introduction ..................................... 409
36.2 Types of Testing .................................. 409
36.3 What Should Be Tested? ............................ 410
36.4 Types of Testing .................................. 411
36.4.1 Unit Testing .............................. 412
36.4.2 Integration Testing ......................... 413
xvi Contents
36.4.3 System Testing ............................ 413
36.4.4 Installation Testing ......................... 413
36.4.5 Smoke Tests .............................. 414
36.5 Automating Testing ................................ 414
37 Scala Testing .......................................... 415
37.1 Introduction ..................................... 415
37.2 Scala Runtime Test Facilities ......................... 415
37.2.1 Validation Checks .......................... 415
37.2.2 Using Require and Assert .................... 416
37.3 Test Libraries in Scala .............................. 417
37.3.1 ScalaTest ................................ 417
37.3.2 Spec ................................... 417
37.3.3 ScalaCheck ............................... 418
37.4 Scalatest Testing Framework ......................... 418
37.4.1 Setting up Your Scala Project ................. 418
37.4.2 ScalaTest and JUnit ........................ 419
37.4.3 Scala Test and Functional Test Suites ........... 424
37.5 Scalatest and Feature Tests .......................... 425
37.6 Test-Driven Development ........................... 427
37.6.1 The TDD Cycle ........................... 427
37.6.2 Test Complexity ........................... 428
37.6.3 Refactoring ............................... 429
38 Play Framework ....................................... 431
38.1 Introduction ..................................... 431
38.2 Introduction to Play ................................ 431
38.2.1 Working with a Web Application .............. 432
38.2.2 How Play Changes the Stack .................. 432
38.3 Starting with Play ................................. 434
38.3.1 Download and Install Play ................... 434
38.3.2 Using a Play Starter Project ................... 434
38.3.3 Starting the Application ..................... 436
38.4 Examining the Structure of the Application .............. 438
38.5 Editing the Application ............................. 439
38.5.1 Working with Your IDE ..................... 439
38.5.2 Importing into IntelliJ ....................... 439
38.5.3 Working with the Application ................. 441
38.6 Model–View–Controller ............................ 442
38.7 Exploring the Play Application ....................... 444
39 RESTful Services ...................................... 447
39.1 Introduction ..................................... 447
39.2 RESTful Services ................................. 447
Contents xvii
39.3 A RESTful API .................................. 448
39.4 Creating the RESTful Web Application ................. 449
39.5 JavaScript and jQuery .............................. 454
39.6 The jQuery Client ................................. 455
39.6.1 Obtaining jQuery .......................... 455
39.6.2 Adding jQuery to the Application .............. 456
40 Scalaz ............................................... 463
40.1 Introduction ..................................... 463
40.2 Obtaining Scalaz .................................. 463
40.3 Scalaz Overview .................................. 464
40.4 Some Useful Typeclasses ........................... 465
40.4.1 Equals Typeclass .......................... 465
40.4.2 Order Typeclass ........................... 465
40.5 Standard Class Extensions ........................... 466
40.5.1 Extensions to Option ........................ 466
40.5.2 Boolean Extensions......................... 468
40.5.3 Extensions to List .......................... 469
40.5.4 Extensions for Map ......................... 470
40.5.5 Extensions to String ........................ 471
40.6 The Other Either .................................. 471
40.7 Tagging ........................................ 472
41 GUIs in Scala Swing .................................... 475
41.1 Introduction ..................................... 475
41.2 Windows as Objects ............................... 475
41.3 Windows in Scala ................................. 476
41.4 Scala Swing ..................................... 477
41.5 Scala Swing Packages .............................. 478
41.6 Swing Scala Worked Examples ....................... 480
41.6.1 Simple Hello World UI ...................... 480
41.6.2 Panels and UI Layout ....................... 481
41.6.3 Working with a BorderPanel .................. 482
41.6.4 Working with a BoxPanel .................... 484
41.6.5 Displaying a Table ......................... 485
42 User Input in Scala Swing ............................... 489
42.1 Introduction ..................................... 489
42.2 Handling User Input ............................... 489
42.2.1 Scala Swing Actions ........................ 492
42.2.2 Working with Menus ....................... 494
42.3 A Simple GUI Example ............................ 496
xviii Contents
43 Scala Build Tools ...................................... 501
43.1 Introduction ..................................... 501
43.2 Why We Need a Build Tool ......................... 501
43.3 Maven ......................................... 502
43.3.1 Maven Repositories ........................ 504
43.3.2 The Maven POM .......................... 504
43.3.3 Scala and Maven .......................... 506
43.3.4 Maven Lifecycle Commands .................. 508
43.4 SBT ........................................... 508
43.4.1 Creating an SBT Project ..................... 510
43.4.2 SBT Lifecycle Commands .................... 512
44 Scala & Java Interoperability ............................. 515
44.1 Introduction ..................................... 515
44.2 A Simple Example ................................ 515
44.3 Inheritance ...................................... 517
44.4 Issues .......................................... 517
44.4.1 Scala Objects ............................. 518
44.4.2 Companion Modules ........................ 519
44.4.3 Traits ................................... 521
44.5 Functions ....................................... 524
44.6 Collection Classes ................................. 528
44.7 Implementing a Java Interface ........................ 530
Contents xix

Chapter 1
Introduction
1.1 Introduction
This book is intended as an introduction to Scala for computer science students or
those actively involved in the software industry. It assumes some familiarity with
standard computing concepts, such as the idea of compiling a program and exe-
cuting this compiled form, and with the basics of procedural language concepts
such as variables and allocation of values to variables. However, the early chapters
of the book do not assume any familiarity with Object Orientation nor functional
programming. They also step through other concepts with which the reader may not
be familiar (such as list processing). From this background, it provides a practical
introduction to object and functional technology using Scala, one of the newest and
most interesting programming languages available.
This book introduces a variety of concepts through practical experience. It also
tries to take you beyond the level of the language syntax to the philosophy and
practice of Object-Oriented development and functional programming.
In the remainder of this chapter, we will consider what Scala is, why you should
be interested in Scala and whether this book is for you.
1.2 What Is Scala?
Scala is a new programming language developed by Martin Odersky and his team
at the EPFL (Ecole Polythenique Fererale de Lausanne, Lausanne, Switzerland) and
now supported by Lightbend Inc. (previously known as Typesafe).
The name Scala is derived from Sca(lable) La(nguage) and is a multi-paradigm
language, incorporating Object-Oriented approaches with functional programming.
What does this mean in practice? It means that you can write applications as pure
Object-Oriented solutions using Classes, Objects and Traits. You can exploit
©Springer International Publishing AG 2018
J. Hunt, A Beginner’s Guide to Scala, Object Orientation and Functional
Programming, https://doi.org/10.1007/978-3-319-75771-1_1
1

inheritance, polymorphism and abstraction and encapsulation techniques. In this
respect, Scala is very much like any other Object-Oriented language (such as Java,
C# or C++). However, you can also develop solutions using purely functional
programming principles in a similar manner to languages such as Haskell or
Clojure. In such an approach, programs are written purely in terms of functions that
take inputs and generate outputs without any side effects.
Scala though is different in that it is a hybrid programming language. That is, it is
possible to combine the best of both worlds when creating a software system. You
can therefore exploit Object-Oriented principles to structure your solution but
integrate functional aspects when appropriate. Whilst this approach is not unique
(the Common Lisp Object Systems did something similar in the 1980s), it is cer-
tainly bringing functional programming to the mainstream and integrating it within
an environment that can execute almost anywhere.
Of course Scala has not been developed in isolation and has been influenced by
many of these and other languages. The influences on the Scala language are shown
in Fig. 1.1.
1.3 Why Scala?
This of course raises the question why Scala and why now? There are a number of
reasons why Scala should be a language that is given serious consideration by any
development project. We have already mentioned that fact that it coherently brings
together two very powerful programming paradigms that combined can allow very
elegant, concise and maintainable systems to be created. However, there are other
reasons why Scala is of interest. The first is that Scala can be compiled to Java Byte
Fig. 1.1 Scala Genealogy
2 1 Introduction
Codes. This means that a Scala system can run on any environment that supports
the Java Virtual Machine (or JVM). There are already several languages that
compile to Java Byte Codes. This list includes Java but also extends to Ada,
JavaScript, Python, Ruby, Tcl and Prolog. Scala is just another such language.
However, this has the additional advantage that Scala can also be integrated with
any existing Java code base that a project may have. It also allows Scala to exploit
the huge library of Java projects available both for free and for commercial use.
Another reason to consider Scala is that one of the design goals for the Scala
development team was to create:
A scalable language suitable for the construction of component based software within
highly concurrent environments.
This means that it has several features integrated into it that support large
software developments. For example, the Actor model of concurrency greatly
simplifies the development of concurrent applications. In addition, the syntax
reduces the amount of code that must be written by a developer (at least compared
with Java). This is because it avoids a lot of the boilerplate code that any Java
developer will be familiar with.
To summarise then, the following points can be made that Scala:
•Provides Object-Oriented concepts including classes, objects, inheritance and
abstraction.
•Extends these (at least with reference to pre Java 8) to include Traits which
represent data and behaviour that can be mixed into classes and objects.
•Includes functional concepts, such as functions as first-class entities in the
language, as well as concepts such as Partially Applied functions and Currying
which allow new functions to be constructed from existing functions.
•Uses statically typed variables and constants with type inference used wherever
possible to avoid unnecessary repetition.
•Has interoperability (mostly) with Java.
To return the question of ‘Why now?’—now is a good time to be learning about
Scala. At the time of writing Scala has been in commercial use (at least to my
knowledge) for seven years and has stabilised and addressed some of the concerns
that commercial development projects had about early version of Scala.
1.4 Java to Scala Quick Comparison
As a comparison, for those who are familiar with Java, the following two listings
compare and contrast equivalent code defined in Java and Scala. Do not worry at
this point too much about the syntax; it is more for illustration than the specifics of
either Java or Scala at this point.
Here is the Java class:
1.3 Why Scala? 3
class Person {
private String firstName;
private String lastName;
private int age;
public Person(String firstName, String
lastName, int age) {
this.firstName = firstName;
this.lastName = lastName;
this.age = age;
}
public void setFirstName(String firstName) {
this.firstName = firstName; }
public void String getFirstName() {
this.firstName; }
public void setLastName(String lastName) {
this.lastName = lastName; }
public void String getLastName() {
this.lastName; }
public void setAge(int age) { this.age = age;
}
public void int getAge() { return this.age; }
}
And here is the equivalent Scala class:
class Person(var firstName: String, var lastName: String, var
age: Int)
As you can see, the Scala version is much shorter but actually captures the same
concepts. The core concepts here are that:
A Person has three properties firstName,lastName and age. These properties are
readable and writable. When a new Person is constructed, you must provide values for
the firstName,lastName and the age.
Both listings implement these concepts; however, in Java’s case it has no concept of
a property and thus we must define how the data is held internally to a Person and
how it can be accessed or updated via various getter and setter methods. In contrast,
Scala has a concept of properties and thus we do not need to write the update and
access style methods. Instead, we need to decide if they are read-only (known as
vals) or read–write properties (as indicated by the keyword var).
4 1 Introduction
1.5 Scala Versions
There have been several significant Scala versions over recent years. It is useful to
be aware of these so that if you are looking at blogs or articles on the Web you can
see which ones are relevant to you. Previous significant versions have been Scala
2.9, 2.10 and 2.11. This book focuses on Scala 2.12 which is the current release at
the time of writing.
1.6 Is This Book for You?
This book does not assume a great deal of programming experience. However, it is
not a basic introduction to programming. Instead, it is aimed at those with little
programming and no functional or Object-Oriented experience. It does introduce
concepts such as lists, data collections, for loops and conditional control state-
ments. However, it assumes a basic understanding of how programs work, of what a
programming stack might be, that memory must be allocated for data, etc.
It can also be used to develop some basic knowledge of programming into a
more in-depth knowledge of a particular technology. It could also be used to
support an introduction to programming course.
1.7 Approach Taken by This Book
In general, the book takes a very “hands-on”approach to the whole subject and
assumes that you will implement the examples as you progress. It supports this
through many examples that take you through how to use the Scala IDE to support
what you are doing as well as providing complete code examples with indications
of the expected outcomes. Unlike many books on Scala, the focus is on using Scala
within an IDE and constructing simple applications rather than using the interactive
Scala interpreter. In addition, all the samples used in the book are available from
Springer to be downloaded and used in your own IDEs.
References Haskell
•http://www.haskell.org/
Clojure
•http://clojure.org/
Common Lisp Object System
•Sonya E. Keene, Object-Oriented Programming in Common LISP: A
Programmer’s Guide to CLOS, Pub. Addison Wesley, (Jan 1989) 0201175894.
1.5 Scala Versions 5
•List of JVM Languages http://en.wikipedia.org/wiki/List_of_JVM_languages
The Scala programming language home page
•see http://www.scala-lang.org
The Scala mailing list
•see http://listes.epfl.ch/cgi-bin/doc_en?liste=scala
The Scala wiki
•see http://scala.sygneca.com/
Lightbend Inc.
•https://www.lightbend.com/
6 1 Introduction

Chapter 2
Elements of Object Orientation
2.1 Introduction
This chapter introduces the core concepts in Object Orientation. It concisely defines
the terminology used and attempts to clarify issues associated with hierarchies. It
also discusses some of the perceived strengths and weaknesses of the
Object-Oriented approach. It then offers some guidance on the approach to take in
learning about objects.
2.2 Terminology
Class A class defines a combination of data and procedures that operate on that
data. Instances of other classes can only access that data or those procedures
through specified interfaces. A class acts as a template when creating new instances.
A class does not hold any data but it specifies the data that is held in the instance.
The relationship between a class, its superclass and any subclasses is illustrated in
Fig. 2.1.
Subclass A subclass is a class that inherits from another class. For example, in
the last chapter, Student Employee is a subclass of Temporary Employee.
Subclasses are, of course, classes in their own right. Any class can have any number
of subclasses.
Superclass A superclass is the parent of a class. It is the class from which the
current class inherits. For example, in the last chapter, Temporary Employee is the
superclass of Student Employee. In Scala, a class can have only one superclass.
©Springer International Publishing AG 2018
J. Hunt, A Beginner’s Guide to Scala, Object Orientation and Functional
Programming, https://doi.org/10.1007/978-3-319-75771-1_2
7
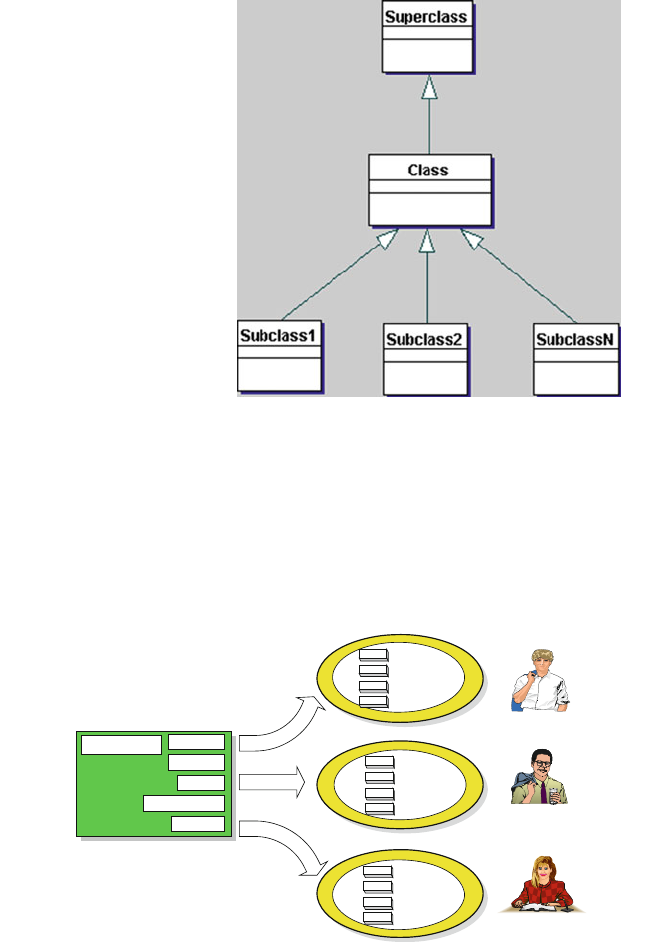
Fig. 2.1 Relationship
between class, superclass and
subclass
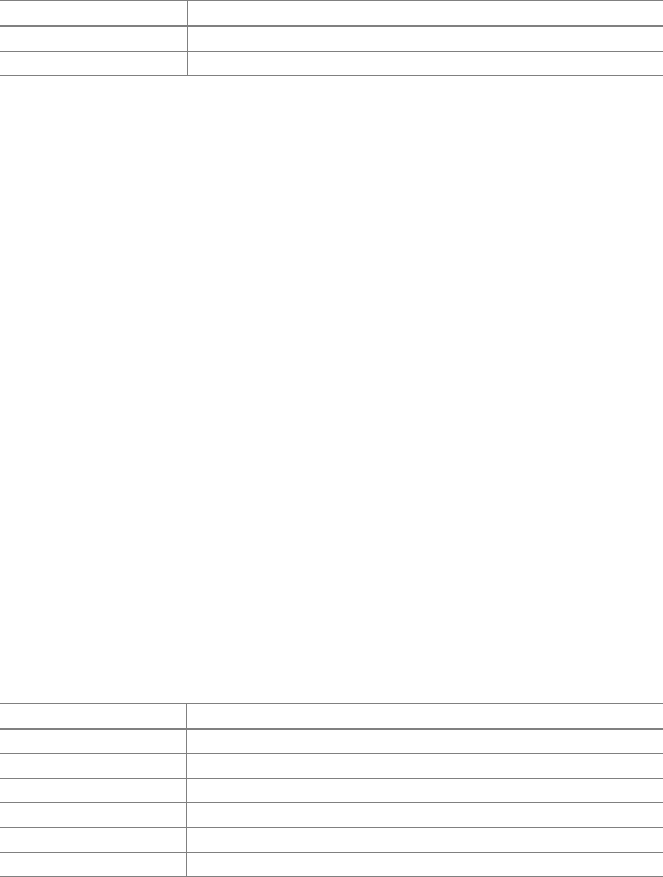
Instance or object An instance is an example of a class. All instances of a class
possess the same data variables but contain their own data. Each instance of a class
responds to the same set of requests.
John
setDepartment
setHourlyRate
printPaySlip
printBirthdayMessage
payExpenses
Employee Class
1455
8989F
220
name
Class to instance relationships
department
employeeNo
hourlyRate
Chris
3345
9987B
560
name
department
employeeNo
hourlyRate
Kate
1455
1122A
250
name
department
employeeNo
hourlyRate
Instance variable This is the special name given to the data which is held by an
object. The “state”of an object at any particular moment relates to the current
values held by its instance variables. (In Scala, there are also class-side variables,
referred to as static variables, but these will be discussed later.) Figure 2.2 illus-
trates a definition for a class in pseudo-code. It includes some instance variable
definitions: fuel, mileage and name.
8 2 Elements of Object Orientation

Method A method is a procedure defined within an object. In early versions of
Smalltalk, a method was used to get an object to do something or return something.
It has since become more widely used; languages such as CLOS and Scala also use
the term. Two methods are defined in Fig. 2.2: one calculates the miles per gallon,
while the other sets the name of the car object.
Message One object sends a message to another object requesting some oper-
ation or data. The idea is that objects are polite, well-behaved entities which carry
out functions by sending messages to each other. A message may be considered
akin to a procedure call in other languages.
Single or multiple inheritance Single and multiple inheritance refer to the
number of superclasses from which a class can inherit. Scala is a single inheritance
system, in which a class can only inherit from one class. C++ is a multiple
inheritance system in which a class can inherit from one or more classes.
2.3 Types of Hierarchy
In most Object-Oriented systems there are two types of hierarchy; one refers to
inheritance (whether single or multiple) and the other refers to instantiation. The
inheritance hierarchy (or extends hierarchy) has already been described. It is the
way in which an object inherits features from a superclass.
The instantiation hierarchy relates to instances rather than classes and is
important during the execution of the object. There are two types of instance
hierarchy: one indicates a part-of relationship, while the other relates to a using
relationship (It is referred to as an is-arelationship.).
The difference between an is-arelationship and a part-of relationship is often
confusing for new programmers (and sometimes for those who are experienced in
Fig. 2.2 A simple Scala class definition
2.2 Terminology 9
one language but are new to Object-Oriented programming languages, such as
Scala). Figure 2.3 illustrates that a student is-atype of person, whereas an engine is
part-of a car. It does not make sense to say that a student is part-of a person or that
an engine is-atype of car!
In Scala, extends relationships are generally implemented by the subclassing
mechanism. It is possible to build up large and complex class hierarchies which
express these extends relationships. These classes express the concept of inheri-
tance, allowing one class to inherit features from another. The total set of features is
then used to create an instance of a class. In contrast, part-of relationships tend to be
implemented using instance variables in Scala.
However, is-arelationships and classes are not exactly the same thing. For
example, if you wish to construct a semantic network consisting of explicit is-
arelationships between instances you will have to construct such a network
manually. The aim of such a structure is to represent knowledge and the relation-
ships between elements of that knowledge, and not to construct instances. The
construction of such a network is outside the scope of the subclassing mechanism
and would therefore be inappropriate.
If John is an instance of a class Person, it would be perfectly (semantically) correct
to say that John is-aPerson. However, here we are obviously talking about the
relationship between an instance and a class rather than a subclass and its parent class.
A further confusion can occur for those encountering Scala after becoming
familiar with a strongly typed language. These people might at first assume that a
subclass and a subtype are essentially the same. However, they are not the same,
although they are very similar. The problem with classes, types and is-arelation-
ships is that on the surface they appear to capture the same sorts of concept. In
Fig. 2.4, the diagrams all capture some aspect of the use of the phrase is-
a. However, they are all intended to capture a different relationship.
The confusion is due to the fact that in modern English we tend to overuse the
term is-a. We can distinguish between the different types of relationship by being
more precise about our definitions in terms of a programming language, such as
Scala. Table 2.1 defines the relationships illustrated in Fig. 2.4.
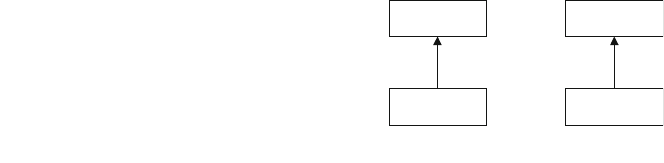
To illustrate this point, consider Fig. 2.5, which illustrates the differences
between the first three categories.
The first diagram illustrates the potential relationships between a set of classes
that define the behaviour of different categories of vehicle. The second diagram
presents the subtype relationships between the categories. The third diagram
Person
Student
Car
Engine
is-a part-of
Fig. 2.3 is-adoes not equal
part-of
10 2 Elements of Object Orientation

VehicleVehicle Vehicle
Car
Sports
Car
Sports
Car
Sports
Car
CarCar
is-a sub typing subclassing
Vehicle
Car
instance
MGF
Fig. 2.4 Satisfying four relationships
Table 2.1 Types of is-arelationships
Specialisation One thing is a special case of another
Type One type can be used interchangeably with another type
(substitutability relationship)
Subclassing or
inheritance
An implementation mechanism for sharing code and representations
Instantiation One thing is an example of a particular category (class) of things
Vehicle
Estate CarCar with Hatch
Car
MotorVehicle
Sports Hatch
Subclassing (inheritance)
Vehicle
Estate CarCar with HatchCar
MotorVehicle
Sports Hatch
Subtyping
Vehicle
Estate Car
Car with Hatch
Car
MotorVehicle
Sports Hatch
Specialization
Fig. 2.5 Distinguishing between relationships
2.3 Types of Hierarchy 11
illustrates a straight specialisation set of relationships. Notice that although estate
car is a specialisation of car with hatch, its implementation (the subclassing hier-
archy) indicates that it does not share any of its implementation with the car with
hatch class. It is worth noting that type relationships are specifications, while
classes (and subclasses) are implementations of behaviour.
2.4 The Move to Object Technology
At present you are still acclimatising to Object Orientation. It is extremely
important that from now on you do your utmost to immerse yourself in Object
Orientation, object technology and Scala. This is because when you first encounter
a new language or paradigm, it is all too easy to say that it is not good because you
cannot do what you could in some other language or paradigm. We are all subject to
the “better the devil you know than the devil you don’t”syndrome. If you embrace
Object Orientation, warts and all, at least for the present, you will gain most.
In addition, it is a fact of life that most of us tend to fit in learning something new
around our existing schedules. This may mean, for example, that you are trying to
read this book and do the exercises while still working in C, VisualBasic, Ada, etc.
From personal experience, and from teaching others about Scala, I can say that you
will gain most by putting aside a significant amount of time and concentrating on
the subject matter involved. This is not only because Object Orientation is so
different, but also because you need to get familiar not only with the concepts but
also with Scala and its development environment.
So have a go, take a “leap of faith”and stick with it until the end. If, at the end,
you still cannot see the point, then fair enough, but until then accept it.
2.5 Summary
In this chapter, we reviewed some of the terminology introduced in the previous
chapter. We also considered the types of hierarchy which occur in Object-Oriented
systems and which can at first be confusing. We then considered the pros and cons
of Object-Oriented programming. You should now be ready to start to think in
terms of objects. As has already been stated, this will at first seem a strange way to
develop a software system, but in time it will become second nature. In the next
chapter we examine how an Object-Oriented system might be developed and
structured. This is done without reference to any source code as the intention is to
familiarise you with objects rather than with Scala. It is all too easy to get through a
book on Smalltalk, C++, Scala, etc., and understand the text but still have no idea
how to start developing an Object-Oriented system.
12 2 Elements of Object Orientation
2.6 Exercises
Research what other authors have said about single and multiple inheritance. Why
do languages such as Smalltalk and Scala not include multiple inheritance?
Look for terms such as class, method, member, member function, instance
variable and constructor in the books listed in the further reading section. When you
have found them, read their explanation of these terms and write down your
understanding of their meaning.
2.7 Further Reading
Suggested further reading for this chapter includes Coad and Yourdon (1991),
Winston and Narasimhan (2001) and Meyer (1988). In addition all the books
mentioned in the previous chapter are still relevant.
2.6 Exercises 13

Chapter 3
Why Object Orientation?
3.1 Introduction
The previous chapter introduced the basic concepts behind Object Orientation, the
terminology and explored some of the motivation. This chapter looks at how Object
Orientation addresses some of the issues that have been raised with procedural
languages. To do this it looks at how a small extract of a program might be written
in a language such as C, considers the problems faced by the C developer and then
looks at how the same functionality might be achieved in an Object-Oriented
language such as Scala, Java or C#. Again do not worry too much about the syntax
you will be presented with, it will be Scala but it should not detract from the
legibility of the examples.
3.2 The Procedural Approach
As has already been stated, Object Orientation provides four things:
1. Encapsulation
2. Abstraction
3. Inheritance
4. Polymorphism.
It has been claimed that these four elements combine to provide a very powerful
programming paradigm, but why? What is so good about Object Orientation?
©Springer International Publishing AG 2018
J. Hunt, A Beginner’s Guide to Scala, Object Orientation and Functional
Programming, https://doi.org/10.1007/978-3-319-75771-1_3
15
3.2.1 A Naked Data Structure
Consider the following example:
record Date {
int day;
int month;
int year;
}
This defines a data structure for recording dates. There are similar structures in
many procedural languages such as C, Pascal and Ada. It is naked because it has no
defenses against procedures accessing and modifying its contents.
So what is wrong with a structure such as this? Nothing, apart from the issue of
visibility? That is, what can see this structure and what can update the contents of
the structure? For example, code could set the day to 1, the month to 13 and the
year to 9999. As far as the structure is concerned the information it holds is fine
(that is day = 01, month = 13, year = 9999). This is because the structure only
knows it is supposed to hold an integer, it knows nothing about dates per se. This is
not surprising, it is only data.
3.2.2 Procedures for the Data Structure
This data is associated with procedures that perform operations on it. These
operations might be to test whether the date represents a date at a weekend or part of
the working week. It may be to change the date (in which case the procedure may
also check to see that the date is a valid one.
For example:
•isDayOfWeek(date);
•inMonth(date, 2);
•nextDay(date);
•setDay(date, 9, 23, 1946);
How do we know that these procedures are related to the date structure we have
just looked at? By the naming conventions of the procedures and by the fact that
one of the parameters is a data (record).
The problem is that these procedures are not limited in what they can do to the
data (e.g. the setDay procedure might have been implemented by a Brit who
assumes that the data order is day, month and year. However, it may be used by an
American who assumes that date order is month, day, year. Thus the meaning of
setDay(date, 9, 23, 1946) will be interpreted very differently. The American views
this as the 23rd of September 1946, while the Brit views this as the 9th of the 23rd
16 3 Why Object Orientation?
month, 1946. In either case, there is nothing to stop the date record being updated
with both versions. Obviously the setDay() procedure might check the new date to
see it was legal, but then again it might not. The problem is that the data is naked
and has no defense against what these procedures do to it.
Indeed, it has no defense against what any procedures that can access it, may do
to it.
3.2.3 Packages
One possibility is of course to use a package construct. In languages such as Ada
packages are commonplace and are used as a way of organizing code and restricting
visibility. For example,
package Dates is
type Date is ….
function isDayOfWeek(d: Date) return BOOLEAN;
function inMonth(d: Date, m: INTEGER) return
BOOLEAN;
…
The package construct now provides some ring fencing of the data structure and
a grouping of the data structure with the associated functions. In order to use this
package a developer must import the package (e.g. using with and uses in Ada).
They can then access the procedures and work with data of the specified type (in
this case Date). There can even be data that is hidden from the user within a private
part. This therefore increases the ability to encapsulate the data (hide the data) from
unwelcome attention.
3.3 Does Object Orientation Do Better?
This is an important question “Does Object Orientation do any better”than the
procedural approach described above? We will first consider packages, then
inheritance …
3.3.1 Packages Versus Classes
It has been argued (to me at least) that a package is just like a class. It provides a
template from which you can create executable code, it provides wall around your
data with well-defined gateways, etc. However, there are a number of very sig-
nificant differences between packages and classes.
3.2 The Procedural Approach 17
Firstly, packages tend to be larger (at least conceptually) units than classes. For
example, the TextIO package in Ada is essentially a library of textual IO facilities,
rather than a single concept such as the class String in C#. Thus packages are not
used to encapsulate a single small concept such as Date, but rather a whole set of
related concepts (as indeed they are used in C# itself where they are called
namespaces). Thus a class is a finer level of granularity than a package even though
it provides similar levels of encapsulation.
Secondly, packages still provide a relatively loose association between the data
and the procedures. A package may actually deal with very many data structures
with a wide range of methods. The data and the methods are related primarily via
the related set of concepts represented by the package. In contrast a class tends to
closely relate data and methods in a single concept. Indeed, one of the guidelines
presented later in this book relating to good class design, is that if a class represents
more than one concept, split it into two classes.
Thus this close association between data and code and means that the resulting
concept is more than just a data structure (it is closer to a concrete realization of an
abstract data type). For example:
class Date {
val day: Int = 1
val month: Int 1
val year: Int = 14
def isDayOfWeek(): Boolean = {..}
}
Anyone using an instance of Date now gets an object which can tell you whether
it is a day of the week or not and can hold the appropriate data. Note that the
isDayOfWeek() method takes no parameters, it does not need to as it and the
date is a part of the same thing. This means that a user of a Date object will never
get their hands on the actual data holding the date (i.e. the integers day, month and
year). Instead, they are forced to go via the internal methods. This may only seem a
small step, but it is a significant one, nothing outside the object may access the data
within the object. In contrast the data structure in the procedural version, is not only
held separately to the procedures, the values for day, month or year could be
modified directly without the need to use the defined procedures.
For example, compare the differences between an ADA-esque excerpt from a
program to manipulate dates:
d: Date;
setDay(d, 28);
setMonth(d, 2);
setYear(d, 1998);
isDayOfWeek(d);
inMonth(d, 2);
18 3 Why Object Orientation?
Not that it was necessary to first create the data and then to set the fields in the
data structure. Here we have been good and have used the interface procedures to
do this. Once we had the data set-up we could then call methods such as
IsDayOfWeek and InMonth on that data.
In contrast the Scala code uses a constructor to pass in the appropriate initial-
ization information. How this is initialized internally is hidden from the user of the
class Date. We then call method such as isDayOfWeek() and isMonth(12)
directly on the object date.
val d = new Date(12, 2, 1998)
d.IsDayOfWeek()
d.InMonth(12)
The thing to think about here is where would code be defined?
3.3.2 Inheritance
Inheritance is the key element that makes an Object-Oriented language more than an
object-based language. An object-based language possesses the concept of object,
but not of inheritance. Indeed, inheritance is the thing that marks an Object-Oriented
language as different from a procedural language. The key concept in inheritance is
that one class can inherit data and methods from another, thus increasing the amount
of code reuse occurring as well as simplifying the overall system. One of the most
important features of inheritance (ironically) is that it allows the developer to get
inside the encapsulation bubble in limited and controlled ways. This allows the
subclass to take advantage of internal data structures and methods, without com-
promising the encapsulation a forded to objects. For example, let use define a
subclass of the class Date (extends are used to indicate inheritance in Scala):
class Birthday extends Date {
val name: String = ""
val age: Int = 0
def isBirthday(): Boolean = {..}
}
The method isBirthday() could check to see if the current date, matched
the birthday represented by an instance of Birthday and return true if it does and
false if it does not.
Note however, that the interesting thing here is that not only have I not had to
define integers to represent the date, nor have I had to define methods to access such
dates. These have both been inherited from the parent class Date.
3.3 Does Object Orientation Do Better? 19
In addition, I can now treat an instance of Birthday as either a Date or as a
Birthday depending on what I want to do!
What would you do in languages such as C, Pascal or Ada? One possibility is
that you could define a new package Birthday, but that package would not extend
Dates, it would have to import Dates and add interfaces to it etc.? However, you
certainly could not treat a Birthday package as a Dates package.
In languages such as Scala, because of polymorphism, you can do exactly that.
You can reuse existing code that only knew about Date, for example:
•def test(Date d): Unit = {..}
•t.test(birthday)
This is because Birthday is indeed a type of Date as well as being a type of
Birthday.
You can also use all of the features defined for Date on Birthdays:
•birthday.isDayOfWeek()
Indeed you do not actually know where the method is defined. This method
could be defined in the class Birthday (in which it would override that defined in the
class Date). However, it could be defined in the class Date (if no such method is
defined in Birthday). However, without looking at the source code there is no
way of knowing!
Of course you can also use the new methods defined in the class Birthday on
instance (objects) of this class. For example:
•birthday.isBirthday()
3.4 Summary
Classes in an Object-Oriented language provide a number of features that are not
present in procedural languages. Hopefully by the end of the book you will agree
that they are useful additions to the developers’toolbox. If not, give it time, one of
the problems that we all face (myself included) is a reluctance to change. To
summarise, the main points to be noted from this chapter on Object Orientation are:
•Classes provide for inheritance.
•Inheritance provides for reuse.
•Inheritance provides for extension of data type.
•Inheritance allows for polymorphism.
•Inheritance unique feature of Object Orientation.
•Encapsulation represents a particularly good Software Engineering feature in
Object Orientation.
20 3 Why Object Orientation?

Chapter 4
Constructing an Object-Oriented System
4.1 Introduction
This chapter takes you through the design of a simple Object-Oriented system
without considering implementation issues or the details of any particular language.
Instead, this chapter illustrates how to use Object Orientation concepts to construct
a software system. We first describe the application and then consider where to start
looking for objects, what the objects should do and how they should do it. We
conclude by discussing issues such as class inheritance and answer questions such
as “where is the structure of the program?”.
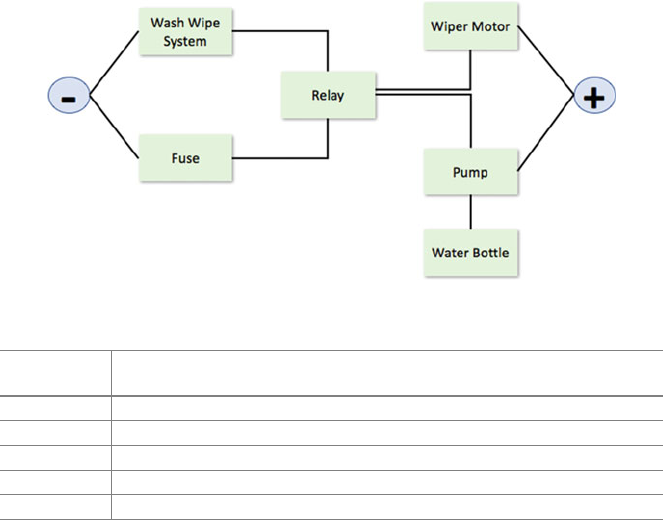
4.2 The Application: Windscreen Wipe Simulation
This system aims to provide a diagnosis tutor for the equipment illustrated in
Fig. 4.1. Rather than use the wash–wipe system from a real car, students on a car
mechanics diagnosis course use this software simulation. The software system
mimics the actual system, so the behaviour of the pump depends on information
provided by the relay and the water bottle.
The operation of the wash–wipe system is controlled by a switch which can be in
one of five positions: off, intermittent, slow, fast and wash. Each of these settings
places the system into a different state:
©Springer International Publishing AG 2018
J. Hunt, A Beginner’s Guide to Scala, Object Orientation and Functional
Programming, https://doi.org/10.1007/978-3-319-75771-1_4
21
Switch
setting
System state
Off The system is inactive
Intermittent The blades wipe the windscreen every few seconds
Slow The wiper blades wipe the windscreen continuously
Fast The wiper blades wipe the windscreen continuously and quickly
Wash The pump draws water from the water bottle and sprays it onto the windscreen
For the pump and the wiper motor to work correctly, the relay must function
correctly. In turn, the relay must be supplied with an electrical circuit. This elec-
trical circuit is negatively fused, and thus the fuse must be intact for the circuit to be
made. Cars are negatively switched as this reduces the chances of short circuits
leading to unintentional switching of circuits.
4.3 Where Do We Start?
This is often a very difficult point for those new to Object-Oriented systems. That is,
they have read the basics and understand simple diagrams, but do not know where
to start. It is the old chestnut, “I understand the example but do not know how to
apply the concepts myself”. This is not unusual and, in the case of Object
Orientation, is probably normal.
The answer to the question “where do I start?”may at first seem somewhat
obscure; you should start with the data. Remember that objects are things that
exchange messages with each other. The things possess the data that is held by the
system and the messages request actions that relate to the data. Thus, an
Object-Oriented system is fundamentally concerned with data items.
Before we go on to consider the Object-Oriented view of the system, let us stop
and think for a while. Ask yourself “where would I start if I was going to develop
Fig. 4.1 Windscreen wash–wipe system
22 4 Constructing an Object-Oriented System
such a system in C or Pascal or even Ada?”In most cases, the answer is “with some
form of functional decomposition”. That is, you might think about the main func-
tions of the system and break them down into subfunctions and so on. As a natural
part of this exercise, you would identify the data required to support the desired
functionality. Notice that the emphasis would be on the system functionality.
Let us take this further and consider the functions we might identify for the
example presented above:
Function Description
Wash Pump water from the water bottle to the windscreen
Wipe Move the windscreen wipers across the windscreen
We would then identify important system variables and subfunctions to support
the above functions.
Now let us go back to the Object-Oriented view of the world. In this view, we
place a great deal more emphasis on the data items involved and consider the
operations associated with them (effectively, the reverse of the functional decom-
position view). This means that we start by attempting to identify the primary data
items in the system; next, we look to see what operations are applied to, or per-
formed on, the data items; finally, we group the data items and operations together
to form objects. In identifying the operations, we may well have to consider
additional data items, which may be separate objects or attributes of the current
object. Identifying them is mostly a matter of skill and experience.
The Object-Oriented design approach considers the operations far less important
than the data and their relationships. In the next section we examine the objects that
might exist in our simulation system.
4.4 Identifying the Objects
We look at the system as a whole and ask what indicates the state of the system. We
might say that the position of the switch or the status of the pump is significant.
This results in the data items shown in Table 4.1.
Table 4.1 Data items and their associated state information
Data item States
Switch setting Is the switch set to off, intermittent, wipe, fast wipe or wash?
Wiper motor Is the motor working or not?
Pump state Is the pump working or not?
Fuse condition Has the fuse blown or not?
Water bottle level The current water level
Relay status Is current flowing or not?
4.3 Where Do We Start? 23
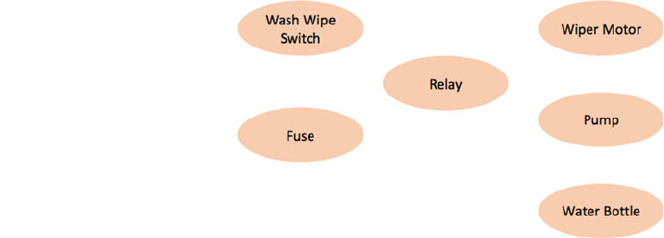
The identification of the data items is considered in greater detail later. At this
point, merely notice that we have not yet mentioned the functionality of the system
or how it might fit together, we have only mentioned the significant items. As this is
such a simple system, we can assume that each of these elements is an object and
illustrate it in a simple object diagram (Fig. 4.2).
Notice that I have named each object after the element associated with the data
item (e.g. the element associated with the fuse condition is the fuse itself) and that
the actual data (e.g. the condition of the fuse) is an instance variable of the object.
This is a very common way of naming objects and their instance variables. We now
have the basic objects required for our application.
4.5 Identifying the Services or Methods
At the moment, we have a set of objects each of which can hold some data. For
example, the water bottle can hold an integer indicating the current water level.
Although Object-Oriented systems are structured around the data, we still need some
procedural content to change the state of an object or to make the system achieve
some goal. Therefore, we also need to consider the operations a user of each object
might require. Notice that the emphasis here is on the user of the object and what
they require of the object, rather than what operations are performed on the data.
Let us start with the switch object. The switch state can take a number of values.
As we do not want other objects to have direct access to this variable, we must
identify the services that the switch should offer. As a user of a switch we want to
be able to move it between its various settings. As these settings are essentially an
enumerated type, we can have the concept of incrementing or decrementing the
switch position. A switch must therefore provide a moveUp and a moveDown
interface. Exactly how this is done depends on the programming language; for now,
we concentrate on specifying the required facilities.
If we examine each object in our system and identify the required services, we
may end up with the Table 4.2.
Fig. 4.2 Objects in
simulation system
24 4 Constructing an Object-Oriented System
We generated this table by examining each of the objects in isolation to identify
the services that might reasonably be required. We may well identify further ser-
vices when we attempt to put it all together.
Each of these services should relate to a method within the object. For example,
the moveUp and moveDown services should relate to methods that change the
state instance variable within the object. Using a generic pseudo-code, the
moveUp method, within the switch object, might contain the following code:
define method moveUp()
if state == "off" then
state = "wash"
elseif state == "wash" then
state = "wipe"
endif
end define method
This method changes the value of the state variable in switch. The new
value of the instance variable depends on its previous value. You can define
moveDown in a similar manner. Notice that the reference to the instance variable
illustrates that it is global to the object. The moveUp method requires no param-
eters. In Object-Oriented systems, it is common for few parameters to be passed
between methods (particularly of the same object), as it is the object that holds the
data.
Table 4.2 Object services
Object Service Description
Switch moveUp Increment switch value
moveDown Decrement switch value
state? Return a value indicating the current switch state
Fuse working? Indicate if the fuse has blown or not
Wiper motor working? Indicate whether the wipers are working or not
Relay working? Indicate whether the relay is active or not
Pump working? Indicate whether the pump is active or not
Water bottle fill Fill the water bottle with water
extract Remove some water from the water bottle
empty Empty the water bottle
4.5 Identifying the Services or Methods 25

4.6 Refining the Objects
If we look back to Table 4.2, we can see that fuse, wiper motor, relay and pump all
possess a service called working? This is a hint that these objects may have
something in common. Each of them presents the same interface to the outside
world. If we then consider their attributes, they all possess a common instance
variable. At this point, it is too early to say whether fuse, wiper motor, relay and
pump are all instances of the same class of object (e.g. a Component class) or
whether they are all instances of classes which inherit from some common super-
class (see Fig. 4.3). However, this is something we must bear in mind later.
4.7 Bringing It All Together
So far we have identified the primary objects in our system and the basic set of
services they should present. These services were based solely on the data the
objects hold. We must now consider how to make our system function. To do this,
we need to consider how it might be used. The system is part of a very simple
diagnosis tutor; a student uses the system to learn about the effects of various faults
on the operation of a real wiper system, without the need for expensive electronics.
Fig. 4.3 Possible classes for components in the simulation
26 4 Constructing an Object-Oriented System
We therefore wish to allow a user of the system to carry out the following
operations:
•change the state of a component device
•ask the motor what its new state is.
The moveUp and moveDown operations on the switch change the switch’s
state. Similar operations can be provided for the fuse, the water bottle and the relay.
For the fuse and the relay, we might provide a changeState interface using the
following algorithm:
define method changeState()
if state == "working" then
state = "notWorking"
else
state = "working"
endif
end define method
Discovering the state of the motor is more complicated. We have encountered a
situation where one object’s state (the value of its instance variable) is dependent on
information provided by other objects. If we write down procedurally how the value
of other objects affects the status of the pump, we might get the following
pseudo-code:
if fuse is working then
if switch is not off then
if relay is working then
pump status = "working"
endif
endif
endif
This algorithm says that the pump status depends on the relay status, the switch
setting and the fuse status. This is the sort of algorithm you might expect to find in a
main() program. It links the subfunctions together and processes the data.
In an Object-Oriented language (such as Scala), we do not have a main program
in the same way that a C program has. Instead the main() method in Scala is an
initiating point for an Object-Oriented system (in Scala this is simplified further by
the use of the App trait). As it is part of an object, the main method can trigger the
creation of instances, but it is not itself part of those instances. This can be con-
fusing at first; however, if you think of the main() method in Scala as initiating a
program, that is the starting point for a program, then you are fairly close.
4.7 Bringing It All Together 27

In an Object-Oriented system, well-mannered objects pass messages to one
another. How then do we achieve the same effect as the above algorithm? The
answer is that we must get the objects to pass messages requesting the appropriate
information. One way to do that is to define a method in the pump object that gets
the required information from the other objects and determines the motor’s state.
However, this requires the pump to have links to all the other objects so that it can
send them messages. This is a little contrived and loses the structure of the
underlying system. It also loses any modularity in the system. That is, if we want to
add new components, then we have to change the pump object, even if the new
components only affect the switch. This approach also indicates that the developer
is thinking too procedurally and not really in terms of objects.
In an Object-Oriented view of the system, the pump object only needs to know
the state of the relay. It should therefore request this information from the relay. In
turn, the relay must request information from the switches and the fuse.
Figure 4.4 illustrates the chain of messages initiated by the pump object:
1. pump sends a working? message to the relay
2. relay sends a state? message to the switch
the switch replies to the relay
3. relay sends a second working? message to the fuse
the fuse replies to the relay
the relay replies to the motor
If the pump is working, then the pump object sends the final message to the
water bottle
4. pump sends a message extract to the water bottle.
In step four, a parameter is passed with the message because, unlike the previous
messages that merely requested state information, this message requests a change in
Fig. 4.4 Collaborations between the objects for wash operation
28 4 Constructing an Object-Oriented System
state. The parameter indicates the rate at which the pump draws water from the
water bottle.
The water bottle should not record the value of the pump’sstatus as it does not
own this value. If it needs the motor’s status in the future, it should request it from
the pump rather than using the (potentially obsolete) value passed to it previously.
In Fig. 4.4, we assumed that the pump provided the service working? which
allows the process to start. For completeness, the pseudo-code of the working?
Method for the pump object is:
def working?()
begin
this.status = relay.working().
if this.status == "working" then
water_bottle.extract(this.status)
endif
end
end define method
This method is a lot simpler than the procedural program presented earlier. At no
point do we change the value of any variables that are not part of the pump,
although they may have been changed as a result of the messages being sent. Also,
it only shows us the part of the story that is directly relevant to the pump. This
means that it can be much more difficult to deduce the operation of an
Object-Oriented system merely by reading the source code. Some Scala environ-
ments (such as the Scala IDE) alleviate this problem, to some extent, through the
use of sophisticated browsers.
4.8 Where Is the Structure?
People new to Object Orientation may be confused because they have lost one of
the key elements that they use to help them understand and structure a software
system: the main program body. This is because the objects and the interactions
between them are the cornerstone of the system. In many ways, Fig. 4.4 shows the
Object-Oriented equivalent of a main program. This also highlights an important
feature of most Object-Oriented approaches: graphical illustrations. Many aspects
of object technology, for example, object structure, class inheritance and message
chains, are most easily explained graphically.
Let us now consider the structure of our Object-Oriented system. It is dictated by
the messages that are sent between objects. That is, an object must possess a
reference to another object in order to send it a message. The resulting system
structure is illustrated in Fig. 4.5.
4.7 Bringing It All Together 29
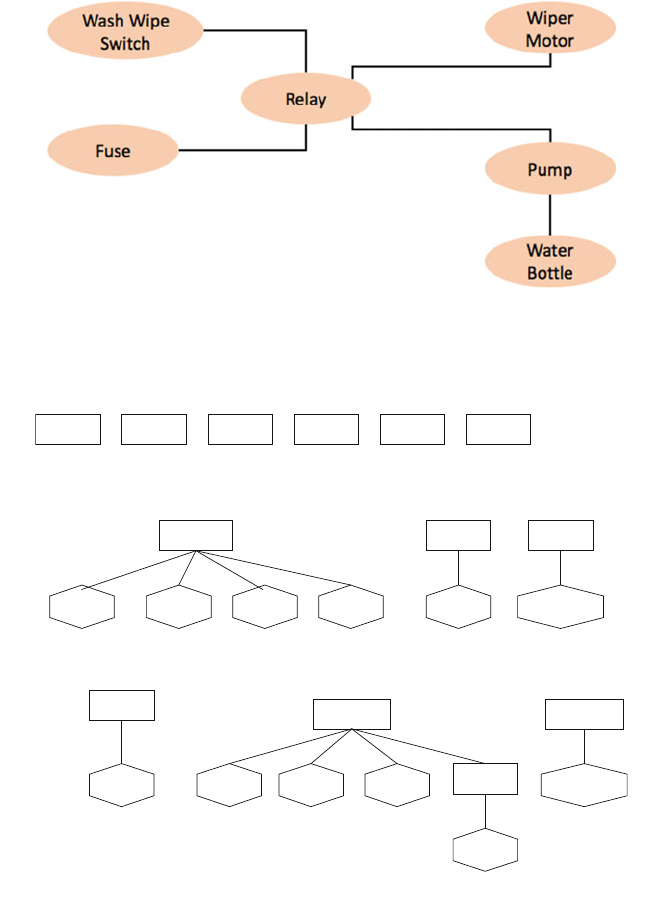
In Scala, this structure is achieved by making instance variables reference the
appropriate objects. This is the structure which exists between the instances in the
system and does not relate to the classes, which act as templates for the instances.
We now consider the classes that create the instances. We could assume that
each object is an instance of an equivalent class (see Fig. 4.6a). However, as has
Fig. 4.5 Wash–wipe system structure
Component Switch Water
bottle
Switch Component Waterbottle
Motor
(aPump)
(a)
(aSwitch) (aPump) (aFuse)
(aFuse) (aRelay) (aWaterbottle)(aSwitch)(aMotor)
(aWaterbottle)(aRelay)
(aMotor)
Switch Water
bottle Motor Fuse Pump Relay
(b)
(c)
Fig. 4.6 Possible class inheritance relationships
30 4 Constructing an Object-Oriented System

already been noted, some of the classes bear a very strong resemblance. In par-
ticular, the fuse, the relay, the motor and the pump share a number of common
features. Table 4.3 compares the features (instance variables and services) of these
objects.
From this table, the objects differ only in name. This suggests that they are all
instances of a common class such as Component (see Fig. 4.6b). This class would
possess an additional instance variable, to simplify object identification.
If they are all instances of a common class, they must all behave in exactly the
same way. However, we want the pump to start the analysis process when it
receives the message working? so it must possess a different definition of
working? from fuse and relay. In other ways it is very similar to fuse and relay,
so they can be instances of a class (say Component) and pump and motor can be
instances of classes that inherit from Component (but redefine working?). This is
illustrated in Fig. 4.6c. The full class diagram is presented in Fig. 4.7.
4.9 Summary
In this chapter, you have seen how a very simple system can be broken down into
objects. These objects combine to provide the overall functionality of the system.
You have seen how the data to be represented determines the objects used and that
the interactions between objects determine the structure of the system. You should
also have noted that objects and their classes, methods and instance variables are
identified by more of an evolutionary process than in languages that are not Object
Oriented.
4.10 Exercises
Take a system with which you are familiar and try to break it down into objects.
Carry out a similar set of steps to those described above. Do not worry about how to
implement the objects or the classes. Use whatever representation best fits your way
of working to describe what the methods do (pseudo-code or a programming lan-
guage, such as C or Pascal, if you prefer). You can even use a flow chart if you are
most comfortable with that. It is very important that you try and do this, as it is a
useful exercise in learning to think in terms of objects.
Table 4.3 Comparison of components
fuse relay motor pump
Instance variable state state state state
Services working? working? working? working?
4.8 Where Is the Structure? 31
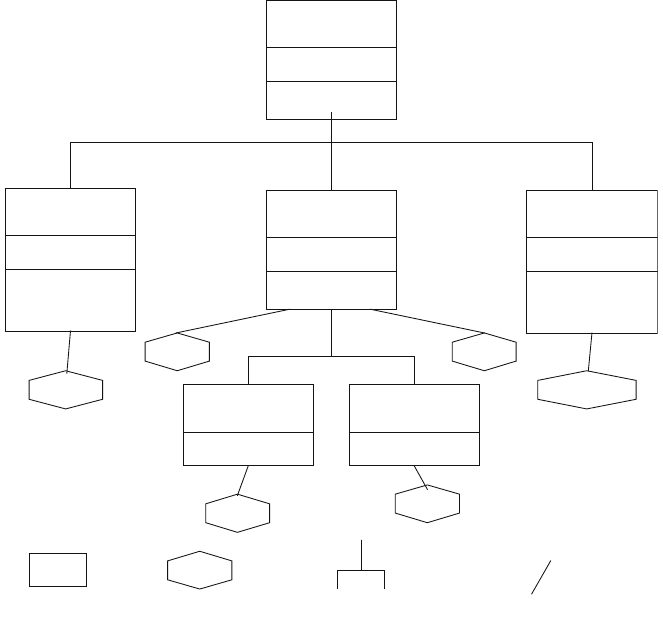
4.11 Further Reading
A good place to start further reading on building Object-Oriented systems is with
the first few chapters of Blaha and Rumbaugh (2004). In addition, Wirfs-Brock and
McKean (2002) is an excellent, non-language-specific introduction to structuring
Object-Oriented systems. It uses a rather simplistic approach, which is ideal for
learning about Object-Oriented system design but is not generally applicable. This
is not a problem as what you want to do at the moment is to get the background
rather than specific techniques. Another good reference for further reading is
Larman (2008).
SimulationClass
name: ''
traceMessages()
Switches
state
moveUp()
moveDown()
state?
Component
state
working?
Waterbottle
level
empty()
fill()
extract()
Motor
working?
Pump
working?
inheritanceclass
instance
of
instance
(switches) (water bottle)
(motor) (pump)
(relay)(fuse)
Fig. 4.7 Final class hierarchy and instance diagram
32 4 Constructing an Object-Oriented System
References
Blaha MR, James R (2004) Rumbaugh, Prentice Hall. 8120330161, 2nd edn.
Larman C (2008) Applying UML and patterns: an introduction to object-oriented analysis and
design and iterative development. Dorling Kindersley Pvt Ltd.; 3rd edn. 8177589792 (1 Dec
2008)
Wirfs-Brock R, McKean A (2002) Object design: roles, responsibilities and collaborations.
Addison-Wesley Object Technologiey Series. 0201379430 (Nov, 2002)
References 33

Chapter 5
Functional Programming
5.1 Introduction
Previous chapters have focussed on the Object-Oriented side of the Scala language.
However, Scala is a hybrid Object Oriented (OO) and functional programming
(FP) language. In this chapter, we will now look at functional programming and its
advantages and disadvantages.
5.2 What Is Functional Programming?
Wikipedia describes Functional Programming as:
…a programming paradigm, a style of building the structure and elements of computer
programs, that treats computation as the evaluation of mathematical functions and
avoids state and mutable data.
There are a number of points to note about this definition. The first is that it is
focussed on the computational side of computer programmes. You might consider
that obvious, but at least half of what we have looked at around objects and classes
has been focussed on the representation of domain concepts and data within those
concepts. Thus there is a difference of emphasis between the functional program-
ming world and the Object-Oriented programming world.
Another thing to note is that the way in which the computations are represented
emphasises functions that generate results based on data and computations. These
functions only rely on their inputs and generate a new output. They do not rely on
any side effects and do not depend on the current state of the program. Taking each
of these in turn:
1. Functional programming aims to avoid side effects. A function should be
replaceable by taking the data it receives and inlining the result generated (this is
©Springer International Publishing AG 2018
J. Hunt, A Beginner’s Guide to Scala, Object Orientation and Functional
Programming, https://doi.org/10.1007/978-3-319-75771-1_5
35
referred to as referential transparency). This means that there should be no
hidden side effects of the function. Hidden side effects make it harder to
understand what a program is doing and thus make comprehension, develop-
ment and maintenance harder. Pure functions have the following attributes:
•the only observable output is the return value.
•the only output dependency are the arguments.
•arguments are fully determined before any output is generated.
2. Functional programming avoids concepts such as state. Lets us take these as
separate issues. If some operation is dependent upon the state of the program or
some element of a program, then its behaviour may differ depending upon that
state. This may make it harder to comprehend, implement, test and debug. As all
of these impacts on the stability and probably reliability of a system, state-based
operations may result in less reliable software being developed. As functions do
not (should not) rely on any given state (only upon the data they are given) they
should as a result be easier to understand, implement, test and debug.
3. Functional programming promotes immutable data. Functional programming
also tends to avoid concepts such as mutable data. Mutable data is data that can
change its state. By contrast immutability indicates that once created, data cannot
be changed. In Scala Strings are immutable. Once you create a new string you
cannot modify it. Any functions that apply to a string that would conceptually
alter the contents of the string, result in a new String being generated. Scala takes
this further by having a presumption of immutability that means that by default
all data holding types are immutable. This ensures that functions cannot have
hidden side effects and thus simplifies programming in general.
4. Functional programming promotes declarative programming (and is in fact a
subtype of declarative programming), which means that programming is ori-
ented around expressions that describe the solution rather than focus on the
imperative approach of most procedural programming languages. These lan-
guages emphasise aspects of how the solution is derived. For example, an
imperative approach to looping through some container and printing out each
result in turn would look like this:
int sizeOfContainer ¼container:length
for int I ¼1to sizeOfContainerðÞdo
element ¼container:get iðÞ
print elementðÞ
enddo
whereas a functional programming approach would look like:
container:foreachðprintÞ
36 5 Functional Programming
Functional programming has its roots in the lambda calculus, originally devel-
oped in the 1930s to explore computability. Many functional programming lan-
guages can thus be considered as elaborations on this lambda calculus. There have
been numerous pure punctional programming languages including Common Lisp,
Clojure and Haskell. Scala allows you to write in a purely functional programming
style or to combine functions with objects. Care needs to be taken when doing this
that the principles of functional programming, and thus the advantages of functional
programming, are not undermined. However, when used judiciously functional
programming can be a huge benefit for, and an enhancement to, the purely
Object-Oriented world.
To summarise then:
Imperative Programming is what is currently perceived as traditional pro-
gramming. That is, it is the style of programming used in languages such as C, C++,
Java and C#. In these languages a programmer tells the computer what to do, e.g.
x=y+z. It is thus oriented around control statements, looping constructs and
assignments.
Functional Programming aims to describe the solution, that is, what the pro-
gram needs to be doing (rather than how it should be done).
5.3 Advantages to Functional Programming
There are a number of significant advantages to functional programming compared
to imperative programming. These include:
1. Less code. Typically a functional programming solution will require less code
to write than an equivalent imperative solution. As there is less code to write,
there is also less code to understand and to maintain. It is therefore possible that
functional programmes are not only more elegant to read but easier to update
and maintain. This can also lead to enhanced programmer productivity as they
spend less time writing reams of code as well as less time reading those reams of
code.
2. Lack of (hidden) side effects (Referential Transparency). Programming
without side effects is good as it makes it easier to reason about functions (that is
a function is completely described by the data that goes in and the results that
come back). This also means that it is safe to reuse these functions in different
situations (as they do not do unexpected things). It should also be easier to
develop, test and maintain such functions.
3. Recursion is a natural control structure. Functional languages tend to
emphasis recursion as a way of processing structures that would use some form
of looping constructs in an imperative language.
Although you can often implement recursion in imperative languages it is often
easier to do in functional languages. It is also worth noting that recursion is a very
5.2 What Is Functional Programming? 37
expressive and a great way for a programmer to write a solution to a problem;
however it is not as efficient at run time as looping. However, any expression that
can be written as a recursive routine can also be written using looping constructs.
Functional programming languages often incorporate tail end recursive optimiza-
tions to convert recursive routines into iterative ones at runtime. Essentially, if the
last thing a routine does before it returns is to call another routine, rather than
actually invoking the routine and having to set up the context for that routine, it
should be possible to reuse the current context and to treat it in an iterative manner
as a loop around that routine. This means that both the programmer benefits of an
expressive recursive construct and the runtime benefits of an iterative solution can
be achieved using the same source code. This option is typically not available in
imperative languages.
•Good for prototyping solutions. Solutions can be created very quickly for
algorithmic or behaviour problems in a functional language. Thus allowing
ideas and concepts to be explored in a rapid application development style.
•Modular functionality. Functional programming is modular in terms of func-
tionality (where Object-Oriented languages are modular in the dimension of
components). They are thus well suited to situations where it is natural to want
to reuse or componentise the behaviour of a system.
•The avoidance of state-based behaviour. As functions only rely on their
inputs and outputs (and avoid accessing any other stored state) they exhibit a
cleaner and simpler style of programming. This avoidance of state based
behaviour makes many difficult or challenging areas of programming simpler
(such as those used in concurrency applications).
•Additional control structures. A strong emphasis on additional control
structures such as pattern matching, managing variable scope, tail recursion
optimizations.
•Concurrency and immutable data. As functional programming systems
advocate immutable data structures it is simpler to construct concurrent systems.
This is because the data being exchanged and accessed is immutable. Therefore
multiple executing thread or processes cannot affect each other adversely. The
Akka Actor model builds on this approach to provide a very clean model for
multiple interacting concurrent systems.
•Partial evaluation. Since functions do not have side effects, it also becomes
practical to bind one or more parameters to a function at compile time and to
reuse these functions with bound values as new functions that take fewer
parameters.
38 5 Functional Programming
5.4 Disadvantages of Functional Programming
If functional programming has all the advantages previously described, why isn’tit
the mainstream force that imperative programming languages are? The reality is
that functional programming is not without its disadvantages, including:
•Input–output is harder in a purely functional language. Input–output flows
naturally align with stream style processing, which does not neatly fit into the
data in, results out, nature of functional systems.
•Interactive applications are harder to develop. Interactive application is con-
structed via request response cycles initiated by a user action. Again these do not
naturally sit within the purely functional paradigm.
•Continuously running programs such as services or controllers may be more
difficult to develop, as they are naturally based upon the idea of a continuous
loop.
•Functional programming languages have tended to be less efficient on current
hardware platforms. This is partly because current hardware platforms are not
designed with functional programming in mind and also because many of the
systems previously available were focussed on the academic community where
out and out performance was not the primary focus. However, this has changed
to a large extent with Scala and the functional language Heskell.
•Not data oriented. A pure functional language does not really align with the
needs of the primarily data-oriented nature of many of today’s systems. Many
(most) commercial systems are oriented around the need to retrieve data from a
database, manipulate it in some way and store that data back into a database.
Such data can be naturally represented via objects in an Object Oriented
language.
•Programmers are less familiar with functional programming concepts and thus
find it harder to pick up function-oriented languages.
•Functional programming idioms are often less intuitive to (traditional) pro-
grammers than imperative idioms (such as lazy evaluations) which can make
debugging and maintenance harder.
•Many functional programming languages have been viewed as Ivory tower
languages that are only used by academics. This has been true of some older
functional languages but is increasingly changing with the advent of languages
such as Scala.
5.4 Disadvantages of Functional Programming 39
5.5 Scala and Functional Programming
Scala overcomes many of the disadvantages of functional programming by pro-
viding a hybrid environment in which you can use the Object-Oriented features of
the language to represent concepts, data-rich elements, etc. and use functions to
express behaviour oriented aspects of a program. It thus provides a best of both
worlds approach to your choice of programming language constructs.
40 5 Functional Programming

Chapter 6
Scala Background
6.1 Introduction
Ifirst encountered the Scala language in 2010. I was working on a graduate training
programme for an international banking organisation when I was asked to give an
hour talk to the graduates on Scala. At that point, I had heard the name mentioned
but had no idea what it was. I therefore did some reading, installed the IDE being
used and tried out some examples—and was hooked.
Since then I have trained a wide range of people in Scala, used it to develop large
commercial systems and written a book on Scala and Design Patterns. I am still
hooked on it and find myself discovering new aspects to the language and the
environment on almost every Scala project I am involved with.
6.2 The Class Person
The following classes define a simple class Person that has a first name and a last
name and an age (these examples were first considered in the introduction).
APerson is constructed by providing the first and last names, and their age and
setters and getters are provided for each.
Here is the Java class:
class Person {
private String firstName;
private String lastName;
private int age;
public Person(String firstName,
String lastName,
int age) {
©Springer International Publishing AG 2018
J. Hunt, A Beginner’s Guide to Scala, Object Orientation and Functional
Programming, https://doi.org/10.1007/978-3-319-75771-1_6
41
this.firstName = firstName;
this.lastName = lastName;
this.age = age;
}
public void setFirstName(String firstName){
this.firstName = firstName;
}
public void String getFirstName() {
return this.firstName;
}
public void setLastName(String lastName) {
this.lastName = lastName;
}
public void String getLastName() {
return this.lastName;
}
public void setAge(int age) {
this.age = age;
}
public void int getAge() {
return this.age;
}
}
And here is the equivalent Scala class:
class Person(
var firstName: String,
var lastName: String,
var age: Int)
Certainly the Java class is longer than the Scala class, but look at the Java class
“How many times have you written something like that?”Most of this Java class is
boilerplate code. In fact, it is so common that tools such as Eclipse allow us to create
the boilerplate code automatically which may mean that we do not have to type much
more in the Java case than the Scala case. However, when I look back and have to
read this code I may have to wade through a lot of such boilerplate code in order to
find the actual functionality of interest. In the Scala case this boilerplate code is
handled by the language meaning that I can focus on what the class actually does.
Actually the Object-Oriented side of Scala is both more sophisticated than that in
either Java or C# and also different in nature. For example, many people have found
the distinction between the static side of a class and the instance side of a class
confusing. Scala does away with this distinction by not including the static concept.
42 6 Scala Background
Instead it allows the user to define singleton objects, if these singleton objects have
the same name as a class and are in the same source file as the class, then they are
referred to as companion objects. Companion objects then have a special rela-
tionship with the class that allows them to access the internals of a class (private
fields and methods) and can provide the Scala equivalent of static behaviour.
The class hierarchy in Scala is based on single inheritance of classes but allows
multiple traits to be mixed into any given class. A Trait is a structure within the
Scala language that is neither a class nor an interface (note Scala does not have
interfaces even though it compiles to Java Byte Codes). It can however, be com-
bined with classes to create new types of classes and objects. As such a Trait can
contain data, behaviour, functions, type declarations, abstract members, etc. but
cannot be instantiated itself.
The analogy might be that a class is like a flavour of ice cream. You can have
vanilla as the basic flavour with all the characteristics of ice cream; chocolate could
be a subclass of Vanilla which extends the concept to a chocolate flavour of ice
cream. Separately we could have bowls containing chocolate chips, mint chips,
M&Ms, sprinkles of various types. We can combine the vanilla ice cream with the
mint chips to create vanilla mint chip ice cream. This provides a new type of ice
cream but those mint choc chips are not in and of themselves an ice cream. Traits
are like the mint chocolate chips, while classes are like the ice cream.
6.3 Functional Programming
So much for the Object-Oriented view of Scala, what about this functional pro-
gramming concept? For those of you coming from a Java background this may
seem a bit alien; however, functional programming languages have a long history
from LISP developed in the late 1950s to more recent functional languages such as
ML and Haskell.
Working with functions is not that difficult although until you become familiar with
the syntax they may seem unwieldy—but the key is to hang in there and keep trying.
The following provides a simple example of a function literal in Scala that takes
two numbers and adds them together:
val add ¼a:Int;b:IntðÞ¼[aþb
This defines a new function that takes two integers in the parameters a and b and
returns the result of adding a to b. The function can be accessed via the variable
add. This is a variable of type Function. We can invoke this function as the
following:
6.2 The Class Person 43

addð4;5Þ
which should return the value 9. In Scala we can then partially apply this function.
This means that we can bind one of the parameters to a value to create a new
function that only takes one parameter; for example,
val addTwo ¼2;:IntðÞ
This function, addTwo, now adds 2 to whatever integer is passed to it, for
example,
addTwoð5Þ
will return 7.
6.4 A Hybrid Language
If all Scala did was provide the ability to program functionally all that would do is
provide yet another functional programming language. However, it is the fact that
Scala mixes the two paradigms that allow us to create software solutions that are
both concise and expressive.
The Object-Oriented paradigm has been such a success because it can be used to
model concepts and entities within problem domains. When this is combined with
the ability to treat functions as first-class entities we obtain a very powerful
combination.
For example, we can now create classes that will hold data (including other
objects) and define behaviours in terms of methods but which can easily and
naturally be given functions that can be applied to the members of that object.
val numbers = List(1, 2, 3, 4, 5)
println(numbers)
In this case I have created a list of integers (note that this is a list of Integers as
the type has been inferred by Scala) that are stored in the variable numbers.
val filtered = numbers.filter((n: Int) => n < 3)
println(filtered)
I have then applied a function to each of the elements of the list. This function is
an anonymous function that takes an Int (and stores that Int in the variable n). It
then tests to see if the value of nis less than 3. If it is it returns true otherwise it
44 6 Scala Background
returns false. The method filter uses the function passed to it to determine
whether the value passed it should be included in the result or not. This means that
the variable filtered will hold a list of integers where each integer is less than the
value 3. Again note that this is again a List of Ints as once again Scala has
inferred the type.
The output from these statements I shown below:
List(1, 2, 3, 4, 5)
List(1, 2)
6.4 A Hybrid Language 45

Chapter 7
A Little Scala
7.1 Introduction
In the last chapter, you learned a little about the history of Scala and the Scala
development environment. In this chapter, you encounter a little of the Scala lan-
guage, what happens when you compile and run a Scala program, the Scala runtime
(Virtual Machine) and the Scala IDE.
7.2 The Scala Environment
There are a number of things that you need in order to develop using the Scala
language. First of all you need access to the Scala compiler. The compiler is called
scalac, and you may use it from the command line to compile Scala code files
directly or you may use it via an IDE (such as the Scala IDE) that can compile your
code for you automatically. It can also be used via various application build tools
such as the Simple Build Tool (SBT) for Scala.
When you compile Scala source files (ones with a .scala extension) you
create byte code files. These files have a .class extension. They are not exe-
cutable files directly (these are files which have a .exe. or .bin type extension and
can be run natively by the operating system). Instead a byte code file is a com-
pressed version of your Scala code that is run via a Virtual Machine. This Virtual
Machine acts like a computer that executes byte code files but is actually a software
application that can be ported to numerous different operating systems.
Scala can run on the Scala Virtual Machine (which is the Java Virtual Machine,
or JVM allied with the Scala runtime libraries that provide for the various concepts,
functionality and frameworks that Scala uses). This combination of the JVM and
the Scala libraries can be referred to as the Scala runtime and can be used in either
interpreter mode (in which case you can type in Scala code and immediately see the
©Springer International Publishing AG 2018
J. Hunt, A Beginner’s Guide to Scala, Object Orientation and Functional
Programming, https://doi.org/10.1007/978-3-319-75771-1_7
47
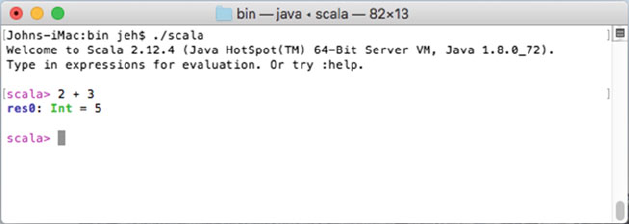
result) or batch mode in which case you can run applications as you would any
other type of environment.
To summarise then, to run the Scala environment you need:
•The Scala compiler
•The Scala Virtual Machine
•The Scala runtime libraries.
If you use the Scala IDE described later in this chapter then you will automat-
ically obtain these. However, you can install Scala without the need for an IDE if
you wish. This can be obtained from the main Scala website.
7.3 The Scala Shell
Scala provides an interactive interpreter or shell that you can use to try out pieces of
Scala code. This interactive shell allows you to type in Scala code and for that Scala
code to be immediately evaluated and the results presented to you. This shell is
often referred to as REPL for ‘R’ead, ‘E’valuate, ‘P’rint ‘L’oop.
To start up the interactive shell all you need to do is to open a command window
(on Windows) or a terminal (on Mac or Unix) and to type in scala (assuming that
the Scala bin directory is on your path or you are in the bin directory). When you
type in scala you will enter the interactive interpreter and can enter Scala expres-
sions and immediately see the result. For example, the expression 2+3is shown
below.
In this example, we asked the interpreter to add 2 and 3 together. The Scala
interpreter evaluated the expression and printed out the result. The result (res0)
indicates that the result is an Int (integer) of the value 5. This is because we entered
an expression that returned a result. We could also have entered an operation that
returned nothing, such as println; this is shown in the next figure.
48 7 A Little Scala
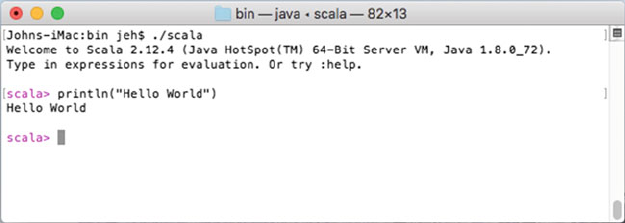
Here you can see that the result is that the string is printed out.
To leave the Scala interpreter shell use CTRL-D or use the command exit.
7.4 The Scala IDE
You will need a Scala environment on your local machine in order to develop,
compile, test and run Scala applications. As Scala is a JVM language this also
means that you must have a Java environment on your machine. In theory, you
could install each of these components yourself and use whatever editor you wished
(including Emacs, or TextEdit). However, the easiest way to get started with Scala
is to install one of the Scala IDEs available free on the Web.
There are several to choose from with the Intellij IDEA and Eclipse-based Scala
IDEs being the most popular.
We will be using the IntelliJ-based Scala IDE in the examples throughout this
book.
The IntelliJ IDE provides full support for Scala (as well as Java). Support for
Scala is built into the IntelliJ IDEA Ultimate version; however, an additional plugin
must be installed to use Scala with the IntelliJ IDEA Community Edition (the free
version).
We will step through installing the IntelliJ IDEA Community Edition and then
add the Scala Plugin to it.
You can download the IntelliJ IDE from:
•https://www.jetbrains.com/idea/download
7.3 The Scala Shell 49
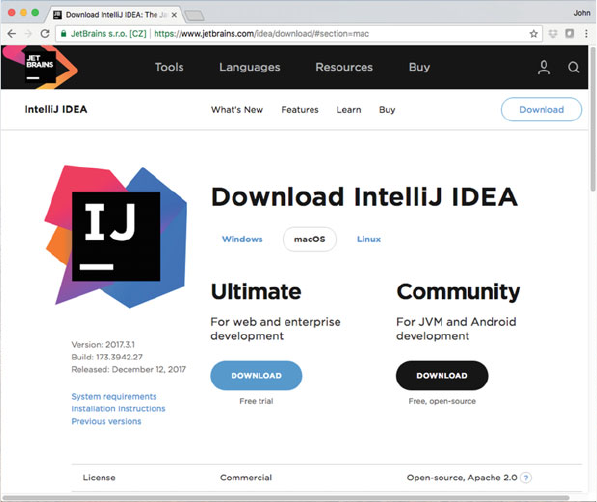
There are versions available for Windows, Linux and Mac systems.
Once you have installed IntelliJ you can install the Scala plugin; see the fol-
lowing link for more information.
https://www.jetbrains.com/help/idea/discover-intellij-idea-for-scala.html
To install the Scala plugin start up your IntelliJ IDE. If this is the first time you
are running IntelliJ then it will prompt you to download featured plugins. At this
point you can select the Scala plugin.
If you have already run IntelliJ then you can use the Plugins page for the instal-
lation. To find this page go to the menu bar and select IntelliJ IDEA->Preferences…
This will display the ‘Preferences’dialog. On the left-hand side, select the option in
which the ‘Plugins’are listed. Select this and the available plugins are listed on the
right-hand side and select ‘Search in repositories’as shown below:
50 7 A Little Scala
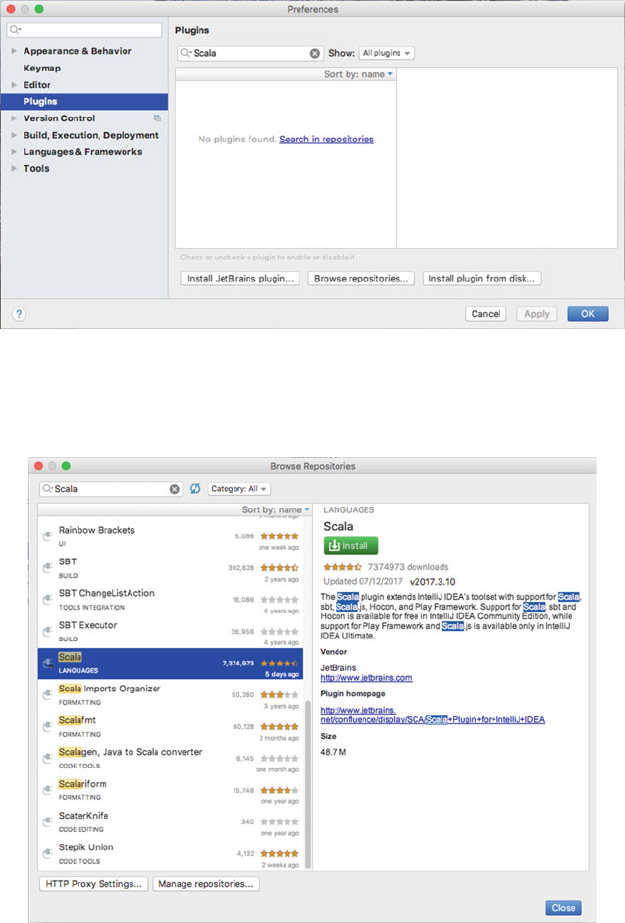
Enter Scala into the search box and find the Scala Plugin in the list displayed, as
shown below:
Now click on the ‘Install’button on the right-hand side. Once the plugin is
downloaded and installed you will need to restart IntelliJ (this is indicated by a
button stating ‘Restart IntelliJ IDEA’).
You are now ready to start working with Scala and IntelliJ.
7.4 The Scala IDE 51
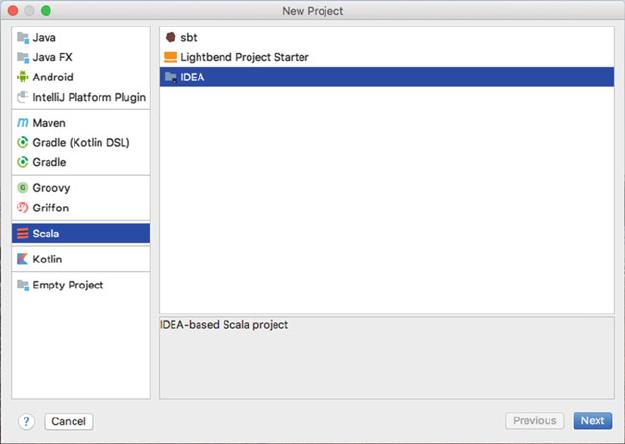
7.4.1 Creating an IntelliJ Project
IntelliJ is oriented around the idea of a project containing one or more modules. The
project is associated with a directory location, and typically modules reside under
that project location.
Personally I create a directory called projects, in which I place a particular
project for a particular task or tool and inside this I have my modules. The project
and the Scala environment to use with the project are specified when you create a
new Project from the File->New->Projects …menu. This causes a dialog wizard to
be displayed that will take you through the steps required to create a new Scala
project as shown in below figure.
If this is the first tie that you have created a Scala project you may also need to
set up the Scala SDK.
On the next screen give your project a name, and select the location of the
project (an appropriate directory).
If on this screen, the Scala SDK field is blank (or does not contain the version of
Scala you wish to use) click on the ‘Create…’. On the resulting dialog, Browse to
the location in which you have installed the Scala SDK and select it.
52 7 A Little Scala
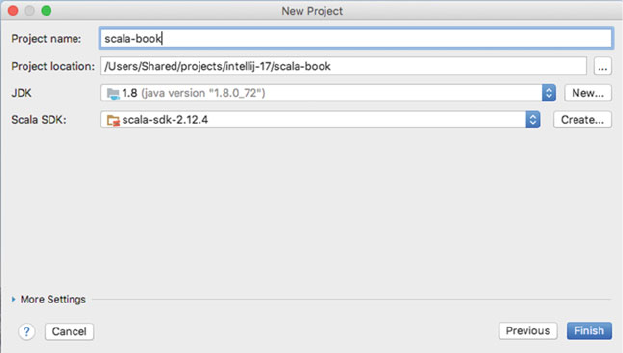
My set-up is shown below:
Now click on ‘Finish’.
7.4.2 Inside IntelliJ
You will now be presented with an empty editor (see Fig. 7.1). This editor is made
up of Windows providing access to the modules and source files you are working
with. The current display shows the Project Window on the left. The currently blank
central area is where your code will be displayed.
7.4.3 Creating a Module
Although it is not strictly necessary to have multiple modules within an IntelliJ
project, it does help to organise your work. We will therefore create an initial
module to hold our first examples.
To do this select File->New->Module…Make sure that the Scala module type is
selected in the left-hand list of the resulting dialog, and click Next.
You will now be presented with the New Module dialog as shown below. Enter
a name for your module, for example ‘HelloWorld’. Assuming that you want the
module to be located under the project directory you can accept the defaults for the
remaining fields.
7.4 The Scala IDE 53
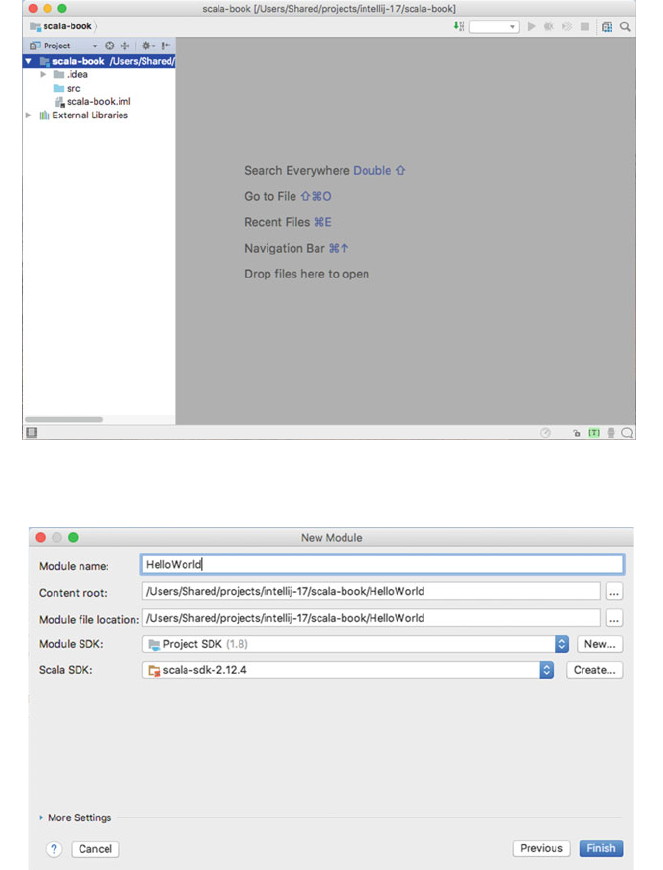
Now click Finish.
You will now see the module listed under your project in the IDE.
We will add a new Scala object to this module. This is done by using the right
mouse menu, from the src node in the Project Window tree (i.e. click on
HelloWorld–>src and bring up the right mouse menu). Select New–>Scala Class as
shown in Fig. 7.2.
Fig. 7.1 IntelliJ IDEA IDE
54 7 A Little Scala
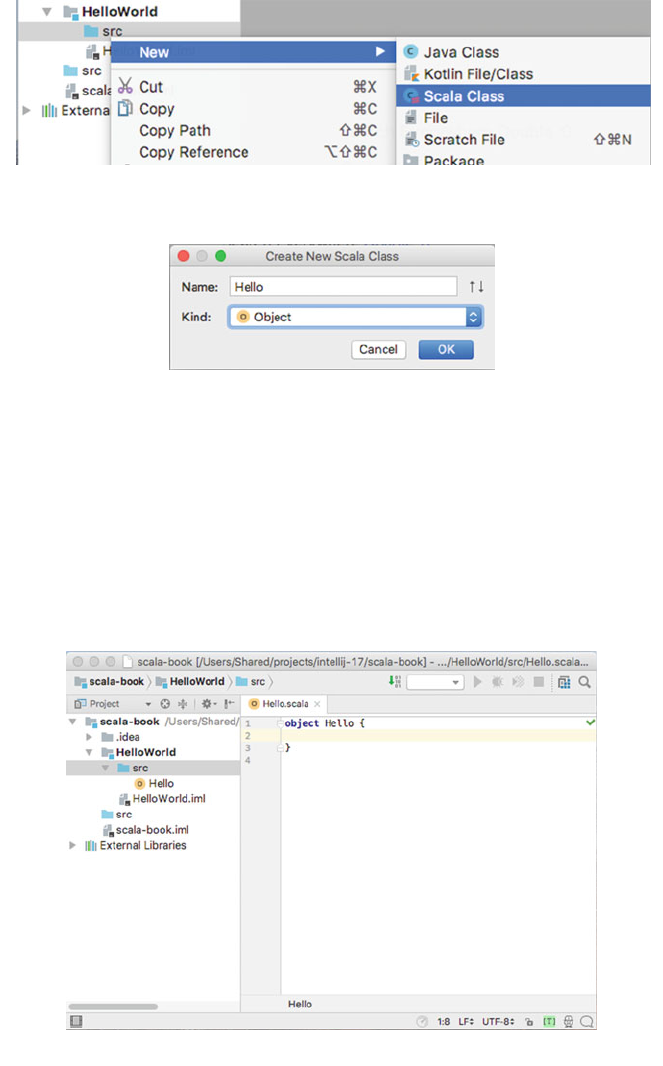
This will display the Create New Scala Class dialog. Enter the name of the Scala
object to be created (e.g. ‘Hello’) and change the ‘Kind’to Object. This is illus-
trated in Fig. 7.3.
And now click ‘OK.
This results in a new file Hello.scala being created under src, and the basic
structure of a Scala object will be displayed in the central code area (see Fig. 7.4).
Fig. 7.2 Selecting the Scala Class Wizard
Fig. 7.3 Scala New Object Wizard
Fig. 7.4 Hello Object in the IDE
7.4 The Scala IDE 55
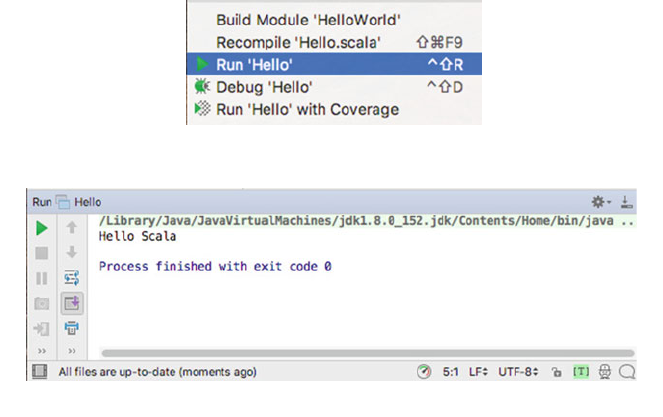
7.5 Implementing the Object
To implement the Hello Object we created above, type in the definition for the main
method as shown below.
object Hello {
def main(args: Array[String]): Unit = {
println("Hello Scala")
}
}
This says that the object Hello defines a ‘main’method. A ‘main’method is the
entry point for this application. The main method takes an array of Strings (that is the
type), and the parameter that this array is placed into is called args (although you can
call the parameter whatever you like). The parameter is placed in parentheses.
Following the parameters is a ‘:’followed by the return type of ‘Unit’. This
indicates that this method does not return a value (Unit indicates no returned value).
This is followed by an ‘=’and the definition of the body of the method (within the
‘{…}’brackets).
In this case all that the body of the method does is to printout the string “Hello
Scala”using the function println, which is automatically made available to all code
by the Scala environment.
7.6 Running the Application
To run the application, select the file Hello.scala in the Project Window. Using the
right mouse menu select the Run menu option followed by the Scala Application
option. This is illustrated in Fig. 7.5.
Fig. 7.5 Menu option to run the application
Fig. 7.6 Output from the Hello application
56 7 A Little Scala
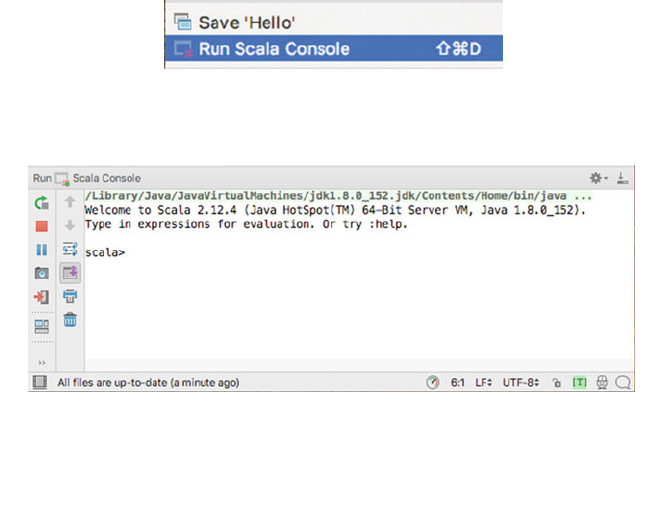
This will look for a main method in the object in Hello.scala and run that
method. This will result in the “Hello Scala”string being printed out in the Console
window (which is the output window for running applications within Eclipse). This
is illustrated in Fig. 7.6.
7.6.1 Scala Interpreter Console
The Scala Interpreter Console is also available within the IntelliJ IDEA. This allows
you to use the Scala interpreter (The REPL) directly from IntelliJ IDEA IDE. It
automatically picks up your project contents and allows you to run Scala code
(including the code you have written in your classes and objects) in the interpreter.
This can be quiet useful for trying things out.
The Scala Console can be run from the right mouse menu for a Scala file. For
example, select the Hello Object in the Project Window, and the from the right
mouse menu, select ‘Run Scala Console’, as shown in Fig. 7.7.
The Scala interpreter is shown in Fig. 7.8. This interpreter is linked to the
helloworld project and shows that you can type in an expression to the Evaluate
box. This expression is evaluated, and the expression and the result are presented in
the main window above the Evaluate box.
Fig. 7.7 Selecting the Scala Interpreter Console
Fig. 7.8 Using the Scala Interpreter Console
7.6 Running the Application 57
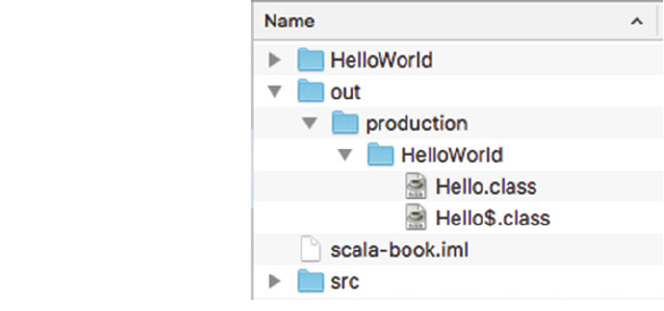
7.7 Scala Classpath
Whatever your platform, you should be aware of the CLASSPATH environment
variable. This variable tells Scala (actually the JVM) where to look for class def-
initions, so it should at least point to the runtime library and the current directory. It
may also point to other directories in which you have defined classes. On Windows,
you may change CLASSPATH in the autoexec.bat file by adding the following
declaration:
SET CLASSPATH= .;c:\Scala\lib\classes.zip
Note that on a Windows machine the Classpath is a ‘;’separated list, whereas on
a Unix machine it is a ‘:’separated list. Thus, for a Unix box you can define the
CLASSPATH as:
setenv CLASSPATH
.:/usr/local/misc/Scala/lib/classes.zip
You should also add the Scala bin directory to your path. You should now be
ready to use the Scala tools.
7.8 Compiling and Executing Scala
It is useful and instructive to actually look at what happens when you compile and
execute a Scala program.
If your code is compiled successfully, the compiler will generate class files
representing your Scala code such as Hello.class and Hello$.class. The files
are located (by default) under the out directory of your project; for example, on a
Mac, the directory listing is as shown in Fig. 7.9.
Fig. 7.9 Multiple .class files
generated for a scala type
58 7 A Little Scala
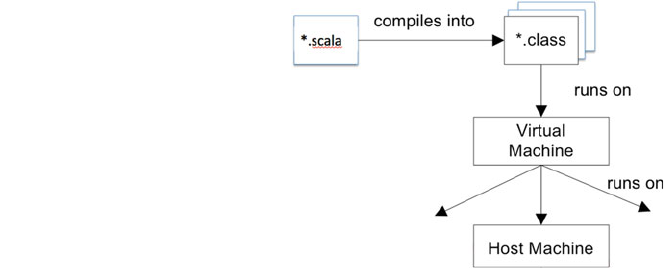
The .class files represent the compiled version of the Scala object Hello.
So what has happened here—we haven’t created any form of executable, rather
we have created a set of class files. The effects of compiling your Scala code are
illustrated in Fig. 7.10.
As can be seen from this figure, the compiler compiles the.scala files into.-
class files. These in turn run on the Virtual Machine (this is what runs when you
type in scala to the command prompt). The Virtual Machine (actually the JVM plus
the Scala libraries) reads the class files and then runs them. This may involve
interpreting the class files, compiling the class files to native code or a combination
of the two depending upon the JVM being used. If we take the original approach the
JVM interprets the class files. Thus the class files run on the JVM.
The JVM can be viewed as a virtual computer (that is one that exists only in
software). Thus, Scala runs on a software computer. This software computer must
then execute on the underlying host machine. This means that in effect the JVM has
two aspects to it: the part that interprets Scala programs and a back end that must be
ported to different platforms as required. This means that although the Scala pro-
grams you write are indeed “write once, run anywhere”the JVMs they run on need
to be ported to each platform on which Scala will execute.
Although your Scala programs do not need to be re-written to run on Unix, NT,
Linux, etc., the JVM does. This means that different JVMs on different platforms
can (and do) have different bugs in them. It is therefore essential to test your Scala
programs on all platforms that they are to be used on. In reality Scala is actually
“write once, run anywhere, test everywhere”that you will use your Scala programs.
Note that there are multiple languages that can be compiled to JVM byte codes
(and Scala is just one example, others include Ada, C#, Python), but that the byte
code language was originally designed for Scala and thus must directly support the
Scala language. As Scala was not the original source language for byte codes there
must be a mapping from the concepts in Scala to these byte codes. Thus one Scala
concept may generate one, two or three different implementations at the byte code
level. In this case our hello world object results in two-byte code elements being
Fig. 7.10 Relationship
between the scala source files
and the Virtual Machine
environment
7.8 Compiling and Executing Scala 59
created called Hello.class and Hello$.class. For the most part you can
ignore these details; they will typically become relevant only if you need to inte-
grate Java into a Scala application (or Scala code into a Java application).
7.9 Memory Management
7.9.1 Why Have Automatic Memory Management?
Any discussion of Scala needs to consider how Scala handles memory. One of the
many advantages of languages such as Java, C# and Scala over languages such as C
++ is that they automatically manage memory allocation and reuse.
It is not uncommon to hear C++ programmers complaining about spending
many hours attempting to track down a particularly awkward bug only to find it was
a problem associated with memory allocation or pointer manipulation. Similarly, a
regular problem for C++ developers is that of memory creep, which occurs when
memory is allocated but is not freed up. The application either uses all available
memory or runs out of space and produces a runtime error.
Most of the problems associated with memory allocation in languages such as C
++ occur because programmers must concentrate not only on the (often complex)
application logic but also on memory management. They must ensure that they
allocate only the memory that is required and de-allocate it when it is no longer
required. This may sound simple, but it is no mean feat in a large complex
application.
An interesting question to ask is “why do programmers have to manage memory
allocation?”. There are few programmers today who would expect to have to
manage the registers being used by their programs, although 20 or 30 years ago the
situation was very different. One answer to the memory management question,
often cited by those who like to manage their own memory, is that “it is more
efficient, you have more control, it is faster and leads to more compact code”.Of
course, if you wish to take these comments to their extreme, then we should all be
programming in assembler. This would enable us all to produce faster, more effi-
cient and more compact code than that produced by Pascal or C++.
The point about high-level languages, however, is that they are more productive,
introduce fewer errors, are more expressive and are efficient enough (given modern
computers and compiler technology). The memory management issue is somewhat
similar. If the system automatically handles the allocation and de-allocation of
memory, then the programmer can concentrate on the application logic. This makes
the programmer more productive, removes problems due to poor memory man-
agement and, when implemented efficiently, can still provide acceptable
performance.
60 7 A Little Scala
7.9.2 Memory Management in Scala
Scala provides automatic memory management. Essentially, it allocates a portion of
memory as and when required. When memory is short, it looks for areas that are no
longer referenced. These areas of memory are then freed up (de-allocated) so that
they can be reallocated. This process is often referred to as “garbage collection”.
The Virtual Machine (the JVM) uses an approach known as mark and sweep to
identify objects that can be freed up. The garbage collection process searches from
any root objects, i.e. objects from which the main method has been run, marking all
the objects it finds. It then examines all the objects currently held in memory and
deletes those objects that are not marked.
A second process invoked with garbage collection is memory compaction. This
involves moving all the allocated memory blocks together so that free memory is
contiguous rather than fragmented.
7.9.3 When Is Garbage Collection Performed?
Thegarbage collection process runs in its own thread. That is, it runs at the same
time as other processes within the JVM. It is initiated when the ratio of free memory
versus total memory passes a certain point.
You can also explicitly indicate to the JVM that you wish the garbage collector
to run. This can be useful if you are about to start a process that requires a large
amount of memory and you think that there may be unneeded objects in the system.
You can do this using the sys object:
sys.runtime.gc()
However, calling sys.runtime.gc is only an indication to the compiler that
you would like garbage collection to happen. There is no guarantee that it will run.
7.9.4 Checking the Available Memory
You can find out the current state of your system (with regard to memory) using the
Runtime environment object. This object allows you to obtain information about
the current free memory, total memory, etc.:
7.9 Memory Management 61
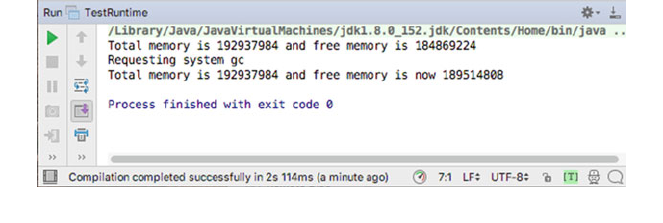
package com.jjh.scala.memory
object TestRuntime {
def main(args: Array[String]): Unit = {
val runtime = sys.runtime
val freeMemory = runtime.freeMemory()
val totalMemory = runtime.totalMemory()
println("Total memory is " + totalMemory +
" and free memory is " + freeMemory)
println("Requesting system gc")
sys.runtime.gc()
val newFreeMemory = runtime.freeMemory()
println("Total memory is " + totalMemory +
" and free memory is now " + newFreeMemory)
}
}
The result of running this application is shown in Fig. 7.11.
References
Scala
To download Scala (without the use of an IDE see www.scala-lang.org/downloads)
The Scala programming language home page
see http://www.scala-lang.org
The Scala mailing list
see http://listes.epfl.ch/cgi-bin/doc_en?liste=scala
The Scala wiki
see http://scala.sygneca.com/
Scala and.Net
http://www.scala-lang.org/old/node/10299
Fig. 7.11 Output from memory application
62 7 A Little Scala
Maven: Build tool for Scala and Scala
http://maven.apache.org/
https://code.google.com/p/esmi/wiki/ScalaMavenSupport
Ant: Build tool for Scala and Scala
http://ant.apache.org/
http://www.scala-lang.org/old/node/98
SBT (Simple Build Tool): Build tool for Scala and Scala
http://www.scala-sbt.org
Scala IDE for Eclipse
http://scala-ide.org/
Plugin for Existing Eclipse
If you already have an Eclipse installation and wish to add Scala to that then see the
Scala plugin for Eclipse
see http://www.scala-lang.org/downloads/eclipse/index.html
Scala IDE IntelliJ
http://www.jetbrains.com/idea/features/scala.html
Scala IDE for NetBeans
http://sourceforge.net/projects/erlybird/files/nb-scala/
Further Reading
The Scala Language Specification 2.12
See http://scala-lang.org/files/archive/spec/2.12
The busy Scala developer’s guide to Scala: Of traits and behaviours Using Scala’s
version of Java interfaces
see http://www.ibm.com/developerworks/Scala/library/j-scala04298.html
Scala for Java Programmers
http://docs.scala-lang.org/tutorials/scala-for-java-programmers.html
7.9 Memory Management 63

Chapter 8
Scala Building Blocks
8.1 Introduction
This chapter presents an introduction to the Scala programming language. As such,
it is not intended to be a comprehensive guide. It introduces the basic elements of
the Scala language, including Apps, discusses the concept of classes and instances
and how they are defined, presents methods and method definitions and considers
constructors and their role.
8.2 Apps and Applications
In the previous chapter we wrote a simple object that possessed a main method.
This main method was the starting point or entry point for an application. That is,
unless we are writing software that will be controlled by something else, such as a
Web application server or a code library, every application needs a starting point.
This is provided by the main method. In the last chapter this main method was
defined in the object Hello as shown below:
object Hello {
def main(args: Array[String]): Unit = {
println("Hello Scala")
}
}
This method is called main, takes one parameter (the data passed into it) and this
parameter must be of type Array of Strings. This means that a sequence of strings
can be made available to the program. It returns Unit (which indicates that it does
not return anything at all). Any return values must be managed via an explicit call to
a special object called sys (e.g. sys.exit(0)). This is because in a long-running
©Springer International Publishing AG 2018
J. Hunt, A Beginner’s Guide to Scala, Object Orientation and Functional
Programming, https://doi.org/10.1007/978-3-319-75771-1_8
65
application the value to be returned may not be available in the original main
method.
However, you cannot change the definition of the main method—it must be as
shown, i.e.
def main(args: Array[String]): Unit = {…}
This is because the underlying JVM expects there to be a main method with this
signature available.
However, from Scala’s point of view this is boilerplate code—that is it is always
the same and in general in Scala where something can be inferred by Scala let Scala
do that and we can simplify our code. In this case you must remember to provide a
parameter to the method main even if you never expect to pass any data into your
program! You must also remember (or learn) the syntax for array in Scala—which
we will not be looking at for a while. Actually, the name of the parameter (args in
this case) is not fixed but by convention is called args.
To simplify this issue Scala provides a way of avoiding the need to write the
main method. If the object that will be used as the entry point to your application
extends a trait called App then any code not placed into any named function or
method (main is an example of a named method) will be assumed to be part of the
main method. We could therefore rewrite the Hello object from above as:
class Hello extends App {
println("Hello World")
}
This is clearly simpler to write and remember than having to include the def
main …element.
It should be noted that if you search Scala applications on the Web you may well
find a reference to a trait called Application. This plays a similar role to App
but was replaced by App in Scala 2.9 (App is more efficient as it is implemented in
a different way to Application).
It should also be noted that if you include the App trait (using the keyword
extends) you cannot also write the main method—you can choose one or other
approach but not both.
You may be wondering at this point about the term trait that has been used to
describe both App and Application—for the moment just treat this as some
functionality that can be incorporated into or mixed into an object (or indeed a
class). We will return to traits again later in the book.
66 8 Scala Building Blocks
8.3 The Basics of the Language
All Scala programmers make extensive use of the existing Scala libraries even when
they write relatively trivial code. For example, the following version of the “Hello
World”program reuses existing classes rather than just using the language (for the
moment do not worry too much about the syntax of the definition or use of key-
words such as extends—this just allows us to mix in the App trait):
object HelloJohn extends App {
val myName ="John Hunt"
if (myName.endsWith("Hunt")) {
println("Hello " +myName)
}else {
println("Hello World")
}
}
In this example, I have reused the String class to represent the string “John
Hunt”and to find a substring in it using the message endsWith(). Some of you
may say that there is nothing unusual in this and that many languages have string
handling extensions. However, in this case, it is the String contained within
myName which decides how to handle the endsWith message and thus whether it
contains the substring “Hunt”. That is, the data itself handles the processing of the
string! What is printed to standard output (i.e. the Console) thus depends on which
object receives the message. These features illustrate the extent to which existing
classes are reused: you cannot help but reuse existing code in Scala, and you do so
by the very act of programming.
As well as possessing objects and classes, Scala also possesses an inheritance
mechanism. This feature separates Scala (and languages such as Java and C#) from
object-based languages, such as Ada, which does not possess inheritance. For
example, in the simple program above, I reuse the class Any (the root of all classes
in Scala) and the class HelloJohn automatically inherits all the features of Any.
Inheritance is very important in Scala. It promotes the reuse of classes and
enables the explicit representation of abstract concepts that can then be turned into
concrete concepts.
8.3.1 Some Terminology
We now recap some of the terminology introduced so far in this book, explaining it
with reference to Scala.
In Scala programs, actions or operations are performed by passing messages to
and from instances. An instance (the sender of the message) uses a message to
request that some behaviour (referred to in Scala as a method or indeed a function)
8.3 The Basics of the Language 67
be performed by another instance (the receiver of the message). Just as procedure
calls can contain parameters, so can messages.
Scala is a strongly typed language; however, the typing relates to the class of an
object (or the trait a class mixes in—we will return to this later) rather than its
specific type. Thus, by saying that a method can take a parameter of a particular
type, you actually mean that any instance of that class (or one of its subclasses) can
be passed into that method.
8.3.2 The Message Passing Mechanism
The Scala message passing mechanism is somewhat like a procedure call in a
non-Object-Oriented language:
•The point of control moves to the receiver; the object sending a message is
suspended until it receives a response.
•The receiver of a message is not determined when the code is created (at compile
time); it is identified when the message is sent (at runtime).
This dynamic (or late) binding mechanism is the feature that gives Scala its
polymorphic capabilities (see Chap. 1for a discussion of polymorphism).
8.3.3 The Statement Terminator
In Scala, although a semicolon can be used as a statement terminator, the majority
of statements do not need an explicit statement termination (as this can be inferred
by the compiler) and thus for the majority of your code a semicolon is not required
at the end of a statement. Therefore, the following are equivalent:
println("Hello");
println("World");
And
p
rintln("Hello")
p
rintln("World")
Generally, in Scala, the latter style is preferred.
68 8 Scala Building Blocks

Chapter 9
Scala Classes
9.1 Introduction
This chapter considers the constructs in Scala used to define classes.
9.2 Classes
A class is one of the basic building blocks of Scala. Classes act as templates which
are used to construct instances. Classes allow programmers to specify the structure
of an instance (i.e. its instance variables or fields) and the behaviour of an instance
(i.e. its methods and functions) separately from the instance itself. This is important,
as it would be extremely time-consuming (as well as inefficient) for programmers to
define each instance individually. Instead, they define classes and create instances
of those classes.
9.2.1 Class Definitions
In Scala, a class definition has the following format:
class nameOfClass extends SuperClass / Trait {
scope properties;
scope methods
scope functions
}
©Springer International Publishing AG 2018
J. Hunt, A Beginner’s Guide to Scala, Object Orientation and Functional
Programming, https://doi.org/10.1007/978-3-319-75771-1_9
69
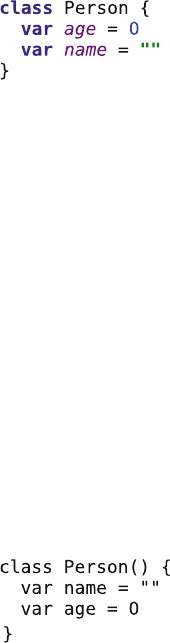
Although you should note that you can mix the order of the definition of
properties, functions and methods as required within a single class.
You need not remember this format precisely, as the meaning of the various
parts of the class definition is explained later in the book. Indeed, the above is far
from complete, but it illustrates the basic features. The following code is an
example of a class definition:
This code defines a class called Person. This class possesses two properties (or
instance variables) called name and age. It has no functions nor methods defined.
Notice that the age instance variable contains a value of type Int (this is a basic
data type), while the instance variable name possesses an instance of the class
String. Here Scala is inferring the type of the properties based on the initial
assignments made to the age and name—they are statically typed but that type is
determined by the compiler at compile time (not at runtime). Both variables are
initialised: age to Zero and name to the empty string “”.
Classes are not just used as templates. They have three further responsibilities:
holding methods, providing facilities for inheritance and creating instances.
9.2.2 Developing a Class Definition
Let us return to the class Person and explore the definition of this class a bit
further. A slightly different version of the definition for this class is presented again
below:
What does this class actually say? It defines a number of things:
It states that both name and age are read/write properties. This can be determined
by the fact that they are vars and not vals.Avar is a property (or local variable) that
can be written to multiple times. A val is a property (or local variable) that can only
be set once. In both cases they can be read as many times as required. Thus, in this
case both name and age can be read and reset as required by the application. If we
had made name a val, then it would only be possible to write to it once, after a value
has been set it cannot be reset.
This definition also defines what is known as a Zero parameter constructor.
These are the ‘()’after the name of the class. Every class in Scala will have at least
70 9 Scala Classes

one constructor. A constructor is actually used to initialise values within the object
created from the class. In this case that constructor does not take any parameters and
merely provides a default placeholder. In Scala such definitions are typically
optional and this is the case here.
In either case when we create a new instance of the Person class, we cannot
provide the appropriate name and age until later. Thus a test program for this class
might look like:
In this case line 2 causes a new instance of the class Person to be created. Note
that it is the keyword new that is being used here to create a new instance of the
class and the ‘()’which are used to indicate the constructor to execute when that
new instance is created. The result of this creation is that the address of this new
object is stored in the variable p1 which is a variable that can hold references to
(i.e. the address of) an instance of type Person. This could have been written in
longhand form as:
val p1: Person = new Person()
Here we explicitly specify the type of the variable p1. In the earlier example (in
PersonTest1) Scala inferred the type of p1 for us.
Line 3 then accesses the current values of name and age for the instance ref-
erenced by p1 and prints them to the console (standard output) of your IDE. It uses
string interpolation to embed the current value of the name and age fields into a
string. The interpolation is indicated by the ‘s’preceding the string itself. Scala will
then look inside the string for values preceded by a ‘$’such as $p1 or for expression
surrounded by a ${..} such as ${p1.age}. It will then evaluate the variable or
expression and inline the result into the string being processed.
In lines 4 and 5 we actually assign the values and we want to name and age
properties of p1. After line 8 p1 now represents John who is 49. Line 9 the reprints
this data out.
We can see the effect of running this program on the Console in the IDE, for
example,
9.2 Classes 71
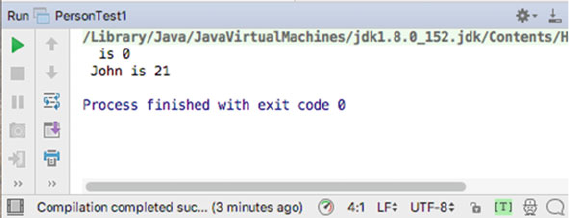
As can be seen from this, the effect of the first print out is that the empty string
and Zero are first printed—which seems a little confusing. The second print out
then shows ‘John’and 21, which appears to make more sense.
9.2.3 Classes and Messages
When a message is sent to an instance of a class, it is not the instance which
possesses the method but the class. This is for efficiency reasons: if each object
possessed a copy of all the methods defined for the class, then there would be a
great deal of duplication. Instead, only the class possesses the method definitions.
Thus, when an object receives a message, it searches its class for a method with the
name in the message. If its own class does not possess a method with the appro-
priate name, it goes to the superclass and searches again. This search process
continues up the class hierarchy until either an appropriate method is found or the
class hierarchy terminates (with the class Any). If the hierarchy terminates, an error
is raised.
If an appropriate method is found, then it executes within the context of the
object, although the definition of the method resides in the class. Thus, different
objects can execute the same method at the same time without conflict.
Do not confuse methods with the data held by a property. Each instance pos-
sesses its own copy of the data (as each instance possesses its own state). Following
Figure illustrates this idea more clearly.
9.2.4 Instances and Instance Variables
In Scala, an instance is an example of a class. All instances of a class share the
same responses to messages (methods or functions), but they contain different data
(i.e. they possess a different “state”). For example, the instances of class Point all
72 9 Scala Classes
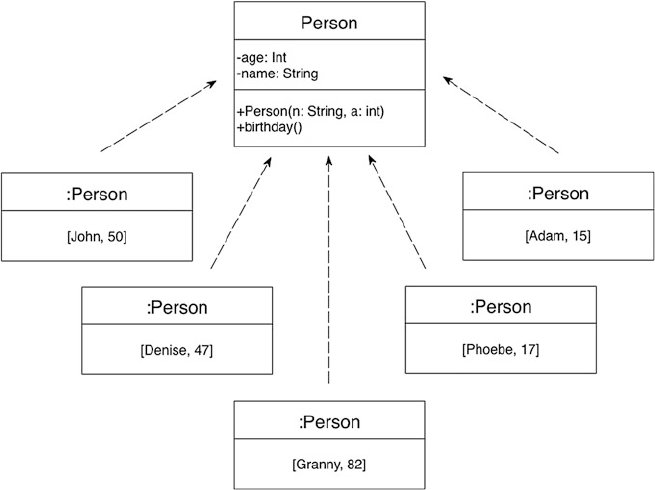
respond in the same way to messages inquiring about the value of the x-coordinate,
but they may provide different values.
The class definition consists of variable declarations and method definitions. The
state of each instance is maintained in one or more instance variables/properties
(also known as fields).
The above figure contains five instances of the class Person. Each instance
contains copies of the instance variable definitions for name and age, thus
enabling them to have their own values for these instance variables. In contrast,
each instance references the single definition for the method birthday, which is
held by the class.
9.2.5 Classes and Inheritance
It is through classes that an object inherits facilities from other types of object. That
is, a subclass inherits properties from its superclass. For example, the Person
definition above is a subclass of AnyRef which in turn is a subclass of Any.
Therefore, Person inherits all the methods and instance variables that were
defined in AnyRef and Any (except those that were overwritten in Person).
9.2 Classes 73
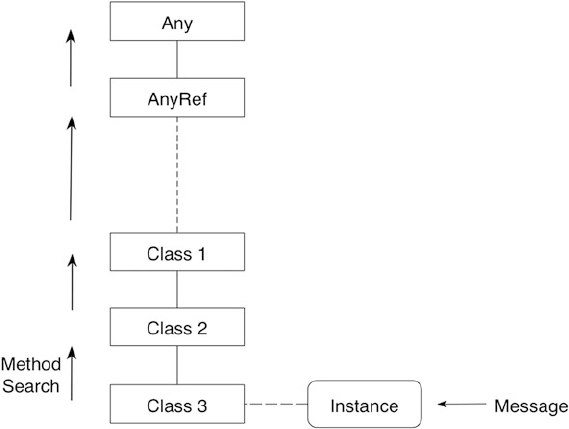
Subclasses are used to refine the behaviour and data structures of a superclass. It
should be noted that Scala supports single inheritance (as does Java and C#) while
some Object-Oriented languages (most notably C++) support multiple inheritance.
Multiple inheritance is where a subclass can inherit from more than one
superclass. However, difficulties can arise when attempting to determine where
methods are executed. Scala introduces the concept of traits to overcome one of the
most significant problems with single inheritance. However, the discussion of Scala
traits comes later in this book.
9.2.5.1 An Example of Inheritance
To illustrate how single inheritance works, consider the following Figure. There are
several classes: Class1 is a subclass of AnyRef,Class2 is a subclass of
Class1 and Class3 is a subclass of Class2. Note that AnyRef is a direct
subclass of Any. In Scala Any is the root of all types.
When an instance of Class3 is created, it contains all the instance variables
defined in Classes 1–3 and class AnyRef. If any instance variable has the same
name as an instance variable in a higher class, then the Class3 instance uses the
instance variable definition from the nearest class. That is, Class3 definitions take
priority over Class2, and Class2 definitions take priority over Class1.
We can send an instance of Class3 a message requesting that a particular
method is executed. Remember that methods are held by classes and not by
74 9 Scala Classes
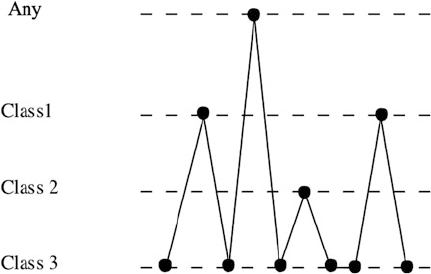
instances. This means that the system first finds the class of the instance (in this case
Class3) and searches it for the required method. If the method is found, then the
search stops and the method is executed. However, if the method is not found, then
the system searches the superclass for Class3, in this case Class2. This process
is repeated until the method is found. Eventually, the search through the super
classes may reach the class Any (which is the root class in the Scala system). If the
required method is not found here, then the search process terminates and the
doesNotUnderstand: method in the class Any is executed instead. This
method raises an exception stating that the message sent to the original instance is
not understood.
This search process is repeated every time a message is sent to the instance of
Class3. Thus, if the method that matches the original message sends a message to
itself (i.e. the instance of Class3), then the search for that method starts again in
Class3 (even if it was found in Class1).
9.2.5.2 The Yo-Yo Problem
The process described above can pose a problem for a programmer trying to follow
the execution of the system by tracing methods and method execution. This
problem is known as the Yo-Yo problem (see the figure below) because, every time
you encounter a message that is sent to “this”(the current object), you must start
searching from your own class. This may result in jumping up and down the class
hierarchy.
The problem occurs because you know that the execution search starts in the
current instance’s class, even if the method which sends the message is defined in a
superclass of the current class. In the above Figure, the programmer starts the search
in Class3 but finds the method definition in Class1; however, this method sends
9.2 Classes 75
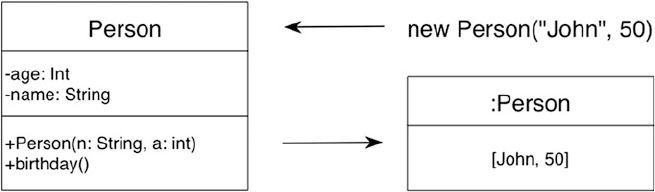
a message to “this”which means that the programmer must restart the search in
Class3. This time, the method definition is found in the class Any, etc. Even with
the browsing tools provided, this can still be a tedious and confusing process
(particularly for those new to Scala).
9.2.6 Instance Creation
A class creates an instance in response to a request, which is handled by a con-
structor. The request is represented by the keyword new followed by the name of
class. The constructor to be invoked once the class is created is indicated by the
parameters that follow the name of the class in parentheses (with the empty
parameter list often being referred to as the no parameter constructor).
A programmer requests a new instance of a Scala class using the following
construct:
new ClassName()
Any parameters which need to be passed into the constructor can be placed
between the parentheses. They are then passed onto an appropriate constructor.
Constructors are special as every class has a primary constructor and can optionally
have one or more auxiliary constructors (which must eventually invoke the primary
constructor). As previously mentioned, constructors are used to initialise a new
instance of the class in an appropriate manner (you do not need to know the details
of the process).
The whole of this process is referred to as instantiation. An example of
instantiating the class Person is presented below:
new Person("John", 50)
The class Person receives the message new which causes the Scala to generate
a new instance of the class, with its own copy of the instance variables age and
name (see the following Figure). The name property of the instance is “John”and
the age property is set to 50.
76 9 Scala Classes
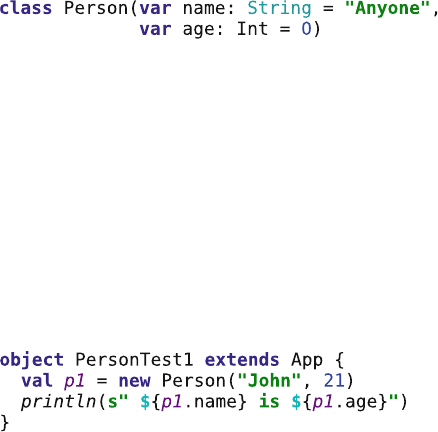
9.2.7 Constructors
A constructor is not a method, but a special operation that is executed when a new
instance of a class is created. Depending on the arguments passed to the class when
the instance is generated, a different constructor can be called. For example, a class
may need to have three fields initialised when it is instantiated. However, the
programmer may allow the user of the class to provide one, two or three values.
They can do this by defining auxiliary constructors that take one or two in addition
to the primary three parameter constructors.
The syntax for a constructor is:
class classname(.. primary constructor parameters ..) {
auxiliary constructors (…parameters …){
…statements …
}
}
By default every class has a single primary constructor. It is up to the pro-
grammer to decide if this is a no parameter constructor or one that takes a set of
parameters. It is defined following the class name in the class definition. An
example of a primary constructor for the class Person is shown below:
The above is complete as a class definition. It defines a class Person with a
primary constructor that takes two parameters and defines no additional methods
(beyond the defaults provided). As such no braces are needed unless you want to
add any code, fields or methods to the body of the class.
The primary constructor defines two properties for name and age and also
provides default values for these properties. Note that both properties are vars, and
therefore both readers and writers are generated for them by Scala.
The main advantage of this version of the class Person over those defined
earlier is that the name and age can be provided at the same time as the class is
instantiated, rather than having to create the instance and then set the name and age
separately. Thus we can now write:
9.2 Classes 77
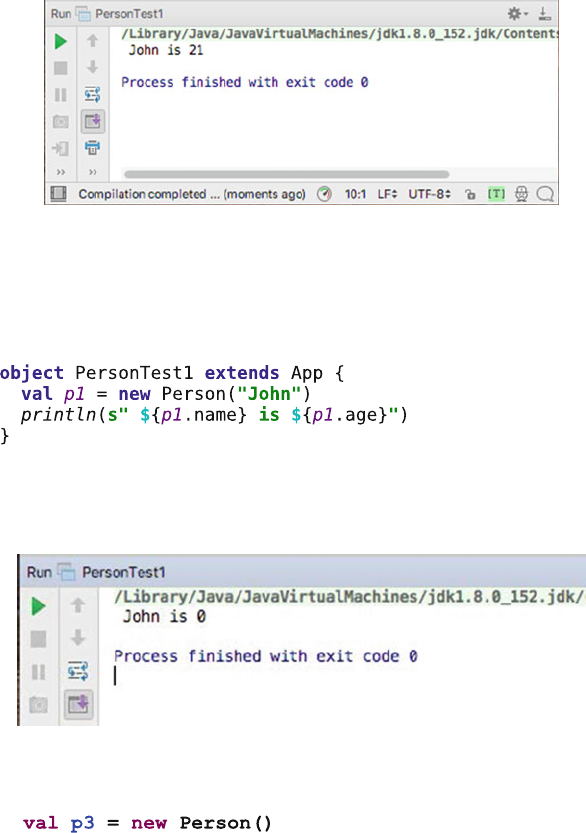
Now a Person type object can be created with a name and an age which
seems more meaningful and understandable. The output generated from this
application is illustrated below:
Rather than having a null string and 0 printed out we have “John”and 21 right
from the start.
However, because we have provided default values for both the name and the
age, they are in fact optional. If we omit the age and only provide the name as in:
Then the result is that we set the age to Zero, and thus if we run this example, we
would find that the output is:
Similarly, we can omit the name and the age:
Which would result in the name being set to the string “Anyone”and the age to 0.
78 9 Scala Classes

Note that we cannot omit the name and just provide the age as Scala would try
and bind an integer (e.g. 18) to the name field which is invalid. However, as we are
not passing in any parameters we can omit the brackets, e.g.:
9.2.8 Auxiliary Constructors
Every class in Scala has a primary constructor; however, optionally any class in
Scala can also have one or more auxiliary constructors.
If we wanted to allow a Person to be instantiated with just an age, then one way
to do it would be to define an auxiliary constructor. An auxiliary constructor must
be called this and must call another constructor. It can either call the primary
constructor or another auxiliary constructor defined within the same class (you can
have any number of auxiliary constructors) as their first action. They cannot simply
call the superclass’s constructor explicitly or implicitly as they can in Java. This
ensures that the primary constructor is the sole point of entry to the class.
The following example defines an auxiliary constructor for the Person class that
takes an integer to use for a Person’s age without the need to define the person’s
name:
Note that the only thing this auxiliary constructor does is to call the primary
constructor providing a default name for all unnamed person. This is a very
common idiom for auxiliary constructors to use.
We can now use this constructor to construct a new instance of the Person class
using only an age (but who will be default be called Bob):
9.2 Classes 79
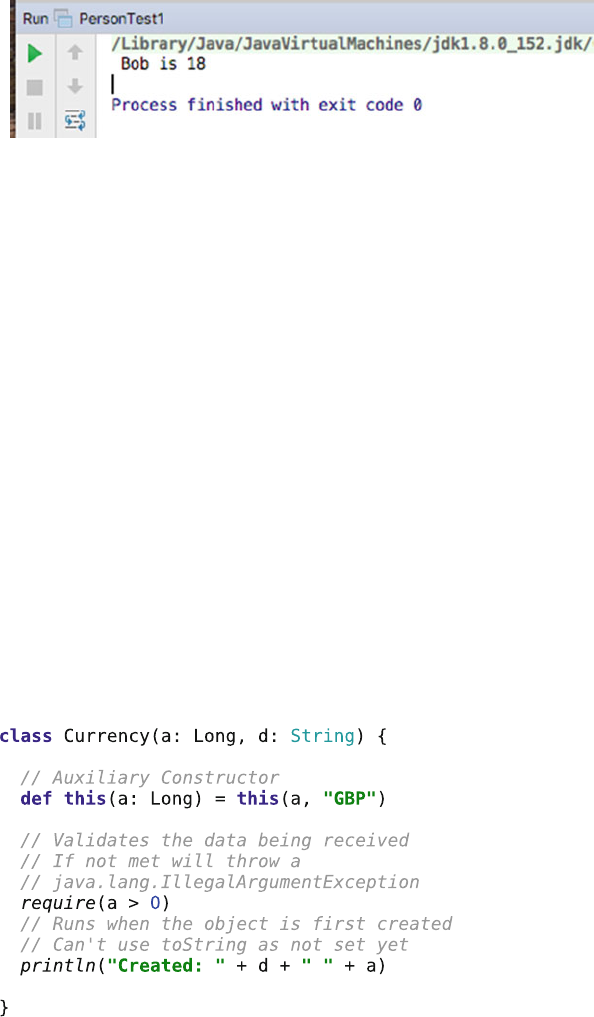
The result of executing this program is:
As you can see the name has been set to Bob (by the auxiliary constructor) and
the age to 18.
To summarise auxiliary constructors:
•Any class can have any number of additional, auxiliary constructors
•The first statement within an auxiliary constructor must be a call to another
auxiliary constructor, or to the primary constructor
•Thus, every object creation eventually ends up at the primary constructor
9.2.9 Class Initialisation Behaviour
It may seem somewhat strange, but you can place free-standing code anywhere
within the body of the class. Here free-standing code means executable statements
that are not part of a method, function or constructor but are defined within the
scope of the class as a whole. Such free-standing code is executed after a new
instance has been created, and after any values have been assigned to any properties
defined within the primary constructor. Such code can be treated as part of the
initialisation process and may be treated as the way in which you can define your
own initialisation behaviour. Free-standing code is typically used for validation
checks, additional processing and auditing functions, for example,
80 9 Scala Classes
In the above example, we have a class Currency, which possesses:
•A primary constructor with two parameters.
•An auxiliary constructor with one parameter and which defaults the type of the
currency to “GBP”.
•A validation statement that checks that the parameter ‘a’is greater than Zero. If
it is not then an illegal argument exception is thrown (a type of error).
•A logging (println) statement that indicates what has been created.
•The require statement and the println statements are free-standing statements
and are therefore part of the initialisation routine of the class.
An important point to note is that the initialisation behaviour (the free-standing
code) runs before the code in the auxiliary constructor. This is because it is asso-
ciated with the instantiation of the class and allows behaviour to be defined for the
primary construction process. The auxiliary constructor can then override this if it
needs to. This is achieved by requiring the auxiliary constructor to always call
another constructor (e.g. the primary constructor) as the first thing that it does.
9.2.10 Review of Classes and Constructors
The syntax of a class is
class ClassName(constructor parameters) {body}
The ClassName should begin with a capital letter and be in Camel Case to follow
Scala conventions. The constructor is indicated by the parenthesis ‘()’following the
class name, and there must always be a constructor defined (no hidden constructors
as in Java) even though it may take no parameters. Within the constructor there can
be specific meanings for the parameters:
•Avar parameter will cause a field, getter and setter to be included.
•Setter and getter methods can be redefined inside the method.
•Aval parameter will create a field and a getter, but no setter.
•A parameter with neither val nor var does not create a field or any methods, but
it can be used within the body of the class—it is a local field to the class.
•However, note that if a case class is used, then parameters to the primary
constructor default to val (see below).
When a new instance of a class is defined, the fields are created, the methods are
defined and any “loose”code (not within a def) is executed.
To make some of the terminology clearer here are some definitions:
•Class acts as a template for defining the structure and behaviour of a type of
thing.
•Instance is an example of a class that maintains its own state (copy of the data
held within it).
9.2 Classes 81
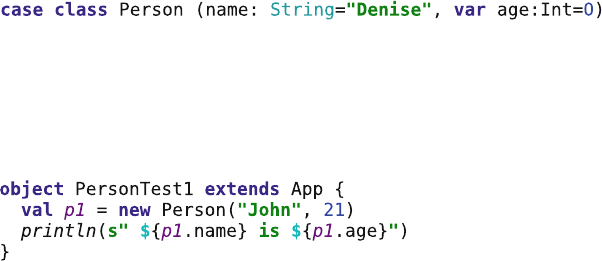
•Instance variables are defined in the class, but a copy is maintained in each
instance, which has its own value.
•Instance methods are defined in the class, with a single copy maintained in the
class, but they are executed within the context of an object.
•Constructors are used to initialise properties once the instance has been con-
structed in memory, but before any other code has access to the instance.
•Auxiliary constructors can be used to extend the functionality of the base
constructor but must either directly or indirectly invoke the base constructor.
9.3 Case Classes
There is another construct that can be used when defining a class, this is a case
class. A case class is defined in the same way as a normal class, with an additional
keyword placed in front of the class keyword. This keyword is case. For example,
The effect of this is that a number of additional features are provided for your
class. The first obvious difference is that it appears that you no longer have to use
the keyword new to create a new instance of a class; instead you can apparently just
use the name of the class, for example,
Actually a factory facility has been created that is named after the class and hides
the use of the new keyword (although logically it is still new that is being used to
construct the instance). A factory is a recurring software pattern that is used to
produce instances of things (in the same way that a physical car factory produces
cars).
Actually, the use of the case keyword provides a number of enhancements to
the basic class definition including:
1. A default factory creation facility—no need to use new.
2. All arguments to the constructor are val by default, no need to state that they
are vals (although you can override with a var).
3. Default implementation of toString method. This method is used to convert
the object into a printable string format. The normal default provides the name
of the class from which the instance was created and an indication of where it
resides in memory.
82 9 Scala Classes
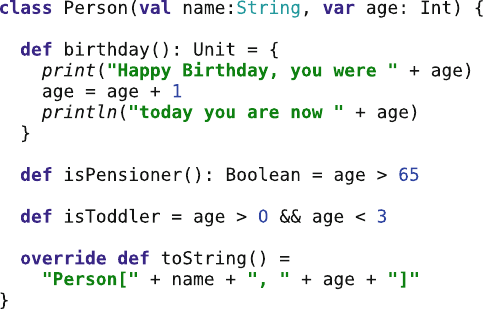
4. Default value-based implementation of the equals method (used by ==). That
is, equality is based on the values held in the parameters to the primary
constructor.
5. Default copy method to create a copy of an object.
6. Default implementation of the hashcode method. This is an unique code used
to represent an unique instance in memory and which is suitable for use in a
hash map data structure (which relies on a key to value mapping).
The use of a case class also allows some additional comparison tests, which we
will look at when we consider pattern matching in Scala.
Case classes can be used to represent data-oriented classes (although Value Types
are a better option). They are also very useful when writing more function-oriented
code as they avoid a lot of extra syntaxes.
Note that in older versions of Scala (pre-Scala 2–11) the number of parameters to
a case class constructor was restricted to 22. Since Scala 2–11, this limitation has
been removed; although if you find yourself with such large numbers of parameters,
then consideration should probably be given to your design.
9.3.1 A Sample Class
Let us bring together the concepts that we have looked at so far in another version
of the class Person. A new version of the class Person is shown below:
This class exhibits several features we have seen already and expands a few
others:
9.3 Case Classes 83
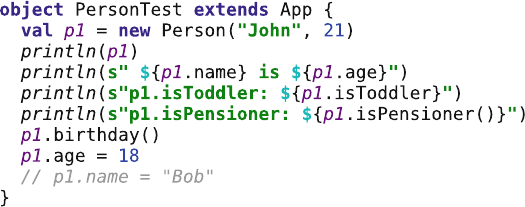
•The class has two parameter constructors that take a String and an Int.
•It defines two properties a read-only name and a read/write age (i.e. a val and a
var) as part of the constructor definition.
•It redefines the toString method so that the details of the person object can
be used in the string representation of an instance of the class.
•It defines three methods birthday,isPensioner and isToddler.
•The method isTodder does not include ‘()’and thus can only be invoked
without brackets.
•The method birthday() returns Unit (i.e. it does not return a value) and is
comprised of three statements, two print statements and an assignment, and the
method body must therefore be placed in curly brackets {…}.
•isPensioner and isToddler represent shorthand forms written in a single
line.
•isPensioner returns a Boolean value (i.e. one that returns true or false).
•Scala infers the value returned by isToddler which will also be a boolean.
It also illustrates a few other ideas:
•The test ‘>’is a Boolean operator which returns a true of false value depending
upon the left- and right-hand values
•The && represents another Boolean operation, this time the ‘and’operation that
will return true if and only if both the right-hand expression (age > 0) and the
left-hand expression (age < 3) are true.
These Boolean operators will be explored in more detail later in the book.
An example application using this class is given below:
This application creates an instance of the Person class using the values “John”
and 21. It then prints out p1 using println (which will automatically call the
toString() method on the instances passed to it). It then accesses the values of
name and age properties and prints these. Following this it calls the isToddler
and isPensioner methods and prints the results returned. It then calls birthday.
Finally it assigns a new value to the age property (this is allowed as it is a var).
However it is not possible to reassign a value to the name field as it is defined as a
val. The output from this application is given below:
84 9 Scala Classes
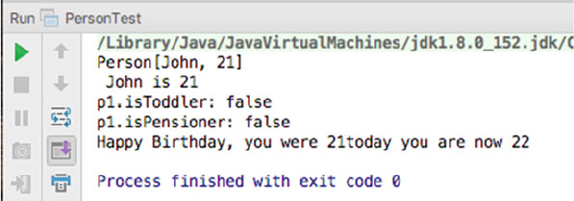
9.3 Case Classes 85

Chapter 10
Scala Methods
10.1 Introduction
This chapter presents how methods and associated behaviour is defined in Scala.
10.2 Method Definitions
Methods provide a way of defining the behaviour of an object, i.e. what the object
does. For example, a method may change the state of the object or it may retrieve
some information. A method is the equivalent of a procedure in most other lan-
guages. A method can only be defined within the scope of an object. It has a
specific structure:
access-control-modifier
def methodName(args: argTypes): returnType = {
/* comments */
local variable definitions
statements
}
The access control modifier is one of the keywords that indicate the visibility of
the method. The returnType is the type of the object returned; for example,
String, or Int. methodName represents the name of the method and args rep-
resents the types and names of the arguments. These arguments are accessible
within the method:
©Springer International Publishing AG 2018
J. Hunt, A Beginner’s Guide to Scala, Object Orientation and Functional
Programming, https://doi.org/10.1007/978-3-319-75771-1_10
87
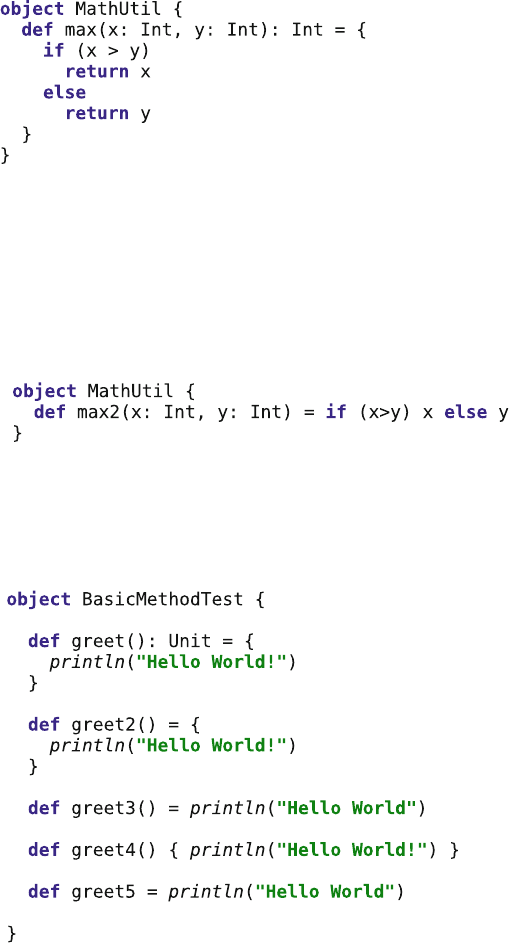
The above definition defines a method ‘max’as part of an object MathUtil. The
method takes two parameters both of type Int, one accessible via the parameter x
and the other via the parameter y. The return type of the method is explicitly
specified to be Int. Both of the methods contain an ‘if’conditional statement which
will return x if x is greater than y, otherwise it will return y.
Scala is quiet flexible in the way that methods are defined. The above could also
be rewritten as:
Both max and max2 do exactly the same thing and seen by Scala as exactly the
same (as Scala infers much of what has been omitted).
In the following example class the different variations on defining the method
greet are all valid.
The methods are discussed below:
88 10 Scala Methods
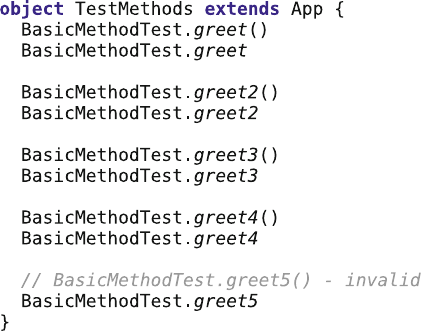
•The greet() method. This is a longhand definition of a method. It has a set of
parentheses indicating that no parameters are required. It explicitly states that
Unit (nothing) is the return type. And the body of the method follows the ‘=’
symbol surrounded by curly brackets.
•The greet2() method. This version defaults the return type to be Unit; this is
the default if nothing is stated as the return type of println is also Unit.
•The greet3() method. This method defaults the return type and does not
include {} as it is a single line definition.
•The greet4() method. This includes brackets around the statements, but
defaults the return type and does not include the ‘=’—this is known as proce-
dural style.
•The greet5 method does not even include the () as they are not needed.
Invoking methods greet to greet4 can be invoked with or without ‘()’.
However, it should be noted that greet5 can only be involved without parame-
ters, for example,
10.2.1 Method Parameters
Methods can take parameters. Parameters are values or instances that are passed
into a functional unit such as a method. If the parameters are reference types (i.e.
instances) then a copy of the reference is passed in. However, as the reference is
essentially the address of the underlying object in memory, this means that a
parameter refers to the same instance as any values that hold that reference exter-
nally to the method.
In Scala a method can take Zero or more parameters. The main method that you
have seen several times in the last chapter takes a single parameter of type Array
[String]. That is, it holds a reference to an array of strings. This is shown in the
following example.
10.2 Method Definitions 89
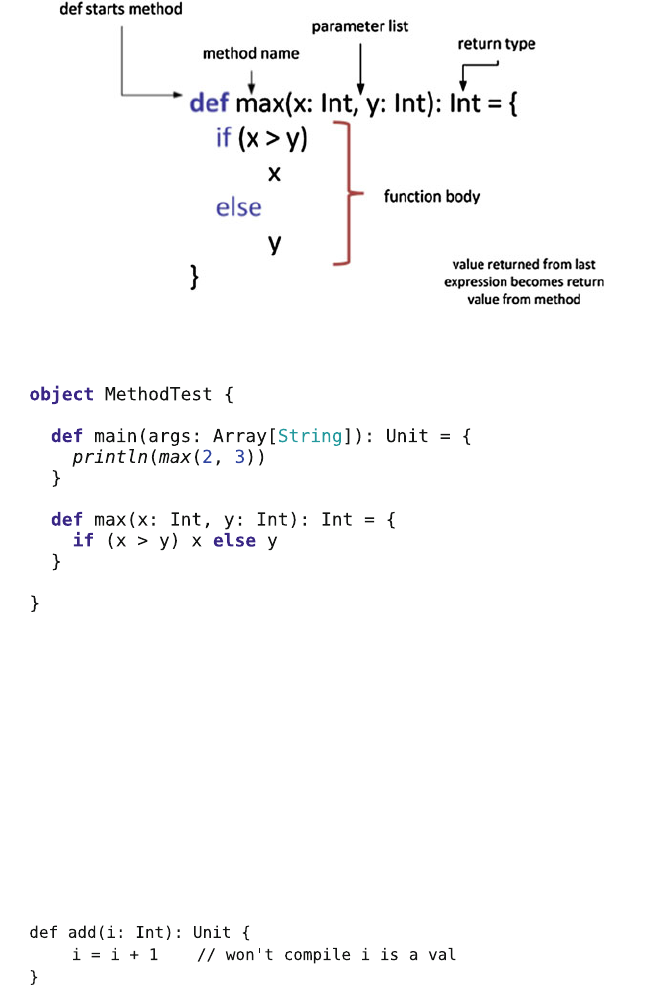
In this example, as well as the main method, a second method has also been
defined within the MethodTest object. This method is called max and takes two
parameters. That is, there are two parameters in the parameter list for the method, in
this case x and y. The anatomy of the method is explored in more detail in
Fig. 10.1.
The keyword def started the declaration. Here the method name is max, it has
two parameters in its parameter list (of type Int) called x and y, and it returns an Int.
Within the {..} is the method body which in this case considers x relative to y and
returns (by default) either x or y.
Within the method all parameters are vals; that is it is not possible to assign a
new value to a parameter to the method. That is, you cannot reassign a value to x or
y in the above example. Thus it is not possible to write:
Fig. 10.1 Elements of a method
90 10 Scala Methods
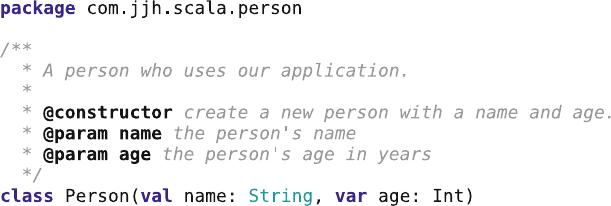
10.2.2 Comments
The /* comments */ section describes the operation performed by the method and
any other useful information. Comments cannot be nested in Scala, which can be
awkward if you wish to comment out some code for later. For example, consider
the following piece of code:
/*
val x = 12 * 4
/* Now calculate y */
val y = x * 23
*/
The Scala compiler reads this as a comment, followed by the code y=x*23;
followed by the end of another comment. This causes an error. However, Scala has
two other types of comment. You can instruct the Scala compiler to ignore
everything until the end of the line, using the // indicator:
val x = 12 * 4
// Now calculate y
val y = x * 23
The final type of comment, the documentation comment, starts with /** and ends
with */. Note the two asterisks at the beginning of this statement. They are picked
up and processed by the documentation utility (scaladoc), which generates HTML
pages that can be viewed in a Web browser. They can contain wiki markup and
other control directives. These directives are defined as @<directive>, for example,
@constructor—used to provide documentation for the constructor
@param—used to provide documentation for a parameter
@return—used to provide documentation on a return type.
An example of such Scaladoc comments is shown below:
In IntelliJ it is possible to run the Scaladoc command from within the tool. On
the main menu bar, see the ‘Tools->Generate Scaladoc’option:
10.2 Method Definitions 91
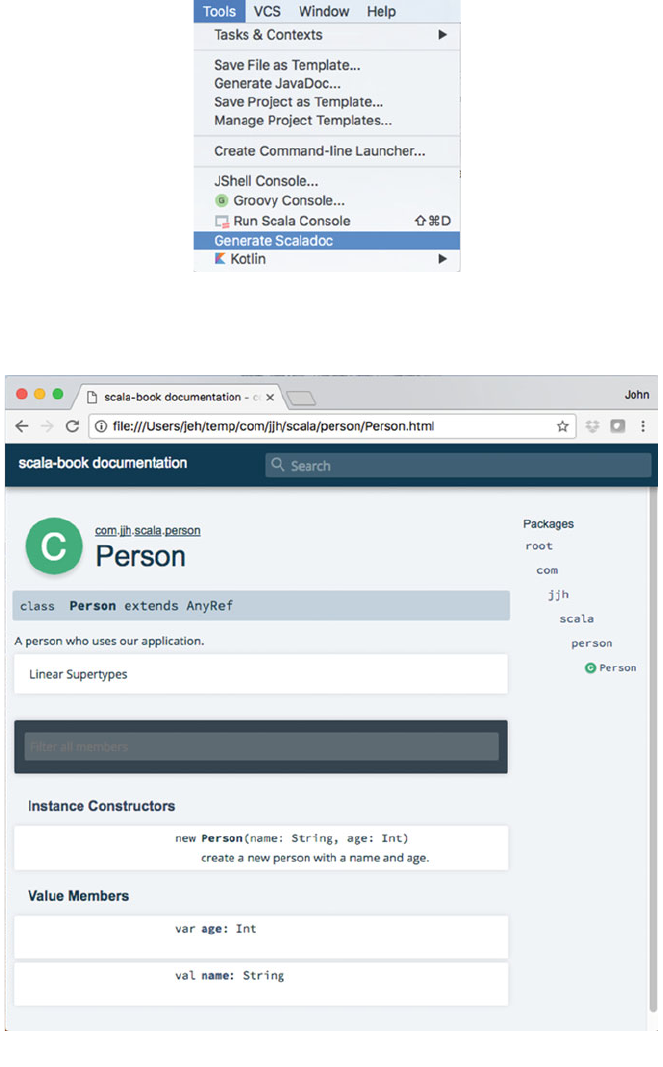
This will present you with a dialog allowing you to control what you want to
apply the scaladoc command to.
Fig. 10.2 Scaladoc-generated reference material for the Person class
92 10 Scala Methods
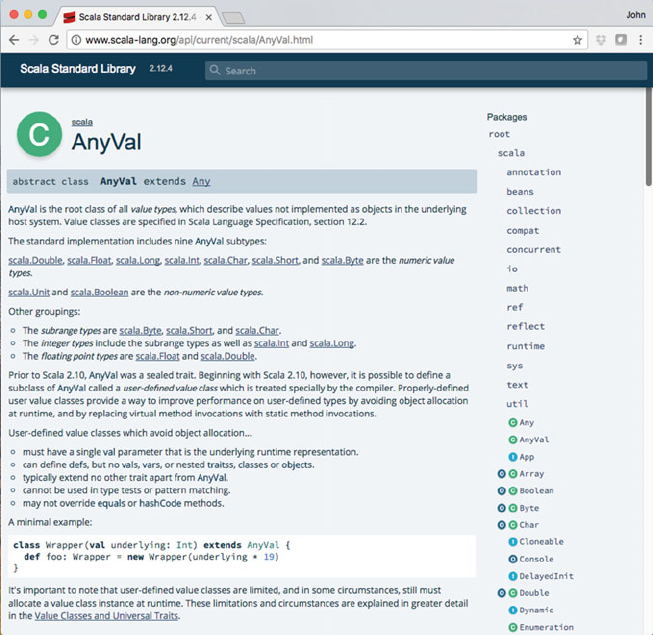
The result of running the scaladoc tool against this class is shown in Fig. 10.2.
In fact the whole of the reference material available for Scala has been produced
using Scaladoc. A more complex example of which is shown below. This presents
the scaladoc for the Scala class AnyRef.
This Scaladoc is available online at
•http://www.scala-lang.org/api/current
10.2.3 The Local Variables Section
In the local variable definition section, you define variables which are local to the
method. These variables are typed and can appear anywhere in the method
10.2 Method Definitions 93
definition. They are only available within the method definition itself and have no
meaning elsewhere and are not visible elsewhere.
birthday()
val newAge = 0;
…
The variables may be vals or vars depending on whether you want to allow
reassignment to them or not. However, it is worth noting that by convention in
Scala, vals are preferred and may IDEs will mark vars in red as a warning that they
should not be used.
10.2.4 The Statements Section
The statements section represents any legal set of Scala statements that implement
the behaviour of the method.
10.2.5 The Return Operator
Once a method has executed, an answer can be returned to the sender of the
message. The value returned (whether an object, a basic type or an instance of a
subclass) must match the return type specified (or inferred by Scala) in the method
definition. The return expression in Scala is the last expression executed in a
method, although it need not be the last expression in the method.
The Scala keyword to return a value is return (just as in Java); however, it is
optional as the result of the last expression will automatically be returned if the
method returns something other than Unit; thus, the following are equivalent:
if (x == y)
return x;
else
return y;
Or
if (x == y)
x;
else
y;
94 10 Scala Methods
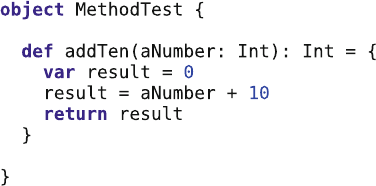
In both these cases, the value of x or y is returned, depending upon whether x
and y are equal or not.
10.2.6 An Example Method
Let us examine a simple method definition in Scala. We wish to define a procedure
to take in a number, add 10 to it and return the result.
Although the format may be slightly different from code that you have been used
to, it is relatively straightforward. If you have C or C++ experience you might think
that it is exactly the same as what you have seen before. Be careful with that idea—
things are not always what they seem!
Let us look at some of the constituent parts of the method definition. The method
name is addTen. In this case, the method has one parameter, called aNumber,of
the basic type Int. Just, and as in any other language, the parameter variable is
limited to the scope of this method (and is a val). The method also defines a
temporary variable, result, also of the basic type Int and limited to the scope of
this method (and this is a var).
Variable names are identifiers that contain only letters and numbers and must
start with a letter (the underscore, _, and the dollar sign, $, count as letters). Some
examples are:
anObject MyCar totalNumber $total
A capitalisation convention is used consistently throughout Java and most Scala
programmers adhere to this standard:
•Private variables and methods (i.e. instance or temporary variables and almost
all methods) start with a lower case letter.
•Shared constants are all in upper case.
•Class always start with an upper case letter.
Another convention is that if a variable or method name combines two or more
words, then you should capitalise the first letter of each word, from the second word
10.2 Method Definitions 95
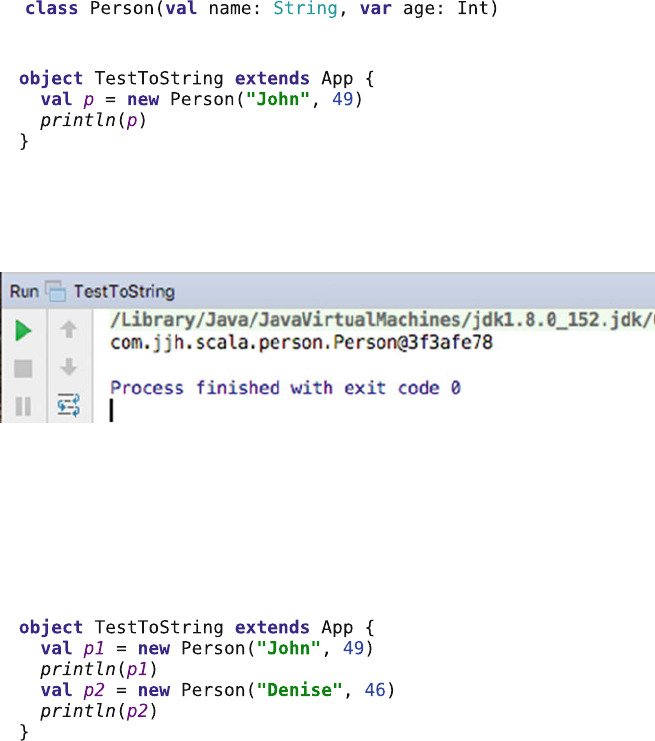
onwards, e.g. displayTotalPay,returnStudentName. This is referred to
as modified Camel Case.
10.2.7 Overriding toString
One of the facilities that is available for all types is the ability to convert itself to a
string. This is particularly useful when printing an instance out (i.e. to help with
debugging scenarios). The println functionality we have been using is written in
such a way that if it is given an instance to print, it will ask that instance to convert
itself to a string and then print that string. It does this by calling a method called
toString on the instance. Given the following class, we can therefore print the string
representation of instances to the console:
This can be shown by the following test harness application:
The result of running this program is shown in the console of the Eclipse IDE.
However, the output might not be what you expect. The following diagram presents
an example of the default output generated by toString.
As you can see from this example, the default behaviour for an object is to
convert itself into a string version based on the fully qualified class name (i.e. com.
jjh.scala.person.Person), followed by an ‘@’sign, followed by the hashcode for the
object (the hexadecimal number following the ‘@’). The hashcode should be
unique and allows us to distinguish between one instance of a class and another, for
example,
96 10 Scala Methods
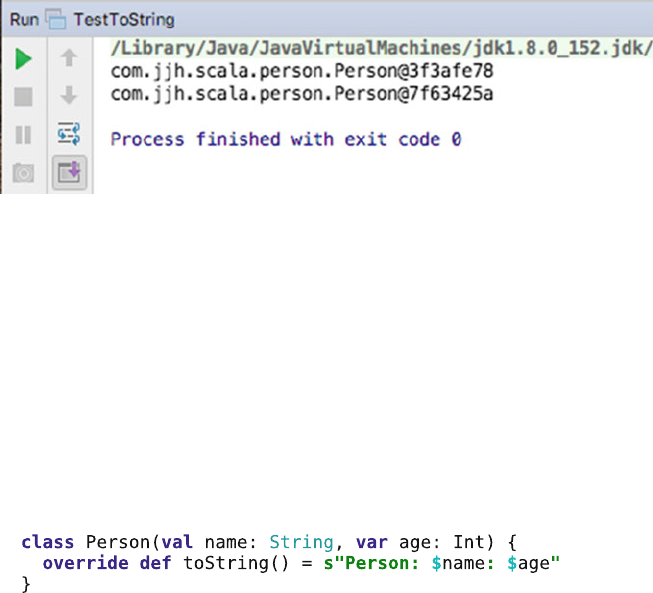
The result of executing this application is shown in the next figure.
As you can see, the hexadecimal numbers following the ‘@’are different.
However, this is not very useful when need to distinguish between the instance
representing John and the instance representing Denise.
The problem is that the default toString behaviour is defined at a more abstract
level than the class Person. That is, the default behaviour does not know about the
name and age properties. We can overcome this problem by redefining the way in
which instances of the class Person convert themselves to a String. We do this by
redefining the toString method mentioned earlier.
For example, in the following listing, we have redefined the toString to return a
string constructed from the string “Person”, followed by the instances current
values for name and age:
Be very careful how you define this method. It must be called toString (with a
capital ‘S’). Scala is very case sensitive, and the method tostring and the method
toString are two completely different methods. As we are redefining the default
behaviour for toString, we must make sure the spelling and capitalisation are the
same. Also note that we must use the keyword override before the def keyword to
indicate we are expecting to be redefining the default method (it is called override
as it is actually via inheritance that we obtain the default implementation of
toString, but we will return to this in the chapter that focuses on inheritance). Also,
note that the toString method must return a String!
Now when we rerun our simple application the output is modified such that we
now obtain a far more meaningful result:
10.2 Method Definitions 97
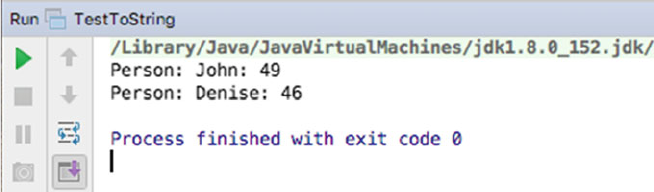
10.2.8 Defining Property Methods
In the previous section we described name and age as properties of the instance
p1, but what does this mean? A Property is an item of data, held within an instance
of a class, that can be accessed externally to that instance either as a read-only
property or as a read/write property.
Essentially Scala creates a reader (also known as a getter) method and a writer
(also known as a setter) method associated with each property. If the properties
were marked as vals, then it would only create the reader methods.
Depending upon the context in which you reference the property, Scala knows
whether to invoke the reader or writer. For example if you are attempting to access
the value of the property then it knows to invoke the writer, whereas if you are
attempting to set the value of the property it knows to use the writer method.
Scala also allows a programmer to override the default readers and writers if
required; it is just that the default behaviour provided by Scala generally meets the
requirements of most developers.
If you wish to define your own readers and writers (or to help understand what is
being created for you) then there are a few additional things to understand. The first
is that the properties you have defined are by default public—that is visible outside
of your instances to anything within the Scala world. An alternative would have
been to mark them as private (note you do not need to say anything for them to be
made public, but you need to make a conscientious decision to make them private).
The second thing you need to be aware of is that Scala does not actually
distinguish between a property, a method or a function to any great extent, and it is
the way that it is defined and invoked which actually allows Scala to work out what
you want. Therefore if you are defining your own readers and writers then you will
need to ensure that the name of the field that will hold the data is different to the
name of the methods used to access that field. Although any name could be used, by
convention the field name is prefixed by an underbar (‘_’).
98 10 Scala Methods
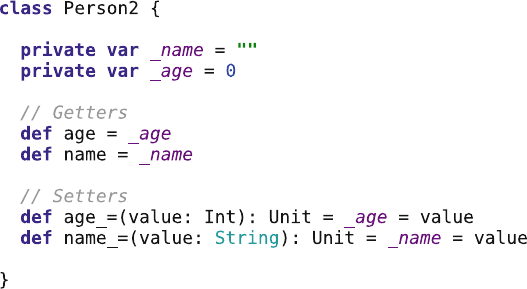
Thirdly to distinguish between a method that should be used on the left-hand
side of an assignment and one that should be used to retrieve a value, a writer
method is post fixed by an underbar (‘_’).
Given the above, Person2 is a class that defines the same behaviour as
Person1 but we have done it longhand ourselves rather than rely on Scala to
create the getters and setter methods for us:
In the above code we have created two private properties _name and _age. These
are accessed by two methods each; one to return the value (the getter) and one to set
the value (the setter).
For example, the def age method returns the value of _age. Note it could have
been written longhand as:
def age(): Int = {
return _age
}
However we are using Scala’s ability to infer much of the template from above
and thus merely need to write:
def age = _age
The setter methods are a little more complex. We have had to call the methods
age_ and name_. They are defined to take a value (of an appropriate type which
we are explicitly specifying here). And we are indicating that they do not them-
selves return anything (hence the Unit return type). Within the body of the
methods we then indicate that the value passed in is assigned to the appropriate
property. Even so this is still a shorthand for the longhand from which would be
(for the age setter method):
10.2 Method Definitions 99
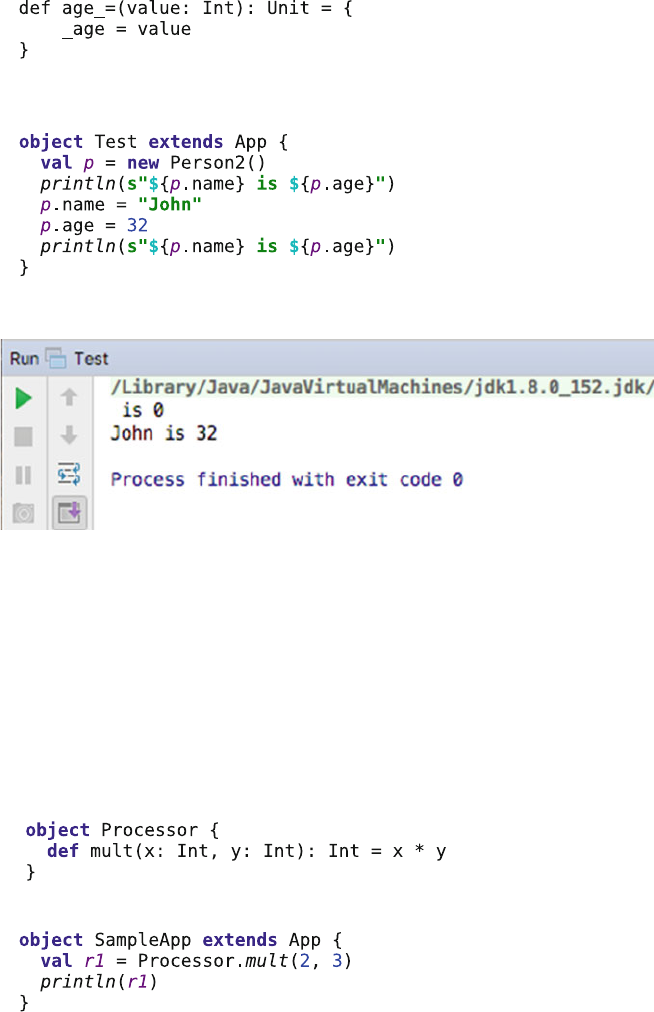
We can now use the same test program with this class as we have previously
used for the Person1 class:
And it produces the output shown below.
This approach may be useful if you wish to add some non-default behaviour to
either the setter or getter methods.
10.3 Named Parameters
In most situations, when you invoke a constructor, a method or a function each
argument is matched, in sequence with the parameters of the constructor, method or
function. Thus given the method mult in the object Processor:
Then we can invoke this method as follows:
In this case the value 2 is bound to the parameter ‘x’and the value 3 is bound to
the parameter yand thus we multiply 2 by 3 to obtain 6.
100 10 Scala Methods
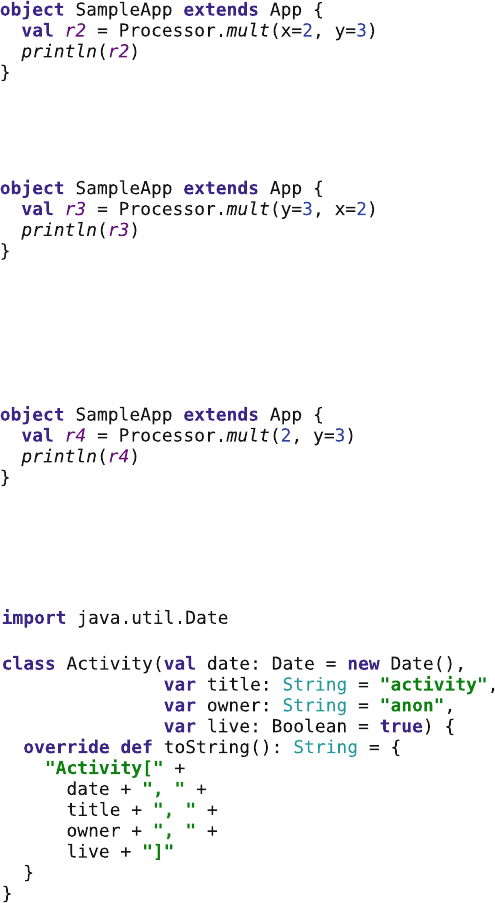
However, an alternative approach is to use the names of the parameters. Named
parameters allow you to pass in argument to a constructor, method or function as
name–value pairs. These pairs can be in any order, and Scala will work out how to bind
them. The syntax for this is based on name=value, with each parameter separated
by a comma (‘,’). For example, the above invocation of mult could be rewritten as:
Now we are explicitly binding the value 2 to xand the value 3 to y. The end
result is that the value 6 is again printed out. However, as the order is no longer
significant we could also write:
This again binds the value 2 to xand the value 3 to yand once again results in
the value 6 being printed out.
Thus the order of the parameters is no longer significant. Note that you can also
mix positional arguments with named arguments (in which case the positional
arguments come first), for example,
Named parameters are most often used with default parameters. This allows the
optional values to be used for all omitted parameters, but the named parameters to
be used for those to be specified. For example,
10.3 Named Parameters 101
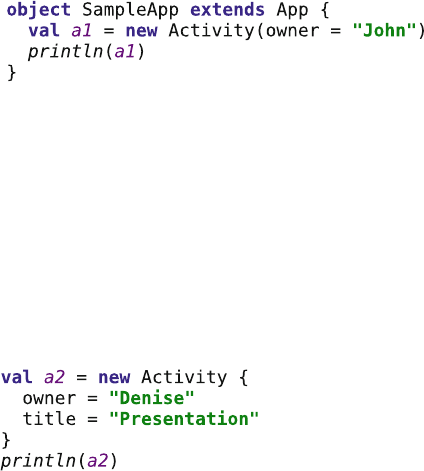
The class Activity defines a primary constructor that takes four parameters.
Each of these parameters has a default value. However, if we used position-based
parameters then we could not just provide the second, third or fourth parameter
when we create an Activity. However, using named parameters allows us to do
exactly this. For example, to create a new Activity with the owner set to “John”
but with the defaults used or the other three parameters we can write:
The result of running this code is shown below:
Activity[Wed Dec 13 14:29:50 GMT 2017, activity, John,
true]
As you can see the default values for date, title and live have been used with the
owner set to “John”.
It is also common to find that the use of named parameters is used with the
alternative curly bracket ‘{}’syntax used for parentheses. This form results in a
construct that looks more as if it is part of the language than a user-defined type. For
example, using the alternative syntax we can create a new Activity specifying
the type of activity and the owner (as “Presentation”and “Denise”, respectively).
The result of running this is shown below:
Activity[Wed Dec 13 14:31:20 GMT 2017, Presentation,
Denise, true]
Note that the order of owner and title is not significant and that date and live are
still defaulted. Also note that Activity now appears to be a language construct.
102 10 Scala Methods

Chapter 11
Packages and Encapsulation
11.1 Introduction
This chapter discusses the encapsulation and packaging features of Scala. The
concept of packages is discussed, along with some concrete examples. It then
illustrates how the encapsulation facilities can allow quite fine-grained control over
the visibility of the elements of your programs.
11.2 Packages
You can bring a set of related classes together in a single compilation unit by
defining them all within one file. By default, this creates an implicit (unnamed)
package; classes can access variables and methods that are only visible in the
current package. However, only one of the classes can be publicly visible (the class
with the same name as the file). A much better approach is to group the classes
together into an explicit, named package.
Packages are encapsulated units that can possess classes, interfaces and sub-
packages. Packages are extremely useful:
•They allow you to associate related classes and interfaces.
•They resolve naming problems that would otherwise cause confusion.
•They allow some privacy for classes, methods and variables that should not be
visible outside the package. You can provide a level of encapsulation such that
only those elements that are intended to be public can be accessed from outside
the package.
The Scala libraries provide a number of packages, some of which are inherited
from the underlying Java runtime. In general, you use these packages as the basis of
your programs.
©Springer International Publishing AG 2018
J. Hunt, A Beginner’s Guide to Scala, Object Orientation and Functional
Programming, https://doi.org/10.1007/978-3-319-75771-1_11
103
11.2.1 Declaring a Package
An explicit package is defined by the package keyword at the start of the file in
which one or more classes (or interfaces) are defined:
package benchmarks
package com.jjh.transport
Package names should be unique to ensure that there are no name conflicts.
Scala does not require, although it is common to find that a naming convention is
adopted across projects. This naming convention is derived from the Java world in
which a package name is made up of a number of components separated by a full
stop. The start of such a name is often your organisations domain in reverse; this
ensures uniqueness across all software systems.
The package name components actually correspond to the location of the files.
Thus if the files in a particular package are in a directory called benchmarks, within
a directory called tests, then the package name is given as:
package tests.benchmarks
Notice that this assumes that all files associated with a single package are in the
same directory. It also assumes that files in a separate package will be in a different
directory. Any number of files can become part of a package; however, any one file
can only specify a single package. Also note that any number of directories can
make up the package (particularly if they are arranged in different jar files).
All components in the package name are relative to the contents of the
CLASSPATH variable. This environment variable tells the Scala compiler where to
start looking for class definitions. Thus, if the CLASSPATH variable is set to C:
\jjh\Scala, then the following path is searched for the elements of the package:
c:\jjh\Scala\tests\benchmarks
All the files associated with the tests.benchmarks package should be in
the benchmarks directory.
11.2.2 Additional Package Definitions Options
11.2.2.1 Package Per File
The simplest way to define a package is to use a single package statement at the
start of a file. It must be the first line of Scala (other than any comments in the file).
It defines the whole contents of the file as being part of that package:
package com.jjh.transport
104 11 Packages and Encapsulation
11.2.2.2 Chain Package Definitions
A further package definition approach in Scala is what is called chaining package
definitions together. This allows multiple package declarations to be specified with
subsequent package declarations being chained to the earlier declaration. For
example, the following defines a package com.jjh.transport containing the class
Ship:
package com
package jjh
package transport
class Ship {
}
The style presented here indicates how packaging chaining can be used with the
package declaration at the start of a file. In terms of package chaining, it is a style
that you should be familiar with as you may encounter it in examples presented on
the Web. However, it is not a style that is generally used. The style of nested
packages which leads to package name chaining is more common, although the
most common form of package is a single one-line declaration at the start of the file.
11.2.2.3 Nested Package Definitions
Scala packages can also be nested one inside another. In this case the scope of one
packaged needs to be indicated via the presence of curly braces ‘{…}’. For
example,
package test {
…
}
Actually the curly braces can always be used with a package definition; it is just
that if they are omitted it is assumed that the whole of the file represents the
contents of the same package.
Curley braces are normally used to when defining one or more nested packages
so that the scope of one package can be represented. For example,
11.2 Packages 105
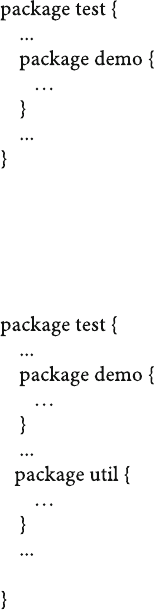
The above dots imply that there are members defined in the package test and
members defined in the package test.demo. It is also clear from this that in Scala
you can therefore have more than one package in a single file. In fact you have
multiple packages, for example,
The above example would have three packages in a single file; these packages
would be:
•Package test
•Package test.demo
•Package test.util
Note that we could further nest packages so that package demo could have a
further nested package print:
106 11 Packages and Encapsulation
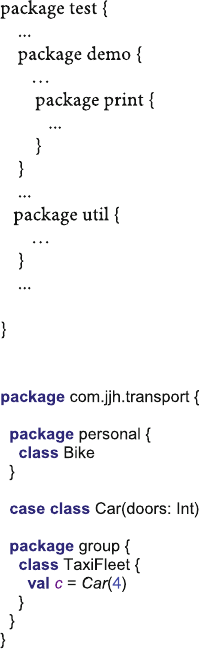
As a concrete example of this consider the following listing:
This example defines the package com.jjh.transport as the top-level package (note
that it is perfectly legal to name a package with multiple elements and then to provide
nested packages that build on that namespace). The top-level package contains two
nested packages: personal and group. The full name of these packages is:
•com.jjh.transport.personal
•com.jjh.transport.group
If you were importing these packages to use in your own code, then these are the
names that you would have to use.
An interesting set of questions to ask is what is the scope or visibility of the
classes:
•Car defined in com.jjh.transport
•Bike defined in com.jjh.transport.personal
•TaxiFleet defined in com.jjh.transport.group
11.2 Packages 107
The answers are that:
•The Car class is directly visible in com.jjh.transport and in the nested packages:
personal and group. This is why it can be directly referenced within the class
TaxiFleet.
•The Bike is only visible directly within the package personal.
•The TaxiFleet is only directly visible within the nested package group.
From this we can see one of the key aspects of packages—helping to organise
our code elements (and to restrict the default namespaces of such elements).
However, this approach is not without its problems and it can actually lead to
namespace issues of its own. For example, consider the following listing:
package engine {
class Petrol1
}
package family {
package economy {
package engine {
class Petrol2
}
class Control {
val b1 = new engine.Petrol2
val b2 = new economy.engine.Petrol2
val b3 = new family.engine.Petrol3
// val b4 = new engine.Petrol1
val b5 = new _root_.engine.Petrol1
}
}
package engine {
class Petrol3
}
}
108 11 Packages and Encapsulation
This example has the following packages with the following contents:
•Package engine with the class Petrol1
•Package family with two nested packages: economy and engine
•Package family.economy with the class Control and a nested package engine
•Package family.economy.engine with the class Petrol2
•Package family.engine.Petrol3
All this looks fine except when you realise that currently there is no way for the
commented out line
val b4 = new engine.Petrol1
to compile? Why is this? It is because in Scala when you reference a class or a
package Scala always attempts to find the most local version of that class or
package. For the class Control the package engine which is nearest to it in terms
of namespace is the package engine defined within the package family, and as it is a
nested package within family as is the package economy, there is no need for code
within either package to have to mention the root package family in order to access
each other (it is implied by their nested status). However, as there is an external
package called engine also present this means that there is a name conflict between
the two packages engine.
To get around this problem, Scala provides a special root package reference
which can be used to indicate that you do not want to use the locally scoped
package but to start at the root location of all package names and find a package
from there. This root package reference is referred to by pre-fixing a package name
with ‘_root_’, for example,
val b5 = new _root_.engine.Petrol1
This ensures that the search for the package engine starts at the root of all
packages rather than looking locally. This approach works as root is essentially a
special package that pre-fixes all packages.
11.2.3 An Example Package
As an example, the files for the com.jjh.lights package are stored within a
directory called lights, within a directory called jjh, within the com directory.
The lights directory contains three classes that make up the contents of the
lights package: Light,WhiteLight and ColoredLight. The header for
the Light.Scala file contains the following code:
package com.jjh.lights
abstract class Light
11.2 Packages 109
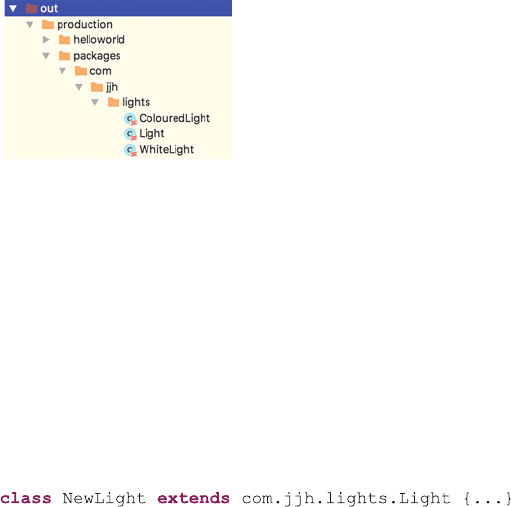
The WhiteLight.Scala and ColoredLight.Scala files are similar, for
example,
package com.jjh.lights
class ColouredLight extends Light
And
package com.jjh.lights
class WhiteLight extends Light
Note in the above example we have placed each class in a separate file; however,
we could have defined all three classes in the same source file and this would have
produced the same set of.class files as are described below.
The directory containing the compiled (byte code) version of the lights
package is shown below:
The CLASSPATH variable (set up by the IDE) includes the path bin directory
of the current project, so the package specification, com.jjh.lights, com-
pletely specifies the location of the byte code files.
11.2.4 Accessing Package Elements
There are two ways to access an element of a package. One is to name the element
in the package fully; this is referred to as the fully qualified class name. For
example, we can specify the Light abstract class by giving its full designation:
This tells the Scala compiler exactly where to look for the definition of the class
Light. However, this is laborious if we refer to the Light class a number of
times.
The alternative is to import the Light class, which makes it available to the
package within which we are currently working:
110 11 Packages and Encapsulation
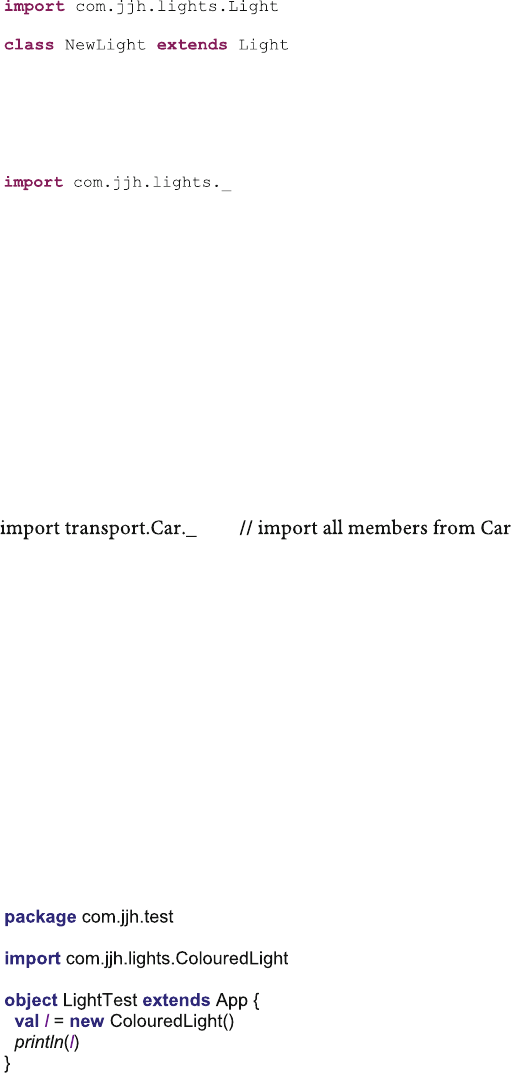
However, in some situations, we wish to import a large number of elements from
another package. Rather than generating a long list of import statements, we can
import all the elements of a package at once using the ‘_’wild card. For example,
This imports all the elements of the com.jjh.lights package into the
current package. Notice that this can slow down the compilation time (although it
has no effect on the runtime performance). Also note that this only imports the
contents of the com.jjh.lights package—it has no effect on any subpackages
of lights. Also note that if you are a Java programmer that the wild card here is ‘_’
and not ‘*’as it is in Java. Also note that we do not include the (optional) ‘;’
statement terminator in Scala—you can use the ‘;’to terminate both the package
declaration and the import statements; it is just that it is considered superfluous and
thus not good style.
It is also possible to import all the methods or functions defined on a type using
the name of the type followed by the ‘_’wild card, for example,
To summarise then it is possible to
•import the whole contents of a package,
•import a single type from a package,
•use an alias with a type and
•import the functionality for a given type.
11.2.5 An Example of Using a Package
The lights package described above has been used within a code outside the
package. This application defined in the com.jjh.test packages uses the
ColoredLight class. It therefore imports it into the current package. For example,
11.2 Packages 111
Notice that we have chosen to import the ColoredLight class explicitly rather
than the whole package. Also note that we can import any number of classes,
objects, traits, types, etc., as required into a single file but that these imports are
only in scope for the current file.
11.3 Import Options
Scala actually has a wider set of import options than Java. In Java an import can
only be specified at the top of a file after any (optional package declaration) and
before any other Java declarations (such as a class or interface). In Scala an import
can appear anywhere and affects the scope within which it was specified. Thus
imports can appear in a:
•Package
•Class
•Method or function
•Package object.
For example, the following example illustrates importing a set of functions
defined on the object util.PrintAccount into a method so that they can be accessed
directly within that method (but only that method):
package banking
case class Account(name: String, number: String)
class Bank {
def print(acc: Account) {
import util.PrintAccount._
printAccount(acc)
}
}
PrintAccount is a singleton object defined in the package util, for example,
package util
import banking.Account
object PrintAccount {
def printAccount(acc: Account) {
println(acc.name + ": " + acc.number)
}
}
Scala also allows you to import more than just classes, objects or traits. You can
import the methods on instances of a given class. For example, in the following
example the method printCar imports the methods defined on the parameter car so
112 11 Packages and Encapsulation
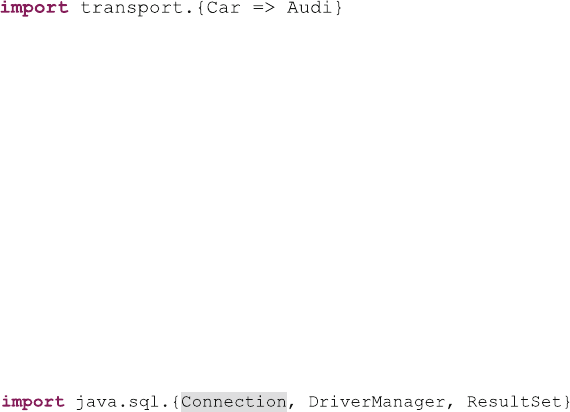
that it does not need to prefix model and spec with car (e.g. car.model and car.spec),
thus making the code simpler:
}
}
class Car(val model: String, val spec: String)
object CarTestApp extends App {
// Main behaviour
val c = new Car("BMW 320", "SE")
printCar(c)
// Support method
def printCar(car: Car) {
import car._
println(model + ": " + spec)
11.4 Additional Import Features
It is also possible to provide an alias as part of an import, for example,
This indicates that the type transport.Car will be alias to (and accessible via)
Audi in the current context (e.g. the current file).
It is also possible to indicate what should not be imported, for example,
import transport.{Car=>_, _}
This import indicates that everything should be imported from the package
transport with the exception of Car. This is because the first part of the contents of
the curly brackets ‘{…}’indicates what not to import, e.g. Car=>_ and the second
part is the wild card that indicates what should be imported (i.e. the second ‘_’).
A further way in which the types to import can be specified is via the curly
bracket ‘{..}’notation. This can be used to reduce the number of import statements
when several (but not all) of the types in a particular package should be imported.
This is written in the following way:
Note that this statement imports the Connection, DriverManager and ResultSet
types from the java.sql package.
11.3 Import Options 113
11.5 Package Objects
A package can also (optionally) have a package object associated with it. A package
object is an object that is part of the package (and has the same name as the
package) that can be used to hold utility functions or methods. Any members
defined in the package object are considered to be top-level members of the package
and can be accessed by other members of the package directly.
As an example of a package object consider the following listing:
package com.jjh
package object banking {
def printAccount(acc: Account) {
import acc._
println(name + ": " + number)
}
}
This defines a package object for the package com.jjh.banking. Note that it is
defined by a keyword for the package level above banking (com.jjh) with a package
object definitions for the banking element of the package. This banking package
object defines a single utility method printAccount that can be used by any other
members of the com.jjh.banking package to print out bank account information. For
example,
package com.jjh.banking
case class Account(val name: String, val number: Int)
object TestAccount extends App {
val acc = Account("John", 1234)
printAccount(acc)
}
You can also use the printAccount method in other packages by importing it. For
example, the following code is in a separate package com.jjh.test. It imports both
the Account case class and the printAccount method from the com.jjh.banking
package. Notice that from this you cannot see that com.jjh.banking is both a
package and a package object. We can then use the Account class to create an
account instance and print its details via printAccount (the utility methods defined
on the package object).
114 11 Packages and Encapsulation
package com.jjh.test
import com.jjh.banking.printAccount
import com.jjh.banking.Account
object AccountTestApp extends App {
val acc = Account("John", "AC123")
printAccount(acc)
}
11.6 Key Scala Packages
There are very many packages in Scala, but the core or central ones are:
•Scala—the core types
•scala.collection provide basis of the Scala collections (data structures)
frameworks.
•scala.collection.immutable provides the definitions for the immutable versions
of the collection classes in Scala.
•scala.collection.mutable provides definitions for the mutable versions of the
collection classes in Scala.
•scala.actors provides the actor based concurrency types.
•scala.io provides for input and output type definitions.
•scala.math provides basic mathematical functions and additional numeric types.
•scala.sys provides types for interacting with other processes and the operating
system.
•scala.util.matching provides pattern matching in text using regular expressions.
•scala.xml containing types is used when parsing, manipulating and serialising
XML structures.
11.7 Default Imports
There are also a set of default imports that are imported into every Scala file; these
are:
•The java.lang package
•The Scala package
•The Predef object.
The core java.lang package is imported as it provides some of the basic concepts
that underpin the Scala (and Java) runtime such as the definition of a String.
The Scala package contains definitions for the core Scala types, and as such, it is
always available in any Scala code without the need for an explicit import.
11.5 Package Objects 115
The Predef object in Scala provides type aliases for commonly used Scala types
(such as the immutable collection classes), some simple functions for Console I/O
(such as println), basic assertions (such as require) and some implicit conversion
routines. The inclusion of the Predef object reduces the amount of explicit code that
needs to be written in Scala.
11.8 Encapsulation
In Scala, you have a great deal of control over how much encapsulation is imposed
on a class, a trait and an object. You achieve it by applying modifiers to classes,
objects and trait properties, methods and functions. Some of these modifiers refer to
the concept of a package, and others to the type itself.
11.8.1 Scala Visibility Modifiers
By default all the members of a package, a class, an object or a trait are public. Thus
the following holds true:
package com.jjh.sample
object PublicObject {
val publicVal: Int = 32
var publicVar: Int = 0
def publicMethod = println("Hello")
}
That is everything above is publically available, you only need to import the
contents of the package com.jjh.sample._ or the object itself com.jjh.sample.
PublicObject to be able to access everything. You do not need to use a special
keyword public to make it so.
However, not all members of a type should be public; indeed in many cases you
specifically do not want them to be publically available. In these cases, there are
two additional keywords that can be used to control visibility; these are private and
protected.
This means that you can choose whether these elements of your program are
publically visible everywhere (the default), only visible to inherited types (pro-
tected) or only visible within the context they are defined (private). Thus these
visibility modifiers can be used to restrict the access to (or visibility of) these
members to other regions of code. In general, to use an access modifier you need to
include the appropriate keyword (private or protected) in the definition of the
member of a package, class or object.
116 11 Packages and Encapsulation
However, a word of caution is advisable here. Protected and private in Scala are
not the same as in Java. For example, protected in Scala means that the member is
only available in the current class and subclasses—it is not available in the current
package. However, this is a default; both protected and private can be modified to
indicate the scope; they should be applied to. In the case of private it means that in
Scala we can distinguish between private to an instance and private to a class.
11.8.2 Private Modified
A private member is (by default) only visible to the class or object that it is defined
in. Thus in the following example, the method print is only available to methods
defined within the class Account:
package com.jjh.banking
case class Account(name: String, number: String) {
private def print = println(name)
}
However, an issue is that it is available to all instances of the class Account.
Thus John’s account can access the private method of the Denise’s account. This is
the approach taken by Java, and it is the default approach taken by Scala and
represents class-based privacy. If we want instance-based privacy, that is the
method print can only be called from within the same instance of the class Account,
then we need to qualify its scope. This can be done with a scope associated with the
keyword in square brackets, for example private[this], for example,
package com.jjh.banking
case class Account(name: String, number: String) {
private[this] def print = println(name)
}
In this case private means private to this instance and not the whole class.
Interestingly you can also provide a package name within the square brackets so
that you can indicate that a method is private to the package, for example,
package com.jjh.banking
case class Account(name: String, number: String) {
private[banking] def print = println(name)
}
In this revised version, the method print is private to the package (i.e. it is
available anywhere in the current package). This equates to package visibility in
Java.
11.8 Encapsulation 117
In fact the qualifier can be any form of scope; thus, the form private[x] can be
used where x is one of an enclosing package, class or singleton object.
Also note that the keyword private can be applied to properties, methods and
functions within a class, trait or object.
11.8.3 Protected Modifier
The protected modifier indicates that a member of a class, trait or object is visible
within subtypes in any package (by default). For example, given the following
definition:
package com.jjh.test
class Super {
protected def print = println("Super")
}
class Sub extends Super {
print
}
class Other {
val s = new Super()
// s.print - error is not visible
}
The class Super defines a protected method print. This method is only accessible
(visible) in subclass of Super. The class Sub extends Super and therefore can
reference the method print directly. It happens that this class is defined in the same
package as Super but it could have been defined anywhere. However, even though
the class Other is defined in the same package as Super and can create an instance
of Super, it cannot reference the method print on an instance of Super as it is only
visible/accessible to subclasses of Super.
As with the private access modifier, the protected access modified can be
qualified with a scope. For example, we can indicate that the protected member is
protected up to a particular scope. Thus the previous example could be redefined
such that the qualified test is added to the protected method print:
118 11 Packages and Encapsulation
package com.jjh.test
class Super {
protected[test] def print = println("Super")
}
class Sub extends Super {
print
}
class Other {
val s = new Super()
s.print // No longer an error as it is now visible
}
In this way, we can indicate that a member should be visible up to a certainly
level and after that is only accessible to subclasses. Thus the example above in
which we specify protected[test] is the equivalent of Java’s version of protected as it
indicates that the method print is visible in the current package and in any subclass
in any package.
As with the private access modifier the protected modifier can be qualified with a
range of scopes. In fact the qualifier can be any form of appropriate scope; thus, the
form protected[x] can be used where x is one of an enclosing package, class or
singleton object.
Also note that the keyword protected can be applied to properties, methods and
functions within a class, trait or object.
11.8 Encapsulation 119

Chapter 12
Building a Class
12.1 Introduction
In this chapter, we will work through the creation of a simple class to represent a
Company. As we are using IntelliJ, we will step through using this IDE to create
our class.
12.2 Create a New Module
Assuming you already have a Project to work in you should add a new module to
that Project. If not create a new Project using the File-> New-> Project…option
from the menu bar.
Next you can create a suitable module within the IntelliJ IDE to create your
application. A new module can be created from the File menu under File->
New -> Module…(Fig. 12.1).
This will cause the ‘New Module’wizard to be displayed as shown below.
©Springer International Publishing AG 2018
J. Hunt, A Beginner’s Guide to Scala, Object Orientation and Functional
Programming, https://doi.org/10.1007/978-3-319-75771-1_12
121
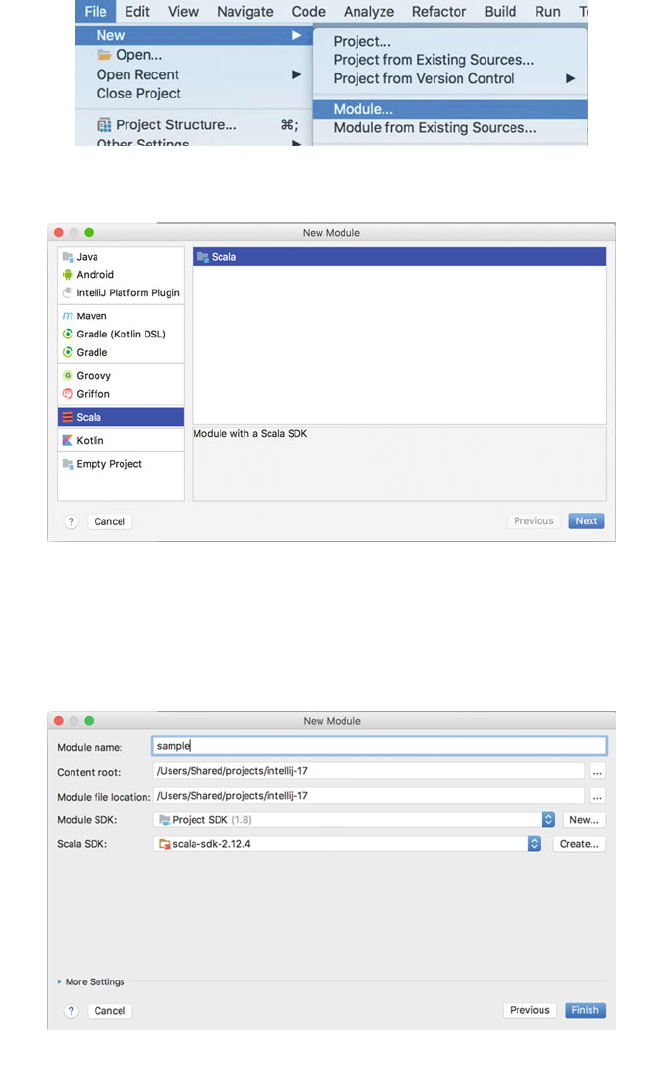
Make sure that you have selected the Scala option in the left-hand window. Then
click ‘Next’.
You can name the module anything. In this case, we will call the Project sample.
Enter the Project name into the ‘Module name’field as shown here (Fig. 12.2).
Fig. 12.1 Selecting the create a new ‘Scala Project’option
Fig. 12.2 Naming the project
122 12 Building a Class
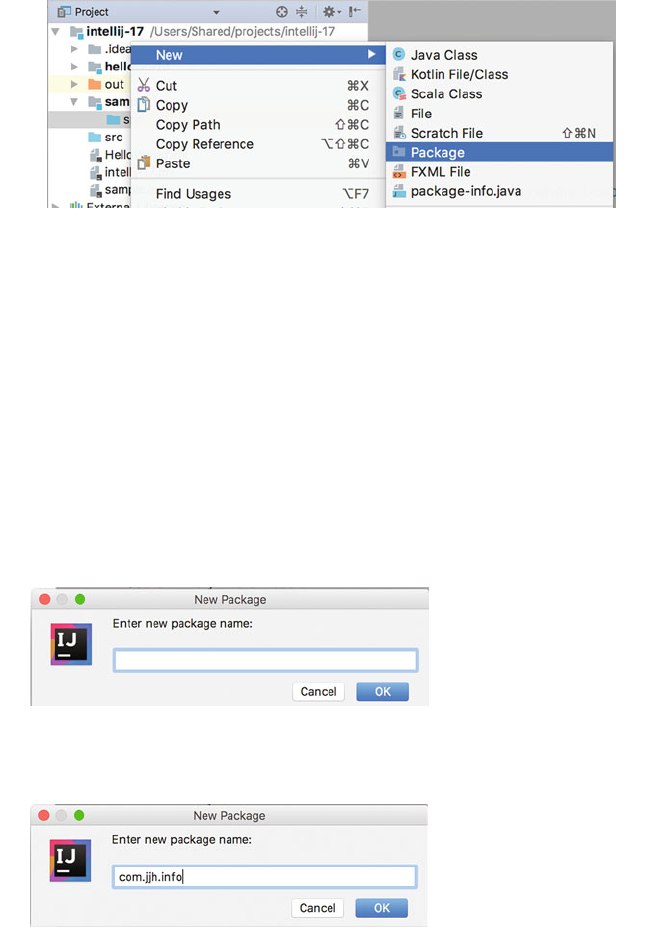
I would also create a package to place your code in. A package is an organi-
sational construct that helps you manage your code. It also relates to name spacing
(what can be seen where) and is a good programming technique to get into.
12.3 Create a New Package
To create a new package, select your src directory under your module and from the
right mouse menu select New -> Package, for example (Fig. 12.3):
This will display the new Package Wizard (note it says Java but is being reused
for Scala packages in the Scala IDE). This dialog is shown here.
You can use whatever name you wish although you should note that a Scala
package is a series of names separated by ‘.’which are typically prefixed by the
domain of the organisation creating the code. I am using com.jjh.info.
Fig. 12.3 Selecting the new package option
12.2 Create a New Module 123
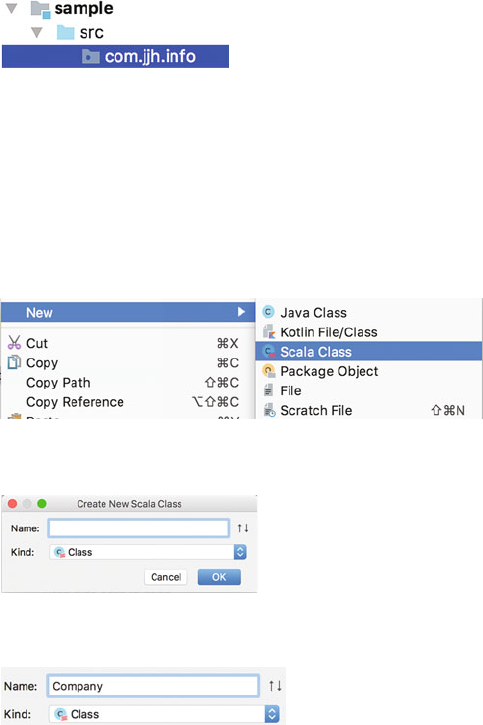
Once you have provided a package name click ‘OK’.
You will now see a new package provided for you in the Project View of the
IDE. An example of the structure created under the Project heading is shown below.
12.4 Create a New Class
We will now add a new class to the package we just created. This can be done using
the New Scala Class Wizard. Select the package we just created in the Project View
and from the right mouse menu select New -> Scala Class.
You will now be shown the ‘Create New Scala Class’wizard:
Specify the name of the class you want to create using the Name field. In our
case, we will create a new Scala class called Company as shown below.
Now click ‘OK’.
You should now find that you have a new class Company,inafile called
Company.scala under the com.jjh.info package. While in the middle of
the IDE in the code presentation area, you should see the outline skeleton code for
the class Company.
124 12 Building a Class
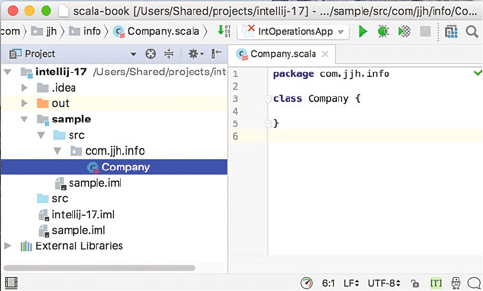
12.5 Defining the Class
The simple class you just created now needs to be expanded to represent a com-
pany. The class must have the following information:
•The name of the company
•The address of the head office of the company
•The phone number of the company
•The company registration number
•The company VAT number
The address of the company could be a separate type including county, postcode/
zipcode. However, we will keep things simple for the moment.
The fields of the company will all be of type String and will have some form
of default value, for example the empty or null string represented by “”. String is
referred to as a type as it represents a concept with the programming language. As
such a string is Zero or more characters which respond to certain operations such as
substring, length.
Update your definition of the Company class so that it resembles the following
listing:
package com.jjh.info
class Company {
var name = ""
var address = ""
var telephone = "0000"
var registrationNumber = "000"
var vatNumber = "xxxx"
var postcode = "xxx xxx"
}
12.4 Create a New Class 125
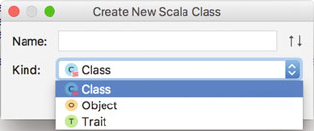
12.6 Adding Behaviour
We can also add some behaviour to this class by providing a print method that
will print out the Company details in an appropriate format.
The printer method will be done first. This method will not return a value as it
will be used to print information on the Company out to the Console.
package com.jjh.info
class Company {
var name = ""
var address = ""
var telephone = "0000"
var registrationNumber = "000"
var vatNumber = "xxxx"
var postcode = "xxx xxx"
def print() = println(s"Company name $name at $address")
}
Note that we have used the single line form of defining a method—this is not the
only option and you could experiment with other formats one you have this version
working.
12.7 Test Application
You should then create a simple test application (use the App trait with a Scala
object type) to create new instances of the Company class.
You can use the New Scala Class dialog to create an object as well as a class. For
example, select the package again and for the right mouse menu select ‘New Scala
Class’. However, when the dialog is displayed, select the drop-down box below the
Class Name field.
126 12 Building a Class

You will then see that there are actually three options available at this point;
Class, Object and Trait. Select the Object option and provide a name for the Object
(I am using CompanyTestApp):
You should now see a new tab on in the central code editor area of the IDE as
shown below.
This contains the skeleton of the CompanyTestApp object. It is not yet an
application. Modify the declaration of the object so that it extends the App trait. So
that you now have:
package com.jjh.info
object CompanyTestApp extends App {
}
Remember as you are using the App trait, you do not need to define a main
method declaration—you only need to add what the application needs to do.
In our case, we will create a new instance of the Company class and print out its
details:
package com.jjh.info
object CompanyTestApp extends App {
println("Starting CompanyTestApp")
val company = new Company()
company.print
println("Done CompanyTestApp")
}
Recall that we do not need to define the type of the val we will hold our
company reference in (this will be inferred by Scala), but that new instances are
created using the keyword new.
We can now run this application either using the right mouse menu from the file
CompanyTestApp in the Project View (Run).
In the Run output console, you should see output similar to that shown here.
12.7 Test Application 127

This is because the Company object does not yet have any data defined by you.
We will now add that data:
package com.jjh.info
object CompanyTestApp extends App {
println("Starting CompanyTestApp")
val company = new Company()
// Set up the company information
company.name = "John Sys"
company.address = "Coldharbour Street, London"
company.telephone = "123456"
company.registrationNumber = "99999999"
company.vatNumber = "BB112233AA"
company.postcode = "BS16 1QY"
company.print
println("Done CompanyTestApp")
}
In the above example, we have populated the fields that are defined within the
Company instance with suitable data. If you now rerun this application, you should
see more comprehensible output in the Run console.
12.8 Override Tostring
In general, we would not define a custom method such as print to print out the
Company instances. Typically, we would use the println method directly with
the company instance. To do this, we must override the toString method as we
did in the last chapter. In this case, our toString method must include
128 12 Building a Class
information for all of the fields. We can thus add a toString method to the
Company class with the result that we can print out a Company instance directly.
The Company class would now look like:
package com.jjh.info
class Company {
var name = ""
var address = ""
var telephone = "0000"
var registrationNumber = "000"
var vatNumber = "xxxx"
var postcode = "xxx xxx"
def print() = println(s"Company name $name at $address")
override def toString = s"Company[$name, $address, " +
s"$telephone, $registrationNumber, $vatNumber" +
s"$postcode]"
}
The test program could be updated to include a println for the company
instance (e.g. println(company)):
package com.jjh.info
object CompanyTestApp extends App {
println("Starting CompanyTestApp")
val company = new Company()
// Set up the company information
company.name = "John Sys"
company.address = "Coldharbour Street, London"
company.telephone = "123456"
company.registrationNumber = "99999999"
company.vatNumber = "BB112233AA"
company.postcode = "BS16 1QY"
company.print
println(company)
println("Done CompanyTestApp")
}
The output of this program is now:
Starting CompanyTestApp
Company name John Sys at Coldharbour Street, London
Company[John Sys, Coldharbour Street, London, 123456,
99999999, BB112233AABS16 1QY]
123456, 99999999, BB112233AABS16 1QY]
Done CompanyTestApp
12.8 Override Tostring 129
12.9 Extras
You could try out different syntax options, for example:
p
rintln(company name)
company print()
company print
130 12 Building a Class

Chapter 13
Classes, Inheritance and Abstraction
13.1 Introduction
Inheritance is one of the most powerful features of Object Orientation. It is the
difference between an encapsulated language that provides an object-based model
and an Object-Oriented language. Inheritance is also one of the main tools sup-
porting reuse in an Object-Oriented language (although in Scala’s case Traits are
also a major tool for reuse). You will use inheritance all the time without even
realising it, indeed you have already been doing so every time you have benefited
from the default implementation of toString.
Scala has single class inheritance although it does have a form of multiple
inheritance via Traits.
13.1.1 What Are Classes for?
In some Object-Oriented languages, classes are merely templates used to construct
objects (or instances). In these languages, the class definition specifies the structure
of the object and a separate mechanism is often used to create the object using this
template.
In some other languages (e.g. Java, C#, Smalltalk), classes are objects in their
own right; this means that they can not only create objects, they can also hold data,
receive messages and execute methods just like any other object. However, many
programmers find this distinction confusing and Scala has adopted the Companion
object approach instead (see later in this book) which means that a class is sup-
ported by a singleton object that can hold data and provide a placeholder for
additional supporting behaviours.
©Springer International Publishing AG 2018
J. Hunt, A Beginner’s Guide to Scala, Object Orientation and Functional
Programming, https://doi.org/10.1007/978-3-319-75771-1_13
131
Thus, in Scala, classes are unique within a program and can:
•defined using the keyword class,
•be used to create instances (via the keyword new),
•be inherited by subclasses (and can inherit from existing classes),
•mix in traits,
•define properties,
•define methods,
•define functions,
•define instance variables and values,
•be sent messages.
Objects, on the other hand, are:
•defined using the keyword object,
•singleton entities within the systems,
•cannot be instantiated (and do not support the new operation),
•cannot be used to create new instances,
•are accessed directly via their name rather than via any val or var.
Confusingly many Object-Oriented languages use the term object to refer to an
instance of a class. In Scala an instance of a class is exactly that, an instance of a
class, an object is a different concept. Instances can be
•created from a class (using the keyword new),
•hold their own copy of their state (in terms of properties or instance variables),
•be sent messages,
•execute instance methods,
•execute functions,
•have many copies in the system (all with their own data).
13.2 Inheritance Between Types
To recap on the concept of inheritance, inheritance is supported between types
within Scala. For example, a class and extend (subclass) another class. A trait
(another type) can extend other traits, etc., and objects can extend traits or classes.
All of these types support and enable inheritance.
In terms of the inheritance we say:
•A subtype inherits from a super type
•A subtype obtains all code and data from the super type
•A Subtype can add new code and data
•A subtype can override inherited code and data
•A subtype can invoke inherited behaviour or access inherited data.
132 13 Classes, Inheritance and Abstraction
13.3 Inheritance Between Classes
Inheritance is achieved in Scala using the extends keyword (as was discussed in
Chap. 6). Scala is a single class inheritance system, so a Scala class can only inherit
from a single class (although it can mix in multiple traits, to be discussed later).
The following class definition builds on the class Person presented earlier:
class Person(val name: String,var age: Int)
class Student(var subject: String,
n: String,
a: Int)
extends Person(n, a) {
}
This class extends the class Person by adding a new variable property,
subject. As this is a var the class Student also provides reader and writer
functionality for the subject property. We say that Student is a subclass of
Person and that Person is the super class of Student.
Note that as the class Person defined two properties in its primary constructor,
the class Student must invoke the constructor explicitly. It does this by indicating
the data to pass to this constructor after the parent class name following the extends
expression. For the student class we take these values in as part of its own con-
structor. However the parameters ‘n’and ‘a’are not properties; they are local fields
which can be used within the definition of the class Student. We are only using
them to pass the data up to the definition of the constructor in the class Person. As a
result you can only instantiate the class Student by providing the subject to be
studied, the student’sname and their age. For example,
object StudentTest extends App {
val s=new Student("Computer Science","John",18)
println(s.name + " is studying " +s.subject)
}
The end result is that a new instance of the class Student is created that has a
subject property and also a name property and an age property inherited from
the class Person. In fact the instance referred to by the variables is a Student
and is also a Person (in the same way that any human is also a Mammal, etc.).
Note that it is necessary to invoke a parent class’s constructor explicitly. The
only exceptions to this are if the parent class only defines a Zero parameter con-
structor, or if the primary constructor provides default values for all of its
parameters.
13.3 Inheritance Between Classes 133
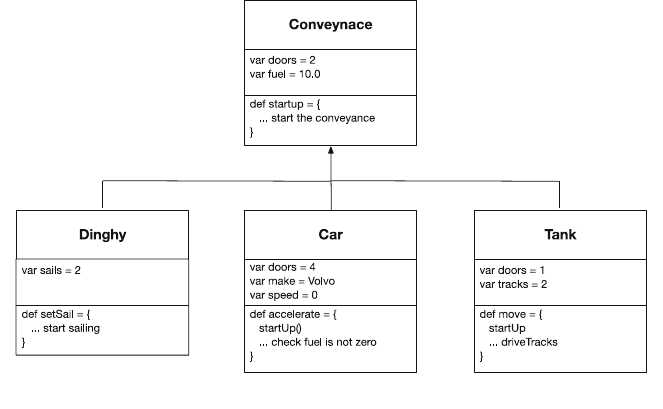
13.3.1 The Role of a Subclass
There are only a small number of things that a subclass should do relative to its
parent or super class. If a proposed subclass does not do any of these, then your
selected parent class is not the most appropriate super class to use.
A subclass should modify the behaviour of its parent class or extend the data
held by its parent class. This modification should refine the class in one or more of
these ways:
•Changes to the external protocol, the set of messages to which instances of the
class respond.
•Changes in the implementation of the methods, i.e. the way in which the
messages are handled.
•Additional behaviour that references inherited behaviour.
If a subclass does not provide one or more of the above, then it is incorrectly
placed. For example, if a subclass implements a set of new methods, but does not
refer to the instance variables or methods of the parent class, then the class is not
really a subclass of the parent (it does not extend it).
As an example, consider the class hierarchy illustrated in Fig. 13.1. A generic
root class has been defined. This class defines a Conveyance which has doors,
fuel (both with default values) and a method, startUp, that starts the engine of the
conveyance. Three subclasses of Conveyance have also been defined: Dinghy,
Car and Tank. Two of these subclasses are appropriate, but one should probably
not inherit from Conveyance. We shall consider each in turn to determine their
suitability.
Fig. 13.1 A class and its subclasses
134 13 Classes, Inheritance and Abstraction
The class Tank overrides the number of doors inherited, uses the startUp
method within the method fire and provides a new instance variable. It therefore
matches all three of our criteria.
Similarly, the class Car overrides the number of doors and uses the method
startUp. It also uses the instance variable fuel within a new method ac-
celerate. It also, therefore, matches our criteria.
The class Dinghy defines a new instance variable sails and a new method
setSail. As such, it does not use any of the features inherited from
Conveyance. However, we might say that it has extended Conveyance by
providing this instance variable and method. We must then consider the features
provided by Conveyance. We can ask ourselves whether they make sense within
the context of Dinghy. If we assume that a dinghy is a small sail-powered boat,
with no cabin and no engine, then nothing inherited from Conveyance is useful.
In this case, it is likely that Conveyance is misnamed, as it defines some sort of a
motor vehicle, and the Dinghy class should not have extended it.
The exceptions to this rule are subclasses of Any and AnyRef. This is because
these classes are the root types in the Scala type hierarchy. AnyRef is the root of all
reference types—that is classes in Scala. As you must create a new class by sub-
classing it from an existing class, you can subclass from AnyRef when there is no
other appropriate class.
13.3.2 Capabilities of Classes
A subclass or class should accomplish one specific purpose; it should capture only
one idea. If more than one idea is encapsulated in a class, you may reduce the
chances for reuse, as well as contravene the laws of encapsulation in
Object-Oriented systems. For example, you may have merged two concepts toge-
ther so that one can directly access the data of another. This is rarely desirable.
Breaking a class down costs little but may produce major gains in reusability and
flexibility. If you find that when you try and separate one class into two or more
classes, some of the code needs to be duplicated for each class, then the use of
abstract classes can be very helpful. That is, you can place the common code into an
abstract superclass to avoid unnecessary duplication.
The following guidelines may help you to decide whether to split the class with
which you are working. Look at the comment describing the class (if there is no
class comment, this is a bad sign in itself). Consider the following points:
•Is the comment short and clear. If not, is this a reflection on the class? Consider
how the comment can be broken down into a series of short clear comments.
Base the new classes around those comments.
13.3 Inheritance Between Classes 135
•If the comment is short and clear, do the class and instance variables make sense
within the context of the comment? If they do not, then the class needs to be
re-evaluated. It may be that the comment is inappropriate, or the class and
instance variables inappropriate.
Look at the instance variable references (i.e. look at where the instance variable
access methods are used). Is their use in line with the class comment? If not, then
you should take appropriate action.
13.3.3 Overriding Behaviour
As was mentioned at the start of this chapter, a subtype (e.g. a subclass) can
override the behaviour defined in a parent class. In fact it is possible to override
both methods and fields. It should be noted that in Scala; it is also possible to
override a parameterless method by a new field or property (this is actually to do
with the way in which Scala internally represents data and methods) but can be
useful and also confusing.
To override either a field or a method in a parent class you must use the keyword
override. You have seen this already with the toString method where we had to
include the keyword override in order to redefine toString to do something more
useful then display the fully qualified class name and a hexadecimal number. Of
course the default behaviour of toString was being inherited into our classes via
the class AnyRef (which we implicitly extended).
In the following example, the class Base overrides toString so that the name
and age properties of the Base class are used to create the string representation of
instances of the class. It also defines a method max and a property working.
class Base(val name: String,var age: Int) {
def max(x: Int, y: Int): Int = if (x > y) x else y
val working =false
override def toString() = s"$name is $age"
}
We can then subclass Base with the class Derived and override both max and
working if we wish, for example,
class Derived(n: String, a: Int) extends Base(n, a) {
override def max(x: Int, y: Int): Int =
if (x > y) y else x
override val working =true
}
In Derived we have redefined max to actually return the minimum value for
some reason and overridden working to be true.
136 13 Classes, Inheritance and Abstraction
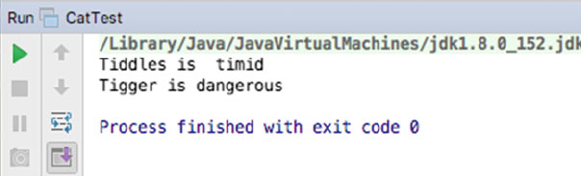
As another option consider the classes Cat and Tiger below
•Cat has vals dangerous and name.
•Tiger overrides dangerous and name. However, the value for name is now
set when the instance is created. Thus the property that is defined as part of the
constructor overrides a property used with the Cat class, which was not orig-
inally part of any construction process.
class Cat {
val dangerous =false
val name:String ="Tiddles"
override def toString =
s"$name is ${(if (dangerous)"dangerous" else "timid")}"
}
class Tiger(override val name: String)extends Cat {
override val dangerous =true
}
object CatTest extends App {
var c=new Cat()
println(c)
c=new Tiger("Tigger")
println(c)
}
The effect of running the CatTest program is shown below.
13.3.4 Protected Members
By default, within Scala all behaviour (methods and functions) as well as data
(properties) is public, that is they are visible (can be accessed) anywhere within an
application. We have seen that it is possible to mark both behaviour and data as
private so that they are only accessible within a single object or class. However,
there is another option which has not been mentioned yet. That is, it is possible to
make either behaviour or data protected.
13.3 Inheritance Between Classes 137
Protected members of a class are members (methods, functions, properties) that
can only be accessed in the current class and in subclasses and only in subclasses.
They are not visible to other elements of an application.
For example, in the following abstract class Base the property age is public, the
method max is public and the overridden method toString is public. However,
the property working is only visible within Base and any subclasses of Base.
class Base(val name: String,var age: Int) {
def max(x: Int, y: Int): Int = if (x > y) x else y
val working =false
override def toString() = s"$name is $age"
}
The use of protected properties or behaviour helps to explicitly specify the
interface between a subtype and its super type.
13.4 Restricting a Subclass
You can restrict the ability of a subclass to change what it inherits from its
superclass. Indeed, you can also stop subclasses being created from a class. This is
done using the keyword final. This keyword has different meanings depending on
where it is used. For example in the following example, the keyword final has been
applied to the whole class:
final class Employee(n: String,
a: Int,
company: String)
extends Person(n, a)
This means that no element of this class can be extended, so no subclass of
Employee can be created.
The keyword final can also be applied to a public property. For example,
final var maximumMemory =256
This indicates that the property maximumMemory cannot be overridden in a
subclass. This means that the value of maximumMemory is set for this class and
for all subclasses wherever they are defined by this class. Using a val instead of a
var means that the value cannot merely be overridden by a subclass, it is also only
set once and is thus a constant for the hierarchy below the current class:
138 13 Classes, Inheritance and Abstraction
class Employee(n: String,
a: Int,
company: String)
extends Person(n, a) {
final val max =10
}
The keyword final can also be applied to methods. This means that a method
cannot be overridden in a subclass, for example,
class Volunteer (n: String ,
a: Int,
company: String)
extends Person(n, a) {
final def prettyPrint(): Unit = {
println("Volunteer")
println("\tName: " + name)
println("\tAge: " + age)
println("\tCompany: " + company)
}
}
This states that the method prettyPrint cannot be overridden in a subclass.
That is, a subclass cannot redefine prettyPrint(); it must use the one that it
inherits.
Restricting the ability to overwrite part of, or all of, a class is a very useful
feature. It is particularly important where the correct behaviour of the class and its
subclasses relies on the correct functioning of particular methods, or the appropriate
value of a variable, etc. A class is normally only specified as final when it does not
make sense to create a subclass of it. These situations need to be analysed carefully
to ensure that no unexpected scenarios are likely to occur.
13.5 Abstract Classes
An abstract class is a class from which you cannot create an object. It is missing
one or more elements required to create a fully functioning instance. In contrast a
non-abstract (or concrete) class leaves nothing undefined and can be used to create a
working instance. You may wonder what use an abstract class is. The answer is that
you can group together elements that are to be shared amongst a number of classes,
without providing a complete implementation. In addition, you can force subclasses
to provide specific methods ensuring that implementers of a subclass at least supply
appropriately named methods. You should therefore use abstract classes when:
13.4 Restricting a Subclass 139
•you wish to specify data or behaviour common to a set of classes, but insuffi-
cient for a single instance,
•you wish to force subclasses to provide specific behaviour.
In many cases, the two situations go together. Typically, the aspects of the class
to be defined as abstract are specific to each class, while what has been imple-
mented is common to all classes.
For example, consider the following class.
abstract class Person(val name: String,var age: Int) {
// Override inherited toString
override def toString = s"$name,$age";
//Define an abstract method
def prettyPrint
def birthday = age = age + 1
}
This is a revised version of the Person class we have seen several times before.
However we are now making Person an abstract concept. This means that you do
not create instances o the Person class itself, but rather you create instances of
subclasses of Person such as Employee, Student, Graduate, etc. Person brings
together the common features of these subclasses, but on its own it is not sufficient
to warrant an instance being created. It is only the concrete classes (non-abstract
classes) which actually make sense as instances:
This abstract class definition means that you cannot create an instance of
Person. Within the definition of Person, we can see that the toString and
birthday methods are concrete or defined methods, whereas the method
prettyPrint is not defined (it has no method body). The prettyPrint
method is what is known as an abstract method. Any class, which has one or more
abstract methods, is necessarily abstract (and must therefore have the keywords
abstract class). However, a class can be abstracted without specifying any
abstract methods.
An abstract class can also define any number of concrete methods. The method
birthday is a concrete method that adds one to the current age of the person.
Any subclass of Person must implement the prettyPrint method if
instances are to be created from it. Each subclass can define how to pretty print
itself in a different manner. The following Graduate class provides a concrete
class that builds on Person:
140 13 Classes, Inheritance and Abstraction
class Graduate(n: String, a: Int,
degree: String,
uni: String)extends Person(n, a) {
val institution:String =uni
def this(n: String, a: Int, degree: String) =
this(n, a, degree, "Oxford")
override def toString =
s"Graduate ${super.toString} $degree ]";
def prettyPrint = {
println("Graduate")
println("\tName: " + name)
println("\tAge: " + age)
println("\tDegree: " + degree)
println("\tUniversity: " + uni)
}
}
This class extends the class Person and also provides:
•The four-parameter constructor is used to passing the name and age for the
Person class’s primary constructor and to provide a degree and University for
the Graduate class.
•A three-parameter auxiliary constructor invokes the four-parameter primary
constructor.
•A concrete version of the prettyPrint method.
We can also return to the Employee class from earlier and see that it also
provides a concrete prettyPrint method and invokes the Person class’s
primary constructor:
class Employee(n: String, a: Int, company: String)
extends Person(n, a) {
final def prettyPrint(): Unit = {
println("Employee")
println("\tName: " + name)
println("\tAge: " + age)
println("\tCompany: " + company)
}
}
13.5 Abstract Classes 141
13.6 The Super Keyword
We have already seen that it is possible to override behaviour defined in a parent
class so that the version in the current class meets that needs of that class. The
method toString is a typical example of this. In numerous examples we have
redefined toString to create a string based on the data held by a class rather than
to use the generic version. To do this we used the keyword override and ensured
that the method signature (its name, parameters and return matched those defined in
the parent class).
However, rather than completely override the version of the method defined in
the parent class we can chose to extend its behaviour. This is done by defining a
new version of a method in a subclass and then using the keyword super to invoke
the version defined higher up the inheritance hierarchy.
For example, in the following example, the abstract class Base defines a method
print that prints out a message “Base print”. The subclass Derived extends Base and
overrides the method print. However within the body of the method it called
super.print that causes it to invoke the parent class’s version of print. Note this
call could be made anywhere within the body of the method print in Derived, it
does not need to be the first line of the method.
abstract class Base {
def print = println("Base print")
}
class Derived extends Base {
override def print {
super.print
println("Derived print")
}
}
The effect of the overridden print method in Derived is that it calls the parent
class’s version of print. This means that in effect it extends, rather than replaces, the
behaviour of the original version of print. Note that super tells Scala to start
searching up the class hierarchy for a version of print defined above the current
class in the hierarchy. In this case it is defined in the parent class, but it could have
been defined in a parent of Base—that is it starts searching Base and will continue
search up the class hierarchy until it finds another definition of print to execute.
To illustrate this idea we could create a simple application:
object Test extends App {
var d=new Derived()
d.print
}
142 13 Classes, Inheritance and Abstraction
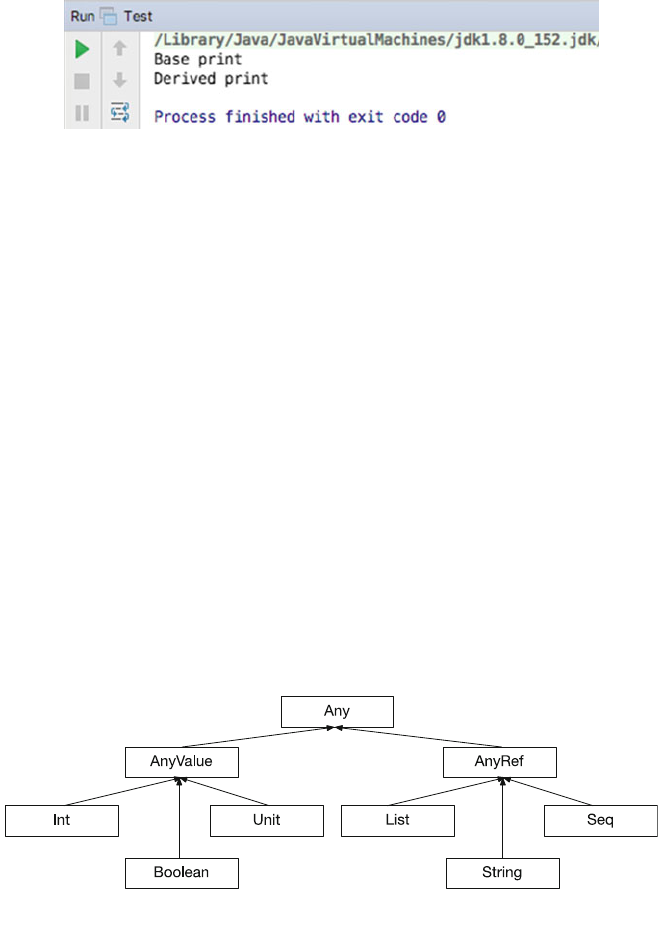
If we now run the above application, the output would be as shown below:
Here you can see that both the original version and the derived version of print
have been executed.
13.7 Scala Type Hierarchy
The type hierarchy in Scala is complicated by the presence of traits, but the core
types are divided between two types, AnyVal and AnyRef, with the class Any at the
root (see Fig. 13.2).
Thus the root of everything in Scala is the abstract class Any. Any has two
subclasses, the abstract AnyVal and the concrete AnyRef:
•AnyVal this is used to represent Value like types, such as Boolean, Char, Byte,
Short, Int, Long, Float, Double. Strictly speaking Scala has no primitive types—
these are objects. However, they are a special type of objects that are managed
by the Scala runtime efficiently.
•AnyRef this is used for all reference types such as classes and traits. Examples
of AnyRef subtypes include the data structure (or collection) classes such as
Array, List, Seq and String. It is also used as the root for all user-defined classes
that do not explicitly extend any other class.
Fig. 13.2 Simplified extract form Scala type hierarchy
13.6 The Super Keyword 143
13.8 Polymorphism
Polymorphism was a concept discussed earlier in the book relating to one of the
four key concepts in Object Orientation. In terms of Scala programming
Polymorphism means that a val or var local variable or property can actually
reference an instance of a particular type or any subtype of that type. Thus a var of
type Person can actually hold a reference to a Person (assuming it is not an abstract
type) or any subclass of Person (including Student, Employee and graduate, etc.).
For example, we can write:
object TestPolymorphism extends App {
var p: Person = new Graduate("Bill",21,"English")
println(p)
println("----------------------------")
p.prettyPrint
println("----------------------------")
p=new Employee("Adam",32,"MyCo")
println(p)
println("----------------------------")
p.prettyPrint
println("----------------------------")
}
In this test application the variable p is of type Person. It can thus reference a
Person,aGraduate or an Employee. Initially we are storing a reference to a
Graduate in p. We then call println on p (which causes the toString
method to be invoked on the instance reference by p and then call prettyPrint
on p. Both toString and prettyPrint can be guaranteed to be available in
whatever instance prefers to because the functionality in the class Person guar-
antees it. Any methods defined only in the Graduate are not visible via p
(although they are still present in the instance being referenced, they just cannot be
accessed at this point).
After this we create a new instance of the Employee class and store a reference
to that instance in p and then use toString to print the object out and
prettyPrint again. However, the behaviour that now executes is whatever
behaviour is either defined in Employee or inherited into Employee.
144 13 Classes, Inheritance and Abstraction
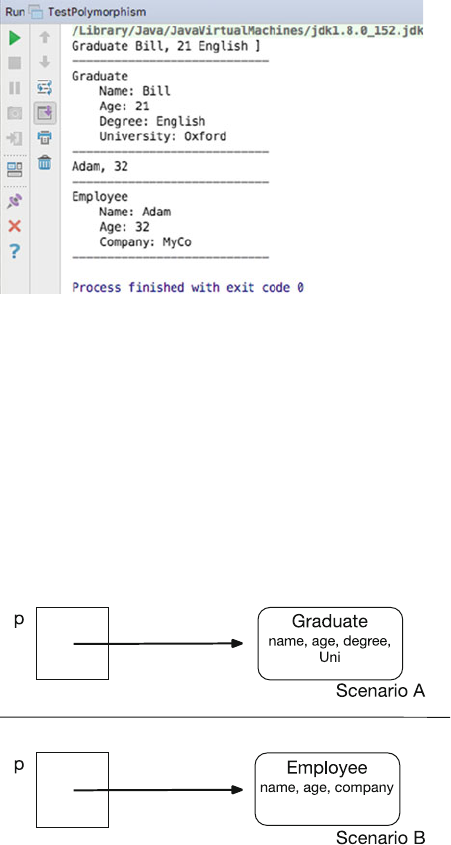
The output produced by this application is shown here.
The key here is that with polymorphism:
1. The type of the variable p acts as a filter—ensuring that only common behaviour
is accessible
2. But at runtime the actual definition of, for example, prettyPrint is
dynamically bound. That is, the version defined the class that the instance is
actually an example of what is executed.
The illustrate sees the following diagram, and scenario A indicates the situation
when p references a graduate. Thus when the prettyPrint method is called on p
at that point, it is the Graduate version of prettyPrint that is run. Scenario B
indicates the situation when p references an employee. Thus when prettyPrint
is called on this instance, it is the version in Employee that is run.
To summarise then, polymorphism in Scala is similar to that in languages such
as Java and C#, in that:
•A variable of type X can refer to instance of X or any subclass of X
•At runtime method invocations are dynamically bound based on the type of the
receiving object (not the type of the variable)
13.8 Polymorphism 145

Chapter 14
Objects and Instances
14.1 Introduction
This chapter will discuss the difference between objects in Scala and Instance of a
class. This is important as many other Object-Oriented languages use these terms
interchangeably. However, in Scala they are significantly different concepts,
defined with different language constructs and used in different ways.
14.2 Singleton Objects
Scala provides another type that can sit alongside the class types. It is directly
supported by the language construct object. A Scala object is a singleton object that
is accessible to any Scala code that has visibility of that object definition. The term
singleton here refers to the fact that there is a single instance of the object definition
within the virtual machine executing the Scala program. This is guaranteed by the
language itself and does not require any additional programmer intervention.
If you have never come across the concept of a Singleton object before it may
appear an odd idea. However, it is very widely and commonly used within the
Object-Oriented programming world. Examples of the singleton concept can be
found in Java, C#, Smalltalk, C++, etc. and have been documented in various ways
since it was first popularised in the so-called Gang of Four patterns book. The four
authors of this book, Erich Gamma, Richard Helm, Ralph Johnson and John
Vlissides (collectively known as the “Gang of Four”, or GoF for short) popularised
the patterns concepts and ideals.
So what are Design Patterns? They are essentially useful recurring solutions to
problems within designs. For example, “I want to loosely couple a set of objects,
how can I do this?”, might be a question facing a designer. The mediator Design
Pattern is one solution to this. If you are familiar with Design Patterns you can use
©Springer International Publishing AG 2018
J. Hunt, A Beginner’s Guide to Scala, Object Orientation and Functional
Programming, https://doi.org/10.1007/978-3-319-75771-1_14
147

them to solve problems that occur. Typically early in the design process, the
problems are more architectural/structural in nature, while later in the design pro-
cess they may be more behavioural. Design Patterns actually provide different types
of patterns some of which are at the architectural/structural level and some of which
are more behavioural. They can thus help every stage of the design process.
The Singleton pattern describes a type that can only have one instance con-
structed for it. That is, unlike other types it should not be possible to obtain more
than one instance within the same virtual machine. Thus the Singleton pattern
ensures that only one instance of a type is created. All elements that use an instance
of that type; use the same instance.
The motivation behind this pattern is that some classes, typically those classes
that involve the central management of a resource, should have exactly one
instance. For example, a object that managements the reuse of database connections
(i.e. a connection pool) could be a singleton.
However, implementing a singleton in some language can be more complex than
initially thought, as it is necessary to ensure that it is not possible to have multiple
instances of the singleton concept. Scala solves this problem by making the sin-
gleton concept part of the language.
You have already seen examples of the syntax used for singletons as that is the
syntax we have used for each of our application entry points (whether with an
explicit main method or by using the App trait). The syntax is:
Objects can
•extend classes,
•mix in traits,
•define methods and functions
•as well as properties (both vals and vars).
•But they cannot define constructors.
A simple singleton object is shown below:
This simplified mock connection pool object defines a count of the number of
connections being managed and a method next that adds to the count. This object
does not need to be instantiated to be used instead it can be referenced directly by
any client code:
148 14 Objects and Instances
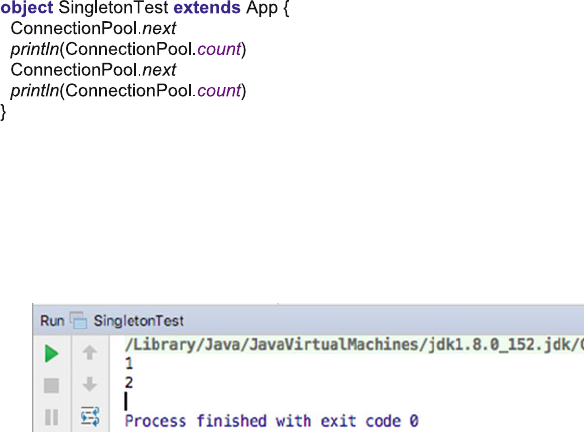
In the above client code we are accessing the functionality in next and the data in
count directly by reference to the name of the object (we did not create a new object
using the keyword new nor did we run a constructor).
The result of running this simple application is shown in below figure, indicating
that the same object is used throughout as the count is incremented from 1 to 2:
14.3 Companion Objects
Companion objects are singleton objects’for a class—they can be used to provide
utility functions such as factory methods that will support the concept being
modelled by the class. As a companion object is an object, it is a singleton instance
that sits alongside the class.
To define a companion object it must:
•Have the same name as the Companion Class.
•Must be defined in the same source file as the Class.
When used in this way companion objects are useful placeholders for static style
behaviour (as found in languages such as Java or C#).
From the point of view of the user of the class; the companion object and the
class appear to be a single concept. For example, consider the following definition
of a Session class and a companion object.
14.2 Singleton Objects 149

Notice that the object Session has a private counter (initialised to Zero) and
a private method next. By default all methods and properties are public (accessible
anywhere); here we are making the property counter and the method next visible
only within the Object Session.
The utility method create then uses the method next to increment the
counter before it creates a new Session instance. Note that we are using a ‘;’here
to separate the two statements as they are on the same line and Scala would infer
that they were related. I am also surrounding them with curly brackets ‘{..}’as this
is a multiple statement method and thus need to group them.
From a client of the Session concepts point of view they can now create a new
session using the create (factory) method or by using the keyword new and the
class name directly:
The first two session instances above are created using the Session objects
Create method and the third session instance is created using the new keyword.
From the client programmers point of view there is a single concept here Session
which can be instantiated into two ways. The advantage of the Create method is that
it handles ensuring an increment of the session ID whereas the use of new allows
any Session id to be used. The out of this program is shown below.
150 14 Objects and Instances
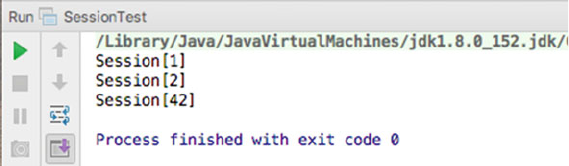
14.3.1 Companion Object Behaviour
It may at first seem unclear what should normally go in a method defined in the
class as opposed to what should go in a method defined in a companion object when
defining a new class. After all, they are both defined in the same file and relate to
the same concept. However, it is important to remember that one defines the
behaviour of which will be part of an instance and the other the behaviour of which
can be shared across the whole concept being implemented.
In order to maintain clarity companion object methods, should only perform one
of the following roles:
•Application Entry Point This role is very important as it is how you can use a
companion object as the root of an application. It is common to see main
methods (or the App trait) which do nothing other than create a new instance the
main class of an application and fire off the appropriate behaviour. For example,
object Editor extends App {
val editor = new EditorView()
editor.startDisplay
}
If you define such a method, but the class is not the root of the application, it is
ignored. This makes it a very useful way of providing a test harness for a given
class.
•Answering enquiries about the class This role can provide generally useful
objects, frequently derived from companion object variables. For example, they
may return the number of instances of this class that have been created using a
factory method.
•Instance management In this role, companion object methods control the
number of instances created. For example, a class only allows a ten instance to
be created. Instance management methods may also be used to access an
instance (e.g. randomly or in a given state).
14.3 Companion Objects 151
•Examples Occasionally, companion object methods are used to provide helpful
examples which explain the operation of a class.
•Testing companion object methods can be used to support the testing of an
instance of a class. You can use them to create an instance, perform an operation
and compare the result with a known value. If the values are different, the
method can report an error. However, test frameworks are generally a better
approach.
•Support for one of the above roles.
Any other tasks should be performed by a method (of function) defined in the
class.
14.3.2 A Object or an Instance
In some situations, you may only need to create a single instance of a class and
reference it wherever it is required. A continuing debate ponders whether it is worth
creating such an instance or whether it is better to define the required behaviour in a
companion object. The answer to this is not straightforward as there are several
factors that should be taken into account including:
•The use of an object in Scala guarantees you a singleton instance within the
current JVM. This means that it also limits you to a single instance in the current
JVM and over time this may be a problem.
•The creation of an instance has a very low overhead. This is a key feature in
Scala and it has received extensive attention.
•You may be tempted to treat the object as a global reference. This suggests that
the implementation has been poorly thought out.
In deciding whether to use a Scala object or a Scala class to hold data and/or
behaviour or functionality you need to consider the context in which it will be used,
how you expect to develop the concept and whether there will ever be a need for
more than one instance of that concept.
References
Gang of Four Design Patterns Book
•Gamma E, Helm R, Johnson R, Vlissades J (1995) Design Patterns: elements of
reusable Object-Oriented software, Addison-Wesley
Quick reference list of Design Patterns
152 14 Objects and Instances

Chapter 15
Value Classes
15.1 Introduction
This chapter introduces another type of class in Scala, Value Classes. A Value Class
is a type where the actual value being represented by the type class is hold directly
by a variable, rather than needing to access that value via a reference (an address in
memory). Examples of Value Types include Booelan, Int and Double which can
have the values true, false, 32, 45.7, etc. Such values can be held directly by a
variable, rather than accessed via a reference. This can be more efficient for simple
types like Int.
Value Classes inherit from AnyVal, rather than AnyRef. However, prior to Scala
2.10 AnyVal was actually a type of Trait not a Class. This meant that it was not
possible to create user-defined Value Types. However in Scala 2.10 AnyVal was
redefined as an abstract class. As it is normal to subclass abstract classes it is now
possible to create user-defined Value Classes. Thus subclasses of AnyVal are
user-defined Value Classes.
15.2 Value Classes
Value Classes are treated as special by the Scala compiler. That is, the compiler will
determine if it can inline the value to be used directly. This avoids the need to
allocate runtime objects and is thus more efficient and faster (as no allocation must
be made and no reference must be followed).
To ensure that the compiler can treat a value in this way it is necessary for the
programmer to ensure that no object allocation is performed within the type. Thus a
Value Type cannot hold within itself a reference to a non-Value Type (such as an
instance of the class Person). It must also ensure that the type being defined:
©Springer International Publishing AG 2018
J. Hunt, A Beginner’s Guide to Scala, Object Orientation and Functional
Programming, https://doi.org/10.1007/978-3-319-75771-1_15
155
•must extend AnyVal,
•must be immutable by nature (i.e. it should not change itself but return a new
instance whenever a change in value is required),
•must have a single public val parameter for the underlying type (i.e. the built-in
Value Type being wrapped),
•does not declare any additional fields within itself,
•cannot have any auxiliary constructors,
•cannot define any nested types such as classes, objects or traits,
•are not used in tests used to determine their type or in type-based pattern
matching,
•must not override the equals or hashcode methods,
•cannot have any initialisation statements.
However, they can have
•any methods or functions as required.
15.3 Simple Value Type Example
The following Value Type class meets the criteria defined in the last section. That
is, the Value Class Meter has a single val property value of type Double
(which is a built-in Value Type); it extends AnyVal directly and provides a method
‘+’. In addition it exhibits immutability. That is, when the ‘+’method is invoked, it
does not change value instead it returns a new instance of the Meter class rep-
resenting the new value:
class Meter(val value: Double) extends AnyVal {
def +(m: Meter) : Meter = new Meter(value + m.value)
}
The following simple application illustrates how this class may be used:
object Main extends App {
val x=new Meter(3.4)
val y=new Meter(4.3)
val z=x+y
Console.println("Result: " +z.value)
}
In this example, we create two instances of the Meter Value Class and store
them in the variables xand y. We then add them together and store the result in z.
Note that this line looks very much as it would if xand yheld Int or Doubles and
we added them together. The result is then printed out. The effect of running this
application is shown below.
156 15 Value Classes
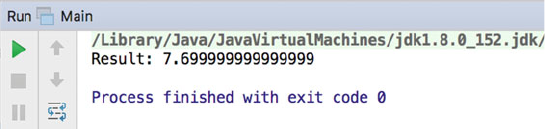
Interestingly the compiler actually replaces the references to Meter with the
primitives held within the Value Class at runtime. Thus there is virtually no
overhead in using Meter than in using Double directly. This raises the question
“Why bother?”The answer is twofold:
•Meter is more semantically meaningful than Double. That is Double is a
generic way of representing 54 bit real numbers. The Value Class Meter rep-
resents the concept of a length, i.e. a meter.
•Meter also allows methods to be defined that allow semantically meaningful
operations to be defined that can also indicate what is being done at a higher
level of abstraction than the basic type Double would allow.
15.4 Additional Value Class Concepts
Value Classes are implicitly treated as final classes, thus ensuring that they cannot
be extended by other classes. This is important as it restricts the need for poly-
morphism and thus allows the compiler to inline the values being represented.
Value Classes are implicitly assumed to have structural equality and hashcode.
That is, their equals and hashcode methods are taken to be defined as follows (and
this is why you must not redefine them):
def equals(other: Any) = other match {
case that: C => this.u == that.u
case _ => false
}
def hashCode = u.hashCode
Where u equates to the underlying (Value Type) property (such as Double, or
Int). In other words if the underliers have the same value, then the Value Types are
equal; otherwise, they are not equal. In addition the hashcode of a Value Type is the
hashcode of its underling type.
Value Classes can only mix in Universal Traits. If you try to mix in a trait which
is not a Universal Trait, then the class you are defining is not a Value Class but a
reference class. A Universal Trait is a special trait which extends the Any type
rather than the default AnyRef type.
15.3 Simple Value Type Example 157
You can make the Value Class a case class that simplifies the syntax and means
that you do not need to use the keyword new. This often makes for much more
readable and semantically clear Value classes. For example, taking the Meter class
defined earlier and changing it into a case class:
case class Meter(val value: Double) extends AnyVal {
def +(m: Meter) : Meter = new Meter(value + m.value)
}
This now means that we do not need to use the keyword new, and thus the test
application looks less as if we have created instance of a class and more as if Meter
was a built-in type:
object Main extends App {
val x=Meter(3.4)
val y=Meter(4.3)
val z=x+y
Console.println("Result: " +z.value)
}
15.5 Negating Value Classes
It should be noted that the compiler will not treat a class as a Value Class in some
situations. These are presented below:
The compiler will not treat an instance of a Value Class as a value when:
•It is used in an array—it will not inline values into an Array.
•It is used in pattern matching situations such as case statements.
•When used within any polymorphic situation. For example, where the type of
the variable relates to a more generic type (such as a trait).
158 15 Value Classes

Chapter 16
Scala Constructs
16.1 Introduction
This chapter presents more of the Scala language. It considers the representation
and use of numbers, strings and characters. It also discusses assignments, literals
and variables. Finally, it considers messages, message types and their precedence.
16.2 Numbers and Numeric Operators
16.2.1 Numeric Values
Just as in most programming languages, a numeric value in Scala is a series of
numbers which may or may not have a preceding sign and may contain a decimal
point:
25; −10; 1996; 12.45; 0.13451345; −3.14
Unusually for a programming language, Scala explicitly specifies the number of
bytes that must be used for data types such as Short, Int, Long, Float and Double:
The Scala language designers’purpose in specifying the number of bytes to use
for each data type was to enhance the portability of Scala implementations. In C,
the number of bytes used for int and long is at the discretion of the compiler
writers. The only constraint placed upon them is that int cannot be bigger than
long. This means that a program that compiles successfully on one machine may
prove unreliable and have errors when recompiled on another machine. This can
make porting a program from one system to another extremely frustrating (ask
anyone who has ever had to port a sizeable C system!) (Tables 16.1).
©Springer International Publishing AG 2018
J. Hunt, A Beginner’s Guide to Scala, Object Orientation and Functional
Programming, https://doi.org/10.1007/978-3-319-75771-1_16
159
16.2.2 Arithmetic Operators
In general, the arithmetic operators available in Scala are the same as in any other
language. There are also comparison functions and truncation functions (see
Table 16.2). Numbers can also be represented by objects which are instances of
classes such as Integer,Float. These classes are all subclasses of the class
Number and provide different facilities. However, some of the methods are fairly
common (Table 16.3).
A number of the numeric classes also provide class variables, such as
MAX_VALUE and MIN_VALUE (i.e. in Integer,Long,Double,Float), and
numbers such as NEGATIVE_INFINITY and POSITIVE_INFINITY (i.e. in
Double and Float).
In addition, Scala provides a class called Math. This class, which is a subclass
of Object, provides the usual range of mathematical operations (see Table 16.4).
All these methods are class (or static) methods available from the class Math. You
do not have to create an instance of the class to use them.
It is also interesting to notice that, to enhance the portability of Scala, the
language designers have stated that the definitions of many of the numeric methods
must produce the same results as a set of published algorithms.
Table 16.1 Standard
numbers of bytes for numeric
data types
Type Bytes Stores
Byte 1 Integers
Short 2 Integers
Int 4 Integers
Long 8 Integers
Float 4 32-bit IEEE 754 single-precision float
Double 8 64-bit IEEE 754 double-precision float
Table 16.2 Basic numeric
operators + Addition
−Subtraction
* Multiplication
/ Division
% Remainder
== Equality
< Less than
> Greater than
!= Inequality
<= Less than or equal to
>= Greater than or equal to
160 16 Scala Constructs
16.3 Characters and Strings
16.3.1 Characters
Characters in Scala are of type Char and are represented by 16-bit unsigned inte-
gers. In Scala, a single character is defined by surrounding it with single quotes:
'J' 'a' '@' '1' '$'
16.3.2 Strings
Strings in Scala are represented by the (Java) class String and examples of a
string are instances of this class. As such, they are made up of individual elements,
similar to strings in C. However, this is the only similarity between strings in C and
Scala. A Scala string is not terminated by a null character and should not be treated
as an array of characters. It should be treated as an object which responds to an
appropriate range of messages (e.g. for manipulating or extracting substrings)
(Table 16.5).
A string is defined by one or more characters placed between double quotes
(rather than the single quotes used for characters):
Table 16.3 Methods
provided by numeric classes equals() Equality
doubleValue() Conversion
toHexString() Conversion
valueOf(aString) Conversion (class-side)
toBinaryString() Conversion
toOctalString() Conversion
Table 16.4 Mathematical
functions provided by Math max Maximum
ceil Round up
round Round to nearest
abs Absolute value
pow Raises one number to the power of the other
min Minimum
floor Round down
sqrt Square root
exp Exponential
random Random number generator
16.3 Characters and Strings 161
"John Hunt" "Tuesday" "dog"
You cannot create a stringby generatingan array of characters. This can be the source
of much confusion and frustration when an apparently correct piece of code does not
work. A string containing a single character is not equivalent to that single character:
'a' ! = "a"
The string "a" and the character 'a' are, at best, instances of different classes
and, at worst, one may be an instance and one a basic type. The fact that the string
contains only one character is just a coincidence.
To denote that a variable should take an instance of String, define it as being of
type String:
val aVariable: String = "John"
Of course due to type inference in most situations Scala can infer that the type of
the variable should be String.
16.4 Assignments
A variable name can refer to different objects at different times. You can make
assignments to a variable name, using the = operator. It is often read as “becomes
equal to”(even though it is not preceded by a colon as in languages such as Ada).
Some examples of assignment statements follow:
currentEmployeeIndex = 1;
newIndex = oldIndex;
myName = "John Hunt";
Table 16.5 Methods provided by the class String
charAt(index: Int) Returns the character at position index
compareTo (anOtherString) Compares two strings lexicographically
equals(String aString) Compares two strings
equalsIgnoreCase (String
aString)
Compares two strings, ignoring the case of the characters
indexOf
(char aCharacter)
Returns the first index of the character in the receiving
string
substring
(int start, int stop)
Creates substring from start to stop (in the receiving string)
toLowerCase() Returns the receiver in lower case letters
toUpperCase() Returns the receiver in upper case letters
162 16 Scala Constructs
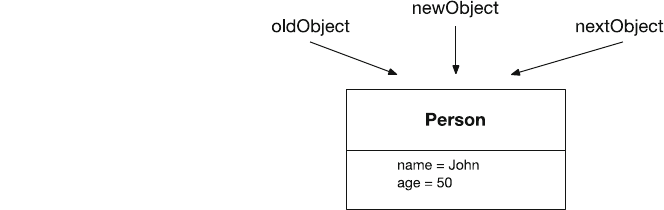
Like all Scala operators, the assignment operator returns a value. The result of an
assignment is the value of that assignment (thus the value of the expression
x=2+2;is 4). This means that several assignments can be made in the same
statement:
nextObject = newObject = oldObject;
The above example also illustrates a feature of Scala style—variable names that
indicate their contents. This technique is often used where a more meaningful name
(such as currentEmployeeIndex) is not available (temp might be used in
other languages).
Although variables in Scala are strongly typed, this typing is perhaps not as
strong as in languages such as Pascal and Ada. You can state that a variable is of
type Any.AsAny is a class, such a variable can possess instances of the class Any
or one of its subclasses! This means that a variable that holds a String may then be
assigned a Person or a List (a type of data structure) instance. This is quite
legitimate:
var temp: Any = new Person()
temp = "John"
temp = List(..)
An important point to note is that assignment is by reference when dealing with
objects. This means that, in the following example, nextObject,newObject
and oldObject all refer to the same object (as illustrated in Fig. 16.1)
newObject = oldObject = new Person(..)
nextObject = newObject;
As all three variables point to an instance of a class (in this case Person), if an
update is made to the contents of any one of the properties maintained by the person
(such as the age property), it is made for all three!
Fig. 16.1 Result of a
multiple assignment
16.4 Assignments 163
16.5 Variables
16.5.1 Temporary Variables
These variables exist only for the duration of some activity (e.g. the execution of a
method). They can be defined anywhere within a method (as long as they are
defined before they are used). The definition takes the form of the type (or class) of
the variable and the variable name followed by any initialisation required:
var aChar: Char;
var anotherChar = 'a';
var anInstance: AnyRef;
var myName = "John Hunt";
Note all of these are written as vars but they could equally have been vals. The
scope of a temporary variable depends on the context in which it is defined. For
example, variables declared at the top level of a method are in scope from the point
at which they are declared. However, block variables only have scope for the block
within which they are defined (including nested blocks). Loop variables only have
scope for the loop within which they are defined. Thus the scope of each of the
following variables is different:
def add (a: Int, b: Int): Int = {
val result = 0 r
for (i <-0to5){ ir
if (a < i) { ir
var total = b tir
total = total + c * i tir
}ir
}r
return result r
}
In the right-hand column, rindicates that result is in scope, iindicates the
scope of the loop variable and tindicates the scope of the inner block variable,
total.
164 16 Scala Constructs
16.5.2 Pseudo-Variables
A pseudo-variable is a special variable, whose value is changed by the system, but
which cannot be changed by the programmer. The value of a pseudo-variable is
determined by the current context and can be referenced within a method.
this is a pseudo-variable that refers to the receiver of a message itself. The
search for the corresponding method starts in the class of the receiver. To ensure
that your source code does not become cluttered, Scala assumes you mean this
object if you just issue a reference to a method. The following statements have the
same effect:
this.myName()
myName()
You can use this to pass a reference to the current object to another object:
otherObject.addLink(this)
16.5.3 Variable Scope
Temporary variables are only available within the method in which they are
defined. However, both class variables and instance variables are in scope (or are
visible) at a number of levels. An instance variable can be defined to be visible
(available) outside the class or the package, only within the package, within sub-
classes or only within the current class. The scope is specified by modifiers which
precede the variable definition:
Public val myName = "John Hunt";
16.5.4 Option, Some and None
Sometimes what we need to represent is that a variable currently does not hold
anything. The approach taken in Java was to represent such values as null. The idea
was that the null value is an object that represents nothing or no object. It is not of
any type nor it is an instance of any class (including Object). It really does means
nothing or no value. However, this has lead to the now much discussed
NullPointerException in Java which is generally considered now to be a weakness
of the language.
The approach adopted within Scala is to use a type called an Option. An Option
can hold any type or can be set to None. None indicates the absence of an actual
value but is not the same as Null in Java.
16.5 Variables 165
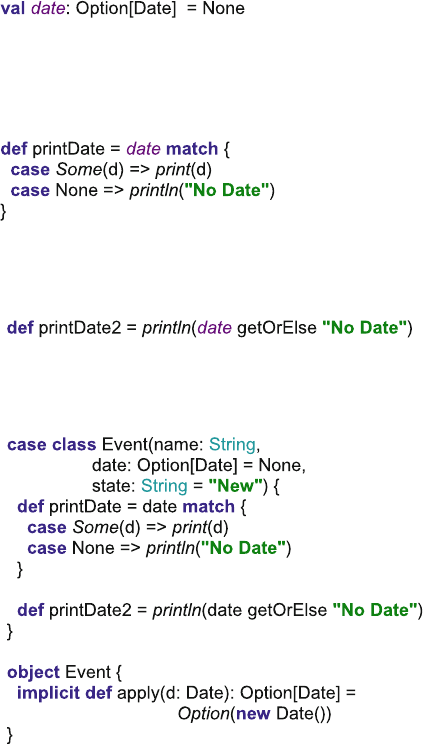
For example, using Option you can indicate that a variable date should hold a
Date type but currently a data has not been specified, for example:
This declares that the val date is holding an Option wrapper, around an instance
of Data but that currently this is initialised to None.
Such values can then be used within a match statement to perform one action if a
value is present or another action if there is no value (or None), for example:
Although a more idiomatic Scala approach would be to use the getOrElse
method on Option which indicates that you should return the value held by an
option or return some default value, for example:
As a more concrete example of using an option consider the following class
Event. This class represents some interesting event that has occurred within some
system at some point in time.
When the data associated with the Event is printed via the printDate method
where we either print the date or a string “No date”. Note that the companion object
Event defines a utility conversion method that will take a date and convert it into an
Option so that users of the class Event do not have to do this themselves. As the
apply is marked as implicit, if the method is in scope, then when Scala is looking
for a way to convert a Date into an option it can use this method automatically
without the programmer explicitly specifying it.
A simple example of using this class is shown below:
166 16 Scala Constructs
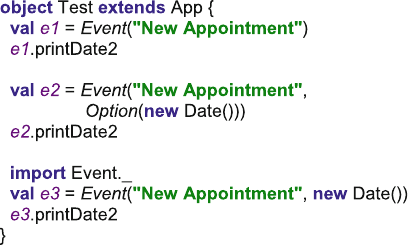
Note that the second Event created uses the implicit apply conversion method to
convert the new instantiated Date into an option. The output from this application is
No Date
Tue Dec 19 17:19:37 GMT 2017
Tue Dec 19 17:19:37 GMT 2017
16.5.5 Boolean Values
In Scala there is a specific type used to represent truth or falsehood. This is the
Boolean type. It has two values true and false which can be written as literals and
can be assigned to variables and values and used in logical operations.
16.5.6 Literals
All of the preceding types can be written in literal form. That is 23 is a literal Int,
23.0 a literal Double, ‘A’a Char and “John”a String literal. Scala also supports
literals written using:
–Hexadecimal preceding the literal with Ox
–Octal preceding the literal with O5=
–Integer ending with L or l is a Long
–Character literals in ‘‘ e.g. ‘A’
–Character literal preceded by \u is a Unicode character, e.g. ‘\u0041’
–Symbol literal is ‘aSymbol
16.5 Variables 167
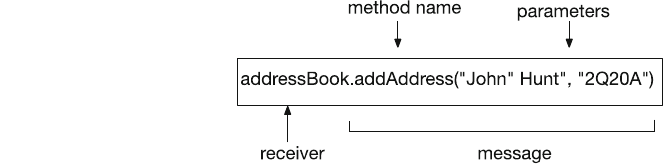
16.6 Messages and Message Selectors
16.6.1 Invoking Methods
Invoking a method is often referred to as sending a message to the object that owns
the method. The expression which invokes a method is composed of a receiving
object (the receiver), the method name and Zero or more parameters. The combi-
nation of method name and parameters is often called the message and it indicates,
to the class of the receiving object, which method to execute. Figure 16.2 illustrates
the main components of a message expression.
The value of an expression is determined by the definition of the method it
invokes. Some methods are defined as returning no value (e.g. Unit) while others
may return a Value Type (such as Int) or instance. In the following code, the result
returned by the method marries is saved into the variable newStatus:
newStatus = thisPerson.marries(thatPerson)
16.6.2 Precedence
The rules governing precedence in Scala are similar to those in other languages.
Precedence refers to the order in which operators are evaluated in an expression.
Many languages, such as C, explicitly specify the order of evaluation of expressions
such as the following:
2+5*3−4/2;
Scala is no exception. The rules regarding precedence are summarised in
Table 16.6. The above expression would be evaluated as:
(2 + (5 * 3)) −(4 / 2);
Notice that if operators with the same precedence are encountered they are
evaluated strictly from left to right.
Fig. 16.2 Components of a
message expression
168 16 Scala Constructs

16.7 Summary
In this chapter and the previous, you have learnt about classes in Scala, how they
are defined, how instance variables are specified and how methods are constructed.
You have also encountered many of the basic Scala language structures.
Table 16.6 Operator precedence
Operation Meaning Precedence
x++ −−x Prefix increment/decrement 16
x++ x−− Postfix increment/decrement 15
–!*Arithmetic negation/logical not/flip 14
(typename) Cast (type conversion) 13
* / % Multiplication/division/remainder 12
+−Addition/subtraction 11
>>> Left and right bitwise operators 10
< > <= >= Relational operators 9
== != Equality operators 8
& Bitwise and 7
^ Bitwise exclusive or 6
| Bitwise or 5
&& Conditional and 4
|| Conditional or 3
? : Conditional operators 2
¼Assignment operator 1
16.7 Summary 169

Chapter 17
Control and Iteration
17.1 Introduction
This chapter introduces control and iteration in Scala. In Scala, as in many other
languages, the mainstay of the control and iteration processes is the if and
switch statements and the for and while loops.
17.2 Control Structures
17.2.1 The if Statement
The basic format of an if statement in Scala is the same as that in languages such
as C, Pascal and Java. A test is performed and, depending on the result of the test, a
statement is performed. A set of statements to be executed can be grouped together
in curly brackets { }. For example,
if (a == 5)
println("true")
else
println("false")
if (a == 5) {
print("a = 5")
println("The answer is therefore true")
}else {
print("a != 5")
println("The answer is therefore false")
}
©Springer International Publishing AG 2018
J. Hunt, A Beginner’s Guide to Scala, Object Orientation and Functional
Programming, https://doi.org/10.1007/978-3-319-75771-1_17
171
Of course, the if statement need not include the optional else construct:
if (a == 5) {
print("a = 5")
println("The answer is therefore true")
}
You must have a Boolean in a condition expression, so you cannot make the
same equality mistake as in C. The following code always generates a compile time
error:
if (a = 1) {
…
}
Unfortunately, assigning a Boolean to a variable results in a boolean (all
expressions return a result) and thus the following code is legal, but does not result
in the intended behaviour (the string “Hello”is always printed on the console):
var a = false
if (a = true)
println("Hello")
You can construct nested if statements, as in any other language:
if (count < 100)
if (index < 10)
{…}
else
{…}
else
{…}
However, it is easy to get confused. Scala does not provide an explicit
if-then-elseif-else type of structure. In some languages, you can write:
if (n < 10)
print ("less than 10");
else if (n < 100)
print ("greater than 10 but less than 100");
else if (n < 1000)
172 17 Control and Iteration
print ("greater than 100 but less then 1000");
else
print ("greater than 1000");
This code is intended to be read as laid out above. However if we write it in
Scala, it should be laid out as below:
if (n < 10)
print ("less than 10")
else if (n < 100)
print ("greater than 10 but less than 100")
else if (n < 1000)
print ("> than 100 but < 1000")
else
print ("> than 1000")
This code clearly has a very different meaning (although it may have the same
effect). This can lead to the infamous “dangling else”problem. Another solution is
the switch statement. However, as you will see the switch statement has sig-
nificant limitations.
17.2.2 If Returns a Value
Almost all statements in Scala return a result, and the if statement is no different.
This means that you can use an if statement to determine the value to assign to a
value (or pass to a method, etc.). For example, the following code assigns either the
string “Dad”or the string “No Data”to the value role defining the current string
referenced by the variable name:
val role =
if (name == "John")
"Dad"
else
"No Data"
p
rintln(role)
This is a very useful feature of the if statement which can be used effectively in
many situations.
17.2 Control Structures 173
17.3 Iteration
Iteration in Scala is accomplished using the for,while and do-while state-
ments. Just like their counterparts in other languages, these statements repeat a
sequence of instructions a given number of times.
17.3.1 For Loops
Afor loop in Scala is very similar to a for loop in other languages. It is used to
step a variable through a series of values until a given test is met. Many languages
have a very simple for loop, for example,
fori=0to10do
…
endfor;
In this case a variable I would take the values 0, 1, 2, 3, etc., up to 10. The
longhand form of this in Scala is:
for (i <- (0).to(10)) {
print(i)
}
Note that in the above to is a method calls on the Int (integer) type. In practice,
this is a lower level implementation issue, and it would be far more common to
write:
for (i <- 0to 10)print(i)
This can be done as Scala can infer the brackets and the dot which has the benefit
that it will look far more familiar as a language construct to those used to pro-
gramming languages such as C and Pascal.
One thing to note is that the operator here includes the value 10, whereas in
languages such as C and Java it would mean up to but not including 10.
Multiple indexes can be used with a for loop. For example, we could increment I
from 1 to 3 and j from 5 to 7:
object MultipleForLoopTest extends App {
for (i <- 1to 3; j <- 5to 7) {
print("Value of i: " + i);
println(" / Value of j: " + j);
}
}
This may not have the effect you expect. This equates to loop the value of I
through 1 to 3 for each of the values of j; thus, the output is:
174 17 Control and Iteration
Value of i: 1 / Value of j: 5
Value of i: 1 / Value of j: 6
Value of i: 1 / Value of j: 7
Value of i: 2 / Value of j: 5
Value of i: 2 / Value of j: 6
Value of i: 2 / Value of j: 7
Value of i: 3 / Value of j: 5
Value of i: 3 / Value of j: 6
Value of i: 3 / Value of j: 7
As you can see from this, the value of I remains constant for all values of j and is
then incremented for a repeated for the values of j.
17.3.2 For Until
An alternative to the to operator is the until operator which indicates that a variable i
should loop unto but not including the higher bound, thus:
for (i <- 1until 4)println(i)
Producers the output:
1
2
3
But does not include the value 4.
17.3.3 For Loop with a Filter
Another option with the for loop is to include a filter into the looping process. This
can be used to filter out those elements within a loop that you do not want to
process. A filter is an additional logical test added to the for loop following the
iteration values already presented. For example, assuming that the variable files
contain some form of list of files, we can add an extra test to check so that we only
print out files where the filename ends with “.txt”:
for (f <- files if f.getName.endsWith(".txt"))
println(f)
With this loop each file in the list of files is tested such that the name is first
obtained (getName) and then the string method endsWith tests to see if the filename
ends with “.txt”; if it does, then the file is processed by the loop—which in this case
involving printing out the file. If the filename does not end with “.txt,”then the loop
immediately moves onto the name file in the list.
17.3 Iteration 175
The complete program for this example is shown below:
import java.io.File
object FileLoopTest extends App {
val files = (new File(".")).listFiles
for (f <- files if f.getName.endsWith(".txt"))
println(f)
}
Note that any number of if conditions can be added to provide multiple filters on
a for loop. Each if condition is separated by a ‘;’, for example,
for (f <- files if f.getName.startsWith("Help"); i
f
f.getName.endsWith(".txt"))
println(f)
17.3.4 Longhand for Loop
Although we have looked at a number of different for loops in the preceding
sections, they are all subsets of the full for loop which is made up of a generator, an
optional definition and a filter. Thus you could write:
for (
p <- persons ; // a generator
n = p.name ; // a definition
if (n startsWith "To") // a filte
r
)println(n)
With the definition being reset each time round a loop.
17.3.5 For-Yield Loop
A special for loop is a for-yield loop. It is particularly useful for collecting together
a set of results from a for loop that can be processed by other code rather than
performing the processing directly within the for loop.
That is, the value of the all the previous for loops (from the point of view of the
expression being evaluated when the for loop executes) is Unit or nothing.
However, using a yield then each time around the loop a yield expression can be
evaluated and the results of the expression are collected together and made available
to subsequent lines of code once the for loop has completed.
176 17 Control and Iteration
The general syntax for a for-yield loop is:
for (sequence) yield expression
Examples of the use of the for-yield loop are shown below:
val data =for (i <- 1to 5)yield 10 * i
produces a sequence of values (10, 20, 30, 40, 50) held in the val data
val info =for (n <- List("one","two","three")) yield n.substring(0,2)
produces a list of values List(on, tw, th) held in info.
In both cases subsequent code could process either the data variable or the info
variable. This is a very powerful construct for creating a collection of data items to
be further processed from some loop-based operations.
17.3.6 While Loops
The while loop exists in almost all programming languages. In most cases, it has a
basic form such as:
while (test expression)
statement
This is also true for Scala. The while expression controls the execution of one
or more statements. If more than one statement is to be executed, then the state-
ments must be enclosed in curly brackets { }:
var i=0;
while (i<10) {
println(i)
i+= 1
}
The above loop tests to see if the value of iis less than or equal to 10, and then
prints the current value of ibefore incrementing it by one. This is repeated until the
test expression returns false (i.e. i=11).
You must assign ian initial value before the condition expression. If you do not
provide an initial value for i, it defaults to none value, and the comparison with a
numeric value raises an exception.
The behaviour of the while loop is illustrated in Fig. 17.1.
17.3 Iteration 177

17.3.7 Do Loops
In some cases, we want to execute the body of statements at least once; you can
accomplish this with the do loop construct:
do
statement
while (test expression);
This loop is guaranteed to execute at least once, as the test is only performed
after the statement has been evaluated. As with the while loop, the do loop
repeats until the condition is false. You can repeat more than one statement by
bracketing a series of statements into a block using curly brackets { }:
var n = 10
do {
println(n)
n= n –1
}while (n > 0)
The above do loop prints the numbers from 10 down to 1 and terminates when n
= 0. The logic of the while loop is illustrated in Fig. 17.2.
Fig. 17.1 Behaviour of a
while loop
178 17 Control and Iteration
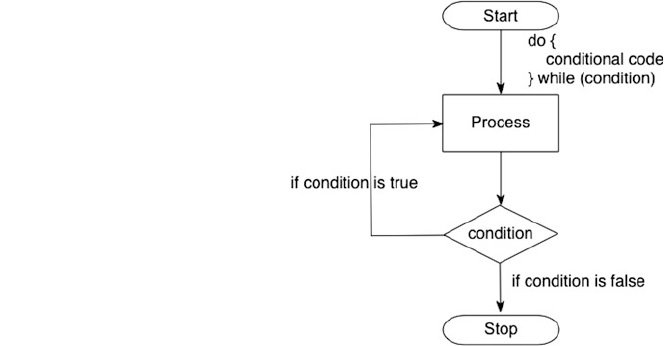
17.3.8 An Example of Loops
As a concrete example of the for and while loops, consider the following class.
It possesses a method that prints numbers from 0 to the MaxValue variable:
class Counter {
var MaxValue =10
def count() = {
var i = 0
println("----- For -------------");
for (i <- 0to MaxValue) {
print(" " + i)
}
println(" ")
println("----- While -----------")
i = 0
while (i <= MaxValue) {
print(" " + i)
i = i + 1
}
println(" ")
println("-----------------------")
}
}
object Counter extends App {
val c=new Counter()
c.count
}
Fig. 17.2 Behaviour of a do
loop
17.3 Iteration 179
The result of running this application will be:
----------For--------------
012345678910
----------While------------
012345678910
-----------------------------
17.4 Equality
Two instances may be considered equivalent if their contents are the same. This
equivalence is defined by the equals method on a class and is used by the ‘==’and
‘!=”operators, where:
•== tests for equality
•! = tests for not equals
The equality operators are actually invoked on the left-hand operand with the
right-hand operand being passed to the operator as a parameter.
You can compare two instances using == and ! = , for example,
•1 == 2 // false
•1 ! = 2 // true
•1 == 1.0 // true
•List(1, 2, 3) == List(1, 2, 3) // true
•List(1, 2, 3) == ”John”// false
Note that there is also a referential equality operator in Scala. This is provided
by ‘eq’method. This method tests that the two instances being compared are
literally the same instance rather than just equivalent in value.
17.5 Recursion
Recursion is a very powerful programming idiom found in many languages. Scala
is no exception. The following class illustrates how to use recursion to generate the
factorial of a number:
180 17 Control and Iteration

class Factorial {
def factorial(number: Int): Int = {
println(number)
if (number == 1)
return 1
else
return { number + factorial(number - 1) }
}
}
object FactorialTest extends App {
val f=new Factorial()
println("= " +f.factorial(5))
}
The result of running this application is illustrated here.
One problem for recursion is that although it is elegant to program, it may not be
the most efficient runtime solution. However, Scala can optimise tail-recursive
methods such that it can be expressed via recursion in terms of the program but
optimised into an iterative loop at runtime. Since Scala 2.8, you can now mark a
method that you expect to use tail recursion with the annotation @tailrec. An
annotation is a piece of metadata that the runtime can use to perform additional
processing, etc. This allows you to indicate that the method should be optimisable
for tail recursion by the compiler. It thus allows the compiler to provide a warning if
the method does not succeed in being tail recursive. For example,
object Util {
def factorial(n: Int): Int = {
@tailrec
def factorialAcc(acc: Int, n: Int): Int = {
if (n <= 1) acc
else factorialAcc(n * acc, n - 1)
}
factorialAcc(1, n)
}
}
package com.jjh.scala.tail
import scala.annotation.tailrec
17.5 Recursion 181
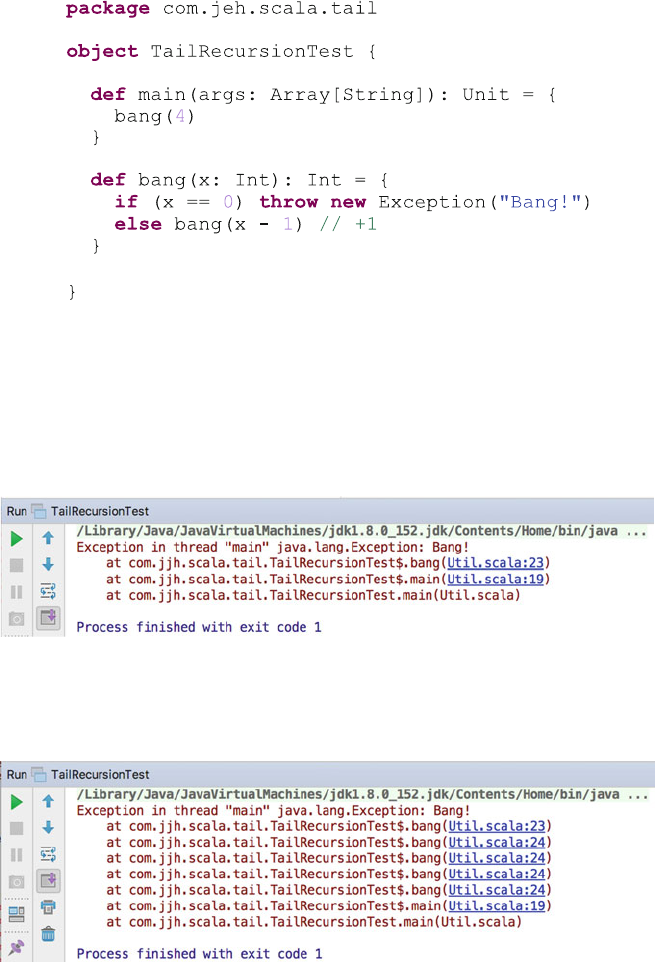
To understand why this makes a difference consider the following method:
The method bang intentionally throws an Exception (causes an error to occur)
when x is Zero. This allows you to see what the compiler has done with the runtime
version of the code. With the +1 element of the else part of the if statement
commented out this is a tail-recursive method. When we run this program, the
output is as shown below:
If we now uncomment the +1 at the end of the ‘if’statement and rerun this
program, we now get:
182 17 Control and Iteration
What you can see is that the first version has been converted into an iterative
loop which does not need to keep calling itself (which is inefficient at runtime).
However, with the second example we have called the same bang method
multiple times which has resulted in the need to handle each call separated (set-up
the call stack for each method invocation) which is far less efficient.
Thus knowing whether the recursive method is tail recursive or not is an
important consideration.
17.5.1 The Match Expression
Scala’s match expression allows for a selection to be made between a number of
alternative tests and as such is similar in nature to the case statement in Pascal and C
or the switch statement in Java. However, compared to the switch statement in Java
allows much wider pattern matching capability in the case clause of the expression
this provides for a far more powerful and flexible construct. Also note that the
match expression is an expression (and not just a statement), thus it returns a value
and can be used as part of an assignment clause.
The pattern element of the match expression is much more flexible than in
languages such as C and Java and can be any one of the following:
•a literal,
•a wild card (to match anything),
•a type,
•a variable which will be populated,
•of different types,
•tuple patterns, etc.
As an example, consider the following simple literal match test:
object MatchTest extends App {
val arg ="John"
val relationship =
arg match {
case "John" => "Dad"
case "Denise" => "Mum"
case "Phoebe" => "Daughter"
case "Adam" => "Son"
// Default / wildcard
case _ => "WhoAreYou?"
}
println(relationship)
}
17.5 Recursion 183
This example compares the arg varl with the String literals “John”,“Denise”,
“Phoebe”and “Adam”. If it is one of these values, it returns the string associated
with that literal. Thus if arg holds the string “John”, then the match expression will
return the String “Dad”. The result of the match expression is then saved into the
relationship val and printed out. If the value held in arg is not one of the strings
explicitly mentioned then it will use the default (wild card) case test. Thus any other
string in arg will result in “WhoAreYou?”being returned by the match expression.
Note in match expression “_”is being used as a wild card that will match any string
not mentioned above in the case tests.
However, unlike many other languages the literals used in the individual case
tests do not need to be of the same type. For example, the following uses four
different types of literal from an Int, to a Boolean, to a string and an empty list (Nil):
object MatchTest2 {
def main(args: Array[String]): Unit = {
println(describe(5))
println(describe(true))
println(describe("hello"))
println(describe(Nil))
println(describe(List(1,2,3)))
}
def describe(x: Any) = x match {
case 5=> "five"
case true => "truth"
case "hello" => "welcome message"
case Nil => "The empty list"
case _ => "something else"
}
}
The type of the parameter x is Any which is the root of everything in Scala, and
thus x can indeed hold any type of value. We can now use the method describe to
produce a printed string for any type of value in Scala—although unless it is the
value 5, true, “hello”or Nil, it will print the description as “something else”.
A variable on the last example allows us to use a variable in the case test of the
wild card to obtain the actual value passed in and to use that in the expression being
evaluated:
184 17 Control and Iteration
object MatchTest3 {
def main(args: Array[String]): Unit = {
println(describe(5))
println(describe(true))
println(describe("hello"))
println(describe(Nil))
println(describe(List(1,2,3)))
}
def describe(x: Any) = x match {
case 5=> "five"
case true => "truth"
case "hello" => "welcome message"
case Nil => "The empty list"
case somethingElseVariable => "something else: " +
somethingElseVariable
}
}
Now when something other than the value 5, true, “hello”or Nil is passed in,
then the result will be that the string “something else: “concatenated with that thing
in string format will be returned by the described method.
We can also match by type rather than by specific value. For example, in the
following example if the type of data passed in is a String, then the first case test
will pass and the string will be bound to the variables and thus available for
processing in the resultant operation associated with that test. In turn if the instance
passed into getSize is a List, then it will pass the second test and be bound to the
variable l and be available to the operation following this test. If the instance passed
to getSize is actually a Map, then it will meet the criteria specified by the third case
test. The result in each case is that an appropriate method is called to determine the
size of the instance passed to getSize. If the instance is not a String, a List or a Map,
then −1 is returned by default:
17.5 Recursion 185
def main(args: Array[String]): Unit = {
val name = "John"
println(getSize(name))
val xxx = List(1,2,3)
println(getSize(xxx))
val myMap = Map("London" -> "01","Cardiff" -> "020")
println(getSize(myMap))
val otherMap = Map(1-> "a",2-> "b",3->"c")
println(getSize(otherMap))
val lectureMap =
Map("John" -> "Scala","Fed" -> "PHP")
println(getSize(lectureMap))
val info = (1,2,3)
println(getSize(info))
}
def getSize(x: Any) = x match {
case s: String => s.length()
case l: List[_] => l.size
case m: Map[_,_] => m.size
case _ => -1
}
}
object MatchTest4 {
186 17 Control and Iteration

Chapter 18
Traits
18.1 Introduction
In the previous chapters there have already been several references to these things
called Traits. For example, we have encountered the App trait numerous times.
However, we have avoided the question “What are traits?”
In this chapter we will look at the core concepts behind traits and attempt to
explain how and why you might want to use them. The next chapter will then
explore some more advanced uses and concepts within the area of Traits.
18.2 What Are Traits?
Let us start of with what Traits are not:
•They are not Classes or Objects.
•They are not Abstract Classes.
•They are not (Java and C#) Interfaces.
•They cannot be instantiated directly.
However, Traits are part of the type system in Scala. That is a Trait defines a
type just as a class defines a type. Thus vals and vars, properties parameters, return
types, etc., can all be of a type defined by a Trait and can reference instances (or
indeed objects) that mix in a Trait.
They are also a fundamental unit of reuse within the Scala language. If you use
Traits appropriately, you will find that they allow you to reuse code very elegantly
and in a much cleaner way than is possible with Java (or C#) interfaces and abstract
classes.
Traits allow you to define methods, functions and properties. They also allow
you to define abstract methods, functions and properties. They allow type
©Springer International Publishing AG 2018
J. Hunt, A Beginner’s Guide to Scala, Object Orientation and Functional
Programming, https://doi.org/10.1007/978-3-319-75771-1_18
187
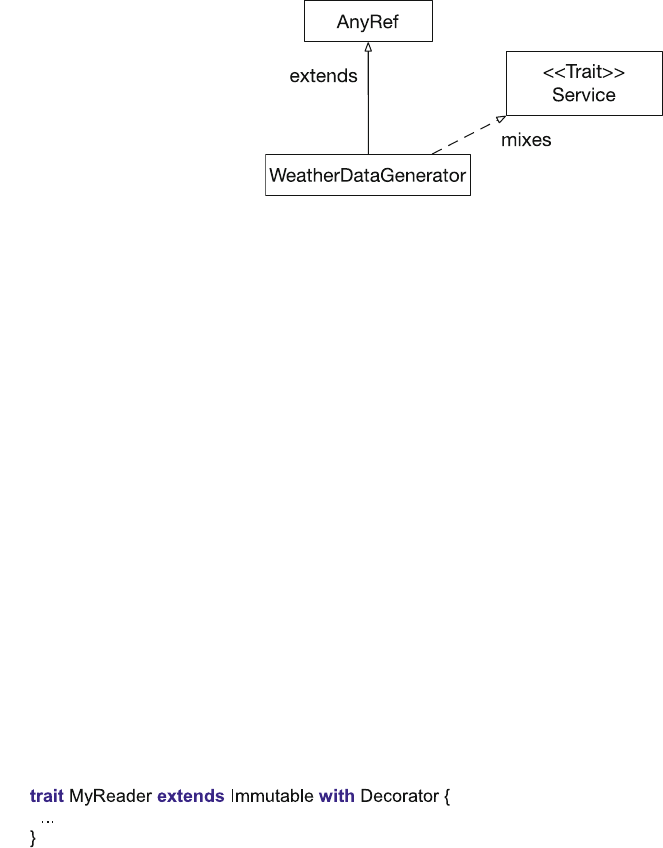
declarations and can use a self-reference to indicate the types that they expect to be
used with. When you define a method, a function or a property they can be made
available to the type (Class or Object) that the Trait is used with.
Adding a Trait to a class or object is referred to as mixing in a Trait to that type.
In fact a class or object can mix in any number of traits allowing for a great deal of
flexibility and reuse of Traits. This idea is illustrated in Fig. 18.1. In this diagram
the class WeatherDataGenerator extends the class AnyRef (the default super class)
and mixes in the Trait Service. Thus the WeatherDataGenerator is a reference type
and a Service.
You will find many texts refer to a class or object as inheriting form a Trait
(partly due to the syntax used with Traits); however, I will restrict this terminology
to the relationship between one Trait and a subTrait that directly inherits the fea-
tures of that Trait. Thus inheritance is possible between Traits, and we can use
terms such as Super Trait, Trait and SubTrait to refer to the inheritance relationships
between traits. This idea is illustrated in Fig. 18.2.
Note that in Fig. 18.2 the root of the Trait hierarchy is shown as extending
AnyRef. Prior to Scala 2.10 this was the only option—all traits extended AnyRef;
however, since Scala 2.10 you can also make a Trait extend AnyVal that is used for
Universal Traits that are discussed later in the chapter.
Also note that a trait can extend one Trait but can mix in any additional traits
required using with. This Traits support multiple inheritance rather than single
inheritance. It is thus legal to write:
In summary, a Trait is a reusable type that can be combined with Classes and
Objects to provide a very significant form of code reuse in Scala.
Fig. 18.1 Mixing a Trait into
a class
188 18 Traits
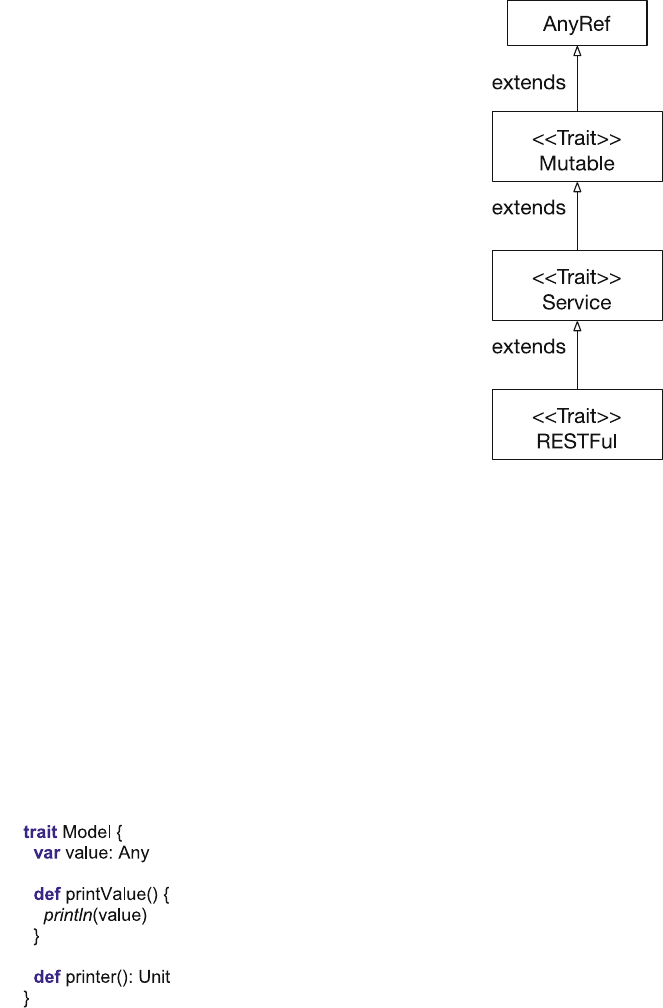
18.3 Defining a Trait
A trait is defined by the keyword trait, this is followed by the name of the Trait with
the body of the trait defined between curly brackets ‘{..}’.
access-modifier trait <name> extends <super trait> {..}
Trait definitions can have any number or combination of concrete methods,
functions, properties, field, type definitions. It can also have any number or com-
bination of abstract methods, functions and properties. However, Traits do not have
constructors (either primary or auxiliary) and may or may not have the extends
keyword to indicate inheritance.
A simple example of a trait definition is presented below.
Fig. 18.2 Trait inheritance
hierarchy
18.3 Defining a Trait 189
This trait, called Model, defines
•a method printValue() that returns Unit,
•an abstract property value which can hold Any type of element but currently is
not initialised (and is thus abstract),
•an abstract method printer() which returns Unit.
Note that this is not an abstract class (a concept which Scala also supports); it is a
Trait that can optionally have concrete (fully defined) methods, functions and
properties or abstract methods functions and properties. Any abstract member of the
trait will have to be defined either in a subTrait of this trait, or in a class or object
with which this trait is mixed.
Note that in this example all the members (that is the property value and the two
methods) are public as this is the default in Scala. However, any member can have
either of the encapsulation modifiers applied to them. Thus the methods or the
property could be private or protected (and may be qualified).
18.4 Using a Trait
How do you use the trait presented in the last section? You cannot instantiate it
directly, you cannot invoke the behaviour defined in it directly; you must mix it into
a class or an object.
That is, classes and objects mix in traits such as Model. Any class or object that
does this obtains the method printValue and must implement the abstract members
value and printer. The keyword used to do this differs depending on whether the
class or object being used currently extends a named class or not.
If the class or object does not extend a named class, then the keyword extends is
used to indicate the first trait to mix in. If extends is already being used to extend a
named class, then the keyword with is used to indicate the first trait to mix in. Any
subsequent traits are always indicated via the keyword with.
Thus the generic syntax is actually:
Class <class-name> extends <class or if no class a Trait> with <Trait> with
<Trait> …
Object <object-name> extends <class or if no class a Trait> with <Trait> with
<Trait> …
190 18 Traits
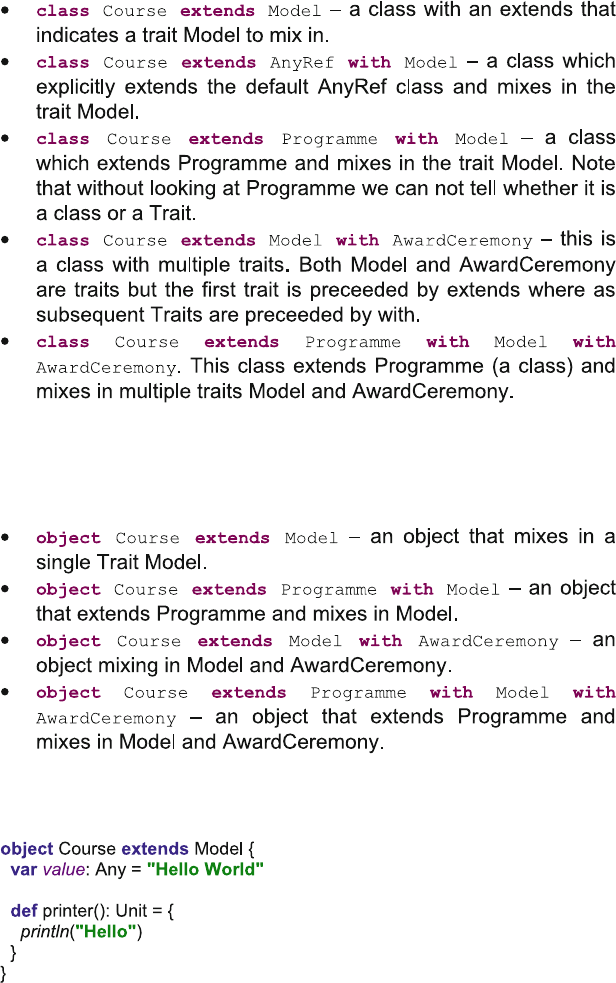
The following list illustrates several different combinations:
Note that we have used classes above, but the same can be done with Objects.
For example,
As a concrete example of this consider the following listing:
18.4 Using a Trait 191
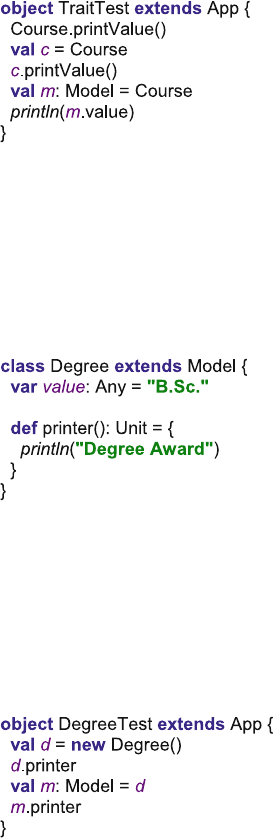
This object mixes in the Model trait (even though it uses the extends keyword)
and implements the abstract value property and the abstract printer method. It
therefore meets the contract of the Model trait (which required the two abstract
members to be implemented by a concrete class or object).
It is now possible to treat the Course object as either a Course or as a Model, for
example,
This simple test application assigns the Course object to the val ‘c’and then
invokes the printValue method on ‘c’(of course we could also have invoked it
directly on the Course object). We then assign c to the val ‘m’that is of type Model
(we have explicitly stated that in the declaration of m). This is perfectly legal
because in terms of the Scala type system, a Course is also a Model.
Of course we are not limited to do this with objects; we could also use a class
declaration, for example,
This class mixes in the Model trait into the class Degree and as before this means
that it must implement the value property and the printer method (otherwise we
would be defining an abstract class which would require us to prefix the class
keyword with the keyword abstract and would mean that we could not instantiate
the class).
The following listing shows how you can instantiate the Degree class and treat it
as a Degree type or a Model type (or indeed an AnyRef or Any type):
192 18 Traits

18.5 Abstract Trait Members
The members of a trait (i.e. the properties, types, methods and functions defined
within a trait) can be abstracted (as illustrated in the Model trait). The following
Sample trait illustrates an abstract type T, an abstract method transform and two
abstract properties; a read only (val) initial and a read-write (var) current.
The implementing class (or object) must provide implementations for all the
abstract members:
This class defines a concrete-type String for the type T (which can then be used
within the rest of the trait). It also provides an implementation for the transform
method that takes a parameter of type T (String) and concatenates it to itself. It also
sets initial to the string “first”and current to the value set in initial.
18.6 Dynamic Binding of Traits
There is another way in which you can combine a trait with a class. It is possible to
mix in a trait at the point that an instance of a given class is created. For example,
given the class Person that contains a name property and an override of the toString
method defined as follows:
18.5 Abstract Trait Members 193
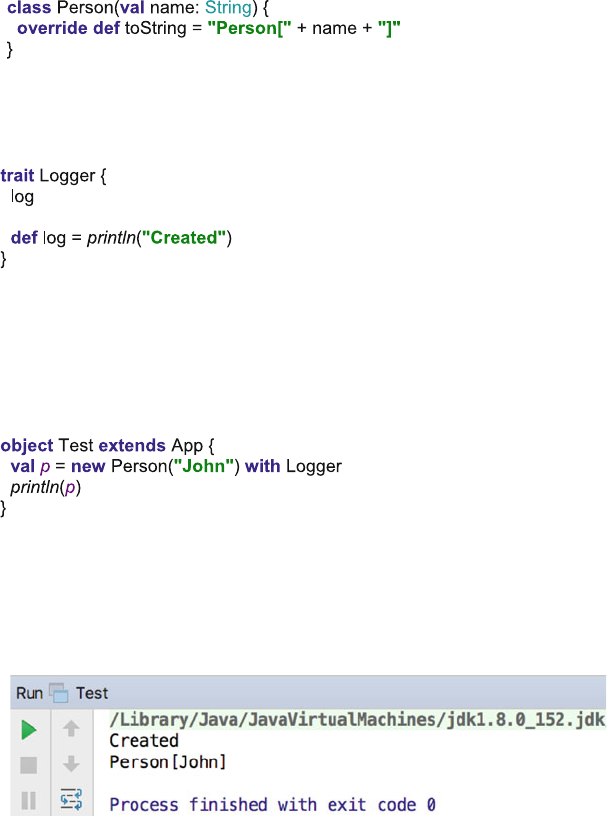
We can also define a trait Logger that defines a single method log that prints out
a“Created”string and runs the Log method whenever anything it is mixed with is
instantiated (the invocation of the Log method):
The trait Logger can be mixed into an instance of the class Person dynamically
when that instance is created by combining the call to new with an additional
reference to the trait via the with keyword. The syntax for this is:
new <classname> (<params>) with <traitname>
For example,
As you can see form this we are creating a new instance of Person and mixing in
Logger at the same time. Thus the instance referenced by the val ‘p’is both a
Person type and a Logger type. It combines the behaviour and data in these types
together. The result of running this application is shown below:
From this you can see that when we created the new instance, the log method
was run as part of the free-standing code executed when the instance was created.
This resulted in the String “Created”being printed out. When the method println
was invoked on the contents of ‘p’the resulting version of toString (invoked by
println) was that defined in the Person class and hence Person[John] was printed
out. Thus we have indeed combined the two together at the point of instantiation.
194 18 Traits
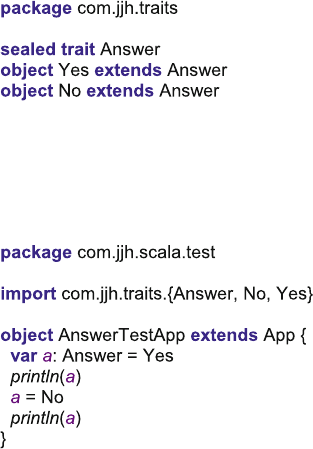
18.7 Sealed Traits
A sealed trait is a trait that can only be used within the file that it is defined within.
That is only the classes and objects within the same file as the sealed trait can mix in
that trait. It can also only be extended by traits in the same file. For example,
Note that the trait Answer can be used as the type of a variable or a value within
other packages, but it cannot be extended or mixed in elsewhere. Therefore in a
package com.jjh.scala.test you can reference the type and use it as the type for vars
or vals to hold the singleton instances of Yes and No. For example,
18.8 Marker Traits
A marker trait is a trait that declares no methods, functions, types or properties.
Instead it is used to indicate additional semantics of a type (class, object or further
traits). For example see the scala.Mutable and scala.Immutable traits; these are
marker traits indicating the semantics of mutability and immutability.
Marker traits can be used where:
•it is useful to semantically indicate a role or concept that other entities may play
with the application. However, these entities may be of varying types (from
classes, to objects to further traits) and may inherit behaviour from various
different places in the type hierarchy.
•semantically there is a common concept, but there is little or no common
behaviour or data representation between the concrete implementations of the
generic domain concept.
18.7 Sealed Traits 195
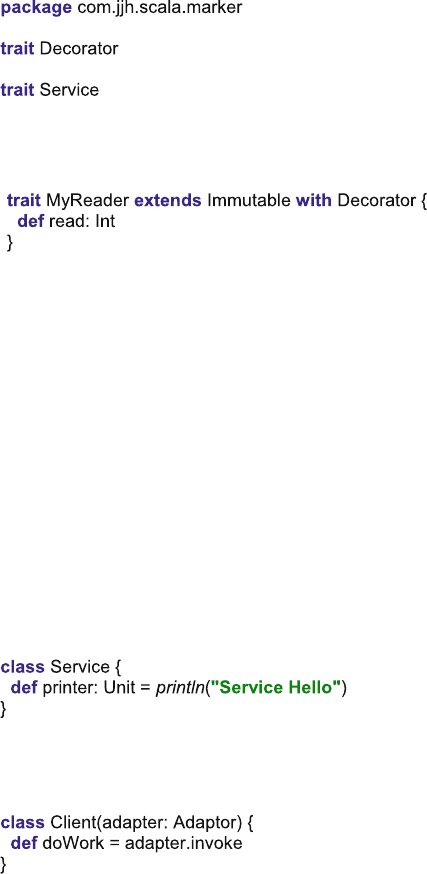
•client classes may need to know something about the type of an object without
actually needing to know the specific type (at least at the interface level).
Using a trait, as the basis of a marker, is particularly convenient in Scala as a
type may mix in any number of traits. For example, the following code defines two
marker traits, one called Decorator and one called Service.
Any type can implement one or more traits; thus, any type can implement a
marker trait and any other traits as required. For example,
Semantically this tells us that MyReader is a type of Decorator and that it is
immutable.
18.9 Trait Dependencies
When you mix a trait into another type you may want to be able to invoke func-
tionality form the host type. This can be done by defining a self reference. A self
reference ties one type to another type which will be provided at a future point in
time. This means that the this value can be used to access another types behaviour
and data. That is the type it will be mixed into must be of a particular kind, and thus
the trait you are defining can rely on certain data or behaviour being provided by the
host type in the trait.
For example, let us assume that we have defined a class Service:
We will then define a class Client that takes an Adaptor type. The method
doWork invokes the method on the adapter.
Let us assume that we have initially written the Adaptor type as follows:
196 18 Traits
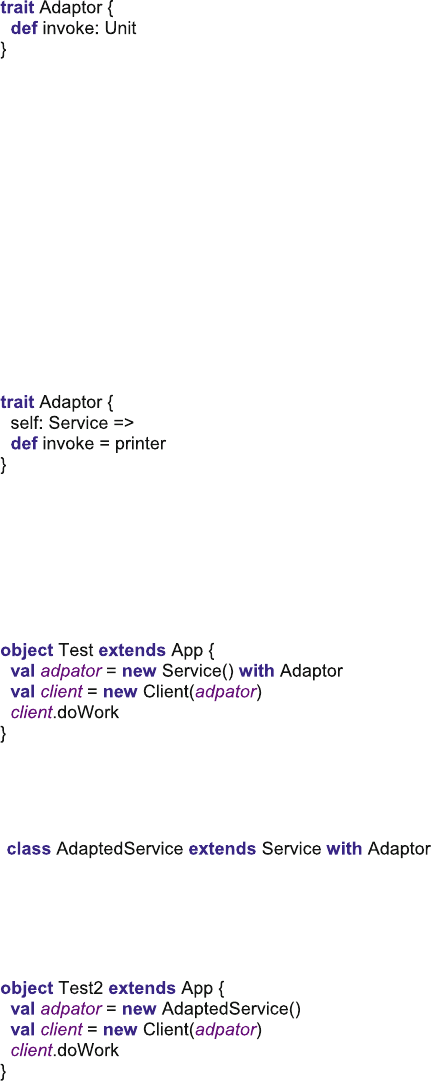
However, we would like to use an instance of Service with the Client class. But
currently the Service type does not implement an invoke method, and the Adapter
trait defines an abstract invoke method.
Ideally we want to link the Adaptor to the Service types. There are various ways
in which we could do this but the core issue is that currently there is no link
between the Service type and the Client type. To solve this problem we will use a
self reference in the Adapter type. This allows us to define a trait that can only be
used with Service types (and subtypes).
This trait defines a method invoke to use the method printer (provided by the
Service type). Thus we can guarantee that the trait Adapter will be used with a
Service or a subtype of Service (whether that is a class or an object). Therefore the
method printer will be available to wherever the Adapter trait is used.
We can then mix this trait into a Service either dynamically at the point of use or
statically with the Service in a new type. For example, the following example
dynamically binds Adaptor into Service when an instance of the Service class is
created. It then passes this to the Client class as a (compatible) parameter. We can
then invoke the doWork method.
Alternatively we could have defined a new subtype (AdaptedService) of the
class Service that also mixes in the Adapter trait.
We can now use instances of this type with the client—the only difference to the
previous example is that we have statically defined a new type that combines the
Service class with the Adaptor trait that can be reused in multiple situations.
18.9 Trait Dependencies 197
18.10 To Trait or not to Trait
It is worth considering when you should define a trait and when you might define a
class. The general set of guidelines on when something should be a trait includes:
•If behaviour or data will not be reused, then implement that behaviour or data as
a concrete class.
•If behaviour or data might be reused in multiple, unrelated classes, then make it
a trait.
•If efficiency is of ultimate importance, lean towards a class.
•If it is a reusable concept for a root of a class hierarchy, use an abstract class.
•If you want to use it in Java code, use an abstract class.
•If you want to model domain concepts to be implemented by different classes in
different ways, then use Traits.
198 18 Traits

Chapter 19
Further Traits
19.1 Introduction
This chapter looks at some of the more advanced features associated with the use of
traits. The chapter looks at the way in which Traits can be dynamically wrapped
around an instance providing a form of aspect-oriented programming (AOP) known
as stackable traits. We then look at the role Traits can play in developing reusable
behaviour that simplifies the development of new types. Universal Traits used with
Value Types are then discussed. The chapter concludes by considering the way in
which traits can be used to define a restricted set of values for a given type.
19.2 Stackable Modifications
Traits can be stacked one on top of another when an instance of a class is created.
Each stacked trait can override the behaviour of the trait it is stacked on top of. This
allows the trait to either replace some of the behaviour of that trait, or wrap
additional behaviour around that trait. This idea is illustrated in the following figure.
©Springer International Publishing AG 2018
J. Hunt, A Beginner’s Guide to Scala, Object Orientation and Functional
Programming, https://doi.org/10.1007/978-3-319-75771-1_19
199
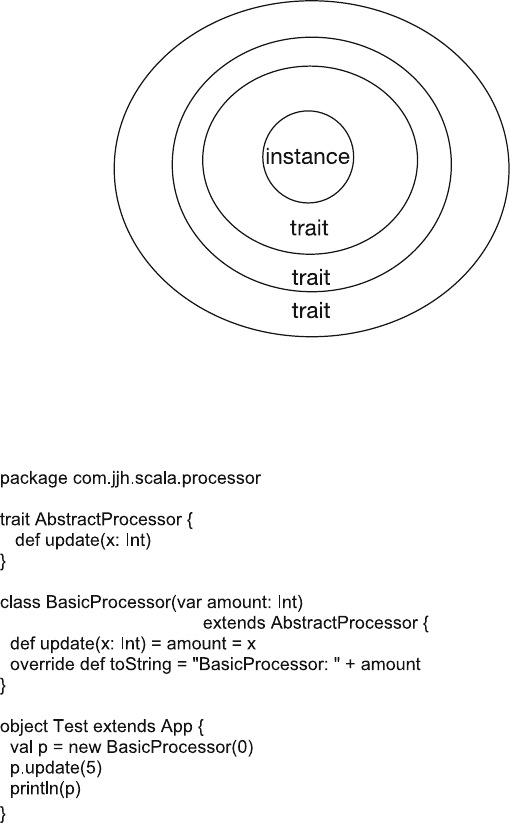
As an example, the following code defines an abstract trait AbstractProcessor. It
is abstract because it defines an abstract method update that takes an Int and returns
Unit. This trait is mixed into the class BasicProcessor. This class defines the update
method as setting the amount property defined on the class.
The simple test harness class creates a new BasicProcessor using the initial value
0 and then updates it to 5 and prints out the result. The result of executing this
program is:
BasicProcessor: 5
We could new define a Trait Doubling that also extends the AbstractProcessor
trait. Note that the update method in this trait states that it overrides any other
definitions but that it is also abstract. That is, it expects to build on something that it
will be mixed into at a later date which is expected to be able to provide the
200 19 Further Traits
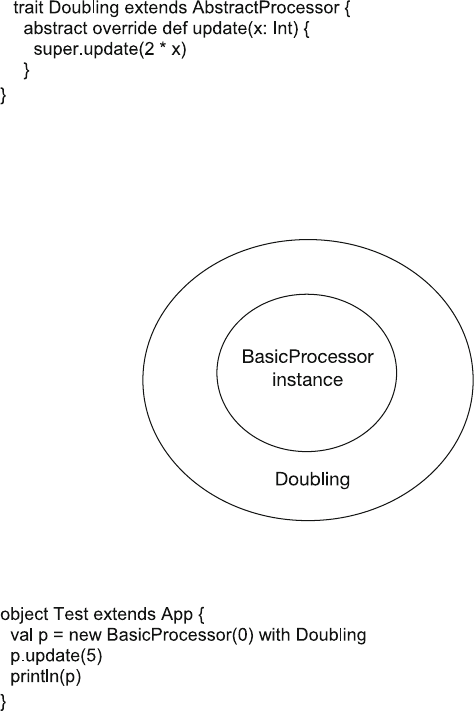
remainder of the behaviour of the update method. This allows it to invoke the super.
update method. Here super means the next version of update in the stack of traits
wrapping the concrete instance of a class (or indeed that concrete instance).
Note if the method is not marked as abstract, it cannot invoke the super version
of the update method.
This trait can be mixed into the BasicProcessor when that BasicProcessor is
instantiated, which results in the Doubling trait wrapping around the BasicProcessor
as shown below.
The following listing illustrates how the Test application is modified to stack the
Doubling trait onto the BasicProcessor:
The result of running this program is:
BasicProcessor: 10
As you can see from this, the value 10 is now being stored in the Basic
Processor—thus the Doubling trait version of update is being invoked which results
in the integer being doubled before being passed on down the line to the update
method defined on the BasicProcessor instance.
19.2 Stackable Modifications 201
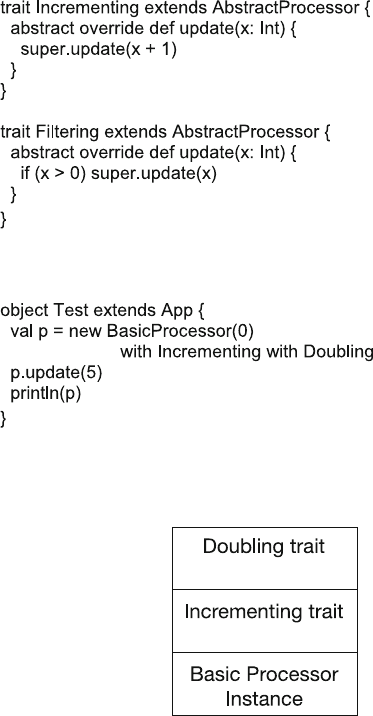
This can be taken further; we could define additional traits such as Filtering and
Incrementing that either filter the value to be updated or add one to the value being
updated. For example,
We can now combine these traits in various ways and in different orders. For
example,
The effect of this is that the Doubling trait is stacked on top of the Incrementing
trait, which is stacked on top of the BasicProcessor. This idea is illustrated in the
next figure.
The end result of executing the above program is shown below:
BasicProcessor: 11
202 19 Further Traits

whereas this version results in a different output:
The result this time is:
BasicProcessor: 12
This is because in one example the value is doubled and then incremented by
one and in the second example it is incremented first and then doubled. Thus you
can see that the order in which the traits are added is significant (with the last trait
being the one that is accessed first). Thus the above listing can be represented as
shown in the next figure.
Finally, we can also include the Filtering Trait to decide if anything is to be done
with a value at all:
where the attempt to update the BasicProcessor instance to Zero is vetoed by the
Filtering trait, and thus the output from this program is:
BasicProcessor: 10
Note that the AbstractProcessor could also have been an abstract class rather
than a Trait; however, from a design point of view it is cleaner to have the
AbstractProcessor as a Trait.
19.2 Stackable Modifications 203
Of course we are not just limited to mixing in stackable traits when an instance
of class I created. We could also have defined a new type with the base class and the
stackable traits mixed together. For example,
class DoublingProcessor extends BasicProcessor with Doubling {..}
19.3 Fat Versus Thin Traits
There is a continual tension in software between the richness of an interface offered
by a component or library and implementation and maintenance effort required for
such an interface. This is because although (in theory) a rich interface is better for
client applications, a simpler interface is easier to develop and maintain. Ideally, we
want the best of both worlds: minimum effort for the developer of the component
and maximum utility for the user of the component. Traits allow methods to be
constructed based on existing implementations.
For example, the Ordered Trait defined in the scala.math package is a trait for
data that has a single natural ordering. Class or traits that implement this trait inherit
a range of concrete method such as <, <=, >, >= which rely on a method compare.
However, the method compare is an abstract method that is expected to return an
integer depending on the value being compared. This method must be provided by a
concrete trait, class or object. The definition of the method is:
abstract def compare(that: A): Int
This method returns the result of comparing the current instance with the
operand that.
The method returns a value ‘x’where:
•x < 0 when this <that
•x == 0 when this == that
•x > 0 when this >that
For example, if we wished to create a new Balance class, which supported basic
Ordering and comparison type behaviour, we could do this by mixing in the
Ordered trait, as shown below.
204 19 Further Traits
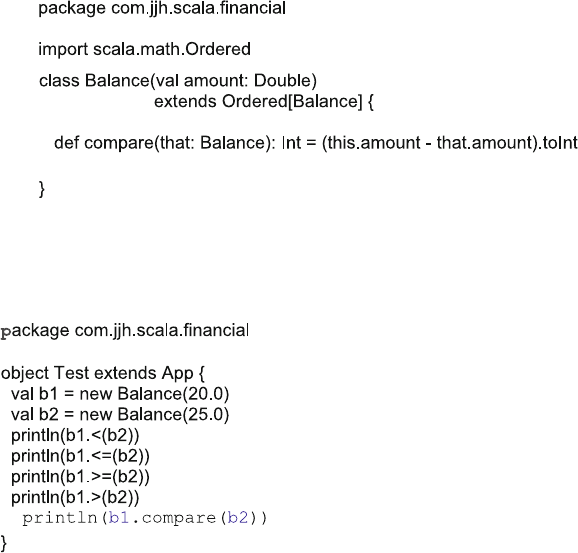
The result is that although the code we have written is quite light as have
obtained a rich interface. For example the range of operations available on the
currency instance are shown in:
Thus the Balance class has a rich interface but has a simple implementation. The
majority of the comparison behaviour is mixed in from the trait (such as the <, >
methods), but they build on a concrete implementation of the compare method.
19.4 Universal Traits
Scala’s rules for inheritance do not permit Value Classes to mix in traits that extend
from AnyRef. Prior to Scala 2.10, all traits eventually extended AnyRef, and thus
traits could not be mixed into a Value Class. However, since Scala 2.10 traits can
optionally extend Any instead of AnyRef. This must be specified explicitly when
the trait is defined. Such a Trait is known as a Universal Trait as it can be mixed into
all types of classes from reference types to Value Classes. This permits Value
Classes to extend traits (as long as they are Universal Traits).
When a Universal Trait is mixed into a Value Class, then they allow inheritance
of methods for the Value Class but they do not incur the overhead of heap allo-
cation and referencing.
19.3 Fat Versus Thin Traits 205
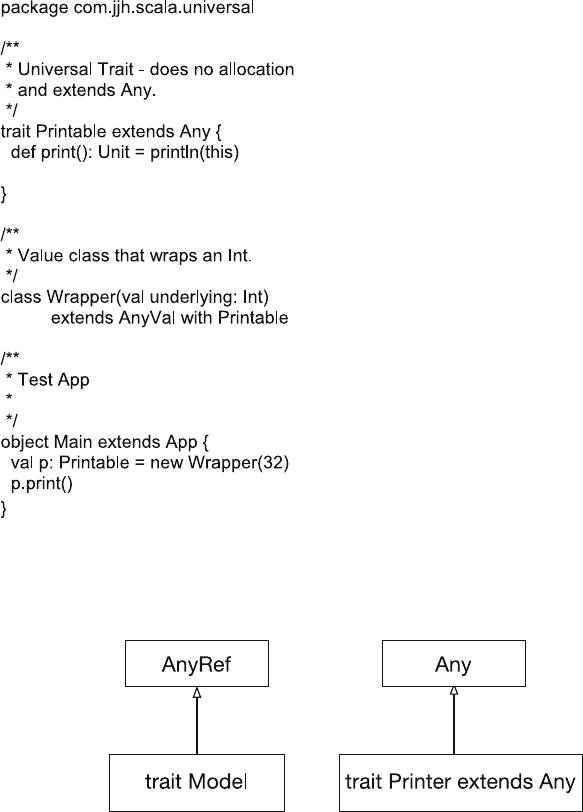
The following trait Printable is a Universal Trait as it explicitly specifies the
parent type as Any. It is then used with the Value Class Wrapper (which merely
wraps around the underlying type Int) and extends AnyVal and mixes in Printable.
Note that if you do not explicitly specify Any as the super type of a Trait, then
that trait still defaults to extending AnyRef. Thus in the next figure, the trait Model
is a Trait as it (by default) extends AnyRef and the trait Printer is a Universal Trait
as it explicitly extends Any.
This also has some implications for further inheritance. If we have a Universal
Trait Equals (which explicitly extends Any) and a subtrait Ordered that extends
Equals, then the effect is that the trait Ordered by default extends the class AnyRef
and mixes in the trait Equals. The end result is that this is not a Universal Trait:
206 19 Further Traits
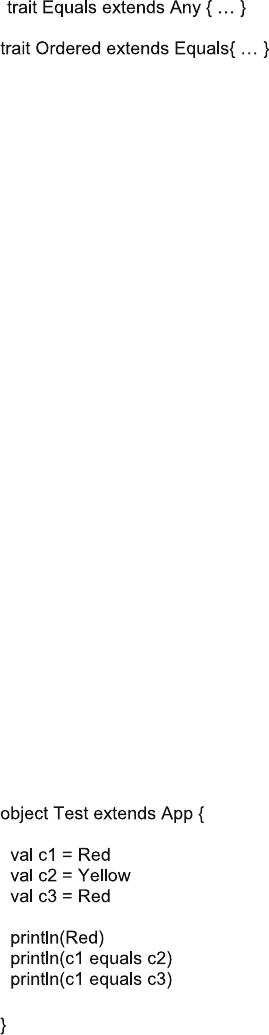
To turn Ordered into a Universal Trait then you must explicitly specify that Any
is the super class of Ordered as follows:
trait Ordered extends Any with Equals {…}
The trait Ordered is now explicitly a Universal Trait.
19.5 Traits for a Data Type
Although Scala has an enumeration type, this implies a specific ordering whereas in
some cases we merely want to define a set of associated values. For example, if we
wished to create a set of values for traffic lights, then we might wish to create values
for Red, Yellow and Green. However, there is no specific ordering, just these
values. We could use a trait to help define the objects used to represent the traffic
light colours. For example,
package com.jeh.scala.traits
trait TrafficLight
case object Red extends TrafficLight
case object Yellow extends TrafficLight
case object Green extends TrafficLight
In this case, the trait TrafficLight has been defined but contains no data elements
or behaviour (other than the defaults inherited from AnyRef). It is then used to create
a set of objects, Red, Yellow and Green. Note that these are case objects indicating
that all the values associated with TrafficLight are defined in the same file and thus
Red, Yellow and Green can be used safely within pattern matching statements with
the compiler able to indicate if all conditions are being accounted for.
As an example of using these values, the following test harness creates a set of
vals for each colour and can be used to print out the results and test fro equality, etc.
This is a commonly recurring idiom in Scala.
19.4 Universal Traits 207
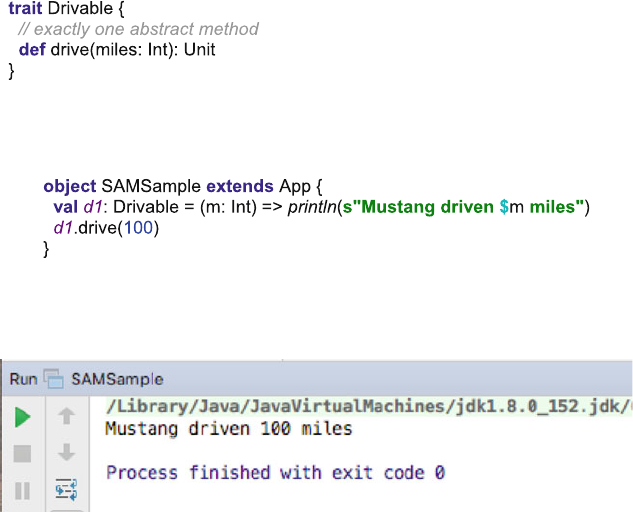
19.6 Single Abstract Method (SAM) Traits
A SAM trait is a trait with a single abstract method. SAMs are originally introduced
in Java 8 (in the form of single abstract method interfaces also known as functional
interfaces) as it started to support the functional programming world.
This feature has been incorporated into the Scala world (essentially since Scala
2.11.5) as it makes Java interoperability easier. Strictly speaking Scala does not
need to support the concept of a SAM as it has its own (richer) set of features
available. However, it can make working with functional literals easier.
There are a set of constraints that must be met by a trait that wishes to be treated
as a SAM; these are:
•It must define a single abstract method (SAM).
•The abstract method must take a single argument list.
The following example illustrates a SAM trait. It defines a single abstract
method drive that takes a single Integer argument:
This can then be used to create a concrete implementation of the trait on the fly
using what is now as a functional literal or a lambda:
The output from this simple application is
208 19 Further Traits

This means that it is not necessary to define a class or object to implement the
abstract method defined in the trait. This reduced the amount of code written and
compiled.
A SAM trait can define any number of concrete values and methods (as long as
there is only a single abstract method). For example,
We can now use these properties and methods in our code:
Note that the function we have defined that takes an Integer refers to the variable
d1 that is being used to set up—this is referred to as closure. It works as the variable
d1 will be set up by the time the function is executed.
The output from this is:
We will return to functions later in this book.
19.6 Single Abstract Method (SAM) Traits 209
Chapter 20
Arrays
20.1 Introduction
This chapter discusses how arrays are represented in Scala. Arrays are (logically) a
continuous set of slots that can hold values or references to instances of a specific type.
20.2 Arrays
Arrays in Scala are objects, like most other data types. Like arrays in any other
language, they hold elements of data in an order specified by an index. They are
Zero-based arrays, as in C, which means that an array with 10 elements is indexed
from 0 to 9.
To create a new array, you must specify the type of array object and the number of
elements in the array. The Array type defines array like behaviour in Scala. The type
of element held in the Array is indicated within a set of square brackets after the
Array. The number of elements is specified by an integer between round brackets. As
an array is an instance, it is created in the usual way using the new operation:
This creates an array capable of holding ten String objects. We can assign such
an array instance to a variable by specifying that the variable holds an array. You do
this by indicating the type of the array to be held by the variable along with the
array indicator. Notice that we do not specify the number of array locations that are
held by the array variable:
val myArray: Array[String]
var names: Array[String]
©Springer International Publishing AG 2018
J. Hunt, A Beginner’s Guide to Scala, Object Orientation and Functional
Programming, https://doi.org/10.1007/978-3-319-75771-1_20
211
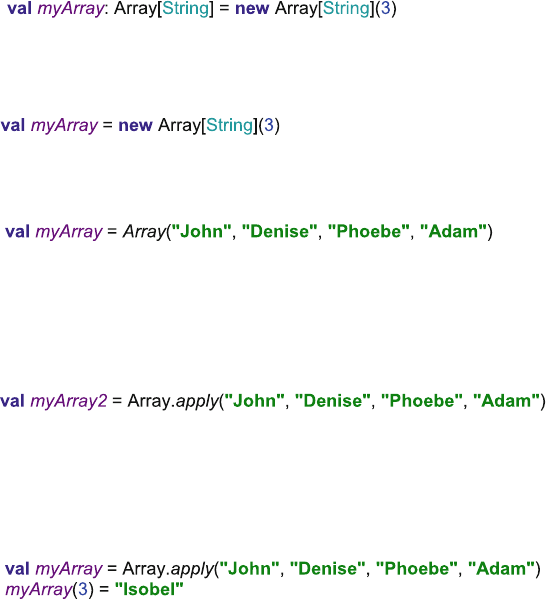
Both of the above define variables which can hold a reference to an array of
Strings. However, neither declaration defines how large the array object being
referenced will be. This is not a problem as myArray and names will only hold a
reference to (or an address of) an array. The reference is the same size whatever the
length of array being pointed to.
We now create an array and assign it to our variable:
We could also have used the shorter from relying on type inference for the
myArray val:
There is a short cut way to create and initialise an array:
This relies on both Scala to infer the type of the myArray val and for Scala to use
a factory method (called apply) to construct the array. You can use the apply factory
method directly if you wish, and thus the above is semantically the same as:
Both of the above create an array of four elements containing the strings “John”,
“Denise”,“Phoebe”and “Adam”. We can change any of these fields by specifying
the appropriate index and replacing the existing value with a new string:
The above statement replaces the string “Adam”with the string “Isobel”. Merely
being able to put values into an array would be of little use; we can also access the
array locations in a similar manner:
myArray.apply(0)
This retrieves the current value held in the array referenced by myArray. Once
again this is a common enough operation that a shorthand (and more commonly
used variant) is available:
myArray(0)
212 20 Arrays
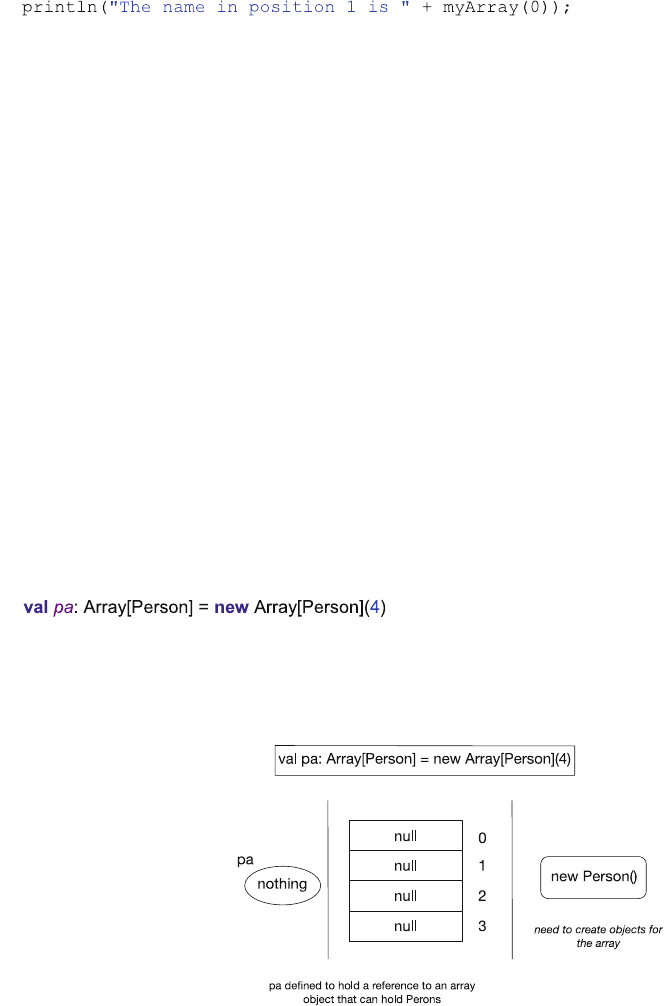
This can be used to retrieve the zeroth value in the array. For example,
The above statement results in the following string being printed:
The name in position 1 is John
As arrays are objects, we can also obtain information from them. For example, to
find out how many elements are in the array we can use the instance variable
length:
myArray.length
Arrays are fixed in length when they are created, whereas vectors can change their
length. To obtain the size of an array, you can access instance variable, length, but
you must use a method, size, to determine the current size of a vector.
Arrays can be passed into and out of methods very simply by specifying the type
of the array, the name of the variable to receive the array and the array indicator.
20.2.1 Arrays of Objects
The above examples have focussed on arrays of Strings; however, you can also
create arrays of any type of object but this process is a little more complicated (it is
actually exactly the same for strings, but some of what is happening is hidden from
you). For example, assuming we have a class Person, then we can create an array of
Persons:
Figure 20.1 illustrates the result of creating an array of Person instances. It is
important to realise what this gives you. It provides a variable pa that can hold a
reference to an array object of Persons. At present this array is empty and does not
Fig. 20.1 Creating an array
of objects
20.2 Arrays 213
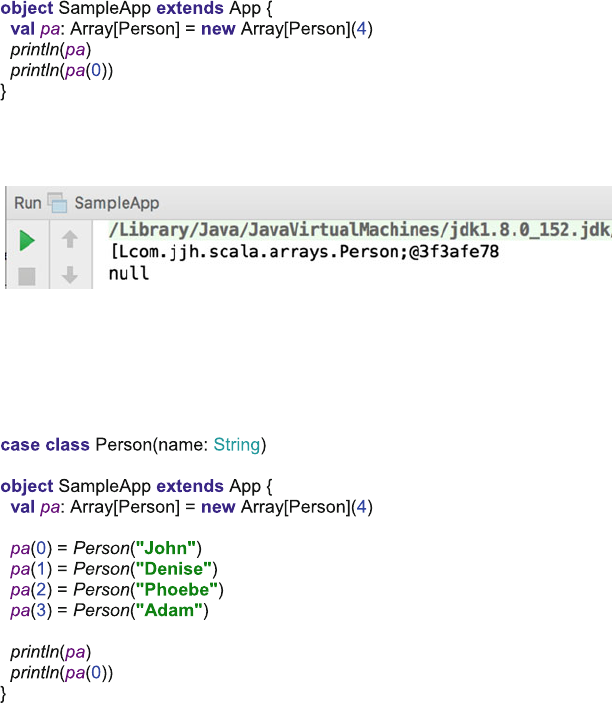
hold references to any instances of Person. For example, if you now print out the
value of pa and the value of pa(0), that is,
you will get:
Note that this indicates that the array is actually an array of references to the
instances “held”in the array as opposed to an array of those instances. This is
illustrated in the first part of Fig. 20.1. To actually make it hold instances of Person
we must add each person instance to the appropriate array location. For example,
This is illustrated in the last part Figs. 20.1 and 20.2. Thus the creation of an
array of objects is a three-stage process:
1. Create a variable that can reference an array of the appropriate type of object.
2. Create the array object.
3. Fill the array object with instances of the appropriate type.
214 20 Arrays
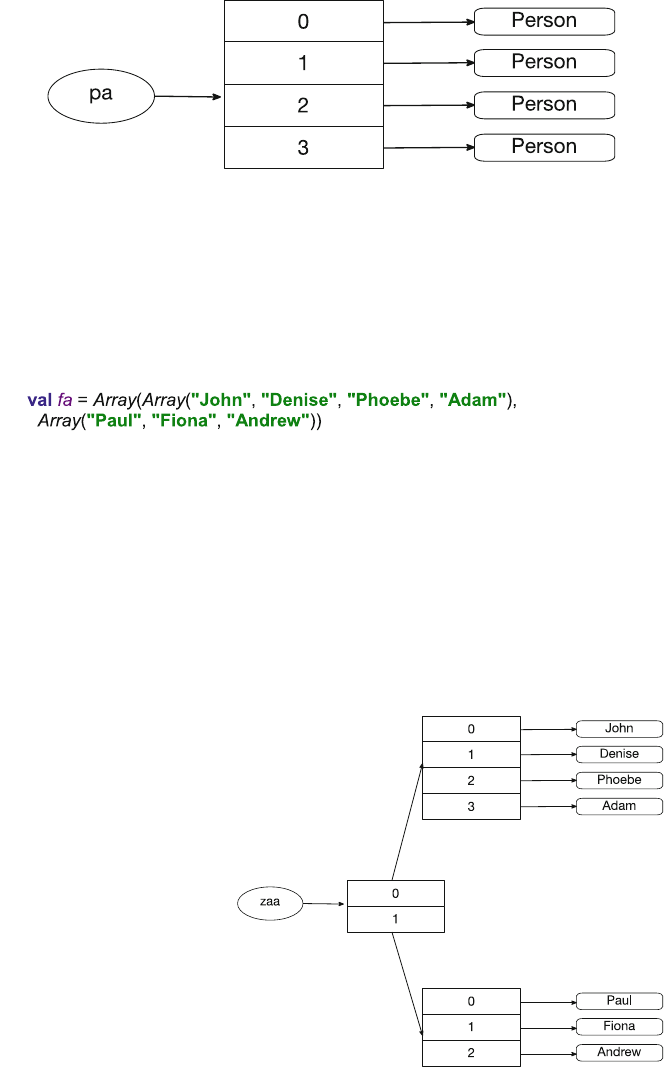
20.2.2 Ragged Arrays
As in most high-level languages multidimensional arrays can be defined in Scala.
This is done in the following manner:
Pictorially this can be viewed as shown in Fig. 20.3.
As can be seen from this example, two-dimensional arrays in Scala are actually
Array objects holding references to other Array objects. Thus in this case, the first
array is an array of two elements (0 and 1). The type of these elements is an Array
of Strings. The first array element 0 holds a reference to another array object (one
that holds Strings), etc. This means that the structure created can be ragged—that is
the second dimension in this example is not the same across the two subarrays: one
is of length 4, and one is of length 3.
Fig. 20.3 A ragged Array
Fig. 20.2 Complete array structure
20.2 Arrays 215
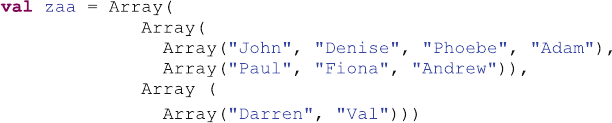
Thus if you create these arrays and object for the Person class, then we would:
1. Define the val paa as hold a reference to an array of arrays
val paa: Array[Array[Person]]
2. Create the multidimensional array
val paa: Array[Array[Person]] =
new Array[Array[Person]](2)
Note we have to specify the first dimension as it is necessary to allocate enough
space for the required references. We do not have to specify the second
dimension as these can be specified in the subsequent array object creation
messages.
3. Create the subarrays:
pa(0) = new Array[Person](4)
pa(1) = new Array[Person](3)
4. We are now ready to add instances to the two-dimensional array, for example
pa(0)(0) = new Person(“John”)
As you can see from this last example, multidimensional arrays are accessed in
exactly the same way as single-dimensional arrays with one index following
another (note each is within its own set of round brackets—()). That is you can
access this two-dimensional array by specifying a particular position within the
array using the same format:
println(matrix(2)(2))
Note that the way that multidimensional arrays are implemented in Scala means
that you can easily implement any number of dimensions required, for example
This defines a three-dimensional array structure containing two 2-dimensional
arrays. This is illustrated in Fig. 20.4.
216 20 Arrays
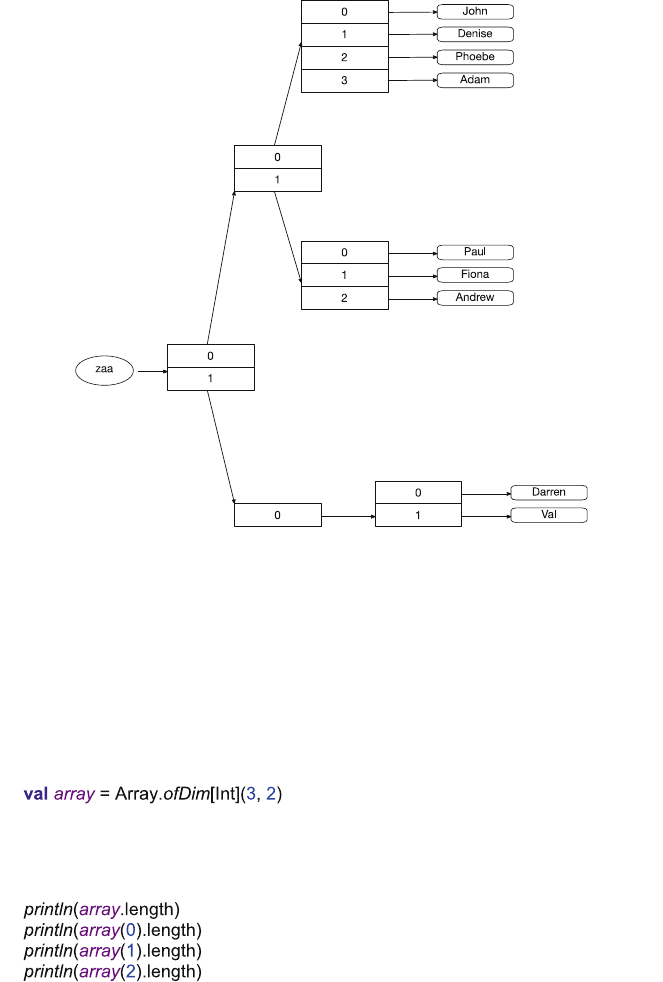
20.3 Creating Square Arrays
Of course, although it is possible to create raged arrays in Scala, it is far more
common to create square arrays, for example a 2 by 2 or a 3 by 3 array. To do this
the Array type provides a factory method ofDim that can be used to create an array
of an appropriate dimension, for example
This creates a two-dimensional array of size 3 by 2 that can hold Int types. These
following statements
Fig. 20.4 A multidimensional ragged array
20.3 Creating Square Arrays 217
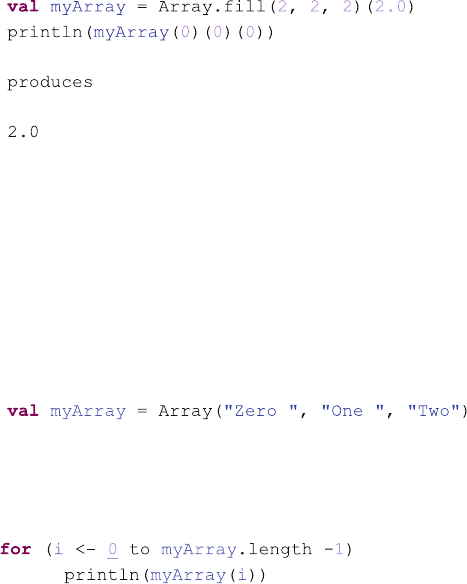
produce this output
3
2
2
2
Of course this populates the array of Ints with a set of Zeros. If you wish to
initialise such an array with other default values, then you can use the fill factory
method on the Array type:
This creates a three-dimensional array with all the elements of the array popu-
lated with the double value 2.0.
20.4 Looping Through Arrays
You can use a loop to process the contents of an array. For example, given an array,
myArray, containing three strings:
We can loop through the elements in that array in a number of ways. For
example, we can use the length of the array and an index to access each element in
turn, for example
In this example the loop variable ‘I’ranges from 0 to one less than the length of
the array. This is because the array contains three strings, with indexes, Zero, one
and two! This is important, if you try and access the element with the index ‘3’
(which is the fourth element in the array) you will get an index out of bounds
exception generated—that is your program will generate an error!
218 20 Arrays
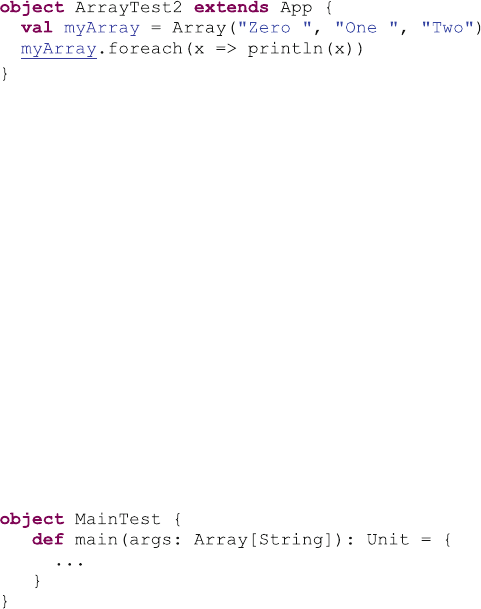
The result of running this program is
Zero
One
Two
However, the problem with this approach is that you must remember to ensure
that you loop from Zero to one less than the length of the array (otherwise you will
not access the elements of the array you expect, and you will generate a runtime
error). An alternative approach is to loop through each of the elements in turn
applying a function to those elements. This is actually an example of functional
programming and uses the foreach function defined on the Array type. For
example,
With this approach the foreach function takes element in turn and binds it to the
variable x above. It then executes the body of the behaviour provided (in this case
println(x)). The end result is the same as before:
Zero
One
Two
However, it is a better (and simpler) abstraction of processing each of the
elements in the array.
20.5 The Main Method Revisited
At this point you are ready to review the parameter passed into the main class
method. As a reminder, it always has the following format:
From this you can see that the parameter passed into the main method is an array
of strings. This array holds any command line arguments passed into the program.
We now have enough information to write a simple program that parses the main
method command line arguments:
20.4 Looping Through Arrays 219
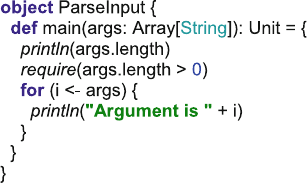
This is a very simple program but it provides the basics for a command line
parser. Do not worry if you do not understand the syntax of the whole program; we
cover if statements and for loops later in the book.
Arrays in Scala are passed into methods by value. However, as parameters only
hold a reference to the objects they contain, if those objects are modified internally, the
array outside the method is also modified. This can be the cause of extreme frustration
when trying to debug programs. Arrays can also be returned from methods:
modifiers methodName: type (…)
def returnNames: Array[Person] () {
…
}
As an example of an array-based application, consider the following application
ArrayDemo, which calculates the average of an array of numbers. This array is
created in the ArrayDemo application and is passed into the processArray
method as a parameter. This method is defined on the class ArrayProcessor. Within
this method, the values of the array are added together and the total is divided by
the number of elements in the array (i.e. its length):
220 20 Arrays
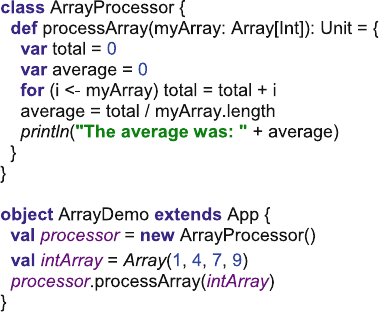
20.5 The Main Method Revisited 221

Chapter 21
Tuples
21.1 Introduction
In this chapter we introduce Scala tuples, which are useful (and very simple con-
struct) for grouping instances together.
21.2 Tuples
Tuples are container style objects that can hold multiple types of instances.
Examples of some simple tuples are presented below:
•(49, “John”) // a 2 element tuples
•(49, “John”,“Hunt”, 12.75) // a 4 element tuples
•(“John”, 76, Invoice(123)) // a 3 element tuples
As can be seen from these examples, tuples can hold different types of elements
(whereas an array instance holds a set of the same type such as Strings, Ints,
Doubles or Persons). The first example is tuple which presented here is:
•(49, “John”)
This holds an Int and a String. The first element in the tuple is of type Int and the
second is of type String. The second example is a three element tuples:
•(49, “John”,“Hunt”, 12.75)
In this example, the first element is of type Int, the second of type String, the
third again of type String and the fourth of type Double. In fact it is possible to
define tuples with 1–22 elements in them.
©Springer International Publishing AG 2018
J. Hunt, A Beginner’s Guide to Scala, Object Orientation and Functional
Programming, https://doi.org/10.1007/978-3-319-75771-1_21
223

21.3 Tuple Characteristics
Tuples exhibit a number of characteristics that are worth noting. Tuples
•Are container style objects
•Are immutable sequences of instances
•Can contain objects of different types (unlike lists and arrays)
•Are useful if you need to return more than one object from a method
•Are not collections as they do not support the normal collection style methods
•Allow access to their contents via a dot (.) notation
•Can be simply created without the need for the new keyword
•Are backed by specific Tuple classes.
21.4 Tuple Classes
Each tuple is backed by a class named Tuple followed by the number of elements in
the tuple. For example,
(42, “Denise”)—is an example of a Tuple2 instance
(“John”)—is an example of a Tuple1 instance
(49, “John”,“Hunt”, 12.75)—is an example of a Tuple4 instance
In actual fact there are classes named for all the different combinations of Tuple
from 1 to 22, for example,
Tuple1, Tuple2, Tuple3, ...Tuple21, Tuple22
Mostly this fact is hidden from you as a programmer, but it is worth being aware
of. Essentially when you create a new tuple example, an instance of the appropriate
type is created with each of the elements used to infer the type to use for those
positions. Thus,
(“Pete”, 21)
Tells Scala to create an instance of the Tuple2 type, with the first element set to
String and the second element set to Int types.
21.5 Creating a Tuple
There are a number of different ways in which you can create a new Tuple. The
longhand form is to create a Tuple of the correct type and use type parameterisation
to indicate the types to use for each position. For example,
224 21 Tuples
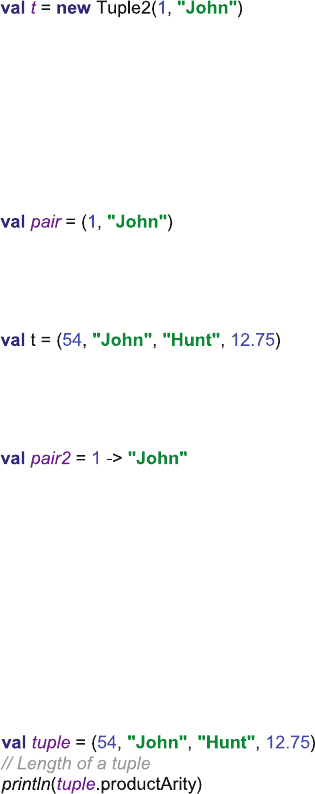
This creates a new instance of the Tuple2 type with the first element being of
type Int and the second element being of type String. The actual values held by the
tuple instance are then 1 and “John”.
This is a bit long winded for Scala and thus a shorter form of the above allows
the types to be inferred by Scala. For example, the above can be written without the
type parameterisation information as:
Now Scala infers that the first element is an Int, and the second element is a
String from the values being held by the tuple (namely 1 and “John”).
However, this is still a bit repetitive for Scala. Given that we are creating a tuple
and there are two elements. Scala can infer that what we are creating a Tuple2
instance. Therefore we do not need to include the name of the type being instan-
tiated. We also do not need to include the keyword new. Thus the previous example
can be reduced to:
This creates an instance of the Tuple2 class with the first value of type Int and set
to 1 and the second element of type String and set to “John”.
Similarly we could write:
which creates an instance of the Tuple4 class with the types being Int, String,
String and Double, respectively.
The very shorted form of the Tuple syntax is to use the ‘->’syntax. For example,
which again creates a Tuple2 instance containing 1 and “John”with the first
element of type Int and the second element of type String.
21.6 Working with Tuples
Once you have created a tuple using one of the forms described in the previous
section you can access information about the tuple as well as the information held in
the tuple. For example, to access the size of the tuple you can use productArity:
The output of this program is 4.
21.5 Creating a Tuple 225
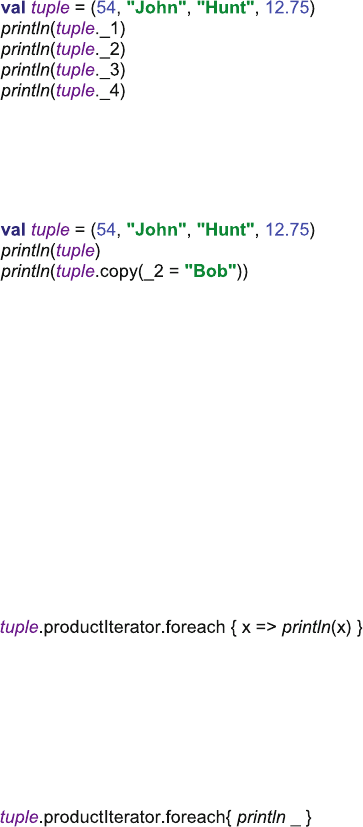
To access the individual elements within a tuple we can use the “._<n>”notation
where <n> indicates the position or element to be accessed, for example,
Note that the index used for accessing Tuples is one based (where as that used
for Arrays and Lists is Zero based). As Tuples are immutable there is no way to
update an element within a tuple. However we can make a copy of a tuple and while
making a copy change one of the values. For example,
The output of this program is:
(47,John,Hunt,12.75)
(47,Bob,Hunt,12.75)
21.7 Iterating Over a Tuple
If you want to iterate over a tuple, then you can obtain a product iterator built on top
of your tuple. A product iterator provides a wrapper that can access each element in
a tuple in turn. A function can then be applied to each element in turn. Thus we can
write a simple tuple iterator that will print out the values in our tuple one at a time.
This states that we want to create an iterator over the contents of the tuple and
then for each of the elements produced apply the function that takes a single
parameter (x) and applies the println(x) method. A shorthand form of this can imply
the parameter as it is only used to temporarily pass a given element in the tuple to
the println method. We can therefore infer this in Scala and write the following
(where the under bar ‘_’represents a placeholder for the parameter x):
The output of either of the above versions of the foreach operation is:
47
John
Hunt
12.75
226 21 Tuples
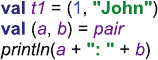
21.8 Element Extraction
It is also possible to extract the values held in a tuple using simple matching
variables. For example, given a tuple t1 containing two elements an Int and a String,
we can extract them as follows:
Here the val ‘a’is of type Int and the val ‘b’is of type String. The val ‘a’will
hold 1, and the val ‘b’will hold a reference to the string “John”. The output of this
program is thus:
1: John
21.8 Element Extraction 227

Chapter 22
Functional Programming in Scala
22.1 Introduction
This chapter examines the functional programming features of Scala and looks at
how they can be used while the next chapter will look at concepts such as Currying
and Partially Applied functions.
22.2 Scala as a Functional Language
In Scala functions are first-class language constructs just as classes and objects and
Value Classes are first-class language types. That is Functions are part of the type
system in Scala, a variable can be defined to hold a reference to a function, and
functions can be assigned to vals and vars. They can be passed into methods,
constructors and other functions as parameters, etc. They are top-level entities that
act as independent units or entities within the language. They can of course be
evaluated in which case they are executed and will take in some data as parameters
and return a result, etc.
That is, functions are like instances or values and can be:
•Assigned to variables,
•Passed as parameters to functions,
•Returned as results of functions,
•Written as function literals.
In addition, they can be evaluated which results in the function being executed.
Functions should have referential integrity, and this is true of Scala functions just
as much as it is true of functions in pure functional languages. Given the same set of
inputs, a function should produce the same set of outputs every time. It should thus
be possible to replace the function call with the result (at least in theory).
©Springer International Publishing AG 2018
J. Hunt, A Beginner’s Guide to Scala, Object Orientation and Functional
Programming, https://doi.org/10.1007/978-3-319-75771-1_22
229
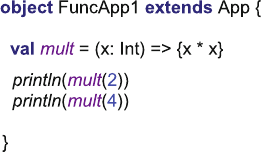
Thus a Scala function should only transform its inputs into its outputs and should
have no (hidden) side effects. That is, it should not change the state of the system
nor should it be involved in any state-based behaviour.
22.3 Defining Scala Functions
A function definition can be anonymous as it defines a type and this it is an entity in
its own right. For example, the syntax for a function definition is:
parameter listðÞ)func body
fg
An example of a function definition (or functional literal) is:
x : IntðÞ)xx
fg
This defines a function that takes an Int and returns an Int where the body of the
function is defined as x * x. The signature of this function (sand thus its type) is
•(Int): Int
That is, it takes a single parameter of type Int and returns an Int.
Note that this function definition matches the criteria we specified for functions—
the function takes in a single Int and returns a value derived purely based on this
parameter (it multiplies itself by itself). We could thus replace it by its result.
As it stands it is of limited value as the function merely defines a new function.
However, we can assign this to a local variable or to a property. Once we have done
this we can invoke the function via that variable or property. As a very simple
example consider the following same application:
The result of running this simple application is:
4
16
In this example within the object FunctionTest1 we have defined a function
(x:Int) => {x * x} and assigned that function to mult. In essence, we have the
following:
230 22 Functional Programming in Scala
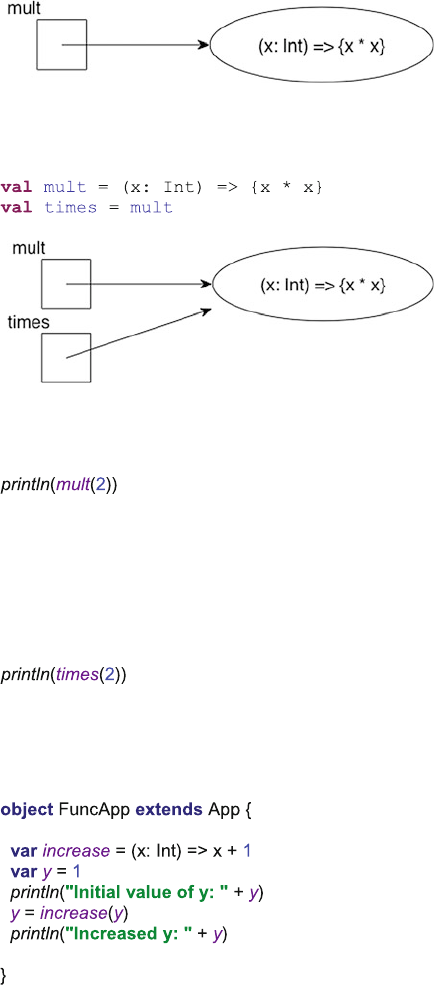
This illustrates that a function is an entity within the language rather than just
some code held within an object (as is the case for methods). This means we can
also assign the function referenced by mult to another variable, thus we could write:
We could now have:
We can thus access the function via either mult or times.
In the earlier example application, we accessed the function via the val mult, for
example,
The result of this expression is that the function referenced by mult is evaluated
by passing in the value 2. This value is bound to the variable x and the body of the
function is executed. Which results in the expression 2 * 2 being processed
resulting in 4 being returned by the function. This is then passed to the println
method and printed out to the console.
Notice that we could now also have written
And the same function would have been evaluated. Although in reality mult and
times reference the same function definition, the effect is that mult and times are
aliases for the same functionality.
As another example, consider the following lines of code.
In this block of code a variable increase is defined that references a function.
This function takes an Int and adds one to whatever value is passed into it. As the
‘+’operator returns a result this is used as the value returned by the function. In this
22.3 Defining Scala Functions 231
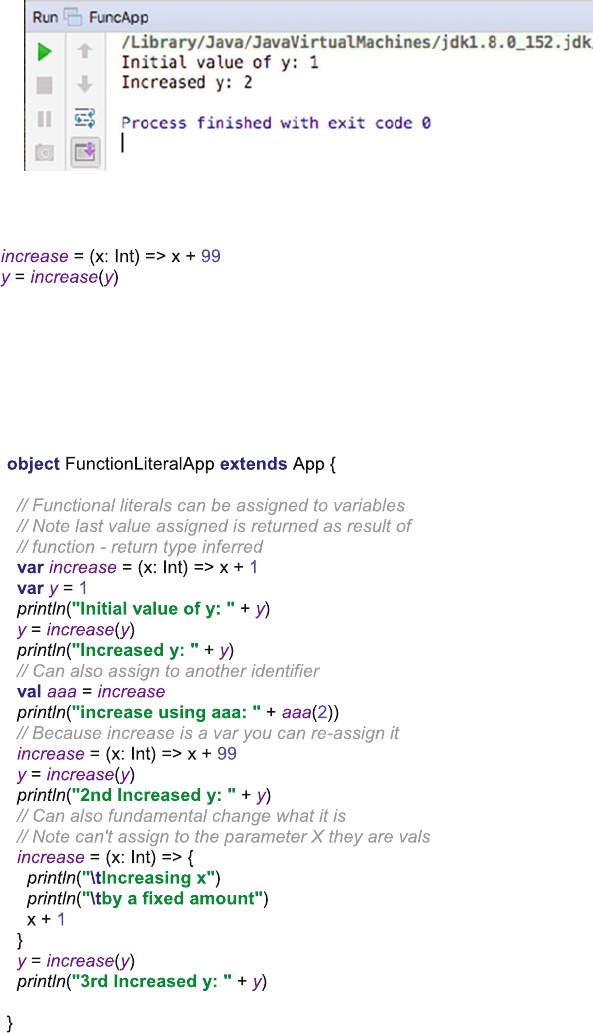
case a variable y has an initial value 1 assigned to it. The result generated by the
function referenced by the increase variable is then assigned to y. The output is
Note that as increase is a var we can reassign to it—thus we can change the
function referenced by increase, for example,
The variable increase now references a function that adds 99 to the integer
passed to it. Thus if we invoke increase it now appears that its functionality has
changed. Be careful of doing this indiscriminately as it can make programs harder
to understand and debug.
The above samples are grouped together in the following listing as a set of
worked examples:
232 22 Functional Programming in Scala
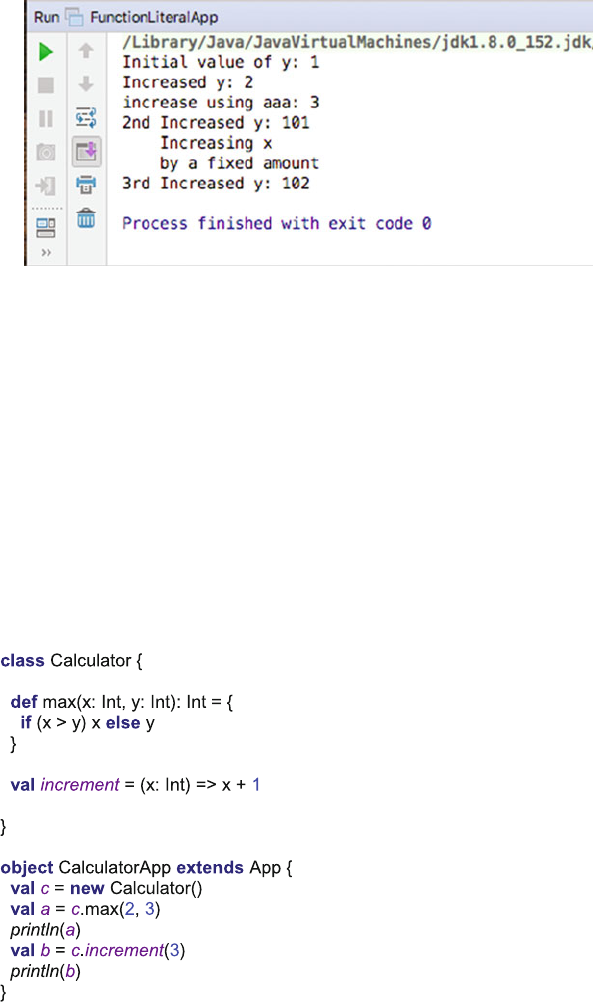
The result of executing this simple application is shown below:
22.4 Class, Objects, Methods and Functions
Classes and objects can have both methods and functions defined for them. In many
cases you can ignore the difference between the two, they are just parts, or members
of, the class or object:
•A method defines behaviour which is tied to the class or object and which can be
invoked via the dotation and
•A function defines an operation held by the class or object that can be invoked
via the dot notation.
For example:
22.3 Defining Scala Functions 233
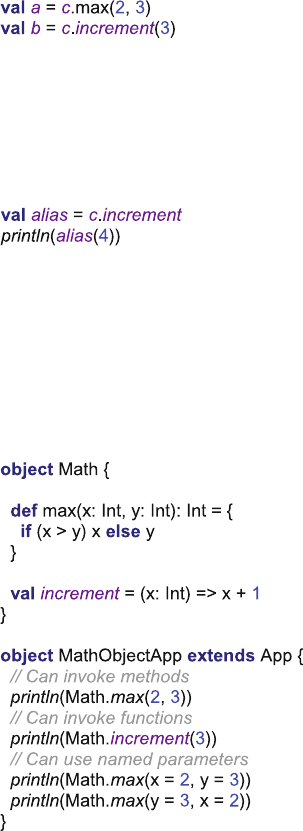
In the above listing we have defined a class Calculator that defines both a
method max and a function increment. From the client of the class Calculator they
look the same. They are both invoked via the dot natation, for example,
However, the way in which they were defined gives a hint to the differences. The
method is an integral part of the definition of the class Calculator. The method is
literally part of the fabric of that class. In contrast increment is a read-only val
property which holds a reference to the function (x: int) => x + 1. This means that
the function referenced by the property could be assigned to another variable, for
example,
When we execute these lines the result is
5
Such assignment of functionality is not available for methods (as they are not
separate entities in the way that functions are). This also means that functions can
be passed as parameters into other functions or method, etc.
The above example uses a class to define the method max and the function
increment. We could also have defined them within an object, for example,
Although this is now an object, everything that was said about methods and
functions for classes is also true for methods and class within an object. Thus the
max method is an integral part of the object Math, whereas increment is a read-only
property holding a reference to a function that increments the value passed to it.
234 22 Functional Programming in Scala
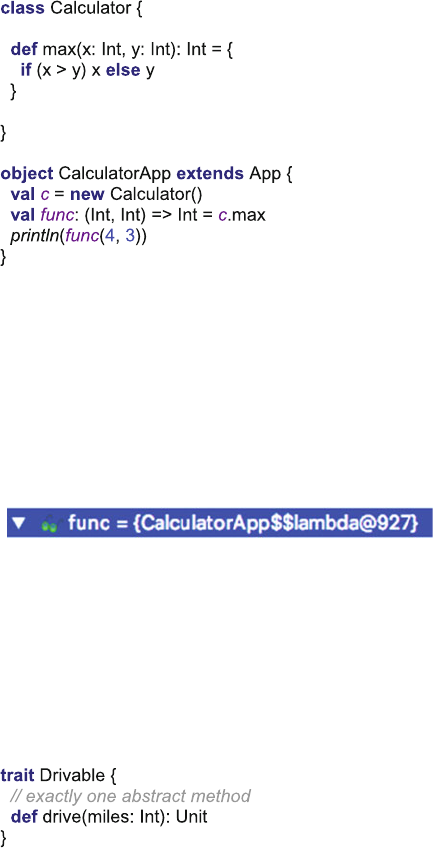
22.5 Lifting a Method
Above we said that one of the differences between a function and a method is that the
method is tied to the class/object it is defined in; whereas the function is really a
free-standing element that just happens to have been defined within a class or an object.
While this is true, it does not actually mean that we cannot treat a method as if it
was a free-standing function. A concept known as lifting can be used to apparently
convert a method into a function, for example,
In the above listing the method max on an instance of the class Calculator is
assigned to a variable func of type (Int, Int) => Int; that is a function that takes two
Integer parameters and returns an Integer.
What is happening here is that the method max has been lifted to a function; in
practice this means that it is wrapped up in a function that will invoke the method
for us.
If we look at this in the IntelliJ debugger we can see that func holds a reference
to a lambda (function literal) that has been created for us by Scala and that refer-
ences the method max on the instance held in the val c.
22.6 Single Abstract Method Traits
Chapter 19: Further Traits introduced the concept of a single abstract method
(SAM) trait. This is a trait that contains a single abstract method that can be
implemented via a functional literal (lambda).
An example of such a SAM trait was given and is reproduced here:
22.5 Lifting a Method 235

A function literal can be used to provide a concrete implementation of the trait as
shown below:
The output of this sample application is
However, it is worth noting the difference between using a function literal (or
lambda) to implement a SAM trait and merely creating a reference to a function
literal.
In the above code the val d1 is of type Drivable, whereas the val f1 is function of
type Int => Int (that is it is a function that takes an Integer and returns an Integer).
This means that the method drive can be invoked on the object referenced by d1
but it cannot (quiet obviously be invoked on f1).
In turn both the apply method and the () operator can be used with the function
f1, but they have no meaning for a Drivable type.
236 22 Functional Programming in Scala
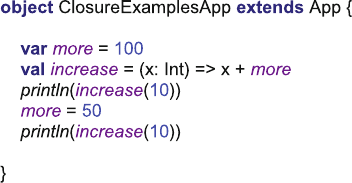
22.7 Closure
One question that might well be on your mind now is what happens when a
function references some data that is in scope where it is defined but is no longer
available when it is evaluated? This question is answered by the implementation of
a concept known as closure.
Within computer science (and programming languages in particular) a closure
(or a lexical closure or function closure) is a function (or more strictly a reference to
a function) together with a referencing environment. This referencing environment
records the context within which the function was originally defined and if nec-
essary a reference to each of the non-local variables of that function. These
non-local or free variables allow the function body to reference variables that are
external to the function but which are utilised by that function. This referencing
environment is one of the distinguishing features between a functional language and
a language that supports function pointers (such as C).
The general concept of a lexical closure was first developed during the 1960s but
was first fully implemented in the language Scheme in the 1970s. It has since been used
within many functional programming languages including LISP, ML and Scala.
At the conceptual level, closure allows a function to reference a variable
available in the scope where the function is originally but not available by default in
the scope where it is executed.
For example, in the following simple program, the variable more is defined
outside the body of the function referenced by increase. This is permissible as the
variable is defined within the body of the main method of the ClosuresTest object,
as is the function. Thus the variable more is within scope at the point of definition.
Within the main method we then invoke the increase method by passing in the
value 10. This is done twice with the variable more being reset to 50 between the
two. The output from this program is shown below:
The result of running this simple application is:
110
60
Note that it is the current value of more that is being used with the function
executes and not the value of more present at the point that the function was
defined. Hence the out is 110 and 60 that is 100 + 10 and then 50 + 10.
22.7 Closure 237
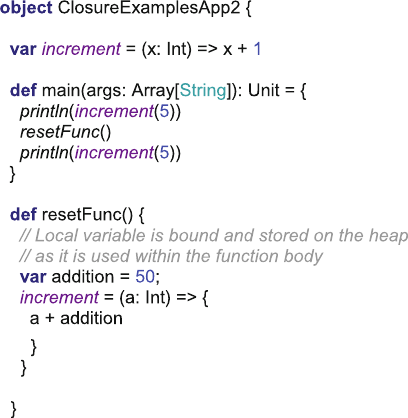
This might seem obvious as the variable more is still in scope within the same
method as the invocations of the function referenced by increase. However, con-
sider the following example:
In the above listing a property increment holds a reference to a function. Initially
the function being referenced adds 1 to whatever value has been passed to it. In the
main method this function is called with the value 5 and the result returned by the
function is printed. This will be the value 6.
However, after this a second method, resetFunc() is invoked. This method has a
variable that is local to the method. That is, normally it would only be available
within the method resetFunc. This variable is called addition and has the value 50.
The variable addition is however, used within the method body of a new
function definition. This function takes an integer and adds the value of addition to
that integer and returns this as the result of the function. This new function is then
assigned to the property increment.
Now, when the second invocation of increment occurs, back in the main method,
the resetFunc() method has terminated and normally the variable addition would no
longer even be in existence. However when this program runs the value 55 is
printed out from the second invocation of increment. That is the function being
referenced by increment when it is called the second time in the main method is the
one defined within resetFunc() and which uses the variable addition.
The actual output is shown below:
238 22 Functional Programming in Scala
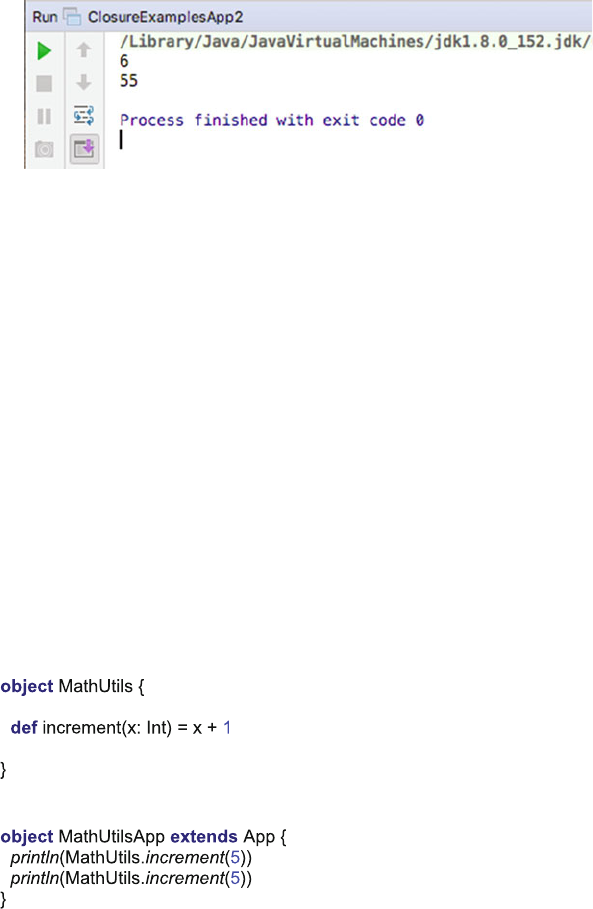
So what has happened here? It should be noted that the value 50 was not copied
into the second function body. Rather it is a concrete element of the use of a
reference environment used with the closure concept. Scala ensures that the variable
addition is available to the function, even if the invocation of the function is
somewhere different to where it was defined by binding any free variables (those
defined outside the scope of the function) and storing them so that they can be
accessed for the functions context (in effect moving the variable from the local stack
to the heap).
22.8 Referential Transparency
An important concept within the world of functional programming is that of ref-
erential transparency. An operation is said to be referentially transparent if it can be
replaced with its corresponding value, without changing the programs behaviour,
for a given set of parameters.
For example, let us assume that we have defined the function increment on an
object MathUtils as shown below.
If we use this simple example in an application to increment the value 5:
We can say that the operation (in this case a method but it could be a function) is
referentially transparent (or RT) if it always returns the same result for the same
value (i.e. that increment(5) always returns 6):
22.7 Closure 239
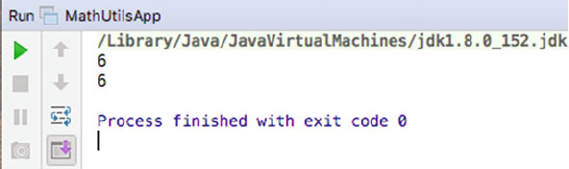
Any function or method that references a value which has been captured from its
surrounding context and which can be modified cannot be guaranteed to be RT. Thus
some of the examples presented earlier, such as that in the ClosureExamplesApp
example is therefore not guaranteed to be referentially transparent. This can have
significant consequences for the maintainability of the resulting code.
A closely related idea is that of No Side Effects. That is a function should not
have any side effects, it should base its operation purely on the values it receives
and its only impact should be the result returned. Any hidden side effects again
make software harder to maintain.
Of course within most applications there is a significant need for side effects; for
example any logging function has a side effect of recording the logged information
somewhere (typically in a file), any database updates have some side effect of
updating the database.
However, for pure functions it is a useful consideration to follow.
240 22 Functional Programming in Scala

Chapter 23
Higher-Order Functions
23.1 Introduction
Functions in Scala are part of the type system. That is, they are part of the system of
entities that comprise the types that variables and parameters can reference. Thus
just as a parameter can be of type Int, or Boolean, or Person a parameter to a
method or a function can be another functions. A function that takes a function as a
parameter is referred to as a higher-order function. This chapter discusses
higher-order functions and how they can be used and provides some examples
taken from the collection classes in Scala.
23.2 Higher-Order Function Concepts
In Scala higher-order functions are functions that do at least one of the following
(and may do both):
•Take as a parameter one or more functions
•Return as output a function
All other functions in Scala are first-order functions.
Many of the functions found in the collection classes such as map,foldLeft,
foldRight and forEach are higher order functions. It is a common enough pattern
that once you are aware of it you will recognise it in many different classes and
objects.
As an abstract example, consider the following higher-order function apply. This
function (written in pseudo code) takes an integer and a function. Within the body
of the function being defined the function passed in as a parameter is applied to the
integer parameter. The parameter function takes an integer and returns a Double.
The result of the function being defined is then returned:
©Springer International Publishing AG 2018
J. Hunt, A Beginner’s Guide to Scala, Object Orientation and Functional
Programming, https://doi.org/10.1007/978-3-319-75771-1_23
241
define apply x :Int;func :IntðÞ¼[DoubleðÞ:Double
begin
result ¼func xðÞ
return result
end
The function apply is a higher-order function because its behaviour (and its
result) will depend on the behaviour defined by another function—the one passed
into it.
We could also define a function that multiplies an integer by 10.0, for example:
define mult y :IntðÞ:Double
begin
return y 10:0
end
Now we can use the function mult with the function apply, for example,
applyð5;multÞ
This would return the value 50.0.
23.3 Scala Higher-Order Functions
The key to understanding how higher-order functions are defined is to understand
that a function definition defines a function type. That is a type that takes Zero or a
set of parameters (of given types) and returns a result. Thus the function:
ðx : IntÞ¼[x2
Is a one parameter function that takes an Int and returns a Int—that is its type.
Thus the
ðParameter type listÞ¼[return type
Defines a new Function type.
Thus a parameter that expects to be given a reference to a function that takes an
Int and returns an Int can be given a reference to any function that takes an Int and
returns an Int. All of the following functions meet that criteria
242 23 Higher-Order Functions
(x: Int) => 1
(y: Int) => y
(a: Int) => a * 2
(x: Int) => x * x
All of the above could be used with the following higher-order function:
object Processor {
val apply = (n: Int, f: Int => Int) => f(n)
}
For example,
object HigherOrderFunctionsApp extends App {
val f1 = (x: Int) => x * x
println(Processor.apply(10,f1))
}
The output from this application is:
100
This is actually also true for methods. For example the following is a
higher-order method, where the second parameter is a function:
object Processor {
def apply(n: Int, f: Int => Int) = f(n)
}
For example:
printlnðProcessor:applyð10;f1Þ
Notice that as previously mentioned, from the invoking clients point of view
there is little different between a function and a method.
The following listing provides a complete set of the earlier sample functions and
how they may be used with the apply function:
object Processor {
val apply = (n: Int, f: Int => Int) => f(n)
}
object HigherOrderFunctionsApp extends App {
val f1 = (x: Int) => 1
val f2 = (y: Int) => y
val f3 = (a: Int) => a * 2
val f4 = (x: Int) => x * x
println(Processor.apply(10,f1))
println(Processor.apply(10,f2))
println(Processor.apply(10,f3))
println(Processor.apply(10,f4))
}
23.3 Scala Higher-Order Functions 243
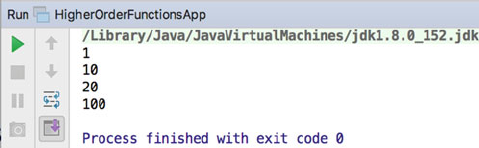
The output from this program is:
23.4 Using Higher-Order Functions
Looking at the previous section you may be wondering why you would want to use
a higher-order function or indeed why define one. After all could you not have
called one of the functions (f1 to f4) directly by passing in the integer to used? Yes
we could have, for example we could have done:
f4ð10Þ
And this would have exactly the same effect as calling:
Processor.apply(10,f4)
The first approach would seem to be both simpler and more efficient.
The key to why higher-order functions are so powerful is to consider what would
happen if we know that some function should be applied to the value 10 but we do
not yet know what it is. The actual function will be provided at some point in the
future. Now we are creating a reusable piece of code that will be able to apply an
appropriate function to the data we have when that function is known.
For example, let us assume that we have a Person class. This person class has a
salary property. However, we do not know how to calculate the tax that this person
must pay as it is dependent on external factors. The calculateTax method could
take an appropriate function that performs that calculation and provides the
appropriate tax value to be stored.
The following listing implements this approach. The class Person itself does not
have a way of calculating the tax; this must be provided as a parameter to the
calculateTax method. The function passed in takes a Double and returns a
Double. It is used with the salary property to determine the taxToPay property.
244 23 Higher-Order Functions
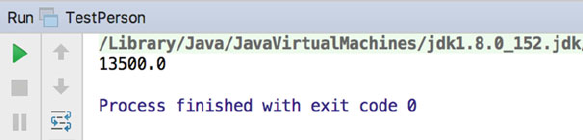
class Person(val salary: Double) {
var taxToPay =0.0
def calcuateTax(calculator: (Double) => Double) {
taxToPay = calculator(salary)
}
}
object TestPerson extends App {
val taxCalculator = (x: Double) => Math.ceil(x * 0.3)
val p=new Person(45000.0)
p.calcuateTax(taxCalculator)
println(p.taxToPay)
}
The TestPerson object defines a new function that takes a double and
multiplies it by 0.3 and then uses the Math.ceil function to round it up to a
whole number. This function is stored into the taxCalculator local val vari-
able. It then creates a new instance of the Person class specifying a salary of 45,000.
The calculateTax method is called passing in the taxCalculator function.
Finally it prints out the tax calculated for the person. The result of running this
program is:
Thus the class Person is a reusable class that can have different tax calculation
strategies defined for it.
23.5 Higher-Order Functions in Scala Collections
The place that you are most likely to encounter higher-order functions in Scala, at
least when learning Scala, is within the Scala collection classes. Two examples are
the filter method and the foreach method. These are both higher-order func-
tions defined on the Class List. A List is an ordered sequence of values (and will
be discussed in greater detail later in this book).
The definition of the filter method is:
def filter(p: (A) => Boolean): List[A]
That is, the method takes a single parameter. This parameter is a type of function
that takes a single parameter and returns a Boolean. The whole method (filter) itself
23.4 Using Higher-Order Functions 245
returns a new List. The ‘A’in the above is a placeholder for the type held by the List
to which filter will be applied (i.e. a list of Strings, or a List of Ints).
The filter method selects all elements of the list that satisfy the predicate function
p. The function p is used to test all the elements in the List. Those that return true
are included in the list of values returned. The result returned is a new list consisting
of all elements of this list that satisfy the given predicate p. The order of the
elements is preserved.
The definition of the foreach method is:
def foreach(f: (A) => Unit): Unit
The foreach method applies a function ‘f’to all elements of the list in turn.
Any result generated by the function ‘f’is discarded.
The following listing illustrates creating a list and applying simple functions to
filter and foreach. Note the examples illustrate the different ways in which the
functions to be applied can be defined:
// libraries that provide higher-order functions
var list =List(1,2,3,4)
// Filter is a higher order function that takes the
// function to be used to filter the contents of a list
var list2 =list.filter((x: Int) => x > 2)
println(list2)
// Short hand forms for function literals
// e.g. 'target typing' this allows parameter type to be
// inferred here because it is being applied to a
// list of integers
list2 =list.filter((x) => x > 2)
println(list2)
// Can also write this without the parentheses
list2 =list.filter(x => x > 2)
println(list2)
// Place holder syntax - allows for the variable
// x itself to be implied
list2 =list.filter(_ > 2)
println(list2)
// Place holder extreme!
list.foreach(x => println(x))
// Can replace whole parameter list and
// expression with underscore
list.foreach(println _)
// But Scala can imply the underscore so can
// just write
list.foreach(println)
}
object HigherOrderFunctionTests extends App {
// Can use as function literals with various Scala
246 23 Higher-Order Functions

Chapter 24
Partially Applied Functions
and Currying
24.1 Introduction
This chapter looks at two ways in which functions (and in fact methods) in Scala
can comprise components of reuse within a software system. These two approaches
are partial application of functions and Currying. The two approaches represent
variations on a theme. In both cases they allow a function with one or more
parameters to have one or more of those parameters bound to a specific value to
create a new function with one or more fewer variables.
At an abstract level, consider having a function that takes two parameters. These
two parameters, x and y, are used within the function body with the multiplying
operator in the form x * y. For example, we might have:
operation ¼x;yðÞ¼[xy
This operation might then be used as follows:
total ¼operation 2;5ðÞ
which would result in 5 being multiplied by 2 to give 10. Or it could be used:
total ¼operation 10;5ðÞ
which would result in 5 being multiplied by 10 to give 50.
If we needed to double a number we could thus reuse operation many times, for
example
©Springer International Publishing AG 2018
J. Hunt, A Beginner’s Guide to Scala, Object Orientation and Functional
Programming, https://doi.org/10.1007/978-3-319-75771-1_24
247
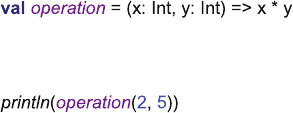
operation 2;5ðÞ
operation 2;10ðÞ
operation 2;6ðÞ
operation 2;151ðÞ
All of the above would double the second number. However, we have had to
remember to provide the 2 so that the number can be doubled. However, the
number 2 has not changed between any of the invocations of operation. What if we
fixed the first parameter to always be 2, this would mean that we could create a new
function that apparently only takes one parameter (the number to double). For
example, let us say we could write something like:
double ¼operation 2;ðÞ
Such that we could now write:
double 5ðÞ
double 151ðÞ
In essence double is an alias for operation, but an alias that provides the value 2
for the first parameter and leaves the second parameter to be filled in by the future
invocation of the double function.
This is essentially what Scala provides, although it has two mechanisms through
which this style of parameter binding can be implemented. The two approaches are
Partially Applied functions and Currying.
Note that what is said in the rest of this chapter for functions is also true for
methods. The only difference is that methods are always part of the class or object
in which they are defined. However it is possible to partially apply and curry both
functions and methods.
24.2 Partially Applied Functions
A Partially Applied function in Scala is a function where one or more of its
parameters have been applied or bound to a value, resulting in the creation of a new
function one fewer parameters than the original. For example, let us create a
function operation based on the example presented above in Scala.
This operation does exactly what the previous example did. It takes two parameters
and multiples them together. We can thus invoke it in the normal manner:
248 24 Partially Applied Functions and Currying
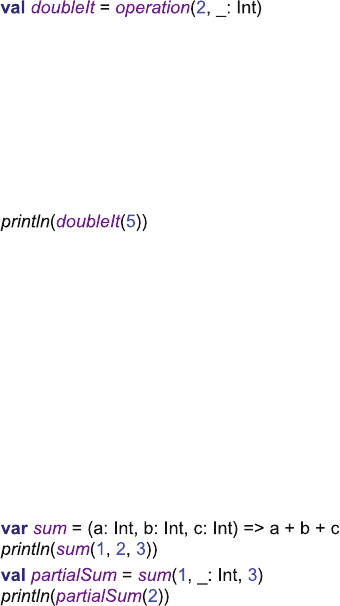
The result of executing this statement is:
10
However, we can bind the first parameter to 2 so that it will always double the
second parameter and store the resulting function reference into a property double.
For example,
Double now references a function that takes one parameter an Int. Note that the
‘_’underbar indicates that this is a placeholder for future values and that the type
that will be used with this placeholder is Int. This allows for overloading of
functions and distinguishing between such overloading (overloading relates to
functions with the same names but different parameter types).
To invoke this function we merely need to provide the parameter value to be
double, for example
The result of executing this line is once again:
10
It is also possible to have more than one parameter bound and more than one
parameter left unbound. These parameters can be intermixed with any parameter in
any position being bound or unbound as required.
The following listing shows a simple summation function that takes three
integers and adds them together. It also shows a situation where the first and the
third parameters are bound and the resulting function assigned to the val
partialSum. The function referenced by partialSum takes a single Int and adds the
value passed into the values 1 and 3.
The result of executing this listing is:
6
6
Partially Applied functions are very useful for creating new functions from
existing functions. The other approach is Currying which is described below.
24.2 Partially Applied Functions 249
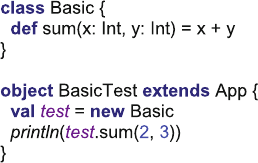
24.3 Currying
24.3.1 Introduction to Currying
An alternative approach to Partially Applied functions is to use a technique/pattern
known as Currying in the Scala/Functional world. The name Currying may seem
obscure but the technique is named after Haskell Curry (for whom the Haskell
programming language is named).
Currying allows new language structures to be created. The language features
can resemble normal function invocations or can resemble language constructs.
This allows the constructs developed to be presented to client code as if they are
merely an extension to Scala (which in many ways they are). For example, struc-
tures such as:
transaction {
…
}
can be created where transaction is a function that has been curried such that it is
linked to an appropriated database, etc.
A curried function is a function that is applied to multiple argument lists (in
contrast a Partially Applied function has one argument list). Note that functions can
have one or more parameter lists.
24.3.2 Defining Multiple Parameter List Functions
All the function examples we have seen so far have used a single argument list with
multiple parameters. For example this function takes two parameters (x and y) and
multiplies them together. It is used with println in this example to print out the
result of multiplying 2 and 3:
In Scala we can rewrite this function as a multiple argument function, on which
case each argument list takes a single argument. The arguments can still be used in
the body of the function (and thus we can still multiple x and y together):
250 24 Partially Applied Functions and Currying

Both of these functions return the value 6, and both allow you to pass in two
parameters to the function. However, in effect the second version results in two
function invocations back to back. It is a bit like chaining two functions together.
The first function invocation takes a single Int parameter x and returns a function
value for the second function. The second function takes the Int parameter Y and
applies it to the first functions result.
24.3.3 Using Curried Functions
Why is this useful? It is because we can provide a value to use for the first function
before we wish to provide a value for the second function. As the result of pro-
viding the value for the first function is to return a function value to use with the
second, we can essentially store that functions and its subsequent invocation for
later use. For example, given the following function definition in the class
CurryTest:
This function has multiple argument lists and could be called directly as shown
above.
However we could curry the function such that we provide the first argument but
not the second. Note that in comparison with Partially Applied Functions where any
argument can be applied, when Currying it is only the left-hand side arguments that
can be applied. Thus in this case we could not supply the second argument rather
than the first. Also note that because of this Currying does not require that you
specify the types of the omitted parameters.
24.3 Currying 251
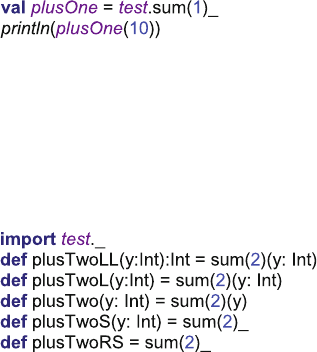
The approach used with multiple argument lists is to provide the arguments from
the left and to use ‘_’to indicate that the remainder of the function invocation has
been left out:
The plusOne function is now a curried function that takes the y argument and
adds it to the value 1 which was provided for the x argument when the plusOne val
was defined. Note that as far as the client code of plusOne is concerned this is just a
normal single parameter function.
The definition of plusOne used above is actually a shorthand form for the
definition of the curried function. All of the following are also variations on the
definition of the curried function:
The explanation for of the variations on the plusTwo function is provided below:
•The function definition plusTwoLL is the longest longhand form of the function
where we specify the parameter and the return type of the newly created
function as well as the binding of the first parameter to 2.
•The plusTwoL function is a longhand form which infers the return type.
•The plusTwo method allows the type of the second parameter in the second
parameter list to be inferred (this is allowed in Currying—specifying the type is
optional here; this was not the case for Partially Applied functions).
•The plusTwoS definition is a shorthand form where the second parameter list is
replaced by the underbar (‘_’) placeholder.
•The plusTwoRS is the real shorthand form where the parameter type of the
newly created function is also inferred.
24.3.4 Building Domain-Specific Languages
If you need to create a framework to be used by Scala programmers, but want to
provide a flexible way to configure that framework and allow the developers to
view the end results as merely part of the Scala environment, then Currying has
many advantages.
For example, the use of Currying allows you to build new language structures
based on multiple argument lists. For example you can then exploit the ‘{}’syntax
for a single parameter. If this parameter is itself a function, the end result is a
construct that looks like a language feature:
252 24 Partially Applied Functions and Currying
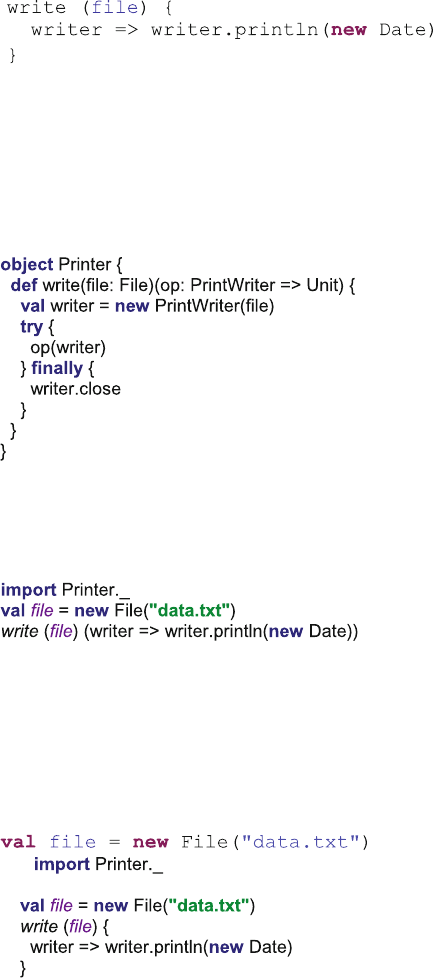
The above is a function write that has two argument lists: one that takes a file
and one that takes a function. The round bracket syntax could be used for both
parameters. However, by using the ‘{}’syntax for the last parameter this looks
more like a language structure! This is an alternative syntax for parameters that can
be used for the last set of parameters lists.
We can create the write example presented earlier by implementing a function or
a method with multiple parameters. In this example, we are using a method write:
This method has two parameter lists defined: one parameter list that takes a file
and one parameter list that takes a function. This function takes a PrintWriter and
returns Unit.
This could then be used as follows:
Note that the second parameter lists contain a function definition that takes a
parameter of type PrintWriter and calls the method println on that print writing. The
result is that the current Date is written into whatever writer is passed to this
function. Inside the write method, the function passed a PrintWriter that is bound to
the file passed in within the first parameter list.
Of course we could also exploit the ‘{}’syntax which means that we could also
write:
which makes the write function appear more of a language construct than a
straight function or method call.
24.3 Currying 253
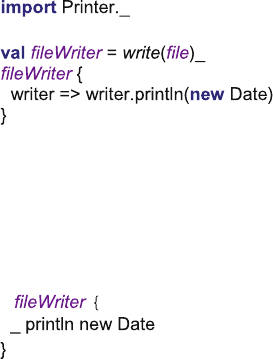
However, we could take this further. If we are creating a logging system in
which we always want client code to write to the same log file we could use
Currying to create a fileWriter function that is guaranteed to write the file we wish
to specify:
Client code can now invoke the fileWriter merely providing the function that
will determine the actual value to write. If this is returned to client code via a
factory or explicitly imported, they will merely see this as a part of the language.
In fact this can be written more concisely yet using the implicit parameter syntax
in which an underbar is used to represent a parameter passed into the function and
used within that function:
which is very clean and simple to present to client code.
The advantages of Currying are:
•It allows new language constructs to be created.
•It allows constructs to be bound at runtime to specific objects, etc. If this
approach is combined with the Factory pattern, then the details can be hidden
from client code.
The drawbacks of Currying include:
•Partially Applied functions are more flexible in terms of which parameters are
applied and which are not yet applied.
254 24 Partially Applied Functions and Currying

Chapter 25
Scala Collections Framework
25.1 Introduction
The collections framework is one of the main categories within the set of Scala
libraries that you will work with. It provides types (Traits, Objects and Classes) that
support various types of data structures (such as lists and maps) and ways to process
elements within those structures. This chapter introduces the Scala collections
framework.
25.2 What Are Collections?
Acollection is a single object representing a group of objects (such as a list or
dictionary). That is, they are a collection of other objects. Collections may also be
referred to as containers (as they contain other objects). These collection classes are
often used as the basis for data structures and abstract data types. In general a
collection should be used wherever some significant behaviour is associated with
the data in the collection (arrays can be used elsewhere). For example, a
SortedList may need to support the idea of adding and removing elements from
the list but also maintaining some sort order etc. Collections are thus the Scala
mechanism for building data structures of various sorts; it is therefore important to
become familiar with the collection API and its functionality.
Some of the collection classes, for example, ListBuffer, provide function-
ality similar to existing data structure classes such as Arrays, but are more flexible
to use (at a small performance cost). For example, ListBuffers are growable;
that is, they can grow in size as new elements are added to them, whereas Scala
Arrays are of fixed size.
©Springer International Publishing AG 2018
J. Hunt, A Beginner’s Guide to Scala, Object Orientation and Functional
Programming, https://doi.org/10.1007/978-3-319-75771-1_25
255
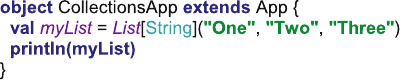
25.3 Scala Collections
The Scala collections framework is defined within the scala.collection
package and the subpackages associated with it. This package provides a collec-
tions framework for holding references to objects, instances and values.
The collection types incorporate higher-order functions, such as the Scala List
type that includes a foreach function that can be used to apply an operation to
each of the elements held in a collection.
The Scala collection framework is split into mutable and immutable structures
that are defined in the scala.collection.mutable and the scala.col-
lection.immutable packages. Thus all the collections in the mutable package
can be updated, added to, removed from, etc. In practice this means that you can
change the contents of the mutable collection after it has been created. All
immutable collections, however, once created cannot change their content. Thus
when you create an immutable list then the element that comprised that list cannot
be removed, added to, etc. This does not mean that these collections do not include
operations that appear to add, remove or otherwise alter their contents; rather that
these operations produce a copy of the original collection which reflects the changes
being made.
Note that by default the contents of the scala.collection.immutable
package is imported into all Scala source files and thus you need to explicitly
import the collection types in the scala.collection.mutable package.
All Scala collections have type parameters which can be used to specify the type
contained within the collection. For example
This specifies that we wish to create a new List that will hold references to
Strings and is initialised with the strings “One”,“Two”and “Three”. We can often
get Scala to infer the type of the collection for us but such type parameterisation of
collections is very common. The output of this application is
List(One, Two, Three)
The Scala collections framework was heavily revised in Scala 2.8 to provide a
common, uniform framework for collection types. A number of key design prin-
ciples underpin the framework, and these are:
256 25 Scala Collections Framework
•Ease of Use. Most problems can be solved with just a couple of operations,
which are common across the framework.
•Concise. Due to the presence of higher-order functions within the framework,
such as the foreach function, activities that would have taken several statements
in other collection frameworks can be achieved in a single statement.
•Safe. The presumption of immutability and the avoidance of side effects make
the use of collection types much safer in Scala.
•Fast. The operations within the collections framework have been heavily tuned
and optimised to maximise performance.
•Universal. A common set of operation exists across all the collection types.
Thus one collection type has similar operations to another collection type that is
similar in nature. This means that developers only need to learn a fairly small
vocabulary to be able to use a wide range of types.
•Expressive. The vocabulary that is used is expressive and semantically mean-
ingful helping developers to clearly express the intent of their code. For
example, val (minors, adults) = people.partition(_.age < 18).
The packages that comprise the Scala collection framework are:
•scala.collection. This package contains the root collection types. These root
types may be mutable or immutable. For example, scala.collection.IndexedSeq
is a parent of both collection.immutable.IndexedSeq and of scala.collection.-
mutable.IndexedSeq. In general the operations defined on the type in the
scala.collection package are repeated in the immutable type and extended on in
the mutable type.
•scala.collection.mutable. This package contains the mutable versions of the
collection types.
•scala.collection.immutable. This package contains the immutable versions of the
collection types.
•scala.collection.generic. This package provides building blocks for constructing
collection types; you would not normally need to work this package.
25.3 Scala Collections 257
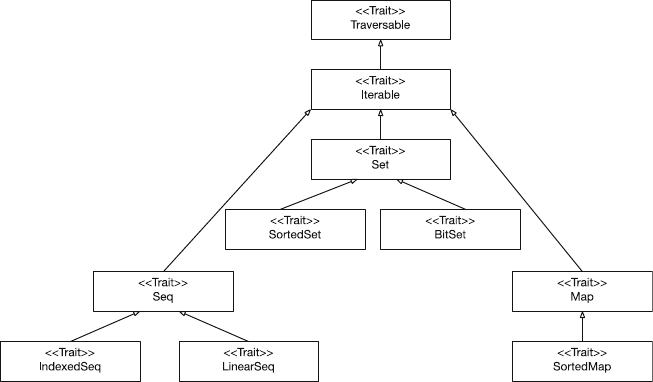
25.3.1 Package Scala.Collection
There is a relatively small set of collection types in the scala.collection package.
Some of these types are presented above and described briefly below. This hier-
archy was introduced in Scala 2.8 and forms the foundation of the current (in-
cluding Scala 2.12) collections types (however the Scala 2.13 version is exploring a
rework of the collections hierarchy if you are using this version then check the
online reference material).
The major of the types are traits although some also have objects that support
utility type operations such as the Map object with methods such as apply, empty.
•Traversable. This trait is the root trait of all traversable collections. It is the
base trait for all kinds of Scala collections. It provides the common behaviour
common to all collections (such as the foreach method). Thus all collection
types that mix in this trait must implement a foreach operation.
•Iterable. A base trait for iterable collections. An iterable collection is one that it
is possible to iterate over. This means that it is possible to process each element
in an iterable collection one-by-one. Implementations of this trait need to pro-
vide a concrete method with the signature def iterator: Iterator[A].
•Seq. This is a base trait for all sequence like collections. A sequence is a
collection in which there is a specific order to the elements it holds. Sequences
provide an apply method for indexing, operations such as indexOf, lastIndexOf,
startsWith, endsWith and reverse.
•IndexedSeq. This is a base trait for indexed sequences. An indexed sequence is
a sequence where each element is accessible by an index and where element
258 25 Scala Collections Framework
access is supported in constant time (or near constant time) for elements across
the collection. An IndexedSeq provides fast random access to elements and a
fast length operation.
•LinearSeq. The base trait for linear sequences such as Lists and Streams.
A LinearSeq provides fast access only to the first element, via the head, but also
fast tail operation.
•Set. The base trait for all sets (both mutable and immutable). A Set does not
allow a duplicate of en element.
•SortedSet. The SortedSet trait represents a Set that has been sorted.
•BitSet. A base trait for BitSets. BitSets are sets of nonnegative integers that can
be used to represent variable-size arrays of bits packed into 64-bit words.
•Map. This is a trait that represents the key concepts implemented by all Maps.
A map is a collection that maintains relationships between keys and values.
•SortedMap. A SortedMap trait is a Map whose keys are sorted.
25.3.2 Common Seq Behaviour
The following lists some of the common behaviour shared by all Seq types.
•seq(n) Return the element n in the sequence seq. Note that Scala collections are
Zero based and therefore the first element in the sequence will be the element
‘0’. This means that if the sequence holds 5 elements they will be accessed by
the indexes 0–4.
•seq.length Return the length of the sequence.
•seq.lengthCompare(s2) Returns −1 if seq is shorter than s2 and +1 it is longer,
with Zero indicating that they have the same length.
•seq.indexOf(x) The index of the first element in seq equal to x.
•seq.lastIndexOf(x) Return the index of the last element in seq that equals x.
•seq.indexOfSlice(s2) The first index of seq such that the successive elements
starting from that index from the sequence s2.
•seq +: x A new sequence that consists of x prepended to seq.
•seq :+ x A new sequence that consists of x appended to seq.
•seq.padTo(length, x) The sequence resulting from appending the value x to seq
until the length is reached.
•seq(i) = x Changes the element of seq at index I to be x.
•seq.sorted A new sequence obtained by sorting the elements of seq using the
standard ordering of the element type contained within seq.
•seq.sortWith(test) A new sequence obtained by sorting the elements of seq using
the ‘test’as the comparison operation.
•seq.reverse Returns a sequence with the elements of seq in reverse order.
•seq.iterator Returns an iterator yielding each of the elements of seq in order.
•seq.reverseiterator Returns an iterator yielding each of the elements of seq in
reverse order.
25.3 Scala Collections 259
•seq.contains(x) Tests whether seq contains an element equal to x.
•seq.startsWith(s2) Returns true if seq starts with the sequence contained in s2.
•seq.endsWith(s2) Returns true if seq ends with the sequence contained in s2.
•seq.intersect(s2) The multi-set intersection of sequences seq and s2 that pre-
serves the order of the elements in seq.
•seq.diff(s2) The multi-set difference of sequences seq and s2 that preserves the
order of the elements in seq.
25.3.3 Common Set Behaviour
The following lists some of the common behaviour shared by all Set types.
•set.contains(x) Tests whether set contains an element equal to x.
•set(x) Same as set.contains(x).
•set.subsetOf(s2) Tests whether set is a subset of s2.
•set + x Returns the set containing all the elements of set plus x.
•set ++ s2 A set containing the union of all the elements of set and s2.
•set −x A set containing all the elements of set except x.
•set −s2 A set containing all the elements of set except those elements also in s2.
•set.empty Test to see if the set is empty.
•Set interest s2 The set intersection of set and s2.
•Set diff s2 The set difference between set and s2.
25.3.4 Common Map Behaviour
The following lists some of the common behaviour shared by all Map types.
•m.contains(k) Tests whether m contains a mapping for key k.
•m.get(k) Retrieves the value associated with the key k as an Option or None if
there is no mapping.
•m(k) Retrieves the value associated with the key k or an exception if not
mapping is present.
•m.getOrElse(k, d) Retrieves the value associated with the key k or the default
value d if no key is found.
•m+(k–> v) Add the mapping k –> v to the map.
•M−k Remove the key k (and its associated value) from the map m.
•m.keys Return an iterable containing each of the keys in the map m.
•m.keySet Return a set containing all the keys in the map m.
•m.keyIterator Return an iterator for each of the keys in the map m.
•m.values An iterable containing each of the values in the map m.
•m.valuesIterator An iterator over the values in the map m.
260 25 Scala Collections Framework

Chapter 26
Immutable Lists and Maps
26.1 Introduction
This chapter focuses on the List and Map types from the scala.collection.
immutable package.
26.2 The Immutable List Collection
As a common approach is applied across all the collection classes in Scala we will
first use the scala.collection.immutable.List class as a detailed case
study to look at the facilities it provides and the operations that can be performed
on it.
AList is an immutable (fixed) sequence of elements that provides for constant
time access to the first element and to the tail (remaining) elements. Many other
operations take linear time. Lists are a very widely used collection as they provide
all the core sequence like behaviours.
26.2.1 List Creation
The following listing illustrates some of the list creation options available:
©Springer International Publishing AG 2018
J. Hunt, A Beginner’s Guide to Scala, Object Orientation and Functional
Programming, https://doi.org/10.1007/978-3-319-75771-1_26
261
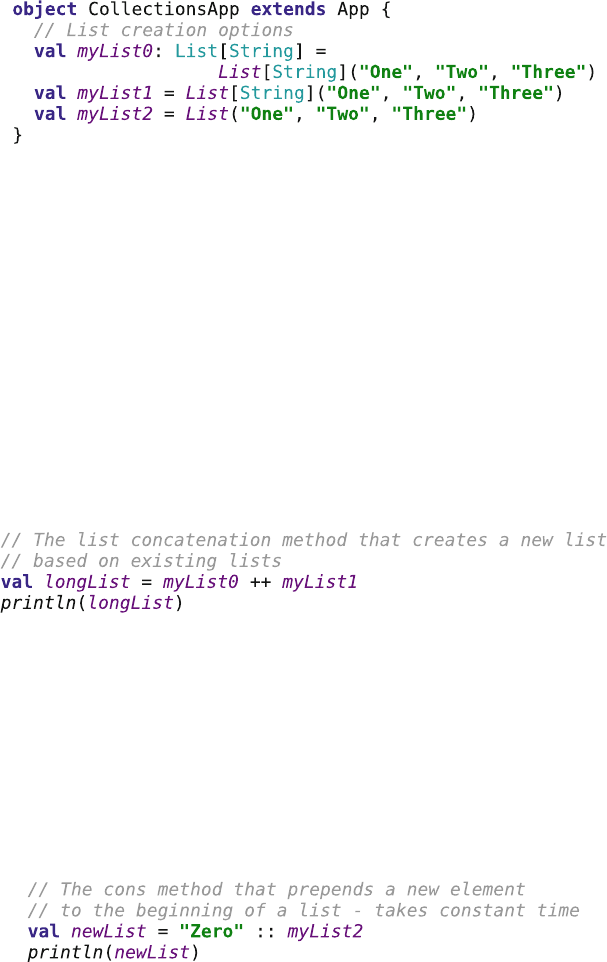
The first option illustrated by myList0 creates a list containing strings ini-
tialized to “One”,“Two”and “Three”. This is saved into a val myList0 which is
specified to be of type List[String]. The second example illustrates how Scala
can infer the type of the val myList1 for us, and the third indicates that Scala can
determine the type of the contents of the list so that it is not necessary to explicitly
state that the list will contain Strings.
26.2.2 List Concatenation
We can concatenate strings together using the ‘:::’operator. This creates a new
list based on two existing lists, for example,
This results in longList now containing the list:
List(One, Two, Three, One, Two, Three)
Note that in the older versions of Scala the ‘:::’operator was available instead of
the ‘++’. However, the effect will be the same whichever operation you select to use.
It is also possible to use the cons operator (‘::’) to prepend an element to the
front of a list (which takes constant time), for example,
Note that this of course produces a new list referenced by newList as Lists are
immutable. The contents of newList is:
262 26 Immutable Lists and Maps
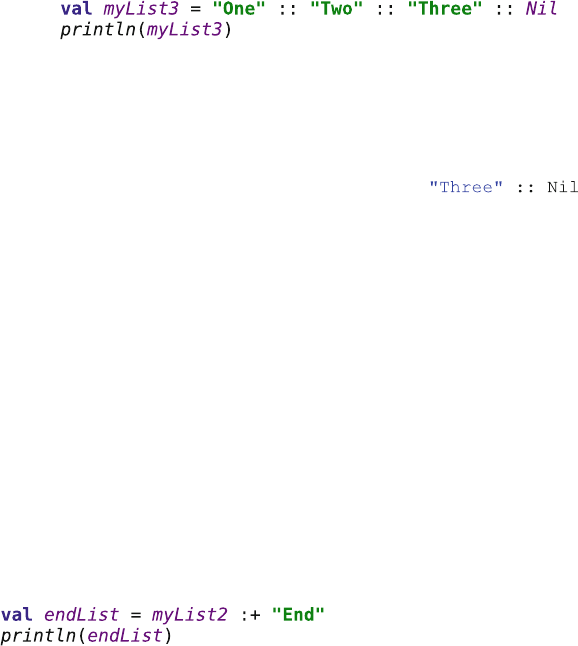
List(Zero, One, Two, Three)
The cons operator can also be used to construct a list from a set of existing
values. For example,
This example may look a little strange. This is because the value Nil at the end
of the statement represents an empty list. It is thus to this list that the strings “One”,
“Two”and “Three”are being added. This raises the question, why is Nil at the end
of the statement and not at the start? This is because any method or operation that
ends with a ‘:’is right associative. Thus the expression:
must be read from the right to the left (and not from the more traditional left to
right). Thus the String “Three”is being prepended to the empty list represented by
Nil. This expression then returns the new list containing the String “Three”. The
String “Two”is then prepended to that list by the next ‘::’cons operation. This
result sin a new List containing “Two”and “Three”. The string “One is then
prepended to that List to create the final list containing “One”,“Two”and “Three”.
As prepending is done in constant time is the preferred way to add an element to the
List. The result is
List(One, Two, Three)
There is also the ‘+:’operator which again prepends an element to the front of
the list return a new copy of the list.
We could also append an element to the contents of the existing list using the ‘:
+’operator. However, this is rarely used as the time it takes to append to the list
grows linearly as the size of the list grows:
The val endList would now hold a reference to the following list:
List(One, Two, Three, End)
26.2 The Immutable List Collection 263
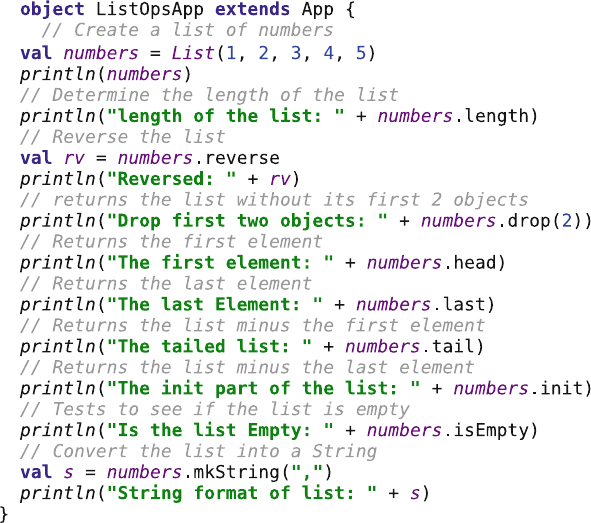
26.2.3 List Operations
Other operations of interest on the List class are illustrated in the following listing
and discussed below:
The method length returns the length of the list while the method reverse
returns the list in reverse order. The head of the list returns the first element in the
list and the method last returns the last element in the list. The method tail
returns all the elements in the list bar the first element. The method isEmpty
returns a Boolean true of false depending upon whether the list is empty or not
and the .mkString method converts the contents of the list into a string with each
element in the list separated by the string passed into the method. The result of
executing Test2 is shown below:
List(1, 2, 3, 4, 5)
length of the list: 5
Reversed: List(5, 4, 3, 2, 1)
Drop first two objects: List(3, 4, 5)
The first element: 1
The last Element: 5
264 26 Immutable Lists and Maps
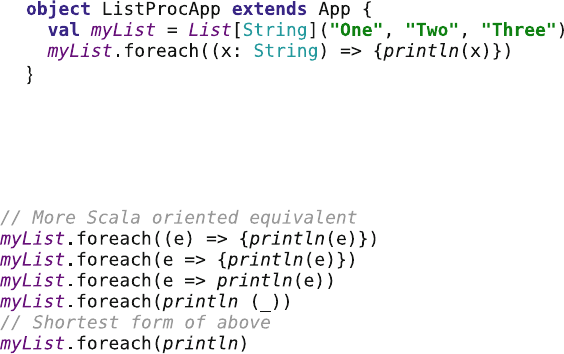
The tailed list: List(2, 3, 4, 5)
The init part of the list: List(1, 2, 3, 4)
Is the list Empty: false
String format of list: 1,2,3,4,5
26.2.4 List Processing
You can also process all the elements in the list. This can be done in a number of
ways. For example, lists are iterable collections and thus you can iterate over the
elements in the list as follows:
However, many of the collection classes also provide the foreach higher-order
function that can take a function to apply to each of the elements in the List in turn.
Therefore you can also write:
Of course in Scala this can be written in a number of different (and shorter)
ways, including:
where we gradually rely in Scala to infer more and more of what is being defined.
26.2.5 Further List Processing
As well as the foreach operation, there is a whole range of higher order functions
that you can use with Lists. These include filter,map,foldLeft and
foldRight,flatMap.
For example, if you wish to select only certain elements in a list, that meet a
specific criterion, you can do that using the filter higher order function. For
example,
26.2 The Immutable List Collection 265
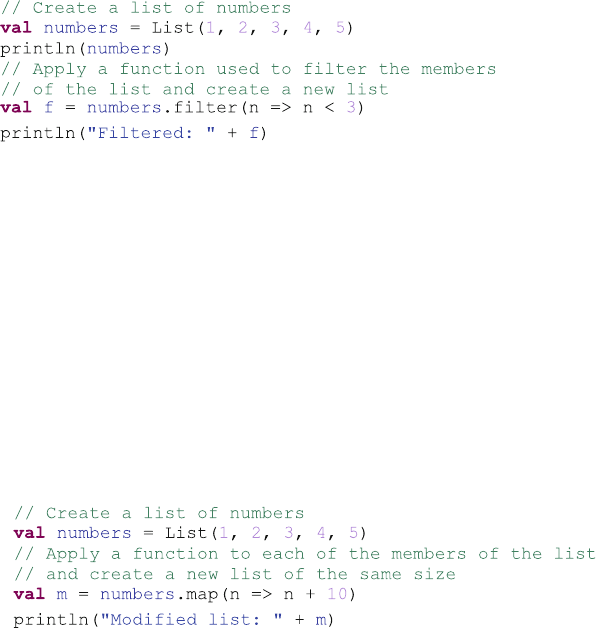
This would result in the following output:
List(1, 2, 3, 4, 5)
Filtered: List(1, 2)
As you can see from this example, the result of applying the function literal
passed into the filter is that only elements less than three have been included in the
filter list ‘f’.
We can also apply a function to each of the elements in a list and create a new
list of the same size, based on the result returned by the function we applied. For
example,
The output from this is
Modified list: List(11, 12, 13, 14, 15)
Thus the modified list has five elements, and these elements are each 10 greater
than the elements in the original list. Thus the function:
n=>N+10
has added 10 to each of the elements and collated the results into a new list
referenced by ‘m’.
We could have written this in a short from as:
266 26 Immutable Lists and Maps
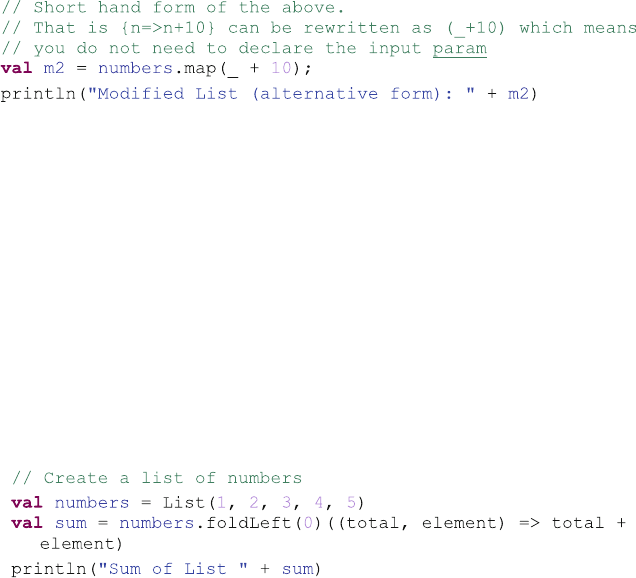
Which would also result in a list being created containing five elements, where
each element is 10 greater than that in the original list:
Modified List (alternative form): List(11, 12, 13, 14, 15)
We can also apply a function to all the elements in the list and gather up the
results into a single value. This can be done using either the foldLeft or the
foldRight methods. The foldLeft operation takes an initial value (or state)
and propagates that state from one element to the next, with the result of one
evaluation being passed as input to the next. It starts from the left most element and
processes right towards the end of the list. For example, given our list of numbers
we could add them all up using the foldLeft operation:
The result of this is:
Sum of List 15
Note that foldLeft is a multi-argument list operation, thus the first argument
takes the initial value to use (in this case Zero) and the second argument list takes
the function to apply. This function is a two parameter function, one which takes
the total already calculated and one parameter that is the current element to process.
The result return from this function is then passed to the next invocation of the
function. Note due to the alternative syntax available for single parameter lists the
above could also be written as the following with the second parameter list being
represented by the curly braces ‘{…}’:
26.2 The Immutable List Collection 267
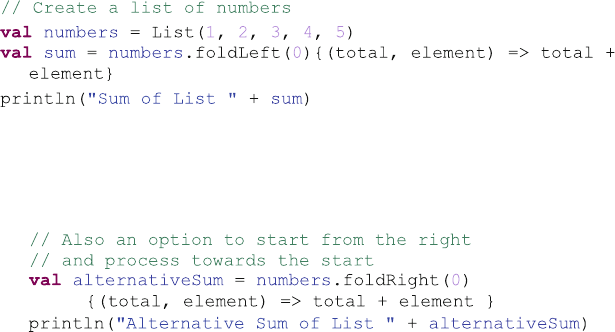
There is also a foldRight operation which starts at the end of the list with the
last element and processes towards the start of the list. For example,
The result (in this case) is exactly the same, alternativeSum contains the
value 15:
Alternative Sum of List 15
However, there are some issues with foldRight when it comes to processing
very large lists and thus it is often better to reverse a list and then call foldLeft,
for example,
myList.reverse.foldLeft(0){(t, e) => t + e}
Another operation flatten can be used to flatten a list. That is, given a list of
lists it can return a single list constructed from the contents of the original sublists.
For example,
scala > val nested = List(List(1, 2, 3), List(4, 5))
nested: List[List[Int]] = List(List(1, 2, 3), List(4, 5))
scala > nested flatten
res0: List[Int] = List(1, 2, 3, 4, 5)
In the above example, the first sublist containing 1, 2 and 3, and the second
sublist containing 4 and 5 have been flattened into a single list containing 1, 2, 3, 4
and 5.
The operation flatMap is essentially map plus flattern combined together.
The function given to the flatMap is expected to return a list of values. The
resultant list of lists is then flattened into a single list. For example, given a val
268 26 Immutable Lists and Maps

‘contents’containing a list of Arrays of Integers. In the following example, we use
flatMap to convert the array to a list and then to flattern the two lists into a single
list:
The output from this program is:
List(1, 2, 3, 4, 5, 6)
26.2.6 Pattern Matching
It is possible to extract the contents of a list into a set of variables as follows:
val myList = List("a", "b", "c")
val List(x, y, z) = myList
with the result that x,yand zare variables containing the contents of the myList
(rather than being the members of a new list):
x: java.lang.String = a
y: java.lang.String = b
z: java.lang.String = c
However, this has limited utility unless you know the number of elements in the
list. A generally more useful approach is to extract the head and the tail of a list in
this way:
val hd :: tl = myList
which results in two vals being created one called hd and containing the string “a”
and one called tl containing the list of strings (“b”and “c”):
hd: java.lang.String = a
tl: List[java.lang.String] = List(b, c)
26.2 The Immutable List Collection 269
26.2.7 Converting to a List
There are numerous ways in which you can convert other sequence like constructs
into lists. For example, you can convert an array to a list:
scala > Array(1, 2, 3, 4) toList
List[Int] = List(1, 2, 3, 4)
Or a string to a list (which results in a list of characters);
scala > "abc" toList
List[Char] = List(a, b, c)
Or a generated sequence into a list
var shortList = 1 to 10 toList
And indeed other collection types into a list, such as a Set or a Map:
scala > Set("abc", 123) toList
List[Any] = List(abc, 123)
scala > Map("apple" - > "red", "banana" - > "yellow") toList
List((apple,red), (banana,yellow))
Of course the reverse is also true. That is it is possible to convert a list to a range
of sequence like structures using various to <Type> methods, such as toArray,
toString,toSet,toMap.
26.2.8 Lists of User Defined Types
All of the examples we have looked at so far with Lists have used strings or
Integers. We can of course also make lists of user-defined types. For example, given
the class Person as can create lists which hold Person types:
270 26 Immutable Lists and Maps
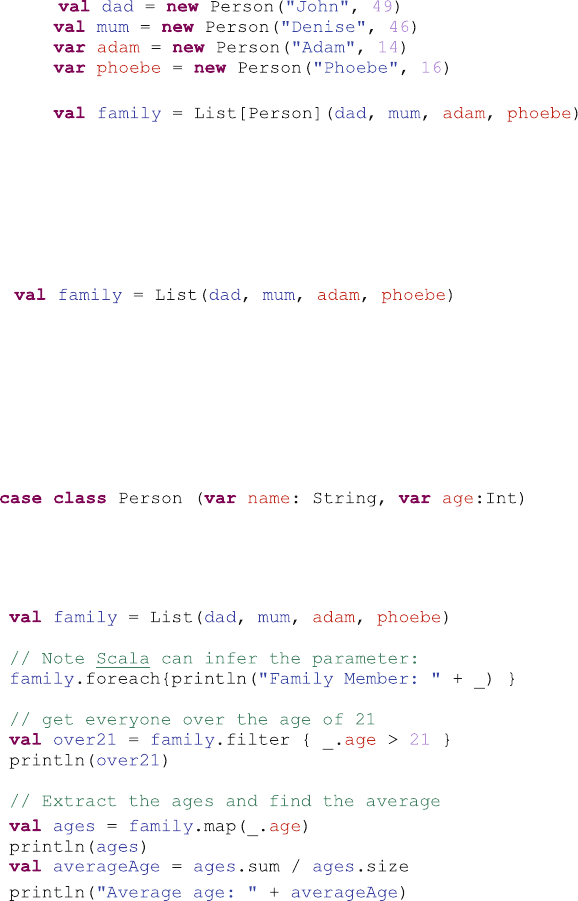
This defines four vals holding references to four istances of a class Person. These
four vals are then used to initialise a List of Persons referenced by the val family.
We have explicitly stated the type of the contents of the List as Person in this
case, but that is of course optional, and we could also have written:
In the above example, Scala will infer that this is a list of Person types.
We can now apply the operations discussed earlier in this section with this list of
persons. Of course we can now access the properties and methods defined on the
class Person within the functions we apply to the elements of the list. Thus
assuming the class Person is defined as follows:
We can write:
The examples illustrate the use of foreach,filter and map. The foreach
example prints out each member of the family with a prefixof“Family member:”.
The second filters the family members to find those over 21 using the age property.
The final example uses the map function to obtain a list containing the ages of each
26.2 The Immutable List Collection 271
of the members of the family which is then used to calculate the average of all the
ages. The output of this program is:
Family Member: Person(John,49)
Family Member: Person(Denise,46)
Family Member: Person(Adam,14)
Family Member: Person(Phoebe,16)
List(Person(John,49), Person(Denise,46))
List(49, 46, 14, 16)
Average age: 31
26.3 The Immutable Map Type
AMap is a set of associations, each representing a key-value pair. The elements in a
Map may be unordered, but each has a definite name or key. Although the values
may be duplicated, keys cannot. In turn a key can map to at most one value. Some
Map implementations, like TreeMap and ArrayMap, make specific guarantees as
to their order; others, like HashMap, do not. The Map protocol allows either the
keys to be viewed, the values to be viewed or for the keys to be used to access the
values.
A Concrete implementation of the Map trait is the scala.collection.
immutable.HashMap class. It provides an immutable implementation of a Map
based on the use of a hashing trie. A hash trie is a standard way to implement
immutable sets and maps efficiently within Scala. To find a given key in a map, the
code first takes the hash code of the key and based on information held in the hash
find the appropriate bucket into which the key value pair will have been placed. The
advantage of hash tries are that they strike a balance between reasonably fast lookup
and reasonably efficient inserts and deletions.
The following listing illustrates some of the operations available on the Map trait
that is implemented by the HashMap class.
272 26 Immutable Lists and Maps
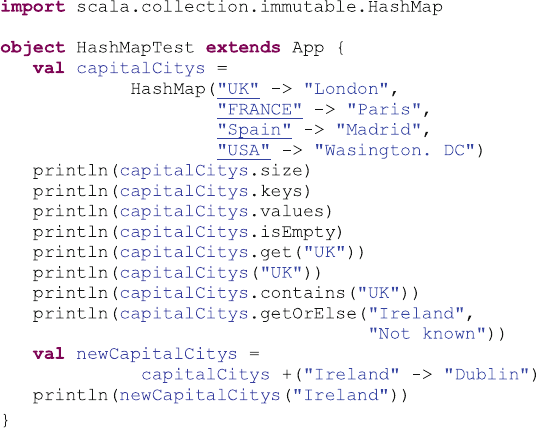
The result of executing this program is shown below:
4
Set(USA, Spain, UK, FRANCE)
MapLike(Wasington. DC, Madrid, London, Paris)
false
Some(London)
London
true
Not known
Dublin
The points to note about this listing include that a map contains key to value
pairs. Thus the size of the map is four elements just after it is instantiated. Also note
that you can obtain the keys and values in the map separately should you need to do
so. The keys are returned as a Set as they will be unique. The Values are returned
as a type of sequence as there may be duplicates amongst them. You can also test a
map to see if it is empty. The method get and the access (nth) are often treated as
synonymous, but they actually have different return types, for example,
26.3 The Immutable Map Type 273
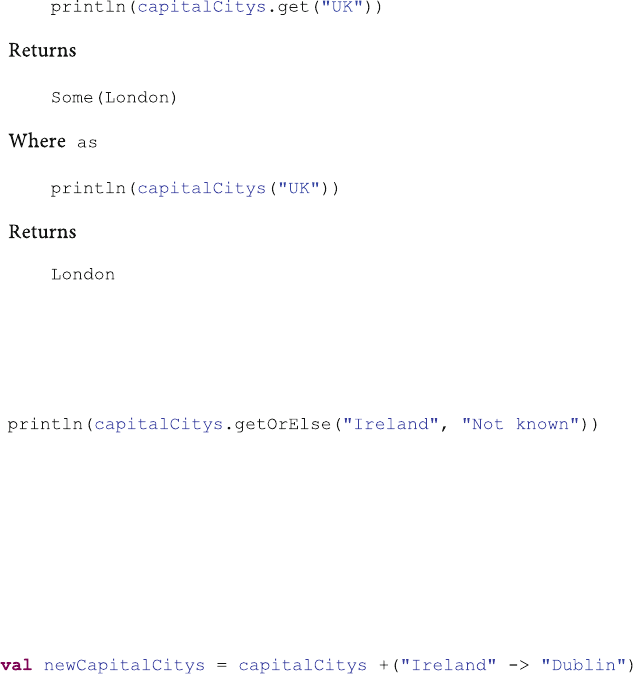
The difference being that get will return None if the key does not exist in the
HashMap were as the accessor will throw an exception if the key is not present.
An alternative is to use the getOrElse method:
This will return the value associated with the specified key (in this case Ireland)
or if the key is not present it will return the value passed to the method as the second
parameter.
Finally note that act of adding a new key-value pair to the map results in a new
map being created containing the same set of key-value pairs as the original map
with the addition of the new key-value pair (the original map is unaffected):
274 26 Immutable Lists and Maps

Chapter 27
Immutable and Mutable Collection
Packages
27.1 Introduction
This chapter discusses the contents of the Scala collection framework packages for
immutable and mutable collections.
27.2 Package Scala.Collection.Immutable
The key classes and traits in the scala.collection.immutable package are
shown in Fig. 27.1 and described in the rest of this section.
27.2.1 Sequences
There are a number of different types of Sequences including:
•Vector. This is a general-purpose immutable indexed sequence. As a general
rule you might choose to use a Vector over a List as it provides faster
access. An example of using the Vector class is given below:
©Springer International Publishing AG 2018
J. Hunt, A Beginner’s Guide to Scala, Object Orientation and Functional
Programming, https://doi.org/10.1007/978-3-319-75771-1_27
275
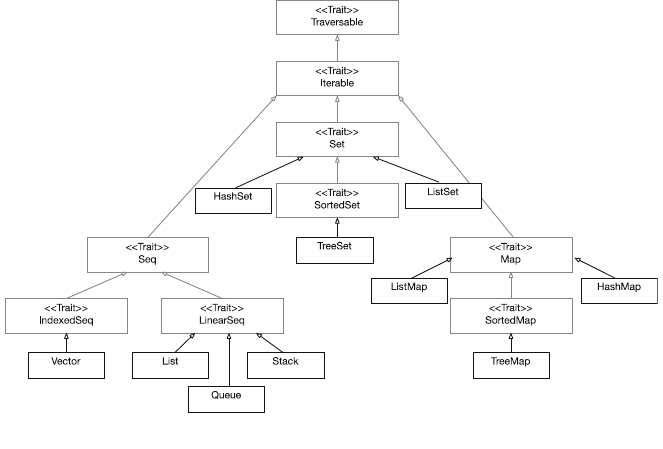
The result of running this program is shown below:
Vector(3, 2, 1)
3
3
Vector(4, 3, 2, 1)
•List. The List class has been discussed extensively earlier in this chapter.
However, it is worth noting that it is probably the most widely used type in the
scala.collection.immutable package.
•Queue. A Queue is a first-in first-out (FIFO) type of collection. That is elements
can be added to a queue and removed from the queue in the same order. The
primary methods on a Queue are the enqueue method for adding an element to
the queue,dequeue for removing an object from the queue. This type might
at first seem a strange choice for the immutable a package. After all once you
create an immutable Queue you cannot modify it. This is true, but there oper-
ations such as enqueue and dequeue that return a copy of the original queue
with a new element added or an element removed, respectively. This is par-
ticularly useful in concurrent processing environments where this avoids the
need to worry about multiple processes updating a common data structure such
as a Queue. An example of using the Queue class is shown below:
Fig. 27.1 Key classes and traits in the scala.collection.immutable package
276 27 Immutable and Mutable Collection Packages
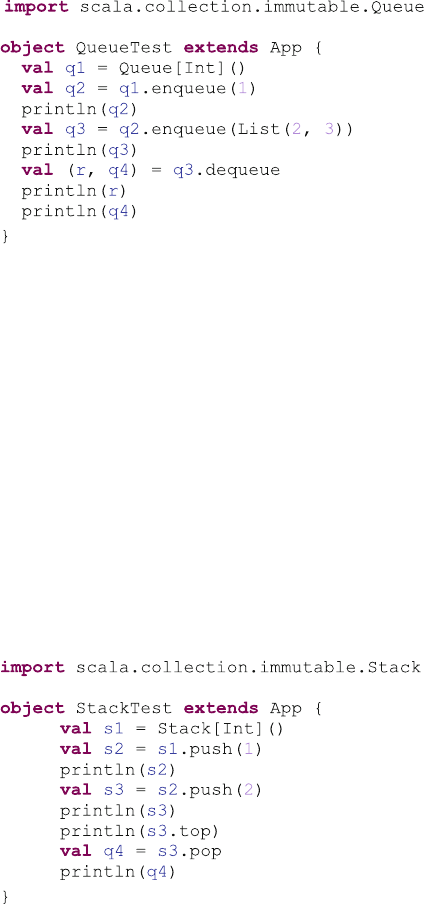
The result of executing this program is:
Queue(1)
Queue(1, 2, 3)
1
Queue(2, 3)
Points to note about this example are that each of the operations to add or
remove elements from the queue generated a new Queue instance. Also note
that dequeue returned both the result of removing the first element from the
queue and the newly generated queue instance containing all the elements of
‘q3’minus the value removed. Finally, also note that we had to import the
Queue type.
•Stack. This class was deprecated in 2.12. A Stack provides a last-in first-out
behaviour (LIFO). As with the Queue any operations that add elements to the
stack or remove elements from the stack actually result in a new Stack
instance being created. A simple example is shown below:
27.2 Package Scala.Collection.Immutable 277
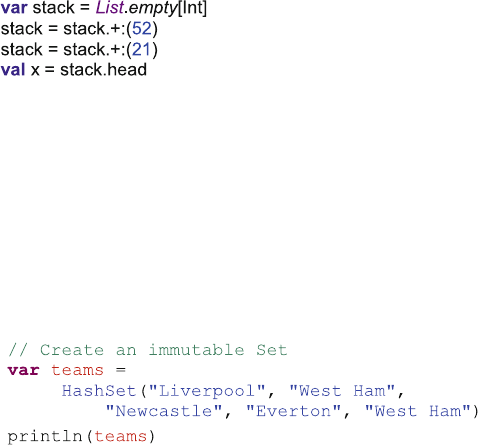
The result of executing this program is given below:
Stack(1)
Stack(2, 1)
2
Stack(1)
Note that we have again imported the scala.collection.immutable.
Stack class. Also note that the top method returns the value at the top of the
stack but does not remove it. Pop on the other hand removes the top value and
returns a copy of the original stack without the top element.
From Scala 2.12 onwards a list should be used with a var, along with the +: and
head methods.
27.2.2 Sets
There are a number of different types of Sets including:
•HashSet is an immutable Set implementation based on a hashing function.
A Set only allows a single instance of an element in the Set—the equals
method is used to determine equality. For example,
This results in the following output:
HashSet(Liverpool, West Ham, Newcastle, Everton)
Note that there is only one occurrence of the String “West Ham”in this set.
•TreeSet. This class implements the Set concept based on a tree structure.
Specifically on a Red-Black Tree structure. Red-Black Trees are a form of
balanced binary tree where some nodes are designed red and some nodes are
designated black. With any balanced tree structure the operations applied to the
tree complete in time logarithmic to the size of the tree.
278 27 Immutable and Mutable Collection Packages

•ListSet.AListSet is an immutable set using a list-based structure internally.
It can be viewed as a List that restricts the occurrences of some element to one
within the list. For example,
which results in the following output:
ListSet(Everton, Newcastle, West Ham, Liverpool)
27.2.3 Maps
There are a number of different types of Maps including
•ListMap.AListMap is a map that uses a linked list-based structure to
internally represent the key-value pairs in the Map. Operations on a list map take
linear time relative to the size of the map. Due to this there is little benefitin
using a ListMap and a HashMap is almost always a better choice.
•HashMap. It represents a collection of associated keys and values that are
organized based on the hash code of the key.
•TreeMap. This class implements the Map as a tree structure.
27.3 Package Scala.Collection.Mutable
The key types in the scala.collection.mutable package are shown in
Fig. 27.2. You will notice that many of the names are the same as those in the
immutable collection described earlier. This can make it very confusing for
someone working with the collection classes to understand the impact of the
operations being performed. For example, an operation on an immutable collection
may generate a new instance of that collection containing the new element, whereas
the mutable version will merely add that element to the collection (and both col-
lections are called HashMap!). Therefore ensuring that you know which type of
collection you are working with is an important issue.
The actual set of mutable collection classes available is continually growing; for
example, in Scala 2.11 additional mutable types, LongMap and AnyRefMap were
added to provide improved performance when using Long or AnyRef keys. In turn,
Scala 2.12 added a mutable TreeMap collection class.
In this section we will look at the ArrayBuffer, ListBuffer, Stack and
HashMap classes.
27.2 Package Scala.Collection.Immutable 279
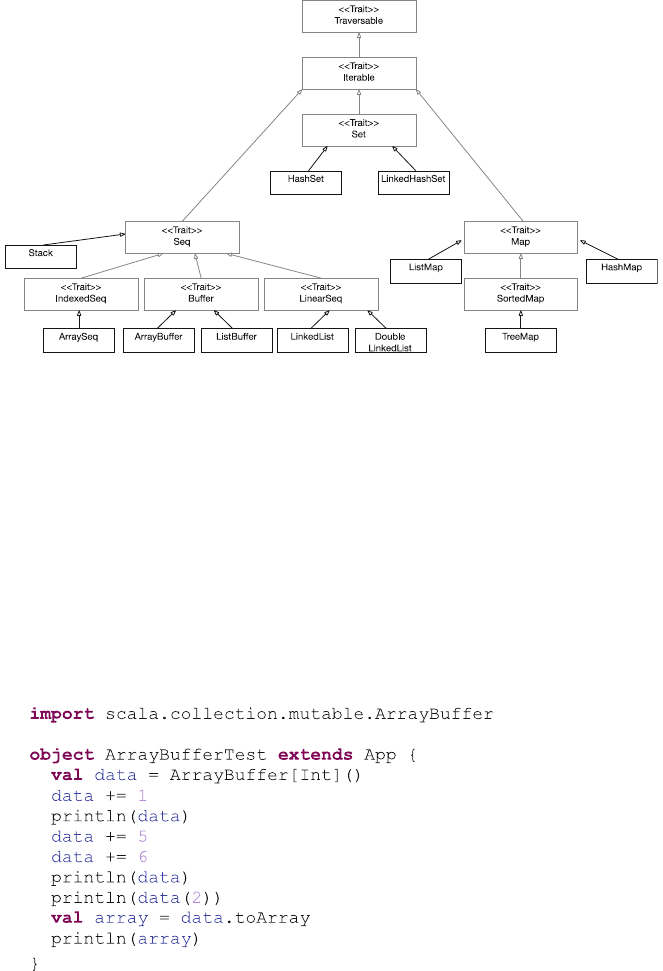
27.3.1 ArrayBuffer
An ArrayBuffer is a growable collection that is backed by an array and has a
current size (it is similar in nature to the ArrayList class in Java). The majority of
operations on an array buffer have the same speed as for an array as the operations
simply access and modify the underlying array, ArrayBuffers can therefore be used
for efficiently building up a large collection whenever new items are added to the
end of the array (e.g. as a result of reasoning data from a file or a database). The
following example illustrates how they are used (remember elements in a collection
such as ArrayBuffer are indexed from Zero not one):
Fig. 27.2 Key types in the scala.collection.mutable package
280 27 Immutable and Mutable Collection Packages
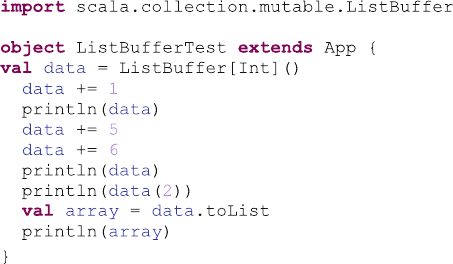
The result of executing this program is shown below:
ArrayBuffer(1)
ArrayBuffer(1, 5, 6)
6
[I@3d5b5376
As you can see from this example it is the ArrayBuffer data which is updated
when we add an element using the ‘+=’operator. Thus we can see that data is a
mutable collection as opposed to the immutable collections we looked at earlier. We
have also included how an ArrayBuffer can be converted into an Array using
the toArray (other options include toList and toSet).
27.3.2 ListBuffer
AListBuffer is like an ArrayBuffer except that it uses a linked list as its
underlying structure (rather than an array). This means that insertion may be faster
than for an ArrayBuffer. Also if you intend to convert your structure to a List
once you have added all the elements to the buffer, then a ListBuffer is a more
efficient option. Here is an example of working with a ListBuffer:
The output from this program is given below:
ListBuffer(1)
ListBuffer(1, 5, 6)
6
List(1, 5, 6)
27.3 Package Scala.Collection.Mutable 281
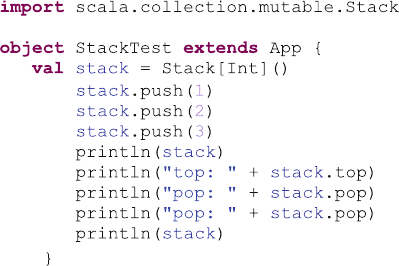
27.3.3 LinkedList
Linked lists are mutable sequences that consist of nodes that are linked together via
pointers. That is, the first node has a reference to the second node, the second node
has a reference to the third, etc., with next pointers.
27.3.4 Stack
The mutable Stack provides similar functionality to the immutable Stack with the
primary difference being that when an element is added to the stack or removed
from the stack it affects that stack (rather than creating a copy of the stack modified
as appropriate). The following listing illustrates typical mutable stack behaviour:
The result of running this program is:
Stack(3, 2, 1)
top: 3
pop: 3
pop: 2
Stack(1)
Note that the push operation updates the stack directly as the pop option. Note
that for the mutable stack pop returns the item popped whereas for the immutable
version it returned the state of the stack after the pop.
282 27 Immutable and Mutable Collection Packages

27.3.5 HashMap
The mutable HashMap class is very similar to the immutable HashMap except that
modifications are made to the receiver of the operation rather than to a copy. The
following listing illustrates HashMap usage:
The result of executing this program is given below:
Map(FRANCE - > Paris, UK - > London, Spain - > Madrid, USA - > Wasington.
DC)
4
Set(FRANCE, UK, Spain, USA)
HashMap(Paris, London, Madrid, Wasington. DC)
false
Some(London)
London
true
Not known
27.3 Package Scala.Collection.Mutable 283
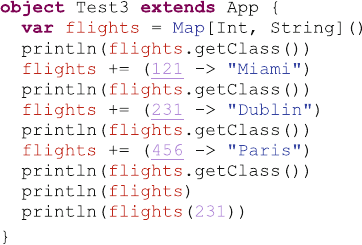
27.4 Generic Collections
One interesting area is to look at what happens if you create one of the
scala.collection core collections such as Set or Map. The following pro-
gram uses the Map type from the scala.collection.
Now consider the output from this program:
class scala.collection.immutable.Map$EmptyMap$
class scala.collection.immutable.Map$Map1
class scala.collection.immutable.Map$Map2
class scala.collection.immutable.Map$Map3
Map(121 - > Miami, 231 - > Dublin, 456 - > Paris)
Dublin
There is something strange happening here. The class name retrieved from the
getClass method appears to be different!
This is because by default the core Map type uses the immutable Map from the
scala.collection.immutable package. However, because our program
then adds a series of key-value pairs to that map it must create new instances of the
Map class to represent the new map and bind those to the variable flights. It does
this as flights actually reference a wrapper around an immutable Map and it is this
inner map that is replaced.
If we add an import to this program to import the scala.collection.-
mutable.Map, for example:
284 27 Immutable and Mutable Collection Packages

we can now use the same immutable HashMap throughout the application:
class scala.collection.mutable.HashMap
class scala.collection.mutable.HashMap
class scala.collection.mutable.HashMap
class scala.collection.mutable.HashMap
Map(456 - > Paris, 121 - > Miami, 231 - > Dublin)
Dublin
27.5 Summary
It is likely that, just as in C# and Java, these classes will become the most used
classes in Scala. The various collection API interfaces and classes will form the
basis of the data structures you build and will be the cornerstone of most of your
implementations. Stick with them, try them out, implement some simple programs
using them, and you will soon find that they are easy to use and extremely useful.
You will very quickly come to wonder why every language doesn’t have the same
facilities!
27.4 Generic Collections 285
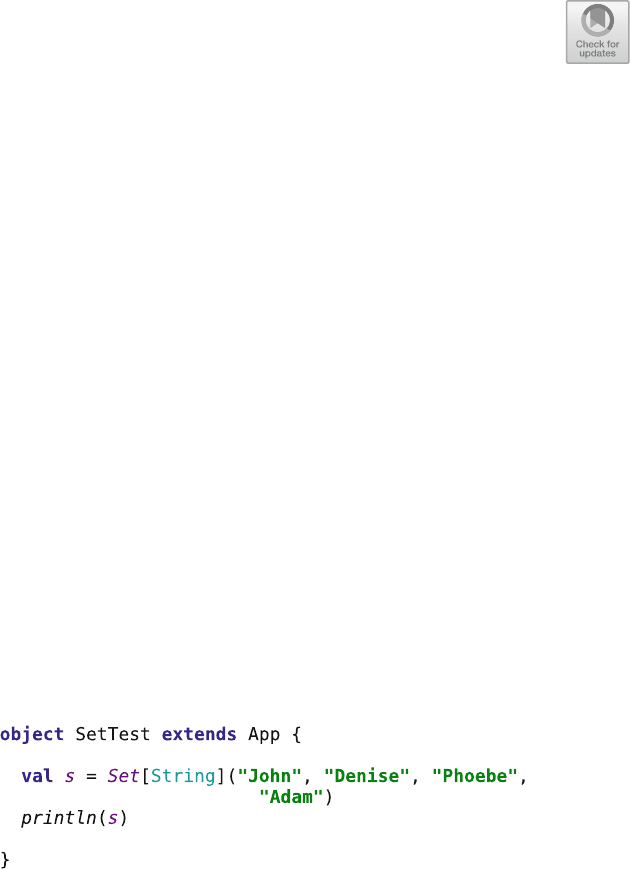
Chapter 28
Type Parameterisation
28.1 Introduction
This chapter introduces and discusses type parameterisation. We have already seen
examples of type parameterisation in the collection types where a List can be
parameterised to hold only Strings, Person objects or integers. In this chapter, we
will look at how you can create your own parameterised types and the options
available for controlling the types that can be used with those parameterisations.
28.2 The Set Class
As a concrete example of type parameterisation, we will explore the Set class. The
Set class allows the type of element that it will hold to be specified between square
brackets ‘[..]’after the name of the class and before any parameters passed to the
Set constructor. For example
In the above listing, the Set class is being parameterised to only hold items of
type String (hence the Set[String]). If we wanted it to be limited to only holding
integers then we would use Set[Int] and to only hold Person types then we would
use Set[Person]. The type parameterisation is the application of [String] or [Int] to
the type Set. Of course, this is Scala, so Scala is quite capable of inferring this from
the contents of the Set, thus
©Springer International Publishing AG 2018
J. Hunt, A Beginner’s Guide to Scala, Object Orientation and Functional
Programming, https://doi.org/10.1007/978-3-319-75771-1_28
287
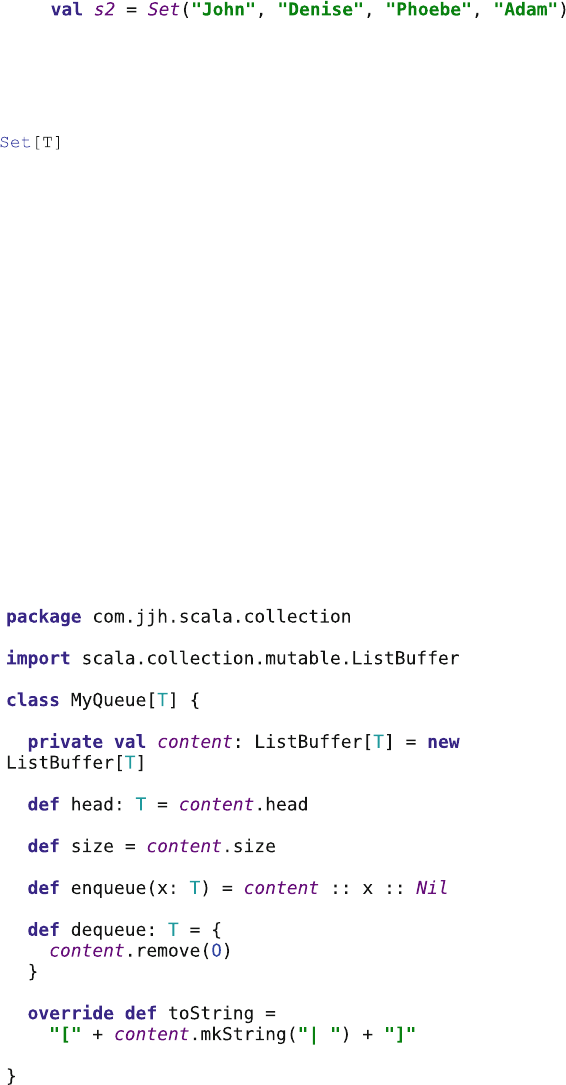
s2 also references a Set that has been parameterised to only hold Strings.
In both cases the class Set is referred to as a generic class. If you look at the
definition of Set in the Scaladoc then you will see that it is defined as being:
Which indicates that Sets can hold elements of a type T where T is a placeholder
for the type to be defined. Thus in Set[String] and Set[Int] the placeholder T has
been replaced by String and Int, respectively. The result of applying a type to a Set
is a parameterized Set.
28.3 Adding Type Parameterisation
28.3.1 The MyQueue Mutable Class
You can create your own types that are generic type and that can be parameterised by
concrete type. For example, the mutable collection class MyQueue, presented in the
following listing, is a programmer defined generic type. It defines a placeholder T
that will be used to represent various concrete types. Note by convention the letter T
is used to indicate a type to specify (but we could use any letter or sequence of letters;
thus if the types for a key and a value were being specified we might use K and V).
288 28 Type Parameterisation
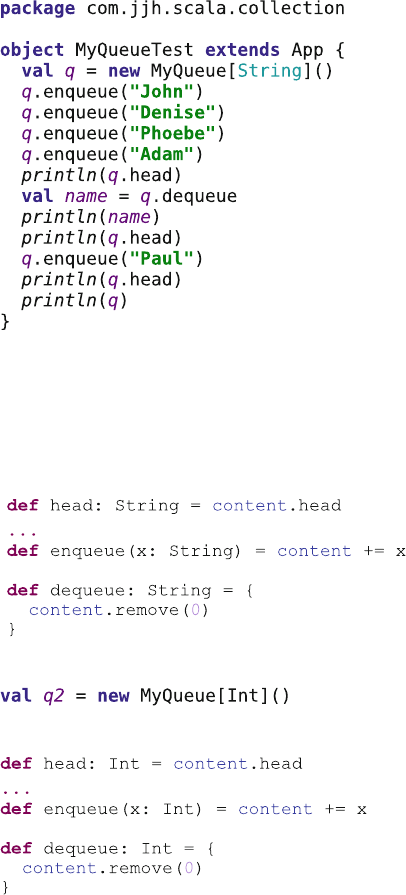
The class MyQueue uses T as if it were an actual type in the body of the class.
Thus the type of element held by the ListBuffer is T, the type of element that can be
enqueued using the enqueue method is T and the result returned by the dequeue
method is T. The type of the head element is also T.
This class is used in exactly the same way as one of the built-in collection classes
as shown below:
In this example, the type String is used to parameterise MyQueue such that it
now holds Strings. The effect is that the latter T is replaced by the type String
throughout the instance of the MyQueue class referenced by the variable ‘q’. This
effect is that the type of head is String, the type used as a parameter to enqueue is
String and the type returned by dequeue is String. Thus it is the same as writing:
However, we can also create a MyQueue of Ints, for example
This is now the equivalent of writing:
28.3 Adding Type Parameterisation 289

As well as String and Int any type can be used as the concrete type including
Double, Boolean as well as user-defined types such as the class Person or the Trait
Model.
Thus generic class and type parameterisation provide a powerful construct for
creating type safe, reusable code.
Note that you can create generic Classes and Traits as both can be instantiated
with a concrete type. You cannot create generic Objects as you do not instantiate an
Object (this is handled for you by the Scala runtime).
The output from the Queue test program is shown below:
[John| Denise| Phoebe| Adam]
John
John
Denise
Denise
[Denise| Phoebe| Adam| Paul]
28.3.2 The Immutable Queue Class
We can also create generic types that are immutable and that take parameters into
the primary constructor. Note that the types used in the primary constructor can also
refer to the type T. Thus the head passed into the Queue is of type T and the tail is a
List of type T. Also note that as this is an immutable Queue when you add
something to this queue a new copy of the queue is created containing the existing
data plus the new element. Of course, the type of the push method is T.
290 28 Type Parameterisation
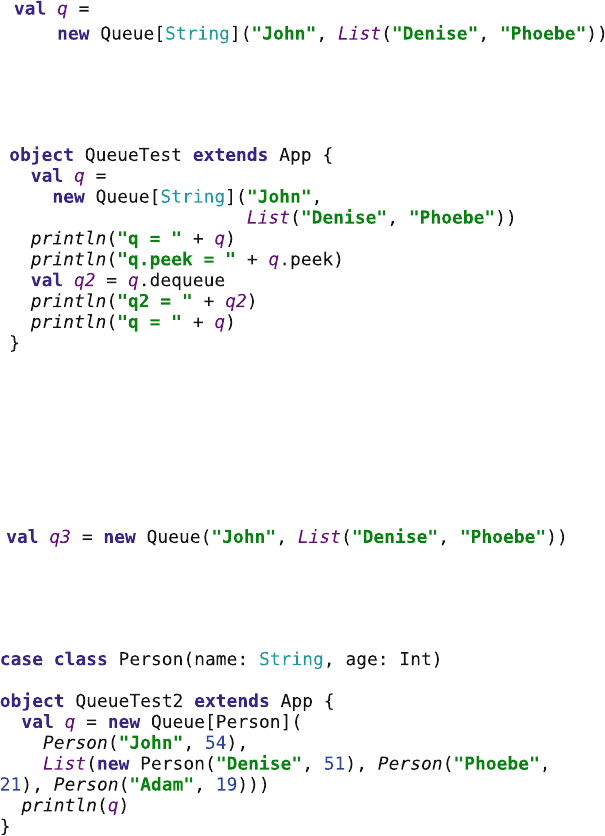
The Queue class creates a new Queue when a value is added to the Queue,
returns a new Queue class (with the current head removed) in response to a dequeue
and provides a peek operation to see what is currently at the head of the queue.
To use this class we can specify the concrete type such as String when we create
an instance. For example
This is used in the following program listing to create a Queue which is then
processed using peek and dequeue.
Again the result is that the placeholder ‘T’has been replaced within the instance
of the Queue class by the concrete type String. Thus the type of the head property is
String, the type of the tail is List[String] and the type of the parameter ‘x’in the
enqueue method is String as is the type returned by the dequeue method.
Note that Scala could have inferred the type being used with the myQueue class;
thus we could also have written:
This would also have been a Queue instance parameterised by the type String.
We can actually create a Queue parameterised by Int, Boolean, Double or any
user-defined type such as Person. For example
28.3 Adding Type Parameterisation 291
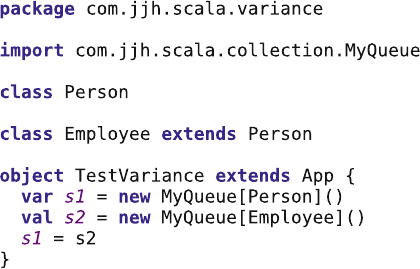
28.4 Variance
An important question to consider when looking at generic types is how are sub-
types (such as sub classes or sub traits) treated with respect to classes that have been
parameterised by a parent type. For example, if we have a Set that can hold Persons,
should it be able to hold references to instances of the class Employee if it is a
subtype of Person? This subject is referred to as variance and within a type system
in a programming language a type rule is
•Covariant if it preserves the ordering of types from more specific ones to more
generic ones.
•Contravariant if it reverses the ordering.
•Invariant if neither of these applies.
In Scala, the default for generic types is invariance—that is given a type Person
and a subtype Employee MyQueue[Employee] is not a subtype of MyQueue
[Employee] and thus it is not possible to assign a reference to a variable of type
MyQueue[Employee] to a variable of type MyQueue[Person]. For example, the
following listing illustrates an attempt to do just that. However, the compiler will
indicate that there is a compilation problem at line 12 when we try and assign s2–s1.
This would still be true if we used a built-in type such as ListBuffer or ArrayBuffer.
However, you can override this limitation with what are known as variance
annotations. When we define our generic types we can indicate whether we would
like them to be covariant or contravariant using either a ‘+’or a ‘−‘before the type
placeholder. For example,
•Queue[+ T](…){…} indicates covariant where Queue[String] is considered a
subtype of Queue[AnyRef]
•Queue[−T](…){…} indicates contravariance where Queue[AnyRef] would be
considered a super type of Queue[String].
Using these we can control whether we wish MyQueue[Employee] to be a
subtype of MyQueue[Person] or not.
292 28 Type Parameterisation
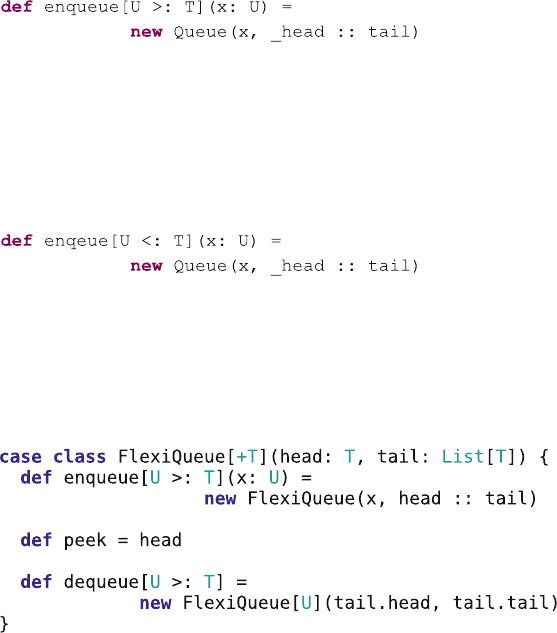
28.5 Lower and Upper Bounds
If you want to limit the types that can be used for T or any supertype of T then you
can use a lower bound on the type specification. For example
In this case if we try to enqueue an item then the type of this item must be of type
T or a super type of T. Thus if we have a queue of Employees this would allow us
to enqueue a Person to the Queue (although the resulting Queue only guarantee that
it holds references to Person objects (or subtypes of Person).
If you want to limit the types that can be used with T or any subclass of T then
you can use an upper bound. For example
28.6 Combining Variance and Bounds
We can combine variable and bounds together to create flexible containers, for
example
This class, the FlexiQueue class indicates that the type T will be treated
covariantly and that the methods enqueue and dequeue have lower bounds indi-
cating that the type T and its super types may be used with these methods. Thus if
we create a FlexiQueue of Employees and then subsequently enqueue a Person this
will return a FlexiQueue of Person types. This scenario is represented by the
following listing:
28.5 Lower and Upper Bounds 293
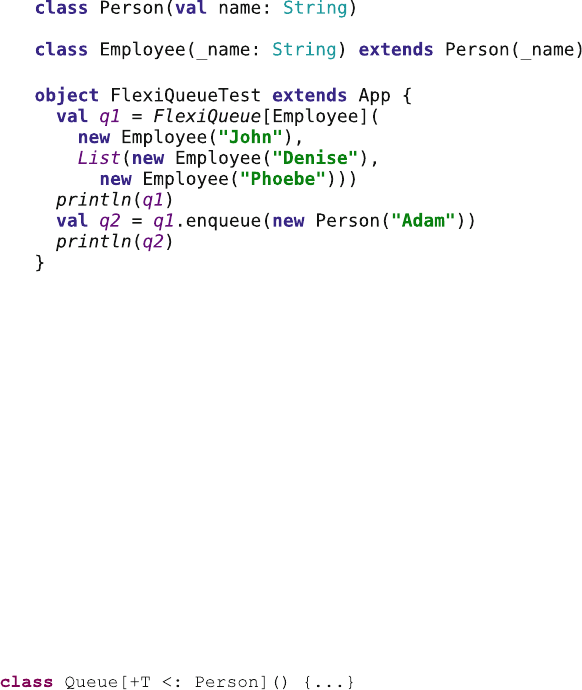
The interesting thing to note is that type inferred by Scala for q1 and q2:
•q1 holds a reference to a FlexiQueue[Employee] type of instance.
•q2 holds a reference to a FlexiQueue[Person] type of instance.
This of course makes sense because when we first created the FlexiQueue we
could guarantee that all the elements in the queue were Employees. However once
we added a Person to the FlexiQueue, the only thing we could now guarantee is that
the contents of the queue were now at least Person instance (although others may be
Employee instances).
You can also combine lower or upper bounds with specific types and covariance
or contravariance. For example, if you wish to indicate that the type to be used
should be a Person or a subtype of Person then you can do so using the Upper
bound limit and the type Person with a covariant annotation, for example
294 28 Type Parameterisation
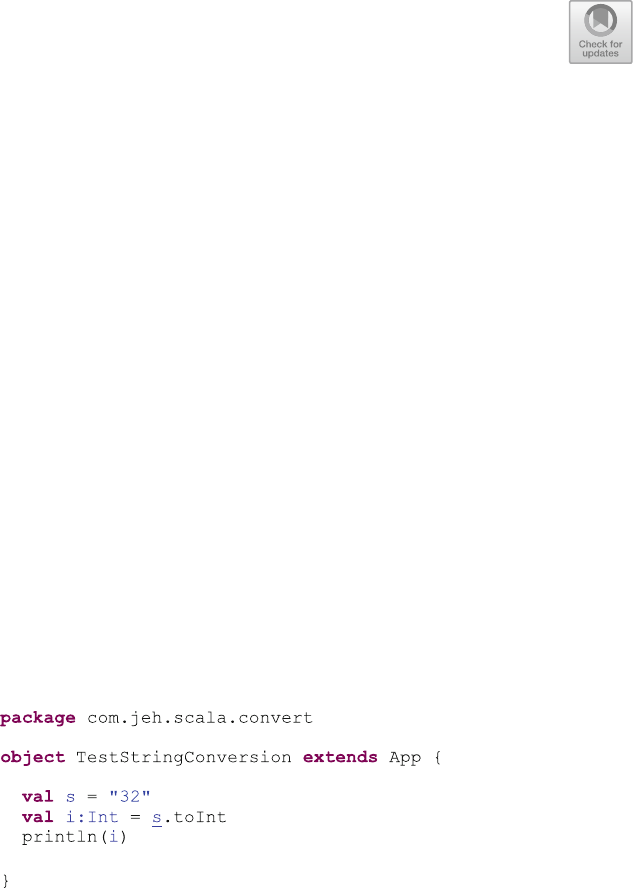
Chapter 29
Further Language Constructs
29.1 Introduction
This chapter introduces a number of new concepts. The first is the use of implicit.
Implicit facilities are a range of language facilities that provide implicit conversions
between one type and another (typically in order to access some functionality or to
provide compatibility between types). This chapter then introduces Scala annota-
tions (a form of meta data for types), Enumerations and lazy evaluation.
29.2 Implicit Conversions
Explicit conversions are achieved programmatically using conversion methods and
functions. An example of an explicit conversion is the way in which a string can be
converted to an Int using the toInt function. For example:
The val sholds a reference to a String containing the characters ‘3’and ‘2’.
Using the toInt operation we can convert it into the integer 32, which is stored in the
val ‘i’(which we have explicitly declared as an Int although this is not actually
necessary as Scala can infer the type of i). The result of this program is that the
integer 32 is printed out.
©Springer International Publishing AG 2018
J. Hunt, A Beginner’s Guide to Scala, Object Orientation and Functional
Programming, https://doi.org/10.1007/978-3-319-75771-1_29
295
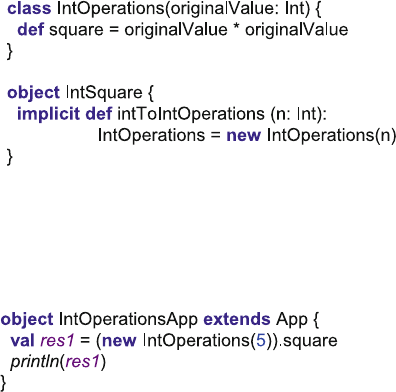
Implicit conversions, by contrast, are conversions from one type to another type
that happens automatically. Scala supports the idea of implicit conversions by
looking for any available, appropriate conversion functions when it finds that the
type made available does not match the type required. For example, if a function or
method required an integer and the programmer provided a string, Scala would look
to see if there was an appropriate conversion method available (within scope) that
could be used to convert a string into an integer.
For a method or function to be used in this way it must be marked with the
keyword implicit. This means that only those methods marked by the developer as
being suitable to be used with an implicit conversion can be used in this way.
Implicit conversion methods and functions are a very useful way of extending
the types that a library of code can work with. For example, you cannot extend the
class Integer, but in Scala you can extend the concept of an Integer, for example,
what if you want to be able to use a ‘square’operator to square any integer value.
There is no support in the current Integer class for this, but we can add it. This can
be done by creating a new class, the IntOperations class, and providing an implicit
converter that converts from a standard Integer into an IntOperations class. For
example:
The key here is that the intToIntOperations method is marked as being implicit
and thus can be used when an implicit conversion is required.
At one level we have defined a new class that builds on an Integer and allows
that Integer to be squared. It also provides a method that allows a string to be
converted into an IntOperations instance. This code could be used as shown below:
This would result in the following output:
25
296 29 Further Language Constructs
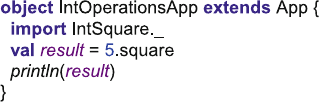
However, this does not meet the proposed aim described earlier. We have not
extended the concept of an Integer. However, the following example appears to
suggest that we have done exactly that:
In this case the Integer “5”does not have an operation ‘square’defined for it.
However, Scala looks to see if there is an implicit method available that can convert
an Integer into a type that does support the ‘square’operation. If the
intToIntOperations method is in scope (e.g. because it has been imported), then
Scala can use that method to convert the Integer ‘5’into a IntOperations instance
and then invoke the ‘*’operator on it. As the return type of the ‘*’method is a
String the val result holds a String. Thus it appears that Strings now support the ‘*’
operator. The result of printing out result is again:
25
Implicit conversions can be very powerful; however, you should be careful how
and when you use implicit conversions as there can be unintended consequences. It
is therefore important to manage the visibility of your implicit conversion methods
appropriately.
29.3 Implicit Parameters
An implicit parameter is a parameter to a method, function or constructor that is
marked as implicit. Such a parameter does not need to have been provided by the
caller. Instead, if an implicit parameter is missing when the method is invoked,
Scala will attempt to provide an appropriate value. It does this by looking at the set
of variables currently in scope and attempts to find one that has been marked as
implicit and is of the right type (or that can be implicitly converted to the right
type).
Note that this is not the same as providing a default value for a parameter, rather
it provides a way for Scala to find suitable parameters from those that are currently
in scope. That is, the compiler will search for an implicit value defined within the
current scope (according to the resolution rules). Implicit parameters are very good
for simplifying an API by providing values that can be imported and used when the
programmer does not want (or need) to provide them.
29.2 Implicit Conversions 297
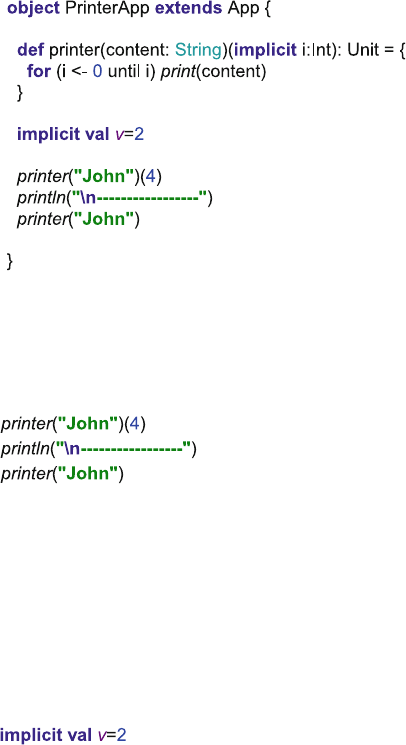
To explore implicit parameters, we will use the following sample code:
The printer method defines two parameter lists with the second parameter list
containing a single implicit parameter ‘i’:
The printer method can now be called within 1 or 2 arguments (as long as an
implicit variable is available to provide the second parameter). Thus we can call the
printer function in the following ways:
The first invocation of printer passes in the string “John”and the integer 4. The
output of this is
JohnJohnJohnJohn
The second invocation again passes in the string “John”, but Scala looks for an
implicit argument to provide for the second parameter list. If none is available, a
compilation error will be generated. In this case a definition of an implicit val
integer ‘v’is in scope:
Thus Scala uses the value in ‘v’as the value to use for the second parameter
which means that the second invocation of printer is the same as writing (printer
(“John”)(2)), with the result that the output generated is:
JohnJohn
298 29 Further Language Constructs

Defining a val or var (or indeed a method that will supply an appropriate value)
as implicit means that the value held will be considered during any implicit reso-
lution. However, you should note that an explicit invocation would always override
an implicit value.
There are some restrictions on implicit parameters, including:
•There can only be a single implicit keyword per method
•The implicit parameter must be at the start of a parameter list (although there can
be multiple parameter lists)
•When the implicit keyword is used with a parameter list, then it makes all values
of that parameter list implicit
•If there are multiple parameter lists, then only the last one may be implicit.
29.4 Implicit Objects
It is also possible to have a companion object that contains appropriate implicit
values or implicit conversion method. Scala will search companion objects for
implicit values or conversion methods/functions. This is a very useful feature and
can be used for building implicit adapters that convert one type to another.
For example, in the following listing a trait LabelMaker has a companion object
LabelMaker. This companion object defines two things. The first is an
AddressLabelMaker inner object. This AddressLabelMaker is a subtype of the
LabelMaker trait. It defines a method output that takes an Address instance and
returns a string representing the Address as a Label. It is also marked as an implicit
object and thus can be used whenever an implicit value is required.
29.3 Implicit Parameters 299
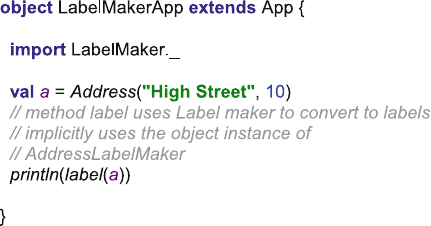
The other method defined by the companion object LabelMaker is label. This
method is a generic method which defines the generic type ‘T’as the parameter type
for the single parameter in the first parameter list. It then specifies an implicit
parameter in the second parameter list. This second parameter requires an instance
of r object that is a type of LabelMaker. This label maker is used to convert the
parameter ‘t’into a label. Any client of the LabelMaker can either call the
printLabel using the two parameter lists, for example:
label(address)(myLabelMaker)
or they can call it with a single parameter list, for example:
label(address)
In this latter case, Scala will look within the current context to see if there is an
implicit value that can be used for the required second parameter. If there is, it will
use it; if there is not, then the code will not compile.
In the test application presented below, we are importing the LabelMaker def-
initions into the Test object. Note that we have used the import statement within the
body of the Test object. This means that the properties, methods and functions
defined on the LabelMaker concept will only be directly accessible within Test.
Also note that the LabelMaker concept is comprised of the LabelMaker Trait and
the LabelMaker companion object, and thus, the contents of both are imported at
this point. The Test object creates an Address to use and then calls the println
function passing in the result returned from the label method. Note that it is the
single parameter list version that is being invoked here, and thus, Scala looks for an
implicit value to use for the second parameter list for the LabelMaker. As the
LabelMaker object has been imported it finds an implicit object
AddressLabelMaker that it can use and thus the second parameter is bound to the
AddressLabelMaker.
300 29 Further Language Constructs

The result of executing this program is shown in Fig. 29.1.
29.5 Implicit Classes
Implicit classes (which were introduced in Scala 2.10) can be used to automatically
provide a factory conversion function that will convert a given type into the implicit
class type. That is, using the implicit keyword in front of the class definition causes
Scala to create a factory method that will convert another type of object into an
instance of the implicit class.
Classes annotated with the implicit keyword are referred to as implicit classes.
There are a set of restrictions on implicit class that must be met, and these are:
1. All implicit classes must have a primary constructor with exactly one argument
in its first parameter list (although it can have additional parameter lists that may
include additional implicit parameters).
2. Implicit class cannot be top-level classes, and they must be contained within
another type (but may be defined within an object, a trait or another class).
3. There cannot be any method, member or object in scope with the same name as
the implicit class.
For example, in the following listing the implicit inner class RandomString
makes its primary constructor available for implicit conversions. Thus if we need to
convert a string into a RandomString in order to invoke the random method, then
the RandomString will be invoked by creating a new instance of the RandomString
based on the original string (which is passed in the value required by the single
parameter constructor).
Fig. 29.1 Output from the LabelMaker test application
29.4 Implicit Objects 301
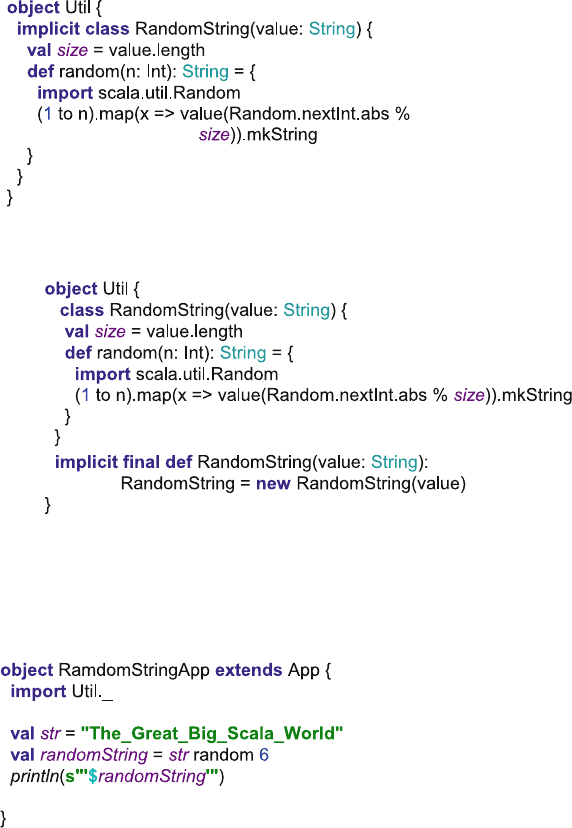
The compiler effectively converts this into the following:
The above has the same behaviour as the implicit class—although the implicit
class is both more concise and simpler to understand.
This Util class and its implicit inner class RandomString can be used in the
following way:
Note that again although the Util object is imported at the top of the file the
RandomString implicit class is only imported (without qualification) within the
RamdomStringApp object. This means that the string “The_Great_Big_Scala_
World”is implicitly converted into a RandomString using the RandomString
constructor so that the random method can be invoked on that instance.
In this case the integer 6 is passed into the random method and a random string
is generated from the contents of the original string. The end result is that the String
302 29 Further Language Constructs
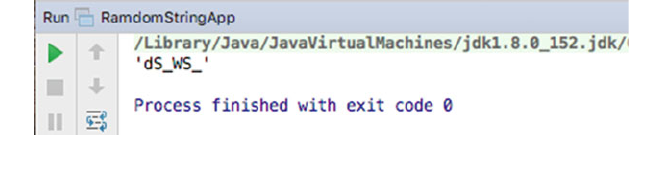
“The_Great_Big_Scala_World”is used to generate a random string such as the
string “dS_WS_”below, as illustrated in Fig. 29.2.
29.6 Scala Annotations
Annotations are meta data about program code; that is, they provide additional
information about a class, object, trait, method, function, parameter, etc., to the
compiler and to the runtime environment within which the code executes. Scala is
not the only programming language to have annotations (or annotation like con-
structs). Both Java and C# support annotation style constructs.
In general annotations are used to provide:
•Directives to the compiler
•Generating additional material—Scaladoc
•Pretty printing
•Checking for common errors
•Information to third-party frameworks.
In Scala annotations can be applied to:
•vals, vars, defs, classes, objects, traits, types and expressions
Basic Scala annotations have the format:
@<annotation-name>
For example:
@deprecated
class Author {…}
Annotations with parameters have round brackets ‘(..)’and can take a comma
separated list of expressions, for example:
@SerialVersionUID(1L)
Fig. 29.2 Using the implicit class
29.5 Implicit Classes 303
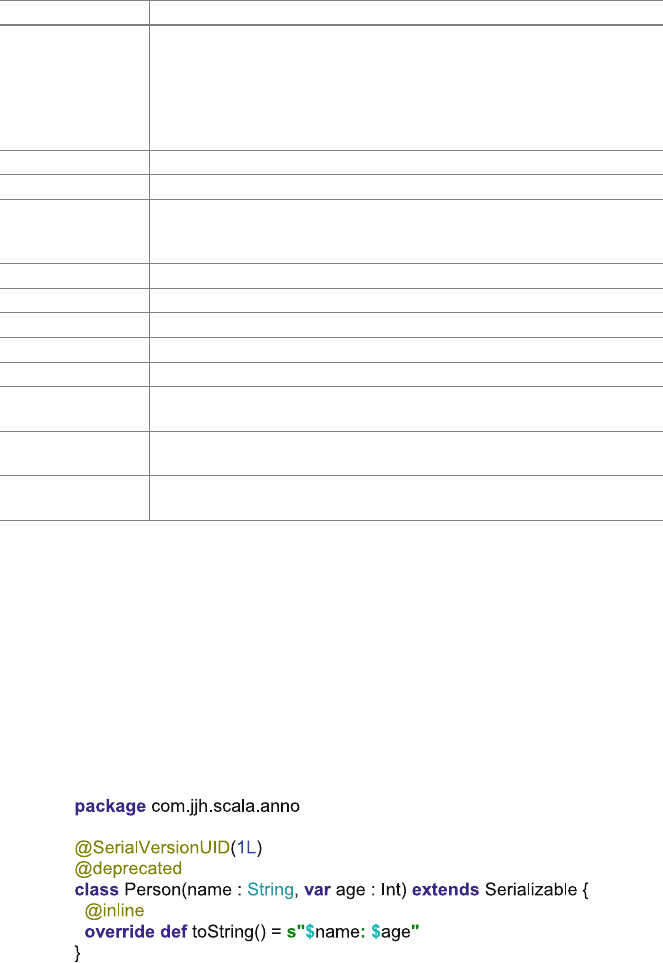
Currently there is a range of annotations that can be used as shown in
Table 29.1.
The following listing illustrates a single class which has a number of annotations
applied to it. Note that more than one annotation can be applied to a particular
program element. In this case the class Person has two annotations applied,
@SerialVersionUID and @deprecated. In addition the method toString has been
marked with the @inline annotation.
Table 29.1 Annotations in Scala
Annotation Meaning
scala.
SerialVersionUID
It indicates serial version UID value. A serial version unique ID is used to
determine whether a serialised instance is compatible with the class that
will used when the instance is deserialised. If the number associated with
the class is the same as that stored with the instance, then they are
compatible. If they are not the same, then a serialisation exception is
thrown
scala.serializable This annotation designates the class to which it is applied as serializable
scala.cloneable It indicates that the instance of the associated type can be cloned (copied)
scala.deprecated It indicates that the associated type or construct is deprecated. This means
that the type or construct should no longer be used and (typically)
alternatives have been provided
scala.inline It indicates that compiler should try to inline annotated method
scala.native Type checking is present, but implementation will be native
scala.remote It indicates can be accessed remotely
scala.throws It indicates that a method throws a checked exception
scala.transient It indicates field is transient
scala.reflect.
BeanProperty
It adds setter and getter methods to a field
scala.volatile This annotation allows programmers to use mutable state in concurrent
programs
scala.unchecked This annotation gets applied to a selector in a match expression. If
present, exhaustiveness warnings for that expression will be suppressed
304 29 Further Language Constructs

29.7 Type Declarations
A type declaration can be used to create a new type or provide an alias to an
existing type. It can also be used as a way of defining an abstract type that must be
provided at a later date. It is particularly useful as a way of proving a more
semantically meaningful name for a generic type. Types are defined using the
keyword type; for example, a type can be defined based on an existing type as
follows:
type T:=String
Alternatively a type declaration can be based on a function signature:
type F=Int=>String
which is a very useful way of specifying a meaningful name for such a signature.
A type can also be an abstract declaration:
type T//actual type to be supplied in sub type
in which case the concrete type used with T must be provided in a subtype (for
classes) or in the class (or object) that the trait is being mixed into.
An abstract type may also have a bound that is used to restrict the range of
concrete types that can be used with it. For example:
type T<: Transport
Thus the abstract type ‘T’has an upper bound of Transport. This means that the
concrete type used in a class or object must either be of type Transport or a subtype
of Transport.
Examples of the above are shown in the following listing:
29.7 Type Declarations 305
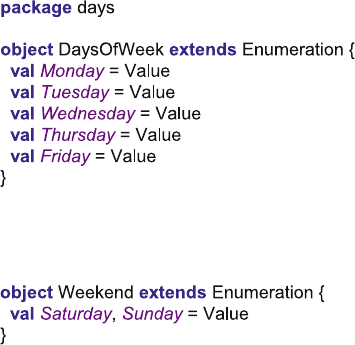
29.8 Enumerations
There is a type Enumeration in Scala. This type is a trait that defines the core
concepts of an Enumeration. An enumeration is a collection of entities that rep-
resent a complete, ordered set of all of the entities in that set. For example, the days
of the week could be represented by an Enumeration as there is a finite set of days
in the (working) week.
In Scala an enumerated set is an object that mixes in the trait Enumeration and
defines the vals that will form the set of values that comprise that enumeration. For
example, the days of the (working) week enumeration could be defined as follows:
Note that each of the val in the enumeration is of type Value and is represented
by a Value instance. Because all of the values in the enumeration are of the same
type, a shorthand form can be used to define them, as follows:
Here both Saturday and Sunday are values of the enumeration Weekend and
both are represented by instances of Value.
The Value of an enumeration entry is actually an inner class of the Enumeration
trait. The Value inner class:
•has an id—the value for this element of the enumeration. Note that enumerations
are Zero based by default and thus the first element in an enumeration has the
value 1.
•provides numerous methods +, <, equals, etc.
•defines a number of implicit methods.
Each call to a Value method adds a new unique value to the enumeration set
where the id (or value) is incremented by one. Thus in the above example, Monday
has id0, Tuesday the id1, Wednesday the id2, etc.
Once we have defined the enumeration it can be imported into other code using
the import statement. Once it is imported then it can be used to provide values for
variables, etc. For example:
306 29 Further Language Constructs
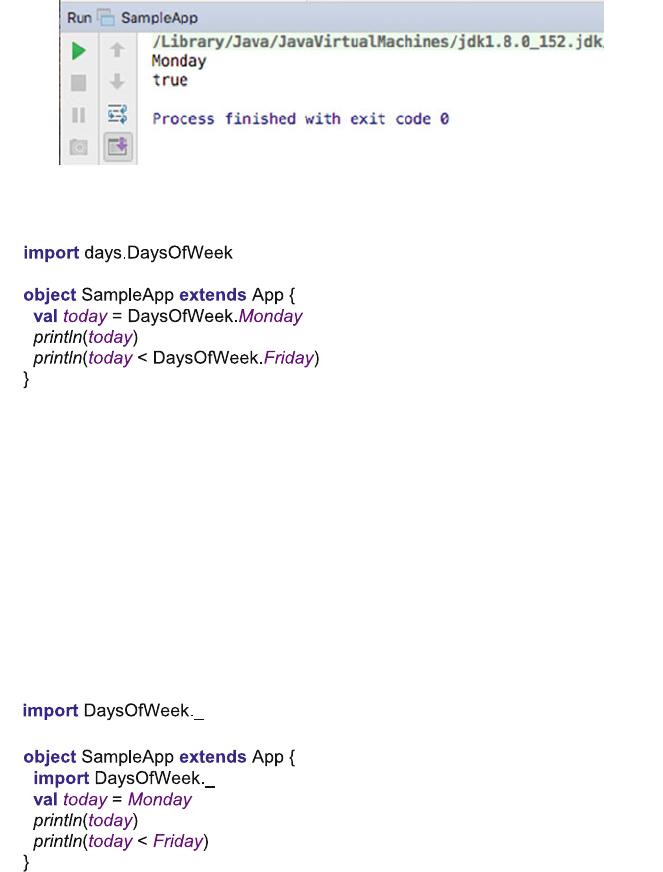
In the above code the DaysOfWeek enumeration has been imported and the
enumeration element Monday has been used for the value of the val today. We then
compare the value of today to see if it less than the value for Friday. As an
enumeration is an ordered set there is an ordering to the element in the set and thus
we can perform such comparisons. The result of executing this program is shown in
Fig. 29.3. As you can see the value of today is printed as Monday, the string
representation of an element of an enumeration is the name of the element (and not
the underlying id).
In Scala is it also possible to import the values defined within an enumeration so
that they can be used directly (without the need to prefix them with the name of the
Enumeration). This can be done by directly importing the contents of the enu-
meration. For example:
It is now possible to use the Enumeration values directly, for example:
Note that we have imported the enumeration inside the definition of SampleApp,
and thus, the enumerated values are only directly visible within the scope of
SampleApp.
It is also possible to obtain all of the values in an Enumeration using the values
property of the enumeration. For example, to print out all of the values in the
DaysOfWeek enumeration we can:
Fig. 29.3 Output from enumeration
29.8 Enumerations 307
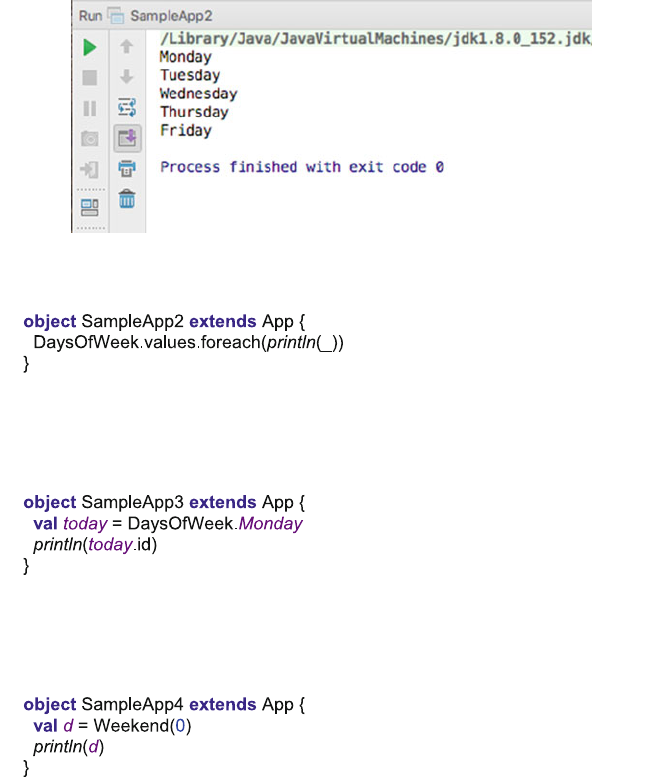
This results in the output shown in Fig. 29.4.
If you wish you can of course get hold of the underlying id of each of the values
in an Enumeration. This is done by accessing the readonly id property of any value
within the enumeration. For example, to obtain the id of Monday we can:
This also means that it is possible to access a specific value of an enumeration
using the id. Referencing the Enumeration and specifying the index to use as a
parameter to a factory function that returns the appropriate value do this. For
example:
In the above code, we access the value Saturday using the index ‘0’.
It is also possible to define your own ids for the value in the enumeration (i.e.
they do not need to start Zero and be incremented by one). For example, in the
following listing the Direction enumeration contains four values for North, South,
East and West with the degrees used to represent these compass points used as the
value of each element in the enumeration. Note that the value to use as the id is used
with the factory constructor for the Value inner class.
Fig. 29.4 Output from the Test2 program
308 29 Further Language Constructs
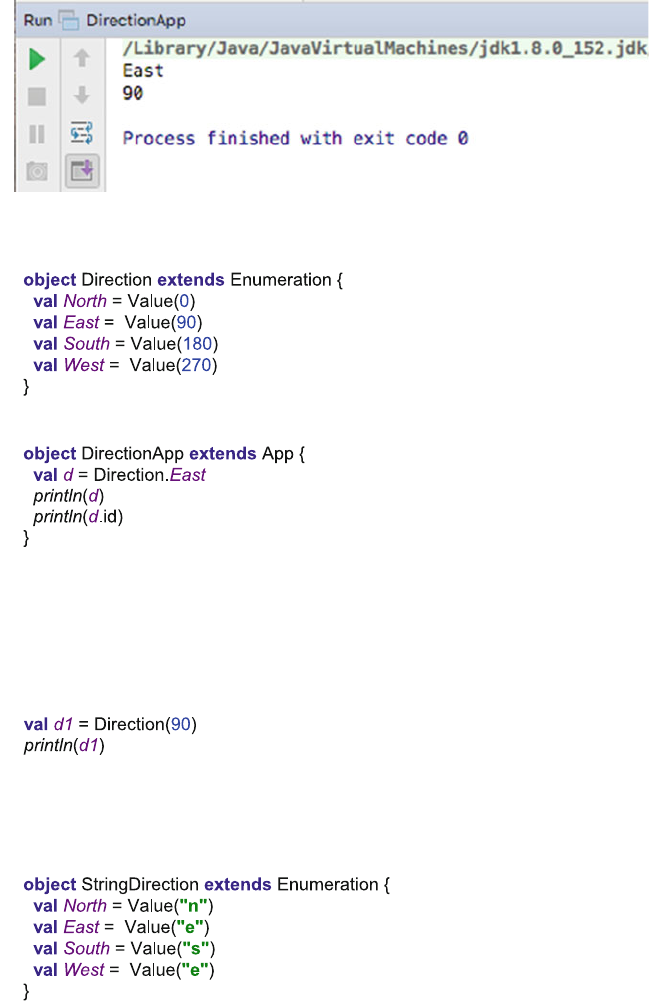
As before it is possible to access the id of the value as well as the value itself:
The result of running this program is shown in Fig. 29.5. In this figure you can
see that the result of printing the enumerated value is East but the id of this value is
now 90.
Note that you can access the custom values in exactly the same way as you can
access the default index values. You can therefore specify the enumerated element
using values such as 0, 90, 180 and 270:
However, values are not restricted to integers as indexes. It is also possible to
define values based on Strings. These are referred to as named values. In the
following example the strings “n”,“e”,“s”and “e”are used to uniquely name (or
identify) the individual members of the Enumeration.
Fig. 29.5 Using a custom value
29.8 Enumerations 309

As before we can access the members of the enumeration using North, East,
West and South or using their names such as “n”. However to do this we use an
accessor function on the enumeration called withName. For example:
One issue with the examples we have looked at so far is that the type of the
members of the enumeration is Value. Thus if we wish to create properties or
functions that work with the values of the enumeration the specified type will be
Value. For example, the type of the parameter today is Value:
val today = DaysOfWeek.Monday
println(today)
Thus if we wrote a method to take this value and print it we would write:
def printDay(d: Value) = println(d)
While this is legal Scala it is not very meaningful to a human reader of the code.
There is some semantic meaning that has been lost from the Enumeration to the
inner Value. It is thus common to find that a recurring idiom is present within an
Enumeration. This idiom defines a new type with a more meaningful alias for Value
that can be used with clients of the enumeration. This type is defined within the
scope of the Enumeration and thus does not pollute the namespace of a system. For
example within the Enumeration DaysOfWorkingWeek we have defined a new type
called Day that is an alias for Value. Monday, Tuesday, Wednesday, etc., are still
instances of the inner class Value. However, we can refer to this type either through
the name Value or the name Day.
Thus given the definition of the Enumeration DaysOfWorkingWeek:
object DaysOfWorkingWeek extends Enumeration {
type Day=Value
val Monday, Tuesday, Wednesday, Thursday, Friday=Value
}
We can now import the contents of the Enumeration and directly refer to the type
Day as well as the values Monday, Tuesday, Wednesday, etc. Thus the parameter to
the function printDay can now be Day (rather than Value):
310 29 Further Language Constructs
import DaysOfWorkingWeek._
def printDay(d: Day)=println(d)
29.9 Lazy Evaluation
Scala possesses the ability to mark a val or var as lazy; for example, the following
standard definition of val is evaluated immediately:
val x=15
However, you can use the prefixlazy to indicate that the val should only be
evaluated the first time it is accessed:
lazy val x=15
This can be used to improve the performance of a system where some resource is
expensive to create (either in terms of time and/or resources) but is only infre-
quently required.
29.8 Enumerations 311

Chapter 30
Exception Handling
30.1 Introduction
This chapter considers exception handling and how it is implemented in Scala. You
are introduced to the object model of exception handling, to the throwing and
catching of exceptions, and how to define new exceptions and exception-specific
constructs.
30.2 What Is an Exception?
In Scala, everything is an instance of a class, although we have Value Classes and
Reference Classes. Exceptions and exception handling relate to reference
(Table 30.1).
All exceptions in Scala must extend the (Java) class Throwable or one of its
subclasses, which allows an exception to be thrown or raised. Figure 30.1 presents
the Exception class hierarchy.
The Throwable class has two subclasses: Error and Exception. Errors
are exceptions generated at runtime from which it is unlikely that a program can
recover (such as out of memory errors), whereas Exceptions are issues that your
program should be able to deal with (such as attempting to read from the wrong
file).
Unlike Java which has two types of Exception subclass (one for checked or
managed exceptions and one for unchecked or runtime exceptions) Scala only has
one type of Exception. These are in Java terminology unchecked exceptions—
meaning that you can handle them if you wish but the compiler will not check to
see that you have handled them.
An exception can be thrown explicitly by your code or implicitly by the
operations you perform. In either case, an exception is an object, and you must
©Springer International Publishing AG 2018
J. Hunt, A Beginner’s Guide to Scala, Object Orientation and Functional
Programming, https://doi.org/10.1007/978-3-319-75771-1_30
313
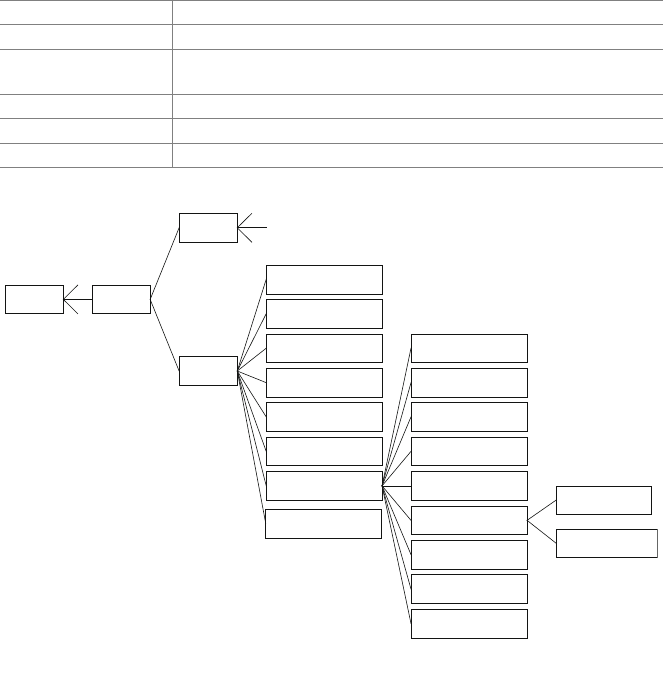
instantiate it before you do anything with it. You do this by using the throw
operator. This is used to throw an instance of the appropriate exception. For
example, to raise (and then throw) an ArithmeticException for a divide by
Zero error, we write:
throw new ArithmeticException(“Division By Zero”)
The exception is caught by the first handler (try block) that is defined on the
ArithmeticException (or one of its parent exception types).
We can also define new exceptions based on existing Exception classes. For
example,
Object
Error
Exception
Throwable
ClassNotFoundException
CloneNotSupportedException
IllegalAccessException
InstantiationException
InterruptedException
NoSuchMethodException
RuntimeException
ArithmeticException
ArrayStoreException
ClassCastException
IllegalArgumentException
IllegalMonitorStateException
IndexOutOfBoundsException
NegativeArraySizeException
NullPointerException
SecurityException
ArrayIndexOutOfBounds
Exception
StringIndexOutOfBounds
Exception
IOExcep tion
Fig. 30.1 Part of the Exception class hierarchy
Table 30.1 Terms used in exception handling
Exception An error that is generated at runtime
Raising an exception Generating a new exception
Throwing an
exception
Triggering a generated exception
Handling an exception Processing code that deals with the error
Handler The code that deals with the error (referred to as the catch block)
Signal A particular type of exception (such as out of bounds or divide by Zero)
314 30 Exception Handling
class RottenEggException extends Exception
…
throw new RottenEggException
The class RottenEggException directly extends the java.lang.
Exception class. It thus inherits all the behaviour of an exception and can be
instantiated using the keyword new and thrown using the keyword throw in exactly
the same way as any built-in exception class.
30.3 What Is Exception Handling?
An exception moves the flow of control from one place to another. In most
situations, this is because a problem occurs which cannot be handled locally, but
can be handled in another part of the system. The problem is usually some sort of
error (such as dividing by Zero), although it can be any problem (e.g. identifying
that the postcode specified with an address does not match). The purpose of an
exception, therefore, is to handle an error condition when it happens at runtime.
It is worth considering why you should wish to handle an exception; after all, the
system does not allow an error to go unnoticed. For example, if we try to divide by
Zero, then the system generates an error. This may mean that the user has entered an
incorrect value, and we do not want users to be presented with a dialog suggesting
that they enter the system debugger. We can use exceptions to force the user to
correct the mistake and rerun the calculation.
Different types of error produce different types of exception. For example, if the
error is caused by dividing an integer by Zero, then the exception is a divide by Zero
exception. The type of exception is identified by objects called signals which
possess exception handlers. Each handler can deal with exceptions associated with
its class of signal (and its subclasses).
An exception is initiated when it is thrown. The system searches back up the
execution stack until it finds a handler which can deal with the exception (i.e. it
searches for a try block of the appropriate type). The associated handler then
processes the exception. This may involve performing some remedial action or
terminating the current execution in a controlled manner. In some cases, it may be
possible to restart executing the code.
As a handler can only deal with an exception of a specified class (or subclass), an
exception may pass through a number of other blocks before it finds one that can
process it.
Figure 30.2 illustrates a situation in which a divide by Zero exception is raised.
This exception is passed up the execution stack where it encounters an exception
handler defined for an End of File exception. This handler cannot handle the divide
30.2 What Is an Exception? 315
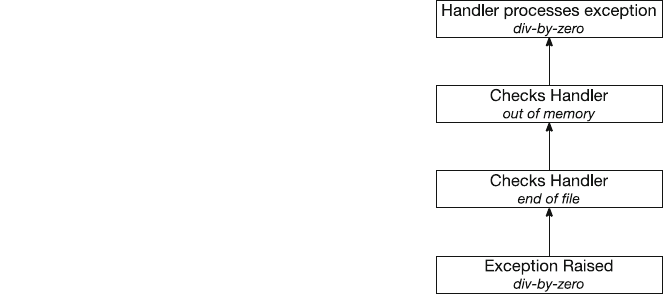
by Zero exception and so it is passed further up the execution stack. It then
encounters a handler for an out of memory exception. Again, it cannot deal with a
divide by Zero exception and the exception is passed further up the execution stack
until it finds a handler defined for the divide by Zero exception. This handler then
processes the exception.
30.4 Throwing an Exception
Unlike Java, Scala methods and functions do not need to specify whether they
throw exceptions or not. Thus any type of operation could throw an exception if a
problem occurs. When an exception is thrown there are three things that can be
done:
•Let the exception propagate back/pass back up the call chain.
•Catch the exception and handle it within the method.
•Catch the exception and map it onto your own exceptions by throwing a new
exception.
Passing the exception back up the execution stack is acceptable as long as you
know that it will be dealt with sensibly at some point. Scala does not force you
either to handle the exception locally or to pass it back up the execution stack
explicitly. Instead you must decide how to handle an exception and document
which methods throw which exceptions. In general you must consider carefully
whether to throw or handle the exception and such handling of exceptions should be
part of the design of your software and not an afterthought.
Fig. 30.2 Searching through
the execution stack
316 30 Exception Handling
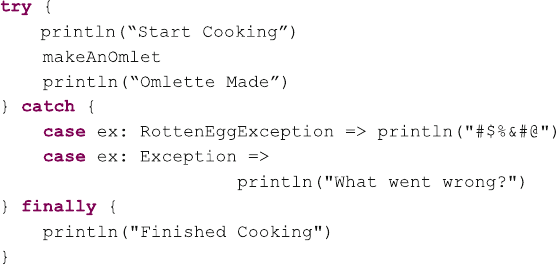
30.5 Catching an Exception
You can catch an exception by implementing the try-catch-finally construct. This
construct is broken into three parts:
•Try block
The try block indicates the code that is to be monitored for the exceptions
listed in the catch expressions.
•Catch expressions
You can use an optional catch expression to indicate what to do when certain
classes of exception occur (e.g. resolve the problem or generate a warning
message).
•Finally block
The optional finally block runs after the try block exits (whether or not this
is due to an exception being raised). You can use it to clean up any resources,
close files, etc.
This construct may at first seem confusing; however, once you have worked with
it for a while you will find it less daunting. Typically, you use the same incantation
of the construct; concentrate on the details of the code within the try block and do
not worry about the exception handling mechanism.
The basic construct is illustrated below:
30.5 Catching an Exception 317
In the above we try and make an Omlet. The first thing we do when we enter the
try block is print out the message “Start Cooking”. We then invoke the
makeAnOmlet method. However if something goes wrong while invoking the
makeAnOmlet method then we will move straight to the catch block (and do not
execute the rest of the makeAnOmlet method and the second println
statement). If no problem occurs then we will print out the “Omlette Made”string.
In both cases once processing of the try (and optionally catch) blocks finishes we
execute the finally block (which is always run) and print out the “Finished
Cooking”string.
If a problem does occur in the main try block and processing moves to the catch
block, we then use pattern matching to compare the type of exception raised
with the types listed in the order they are defined in. Thus the first compar-
ison is with the RottenEggException type. If what we have is a type of
RottenEggException (or a subclass of RottenEggException), then the
behaviour associated with that check is performed. Note that the actual exception is
available in the variable ex (although you can call this variable any name you like).
If the type of exception is not a RottenEggException, then we move onto the
next test and check to see if what we have is an Exception or a subclass of
Exception. If it is, then we process the associated behaviour. Due to the fact that
consideration is given to subclass of the type of exception listed, more specific
Exceptions need to come before more generic exceptions.
The following example uses the try-catch-finally construct to read data from a
file and process it. The try block incorporates the file access code, and the code in
the catch block states what should happen if a FileNotFoundException is
raised. In this case, it prints a message. The message in the finally block is always
printed. It brings together many of the aspects of the Scala language. It includes a
ListBuffer,amatch statement, the use of the Option wrapper and for
loops. It also uses a Scala Source to read information from a file.
318 30 Exception Handling
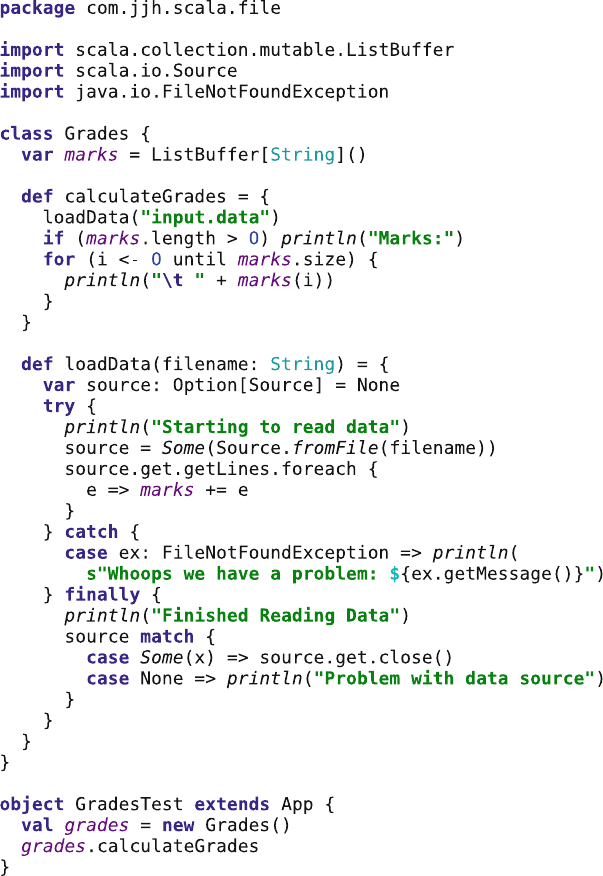
The Grades application reads data from a file called input.data that has the
following format:
Bob 45
Paul 32
Peter 76
Mike 29
John 56
30.5 Catching an Exception 319
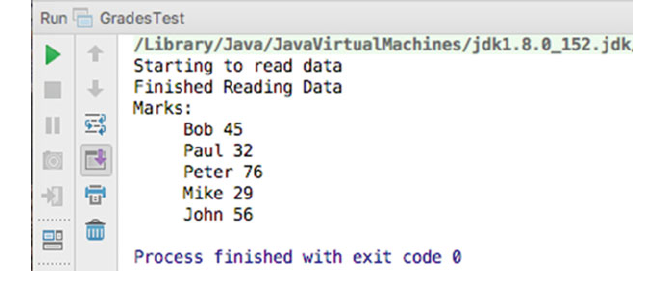
The loadData method uses the scala.io.Source object to access the file
indicated by the filename parameter. A factory style method (fromFile) is used to
create an appropriate source instance. This instance is then used to obtain the
contents of the file (using getLines) and then a foreach loop is used to process
each line read in turn. This is processed within the function specified in the body of
the foreach where each line is added to the ListBuffer marks.
This code is wrapped up in a try block. If this code raises a
FileNotFoundException, the message “Whoops we have a problem”is
printed. Once the try block is processed, the finally block prints out “Finished
Reading Data”. It then checks to see if the source has been set or not. If it has been
set, then it closes the source. If it was not set, then it prints out a message stating
that there was a problem with the source.
The calculateGrades method loads in the data file (using loadData) and
prints out the data in the marks ListBuffer. Figure 30.3 shows the result of
executing the Grades application.
30.6 Try Block Returns a Value
In Scala most statements are actually expressions that return a value. The
try-catch-finally expression is no different. You can assign the value
returned by the try block (or the catch block if an error occurs) to a val or var. For
example, the following listing reads the contents of a file into the val content or
throws an appropriate exception. If an exception is thrown, then the value assigned
Fig. 30.3 Output from the file processing application
320 30 Exception Handling
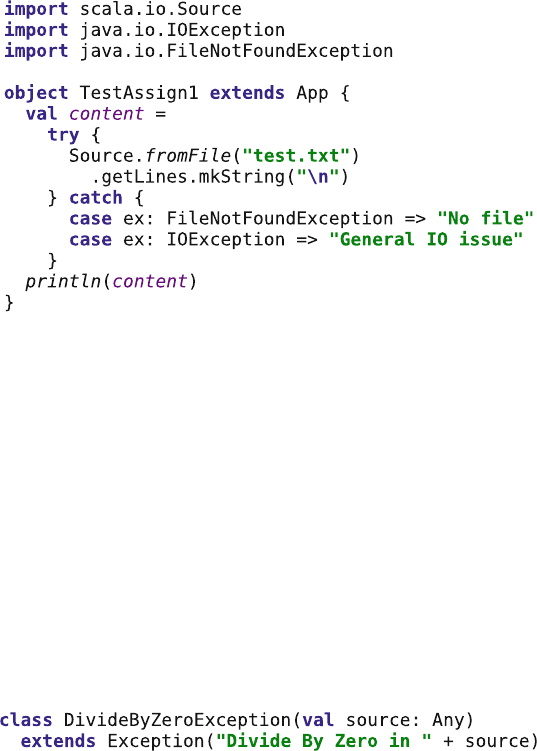
is determined by which exception it is. If the FileNotFoundException is
thrown, then the string “No file”is returned by the try-catch construct. If it is the
IOException which is thrown, then it is the string “General IO issue”which is
returned. In all cases the string returned is assigned to the val contents and is
then printed out:
Note that the FileNotFoundException is a subtype of the IOException
and thus must come before the FileNotFoundException. Also note that the
mkString method converts an array of strings into a single string (and in this case
uses ‘\n’or carriage return) to separate the lines within the String.
30.7 Defining an Exception
As mentioned earlier in this chapter, you can define your own exceptions, which
can give you more control over what happens in particular circumstances. To define
an exception, you create a subclass of the Exception class or one of its sub-
classes. For example, to define a DivideByZeroException, we can extend the
Exception class and generate an appropriate message:
This class explicitly handles divide by Zero exceptions. We could have made it a
subclass of ArithmeticException, however we have decided to extend
Exception here to illustrate that it is the programmer’s choice which exception
should be extended.
30.6 Try Block Returns a Value 321
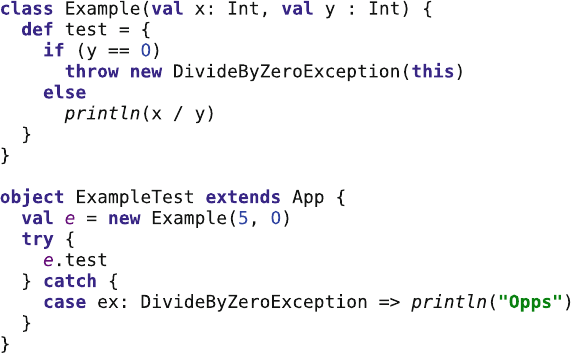
The following code is an example of how we might use DivideByZero
Exception:
In this example, we check to see if the divisor is Zero. If it is, we create a new
instance of the DivideByZeroException class and throw it. The test
method delegates responsibility for this exception to the calling method (in this
case, the main method). The main method catches the exception and prints a
message.
30.8 A More Functional Approach
For those of you who are familiar with exception handling in other languages such
as Java, C# you will see that Scala’s try-catch-finally construct is very similar.
However, it is not without its drawbacks. The need to work with some resources
(such as source, database connections or connections to a file) in multiple places
can result in some awkward programming solutions. In general there are two key
problems with this approach:
•The syntax results in scoping issues leading to unnecessarily complicated
constructs as well as the need to nest try-catch block within either the try, catch
or finally part of the top-level construct!
•Multi-threaded code can be difficult to deal with using the try-catch-finally
construct. For example, how should you react to an =exception which occurs in
a separate thread but which impacts the data being accessed? In fact the
try-catch-finally construct primarily assumes that the exception is handled in the
current thread (i.e the exception is completely handled within the thread in
322 30 Exception Handling
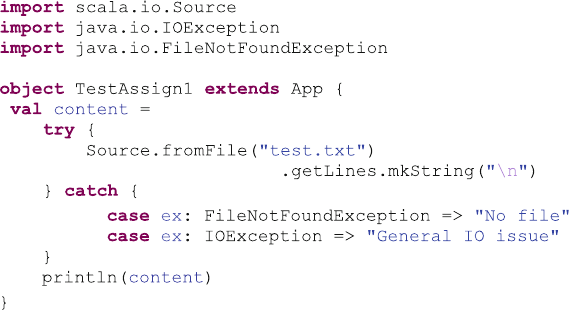
which it occurred). This is not ideal for a concurrent program and seems at odds
with the Actor model implemented by Akka.
It can also be argued that the try-catch-finally approach is not particularly
functional and is more procedural in nature. As Scala is a hybrid language this is not
necessarily an issue in its own right, but it does highlight that alternative approaches
can be developed based on the functional programming model.
An alternative approach is based on the
•scala.util.control.Exception singleton object and associated Catch
class.
This singleton object provides the catching method for handling exceptions that
does not require the use of the try-catch-finally construct. In addition the associated
Catch class provides the withApply method and the apply method. To see
how the methods associated with scala.util.control.Exception can be
used let us consider a simple try-catch-finally example:
The above example reads the contents of the file text.txt into the val contents
(or stores the string “No file”or “General IO issue”into content if an exception is
thrown).
We could rewrite this using the scala.util.control.Exception object
method catching as follows:
30.8 A More Functional Approach 323
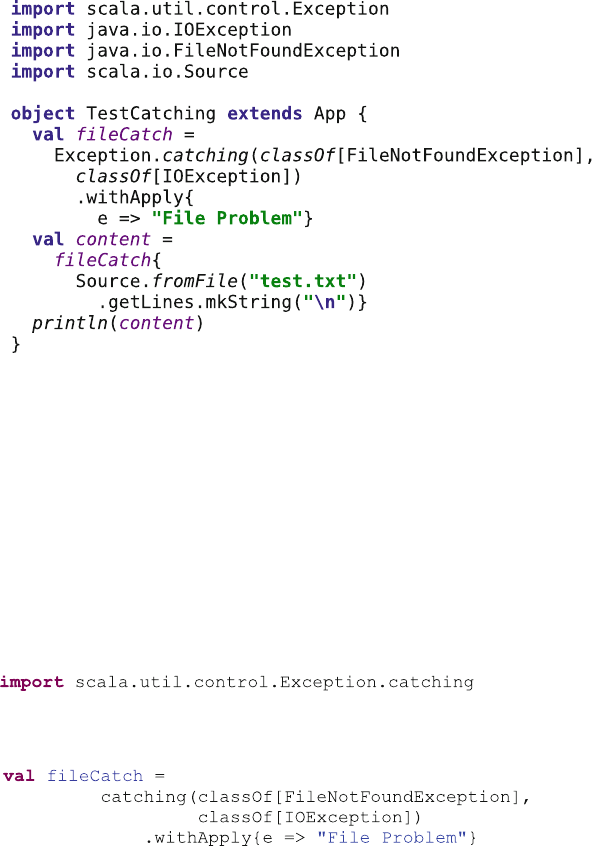
The catching method returns an instance of the Catch class (the Catch class
is a ‘nested’member class of the scala.util.control). Every object of this
class captures the exception handling logic usually represented by the catch (and the
optional finally) parts of the try-catch-finally construct. The fileCatch val is of
type Catch and can be used to execute behaviour which we want to wrap in
try-catch style processing. In the above example, the fileCatch val is used to
execute the process of reading the contents of the file test.txt. The strings in the val
content are either the string lines in the file test.txt or the string “File Problem”if
aFileNotFoundException or a IOException is thrown. In either case the
string(s) in conent are printed out.
Note that we can import the catching method directly from the Exception object
by importing:
which means that in the main body of the application we would not need to repeat
Exception.catching; instead we only need to use catching, for example,
Another variation on the processing of the Catch instance is to use the opt
method. This method takes a code block as parameter and executes the code as we
have seen before. However, the result is an Option wrapper that either wraps a
value or returns None. This may be more appropriate where we do not want to
provide a default value in the catching specification. We can the use standard
324 30 Exception Handling

Option functionality to obtain the value or retrieve a default value, etc. For
example,
30.9 The Try Type
Scala 2.10 added a new type to the facilities available for processing exception.
This is the scala.util.Try type. The Try type is intended to further enhance
the handling of exceptions in a functional style in Scala. The Try type is a con-
tainer that has one of two possible values: one of type Success and one of type
Failure. The Failure instance holds the Throwable instance (the exception)
that caused the code that was run to fail.
For example,
This example attempts to convert a string to an integer for the val iand the val
j. The string used for ican be converted to an Int (the Int 123), but the string used
for jcannot be converted into an integer. Thus the first expression should succeed,
but the second should fail. The output of this program is:
30.8 A More Functional Approach 325
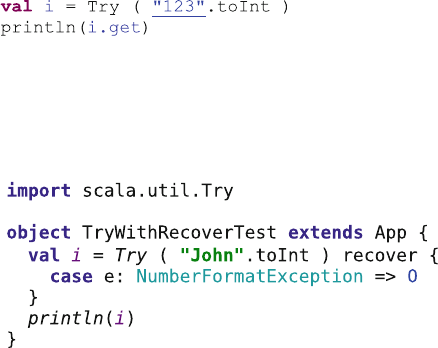
Success(123)
Failure(java.lang.NumberFormatException: For input string: ”John”)
As you can see from this the value held in ‘i’is a Success type but the value held
in ‘j’is a Failure type. The Failure also contains information about the problem that
occurred and the value associated with it. To obtain the actual value from the
Success wrapper you can use the method get, for example,
which would print the Int 123.
There are a number of useful features associated with the Try type. One of the
most useful is the recover method. The recover method allows us to include logic to
identify and recover from the exception that caused the failure of the Try
behaviour. For example,
In this case we are mimicking the try-catch behaviour where the catch behaviour
provides an alternative value to use. Thus in this case if the string to be converted to
an Int cannot be represented as an Int we will default to the value Zero.
326 30 Exception Handling

Chapter 31
Akka Actors
31.1 Introduction
This chapter introduces the concept of an Actor as an approach to the development
of concurrent programs. In particular we focus on the Scala Akka implementation of
the Actor model based on release 2.5.x (the current release at the time of writing).
Note that older versions of Scala also had their own scala.actor implementation of
the Actor model—however this is now deprecated and the recommendation is to
use the Akka implementation.
31.2 The Actor Model
The Actor model of concurrency (which dates from 1973) is based on the idea of
having independent concurrent Actors that receive and send asynchronous mes-
sages and that perform some behaviour based on these message requests. These
actors can hold their own state and behaviour. However, ideally only immutable
data is exchanged between them. Therefore each actor is independent of all other
actors and only performs some computation or processing based on a message sent
to it. This is illustrated in Fig. 31.1.
The key idea underpinning the Actor model is that most of the problems with
concurrency, from deadlocks to data corruption, result from having shared state.
Thus in the Actor world there is no shared state (such as a concurrent producer–
consumer queue). Instead, messages are sent between actors and these messages are
queued in an inbox in a similar manner to email messages. The actors then respond
to the messages as they get to them.
The Actor model has been used as the basis of a number of implementations
including those in Erlang, the scala.actor framework and the Scala and Java Akka
libraries. It is also used with the education system scratch.
©Springer International Publishing AG 2018
J. Hunt, A Beginner’s Guide to Scala, Object Orientation and Functional
Programming, https://doi.org/10.1007/978-3-319-75771-1_31
327

The actor model consists of a few key principles:
•No shared state.
•Lightweight processes.
•Asynchronous message passing.
•Buffering for incoming messages via an a inbox in which it receives messages.
•Message processing with pattern matching with each message being processed
one at a time.
•No shared mutable data.
•No blocking operations.
•Any process can send a message to an actor.
•An actor does not do anything unless/until it receives a message.
Thus an actor is an independent flow of control running in its own thread or
process. In many ways you can think of an actor as a thread of execution with extra
features.
The fact that Actors do not share state means that you implement an actor as if it
was a simple sequential process. This avoids a large number of the problems that
result from shared state. It should be noted that in most Actor implementations it is
actually possible to share state; it is just a very bad idea!
Within Scala there are actually two distinct implementations of the Actor model,
these are the scala.actor framework and the akka.actor framework. In the rest of
this chapter we will look at the latter of these two.
31.3 Some Terminology
The world of concurrent programming is full of terminology that you may not be
familiar with. Some of those terms and concepts are outlined below:
•Asynchronous versus synchronous invocations. Most of the method, function or
procedure invocations you will have seen in programming represent
Fig. 31.1 Actors
communicating via
asynchronous messages
328 31 Akka Actors
synchronous invocations. A synchronous method or function call is one which
blocks the calling code from executing until it returns. Such calls are typically
within a single thread of execution. Asynchronous calls are ones where the flow
of control immediately returns to the callee and the caller is able to execute in its
own thread of execution, allowing both the caller and the call to continue
processing.
•Non-blocking versus blocking code. Blocking code is a term used to describe the
code running in one thread of execution, waiting for some activity to complete
which causes one of more separate threads of execution to also be delayed. For
example, if one thread is the producer of some data and other threads are the
consumers of that data, then the consumer treads cannot continue until the
producer generates the data for them to consume. In contrast, non-blocking
means that no thread is able to indefinitely delay others.
•Concurrent versus parallel code. Concurrent code and parallel code are similar,
but different in one significant aspect. Concurrency indicates that two or more
activities are both making progress even though they might not be executing at
the same point in time. This is typically achieved by continuously swapping
competing processes between execution and non-execution. This process is
repeated until at least one of the threads of execution (Threads) has completed
their task. This may occur because two threads are sharing the same physical
processor with each is being given a short time period in which to progress
before the other gets a short time period to progress. The two threads are said to
be sharing the processing time using a technique known as time slicing.
Parallelism on the other hand implies that there are multiple processors available
allowing each thread to execute on their own processor simultaneously.
31.4 Scala Threads
Underpining the Akka Actor model is the notation of a Thread. A Scala Thread is a
pre-emptive lightweight process. Every thread (process) has an associated priority,
and a Scala thread runs to completion unless a higher priority process attempts to
gain control. Scala does not necessarily share the processor time amongst processes
of the same priority (as this is the responsibility of the underlying JVM). Threads
with a higher priority are executed before threads with a lower priority. A thread
with a higher priority may interrupt a thread with a lower priority. By default, a
process inherits the same priority as the process that spawned it.
A thread is a “lightweight”process because it does not possess its own address
space and it may not be treated as a separate entity by the host operating system.
Instead, it typically exists within a single virtual machine process using the same
address space.
It is useful to get a clear idea of the difference between a thread (running within a
single virtual machine process) and a multi-process system. The thread that is
31.3 Some Terminology 329
currently executing is termed the active thread. A thread can also be suspended (i.e.
waiting to use the processor) or stopped (waiting for some resource).
You will find when reading about Akka Actors this term thread is used when
considering how an Actor manages the requests it receives. For example, an Actor
utilizes a single thread thus allowing it to process a single request at a time, to
completion, before processing the next request. Alternatively, multiple Actors may
use a pool of threads, so that they can process multiple requests via the multiple
underling threads managed in the pool.
31.5 Akka Scala Actor Library
The Akka Actor library is an implementation of the Actor model. Note that there is
both a version of this library for Java and for Scala. You therefore need to be careful
if you are researching this library on the Web that you are looking at material for the
Scala version.
At the time of writing the current version of this library is the Akka 2.2.3 release.
Note that the 2.2 family of distributions are significantly different to those that
predate them and you therefore also need to be careful that you are not looking at
documentation related, for example, to the 2.1 release of the Akka library.
The Akka library is open source and is available under the Apache 2 licence.
You can obtain it from the Akka home page (http://akka.io). If you wish to
download the Akka library then you can do so from the Download page, which is
available from the site shown in Fig. 31.2.
Note that there are two downloads available: one is the LightBend (aka
Typesafe) akka-quickstart-scala.zip distribution which includes the Akka library as
well as other resources and templates.
Many projects will access the Akka libraries using a dependency management
system such as Maven or Ivy. The examples in this chapter were written with Akka
2.5.4, and so this dependency can be added to your project:
<dependency>
<groupId>com.typesafe.akka</groupId>
<artifactId>akka-actor_2.12</artifactId>
<version>2.5.4</version>
</dependency>
The Akka library is actually a very modular library. This is because it is com-
prised of different library jar files representing different features of the Akka system.
If you are not using those features then you do not need to incorporate those library
files. Some of the modules you might decide to use are presented below:
330 31 Akka Actors

•akka-actor—Classic Actors, Typed Actors, IO Actor, etc.
•config—used to handle configuration type tasks within the framework.
•akka-cluster—cluster membership management, elastic routers.
•akka-mailboxes-common—common infrastructure for implementing durable
mailboxes.
The two parts of the library that we will be working with are the akka-actor and
the config jars. It is these two jars that you need to find and add to your projects.
Note that the names of the files are derived from the release of Scala that is targeted
and the release number of Akka; for example in Fig. 31.3 the akka-actor file is
actually called akka-actor_2.12-2.5.4.jar, that is it applies to Scala 2.12 and is
release 2.5.4 of Akka.
The library itself can also be downloaded from the Maven repository if required.
If you do this directly then you will need to add the jars to your build path of your
project within the Scala IDE as shown in Fig. 31.4.
Fig. 31.2 Obtaining the Scala Akka library
31.5 Akka Scala Actor Library 331
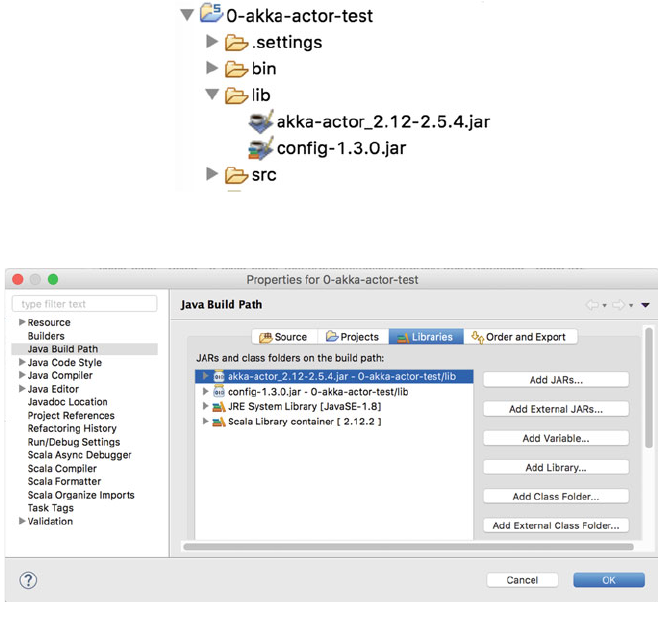
31.6 Concurrent Hello World
In this section we will look at two simple Akka-based programs. The first of these
programs creates a simple Actor that can be sent messages. If the message sent is
the string “Hello”then it will print out the message “Hello World”; if anything else
(of any type) is sent to the actor then it will print out the string “Hello Whoever”.
To implement an Actor you must mix in the Actor trait. This trait requires that
a single method receive is implemented. This method will be called when a
message is available to be processed in the actor’s inbox. Locally the inbox is queue
in which messages are added to the back of the queue and taken from the front of
the queue. Each message is processed to completion before the next message is
taken. This is shown in Fig. 31.5.
The import statements for the example being discussed here are:
import akka.actor.Actor
import akka.actor.Props
import akka.actor.ActorSyste
m
Fig. 31.3 Akka library jar files
Fig. 31.4 Setting the classpath properties for an Akka project in the Scala IDE
332 31 Akka Actors
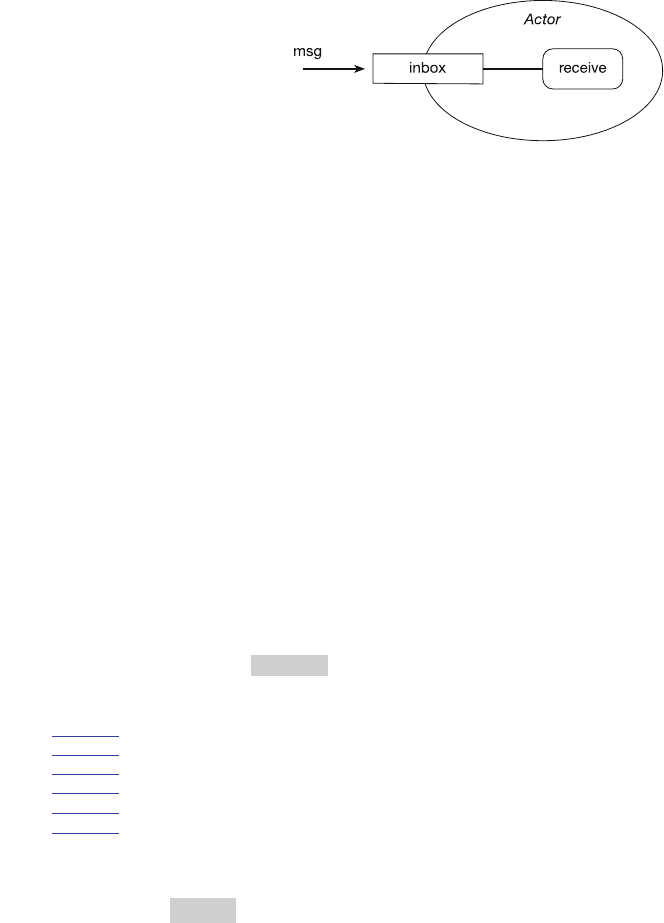
It is important to take note of the package names as there is also an Actor type in
the scala.actor package. If you import that type you will get compilation
problems as it is not compatible with the Akka library.
The following listing illustrates how a simple actor called Greeter can be
implemented:
class Greeter extends Actor {
def receive = {
case "hello" => println("Hello World")
case _ => println("Hello Whoever")
}
}
In this case, when the string “hello”: is received it will print out “Hello World”,
while anything else (as indicated by the wild card ‘_’) will print out “Hello
Whoever”. Notice that the receive method is implemented using case pattern
matching, and thus, the Actor can handle different messages, different message
types, etc., in different ways. If you want to be able to handle unknown messages
then you need to have a default case as in the example above.
The test application that uses this Greeter actor is shown below:
object HelloworldAkkaTest extends App {
val props = Props[Greeter]
val system = ActorSystem("mysystem")
val actor1 = system.actorOf(props)
actor1 ! "hello"
actor1 ! "Goodbye"
actor1 ! "hello"
actor1 ! 42
actor1 ! true
system.terminate
}
This test application goes through three steps in order to obtain a reference to the
actor held in the val actor1. The steps are:
1. Create a Props instance.Props is a configuration class used to specify the
options to be used to create an actor. In this case it is specifying the class that
defines the Actor (i.e. the Greeter class). This Props type can also be used to
pass data to any constructor defined on the class (we will see this later).
Fig. 31.5 Actor with an
inbox and a receive method
31.6 Concurrent Hello World 333
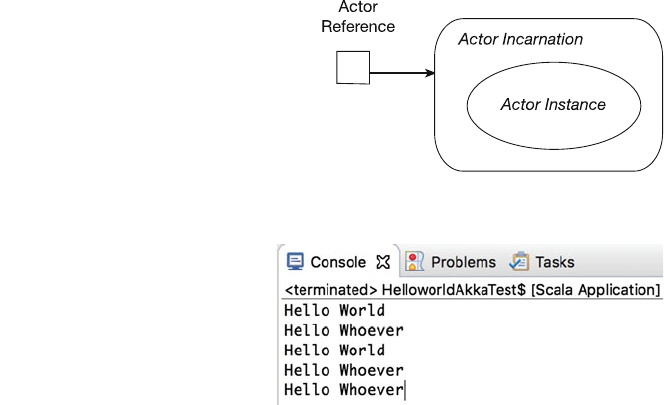
2. Access the ActorSystem. The Actor system is the element within the Akka
framework that is responsible for creating top-level actors. These actors can
create child actors, can respond to messages and can be stopped, restarted, etc.
The ActorSystem is given a name so that multiple such systems can be
created if required. However, note that the ActorSystem is a heavyweight
object and you should try to only create one per application unless absolutely
necessary.
3. Create a new actor using actorOf. Using the actor system reference obtained
in the previous step, the application creates a new actor based on the properties
in props. The actorOf method is a factory method that creates new actors of
the type specified by the props object. The type returned by the actorOf
method is an ActorRef.
Once it has successfully created a new actor a series of message are sent to the
actor. These mix strings, within an Int and a Boolean. They are handled by the
receive method in turn. The method decides what to do with each message based
on the pattern-matching case statements defined within it.
It should be noted that actor1 does not hold a reference to the actual actor
instance. Instead it holds a reference to the Actor Incarnation. This is a wrapper
around the current Actor Instance. For the most part this is transparent to the
programmer. This structure is used to allow an actor that has exited its own
underlying thread (or process) to resume processing. This is done within the Akka
library by creating a new Actor instance and restarting it. However, as this is
hidden inside the Actor Incarnation the programmer is not affected by this
(Fig. 31.6).
The output generated by running the HelloworldAkkaTest is shown in Fig. 31.7.
Fig. 31.6 Role of the actor
reference
Fig. 31.7 Output form the
HelloworldAkkaTest
application
334 31 Akka Actors

31.7 Concurrent Actors
The example discussed in the previous section illustrates how an Akka Actor can be
defined and how messages can be sent to an actor. However, it does not really
capture the concurrency inherent in Actors. To illustrates this idea see the following
listing presenting the Printer Actor. This Actor prints out different strings
depending upon the messages it receives. However, it does each string 500 times.
This means that if we have multiple instances of the Printer running concur-
rently, we should be able to observe a mixture of A, B, C and _ being printed out.
class Printer extends Actor {
def receive = {
case "A" => for (i <- 1to 500) print("A")
case "B" => for (i <- 1to 500) print("B")
case "C" => for (i <- 1to 500) print("C")
case _ => for (i <- 1to 500) print("_")
}
}
The sample program that uses this Printer Actor is shown below:
val actor4 = system.actorOf(props, "actor4")
println("Sending messages to Actors")
actor1 ! "A"
actor2 ! "B"
actor3 ! "C"
actor4 ! "X"
println("Done setup - now sleeping")
Thread.sleep(1000)
println("Terminating the ActorSystem")
system.terminate
}
object AkkaPrinterTest extends App {
val props = Props[Printer]
val system = ActorSystem("mysystem")
val actor1 = system.actorOf(props, "actor1")
val actor2 = system.actorOf(props, "actor2")
val actor3 = system.actorOf(props, "actor3")
In this program we again obtain a Props instance but this time for the class
Printer. We then obtain the ActorSystem and then use this to crate the actors.
In this case we create four actors. Each actor is an independent instance of the
Printer Actor.
As you can see the version of actorOf used here takes the Props instance and
a name string. The name parameter is optional. However as the name is used with
31.7 Concurrent Actors 335
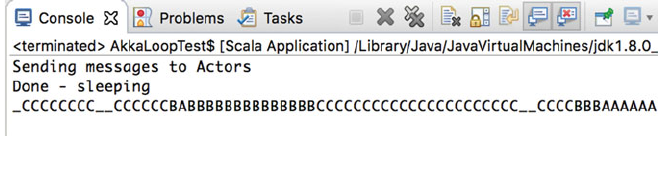
log messages it may be helpful during debugging. Note if a given name is already in
use then an exception will be thrown.
Once we have created the four actors each is sent a message. As the main
application will run concurrently to the actors themselves, all four messages should
be sent before the first actor has a chance to complete the printout 500 strings. We
should therefore see a mixture of different strings being output. This is shown in
Fig. 31.8.
From this we can see that the four Actors run concurrently, sharing the available
processor, with output coming from Actors 1, 2 and 3 clearly marked by the “A’s,
“B’s”and “C’s”. The output from actor 4 is indicated by the “_”s.
31.8 The Akka Actor API
The Actor trait we looked at in the last couple of sections only defines a single
abstract method, receive, which must be implemented to define the behaviour of
the Actor. However, several other facilities are provided by the trait which are
presented below:
•Self—a reference to the ActorRef of the actor.
•Sender—a reference to the sender of the message currently being processed by
the Actor. Useful for returning results.
•Context—a reference to the actors execution context. This allows access to
various facilities including the ability to create child actors (actors that execute
under the control of the parent actor) and lifecycle operations.
•supervisorStrategy—this is used to allow a strategy to be defined that will
control what should happen to child actors when various situations occur. This
is discussed in the next chapter.
Fig. 31.8 Output from multiple concurrent Akka Actors
336 31 Akka Actors
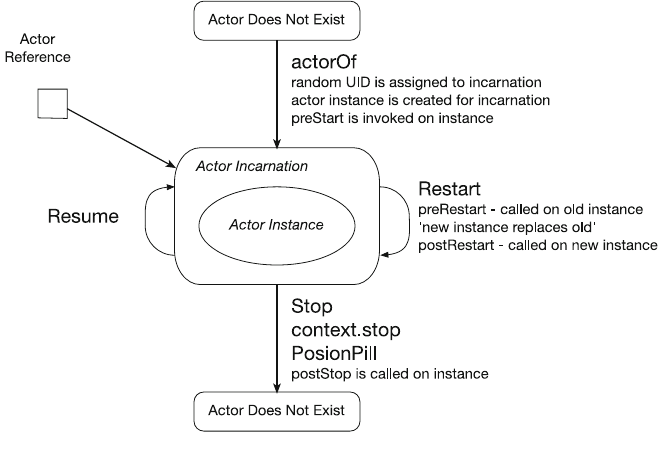
31.9 Actor Lifecycle
Each Actor can go through a number of states during its lifetime. This is illustrated
in Fig. 31.9.
An actor goes through the following states during its lifetime:
•Does not exist—initially an actor does not exist.
•Actor is incarnated. When the actorOf method is called it assigns an incar-
nation of the actor described by the Props to a given path. A Path represents a
route from the top-level location, via any parents, to the actor being created. If
the actor is being created by the ActorSystem then it is a top-level actor. If it
is being created by another actor then it is a child of that actor and its path is
relative to the parent. An actor incarnation has a unique ID (a UID) and holds a
reference to the current Actor Instance. Once the Actor Instance has been cre-
ated from the actor incarnation then the prestart method is called on the
actor instance. Note the fact that the Actor incarnation wraps the actor instance
allows different actor instances to be used without the external references being
aware of this.
•The lifecycle of the Actor incarnation ends when the actor is stopped. This can
be done by called the stop method on the context. At that point the
postStop method is called on the actor instance allowing for any clean-up
operations to be performed. Once the actor has been stopped the name of the
actor can be reused.
Fig. 31.9 Lifecycle of an Actor
31.9 Actor Lifecycle 337

•If an actor throws an exception it can be restarted if the exception scenario can
be handled. The restart involves creating a new Actor instance to run the con-
current behaviour wrapped inside the same Actor incarnation. The lifecycle
methods preRestart and postRestart are available to handle suitable
processing of this scenario. However, you should note that preRestart is
called on the old actor instance and the postRestart is called on the new
actor instance.
•Resume is an alternative to Restart. That is, whereas Restart is used to restart a
clean internal actor instance, Resume can be used to continue with the internal
Actor Instance (as long as the internal state of the actor is stable).
To illustrate some of these ideas the following simple LifecycleGreeter
actor defines overrides for the preStart and postStop lifecycle methods.
These methods merely print out a string in this example.
The Actor’sreceive method is defined such that it will print out a message
“Hello World”when it is sent the message “hello”. It will also print out “Hello
Whoever”if sent any other string the “stop”. However, if sent the message string
“stop”, it will use the context property of the actor to stop itself.
The associated LifecycleTest1 application then sends three messages to the
actor, “hello”,“Welcome”and “stop”:
import akka.actor.Actor
import akka.actor.Props
import akka.actor.ActorSystem
class LifecycleGreeter extends Actor {
override def preStart(): Unit =
{ println("preStart") }
override def postStop(): Unit =
{ println("postStop") }
def receive = {
case "hello" => println("Hello World")
case "stop" => context.stop(self)
case _ => println("Hello Whoever")
}
}
object LifecycleTest1 extends App {
val props = Props[LifecycleGreeter]
val system = ActorSystem("mysystem")
val actor = system.actorOf(props)
actor ! "hello"
actor ! "Welcome"
actor ! "stop"
system.terminate
}
338 31 Akka Actors
The output from this program is shown below:
preStart
Hello World
Hello Whoever
postStop
As you can see from this the prestart method is called before the actor starts
processing the messages sent to it. It then processes each of the messages in turn.
The final message causes the actor to stop, and thus, the postStop method is
called.
31.10 Akka Configuration
The Akka system is configured via the ActorSystem. That is, all configuration
information is provided to the ActorSystem object. This can be done by specifying
aConfigobject or by relying on the default locations used by Akka. If you wish to use
the default configuration files, then you have a choice of the following files:
•application.conf
•application.json
•application.properties
These files are found in the root of the classpath. The Actor system merges
information from these locations together to determine the default configuration
information.
An example of a custom application.conf file is shown below. This
example configures the information to be used by a TockTock actor.
TickTock {
howlong = 2
Ticker {
message : "Ping"
}
Tocker {
message : "Pong"
}
}
This file can be loaded via the com.typesafe.config.ConfigFactory.
load method. This method returns a Configobject initialised using the default
application files (e.g. application.config).
31.9 Actor Lifecycle 339
Alternatively you can explicitly create a Configinstance. This is very flexible
and allows you to load or specify any configuration information in any form. There
are numerous factory methods that allow you to create configobjects in different
ways defined on the ConfigFactory object. For example, you can use the
parseString method to create a configobject based on the content of a string,
for example:
Config config =
ConfigFactory.parseString("something=somethingElse");
ActorSystem system =
ActorSystem.create("myname", config);
In the following example, the Actor System is configured using the
ConfigFactory.load method. The system then provides access to this con-
figuration information via the settings.configobject. The configobject has
numerous methods available on it that allow the values held in the configuration to
be retrieved. For example getInt can be used to retrieve an integer representing
how long an application should run.
340 31 Akka Actors

import akka.actor.Props
import akka.actor.ActorSystem
import akka.actor.Actor
import com.typesafe.config.ConfigFactory
import akka.actor.ActorLogging
sealed abstract class Message
case class StartTicking ( tocker: ActorRef )
extends Message
case object TickMessage extends Message
case object TockMessage extends Message
object ActorApp extends App {
val system = ActorSystem("mysystem",
ConfigFactory.load)
println(system.settings.config)
val howLong =
system.settings.config.getInt("TickTock.howlong")
val config = system.settings.config
println(s"Running for $howLong seconds")
val ticker = system.actorOf(
Props(classOf[TickActor],
config.getString("TickTock.Ticker.message")),
"Ticker")
val tocker = system.actorOf(
Props(classOf[TockActor],
config.getString("TickTock.Tocker.message")),
"Tocker")
ticker ! StartTicking(tocker)
Thread.sleep(1000 *howLong)
system.terminate()
}
When the actors are created the ticker message or the tocker message are retrieved as strings
from the configobject and used to initialise the TickActor or TockActor
respectively.
The actual actor classes themselves are given below:
31.10 Akka Configuration 341

class TickActor(msg: String)
extends Actor with ActorLogging {
log.info(s"Creating Tick Actor with msg: $msg")
override def receive = {
case StartTicking(tocker) =>
log.info(s"Starting... Tick ($msg)");
tocker !TockMessage
case TickMessage =>
log.info(msg);
Thread.sleep(500); sender !TockMessage
}
}
class TockActor(msg: String)
extends Actor with ActorLogging {
log.info("Creating Tock Actor with msg: $msg")
override def receive = {
case TockMessage =>
log.info(msg);
Thread.sleep(500); sender !TickMessage
}
}
Both these actors take a msg constructor parameter to be displayed when they
receive a message they also send message between each other using the sender
pseudo variable.
The output from this simple application is given below:
Config(SimpleConfigObject({"TickTock":{"Ticker":
{"message":"Ping"},"Tocker":
{"message":"Pong"},"howlong":2},"akka…))
Running for 2 seconds
[INFO] […] [akka://mysystem/user/
Tocker] Creating Tock Actor with msg: $msg
[INFO] […] [akka://mysystem/user/
Ticker] Creating TickActor with msg: Ping
[INFO] […] [akka://mysystem/user/Ticker] Starting…Tick (Ping)
[INFO] […] [akka://mysystem/user/Tocker] Pong
[INFO] […] [akka://mysystem/user/Ticker] Ping
[INFO] […] [akka://mysystem/user/Tocker] Pong
[INFO] […] [akka://mysystem/user/Ticker] Ping
[INFO] […] [akka://mysystem/user/Tocker] Message
It is possible to see from this the configuration information as well as its use in
the application. Note that the configobject also contains an extensive set of default
values used by the Akka runtime.
342 31 Akka Actors

31.11 Actor DSL
To make it easier to create simple Actors, the Akka library provides a
domain-specific language (or DSL) specifically for their creation. For example, one
off workers can be created very concisely using the Act trait. The Act trait is
defined by the akka.actor.ActorDSL._ type and includes supporting objects.
The implicit actor system serves as the ActorRefFactory required by the
actor function when using the Act trait to create the actor. The actor function
essentially uses the ActorOf functionality of the ActorSystem (or
ActorContent if used inside an Actor) to create the new actor based on the Act
trait. This is done by overriding the default behaviour of the Act traits become
method. The overridden version of become essentially swaps the created Actors’
receive method with that defined in the Act trait at runtime.
The following listing provides a simple example of creating a worker Actor:
import akka.actor.ActorDSL._
import akka.actor.ActorSystem
object TestWorker extends App {
implicit val system = ActorSystem("demo")
val a= actor(new Act {
become {
case "A" => println("hello")
}
})
a! "A"
}
In this example the new Act instance defines the behaviour which will be used
for the resulting actors receive method in the become function. Here if the
string “A”is received, the actor will print out the string “hello”. After defining this
actor the message “A”is sent to the reference held to that actor.
The output from this program is:
Hello
The DSL also supports defining lifecycle behaviours. This is done using the
whenStarting,whenStopping,whenFailing and whenRestarted
functions, as shown below:
31.11 Actor DSL 343

import akka.actor.ActorDSL.Act
import akka.actor.ActorDSL.actor
import akka.actor.ActorSystem
object LifecycleTest2 extends App {
implicit val system = ActorSystem("demo")
val a= actor(new Act {
become {
case "hello" => println("hello World")
case "stop" => context.stop(self)
case _ => println("Hello Whoever")
}
whenStarting { println("starting") }
whenStopping { println("stopping") }
whenFailing {case m@(cause, msg) =>println("Error")}
whenRestarted { cause => println("whenRestarted") }
})
a! "hello"
a! "Goodbye"
a! "stop"
system terminate
}
The output from this program is:
starting
hello World
Hello Whoever
stopping
This is because the starting and stopping behaviours have been invoked but the
failing and restarted ones have not.
344 31 Akka Actors

Chapter 32
Further Akka Actors
32.1 Introduction
The previous chapter introduced the basic Akka Actor concepts and constructs.
This chapter takes these concepts further looking at how a result can be returned by
(obtained from) an Actor. It also looks at Actor hierarchies and Actor supervision.
32.2 Generating a Result from an Actor
So far all our examples have received a message and then performed some oper-
ation. This operation has not returned a result and thus this has not been an issue.
However, there are many situations where we do require a result. If you look at the
specification for receive you will see that it is actually a PartialFunction
which returns Unit. Thus the receive method cannot return a value.
To return a result from an actor when it has finished processing a message, you
can use the sender property to send a result back to the requesting actor. Note this
assumes that the requester is also an Actor itself; however, the next section on
Futures will look at how we can retrieve a result when the sender is not an actor.
In this example we are using a companion object to act as a factory for the
generation of the Props object associated with the Actors. Thus the Calculator
Actor has a Calculator companion object with a method props that returns the
Props instance configured as appropriate for the actor. The calculator actor is
listed below:
©Springer International Publishing AG 2018
J. Hunt, A Beginner’s Guide to Scala, Object Orientation and Functional
Programming, https://doi.org/10.1007/978-3-319-75771-1_32
345

object Calculator {
def props = Props[Calculator]
}
class Calculator extends Actor {
def receive = {
case x: Int => {
println("Calculator received: " +x)
val result1 =
(1to x).map(i=> i)
.foldLeft(x)((total, i) => total *i)
println(
"Calculator processing completed, " +
"returning result")
sender ! result1
}
}
}
The key element of interest here is the receive method. This has a case pattern
matcher that will handle Ints. Within the body of the associated behaviour a cal-
culation is performed based on the integer received. Once this calculation is
completed the result is sent back to the Actor that installed the request using the
sender which is always bound to the actor that issued the request (if the message
sender was indeed an Actor). Thus:
sender ! result
causes in a new message to be sent from the calculator actor to whatever actor
issued the initial request.
The invoking actor, the Controller Actor, also has a companion object with
aprops factory method. In this case a string is passed in as a parameter to the
constructor on the Controller. Thus the Props construction process requires a
different syntax. This syntax allows information to be passed to the actors con-
structor. To do this we use an alternative Props factory method. This version of
the Props factory takes the type of class to configure (the actor class) and the
parameters to pass into the constructor of that class. Note any number of parameters
can be passed here, as this is a variable length parameter list.
346 32 Further Akka Actors
object Controller {
// String controller passed as a parameter to the
// contructor of the controller class
def props = Props(classOf[Controller], "Controller")
}
class Controller(name: String) extends Actor {
def receive = {
case "start" => {
println(name + ": starting calculator")
context.actorOf(Calculator.props) ! 4
println(name + ": message set")
}
case result: Int => {
println(name + " received: " + result)
context.stop(self)
}
}
}
The Controller actor itself has two case statements in its receive method.
One matches the string “start”which obtains a reference to the Calculator actor and
sends it a message containing the integer ‘4’. The other case condition matches an Int
which is assumed to be the result of the calculator’s calculations and is printed out. In
this case, once it has done that it stops itself (and as the Calculator was created by
the Controller as a child of the controller) it also stops the Calculator actor.
The simple application that exercises these actors is shown below:
object ReplyTest extends App {
println("Starting ReplyTest application")
val system = ActorSystem("mysystem")
val controller = system.actorOf(Controller.props)
controller ! "start"
println("End of ReplyTest body")
system terminate
}
This program obtains a reference to the Controller actor from the
ActorSystem and sends it the message string “start”.
Note that the three imports for these three elements are the usual:
32.2 Generating a Result from an Actor 347
import akka.actor.Actor
import akka.actor.Props
import akka.actor.ActorSyste
m
The output of this program is:
Starting ReplyTest application
End of ReplyTest body
Controller: starting calculator
Controller: message set
Calculator received: 4
Calculator processing completed, returning result
Controller received: 96
Notice that the two Strings printed by the main application body are at the start
of the output. Thus the main program completes before the controller and the
calculator start their message processing. This clearly indicates that the
Controller and the Calculator are executing in their own threads of
execution.
32.3 Futures
The previous example illustrates how one actor can return a result to another actor.
However, what happens if the sending code is not part of an actor? One answer is to
use a scala.concurrent.Future.AFuture is a object which offers to
return the result of some process or calculation, at a point in the future, allowing the
current code to continue processing. Futures can be used in many different situa-
tions, such as reading data from a database, executing some long-running process,
requesting data from a remote service.
The key to a scala.concurrent.Future is that it can take an actor, and
the message to send to the actor, and wrap the resulting response message in a form
that the requesting code can access. As in the last section a simple Calculator
Actor will be used. This Actor again has a companion object to generate the
properties for the Calculator and again the receive message handles Integers
and returns a result by sending that result back to the sender.
348 32 Further Akka Actors

object Calculator2 {
def props = Props(classOf[Calculator2])
}
class Calculator2 extends Actor {
def receive = {
case x: Int => {
println("Calculator2 -> received: " + x)
val result1 =
(1to x).map(i=> i)
.foldLeft(x)((total, i) => total *i)
println("Calculator2 -> processing completed, " +
" returning result")
sender ! result1 }
}
}
The code that invokes the above behaviour however uses a Future:
import scala.concurrent.ExecutionContext
import scala.concurrent.Future
import scala.concurrent.duration._
import akka.actor.Actor
import akka.actor.ActorSystem
import akka.actor.Props
import akka.pattern.ask
import akka.util.Timeout
import scala.util.{Success,Failure}
object FutureTest extends App {
import scala.concurrent.ExecutionContext.Implicits.global
println("FutureTest -> Starting ReplyTest application")
val system = ActorSystem("mysystem")
val calc = system.actorOf(Calculator2.props)
val future: Future[Int] =
ask(calc, 4)(Timeout(5seconds)).mapTo[Int]
println("FutureTest -> Obtained : " +future)
future onComplete {
case Success(i: Int) =>
println(s"FutureTest -> Result from future: $i")
case Failure(ex) => println(s"Failed: $ex")
}
println("FutureTest -> Finished")
system.terminate
System.exit(0)
}
32.3 Futures 349
There are a number of elements to note about this listing including:
1. An implicit declaration is used to provide an execution context for the future
processing. This is required as Actors run within an execution context and thus
the Future must also have an execution context. This implicit statement provides
a suitable execution context that can be implicitly made available to the Future
invocation. This is implemented as:
import scala.concurrent.ExecutionContext.Implicits.global
2. The ask function for the akka.pattern package is used to create the Future
which will send the message containing the integer ‘4’to the calc Actor. It is a
multiple parameter list function and thus the first parameter list takes the actor
and the message and the second parameter list takes a timeout. This could also
have been declared implicitly.
3. The ask function generates a Future which returns Any type of elements,
whereas we know that the Calculator returns an Integer as a result and thus
the Future returned by the ask function is then mapped to one that will work
with an integer result using (mapTo[Int]).
4. The resulting Future is then stored in the val ‘future’. The main program then
continues on and prints out a message. It then defines the behaviour to be
invoked once a result is generated—note it does not wait for that result to be
made available before continuing on.
5. The main programme then prints out the final string saying it has finished.
6. Once the calculation performed by the calculator has completed, the future
onComplete behaviour is executed. Pattern matching is then used to deter-
mine whether the Actor completed successfully or whether in fact there was a
failure generated. If the actor completed successfully then the future will contain
the value to be retrieved in the Success object; if instead it failed (e.g. because an
exception was thrown) then it will contain a Failure object.
The result of executing this program is shown below:
FutureTest -> Starting ReplyTest application
Calculator2 -> received: 4
Calculator2 -> processing completed, returning result
FutureTest -> Obtained: Future(<not completed>)
FutureTest -> Finished
FutureTest -> Result from future: 96
350 32 Further Akka Actors

32.4 Dispatchers
In Akka it is a dispatcher (specifically a Message Dispatcher) that provides the
foundation for an Akka Actor. That is a Message Dispatcher handles how any
request received by the actor is processed.
Notice that the dispatcher triggers an execution as well as determining how the
request (or message) will be processed. This is because an implementation of the
MessageDispatcher is also an ExecutionContext. This means that it can
execute arbitrary code such as that used to define the behaviour of the actor or to
trigger a future.
In many (most) cases the default dispatcher will be more than adequate; however, it
is possible to change an actors’dispatcher. To do this you need to have an alternative
dispatcher available. This can be provided by defining an appropriate dispatcher in one
of the Akka configuration files. There are two executors available with the default
dispatcher. These are the fork-join-executor and the thread-pool-executor. The first
executor forks a separate thread for each request to the Actor and then waits to rejoin
that thread before continuing. The thread pool executor uses a pool of threads to
process multiple requests in parallel across multiple instances of an Actor.
For example, the following dispatcher configuration defines a new
thread-pool-based executor called jeh-pool-dispatcher.
akka {
actor {
jeh-pool-dispatcher {
# Dispatcher is the name of the
# event-based dispatcher
type = Dispatcher
# What kind of ExecutionService to use
executor = "thread-pool-executor"
# Configuration for the thread pool
thread-pool-executor {
# minimum number of threads to cap
# factor-based core number to
core-pool-size-min = 3
# maximum number of threads to cap
# factor-based number to
core-pool-size-max = 3
}
# Throughput defines the maximum number
32.4 Dispatchers 351
# of messages to be processed per actor
# before the thread jumps to the next actor.
throughput = 5
}
}
}
The above specification states that the thread pool has an initial size of 3, with a
maximum of 3 threads. Note that there are numerous properties available including
a property to specify how long to keep alive a thread when it is not being used
(default 60 s).
A thread pool is a set of underlying threads that can be used by instances of an
actor to process messages. When a message is received, the Actor will attempt to
obtain a new thread from the thread pool. If one is available (not being used) then
that thread will be returned from the pool and processing of a message can start. If
no threads are available then the request will wait until one thread is returned to the
pool and is thus available to service a request. Note that it is not uncommon for a
thread pool to have a minimum and a maximum size—thus when demand is low
threads can be removed and at busy times the number of threads in the pool can
grow (to some predefined maximum). This provides some control over the number
of concurrent requests that can be processed at any one time. However, care needs
to be taken when configuring such pools to ensure that a suitable set of defaults can
be used otherwise the performance of the system can suffer due to the lack of
threads (or thread starvation).
Also note some general rules of thumb regarding throughput:
•If you have a case where the number of threads is equal to the number of actors
using the dispatcher, set the throughput number extremely high, like 1000.
•If your actors perform tasks that will take some time to complete and you need
fairness to avoid starvation of other actors sharing the pool, set the throughput to
1.
•For general usage, start with the default value of 5 and tune this value for each
dispatcher so that you get reasonable performance characteristics without the
risk of making actors wait too long to handle messages in their mailboxes.
A significant point of confusion relating to threads and thread pools is that a
specific instance of an Actor is always a singled threaded process. That is, every
Actor instance, when it receives a request, will process that request from start to
finish before moving onto the next request in its in box. However, multiple
instances of an actor can be created and can be sent requests in parallel. The
underlying dispatcher determines whether these are queued up for processing
(the default behaviour) or whether the instances of an actor can run concurrently.
The following simple application creates four instances of the LongProcessor
actor and sends 4 messages to the actors. However, the ActorSystem uses the
earlier configuration file and thus only allows three threads to be used at any one
352 32 Further Akka Actors

time by a single type of Actor. Thus the first three actors obtain a thread for
execution, while the fourth will have to wait until a thread becomes free:
import akka.actor.Props
import akka.actor.ActorSystem
import akka.actor.Actor
class LongProcessor extends Actor {
def receive = {
case s:String => {
for (i<- 1to 5) print(s)
println
Thread.sleep(2000)
for (i<- 1to 5) print(s)
println
}
}
}
object AkkaConfigTest extends App {
val props =
Props[LongProcessor]
.withDispatcher("akka.actor.jeh-pool-dispatcher")
val system = ActorSystem("mysystem")
val actor1 = system.actorOf(props, "actor1")
val actor2 = system.actorOf(props, "actor2")
val actor3 = system.actorOf(props, "actor3")
val actor4 = system.actorOf(props, "actor4")
println("Sending messages")
actor1 ! "A"
actor2 ! "B"
actor3 ! "C"
actor4 ! "D"
println("Messages sent")
system.terminate
}
package com.jjh.akka
Notice that the path to the dispatcher configuration is formed from the elements
wrapping that definition. Thus the format in the configuration file wraps akka
around actor, which is around the jeh-pool-dispatcher, and thus the path is akka.
actor.jeh-pool-dispatcher. Also note that the withDispatcher
method on the Props type is used to load the configuration information associated
without custom pool-based dispatcher.
32.4 Dispatchers 353
The output from this application is a mix of the output from the instances of the
LongProcessor actor handling the “A”,“B”and “C”strings. The instance
handling the “D”string has to wait until a thread becomes free and thus does not
start to run until after the instance processing the “C”string completed.
Sending messages
Messages sent
CCCCC
BBBBB
AAAAA
CCCCBBAABC
BB
DDDDD
AAA
DDDDD
32.5 Actor Hierarchies
A number of times in this chapter we have seen the term ‘child’actor. However, we
have not really defined what a child actor is. Within the Actor model there can be
relationships between one Actor and another. If one Actor is created from within the
context of another actor, then this Actor is a child of the originating Actor, while the
originating Actor is referred to as a parent of the child actor. In addition any actor
can create child actors. Thus there can be a hierarchy of actors where any particular
actor can have a parent Actor and any number of child actors. This is illustrated in
Fig. 32.1.
In addition any Actor can also have grandchildren and great grandchildren
depending on the level of the hierarchy.
As an example, the following listing illustrates an Actor that creates two child
actors and then sends messages to both the children. Note that these child actors are
created using the Actors own context rather than the top-level ActorSystem:
354 32 Further Akka Actors
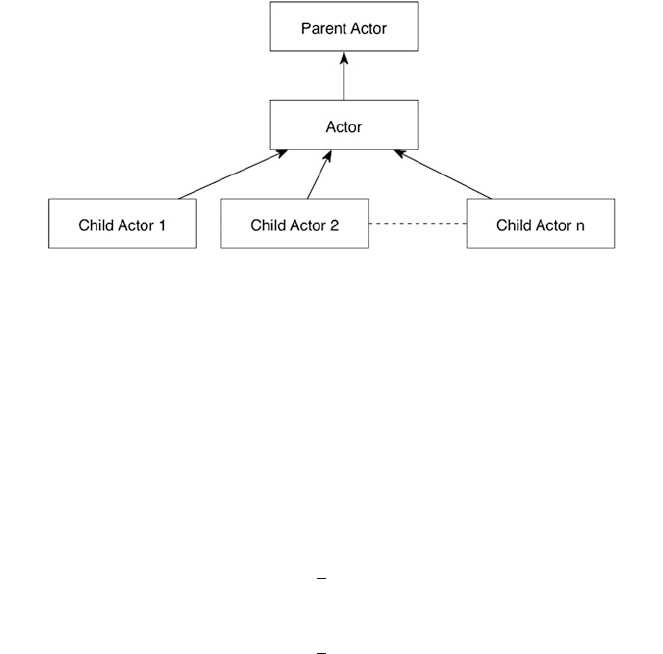
class Supervisor extends Actor {
var children = ArrayBuffer[ActorRef]()
override def preStart(): Unit = {
children += context.actorOf(Props(classOf[ChildActor],
"child1"))
children += context.actorOf(Props(classOf[ChildActor],
"child2"))
}
def receive = {
case "run" => {
println("Supervisor run")
children.foreach(a => a ! "msg")
}
case "error" => {
println("Supervisor error")
children.foreach(a => a ! "error")
}
}
}
In this case the prestart lifecycle method is being used to create the children.
Child actors are created whenever the Actors context is used to create the actor
using the actorOf method, rather than the ActorSystem. As this context is
available in the receive,prestart,preRestart, etc., method, children can
be created wherever appropriate within the Actor.
32.6 Actor Supervision
Other than an interesting concept, why is it significant that an Actor be considered a
child of another actor? The answer relates to supervision of Actors. Within the Actor
model supervision describes a dependency relationship between actors: the
Fig. 32.1 Parent–Child relationships for an actor
32.5 Actor Hierarchies 355
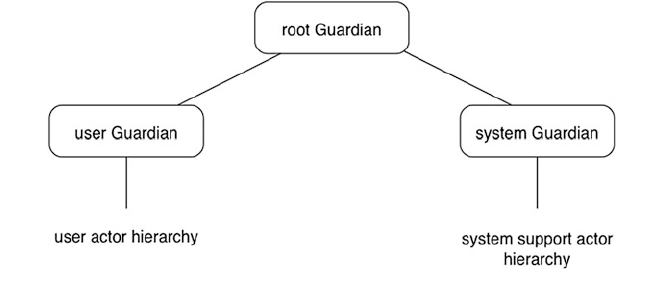
supervisor or parent of an actor delegates tasks to its subordinates and therefore must
respond to their failures or errors. When a subordinate or child detects a failure (i.e. it
throws an exception) it suspends itself and any of its subordinates (or children) and
sends a message to its supervisor, indicating the failure (i.e. the exception).
At this point the supervisor can determine what action to take, which includes:
1. Resume the subordinate keeping the current state of that subordinate.
2. Restart the subordinate that clears out the current state by creating a new Actor
instance within the Actor incarnation.
3. Stop the subordinate permanently.
4. Escalate the failure to its parent.
Note that each of these is an object defined within the SupervisorStrategy
type. The Supervisor strategy uses the object to determine what action is being
requested by the programme.
This hierarchy of supervision extends right up to the top of the Actor framework.
Thus an actor can receive failures which were generated by its children, grand
children or great grand children. At the root of this hierarchy is the Root Guardian.
The Root Guardian has two children; the User Guardian and the System Guardian
(see Fig. 32.2). All user created actors are the responsibility of the User Guardian.
In practice you would normally handle the errors yourself to ensure a clean and
stable system rather than allowing them to propagate up to the User Guardian.
The Supervisor actor class presented in the previous section can now be mod-
ified to specify how it will deal with certain types of failure. This is achieved by
specifying a Supervision Strategy and is implemented by overriding the default
Supervision Strategy. Thus the Supervisor actor can now be defined as:
Fig. 32.2 Root of Guardianship hierarchy for all actors
356 32 Further Akka Actors

class Supervisor extends Actor {
var children = ArrayBuffer[ActorRef]()
// Restart the child actors child when RuntimeException is
// thrown.
// After 3 restarts within 1 minute it will be stopped.
override val supervisorStrategy =
OneForOneStrategy(maxNrOfRetries = 3,
1minute) {
case _: RuntimeException =>
println("Supervisor Restarting"); Restart}
}
override def preStart(): Unit = {
children +=
context.actorOf(Props(classOf[ChildActor], "child1"))
children +=
context.actorOf(Props(classOf[ChildActor], "child2"))
}
def receive = {
case "run" => {
println("Supervisor run")
children.foreach(a => a ! "msg")
}
case "error" => {
println("Supervisor error")
children.foreach(a => a ! "error")
}
}
}
withinTimeRange =
{
Note that a OneForOneStrategy is being used here. There are actually two
classes of Supervision Strategy available in Akka:
•OneForOneStrategy—which only applies the following action to the failed
child. In our case this means that only the failed child is restarted.
•AllForOneSrategy—which applies the action it defines to all children.
These are defined in the akka.actor package along with other Supervision
Strategy types such as the Restart action. Both the strategies presented above take
information on the number of times a child can be restarted in a particular time
period. In this example, the child can be restarted three times within 1 min. After
this the child will be stopped. Both strategies also use pattern matching to determine
what action to take when an exception is thrown. In our case whenever a
RuntimeException is thrown by one of the children it will be handled by
restarting that child.
32.6 Actor Supervision 357
There is nothing special about the actors that will become child actors other than
the fact that they can throw a RuntimeException if the message “error”is sent
to them:
class ChildActor(name: String) extends Actor {
override def preStart(): Unit =
{ println(name + " preStart") }
override def postStop(): Unit =
{ println(name + " postStop") }
override def preRestart(reason: Throwable,
message: Option[Any]): Unit ={
super.preRestart(reason, message)
println(name + " preRestart")
}
override def postRestart(reason: Throwable): Unit = {
println(name + " postRestart")
super.postRestart(reason)
}
def receive = {
case "error" => throw new RuntimeException(name)
case _ => println(name + " received msg")
}
}
The imports for this program are:
import scala.collection.mutable.ArrayBuffer
import scala.concurrent.duration.DurationInt
import akka.actor.Actor
import akka.actor.ActorRef
import akka.actor.ActorSystem
import akka.actor.OneForOneStrategy
import akka.actor.Props
import akka.actor.SupervisorStrategy.Restart
import akka.actor.actorRef2Scala
The sample program which uses the Supervisor looks like any other Actor
program with nothing to indicate that the Supervisor is monitoring the child actors
(or indeed that there are child actors involved):
358 32 Further Akka Actors

object ParentChildActorTest extends App {
val props = Props[Supervisor]
val system = ActorSystem("mysystem")
val actor = system.actorOf(props, "supervisor")
actor ! "run"
Thread.sleep(100)
actor ! "error"
actor ! "run"
system terminate
}
The output from executing these classes is presented below:
Supervisor run
child1 preStart
child1 received msg
child2 preStart
child2 received msg
Supervisor error
Supervisor run
Supervisor Restarting
Supervisor Restarting
child2 postStop
child2 preRestart
child1 postStop
child1 preRestart
child2 postRestart
child1 postRestart
child2 preStart
child1 preStart
child1 received msg
child2 received msg
Note you can see the preRestart and postRestart methods producing
output as well as the preStart and postStop methods’output in this example.
This is because the supervisor is restarting the ChildActors following an exception
being thrown by the children.
32.6 Actor Supervision 359

32.7 Good Practices
This section provides some guidelines on good practices when developing Akka
Actor applications:
1. Actors should not block while processing a message. Such blocking will cause
performance issues and may lead to deadlock between communicating Actors.
2. Communicate with actors only via messages. Do not try to define additional
methods through which you will invoke actor functionality.
3. Do not share state. Scala Akka does not prevent actors from sharing state, so it
is (unfortunately) very easy to do. Any shared mutable object represents state
including objects in messages.
4. Prefer immutable messages. Ensure that all the data within your messages is
immutable. Mutable data in a message is shared state.
5. Make messages self-contained. When you get a response from an actor, it may
not be obvious what is being responded to. If the request is immutable, it is very
inexpensive to include the original request as part of the response. The use of
case classes often makes messages more readable.
6. Factory methods. Provide a factory method for the Actors property
configuration:
object Calculator {
def props = Props[Calculator]
}
class Calculator extends Actor {
def receive = {
case x: Int => {
println("Calculator received: " +x)
val result1 =
1to x).map(i=> i)
foldLeft(x)((total, i) => total *i)
println("Calculator processing completed, " +
(
.
"returning result")
sender ! result1
}
}
}
Online References
Introduction to Actor Model—http://en.wikipedia.org/wiki/Actor_model
Akka Actor homepage—http://akka.io/
360 32 Further Akka Actors

Chapter 33
Scala and JDBC Database Access
33.1 Introduction
In this chapter we will primarily look at how Scala can use a database connectivity
API referred to as JDBC. Strictly speaking this is available to Scala when run on a
JVM due to its relationship to the byte code environment of the JVM. Officially
JDBC is not an acronym; however, to all intents and purposes it stands for Java
DataBase Connectivity. This is the mechanism by which relational databases are
accessed in Java. As Scala runs in the same environment, Java Scala programs also
have access to JDBC. At the time of writing it is the simplest and most stable
approach to database access in Scala; however, it is not the only approach and we
will look at some of the more Scalaesque approaches in the next chapter.
33.2 Why JDBC?
Java is an (almost) pure Object-Oriented language; however, although there are
some Object-Oriented databases available, many database systems presently in
commercial use are relational (although NoSQL databases are gaining in interest it
is still the case that relational database systems are the most prevalent). It is
therefore necessary for any Object-Oriented language that is to be used for com-
mercial development to provide an interface to such databases.
For many technologies, each database vendor provides their own proprietary
(and different) API that can be used to access their (and only their own) database
system. These libraries are commonly used by other languages such as Pascal
and C. In many cases they are little more than variations on a theme; however, they
tend to be incompatible. This means that if you were to write a program that was
designed to interface with one database system, it is unlikely that it would auto-
matically work with another.
©Springer International Publishing AG 2018
J. Hunt, A Beginner’s Guide to Scala, Object Orientation and Functional
Programming, https://doi.org/10.1007/978-3-319-75771-1_33
361
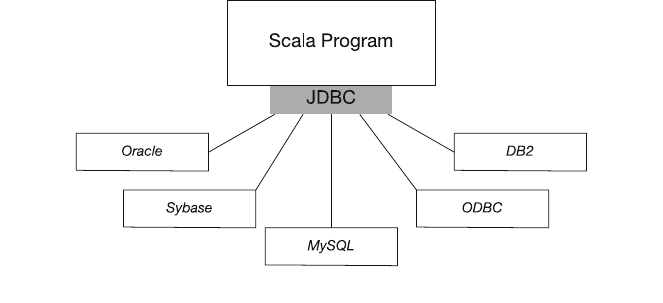
Of course one of the philosophies of Java (and by implication Scala) is “write
once, run anywhere”. This means we do not want to have to re-write our Scala code
just because it is using a different database on a different platform (or even the same
platform). JDBC was Sun’s (and now Oracle’s) attempt to provide a vendor
independent interface to any relational database system. That is, a single interface
(JDBC) is provided to any relational database. A programmer therefore only needs
to program to the JDBC interface, while behind the scenes the differences between
database systems is managed by JDBC. This is illustrated in Fig. 33.1.
This is possible as most vendors implement most (if not all) of the standard SQL,
thus allowing a common denominator. SQL stands for Standard Query Language
and is used for obtaining information from relational databases. SQL is a large topic
in its own right and is beyond the scope of this book.
One potential problem with such an approach is that although the developers
interface is the same, different implementations of the framework would be needed
to link to different databases. In the JDBC this is overcome by providing different
back-end drivers. The developer is now insulated from the details of the various
relational database systems that they may be using and have a greater chance of
producing portable code.
33.3 What Is JDBC?
The JDBC allows a Java or Scala developer to connect to a database, to interact
with that database via SQL, and of course to use those results within a Scala
application. The combination of Scala and JDBC allows information held in
databases to be easily and quickly accessed. It also provides a bridge that supports
the Open Database Connectivity (ODBC) standard. The first version of the JDBC
was released in the summer of 1996, and since then it has been enhanced with
numerous additions. It is an important addition to Scala’s armoury, as the JDBC
Fig. 33.1 The relationship between Scala, JDBC and relational database systems
362 33 Scala and JDBC Database Access
provides programmers with a language and environment that is platform and
database vendor independent.
ODBC is a database access standard developed by Microsoft. This standard has
been widely adopted not only by the vendors of Windows-based databases but by
others as well. For example, a number of databases more normally associated with
Unix-based systems or IBM mainframes now offer an ODBC interface. Essentially,
ODBC is a basic SQL interface to a database system that assumes only “standard”
SQL features. Thus specialist facilities provided by different database vendors
cannot be accessed. In many ways JDBC has similar aims to ODBC. However, one
major difference is that JDBC allows different database drivers (interfaces) to be
used, one of which is the ODBC driver.
The JDBC is able to connect to any database by using different (back-end)
drivers. These act as the interfaces between the JDBC and databases such as Oracle,
Sybase, Microsoft Access and open source systems such as MySQL.
The idea is that the front end presented to the developer is the same whatever the
database system, while the appropriate back-end is loaded as required. The JDBC
then passes the programmer’s SQL to the database via the back end. JDBC is not
the first system to adopt this approach; however, a novel feature of the JDBC is that
more than one driver can be loaded at a time. The system will then try each driver
until one is found that is compatible with the database system being used. Thus
multiple drivers can be provided and at runtime the appropriate one is identified and
used. This is illustrated in Fig. 33.2.
Figure 33.2 illustrates some of the most commonly used methods provided by
the JDBC along with two database drivers (namely the MySQL driver and the
ODBC driver; not that any number could have been provided). Such a set-up would
allow a Java program to connect to a MySQL database via the MySQL driver and to
any database that supports the ODBC standard through the ODBC driver. The
getConnection(),executeQuery() and executeUpdate() methods
will be looked at in more detail later in this article.
There are a number of database drivers available for JDBC. At present databases
such as Oracle, Sybase and Ingres all have their own drivers. This allows features of
those databases to be exploited. However, even databases that are not directly
mSQL
Driver
ODBC
driver
JDBC API
executeQuery()
executeUpdate())
getConnection()
Fig. 33.2 The structure of
the JDBC
33.3 What Is Jdbc? 363
supported can be accessed via the ODBC driver, thus making a huge range of
databases available to the Java developer.
To summarise JDBC (Java DataBase Connectivity):
•It is available to all JVM languages including Java and Scala.
•It provides common front end for different databases.
•It relies on database-specific drivers for the back-end connection to the actual
database.
•It provides an ODBC bridge (which is essentially a default back-end driver).
•It is implemented within the java.sql and javax.sql packages as it is a core part of
the Java libraries on which Scala builds.
33.4 Working with JDBC
There is a very definite series of steps that must be performed by any JDBC
program. These involve loading an appropriate driver, connecting to a database,
executing SQL statements and closing the connection made. These are discussed in
more detail later in this chapter. However, for reference they are illustrated
graphically in Fig. 33.3. This illustrates the key elements that comprise the
JDBC API (Application Programmers Interface):
In Fig. 33.3 you can see that the Driver Manager can have multiple drivers asso-
ciated with it. Currently this runtime has three drivers; the Oracle driver, the DB2 driver
and the MySQL driver. When the program asks the Driver Manager for a Connection,
each driver is prompted in turn for a connection. In this case it is the MySQL driver that
returns a connection instance from the getConnection request.
Using the connection, the program can get metadata about the database it is con-
nected to use the getMetaData method. This returns a DatabaseMetaData
instance.
Also using the connection instance the program can obtain a statement instance
using the createStatement method. This returns an instance that can be used
to execute a query or execute an update against the database. In this case, we are
using an executeQuery method with some SQL (such as SELECT * from <
table name>). This method returns a ResultSet instance. A ResultSet
instance can provide meta data about the data held in the result set via the
getMetaData method. This returns a ResultSetMetaData instance (con-
taining the number of columns and their names).
It is also possible to loop through each of the rows in the ResultSet using the
next method that moves the cursor on a row at a time (note it starts before the first row).
Once the cursor (a pointer to the current row in the result set) is referencing a row
various get methods can be used to retrieve the data. For example, getString(name)
will return the value associated with the column called name as a string. Alternatively
you can use getString(2) which will return the value held in the second column as a
String. There are appropriate get methods for all of the fundamental types in Scala.
364 33 Scala and JDBC Database Access
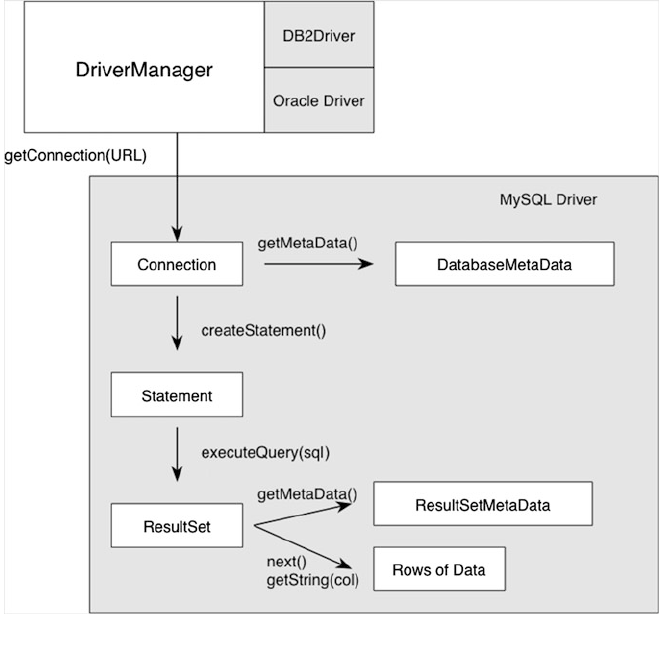
Note if something goes wrong in connecting to the database, running some SQL,
retrieving a value, etc., then an SQLException is thrown.
33.5 The Database Driver
What actually is a driver? In practice it provides the concrete implementation for a
number of interfaces defined in the SQL package. In particular it defines imple-
mentations for the types (such as Driver,Connection,Statement and
ResultSet) which form a major part of the sql API. Each of these will be
considered in more detail later. However, essentially they comprise the way to
connect to a database, to pass SQL statements to be executed to that database and to
examine the results returned. Note that, unlike some object to relational database
interfaces, JDBC does not try to objectify the results of querying a relational
Fig. 33.3 Working with JDBC
33.4 Working with JDBC 365
database. Instead the results are returned in a table-like format within a results set. It
is then up to the developer to decide how to handle the information retrieved.
33.6 Registering Drivers
As part of the JDBC API a JDBC Driver Manager is provided. This is the part of
the JDBC that handles the drivers currently available to a JDBC application. It is
therefore necessary to “register”a driver with the Driver Manager. There are a
number of ways of doing this, however for the moment we will focus on doing this
programmatically. A JDBC driver can be loaded by referencing the class that is the
root of the Driver’s implementation. JDBC requires a JDBC driver to register itself
with a central DriverManager when it is loaded. Within Scala there is a feature that
allows a class to be loaded without an instance of it being created. These features
use a construct called classOf. Thus to load a JDBC Driver programmatically all
you have to do is to mention the drivers root class via a classOf statement, for
example:
// Load the driver
classOf[com.mysql.jdbc.Driver]
This will cause the associated class (in this case the MySQL JDBC Driver) to be
loaded into the running application.
As was mentioned earlier you can install more than one driver in your JDBC
program. For example you could write:
// Load the driver
classOf[com.mysql.jdbc.Driver]
classOf[sun.jdbc.odbc.JdbcOdbcDriver]
When a request is made to make a connection to a database each one will be
tried in turn until one accepts that request. However, using more than one driver
will slow down both system start-up (as each must be loaded) and your runtime (as
each may need to be tried in turn). For this reason, it may be best to select the most
appropriate driver and stick with that one.
The JDBC ODBC driver is provided as part of the underlying (Java-derived)
runtime used with Scala. However, other drivers can be obtained and used with the
JDBC.
366 33 Scala and JDBC Database Access
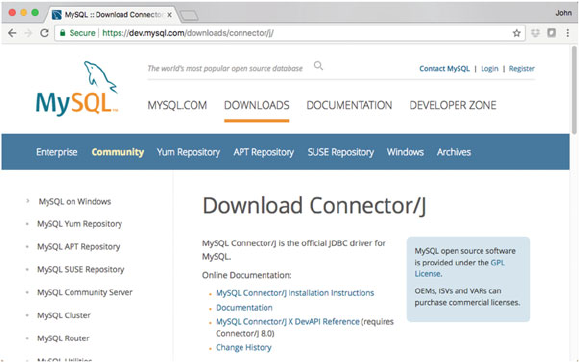
33.7 Setting Up MySQL
To download the MySQL driver got to the MySQL home (there are versions of the
driver for numerous different languages) and select the Connector/J (which indi-
cates that it is used by JVM languages such as Java and Scala). The URL is
currently https://dev.mysql.com/downloads/connector/j/:
Download the drive and install in an appropriate directory.
As a general approach, this allows vendors to supply their own proprietary
database drivers that developers can then utilize in their own applications.
If you are going to use this library with IntelliJ you now need to tell IntelliJ about
it. To do this select the Module you are going to use for your database examples and
from the right mouse menu select the ‘Open Module Settings’option. This will
display the Project Structure dialog. On the left-hand side of the dialog select the
‘Libraries’option.
When the right side of the dialog changes to show the list of libraries, select the ‘+’
symbol at the top of the display. This pops up a little ‘New Project Library’dialog
asking what the type of the library is, select ‘Java’(even though we are using Scala).
Use the file selection dialog to find the location in which you saved the MySQL
connector driver. In this directory/folder select the my-sql-connector-java.jar file (it
may have a version number as part of its name but make sure you select the .jar file).
33.7 Setting Up MySQL 367
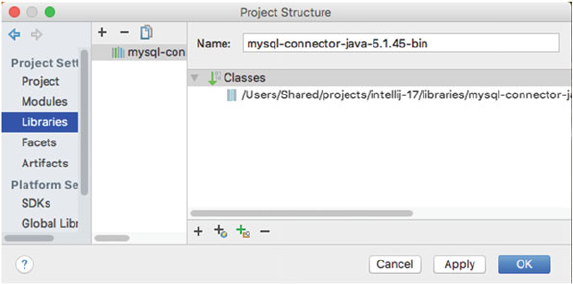
You can then choose other modules to add the library to. Finally close the
Project Structure dialog by clicking OK.
33.8 Setting Up the Database
33.8.1 Starting/Stopping/Connecting to MySQL
You should use the information provided by MySQL with regard to your platform
and the best way of running MySQL for a Windows machine, a Mac or a Linux
box. For example, if you are on a Windows machine then open a command window
and CD into the bin directory of the location you installed MySQL in. You can then
enter the command
mysqld –console
This will start MySQL if it is not already running. However, if you are on a Mac
then you will need to issue a command such as
sudo /Library/StartupItems/MySQLCOM/MySQLCOM start
The same is true for setting MySQL down. For example, on a windows box you
can use
mysqld –stop
Where as on a Mac you can use
sudo/usr/local/mysql/support-files/mysql.server stop
368 33 Scala and JDBC Database Access

33.9 Creating a Database
To access MySQL you may wish to use the command line client (mysql) or a tool
such as Toad or MySQLWorkbench. In the following we will assume that we have
started the command line client for MySQL. On Windows this can be done by
changing into the bin directory of MySQL within a command window and issuing
the following command (assuming the root user has no password):
mysql –u root
While on a Mac you will need to open a terminal and issue the command:
/usr/local/mysql/bin/mysql -u root
You can now create any databases that you will need to work with. For example,
to create the database employees from the lecture notes, issue the following
command:
CREATE DATABASE employees;
If this is successful you will see a prompt back from MySQL confirming the
creation:
33.9.1 Adding a User
You can now add a user to the DMBS who will be allowed to access and work with
the employees’database:
GRANT ALL on employees.* to ’user’@’localhost’IDENTIFIED by ’user123’;
Again if you are successful you should see a confirmatory message from
MySQL:
Query OK, 0 rows affected (0.00 sec)
You can also confirm that the user has appropriate rights using the command
SHOW GRANTS FOR ’user’@’localhost’;
33.9 Creating a Database 369
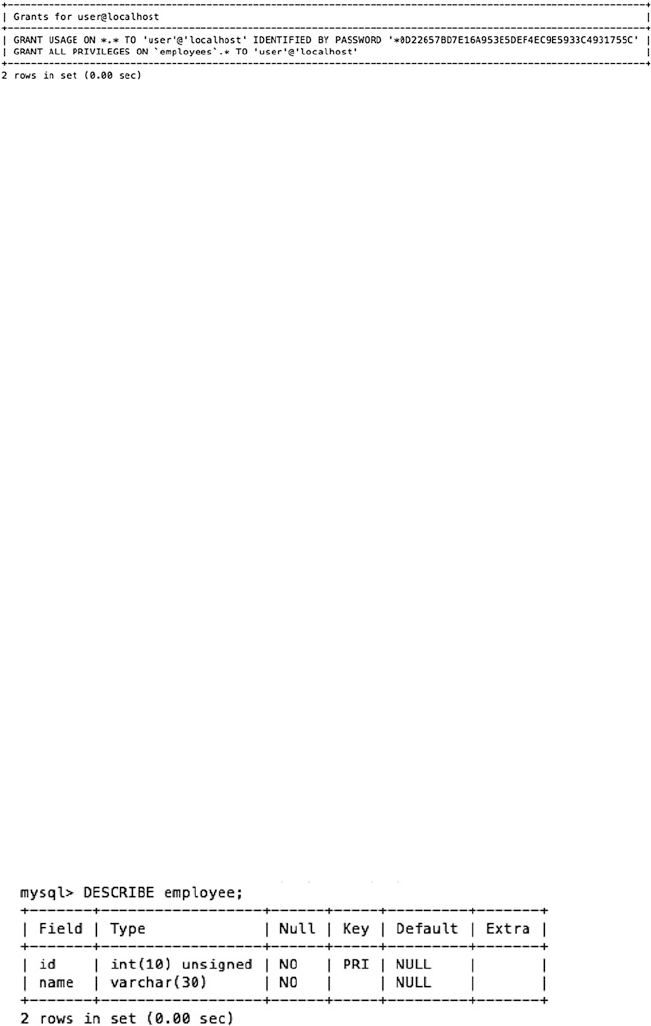
This should display the information related to the user:
33.9.2 Selecting to Work with a Database
In MySQL you can move into a database so that all commands you issue are by
default associated with that database. You do that by issuing the command
use < database name>
For example
use employees
You should get a confirmatory ‘Database changed’message from MySQL.
33.9.3 Creating a Table
The easiest way to create and manage tables is to use an appropriate tool such as
Toad (see http://www.quest.com/toad-for-mysql/); however, you can do the same
thing from the MySQL command line prompt.
To create a table such as that presented in the lectures you can issue a create
command such as:
CREATE TABLE employee (id INT UNSIGNED NOT NULL,
PRIMARY KEY (id), name VARCHAR(30) NOT NULL);
If this is successful you will obtain a confirmatory message from MySQL.
However, you can also check that the table is as expected using the describe
table command:
370 33 Scala and JDBC Database Access
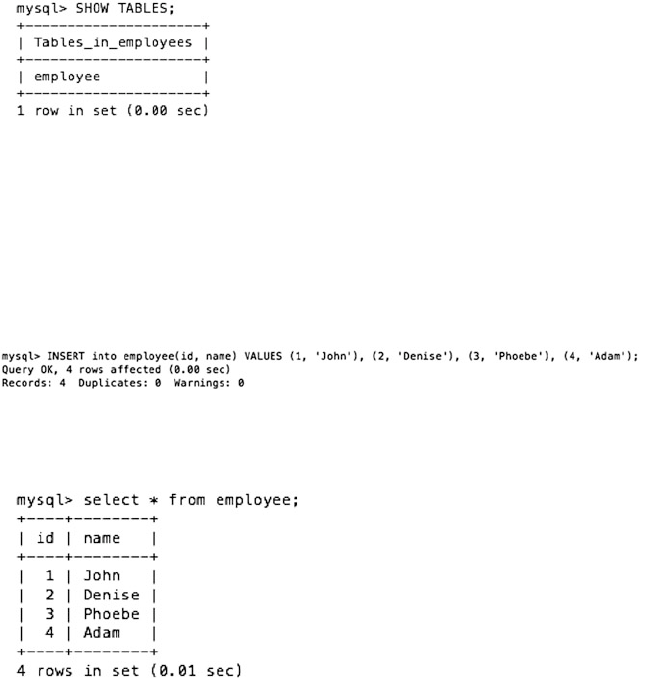
Alternatively, you can enter a show tables command:
33.9.4 Adding Data to a Table
Again using a tool such as Toad will make this much easier, but you can still issue
SQL insert and update statements from the MySQL command line. For example,
given the employee table in the employees’database we could issue:
As usual MySQL provides a confirmatory response. However you could check that
the data you expected has been added by running a SELECT statement against it:
The examples in this chapter use a database called employees with a table
employee.
Exactly how you create your database is up to you. I use the MySQLWorkbench
which can be downloaded from https://www.mysql.com/products/workbench.
The actual SQL commands used to create the schema (database) and the tables in
that database are summarised below:
CREATE SCHEMA `employees`;
CREATE TABLE `employees`.`employee` (
`id` INT NOT NULL,
`name` VARCHAR(45) NULL,
PRIMARY KEY (`id`));
33.9 Creating a Database 371
33.10 Opening a Connection
Listing 1 presents a simple class that uses the MySQL driver to connect to a
MySQL database. We must first make the JDBC API available, and this is done by
importing the SQL package. Next the application loads the JDBC MySQL driver
and then requests that the DriverManager makes a connection with the database
employee. Note that to make this connection a string (called url) is passed to the
Driver Manager along with the user id and the password.
import java.sql.DriverManager
import java.sql.Connection
object TestConnect extends App {
// Change to Your Database Config
val url =
"jdbc:mysql://localhost:3306/employees?" +
"user=user&password=user123"
var conn: Option[Connection] = None
try {
println("Load the driver")
classOf[com.mysql.jdbc.Driver]
println("Set up the connection")
conn =Some(DriverManager.getConnection(url))
println("Success")
}catch {
case ex: Exception => {
ex.printStackTrace()
}
}finally {
println("Close the connection")
conn match {
case Some(c) => c.close
}
}
}
If you have the MySQL database running, containing an employees’database
then when this application is run you will get the output shown below:
372 33 Scala and JDBC Database Access
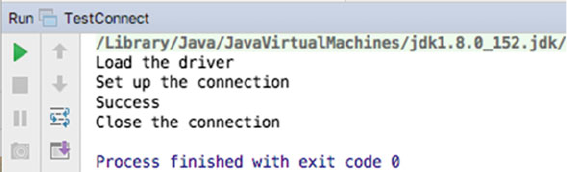
The string specifying the database to connect to is formed from a JDBC URL.
This is a URL that is comprised of three parts:
1. The JDBC protocol indicator (jdbc:)
2. The appropriate sub-protocol such as mysql:
3. The driver-specific components (in this case server, followed by port and then
database information and user name).
URLs are used as the program accessing the database may be running as a
stand-alone application or may be running in an application server (such as WebLogic,
WebSphere or Tomcat) and may need to connect to the database via the Internet. Note
that different database drivers will require different driver-specificcomponents.
Once a connection has successfully been made to the database, the program then
does nothing other than to close that connection. This is important as some database
drivers require the program to close the connection while others leave it as optional.
If you are using multiple drivers, it is best to close the connection.
Note that the attempt to load the driver and make the connection was placed
within a try {} catch{} block. This is because both operations can raise
exceptions and these must be caught and handled (as they are not runtime excep-
tions). The classOf[…]operation raises the ClassNotFoundException if
it cannot find the class which represents the specified driver. In turn the
getConnection()method of the DriverManager raises the SQLException if
the specified database cannot be found.
The try {} catch {} block works by trapping any exceptions raised in the try
part within the catch part (assuming the exception raised is an instance of the
specified class of exception or one of its subclasses).
Another thing to note about this application is that we are using the Scala option
wrapper to hold the Connection. A variable of type Option can either hold a value
within the Option or can have the value None. None can be used to indicate that the
value is currently empty (but is not abstract). This is important for a Connection as
when we try and make a connection it may fail and thus no connection will exist.
However as the code that creates the connection is within one block scope (the try
block) and the code which is guaranteed to run even if a problem occurs is within
the finally block scope we cannot be sure if a connection was made or not. Thus, the
finally block must protect against situations whether the connection failed to be
made by testing to see if the connection currently holds a value (i.e. there is
Something there or whether it is None. As we are only interested in the situation
where there is a value present we do not test for None.
33.10 Opening a Connection 373
conn match {
case Some(c) => c.close
}
This will only try and close the connection if conn matches the situation where
there is something present that can be bound to the variable c.
33.11 Inserting into a Table
In addition to querying an existing table for values, it is also possible within JDBC
to insert new rows into tables. This is done using the executeUpdate method.
Essentially the same process is adopted as that shown in the previous section.
However, the values to be inserted must be provided via an SQL INSERT state-
ment. This could be constructed using String manipulation; however, it is common
to use a Prepared statement for this.
A prepared statement is again obtained from a connection instance (and is
actually a sub type of the more generic statement). However, it is oriented around
multiple executions. Thus it is created with SQL that is sent to DBMS immediately
to be compiled. The statement instance can then be used with parameters in SQL,
indicated via ‘?’. For example,
INSERT INTO employee (id, name) VALUES(?, ?)
Use the setXXX(pos, value) methods to set values for the insert
st.setString(1, “Phoebe”)
st.setString(2, “B50”)
Note if you wish to make a set of insertions together as a database transaction
(i.e. all the changes are treated as one or are not made) then you can indicate this to
the driver managed by setting autocommit to false on the connection, for example:
conn.setAutoCommit(false)
And then when you wish the changes to be made as a group setAutoCommit to true:
conn.setAutoCommit(true)or alternatively call the commit method on the
connection:
connection.commit
The difference is that commit allows you to restart building up a set of changes
until the next commit where as setAutoCommit(true) reverts to immediately
updating the database.
If for some reason you decide not to commit (record) the changes then you can
call rollback on the connection instance:
connection.rollback()
The following is an example of a series of changes made as part of a single
database transaction:
374 33 Scala and JDBC Database Access
p
rintln("Set up the connection")
conn =Option(DriverManager.getConnection(url))
conn.get.setAutoCommit(false)
val sql = "INSERT INTO employee (id, name) VALUES(?, ?)"
val st = conn.get.prepareStatement(sql)
st.setString(1,"1")
st.setString(2,"Adam")
st.executeUpdate
st.setString(1,"2")
st.setString(2,"Denise")
st.executeUpdate
conn.get.commit
conn.get.setAutoCommit(true)
An example of a simple but complete insert program in Scala is shown below.
This program inserts a new row for Jocelyn into the employee table.
import java.sql.DriverManager
import java.sql.Connection
object TestDbInsert extends App {
var conn: Option[Connection] = None
// Change to Your Database Config
val url ="jdbc:mysql://localhost:3306/employees?"
"user=user&password=user123"
try {
println("Load the driver")
classOf[com.mysql.jdbc.Driver]
println("Set up the connection")
conn =Option(DriverManager.getConnection(url))
println("database insert")
val prep =
conn.get.prepareStatement(
"INSERT INTO employee (id, name) VALUES (?, ?) ")
prep.setString(1,"3")
prep.setString(2,"Phoebe")
prep.executeUpdate
println("Success")
}catch {
case ex: Exception => ex.printStackTrace()
}finally {
println("Close the connection")
conn match {
case Some(c) => c.close
}
}
}
33.11 Inserting into a Table 375
33.12 Obtaining Data from a Database
Having made a connection with a database we are now in a position to obtain
information from it. The following listing builds on the application in listing 1 by
querying the database for some information. This is done by obtaining a
Statement object from the Connection object. SQL statements without
parameters are normally executed using Statement objects. However, if the same
SQL statement is executed many times, it is more efficient to use a
PreparedStatement. In this example, we will stick with the Statement
object.
import java.sql.DriverManager
import java.sql.Connection
object TestDbQuery extends App {
// Change to Your Database Config
val url ="jdbc:mysql://localhost:3306/employees?" +
"user=user&password=user123"
var conn: Option[Connection] = None
try {
println("Load the driver")
classOf[com.mysql.jdbc.Driver]
println("Set up the connection")
conn =Option(DriverManager.getConnection(url))
println("Obtain a statement")
val statement = conn.get.createStatement()
println("Execute Query")
val rs =
statement.executeQuery("SELECT * FROM employee")
// Iterate Over ResultSet
println("Results:")
while (rs.next)
println(s"${rs.getString("id")}:${rs.getString("name")}")
}catch {
case ex: Exception => ex.printStackTrace()
}finally conn match {
case Some(c) => c.close
}
}
376 33 Scala and JDBC Database Access
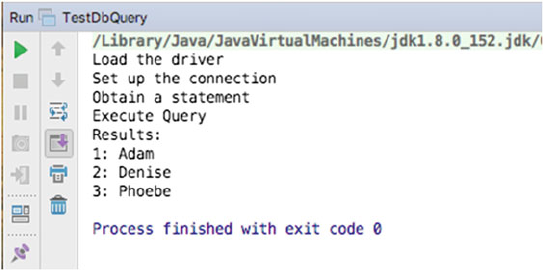
Having obtained the statement object, we are now ready to pass it some SQL.
This is done as a string within which the actual SQL statements are specified. In this
case the SQL statement is:
SELECT * FROM employee
This is pure SQL. The SELECT statement allows data to be obtained from the
tables in the database. In this case the SQL states that all columns from the table
employee should be retrieved for all rows in the table.
This string is passed to the statement object via the executeQuery() method.
This method also generates an SQLException if a problem occurs. The method
passes the SQL to the driver previously selected by the Driver Manager. The driver in
turn passes the SQL onto the database system. The result is then returned to the driver
that in turn returns it to the users program as an instance of ResultsSet. A results set
is a table of data within which each row contains the data that matched the SQL
statement. Within the row, the columns contain the fields specified by the SQL.
AResultSet maintains a cursor pointing to its current row of data. Initially the cursor
is positioned before the first row. The next() method moves the cursor to the next row.
The ResultsSet class defines a variety of get methods to obtain information
out of the ResultsSet table, for example, getBoolean(),getByte(),
getString(),getDate(). These methods are provided by the JDBC driver
and attempt to convert the underlying data to the specified Java or Scala type and
return a suitable Scala value. In listing 2, we merely print out each information for
each employee in turn using the next() method to move the table cursor on.
Finally, the statement and the connection are closed. In many cases it is
desirable to immediately release a statement's database and JDBC resources
instead of waiting for this to happen when it is automatically closed; the close
method provides this immediate release.
Given the insert statements presented in the previous section, the output of the
TestDbQuery application is given below:
33.12 Obtaining Data from a Database 377
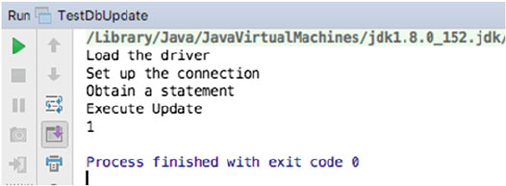
33.13 Update an Existing Row
Updates are performed in a similar manner to inserts. In the following example,
rather than using a prepared statement, we are using the generic statement and
passing the UPDATE SQL statement and the values to use with it to the
executeUpdate method:
object TestDbUpdate extends App {
val url ="jdbc:mysql://localhost:3306/employees?" +
"user=user&password=user123"
var conn: Option[Connection] = None
try {
println("Load the driver")
classOf[com.mysql.jdbc.Driver]
println("Set up the connection")
conn =Option(DriverManager.getConnection(url))
println("Obtain a statement")
val statement = conn.get.createStatement()
println("Execute Update")
val rs = statement.executeUpdate(
"UPDATE employee SET name='Sofie' WHERE id='3'")
println(rs)
}catch {
case ex: Exception => ex.printStackTrace()
}finally {
conn match {
case Some(c) => c.close
}
}
}
The output from this is:
Illustrating that 1 row in the table was updated.
378 33 Scala and JDBC Database Access
33.14 Deleting from a Table
Completing the set is the ability to delete a row (or rows) of data from a database.
Again, this uses the executeUpdate method but now with an SQL DELETE
statement. For example,
object TestDbDelete extends App {
val url ="jdbc:mysql://localhost:3306/employees?" +
"user=user&password=user123"
var conn: Option[Connection] = None
try {
println("Load the driver")
classOf[com.mysql.jdbc.Driver]
println("Set up the connection")
conn =Option(DriverManager.getConnection(url))
println("Obtain a statement")
val statement = conn.get.createStatement()
println("Execute update")
val rs = statement.executeUpdate(
"DELETE FROM employee WHERE id='5'")
println(rs)
}catch {
case ex: Exception => ex.printStackTrace()
}finally {
conn match {
case Some(c) => c.close
}
}
}
33.15 Creating a Table
So far we have assumed that the database already existed for our Scala application.
The database could be created by something else; for example, it could be generated
by a legacy system, by a Tool Such as Toad or MySQLWorkbench.
However, in many situations it is necessary for the tables in the database to be
updated (if not created) by a JDBC program. The following listing shows how a
statement object can be used to create a table and how information can be inserted
into that table.
33.14 Deleting from a Table 379
Again the strings passed to the statement are pure SQL; however, this time we
have used the executeUpdate() method of the Statement class.
import java.sql.DriverManager
import java.sql.Connection
object TestDbCreate extends App {
val url ="jdbc:mysql://localhost:3306/employees?" +
"user=user&password=user123"
var conn: Option[Connection] = None
try {
println("Load the driver")
classOf[com.mysql.jdbc.Driver]
println("Set up the connection")
conn =Option(DriverManager.getConnection(url))
println("Obtain a statement")
val statement = conn.get.createStatement()
println("Create the Table")
statement.executeUpdate(
"CREATE TABLE `employees`.`employee` (`id` INT NOT NULL,
`name` VARCHAR(45) NULL, PRIMARY KEY (`id`));")
println("Now add data")
val sql = "INSERT INTO employee (id, name) VALUES(?, ?)"
val st = conn.get.prepareStatement(sql)
st.setString(1,"1")
st.setString(2,"Adam")
st.executeUpdate
st.setString(1,"2")
st.setString(2,"Denise")
st.executeUpdate
st.setString(1,"3")
st.setString(2,"Phoebe")
st.executeUpdate
statement.close();
}catch {
case ex: Exception => ex.printStackTrace()
}finally {
conn match {
case Some(c) => c.close
}
}
}
380 33 Scala and JDBC Database Access
The executeUpdate() is intended for SQL statements which will change the
state of the database, such as INSERT, DELETE and CREATE. It does not return a
result set, rather it returns an integer indicating the row count of the executed SQL.
You can either use this value or ignore it (as in listing 3).
33.16 Stored Procedures
Stored procedures in a database are procedural code written in database-specific
languages that run within the database. They can be invoked from Scala via JDBC.
This is done obtaining a statement instance from a connection and then executing
an appropriate invocation. For example,
val storedProc ¼''...''
val st ¼con:createStatement
st:executeUpdate storedProcðÞ
val cst ¼
con:prepareCall '' call ...
fg
''ðÞ
val rs ¼cst:executeQuery
The result of the call to execute the stored procedure will be depending on what
the stored procedure actually does.
33.17 JDBC Data Sources
Although all the examples so far in this chapter have used a DriverManager as the
basis for obtaining a connection to a database, DriverManagers are not without their
own limitations. For example, a DriverManager requires the Driver classes to be
available on all JVMs in which the driver will be used. Thus it will need to be
available to all clients of the database. Then to use the Driver with the
DriverManager you must:
1. Load the Driver class
2. Connect to the database using a URL like string
This URL might contain driver protocol, machine name, port number, etc. All of
which can easily become difficult to maintain even with the use of properties files,
etc.
However with JDBC 2.0 DataSources were introduced. This allows JNDI (The
Java Naming and Directory Interface) to be used to map a logical name to the actual
data source. Thus in client (to the database) program the logical name can map to
33.15 Creating a Table 381
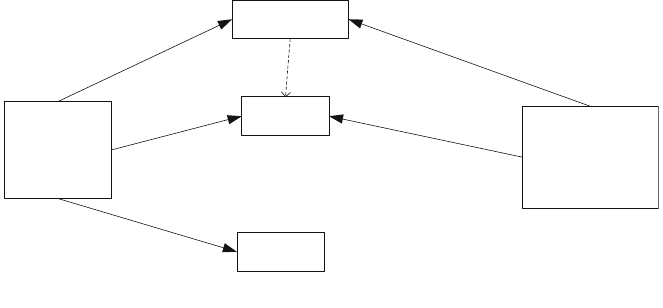
whatever data source is held in a naming service accessed via JNDI. This is easier
to maintain as the client program does not need to be changed if something changes
with the location or port used to access the database. Instead a separate program that
is used to configure the data source will need to be modified.
Thus the process of providing a connection between a database and the program
accessing the database is broken down into two steps:
1. Set up a data source with an appropriate driver and register with a naming
service via JNDI.
2. In the client application program access the data source from the naming service
again via JNDI.
3. The client application program can then obtain a connection from the
DataSource object.
4. The DataSource object in turn acts as a factory for connection objects.
5. The connection obtained from the data source is then used in exactly the same
way as a connection obtained from a DriverManager. The following code
snippet illustrates this idea:
val ctx ¼new InitialContextðÞ
val ds ¼DataSourceðÞctx:lookup ''jdbc=Personnel''ðÞ
val con ¼ds:getConnectionðÞ
This code snippet connects up to the current naming service (defined by the
properties in a file called jdbc.properties). It will then look in this naming service
for a DataSource object bound to the name “jdbc/Personnel”.
These steps are illustrated graphically in Fig. 33.4.
In many situations step 1 will be performed by some form of application server
such as JBOSS or WebSphere. However it is by no means the only way in which a
Naming Service
DataSource Setup
Program
Client
Application
Program
DataSource
Connection
1. creates DataSource object
2. registers DataSource object
3. look up DataSource
by logicalname
4. Obtain a connection
5. Obtain a statment object etc.
Fig. 33.4 The steps taken to use a DataSource
382 33 Scala and JDBC Database Access
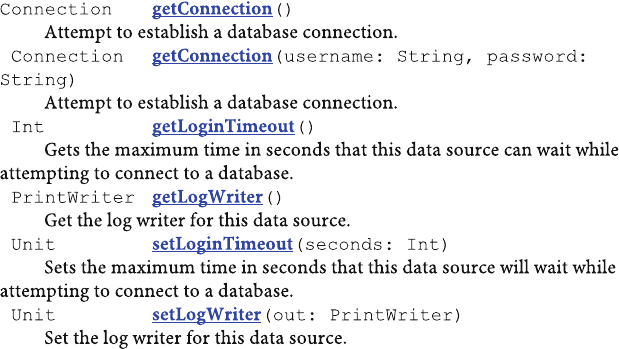
DataSource could be registered with a naming service. For example, a separate
set-up program could be written to create a data source object and register it, for
example:
DataSource ds ¼newOracleDataSourceðÞ
ds:setServerName ''thor''ðÞ
ds:setDatabaseName ''employees''ðÞ
Contactctx ¼new InitialContextðÞ
ctx:bind ''jdbc=Personnel'';dsðÞ
The above snippet creates an OracleDataSource object that will provide con-
nections to a database called employees, running on the server there. It can be
accessed from the naming service being used via the name jdbc/Personnel.
It is interesting to note that originally it was expected that the use of DataSources
would replace the use of DriverManagers. However what seems to have happened
is that for simple single or two-tier applications the DriverManager approach is still
being used. However for EJB-based applications the DataSource approach is used.
The methods defined by the DataSource interface are presented below:
The example code illustrated in Fig. 33.5 defines a test harness client illustrating
how a client may access a data source and obtain a connection in Scala.
33.17 JDBC Data Sources 383

33.18 Connection Pooling
The basic idea behind connection pooling is that a “pool”of connections is
maintained and shared amongst several users. Why would this be a useful strategy?
The answer is to do with both the overheads of creating a connection in the first
place and the limit on the number of connections allowed by a database. We shall
start with the first issue.
Although in many cases it may not be apparent, but the creation of objects is
both time-consuming and expensive in terms of memory, which may need to be
garbage collected at a later date. In the case of connections this is exacerbated by
the need to make an external connection to the database, to authenticate the user and
verify their password in addition to the allocation of memory by the JVM for the
connection. It is not uncommon for this operation alone to take one, two or more
seconds in heavily used applications. When we take into account that what we are
looking at are server applications that service many clients (possibly thousands of
clients) we can see that this overhead is very expensive for the system.
An additional concern is that in many cases there is some limit on the number of
connections that are either allowed on a database system or that are in some way
optimal. If we are considering a Web application being accessed worldwide we may
be taking about thousands of concurrent user. However in most cases most users are
not using the connection all the time; rather, they will perform some task and then
need to read, consider and digest the information they receive. Thus one connection
could be shared amongst several users, each getting a slice of the connection while
the others are busy doing other things. In this way fewer connections can support a
large number of concurrent users.
package com.jeh.scala.jdbc
import javax.sql.DataSource
import javax.naming.InitialContext
object TestDataSource extends App {
val ctx = new InitialContext()
val source = ctx.lookup("jdbc/testDS")
val ds: DataSource = source.asInstanceOf[DataSource]
if (ds != null) {
val con = ds.getConnection()
val st = con.createStatement()
val rs = st.executeQuery("SELECT * FROM employee")
while (rs.next) {
println(rs.getString("id") + ": " + rs.getString("name"))
}
}
}
Fig. 33.5 Testing a DataSource
384 33 Scala and JDBC Database Access
The two points discussed above are the basis for the need for connection
pooling. In connection pooling a pool of connections is maintained. When a client
needs to connect to the database they obtain a connection (temporarily) from the
pool. They perform whatever operations they require and then return the connection
back to the pool. When they need to perform further database operations they will
return to the connection pool and obtain another connection. If no connections are
available (there is usually a limit on the number of connections held in the pool)
then they are queued until such time as a connection is free.
There are some constraints on connection pooling. Firstly users who access the
database must do so either through a single account or through a small set of
common accounts. This is necessary as each connection is instantiated for a par-
ticular account. Thus it is not possible for each user to access the database with a
separate account. If they do this then connection pooling is not appropriate. This is
not as strict a restriction as it may seem. For example, Internet search engines do not
require a user to login, if they use a database a common account can be used to
perform the search. Secondly although users may log into an application via their
own user id this does not mean that they have to access the database behind the
application with that id. Rather the application can perform some authentication
operation and once logged in the users can be allocated to an appropriate (but
shared) database account.
The second constraint is that the application does not need to hold on to the
connections for long periods of time. That is, the application can perform some
operation and release the connection. If a permanent connection to the database is
required, then connection pooling will not work. However again the application can
be designed around this. For example, in the next section two types of RowSet are
described a JdbcRowSet and a CachedRowSet. The JdbcRowSet requires a per-
manent connection to the database whereas the CachedRowSet does not. Thus by
choosing an appropriate RowSet we can work around the need for permanent
database connections.
The javax.sql package provides for connection pooling in such a way as to hide
the details of this from the application programmer. That is the application server
(such as JBOSS or WebSphere) and the database Driver handle the connection
pooling behaviour internally. This however will only work if we use DataSource
objects. In most cases it is necessary to configure the application server so that it
will use connection pooling; however, this is in general done externally to any Scala
(or indeed Java) program. This means that from the developers’point of view, their
programs do not need to change to use connection pooling and the hard work is
done by the application server. This means that we can modify the diagram in
Fig. 33.4 to show the use of a connection pool. This modified diagram is illustrated
in Fig. 33.6. The changes from the earlier diagram are highlighted in bold.
Exactly how the application server is configured will differ from one server to
another (e.g. from WebLogic to Websphere to JBOSS). However in general they
will need to specify:
33.18 Connection Pooling 385
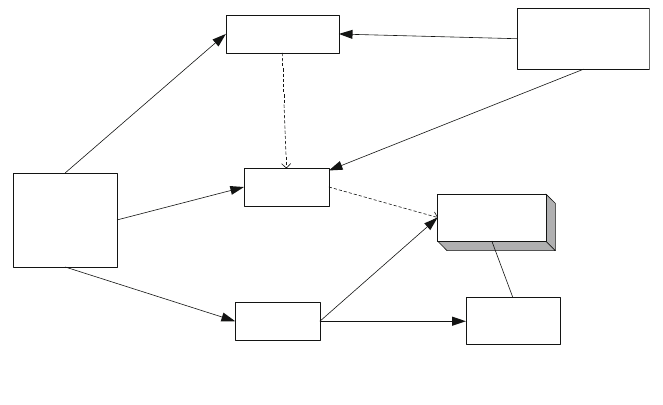
•The class implementing the javax.sql.ConnectionPoolDataSource interface
•The class implementing the java.sql.Driver interface
•The size of the connection pool (usually minimum and maximum size)
•The timeout period for a connection
•Authentication for the database.
33.19 JDBC Metadata
MetaData is data about data, with respect to databases that means that it is data
about the database or results obtained from the database. For example, the tables in
a database, rows and columns in a table or results set. This can be very useful
information if you need additional flexibility in your application or if you need to
dynamically adjust to the contents of a database or results set. For example,
MetaData can be used to create a Database-aware JTable. Such a table could be
given a database to connect to, login details and a select statement to be used to
populate itself. It could then configure itself as appropriate given the results
obtained (e.g. the number of columns and their titles, the type of each column).
Note it is up to the database driver to implement the metadata objects. However not
all drivers will provide all the information indicates via the various metadata
interfaces.
7. Connection uses
Pooled Connection
to access databse
Naming Service DataSource Setup
Program
Client
Application
Program
DataSource
Connection
1. creates DataSource object
2. registers DataSource object
3. look up DataSource
by logicalname
4. Obtain a connection
5. Obtain a statment object etc.
Connection
Pool
Pooled
Connection
1.1 creates a connection pool
6. Obtain a
pooled connection.
Fig. 33.6 Using PooledConnections with a DataSource
386 33 Scala and JDBC Database Access
33.19.1 DatabaseMetaData
The DatabaseMetaData object can provide information about the structure of a
particular database. This metadata object is obtained from the connection to that
database. For example,
con.getMetaData()
The DatabaseMetaData object is very comprehensive and provides over 130
methods. These are organised (loosely) into four categories:
•Methods that return a String
•Methods that return an Int
•Methods that return a Boolean
•Methods that return a ResultSet
String returning methods provide information about the database such as the user
name, product name, version, driver name. They also provide Information about
database specifics such as:
•terms used for schema, procedure
•that actual Database product name
The string returning methods can also provide information on the SQL under-
stood by the database and the escape character used.
The int returning methods usually provide information on limits such as the
maximum length allowed for a column name. They are generally of the form
getMaxXXX, for example getMaxColumnNameLength() or getMaxColumnsIn
Table().
The methods that return a Boolean are the largest category (with well over 70
methods in all) and allow you to test for compliance with standards or for support
for various features. They are usually of the form supportsXXX such as
supportsANSI92FullSQL, supportsFullOuterJoins(), supportsSelectForUpdate().
The final categories are methods that themselves return a ResultSet. This is the
most complex category of methods and need careful examination of the methods to
determine how to use them. For example, it is possible to obtain a description of the
stored procedures in a database using the getProcedures method:
getProceduresðcatalog:String;
schemaPattern:String;
procedureNamePattern:StringÞ
However the ResultSets retrieved by these methods may themselves be large and
need analysis and processing in their own right.
33.19 JDBC Metadata 387
33.19.2 ResultSetMetaData
It is possible to obtain a MetaData object from a ResultSet (or RowSet). This is
obtained from a ResultSet using the getMetaData() method. For example,
val md = resultsSet.getMetaData()
Thus the ResultSetMetaData object contains information about the ResultSet
form which it was derived.
As an example of using the metadata object look at the following code snippet:
val md ¼rs:getMetaData
int cols ¼md:getColumnCount
for i\1to colsðÞ
println md:getColumnName iðÞðÞ;
==Note from 1to cols not 0to cols 1
In this example we obtain the metadata for a result set and then print out the
name of each of the columns in that result set using the getColumnCount() method
and the getColumnName() method. Note that the columns are number from 1 rather
than 0.
388 33 Scala and JDBC Database Access

Chapter 34
Scala Style Database Access
34.1 Introduction
The last chapter introduced how Scala can use JDBC to access a database.
However, there are a number of different Scala-based approaches being developed
to explore more Scala-like ways of interacting with a database than JDBC.
Although JDBC works very well it is far more Java like than Scala like and actually
provides a very low level of abstraction (witness the many Object Relational
Mapping, or ORM, tools within the Java world such as Hibernate).
The list of possible approaches includes
•SLICK (previously Scalaquery)
•Querulous
•Squeryl
•O/R Broker
We will look at each of these briefly in the remainder of this chapter.
34.2 Slick
Scala language-integrated connection kit (SLICK) provides database query and
access facilities for Scala. It attempts to treat data stored in the database as if it was
just another Scala collection. This means that using Slick can be (almost) as easy as
working with standard Scala collections.
The aim of SLICK is that it abstracts (hides) the lower level JDBC or SQL calls.
Thus an object of a specific type can extend the concept of a table (and indicate the
name of the table in the underlying database). Methods on this object can then be
used to add rows to the table, search the table, etc.
©Springer International Publishing AG 2018
J. Hunt, A Beginner’s Guide to Scala, Object Orientation and Functional
Programming, https://doi.org/10.1007/978-3-319-75771-1_34
389
The following simple code snippet illustrates these ideas:
object Coffees extends Table[(String, Int, Double)]("COFFEES") {
def name = column[String]("COF_NAME", O.PrimaryKey)
def supID = column[Int]("SUP_ID")
def price = column[Double]("PRICE")
}
The object Coffee relates to a table called COFFEES in a database. This table has
three columns (COF_NAME, SUP_ID and PRICE). Based on these columns four
methods are provided called name, supID and price which act as accessors. This
object can now be used to insert new rows:
Coffees.insertAll(
("Colombian", 101, 7.99),
("Colombian_Decaf", 101, 8.99),
("French_Roast_Decaf", 49, 9.99)
)
And to query for values currently held by the table
val q = for {
c <- Coffees if c.supID === 101
} yield (c.name, c.price)
34.3 Querulus
Querulus is a open-source Scala project from Twitter. Querulus still provides direct
access to SQL but avoids a number of the basic frustrations of using JDBC. For
example, the basic usage of Querulus is very simple. Having imported the core
QueryEvaluator class from Querulus you can write:
val queryEvaluator = QueryEvaluator(“host”,“username”,
“password”)
Once you have a queryEvaluator you can then use this to run a select statement:
val users = queryEvaluator.select("SELECT * FROM employee")
{ row => new User(row.getInt("id"),
row.getString("name")) }
390 34 Scala Style Database Access
or to insert or update values in the database:
queryEvaluator.execute
("INSERT INTO users VALUES (?, ?)", 1, "Jacques")
You can also group database operations into transactional units:
queryEvaluator.transaction { transaction =>
transaction.select("SELECT …FOR UPDATE", …)
transaction.execute(
"INSERT INTO users VALUES (?, ?)", 1, "John")
transaction.execute(
"INSERT INTO users VALUES (?, ?)", 2, "Denise") }
34.4 Squeryl
Style-wise, Squeryl sits midway between SLICK, which hides SQL behind Scala
comprehensions as much as possible, and Querulous which uses SQL strings
directly.
Squeryl provides an SQL-like domain-specific language (DSL), which gives you
type safety and aims to ensure that if a statement will compile then it will not fail at
runtime.
To illustrate the core concepts let us look at another example. Here we have two
classes Author and Book that map to information in tables in the database. For the
class Book an annotation @Column is being used to map AUTHOR_ID to the field
authorId.
import org.squeryl.PrimitiveTypeMode._
class Author(var id: Long,
var firstName: String,
var lastName: String)
class Book(var id: Long,
var title: String,
@Column("AUTHOR_ID") var authorId: Long,
var coAuthorId: Option[Long]) {
def this() = this(0,"",0,Some(0L))
}
34.3 Querulus 391
The object Library maps these classes to the appropriate database tables. In this
case the Author class is being mapped to the table Authors and the Book class is
mapped to a table called Book (note if the names are the same they do not need to
be repeated).
object Library extends Schema {
//When the table name doesn't match the class name, it
is specified here :
val authors = table[Authors]("AUTHORS")
val books = table[Book]
}
The following provides a basic example of the use of Squeryl to insert some
values into the books table. All interaction is via a session instance with a using
block. The authors are added to the books table. A query is then run to retrieve all
authors called hunt.
classOf["org.postgresql.Driver")]
val conn =
java.sql.DriverManager.getConnection("jdbc:postgresql:/
/localhost:5432/squeryl", "squeryl", "squeryl")
val session = Session.create(conn, new PostgreSqlAdapter)
//Squeryl database interaction is within a 'using' block :
import Library._
using(session) {
books.insert(new Author(1, "Michel","Folco"))
val a = from(authors)(a=> where(a.lastName === "Hunt") select(a))
}
34.5 O/R Broker
The final approach we will look at is called O/R Broker. It is not an Object
Relational mapping tool (although the name might imply this). Instead it is a JDBC
library for Scala that aims to hide most of the JDBC API and wrap it up into a more
Scala-like interface.
392 34 Scala Style Database Access
Extractors are used to extract information from the database. Extractors are
declarative, written in Scala. They can be reused in other queries that fit the
expectation of the extractor. A very simple extractor is shown below:
object CustomerExtractor extends RowExtractor[Customer] {
// Construct object from row.
def extract(row: Row) = {
val id = row.integer("ID").get
val name = row.string("NAME").get
new Customer(id, name)
}
}
This is then connected to a query by declaring a named Token:
val SelectCustomer =
Token('selectCustomer, CustomerExtractor)
This can then be executed via the broker:
val customer = broker.readOnly() { session =>
session.selectOne(SelectCustomer, "custID"->1234)
}
References
SLICK, from typesafe
http://slick.typesafe.com/
Squeryl
http://squeryl.org/
Querulous
https://github.com/twitter/querulous
O/R broker
http://code.google.com/p/orbroker/
34.5 O/R Broker 393

Chapter 35
Slick: Functional Relational Mapping
for Scala
35.1 Introduction
In this chapter, we will look at Slick. Slick (or in full Scala Language-integrated
Connection Kit) is a library that provides access to relational databases from a Scala
application. It is heavily based on the functional programming paradigm and as
such is much more aligned with the Scala way or programming than the rather
procedural approach of JDBC.
The approach is often referred to now as Functional Relational Mapping (or
FRM for short). Slick’s aim is to provide a solution to database access that allows
regular operations over collections to be performed against a database (with of
course a strong emphasis on type safety).
It should be noted that at the time of writing Slick is still a relatively young
library and although the changes from one version to another have become less
onerous (the changes from version 2.x to 3.x where quite extensive) backwards
compatibility may still be an issue.
35.2 Obtaining Slick
Information on Slick can be found at www.slick.lightbend.com.
©Springer International Publishing AG 2018
J. Hunt, A Beginner’s Guide to Scala, Object Orientation and Functional
Programming, https://doi.org/10.1007/978-3-319-75771-1_35
395
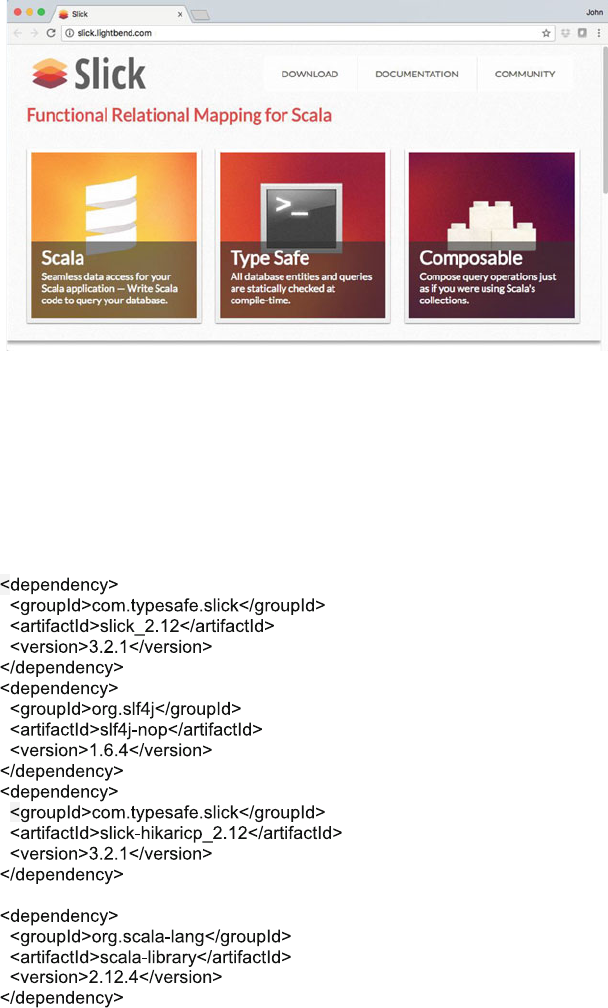
Slick can be obtained in several ways from http://slick.lightbend.com/download.
The easiest way is to follow the download link and download the slick
<version>.jar file and then add it to IntelliJ as a library for your project.
However, in my case I have used Maven to set up a Scala project within IntelliJ
to use Slick. The advantage of this is that the transitive dependencies (such as the
libraries that Slick depends upon) are handled by Maven.
My Maven POM file has the following dependencies:
396 35 Slick: Functional Relational Mapping for Scala
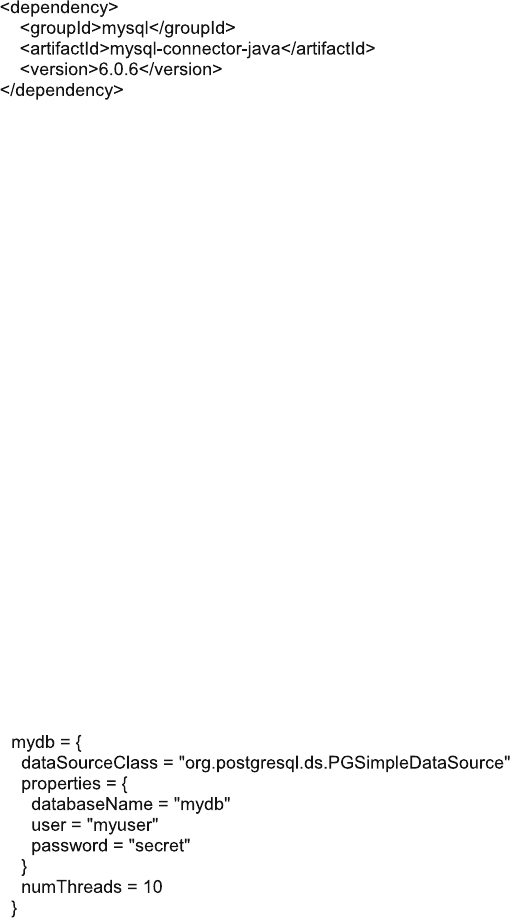
Note that in this chapter we are also using MySQL as the database we will be
connecting to. We therefore also need to add the MySQL libraries to the list of
Maven dependencies:
We are now ready to get started.
35.3 Connecting to a Database
You can use Slick to create tables and populate data within a database (schema). To
do this it is first necessary to create the database itself. This can be done in several
ways, in our case I used MySQL Workbench and created the schema interactively.
The schema/database is called company and can be created using
CREATE DATABASE ‘company’
We can now set up the Slick database link. This can be done in several ways:
Database URL. A database URL is a JDBC style URL of the format jdbc:
<protocol>:<protocol-specific-arguments>. This is supported by Database.forURL.
The driver to use can also be specified using this method.
Via a Datasource. A DataSource object can be used to provide the database link.
This is useful if an application framework is being used that configures the data
source externally to your application. This is supported by Database.forDataSource.
Using a Configfile. Another approach is to use a configuration file (called
application.conf) that can be loaded from the classpath. This file can contain driver
and data source information. This is supported via the Database.forConfig
(config-name-string) method. For example, given the application.conf file:
35.2 Obtaining Slick 397
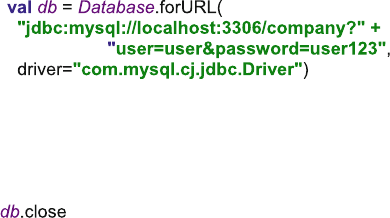
This file could be loaded using
val db = Database.forConfig(``mydb'')
In the following example we use the Database.forURL approach in which we
specify the database URL and the database driver in a similar manner to that used
with JDBC:
Note that the Database object manages a connection pool used to connect to the
database and a thread pool to execute operations. It is therefore very important that
it is shut down/closed appropriately when it is no longer needed. This can be done
using
35.4 Mapping Tables to Scala Types
In many cases the management of the tables within a database may occur outside of
the Scala application. However, if not then Slick can automatically create the table
structure for you.
The first thing required to create type-safe queries is a definition of a Table class
that will represent the tables in your database. This class defines the structure of the
table (its columns and the types of those columns) and how they map into the types
within your application.
In the following example a case class User is mapped to a table USERS via a
class Users (which extends the Table type):
398 35 Slick: Functional Relational Mapping for Scala
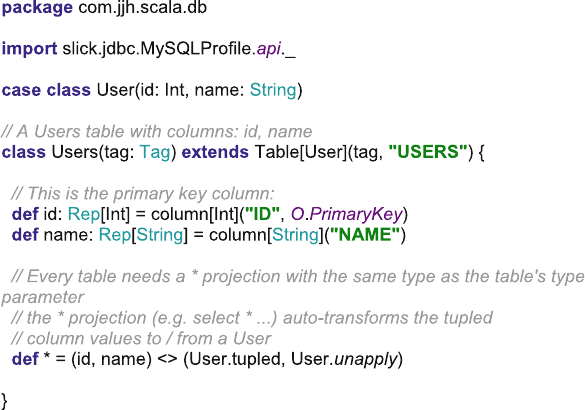
The case class User is the domain model used within the Scala application to
represent Users. In the relational database there is a table called USERs that con-
tains an ID (which is the primary key of type Integer) and a column NAME which
is a varchar.
The class Users maps the relational table to the case class User.
The Users class extends the Table class specifying the type to use with the
Table (in this case User).
All columns are defined through the column method. Each column has a Scala
type and a column name for the database (usually in upper case). The following
primitive types are supported out of the box for JDBC-based databases in
JdbcProfile (with certain limitations imposed by the individual database profiles):
•Numeric types: Byte, Short, Int, Long, BigDecimal, Float, Double
•LOB types: java.sql.Blob, java.sql.Clob, Array[Byte]
•Date types: java.sql.Date, java.sql.Time, java.sql.Timestamp
•Boolean
•String
•Unit
•java.util.UUID
Nullable columns are represented by Option[T] where T is one of the supported
primitive types.
After the column name, you can add optional column options to a column
definition. The applicable options are available through the table’s O object. The
following ones are defined for JdbcProfile:
35.4 Mapping Tables to Scala Types 399
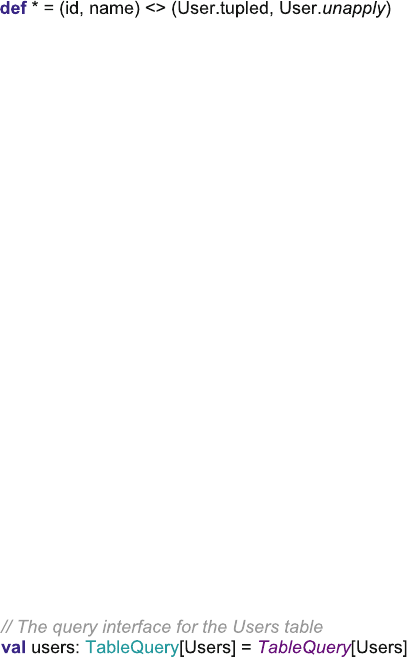
•PrimaryKey: Mark the column as a (non-compound) primary key when creating
the DDL statements.
•Default[T](defaultValue: T): Specify a default value for inserting data into the
table without this column. This information is only used for creating DDL
statements so that the database can fill in the missing information.
•SqlType(typeName: String): Use a non-standard database-specific type for the
DDL statements (e.g. SqlType(``VARCHAR(20)'') for a String column).
•AutoInc: Mark the column as an auto-incrementing key when creating the DDL
statements. Unlike the other column options, this one also has a meaning outside
of DDL creation: Many databases do not allow non-AutoInc columns to be
returned when inserting data (often silently ignoring other columns), so Slick
will check if the return column is properly marked as AutoInc where needed.
If you look back at the definition of the Users class you may note that there is an
odd looking method defined at the end of the class:
Every table class must supply a ‘*’method containing a default projection. That
is, this method defines how to convert a row returned from the database into the
domain instances used within the application. Or to put it another way this method
converts rows into Users in this case.
The above example uses a custom type for its * projection by adding a bidi-
rectional mapping with the <> operator. This approach is optimised for case classes
(with a simple apply method and an unapply method that wraps its result in an
Option) but it can also be used with arbitrary mapping functions.
Interestingly, it is also possible to get Slick to auto-generate classes to handle the
mapping from an existing database structure to a set of Scala classes. This is done
using the click.codegen library (see online documentation for more information on
how to do this https://github.com/slick/slick-codegen-example).
35.5 Table Query Interface
As well as the table to Scala type mapping class, it is also necessary to create a
TableQuery object that will represent the actual database table.
This can be done very easily using the TableQuery[T] type. The simple
TableQuery[T] is actually a macro which expands to a proper TableQuery instance
that calls the table class’s constructor (in our case that would be newTableQUery
(new Users()).
This is can be used as follows:
400 35 Slick: Functional Relational Mapping for Scala
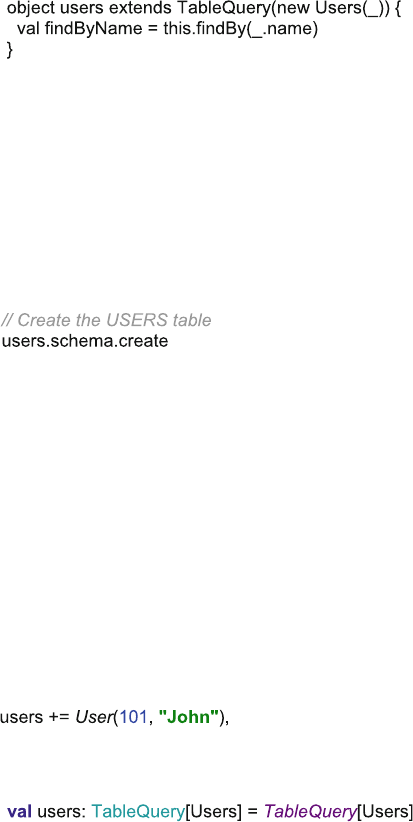
It is also possible to create an object to allow additional functionality to be
associated with a table:
35.6 Creating Tables
We can get Slick to create tables within our database (by generating the underlying
Data Definition Language (DDL) statements). This can be done using the
TableQuery’s schema method. The object returned by this method supports actions
such as create, drop and truncate.
For example, to create the users table we can use
For debugging purposes, you can get hold of the statements generated by these
operations using:
schema.create.statements.foreach(println)
35.7 Inserting Data
Rows can be inserted into the database using the TableQuery object and the
mappings supported by the Table type. In this case it means that we can add
instances of the User case class to the TableQUery object users. The act of adding
these instances to the TableQuery type results in a row being added to the table, for
example
This will add the user “John”with the Id 101 to the tables users, where users was
defined as:
By default, += gives you a count of the number of affected rows (which will
usually be 1). When using the ++= batch insert operation, Slick makes use of the
JDBC batch API. The underlying JDBC driver will decide how to transmit the
batch (via SQL) to the database server.
35.5 Table Query Interface 401
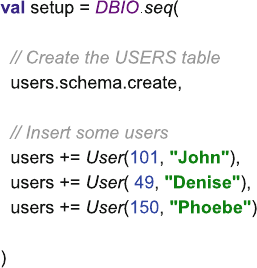
35.8 Composing Database I/O Actions
All actions on a database in Slick are instances of a DBIOAction, parameterised by
the result type it will produce when you execute it.
DBIOActions can be combined together using several different combinators
accessible from the DBIO utility. The simplest of these is the DBIO.seq combi-
natory which takes a varargs list of actions to run in sequence, discarding their
return value.
As an example, if we want to combine together a sequence of actions that will
create a table and populate it with some initial data we can use the DBIO.seq
combinatory as follows:
It is possible to pick up a return value as that via the andThen operator. This can
be used to combine together a series of actions and keep the result of that last one,
for example
val ins1: DBIO[Int] = users += User(101, ``John'')
val ins2: DBIO[Int] = users += User(49, ``Denise''),
val a1: DBIO[Int] = ins1 andThen ins2
35.9 Example Setting Up a Database
The following listing brings all of the aspects presented earlier in this chapter
together. It connects up to a company database and creates a new table USERS. It
then adds several users to that table and then waits for the action to complete before
terminating.
402 35 Slick: Functional Relational Mapping for Scala
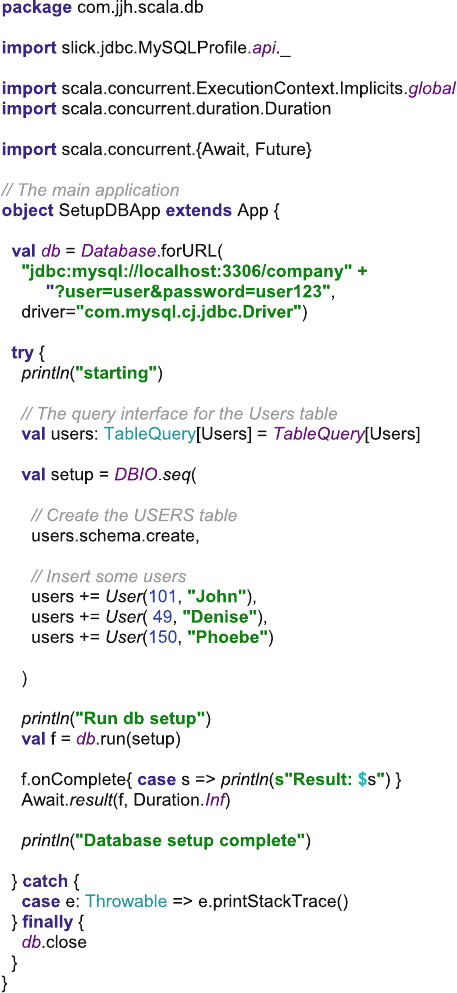
35.9 Example Setting Up a Database 403
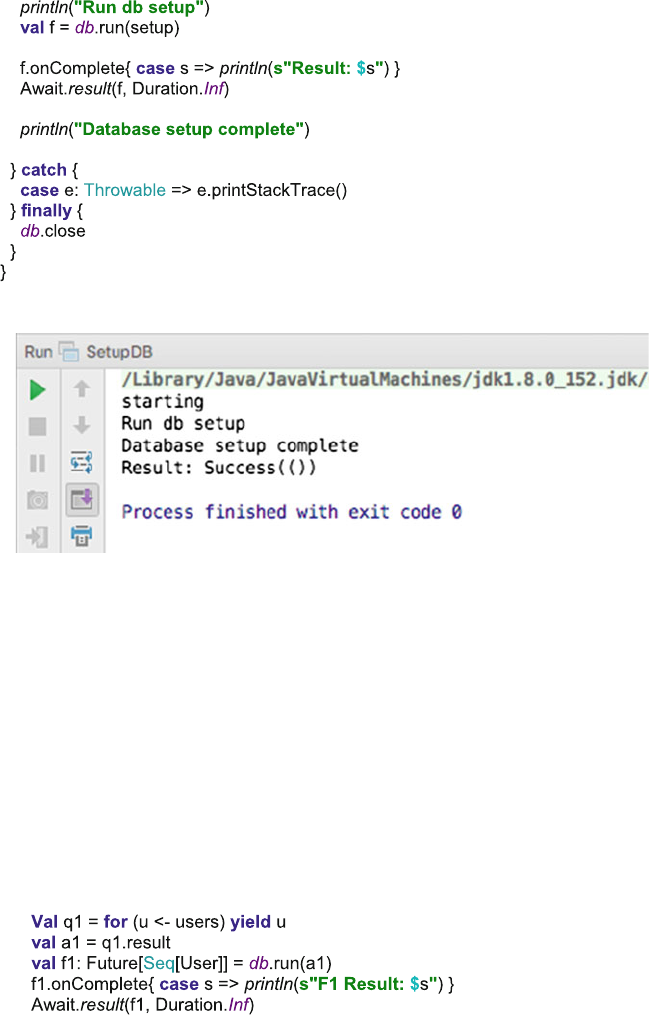
The output generated when this application is run is illustrated below:
35.10 Querying for Data
This is where the power (and simplicity) of Slick really comes to the fore. Using
Slick querying a database for data looks very much as it would like if a simple
collection was being used as the source of the data.
Of course the source of the data is now a database and the query that underpins
the retrieval of that data is still an SQL statement, but the programmers API hides
all of this. The one aspect that is different is that the execution of the query is
handled asynchronously and thus a Future is returned from the Database run
method. This future will return a result at some point in the future (hence the name).
For example
The above code appears to use a for comprehension on the users object (of
course this actually runs a SQL query and then applies the for comprehension to the
404 35 Slick: Functional Relational Mapping for Scala
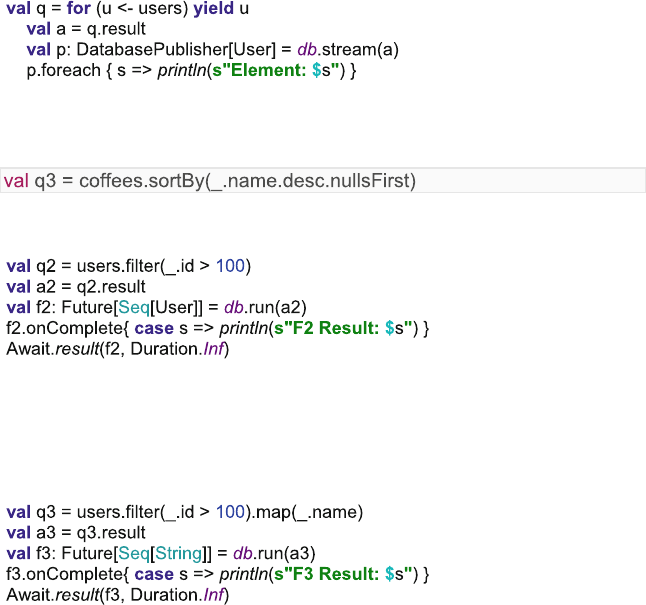
results. Strictly speaking (and working backwards) the db.run method takes a
DBIOAction and returns a Future that will allow the results of the query to be
accessed. Execution of the action starts in the background when the run method is
called. Thus the call method is not blocked. This example therefore uses the Await.
result method to wait until the result is returned from the Future. When the Future
completes the onComplete method will be invoked which in this cases will print the
result returned. The result is a collection of User objects.
Another approach is to stream results. In this case the actual collection type is
ignored and elements are streamed directly from the result set through a Reactive
Stream Publisher, which can be processed and consumed by an Akka Stream.
Execution of the DBIOAction does not start until a Subscriber is attached to the
stream. If multiple Subscribers subscribe to the same Publisher, each one triggers an
independent execution of the actions.
Stream elements are signalled as soon as they become available in the streaming
part of the DBIOAction. The end of the stream is signalled only after the entire
action has completed. For example, when streaming inside a transaction and all
elements have been delivered successfully, the stream can still fail afterwards if the
transaction cannot be committed. The Subscriber is notified of this failure.
The previous query can be rewritten to use streams as follows:
It is also possible to sort and filter results. The Database.sortBy method can be
used to sort the results of a query, for example
In turn the database filter method can be used to filter a query, for example
In this case the result is a collection of User instances where the id of the user is
above 100.
Of course it is not necessary to always generate a collection of User objects, and
if all we are interested in are the names of the users we could select those values
from the query:
35.10 Querying for Data 405
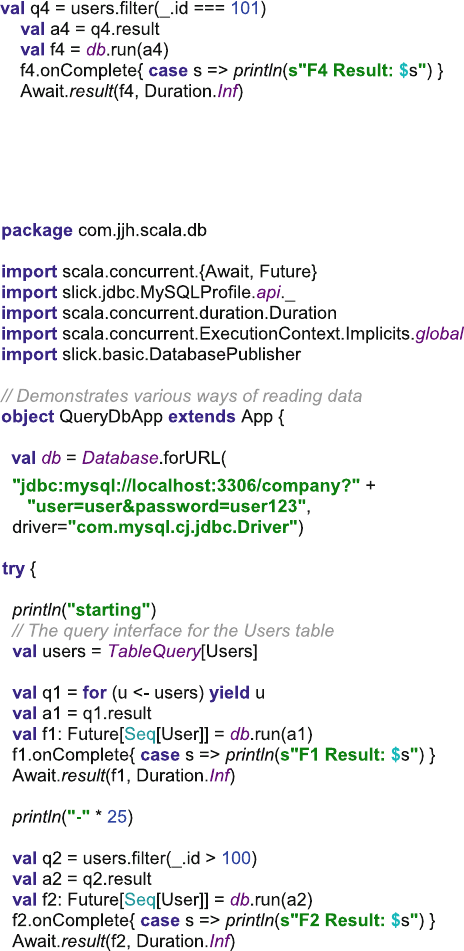
Note how this is done using the map function chained to the result of the filter
function. Of course in reality the SQL query generated from this combines both the
filter and the map so that only the names are returned from the database.
It is also possible to use the filter function to select just a single row from the
database:
Note the use of the ‘===’comparison operator. In fact you also have to use =!=
instead of != for inequality. This is necessary because these operators are already
defined (with unsuitable types and semantics) on the base type Any, so they cannot
be replaced by extension methods.
406 35 Slick: Functional Relational Mapping for Scala
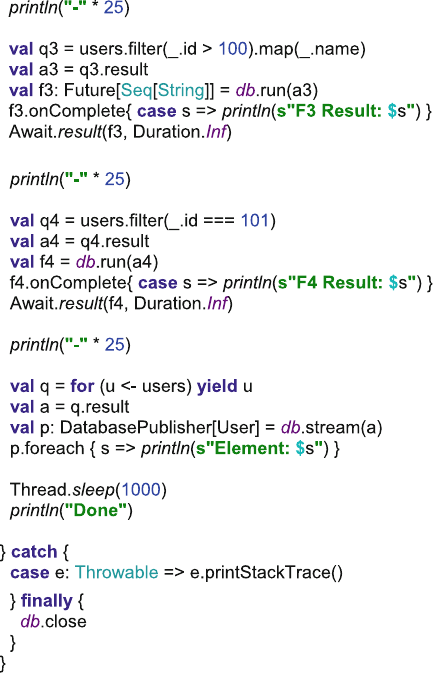
35.11 Updating, Upserting and Deleting Data
Updates are performed by writing a query that selects the data to update and then
replacing it with new data. The query must only return raw columns (no computed
values) selected from a single table.
val q = for {c <- coffees if c.name === ``Espresso''} yield c.price
val updateAction = q.update(10.49)
Deleting works very similarly to updating. You write a query which selects the
rows to delete and then get an Action by calling the delete method on it:
val q = users.filter(_.Id === 15)
val action = q.delete
35.10 Querying for Data 407

It is also possible to upsert—that is either insert or update (depending on whether
the row already exists in the database or not):
val updated = users.insertOrUpdate(User(1, ``Bob))
// returns: number of rows updated
408 35 Slick: Functional Relational Mapping for Scala

Chapter 36
Testing
36.1 Introduction
This chapter considers the different types of tests that you might want to perform
with the systems you develop in Scala. It also introduces test-driven development.
36.2 Types of Testing
There are at least two ways of thinking about testing:
1. It is the process of executing a program with the intent of finding errors/bugs
(see Glenford Myers, The Art of Software Testing).
2. It is a process used to establish that software components fulfil the requirements
identified for them; that is that they do what they are supposed to do.
These two aspects of testing tend to been emphasised at different points in the
software lifecycle. Error testing is an intrinsic part of the development process, and
an increasing emphasis is being placed on making unit testing a central part of
software development.
It should be noted that it is extremely difficult—and in many cases impossible—
to prove that software “works”and is error free. The fact that a set of tests finds no
defects does not prove that the software is error free. ‘Absence of evidence is not
evidence of absence!’. This was discussed in the late 1960s and early 1970s by
Dijkstra and can be summarised as:
Testing shows the presence, not the absence of bugs
Testing to establish that software components fulfil their contract involves
checking operations against their requirements. Although this does happen at
development time, it forms a major part of QA and user acceptance testing.
©Springer International Publishing AG 2018
J. Hunt, A Beginner’s Guide to Scala, Object Orientation and Functional
Programming, https://doi.org/10.1007/978-3-319-75771-1_36
409
It should be noted that with the advent of test-driven development, the emphasis on
testing against requirements during development has become significantly higher.
There are of course many other aspects to testing; for example, performance
testing helps identify how a systems will perform as various factors that affect that
system change. For example, as the number of concurrent requests increase, as the
number of processors used by the underlying hardware changes, as the size of the
database grows.
However you view testing, the more testing applied to a system the higher the
level of confidence that the system will work as required, and therefore the lower
the risk of building a business around that system.
36.3 What Should Be Tested?
What aspects of your software system should be subject to testing? In general
anything that is repeatable should be subject to formal (and ideally automated)
testing. This includes (but is not limited to):
•The build process for all technologies involved.
•The deployment process to all platforms under consideration.
•The installation process for all runtime environments.
•The upgrade process for all supported versions (if appropriate).
•The performance of the system/servers as loads increase.
•The stability for systems that must run for any period of time (e.g. 24 x 7
systems).
•The backup process.
•The security of the system.
•The recovery ability of the system on failure.
•The functionality of the system.
•The integrity of the system.
Notice that only the last two of the above list might be what is commonly
considered areas that would be subject to testing. However, to ensure the quality of
the system under consideration, all of the above are relevant. In fact, testing should
cover all aspects of the software development lifecycle and not just the QA phase.
During requirements gathering testing is the process of looking for missing or
ambiguous requirements. During this phase consideration should also be made with
regard to how the overall requirements will be tested, in final software system. Test
planning should also look at all aspects of the software to test for functionality,
usability, legal compliance, conformance to regulatory constraints, security, per-
formance, availability, resilience, etc. Testing should be driven by the need to
identify and reduce risk.
410 36 Testing
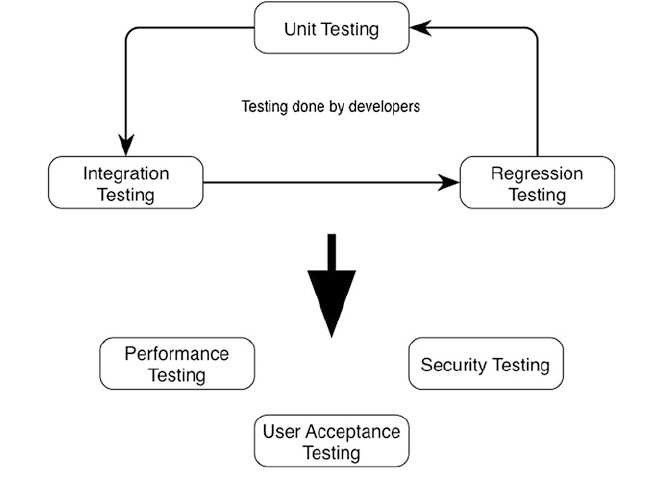
36.4 Types of Testing
As indicated in Fig. 36.1 there are a number of different types of testing that are
commonly used within industry. These types are:
•Unit Testing which is used to verify the behaviour of individual components.
•Integration Testing that tests that when individual components are combined
together to provide higher-level functional units that the combination of the
units operates appropriately.
•Regression Testing. When new components are added to a system, or existing
components are changed, it is necessary to verify that the new functionality does
not break any existing functionality. Such testing is known as regression testing.
•Performance Testing is used to ensure that the systems’performance is as
required and, within the design requirements, is able to scale as utilization
increases.
•Security Testing ensures that access to the system is controlled appropriately
given the requirements. For example, for an online shopping system there may
be different security requirements depending upon whether you are browsing the
store, purchasing some products or maintaining the product catalogue.
•Usability Testing which may be performed by a specialist usability group and
may involved filming of users while they use the system.
Fig. 36.1 Types of testing
36.4 Types of Testing 411
•User Acceptance Testing validates that the system actually meets the user
requirements and conforms to required application integrity.
Key testing approaches are discussed in the remainder of this section.
36.4.1 Unit Testing
A unit can be as small as a single function or as large as a subsystem but typically is
a class, object, self-contained library (API) or Web page.
By looking at a small self-contained component an extensive set of tests can be
developed to exercise the defined requirements and functionality of the unit.
Unit testing typically follows a white box approach, (also called Glass Box or
Structural testing), where the testing utilises knowledge and understanding of the
code and its structure, rather than just its interface (which is known as the black box
approach).
In white box testing, test coverage is measured by the number of code paths that
have been tested. The goal in unit testing is to provide 100% coverage: to exercise
every instruction, all sides of each logical branch, all called objects, handling of all
data structures and files, (including the absence of a file) normal and abnormal
termination of all loops, etc. Of course this may not always be possible, but it is a
goal that should be aimed for. Many automated test tools will include a code
coverage measure so that you are aware of how much of your code has been
exercised by any given set of tests.
Unit testing is almost always automated—there are many tools to help with this,
perhaps the best known being JUnit for Java and ScalaTest for Scala (with similar
tools being available for other languages). Developers write test and stubs, allowing
us to:
•focus on testing the unit
•simulate data or results from calling another unit (representative good and bad
results.)
•try to create data-driven tests for maximum flexibility and repeatability.
•Often rely on mock objects that represent elements outside the unit that it must
interact with.
Having the tests automated means they can be run frequently, at the very least
after initial development and after each change that affects the unit.
Once confidence is established in the correct functioning of one unit, developers
can then use it to help test other units with which it interfaces, forming larger units
that can also be unit tested or, as the scale gets larger, put through integration
testing.
412 36 Testing
36.4.2 Integration Testing
Integration testing is where several units (or modules) are brought together to be
tested as an entity in their own right. Typically integration testing aims to ensure
that modules interact correctly and the individual unit developers have interpreted
the requirements in a consistent manner.
An integrated set of modules can be treated as a unit and unit tested in much the
same way as the constituent modules but usually working at a “higher”level of
functionality. Integration testing is the intermediate stage between unit testing and
full system testing.
Therefore integration testing focuses on the interaction between two or more
units to make sure that those units work together successfully and appropriately.
Such testing is typically conducted from the bottom up but may also be conducted
top down using mocks or stubs to represented called or calling functions. An
important point to note is that you should not aim to test everything together at one
(so-called Big Bang testing) as it is more difficult to isolate bugs so that they can be
rectified. This is why it is more common to find that integration testing has been
performed in a bottom-up style.
36.4.3 System Testing
System testing aims to validate that the combination of all the modules, units, data,
installation, configuration, etc. operates appropriately and meets the requirements
specified for the whole system. Testing the system has a whole typically involves
testing the top most functionality or behaviours of the system. Such
behaviour-based testing often involves end users and other stake holders who are
less technical. To support such tests a range of technologies have evolved that
allows a more English style for test descriptions. Cucumber is one example of a
behaviour-driven development system, and ScalaTest has a behavioural aspect to its
testing styles.
36.4.4 Installation Testing
Installation testing is the testing of full, partial or upgrade install processes. It also
validates that the installation and transition software needed to move to the new
release for the product is functioning properly. Typically, it
•verifies that the software may be completely uninstalled through its back-out
process
•determines what files are added, changed or deleted on the hardware on which
the program was installed
36.4 Types of Testing 413
•determines whether any other programs on the hardware are affected by the new
software that has been installed
•determines whether the software installs and operates properly on all hardware
platforms and operating systems that it is supposed to work on.
36.4.5 Smoke Tests
A smoke test is a test or suite of tests designed to verify that the fundamentals of the
system work. Smoke tests may be run against a new deployment or a patched
deployment in order to verify that the installation performs well enough to justify
further testing. Failure to pass a smoke test would halt any further testing until the
smoke tests pass. The name derives from the early days of electronics: If a device
began to smoke after it was powered on, testers knew that there was no point in
testing it further. For software technologies, the advantages of performing smoke
tests include:
•Smoke tests are often automated and standardised from one build to another.
•Because smoke tests test things that one expects to work, when they fail, one
might suspect that the program may have been built with a wrong file, or that the
new build introduced a new bug.
•If a system is built daily, it should be smoke tested daily.
•It will be necessary to periodically add to the smoke tests as new functionality is
added to the system.
36.5 Automating Testing
The actual way in which tests are written and executed needs careful consideration.
In general, we wish to automate as much of the testing process as is possible as this
makes it easy to run the tests and also ensures not only that all tests are run but that
they are run in the same way each time. In addition, once an automated test is set up
it will typically be quicker to re-run that automated test than to manually repeat a
series of tests. However, not all of the features of a system can be easily tested via
an automated test tool and in some cases the physically environment may make it
harder to automated tests.
Typically, most unit testing is automated and most acceptance testing is manual.
You will also need to decide which forms of testing must take place. Most software
projects should have unit testing, functional testing and acceptance testing as a
necessary requirement. Not all projects will implement performance or regression
testing, but you should be careful about omitting any stage of testing and be sure it
is not applicable.
414 36 Testing

Chapter 37
Scala Testing
37.1 Introduction
This chapter examines the various facilities available within Scala to perform a
range of tests.
37.2 Scala Runtime Test Facilities
37.2.1 Validation Checks
Scala provides three language facilities that can be used for validation. These are:
•Assert—this operation is used to validate the sate of some property and throws a
java.lang.AssertionError if the condition it defines is not met.
•Require—this is intended as a pre-condition for a class, method or function. It
can be used to validate parameters and throws an IllegalArgumentException if
the condition specified is not met.
•Assume—this is essentially an alias for assert—it can therefore be used to
validate the state of an instance of an object and also throws the AssertionError
if the condition specified is not met. However, static analysis tools could decide
to treat assume as being different. For example, it could be that assume is used to
represent a concept which has already been verified and thus it can be assumed
to be correct.
None of the above operations use the Java framework assertion and are always
evaluated unless turned off at compile time. In fact, if you examine the Predef.
scala source file you will find that the three validation type assertions are all very
similar and differ only in the exceptions that they throw. An example illustrating the
definitions of the assert, assume and require methods is shown below:
©Springer International Publishing AG 2018
J. Hunt, A Beginner’s Guide to Scala, Object Orientation and Functional
Programming, https://doi.org/10.1007/978-3-319-75771-1_37
415
def assert(assertion: Boolean) {
if (!assertion)
throw new java.lang.AssertionError(
"assertion failed")
}
def assume(assumption: Boolean) {
if (!assumption)
throw new java.lang.AssertionError(
"assumption failed")
}
def require(requirement: Boolean) {
if (!requirement)
throw new IllegalArgumentException(
"requirement failed")
}
37.2.2 Using Require and Assert
The following simple listing illustrates how the require and the assert operations
can be used:
package com.jjh.scala.validate
object AssertionTests {
def main(args: Array[String]): Unit = {
var count = 0
// Try require
require(count == 0)
require(count == 0,
{
println("Require called should be 0")
})
// Assert
assert(count == 0)
assert(count == 0,
{
println("Assert called is not 0")
})
}
}
416 37 Scala Testing
Note that the operations, require, assert and assume can all take a condition that
returns true or false and an operation to perform if the condition is not met. Thus:
require(count == 0)
validates that count is currently set to Zero, while
require(count == 0,
{
println("Require called should be 0")
})
also validates that count is Zero but evaluated the behaviour passed in as the second
parameter if the Boolean test fails. In this case we merely print a message out to the
console. The same is true for the assert example above.
37.3 Test Libraries in Scala
There are several libraries in Scala which extend the basic facilities available within
the language itself to provide a richer way to represent and express tests. At the time
of writing the three leading libraries are:
•ScalaTest
•Spec
•ScalaCheck
Each of these is briefly described below, while ScalaTest will be discussed in
more detail in the next section.
37.3.1 ScalaTest
ScalaTest (see http://www.scalatest.org) provides a number of different testing
options from Unit Tests, through functional testing to behaviour-based testing.
37.3.2 Spec
Spec is a Behaviour-Driven Development testing framework for Scala (see http://
code.google.com/p/specs).
37.2 Scala Runtime Test Facilities 417

37.3.3 ScalaCheck
ScalaCheck (see http://www.scalacheck.org) is a testing framework developed from
the Haskell library QuickCheck but has now extended beyond this. It is a
property-based testing framework which means that each test is associated with a
property that you wish to ensure for the elements being tested and how that property
is verified. For example,
import org.scalacheck.Properties
import org.scalacheck.Prop.forAll
object StringSpecification extends Properties("String")
{
property("startsWith") = forAll { (a: String, b:
String) => (a+b).startsWith(a)
}
property("concatenate") = forAll { (a: String, b:
String) => (a+b).length > a.length && (a+b).length >
b.length
}
property("substring") = forAll { (a: String, b:
String, c: String) => (a+b+c).substring(a.length,
a.length+b.length) == b
}
}
37.4 Scalatest Testing Framework
The most established Scala test framework in use is ScalaTest. This framework
actually allows several different testing styles to be adopted. The simplest of which
is the unit testing approach based on direct integration between JUnit (originally a
Java Unit Test framework) and Scala. Essentially, using ScalaTest around JUnit, a
developer writes a simple Unit Test using Scala idioms that is then run through the
JUnit infrastructure. This means that if a development project is using a mixture of
Java and Scala code, then can write JUnit tests in either Java or Scala and run them
through the same tool sets.
37.4.1 Setting up Your Scala Project
The first thing you will need to do if you are going to use ScalaTest and JUnit is to
make them available to your applications. That is, to write test that will utilise the
418 37 Scala Testing
ScalaTest to JUnit bridge you will need to have both the ScalaTest library and the
JUnit library on your classpath. Note that you must ensure that you are using
compatible versions of JUnit and ScalaTest. If the versions are not compatible you
may find that you get unexpected results.
To set up your environment in Eclipse you will need to add the JUnit jar and the
ScalaTest jar to your project.
First let us obtain the ScalaTest jar. The current release at the time of writing is
the ScalaTest 3.0.4 release. This can be obtained from the downloads page of the
main ScalaTest website (see http://www.scalatest.org/download). You can either
download the libraries, add the appropriate Maven dependencies or if you are using
SBT add the SBT dependencies to your build file. For example, for Maven you can
add:
<dependency>
<groupId>org.scalactic</groupId>
<artifactId>scalactic_2.12</artifactId>
<version>3.0.4</version>
</dependency>
<dependency>
<groupId>org.scalatest</groupId>
<artifactId>scalatest_2.12</artifactId>
<version>3.0.4</version>
<scope>test</scope>
</dependency>
This adds both the Scalatest library and its sister library Scalactic to your project.
Strictly speaking, Scalactic is not required; however it is recommended as it
focusses on quality through types.
The jUnit framework will be used to run the Scalatest test, and so this is also
required. Again this can be downloaded, or if you are using Maven then you can
just add the appropriate dependency to your POM file:
<dependency>
<groupId>junit</groupId>
<artifactId>junit</artifactId>
<version>4.12</version>
<scope>test</scope>
</dependency>
37.4.2 ScalaTest and JUnit
In this section, we will look at how you can write simple Unit Tests in ScalaTest.
A ScalaTest test mixes in the trait org.scalatest.Suite and can mix in one
or more additional traits that allow you to control the behaviour of the tests. In
general, we will call our test classes <something>Test or Test<something> where
37.4 Scalatest Testing Framework 419
something is an appropriately descriptive name. Therefore we might write a class
called PersonTest (which indicates that it provides one or more test methods
associated with the class Person. To illustrate the idea let us assume that we have a
simple class Person as shown in the following listing:
package com.jjh.scala
class Person(val name: String, var age: Int) {
override def toString() = s"$name is $age"
}
A simple test class for this Person class might thus be:
package com.jjh.scala
import org.junit.runner.RunWith
import org.scalatest.junit.JUnitRunner
import org.junit.Assert._
import org.scalatest.FlatSpec
@RunWith(classOf[JUnitRunner])
class PersonTest extends FlatSpec {
"A new Person instance" should "have an age 0" in {
val p = new Person("John")
assertEquals("Age shoud be Zero",0, p.age)
}
"A new Person with an age of 54" should "return set their age
appropriately" in {
val p = new Person("John", 54)
assertEquals("Age shoud be 54",54, p.age)
}
}
There are a number of points to note about this simple test class.
37.4.2.1 The package
The first is that both the Person class and the PersonTest class are defined within the
package com.jjh.scala. However, this does not mean that they are both defined in
the same source location. I have created a second location that will contain all my
tests. I thus have a route folder main/scala/src and a root folder test/scla/src that can
both contain Scala source code. The main path indicates the main body of the
system and the test path the location of test code.
420 37 Scala Testing
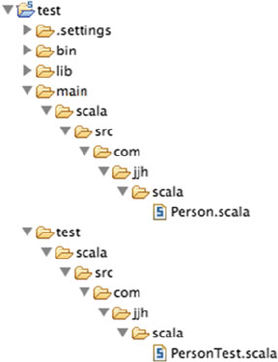
This means that we can ensure that no test code is accidently included in the
deployed system as the deployed system should not contain anything under the test
root. However, for testing purposes we would like to allow the test class to have at
least package visibility of all data and methods as this can make setting up test
scenarios easier. In Scala it does not matter that Person and PersonTest are in
different source locations, and the important point is that they are both part of the
package com.jjh.scala. This is illustrated below.
37.4.2.2 RunWith Annotation
Secondly the class is annotated with a
@RunWith(classOf[JUnitRunner])
This indicates that when this class is run it is not run as a standard Scala
application. Instead it should be run through the JUnit framework via the
JUnitRunner.
37.4.2.3 Naming Conventions
The third point to note is that the test specifications within the PersonTest class are
written in a very English style. This test specification style is of the format “X
should Y”or “A must B”.
37.4 Scalatest Testing Framework 421
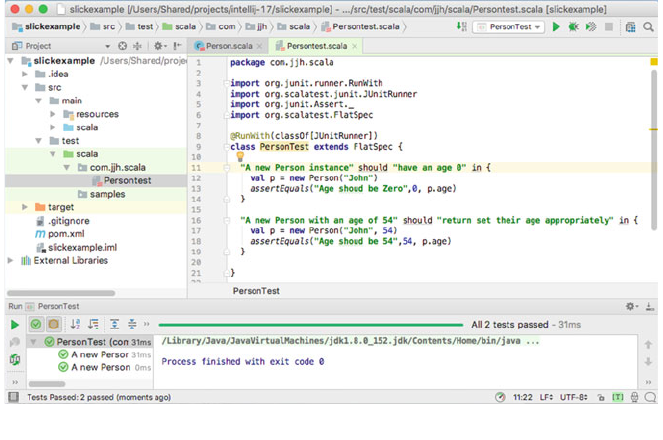
Finally, within the test specification methods, having created an instance of the
Person class we validate the test using an Assert.assertEquals method. In fact the
Assert class of the org.junit package provides many different assertion methods. We
could have used the Assert.assert.Equals, but this is quiet long winded, and Assert.
assert seems a bit repetitive. To avoid this we imported the methods on the Assert
class into this file using:
import org.junit.Assert._
We can now run this simple test. In IntelliJ you can just select to the run the
PersonTest class and IntelliJ will work that this is a test class with multiple test
specifications and run each of them in turn. It will then open the test results view at
the bottom of your IDE (Fig. 37.1).
There is a range of options that can be applied to these tests. For example, if you
wish to define some behaviour that will be run before each test, referred to as test
fixtures, you can mix in the BeforeAndAfter trait. This provides the ability to define
abefore and after expression. The following listing illustrates a test suite for a class
Stack that has two tests and a before fixture and an after fixture:
Fig. 37.1 JUnit runtime view in Eclipse
422 37 Scala Testing
package com.jjh.scala
import org.scalatest.junit.JUnitRunner
import org.junit.runner.RunWith
import org.scalatest.FlatSpec
import org.scalatest.BeforeAndAfter
import org.junit.Assert._
@RunWith(classOf[JUnitRunner])
class SuiteTest extends FlatSpec with BeforeAndAfter {
before {
println("Before behaviour")
}
after {
println("After behaviour")
}
"A list treated as a pre 2.12 Stack" must "pop off value added" in {
var stack = List.empty[Int]
stack = stack.+:(52)
assertEquals(1, stack.size)
}
"A list treated as a pre 2.12 Stack" should "return values in reverse
order" in {
var stack = List.empty[Int]
stack = stack.+:(52)
stack = stack.+:(21)
val x = stack.head
assertEquals(21, x)
}
}
The result of executing this test is that both tests pass and the console contain the
output shown below:
Before behaviour
After behaviour
Before behaviour
After behaviour
As you can see from this example, the before and after behaviours have been run
before (and after) each test.
37.4 Scalatest Testing Framework 423

37.4.3 Scala Test and Functional Test Suites
The functional test suite facilities available in ScalaTest are aimed at supporting
TDD style development. In a function style test each test is a named function within
the test suite. A developer’s class extends the FunSuite (which stands for Function
Suite) and can use BeforeAndAfter fixtures for set-up and tear down style beha-
viour. In the function suite tests, names can be more description as the name of tests
are strings and can have spaces within them. However, at runtime they are pre-
sented as normal JUnit tests.
The following listing illustrates a Function Test Suite:
package com.jjh.scala
import org.junit.Assert.assertEquals
import org.scalatest.junit.JUnitRunner
import org.junit.runner.RunWith
import org.scalatest.FunSuite
import scala.collection.mutable.Stack
@RunWith(classOf[JUnitRunner])
class FunctionTest extends FunSuite {
test("Check Add-and-Pop a stack") {
var stack = List.empty[Int]
stack = stack.+:(52)
assertEquals(1, stack.size)
}
test("Check an empty stack has no members") {
var stack = List.empty[Int]
stack = stack.+:(52)
stack = stack.+:(21)
val x = stack.head
assertEquals(21, x)
}
}
The results of running this FunctionTest within Eclipse are presented via the
JUnit view as shown below.
424 37 Scala Testing
37.5 Scalatest and Feature Tests
Another test style supported by ScalaTest is that of the feature test. A feature is
typically a very high-level concept that would be meaningful to a user. As such
features are primarily those things that might be tested at the user acceptance testing
level. ScalaTest provides the FeatureSpec trait that can be used to represent these
very high-level concepts. The aim is to provide a structure that allows developers to
work along side non-programmers to define the acceptance criteria. The following
listing illustrates a ScalaTest Feature Specification test:
package com.jjh.scala
import org.junit.Assert.assertEquals
import org.scalatest.FeatureSpec
import org.scalatest.GivenWhenThen
import scala.collection.mutable.Stack
import org.scalatest.junit.JUnitRunner
import org.junit.runner.RunWith
@RunWith(classOf[JUnitRunner])
class FeatureTest extends FeatureSpec with GivenWhenThen {
feature("The user can pop an element off the top of the stack") {
info("As a programmer")
info("I want to be able to pop items off the stack" )
info("So that I can get them in last-in-first-out order" )
scenario("pop is invoked on a non-empty stack") {
37.5 Scalatest and Feature Tests 425

Given("a non-empty stack")
var stack = List.empty[Int]
stack = stack.+:( 52)
stack = stack.+:( 21)
val oldSize = stack.size
When("when pop style ops are invoked on the stack")
val result = stack.head
stack = stack.tail
Then("the most recently pushed element should be returned")
assert(result === 21)
And("the stack should have one less item than before")
assert(stack.size === oldSize - 1)
}
scenario("pop is invoked on an empty stack") {
Given("an empty stack")
var emptyStack = List.empty[Int]
When("when pop is invoked on the stack")
Then("NoSuchElementException should be thrown")
intercept[NoSuchElementException] {
emptyStack.head
}
And("the stack should still be empty")
assert(emptyStack.isEmpty)
}
}
}
The result of running this as a Scala JUnit test in Eclipse is shown below
426 37 Scala Testing
37.6 Test-Driven Development
Test-Driven Development (of TDD) is a development technique whereby devel-
opers write test cases before they write any implementation code. The tests thus
drive or dictate the code that is developed. The implementation only provides as
much functionality as is required to pass the test, and thus the tests act as a
specification of what the code does (and some argue that the test are thus part of the
that specification and provide documentation of what the system is capable of).
TDD has the benefit that as tests must be written first, there are always a set of
tests available to perform unit, integration, regression testing, etc. This is good as
developers can find that writing tests and maintaining tests are boring and of less
interest than the actual code itself, and this put less emphasis into the testing regime
than might be desirable. TDD encourages, and indeed requires, that developers
maintain an exhaustive set of repeatable tests and that those tests are developed to
the same quality and standards as the main body of code.
There are three rules of TDD as defined by Robert Martin for TDD; these are:
1. You are not allowed to write any production code unless it is to make a failing
Unit Test pass.
2. You are not allowed to write any more of a Unit Test than is sufficient to fail,
and compilation failures are failures.
3. You are not allowed to write any more production code than is sufficient to pass
the one failing Unit Test.
This leads to the TDD cycle described in the next section.
37.6.1 The TDD Cycle
There is a cycle to development when working in a TDD manner. The shortest form
of this cycle is the TDD mantra:
Red / Green / Refactor
which relates to the JUnit suite of tools where it is possible to write a JUnit-based
test. Within tools such as Eclipse, when you run a JUnit test a JUnit view is shown
with Red indicating that a test failed, Green indicating that the test passed. Hence
Red/Green, in other words write the test and let it fail, then implement the code to
ensure it passes. The last part of this mantra is Refactor which indicates once you
have it working make the code cleaner, better, fitter by Refactoring it. Refactoring is
the process by which the behaviour of the system is not changed, but the imple-
mentation is altered to improve it.
37.6 Test-Driven Development 427

The TDD mantra can be seen in the TDD cycle that is shown in Fig. 37.2 and
described in more detail below:
1. Write a single test.
2. Compile it. It should not compile because you have not written the imple-
mentation code.
3. Implement just enough code to get the test to compile.
4. Run the test and see it fail
5. Implement just enough code to get the test to pass.
6. Run the test and see it pass
7. Refactor for clarity and deal with any issue of reuse, etc.
8. Repeat for next test.
37.6.2 Test Complexity
The aim is to strive for simplicity in all that you do within TDD. Thus you write a
test that fails and then do just enough to make that test pass (but no more). Then you
Refactor the implementation code (that is change the internals of the unit under test)
to improve the code base. You continue to do this until all the functionality for a
unit has been completed. In terms of each test, you should again strive for simplicity
with each test only testing one thing with only a single assertion per test (although
this is the subject of a lot of debate within the TDD world).
Fig. 37.2 TDD cycle
428 37 Scala Testing
37.6.3 Refactoring
The emphasis on Refactoring with TDD makes it more than just testing or Test First
Development. This focus on Refactoring is really a focus on (re)design and
incremental improvement. The tests provide the specification of what is needed as
well as the verification that existing behaviour is maintained, but Refactoring leads
to better design software. Thus with Refactoring TDD is not TDD!
References
•Astels D (2003) Test-driven development: a Practical Guide. Prentice-Hall/
Pearson Education. ISBN 0-13-101649-0
•Beck K (2003) Test-driven development: by example. Addison-Wesley. ISBN
0-321-14653-0
•Dijkstra EW (1970) Notes on structured programming. Technical University of
Eindhoven, The Netherlands, Department of Mathematics, Technical Report
70-WSK-03, April 1970 (see http://www.cs.utexas.edu/users/EWD/ewd02xx/
EWD249.PDF).
•Myers G, Badgett T, Sandler C (2011) The art of software testing, 3rd edn.
Wiley, 1118031962
•Fowler M (1999) Refactoring: improving the design of existing code.
Addison-Wesley, 0201485672, published June 1999
Online References
Cucumber behaviour driven development, see http://cukes.info/
ScalaTest see http://www.scalatest.org
ScalaCheck see http://www.scalacheck.org
Robert C. Martin (aka Uncle Bob) http://butunclebob.com/ArticleS.UncleBob.
TheThreeRulesOfTdd
http://www.testdriven.com
testdrivendevelopment group (Yahoo):
http://groups.yahoo.com/group/testdrivendevelopment
xUnit implementations:
http://www.xprogramming.com/software.htm
http://www.junit.org
Refactoring.com
http://www.refactoring.com/
37.6 Test-Driven Development 429

Chapter 38
Play Framework
38.1 Introduction
The Play framework is a lightweight, stateless, asynchronous framework for
building Web applications and services. It is built on top of Scala and the Akka
concurrency API and aims to provide predictable behaviour with minimal resource
consumption (i.e. CPU, memory, threads) for highly scalable applications. Play is
open source and can be obtained from http://www.playframework.com.
38.2 Introduction to Play
Play is a framework for building a wide range of different types of Web application.
These are applications that receive requests for data and functionality over HTTP
(s). Play aims to make the construction of such applications simple, flexible and
intuitive. It incorporates an integrated HTTP Server (so there is no need for a
separate Web application server as there is with many Java Web frameworks); it
also incorporates a templating framework for the creation of websites and a
RESTful Web service API for the creation of a service-based implementation. It
exploits Scala and the facilities within the Scala ecosystem, such as Akka, to ensure
that the applications developed are scalable and perform well.
The basic installation also allows for in code changes to be reloaded and
reflected in the Web application without the need for separate build and deploy
steps (which greatly simplifies, and speeds up, development).
©Springer International Publishing AG 2018
J. Hunt, A Beginner’s Guide to Scala, Object Orientation and Functional
Programming, https://doi.org/10.1007/978-3-319-75771-1_38
431
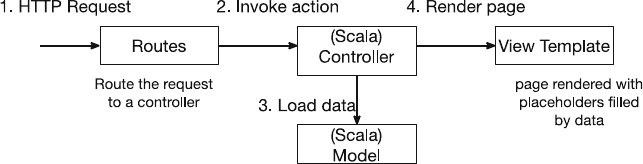
38.2.1 Working with a Web Application
Let us first look at the basic structure of a Play Web application. This is illustrated
below. This indicates that a HTTP request is routed to an application (Scala)
controller. The controller loads data via an element typically referred to as the
Model. It then renders a HTML page that is populated with data from the model.
This page is known as the View and is defined by a template. Within the template,
the placeholders are replaced with the values provided by the controller and model.
38.2.2 How Play Changes the Stack
The Web application technology stack in the Java Enterprise world is built on
technology that has both evolved over many years and requires multiple elements in
order to work. The evolution has taken the simple Servlet technology and con-
structed layer upon layer on top of this to achieve the sophistication needed by
today’s Web applications (see Fig. 38.1). The multiple technologies that actually
comprise this stack ensure that even deploying simple applications can be trou-
blesome and error prone as each technology needs to be successfully integrated
with the next, often relying on configuration files or standard conventions. This
makes for both a heavyweight infrastructure and an overly complex environment.
By contrast the Play framework is a much simpler stack. The Play framework
was designed for the current generation of Web application from the start and only
requires the services of a HTTP Server (Netty) in order to operate. This means that
configuration and deployment are restricted to a single infrastructure (see
Fig. 38.2).
Play is comprised of a number of elements; these include:
•The HTTP Server—This is the element of the environment which receives the
HTTP request from a client (such as a browser or another software system) and
returns a result based on the information provided in the request. This response
may be in terms of HTML markup, XML data or JSON (JavaScript Object
Notation) format—or indeed any data format you chose.
432 38 Play Framework
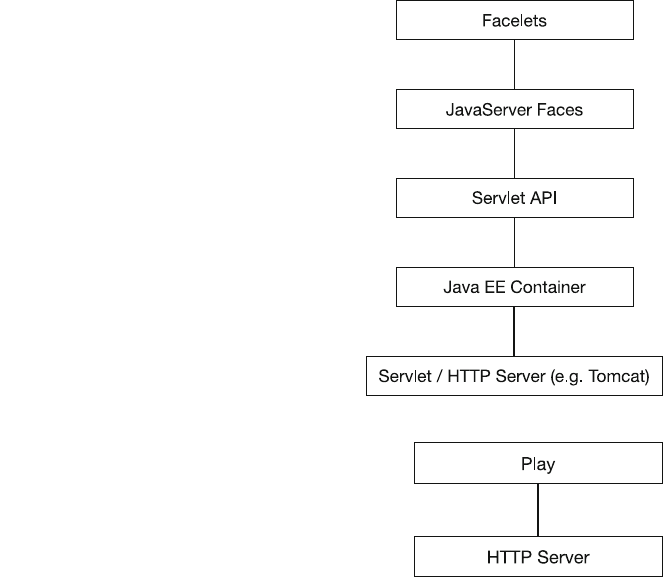
•Routing information—When a HTTP request is received, Play must determine
where to route the request—that is what code to execute in response to the
request—it therefore provides a route configuration file that is used to handle
this routing information.
•Supporting Scala types—Various types are defined within the Play framework
that can be used to implement the programmatic elements of the Web appli-
cation (such as querying a database in response to a request to get the data
associated with an id, etc.).
•A templating system—It used to take standard HTML style pages and populate
them with data that is dynamically generated by the application. This essentially
means that standard HTML is augmented with additional elements some of
which are placeholders for data that will be provided by the Scala code.
•An integrated play console and build system—To simplify working with Play
a suite of tools is provided that can be used to create, update and deploy a
Play Web application. These tools are accessed from and managed by the play
console.
•A persistent framework—To simplify accessing databases.
Fig. 38.1 Java EE layered
architecture
Fig. 38.2 The Play layered
architecture
38.2 Introduction to Play 433
38.3 Starting with Play
38.3.1 Download and Install Play
You can download Play from the Play frameworks home page. You can choose to
use the Lightbend Activator installation or the plain play installation. We will use
the plain play installation as we can then focus on the just the features provided by
Play. To do this download the zip containing the version of Play you wish to use. At
the time of writing the current version was Play 2.6.9 (see https://www.
playframework.com/documentation/2.6.x/Home).
You can download the Play framework from
•https://www.playframework.com/download
There are several options available here, including starter projects, template
projects, as well as downloads for the Play framework itself. At the time of writing
the version available is Play 2.6.9 (dated December 2017).
Play is also available as a series of library in Maven; it can therefore be used in a
Maven-managed project. The core Maven dependency is:
<dependency>
<groupId>com.typesafe.play</groupId>
<artifactId>play_2.12</artifactId>
<version>2.6.9</version>
</dependency>
38.3.2 Using a Play Starter Project
Prior to Play 2.3.0 Play provided a command ‘play’that could be used to create new
applications, run tests and run the application. Since Play 2.3.0 the ‘play’command
is no longer used. Instead projects can be created from an example project or a
template.
We will use the starter project provided by the online Play documentation site;
this can be found at:
https://playframework.com/download#starters.
434 38 Play Framework
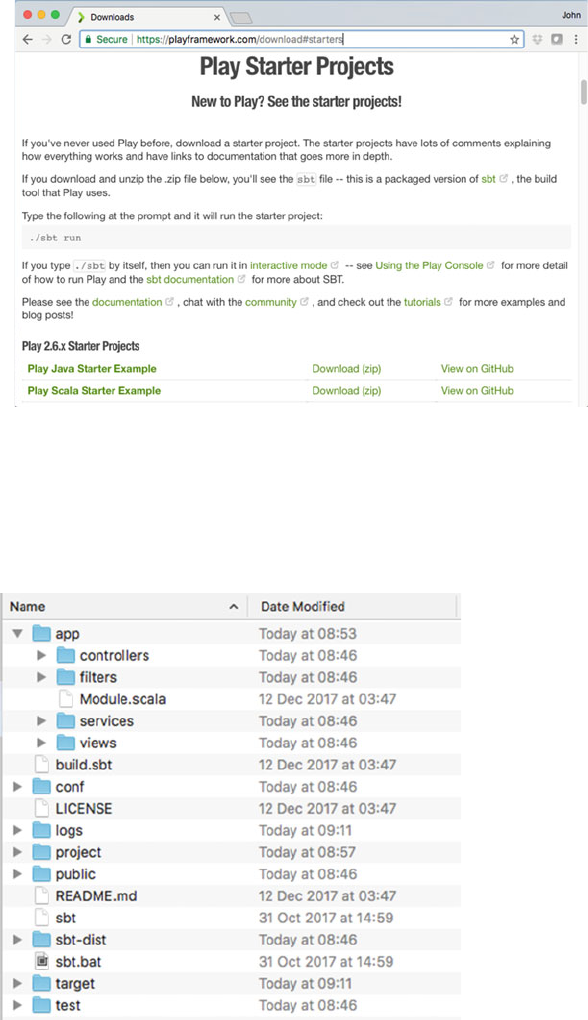
Select the ‘Play Scala Starter Example’and download the zip file (note that Play
is also available for Java, so be careful which version you download).
Once you have downloaded the zip file, unzip it into a suitable location. Once
you have done that, if you look into the directory created for you should find a
structure similar to that shown below:
38.3 Starting with Play 435
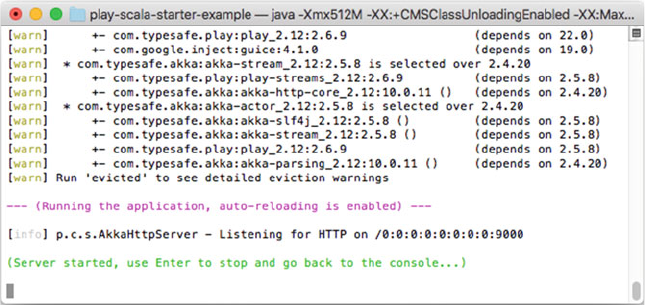
Note that when you run the sbt command later on, it will write some files into
this directory structure; you should therefore make sure that you have both read and
write access to wherever you have installed the Play sample project.
38.3.3 Starting the Application
Once you have downloaded and unzipped the sample project, you are ready to run
it. The starter project comes with SBT already set up (if you are on Windows, there
is a sbt.bat file; if you are on Unix, there is a sbt file).
Type the following command to run the starter project:
./sbt run
Alternatively if you type ./sbt on its own, then it will run in interactive mode,
allowing you to type in run once the play console has started. In either case you
should see something similar to:
436 38 Play Framework

indicating that the Play server has started up and is listening on port 9000.
This will download all the dependencies required by the starter project for you
using SBT’s dependency mechanism. Once the SBT has finished downloading all
the required dependencies, you can view the running application at:
•http://localhost:9000
Of course, this is the default page and the page does not yet reflect you own
output. The page is defined by the view element of the application. It was created
for you by Play and uses a default template into which we will place our own
message.
To shut down the server use CTRL-D, which will stop the server, and then ‘exit’
to terminate the play console.
38.3 Starting with Play 437

38.4 Examining the Structure of the Application
The following expanded directory structure illustrates the organisation and contents
of the starter project.
The contents of the starter project directory are explained below:
•The app directory—This contains all the application source files.
•The app/controllers directory—This contains all the application controllers.
These are the code elements that determine what action should be performed
based on user selection.
•The app/views directory—This directory contains html template files that are
used to generate the output presented to the user via a browser.
•The build.sbt file—The application build script used by the Simple Build Tool
(SBT is a commonly used built tool for Scala).
438 38 Play Framework

•The conf directory—This contains configuration files and other non-compiled
resources such as the application.conf file used for general application config-
uration and the routes file used to route URL requests to Scala code.
•The project directory—This contains various sbt files.
•The public directory—This holds resources used with the browser interface
presented to the user such as javascript files, CSS files and images.
•The sbt-dist directory—This contains the packages SBT installation used with
Play.
•The target directory—This contains everything generated by the build system.
It can be useful to know what is generated here.
•The test directory—This is a source directory that can be used for unit or
functional test code.
38.5 Editing the Application
38.5.1 Working with Your IDE
In order to edit the contents of the files within the Play application, you can use
whatever editor you like. However, it makes it easier if you generate Eclipse
configuration files, so that you can import the project into an IDE. Play provides
support for working with both Eclipse and IntelliJ IDEA. Information on importing
the Play project into both IDEs can be found at
https://www.playframework.com/documentation/2.6.x/IDE
In this section we will step through importing the project into IntelliJ.
38.5.2 Importing into IntelliJ
To import the application you set up above into IntelliJ, open the Project wizard
from the menu by selecting File->New->Project from Existing Sources…as shown
below:
In the dialog that is now displayed navigate to the location into which you
unzipped the starter project and select ‘open’. On the next screen select ‘Import
project from external model’and choose ‘SBT project’:
38.4 Examining the Structure of the Application 439
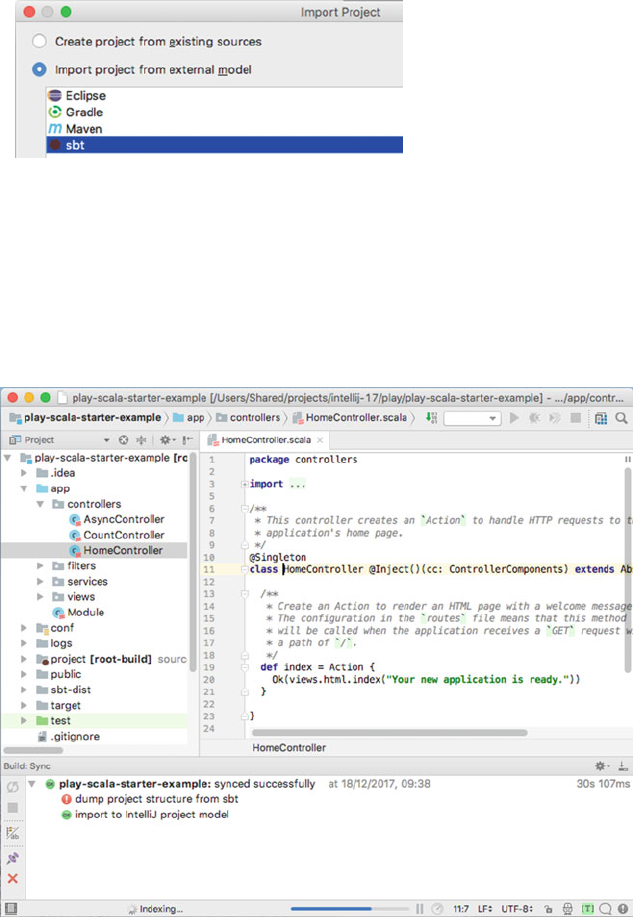
And click Next and on the final screen check the options selected and click
‘Finish’.
This will create some additional files and directories (such as .idea) within the
directory structure for IntelliJ.
You should now see that the IntelliJ Editor is displaying the file structure
reviewed earlier. If you select app->controllers->HomeController, you can also see
the contents/definition of a simple controller, for example,
440 38 Play Framework

38.5.3 Working with the Application
As shown above, select the HomeController class under the app/controllers folder.
This class is the main entry point for the Web. It indicates that when this Web
application runs (and the index page is requested, which is the default displayed for
the Web application), the message displayed to the user is “Your new Application is
ready.”. The source code for the HomeController is:
For larger applications this controller would access one or more models that
might invoke a persistence layer, business logic or other processing in order to
generate the appropriate response.
Using your IDE change the message to be displayed by editing the String such
that is says something like "Hello Play World", for example,
Now return to your Web browser and refresh the page. You should now see your
message displayed at the top of the page as shown below:
38.5 Editing the Application 441
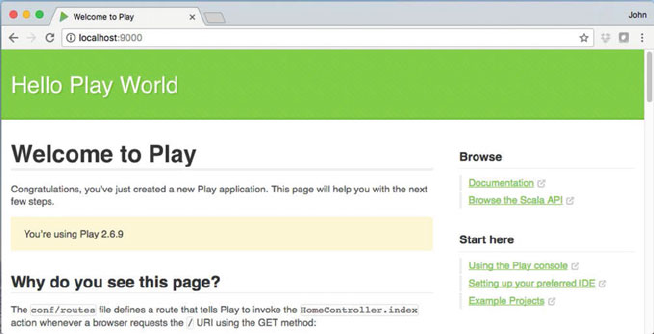
The page has been updated because auto reload is enabled by default in Play.
That is, when a file changes; Play automatically reloads it. In Scala’s case it first
recompiles it and then reloads it.
Note that the use of @Inject()(cc: ControllerComponents) on the
HomeController definition is an example of Dependency Injection (or DI).
If you have a component, such as a controller, and it requires some other com-
ponents as dependencies, then this can be declared using the @Inject annotation.
In this case the ControllerComponents instance is being made available to the
controller. This instance groups together components that might be used by a con-
troller. In this case we are not using any but the starter project provided this injection
by default.
Note that the @Inject annotation must come after the class name but before the
constructor parameters and must have parentheses. The @Inject annotation can
also be used on fields as well as on constructors. Finally, you may have noticed that
the class as a whole is annotated with @Singleton. This indicates that only a single
instance of the class will be created within the framework. In standard Scala an
object can be used to represent a singleton, but that would not allow the
Dependency Injection framework to operate and is thus not now used when creating
a Play controller.
38.6 Model–View–Controller
From the previous section, you may be wondering where the rest of the data on the
web page came from. To understand this we must first talk about the Model–View–
Controller framework on which Play is built.
442 38 Play Framework
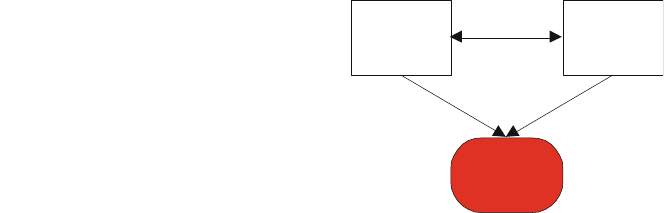
The Model–View–Controller (MVC) architecture separates the interface objects
(the views) from the objects that handle user input (the Handlers) from the appli-
cation (the model). The MVC is not a new idea; it originated in Smalltalk back in
the 1980s, but the concept has been used in many places and in many languages. It
has become particularly popular within the Web development community.
The intention of the MVC architecture is the separation of the user display, from
the control of user input, from the underlying information model as illustrated in
Fig. 38.3. This is often referred to as model-driven programming (i.e. the separation
of GUIs from the data they present). There are a number of reasons why this is
useful:
•reusability of application and/or user interface components
•ability to develop the application and user interface separately
•ability to inherit from different parts of the class hierarchy
•ability to define control style classes which provide common features separately
from how these features may be displayed
•a very clean separation of concerns.
This means that different interfaces can be used with the same application,
without the application knowing about it. It also means that any part of the system
can be changed without affecting the operation of the other. For example, the way
that the graphical interface (the look) displays the information could be changed
without modifying the actual application or how input is handled (the feel). Indeed
the application need not know what type of interface is currently connected to it at
all.
In Play the view is implemented using HTML, CSS, JavaScript and a templating
language. The controllers are implemented as Scala objects (as you have already
seen), and the Models are the data and business logic that a controller would invoke
or construct. Given this introduction we can now explore how the web page pre-
sented to us was constructed.
Display/
View
Control of
User Input
Information
Model
Fig. 38.3 The Model–View–
Controller architecture
38.6 Model–View–Controller 443
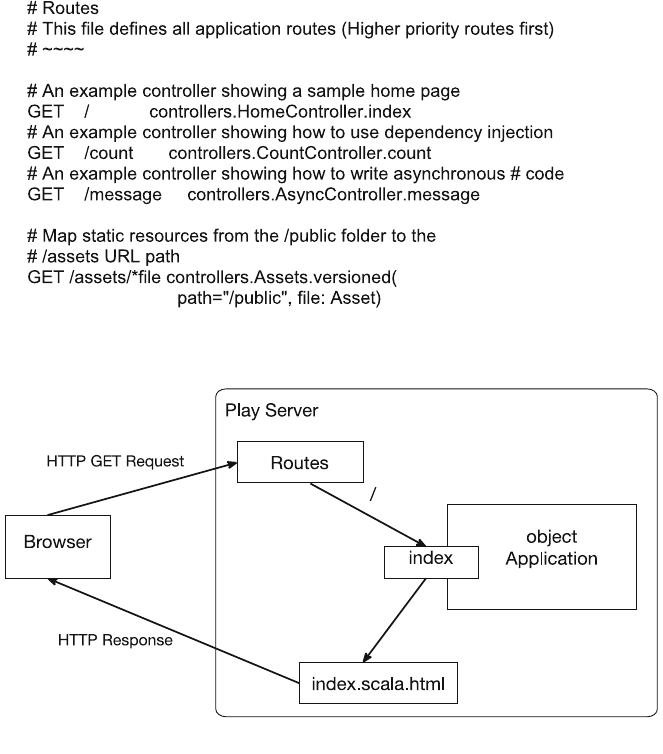
38.7 Exploring the Play Application
First of all let us look at how the URL request entered into the browser URL
resulted in our Scala code being run. The elements that we are going to look at are
illustrated in Fig. 38.4.
The data entered into the URL bar causes the browser to generate a HTTP GET
request to the server running on localhost and listening to port 9000. That server is
the Play server. When it received the request, it looks at the contents of the conf/
routes file to determine what to do with that request. The contents of this file are
shown below.
Fig. 38.4 Layout of a Play application
444 38 Play Framework
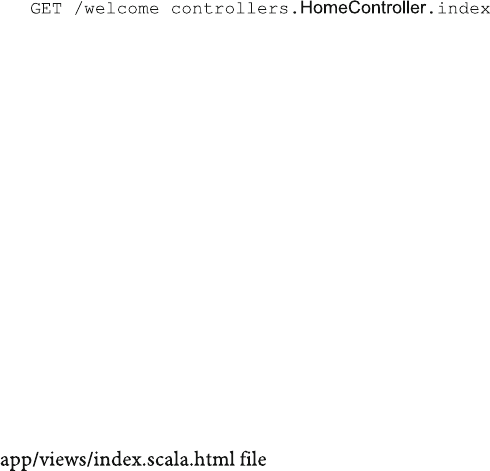
The main entry of interest is the line
GET / controllers.HomeController.index
This line essentially states then when a GET request is received, where there is
nothing beyond the server name and the port number, then invoke the con-
trollers. HomeController.index Scala method. If you change this line to
read:
It is now necessary to enter a URL of the form:
http://localhost:90000/welcome
into the browser URL bar in order to run the index method of the
Application object.
The URL is therefore routed by Play to the appropriate method on the controller
class. The index property shown below sets the index message of the views.html:
def index = Action {
Ok(views.html.index(“Hello Play World”))
}
An Action is actually a function that handles the request and generates a result to
send back to the Web client. In this case an OK response is being generated using a
template to fill in the content. The template is defined in the
and compiled into a Scala function.
In fact a Controller is really only an object that holds actions. Controllers are
defined as classes so that they can take advantage of Dependency Injection (cur-
rently a controller can be defined as an Object, and also future versions will not
allow this).
The template defines the function signature (it takes a String and stores this in
the variable message) and the content of the body of the web page. These files can
mix HTML, CSS, JavaScript and Scala code and represent the presentation or view
aspect of the MVC framework.
The original version of this file (that comes with the Starter project) makes use of
Scala and the templating language. However, to better illustrate how the template
can be mixed with HTML we will change this file as listed below:
38.7 Exploring the Play Application 445

In this listing we are using HTML to manage the layout of the web page and
leaving the message presented within the page to be generated from the data passed
into the view (from the controller).
Notice that the parameter to the page is defined at the top of the page using the
Play templating language and is accessed in the body of the page by prefixing the
parameter with an ‘@’symbol. Also note that comments in the template page start
@* and end with *@.
The result of re writing the view file in this way is that if we now refresh the Web
application, we will see the new landing page displayed:
446 38 Play Framework

Chapter 39
RESTful Services
39.1 Introduction
This chapter looks at RESTful Web services as implemented using the Play
framework.
39.2 RESTful Services
As well as dynamic Web applications, many developers also want to be able to
create RESTful services that can be invoked by Ajax style clients.
REST stands for Representational State Transfer and was a term coined by Roy
Fielding in his Ph.D. to describe the lightweight, resource-oriented architectural
style that underpins the Web. Fielding, one of the principle authors of HTTP, was
looking for a way of generalising the operation of HTTP and the Web. He gen-
eralised the supply of Web pages as a form of data supplied on demand to a client
where the client holds the current state of an exchange. Based on this state infor-
mation the client requests the next item of relevant data sending all information
necessary to identify the information to be supplied with the request. Thus the
requests are independent and not part of an ongoing stateful conversation (hence
state transfer). If you are interested in the background to this see
•http://www.ics.uci.edu/*fielding/pubs/dissertation/top.htm
It should be noted that although Fielding was aiming to create a way of
describing the pattern of behaviour within the Web, he also had an eye on pro-
ducing lighter weight Web-based services (than those using either proprietary
Enterprise Integration frameworks or SOAP-based services). These lighter weight
HTTP-based Web services have become very popular and are now widely used in
many areas. Systems which follow these principles are termed RESTful services.
©Springer International Publishing AG 2018
J. Hunt, A Beginner’s Guide to Scala, Object Orientation and Functional
Programming, https://doi.org/10.1007/978-3-319-75771-1_39
447
A key aspect of a RESTful service is that all interactions between a client
(whether some JavaScript running in a browser or a standalone application) are
done using simple HTTP-based operations. HTTP supports four operations:
HTTP GET, HTTP POST, HTTP PUT and HTTP DELETE. These can be used as
verbs to indicate the type of action being requested. Typically these are used as
follows:
•retrieve information (HTTP GET)
•create information (HTTP POST)
•update information (HTTP PUT)
•delete information (HTTP DELETE).
It should be noted that REST is not a standard in the way that HTML is a
standard. Rather it is a Design Pattern that can be used to create Web applications
that can be invoked over HTTP and that give meaning to the use of GET, POST,
PUT and DELETE HTTP operations with respect to a specific resource (or type of
data).
The advantage of using RESTful services as a technology, compared to some
other approaches (such as SOAP-based services which can also be invoked over
HTTP) is that
•the implementations tend to be simpler,
•the maintenance easier.
•They run over standard HTTP and HTTPS protocols and
•do not require expensive infrastructures and licences to use.
This means that there is lower server and server-side costs. There is little vendor
or technology dependency, and clients do not need to know anything about the
implementation details or technologies being used to create the services.
39.3 A RESTful API
A RESTful API is one in which you must first determine the key concepts or
resources being represented or managed. These might be books, products in a shop,
room bookings in hotels, etc. In our case we will assume a bookstore-related service
in which the data being held represents types of books, CDs, DVDs, etc. This data
is split into resources with books as one type of resource. We will ignore the other
resources such as DVDs and CDs. Based on these books we will identify suitable
URLs for these RESTful services. Note that although URLs are frequently used to
describe a web page—that is just one type of resource. For example, we might
develop a resource such as
/bookservice/book
from this we could develop a URL based API, such as
448 39 RESTful Services
/bookservice/book/:isbn
Where ISBN indicates a unique number to be used to identify a specific book
whose details will be returned using this URL.
We also need to design the representation or formats that the service can supply.
These could include plain text, JSON, XML. JSON stands for the JavaScript Object
Notation and it is a concise way to describe data that is to be transferred from a
service running on a server to a client running in a browser. This is the format we
will use in the next section. As part of this we might identify a series of operations
to be performed by our services based on the type of HTTP method used to invoke
our service and the contents of the URL provided. For example, for a simple
BookService this might be:
•GET /book/{isbn}—used to retrieve a book for a given ISBN
•GET /book/list.xml—used to retrieve all current books in XML format
•GET /book/list.json—used to retrieve all current books in JSON format
•POST /book (XML or JSON in body of the message)—which supports creating
a new book
•PUT /book (XML or JSON in body of message)—used to update the data held
on an existing Book
•DELETE /book/{isbn}—used to indicate that we would like a specific book
deleted from the list of books held.
Note that the parameter ISBN in the above URLs actually forms part of the URL
path.
39.4 Creating the RESTful Web Application
We will create a new Play application for this. This is done in exactly the same way
as before. In fact Play creates Web-based applications. These can be treated as
websites or as RESTful services depending upon the type of data supplied and the
way in which you expect the service to be invoked. Thus the distinction between a
RESTful service and a Web page is in the eye of the beholder (or at least the client
application). Indeed if you wish rather than unzipping the start project again you
can choose to modify the simple application we created in the last chapter.
Given the Model–View–Controller structure described earlier we need the model
for our RESTful services. This will be defined in a separate package model and
comprise a Book case class and a Books object. This can be accessed by our
controller as and when required. The class and object that comprise the model
package are shown below:
39.3 A RESTful API 449
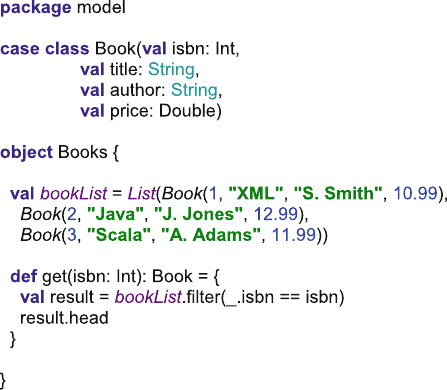
Note that the Books object defines both a property list and a method get.
The list property holds the list of books currently available, and the get method
returns a book given a specified ISBN.
However, we now need to determine what the HTTP requests we will support
will be. Our bookstore service will be a read-only service which will provide a list
of books or a single book if an ISBN is supplied. As this is an access-oriented
service we only need to support the HTTP GET requests. We therefore want to
provide mappings from
•/book/list
•/book/:isbn
Both of these routes can be supported by the same object, the controllers.
Bookstore object via methods list and get; thus we will map:
•/book/list -> controllers.BookstoreController.list
•/book/:isbn -> controllers.BookstoreController.get(isbn: Int)
Note that the routing information will be used to map the isbn information
provided as part of the/book/:isbn URL to the parameter passed into the get
method. We will thus update our routes file as illustrated below.
450 39 RESTful Services
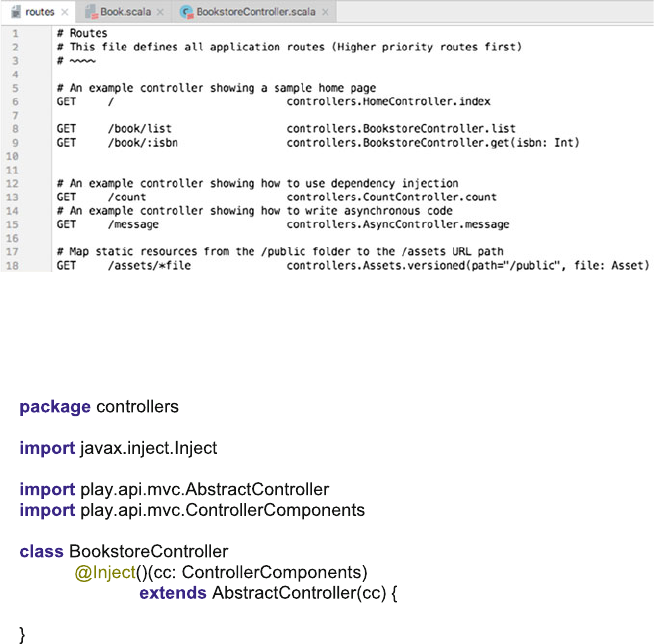
Next we need to write the BookstoreController. As with the original
HomeController controller in the last chapter, our BookstoreController
extends the Controller type. The initial state of the object is shown below:
The list method to be added to the BookstoreController will take no
parameters and implement an Action that will return a list of Books. We will use
the JSON data format as it is very widely used within Web-based services.
However, we need to specify how an instance of the Book class should be con-
verted into a JSON object. We will do this using the toJson method that is
designed to convert a Book instance into a JSON object by extracting the isbn, title,
author and price from a book and wrapping them up within an appropriate JSON
type. The Play frameworks’JSON library is defined within play.api.libs.
json and contains case classes for JSON types such as JsString,JsNumber,
JsBoolean,JsObject,JsArray and JsNull.
39.4 Creating the RESTful Web Application 451

The get method will take an ISBN. The type of the ISBN needs to be deter-
mined. We will assume that all our ISBNs are integers and thus the type of the
parameter for the get method will be Int. The get method uses this ISBN
number to return a book with that ISBN number or a message indicating that no
book with that number was found.
Note that the JsObject constructs a JSON object comprised of key-value pairs
that are used to represent the actual Book. This type is obtained from the play.
api.libs.json package. The JsString and JsNumber are also defined by
that package.
452 39 RESTful Services

If we now invoke this RESTful service from a client browser, we can see the
data returned. For example, if you enter into the browser:
http://www.localhost:9000/book/list
you should see the result presented in Fig. 39.1. The data returned is in JSON
format and indicates that the property books relates to an array of book information.
Each item of book information is comprised of an isbn, a title, an author and a price.
We can also obtain information on a single book using the url/books/:isbn
routing information; here the isbn number forms part of the URL—thus indicating a
(dynamically generated) resource, for example, using the URL:
http://www.localhost:9000/book/2
The information about the book with the ISBN 2 is returned as shown in
Fig. 39.2.
Fig. 39.1 Data returned from the book service
Fig. 39.2 Retrieving a single book details from the book service
39.4 Creating the RESTful Web Application 453
Alternatively, we could construct a client using JavaScript that would be run
within a browser. This client could invoke the RESTful service we have just created
asynchronously when requested to do so by the user.
39.5 JavaScript and jQuery
The Web service we have created supplies data that can be consumed by a suitable
client. In many cases these clients will be implemented in JavaScript and executed
within the client-side browser (such as Chrome and Firefox). Note that the
server-based Scala code will execute within the confines of the server, whereas the
client will run within a browser potentially anywhere in the world.
A very common approach is to create a Web page containing some JavaScript
that will, in response to user actions, such as clicking a button, asynchronously
invoke the remote service and populate the current Web page with the data pro-
vided. For example, if you are requesting your recent bank transactions, the request
for those transactions occurs in page without the need for the whole page to be
refreshed.
JavaScript itself is a programming language that can be executed within a wide
range of environments. The most common environment to run JavaScript in is
within a browser, where a JavaScript engine interprets it. As such JavaScript is
commonly treated as a client-side programming language to be embedded in a Web
page and interacts with the contents of that Web page (represented as the Document
Object Model or DOM of the page).
A common library to use with such applications is jQuery. This is because it
simplifies many activities that you would need to develop from scratch if you were
using JavaScript on its own (such as the look and feel generation, calendars and
Ajax style programming). The basic concept behind Ajax is that data can be
retrieved from a server asynchronously in the background, without interfering with
the display and behaviour of the existing page. The name original came from the
acronym for Asynchronous JavaScript and XML programming. However, Ajax
style applications are very widely used with JSON rather than XML as the data
interchanges format. It should be noted that Ajax as such is not a technology; rather
it is a set of technologies that are used together in a particular “Design Pattern”or
implementation strategy. This approach typically utilises:
•XHTML and CSS for presentation
•The Document Object Model (DOM) for dynamic display of and interaction
with data
•XML, JSON or plain text for the interchange, manipulation and display of data
•Facilities in JavaScript for asynchronous communication
•JavaScript to bring these technologies together.
454 39 RESTful Services

jQuery makes it easy to implement an Ajax style client and to use the data
provided by remote services to change the current Web page.
39.6 The jQuery Client
We will create a simple jQuery-based client. This client will be loaded when an
initial Web page is displayed to the user. The Web page will be created using the
Play framework. This allows us to dynamically determine some of the information
to display in this page and links the client to the back-end service.
39.6.1 Obtaining jQuery
jQuery can be downloaded from https://jquery.com/download/.
jQuery is a fast, small and feature-rich JavaScript library. It makes things like
HTML document traversal and manipulation, event handling, animation and Ajax
much simpler with an easy-to-use API that works across a multitude of browsers.
39.5 JavaScript and jQuery 455
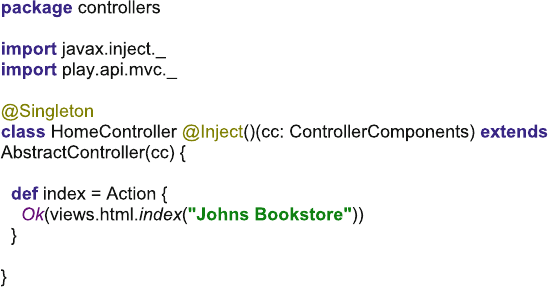
39.6.2 Adding jQuery to the Application
We will first modify our HomeController class so that the string passed to the
index view template provides the name of the bookstore. This is shown below:
Next, we will rewrite the index.scala.html template file such that it uses
more of the templating features of the Play framework. The implementation of our
view is presented below.
The head of the template still indicates the information being provided to it. This
is the string passed to the view from the Application controller. However, this
string is now used within an HTML Web page. The Web page uses the string in the
welcome heading presented to the user. The rest of the template is presented below:
456 39 RESTful Services
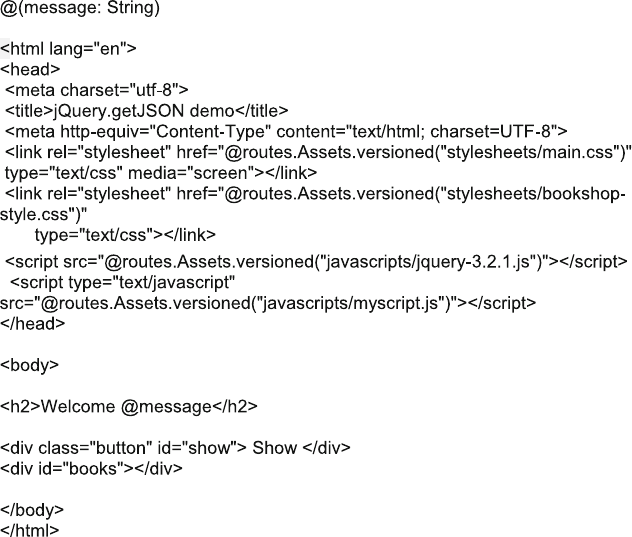
An HTML page can be divided into a header and a body. The header tells the
browser information about the page, and the body provides the data to be displayed
to the user.
The above Web page contains a simple HTML body that merely displays a
welcome message and places a string shown in a divider and an empty divider
called books within the page. Note that use of @message indicates that this is a
template where the value of the message will be provided by the Application
controller at runtime. However, the interesting parts are in the HTML header. This
header includes:
39.6 The jQuery Client 457
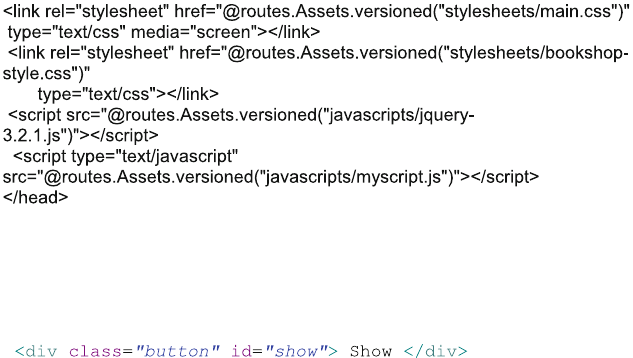
The links specify the CSS style sheet to use. This style sheet defines various
colours and formats to be used with elements within the Web page. For example,
the bookshop-style.css file defines the button style. This style is used within the
body of the HTML page in:
which indicates that the button CSS style class will be used with the text Show.
Note that the location of the style sheets is relative to the Web application we are
writing and thus the @routes.Assets.versioned() function is used to
generate the actual path to the style sheet directory (this is also used below to access
the jQuery files).
The notable aspect of the header is that it specifies two scripts to use. The first is
the jQuery library itself (version 3.2.1), and the second is the file containing the
custom code that implements our jQuery client.
The contents of the myscript.js file are presented below. This jQuery program does
two things. It first links the hover function to the HTML element with the id “show”
such that when the user moves the cursor over the button the cursor changes—which
provides some useful feedback to the user. The second thing it does is specifies what
should happen when the user clicks on the button.
458 39 RESTful Services
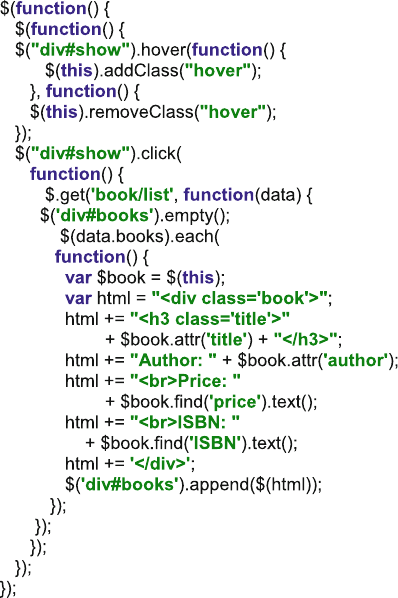
The function defined for the user ‘click’event on the element called show
performs an asynchronous get request to the URL books/list. When the data returns,
the associated second function executes. The data returned from the RESTful
service will be supplied to the variable data. The second function initially removes
anything that is currently being displayed by the element books. It then looks
through the array of books indexed by the value books in the JSON object structure.
For each book in that array it creates some HTML to format the book information
and retrieves the appropriate data items from the book structure (such as title,
author, price). The resulting information is then appended to the books element
within the Web page.
The above files are stored under the public area of Web application project
structure. This is where static assets of the project are location such as images, style
sheets, JavaScript files and HTML files. In our case the style sheet is under the
stylesheets directory and the jQuery and myscript.js files are under the javascript
directory. This is illustrated in Fig. 39.3.
39.6 The jQuery Client 459
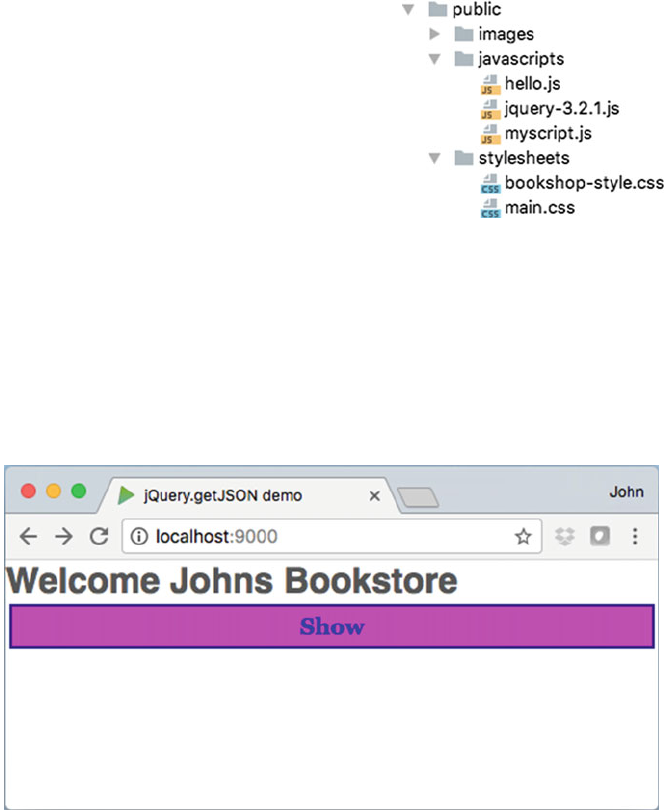
As Play automatically reloads the changes you make, all you need to do to see
the behaviour of your jQuery client is to change the URL in your browser such that
the address is:
http://www.localhost:9000
This will run the index (or default) page of your application that should now
display the simplified Web page welcoming you to Johns Bookstore:
Fig. 39.3 Location of the
assets used in the web
application
460 39 RESTful Services
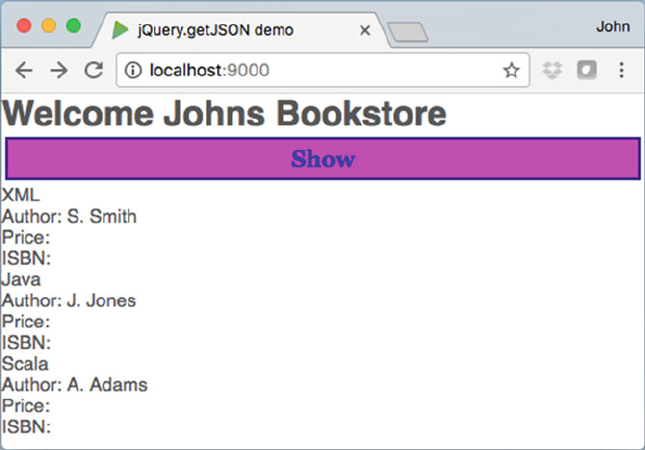
If you move your mouse over the show button you should see it change. Now
click on the show button, and the page should (in the background) request the data
from the bookstore service and display each of the books within the current page.
This is shown below:
Interestingly if you view the source code for this page you will see that there are
no books listed—this is because they were dynamically obtained from the server
and added to that page by the jQuery based functions and are thus not part of the
static HTML of the page. This is illustrated here:
39.6 The jQuery Client 461
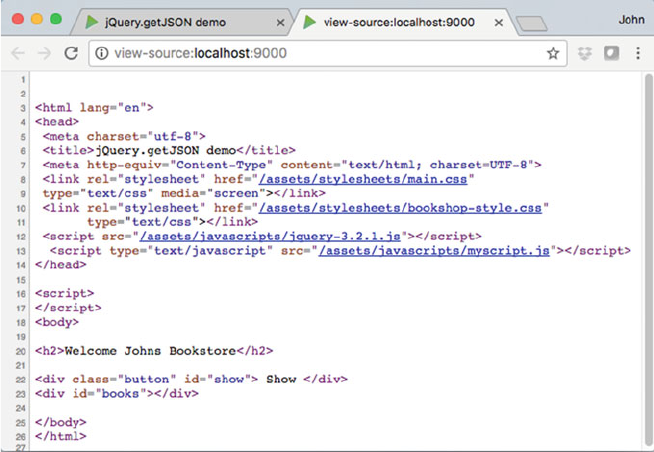

Chapter 40
Scalaz
40.1 Introduction
If you start working with Scala you will probably quickly come across the library
Scalaz. It is a very widely used set of extensions to the core language. In many
cases when people talk about developing systems in Scala they actually mean a
combination of Scala and Scalaz.
Scalaz is actually a very large library of extensions which could have (and do
have) books dedicated just to it. Indeed, if you look at
•http://eed3si9n.com/learning-scalaz
You can find a 21-day course dedicated to Scalaz. As this book is intended as an
introduction to Scala and covers much of the language, this chapter will be
restricted to an introduction to Scalaz and an overview of the most useful features
for you at this stage.
40.2 Obtaining Scalaz
Scalaz is not a standard part of the Scala installation. You must therefore add it
yourself to your environment. At the time of writing, the current version of Scalaz is
7.2.17 for Scala 2.12.
The easiest way is to add it to your project dependencies using Maven or SBT.
To add Scalaz to your Maven project use:
<dependency>
<groupId>org.scalaz</groupId>
<artifactId>scalaz-core_2.12</artifactId>
<version>7.2.17</version>
</dependency>
©Springer International Publishing AG 2018
J. Hunt, A Beginner’s Guide to Scala, Object Orientation and Functional
Programming, https://doi.org/10.1007/978-3-319-75771-1_40
463
If you are using SBT, add the following line to your build file:
libraryDependencies += "org.scalaz" %% "scalaz-core" % "7.2.17"
Alternatively, you can download Scalaz from
•http://central.maven.org/maven2/org/scalaz/scalaz-core_2.12/7.2.17/scalaz-
core_2.12-7.2.17.jar
40.3 Scalaz Overview
Scalaz is a very large and exhaustive library of extensions for Scala. Its focus is on
emphasizing and supporting functional programming and type correctness. Many
teams therefore adopt Scalaz either because they wish to explicit its set of typesafe
extensions or because they wish to further push the use of functional program (or of
course both).
A significant aspect of Scala is its support for typesafe operations. These are
primarily supported by the introduction of Typeclasses in Scalaz. A Typeclass is a
mechanism for ad hoc, compile time, polymorphism. Note the comment about
‘compile time’in that sentence. In standard Scala (and languages such as Java and
C#) runtime polymorphism is supported. However, Scalaz supports compile time
polymorphism, while the distinction may not be of that much interest to you; it does
mean that at compile time you can be notified of potential issues that might only be
identified at runtime due to undesirable behaviour. An example might be:
1 == "1"
This is legal Scala but will always return false; as an Int can never equal a String.
In Scalaz the ‘===’operator is used to perform a compile time check on the types.
Thus
1 == "1"
will generate a compile time error (rather than allowing the runtime environment to
merely execute).
From a functional programming point of view, the extensions provided by
Scalaz are inspired by Haskell and the theoretical concepts behind functional
programming. This can mean that, at least initially, it can seem that Scalaz is
complicated and quiet abstract (which is probably true) although some aspects of
the library are very straight forward to use and very useful (and these are the focus
of this chapter).
464 40 Scalaz
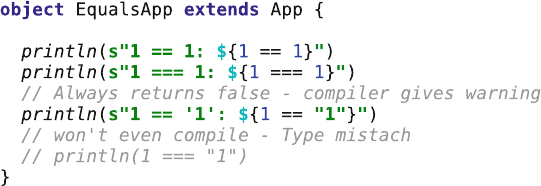
There are many tutorials available online which will explore much of the the-
oretical side of Scala such as Monads, Functors, Applicatives, etc., and some of
these are listed at the end of this chapter.
40.4 Some Useful Typeclasses
40.4.1 Equals Typeclass
Scalaz provides a typesafe equals operator that will generate a compile error if
incompatible types are compared.
For example, while == and != in standard Scala will allow you to compare
a String and an Int but will always return false, the Scalaz operators === and =/=
operators will result in a compile time error:
As can be seen above although Scala allows the integer 1 and the string “1”to be
compared, Scalaz does not.
40.4.2 Order Typeclass
Scalaz provides a very easy to use typeclass that provides for typesafe ordering.
This means that instances can be compared for relative ordering but that ordering of
incompatible types will now generate a runtime error:
40.3 Scalaz Overview 465
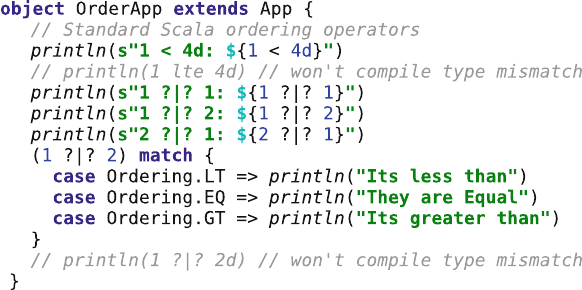
In the above example Scala allows the integer 1 and the double 4 to be com-
pared, whereas Scalaz does not.
The ?|? operator can also be used to compare two compatible values and
returns a scalaz.Ordering object. This object is one of:
•Ordering.LT—indicating that the first value is less than the second value
•Ordering.EQ—indicating that the values are equal
•Ordering.GT—indicating that the second value is greater than the first.
The output generated from this application is:
1 < 4d: true
1 ?|? 1: EQ
1 ?|? 2: LT
2 ?|? 1: GT
Its less than
40.5 Standard Class Extensions
40.5.1 Extensions to Option
Scalaz provides a set of extensions to the Option type in Scala. These extensions
make it easier to work with Options. For example, there are some convenience
constructor methods that return Option types (rather than returning Some or None
types). See
466 40 Scalaz

•some—returns a Some instance but the specified type is Option[T]
•none[T]—returns a None value of type Option[T]
Scalaz also provides some alternatives to the getOrElse operation available
on standard Options types. These such as the ternary operator for Options do not
directly have an equivalent in the standard library.
The final operator examined here is the ‘*’operator that returns the item
contained in the Option (if it is defined), otherwise it returns the Zeroth value for
the type specified. If the type is an Int, then it is 0,ifitisaBoolean, then it is
false, etc.
40.5 Standard Class Extensions 467
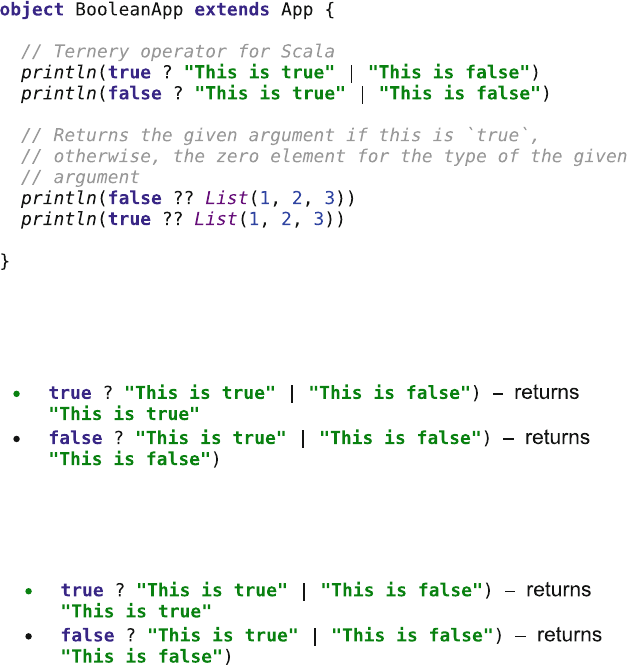
The output from this simple application is:
x1: 20
x2: 10
x3: 5
3
0
40.5.2 Boolean Extensions
Scalaz also adds some additional functionality to the Boolean type. For example,
it provides the ?| and ?? operators.
The ?| operator is a ternary operator that will return the first value following the
‘?’if the condition is true, otherwise it returns the second value. For example,
The ?? operator returns the given argument if the condition is true, otherwise it
returns the Zeroth version of the argument, thus
468 40 Scalaz
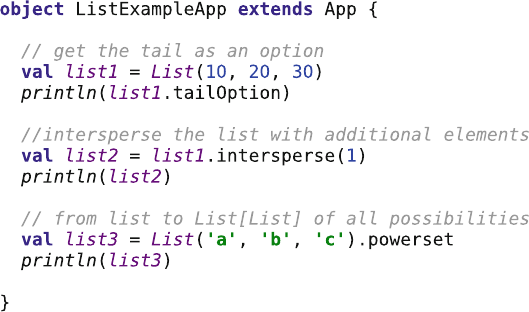
40.5.3 Extensions to List
Scalaz also provides some extensions to the List type. Some of these extensions are
shown below.
In the above example three extensions to the List type are shown, namely:
•tailOption—this returns a list containing the tail of the list it is applied to
wrapped in an Option.
•Intersperse—this adds the provided argument to the elements in the original list,
between each of the values held in the list.
•Powerset—this returns a list of lists that represent all combinations of the values
in the original list.
Note that none of these operations affects the original list; they all generate a new
list.
The output from the example is:
Some(List(20, 30))
List (10, 1, 20, 1, 30)
List (List(a, b, c), List(a, b), List(a, c), List(a), List(b, c), List
(b), List(c), List())
40.5 Standard Class Extensions 469
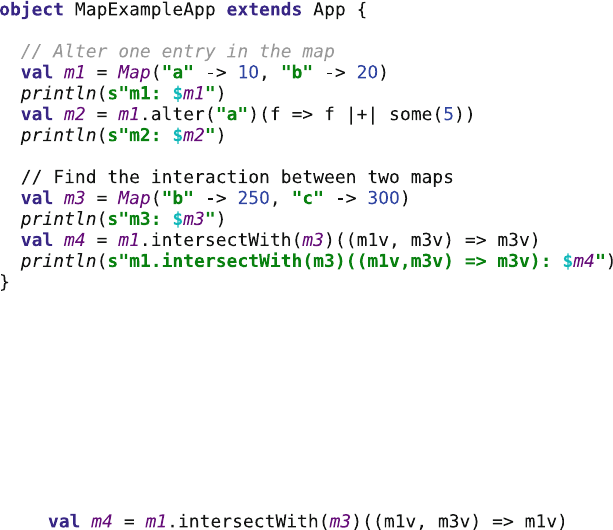
40.5.4 Extensions for Map
Another collection type that is extended by Scalaz is Map. As an example, the
following code example illustrates altering a map within a safe manner. The
example creates a simple Map and then uses the Scalaz alter operation to modify the
value with the key “a”. In this case a function is applied to the value in which the
value 5 is applied to the existing value. It uses the |+| which is an alias for
mappend (a function that appends a value and returns the result). The mappand
function takes two values of the same type and returns a value of that type (which is
the result of appending them). In this case the argument fto the function is of type
Option[Int].
The second example in the above code uses a method intersectWith that
determines the intersection (between keys) of two maps. In this case only the key
“b”is common to the maps m1 and m3. The result returned in this case is the value
held in the second map. If we wanted the value held in the first map, then we would
return that value from the function passed to the intersectWith method, for
example,
The output from this example is:
m1: Map(a -> 10, b -> 20)
m2: Map(a -> 15, b -> 20)
m3: Map(b -> 250, c -> 300)
m1.intersectWith(m3)((m1v,m3v) => m3v): Map(b -> 250)
470 40 Scalaz
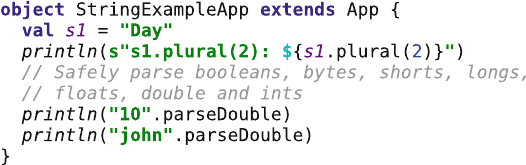
40.5.5 Extensions to String
Scalaz also provides some interesting extensions to the String class.
One example is its introduction of the plural operator which tries (with some
mixed success) to convert words into their plural version, for example “Day”into
“Days”. It is a little naïve as the approach taken is to pluralise a String by appending
an "s" unless this String ends with "y" and not one of ["ay", "ey", "iy", "oy", "uy"]
in which case the 'y' character is chopped and "ies" is appended. It is possible to
specify an integer to plural that indicates how many of something is being specified;
1 indicates a singular value (and thus just returns the string as is).
A more useful feature of the string extensions is the set of parse operations.
These will safely parse booleans, bytes, shorts, longs, floats, doubles and ints from a
string without throwing an exception if the value passed to them is not a number.
Instead the operations return a Success or Failure object that wraps the result or the
associated exception.
The output generated by the example application is:
s1.plural(2): Days
Success(10.0)
Failure(java.lang.NumberFormatException: For input string: "ten")
40.6 The Other Either
Another feature of Scalaz is its provision of what is sometimes known as the other
Either. Scala provides Either as a way of capture that either a successful result has
been generated or not. Scalaz version provides a set of utility methods that make it
easier to work with.
The Scalaz Disjunction is defined as \/[A, B]. It is right biased (as right by
convention is the success element) and provides operations such as map,flatMap,
etc., that work on the right side of the object.
40.5 Standard Class Extensions 471
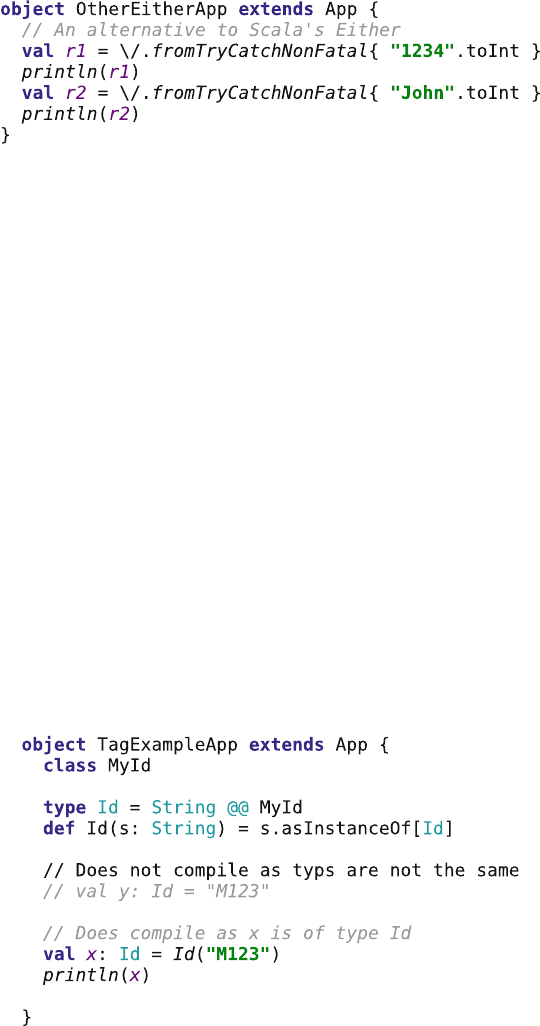
The output from this simple example is:
\/-(1234)
-\/(java.lang.NumberFormatException: For input string: "John")
One of the easiest ways of working with Sclacz \/[A, B] is to use the
fromTryCatchNonFatal method. This will try to execute an expression. If it is
successful, then the result is stored in the right side of the result. If an exception is
thrown, then this is stored in the left side. The side of the value is indicated by a ‘-’;
either to the right or left of the \/ symbol (as shown above).
40.7 Tagging
Tags can be used to create new types based on existing types. It uses the @@ symbol
to tag an existing type as another type (creating a new type). This can be useful if
you want to use, for example, a String to represent an ID but do not want just any
old string to be used.
The following example illustrates the basic idea of using tagging to create a new
type:
472 40 Scalaz
In this example, we use the @@ symbol to tag a String with the class MyID. This
is used to define a type Id (which is actually an alias to String @@ MyId, which
expands to @@[String, MyId], which in turn expands to String with
Tagged[MyId]).
Online Scalaz Resources
http://central.maven.org/maven2/org/scalaz/scalaz-core_2.12/7.2.17/scalaz-core_2.
12-7.2.17.jar download Scalz JAR file
http://scalaz.github.io/scalaz/#scaladoc ScalaDoc for Scalaz
http://eed3si9n.com/learning-scalaz 21-day online course for Scalaz
http://typelevel.org/blog/2013/10/13/towards-scalaz-1.html Towards Scalaz Tutorial
40.7 Tagging 473

Chapter 41
GUIs in Scala Swing
41.1 Introduction
This chapter describes how to create rich client graphical displays (desktop appli-
cation) using the Scala Swing windowing and graphical types.
Since Scala 2.11, the Scala wing package I is no longer considered to be a part of
Scala’s standard library API and thus some tools may require an additional
dependency to be set up to pick it up. This is not the case with IntelliJ’s IDE but is
the case with the Simple Build Tool (SBT).
The reason for this is that Scala Swing library is now a community-maintained
library and this considered to be unsupported by the core Scala maintainers. For
more information, see https://github.com/scala/scala-swing.
In this chapter, we consider how Windows, buttons, tables, etc., are created,
added to Windows, positioned and organised in Scala.
41.2 Windows as Objects
In Scala, Windows and their contents are instances of appropriate classes (such as
Button or FlowPanel). Thus, when you create a window, you create an object that
knows how to display itself on the computer screen. You must tell it what to display,
although the framework within which the associated method (paint) is called is hidden
from you. You should bear the following points in mind during your reading of this
chapter; they will help you understand what you are required to do:
•You create a window by instantiating an object.
•You define what the window displays by adding a component to its contents,
such as a type of panel or a button.
•You can send messages to the window to change its state, perform an operation
and display a graphic object.
©Springer International Publishing AG 2018
J. Hunt, A Beginner’s Guide to Scala, Object Orientation and Functional
Programming, https://doi.org/10.1007/978-3-319-75771-1_41
475
•The window, or components within the window, can send messages to other
objects in response to user (or program) actions.
•Everything displayed by a window is an instance and is potentially subject to all
of the above.
This approach may very well contrast with your previous experience. In many
other windowing systems, you must call the appropriate functions in order to obtain
a window, providing default behaviour either by using pointers to functions or by
associating some event with a particular function. You also determine what is
displayed in the window by calling various functions on the window.
In the Object-Oriented World, you define how a subclass of the windowing
classes responds to events, for example what it does in response to a request to paint
itself. All the windowing functionality and window display code are encapsulated
within the window itself.
41.3 Windows in Scala
Of course the above description is a little simplistic. It ignores the issue of how a
window is created, initialised and displayed, and how its contents are generated. In
Scala, these are handled by the concepts of a frame, a component and a container:
Frames provide the basic structure for a window: borders, a label and some
basic functionality (e.g. resizing).
Components are graphical objects displayed in a frame. Some other languages refer
to them as widgets. Examples of components are lines, circles, boxes
and text.
Containers are special types of component that are made up of one or more
components (or containers). All the components within a container
(such as a panel) can be treated as a single entity.
Windows have a component hierarchy that is used (amongst other things) to
determine how and when elements of the window are drawn. The component
hierarchy is rooted with the frame, within which components and containers can be
added. Figure 41.1 illustrates a component hierarchy for a window with a frame,
two containers (subclasses of Panel, which is itself a direct subclass of
Container) and a few basic components.
When the runtime environment needs to redraw the window displayed by the
above hierarchy, it starts with the highest component (the frame) and asks it to
redraw itself. It then works down the hierarchy to the bottom components, asking
each to redraw itself. In this way, each component draws itself before any com-
ponents that it contains; this process is handled by the windowing framework. The
user generally only has to redefine the paint method to change the way in which a
component is drawn.
476 41 GUIs in Scala Swing
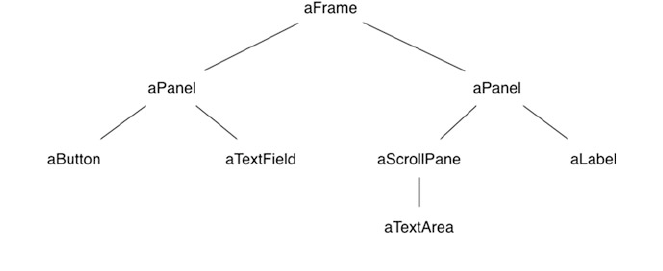
41.4 Scala Swing
Scala Swing is a Scala wrapping around the underlying Swing library of GUI
classes and types. This of course raises the question ‘What is Swing?’Swing is a
generic, platform-independent, windowing system originally developed for the Java
programming language. It allows you to write graphical programs that have (al-
most) the same look and feel, whatever the host platform. For example, the
graphical applications presented within this section of the book have been written
primarily on a Mac; however, they have been run on Macs, Windows machines of
various flavours and Linux boxes. This is because these are the machines available
to me, and depending on the time of day, I may be working on one or the other. I do
not need to worry about the host environment, only about the Swing.
There are a number of concepts that are important when considering Swing.
These are:
•All components in Swing are 100% implemented purely in byte codes (and are
referred to as lightweight). This means that the Windows (and their contents)
should look the same whatever platform they are on and should be easier to
maintain across different operating systems. As all graphical components are
“lightweight”, their appearance is controlled purely by the runtime code
(without the need for platform dependent peers—or platform dependent
libraries). In Swing, a separate user interface “view”component performs the
actual rendering of the component on the screen. This allows different views to
be plugged in. This in turn allows the idea of installing different “look and feel”.
This means that it is easier to deploy the same software on different platforms,
but with interfaces that match the interface manager on that particular platform.
This separation of view from the actual component is based on a modified
version of the Model-View-Controller architecture (described earlier in the Play
framework chapter).
Fig. 41.1 Component hierarchy for a sample window
41.4 Scala Swing 477
•Swing also provides a rich set of facilities for graphical user interfaces, including
trees, icons on buttons, dockable menus bars, menus with icons, borders and
improved support for fonts and colours.
However, the Scala Swing library is more than just a wrapping around the
original Swing library. It significantly simplifies the Swing API and the tasks that
the programmer must perform to create a user interface. In many ways, the Scala
Swing library is what the original Swing library should have been; lean, efficient
and simple to work with.
Whichever UI framework you choose to use, such toolkits greatly reduce the
problems that software vendors often face when attempting to deliver their system
on different platforms.
41.5 Scala Swing Packages
There are two key packages within the Scala Swing library.
•scala.swing is the package that contains the core types with which you will be
working, such as Button, ComboBox, EditorPane, FileChooser, FlowPanel,
MainFrame, RadioButton, ScrollPane.
•scala.swing.event package provides types used with the event handling
mechanism that underpins how a UI can react to user inputs (such as what to do
when a user clicks on a button). This package includes types such as
ButtonClicked, KeyPressed, MouseMoved, WindowClosing.
However, you will primarily work with the scala.swing package as this is where
the majority of the types you will need are defined. The reactor framework (dis-
cussed in the next chapter) is used to handle user input and is built on top of the
lower-level event framework (inherited from Java). This framework is also defined
within the scala.swing package.
The key classes within the scala.swing package are:
•Component. This is the base class for all user interface elements that can be
displayed within a Scala window. Components have properties such as whether
they are enabled or not, the font used with them, foreground colours and
background colours, borders and tool tips (text popped up and displayed to the
user if they hover the mouse over the component). Components also publish (or
fire) events that allow developers to react to these events (such as the component
being selected by a user). There are a large number of subtypes for Component
including various types of buttons, panels, fields, menus, tables.
478 41 GUIs in Scala Swing
•Container. This is a base trait for user interface elements that can act as con-
tainers of other UI elements. For example, a FlowPanel can contain a set of
other elements (such as button) organised across the panel. As well as
FlowPanel, BoxPanel, BorderPanel, MenuBar, ScrollPane, SplitPane, etc., are
all examples of containers.
•MainFrame. This class defines a frame that can be used as the top-level, main
application window that can contain other containers and components. When
the MainFrame is closed, then the UI application is terminated.
•SwingApplication and SimpleSwingApplication. These classes provide a set
of utility methods to handle starting up a UI application. SwingApplication is
the root class, and SimpleSwingApplication is its subclass. Most UI applications
will extend the SimpleSwingApplication class (e.g. instead of mixing in the App
trait). The subtype extending this class must implement the top method that must
return the top-level frame (e.g. MainFrame) to be used with this application.
The UI framework initialisation and initiation is done by the SimpleSwing
Application. If you wish to customise the behaviour of the start-up and shut-
down process, then you can override the shutdown method or extend the startup
method.
•FlowPanel. It is a panel (i.e. container) that organises its contents horizontally,
one after the other. If the contents do not fit in the current display, then the pane
will introduce a break and try on the next line. It is similar in effect to a JPanel
with a FlowLayout in Java Swing.
•BorderPanel. It is a panel (i.e. container) that organises its contents into discreet
locations, such as centre, top, bottom, left and right.
•Button provides the basic button type display and behaviour present in most
user interfaces.
•Menu,MenuBar and MenuItem. The components that can be used to construct
a menu across the top of a UI.
•ScrollPane a type used to wrap up other UI elements that need to be displayed
using a scrollable view. The view is controlled by a set of scroll bars.
•TextField and TextArea. Both are used to display textual information and may
be editable or not. A TextField is a single line display, and a TextArea is a
multi-line textual display. A TextArea should be displayed within a ScrollPane
if it is too large to display within the available space.
•Table. It provides a tabular display comprising rows and columns and
optionally a set of headings.
•ComboBox is used to allow a user to make a selection from a list of pre-defined
items.
•ListView is used to present a (non-editable) list of items.
41.5 Scala Swing Packages 479
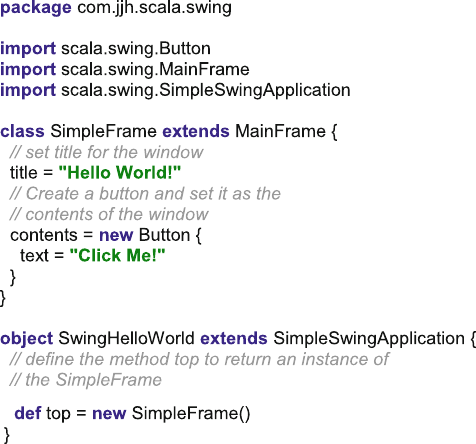
41.6 Swing Scala Worked Examples
This section presents a series of examples that explore a number of the concepts that
underpin the Scala Swing framework and illustrate how some of the key classes
presented above can be used.
41.6.1 Simple Hello World UI
The following listing provides a basic user interface containing a Button labelled
“Click Me!”and with a window title “Hello World!”. The application imports the
Button, MainFrame and SimpleSwingApplication types from the scala.swing
package. It then defines a class SimpleFrame that is a subclass of MainFrame. It
defines the title of the main frame and creates a new instance of the Button class.
The button will have the text “Click Me!”displayed. The instance of the button is
then used as the contents of the main display area of the frame.
The object SwingHellWorld extends the SimpleSwingApplication type and
defines the top method as returning an instance of the new SimpleFrame class.
When this SwingHelloWorld application runs, the main method defined by the
SimpleSwingApplication executes and sets up the windowing framework and calls
the top method to display the top most element of the UI. The result of executing
this application is shown in Fig. 41.2.
480 41 GUIs in Scala Swing
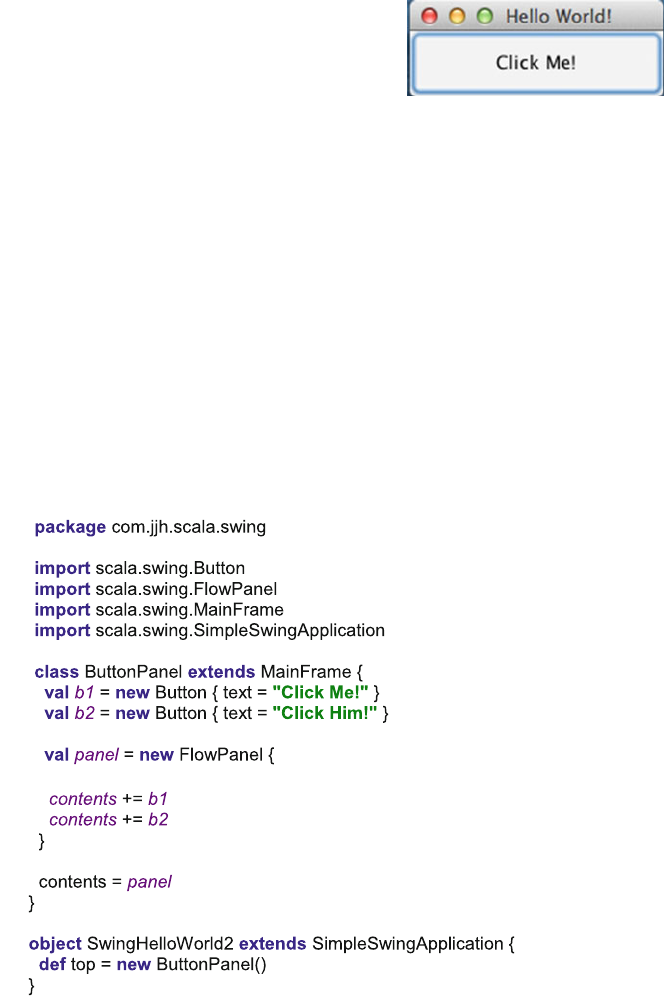
41.6.2 Panels and UI Layout
The example shown in the last section works as a simple user interface example; however,
the whole of the display is taken up with a single button. User interfaces are normally
comprised of multiple components displayed within a single frame. This is achieved in
Scala Swing using appropriate (potentially nested) containers as discussed earlier.
In this section, we will look at using a simple panel, a FlowPanel that allows
multiple components and/or contains to be contained within it. The result of exe-
cuting our program is shown in Fig. 41.3. The FlowPanel provides a flow-like layout
with user interface components being added to the contents buffer of the FlowPanel.
In the following listing, we create two buttons (b1 and b2). These buttons are
added to the contents of the FlowPanel when we create the panel. Notice that the
FlowPanel instance is then set as the content for the main frame’s display.
Fig. 41.2 Simple Hello
World UI
41.6 Swing Scala Worked Examples 481
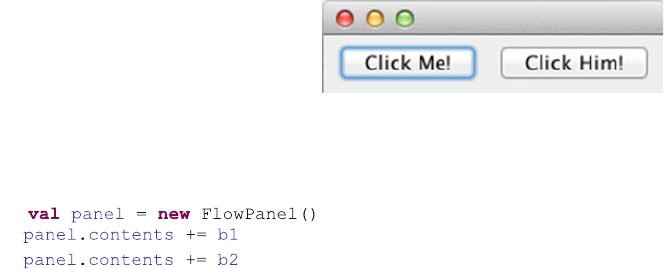
Note that we could of course have created the FlowPanel and then added the
buttons to the FlowPanel’s contents buffer at a later date, for example
You may be wondering at this point how the FlowPanel knew where to position
the buttons—we did not give it absolute Xand Ycoordinates.
The actual positioning of the components is handled by an object used by the
panel. This object is known as a layout manager. A layout manager is thus the
object that works with a graphical application and the host platform to determine
the best way to display the objects in the window. The programmer does not need to
worry about what happens if a user resizes a window and works on a different
platform or a different windowing system.
Layout managers help to produce portable, presentable user interfaces. There are
a number of different layout managers that use different philosophies to handle the
way in which they lay out components: FlowLayout, BorderLayout,
GridLayout. Note that if you are familiar with Java’s Swing library, then you
will note that in Scala the layout managers, that handle actually determining where
components are placed, are combined with the panels rather than being separate
entities. Thus, we have FlowPanel, GridPanel, BorderPanel, etc.
41.6.3 Working with a BorderPanel
FlowPanel is not the only panel type available to the Scala programmer. Another
type of panel is the BorderPanel. The BorderPanel possesses a layout manager that
has a concept of four outer points and a central point (labelled North, East, South,
West and Centre).
The panel is thus divided up as illustrated in Fig. 41.4. Of course, you do not
have to place components at all available locations. If you omit one (or more)
locations, the others stretch to fill up the space (except centre which depends on the
size of the window in which the BorderPanel is being used). The border panel
honours the height of the components in the north and south regions (but forces
Fig. 41.3 Using a FlowPanel
482 41 GUIs in Scala Swing
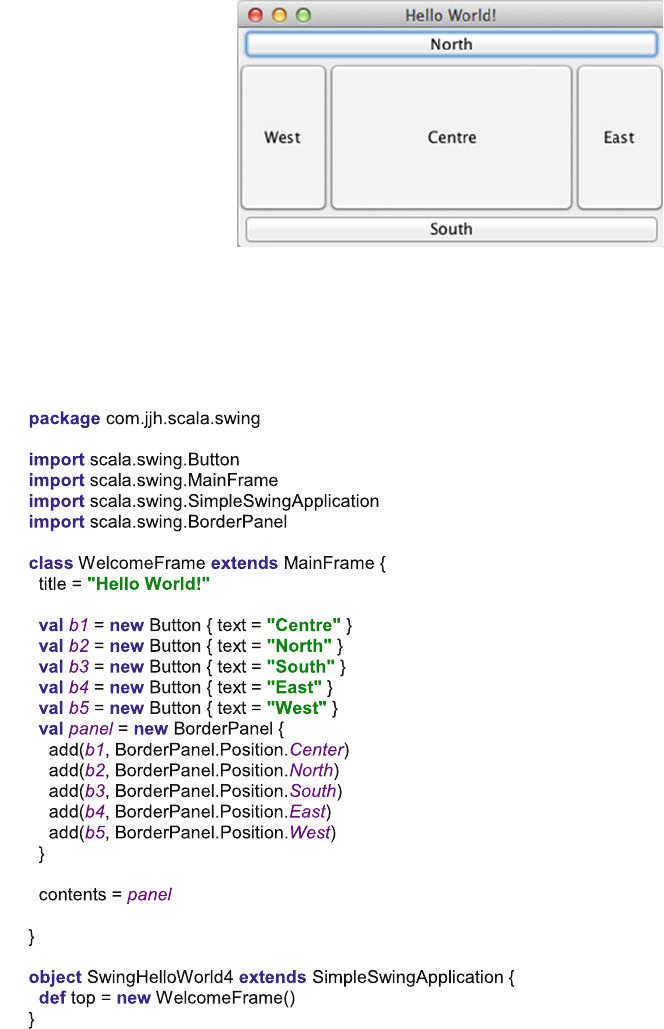
them to fill the region horizontally). In turn it honours the width of the components
in the East and West regions (but forces them to fill the available vertical space).
The centre component is forced to fill the remaining space (thus its preferred width
and height are ignored).
Fig. 41.4 Using the
BorderPanel in a UI
41.6 Swing Scala Worked Examples 483

In the above program, we create five buttons that are positioned within the
BorderPanel using the position constraints, Centre, North, South, Each and West.
41.6.4 Working with a BoxPanel
Yet another panel is the BoxPanel; this is similar to the FlowLayout except that it
can have a Horizontal or a Vertical orientation. In which case it either lays out
components across the screen or down the screen depending upon the orientation. It
therefore offers greater flexibility than the FlowPanel.
The following program uses the Horizontal orientation to create a display similar
in style to the FlowLayout. The display contains a button and a label and is shown
in Fig. 41.5.
484 41 GUIs in Scala Swing
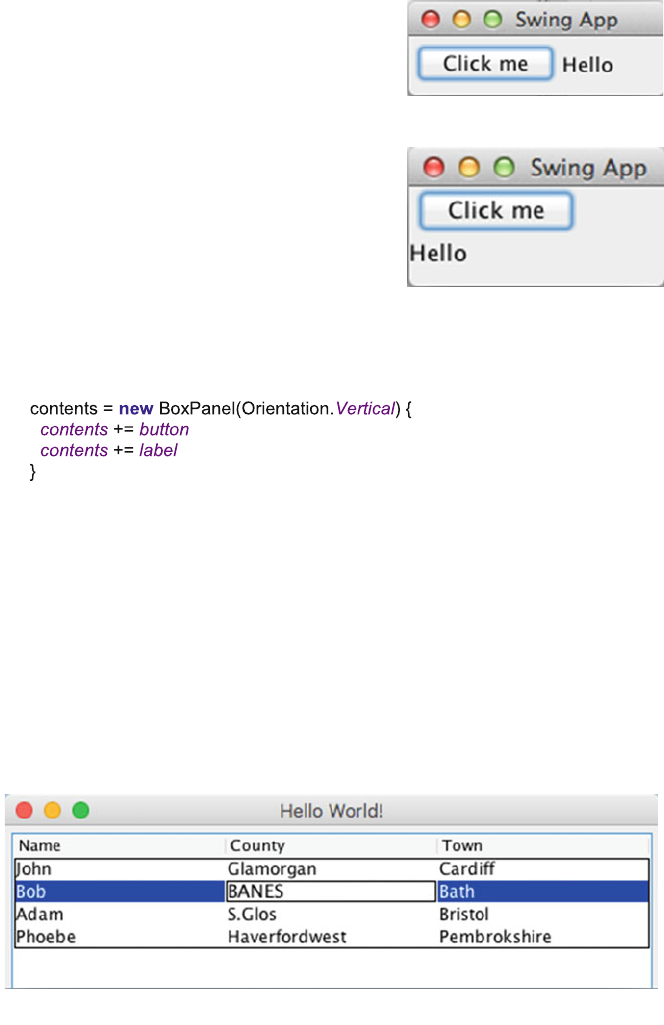
Note that we change the orientation of the BoxPanel such that it has vertical
orientation as shown below:
This results in the display altering as shown in Fig. 41.6. Now the button is
positioned above the label rather than beside it.
41.6.5 Displaying a Table
Another common user interface component is the Table. Tabes are user to present
tabular information using rows and columns. A simple example table is shown in
Fig. 41.7. This table has a row containing the headings (which are ‘name’,‘county’
Fig. 41.6 An alternative
orientation for the BoxPanel
Fig. 41.5 Using a BoxPanel
Fig. 41.7 Using a Table in a UI
41.6 Swing Scala Worked Examples 485
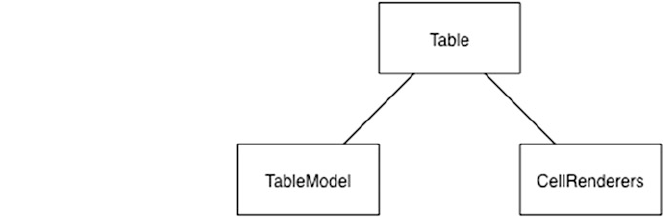
and ‘town’) and four rows with the actual data. Such tables can respond to user
selection, editing and ordering. However, in this example, it is a read only table that
cannot be altered.
To create a table, we use the scala.swing.Table class. This can be constructed
with an array of names and an array of arrays for the data. Strictly speaking behind
the table is a table model that holds the actual data (see Fig. 41.8). There are also
cell renderers that are used to determine how to display different types of data. In
the following listing, we are merely using two arrays as a very simple way of
initialising these models.
The following listing creates a new Table using the headers and rowData arrays.
The border property of the Table is set to be a LineBorder coloured in Black. This is
from the javax.swing.border package which is part of the underlying Java Swing
library that is being reused here. Note that the Colour Black is from the underlying
java.awt package that includes the Colour type.
Once the table is created, it added the FlowPanel which is used for the main
contents of the window. Note that the table is wrapped within a ScrollPane. This
provides any scrollbars for the table if they are required.
Fig. 41.8 Relationship
between Table, TableModel
and CellRenderers
486 41 GUIs in Scala Swing
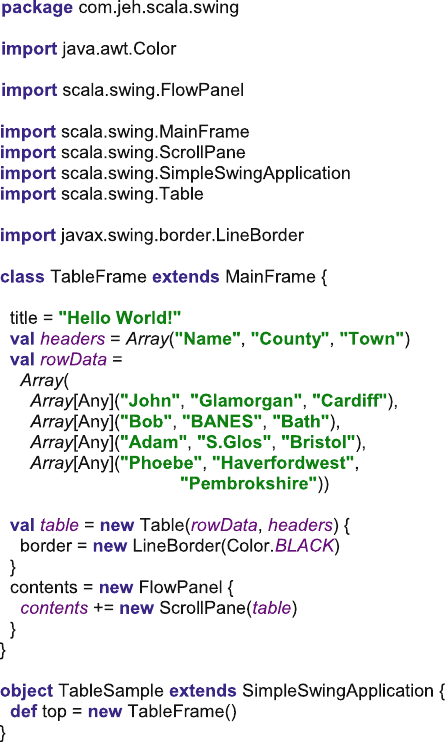
41.6 Swing Scala Worked Examples 487
Chapter 42
User Input in Scala Swing
42.1 Introduction
The last chapter looked at various different types of user interface component
available within Scala Swing. This chapter now looks at how user input, via those
components, can be handled.
42.2 Handling User Input
If you are familiar with the Java Swing event delegation model, then you will find the
Scala approach to handling user input, a great deal simpler. It is based on the idea of
using pattern matching within reactors to handle user input. Objects publish events
that are listened to by a list of reactors. A Reactor is a Partial Function that is defined
by the Type Reaction on the Reactions object to take an Event and return Unit.
If a reactor matches the event type and the source specified, then the associated
behaviour is invoked. This framework is based on the classes that emit events
mixing in the Publisher trait and classes that listen to publishers mixing in the
Reactor trait.
The Publisher trait defines the publish method, the listeners prop-
erty, and invokes the listenTo behaviour. The listeners property holds a list
of reactors that will react to the events raised by the source component. An event is
just an object containing information associated with the action that occurred. For
example, a ButtonEvent indicates the source object that the user clicked on,
whereas a MouseEvent may include the xand ycoordinates of the mouse when it
was clicked or moved. The publish method is defined as
©Springer International Publishing AG 2018
J. Hunt, A Beginner’s Guide to Scala, Object Orientation and Functional
Programming, https://doi.org/10.1007/978-3-319-75771-1_42
489

This sends the event ‘e’to all the members of the listeners list.
The Reactor trait defines two methods deafTo and listenTo and the
property reactions. The methods are defined as:
•def deafTo(ps: Publisher*): Unit
•Installed reaction will not receive events from the given publisher any longer.
•def listenTo(ps: Publisher*): Unit
•Listen to the given publisher as long as deafTo is not called for them.
For example, for an instance to listen to the event generated by a button we could write:
listenTo(`button`)
The reactions property is an instance of a subclass of the Reactions abstract
class. It defines a set of methods which allow the reactions held in the reactions list
to be processed. It also defines the += and −= methods that can be used to add or
remove reactors from the list of reactors:
•def +=(r: Reaction) Add a reaction.
•def -=(r: Reaction) Remove the given reaction.
An example of using the += method to add some reactors is given below:
reactions += {
case ButtonClicked(`b1`) => println("Hello World")
case ButtonClicked(`b2`) => println("North")
case ButtonClicked(`b3`) => println("South")
case ButtonClicked(`b4`) => println("East")
case ButtonClicked(`b5`) => println("West")
}
In this example, we have added five reactors to the reactions list that handle
behaviour on different buttons.
Thus to listen to user events on buttons, combo boxes, tables, menus, etc., it is
necessary to mix in the Reactor trait and to register yourself with the UI compo-
nents you wish to listen to. This is what the following examples do.
The first example relies on the fact that the MainFrame mixes in the Reactor
trait. This means that you can define the reactions to a button within the body of the
MainFrame itself. Also note that the MainFrame uses the listenTo method to
register itself with the button. The user interface generated by the code is shown in
Fig. 42.1.
Fig. 42.1 A button in a UI
490 42 User Input in Scala Swing
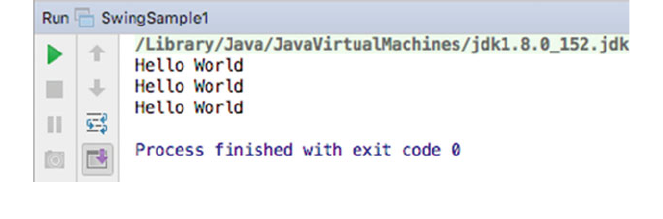
package com.jeh.scala.swing
import scala.swing.Button
import scala.swing.MainFrame
import scala.swing.SimpleSwingApplication
import scala.swing.event.ButtonClicked
class SimpleFrame extends MainFrame {
title = "Hello World!"
val button =new Button {
text = "Click Me!"
}
contents = button
listenTo(button)
reactions += {
case ButtonClicked(button) =>
println("Hello World")
}
}
object SwingSample1 extends SimpleSwingApplication {
def top = new SimpleFrame()
}
In the above code, the mainframe listens to the button for events that it is
publishing. When those events are received, the reactors in the reactions list are
checked in sequence to find one that will handle the event. In this case, the event is
the ButtonClicked event. Thus when the user clicks the button the String Hello
World should be printed out to the console. This is illustrated in Fig. 42.2.
One problem with this code is that the reactor is defined by the MainFrame.
While this works for a simple application is it unlikely that this approach would
work in a larger application. Therefore the following listing modifies this approach
and defines a separate class ButtonReactor that mixes in the Reactor trait
Fig. 42.2 Output from the reactor when button clicked twice
42.2 Handling User Input 491
and defines the reactions within itself. It is then instantiated and used by the
SimpleFrame (MainFrame). Note that the reactor must be registered with the
button by having the listenTo method called on it rather than on the
MainFrame:
package com.jeh.scala.swing
import scala.swing.Button
import scala.swing.MainFrame
import scala.swing.SimpleSwingApplication
import scala.swing.event.ButtonClicked
import scala.swing.Reactor
class SimpleFrame2 extends MainFrame {
title = "Hello World!"
val button =new Button {
text = "Click Me!"
}
val reactor =new ButtonReactor()
contents = button
reactor.listenTo(`button`)
}
class ButtonReactor extends Reactor {
reactions += {
case ButtonClicked(button) =>
println("Hello World")
}
}
object SwingSample2 extends SimpleSwingApplication {
def top = new SimpleFrame2()
}
The actual user interface and the output remain unchanged.
42.2.1 Scala Swing Actions
An action can be used to separate the behaviour associated with a button (or menu
item) from the instance of the button (or menu item) concerned. This can be useful
as it is common within a user interface to have several ways to access the same
operation, for example from a button bar, from a toolbar or from a menu item.
Using an action, this behaviour can be defined once (in the Action) and then reused
with each of the UI components that will be presented to the user. Thus an Action
492 42 User Input in Scala Swing
separates the definition of some behaviour to be applied, from the UI component
used to invoke that behaviour.
An action is defined using the Action type from the scala.swing package.
The action can take a title and the functionality to be invoked when that action is
used. Thus the following lines of code create an action with a title “Click Me”and
the function to apply when the action is invoked (in this case to print a message to
the console):
val myAction = Action("Click Me") {
println("I was clicked")
}
This action instance can now be used with a range of UI components such as
buttons and menu items. In the following listing we use this action with two
buttons, b1 and b2. Note that the action is used to initialise the action property of
the buttons. Thus both buttons will invoke the same println function when
clicked, wherever they are in the UI.
package com.jeh.scala.swing
import scala.swing.Action
import scala.swing.Button
import scala.swing.FlowPanel
import scala.swing.MainFrame
import scala.swing.SimpleSwingApplication
class ButtonPanel extends MainFrame {
val myAction =Action("Click Me") {
println("I was clicked")
}
val b1 =new Button { action = myAction }
val b2 =new Button { action = myAction }
val panel =new FlowPanel {
contents += b1
contents += b2
}
contents = panel
}
object SwingHelloWorld2 extends SimpleSwingApplication {
def top = new ButtonPanel()
}
42.2 Handling User Input 493
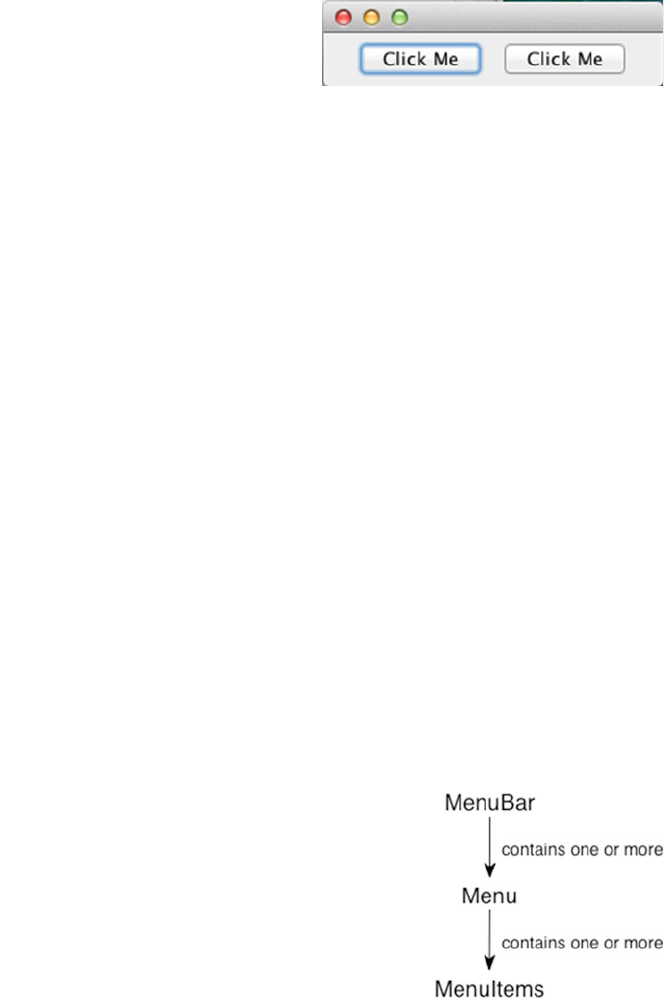
The end result of using the myAction with both buttons is that there is a single
definition of the action behaviour shared between the two button instances. Note
that actions can also be enabled or disabled and have icons, tooltips, etc.
The display generated from the above listing is shown in Fig. 42.3. The result of
clicking on either of the Click Me buttons is that the string “I was clicked”is
printed to the standard output.
42.2.2 Working with Menus
Many (most) applications will have some aspect of a menu bar, menus and items on
those menus. In Scala such user interface components are represented by instances
of the classes MenuBar,Menu and MenuItem. The relationship between these
components is illustrated in Fig. 42.4. These classes are all defined in the scala.
swing package.
As can be seen a MenuBar references (holds) one or more Menus. Menus in
turn reference one or more MenuItems.MenuItems can be either simple menu
items that may be selected, or menus in their own right. This is because the Menu
type extends the MenuItem type and thus we can create hierarchical menus.
The following listing illustrates how a simple MenuBar, with a single Menu
(file), can be created. The Menu file has a single MenuItem (Exit) that is defined
using an Action. Note that the MenuBar is used to set the menuBar property of
the MainFrame. The MenuBar has a contents property, which we are adding the
Menu to. Also note that the Menu has a contents property to which we are adding
the MenuItem (be careful not to confuse these two).
Fig. 42.3 A UI that reuses an
Action
Fig. 42.4 Relationship
between Menus, MenuBars
and MenuItems
494 42 User Input in Scala Swing
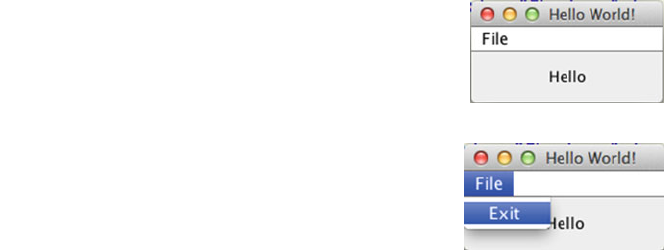
package com.jeh.scala.swing
import scala.swing.MainFrame
import scala.swing.SimpleSwingApplication
import scala.swing.Label
import scala.swing.MenuBar
import scala.swing.Menu
import scala.swing.MenuItem
import scala.swing.Action
class SimpleFrame extends MainFrame {
title = "Hello World!"
contents = new Label {
text = "Hello"
}
menuBar = new MenuBar {
contents += new Menu("File") {
contents += new MenuItem(Action("Exit") {
sys.exit(0)
})
}
}
}
object SampleMenuUI extends SimpleSwingApplication {
def top = new SimpleFrame()
}
The result of executing this program is illustrated in Figs. 42.5 and 42.6. The
first figure shows the basic MenuBar display with the File menu shown. The
second figure illustrates what happens when the user moves their mouse over the
File menu and selected the Exit Menu Item.
When the user selects the Exit option, as shown in Fig. 42.6, then the behaviour
defined by the Action in the earlier listing is invoked. In this case it is to call the
sys.exit(0) operation. This invokes the exit behaviour on the system with a
return code of ‘0’, which typically indicates that the application terminated
Fig. 42.5 A UI with a Menu
Bar
Fig. 42.6 Selecting the
‘Exit’Menu Item
42.2 Handling User Input 495
normally. Explicitly invoking the sys.exit operation is necessary as the main
method, which is usually used to control when an application terminates and only
used to initiate the display. After that, the main method terminates and the exe-
cution of the system is handed over to a UI thread (process). We must therefore be
able to terminate this process in a controlled manner; this is done using the sys.
exit operation.
42.3 A Simple GUI Example
In this section we present a very simple GUI example. An instance of this class
generated the window displayed in Fig. 42.7. This application performs the fol-
lowing functions:
•Displays the string “Hello”in a text field in response to the user clicking on the
Hello button.
•Displays the string “Goodbye”in a text field in response to the user clicking on
the Goodbye button.
•Exits the application in response to the user clicking on the Exit button.
It combines the layout panels and components presented in the last chapter, with
the event handling mechanism described above.
The components that comprise this user interface are illustrated in Fig. 42.8.
This shows that the buttons are organised (displayed by) a flow panel (which does
not itself have any visible presence). The strings are displayed in a text field, and a
label displays the copyright statement. These are all organised within a border panel
that is the top-level contents of the SimpleGUI MainFrame.
The class SimpleGui, see the listing below, first sets the title of the frame to be
“Simple GUI”. It then creates two buttons, which have a text label and a tooltip. It
then creates a new FlowPanel to which it adds two buttons. The program then
creates a non-editable field—note that the editable property is set to false after the
text field is created—this allows this property to change its value over time. It
finally creates a label, for the copyright string. This label uses a new font (the Ariel
font) and introduces a buffer to give a bit of spacing around the text using the
scala.swing.Swing utility type. The button panel, text field and label are
496 42 User Input in Scala Swing
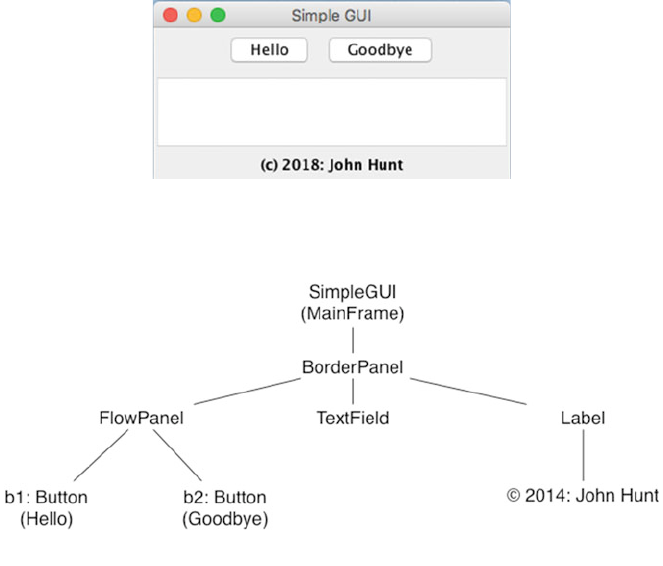
added to the border panel using the constraints Position.North,Position.
Center and Position.South, respectively. Note that we have imported
scala.swing.BorderPanel._ so that we only need to specify Position.
North rather than BorderPanel.Position.North which is easier to read.
Finally the window sets a default size using a new Dimension instance.
Fig. 42.8 Structure of simple GUI application
Fig. 42.7 A simple graphical application
42.3 A Simple GUI Example 497
text = "Hello"
tooltip = "Click to say hello"
}
val b2 =new Button {
text = "Goodbye"
tooltip = "Click to say goodbye"
}
// Set up panel for buttons (using a flow layout)
val panel =new FlowPanel {
contents += b1
contents += b2
}
// Create a non-editable text field and add that
val field =new TextField()
field.editable = false
// Create a label for the frame
val label =new Label() {
text = "(c) 2018: John Hunt"
border = Swing.EmptyBorder(5,5,5,5)
font = new Font("Ariel", Font.BOLD,12)
}
// Setup litensing to the buttons and reactions
listenTo(b1,b2)
reactions += {
case ButtonClicked(`b1`) => field.text = "Hello"
case ButtonClicked(`b2`) => field.text = "Goodbye"
}
contents = new BorderPanel() {
// Add the button panel to the frame
add(panel, Position.North)
// Add the text field to the centre
add(field, Position.Center)
// Add the label to the bottom of the display
add(label, Position.South)
}
// Resize the window
size = new Dimension(300,150)
}
object SampleGui extends SimpleSwingApplication {
def top = new SampleGui()
}
package com.jeh.scala.sample
import java.awt.Font
import java.awt.Dimension
import scala.swing._
import scala.swing.BorderPanel._
import scala.swing.event.ButtonClicked
class SampleGui extends MainFrame {
title = "Simple GUI"
// Set up the buttons
val b1 =new Button {
498 42 User Input in Scala Swing
Note that the two buttons are listened to and thus we define two reactors to
handle what should happen when the user clicks on a button. In this case we set the
field.text property to the appropriate string. You could have a different con-
troller for each button. In such a situation, you do not need to test to see which
button generated an event (thus eliminating the case pattern matching statement
that selects the actual behaviour to perform).
42.3 A Simple GUI Example 499

Chapter 43
Scala Build Tools
43.1 Introduction
There are many ways in which a Scala application can be built. These include the
REPL loop and automated compilation within an IDE such as the Eclipse-based
Scala IDE. However, neither of these is suitable for centrally building large
applications as might be found within many commercial organisations. The most
popular build environments for Scala are Maven and SBT. In this chapter, we will
briefly examine both so that you have a flavour of both tools and the potential
benefits and drawbacks of each.
43.2 Why We Need a Build Tool
The first question to consider is why we need a build tool in the first place. In this
book, we have been compiling our Scala applications using the IntelliJ IDE
although we could have compiled them from the command line or used the
Scala REPL interpreter. However, many applications are comprised of many parts,
all of which need to be processed in the appropriate way and package as required.
For example, many Web applications are made up of multiple components:
•HTML files and image files
•PHP scripts
•Java or Scala services
•The libraries used by Scala and Java
•Configuration files
•Database scripts
•Property or metadata data files
©Springer International Publishing AG 2018
J. Hunt, A Beginner’s Guide to Scala, Object Orientation and Functional
Programming, https://doi.org/10.1007/978-3-319-75771-1_43
501
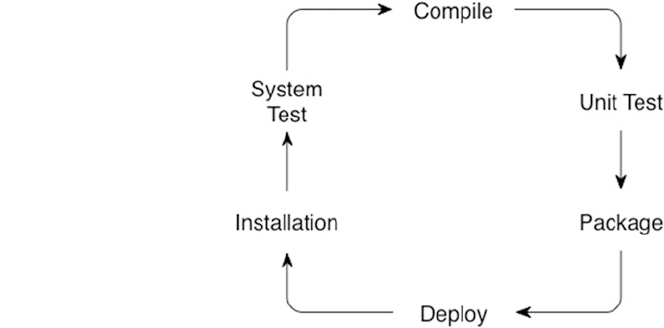
Multiple people may develop all of these elements at different times and on
different machines. In addition, the process of building a project may require several
steps or involve different phases, such as compiling the code, testing, the code,
packaging the system up as required by the target platform, installing it on that
platform and deploying it into the target runtime environment. This is illustrated in
Fig. 43.1.
These steps must be repeatable and must bring together a diverse range of
elements.
As mentioned before we could, of course, use our favourite IDEs or write our
own build scripts; however:
•You can build your projects manually but this is tedious and error-prone.
•You can use IDEs like Scala Eclipse. This approach is easy, but not very
portable to server environments, and requires each person to build their part
independently of others.
•You can write scripts to automate the process using tools such as Ant. This
approach does have benefits to commend it; however, a great deal of time can be
spent on designing, testing and maintaining the scripts.
Another approach is to use a dedicated build tool such as Maven or SBT. Both
these tools come with useful internal or default knowledge about different types of
projects, how to build them (for Java and Scala) and what constitutes the normal
build cycle for different types of applications.
43.3 Maven
Maven is an industry standard project build tool that understands project lifecycle
as well as the steps that make up such a lifecycle (see http://maven.apache.org).
Fig. 43.1 Build cycle for
applications
502 43 Scala Build Tools
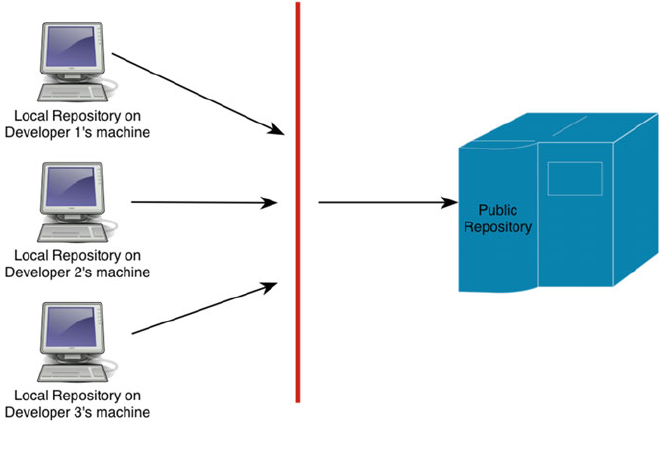
Maven was originally designed for the Java programming language but is
equality applicable to Scala and thus is very widely used within industry.
Maven is a convention over configuration-based system. This means that if you
follow the standard conventions then you do not need to explicitly specify addi-
tional information. For example, if you are creating a Web application then as long
as you follow the conventions, Maven will know where to find the elements that
make up a Web application and can package them appropriately when asked to
build the system. This greatly reduces the amount of project set-up and manage-
ment required. However, the defaults are primarily oriented towards Java appli-
cations and thus for Scala we need to indicate that we are working with Scala and
thus there are additional configurations required (although in practice these can be
provided by a Maven archetype—a type of template that provides defaults for
different types of projects).
The other major feature of Maven is its ability to handle the dependencies that
applications have to libraries (and additionally the transitive dependencies that these
libraries themselves have). Maven does this using dependency information asso-
ciated with the type of the project and the specific libraries used by the developer.
To access the definitions for these libraries it uses a dependency framework that can
download libraries from a central repository. This idea is illustrated in Fig. 43.2.
When a developer runs a Maven command, Maven checks to see if it is necessary to
access a particular library. If that is required it will look in a number of predefined
repository locations and access the first that it finds.
Fig. 43.2 Local versus remote repository structure
43.3 Maven 503
Maven also understands the concept of versioning of libraries and thus it can
distinguish between the latest release of a library as well as previous releases of that
library (such as release 1, 2 or 3) and access an appropriate version.
43.3.1 Maven Repositories
The concept of a repository is very important within Maven, and there are two
flavours of repository as shown in Fig. 43.2. These are remote and local
repositories:
•Remote repository. A remote repository is accessed over a network and may be
hosted internally to an organisation and/or externally on the Internet. The central
Maven repository can be viewed via a browser at http://mvnrepository.com.In
many cases an organisation will have their own version either to control the
library versions used or to improve performance.
•Local repository. A local cache of downloaded artefacts, libraries and latest
builds is maintained on each developer’s machine. Maven first checks locally
before trying to download a library—thus reducing the overhead of library
access.
The use of repositories and library version information is one of Maven’s biggest
benefits.
43.3.2 The Maven POM
The core concept within Maven is the Project Object Model or POM (and example
is shown in Fig. 43.3). The POM is actually an XML file that is used to tell Maven
what type of project is being created and to provide Maven with any additional
configuration information that cannot be deduced using the convention over con-
figuration model.
The POM contains detailed metadata information about the project, including
•Organisational information (such as your group Id which is often your organ-
isation’s domain in reverse) and project-specific information such as the name of
the project and the version of the project being built.
•Dependencies such as libraries being used within the project. For example,
ScalaTest is a common library to specify.
•The type of project being constructed such as a stand-alone application, a Web
application, a service.
•Application and testing resources such as data or configuration files.
504 43 Scala Build Tools

The POM file can also be used to override any of the default assumptions made
by Maven but this is often not required.
The Maven conventions not specified in Fig. 43.3 include the location of the
source code and the test code, the locations of the repositories containing the
libraries, the steps involved in constructing a stand-alone application, etc. These are
all defaulted. For example, Maven assumes that all source code is found in the
following locations:
•src/main/java
•src/main/test
This is why it is common to find such structures in many other (non-Maven)
projects.
Of course, looking at the above directories you will note that they specify java in
the path; we are working with Scala and thus this is one of the things that must be
changed (or at least added) if we are to use Maven to build a Scala application. This
is considered in the next section.
Fig. 43.3 Simple Java POM
43.3 Maven 505
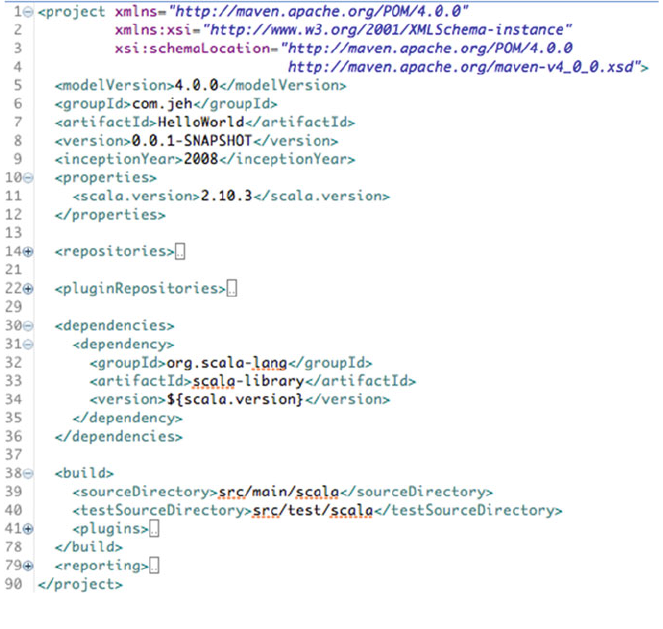
43.3.3 Scala and Maven
To use Maven with Scala we need to add some additional information to the project
POM file. We need to indicate that we are using Scala and that location of our Scala
code will not be under Java. In Fig. 43.4 we add a dependency specifying that we
are using Scala and specify that the Scala source code can be found in:
•src/main/scala
•src/test/scala
Note that this does not stop us having multiple source directories under src/main
and src/test, and it is not uncommon in projects that use multiple languages to have
a structure such as:
•src/main/java
•src/main/scala
•src/main/javascript
Fig. 43.4 A Scala configuration for a Maven POM file
506 43 Scala Build Tools
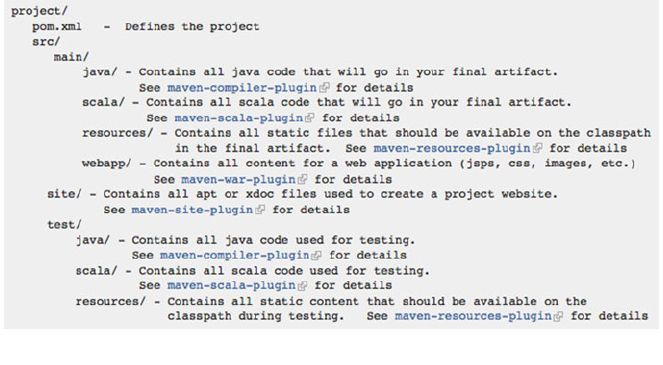
•src/test/java
•src/test/scala
•src/test/javascript
Thus the final default project structure for such an application may be modified
to include both a Java and a Scala root directory within the main and test paths. This
is illustrated in Fig. 43.5.
The dependency entry that specifies that we are using Scala indicates the groupId
for Scala (essentially the Scala organisation’s domain) and the artifactId (the name
of the library) followed by the version. In the POM file the version is indicated by a
Maven property scala.version, which is set at the top of the file. This means that it
is easy to find and change the version of Scala being used—this is a common idiom
in Maven files. The end result is that the actual dependency is as shown below:
<dependency>
<groupId>org.scala-lang</groupId>
<artifactId>scala-library</artifactId>
<version>2.10.3</version>
</dependency>
We must also indicate where to find the Scala libraries if they are not available
within the main Maven repository. For a Scala project, Maven must be told where
to find the Scala libraries. This may occur if you wish to use a non-standard or
milestone version of Scala. In our case we are also adding the Scala tools repository
as this provides some bridging tools between Maven and Scala:
Fig. 43.5 Scala Maven project structure
43.3 Maven 507
<repositories>
<repository>
<id>scala-tools.org</id>
<name>Scala-Tools Maven2 Repository</name>
<url>http://scala-tools.org/repo-releases</url>
</repository>
</repositories>
43.3.4 Maven Lifecycle Commands
The same build lifecycle commands can be used whatever the project is (as Maven
understands what they mean relative to that type of project), and thus we have the
following available:
•validate—validate the project; check it complies with the rules for that type of
project.
•compile—compile the source code into .class files.
•test—test the compiled source code; run the tests defined within the src/test
directory.
•package—package in distributable format, e.g. jar
•install—install the package into the local repository
•deploy—copies the final package to the remote repository for sharing with other
developers and projects.
If you are using an IDE, such as the Scala IDE, then you can use a Maven plugin
that will help with creating projects, issuing Maven commands, finding depen-
dencies, etc. For example, using the New Maven Project wizard with the Scala IDE
displays a Maven archetype selection dialog. A Maven archetype is essentially a
definition or template for a particular type of project. There are archetypes for
Web-based applications, archetypes for particular frameworks and a Scala arche-
type (as shown in Fig. 43.6).
The end result of creating a new project in this way is that the default Scala
Maven project structure is created as shown in Fig. 43.7.
43.4 SBT
Although Maven was intended to simplify the definition and construction of
applications, it can seem somewhat complex for very simple applications. As a
consequence there have been initiatives to further simplify the project definition and
build process. One such initiative is the Simple Build Tool, known as SBT for
short.
508 43 Scala Build Tools
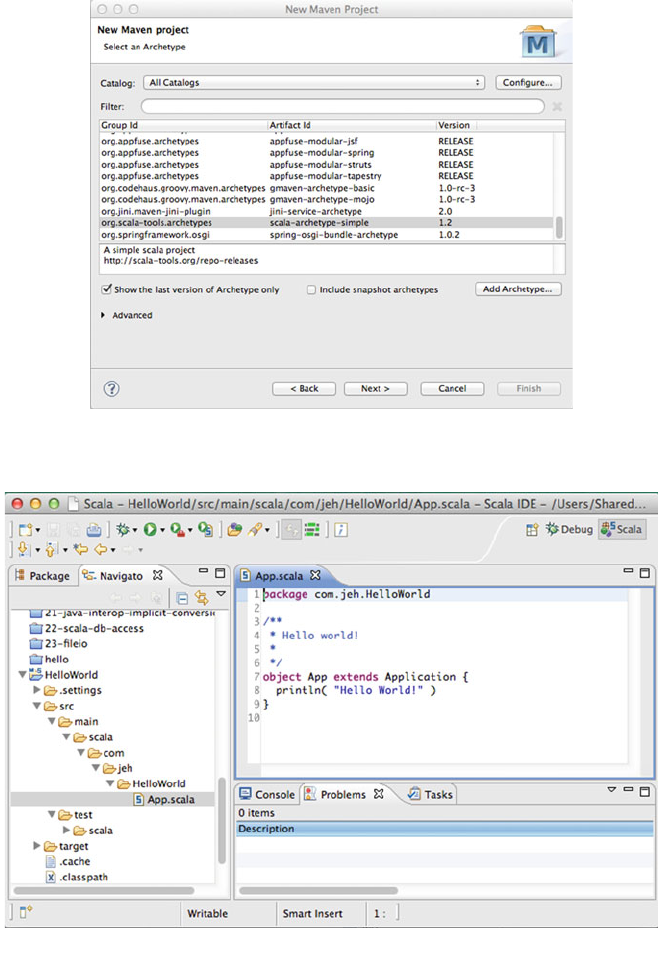
Fig. 43.6 Selecting the Scala Maven archetype
Fig. 43.7 A Scala Maven project in the Scala IDE
43.4 SBT 509
SBT is an Open Source build system for Scala (and for Java although it was
originally designed for, and is implemented in, Scala). The key features of the
SBT are:
•Minimal configuration for simple projects,
•Support for Scala and (many) Scala Test frameworks,
•Build tasks written in Scala DSL,
•Dependency support via Ivy. Ivy is a dependencies management system that
handles the version of, and dependencies between, libraries,
•Integration with Scala interpreter.
It is used in many Scala projects including in the construction of Scala itself. It
aims to simplify the build process to allow easy creation, compilation and
deployment of Scala-based applications.
43.4.1 Creating an SBT Project
To create a project using SBT you need to take the following steps:
•Install SBT and create a script to launch it.
•Create a project directory with source files in it.
•Create your build definition.
SBT can be downloaded from the main SBT home page (http://www.scala-sbt.
org)—there are a number of ways in which it is distributed but the simplest in many
cases will be to download the sbt.zip file. Once you extract the SBT content into an
appropriate location you will need to configure it for your environment—see the
guidance on the SBT download page for your platform.
By following the SBT conventions we can get started by ensuring that:
•Sources in the base directory
•Sources in src/main/scala or src/main/java
•Tests in src/test/scala or src/test/java
•Data files in src/main/resources or src/test/resources
•jars in lib directory
By default, SBT will build projects with the same version of Scala used to run
SBT itself.
SBT provides an interactive mode (or console) in which you can use the SBT
console to issue a series of commands and control the build process. Using the sbt
command without any options allows the user to enter the interactive SBT console.
We will use SBT to create a new project via the SBT console. To do this we can
use the np (new project) SBT plugin; prior to version 0.13 of SBT you could create
a default project directly using SBT; however, it is now necessary to use the np
plugin (see the np site for directions on how to do this). This is indicated in
510 43 Scala Build Tools

Fig. 43.8. When issuing the np command from within the SBT console, it is nec-
essary to provide the information for the name of the project and your organisation,
etc. The actual template structure follows that of Maven described earlier.
Once we have created a new project, we can now place our application code
under the src/main/scala directory structure and place our tests under the src/test/
scala structure (as shown in Fig. 43.9). The resources directory is for data files,
property files, etc., that might be used with our application.
Although the aim of SBT is that there is little or no configuration required for
simple projects, there are two ways of configuring SBT. The two approaches are the
light configuration and the full configuration.
The light configuration approach is more akin to Ant (another Java build tool),
which is an imperative approach to the definition of a build. That is, the light
approach allows you to specify what constitutes the elements that comprise the
version of the system to build explicitly but using a lightweight syntax.
Figure 43.10 illustrates the SBT configuration file created for our new project
earlier.
The build.sbt file is also where we would place any library dependency infor-
mation for our project. For example,
Fig. 43.8 Creating a project using SBT
Fig. 43.9 Project structure
43.4 SBT 511
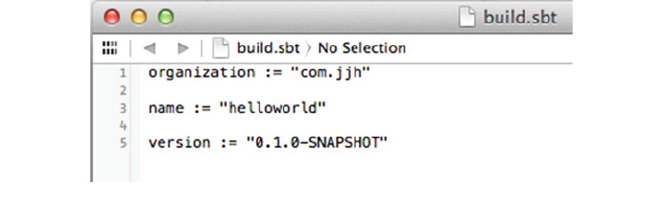
// Set the project name and version
name := "my-project"
version := "1.0.0"
// Add a single dependency, for tests.
libraryDependencies += "junit" % "junit" % "4.8" % "test"
// Add multiple dependencies.
libraryDependencies ++= Seq(
"net.databinder" %% "dispatch-google" % "0.7.8",
"net.databinder" %% "dispatch-meetup" % "0.7.8" )
This specifies ‘my-project’as the name of the project; that it is version 1.0.0; and
that it is dependent on the JUnit library as well as two additional libraries.
The full configuration approach is essentially a Scala program implemented
using the SBT DSL for defining the build process. As such you can write almost
anything in the full configuration. However, the DSL makes it easier to specify that
common tasks are to be performed. An example of part of a full configuration file is
shown in Fig. 43.11. As can be seen from this example, it captures similar infor-
mation to the simple build.sbt file but does it in terms of Scala objects.
43.4.2 SBT Lifecycle Commands
In a similar manner to Maven, SBT can be used to issue a series of build commands
such as
•clean Deletes all generated files (in the target directory).
•compile Compiles the main sources (in src/main/scala and src/main/java
directories).
•test Compiles and runs all tests.
Fig. 43.10 SBT build.sbt configuration file
512 43 Scala Build Tools
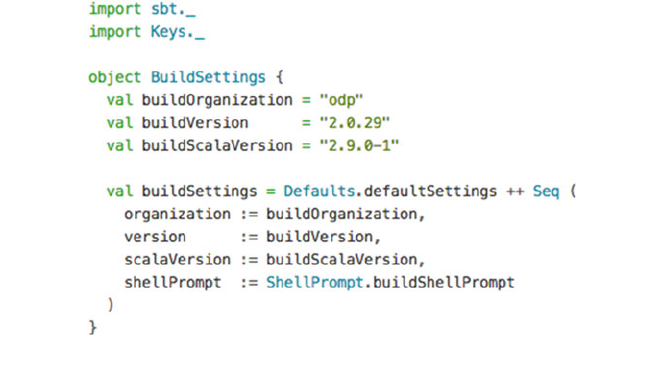
•console Starts the Scala interpreter with a classpath including the compiled
sources and all dependencies. To return to sbt, type: quit, Ctrl+D (Unix), or Ctrl
+Z (Windows).
•run <argument>* Runs the main class for the project in the same virtual
machine as sbt.
•package Creates a jar file containing the files in src/main/resources and the
classes compiled from src/main/scala and src/main/java.
•help <command> Displays detailed help for the specified command. If no
command is provided, displays brief descriptions of all commands.
However, SBT can be used with Eclipse as an underlying tool. This requires the
installation of the SBT plugin in a similar manner to the installation of a Maven
plugin.
Online References
Ant home page http://ant.apache.org/
Maven home page http://maven.apache.org/
Maven and Scala http://www.scala-lang.org/node/347
Maven Repository http://mvnrepository.com/
Simple Build Tool (SBT) http://www.scala-sbt.org
SBT and Eclipse https://confluence.dev.bbc.co.uk/display/linkeddata/Cheat+sheet
+for+using+Eclipse+to+develop+Scala+applications+on+the+sandbox
SBT np plugin (for new projects)—https://github.com/softprops/np
Fig. 43.11 Part of a Scala definition for a full configuration file for SBT
43.4 SBT 513

Chapter 44
Scala & Java Interoperability
44.1 Introduction
In this chapter, we will look at the interoperation of Java and Scala. Both Java and
Scala are JVM byte code languages. That is, they both compile to the byte code
language that is understood by the JVM. The byte code language of the JVM was
originally designed to be the compiled form of Java and was what the Java Virtual
Machine executed. However, things have evolved such that today the JVM is a
virtual environment for executing byte code languages. In fact, there are now
several languages that can be compiled to JVM byte codes including Java, Groovy,
Clojure, Jruby, Jython, JavaScript, Ada, Pascal as well as Scala. A common term
used for these languages is that they are all byte code languages.
As such at the byte code level, there is no difference between Java and Scala—
they are just different starting points for the same destination. Therefore, at runtime
it is only the byte code that executes—there is no such thing as Java or Scala. Scala
can thus interoperate with other byte code languages.
44.2 A Simple Example
As a simple example, consider the Scala Person shown below:
package com.jjh.java
class Person (name: String="John",var age:Int=47)
This class compiles to a Person.class file just as any other byte code
language. This means that it can be used within Scala or Java. The following code
sample illustrates the use of the Scala class Person within a Java application:
©Springer International Publishing AG 2018
J. Hunt, A Beginner’s Guide to Scala, Object Orientation and Functional
Programming, https://doi.org/10.1007/978-3-319-75771-1_44
515
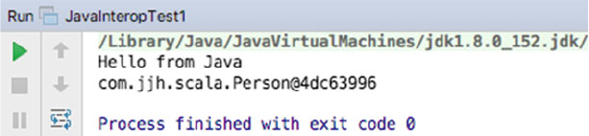
package com.jjh.java;
/
**
* This is a standard Java class with a main method.
* But note that Person is a Scala class.
*
* This illustrates the interop between Scala and
* Java.
*/
public class JavaInteropTest1 {
public static void main(String [] args) {
System.out.println("Hello from Java");
Person p = new Person("Granny",85);
System.out.println(p);
}
}
Notice that as far as Java is concerned that this is a class Person with a
constructor that takes a String and an Integer. Also notice that both the Scala
class Person and the Java class JavaInteropTest1 are in the same package (com.
jjh.scala). This works because from a byte code point of view, there is no difference
between a Scala class Person in the package com.jjh.scala and a Java class
Person in the same package—they are both byte classes in the package com.jjh.
scala.
The output from this application is given blow in IntelliJ IDEA:
One thing to note is that the Scala class Person defines some slightly strange
(from a Java perspective) methods for the property age. It defines the age() accessor
method (not getAge) and the age_$eq method for setting the new value of age (as
it’s a var):
System.out.println(p.age());
p.age_$eq(55);
System.out.println(p.age());
The output of these lines is:
85
55
516 44 Scala & Java Interoperability
44.3 Inheritance
It is possible to inherit between Java and Scala classes. For example, in the fol-
lowing, Employee is a Java class while Person is the Scala class presented in the
previous section. The rules for constructors are maintained, and the Java class can
call the superclass constructor.
package com.jjh.java;
/
**
* This is a Java class that extends a Scala class!
*
* Note the call to super for the parent class
* constructor.
*/
public class Employee extends Person {
private String company;
public Employee(String name, int age, String company) {
super(name, age);
this.company = company;
}
public String toString() {
return super.toString() + ", " +company;
}
}
44.4 Issues
There are of course some issues related to interoperating between Scala and Java.
The first one of which is that Scala requires a Java 8 or newer runtime to operate
within. The other is that Scala has some concepts that Java has no knowledge of
such as objects,traits and functions as first-class language elements. This last may
change with the future versions of Java. In turn Scala has no concept of an Interface.
Therefore, if care is not taken, problems may arise.
In general, Scala to Java interoperability is relatively seamless as Scala builds on
top of Java. However, Java to Scala can sometimes be problematic. The most
common set of issues are:
•Java has no equivalent of Traits.
•Functions are object values.
•The Scala-type system is more complex.
44.3 Inheritance 517

•Scala has no notion of static, so can’t access statics in the same way as Java
code.
•Java doesn’t understand Scala’s companion module.
•Java sees Scala objects as a final class with statics.
44.4.1 Scala Objects
Of course, the underlying byte code representation also lacks many of the features
of Scala presented above. Scala therefore often generates more than one byte code
class or type for a single Scala concept. This is illustrated below for a simple test
Scala object.
The following code generates two .class files:
package com.jjh.java
object Test {
val name ="MyName"
def print = println(s"Print $name")
val func = () => println("Printer function $name")
}
The two .class files are Test.class and Test$.class:
This can make it difficult to decide how to treat a Scala concept from the Java
side. It can be useful to examine what these class files contain in order to under-
standing the Java view of these structures. This can be done using the javap pro-
gram. javap is the class file disassembler distributed with the standard Oracle SDK.
The result of using the javap program with the Test examples is shown below:
518 44 Scala & Java Interoperability
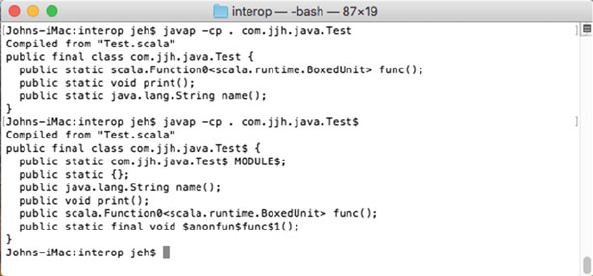
What this shows is that the Scala object Test is represented at the byte code level
by a public final class Test and a second public final class Test$.
How would you then call the Scala object Test from java? From the javap
de-compilation, you have a choice of the Test class with a static method print and
the Test$ class with a non-static method print. In fact, in this case from Java we
can just treat the object Test as if it was a statically defined entity. This is because
the static method on a final class means that we cannot extend the class Test, and
then we can call the method without needing to instantiate the class. Thus, we can
just write:
package com.jjh.test;
import com.jjh.java.Test;
public class JavaTest {
public static void main(String[] args) {
Test.print();
}
}
Which is semantically the closest we can get in Java to the concept embodied in
the Scala Object.
44.4.2 Companion Modules
Companion modules are another point of conflict in that Scala has the concept of a
class and an associated companion object (which must have the same name as the
class and be defined within the same file). For example,
44.4 Issues 519
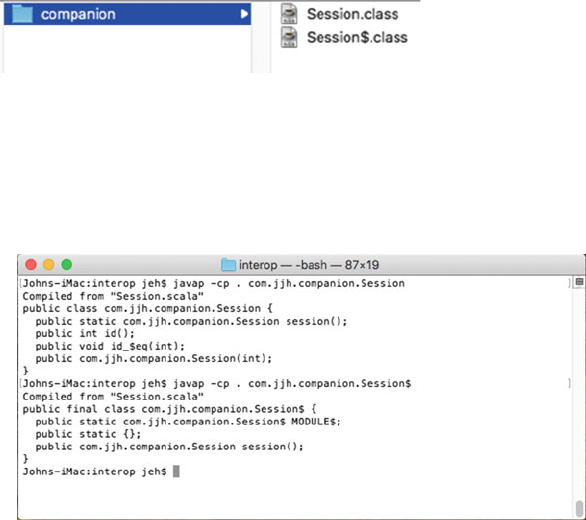
package com.jjh.companion
/
**
* The Companion class
*/
class Session(var id: Int) {
}
/
**
* Its Companion (singleton) objec
t
*/
object Session {
private var counter =0
def session() = {
counter =counter +1
new Session(counter)
}
}
This listing when compiles generates the classes shown below:
If we use the javap de-compiler again on these classes, then we can see that the
byte code Session class combines elements of both the Scala Session class and the
Scala Session object. However, note that the Session is not final and thus can be
extended! This is shown below where the javap program is used to de-compile both
the Session and the Session$ classes.
If you need to access the Session from within Java code, then this can be done as
the Session just looks like a normal Java class with a static factory method:
520 44 Scala & Java Interoperability

package com.jjh.companion;
public class JavaTest {
public static void main(String[] args) {
Session session = Session.session();
System.out.println(session.id());
}
}
Indeed you can even be able to extend it. For example,
package com.jjh.companion;
public class ExtendedSession extends Session{
public ExtendedSession(int id) {
super(id);
}
}
44.4.3 Traits
Scala has Traits—these are a type within the Scala-type system, and they are neither
abstract classes nor are they Java interfaces. Java does not have Traits although it
does have interfaces and abstract classes. There cannot therefore be a direct map-
ping from a Scala trait to a Java concept. However, this is also true of the under-
lying byte code representation—it does not have a concept of a Trait. This raises the
question what happens when a trait is defined at the byte code level? For example,
given the trait Model shown below, how is this represented at the byte code level:
p
ackage com.jjh.traits
trait Model {
def info(x: String):String
}
If you examine the .class files generated for this type, you will see that the single
trait Model is represented by a single .class file Model.class (Fig. 44.1).
Fig. 44.1 Representing a
trait via two class files
44.4 Issues 521
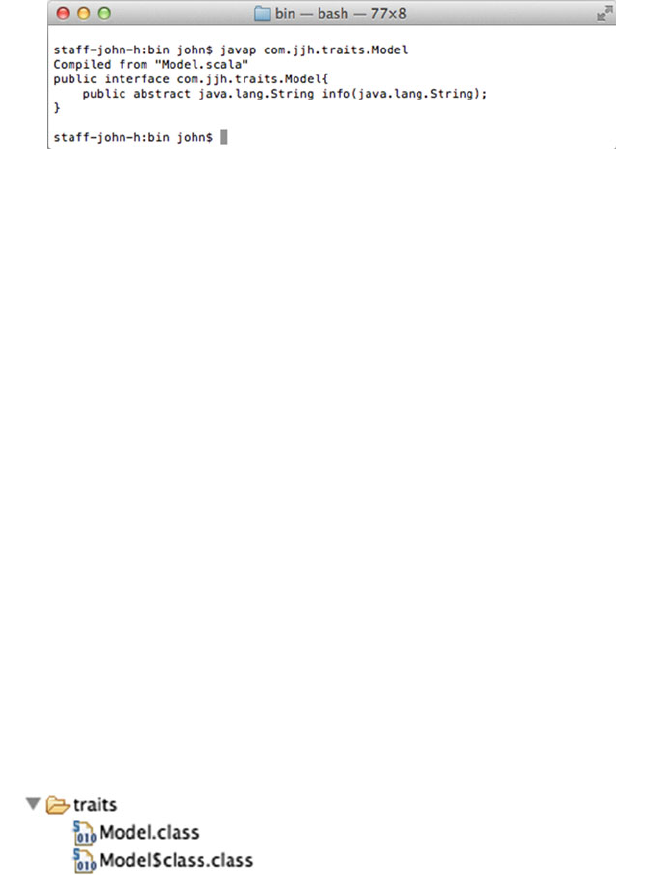
The file Model.class defines an interface containing a single public abstract
method that takes a string and returns a string. This can be implemented by Java
class who wish to implement the Trait (Fig. 44.2).
However, what happens if the trait defines actual behaviour and data. This is the
biggest area of change in terms of Java interoperability from pre-Scala 2.12 to
post-Scala 2.12. Prior to Scala 2.12, a trait was represented as an interface and a
class that held any concrete implementations defined in the trait.
In Java 7 and older versions of Java, interfaces were only allowed to define
method signatures (abstract methods) and static final constant values.
The following listing defines a modified version of the Model trait that contains
behaviour (the print method) and data (the title variable):
p
ackage com.jjh.traits
trait Model {
var title = "CS123-10"
def info(x: String):String
def print = println("Hello World")
}
This is used to result in two class files being generated as shown in here:
In this older version of Scala, the Model.class file contained an interface defi-
nition Model with a single public abstract method info. The Model$class.class
file contained an abstract class called Model$class that extends the java.lang.Object
type and defined two static methods one info and the other $init$ both of
which take a Model as their parameters.
Fig. 44.2 Representing a simple trait in byte codes
522 44 Scala & Java Interoperability
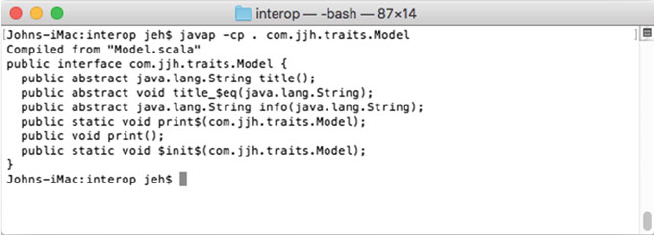
This made interoperability of such traits with Java difficult!
However, Java 8 introduced new features to interfaces that allow interfaces to
have concrete methods defined. This means that Scala 2.12 (and newer) is able to
compile a trait to a single interface class file.
This is shown below:
This means that from the Java world, a Trait appears as an interface to
implement.
However, there are still a couple of things to bear in mind. The first is that the
interface that has been generated has three abstract methods that must be provided
by any Java class that wish to implement this Interface. The first of these is fairly
obvious; the method info(x: String) is an abstract method in the Scala trait is
therefore an abstract method in the Java interface.
However, the other two methods are
String title() and
void title_eq(String)
Neither of these methods I listed in the Scala trait—instead there is a var
property called title. What has happened here is that the Scala compiler converts a
val or a var into 1 or two methods (one for reading and one for writing) the value.
As this is a var, there are two methods required. However, no default imple-
mentation is given and thus the subclass must provide appropriate implementations.
In this case, however, the var is initialised to the string “CS123-10”.Itis
therefore also necessary to provide a way to initialise such properties. This is
provided by the slightly strangely named method:
public static void $init$(com.jjh.traits.Model)
This method can be invoked in the subclass (e.g. in the constructor) to initialise
any properties defined in the Trait. This is done via reference to the interface name:
44.4 Issues 523
Model.$init$(this);
The end result is that the class implementing the Model interface in Java looks
like this:
package com.jjh.traits;
public class Foo implements Model {
private String _title;
public Foo() {
Model.$init$(this);
}
public String info(String x) {
return "title: " +this.title() + " with " + x;
}
public String title() {
return this._title;
}
public void title_$eq(String s) {
System.out.println("Setting title: " + s);
this._title = s;
}
}
As this example illustrates, some further work is still involved, so care must be
taken if a trait is meant to be implemented in Java. Briefly, if a trait does any of the
following, its subclasses require synthetic code:
•defining fields (val or var, but a constant is ok—final val without result type)
•calling super
•initialiser statements in the body
•extending a class
•relying on linearisation to find implementations in the right supertrait
44.5 Functions
Scala is a hybrid Object-Oriented and functional language. However, Java (at least
up until Java 8) is an Object-Oriented language and thus has no concept of a
Function. Scala of course treats Functions as top-level entities, or first-class ele-
ments in the language with functions making up part of the type system of the
language. However, the underlying byte code representation to which Scala com-
piles also does not have a concept of a function thus there must be some from of
524 44 Scala & Java Interoperability
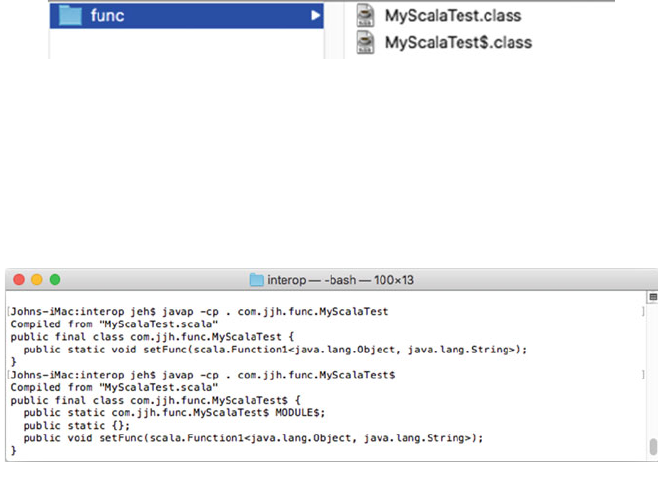
mapping from the Scala world into the byte code world. This thus means that from
the Java side of things that mapping can be exploited.
Functions are actually represented at the byte code level by the various Function
types that model a function. The following code which defines an object called
MyScalaTest containing a method which takes a single parameter of type
Int => String. This method is represented at the byte code level as being a
method that takes a single parameter of type Function1 which is parameterised to
use an Object and a String as the types involved.
package com.jjh.func
object MyScalaTest {
def setFunc(func: Int => String) {
println(func(10))
}
}
The object MyScalaTest is represented by two .class files at the byte code level
as illustrated below.
This is shown when we use javap to de-compile the compiled version of the
MyScalaTest. The MyScalaTest.class contains a final class that defines a single
public static method setFunc that takes a parameter of type scala.Function1.
The associated MyScalaTest$ class defines a non-static (instance side) method
setFunc that also takes a scala.Function1 parameter (Fig. 44.3).
Fig. 44.3 De-compiling the MyScalaTest class files
44.5 Functions 525
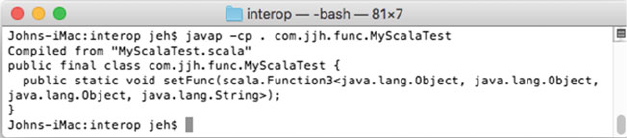
In fact, within Scala there are a range of types (actually Traits) that are used to
represent functions from Function1, Function2 and Function3 through
to Function22. Therefore functions can have up to 22 parameters. This appears
to be an arbitrary choice and is limited only because the underlying types are only
written from Function1 through to Function22. If you find yourself hitting this
limit, then you probably need to rethink your design!
As an example, if we changed the function type taken by setFunc to have three
input parameters and one result, as follows:
package com.jjh.func
object MyScalaTest {
def setFunc(func: (Int, Int, Int) => String) {
println(func(10,1,2))
}
}
Then when we de-compile the resulting .class byte codes, we would find that this
is now as shown below.
To exploit this within the Java world, we can create Java code that implements
the Function1 type (which appears as an Interface in the Java world). This can be
done by using one of the abstract runtime classes that implement the appropriate
interface. For example, if we have a single parameter function, then the interface for
it in the Java world is Function1 and the abstract class that provides the basic
infrastructure for that interface is AbstractFunction1 (where as for a three parameter
function we would use the Function3 interface and the AbstractFunction1 class).
The following listing illustrates how we can create a Scala function in Java and use
it with a Scala object that expects to receive a function:
526 44 Scala & Java Interoperability
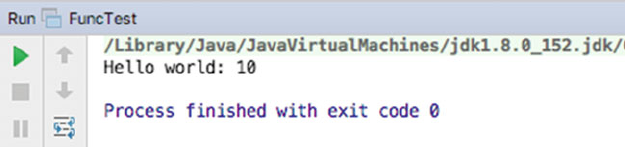
package com.jjh.func;
import scala.Function1;
import scala.runtime.AbstractFunction1;
public class FuncTest {
public static void main(String[] args) {
Function1<Object, String> f =
new AbstractFunction1<Object, String>() {
public String apply(Object someInt) {
return "Hello world: " + someInt;
}
};
MyScalaTest.setFunc(f);
}
}
In the above example, a new (anonymous) inner class is created on the fly based
on the AbstractFunction1 class. It defines a method apply that takes a parameter of
type Object (anything in the Java world) and returns a String. In this case, the string
is constructed by prefixing whatever was passed in with the string “Hello World”.
Using this new anonymous class, a new instance is created and a reference to
that instance stored in the variable ‘f’which is of type Function1. Note that the
parameters to Function1 indicate that the function being defined takes one
parameter (the first type in the angle brackets ‘<>’and the return type is String the
second type in the angle brackets.
The instance referenced by f is then passed on the setFunc method of
MyScalaTest, which is the Java representation of the MyScalaTest object. The end
result of executing this Java program is the output:
It is worth noting that Scala does not use Java’s representation of functions. This
is primarily for two reasons, firstly Scala had functions before Java did and thus
developed its own representation but secondly (and more importantly) Scala’s
representation of functions is considerably richer than that in Java 8.
44.5 Functions 527

44.6 Collection Classes
Both Java and Scala have libraries of collection classes, and confusingly many of
the names are similar.
As an example, there is a Set collection in both Java and Scala and there is a
List in both Java and Scala. However, the Scala collections are not just wrappers
around the Java collection classes and thus you cannot just assign from one to the
other.
For example, you cannot assign a Java Set type to a Scala Set type. The
following does not work:
p
ackage com.jeh.scala.interop
object SetTest1 extends App {
val jSet: java.util.Set[String] = new
java.util.HashSet[String]()
jSet.add("Adam")
jSet.add("Phoebe")
val sSet: scala.collection.mutable.Set[String] = jSet
}
If you do try this, you will find that the assignment of the jSet to the Scala Set
will result in a compilation error. There is no relationship between these two types
of Sets to allow a cast to occur.
You might think that you can create a new instance of the Scala set using the
Java Set as a parameter to the constructor:
val sSet: Set[String] = Set(jSet.toArray(): _*)
For an appropriate Scala set, this could work but the array type generated by
Java is an Array of Objects, but we are using a Set with an array of String (which is
what both types of sets hold).
It is therefore necessary to look at the Java Converter facilities provided in the
scala.collections package. For example, the JavaConverters object (previously
known as JavaConverters but that name is now deprecated and introduced in Scala
2.8) provides numerous conversions.
The following conversions are supported via asJava, asScala
•scala.collection.Iterable <=> java.lang.Iterable
•scala.collection.Iterator <=> java.util.Iterator
•scala.collection.mutable.Buffer <=> java.util.List
528 44 Scala & Java Interoperability
•scala.collection.mutable.Set <=> java.util.Set
•scala.collection.mutable.Map <=> java.util.Map
•scala.collection.mutable.ConcurrentMap <=> java.util.concurrent.
ConcurrentMap
The following conversions are supported via asScala and through specially
named extension methods to convert to Java collections, as shown:
•scala.collection.Iterable <=> java.util.Collection (via asJavaCollection)
•scala.collection.Iterator <=> java.util.Enumeration (via asJavaEnumeration)
•scala.collection.mutable.Map <=> java.util.Dictionary (via asJavaDictionary)
In addition, the following one-way conversions are provided via asJava:
•scala.collection.Seq => java.util.List
•scala.collection.mutable.Seq => java.util.List
•scala.collection.Set => java.util.Set
•scala.collection.Map => java.util.Map
The following one-way conversion is provided via asScala:
•java.util.Properties => scala.collection.mutable.Map
Thus, the earlier example should be written as follows.
package com.jeh.scala.interop
import scala.collection.JavaConverters._
object SetTest1 extends App {
val jSet: java.util.Set[String] = new java.util.HashSet[String]()
jSet.add("Adam")
jSet.add("Phoebe")
val sSet: scala.collection.mutable.Set[String] = jSet.asScala
}
However, note that the asScala returns a mutable set not an immutable set. This
is because Java collections are all mutable whereas Scala has mutable and immu-
table collections.
It should also be noted that the JavaConverters classes use the Adapter pattern to
wrap the original Java collection (the underlier) within a Scala interface that
resembles the Scala collection types. Thus, both converting and accessing con-
verted collections is a constant time (O(1)) operation introducing only a minor
overhead. Due to this Design Pattern, it is also worth noting that converting Java
collection to Scala and then back to Java yields the original collection, not
double-wrapper.
44.6 Collection Classes 529
44.7 Implementing a Java Interface
Java makes extensive use of interfaces, which are used to define abstract definitions
of method signatures (and static constant values). Scala has no concept of an
interface; however; it does have traits. One of viewing an interface is as a very
restricted type of trait. Thus, a Scala class can implement a Java interface by treating
it as a Trait which it is mixing into that class.
However, unlike Scala traits, interfaces can only have abstract methods. Thus,
the class mixing in the interface must implement the method (or methods) specified
by the interface.
For example, given the following Java interface:
package com.jjh.java;
import java.util.List;
public interface Processor {
double calc(List<String> l);
}
Any Scala class must provide an implementation for the abstract method calc.
Note also that the method calc takes a List, which in the Java world is an interface
itself. Thus whatever is passed into the calc method will be a class or an object
that implements that interface.
The following listing provides a simple Scala class that implements the
Processor interface. The
package com.jjh.interop
import java.util.List
import com.jjh.java.Processor
class MyProcessor extends Processor {
def calc(l: List[String]): Double = {
import scala.collection.JavaConverters._
val list = l.asScala
return list.foldLeft(0)
{ (total, element) => total + element.toInt }
}
}
The simple class MyProcessor converts the Java list into a Scala list to make it
easier to work with. It then processes all the elements within the list in order to
generate a total (it is assumed that all the string sin the list passed in will contain
integer values allowing the toInt operation to convert the string into an integer). The
result returned is a Double (which is treated as a raw value double in the Java
world).
530 44 Scala & Java Interoperability
The interesting thing is that the Scala class MyProcessor could be used from the
Scala world or from the Java world. Thus the following listing implemented in Java
creates a new instance of the MyProcessor and stores it into a variable of type
Processor. It then creates a list of strings and passes them into the MyProcessor
object, etc.
package com.jjh.java;
import java.util.ArrayList;
import java.util.List;
import com.jjh.interop.MyProcessor;
public class TestApp {
public static void main(String[] args) {
Processor proc = new MyProcessor();
List<String> l = new ArrayList<String>();
l.add("32");
l.add("5");
double x = proc.calc(l);
System.out.println(x);
}
}
The output of this program is 37.0.
44.7 Implementing a Java Interface 531
