BonCode Apache Tomcat AJP 1.3 Connector Bon Code Manual
User Manual:
Open the PDF directly: View PDF ![]() .
.
Page Count: 60

BonCode (www.BonCode.net)
11
BonCode Apache Tomcat
AJP 1.3 Connector
How to connect IIS to Apache Tomcat via the
Apache JServ Protocol v 1.3 using BonCode AJP
connector
© 2011-2016 by Bilal Soylu

2 | P a g e
Table of Contents
BonCode AJP 1.3 Connector ......................................................................................................................... 4
License....................................................................................................................................................... 4
Distribution Site ........................................................................................................................................ 4
The Beginning ........................................................................................................................................... 4
BonCode Connector Solution .................................................................................................................... 4
Prerequisites ......................................................................................................................................... 5
Note on http headers ............................................................................................................................ 5
The Package Content ................................................................................................................................ 5
How to Install Automatically ..................................................................................................................... 7
How to Install Manually ............................................................................................................................ 9
ASP.NET Web Services Extension Enabled on IIS6 (Windows 2003): ................................................. 13
Wildcard mappings: ............................................................................................................................ 13
Step 1: IIS6 Example of adding a wildcard map .................................................................................. 14
IIS7/8 Example of adding a wildcard managed handler ..................................................................... 15
Example of correctly installed files and directories on IIS on a Site basis (all): .................................. 16
OPTIONAL STEPS (INTERNATIONAL CHARACTERS) ............................................................................. 17
Sample web.config file (IIS6 only) ....................................................................................................... 17
The settings file (BonCodeAJP13.settings) .............................................................................................. 18
Example Settings file ........................................................................................................................... 26
Configuring the Connector for Performance .......................................................................................... 26
Enable Additional Logging ....................................................................................................................... 28
How to uninstall the connector .............................................................................................................. 28
Using the connector .................................................................................................................................... 29
The Issue with Path-Info ......................................................................................................................... 29
The Issue ............................................................................................................................................. 29
The Solution ........................................................................................................................................ 29
RFC Compliance .................................................................................................................................. 29
Differences with ISAPI ............................................................................................................................. 31
SSL Certificates .................................................................................................................................... 31
JVM Route Attribute ........................................................................................................................... 32
General Recommendations .................................................................................................................... 33

3 | P a g e
Unblock before use ............................................................................................................................. 33
Connector Thoughts ............................................................................................................................ 33
Using Connection Pools ...................................................................................................................... 34
Setup Recommendations .................................................................................................................... 34
Connector Commands ................................................................................................................................ 36
Identifying the installed Version ............................................................................................................. 36
Listing known virtual directories ............................................................................................................. 37
Enabling Windows Application Log Entries ............................................................................................. 37
List Active Configuration Settings ........................................................................................................... 37
HTTP Headers and connector behavior ...................................................................................................... 37
Inbound White Lists ............................................................................................................................ 38
Inbound Black Lists .............................................................................................................................. 38
Using Header Data Support ........................................................................................................................ 39
Transmission of IIS Document Root ........................................................................................................ 39
Transmitting Virtual Directories Information ......................................................................................... 39
Working Principles .............................................................................................................................. 39
Testing Virtual Directories Setup ........................................................................................................ 39
Setup Additional Permissions Requirement ....................................................................................... 40
Scripted Deployment .................................................................................................................................. 43
Installing .................................................................................................................................................. 43
Installer Command Line Parameters ................................................................................................... 43
Installer Parameters File (installer.settings) ....................................................................................... 45
Uninstalling ............................................................................................................................................. 49
Troubleshooting .......................................................................................................................................... 51
Q&A ......................................................................................................................................................... 60

4 | P a g e
BonCode AJP 1.3 Connector
License
This manual is distributed under the Creative Commons v.3 license
(http://creativecommons.org/licenses/by/3.0/). The code is distributed under the Apache License
Version 2 (http://www.apache.org/licenses/LICENSE-2.0). In short, you are totally and utterly at your
own risk and merit if you use any samples provided.
Full source code can be downloaded from here:
https://github.com/Bilal-S/iis2tomcat
Distribution Site
The most current version can be downloaded from the BonCode site (boncode.net)
http://www.boncode.net/boncode-connector
The Beginning
You are using Microsoft IIS 5, 6, 7, or 8+ as your webserver and want to connect it effectively to an
Apache Tomcat application server. You want to make this easy and do not want to install ISAPI based
connectors which have their own share of issues. Or, you may want to interoperate better using
multiple Tomcat applications with one IIS server.
BonCode Connector Solution
The BonCode AJP (Apache JServ Protocol version 1.3) Connector uses already existing pathways to
connect to Apache Tomcat. The AJPv13 protocol details can be found here
(http://tomcat.apache.org/connectors-doc/ajp/ajpv13a.html).
In general it is a preference question whether you use the ISAPI connection, which is the old C/C++ way
of connecting IIS to other protocols or the methods implemented in the BonCode connector.
There are several advantages with the BonCode connector though:
no ISAPI code (less risk of memory leaks, easier debugging)
no IIS6 vestiges or backward compatibility elements needed on IIS7+
all managed code .net extensibility framework
works on IIS5.1, IIS6, IIS7, IIS7.5, IIS8, IIS8.5
speed improvements
easier control by using IIS UI and handler mappings
no virtual directories and virtual mapping needed
configuration can be inherited to sub-sites and virtual sites
easy install/uninstall
support partial stream sending to browser (automatic flushing) with faster response to client

5 | P a g e
support both 32/64 bit of Windows with same process and files
transfer of all request headers to servlet container
build in simple-security for web-administration pages
Prerequisites
Besides Apache Tomcat, you will need a dot-net framework (3.51 or higher) installed on your machine.
The install packages includes .net version 3.5. This is also a standard feature in Windows 2008+ server
and Windows 7+. It can be downloaded for previous versions of Windows. The standard package
downloaded contains the installation stub that can be run separately if needed.
IMPORTANT: If you have already installed .net framework version 4 or 4.5 you do not need to install
3.51. If you receive a 500.21 error. Please see troubleshooting section.
Note on http headers
Http headers are important markers that are sent along with http requests on the Internet. They can
denote the length of content, the type of content, how to treat the response etc.
The BonCode connector will send more headers along than any previous connection technology
between IIS and Apache Tomcat. Header name case as sent by browser will be preserved. However, if
header names are set by IIS only, they will be lower cased, e.g. X-Forwarded-For will become x-
forwarded-for, this is to follow convention of previous connectors. Also, the connector will
suppress headers that do not contain any data (are blank), to save on network bandwidth and
processing. You can influence these and other behaviors by supplying settings that change how the
connector operates. See the “The settings file (BonCodeAJP13.settings)” later in this document for
details.
The Download Package Content
The BonCode IIS to Apache Tomcat connector consists of 2 mandatory and one optional file. Additional
documentation, license, and experimental files may be present based on the state of the build.
BonCodeIIS.dll
This is the main handler for the IIS communication process. It will intercept requests and pass
them to the protocol handler for translation.
BonCodeAJP13.dll
This is the implementation of JServ 1.3 communication protocol. This is the main library for
communicating with tomcat.
BonCodeAJP13.settings
This file is completely optional. It is a settings file that can be used to change behavior of the
connector. It needs to be placed in the same directory as BonCodeAJP13.dll in site wide

6 | P a g e
deployments. In global deployments, this file will need to be placed in system directory
(c:\windows)
Connector_Setup.exe
This is the automated installation program. It will do all tasks needed (outlined in the manual
installation section) to get the connection between IIS and Apache Tomcat to work.
Dotnetfx35setup.exe
The .net framework version 3.51 installation program. It can be used to install this framework on
your computer if it is not already installed (requires Internet access). The automated installer
(Connector_Setup.exe) will check and run this if needed. Do not use this for Windows 2008 or
later. For Windows 2008 and later you should use the feature manager to install .Net framework
from the server manager. The connector has been tested with .net 3.5, 4, and 4.5.
Microsoft.Web.Administration.dll
This is an experimental file in package. It is a standard Microsoft library. It may be included in
the distribution for features that require deeper access to IIS.

7 | P a g e
How to Install Automatically
Before you start the automatic installation please ensure that you have unblocked the content. If you
downloaded the software package from the Internet, Windows may block the execution of the program.
See Unblock before use section for how to do so.
Automatic installation is the recommend way of installing the connector and
configuring your webserver.
Start the Connector_Setup.exe program within the distribution directory and follow prompts. The
automated setup will walk you through the available options.
You can also adjust the setup manually after installer has completed the initial tasks. For example, you
can change the settings file manually within the “\BIN” directory of your website (or C:\windows for
global installs). See below for details on the settings file.
Most choices in the installer should be self-explanatory; however, the install mode step requires further
clarification. The setup program offers two choices of installs on the “Select All (Global) or Specific Site
Option” screen. These are mutually exclusive forms of installs.

8 | P a g e
Figure 1: Installer Mode Selection Step
a) All IIS Sites (Global Install). This is the most common use case. You wish to connect all your IIS
sites to ONE instance of Apache Tomcat. The setup will make some changes for maximum
efficiency of memory and code management. For example, this will install the connector in
Windows Global Assembly Cache (GAC), using one instance of code for all your sites. There is
only one configuration file located in your system directory (c:\windows). All existing and new
sites will automatically inherit connector settings and be enabled for use. If you select this mode
of install by accident or need to change it later, you will have to first UNINSTALL the connector,
then, re-run the setup and select the other option.
b) Let me choose specific sites. This is a good option if you do not want all your IIS sites to be
enabled to communicate with Tomcat or if you need to access multiple Tomcat instances, e.g. a
different Tomcat instance for each site. Each site can be configured individually. You can re-run
the setup as often as needed to enter different Tomcat parameters for different IIS sites. The
subsequent step in the setup will allow you to choose the affected IIS sites. In this mode, new
sites will not automatically be enabled to use connector. Each instance will have its own
configuration and code files.
The installer will add handlers for the document-types (cfm, jsp, wildcard, etc.) you have chosen on the
machine-root level so they can be inherited to all newly created sites as well. If you wish to control this,
you should not choose a handler during automated install, rather use the UI to add handlers using the
documentation guidelines later in this manual.
9 | P a g e
The installer will also add the default documents such as index.cfm and index.jsp depending on options
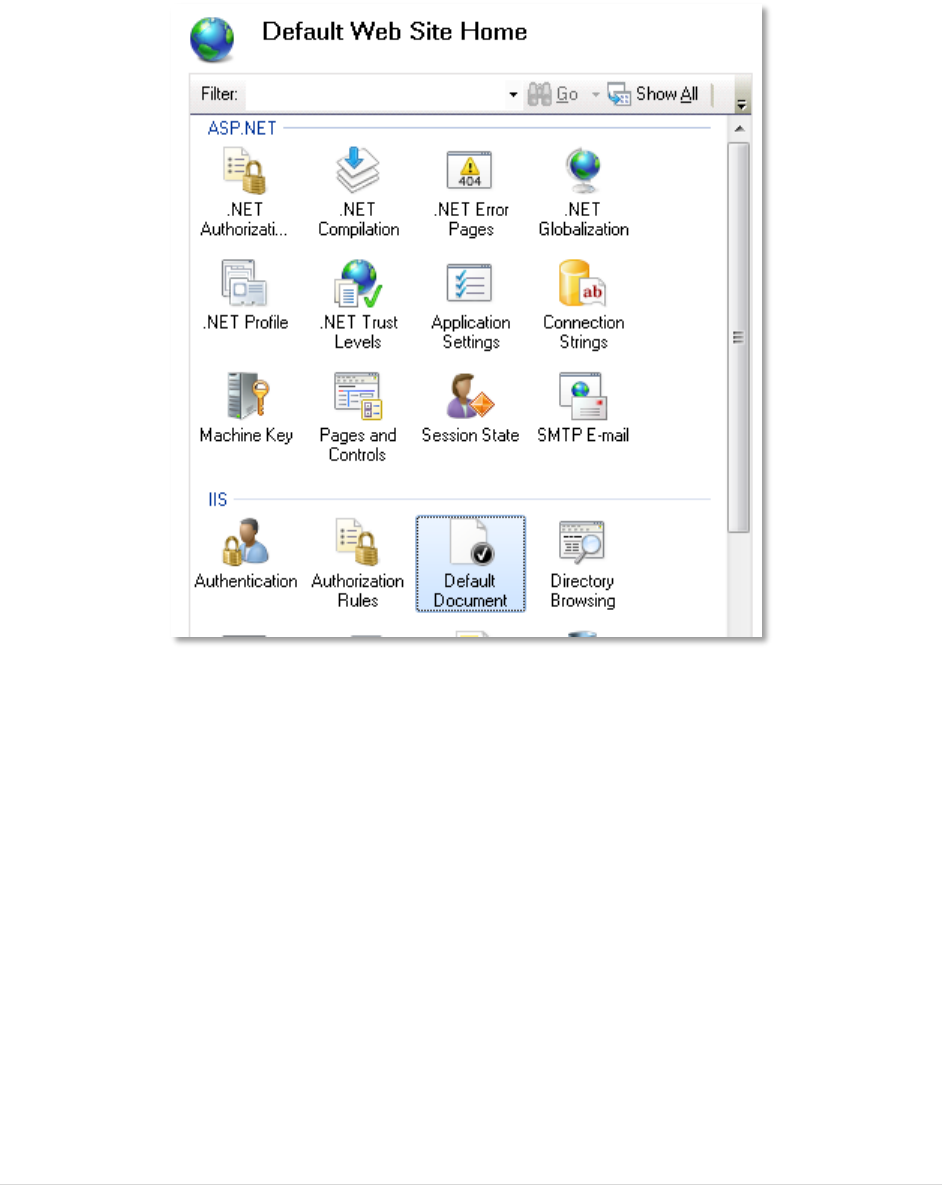
chosen. You can make manual changes to this using the “Default Document” feature of IIS
How to Install Manually
If possible avoid manual install as there are many elements to consider. The installation consists of
several steps; some of these steps are defaulted and are only here for completeness. For example on
tomcat 6,7 or 8, all the Apache Tomcat defaults will work out of the box, and only the IIS configuration is
needed.
Prerequisite on the IIS side is the installation of the .NET Framework. Framework version 3.5.1 or higher
should be used. The 3.51 version can be downloaded
(http://www.microsoft.com/downloads/en/details.aspx?FamilyID=ab99342f-5d1a-413d-8319-
81da479ab0d7). Later versions are installed as feature on Windows server, no download is needed.
IIS Generic Configuration (both IIS6 and IIS7/8):
IIS 7 GUI for Default Document Feature for use after install completes

10 | P a g e
a) Create a subdirectory under your default IIS7/8 document root and name it “BIN”, e.g. if your
website document root is located at c:\inetpub\wwwroot, create a “BIN” subdirectory here
c:\inetpub\wwwroot\BIN
b) If you want to create a log file in this newly created directory assign the IIS_IUSRS group
sufficient rights to READ/WRITE in “BIN” subdirectory. Alternately specify a different directory
for logging in the settings file. By default logging is disabled and this step can be skipped.
IIS7+ Configuration (Windows 2008+):
c) Ensure that the Application pool associated with the website operates in “Integrated” Managed
Pipeline Mode.
d) Add dot net extensibility feature to IIS. You can do so using the computer management UI or
running this command in a command window (important not to use a power-shell (blue
background) window):
start /w pkgmgr /iu:IIS-NetFxExtensibility
e) Add managed handler mapping(s). You can do so using the IIS manager UI or you can run this
appcmd command (it adds a handler for jsp pages). You can add as many handlers as you need,
simply change the name attribute as needed.
appcmd.exe is located here: %windir%\system32\inetsrv
Paste the next lines as one line into the command:
%windir%\system32\inetsrv\appcmd set config /section:handlers
/+[name='BonCode-Tomcat-JSP-
Handler',path='*.jsp',verb='*',type='BonCodeIIS.BonCodeCallHandle
r',preCondition='integratedMode']
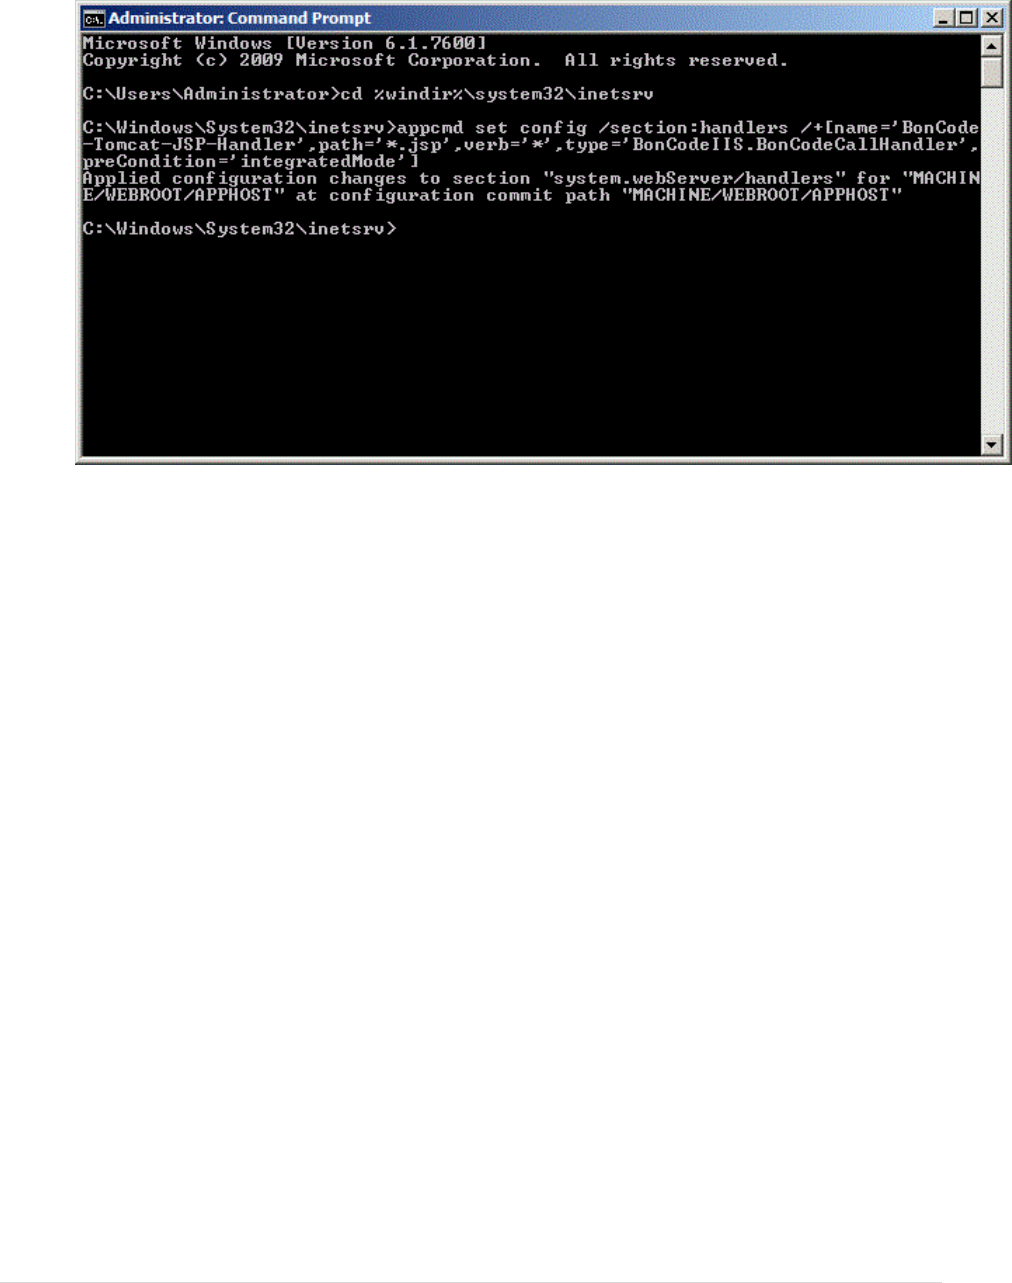
11 | P a g e
Example Command Prompt with executed commands:
IIS6 Configuration (Windows 2003 only)
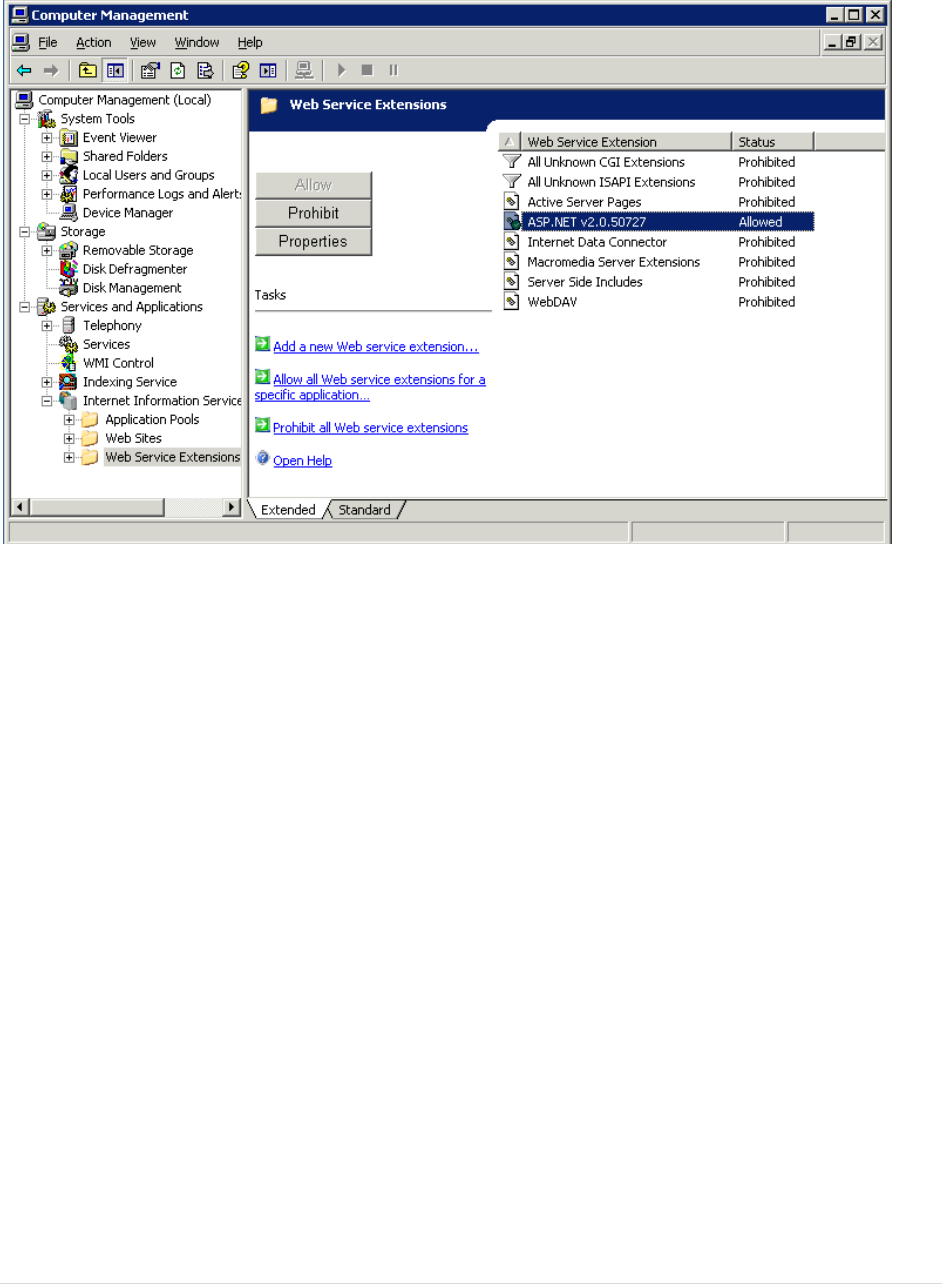
c) Ensure that you allow ASP.NET in web service extension within your website (see image below).
d) Add a managed handler mapping to your web.config file. If you do not have a web.config file in
your website, create one in your document root. A sample is available later in this document.
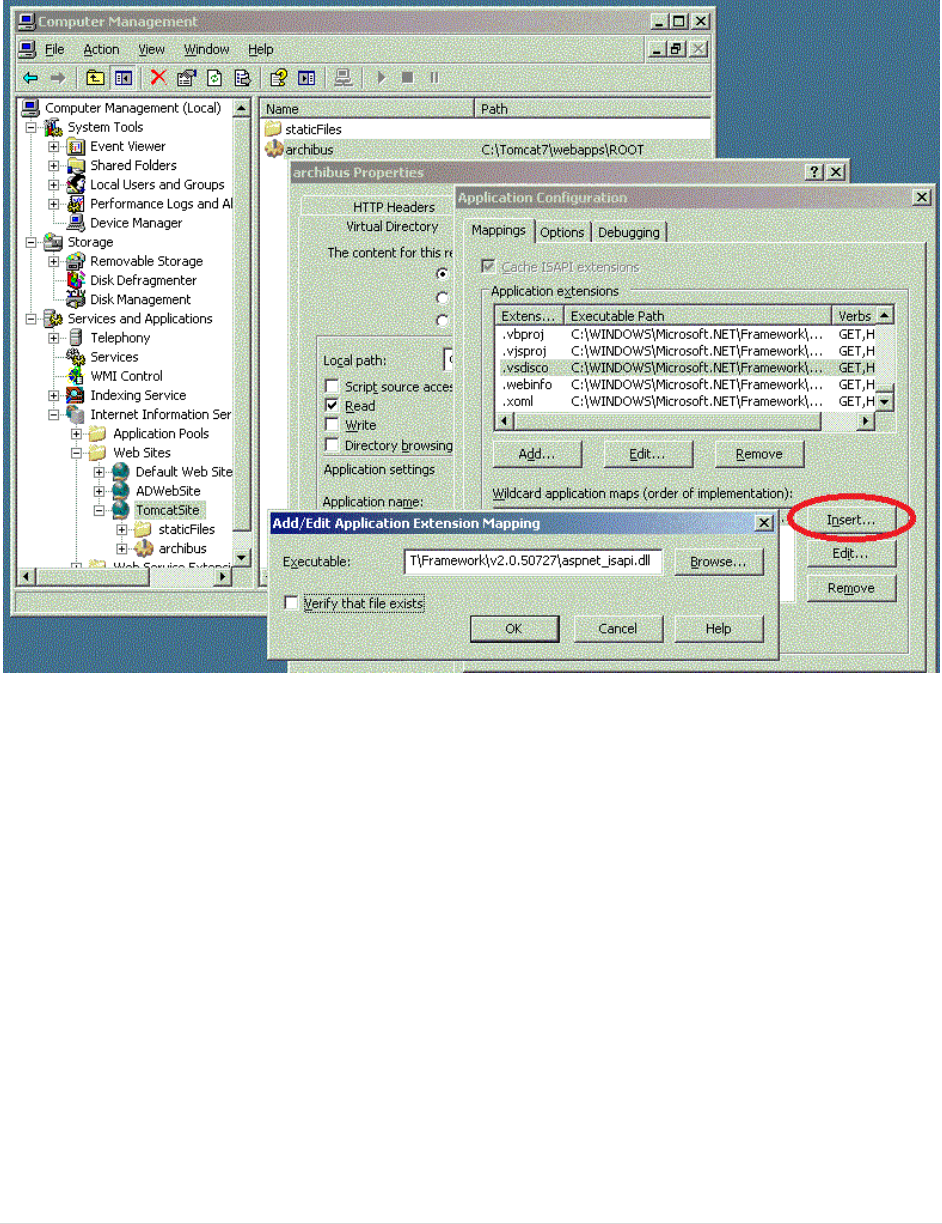
e) Add an HTTP Handler extension to IIS. To do so follow the remainder of the steps outlined here:
f) Right click on site within site manager and select Properties.
g) Click the Home Directory or Virtual Directory tab, and then click Configuration.
h) On the Mappings tab, click Add. The Add/Edit Application Extension Mapping dialog box is
displayed.
i) In the Executable box, type or browse to the file Aspnet_isapi.dll. This file is normally located
here: %windir%\Microsoft.NET\Framework\version\
version v2.0.50727 or later should work.
thus: %windir%\Microsoft.NET\Framework\v2.0.50727\aspnet_isapi.dll
For Windows 2003 64 bit or 64 bit Windows XP you will need to reference the 64 bit version of
aspnet like so:
%windir%\Microsoft.NET\Framework64\v2.0.50727\aspnet_isapi.dll
j) In the Extension box, type the file-name extension, such as .jsp or .cfm. If you need to enable
servlets, you probably will need to add a wildcard map as well (see example below). The easiest
way to do this is to create a virtual directory using your IIS6 manager UI that points to your
Tomcat application’s servlets path. You may have to experiment with the “Verify that files exist”
option. Commonly you should leave it checked.
k) Click OK

12 | P a g e
Global Deployment in Global Assembly Cache:
GLOBAL DEPLOYMENT IS A COMPLETELY OPTIONAL STEP. IT IS NOT REQUIRED. YOU WILL NEED TO BE
AN EXPERT ON WINDOWS SOFTWARE DEPLOYMENT. NO SUPPORT IS AVAILABLE FOR THIS OUTSIDE
THIS SECTION.
The automated installer will perform a global deployment of the connector on IIS7 and above when you
select the “All IIS Sites” option. This has the advantage that even new sites that you create will inherit
the connector without any special steps.
You have the option with version 0.9.2.8 onward to deploy the connector one time per server, rather
than one time for each web site. If you want to do this manually, you have to add the dll files to the
windows global assembly cache (GAC). The libraries are signed and have strong names so are ready to
be deployed in such a fashion.
You should be familiar with the process of adding assemblies to the GAC. This involves special tools that
are outside the scope of this manual. You can either use the gacutil.exe or the .NET Framework
Configuration Tool (Mscorcfg.msc), both of these are separate downloads.
Once you have added the libraries to the GAC, you will need to change the “Type:” reference in the
Managed Handler or web.config file like so:
from:
BonCodeIIS.BonCodeCallHandler
to:
BonCodeIIS.BonCodeCallHandler, BonCodeIIS, Version=1.0.0.0,
Culture=neutral, PublicKeyToken=ad590a40d40745cf
Also, the default directories for the setting and log file are changed to the system windows directory,
normally c:\windows. If a setting file is placed there it will become effective for all IIS sites.
You cannot perform a site specific install after you installed the connector in global mode. The site
specific install will NOT override the global properties.
13 | P a g e
ASP.NET Web Services Extension Enabled on IIS6 (Windows 2003):
Wildcard mappings:
If you are using Java servlets or want to designate either a whole site or a site- path in IIS to forward
every request with a matching URI pattern to tomcat for processing you will need to add Wildcard
mappings to IIS. This will also need to be done for SES URLs. However, this is simple to do.
Here are examples of Wildcard mappings. Additional videos are available online/YouTube that walk you
the process step-by-step.
The wildcard mapping for IIS6 on Windows 2003 has two steps,
i) Using the IIS6 UI and
ii) Changing the web.config file.
The wildcard mapping for IIS7 and later can be done in one step either via the UI or web.config changes.
The example shows the use of UI.
14 | P a g e
Step 1: IIS6 Example of adding a wildcard map
Step 2: To complete the wild-card map for IIS6 you will also need to change the web.config file. Add this
line as last line of your <httpHandlers> section:
<add verb="*" path="*" type="BonCodeIIS.BonCodeCallHandler"/>
15 | P a g e
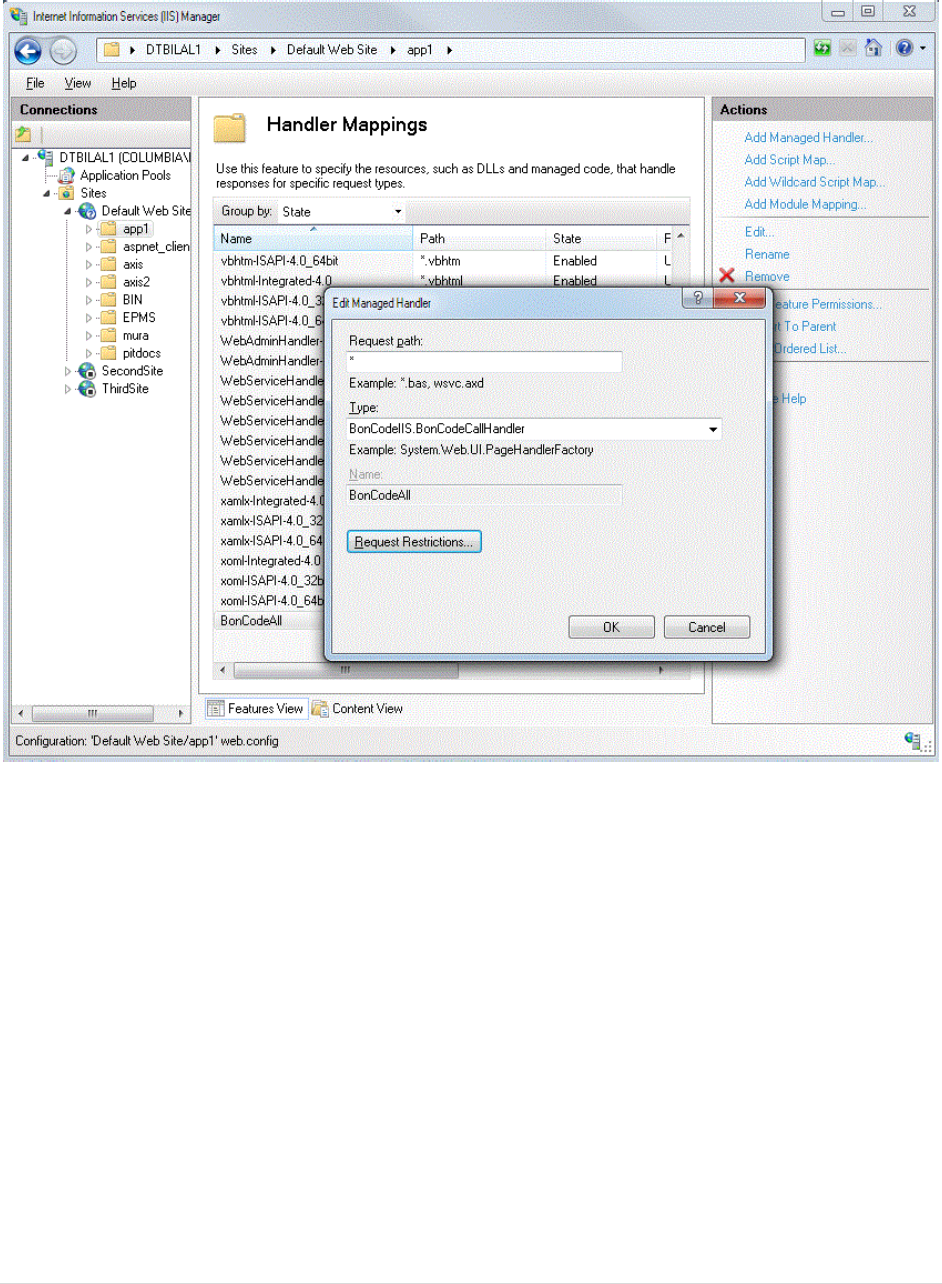
IIS7/8 Example of adding a wildcard managed handler
The IIS7 or IIS8 configuration does not require the change of any configuration file directly. You can do
the mapping within IIS Administrator UI. In the example case the overall site already has the connector
installed under the BIN directory. Any subdirectory can inherit it. In this case all requests for any part of
the “app1” directory will be passed on to tomcat. The actual documents/files do not need to be visible
to IIS for this to work correctly.
16 | P a g e
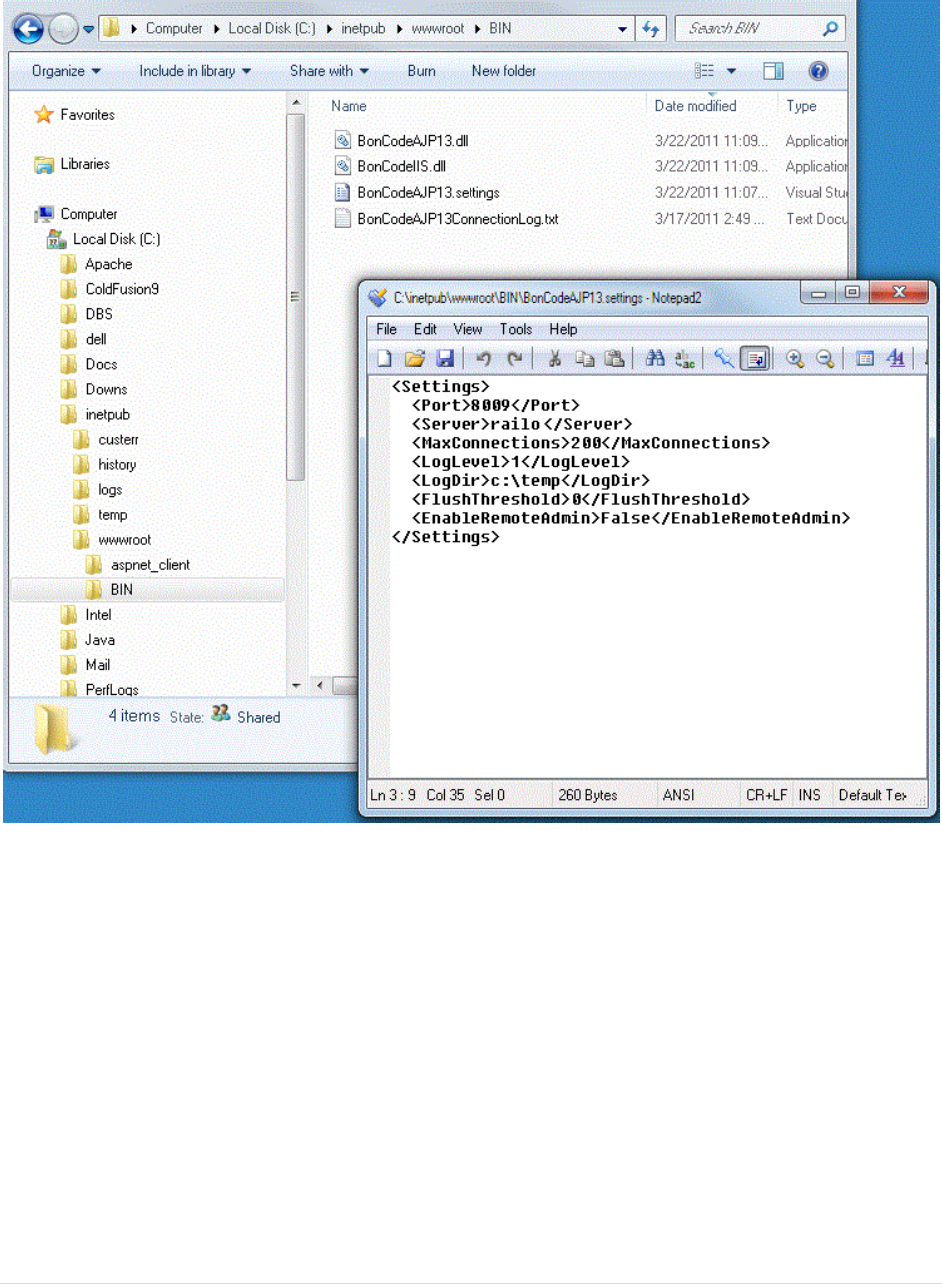
Example of correctly installed files and directories on IIS on a Site basis (all):
In this case the connection log file would be created in the C:\temp directory.

17 | P a g e
OPTIONAL STEPS (INTERNATIONAL CHARACTERS)
SKIP THIS STEP IF YOU JUST INSTALLED APACHE TOMCAT AND YOU DO NOT NEED UTF-8 SUPPORT.
THERE IS NOTHING FOR YOU TO DO. THE DEFAULT INSTALLATION OF TOMCAT HAS ALL YOU NEED.
But, if you already have manually configured your Apache Tomcat instance to disable the AJP protocol,
you will need to re-enable it. You should consult the Apache Tomcat manuals if you need to make these
changes.
You do not need to worry about making changes to worker.properties or uriworkermap.properties,
these files are not used with the BonCode connector.
Apache Tomcat configuration only requires that you enable the AJP protocol in the server.xml file. This is
the same place internationalization is configured, e.g. you use URLs with double byte characters. To
make this work you will need to configure UTF-8 support on the Tomcat side. UTF-8 encoding is enabled
by default on the BonCode connector side.
<Connector port="8009" URIEncoding="UTF-8" enableLookups="false"
redirectPort="8443" protocol="AJP/1.3" />
This allows Apache Tomcat to accept and translate characters in UTF-8 format in the Uri and Query
parameters. If you work with UTF-8 character anywhere else the BonCode connector will still transfer
this correctly but there will be no automatic translation on the Apache Tomcat side. You will have to
correctly decode the traffic before you can use it in your application.
Java example of retrieving a custom header containing UTF-8 characters:
String pathInfo = request.getHeader("path-info");
String decodedPath = new String(pathInfo.getBytes(),"UTF-8");
Sample web.config file (IIS6 only)
The following is a sample file that can be used in IIS6 managed handler configurations. It will prepare
IIS6 to send jsp and cfm requests to tomcat via the connector.
<?xml version="1.0" encoding="utf-8"?>
<configuration>
<system.web>
<httpHandlers>
<add verb="*" path="*.jsp" type="BonCodeIIS.BonCodeCallHandler"/>
<add verb="*" path="*.cfm" type="BonCodeIIS.BonCodeCallHandler"/>
</httpHandlers>
</system.web>
</configuration>

18 | P a g e
The settings file (BonCodeAJP13.settings)
This file (BonCodeAJP13.settings) needs to be located in the same directory as the library (dll) files. By
default this is most likely the c:\inetpub\wwwroot\BIN directory. In global (server wide) install, this file
will be located in the Windows directory of your server, most likely c:\windows. You can configure
several settings for the connector. All of these are optional, thus this file is not required for the
connector to work. The setting file is a simple XML formatted file and contains the following keys.
Setting Name
Impact
Port
Default: 8009.
You can set a different port for AJP communication.
Server
Default: localhost.
If the Apache Tomcat server is located on a different server you can set
the server IP or DNS name here.
MaxConnections
Default: 0.
The number of connections maintained in connection pool. This should be
either zero or correspond to Max JK threads on the tomcat side.
One the Tomcat side a corresponding change should be made in
server.xml:
For example:
<Connector port="8009" protocol="AJP/1.3"
redirectPort="8443" maxThreads="1000" />
If you set this setting to zero, the BonCode connector will not maintain a
connection pool and instead will re-connect for every request.
Using a connection pool will aid with performance but requires that you
manage the start/stop cycles of Tomcat and IIS carefully.
When it is enabled your restart process will need to recycle (stop/start) IIS
application pool whenever you are restarting Tomcat to expire the
connection pool connections. If you do not do restart IIS with connection
pool enabled, you will have either remnants of old communication or see
message that the Tomcat has stopped responding for a subset of your
users. Please plan accordingly.
Log Level
Default: 0.
Determines what will be logged by the connector. Log levels are
0= none,
1= Errors and Exceptions only,
2=+ Basic (startup/shutdown/error) and connection count
3=+ Headers (including HTTP Headers),
4=+ Debug and packet Contents.
If you set logging above 2 the log file can get large quickly; please monitor
connector carefully. Also ensure that IIS has write permission in the
designated Log Directory (see below).

19 | P a g e
LogDir
Default: installation directory of connector (e.g. BIN folder) or when using
global install the Windows system directory (c:\Windows).
Determines in which path the connector will create a log file. Please
ensure that the IIS_IUSRS group has permission to read/write in the
designated directory and that the directory exists. You will see an error in
your browser otherwise. You do not need to specify a LogDir setting for
logging to work.
LogFile
Default:
BonCodeAJP13Connection_[SiteId]_[ServerName]_[yyyyMMdd].log.
This is the name of the log file that will be populated with log data. If you
have multiple instances of the connector, e.g. multiple sites running on IIS
with individual instances of connector, and you name your files manually,
you should either specify a different file name or directory to avoid log
file contention errors. Do not specify an extension, the default “.log”, IIS
SiteId, ServerName and timestamp will be added. You do not need to
specify a LogFile for logging to work.
EnableRemoteAdmin
Default: True.
Whether remote administration of Apache Tomcat or railo servers is
allowed. Will block access to certain URI signatures if set to False.
FlushThresholdTicks
(was FlushThreshold)
Default: 0.
BonCode connector will respond to AJP flush directives when this is
activated but it can also flush content based on processing time expired.
This is the count in time-ticks (10,000 ticks per ms) that determine
whether a flush has occurred on the Apache Tomcat side. If we receive a
partial response after this many tick counts, we will assume a flush is
desired and thus the webserver should start transferring the output cache
to the browser. A reasonable tick count for this setting is 100,000 (10ms)
or more. This allows a response to browser while processing is still on-
going. You can experiment based on your expected CPU processing time.
If you set this to zero, content flushing based on time will be disabled. If
you experience problems with content transfer (garbled text, or image
files not transferring it is recommended to turn this feature off).
If you want to only use Tomcat native flush detection set the
FlushThresholdBytes to a high value (e.g. 5242880) and do not set Ticks.
Note:
When both FlushThresholdBytes and FlushThresholdTicks are specified
the FlushThresholdBytes will not be used until we have at least one
occurrence of FlushThresholdTicks (time based activity pause).
FlushThresholdBytes
Default:0.
BonCode connector will respond to AJP flush directives when this is
activated but it can also flush content based on bytes transmitted.

20 | P a g e
This will determine whether we should flush content to client by bytes in
buffer. If the count in bytes as set here is reached, the connector will send
content to client and clear buffer. This allows streaming of large files as
controlled by Tomcat without using up all server memory. A reasonable
size for this setting would be 2097152 (2MB). It would not be desired to
do many small flushes of cache as that lowers performance. If this is set to
zero, content flushing will be disabled.
If you want to only use Tomcat native flush detection (AJP Flush) set the
FlushThresholdBytes to a high value (e.g. 5242880) and do not set Ticks.
Note:
When both FlushThresholdBytes and FlushThresholdTicks are specified
the FlushThresholdBytes will not be used until we have at least one
occurrence of FlushThresholdTicks (time based activity pause).
EnableHeaderDataSupport
Default: False
This is for dynamic host configuration on Tomcat side. It will insert
specialized headers with the request stream so that Tomcat is aware of
normally IIS only configuration options.
The special mode_cfml_valve open source project by Jordan Michaels
(http://www.modcfml.org/) uses this information to create dynamic
contexts in Tomcat which reduces the Tomcat configuration drastically for
multi-site hosts. The connector will insert the x-tomcat-docroot http
header and/or the x-vdirs http header into the communication stream.
Please review the Using Header Data Support section later in this manual.
HeaderWhitelist
Default: [empty string]
If this setting is enabled, only HTTP headers on this comma separated
value (CSV) list will be transferred to tomcat. These headers have to be in
the IIS specific notation (most likely with HTTP_ prefix).
Follow this URL for default list:
http://msdn.microsoft.com/en-us/library/ms524602(v=vs.90).aspx
Example of valid headers are:
HTTP_CONNECTION,CONTENT_LENGTH,HTTP_ACCEPT,HTTP_ACCEPT_EN
CODING,HTTP_ACCEPT_LANGUAGE,HTTP_COOKIE,HTTP_HOST,HTTP_USE
R_AGENT
HeaderBlacklist
Default: [URL,SERVER_SOFTWARE,SERVER_NAME,SERVER_PROTOCOL]
CSV list of HTTP headers that will not be transferred to Tomcat even if
populated by client. These will need to be expressed in valid IIS specific
notation (see above HeaderWhitelist for instructions). Additionally,
headers that the Connector may generate are also blocked. If you want all
headers that are possible please change to [empty string] or non-existing
header.

21 | P a g e
ReadTimeOut
Default: 120000 (20 min).
Number of milliseconds to wait before we stop listening for more traffic.
1000ms=1s.
WriteTimeOut
Default: 30000 (30s).
Number of milliseconds to wait until we stop writing to tomcat.
1000ms=1s.
ForceSecureSession
Default: False.
Forces SSL to tomcat; forces secure jsession cookie. Standard HTTP
connection will be accepted but responses will be redirected to secure
port. True/False.
ResolveRemoteAddrFrom
Default: [empty string]
If another HTTP header contains valid IP instead of REMOTE_ADDR, it
should be provided here. The connector will extract the first IP from list of
IPs in the alternate header. Set to blank if this is to be disabled.
Commonly the HTTP_X_FORWARDED_FOR header is the standard
populated header when intermediaries such as load balancers or proxy
servers are used. In those cases REMOTE_ADDR contains the
intermediary’s IP rather than the client’s IP. This feature corrects for this.
Defaults to blank (disabled).
AllowEmptyHeaders
Default: False.
By default the connector only sends HTTP headers that contain a value. If
you need to see all headers all the time, you need to change this to True.
PathInfoHeader
Default: xajp-path-info
PATH-INFO HTTP header is not implemented in Apache Tomcat AJP
acceptor. The connector will send path info in this header instead. If set to
blank this will be disabled.
TomcatConnectErrorURL
Default: [empty string]
If Tomcat is not available, e.g. shutdown or any other error occurs during
the establishment of the connection, the user will be redirected to URL
provided in this setting. If this setting is not set, a default message is
displayed instead.
Two arguments will be automatically added to redirect url
errorcode: (normally 504)
detail: the message that would have been displayed to user if allowed. If
the request is from a local IP this may contain partial stack trace.
The targeted web-url can, then, do any processing necessary to handle
the error including transparently retrying to original URL (referrer).
EnableHTTPStatusCodes
Default: True
True or False.
HTTP status codes that are set by Tomcat will be set for IIS.

22 | P a g e
TCPClientErrorMessage
Default: [empty string]
If TCP communication is experiencing an error, a default message is
displayed to users. An alternate message can be provided in this setting.
TCPStreamErrorMessage
Default: [empty string]
If there is a problem with the TCP stream, a default message is displayed
to users. An alternate message can be provided in this setting.
PathPrefix
Default: [empty string]
To make it easier to map Tomcat deployed application to the root of IIS
sites you can specify a path prefix. A path prefix has to start with a
forward slash (/). For example if you deployed axis2 as war archive in
tomcat webapps directory, it would be available for IIS using a URL
pattern such as http://[server]/axis2. If the desire is to map it to the site
root of a new IIS (e.g. http://[server] or http://webservice.mysite.com)
then a PathPrefix setting must be set for the translation to take place
between Tomcat and IIS.
In this example a PathPrefix of
“/axis2” can be used on the IIS site’s connector:
<PathPrefix>/axis2</PathPrefix>
Using the connector IIS will redirect all inbound request from “/” to
/axis2 on tomcat transparently.
PacketSize
Default: 8192 (see conditions), Max 65536
Integer
This defines the size of packets exchanged between IIS and Tomcat in
bytes. Normally there should be no need to change the default. However,
in some cases, this results in errors when long SSL certificate chains are
used.
You will need to change the Apache Tomcat packetSize attribute on the
AJP protocol to correspond to the PacketSize setting. The maximum value
possible is 65536 bytes.
To change the BonCode connector, add or alter the PacketSize setting in
the BonCodeAJP13.settings file, e.g.:
<PacketSize>16384</PacketSize>
Correspondingly in the Apache Tomcat conf directory, change the
server.xml file for the AJP protocol and add or alter the packetSize
attribute , e.g.:
<Connector port="8009" protocol="AJP/1.3"
redirectPort="8443 packetSize="16384"/>
This setting is overridden when you use EnableAdobeMode setting
concurrently.
23 | P a g e
EnableAdobeMode
Default: False
True or False.
This is a setting that will switch the connector into supporting Adobe
ColdFusion in “Server Install” scenarios.
This Adobe support is experimental.
When switched into this mode, the connector will respond to non-
standard extensions to the AJP protocol introduced by Adobe.
Important note on PacketSize setting with Adobde:
PacketSize 65531 ::
With version 1.0.15 to 1.0.17 we do not set this automatically. We simple
use the default of 8192 bytes. You will have to make manual changes for
these versions.
Packet size discrepancy:
Please check your CF installed Tomcat server.xml (normally in
C:\ColdFusion10\cfusion\runtime\conf) and find the line similar to:
<Connector port="8012" protocol="AJP/1.3"
redirectPort="8445" tomcatAuthentication="false"
/>
Change it to:
<Connector port="8012" protocol="AJP/1.3"
redirectPort="8445" tomcatAuthentication="false"
packetSize="65531"/>
The packetSize attribute is not set visibly but seems to be hardcoded
nonetheless to non-standard value. Thus, by making this change in
server.xml, you document this behavior for all other processes to follow.
When you switch to Adobe mode the BonCode connector adjusts the
PacketSize setting automatically to the Adobe value above.
In version 1.0.18+ we will also automatically override the following
settings and values for you on the BonCode at runtime side like so:
PathInfoHeader path-info
PacketSize 65531
You still need to set the correct AJP port during setup for ColdFusion:
ColdFusion 10:
CF10 uses AJP port 8012.
ColdFusion 11:
CF11 uses AJP port 8014

24 | P a g e
ColdFusion 2016:
CF2016 uses AJP port 8016
Please contact the support email if you find that the packet size or ports
no longer works as Adobe does make changes to this without announcing
any further.
EnableClientFingerPrint
Default: False
True or False.
The connector will use a combination of HTTP header data (see below) to
attempt to uniquely identify a client (browser). The result of this
calculation is a base 64 encoded MD5 hash. It will be passed in separate
HTTP header xajp-clientfingerprint.
The data in the xajp-clientfingerprint header can be used to identify
invalid session access in web application (OWASP TOP 10 A-3).
FPHeaders
Default: (see below CSV list of headers)
Override Finger Print Headers with this setting. When using client
fingerprint (EnableClientFingerPrint=True), the connector creates a
fingerprint using a set of headers:
REMOTE_ADDR,HTTP_ACCEPT,HTTP_ACCEPT_CHARSET,HTTP_ACCEPT_E
NCODING,HTTP_ACCEPT_LANGUAGE,HTTP_USER_AGENT,UA_CPU,REMO
TE_HOST
Sometimes this will lead to connection problems with Ajax requests from
the same client as JavaScript XHTTP requests return a slightly different set
of HTTP headers. You may adjust the headers as needed. Keep in mind
that these have to be upper case and match published IIS headers (see
HeaderWhiteList).
SkipIISCustomErrors
Default: False
Sets IIS response pipeline setting “Response.TrySkipIisCustomErrors”
processing flag in IIS to true similar to setting
“HttpResponse.TrySkipIisCustomErrors” to true in web.config. This will
disable IIS from processing any error status code and displaying IIS
generated error pages. Also similar in behavior to Classic mode. We will
only use when an error code is returned by servlet. If this flag is set and
your servlet returns an error code it will also need to return all page
information related to the error for display to the user. Thus, Tomcat
controls what is displayed for common errors.
LogIPFilter
Default: [empty string]

25 | P a g e
If you want to limit the amount of logging based on clients’ IP address you
can use this setting and provide a regular expression to use against client
IPs.
For example, if you provide a simple string like:
172.12
Or
:::1
the connector will only log traffic from clients that contain matching or
partial matching (anywhere) IP addresses. You may use reg-ex
expressions. Please consult .net regex guidelines.
If setting is left blank this is disabled and regular logging behavior will
occur.
If your RegEx contains errors logging will be done for all clients.
RequestSecret
Default: [empty string]
The connection request secret on the protocol level. Both Tomcat and
Boncode can use a shared secret to secure the connection. This also
needs to be added as requiredSecret on Tomcat side in server.xml:
<Connector port="8009" requiredSecret="yomamma"
protocol="AJP/1.3" redirectPort="8445"
tomcatAuthentication="false" URIEncoding="UTF-8"
/>
If there is a misconfiguration in this setting, i.e. when Tomcat and
Boncode do not have matching secrets you will see blank responses from
Tomcat with HTTP 403 errors.
ModCFMLSecret
Default: [empty string]
The shared secret to be used with Tomcat mod_cfml valve. The mod_cfml
valve can be implemented on the Tomcat side and allows Tomcat to
automatically create contexts based on the information sent by BonCode
connector. This mechanism can be further secured with a shared secret. A
special HTTP header will be added to connection with this data. No new
contexts in Tomcat will be created if this is not the same on both sides.
Dependency:
You will also need to set EnableHeaderDataSupport=True
EnableAggressiveGC
Default: False
This determines how aggressive Garbage Collection (GC) is performed to
manage connector memory. If set to True, we will attempt to initiate GC
explicitly. If you are sending large byte content through connector you
may wish to turn this on as well as set memory recycling conditions on
the Application Pool (advanced section) in IIS.
In particular
- Private Memory Limit
- Virtual Memory Limit

26 | P a g e
DocRoot
Default: [empty string]
When setting EnableHeaderDataSupport is set to True IIS determines the
Document Root and it will be send it along to Tomcat in HTTP header x-
tomcat-docroot. However, this may not work when Tomcat runs on
different machines (e.g. Linus hosts). This alternate setting will allow an
override to point to alternate file location in those circumstances.
Example Settings file
<Settings>
<Port>8009</Port>
<Server>myTomcatServer</Server>
<MaxConnections>500</MaxConnections>
<LogLevel>1</LogLevel>
<LogDir>c:\temp</LogDir>
</Settings>
Configuring the Connector for Performance
By default the BonCode connector is made to fit a large number of use cases and produce minimal
errors. However, in case where maximum performance is desired the following changes from default
should be considered to the settings.
MaxConnections
By default no connection pool is used. By setting this to a number greater than 2 the connector behavior
changes and a pool is generated. Set this to at least 500 and adjust the Tomcat side accordingly. This will
remove the overhead of creating and tearing down TCP connection which can be substantial. Please
note that this also requires a difference in the shutdown/startup/recycle process.
During startup: First start Tomcat, then IIS
During shutdown: First shutdown IIS, then Tomcat.
If you do not do this, you may see data echoes from connections in progress when only Tomcat is
restarted or restarted out of order. Users may see unrelated data and connection closed massages may
be displayed.
However, if you can follow the cycling process the connection performance will greatly increase.
27 | P a g e
PacketSize
The default packet size is based on an old Tomcat default. It is outdated by modern infrastructure but
since both ends have to in sync we use the default first. Using a higher value reduces the number of
roundtrips and packets exchanged. Unless you are using Adobe Coldfusion, the recommendation is to
change it to the maximum possible (65536) on both sides. It has to be the same number of bytes. Please
see the setting for how to do this for Tomcat.
LogLevel
Keep this turned off, i.e. set to zero
TimeOut settings on TCP/IP
Do not set any of the timeout settings for read/write for TCP. Those will add substantial overhead to the
connections.
Setting Idle Timeouts
To release unused/stuck connections faster you should establish idle timeouts. These have to be set on
both Tomcat and IIS sides and they take different shapes. You should ensure that the Tomcat idle
timeout is slightly longer than the IIS one. For example, the following definition sets the Tomcat timeout
to 2mins and 1s
<!-- Define an AJP 1.3 Connector on port 8009 -->
<Connector port="8009" protocol="AJP/1.3" redirectPort="8443"
maxThreads="1000" connectionTimeout="121000" packetSize="65536" />
You should set the corresponding IIS timeout to 2 minutes by manipulating the IIS manager advanced
settings or config files:

28 | P a g e
Enable Additional Logging
The installer creates dedicated log files when certain settings are enabled. You can determine where
such logging files are located and how much information is logged. Please see “The settings file
(BonCodeAJP13.settings)” of this manual.
You can have the connector log additional errors that are connection related to the Windows Event Log.
It can log additional entries in the System Application log. To do so run the following command window
in any command window with administrative rights:
eventcreate /ID 1 /L APPLICATION /T INFORMATION /SO BonCodeConnector
/D "Source Created"
If you use PowerShell you can use the following command:
New-EventLog –LogName Application –Source "BonCodeConnector"
Once that is done you can find connection issues logged under BonCodeConnector event source or
eventId 417.
How to uninstall the connector
If you used the setup program it registered itself with the Windows Program manager. Simply go to the
control panel area and use the Add/Remove Programs or Programs and Features control
panel to uninstall. Find the BonCode Connector entry and run the uninstall.

29 | P a g e
Using the connector
The Issue with Path-Info
The Issue
Using an AJP based connector, like the BonCode connector, you have many advantages, including binary
transfer of data, efficient reuse of connections, and SSL data support. However, one of the elements
that causes repeated hiccups is the use of the PATH_INFO CGI variable. The AJP protocol currently does
not have a method to transfer this information to Apache Tomcat in a native format. Thus references to
request.getPathInfo() or CGI.PATH_INFO will return null or empty string in all cases.
The Solution
The current work-around the BonCode connector is offering to developers is that it will transfer the
PATH_INFO data from IIS to Apache Tomcat via an alternate HTTP Header variable. This variable is
labeled by default: xajp-path-info. You can change this, please see previous section on setting file on
how to do this.
Several application servers Lucee (lucee.org), (Railo (getrailo.org), Adobe Coldfusion
(www.adobe.com/products/coldfusion-family.html), and Open Blue Dragon (openBlueDragon.org)
automatically look for this alternate value and place it correctly into the CGI scope PATH_INFO. Thus,
using one of these application servers on top of Tomcat, will avoid code changes.
If you cannot make any code changes, and you absolutely require the use of CGI.PATH_INFO you will
have to use an alternate connector (HTTP) or layer a URL rewrite engine on top of AJP connector. Both
of these options are outside the scope of this document.
RFC Compliance
If you have been using a different web server than IIS, you will also need to note, that the PATH_INFO
data IIS supplies is not RFC compliant (http://www.ietf.org/rfc/rfc3875). Rather it is a repeat of the
SCRIPT_NAME/PATH_INFO combination.
The BonCode connector, changes the xajp-path-info data automatically to be RFC 3875 compliant. If this
is not desired, the connector also supplies the original IIS determined data in path-header http variable
that can be used instead.
Using this example URL:
http://somehost.com/cgi-bin/somescript.jsp/this%2eis%2epath%3binfo?Qn=Yes
Using RFC compliant formatting the PATH_INFO would be: /this.is.the.path;info
Otherwise, the IIS default designation would be: somescript.jsp/this.is.the.path;info

30 | P a g e
Extending the Timeouts for Long Running Requests
I am including this for completeness as some users were wondering about available options.
If you have very long running requests you need to be aware that IIS has built in timeouts that you may
need to adjust. For example the default execution timeout is 110 seconds.
If you need to extend this you need to change the appropriate web.config file in each site.
The httpRuntime section will need to be adjusted:
The complete option set for httpRuntime:
<httpRuntime useFullyQualifiedRedirectUrl="true|false"
maxRequestLength="size in kbytes"
executionTimeout="seconds"
minFreeThreads="number of threads"
minFreeLocalRequestFreeThreads="number of threads"
appRequestQueueLimit="number of requests"
versionHeader="version string"/>
A sample web.config with httpRuntime execution timeout defined:
<?xml version="1.0" encoding="utf-8"?>
<configuration>
<system.web>
<httpRuntime
executionTimeout="180"
/>
<httpHandlers>
<add verb="*" path="*.jsp" type="BonCodeIIS.BonCodeCallHandler"/>
<add verb="*" path="*.cfm" type="BonCodeIIS.BonCodeCallHandler"/>
</httpHandlers>
</system.web>
</configuration>

31 | P a g e
Differences with ISAPI
SSL Certificates
The BonCode connector, working closely with IIS, will make more data available to servlet container
regarding SSL (secure) connections. Especially deep insight into data is provided about the certificate
that is being used. However, in order to do this successfully, we had to break with the past. The previous
ISAPI connector only assumes that a few values are available when in modern environments more
elements of the certificate are needed. So, some of the ways that the ISAPI AJP connection worked were
not transferred to BonCode in order to be able to go beyond what was available and offer a simpler,
more straight forward path to accessing this data.
We used one rule of Simplification:
All SSL data is transmitted via HTTP Headers.
This allows for easier introspection with a multitude of tools and consistent access to data where most
programmers would expect. Nonetheless, we also support the alternate mechanism of the “Attributes”
scope of the AJP transport for backward compatibility. This may confuse programmers when using ISAPI
redirector as they will need to access two different areas of the inbound request to determine only a
limited set of the SSL data.
Though legacy calls are still supported. For example, older call structure for attributes like this using the
getAttribute() method will return the client cert:
request.getAttribute("javax.servlet.request.X509Certificate")
With BonCode please use the getHeader() method of the request object to access all SSL certificate
information.
Here is a sample routine to output all current HTTP headers in a JSP page:
<%
out.println("<ul>");
java.util.Enumeration names = request.getHeaderNames();
while (names.hasMoreElements()) {
String name = (String) names.nextElement();
String value = request.getHeader(name);
out.println(" <li> <b>" + name + "=</b>" + value +"</li>");
}
out.println("</ul>");

32 | P a g e
%>
Place above code inside a JSP page and it will show you all the data available for a given SSL certificate
when called.
JVM Route Attribute
The inbound information transfer of JVM route via the request attribute scope is not supported via
BonCode and IIS. BonCode will attempt to transfer any extraneous information via more common HTTP
headers.

33 | P a g e
General Recommendations
Unblock before use
Most likely you have received this package via internet download. To avoid multiple issues with using
the zip file content I would recommend that you unblock the package before unzipping. This avoids
security issues with Windows Vista and later operating systems as well as Windows 2008 and later
server operating systems. Simply right click on the zip file and click “Unblock” on the “General” tab.
Connector Thoughts
The BonCode connector has been engineered for throughput in concert with IIS7. Thus, it will efficiently
create and destroy threads; however, it will also maintain a larger number of threads for re-use then
the, previous, ISAPI based connector. This will allow it to handle demand spikes gracefully.
Consequently, it is recommended that some of the Apache Tomcat default parameters are adjusted to
allow higher level of concurrency in production as well.

34 | P a g e
For example, in the tomcat server.xml file add the maxThreads, connectionTimeout, and packetSize
attributes to the AJP1.3 protocol like so:
<!-- Define an AJP 1.3 Connector on port 8009 -->
<Connector port="8009" protocol="AJP/1.3" redirectPort="8443"
maxThreads="1000" connectionTimeout="121000" packetSize="65536" />
Also a corresponding change is required on the connector for the packet size. This is spelled differently
(case sensitive). Find the active BonCodeAJP13.setting file and add:
<PacketSize>65536</PacketSize>
It is also recommend that IIS and Apache Tomcat point to the same document directories. Thus for each
additional website that is added on IIS a similar entry need to be made in the Apache Tomcat
configuration.
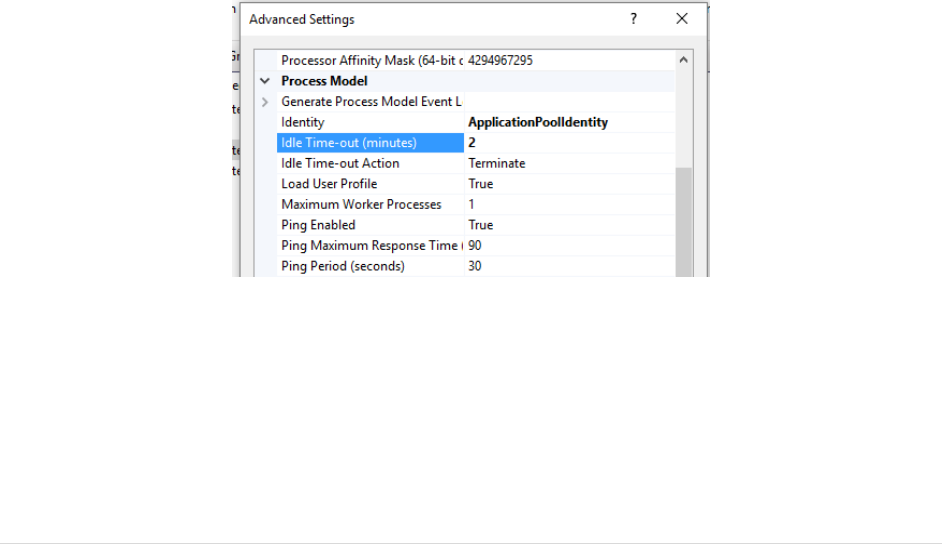
In addition, you should think about a connection and idle timeout to clean up errand and dead
connections automatically. The above example shows a connectionTimeout for Tomcat; a similar idle
timeout can be configured on the application pool for IIS by changing the advanced section of the
Application Pool -- Application Pool: Process Model Section: Idle Time-out (minutes) -- to a lower value,
e.g. 3 minutes. The IIS idle timeout should be slightly lower than the one for Tomcat
Using Connection Pools
Connection pools are created (reuse enabled) when the MaxConnections setting is changed from zero to
number greater than 2. This changes the behavior substantially and the considerations outlined in this
manual should be followed if you wish to avoid errors.
Thus, the default setup of the connector does not use a connection pool, i.e. MaxConnections is set to 0.
For the majority of uses this will work well and no change is needed.
However, in circumstances where the connector is used in high performance environments this method
is insufficient. We should enable connection pools. If you do so please see section “Configuring the
Connector for Performance”
Setup Recommendations
This is my personal preference on setup of the Tomcat and IIS configurations.
I setup two new web-sites in IIS, before the installation of the connector. The first site is for deployed
applications using Tomcat (regular application), the second one for tomcat administration.
Configuration of Application Site:

35 | P a g e
In this setup I point the IIS website’s physical path to the Tomcat [tomcat]\webapps\ROOT folder. Thus
Tomcat’s references do not change. I can deploy all WAR files as usual and they should become available
through IIS as apps as well. Depending on whether I need servlet support, I will go into the IIS GUI to add
a wildcard mapping for a subfolder. For example, if I deployed axis2, the path axis2 and below will need
a wildcard mapping.
Configuration of Admin Site:
This is a slightly more complex piece as I also setup an alternate DNS name so I can map a host header in
IIS. For example, if I wish to access the tomcat administration through IIS, I do the following setup:
Add a host reference in either host file (c:\windows\system32\drivers\etc) or in DNS, e.g.
tomcatadmin.local
Create new IIS web site with: Map IIS-physical path to [tomcat]\webapps
Host header name: tomcatadmin.local
I enable wildcard mapping on the site level.
I have, now, options to use Windows integrated security or IP based security to control access to the
admin site in addition to all other tools. And, I can access tomcat manager through IIS.
Configuration of the Application Pool:
I am also recommending a lower idle-timeout for the application pool. This will allow the connections to
be recycles sooner. This is a good idea with low, medium load sites as it releases resources faster. You
do this by accessing the “Advanced Settings…” of the application pool. In the “Process Model” section of
the properties change the “Idle Timeout (minutes) to 10.
Also in the same configuration section, the “identity” of the application pool should be changed to
“NetworkService” to avoid the common “System.Web.AspNetHostingPermission” error that occurs with
IIS 7.5 and beyond.
36 | P a g e
Connector Commands
With version 1.0.3 and later, the BonCode connector will support a special URL/query parameters that
can be used from a local IP address. Thus on the local server/machine the connector will listen for those
parameters so that it can provide additional information or can perform special actions. Thus, it does
not matter which “page” you are trying to call, as long as the handler is bound to that type of page, the
connector will first look for commands when this is done locally. If you have are using the connector
with jsp, a .jsp page call can be used, with .cfm/cfc a fictional .cfm.cfc page can be used, etc.
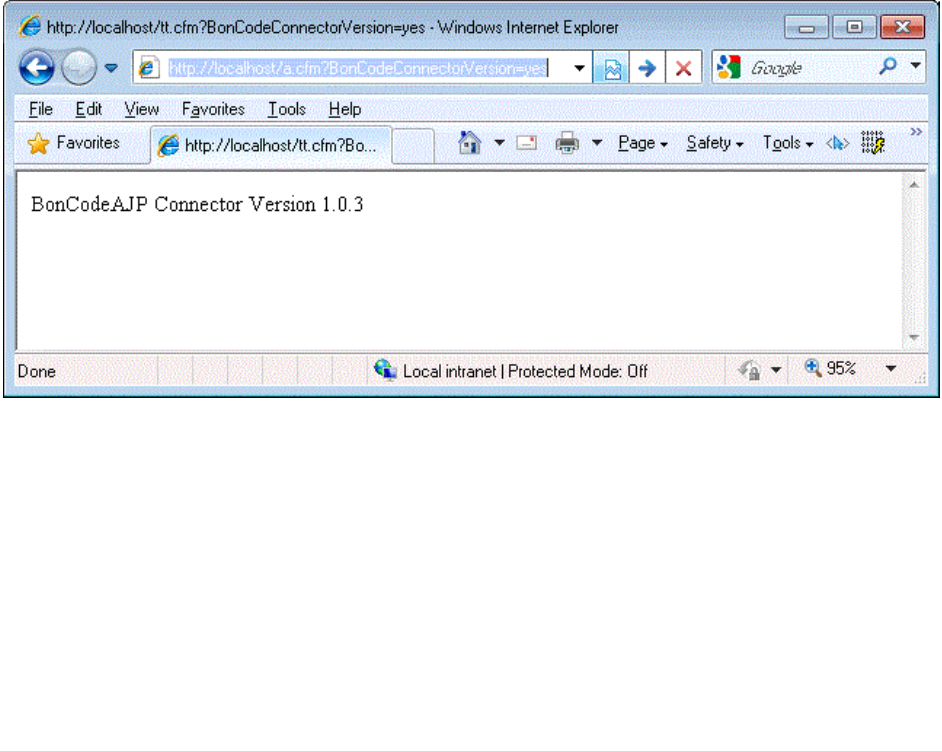
Identifying the installed Version
The connector will show the installed version and the source of setting file, if any, to the user.
Add the BonCodeConnectorVersion Query Parameter to any request. The main body of the
request will be ignored.
An example identifier call:
http://localhost/a.jsp?BonCodeConnectorVersion=true
This has no effect when used from a remote client.
Also to note is that when a log file is used (log level is set between 1 and 3) the version number will be
appended to any system error in the log.

37 | P a g e
Listing known virtual directories
Add the BonCodeVDirList Query Parameter to any request. The main body of the request will be
ignored. A setup is required for this to work. For further instructions on how to see “Transmitting Virtual
Directories Information” later in this document
http://localhost/a.jsp?BonCodeVDirList=true
Enabling Windows Application Log Entries
In order for the connector to log connection negotiation issues you will have to enable a windows event
source one time. There are instructions on how to so using command window and PowerShell window
in “Enable Additional Logging” section of this document. As an alternative, if the connector has sufficient
permissions, you can use a connector command to do the same.
Add the BonCodeEventLogPrep Query Parameter to any request. The main body of the request
will be ignored.
http://localhost/a.jsp?BonCodeEventLogPrep=true
List Active Configuration Settings
Add the BonCodeConfigList Query Parameter to any request. The main body of the request will be
ignored. This will list all connector configuration options that are currently active. Caution this may
display sensitive information in your browser.
http://localhost/a.jsp?BonCodeConfigList=true
HTTP Headers and connector behavior
There are generally two streams of HTTP headers to consider. An inbound stream, the headers set by an
HTTP client such as a browser in concert with headers set by the webserver, i.e. IIS, vs. an outbound
stream, headers set by Apache Tomcat, as response to the initial client request. In the latter, the
outbound stream, no changes are made by the connector. Everything is passed on as is. However, during
the inbound stream some optimizations take place.
During the inbound phase, the connector normally passes through headers as they are provided by
clients (browsers). There are exceptions though. You can set up black lists and white lists to restrict how
the connector behaves in this regard. There are also headers that the connector will block by default
and which cannot be controlled by any setting. These fall generally into two groups themselves. They
are either IIS generated headers and are not assumed to be useful in the tomcat context, or they already
exist in some form in the communication stream and are duplicated by IIS.
This is the list of always suppressed headers:
INSTANCE_META_PATH

38 | P a g e
APPL_MD_PATH
ALL_HTTP
ALL_RAW
AUTHORIZATION
CONNECTION
HTTP_CONTENT_TYPE
HTTP_CONTENT_LENGTH
PRAGMA
Inbound White Lists
When using white lists only headers on that list will be transferred regardless of how many headers the
client actually submits to webserver. This can be adjusted in the setting file for the connector.
Inbound Black Lists
When using black lists, headers that are on this list will be suppressed and will not be transferred to
Tomcat. This can be adjusted in the setting file for the connector.

39 | P a g e
Using Header Data Support
Header data support can be turned on or off by using the appropriate setting (HeaderDataSupport) and
placing it into the BonCodeAJP13.setting file. Please review The settings file (BonCodeAJP13.settings)
for details. Once this feature is turned on the connector will operate in such a fashion as to supply
additional information available from the webserver (IIS) to the servlet container (Tomcat) via HTTP
Headers.
Transmission of IIS Document Root
The connector will determine the root of the physical documents for each of the IIS sites that it supports
and will populate this data for each request in the x-tomcat-docroot HTTP header. For example,
for the default site this is normally c:\inetpub\wwwroot. This will also resolve any virtual or network
drives.
Transmitting Virtual Directories Information
Working Principles
The connector can also transmit information about IIS mapped virtual directories as part of the
information stream in HTTP headers. This is more complex process as virtual directory mappings can
exists on multiple levels of the IIS schema and configuration. This also requires additional permissions to
be assigned to the connector.
Once configured, the connector will add an additional x-vdirs headers into the request stream if
there are virtual directories used by IIS. This header will contain a comma and semicolon delimited list of
Uri to physical mapping of paths used by IIS.
For example the following x-vdirs value :
/test/unit4,C:\unittests\unit4;/test/all,D:\alltests\default\all
Would mean the following mappings are used by IIS:
/test/unit4 mapped to C:\unittests\unit4
/test/all mapped to D:\alltests\default\all
Testing Virtual Directories Setup
From the local server (localhost only) you can use the BonCodeVDirList Uri/Url attribute to retrieve the
currently mapped virtual directories for a given site. Add the attribute to any Url that would trigger the
handler, e.g.:

40 | P a g e
http://localhost/a.jsp?BonCodeVDirList=true
If permissions are sufficient this will retrieve the current Uri to physical mapping. If permissions are
insufficient you will see an error message instead.
IMPORTANT!
WHEN ADDING NEW VIRTUAL DIRECTORIES IN IIS YOU WILL NEED TO RESET THE APPLICATION POOL
FOR THE SITE BEFOR THE MAPPINGS BECOME AVAILABLE TO THE CONNECTOR.
Setup Additional Permissions Requirement
In order for the handler to read Virtual Directories, elevated permissions are needed to be granted to
the Application Pool under which the IIS Site(s) operate.
This can be done, by either changing the Application Pool Identity to “Local/System” or granting
specialized permissions to a custom account or the IIS_IUSRS group. The more conservative approach is
using assigned specialized read permissions.
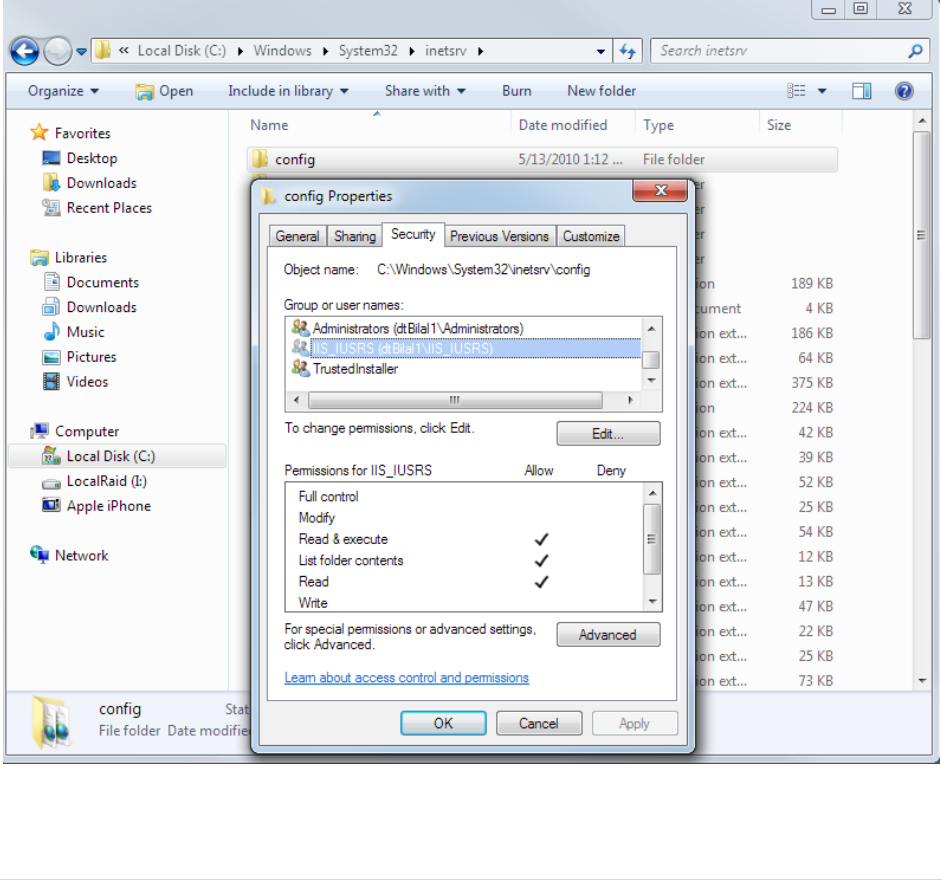
41 | P a g e
Specialized Read Permissions
The handler will need “read” permissions to all IIS related configuration files that can store information
about virtual directories:
Located in IIS site itself:
web.config
In IIS config folder containing these files normally in C:\Windows\System32\inetsrv\config:
administration.config
applicationHost.config
redirection.config
It is easiest to assign these permissions on the directory level (C:\Windows\System32\inetsrv\config)
and have windows inherit from there to the children in the directory. You may receive some

42 | P a g e
“permissions denied” messages during this assignment for “Export” and “schema” folders which is
expected.
Running this command in the system command prompt with Admin rights will be equivalent to
permission configuration above:
icacls %SystemRoot%\system32\inetsrv\config /grant IIS_IUSRS:(OI)(CI)(rd,rx,r) /c
Alternately, you can create a new user and assign it to the Application Pool Identity as custom account
with the permissions outlined above and as a member of the IIS_IUSRS group.

43 | P a g e
Scripted Deployment
Installing
If you got this far, you have proven to have a curious mind. The information in this section is meant for
users who want to deploy the connector on many machines and thus need to create some sort of
automated way to do this. You can stop reading otherwise.
To deploy the BonCode connector in an automatic fashion across multiple servers you have two basic
options. Firstly, you can use the guidelines provided in this manual installation steps section to build
your installers and scripts. Secondly, you can use the distribution files and the installer provided.
We will focus on the second alternative. The installer provided (Connector_Setup.exe) can operate in
silent mode to fully install the connector. In order to provide the inputs needed you will need to provide
both command line parameters and a setting file (installer.settings) to the installer.
Installer Command Line Parameters
The recommended combination of command line parameters is:
/VERYSILENT /SUPPRESSMSGBOXES /LOG /SP- /NOCANCEL /NORESTART
Thus the full command line would most likely look like this:
Connector_Setup.exe /VERYSILENT /SUPPRESSMSGBOXES /LOG /SP- /NOCANCEL /NORESTART
The command line options in detail:
/VERYSILENT
Instructs Setup to be very silent. When Setup is silent the wizard and the background window,
and the progress window are not displayed. Everything else is normal so for example error
messages during installation are displayed and the startup prompt is (if you haven't disabled it
with the '/SP-' command line option explained below) displayed as well.
If a restart is necessary and the '/NORESTART' command isn't used (see below) it will reboot
without asking.
/SUPPRESSMSGBOXES
Instructs Setup to suppress message boxes. Only has an effect when combined with
'/VERYSILENT'.
The default response in situations where there's a choice is:
•Yes in a 'Keep newer file?' situation.
•No in a 'File exists, confirm overwrite.' situation.

44 | P a g e
•Abort in Abort/Retry situations.
•Cancel in Retry/Cancel situations.
•Yes (=continue) in a
DiskSpaceWarning/DirExists/DirDoesntExist/NoUninstallWarning/ExitSetupMessage/ConfirmUni
nstall situation.
•Yes (=restart) in a FinishedRestartMessage/UninstalledAndNeedsRestart situation.
/LOG
Causes Setup to create a log file in the user's TEMP directory detailing file installation and [Run]
actions taken during the installation process. This can be a helpful debugging aid. For example, if
you suspect a file isn't being replaced when you believe it should be (or vice versa), the log file
will tell you if the file was really skipped, and why.
The log file is created with a unique name based on the current date. (It will not overwrite or
append to existing files.)
The information contained in the log file is technical in nature and therefore not intended to be
understandable by end users. Nor is it designed to be easily parseable; the format of the file is
subject to change without notice.
/SP-
Disables the This will install... Do you wish to continue? prompt at the beginning of Setup.
/NOCANCEL
Prevents the user from cancelling during the installation process, by disabling the Cancel button
and ignoring clicks on the close button. Useful along with '/VERYSILENT'.
/NORESTART
Prevents Setup from restarting the system following a successful installation, or after a
Preparing to Install failure that requests a restart. Typically used along with /VERYSILENT.
45 | P a g e
Installer Parameters File (installer.settings)
Most likely in addition to the command line parameters you will want to provide installation parameters
for the installer to use. These will need to be placed in a file with the designated name of
“installer.settings” and located in the same directory as the executable file (Connector_Setup.exe). The
format of this file follows a standard Windows “.ini” file structure, i.e. it is a text file with section
delineated by headers (in square brackets).
If the installer finds such a file during execution it will read it and determine the parameters from the
data contained in the file. All sections and keys are optional. If not provided the default values are
assumed.
DON’T LEAVE AN ACTUAL “INSTALLER.SETTINGS” FILE IN THE SAME DIRECTORY AS THE INSTALLER IF
YOU DO NOT MEAN TO USE IT. IF YOU START YOUR SETUP WHEN A PARAMETER FILE IS PRESENT, USER
INPUTS WILL BE IGNORED.
A sample installer.settings file
[Setup]
installType=global
acceptLicense=1
enableRemote=0
[Handlers]
installCF=1
installJSP=1
installWildCard=0
[Tomcat]
server=localhost
ajpPort=8009
configureServerXml=0
[Settings]
allowEmptyHeaders=1
The Setup Section Options
Parameter Name
Impact
installType
Default: global.
Options: global or sites
Either “global” or “sites”. If you specify global, the installer will install
connector server wide for all IIS sites found. The connector libraries will
also be installed in Global Assembly Cache (GAC).

46 | P a g e
If you specify “sites”, you will also need to add a [Sites] section to the
parameter file. The installer will, then, determine by site order which IIS
sites will have the connector installed.
acceptLicense
Default:1
Options: 0 or 1 (0=No, 1=Yes)
Indicates that you accept license.
enableRemote
Default:1
Options: 0 or 1 (0=No, 1=Yes)
Indicates whether you wish the connector to allow remote administration
of tomcat or Railo servers through this channel.
uninstallDir
Default: [blank]
The directory in which uninstall logs and references should be placed. If
left blank the installer will determine this based on operating system
automatically. A valid existing path should be used.
configurePoolPermissions
Default: 0
Options: 0 or 1 (0=No, 1=Yes)
This will change the Application Pool Identity’s user permissions in IIS. It
will add read rights to the IIS_IUSRS group to allow access of files in IIS
configuration directory (normally C:\Windows\System32\inetsrv\config).
You will need this if you want to allow the connector to retrieve virtual
directories from IIS in support of the EnableHeaderDataSupport directive.
The Handlers Section Options
Parameter Name
Impact
installCF
Default:1
Options: 0 or 1 (0=No, 1=Yes)
Installs connector support for cfm/cfc pages.
installJSP
Default:1
Options: 0 or 1 (0=No, 1=Yes)
Installs connector support for JSP pages.
installWildCard
Default:0
Options: 0 or 1 (0=No, 1=Yes)
Install wild card connector. All traffic will be passed to Tomcat.
47 | P a g e
The Tomcat Section Options
Parameter Name
Impact
server
Default: localhost
Name of server on which Tomcat instance is installed.
ajpPort
Default:8009
Port on which Tomcat is listening to AJP traffic
configureServerXml
Default:0
Options: 0 or 1 (0=No, 1=Yes)
If Apache Tomcat is installed on the local server as Windows service and
you have opted to do a global install, then the installer can also allow an
automatic configuration of Tomcat.
It will change the Tomcat server.xml file. It will redirect the webapps
directory to the same directory as the Default IIS site’s physical path
(normally c:\inetpub\wwwroot). It will also copy any files contained in the
existing Tomcat webapps directory to the IIS site’s directory.
The Settings Section Options
Parameter Name
Impact
allowEmptyHeaders
Default:0
Options: 0 or 1 (0=No, 1=Yes)
The connector does not transfer HTTP headers that do not contain data. If
you like to change it during setup provide this in parameter file.
forceSecureSession
Default:0
Options: 0 or 1 (0=No, 1=Yes)
Will set the ForceSecureSession option. See settings file description for
impact of this selection
enableHeaderDataSupport
Default:0
Options: 0 or 1 (0=No, 1=Yes)
Enable Header Data support setting (set to True). See setting description
for impact of this selection.
enableFlush
Default:0
Options: 0 or 1 (0=No, 1=Yes)
Enable IIS based HTTP flushing. The contents of cache are send to
browser. This will set the setting for Flush Threshold in time ticks
<FlushThresholdTicks>50000</FlushThresholdTicks>

48 | P a g e
enableRemoteIpDetection
Default:0
Options: 0 or 1 (0=No, 1=Yes)
Enable translation of headers to determine the correct client IP address
behind load balancers. This will set the setting for Resolve Remote Addr
like so:
<ResolveRemoteAddrFrom>HTTP_X_FORWARDED_FOR</ResolveRemote
requestSecret
Default:[blank]
If you wish to add a RequestSecret to the AJP connection. This will secure
communication on the protocol level. Please see the Setting File section
of this document for further details.
Both Tomcat and BonCode will need to use the same shared secret for
this to work.
modCfmlSecret
Default:[blank]
If you wish to add a ModCFMLSecret so the mod_cfml Tomcat valve only
creates context when this is present. Please see the Setting File section of
this document for further detail.
Both Tomcat and BonCode will need to use the same shared secret for
this to work.
The Sites Section Options
The [Sites] section is a special section that is available when the “installType=sites” is used. This is a
dynamic section containing an ordered list of entries. It contains a site reference and a flag (0 or 1) to
indicate whether the connector should be installed. It is important to know the order of the sites setup
in IIS to correctly supply information. For example, the third IIS site would be referenced as “Site3”. In
this schema the IIS Default Site will always be referenced as “Site1”.
In the following example we would setup the connector for Site 1 and Site 6:
[Sites]
Site1=1
Site6=1
You may omit sites for which you do not want to setup the connection. We recommend that you specify
at least one site though.

49 | P a g e
Uninstalling
If you used a scripted deployment model you can run the uninstall program which is an executable that
is placed into the Windows folder (normally c:\Windows). The uninstall program is named according to
this pattern unins???.exe where ??? is a number, e.g. 000. Thus an example of unstinaller file would
be: unins000.exe. Please ensure that you are running the correct uninstall program.
If you supplied an uninstallDir parameter in the installer.setting file the uninstaller
executable will be placed in the directory specified by your parameter. This is the recommend approach
to scripted uninstall.
The uninstaller program (unins???.exe) accepts optional command line parameters. These can be useful
to system administrators, and to other programs calling the uninstaller program.
/SILENT, /VERYSILENT
When specified, the uninstaller will not ask the user for startup confirmation or display a message
stating that uninstall is complete. Shared files that are no longer in use are deleted automatically
without prompting. Any critical error messages will still be shown on the screen. When '/VERYSILENT' is
specified, the uninstallation progress window is not displayed.
If a restart is necessary and the '/NORESTART' command isn't used (see below) and '/VERYSILENT' is
specified, the uninstaller will reboot without asking.
/SUPPRESSMSGBOXES
Instructs the uninstaller to suppress message boxes. Only has an effect when combined with '/SILENT'
and '/VERYSILENT'. See '/SUPPRESSMSGBOXES' under Setup Command Line Parameters for more details.
/LOG
Causes Uninstall to create a log file in the user's TEMP directory detailing file uninstallation and
[UninstallRun] actions taken during the uninstallation process. This can be a helpful debugging aid.
The log file is created with a unique name based on the current date. (It will not overwrite or append to
existing files.)
The information contained in the log file is technical in nature and therefore not intended to be
understandable by end users. Nor is it designed to be machine-parseable; the format of the file is
subject to change without notice.
/LOG="filename"

50 | P a g e
Same as /LOG, except it allows you to specify a fixed path/filename to use for the log file. If a file with
the specified name already exists it will be overwritten. If the file cannot be created, Uninstall will abort
with an error message.
/NORESTART
Instructs the uninstaller not to reboot even if it's necessary.

51 | P a g e
Troubleshooting
No page response (blank
page)
You are not getting a response via IIS, but when accessing tomcat web-
port the page is displayed correctly.
You have packetSize protocol issues. You are sending an initial packet
that is larger than the default protocol size of 8096 bytes. Increase the
packet size. Search for ‘packetSize’ to see examples of how to do this
in this manual. The maximum size is 65536 bytes.
You may have turned on content compression (e.g. if you use a cfml
engine like Railo or Lucee) and also use IIS URL Rewrite. This causes
URL Rewrite errors and the process is stopped (check your debug
output in event log or in browser debug window). Either disable URL
rewriting or disable content compression on the servlet container
level. You can still do dynamic compression on the IIS level.
You may have run into the maxThreads restrictions for tomcat, please
see above for general recommendations. You should ensure that both
tomcat and the BonCode AJP connector use the same maximum
connections.
J2EE Sessions dropped
It appears like all your requests are creating new sessions, rather than
reusing the session that is present.
Check whether IIS is using keep-alive directive. On IIS7: IIS Admin
select server > HTTP Response Headers > Actions > Set Common
Headers > check Enable HTTP keep-alive (by default) > ok
Error Message:
No connection could be
made because the target
machine actively refused it
127.0.0.1:8009
Tomcat may not be listening/ running on the assigned machine and
port.
Start tomcat, or if you need to change the target machine and port to
connect to you will need to add a settings file (BonCodeAJP13.settings)
normally into the /BIN directory. See above for instructions.
Error Message:
HTTP Error 500.21 - Internal
Server Error
Handler "BonCode-Tomcat-
CFM-Handler" has a bad
module
"ManagedPipelineHandler"
in its module list.
COMMON ERROR WITH SEVERAL ORIGINS ON THIS ERROR:
(Listing by simple to more complex)
IIS and .net framework are not always perfectly synchronized
especially if there have been a few framework versions installed.
i) You installed a later version of .net framework while you have set
your application pool to an earlier version
Check your IIS Application Pool. In Application Pool, click “Basic
Settings” on panel to the right. If the .net version is 2.0.0 change it to
latest, e.g. 4.X and save the change.

52 | P a g e
ii)
You are not able to retrieve mapped extensions from IIS7.
You may not have installed the “.net extensibility” for IIS7. See above
for instructions or use the Server Manager GUI to install this IIS7
feature.
iii)
You have installed a later version of the .net framework, for example
.net version 4.0, before you installed the connector and .net version
3.51. If you also have ISAPI role features enabled, you may have
created a conflict to resolve.
To keep using ISAPI and .net version 4:
a) Re-register asp.net under the correct .net version, run command:
C:\Windows\Microsoft.NET\Framework64\v4.0.30319\aspne
t_regiis.exe -i
b) Switch the Application pool connected to your site to “integrated
mode” and the .net version 4
iv)
Conflict with existing .net framework setup and ISAPI Filters and ISAPI
Extensions Role Sub service.
If you do not need ISAPI support (the connector does not need this
with .net 3.5.1), you can remove ISAPI extensions and filters.
Remove: ISAPI Extension, ISAPI Filter support
v) Conflict between .net frameworks installed. If you do not use .net 4:
a) uninstall .net 4,
b) uninstall .net 3.51,
c) then, rerun the connector installer
vi) The .net services and installations are out of sync and all the
installation and uninstallation did not fix it.
Check your IIS applicationHost.config after you installed your
target .net framework (in C:\Windows\System32\inetsrv\config).
Ensure that the global entries for .net version (and bit count) are
registered here. For example, .net 4 entries in <globalModules>
should look like this:

53 | P a g e
<add name="ManagedEngineV4.0_32bit"
image="%windir%\Microsoft.NET\Framework\v4.0.303
19\webengine4.dll"
preCondition="integratedMode,runtimeVersionv4.0,
bitness32"/>
<add name="ManagedEngineV4.0_64bit"
image="%windir%\Microsoft.NET\Framework64\v4.0.3
0319\webengine4.dll"
preCondition="integratedMode,runtimeVersionv4.0,
bitness64" />
In this example, restart IIS, and, then, switch your application pool to
.net 4.
HTTP Error 500.22 - Internal
Server Error
An ASP.NET setting has
been detected that does not
apply in Integrated
managed pipeline mode.
You may have installed and removed IIS features, then, reinstalled
feature. If this happened your application pipeline configuration may
be out of sync.
Try to run a command like this (example default site):
%SystemRoot%\system32\inetsrv\appcmd migrate
config "Default Web Site/"
Error Message:
Could not load type
'BonCodeIIS.BonCodeCallHa
ndler'.
Most likely you have registered the handlers correctly but probably
either not created a /BIN subdirectory under your website root and/or
forgot to copy the library files (BonCodeAJP13.dll and BonCodeIIS.dll)
into it.
Double check your webroot and ensure that you have the BIN
subdirectory.
Double check that library files (BonCodeAJP13.dll and BonCodeIIS.dll)
are in your BIN subdirectory.
Another option is that you have a dot net framework registration
issue. It is recommended that you install .net frameworks in the order
of release if you use multiple; e.g. first 3.51, then 4.0, then 4.5 etc.
(also see troubleshooting of HTTP 500.21 errors).
Error Message:
Security Exception
Description: The application
attempted to perform an
operation not allowed by
the security policy. To grant
this application the required
permission please contact
your system administrator
or change the application's
trust level in the
configuration file.
You are using IIS7.5 on Windows 2008 R2 or later. A change was
introduced that changes security requirements for dll files to be
deployed.
You will need to unblock the BonCodeIIS.dll and BonCodeAJP13.dll
libraries. See this blog for details:
http://blogs.msdn.com/b/friis/archive/2010/06/09/system-security-
securityexception-request-for-the-permission-of-type-system-web-
aspnethostingpermission-failed.aspx
Simply browse to the files in your webfolder, right-click, then, click the
“Unblock” button on the General-Tab. See example earlier in this
document.
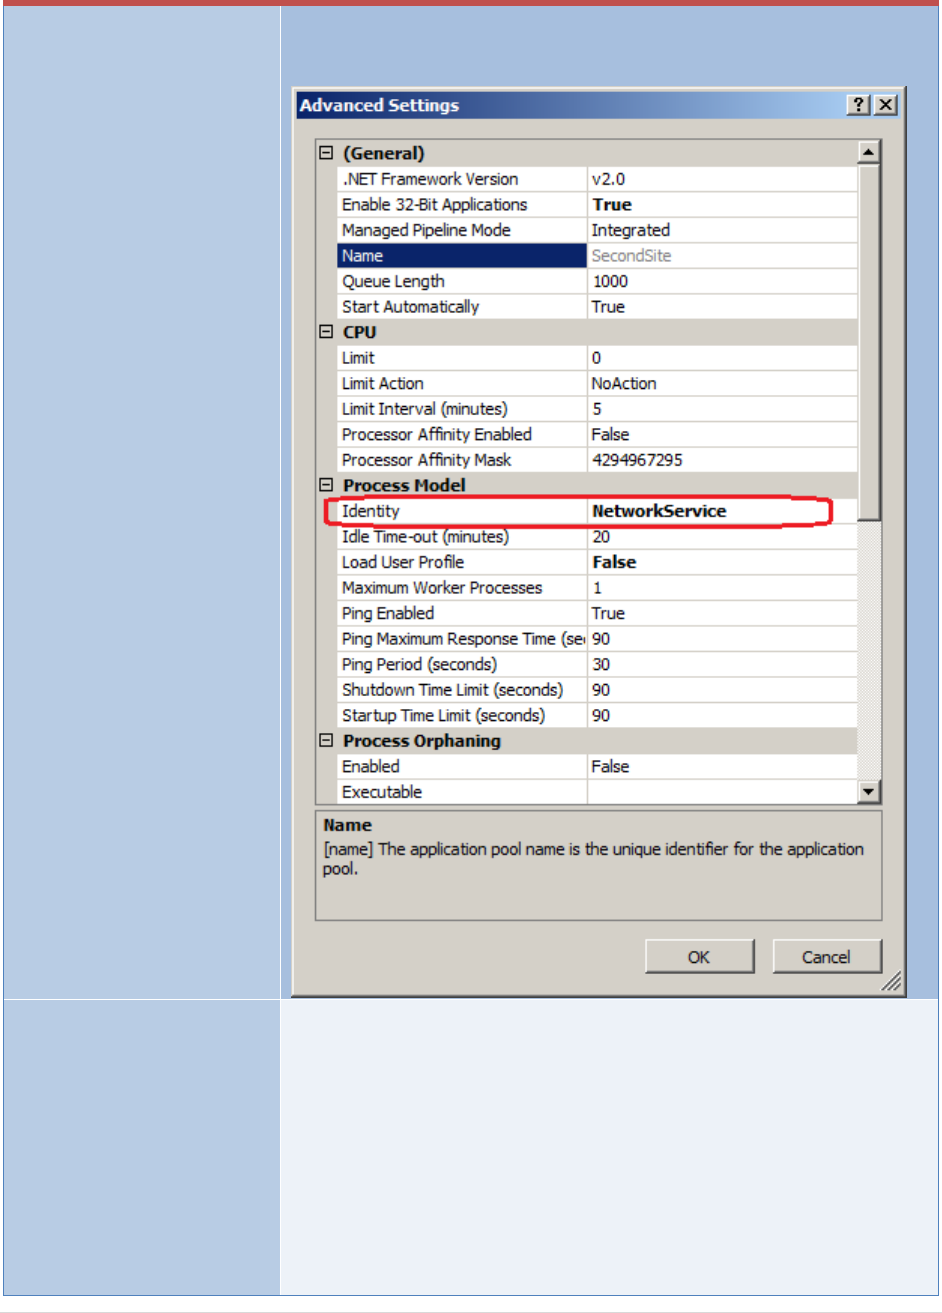
54 | P a g e
Exception Details:
System.Security.SecurityExc
eption: Request for the
permission of type
'System.Web.AspNetHostin
gPermission, System,
Version=2.0.0.0,
Culture=neutral,
PublicKeyToken=b77a5c561
934e089' failed.
Or, you can change the Application Pool Identity back to
“NetworkService” which was used in IIS7.
Microsoft MVC:
You are receiving a 404
message and have
Microsoft MVC installed
prior to installing the
connector.
By default the MVC handler will receive all communication and thus
the BonCode connector will be ignored.
You will have to add the “IgnoreRoutes” directive to your code.
For example:
public static void RegisterRoutes(RouteCollection routes)
{
routes.Ignore("{resource}.jsp/{*pathInfo}");
}
Or

55 | P a g e
routes.IgnoreRoute("{resource}.jsp/{*pathInfo}");
Invalid content length. Last
header processed
[HTTP_COOKIE]. Please
reconfigure BonCode
Connector and Apache
Tomcat to allow larger
transfer packets. Your max
allowed content length is
8192 bytes. Provided
content length would be at
least 8422 bytes.
A message similar to this (different bytes) indicates that the transfer
packet size used to communicate information between Apache Tomcat
and IIS is too small.
Most likely issue here is the use of long certificate chains with SSL
enabled or encountering of larger than allowed client cookies.
You have two principal options:
a) you should limit the size of client cookies used and/or clear
existing ones
b) change the packet size
To change packet size, you will need to adjust both the BonCode
connector as well as the Apache Tomcat side.
To change the BonCode connector, add or alter the PacketSize setting
in the BonCodeAJP13.settings file, e.g.:
<PacketSize>16384</PacketSize>
Correspondingly in the Apache Tomcat conf directory, change the
server.xml file for the AJP protocol and add or alter the packetSize
attribute , e.g.:
<Connector port="8009" protocol="AJP/1.3"
redirectPort="8443 packetSize="16384"/>
Upload Error 500
You may receive this error message when you attempt to upload files
that are larger than 4MB in size. This error is not related to the
connector but is included here for completeness.
IIS has a built in size limit for file uploads which is set to 4096 KB /
4MB. You can change this either in machine.config file for the whole
server or web.config file for the individual web site.
For example in web.config, change the maxRequestLength attribute of
httpRuntime tag. In this example setting it to 8MB:
<system.web>
<httpRuntime
executionTimeout="90"
maxRequestLength="8096"
useFullyQualifiedRedirectUrl="false"
minFreeThreads="8"
minLocalRequestFreeThreads="4"
appRequestQueueLimit="100"
enableVersionHeader="true"

56 | P a g e
/>
…
On screen display of:
“Error in transfer of data
from tomcat to browser.”
You may have enabled Flush Detection, but set a value that is too low
for the <FlushThresholdTicks> setting. IIS will only allow that we
transfer HTTP headers one time. Setting a low Flush Threshold Ticks
will cause the headers, even if partial, to be streamed to browser and
when you receive additional headers, this message is displayed.
Increase the value, recommended is in 10000 tick increments until the
message goes away. Alternately use FlushThresholdBytes setting.
If the FlushThresholdTicks was zero when this message was received
there was an issue with the protocol order of packets. Please look at
updates to connector and or Apache Tomcat update to resolve this
issue.
Repeated on screen display
of: “Connection to Tomcat
has been closed. Tomcat
may be restarting. Please
retry later.”
Two scenarios:
a)
If this message does not go away after you retry (and you are certain
Tomcat is configured and listening on AJP port), you may have a
connector configuration issue. Most likely is a mismatch of .net
framework version. Please set the application pool for your IIS site to
the latest .net version that is installed on the server and retry.
If this does not resolve the issue, enable logging with level 1 or higher
and report the exception to the support issue on GitHub
b)
This message occurs occasionally and you have not restarted Tomcat.
Please ensure that you have not set a connectionTimeout parameter
on the AJP connection definition in Tomcat’s server.xml that is smaller
than the Application Pool idle timeout in IIS (Advanced settings). By
default the IIS timeout for this is 20 minutes. If the Tomcat timeout
occurs before the IIS timeout it will cause the channel to be shut down
unnecessarily. Recommended is that you remove the timeout on the
Tomcat side in server.xml:
<Connector port="8009" protocol="AJP/1.3" redirectPort="8445"
tomcatAuthentication="false" maxThreads="500"
connectionTimeout="60000" />
IIS throws error:
“A potentially dangerous
Request.QueryString value
was detected from the
client ….”
IIS Security preference defaults have changed with upgrade of .net
framework from 3.51 to 4.x and beyond.
The validation is now strict and certain URL (Query) parameters will fail
validation and trigger this exception.
If you like to switch back to the previous way you will need to make a
change in your web.config file.
Add the requestValidationMode option to the httpRuntime node like
so:

57 | P a g e
<httpRuntime requestValidationMode="2.0" />
Here is an example of full web.config to change for larger timeout and
revert validation:
----------------------------------------------------------------------------------
<?xml version="1.0" encoding="utf-8"?>
<configuration>
<system.web>
<httpRuntime executionTimeout="180"
requestValidationMode="2.0" />
</system.web>
</configuration>
----------------------------------------------------------------------------------
Inside your HTML output
you see:
“Generic Connector
Communication Error:
<hr>Please check and adjust
your setup:<br>Ensure that
Tomcat is running on given
host and port.<br>If this is a
timeout error consider
adjusting IIS timeout by
changing executionTimeout
attribute in web.config (see
manual).”
a) TCP/IP level error:
----------------------------
There may be multiple reasons for this. It is “generic” in the sense that
the error occurred in the establishment of TCP/IP connection phase
and thus the main connector has not been active yet.
Alternately, the TCP/IP connection has been impacted by client see
point b) for an example.
In either case, this is low level error, indirectly related to connector.
You can collect more detailed error information in the Windows Event
Logs, you have to turn on event logging for this. See: Enable Additional
Logging in this document.
If you see entries like this under load in the Windows Event Log:
Thread was being aborted. at
System.Net.UnsafeNclNativeMethods.OSSOCK.recv
The error code is 0x80070057
You might be beyond the limit of threads that your server can handle.
Throttle them to a level that it can process. First determine the
number of requests before the system misbehaves (via event monitor
or similar), then, use ServiceThrottling (in app.config or web.config) to
ensure that system queues and processes only the amount that it can
handle:
https://msdn.microsoft.com/en-us/library/ms731379.aspx
b) Flush when not allowed error:
--------------------------------------------

58 | P a g e
This may be caused by setting a FlushThresholdTicks value that is too
low. In cases where user code changes HTTP header values after the
initial flush is occurred you will see this error. Once header data is sent
to client (browser) you can no longer make changes to HTTP headers
and an error will be thrown.
Solutions:
a) Do not make changes to HTTP headers after response is
spooling
b) turn off time ticks based flush
c) increase <FlushThresholdTicks>
d) use byte based flush
Failed:Nothing received
from the tomcat.
Standard warning for some packages from Tomcat. If persistent, please
check the installation of your .net framework and IIS feature
components such as .net support and asp.net support are required.
Please see manual installation section on which IIS features are
needed.
404 Error to Lucee admin
when using Lucee cfml
Engine
I)
If you receive 404 errors from IIS while the direct access to Tomcat
web port shows working admin pages you can do the following:
a) The existing workaround is to create a virtual directory inside
the IIS site and point to any empty folder.
To fix and operate without empty virtual directory you can check the
following:
a) The bit-version of Tomcat/JVM is 64-bit e.g. the Tomcat status
pages shows amd64 as the architecture. Install correct bit
version of JVM and Tomcat for your version of Windows.
b) If using WAR deployments of Lucee, ensure the engine is
successfully deployed (remove and redeploy if needed)
II)
This error may be caused by underlying use of Mura CMS as well. The
404 error may be a valid message issued by Tomcat container. IIS will
intercept this status and display its own 404 message. You can turn off
IIS error handling for this by setting this option
<SkipIISCustomErrors>True</SkipIISCustomErrors>
This will display the Tomcat error page directly. You should fix the
missing file error.
Inside your log file you see:
“Failed Nothing received
from the tomcat. Closing
the Connection.”
If you see this message repeatedly we may have a TCP channel
synchronization problem between Windows TCP and Java (Tomcat)
TCP stack. When the last message from Tomcat is combined with a
closing of the channel, Windows may only see the channel being
closed, dropping the last message.
You may wish to change your code to add a slight delay (1ms) just
before returning from HttpServlet.doPost

59 | P a g e
(Thanks to Bernard Brochu for researching this and providing the
solution.)
Memory Utilization seems
high on W3WP.EXE
(Application Pool Instance)
There are few reasons this can occur. Garbage Collection (GC), i.e. the
automatic memory management inside the .net framework is not
operating as efficiently in certain circumstances. If this is an issue you
can look at the following options:
a) If you architected your solution to pass through large byte
content, e.g. image files, reports and or static assets, attempt
to have IIS serve those directly.
b) Adjust GC collection levels to “Workstation GC” model in the
.net configuration file. For 64-bit .net 4 this file is located
typically in
c:\Windows\Microsoft.NET\Framework64\v4.0.30319\Aspnet.
config add the line <gcServer enabled="false"/>
under <runtime> node
c) Use the BonCode connector EnableAggressiveGC setting. This
will explicitly call for Garbage Collection after each call has
been completed.
d) Adjust the Application Pool Recycling options in advanced
setting of Application Pool configuration. Set the memory
limits for Private and Virtual memory you would like the
system to follow.