Brew Maniac Ex Manual 0.3
User Manual:
Open the PDF directly: View PDF ![]() .
.
Page Count: 28
BrewManiacEx Manual
Version 0.3 draft v1
July 5 2017

0. Software Configuration
If you are using different configuration from mine, like different pin assignment or different IO
Expander address, some of the compile options must be changed. Two files are involved:
config.h
and pins.h
.
config.h contains most important options. Two important options are
● line 32@config.h
#define MaximumNumberOfSensors 1
Define MaximumNumberOfSensors to 1 for single sensor, and 5 for multiple sensors.
The real number of sensors is determined by scanning when setup, so 5 is good for
all multiple sensor setup.
● line 38@config.h
#define UsePaddleInsteadOfPump false
If you are using mixer or stirrer, change this option to true. The differences from
using PUMP are
○ no “pump priming” at the start of automatic mode
○ The unit of Pump(stir) Rest/Pump(stir) cycle is second instead of minute
○ Heating control(PID) is not turned off during “Stir Rest”
○ ‘stir’ is used in place of ‘pump’ for button labels.
● line 39@config.h
#define SecondaryHeaterSupport false
Dual heaters support.
● line 38@config.h
#define SpargeHeaterSupport false
Sparge heater support is default to false since v0.3
pins.h contains the hardware configuration, include buttions, IO expander, and etc. You
should know what you are using before changing them. Two of these options you might
need to change are
● line 25@pins.h
#define PUMP_INVERTED_LOGIC false
SSR(Solid State Relay) is recommended for heating control, and mechanical relay is
usually good enough for PUMP control. Some relay modules on eBay use inverted
logic. Change this option when necessary.

● line 27@pins.h
#define PCF8574_ADDRESS 0x20
Address of the IO Expander.

1.Sensor Configuration
There are two configurations of BrewManiacEx: single sensor and multiple sensors.
It is necessary to assign and identify the sensors before use for multi-sensor configuration.
For single sensor configuration this is not necessary, you can however use just one sensor
in multiple sensor configuration, but sensor setup is still necessary.
For multi-sensor configuration, the sensor setting must be configured before all other
functions.
2.Settings
2.1 PID-PWM
Setting
Values
Description
Constant kP
-100~100
PID parameters (can be auto tuned.)
Constant kI
-100~155
PID parameters (can be auto tuned.)
Constant kD
-100~100
PID parameters (can be auto tuned.)
Sample Time
1500~3500
PID algorithm parameters
WindowSet
4000~7500
PID algorithm parameters. It should be greater
than 2x Sample Time
Heat/PWM in Boil
0~100
The default PWM after Boil Point reached.
Sensor Calibration
-5 ~ +5
Calibration value of sensor(s)
PID Start
1 ~ 3.5
PID will be applied when the difference between
the current and the set temperature is smaller
than this value. For example, if set point is 65,
and PID start is 1.5, then the PID will be applied
when the temperature reaches 63.5. Before that,
the heating is full-on.
Note1: for
multi-sensor configuration
, the “calibration value” should be the the number of
sensors.
Note2: PID is used to maintain the temperature of the mashing stages only. For the boiling
stage, or when the setting point is greater or equal to boiling temperature, the heating is
full-on until the boil temperature is reached. After reaching the boil temperature, the heating
output is controlled by PWM.

Note 3: If
SecondaryHeaterSupport is “true”, there will be 3 set of P,I,D settings. The
corresponding values will be used when heating elements configuration changes.
2.2 Unit Parameters
Setting
Values
Description
Temperature Unit
°C/°F
Celius or Fahrenheit
Disable Delay Start
No/Yes
Yes: Disable Delay Start
Boil Temperature
80-120°C
176-248°F
The temperature regarded as “Boiling”. Note:
the set temperature must be greater or equal
to this setting to be regarded as “boiling”.
PWM is enabled once the measured
temperature is greater than the set
temperature AND the Boil temperature.
Pump Cycle
5 ~ 15
Pump Rest
0 ~ 5
Set to 1-4 to enable auto pump rest. During
mash stages, pump will run for “Pump Cycle”
time and stop for “Pump Rest” time.
Pump PreMash
OFF/ON
Turn on pump before Mash-in.
Pump on Mash
OFF/ON
Pump MashOut
OFF/ON
Pump on Boil
OFF/ON
Pump Stop
Temperature
80-120°C
176-248°F
The temperature at which to stop the pump.
PID DoughtIn
OFF/ON
Specify if HEATING is no during dought-in.
PID MaltOut
OFF/ON
Specify if HEATING is no during removing
malt pipe.
Skip Add
No/Yes
Skip asking “Add Malt”, go direct into first
Mash step after “Mash-in” temperature
reached.
Skip Remove
No/Yes
Skip asking “Remove Malt”, go direct into
Boiling after mashout.
Skip Iodine
No/Yes
Skip iodine test, go directly to Mashout after
last mash step.
Iodine Time
0-120
The time to wait for iodine test.
Whirlpool
Off/Cool/Hot
The time to run Whirlpool.

Off: no whirlpool
Cool: whirlpool after cooling phase.
Hot: whirlpool before cooling phase.
2.3 Misc Setting
Setting
Values
Description
Disable Delay Start
No/Yes
Yes: Disable Delay Start. The controller won’t delay
start.
Buzz On Button
OFF/ON
Button pressing feedback.
Pump Prime Cycle
0~10
The number of pump priming cycle.
Pump Prime On
Time
250-10,000
ms
To prime the pump before automatic mode, the
pump will be turned on and then off for multiple
times. This setting defines the duration of ON.
It increases in 250ms step.
Pump Prime Off
Time
0-10,000
ms
see above.
Sparge Water heating Control *1
Control Sparge
Heating
No/Yes
disable/enable the sparge water heating control
Temp. Ctrl
No/Yes
Whether or not to control the temperature of spage
water heating
Sparge Sensor
1-[max
sensor id]
the sensor id for sparge water
Sparge Temp
75 ~ 80°C
the desired temperature for sparge water
Temp. Diff
0.5 ~ 2.0°C
the temperature range to keep
Heating Element Usage
PreMash Heating
Element
Primary
Secondary
Both
The elements used for PreMash stage, that is
before dough-in.
Mashing Heating
Element
Primary
Secondary
Both
The heating element used during mashing.

Boiling Heating
Element
Primary
Secondary
Both
The heating element used during boiling.
Post Boil Heating
Element
Primary
Secondary
Both
The heating element used for Hop Stand, if
necesssary.
The advantage of using sparge water heating control is that the sparge heater and main
heater will run exclusively
so that they can share one 120V/20A GFI socket(loop)
(American system)
The heating of sparge water can be temperature controlled if required. If temperature control
is not applied, the heating is ON when the main heating is OFF, in this case the temperature
of the sparge water should be controlled manually or by another controller. The temperature
control options are only available in multi-sensor configuration.
You don’t need to specify all P.I.D parameters for all usage of heating element. For example,
if BOTH is used only for boiling, P.I.D. is not applied in boiling stage so it is not necessary to
supply the setting values. (However, it might be used in manual mode.)
2.4 Sensor Setting
Connect all the sensors, and run sensor setting before all other actions.
The maximum number of sensors supported is 5.
There are two steps in sensor setting, identifying sensors and assigning sensor usage. In
the first step, the sensor is identified and assigned to a number
as its ID. In the second step,
the primary sensor for temperature control and the auxiliary sensor reading to be displayed
are assigned for each step, including Pre-Mash, Mashing, Boiling, Cooling, Manual mode,
and Main screen.
Step 1: Assign sensors
Assign the sensor to the number displayed, #1 in this picture. Use up/down to change
sensors. The last 8 digits of the sensor address and current temperature reading is
displayed. To get updated temperature reading, use UP/DOWN to change to other sensors
and get lastest reading.
Step 2: Assign sensor usage
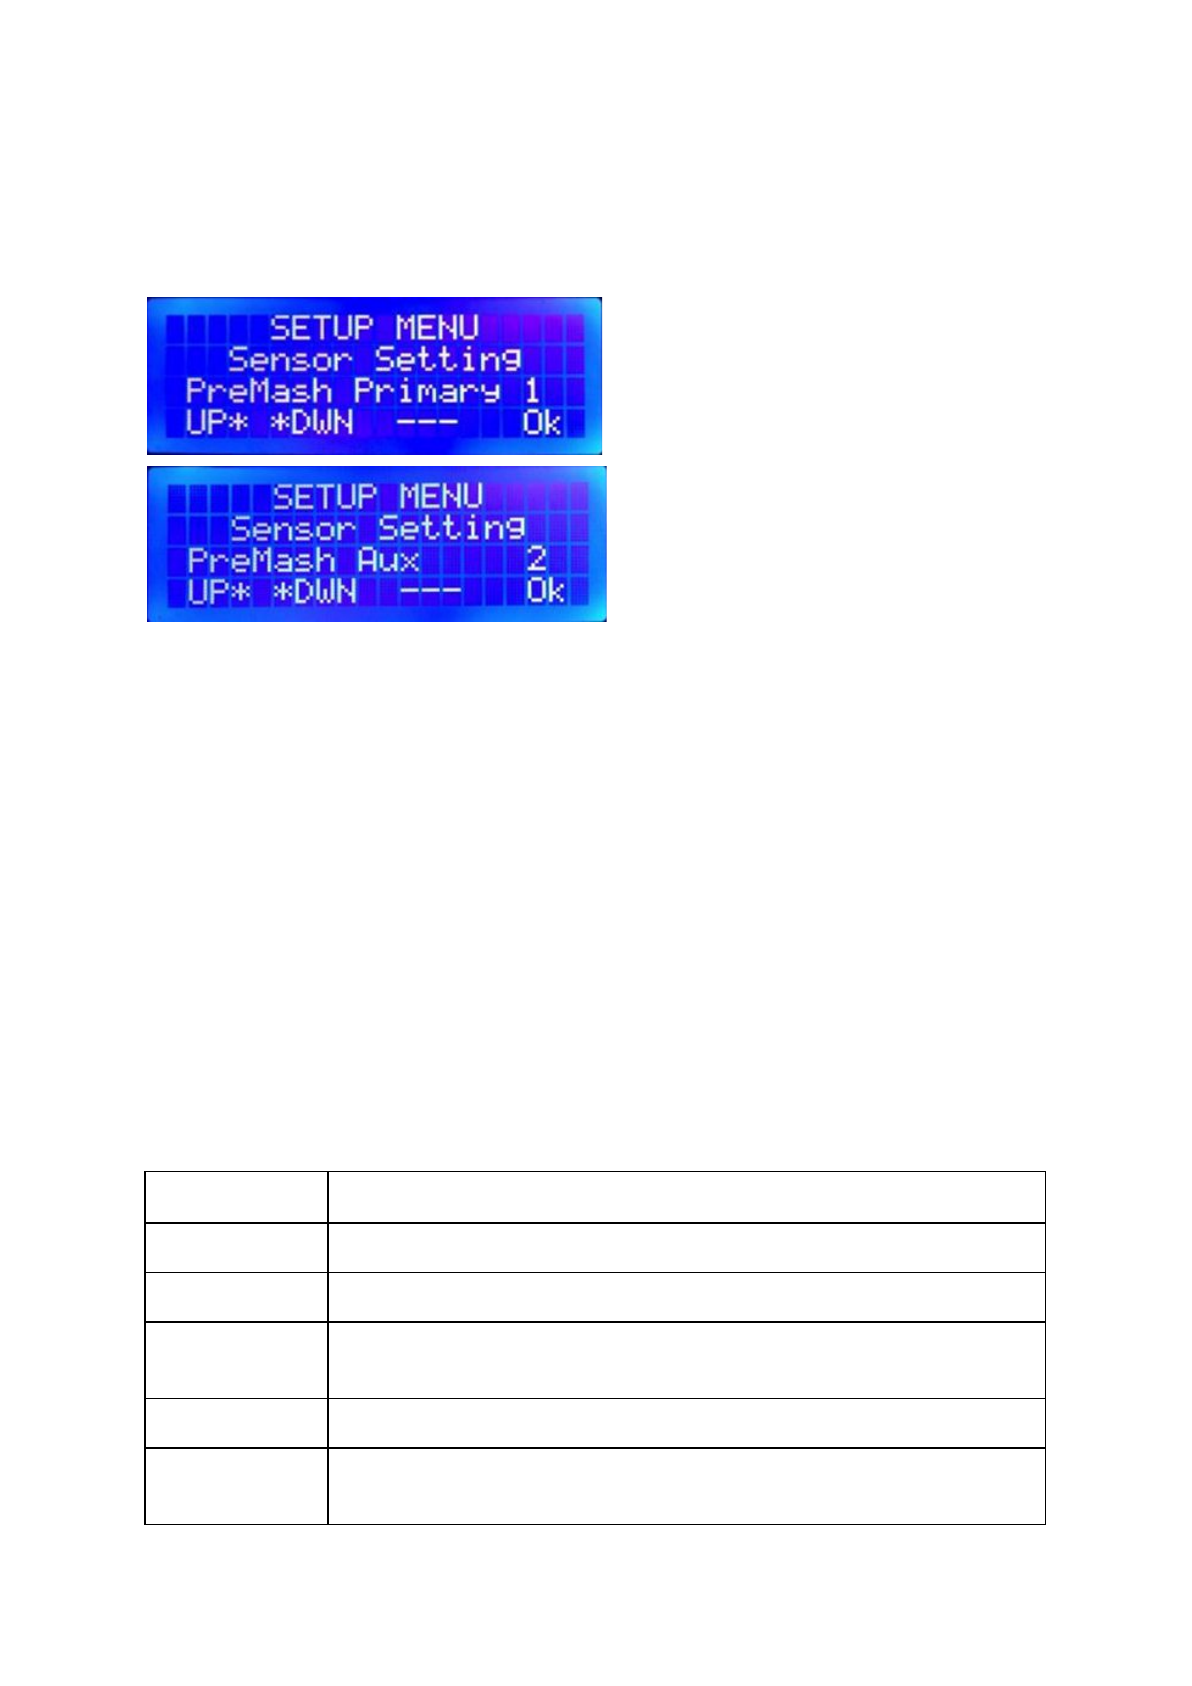
Only two readings can be displayed on the 20x4 LCD, the primary
one is used for
temperature control while the auxiliary
one is for display only. The primary and auxiliary
sensors can be set for the following stages: Pre-Mash, Mashing, Boiling, Cooling, Manual
Mode, and Main screen. The reading of primary sensor is always the number at TOP
or
LEFT
.
Note: if temperature controlled sparge water heating control is applied, the
secondary reading is always the sensor assigned to the sparge water temperature
during Mashing.
3. Manual Mode and PID autotune
3.1 Manual Mode
In manual mode, the heating system the and pump are controlled manually.
The time starts running when the temperature reaches the set point, and it will be reset when
the set temperature is changed 1 degree away.
Buttons
Functions
Up
Increse setting temperature. Long press to speed up.
Down
Decrease setting temperature. Long press to speed up.
Heat(Start)
Toggle heating element. In dual element mode, it controls primary
heating element.
Pump(Enter)
Toggle pump.
Heat + Pump
Enter countdown mode to input count down time. After input of
countdown time, press Heat + Pump again to end editing countdown
timer. The countdown will begin when the set temperature is reached.
After the countdown finishes, there will be a buzzing sound and the
time starts to count “up”.
Down + Heat
Toggle sparge heating, if supported.
Up + Heat
Toggle Secondary heating, if supported.
Long press Heat
Enter PID autotune. The P.I.D tuned will be the configuration of heating
elements used.
Long press
Pump
Enable Pump rest.
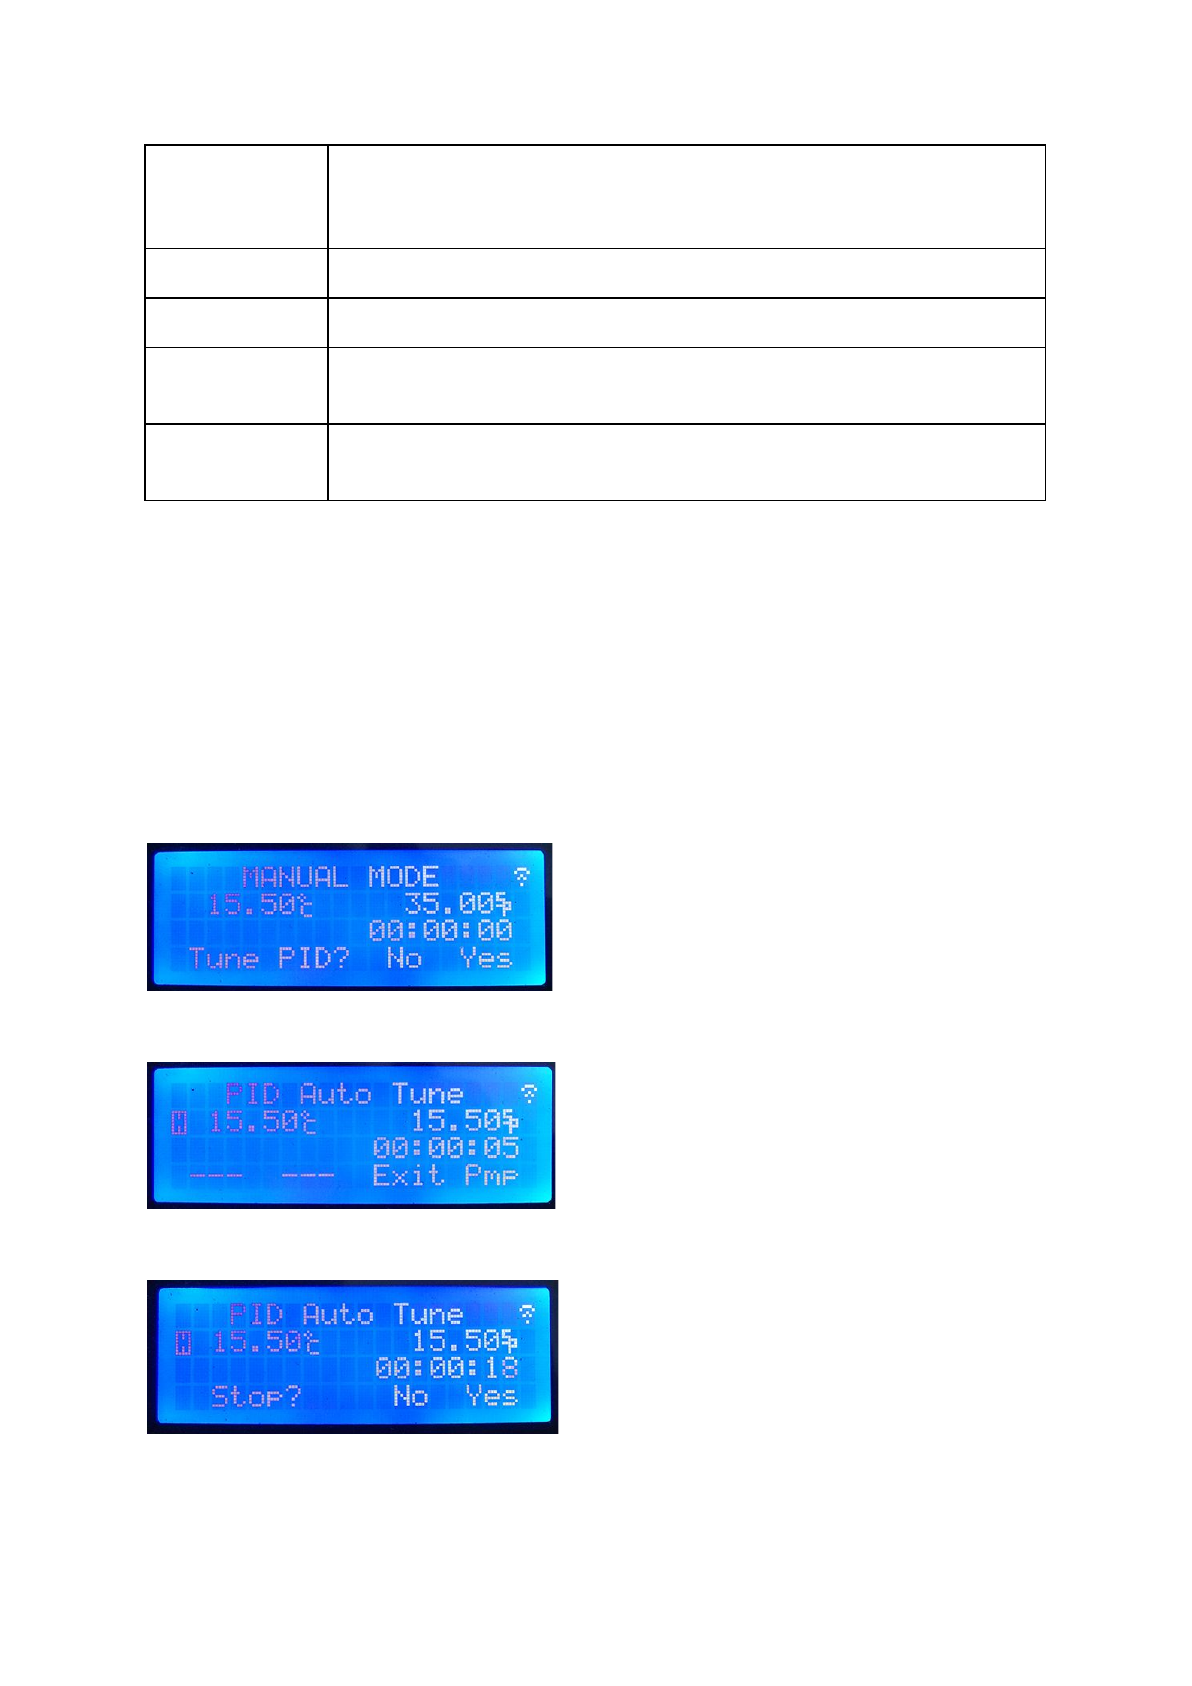
3.2 PID AutoTune
The PID autoTune function is used to derive the kP, kI, and kP values. To run PID
AutoTune:
1. Add water
2. Enter Manual Mode, set the desired temperature to the temperature you usually mash at.
3. After the set point is reached, LONG PRESS the “Heat” button, and answer “Yes” to
enter PID AutoTune.
4. The PID AutoTune function will run to get the optimal parameters which can keep the
temperature steady at current temperature.
5. When the process is finished, the parameters are stored automatically. The controller will
return to Manual mode. You can stop the auto tune anytime before it finishes.
Note:
The PID AutoTune function derives the optimal parameters by kicking the target either way
and seeing how far and how quickly it goes. Therefore, the parameters derived are best for
the conditions in which it runs. To get the best result, use the same volume of water as your
brew size, and put your device in the place where you usually brew. Running the PUMP is
also recommended if the pump is on during mashing, which is usually true.
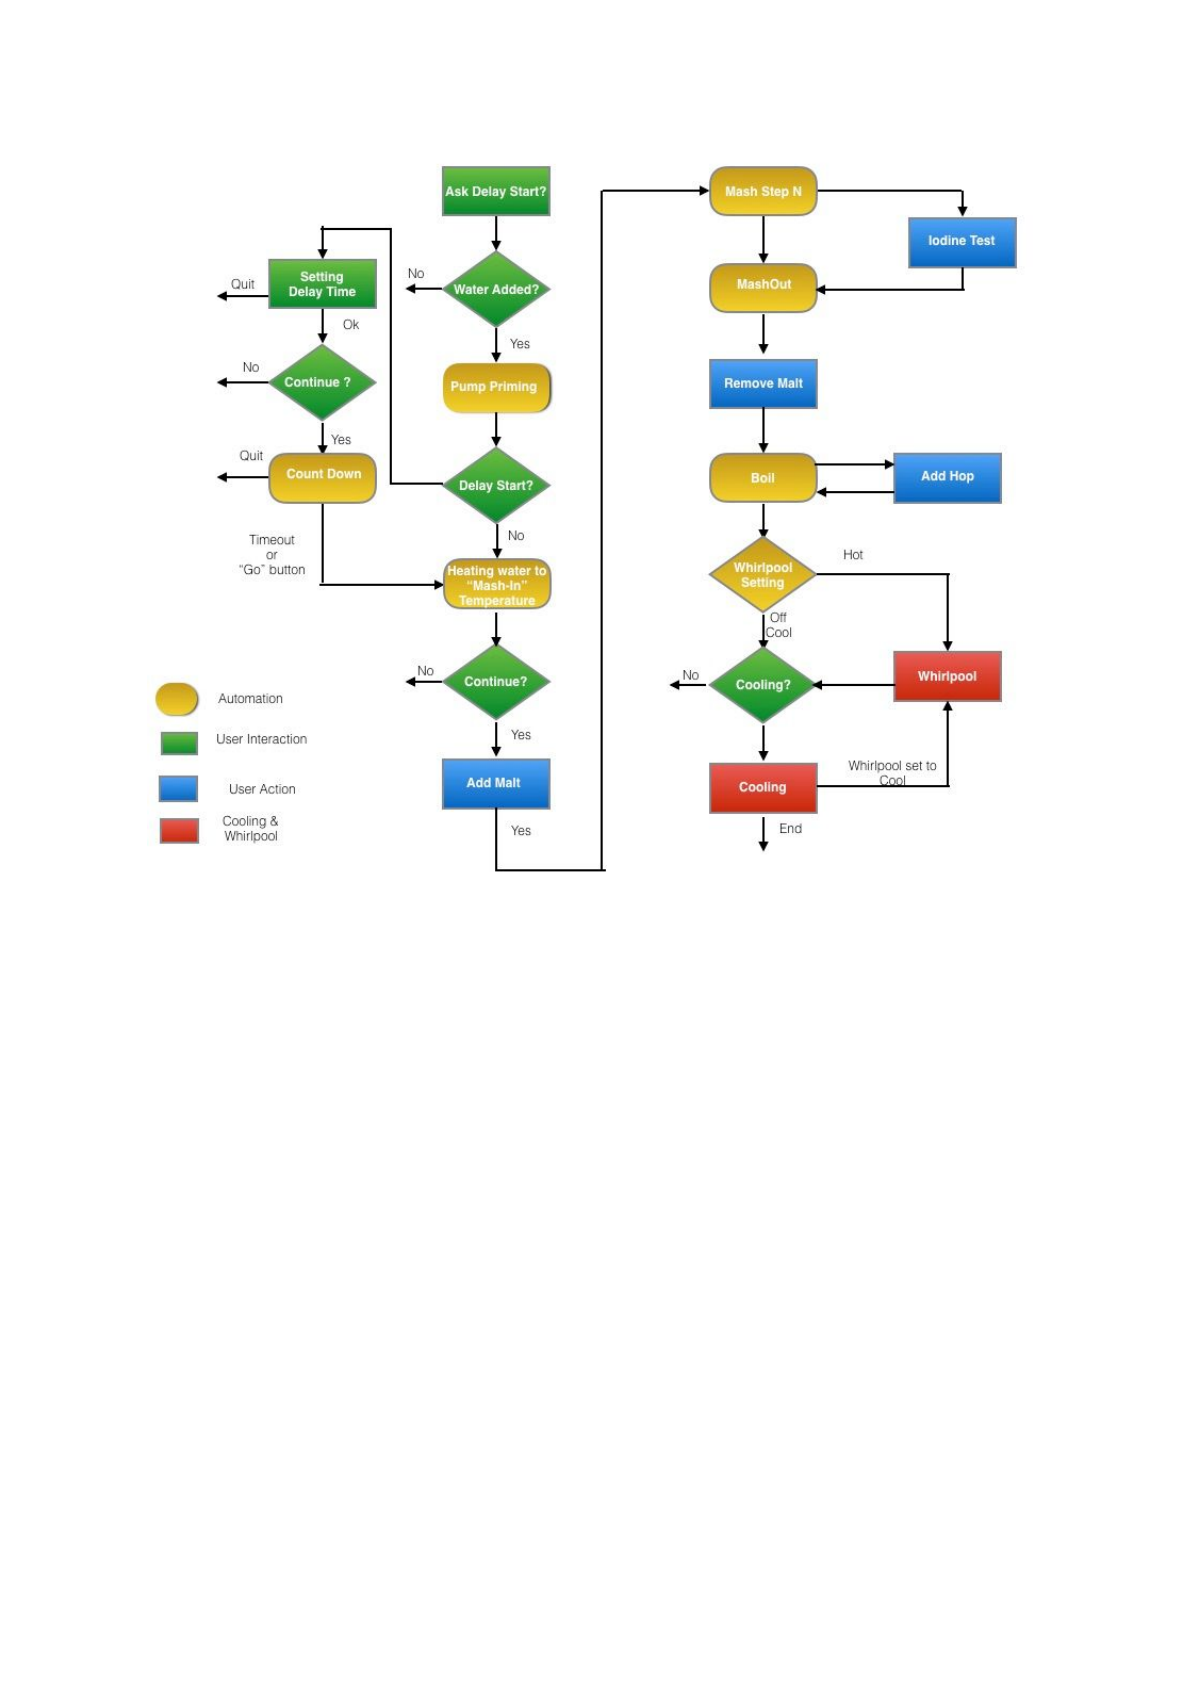
4. Brew with Automatic mode
Automation is the heart of BrewManiacEx controller. The brew process starts from heating
strike water to optional whirlpool and cooling. It prompts for user interactions, including:
-Malt In
-Malt Out
-Iodine test
-Hop throwing
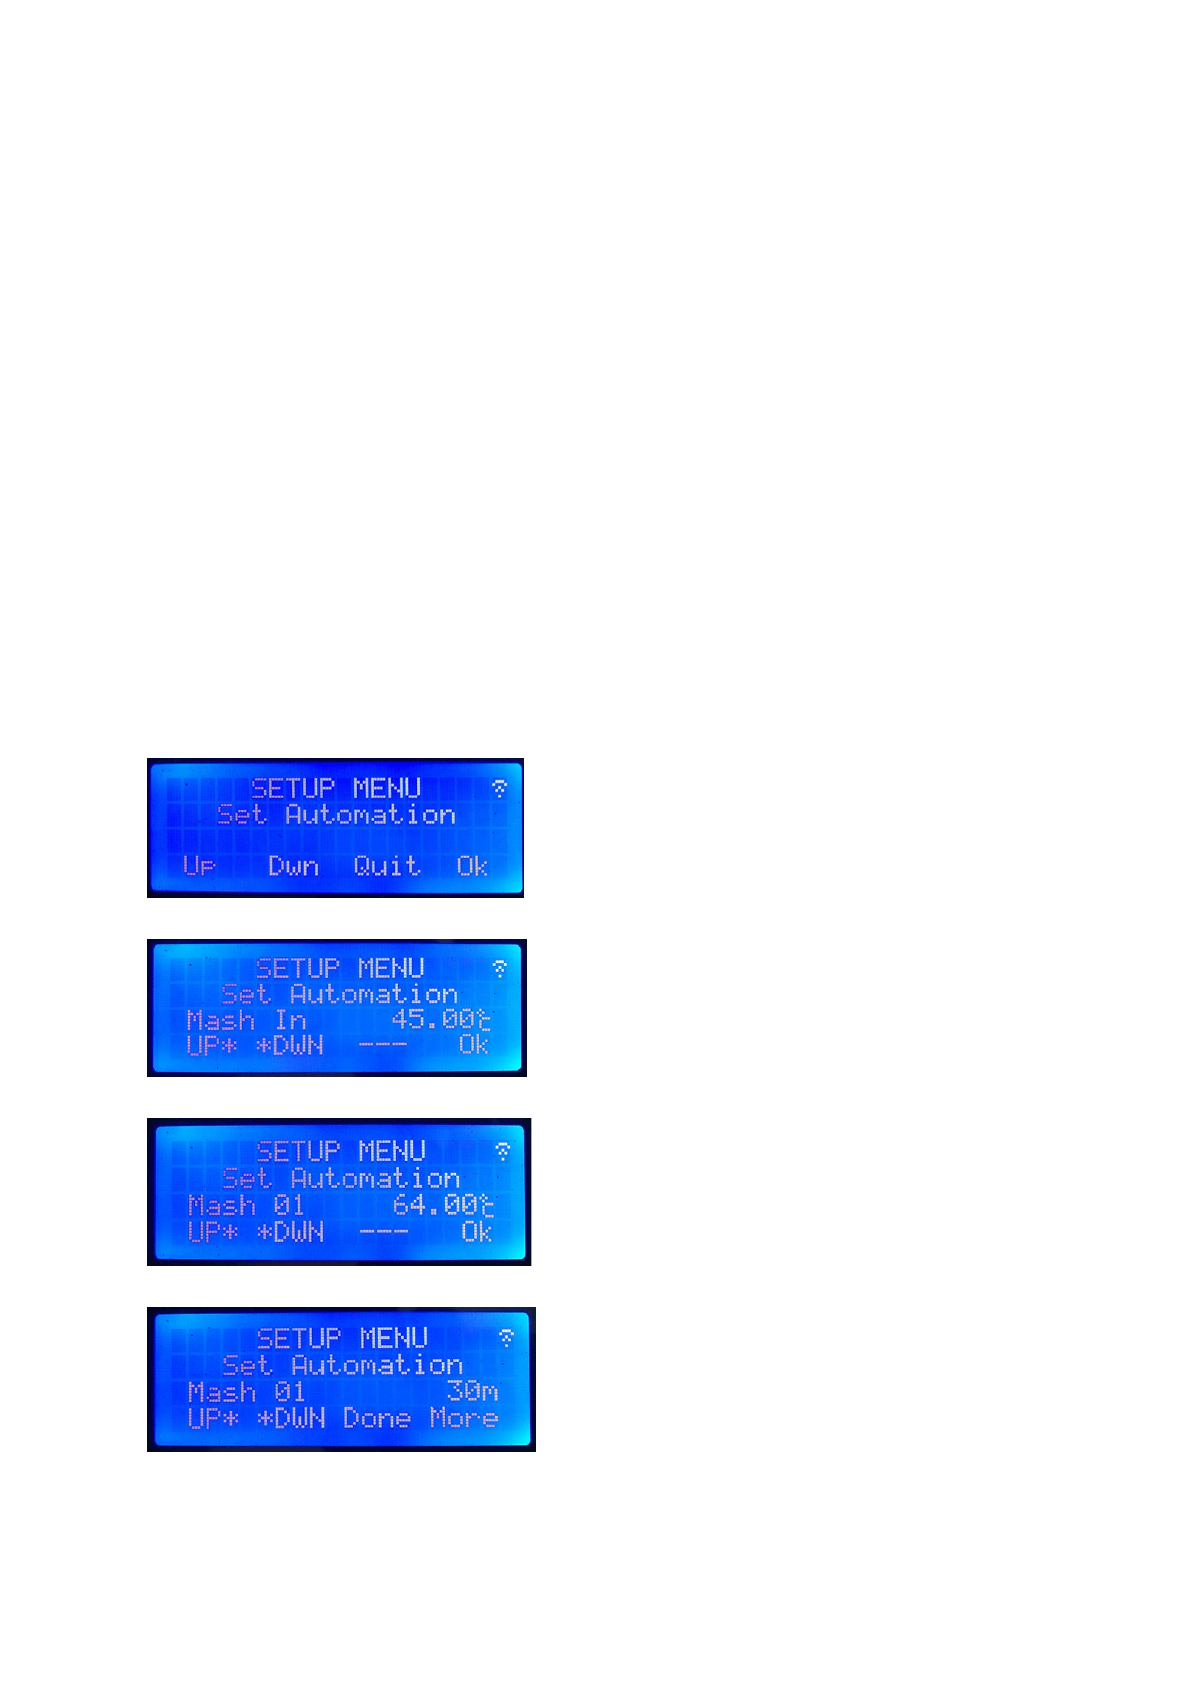
4.1 Setup Automation
Before starting automation, the mash schedule, boil time, and hop time need to be specified.
To edit the automation procedure, enter “Setup” then select “Automation”.
The first item to edit is the temperature of “Mash In”, or the temperature of the strike water.
Then, specify the first mash step temperature:
and, the rest time.
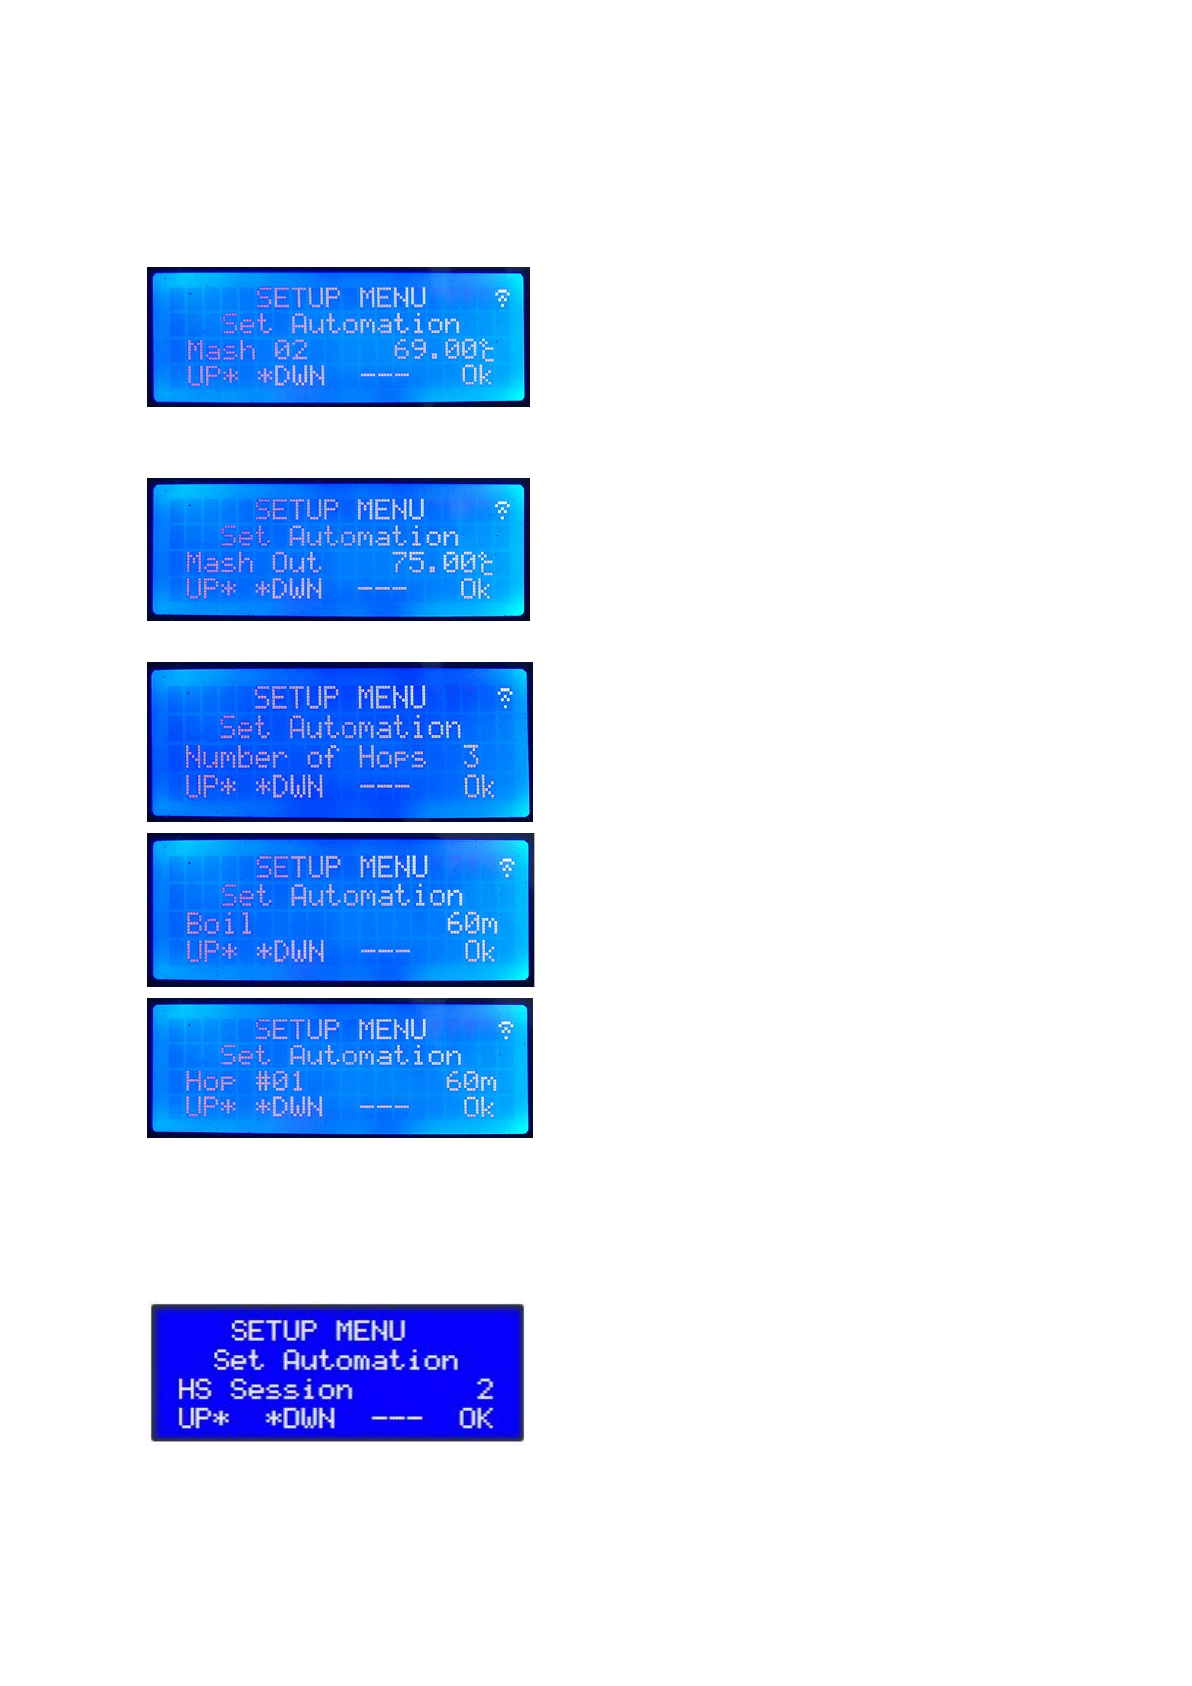
After entering the time by Up/Down buttons, press “Done”(Start button) if this is the final
mash step(rest), or “More”(Enter button) if more rests are needed.
Repeat the input of temperature and time until all steps are input or the maximum 6 steps
are input.
Then mashout temp and time:
Input number of hops, Boil Time, and the time of each hop.
The automation settings are saved. Therefore, if the same recipe is brewed, it is not
necessary to setup again.
HopStand editing:
A HopStand Session is a span of temperature range. Maximum number of sessions is 5.
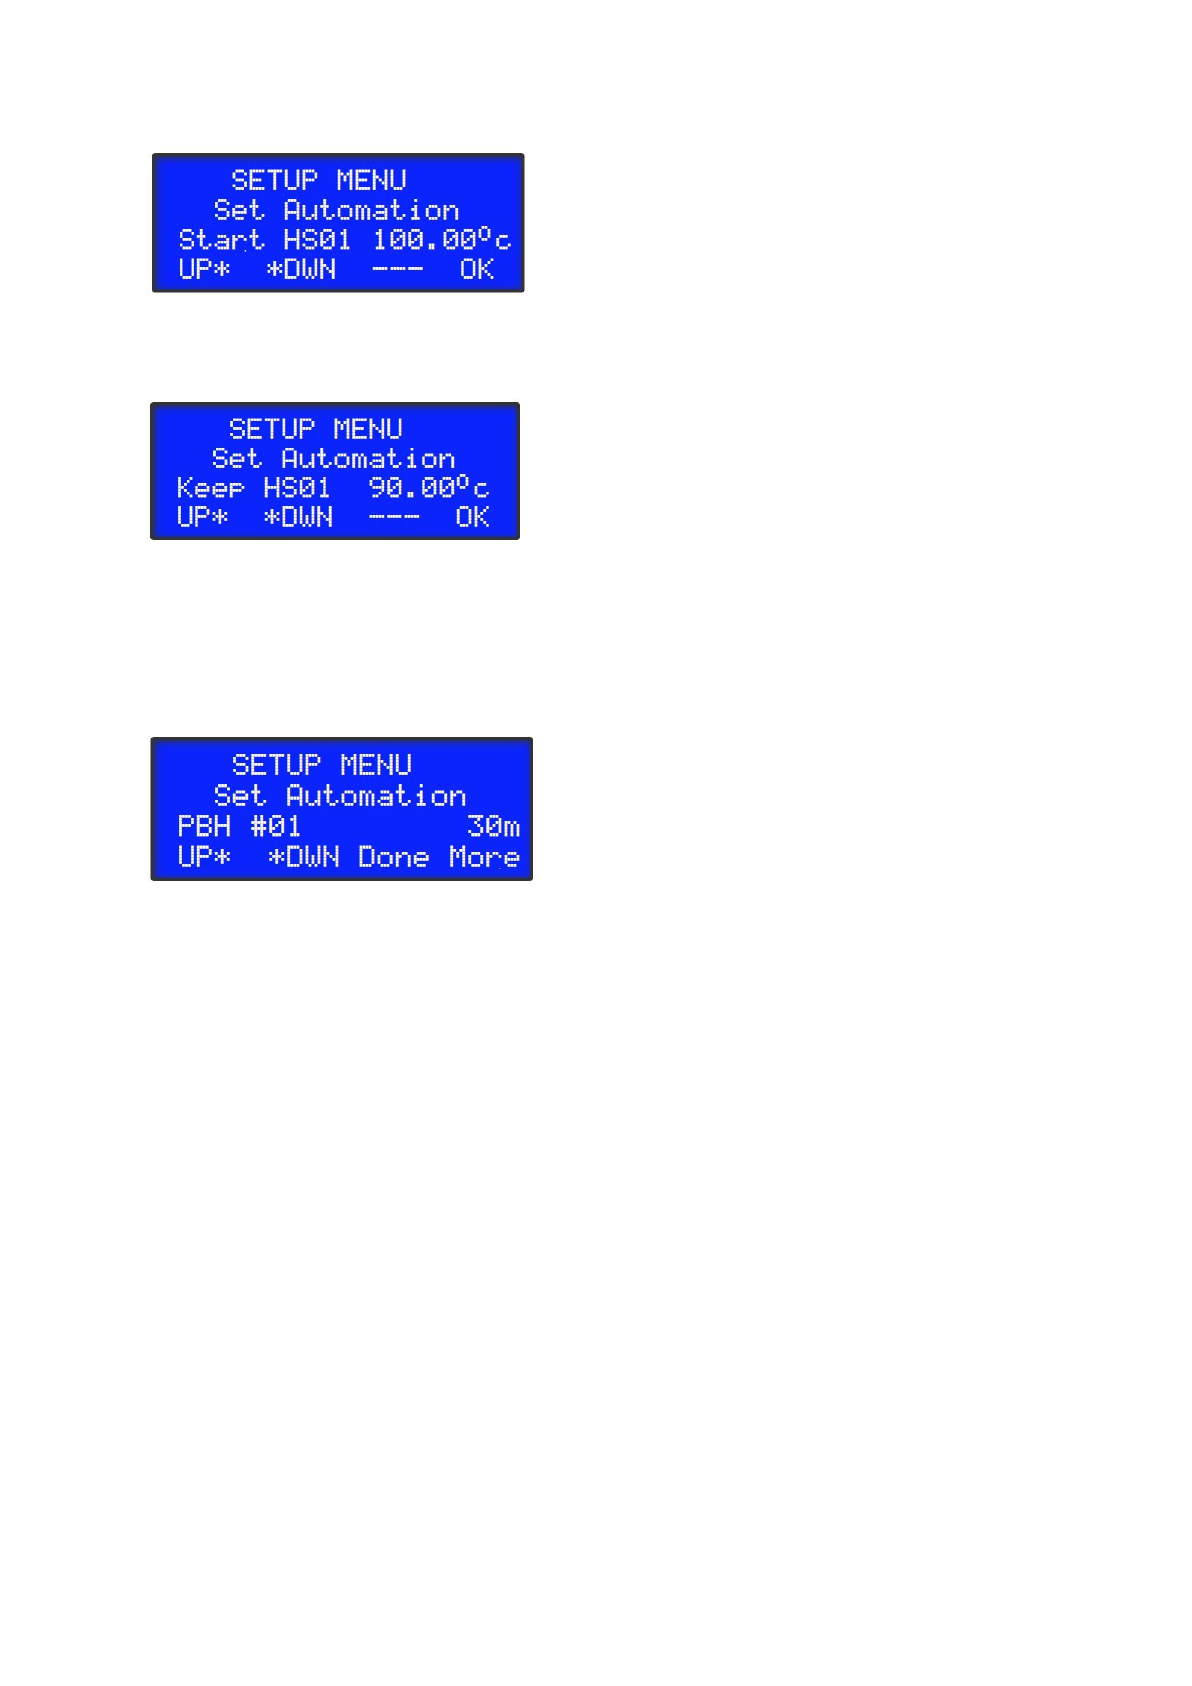
The “start” of hop stand. For FlameOut(KnockOff) hopping, set this number to greater or
equal to boiling point. After boiling, when the temperature drops to this value, the controller
will alarm to prompt for hop dropping and start counting time.
The minimu temperature of this hopstand session. If the temperature drops below this
setting before the specified hop time expires, the heating will be kicked start. If using of
heating element is not desired, set this value to a lower value. However, the “start”
temperature of next session should be lower than previous “keep” temperature. If precise
and specific temperature is desired, set the start and keep temperature to exact the same
value.
Set the time of PostBoilHop #01. The first hop in the hopstand session defines the time of
the hop stand. Press “Done” if no more hop, “More” else.
Repeat editing HopStand Session and PostBoilHop time until finished.
4.2 Running Automation
The automation will run through the brew process that is specified by the automation setup.
When user interaction is needed, it will alert the user.
During automated processes, like mashing and boil, additional control is possible. For
example, the mash step can be skipped, and the pump can be controlled manually during
mashing and boiling.
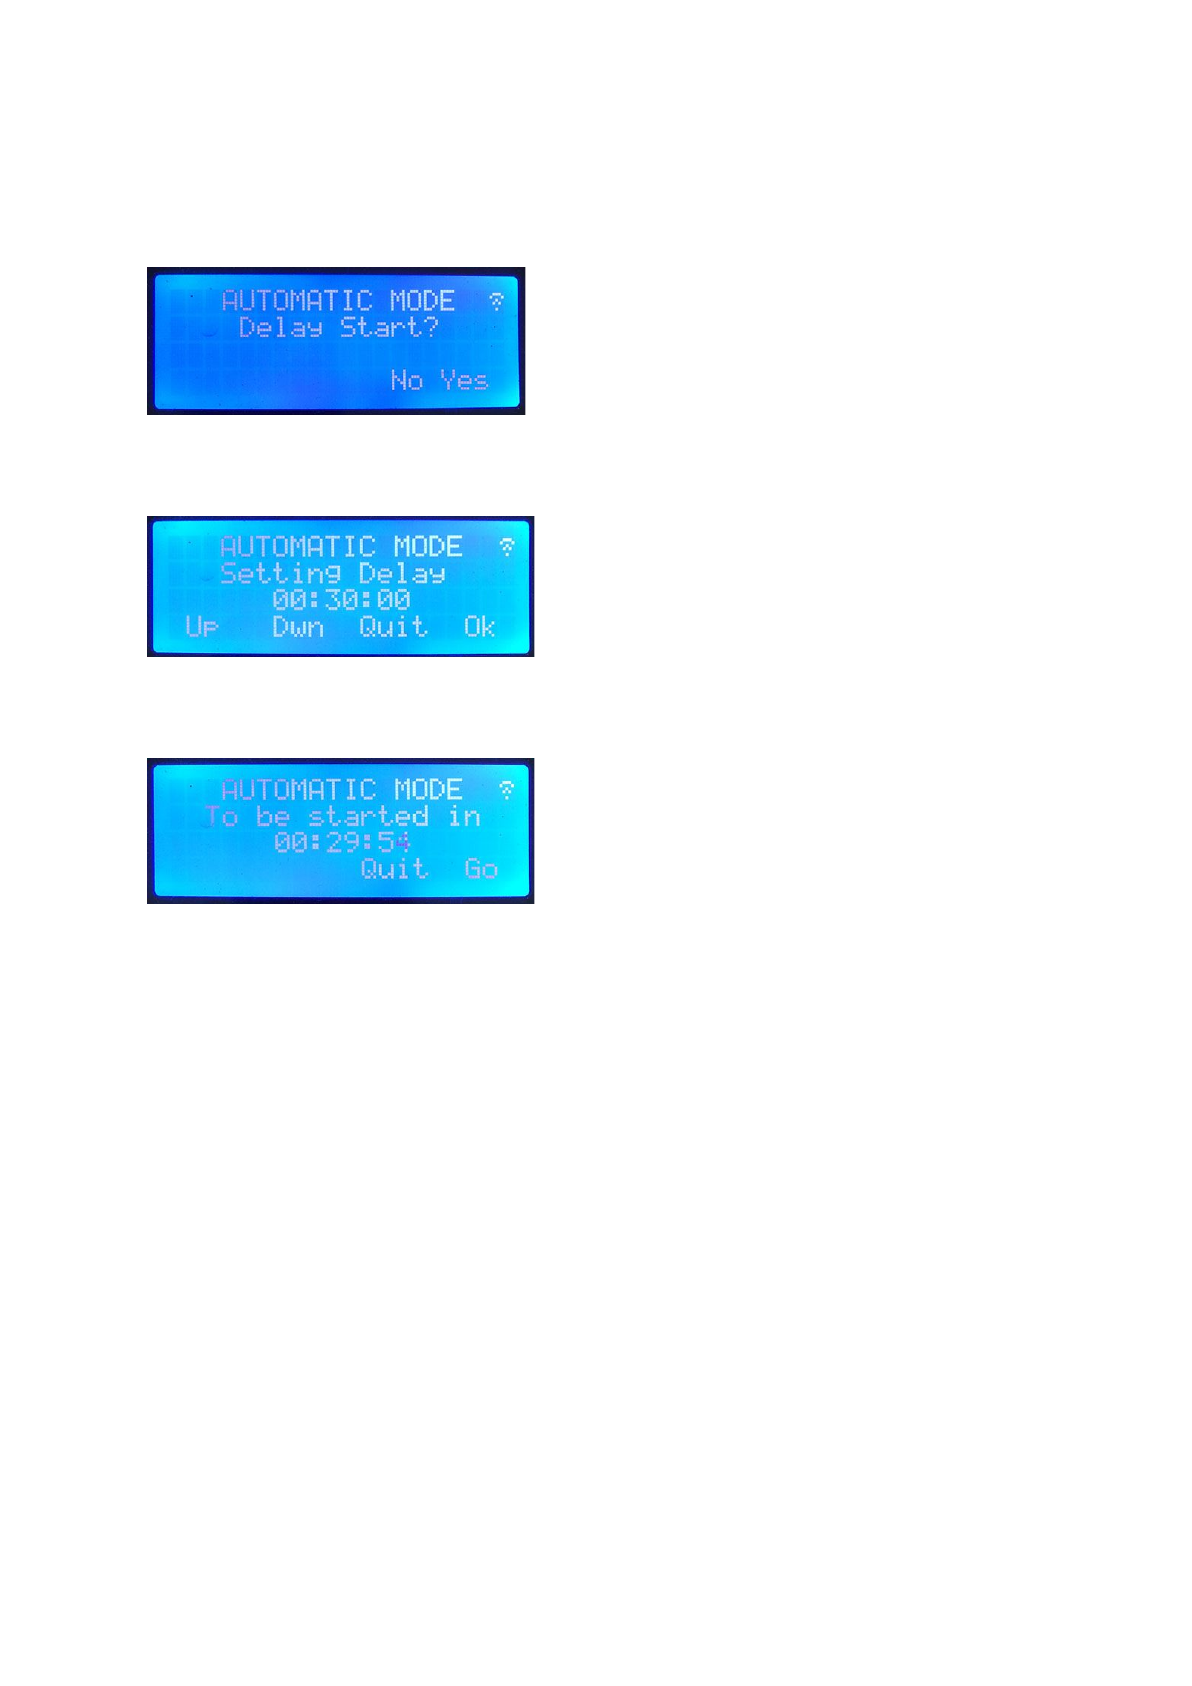
Automatic Brewing Screens:
● Delay Start
If “Disable Delay Start” is set to “NO”, you will have the option to delay-start the brew.
● Edit Delay Start Time
Use Up/Down to change the delay time. 15min a step.
● Delay Start Waiting
The brew process will begin after the time counts to zero.
Go: start immediately.
Quit: quit the brew.
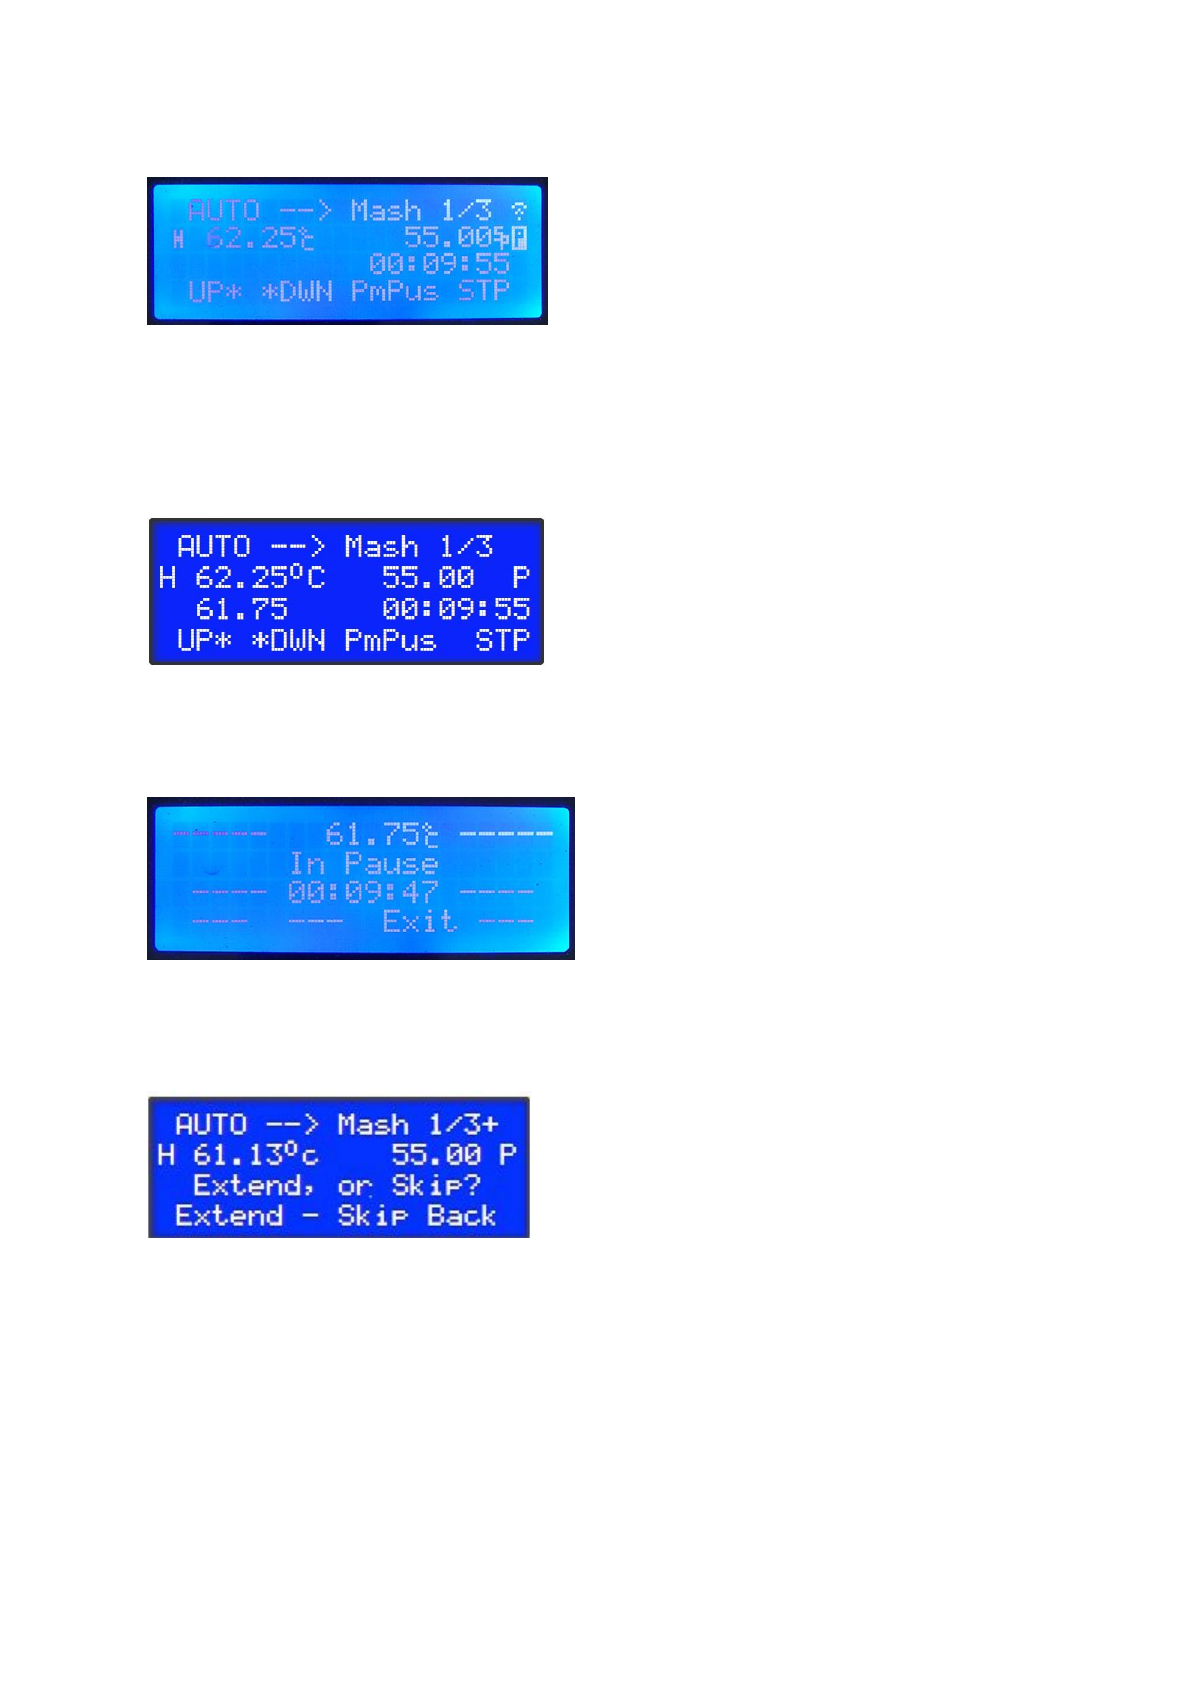
● Mashing
Up/Down: adjust the setting temperature.
PmPus (Pump & Pause): Press to toggle pump.
Long press to Pause the brew.
STP: long press to extend or skip this rest step.
Multi-sensor Mashing Screen
The upper reading is the main temperature reading which is under PID control.
The lower reading is AUXiliary temperature reading.
● Paused
Paused mash step. The brew is paused until “Exit” pressed. The timer is stopped, as well as
the pump and temperature control(heating).
● Modify Mash Step
The mash step can be modified by LONG PRESS the “STP” button.
Extend
: toggle rest extension. The extension status is displayed as “+” sign or nothing after
the “Mash 1/3" title line.
Skip
: Skip this rest step.
Back
: back to mashing screen.
● Extended Mashing
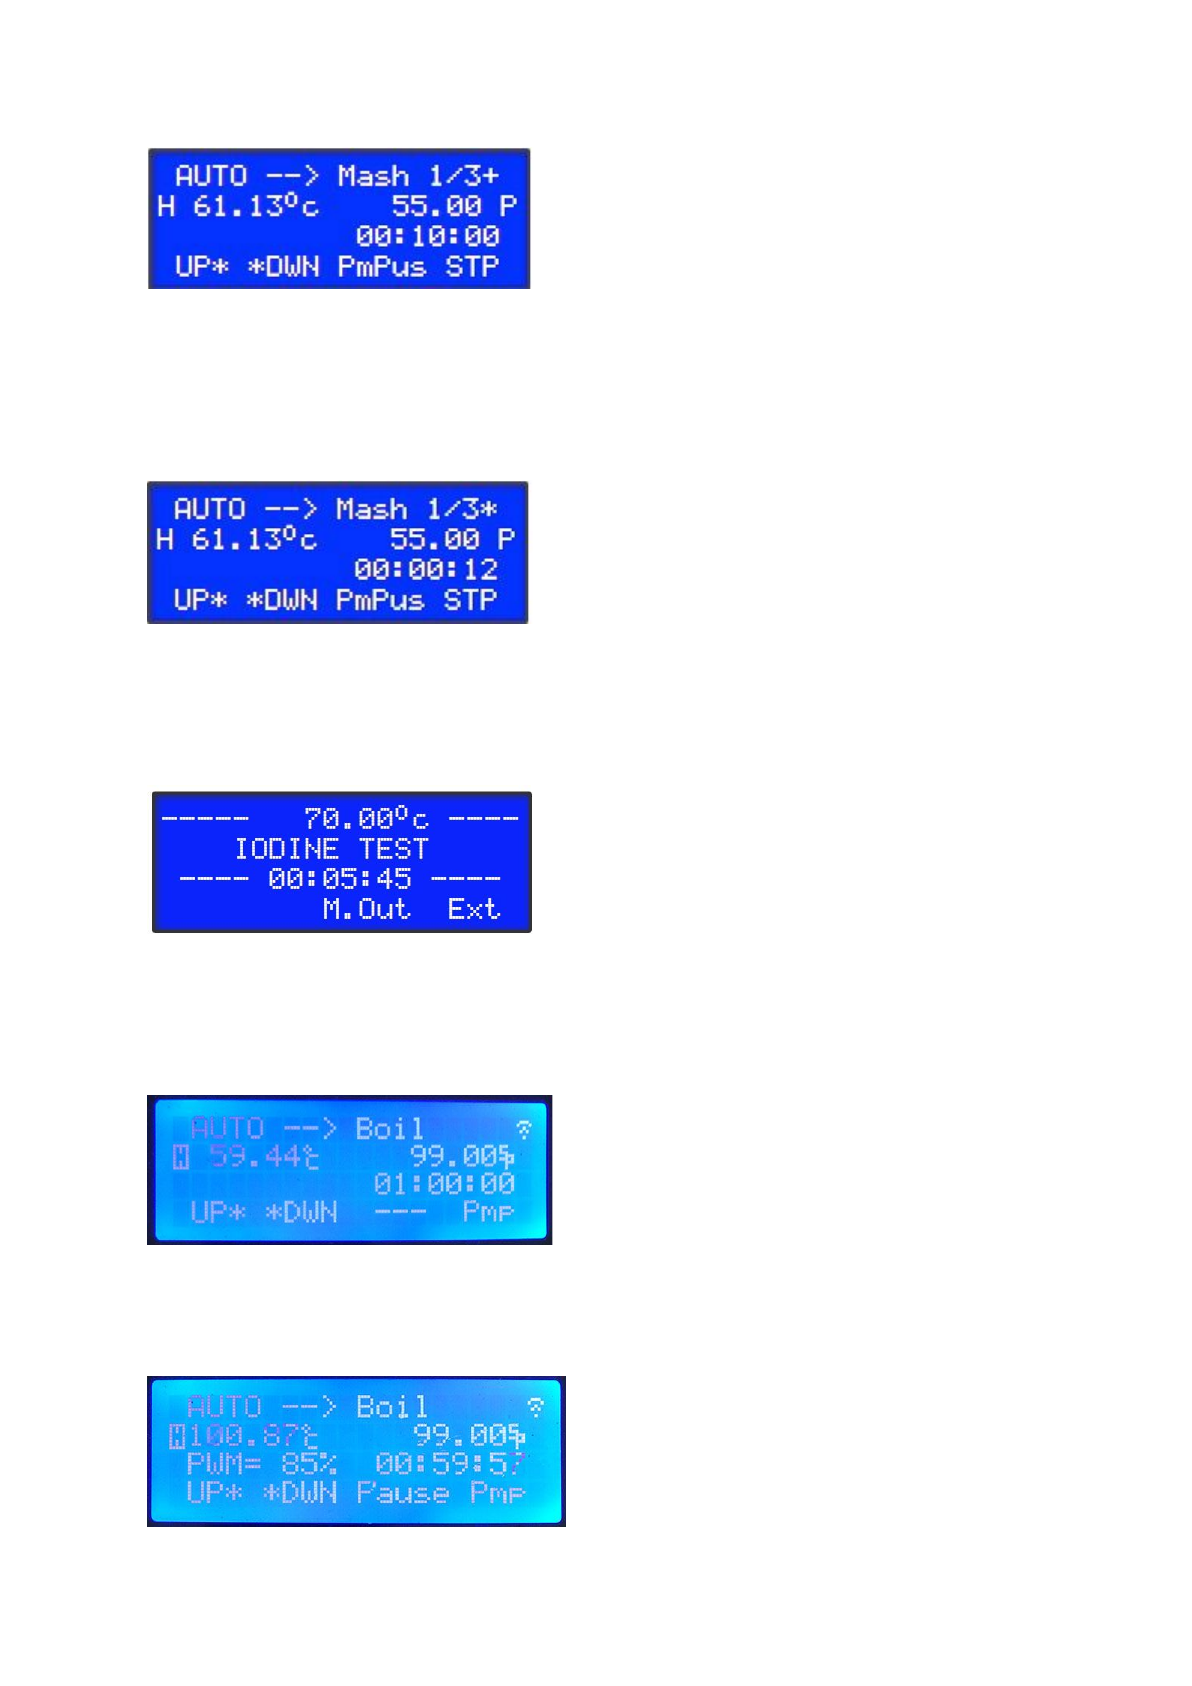
The duration of mash rest can be extended when necessary. It is useful under certain
circumstances, like when decoction is used or conversion isn’t finished yet. When extended
status is set, a “+”(plus sign) will be shown. When time runs out, the timer starts to count
UP
, and the “+”(plus sign) turns into “*”(star sign).
Press “STP” to finsih current rest step.
● Iodine Test
If enabled (skip iodine set to No), the controller will prompt for “Iodine Test” after last mash
step finished and before Mashout start.
If the Iodine test reveals the conversion is finished, press “M.Out” to go to mashout. If the
conversionis not finished, press “Ext”. The last mashing step will be extended and run until
“STP” is pressed.
● Before Boiling
Up/Down: adjust target temperature.
Pmp: toogle pump.
● Boiling
Up/Down: adjust target temperature or PWM.
Pause: pause timer. The timer will paused, but the heating control remain active. Use this to
extend boil time when needed.
Pmp: toogle pump.
Note: Only when the temperature is higher than Target Temperature and the Boil
Temperature
will the heating be controlled by PWM, the PWM value will be shown.
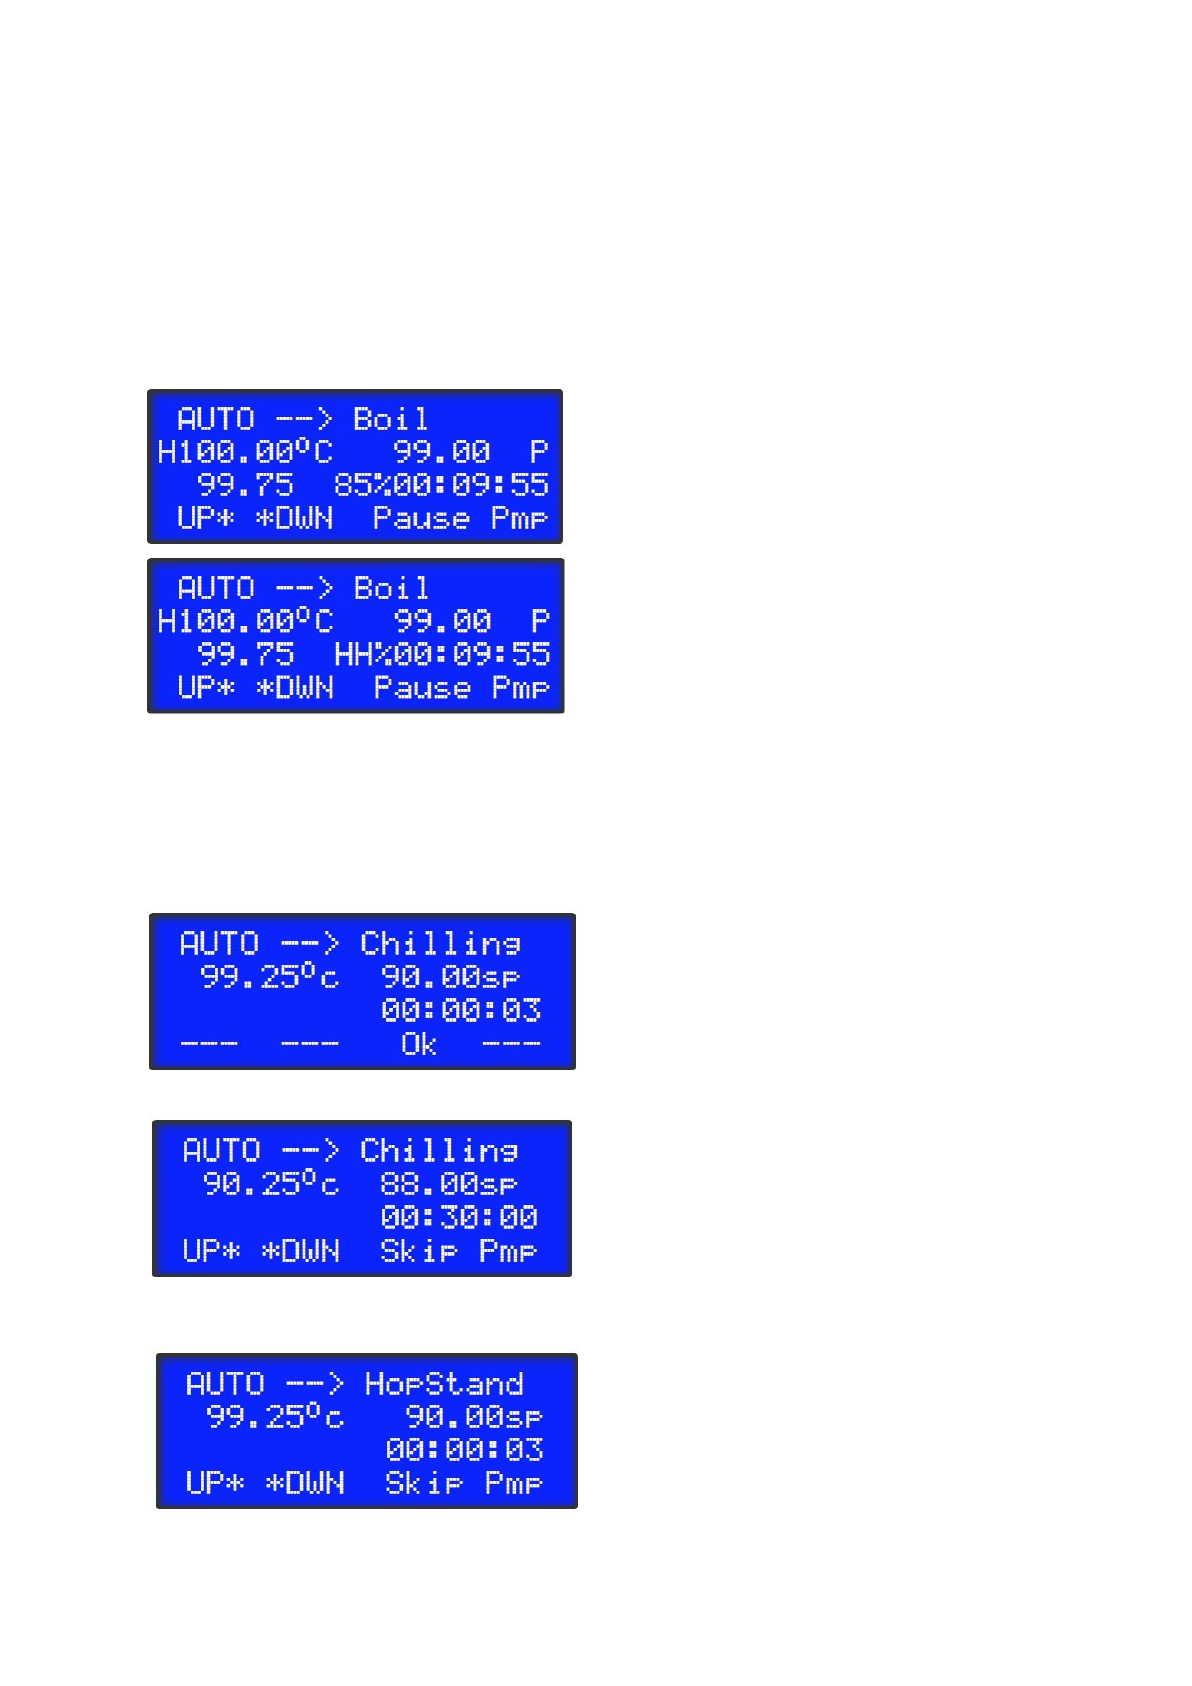
Boiling Screen for Multi-sensor
The PWM duty cycle is displayed before the timer. When it is 100%, it is displayed as
“HH%”.
● HopStand
If hopstand is specified, the controller will prompt “chilling” to drop temperature for hopstand.
(“Cooling” is for final cooling.)
Press OK, and start chilling
The temperature can be adjusted. The chilling can be skipped by LONG PRESS
“Skip”, and
the controller will go to HopStand directly without checking the temperature.
When temperature reaches the “start” temperature, the controller prompts for hop adding
and start counting time. When time is up, the controller prompt for chilling again if another
hopstand follows.
4.3 Automation Resumption
If a brew is not ended “normally” by pressing the “END” button after boiling finishes, the brew
is considered “unfinished”, and BrewManiacEx will ask for resumption when entering
automation.
The system will try to resume from last step.
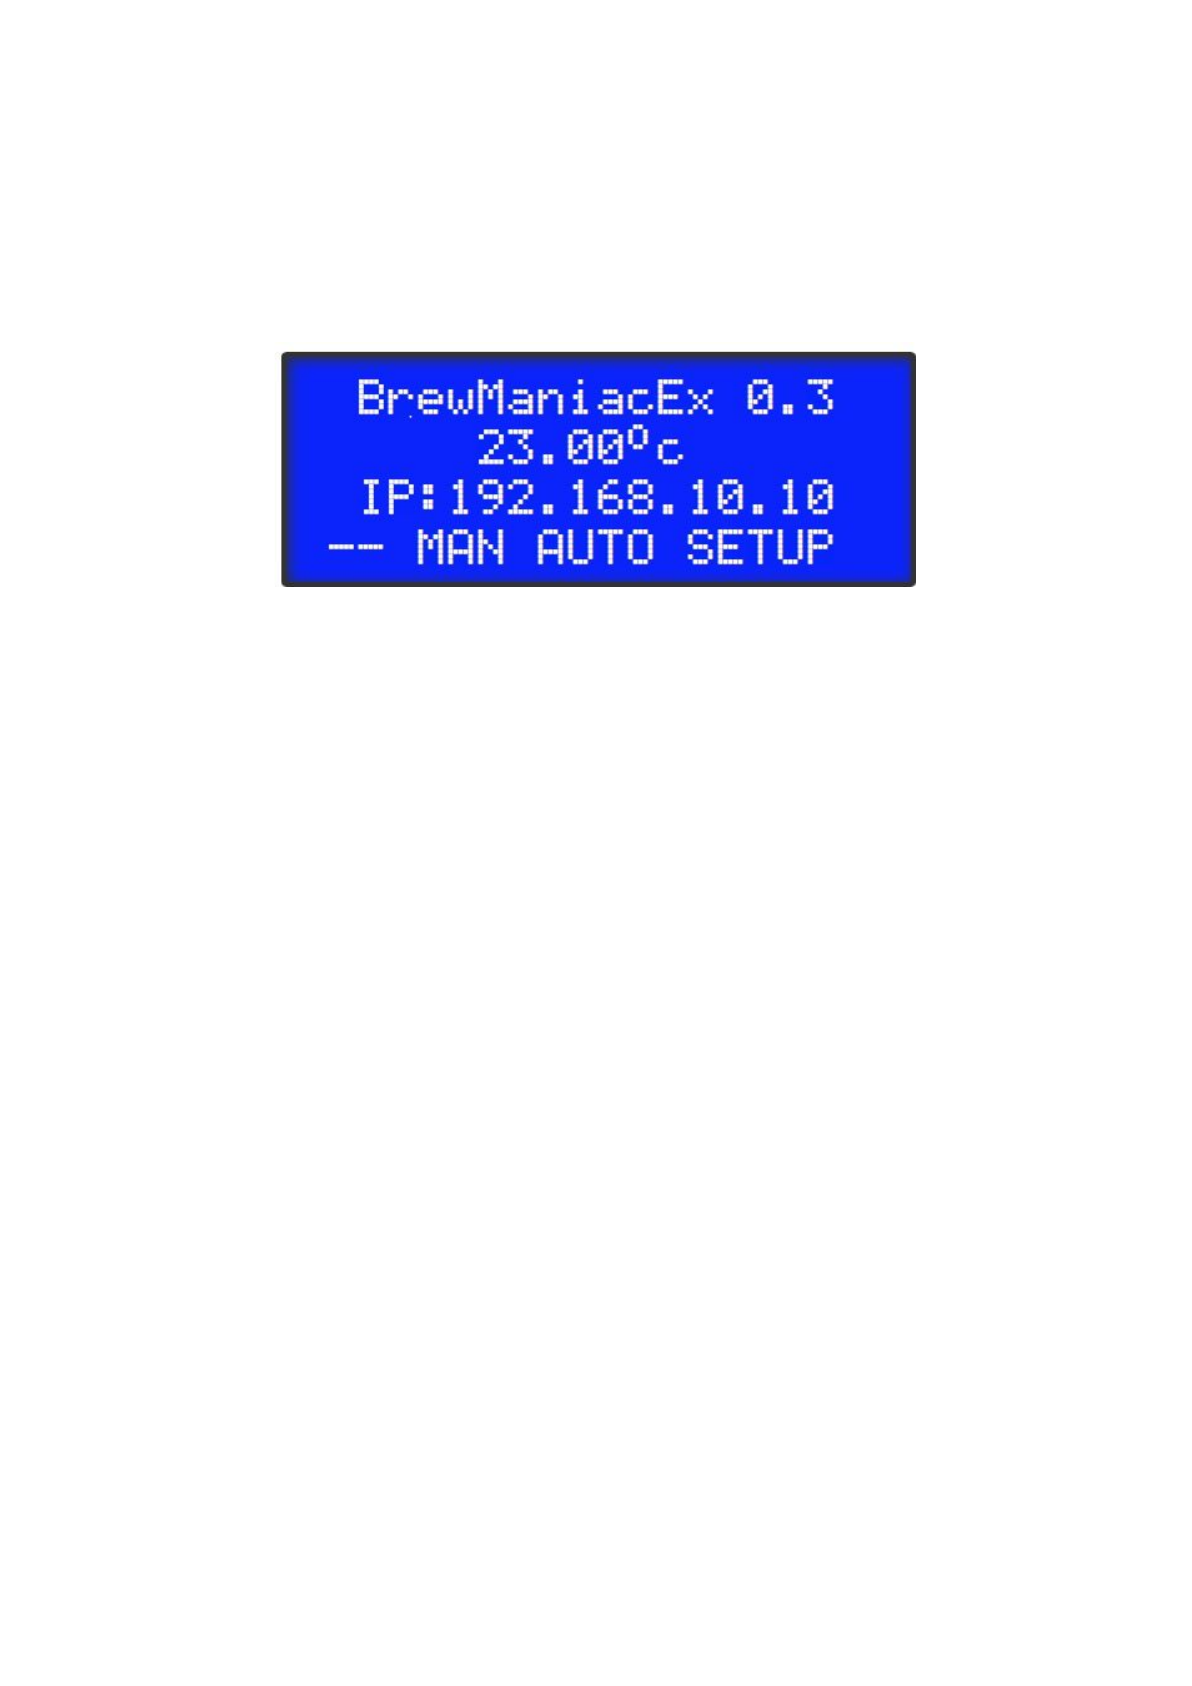
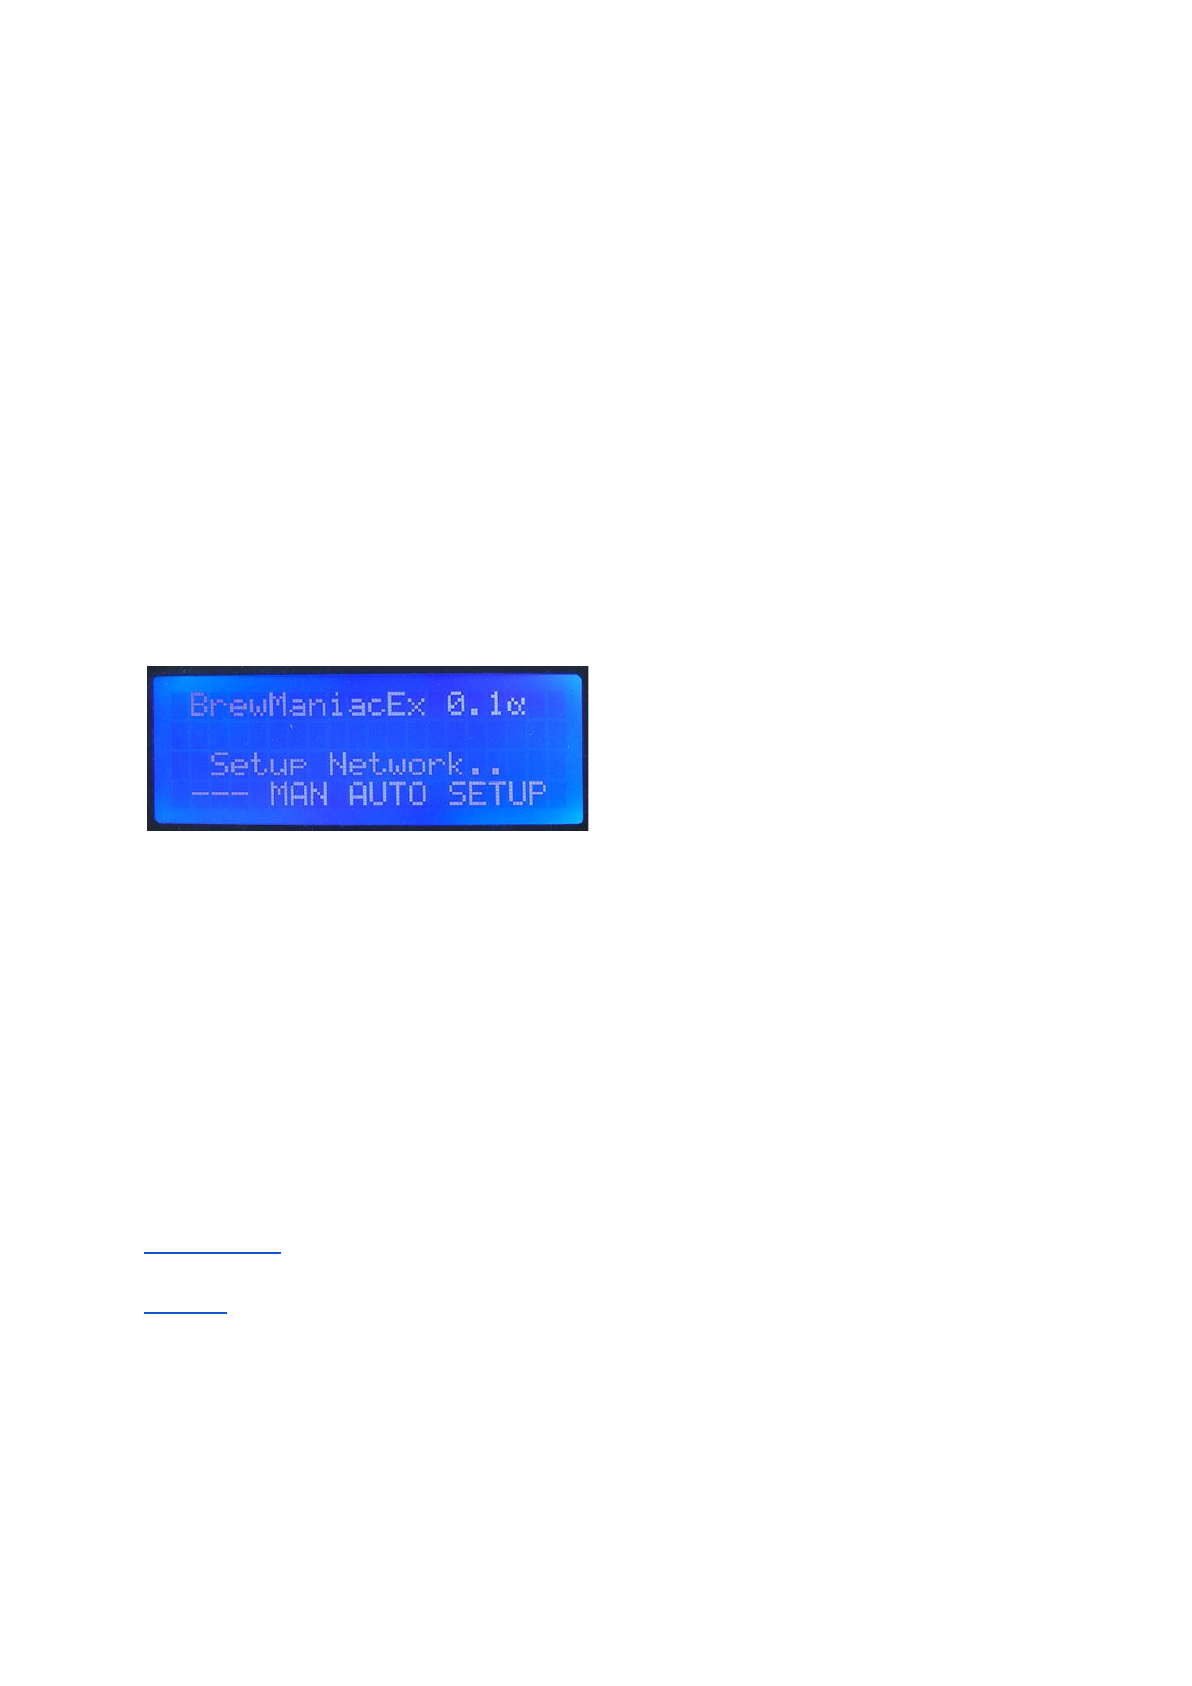
5. Web Interface
5.1 Serving page
BrewManiacEx will try to connect to the previously connected network at startup. If the
connection is successful, the IP address will be shown. If it can’t connect to the network, it
will stay at the “Setup Network..” screen and setup a network named “bm”. Using a computer
or phone to connect to that “bm” network, and specify the WiFi network and optional
password. If BrewManiacEx connects the network successfully, it will show the IP address
on LCD.
The web interface can be accessed by browsers that support HTML5 and
SSE(ServerSideEvent), like Chrome
and Safari
. Microsoft IE and Edge are not compatible
due to lack of SSE support at the time of writing.
The hostname which by default is ‘bm’, can be used if mDNS is supported by your phone or
computer, which is true for Apple’s products. The serving page can be accessed from
http://bm.local
or
http://[IP
Address]
5.2 Main/Panel
This tab is used to control and watch the status of BrewManiacEx. There is a “cover” above
the buttons to prevent fat fingers.
NOTE: it is not recommended to control the brew remotely.
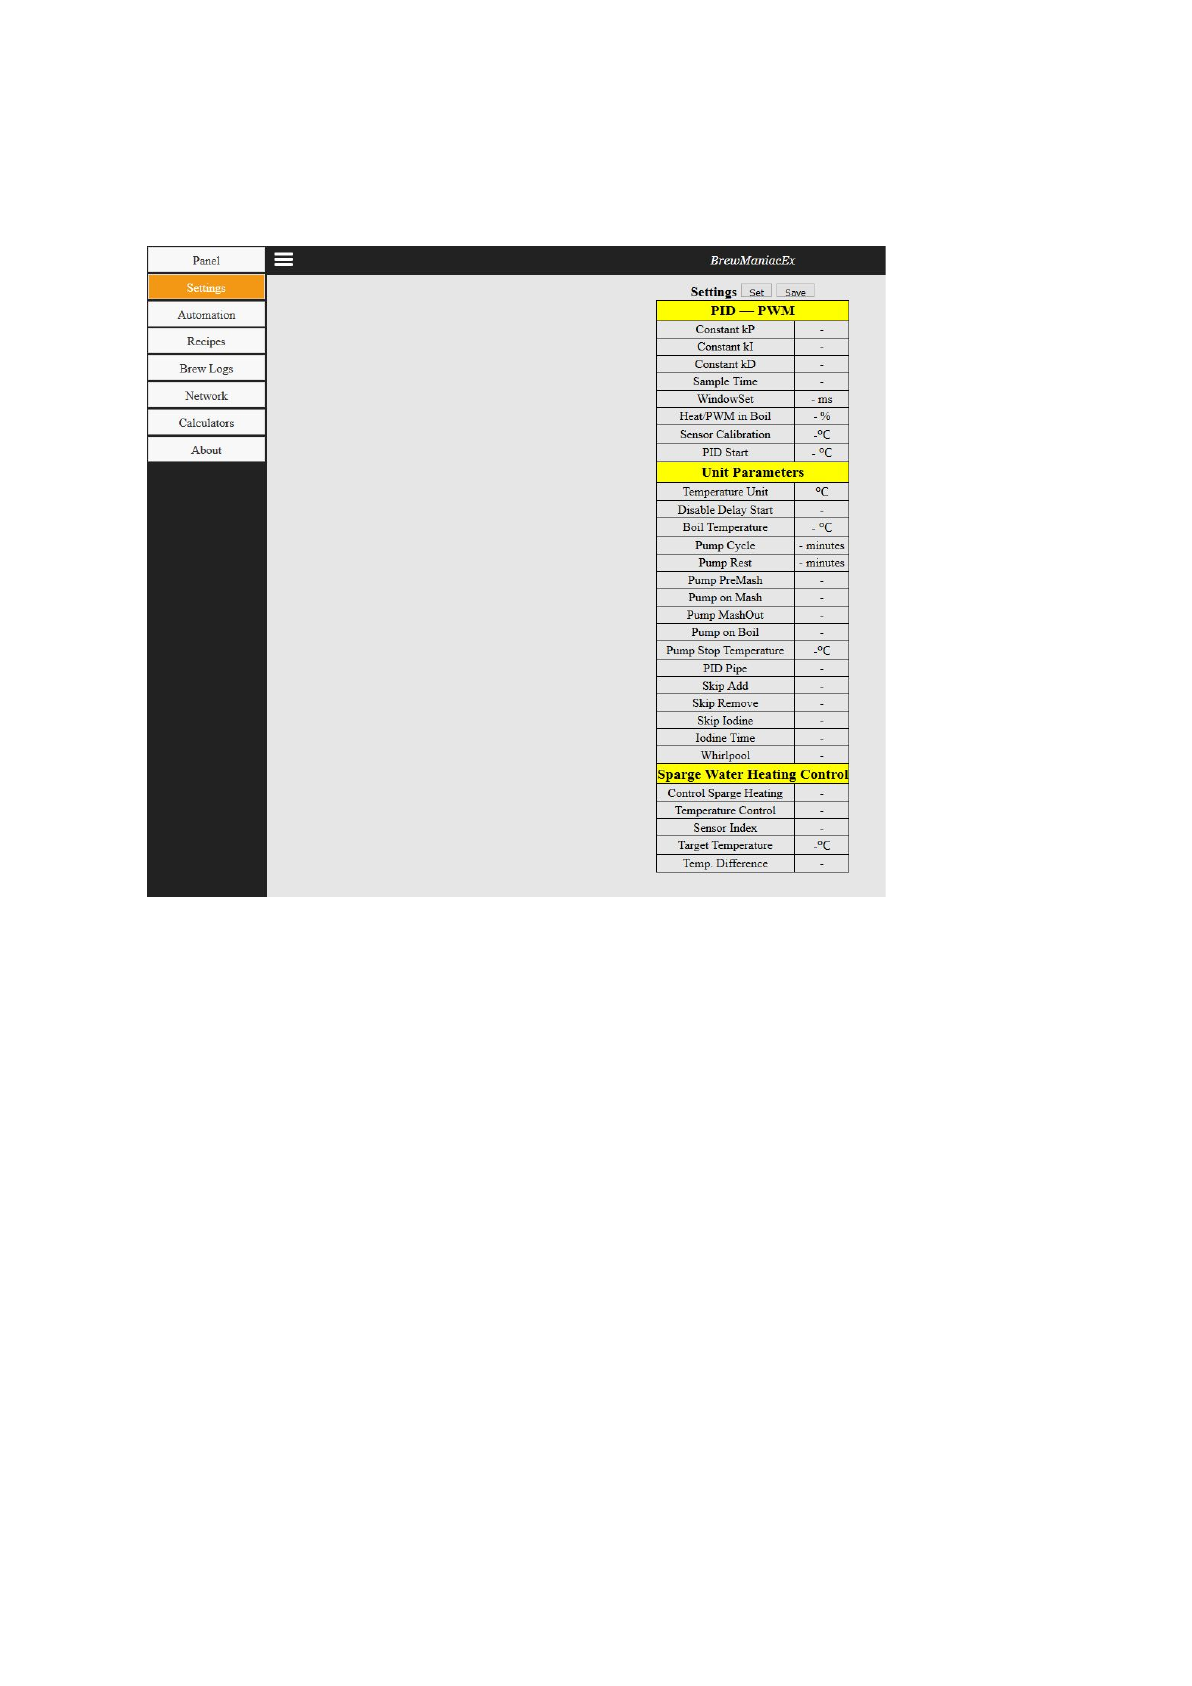
5.3 Settings
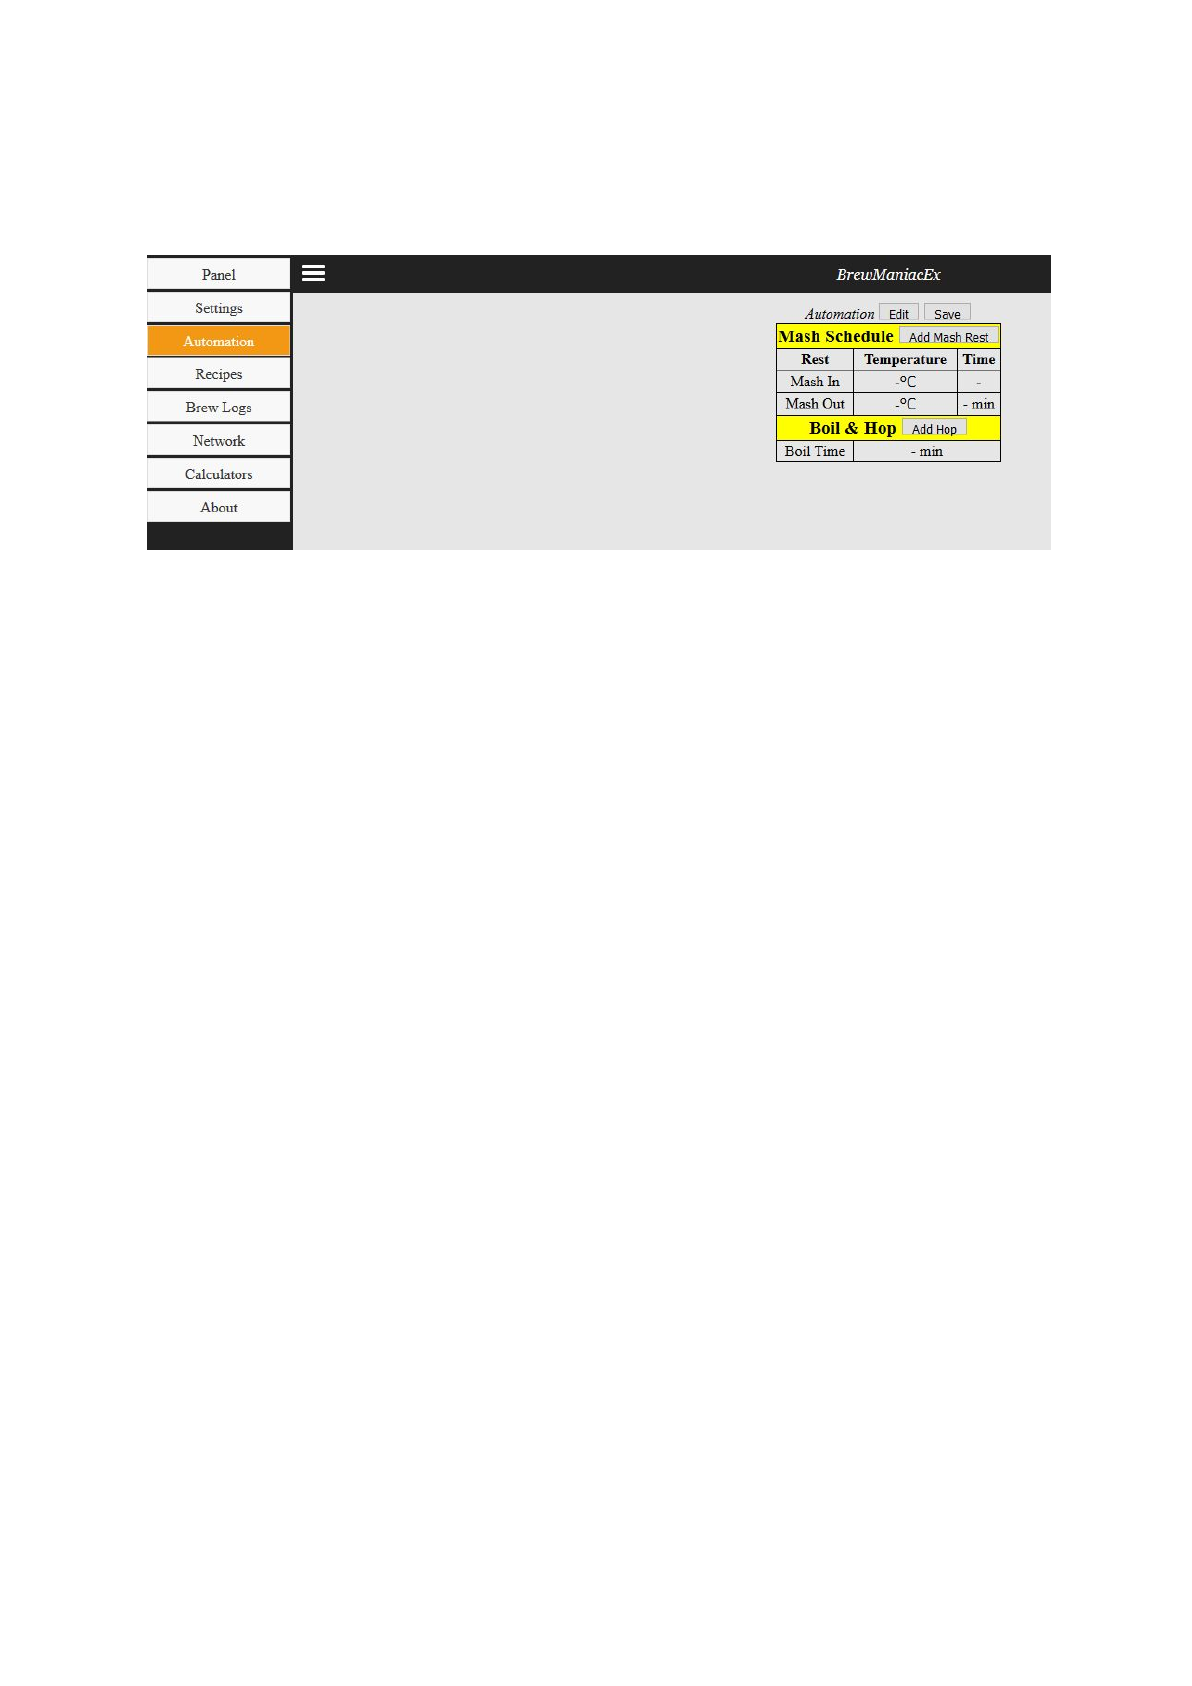
5.4 Automation
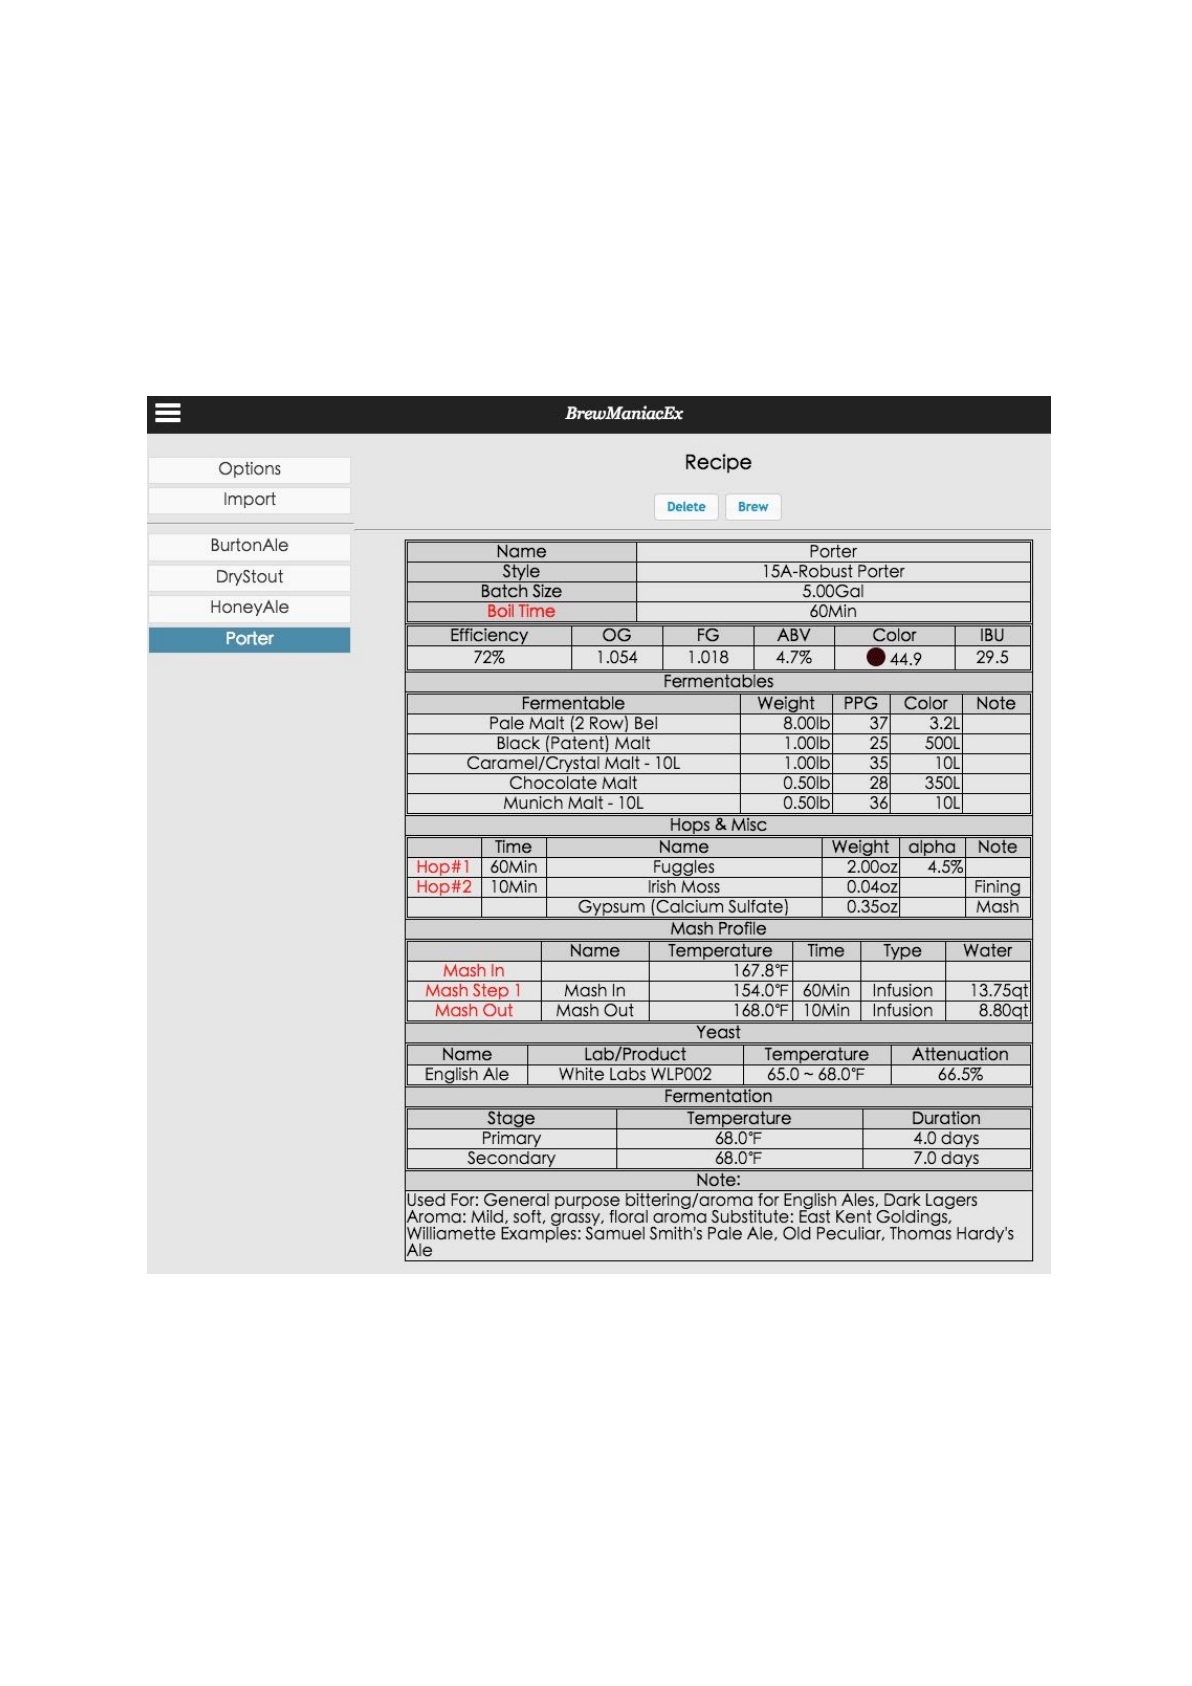
5.5 Recipes
Recipes are created by the import of BeerXML files. The imported BeerXML should have the
following information so that it can be used and translated into automation settings:
● Boil time
● Mash profile
The following fields are also referenced if available
● Hop and other additions schedules
○ The information will be translated into time of “Hop#1”, “Hop #2”, etc.
● Water amount of first mash step
○ If the mash-in temperature is set to “calculated”, this field is used in the
formula to derive mash-in temperature.
Other fields are display only.
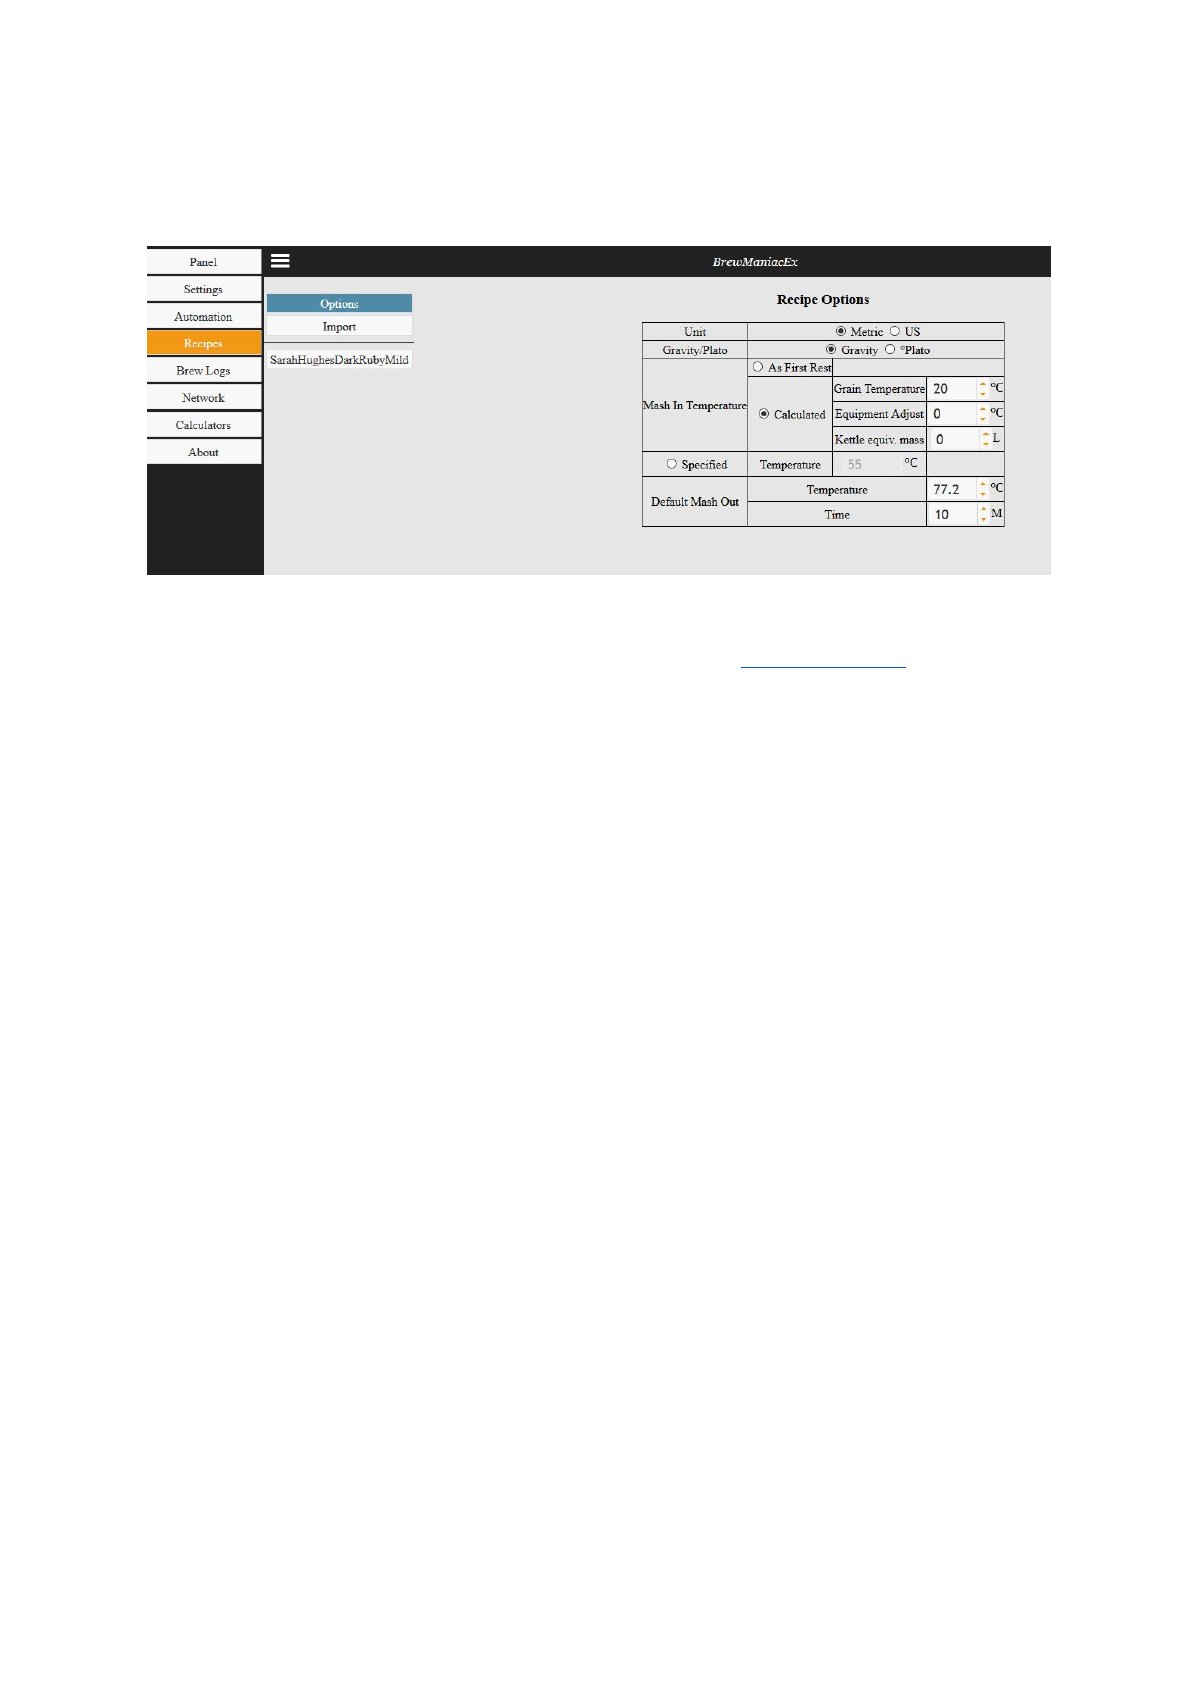
5.5.1 Recipe Options
● Mash-in temperature will be inserted automatically based on the settings. The
formula to calculate mash-in temperature is based on Palmer’s formula.
● Temp = R * [Grain weight] / [Water amount] * ( [First rest temp] – [Grain temp] ) +
[First rest temp] + [Equipment Adjustment]
● R: is the heat capacity coefficient of grain.
● General speaking, the “Equipment Adjust” should be a minus value because the
kettle is at the “mash-in” temperature when doughing in.
● A mash-out is necessary for BrewManiacEx. If the last mash step in the BeerXML
recipe is in the mash-out range( >75°C), it will be regarded as the Mashout step.
Otherwise a ”Default Mash Out” will be inserted automatically.
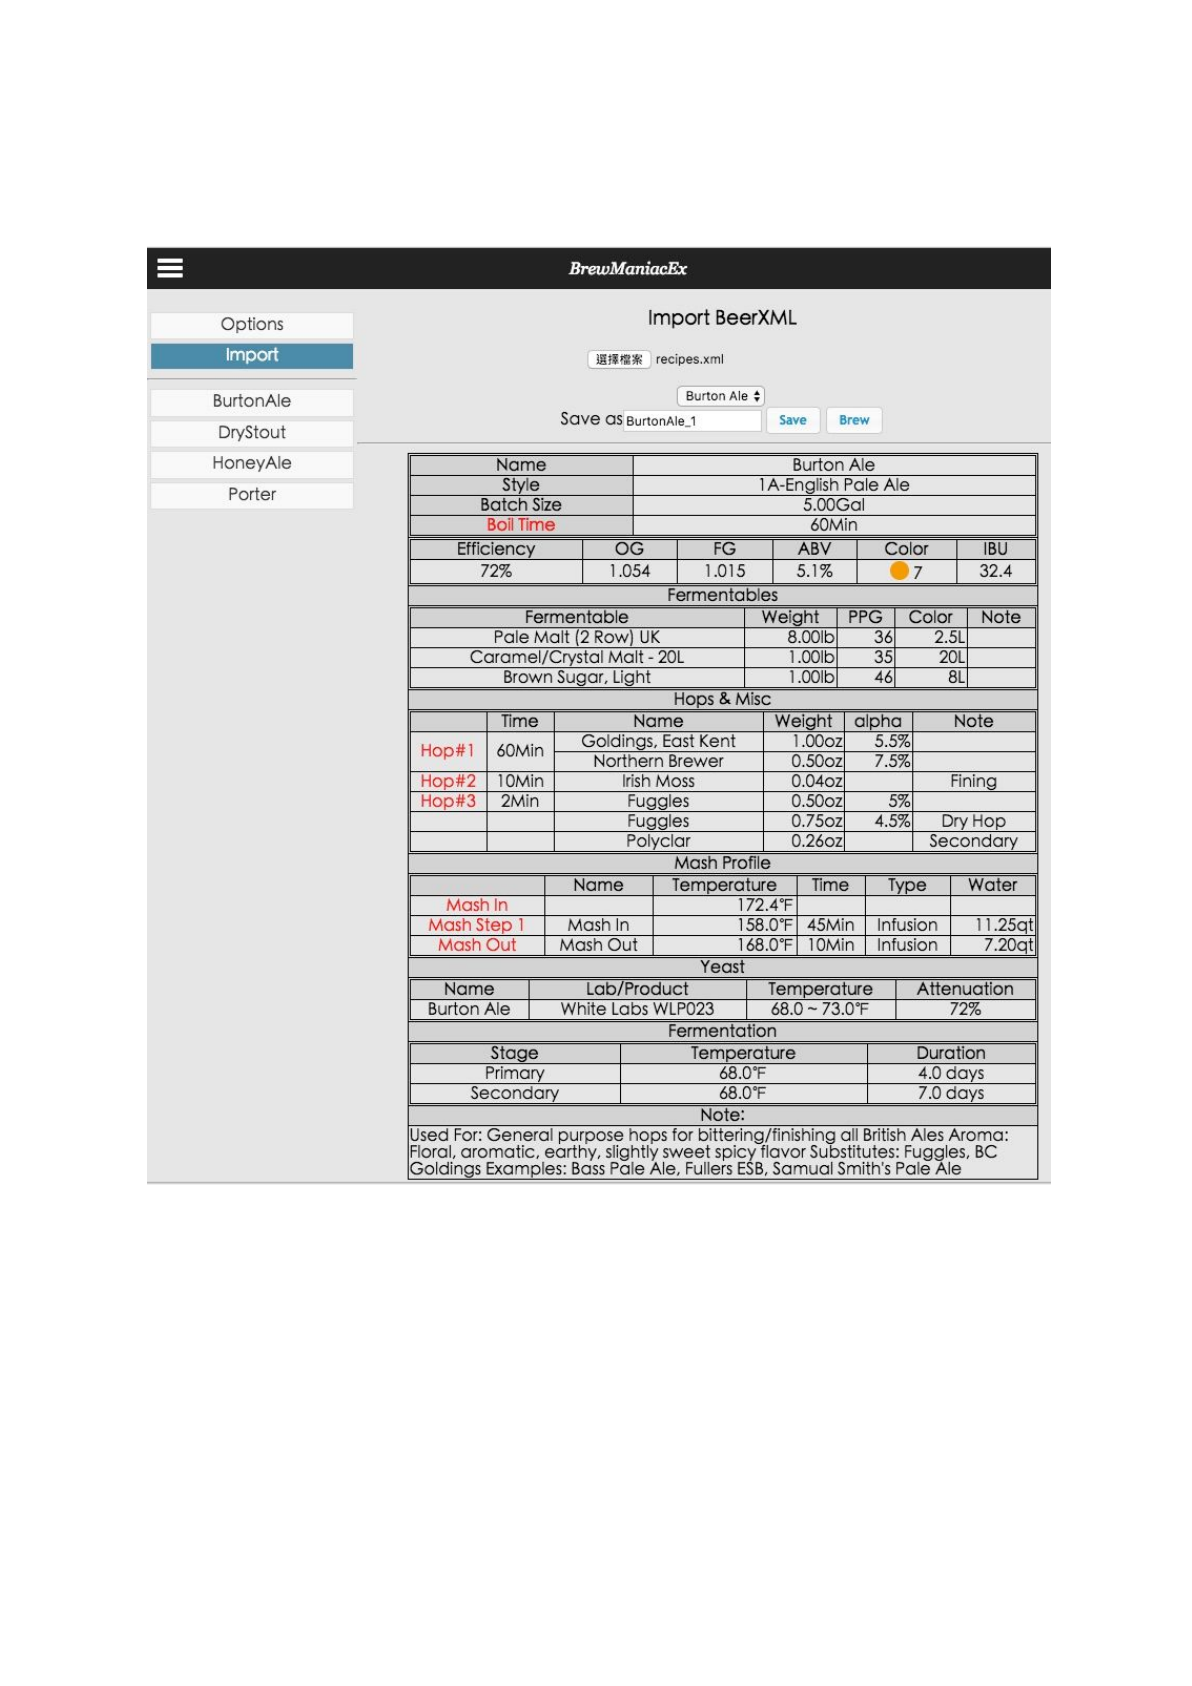
5.5.2 Import
Used to import the beer.xml file
● Your BeerXML file may contain more than one recipe, if so you can select your
desired recipe.
● You can “Save” or “Brew” your recipe only if it specifies at least the Boil Time and
Mash Profile.
● The saved name can’t contain special characters and spaces. The maximum length
is 28.
●Caution: Using the same recipe name as an existing saved recipe will overwrite the
existing saved recipe.
● You can “Brew” a recipe without having used “Save”. Pressing “Brew” button will set
the automation settings.
● The “Mash-In” temperature is derived from the settings at the time it is shown. The
“Mash-out” is set to a default if it is not present in the imported BeerXML file. The
original BeerXML is saved, and you can have different Mash-In and Mash-out(if not
present in the BeerXML) if you change the options before “viewing” a recipe
5.5.3 Saved recipe view
● You can “Delete” and “Brew” the saved recipes.
● You can change the options to get a different Mash-In temperature just before you
“Brew” it.
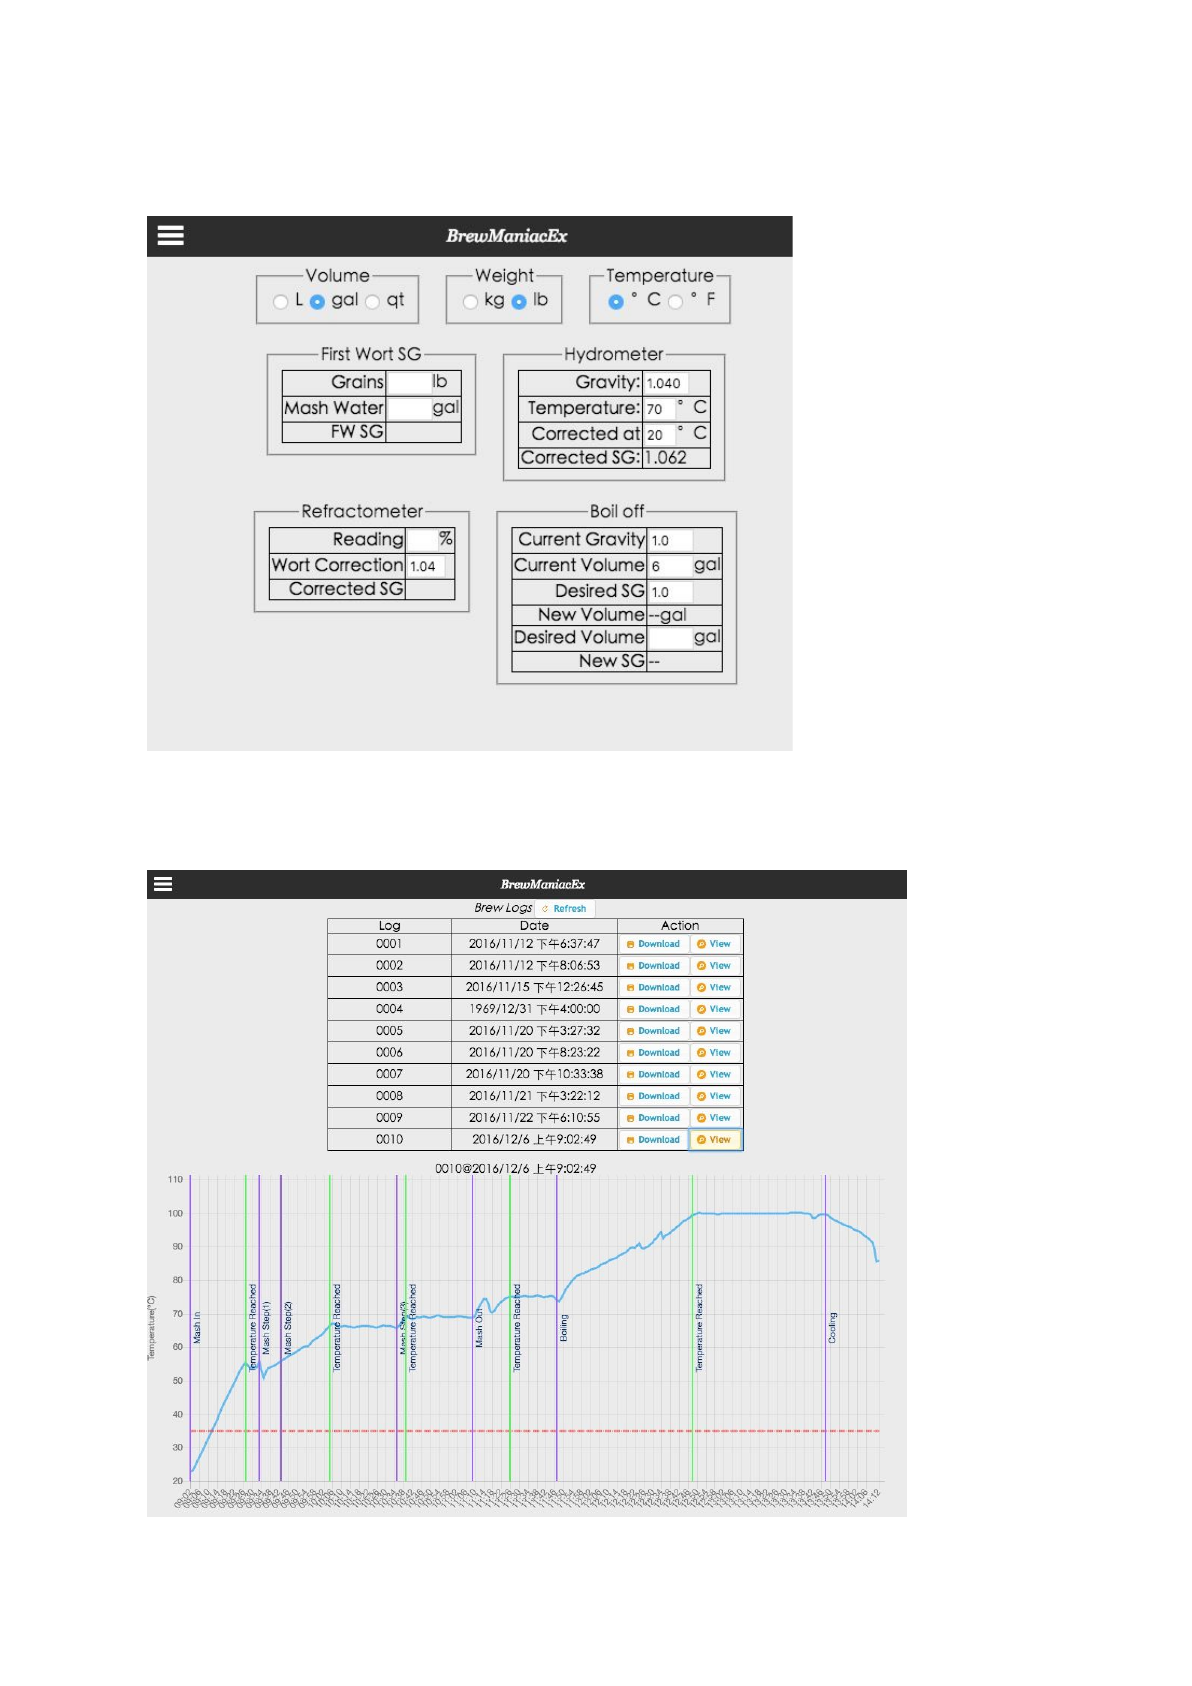
5.6 Calculators
For convenience when brewing a series of calculators are provided as follows
5.7 Brew Logs
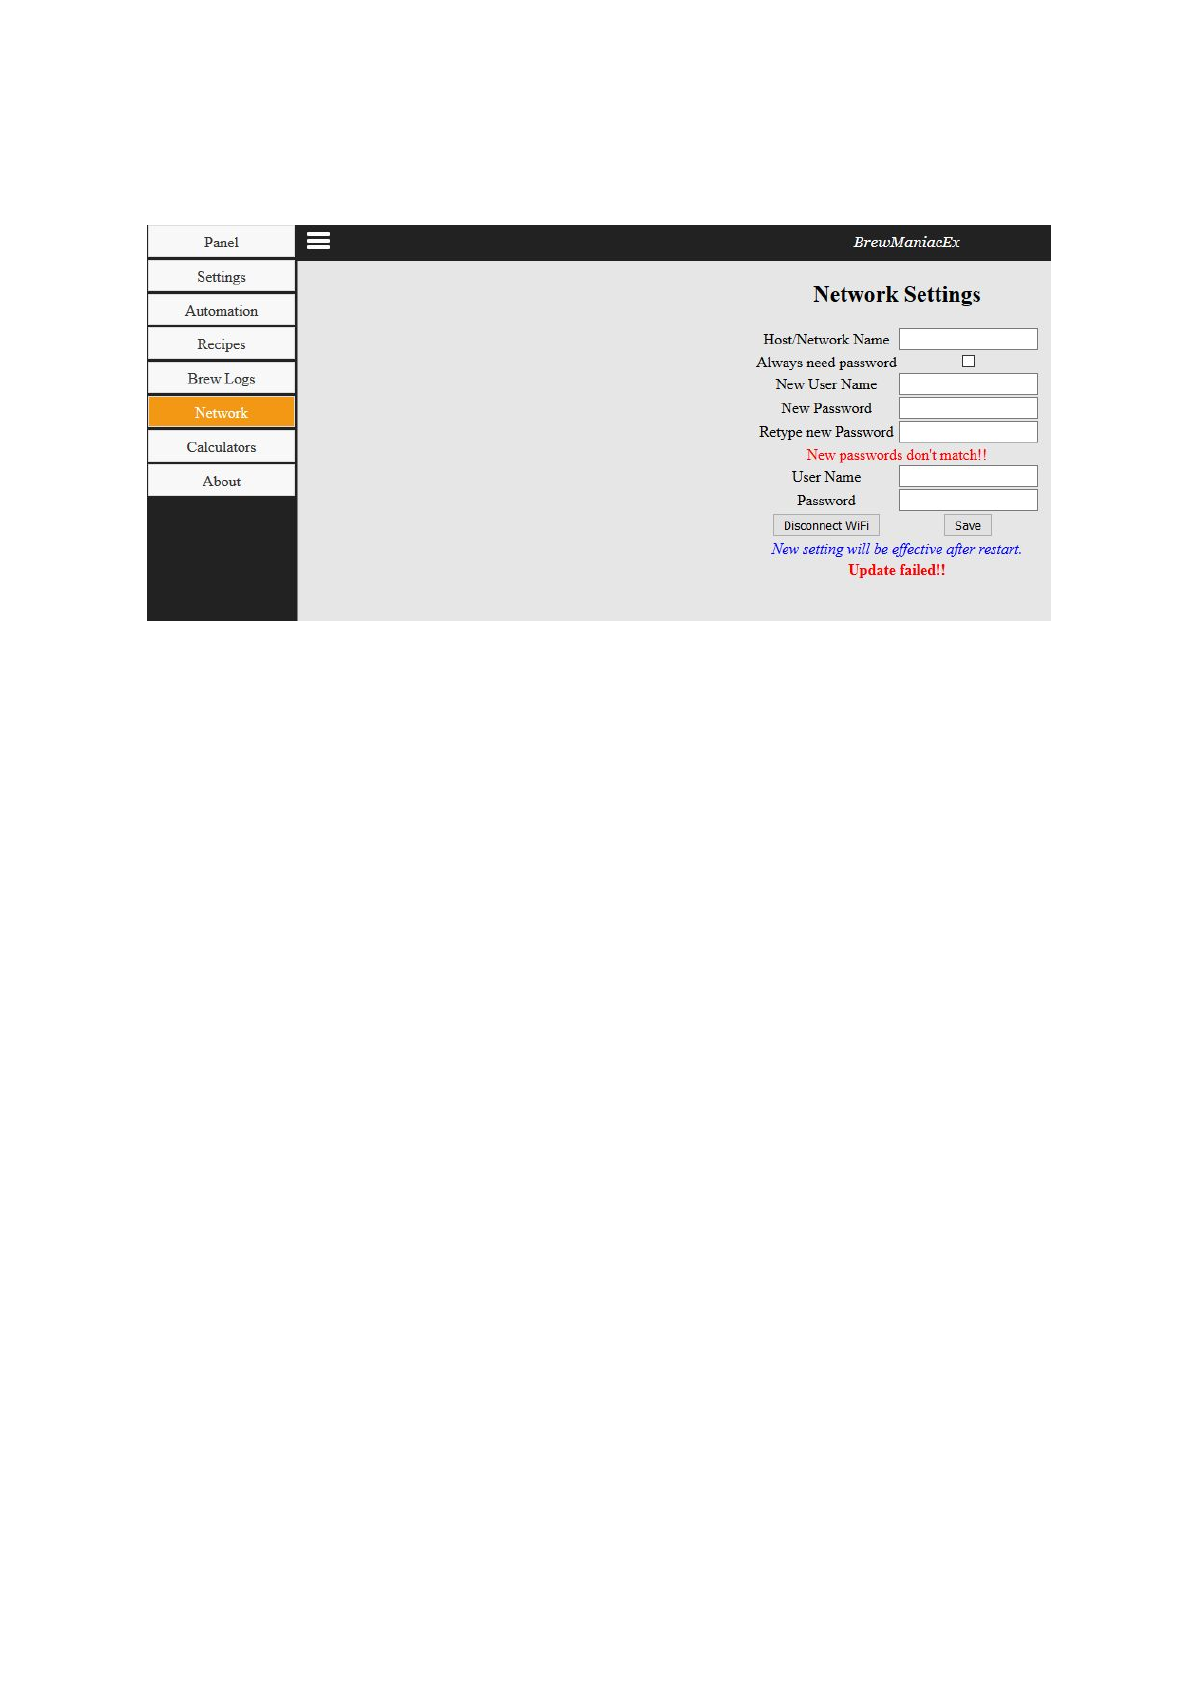
5.8 Network
The serving page can be password-protected if “Always need password” option is checked.
It is not protected by default.
The username, password, and hostname can be changed in “Network Settings” page. To
change the setting in “Network Settings” page, the correct username and password must be
provided. The change of network settings will be effective after next power on.
Default values: Host Name: bm
UserName: brewmaniac
Password: rdwhahb
5.9 Update page
5.9.1 Firmware update
!!BE CAREFUL!! Uploading the wrong image might brick your controller.
The firmware can be updated by uploading new *.bin file from browser at this url
http://bm.local:8008/systemupdate
5.9.2 Web file update
!!BE CAREFUL!! Messing up the files might result in misbehavior of BrewManiacEx.
To access the SPIFFS file sytem, use the url,

http://bm.local:8008/filemanager
Take care not to mess up the files.
Be Warned! Dangerous!!!
Dangerous!!! Don’t read the following content
There is a way to format the file system by which all the files and logs will be gone. The url is at
http://bm.local/format-spiffs
Dangerous!!! Don’t read the content brefore
5.9.3 Automatic OTA Update
Functionality currently unstable
By accessing the url below, BrewManiacEx will check the availability of new firmware and
new web page files.
http://bm.local/update
If BrewManiacEx can’t find the files, the update page will be present when main page is
accessed. The data files can be downloaded from the network instead of using SPIFFS tool.
Appendix
A1.Q&A
Q1: PID AutoTune.
A1: Check the detail at this page:
http://brettbeauregard.com/blog/2012/01/arduino-pid-autotune-library/
Q2: First Wort Gravity?
A2: The first wort gravity is calculated based on 80% yield of grain, so it’s a approximate
value.
Brix of First Wort = ( grain in kg) * 0.8 / [ ( grain in kg) * 0.8 + (water in L)]
Convertion from Brix to Gravity:
SG = 1 + (Brix/(258.6-((Brix/258.2)*227.1)))
Q3: Zero crossing relay and heater switch.
A3:
Zero crossing relays switch ON/OFF when the voltage crosses zero, which introduces a lag
or delay. If both the main heater and sparger heater are controlled by zero crossing relays, it
should be fine because they will be turned on and off at the same time when the voltage
crosses zero. However, if one of the relay isn’t zero crossing and switches immediately, it

might result in overload of power when the turned-off zero crossing relay “waits” for the
voltage to cross zero and the non zero crossing relay turns on immediately.
A minimum 10ms delay between heater switch is introduced to solve this issue. The delay
might sometimes extends over 100ms because of the limitation of software structure.
Q4: Time in brew logs.
A4: The real clock time will be recorded in the brew log as long as the time is known when
the brew starts. BrewManiacEx will try to get time from the internet, NTP servers, at startup.
If that fails, it can still get time from the computer or phone that connects to it. Therefore,
connect to BrewManaicEx before the brew starts so that it can get the time of your computer
or phone if it doesn’t have internet access.

Revision:
Dec 7, 2016
0.1 draft V1
Vito Tai
Jan 19, 2017
0.1 draft V2
Iain Hay
Mar 8, 2017
0.2 draft V1
Iain Hay
Mar 14, 2017
0.2 draft V2
Iain Hay
July 5, 2017
0.3 drat V1
Vito Tai
