2100 2300 2400 Crib Instructions 7 12 13 Btgcrib Assemblypdf
2014-03-18
: Btgcrib 2300 2400-Assemblypdf btgcrib_2300_2400-assemblypdf images 999 p4dbimg
Open the PDF directly: View PDF ![]() .
.
Page Count: 16

ModelV:
BTG 2300%XLOWWR*URZ/\ULF&ULE
BTG 2400 %XLOWWR*URZ6OHLJK&ULE
Proper assembly will ensure every effort has been made to design this crib with
your baby's safety in mind. It is certified to meet all safety guidelines established
by ASTM International and the CPSC-Consumer Product Safety Commission.
Built to Grow Crib Assembly Instructions
IMPORTANT - RETAIN FOR FUTURE REFERENCE - READ CAREFULLY

2
! 9#40+0): (#+.74'61(1..196*'5'9#40+0)5#0&6*'
#55'/$.;+05647%6+105%17.&4'57.6+05'4+175+0,74;14&'#6*
x 9JGPEJKNFKUCDNGVQRWNNVQCUVCPFKPIRQUKVKQPUGVVJGOCVVTGUUVQVJGNQYGUV
RQUKVKQPCPFTGOQXGDWORGTRCFUNCTIGVQ[UCPFQVJGTQDLGEVUVJCVEQWNFUGTXG
CUUVGRUHQTENKODKPIQWV
x 9JGPCEJKNFKUCDNGVQENKODQWVQTTGCEJGUVJGJGKIJVQHKPEOVJGETKD
UJCNNPQNQPIGTDGWUGF
x &1016RNCEGCETKDPGCTCYKPFQYYJGTGEQTFUHTQODNKPFUQTFTCRGUOC[
UVTCPINGCEJKNF
x 6QTGFWEGVJGTKUMQH5+&5RGFKCVTKEKCPUTGEQOOGPFJGCNVJ[KPHCPVUDGRNCEGFQP
VJGKTDCEMUVQUNGGRWPNGUUQVJGTYKUGCFXKUGFD[[QWTRJ[UKEKCP
x 6QJGNRRTGXGPVUVTCPIWNCVKQPVKIJVGPCNNHCUVGPGTU#EJKNFECPVTCRRCTVUQHVJG
DQF[QTENQVJKPIQPNQQUGHCUVGPGTU
x 5VTKPIUECPECWUGUVTCPIWNCVKQP&QPQVRNCEGKVGOUYKVJCUVTKPICTQWPFC
EJKNFUPGEMUWEJCUJQQFUVTKPIUQTRCEKHKGTEQTFU&QPQVUWURGPFUVTKPIUQXGT
CETKDQTCVVCEJUVTKPIUVQVQ[U
x $GHQTGGCEJWUCIGQTCUUGODN[KPURGEVETKDHQTFCOCIGFJCTFYCTGNQQUGLQKPVU
OKUUKPIRCTVUQTUJCTRGFIGU&1016WUGETKDKHCP[RCTVUCTGOKUUKPIQTDTQMGP
%QPVCEV[QWTFGCNGTQTYTKVGVQ5VCPNG[(WTPKVWTG0QTVJ*COKNVQP5V0Q
*KIJ2QKPV0%HQTTGRNCEGOGPVRCTVUCPFKPUVTWEVKQPCNNKVGTCVWTGKHPGGFGF
x &1016UWDUVKVWVGRCTVU7UGQPN[DQNVUQTRCTVUUWRRNKGFD[OCPWHCEVWTGTQT
RCTVUQHEQORCTCDNGSWCNKV[CPFGSWCNFKOGPUKQPU&QPQVCNNQYGPFUQHDQNVUQT
UJCTRGFIGUVQDGGZRQUGF
x (QNNQYYCTPKPIUQPCNNRTQFWEVUKPCETKD
x +HTGHKPKUJKPIWUGCPQPÄVQZKEHKPKUJURGEKHKGFHQTEJKNFTGPURTQFWEVU
x +PHCPVUECPUWHHQECVGQPUQHVDGFFKPI0GXGTCFFCRKNNQYEQOHQTVGTQTRCFFKPI
0GXGTRNCEGCFFKVKQPCNRCFFKPIWPFGTCPKPHCPV
x +PHCPVUECPUWHHQECVGKPICRUDGVYGGPETKDUKFGUCPFCOCVVTGUUVJCVKUVQQUOCNN
x 0GXGTWUGRNCUVKEUJKRRKPIDCIUQTQVJGTRNCUVKEHKNOCUOCVVTGUUEQXGTUDGECWUG
VJG[ECPECWUGUWHHQECVKQP
x &QPQVCNNQYEJKNFVQETCYNQTRNC[WPFGTPGCVJETKD
x 7UGECWVKQPYJGPCXCRQTK\GTKUKPWUG#NYC[UCKOVJGXCRQTUVGCOCYC[HTQO
VJGETKDCUYGNNCUCYC[HTQOCP[QVJGTYQQFHWTPKVWTGKVGO
x 6JGETKDOWUVDGHWNN[CUUGODNGFRTKQTVQWUG
x 4GCFCNNKPUVTWEVKQPUDGHQTGCUUGODNKPIETKD-''2+05647%6+105(14
(7674'75'
x %#76+10#P[OCVVTGUUWUGFKPVJKUETKDOWUVDGCVNGCUVÄ´
D[Ä´ YKVJCVJKEMPGUUQHPQNGUUVJCPKPEJGUCPFPQVGZEGGFKPIKPEJGU
9JGP%QPXGTVKPIVQC6QFFNGT$GF
x 0'8'4WUGDGFYKVJEJKNFTGPWPFGTOQPVJUQHCIG
x 6JGOCZKOWOYGKIJVQHVJGKPVGPFGFWUGTUJCNNPQVDGITGCVGTVJCPNDMI
3
The crib illustrations in these instructions are generic in nature. The crib you have purchased
may not look like the ones illustrated; however, they all assemble in the same manner.
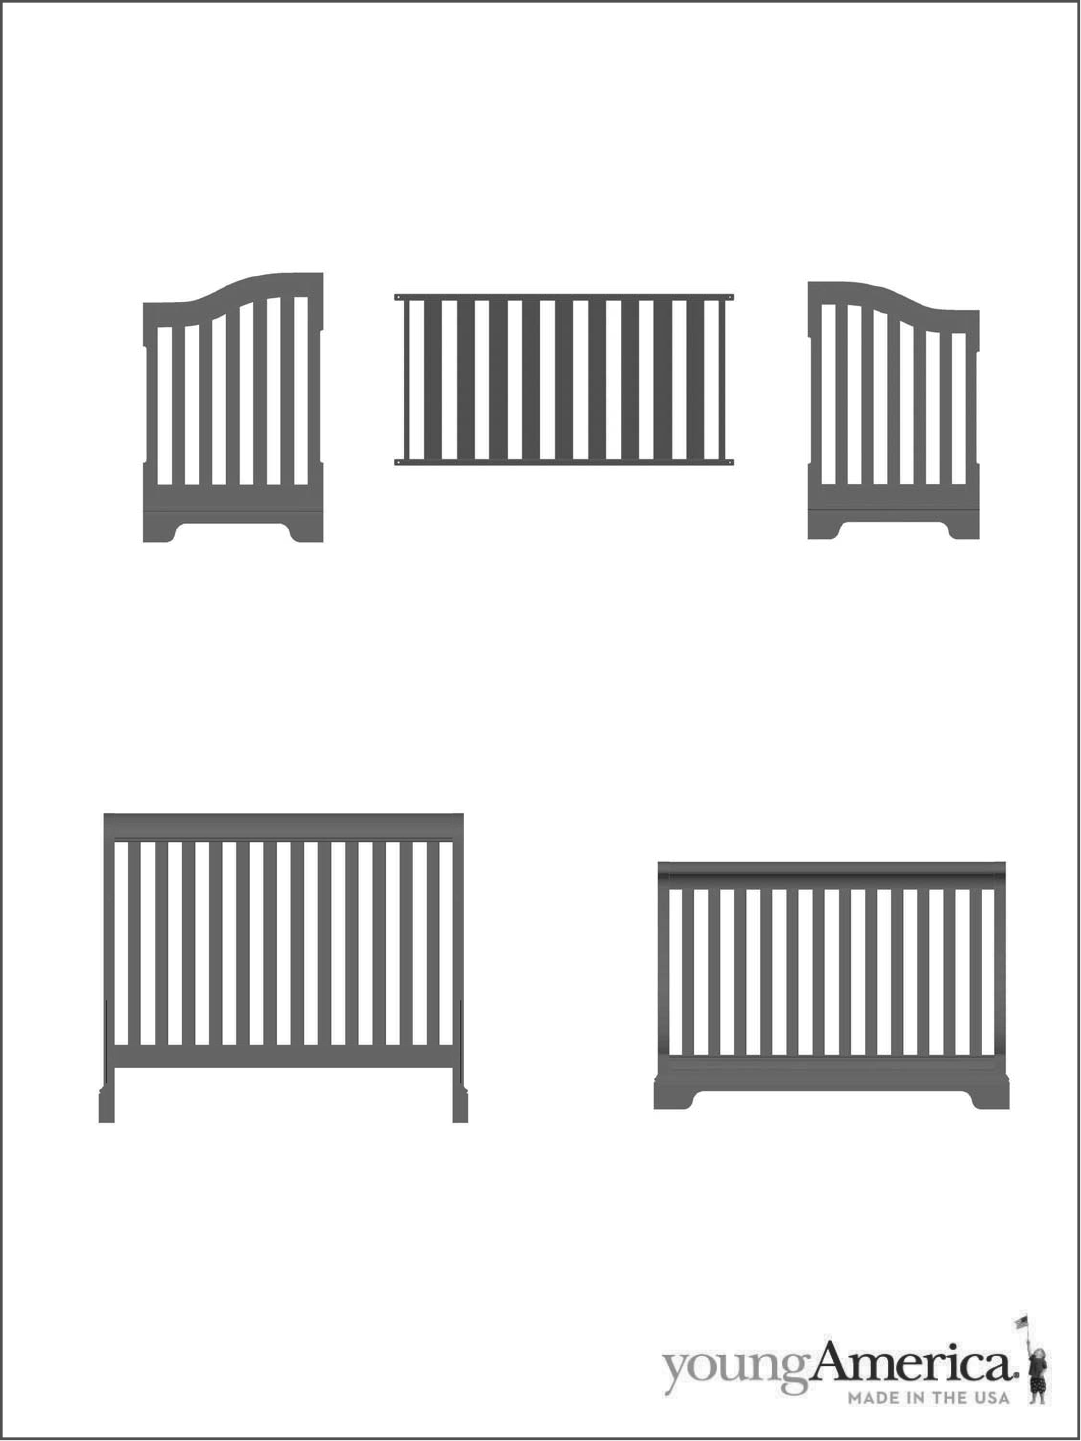
Identifying the Parts
Left Crib End
Mattress Platform
Right Crib End
Headboard Footboard
4
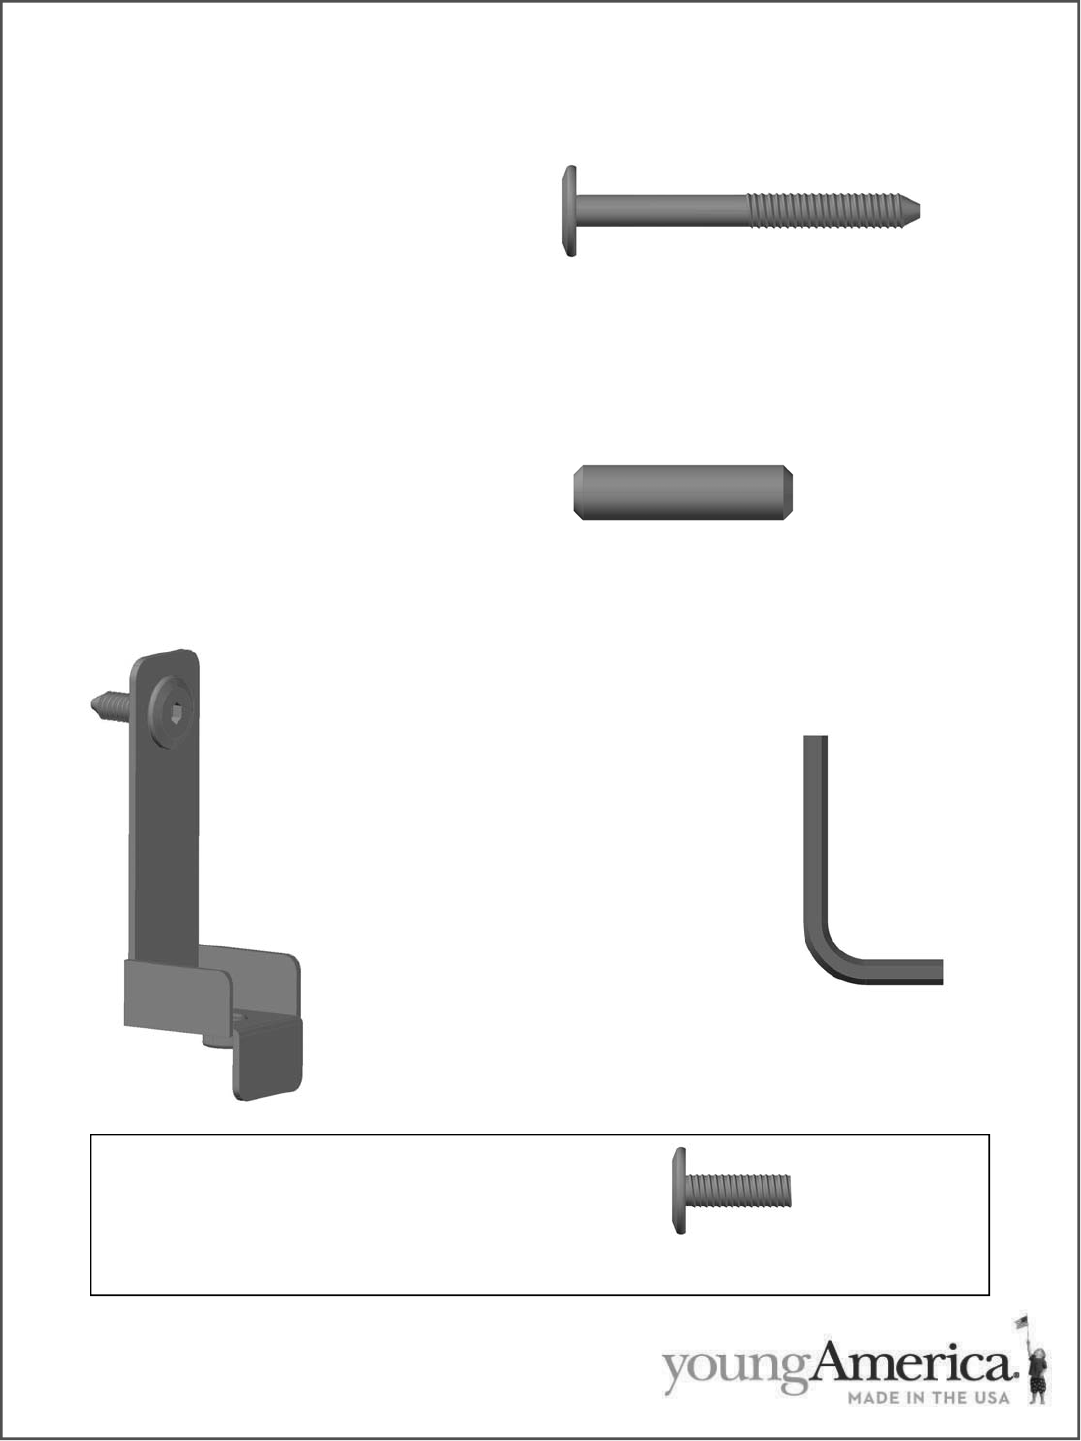
12 Connector Bolts
2 3/8” (1/4” x 20 thread)
2 Metal Locator Pins
3/8” diameter x 1 1/2” long
6 Hole Bolts (3/4” x 1/4” x 20 thread)
This hardware is for use when converting to a day bed and a full size bed.
Identifying the Hardware
Identify the hardware included using the illustrations below
4 Mattress Brackets
with Bolts
2 Allen Wrenches

5
Crib Assembly
NOTE: Read all instructions before assembling crib. KEEP INSTRUCTIONS FOR
FUTURE REFERENCE.
Attached to the mattress platform is a sleeve to store the instruction booklet.
After assembly is complete, return this instruction booklet to the sleeve for future
reference.
This crib conforms to the ASTM International and the CPSC-Consumer Product Safety
Commission guidelines for product safety. Please adhere to the guidelines in this book-
let for assembly, use and maintenance.
Note the recommendations below:
x Power tools are not recommended for assembly.
x Give yourself plenty of room to work.
x Due to the size of this bed, it must be assembled in the space it will occupy.
x The assembly will take two people to complete.
x Layout all the hardware and make sure that the proper length bolts are used in the
designated areas.
x Do not substitute hardware. If an item is missing or damaged contact Stanley
Furniture Company immediately for replacement. Inspect all component parts and
hardware prior to beginning the assembly process.
x Make sure all fasteners are tight.
x Above all, take your time and read the instructions carefully.
Tools required for Assembly:
x Allen Wrenches (provided)
This Crib is equipped with these additional features:
Bolt Retainer Sleeve—The Retainer Sleeves are located where Connector Bolts are used
to assemble the crib. It is designed to prevent loss of the Connector Bolts after crib is
disassembled. The Bolt Retainer Sleeves are permanently installed at the factory.
6
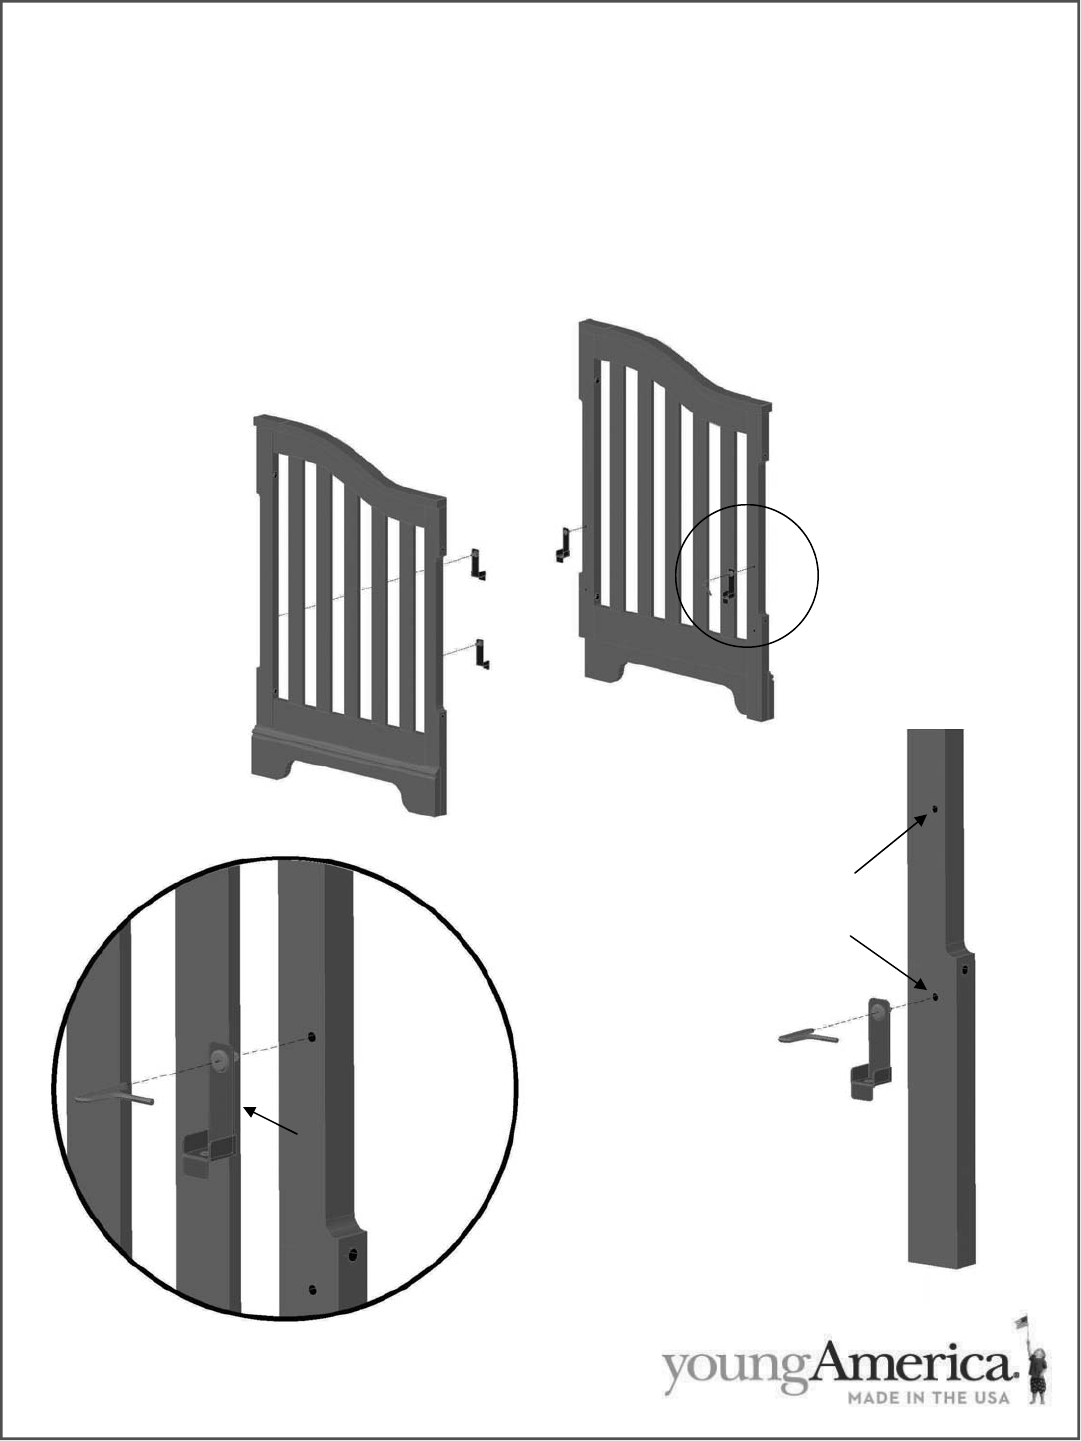
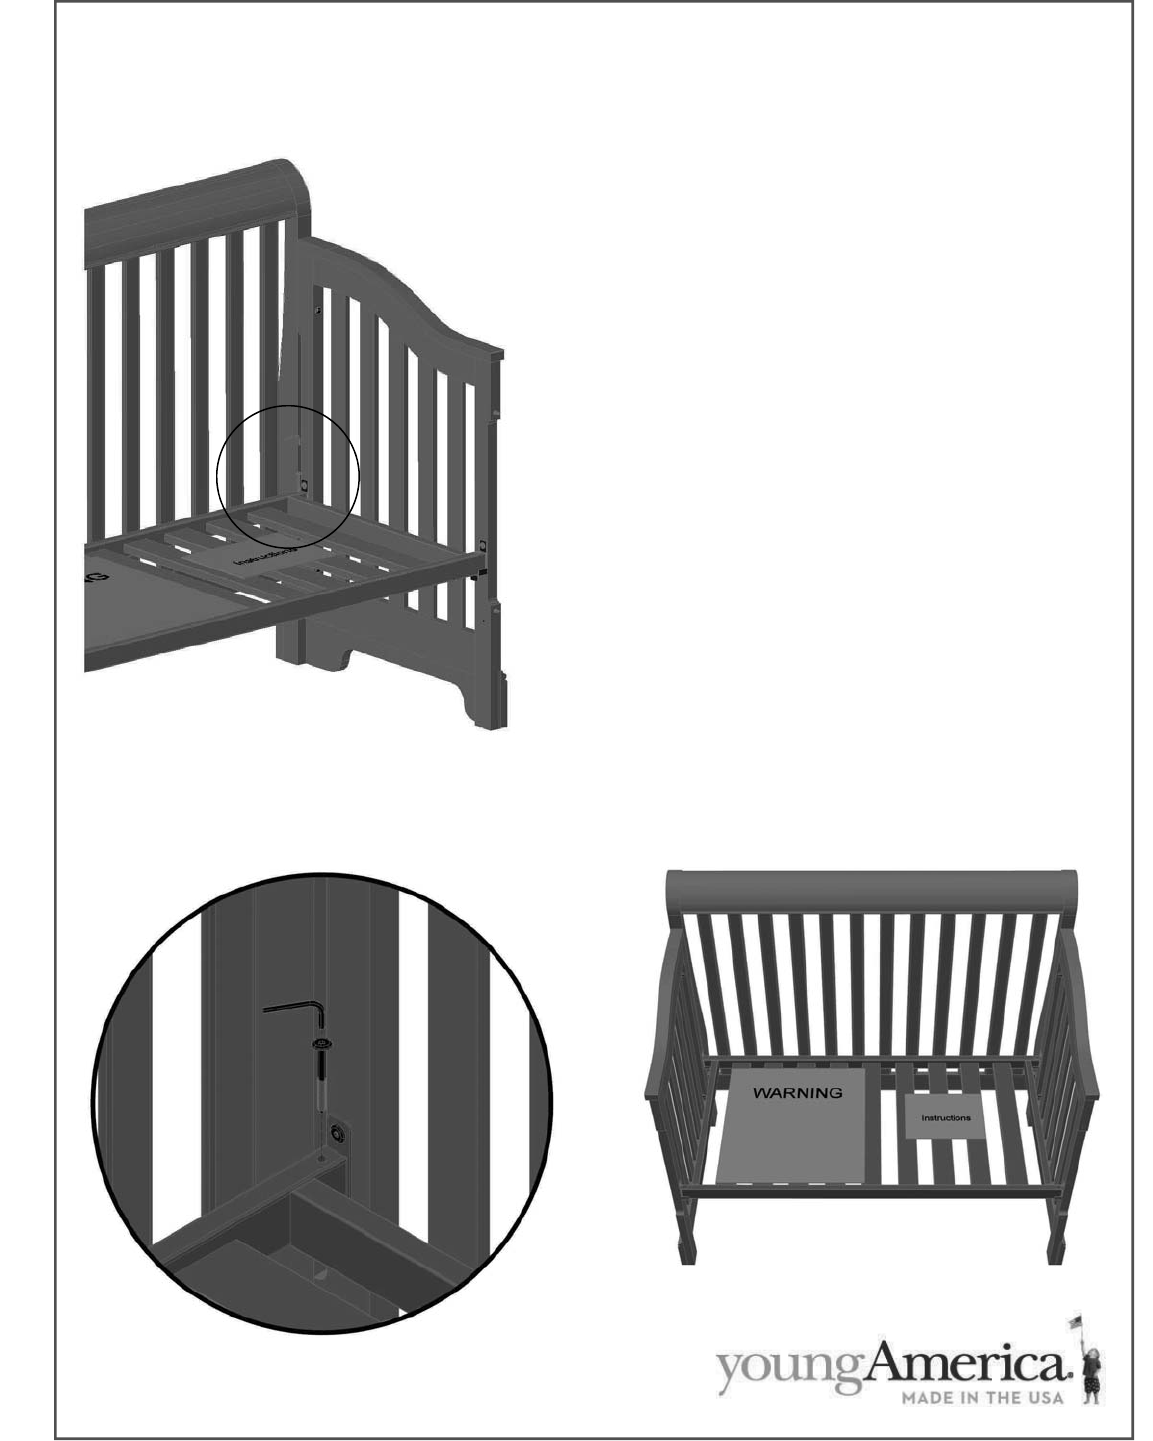
Figure 2.
Attaching the Mattress Platform Brackets
Figure 2.
Enlarged
View
Wrench
Mattress bracket
Figure 1. Left and Right
End Assemblies
Higher location
Lower location
Figure 3.
x Make sure the brackets are straight and
perpendicular to the crib uprights.
x When child is able to pull to a standing
position, set the mattress platform to the
lowest position and remove bumper pads,
large toys and other objects that could
serve as steps for climbing out.
Step 1:
x Locate the (4) Mattress Platform Brackets with
attached assembly bolts as shown in Fig. 1. De-
termine the high or low position of the mattress
foundation (Fig. 3) and attach the brackets on
both the left and right end section in the same
height location. (This is very important to keep
the foundation level and your child safe).
x Attach the (4) brackets and tighten bolts using
the wrench provided. See Figure 2.
7
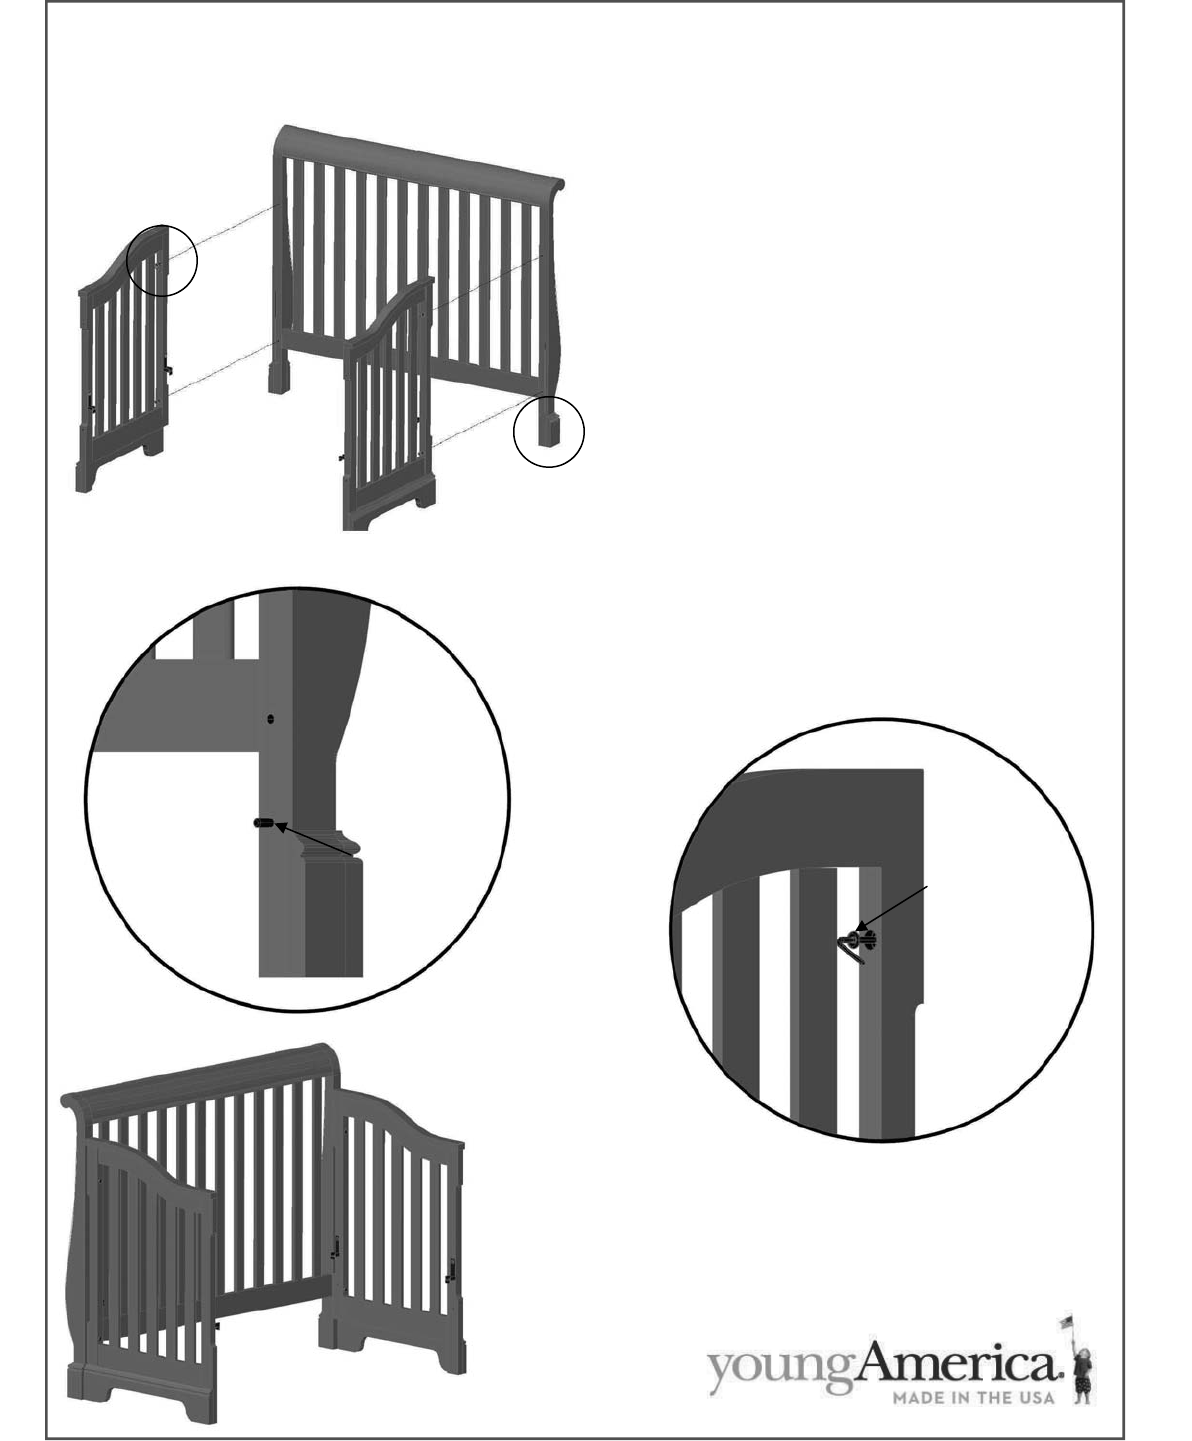
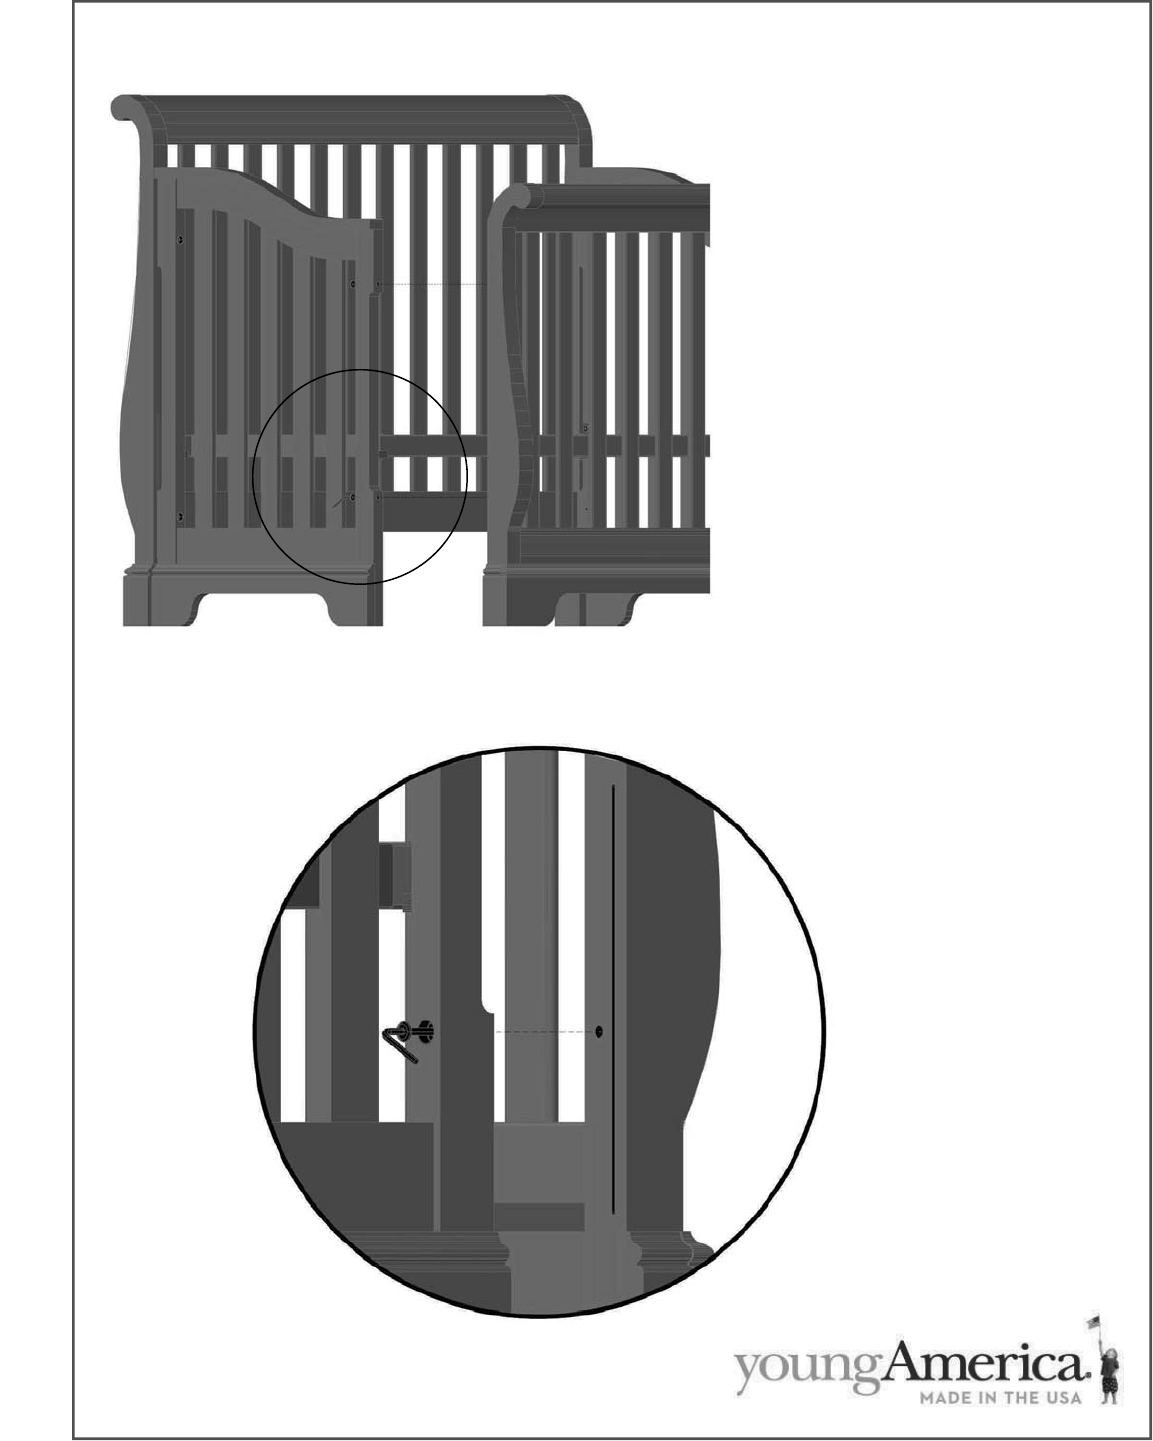
Attaching the End Sections
See Figure 4.
Insert the locator pins
See Figure 5.
Insert bolts and
tighten from in-
side the Crib Ends
Figure 4a.
Enlarged view
Figure 5.
Enlarged view
Figure 6.
Assembled ends to headboard
Step 2:
x Insert the (2) metal locator pins in
the lower hole of the head board
post as shown in Fig 4a.
x Support the headboard and attach
one end section to the headboard
by aligning the metal locator pin
in the headboard with the bottom
hole in the end section. (make
sure the mattress platform brack-
ets are to the inside of the crib).
See Fig 6.
x Using (2) 2 3/8” connector bolts,
attach the bolts from the inside of
the Crib Ends and tighten with the
provided wrench. See Fig 5.
x Repeat for the remaining End
Section.
Wrench
2-3/8” Bolt
Locator Pin
8
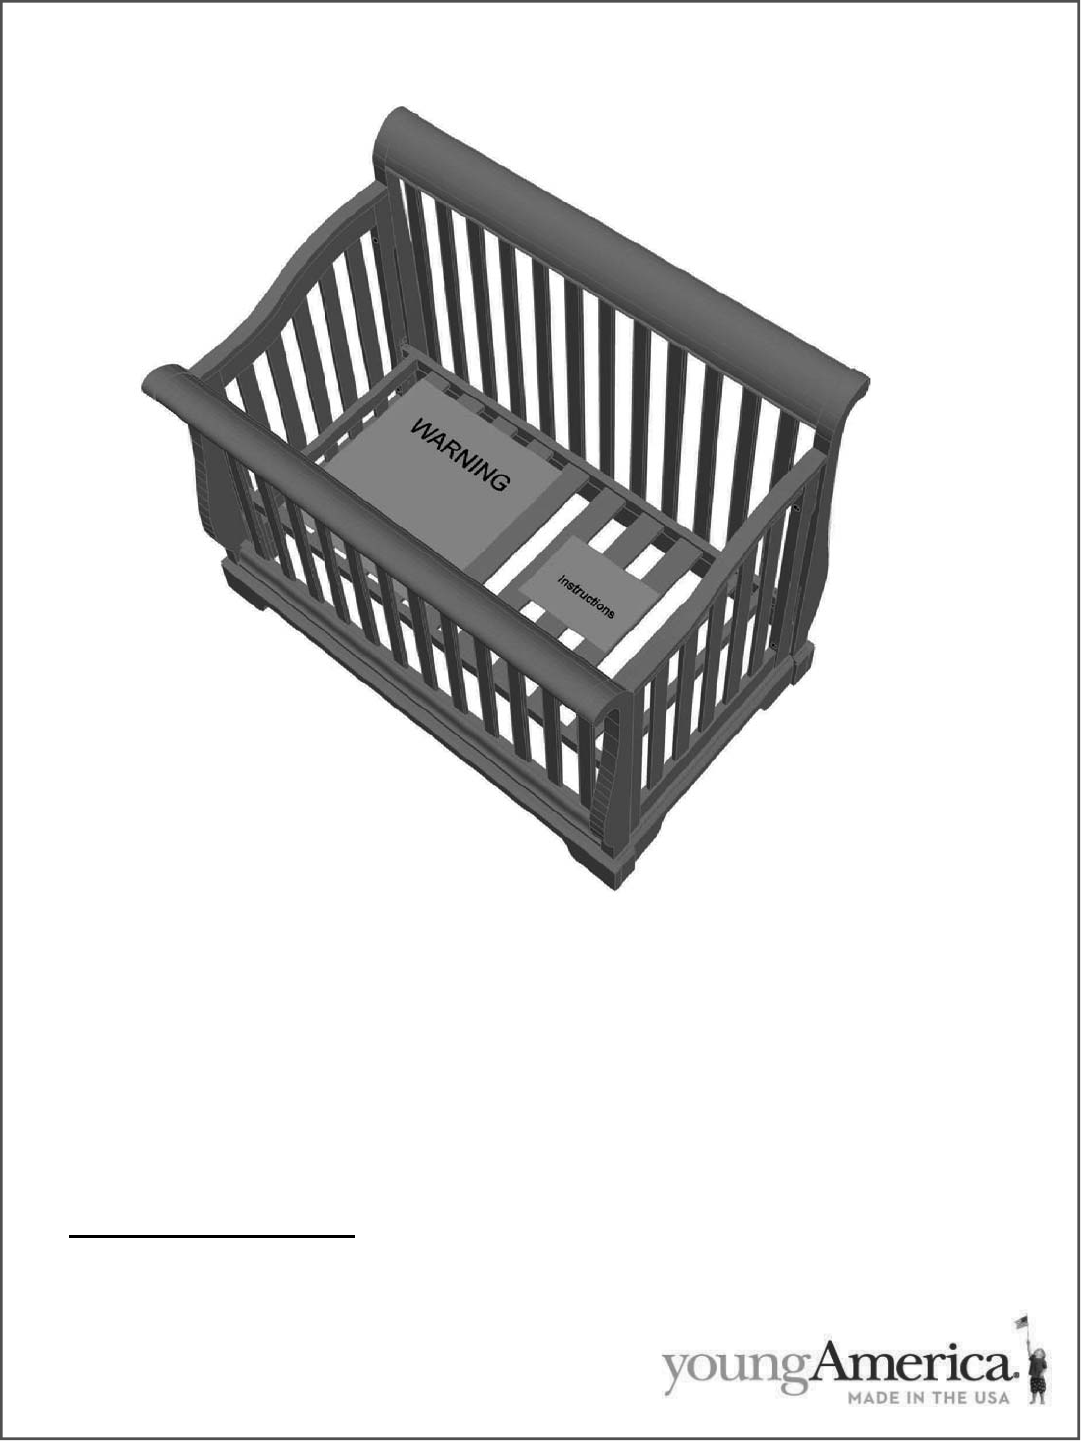
Attaching the Mattress Platform
Step 3:
x Place the mattress platform into the support
brackets. (Before inserting bolts, make sure
the instruction holder and the warning label
are facing up and readable as shown in Fig
8.
x After the mattress platform is in place, use
(4) 2 3/8” connector bolts to attach the mat-
tress platform to the support brackets. Insert
each bolt in place and loosely start the bolt
into the bracket threads.
See Fig 7.
x After all bolts have been set, securely
tighten each bolt with the provided wrench
to complete the mattress platform assembly.
x Fig 8. is how your crib should look with
Warning labels facing the front of the crib.
Figure 8.
Assembled with mattress platform
Figure 7.
Enlarged view of bolt attachment
See Figure 7.
9
Attaching the Footboard
Step 4:
x Align the footboard with the
end sections.
x Using (4) 2 3/8” connector
bolts, loosely attach the foot-
board as indicated in Fig 9.
x After the bolts have been at-
tached, use the wrench pro-
vided to tighten each of the
bolts to secure the footboard.
See Figure 9.
Attach the footboard
Figure 9.
Enlarged view of
bolt attachment
Footboard
10
Final Step in Crib Assembly
Step 5: (The final and most important) Checklist.
x Inspect the crib once again to assure that all bolts are tight and that no hardware is missing. (if you
have missing hardware, contact Stanley Furniture immediately for replacement and do not use the
crib until the new hardware arrives).
x Do not place the crib near a window where the child may have access to window coverings, cords or
draperies as these articles pose a strangulation hazard.
x Replace the instructions in the holder provided. KEEP THE INSTRUCTIONS WITH THE CRIB.
x Install the crib mattress.
x Follow all the warnings on the use of this crib and all products in the crib.
x CAUTION: Any mattress used in this crib must be at least 27-1/4” by 51-5/8”
with a thickness of no less than 4 inches and not exceeding 6 inches.

11
Cleaning:
Mix together a mild solution of gentle dishwashing liquid and water, apply to the crib sur-
face using a soft clean cloth lightly dampened in the solution. Rinse with clear water
again using a soft clean cloth, then dry all surfaces thoroughly with a dry cloth. NO
ABRASIVE CLEANERS, SCOURING PADS, STEEL WOOL OR COURSE RAGS
SHOULD BE USED TO CLEAN THIS FINE FURNITURE.
Storage:
A permanent storage pouch is attached to the mattress platform for the storage of the as-
sembly instructions. After completing the assembly process, you are advised to read and
be aware of all WARNINGS, CAUTIONS, CLEANING, STORAGE, USE AND MAIN-
TENANCE notices contained in these instructions. Do not place excess hardware in the
storage pouch as it could present a danger to a child if retrieved and could also damage
the mattress. When storing the crib, use CAUTION as temperature changes and hu-
midity could be harmful to the crib. It is recommended that the crib be stored in a tem-
perature controlled environment.
Periodic Maintenance:
1. Periodically check to make sure all bolts and connections are fastened securely.
2. If you are missing a part or need a replacement part, do not substitute parts. Ask your
dealer for replacement parts or contact Customer Service at (800) 659-7297.
3. The crib allows for 2 mattress heights. Move to the low position when the child can
pull up to a standing position. When the child reaches a height of 35” or can climb out
of the crib you should place the child in a youth or regular bed.
4. Save these instructions in the event you disassemble the crib and need to reassemble it.
These instructions will also be useful in identifying replacement parts if needed at a
future date.

12
Lowering the Mattress Platform
Higher location
Lower location
Figure 12.
Enlarged view
of Footboard
removal
Footboard
Figure 13.
Figure 14.
Wrench
Mattress bracket
See
Figure 12.
Steps to lower the mattress:
x Remove the mattress from the crib
x Loosen the (4) bolts attaching the footboard and remove the footboard. See Figure 12.
x Loosen the (4) bolts attaching the Mattress Platform and remove the platform from the crib. Note the
bolts will stay with the Mattress Platform. See Figure 13.
x Remove the platform brackets and place in the lower position. See Figure 14.
x Follow Steps 3, 4 and 5 on Pages 8, 9, and 10 to reassemble the crib.

13
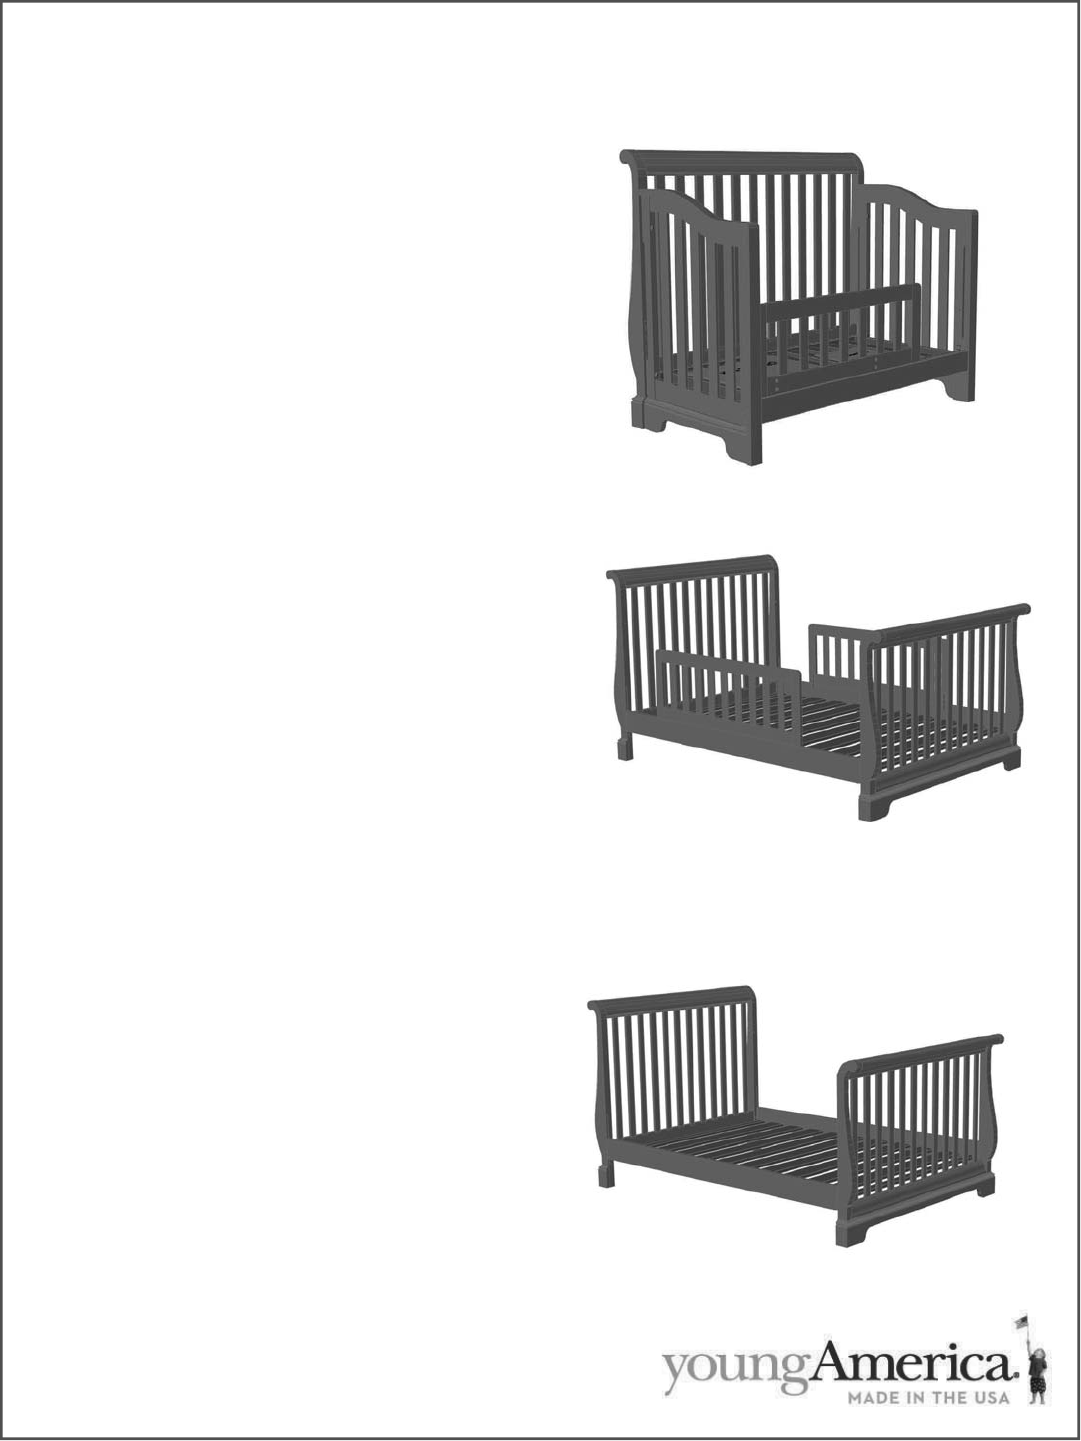
Converting Your Crib to a Daybed
Steps to Convert Crib to a Daybed:
Step A:
x The mattress should be in the low position. Follow the instruc-
tions on page 12 for lowering the Mattress Platform. Do not
reattach the footboard.
Step B:
x Remove the (4) Bolts located in the End Frames: Locate the (4)
2 3/8” Inch Bolts using the illustration below. For each bolt,
gently apply pressure to the exposed threaded end of Bolt. This
will engage the threads of the Bolt with the Retainer Sleeve.
With pressure being applied, insert the provided Allen Wrench
into the opposite end and turn counter-clockwise.
Fully assembled Daybed
View from back of Daybed
Push to Gently
Apply pressure to
this end of Bolt.
Insert Allen
Wrench and
rotate counter-
clockwise.
Installing Bolt Bolt properly seated Installed Bolt
Step C:
x Install (4) 3/4” Inch Bolts into the countersink holes where the 2 3/8” Inch Bolts were removed in Step
B. Insert the 3/4” Inch Bolts into the countersink holes. Using the provided Allen Wrench while gently
applying pressure, turn the Bolt in a clockwise motion. As the Bolt threads engage into the Bolt Retainer
sleeve, gently tighten until the Bolt seats with the Retainer Sleeve (See illustrations below). Note: Do
not apply excessive force as the Bolt seats.
14
Conversion to a Full Size BTF-3235 LV available.
Instructions to convert the Built to Grow crib are on
the following page. Contact your local Young
America retailer, our Customer Service Center, or
website to purchase this item.
Toddler Bed Conversion Kit item BTK-3230
is available as an option to convert the Built to
Grow Crib to a toddler or day bed. Contact your
ORFDO<oungAmerica UHWDLOHURXU&XVWRPHU
6HUvLFH&HQWHURUZHEVLWHto purchase this kLW.
Safety Rails for a Full Size Bed item PSR-3268
are available for added safety when the bed is
converted to a full size bed. &RQWDFW\RXUORFDO
<RXQJ$PHULFDUHWDLOHURXU&XVWRPHU6HUvLFH
&HQWHr, RUZHEVLWHWRSXUFKDVHWKLVLWHP
Accessories and Options
15
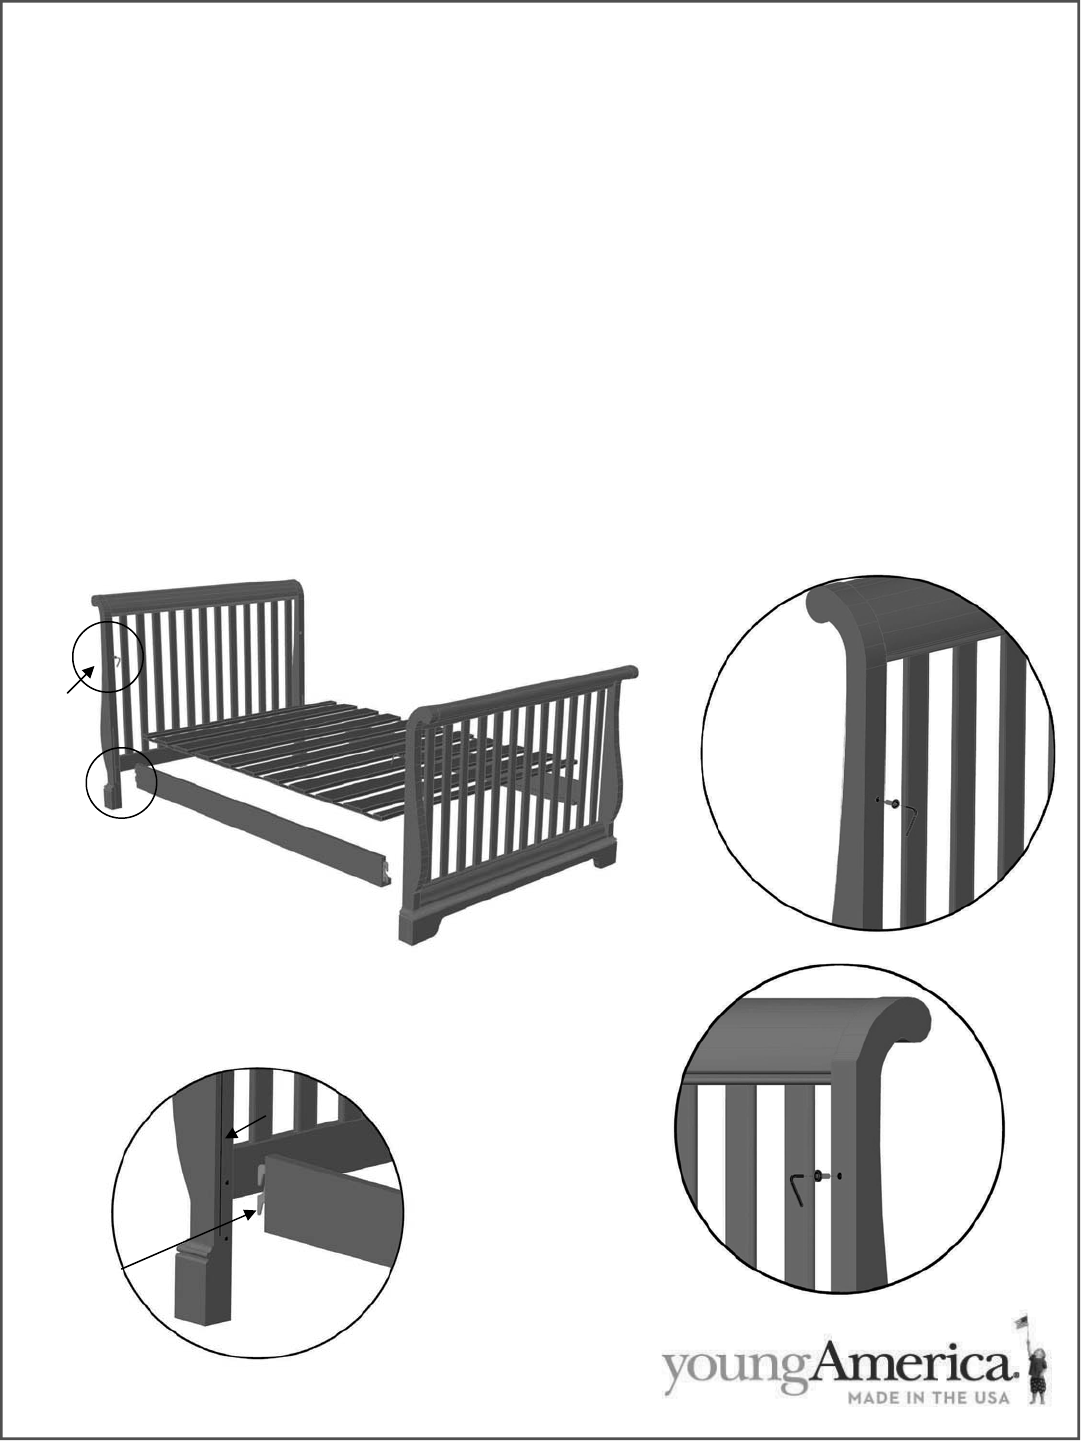
Converting to a Full Size Bed
Step 1: Disassemble the crib or toddler/day bed.
x Using the wrench provided remove the components in the following order:
x Remove the footboard
x Remove the mattress platform
x Remove the crib ends from the crib headboard
x Keep and store all the hardware for future assembly of the crib. Store the crib components in a safe
dry place to prevent damage.
Step 2: Attach the side rails and slat roll.
x The side rails can be installed in two positions. The lower position, along with the purchase of
Safety Rails, is recommended for transition from the crib to a child’s first full size bed. The bed
side rails can be moved to the upper position after your child adapts to the transition. Under bed
storage options can be used with the bed rails positioned in the upper location. Contact your
youngAmerica dealer for more information on available options.
x Install the rails into the headboard and foot board as shown and press down to lock into position.
x Insert (2) 3/4” bolts in the headboard and (4) 3/4” bolts in the footboard to cover the crib assembly
holes. Tighten with the wrench provided. See Figure 15.
x Install the slat roll using the instructions provided with the slat roll for proper installation.
Footboard
Headboard
Figure 15.
Figure 15.
See Figure 16.
Figure 16.
Slot in
Headboard
Hook
See Figure
15.

16
Stanley
<RXQJ$PHULFD
Stanley Furniture Company
200 North HamiltonStUHHW
High Point, NC 27260
For TXHVWLRQVDQGparts, contact your <RXQJ$PHULFDUHWDLOHU RUour Customer
Service &HQWHU800659-7297Mon.-Fri. 8am-5pm6DWDPSP ES7
ZZZ\RXQJDPHULFDFRP
Furniture
