プレゼンテーション CA378 AOIS Software Setup Guide Raspi3 Ver1.0.2
User Manual:
Open the PDF directly: View PDF ![]() .
.
Page Count: 29

Copyright 2017-2018 CenturyArks Co.,Ltd. All Rights Reserved Page 1
Version 1.0.2
Dated: 2018/11/07
Home Page http://www.centuryarks.com/
CA378-AOIS for Raspberry Pi 3
Software Setup Guide

Copyright 2017-2018 CenturyArks Co.,Ltd. All Rights Reserved Page 2
History
Date
Version
Comment
2017/12/21
v1.0.0
Initial Release
2018/02/07
v1.0.1
Fixed missing of procedure manual
Added optical black correction for RAW to DNG conversion
Added color management adjustment for still image capturing
2018/11/07
v1.0.2
Update Installation Guide

Copyright 2017-2018 CenturyArks Co.,Ltd. All Rights Reserved Page 3
Contents
1. Environment configuration
2. Software install
3. Demonstration functions
3.1. Focus & OIS
3.2. High-speed video recording
3.3. 4K3K-resolution(12Mpixel) still image capturing
3.4. HDR still image capturing
Appendix
A.1. Directory structure
A.2. Setting file

Copyright 2017-2018 CenturyArks Co.,Ltd. All Rights Reserved Page 4
1. Environment configuration
1.1. Procedure for using SSP library installed Raspbian image
Raspbian Stretch with desktop
Release date: 2018-10-09
SSP Library: 1.31
(1-1) Please download the following image.
https://www.centuryarks.com/images/product/sensor/2018-10-09-raspbian-stretch-CA378-AOIS.zip
(1-2) Follow the installation guide of Raspbian.
https://www.raspberrypi.org/documentation/installation/installing-images/README.md
1.2. Manual installation procedure of SSP library
(2-1) Please download the latest image of Raspbian from the following site.
https://www.raspberrypi.org/downloads/raspbian/
(2-2) Follow the installation guide of Raspbian.
https://www.raspberrypi.org/documentation/installation/installing-images/README.md

Copyright 2017-2018 CenturyArks Co.,Ltd. All Rights Reserved Page 5
1. Environment configuration
(2-3) Update the Raspberry Pi firmware to the specific version.
(2-4) Register as user at Vision Processing Community.
https://www.visionproc.org/login_new_account.php?lang=en
(2-5) Download “SSP library 1.31” and “HexaVisionControl 0.92” from the following site.
https://www.visionproc.org/download.php
(2-6) Extract the downloaded file.
(2-7) Install Qt development package and RAW development software
$ sudo rpi-update e37295d7a8f9f28eda5b6af35eb0fd4c9341a3e0
$ sudo apt-get update
$ sudo apt-get upgrade
$ sudo apt-get install libopencv-dev
$ sudo apt-get install qt4-dev-tools
$ sudo apt-get install ufraw
$ tar zxvf libssp-1.31.tar.gz
$ tar zxvf HexaVisionControl-0.92.tar.gz

Copyright 2017-2018 CenturyArks Co.,Ltd. All Rights Reserved Page 6
2. Software install
Please install by the following procedure.
· Installation procedure
1. Download " demo_v1.0.2_pi3.tar.gz " from the following site.
https://github.com/centuryarks/Sample/releases
2. Unzip the "demo_v1.0.2_pi3.tar.gz" file.
3. Execute "Install.sh" in the extracted folder.
4. A shortcut is created on the desktop.
Demo.sh
Hispeed.sh
$ cd demo
$ ./Install.sh
$ tar zxvf demo_v1.0.2_pi3.tar.gz
$ wget --no-check-certificate https://github.com/centuryarks/Sample/releases/download/v1.0.2/demo_v1.0.2_pi3.tar.gz

Copyright 2017-2018 CenturyArks Co.,Ltd. All Rights Reserved Page 7
3. Demonstration functions
3.1. Focus & OIS
3.2. High-speed video recording
3.3. 4K3K-resolution(12Mpixel) still image capturing
3.4. HDR still image capturing
Copyright 2017-2018 CenturyArks Co.,Ltd. All Rights Reserved Page 8
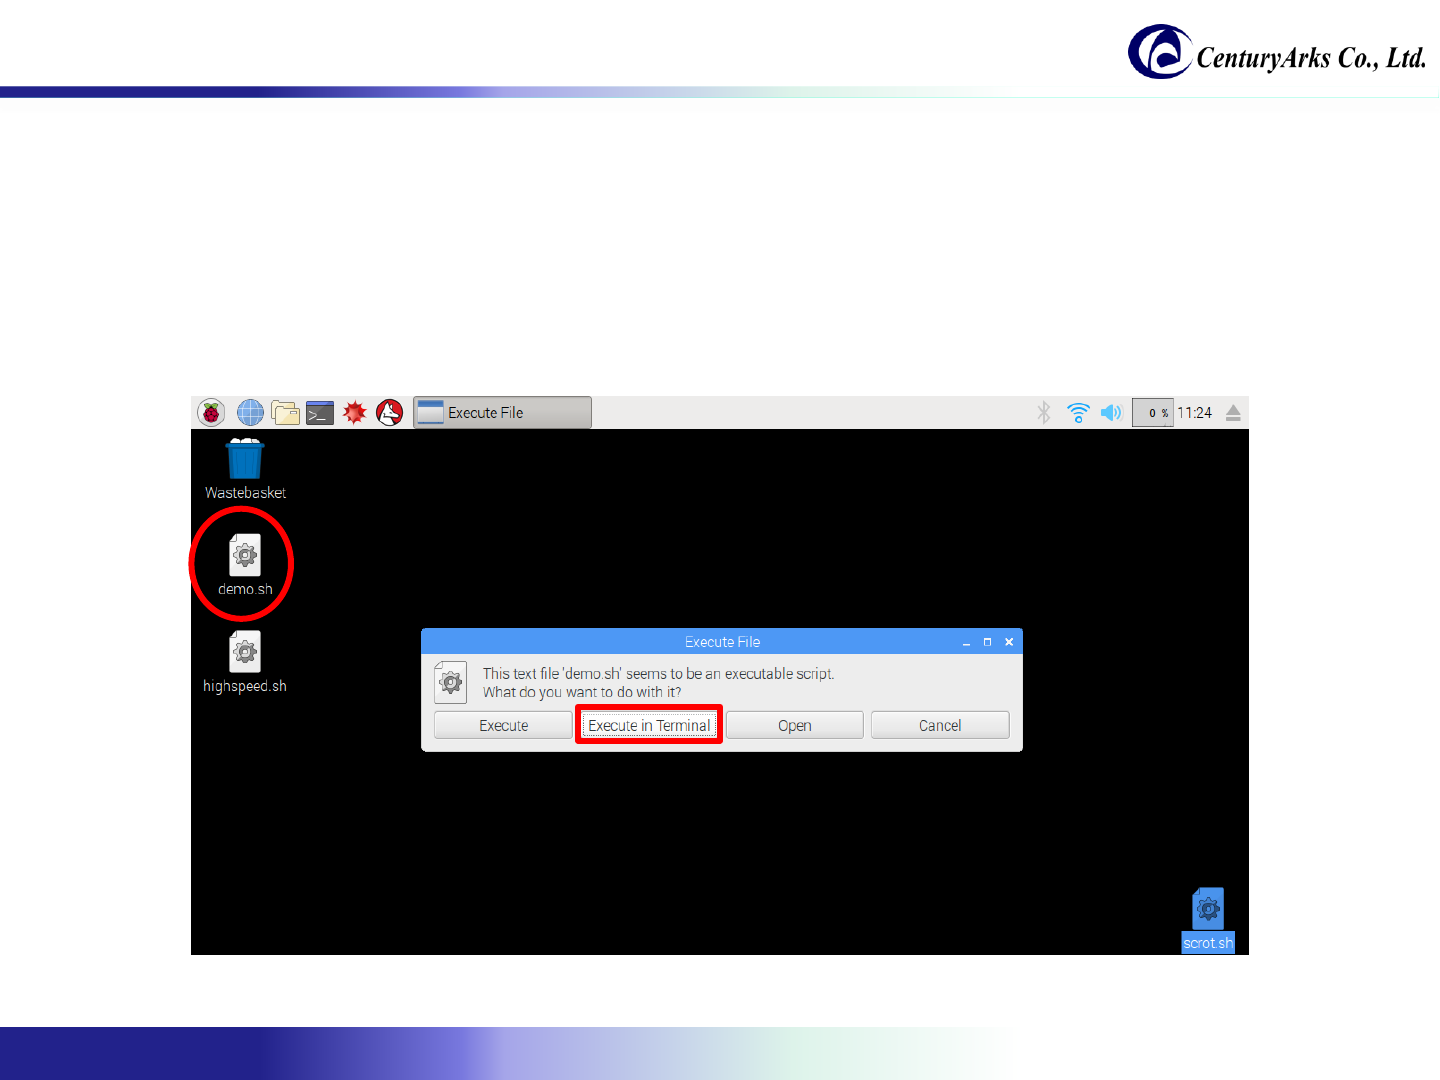
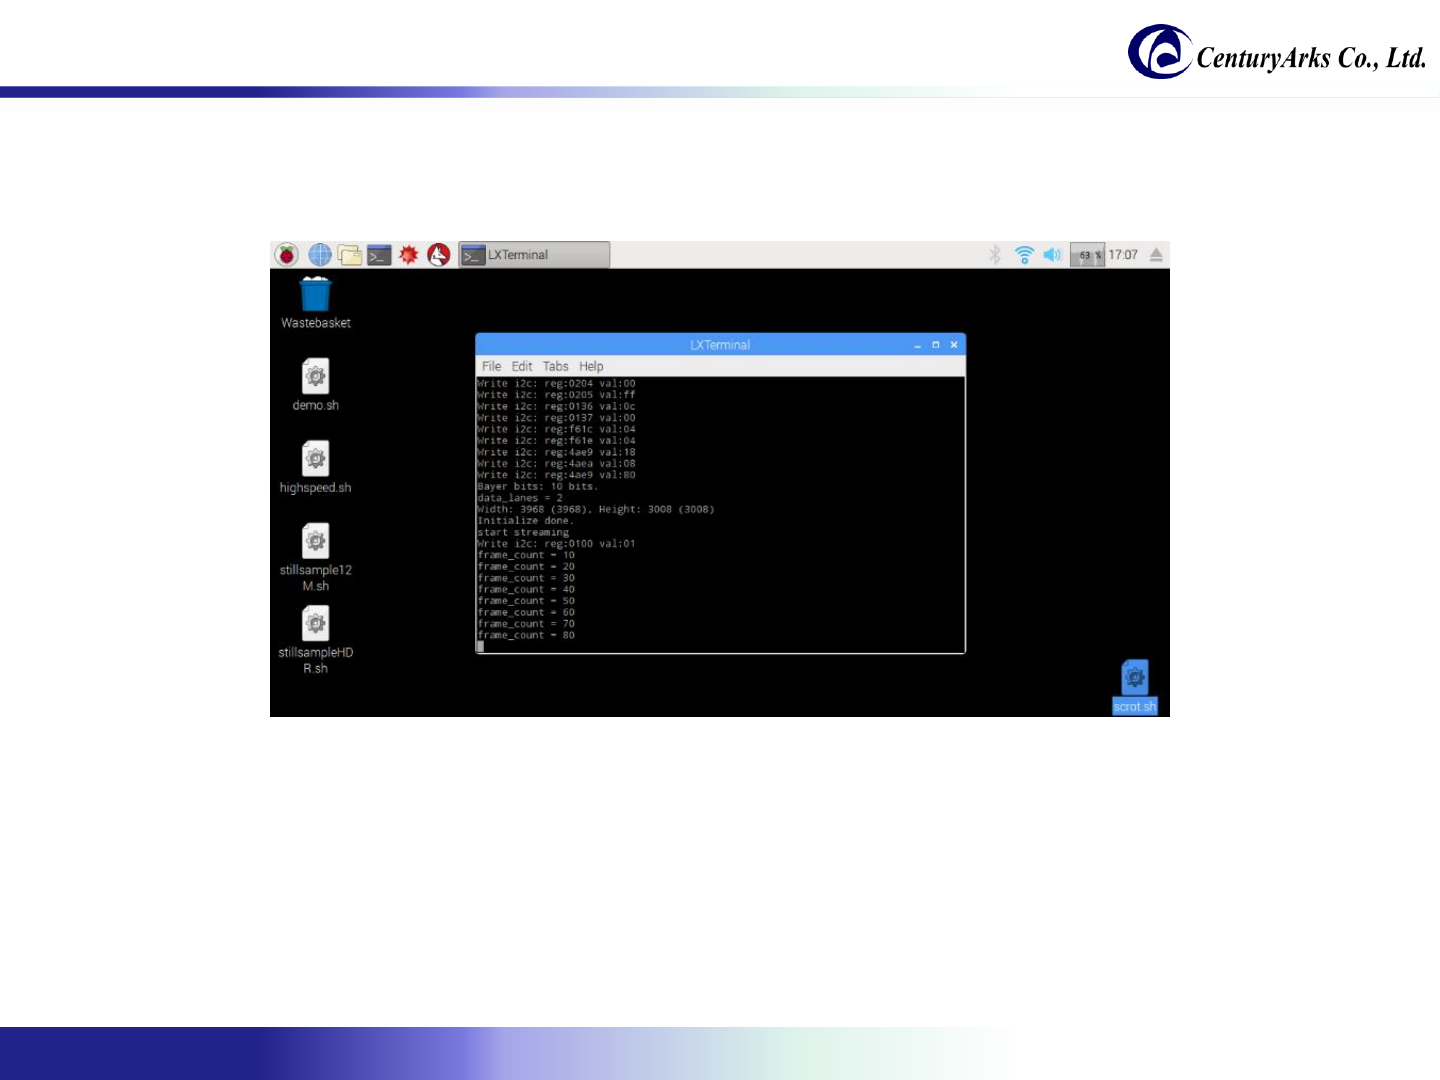
Procedure of starting Focus & OIS:
1. Click "demo.sh" on the desktop.
2. Click [Execute in Terminal].
3. After a while the GUI screen will be displayed.
4. Please change the distance of the object, or move the camera, confirm the function.
* For details of functions, refer to page 9-10.
3.1. Focus & OIS
Copyright 2017-2018 CenturyArks Co.,Ltd. All Rights Reserved Page 9
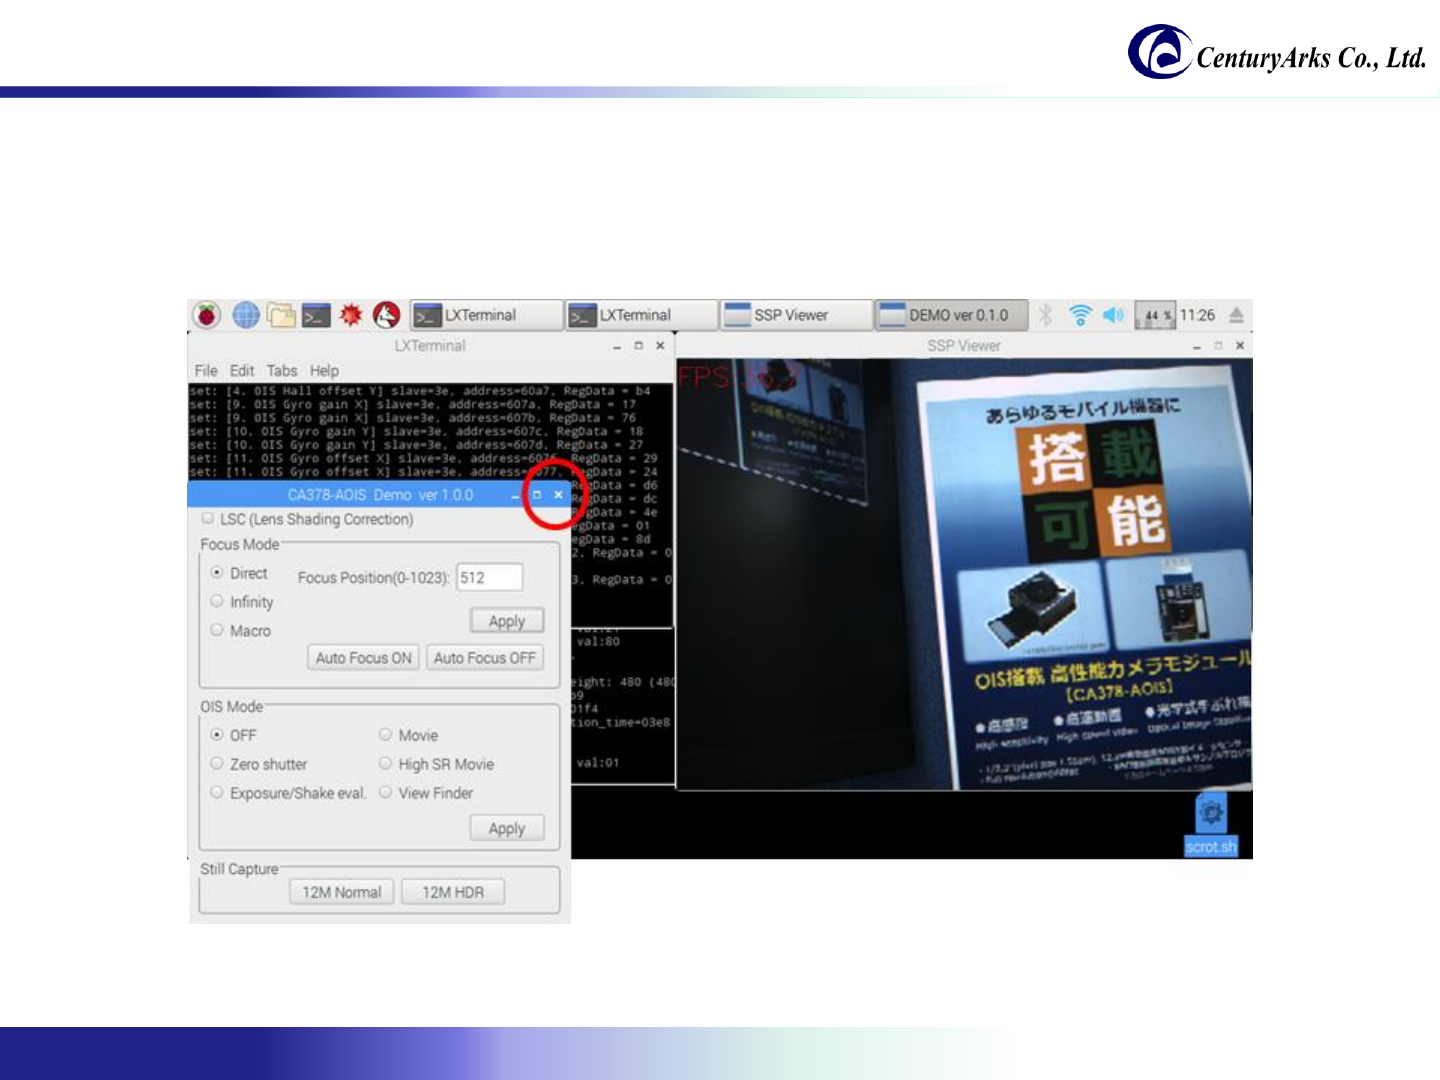
Procedure of finishing Focus & OIS:
1. Click the [x]
3.1. Focus & OIS

Copyright 2017-2018 CenturyArks Co.,Ltd. All Rights Reserved Page 10
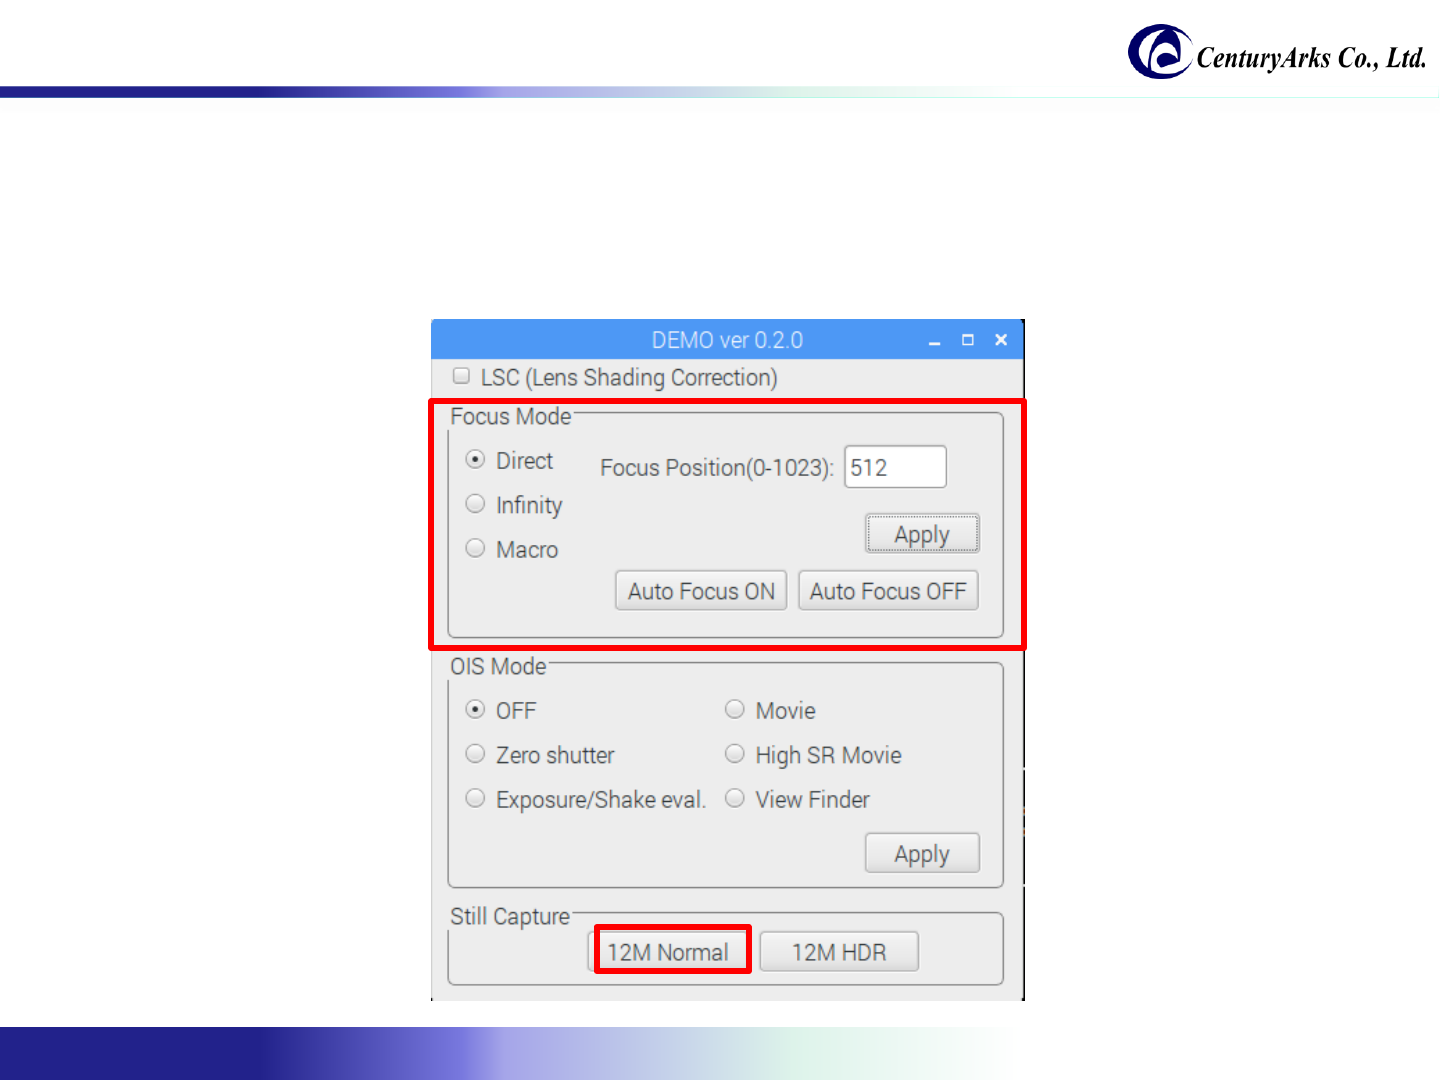
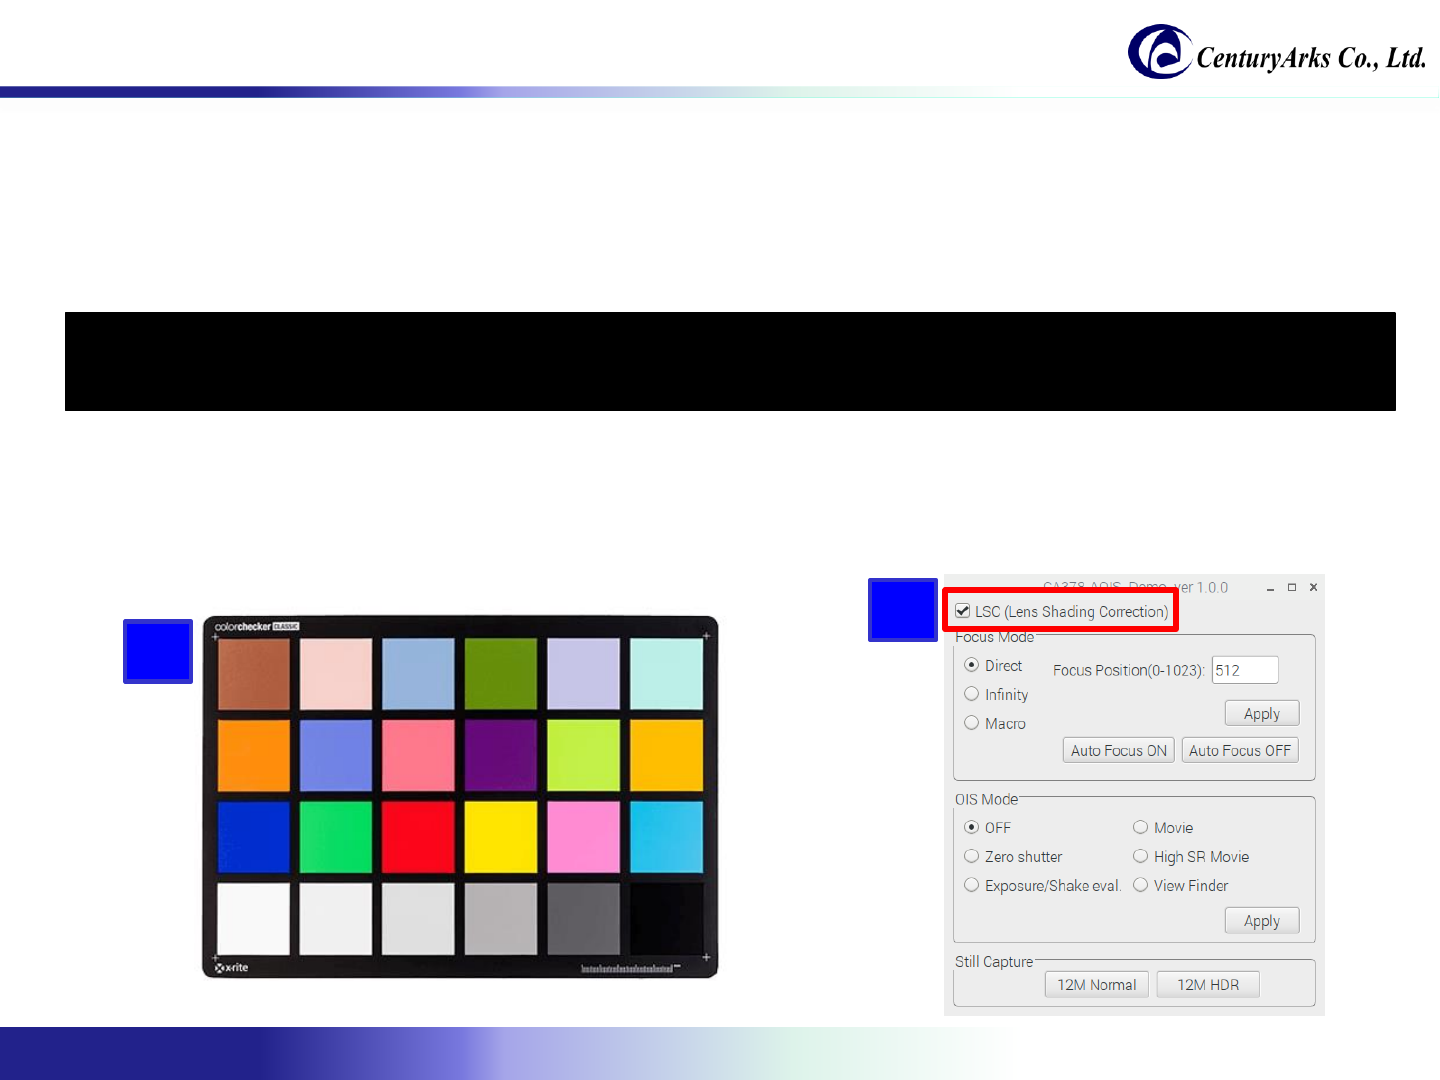
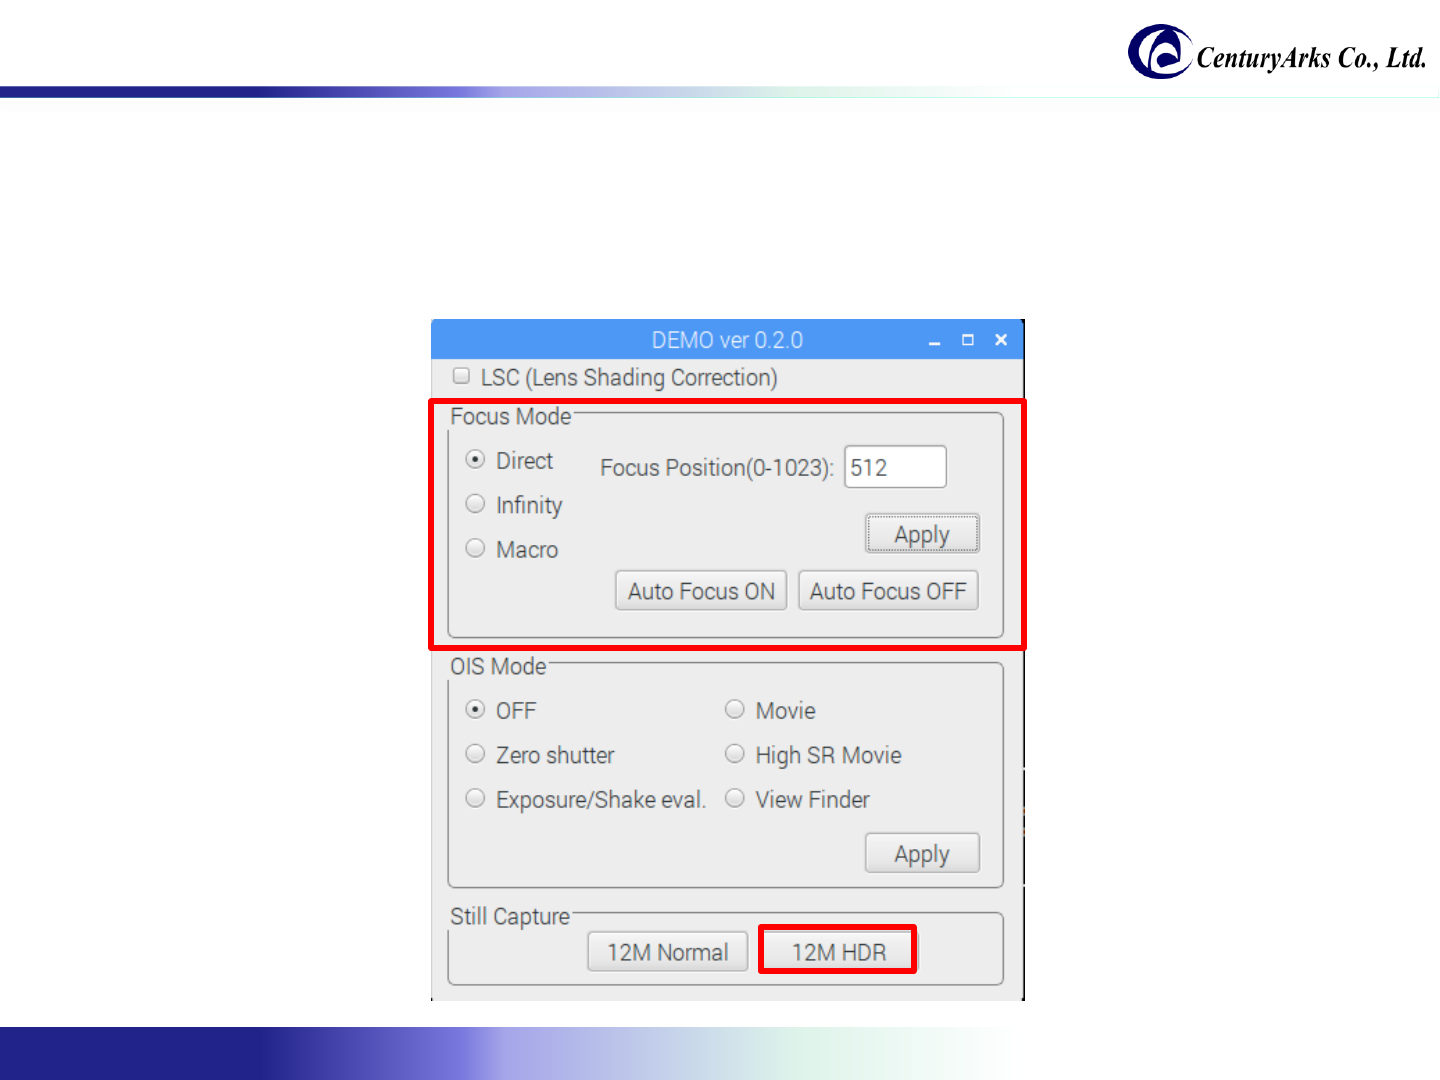
The following section describes each function of Focus & OIS.
Function Description
LSC Check to enable shading correction.
※ Theoretical values have been set.
Focus Mode Direct: Directly specify the focus position.
Infinity: Set the focus position to infinity.
Macro: Set the focus position to the short distance.
Focus Position: Focus position.
Apply: Apply the settings.
Auto Focus ON: Enable auto focus.
Auto Focus OFF: Disable auto focus.
* Current debug control is for demo.
OIS Mode OFF: Disable OIS.
It corresponds to each OIS mode.
Zero Shutter
Exposure / Shake eval.
Movie
High SR Movie
View Finder
Apply: Apply the settings.
Still Capture 12M Normal: Capture 12Mpixel normal still image.
12M HDR: Capture 12Mpixel HDR still image.
3.1. Focus & OIS

Copyright 2017-2018 CenturyArks Co.,Ltd. All Rights Reserved Page 11
Description of the script file:
It describes about the “script/preview.sh".
#!/bin/sh
cd /home/pi/demo
./bin/highspeed ./profile/IMX378_640x480_4x4.xml 953 256 2372 IMX378
Function Description
The first argument Specify the VPF profile.
The second argument Specify the analog gain.
Range: 0 –978
Analog Gain = 1024 / (1024 –value)
The third argument Specify the digital gain.
Range: 256 to 4057
Digital gain = value / 256 [times]
The fourth argument Specify the shutter speed.
Conditions:
Long exposure: None
COARSE_INTEG_TIME = 500 (fourth argument)
LINE_LENGTH_PCK = 3000 (specified in the profile of the first argument)
Pixel rate [pixels / s] = 210 [MHz] * 4
Example:
Exposure time = (500 * 3000) / (210 [MHz] * 4) = 1.785 [msec]
Frame rate = 560 [fps]
* Please understand that Frame rate does not rise only by changing shutter speed.
The fifth argument specify IMX 378
3.1. Focus & OIS

Copyright 2017-2018 CenturyArks Co.,Ltd. All Rights Reserved Page 12
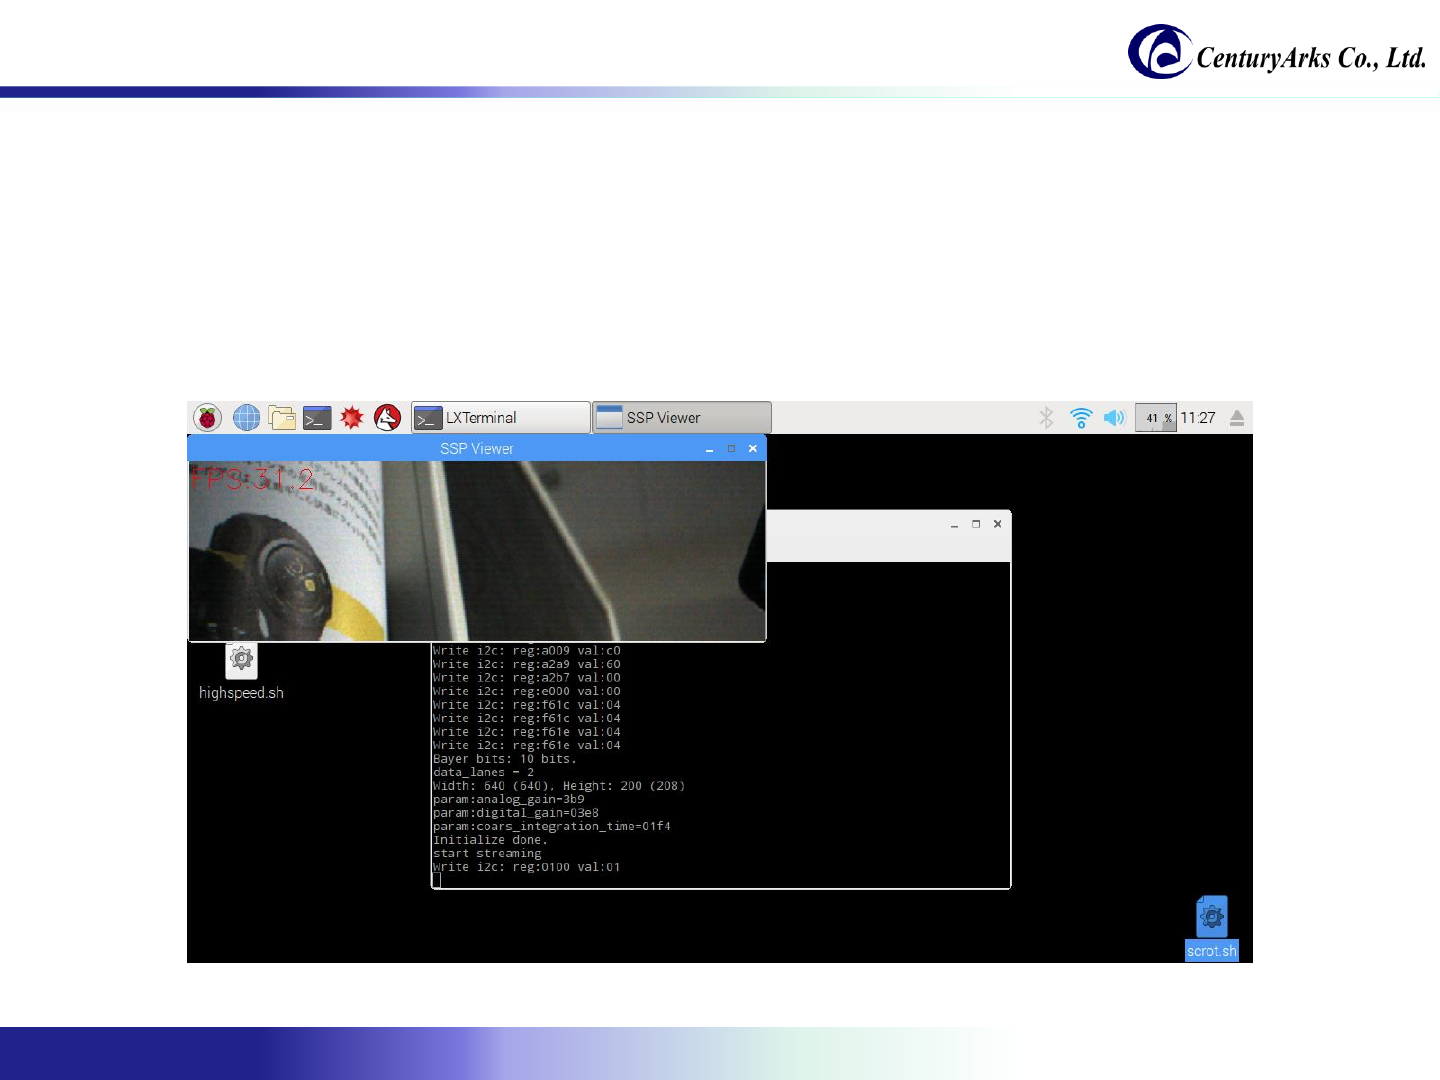
Procedure of starting high-speed video recording:
1. Click "highspeed.sh" on the desktop.
2. Click [Execute in Terminal].
3. Preview will start automatically when you start up.
4. Press the [r] key on the keyboard at the timing you want to shoot.
* For detailed operation, refer to page 14
3.2. High-speed video recording
Copyright 2017-2018 CenturyArks Co.,Ltd. All Rights Reserved Page 13
3.2. High-speed video recording
Procedure of finishing high-speed video recording:
(1) If you press any of [w], [W], [a] on the keyboard, you can save captured data in the specified format.
([w]: uncompressed, [W]: Motion JPEG, [a]: MP 4)
(2) Press [q] on the keyboard.
(* It does not exit even if clicking the [x] button.)
(3) Saved image data can be edited / played with general software.

Copyright 2017-2018 CenturyArks Co.,Ltd. All Rights Reserved Page 14
#!/bin/sh
cd /home/pi/demo
#./bin/highspeed ./profile/IMX378_640x480_250fps_10bit_2lane.xml 978 384 1000 IMX378
./bin/highspeed ./profile/IMX378_640x200_500fps_10bit_2lane.xml 978 768 500 IMX378
By exchanging the third and fourth rows,
You can change the image size and frame rate.
3.2. High-speed video recording
Description of the script file:
It describes about the “script/highspeed.sh".
Function Description
The first argument Specify the VPF profile.
The second argument Specify the analog gain.
Range: 0 –978
Analog Gain = 1024 / (1024 –value)
The third argument Specify the digital gain.
Range: 256 to 4057
Digital gain = value / 256 [times]
The fourth argument Specify the shutter speed.
Conditions:
Long exposure: None
COARSE_INTEG_TIME = 500 (fourth argument)
LINE_LENGTH_PCK = 3000 (specified in the profile of the first argument)
Pixel rate [pixels / s] = 210 [MHz] * 4
Example:
Exposure time = (500 * 3000) / (210 [MHz] * 4) = 1.785 [msec]
Frame rate = 560 [fps]
* Please understand that Frame rate does not rise only by changing shutter speed.
The fifth argument specify IMX 378

Copyright 2017-2018 CenturyArks Co.,Ltd. All Rights Reserved Page 15
The following section describes the functions of high-speed video recording.
Activate SSP Viewer and correspond to the following key command.
Command Description
q Quit
r Go to recording mode
v Go to real-time preview mode
w Movie file output (uncompressed)
W Movie file output (Motion JPEG format)
a Movie file output (MP4 format)
p Pause
s Jump to start frame
e Jump to end frame
z Export current frame
x Export entire frames
t Toggle show / hide message
Command Description
0 to 5 Adjust preview speed
9 Play with skipping 5 frames
8 Play without skipping
[Space] Show next frame
m Show back frame
f Forward 100 frames
b Back 100 frames
F Forward 200 frames
B Back 200 frames
c Perform simple white balance gain adjustment
3.2. High-speed video recording
Copyright 2017-2018 CenturyArks Co.,Ltd. All Rights Reserved Page 16
Procedure of capturing 12Mpixel still image:
1. Adjust the focus.
(It is useful to turn on Auto Focus and turn Auto Focus OFF when focus is on)
2. Click the [12M Normal] button
3.3. 12Mpixel still image capturing
Copyright 2017-2018 CenturyArks Co.,Ltd. All Rights Reserved Page 17
3. The image is taken at the timing when Frame count becomes 20 (initial setting).
(Currently you can use only in the countdown system, manual push is planned for the future.)
4. The display method is explained in the following procedures.
(1) How to adjust color management (*Please skip, if you do not adjust.)
(2) How to display still images with Raspberry Pi
(3) How to display still images in environments such as PCs and smartphones.
3.3. 12Mpixel still image capturing
Copyright 2017-2018 CenturyArks Co.,Ltd. All Rights Reserved Page 18
3.3. 12Mpixel still image capturing
(1) How to adjust color management
(*Please skip, if you do not adjust.)
1. Install color management tool.
2. Prepare a color checker (24 colors).
3. Check "LSC (Lens Shading Correlation)".
4. Run the procedure of capturing 12Mpixel still image.
$ sudo apt-get update
$ sudo apt-get install argyll
3
2
Copyright 2017-2018 CenturyArks Co.,Ltd. All Rights Reserved Page 19
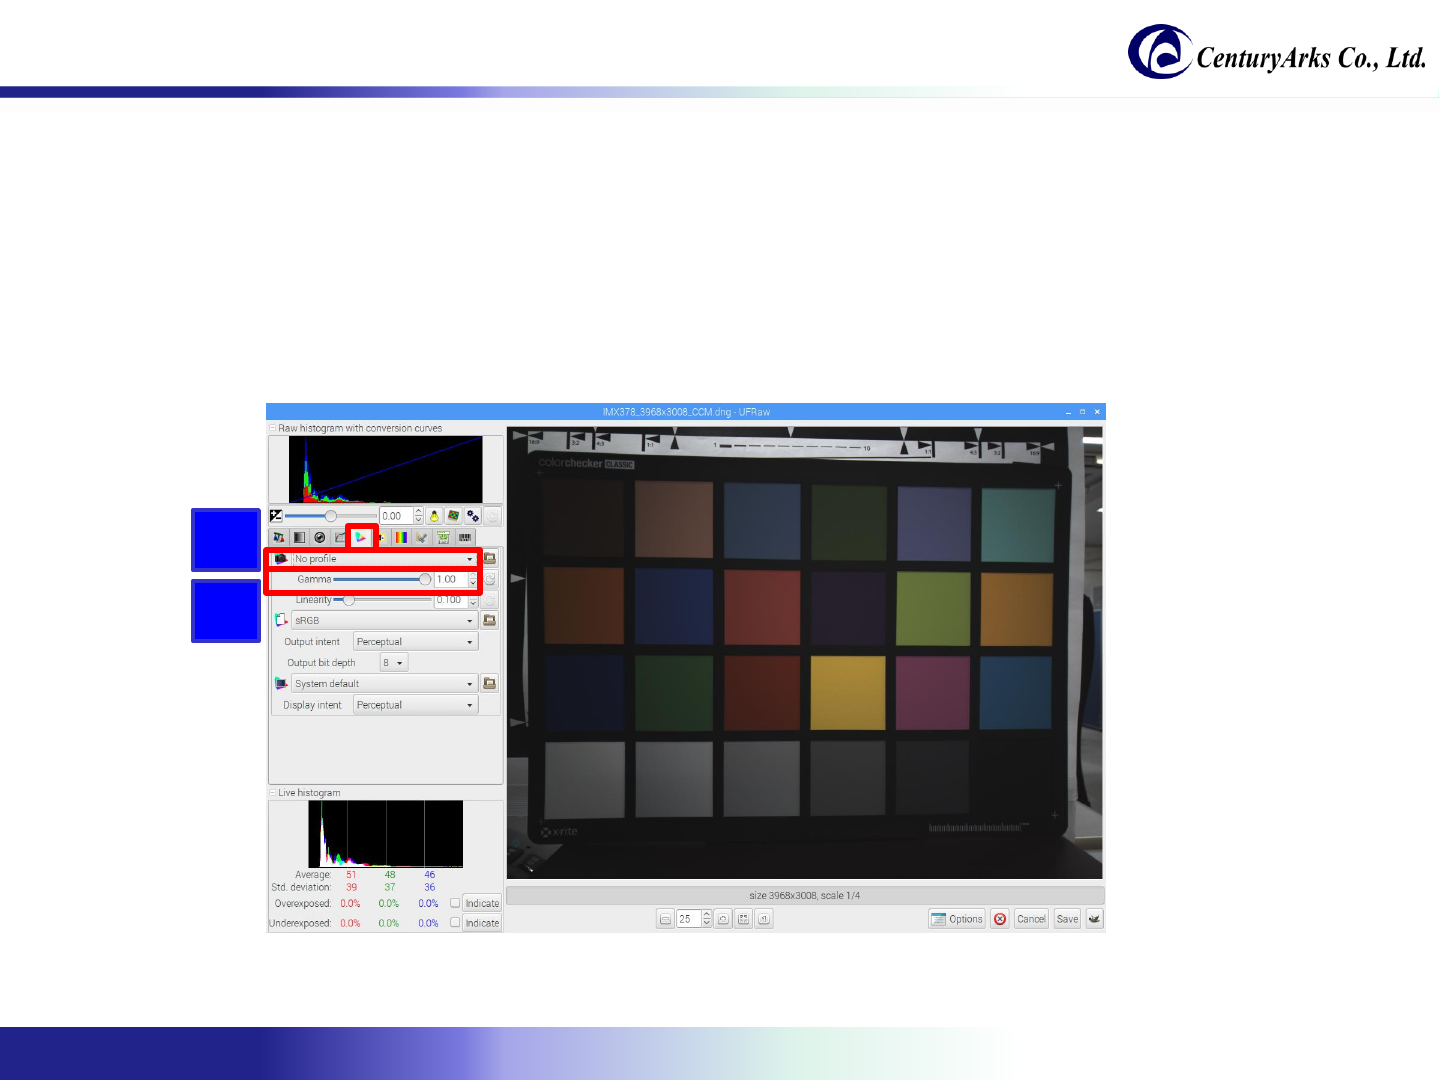
3.3. 12Mpixel still image capturing
5. UFRaw will be started when capturing is completed.
6. Set the camera profile of color management to "No profile".
7. Set Gamma to "1.0".
6
7
Copyright 2017-2018 CenturyArks Co.,Ltd. All Rights Reserved Page 20
3.3. 12Mpixel still image capturing
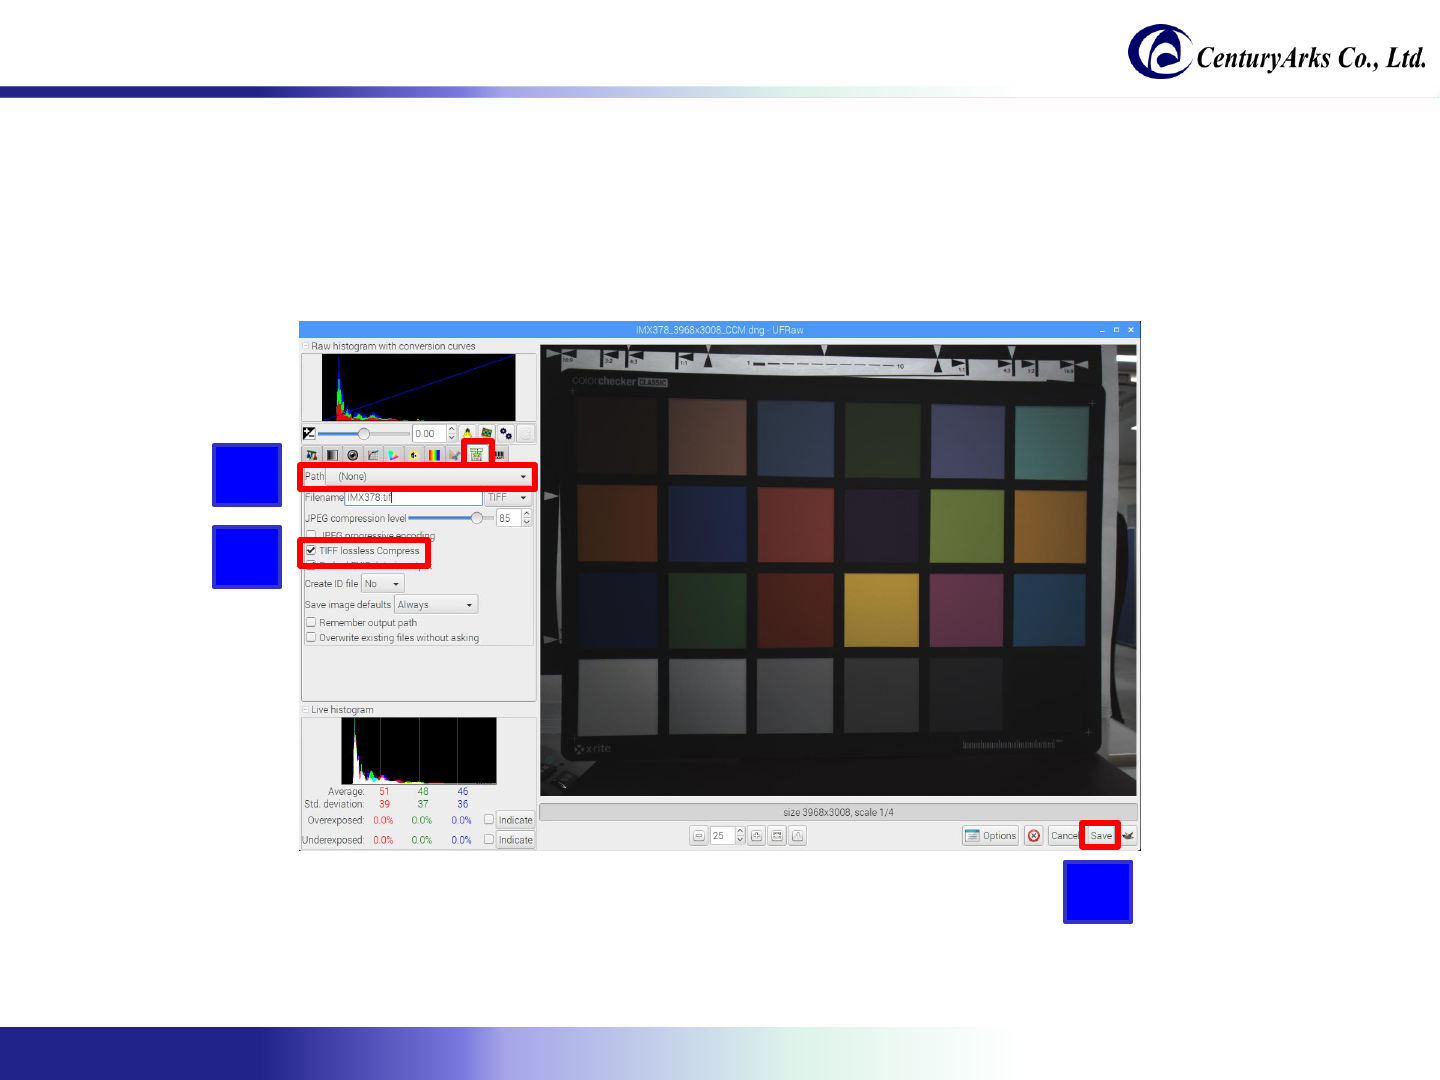
8. Change "Filename" of Save to "IMX378.tif".
9. Check "TIFF lossless compress".
10. Click the [Save] button.
8
9
10
Copyright 2017-2018 CenturyArks Co.,Ltd. All Rights Reserved Page 21
3.3. 12Mpixel still image capturing
11. Adjust the color management using Argyll.
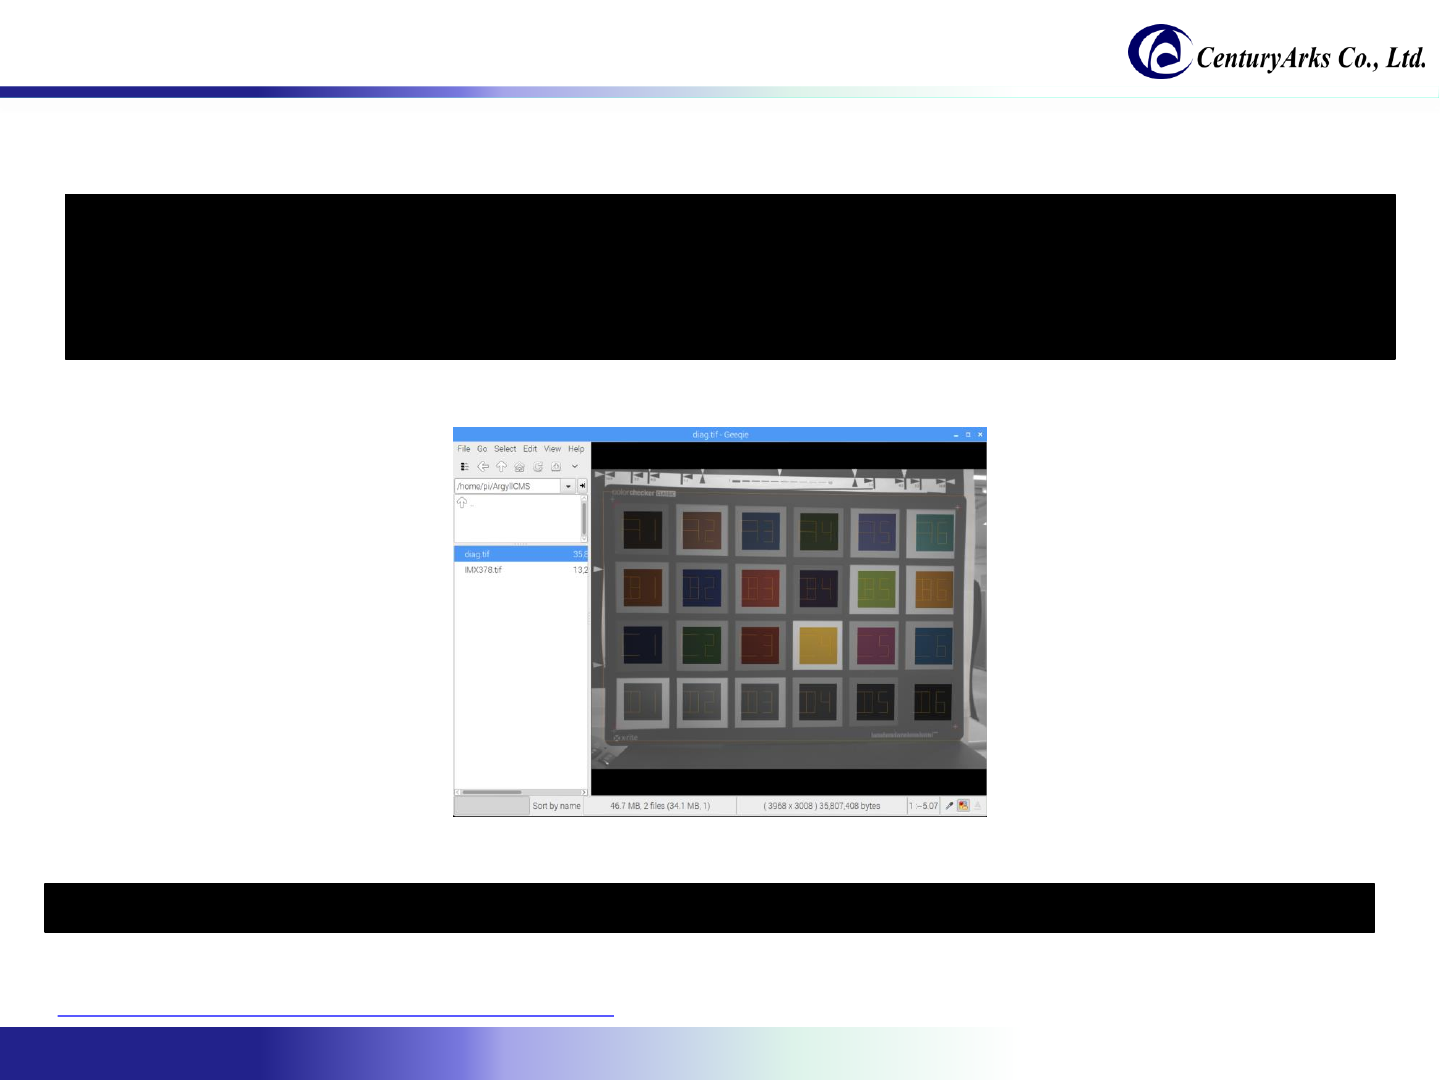
12. Open the output "diag.tif" with the image viewer and confirm the measurement result.
13. If it was measured successfully, run colprof to create the .icc profile.
$ cp -r /usr/share/color/argyll/ref/ ~/ArgyllCMS
$ mv IMX378.tif ~/ArgyllCMS/
$ cd ~/ArgyllCMS
$ scanin -v -p -a -G 1.0 -dipn IMX378.tif ColorChecker.cht ColorChecker.cie diag.tif
$ colprof -v -qh -am -nc -u IMX378
Reference URL:
http://www.russellcottrell.com/photo/LinuxWorkflow.htm
Copyright 2017-2018 CenturyArks Co.,Ltd. All Rights Reserved Page 22
3.3. 12Mpixel still image capturing
(2) How to display still images with Raspberry Pi:
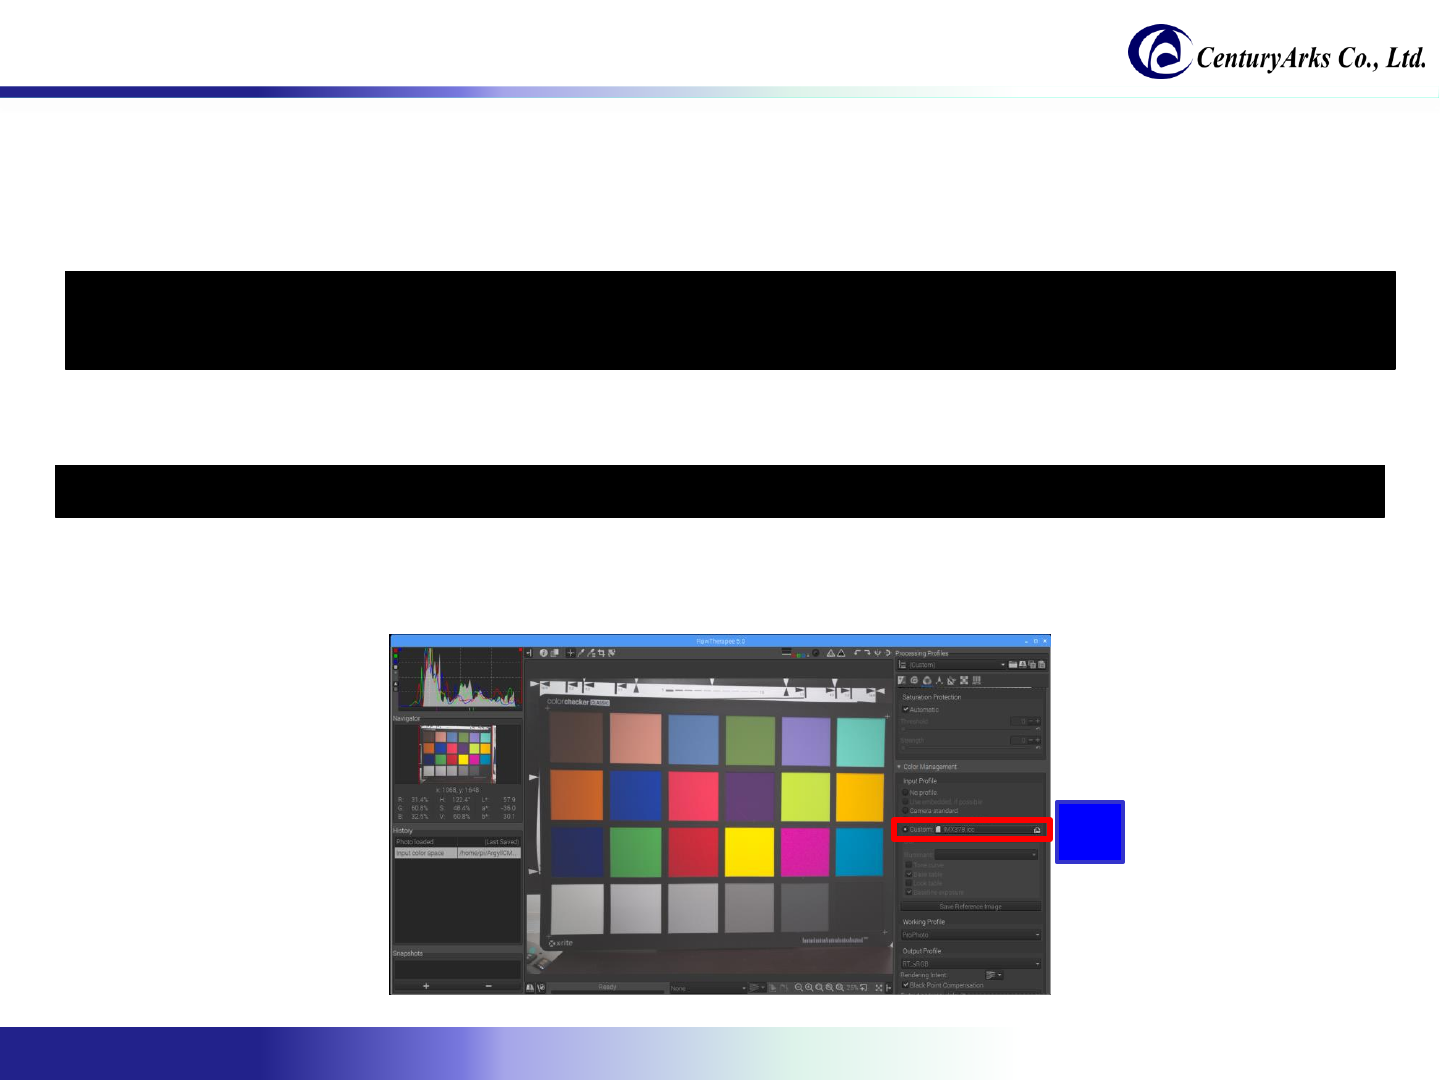
1. Install RAW development software (RawTherapee).
2. Start RawTherapee.
3. Specify "IMX378.icc" in the color management function profile.
(Please select "No profile" if color management adjustment is not done)
3
$ sudo apt-get update
$ sudo apt-get install rawtherapee
$ rawtherapee IMX378_3968x3008.dng
Copyright 2017-2018 CenturyArks Co.,Ltd. All Rights Reserved Page 23
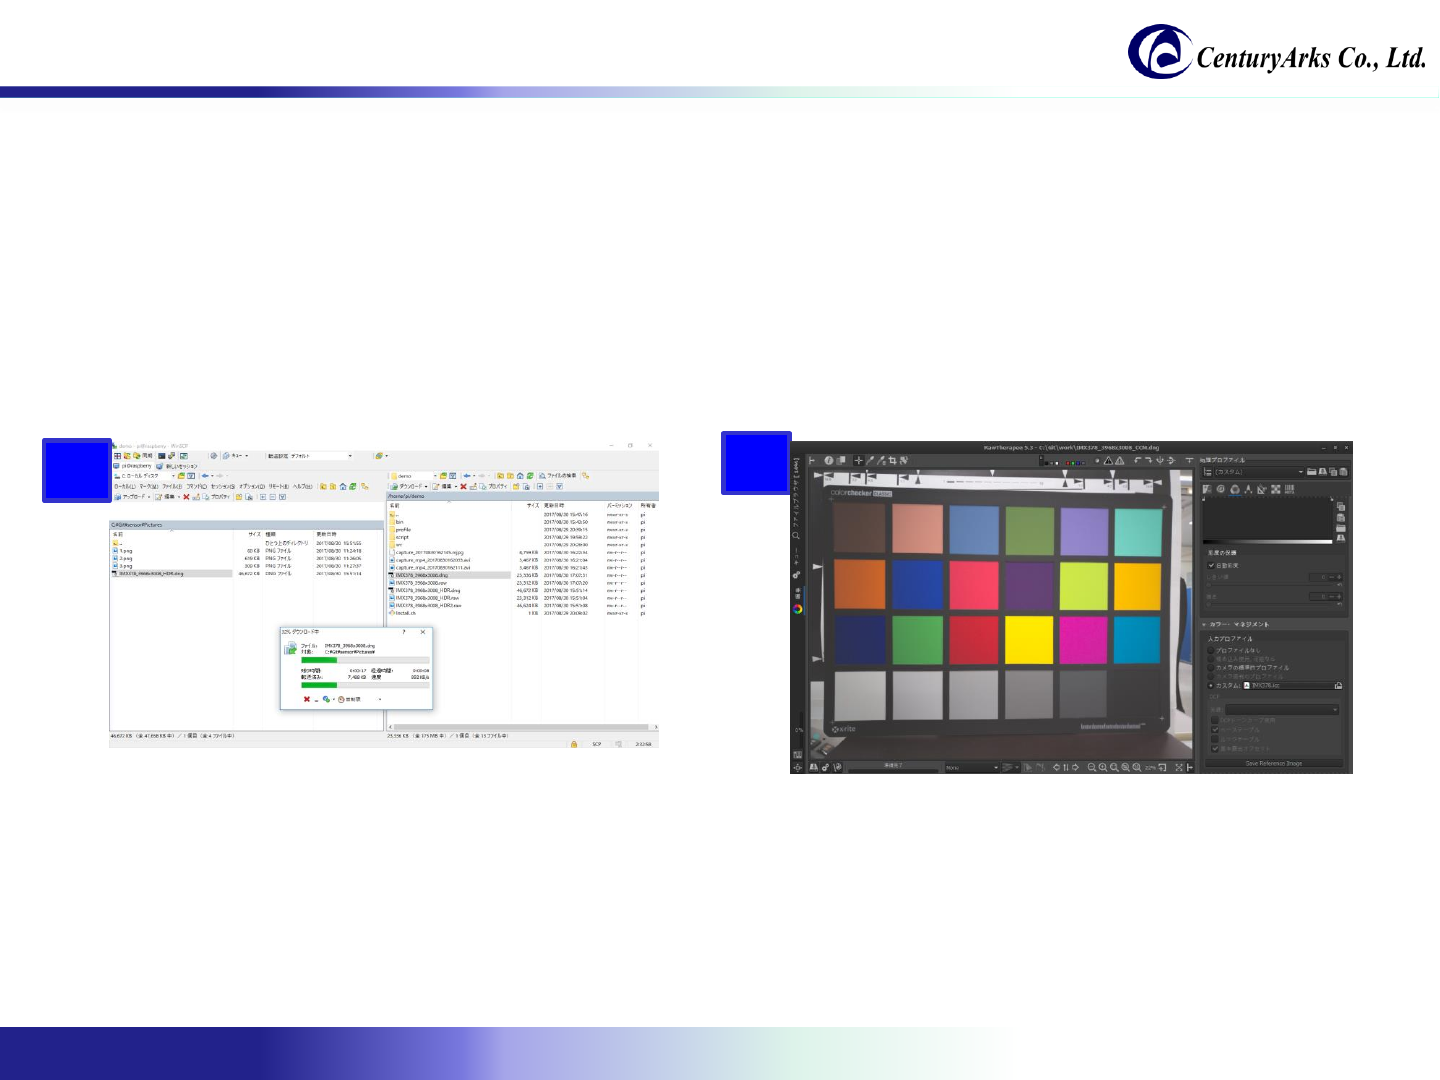
(3) How to display still images in environments such as PCs and smartphones:
1. Please download "/home/pi/demo/IMX378_3968x3008.dng" and "IMX378.icc" on PC or smartphone
with WinSCP etc.
2. Display dng file with UFRaw/RawTherapee/Adobe Photoshop Lightroom etc.
* Please specify "IMX378.icc" or "No profile" with the color management function.
12
3.3. 12Mpixel still image capturing

Copyright 2017-2018 CenturyArks Co.,Ltd. All Rights Reserved Page 24
3.4. HDR still image capturing
Procedure of capturing HDR still image:
1. Install OpenCV 3.4.
2. Install the image viewer.
$ sudo apt-get update
$ sudo apt-get install geeqie
sudo apt autoremove libopencv3
wget https://github.com/mt08xx/files/raw/master/opencv-rpi/libopencv3_3.4.0-20180115.1_armhf.deb
sudo apt install -y ./libopencv3_3.4.0-20180115.1_armhf.deb
sudo ldconfig
Copyright 2017-2018 CenturyArks Co.,Ltd. All Rights Reserved Page 25
3. Adjust the focus.
(It is useful to turn on Auto Focus and turn Auto Focus OFF when focus is on)
4. Click the [12M HDR] button.
3.4. HDR still image capturing
Copyright 2017-2018 CenturyArks Co.,Ltd. All Rights Reserved Page 26
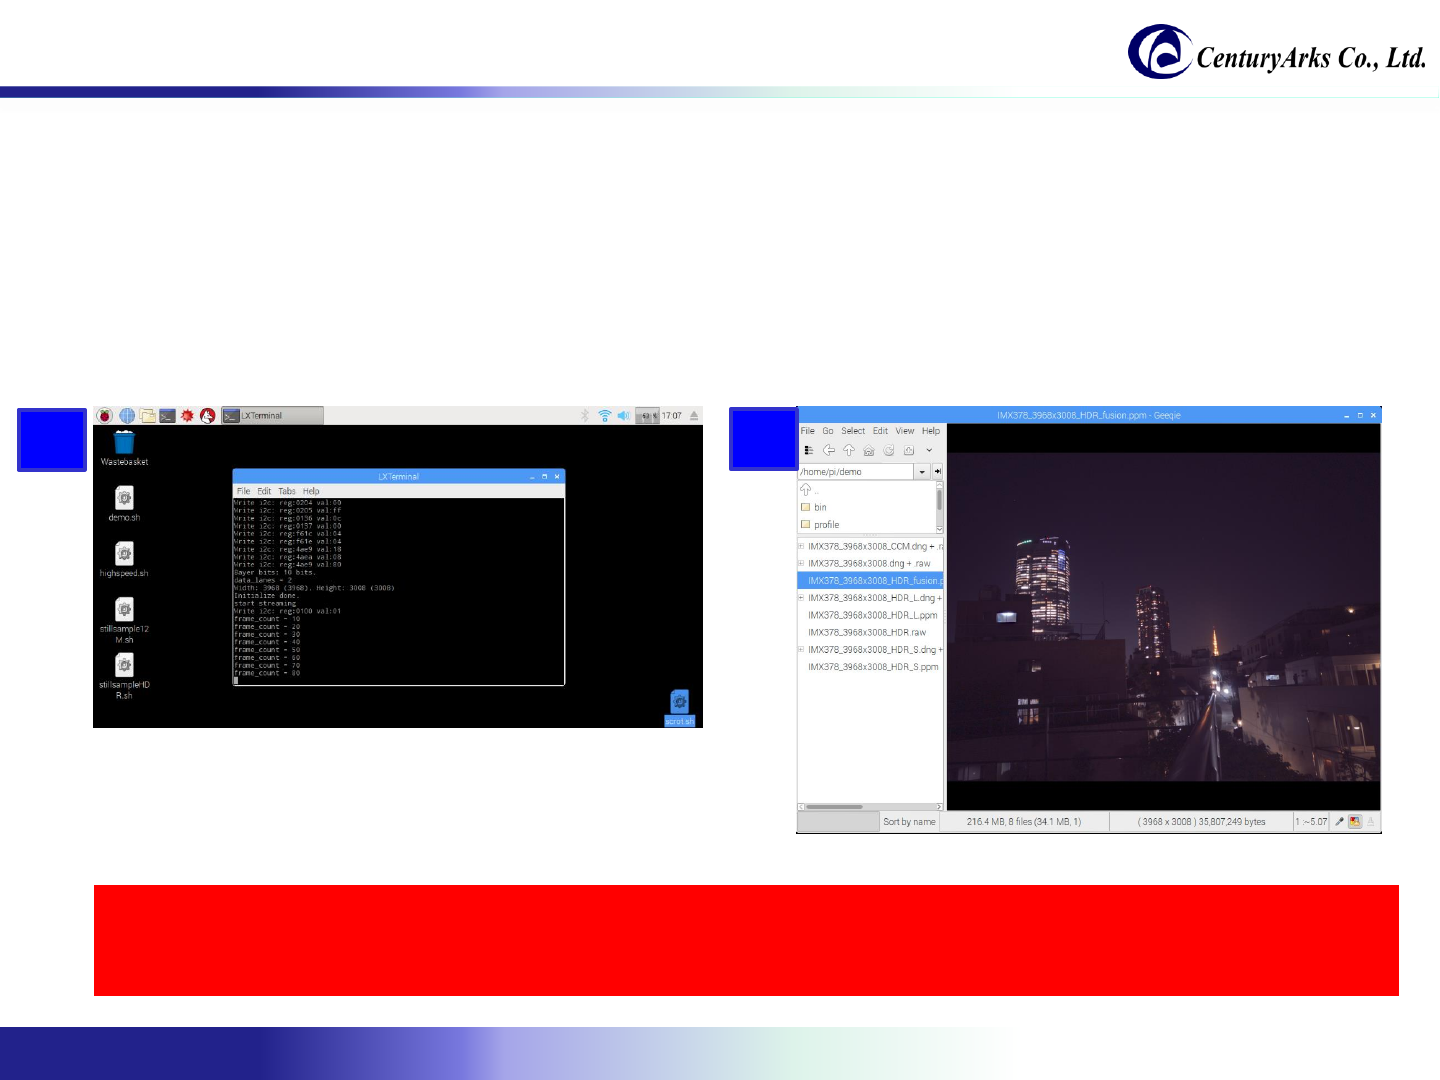
5. The image is taken at the timing when Frame count becomes 20.
(Currently you can use only in the countdown system, manual push is planned for the future.)
6. The display method is the same as 12M still image capturing.
* Only with extracting long storage and short storage,
HDR setting and tone mapping method will be described in separate document.
4
3
3.4. HDR still image capturing

Copyright 2017-2018 CenturyArks Co.,Ltd. All Rights Reserved Page 27
Appendix
Copyright 2017-2018 CenturyArks Co.,Ltd. All Rights Reserved Page 28
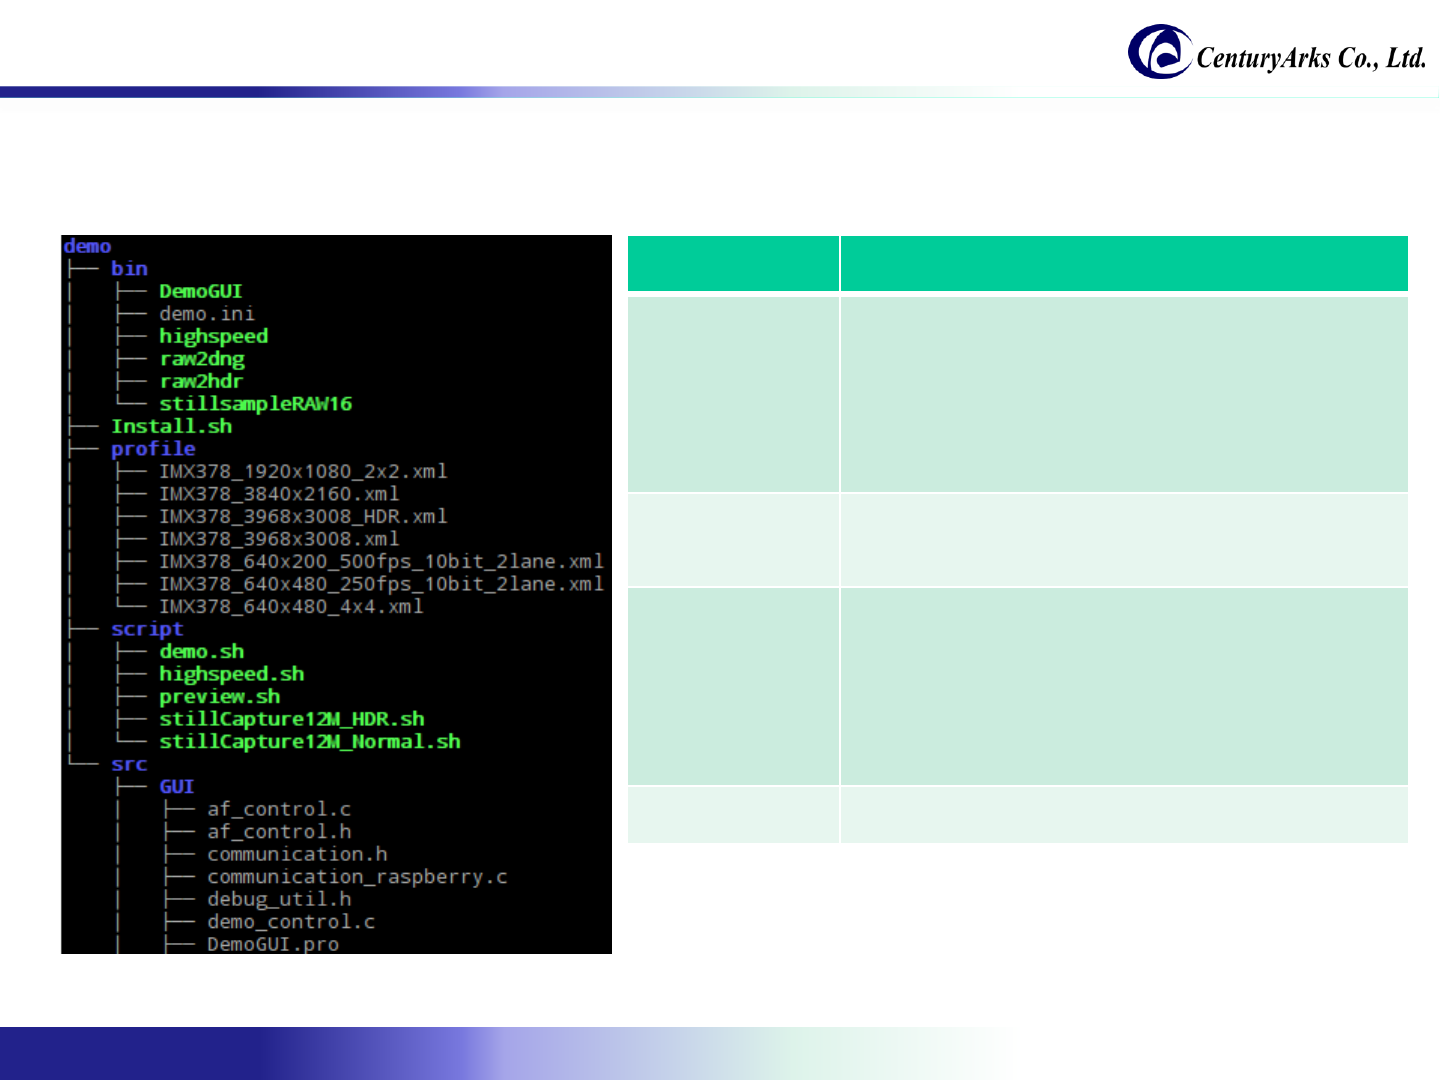
A.1. About the directory structure
The following section describes the directory structure of the software.
Function Descripution
bin DemoGUI: Demonstration software
Demo.ini: Demonstration software setting file
Highspeed: High-speed video recording program
raw2dng: RAW to dng file converting program
raw2hdr: Program that extracts HDR long storage and
short storage from RAW
stillsampleRAW 16: Still image capturing program
profile This is a profile describing register values to send to the
sensor.
You can use the profile used in VPF as it is.
script Script files are described.
It can be customized according to specifications.
demo.sh
highspeed.sh
preview.sh
stillCapture12M_HDR.sh
stillCapture12M_Normal.sh
src It is a set of demo software source code.
Copyright 2017-2018 CenturyArks Co.,Ltd. All Rights Reserved Page 29
A.2. About the setting file
The following section describes the "demo.ini" of the setting file.
# DEMO Setting
preview = /home/pi/demo/script/preview.sh
stillCapture12M_Normal = /home/pi/demo/script/stillCapture12M_Normal.sh
stillCapture12M_HDR = /home/pi/demo/script/stillCapture12M_HDR.sh
stillCaptureFrame = 20
gyroGainRateX=1.0
gyroGainRateY=1.0
autoFocusGain=2.0
autoFocusConfidenceThreshold=10
autoFocusMoveLimit=100
Function Description
preview Script path for preview
stillCapture12M_Normal Script path for capturing 12M normal still images
stillCapture12M_HDR Script path for capturing 12M HDR still image
stillCaptureFrame You can specify the countdown frame for still
image capturing.
* If it is set to 10 or less, it is possible to fail.
gyroGainRateX
gyroGainRateY
It is valid only when OIS calibration result is
written in EEPROM.
Currently, since the value of Gyro gain is too
effective, the rate is adjusted.
autoFocusGain Adjust the autofocus gain.
autoFocusConfidenceThreshold Specify the threshold value of the confidence
level of Phase Difference.
autoFocusMoveLimit Limit the amount of focus movement at one time.
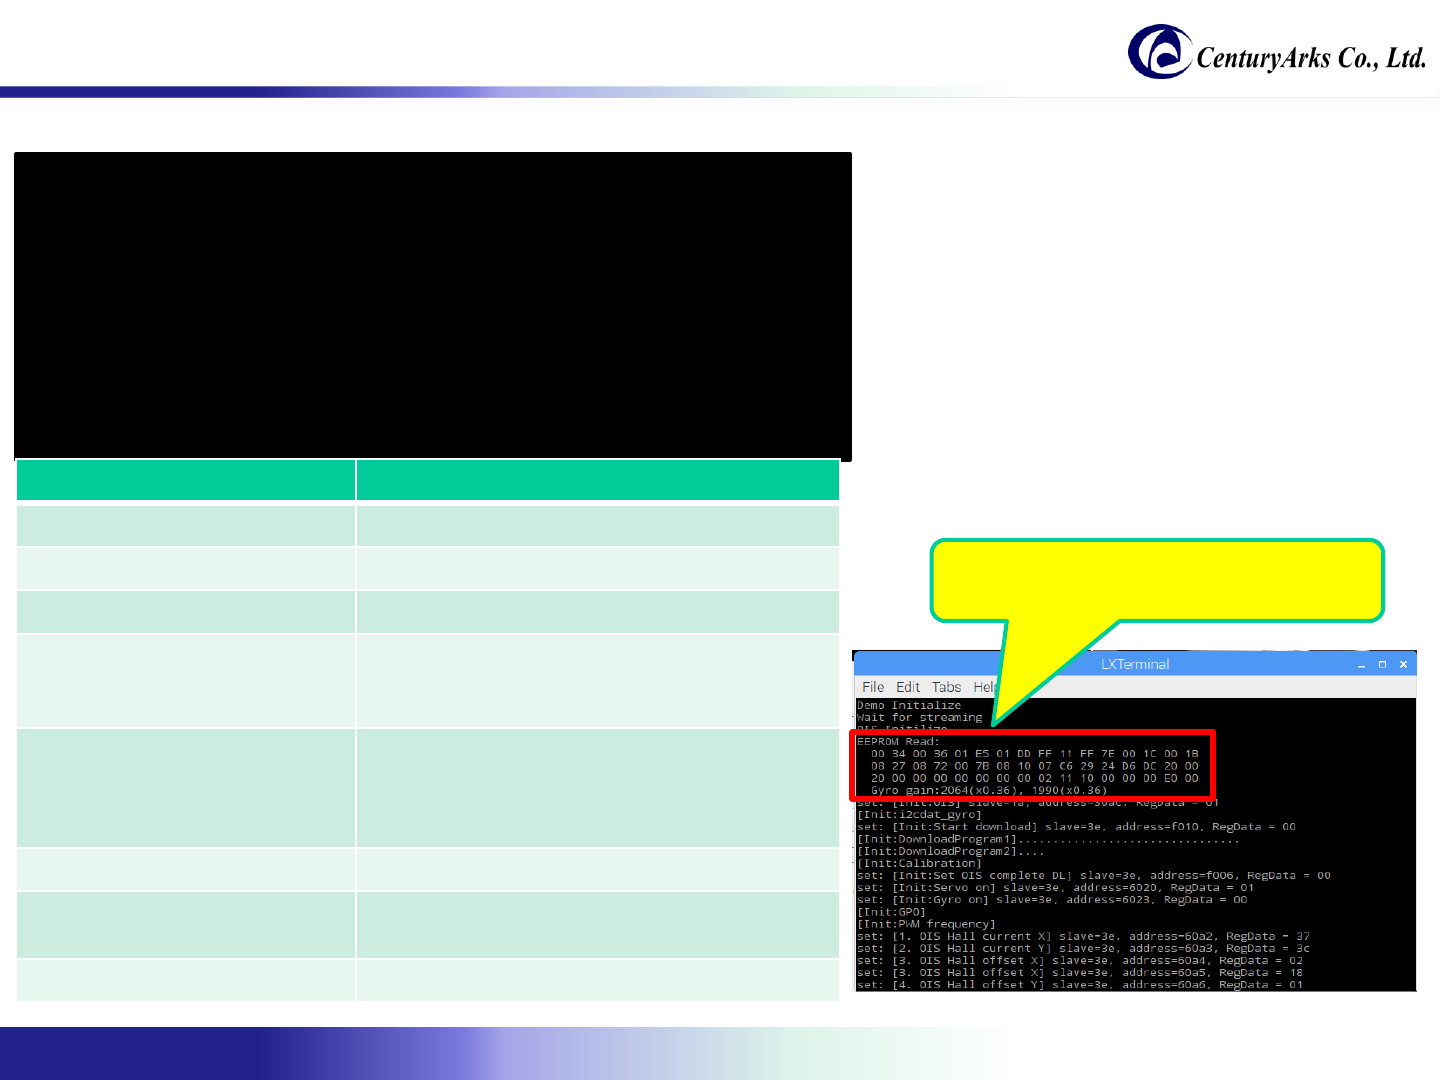
If OIS calibration is already done,
The following log is output to Terminal.
