253110 CA5528 Mitek OMNISPAN Surgical Technique 901086
User Manual: 253110
Open the PDF directly: View PDF ![]() .
.
Page Count: 4
OMNISPAN™ Applier w/ Malleable Graft Retractor 228143
OMNISPAN Meniscal Repair System 0° (Straight) 228140
OMNISPAN Meniscal Repair System 12° 228141
OMNISPAN Meniscal Repair System 27° 228142
Arthroscopic Pusher/Cutter 228302
Meniscal Rasp Up 45° 253110
Meniscal Rasp Up 90° 253111
Meniscal Rasp Straight 90°, calibrated 253112
Meniscal Probe 253113
Meniscal Depth Probe 228001
#2/0 ORTHOCORD®with Double-arm Meniscal Needles 228144
#2/0 ORTHOCORD (three free strands) with Meniscal Needle 228145
CHIA PERCPASSER®Suture Passer (5/box) 214101
* PDS is a trademark of Ethicon, Inc.
** ULTRA FAST-FIX is a registered trademark of Smith & Nephew, MAXFIRE is
a registered trademark of Biomet Sports Medicine, and CROSSFIX is a
registered trademark of Cayenne Medical.
1 A. Barber, Arthroscopy, September 2009.
Ordering Information
Prominent in Strength,
Subtle in Profile
1-800-382-4682 | www.depuy.com
©DePuy Mitek, Inc. 2010. All rights reserved. Printed in the USA.
Dyneema®Purity is a registered trademark of Royal DSM N.V.
P/N 901086 Rev. A 5/10
Select the needle most appropriate for
the tear you are repairing. Attach the
needle to the OMNISPAN applier by
lifting the lock lever on top of the applier
to expose the connector (figure 1).
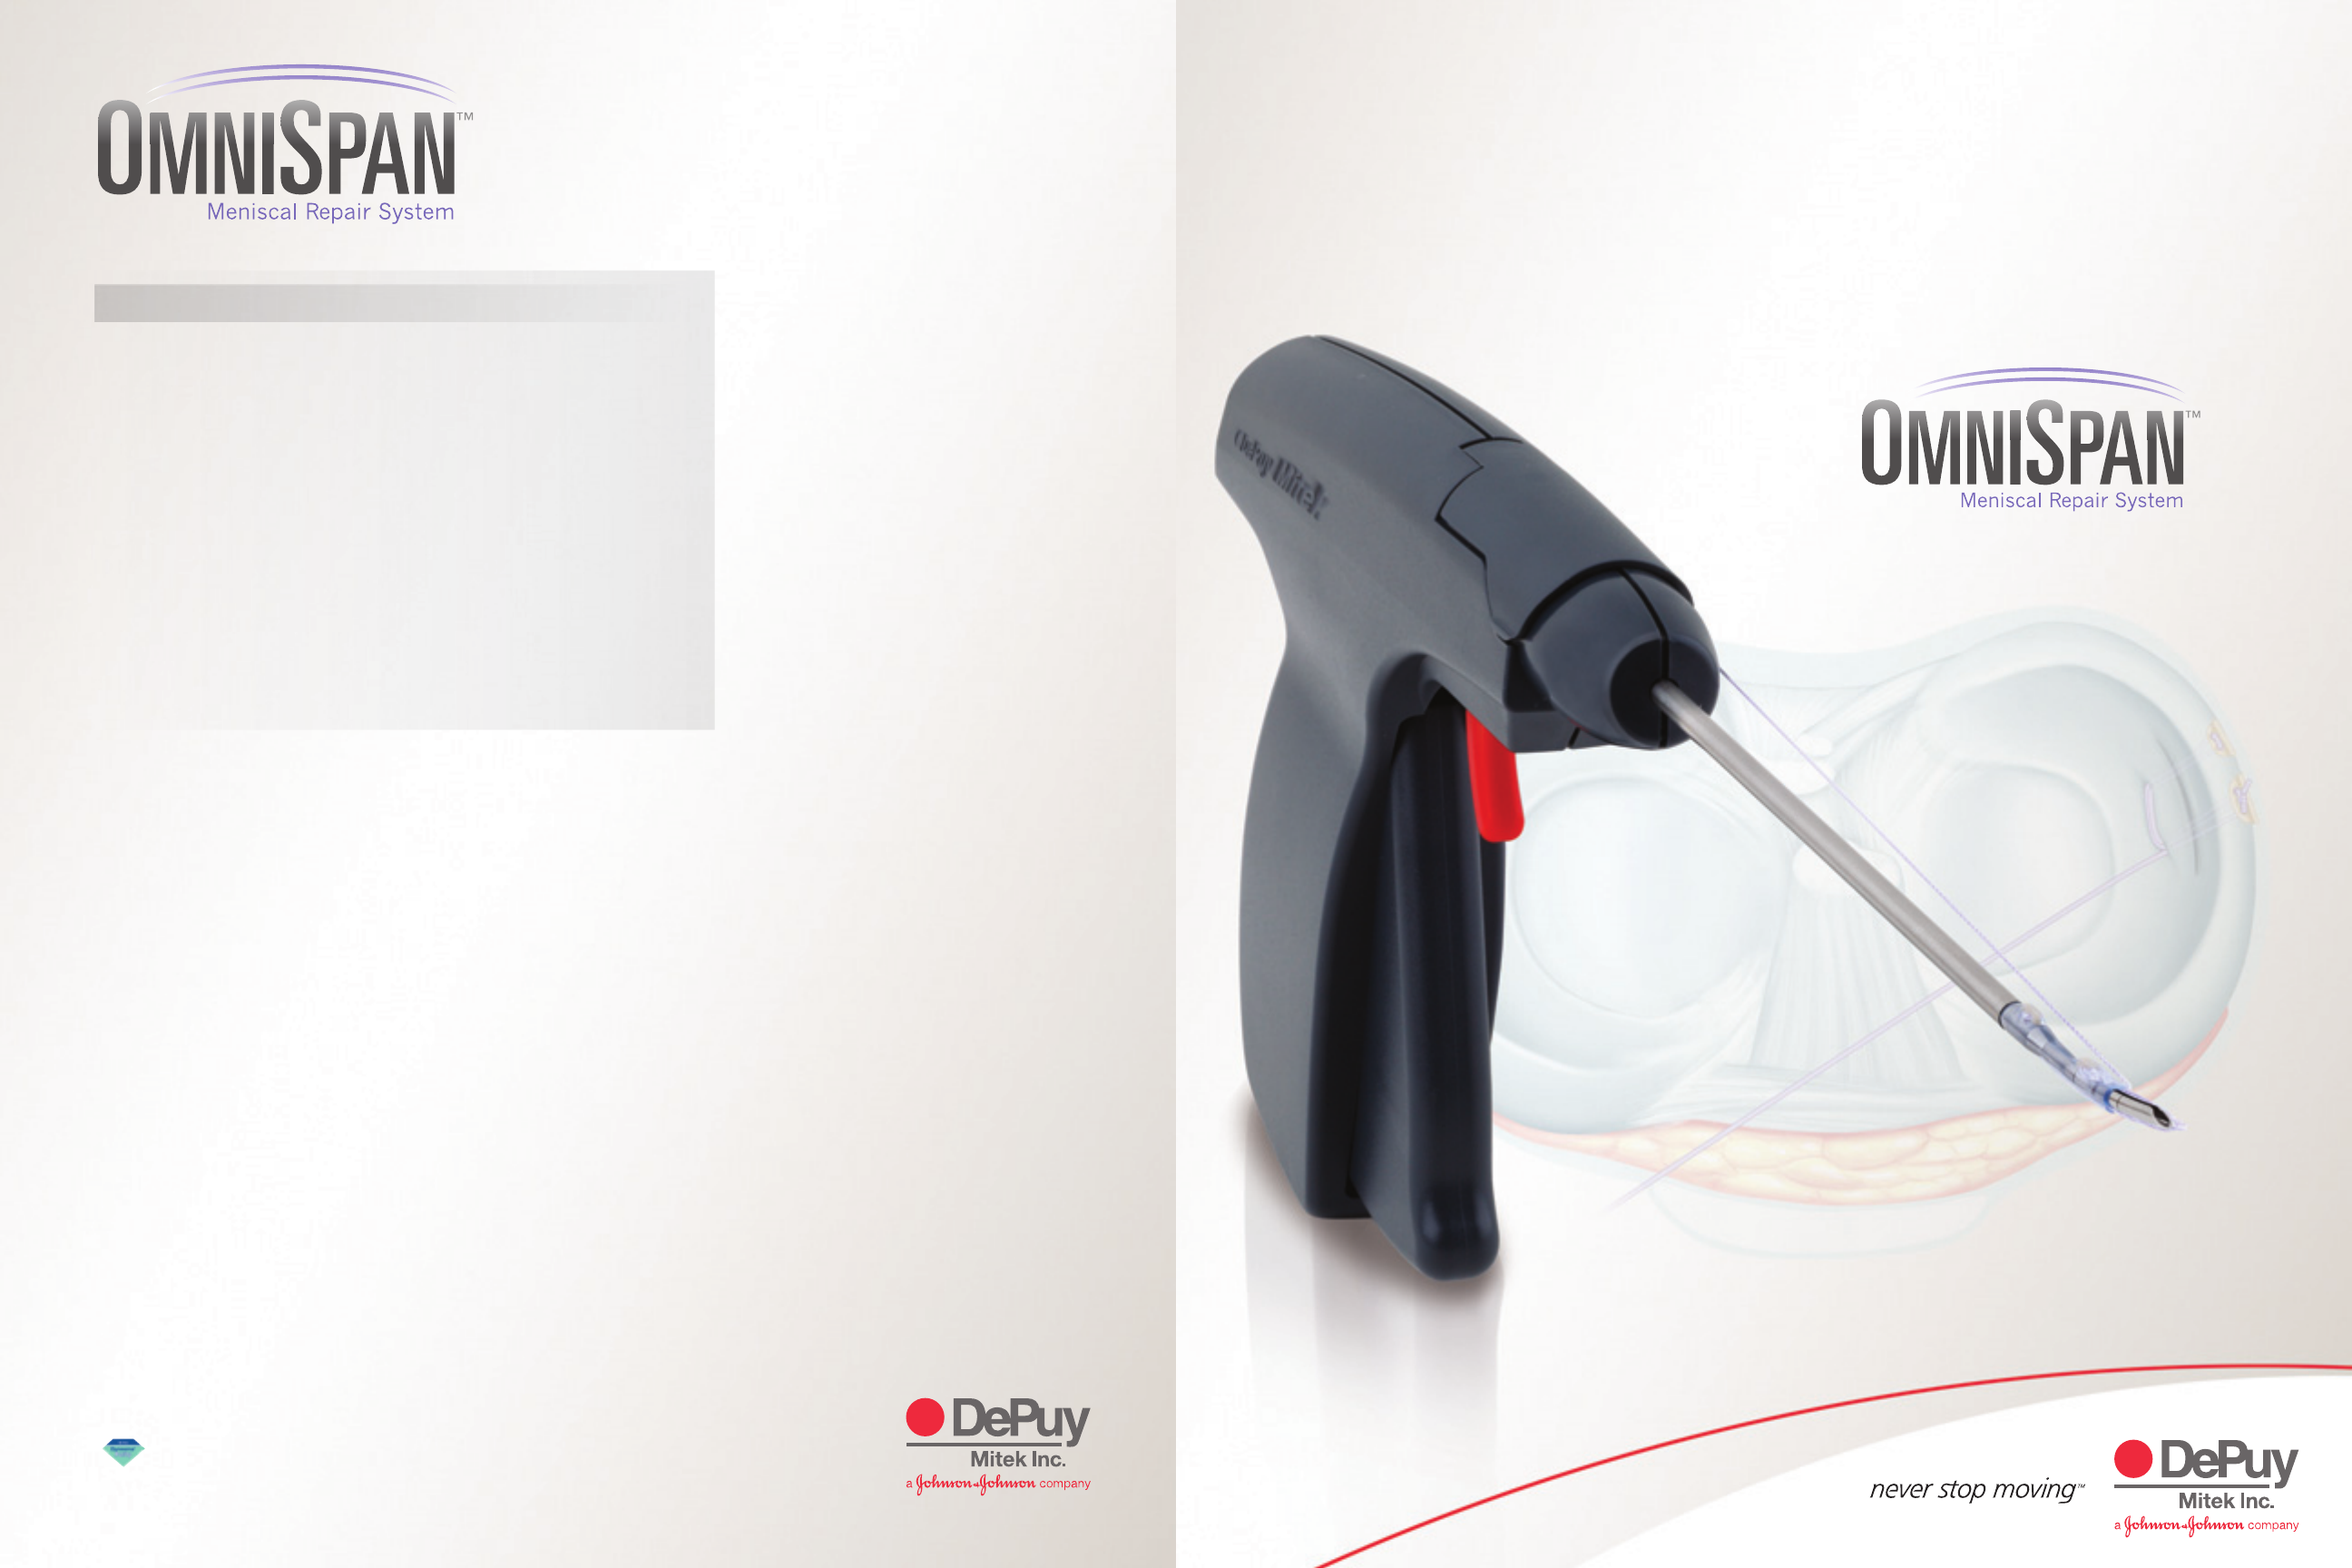
The OMNISPAN™Meniscal Repair System from DePuy Mitek is designed to provide optimized
all-inside meniscal repairs. The system consists of a low profile needle, pre-loaded with two
PEEK backstops and ORTHOCORD®suture, which are delivered using the OMNISPAN applier.
No Hard Bodies on the Surface of the Meniscus: OMNISPAN repairs leave no hard bodies making
contact with the femoral chondyles. Even the knot has been moved to the backside of the meniscus,
leaving a just low profile double span of #2/0 ORTHOCORD suture.
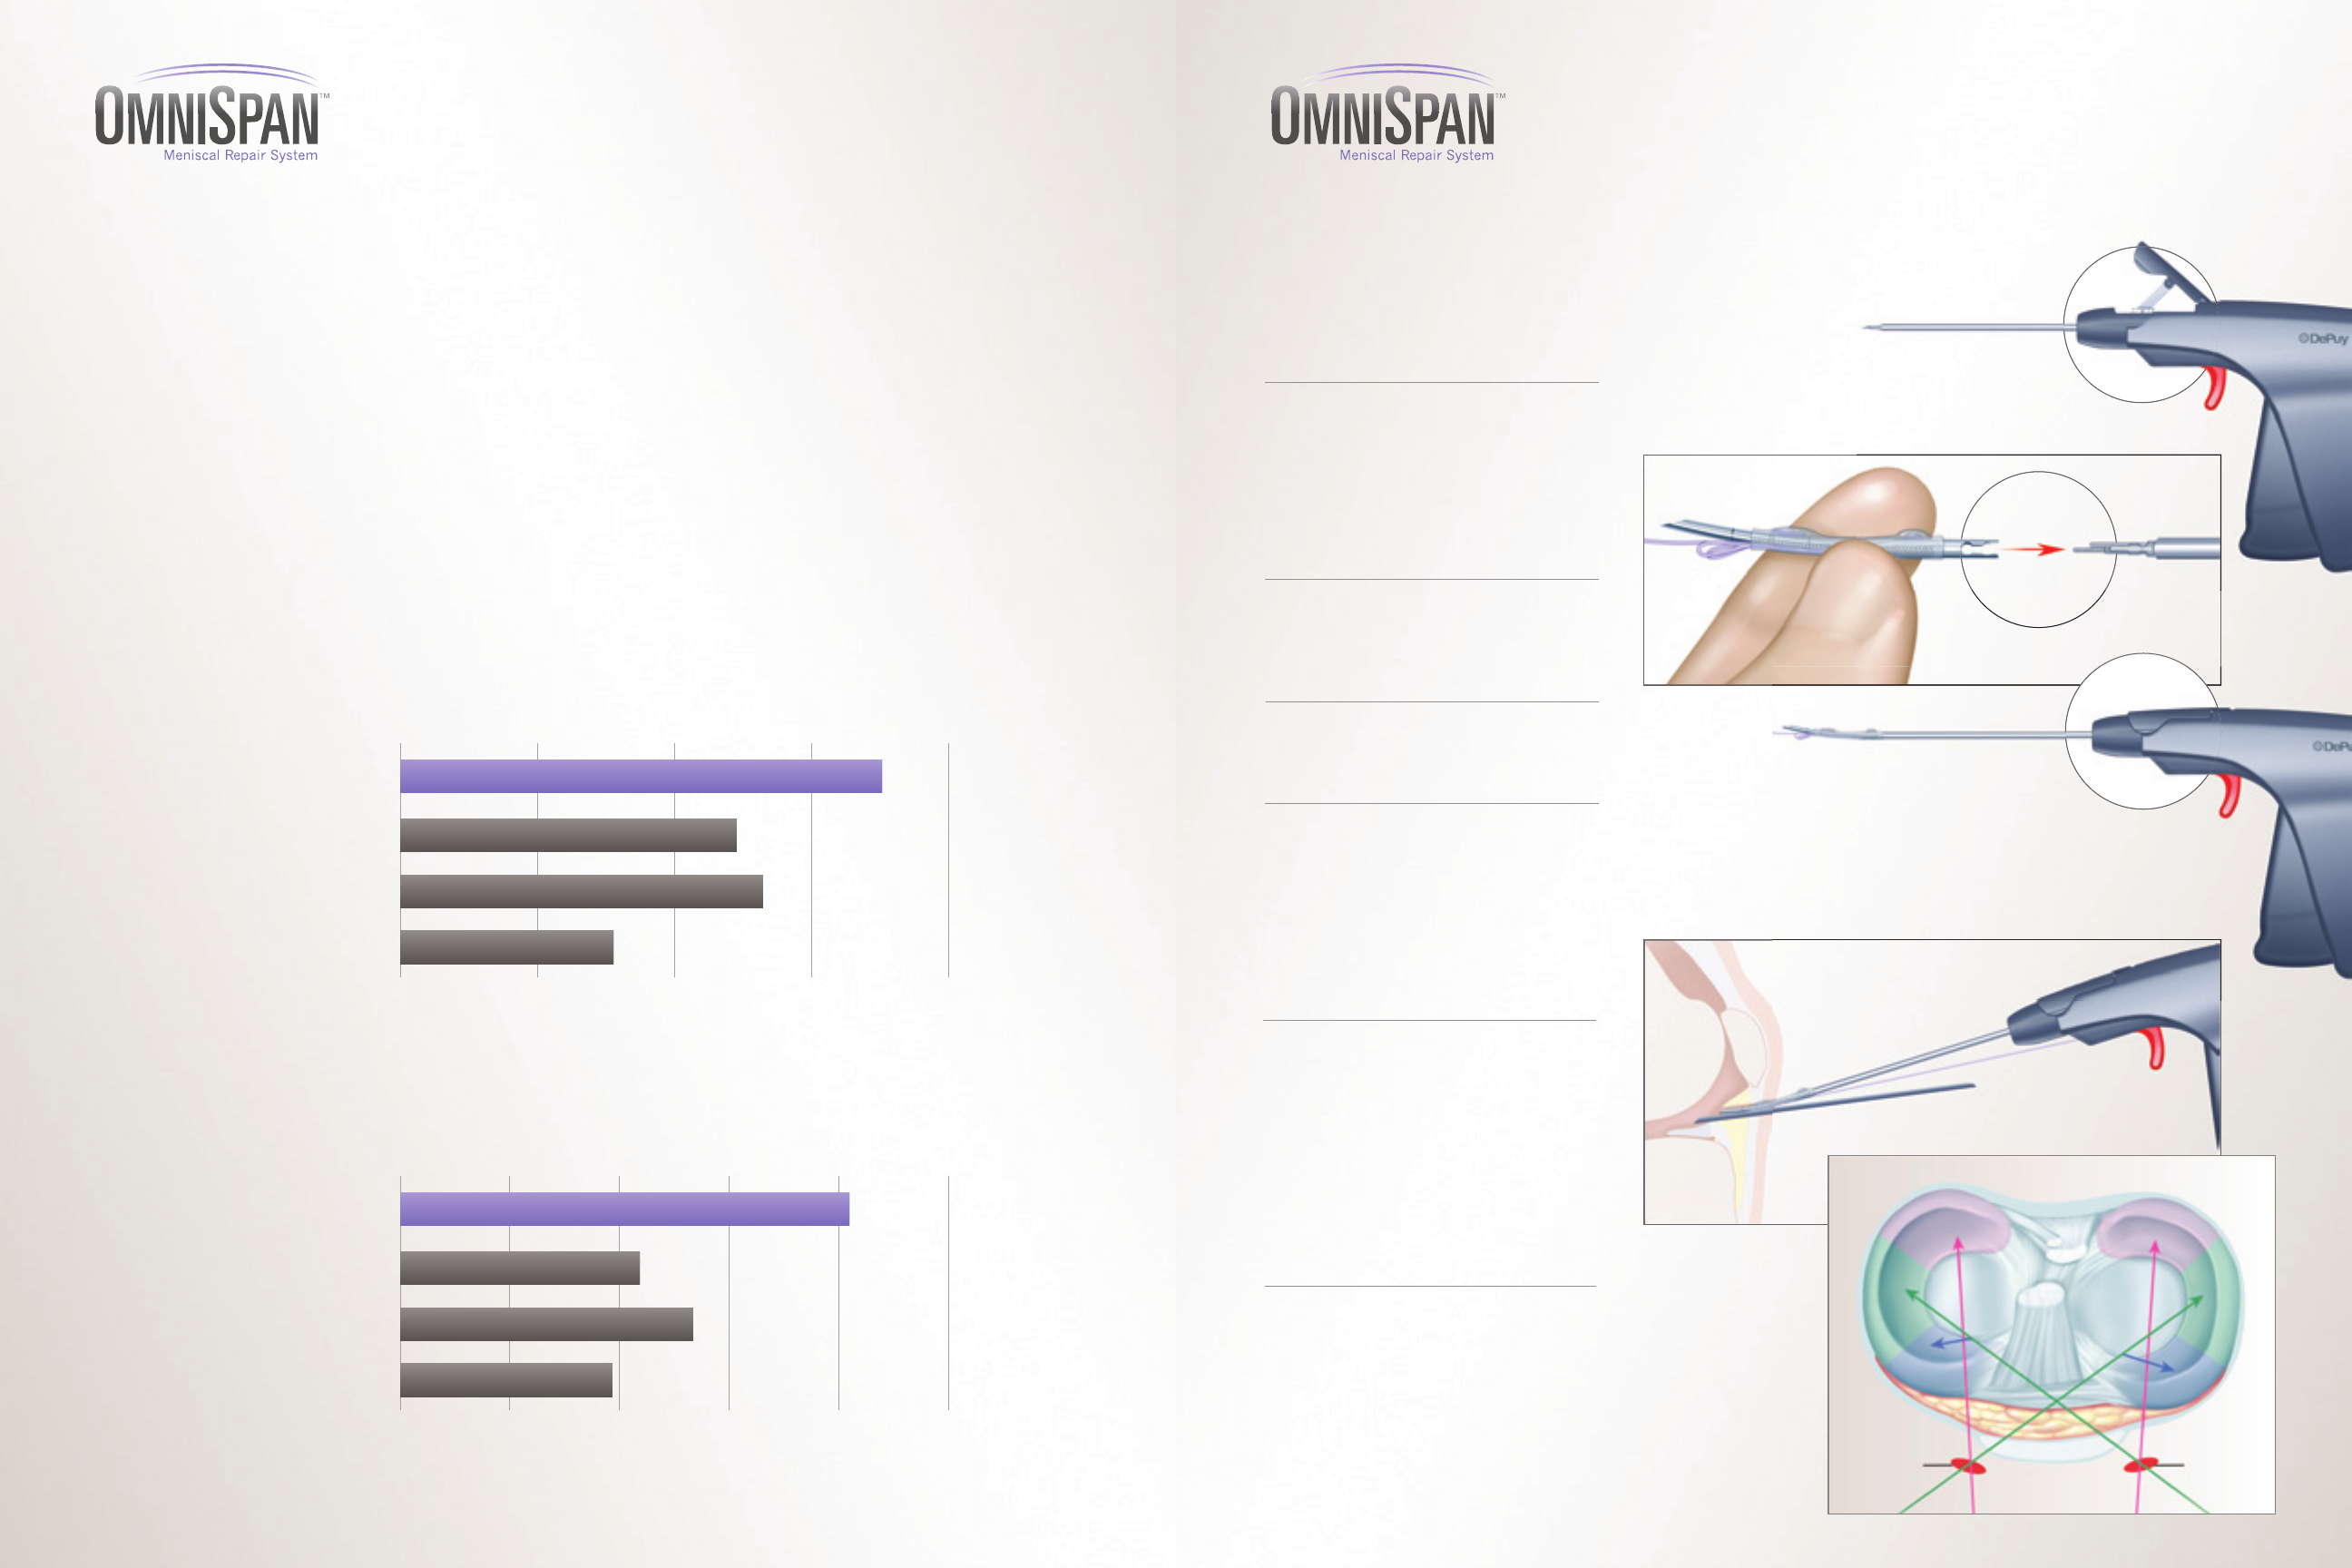
Excellent Strength1:Testing has shown OMNISPAN provides outstanding strength compared to
competitive all-inside devices. Single pull to failure testing (table 1) in porcine menisci resulted in over 177
N of strength, while cyclic testing (table 2) in porcine menisci resulted in 204 N of strength.
Less Mass Postoperatively: While providing an excellent strength profile, #2/0 ORTHOCORD is
composed of 55% PDS™* and 45% High Molecular Weight Polyethylene. As a result, the suture’s PDS
component is resorbable and will result in less suture mass on the surface of the meniscus over time.
Active Deployment: The active deployment provided by the OMNISPAN applier allows you decide when and
where the backstops are ultimately deployed behind the meniscus – no plunging and relying on friction.
1
Push the proximal end of the needle onto
the connector until it clicks on securely
(figure 2).
2
Close the lock lever to secure the connection
(figure 3).
3
Needle must always be connected to
the applier with the needle slot facing
up (figure 4).
4
Use the Malleable Graft Retractor
packaged with the applier to protect
the implants and suture from getting
caught on soft tissue and the fat pad,
during insertion into the knee. Once
inside the joint space, remove the
Malleable Graft Retractor (figure 5).
5
TIP: When completing repairs in the
posterior 1/3 of the meniscus, use the
arthroscopic portal on the same side.
When completing repairs in the middle
and anterior 1/3 of the meniscus, use
the arthroscopic portal on the opposite
side (figure 6).
6
Surgical Technique
Meniscal Repair System
Table 1
The OMNISPAN™Meniscal Repair System consists of a single-patient, multi-use
applier and needles with pre-loaded implants in 0º (straight), 12º, and 27º options.
Fig.1
Fig.2
Fig. 3
Fig. 5
Fig. 6
Fig. 4
Posterior
Lateral
Lateral Portal Medial Portal
Medial
Anterior
OMNISPAN
Single Destructive Pull Data1**
ULTRA FAST-FIX®
MAXFIRE®
CROSSFIX®
0 50 100
Newton’s Force
150 200
177
121
130
77
Table 2
OMNISPAN
Cyclic Load Data1**
ULTRA FAST-FIX
MAXFIRE
CROSSFIX
0 50 100
Newton’s Force
150 250200
204
110
132
95
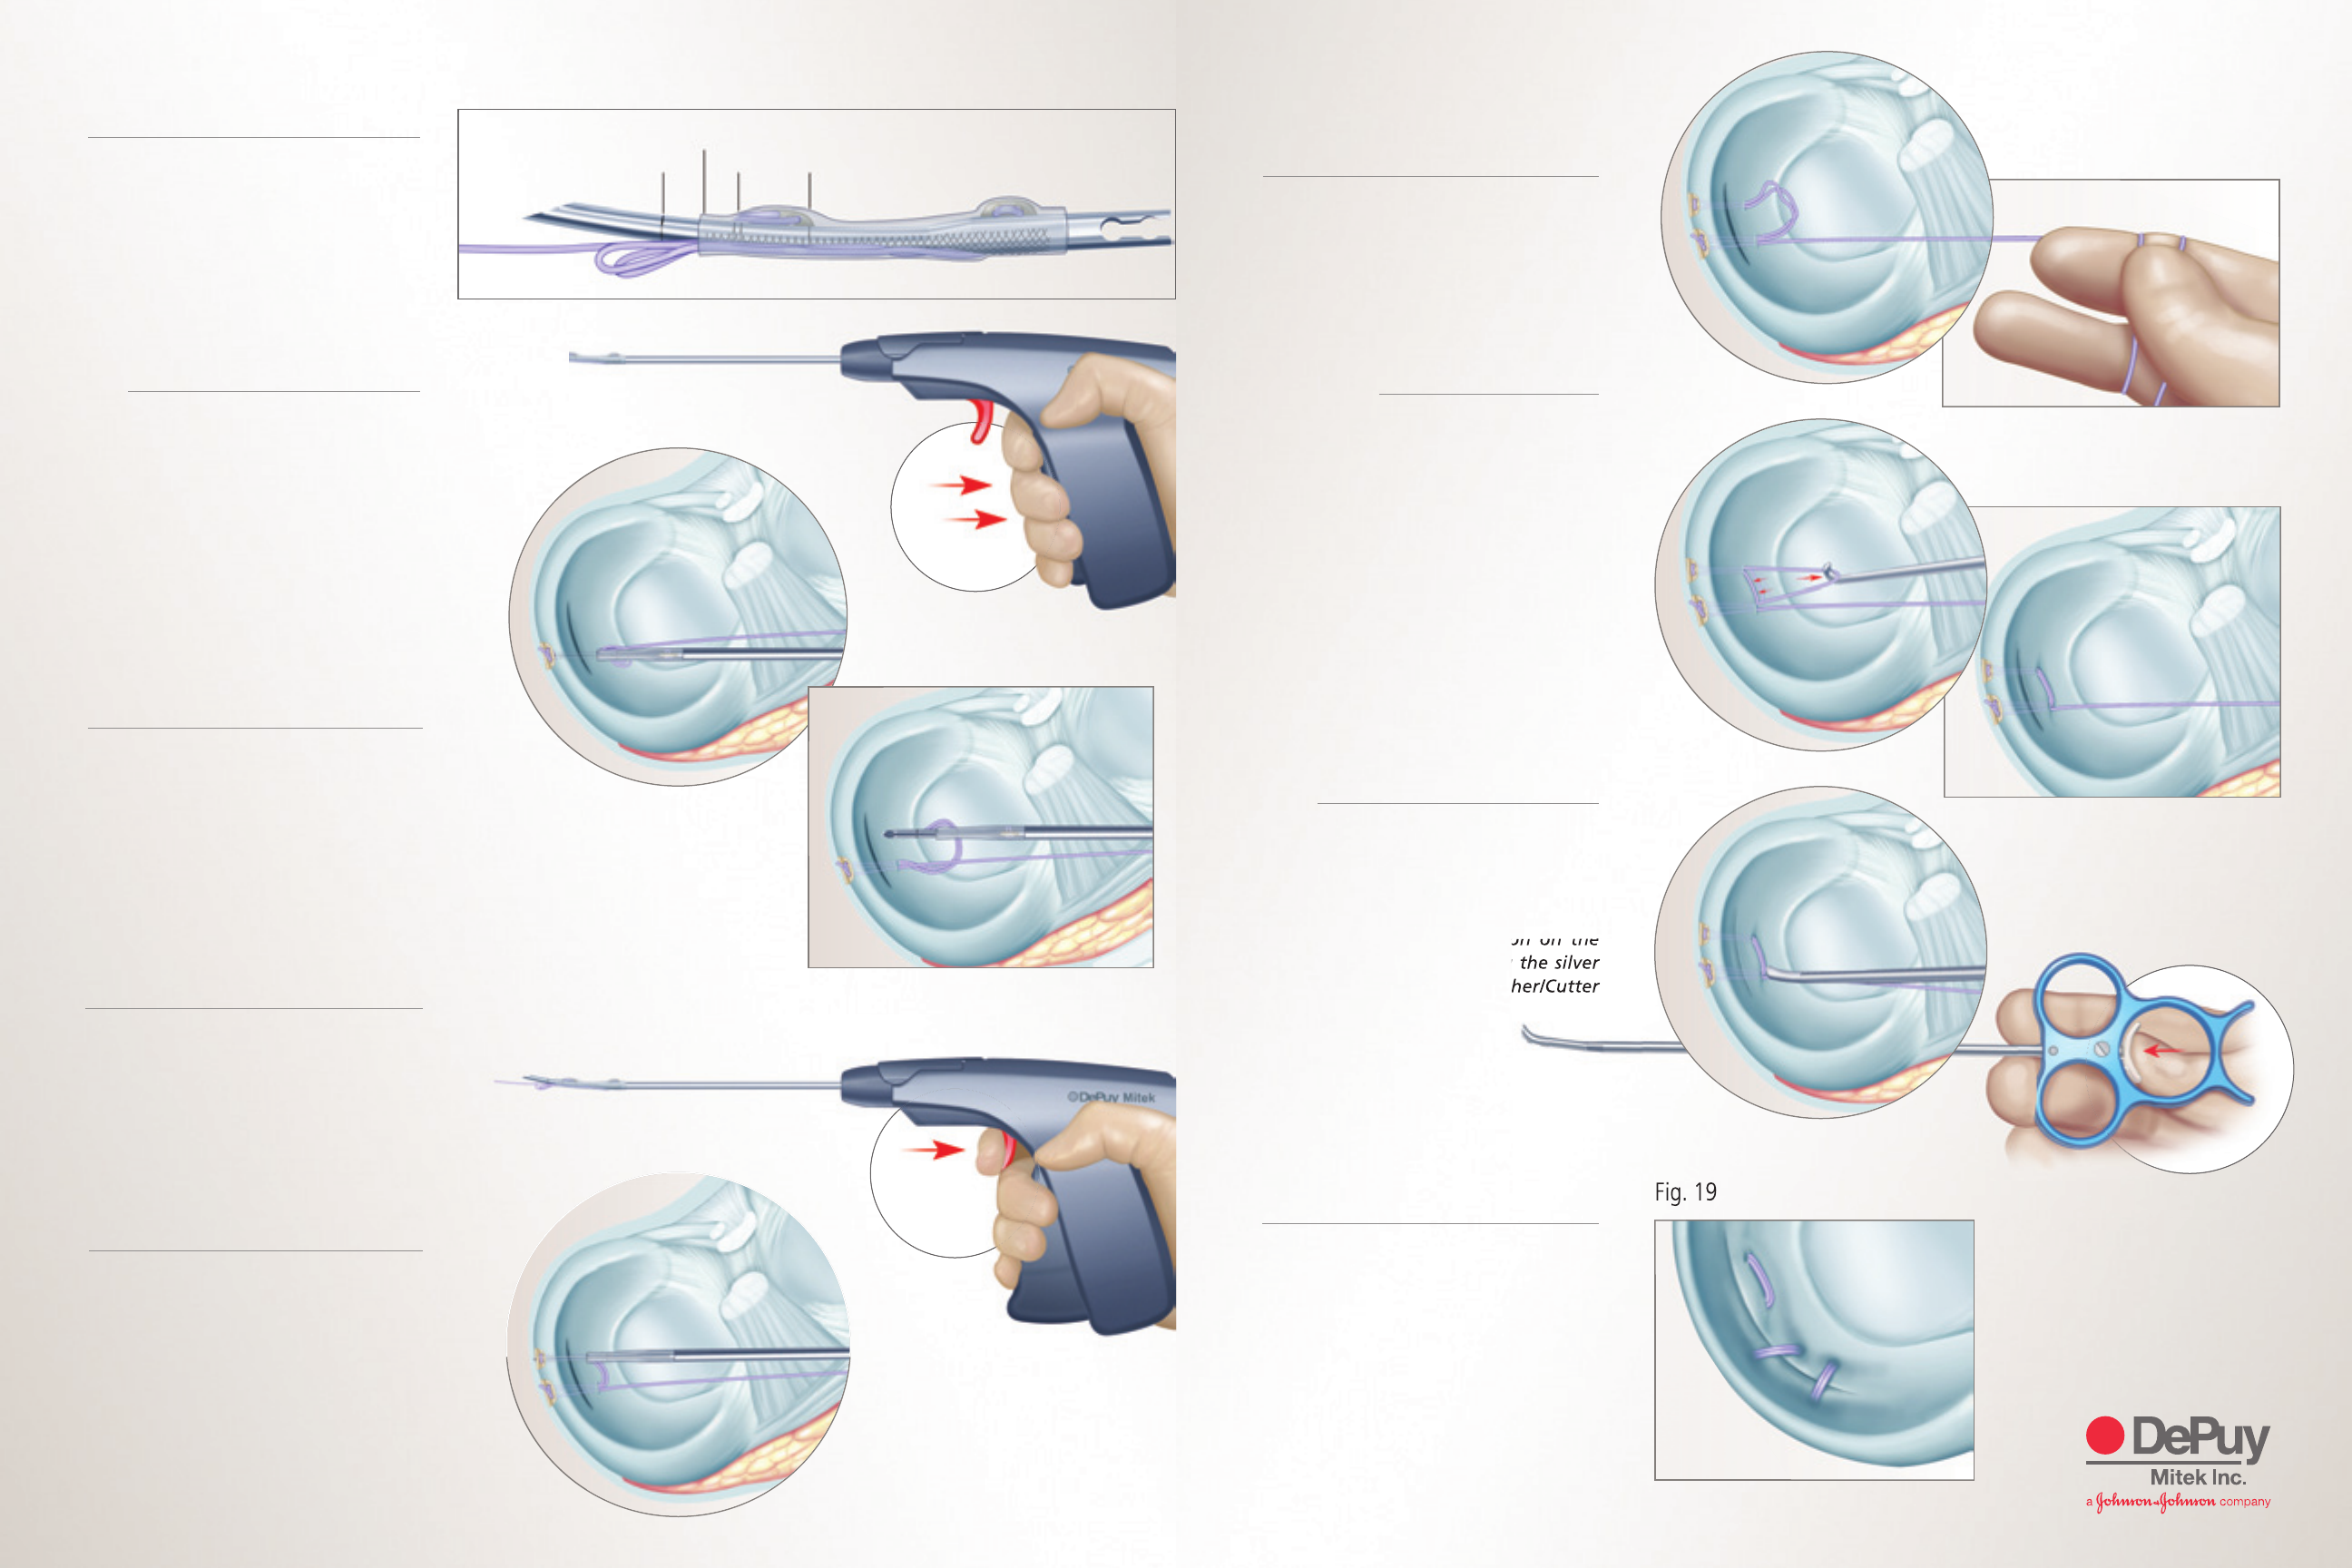
Release the lever and remove the applier
and needle from the joint space (figure 13).
13
Keeping the free suture leg as perpendicular
to the repair as possible, pull the free suture
leg slightly to identify the first loop that
moves. Capture that loop with the probe
and pull until the other loop lies tight
against the meniscus. Remove the probe
and pull the free suture leg to tighten the
second loop. Then complete the repair until
the desired tension is achieved against the
tissue surface
(figures 14, 15, and 16).
14, 15, 16
Continue to implant devices as determined
by the tear. Cut each suture leg with the
DePuy Mitek Arthroscopic Pusher/Cutter
by advancing the Pusher/Cutter until
flush with the surface of the repair,
maintaining moderate tension on the
free suture leg, and pressing the silver
cutting trigger on the Pusher/Cutter
(figures 17 and 18).
17, 18
Penetrate the meniscal tissue to the
desired depth. The silicone tube on
the needle provides a “soft stop” at
approximately 13mm. The OMNISPAN™
needle is also laser marked at 10mm,
15mm (double line), and 20mm (figure 7).
7
Once at the desired depth, squeeze the
large dark gray lever to deliver the first
implant to the back of the meniscus
(figures 8 and 9).
NOTE: There will be a slight pushback on
the deployment gun while the implant
goes through the tissue. Provide the
necessary counter resistance to ensure
that needle depth is maintained.
8, 9
Fig. 13
Fig. 19
Fig. 15
Fig. 14
Fig. 16
Fig. 9
Fig. 8
Fig. 18
Fig. 7
10mm
13mm
15mm 20mm
Final repair showing vertical horizontal
and oblique repairs (figure 19).
19
Keeping the large grey lever squeezed
when exiting the tissue will help to ensure
that the suture stays out of the barrel of
the needle, and the second implant
remains in its intended position. Remove
the needle from the tissue and maintain
visualization of the tip of the needle to
ensure the second implant maintains the
proper position (figure 10).
10
Pull the small red loading trigger until
you hear a click. This will move the second
implant into a position on the needle
from which it can be deployed (figure 11).
If needed, you can pull the red trigger
multiple times to ensure the second
implant is in the firing position.
11
Maintain a span of 6-10mm between the
first and second implants. Repairs can be
done in horizontal, vertical, or oblique
configurations. Penetrate the meniscal
tissue to the desired depth and squeeze
the large, dark grey lever to deliver the
second implant to the back of the
meniscus (figure 12).
12
Fig. 11
Fig. 10
Fig. 12
Fig. 17
Surgical Technique (Cont.)
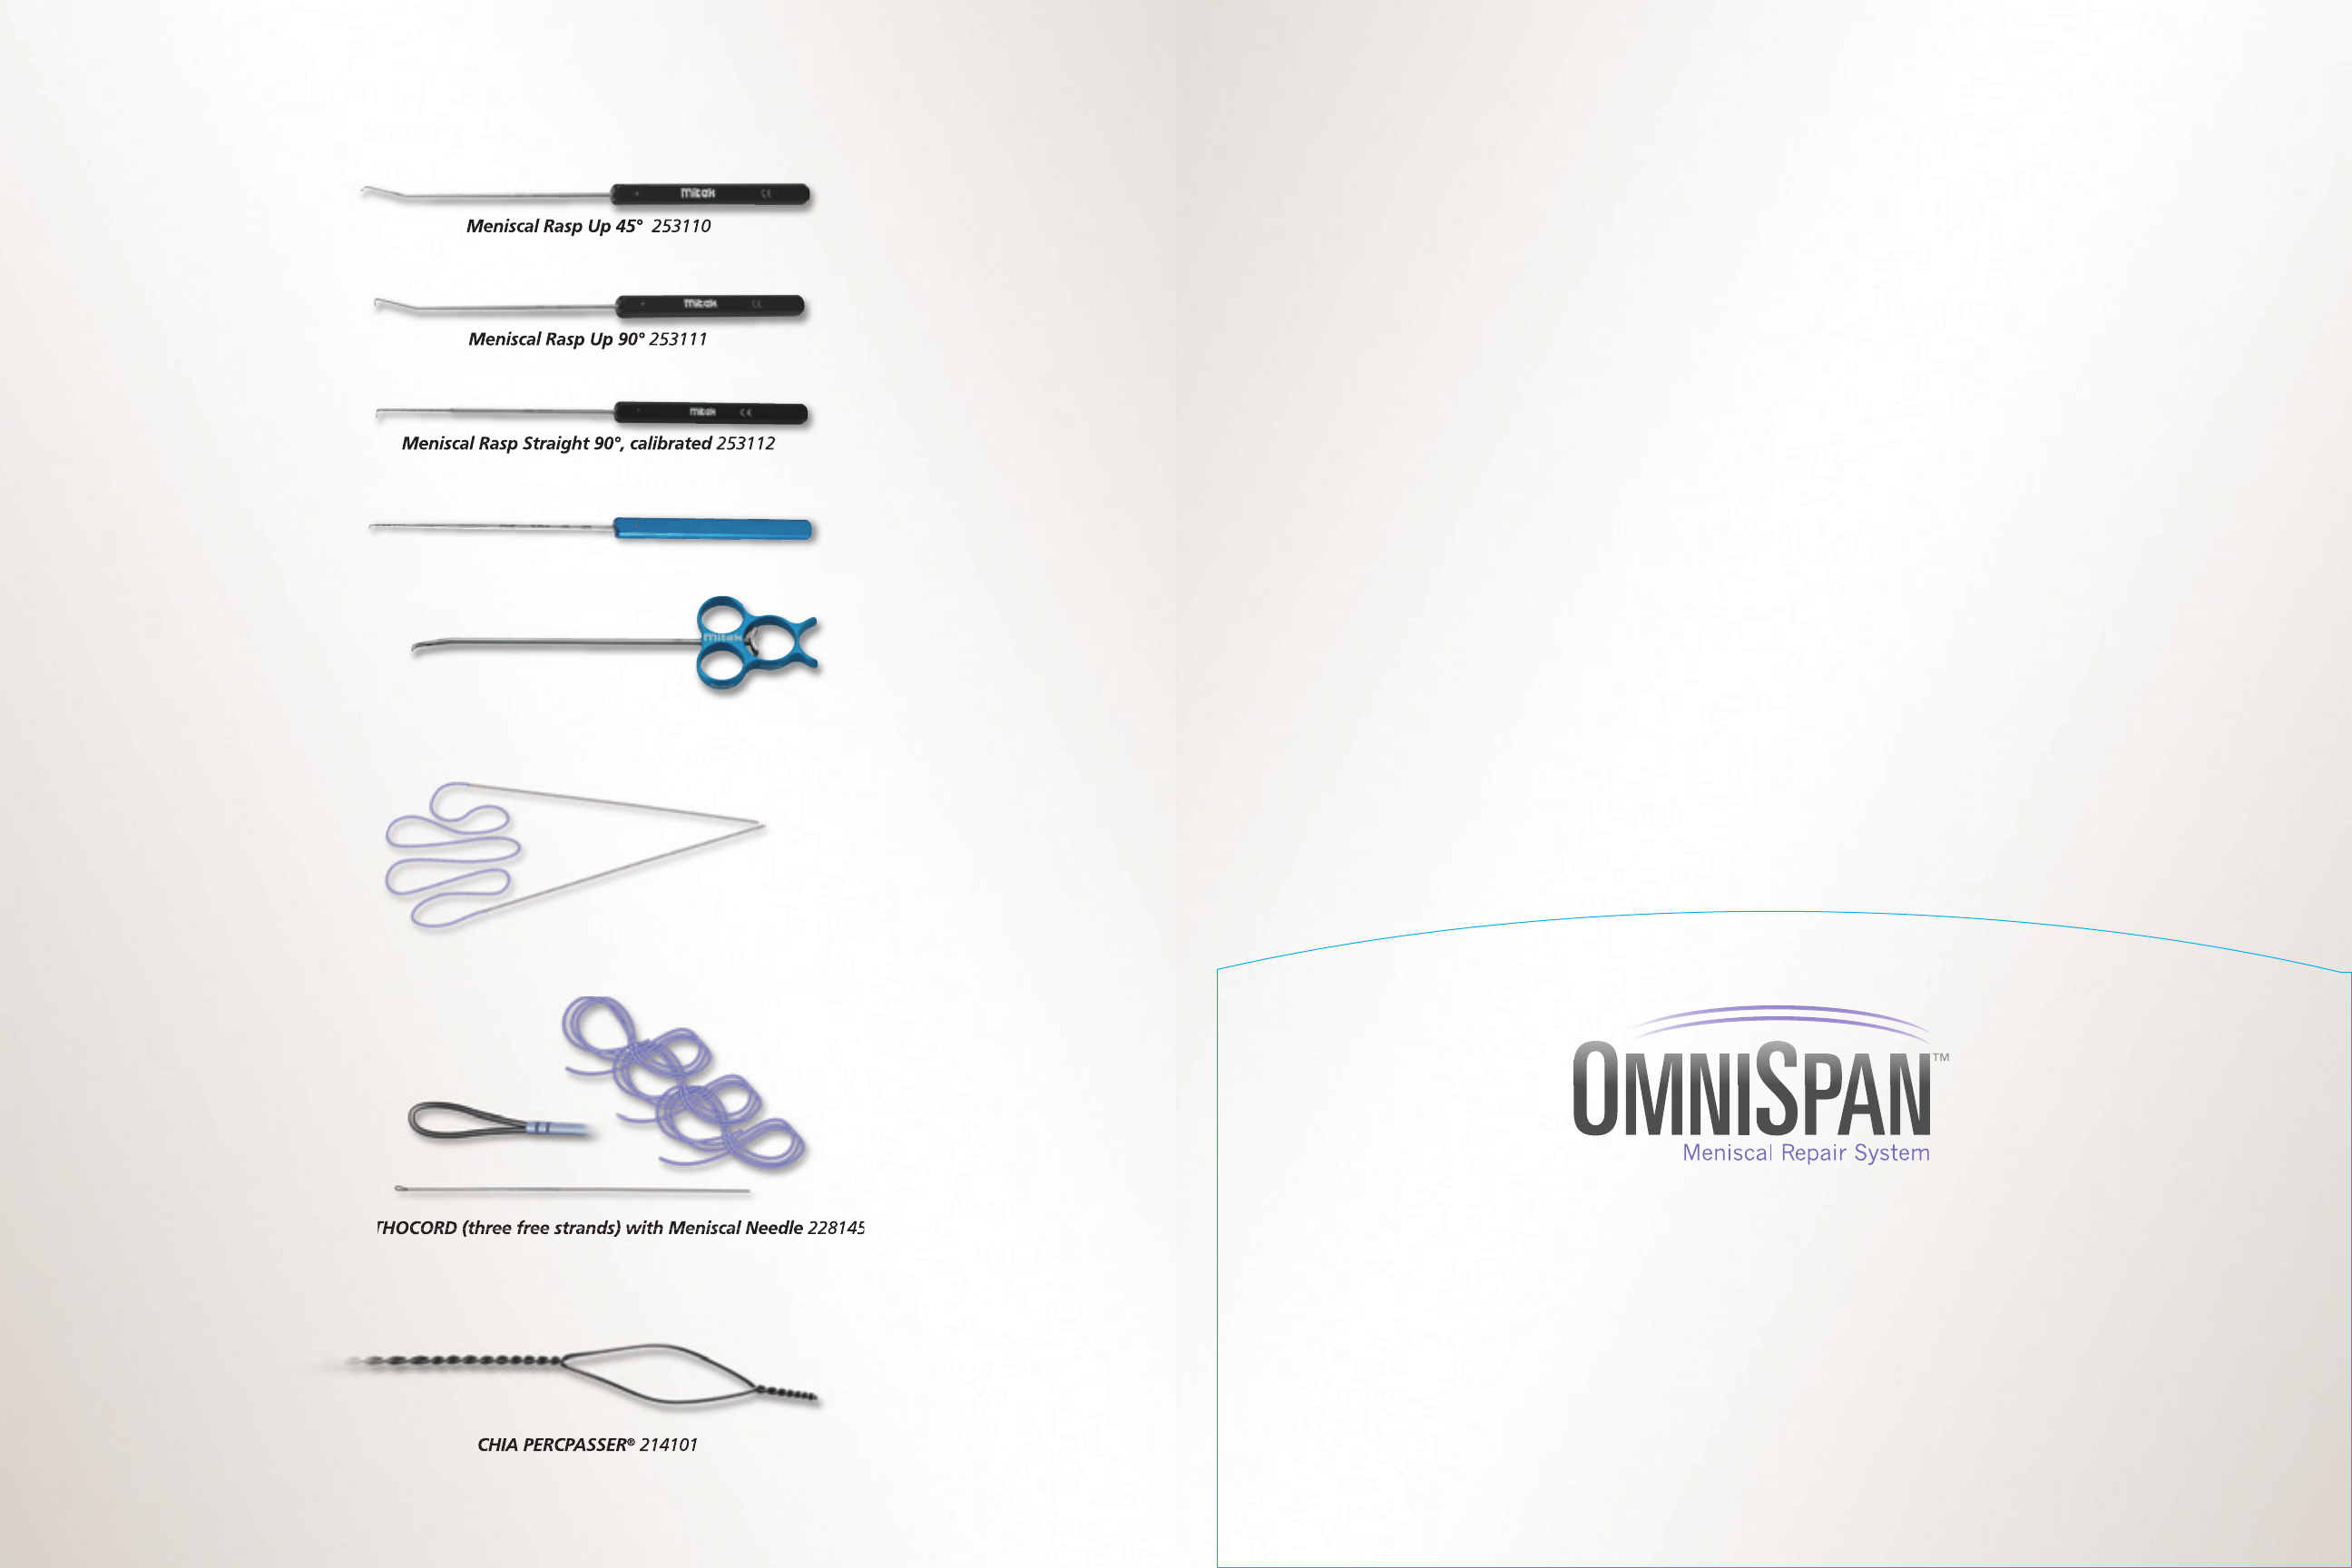
#2/0 ORTHOCORD (three free strands) with Meniscal Needle 228145
Meniscal Rasp Up 45° 253110
Meniscal Rasp Up 90° 253111
Meniscal Rasp Straight 90°, calibrated 253112
Meniscal Probe 253113
Arthroscopic Pusher/Cutter 228302
#2/0 ORTHOCORD®with Double-arm Meniscal Needles 228144
A Range of Additional Solutions for Meniscal Repair
CHIA PERCPASSER®214101
