TDS For CDF/QT 750 CQDF802 CDFVision
User Manual: CQDF802
Open the PDF directly: View PDF ![]() .
.
Page Count: 2
- Step 1: PREPARE THE FABRIC
- Step 2: ADHERE CDF VISION TO THE FABRIC
- Step 4: DRY THE SCREEN; REMOVE THE BACKING SHEET
- Dry the screen thoroughly at room temperature. Use a fan to speed drying. If possible, use a dehumidifier in the drying area. Under humid conditions, dry the screen in a commercial dryer with filtered air < 104 F. (40 C.). Immediately before expos...

Technical Data Sheet
CDF® Vision™
DIAZO DUAL-CURE CAPILLARY FILM SYSTEM ENHANCES CROSS-LINKING,
YIELDING SHARP PRINTING SHOULDERS AND MECHANICAL DURABILITY
CDF Vision is a diazo dual-cure capillary film system. Its special formulation controls mesh penetration and forms an enhanced cross-linking
“matrix” during exposure, resulting in sharp printing shoulders and mechanical durability. Particulate-size control reduces granularity effects
for optimal resolution and definition. Texturing agents impart a micro-structural pattern to the bottom of the stencil, reducing adverse effects
from high or low humidity during printing. We recommend CDF Vision-15 for mesh counts of 165 or more threads per cm. (420+ per inch);
CDF Vision-18 for mesh counts of 120-165/cm. (305-420/inch); CDF Vision-20 for mesh counts of 120-150/cm. (305-380/inch);
CDF Vision-25 for mesh counts of 100-150/cm. (255-380/inch); CDF Vision-30 for mesh counts of 90-120/cm. (230-305/inch);
CDF Vision-35 for mesh counts of 70-110/cm. (180-280/inch); and CDF Vision-50 for mesh counts of 33-77/cm. (86-196/inch). CDF Vision
is compatible with UVs, vinyls, and virtually all solvent-based inks. Depending on the thickness selected, it is suited to such printing applica-
tions as: electronics, circuit traces, membrane switches, halftones, CDs and DVDs, ceramic decals, posters, and containers and bottles.
INSTRUCTIONS
Step 1: PREPARE THE FABRIC
Used or surface-treated fabric need only be degreased using Screen Degreaser Liquid No. 3 or dilute Screen Degreaser Concentrate No. 33,
or Magic Mesh Prep. (Mechanical abrasion, an option for new fabric that is not surface treated, increases the surface area of fabric for a better
mechanical bond of the stencil. Use Microgrit No. 2 before degreasing. Abrading and degreasing can be combined in one step with
Ulanogel 23.) Rinse thoroughly. Use Magic Mesh Prep or CDF Mesh Prep No. 25 to promote uniform water retention in the mesh openings
during adhering. (Magic Mesh Prep also acts as both a degreaser and an antistatic treatment.)
Step 2: ADHERE CDF VISION TO THE FABRIC
Standard Method: Position a sheet of CDF Vision on a flat surface, emulsion side up. Place the printing side of a wet screen (ideally, directly
following the fabric preparation rinse) on top of the film. The film will darken as it is wetted. Make a single squeegee stroke across the
squeegee side. Wipe off any excess water, especially from the inside of the frame. “Roll-Down” Method: Roll the cut-to-size film, emulsion
side out, around a small plastic tube 1” – 1 ½” (ca. 2 ½ X 4 cm.) in diameter. Make a squeegee stroke on the printing side of the mesh to assure
uniform wetting. Contact the edge of the roll to the printing side of the mesh at the top end of the screen. Unwind the roll, maintaining firm
contact with the mesh. Make one light squeegee stroke across the squeegee side to remove excess water.
Step 4: DRY THE SCREEN; REMOVE THE BACKING SHEET
Dry the screen thoroughly at room temperature. Use a fan to speed drying. If possible, use a dehumidifier in the drying area. Under humid
conditions, dry the screen in a commercial dryer with filtered air < 104° F. (40° C.). Immediately before exposure, remove the backing sheet.
Step 5: CALCULATE THE APPROXIMATE EXPOSURE
From the Base Exposure Table (reverse side), identify the light source you are using and refer to the thickness of CDF Vision you have.
The exposure time shown is your Base Exposure Time. Multiply your Base Exposure Time by all relevant Exposure Variable Factors to
find your Approximate Exposure Time. (Base Exposure Time X Exposure Variable Factors = Approximate Exposure Time.)
Step 6: DETERMINE THE OPTIMAL EXPOSURE TIME
Make a Step Wedge Test (there is an instructional video covering this on the Ulano Web site (www.ulano.com) or use the Ulano
ExpoCheck to determine your optimum exposure time. Optimum exposure is indicated: ■ At that exposure time when the film first
reaches its maximum color density and the edges of the positive do not "resolve." ■ The squeegee side of the stencil is hard and not soft or
slimy. ■ The print best duplicates the test positive at the level of resolution that the job requires. (Note: because resolution is relative to
stencil thickness, it is not possible to resolve a line finer than the overall thickness of the fabric and stencil.) An actual test print should be
made as part of any exposure evaluation.
Step 7: WASHOUT:
Wash out the stencil with water from the printing side only using high pressure water. When the image areas start to open, reduce the water
pressure and rinse the stencil from the squeegee side until the image areas are completely clear. Blot excess water from both sides of the screen
with newsprint. Dry the screen.
Step 8: TOUCHUP AND BLOCKOUT
For blocking out the screen, use Screen Filler No. 60 or Extra Heavy Blockout No. 10 on the dry fabric. For touchups, use Screen Filler
No. 60 or Extra Heavy Blockout No. 10 thinned with water.
Step 9: RECLAIM THE SCREEN
Caution: Strong screen openers or ink washes may cause CDF Vision to “lock,” making reclaiming very difficult. Use All-Purpose Ink
Wash, the ink manufacturer’s recommended washup solvent, or the least powerful ink diluent necessary to remove all ink remaining in the
screen. Use Screen Degreaser Liquid No. 3 to help remove ink or solvent residues that might impair the action of the stencil remover. Rinse
the screen with a powerful spray of water. Brush Stencil Remover Liquid No. 4 or Stencil Remover Paste No. 5 on both sides of the screen.
Do not let the stencil remover dry on the screen, as this can result in a permanent stencil. Wash the screen with a strong spray of water. Use
Walk Away Haze Remover or Haze Remover Paste No. 78 to remove ink and haze residues.
Technical Data Sheet
Ulano Corporation, 110 Third Avenue, Brooklyn, NY 11217, USA. Tel: +718 237-4700; Fax: +718 802-1119 or +718 625-0558
Ulano International Representative Office, Rütistrasse 17, CH-8952 Shlieren-Zurich, Switzerland. Tel: +41 44 755 44 77; Fax: + 41 44 773 16 06
Correspondence Address in Singapore, 16 New Industrial Rd.,.#05-07, Hudson TechnoCentre, Singapore 536204. Tel: +65 6451 7505; Fax: +65 6252 3414
www.ulano.com
2
STORAGE: Unused roll and sheets should be kept under cool conditions (not exceeding 24º C. or 75º F.) with relative humidity of 20-
40%. Shelf life is 18 months from the date of manufacture. Storage outside the recommended conditions will result in reduced shelf life.
Screens with unexposed film adhered can be stored for up to two weeks in a cool, dark, dry area. Heat and humidity reduce storage time.
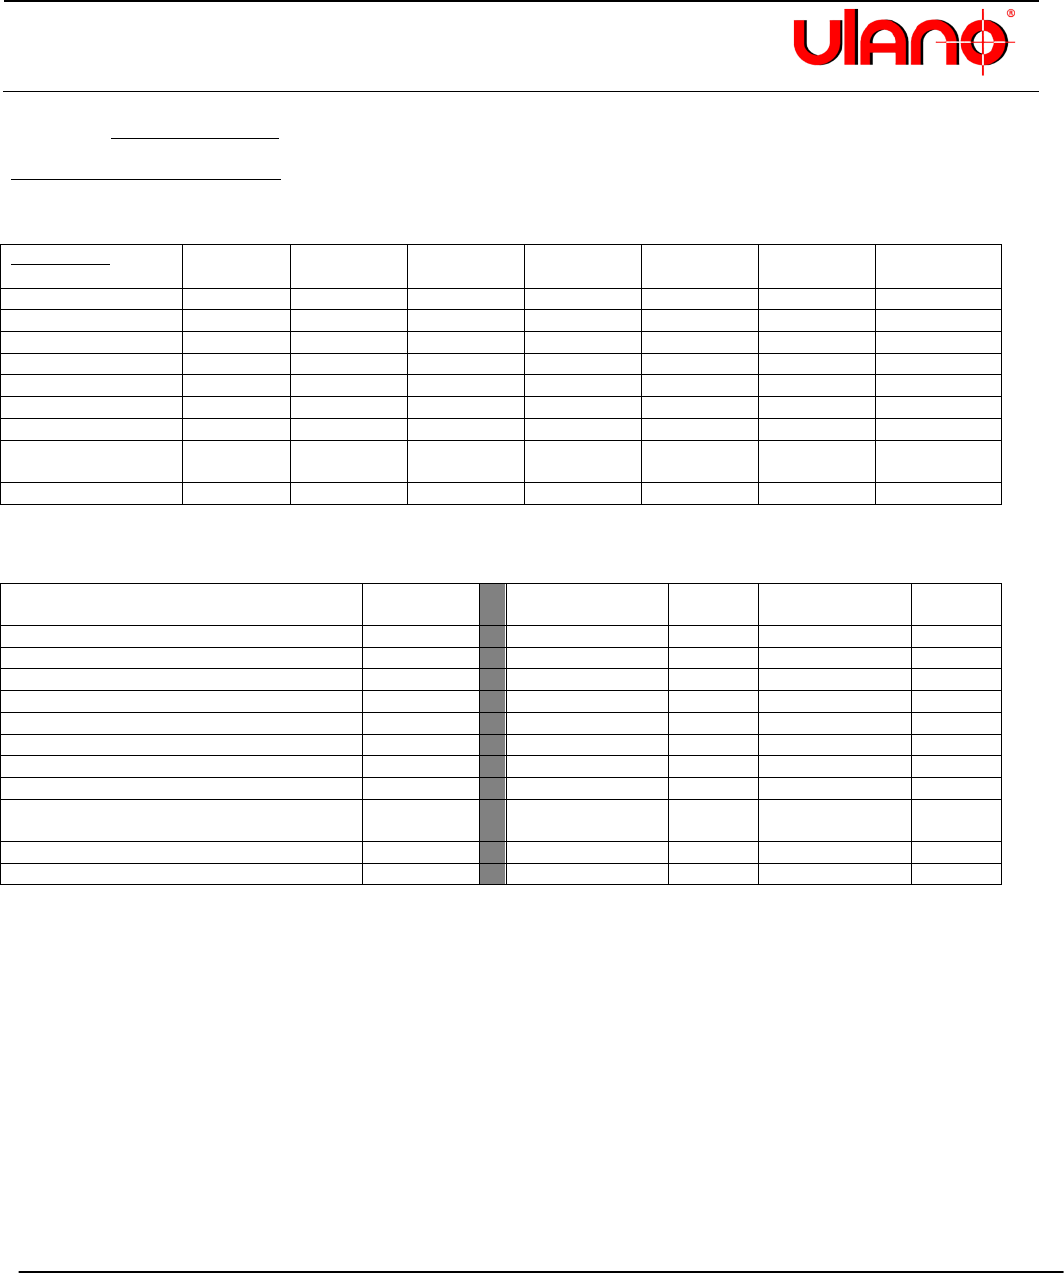
BASE EXPOSURE TABLE for CDF Vision at 40 inches (100 cm.) on white polyester or nylon.
Light Source
CDF Vision-
15
CDF Vision-
18
CDF Vision-
20
CDF Vision-
25
CDF Vision-
30
CDF Vision-
35
CDF Vision-
50
Metal Halide:
2000 watts
50 sec.
1 min.
66 sec.
85 sec.
109 sec.
2 ¾ min.
4 min.
3000 watts
34 sec.
40 sec.
44 sec.
55 sec.
73 sec.
110 sec.
165 sec.
4000 watts
25 sec.
30 sec.
33 sec.
42 sec.
55 sec.
85 sec.
2 min.
5000 watts
20 sec.
24 sec.
26 sec.
33 sec.
44 sec.
66 sec.
1 ½ min.
7000 watts
14 sec.
17 sec.
20 sec.
24 sec.
30 sec.
50 sec.
70 sec.
8000 watts
12 sec.
15 sec.
17 sec.
20 sec.
28 sec.
43 sec.
1 min.
Fluorescent
Tubes#
40 watts
5 min.
6 min.
7 min.
9 min.
11 min.
NR
NR
#Base Exposure Times at 4 inches (10 cm.) using unfiltered black light tubes. For "cool white" or "daylight" tubes, use at least double the exposure time.
NR = not recommended
EXPOSURE VARIABLES FACTORS: variables affecting exposure time
Mesh Exposure
Distance:
Exposure
Distance:
Dyed Mesh
1.5-2.0
20”/50 cm
0.25
56”/140 cm
1.95
24”/60 cm 0.36 60”/150 cm 2.25
Imaging
28”/70 cm
0.49
72”/180 cm
3.24
Fine line reverse printing
1.2
32”/80 cm
0.64
84”/210 cm
4.41
36”/90 cm
0.81
100”/250 cm
6.25
40”/100 cm
1.00
44”/110 cm
1.21
Adhering
48”/120 cm
1.44
Direct/Indirect Method using LX-660
(Blue) or Proclaim direct emulsion
1.5
52”/130 cm
1.69
Taped-up Positives
Taped-up or montage positives, per layer 1.1
1012dm; rev. 3, 0314
