CMS Series V6.5, V7.0
User Manual: CMS Series v6.5, v7.0
Open the PDF directly: View PDF ![]() .
.
Page Count: 87
- About CAYIN
- Copyright Notice
- Trademark Notice
- Disclaimers
- CMS Overview
- 1-1 CMS-Performance
- 1-2 CMS-Mini
- 1-3 Major Features
- 1-4 Install CMS
- 1-5 Start and Login
- Access Control
- 2-1 Create and Manage Folders
- 2-2 Create and Manage Groups
- 2-3 Aggregation
- 2-4 Create and Manage Accounts
- Player Management
- 3-1 Client List
- RTB Server
- Resource Management
- 5-1 Skin Manager
- 5-2 Program
- 5-3 Video Playlist
- 5-4 Web Playlist
- 5-5 Font Manager
- Central Scheduling
- 6-1 Add Scheduling Period
- 6-2 Skin
- 6-3 Multimedia
- 6-4 Image Slide Show
- 6-5 Ticker
- 6-6 WEB Playlist
- 6-7 Volume
- 6-8 Add Emergency Scheduling
- 6-9 Import/Export Schedule
- 6-10 Schedule Priority
- System and Network Settings
- 7-1 System Status
- 7-2 System Settings
- 7-3 Network Settings
- 7-4 CMS and NAT Firewall
- LOG

Version 6.5
Version 7.0
CONTENT MANAGEMENT SERVER (CMS)
User Manual
CAYIN TECHNOLOGY CO,LTD
8F, NO. 577, Linsen N. Rd.,
Taipei City104, Taiwan, R.O.C
TEL: +886-2-2595 1005
FAX: +886-2-2595 1050
2010
©
CAYIN Technology Co., Ltd.
All Rights Reserved
MSAL70/EN/100210
CAYIN TECHNOLOGY

2
CMS
About CAYIN
CAYIN Technology offers a complete portfolio of digital signage solutions, including media players,
servers, and software, for various commercial applications, such as education, transportation, retail,
hospitality, corporate use, and nancial and public institutions. CAYIN is committed to being a reliable
partner to its clients worldwide, and has successfully set up various application references interna-
tionally. In order to best facilitate the deployment of CAYIN products, the Company also provides tai-
lord services to satisfy the ascending market demand for almost limitless applications.
Copyright Notice
Copyright © 2010 CAYIN TECHNOLOGY CO., LTD. All Rights Reserved.
All the contents in this manual are the intellectual property of CAYIN Technology Co., Ltd (“CAYIN”).
No part of this manual, including the products and software described in it, shall be reproduced,
transferred, distributed, stored in any form,or translated into any language without the prior written
permission of CAYIN. Specications and information in this manual are subject to change at any time
without obligation to notify any person of such revision or changes.
Trademark Notice
All brand names, icons, and trademarks appeared in this manual are the sole property of their re-
spective holders.
Disclaimers
THE CONTENTS OF THIS MANUAL ARE PROVIDED “AS IS.” CAYIN MAKES NO OTHER REP-
RESENTATION OR WARRANTIES, EITHER EXPRESSED OR IMPLIED WITH RESPECT TO THE
CONTENTS HEREOF AND SPECIFICALLY DISCLAIMS THE IMPLIED WARRANTIES OF MER-
CHANTABILITY OR FITNESS FOR A PARTICUAL PURPOSE. IN NO EVENT SHALL CAYIN, ITS
DIRECTORS, OFFICERS, EMPLOYEES OR AGENTS BE LIABLE FOR ANY INDIRECT, SPECIAL,
INCIDENTAL, OR CONSEQUENTIAL DAMAGES (INCLUDING DAMAGES FOR LOSS OF PROF-
ITS, LOSS OF USE OR DATA, AND THE LIKE), EVEN IF CAYIN HAS BEEN ADVISED OF THE
POSSIBILITY OF SUCH DAMAGES ARISING FROM ANY DEFECT OR ERROR IN THIS MANUAL
OR PRODUCT.

3
CMS USER MANUAL
Contents
About CAYIN ................................................................................... 2
Copyright Notice .............................................................................. 2
Trademark Notice ............................................................................ 2
Disclaimers ...................................................................................... 2
1. CMS Overview ............................................................................ 7
1-1 CMS-Performance ................................................................... 8
1-1-1 Specications ................................................................... 8
1-1-2 Front View ........................................................................ 9
1-1-3 Rear View ......................................................................... 9
1-2 CMS-Mini ................................................................................ 10
1-2-1 Specications ................................................................. 10
1-2-2 Front View ...................................................................... 11
1-2-3 Rear View ....................................................................... 11
1-3 Major Features ........................................................................ 12
1-4 Install CMS .............................................................................. 13
1-5 Start and Login ........................................................................ 14
2. Access Control ......................................................................... 15
2-1 Create and Manage Folders ................................................... 16
2-1-1 Add/Delete Media Folder ................................................ 16
2-1-2 Assign Folder Access Mode ........................................... 18
2-1-3 Upload Files to CMS Server .......................................... 20

4
CMS
2-2 Create and Manage Groups ................................................... 21
2-2-1 Add Group ...................................................................... 22
2-2-2 Edit Group ...................................................................... 23
2-2-3 Delete Group .................................................................. 23
2-3 Aggregation ............................................................................. 24
2-4 Create and Manage Accounts ................................................. 27
3. Player Management .................................................................. 29
3-1 Client List ................................................................................ 30
4. RTB Server ................................................................................ 31
5. Resource Management ............................................................. 33
5-1 Skin Manager .......................................................................... 34
5-2 Program .................................................................................. 36
5-2-1 Create a Program Set ..................................................... 36
5-2-2 Edit Program: Skin .......................................................... 37
5-2-3 Edit Program: Multimedia ............................................... 37
5-2-4 Edit Program: Image Slide Show .................................... 41
5-2-5 Edit Program: Ticker ....................................................... 42
5-2-6 Edit Program: Flash ........................................................ 44
5-2-7 Finish your Program ...................................................... 45
5-3 Video Playlist ........................................................................... 45
5-3-1 Edit Video Playlist ........................................................... 46
5-3-2 Import/Export Video Playlist ........................................... 47

5
CMS USER MANUAL
5-4 Web Playlist ............................................................................ 48
5-4-1 Edit Web Playlist ............................................................. 48
5-4-2 Import/Export Web Playlist ............................................. 51
5-5 Font Manager .......................................................................... 52
5-5-1 Add Fonts to SMP Players .............................................. 52
5-5-2 Apply Fonts in SMP-PRO Series Players ....................... 53
5-5-3 Apply Font in SMP-WEB Series Players ........................ 54
6. Central Scheduling .................................................................... 55
6-1 Add Scheduling Period ............................................................ 56
6-2 Skin ......................................................................................... 57
6-3 Multimedia ............................................................................... 58
6-3-1 Add Schedule - Video ..................................................... 59
6-3-2 Add Schedule - Image .................................................... 61
6-3-3 Add Schedule - Streaming Video .................................... 63
6-3-4 Add Schedule - Video-In ................................................. 64
6-4 Image Slide Show ................................................................... 64
6-5 Ticker ...................................................................................... 67
6-6 WEB Playlist ........................................................................... 69
6-7 Volume .................................................................................... 72
6-8 Add Emergency Scheduling .................................................... 73
6-8-1 Setup Emergency Schedule ........................................... 73
6-8-2 Trigger Emergency Schedule ......................................... 74

6
CMS
6-9 Import/Export Schedule .......................................................... 76
6-10 Schedule Priority ................................................................... 76
7. System and Network Settings ................................................... 77
7-1 System Status ......................................................................... 78
7-1-1 Basic Information ............................................................ 78
7-1-2 Advanced Information ..................................................... 79
7-1-3 Firmware Information ..................................................... 79
7-2 System Settings ...................................................................... 80
7-2-1 Set System Time ............................................................ 80
7-2-2 Set Auto-Restart ............................................................. 81
7-2-3 Change SuperMonitor 3 Service Port ............................. 82
7-2-4 Change SuperMonitor 3 Encryption Key ........................ 82
7-2-5 Set Language ................................................................. 82
7-2-6 System Maintenance ...................................................... 83
7-2-7 Import/Export/Restore Congurations .......................... 84
7-3 Network Settings ..................................................................... 84
7-4 CMS and NAT Firewall ............................................................ 85
8. LOG ........................................................................................... 86

CMS Overview
1-1 CMS-Performance ..................................................8
1-1-1 Specications ..................................................8
1-1-2 Front View .......................................................9
1-1-3 Rear View ........................................................9
1-2 CMS-Mini ...............................................................10
1-2-1 Specications ................................................10
1-2-2 Front View ..................................................... 11
1-2-3 Rear View ...................................................... 11
1-3 Major Features .......................................................12
1-4 Install CMS .............................................................13
1-5 Start and Login .......................................................14
8
CMS
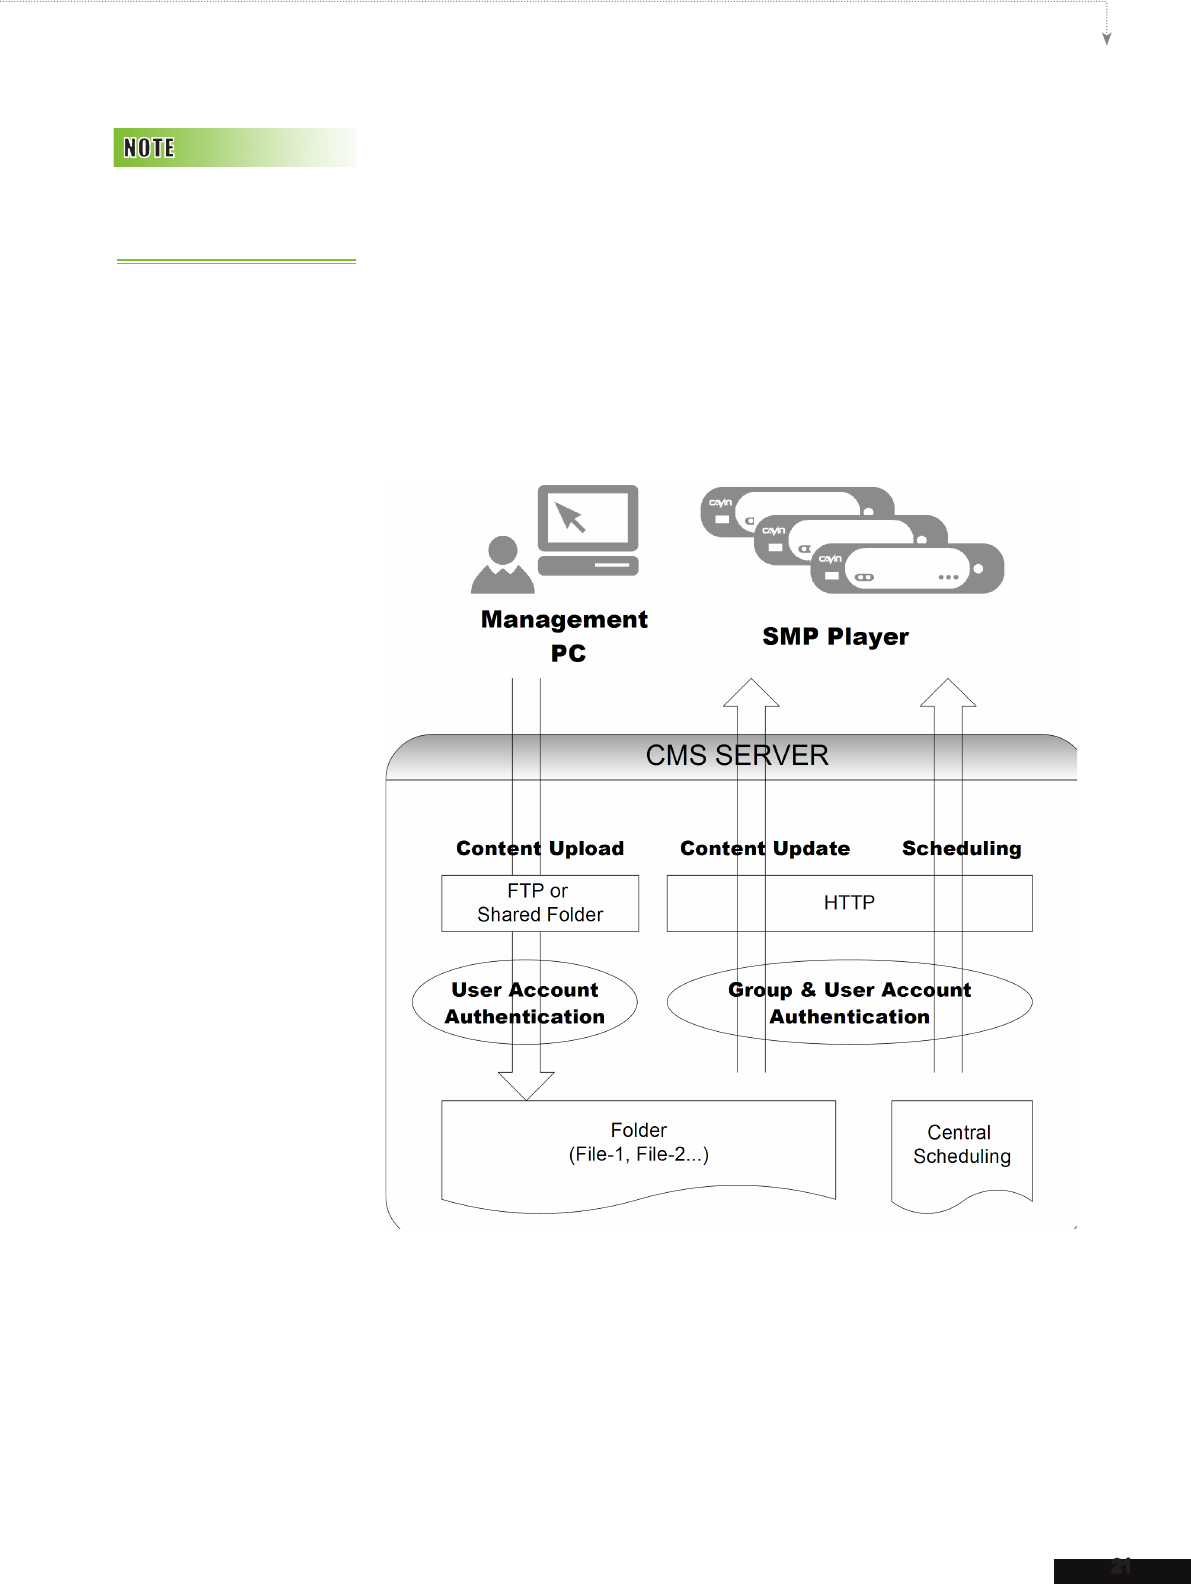
CAYIN CMS (Content Management Server) server is especially designed to manage digital signage
players in medium or large-scale deployment. It offers automatic content update, playlist editing and
advanced central scheduling functions for applications which require centralized management and
grouping content distribution over LAN or the Internet. With CMS’s access right management, admin-
istrators can use authentication and access control functions to assign authorization to each user to
manage respective groups of players. In addition, CMS server can also support real-time broadcast
function (e.g. live streaming of a TV channel).
1-1 CMS-Performance
1-1-1 Specications
Dimension 88 (H) x 482 (W) x 450 (D) mm; 2U Rack
Material Steel
Color Black
Weight 13.5 Kg (May differ between models)
Storage 160G 3.5’’ HDD (Can be upgraded by user’s request)
Video streaming Max. 8 channel
User Account Unlimited accounts (include 3 default accounts)
Content Management Support to manage 250 SMP players
9
CMS USER MANUAL
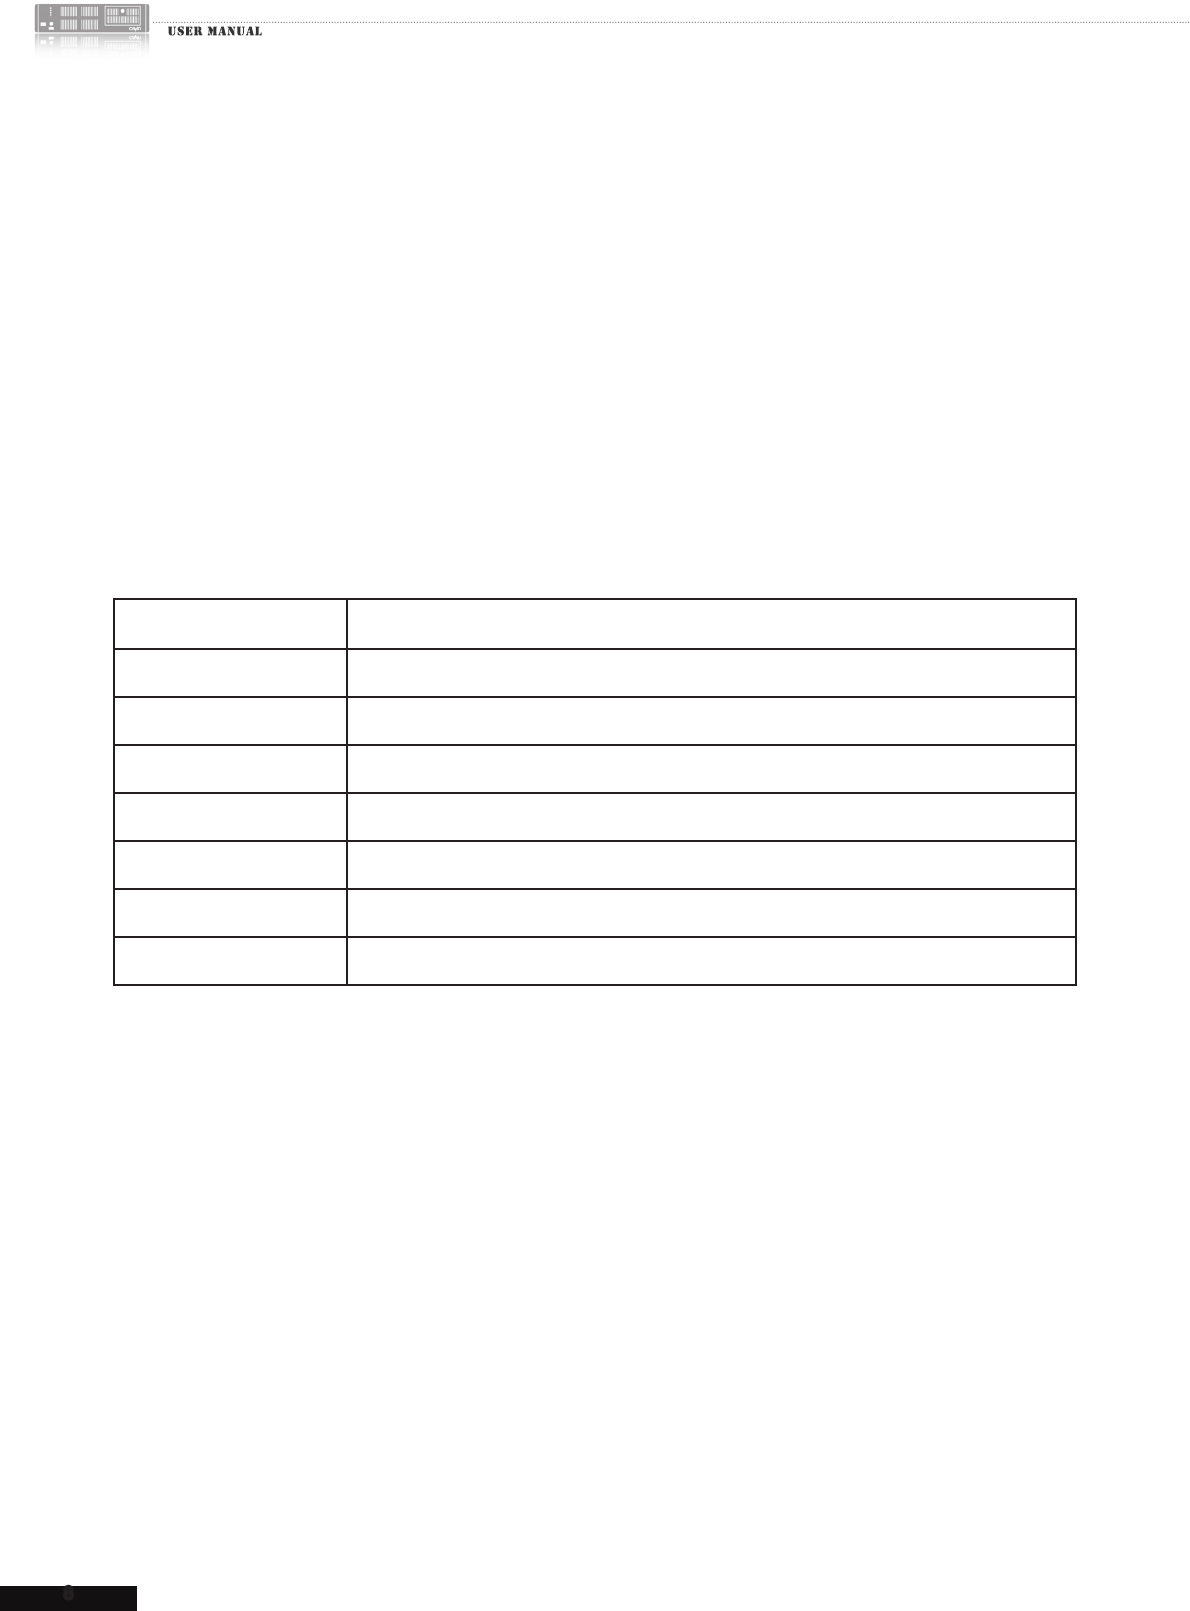
1-1-2 Front View
1
2
1. Power/HD Indicator 2. USB×2 3. PS/2 4. Power 5. CD-ROM
4
5
3
1-1-3 Rear View
1
2
3
6 5 4
1. Video-In×4 (optional) 2. Line In × 4 (optional) 3. COM 4. Ethernet
5. VGA 6. PS/2 7. Power Connector
7
10
CMS
1-2 CMS-Mini
1-2-1 Specications
Dimension 65 (H) x 320 (W) x 334 (D) mm
Material Aluminum
Color Black
Weight 4 kg
Storage 160G 3.5” IDE-HDD
Video streaming Max. 1 channel
User Account Max. 30 accounts (include 3 default accounts)
Content Management Support to manage 40 SMP players
11
CMS USER MANUAL
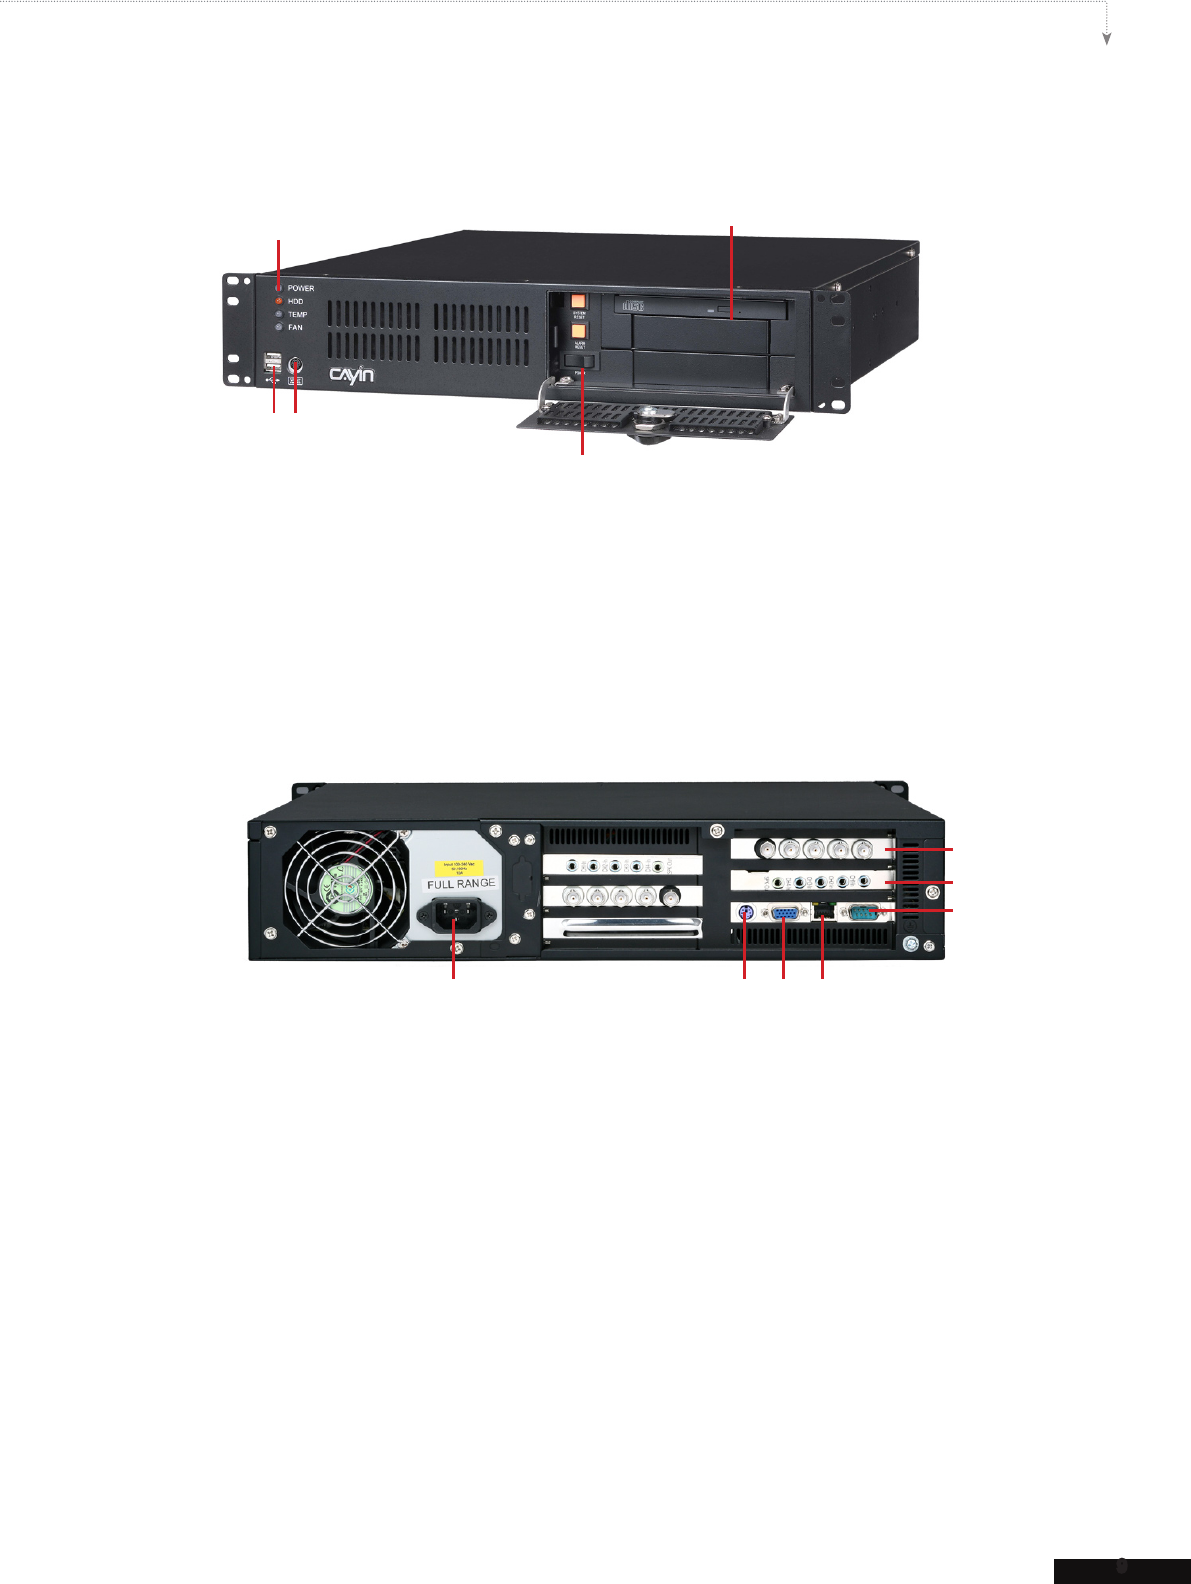
1-2-2 Front View
1. USB×2 2. Network Indicator 3. HDD Indicator 4. Power Indicator 5. Power
2 3 4 5
1
1-2-3 Rear View
1. PS/2 MOUSE 2 . Ethernet 3. USB×2 4. VGA 5. Power Connector
6. Video In (optional) 7. Audio In (optional) 8. Mic In (optional)
4
1 2/3
6
5
8
7

12
CMS
1-3 Major Features
Media Player Management
Provide a completed client list, detailing all media players controlled by this CMS server•
Create media player groups for easy systematized management•
Remotely manage media players in two major aspects: content update and playlist scheduling•
Access Control
Create multiple user accounts and authorize each account to possess different access rights•
Secure the access to Web Manager and Media Folder by username and password•
Content Update
Update and synchronize content automatically to all media players in groups and aggregations •
(two-layer groups)
Synchronize playlist, skin, font, and all multimedia contents in the Media Folder to media players •
Support to create folders and sub-folders to store and organize multimedia content•
Upload contents by FTP and Network Neighborhood•
Central Scheduling
Centrally control the playlists of all media players in groups and aggregations (two-layer groups)•
Edit playlists of video, image, ticker, skin, and volume for SMP-PRO series•
Edit playlists of video, web playlist, program, and volume for SMP-WEB series•
Schedule the playlist to minutes by weekly basis or schedule an one-time event•
Edit unlimited number of client groups•
Edit Emergency Scheduling•

13
CMS USER MANUAL
RTB (Real Time Broadcast)
Assign each video signal (NTSC and PAL) to a particular channel•
Real-time video/audio signal transcoding and broadcasting•
Transmit streaming data to media players by means of LAN broadcasting, multi-casting, or •
uni-casting
(•
CMS-PERFORMANCE) Manage up to 8 video signals per server; up to 64 inputs for the whole
syst
em
Support DVD quality MPEG-2 and MPEG-4 transport streaming; bit-rate from 1 Mbps to 5 Mbps •
(1Mbps for CIF; 2Mbps or up for Full D1)
1-4 Install CMS
1. Open CMS package.
2. Connect the power cord.
3. Connect the Ethernet to LAN port. (By default, CMS will get IP address from DHCP server)
4. Press the power button to turn on the system.
5. After the system boots up, enter “Network Management” in text console to check the server’s IP
address. CMS will get the IP address from DHCP server automatically.
6. Open “Web Manager” from your PC’s browser – type http://server_ip_address in the
address bar of the browser. The default administrator’s account is “administrator”, and the
password is “admin”.
14
CMS
1-5 Start and Login
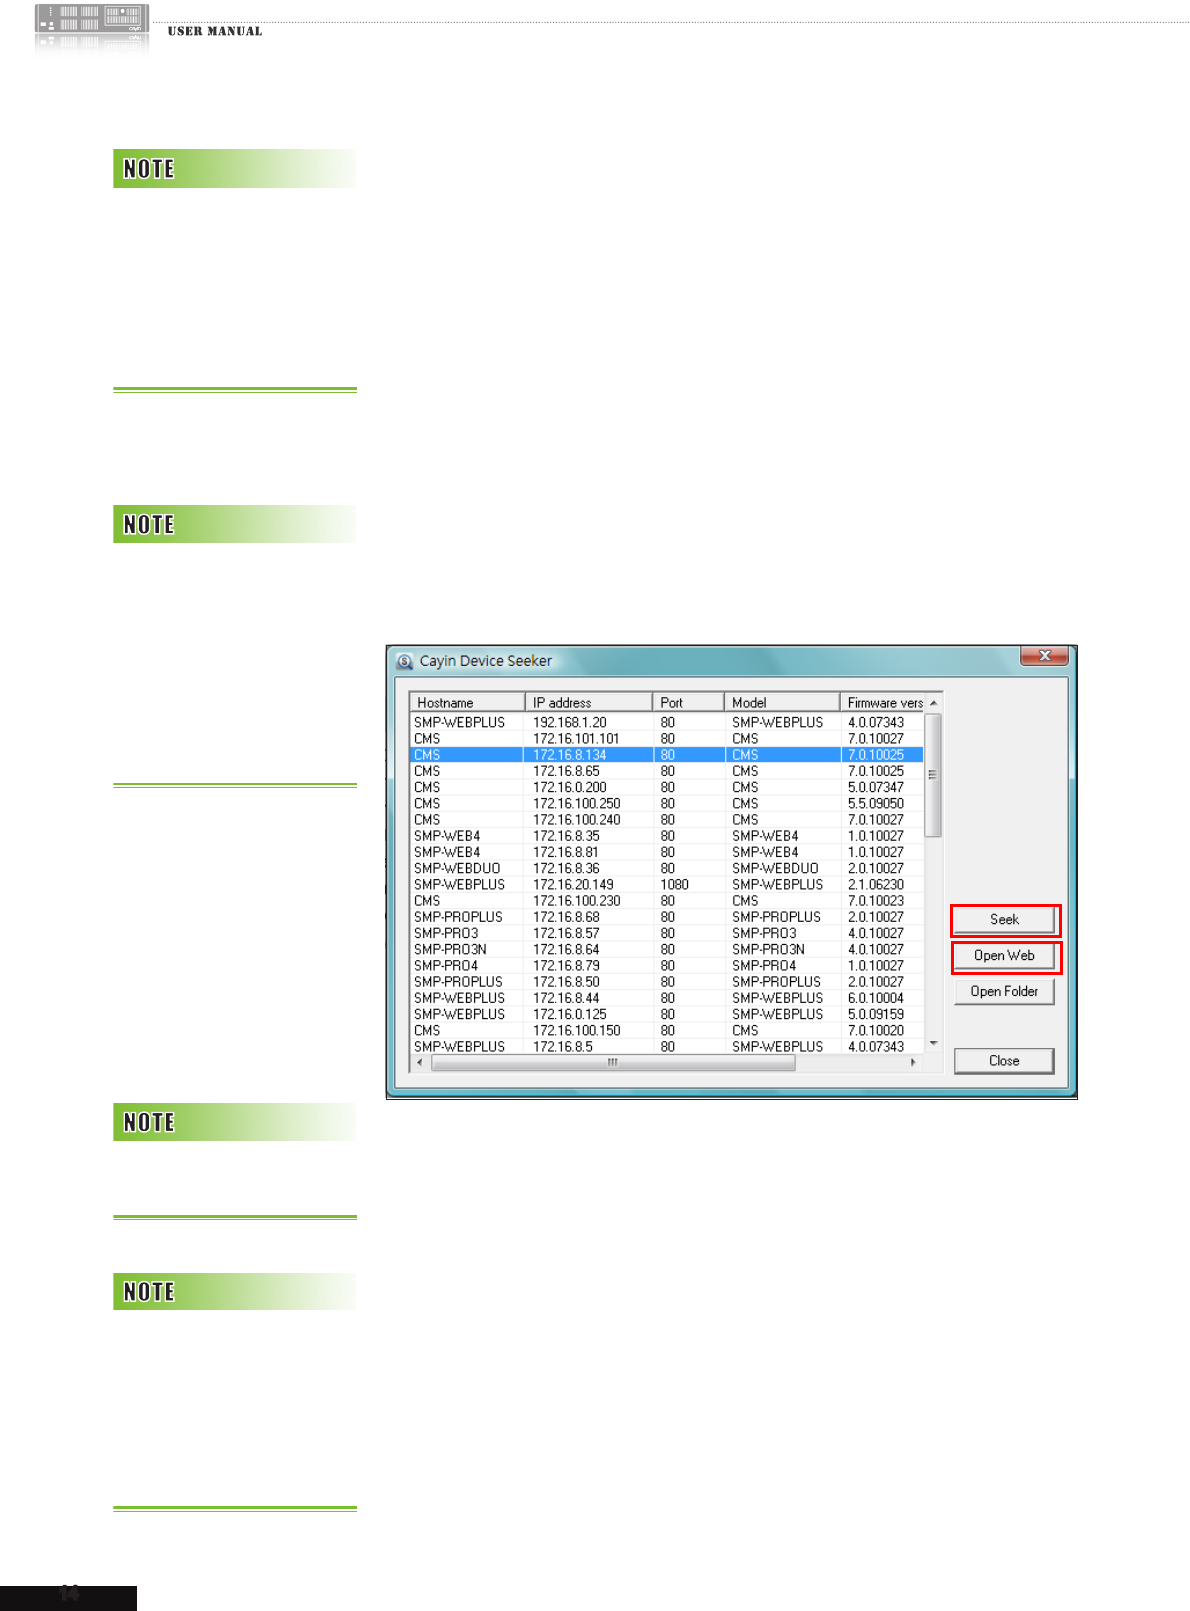
After installing CMS, please login and start to manage CMS remotely
on your own PC.
1. Insert the product CD into your CD-ROM, and run “CAYIN Device
Seeker” (\Tool\Device Seeker\seeker.exe). You can also copy this
le to your PC for future management.
2. Click [Seek] and the seeker will search all available SMP clients or
CMS servers in the same LAN. Select one CMS server and double
click the server’s name. Or, you can also click a server’s name, and
click [Open Web].
3. Click LOGIN on CMS Server’s main page. Enter a username and
password.
Default web username: administrator
Default password: admin
Upon successful login, you can start to manage CMS Server.
You can also open the Me-
dia Folder of any player by
CAYIN Device Seeker.
Select the player you want
to connect, and click [Open
Folder].
To connect to CMS and
SMP, make sure your PC
and the machine are in the
same subnet. If not, you
can adjust either the IP ad-
dress of your PC or the one
of the devices.
We recommend using IE 5
(or above) or Mozilla Firefox.
If you forget the password,
you can plug a keyboard
to CMS, and enter the text
managemnent concole.
You can manually reset the
password to "admin".

2. Access Control
2-1 Create and Manage Folders .................................. 16
2-1-1 Add/Delete Media Folder ............................... 16
2-1-2 Assign Folder Access Mode .......................... 18
2-1-3 Upload Files to CMS Server ......................... 20
2-2 Create and Manage Groups .................................. 21
2-2-1 Add Group ..................................................... 22
2-2-2 Edit Group ..................................................... 23
2-2-3 Delete Group ................................................. 23
2-3 Aggregation ............................................................24
2-4 Create and Manage Accounts ................................ 27
16
CMS
CMS server enables administrators to manage the access right. Via acess
control, administrators can create accounts and assign authorization each
account to manage respective groups of media folders. Please follow
these steps:
1. Add a new folder in the “FOLDER MANAGEMENT” page;
2. Create a group in the “GROUP” page and associate this group with
one media folder;
3. Create user accounts in the “ACCOUNT” page and congure each
account’s access right of media folder(s) and functions.
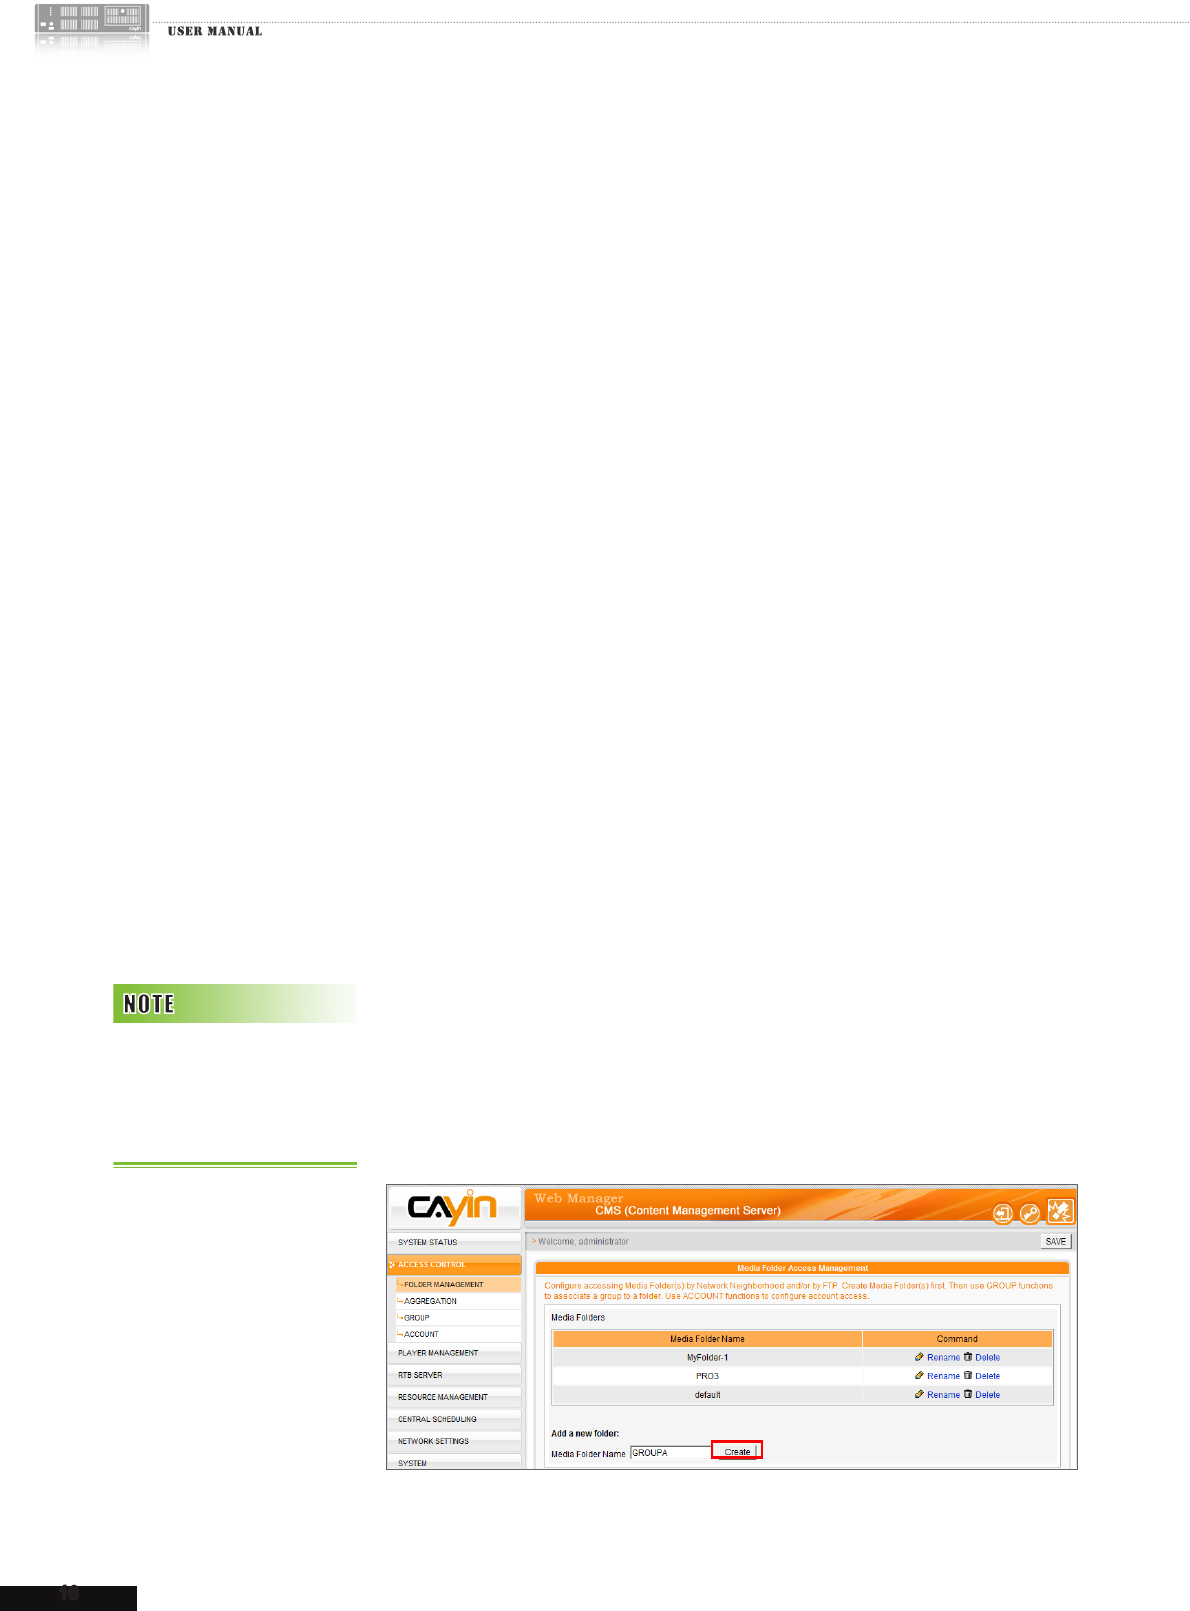
2-1 Create and Manage Folders
You can add, delete, or edit the media folder and also congure the access
mode in the “FOLDER MANAGEMENT” page.
2-1-1 Add/Delete Media Folder
Use the following steps to add a new folder.
1. Login CMS server with the account which is allowed to access the
function: “ACCESS CONTROL > FOLDER MANAGEMENT”.
2. Click [ACCESS CONTROL] on the main page, and select the sub-
page, “FOLDER MANAGEMENT”.
3. Enter a name in the “Media Folder Name” text box; then, click
[Create].
Please refer to "2-4 Create
and Manage Account"
for detailed settings about ac-
counts.
17
CMS USER MANUAL
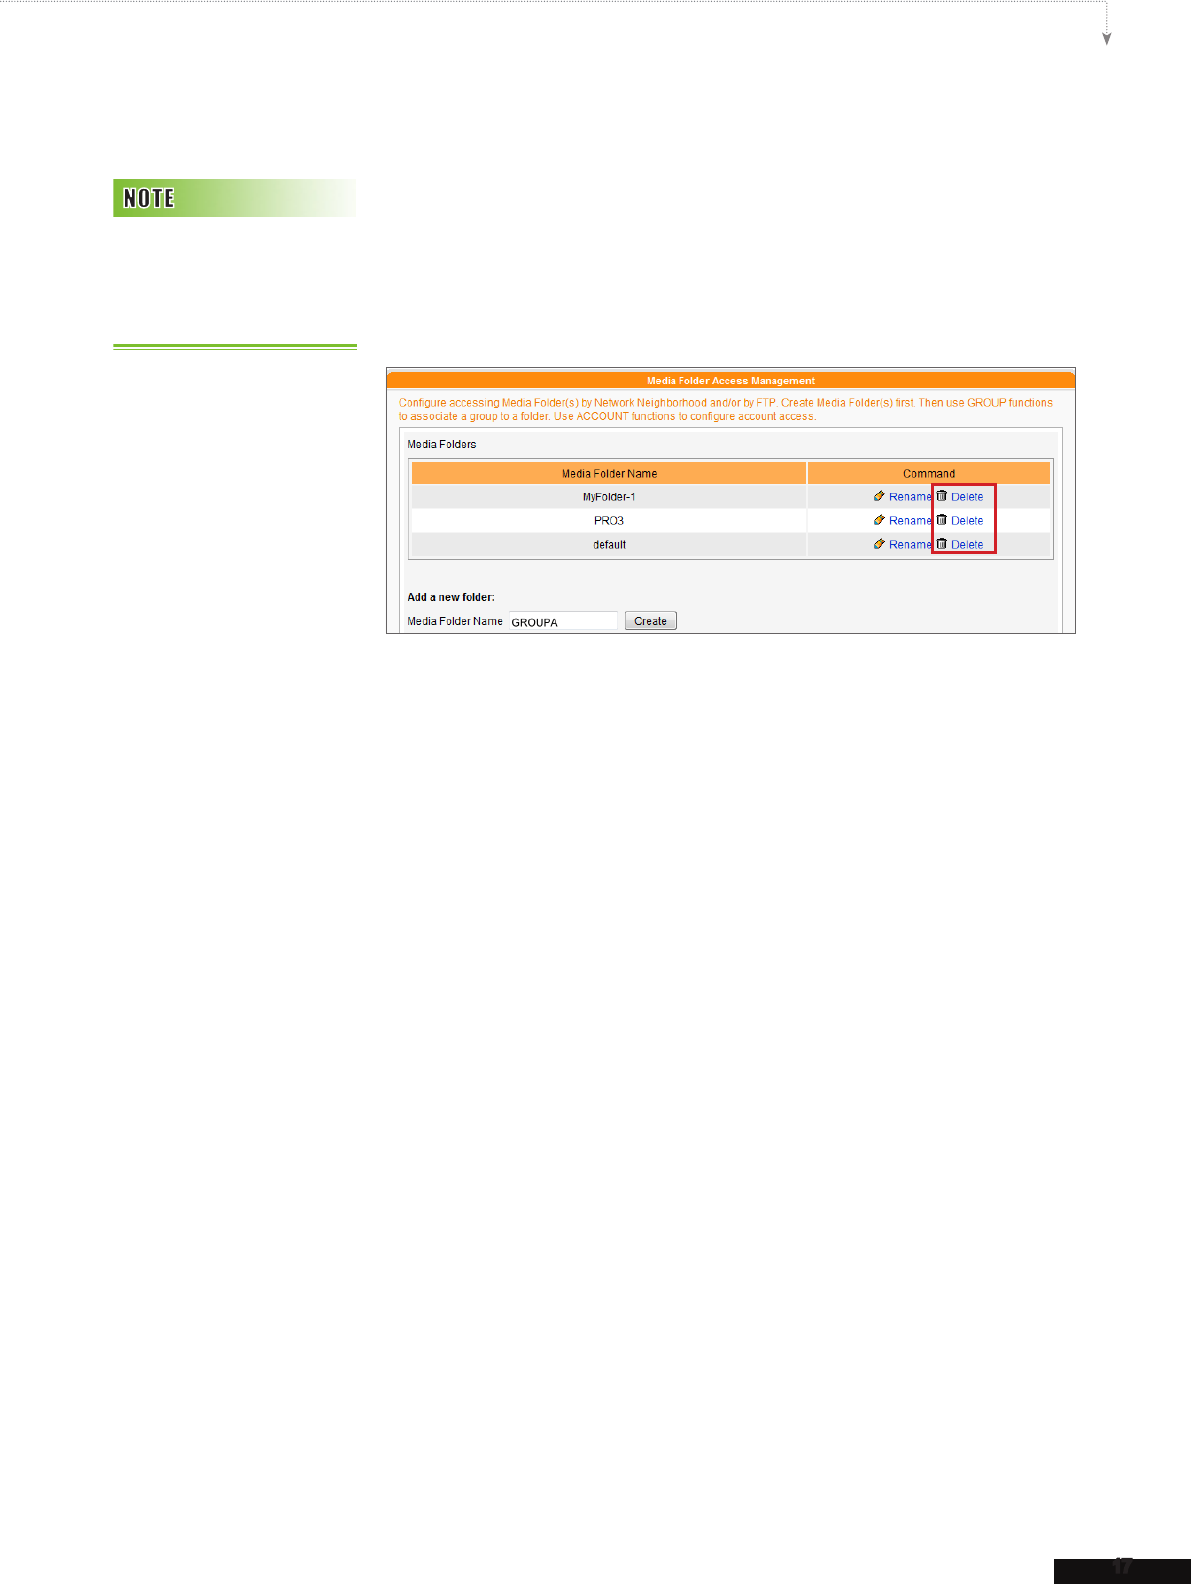
Use the following steps to delete a folder.
1. Login CMS server with the account which is allowed to access the
function: “ACCESS CONTROL > FOLDER MANAGEMENT”.
2. Click [ACCESS CONTROL] on the main page, and select the sub-
page, “FOLDER MANAGEMENT”.
3. Locate the “Media Folder Name” of the folder that you would like
to delete. Then, click [Delete] on the command column.
You cannot delete the “de-
fault” folder and those folders
which are associated with
any groups.
18
CMS
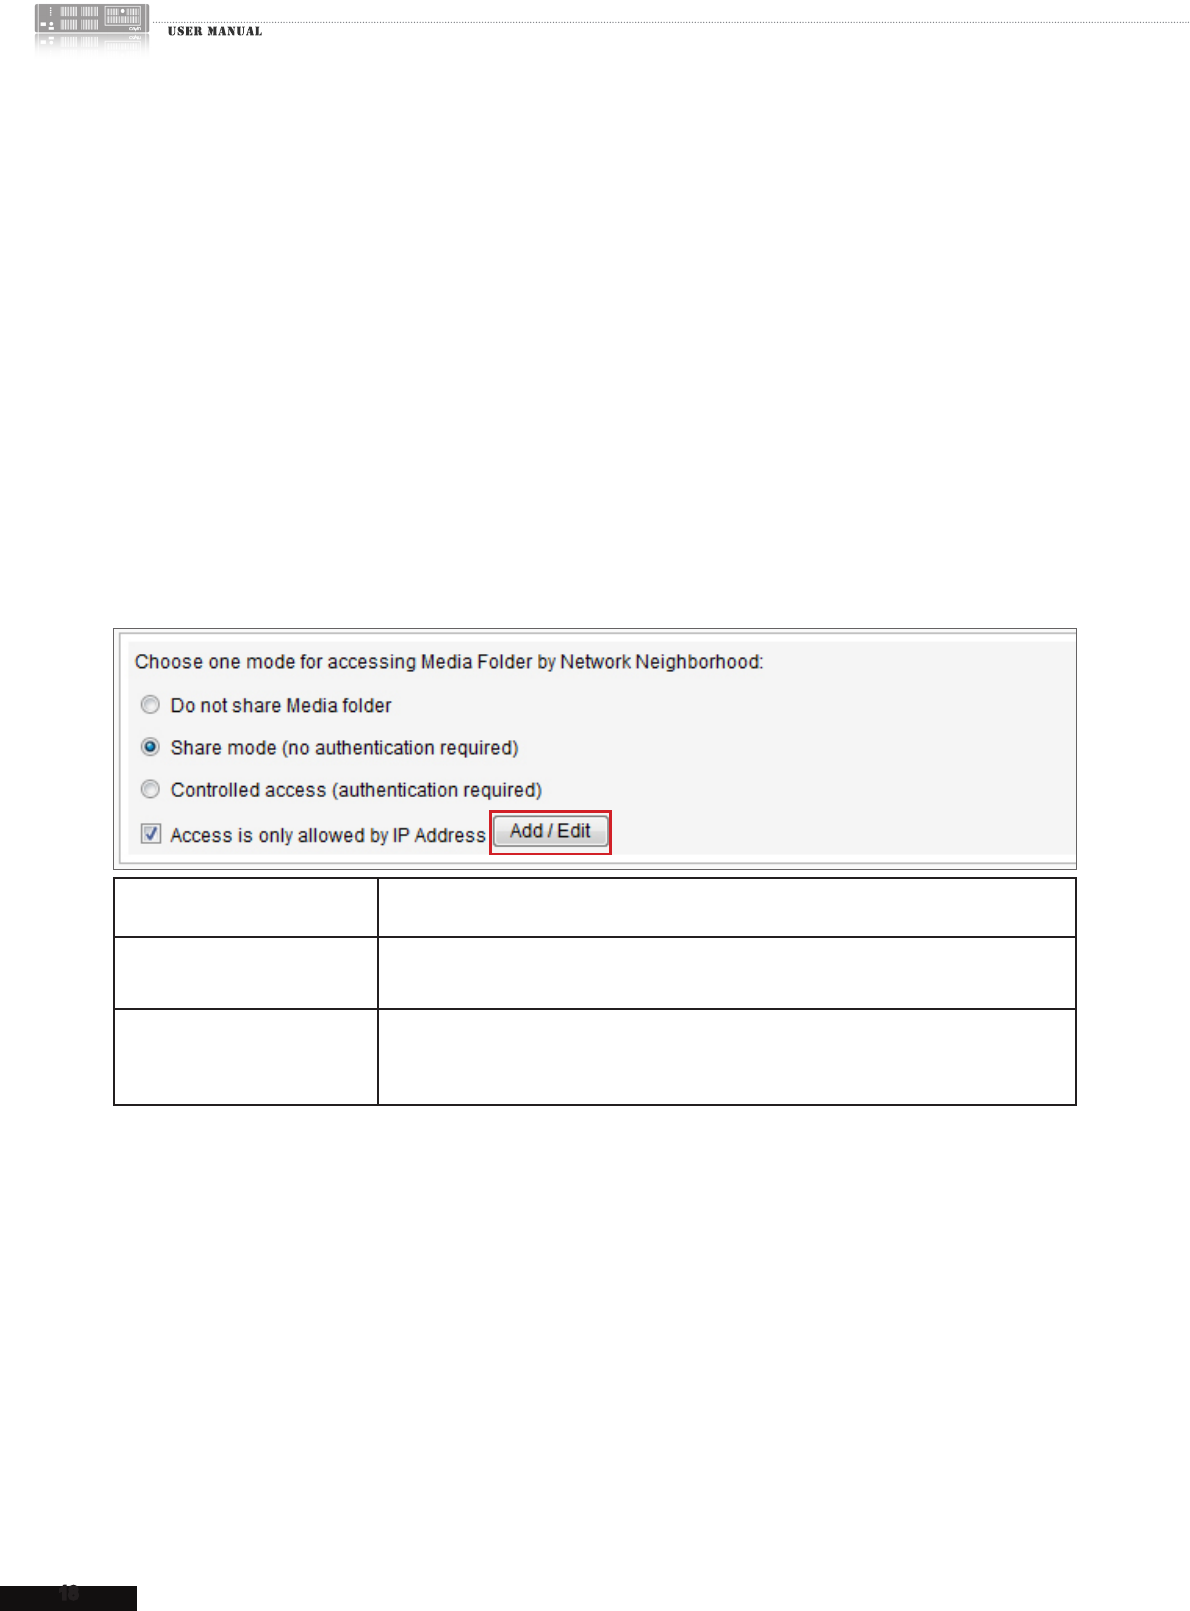
2-1-2 Assign Folder Access Mode
You can assign the access mode of all folders in CMS, so that users can access folders with suitable
authorization.
You can select one suitable access mode from the following table and upload contents by “Network
Neighborhood” or FTP.
1. Login CMS server with the account which is allowed to access the function: “ACCESS
CONTROL > FOLDER MANAGEMENT”.
2. Click [ACCESS CONTROL] on the main page, and select the sub-page, “FOLDER
MANAGEMENT”.
3. Select a suitable access mode.
Do not share Media folder No one can access the Media Folder
Share mode
(no authentication required)
All users can access the Media Folder without authentication.
Controlled access
(authentication required)
Only authorized users can access the Media Folder. A user can only access those
folders which are associated with the groups which he is able to manage. Users
need to login with username and password.
19
CMS USER MANUAL
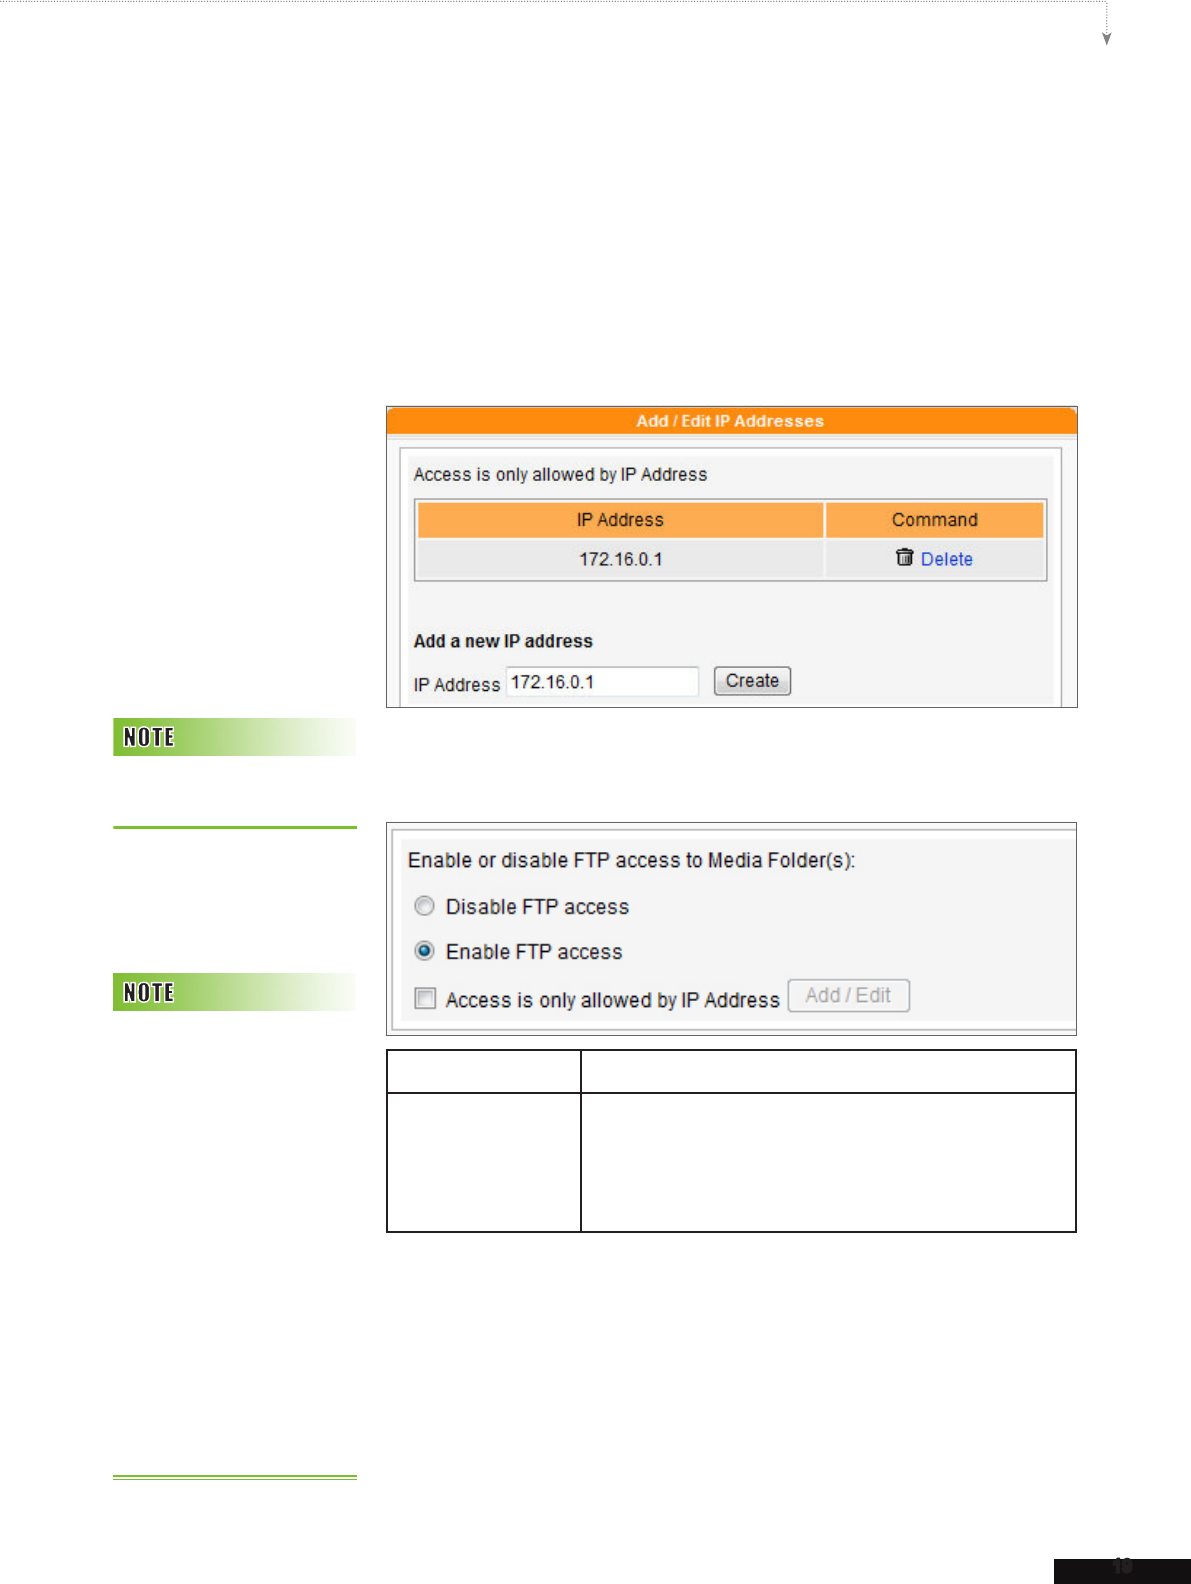
Access is only allowed by specied IP Address:
Enable this function in order to allow access from a particular IP address
or subnet in the “share mode” or “controlled access mode”.
Click [Add / Edit] and you will see a pop-up window.
Enter the IP address or partial IP address, e.g. type “172.16.0.1” to
allow access only from this IP address, or type “172.16.0.” to allow
access from all computers in this subnet.
4. If you would like to access Media Folder by FTP, please click “Enable
FTP access”.
Disable FTP access Users can not access Media Folder by FTP.
Enable FTP access
Users can access Media Folder by FTP. Users who want
to use FTP service should have the accounts which are
allowed to access the function, “Media Folder access
by FTP”. Users have to login with username and password
before using it.
Access is only allowed by specied IP Address:
Enable this function, you can allow access from a particular IP address
or subnet in the “share mode” or “controlled access mode”.
Click [Add / Edit] and you will see a pop-out window.
Enter the IP address or partial IP address, e.g. type 172.16.0.1 to allow
access only from this IP address, or type 172.16.0. to allow access from
CMS does not support anon-
ymous FTP.
Encoding Type of File Name:
CMS and SMP all use
UTF-8 as the encoding of
le names. If you include
any non-English character
in the
le name, we suggest
you upload les in a PC with
Windows XP or the latest OS
and the FTP software need to
support UTF-8, too. If you do
not know whether your OS
or software support UTF-8 or
not, please only use English
or numbers as the le name,
such as “abc01.mpg”.
20
CMS
all computers in this subnet.
Click [Save] on the bottom to save the settings, and then click [Apply]
on the left column so that those settings will come into effect.
2-1-3 Upload Files to CMS Server
After conguring the Media Folder and the access mode, you can
choose to use one of the following methods to upload your les to a
CMS server.
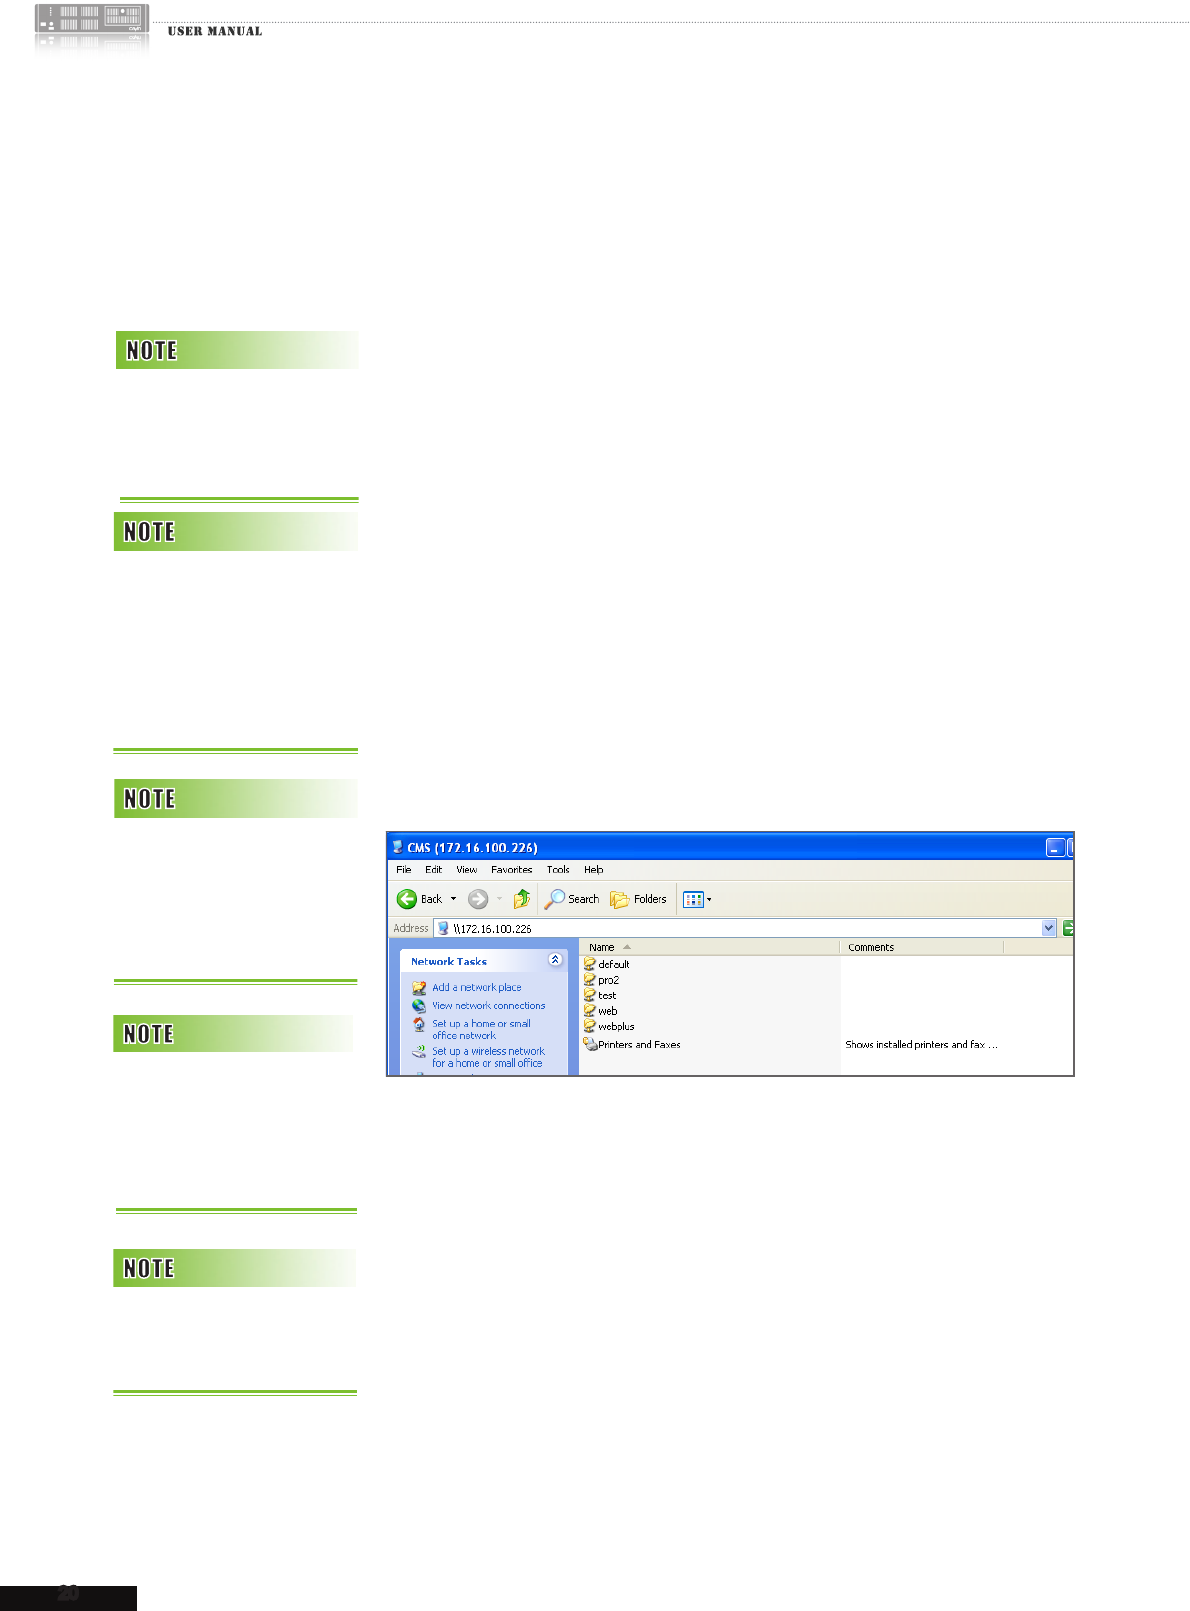
Access Media Folder by Network Neighborhood
You can use the File Explorer or Network Neighborhood in your PC and
enter \\cms.ip.address (ex. \\10.1.2.3) in the address bar. Then, you can
see the Media Folder you created and start to manage it.
You can also use CAYIN Device Seeker to open the folder if CMS
and your PC are in the same LAN. Please refer to “1-5 Start and
Login” for the usage of CAYIN Device Seeker.
Use FTP Client Software
If you enable FTP access to Media Folder(s) in 2-1-2 section,
you can choose your familiar FTP client software in your PC. After
entering username and password, you can upload/delete les in
Media Folder(s).
You can only download 8192
les and 256 folders in
maximum for each mapping
group.
You can choose to manage
Media Folder(s) by FTP or
Network Neighborhood. You
will access the same Media
Folder and upload/download
the same data either way.
If you set the access mode
as “Controlled Access”,
you need to enter username
and password while building
the connection.
The maximum single le
size in Media Folder is 2G
Bytes. SMP player cannot
synchronize any le bigger
or equal to 2G Bytes
.
We strongly suggest you use
the FTP client software which
supports UTF-8 encoding.
21
CMS USER MANUAL
2-2 Create and Manage Groups
You can group players for easy management. Assign a folder to a group;
then, players in the same group can automatically retrieve information
and synchronize contents in the corresponding folder located in CMS.
In many cases, Group is easy and sufcient for player management. If
you need one more layer for your player management, you can consider
Aggregation which will be introduced in Section 2-3.
Group and aggregation
names are case sensitive
and have to be in English.
22
CMS
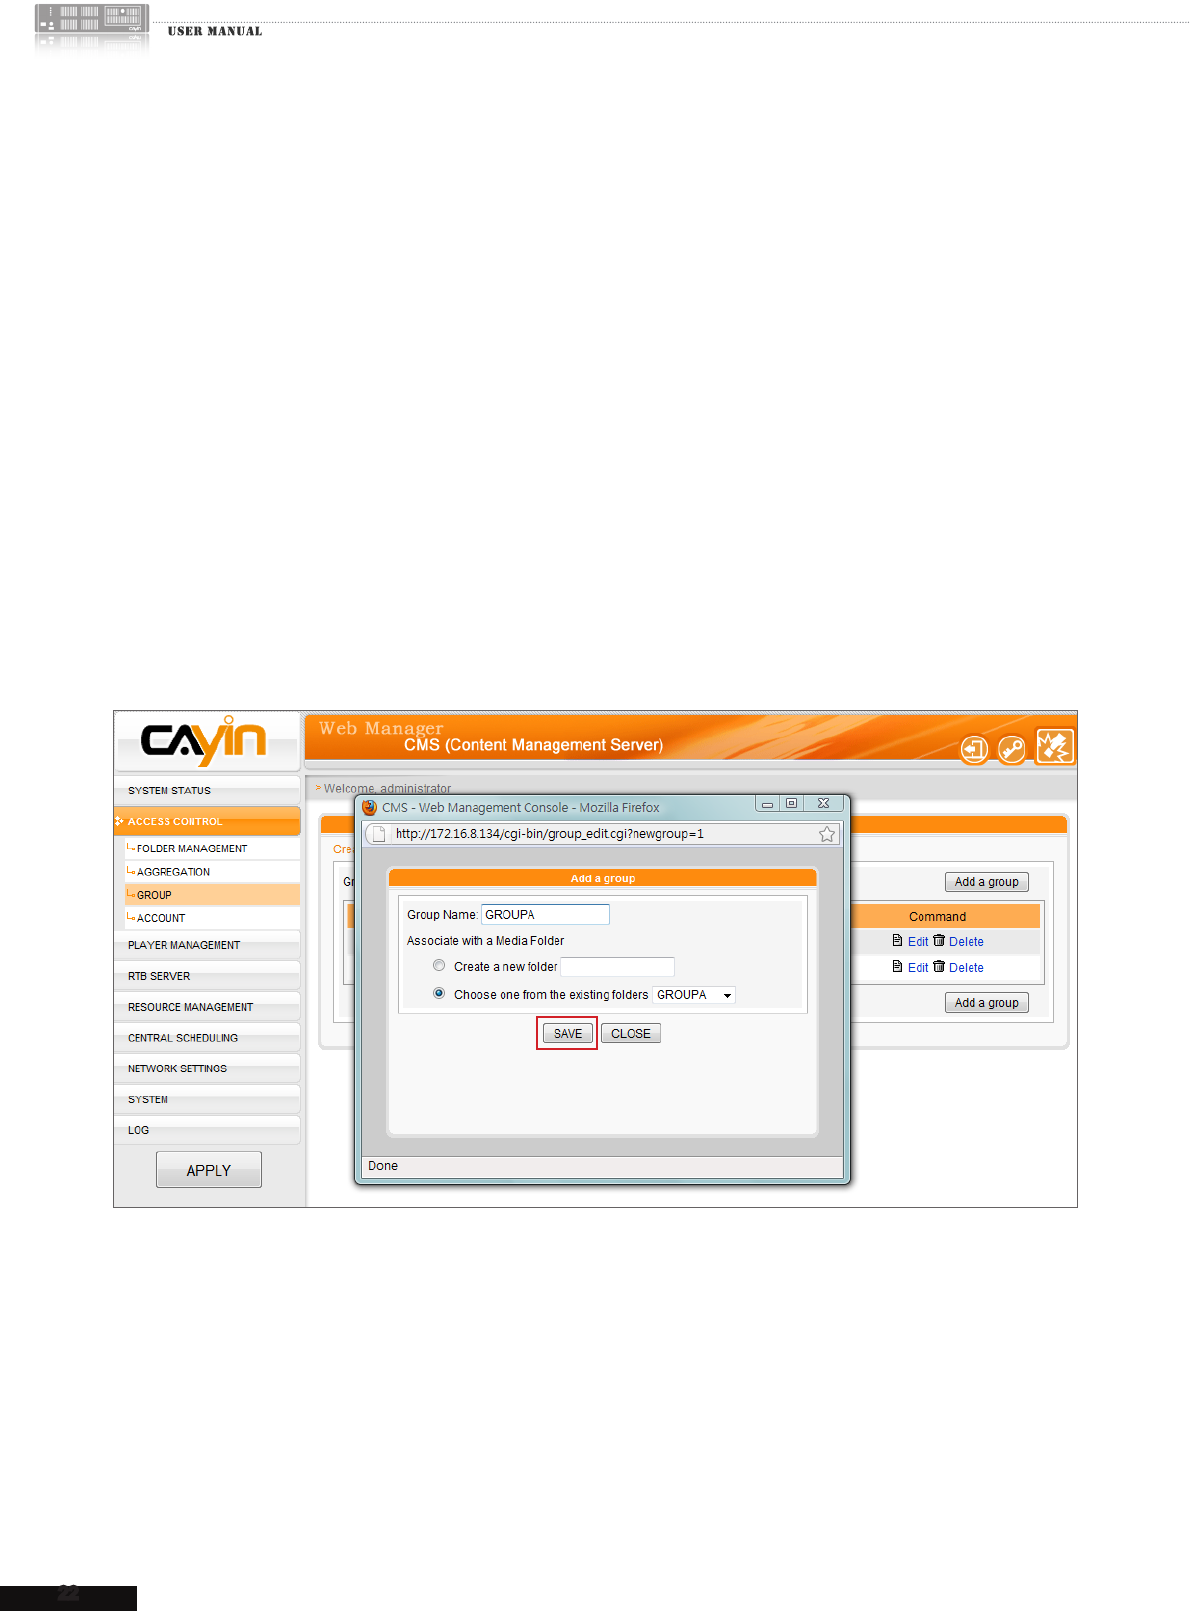
2-2-1 Add Group
Please follow the below steps to add a new group.
1. Login CMS server with the account which is allowed to access the function: “Access Control >
Group”.
2. Click [ACCESS CONTROL] on the main page, and select the sub-page, “GROUP”.
3. Click [Add a group] and you will see a pop-up window. Enter a group name in the “Group
Name” box. Select “Create a new folder” and enter a folder name. Click [SAVE]; then, you
just create a new group and a new folder.
4. If you have already created a folder in CMS server, you can click “Choose one from the
existing folders” and select one folder in the drop-down menu. Click [SAVE] to complete the
procedure.
23
CMS USER MANUAL
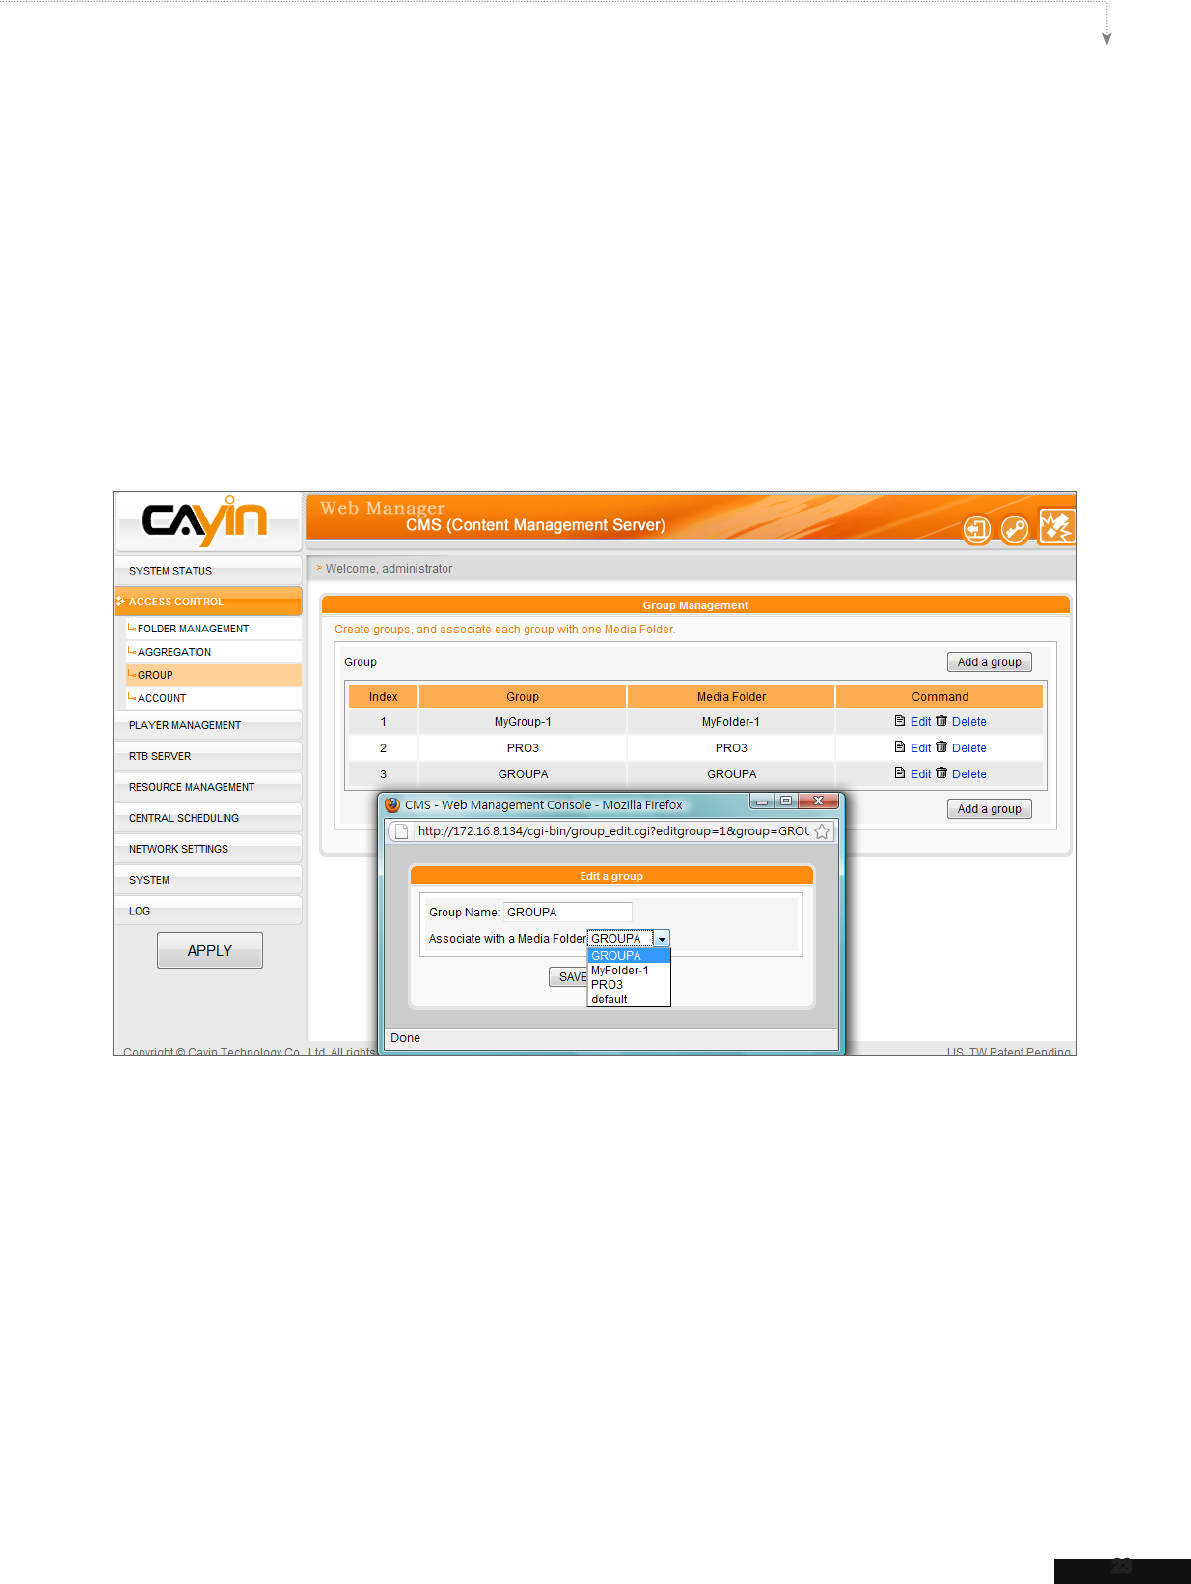
2-2-2 Edit Group
You can modify the settings of “Group”. Please follow below steps:
1. Login CMS server with the account which is allowed to access the function: “ACCESS
CONTROL > GROUP”.
2. Click [ACCESS CONTROL] on the main page, and select the sub-page, “GROUP”.
3. Locate the group name and click [Edit] in the “Command” column. Then, you can change the
settings in the pop-up window.
4. Click [SAVE] and go back to the main page. Click [APPLY ] and complete the setting.
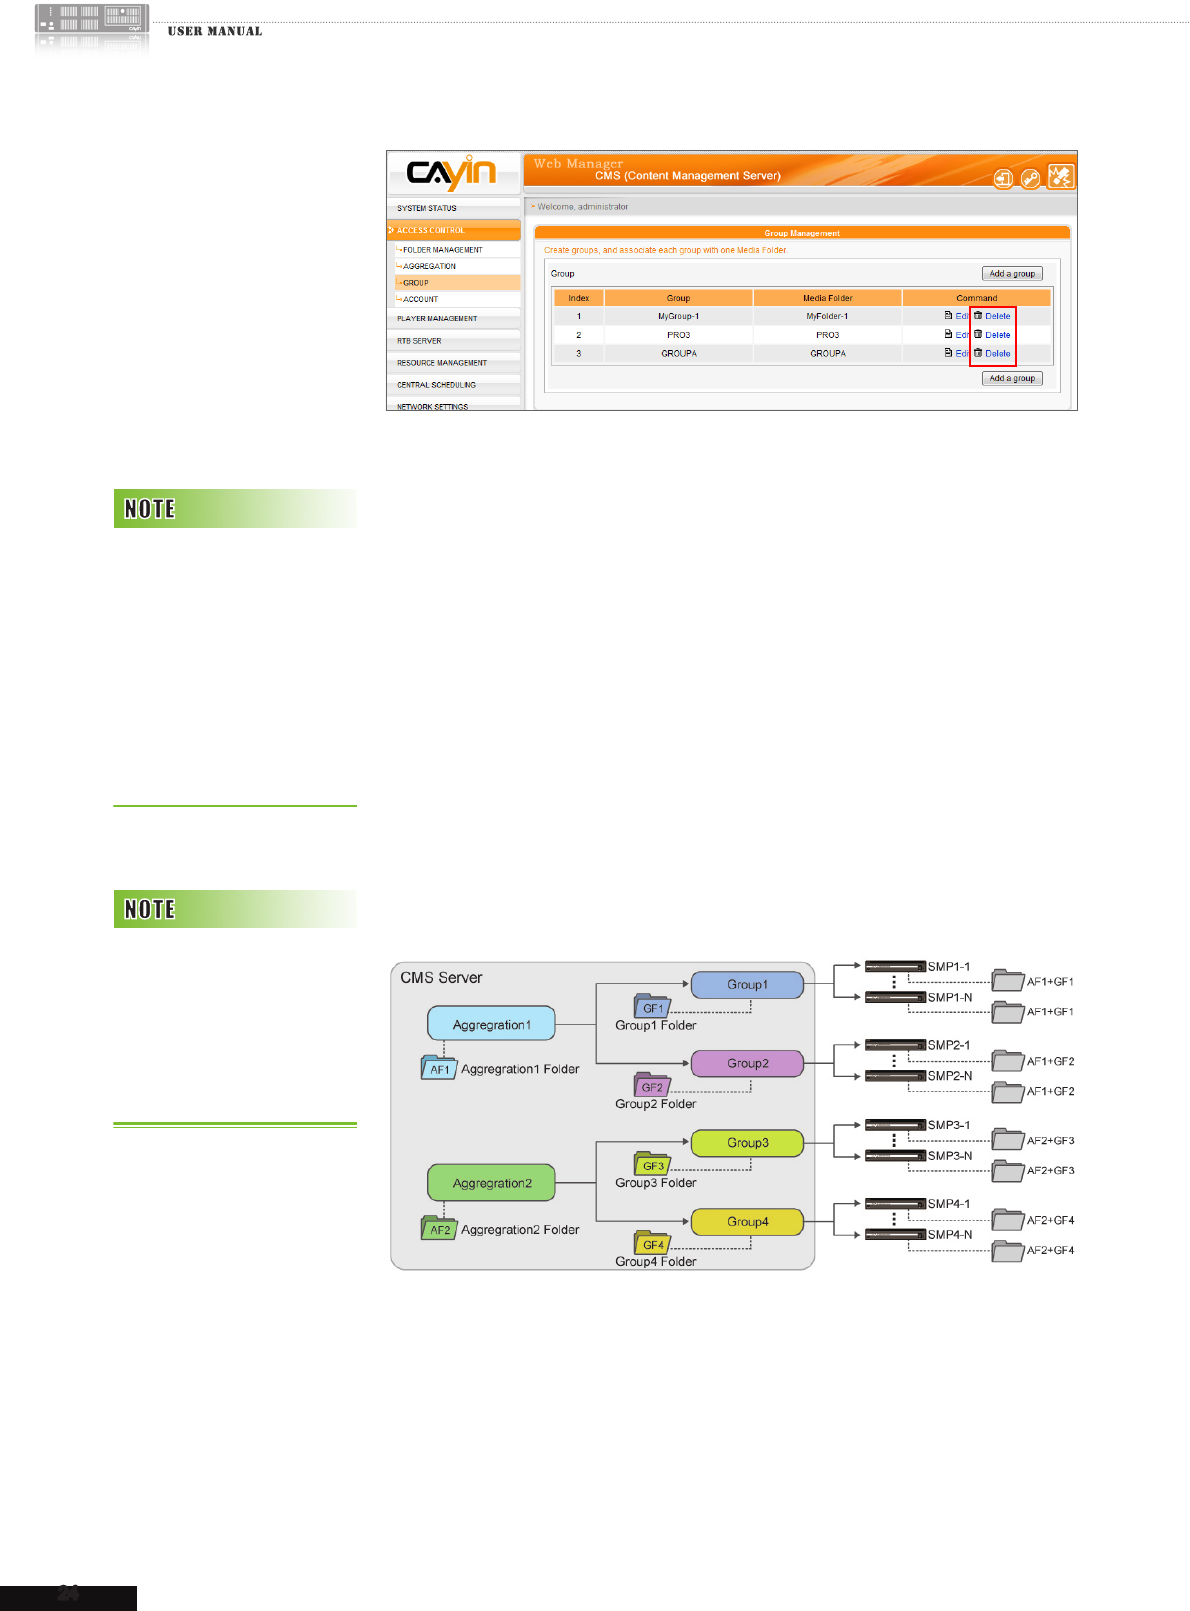
2-2-3 Delete Group
You can remove those groups which you do not need anymore.
1.
Login CMS with the account which is allowed to access the function: “ACCESS CONTROL > GROUP”.
2. Click [ACCESS CONTROL] on the main page, and select the sub-page, “GROUP”.
3. Locate the group name and click [Delete] in the “Command” column. Then, you can delete the
group.
24
CMS
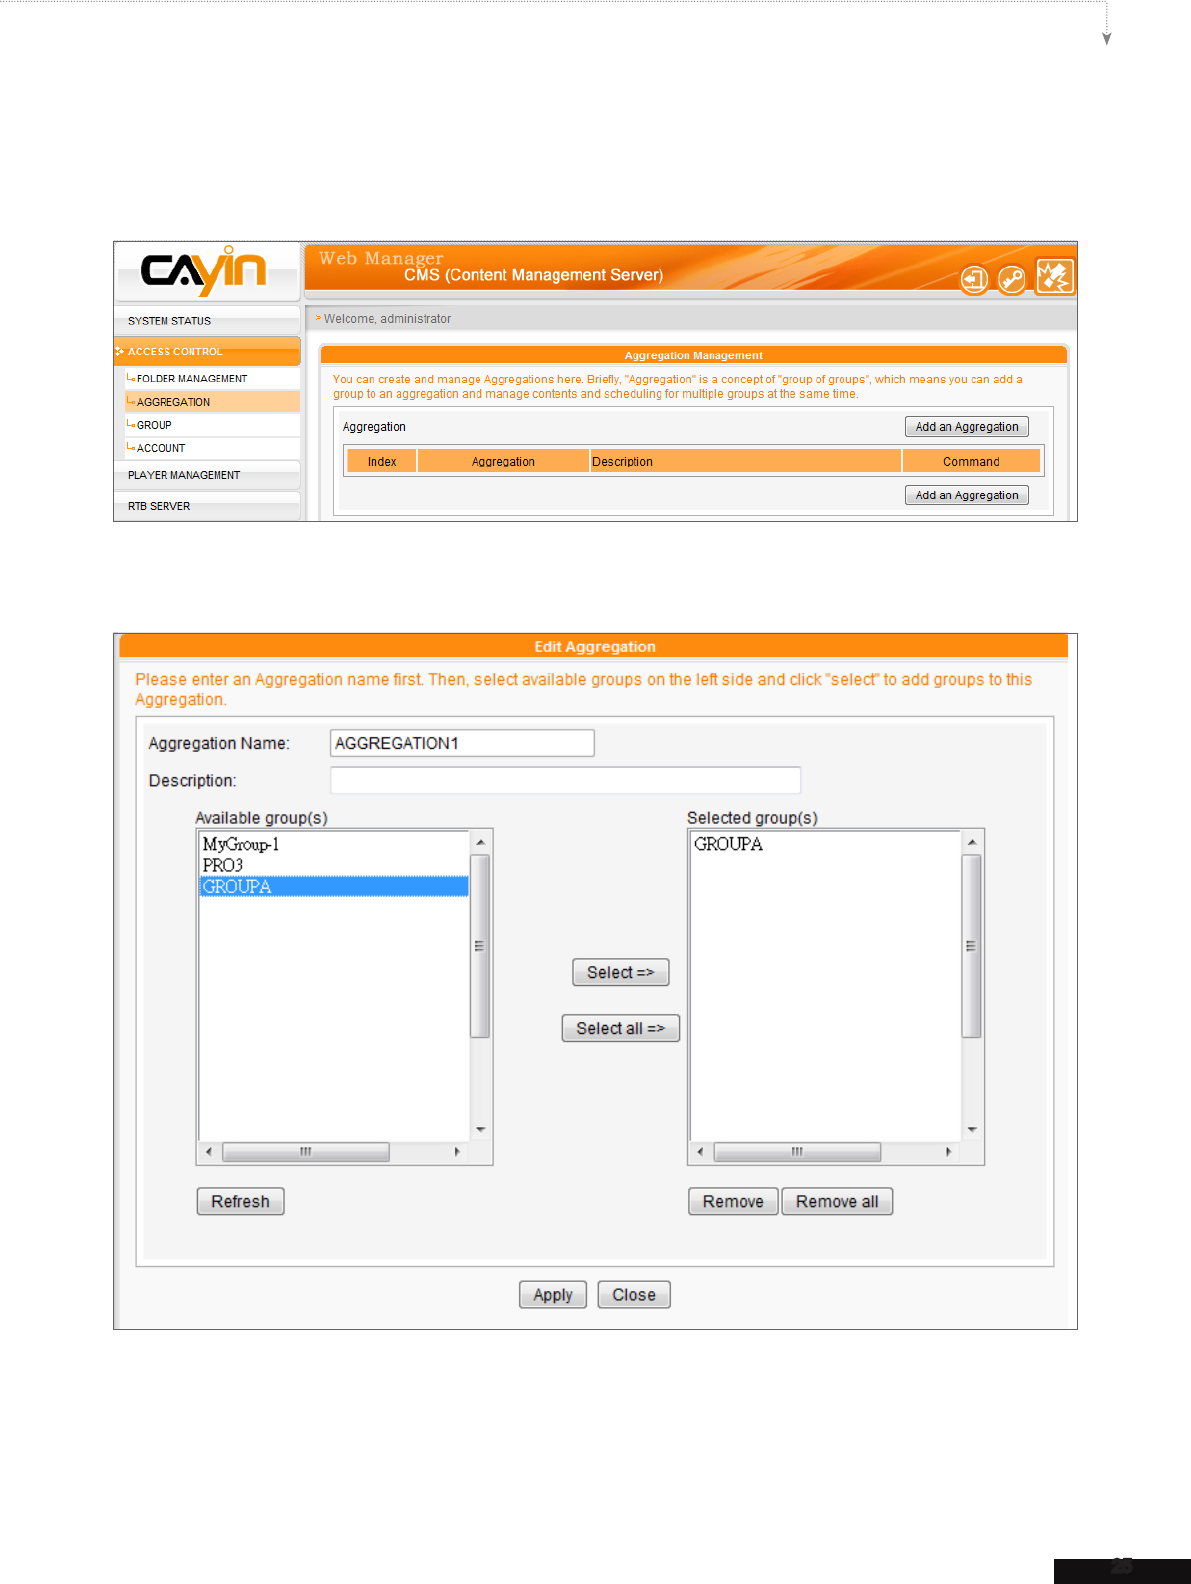
2-3 Aggregation
You can create and manage “Aggregation” here. Briey,
“Aggregation” is a concept of “group of groups”, which means you
can add a group to an aggregation and manage contents and scheduling
for multiple groups at the same time. For example, if you assign player1
to group1, and group1 to aggregation1, the player1 will playback the
les in group1 and aggregation1 according to the priority you set. This
is convenient for users who want players within different groups play the
same multimedia les. You can add / edit aggregation here to help you
manage multiple groups in a fast and exible way.
If the schedule of aggregation
overlaps with schedule of
group, SMP player will play
the group schedule by default.
You can also congure the
aggregation “High Priority”
option to overide group
scheduling when setting up
the schedule.
You cannot include one group
into different aggregations. If
you do not want the aggregation
administrator to access their
groups,
please refer to chapter
2-4 for further information.
25
CMS USER MANUAL
1. Login CMS with the account which is allowed to access the function: “ACCESS CONTROL >
AGGREGATION”.
2. Click [Add an Aggregation] button and you will see a pop-up window.
3.
Name your aggregation here and choose groups you want to add in the aggregation. Click
[Select=>] to move them to the “select” column. You can also click [Select all=>] to choose all
available groups.
26
CMS
4. Click [Refresh] to get the latest groups if needed. If you want to remove selected groups, please
click [Remove] or [Remove all].
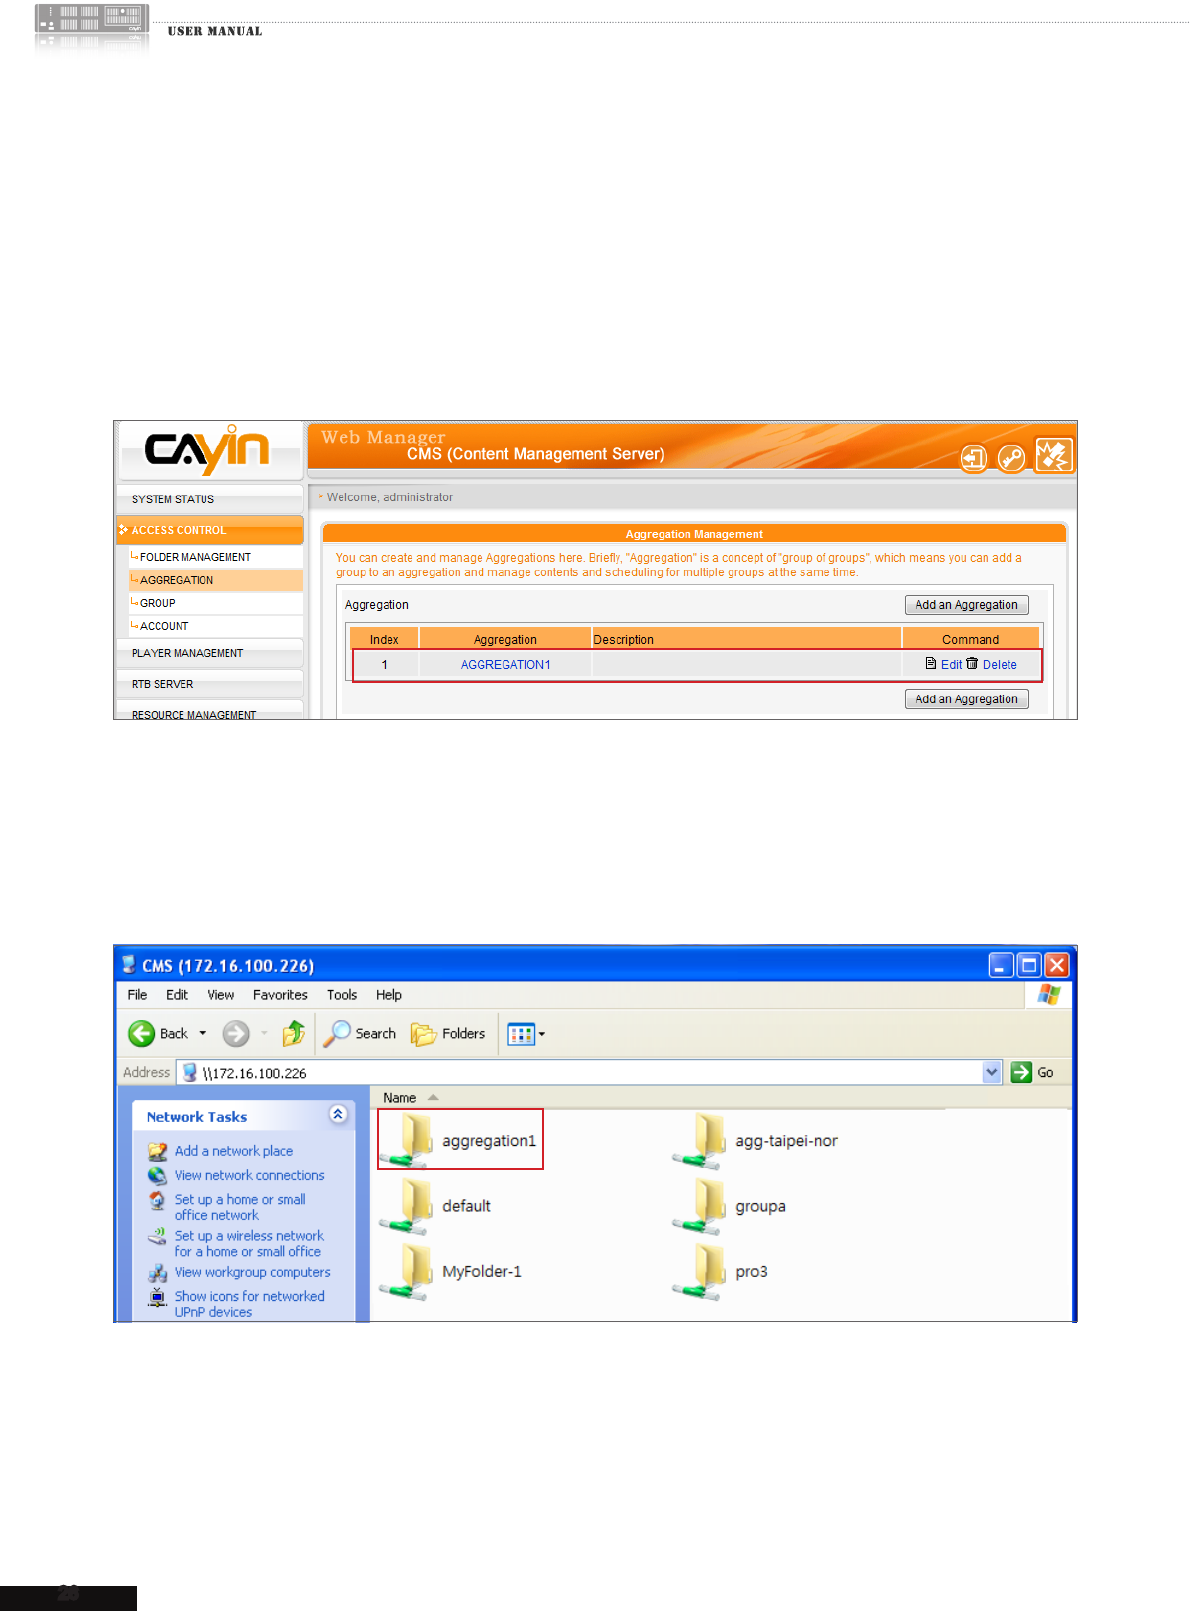
5. Click [Apply] to adopt the change and go back to “aggregation” page.
6. Now you can see the newly added aggregation in the list. You can click [Edit] to make changes of
your aggregation or [Delete] to take out the selected aggregation.
7. After aggregation is created, system will create a Media folder in Aggregation’s name. Every
les will be stored in the aggregation’s folder. SMP players within the aggregation’s group list will
download those les to their own local Media Folders.
27
CMS USER MANUAL
2-4 Create and Manage
Accounts
In CMS server, you can create accounts for different users and assign
appropriate management authority to each account. Please follow the
steps to add a new account.
1. Login CMS server with the account which is allowed to access the
function: “ACCESS CONTROL > ACCOUNT”.
2. Click [ACCESS CONTROL] on the main page, and select the sub-
page, “GROUP”.
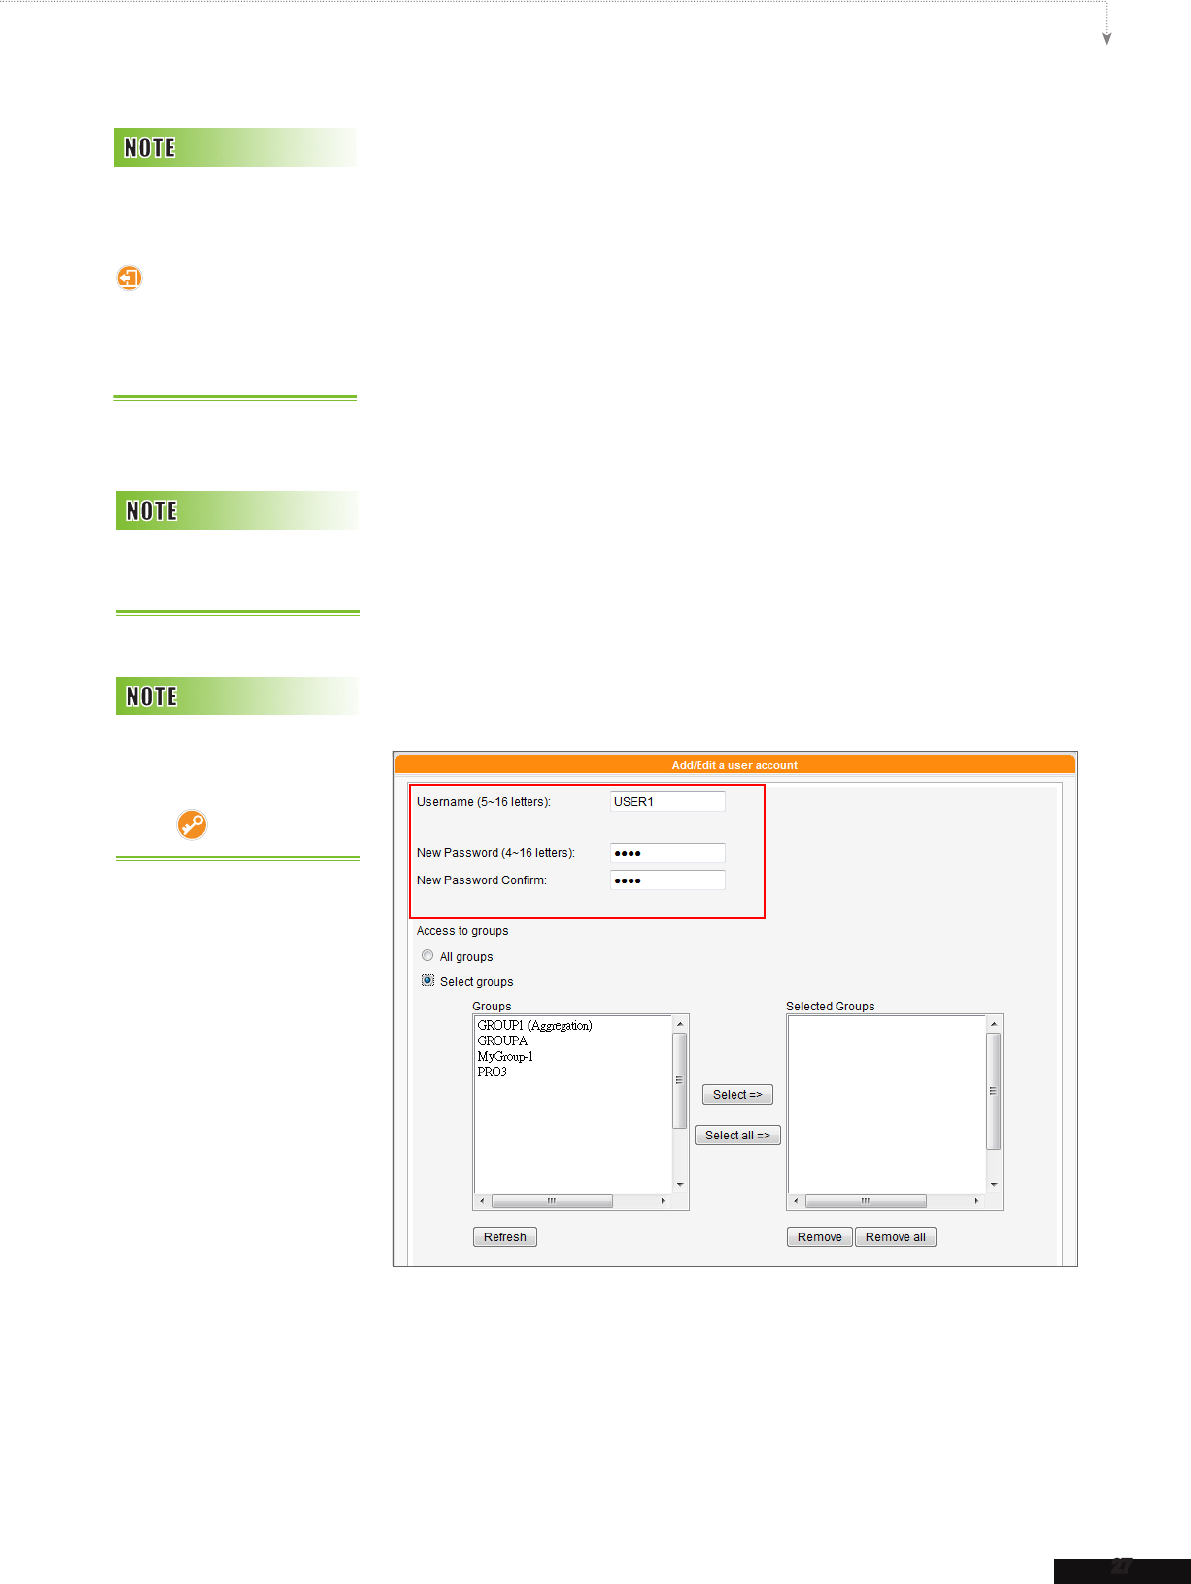
3. Click [Add a new account] and you will see a pop-up
window. Enter the account name in the “Username” tex t
box. Enter a password in the “New Password” text box and
enter it again in the “New Password Confirm” text box.
box.
If you want to login Web Man-
ager with another account,
you can Click the [Logout
] icon to leave the current
page. Then, you can use
another account to login Web
Manager again.
Username has to contain
lower case English character.
You can change the pass-
word of current account by
clicking the [Change pass-
word ] icon.
28
CMS
4. In the “Access to groups” area, you can assign the management
authority of group(s) to this account. If you authorize this account to
manage all folders in this CMS server, please select “All groups”.
5. If you want this account to manage only selected folders, please
enable “Select groups”. All groups in this CMS server will be listed
in the “Groups” area on the left-hand side. You can select groups
and click [Select =>]; then, all selected groups will be duplicated
to the right-hand side, “Selected Groups”. This account can only
manage those folders which are in the “Selected Groups”.
6. To cancel selected items in the right column, you can select those
items and click [Remove] to delete them. You can also click
[Remove all] to delete all selected items.
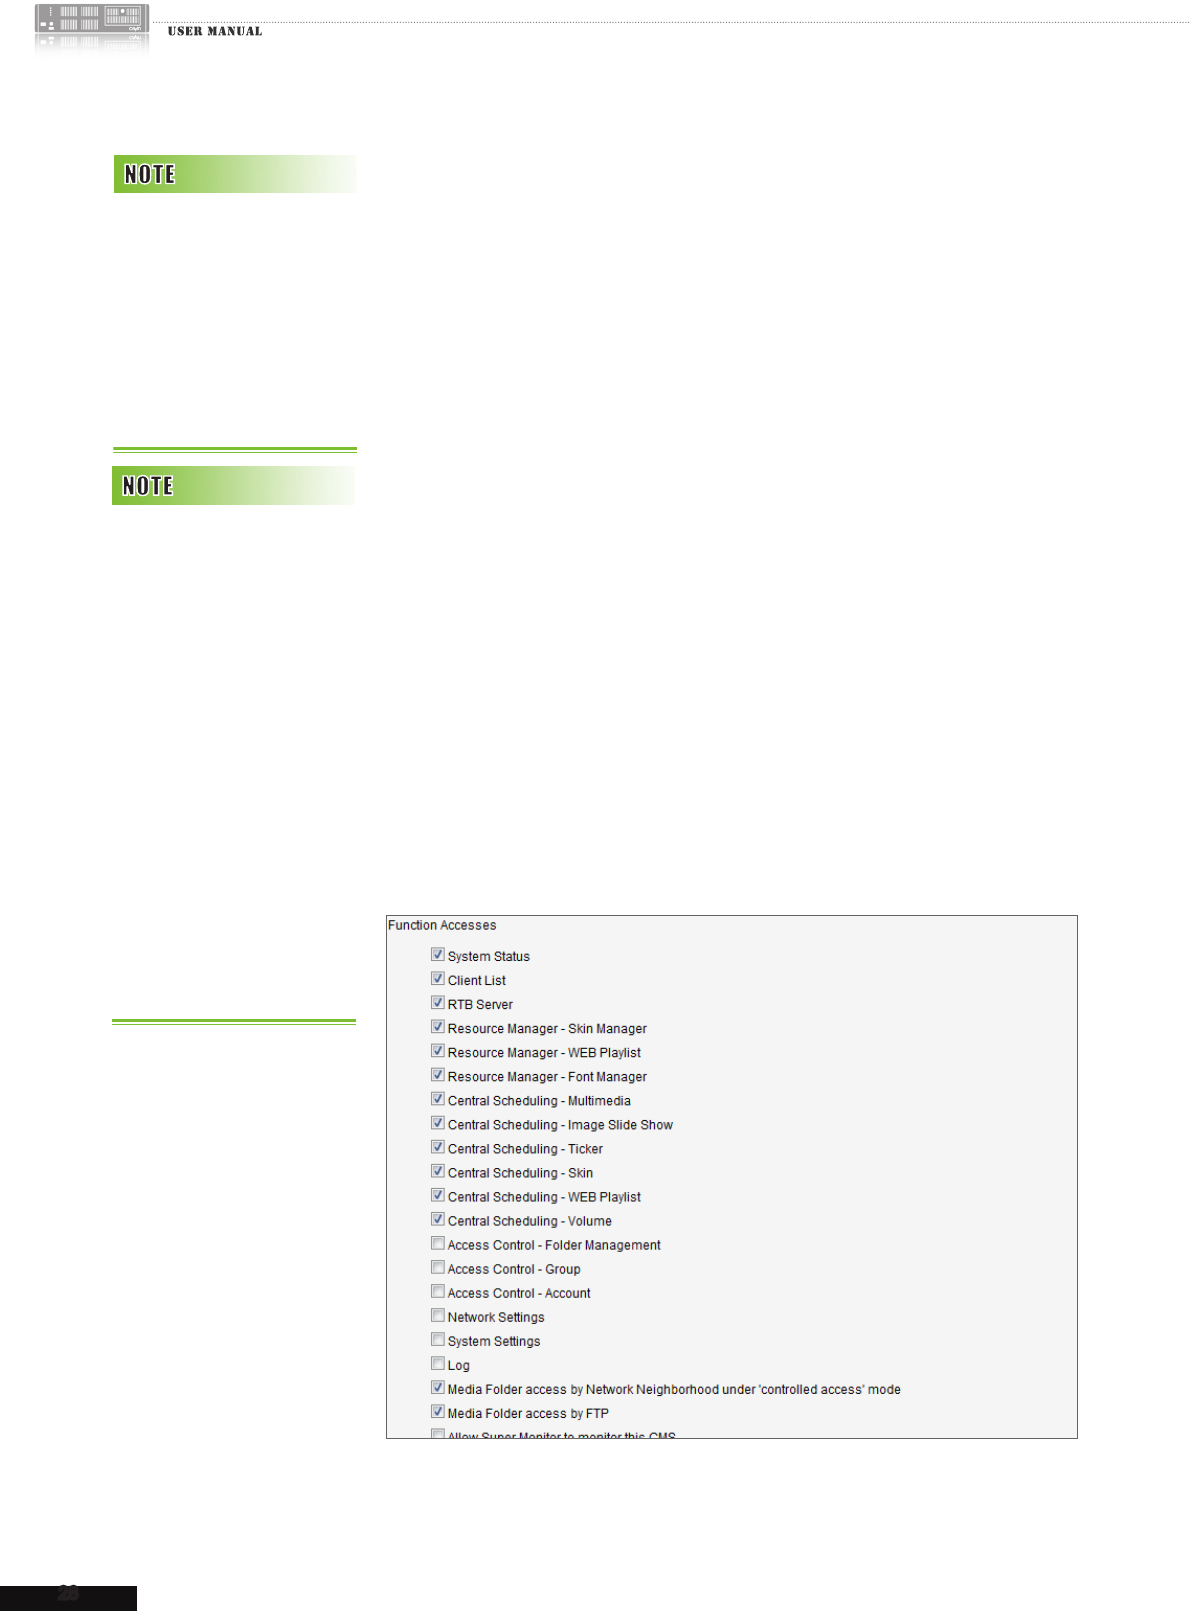
7. Finally, in the “Function Access” area, choose those management
activities this account is authorized to do. If you do not enable any
function for this account, the user with this account cannot login Web
Manager, but still can synchronize contents with the CMS server.
8. Click [SAVE] and [CLOSE] to go back to the main page. Then, click
[APPLY ] so that those settings will come into effect.
There are three default ac-
counts in a CMS server: ad-
ministrator, webadmin, and
smbuser. “administrator” is the
default account for the main
administrator. “webadmin”
and “smbuser” are accounts
for compatible older version
of SMP players. You can only
edit the settings of these three
accounts, but cannot remove
them.
The default password for “ad-
ministrator” and “webadmin”
is “admin”; the one for “sm-
buser” is “smbuser”.
You can also assign aggre-
gation access right here. If
you choose aggregation only
but not groups belong to this
aggregation, you can only
access to the aggregation
but not groups belong to that
aggregation.

30
CMS
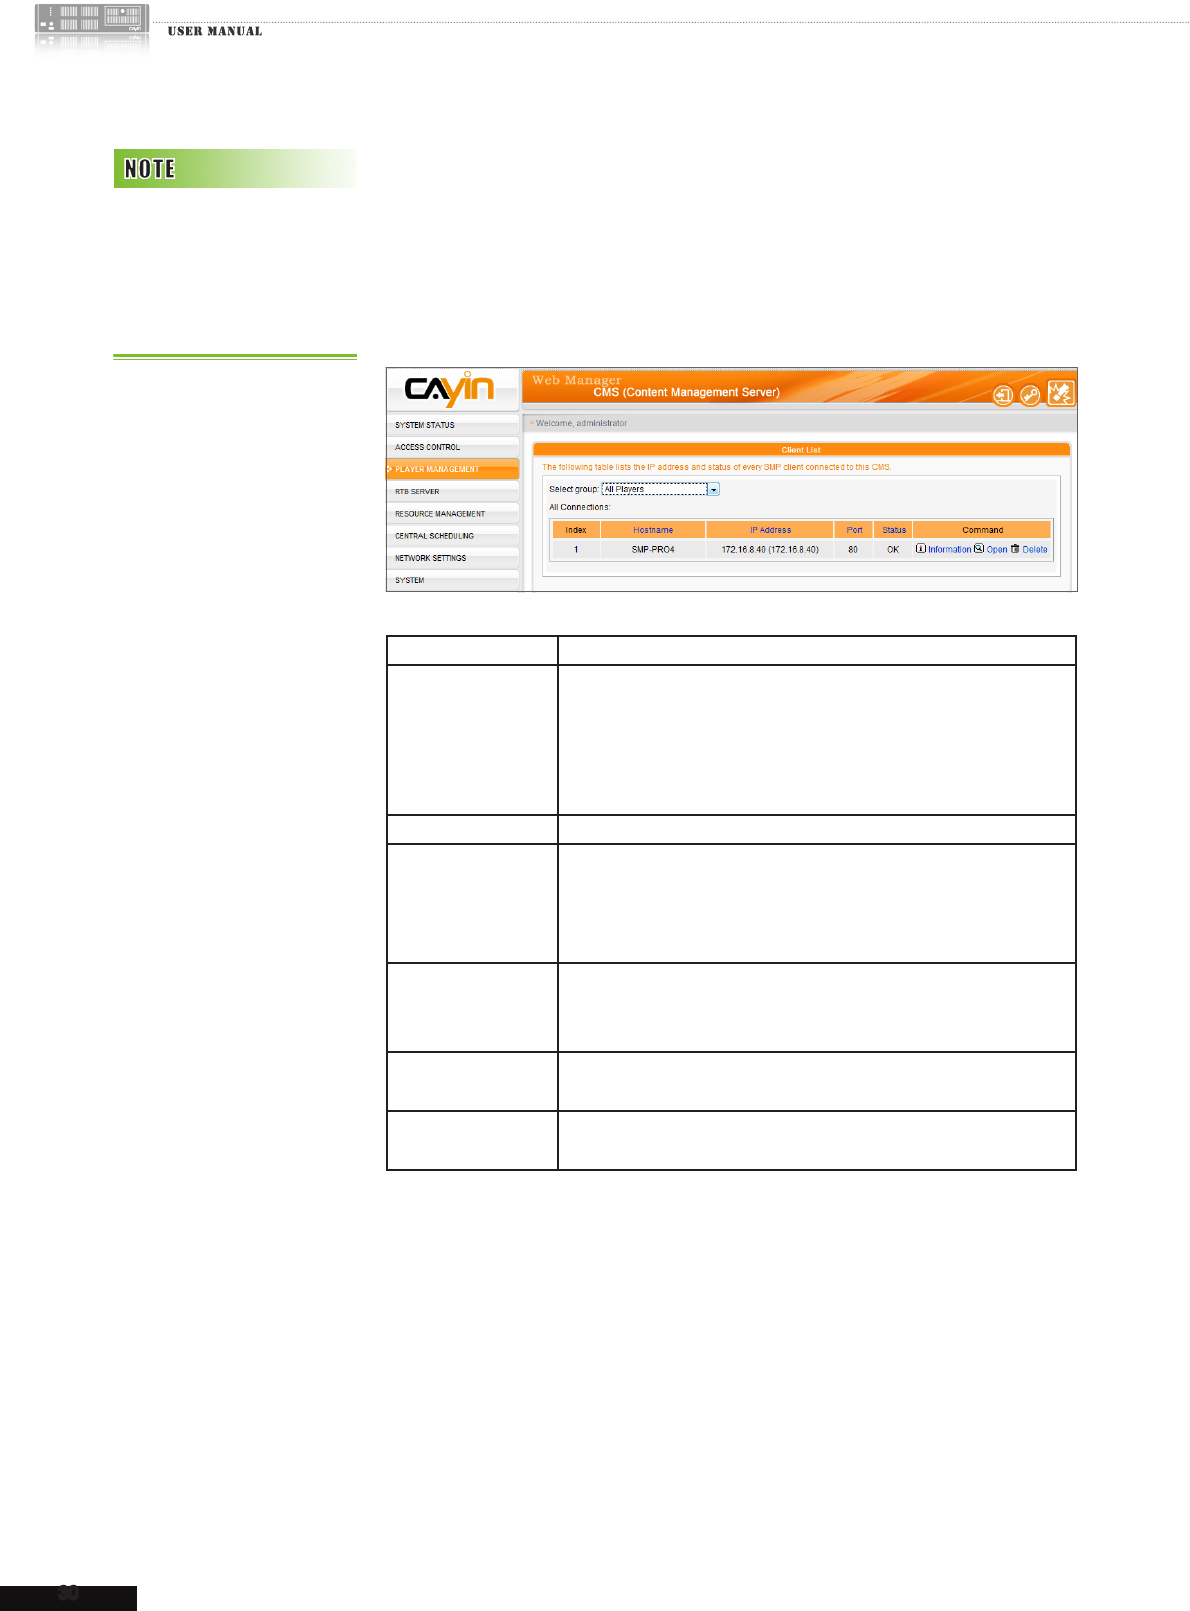
3-1 Client List
All SMP clients which connect to this CMS server will be listed here. You
can check the client’s name, IP address, web manager port number, and
status.
Host name Hostname of SMP client
IP Address The IP address of SMP client. If the SMP is deployed behind a
rewall, the rst IP will be the physical IP and the second one,
in the brackets, will be the virtual IP (the IP that SMP really
owns). Other than the above situation, the rst and second IP
addresses are usually the same.
Port The Web Manager’s port number
Status “OK” means the SMP client functions normally; “Fail” means
the SMP client no longer sends connection signals to the
server. The “Fail” status usually occurs when the network is
disconnected or the SMP client is shutdown abnormally.
Command
(Information)
You can preview the detailed information for each SMP player
that belongs to the CMS server here, including model, rmware
and other descriptions.
Command
(Open)
Open a browser to connect to SMP’s Web Manager. The pro-
gram will try to connect to the physical IP address here.
Command
(Delete)
Manually remove the item
When you move the mouse cursor on top of the player item, you can see
the tool-tip shows the last heart-beat and register time of that player.
Players in a special Group,
“Players without group info.”
belong to old versions, so
they do not have the Group
information.

4. RTB Server
32
CMS
CMS server is equipped with the RTB server function only when you
purchase a CMS server installed with CAYIN’s multimedia streaming
card. In RTB SERVER page, you can assign each media input to a
particular
channel and add/edit streaming clients. Please follow the
steps:
1. Login CMS server with the account which is allowed to access the
function: “RTB Server”. Then, switch to “RTB SERVER” page.
2. Enable media inputs and assign each input to a particular channel.
3. Select a signal format (NTSC/PAL), codec and bandwidth based on
your own TV signal.
4. Click [Add/Edit] and assign streaming modes of players. Please
refer to the following table for detailed information.
Broadcast All clients in the network area will receive streaming contents.
Multicast Enable multicast and send streaming packets to those players
which enable this function. Multicasting IP address ranges between
224.0.0.1 and 239.255.255.255.
Unicast Send signals to the player with the particular IP address. To add a
unicast client, please enter a client’s name and its IP address, and
click [Add]. This item will be added into the “Unicast” table. To
delete the existing client in the table, please locate the item and click
[Remove] in the command column.
Regarding “Please contact your dealer or CAYIN Technology for buying
this option.” Message.
There are two possibilities that you read this message on webpage:
1. You have not purchased any RTB license or video capture card from CAYIN. Please
contact our salespeople if you are interested in using real-time broadcasting function.
2. If you have purchased a model with RTB function but the purchase web page is still
shown, it may due to improper connection of the PCI Video capture card inside the
server. Please consult our reseller or distributor.
The number of media inputs
in the “RTB SERVER” page
is decided by the specication
of the multimedia streaming
card which you purchase for
the CMS server. If you see
four media inputs in the page,
it means that this CMS can
manage four streaming signal
inputs.
Do not add a client that does
not exist, because it will
waste your network band-
width. Do not send packet
to Microsoft Windows PC,
because Windows send mass
“ICMP port unreachable”
packets back to server when
process listening the udp port.
Theoretically, you can use
broadcast, multicast, and
unicast at the same time.
However, we suggest you
choose only one way to send
streaming signals unless you
are good at network proto-
cols and operation.

5.Resource Management
5-1 Skin Manager ......................................................... 34
5-2 Program ................................................................. 36
5-2-1 Create a Program Set .................................... 36
5-2-2 Edit Program: Skin ......................................... 37
5-2-3 Edit Program: Multimedia .............................. 37
5-2-4 Edit Program: Image Slide Show ................... 41
5-2-5 Edit Program: Ticker ...................................... 42
5-2-6 Edit Program: Flash ....................................... 44
5-2-7 Finish your Program ..................................... 45
5-3 Video Playlist .......................................................... 45
5-3-1 Edit Video Playlist .......................................... 46
5-3-2 Import/Export Video Playlist .......................... 47
5-4 Web Playlist ........................................................... 48
5-4-1 Edit Web Playlist ............................................ 48
5-4-2 Import/Export Web Playlist ............................ 51
5-5 Font Manager ......................................................... 52
5-5-1 Add Fonts to SMP Players ............................. 52
5-5-2 Apply Fonts in SMP-PRO Series Players ...... 53
5-5-3 Apply Font in SMP-WEB Series Players ....... 54
34
CMS
You can manage skins and playlists of SMP players in “RESOURCE
MANAGEMENT” section.
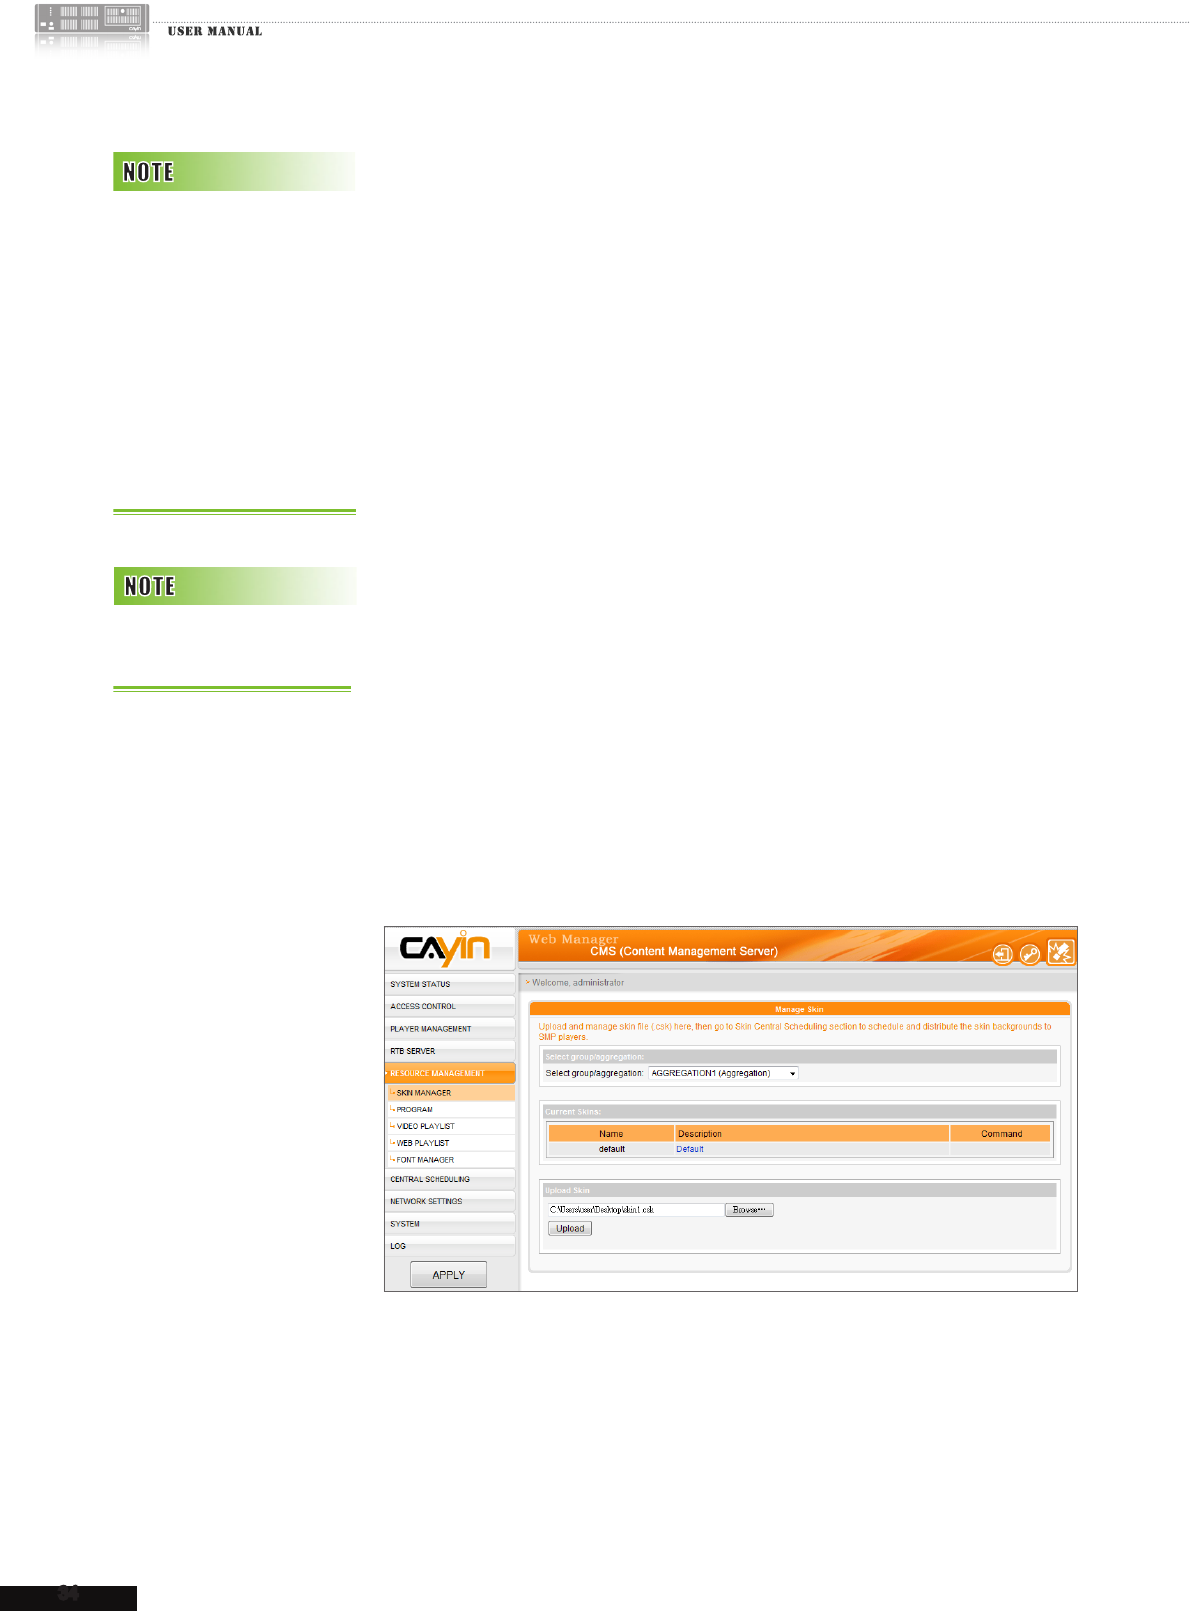
5-1 Skin Manager
For SMP player, users can change skins to have various presentations.
You can upload well-designed .csk les to a CMS server, and manage
each SMP player’s skin centrally by CMS.
Please follow the following steps to upload skin les (.csk) into the
CMS server.
1. Login CMS server with the account which is allowed to access the
function: “RESOURCE MANAGER > SKIN MANAGER”.
2. Click [RESOURCE MANAGEMENT] on the main page, and select
the sub-page “SKIN MANAGER”.
3. Select [Group/Aggregation] and click [Browse...] to select a skin
le (.csk). CMS will apply the skin to players in the selected group or
aggregation.
4. Click [Upload] to complete uploading a skin.
The resolution of the skin and
the display set in the SMP
player should be the same.
You can produce a skin le
(.csk) which supports multi-
ple resolutions. Please refer
to the user manual of SMP
players for detailed informa-
tion regarding the usage of
CAYIN’s Skin Editor.
SMP-WEB player use Skin
via “Program” function.
35
CMS USER MANUAL
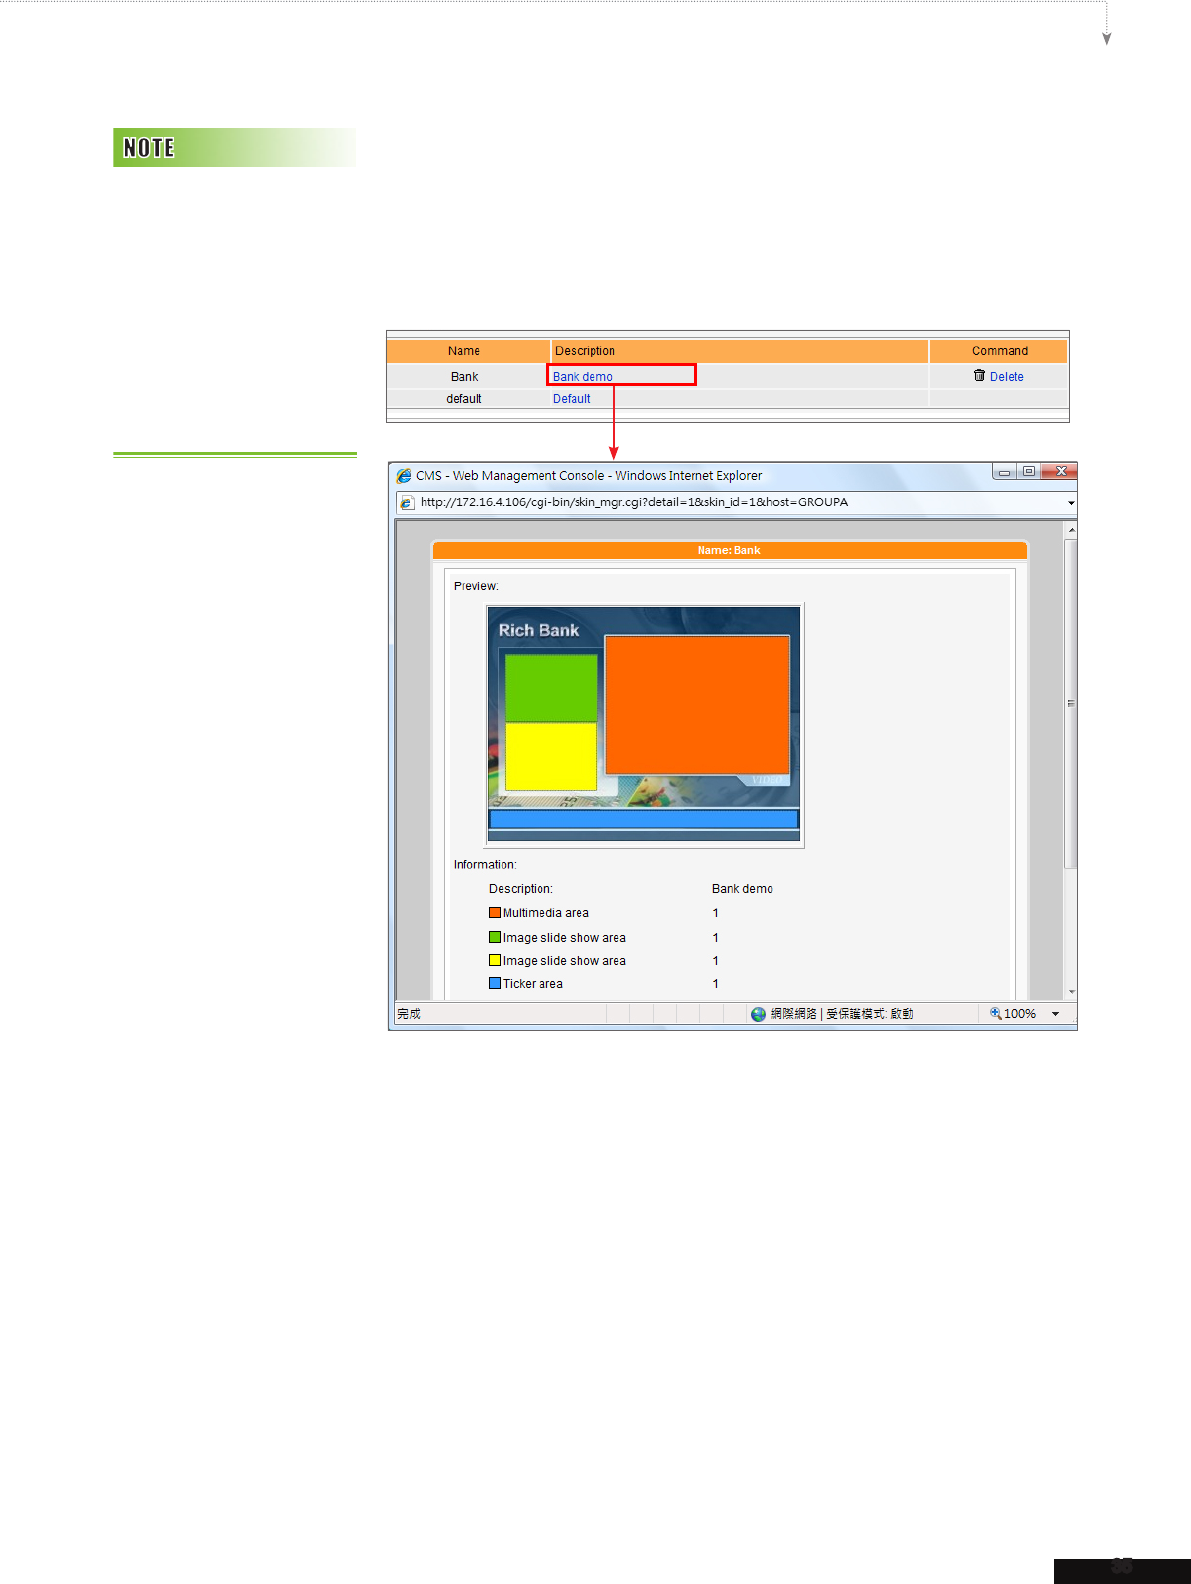
5. Now, you can see the skin listed in the “Current Skins” table.
The column “Name” and “Description” show the skin name and
description of a skin that you create in CAYIN’s Skin Editor. You can
click the description of each skin to preview it.
6. If you want to remove a skin, please click [Delete].
Skin les (.csk) are
created by CAYIN’s Skin
Editor (seeker.exe). All
uploaded skins will be
listed in the "Current
Skins" table. Please
refer to the user manual of
SMP players to learn more
about this editing tool.
36
CMS
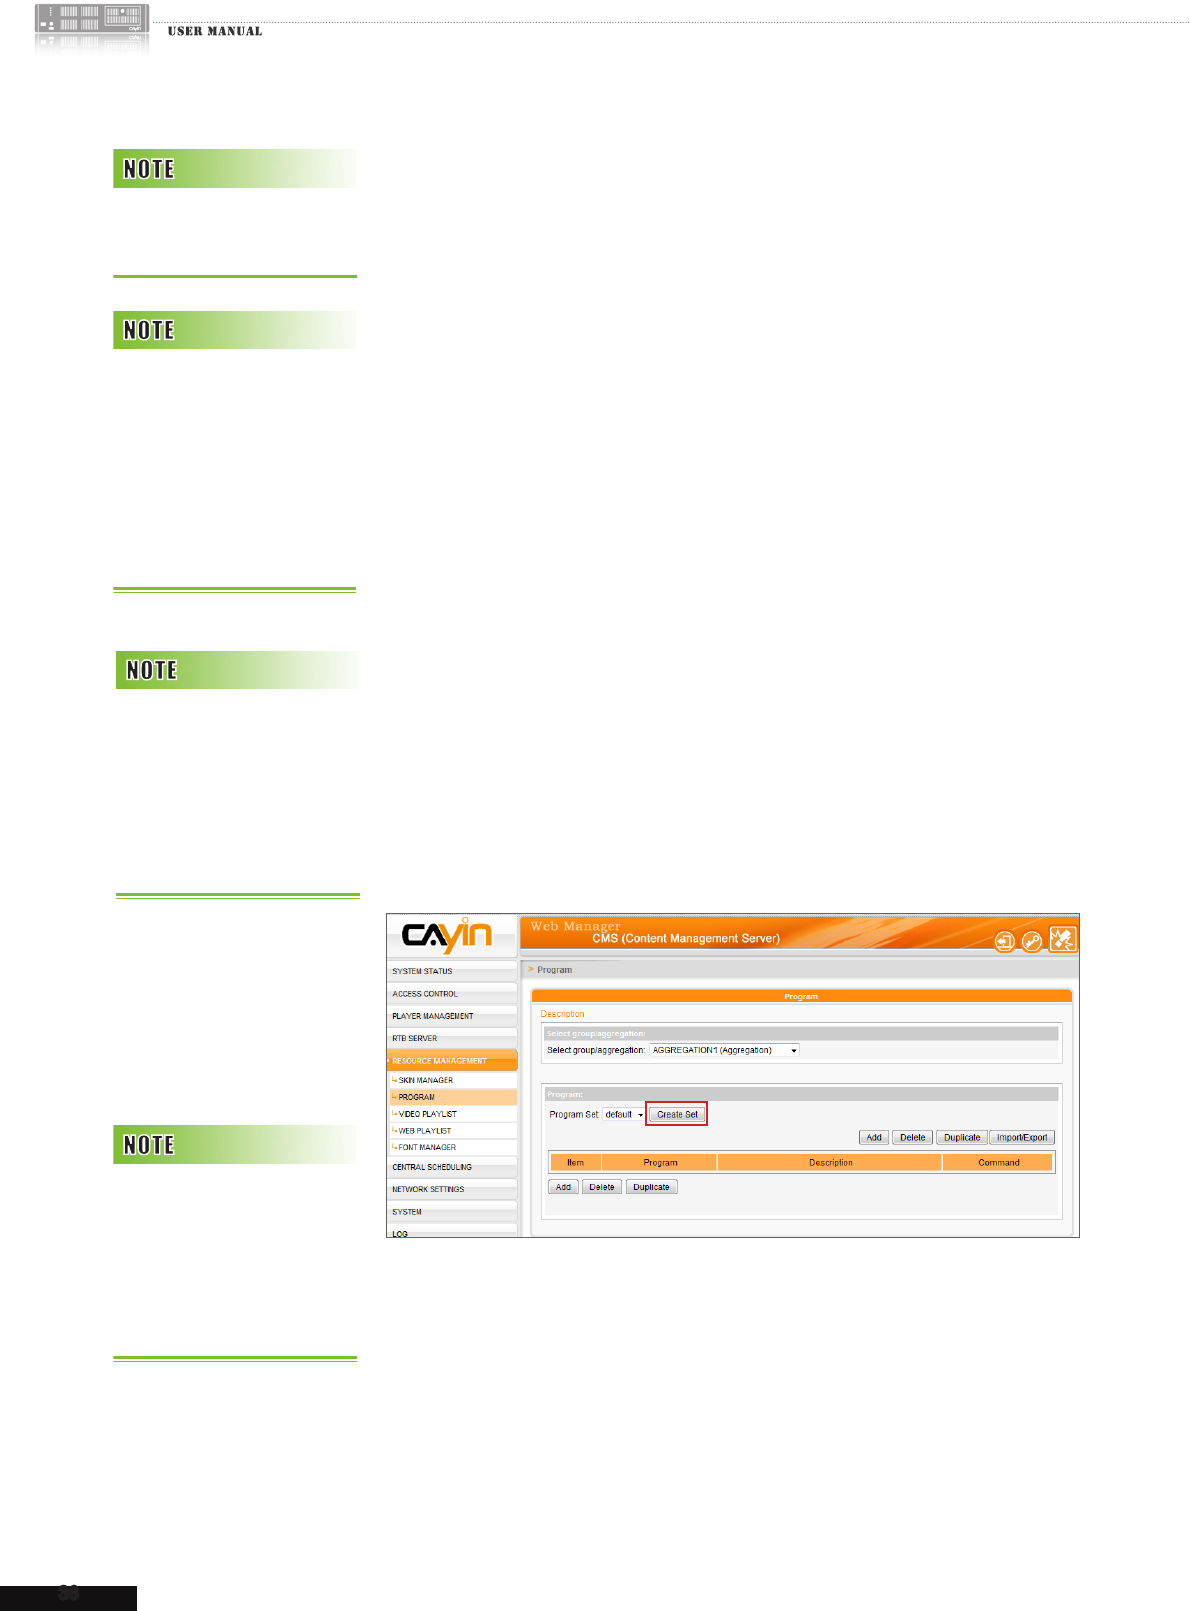
5-2 Program
5-2-1 Create a Program Set
You can divide all SMP players into groups and edit programs for each
group. Then, all players in the same group will apply the same program.
Please follow steps below to edit program.
1. Login CMS server with the account which is allowed to access the
function: “RESOURCE MANAGER > PROGRAM”
2. Click [RESOURCE MANAGEMENT] on the main page, and select
the sub-page “PROGRAM”.
3. Select a group or aggregation in the drop-down menu. CMS will apply
the program to players in the selected group or aggregation.
4. Choose a program set and the program you are going to create in the
following steps will be included in this category. If you haven’t created
any program set, please click [Create Set] and enter a program set
name.
5. Then, click [Add] and you can start to edit a program step by step.
This function only works with
SMP-WEB series.
If you have not created
any group or aggregation,
please go to “ACCESS
CONTROL > GROUP” or
“ACCESS CONTROL >
AGGREGATION” page to
add a group or an aggregation.
You can create a program
set to classify your program.
Program set is only for easy
management. It can’t be used
for scheduling or content
update.
The steps for creating a
program will be based on the
skin you choose. System may
skip some steps if the skin you
choose does not reserve areas
for some multimedia types.
37
CMS USER MANUAL
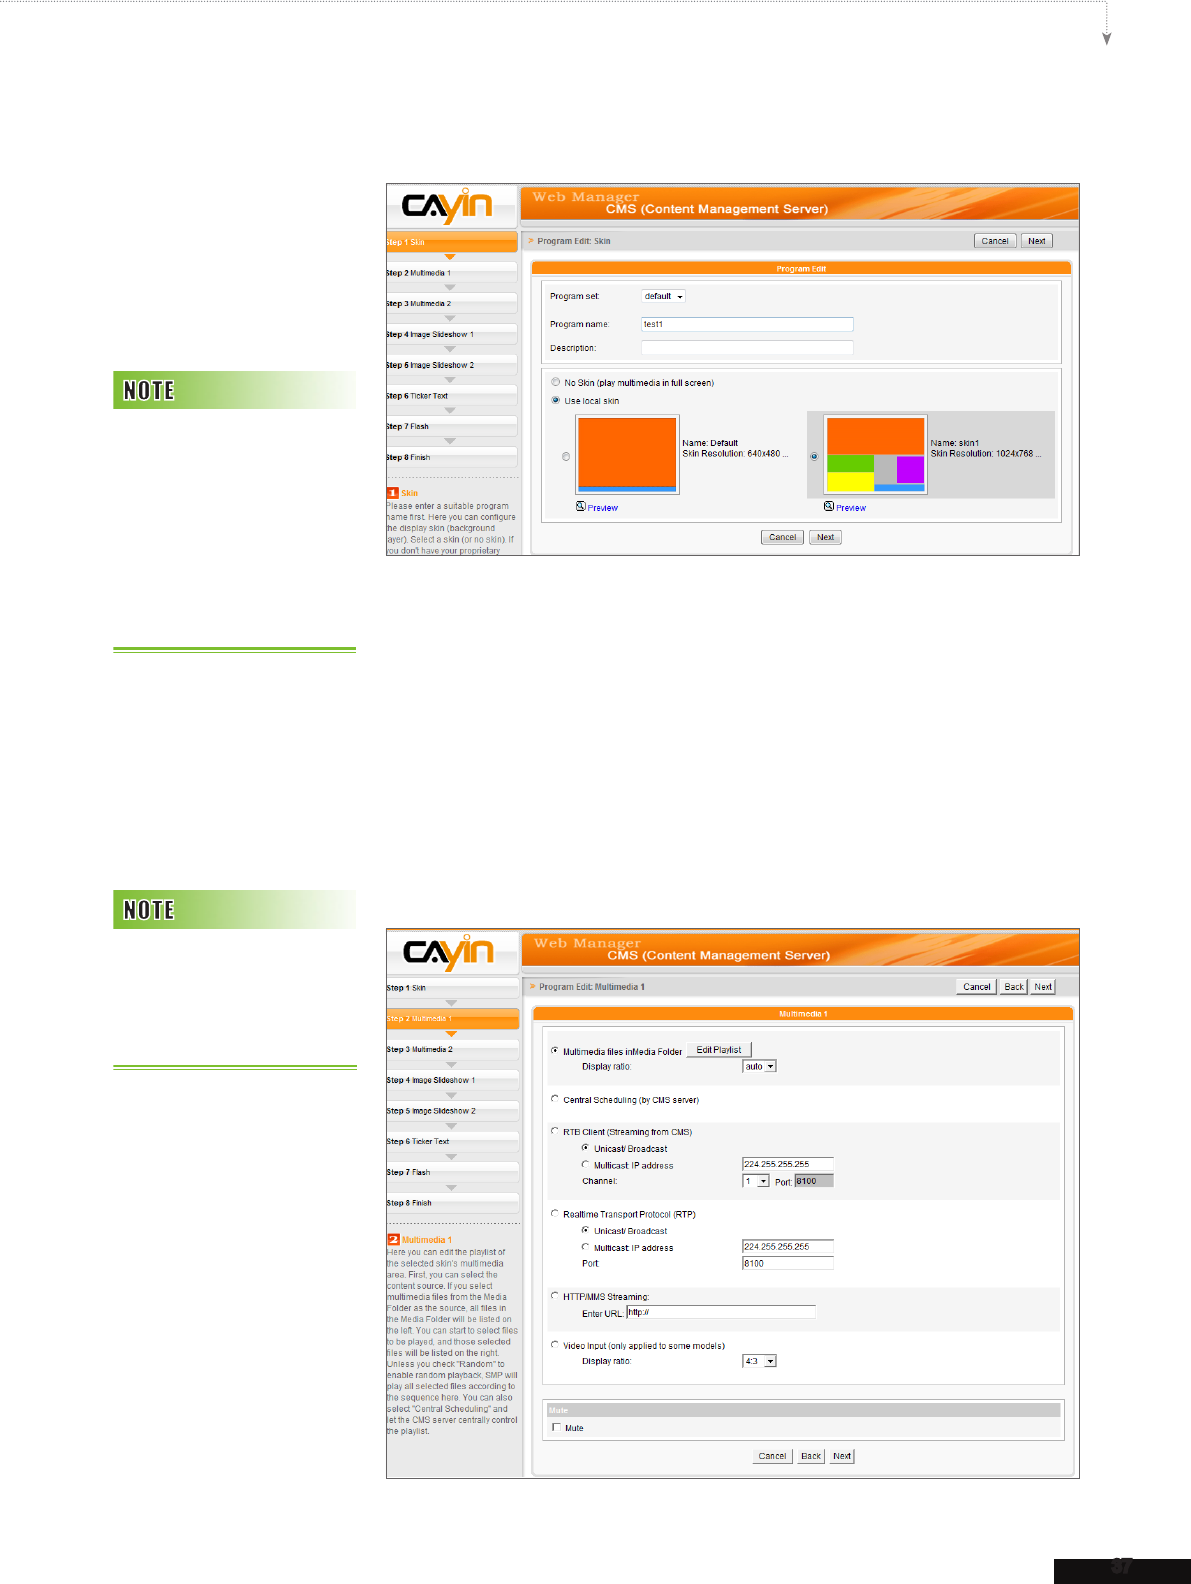
5-2-2 Edit Program: Skin
1. Before you start to select a Skin, please enter a program name and
description.
2. Choose the skin type you want to apply to this program. Click
[Preview] for detailed information of the skin. If you choose “No
Skin”, the player will playback multimedia in full screen. Click [Next]
to the next step.
5-2-3 Edit Program: Multimedia
You can create your own
skin by using CAYIN Skin
Editor and upload it to CMS
for future use. Please go to
“RESOURCE MANAGER >
SKIN MANAGER” to upload
skins.
Please remember to go to the
“SKIN MANAGER” page
and select a skin with a pre-
edited Multimedia area.
38
CMS
(A) Multimedia Files in Media Folder:
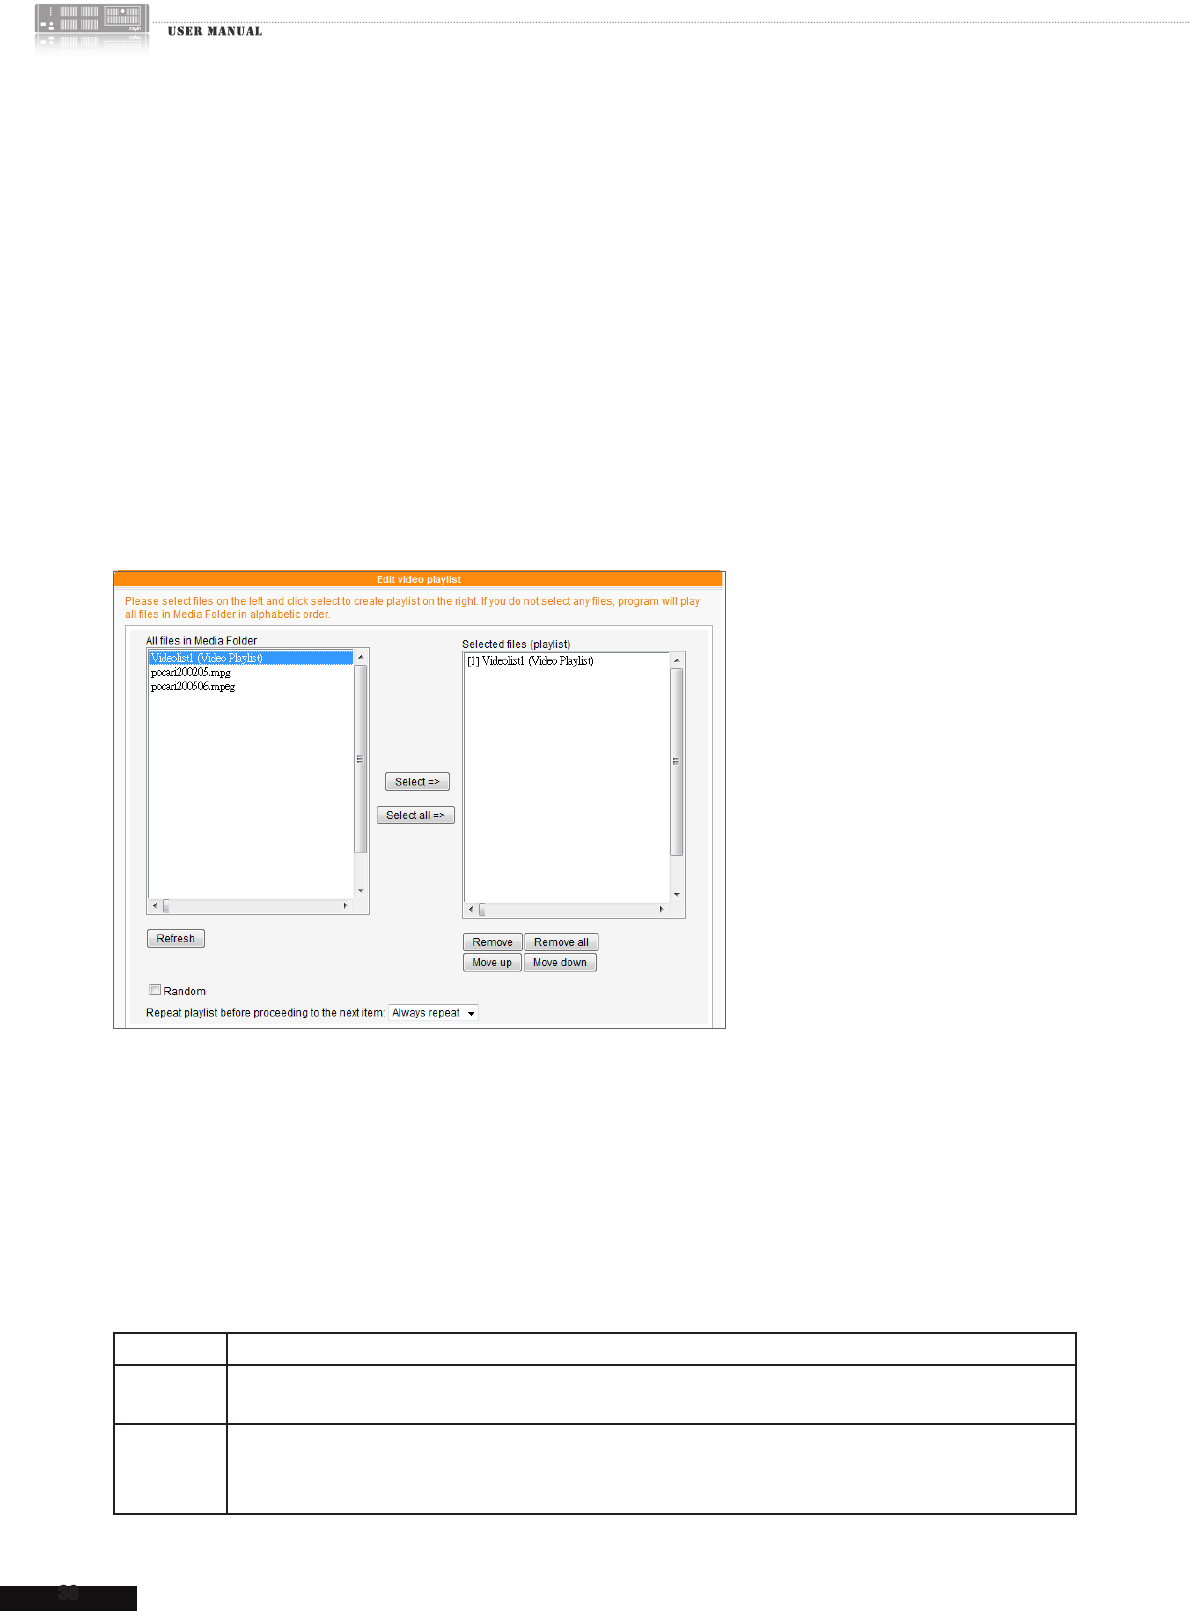
1. Tick “Multimedia files in Media Folder" and click “Edit Playlist”, you will see a pop-
up window. All video les in the Media Folder will be listed in the left column. If the left column is
empty, that means there is no le in the Media Folder. Please add video les to Media Folder rst.
2. Select the files you want to play. You can select multiple files at one time by holding the Shift
or Ctrl key, or just select les one by one. In the left column, the item with “*” sign represents a
folder’s name. If you choose this item, it means you will select all les in this folder.
3. Click [Select=>], and all selected les in the left column will be duplicated to the right column.
SMP will only play those les in the right column.
4. If you want to play all les in the media folder, you can simply click the [Select all=>] button.
Then, all les in the left column will be duplicated to the right column.
5. Now, you can arrange the order of those selected files. In the right column, each file will be
added a serial number. SMP will play media les in the sequence, 1, 2, 3 … N. Please refer to the
following table for more functions. You can change the sequence of the playlist by using [Move
up] and [Move down], or delete items in the playlist by using [Remove] and [Remove all].
Move up Select one item in the right column. Click [Move up], and this item will be moved forward in the playlist.
Move down Select one item in the right column. Click [Move down], and this item will be moved backward in the
playlist.
Remove If you want to remove les from the “Selected Files” in the right column, please select les and click
[Remove]. Then, those les will be removed from the right column, but will not be deleted from the Media
Folder.
39
CMS USER MANUAL
Remove all Click [Remove all], and all items will be removed from the right column, but all les will still be kept in
the Media Folder.
Random If you select “Random”, all les in the right column will be played randomly, without following the se-
quence.
6. If you want to play all multimedia files in the Media Folder more than once, please enable
"Repeat playlist before proceeding to the next item" and set repeat number of times
here. If you select "Always repeat", SMP player will keep playing this program without playing next
times in the web playlist. If you select "3", SMP player will repeat playing those multimedia les in
the Media Folder for three times and then move on to the next item in the playlist.
If you want to enable the function, “Repeat playlist before proceeding to the next item”, please remember to set
the duration of this program as “Always” in the web playlist (RESOURCE MANAGEMENT > WEB PLAYLIST). If you
set a certain duration for this program (e.g. 50 seconds), SMP may not be able to repeat playing all les in the Media Folder
within the congured time period. Then, this function may not be able to function properly as you expect.
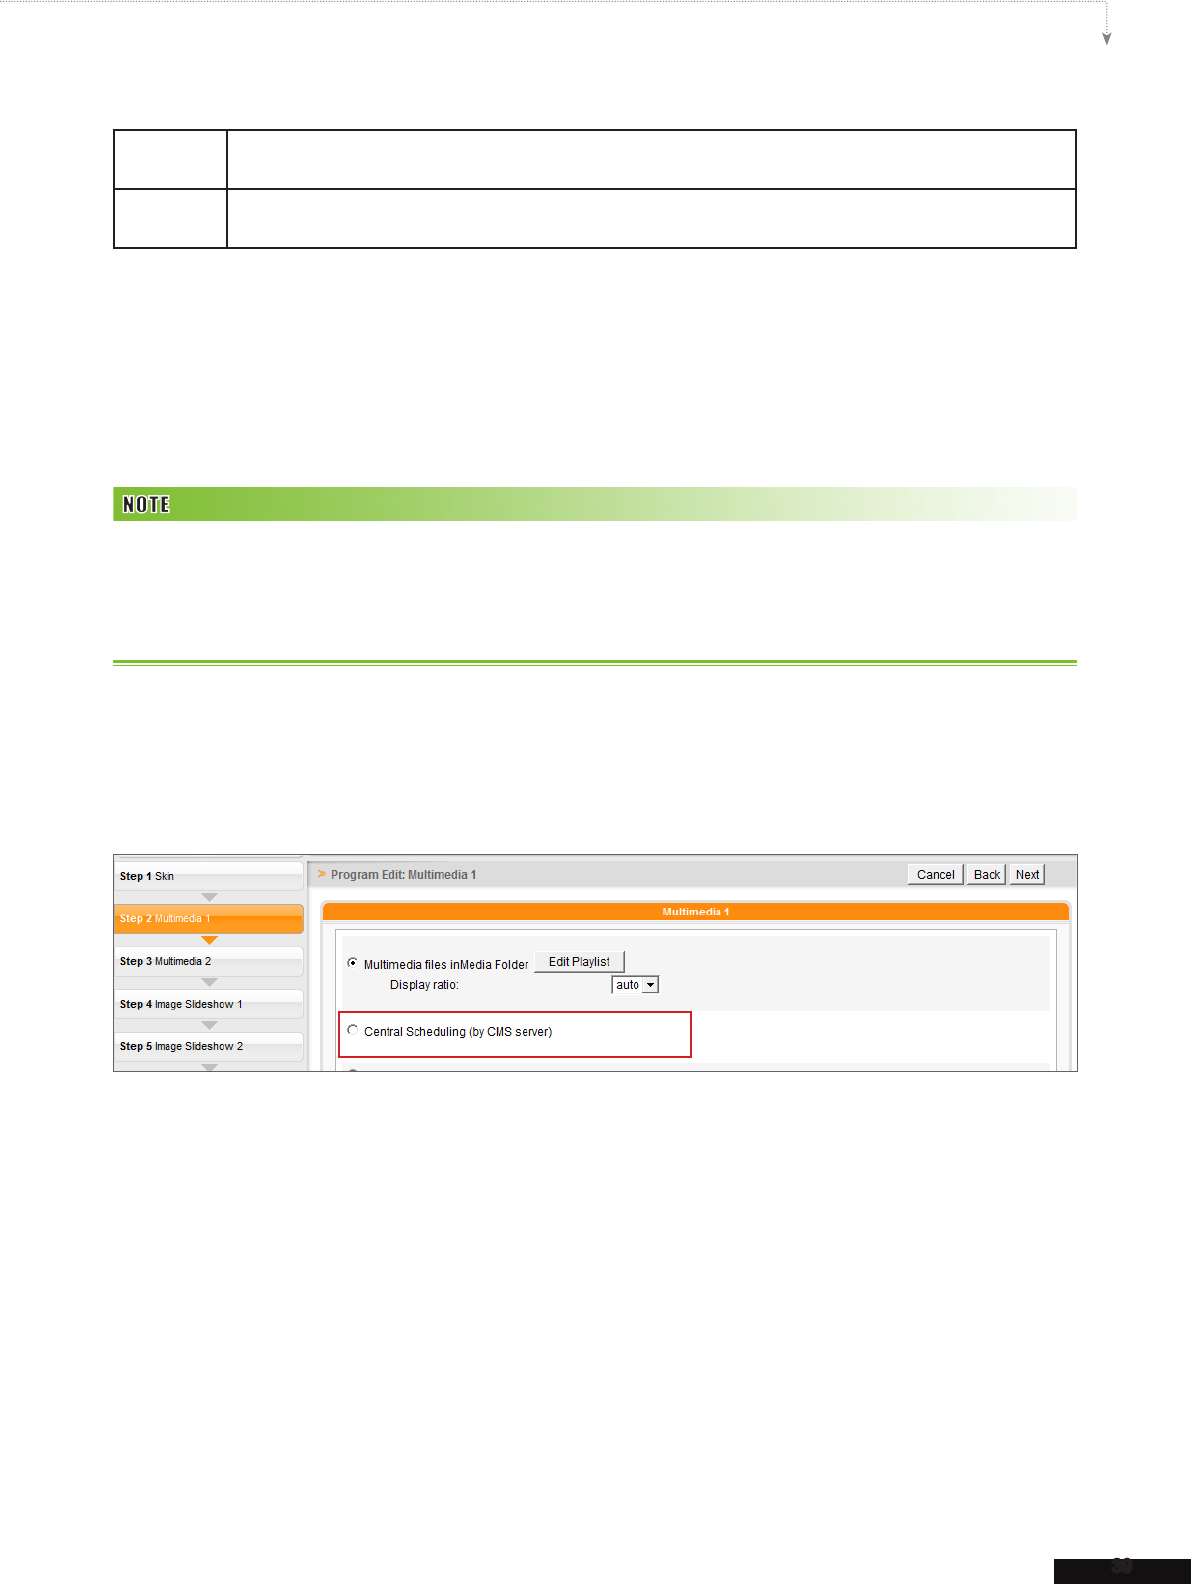
(B) Central Scheduling (by CMS Server):
Please tick this option if you want the playlist of media les can be centrally scheduled and controlled by
CMS server. Enable this function and you can play selected media les once or weekly at certain time or
periods. Please refer to the section “CENTRAL SCHEDULING” in CMS server for further settings.
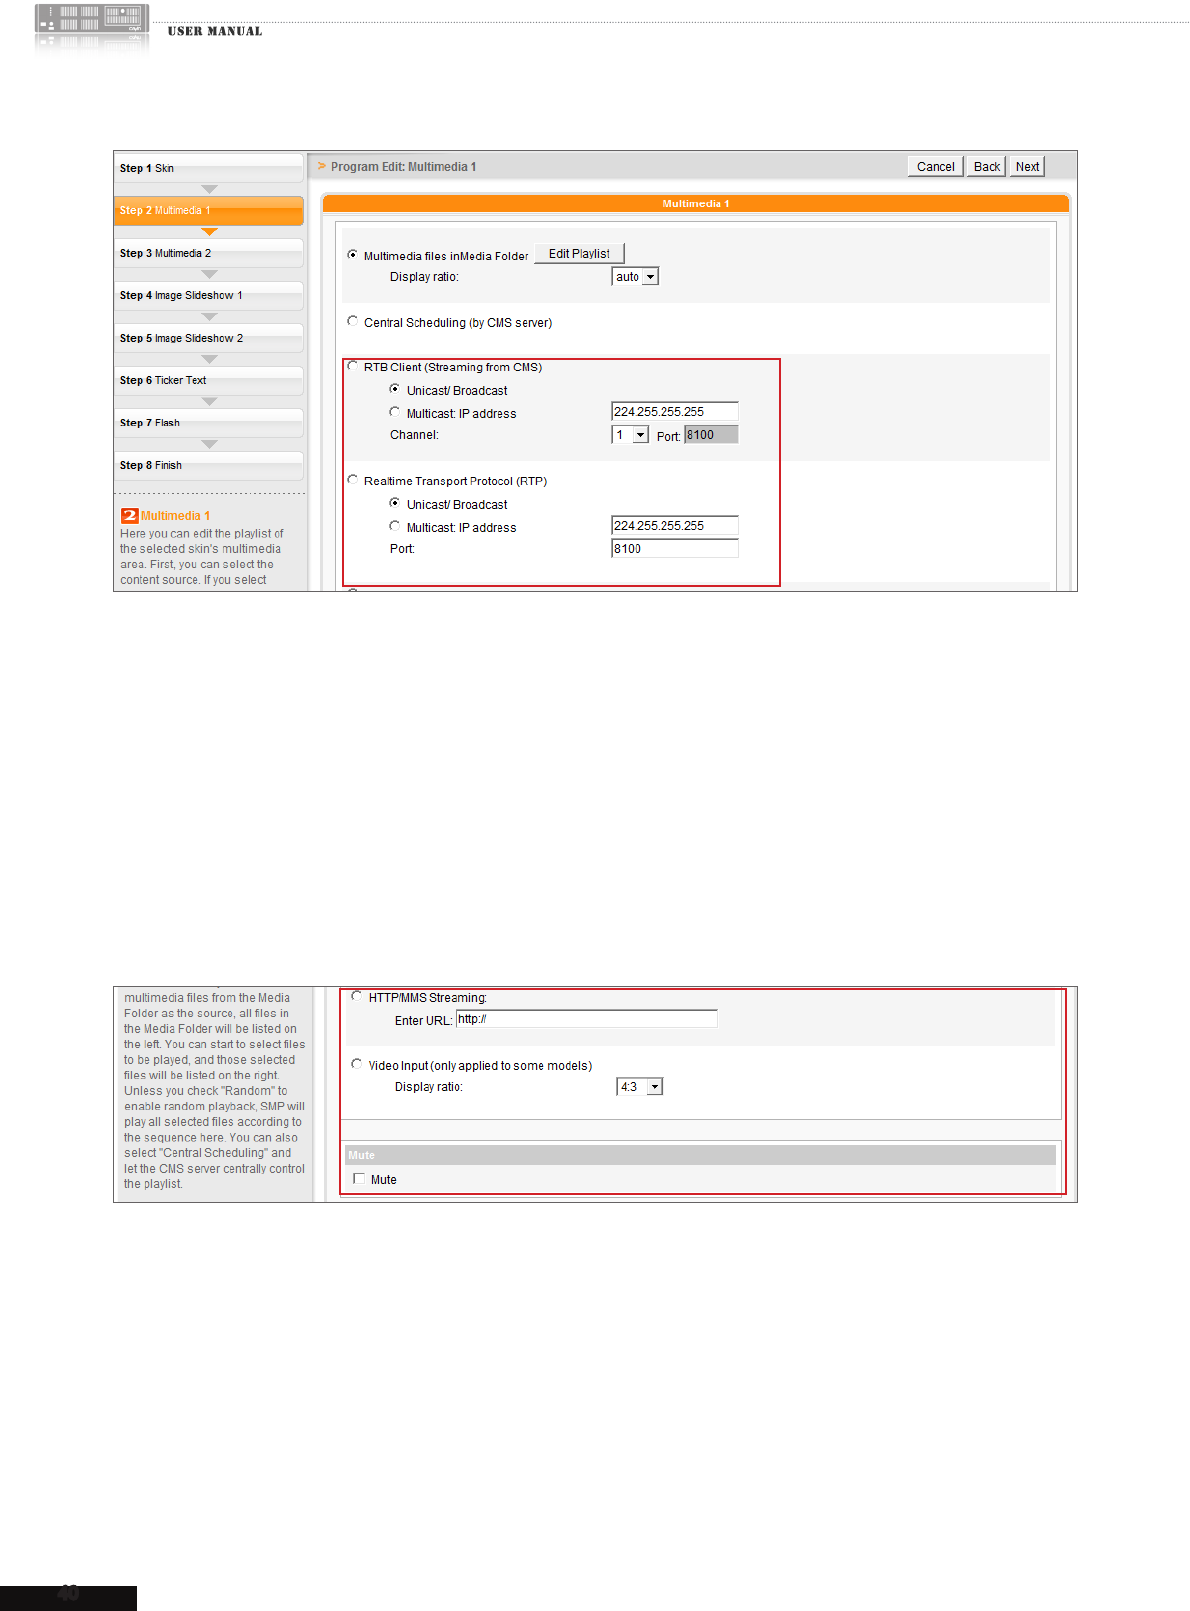
(C) RTB/RTP Streaming
To play streaming video as RTB (Real-Time Broadcast) client, you need to select the channel
corresponding to the client’s server, i.e. CMS server. To play Real-time Transport Protocol (RTP)
streaming, please enter the port number of the relevant RTP server. Select the broadcast mode
for the source. You can select to play les in Media Folder when there is no video packet delivered
from the streaming.
RTB and RTP are different protocols.
1. RTB Client only works with CMS’s RTB Server function.
2. You can use RTP compliant software sending RTP streaming to SMP, e.g. VideoLAN client/server
(http://www.videolan.org)
40
CMS
(D) HTTP/MMS Streaming
To play video le via HTTP or MMS streaming, e.g. video le on a web server or MMS server, enter
the URL of the le in this option.
(E) Video Input (only applied to some models)
To play AV-IN signal on the multimedia area, please select this item, and refer to section 6.5 in
SMP-WEB series manual for detailed video input congurations.
(F) Mute Function
If you do not want to play the audio of the multimedia source, please tick [Mute] option to stop the
audio playback.
After nishing all the congurations, please click [Next] to proceed.
Please complete the “Multimedia 2” settings according to the previous steps.
41
CMS USER MANUAL
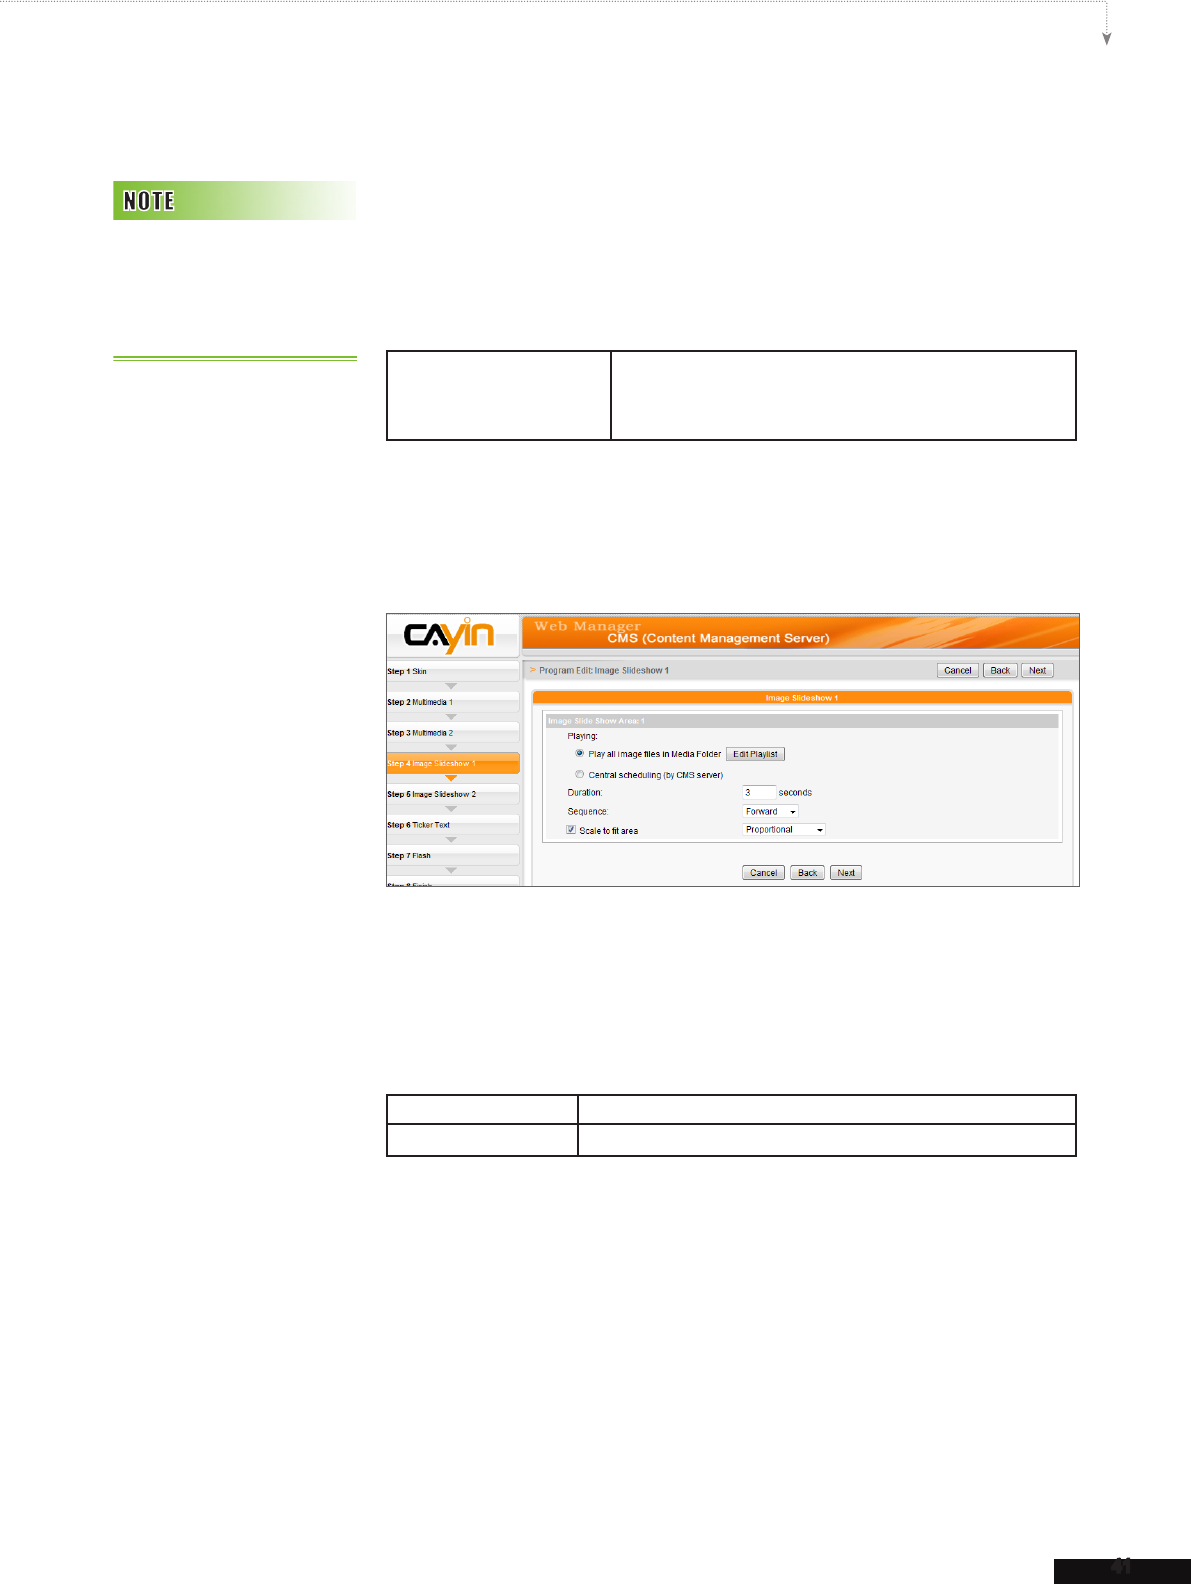
5-2-4 Edit Program: Image Slide
Show
1. You can assign the content source and congure related settings here
and refer the following table for detailed descriptions:
Play all image les in
Media Folder
Play all les in the media folder, including the top-level
directory and subfolders (depend on your conguration.).
Click [Edit Playlist] to further congure your playlist.
2. Set the “Duration” in seconds for playing each picture.
3. Set the “Sequence”. You can select to play files in forward or
backward order, or random.
4. If you enable the function “Scale to fit area”, the system will
automatically adjust the size of each image to t the display area of
image slide show which you dene in the skin. There are two methods
for you to choose:
proportional Image will be resized according to its original ratio.
non-proportional Image can be resized by its width or length separately.
5. Click [Next] to proceed.
Please complete the “Image slideshow 2” settings according to the
previous steps.
Please remember to go to the
“SKIN MANAGER” page
and select a skin with a pre-
edited Image Slideshow area.
42
CMS
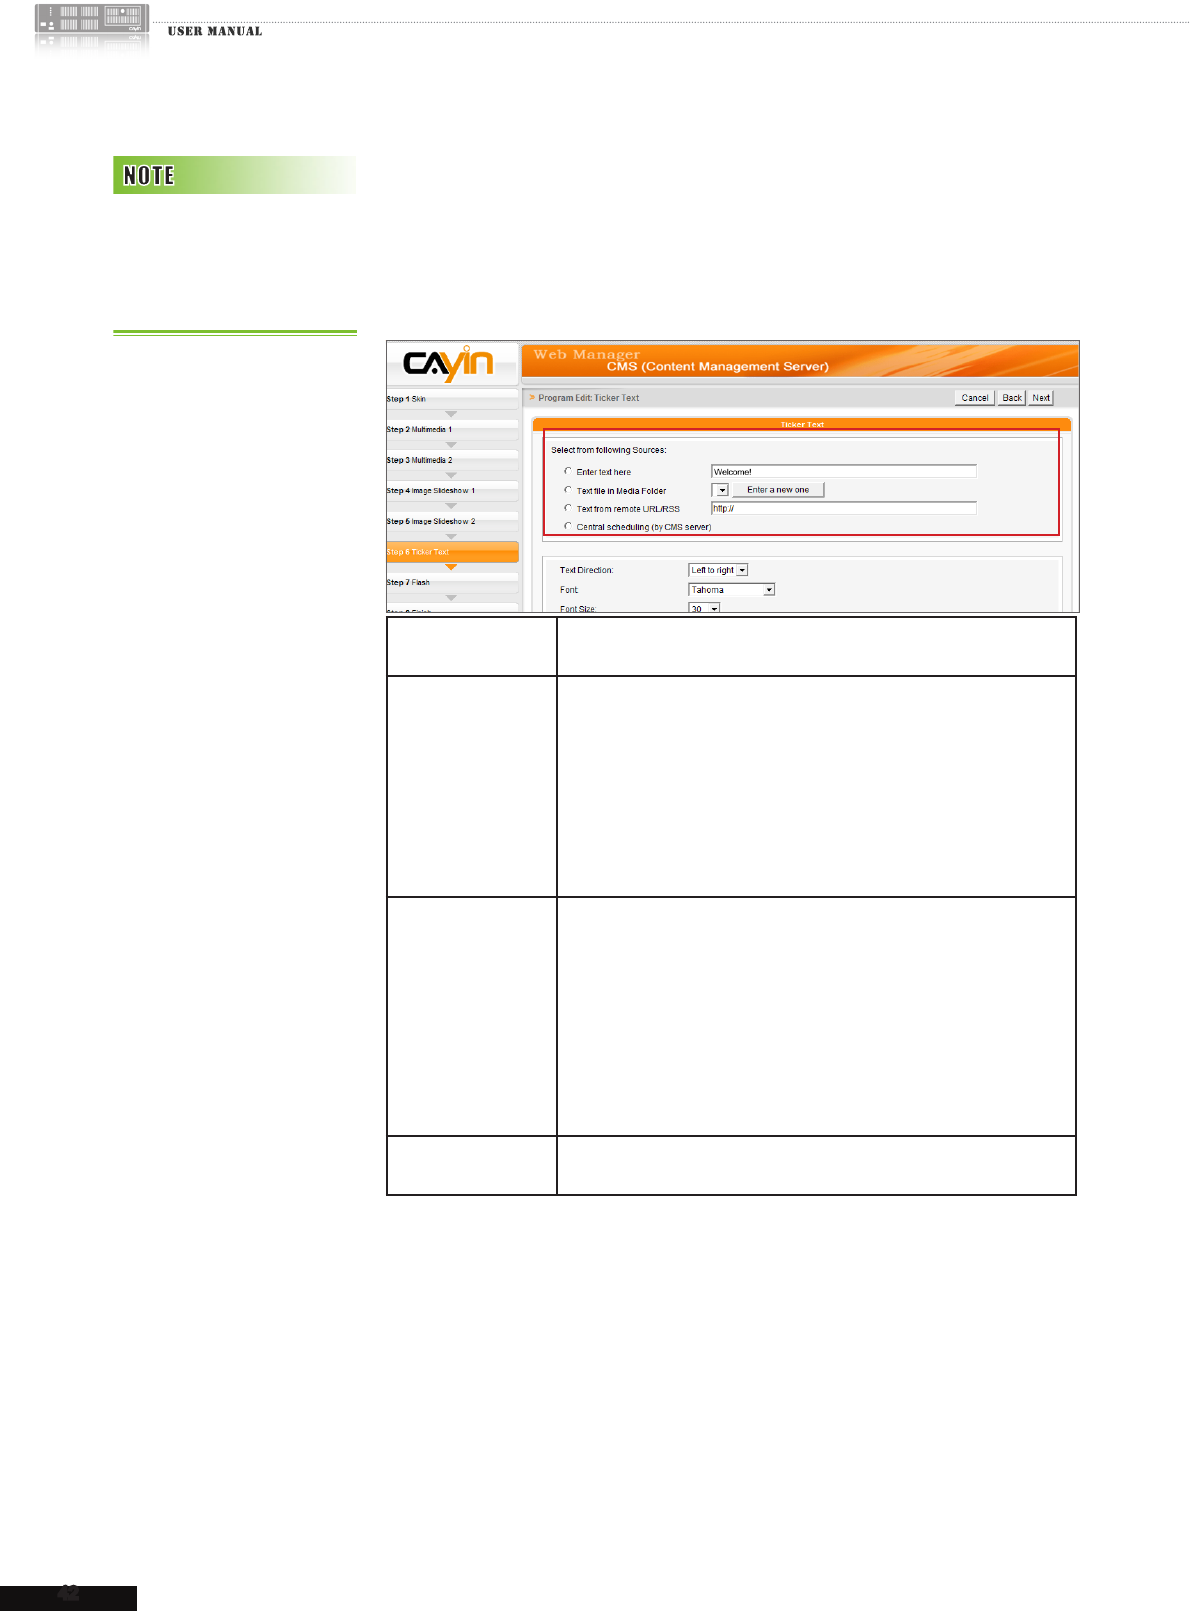
5-2-5 Edit Program: Ticker
Select from multiple sources for the ticker text, and set up the font and
the color of the ticker area. Please refer the following table to congure
the source and content of the ticker.
Enter Text here You can enter a text message. Save the settings and the text will
be displayed on the screen.
Text le in
Media Folder
You can type your message in a text le and put the le in
Media Folder. When you enable this option, system will nd all
les with extension in .txt for your choices. The message in the
text le will be displayed.
SMP now supports UTF-8 character encoding. If the content
is not written in English, please choose encoding type “UTF-8”
when you save the text le.
Text from remote
URL/RSS
To show a text message available on a URL, enter the URL ad-
dress in the option, e.g. http://your_ server/message.txt. If you use
the server side script to generate the dynamic text, we suggest
you only send the text result (mime type txt/plain) back to the SMP
player. You can also retrieve live RSS messages. Enter the URL
address in the option, e.g. http://rss.cnn.com/rss/cnn_us.rss. The
format of non-English RSS link should be in the UTF-8 character
encoding.
Central Scheduling
(by CMS Server)
Control ticker text from CMS server’s Central Scheduling Ticker
area.
You can change the font type, size, and color of the ticker.
1. In “Text Direction” drop down menu, you can change the direction
of the text from “left to right” or “right to left” to suit your own
language conguration.
2. You can also select Font and Font Size as well as the Font Color by
entering the R, G, B code directly. Click [>>] to preview the accurate
color.
Please remember to go to the
“SKIN MANAGER” page and
select a skin with a pre-edited
ticker area.

43
CMS USER MANUAL
Furthermore, you can enable single color background and choose a suitable color for your ticker.
Otherwise, the ticker background area will be transparent to Skin background.
1. Click “Set background color” and enter the R, G, B code directly. Then, click [>>] to see the
accurate color.
If you want to change the scrolling text for ticker, please choose one of options from “No scrolling
effect”, “Simple crawl”, “Simple bottom-up”, and “Bottom-up and crawl”. Set a suitable
speed. “1” represents the slowest speed, and “6” represents the fastest one.
No scrolling effect The text is static without moving
Simple crawl Text moving either from left to right or right to left. The next line will follow the previous line.
Simple bottom-up Text moving from bottom to top. If your sentences are too long, the system will break them
automatically into the next lines.
Bottom-up and crawl First, the text is moving from bottom to top and pause; then it is moving from left to right to
nish a line.
3. Set duration of “Pause” when you choose “Simple bottom-up” or “Bottom-up and crawl”.
This option will let text pause specic seconds when nish a line.
4. Click [Next] to proceed.
44
CMS
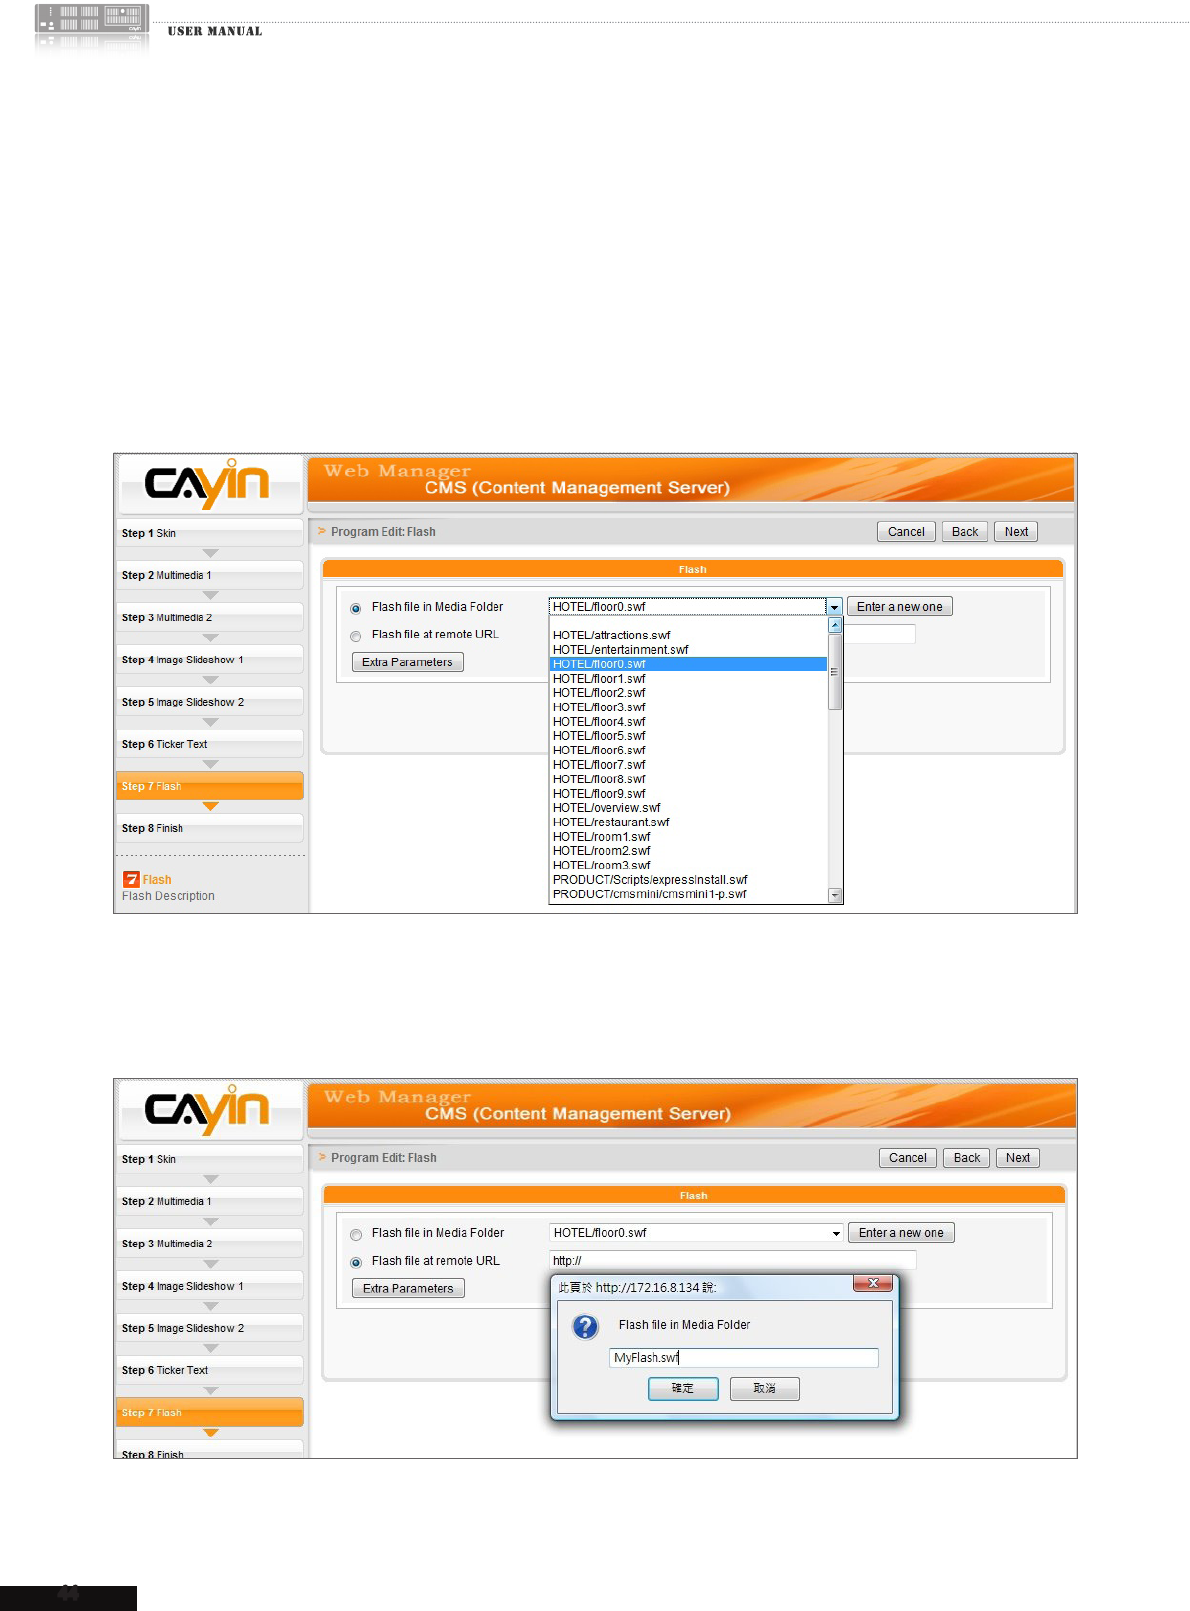
5-2-6 Edit Program: Flash
Only SMP-WEB series supports Flash playback. If you select a skin with Flash area, you can add
and edit your Flash content here.
1. “Flash le in Media Folder”: If you tick this option, you can choose one .swf le you want
to playback in drop-down menu. If you want to add any other new extra parameters, please click
[Extra Parameters] and ll in the required elds to add extra parameters.
2. “Flash le at remote URL”: If you tick this option, please enter an URL address of your Flash
le. If you want to add any other new extra parameters, please click [Extra Parameters] and ll
in the required elds to add extra parameters.
3. Click [Next] to proceed.
45
CMS USER MANUAL
5-2-7 Finish your Program
After nishing all the congurations according your selected skin, you
will see the preview of your skin together with other related information.
Press [Finish] to nish the Program Wizard settings.
Now you can see the new program shows in the program table. Click
[Edit] to modify your program or [Info] to review the detailed program
information. If you want to delete the program, please click [Delete].
You can also copy one or more programs to the program set you choose.
Simply click [Duplicate] and choose the programs and program set
that you want to move your selected programs in. Click [Duplicate] to
nish.
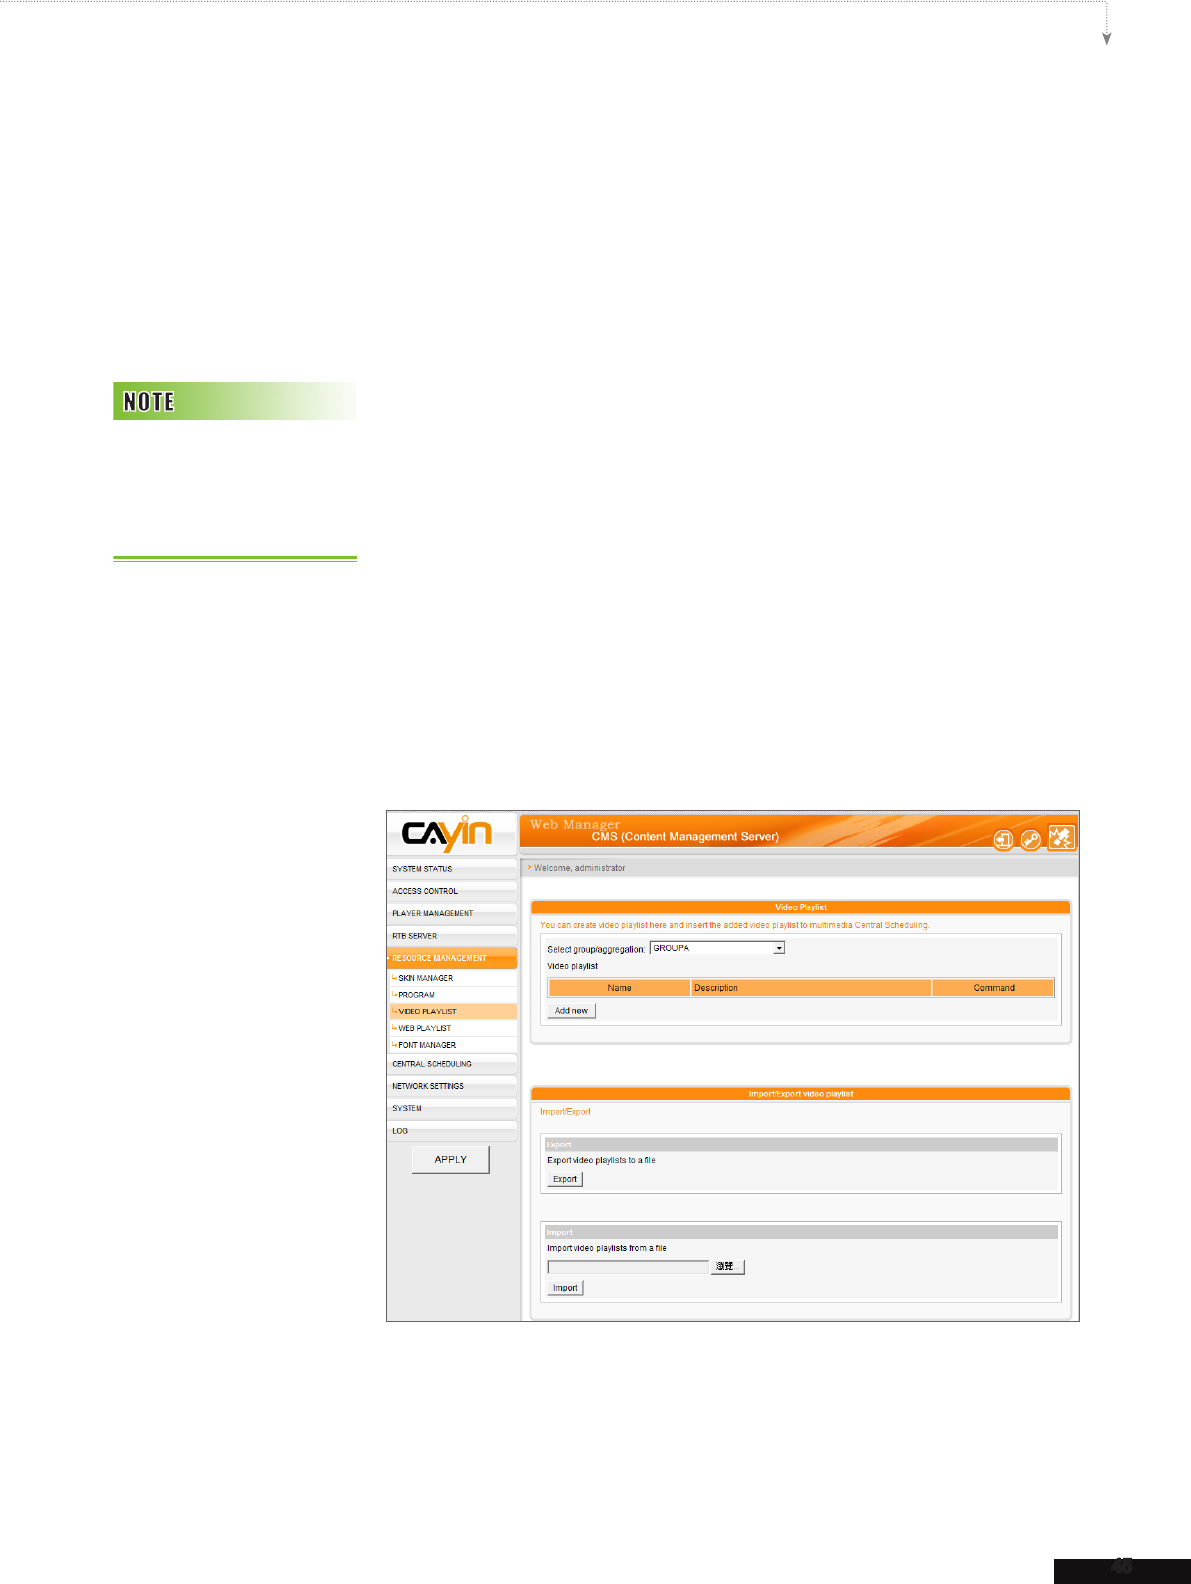
5-3 Video Playlist
Here you can create a video playlist to insert the added video playlist to
multimedia Central Scheduling or Program’s Multimedia area in CMS.
If you copy the program to the
same program set, the “-copy”
will be added in the program
name for distinction.
46
CMS
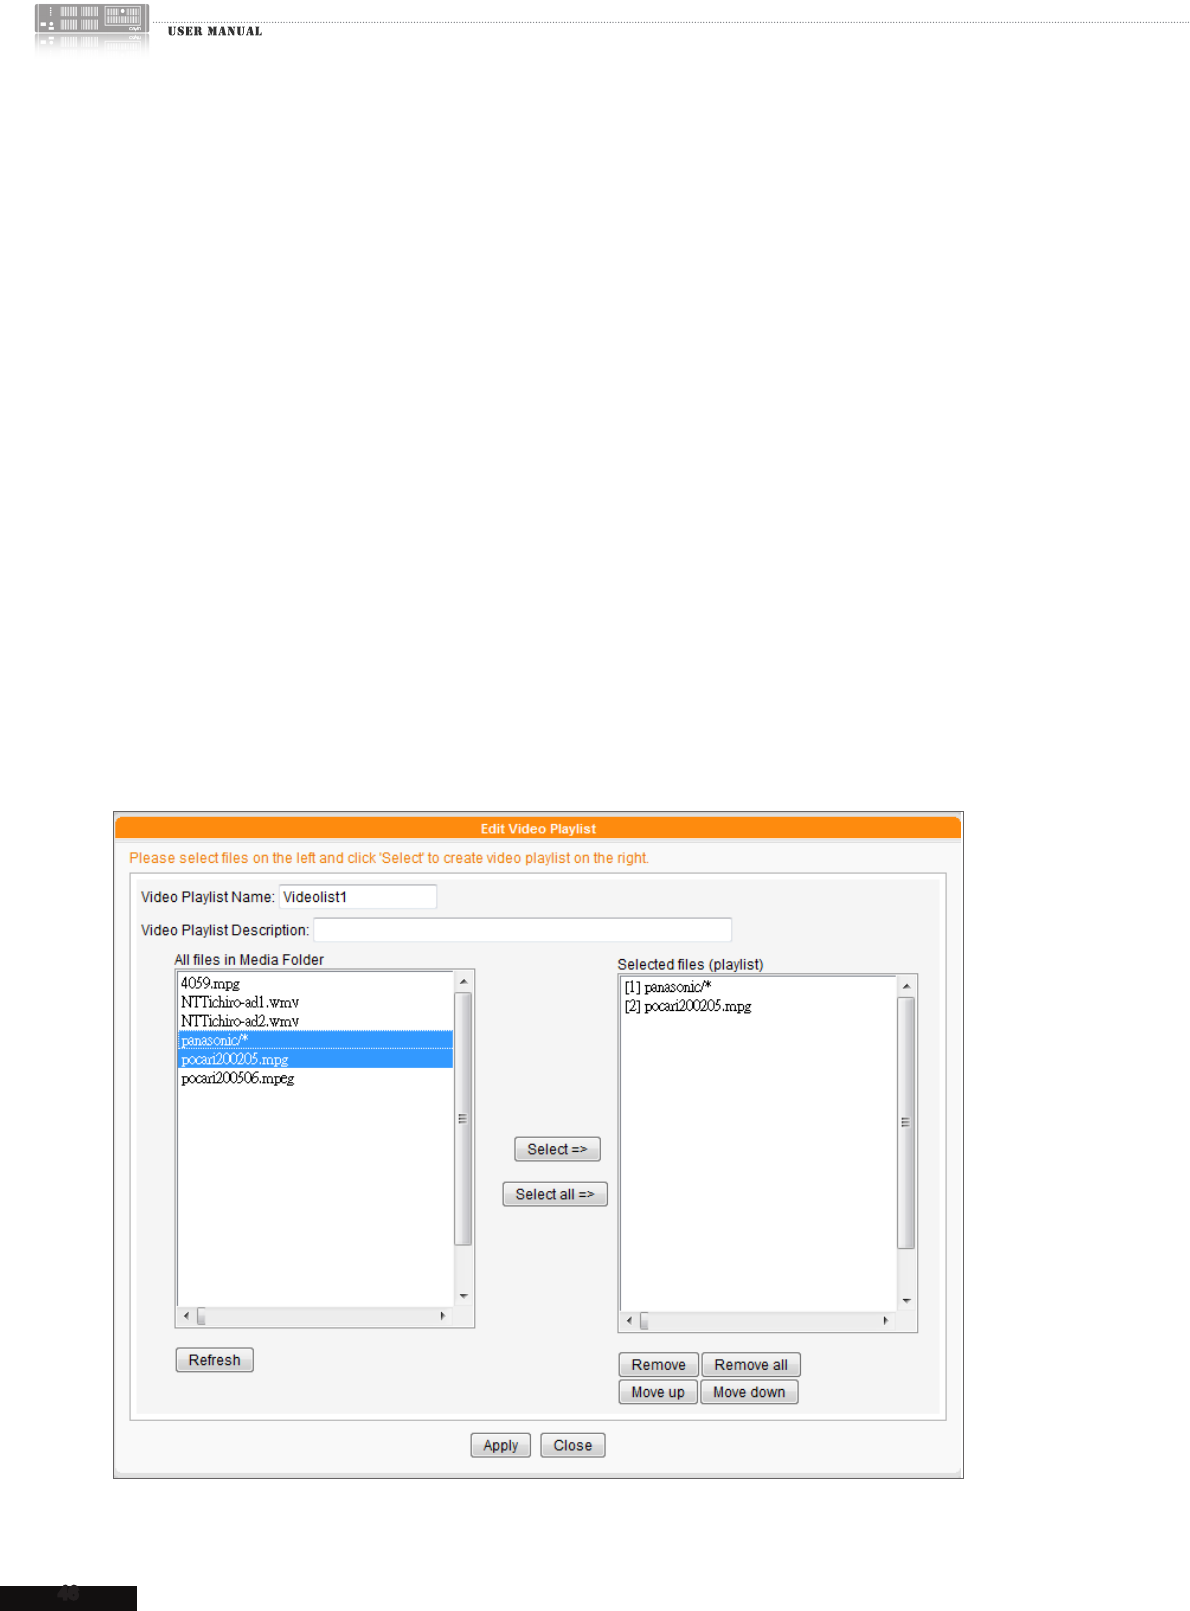
5-3-1 Edit Video Playlist
1. Select a group or aggregation rst; you can see and edit the existing video playlist in the group you
choose. You can also choose a group or aggregation that you want to add your new video playlist
in.
2. Click [Add new], and then you will see a pop-up window. Please enter a video playlist name and
a description (optional) here.
3. Now you can see all les in Media Folder in the left column. Choose les you want to add in the
new video playlist, click [Select =>], and you will see those selected les in the right column. If
you would like to select all les in Media Folder, please select [Select all=>]. Furthermore, you
can also click [Refresh] to get the latest le list.
4. If you would like to delete any files you’ve chosen or change the sequence of the selected
files, please click [Remove], [Remove all], [Move up], [Move down] according to your
requirements.
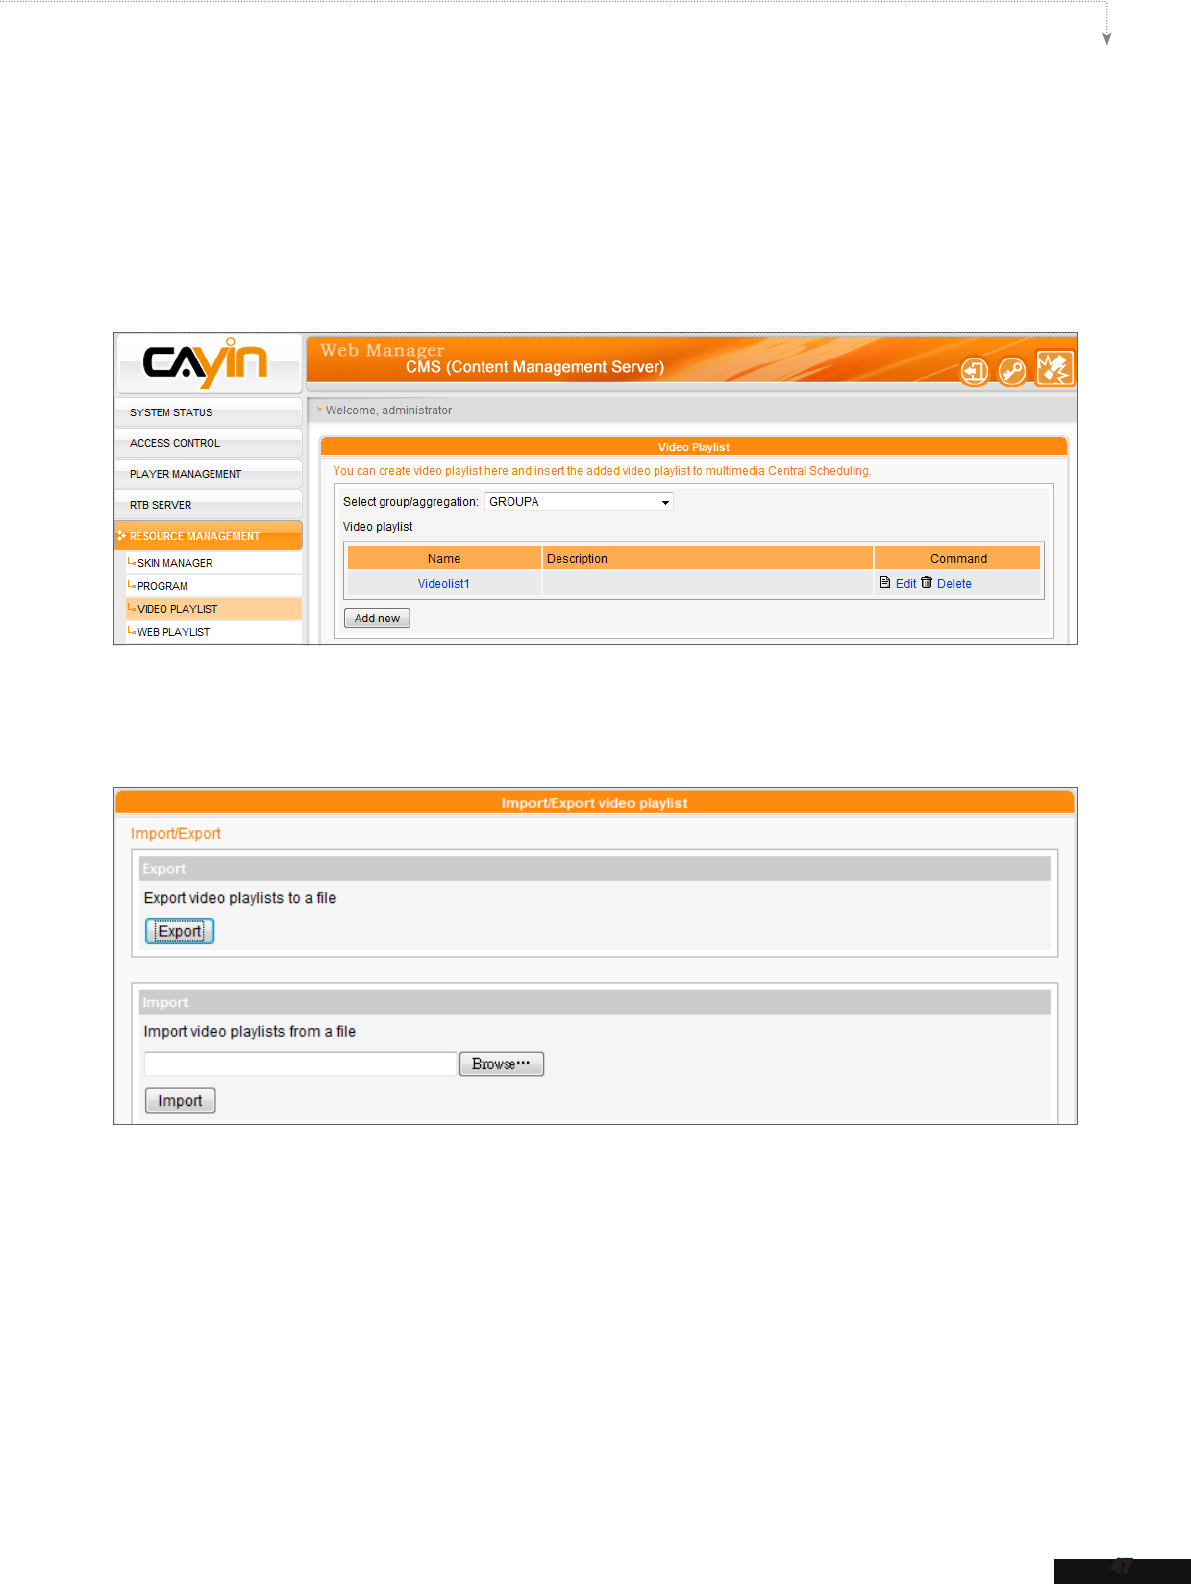
47
CMS USER MANUAL
5. Finally, click [A PPLY ] to adopt the changes or [CLOSE] to leave the window without saving any
changes.
6. Now you can see your new video playlist in the main page. You can choose to edit or delete it by
clicking [Edit] or [Delete] button in the command column.
5-3-2 Import/Export Video Playlist
You can import or export video playlists for other Groups or Servers.
Export
1. Select a group in the drop-down menu, “Select group”.
2. Click [Export]; then, you can export the playlist of this group to a le (.cps) and store it in your PC.
Import
1. Please select the group that you want to apply a pre-edited video playlist from another group or
CMS server.
2. Click [Browse…] to select the video playlist le (.cps).
3. Click [Import] and you will see the video playlist on the above table.
48
CMS
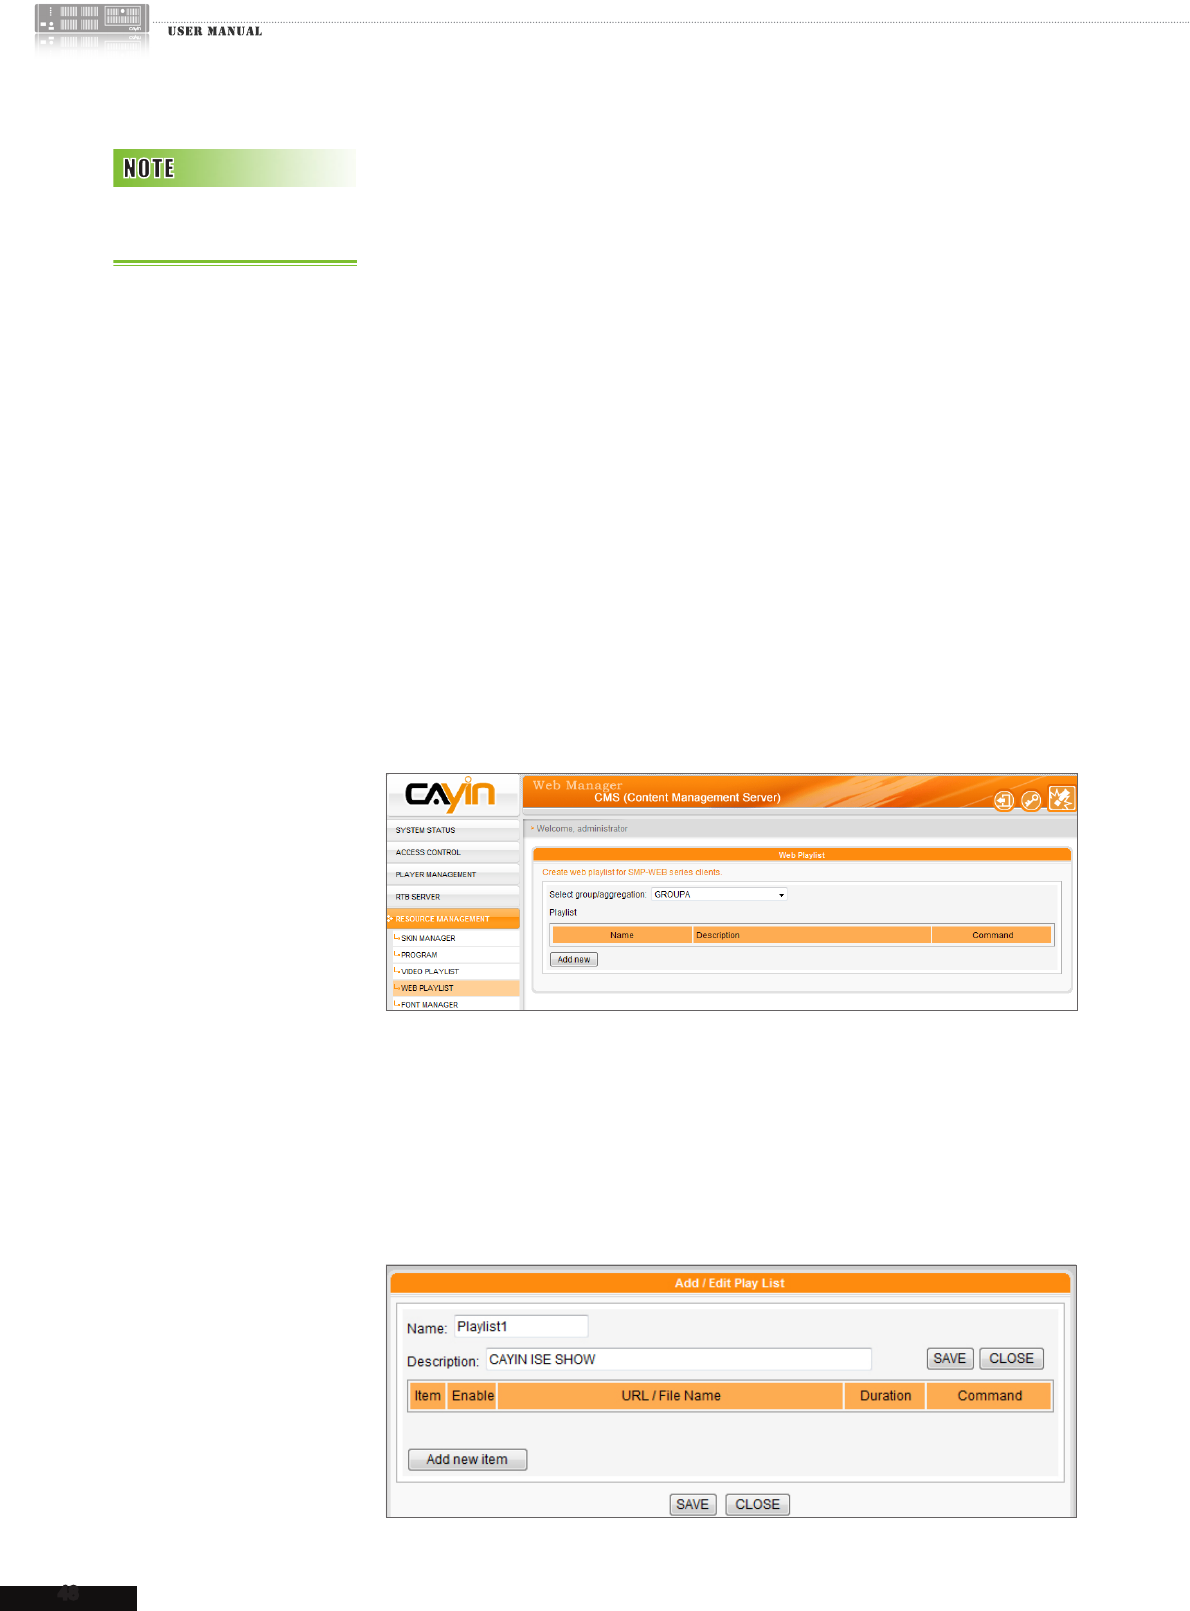
5-4 Web Playlist
5-4-1 Edit Web Playlist
You can divide all SMP players into groups and edit web playlists for
each group. Then, all players in the same group will apply the same
playlists. Please follow the steps below to edit web playlists for each
group.
1. Login CMS server with the account which is allowed to access the
function: “RESOURCE MANAGER > WEB PLAYLIST”.
2. Click [RESOURCE MANAGEMENT] on the main page, and select
the sub-page, “WEB PLAYLIST ”.
3. Select a group in the drop-down menu, “Select group”. If you
have not created any group, please go to “ACCESS CONTROL” >
“GROUP” page to add a group.
4. Then, we will start to add a new web playlist. Click [Add new] and
you can start to edit a playlist in the pop-up window.
5. Enter the name of this playlist in the “Name” text box and a short
description in the “Description” text box. Click [Add new item]
and edit an item in a playlist. You can add up to 99 items to a playlist.
Only SMP-WEB series
supports this feature.
49
CMS USER MANUAL
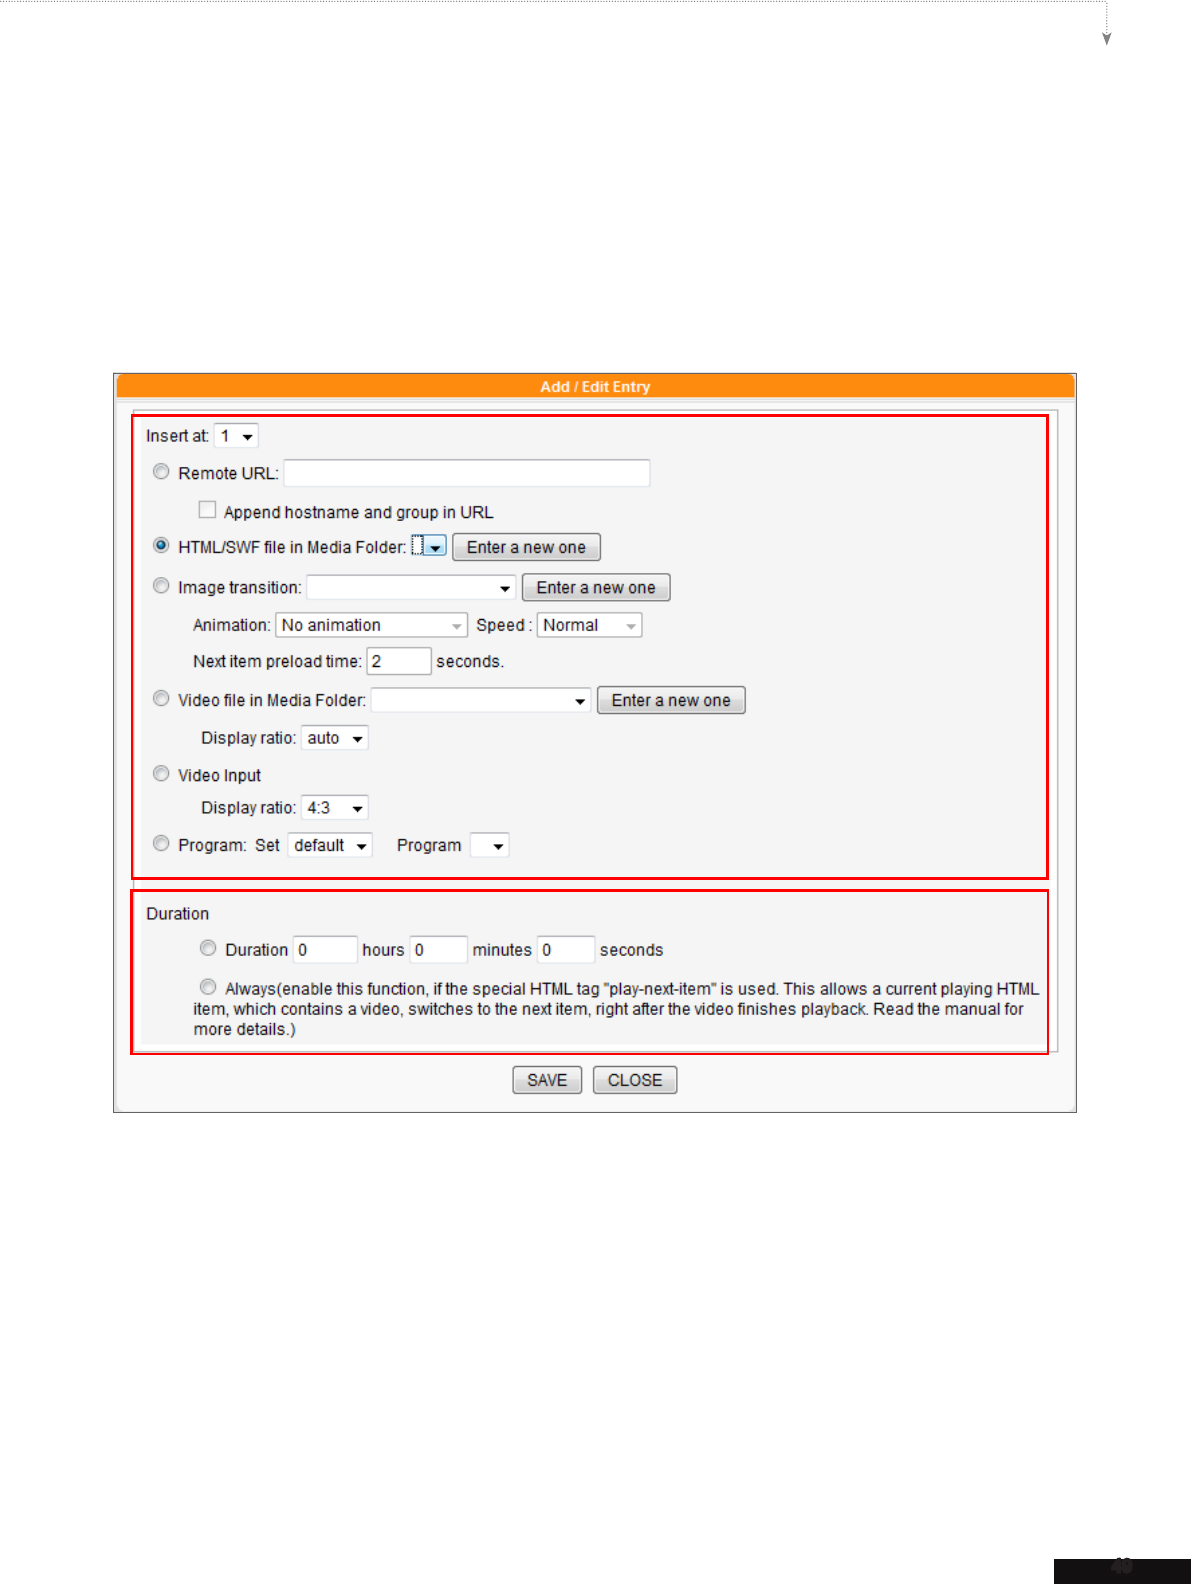
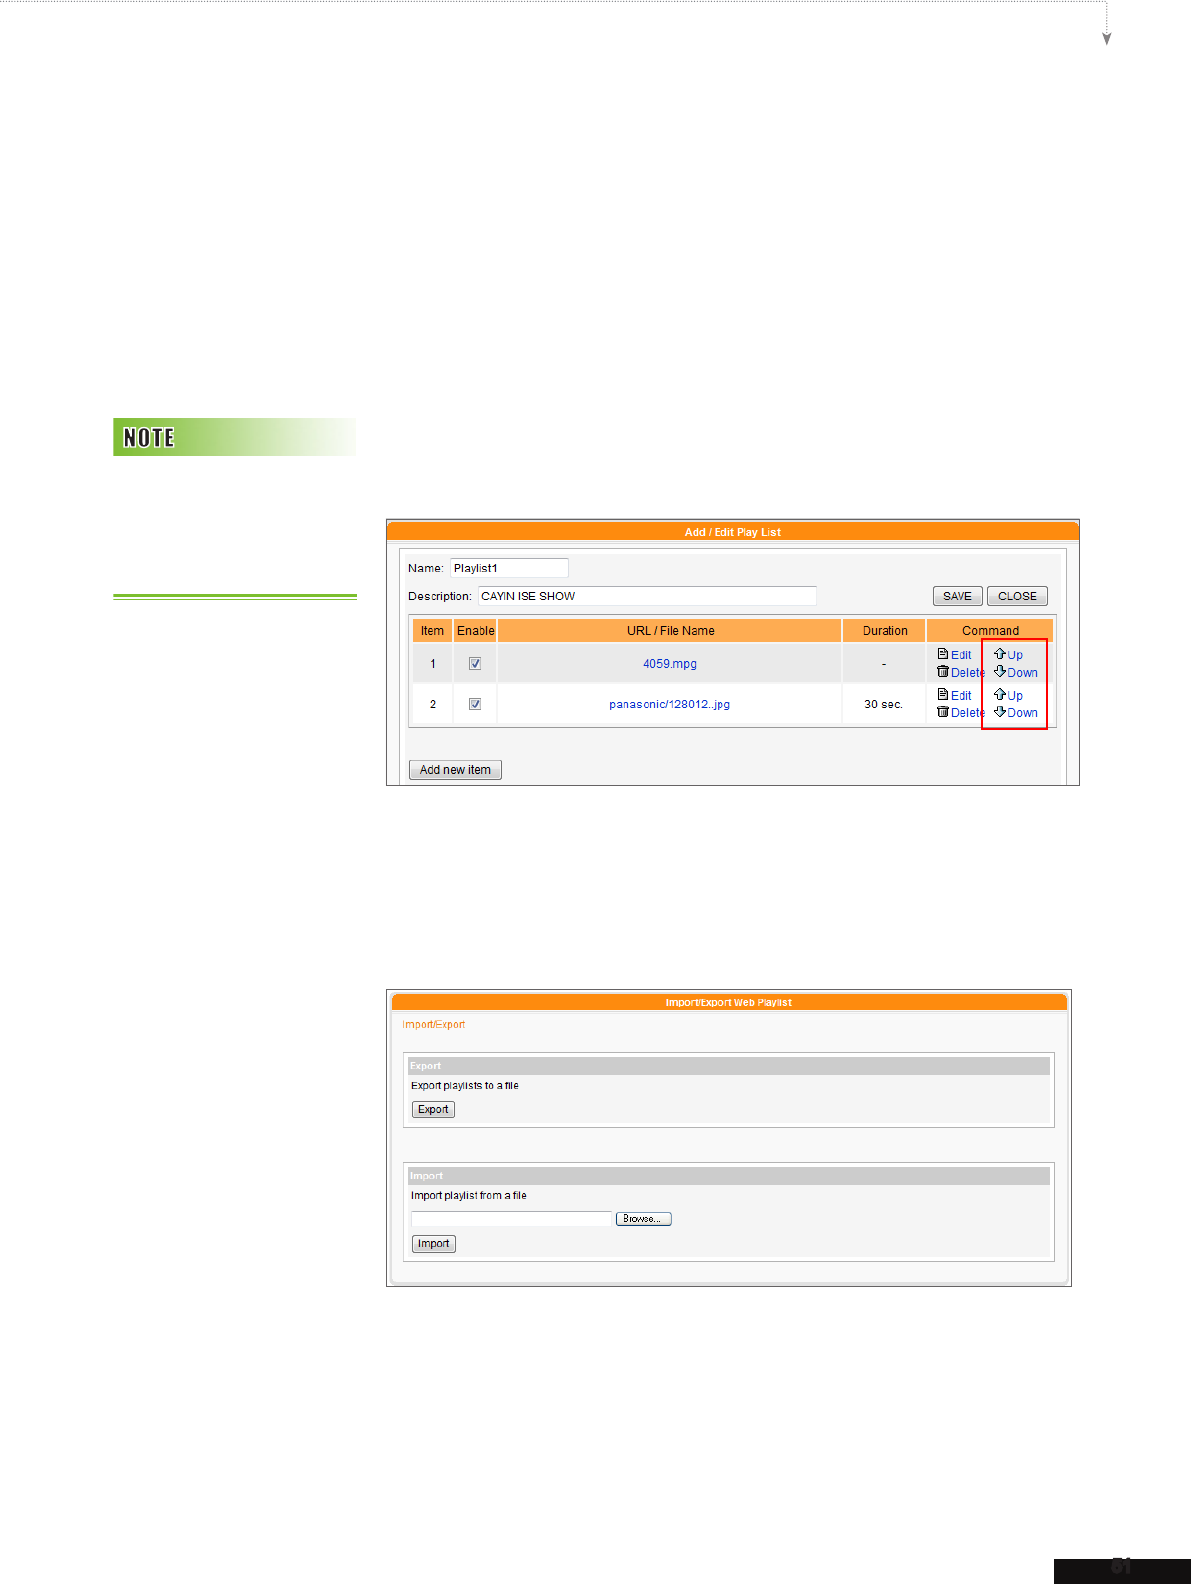
6. In the “Add / Edit Entry” window, you can decide the sequence of this new item in the playlist.
By default, the new item will be inserted as the last one. For example, if you already have five
items in this playlist, the system will automatically place this new item at the sixth place by default.
You can also choose to insert this new item between the first and fifth place. Please refer the
following table for all detailed settings:

50
CMS
Remote
URL
Specify a URL where SMP-WEB can connect to the html content, e.g.
http://remote_web_server/path/to/your.html.
You can also use dynamic server script, such as ASP, PHP, or CGI
to generate the HTML page. Check the box ”Append Hostname
Parameter” and the system will append hostname/group parameter
to the end of the html URL automatically. For example, you enter http://
remote_web_server/test.php in this option, SMP-WEB will actually
send a request as http://remote_web_server/test.php?hostname=hostn
ame&group=groupname The hostname here is the hostname that you
congure in “7-3 NETWORK SETTINGS”.
HTML/
SWF file
in Media
Folder
Select to play an html or swf le in the Media Folder.
By default, CMS will automatically list all html and swf les in the Media
Folder, so you can select an item here.
If you haven’t uploaded your files in the Media Folder, you can also
pre-edit the playlist by clicking [Enter new one] and entering the item
(e.g. /cayin/main.html) directly in the text box.
I m a g e
transition
You can insert an image le (JPEG) as a display item or a transition
between two HTML files by enabling this function. You can also
configure the transition effect as follows. By default, CMS will
automatically list all image les in the Media Folder, so you can select
one here. If you haven’t uploaded your les in the Media Folder, you
can also pre-edit the playlist by clicking [Enter a new one] and
entering the item (e.g. /cayin/cartoon.jpg) directly in the text box.
* Animation: The transition effect when the image enters and leaves
the screen. We now provide four animations: “fly from top to
bottom”, “y from bottom to top”, “y from left to right”
and “y from right to left”.
* Speed: The speed of animation effect.
* Next item preload time: You must set the time when you want
the system to start pre-loading the next item (e.g. an html le) before
the image disappears. For example, the duration of this image is 20
seconds and you want the system to start pre-loading the next item
at the 15th seconds, you need to set the number “5 (seconds)” in the
eld. The number here depends on the loading time of the next item
(html).
Video file
in Media
Folder
You can insert a video file as one of the items in the playlist, and
display a full-screen video.
By default, CMS will automatically list all video les in the Media Folder,
so you can select one here.
If you haven’t uploaded your files in the Media Folder, you can also
pre-edit the playlist by clicking [Enter a new one] and entering the
item (e.g. /cayin/cartoon.mpg) directly in the text box.
Display ratio: You can choose display ratio as "auto", "4:3" or
"16:9"
Video Input You can choose 4:3 or 16:9 as the video display ratio.
Program You can choose to play a program set or a program itself.
This method is similar to
the way you use in your PC
browser. SMP-WEB products
do not support HTTPS (SSL)
protocol currently.
If you choose to play video
les in Media Folder, you
will not be able to set the
duration of this video. The
system will automatically
play the next item in this
playlist after the system
nishes playing the whole
video.
51
CMS USER MANUAL
7. Finally, set the duration of each playback item. After the time is up,
SMP-WEB will play the next item. If you configure the duration as
“Always”, the playlist will stop here, which means that SMP-WEB will
keep playing this item without moving to the next item. use JavaScript
or ‘play-next-item’ tag to change the playlist item. Click [SAVE]
and [CLOSE] to complete the settings.
8. After adding items, you can adjust the order by clicking the [Up] or
[Down] button in the Command column.
5-4-2 Import/Export Web Playlist
You can import or export web playlists for other Groups or Servers.
Export
1. Select a group in the drop-down menu, “Select group”.
2. Click [Export]; then, you can export the playlist of this group to a le
(.cps) and store it in your PC.
Remember to click the check
box to enable those items
that you want to play. Then,
click [SAVE] and [CLOSE].
52
CMS
Import
1. Please select the group, which you want to apply a pre-edited Web
Playlist from another Group or CMS server.
2. Click [Browse…] to select the Web Playlist le (.cps).
3. Click [Import]. Then, you will see the Web Playlist listed in the above table
.
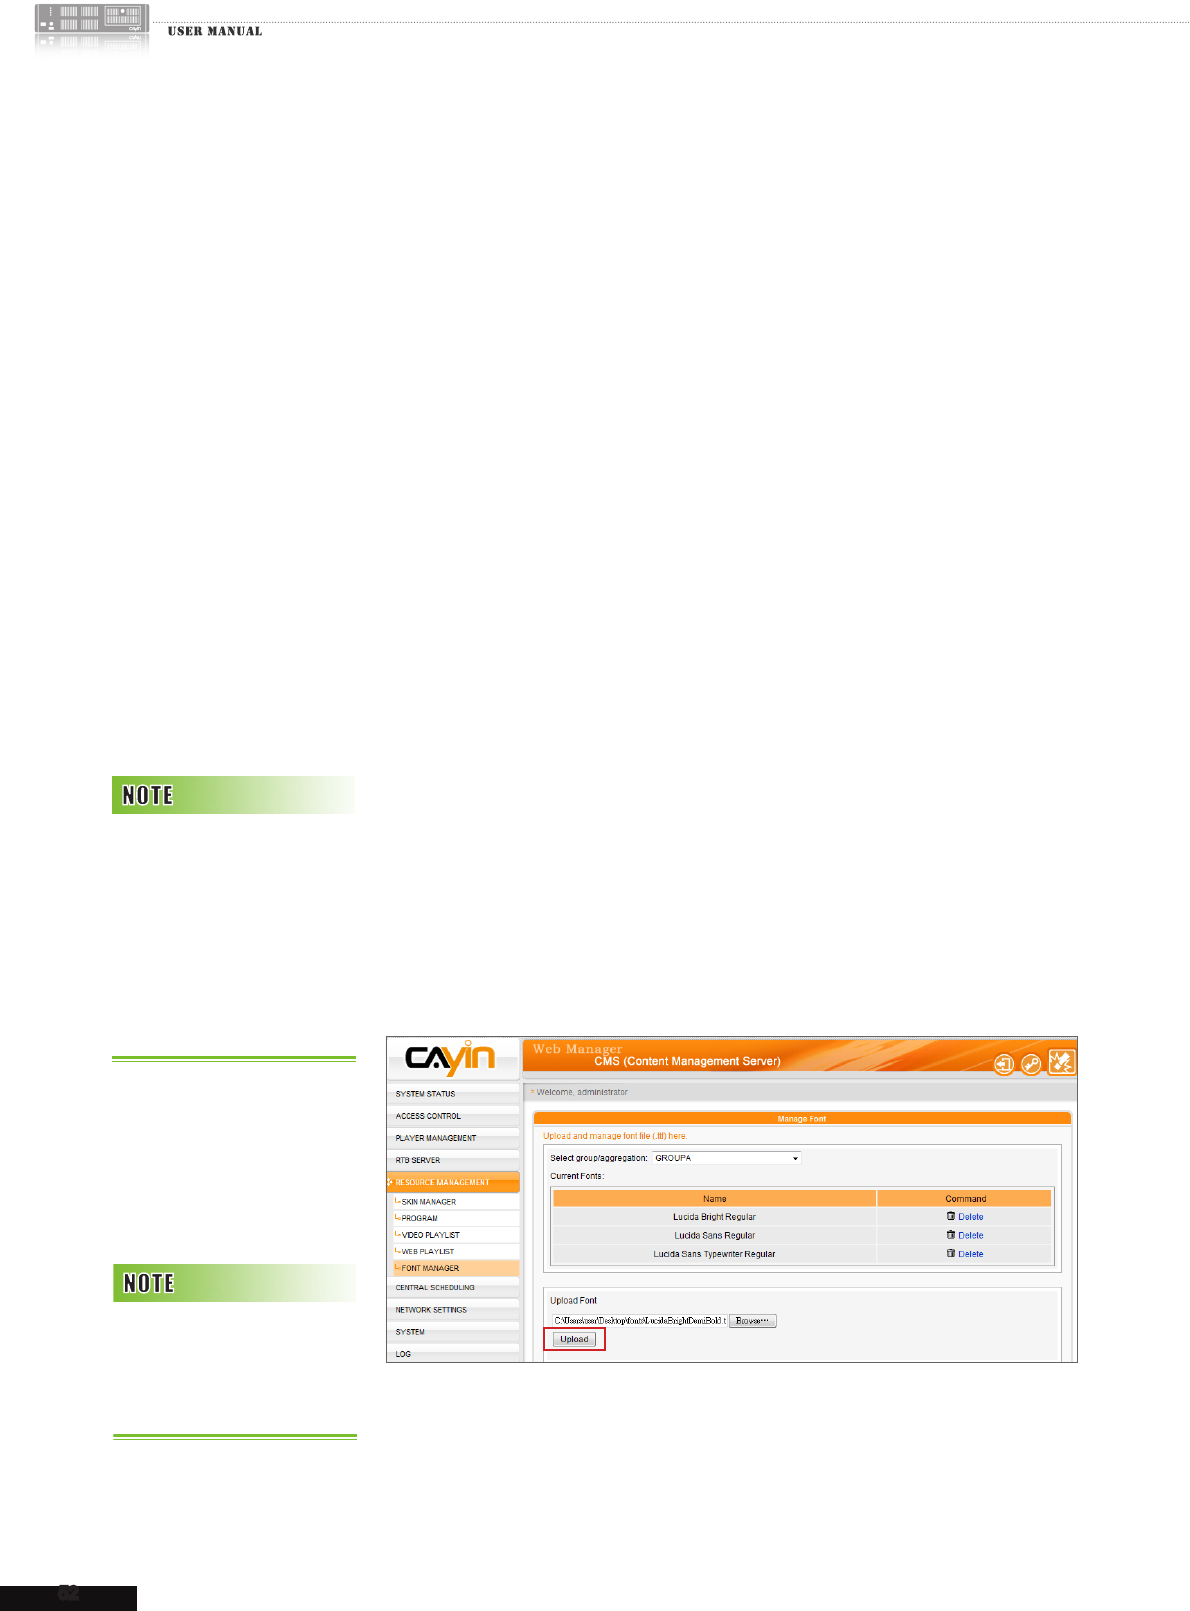
5-5 Font Manager
You can upload new fonts to SMP players via a CMS server, so that
you can choose your favorite text fonts for a better presentation.
5-5-1 Add Fonts to SMP Players
1. Login CMS server with the account which is allowed to access the
function: “RESOURCE MANAGER - FONT MANAGER”.
2. Click [RESOURCE MANAGEMENT] on the main page, and select
the sub-page, “FONT MANAGER”.
3. Select a group in the drop-down menu, “Select group”. If you
have not created any group, please go to “ACCESS CONTROL >
GROUP” page to add a group.
4. You can start to upload selected fonts one by one. Click [Browse]
and select a font le; then, click [Upload]. After that, you can see all
uploaded fonts in the table.
You can only upload Windows®
TTF font with UTF-8 character
encode. You will fail to upload
fonts if you choose incorrect
font les. We don’t guarantee
all font les can work normally
in SMP player.
Not all fonts that user upload
to CMS will be stored in SMP
players. It will depend on the
capacity of SMP partition.
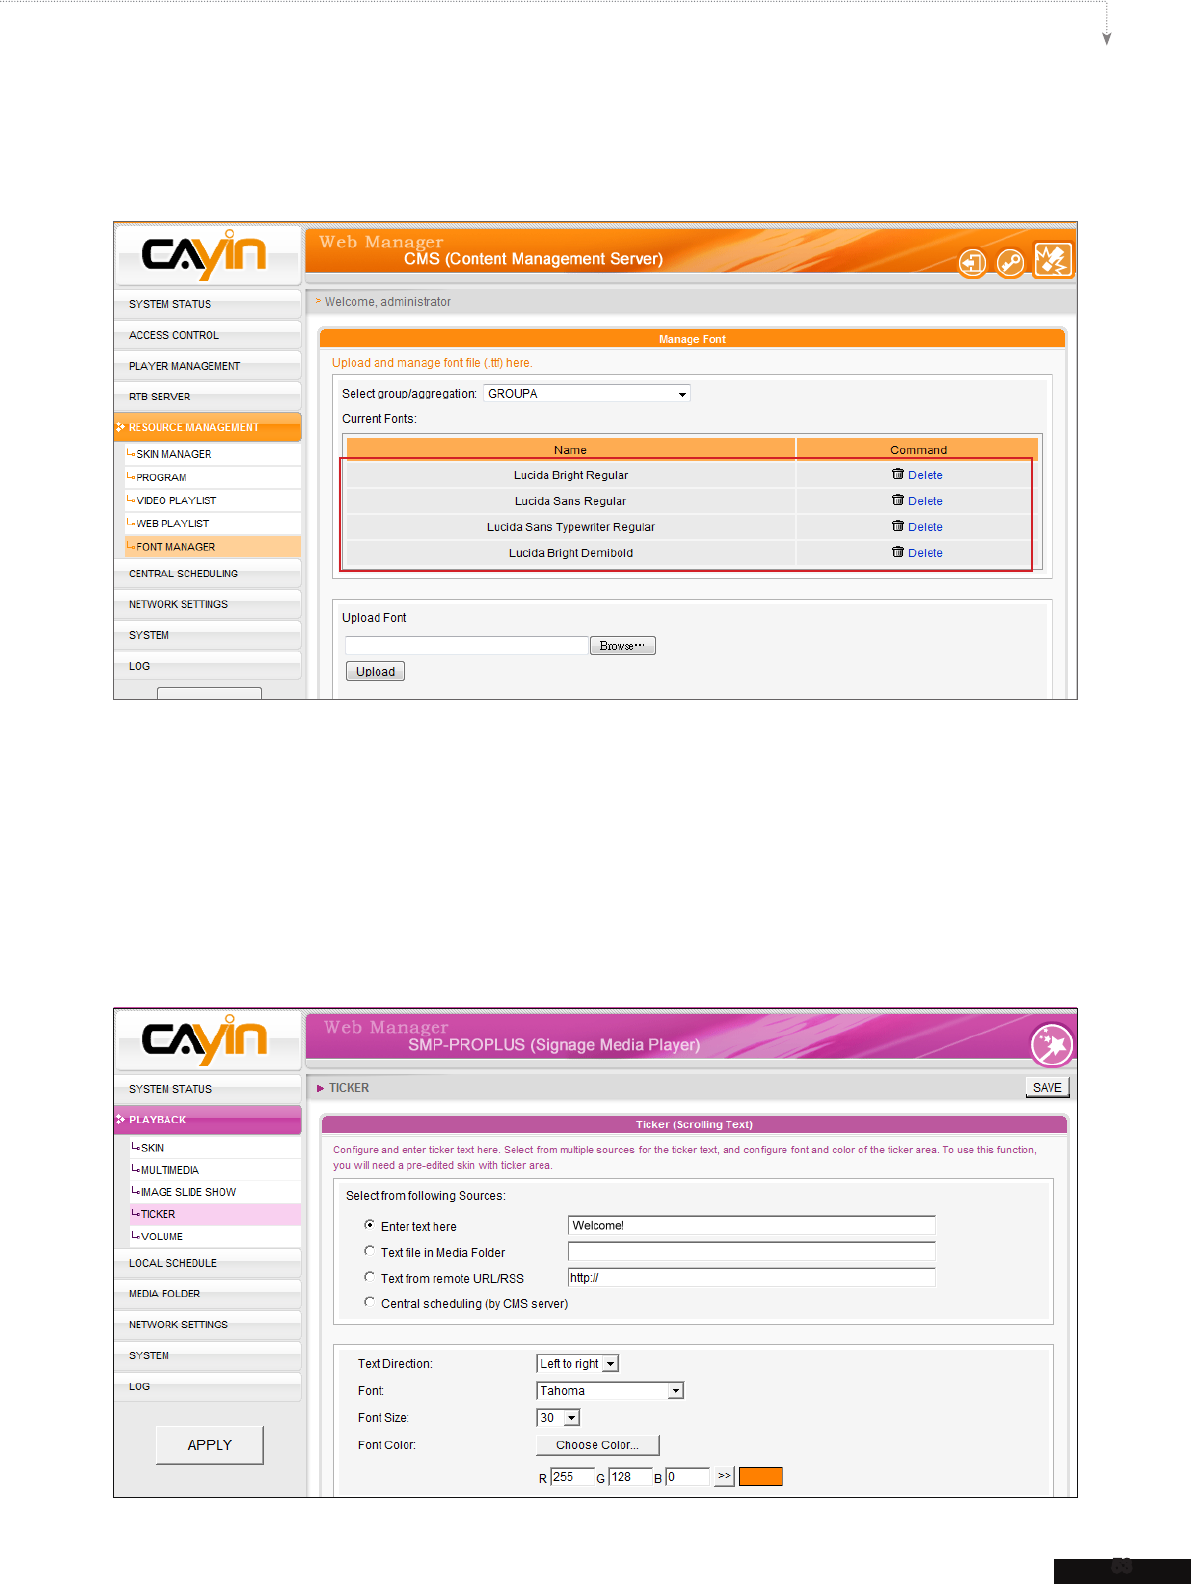
53
CMS USER MANUAL
5. After uploading TTF font to CMS, the uploaded font les will be synchronized to SMP together with
contents. After synchronization, you can choose these fonts in SMP.
5-5-2 Apply Fonts in SMP-PRO Series Players
After fonts are synchronized to SMP-PRO series players, you can use the font by the following
steps:
1. Click [PL AYBACK ] on the main page, and select the sub-page, “TICKER”.
2. Then, you can see all available fonts here for your choice.

54
CMS
5-5-3 Apply Font in SMP-WEB Series Players
After a fonts is synchronized to SMP-WEB series players, you can use that font in HTML by the
following steps:
1. Open HTML le by text editor or HTML editor (e.g. Adobe® Dreamweaver®).
2. Copy font name from CMS’s User Interface and specify the font face HTML tag:
e.g.
<font face=” Vagabond”>This is a sample text.</font>

6.Central Scheduling
6-1 Add Scheduling Period ........................................... 56
6-2 Skin ........................................................................ 57
6-3 Multimedia .............................................................. 58
6-3-1 Add Schedule - Video .................................... 59
6-3-2 Add Schedule - Image ................................... 61
6-3-3 Add Schedule - Streaming Video ................... 63
6-3-4 Add Schedule - Video-In ................................ 64
6-4 Image Slide Show .................................................. 64
6-5 Ticker ..................................................................... 67
6-6 WEB Playlist .......................................................... 69
6-7 Volume ................................................................... 72
6-8 Add Emergency Scheduling ................................... 73
6-8-1 Setup Emergency Schedule .......................... 73
6-8-2 Trigger Emergency Schedule ........................ 74
6-9 Import/Export Schedule ......................................... 76
6-10 Schedule Priority .................................................. 76
56
CMS
CMS server will periodically update the playlists to SMP players and
centrally manage playlists, media les, tickers, etc. of SMP players.
6-1 Add Scheduling Period
You can apply different schedules to specic dates or periods and
edit schedules in advance. For those dates without particular settings,
players will play the “default” schedule. All scheduling functions in CMS
support period scheduling.
1. Login CMS server with the account which is allowed to access the
function: “CENTRAL SCHEDULING”.
2. Click [CENTRAL SCHEDULING] on the main page, and go to the
sub-page that you want to edit.
3. If you want to schedule particular players in groups, please select a
group here.
4. Click [Add] in the “Scheduling period” area. You will see a pop-
up window
.
5. Select a beginning and an ending date for this schedule.
6. If you want to duplicate a schedule from an existing schedule, please
enable “Copy one another period” and select the schedule from
the drop-down menu. Then, they system will copy all contents in the
selected schedule to the new one.
Schedules in different
scheduling periods represent
individual ones. Please make
sure that you select a correct
scheduling period before you
start to edit a schedule. Pe-
riod scheduling only affects
the weekly schedule, but
won’t affect the “play once”
one.
57
CMS USER MANUAL
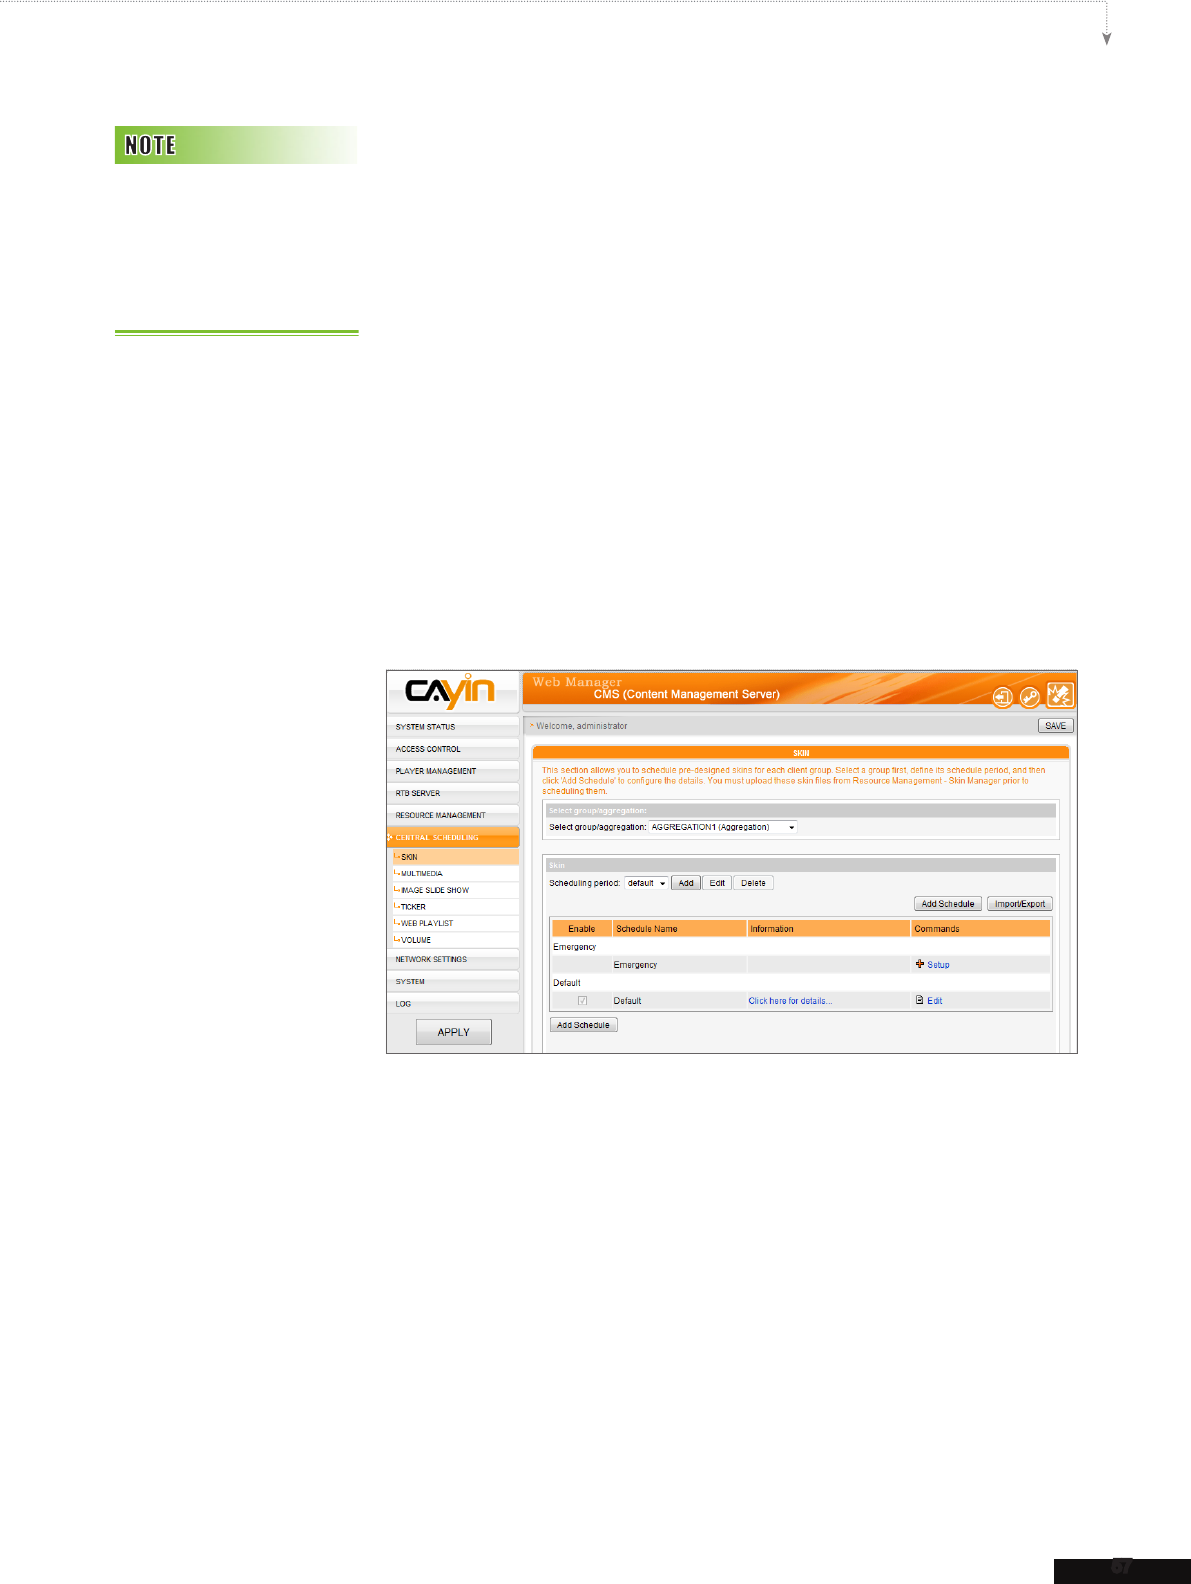
6-2 Skin
With CMS server, you can schedule pre-designed skins for each client
group. Please follow the steps to congure settings:
1. Login CMS server with the account which is allowed to access the
function: “CENTRAL SCHEDULING > SKIN”.
2. Click [CENTRAL SCHEDULING] on the main page, and select the
sub-page, “SKIN”.
3. Select a group or aggregation from the drop-down menu to decide
which players will apply this schedule.
4. Select or add a scheduling period. Please refer to 6-1 for details.
5. Click [Add Schedule] and start to edit a new schedule for skins.
6. Enter a “Schedule Name” and select a schedule type: “Weekly”
or “Play once”. Weekly schedule repeats itself every week. “Play
once” schedule only occurs once. After the task is finished, the
schedule will be expired. For weekly schedule, choose the days of the
week that you want to play the selected les. Set the start and end
time of the schedule within a day. For play-once schedule, enter the
start time, with date/time, of the schedule, and enter the duration of
this schedule.
Please go to “RESOURCE
MANAGEMENT > SKIN
MANAGER” and upload
skins to the CMS serve be-
fore you schedule skins here.
58
CMS
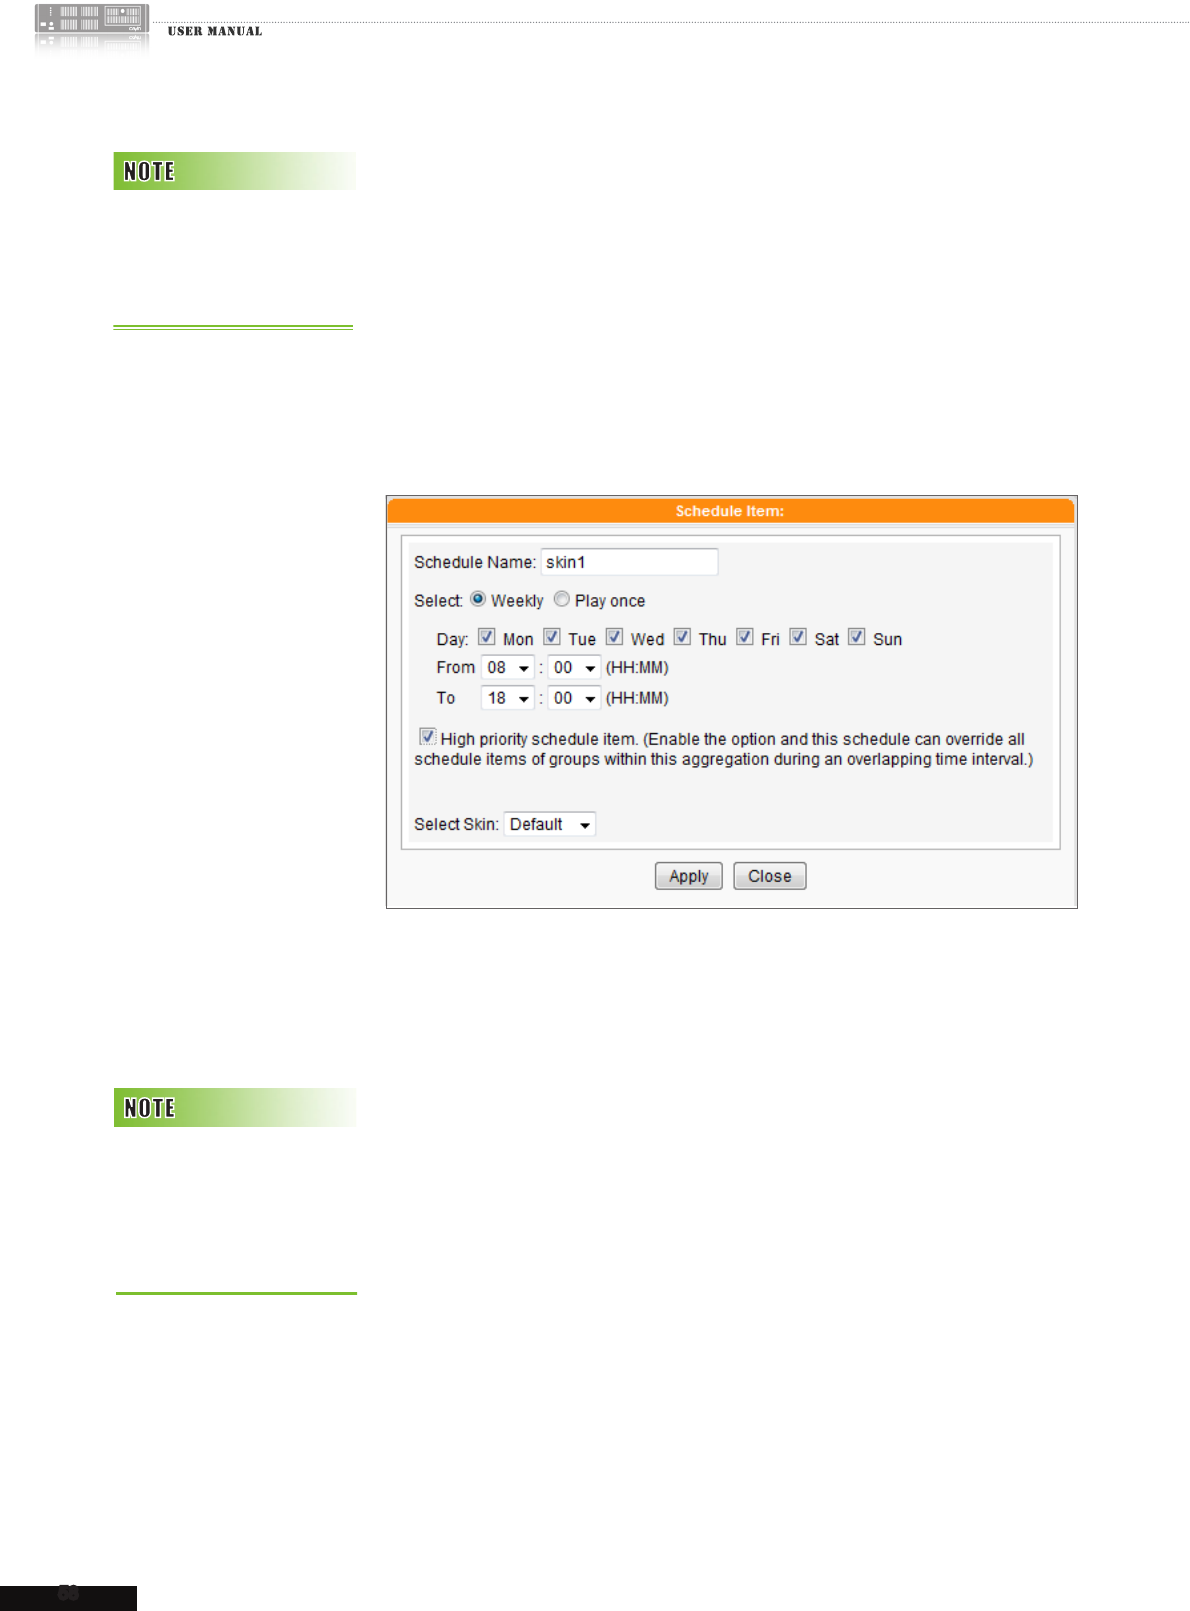
7. If you choose an aggregation from the group drop-down menu, you
will see the “High priority schedule item” function here. Enable
this option and this schedule can override all schedule items of groups
within this aggregation during an overlapping time interval.
8. Select one of the uploaded skins in the drop-down menu, “Select
Skin”. You will see all skins which you upload at “RESOURCE
MANAGEMENT > SKIN MANAGER”.
9. Finally, click [APPLY ] to adopt the changes or [CLOSE] to leave the
window without saving any changes.
6-3 Multimedia
In this section, you can congure a time-line of playlist for each client
group (clients with the same group). Central Scheduling schedules
image and video as Multimedia playlist for each client group.
You will only see “High
priority schedule item”
function when you choose
an aggregation.
Only SMP-PROPLUS
and SMP-WEBDUO /
SMP-WEBPLUS support
Multimedia-2 Central
Scheduling.
59
CMS USER MANUAL
6-3-1 Add Schedule - Video
Please follow the steps to add a schedule for a group and edit the
playlist of video.
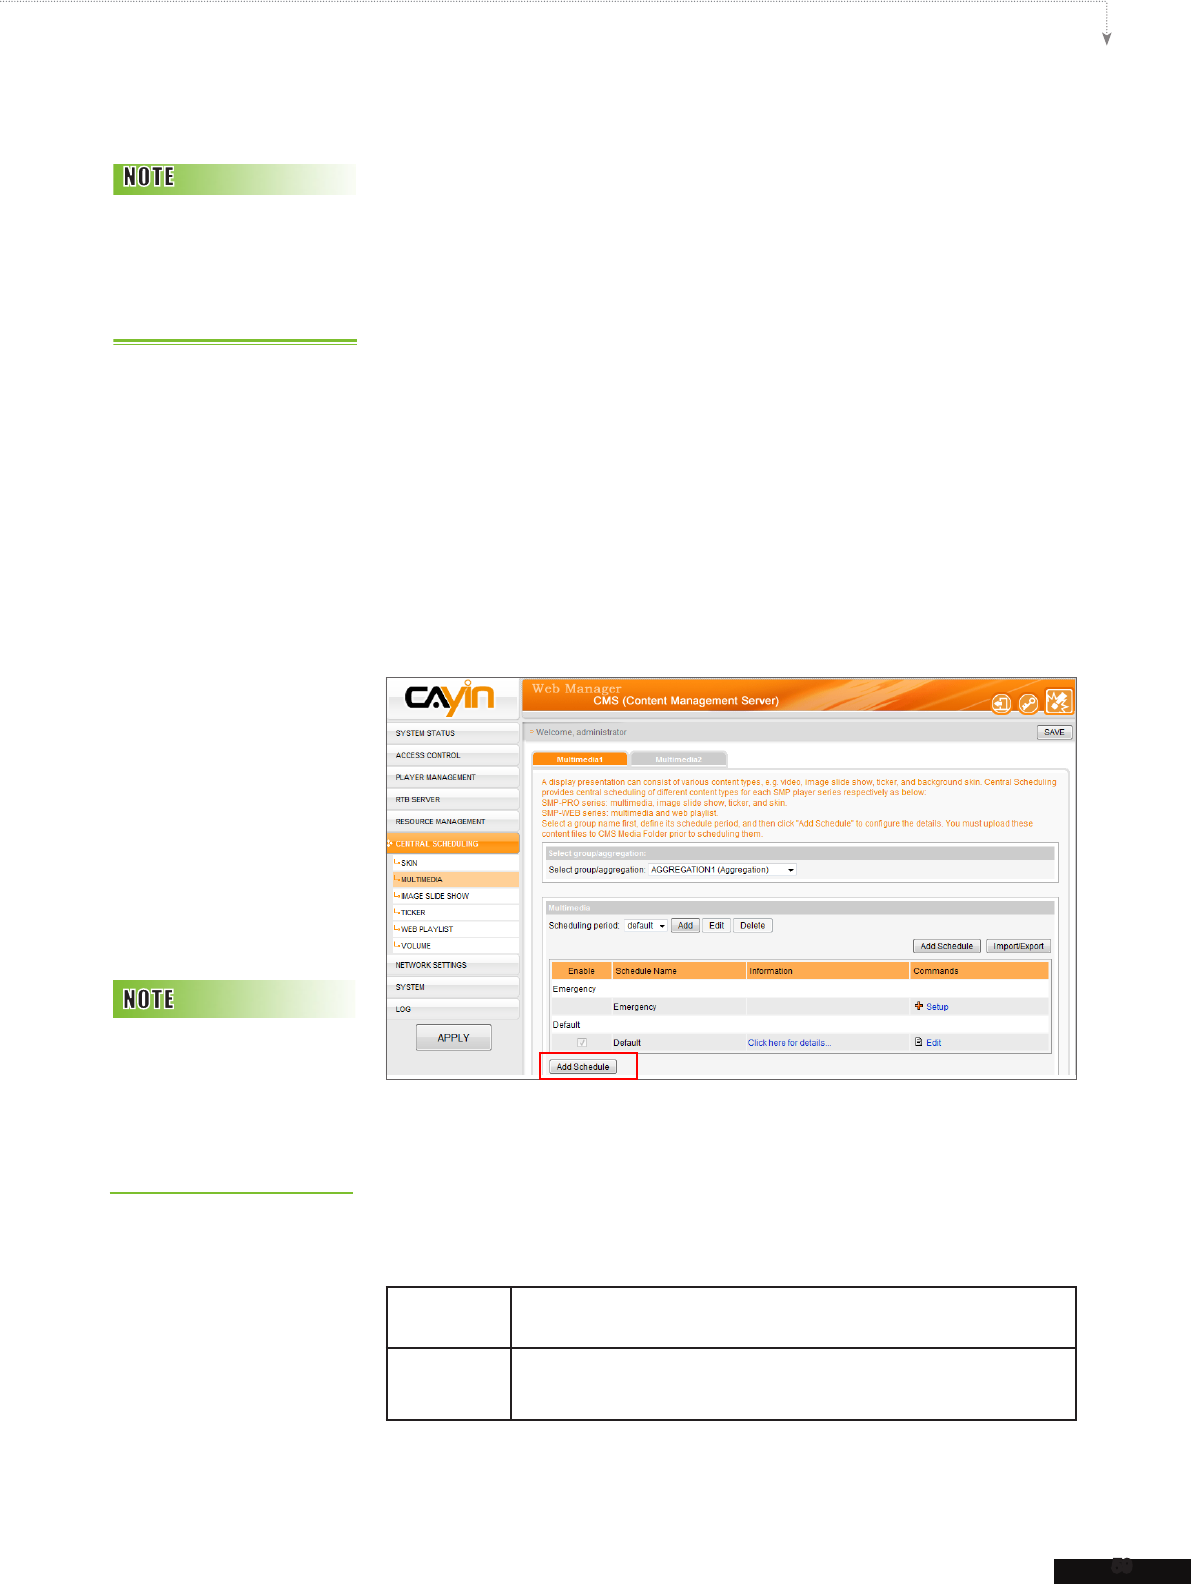
1. Login CMS server with the account which is allowed to access the
function: “CENTRAL SCHEDULING > MULTIMEDIA”.
2. Click [CENTRAL SCHEDULING] on the main page, and select the
sub-page, “MULTIMEDIA”.
3. Select a group or aggregation from the drop-down menu to decide
those players which will apply this schedule.
4. Select or add a scheduling period. Please refer to 6-1 for details.
5. Click [Add Schedule] and start to edit a new schedule.
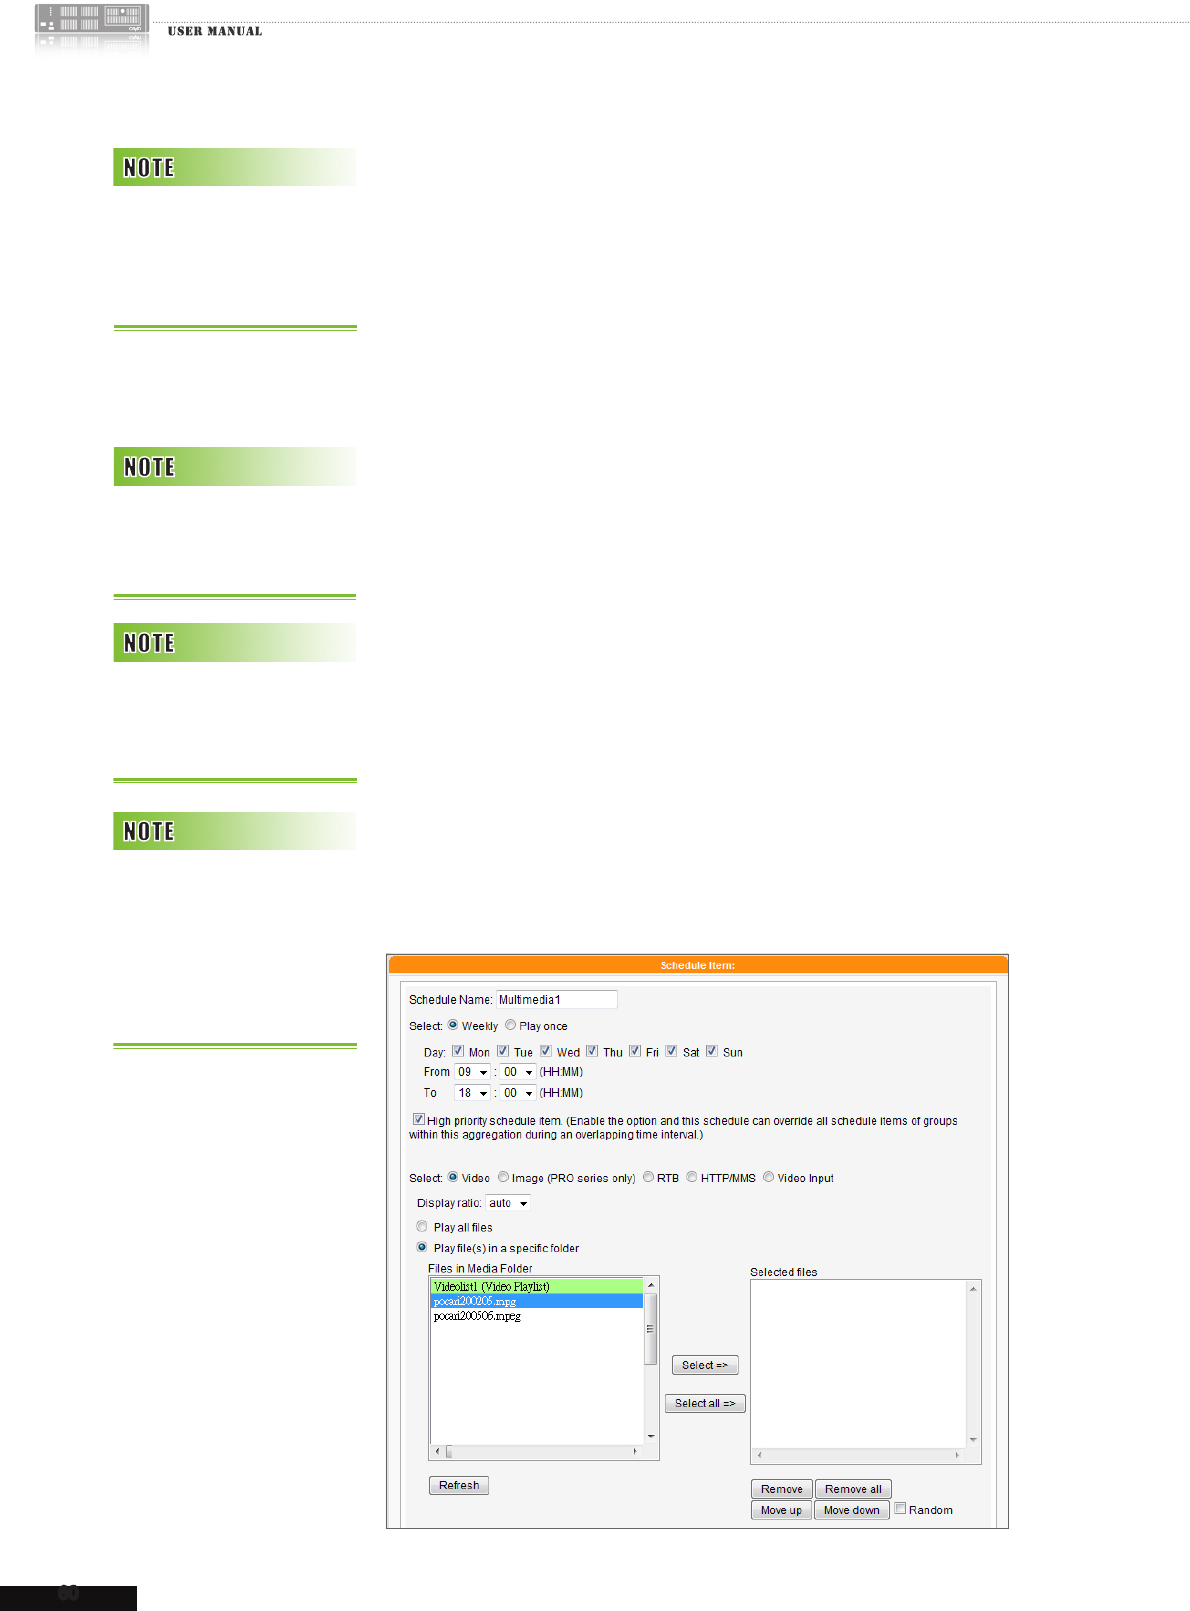
6. Enter a “Schedule Name” and select a schedule type: “Weekly”
or “Play once”. Weekly schedule repeats itself every week. “Play
once” schedule only occurs once. After the task is finished, the
schedule will be expired.
Weekly Choose the days of the week that you want to play the selected
les. Set the start and end time of the schedule within a day.
Play once Enter the start time, with date/time, of the schedule, and enter the
duration of this schedule.
You must upload Multime-
dia les to Content Update
folder prior to scheduling
them.
When the schedule task is
expired or with invalid set-
tings (e.g. The selected les
no longer exist), the item will
become red.
60
CMS
7. If you choose an aggregation from the drop-down menu of group, you
will see the "High priority schedule item” function here. Enable
the option and this schedule can override all schedule items of groups
within this aggregation during an overlapping time interval.
8. Select a media type: Video, Image, RTB, or HTTP/MMS. Please enable
“Video” here; then, you will see all available video les in the Media Folder.
9. Choose the display ratio here. You can select auto, 4:3 or 16:9
according to your display.
10. Select les you want and click [Select=>]. Those selected les will
be duplicated to the “Selected les” column. You can also select
video playlist directly here. If you want to play all files in the media
folder, please tick “Play all les”.
11. You can use [Move up] and [Move down] to arrange the order
of those selected les. If you want to remove les from the “Selected
Files” in the right column, please select les and click [Remove]. Or,
you can click [Remove all] to remove all items. Click [Random] t o
play selected les randomly.
You will only see “High
priority schedule item”
function when you choose an
aggregation.
You can also select the
Video Playlist here along
with the video les.
You cannot play video and
image les in the same
playlist.
If you select les which
include a symbol “*” in the
path, it means that you
select all les of the same
media type under that
folder.
61
CMS USER MANUAL
12. Finally, click [APPLY ] to adopt the changes or [CLOSE] to leave
the window without saving any changes.
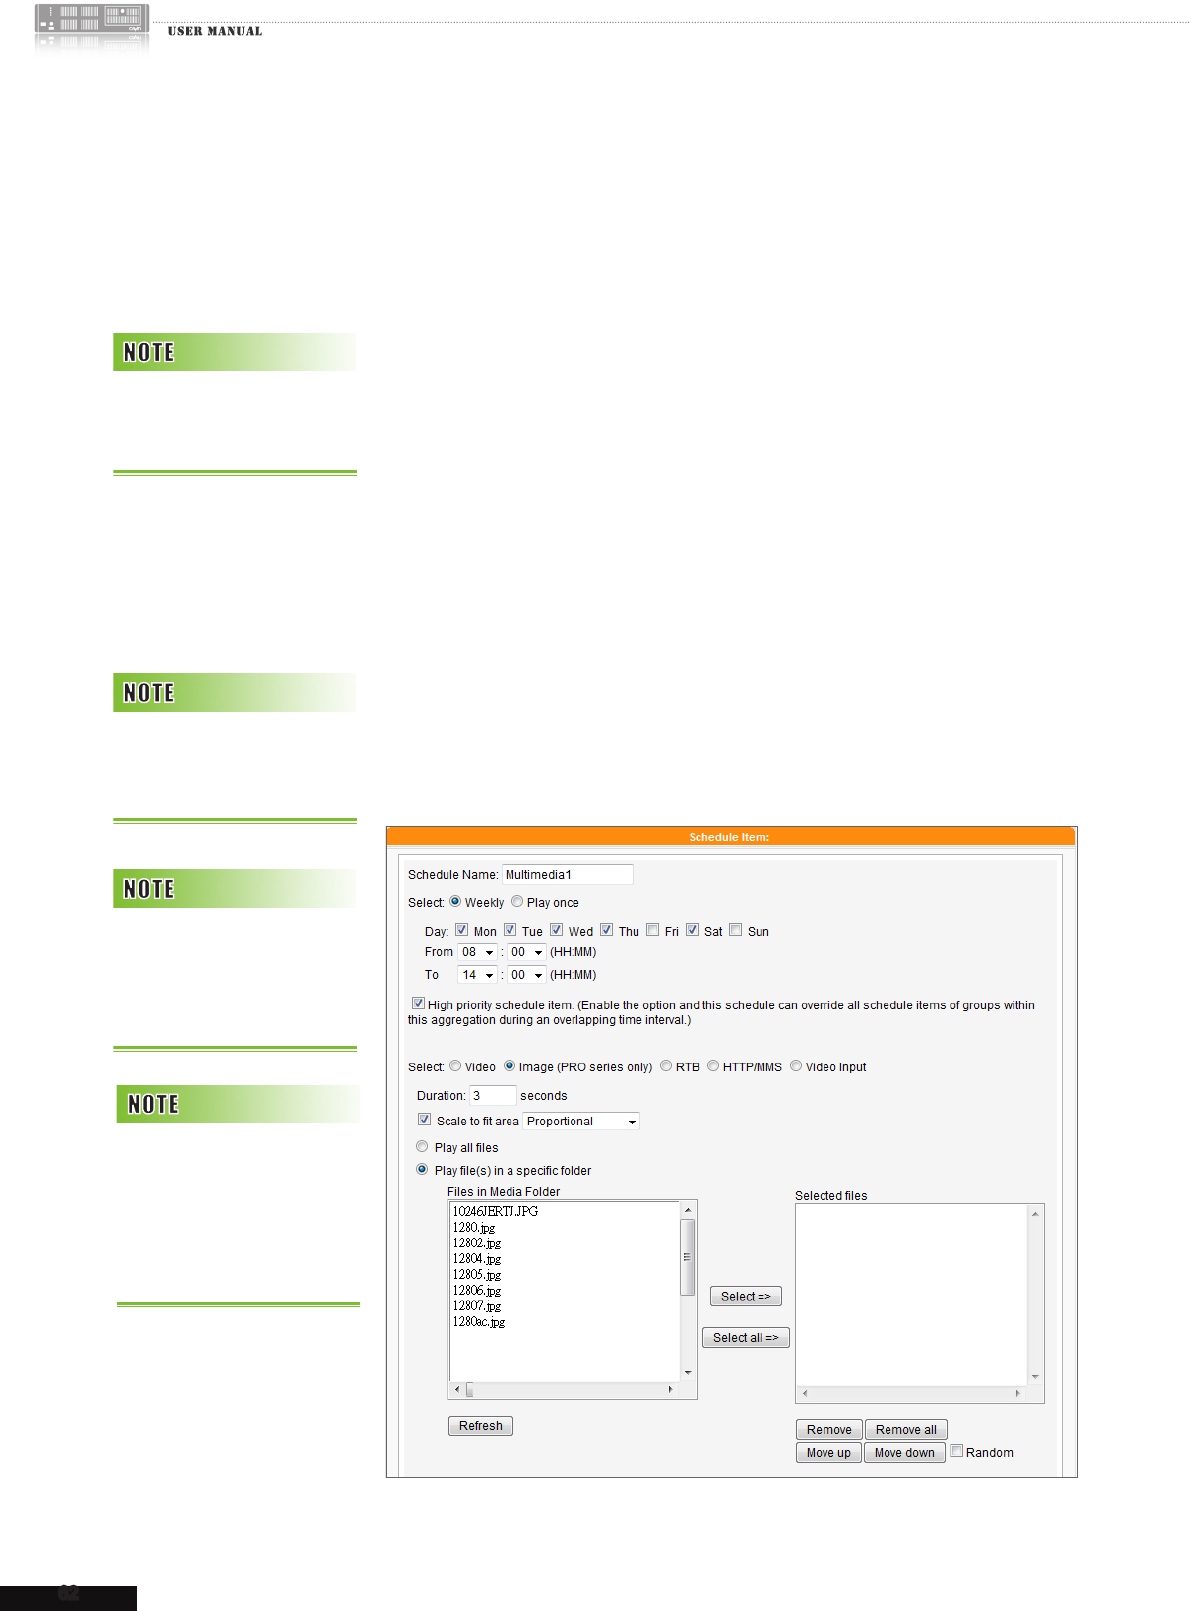
6-3-2 Add Schedule - Image
SMP-PRO series products can display static images. Please follow the
steps to add a schedule for a group and edit the playlist of images.
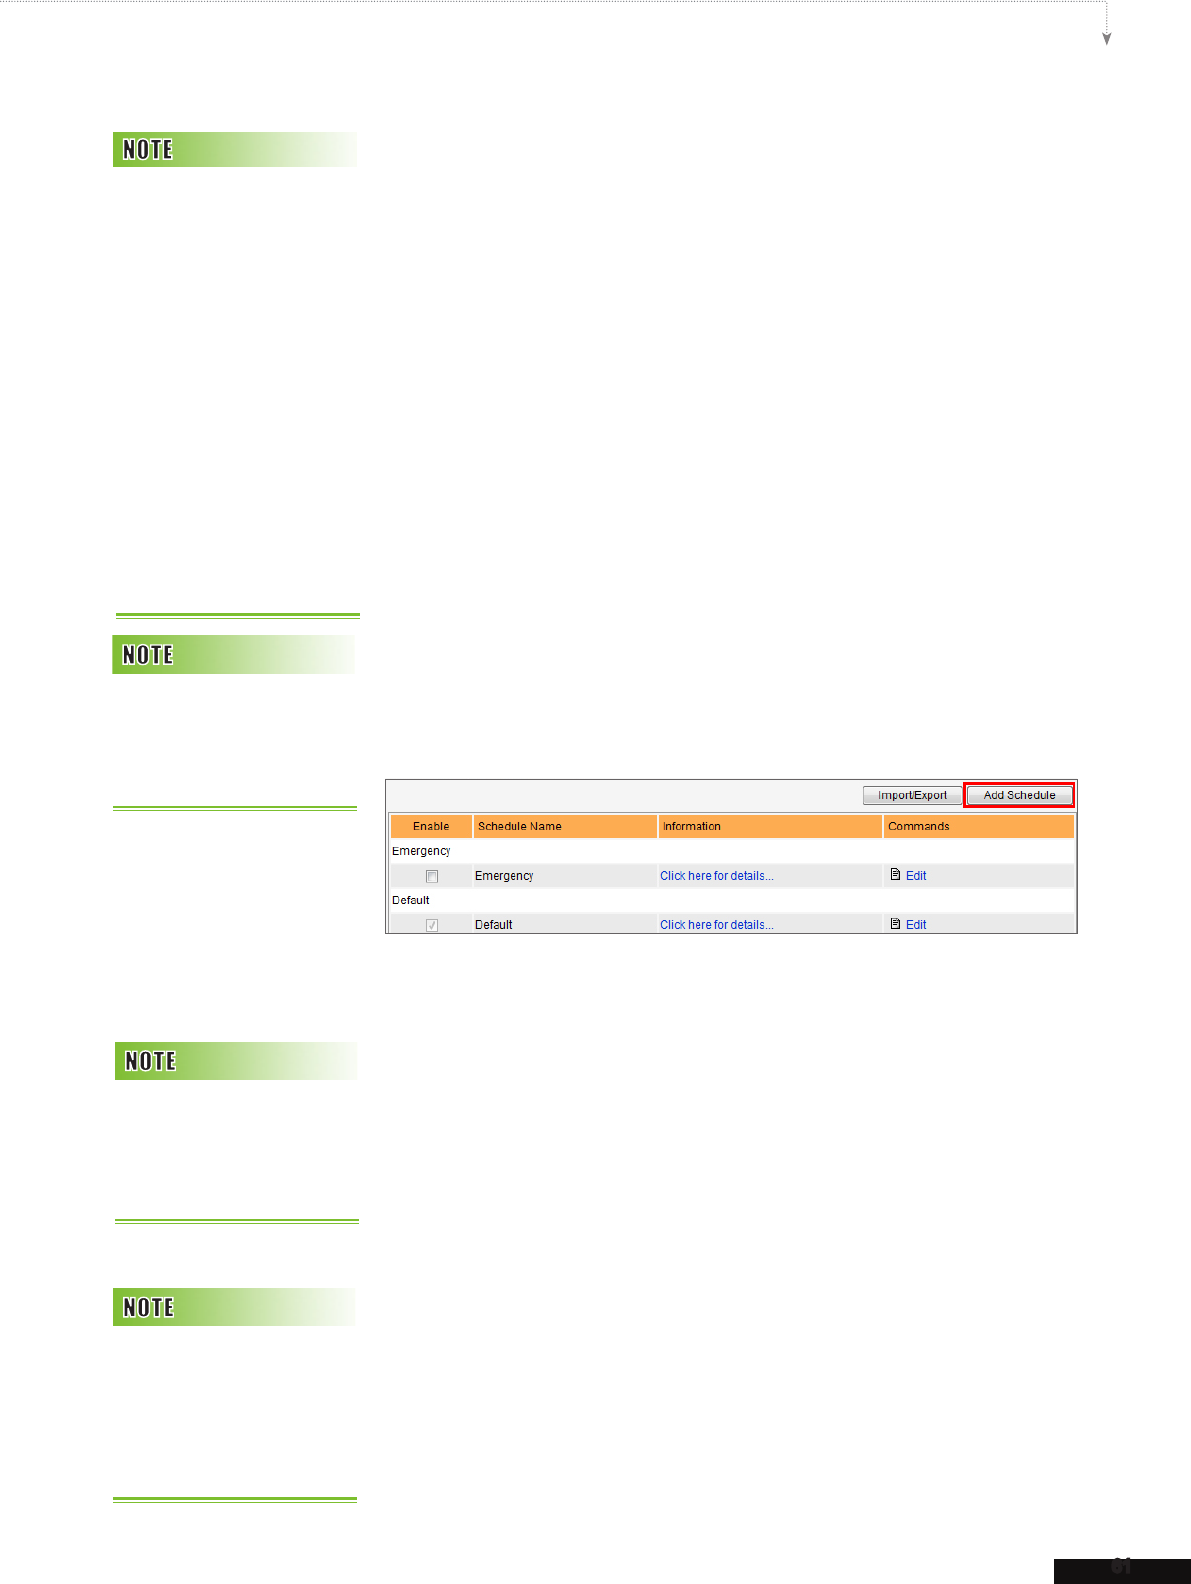
1. Login CMS server with the account which is allowed to access the
function: “CENTRAL SCHEDULING > MULTIMEDIA”.
2. Click [CENTRAL SCHEDULING] on the main page, and select the
sub-page, “MULTIMEDIA”.
3. Select a group from the drop-down menu to decide those players
which will apply this schedule.
4. Select or add a scheduling period. Please refer to 6-1 for details.
5. Click [Add Schedule] and start to edit a new schedule.
6. Enter a “Schedule Name” and select a schedule type: “Weekly”
or “Play once”. Weekly schedule repeats itself every week. “Play
once” schedule only occurs once. After the task is finished, the
schedule will be expired.
7. If you choose an aggregation from the drop-down menu of group, you
will see the “High priority schedule item” function here. Enable
the option and this schedule can override all schedule items of groups
within this aggregation during an overlapping time interval.
8. Select a media type: Video, Image, RTB, or HTTP/MMS. Please
enable “Image” here; then, you will see all image files which are
available in the Media Folder. You can display images as the image
slide show and set the “Duration” in seconds for it.
Please remember to
select the function
“Central Scheduling
by CMS Server” on
Web Manager of SMP-
PRO series (Playback
> Multimedia). For
SMP-WEB series, please
remember to add the
attribute “play-server-
schedule” in media
player’s tag in a HTML le.
Please refer to the user
manual of SMP-WEB series.
Only the latest SMP-PRO
series products support the
image le type in the Multi-
media section.
You will only see “High
priority schedule item”
function when you choose an
aggregation.
When the schedule task
is expired or with invalid
settings (e.g. the selected
les no longer exist), the item
will become red.
62
CMS
9. Please tick “Scale to t area” if you would like to adjust all images
sizes automatically according to your designated display area. You
can choose “Proportional” or “Non-proportional” for your
image from the drop-down menu.
10. Select those les you want and click [Select=>]. The selected les
will be duplicated to the “Selected les” column. If you want to play
all les in the media folder, please tick “Play all les”. You can use
[Move up] and [Move down] to arrange the order of those selected
les. If you want to remove les from the “Selected Files” in the
right column, please select files and click [Remove]. Or, you can
click [Remove all], and all items in the right column will be removed.
Click [Random] if you would like to play selected les randomly.
11. Finally, click [A PPLY ] to adopt the changes or [CLOSE] to leave the
window without saving any changes.
You cannot play video and
image les in the same
playlist.
You have to put image les
into the media folder rst;
then you can select them.
If you select “Random”, all
les in the right column will
be played randomly, without
following the sequence.
Please remember to
upload Multimedia les to
Content Update folder prio
r
to scheduling them, or you
will not see any les here.
63
CMS USER MANUAL
The playlist is the order how all multimedia les in the folder “media” are played. If you do not edit your own playlist,
SMP will play all les in the Media Folder in the alphabetical order.
If you create sub-folders under the folder “media”, all media les in these sub-folders will also be added together to the
play list according to the following sorting rules: (the former rules have higher priority than the later ones)
1. Files in the folder “media” will be played prior to any les located in sub-folders.
2. Files in the folder “media” will be sorted and played following alphabetical order.
3. Sub-folders will be sorted by alphabetical order.
4. Files in the sub-folders will be sorted and played following alphabetical order.
For example:
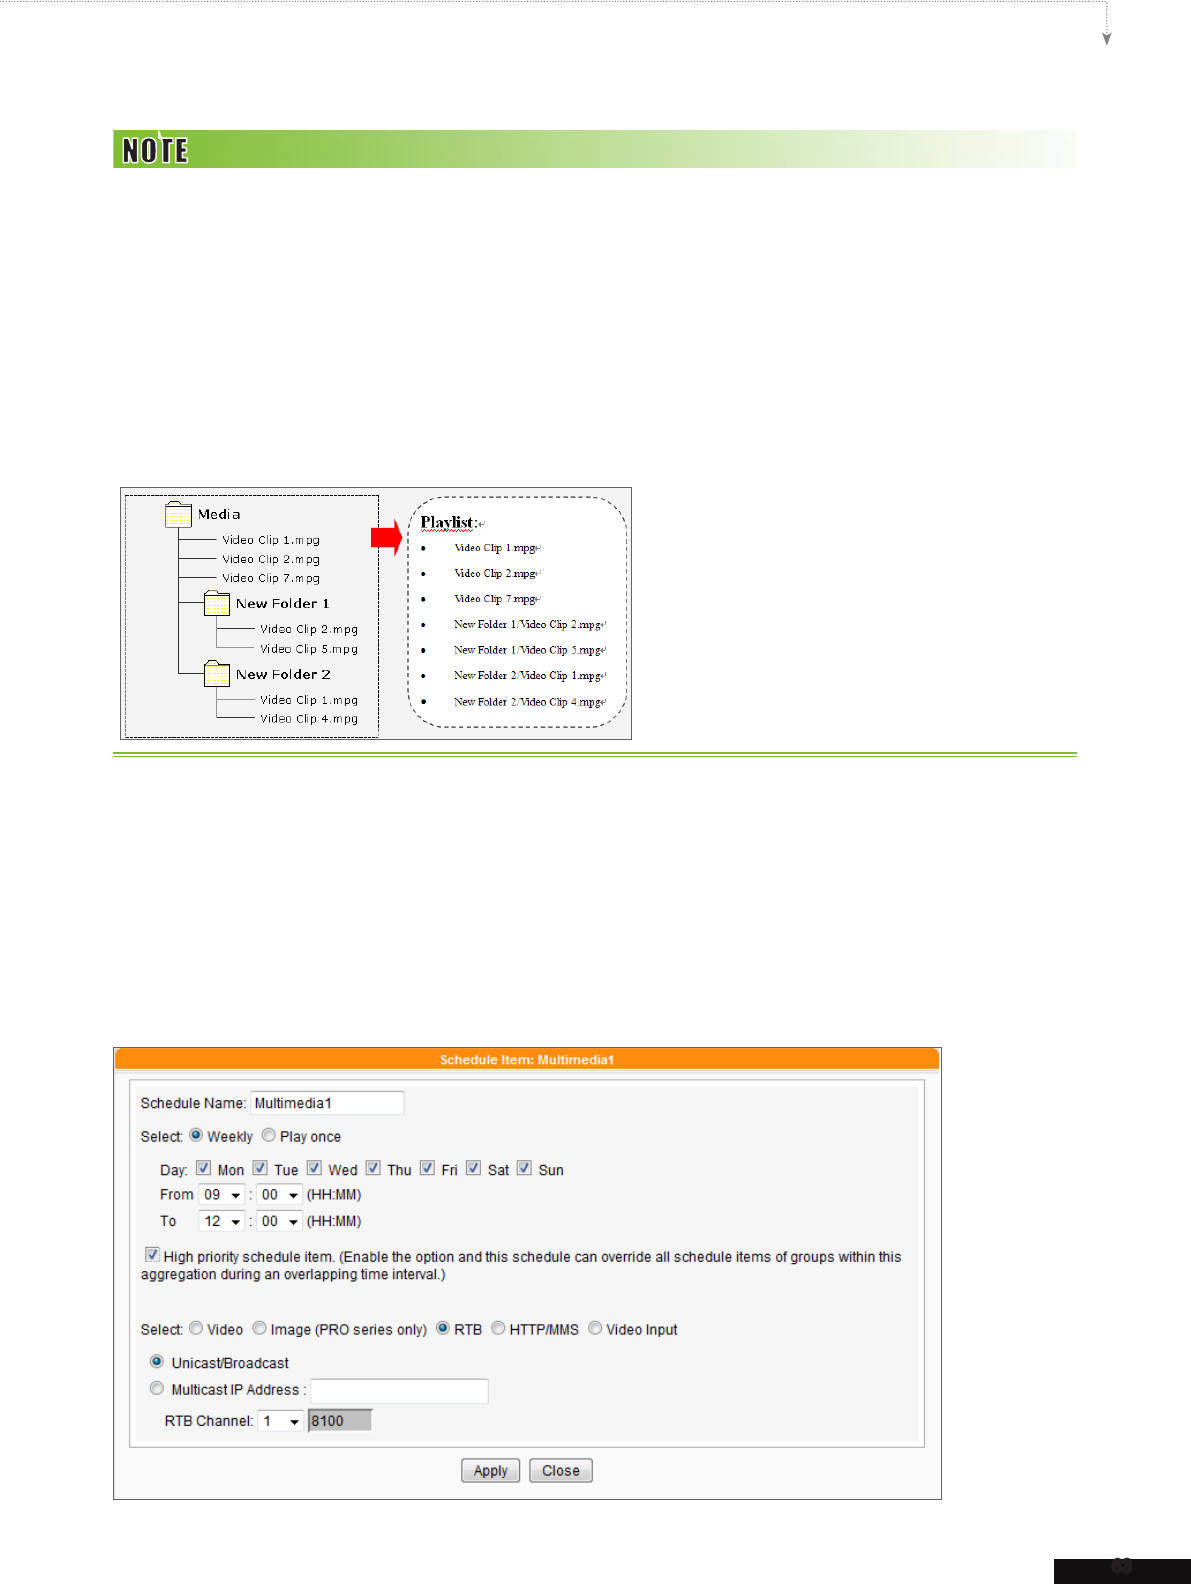
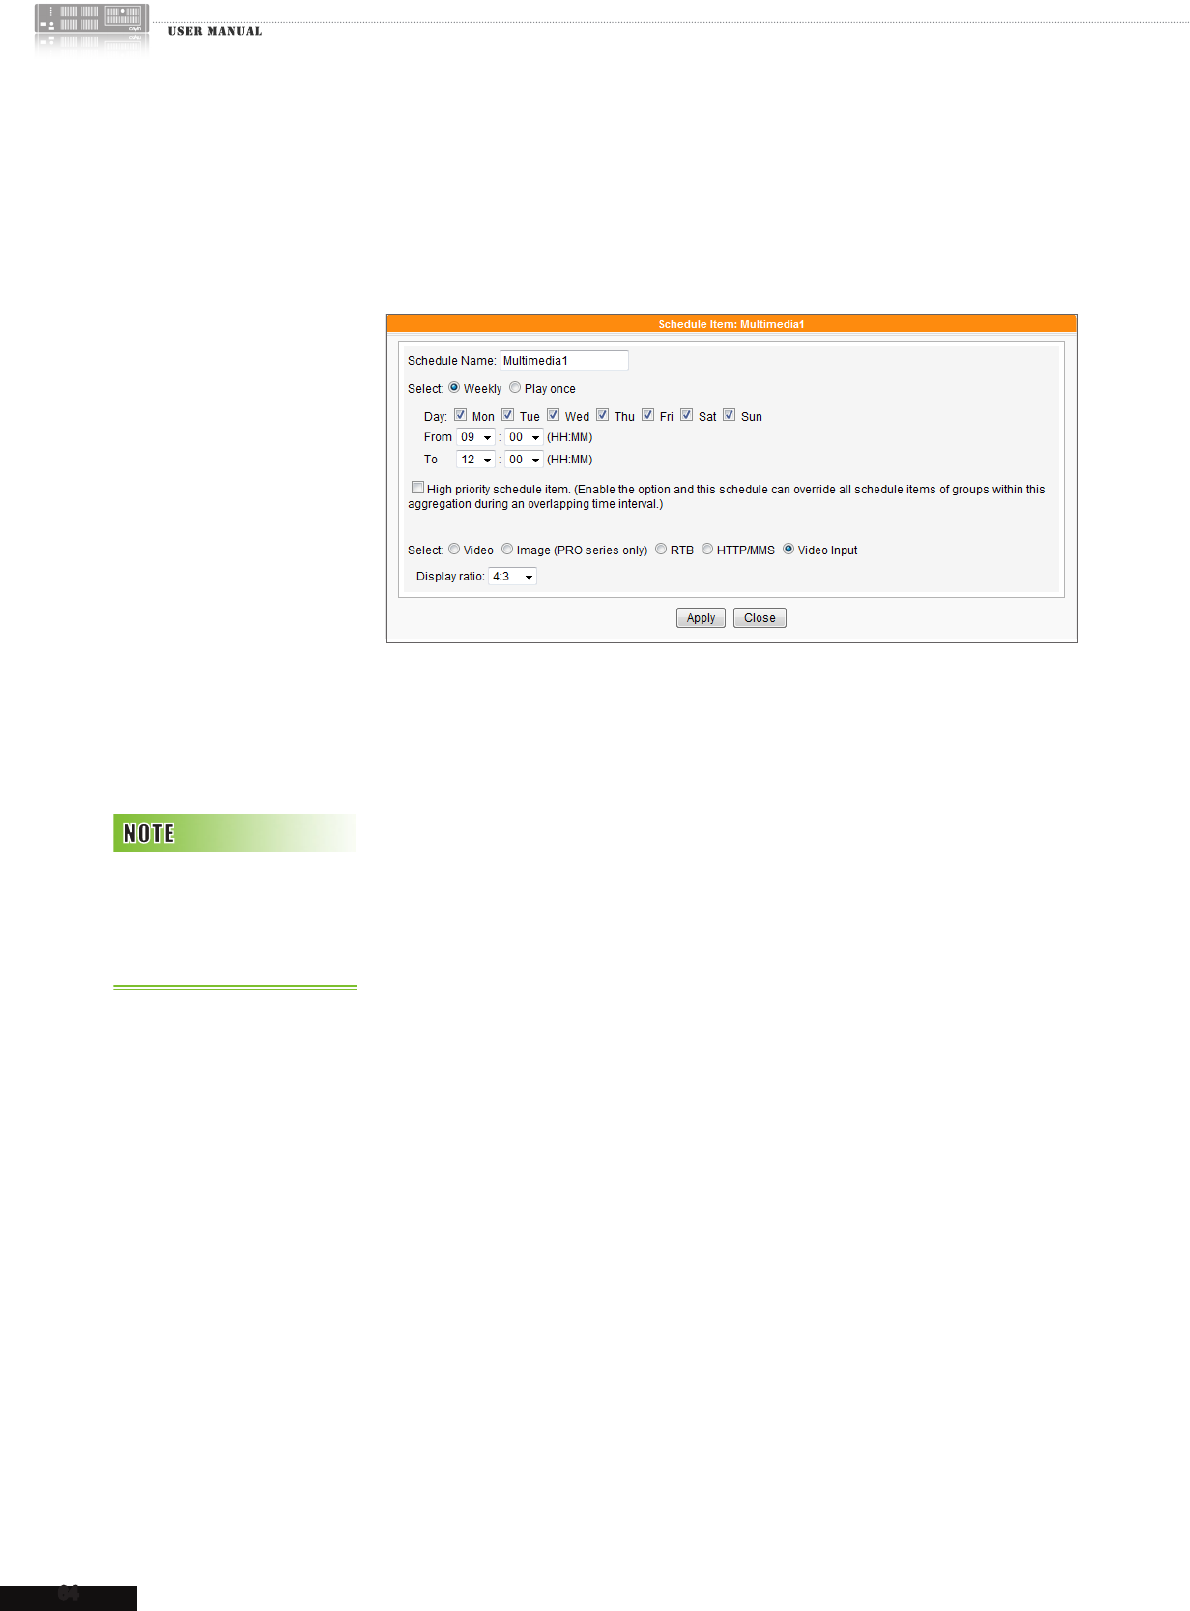
6-3-3 Add Schedule - Streaming Video
You can also display streaming video by CMS. Please select RTB or HTTP/MMS as your media type
and enter suitable settings. You can enable “High priority schedule item” function to override
all schedule items of groups within this aggregation during an overlapping time interval if you choose
an aggregation from the drop-down menu of group,
64
CMS
6-3-4 Add Schedule - Video-In
You can also display video input signal. Please select Video-in as your
media type. You can select display ratio from its drop down menu.
6-4 Image Slide Show
SMP players are capacable of displaying images in different areas on
the skin background. You can play image les in the Multimedia area
(refer to 6-3-2). You can also display image slide shows in different
areas except for the Multimedia area. Please follow the steps:
1. Login CMS server with the account which is allowed to access the
function: “CENTRAL > SCHEDULING > IMAGE SLIDE SHOW”.
2. Click [CENTRAL SCHEDULING] on the main page, and select the
sub-page, “IMAGE SLIDE SHOW”.
3. Select a group or aggregation from the drop-down menu to decide
which players will apply this schedule.
SMP-WEB series player
support Image Slideshow
Central Scheduling by
Program function.
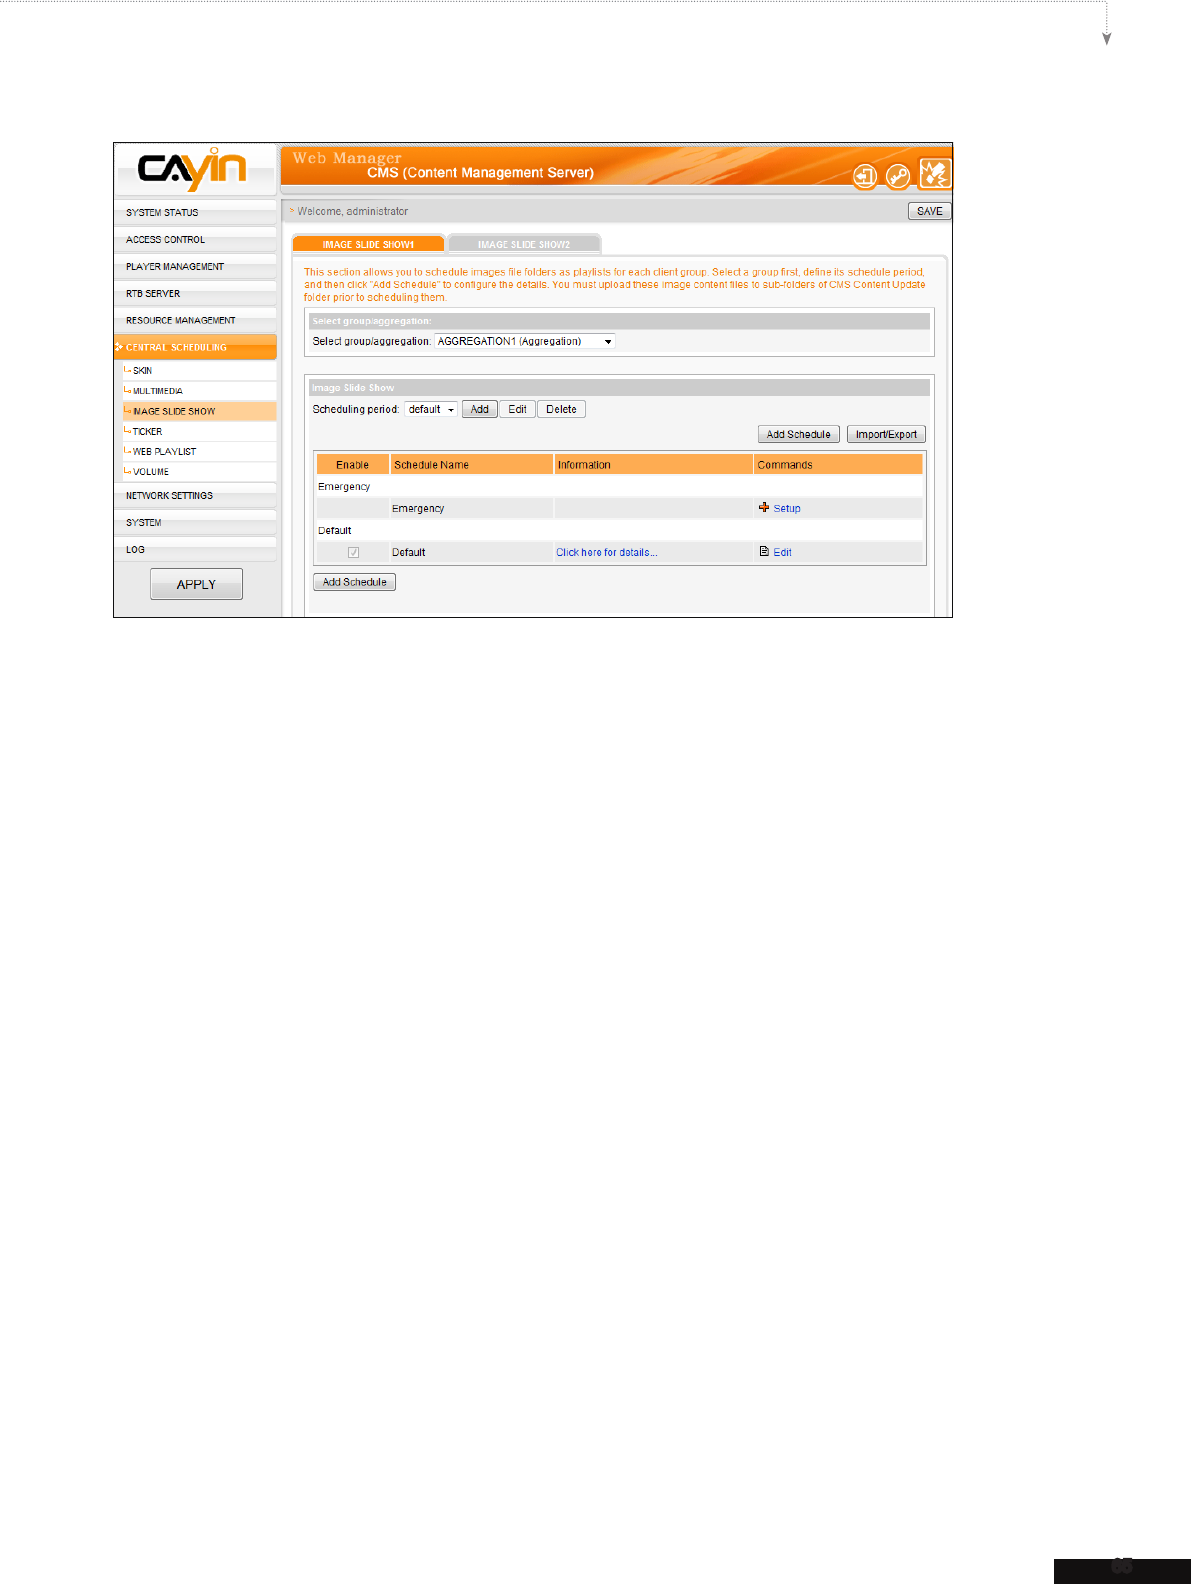
65
CMS USER MANUAL
4. Select or add a scheduling period. Please refer to 6-1 for details.
5. Click [Add Schedule] and start to edit a new schedule.
6. Enter a “Schedule Name” and select a schedule type: “Weekly” or “Play once”. Weekly
schedule repeats itself every week. “Play once” schedule only occurs once. After the task is
nished, the schedule will be expired. For weekly schedule, choose the days of the week that you
want to play the selected les. Set the start and end time of the schedule within a day. For play-
once schedule, enter the start time, with date/time, of the schedule, and enter the duration of this
schedule.
7. If you choose an aggregation from the drop-down menu of group, you will see the “High priority
schedule item” function here. Enable the option and this schedule can override all schedule
items of groups within this aggregation during an overlapping time interval.
8. You can also configure the time that you want each image slide show to play, and the play
sequence of the les in folders from the drop-down menu. If you would like to adjust all images
sizes automatically according to your designated display area, please tick “Scale to t area”.
You can choose “Proportional” or “Non-proportional” for your image from the drop-down
menu.
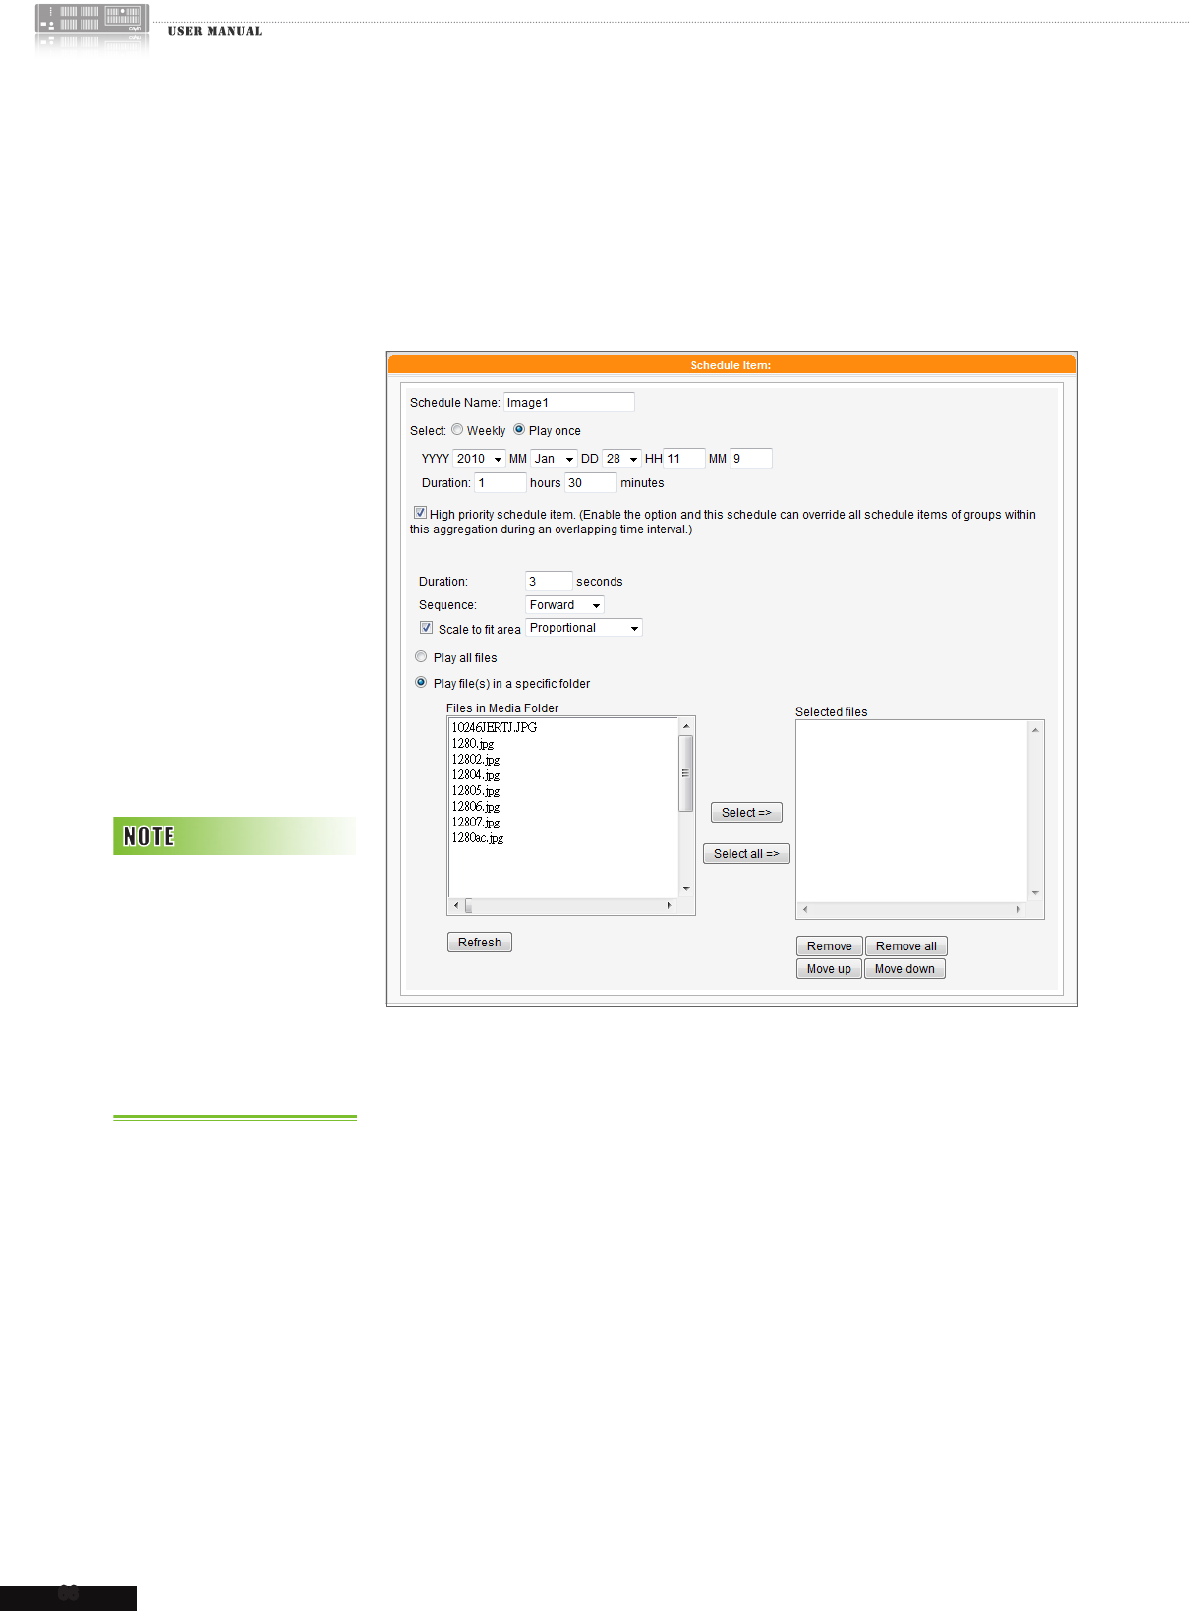
66
CMS
9. Now please select les. If you enable “Play all les”, it means that
you will play all image les in the Media Folder. If you want to play all
image les in a selected folder, choose one folder, and SMP players
will play all image les in the selected folder.
10. Finally, click [APPLY] to adopt the changes or [CLOSE] to leave
the window without saving any changes.
SMP player can support two
image slide show areas.
If you assign more than 1
image slide show areas in
your skin, you can follow the
above steps to configure
settings in “Image Slide
Show 2”.
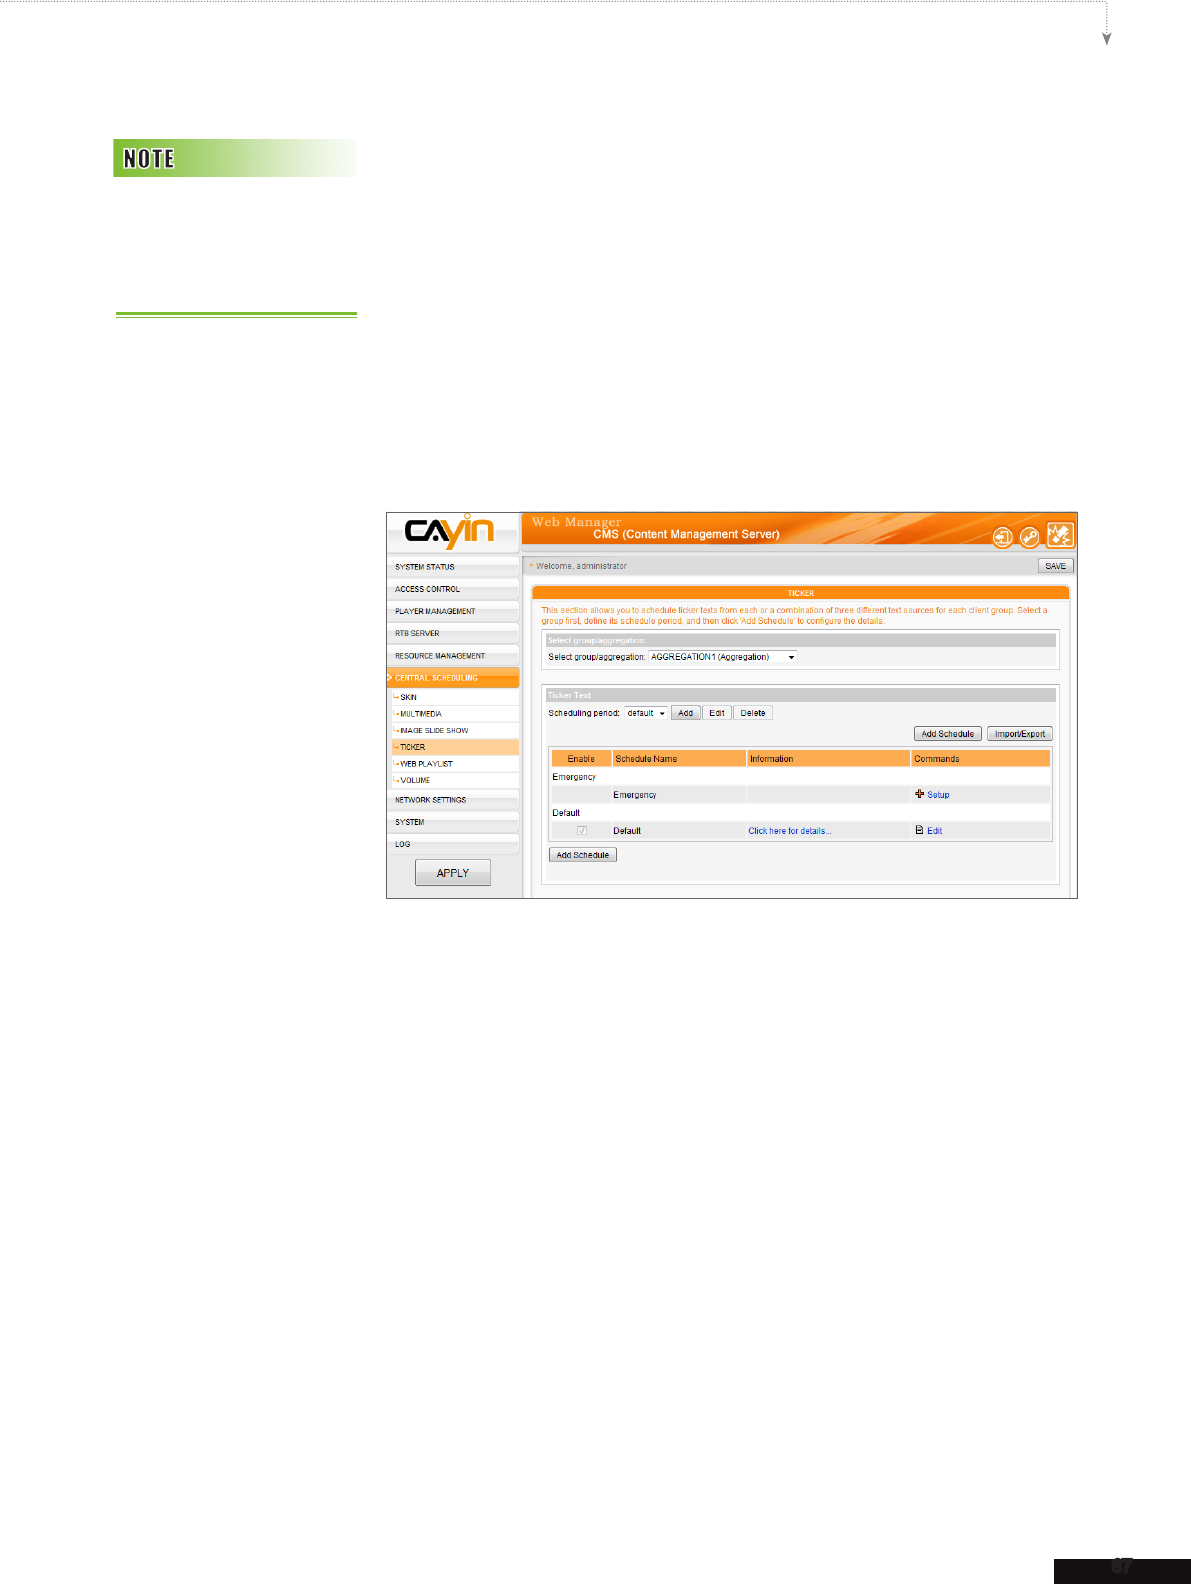
67
CMS USER MANUAL
6-5 Ticker
With CMS server, you can schedule ticker text for each client group from
each or a combination of three different text sources: text box, text le,
and URL. Please follow the steps to congure settings:
1. Login CMS server with the account which is allowed to access the
function: “CENTRAL SCHEDULING > TICKER”.
2.
Click [CENTRAL SCHEDULING] on the main page, and select
the sub-page, “TICKER”.
3. Select a group or aggregation from the drop-down menu to decide
those players which will apply this schedule.
4. Select or add a scheduling period. Please refer to 6-1 for details.
5. Click [Add Schedule] and start to edit a new schedule.
6. Enter a “Schedule Name” and select a schedule type: “Weekly”
or “Play once”. Weekly schedule repeats itself every week. “Play
once” schedule only occurs once. After the task is finished, the
schedule will be expired. For weekly schedule, choose the days of the
week that you want to play the selected les. Set the start and end
time of the schedule within a day. For play-once schedule, enter the
start time, with date/time, of the schedule, and enter the duration of
this schedule.
SMP-WEB series player
support Ticker Central
Scheduling by Program
function.
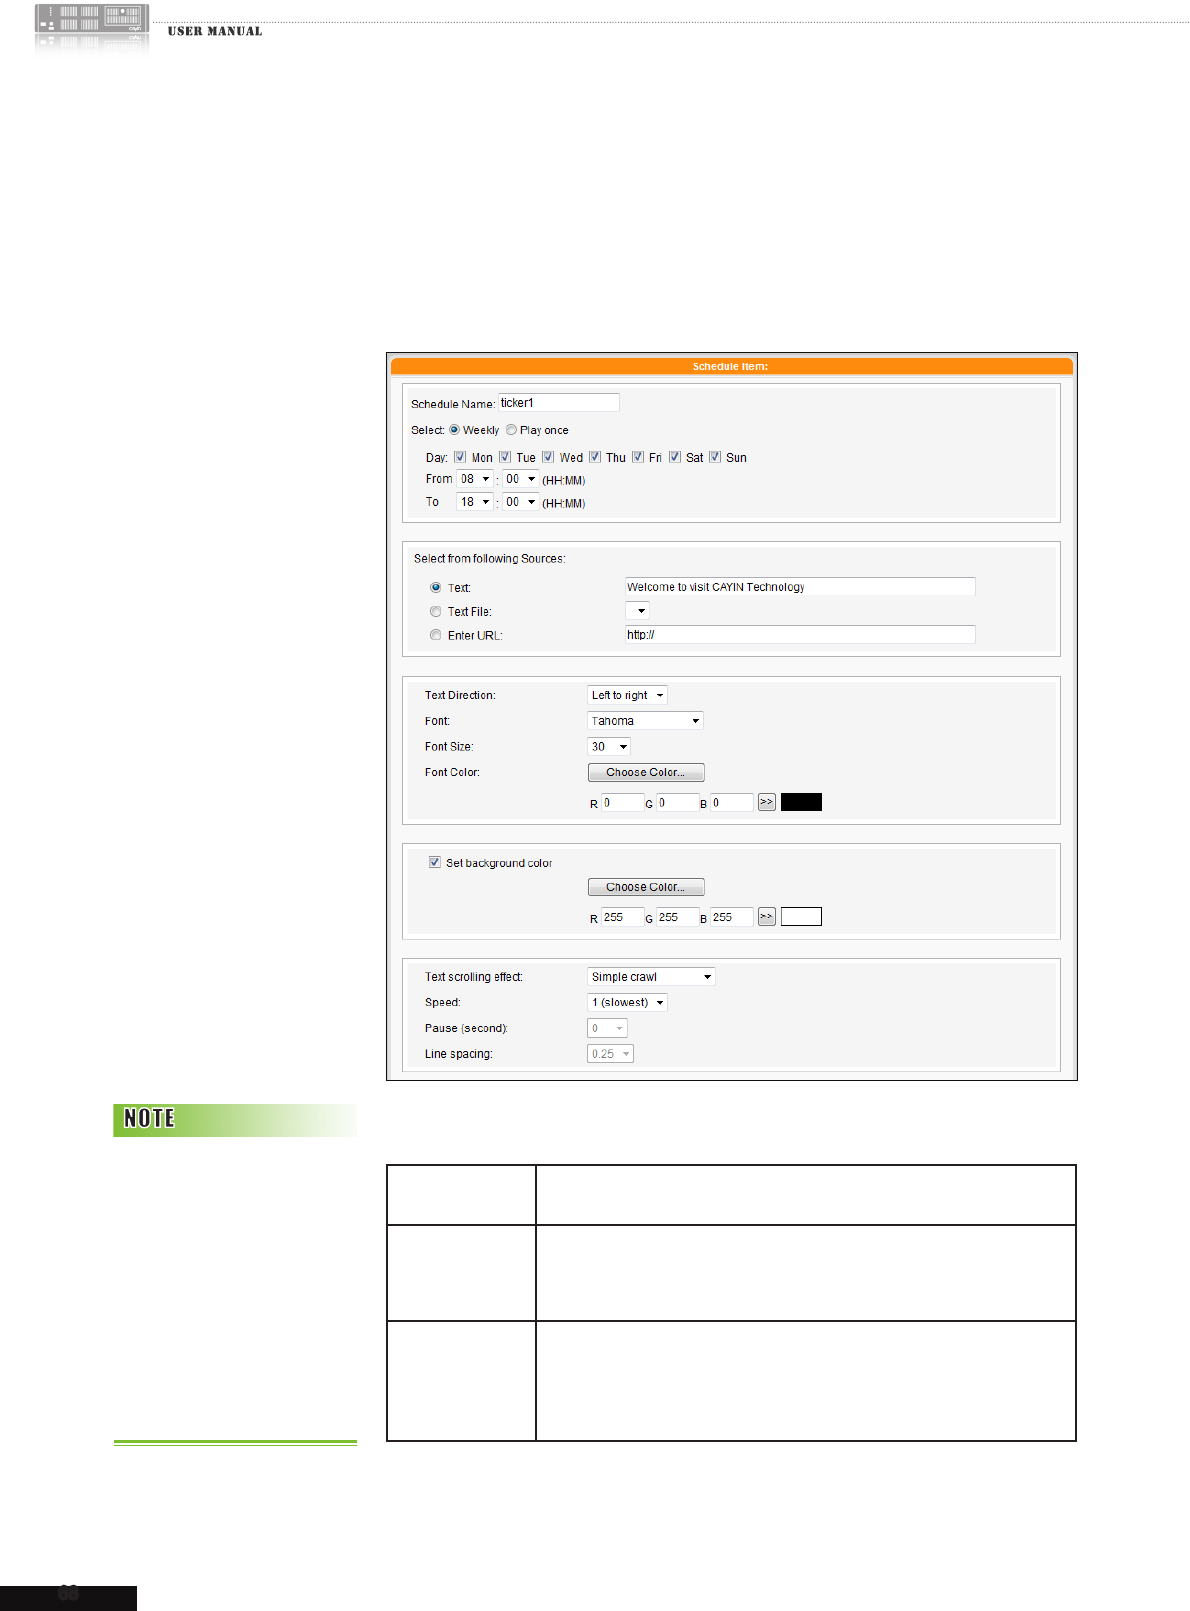
68
CMS
7. If you choose an aggregation from the drop-down menu of group, you
will see the “High priority schedule item” function here. Enable
the option and this schedule can override all schedule items of groups
within this aggregation during an overlapping time interval.
8. Please select a source of the ticker.
Text Directly enter your ticker text here.
Text File
Read ticker text from a text le in the Media Folder. Click [Enter
a new one] to enter a new ticker text and then you can just
choose from the list every time when you edit the ticker text.
Enter URL
The text source comes from a remote http server (web server).
Enter a http url here to retrieve the ticker text. You can also
retrieve live RSS messages. Enter the URL address in the text
box, e.g. http://rss.cnn.com/rss/cnn_us.rss.
If the content in a text le
is not written in English,
please choose encoding
type “UTF-8” when you
save the text le.
The format of non-English
RSS link should also be
in the UTF-8 character
encoding.
69
CMS USER MANUAL
9. Set the font type, size, and color.
10. If you want to use a single color on the background of the ticker
zone, you can set background color here.
11. Set a text scrolling effect. You can choose one of options from “No
scrolling effect”, “Simple crawl”, “Simple bottom-up”, and
“Bottom-up and crawl”.
12. Set a suitable speed. “1” represents the slowest speed, and “6”
represents the fastest one.
13. Set duration of “Pause” when you choose “Simple bottom-up”
or “Bottom-up and crawl”. This option will let text pause specic
seconds when nish a line.
14. If you choose “Simple bottom-up” as your text scrolling effect,
please set proper “Line spacing” value here.
15. Finally, click [APPLY] to adopt the changes or [CLOSE] to leave
the window without saving any changes.
6-6 WEB Playlist
This section only applies to SMP-WEB series products. With CMS serv-
er, you can schedule pre-edited playlists for each client group. Please
follow the steps to congure settings:
1 Login CMS server with the account which is allowed to access the
function: “CENTRAL SCHEDULING > WEB PLAYLIST”.
2. Click [CENTRAL SCHEDULING] on the main page, and select the
sub-page, “WEB PLAYLIST”.
3. Select a group or aggregation from the drop-down menu to decide
which players will apply this schedule.
4. Select or add a scheduling period. Please refer to 6-1 for details.
Please go to “RESOURCE
MANAGEMENT > WEB
PLAYLIST” and edit the
Web Playlist on the CMS
serve before you schedule
the Web Playlist here.
Only SMP-WEBDUO can
support Web Playlist 2 Cen-
tral Scheduling.
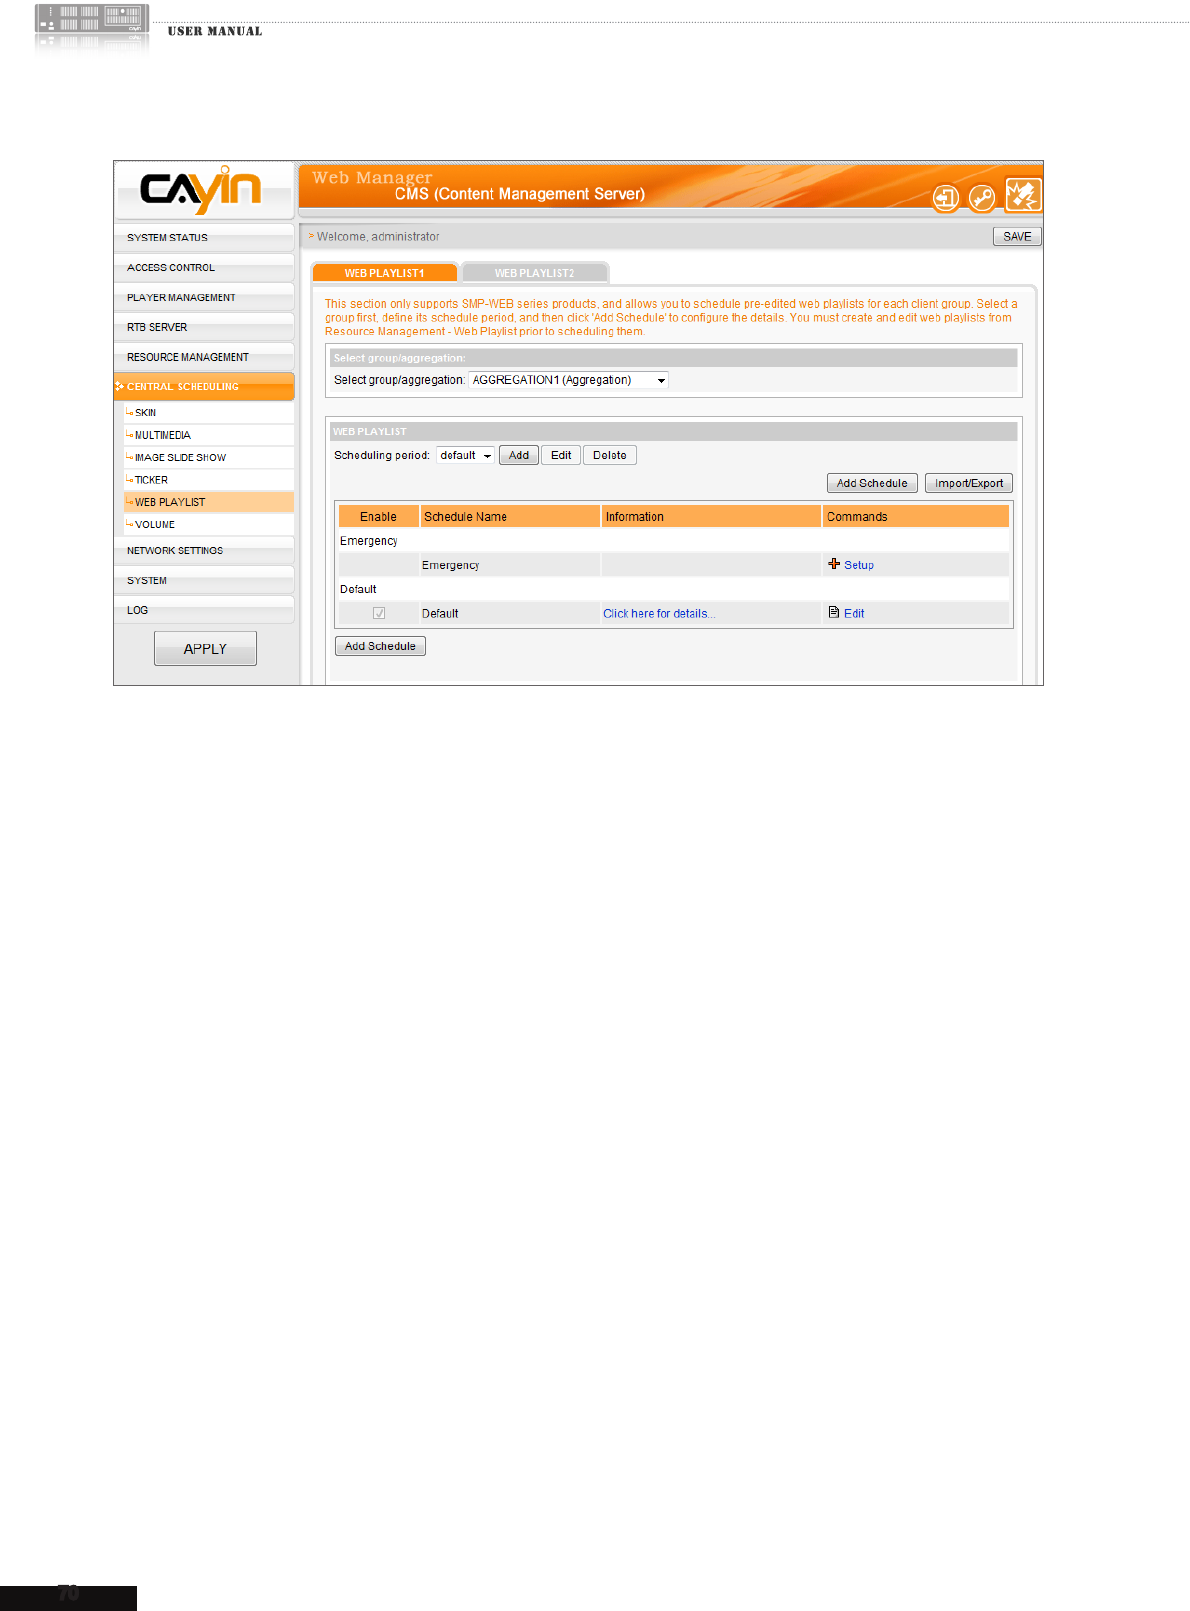
70
CMS
5. Click [Add Schedule] and start to edit a new schedule for Web Playlist.
6. Enter a “Schedule Name” and select a schedule type: “Weekly” or “Play once”. Weekly
schedule repeats itself every week. “Play once” schedule only occurs once. After the task is
nished, the schedule will be expired. For weekly schedule, choose the days of the week that
you want to play the selected les. Set the start and end time of the schedule within a day. For
play-once schedule, enter the start time, with date/time, of the schedule, and enter the duration
of this schedule.
7. If you choose an aggregation from the drop-down menu of group, you may see the “High
priority schedule item” function here. Enable the option and this schedule can override all
schedule items of groups within this aggregation during an overlapping time interval.
8. Select the pre-edited Web Playlists in “Web playlist” and click [Select=>]. The selected les
will be duplicated to the “Selected playlists” column. You can use [Move up] and [Move
down] to arrange the order of those selected les. If you want to remove les from the “Selected
Playlist” in the right column, please select les and click [Remove]. Or, you can click [Remove
all], and all items in the right column will be removed.
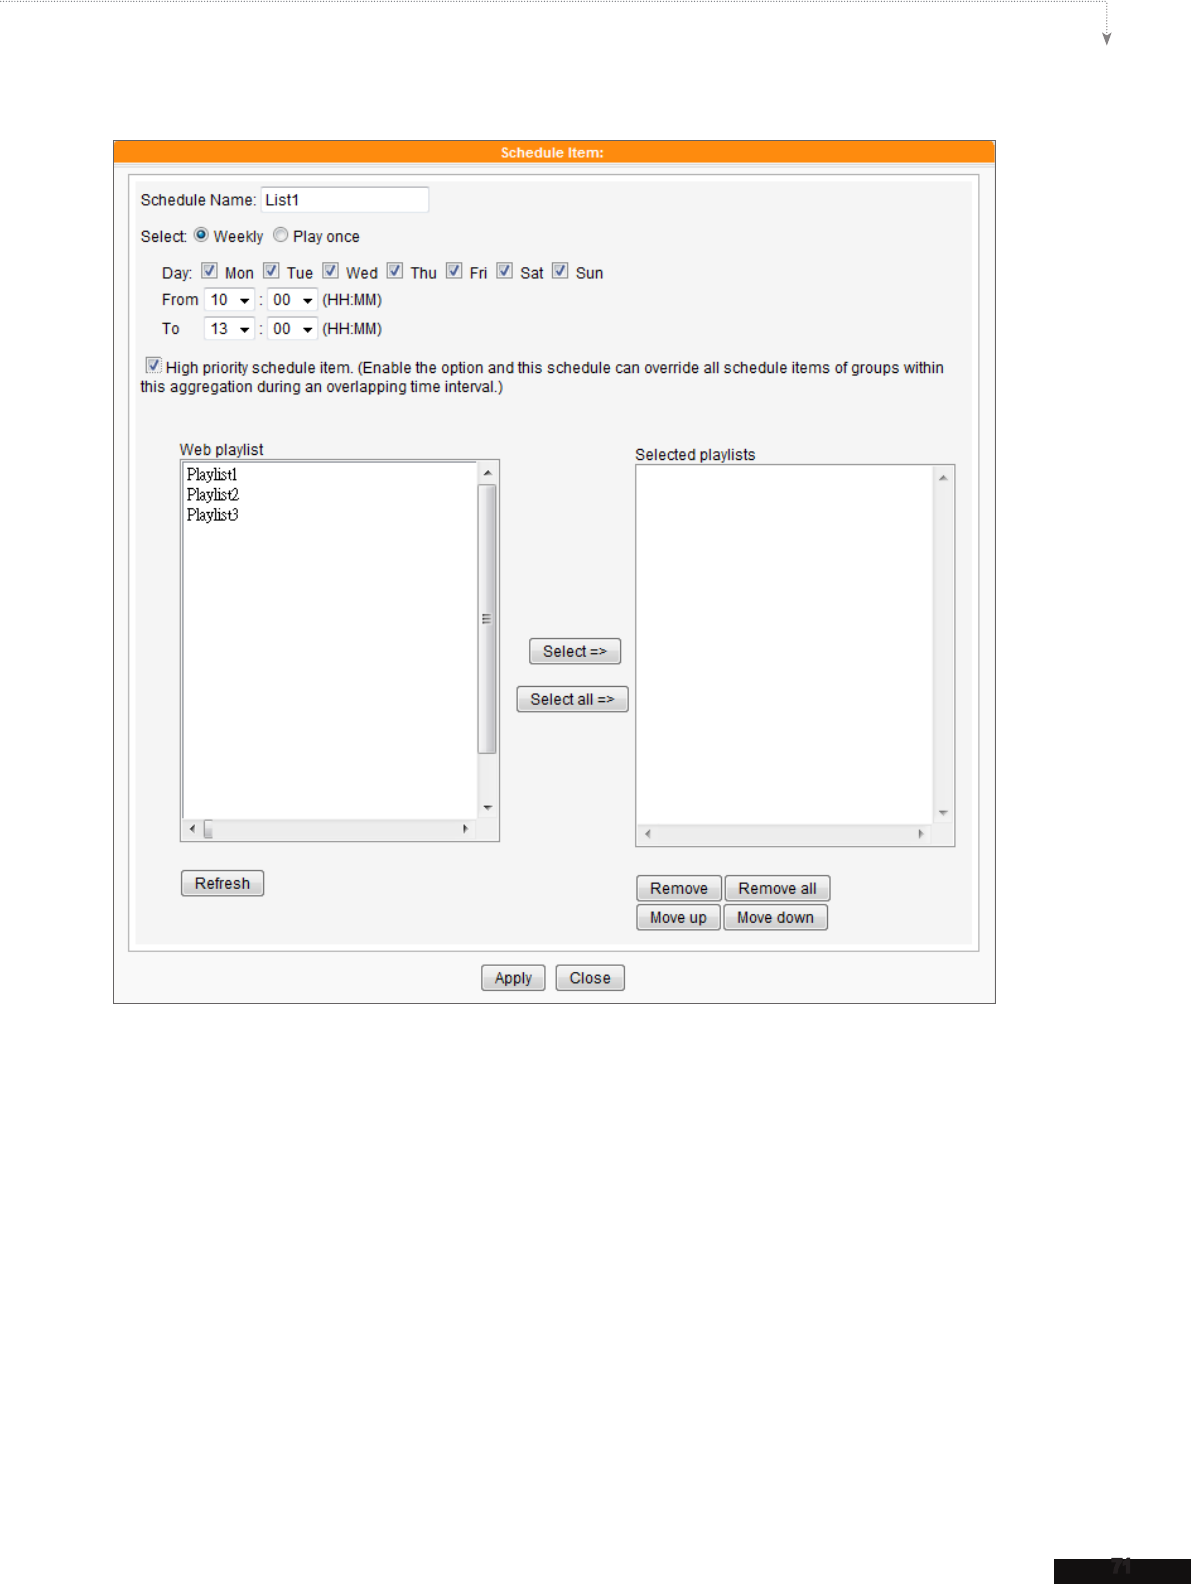
71
CMS USER MANUAL
9. Finally, click [A PPLY ] to adopt the changes or [CLOSE] to leave the window without saving any
changes.
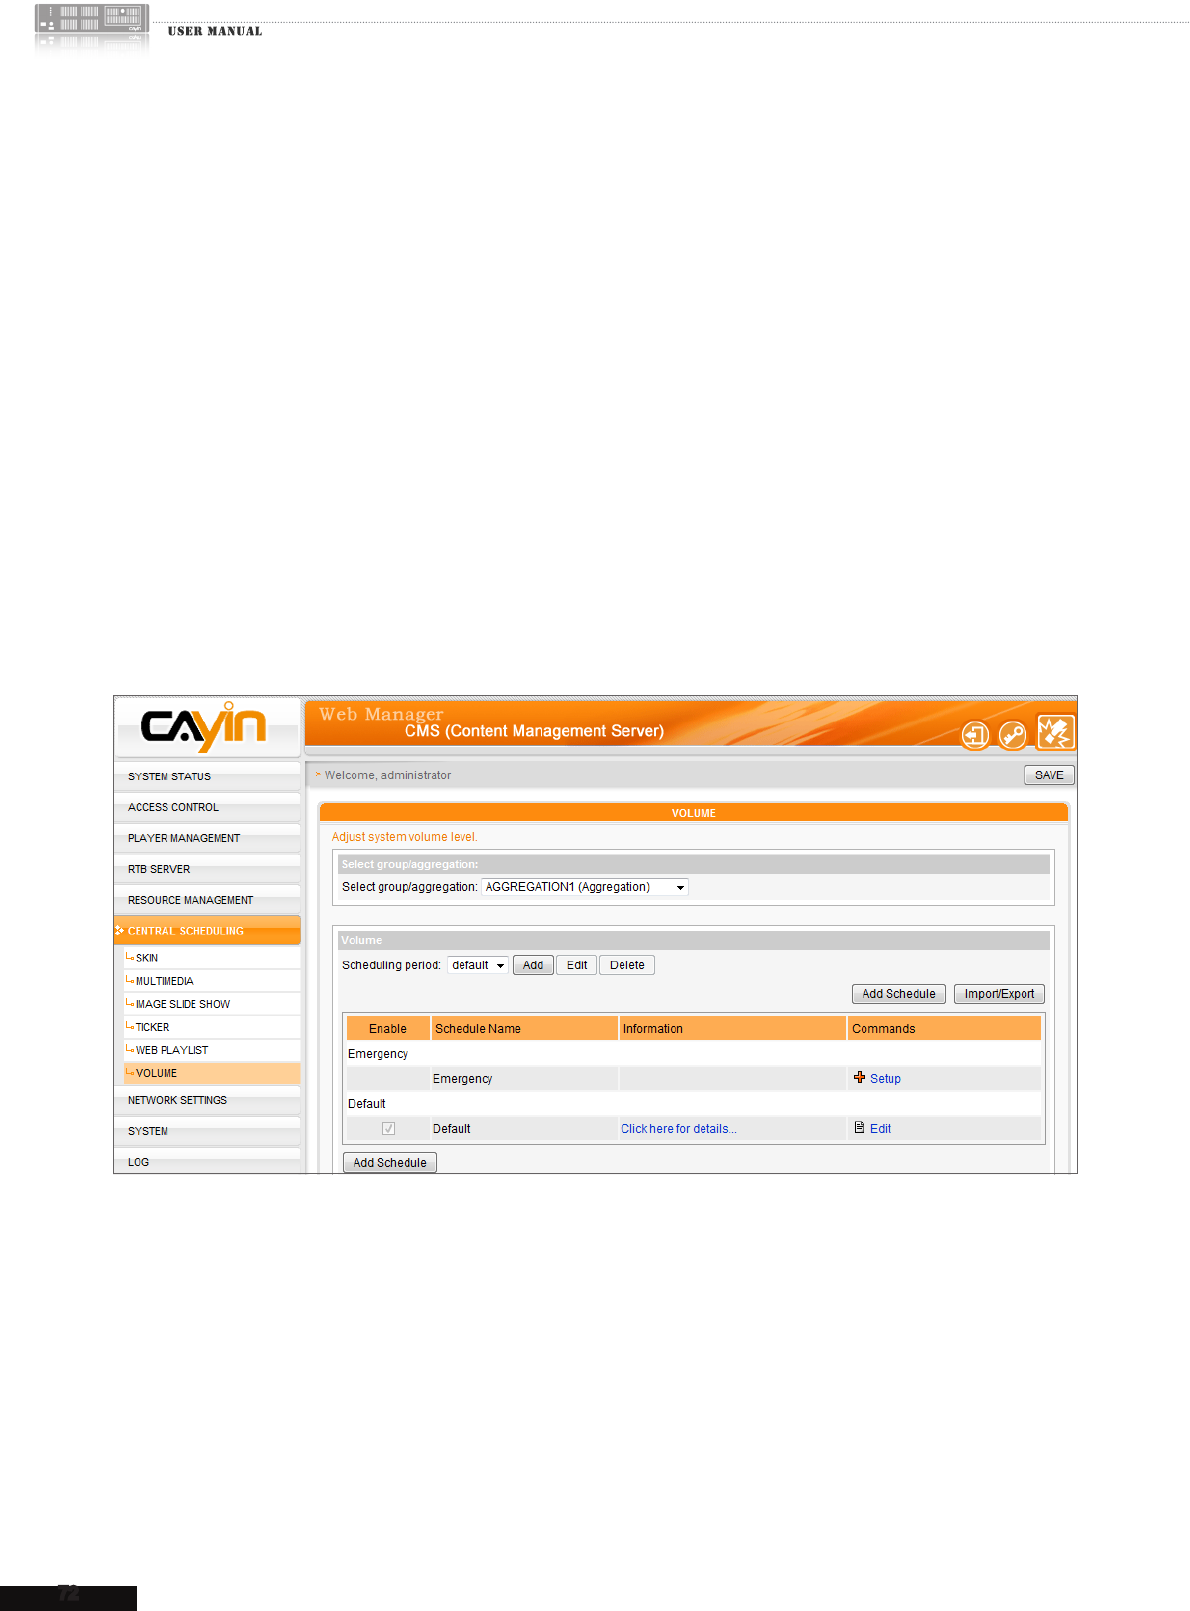
72
CMS
6-7 Volume
With CMS server, you can schedule pre-dened system volume for each group. Please follow the
steps to congure settings:
1. Login CMS server with the account which is allowed to access the function: “CENTRAL
SCHEDULING > VOLUME”.
2. Click [CENTRAL SCHEDULING] on the main page, and select the sub-page, “VOLUME”.
3. Select a group or aggregation from the drop-down menu to decide those players which will apply
this schedule.
4. Select or add a scheduling period. Please refer to 6-1 for details.
5. Click [Add Schedule] and start to edit a new schedule for volume.
6. Enter a “Schedule Name” and select a schedule type: “Weekly” or “Play once”. Weekly
schedule repeats itself every week. “Play once” schedule only occurs once. After the task is
nished, the schedule will be expired. For weekly schedule, choose the days of the week that
you want to play the selected les. Set the start and end time of the schedule within a day. For
play-once schedule, enter the start time, with date/time, of the schedule, and enter the duration
of this schedule.
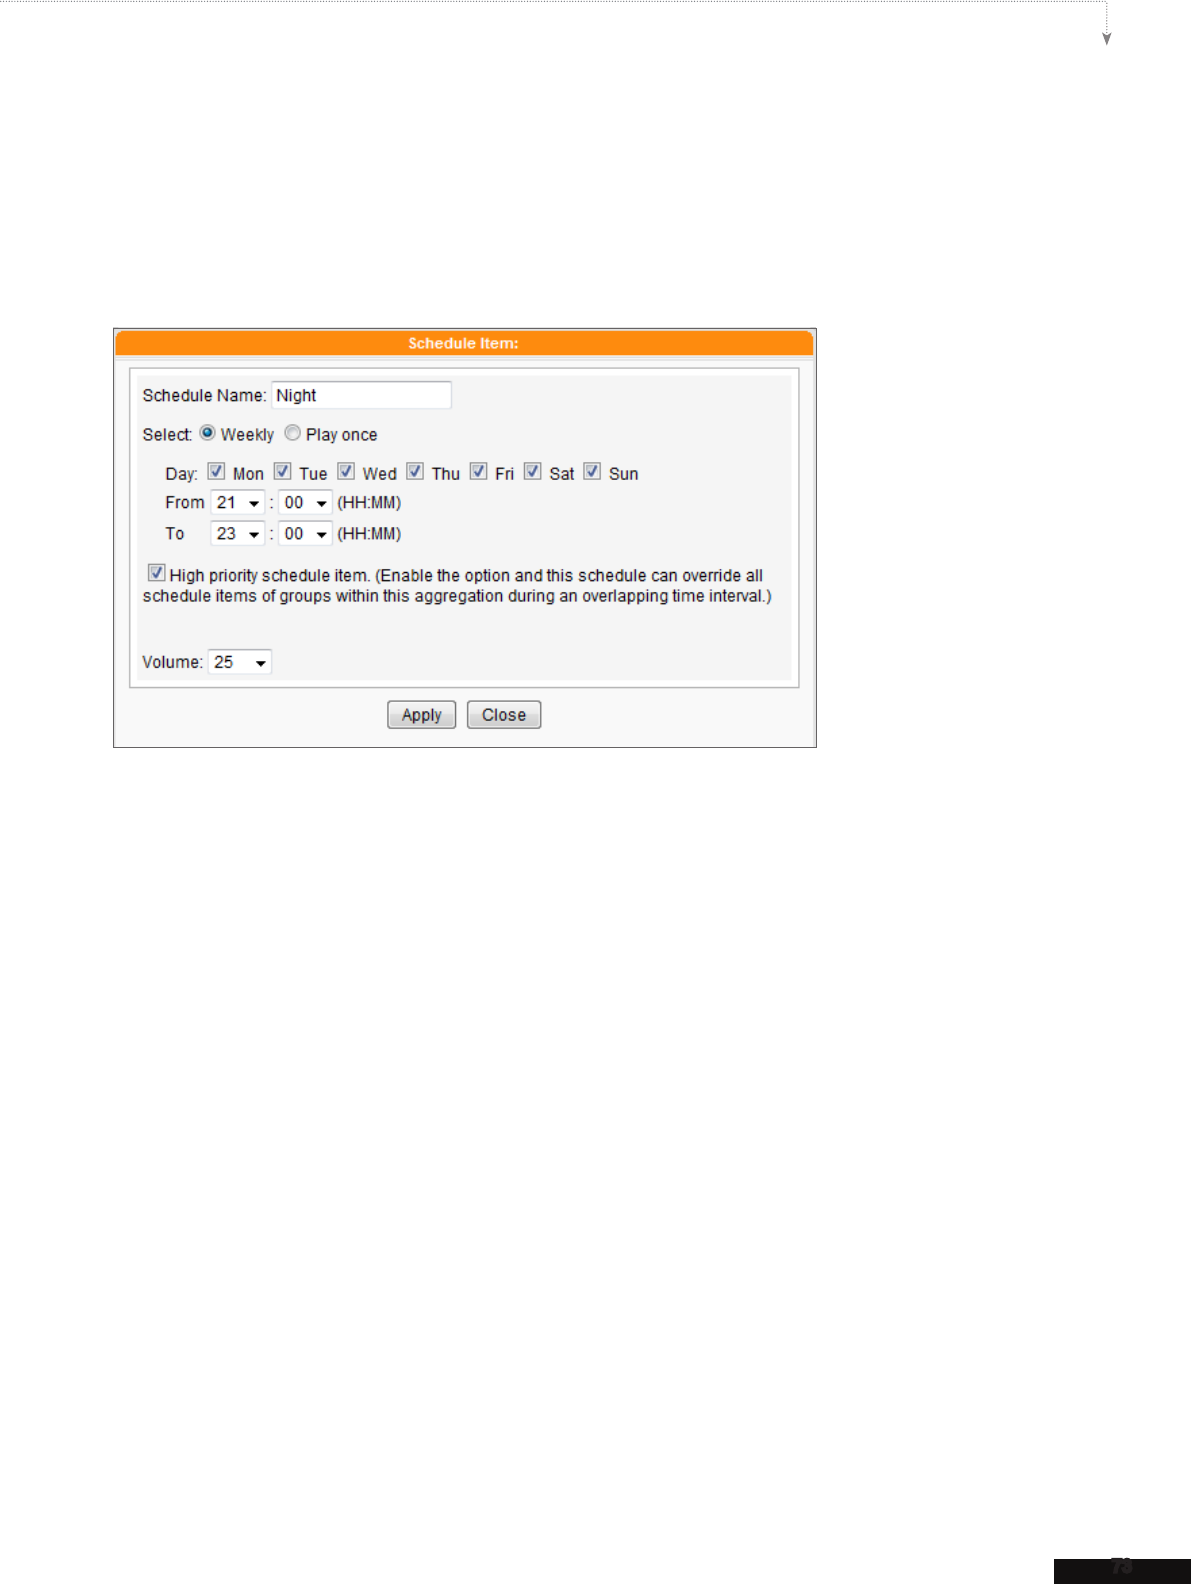
73
CMS USER MANUAL
7. If you choose an aggregation from the drop-down menu of group, you will see the “High priority
schedule item” function here. Enable the option and this schedule can override all schedule
items of groups within this aggregation during an overlapping time interval.
8. Select the system volume. Larger numbers mean louder sounds.
9. Finally, click [A PPLY ] to adopt the changes or [CLOSE] to leave the window without saving any
changes.
6-8 Add Emergency Scheduling
Emergency Scheduling (or Emergency Event) is a special scheduling item, which is triggered
manually, rather than automatically based on the pre-set time. After you congure the Emergency
Scheduling, you can trigger it anytime by CMS or SuperMonitor. The Emergency Scheduling has
the highest priority than any other scheduling type.
6-8-1 Setup Emergency Schedule
You can setup emergency schedule item in every media type (Multimedia, Image Slide Show, Ticker,
Skin, Web Playlist, and Volume) for a specic Group.
1. Login CMS server with the account which is allowed to access the function: “CENTRAL
SCHEDULING”.
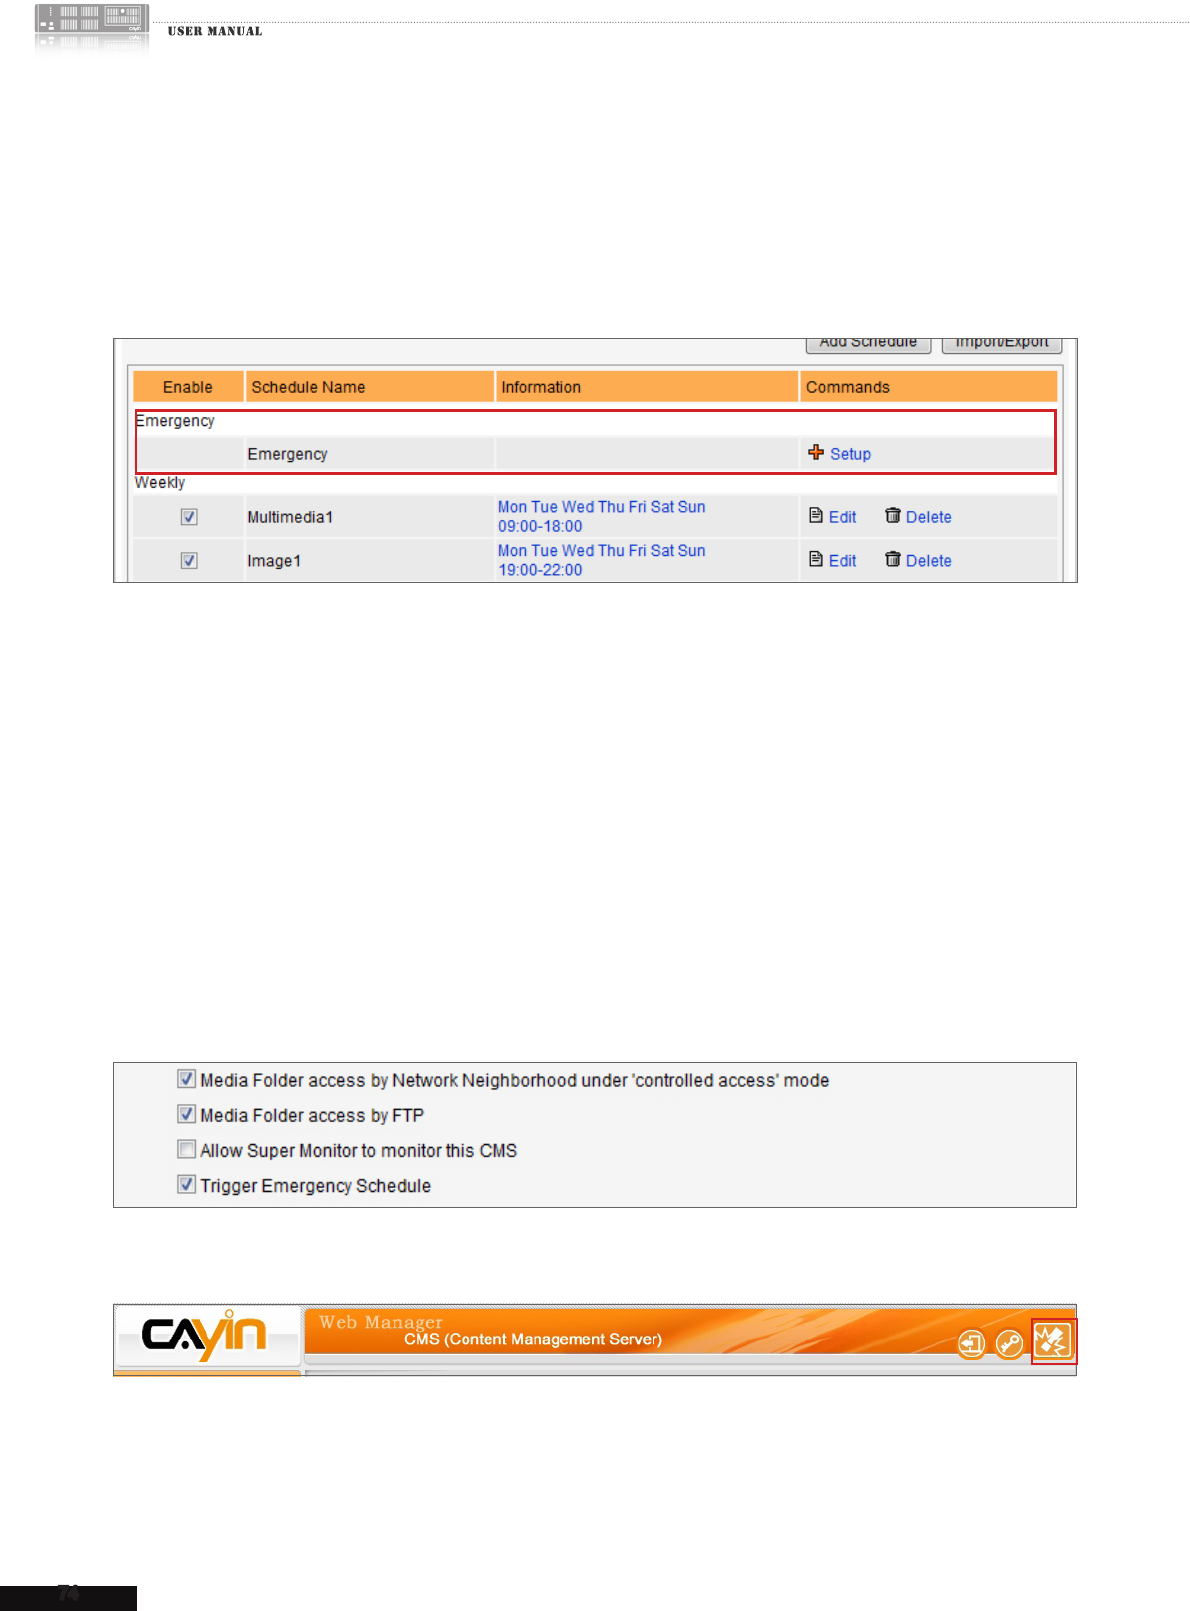
74
CMS
2. Click [CENTRAL SCHEDULING] on the main page, and select a sub-page from the six
items: Multimedia, Image Slide Show, Ticker, Skin, Web Playlist, and Volume. When you trigger
the emergency mode for a group, all emergency scheduling of this group will be activated
simultaneously no matter in any of the above items.
3. Select a group or aggregation from the drop-down menu to decide which players will apply this
schedule.
4. Click on [Setup] on the Command column of the special schedule item “Emergency”.
5. Follow the instructions on the pop-up window and setup scheduling task as other normal
scheduling.
6-8-2 Trigger Emergency Schedule
1. Login CMS server with the account which is allowed to access the function: “Trigger
Emergency Schedule”.
2. On the right top of CMS Web Manager, you can see the button to trigger the Emergency Schedule.
Click on it.
3. You can trigger or stop emergency schedule here by clicking on [Trigger] or [Stop] button. By
clicking [Trigger All] or [Stop All], you can enable or stop emergency schedule for all groups.
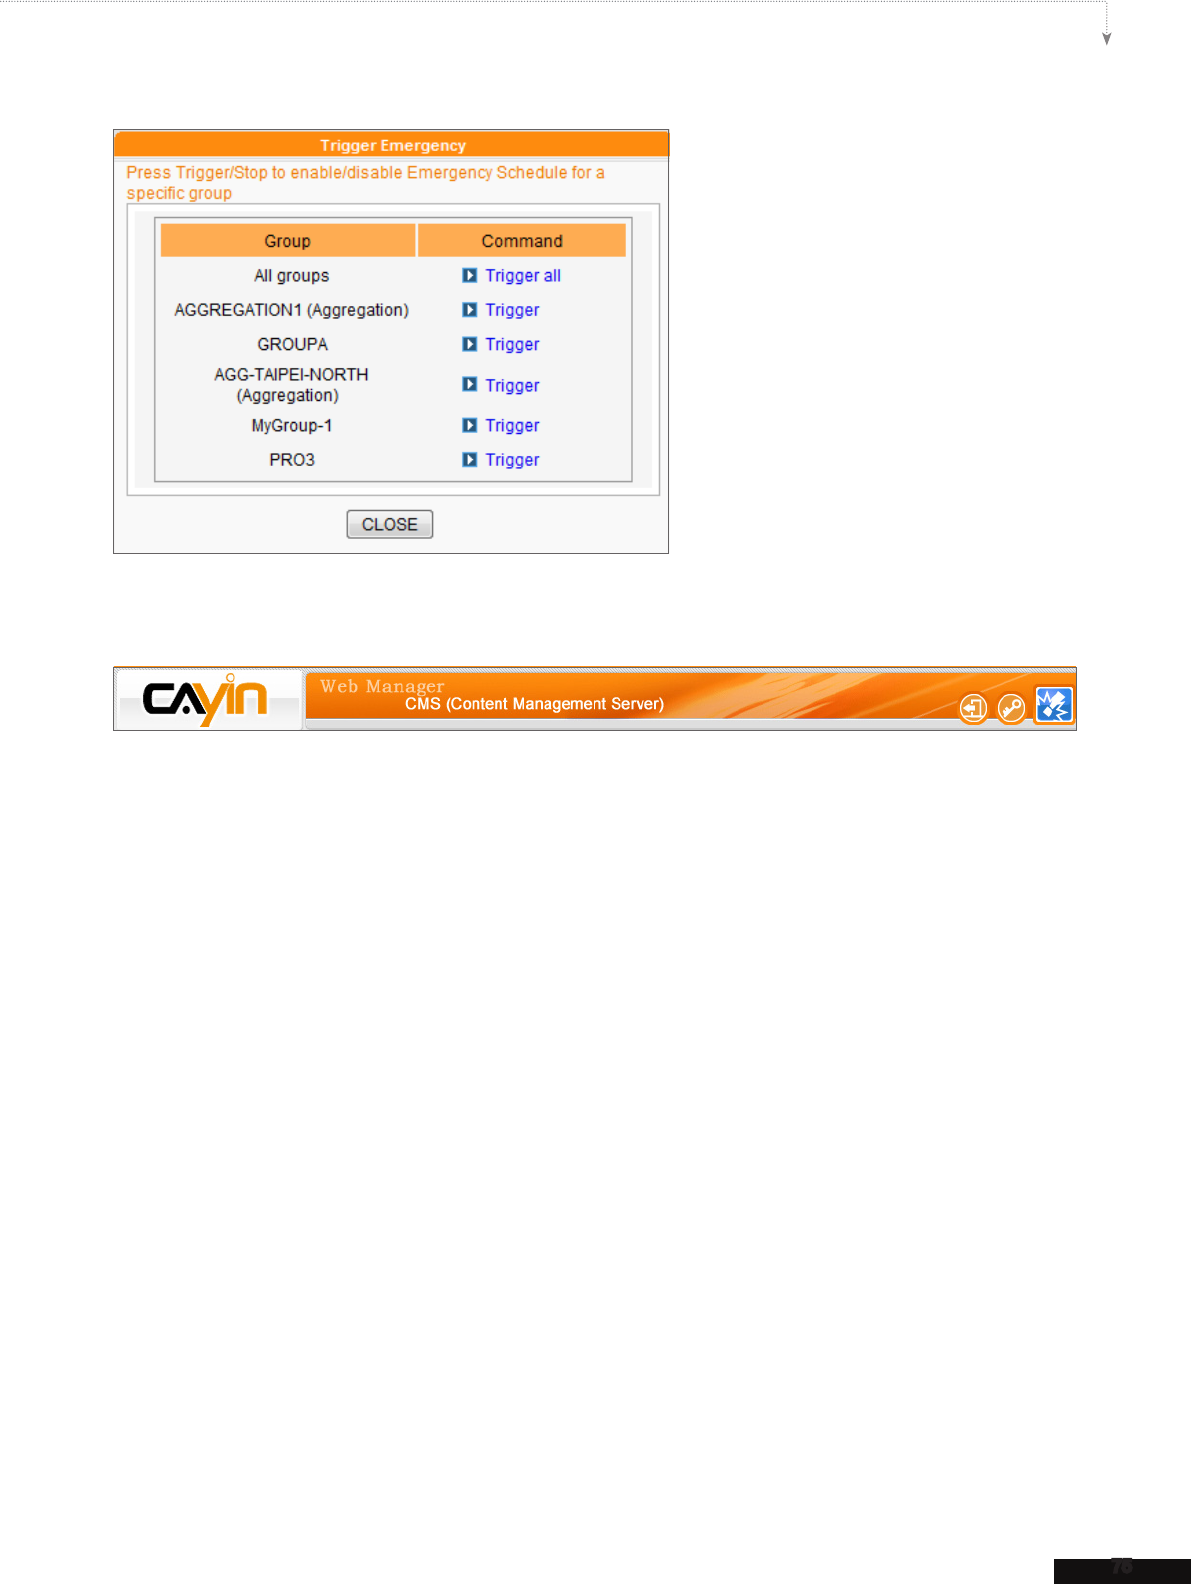
75
CMS USER MANUAL
4. If any one of the groups is in the emergency mode, the Emergency button on the top of Web
Manager will start to ash.
5. If the Group’s emergency schedule is in the triggered mode, players belong to that group as well
as are congured as central scheduling will switch to play the pre-congured scheduling item.
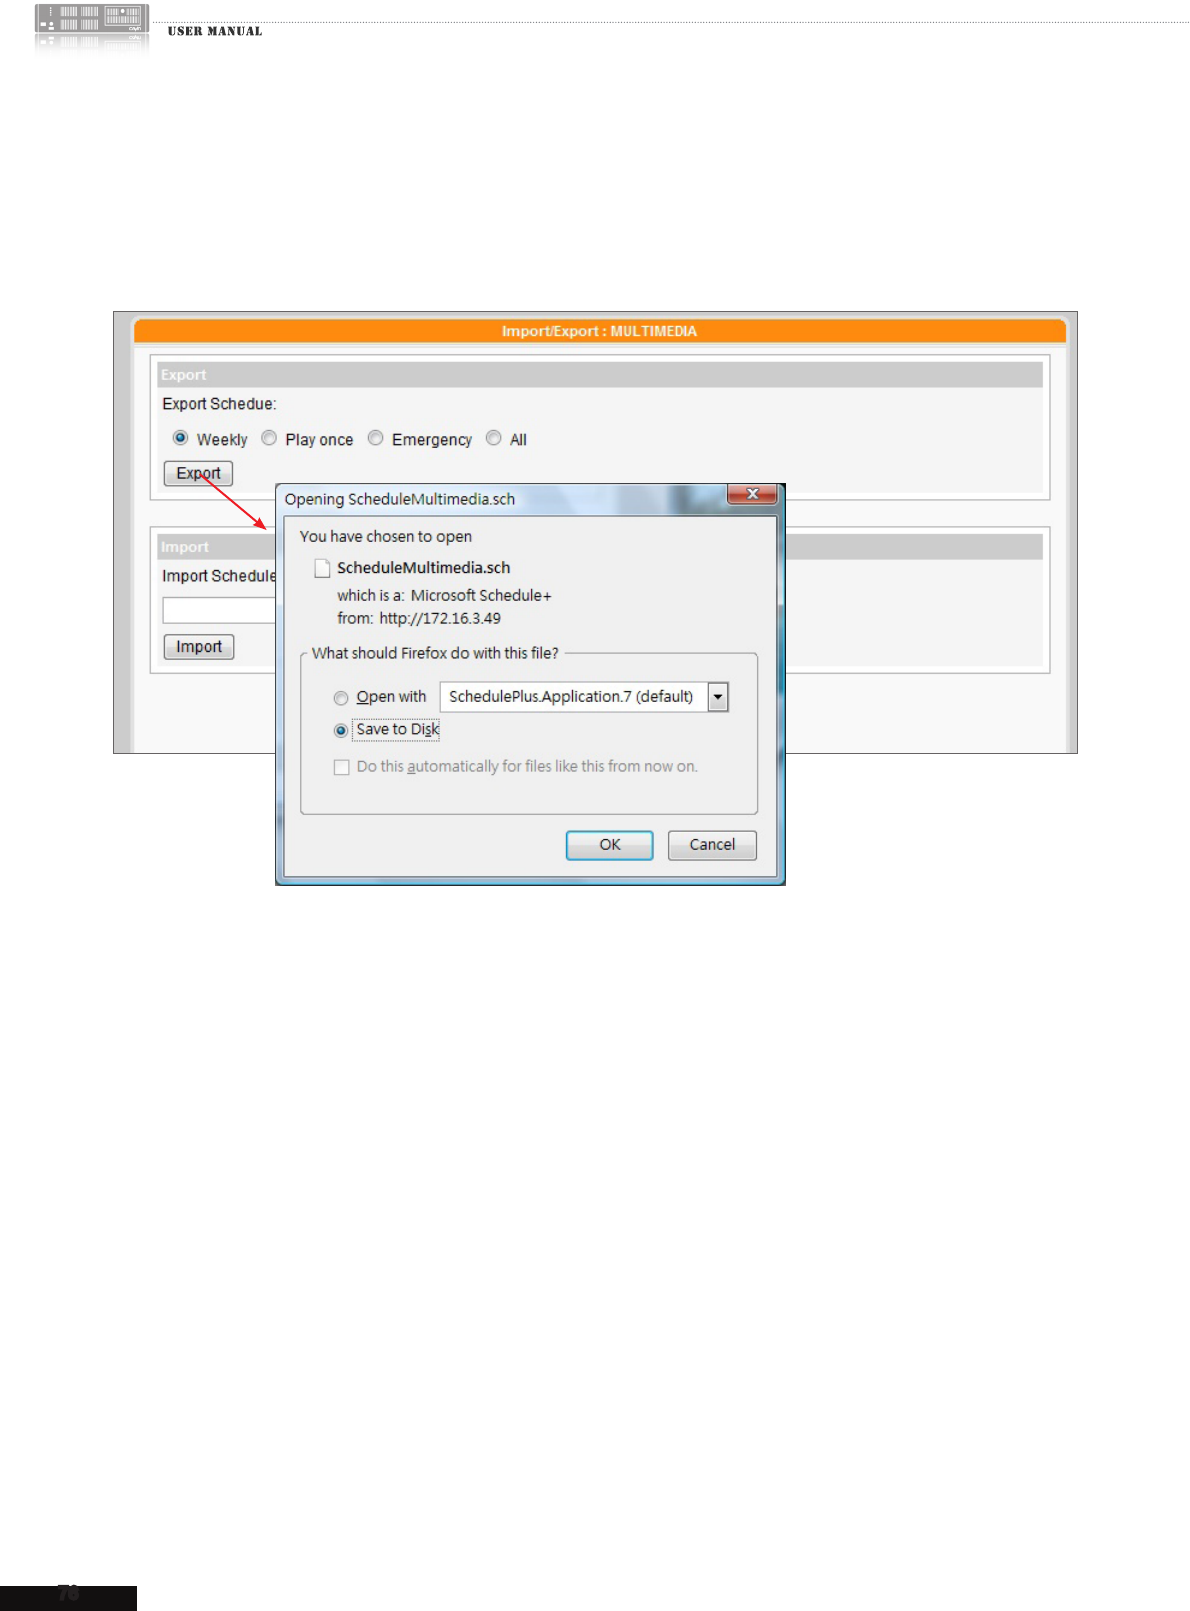
76
CMS
6-9 Import/Export Schedule
You can click on [Import] / [Export] button at Central scheduling page of Web Manager to import
or export Schedule table.
After the schedule le is exported, you can import the schedule table to other Groups or other CMS
servers.
6-10 Schedule Priority
SMP players run schedules based on the following proiority rules:
With Aggregation’s High Priority:
Emergency (Aggregation) > Emergency (Group) > Play once (Aggregation) > Play once (Group) >
Weekly (Aggregation) > Weekly (Group) > Default (Aggregation) > Default (Group)
Without Aggregation’s High Priority:
Emergency (Group) > Emergency (Aggregation) > Play once (Group) > Play once (Aggregation) >
Weekly (Group) > Weekly (Aggregation) > Default (Group) > Default (Aggregation)

7. System and Network Settings
7-1 System Status ........................................................ 78
7-1-1 Basic Information ........................................... 78
7-1-2 Advanced Information .................................... 79
7-1-3 Firmware Information .................................... 79
7-2 System Settings ..................................................... 80
7-2-1 Set System Time ........................................... 80
7-2-2 Set Auto-Restart ............................................ 81
7-2-3 Change SuperMonitor 3 Service Port ............ 82
7-2-4 Change SuperMonitor 3 Encryption Key ....... 82
7-2-5 Set Language ................................................ 82
7-2-6 System Maintenance ..................................... 83
7-2-7 Import/Export/Restore Congurations ......... 84
7-3 Network Settings .................................................... 84
7-4 CMS and NAT Firewall ........................................... 85
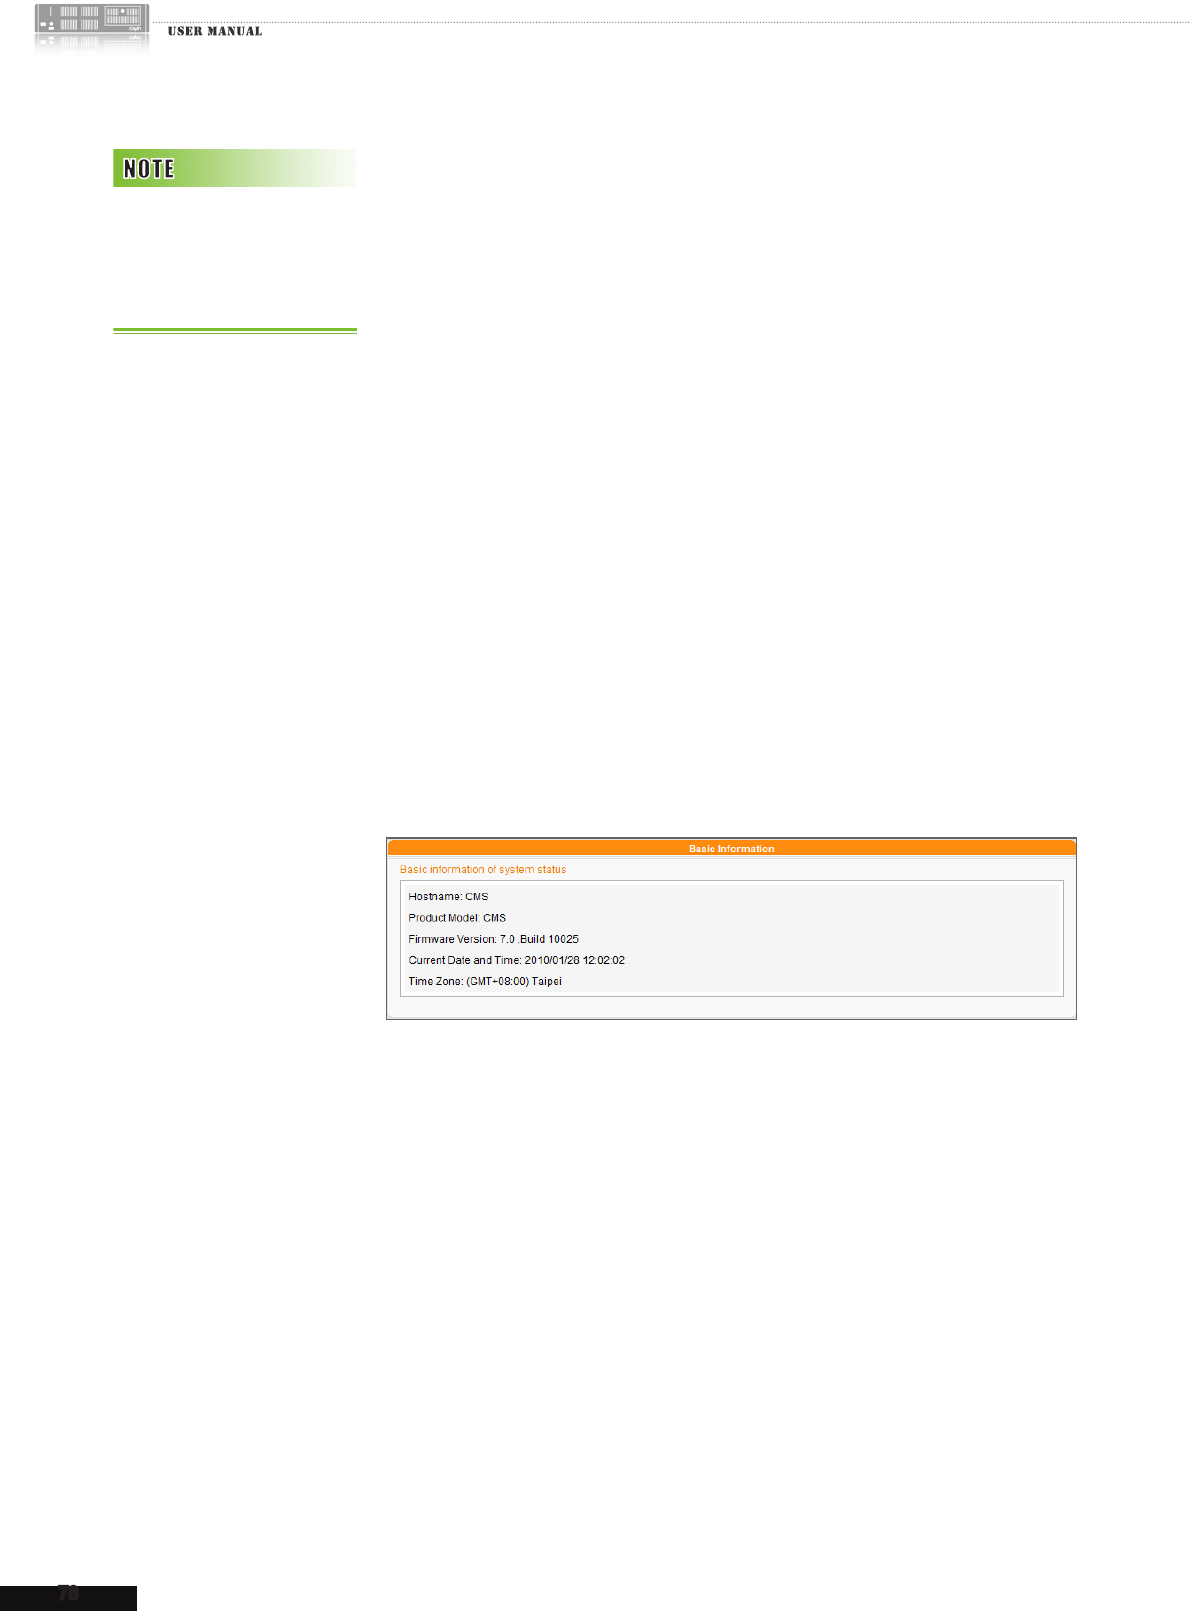
78
CMS
You have to congure network settings, update rmware, or use other
management tools when you rst install CMS. In “SYSTEM STATUS”,
“SYSTEM SETTINGS”, and “NETWORK SETTINGS”
pages, you
can check the system information of the CMS server, manage the
system, and congure the network settings.
7-1 System Status
In the “SYSTEM STATUS” page, you can access all related system
information from three parts: “Basic Information”, “Advanced
Information”, and “Firmware Information”.
7-1-1 Basic Information
Hostname, Product Model, Firmware Version, and Current Date/time are
information about the current status of the CMS server. Please refer
“7-3 Network Settings” for how to specify the hostname and “7-2
System Settings” for how to change the date/time/time-zone.
Please refer to 7-4 CMS
and NAT Firewall” if you
place the CMS server behind
a NAT rewall.
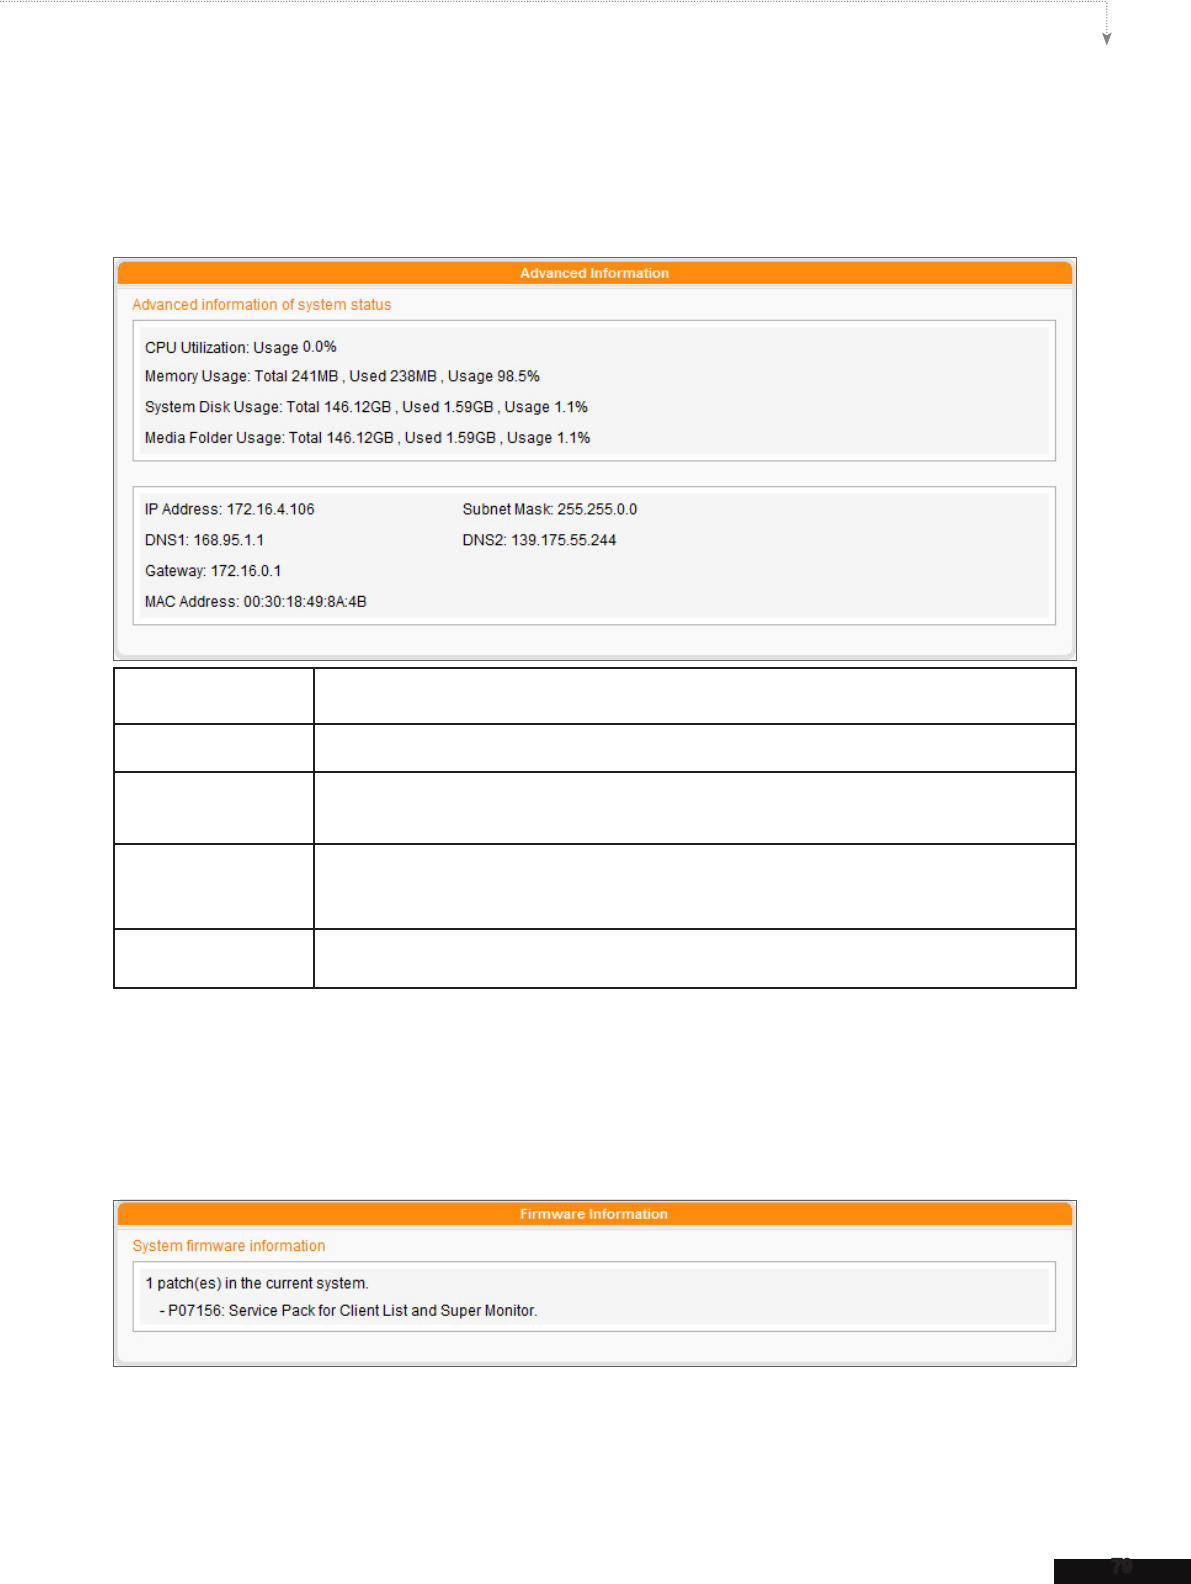
79
CMS USER MANUAL
7-1-2 Advanced Information
You can check related hardware usages in the “Advanced Information”.
CPU Utilization Real-time CPU usage
Memory Usage Usage of system DRAM
System Disk Usage Disk usage of system rmware disk. If the usage exceeds 95%, we strongly suggest that you
do not upload more patches for preventing from disk overloaded.
Media Folder Usage Disk usage of Shared Folder. If you run out of disk space, you will not be able to add more
media les in Media Folder.
Network Information You can check IP address and other related network information here.
7-1-3 Firmware Information
You can check all updated patches information here. If you want to update your rmware, please
refer to the section “7-2-6 System Maintenance”.
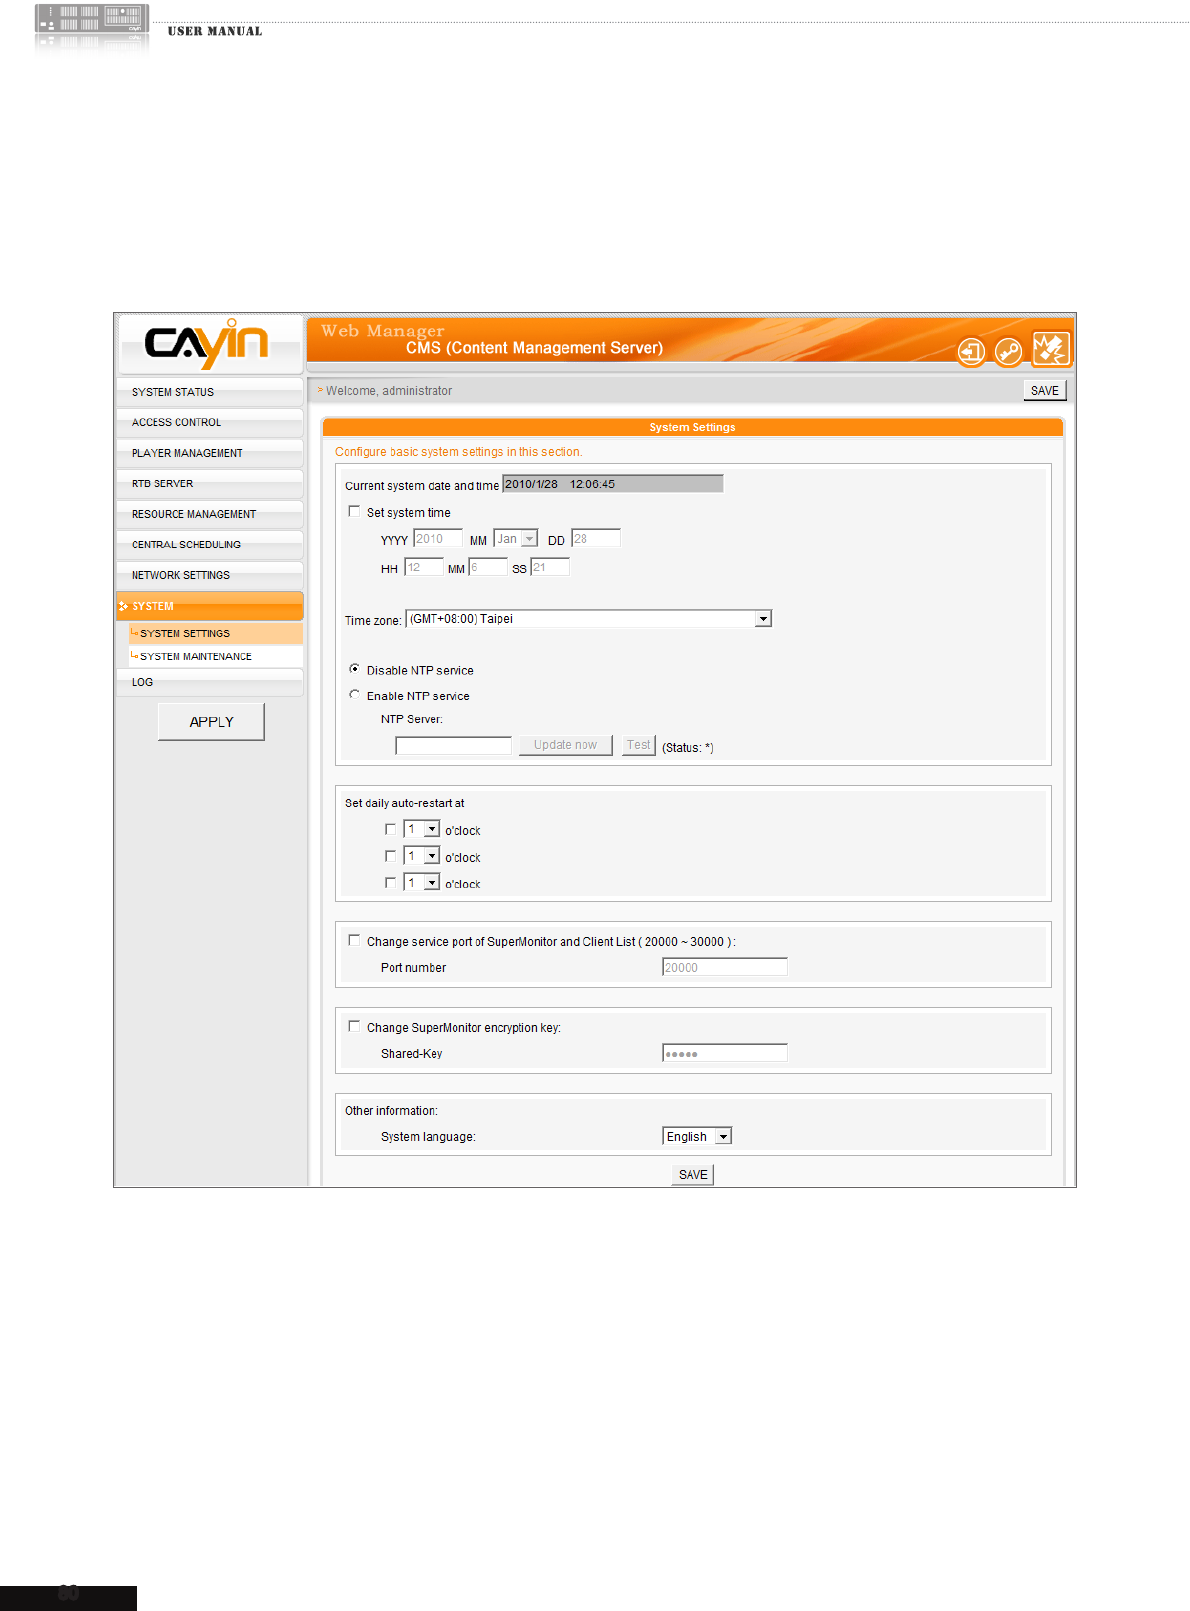
80
CMS
7-2 System Settings
In the “SYSTEM SETTINGS” page, you can re-set the date and time of the system, auto-restart
time, and the system language.
7-2-1 Set System Time
Please follow the steps to set the system time.
1. Login CMS server with the account which is allowed to access the function: “SYSTEM
SETTINGS”.
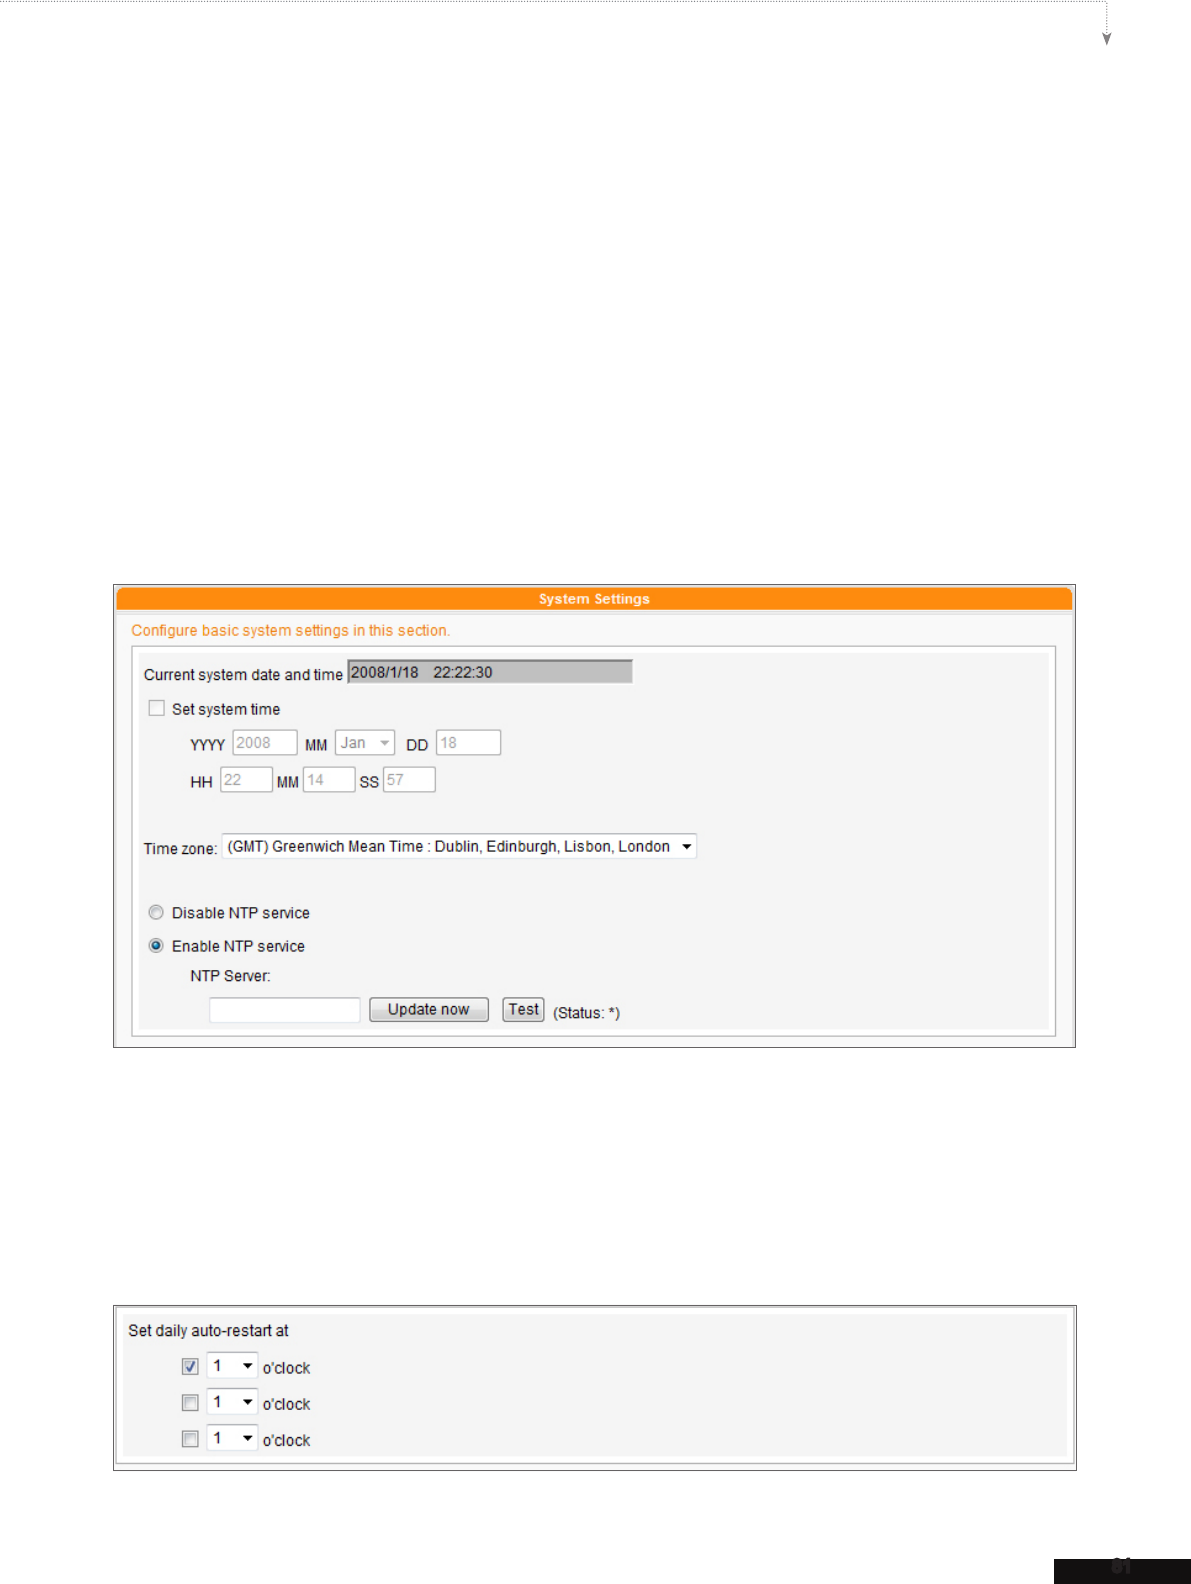
81
CMS USER MANUAL
2. Enable “Set system time” and enter the system date for the server. “YYYY” represents “Ye ar ”,
“MM” means “Month”, and “DD” is “Date”.
3. Enter the time for the server. “HH” represents 24-hour system clock. “MM” represents “Minute”
and “SS” represents “Second”.
4. You can also choose NTP function to synchronize the clocks of media players from an NTP server
automatically (e.g. time.nist.gov). CMS will update the system time from NTP server every 7 days
or when the system restarts. You can also click [Update now] to update the time immediately.
Click [Test] to verify the availability of the NTP server.
5. After completing the settings, please click [SAVE] and [APPLY ].
7-2-2 Set Auto-Restart
You can also assign one to three particular time sections within a day that the server will restart
automatically. Check the box and select the time. Then click [Save] to save the settings.
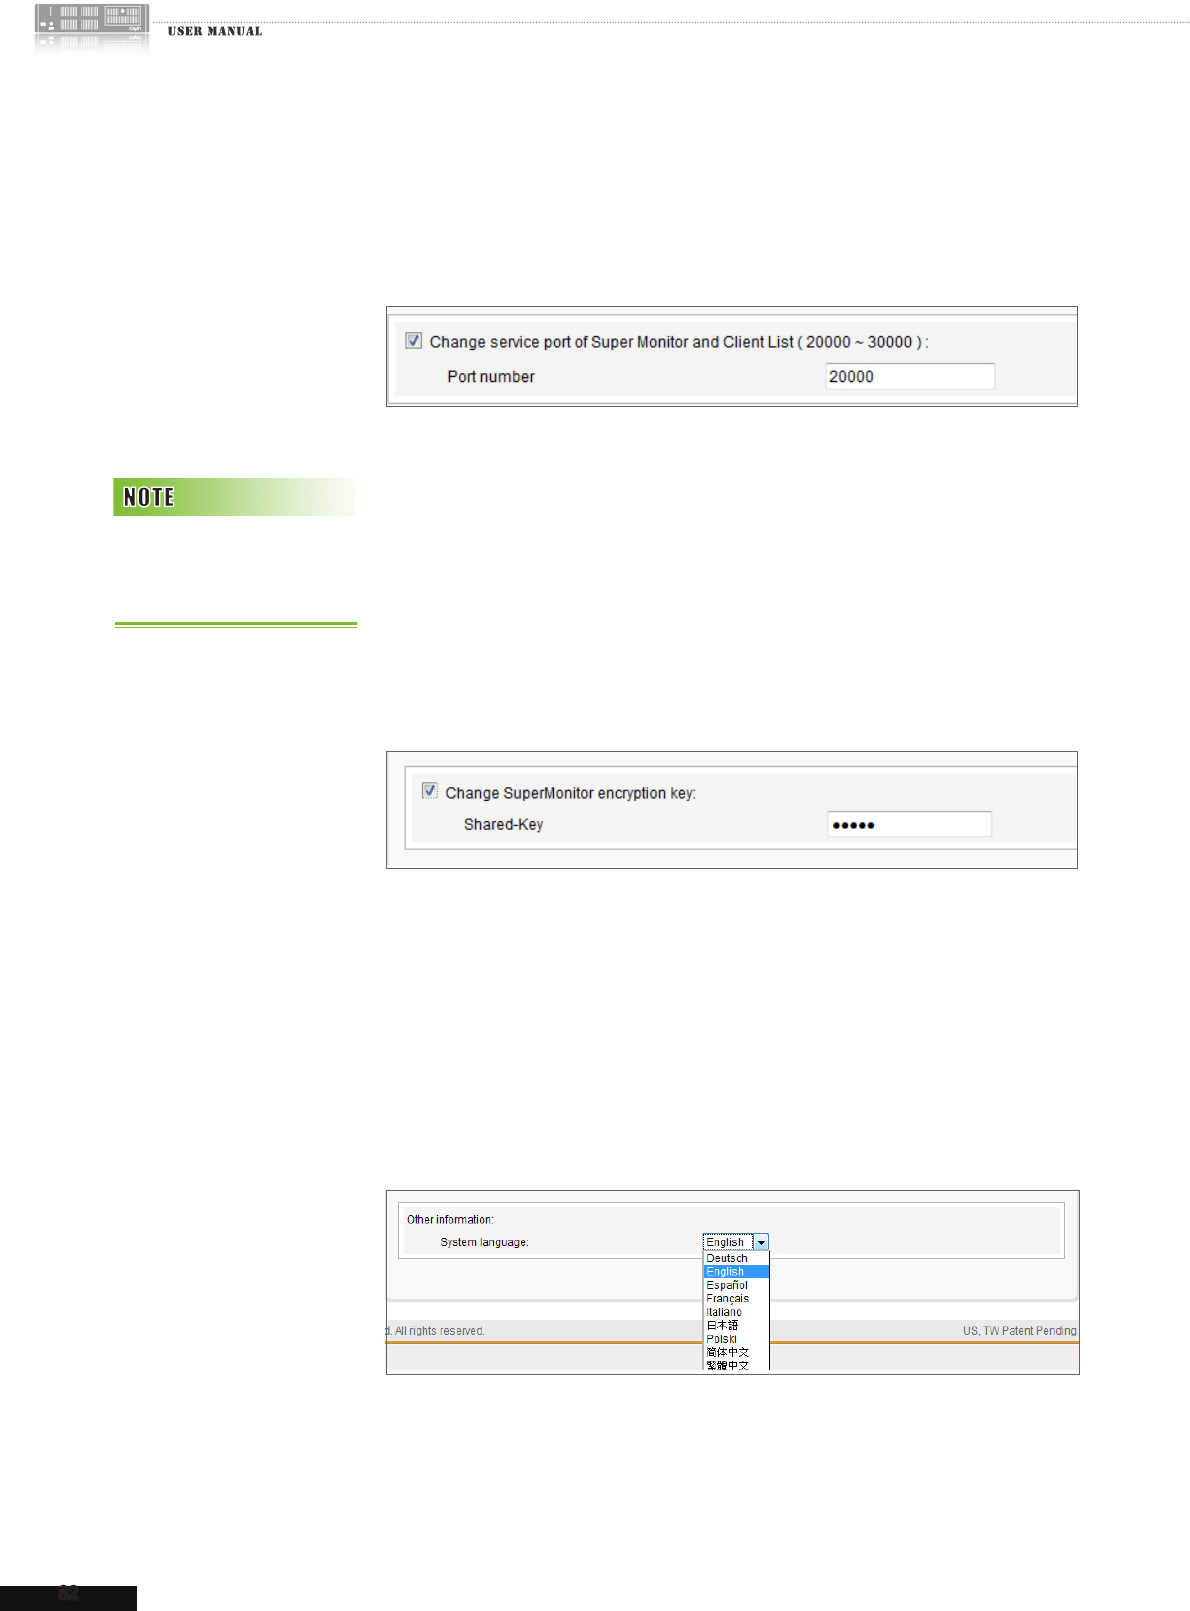
82
CMS
7-2-3 Change SuperMonitor 3
Service Port
You can change service port of SuperMonitor 3 here (default is 20000).
7-2-4 Change SuperMonitor 3
Encryption Key
You can change SuperMonitor 3 encryption key here to avoid other
SuperMonitor 3 users accessing your CMS server. The default key will
be the same as all shipped CMS server. Please remember to reset
your password here if you would like to enable this function.
7-2-5 Set Language
You can select the system language here. We provide nine system
languages, which are English, French, Germany, Spanish, Italian,
Japanese, Polish, Traditional Chinese, and Simplied Chinese. Select
a system language. Then click [SAVE] to save the settings.
This function only available
for SuperMonitor 3 and CMS
v. 7.0, 6.5.
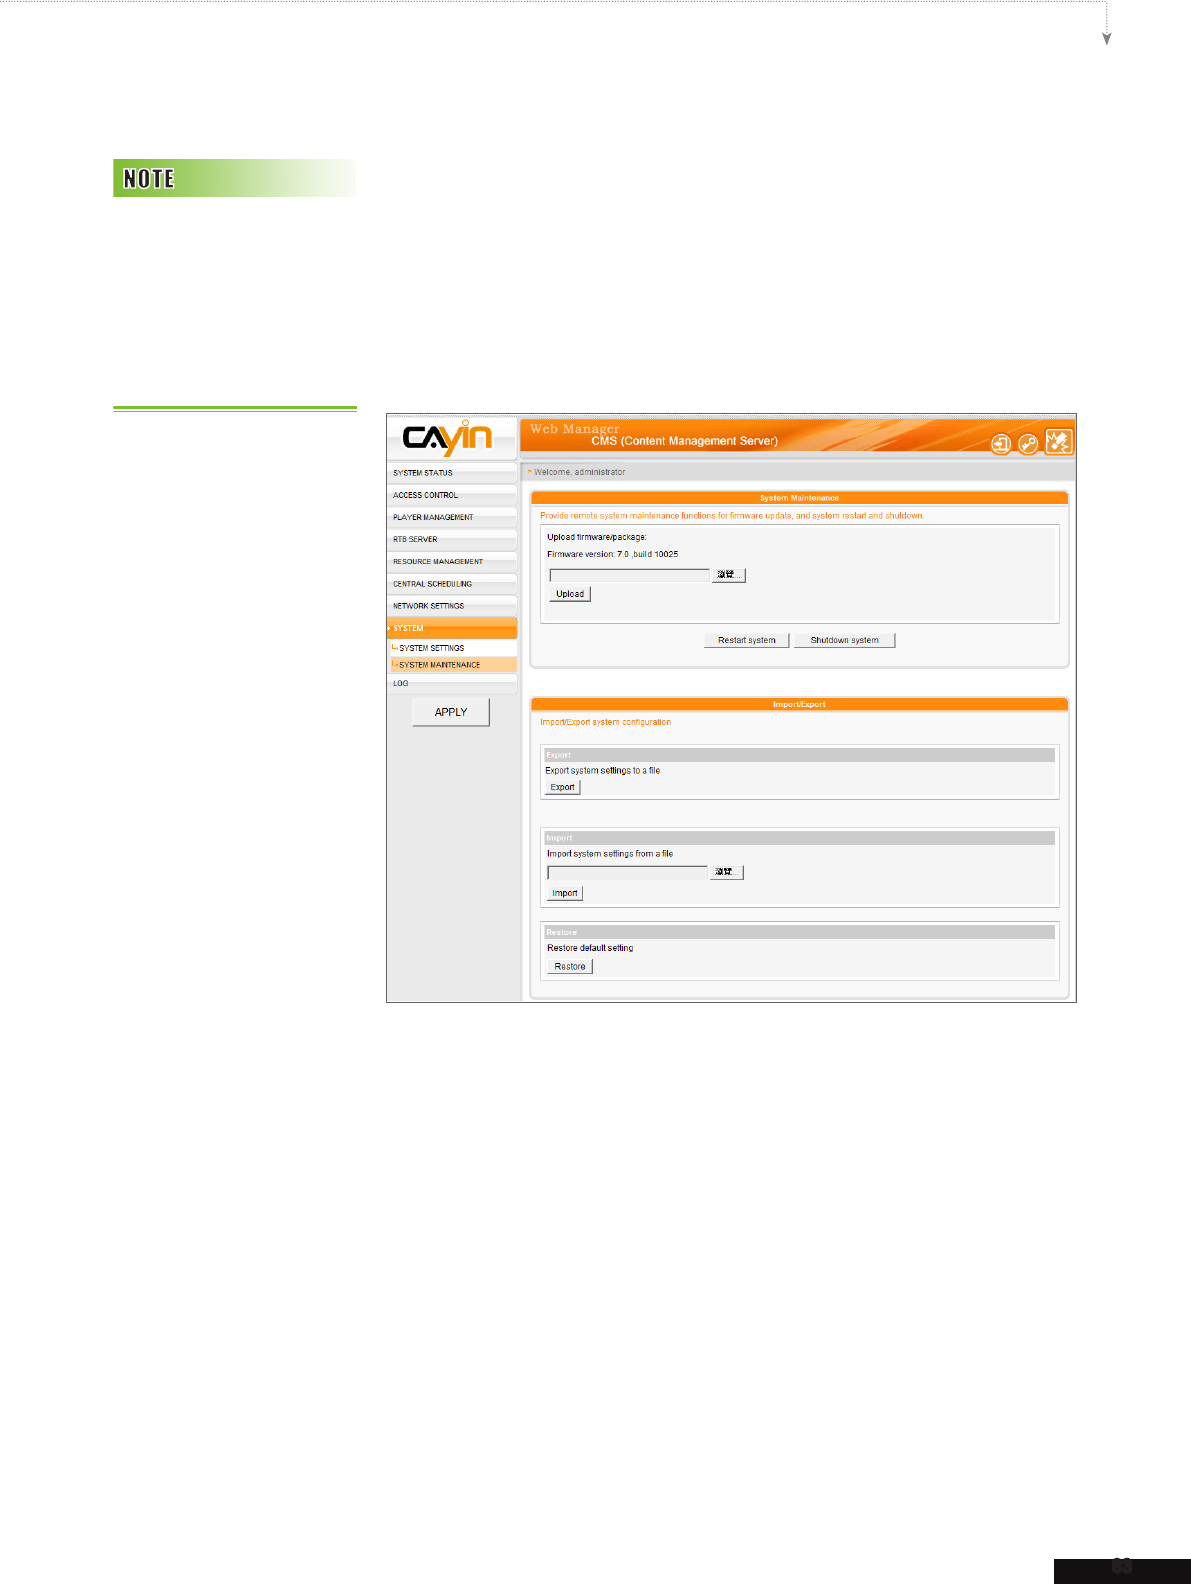
83
CMS USER MANUAL
7-2-6 System Maintenance
You can update the system rmware by uploading CAYIN’s patch le.
To update the rmware version of the server, select the le and click
[Upload].
You can also restart or shut down the system by clicking the corresponding
button at the end of the page
.
Remember to click [SAVE]
on the bottom of every sec-
tion to save the settings, and
then click [APPLY] on the
left column, so that those
settings will come into effect.
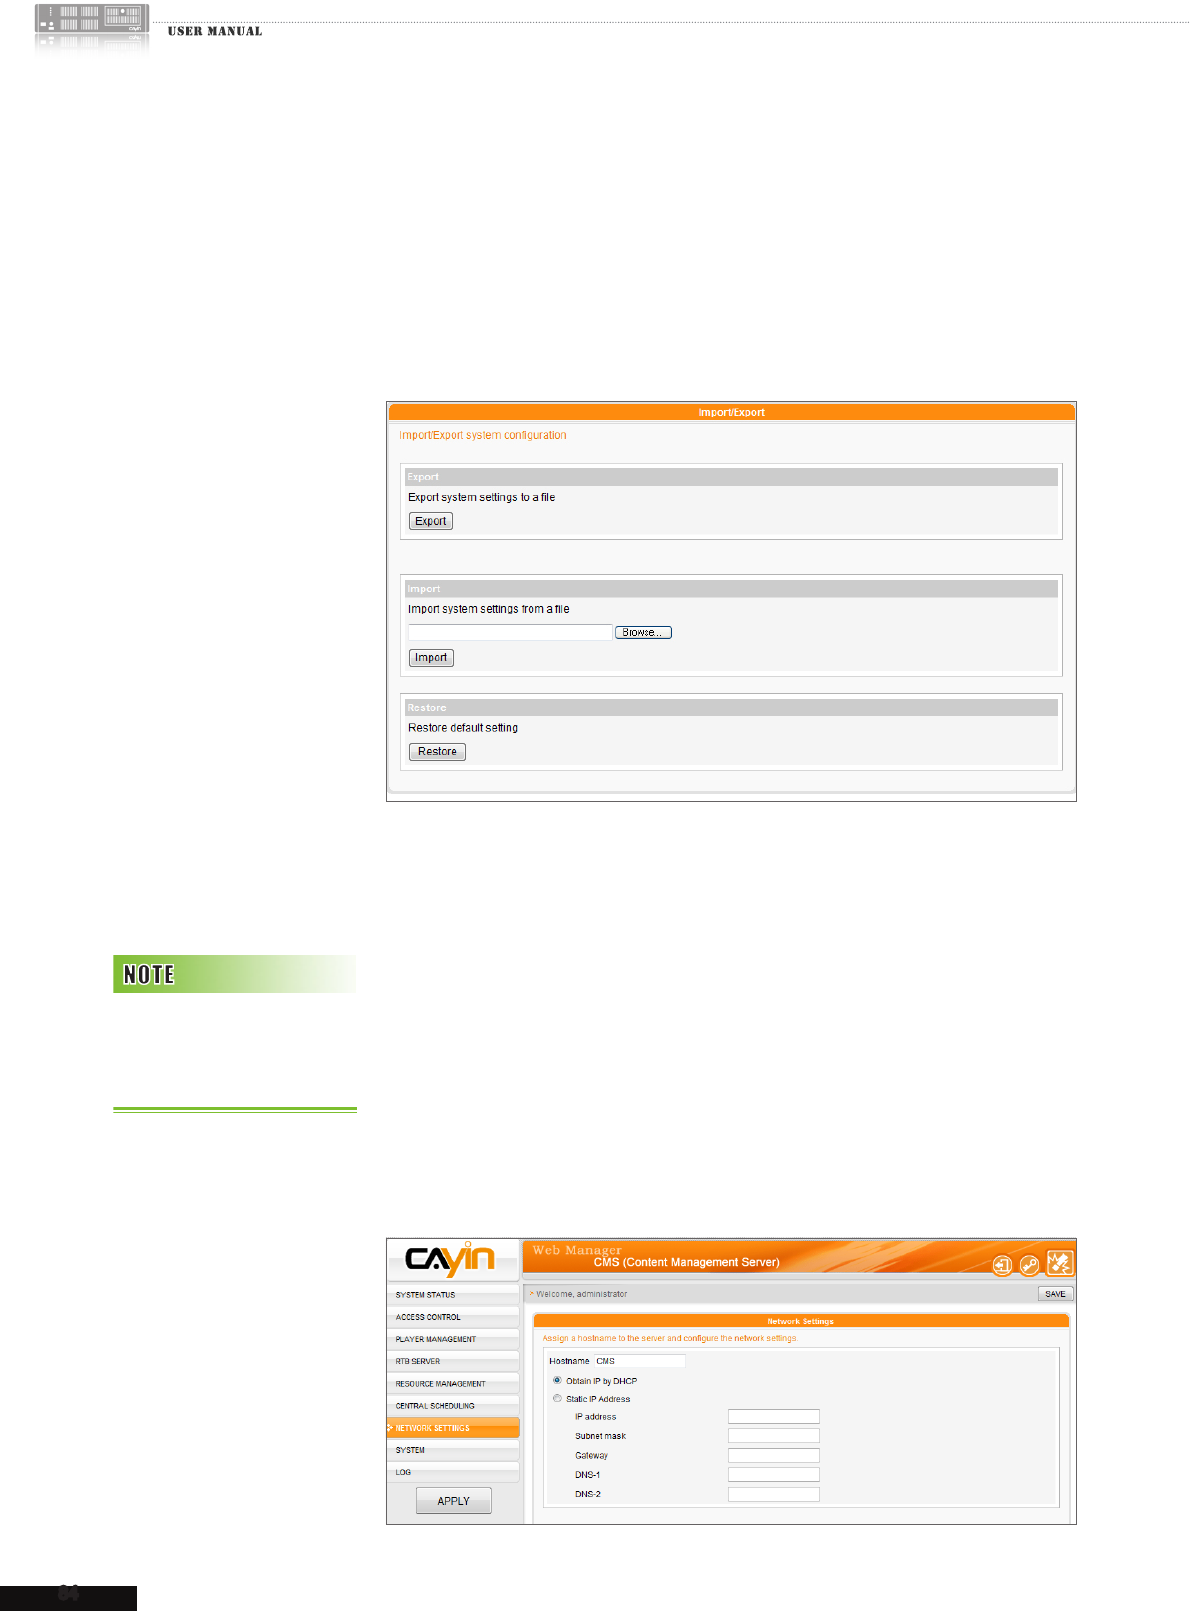
84
CMS
7-2-7 Import/Export/Restore
Congurations
You can export system settings to a local le and import it to the same
or different machines later. You can only upload the setting le to those
devices with the identical model and rmware version.
7-3 Network Settings
Here you can assign a hostname for the server and dene the network
connection mode. You can select “Obtain IP by DHCP” for the
server to retrieve IP settings automatically. To use static IP setting,
please select “Static IP Address” and enter the information such
as subnet mask, gateway and DNS server IP.
Click [Save] on the bottom to save the settings, and then click [Apply]
on the left column so that those settings will come into effect.
For using RTB Server mul-
ticasting function, you must
set Gateway IP properly.
85
CMS USER MANUAL
7-4 CMS and NAT Firewall
CMS provides many services to your PC and SMP players via TCP/UDP protocols. Therefore, you
have to forward the service port into CMS IP address, if you deploy CMS behind a NAT rewall and
access CMS services via Internet.
Service Function Port
HTTP (WEB) Content Update
Web manager
Client List
80 (TCP)
FTP FTP 20, 21 (TCP)
SMB Share Folder 139 (TCP+UDP)
SMP/CMS Command Client List
Super Monitor
20000 (TCP)
Please refer to the manual of your rewall for detailed rewall settings. You can check the chapter
related to Virtual Server or Port Forwarding.
For Example:
Local IP Address Protocol Port
192.168.1.2 TCP 20-21
192.168.1.2 TCP+UDP 139
192.168.1.2 TCP 80
192.168.1.2 TCP+UDP 20000

8.LOG
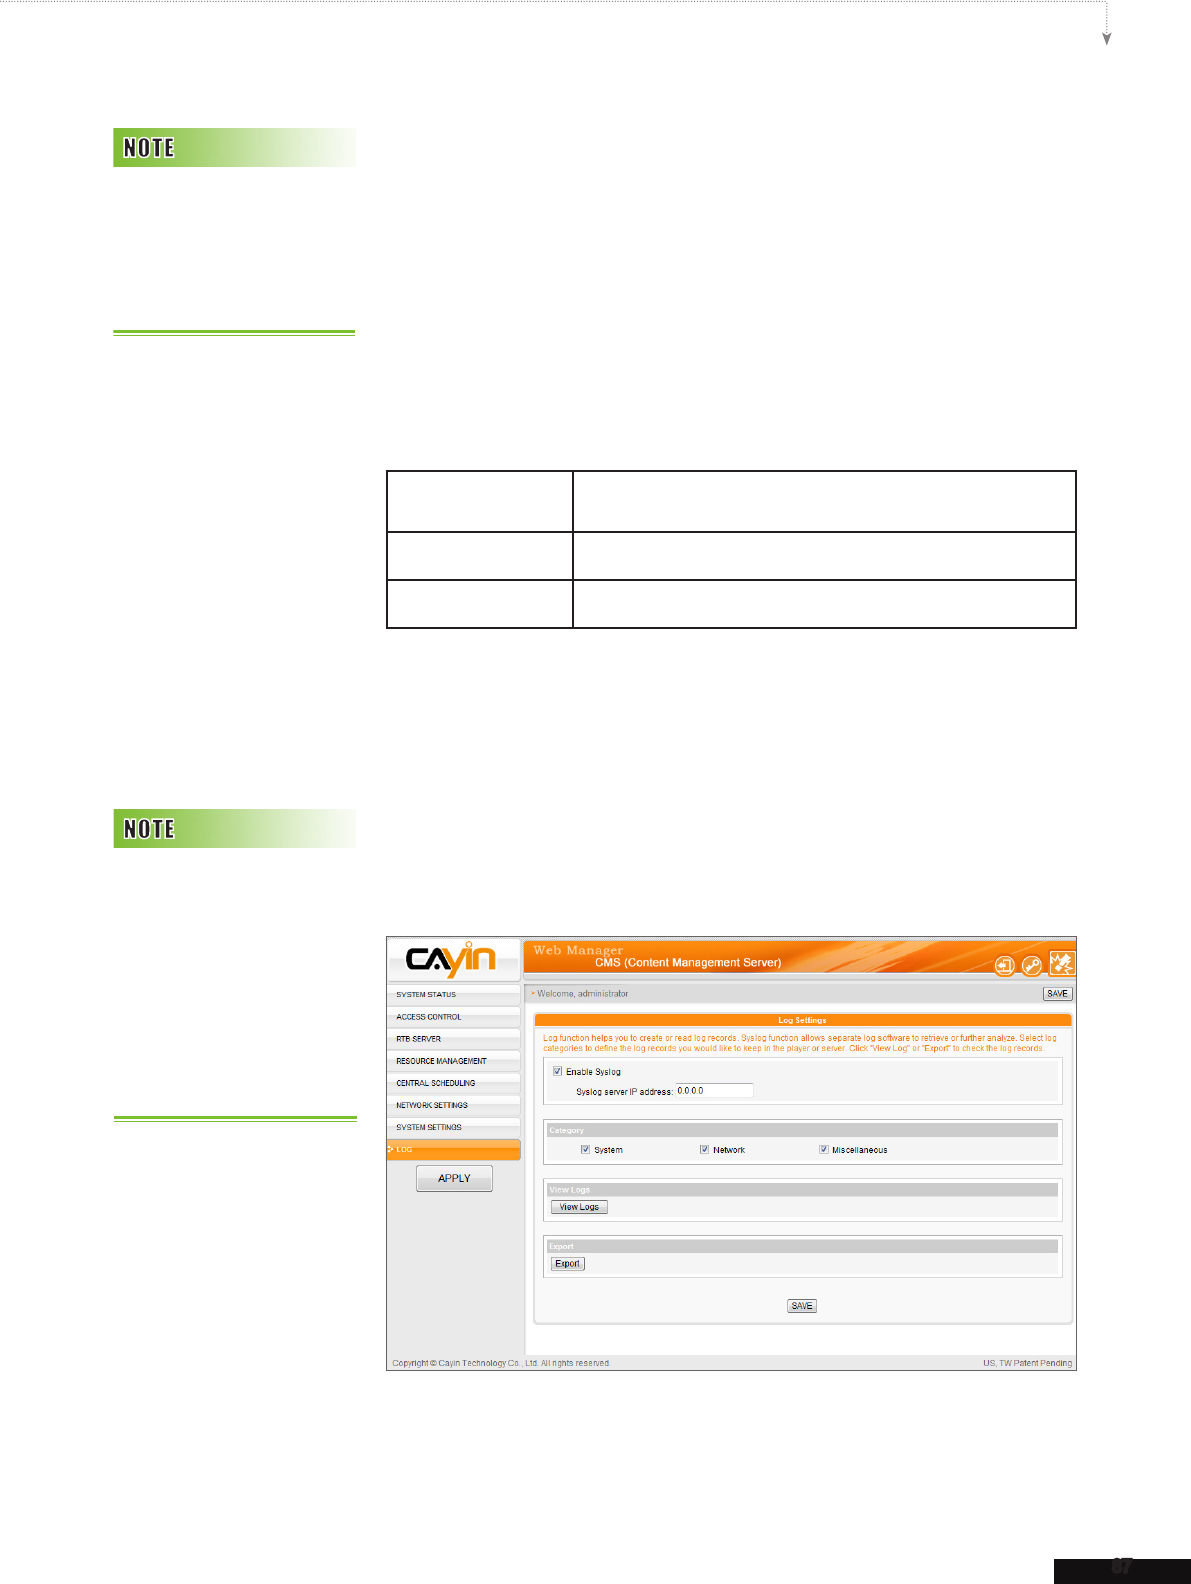
87
CMS USER MANUAL
In this section, you can congure related settings for log les, which are
the records of the CMS activities used for statistical purposes. Syslog
function allows separate log software to retrieve and further analyze the
log les.
1. If you want to store logs in the Syslog server, please click “Enable
Syslog” and enter the IP address of the Syslog server.
2. Select log categories to define those log records you would like to
keep in the player or server.
System system status change or system error
Network network status or conguration change
Miscellaneous other log les
3. Click [View Logs] to see log records.
4. Click [Export], then you can export and save the log les as xx.log.
The log file is a text file, which you can edit and analyze with your
favorite text editor software, such as Notepad, Excel, etc. The export
procedures will vary from browser to browser. Please follow the
instructions of your browser.
You can use a syslog
compatible software to
receive syslog records in
a PC, for example, CAYIN
SuperReporter.
If you congure the Pop-up
Blocker in your browser, the
“Export” function will not
be able to function properly.
Please turn off your “Pop-
up Block” or add CMS Web
Manager in the “Allow Web
Sites List”.
