CSI Driver For VxFlex OS Product Guide Vx Flex
User Manual:
Open the PDF directly: View PDF ![]() .
.
Page Count: 20

CSI Driver for VxFlex OS
Version 1.0
Product Guide
302-005-685
01
Copyright © 2019 Dell Inc. or its subsidiaries. All rights reserved.
Published April 2019
Dell believes the information in this publication is accurate as of its publication date. The information is subject to change without notice.
THE INFORMATION IN THIS PUBLICATION IS PROVIDED “AS-IS.“ DELL MAKES NO REPRESENTATIONS OR WARRANTIES OF ANY KIND
WITH RESPECT TO THE INFORMATION IN THIS PUBLICATION, AND SPECIFICALLY DISCLAIMS IMPLIED WARRANTIES OF
MERCHANTABILITY OR FITNESS FOR A PARTICULAR PURPOSE. USE, COPYING, AND DISTRIBUTION OF ANY DELL SOFTWARE DESCRIBED
IN THIS PUBLICATION REQUIRES AN APPLICABLE SOFTWARE LICENSE.
Dell, EMC, and other trademarks are trademarks of Dell Inc. or its subsidiaries. Other trademarks may be the property of their respective owners.
Published in the USA.
Dell EMC
Hopkinton, Massachusetts 01748-9103
1-508-435-1000 In North America 1-866-464-7381
www.DellEMC.com
2CSI Driver for VxFlex OS 1.0 Product Guide
Introduction 5
Product overview......................................................................................... 6
Installing the CSI Driver for VxFlex OS 7
Installation overview.....................................................................................8
Prerequisites................................................................................................ 8
Enable Kubernetes feature gates.....................................................8
Configure Docker service............................................................... 10
Install Helm package manager........................................................ 10
Install VxFlex OS Storage Data Client............................................. 11
Install CSI Driver for VxFlex OS................................................................... 11
Testing driver 15
Test deploying a simple pod with VxFlex OS storage...................................16
Test creating snapshots.............................................................................. 17
Test restoring from a snapshot................................................................... 18
Troubleshooting 19
Troubleshooting......................................................................................... 20
Chapter 1
Chapter 2
Chapter 3
Chapter 4
CONTENTS
CSI Driver for VxFlex OS 1.0 Product Guide 3
CONTENTS
4CSI Driver for VxFlex OS 1.0 Product Guide
Product overview
The CSI Driver for VxFlex OS is a plug-in that is installed into Kubernetes to provide
persistent storage using Dell EMC VxFlex OS storage system.
The CSI Driver for VxFlex OS and Kubernetes communicate using the Container
Storage Interface protocol. CSI Driver for VxFlex OS conforms to CSI specification
v1.0 and compatible with Kubernetes versions 1.13.1, 1.13.2 and 1.13.3.
Features of CSI Driver for VxFlex OS
The CSI Driver for VxFlex OS supports the following features:
lPersistent volume (PV) capabilities - create, list, delete, and create-from-
snapshot
lDynamic and static PV provisioning
lSnapshot capabilities - create, delete, and list
lVolume mount as
ext4
or
xfs
file system on the worker node
lSupports the following access modes:
nmulti-node-single-writer
nsingle-node-writer
nsingle-node-reader-only
nmulti-node-reader-only
nmulti-node-single-writer
lVolume prefix for easy LUN identification
lSupports HELM charts installer
lSupports CSI 1.0
lSupports Kubernetes version 1.13.1, 1.13.2 and 1.13.3
lCompatible with VxFlex OS version 3.0 with medium granularity storage pools.
The CSI Driver for VxFlex OS depends on the following libraries:
l
gofsutil
l
gocsi
l
goscaleio
l
godog
l
protobuf
l
logrus
l
gosync
l
grpc
These libraries are used in the current version of the driver.
Introduction
6CSI Driver for VxFlex OS 1.0 Product Guide
CHAPTER 2
Installing the CSI Driver for VxFlex OS
This chapter contains the following sections:
lInstallation overview............................................................................................ 8
lPrerequisites........................................................................................................8
lInstall CSI Driver for VxFlex OS...........................................................................11
Installing the CSI Driver for VxFlex OS 7
Installation overview
The Helm chart installs CSI Driver for VxFlex OS using a shell script. This script installs
the CSI driver container image along with the required Kubernetes sidecar containers.
The controller section of the Helm chart installs the following components in a
Stateful Set
in the namespace
vxflexos
:
lCSI Driver for VxFlex OS
lKubernetes Provisioner, which provisions the provisioning volumes
lKubernetes Attacher, which attaches the volumes to the containers
lKubernetes Snapshotter, which provides snapshot support
The node section of the Helm chart installs the following component in a
Daemon Set
in the namespace
vxflexos
:
lCSI Driver for VxFlex OS
lKubernetes Registrar, which handles the driver registration
Prerequisites
Before you install CSI Driver for VxFlex OS, verify the requirements that are
mentioned in this topic are installed and configured.
Requirements
lInstall Kubernetes. The CSI Driver for VxFlex OS works with Kubernetes version
1.13.1 or later.
lEnable the Kubernetes feature gates
lConfigure Docker service
lInstall Helm and Tiller with a service account
lInstall VxFlex OS SDC
Enable Kubernetes feature gates
The Kubernetes feature gates must be enabled before installing CSI Driver for VxFlex
OS .
The Feature Gates section of Kubernetes home page lists the Kubernetes feature
gates. The following Kubernetes feature gates must be enabled:
lVolumeSnapshotDataSource
lKubeletPluginsWatcher
lCSINodeInfo
lCSIDriverRegistry
lBlockVolume
lCSIBlockVolume
Installing the CSI Driver for VxFlex OS
8CSI Driver for VxFlex OS 1.0 Product Guide

Procedure
1. On each master and node of Kubernetes, edit /var/lib/kubelet/config.yaml and
add the following lines at the end to set feature-gate settings for the kubelets:
/var/lib/kubelet/config.yaml
VolumeSnapshotDataSource: true
KubeletPluginsWatcher: true
CSINodeInfo: true
CSIDriverRegistry: true
BlockVolume: true
CSIBlockVolume: true
2. On the master, set the feature gate settings of the
kube-apiserver.yaml
file as
follows:
/etc/kubernetes/manifests/kube-apiserver.yaml - --feature-
gates=VolumeSnapshotDataSource=true,KubeletPluginsWatcher=true
,CSINodeInfo=true,CSIDriverRegistry=true,BlockVolume=true,CSIB
lockVolume=true
3. On the master, set the feature gate settings of the
kube-controller-
manager.yaml
file as follows:
/etc/kubernetes/manifests/kube-controller-manager.yaml - --
feature-
gates=VolumeSnapshotDataSource=true,KubeletPluginsWatcher=true
,CSINodeInfo=true,CSIDriverRegistry=true,BlockVolume=true,CSIB
lockVolume=true
4. On the master, set the feature gate settings of the
kube-scheduler.yaml
file as
follows:
/etc/kubernetes/manifests/kube-scheduler.yaml - --feature-
gates=VolumeSnapshotDataSource=true,KubeletPluginsWatcher=true
,CSINodeInfo=true,CSIDriverRegistry=true,BlockVolume=true,CSIB
lockVolume=true
5. On each node, edit the variable
KUBELET_KUBECONFIG_ARGS
of /etc/
systemd/system/kubelet.service.d/10-kubeadm.conf file as
follows:
Environment="KUBELET_KUBECONFIG_ARGS=--bootstrap-
kubeconfig=/etc/kubernetes/bootstrap-kubelet.conf --
kubeconfig=/etc/kubernetes/kubelet.conf --allow-
privileged=true --feature-
gates=VolumeSnapshotDataSource=true,KubeletPluginsWatcher=true
,CSINodeInfo=true,CSIDriverRegistry=true,BlockVolume=true,CSIB
lockVolume=true"
6. Restart the kublet with systemctl daemon-reload and systemctl
restart kubelet on all nodes.
Installing the CSI Driver for VxFlex OS
Enable Kubernetes feature gates 9

Configure Docker service
The mount propagation in Docker must be configured on all Kubernetes nodes before
installing CSI Driver for VxFlex OS.
Procedure
1. Edit the service section of /etc/systemd/system/multi-
user.target.wants/docker.service file as follows:
docker.service
[Service]
...
MountFlags=shared
2. Restart the docker service with systemctl daemon-reload and
systemctl restart docker on all the nodes.
Install Helm package manager
Install the Helm and Tiller package manager on the master node.
To install Helm, run the following commands:
Procedure
1. Run curl https://raw.githubusercontent.com/helm/helm/
master/scripts/get > get_helm.sh
2. Run chmod 700 get_helm.sh
3. Run ./get_helm.sh
4. Run helm init
5. Run helm version to test the Helm installation.
6. Set up a service account for Tiller as follows:
a. Create a
rbac-config
.yaml file and add the following snippet to the file:
apiVersion: v1
kind: ServiceAccount
metadata:
name: tiller
namespace: kube-system
---
kind: ClusterRoleBinding
apiVersion: rbac.authorization.k8s.io/v1beta1
metadata:
name: tiller-clusterrolebinding
subjects:
- kind: ServiceAccount
name: tiller
namespace: kube-system
roleRef:
kind: ClusterRole
name: cluster-admin
apiGroup: ""
b. Run kubectl create -f rbac-config.yaml to create the service
account.
Installing the CSI Driver for VxFlex OS
10 CSI Driver for VxFlex OS 1.0 Product Guide

7. Apply the service account to Tiller using helm init --upgrade --
service-account tiller
Install VxFlex OS Storage Data Client
Install the VxFlex OS Storage Data Client (SDC) on all Kubernetes nodes.
For detailed VxFlex OS installation procedure, see the
Dell EMC VxFlex OS Deployment
Guide
. Install the VxFlex OS SDC as follows:
Procedure
1. Download the VxFlex OS SDS from Dell EMC Online support. The filename is
EMC-ScaleIO-sdc-*.rpm, where * is the SDC name corresponding to the
VxFlex OS installation version.
2. Export the shell variable
MDM_IP
in a comma-separated list. This list contains
the IP addresses of the MDMs.
export MDM_IP=10.254.16.58,10.254.16.62
3. Install the SDC with the command rpm -iv ./EMC-ScaleIO-sdc-
*.x86_64.rpm, where * is the SDC name corresponding to the VxFlex OS
installation version.
Install CSI Driver for VxFlex OS
Install CSI Driver for VxFlex OS using this procedure.
Before you begin
lYou must have the downloaded files, including the Helm chart from the source
repository at github.com/dell/csi-vxflexos, ready for this procedure.
lIn the top level helm directory, there should be two shell scripts,
install.vxflexos and uninstall.vxflexos. These scripts handle some of
the pre and post operations that cannot be performed in the helm chart, such as
creating Custom Resource Definitions (CRDs), if needed.
lYou must create a Kubernetes secret with your VxFlex OS username and
password. Use the
secret.yaml
file to create the secret with the following values
to match the default installation parameters:
nName: vxflexos-creds
nNamespace: vxflexos
Note
lCreate the namespace using kubectl create namespace vxflexos.
lFor more information about creating a Kubernetes secret, see: Kubernetes
documentation: Overview of Secrets
Procedure
1. Collect information from theVxFlex OS SDC (Storage Data Client) by executing
the get_vxflexos_info.sh script located in the top-level helm directory.
This script shows the
VxFlex OS system ID
and
MDM IP
addresses. Make a note
of the value for these parameters as they must be entered in the
myvalues.yaml
file.
Installing the CSI Driver for VxFlex OS
Install VxFlex OS Storage Data Client 11

Note
Your SDC might have multiple VxFlex OS systems registered. Ensure that you
choose the correct values.
2. Copy the csi-vxflexos/values.yaml into a file in the same directory as
the
install.vxflexos
named
myvalues.yaml
, to customize settings for installation.
3. Edit
myvalues.yaml
to set the following parameters for your installation:
lSet the
systemName
string variable to the VxFlex OS system name or
system ID. This value was obtained by running the
get_vxflexos_info.sh script in Step 1 of this procedure.
lSet the
restGateway
string variable to the URL of your system’s REST API
Gateway. You can obtain this value from the VxFlex OS administrator.
lSet the
storagePool
string variable to a default (already existing) storage
pool name in your VxFlex OS system.
Note
New storage pools can be created in VxFlex OS UI and CLI utilities.
lSet the
mdmIP
string variable to a comma separated list of MDM IP
addresses.
lSet the
volumeNamePrefix
string variable so that volumes created by the
driver have a default prefix. If one VxFlex OS system is servicing several
different Kubernetes installations or users, these prefixes help you
distinguish them.
lThe
controllerCount
variable is used by advanced users to deploy multiple
controller instances. The specified default value 1 is designed to work as
expected. You can modify the value of this variable to set the desired
number of CSI controller replicas.
lSet the
enablelistvolumesnapshot
variable false unless instructed
otherwise, by Dell EMC support. It causes snapshots to be included in the
CSI operation ListVolumes.
lThe Helm charts create a Kubernetes
StorageClass
while deploying CSI
Driver for VxFlex OS. The
StorageClass
section includes following variables:
nThe
name
string variable defines the name of the Kubernetes storage
class that the Helm charts will create. For example, the "vxflexos” base
name will be used to generate names such as " vxflexos" and "vxflexos-
xfs".
nThe
reclaimPolicy
string variable defines whether the volumes will be
retained or deleted when the assigned pod is destroyed. The valid values
for this variable are Retain or Delete.
nThe
isDefault
variable (valid values for this variable are true or false)
will set the newly created storage class as default forKubernetes.
Installing the CSI Driver for VxFlex OS
12 CSI Driver for VxFlex OS 1.0 Product Guide

Note
–Set this value to “true” only if you expect VxFlex OS to be your
principle storage provider, as it will be used in
PersitentVolumeClaims
where no
storageclass
is provided. After installation, you can add
custom storage classes if desired.
–All strings must be contained within double quotes.
4. Run the sh install.vxflexos command to proceed with the installation.
A successful installation should emit messages that look similar to the following
samples:
[root@k8s113a-10-247-102-211 helm]# sh install.vxflexos
NAME: vxflexos
LAST DEPLOYED: Thu Jan 24 18:28:35 2019
NAMESPACE: vxflexos
STATUS: DEPLOYED
… omitted lots here …
NAME READY STATUS RESTARTS AGE
vxflexos-controller-0 4/4 Running 0 20s
vxflexos-node-r5kdt 2/2 Running 0 20s
vxflexos-node-tq5tj 2/2 Running 0 20s
CSIDrivers:
NAME AGE
vxflexos 21s
CSINodeInfos:
NAME AGE
k8s113a-10-247-102-213.lss.emc.com 21h
k8s113a-10-247-102-215.lss.emc.com 21h
StorageClasses:
NAME PROVISIONER AGE
vxflexos (default) csi-vxflexos 21s
vxflexos-xfs csi-vxflexos 21s
VolumeSnapshotClasses:
NAME AGE
vxflexos-snapclass 2d
Results
At the end of the script, the kubectl get pods -n vxflexos is called to GET
the status of the pods and you will see the following:
lVxflex-controller-0 with 4/4 containers ready, and status displayed as Running.
lAgent pods with 2/2 containers and the status displayed as Running.
Finally, the script lists the created
storageclasses
such as, "vxflexos" and "vxflexos-
xfs". Additional storage classes can be created for different combinations of file
system types and VxFlex OS storage pools. The script also creates
volumesnapshotclasses
such as, "vxflexos-snapclass" and other snapshots classes.
Installing the CSI Driver for VxFlex OS
Install CSI Driver for VxFlex OS 13
Installing the CSI Driver for VxFlex OS
14 CSI Driver for VxFlex OS 1.0 Product Guide
CHAPTER 3
Testing driver
This chapter contains the following sections:
lTest deploying a simple pod with VxFlex OS storage.......................................... 16
lTest creating snapshots......................................................................................17
lTest restoring from a snapshot...........................................................................18
Testing driver 15
Test deploying a simple pod with VxFlex OS storage
Test the deployment workflow of a simple pod on VxFlex OS storage.
Before you begin
In the source code, there is a directory that contains examples of how you can use the
driver. To use these examples, you must create a "test" namespace, using "kubectl
create namespace test", before you can start testing.
The
starttest.sh
script is located in the csi-vxflexos/test/helm directory. This
script is used in the following procedure to deploy helm charts that test the
deployment of a simple pod.
Procedure
1. Navigate to the test/helm directory, which contains the
starttest.sh
and the
2vols
directories.
This directory contains a simple Helm chart that will deploy a pod that uses two
VxFlex OS volumes.
2. Run the sh starttest.sh 2vols command to deploy the pod.
You should see the following:
Normal Pulled 38s kubelet,
k8s113a-10-247-102-215.lss.emc.com Successfully pulled image
"docker.io/centos:latest"
Normal Created 38s
kubelet, k8s113a-10-247-102-215.lss.emc.com Created container
Normal Started 38s
kubelet, k8s113a-10-247-102-215.lss.emc.com Started container
/dev/scinib 8125880 36852 7653216 1% /data0
/dev/scinia 16766976 32944 16734032 1% /data1
/dev/scinib on /data0 type ext4 (rw,relatime,data=ordered)
/dev/scinia on /data1 type xfs
(rw,relatime,attr2,inode64,noquota)
3. To stop the test, run sh stoptest.sh.
This script will delete the pods and the volumes depending on the retention
setting you have configured.
Results
An outline of this workflow is described below:
1. The
2vols
helm chart contains two PersistentVolumeClaim definitions, one in
pvc0.yaml
, and the other in
pvc1
.yaml. They are referenced by the
test.yaml
which
creates the pod. The contents of the
Pvc0.yaml
file are described below:
kind: PersistentVolumeClaim
apiVersion: v1
metadata:
name: pvol0
namespace: test
spec:
accessModes:
Testing driver
16 CSI Driver for VxFlex OS 1.0 Product Guide
- ReadWriteOnce
volumeMode: Filesystem
resources:
requests:
storage: 8Gi
storageClassName: vxflexos
2. The
volumeMode: Filesystem
requires a mounted file system and the
resources.requests.storage
of 8Gi requires an 8 GB file. In this case, the
storageClassName: vxflexos
directs the system to use one of the pre-defined
storage classes created by the CSI Driver for VxFlex OS installation process. This
step yields a mounted
ext4
file system. You can see the storage class definitions in
the VxFlex OS installation helm chart files
storageclass.yaml
and
storageclass-
xfs.yaml
.
3. If you compare
pvol0.yaml
and
pvol1.yaml
, you will find that the latter uses a
different storage class;
vxflexos-xfs
. This class gives you an
xfs
file system.
4. To see the volumes you created, run kubectl get persistentvolumeclaim
–n test and kubectl describe persistentvolumeclaim –n test.
Note
For more information about Kubernetes objects like
StatefulSet
and
PersistentVolumeClaim
see Kubernetes documentation: Concepts.
Test creating snapshots
Test the workflow for snapshot creation.
Procedure
1. Start the
2vols
container and leave it running.
2. Run the snaptest.sh shell script.
This will create a snapshot of each of the volumes in the container using
VolumeSnapshot
objects defined in
snap1.yaml
and
snap2.yaml
. The following
are the contents of
snap1.yaml
:
apiVersion: snapshot.storage.k8s.io/v1alpha1
kind: VolumeSnapshot
metadata:
name: pvol0-snap1
namespace: test
spec:
snapshotClassName: vxflexos-snapclass
source:
name: pvol0
kind: PersistentVolumeClaim
Results
The
snaptest.sh
script will create a snapshot using the definitions in the
snap1.yaml
file. The
spec.source
section contains the volume that will be snapped. For example, if
the volume to be snapped is
pvol0
, then the created snapshot is named
pvol0-snap1
.
Notice that this
VolumeSnapshot
class has a reference to a
snapshotClassName:
vxflexos-snapclass
. The CSI Driver for VxFlex OS installation creates this class as its
default snapshot class. You can see its definition in the installation directory file
volumesnapshotclass.yaml
.
Testing driver
Test creating snapshots 17

Note
The
snaptest.sh
shell script creates the snapshots, describes them, and then deletes
them. You can see your snapshots using
kubectl get volumesnapshot -n test
.
Test restoring from a snapshot
Test the restore operation workflow to restore from a snapshot.
Before you begin
Ensure that you have stopped any previous test instance before performing this
procedure.
To test the restore operation from a snapshot:
Procedure
1. Run the snaprestoretest.sh shell script.
This script deploys the
2vols
example, creates a snap of pvol0, and then
updates the deployed helm chart from the updated directory
2vols+restore
.
This then adds an additional volume that is created from the snapshot.
Results
An outline of this workflow is described below:
1. The snapshot is taken using
snap1.yaml
.
2.
Helm
is called to upgrade the deployment with a new definition, which is found in
the
2vols+restore
directory. The helm/templates directory contains the newly
created
createFromSnap.yaml
file. The script then creates a
PersistentVolumeClaim
, which is a volume that is dynamically created from the
snapshot. Then the helm deployment is upgraded to contain the newly created
third volume. In other words, when the
snaprestoretest.sh
creates a new volume
with data from the snapshot, the restore operation is tested. The contents of the
createFromSnap.yaml
are described below:
apiVersion: v1
kind: PersistentVolumeClaim
metadata:
name: restorepvc
namespace: test
spec:
storageClassName: vxflexos
dataSource:
name: pvol0-snap1
kind: VolumeSnapshot
apiGroup: snapshot.storage.k8s.io
accessModes:
- ReadWriteOnce
resources:
requests:
storage: 8Gi
Note
The
spec.dataSource
clause, specifies a source "VolumeSnapshot" named
pvol0-
snap1
which matches the snapshot's name in
snap1.yaml
.
Testing driver
18 CSI Driver for VxFlex OS 1.0 Product Guide
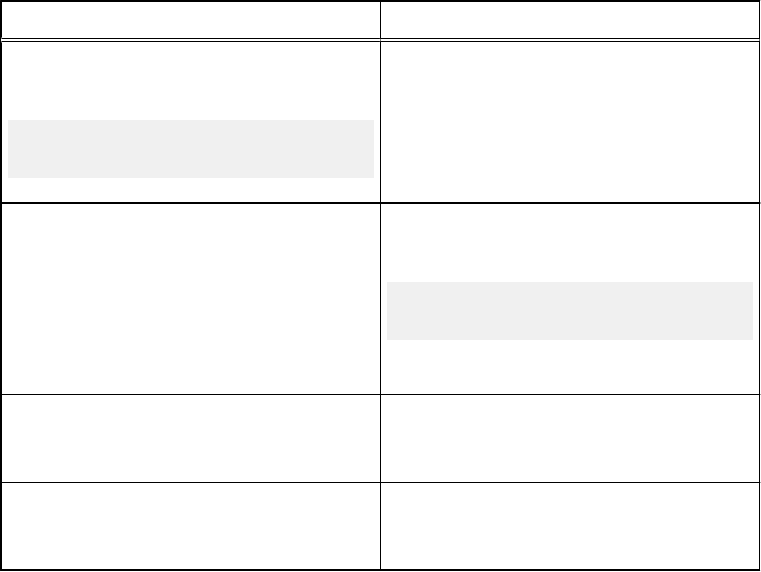
Troubleshooting
The following table lists the CSI Driver for VxFlex OS installation troubleshooting
scenarios:
Symptoms Prevention, resolution, or workaround
The installation fails with the following error
message:
Node xxx does not have the SDC
installed
Install the VxFlex OS SDC on listed nodes.
The SDC must be installed on all the
Kubernetes master and nodes.
When you run the command kubectl
describe pods vxflexos-
controller-0 –n vxflexos, the system
indicates that the driver image could not be
loaded.
Edit the
daemon.json
file found in the registry
location and add
{ "insecure-registries" :
[ "hostname.cloudapp.net:5000" ] }
.
The kubectl logs vxflexos-
controller-0 –n vxflexos logs shows
that the driver is not authenticated.
Check the username, password, and the
gateway IP address for the VxFlex OS system.
The kubectl logs vxflexos-
controller-0 –n vxflexos logs shows
that the system ID is incorrect.
Use the get_vxflexos_info.sh to find
the correct system ID. Add the system ID to
myvalues.yaml
script.
Troubleshooting
20 CSI Driver for VxFlex OS 1.0 Product Guide
