2018 02 12 09:07 Capacitor Meter ELIKE DT6023 Manual
User Manual:
Open the PDF directly: View PDF ![]() .
.
Page Count: 2
Digit
al
Capacitance
Meter
Operator's
Instruction
Manual
..--& WARNING
---.
~
EAD
AND UNDERSTAND THIS
MANUAL BEFORE USING THE
INSTRUMENT
F1llur1 to underatand and
comply
with
the WARNING and operating
In
s
tru
cti
ons
can
result
In
Hrfou1 or
t.tal lnjurf11 and I or property
damage.
0
'
U~Jf
£~::r'C:~a~ance
meter
11
an 3
112
dlgtt12ooocount•)
meter
with .du11
•loPt
nteg1•tlna converter
and
eteady operations, fash
lonabtrola
CJe,
l
itn
antdo
h
2
1llmhlF
relr1ble hlf'nd-h61d
rri1111vrtng
Instrument.
The
meter
ranges m
200pF
01
1nd
equi
pped
with data hold'
and
back
llg
ht
funct
io
n. It
ctn
be
uaed In
measu
ri
ng
the clreun
dHlgned
capacitance
of
cable, switch
and
PCB
l
ayout
.
U
'
J!!.'~
k
f
ng
l
n•
P
•~
on
f~.l!u~n
o~erarg
Manual
· 1 piece
C1pa~nU~eter°1
pi
ece
O n
th1~ckag11
case
and
take
out
the
Meter
,
check
the
Item•
abo
ve
carefully
to":11
a mf
allng
or
dam@lled_part.
In
the
event
you
find
any
mlsslng
or
d1m1g1d,
ease
c6ntact the EUKE Immediate
ly
.
Gtn
tr
•I
Ch1
rect
e
rtnlc
1
Dlap!IY
:
LED
2000counll
~~t~~~.n~1:1:~al~~mauca11y
£1?.!l'lflon Temperature: O"C-40-C
§ia°tl:i
1
/y~!TJ!frrxi:'.b
0
~1?~-c
Fv11:f> fA
Dlmanalon(HXWXO~
.
1•7X70X35mm
Weight:
-6,pprox.
1
Acceuortas
: Operat r's
Manu
al,
Tait
Clip
Backllaht: keeping 5
sec
each push
Data Hold: ·
ow
displayed
Safe
ty
Inf
ormati
on
Th
ia Meter compUes
with
the standard E'MC
EN61326
.
U11
the
Meter
only
aa
specified In
this
operati
ng
manual
, otherwi!fe
the
protection
provided
by
the
Me
ter
may
be
Impaired.
In
th
is Manual, a
warning
Identifies conditions
and
act
i
ons
that
pose
hazards
to
the user,
or
may
dam
a
ge
the
Meter
or
the
equ
ip
ment
under
t11t.
A Note Identifies the lnfonnation
that
user
should pay attention
to
.
~
Wa
rni
ng
To avoid possible shock
or
personal Injury,
and
to
avoid
damage
to
the
Meter
or
to
the equipment
under
tes1
, adhere
to
the following
rules
:
• Before using the
Meter
Inspect the
case
. Do
not
use
the
Meter
If
It
ia
damaged
or
the
case
(or
part
of
the
case)
Is
removed
.
Look
for
the cracks
or
mi
ss
in
g plastic. Pay attention
to
the
In
sulation
around
the
connectors.
• Inspect the
test
leads for damaged Insu
lation
or
exposed
metal
.
Check
the
tes1
leads
with
Identical model
number
or
electncal specifications before
us
ing the Mete
r.
• When measurement
has
been
comple
t
ed
, di
sconnect
the
connection
between the test leads a
nd
the circuit
under
test
,
remove
the
testi
ng
leads
away from the Input tenninals
of
the
Meter
and
tum
the
Meter
power
off
.
The rotary swttch should
be
placed
In
the
right position
and
no
any
change
over
of
range shan
be
made
when
measurement
is
conducted
to
prevent
damage
to
the
Meter
.
•
Do
not
carry
out
the measurement
when
the
Meter
's
back
case
and
battery
compartment
are
not closed
to
avoid electric
shock
and
damaged
to
the
Meter.
•
Use
the proper tenninals. function.
and
range
for
your
measurements.
•
Do
not
use
or
store the
Meter
In
an en
viro
nment
of
hi
gh
temperature,
humid
i
ty
,
explosi
v
es
,
lnftamm
ab
le
and
strong
magnetic
flies
.
The
performance
of
the
Meter
may
deteriorate
after
dampened.
• Replace the battery as soon
as
Iha
battery Indicator
ll!
appears.
With
a
low
battery,
the
Meter might produce false readings that can lead to electric
shock and personal Inju
ry
.
The lntemal circuit or the Meter shall
not
be altered at will to avoid damage
of
the Meter and
any
accident
Soll
clOth
and mild detergent should
be
used to clean the surface
of
the
Meter when servicing. Mo abr
as
ive and solvent should be used to prevent
the surface
of
the Meter from corrosion, damage and accident.
• Tum the
Me
ter
off
when It is
not
in
use
and
take out the battery when not
us
ing for 1 long time.
• Constantly check the battery as it
may
l
eak
when It has been using foe only
some time, replace the battery
es
soon
IS
leaking appears. A leaking battery
w
MI
damage the Meter
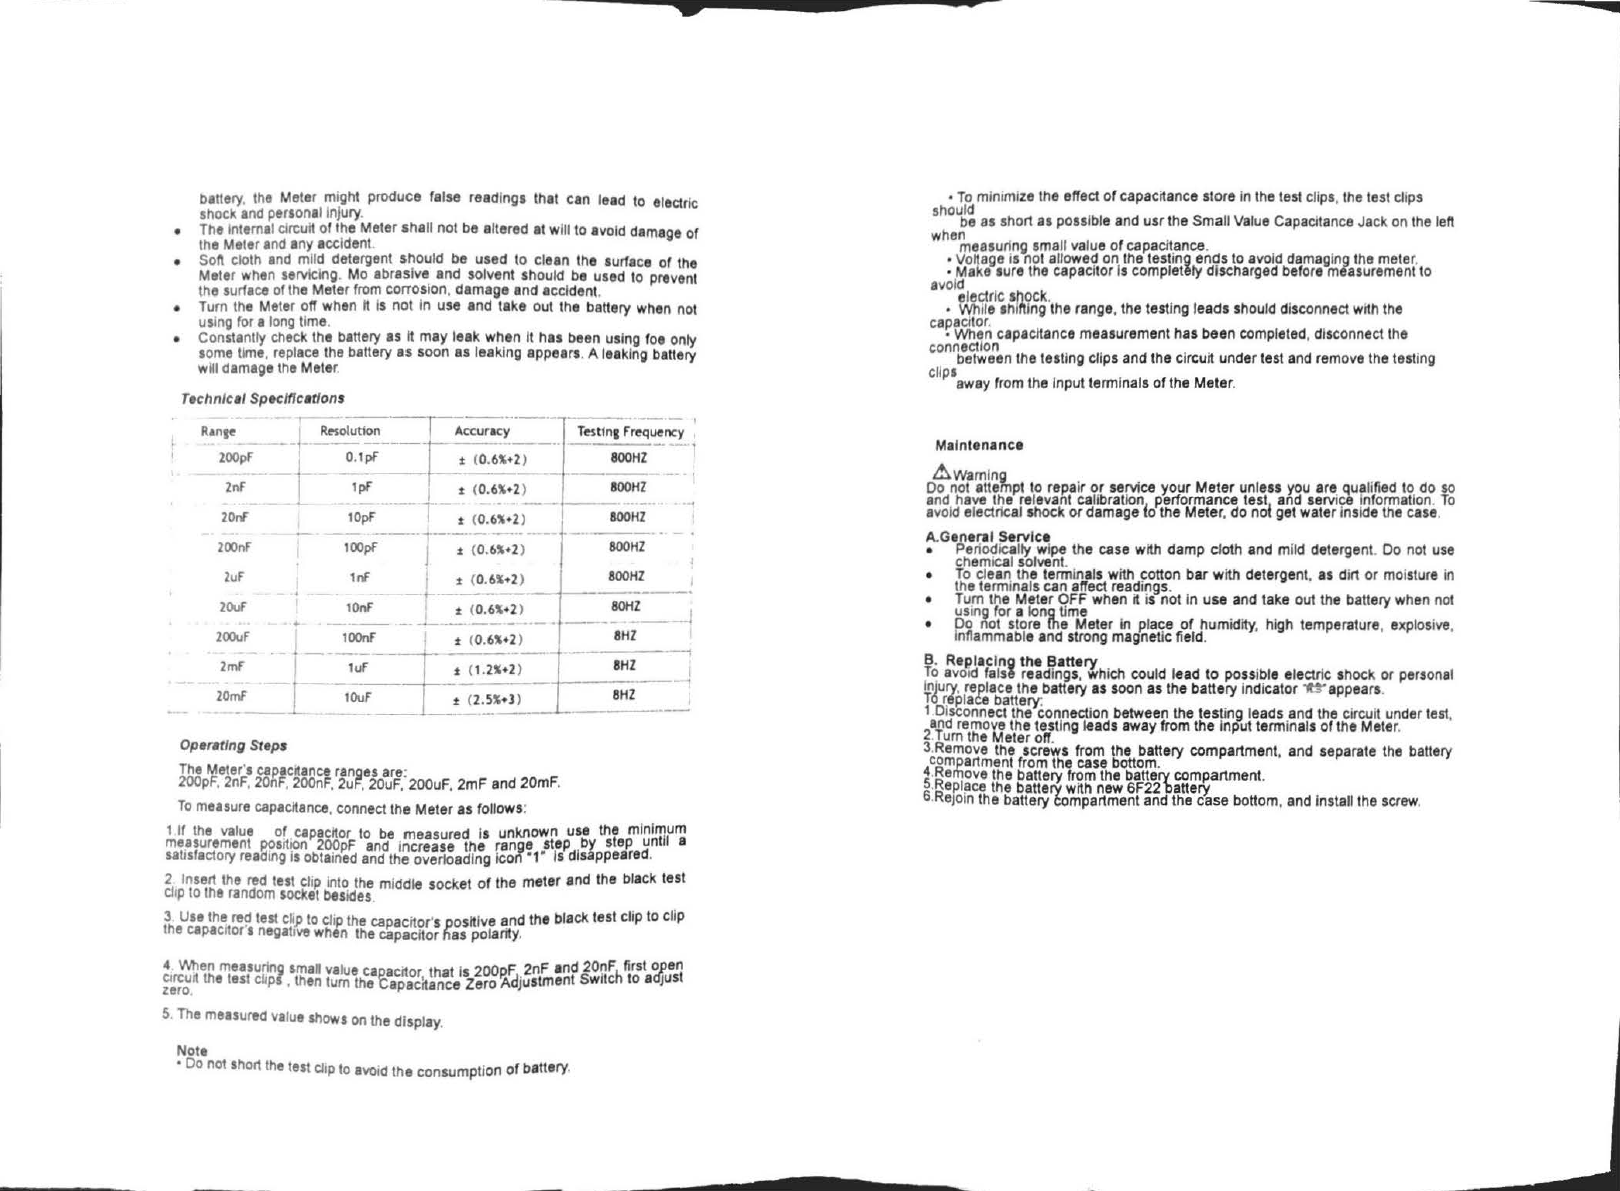
Technical Sptcfflcatlons
Ranae
r
~utlon
---i-
Acc
_
u
_
r
-
~;
··-
.
200pf -j
0.1-;r
·
---~
-~-
+-
2nf I
!pf
I
.t
(0.6,
•2
)
Testfn1
f~ue
;,;;
'
·----·
800HZ
.t
(
0.6,
•2
)
SOOHZ
20nf
-
10pf
-
---
i-
t (0.
6,•2
)
800HZ
200nf
100pf
.t
(0.
6,•2
)
800HZ
2uf
Inf
.t
(0.
6"•2
)
800HZ
-.----
-
10nf
.t
(0
.6"
•2
)
SOHZ
20uf
200uf
2mf
20rnf
~
~
-
-±-
:
;
~::~::
;
·-+-··_-_-_-_-_
:
-
:
_
:
-.--~~
IOuf
~
(
2.5"•)
)
SHZ
I
·--------
--
---
--------
Operating Steps
The
Meter's capacrtance ran a es are·
200pF,
2nF, 20nF,
200nF,
2uF, 20uF: 200uF, 2mF
and
20mF.
To
measure capacitance, connect the
Meler
H follows:
1
If
the value of capacrtor to be measured ls unknown use the minimum
measurement posrtlon 200pF and incre
ase
the
range step
by
step until a
saUsfactory reaalng is obtained and the
ov
e
no
adlng Icon
·1·
ls
disappeared.
2 Insert the red test clip Into the middle socket
of
the
meter
and
the black test
cJ1p
to the random
socJtet
besides.
3
UH
the rejl test
c~p
to clip
111
11
capacitor's
posit
ive and the black test clip to clip
the
capacrtor s negative when
111e
capacitor
has
polarity.
4
'Mlen
measuring
am
al
vilue
ca1>
acitor that is
200P.F
2nF and
20nf
L first open
e1rcurt
the test
cllpf,
111en
tum
111
e Capacltance
zero
Adjustment Swltcn to adjust
zero.
5. The meHured value shows on
l/1e
display.
Note
• Do not short the test
dip
to avoid the consumption
of
battery.
•
To
minimize the effect
of
capacitance store In the test clips, the te
st
dips
should
be
IS
short
as
possible a
nd
usr
the
Sma
ll Value Capacitance Jack on the left
when .
measuring small value
of
capacitance .
• Voltage la not allowed on the testi
ng
ends to
avo
id damaging the meter.
• Make sure the capacitor Is completely discharged before measurement to
avoid
eloctrlc shock.
• While
1h
ll'llng the range, the testing leads should disconnect with the
cap
ac
itor.
• When capacitance measurement has
been
completed, disconnect the
connection
between the testing cli
ps
and
the circuit under test and remove the testing
clip•
away from the Input term Ina ls
of
the
Meter
.
Ma
i
ntenance
6wamlng
Do not attempt to repair
or
service
your
Meter
unless yqu are qualified to do
so
and have the
re
levant callbratlonj performance test1
and service Information.
To
avoid electrical shock
or
damage o the
Meter
,
do
no
get water inside the case.
A.General
Service
• Periodically wipe the case with damp cloth and mild detergent.
Do
not use
chemical solvent.
• To clean the terminals with cotton
bar
with detergen
t,
as di
rt
or
moisture in
the terminals can affect readi
ngs
.
Tum the Meter
OFF
when
it
is not In
use
and take out the battery when not
using for a long time
Do not store the Meter In place
of
hum
idity, high temperature, explosi
ve
,
Inflammable and strong magnetic field.
B.
Replacing
the
Battery
To
avoid fal
si!
readings,
wh
ich could lead
to
possible electric shock or personal
!plury, replace the ba
tt
ery as soon
as
the battery I
nd
icator
"H'
appears.
16
rl!plat e battery:
1 Disconnect the connection between the testing leads
and
the circuit under test,
2
aTnd
remove the testing leads away from the Input termi
na
ls
of
the Meter.
.
um
the
Meter
off
.
3.Remove the screws from the battery compartment,
and
separate the battery
compartment from the case bottom.
4
5.
RRemove
the battery from the battery compartment.
·
efc
lace the battery with new 6F22
battery
6.
Re
oin
Iha
battery tompartment and the case bottom, and Install the screw.
