Cele X SDK Getting Started Guide EN
User Manual:
Open the PDF directly: View PDF ![]() .
.
Page Count: 17

芯仑科技 SDK 快速使用说明 Version1.3
CeleX-5 SDK User Manual
CelePixel Technology Co. Ltd.

芯仑科技 SDK 快速使用说明 Version1.3
目录
1 User Steps of CeleX-5 SDK ........................................................................................................... 3
1.1 Install MIPI to USB3.0 Driver ................................................................................................. 3
1.1.1 Windows ............................................................................................................................. 3
1.1.2 Linux ..................................................................................................................................... 4
1.2 Run CeleX Demo GUI .............................................................................................................. 5
1.2.1 Windows ............................................................................................................................. 5
1.2.2 Linux ..................................................................................................................................... 5
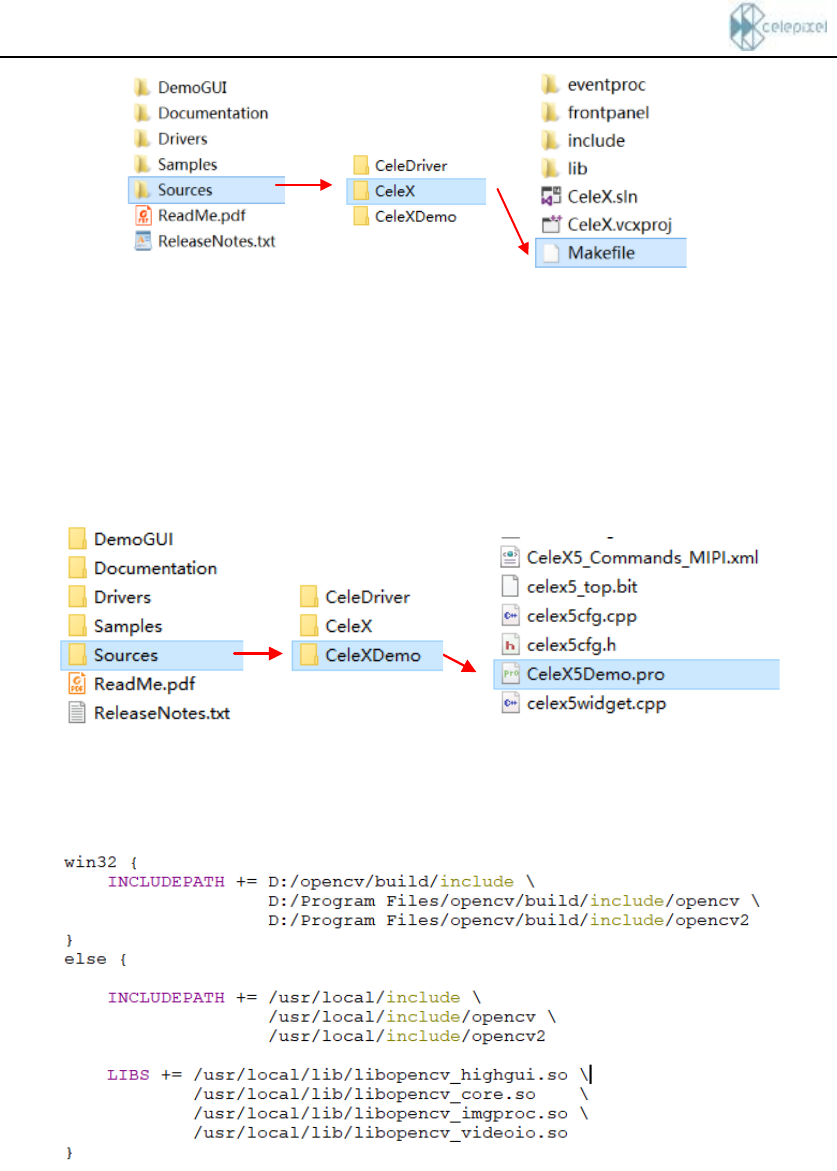
1.3 Compile CeleX-5 Library Source Code ............................................................................. 6
1.3.1 Windows ............................................................................................................................. 6
1.3.2 Linux ..................................................................................................................................... 6
1.4 Compile Source Code of CeleX Demo GUI ..................................................................... 7
1.5 Compile CeleX-5 Driver Source Code .............................................................................. 8
1.5.1 Windows ............................................................................................................................. 8
1.5.2 Linux ..................................................................................................................................... 9
1.6 Generate FPN file ..................................................................................................................... 9
2 The Functions of CeleX-5 Demo Kit GUI ................................................................................ 10
2.1 Change Sensor Mode ........................................................................................................... 11
2.2 Record Raw Data of Sensor (Bin Files) ............................................................................ 11
2.3 Playback Recorded Raw Data of Sensor (Bin Files) ..................................................... 12
2.4 Generate FPN file ................................................................................................................... 12
2.5 Flip image ................................................................................................................................. 15
2.6 Convert bin to video ............................................................................................................. 16
2.7 Convert bin to CSV ................................................................................................................ 16
2.8 Advanced Settings ................................................................................................................. 17
芯仑科技 SDK 快速使用说明 Version1.3
1 User Steps of CeleX-5 SDK
1.1 Install MIPI to USB3.0 Driver
1.1.1 Windows
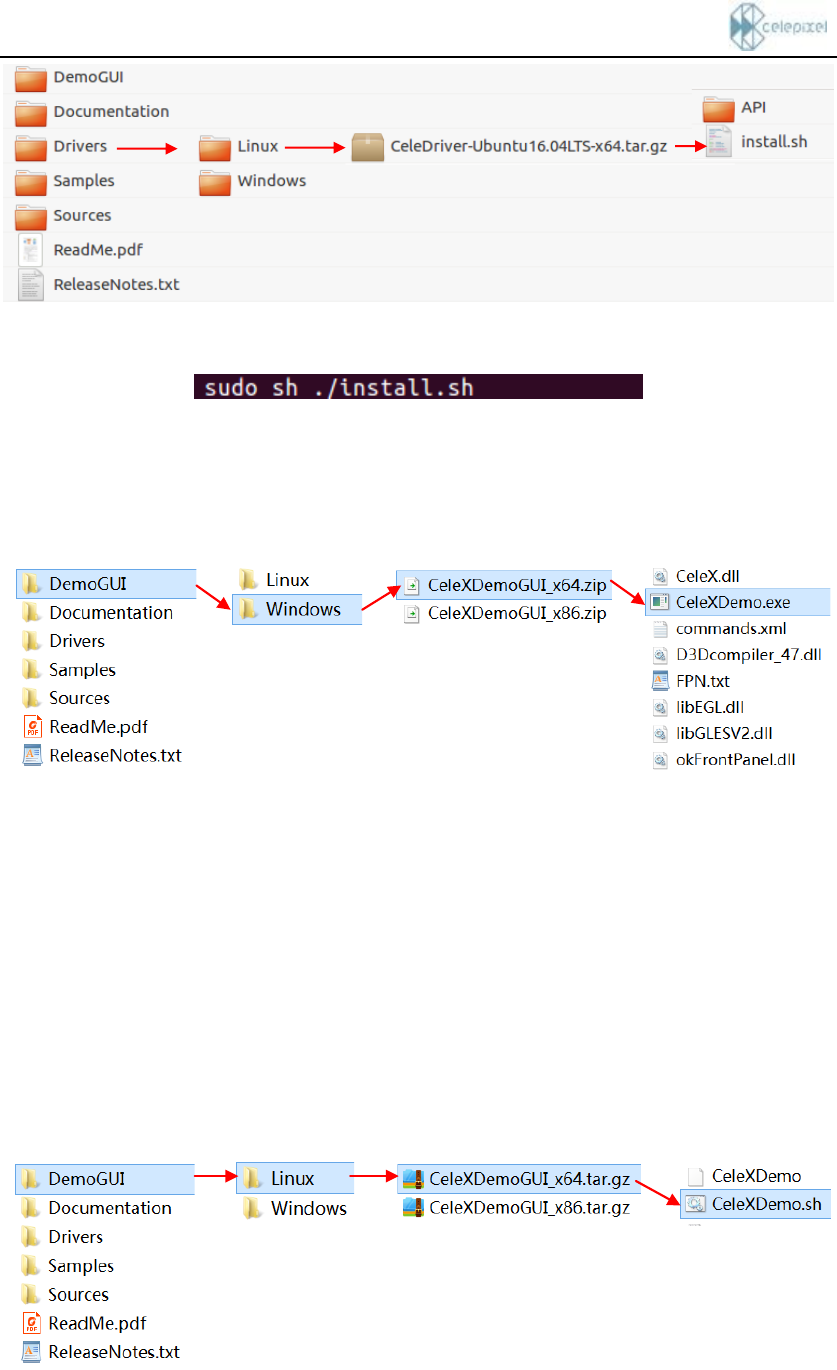
Please install the driver from following folder:
Drivers/Windows
Installation Steps:
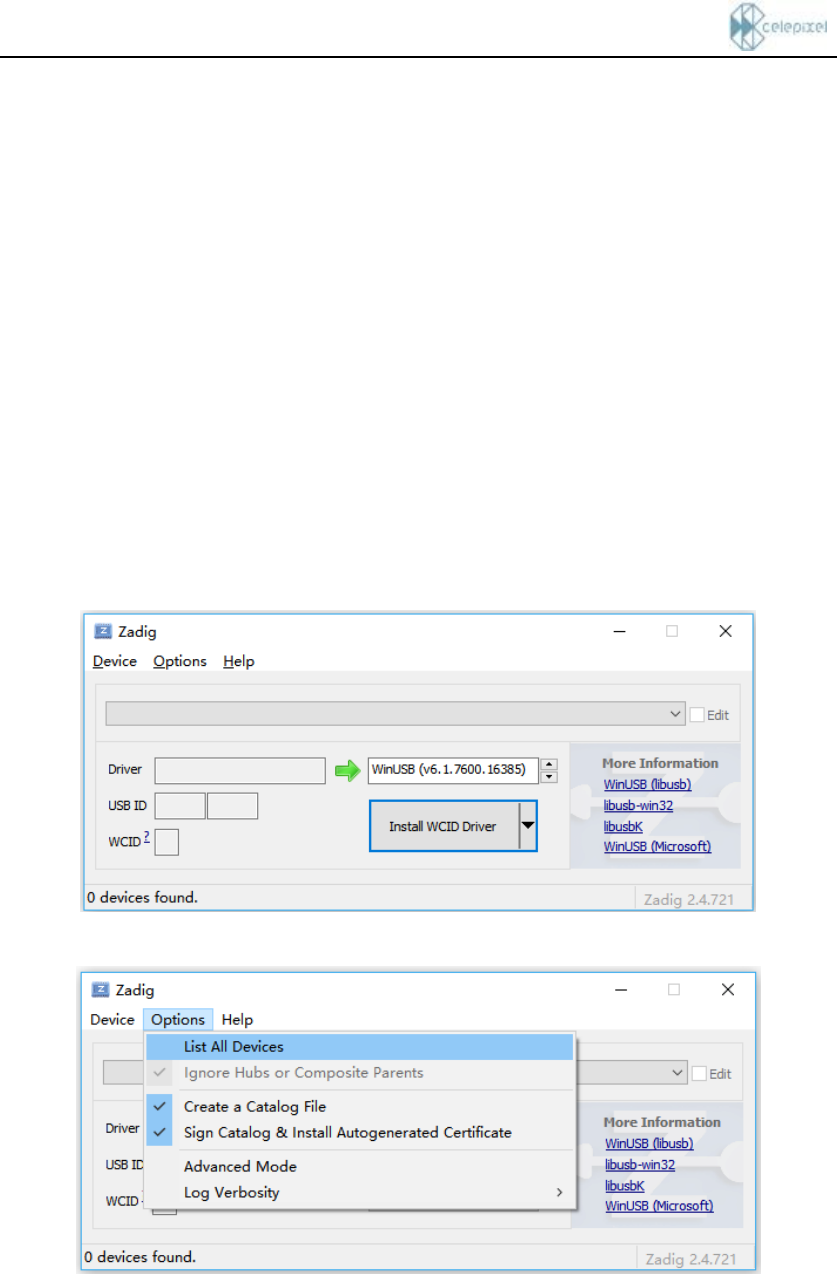
(1) Connect the CeleX-5 Sensor to the PC via the USB cable, double-click “zadig-2.4.exe” to pop
up the interface shown in Fig. 1-1.
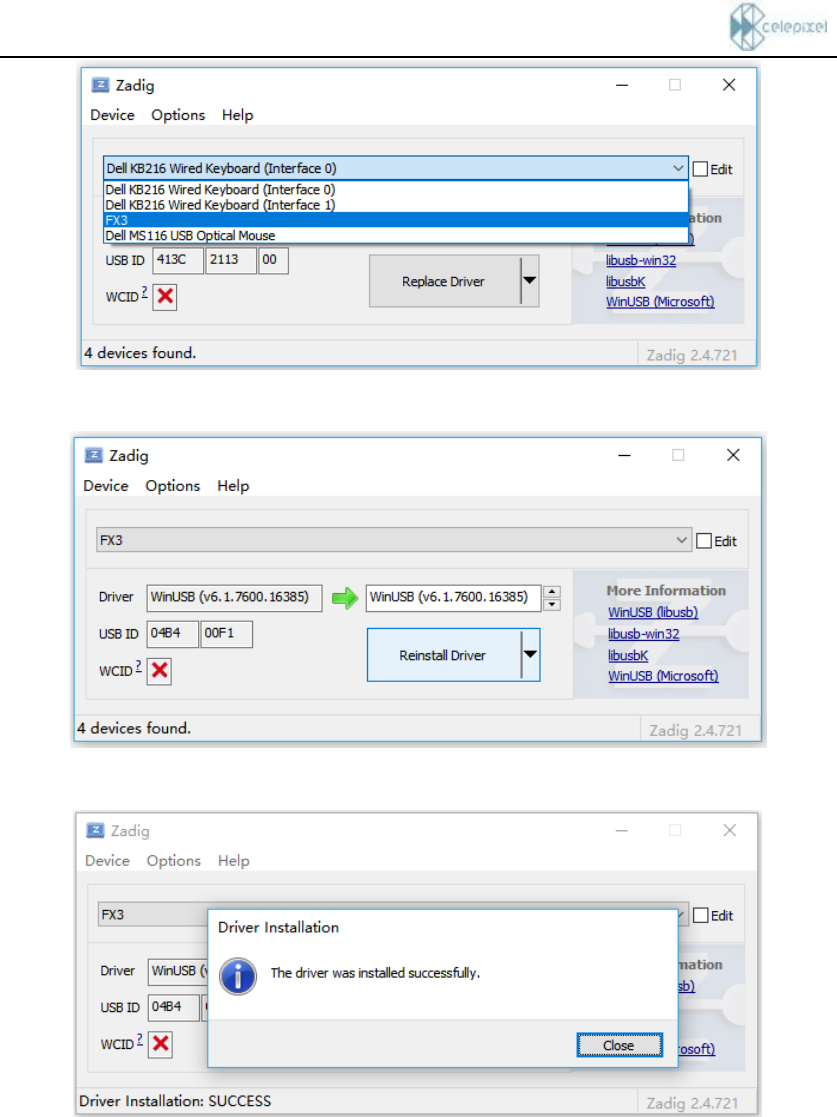
(2) Select Options → List All Devices (Fig. 1-2), then select device FX3 (Fig. 1-3).
(3) Click “Install Driver” or “Reinstall Driver” (Fig. 1-4) to install the driver. After the
installation is successful, Figure 1-5 will be shown.
Notes: The data cable must be connected to the USB 3.0 port on the PC.
Fig. 1-1
Fig. 1-2
芯仑科技 SDK 快速使用说明 Version1.3
Fig. 1-3
Fig. 1-4
Fig. 1-5
1.1.2 Linux
Please install the driver from following folder:
Drivers/Linux
To install the driver for CeleX-5 Sensor on Linux,extract CeleDriver-Ubuntu16.04LTS-x64.tar.gz.
after extracting, users will see the following two files:
芯仑科技 SDK 快速使用说明 Version1.3
Fig. 1-6
Fig. 1-7
1.2 Run CeleX Demo GUI
1.2.1 Windows
After installing the Driver, user could open the Demo GUI from following folder:
Double-click "CeleXDemo.exe" to open the CeleX-5 Demo GUI, as shown in Figure 2-2 in Chapter
2.
Note: If the software cannot be opened and some windows message box popped out saying some
dynamic library files was missing, which may be caused by lacking of Visual C++ supporting
package. You can install the “vc_redist.x86.exe” under the folder <Drives/Windows> and try it again,
the software should be working properly.
1.2.2 Linux
After installing the Driver, user could open the Demo GUI from following folder:
Open a terminal and enter the following command to open the Demo GUI,as shown in Figure 2-
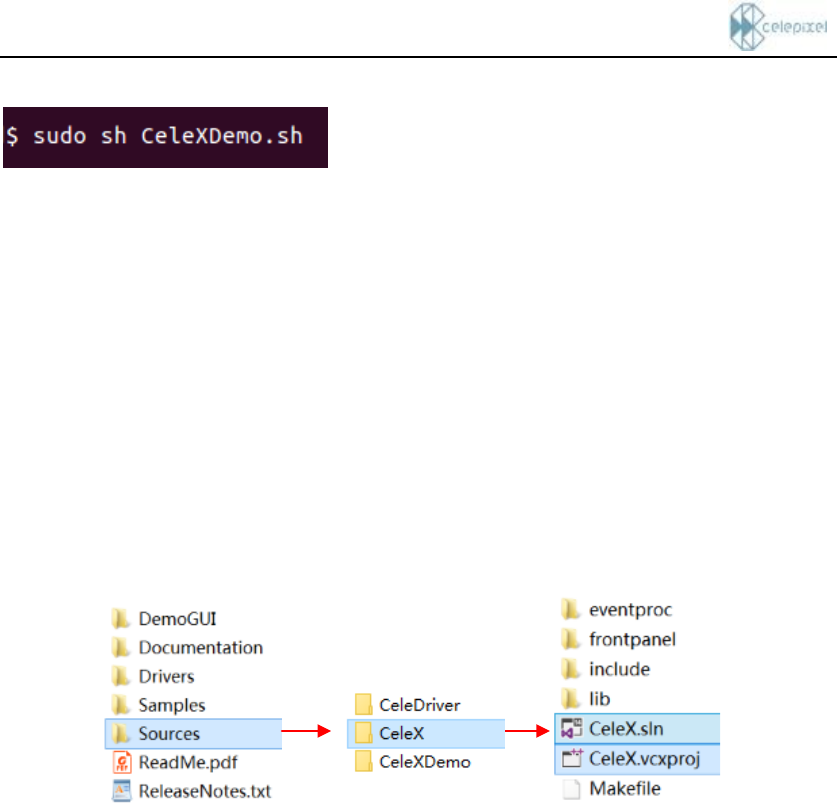
芯仑科技 SDK 快速使用说明 Version1.3
2 in Chapter 3.
Note: Since we need to read and write the usb driver, we need to open the Demo with root privileges.
Without the root permission, the usb device may fail to open.
1.3 Compile CeleX-5 Library Source Code
The OpenCV library (Version 3.3.0) is involved in the CeleX-5 API to develop some interfaces, so
you need to install OpenCV and configure its development environment before compiling the source
code of CeleX-5 library.
1.3.1 Windows
On the Windows platform, a VS2015 project file is provided to compile the source code, and the
build library (CeleX.dll and CeleX.lib) will be imported into the directory build/Windows.
Note:
(1) You need to modify the settings of the OpenCV Include and Lib paths in the project
properties. Otherwise, the compilation will fail because the OpenCV header files and libraries
are not found.
(2) After the compilation is completed, a build/Windows directory will be automatically created
in the directory where the project is located, and the compiled library files (CeleX.dll and
CeleX.lib) will be automatically imported into this directory.
1.3.2 Linux
On the Linux platform, a Makefile is provided to compile the source code, and the shared library
(libCeleX.so) will be generated in the current directory.
芯仑科技 SDK 快速使用说明 Version1.3
1.4 Compile Source Code of CeleX Demo GUI
Development Environment:Qt5.6.3 + OpenCV3.3.0
You could open the project in the following directory and compile it using Qt Creator easily.
Notes: It needs to modify the INCLUDEPATH and LIBS of OpenCV in the file CeleXDemo.pro.
Note: Problems that may occur during compilation (Linux):
(1) Cannot find -lGL
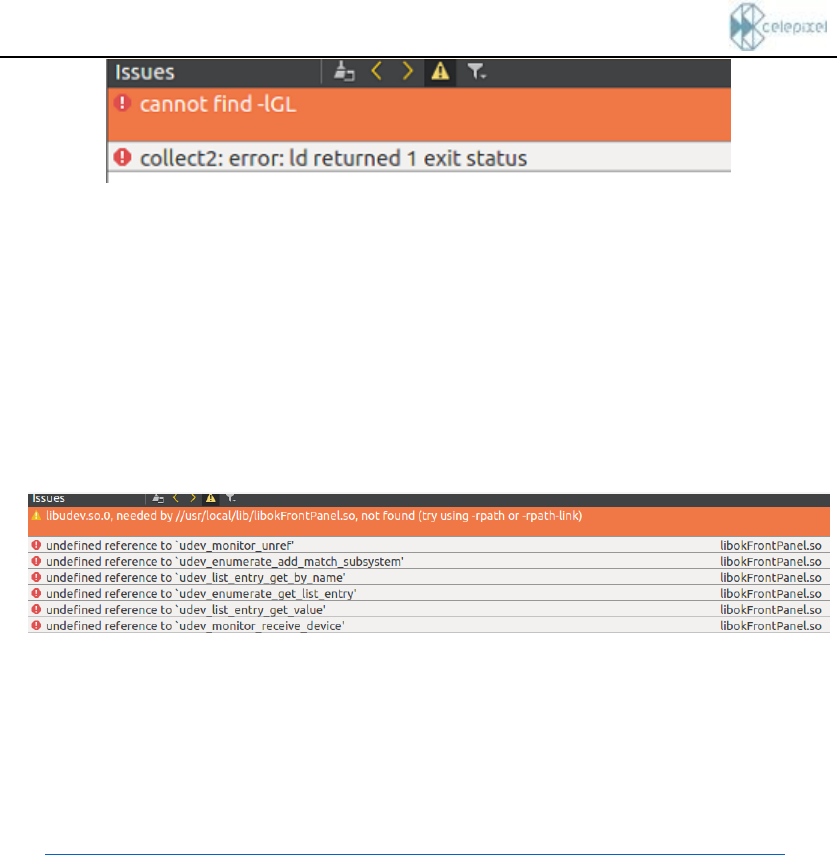
芯仑科技 SDK 快速使用说明 Version1.3
Solution:
sudo apt-get install libgl1-mesa-dev
(2) Udev Errors
Since FrontPanel SDK-v4.5.5 only supports Ubuntu12.04LTS version, the USB device might
not be recognized when connecting with our Sensor, if you are using higher Ubuntu version. It
is caused by the incompatible between “libudev” version used for FontPanel SDK-4.5.5 and
Ubuntu14.04 or Ubuntu16.0.
Solution:
To install the corresponding Ubuntu12.04 library for libudev used, you can either download it
from the following address, or from our Release directory < Drivers/Linux/libudev >.
download link:
https://ubuntu.pkgs.org/12.04/ubuntu-main-i386/libudev0_175-0ubuntu9_i386.deb.html
Name of installation file:
libudev0_175-0ubuntu9_i386.deb or libudev0_175-0ubuntu9_amd64.deb
Installation command:
sudo dpkg -i libudev0_175-0ubuntu9_i386.deb
sudo dpkg -i libudev0_175-0ubuntu9_amd64.deb
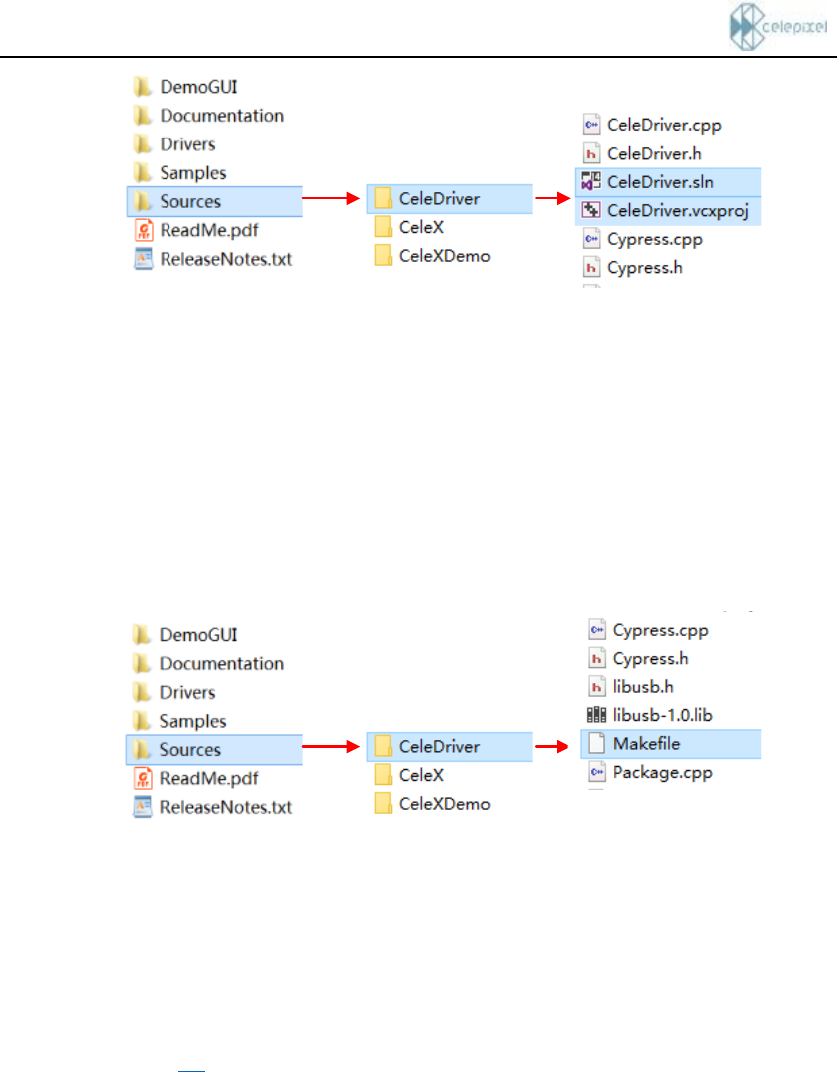
1.5 Compile CeleX-5 Driver Source Code
The CeleX-5 Driver is used to obtain data on the USB side, and the SDK then acquires data through
the CeleX-5 Driver for subsequent processing.
1.5.1 Windows
On the Windows platform, a VS2015 project file is provided to compile the source code. You can
enter the Driver's Source Code directory by following the illustration below:
芯仑科技 SDK 快速使用说明 Version1.3
Note:
(1) After the compilation is completed, a build/Windows directory will be created
automatically in the directory where the project is located. The compiled library files
(CeleDriver.dll and CeleDriver.lib) will be automatically imported into this directory.
1.5.2 Linux
On the Linux platform, we provide a Makefile to compile the code, and the library file
(libCeleDriver.so) will be generated in the current directory.
1.6 Generate FPN file
FPN (Fixed Pattern Noise) is the term given to a particular noise pattern on digital imaging sensors
often noticeable during longer exposure shots where particular pixels are susceptible to giving
brighter intensities above the general background noise. To get rid of FPN, we need to create FPN
files for CeleX-5 Sensor. Each sensor requires its own FPN, and steps for generating FPN are
illustrated in section 2.4.
芯仑科技 SDK 快速使用说明 Version1.3
2 The Functions of CeleX-5 Demo Kit GUI
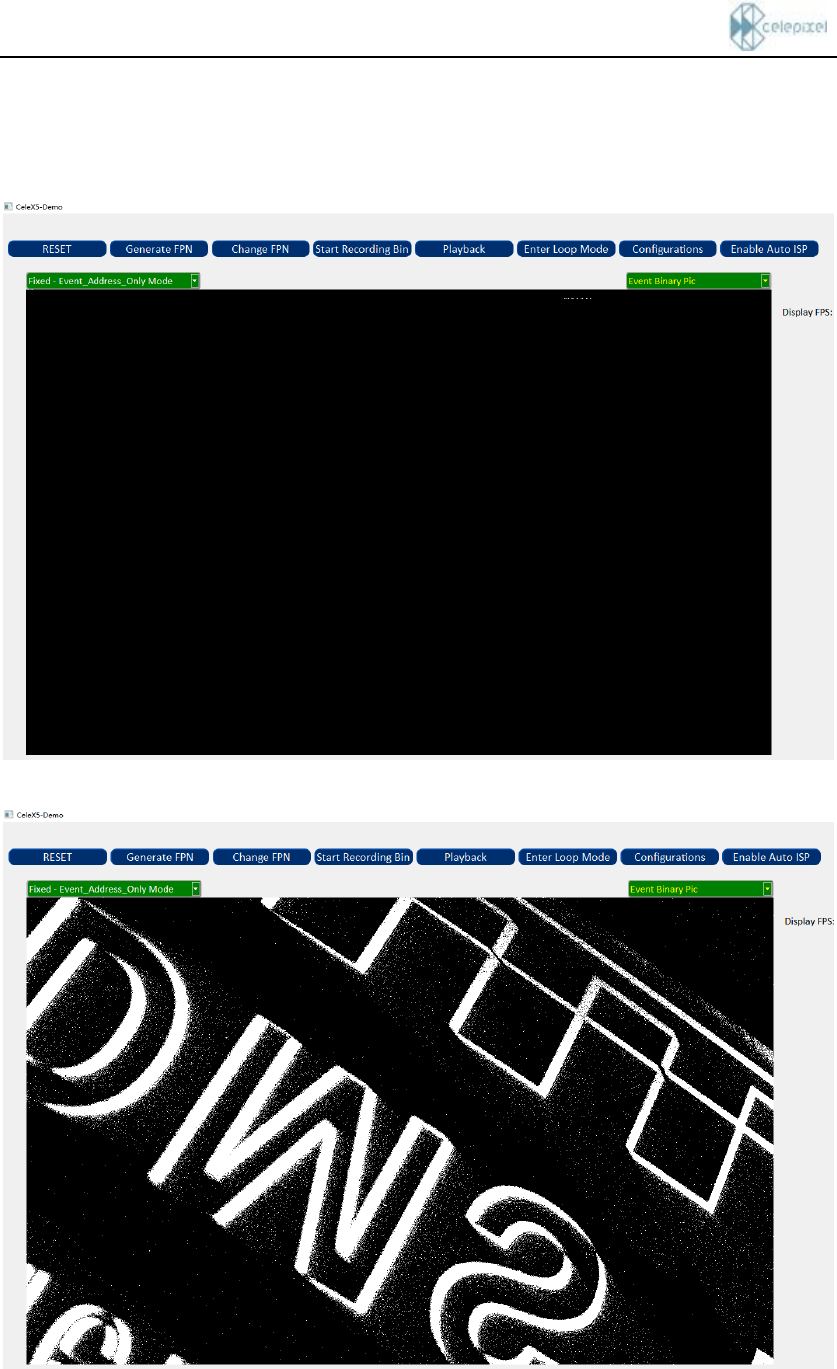
If there is no sensor device connected, the interface screen is shown as Fig.2-1, when there is a
sensor device connected, the interface screen is shown as Fig.2-2.
Fig. 2-1
Fig. 2-2
芯仑科技 SDK 快速使用说明 Version1.3
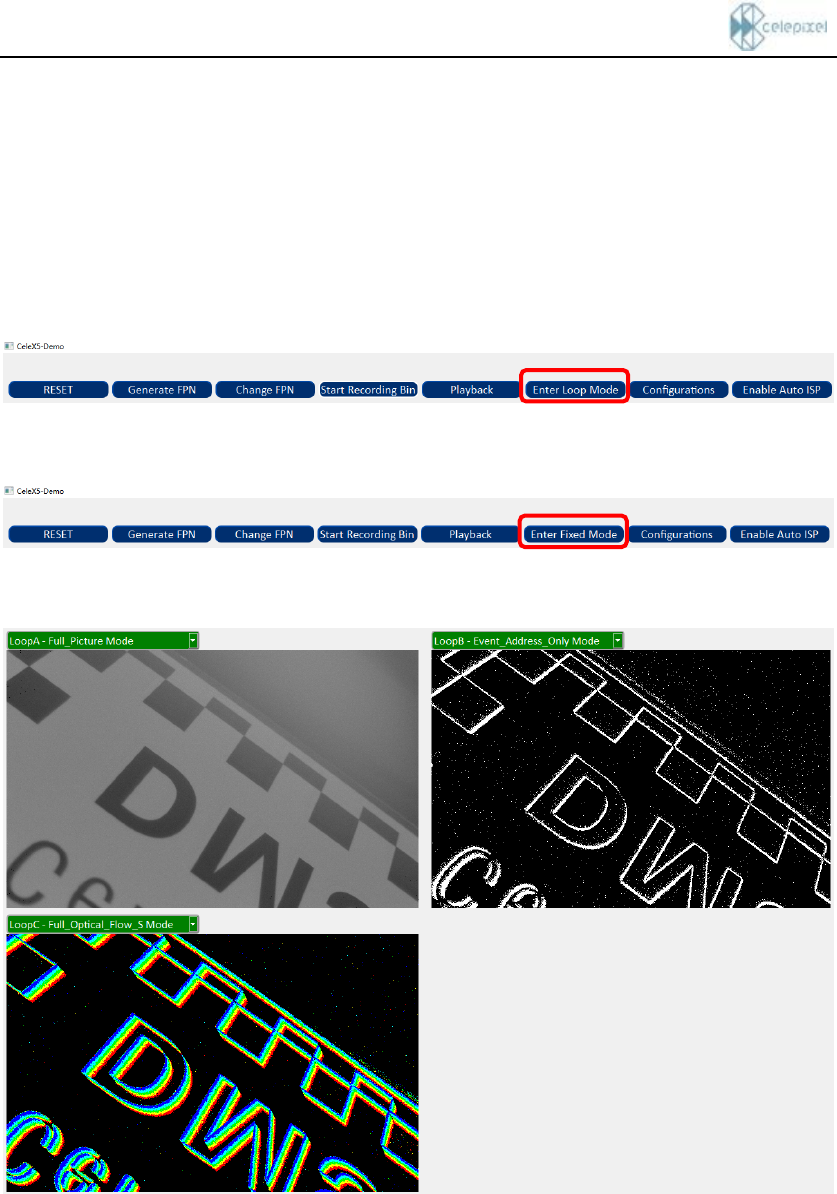
2.1 Change Sensor Mode
In the Fixed Mode, click the button “Enter Loop Mode” shown in Figure 2-3-1 to enter the Loop
Mode. The images of Loop Mode are displayed as shown in Figure 2-4. Loop A is the first loop, its
mode is Full-frame Picture mode, Loop B is the second loop, its mode is Event mode, and Loop C
is the third loop, its mode is Full-frame Optical-flow mode.
In the Loop Mode, click the button “Enter Fixed Mode” shown in Figure 2-3-2 to switch to the
Fixed mode (the default mode is Event mode).
Fig. 2-3-1
Fig. 2-3-2
Fig. 2-4 Sensor works in Event Mode
2.2 Record Raw Data of Sensor (Bin Files)
Click the "Start Recording Bin" button in Figure 2-5-1 to start recording bin data, then the text on
the button will change to "Stop Recording Bin" as shown in Figure 2-5-2.
Click the "Stop Recording Bin" button to stop recording bin data. The recorded bin file will store
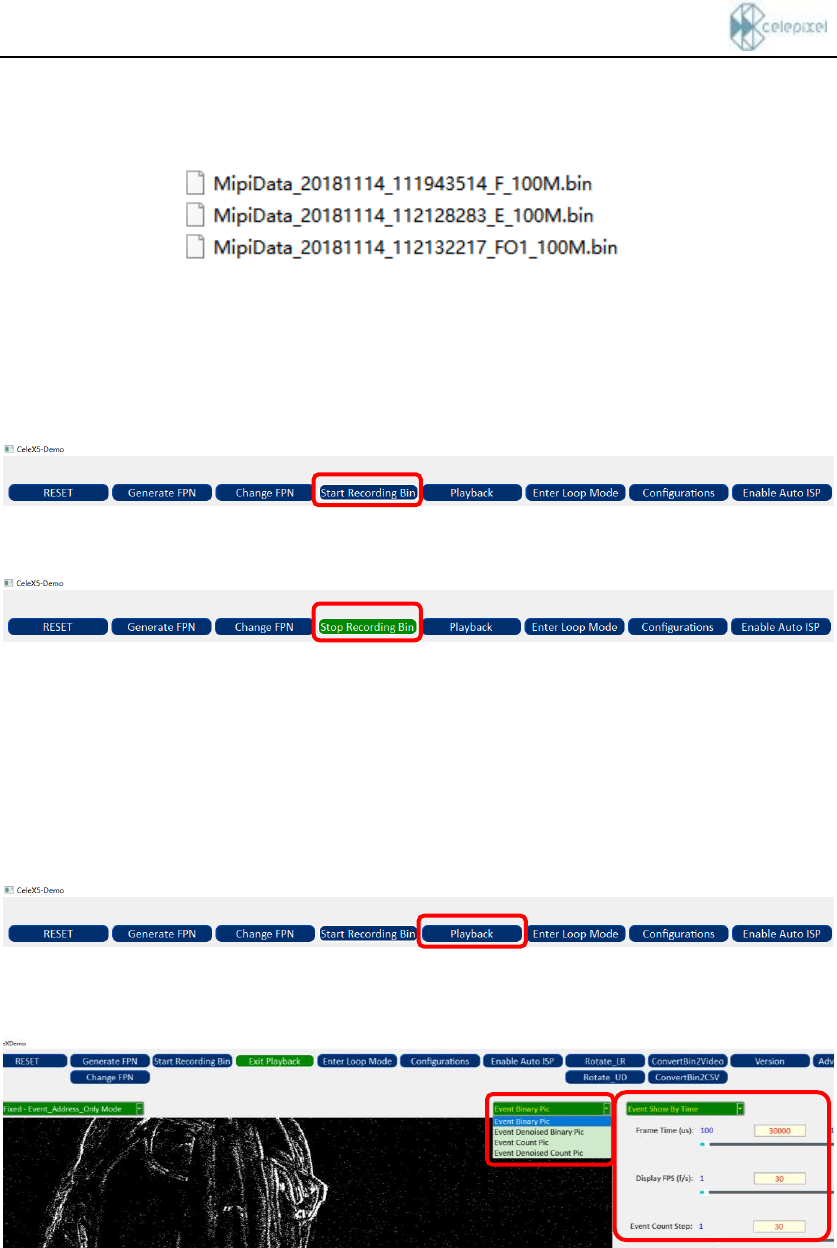
芯仑科技 SDK 快速使用说明 Version1.3
in the same directory as CeleXDemo.exe and is named in the form of
MipiData_YYYYMMDD_HHMMSSSSS_SensorMode_ClockRate.bin, as follow:
F: Full-frame Picture mode,
E: Event mode
FO1: Single Full-frame Optical-flow mode
100MHz: The operating frequency of the Sensor is 100MHz
Fig. 2-5-1
Fig. 2-5-2
2.3 Playback Recorded Raw Data of Sensor (Bin Files)
Click the “Playback” button to select a bin file to play, the image displayed in the interface is related
to the Sensor mode when you record the bin data.
You can select various Pic modes of the Bin file for display, and can select the display mode(show
by time, show by count, show by row cycle) and set parameters such as Frame Time or Display FPS.
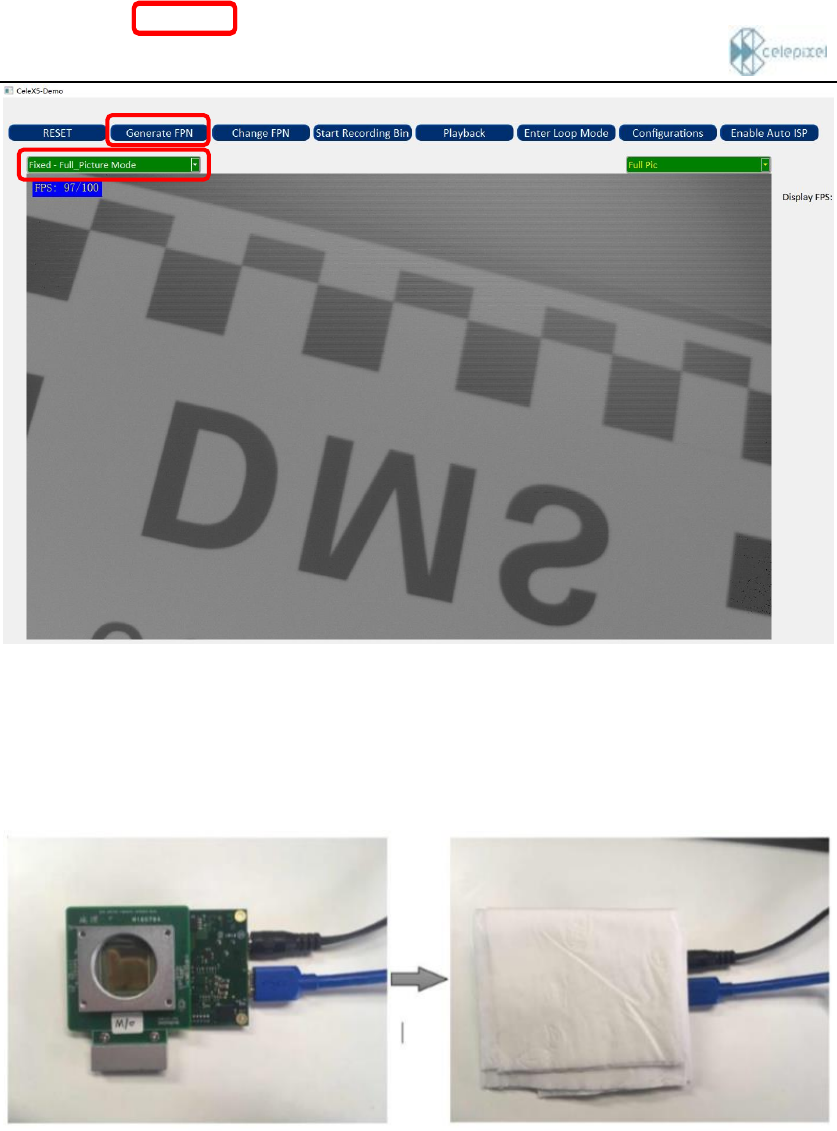
2.4 Generate FPN file
Each sensor requires its own FPN, and steps for generating FPN are illustrated as below:
1) Switch the Sensor operating mode into “Full-frame Picture Mode”.
芯仑科技 SDK 快速使用说明 Version1.3
2) Since the FPN should be conducted under the condition of uniform illumination, we could use
the way of removing optical lens and covering a piece of white paper (thin tissue or A4 paper)
over the exposed Sensor. Make sure that paper completely covers the sensor and sheet is
stationary. NOTE: the effect will be better if you operate in natural light rather than the
LED lamp.
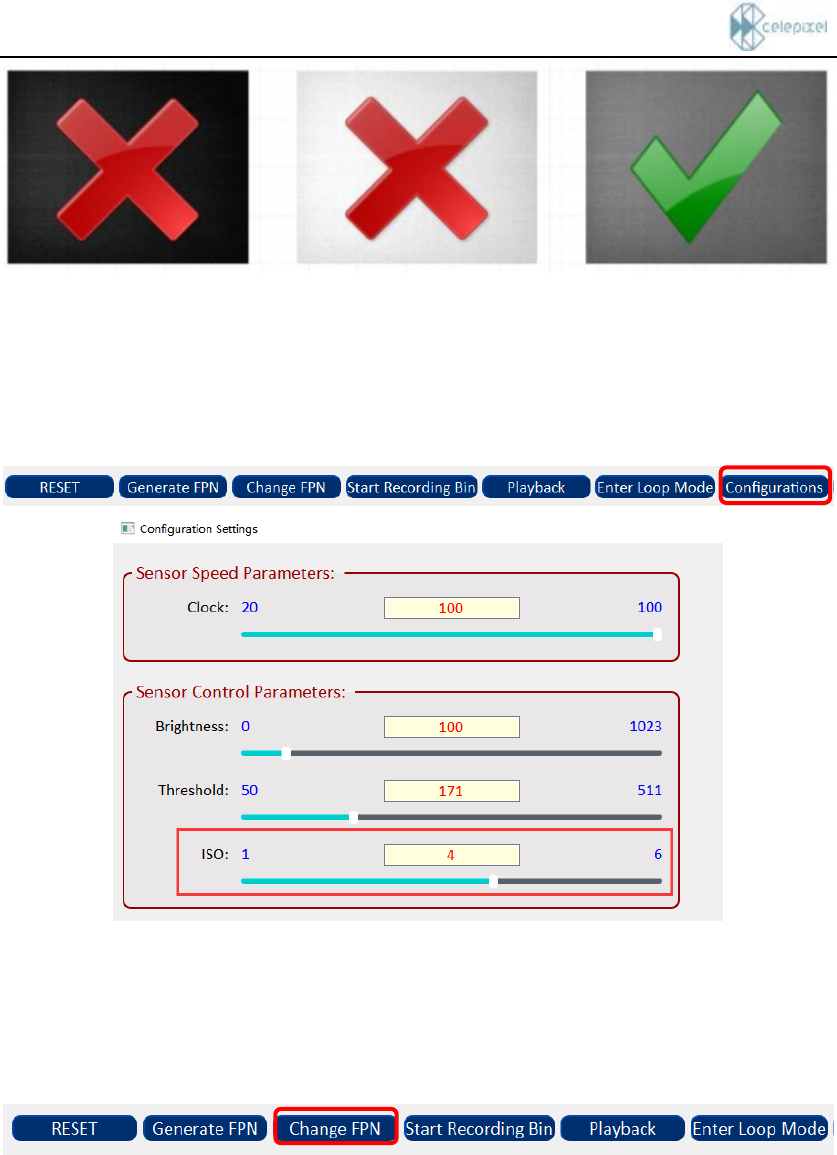
3) Before generating FPNs, please check the image screen and make sure it is normal, which is
neither too dark nor too bright. Then, you could adjust the amount of paper over the Sensor or
switch the “Brightness” slider in the GUI to change the luminance. NOTE: the 3rd figure is
the right luminance among the three figures below.
芯仑科技 SDK 快速使用说明 Version1.3
4) Click the “Generate FPN” button in GUI. Then, you could see the FPN_3.txt file in assigned
direction after FPN file was successfully generated. Note: Different ISO levels correspond
to different FPN files. ISO has a total of six levels. The default is the third level, which
corresponds to the FPN_3.txt file. The user can obtain a brighter or darker image by
adjusting the ISO level in the Configuration settings.
5) After generating the FPN file under the corresponding ISO settings, we can choose to switch
to the corresponding FPN by clicking the “Change FPN” button. Note: If the FPN file is
generated according to the steps, but the image resolution is not improved after switching,
check whether the current ISO corresponds to the FPN; check whether the selected FPN
path contains the Chinese path.
芯仑科技 SDK 快速使用说明 Version1.3
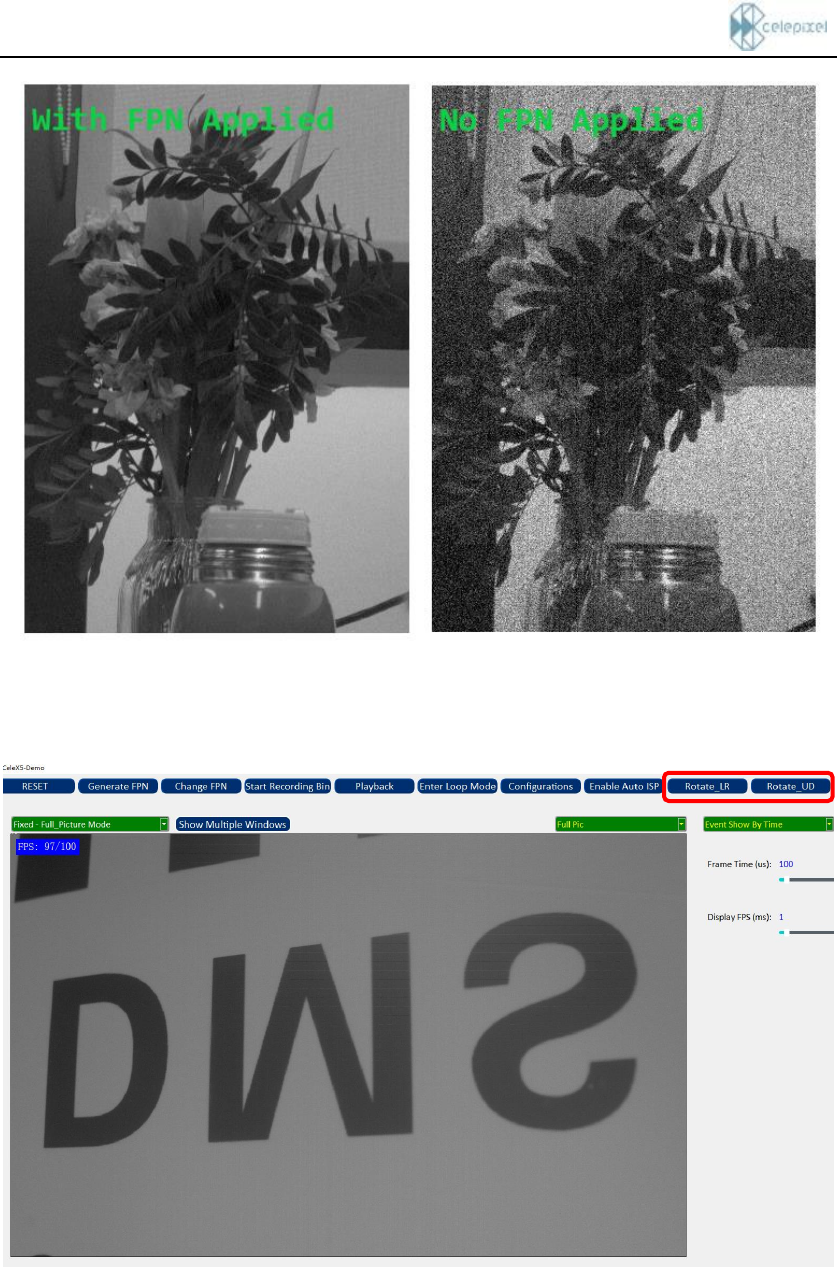
2.5 Flip image
Click the “Rotate_LR” or “Rotate_UD” button to flip the image left and right or up and down.
芯仑科技 SDK 快速使用说明 Version1.3
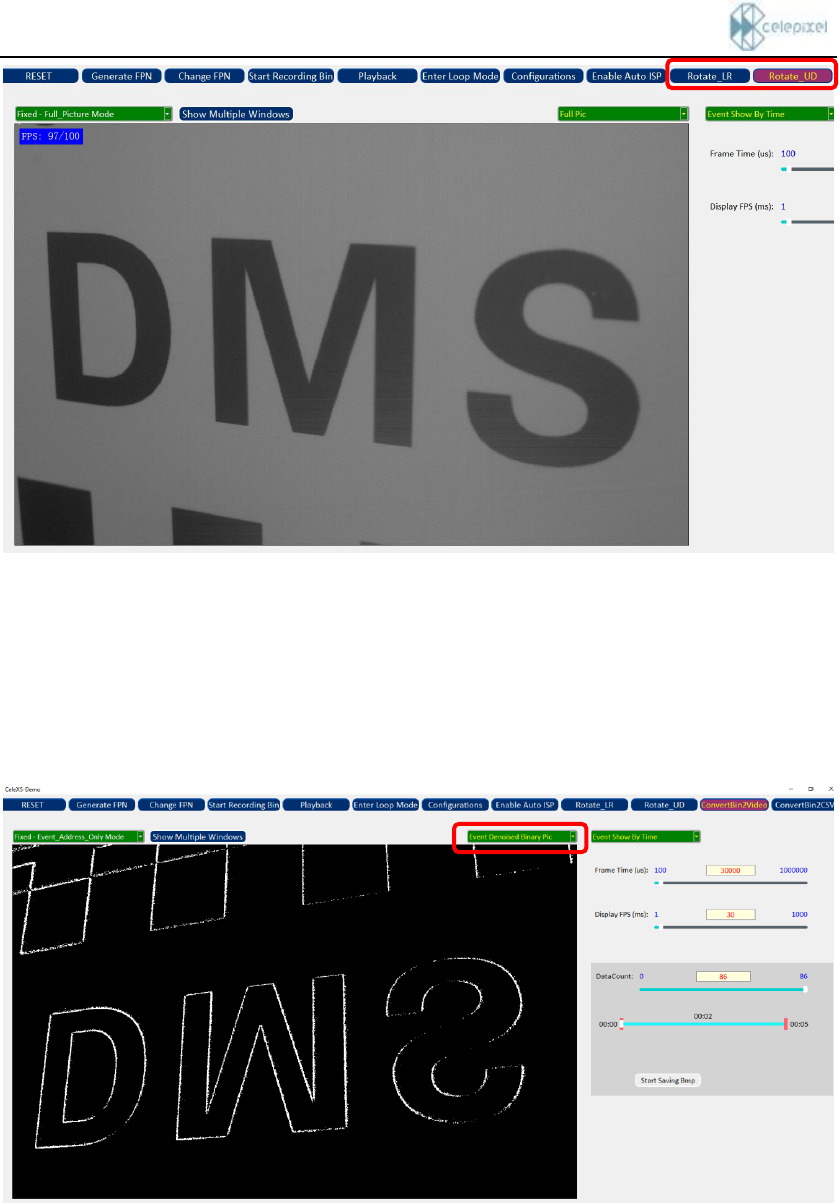
2.6 Convert bin to video
Click the “ConvertBin2Video” button, you can convert the recorded Bin file to a video file with the
same name as the file. A video file in .mkv format is generated under Windows, and a video file
in .mp4 format is generated under Linux. By selecting a different image format, you can convert the
corresponding image format video of the Bin. For example, if you select the denoised image format,
you can convert the Bin file of Event-Address_Only mode into the denoised image video.
2.7 Convert bin to CSV
Click the “ConvertBin2CSV” button to convert the recorded Bin file to a CSV file. For the Event-
Address_Only mode, this file stores the Bin data as the Row, Colum, and TimeStamp information
for the pixel. For Event-Intensity mode, this file stores Bin data as the Row, Colum, Intensity,
Polarity, TimeStamp information for the pixel.
芯仑科技 SDK 快速使用说明 Version1.3
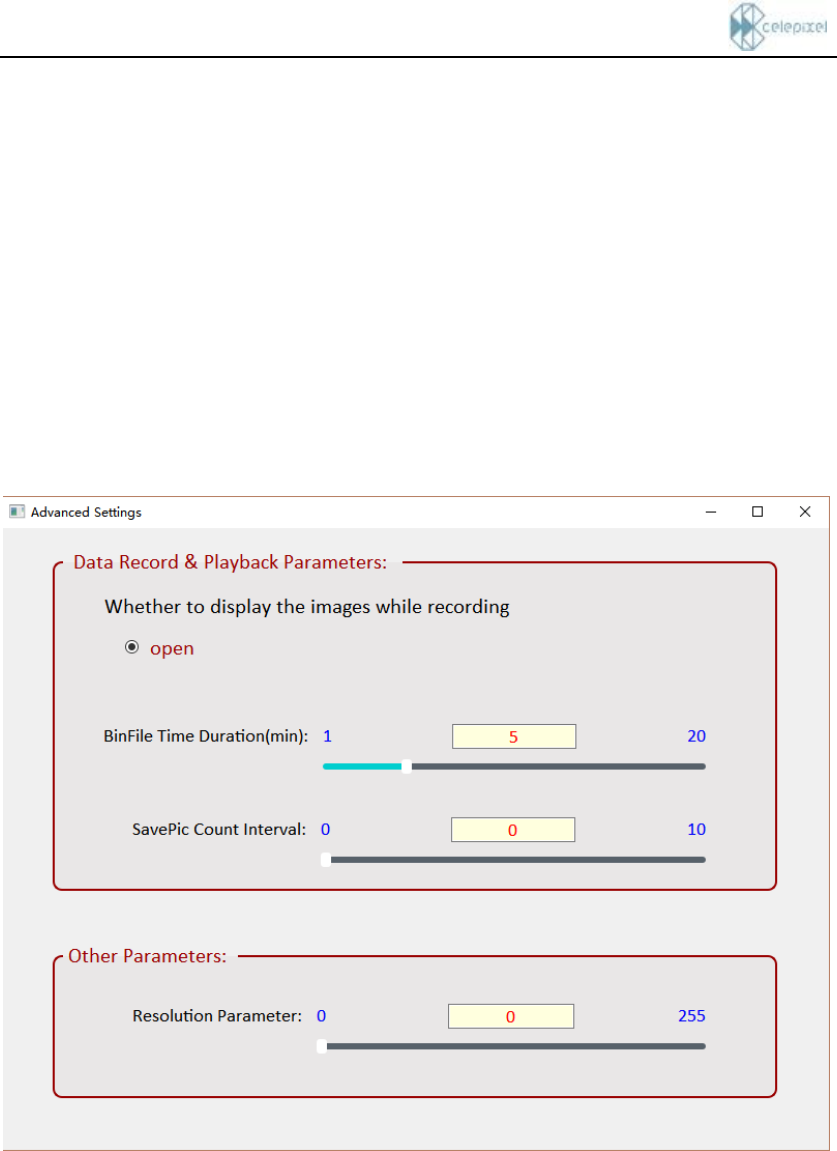
2.8 Advanced Settings
More advanced settings can be made by clicking the “Advanced Settings” button. When recording
a Bin file, you can choose to turn off the screen display to ensure the integrity of the data (due to
the time-consuming analysis of the data when displaying, it may result in data loss). Users can also
set the “BinFile Time Duration” (in minutes) for recording each Bin file. Once the Bin file reaches
the set length, the file will be saved automatically and a new file will be created.
When playing a Bin file, the user can save the picture at the same time. The interval for saving
pictures can be adjusted by setting the “SavePic Count Interval” parameter (if the interval is set to
0, each frame will be saved; if the interval is set to 2, one image will be saved every 2 ).
In addition, a resolution setting is also available. The user can turn off the display of some lines by
modifying the “Resolution Parameter”. A detailed description of this feature can be found in the
CeleX5_SDK_Reference documentation.
