SESR04 S 172, 182, T182, 206 AND T206 (1996 ON) Cessna Single_1996on_structural_repair_MM_SESR04 Single 1996on Structural Repair MM
Cessna_Single_1996on_structural_repair_MM_SESR04 Cessna_Single_1996on_structural_repair_MM_SESR04
User Manual: CessnaSingle_1996on_structural_repair_MM_SESR04
Open the PDF directly: View PDF ![]() .
.
Page Count: 167 [warning: Documents this large are best viewed by clicking the View PDF Link!]
- SESR04 - MODELS 172, 182, T182, 206 AND T206 (1996 AND ON)
- LIST OF EFFECTIVE PAGES
- RECORD OF REVISIONS
- RECORD OF TEMPORARY REVISIONS
- TABLE OF CONTENTS
- INTRODUCTION
- LIST OF REVISIONS
- LIST OF CHAPTERS
- CHAPTER 51 - STANDARD PRACTICES AND STRUCTURES - GENERAL
- LIST OF EFFECTIVE PAGES
- RECORD OF TEMPORARY REVISIONS
- TABLE OF CONTENTS
- STANDARD PRACTICES AND STRUCTURES - GENERAL
- DAMAGE INVESTIGATION AND CLASSIFICATION
- CORROSION AND CORROSION CONTROL - GENERAL
- REPAIR MATERIALS
- FASTENERS
- FLIGHT CONTROL SURFACE BALANCING
- REPAIRS - GENERAL
- RIVETED ALUMINUM STRUCTURE REPAIR
- GLASS FABRIC REPAIR
- REPAIR OF THERMO-FORMED PLASTIC COMPONENTS
- TYPICAL SKIN REPAIRS
- CONTROL SURFACE REPAIR
- CHAPTER 52 - DOORS
- CHAPTER 53 - FUSELAGE
- CHAPTER 55 - STABILIZERS
- CHAPTER 56 - WINDOWS
- CHAPTER 57 - WINGS
- LIST OF EFFECTIVE PAGES
- RECORD OF TEMPORARY REVISIONS
- TABLE OF CONTENTS
- WINGS - GENERAL
- WING DAMAGE CLASSIFICATION
- DAMAGE CLASSIFICATION
- WING SKIN DAMAGE CRITERIA
- WING STRINGER DAMAGE CRITERIA
- WING AUXILIARY SPAR DAMAGE CRITERIA
- WING RIB DAMAGE CRITERIA
- WING SPAR DAMAGE CRITERIA
- WING FUEL BAY SPARS/RIB DAMAGE CRITERIA
- WING LEADING EDGE DAMAGE CRITERIA
- BONDED LEADING EDGE DAMAGE CRITERIA
- WING STRUT DAMAGE CRITERIA
- AILERON DAMAGE CRITERIA (CORRUGATED SKIN AILERON)
- AILERON DAMAGE CRITERIA (MODEL 206 AILERON)
- WING FLAP DAMAGE CRITERIA (CORRUGATED SKIN FLAP)
- WING FLAP DAMAGE CRITERIA (MODEL 206 FLAP)
- WING FUEL BAY REPAIRS
- FUEL BAY SEALING DURING STRUCTURAL REPAIR
- WING RIB
- WING SPARS
- MEASURING WING TWIST - INSPECTION/CHECK
- WING STRINGER REPAIRS
- AUXILIARY SPAR REPAIRS
- LEADING EDGE REPAIRS
- BONDED LEADING EDGE REPAIR
- FLAP LEADING EDGE REPAIR
- FLAPS AND AILERONS
- WING LIFT STRUTS
- CHAPTER 71 - POWER PLANT

Maintenance Manual
SINGLE ENGINE
MODELS 172, 182,
T182, 206 AND T206
1996 And On
.
Member of GAMA
COPYRIGHT © 1996
CESSNA AIRCRAFT COMPANY
WICHITA, KANSAS, USA 2 DECEMBER 1996
SESR04REVISION41JUNE2005
CESSNA AIRCRAFT COMPANY
SINGLE ENGINE
STRUCTURAL REPAIR MANUAL
LIST OF EFFECTIVE PAGES
CHAPTER-SECTION-SUBJECT PAGE DATE
00-Title
00-List of Effective Pages
00-Record of Revisions
00-Record of Temporary Revisions
00-Table of Contents
INTRODUCTION Pages 1-3 Jun 1/2005
LIST OF REVISIONS Page 1 Jun 1/2005
LIST OF CHAPTER Page 1 Jun 1/2005
00 - LIST OF EFFECTIVE PAGES Page 1 of 1
© Cessna Aircraft Company Jun 1/2005

CESSNA AIRCRAFT COMPANY
MAINTENANCE MANUAL
Revision
Number Date
Inserted Date
Removed Page
Number Revision
Number Date
Inserted Date
Removed Page
Number
<!DOCTYPE chapter-toc PUBLIC "-//Cessna D171G031//DTD MM Generic V1.0//EN"><chapter-toc chapnbr=""
model=""> </chapter-toc><!DOCTYPE chapter-lot PUBLIC "-//Cessna D171G031//DTD MM Generic
V1.0//EN"> <chapter-lot> <table> <tgroup cols="3"> <colspec colnum="1" colwidth="3*"> <colspec colnum="2"
colwidth="12*"> <colspec colnum="3" colwidth="4*"> <tbody></tbody></tgroup></table></chapter-lot>
Page 01

CESSNA AIRCRAFT COMPANY
MAINTENANCE MANUAL
RECORD OF TEMPORARY REVISIONS
Temporary Revision
Number Page Number Issue Date By Date Removed By
CESSNA AIRCRAFT COMPANY
SINGLE ENGINE
STRUCTURAL REPAIR MANUAL
CONTENTS
INTRODUCTION ................................................................ INTRODUCTION
Page 1
General.................................................................... INTRODUCTION
Page 1
Coverage .................................................................. INTRODUCTION
Page 1
Airplane Identification ....................................................... INTRODUCTION
Page 1
Aerofiche (microfiche)....................................................... INTRODUCTION
Page 1
Using the Structural Repair Manual or Aerofiche............................... INTRODUCTION
Page 2
Revision(Manual)........................................................... INTRODUCTION
Page 2
IdentifyingRevisedMaterial.................................................. INTRODUCTION
Page 3
LISTOFREVISIONS............................................................. LISTOFREVISIONS
Page 1
General.................................................................... LISTOFREVISIONS
Page 1
LISTOFCHAPTERS............................................................. LISTOFCHAPTERS
Page 1
CONTENTS Page 1 of 1
© Cessna Aircraft Company Jun 1/2005
CESSNA AIRCRAFT COMPANY
SINGLE ENGINE
STRUCTURAL REPAIR MANUAL
INTRODUCTION
1. General
A. The information in this publication is based on data available at the time of publication and is
updated, supplemented, and automatically amended by all information issued in Service News
Letters, Service Bulletins, Supplier Service Notices, Publication Changes, Revisions, Reissues and
Temporary Revisions. All such amendments become part of and are specifically incorporated within
this publication. Users are urged to keep abreast of the latest amendments to this publication through
information available at Cessna Authorized Service Stations or through the Cessna Product Support
subscription services. Cessna Service Stations have also been supplied with a group of supplier
publications which provide disassembly, overhaul, and parts breakdowns for some of the various
supplier issued revisions and service information which may be reissued by Cessna’s Authorized
Service Stations and/or through Cessna’s subscription services.
WARNING: All inspection intervals, replacement time limits, overhaul time
limits, the method of inspection, life limits, cycle limits, etc.,
recommended by Cessna are solely based on the use of new,
remanufactured, or overhauled Cessna approved parts. If parts are
designed, manufactured, remanufactured, overhauled, purchased,
and/or approved by entities other than Cessna, then the data in
Cessna’s maintenance/service manuals and parts catalogs are no
longer applicable and the purchaser is warned not to rely on such
data for non-Cessna parts. All inspection intervals, replacement
time limits, overhaul time limits, the method of inspection, life
limits, cycle limits, etc., for such non-Cessna parts must be
obtained from the manufacturer and/or seller of such non-Cessna
parts.
2. Coverage
A. The Cessna Single Engine Structural Repair Manual is prepared in accordance with the Air Transport
Association Specification 2200 for Manufacturers’ Technical Data.
B. This Structural Repair Manual contains material identification for structure subject to field repair; typical
repairs applicable to structural components; information relative to material substitution and fastener
installation; and a description of procedures that must be performed with structural repair, such as
protective treatment of the repair and sealing.
C. This manual will serve as a medium through which all single engine operators will be advised of actual
repairs. As service records indicate a requirement, this manual will be revised to include additional
specificrepairs.
3. Airplane Identification
A. To identify structural differences to associated airplanes, the specific airplane identity may appear in
the figure and the text. Items not identified for a specific airplane or group of airplanes are suitable
for all airplanes.
4. Aerofiche (microfiche)
A. The Structural Repair Manual is prepared for Aerofiche presentation in addition to 8 ½ by 11 inch loose
leaf manual format. To facilitate the use of the aerofiche, a list of chapters with an aerofiche frame
reference has bee tabulated and incorporated into the Introduction of the Structural Repair Manual.
B. Aerofiche is a microform reproduction of the contents of the 8 ½ by 11 inch manual in a form convenient
for service areas. An aerofiche reader is required to view the 4-inch by 6-inch aerofiche card. Each
aerofiche card contains 12 horizontal rows of 24 images each. An image displays information equal
INTRODUCTION Page 1
© Cessna Aircraft Company Jun 1/2005
CESSNA AIRCRAFT COMPANY
SINGLE ENGINE
STRUCTURAL REPAIR MANUAL
to an 8 ½ by 11 inch loose leaf page and represents a frame. Horizontal rows are lettered from A
at the top to L at the bottom. Vertical columns are numbered 1 to 24. The combination of a letter
and a number identifies a frame (image) in the aerofiche card. The List of Chapters provides a quick
reference to information contained in the aerofiche.
5. Using the Structural Repair Manual or Aerofiche
A. Division of Subject Matter.
(1) Structural repair information is divided into chapters in accordance with Air Transport Association
Specification 100. Each Chapter is further subdivided to provide individual or related structural
member presentation.
(2) Chapter 51 provides general structural information required to perform a repair. Also included
in Chapter 51 are general repair procedures that may be accomplished in noncritical areas.
B. Effectivity Page.
(1) A list of effective pages is provided with each chapter. All pages listed are active and shall appear
in sequence as recorded in the Effectivity Page.
(2) The Effectivity Page contains tabular listing of ATA number, page and date of each page in that
chapter. A change in the chapter requires a revision to the chapter’s Effectivity Page. The date
corresponds to the date that appears on the individual page which defines when that page was
issued.
C. Page Numbering System.
(1) The Structural Repair Manual or corresponding aerofiche page numbering system consists of
the Air Transport Association Specification 100 three element numbers separated by dashes.
The page number and date are printed immediately to the right of the three element number. The
three element number is assigned to a component, with the first set of numbers corresponding
to the ATA-100 assigned chapter number.
(2) The page number complies with Air Transport Association Specification 100 for subdividing a
Structural Repair Manual. Blocks of sequential page numbers are used to identify:
Pages 1 Through 100 - Structural Identification
Pages 101 Through 199 - Allowable Damage
Pages 201 through 999 - Repair Procedures
(3) The date which appears below the page number signifies when the page was issued. If no
revisions to that page have occurred, the date signifies original date.
(4) Illustrations use the same figure numbering as the page block in which they appear. For example:
Figure 202 would be the second figure in a repair procedure.
6. Revision (Manual)
A. Regular Revision.
(1) Pages to be removed or inserted in the Structural Repair Manual are controlled by the Effectivity
Page. Pages are listed in sequence by the three element number and then by page number.
When two pages display the same three element number and page number, the page displaying
the most recent Date of Page Issue shall be inserted into the Structural Repair Manual. The date
column on the corresponding chapter Effectivity Page shall verify the active page.
B. Temporary Revision.
(1) For paper publications:
(a) Temporary revision pages are filed in the Structural Repair Manual by replacing existing
pages in the manual. File the temporary revision cover page according to the filing
instructions on the Temporary Revision Cover Page.
(2) For aerofiche publications:
(a) Draw a line through any aerofiche frame (page) affected by the Temporary Revision with a
permanent red ink marker. This will be a visual identifier that the information on the frame
(page) is no longer valid and the Temporary Revision should be referenced. for "added"
pages in a temporary Revision, draw a vertical line between the applicable frames which is
wide enough to show on the edges of the pages. Temporary Revisions should be collected
and maintained in a notebook or binder near the aerofiche library for quick reference.
INTRODUCTION Page 2
© Cessna Aircraft Company Jun 1/2005
CESSNA AIRCRAFT COMPANY
SINGLE ENGINE
STRUCTURAL REPAIR MANUAL
7. Identifying Revised Material
A. Additions or revisions to text in an existing section will be identified by a revision bar in the left margin
of the page and adjacent to the change.
B. When additions or revisions are made to text in an existing section, all pages displaying the same
three element number shall also display the same Date of Page Issue. The date column on the
corresponding chapter Effectivity Page shall verify the active page. These pages will display the
current revision date in the Date of Page Issue location.
C. When extensive technical changes are made to text in an existing section that requires extensive
revision, revision bars will appear the full length of text.
D. When art is revised or added, a change bar will appear on the full length of the page.
INTRODUCTION Page 3
© Cessna Aircraft Company Jun 1/2005
CESSNA AIRCRAFT COMPANY
SINGLE ENGINE
STRUCTURAL REPAIR MANUAL
LIST OF REVISIONS
1. General
A. This Structural Repair Manual includes the original issue and the following listed revisions. To make
sure that information in this manual is current and the latest maintenance and inspections procedures
are available, revisions must be incorporated in the manual as they are issued.
Table 1. Original Issue--2 December 1996
Revision Number Date Writer Revision Number Date Writer
1 16 May 1997 2 16 July 1999
3 15 January 2001 4 1 June 2005 jmk
LIST OF REVISIONS Page 1
© Cessna Aircraft Company Jun 1/2005
CESSNA AIRCRAFT COMPANY
SINGLE ENGINE
STRUCTURAL REPAIR MANUAL
LIST OF CHAPTERS
CHAPTER Jun 1/2005 FICHE/FRAME
51 Standard Practices - Structures Jun 1/2005 1 A10
52 Doors Jun 1/2005 1 D2
53 Fuselage Jun 1/2005 1 D8
55 Stabilizers Jun 1/2005 1 E7
56 Windows Jun 1/2005 1 E16
57 Wings Jun 1/2005 1 F2
71 Powerplant Jun 1/2005 1 H2
NOTE 1: *Represents date of page one of each chapter's List of Effective Pages which is applicable to Manual
revision date.
LIST OF CHAPTERS Page 1
© Cessna Aircraft Company Jun 1/2005

CHAPTER
STANDARD
PRACTICES -
STRUCTURES
CESSNA AIRCRAFT COMPANY
SINGLE ENGINE
STRUCTURAL REPAIR MANUAL
LIST OF EFFECTIVE PAGES
CHAPTER-SECTION-SUBJECT PAGE DATE
51-Title
51-List of Effective Pages
51-Record of Temporary Revisions
51-Table of Contents
51-00-00 Page 1 Jun 1/2005
51-10-00 Pages 1-2 Jun 1/2005
51-11-00 Pages 1-8 Jun 1/2005
51-30-00 Pages 1-5 Jun 1/2005
51-40-00 Pages 1-12 Jun 1/2005
51-60-00 Pages 1-8 Jun 1/2005
51-70-00 Page 801 Jun 1/2005
51-71-00 Page 801 Jun 1/2005
51-73-00 Pages 801-802 Jun 1/2005
51-73-01 Page 801 Jun 1/2005
51-75-00 Pages 801-808 Jun 1/2005
51-76-00 Pages 801-803 Jun 1/2005
51 - LIST OF EFFECTIVE PAGES Page 1 of 1
© Cessna Aircraft Company Jun 1/2005

CESSNA AIRCRAFT COMPANY
MAINTENANCE MANUAL
RECORD OF TEMPORARY REVISIONS
Temporary Revision
Number Page Number Issue Date By Date Removed By
CESSNA AIRCRAFT COMPANY
SINGLE ENGINE
STRUCTURAL REPAIR MANUAL
CONTENTS
STANDARD PRACTICES AND STRUCTURES - GENERAL . . . . . . . . . . . . . . . . . . . . . . . . . 51-00-00 Page 1
General.................................................................... 51-00-00Page1
Description................................................................. 51-00-00Page1
DAMAGE INVESTIGATION AND CLASSIFICATION . . . . . . . . . . . . . . . . . . . . . . . . . . . . . . . . 51-10-00 Page 1
General.................................................................... 51-10-00Page1
DamageInvestigation ....................................................... 51-10-00Page1
Damage Classification....................................................... 51-10-00Page2
Refinishing Damaged Areas Following Repairs . . . . . . . . . . . . . . . . . . . . . . . . . . . . . . . . 51-10-00 Page 2
CORROSION AND CORROSION CONTROL - GENERAL . . . . . . . . . . . . . . . . . . . . . . . . . . 51-11-00 Page 1
General.................................................................... 51-11-00Page1
TypesofCorrosion.......................................................... 51-11-00Page1
TypicalCorrosionAreas ..................................................... 51-11-00Page3
CorrosionDetection......................................................... 51-11-00Page4
Corrosion Damage Limits . . . . . . . . . . . . . . . . . . . . . . . . . . . . . . . . . . . . . . . . . . . . . . . . . . . . 51-11-00 Page 4
CorrosionRemoval.......................................................... 51-11-00Page5
Control of Corrosion on Landing Gear Springs . . . . . . . . . . . . . . . . . . . . . . . . . . . . . . . . . 51-11-00 Page 7
REPAIRMATERIALS............................................................. 51-30-00Page1
General.................................................................... 51-30-00Page1
RepairMaterials ............................................................ 51-30-00Page1
Extrusions and Formed Sections . . . . . . . . . . . . . . . . . . . . . . . . . . . . . . . . . . . . . . . . . . . . . 51-30-00 Page 1
FASTENERS.................................................................... 51-40-00Page1
General.................................................................... 51-40-00Page1
Rivets...................................................................... 51-40-00Page1
Replacement Of Hi-Shear Rivets . . . . . . . . . . . . . . . . . . . . . . . . . . . . . . . . . . . . . . . . . . . . . 51-40-00 Page 1
Substitution Of Rivets . . . . . . . . . . . . . . . . . . . . . . . . . . . . . . . . . . . . . . . . . . . . . . . . . . . . . . . 51-40-00 Page 1
RivetDiameters............................................................. 51-40-00Page2
RivetLengths............................................................... 51-40-00Page2
SolidShankRivets.......................................................... 51-40-00Page2
BlindRivets ................................................................ 51-40-00Page7
SpacingOfRivets........................................................... 51-40-00Page10
Threaded Fasteners Bolt Torques . . . . . . . . . . . . . . . . . . . . . . . . . . . . . . . . . . . . . . . . . . . . 51-40-00 Page 10
Rivets for Plastic or Composite Parts . . . . . . . . . . . . . . . . . . . . . . . . . . . . . . . . . . . . . . . . . 51-40-00 Page 10
FLIGHT CONTROL SURFACE BALANCING . . . . . . . . . . . . . . . . . . . . . . . . . . . . . . . . . . . . . . . 51-60-00 Page 1
General.................................................................... 51-60-00Page1
ToolsandEquipment........................................................ 51-60-00Page1
Procedures for Balancing Control Surfaces . . . . . . . . . . . . . . . . . . . . . . . . . . . . . . . . . . . . 51-60-00 Page 1
Balancing Definitions........................................................ 51-60-00Page1
Control Surface Balance Requirements . . . . . . . . . . . . . . . . . . . . . . . . . . . . . . . . . . . . . . . 51-60-00 Page 7
REPAIRS-GENERAL............................................................ 51-70-00Page801
Introduction................................................................. 51-70-00Page801
Usage ..................................................................... 51-70-00Page801
Preparation for Repair . . . . . . . . . . . . . . . . . . . . . . . . . . . . . . . . . . . . . . . . . . . . . . . . . . . . . . . 51-70-00 Page 801
RIVETED ALUMINUM STRUCTURE REPAIR . . . . . . . . . . . . . . . . . . . . . . . . . . . . . . . . . . . . . . 51-71-00 Page 801
Preparing Riveted Aluminum Structure For Repair . . . . . . . . . . . . . . . . . . . . . . . . . . . . . 51-71-00 Page 801
GLASSFABRICREPAIR......................................................... 51-73-00Page801
General.................................................................... 51-73-00Page801
ToolsandMaterials ......................................................... 51-73-00Page801
Repair Of Glass Fabric Parts. . . . . . . . . . . . . . . . . . . . . . . . . . . . . . . . . . . . . . . . . . . . . . . . . 51-73-00 Page 801
REPAIR OF THERMO-FORMED THERMO PLASTIC COMPONENTS . . . . . . . . . . . . . . . 51-73-01 Page 801
Thermo-formed Thermo Plastic Repair. . . . . . . . . . . . . . . . . . . . . . . . . . . . . . . . . . . . . . . . 51-73-01 Page 801
TemporaryRepairs.......................................................... 51-73-01Page801
CONTENTS Page 1 of 2
© Cessna Aircraft Company Jun 1/2005
CESSNA AIRCRAFT COMPANY
SINGLE ENGINE
STRUCTURAL REPAIR MANUAL
TYPICAL SKIN REPAIRS. . . . . . . . . . . . . . . . . . . . . . . . . . . . . . . . . . . . . . . . . . . . . . . . . . . . . . . . . 51-75-00 Page 801
General.................................................................... 51-75-00Page801
Guidelines for Corrugated Skin Crack Repairs . . . . . . . . . . . . . . . . . . . . . . . . . . . . . . . . . 51-75-00 Page 801
CONTROL SURFACE REPAIR. . . . . . . . . . . . . . . . . . . . . . . . . . . . . . . . . . . . . . . . . . . . . . . . . . . . 51-76-00 Page 801
General.................................................................... 51-76-00Page801
CONTENTS Page 2 of 2
© Cessna Aircraft Company Jun 1/2005
CESSNA AIRCRAFT COMPANY
SINGLE ENGINE
STRUCTURAL REPAIR MANUAL
STANDARD PRACTICES AND STRUCTURES - GENERAL
1. General
A. Chapter 51 describes general repair practices, materials and procedures which are applicable
throughout the subsequent chapters. This chapter also provides general information for performing
any structural repairs.
B. Unless otherwise specified, all dimensions are in inches; forces are in pounds and torques are in
inch-pounds.
C. The airplanes are of an all metal, semimonocoque construction, with the skin carrying a portion of all
structural loads.
D. To obtain information covering dimensions, areas and stations diagrams, refer to current appropriate
Model 172, Model 182 or Model 206 Maintenance Manual, Chapter 6, Dimensions and Areas.
E. For information covering leveling and weighing, refer to current appropriate Model 172, Model 182 or
Model 206 Maintenance Manual, Chapter 8, Leveling and Weighing.
2. Description
A. The fuselage is of conventional semimonocoque construction. Construction consists of formed
bulkheads, longitudinal stringers, reinforcing channels, and skin panels.
B. The wings are of an all metal, strut-braced, semimonocoque construction, utilizing two spars. Each
wing consists of a wing panel with an integral fuel bay, an aileron and a flap.
C. The empennage group is of a fully cantilevered design and consists of a conventional rudder and
elevator configuration. The horizontal stabilizer is of one-piece construction, consisting of spars, ribs,
and skins. Elevators are constructed of spars, ribs, and skin panels. The skin panels are riveted to
the ribs and spars. A balance weight is located in the outboard end of each elevator, forward of the
hinge line. An elevator trim tab is attached to the right hand elevator and is constructed of a spar,
ribs, and skin, riveted together. The vertical stabilizer is constructed of a forward and aft spar, ribs,
and skin. The rudder is constructed of spars, ribs, and skin panels.
D. The main landing gear consists of 6150M alloy spring-steel, cantilevered with attaching parts of high-
strength 7075-T73 aluminum alloy forgings. Nose gear components are 4130 alloy steel and 7075-
T73 aluminum alloy forgings.
E. The engine mount is constructed of welded 4130 steel tubing on the 172 and 182. The 206 has a
built-up aluminum sheet metal engine mount.
F. The removable engine cowling is made of 2024 Alclad secured with quarter turn fasteners.
51-00-00 Page 1
© Cessna Aircraft Company Jun 1/2005
CESSNA AIRCRAFT COMPANY
SINGLE ENGINE
STRUCTURAL REPAIR MANUAL
DAMAGE INVESTIGATION AND CLASSIFICATION
1. General
A. For the purposes of this manual, damage is considered to be a deviation from the original
configuration of a structural part that compromises its structural integrity by significantly reducing its
strength, significantly decreasing its resistance to fatigue, significantly increasing its susceptibility to
corrosion, significantly altering its flutter characteristics, or adversely affecting the flight characteristics
of the airplane. This can include - but is not limited to - scratches, dents, dings, gouges, cracks,
drill starts, double drilled holes, plastic deformation, reduction in cross-sectional areas, changes in
component center-of-gravity, missing or inadequate fasteners, corrosion, dissimilar metal contact,
work hardening, temper change due to excessive heat, and so forth.
B. Use good judgment in determining the type of significant change to flat stock structural material. The
terms, dent, crease, abrasion, gouge, nick, scratch, crack and corrosion, referred to elsewhere in the
manual, are defined below as a guide for this determination, particularly with respect to the external
skin of the airplane:
(1) Dent - A dent is normally a damaged area which is depressed with respect to its normal contour.
There is no cross sectional area change in the material. Area boundaries are smooth. Its form
is generally the result of contact with a relatively smoothly contoured object.
NOTE: A dent-like form of damage to skin may be the result of the peening action of a
smoothly contoured object contacting it. If the inner surface of skin shows no contour
change, consider that such damage results in a local cross sectional area change.
(2) Crease - A damaged area which is depressed or folded back upon itself in such a manner that its
boundaries are sharp or well defined lines or ridges. Consider it to be the equivalent of a crack.
(3) Abrasion - An abrasion is a damaged area of any size which results in a cross sectional area
change due to scuffing, rubbing, scraping or other surface erosion. It is usually rough and
irregular.
(4) Gouge - A gouge is a damaged area of any size, which results in a cross sectional area change.
It is usually caused by contact with a relatively sharp object which produces a continuous, sharp
or smooth channel-like groove in the material.
(5) Nick - A nick is a local gouge with sharp edges. Consider a series of nicks, in a line pattern to
be the equivalent of a gouge.
(6) Scratch - A scratch is a line of damage of any depth in the material and results in a cross sectional
area change. It is usually caused by contact with a very sharp object.
(7) Crack - A crack is a partial fracture or complete break in the material with the most significant
cross sectional area change. In appearance, it is usually an irregular line and is normally the
result of fatigue failure.
(8) Corrosion - Corrosion, due to a complex electrochemical action, is a damaged area of any size
and depth which results in a cross sectional area change. Depth of such pitting damage must
be determined by a cleanup operation. Damage of this type may occur on surfaces of structural
elements. Refer to Corrosion and Corrosion Control, Section 51-11-00.
C. Use good sense and proper visual measurement in the determination of significant cross sectional
area changes of both depth and length of any type (or combinations) of damage mentioned above.
2. Damage Investigation
A. After a thorough cleaning of the damaged area, all structural parts should be carefully examined
to determine the extent of damage. Frequently, the force causing the initial damage is transmitted
from one member to the next, causing strains and distortions. Abnormal stresses incurred by shock
or impact forces on a rib, bulkhead, or similar structure, may be transmitted to the extremity of the
structural member, resulting in secondary damage, such as sheared or stretched rivets, elongated bolt
holes, or canned skins or bulkheads. Points of attachment should be examined carefully for distortion
and security of fastenings in the primary and secondary damaged areas at locations beyond the local
51-10-00 Page 1
© Cessna Aircraft Company Jun 1/2005
CESSNA AIRCRAFT COMPANY
SINGLE ENGINE
STRUCTURAL REPAIR MANUAL
damage. This is particularly true with wing tip, horizontal stabilizer tip, or vertical fin tip damage. If
the damage is due to an aft load, the rear spars should be checked for indications of compression
damage for the full length, including the fuselage components.
3. Damage Classification
A. Damage to the airplane can be divided into three major categories: negligible damage, repairable
damage, and major replacement damage. These categories are intended to provide the mechanic
with some general guidelines to use in determining the extent and criticalness of any damage.
Obviously, there will be some overlapping between categories, and common sense should be used
in determining the final action to be taken with regard to any damage.
(1) For damage criteria of specific structure (wings, fuselage, and so forth), refer to applicable
chapters within this repair manual.
4. Refinishing Damaged Areas Following Repairs
A. Areas of structure which are damaged and then repaired in the field, must be refinished to restore the
original paint and corrosion protectant properties to factory standards. Refer to applicable airplane
Maintenance Manual, Chapter 20, Exterior Finish - Cleaning/Painting, for refinishing procedures and
required materials.
51-10-00 Page 2
© Cessna Aircraft Company Jun 1/2005
CESSNA AIRCRAFT COMPANY
SINGLE ENGINE
STRUCTURAL REPAIR MANUAL
CORROSION AND CORROSION CONTROL - GENERAL
1. General
A. Corrosion is a natural phenomenon which destroys metal by chemical or electrochemical action and
converts it to a metallic compound such as an oxide, hydroxide, or sulfate. All metals used in airplane
construction are subject to corrosion. If exposed, attack may take place over an entire metal surface.
It may penetrate a surface at random forming deep pits or may follow grain boundaries. Corrosion may
be accentuated by stresses from external loads or from lack of homogeneity in the metallic structure
or from improper heat treatment. It is promoted by contact between dissimilar metals or with materials
which absorb moisture such as wool, rubber, felt, dirt, and so forth.
NOTE: For additional information on corrosion control for aircraft, refer to the FAA Advisory Circular
No. 43-4.
(1) Refer to Figure 1 for a simplified illustration of the conditions which must exist for electrochemical
corrosion to occur.
(a) There must be a metal that corrodes and acts as the anode.
(b) There must be a less corrodible metal that acts as the cathode
(c) There must be a continuous liquid path between the two metals which acts as the
electrolyte, usually condensation and salt or other contamination.
(d) There must be a conductor to carry the flow of electrons from the cathode to the anode.
This conductor is usually in the form of a metal-to-metal contact (rivets, bolts, welds, etc.)
(2) The elimination of any one of the four conditions described above will stop the corrosion reaction
process as shown in Figure 1.
(3) One of the best ways to eliminate one of the four described conditions is to apply an organic film
(such as paint, grease, plastic, etc.) to the surface of the metal affected. This will prevent the
electrolyte from connecting the cathode to the anode, and since current cannot flow, it prevents
corrosive reaction.
(4) At normal atmospheric temperatures, metals do not corrode appreciably without moisture, but
the moisture in the air is usually enough to start corrosive action.
(5) When components and systems constructed of many different types of metals must perform
under various climatic conditions, corrosion becomes a complex problem. The presence of salts
on metal surfaces (from sea coast operation) greatly increases the electrical conductivity of any
moisture present and accelerates corrosion.
(6) Other environmental conditions which contribute to corrosion are:
(a) Moisture collecting on dirt particles.
(b) Moisture collecting in crevices between lap joints, around rivets, bolt, and screws.
2. Types of Corrosion
A. Direct Surface Attack.
(1) The most common type of general surface corrosion results from direct reaction of a metal
surface with oxygen in the atmosphere. Unless properly protected, steel will rust and aluminum
and magnesium will form oxides. The attack may be accelerated by salt spray or salt bearing
air, by industrial gasses, or by engine exhaust gasses.
B. Pitting.
(1) While pitting can occur in any metal, it is particularly characteristic of passive materials such
as alloys of aluminum, nickel, and chromium. It is first noticeable as a white or gray powdery
deposit similar to dust, which blotches the surface. When the deposits are cleaned away, tiny
pits can be seen in the surface.
C. Dissimilar Metal Corrosion.
(1) When two dissimilar metals are in contact and are connected by an electrolyte (continuous liquid
or gas path), accelerated corrosion of one of the metals occurs. The most easily oxidized surface
becomes the anode and corrodes. The less active member of the couple becomes the cathode
51-11-00 Page 1
© Cessna Aircraft Company Jun 1/2005

CESSNA AIRCRAFT COMPANY
SINGLE ENGINE
STRUCTURAL REPAIR MANUAL
Corrosion Identification
Figure 1 (Sheet 1)
51-11-00 Page 2
© Cessna Aircraft Company Jun 1/2005
CESSNA AIRCRAFT COMPANY
SINGLE ENGINE
STRUCTURAL REPAIR MANUAL
of the galvanic cell. The degree of attack depends on the relative activity of the two surfaces; the
greater the difference in activity, the more severe the corrosion. Relative activity in descending
order is as follows:
(a) Magnesium and its alloys.
(b) Aluminum alloys 1100, 3003, 5052, 6061, 220, 355, 356, cadmium, and zinc.
(c) Aluminum alloys 2014, 2017, 2024, and 7075.
(d) Iron, lead, and their alloys (except stainless steel).
(e) Stainless steels, titanium, chromium, nickel, copper, and their alloys.
(f) Graphite (including dry film lubricants containing graphite).
D. Intergranular Corrosion.
(1) Selective attack along the grain boundaries in metal alloys is referred to as intergranular
corrosion. It results from lack of uniformity in the alloy structure. It is particularly characteristic
of precipitation hardened alloys of aluminum and some stainless steels. Aluminum extrusions
and forgings in general may contain nonuniform areas, which in turn may result in galvanic
attack along the grain boundaries. When attack is well advanced, the metal may blister or
delaminate which is referred to as exfoliation.
E. Stress Corrosion.
(1) This results from the combined effect of static tensile stresses applied to a surface over
a period of time. In general, cracking susceptibility increases with stress, particularly at
stresses approaching the yield point, and with increasing temperature, exposure time, and
concentration of corrosive ingredients in the surrounding environment. Examples of parts which
are susceptible to stress corrosion cracking are aluminum alloy bell cranks, landing gear shock
struts with pipe thread-type grease fittings, clevis points, and shrink fits.
F. Corrosion Fatigue.
(1) This is a type of stress corrosion resulting from the cyclic stresses on a metal in corrosive
surroundings. Corrosion may start at the bottom of a shallow pit in the stressed area. Once
attack begins, the continuous flexing prevents repair of protective surface coating or oxide films
and additional corrosion takes place in the area of stress.
3. Typical Corrosion Areas
A. This section lists typical areas of the airplane which are susceptible to corrosion. These areas should
be carefully inspected at periodic intervals to detect corrosion as early as possible.
(1) Engine Exhaust Trail Areas.
(a) Gaps, seams, and fairings on the lower fuselage, aft of the engine exhaust pipe(s) are
typical areas where deposits may be trapped and not reached by normal cleaning methods.
(b) Around rivet heads, skin laps and inspection covers on the airplane lower fuselage aft of
the engine exhaust pipe(s) should be carefully cleaned and inspected.
(2) Battery Box and Battery Vent Opening.
(a) The battery, battery cover, battery box, and adjacent areas, especially areas below the
battery box where battery electrolyte may have seeped, are particularly subject to corrosive
action. If spilled battery electrolyte is neutralized and cleaned up at the same time of
spillage, corrosion can be held to a minimum by using a baking soda solution to neutralize
the lead acid-type battery electrolyte. If baking soda is not available, flood the area with
water.
(3) Stainless Steel control cables.
(a) Checking for corrosion on control cables is normally accomplished during the preventative
maintenance check. During preventative maintenance, broken wire and wear of the control
cable is also checked.
51-11-00 Page 3
© Cessna Aircraft Company Jun 1/2005

CESSNA AIRCRAFT COMPANY
SINGLE ENGINE
STRUCTURAL REPAIR MANUAL
(b) If the surface of the cable is corroded, carefully force the cable open by reverse twisting
and visually inspect the interior. Corrosion on the interior strands of the cable constitutes
failure and the cable must be replaced. If no internal corrosion is detected, remove loose
external rust and corrosion with a clean, dry, coarse-weave rag or fiber brush.
NOTE: Do not use metallic wools or solvents to clean installed cables. Use of metallic
wool will embed dissimilar metal particles in the cables and create further
corrosion. Solvents will remove internal cable lubricant, allowing cable strands
to abrade and further corrode.
(c) After thorough cleaning of the exterior cable surface, apply a light coat of lubricant (VV-L-
800) to the external cable surface.
4. Corrosion Detection
A. The primary means of corrosion detection is visual, but in situations where visual inspection is not
feasible, other techniques must be used. The use of liquid dye penetrants, magnetic particle, X-ray,
and ultrasonic devices can be used, but most of these sophisticated techniques are intended for the
detection of physical flaws within metal objects rather than the detection of corrosion.
(1) Visual Inspection.
(a) A visual check of the metal surface can reveal the signs of corrosive attack, the most
obvious of which is a corrosive deposit. Corrosion deposits of aluminum or magnesium
are generally a white or grayish-white powder, while the color of ferrous compounds varies
from red to dark reddish-brown.
1 The indications of corrosive attack are small localized discoloration of the metal
surface. Surfaces protected by paint or plating may only exhibit indications of more
advanced corrosive attack by the presence of blisters or bulges in the protective film.
Bulges in lap joints are indications of corrosive buildup which is well advanced.
2 In may cases, because the inspection area is obscured by structural members,
equipment installations, or for other reasons, it is awkward to check visually. In such
cases, mirrors, boroscopes, or like devices must be used to inspect the obscured
areas. Any means which allows a thorough inspection can be used. Magnifying
glasses are valuable aids for determining whether or not all corrosion products have
been removed during cleanup operations.
(2) Liquid Dye Penetrant Inspection.
(a) Inspection for large stress-corrosion or corrosion fatigue cracks on nonporous or
nonferrous metals may be accomplished using dye penetrant processes. The dye applied
to a clean metallic surface will enter small openings or cracks by capillary action. After
the dye has an opportunity to be absorbed by any surface discontinuities, the excess dye
is removed and a developer is applied to the surface. The developer acts like a blotter to
draw the dye from cracks or fissures back to the surface, giving visible indication of any
fault that is present on the surface. The magnitude of the fault is indicated by the quantity
of dye brought back to the surface by the developer.
5. Corrosion Damage Limits
A. Following cleaning and inspection of the corroded area, the actual extent of the damage may be
evaluated using the following general guidelines and sound maintenance judgement.
(1) Determine the degree of corrosion damage (light, moderate, or severe) with a dial-type depth
gage, if accessibility permits. If the area is inaccessible, clay impressions, or any other means
which will give accurate results, should be used. In the event the corrosion damage is severe
or worse, contact Cessna Propeller Aircraft Product Support, P.O. Box 7706, Wichita, KS 67277
USA, for assistance.
(2) Light Corrosion.
(a) Characterized by discoloration or pitting to a depth of approximately 0.001 inch maximum.
(3) Moderate Corrosion.
(a) Appears similar to light corrosion except there may be blistering or some evidence of
scaling or flaking. Pitting depths may be as deep as 10 percent of the material thickness.
51-11-00 Page 4
© Cessna Aircraft Company Jun 1/2005

CESSNA AIRCRAFT COMPANY
SINGLE ENGINE
STRUCTURAL REPAIR MANUAL
(4) Severe Corrosion.
(a) General appearance may be similar to moderate corrosion with severe blistering exfoliation
and scaling or flaking. Pitting depths may be as deep as 15 percent of the material
thickness. This type of damage is normally repaired by complete part replacement, but
patches or other types of repair may be available. Contact Cessna Propeller Aircraft
Product Support, P.O. Box 7706, Wichita, KS 67277 USA, for assistance.
6. Corrosion Removal
A. The following methods are provided as an aid in determining the correct method for corrosion removal.
(1) Standard Methods
(a) Several standard methods are available for corrosion removal. The method normally used
to remove corrosion are chemical treatments, hand sanding with aluminum oxide or metal
wool that is of similar material to the surface being treated, and mechanical sanding or
buffing with abrasive mats or grinding mats. The method used depends on the metal and
the degree of corrosion. Select appropriate materials from the abrasives chart as illustrated
in Figure 2.
(2) Aluminum and Aluminum Alloys.
(a) Most formed aluminum parts and skins of this airplane consist of various gauges of sheet
2024-T3 and 2024-T42 Alclad. Alclad is formed by laminating a thin layer of relatively
pure aluminum, one to five mils thick, over the higher strength base alloy surface. Since
pure aluminum has relatively greater corrosion resistance than the stronger alloy, it is
imperative the clad surface be maintained intact to the maximum extent possible and to
avoid unnecessary mechanical removal of the protective coating. In addition, aluminum
parts receive a chemical conversion coating and are then epoxy-primed.
1 Clean area to be reworked. Strip paint as required.
2 To determine the extent of corrosion damage refer to Corrosion Damage Limits.
3 Remove light corrosion by light hand sanding.
4 Mechanically remove moderate or severe corrosion by hand scraping with a carbide-
tipped scraper or fine-fluted rotary file.
5 Remove residual corrosion by hand sanding. Select appropriate abrasive from Figure
2.
6 Blend into surrounding surface any depressions resulting from rework and surface
finish with 400 grit abrasive paper.
7 Clean reworked area.
8 Determine depth of faired depressions to ensure that rework limits have not been
exceeded.
9 Chemically conversion-coat rework area.
10 Restore original finish (epoxy prime).
(3) Steel.
(a) Unlike some other metal oxides, the red oxide of steel (rust) will not protect the underlying
base metal. The presence of rust actually promotes additional attack by attracting
moisture from the air and acting as a catalyst in causing additional corrosion to take
place. Light red rust on bolt heads, hold-down nuts, and other nonstructural hardware
is generally not dangerous. However, it is indicative of a general lack of maintenance
and possible attack in more critical areas, such as highly stressed steel landing gear
components and flight control surface actuating components. When paint failures occur
or mechanical damage exposes highly stressed steel surfaces to the atmosphere, even
small amounts of rusting are potentially dangerous and must be removed. The most
practical means of controlling corrosion of steel is the complete removal of the corrosion
products by mechanical means. Except on highly stressed steel surfaces, the use of
abrasive papers, small power buffers and buffing compounds, and wire brushes are
acceptable for clean up procedures. However, residual rust usually remains in the bottom
of small pits and crevices.
1 Clean area to be reworked.
2Strip paint as required.
3 Remove all degrees of corrosion from steel parts using a stainless steel hand brush
or hand operated power tool. Alternatively, use dry abrasive blasting process.
51-11-00 Page 5
© Cessna Aircraft Company Jun 1/2005

CESSNA AIRCRAFT COMPANY
SINGLE ENGINE
STRUCTURAL REPAIR MANUAL
Abrasives for Corrosion Removal
Figure 2 (Sheet 1)
51-11-00 Page 6
© Cessna Aircraft Company Jun 1/2005

CESSNA AIRCRAFT COMPANY
SINGLE ENGINE
STRUCTURAL REPAIR MANUAL
4 Remove residual corrosion by hand sanding.
5 After removing all corrosion visible through a magnifying glass, fair depression
resulting from rework and finish with 400-grit abrasive paper.
6 Clean reworked area.
7 Determine depth of rework area to ensure rework limits are not exceeded.
8 Prime using rust-inhibitive primer within one hour of rework.
9 Reapply finish topcoat if required.
7. Control of Corrosion on Landing Gear Springs
A. General
(1) The main landing gear springs are made from high strength steel that is shot peened on the
lower surface to increase the fatigue life of the part.
(2) The shot peened layer is between 0.010 and 0.020 inch thick.
(3) If the protective layer of paint is chipped, scratched or worn away the steel may corrode (rust).
(a) If the corrosion pit depth is greater than the thickness of the shot peen layer, the gear spring
fatigue life will be greatly reduced.
(4) Operation from unimproved surfaces increases the likelihood of damage.
B. Corrosion removal and repair.
(1) If damage to the paint finish of the landing gear spring is found, examine the damage area for
signs of corrosion (red rust).
WARNING: High strength steel parts are very susceptible to hydrogen
embrittlement. Acidic solutions, such as rust removers
and paint strippers have been found to cause hydrogen
embrittlement. Hydrogen embrittlement is an undetectable,
time delayed process. Since the process is time delayed,
failure may occur after the part is returned to service. The
only reliable way to prevent hydrogen embrittlement is not to
use chemical rust removers or paint strippers on landing gear
springs.
(2) Carefully remove any rust by light sanding.
(a) The sanding should blend the damage into the surrounding area in an approximate 20:1
ratio.
EXAMPLE: An 0.005 inch pit must be blended to a 0.10 inch radius or 0.20 inch
diameter.
(b) Make sure the final sanding marks are along an inboard to outboard direction, or along the
long dimension of the spring.
(3) After the sanding is complete, measure the depth of the damage removal.
(a) Make sure the depth of the damage is not more than 0.010 to 0.012 inch deep and has not
penetrated the shot peen layer.
(4) If the shot peened layer has been penetrated, the gear spring must be removed and sent to an
approved facility to be re-shotpeened.
(a) The shotpeen specification is to be Almen intensity of 0.012 to 0.016 using 330 steel shot.
(5) After the spring is installed, refinish any damaged or removed finish paint.
NOTE: Additional information regarding corrosion control can be found in AC-43-4, Chapter
6, or AC43.13-1B Chapter 6.
51-11-00 Page 7
© Cessna Aircraft Company Jun 1/2005

CESSNA AIRCRAFT COMPANY
SINGLE ENGINE
STRUCTURAL REPAIR MANUAL
C. Axle bolt hole corrosion.
(1) Operation of an airplane on skis increases the loads on the lower part of the gear spring because
of the unsymmetrical and twisting loads.
(a) The increased loads have produced spring fractures that originate from pits in the axle
attach holes.
1 Catastrophic failures have occurred from fatigue cracks as small as 0.003 to 0.010
inch long that originated at pits.
(b) Although operation on skis causes more loads, the criteria applies to all airplanes.
(2) There is no acceptable damage depth for pits that develop in the axle bolt holes. If pits or
corrosion is found it must be removed by reaming, subject to the following limitations:
(a) Remove the minimum material required to clean up the damage.
(b) Make sure the diameter of the axle attachment holes is 0.383 inches maximum for 3/8 inch
bolts.
(c) Make sure the diameter of the axle attachment holes is 0.321 inches maximum for 5/16
inch bolts.
(d) If reaming to the maximum dimension does not remove all signs of corrosion, discard the
landing gear spring.
51-11-00 Page 8
© Cessna Aircraft Company Jun 1/2005

CESSNA AIRCRAFT COMPANY
SINGLE ENGINE
STRUCTURAL REPAIR MANUAL
REPAIR MATERIALS
1. General
A. This section provides information covering the materials used for repairs.
2. Repair Materials
A. In general, materials used in the airplane include 2024 and 7075 aluminum alloys. Sheet material
requiring little or no forming will generally be of 2024-T3 clad aluminum. Formed parts, such as ribs,
bulkheads, etc., will be of 2024-T42 clad aluminum. Forgings are of 7075-T73. Materials used in
repairs should be, where possible, of the same material and heat treated to the same temper. The
thickness should be equal to or greater than the material being repaired unless otherwise noted. If
the type of material cannot be readily determined and the forming required is not severe, 2024-T3
may be used generally, since the strength of -T3 is greater than that of -T4 or -T42 (-T4 and -T42 may
be used interchangeably, but they may not be substituted for -T3). When it is necessary to form a
part with a smaller bend radius than the standard bend radius for 2024-T3 or 2024-T4, use 2024-0,
and then heat treat to 2024-T42 after forming. In the event that the original temper was -T3, it may
be necessary to increase the material thickness sufficiently to provide strength equivalent to that of
the original part. It is often practical to cut repair pieces from service parts listed in the parts catalog.
Steel sheet material for reinforcement is 4130 steel heat treated to a minimum of 90,000 pounds per
square inch. The firewall is annealed stainless steel sheet.
3. Extrusions and Formed Sections
A. (Refer to Figure 1.) This section provides information on extrusions and formed sections. It also
provides details of equivalent built up sections for extrusions. Alternative materials are provided for
equivalent sections and formed sections.
B. Use of equivalent built up sections for extrusions are to be utilized only when the proper extrusions are
not available. They are intended to be cold formed from raw stock in sheet forms that have already
been heat treated to the required condition. But when workability is required, the parts may be formed
from 2024-0 aluminum and then heat treated to the -T42 condition before installation. When forming
the section, care must be taken to ensure that the bend radii and the cross section areas are not
reduced below the minimum shown in the diagrams. In some cases, equivalent sections are not
given because it is impractical to build them from sheet stock.
C. Illustrated Parts Catalogs do not identify the standard shape from which parts are fabricated. Detailed
measurements of damaged areas are required to determine the standard section from which parts
are fabricated.
51-30-00 Page 1
© Cessna Aircraft Company Jun 1/2005

CESSNA AIRCRAFT COMPANY
SINGLE ENGINE
STRUCTURAL REPAIR MANUAL
Extrusions and Formed Sections
Figure 1 (Sheet 1)
51-30-00 Page 2
© Cessna Aircraft Company Jun 1/2005

CESSNA AIRCRAFT COMPANY
SINGLE ENGINE
STRUCTURAL REPAIR MANUAL
Extrusions and Formed Sections
Figure 1 (Sheet 2)
51-30-00 Page 3
© Cessna Aircraft Company Jun 1/2005

CESSNA AIRCRAFT COMPANY
SINGLE ENGINE
STRUCTURAL REPAIR MANUAL
Extrusions and Formed Sections
Figure 1 (Sheet 3)
51-30-00 Page 4
© Cessna Aircraft Company Jun 1/2005

CESSNA AIRCRAFT COMPANY
SINGLE ENGINE
STRUCTURAL REPAIR MANUAL
Extrusions and Formed Sections
Figure 1 (Sheet 4)
51-30-00 Page 5
© Cessna Aircraft Company Jun 1/2005

CESSNA AIRCRAFT COMPANY
SINGLE ENGINE
STRUCTURAL REPAIR MANUAL
FASTENERS
1. General
A. Fasteners used in the airplane are generally solid aluminum rivets, blind rivets, and steel threaded
fasteners. Usage of each is primarily a function of the loads to be carried, accessibility and frequency
of removal. Rivets used in airplane construction are usually fabricated from aluminum alloys. In
special cases, monel, corrosion-resistant steel and mild steel, copper, and iron rivets are used.
2. Rivets
A. Standard solid shank MS rivets are those generally used in airplane construction. They are
fabricated in the following head types: roundhead, flathead, countersunk head, and universal
head. Flathead rivets are generally used in the airplane interior, where head clearance is required.
MS20426 countersunk head rivets are used on the exterior surfaces of the airplane to minimize
turbulent airflow. MS20470 universal head rivets are used on the exterior surfaces of the airplane
where strength requirements necessitate a stronger rivet head than that of the countersunk head
rivet. Hi-Shear rivets are special, patented rivets having a high shear strength equivalent to that of
standard NAS bolts. They are used in special cases in locations where high shear loads are present,
such as in spars, wings, and in heavy bulkhead ribs. This rivet consists of a cadmium plated pin of
alloy steel. Some have a collar of aluminum alloy. Some of these rivets can be readily identified by
the presence of the attached collar in place of the formed head on standard rivets. Blind rivets are
used, where strength requirements permit, where one side of the structure is inaccessible, making it
impossible or impractical to drive standard solid shank rivets.
3. Replacement Of Hi-Shear Rivets
A. Replacement of Hi-Shear rivets with close tolerance bolts or other commercial fasteners of equivalent
strength properties is permissible.
(1) The hardware used for the Hi-Shear rivets is determined according to the size of the holes and
the grip lengths required.
(2) Bolt grip length should be chosen so that no threads remain in the bearing area.
(3) Holes must not be elongated, and the Hi-Shear substituted must be a smooth, push-fit.
B. Field replacement of main landing gear forgings on bulkheads may be accomplished by using the
following hardware:
(1) NAS464P, NAS436P, and either: NAS1103 through NAS1120, NAS1303 through NAS623 or
NAS6203 through NAS6220 bolt, and either:
(a) MS21042 nut and AN960/NAS1149 washers in place of Hi-Shear rivets for forgings with
machined flat surfaces around the attachment holes.
(b) ESNA2935 mating base washer and ESNA RM52LH2935 self-aligning nut with forgings
(with a draft angle of up to a maximum of eight degrees) without machined flat surfaces
around the attachment holes.
4. Substitution Of Rivets
A. When adapting the typical repairs shown in this manual to suit actual conditions, it may be necessary
to use different fasteners than those originally used. This may be due to non-availability of a particular
fastener, restricted access, or other difficulties. When replacing rivets, it is desirable to use rivets
identical to the type of rivet removed. Countersunk head rivets are to be replaced by rivets of the
same type and degree of countersink. When rivet holes become enlarged, deformed, or otherwise
damaged, several options are available.
(1) The simplest solution is to install a 1/32 inch (0.032 inch) larger size rivet as a replacement. This
solution uses the designed repairability of the structure, and is the quickest repair.
(2) Repair rivets are available.
(a) Repair rivets have a shank that is 1/64 inch (0.016 inch) larger diameter than a standard
rivet but have the same size and shape heads.
(b) NAS1241 repair rivets replace MS20426 rivets if they have the same suffix.
(c) NAS1242 repair rivets replace MS20470 rivets if they have the same suffix.
51-40-00 Page 1
© Cessna Aircraft Company Jun 1/2005

CESSNA AIRCRAFT COMPANY
SINGLE ENGINE
STRUCTURAL REPAIR MANUAL
(d) NAS1738, NAS1939 and some NAS9301 through NAS9311 blind rivets also have oversize
shanks.
B. Replacement shall not be made with rivets of lower strength material.
C. Hi-Shear Rivets.
(1) When Hi-Shear rivets are not available, replacement of sizes 3/16 inch or greater rivets shall be
made with bolts of equal or greater strength than the rivet being replaced, and with self-locking
nuts of the same diameter. It is permissible to replace Hi-Shear rivets with Hi-Lok bolts of the
same material, diameter and grip length.
D. Blind Rivets.
(1) Blind rivets have higher deflection rates in shear than standard solid rivets, are more susceptible
to fatigue failure and are not as strong as solid rivets in thin sheets. For this reason, it is not
advisable to replace any considerable number of solid rivets in a given joint by blind rivets,
because this may result in overstressing the remaining solid rivets. The hollow blind rivet shall
not be used. The blind rivet shall be of the same or greater strength than the rivet it replaces. In
cases of dimpled assemblies (the process of forming the metal around a hole to form a conical
indentation to receive the tapered head of a flush rivet or a screw), the rivet holes shall be
drilled after the sheets are dimpled. When possible, the exposed end of each clipped plug
shall be coated with epoxy primer. Blind rivets shall not be used in fuel bay areas except in
cases of absolute necessity, and must be sealed. If blind fasteners other than blind rivets are
encountered, it is recommended that replacements be made with identical fasteners.
E. For a list of approved solid shank and Hi-Shear rivet substitutions, refer to Tables 1 and 2.
5. Rivet Diameters
A. Rivet diameters range from 3/32 inch to 3/8 inch. Sizes of 1/8 inch, 5/32 inch, and 3/16 inch are
most frequently used. Since smaller diameter rivets lack proper structural qualities and larger
diameter rivets dangerously reduce the splice or patch area, extreme care should be exercised
before substituting other than the specified sizes of rivet diameter.
6. Rivet Lengths
A. Proper length of rivets is an important part of a repair. Should too long a rivet be used, the formed
head will be too large, or the rivet may bend or be forced between the sheets being riveted. Should
too short a rivet be used, the formed head will be too small or the riveted material will be damaged.
If proper length rivets are not available, longer rivets may be cut off to equal the proper length (not
grip). Rivet length is based on the grip.
7. Solid Shank Rivets
A. Removal of Solid Shank Rivets (Refer to Figure 1).
(1) When it becomes necessary to replace a rivet, extreme care should be taken in its removal so
that the rivet hole will retain its original size and replacement with a larger size rivet will not be
necessary. If the rivet is not removed properly, the strength of the joint may be weakened and
the replacement of rivets made more difficult.
(2) When removing a rivet, work on the manufactured head. It is more symmetrical about the shank
than the shop head, and there will be less chance of damaging the rivet hole or the material
around it. To remove rivets, use hand tools, a power drill or a combination of both. The preferred
method is to drill through the rivet head and drive out the remainder of the rivet with a drift punch.
First, file a flat area on the head of any round or brazier head rivet, and center punch the flat
surface for drilling. On thin metal, back up the rivet on the shop head when center punching
to avoid depressing the metal. The dimple in 2117-T3 rivets usually eliminates the necessity of
filing and center punching the rivet.
(3) Select a drill one size smaller than the rivet shank and drill out the rivet head. When using a
power drill, set the drill on the rivet and rotate the chuck several revolutions by hand before
turning on the power. This procedure helps the drill cut a good starting spot and eliminates the
chance of the drill slipping off and tracking across the metal. While holding the drill at a 90°
angle, drill the rivet to the depth of its head. Be careful not to drill too deep because the rivet
51-40-00 Page 2
© Cessna Aircraft Company Jun 1/2005
CESSNA AIRCRAFT COMPANY
SINGLE ENGINE
STRUCTURAL REPAIR MANUAL
shank will turn with the drill and cause a tear. The rivet head will often break away and climb the
drill, which is a good signal to withdraw the drill. If the rivet head does not come lose of its own
accord, insert a drift punch into the hole and twist slightly to either side until the head comes off.
(4) Drive out the shank of the rivet with a drift punch slightly smaller than the diameter of the shank.
On thin metal or unsupported structures, support the sheet with a bucking bar while driving out
the shank. If the shank is exceptionally tight after the rivet head is removed, drill the rivet about
two-thirds of the way through the thickness of the material and then drive out the remainder of
the rivet with a drift punch.
(5) The removal offlush rivets is the same as that just described except that no filing of the
manufactured head is required before center punching. Be very careful to avoid elongation
of the dimpled or the countersunk holes. The rivet head should be drilled to approximately
one-half the thickness of the top sheet.
Table 1. Approved Replacement Fasteners Chart
REPLACE Inch thickness (or thicker) WITH
MS20470AD3 0.025 NAS1398B4, NAS1398D4
0.020 NAS1738B4, NAS1738D4
MS20470AD4 0.050 NAS1398B4, NAS1398D5
0.040 NAS1398B5, NAS1398D5,
NAS9301B5, NAS1738B4,
NAS1738E4, NAS1738D4,
NAS9301B4
0.032 NAS1738B5, NAS1738E5,
NAS1738D5, NAS9301B5
MS20470AD5 0.063 NAS1398B5, NAS1398D5
0.050 NAS1398B6, NAS1398D6,
NAS1738B5, NAS1738E5,
CR3213-5
0.040 NAS1738B6, NAS1738E6,
NAS1738D5, CR3213-6
MS20470AD6 0.080 NAS1398B6, NAS1398D6
0.071 NAS1398D6
0.063 NAS1738B6, NAS1738E6,
NAS1738D, CR3213-6
MS20426AD3 (Countersunk)
(Refer to Note 1) 0.063 NAS1398B4, NAS1399D4
0.040 NAS1739D4
MS20426AD4 (Countersunk) 0.080 NAS1399B4, NAS1399D4,
CR3213-4
0.050 NAS1739D4
MS20426AD4 (Dimpled) 0.063 NAS1739B4, NAS1739E4
51-40-00 Page 3
© Cessna Aircraft Company Jun 1/2005
CESSNA AIRCRAFT COMPANY
SINGLE ENGINE
STRUCTURAL REPAIR MANUAL
Table 1. Approved Replacement Fasteners Chart (continued)
REPLACE Inch thickness (or thicker) WITH
MS20426AD5 (Countersunk) 0.063 NAS1739D5, NAS1739B5,
NAS1739E5
0.050 CR3242-5
MS20426AD5 (Dimpled) 0.071 NAS1739B5, NAS1739E5
NOTE 1: Rework Required. Countersink oversize to accommodate oversize rivet.
NOTE 2: GENERAL NOTE: Do not use blind rivets in any portion of the engine air induction system structure.
Table 2. Approved Fastener Substitutions
Fastener Collar DIAMETER Fastener Collar
REPLACE WITH
NAS178 NAS179 (Refer to Notes 1,
2, 6, 7) HL18 HL70, HL82
(Refer to Notes 1,
4) NAS1054 NAS179, NAS528
(Refer to Notes 1,
4) NAS14XX NAS1080C, NAS1080E,
NAS1080G, NAS1080AG
(Refer to Notes 1,
3, 4) NAS529 NAS528, NAS179
(Refer to Notes 1,
2, 5) NAS1146 NAS1080C, NAS1080E,
NAS1080G, NAS1080AG
(Refer to Notes 1,
5) NAS7034 NAS1080K
(Refer to Notes 1,
6) NAS464 MIL-S-7742
(Refer to Notes 1,
6) NAS1103-
NAS1116 MIL-S-7742
(Refer to Notes 1,
6) NAS1303-
NAS1316 MIL-S-7742
(Refer to Notes 1,
6) NAS6203-
NAS6216 MIL-S-7742
(Refer to Notes 1,
6) NAS6603-
NAS6616 MIL-S-7742
(Refer to Notes 1,
6) AN173 AN305, MS20305,
MS21044, MS21045
NAS1054 NAS179,
NAS528 (Refer to Notes 1,
4) NAS14XX NAS1080C, NAS1080E,
NAS1080G, NAS1080AG
(Refer to Notes 1,
3, 4) NAS529NAS528, NAS179
(Refer to Notes 1,
2, 5) NAS1446 NAS1080C, NAS1080E,
NAS1080G, NAS1080AG
51-40-00 Page 4
© Cessna Aircraft Company Jun 1/2005
CESSNA AIRCRAFT COMPANY
SINGLE ENGINE
STRUCTURAL REPAIR MANUAL
Table 2. Approved Fastener Substitutions (continued)
Fastener Collar DIAMETER Fastener Collar
REPLACE WITH
(Refer to Notes 1,
5) NAS7034 NAS1080K
(Refer to Notes 1,
6) NAS464 (Refer to Note 8)
(Refer to Notes 1,
6) NAS1103-
NAS1106 (Refer to Note 8)
(Refer to Notes 1,
6) NAS1303-
NAS1306 (Refer to Note 8)
(Refer to Notes 1,
6) NAS6203-
NAS6206 (Refer to Note 8)
(Refer to Notes 1,
6) NAS6603-
NAS6606 (Refer to Note 8)
NOTE 1: Refer to appropriate tables for nominal diameters available.
NOTE 2: Available in oversize for repair of elongated holes. Ream holes to provide a 0.001 inch interference
fit.
NOTE 3: NAS529-4 thru -12 take NAS528 same dash number. NAS529-14 thru -20 take NAS179.
NOTE 4: Steel shank fastener designated for drive-on collars. Choose protruding head only.
NOTE 5: Steel shank fastener designated for squeeze-on collars. Installation requires sufficient space for the
tool and extended shank of the fastener. Choose protruding head only.
NOTE 6: Threaded fastener.
NOTE 7: Preferred substitute fastener.
NOTE 8: When you substitute a threaded fastener for a high strength steel shank rivet, use one of these steel
nuts: AN365/MS20365, MS17825, MS21044, MS21045, MS51943 or NAS1079. Approval of the
use of these nuts in this application does not constitute a general approval to use these nut on high
strength bolts.
NOTE 9: GENERAL NOTE: These fastener substitutions address shear strength and hole tolerances only. The
specific application may not allow all of these substitutions because of space considerations.
B. The United States Department of Defense no longer maintains MS and NAS standards. Identical
parts may have MS, NASM or AIA/NAS part numbers.
EXAMPLE: MS20470AD4-6 rivets may also be identified as NASM20470AD4-6. NAS1738M4-4
rivets may be identified as AIA/NAS1738M4-4.
C. Installation of Solid Shank Rivets.
(1) A large percentage of riveting of airplane structure is accomplished on thin gauge aluminum alloy,
and the work must be accomplished without distorting or damaging the material with hammer
blows or riveting tools. All airplane power riveting is accomplished by upsetting the rivets against
a bucking bar instead of striking the shank with a hammer. To prevent deforming the rivet head,
a rivet set must be selected to fit each type of rivet. The depth of this set must not touch material
being riveted. Parts requiring heat treatment should be heat treated before riveting, since heat
51-40-00 Page 5
© Cessna Aircraft Company Jun 1/2005

CESSNA AIRCRAFT COMPANY
SINGLE ENGINE
STRUCTURAL REPAIR MANUAL
Rivet Removal and Rivet Edge Distance
Figure 1 (Sheet 1)
51-40-00 Page 6
© Cessna Aircraft Company Jun 1/2005
CESSNA AIRCRAFT COMPANY
SINGLE ENGINE
STRUCTURAL REPAIR MANUAL
treating process after rivet installation causes warping. Assemblies that require heat treatment
in a salt bath must be treated prior to assembly, as the salt cannot be entirely washed out of the
joints.
(2) The use of hollow rivets in joining highly stressed parts is not permitted. To determine if blind
rivets may be substituted, refer to Tables 1 and 2. Selection of the proper rivet and the proper
number of rivets is very important. Rivets must be of the proper length for the total thickness of
the parts being riveted. Ordinarily, from 1-1/2 to 2 times the diameter of the rivet is the correct
amount for the rivet shank to protrude through the material to form the head. For heavy material,
such as plates or fittings, from 2 to 2-1/2 times the rivet diameter may be used. The rivet should
not be excessively loose in the hole, as this condition will cause the rivet to bend over while
being driven, and the shank will not be sufficiently expanded to completely fill the hole. A drill
from 0.002 inch to 0.004 inch larger than the rivet shank should be used for sheet and plate
riveting. Parts should be held firmly together by clamps, screws, or bolts while they are being
drilled or riveted. The bucking bar is to be held against the end of the rivet shank. Exercise care
while accomplishing this operation to prevent unseating the rivet by too much pressure. For the
first few blows, the bucking bar should be held lightly against the rivet shank so it will receive
the impact of the blow through the rivet. The bucking bar must be held square with the rivet
to produce uniform upsets. As few blows as possible should be struck to properly upset rivet.
Blows must be as uniform as possible.
D. Loose Or Working Solid Shank Rivets.
(1) Rivets which appear to be loose shall be checked with a 0.002 inch feeler gauge by inserting the
gauge around the head of the rivet in question. If the feeler gauge can be inserted to the shank
of the rivet, it shall be classified as a loose rivet and it shall be replaced. If the feeler gauge can
be inserted approximately halfway to the shank for less than 30 percent of the circumference
of the rivet head, it shall not be classified as a loose rivet. The feeler gauge shall be used to
check the shear section between the riveted members (such as skin to spar or different sections
of skins) in a similar manner to that used around the rivet head. If the skin around the brazier
head or countersunk rivet can be moved by depressing the skin with finger pressure around the
rivet, the rivet shall be replaced. If a rivet is found which turns by applying a rotating load to the
head of the rivet, it should be replaced.
(2) In areas where exterior paint has been applied to rivet heads, the paint may harden due to aging
processes and show hairline cracks around the edge of the rivet heads. This should not be
used as a basis for determining whether or not the rivet is loose. The hardened paint may crack
at times and collect dirt or exhaust fumes which will appear as discoloration. It is not possible
to detect loose rivets visually. Replacement rivets should be of like size and type. In some
instances, however, it will be necessary to use the next size larger diameter. For general repair
practices, the spacing between the centerlines of adjacent rivet holes shall be four diameters or
greater. In some areas where the spacing between rivets prohibits the use of the next larger
rivets, special repair instructions and procedures shall be followed. Contact Cessna Single
Engine Support.
8. Blind Rivets
A. General.
(1) Blind rivets are intended for use where access is available to only one side of the work.
(2) Replacement of solid rivets with blind rivets should only be accomplished within the guidelines
of Table 1, when the installation of a solid shank rivet is not possible. Blind rivets do not have the
same resistance to corrosion and fatigue as solid shank rivets, and should not be considered a
universal replacement for solid shank rivets.
B. Removal of Blind Rivets.
CAUTION: Do not drill completely through the rivet sleeve. This method of removing
a rivet will tend to enlarge the hole.
(1) Use a small center drill to provide a guide for a larger drill on top of the rivet stem, and drill away
the tapered portion of the stem to destroy the lock.
(2) Pry the remainder of the locking collar out of the rivet head with a drift punch.
51-40-00 Page 7
© Cessna Aircraft Company Jun 1/2005

CESSNA AIRCRAFT COMPANY
SINGLE ENGINE
STRUCTURAL REPAIR MANUAL
(3) Drill nearly through the head of the rivet using a drill the same size as the rivet shank.
(4) Break off rivet head, using drift pin inserted into the drilled hole as a pry.
(5) Drive out remaining rivet shank with a pin having a diameter equal to the rivet shank.
C. Installation of Blind Rivets.
(1) Refer to Figure 2, for an illustration of installation procedures.
(2) Check that rivet hole size and rivet are compatible.
(3) Check that proper pulling head is installed on rivet gun.
(4) Adjustment of pulling head must be made in accordance with manufacturers instructions.
(5) Check that proper operating air pressure is available to rivet gun.
NOTE: Blind rivets may be installed using pneumatic or mechanical guns, whichever is
available.
(6) Check that holes in parts to be fastened are properly aligned.
(7) In blind clearance applications, check the minimum blind clearance (BK) dimension if the
manufactured head of blind rivet is protruding above the top sheet. The rivet will pull down the
sheet as the stem is pulled if the BK dimension is met or exceeded.
(8) The minimum blind clearance is the BK dimension, and is listed in the manufacturers standard
sheets.
NOTE: When installing a blind rivet (pull-type rivet) in a hole where the previous blind rivet
was removed by drilling and punching the rivet out, inspect the drilled hole to assure
all metal sheets are in place and not separated prior to pulling rivet. It may be
necessary to insert a stiff wire in adjacent hole to hold metal in position while pulling
rivet.
(9) When placing pulling head on rivet stem, hold riveter and pulling head in line with axis of rivet
while holding tool in a light and flexible manner.
(10) When tool is actuated, pulling head will pull down and seat against rivet head.
(11) Clamping action will pull sheets together and seat rivet when tool is actuated.
(12) When tool is actuated, action of rivet will automatically assist in bringing tool and pulling head
into proper alignment with rivet axis.
NOTE: Pressing down with force will not allow rivet and tool to align themselves with hole
and could limit head setting of rivet, however, enough force to seat the head against
the skin is necessary.
(13) Hold tool in line with rivet as accurately as possible, and allow a steady but light pressure; pull
trigger and let the rivet align itself.
(14) When rivet is completely installed, release trigger and pulling head will eject pulling portion of
stem through forward end.
(15) Rivet must break within these limits.
Fastener Dash number Stem Flushness
NAS1738 or NAS1739 All +0.010 or -0.020 inch
Cherry Max -4 +0.010 or -0.015 inch
Cherry Max -5, -6 +0.010 or -0.020 inch
(16) Protruding stems usually indicate incorrect grip length or oversize holes.
D. Loose or Working Blind Rivets.
(1) Blind rivets which are found to be loose or show evidence of working must be replaced with
rivets of like size and type. In some instances, it may be necessary to use the next larger size
rivet. Loose fasteners may be indicated by the following situation:
(a) The fastened material moves relative to the fastener. Skin deflection is evident.
51-40-00 Page 8
© Cessna Aircraft Company Jun 1/2005

CESSNA AIRCRAFT COMPANY
SINGLE ENGINE
STRUCTURAL REPAIR MANUAL
Installation of Blind Rivets
Figure 2 (Sheet 1)
51-40-00 Page 9
© Cessna Aircraft Company Jun 1/2005
CESSNA AIRCRAFT COMPANY
SINGLE ENGINE
STRUCTURAL REPAIR MANUAL
(b) Tipping of the fastener head may indicate its looseness or slippage. Rivet head periphery
rolled upward also indicates looseness.
(c) A black or dark gray stain is found adjacent to or around the fastener head. Generally, it
takes the form of a dirt or oily streak aft of the loose rivet.
(d) Mark a red line across the fastener head and the adjacent material. Check the line at the
next inspection. Any loosening of the fastener will break the line as indicated in Figure 3.
9. Spacing Of Rivets
A. There are no specific rules which are applicable to every case or type of riveting. There are, however,
certain general rules which should be understood and followed. Edge distance of rivets should not
be less than two diameters of the rivet, measured from the edge of the sheet or plate to the center of
the rivet hole. Spacing between rivets, when in rows, depends upon several factors, principally the
thickness of the sheet, the diameter of the rivets, and the manner in which the sheet will be stressed.
This spacing is seldom less than four diameters of the rivet, measured between the centers of the rivet
holes. Rivets, spaced four diameters apart, are found in certain seams of semimonocoque fuselages,
webs or built up spars, and various plates or fittings. Where there are two rows of rivets, they are
usually staggered. The transverse pitch or distance between rows should be slightly less than the
pitch of the rivets, with 75 percent of the rivet pitch being the usual practice. An average spacing or
pitch of rivets in the cover or skin of most structures, except at highly stressed points, will be from 6
to 12 diameters of the rivet. The best practice in repair is to make pitch of rivets equal to those in the
original structure.
10. Threaded Fasteners Bolt Torques
A. The importance of correct application cannot be overemphasized. Refer to appropriate Maintenance
Manual, Chapter 20, Torque Data - Maintenance Practices, for additional information covering torque
values. Under torque can result in unnecessary wear of nuts and bolts as well as parts they are
holding together. When insufficient pressures are applied, uneven loads will be transmitted throughout
assembly, which may result in excessive wear or premature failure due to fatigue. Over torque can
be equally damaging because of failure of a bolt or nut from overstressing threaded areas. There are
a few simple, but very important, procedures that should be followed to assure that correct torque is
applied:
(1) Calibrate torque wrench periodically to assure accuracy, and recheck frequently.
(2) Be sure that bolt and nut threads are clean and dry unless otherwise specified.
(3) Run nut down to near contact with washer or bearing surface and check friction drag torque
required to turn nut.
(4) Add friction drag torque to desired torque recommended. Refer to appropriate Maintenance
Manual, Chapter 20, Torque Data - Maintenance Practices to obtain complete torque calculating
procedures. This is referred to as final torque which should register on indicator or setting for a
snap over-type wrench.
(5) Apply a smooth even pull when applying torque pressure. If chattering or a jerking motion occurs
during final torque, back off and re-torque.
(6) When installing a castellated nut, start alignment with cotter pin hole at minimum recommended
torque plus friction drag torque, and do not exceed maximum torque plus friction drag. If hole
and nut castellation do not align, change washers or nut and try again. Exceeding maximum
recommended torque is not recommended unless specifically allowed or recommended for that
particular installation.
11. Rivets for Plastic or Composite Parts
A. Unlike rivets in metallic joints, blind rivets are often the rivet of choice for riveting non-metallic materials
because they may be installed without the hammering necessary to install solid rivets. If the tail end
of the rivet is adjacent to the non-metal side, install a washer over the shank to prevent the "hole
filling" action built into blind rivets from overloading the non-metal hole. The hole in the washer should
match the specified installation hole for the fastener. If the tail end of the rivet is installed through
metal substructure, the washer is not necessary.
51-40-00 Page 10
© Cessna Aircraft Company Jun 1/2005

CESSNA AIRCRAFT COMPANY
SINGLE ENGINE
STRUCTURAL REPAIR MANUAL
Red Lining of Fasteners
Figure 3 (Sheet 1)
51-40-00 Page 11
© Cessna Aircraft Company Jun 1/2005
CESSNA AIRCRAFT COMPANY
SINGLE ENGINE
STRUCTURAL REPAIR MANUAL
B. Soft ("A" 1100 aluminum shank rivets or "B" 5056 aluminum shank) rivets are also used to install non-
metallic parts. Original equipment soft rivets will be either red or green colored under the paint. If the
butt or driven end of the rivet is adjacent to the non-metallic part, it is preferable to install a washer over
the shank to prevent the rivet shank, which swells during driving, from overloading the non-metallic
hole. The hole in the washer should match the specified installation hole for the fastener. If the tail
end of the rivet is installed through metal substructure, the washer is not necessary. Take care when
driving rivets through non-metal to not overdrive the rivet. If the rivet is overdriven, the shank will swell
even with the washer in place. The rivet butt should be driven to no more than necessary to retain
the part, never more than 1.4 times the shank diameter.
C. If the original equipment rivet provided connection between metal parts as well as non-metallic parts,
it may be a standard (AD) rivet. Original equipment AD rivets are colored gold or uncolored. Replace
original equipment AD rivets with AD rivets.
51-40-00 Page 12
© Cessna Aircraft Company Jun 1/2005
CESSNA AIRCRAFT COMPANY
SINGLE ENGINE
STRUCTURAL REPAIR MANUAL
FLIGHT CONTROL SURFACE BALANCING
1. General
A. This section applies to the balancing of the ailerons, elevators, and rudder. Control surface balance
must be verified after repair or painting.
B. Proper balance of control surfaces is critical to prevent flutter during normal operating conditions.
2. Tools and Equipment
NAME NUMBER MANUFACTURER USE
Control Surface
Balance Fixture Kit 5180002–1 Cessna Aircraft Co. Cessna
Part Distribution
5800 E. Pawnee
P.O. Box 1521
Wichita, KS 67218
Balance elevator and
aileron.
Scale 0-10 Pounds
in 0.01 Pound
increments
Commercially Available Balance rudder
3. Procedures for Balancing Control Surfaces
A. The flight control surface balancing fixture kit (part number 5180002-1) is shown in Figure 1.
(1) Balance of control surfaces must be accomplished in a draft free room or area.
(2) Place hinge bolts through control surface hinges and position on knife edge balancing mandrels,
refer to Figure 2 for positioning of balancing control surfaces.
(3) Make sure all control surfaces are in their approved flight configuration; painted (if applicable),
trim tabs installed, static wicks, and all tips installed.
(4) Place balancing mandrels on a table or other suitable flat surface.
(5) Adjust trailing edge support to fit control surface being balanced while center of balancing beam
is directly over hinge line. Remove balancing beam and balance the beam itself by adding
washers or nuts required at end opposite the trailing edge support.
(6) When positioning balancing beam on control surface, avoid rivets to provide a smooth surface
for the beam and keep the beam 90 degrees to the hinge line of control surface.
(7) Paint is a considerable weight factor. In order to keep balance weight to a minimum, it
is recommended that existing paint be removed before adding paint to a control surface.
Increase in balance weight will also be limited by the amount of space available and clearance
with adjacent parts. Good workmanship and standard repair practices should not result in
unreasonable balance weight.
(8) The approximate amount of weight needed may be determined by taping loose weight at the
balance weight area.
(9) Lighten balance weight by drilling off part of weight.
(10) Make balance weight heavier by fusing bar stock solder to weight after removal from control
surface. The ailerons should have balance weight increased by ordering additional weight and
gang channel, listed in applicable Parts Catalog, and installing next to existing inboard weight
the minimum length necessary for correct balance, except that a length which contains at least
two attaching screws must be used. If necessary, lighten new weight or existing weights for
correct balance.
4. Balancing Definitions
A. Overbalance (refer to Figure 3) is defined as the condition that exists when surface is leading edge
heavy and is defined by symbol (-). If the balance beam uses a sliding weight, the weight must be on
the trailing edge side of the hinge line (to balance the control surface), the control surface is considered
to be overbalanced.
51-60-00 Page 1
© Cessna Aircraft Company Jun 1/2005

CESSNA AIRCRAFT COMPANY
SINGLE ENGINE
STRUCTURAL REPAIR MANUAL
Flight Control Surface Balancing Fixture Kit
Figure 1 (Sheet 1)
51-60-00 Page 2
© Cessna Aircraft Company Jun 1/2005

CESSNA AIRCRAFT COMPANY
SINGLE ENGINE
STRUCTURAL REPAIR MANUAL
Balancing Control Surfaces
Figure 2 (Sheet 1)
51-60-00 Page 3
© Cessna Aircraft Company Jun 1/2005

CESSNA AIRCRAFT COMPANY
SINGLE ENGINE
STRUCTURAL REPAIR MANUAL
Balancing Control Surfaces
Figure 2 (Sheet 2)
51-60-00 Page 4
© Cessna Aircraft Company Jun 1/2005

CESSNA AIRCRAFT COMPANY
SINGLE ENGINE
STRUCTURAL REPAIR MANUAL
Balancing Control Surfaces
Figure 2 (Sheet 3)
51-60-00 Page 5
© Cessna Aircraft Company Jun 1/2005

CESSNA AIRCRAFT COMPANY
SINGLE ENGINE
STRUCTURAL REPAIR MANUAL
Balancing Control Surfaces
Figure 2 (Sheet 4)
51-60-00 Page 6
© Cessna Aircraft Company Jun 1/2005

CESSNA AIRCRAFT COMPANY
SINGLE ENGINE
STRUCTURAL REPAIR MANUAL
Control Surface Overbalance (-)
Figure 3
B. Underbalance (refer to Figure 4) is defined as the condition that exists when surface is trailing edge
heavy and is defined by symbol (+). If the balance beam uses a sliding weight, the weight must be
on the leading edge side of the hinge line (to balance the control surface), is considered to be under
balanced.
Control Surface Underbalance (+)
Figure 4
5. Control Surface Balance Requirements
NOTE: “Approved Flight” must never be exceeded when the surface is in its final configuration for flight.
A. Refer to Tables 1, 2 and 3 for balance limits of the various airplane control surfaces. These approved
flight limits must take into account all items which may be attached and/or applied to the various control
surfaces (static wicks, trim tabs, paint, decorative trim stripes, and so forth).
Table 1. Model 172 Static Balance Limits.
CONTROL SURFACE STATIC BALANCE LIMITS APPROVED FOR FLIGHT
CONFIGURATION (INCH-LBS).
AILERON 0.0 TO +11.31
RUDDER 0.0 TO +9.0
LEFT ELEVATOR 0.0 TO +18.5
RIGHT ELEVATOR 0.0 TO +24.5
51-60-00 Page 7
© Cessna Aircraft Company Jun 1/2005
CESSNA AIRCRAFT COMPANY
SINGLE ENGINE
STRUCTURAL REPAIR MANUAL
Table 2. Model 182 Static Balance Limits.
CONTROL SURFACE STATIC BALANCE LIMITS APPROVED FOR FLIGHT
CONFIGURATION (INCH-LBS).
AILERON 0.0 TO +9.64
RUDDER 0.0 TO +6.0
LEFT ELEVATOR 0.0 TO +20.47
RIGHT ELEVATOR 0.0 TO +20.47
Table 3. Model 206 Static Balance Limits.
CONTROL SURFACE STATIC BALANCE LIMITS APPROVED FOR FLIGHT
CONFIGURATION (INCH-LBS).
AILERON 0.0 TO +3.0
RUDDER (Landplane) -4.0 TO +3.0
LEFT ELEVATOR 0.0 TO +12.1
RIGHT ELEVATOR 0.0 TO +12.1
51-60-00 Page 8
© Cessna Aircraft Company Jun 1/2005
CESSNA AIRCRAFT COMPANY
SINGLE ENGINE
STRUCTURAL REPAIR MANUAL
REPAIRS - GENERAL
1. Introduction
A. Many components of the airframe structure are similar in design and fabrication. Examples of such
items are sheet metal webs, formed structural shapes and extrusions.
B. Typical repairs to these and other items have been compiled in this section to eliminate the duplication
of repairs under each applicable component. Repairs in this section apply to the member shown,
regardless of location on the airplane structure (except as limited), and will include only those parts
or members necessary to show the typical situation.
2. Usage
A. Typical repairs may be accomplished individually, or combined with other repairs for a major repair.
Technique and material variation is permissible only so far as to facilitate fabrication and ensure the
original strength and usefulness of the affected component.
3. Preparation for Repair
A. The airplane should be located in an area where, once positioned, minimum movement or relocation
is required. The airplane should be leveled and supported as necessary. Refer to appropriate
Maintenance Manual, Chapter 7, Jacking - Maintenance Practices and Chapter 8, Leveling -
Maintenance Practices.
51-70-00 Page 801
© Cessna Aircraft Company Jun 1/2005
CESSNA AIRCRAFT COMPANY
SINGLE ENGINE
STRUCTURAL REPAIR MANUAL
RIVETED ALUMINUM STRUCTURE REPAIR
1. Preparing Riveted Aluminum Structure For Repair
A. To prepare an area for repair, examine and classify the damage. Make a thorough check before
beginning repairs. In some cases, a damaged part may be classified as needing replacement;
however, after removal, closer inspection indicates the part may be repaired.
(1) Remove all ragged edges, dents, tears, cracks, punctures, and similar damages.
(2) Stop-drill all cracks using a No. 30 (0.128 inch) drill.
(3) Leave edges, after removal of damaged area, parallel to any square or rectangular edges of the
unit.
(4) Round all corners
(5) Smooth out abrasions and dents
(6) Deburr all edges of repair and ensure that no nicks or scratches remain
(7) Brush all aluminum parts having rough edges with a solution of Iridite or alodine mixed in a ratio
of one ounce of Iridite or alodine to one gallon of water, and rinse thoroughly.
(8) To restore original paint and corrosion protectant properties to factory standards, refer to
appropriate Maintenance Manual, Chapter 20, Exterior Finish - Cleaning/Painting for refinishing
procedures and required materials.
NOTE: Damage adjacent to a previous repair requires removal of the old repair and inclusion
of the entire area in the new repair.
51-71-00 Page 801
© Cessna Aircraft Company Jun 1/2005
CESSNA AIRCRAFT COMPANY
SINGLE ENGINE
STRUCTURAL REPAIR MANUAL
GLASS FABRIC REPAIR
1. General
A. The following procedures are for parts which are constructed of epoxy prepreg glass fabric.
2. Tools and Materials
NOTE: Equivalent substitutes may be used for the following:
NAME NUMBER MANUFACTURER USE
Fiberglass 181 weight Hexcel Repair composite
structures.
Polyethylene sheet Commercially available Cover patches while
curing.
Adhesive EA9394 Loctite Aerospace
Bay Point, CA 94565 Adhesive resin.
Adhesive EA9396 Loctite Aerospace Adhesive resin.
Adhesive Epon 815 Loctite Aerospace Adhesive resin.
Methyl Propyl Ketone Commercially available Cleaning solvent.
Sandpaper Various grits Commercially available Abrading, smoothing.
Rubber sheet Commercially available Cover patches when
applying pressure.
3. Repair Of Glass Fabric Parts
A. The procedures listed below are for repairing of glass fabric parts. Refer to Figure 801 for an illustration
of a typical glass fabric repair.
(1) Cut and trim area immediately beyond damage. If parts were painted, remove paint and sand
clean an area at least 1-1/2 inches larger in diameter than the cut out section.
(2) Prepare necessary size and number of patches of glass fabric style No. 181.
WARNING: Always follow manufacturer's mixing instructions carefully to
ensure proper cure and prevent a spontaneous fire.
(3) Mix sufficient amount of resin in accordance with manufacturers instructions.
(4) Ensure that hands are free from oil, grease, and dirt, and apply an even coat of resin on sanded
area.
(5) Impregnate all the glass fabric patches by laying them on a polyethylene sheet and working the
resin through the glass fabric with a small brush.
(6) Place larger patch over cutout area, working out all air bubbles and wrinkles.
(7) If cutout is large enough to cause the patch to sag, place a suitable support behind repair area.
(8) Apply a second patch over the first patch, working out all wrinkles and air bubbles.
(9) After all patches have been applied, brush the area with an even coat of resin and allow to cure.
Curing time is 24 hours at 77°F.
(10) Smooth patched area with 600-grit sandpaper until desired finish is obtained.
(11) Repaint finished area with matching paint. Refer to the applicable Maintenance Manual, Chapter
20, Exterior Finish - Cleaning/Painting for painting procedures.
51-73-00 Page 801
© Cessna Aircraft Company Jun 1/2005


CESSNA AIRCRAFT COMPANY
SINGLE ENGINE
STRUCTURAL REPAIR MANUAL
REPAIR OF THERMO-FORMED THERMO PLASTIC COMPONENTS
1. Thermo-formed Thermo Plastic Repair
A. Repair of puncture or holes in thermo-formed plastics can be made by trimming out the damaged
area, removing any paint in the area, and installing an overlapping, beveled, or flush patch of identical
material. Doublers may be installed behind the patch where additional strength is desired. MPK,
or any commercially available solvent that will soften and dissolve the plastic, may be used as the
bonding agent. Dissolving some of the plastic shavings in the solvent will furnish additional working
time. Moderate pressure is recommended for best results. Curing time will vary with the agent used,
but repairs should not be strained until fully cured. Cracks can be repaired by saturating the crack itself
with the solvent, then filling with an epoxy filler or a paste made of the plastic shavings and the solvent.
Again, the crack may be reinforced with a doubler on the back side for additional strength. After
the repair has been made, the area may be sanded smooth and painted. Parts that are extensively
damaged should be replaced instead of repaired.
2. Temporary Repairs
A. Crack Repair
(1) It is permissible to stop drill crack(s) that originate at the edge of a fairing if the crack is less than
2 inches (50 mm) in length.
(a) Stop drill the crack with a Number 30 (0.128 inch diameter) drill bit.
(b) A crack may be stop drilled only once.
NOTE: A crack that passes through a fastener hole and does not extend to the edge of
the part, may be stop drilled at both ends of the crack.
(c) Any fairing that has a crack that progresses past a stop drilled hole must be repaired or
replaced.
(d) A fairing that has any of the following conditions must have a repair made as soon as
practical:
1 A crack that is longer than 2 inches (50 mm).
2 Cracks in more than 10 percent of the attach fastener locations per fairing.
(2) Fairings, with a stop drilled crack that does not extend past the stop drilled hole, may remain in
service until the next 100 hour or equivalent inspection.
51-73-01 Page 801
© Cessna Aircraft Company Jun 1/2005
CESSNA AIRCRAFT COMPANY
SINGLE ENGINE
STRUCTURAL REPAIR MANUAL
TYPICAL SKIN REPAIRS
1. General
A. Damage which would involve a typical skin repair can be described as damage that requires
modification, such as material replacement or patching. Skin damage in the form of dents, scratches,
or punctures requires a patch. Refer to Figure 801, for an illustration of typical skin repairs. Refer to
Figure 802 for corrugated skin repairs.
2. Guidelines for Corrugated Skin Crack Repairs
A. Corrugated Aileron Skin Repair:
(1) It is permissible to stop drill crack(s) that originate at the trailing edge of the control surface
provided the crack(s) is(are) not more than 2 inches in length.
(2) Stop dill crack(s) using a Number 30 (0.128 inch diameter) drill.
(3) A crack may only be stop dilled once.
NOTE: A crack that passes through a trailing edge rivet and does not extend to the trailing
edge of the skin may be stop drilled at both ends of the crack.
(4) Any control surface that has a crack that progresses past a stop drilled hole shall be repaired or
replaced.
(5) A control surface that has any of the following conditions shall have a repair made as soon as
practical:
(a) A crack that is longer than 2 inches.
(b) A crack that does not originate from the trailing edge or a trailing edge rivet.
(c) Cracks in more than six trailing edge rivet locations per skin.
(6) Affected control surfaces with corrugated skins and having a stop drilled crack that does not
extend past the stop drilled hole, may remain in service without additional repair.
(7) Refer to Figure 802 as applicable for repair information.
B. Corrugated Flap Skin Repair:
(1) It is permissible to stop drill crack(s) that originate at the trailing edge of the control surface
provided the crack(s) is(are) not more than 2 inches in length.
(2) Stop dill crack(s) using a Number 30 (0.128 inch diameter) drill.
(3) A crack may only be stop dilled once.
NOTE: A crack that passes through a trailing edge rivet and does not extend to the trailing
edge of the skin may be stop drilled at both ends of the crack.
(4) Any control surface that has a crack that progresses past a stop drilled hole shall be repaired or
replaced.
(5) A control surface that has any of the following conditions shall have a repair made as soon as
practical:
(a) A crack that is longer than 2 inches.
(b) A crack that does not originate from the trailing edge or a trailing edge rivet.
(c) Cracks in more than six trailing edge rivet locations per skin.
(6) Affected control surfaces with corrugated skins and having a stop drilled crack that does not
extend past the stop drilled hole, may remain in service without additional repair.
(7) Refer to Figure 802 as applicable for repair information.
C. Corrugated Elevator Skin Repair:
(1) It is permissible to stop drill crack(s) that originate at the trailing edge of the control surface
provided the crack(s) is(are) not more than 2 inches in length.
(2) Stop dill crack(s) using a Number 30 (0.128 inch diameter) drill.
(3) A crack may only be stop dilled once.
NOTE: A crack that passes through a trailing edge rivet and does not extend to the trailing
edge of the skin may be stop drilled at both ends of the crack.
51-75-00 Page 801
© Cessna Aircraft Company Jun 1/2005

CESSNA AIRCRAFT COMPANY
SINGLE ENGINE
STRUCTURAL REPAIR MANUAL
Skin Repair
Figure 801 (Sheet 1)
51-75-00 Page 802
© Cessna Aircraft Company Jun 1/2005

CESSNA AIRCRAFT COMPANY
SINGLE ENGINE
STRUCTURAL REPAIR MANUAL
Skin Repair
Figure 801 (Sheet 2)
51-75-00 Page 803
© Cessna Aircraft Company Jun 1/2005

CESSNA AIRCRAFT COMPANY
SINGLE ENGINE
STRUCTURAL REPAIR MANUAL
Skin Repair
Figure 801 (Sheet 3)
51-75-00 Page 804
© Cessna Aircraft Company Jun 1/2005

CESSNA AIRCRAFT COMPANY
SINGLE ENGINE
STRUCTURAL REPAIR MANUAL
Skin Repair
Figure 801 (Sheet 4)
51-75-00 Page 805
© Cessna Aircraft Company Jun 1/2005

CESSNA AIRCRAFT COMPANY
SINGLE ENGINE
STRUCTURAL REPAIR MANUAL
Skin Repair
Figure 801 (Sheet 5)
51-75-00 Page 806
© Cessna Aircraft Company Jun 1/2005

CESSNA AIRCRAFT COMPANY
SINGLE ENGINE
STRUCTURAL REPAIR MANUAL
Corrugated Skin Repair
Figure 802 (Sheet 1)
51-75-00 Page 807
© Cessna Aircraft Company Jun 1/2005
CESSNA AIRCRAFT COMPANY
SINGLE ENGINE
STRUCTURAL REPAIR MANUAL
(4) Any control surface that has a crack that progresses past a stop drilled hole shall be repaired or
replaced.
(5) A control surface that has any of the following conditions shall have a repair made as soon as
practical:
(a) A crack that is longer than 2 inches.
(b) A crack that does not originate from the trailing edge or a trailing edge rivet.
(c) Cracks in more than six trailing edge rivet locations per skin.
(6) Affected control surfaces with corrugated skins and having a stop drilled crack that does not
extend past the stop drilled hole, may remain in service without additional repair.
(7) Refer to Figure 802 as applicable for repair information.
51-75-00 Page 808
© Cessna Aircraft Company Jun 1/2005
CESSNA AIRCRAFT COMPANY
SINGLE ENGINE
STRUCTURAL REPAIR MANUAL
CONTROL SURFACE REPAIR
1. General
A. Damage which would involve a control surface repair: After the repair is completed, the control surface
balance must be checked as described in Flight Control Surface Balancing. Refer to Figures 801 and
802 which illustrate typical control surface repairs.
51-76-00 Page 801
© Cessna Aircraft Company Jun 1/2005

CESSNA AIRCRAFT COMPANY
SINGLE ENGINE
STRUCTURAL REPAIR MANUAL
Typical Control Surface Rib Repair
Figure 801 (Sheet 1)
51-76-00 Page 802
© Cessna Aircraft Company Jun 1/2005

CESSNA AIRCRAFT COMPANY
SINGLE ENGINE
STRUCTURAL REPAIR MANUAL
Typical Control Surface Trailing Edge Repair
Figure 802 (Sheet 1)
51-76-00 Page 803
© Cessna Aircraft Company Jun 1/2005
CHAPTER
52
DOORS
CESSNA AIRCRAFT COMPANY
SINGLE ENGINE
STRUCTURAL REPAIR MANUAL
LIST OF EFFECTIVE PAGES
CHAPTER-SECTION-SUBJECT PAGE DATE
52-Title
52-List of Effective Pages
52-Record of Temporary Revisions
52-Table of Contents
52-00-00 Page 1 Jun 1/2005
52-10-00 Page 101 Jun 1/2005
52 - LIST OF EFFECTIVE PAGES Page 1 of 1
© Cessna Aircraft Company Jun 1/2005

CESSNA AIRCRAFT COMPANY
MAINTENANCE MANUAL
RECORD OF TEMPORARY REVISIONS
Temporary Revision
Number Page Number Issue Date By Date Removed By
CESSNA AIRCRAFT COMPANY
SINGLE ENGINE
STRUCTURAL REPAIR MANUAL
CONTENTS
DOORS-GENERAL............................................................. 52-00-00Page1
General.................................................................... 52-00-00Page1
DOOR DAMAGE CLASSIFICATION . . . . . . . . . . . . . . . . . . . . . . . . . . . . . . . . . . . . . . . . . . . . . . . 52-10-00 Page 101
RepairableDamage......................................................... 52-10-00Page101
CONTENTS Page 1 of 1
© Cessna Aircraft Company Jun 1/2005
CESSNA AIRCRAFT COMPANY
SINGLE ENGINE
STRUCTURAL REPAIR MANUAL
DOORS - GENERAL
1. General
A. Chapter 52 describes general repair practices, materials and procedures which are applicable to the
doors and door structure.
B. If questions arise concerning approved repairs or for repairs not shown in this section, contact Cessna
Propeller Aircraft Product Support.
52-00-00 Page 1
© Cessna Aircraft Company Jun 1/2005
CESSNA AIRCRAFT COMPANY
SINGLE ENGINE
STRUCTURAL REPAIR MANUAL
DOOR DAMAGE CLASSIFICATION
1. Repairable Damage
A. Bonded doors may be repaired by the same methods used for riveted structure. Rivets are a
satisfactory substitute for bonded seams on these assemblies. The strength of the bonded seams in
doors may be replaced by a single 3/32, 2117-AD rivet per running inch of bond seam. The standard
repair procedures outlined in AC43.13-1b are also applicable to bonded doors.
52-10-00 Page 101
© Cessna Aircraft Company Jun 1/2005
CHAPTER
53
FUSELAGE
CESSNA AIRCRAFT COMPANY
SINGLE ENGINE
STRUCTURAL REPAIR MANUAL
LIST OF EFFECTIVE PAGES
CHAPTER-SECTION-SUBJECT PAGE DATE
53-Title
53-List of Effective Pages
53-Record of Temporary Revisions
53-Table of Contents
53-00-00 Pages 1-3 Jun 1/2005
53-10-00 Pages 1-2 Jun 1/2005
53-20-00 Pages 801-805 Jun 1/2005
53-30-00 Pages 801-806 Jun 1/2005
53-40-00 Pages 801-803 Jun 1/2005
53 - LIST OF EFFECTIVE PAGES Page 1 of 1
© Cessna Aircraft Company Jun 1/2005

CESSNA AIRCRAFT COMPANY
MAINTENANCE MANUAL
RECORD OF TEMPORARY REVISIONS
Temporary Revision
Number Page Number Issue Date By Date Removed By
CESSNA AIRCRAFT COMPANY
SINGLE ENGINE
STRUCTURAL REPAIR MANUAL
CONTENTS
FUSELAGE-GENERAL ......................................................... 53-00-00Page1
General.................................................................... 53-00-00Page1
Fuselage................................................................... 53-00-00Page1
FUSELAGE DAMAGE CLASSIFICATION . . . . . . . . . . . . . . . . . . . . . . . . . . . . . . . . . . . . . . . . . . 53-10-00 Page 1
General.................................................................... 53-10-00Page1
NegligibleDamage.......................................................... 53-10-00Page1
RepairableDamage......................................................... 53-10-00Page1
ReplacementDamage....................................................... 53-10-00Page2
CABIN BULKHEAD REPAIR . . . . . . . . . . . . . . . . . . . . . . . . . . . . . . . . . . . . . . . . . . . . . . . . . . . . . . 53-20-00 Page 801
General.................................................................... 53-20-00Page801
Repair of Webs or Flanges. . . . . . . . . . . . . . . . . . . . . . . . . . . . . . . . . . . . . . . . . . . . . . . . . . . 53-20-00 Page 801
RepairofChannels.......................................................... 53-20-00Page801
Landing Gear Bulkheads . . . . . . . . . . . . . . . . . . . . . . . . . . . . . . . . . . . . . . . . . . . . . . . . . . . . 53-20-00 Page 801
Repair After Hard Landing . . . . . . . . . . . . . . . . . . . . . . . . . . . . . . . . . . . . . . . . . . . . . . . . . . . 53-20-00 Page 801
STRINGER AND CHANNEL REPAIR . . . . . . . . . . . . . . . . . . . . . . . . . . . . . . . . . . . . . . . . . . . . . . 53-30-00 Page 801
General.................................................................... 53-30-00Page801
FIREWALLREPAIR.............................................................. 53-40-00Page801
General.................................................................... 53-40-00Page801
Material.................................................................... 53-40-00Page801
Repairing the Firewall Assembly. . . . . . . . . . . . . . . . . . . . . . . . . . . . . . . . . . . . . . . . . . . . . . 53-40-00 Page 801
CONTENTS Page 1 of 1
© Cessna Aircraft Company Jun 1/2005
CESSNA AIRCRAFT COMPANY
SINGLE ENGINE
STRUCTURAL REPAIR MANUAL
FUSELAGE - GENERAL
1. General
A. Chapter 53 describes general repair practices, materials and procedures which are applicable to the
Fuselage and Fuselage Structure. Refer to Figure 1 for illustrations of fuselage stations.
B. For repairs beyond the scope of this chapter, refer to Chapter 51, Typical Skin Repairs.
2. Fuselage
A. The fuselage is of semimonocoque construction and consists of formed bulkheads, longitudinal
stringers, reinforcing channels and skin panels.
B. If questions arise concerning approved repairs or for repairs not shown in this section, contact Cessna
Propeller Aircraft Product Support.
53-00-00 Page 1
© Cessna Aircraft Company Jun 1/2005

CESSNA AIRCRAFT COMPANY
SINGLE ENGINE
STRUCTURAL REPAIR MANUAL
Fuselage Stations
Figure 1 (Sheet 1)
53-00-00 Page 2
© Cessna Aircraft Company Jun 1/2005

CESSNA AIRCRAFT COMPANY
SINGLE ENGINE
STRUCTURAL REPAIR MANUAL
Fuselage Stations
Figure 1 (Sheet 2)
53-00-00 Page 3
© Cessna Aircraft Company Jun 1/2005

CESSNA AIRCRAFT COMPANY
SINGLE ENGINE
STRUCTURAL REPAIR MANUAL
FUSELAGE DAMAGE CLASSIFICATION
1. General
A. Damage to the fuselage can be divided into three major categories; negligible damage, repairable
damage, and major replacement damage. The categories are provided to assist in determining the
extent and criticalness of any damage.
2. Negligible Damage
A. Any smooth dents in the fuselage skin that are free from cracks, abrasions, and sharp corners, and
which are not stress wrinkles and do not interfere with any internal structure or mechanism, may
be considered as negligible damage. In areas of low stress intensity, cracks, deep scratches, or
deep, sharp dents - which after trimming or stop-drilling can be enclosed by a two-inch circle - can
be considered negligible if the damaged area is at least one diameter of the enclosing circle away
from all existing rivet lines and material edges. Stop drilling is considered a temporary repair and a
permanent repair must be made as soon as practical.
B. Mild corrosion appearing upon clad aluminum surfaces does not necessarily indicate incipient failure of
the base metal. However, corrosion of all types must be carefully considered, and approved remedial
action taken.
C. Small cans appear in the skin structure of all metal airplanes and should not necessarily be a cause
for concern. However. It is strongly recommended that wrinkles which appear to have originated from
other sources, or which do not follow the general appearance of the remainder of the skin panels, be
thoroughly investigated. Except in the landing gear bulkhead areas, wrinkles occurring over stringers
which disappear when the rivet pattern is removed, may be considered negligible. However, the
stringer rivet holes may not align perfectly with skin holes because of a permanent "set" in the stringer.
If this is apparent, replacement of the stringer will usually restore the original strength characteristics
of the area.
NOTE: Wrinkles occurring in the skin of the main landing gear bulkhead areas must not be
considered negligible. The skin panel must be opened sufficiently to permit a thorough
examination of the lower portion of the landing gear bulkhead and its tie-in structure.
D. Wrinkles occurring in open areas which disappear when the rivets at the edge of the sheet are
removed, or a wrinkle which is hand removable, may often be repaired by a 1/2 inch x 1/2 inch x
0.050 inch 2024-T42 extruded angle or a heavy “J” section. The angle should be inserted fore and
aft across the center of the wrinkle and should extend to within 1/16 inch to 1/8 inch of the fuselage
bulkheads comprising the end of the bay. Rivet pattern should be similar to existing manufactured
seam at edge of sheet.
E. Negligible damage to stringers, formed skin flanges, bulkhead channel and like parts is similar to
that for the wing skin. Refer to Chapter 57, Wing Damage Classification for a definition of negligible
damage to these components.
3. Repairable Damage
A. If a skin is badly damaged, repair must be made by replacing an entire skin panel, from one structural
member to the next. Repair seams must be made to lie along structural members and each seam
must be made exactly the same in regard to rivet size, spacing and pattern as the manufactured
seams at the edges of the original sheet. If the manufactured seams are different, the stronger must
be copied. If the repair ends at a structural member where no seam is used, enough repair panel
must be used to allow an extra row of staggered rivets, with sufficient edge margin to be installed.
B. Typical methods of repair for skins, bulkheads, stringers, and channels are illustrated in Chapter 51,
Typical Skin Repairs. Before repairs are attempted, all cracks or deep scratches must be stop-drilled
with a No. 30 (0.128 inch) drill and all sharp corners and ragged edges must be trimmed away and
deburred.
53-10-00 Page 1
© Cessna Aircraft Company Jun 1/2005
CESSNA AIRCRAFT COMPANY
SINGLE ENGINE
STRUCTURAL REPAIR MANUAL
4. Replacement Damage
A. All forgings and castings of any material and structural parts made of steel must be replaced if
damaged. Structural members of a complicated nature that have been distorted or wrenched should
be replaced. Seat rails serve as structural parts of the fuselage and must be replaced if damaged.
53-10-00 Page 2
© Cessna Aircraft Company Jun 1/2005
CESSNA AIRCRAFT COMPANY
SINGLE ENGINE
STRUCTURAL REPAIR MANUAL
CABIN BULKHEAD REPAIR
1. General
A. Bulkheads are comprised of formed "C" channel sections. The principal material of construction
is 2024-0 Alclad aluminum alloy which, after forming, is heat-treated to a 2024-T42 condition. All
bulkheads in the fuselage are of the formed sheet metal or the reinforced formed sheet metal type.
2. Repair of Webs or Flanges
A. The following procedures are for the repair of cracked bulkhead webs or flanges.
(1) Acceptable methods of repairing various types of cracks occurring in service are shown in
Figures 801 and 802.
(2) Stop-drill No. 30 (0.128 inch) minimum holes at extreme ends of cracks to prevent further
cracking.
(3) Reinforcements should be added to carry stresses across damaged portion and stiffen the joints.
NOTE: The condition causing such cracks to develop at a particular point may be stress
concentration at that point, in conjunction with repetition of stress (such as produced
by vibration of the structure). The stress concentration may be due to defects such
as nicks, scratches, tool marks, and initial stresses or cracks from forming or heat-
treating operations. An increase in sheet thickness alone is usually beneficial but
does not necessarily remedy the condition leading to the cracking. Patch-type repairs
are generally employed and are usually satisfactory in restoring the original material
strength characteristics.
3. Repair of Channels
A. The following procedures are for the repair of severely bent, kinked, or torn channels.
(1) If practical, severely bent, kinked, or torn portions of bulkheads should be removed and
replacement sections installed and joined at the original splice joint.
(2) If the procedure outlined in the preceding step is not justified, cutting away the damaged portion
and inserting a trimmed portion of the original section, adequately reinforced by splice plates or
doublers, will prove satisfactory. This is knownas an insertion-type patch.
4. Landing Gear Bulkheads
A. Landing gear bulkheads are highly stressed members, irregularly formed to provide clearance for
control cables, fuel and brake lines. Patch type repairs on these bulkheads are, for the most part,
impractical. Minor damage, consisting of small nicks or scratches, may be repaired by dressing out
the damaged area, or by replacement of fasteners. Any other damage must be repaired by replacing
the landing gear support assembly as an aligned unit.
5. Repair After Hard Landing
A. Buckled skin or floor boards, and loose or sheared rivets in the area of the main gear support are
indications of damage to structure from an extremely hard landing. When such evidence is present,
the entire support structure must be examined and all support forgings must be checked for cracks.
(1) Use fluorescent dye penetrant and magnification to examine for cracks.
B. Bulkheads in the damaged area must be checked for alignment. Deformation of bulkhead webs must
be checked using a straightedge.
C. Damaged support structure, buckled floorboards and skins, and damaged or questionable forgings
must be replaced.
53-20-00 Page 801
© Cessna Aircraft Company Jun 1/2005

CESSNA AIRCRAFT COMPANY
SINGLE ENGINE
STRUCTURAL REPAIR MANUAL
Typical Cabin Bulkhead Repair
Figure 801 (Sheet 1)
53-20-00 Page 802
© Cessna Aircraft Company Jun 1/2005

CESSNA AIRCRAFT COMPANY
SINGLE ENGINE
STRUCTURAL REPAIR MANUAL
Typical Cabin Bulkhead Repair
Figure 801 (Sheet 2)
53-20-00 Page 803
© Cessna Aircraft Company Jun 1/2005

CESSNA AIRCRAFT COMPANY
SINGLE ENGINE
STRUCTURAL REPAIR MANUAL
Typical Cabin Bulkhead Repair
Figure 801 (Sheet 3)
53-20-00 Page 804
© Cessna Aircraft Company Jun 1/2005

CESSNA AIRCRAFT COMPANY
SINGLE ENGINE
STRUCTURAL REPAIR MANUAL
Typical Rib Repair
Figure 802 (Sheet 1)
53-20-00 Page 805
© Cessna Aircraft Company Jun 1/2005

CESSNA AIRCRAFT COMPANY
SINGLE ENGINE
STRUCTURAL REPAIR MANUAL
Typical Stringer and Channel Repair
Figure 801 (Sheet 1)
53-30-00 Page 802
© Cessna Aircraft Company Jun 1/2005

CESSNA AIRCRAFT COMPANY
SINGLE ENGINE
STRUCTURAL REPAIR MANUAL
Typical Stringer and Channel Repair
Figure 801 (Sheet 2)
53-30-00 Page 803
© Cessna Aircraft Company Jun 1/2005

CESSNA AIRCRAFT COMPANY
SINGLE ENGINE
STRUCTURAL REPAIR MANUAL
Typical Stringer and Channel Repair
Figure 801 (Sheet 3)
53-30-00 Page 804
© Cessna Aircraft Company Jun 1/2005

CESSNA AIRCRAFT COMPANY
SINGLE ENGINE
STRUCTURAL REPAIR MANUAL
Typical Stringer and Channel Repair
Figure 801 (Sheet 4)
53-30-00 Page 805
© Cessna Aircraft Company Jun 1/2005

CESSNA AIRCRAFT COMPANY
SINGLE ENGINE
STRUCTURAL REPAIR MANUAL
Typical Stringer and Channel Repair
Figure 801 (Sheet 5)
53-30-00 Page 806
© Cessna Aircraft Company Jun 1/2005

CESSNA AIRCRAFT COMPANY
SINGLE ENGINE
STRUCTURAL REPAIR MANUAL
FIREWALL REPAIR
1. General
A. The firewall is constructed of 0.016 inch, 18-8 corrosion resistant, annealed stainless steel sheet.
(1) A typical firewall patch is illustrated in Figure 801.
(2) A typical repair to the interior firewall angle is illustrated in Figure 802.
2. Material
NAME NUMBER MANUFACTURER USE
Firewall Sealant
AMS 3374 Pro-Seal #700-A Loctite Aerospace
Bay Point, CA 94565 Firewall sealant
3. Repairing the Firewall Assembly
A. Firewall sheets may be repaired by removing damaged material and splicing in a new section. The
splice must be lapped over the old material, sealed and secured with steel rivets.
(1) Patches, splices and joints must be repaired using MS20450 steel rivets.
B. Following any repair to the firewall assembly, seal the damaged areas as follows:
(1) Clean area on surface to be sealed with methyl propyl ketone.
(2) Mix one part of catalyst thoroughly with 100 parts of Pro-Seal No. 700 base.
NOTE: Sealant should be mixed by weight. It is important that accelerator be completely and
uniformly dispersed throughout the base compound.
(3) Using a spatula, caulking gun, or flow gun, apply a fillet of sealer along cracks, seams, joints,
and rows of rivets.
NOTE: If the sealant is applied before the parts are mated, use enough sealing compound
to completely fill the joint, and wipe away excess after parts are mated.
NOTE: If the sealant is applied with a brush or a brush flow gun, more than one coat of sealant
will be necessary on very porous material. Sealant should be allowed to air-dry 10
minutes between coats.
53-40-00 Page 801
© Cessna Aircraft Company Jun 1/2005

CESSNA AIRCRAFT COMPANY
SINGLE ENGINE
STRUCTURAL REPAIR MANUAL
Typical Firewall Repair
Figure 801 (Sheet 1)
53-40-00 Page 802
© Cessna Aircraft Company Jun 1/2005

CESSNA AIRCRAFT COMPANY
SINGLE ENGINE
STRUCTURAL REPAIR MANUAL
Firewall Angle Repair
Figure 802 (Sheet 1)
53-40-00 Page 803
© Cessna Aircraft Company Jun 1/2005
CHAPTER
55
STABILIZERS
CESSNA AIRCRAFT COMPANY
SINGLE ENGINE
STRUCTURAL REPAIR MANUAL
LIST OF EFFECTIVE PAGES
CHAPTER-SECTION-SUBJECT PAGE DATE
55-Title
55-List of Effective Pages
55-Record of Temporary Revisions
55-Table of Contents
55-00-00 Page 1 Jun 1/2005
55-10-00 Page 801 Jun 1/2005
55-20-00 Page 801 Jun 1/2005
55-30-00 Page 801 Jun 1/2005
55-40-00 Page 801 Jun 1/2005
55 - LIST OF EFFECTIVE PAGES Page 1 of 1
© Cessna Aircraft Company Jun 1/2005

CESSNA AIRCRAFT COMPANY
MAINTENANCE MANUAL
RECORD OF TEMPORARY REVISIONS
Temporary Revision
Number Page Number Issue Date By Date Removed By
CESSNA AIRCRAFT COMPANY
SINGLE ENGINE
STRUCTURAL REPAIR MANUAL
CONTENTS
HORIZONTAL AND VERTICAL STABILIZERS. . . . . . . . . . . . . . . . . . . . . . . . . . . . . . . . . . . . . . 55-00-00 Page 1
General.................................................................... 55-00-00Page1
HORIZONTAL STABILIZER. . . . . . . . . . . . . . . . . . . . . . . . . . . . . . . . . . . . . . . . . . . . . . . . . . . . . . . 55-10-00 Page 801
Horizontal Stabilizer . . . . . . . . . . . . . . . . . . . . . . . . . . . . . . . . . . . . . . . . . . . . . . . . . . . . . . . . . 55-10-00 Page 801
NegligibleDamage.......................................................... 55-10-00Page801
RepairableDamage......................................................... 55-10-00Page801
ReplacementDamage....................................................... 55-10-00Page801
ELEVATOR...................................................................... 55-20-00Page801
General.................................................................... 55-20-00Page801
NegligibleDamage.......................................................... 55-20-00Page801
RepairableDamage......................................................... 55-20-00Page801
ReplacementDamage....................................................... 55-20-00Page801
VERTICALSTABILIZER.......................................................... 55-30-00Page801
General.................................................................... 55-30-00Page801
Vertical Stabilizer and Dorsal. . . . . . . . . . . . . . . . . . . . . . . . . . . . . . . . . . . . . . . . . . . . . . . . . 55-30-00 Page 801
NegligibleDamage.......................................................... 55-30-00Page801
RepairableDamage......................................................... 55-30-00Page801
ReplacementDamage....................................................... 55-30-00Page801
RUDDER........................................................................ 55-40-00Page801
Rudder..................................................................... 55-40-00Page801
NegligibleDamage.......................................................... 55-40-00Page801
RepairableDamage......................................................... 55-40-00Page801
ReplacementDamage....................................................... 55-40-00Page801
CONTENTS Page 1 of 1
© Cessna Aircraft Company Jun 1/2005
CESSNA AIRCRAFT COMPANY
SINGLE ENGINE
STRUCTURAL REPAIR MANUAL
HORIZONTAL AND VERTICAL STABILIZERS
1. General
A. Chapter 55 describes general repair practices, materials and procedures which are applicable to the
Horizontal and Vertical Stabilizers.
B. The horizontal and vertical stabilizers are of all metal, fully cantilever, semimonocoque design,
consisting of spars, stringers, ribs, and skins. Skins are riveted to supporting structure with
conventional MS20470AD rivets.
C. If questions arise concerning approved repairs or for repairs not shown in this section, contact Cessna
Propeller Aircraft Product Support.
55-00-00 Page 1
© Cessna Aircraft Company Jun 1/2005
CESSNA AIRCRAFT COMPANY
SINGLE ENGINE
STRUCTURAL REPAIR MANUAL
HORIZONTAL STABILIZER
1. Horizontal Stabilizer
A. The horizontal stabilizer is constructed from spars, ribs, stringers, doublers and skins. Refer to
applicable Maintenance Manual, Chapter 6, Dimensions and Areas, for horizontal stabilizer station
diagram.
2. Negligible Damage
A. The same criteria which is used to define "negligible damage" to the fuselage may be applied to the
horizontal stabilizer. Refer to Chapter 53, Fuselage Damage Classification for a complete description
of negligible damage.
3. Repairable Damage
A. Skin patches may be used to repair skin damage. These patches are illustrated in Chapter 51, Typical
Skin Repairs, Figure 801. For skin damage which includes corrugations, Refer to Chapter 51, Typical
Skin Repairs, Figure 802.
B. Access to the internal stabilizer structure may be gained by removing a portion of the rivets along the
rear spar and ribs and springing back the skin. By using the proper bucking bars through holes in
spar web, skins may by closed with a minimum of blind rivets.
4. Replacement Damage
A. If the damaged area would require a repair which could not be made between adjacent ribs, or the
repair would be located in an area with compound curves, compete skin panels must be replaced.
Ribs and spars may be repaired, but replacement is generally preferable. Where damage is extensive,
replacement of the entire assembly is recommended.
55-10-00 Page 801
© Cessna Aircraft Company Jun 1/2005
CESSNA AIRCRAFT COMPANY
SINGLE ENGINE
STRUCTURAL REPAIR MANUAL
ELEVATOR
1. General
A. The elevator assembly consists of a left and right section bolted together near the airplane centerline
by torque tubes. Each section consists of a front and a rear spar, ribs, skins, and a trim tab assembly.
A balance weight is bolted to the outboard tip leading edge.
2. Negligible Damage
A. Any smooth skin dents that are free from cracks, abrasions, and sharp corners, and which are not
stress wrinkles and do not interfere with any internal structure or mechanism, may be considered
as negligible damage. Exception to negligible damage on elevator surfaces is the front spar, cracks
appearing in web of hinge fitting or in tip rib which supports overhanging balance weight. Cracks
in overhanging tip rib, in the area at the front spar intersection with web of the rib, also cannot be
considered negligible.
3. Repairable Damage
A. Skin patches may be used to repair skin damage. These patches are illustrated in Chapter 51, Typical
Skin Repairs, Figure 801. For skin damage which includes corrugations, refer to Chapter 51, Typical
Skin Repairs, Figure 802.
B. Flight control surfaces must be balanced after repair or painting, in accordance with balancing
procedures outlined in Chapter 51, Flight Control Surface Balancing.
4. Replacement Damage
A. Warped and cracked skin, ribs, and hinge brackets are replaceable items. Where damage is
extensive, replacement of the entire assembly is recommended.
55-20-00 Page 801
© Cessna Aircraft Company Jun 1/2005
CESSNA AIRCRAFT COMPANY
SINGLE ENGINE
STRUCTURAL REPAIR MANUAL
VERTICAL STABILIZER
1. General
A. The vertical stabilizer is of conventional aluminum construction utilizing spars, ribs, and skins.
2. Vertical Stabilizer and Dorsal
A. The vertical stabilizer and dorsal are constructed jointly to form a single unit.
3. Negligible Damage
A. The same criteria which is used to define "negligible damage" to the fuselage may be applied to the
vertical stabilizer. Refer to Chapter 53, Fuselage Damage Classification for a complete description of
negligible damage.
4. Repairable Damage
A. Skin damage exceeding that considered negligible that can be repaired as illustrated in Chapter 51,
Typical Skin Repairs, Figure 801. For skin damage which includes corrugations, Refer to Chapter
51, Typical Skin Repairs, Figure 802. Access to the internal fin structure is best gained by removing
skin attaching rivets on one side of the rear spar and ribs, and springing back the skin. Access to the
stabilizer may be gained by removing skin attaching rivets on one side and springing back the skin. If
the damaged area would require a repair which could not be made between adjacent ribs, or a repair
would be located in an area with compound curves, replacement of parts is recommended.
5. Replacement Damage
A. Hinge brackets and small ribs should be replaced rather than repaired. In general, where parts are
available, the easiest and most satisfactory repairs can be accomplished by replacing the damaged
parts.
B. If the damaged area would require a repair which would not be made between adjacent ribs, or the
repair would be located in an area with compound curves, complete skin panels must be replaced.
Ribs and spars may be repaired, but replacement is generally preferable. Where damage is extensive,
replacement of the entire assembly is recommended.
55-30-00 Page 801
© Cessna Aircraft Company Jun 1/2005
CESSNA AIRCRAFT COMPANY
SINGLE ENGINE
STRUCTURAL REPAIR MANUAL
RUDDER
1. Rudder
A. The rudder is constructed of a spar, ribs, and skin. A torque tube, incorporating a lower hinge bracket,
is attached to the lower leading edge. A balance weight is bolted to the upper tip leading edge.
2. Negligible Damage
A. Minor skin dents and nicks are considered negligible and should be worked out by burnishing.
3. Repairable Damage
A. Skin damage exceeding that considered negligible damage, can be repaired by patching. Typical
repairs are illustrated in Chapter 51, Typical Skin Repair and Control Surface Repair.
B. A flight control surface which has been repaired or replaced must be balanced in accordance with the
procedures outlined in Chapter 51, Flight Control Surface Balancing.
4. Replacement Damage
A. Assemblies that have been twisted or warped beyond usable limits and parts with extensive corrosion
damage are considered replaceable. Small parts which may be easily fabricated from materials
available locally should be replaced.
55-40-00 Page 801
© Cessna Aircraft Company Jun 1/2005
CHAPTER
56
WINDOWS
CESSNA AIRCRAFT COMPANY
SINGLE ENGINE
STRUCTURAL REPAIR MANUAL
LIST OF EFFECTIVE PAGES
CHAPTER-SECTION-SUBJECT PAGE DATE
56-Title
56-List of Effective Pages
56-Record of Temporary Revisions
56-Table of Contents
56-00-00 Page 1 Jun 1/2005
56-10-00 Pages 801-804 Jun 1/2005
56 - LIST OF EFFECTIVE PAGES Page 1 of 1
© Cessna Aircraft Company Jun 1/2005

CESSNA AIRCRAFT COMPANY
MAINTENANCE MANUAL
RECORD OF TEMPORARY REVISIONS
Temporary Revision
Number Page Number Issue Date By Date Removed By
CESSNA AIRCRAFT COMPANY
SINGLE ENGINE
STRUCTURAL REPAIR MANUAL
CONTENTS
WINDOWS-GENERAL.......................................................... 56-00-00Page1
General.................................................................... 56-00-00Page1
PLASTIC WINDOW SURFACE REPAIR . . . . . . . . . . . . . . . . . . . . . . . . . . . . . . . . . . . . . . . . . . . 56-10-00 Page 801
Repair of Plastic Window Surfaces . . . . . . . . . . . . . . . . . . . . . . . . . . . . . . . . . . . . . . . . . . . 56-10-00 Page 801
ToolsandMaterials ......................................................... 56-10-00Page801
Stop-Drilling................................................................ 56-10-00Page801
SurfacePatch .............................................................. 56-10-00Page801
Insert(Plug)Patch.......................................................... 56-10-00Page801
MinorScratches ............................................................ 56-10-00Page804
CleaningPlastic ............................................................ 56-10-00Page804
CONTENTS Page 1 of 1
© Cessna Aircraft Company Jun 1/2005
CESSNA AIRCRAFT COMPANY
SINGLE ENGINE
STRUCTURAL REPAIR MANUAL
WINDOWS - GENERAL
1. General
A. This chapter provides repair information applicable to windshields and windows used on the 1996
and On single engine airplanes. These repairs may be utilized without removing components from
the airplane.
B. For windshield/window removal or replacement, refer to the various model Maintenance Manuals,
Chapter 56 - Windows.
56-00-00 Page 1
© Cessna Aircraft Company Jun 1/2005
CESSNA AIRCRAFT COMPANY
SINGLE ENGINE
STRUCTURAL REPAIR MANUAL
PLASTIC WINDOW SURFACE REPAIR
1. Repair of Plastic Window Surfaces
A. Damaged window panels and the windshield on the airplane are normally removed and replaced
if the damage is extensive. However, certain repairs as described in the following paragraphs can
be accomplished without removing the damaged part from the airplane. Three types of temporary
repairs for cracked plastic are possible. No repairs of any kind are recommended on highly stressed
or compound curves or where the repair would be likely to affect the pilots or copilot's field of vision
during normalflight or landing operations. Curved areas are more difficult to repair than flat areas,
and any repaired area is both structurally and optically inferior to the original surface. Refer to Figure
801 for an illustration of typical windshield and window repair.
NOTE: If temporary repairs are made, operations should be kept to a minimum until replacement
of window can be made.
2. Tools and Materials
NAME NUMBER MANUFACTURER USE
Novus 1 Novus Co.
Minneapolis, MN 55435 To polish scratches
out of windows.
Novus 2 Novus Co. To polish scratches
out of windows.
Methylene Chloride Commercially Available Solvent for repair of
windows.
3. Stop-Drilling
A. The following procedure should be used when stop-drilling.
(1) When a crack appears in a panel, drill a hole at the end of the crack to prevent further spreading.
The hole should be approximately 1/8 inch in diameter, depending on the length of the crack and
the thickness of the material. This is a temporary repair.
NOTE: If temporary repairs are made, operations should be kept to a minimum until
replacement of window or windshield can be made.
4. Surface Patch
A. The following procedure should be used when preparing a surface patch.
(1) Trim away damaged area and round all corners.
(2) Cut a piece of plastic of sufficient size to cover the damaged area and extend ¾ inch on each
side of crack or hole.
(3) Bevel edges as shown in Figure 801.
NOTE: If section to be repaired is curved, shape surface patch to the same contour by
heating it in an oil bath at a temperature of 248°F to 302°F, or it may be heated on a
hotplate until soft. Boiling water should not be used for heating.
(4) Coat surfaces to be bonded evenly with plastic solvent adhesive (acrylic chips dissolved in
methylene chloride) and place immediately over the hole.
(5) Maintain a uniform pressure of 5 to 10 pounds per square inch on the surface patch for a
minimum of 3 hours. Allow surface to dry 24 to 36 hours before sanding or polishing is attempted.
5. Insert (Plug) Patch
A. The following procedure should be used when preparing a plug patch.
(1) Trim hole to a perfect circle or oval and bevel edges slightly.
56-10-00 Page 801
© Cessna Aircraft Company Jun 1/2005

CESSNA AIRCRAFT COMPANY
SINGLE ENGINE
STRUCTURAL REPAIR MANUAL
Typical Windshield and Windows Repair
Figure 801 (Sheet 1)
56-10-00 Page 802
© Cessna Aircraft Company Jun 1/2005

CESSNA AIRCRAFT COMPANY
SINGLE ENGINE
STRUCTURAL REPAIR MANUAL
Typical Windshield and Windows Repair
Figure 801 (Sheet 2)
56-10-00 Page 803
© Cessna Aircraft Company Jun 1/2005
CESSNA AIRCRAFT COMPANY
SINGLE ENGINE
STRUCTURAL REPAIR MANUAL
(2) Make plug patch slightly thicker than the material being repaired, and similarly bevel the edges.
(3) Install plug patch as illustrated in Figure 801.
(4) Heat plug patch until it is soft, press into the hole without plastic solvent adhesive, and allow to
cool to make a perfect fit.
(5) Remove plug patch, coat surfaces to be bonded with plastic solvent (acrylic chips dissolved in
methylene chloride), and insert plug patch in the hole.
(6) Maintain a firm, light pressure until the plastic solvent adhesive has set.
(7) Sand or file edges level with surface; buff and polish. Do not attempt hand polishing until surface
is clean. A soft, open-type cotton wheel is suggested.
NOTE: Acrylic and cellulose plastics are thermoplastic. Friction created by buffing or
polishing for too long a time in one spot can generate sufficient heat to soften the
surface. This will produce visual distortion and is to be guarded against.
6. Minor Scratches
A. The following procedure should be used when repairing minor scratches.
(1) Remove minor scratches by vigorously rubbing the affected area by hand, using a soft, clean
cloth dampened with Novus 2 plastic polish, and finish by polishing with Novus 1. Remove polish
with a soft dry cloth.
NOTE: Plastics should not be rubbed with a dry cloth, since this is likely to cause scratches,
and also builds up an electrostatic charge which attracts dust particles to the surface.
If, after removing dirt and grease, no great amount of scratching is visible, finish the
plastic with a good grade of commercial wax. Apply the wax in a thin, even coat, and
bring to a high polish by rubbing lightly with a soft cloth.
7. Cleaning Plastic
A. The following procedure is the recommended method for cleaning plastic windows.
(1) Clean the plastic by washing with plenty of water and mild soap, using a clean, soft, grit free
cloth, sponge, or bare hands.
CAUTION: Do not use gasoline, alcohol, benzene, acetone, carbon tetrachloride,
fire extinguisher or deicing fluids, lacquer thinners, or window cleaning
sprays because they will soften the plastic and cause crazing.
56-10-00 Page 804
© Cessna Aircraft Company Jun 1/2005
CHAPTER
57
WINGS
CESSNA AIRCRAFT COMPANY
SINGLE ENGINE
STRUCTURAL REPAIR MANUAL
LIST OF EFFECTIVE PAGES
CHAPTER-SECTION-SUBJECT PAGE DATE
57-Title
57-List of Effective Pages
57-Record of Temporary Revisions
57-Table of Contents
57-00-00 Pages 1-4 Jun 1/2005
57-10-00 Pages 1-4 Jun 1/2005
57-11-00 Pages 801-802 Jun 1/2005
57-12-00 Pages 801-803 Jun 1/2005
57-20-00 Pages 801-803 Jun 1/2005
57-21-00 Pages 801-805 Jun 1/2005
57-22-00 Pages 601-606 Jun 1/2005
57-23-00 Page 801 Jun 1/2005
57-24-00 Pages 801-802 Jun 1/2005
57-25-00 Pages 801-802 Jun 1/2005
57-26-00 Pages 801-802 Jun 1/2005
57-27-00 Pages 801-802 Jun 1/2005
57-40-00 Page 801 Jun 1/2005
57-50-00 Page 801 Jun 1/2005
57 - LIST OF EFFECTIVE PAGES Page 1 of 1
© Cessna Aircraft Company Jun 1/2005

CESSNA AIRCRAFT COMPANY
MAINTENANCE MANUAL
RECORD OF TEMPORARY REVISIONS
Temporary Revision
Number Page Number Issue Date By Date Removed By
CESSNA AIRCRAFT COMPANY
SINGLE ENGINE
STRUCTURAL REPAIR MANUAL
CONTENTS
WINGS-GENERAL.............................................................. 57-00-00Page1
General.................................................................... 57-00-00Page1
Tools, Equipment and Materials . . . . . . . . . . . . . . . . . . . . . . . . . . . . . . . . . . . . . . . . . . . . . . 57-00-00 Page 1
Installation of Access Holes . . . . . . . . . . . . . . . . . . . . . . . . . . . . . . . . . . . . . . . . . . . . . . . . . . 57-00-00 Page 1
WING DAMAGE CLASSIFICATION. . . . . . . . . . . . . . . . . . . . . . . . . . . . . . . . . . . . . . . . . . . . . . . . 57-10-00 Page 1
Damage Classification....................................................... 57-10-00Page1
Wing Skin Damage Criteria . . . . . . . . . . . . . . . . . . . . . . . . . . . . . . . . . . . . . . . . . . . . . . . . . . 57-10-00 Page 1
Wing Stringer Damage Criteria . . . . . . . . . . . . . . . . . . . . . . . . . . . . . . . . . . . . . . . . . . . . . . . 57-10-00 Page 1
Wing Auxiliary Spar Damage Criteria . . . . . . . . . . . . . . . . . . . . . . . . . . . . . . . . . . . . . . . . . 57-10-00 Page 1
Wing Rib Damage Criteria . . . . . . . . . . . . . . . . . . . . . . . . . . . . . . . . . . . . . . . . . . . . . . . . . . . 57-10-00 Page 1
Wing Spar Damage Criteria . . . . . . . . . . . . . . . . . . . . . . . . . . . . . . . . . . . . . . . . . . . . . . . . . . 57-10-00 Page 2
Wing Fuel Bay Spars/Rib Damage Criteria . . . . . . . . . . . . . . . . . . . . . . . . . . . . . . . . . . . . 57-10-00 Page 2
Wing Leading Edge Damage Criteria . . . . . . . . . . . . . . . . . . . . . . . . . . . . . . . . . . . . . . . . . 57-10-00 Page 2
Bonded Leading Edge Damage Criteria . . . . . . . . . . . . . . . . . . . . . . . . . . . . . . . . . . . . . . . 57-10-00 Page 2
Wing Strut Damage Criteria . . . . . . . . . . . . . . . . . . . . . . . . . . . . . . . . . . . . . . . . . . . . . . . . . . 57-10-00 Page 3
Aileron Damage Criteria (Corrugated Skin Aileron) . . . . . . . . . . . . . . . . . . . . . . . . . . . . . 57-10-00 Page 3
Aileron Damage Criteria (Model 206 Aileron) . . . . . . . . . . . . . . . . . . . . . . . . . . . . . . . . . . 57-10-00 Page 3
Wing Flap Damage Criteria (Corrugated Skin Flap). . . . . . . . . . . . . . . . . . . . . . . . . . . . . 57-10-00 Page 4
Wing Flap Damage Criteria (Model 206 Flap) . . . . . . . . . . . . . . . . . . . . . . . . . . . . . . . . . . 57-10-00 Page 4
WING FUEL BAY REPAIRS. . . . . . . . . . . . . . . . . . . . . . . . . . . . . . . . . . . . . . . . . . . . . . . . . . . . . . . 57-11-00 Page 801
Preparing Damaged Area In Wing Fuel Bay for Repair . . . . . . . . . . . . . . . . . . . . . . . . . 57-11-00 Page 801
FUEL BAY SEALING DURING STRUCTURAL REPAIR . . . . . . . . . . . . . . . . . . . . . . . . . . . . . 57-12-00 Page 801
General.................................................................... 57-12-00Page801
Integral Fuel Bay Sealant . . . . . . . . . . . . . . . . . . . . . . . . . . . . . . . . . . . . . . . . . . . . . . . . . . . . 57-12-00 Page 801
MixingSealant.............................................................. 57-12-00Page801
ApplyingSealant............................................................ 57-12-00Page801
SealingFuelLeaks.......................................................... 57-12-00Page802
CuringTime................................................................ 57-12-00Page802
Testing Integral Fuel Bay . . . . . . . . . . . . . . . . . . . . . . . . . . . . . . . . . . . . . . . . . . . . . . . . . . . . 57-12-00 Page 802
WINGRIB....................................................................... 57-20-00Page801
General.................................................................... 57-20-00Page801
Wing Rib Damage Classification.............................................. 57-20-00Page801
WingRibRepair ............................................................ 57-20-00Page801
WINGSPARS ................................................................... 57-21-00Page801
General.................................................................... 57-21-00Page801
Damage Classification....................................................... 57-21-00Page801
SparRepair ................................................................ 57-21-00Page801
MEASURING WING TWIST - INSPECTION/CHECK . . . . . . . . . . . . . . . . . . . . . . . . . . . . . . . . 57-22-00 Page 601
General.................................................................... 57-22-00Page601
Tools, Equipment and Materials . . . . . . . . . . . . . . . . . . . . . . . . . . . . . . . . . . . . . . . . . . . . . . 57-22-00 Page 601
Model 172 Series Wing Twist Check Procedure. . . . . . . . . . . . . . . . . . . . . . . . . . . . . . . . 57-22-00 Page 601
Model 182 Series Wing Twist Check Procedure. . . . . . . . . . . . . . . . . . . . . . . . . . . . . . . . 57-22-00 Page 602
Model 206/T206 Series Wing Twist Check Procedure . . . . . . . . . . . . . . . . . . . . . . . . . . 57-22-00 Page 602
WING STRINGER REPAIRS . . . . . . . . . . . . . . . . . . . . . . . . . . . . . . . . . . . . . . . . . . . . . . . . . . . . . . 57-23-00 Page 801
Stringer Damage Classification............................................... 57-23-00Page801
StringerRepair ............................................................. 57-23-00Page801
AUXILIARY SPAR REPAIRS . . . . . . . . . . . . . . . . . . . . . . . . . . . . . . . . . . . . . . . . . . . . . . . . . . . . . . 57-24-00 Page 801
General.................................................................... 57-24-00Page801
Auxiliary Spar Damage . . . . . . . . . . . . . . . . . . . . . . . . . . . . . . . . . . . . . . . . . . . . . . . . . . . . . . 57-24-00 Page 801
Auxiliary Spar Repair . . . . . . . . . . . . . . . . . . . . . . . . . . . . . . . . . . . . . . . . . . . . . . . . . . . . . . . . 57-24-00 Page 801
CONTENTS Page 1 of 2
© Cessna Aircraft Company Jun 1/2005
CESSNA AIRCRAFT COMPANY
SINGLE ENGINE
STRUCTURAL REPAIR MANUAL
LEADING EDGE REPAIRS . . . . . . . . . . . . . . . . . . . . . . . . . . . . . . . . . . . . . . . . . . . . . . . . . . . . . . . 57-25-00 Page 801
Leading Edge Damage Classification......................................... 57-25-00Page801
Leading Edge Repairs....................................................... 57-25-00 Page 801
Notes and Repair Limits . . . . . . . . . . . . . . . . . . . . . . . . . . . . . . . . . . . . . . . . . . . . . . . . . . . . . 57-25-00 Page 801
BONDED LEADING EDGE REPAIR . . . . . . . . . . . . . . . . . . . . . . . . . . . . . . . . . . . . . . . . . . . . . . . 57-26-00 Page 801
General.................................................................... 57-26-00Page 801
Bonded Leading Edge Damage Classification . . . . . . . . . . . . . . . . . . . . . . . . . . . . . . . . . 57-26-00 Page 801
Bonded Leading Edge Repair . . . . . . . . . . . . . . . . . . . . . . . . . . . . . . . . . . . . . . . . . . . . . . . . 57-26-00 Page 801
FLAP LEADINGEDGEREPAIR................................................... 57-27-00 Page 801
Flap Leading Edge Damage Classification..................................... 57-27-00Page801
FlapRepairs................................................................ 57-27-00Page801
FLAPS AND AILERONS.......................................................... 57-40-00 Page 801
General.................................................................... 57-40-00Page801
DamageCriteria ............................................................ 57-40-00Page801
Flap and AileronRepair...................................................... 57-40-00 Page 801
WINGLIFTSTRUTS............................................................. 57-50-00Page801
General.................................................................... 57-50-00Page801
Wing Strut Damage Classification ............................................ 57-50-00 Page 801
CONTENTS Page 2 of 2
© Cessna Aircraft Company Jun 1/2005

CESSNA AIRCRAFT COMPANY
SINGLE ENGINE
STRUCTURAL REPAIR MANUAL
WINGS - GENERAL
1. General
A. Description of Wing Assemblies:
(1) The wing assemblies are a semicantilever type, employing semimonocoque type of structure.
(2) The internal structure consists of a built-up front spar, a formed inboard front fuel spar, a rear
spar, and a formed auxiliary spar assembly in the aileron attach area.
(3) Ribs are formed sheet metal, and consist of nose, intermediate and trailing edge assemblies.
(4) On the 172 series airplanes, stressed skin is riveted to the rib and spar assemblies to complete
the rigid structure. On 182 and 206 series airplanes, the skin is bonded to the leading edge ribs
and riveted at other locations.
(5) The inboard section of the wing is sealed to form an integral fuel cell. The sealed area runs from
the wing root outboard toward the strut attach; and from the front fuel spar to the rear spar.
NOTE: On the 172 series airplanes, the fuel closeout rib is located approximately 7 inches
outboard from the wing root.
(6) Access openings (hand holes with removable cover plates) are located in the wing These
openings afford access to flap and aileron bellcranks and control systems, the flap actuator
in the left hand wing, electrical wiring and wiring disconnect points, the wing portion of the
ventilation system, strut attach fittings, and the inside of the fuel cell.
B. Refer to applicable Maintenance Manual, Chapter 6, Dimensions and Areas, for wing station
diagrams.
C. If questions arise concerning approved repairs, or for repairs not shown in this section, contact Cessna
Propeller Aircraft Product Support, Box 7706, Wichita, KS 67277. (316) 517-5800, Facsimile (316)
942-9006.
2. Tools, Equipment and Materials
A. Refer to Figure 1 for an illustration of wing and fuselage support stands which may by fabricated locally
and used during structural repair.
3. Installation of Access Holes
NOTE: In some instances, it may be advantageous to create access holes in the wing skin to facilitate
wing repair. Refer to the following steps and Figure 2 for an illustration of access holes.
WARNING: The following procedures are not applicable to the integral fuel cell
skins.
A. Precautions and Notes.
(1) Add the minimum number of access holes necessary.
(2) Any circular or rectangular access hole which is used with approved optional equipment
installations may be added in lieu of the access hole illustrated.
(3) Do not add access holes at outboard end of wing: remove wing tip instead.
(4) Locate new access holes near the center of a bay (spanwise).
(5) Locate new access holes forward of the front spars as close to the front spar as practical.
(6) Locate new access holes aft of the front spar between the first and second stringers aft of the
spar. When installing the doubler, rotate it so the two straight edges are closest to the stringers.
(7) Alternate bays, with new access holes staggered forward and aft of the front spar, are preferable.
(8) A maximum of five new access holes in each wing is permissible. If more are required, contact
Cessna Propeller Aircraft Product Support.
B. Access Hole Installation. (Refer to Figure 2)
(1) Establish exact location for inspection cover and inscribe centerlines.
(2) Determine position of doubler on wing skin and center over centerlines. Mark the ten rivet hole
locations and drill to size shown.
57-00-00 Page 1
© Cessna Aircraft Company Jun 1/2005
CESSNA AIRCRAFT COMPANY
SINGLE ENGINE
STRUCTURAL REPAIR MANUAL
(3) Cut out access hole, using dimension shown.
(4) Flex doubler and insert through access hole, and rivet in place.
(5) Position cover and secure, using screws as shown.
57-00-00 Page 2
© Cessna Aircraft Company Jun 1/2005

CESSNA AIRCRAFT COMPANY
SINGLE ENGINE
STRUCTURAL REPAIR MANUAL
Wing and Fuselage Support Stands
Figure 1 (Sheet 1)
57-00-00 Page 3
© Cessna Aircraft Company Jun 1/2005

CESSNA AIRCRAFT COMPANY
SINGLE ENGINE
STRUCTURAL REPAIR MANUAL
Access Hole Installation
Figure 2 (Sheet 1)
57-00-00 Page 4
© Cessna Aircraft Company Jun 1/2005
CESSNA AIRCRAFT COMPANY
SINGLE ENGINE
STRUCTURAL REPAIR MANUAL
WING DAMAGE CLASSIFICATION
1. Damage Classification
A. Damage to the wing and its component assemblies can be divided into three major categories:
negligible damage, repairable damage, and damage necessitating replacement of parts. These
categories are intended to provide the mechanic with some general guidelines to use in determining
the extent and criticalness of any damage. Obviously, there will be some overlapping between
categories, and common sense should be used in determining the final action to be taken with regard
to any damage.
B. For an illustration of various wing component repairs, refer to applicable sections within this chapter.
2. Wing Skin Damage Criteria
A. Negligible damage: Any smooth dents in the wing skin that are not more than 0.030 inch below
contour and can be circumscribed with a 2 inch diameter circle that have no evidence of skin tears,
cracks, or skin penetrations - which are not stress wrinkles and do not interfere with internal structure
of mechanism - constitute negligible damage; and rework is considered cosmetic.
B. Repairable damage: Dents or dings deeper and/or larger than specified above must be repaired.
Skin tears, cracks or penetrations must be repaired. Dings that include understructure (ribs, frames
and spars) must be repaired by reforming or removal and replacement of the damaged member or
damaged are. Reevaluation of the skin after repair of the understructure will determine if the skin
damage is negligible, repairable or requires replacement.
C. Damage Necessitating Replacement Of Parts: If a skin is badly damaged, repair must be made by
replacing an entire skin panel from one structural member to the next. Repair seams must be made
to lie along structural members and each seam must be made exactly the same in regard to rivet size,
spacing and pattern as the manufactured seams at the edges of the original sheet. If the manufactured
seams are different, the stronger must be copied. If the repair ends at a structural member where
no seam is used, enough repair panel must be used to allow an extra row of staggered rivets, with
sufficient edge margin, to be installed.
3. Wing Stringer Damage Criteria
A. Negligible Damage: Minor Scratches or abrasions are the only form of damage considered negligible
to wing stringers.
B. Repairable damage: Dents or bends in a stringer may be repaired by reforming or by replacing a
section of the stringer. Since aluminum work hardens, it is much more likely to crack when reformed
and should be carefully inspected for such cracks after rework. Removal and replacement of damaged
stringers is preferred to reformation.
C. Damage Necessitating Replacement Of Parts: If a stringer is so badly damaged that more than one
section must be spliced, replacement is recommended.
4. Wing Auxiliary Spar Damage Criteria
A. Negligible damage: Minor scratches or abrasions are the only form of damage considered negligible
to wing auxiliary spars.
B. Repairable damage: Dents or bends in an auxiliary spar may be repaired by reforming or by replacing
a section of the auxiliary spar. Since aluminum work hardens, it is much more likely to crack when
reformed and should be carefully inspected for such cracks after rework. Removal and replacement
of a damaged section to the auxiliary spar is preferred to reformation.
C. Damage necessitating Replacement Of Parts: If damage to an auxiliary spar would require a repair
which could not be made between adjacent ribs, the auxiliary spar must be replaced.
5. Wing Rib Damage Criteria
A. Negligible damage: None, other than minor scratches or abrasions.
57-10-00 Page 1
© Cessna Aircraft Company Jun 1/2005
CESSNA AIRCRAFT COMPANY
SINGLE ENGINE
STRUCTURAL REPAIR MANUAL
B. Repairable damage: Dents or bends in a rib may be repaired by reforming or by replacing a section
of the rib. Since aluminum work hardens, it is much more likely to crack when reformed and should
be carefully inspected for such cracks after rework. Removal and replacement of a damaged section
to the rib is preferred to reformation.
C. Damage Necessitating Replacement Of Parts: Leading and trailing edge ribs that are extensively
damaged can be replaced. However, due to the necessity of unfastening an excessive amount of
skin in order to replace the rib, they should be repaired if practical. Center ribs, between the front and
rear spar, should always be repaired if practical.
6. Wing Spar Damage Criteria
A. Negligible damage: Due to the stress which wing spars encounter, very little damage can be
considered negligible. All cracks, stress wrinkles, deep scratches, and sharp dents must be repaired.
Smooth dents, light scratches and abrasions may be considered negligible.
B. Repairable damage: While it is possible to repair the spar channel by reforming a section of the spar,
replacement is preferred. A service kit (SK172-68) is available for replacement of the inboard end of
the rear spar for damage that typically occurs with impact on the outboard leading edge.
C. Damage Necessitating Replacement of Parts: Damage so extensive that repair is not practical
requires replacement of complete wing spar.
7. Wing Fuel Bay Spars/Rib Damage Criteria
A. Negligible damage: Any smooth dents in the wing fuel spar and ribs that have no evidence of tears,
cracks or penetrations - which are not stress wrinkles and do not change (Oil can, or pop in and out)
with internal pressure - are considered negligible damage.
B. Repairable damage: Dents or bends in the wing fuel spar and ribs may be repaired by reforming
or by replacing a section of the structure. Since aluminum work hardens, it is much more likely to
crack when reformed and should be carefully inspected for such cracks after rework. Removal and
replacement of a damaged section is preferred to reformation.
C. Damage Necessitating Replacement Of Parts: Due to the amount of fuel bay sealant which must be
removed from fuel bay components to facilitate repair, individual parts are not available to replace fuel
bay spars or ribs. The entire fuel bay area must be replaced as a unit.
8. Wing Leading Edge Damage Criteria
A. Negligible damage: Any smooth dents in the wing leading edge skin that are not more than 0.030
inch (0.76 mm) below contour and circumscribable with not more than a 1.5 inch (38 mm) diameter
circle that has no evidence of skin tears, cracks, or skin penetrations - which are not stress wrinkles
and do not interfere with internal structure - constitute negligible damage. However, because of the
critical nature of the wing leading edge, this cosmetic repair should be completed.
B. Repairable damage: Dents or dings deeper and/or larger than specified above must be repaired. Skin
tears, cracks or penetrations must be repaired. Dings that include ribs must be repaired by reforming
or removal and replacement of the rib. Reevaluation of the skin after the repair of the understructure
will determine if the skin damage is negligible, repairable or requires replacement.
C. Damage Necessitating Replacement Of Parts: Where extreme damage has occurred, complete
leading edge skin panels should be replaced.
9. Bonded Leading Edge Damage Criteria
A. Negligible damage: Any smooth dents in the wing leading edge skin that are not more than 0.030
inch (0.76 mm) below contour and circumscribable with not more than a 1.5 inch (38 mm) diameter
circle that has no evidence of skin tears, cracks, or skin penetrations - which are not stress wrinkles
and do not interfere with internal structure - constitute negligible damage. However, because of the
critical nature of the wing leading edge, this cosmetic repair should be completed.
57-10-00 Page 2
© Cessna Aircraft Company Jun 1/2005
CESSNA AIRCRAFT COMPANY
SINGLE ENGINE
STRUCTURAL REPAIR MANUAL
B. Repairable damage: Dents or dings deeper and/or larger than specified above must be repaired. Skin
tears, cracks or penetrations must be repaired. Dings that include ribs must be repaired by reforming
or removal and replacement of the rib. Reevaluation of the skin after the repair of the understructure
will determine if the skin damage is negligible, repairable or requires replacement. Bonded ribs may be
removed by applying heat to the damaged area using a heat gun. Replacement ribs may be installed
using protruding head or dimpled flush rivets.
C. Damage Necessitating Replacement Of Parts: Where extreme damage has occurred, complete
leading edge skin panels should be replaced.
10. Wing Strut Damage Criteria
A. Negligible damage: Any smooth dents in the strut that are not more than 0.090 inch (2.03 mm) below
contour and circumscribable with not more than a 3.0 inch (76.2 mm) diameter circle is negligible
damage. Minor scratches which do not involve removal or displacement of strut material is negligible
damage. Because of the critical nature of the strut, any non-cosmetic scratches must be reworked.
B. Repairable damage: For grooves in the strut caused by fairings, strut may be repaired if groove is
less than 0.020 inch and is more than 0.75 inch from a rivet center. For lower trailing edge strut
damage (typically caused by door hitting strut), strut may be repaired if groove depth is less than 50%
of original material thickness.
C. Damage Necessitating Replacement Of Parts: For grooves in the strut caused by fairings, strut must
be replaced if groove exceeds 0.010 inch in depth and is less than 0.75 inch from a rivet center AND/
OR if groove exceeds 0.020 inch in depth and is more than 0.75 inch from a rivet center. For lower
trailing edge strut damage (typically caused by door hitting strut), strut must be replaced if groove is
deeper than 50% of the original material thickness.
11. Aileron Damage Criteria (Corrugated Skin Aileron)
A. Negligible damage: Any smooth dents in the aileron skin that are not more than 0.050 inch (1.27 mm)
below contour and circumscribable with not more than a 1.5 inch (38.1 mm) diameter circle - that
have no evidence of skin tears, cracks or skin penetrations and which do not include a corrugation -
constitute negligible damage.
B. Repairable damage: Dents or dings deeper and/or larger than specified must be repaired. Skin tears,
cracks or penetrations must be repaired. Dings that include corrugations are unlikely to be reworkable,
but may be repaired by replacing the damaged area. Corrugated skin material is available from
Cessna. Special care must be taken to minimize added weight since the surface must be rebalanced
after rework.
C. Damage Necessitating Replacement Of Parts: Because of the balance requirements, multiple areas
of damage may require replacement of skins to allow balance limits to be attained.
12. Aileron Damage Criteria (Model 206 Aileron)
A. Negligible damage: Any smooth dents in the aileron skin that are not more than 0.030 inch (0.76 mm)
below contour and circumscribable with not more than a 1.5 inch (38.1 mm) diameter circle - that
have no evidence of skin tears, cracks or skin penetrations which are not stress wrinkles and do not
interfere with internal structure - constitute negligible damage.
B. Repairable damage: Dents or dings deeper and/or larger than specified must be repaired. Skin tears,
cracks or penetrations must be repaired. Dings that include understructure (ribs) must be repaired
by reforming or removal and replacement of the rib. Revaluation of the skin after the repair of the
understructure will determine if the skin damage is negligible, repairable or replacement damage.
Special care must be taken to minimize added weight since the surface must be rebalanced after
rework.
C. Damage Necessitating Replacement Of Parts: Because of the balance requirements, multiple areas
of damage may require replacement of skins to allow balance limits to be attained.
57-10-00 Page 3
© Cessna Aircraft Company Jun 1/2005
CESSNA AIRCRAFT COMPANY
SINGLE ENGINE
STRUCTURAL REPAIR MANUAL
13. Wing Flap Damage Criteria (Corrugated Skin Flap)
A. Negligible damage: Any smooth dents in the flap skin that are not more than 0.050 inch (1.27 mm)
below contour and circumscribable with not more than a 1.5 inch (38.1 mm) diameter circle - that
have no evidence of skin tears, cracks or skin penetrations and which do not include corrugations -
constitute negligible damage.
B. Repairable damage: Dents or dings deeper and/or larger than specified may be repaired. Skin tears,
cracks or penetration must be repaired. Dings that include corrugations are unlikely to be reworkable,
but may be repaired by replacing the damaged area. Corrugated skin material is available from
Cessna.
C. Damage Necessitating Replacement Of Parts: Multiple repairs to the same area must not be made,
but a larger repair incorporating both repairs may be made. Decisions regarding replacement of parts
should be made based on the feasibility of repair verses complete replacement of the skin
14. Wing Flap Damage Criteria (Model 206 Flap)
A. Negligible damage: Any smooth dents in the flap skin that are not more than 0.030 inch (0.76 mm)
below contour and circumscribable with not more than a 1.5 inch (38.1 mm) diameter circle - that
have no evidence of skin tears, cracks or skin penetrations and which do not include corrugations -
constitute negligible damage.
B. Repairable damage: Dents or dings deeper and/or larger than specified may be repaired. Skin tears,
cracks or penetration must be repaired. Dings that include understructure (ribs) must be repaired
by reforming or removal and replacement of the rib. Reevaluation of the skin after the repair of the
understructure will determine if the skin damage is negligible, repairable or replacement damage.
C. Damage Necessitating Replacement Of Parts: Multiple repairs to the same area must not be made,
but a larger repair incorporating both repairs may be made. Skins must be replaced if damage extends
across more than one rib.
57-10-00 Page 4
© Cessna Aircraft Company Jun 1/2005
CESSNA AIRCRAFT COMPANY
SINGLE ENGINE
STRUCTURAL REPAIR MANUAL
WING FUEL BAY REPAIRS
1. Preparing Damaged Area In Wing Fuel Bay for Repair
A. Before performing any maintenance in fuel bay area, it will be necessary to defuel and purge the fuel
bay. To defuel and purge the fuel bay, proceed as follows:
WARNING: During all fuel system servicing procedures, fire fighting
equipment must be available.
WARNING: Always ground airplane prior to performing any maintenance of the
fuel system.
WARNING: Avoid drainage from residual fuel held in disconnected fuel lines;
this accumulation constitutes a fire hazard.
WARNING: Use NS-40 (RAS-4) (Snap-On Tools Corp., Kenosha, Wisconsin),
MIL-T-83483 (thread compound, anti- seize, graphite petrolatum),
or engine oil as a thread lubricant or to seal leaking connections.
Apply sparingly to all but first two threads of male fittings, being
careful not to allow entry of compound into fuel system.
NOTE: Covers or caps should be installed on lines and fittings to prevent entry of foreign material,
and to prevent damage to threads.
(1) Ground airplane to a suitable ground stake.
(2) Ensure airplane battery switch is in OFF position.
(3) Turn fuel selector valves to OFF position
(4) Remove fuel filler cap on bay that is to be defueled; insert defueling nozzle.
(5) Remove as much fuel as possible through filler opening.
(6) Remove drain valves from bottom side of fuel bay and drain remaining fuel into a clean, open
container. Use defueling nozzle to remove fuel from container.
(7) If necessary, repeat procedures for opposite wing.
WARNING: Purge fuel bays with an inert gas (argon or carbon dioxide)
prior to repairing fuel leaks to preclude possibility of
explosions.
(8) Insert inert gas supply hose into fuel filler opening.
(9) Allow gas to flow into bay for several minutes to remove all fuel vapors. Since argon or carbon
dioxide are heavier than air, these gasses will remain in bay during repair. Non-sparking tools
shall be used to make repairs (air motors, plastic scrapers, etc.).
NOTE: Portable vapor detectors are available to determine presence of explosive mixtures
and are calibrated for leaded fuel. The detectors can be used to determine when it is
safe to make repairs.
NOTE: During structural repair, parts must be predrilled, countersunk or dimpled, and
cleaned before being sealed and positioned for final installation.
(10) Remove all existing sealant from area to be sealed, leaving a taper to the remaining sealant.
The taper will allow a scarf bond and a continuous seal when the new sealant is applied.
NOTE: The best method of removing sealant is with a chisel-like tool made of hard fiber or
plexiglass. Remaining sealant can be removed with aluminum wool. Steel wool or
sandpaper must not be used.
57-11-00 Page 801
© Cessna Aircraft Company Jun 1/2005
CESSNA AIRCRAFT COMPANY
SINGLE ENGINE
STRUCTURAL REPAIR MANUAL
(11) Stop drill cracks using a No. 30 (0.128 inch) drill.
(12) Remove all ragged edges, dents, tears, cracks, and punctures.
(13) After removal of damaged area, leave edges parallel to any square or rectangular edge of the
unit.
NOTE: Damage adjacent to a previous repair requires removal of old repair and inclusion of
the entire area in the new repair.
(14) Round all corners.
(15) Smooth out abrasions.
(16) Vacuum thoroughly to remove all chips, filings, dirt, etc., from bay area.
(17) All surfaces to be sealed after repair should be thoroughly cleaned by wiping with a clean cloth
dampened with methyl propyl ketone (MPK), acetone or similar solvent, and dried with a clean
cloth before allowing solvent to evaporate. Always pour the solvent on the cloth to prevent
contaminating solvent. Do not allow cloth to drip. Never use contaminated solvent.
(18) Any repair that breaks the fuel bay seal will require resealing that bay area, refer to applicable
Maintenance Manual, Chapter 28, Fuel Tank Sealing - Maintenance Practices for sealing
materials and procedures.
57-11-00 Page 802
© Cessna Aircraft Company Jun 1/2005
CESSNA AIRCRAFT COMPANY
SINGLE ENGINE
STRUCTURAL REPAIR MANUAL
FUEL BAY SEALING DURING STRUCTURAL REPAIR
1. General
A. Any repair that breaks the fuel bay seal will necessitate resealing that bay area. Repair parts that
need sealing must be installed during the sealing operations. All joints within the boundary of the
bay, but which do not provide a direct fuel path out of the bay (such as fuel spar flanges and rib
flanges), must be fay-surface-sealed and fillet sealed on the fuel side. Fay surface sealing is applying
sealant to one mating part before assembly. Enough sealant must be applied so it will squeeze out
completely around joint when the parts are fastened together. The fillet seal is applied after the joint
is fay-surface-sealed and fastened. Sealer is (fillet) applied to the edge of all riveted joints, joggles,
bend reliefs, voids, rivets, or fasteners. All boundaries and any other place that could become a fuel
leak are sealed. The fay sealant need not be cured before applying the fillet sealer; however, the fay
sealant must be free of dirt or other contaminants before applying fillet seal. Fillets laid on intersecting
joints shall be joined together to produce a continuous seal. Sealant must be pressed into the joint to
displace any entrapped air bubbles. Use an extrusion gun to lay a bead along joint, and work out all
entrapped air with a small paddle to eliminate bubbles.
2. Integral Fuel Bay Sealant
A. Two types of sealants are used, one to seal the bay and the other to seal access doors, fuel quantity
transmitters, fuel inlet assemblies, and fuel test receptacle. The access door sealant is more pliable,
and will not adhere to metal as firmly as the bay sealant. This permits access doors, fuel quantity
transmitter, etc., to be removed without damage. Service Kit SK210-56, available from Cessna Parts
Distribution, contains Type I Class B-2 and Type VIII Class B-2 (access) sealants with Cessna Parts
Distribution, contains Type I Class B-1/2 and Type VIII Class B-12 (access) sealants with the proper
quantity of accelerator for each sealant.
WARNING: The accelerators contain heavy metal peroxides. Keep them away
from heat and flame. Use only in well-ventilated areas. Avoid skin
and eye contact. Wear eye shields. In case of eye contact, flush
generously with water and get prompt medical attention.
3. Mixing Sealant
A. Use all the accelerator and sealant in the container when mixing to ensure the proper ratio of
accelerator to sealant. Stir the accelerator to absorb all floating liquid before it is mixed with the
sealant. The accelerator can then be poured into the container of sealant for mixing; otherwise, a
wax-free container must be used. Stir accelerator and sealant until they become a uniform mixture.
Do not stir air into mixture so it forms bubbles; if bubbles appear, they must be removed.
CAUTION: Protect drain holes and fuel outlet screens when applying sealants.
NOTE: Work life of sealants contained in SK210-56 is 2 hours from the start of mixing. Work life
of sealants contained in SK210-101 is one-half hour from the start of mixing. This is based
on a standard condition of 77°F (25°C) and 50 percent relative humidi ty. An increase in
either temperature or humidity will shorten the work life of the sealants.
4. Applying Sealant
A. Use the following procedures as the best method for applying sealant.
(1) Apply fay surface sealant to one mating part, and install rivets or fasteners while sealant is still
within its work life.
NOTE: During sealing, the supply of mixed sealant must be monitored to be certain it has
not exceeded the normal work life. To check, use a small wooden paddle, or tongue
depressor, to gather a small amount of sealant. Touch this sealant to a piece of clean
sheet metal. If it adheres, sealant can still be used, if it doesn't adhere, then the
sealant has exceeded the allowable work life, and must not be used.
57-12-00 Page 801
© Cessna Aircraft Company Jun 1/2005
CESSNA AIRCRAFT COMPANY
SINGLE ENGINE
STRUCTURAL REPAIR MANUAL
(2) Apply a fillet seal to the repaired area on the inside of the bay.
(3) Apply a fay surface seal to access doors, fuel quantity transmitters, etc., if removed, and install.
(4) Allow sealant to cure; refer to Curing Time, for time requirements.
(5) Clean stains on outer surface.
(6) Test fuel bay for leaks as described in Testing Integral Fuel Bay.
5. Sealing Fuel Leaks
A. First determine the source of the fuel leak. Fuel can flow along a seam or structure of the wing for
several inches, making the leak source difficult to find. A stained area is an indication of the leak
source. Fuel leaks can be found by testing the complete bay as described in Testing Integral Fuel
Bay. Another method of detecting the source of a fuel leak is to remove access doors and blow with
an air nozzle from the inside of the bay in the area of the leak while soap bubble solution is applied to
the outside of the bay. After the leak source has been found, proceed as follows:
(1) Remove existing sealant in the area of the leak as described in Chapter 57, Wing Fuel Bay
Repairs.
(2) Clean the area and apply a fillet seal. Press sealant into leaking area with a small paddle,
working out all air bubbles.
(3) If leakage occurs around a rivet or bolt, restrike the rivet or loosen bolt, retorque, and reseal
around nutplate.
(4) Apply fay surface door sealant to access doors, fuel quantity transmitters, etc., if removed, and
install.
(5) Test fuel bay for leakage as outlined in Testing Integral Fuel Bay.
6. Curing Time
A. Class B-2 sealant has a maximum tack free time of 40 hours and a maximum cure time of 72 hours.
These values are based on a standard condition of 77°F (25°C) and 50 percent relative humidity.
B. Class B-1/2 sealant has a maximum tack free time of 10 hours and a maximum cure time of 30 hours.
These values are based on a standard condition of 77°F (25°C) and 50 percent relative humidity.
C. The cure of sealants can be accelerated by an increase in temperature and/or relative humidity. Warm
circulating air at a temperature not to exceed 140°F (60°C) may be used to ac celerate cure. Heat
lamps may be used if the surface temperature of the sealant does not exceed 140°F (60°C). At
temperatures above 120°F (49°C), the relative humidity wil l normally be so low (below 40 percent)
that sealant curing will be retarded. If necessary, the relative humidity may be increased by the use of
water containing less than 100 parts per million total solids and less the 10 parts per million chlorides.
7. Testing Integral Fuel Bay
A. The fuel system consists of two vented, integral fuel tanks (one in each wing). The following
procedures are for testing integral fuel bay.
(1) Remove vent line from vent fitting and cap fitting.
(2) Disconnect fuel lines from bay.
(3) To one of the bay fittings, attach a water manometer capable of measuring 20 inches of water.
(4) To the other bay fitting, connect a well-regulated supply of air (1/2 psi maximum, or 13.8 inches
of water). Nitrogen may be used where the bay might be exposed to temperature changes while
testing.
(5) Make sure filler cap is installed and sealed.
CAUTION: Do not attempt to apply pressure to the bay without a good regulator
and a positive shutoff in the supply line. Do not pressurize the fuel
bay to more than one-half psi or damage may occur.
(6) Apply pressure slowly until one-half psi is obtained.
(7) Apply a soap solution as required.
(8) Allow 15 to 30 minutes for pressure to stabilize.
(9) If bay holds for 15 minutes, without pressure loss, bay is acceptable.
57-12-00 Page 802
© Cessna Aircraft Company Jun 1/2005
CESSNA AIRCRAFT COMPANY
SINGLE ENGINE
STRUCTURAL REPAIR MANUAL
(10) Reseal and retest if any leaks are found.
57-12-00 Page 803
© Cessna Aircraft Company Jun 1/2005
CESSNA AIRCRAFT COMPANY
SINGLE ENGINE
STRUCTURAL REPAIR MANUAL
WING RIB
1. General
A. Flanged upper and lower edges of all ribs serve as cap strips in addition to providing rigidity to the rib.
The skin riveted or bonded directly to each rib flange provides the cellular strength for each successive
rib bay. The nose, center, and trailing rib segments are riveted together through the front and rear
spars to form the basic airfoil section. Spanwise, Alclad stringers stiffen the skin between ribs.
2. Wing Rib Damage Classification
A. Damage to the wing rib can be divided into three major categories and is detailed in Wing Damage
Classification.
3. Wing Rib Repair
A. Repairs to the wing rib are illustrated in Figure 801.
57-20-00 Page 801
© Cessna Aircraft Company Jun 1/2005

CESSNA AIRCRAFT COMPANY
SINGLE ENGINE
STRUCTURAL REPAIR MANUAL
Typical Rib Repair
Figure 801 (Sheet 1)
57-20-00 Page 802
© Cessna Aircraft Company Jun 1/2005

CESSNA AIRCRAFT COMPANY
SINGLE ENGINE
STRUCTURAL REPAIR MANUAL
Typical Rib Repair
Figure 801 (Sheet 2)
57-20-00 Page 803
© Cessna Aircraft Company Jun 1/2005
CESSNA AIRCRAFT COMPANY
SINGLE ENGINE
STRUCTURAL REPAIR MANUAL
WING SPARS
1. General
A. Front and rear spars are of riveted construction.
2. Damage Classification
A. Damage to the wing spar can be divided into three major categories and is detailed in Wing Damage
Classification.
3. Spar Repair
A. Repairs to the wing spar are illustrated in Figure 801.
57-21-00 Page 801
© Cessna Aircraft Company Jun 1/2005

CESSNA AIRCRAFT COMPANY
SINGLE ENGINE
STRUCTURAL REPAIR MANUAL
Wing Spar Repair
Figure 801 (Sheet 1)
57-21-00 Page 802
© Cessna Aircraft Company Jun 1/2005

CESSNA AIRCRAFT COMPANY
SINGLE ENGINE
STRUCTURAL REPAIR MANUAL
Wing Spar Repair
Figure 801 (Sheet 2)
57-21-00 Page 803
© Cessna Aircraft Company Jun 1/2005

CESSNA AIRCRAFT COMPANY
SINGLE ENGINE
STRUCTURAL REPAIR MANUAL
Wing Spar Repair
Figure 801 (Sheet 3)
57-21-00 Page 804
© Cessna Aircraft Company Jun 1/2005

CESSNA AIRCRAFT COMPANY
SINGLE ENGINE
STRUCTURAL REPAIR MANUAL
Wing Spar Repair
Figure 801 (Sheet 4)
57-21-00 Page 805
© Cessna Aircraft Company Jun 1/2005
CESSNA AIRCRAFT COMPANY
SINGLE ENGINE
STRUCTURAL REPAIR MANUAL
MEASURING WING TWIST - INSPECTION/CHECK
1. General
A. This section applies to the procedures required to perform a wing twist check and is applicable to both
wing. If damage has occurred to a wing, it is advisable to check the wing twist (washout).
B. Wing twist (washout) for the Model 172, 182/T182 and 206/T206 airplanes is 3°37’.
2. Tools, Equipment and Materials
A. The following equipment is required to accomplish the wing twist check procedure:
NAME NUMBER MANUFACTURER USE
32 Inch Straightedge Commercially Available Used to aid in determining
wing twist.
Protractor Head with
Bubble Level Commercially Available To ensure wings are level.
Bolts Machined to
Specific Lengths Fabricate Locally Used to determine wing
twist.
3. Model 172 Series Wing Twist Check Procedure
A. Mark Wing Station Reference Points (Refer to Figure 601)
(1) Locate WS 39.00. Make a mark, with a felt tip pen, approximately 0.50 inch aft of lateral row of
rivets in wing leading edge spar flange.
(2) Locate WS 100.50. Make a mark, with a felt tip pen, approximately 0.50 inch aft of lateral row
of rivets in wing leading edge spar flange.
(3) Locate outboard WS 207.00. Make a mark, with a felt tip pen, approximately 0.50 inch aft of
lateral row of rivets in wing leading edge spar flange.
B. Measure Wing Twist at Each Wing Station (Refer to Figure 601)
NOTE: While performing the following procedure, stay as far away as possible from the "canned"
areas of the wing.
(1) At WS 39.00:
(a) Grind bolt "A" to a dimension of 2.00 inches. Grind bolt "B" to a dimension of 1.00 inch.
Place these bolts 29.50 inches from each other on the upper edge of the straightedge and
secure using tape.
(b) Secure protractor to bottom of the straightedge.
(c) Hold straightedge parallel to wing station and place bolt "A" on mark.
(d) Set bubble in protractor to center, and lock protractor to hold this reading.
(2) At WS 100.50:
(a) Hold straightedge parallel to wing station.
(b) Place bolt "A" on mark, set protractor head against lower edge of straightedge and verify
bubble in protractor head indicates level.
(3) At WS 207.00:
(a) Remove bolt "A" from straightedge. Grind another bolt "A" to a dimension of 0.45 inch.
Place this bolt 24.00 inches from bolt "B" and secure to straightedge.
(b) Hold straightedge parallel to wing station and place bolt "A" on mark.
(c) Check to assure that protractor bubble is still centered. If proper twist is present, the
protractor readings will be the same (parallel).
NOTE: Forward or aft bolt may be lowered from wing 0.10 inch (maximum) to attain
level indication.
57-22-00 Page 601
© Cessna Aircraft Company Jun 1/2005
CESSNA AIRCRAFT COMPANY
SINGLE ENGINE
STRUCTURAL REPAIR MANUAL
4. Model 182 Series Wing Twist Check Procedure
A. Mark Wing Station Reference Points (Refer to Figure 602)
(1) Locate WS 39.00. Make a mark, with a felt tip pen, approximately 0.50inch aft of lateral row of
rivets in wing leading edge spar flange.
(2) Locate WS 100.50. Make a mark, with a felt tip pen, approximately 0.50 inch aft of lateral row
of rivets in wing leading edge spar flange.
(3) Locate outboard WS 207.00. Make a mark, with a felt tip pen, approximately 0.50 inch aft of
lateral row of rivets in wing leading edge spar flange.
B. Measure Wing Twist at Each Wing Station (Refer to Figure 602)
NOTE: While performing the following procedure, stay as far away as possible from the "canned"
areas of the wing.
(1) At WS 39.00:
(a) Grind bolt "A" to a dimension of 2.00 inches. Grind bolt "B" to a dimension of 1.00 inch.
Place these bolts 29.50 inches from each other on the upper edge of the straightedge and
secure using tape.
(b) Secure protractor to bottom of the straightedge.
(c) Hold straightedge parallel to wing station and place bolt "A" on mark.
(d) Set bubble in protractor to center, and lock protractor to hold this reading.
(2) At WS 100.50:
(a) Hold straightedge parallel to wing station.
(b) Place bolt "A" on mark, set protractor head against lower edge of straightedge and verify
bubble in protractor head indicates level.
(3) At WS 207.00:
(a) Remove bolt "A" from straightedge. Grind another bolt "A" to a dimension of 0.45 inch.
Place this bolt 24.00 inches from bolt "B" and secure to straightedge.
(b) Hold straightedge parallel to wing station and place bolt "A" on mark.
(c) Check to assure that protractor bubble is still centered. If proper twist is present, the
protractor readings will be the same (parallel).
NOTE: Forward or aft bolt may be lowered from wing 0.10 inch (maximum) to attain
level indication.
5. Model 206/T206 Series Wing Twist Check Procedure
A. Mark wing Station Reference Points (Refer to Figure 603)
(1) Locate WS 39.00. Make a mark, with a felt tip pen, approximately 0.50inch aft of lateral row of
rivets in wing leading edge spar flange.
(2) Locate WS 100.00. Make a mark, with a felt tip pen, approximately 0.50inch aft of lateral row
of rivets in wing leading edge spar flange.
(3) Locate outboard WS 207.00. Make a mark, with a felt tip pen, approximately 0.50inch aft of
lateral row of rivets in wing leading edge spar flange.
B. Measure Wing Twist at Each Wing Station (Refer to Figure 603)
NOTE: While performing the following procedure, stay as far away as possible from the "canned"
areas of the wing.
(1) At WS 39.00:
(a) Grind bolt "A" to a dimension of 2.00 inches. Grind bolt "B" to a dimension of 1.00 inch.
Place these bolts 29.50 inches from each other on the upper edge of the straightedge and
secure using tape.
(b) Secure protractor to bottom of the straightedge.
(c) Hold straightedge parallel to wing station and place bolt "A" on mark.
(d) Set bubble in protractor to center, and lock protractor to hold this reading.
57-22-00 Page 602
© Cessna Aircraft Company Jun 1/2005

CESSNA AIRCRAFT COMPANY
SINGLE ENGINE
STRUCTURAL REPAIR MANUAL
Measuring Model 172 Series Wing Twist
Figure 601 (Sheet 1)
57-22-00 Page 603
© Cessna Aircraft Company Jun 1/2005

CESSNA AIRCRAFT COMPANY
SINGLE ENGINE
STRUCTURAL REPAIR MANUAL
Measuring Model 182 Series Wing Twist
Figure 602 (Sheet 1)
57-22-00 Page 604
© Cessna Aircraft Company Jun 1/2005
CESSNA AIRCRAFT COMPANY
SINGLE ENGINE
STRUCTURAL REPAIR MANUAL
(2) At WS 100.00:
(a) Hold straightedge parallel to wing station.
(b) Place bolt "A" on mark, set protractor head against lower edge of straightedge and verify
bubble in protractor head indicates level.
(3) At WS 207.00:
(a) Remove bolt "A" from straightedge. Grind another bolt "A" to a dimension of 0.66 inch.
Place this bolt 20.00 inches from bolt "B" and secure to straightedge.
(b) Hold straightedge parallel to wing station and place bolt "A" on mark.
(c) Check to assure that protractor bubble is still centered. If proper twist is present, the
protractor readings will be the same (parallel).
NOTE: Forward or aft bolt may be lowered from wing 0.10 inch (maximum) to attain
level indication.
57-22-00 Page 605
© Cessna Aircraft Company Jun 1/2005

CESSNA AIRCRAFT COMPANY
SINGLE ENGINE
STRUCTURAL REPAIR MANUAL
Measuring Model 206/T206 Series Wing Twist
Figure 603 (Sheet 1)
57-22-00 Page 606
© Cessna Aircraft Company Jun 1/2005
CESSNA AIRCRAFT COMPANY
SINGLE ENGINE
STRUCTURAL REPAIR MANUAL
WING STRINGER REPAIRS
1. Stringer Damage Classification
A. Damage to the wing stringers can be divided into three major categories and is detailed in Wing
Damage Classification.
2. Stringer Repair
A. Repairs to wing stringer are similar to repairs to fuselage stringers. Refer to Chapter 52, Stringer and
Channel Repair, Figure 801 for repair illustrations.
57-23-00 Page 801
© Cessna Aircraft Company Jun 1/2005
CESSNA AIRCRAFT COMPANY
SINGLE ENGINE
STRUCTURAL REPAIR MANUAL
AUXILIARY SPAR REPAIRS
1. General
A. The auxiliary spar is constructed of formed sheet metal, and is behind the trailing edge ribs from
approximately WS 100.50 to 208.00. The auxiliary spar is attached to upper skins, lower skins and
other wing structure using rivets.
2. Auxiliary Spar Damage
A. Damage to the auxiliary spar can be divided into three major categories and is detailed in Wing
Damage Classification.
3. Auxiliary Spar Repair
A. Repairs to the auxiliary spar are illustrated in Figure 801.
57-24-00 Page 801
© Cessna Aircraft Company Jun 1/2005

CESSNA AIRCRAFT COMPANY
SINGLE ENGINE
STRUCTURAL REPAIR MANUAL
Auxiliary Spar Repair
Figure 801 (Sheet 1)
57-24-00 Page 802
© Cessna Aircraft Company Jun 1/2005
CESSNA AIRCRAFT COMPANY
SINGLE ENGINE
STRUCTURAL REPAIR MANUAL
LEADING EDGE REPAIRS
1. Leading Edge Damage Classification
A. Damage to the leading edge can be divided into three major categories and is detailed in Wing Damage
Classification.
2. Leading Edge Repairs
A. Repairs to the leading edge are illustrated in Figure 801.
3. Notes and Repair Limits
A. The following notes and repair limits are applicable to lading edge repairs:
(1) Dimple leading edge skin and filler material, counter sink the doubler.
(2) Use MS20426AD4 rivets to install filler except where bucking is impossible. Use blind rivets
where regular rivets cannot be bucked.
(3) Contour must be maintained. After repair has been completed, use epoxy filler as necessary
and sand smooth before painting.
(4) Vertical size of patch is limited by ability to install doubler clear of front spar.
(5) Lateral size is limited to seven inches across trimmed out area.
(6) Number of repairs is limited to one per bay.
57-25-00 Page 801
© Cessna Aircraft Company Jun 1/2005

CESSNA AIRCRAFT COMPANY
SINGLE ENGINE
STRUCTURAL REPAIR MANUAL
Leading Edge Repair
Figure 801 (Sheet 1)
57-25-00 Page 802
© Cessna Aircraft Company Jun 1/2005
CESSNA AIRCRAFT COMPANY
SINGLE ENGINE
STRUCTURAL REPAIR MANUAL
BONDED LEADING EDGE REPAIR
1. General
A. Bonded leading edges are used on the Model 182 and Model 206/T206 series of airplanes. The
following repairs apply to these airplanes only.
2. Bonded Leading Edge Damage Classification
A. Damage to the bonded leading edge can be divided into three major categories and is detailed in
Wing Damage Classification.
3. Bonded Leading Edge Repair
A. Repairs to the bonded leading edge are illustrated in Figure 801.
57-26-00 Page 801
© Cessna Aircraft Company Jun 1/2005

CESSNA AIRCRAFT COMPANY
SINGLE ENGINE
STRUCTURAL REPAIR MANUAL
Bonded Leading Edge Repair
Figure 801 (Sheet 1)
57-26-00 Page 802
© Cessna Aircraft Company Jun 1/2005
CESSNA AIRCRAFT COMPANY
SINGLE ENGINE
STRUCTURAL REPAIR MANUAL
FLAP LEADING EDGE REPAIR
1. Flap Leading Edge Damage Classification
A. Damage to the wing flap can be divided into three major categories and is detailed in Wing Damage
Classification.
2. Flap Repairs
A. Repairs to the flap leading edge are illustrated in Figure 801. Repairs to the corrugated skin are
illustrated in Chapter 51, Typical Skin Repairs, Figure 802.
57-27-00 Page 801
© Cessna Aircraft Company Jun 1/2005
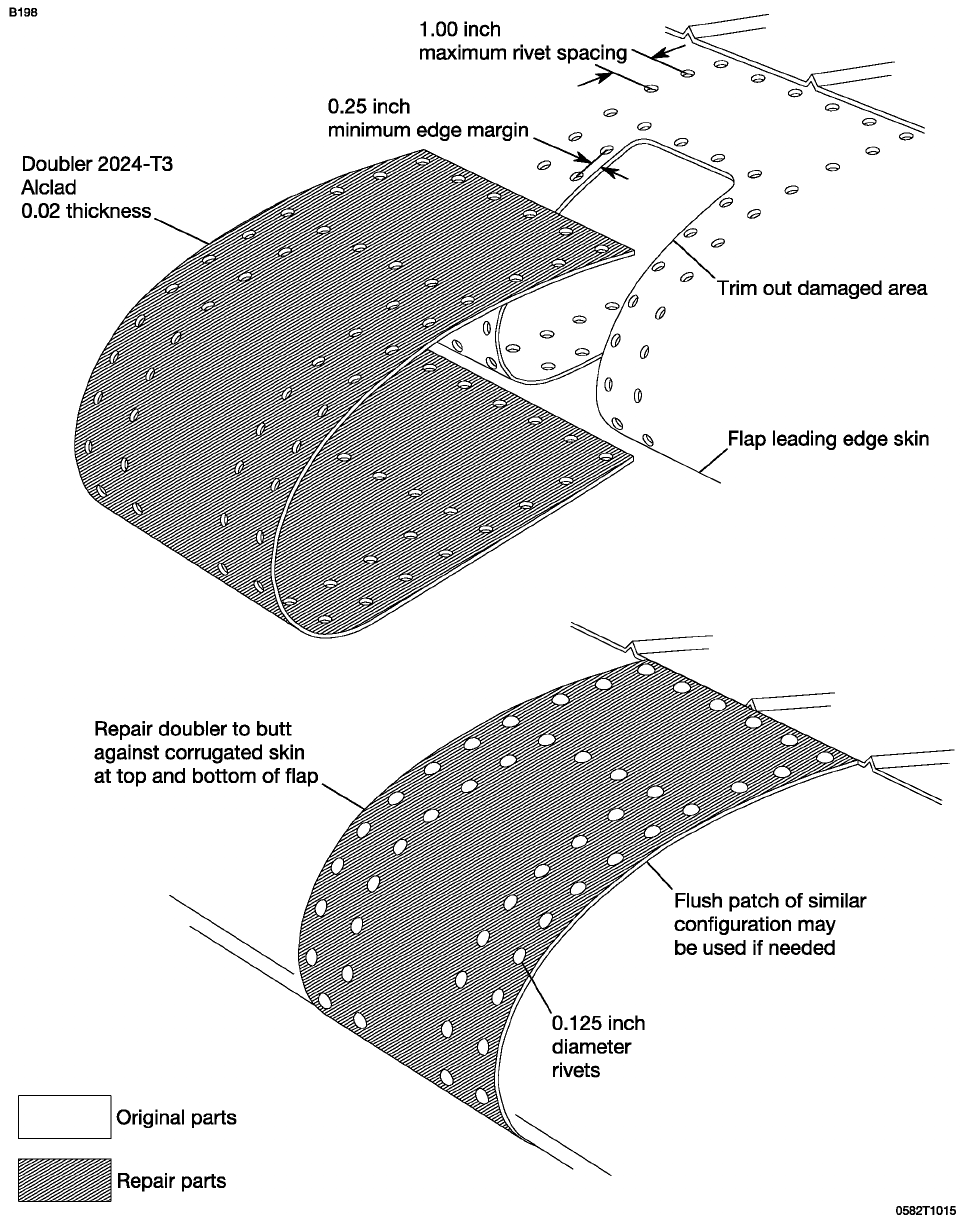
CESSNA AIRCRAFT COMPANY
SINGLE ENGINE
STRUCTURAL REPAIR MANUAL
Flap Leading Edge Repair
Figure 801 (Sheet 1)
57-27-00 Page 802
© Cessna Aircraft Company Jun 1/2005
CESSNA AIRCRAFT COMPANY
SINGLE ENGINE
STRUCTURAL REPAIR MANUAL
FLAPS AND AILERONS
1. General
A. Each wing flap assembly is constructed of a spar, ribs, upper and lower skins and leading edge skin.
B. Each aileron assembly is constructed of a single spar, ribs, upper and lower skin. Balance weights
are installed in the lower inboard leading edge and are retained with screws.
C. Flight control surfaces which have been repaired or replaced must be balanced in accordance with
procedures outlined in Chapter 51, Flight Control Surface Balancing.
2. Damage Criteria
A. Damage to the flaps and ailerons can be divided into three major categories and is detailed in Wing
Damage Classification.
3. Flap and Aileron Repair
A. Skin damage, exceeding that considered negligible, that can be repaired with minor patches can be
considered repairable. Flush skin patches are illustrated in Chapter 51, Typical Skin Repairs, Figure
801. A typical rib repair is illustrated in Chapter 51, Control Surface Repair, Figure 801, trailing edge
repair in Chapter 51, Control Surface Repair, Figure 802, are typical flap and aileron repairs.
B. Flight control surfaces which have been repaired or replaced must be balanced in accordance with
procedures outlined in Chapter 51, Flight Control Surface Balancing.
57-40-00 Page 801
© Cessna Aircraft Company Jun 1/2005
CESSNA AIRCRAFT COMPANY
SINGLE ENGINE
STRUCTURAL REPAIR MANUAL
WING LIFT STRUTS
1. General
A. The wing lift struts consist of 6061-T6 tube stock formed into an aerodynamic shape. Attach fittings
are machined from 7075-T73 bar stock and attached to the strut tubes.
2. Wing Strut Damage Classification
A. Damage to the wing lift strut can be divided into three major categories and is detailed in Wing Damage
Classification.
57-50-00 Page 801
© Cessna Aircraft Company Jun 1/2005
CHAPTER
71
POWER PLANT
CESSNA AIRCRAFT COMPANY
SINGLE ENGINE
STRUCTURAL REPAIR MANUAL
LIST OF EFFECTIVE PAGES
CHAPTER-SECTION-SUBJECT PAGE DATE
71-Title
71-List of Effective Pages
71-Record of Temporary Revisions
71-Table of Contents
71-00-00 Page 1 Jun 1/2005
71-10-00 Page 801 Jun 1/2005
71-20-00 Pages 801-804 Jun 1/2005
71 - LIST OF EFFECTIVE PAGES Page 1 of 1
© Cessna Aircraft Company Jun 1/2005

CESSNA AIRCRAFT COMPANY
MAINTENANCE MANUAL
RECORD OF TEMPORARY REVISIONS
Temporary Revision
Number Page Number Issue Date By Date Removed By
CESSNA AIRCRAFT COMPANY
SINGLE ENGINE
STRUCTURAL REPAIR MANUAL
CONTENTS
POWERPLANT-GENERAL...................................................... 71-00-00Page1
General.................................................................... 71-00-00Page1
ENGINE COWLING REPAIRS . . . . . . . . . . . . . . . . . . . . . . . . . . . . . . . . . . . . . . . . . . . . . . . . . . . . 71-10-00 Page 801
General.................................................................... 71-10-00Page801
Repair of Cowling Skins . . . . . . . . . . . . . . . . . . . . . . . . . . . . . . . . . . . . . . . . . . . . . . . . . . . . . 71-10-00 Page 801
Repair of Reinforcement Angles . . . . . . . . . . . . . . . . . . . . . . . . . . . . . . . . . . . . . . . . . . . . . . 71-10-00 Page 801
DYNAFOCAL-TYPE ENGINE MOUNT REPAIRS . . . . . . . . . . . . . . . . . . . . . . . . . . . . . . . . . . . 71-20-00 Page 801
General.................................................................... 71-20-00Page801
Engine Mount Repairs. . . . . . . . . . . . . . . . . . . . . . . . . . . . . . . . . . . . . . . . . . . . . . . . . . . . . . . 71-20-00 Page 801
CONTENTS Page 1 of 1
© Cessna Aircraft Company Jun 1/2005
CESSNA AIRCRAFT COMPANY
SINGLE ENGINE
STRUCTURAL REPAIR MANUAL
POWERPLANT - GENERAL
1. General
A. Single engine airplanes produced from 1996 and On use Lycoming powerplants. These powerplants
are attached to the fuselage by dynafocal mounts (172R, 172S, 182S, 182T and T182T) or by sheet
metal bed mounts (206H and T206H).
B. This chapter covers structural repair to the cowlings (172R, 172S, 182S, 182T and T182T), and
structural repair to the welded engine mounts (172R, 172S, 182S, 182T and T182T). For repair
information not covered in this manual, contact Cessna Propeller Aircraft Product Support, P.O. Box
7706, Wichita, KS 67277. Telephone(316) 517-5800 or Facsimile (316) 942-9006.
71-00-00 Page 1
© Cessna Aircraft Company Jun 1/2005
CESSNA AIRCRAFT COMPANY
SINGLE ENGINE
STRUCTURAL REPAIR MANUAL
ENGINE COWLING REPAIRS
1. General
A. This section provides repair procedures for the cowl skins and reinforcement angles.
2. Repair of Cowling Skins
A. Cowl halves are made of formed aluminum skin. If extensively damaged, complete sections of cowling
must be replaced. Standard insert-type skin patches, however, may be used if repair parts are formed
to fit. Small cracks may be stop drilled and dents straightened if they are reinforced on the inner side
with a doubler of the same material.
3. Repair of Reinforcement Angles
A. Due to their small size, cowl reinforcement angles should be replaced (rather than repaired) if they
become damaged.
71-10-00 Page 801
© Cessna Aircraft Company Jun 1/2005
CESSNA AIRCRAFT COMPANY
SINGLE ENGINE
STRUCTURAL REPAIR MANUAL
DYNAFOCAL-TYPE ENGINE MOUNT REPAIRS
1. General
A. The engine mount is fabricated from 4130 chrome-molybdenum steel tubing. The mount attaches to
the firewall at four points and to the engine using rubber isolation mounts at four points.
NOTE: Repair by gas welding is acceptable.
2. Engine Mount Repairs
A. The following procedures are to be used when making repairs to the engine mount. Refer to Figure
801.
(1) All welding on the engine mounts should be of the highest quality, since the tendency of vibration
will accentuate any minor defect present and cause fatigue cracks. Engine mount members
are preferably repaired by using larger diameter replacement tube welds. However, reinforced
30-degree scarf welds in place of the fishmouth welds are considered satisfactory for engine
mount repair work.
(2) Minor damage, such as a crack adjacent to an engine attaching lug, may be repaired by
rewelding the tube and extending a gusset past the damaged area. Extensively damaged parts
must be replaced.
(3) Engine mounting lugs and engine mount-to-fuselage attach fittings should be replaced, not
repaired.
(4) For information on damage beyond the scope of these repairs, consult Cessna Propeller
Aircraft Product Support, P.O. Box 7706, Wichita, KS 67277 USA, Telephone (316) 517-5800
or Facsimile (316) 942-9006.
71-20-00 Page 801
© Cessna Aircraft Company Jun 1/2005

CESSNA AIRCRAFT COMPANY
SINGLE ENGINE
STRUCTURAL REPAIR MANUAL
Typical Engine Mount Repairs
Figure 801 (Sheet 1)
71-20-00 Page 802
© Cessna Aircraft Company Jun 1/2005

CESSNA AIRCRAFT COMPANY
SINGLE ENGINE
STRUCTURAL REPAIR MANUAL
Typical Engine Mount Repairs
Figure 801 (Sheet 2)
71-20-00 Page 803
© Cessna Aircraft Company Jun 1/2005

CESSNA AIRCRAFT COMPANY
SINGLE ENGINE
STRUCTURAL REPAIR MANUAL
Typical Engine Mount Repairs
Figure 801 (Sheet 3)
71-20-00 Page 804
© Cessna Aircraft Company Jun 1/2005
