Cinemachine User Manual
CinemachineUserManual
CinemachineUserManual
CinemachineUserManual
CinemachineUserManual
CinemachineUserManual
User Manual:
Open the PDF directly: View PDF ![]() .
.
Page Count: 63
v2.1 User Manual
What is Cinemachine?
Cinemachine is a suite of ‘smart’ procedural modules which allow you to dene camera
behaviours which will follow your direction even under variable scenarios. You can setup shots
which track and compose motion in realtime, like AI camera operators. The procedural nature
makes them bug-resistant as they always work to make the shot even if things change.
The modules work for dynamic in-game gameplay cameras across all genres - first person, 2D,
3rd person, side-scroller, top down, RTS, whatever your project is, if it has a camera you’ll be
spend more time on creating content than coding cameras with Cinemachine. Change an
animation, vehicle speed, terrain - whatever - and Cinemachine will dynamically make the shot.
History
Cinemachine has been in development over a number of years across multiple projects We’ve
been designing camera systems for almost 20 years and have shipped millions of AAA titles
across numerous genres. The Cinemachine team has an award winning cinematographer and
a senior engineer with heavy math skills. Also, we love this stuff to bits.
Take a quick look!
Here’s a 0-60 video showing install and setup of a character with a tracking camera
Quick preview of some new features There’s a number of tutorials on YouTube
1

Mission
Our mission with Cinemachine is built to be an entirely unied camera system bridging
gameplay, cutscenes, from fully procedural cameras to entirely canned sequences and
everything in between.
Example Scenes
Please have a look at our example scenes. They are shipped with the package under
Assets/Cinemachine/Examples. This folder also includes some handy noise presets that you
can use as a starting point for implementing camera noise.
Forums
We have a busy discussion area on the forums.
https://forum.unity3d.com/forums/cinemachine.136/
Frequently asked questions
Do we have to replace our camera system with Cinemachine?
No, Cinemachine can work alongside your existing camera system and you can seamlessly
blend back and forth between both systems. If you wrote some camera tech you love but want
Cinemachine for something else, no problem, mix the two together.
Isn’t having all these cameras around kind of heavy?
No, in fact it’s incredibly light. Each virtual camera has a super low overhead - make as many
as you want. If you are hypersensitive to performance you can disable all the cameras and just
enable the ones you wish to have running at any given moment for extreme performance
How does it all work?
Cinemachine works a bit like a marionette system for your existing Main Camera. It doesn’t
create any new cameras, only new virtual ones. The Cinemachine ‘Brain’ component is
automatically added to the Main Camera in your scene and Cinemachine works with all its
camera blending, priority, mixing magic to deliver a set of transforms to your Main Camera.
Because it’s a completely unified system, you can blend from any camera type to any other.
Seamlessly go from an in-game freelook system to a keyframed cutscene camera and back.
Any combination is possible and the options are limitless.
Can I really save all my tunings in Play mode?
Yes! Almost everything in Cinemachine saves in play mode so jump in and tune some cameras
while the game is running. When you think about it, it’s really the only way to do it. We want
you to get right into the zone and massage cameras at any point in your game - while you’re in
there playing it.

Our engineer spent a long time on our camera system and doesn’t want to change it.
We hear this a lot. It’s never fun to throw code away but you need to think about the big picture
of your project. If you can get up and running really quickly creating and tuning cameras without
further bothering your engineer, isn’t that an advantage? It’s doubtful your existing system
behaves exactly as desired in every scenario so there’s yet more coding to be done anyway.
Cameras are such a huge part of your project and good cameras can make the difference
between an OK game and an amazing one. Try running Cinemachine next to your existing
cameras and see what it’s like. If that engineer is still reluctant share this idea with them -
Rockets eject perfectly great booster sections to get into space. That camera code helped
push you into orbit! Great scenes are often left on the editing room floor. Make the decision
that’s best for your project.
Can I mix between gameplay and cutscene cameras?
You can mix between any cameras. Seamless transitions from gameplay to cutscene and back
are as easy as turning on a camera or playing a Timeline with CM clips on it.
How do you typically configure the cameras for a project?
Instead of one big ball-of-code camera trying to do everything, you make lots of custom
vcams for every given moment and turn them on when needed. Blending or cutting to a
new camera is as easy as turning one on. If the priority is the same or higher, CM will use the
new camera and blend to it based on how you’ve defined the default blend or any other blends
in the Custom Blends
section of the CM ‘Brain’ on the Main Camera.
I don’t want to drastically change the camera in X scenario, I just want a little tweak
Camera changes can be really subtle. You can duplicate your current vcam, change the FOV
or Composition a bit and then blend to that camera just when a player enters a trigger volume or
for any other part of your game. You can turn on vcams with only the subtlest of differences to
get exactly the behavior you want in whatever situation. Projects should have many vcams all
with changes as needed, ready and waiting for whatever game scenario demands them.
When would I use the State Driven Camera? Why have so many camera rigs?
The SDC makes it super easy to link animations and states to different cameras. Picture your
character’s local-motion system and orbit camera. It makes your game feel so much more alive
when the camera shakes a bit more when your character is running, when the camera pulls
back to a larger orbit when they go outside, when the camera gets all close when the character
is sneaking around. The SDC allows you to craft the cameras to best suit what your player is
doing.
For example, one project in dev had 20+ different camera rigs all listening to animations and
game events. Stand, walk, sprint, jump, attack, >3 enemies arrive, inside, outside, trigger
volumes in particular areas of the map, health <20%, etc. So much control is easily possible.

Table of Contents
What is Cinemachine? 1
History 1
Mission 2
Example Scenes 2
Forums 2
Frequently asked questions 2
Table of Contents 4
Overview 6
Cinemachine Virtual Camera 6
Cinemachine Brain 6
Installation and Getting Started 7
User Guide 8
Basic Virtual Cameras 9
CinemachineVirtualCamera 10
LensSettings 11
CinemachineComposer 12
CinemachineTransposer 14
CinemachineBasicMultiChannelPerlin 17
NoiseSettings 18
NoiseSettings.NoiseParams 19
NoiseSettings.TransformNoiseParams 19
Brains and Blending 20
CinemachineBrain 20
CinemachineBlendDefinition 22
CinemachineBlenderSettings 22
CinemachineBlenderSettings.CustomBlend 23
Follow Cams and Player Input 24
CinemachineOrbitalTransposer 24
AxisState 26
AxisState.Recentering 27
CinemachineFreeLook 27
Tracked Dolly 30
CinemachineTrackedDolly 31
CinemachineTrackedDolly.AutoDolly 32

CinemachinePath 33
CinemachinePath.Waypoint 33
CinemachineSmoothPath 34
CinemachineSmoothPath.Waypoint 34
CinemachinePathBase.Appearance 34
State-Driven Camera 35
CinemachineStateDrivenCamera 39
Collision Avoidance and Shot Evaluation 40
CinemachineCollider 40
CinemachineConfiner 41
CinemachineClearShot 42
Multiple Target Objects 44
CinemachineTargetGroup 44
CinemachineTargetGroup.Target 45
CinemachineGroupComposer 46
2D Environments 48
CinemachineFramingTransposer 48
Post-Processing Stack V1 51
CinemachinePostFX 51
Post Processing Stack V2 54
CinemachinePostProcessing 54
And the Rest 54
CinemachinePOV 54
CinemachineSameAsFollowTarget 55
This is a CinemachineComponent in the Aim section of the component pipeline. Its job is
to match the orientation of the Follow target.CinemachineFollowZoom 55
CinemachineDollyCart 55
CinemachineMixingCamera 56
CinemachineBlendListCamera 57
CinemachineExternalCamera 57
CinemachineStoryboard 58
SaveDuringPlay 58
Timeline Integration 60
Special Environments 62
Top-Down Games 62
Split-screen 62
Scripting 63

Overview
Cinemachine is a modular suite of camera tools for Unity which give AAA game quality controls
for every camera in your project. It’s an easy to install plugin which lets you add functionality to
cameras you’ve already got, or make new ones with amazing behaviors.
Cinemachine has been designed to be the entire unified camera system in your project but can
be used alongside your existing cameras as well. If you have a bunch of camera stuff working
already and just want to use Cinemachine for cutscenes or something specific, no problem at
all. However when you use it across your project it allows you to blend any camera to any other
camera in a gameplay-to-cutscene-and-back-seamlessly kind of way.
The heart of Cinemachine is two components; everything else builds on those. They are:
Cinemachine Virtual Camera
The Virtual Camera is a shot, a single camera. It has child modules which you can turn on to
make it do things like procedurally track and compose objects, follow things and shake with
procedural noise. Together they are a very powerful combination and can yield an unlimited
number of results.
These modules have been designed, re-designed and re-designed again to offer the widest
range of possibilities with the least number of controls. The math driving these camera
behaviours is complex and sophisticated, having gone through many different scenarios across
all sorts of games.
The reason for the ‘virtual’ camera scenario is because Unity renders from the main camera.
Out-of-the-box Unity is limited to only one camera being active camera at a time – which makes
the blending of two shots effectively impossible. Cinemachine is engineered to solve this and
provide a wealth of simple, powerful functionality at the same time, allowing unsurpassed
camera behaviors which are fast and easy to setup.
Cinemachine Brain
This is the central Cinemachine component that does all the magic. It’s a component attached
to the Unity camera and it monitors all the Virtual Cameras in the scene and drives the Unity
camera using the shot it likes best.
Installation and Getting Started
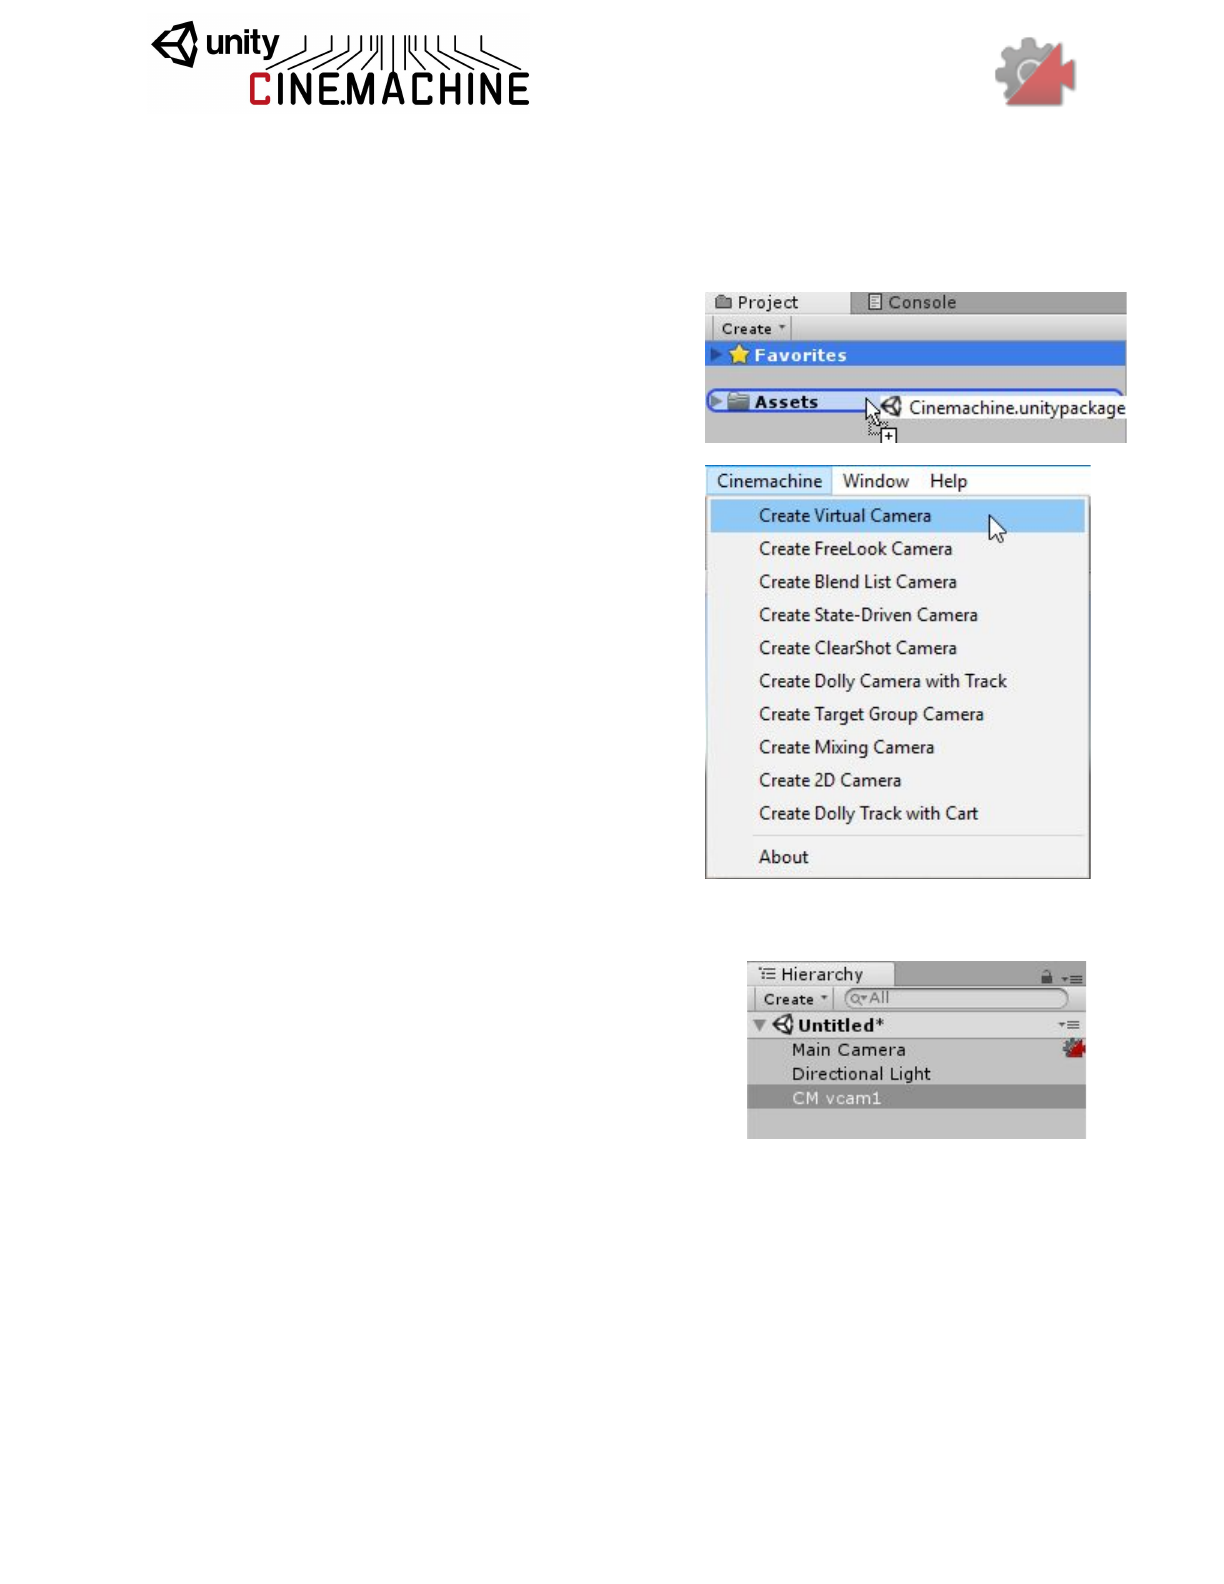
Installing Cinemachine is easy.
1. Drag the Cinemachine unitypackage onto your
assets folder in Unity, OR Install it directly:
Assets->Import Package ->Custom Package…
and point to the Cinemachine unitypackage.
2. Setup the Cinemachine Virtual Camera
environment: Cinemachine-> Create Virtual
Camera. This is also the way to create
additional Cinemachine shots.
3. That’s it! You now have Cinemachine installed
on your machine.
You will notice two changes to your scene:
1. The main camera has a little icon next to it in the
scene hierarchy. This indicates that your camera
has been Cinemachine-enabled using a new
component: the CinemachineBrain.
2. A new GameObject CM vcam1
with a
CinemachineVirtualCamera component, which is a
single camera or shot.
There’s more info below on how to use these new things. Don’t forget to check out the example
scenes included in Cinemachine/Examples/Scenes, and please visit our user forum at
https://forum.unity3d.com/forums/cinemachine.136/
User Guide
This guide is organized in logical sections that cover the ground from simple basic setups all the
way through to advanced cinematic features of Cinemachine. Each of the classes and
behaviours that make up Cinemachine are described in detail.
Cinemachine is by no means limited to the classes and behaviours described here. It has an
open pipeline architecture, and we look forward to seeing the exciting new behaviours and
intelligence that our users will build into the system.
Basic Virtual Cameras
Each virtual camera is a ‘shot’, or a single camera. You can animate them directly or blend two
together to create camera moves. The reason they are ‘virtual’ cameras is to allow for blending,
camera selection based on priorities and the ability to have Cinemachine hold multiple cameras
in memory with the final product being presented to the current active Unity camera(s) which are
rendering.
Cinemachine allows you to create an unlimited number of virtual cameras, blend them together
with the result being presented to the single Unity camera. It does all this automatically.
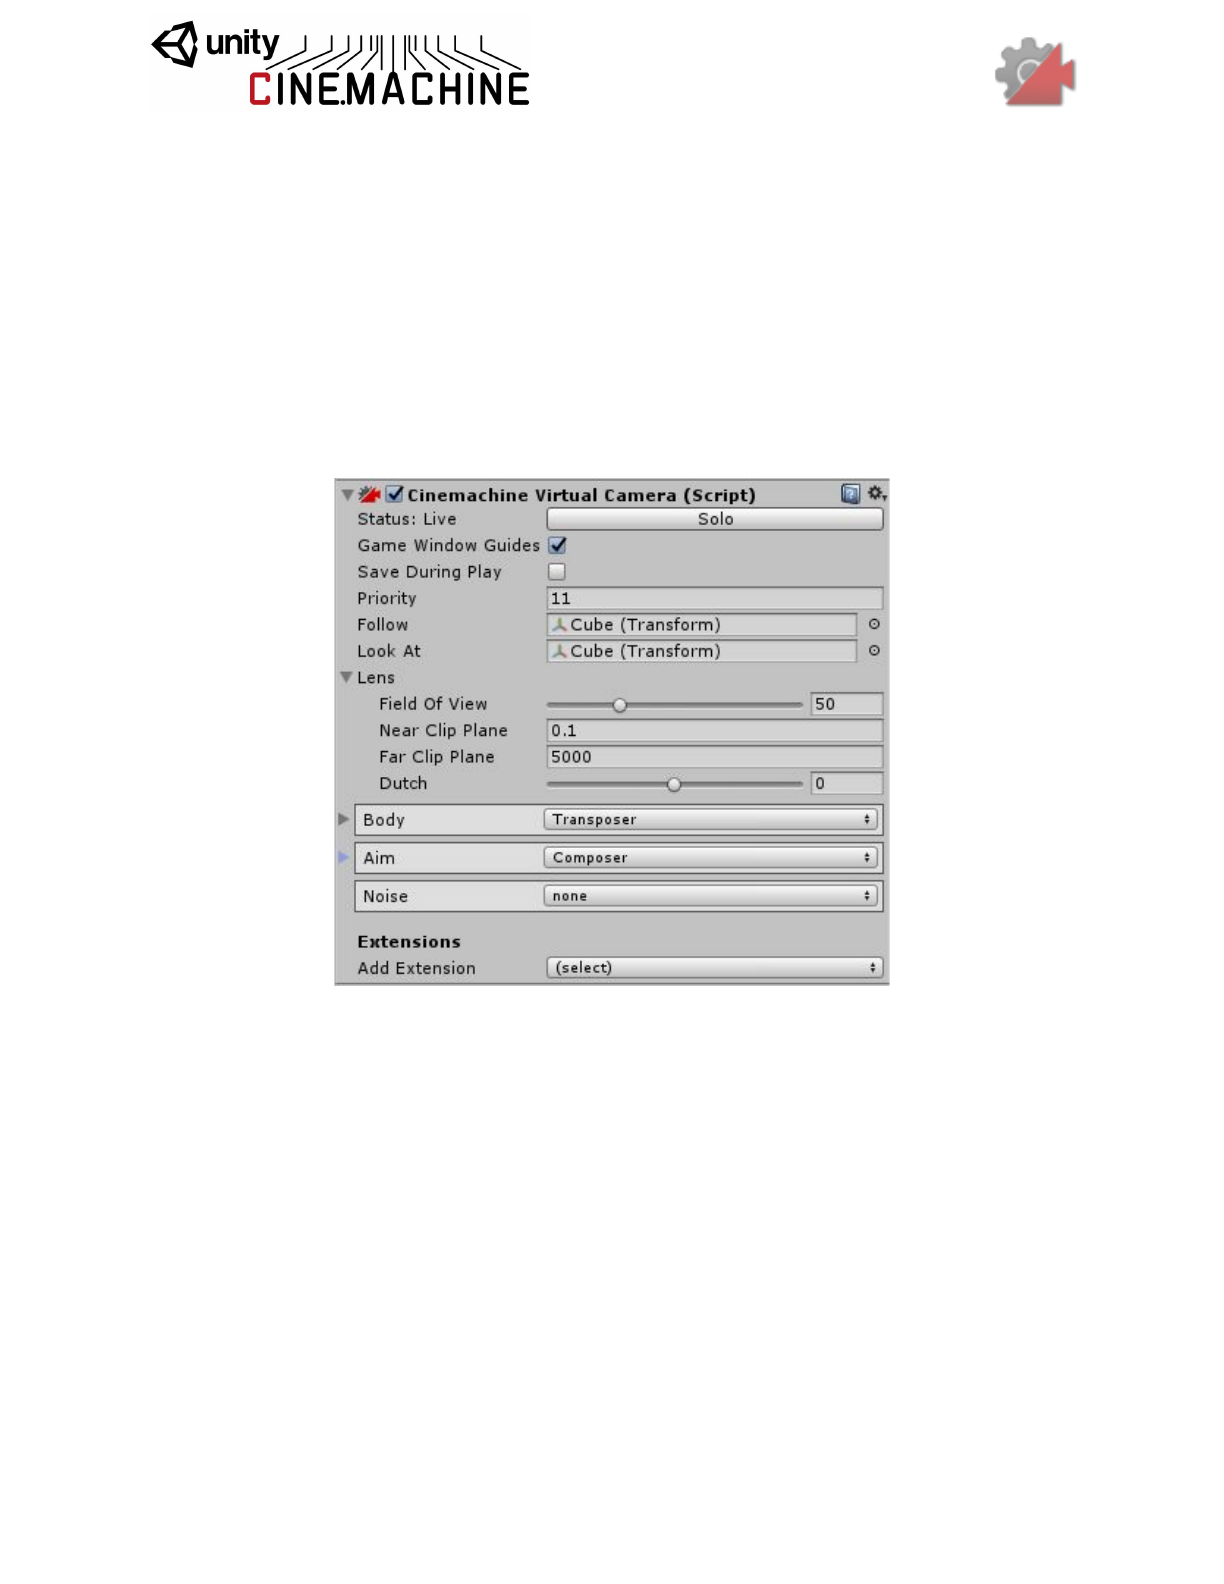
Key components of the Virtual Camera are:
●Priority: The priority of this shot. Equal or Higher value camera priorities compared to
the current camera priority will be activated. This allows for camera state machine
setups where cameras are called based on trigger volumes, animations, health states,
etc. Important cameras will trigger over lower priority ones.
●Lens Settings: What kind of lens to use for this shot: FOV, clipping planes, and dutch
(camera roll). Post-processing effects can also be included here.
●Body: Where the camera is placed in your scene, and procedural ways to ‘mount’ your
camera to any object and move the camera with it.
●Aim: What the camera looks at, and procedural ways to track and compose any
subject.
●Noise: Procedural Perlin multi-layered noise system for handheld behaviors, shakes,

and vibrations.
● Extensions: These are add-ons to the basic Cinemachine pipeline. Post-Processing
and Collision Avoidance are examples of standard extensions shipped with
Cinemachine. The API is open, so that you can author your own extensions as well.
The Solo Button in the Virtual Camera inspector panel will make the virtual camera temporarily
Live so that you can have immediate visual feedback in the game view when tweaking the
behavioural parameters of the camera.
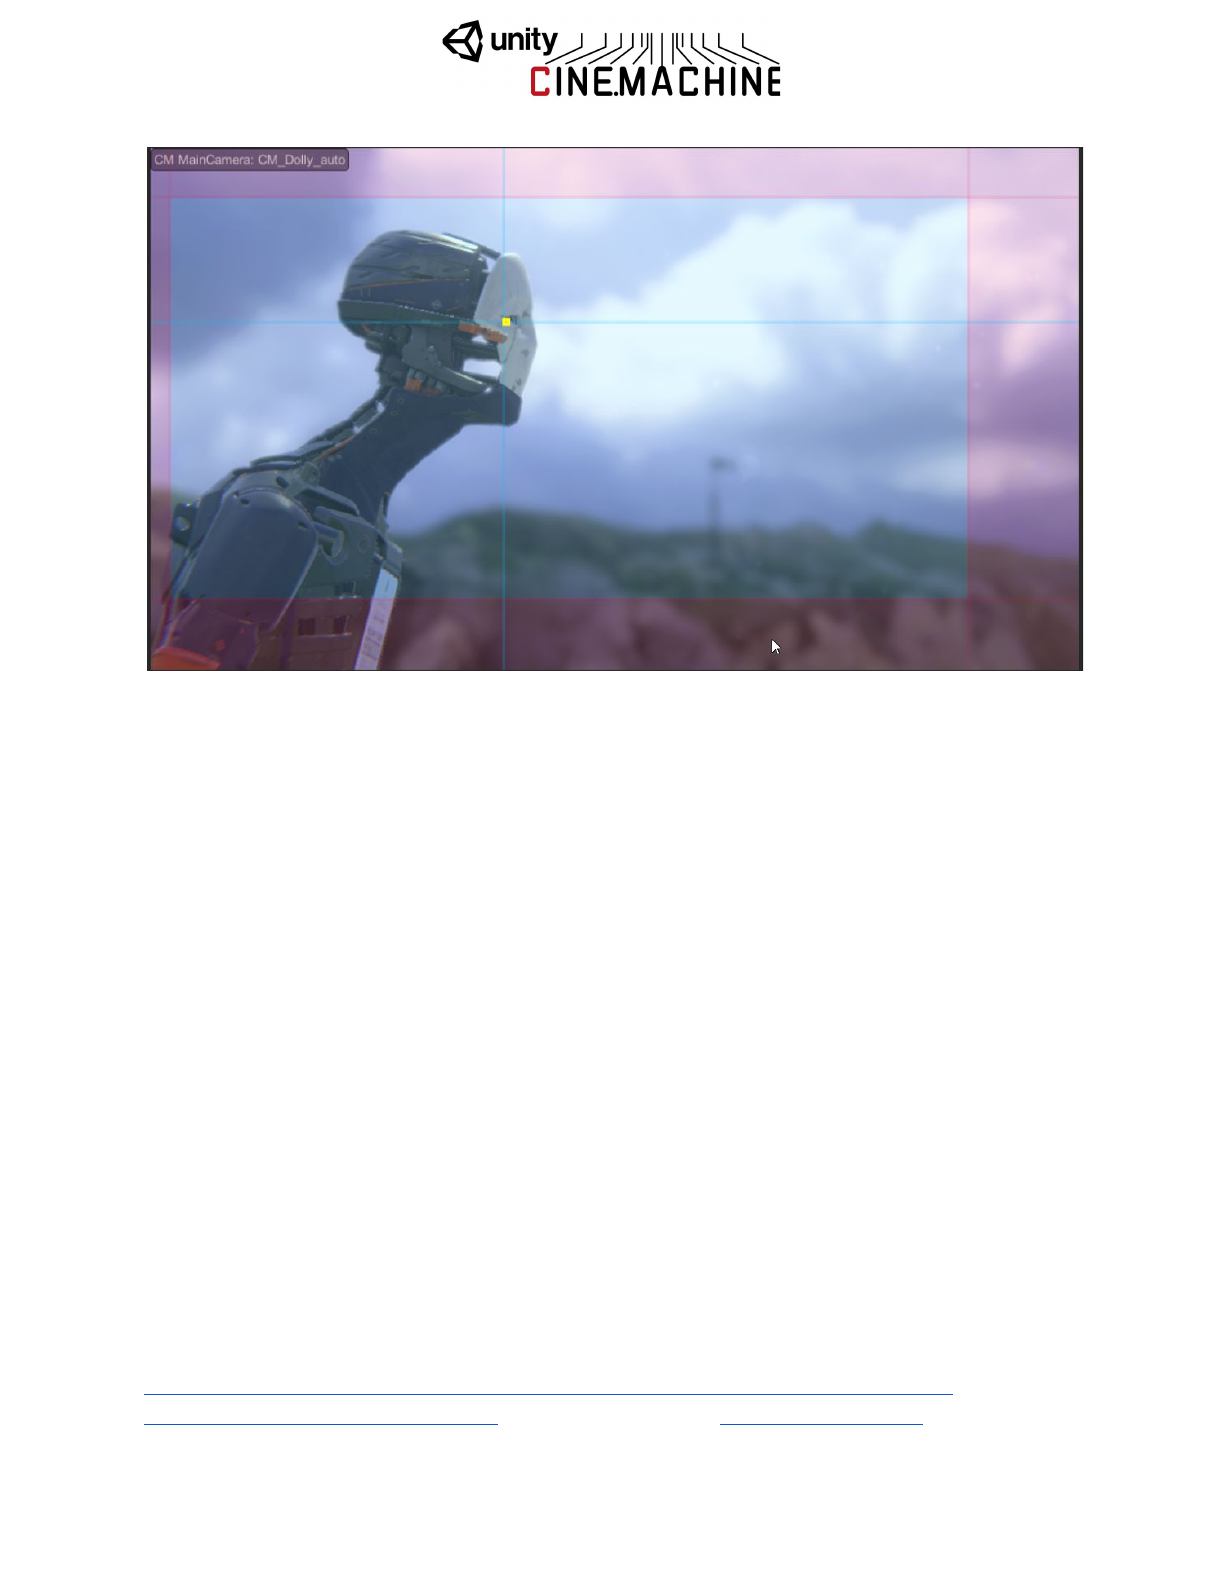
The Game Window Guides checkbox toggles the visibility of any screen compositional guides
that the virtual camera might want to display in the game window. This toggle is a static global,
and applies to all virtual cameras.
The Save During Play checkbox enables the Cinemachine feature of taking camera settings
tweaks made while in Play mode, and propagating them back to the scene. This allows
in-game fine tuning of cameras without having to do a whole lot of copy/pasting. After you exit
play mode, the scene will be updated to reflect the changes made during play. Pressing Undo
will revert those changes.
The following sections describe the behaviours and classes that make up the Cinemachine
Virtual Camera, and some of its standard procedural components.
CinemachineVirtualCamera
This componentis intended to be attached to an empty Transform GameObject, and it
represents a Virtual Camera within the Unity scene.
The Virtual Camera will animate its Transform according to the rules contained in its
CinemachineComponent pipeline (Aim, Body, and Noise). When the virtual camera is Live, the
Unity Camera equipped with a CinemachineBrain will assume the position and orientation of the
virtual camera.
A virtual camera is not a camera. Instead, it can be thought of as a camera controller, not unlike
a cameraman. It can drive the Unity Camera and control its position, orientation, lens settings,
and PostProcessing effects. Each Virtual Camera owns its own Cinemachine Component
Pipeline, through which you provide the instructions for dynamically tracking specific game
objects.
A virtual camera is very lightweight, and does no rendering of its own. It merely tracks
interesting GameObjects, and positions itself accordingly. A typical game can have dozens of
virtual cameras, each set up to follow a particular character or capture a particular event.
A Virtual Camera can be in any of three states:
●Live: The virtual camera is actively controlling the Unity Camera. The virtual camera is
tracking its targets and being updated every frame.
●Standby: The virtual camera is tracking its targets and being updated every frame, but no
Unity Camera is actively being controlled by it. This is the state of a virtual camera that is
enabled in the scene but perhaps at a lower priority than the Live virtual camera.
●Disabled: The virtual camera is present but disabled in the scene. It is not actively
tracking its targets and so consumes no processing power. However, the virtual camera
can be made live from the Timeline.
The Unity Camera can be driven by any virtual camera in the scene. The game logic can
choose the virtual camera to make live by manipulating the virtual cameras’ enabled flags and
their priorities, based on game logic.
In order to be driven by a virtual camera, the Unity Camera must have a CinemachineBrain
behaviour, which will select the most eligible virtual camera based on its priority or on other
criteria, and will manage blending.
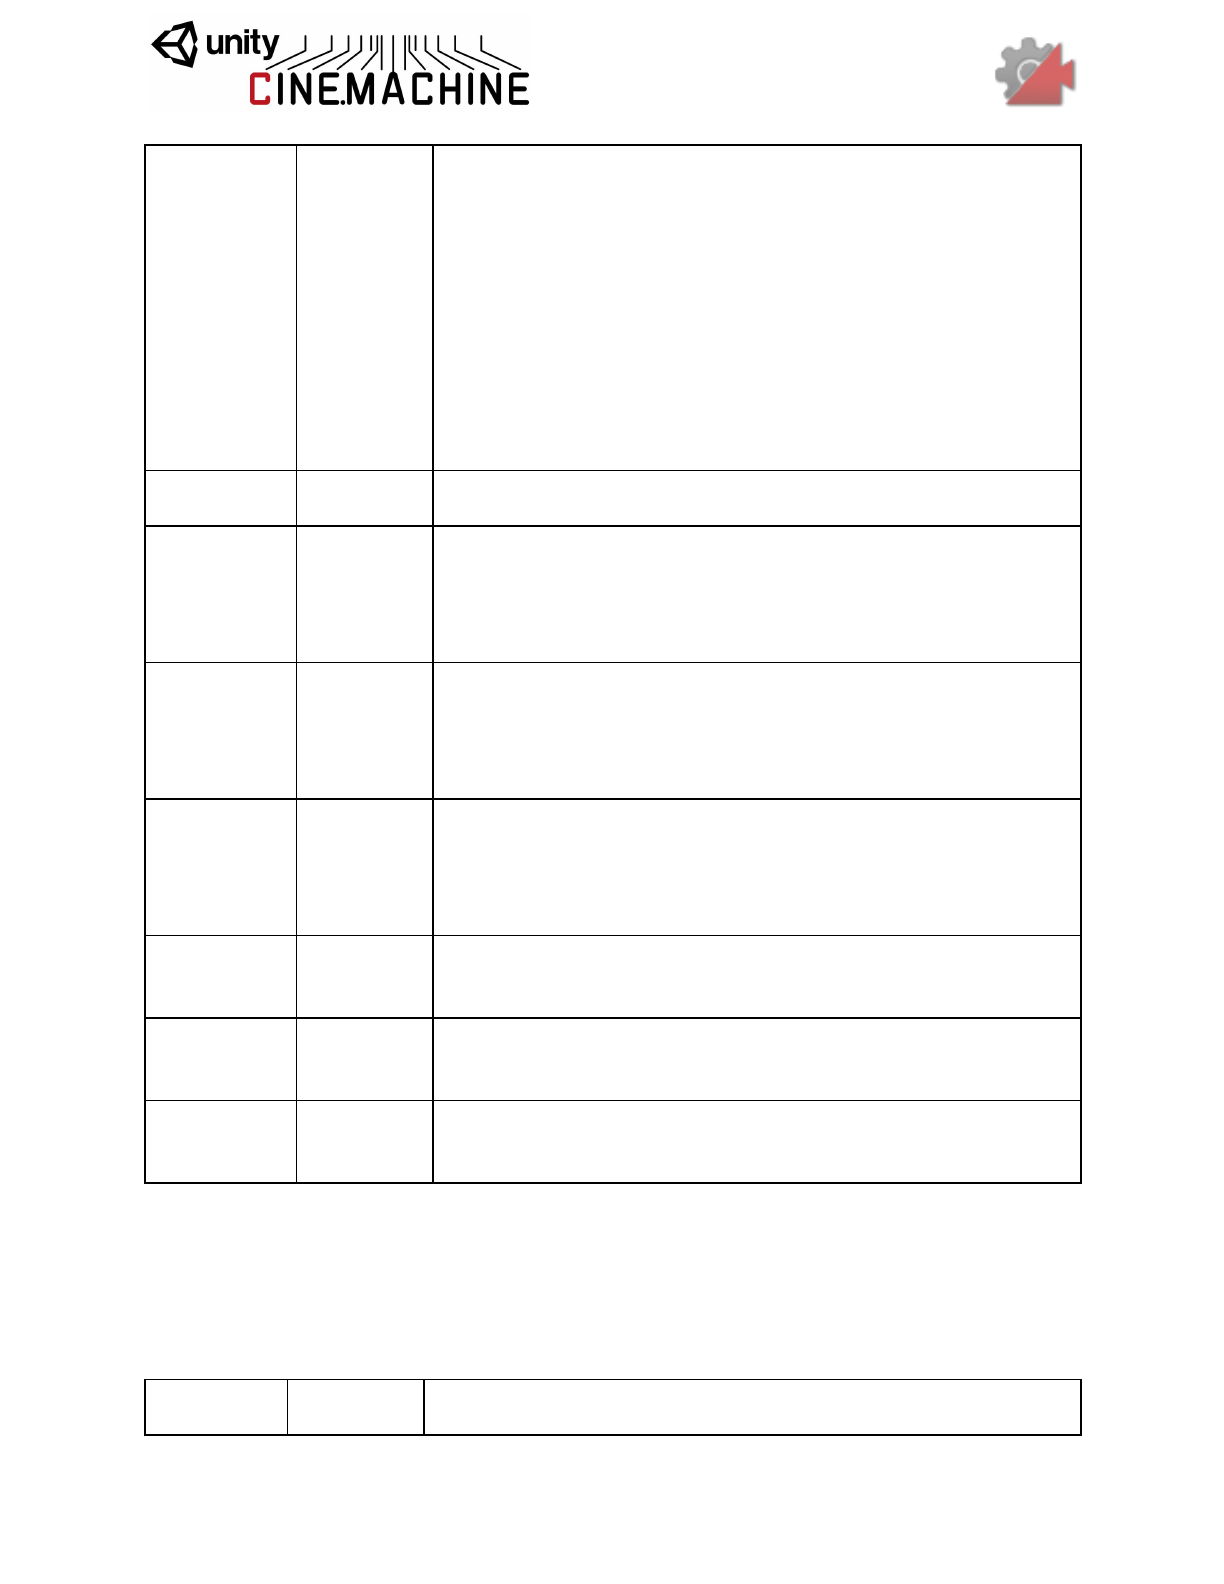
Setting
Type
Description
Look At
Transform
The object that the camera wants to look at (the Aim target). If
this is null, then the vcam’s Transform orientation will define
the camera’s orientation.
Follow
Transform
The object that the camera wants to move with (the Body
target). If this is null, then the vcam’s Transform position will
define the camera’s position.
Position
Blending
PositionBlendMet
hod
Hint for blending positions to and from this virtual camera.
Possible Values:
- Linear: Standard linear position blend.
- Spherical: Spherical blend about LookAt target position, if
there is a LookAt target.
- Cylindrical: Cylindrical blend about LookAt target position, if
there is a LookAt target. Vertical co-ordinate is linearly
interpolated.
Lens
LensSettings
Specifies the lens properties of this Virtual Camera. This
generally mirrors the Unity Camera’s lens settings, and will be
used to drive the Unity camera when the vcam is active.
Priority
Int32
The priority will determine which camera becomes active
based on the state of other cameras and this camera. Higher
numbers have greater priority.
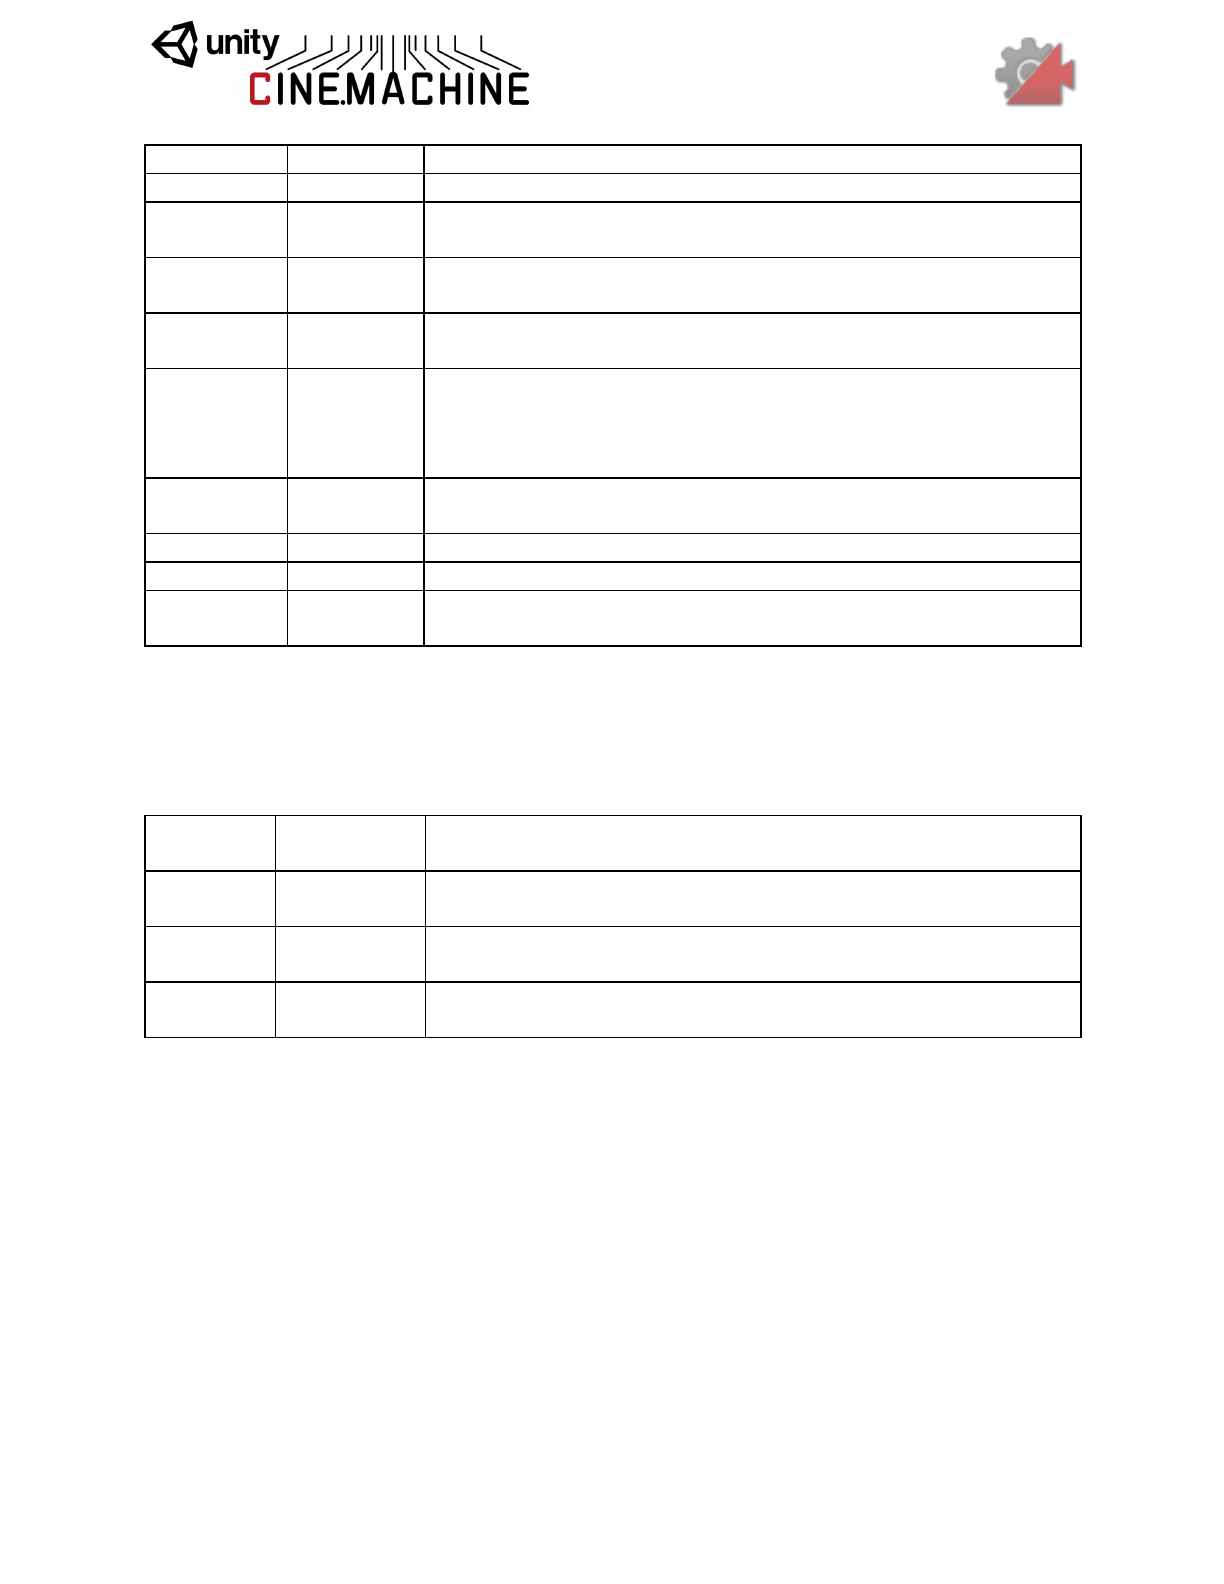
LensSettings
Describes the FOV and clip planes for a camera. This generally mirrors the Unity Camera’s lens
settings, and will be used to drive the Unity camera when the vcam is active.
Setting
Type
Description
Field Of View
Single
This is the camera view in vertical degrees. For cinematic
people, a 50mm lens on a super-35mm sensor would equal a
19.6 degree FOV.
Orthographic
Size
Single
When using an orthographic camera, this defines the half-height,
in world coordinates, of the camera view.
Near Clip
Plane
Single
This defines the near region in the renderable range of the
camera frustum. Raising this value will stop the game from
drawing things near the camera, which can sometimes come in
handy. Larger values will also increase your shadow resolution.
Far Clip Plane
Single
This defines the far region of the renderable range of the camera
frustum. Typically you want to set this value as low as possible
without cutting off desired distant objects.
Dutch
Single
Camera Z roll, or tilt, in degrees.
CinemachineComposer
This is a CinemachineComponent in the Aim section of the component pipeline. Its job is to aim
the camera at the vcam’s LookAt target object, with configurable offsets, damping, and
composition rules.
The composer does not change the camera’s position. It will only pan and tilt the camera where
it is, in order to get the desired framing. To move the camera, you have to use the virtual
camera’s Body section.
The vcam’s LookAt target is the Composer’s target. Common Composer targets: include bones
on a character like the upper spine or head bone, vehicles, or dummy objects which are
controlled or animated programmatically.
Once you’ve set the vcam’s LookAt target and are tracking something, you need to define
where you’d like it to be on the screen and how aggressively you’d like to camera to track it. The
degree of lag, or how tightly the camera follows the subject is defined by the two controls:
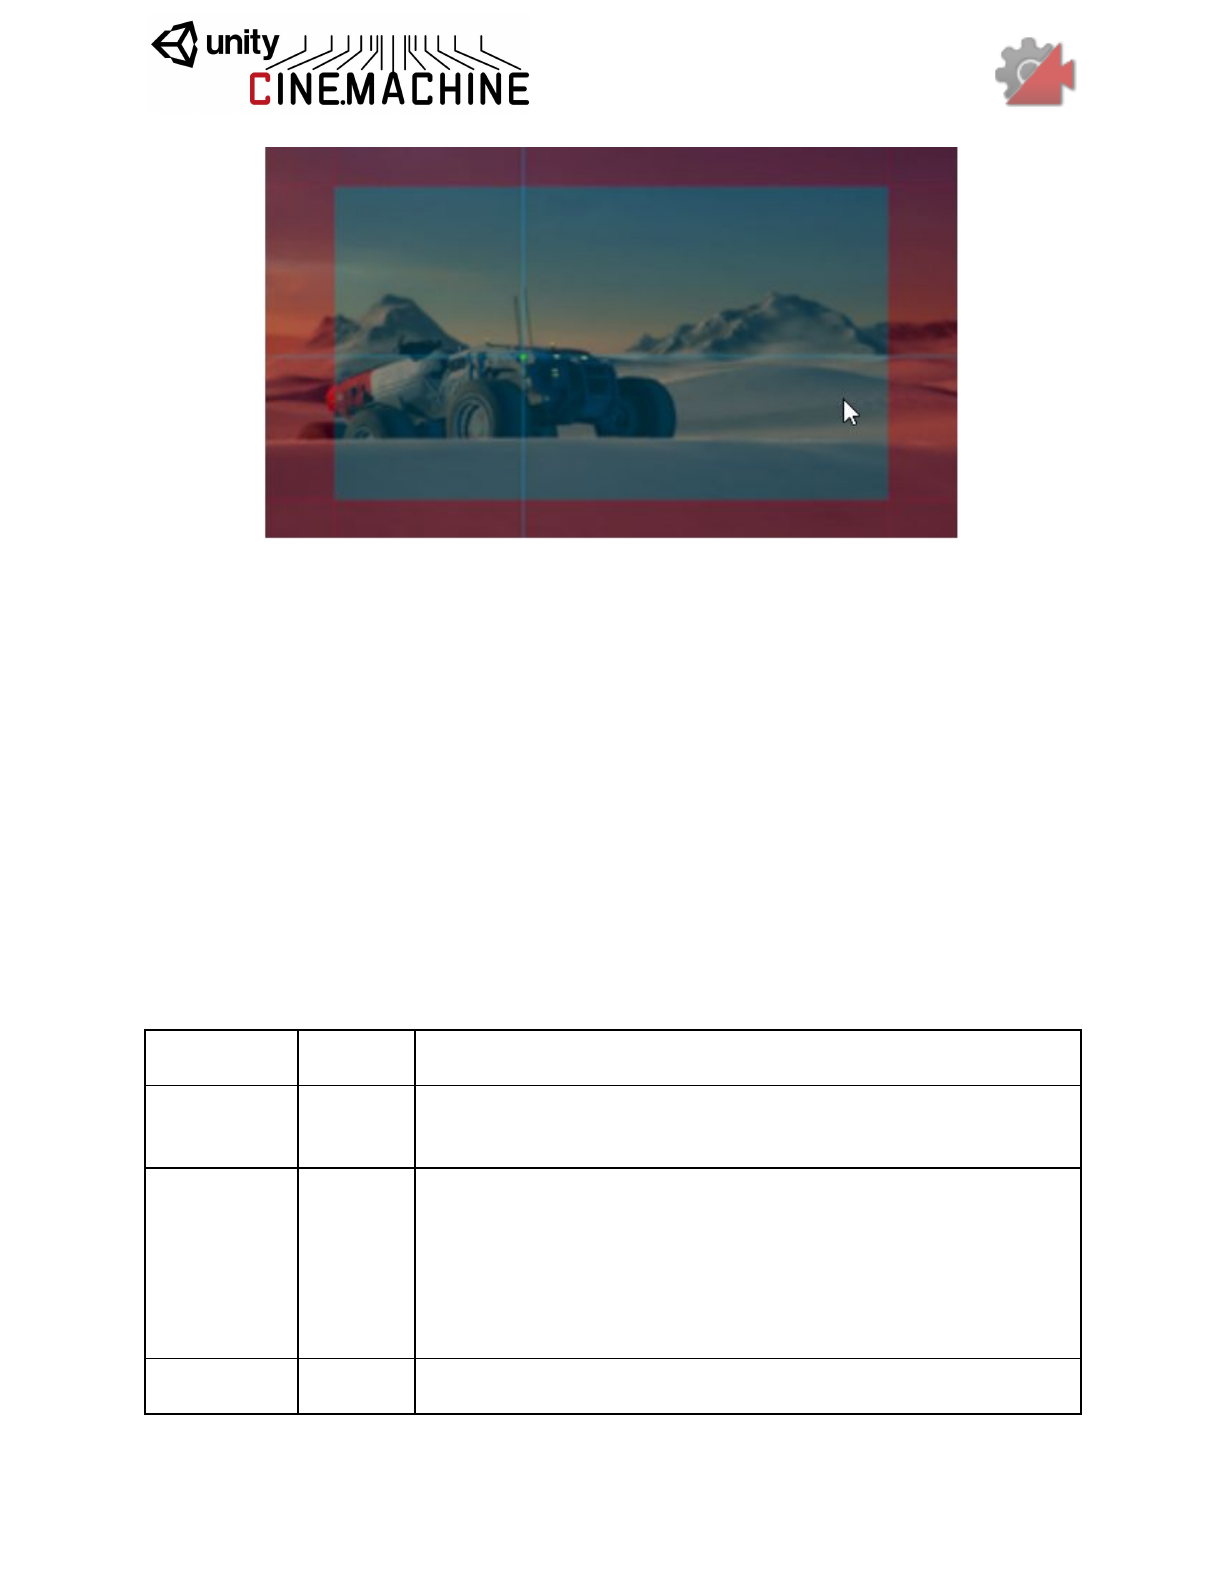
Horizontal/Vertical Soft Damping: Setting these values to zero means the camera will hard
track the subject and the blue regions above will act as rigid barriers locking the camera
movement to keep the target inside those values. Setting the larger will allow the target to
‘squish’ into the blue regions, giving you some really nice camera weight and lag. This is what
real camera operators do!. The vertical and horizontal values are separated so you can let the
camera squish more left to right or follow tighter up and down, etc.
SoftZone/DeadZone: Tune these to define where you want the subject to be onscreen. These
controls are incredibly versatile. The blue areas are the ‘squishy’ areas based on how much
horizontal/vertical damping you have, and the red areas define the ‘no pass’ limits where the
camera will always track the subject. Opening up the soft areas to create a ‘dead zone’ in the
middle allows you to make areas of the screen immune to target motion, handy for things like
animation cycles where you don’t want the camera to track the target if it moves just a little.
Setting
Type
Description
Tracked
Object Offset
Vector3
Target offset from the target object’s center in target-local space.
Use this to fine-tune the tracking target position when the desired
area is not the tracked object’s center.
Lookahead
Time
Single
This setting will instruct the composer to adjust its target offset
based on the motion of the target. The composer will look at a point
where it estimates the target will be this many seconds into the
future. Note that this setting is sensitive to noisy animation, and can
amplify the noise, resulting in undesirable camera jitter. If the
camera jitters unacceptably when the target is in motion, turn down
this setting, or animate the target more smoothly.
Lookahead
Smoothing
Single
Controls the smoothness of the lookahead algorithm. Larger values
smooth out jittery predictions and also increase prediction lag.

Lookahead
Ignore Y
Boolean
If checked, movement along the Y axis will be ignored for lookahead
calculations.
Horizontal
Damping
Single
How aggressively the camera tries to follow the target in the
screen-horizontal direction. Small numbers are more responsive,
rapidly orienting the camera to keep the target in the dead zone.
Larger numbers give a more heavy slowly responding camera.
Using different vertical and horizontal settings can yield a wide
range of camera behaviors.
Vertical
Damping
Single
How aggressively the camera tries to follow the target in the
screen-vertical direction. Small numbers are more responsive,
rapidly orienting the camera to keep the target in the dead zone.
Larger numbers give a more heavy slowly responding camera.
Using different vertical and horizontal settings can yield a wide
range of camera behaviors.
Screen X
Single
Horizontal screen position for target. The camera will rotate to
position the tracked object here.
Screen Y
Single
Vertical screen position for target, The camera will rotate to position
the tracked object here.
Dead Zone
Width
Single
Camera will not rotate horizontally if the target is within this range of
the position.
Dead Zone
Height
Single
Camera will not rotate vertically if the target is within this range of
the position.
Soft Zone
Width
Single
When target is within this region, camera will gradually rotate
horizontally to re-align towards the desired position, depending on
the damping speed.
Soft Zone
Height
Single
When target is within this region, camera will gradually rotate
vertically to re-align towards the desired position, depending on the
damping speed.
Bias X
Single
A non-zero bias will move the target position horizontally away from
the center of the soft zone.
Bias Y
Single
A non-zero bias will move the target position vertically away from
the center of the soft zone.
CinemachineTransposer
This is a CinemachineComponent in the Body section of the component pipeline. Its job is to
position the camera in a fixed relationship to the vcam’s Follow target object, with offsets and
damping.
The Tansposer will only change the camera’s position in space. It will not re-orient or otherwise
aim the camera. To to that, you need to instruct the vcam in the Aim section of its pipeline.
Transposer is a component which mounts a camera to any object. It has a number of
advantages over just putting the camera under the object you want to have the camera follow.
Hood Cam, Door Cam, POV Cam, Missile Cam - if you want to mount the camera to something,
use Transposer.
Using Transposer for your camera body motion has advantages:
● The position tuning is kept, even if the game is running. Tune a regular camera in game
mode and the position is lost once you quit, not with Transposer. Tune it up while the
game is running and you’re done.
● Add damping to the camera - if your camera follows something, the damping values can
give you some ‘weight’ to the camera so they feel smoother.
● Organization: Put all your cameras in one place, instead of having them hidden under all
sorts of assets in your project - you pick their targets vs. put the camera under them in
the hierarchy.
Follow Offset: The camera will go to the centre of the object you’re targeting in the Transposer
Camera Target, so if you want the camera to be further behind, put in some offsets. We default
at -10 so the camera is behind whatever you’re targeting.
Damping: Per channel damping which will cause the camera to lag behind the target. You can
control both the position damping, and the orientation damping.
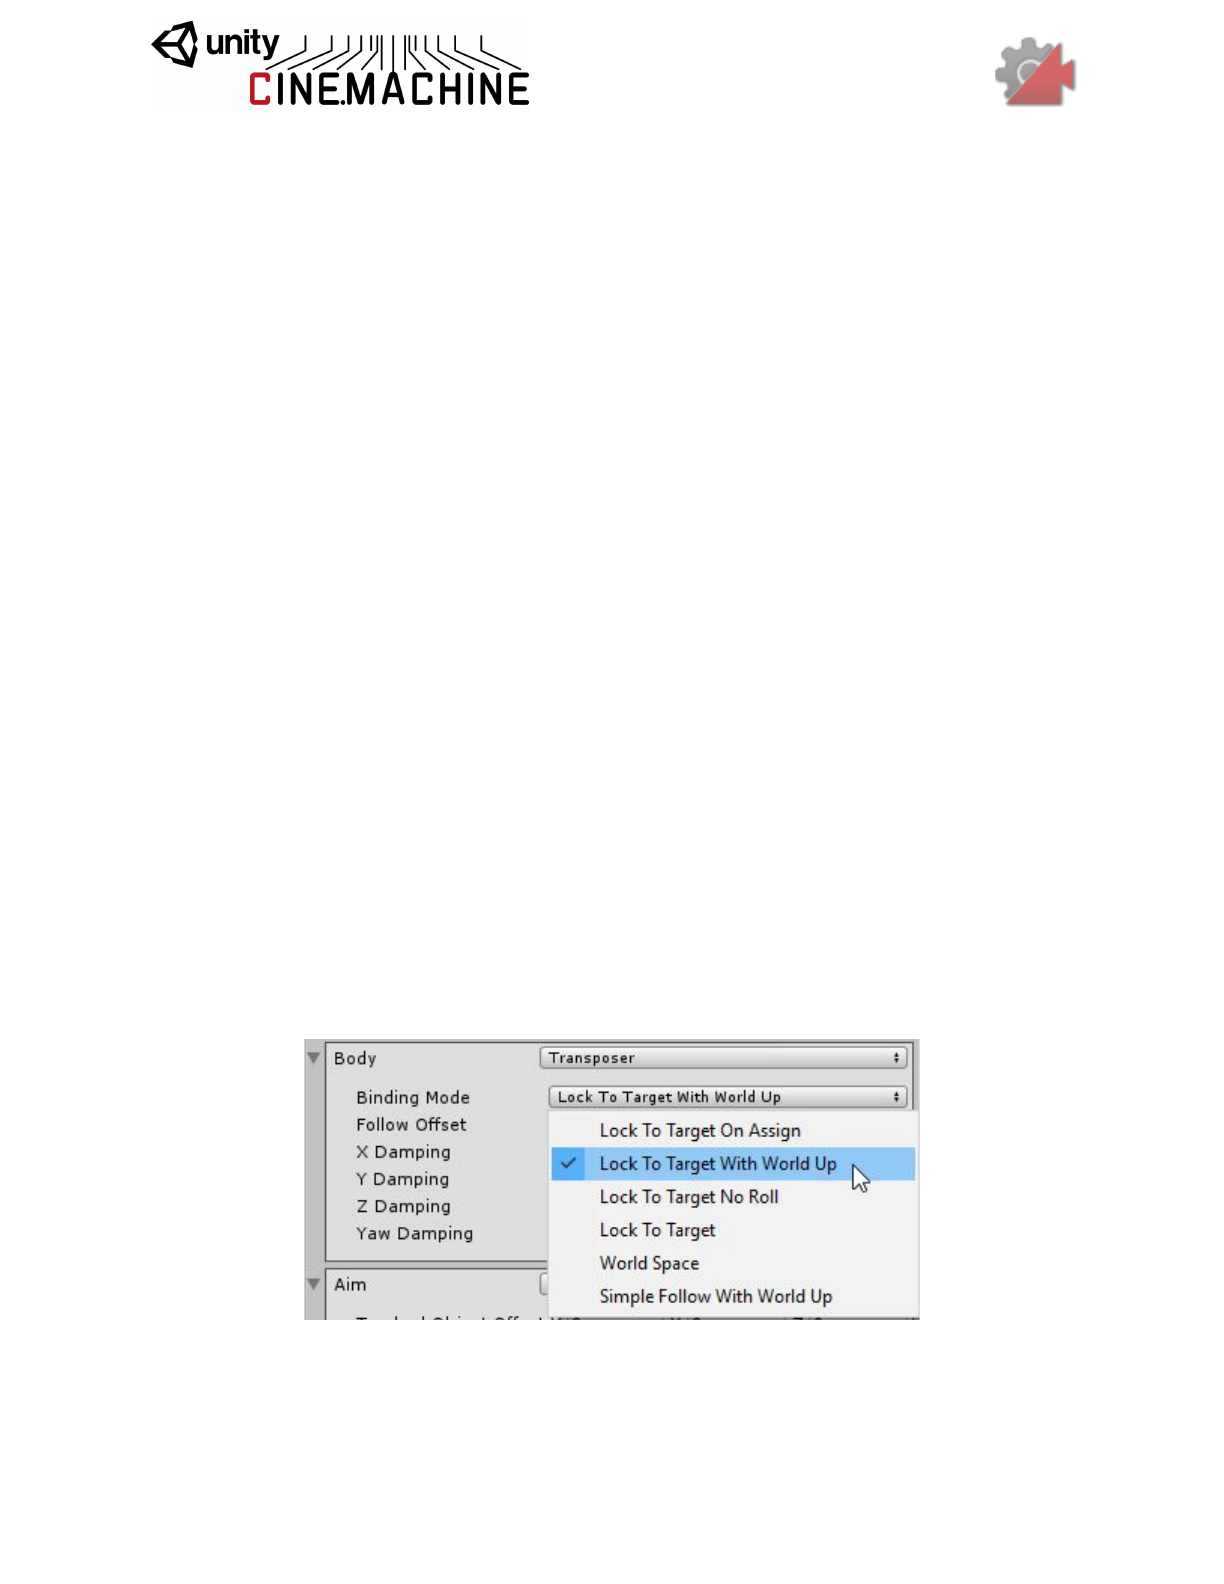
Binding Mode: There’s options in the relationship between the camera and the target object.
●Lock To Target
interprets the camera offset in target-local coords. As the target rotates,
the camera rotates around it to maintain the offset.
●Lock to Target With World Up
is the same as the above but it keeps the camera pointing
up. Handy if your target flips over.
●Lock to Target On Target Assign
mounts the camera relative to the target’s local
coordinate system at the time the camera is initialized. This offset remains constant in
world space, and the camera will not rotate along with the target
●World Space
offsets positions the camera relative to the target in world coords no matter
what direction the target object is facing.
● Simple Follow with World Up
this will follow the target at the desired distance and height
while moving the camera position as little as possible. This is quite similar to what a
human camera operator would do when instructed to follow a target.
These different modes do incredibly different things, so try them out and one should work well
for whatever your requirements are. The ‘Door Cam’ or ‘Hood Cam’ ideas would use Local
Space Locked To Target
.
Setting
Type
Description
Binding Mode
BindingMode
The coordinate space to use when interpreting the offset from
the target. This is also used to set the camera’s Up vector,
which will be maintained when aiming the camera.
Possible Values:
- Lock To Target On Assign: Camera will be bound to the
Follow target using a frame of reference consisting of the
target’s local frame at the moment when the virtual camera was
enabled, or when the target was assigned.
- Lock To Target With World Up: Camera will be bound to the
Follow target using a frame of reference consisting of the
target’s local frame, with the tilt and roll zeroed out.
- Lock To Target No Roll: Camera will be bound to the Follow
target using a frame of reference consisting of the target’s local
frame, with the roll zeroed out.
- Lock To Target: Camera will be bound to the Follow target
using the target’s local frame.
- World Space: Camera will be bound to the Follow target
using a world space offset.
- Simple Follow With World Up: Offsets will be calculated
relative to the target, using Camera-local axes.
Follow Offset
Vector3
The distance vector that the transposer will attempt to maintain
from the Follow target.
X Damping
Single
How aggressively the camera tries to maintain the offset in the
X-axis. Small numbers are more responsive, rapidly translating
the camera to keep the target’s x-axis offset. Larger numbers
give a more heavy slowly responding camera. Using different
settings per axis can yield a wide range of camera behaviors.
Y Damping
Single
How aggressively the camera tries to maintain the offset in the
Y-axis. Small numbers are more responsive, rapidly translating
the camera to keep the target’s y-axis offset. Larger numbers
give a more heavy slowly responding camera. Using different
settings per axis can yield a wide range of camera behaviors.
Z Damping
Single
How aggressively the camera tries to maintain the offset in the
Z-axis. Small numbers are more responsive, rapidly translating
the camera to keep the target’s z-axis offset. Larger numbers
give a more heavy slowly responding camera. Using different
settings per axis can yield a wide range of camera behaviors.
Pitch Damping
Single
How aggressively the camera tries to track the target rotation’s
X angle. Small numbers are more responsive. Larger numbers
give a more heavy slowly responding camera.
Yaw Damping
Single
How aggressively the camera tries to track the target rotation’s
Y angle. Small numbers are more responsive. Larger numbers
give a more heavy slowly responding camera.
Roll Damping
Single
How aggressively the camera tries to track the target rotation’s
Z angle. Small numbers are more responsive. Larger numbers
give a more heavy slowly responding camera.
CinemachineBasicMultiChannelPerlin
As a part of the Cinemachine Pipeline implementing the Noise stage, this component adds
Perlin Noise to the Camera state, in the Correction channel.
The noise is created by using a predefined noise profile asset. This defines the shape of the
noise over time. You can scale this in amplitude or in time, to produce a large family of different
noises using the same profile.
The Noise is a multi-layered Perlin noise function which is applied after the Composer and adds
additional transforms. It has controls for Position and Orientation. You can add as many layers
as you want by increasing the profile’s Size value.
Procedural noise is a complex thing to make look real. Convincing hand-held motion is a
mixture of low, medium and high frequency wobbles which together combine to create
something believable.
Position / Orientation Size: This is how many noise functions you’d like to blend together for
the Position or Orientation or both. Mix at least 3 Orientation channels together for some
realistic hand-held motion.
Amplitude defines the amount of noise in degrees. Wider lenses will need larger degree values
in order to ‘see’ the shake. Telephoto lenses use smaller values as that small setting appears
amplified through narrower FOV lenses.
Frequency defines the speed of the noise in Hz. Typically a ‘low’ frequency value might be
around 0.1. Consider that your game is running at 30 or 60hz, so settings higher than that will
be ‘on the other side’ of the Nyquest frequency meaning that they will not be directly tracked. A
setting of 100 will be higher than what the camera can ‘follow’ as your game is only running at
say 60hz. It can look kind of choppy since the camera can’t track something which is sampling
faster than what the game is running at. It can also look kind of cool, but rarely. Experiment.
Typically, for most hand-held setups, the low is around 0.1-0.5, the mid maybe .8-1.5 and the
high around 3-4. That’s 3-4 shakes back and forth per second.
The most convincing camera shakes are typically done with Orientation noise as that’s where
the camera is aiming. Handheld camera operators tend shake more rotationally than they do
positionally, but of course feel free to mix in some Position noise, just remember it’s probably
best to start with the Orientation.
We’ve included a number of presets to get you going, under
Assets/Cinemachine/Examples/Presets/Noise and of course you can add as many of your own
as you wish, just right click in the Asset window Create->Cinemachine->Noise, and drag that
asset into the Noise Settings window under that Virtual Camera. You can also animate the
Noise through the Amplitude Gain and Frequency Gain settings to ramp the effect up and down.
Setting
Type
Description
Noise Profile
NoiseSettings
The shared asset containing the Noise Profile. Define the
frequencies and amplitudes there to make a characteristic noise
profile. Make your own or just use one of the many presets.
Amplitude
Gain
Single
Gain to apply to the amplitudes defined in the NoiseSettings
asset. 1 is normal. Setting this to 0 completely mutes the noise.
Frequency
Gain
Single
Scale factor to apply to the frequencies defined in the
NoiseSettings asset. 1 is normal. Larger magnitudes will make
the noise shake more rapidly.
NoiseSettings
This is an asset that defines a noise profile. A noise profile is the shape of the noise as a
function of time. You can build arbitrarily complex shapes by combining different base perlin
noise frequencies at different amplitudes.
The frequencies and amplitudes should be chosen with care, to ensure an interesting noise
quality that is not obviously repetitive.
As a mathematical side-note, any arbitrary periodic curve can be broken down into a series of
fixed-amplitude sine-waves added together. This is called fourier decomposition, and is the
basis of much signal processing. It doesn’t really have much to do with this asset, but it’s super
interesting!
Setting
Type
Description
Position
TransformNoiseParams[]
These are the noise channels for the virtual camera’s
position. Convincing noise setups typically mix low,
medium and high frequencies together, so start with a
size of 3.
Orientation
TransformNoiseParams[]
These are the noise channels for the virtual camera’s
orientation. Convincing noise setups typically mix low,
medium and high frequencies together, so start with a
size of 3.
NoiseSettings.NoiseParams
Describes the behaviour for a channel of noise.
Setting
Type
Description
Amplitude
Single
The amplitude of the noise for this channel. Larger numbers vibrate
higher.
Frequency
Single
The frequency of noise for this channel. Higher magnitudes vibrate
faster.
NoiseSettings.TransformNoiseParams
Contains the behaviour of noise for the noise module for all 3 cardinal axes of the camera.
Setting
Type
Description
X
NoiseParams
Noise definition for X-axis.
Y
NoiseParams
Noise definition for Y-axis.
Z
NoiseParams
Noise definition for Z-axis.

Brains and Blending
The CinemachineBrain is the central Cinemachine component that does all the magic. It’s a
component attached to the Unity camera and it monitors all the Virtual Cameras in the scene
and drives the Unity camera using the shot it likes best.
When it’s time to transition from one shot to another, you can choose how this transition is
accomplished. It can be a camera cut, or a Cinemachine blend. Cinemachine Blends are
special: they are not fades, or wipes, or dissolves. Rather, they are an interpolation of one
camera’s settings to another. Think of a blend more as if one cameraman smoothly passed the
camera to another cameraman in a different position, to elegantly transition the shot without a
cut.
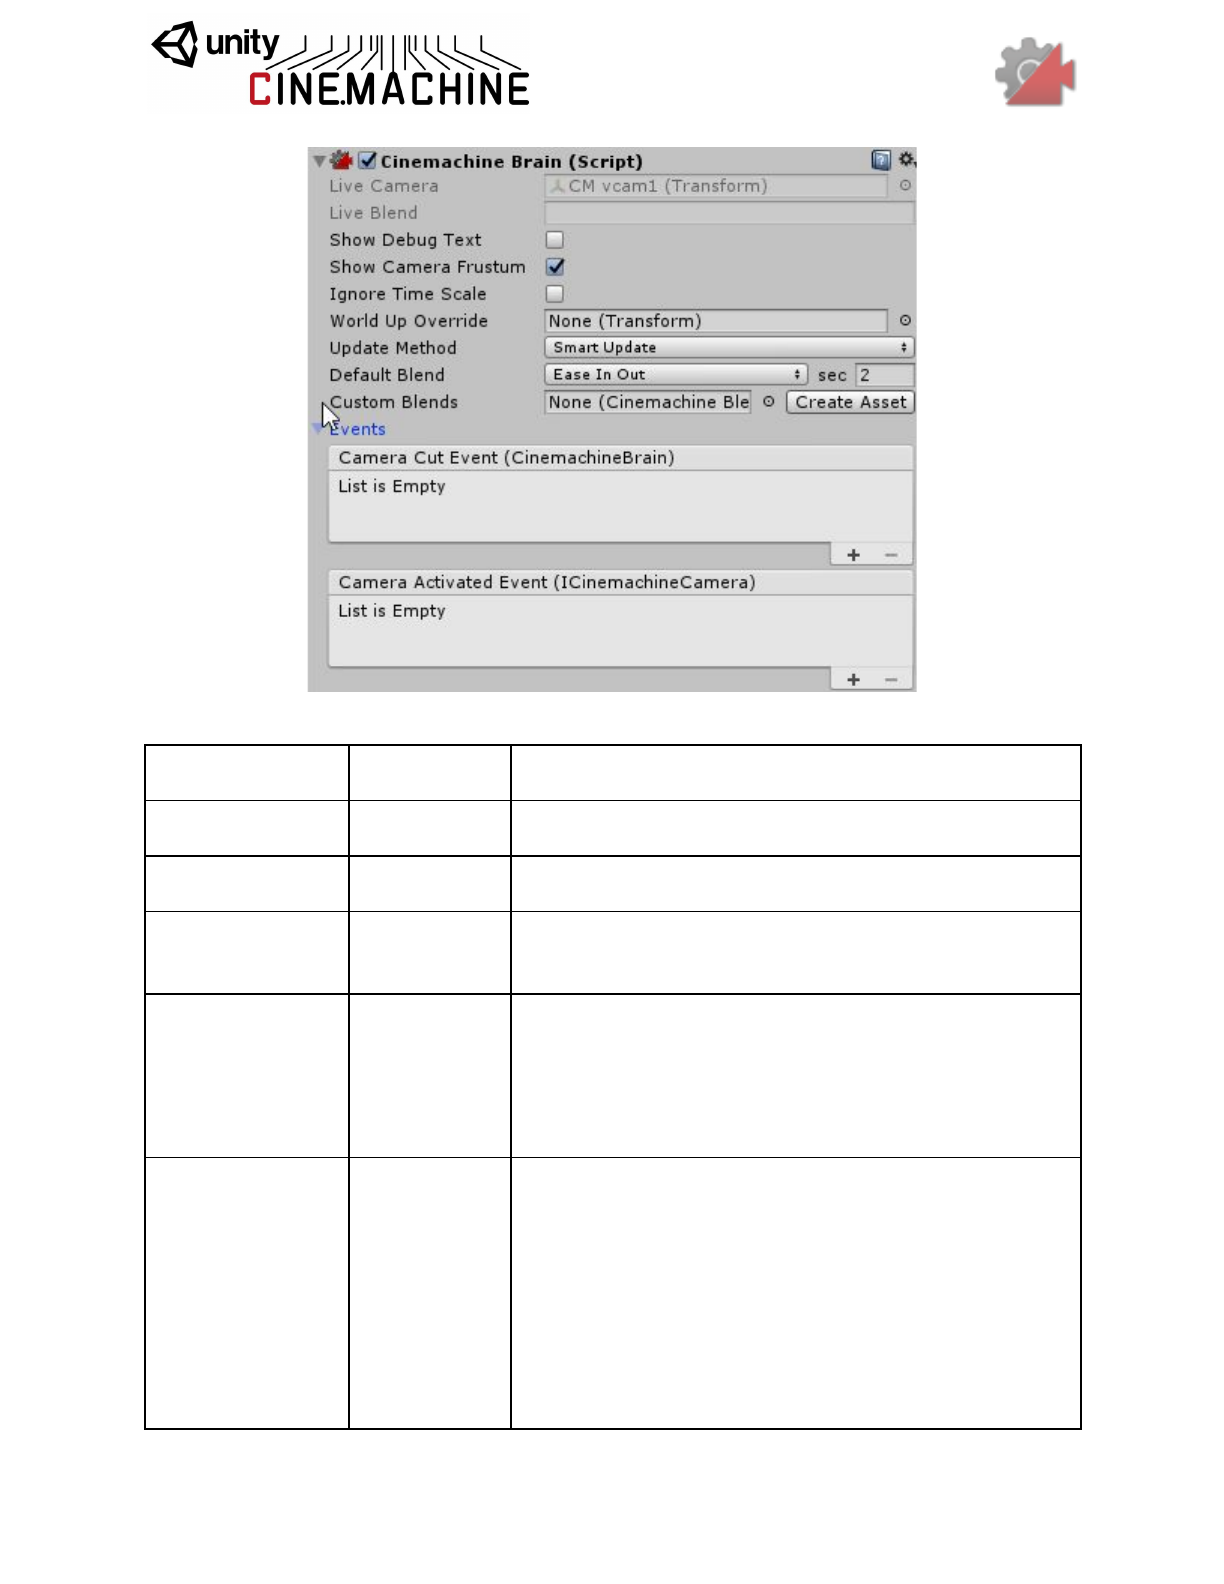
CinemachineBrain
CinemachineBrain is the link between the Unity Camera and the Cinemachine Virtual Cameras
in the scene. It monitors the priority stack to choose the current Virtual Camera, and blend with
another if necessary. Finally and most importantly, it applies the Virtual Camera state to the
attached Unity Camera.
The CinemachineBrain is also the place where rules for blending between virtual cameras are
defined. Camera blending is an interpolation over time of one virtual camera position and state
to another. If you think of virtual cameras as cameramen, then blending is a little like one
cameraman smoothly passing the camera to another cameraman. You can specify the time
over which to blend, as well as the blend curve shape. Note that a camera cut is just a zero-time
blend.
The Brain hold the following key settings:
●Blend Settings: This is the array which defines how any shot blends to any other shot.
You can have a 4 second blend from CameraA to CameraB, but a 1 second blend from
CameraB back to CameraA. This is very powerful when used in a state machine type
setup. If a specific blend between two cameras isn’t defined, it uses the Default
Blend which by default is a smooth 2-second blend (but you can change this).
● Layer Filter: The Brain will only notice those virtual cameras that pass its Unity
Camera’s culling mask. You can set up split-screen environments by assigning different
Virtual Cameras to different layers, and using the culling mask to filter them.
●Event Dispatching: The brain will fire events when the shot changes, in case you need
to monitor this. There in an event for whenever a Virtual Camera goes live, and another
event for when the camera cuts (so that temporal post effects can be reset).
Setting
Type
Description
Show Debug Text
Boolean
When enabled, the current camera and blend will be
indicated in the game window, for debugging.
Show Camera
Frustum
Boolean
When enabled, the camera’s frustum will be shown at all
times in the scene view.
Ignore Time Scale
Boolean
When enabled, the cameras will always respond in
real-time to user input and damping, even if the game is
running in slow motion.
World Up Override
Transform
If set, this object’s Y axis will define the worldspace Up
vector for all the virtual cameras. This is useful for
instance in top-down game environments. If not set, Up is
worldspace Y. Setting this appropriately is important,
because Virtual Cameras don’t like looking straight up or
straight down.
Update Method
UpdateMethod
Use FixedUpdate if all your targets are animated during
FixedUpdate (e.g. RigidBodies), LateUpdate if all your
targets are animated during the normal Update loop, and
SmartUpdate if you want Cinemachine to do the
appropriate thing on a per-target basis. SmartUpdate is
the recommended setting.
Possible Values:
- Fixed Update: Virtual cameras are updated in sync with
the Physics module, in FixedUpdate.
- Late Update: Virtual cameras are updated in
MonoBehaviour LateUpdate.
- Smart Update: Virtual cameras are updated according
to how the target is updated. This is the recommended
setting.
Default Blend
CinemachineBle
ndDefinition
The blend that is used in cases where you haven’t
explicitly defined a blend between two Virtual Cameras.
Custom Blends
CinemachineBle
nderSettings
This is the asset that contains custom settings for blends
between specific virtual cameras in your scene.
Camera Cut Event
BrainEvent
This event will fire whenever a virtual camera goes live
and there is no blend.
Camera Activated
Event
VcamEvent
This event will fire whenever a virtual camera goes live. If
a blend is involved, then the event will fire on the first
frame of the blend.
CinemachineBlendDefinition
Definition of a Camera blend. This struct holds the information necessary to generate a suitable
AnimationCurve for a Cinemachine Blend.
Setting
Type
Description
Style
Style
Shape of the blend curve.
Possible Values:
- Cut: Zero-length blend.
- Ease In Out: S-shaped curve, giving a gentle and smooth transition.
- Ease In: Linear out of the outgoing shot, and easy into the incoming.
- Ease Out: Easy out of the outgoing shot, and linear into the incoming.
- Hard In: Easy out of the outgoing, and hard into the incoming.
- Hard Out: Hard out of the outgoing, and easy into the incoming.
- Linear: Linear blend. Mechanical-looking.
- Custom: Custom blend curve.
Time
Single
Duration (in seconds) of the blend.
CinemachineBlenderSettings
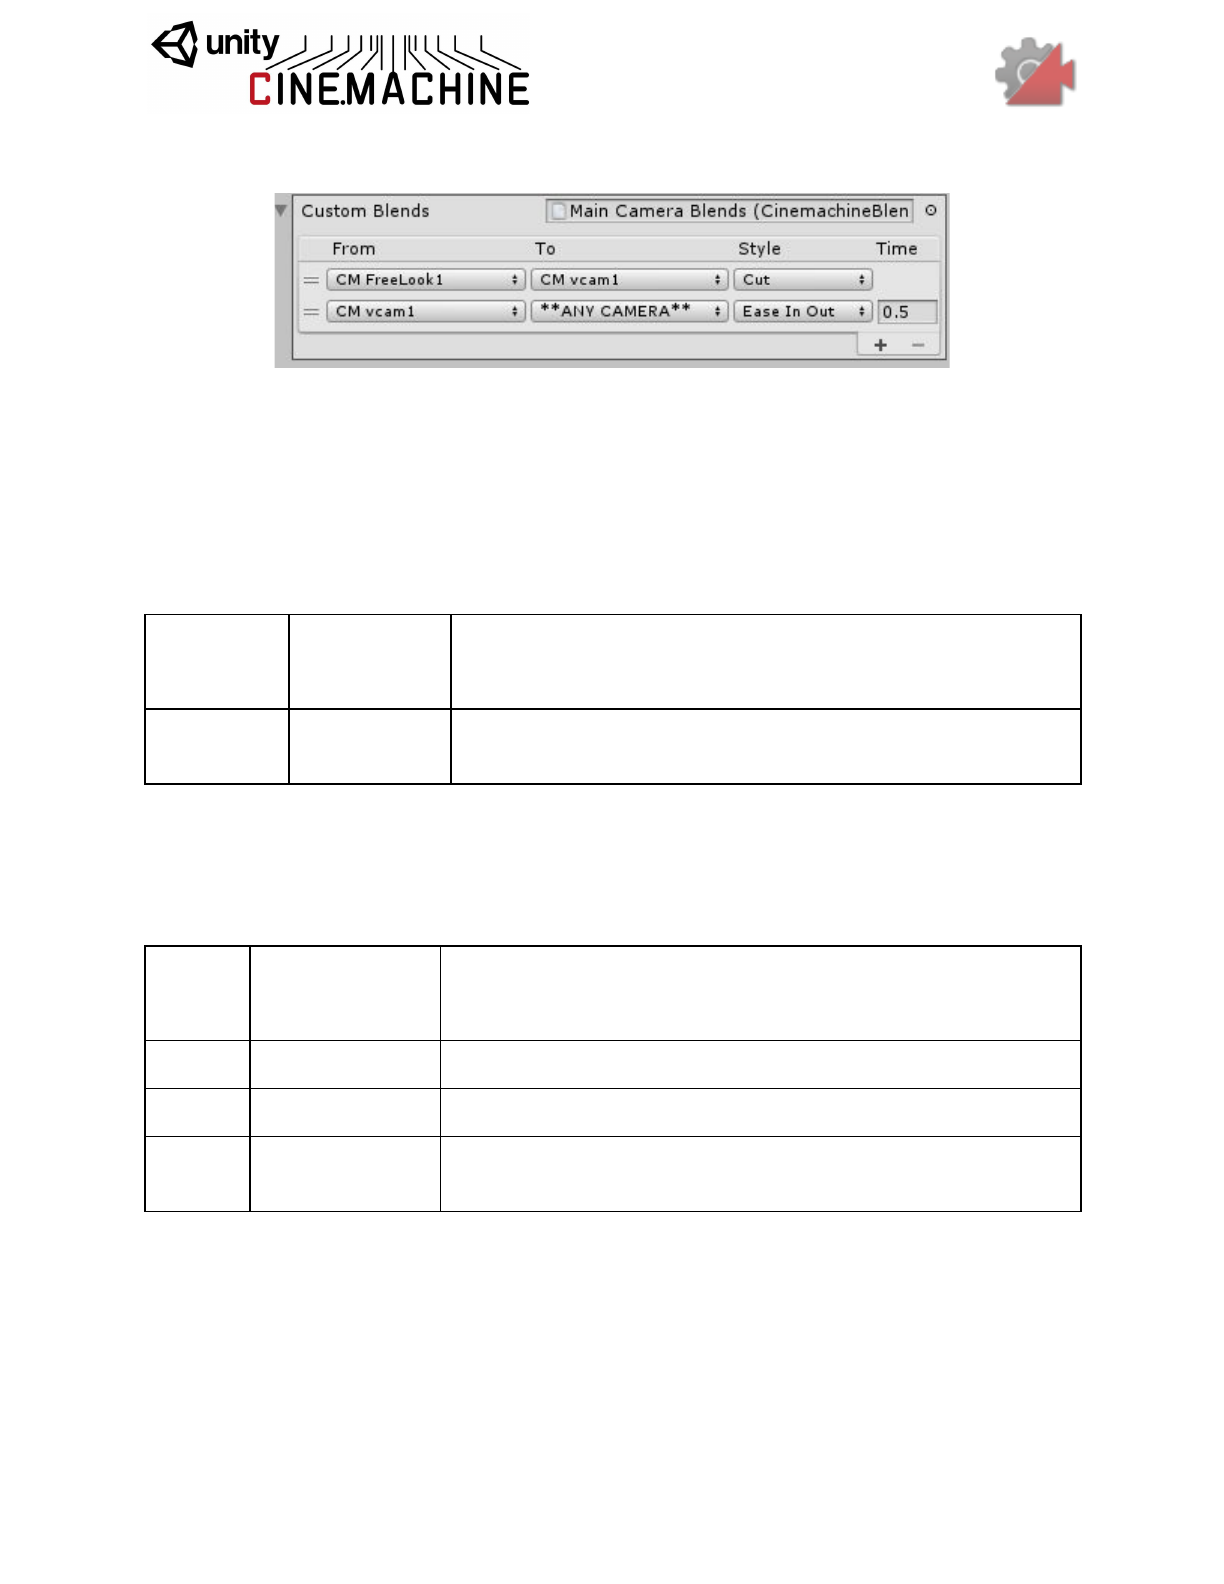
Asset that defines the rules for blending between Virtual Cameras.
The From and To settings are name-based, which means that cameras are found by matching
their names to the settings. They are not linked to specific game objects.
Blender supports wildcards called **ANY CAMERA**, which you can use on the input or
output of blends so that no matter what camera you’re in, you only have to specify one blend to
a particular shot if you always want to blend into or out of that shot the same way.
Setting
Type
Description
Custom
Blends
CustomBlend[]
The array containing explicitly defined blends between two
Virtual Cameras.
CinemachineBlenderSettings.CustomBlend
Container specifying how two specific Cinemachine Virtual Cameras blend together.
Setting
Type
Description
From
String
When blending from this camera.
To
String
When blending to this camera.
Blend
CinemachineBlend
Definition
Blend curve definition.

Follow Cams and Player Input
In the previous sections of the manual we discussed basic virtual cameras. They are great for
cinematics and composition, but it’s hard to set up a camera that follows in the path of a moving
target, and up to now there has been no consideration of cameras that position themselves in
response to player input.
Because Cinemachine is a modular system, it’s easy to replace the Transposer in the Body
section with a different component - one that considers the velocity of the Follow target, and
player input coming from various HIDs. One such component is the OrbitalTransposer.
Building on the OrbitalTransposer, the CinemachineFreeLook camera is a complex rig that
allows the player to position the camera in 2 dimensions: horizontally using the
OrbitalTransposer, and vertically using a super-powerful custom blending of 3 interrelated child
rigs.
Player input is accomplished either by setting up axes in the Unity Input Manager, or you can
drive the values directly using any custom or proprietary input system.
CinemachineOrbitalTransposer
This is a CinemachineComponent in the the Body section of the component pipeline. Its job is to
position the camera in a variable relationship to a the vcam’s Follow target object, with offsets
and damping.
This component is typically used to implement a camera that follows its target. It can accept
player input from an input device, which allows the player to dynamically control the relationship
between the camera and the target, for example with a joystick.
The OrbitalTransposer introduces the concept of Heading, which is the direction in which the
target is moving, and the OrbitalTransposer will attempt to position the camera in relationship to
the heading, which is by default directly behind the target. You can control the default
relationship by adjusting the Heading Bias setting.
If you attach an input controller to the OrbitalTransposer, then the player can also control the
way the camera positions itself in relation to the target heading. This allows the camera to move
to any spot on an orbit around the target. You can configure the OrbitalTransposer to take its
input from any axis previously set up in the Input Manager, or you can control the value directly
using any custom input system.
Another feature of the OrbitalTransposer is automatic recentering. When enabled, it will
automatically move the camera back to the default target heading after is has detected no user
input for a specified time.
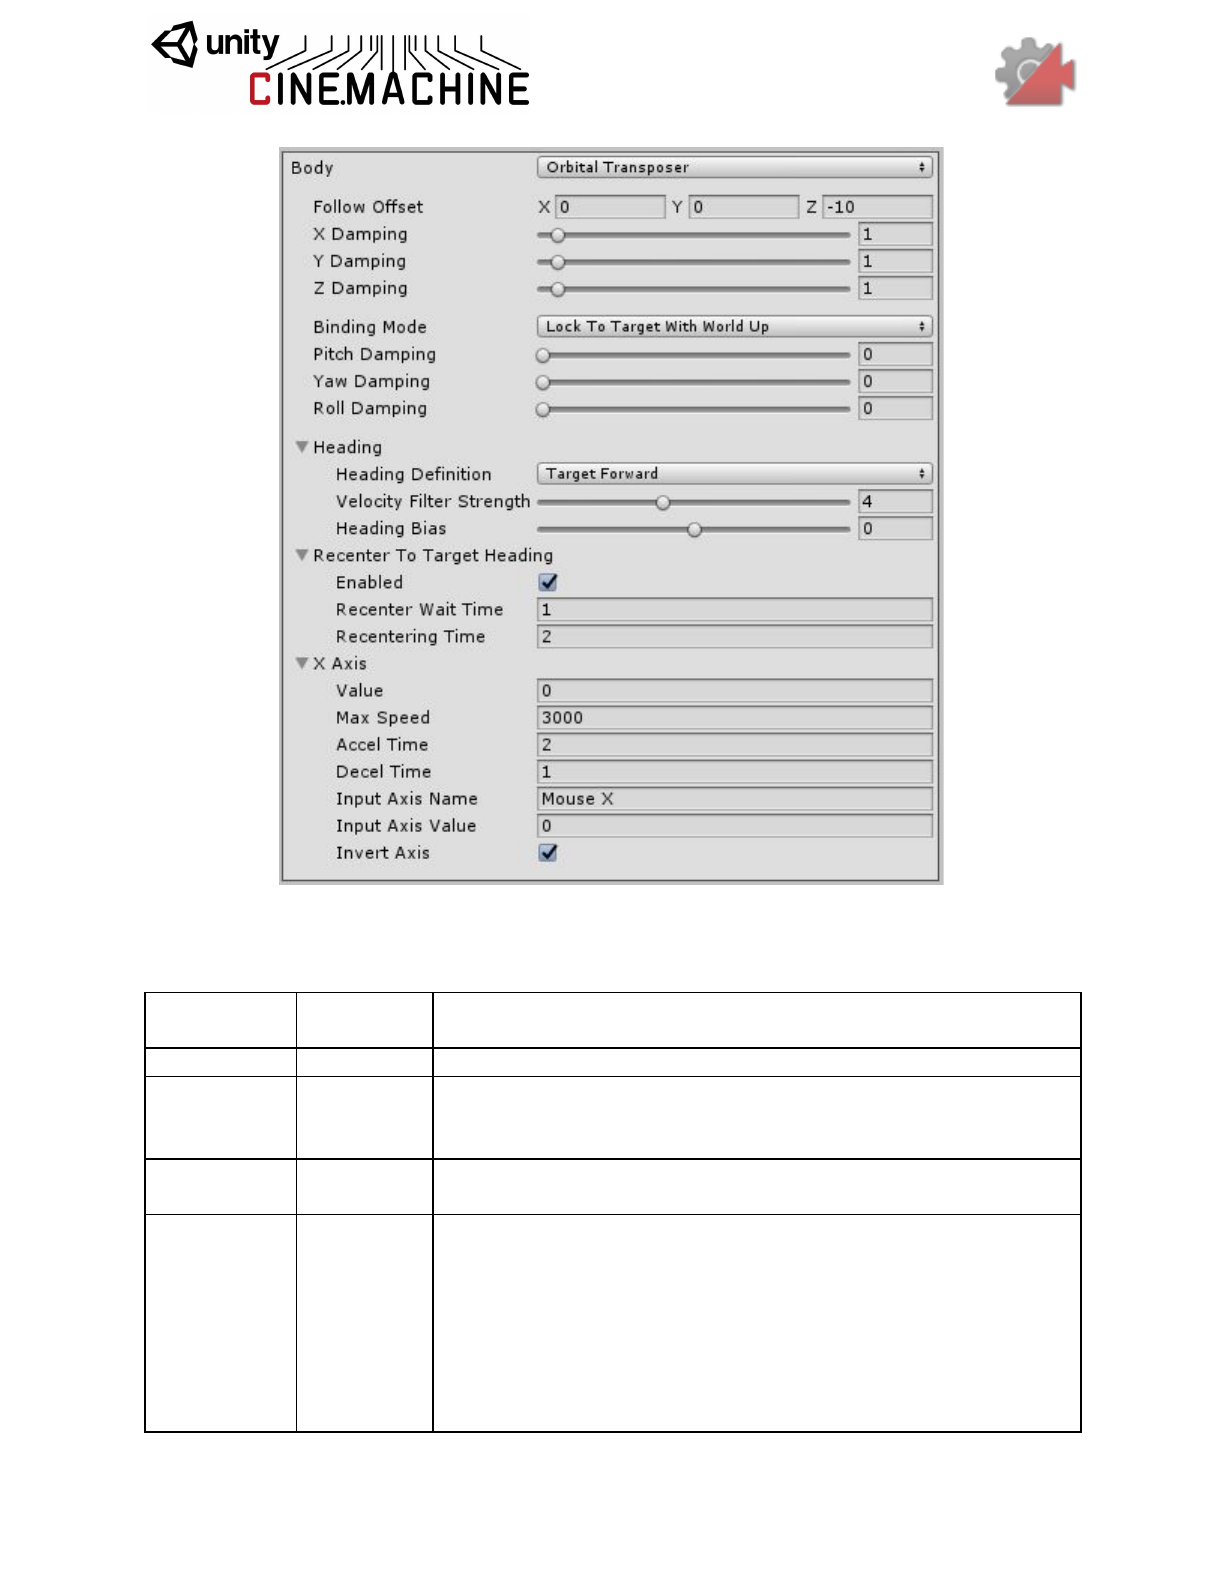
Setting
Type
Description
Heading
Heading
The definition of Forward. Camera will follow behind.
Recenter To
Target
Heading
Recentering
Automatic heading recentering. The settings here defines how the
camera will reposition itself in the absence of player input.
X Axis
AxisState
Heading Control. The settings here control the behaviour of the
camera in response to the player’s input.
Binding Mode
BindingMode
The coordinate space to use when interpreting the offset from the
target. This is also used to set the camera’s Up vector, which will
be maintained when aiming the camera.
Possible Values:
- Lock To Target On Assign: Camera will be bound to the Follow
target using a frame of reference consisting of the target’s local
frame at the moment when the virtual camera was enabled, or
when the target was assigned.
- Lock To Target With World Up: Camera will be bound to the
Follow target using a frame of reference consisting of the target’s
local frame, with the tilt and roll zeroed out.
- Lock To Target No Roll: Camera will be bound to the Follow
target using a frame of reference consisting of the target’s local
frame, with the roll zeroed out.
- Lock To Target: Camera will be bound to the Follow target
using the target’s local frame.
- World Space: Camera will be bound to the Follow target using a
world space offset.
- Simple Follow With World Up: Offsets will be calculated
relative to the target, using Camera-local axes.
Follow Offset
Vector3
The distance vector that the transposer will attempt to maintain
from the Follow target.
X Damping
Single
How aggressively the camera tries to maintain the offset in the
X-axis. Small numbers are more responsive, rapidly translating
the camera to keep the target’s x-axis offset. Larger numbers give
a more heavy slowly responding camera. Using different settings
per axis can yield a wide range of camera behaviors.
Y Damping
Single
How aggressively the camera tries to maintain the offset in the
Y-axis. Small numbers are more responsive, rapidly translating
the camera to keep the target’s y-axis offset. Larger numbers give
a more heavy slowly responding camera. Using different settings
per axis can yield a wide range of camera behaviors.
Z Damping
Single
How aggressively the camera tries to maintain the offset in the
Z-axis. Small numbers are more responsive, rapidly translating the
camera to keep the target’s z-axis offset. Larger numbers give a
more heavy slowly responding camera. Using different settings
per axis can yield a wide range of camera behaviors.
Pitch
Damping
Single
How aggressively the camera tries to track the target rotation’s X
angle. Small numbers are more responsive. Larger numbers give
a more heavy slowly responding camera.
Yaw Damping
Single
How aggressively the camera tries to track the target rotation’s Y
angle. Small numbers are more responsive. Larger numbers give
a more heavy slowly responding camera.
Roll Damping
Single
How aggressively the camera tries to track the target rotation’s Z
angle. Small numbers are more responsive. Larger numbers give
a more heavy slowly responding camera.
AxisState
Axis state for defining how to react to player input. The settings here control the responsiveness
of the axis to player input.
Setting
Type
Description
Value
Single
The current value of the axis.
Max Speed
Single
The maximum speed of this axis in units/second.
Accel Time
Single
The amount of time in seconds it takes to accelerate to MaxSpeed
with the supplied Axis at its maximum value.
Decel Time
Single
The amount of time in seconds it takes to decelerate the axis to
zero if the supplied axis is in a neutral position.
Input Axis
Name
String
The name of this axis as specified in Unity Input manager. Setting
to an empty string will disable the automatic updating of this axis.
Input Axis
Value
Single
The value of the input axis. A value of 0 means no input. You can
drive this directly from a custom input system, or you can set the
Axis Name and have the value driven by the internal Input
Manager.
Invert Input
Boolean
If checked, then the raw value of the input axis will be inverted
before it is used.
Min Value
Single
The minimum value for the axis.
Max Value
Single
The maximum value for the axis.
Wrap
Boolean
If checked, then the axis will wrap around at the min/max values,
forming a loop.
AxisState.Recentering
Helper for automatic axis recentering.
Setting
Type
Description
Enabled
Boolean
If checked, will enable automatic recentering of the axis. If
unchecked, recenting is disabled.
Wait Time
Single
If no user input has been detected on the axis, the axis will wait
this long in seconds before recentering.
Recentering
Time
Single
Maximum angular speed of recentering. Will accelerate into and
decelerate out of this.
CinemachineFreeLook
The FreeLook is a Cinemachine Camera geared towards a 3rd person camera experience. The
camera orbits around its subject with three separate camera rigs defining rings around the
target. Each rig has its own radius, height offset, composer, and lens settings. Depending on the
camera’s position along the spline connecting these three rigs, these settings are interpolated to
give the final camera position and state.
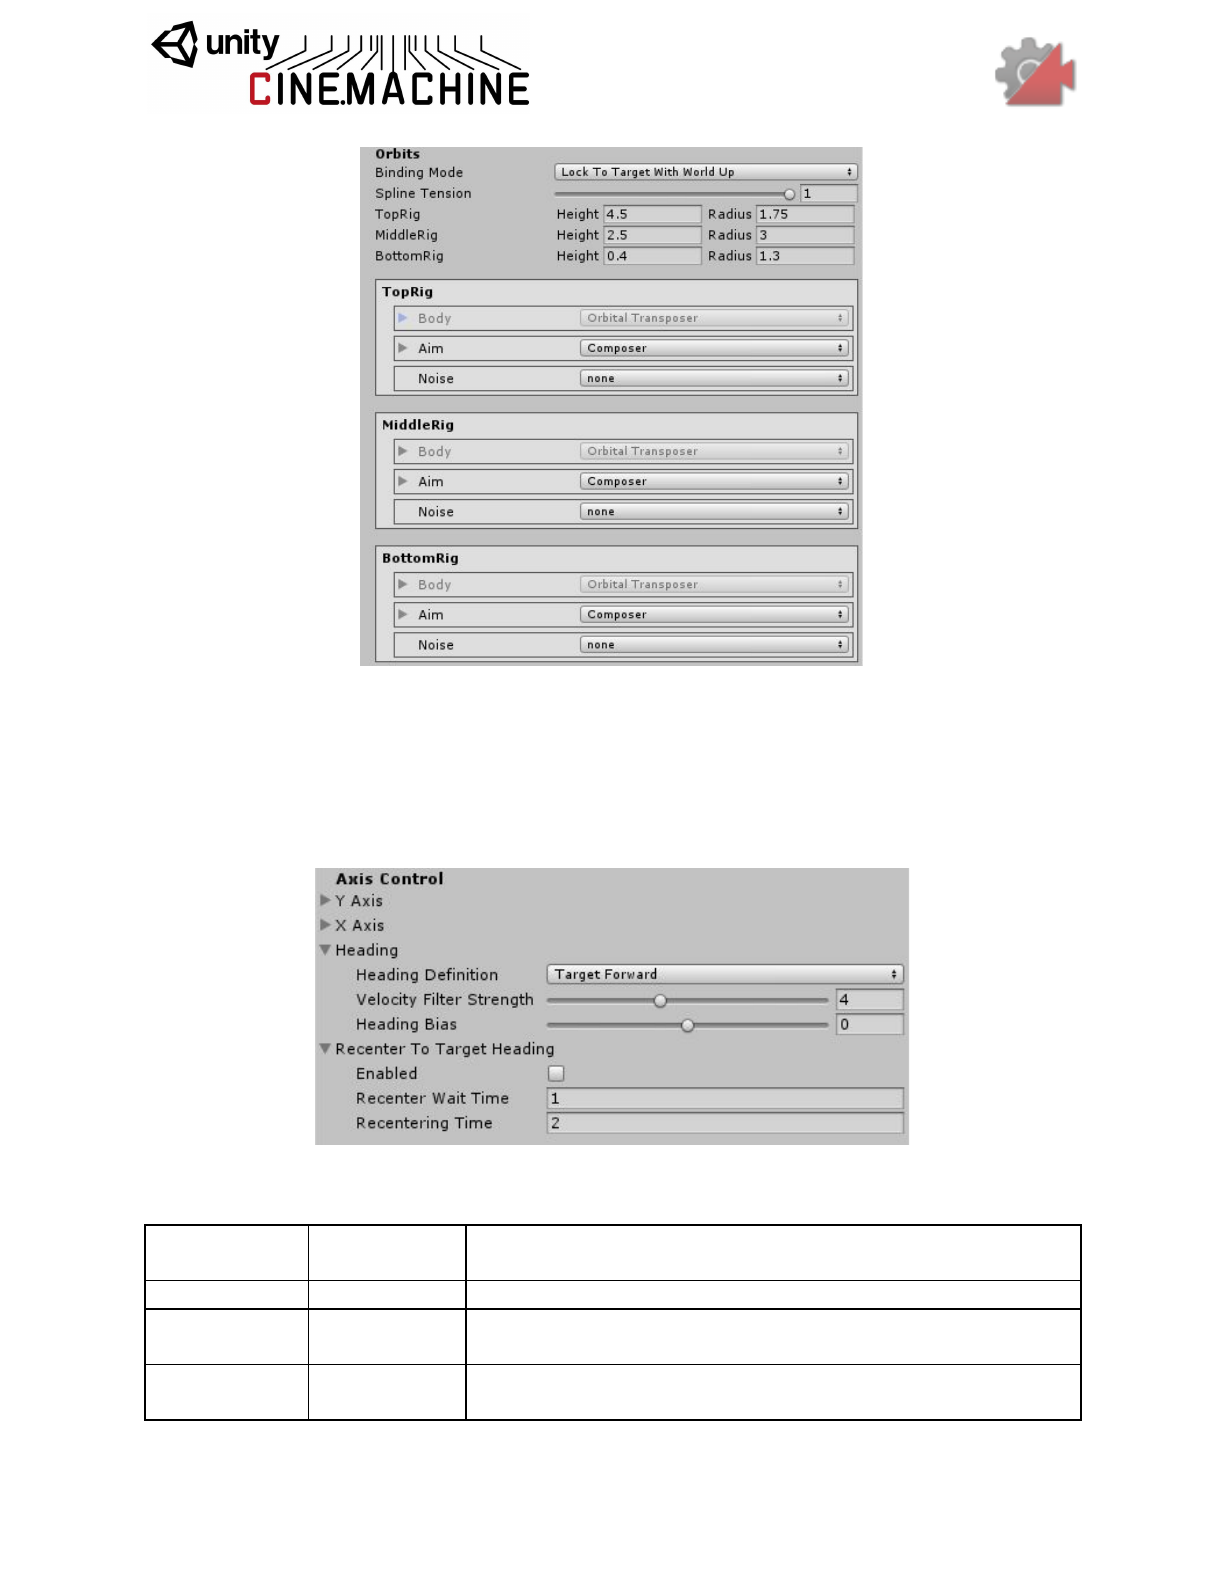
Player input is supplied along 2 axes: the X axis which controls the orbital position (see
CinemachineOrbitalTransposer), and the Y axis which controls the vertical position on the spline
connecting the 3 child rigs.
Each child rig can have its own Lens settings, or common shared values can be used.
Additionally, each child rig can have its own Composer and Noise settings.
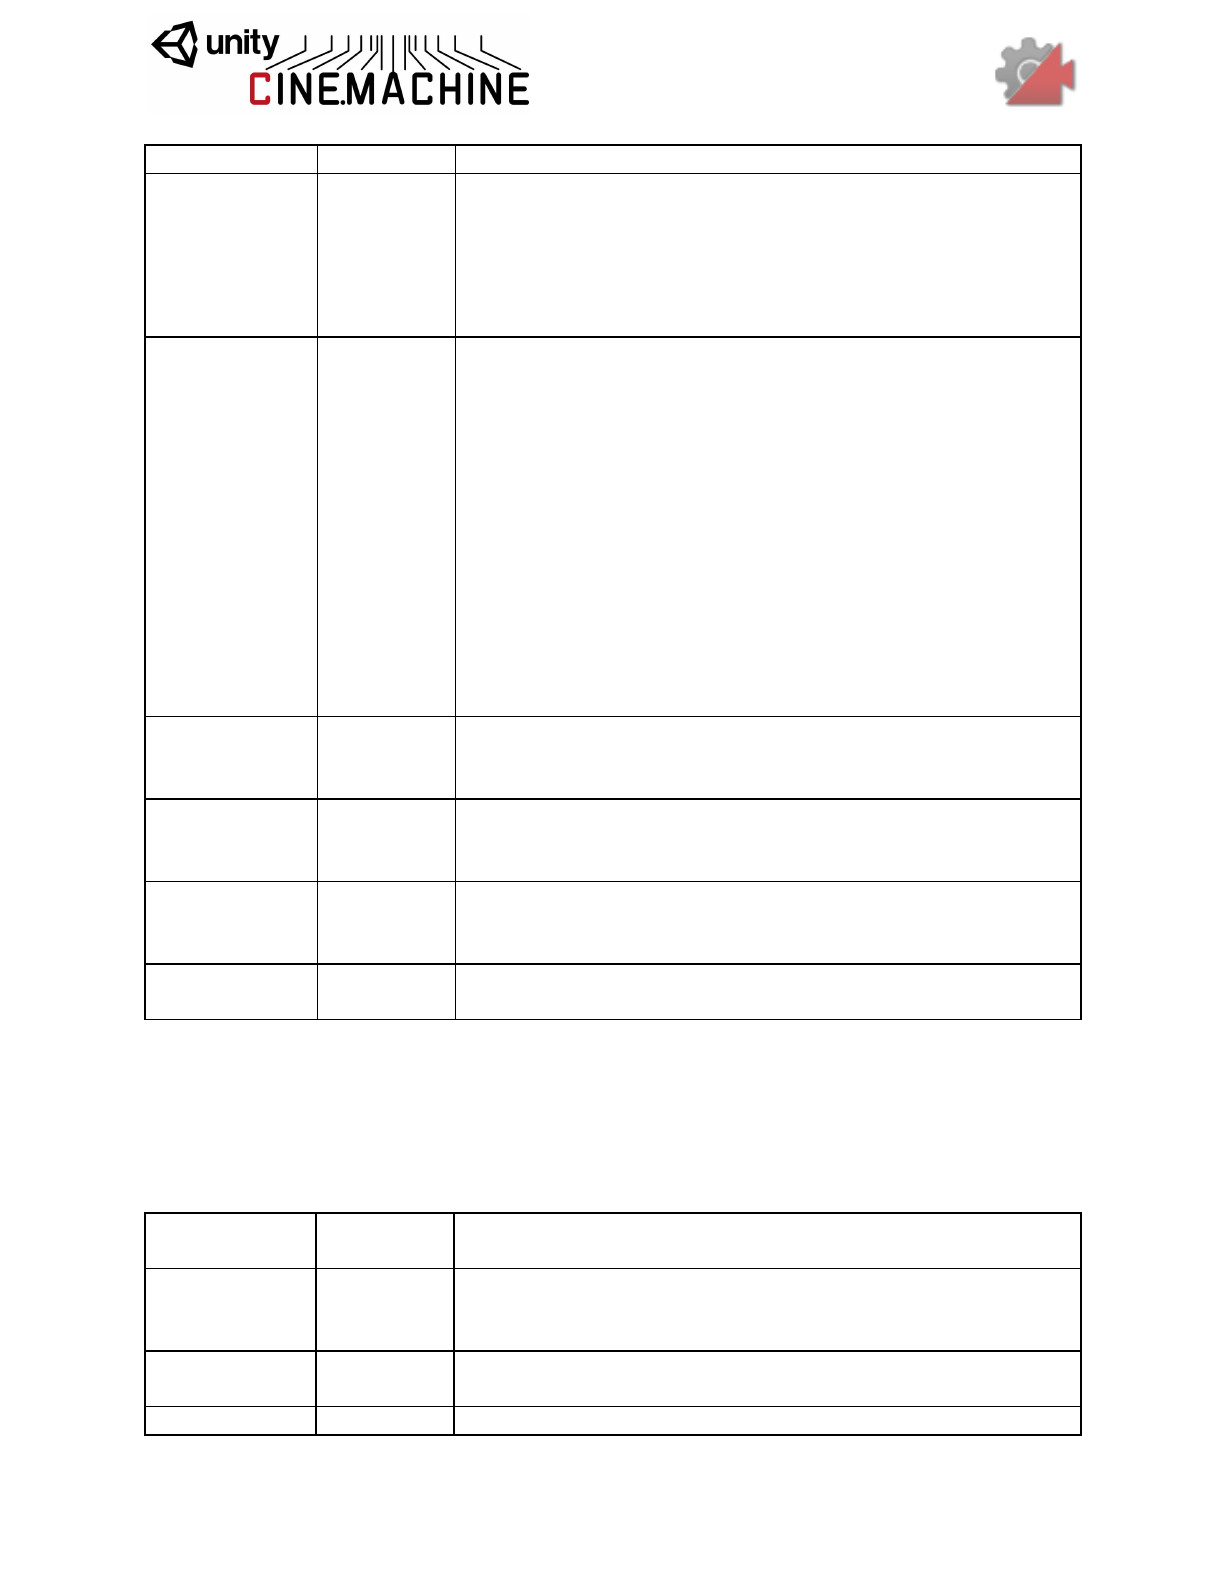
Setting
Type
Description
Look At
Transform
Object for the camera children to look at (the aim target).
Follow
Transform
Object for the camera children wants to move with (the body
target).
Common Lens
Boolean
If enabled, this lens setting will apply to all three child rigs,
otherwise the child rig lens settings will be used.

Lens
LensSettings
Specifies the lens properties of this Virtual Camera. This
generally mirrors the Unity Camera’s lens settings, and will be
used to drive the Unity camera when the vcam is active.
Y Axis
AxisState
The Vertical axis. Value is 0..1. Chooses how to blend the child
rigs.
X Axis
AxisState
The Horizontal axis. Value is 0..359. This is passed on to the
rigs’ OrbitalTransposer component.
Heading
Heading
The definition of Forward. Camera will follow behind.
Recenter To
Target Heading
Recentering
Controls how automatic recentering of the X axis is
accomplished.
Binding Mode
BindingMode
The coordinate space to use when interpreting the offset from
the target. This is also used to set the camera’s Up vector,
which will be maintained when aiming the camera.
Possible Values:
- Lock To Target On Assign: Camera will be bound to the
Follow target using a frame of reference consisting of the
target’s local frame at the moment when the virtual camera
was enabled, or when the target was assigned.
- Lock To Target With World Up: Camera will be bound to
the Follow target using a frame of reference consisting of the
target’s local frame, with the tilt and roll zeroed out.
- Lock To Target No Roll: Camera will be bound to the Follow
target using a frame of reference consisting of the target’s local
frame, with the roll zeroed out.
- Lock To Target: Camera will be bound to the Follow target
using the target’s local frame.
- World Space: Camera will be bound to the Follow target
using a world space offset.
- Simple Follow With World Up: Offsets will be calculated
relative to the target, using Camera-local axes.
Spline
Curvature
Single
Controls how taut is the line that connects the rigs’ orbits,
which determines final placement on the Y axis.
Orbits
Orbit[]
The radius and height of the three orbiting rigs.
Priority
Int32
The priority will determine which camera becomes active
based on the state of other cameras and this camera. Higher
numbers have greater priority.

Tracked Dolly
If you need your camera’s position to be confined to a dolly track, this can be done with a
combination of a CinemachinePath for the track, and a TrackedDolly for the Body component of
the virtual camera. There is a shortcut for creating this pair in the Cinemachine menu:
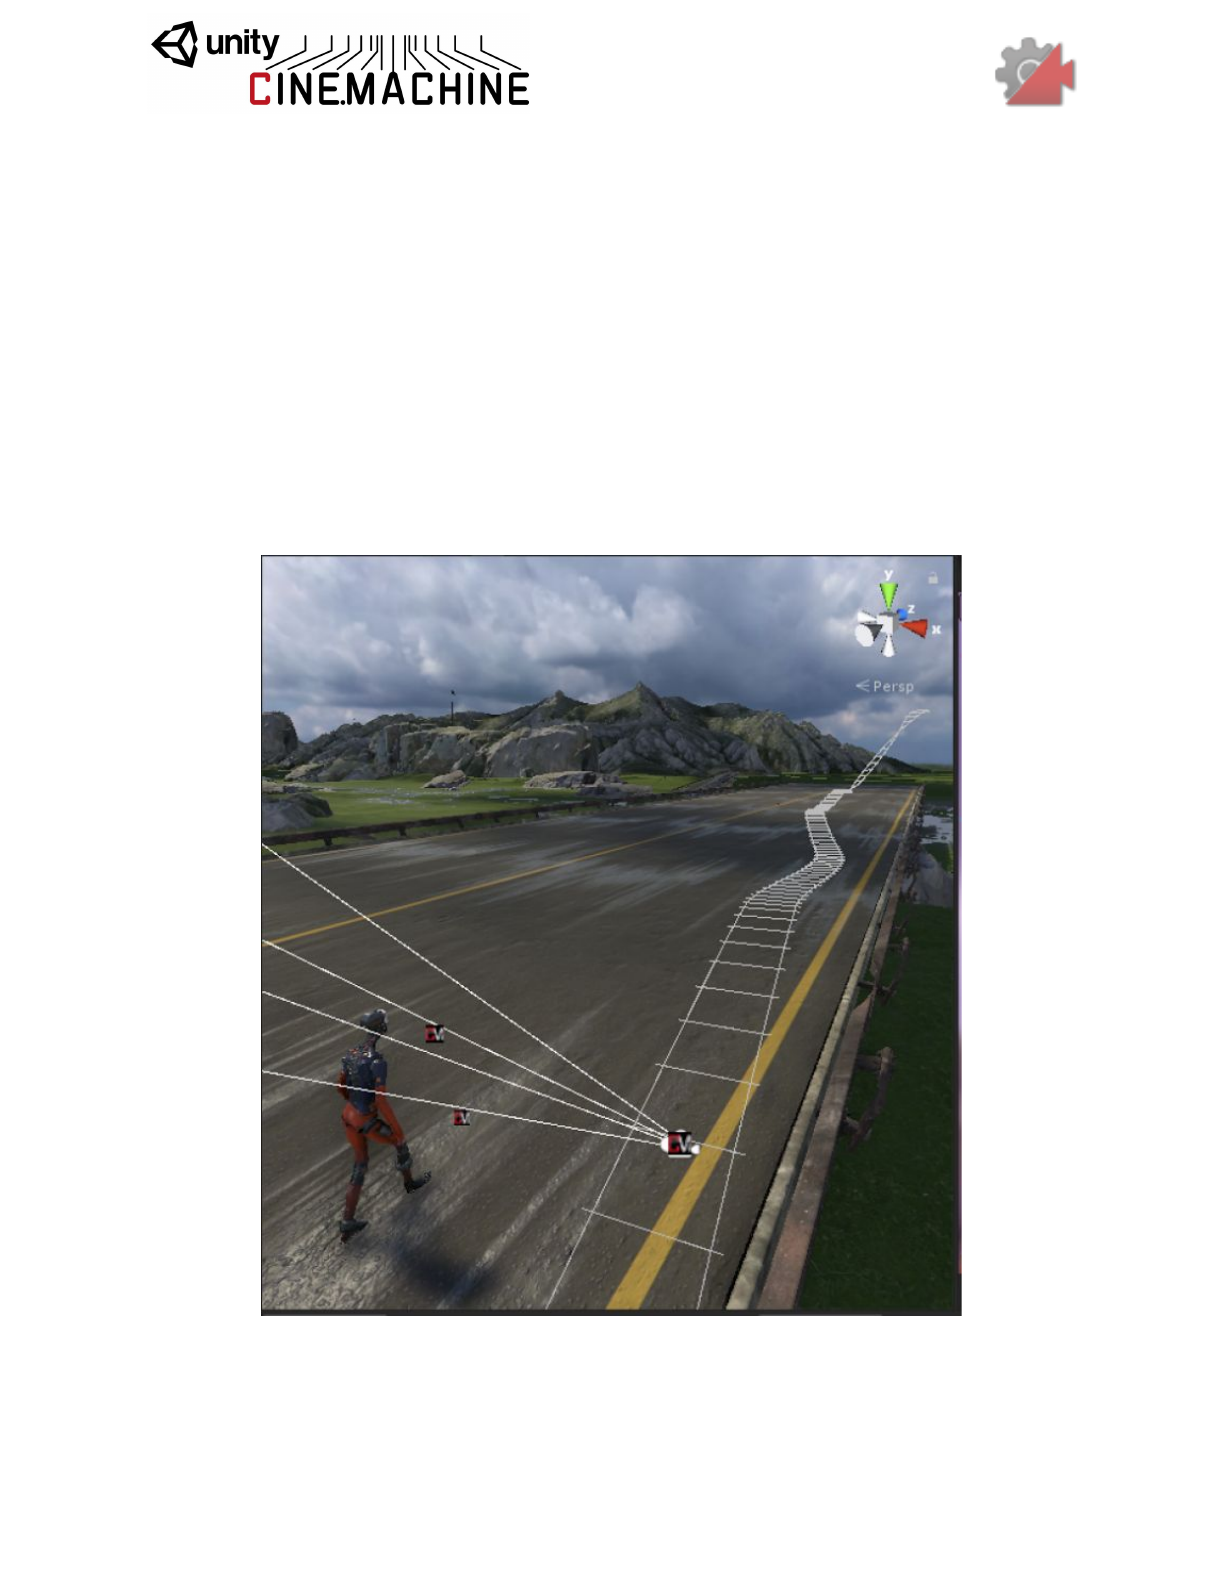
The path itself is defined by positioning waypoints. The CinemachinePath inspector provides a
simple interface for doing this. The waypoints are connected using a bezier, and you can
control how the interpolation occurs by manipulating the curve tangents at the waypoints. The
result of this is a camera track, drawn in the scene view in a manner resembling a railroad track.
It will not be drawn in the game view.

CinemachineTrackedDolly
A Cinemachine Virtual Camera Body component that constrains camera motion to a
CinemachinePath or a CinemachineSmoothPath. The camera can move along the path.
This behaviour can operate in two modes: manual positioning, and Auto-Dolly positioning. In
Manual mode, the camera’s position is specified by animating the Path Position field. In
Auto-Dolly mode, the Path Position field is animated automatically every frame by finding the
position on the path that’s closest to the virtual camera’s Follow target.
Setting
Type
Description
Path
Cinemachine
PathBase
The path to which the camera will be constrained. This must be
non-null.
Path Position
Single
The position along the path at which the camera will be placed.
This can be animated directly, or set automatically by the
Auto-Dolly feature to get as close as possible to the Follow
target. The value is interpreted according to the Position Units
setting.
Position Units
PositionUnits
How to interpret Path Position. If set to Path Units, values are
as follows: 0 represents the first waypoint on the path, 1 is the
second, and so on. Values in-between are points on the path in
between the waypoints. If set to Distance, then Path Position
represents distance along the path.
Possible Values:
- Path Units: Use PathPosition units, where 0 is first waypoint,
1 is second waypoint, etc.
- Distance: Use Distance Along Path. Path will be sampled
according to its Resolution setting, and a distance lookup table
will be cached internally.
Path Offset
Vector3
Where to put the camera relative to the path position. X is
perpendicular to the path, Y is up, and Z is parallel to the path.
This allows the camera to be offset from the path itself (as if on
a tripod, for example).
X Damping
Single
How aggressively the camera tries to maintain its position in a
direction perpendicular to the path. Small numbers are more
responsive, rapidly translating the camera to keep the target’s
x-axis offset. Larger numbers give a more heavy slowly
responding camera. Using different settings per axis can yield a
wide range of camera behaviors.
Y Damping
Single
How aggressively the camera tries to maintain its position in the
path-local up direction. Small numbers are more responsive,
rapidly translating the camera to keep the target’s y-axis offset.
Larger numbers give a more heavy slowly responding camera.
Using different settings per axis can yield a wide range of
camera behaviors.
Z Damping
Single
How aggressively the camera tries to maintain its position in a
direction parallel to the path. Small numbers are more
responsive, rapidly translating the camera to keep the target’s
z-axis offset. Larger numbers give a more heavy slowly
responding camera. Using different settings per axis can yield a
wide range of camera behaviors.
Camera Up
CameraUpM
ode
How to set the virtual camera’s Up vector. This will affect the
screen composition, because the camera Aim behaviours will
always try to respect the Up direction.
Possible Values:
- Default: Leave the camera’s up vector alone. It will be set
according to the Brain’s WorldUp.
- Path: Take the up vector from the path’s up vector at the
current point.
- Path No Roll: Take the up vector from the path’s up vector at
the current point, but with the roll zeroed out.
- Follow Target: Take the up vector from the Follow target’s up
vector.
- Follow Target No Roll: Take the up vector from the Follow
target’s up vector, but with the roll zeroed out.
Pitch Damping
Single
How aggressively the camera tries to track the target rotation’s
X angle. Small numbers are more responsive. Larger numbers
give a more heavy slowly responding camera.
Yaw Damping
Single
How aggressively the camera tries to track the target rotation’s
Y angle. Small numbers are more responsive. Larger numbers
give a more heavy slowly responding camera.
Roll Damping
Single
How aggressively the camera tries to track the target rotation’s
Z angle. Small numbers are more responsive. Larger numbers
give a more heavy slowly responding camera.
Auto Dolly
AutoDolly
Controls how automatic dollying occurs. A Follow target is
necessary to use this feature.
CinemachineTrackedDolly.AutoDolly
Controls how automatic dollying occurs.
Setting
Type
Description
Enabled
Boolean
If checked, will enable automatic dolly, which chooses a path
position that is as close as possible to the Follow target. Note:
this can have significant performance impact.
Position Offset
Single
Offset, in position units, from the closest point on the path to the
follow target.
Search Radius
Int32
How many segments on either side of the current segment. Use
0 for Entire path.
Search
Resolution
Int32
We search a segment by dividing it into this many straight
pieces. The higher the number, the more accurate the result,
but performance is proportionally slower for higher numbers.
CinemachinePath
Defines a world-space path, consisting of an array of waypoints, each of which has position,
tangent, and roll settings. Bezier interpolation is performed between the waypoints, to get a
smooth and continuous path.
Setting
Type
Description
Resolution
Int32
Path samples per waypoint. This is used for calculating path
distances.
Appearance
Appearance
The settings that control how the path will appear in the editor
scene view.
Looped
Boolean
If checked, then the path ends are joined to form a continuous
loop.
Waypoints
Waypoint[]
The waypoints that define the path. They will be interpolated using
a bezier curve.
CinemachinePath.Waypoint
A waypoint along the path.
Setting
Type
Description
Position
Vector3
Position in path-local space.
Tangent
Vector3
Offset from the position, which defines the tangent of the curve at
the waypoint. The length of the tangent encodes the strength of
the bezier handle. The same handle is used symmetrically on
both sides of the waypoint, to ensure smoothness.
Roll
Single
Defines the roll of the path at this waypoint. The other orientation
axes are inferred from the tangent and world up.

CinemachineSmoothPath
Defines a world-space path, consisting of an array of waypoints, each of which has position and
roll settings. Bezier interpolation is performed between the waypoints, to get a smooth and
continuous path. The path will pass through all waypoints, and (unlike CinemachinePath) first
and second order continuity is guaranteed.
Setting
Type
Description
Looped
Boolean
If checked, then the path ends are joined to form a continuous
loop.
Waypoints
Waypoint[]
The waypoints that define the path. They will be interpolated using
a bezier curve.
Resolution
Int32
Path samples per waypoint. This is used for calculating path
distances.
Appearance
Appearance
The settings that control how the path will appear in the editor
scene view.
CinemachineSmoothPath.Waypoint
A waypoint along the path.
Setting
Type
Description
Position
Vector3
Position in path-local space.
Roll
Single
Defines the roll of the path at this waypoint. The other orientation
axes are inferred from the tangent and world up.
CinemachinePathBase.Appearance
This class holds the settings that control how the path will appear in the editor scene view. The
path is not visible in the game view.
Setting
Type
Description
Path Color
Color
The color of the path itself when it is active in the editor.
Inactive Path
Color
Color
The color of the path itself when it is inactive in the editor.
Width
Single
The width of the railroad-tracks that are drawn to represent the
path.
State-Driven Camera
The State-Driven Camera is an implementation of a simple yet powerful concept: activate
specific shots when the subject enters specific animations states.
Even better, the blending between shots within the state-driven rig can be customized and
tuned to maximize the emotional punch of the transitions.
Using Cinemachine it’s possible to set up world-class 3rd person action adventure camera
systems. For example, you can create a unique Free-Look camera for events like this: Stand /
Walk, Run, Sprint, etc. Link the appropriate Cinemachine Free-Look camera up to that
animation state, so when the animation state is triggered it turns on that Cinemachine camera.
The idea is to simply blend into the right Free-Look camera for each animation state. Your
‘Sprint’ Free-Look gets in closer, the lens is wider and there is a ton of handheld noise. Boom,
you now have a ‘Roadie Run’ camera. This concept has been used to set up a complex camera
rig that had over 40 Free-Look cameras for a character’s local-motion and combat system, all
set up so quickly and all tuneable in real-time.
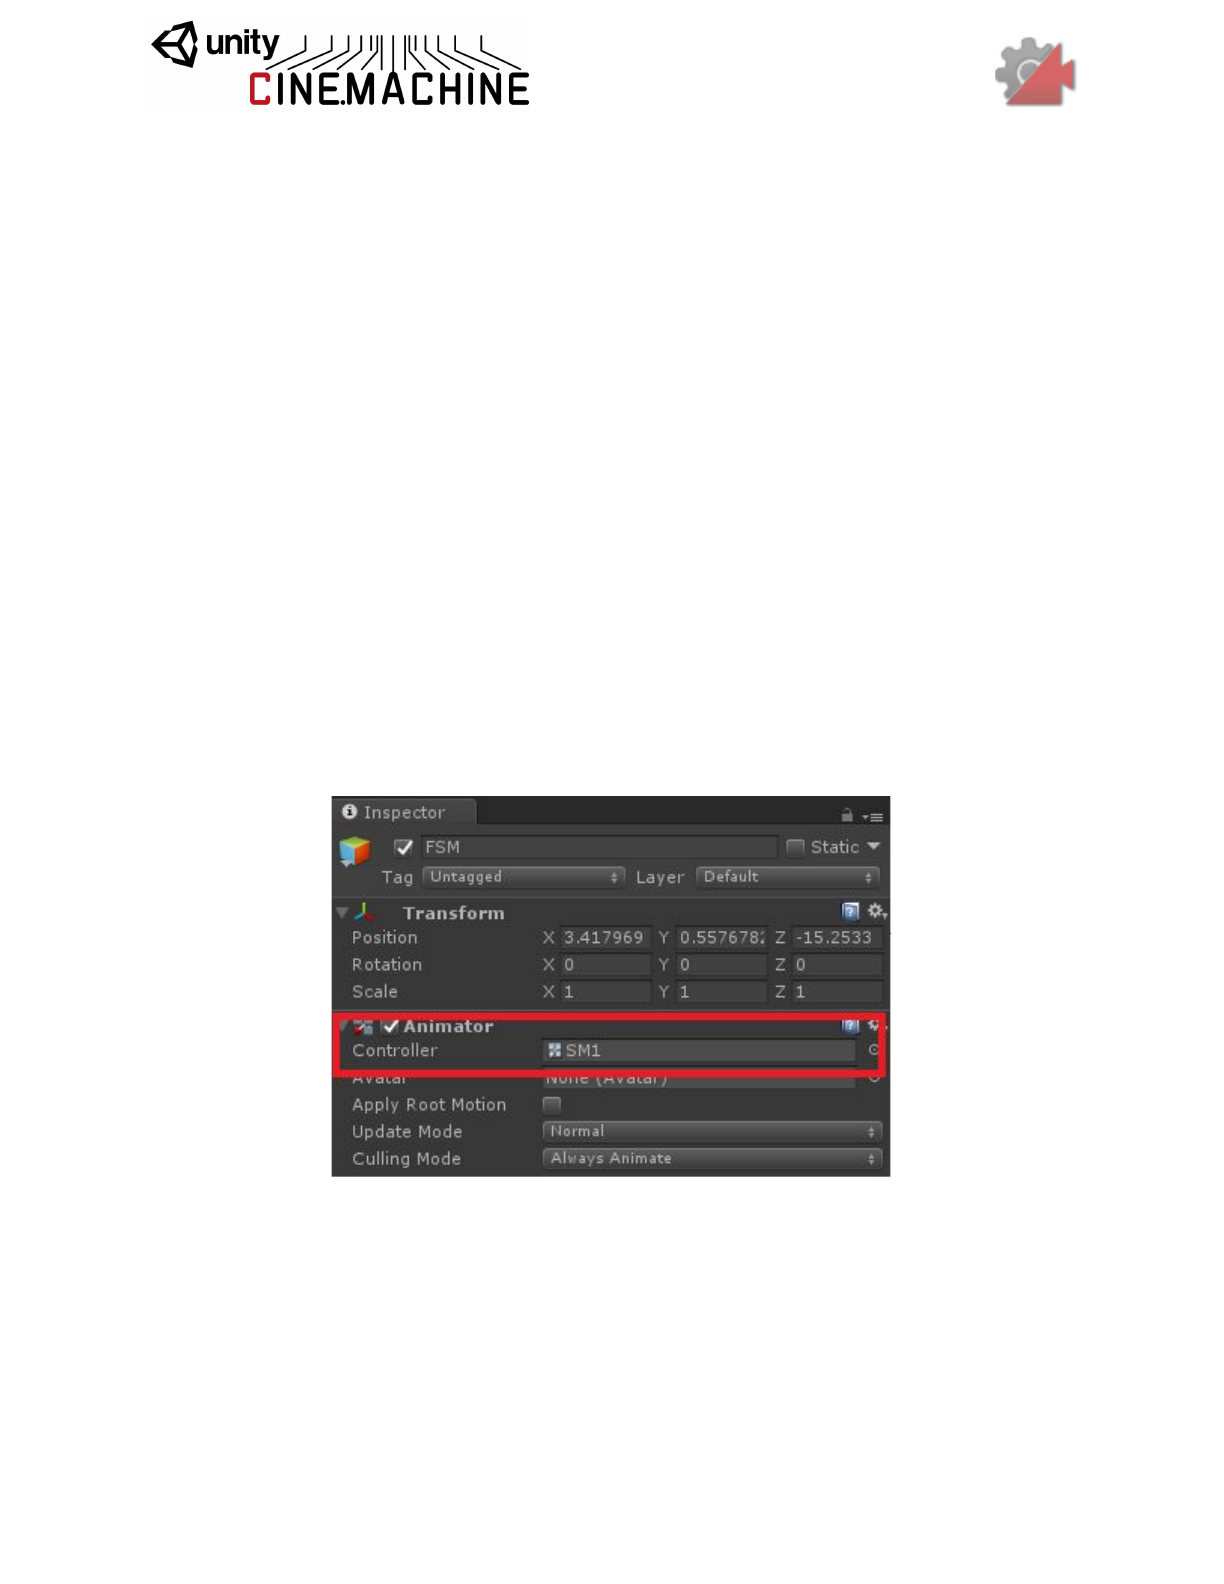
You first start with an animated target, i.e. something that has an Animator component
controlled by an FSM:
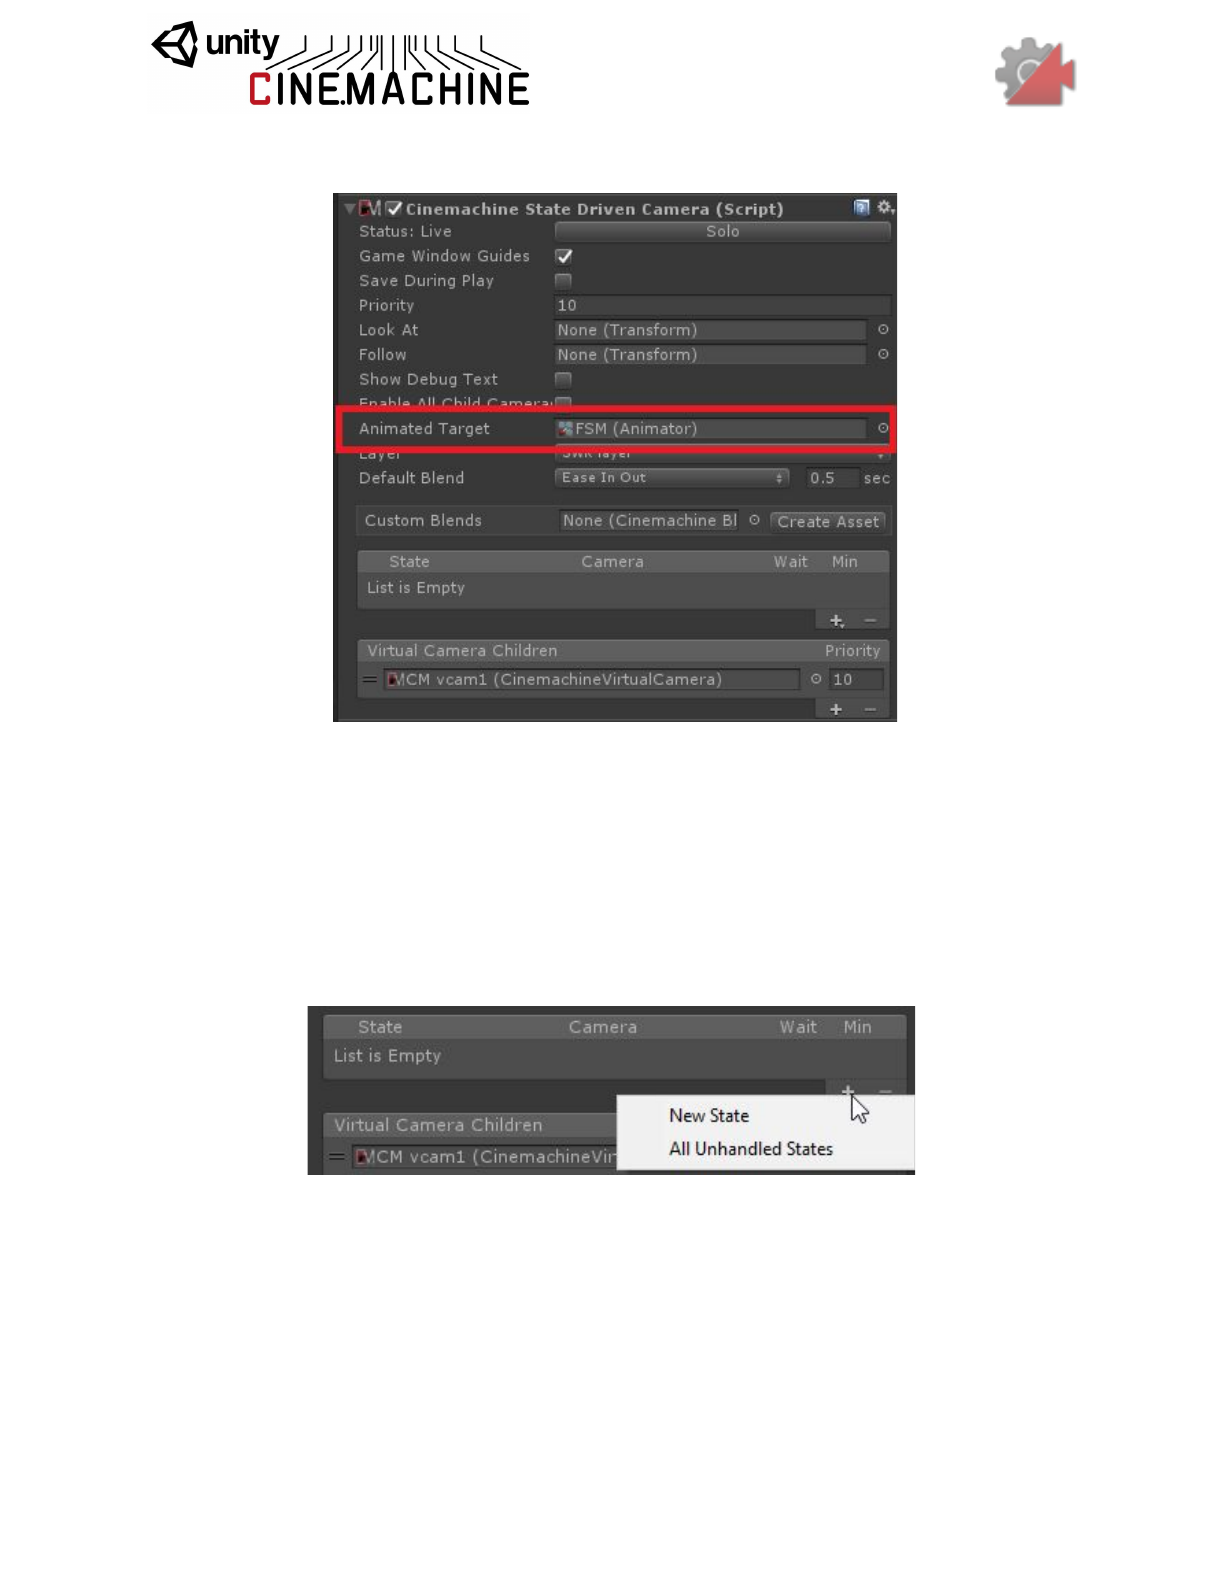
You then create a CinemachineStateDrivenCamera and connect the FSM to its Animated Target
:
Once you have set the Animated Target setting to point to a target object that has animation
states, the inspector editor will scan the target object for animation states and populate its
menus so that you can quickly and easily map available animation states to child vcams.
Next, create some state-to-camera mappings. You do that by clicking on the little + icon in the
state list:
This will add an entry in the state list, and you can then choose the state you want to handle, and
the virtual camera child to map it to.
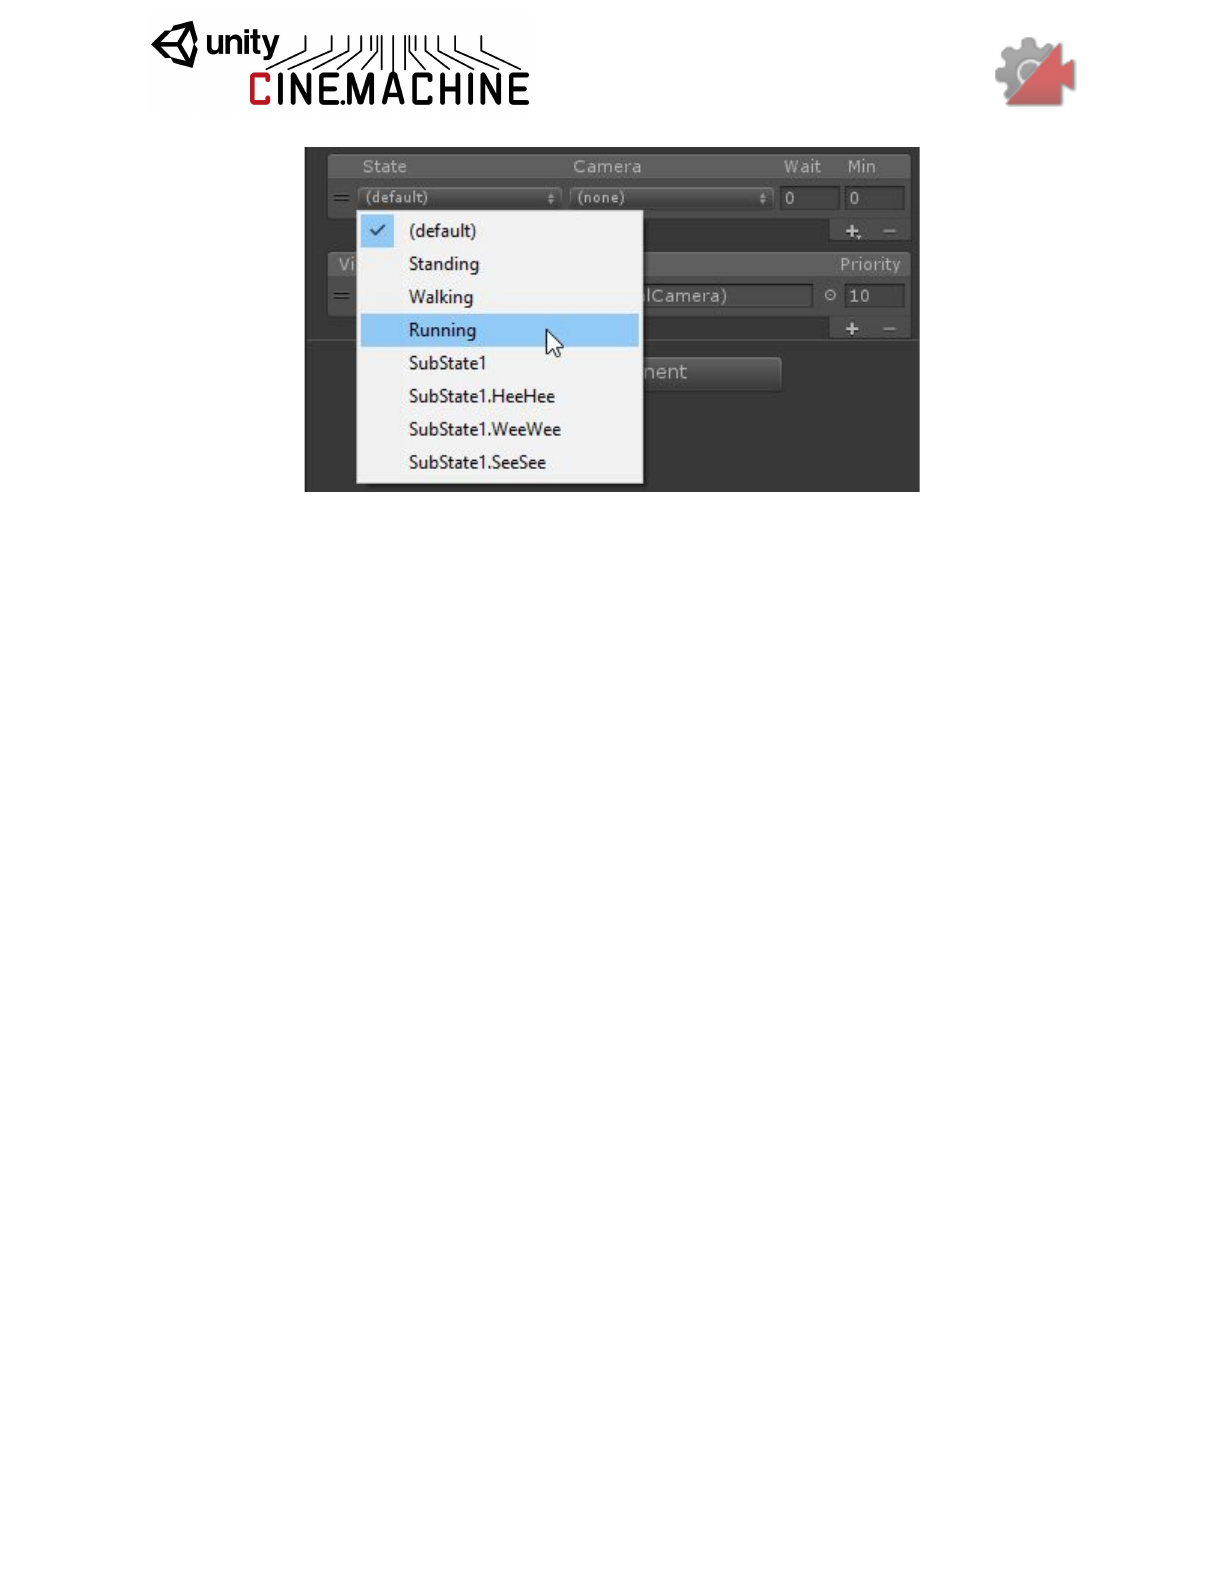
The available cameras are the virtual camera children of the StateDrivenCamera. Create as
many as you like, of whatever variety you need. You can use the hierarchy view to reparent
externally-created vcams to the StateDrivenCamera, if you like, or just press the little + on the
camera list to create a standard one. When you do, those cameras will become available for
mapping. These virtual cameras will only be visible to the State-Driven Camera parent, and
will consume no processing resources until they are activated by the parent.
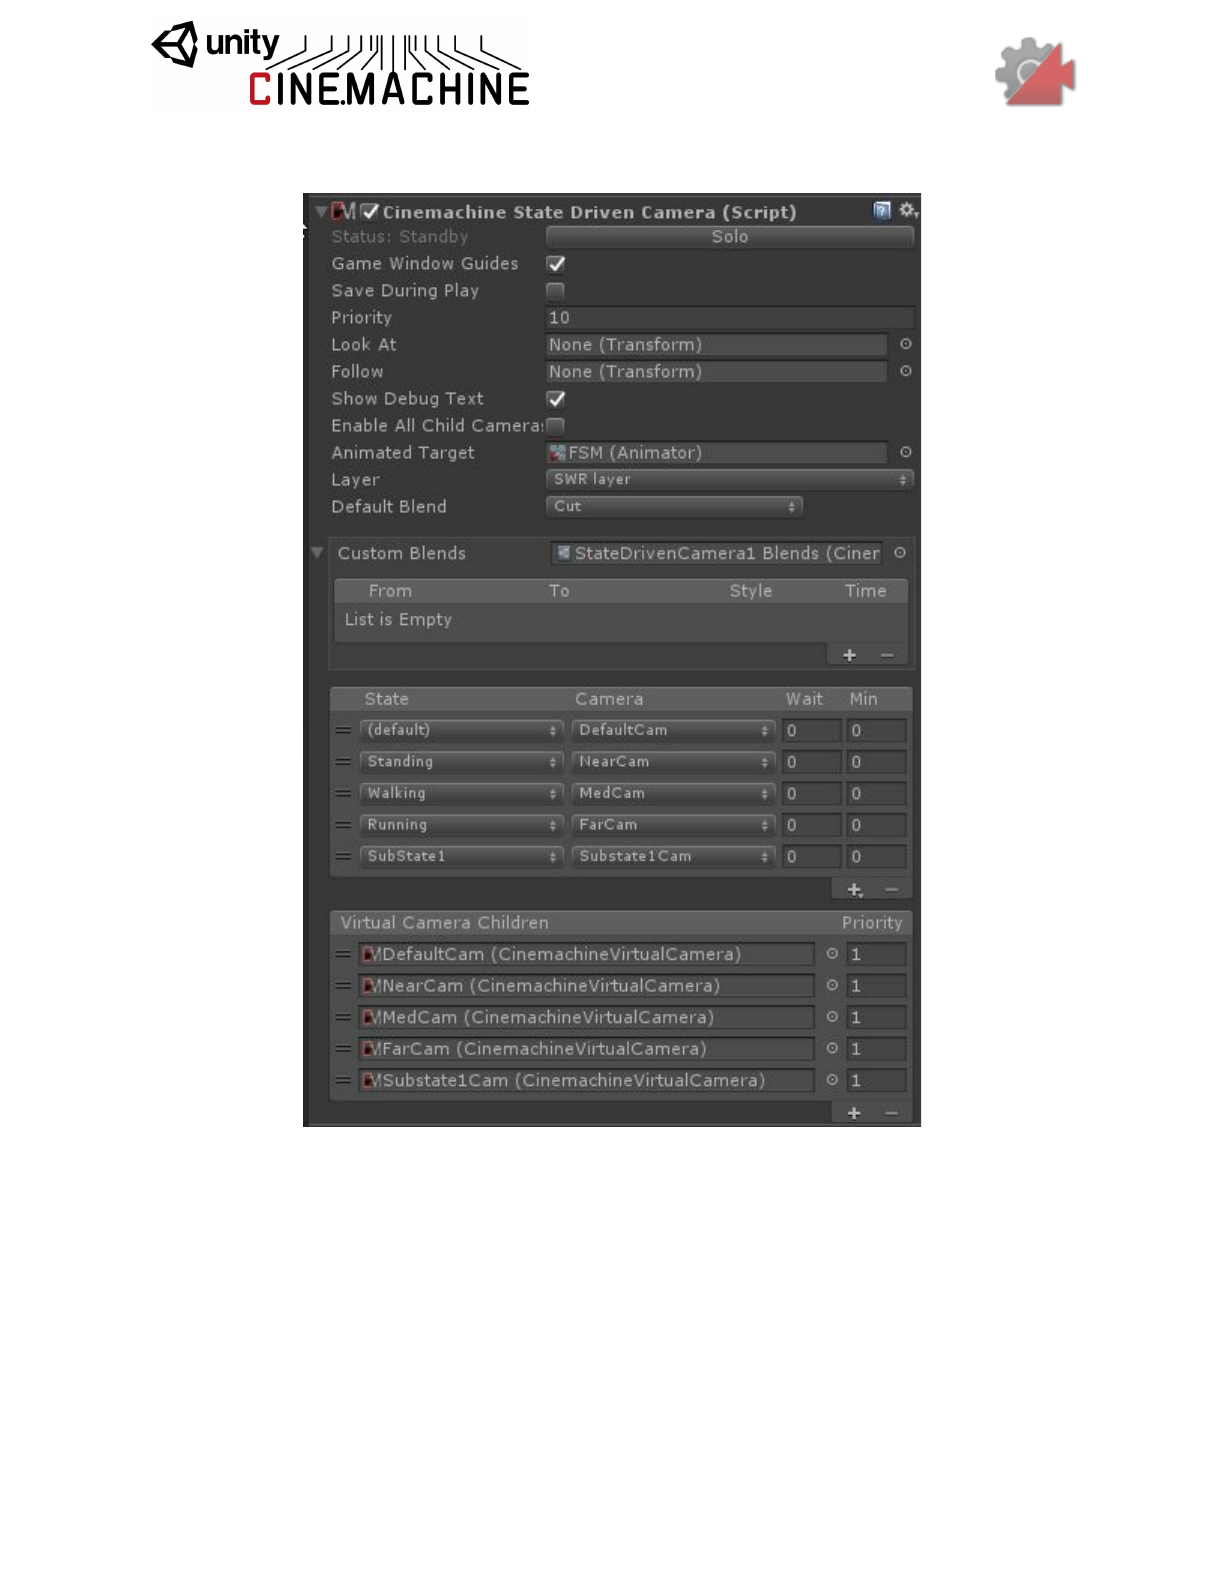
You will end up with something like this:
So now, when the states in the list become active, the associated child cameras will also
become active. They will blend in using the default blend setting defined in the
StateDrivenCamera. You can also create custom blends for specific pairs by creating a custom
blend asset on the StateDrivenCamera.

CinemachineStateDrivenCamera
This is a virtual camera “manager” that owns and manages a collection of child Virtual Cameras.
These child vcams are mapped to individual states in an animation state machine, allowing you
to associate specific vcams to specific animation states. When that state is active in the state
machine, then the associated camera will be activated.
You can define custom blends and transitions between child cameras.
In order to use this behaviour, you must have an animated target (i.e. an object animated with a
state machine) to drive the behaviour.
Setting
Type
Description
Look At
Transform
Default object for the camera children to look at (the aim target), if
not specified in a child camera. May be empty if all of the children
define targets of their own.
Follow
Transform
Default object for the camera children wants to move with (the
body target), if not specified in a child camera. May be empty if all
of the children define targets of their own.
Show
Debug
Text
Boolean
When enabled, the current child camera and blend will be indicated
in the game window, for debugging.
Enable All
Child
Cameras
Boolean
Force all child cameras to be enabled. This is useful if animating
them in Timeline, but consumes extra resources.
Animated
Target
Animator
The state machine whose state changes will drive this camera’s
choice of active child.
Layer
Index
Int32
Which layer in the target state machine to observe.
Instruction
s
Instruction[]
The set of instructions associating virtual cameras with states.
These instructions are used to choose the live child at any given
moment.
Default
Blend
CinemachineBl
endDefinition
The blend which is used if you don’t explicitly define a blend
between two Virtual Camera children.
Custom
Blends
CinemachineBl
enderSettings
This is the asset which contains custom settings for specific child
blends.
Priority
Int32
The priority will determine which camera becomes active based on
the state of other cameras and this camera. Higher numbers have
greater priority.
Collision Avoidance and Shot Evaluation
When characters move around in complex environments, sometimes obstacles in the scene can
come between a camera and its subject. Similarly, it can also happen that scene obstacles will
inconveniently find themselves to be exactly where a camera wants to be. Cinemachine
provides a mechanism to handle these situations.
The Collider module can be added to any Cinemachine Virtual Camera (including complex
camera types such as FreeLook, State-Driven-Camera, and ClearShot). It does some or all of
several things:
● Pushes the camera out of intersecting obstacles in the scene.
● Puts the camera in front of obstacles that come between the camera and its LookAt
target.
● Evaluates shot quality (has the camera been moved away from where it wants to be?
does the camera have a clear view of its target? is the camera at a desirable distance
from its target?). This shot evaluation becomes part of the state information of the vcam,
and is available for use by modules that perform actions based on shot quality (see
ClearShot, for example).
● Gaussian smoothing of camera position.
The collider uses Physics Raycasts to do these things, hence obstacles in the scene must have
collider volumes in order to be visible to the CinemachineCollider. Furthermore, there is an
associated performance cost related to this. If your game is such that the cost of using physics
is prohibitive, then you might prefer to implement this functionality in a different way.
CinemachineCollider
An add-on module for Cinemachine Virtual Camera that post-processes the final position of the
virtual camera. Based on the supplied settings, the Collider will attempt to preserve the line of
sight with the LookAt target of the virtual camera by moving away from objects that will obstruct
the view.
Additionally, the Collider can be used to assess the shot quality and report this as a field in the
camera State.
Setting
Type
Description
Collide Against
LayerMask
The Unity layer mask against which the collider will raycast.
Minimum Distance
From Target
Single
Obstacles closer to the target than this will not be seen.
Avoid Obstacles
Boolean
When enabled, will attempt to resolve situations where the line
of sight to the target is blocked by an obstacle.
Distance Limit
Single
The maximum raycast distance when checking if the line of
sight to this camera’s target is clear. If the setting is 0 or less,
the current actual distance to target will be used.
Camera Radius
Single
Camera will try to maintain this distance from any obstacle.
Try to keep this value small. Increase it if you are seeing
inside obstacles due to a large FOV on the camera.
Strategy
ResolutionSt
rategy
The way in which the Collider will attempt to preserve sight of
the target.
Possible Values:
- Pull Camera Forward: Camera will be pulled forward along
its Z axis until it is in front of the nearest obstacle.
- Preserve Camera Height: In addition to pulling the camera
forward, an effort will be made to return the camera to its
original height.
- Preserve Camera Distance: In addition to pulling the
camera forward, an effort will be made to return the camera to
its original distance from the target.
Maximum Effort
Int32
Upper limit on how many obstacle hits to process. Higher
numbers may impact performance. In most environments, 4 is
enough.
Damping
Single
The gradualness of collision resolution. Higher numbers will
move the camera more gradually away from obstructions.
Optimal Target
Distance
Single
If greater than zero, a higher score will be given to shots when
the target is closer to this distance. Set this to zero to disable
this feature.
CinemachineConfiner
An add-on module for Cinemachine Virtual Camera that post-processes the final position of the
virtual camera. It will confine the virtual camera’s position to the volume specified in the
Bounding Volume field.
This is less resource-intensive than CinemachineCollider, but it does not perform shot
evaluation.
The confiner can operate in 2D or 3D mode. The mode will influence the kind of bounding
shape it will accept. In 3D mode, the camera’s position in 3D will be confined to the volume.
This will work for 2D games, but you will have to take the depth into account. In 2D mode, you
don’t have to worry about depth.
If your camera is orthographic, there will be an additional option to confine the screen edges,
not just the camera point. This ensures that the entire screen area stays within the bounding
shape.
Setting
Type
Description
Confine Mode
Mode
The confiner can operate using a 2D bounding shape or a 3D
bounding volume.
Possible Values:
- Confine 2D: requires a Collider2D bounding shape
- Confine 3D: requires a 3D Collider bounding volume
Bounding
Volume
Collider
The volume within which the camera is to be contained (3D mode
only).
Bounding
Shape 2D
Collider2D
The 2D shape within which the camera is to be contained (2D
mode only).
Confine Screen
Edges
Boolean
If camera is orthographic, screen edges will be confined to the
volume. If not checked, then only the camera center will be
confined. Has no effect if camera is perspective.
Damping
Single
How gradually to return the camera to the bounding volume if it
goes beyond the borders. Higher numbers are more gradual.
CinemachineClearShot
Cinemachine ClearShot is a “manager camera” that owns and manages a set of Virtual Camera
GameObject children. When Live, the ClearShot will check the children, choose the one with the
best quality shot, and make it Live.
This can be a very powerful tool. If the child cameras have CinemachineCollider extensions,
they will analyze the scene for target obstructions, optimal target distance, and other items, and
report their assessment of shot quality back to the ClearShot parent, who will then choose the
best one. You can use this to set up complex multi-camera coverage of a scene, and be
assured that a clear shot of the target will always be available.
If multiple child cameras have the same shot quality, the one with the highest priority will be
chosen.
You can also define custom blends between the ClearShot children.
Setting
Type
Description
Look At
Transform
Default object for the camera children to look at (the aim target), if
not specified in a child camera. May be empty if all children
specify targets of their own.
Follow
Transform
Default object for the camera children wants to move with (the
body target), if not specified in a child camera. May be empty if all
children specify targets of their own.
Show
Debug Text
Boolean
When enabled, the current child camera and blend will be
indicated in the game window, for debugging.
Activate
After
Single
Wait this many seconds before activating a new child camera.
Min
Duration
Single
An active camera must be active for at least this many seconds,
unless a higher-priority camera wants to activate.
Randomize
Choice
Boolean
If checked, camera choice will be randomized if multiple cameras
are equally desirable. Otherwise, child list order and child camera
priority will be used.
Default
Blend
CinemachineBle
ndDefinition
The blend which is used if you don’t explicitly define a blend
between two Virtual Cameras.
Priority
Int32
The priority will determine which camera becomes active based
on the state of other cameras and this camera. Higher numbers
have greater priority.

Multiple Target Objects
If you have multiple LookAt targets and you want to keep them all in the frame, Cinemachine
can do this too. It’s a 2-step process:
1. Define a target group. This is a list of target objects, each with a weight and radius. The
weight says how important the group member is, and the radius is a rough indication of
its physical size.
2. Create a vcam with a GroupComposer, and assign the LookAt target to the target group.
The GroupComposer will make sure that all group members remain in the frame.
There is a shortcut in the Cinemachine menu to set this up and get you going.
CinemachineTargetGroup
Defines a group of target objects, each with a radius and a weight. The weight is used when
calculating the average position of the target group. Higher-weighted members of the group will
count more. The bounding box is calculated by taking the member positions, weight, and radii
into account.
Setting
Type
Description
Position Mode
PositionMode
How the group’s position is calculated. Select GroupCenter for
the center of the bounding box, and GroupAverage for a
weighted average of the positions of the members.
Possible Values:
- Group Center: Group position will be the center of the
group’s axis-aligned bounding box.
- Group Average: Group position will be the weighted average
of the positions of the members.
Rotation Mode
RotationMode
How the group’s rotation is calculated. Select Manual to use
the value in the group’s transform, and GroupAverage for a
weighted average of the orientations of the members.
Possible Values:
- Manual: Manually set in the group’s transform.
- Group Average: Weighted average of the orientation of its
members.
Update Method
UpdateMethod
When to update the group’s transform based on the positions
of the group members.
Possible Values:
- Update: Updated in normal MonoBehaviour Update.
- Fixed Update: Updated in sync with the Physics module, in
FixedUpdate.
- Late Update: Updated in MonoBehaviour LateUpdate.
Targets
Target[]
The target objects, together with their weights and radii, that
will contribute to the group’s average position, orientation, and
size.
CinemachineTargetGroup.Target
Holds the information that represents a member of the group.
Setting
Type
Description
Target
Transform
The target objects. This object’s position and orientation will
contribute to the group’s average position and orientation, in
accordance with its weight.
Weight
Single
How much weight to give the target when averaging. Cannot be
negative.
Radius
Single
The radius of the target, used for calculating the bounding box.
Cannot be negative.
CinemachineGroupComposer
This is a CinemachineComponent in the Aim section of the component pipeline. Its job is to aim
the camera at a target object, with configurable offsets, damping, and composition rules.
In addition, if the target is a CinemachineTargetGroup, the behaviour will adjust the FOV and
the camera distance to ensure that the entire group of targets is framed properly.
Setting
Type
Description
Group
Framing Size
Single
The bounding box of the targets should occupy this amount of
the screen space. 1 means fill the whole screen. 0.5 means fill
half the screen, etc.
Framing Mode
FramingMode
What screen dimensions to consider when framing. Can be
Horizontal, Vertical, or both.
Possible Values:
- Horizontal: Consider only the horizontal dimension. Vertical
framing is ignored.
- Vertical: Consider only the vertical dimension. Horizontal
framing is ignored.
- Horizontal And Vertical: The larger of the horizontal and
vertical dimensions will dominate, to get the best fit.
Frame
Damping
Single
How aggressively the camera tries to frame the group. Small
numbers are more responsive, rapidly adjusting the camera to
keep the group in the frame. Larger numbers give a more
heavy slowly responding camera.
Adjustment
Mode
AdjustmentMode
How to adjust the camera to get the desired framing. You can
zoom, dolly in/out, or do both.
Possible Values:
- Zoom Only: Do not move the camera, only adjust the FOV.
- Dolly Only: Just move the camera, don’t change the FOV.
- Dolly Then Zoom: Move the camera as much as permitted
by the ranges, then adjust the FOV if necessary to make the
shot.
Max Dolly In
Single
The maximum distance toward the target that this behaviour is
allowed to move the camera.
Max Dolly Out
Single
The maximum distance away the target that this behaviour is
allowed to move the camera.
Minimum
Distance
Single
Set this to limit how close to the target the camera can get.
Maximum
Distance
Single
Set this to limit how far from the target the camera can get.
Minimum FOV
Single
If adjusting FOV, will not set the FOV lower than this.
Maximum
FOV
Single
If adjusting FOV, will not set the FOV higher than this.
Minimum
Ortho Size
Single
If adjusting Orthographic Size, will not set it lower than this.
Maximum
Ortho Size
Single
If adjusting Orthographic Size, will not set it higher than this.
Tracked
Object Offset
Vector3
Target offset from the target object’s center in target-local
space. Use this to fine-tune the tracking target position when
the desired area is not the tracked object’s center.
Lookahead
Time
Single
This setting will instruct the composer to adjust its target offset
based on the motion of the target. The composer will look at a
point where it estimates the target will be this many seconds
into the future. Note that this setting is sensitive to noisy
animation, and can amplify the noise, resulting in undesirable
camera jitter. If the camera jitters unacceptably when the
target is in motion, turn down this setting, or animate the target
more smoothly.
Lookahead
Ignore Y
Boolean
If checked, movement along the Y axis will be ignored for
lookahead calculations.
Lookahead
Smoothing
Single
Controls the smoothness of the lookahead algorithm. Larger
values smooth out jittery predictions and also increase
prediction lag.
Horizontal
Damping
Single
How aggressively the camera tries to follow the target in the
screen-horizontal direction. Small numbers are more
responsive, rapidly orienting the camera to keep the target in
the dead zone. Larger numbers give a more heavy slowly
responding camera. Using different vertical and horizontal
settings can yield a wide range of camera behaviors.
Vertical
Damping
Single
How aggressively the camera tries to follow the target in the
screen-vertical direction. Small numbers are more responsive,
rapidly orienting the camera to keep the target in the dead
zone. Larger numbers give a more heavy slowly responding
camera. Using different vertical and horizontal settings can
yield a wide range of camera behaviors.
Screen X
Single
Horizontal screen position for target. The camera will rotate to
position the tracked object here.
Screen Y
Single
Vertical screen position for target, The camera will rotate to
position the tracked object here.
Dead Zone
Width
Single
Camera will not rotate horizontally if the target is within this
range of the position.
Dead Zone
Height
Single
Camera will not rotate vertically if the target is within this range
of the position.
Soft Zone
Width
Single
When target is within this region, camera will gradually rotate
horizontally to re-align towards the desired position, depending
on the damping speed.
Soft Zone
Height
Single
When target is within this region, camera will gradually rotate
vertically to re-align towards the desired position, depending
on the damping speed.
Bias X
Single
A non-zero bias will move the target position horizontally away
from the center of the soft zone.
Bias Y
Single
A non-zero bias will move the target position vertically away
from the center of the soft zone.
2D Environments
Cinemachine supports Orthographic cameras. When you set the Unity Camera’s style to
Orthographic, Cinemachine will adjust to accommodate it. FOV will be replaced by
Orthographic Size in the Lens settings. Note that settings related to FOV and certain
FOV-oriented behaviours such as FollowZoom will not have any effect if the camera is
orthographic.
In orthographic environments, it doesn’t usually make sense to rotate the camera. Accordingly,
Cinemachine has a special transposer that handles framing and composition without rotating
the camera.
CinemachineFramingTransposer
This is a Cinemachine Component in the Body section of the component pipeline. Its job is to
position the camera in a fixed screen-space relationship to the vcam’s Follow target object, with
offsets and damping.
The camera will be first moved along the camera Z axis until the Follow target is at the desired
distance from the camera’s X-Y plane. The camera will then be moved in its XY plane until the
Follow target is at the desired point on the camera’s screen.
The FramingTansposer will only change the camera’s position in space. It will not re-orient or
otherwise aim the camera.
For this component to work properly, the vcam's LookAt target must be null.
If the Follow target is a CinemachineTargetGroup, then additional controls will be available to
dynamically adjust the camera’s view in order to frame the entire group.
Although this component was designed for orthographic cameras, it works equally well with
persective cameras and can be used in 3D environments.
Setting
Type
Description
Lookahead
Time
Single
This setting will instruct the composer to adjust its target offset
based on the motion of the target. The composer will look at a
point where it estimates the target will be this many seconds into
the future. Note that this setting is sensitive to noisy animation,
and can amplify the noise, resulting in undesirable camera jitter. If
the camera jitters unacceptably when the target is in motion, turn
down this setting, or animate the target more smoothly.
Lookahead
Smoothing
Single
Controls the smoothness of the lookahead algorithm. Larger
values smooth out jittery predictions and also increase prediction
lag.
Lookahead
Ignore Y
Boolean
If checked, movement along the Y axis will be ignored for
lookahead calculations.
X Damping
Single
How aggressively the camera tries to maintain the offset in the
X-axis. Small numbers are more responsive, rapidly translating
the camera to keep the target’s x-axis offset. Larger numbers give
a more heavy slowly responding camera. Using different settings
per axis can yield a wide range of camera behaviors.
Y Damping
Single
How aggressively the camera tries to maintain the offset in the
Y-axis. Small numbers are more responsive, rapidly translating
the camera to keep the target’s y-axis offset. Larger numbers give
a more heavy slowly responding camera. Using different settings
per axis can yield a wide range of camera behaviors.
Z Damping
Single
How aggressively the camera tries to maintain the offset in the
Z-axis. Small numbers are more responsive, rapidly translating
the camera to keep the target’s z-axis offset. Larger numbers give
a more heavy slowly responding camera. Using different settings
per axis can yield a wide range of camera behaviors.
Screen X
Single
Horizontal screen position for target. The camera will move to
position the tracked object here.
Screen Y
Single
Vertical screen position for target, The camera will move to
position the tracked object here.
Camera
Distance
Single
The distance along the camera axis that will be maintained from
the Follow target.
Dead Zone
Width
Single
Camera will not move horizontally if the target is within this range
of the position.
Dead Zone
Height
Single
Camera will not move vertically if the target is within this range of
the position.
Dead Zone
Depth
Single
The camera will not move along its z-axis if the Follow target is
within this distance of the specified camera distance.
Unlimited Soft
Zone
Boolean
If checked, then then soft zone will be unlimited in size.
Soft Zone
Width
Single
When target is within this region, camera will gradually move
horizontally to re-align towards the desired position, depending on
the damping speed.
Soft Zone
Height
Single
When target is within this region, camera will gradually move
vertically to re-align towards the desired position, depending on
the damping speed.
Bias X
Single
A non-zero bias will move the target position horizontally away
from the center of the soft zone.
Bias Y
Single
A non-zero bias will move the target position vertically away from
the center of the soft zone.
Group
Framing Mode
FramingMode
What screen dimensions to consider when framing. Can be
Horizontal, Vertical, or both.
Possible Values:
- Horizontal: Consider only the horizontal dimension. Vertical
framing is ignored.
- Vertical: Consider only the vertical dimension. Horizontal
framing is ignored.
- Horizontal And Vertical: The larger of the horizontal and
vertical dimensions will dominate, to get the best fit.
- None: Don’t do any framing adjustment.
Adjustment
Mode
AdjustmentM
ode
How to adjust the camera to get the desired framing. You can
zoom, dolly in/out, or do both.
Possible Values:
- Zoom Only: Do not move the camera, only adjust the FOV.
- Dolly Only: Just move the camera, don’t change the FOV.
- Dolly Then Zoom: Move the camera as much as permitted by
the ranges, then adjust the FOV if necessary to make the shot.
Group
Framing Size
Single
The bounding box of the targets should occupy this amount of the
screen space. 1 means fill the whole screen. 0.5 means fill half
the screen, etc.
Max Dolly In
Single
The maximum distance toward the target that this behaviour is
allowed to move the camera.
Max Dolly Out
Single
The maximum distance away the target that this behaviour is
allowed to move the camera.
Minimum
Distance
Single
Set this to limit how close to the target the camera can get.
Maximum
Distance
Single
Set this to limit how far from the target the camera can get.
Minimum FOV
Single
If adjusting FOV, will not set the FOV lower than this.
Maximum FOV
Single
If adjusting FOV, will not set the FOV higher than this.
Minimum
Ortho Size
Single
If adjusting Orthographic Size, will not set it lower than this.
Maximum
Ortho Size
Single
If adjusting Orthographic Size, will not set it higher than this.
Post-Processing Stack V1
If you have Unity’s Post-Processing Stack as an asset in your project (and if you don’t, you
should, because this is an amazing tool that gives world-class results), you can easily assign
custom post-effects to any shot in your scene, even though it’s a virtual camera and not a real
one.
This section describes the use of Post Processing stack V1. If you have Post Processing V2,
see the section below.
Just define a Post-Processing profile for your vcam, and connect it by attaching a
CinemachinePostFX component to your vcam. To complete the connection, you will also need
a CinemachinePostFX component on the Unity camera, alongside the CinemachineBrain.
That’s all you have to do. Now, whenever the vcam is activated, its custom Post-Processing
profile will be applied to the Unity camera.
CinemachinePostFX
This behaviour is a liaison between Cinemachine with the Post-Processing module. You must
have the Post-Processing Stack unity package installed in order to use this behaviour.
It’s used in 2 ways:
● As a component on the Unity Camera: it serves as the liaison between the camera’s
CinemachineBrain and the camera’s Post-Processing behaviour. It listens for camera Cut
events and resets the Post-Processing stack when they occur. If you are using
Post-Processing, then you should add this behaviour to your camera alongside the
CinemachineBrain, always.
● As a component on the Virtual Camera: In this capacity, it holds a Post-Processing Profile
asset that will be applied to the camera whenever the Virtual camera is live. It also has
the (temporary) optional functionality of animating the Focus Distance and DepthOfField
properties of the Camera State, and applying them to the current Post-Processing profile.
Setting
Type
Description
Profile
PostProcessingProfile
When this behaviour is on a Unity Camera, this setting
is the default Post-Processing profile for the camera,
and will be applied whenever it is not overridden by a
virtual camera. When the behaviour is on a virtual
camera, then this is the Post-Processing profile that
will become active whenever this virtual camera is
live.
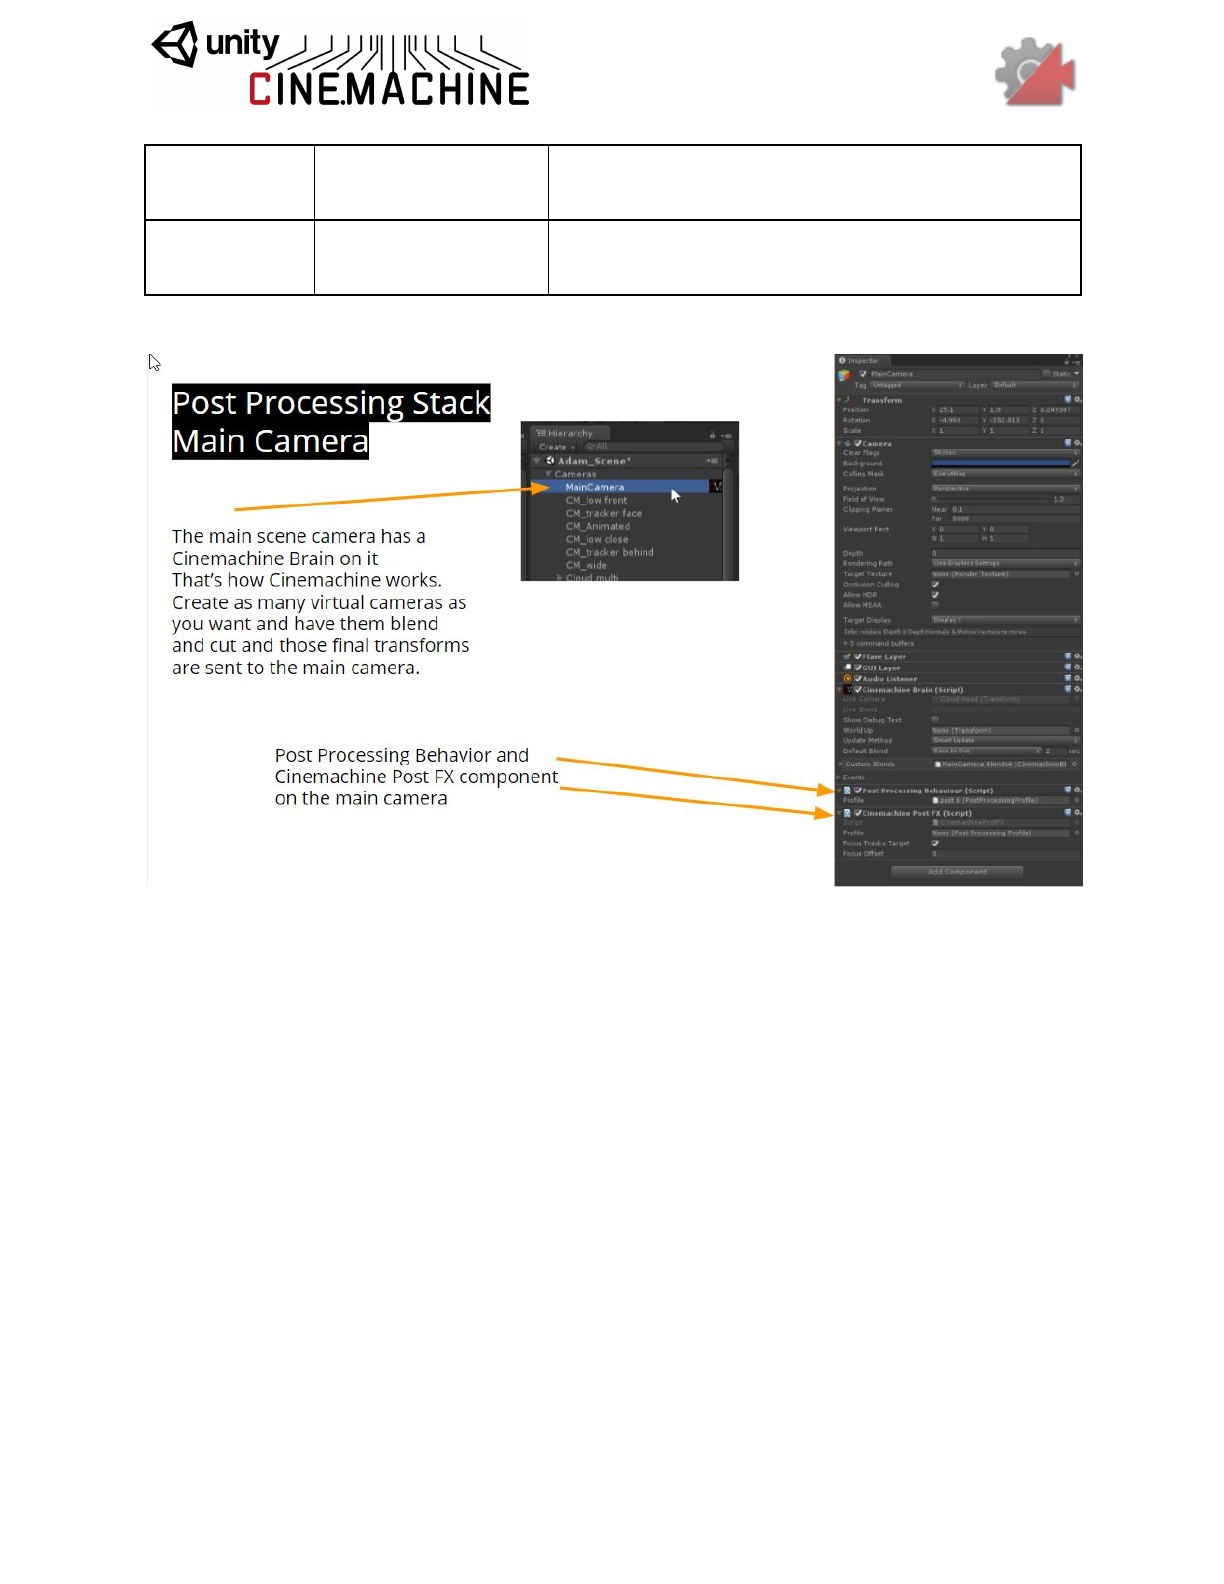
Focus Tracks
Target
Boolean
If checked, then the Focus Distance will be set to the
distance between the camera and the LookAt target.
Focus Offset
Single
Offset from target distance, to be used with Focus
Tracks Target.
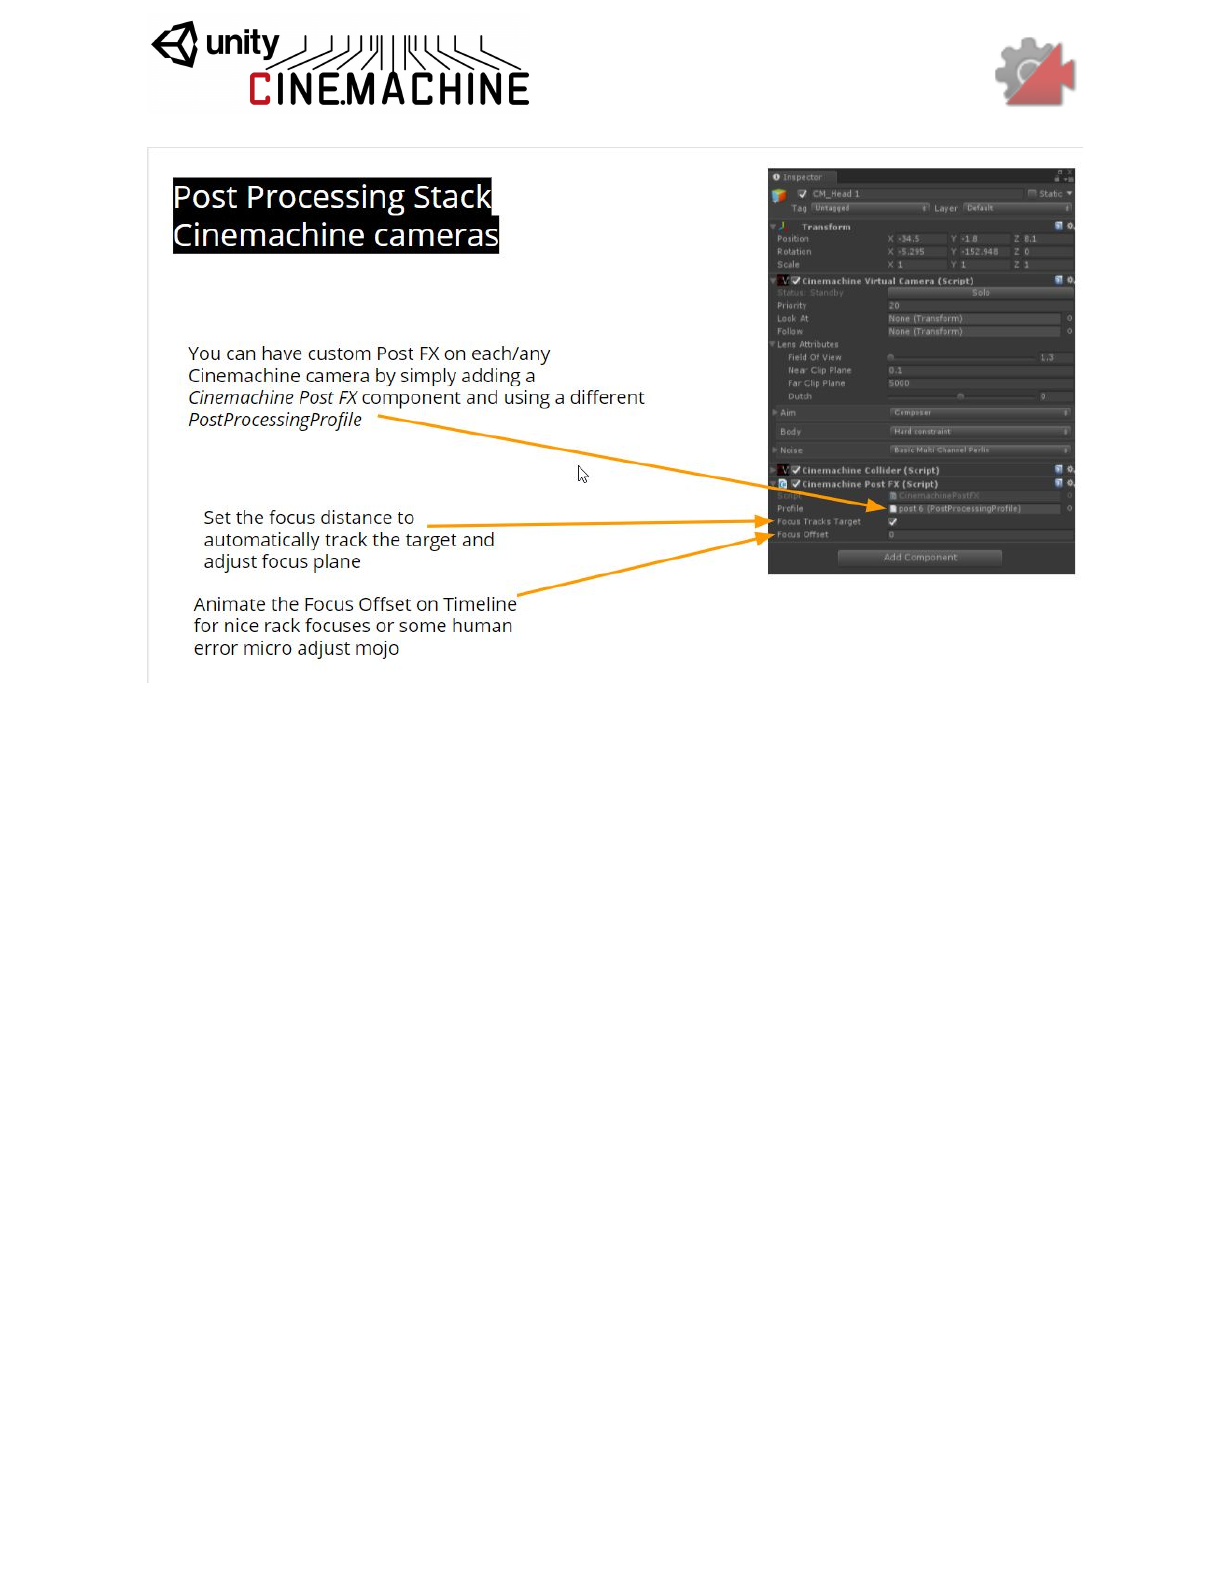
Post Processing Stack V2
Define a Post-Processing profile for your vcam, and connect it by attaching a
CinemachinePostProcessing extension to your vcam. To complete the connection, you will
also need a PostProcessingLayer component on the Unity camera, alongside the
CinemachineBrain.
That’s all you have to do. Now, whenever the vcam is activated, its custom Post-Processing
profile will be applied to the Unity camera. If the camera is blending with another vcam, then the
blend weight will be applied to the Post Processing effects also.
CinemachinePostProcessing
This behaviour is a liaison between Cinemachine with the Post-Processing V2 module. You
must have the Post-Processing Stack V2 unity package installed in order to use this behaviour.
As a component on the Virtual Camera, it holds a Post-Processing Profile asset that will be
applied to the camera whenever the Virtual camera is live. It also has the optional functionality
of animating the Focus Distance and DepthOfField properties of the Camera State, and
applying them to the current Post-Processing profile.
Setting
Type
Description
Profile
PostProcessingProfile
This is the Post-Processing profile that will become
active whenever this virtual camera is live.
Focus Tracks
Target
Boolean
If checked, then the Focus Distance will be set to the
distance between the camera and the LookAt target.
Focus Offset
Single
Offset from target distance, to be used with Focus
Tracks Target.
And the Rest
CinemachinePOV
This is a CinemachineComponent in the Aim section of the component pipeline. Its job is to aim
the camera in response to the user’s mouse or joystick input.
The composer does not change the camera’s position. It will only pan and tilt the camera where
it is, in order to get the desired framing. To move the camera, you have to use the virtual
camera’s Body section.
Setting
Type
Description
Vertical Axis
AxisState
The Vertical axis. Value is -90..90. Controls the vertical
orientation.
Vertical
Recentering
Recentering
Controls how automatic recentering of the Vertical axis is
accomplished.
Horizontal
Axis
AxisState
The Horizontal axis. Value is -180..180. Controls the horizontal
orientation.
Horizontal
Recentering
Recentering
Controls how automatic recentering of the Horizontal axis is
accomplished.
CinemachineSameAsFollowTarget
This is a CinemachineComponent in the Aim section of the component pipeline. Its job is to
match the orientation of the Follow target.CinemachineFollowZoom
An add-on module for Cinemachine Virtual Camera that adjusts the FOV of the lens to keep the
target object at a constant size on the screen, regardless of camera and target position.
Setting
Type
Description
Width
Single
The shot width to maintain, in world units, at target distance.
Damping
Single
Increase this value to soften the aggressiveness of the follow-zoom.
Small numbers are more responsive, larger numbers give a more
heavy slowly responding camera.
Min FOV
Single
Lower limit for the FOV that this behaviour will generate.
Max FOV
Single
Upper limit for the FOV that this behaviour will generate.
CinemachineDollyCart
This is a very simple behaviour that constrains its transform to a CinemachinePath. It can be
used to animate any objects along a path, or as a Follow target for Cinemachine Virtual
Cameras.
Setting
Type
Description
Path
CinemachinePath
The path to follow.
Base
Update Method
UpdateMethod
When to move the cart, if Velocity is non-zero.
Possible Values:
- Update: Updated in normal MonoBehaviour Update.
- Fixed Update: Updated in sync with the Physics
module, in FixedUpdate.
Position Units
PositionUnits
How to interpret the Path Position. If set to Path Units,
values are as follows: 0 represents the first waypoint on
the path, 1 is the second, and so on. Values in-between
are points on the path in between the waypoints. If set to
Distance, then Path Position represents distance along
the path.
Possible Values:
- Path Units: Use PathPosition units, where 0 is first
waypoint, 1 is second waypoint, etc.
- Distance: Use Distance Along Path. Path will be
sampled according to its Resolution setting, and a
distance lookup table will be cached internally.
Speed
Single
Move the cart with this speed. The value is interpreted
according to the Position Units setting.
Position
Single
The position along the path at which the cart will be
placed. This can be animated directly or, if the speed is
non-zero, will be updated automatically. The value is
interpreted according to the Position Units setting.
CinemachineMixingCamera
CinemachineMixingCamera is a “manager camera” that takes on the state of the weighted
average of the states of its child virtual cameras.
A fixed number of slots are made available for cameras, rather than a dynamic array. We do it
this way in order to support weight animation from the Timeline. Timeline cannot animate array
elements.
Setting
Type
Description
Weight 0
Single
The weight of the first tracked camera.
Weight 1
Single
The weight of the second tracked camera.
Weight 2
Single
The weight of the third tracked camera.
Weight 3
Single
The weight of the fourth tracked camera.
Weight 4
Single
The weight of the fifth tracked camera.
Weight 5
Single
The weight of the sixth tracked camera.
Weight 6
Single
The weight of the seventh tracked camera.

Weight 7
Single
The weight of the eighth tracked camera.
Priority
Int32
The priority will determine which camera becomes active based on
the state of other cameras and this camera. Higher numbers have
greater priority.
CinemachineBlendListCamera
This is a virtual camera “manager” that owns and manages a collection of child Virtual Cameras.
When the camera goes live, these child vcams are enabled, one after another, holding each
camera for a designated time. Blends between cameras are specified. The last camera is held
indefinitely.
Setting
Type
Description
Look At
Transform
Default object for the camera children to look at (the aim target), if not
specified in a child camera. May be empty if all of the children define
targets of their own.
Follow
Transform
Default object for the camera children wants to move with (the body
target), if not specified in a child camera. May be empty if all of the
children define targets of their own.
Show Debug
Text
Boolean
When enabled, the current child camera and blend will be indicated in
the game window, for debugging.
Enable All
Child
Cameras
Boolean
Force all child cameras to be enabled. This is useful if animating them
in Timeline, but consumes extra resources.
Instructions
Instruction[]
The set of instructions for enabling child cameras.
Priority
Int32
The priority will determine which camera becomes active based on
the state of other cameras and this camera. Higher numbers have
greater priority.
CinemachineExternalCamera
This component will expose a non-Cinemachine camera to the Cinemachine system, allowing it
to participate in blends. Just add it as a component alongside an existing Unity Camera
component.
Setting
Type
Description
Priority
Int32
The priority will determine which camera becomes active based on

the state of other cameras and this camera. Higher numbers have
greater priority.
CinemachineStoryboard
An add-on module for Cinemachine Virtual Camera that places an image in screen space over
the camera’s output.
Setting
Type
Description
Show Image
Boolean
If checked, the specified image will be displayed as an overlay
over the virtual camera’s output.
Image
Texture
The image to display.
Aspect
FillStrategy
How to handle differences between image aspect and screen
aspect.
Possible Values:
- Best Fit: Image will be as large as possible on the screen,
without being cropped.
- Crop Image To Fit: Image will be cropped if necessary so that
the screen is entirely filled.
- Stretch To Fit: Image will be stretched to cover any aspect
mismatch with the screen.
Alpha
Single
The opacity of the image. 0 is transparent, 1 is opaque.
Center
Vector2
The screen-space position at which to display the image. Zero is
center.
Rotation
Vector3
The screen-space rotation to apply to the image.
Scale
Vector2
The screen-space scaling to apply to the image.
Sync Scale
Boolean
If checked, X and Y scale are synchronized.
Mute Camera
Boolean
If checked, Camera transform will not be controlled by this virtual
camera.
Split View
Single
Wipe the image on and off horizontally.
SaveDuringPlay
Cameras need to be tweaked in context - often that means while the game is playing. Normally,
Unity does not propagate those changes to the scene once play mode is exited. Cinemachine
has implemented a special feature to preserve parameter tweaks made during game play. It
won’t save structural changes (like adding or removing a behaviour), but it will keep the tweaks.
Cinemachine behaviours have a special attribute [SaveDuringPlay] to enable this functionality.
Feel free to use it on your own scripts too if you need it.
It works by scanning the scene after Play exits and applying any changed parameters back to

the scene. This kicks in a second or so after exit. You can always hit Undo to revert the
changes.
If there are specific settings within a behaviour that you want to exclude from Play-Mode save,
you can add the [NoSaveDuringPlay] attribute to them, and they will be skipped.
This feature can be enabled by checking the Save During Play checkbox on any Virtual
Camera inspector. This is a static global setting, not per-camera, so you only need to check it
once.
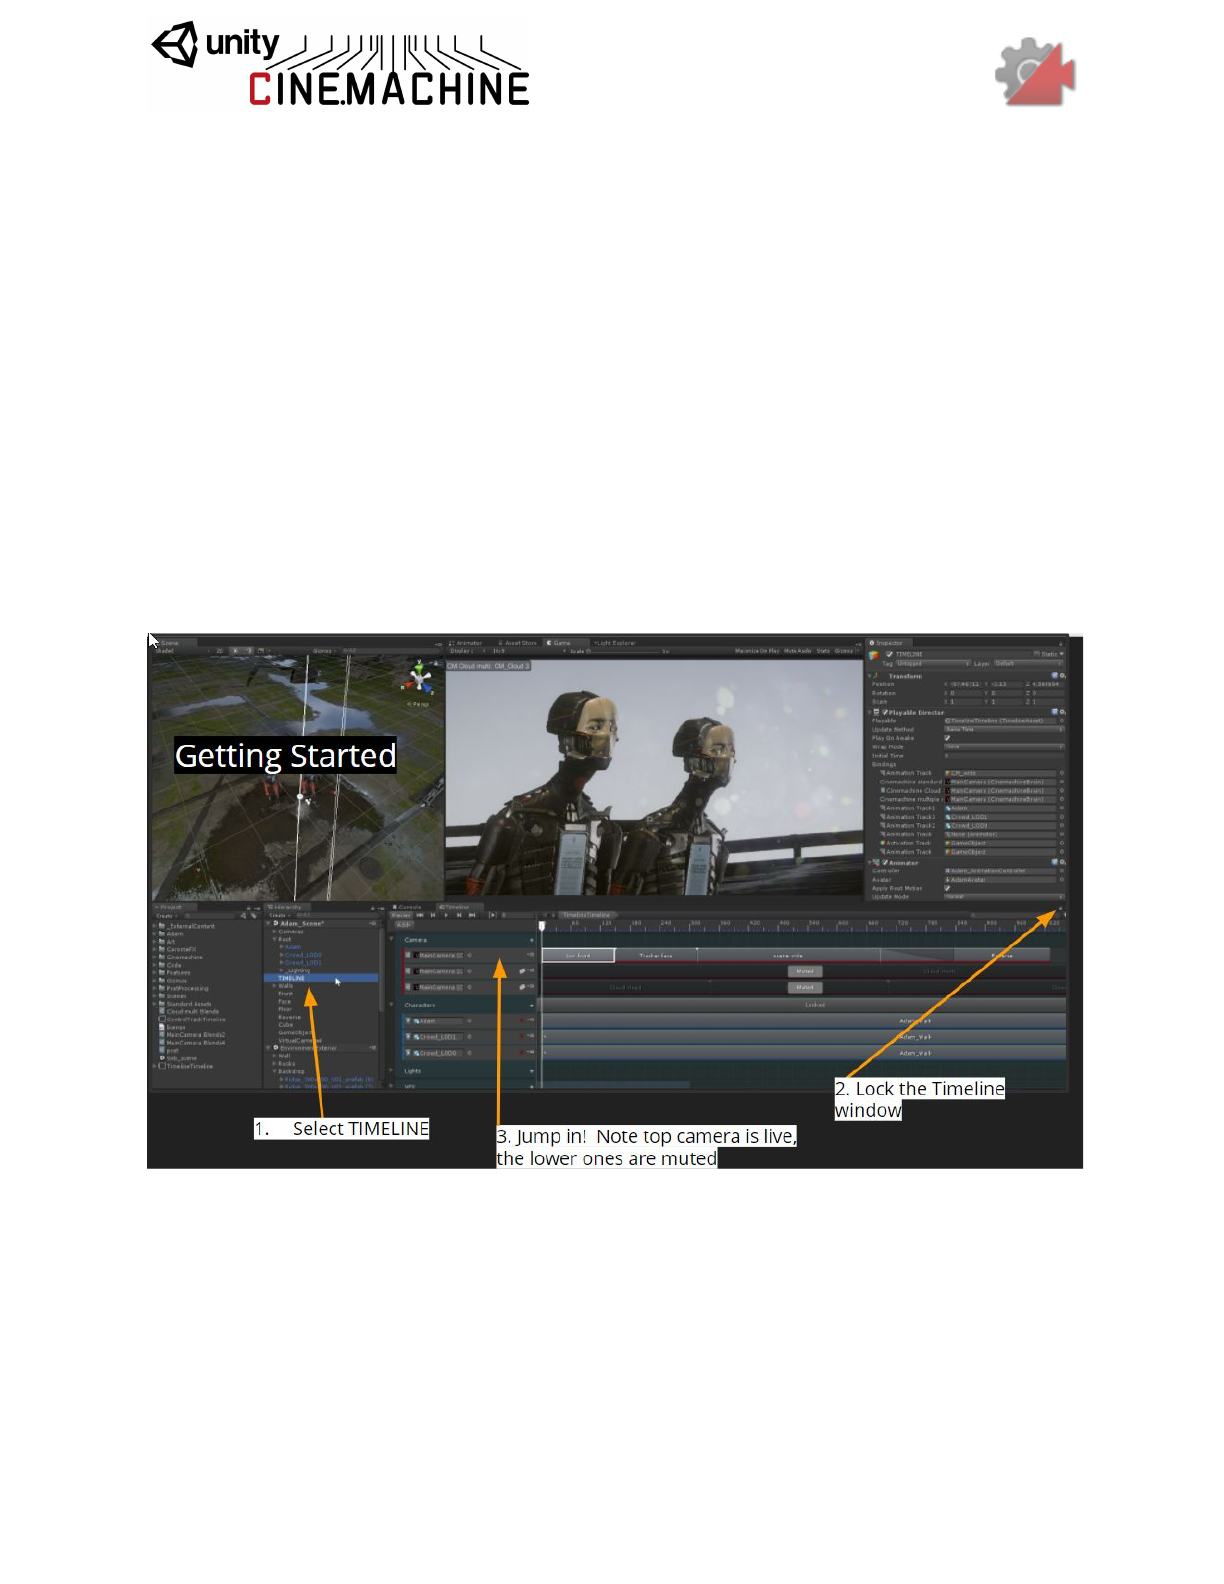
Timeline Integration
1. Drag a Cinemachine-enabled Unity camera (i.e. one with a CinemachineBrain
component) onto the timeline, select Create Cinemachine Track from the popup menu.
2. The Cinemachine track is an enable/disable style track, which means that the clips will
enable Cinemachine Virtual Cameras while they are active in the timeline.
3. Overlapping Cinemachine Shot Clips will produce blends.
4. Create a Cinemachine shot by right-clicking on the Cinemachine Track and selecting
Create Cinemachine Shot Clip.
5. Drag a virtual camera from the scene onto the Cinemachine Shot Clip inspector. That
will associate the shot clip with the virtual camera.
6. The virtual camera does not need to be enabled in the scene. While the clip is active in
the timeline, that camera will become enabled.
The following slides will serve as a brief introduction to get you started.
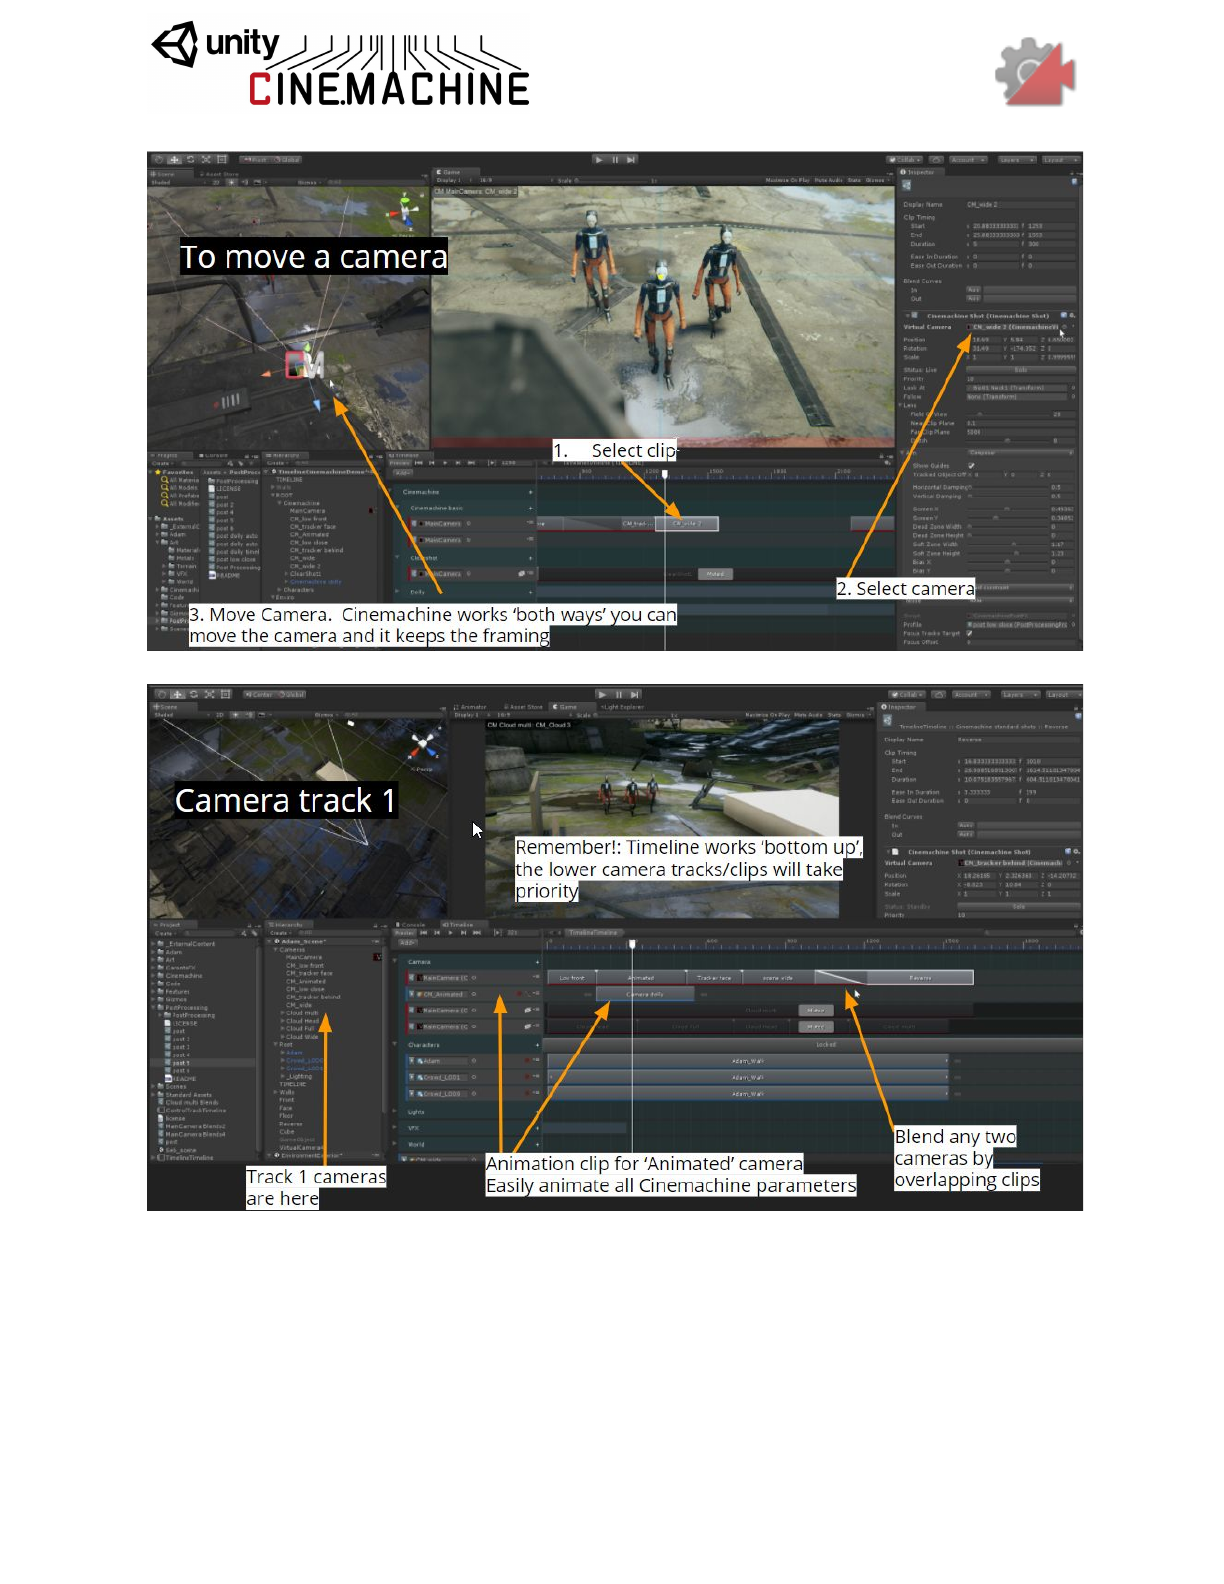

Special Environments
Top-Down Games
Cinemachine Virtual Cameras are modeled after human camera operators. As such, they have
a sensitivity to the up/down axis, and will always try to avoid introducing roll into the camera
framing - unless you deliberately introduce it via such settings as dutch. Because of this
sensitivity, virtual cameras do not like to look straight up or down for extended periods. They
will do it in passing, but if the LookAt target is often straight up or down, they will not always give
the desired results.
If you are building a top-down game where the cameras look straight down, the best practice is
to redefine the up direction, for the purposes of the camera. You do this by setting the World
Up Override in the CinemachineBrain to a game object whose local up points in the direction
that you want the Camera’s up to normally be. This will be applied to all virtual cameras
connected to that brain.
Split-screen
You can set up a multi-camera split-screen with Cinemachine:
1. Make 2 Unity Cameras, give each one its own CinemachineBrain, and set up their
viewports.
2. Now make 2 virtual cameras to follow the players. Assign those virtual cameras to
different layers. We’ll call them layer A and layer B.
3. Go back to the two Unity cameras, and set their culling masks so that one camera sees
layer A but not layer B, and the other camera does the opposite.
4. That’s it! Camera A will be driven by virtual cameras on layer A, and camera B will be
driven by virtual cameras on layer B. They will do their blending etc independently.
5. Add as many layers and cameras as you like.

Scripting
Cinemachine is a pure-csharp implementation and is completely accessible to scripting. All of
the settings visible in the inspector have corresponding fields in the csharp classes. In addition
there is a full scripting API which you can discover either by examining the well-commented
sources in the implementation, or by looking at the scripting scene in the examples, or by
consulting the API documentation shipped with Cinemachine and available online.
