Accela Civic Platform GIS Administration Guide 9.3.0 Administrator
User Manual:
Open the PDF directly: View PDF ![]() .
.
Page Count: 166 [warning: Documents this large are best viewed by clicking the View PDF Link!]
- Civic Platform GIS 9.3.0 Administrator Guide
- Contents
- Introduction
- Configuring Accela Silverlight GIS
- Accela Silverlight GIS Prerequisites and Configuration Summary
- Configuring Accela Silverlight GIS Integrations
- Navigating the Accela Silverlight GIS Administration Site
- Integrating Your Environment
- Setting up a Map Service Connection
- Defining User Groups and Permissions
- Configuring Additional Settings
- Managing Offline Map Data
- Modifying Map Integration Settings
- Configuring Agency Settings
- Using Maintenance Tools
- Configuring Accela GIS
- Appendices

Version 9.3.0
GIS Administrator Guide
Accela Civic Platform®

Accela Civic Platform GIS Administrator Guide
© 2018 Accela, Inc. All rights reserved.
Accela, the Accela logo, the Accela logo with “Government Software” notation, Accela Automation, Accela
Asset Management, Accela Citizen Access, Accela Mobile Citizen Access, Accela ERS, Accela GIS, Accela
IVR, Accela Land Management, Accela Licensing, Accela Mobile Office, Accela Public Health and Safety,
Accela Service Request, Accela Wireless, Kiva DMS, Kiva Development Management System, 'PERMITS'
Plus, SiteSynch, Tidemark Advantage, Civic Platform, Civic Cloud, Civic Hero, E-Boardroom,
EnvisionConnect, Envista, GEOTMS, IQM2, Mediatraq, Minutetraq, PublicStuff, Trusted To Do More,
VelocityHall, Vantage360, and other Accela logos, devices, product names, and service names are
trademarks or service marks of Accela, Inc. Brava! Viewer is a trademark of Informative Graphics
Corporation. Windows is a registered trademark of Microsoft Corporation. Acrobat is a trademark of Adobe
Systems Incorporated. Portions copyright 2009 Ching-Lan 'digdog' Huang and digdog software. All other
company names, product names, and designs mentioned herein are held by their respective owners.
Version 9.2.0
February 2018
Corporate Headquarters
2633 Camino Ramon
Suite 500
Bishop Ranch 3
San Ramon, CA 94583
Tel: (888) 722-2352
Fax: (925) 659-3201
www.accela.com
| Contents | 3
Contents
Introduction.................................................................................................... 6
Accela GIS vs Accela Silverlight GIS................................................................................................. 7
Configuring Accela Silverlight GIS................................................................ 9
Accela Silverlight GIS Prerequisites and Configuration Summary....................................................10
Prerequisites for ArcGIS Server and ArcGIS Engine.............................................................11
Prerequisites for Microsoft Bing Maps................................................................................... 11
Additional Map Service Preconfiguration............................................................................... 11
Configuring Accela Silverlight GIS Integrations................................................................................ 12
Configuring Accela Silverlight GIS for Civic Platform.............................................................12
Configuring Accela Silverlight GIS for Mobile Office Online Mapping....................................13
Configuring Accela Silverlight GIS for Mobile Office Offline Mapping....................................13
Configuring Accela Silverlight GIS for Citizen Access........................................................... 14
Navigating the Accela Silverlight GIS Administration Site................................................................ 15
Logging in to the Accela Silverlight GIS Administration Site..................................................16
Logging out of the Accela Silverlight GIS Administration Site................................................17
Integrating Your Environment............................................................................................................18
Defining a Map Integration Environment................................................................................18
Configuring a Map Integration Environment for Creating GIS Features.................................20
Setting up a Map Service Connection.............................................................................................. 22
Setting up a Connection to a Map Service............................................................................ 22
Configuring Additional Map Services..................................................................................... 44
Defining User Groups and Permissions............................................................................................45
Setting User Group Access to Map Functions.......................................................................45
Setting User Group Access to Map Commands.................................................................... 48
Setting User Group Access to Map Layers........................................................................... 52
Creating an Additional User Group........................................................................................ 53
Configuring Additional Settings......................................................................................................... 55
Configuring External Address, Parcel, and Owner Settings...................................................55
Configuring Data Export Settings...........................................................................................58
Configuring Hotlink Settings................................................................................................... 60
Managing Offline Map Data.............................................................................................................. 62
Creating a Data Package for Offline Maps............................................................................ 62
Modifying Map Integration Settings...................................................................................................64
Editing a Map Integration Environment..................................................................................64
Adding a Map Service to an Integration Environment........................................................... 66
| Contents | 4
Adding a User Group to an Integration Environment.............................................................68
Configuring Agency Settings.............................................................................................................71
Changing the Administration Site Password.......................................................................... 71
Customizing Labels................................................................................................................ 72
Configuring Global Variable Settings..................................................................................... 73
Syncing Address Format and Address Form Layout............................................................. 77
Clearing Cache Data Manually.............................................................................................. 80
Using Maintenance Tools..................................................................................................................83
Running General Diagnostics.................................................................................................83
Diagnosing ArcGIS Server Map Services.............................................................................. 84
Viewing Log Files................................................................................................................... 87
Configuring Accela GIS............................................................................... 89
Accela GIS Prerequisites and Configuration Summary.................................................................... 90
Configuring Accela GIS Integrations.................................................................................................93
Civic Platform and Accela GIS Integration.............................................................................93
Citizen Access and Accela GIS Integration........................................................................... 95
The Accela GIS Administration Site..................................................................................................98
Accela GIS System Administration................................................................................................... 99
Initial Setup.............................................................................................................................99
Managing Agencies.............................................................................................................. 100
Managing Agency Administrators.........................................................................................100
HTTP Request Timeout........................................................................................................101
Accela GIS Agency Administration................................................................................................. 102
Map Profiles..........................................................................................................................104
Product Integrations..............................................................................................................120
Custom Widgets................................................................................................................... 132
XAPO Configuration for Accela GIS.................................................................................... 134
Appendices................................................................................................ 139
Configuring Civic Platform...............................................................................................................140
Configuring GIS Services in Civic Platform..........................................................................140
Configuring Dynamic Themes in Civic Platform...................................................................142
Configuring XAPO in Civic Platform.....................................................................................151
Configuring Proximity Alerts in Civic Platform......................................................................156
Enabling the GIS REST API in Civic Platform..................................................................... 157
Creating Attribute Mapping...................................................................................................157
Securing Communications...............................................................................................................161
Communication Security Overview.......................................................................................161
Importing the Accela GIS Server Certificate........................................................................ 162
Requiring the Use of HTTPS............................................................................................... 163

| Introduction | 6
Introduction
Accela GIS provides a geographic view of all land-use, zoning, and infrastructure information associated
with agency records, such as parcels, permits, inspections, plans, assets, work orders, and service
requests. Agency users can manage records within Accela GIS and efficiently complete research tasks —
from identifying records within their agency’s jurisdiction to determining the staff assigned to specific jobs.
Accela GIS leverages geospatial data to streamline agency processes and is compatible with Windows
and Web-based applications.
For example, an inspector can use Accela GIS to search for assigned inspections within a community
or neighborhood. The inspector can also use Accela GIS to create an inspection route sheet and obtain
driving directions. Accela GIS helps simplify these and other daily tasks.
Accela GIS is Civic Platform's latest map viewer using JavaScript. Accela Silverlight GIS is the Microsoft
Silverlight version of the map viewer in the legacy (pre-8.x) user interface of Civic Platform.
Accela GIS administration consists of the following tasks:
•Set up map service connections - A map service connection defines the parameters for connecting to
your agency's GIS service provider.
•Create map profiles - A map profile is a set of map services that can be easily shared across
integrations or user groups.
•Configure map integration environments - A map integration environment integrates your agency’s
GIS system, Accela GIS, and Civic Platform applications.
•Define user groups and permissions - User groups and permission settings ensure that end-users
are given or restricted access to GIS features and information.
•Deploy custom widgets - If your agency has built custom map widgets, they must be deployed and
enabled for user groups.
•Setup custom GIS data integrations - External address, parcel, and object (XAPO) data source and
custom GIS queries as dynamic themes can be configured and integrated with the map viewer.
•System administration tasks such as managing users, agency administrator, email notification setup,
and viewing diagnostic logs
This guide describes the prerequisites, configuration, and administration tasks to enable Accela GIS.
Related Links
Accela GIS vs Accela Silverlight GIS
| Introduction | 7
Accela GIS vs Accela Silverlight GIS
Accela GIS
Accela GIS is the JavaScript version of the map viewer embedded in Civic Platform 8.x and later. Features
of the JavaScript map viewer include place locator, bookmarks, a variety of base maps, redlining, editing
and display options when viewing locations passed from a list, such as cluster marker and heat map.
• Accela GIS integrates with the 8.x+ (and later versions) of Civic Platform.
Civic Platform 8.x+ allows users to switch to the the legacy (pre-8.x) Civic Platform user interface
which uses the Accela Silverlight GIS map viewer. Users can switch to the legacy user interface to use
existing features that are not currently available in the JavaScript version.
• To configure Accela GIS, use the Accela Administration site. For details about GIS Administration, see
Configuring Accela GIS .
The GIS Administration site only supports map service and integration configurations for the JavaScript
version. GIS Administration is not compatible with existing Accela Silverlight GIS 7.x map service and
integration configurations. Existing Accela Silverlight GIS 7.x customers who intend to use Accela
GIS 8.x+ will need to define map service configurations using the Accela GIS Administration site. This
means that for a limited time, agencies will need to set up both versions of Accela GIS and configure
both versions. However, both configurations can point to the same map services.
You will need both Accela GIS and Accela Silverlight GIS versions if one or more of the following is true:
• Users will switch between the 8.x+ and legacy (pre-8.x) user interface on a daily basis.
| Introduction | 8
• Your agency offers maps in Citizen Access. Civic Platform GIS has integrated with Citizen Access on
the module home page and record detail page, but does not yet integrate with other Citizen Access
pages.
Accela Silverlight GIS
Accela Silverlight GIS is the Microsoft Silverlight version of the map viewer:
• Accela Silverlight GIS integrates with the legacy versions of Civic Platform (formerly known as "Accela
Automation V360"), Mobile Office, and Citizen Access.
• In Civic Platform 8.x+, Accela Silverlight GIS supports the ability to switch to the legacy user interface
which uses the Accela GIS map viewer.
• To configure Accela Silverlight GIS, use the Accela Silverlight GIS Administration site. For details about
Accela Silverlight GIS Administration, see Configuring Accela Silverlight GIS.

| Configuring Accela Silverlight GIS | 9
Configuring Accela Silverlight GIS
The following topics describe the Accela Silverlight GIS configuration tasks:
•Accela Silverlight GIS Prerequisites and Configuration Summary
•Configuring Accela Silverlight GIS Integrations
•Navigating the Accela Silverlight GIS Administration Site
•Integrating Your Environment
•Setting up a Map Service Connection
•Defining User Groups and Permissions
•Configuring Additional Settings
•Managing Offline Map Data
•Modifying Map Integration Settings
•Configuring Agency Settings
•Using Maintenance Tools

| Configuring Accela Silverlight GIS | 10
Accela Silverlight GIS Prerequisites and Configuration Summary
The following table summarizes the prerequisites and required configurations for Accela Silverlight GIS.
In this checklist, Accela Silverlight GIS is referred to as Silverlight GIS, and Civic Platform GIS (JavaScript
version) is referred to as JavaScript GIS.
Important: To help you towards a successful Accela Civic Platform GIS installation and configuration,
follow all the steps listed in the prerequisite checklist. A missed prerequisite or configuration will require
you to fully uninstall and reinstall Accela Civic Platform GIS.
Prerequisite Required or optional? Reference information
Install Silverlight GIS. Required Accela Civic Platform GIS Installation
Guide
Install JavaScript GIS. Required if:
• Agency users switch between
the legacy and 8.x user
interface of Civic Platform
• Agency is upgrading to Citizen
Access 8.0.1 and later
Accela Civic Platform GIS Installation
Guide
Configure security settings. Required Securing Communications
Configure ArcGIS Server and ArcGIS
Engine Prerequisites. Required Prerequisites for ArcGIS Server and
ArcGIS Engine
Configure Silverlight GIS integration with
Civic Platform. Required Configuring Accela Silverlight GIS for
Civic Platform
Configure JavaScript GIS integration
with Civic Platform. Required if agency users switch
between the legacy and 8.x user
interface of Civic Platform
Civic Platform and Accela GIS
Integration
Configure Silverlight GIS integration with
Citizen Access. Required if agency is using Citizen
Access Configuring Accela Silverlight GIS for
Citizen Access
Configure JavaScript GIS integration
with Citizen Access. Required if agency is using Citizen
Access Citizen Access and Accela GIS
Integration
Configure Silverlight GIS integration with
Mobile Office Online. Required if agency is using Mobile
Office Online Configuring Accela Silverlight GIS for
Mobile Office Online Mapping
Configure Silverlight GIS integration with
Mobile Office Offline. Required if agency is using Mobile
Office Offline Configuring Accela Silverlight GIS for
Mobile Office Offline Mapping
Configure Bing Map Prerequisites. Required if agency is using Bing
Maps. Prerequisites for Microsoft Bing Maps
Configure Routing and Geocoding Map
Service Prerequisites. Required if agency is using
Routing and Geocoding services. Additional Map Service
Preconfiguration
Configure APO and XAPO Features in
Civic Platform. Required if agency intends
to leverage APO and XAPO
integration features with Civic
Platform. For example, auto-
populating and synchronizing APO
data with records.
Accela Civic Platform Configuration
Guide > Configuring and Enabling
APO and XAPO Features
| Configuring Accela Silverlight GIS | 11
Prerequisites for ArcGIS Server and ArcGIS Engine
Accela Silverlight GIS supports GIS services published to ArcGIS for Server. To integrate with Accela
Silverlight GIS, you must purchase a license for one of the aforementioned ArcGIS Server versions.
Additionally, you must publish a map service. ArcGIS Server hosts the map service for Civic Platform,
Citizen Access, and online Mobile Office GIS functions. ArcGIS Engine hosts the map service for offline
Mobile Office GIS functions.
If your agency integrates with ArcGIS Server services, you must also complete the ArcMap, ArcCatalog,
ArcSDE, MXD, and ArcGIS Server prerequisites described in the Accela Silverlight GIS for ArcGIS Server
Configuration Guide.
Prerequisites for Microsoft Bing Maps
The use of Bing Maps as a map service provider requires your agency to obtain a Bing Maps license
key from Microsoft, and enter it in the Bing Maps License Key masked field on Accela Silverlight GIS
Administration > Global Variable Settings.
To successfully integrate with Bing Maps, ensure that you have configured the Web Feature Service and
Web Map Service and the services use the same data source.
Related Links
Configuring Global Variable Settings
Additional Map Service Preconfiguration
If you plan to use geocoding or routing in your map integration environment, you must configure distinct
geocoding and routing map services.
Geocoding is the ability to find a location, such as a street address, based on existing geographic data.
For example, you might want to use Accela Silverlight GIS to identify a specific street address and plot the
address on the map. Accela Silverlight GIS can identify and plot the address using existing GIS data, such
as the street name and the range of even-numbered and odd-numbered addresses.
Routing is the ability to identify a course of travel between different stops or different locations. For
example, an inspector might have five inspections to conduct within one neighborhood. The inspector can
use Accela Silverlight GIS to create an inspection route sheet or an inspection path that indicates the order
in which he should conduct the five inspections. The inspector can also use Accela Silverlight GIS to create
a route sheet that minimizes the distance or time traveled between stops. Additionally, the inspector can
use Accela Silverlight GIS to obtain driving directions between each stop.
If you plan to use geodata for offline data mapping, then you must add the data to the geodatabase prior to
configuring Accela Silverlight GIS.

| Configuring Accela Silverlight GIS | 12
Configuring Accela Silverlight GIS Integrations
The Accela Silverlight GIS configuration steps vary depending on the Accela application that your agency
uses. Accela Silverlight GIS can be integrated with the following Accela applications:
•Civic Platform - Accela Silverlight GIS integrates with the legacy user interface of Civic Platform
(pre-8.x) which uses the Silverlight version of the map viewer. If your agency integrates with Civic
Platform, the Accela Silverlight GIS application server automatically registers any changes or updates
that agency users make and requires no additional synchronization. For details, see Configuring Accela
Silverlight GIS for Civic Platform.
•Mobile Office Online Mapping - Accela Silverlight GIS integrates with Mobile Office Online Mapping
version 7.x. If your agency integrates with Mobile Office and agency users access Accela Silverlight
GIS when they are online, any changes or updates Mobile Office users make are automatically
registered on the Accela Silverlight GIS application server; no additional synchronization is required.
For details, see Configuring Accela Silverlight GIS for Mobile Office Online Mapping.
•Mobile Office Offline Mapping - Accela Silverlight GIS integrates with Mobile Office Offline Mapping
version 7.x. If your agency integrates with Mobile Office and Mobile Office users access Accela
Silverlight GIS when they are offline, you must create a data package. A data package includes the
map layer information that Mobile Office users can access and modify when they work offline. When
Mobile Office users are online, they can upload the changes to the Accela Silverlight GIS Server. For
details, see Configuring Accela Silverlight GIS for Mobile Office Offline Mapping.
•Citizen Access - Accela Silverlight GIS integrates with Citizen Access. If your agency integrates with
Citizen Access, the Accela Silverlight GIS application server automatically registers any changes
or updates that agency users make and requires no additional synchronization. For details, see
Configuring Accela Silverlight GIS for Citizen Access.
Related Links
Configuring Accela Silverlight GIS for Civic Platform
Configuring Accela Silverlight GIS for Mobile Office Online Mapping
Configuring Accela Silverlight GIS for Mobile Office Offline Mapping
Configuring Accela Silverlight GIS for Citizen Access
Configuring Accela Silverlight GIS for Civic Platform
To configure Accela Silverlight GIS for Civic Platform, you must define a map integration environment,
set up a connection to a map service, define user groups and their permissions, and configure required
additional settings. Additional settings include external address, parcel, and owner configuration, hotlink
configuration, and data export settings.
The following are the required steps to set up a map integration environment for Civic Platform:
•Integrating Your Environment
•Setting up a Map Service Connection
•Defining User Groups and Permissions
•Configuring Additional Settings
| Configuring Accela Silverlight GIS | 13
•Configuring GIS Services in Civic Platform
When you configure a map integration environment, you can modify the configuration settings. For
example, you might want to add a map provider or modify user group permission levels. To modify map
integration environment settings, follow the steps described in Modifying Map Integration Settings.
Finally, you can access the Global Variable Settings page and modify the Accela Silverlight GIS
Administration site password, customize map labels to accommodate different languages, and configure
global display settings. For instructions on how to configure these settings, follow the steps described in
Configuring Agency Settings.
In addition to configuring a map integration environment for Civic Platform, you must also import the Accela
Silverlight GIS server certificate in to the Civic Platform application server. For instructions on how to
import the Accela Silverlight GIS server certificate, see Importing the Accela GIS Server Certificate.
Configuring Accela Silverlight GIS for Mobile Office Online
Mapping
Accela Silverlight GIS integrates with Mobile Office version 7.x.
When Mobile Office users are online, they connect with the Accela Silverlight GIS application server and
they use Accela Silverlight GIS in Online mode. The Accela Silverlight GIS application server automatically
registers any changes or updates that agency users make and requires no additional synchronization.
When Mobile Office users are online, they connect to the Accela Silverlight GIS server and access maps
created in ArcGIS Server.
To configure Accela Silverlight GIS for Mobile Office Online Mapping, you must define a map integration
environment, set up a connection to a map service, and define user groups and their permissions.
The following are the required steps to set up a map integration environment for Mobile Office Online
Mapping.
•Integrating Your Environment
•Setting up a Map Service Connection
•Defining User Groups and Permissions
When you configure a map integration environment, you can modify the configuration settings. For
example, you might want to add a map provider or modify user group permission levels. To modify map
integration environment settings, follow the steps described in Modifying Map Integration Settings.
You can access the Global Variable Settings page to modify the Accela Silverlight GIS Administration
site password, customize map labels to accommodate different languages, and configure global display
settings. For instructions on how to configure these settings, follow the steps described in Configuring
Agency Settings.
Configuring Accela Silverlight GIS for Mobile Office Offline
Mapping
Accela Silverlight GIS integrates with Mobile Office version 7.x.
When Mobile Office users are offline, they must work from a map stored locally in their wireless device.
The map and related map data that users access in offline mode are configured in the Accela Silverlight
| Configuring Accela Silverlight GIS | 14
GIS Administration site using ArcGIS Engine. ArcGIS Engine is leveraged by Mobile Office for offline
mapping. ArcGIS Engine downloads offline data from the Accela Silverlight GIS Administration site to a
local client machine and facilitates offline mapping functionality.
When you configure a map integration for Mobile Office Offline Mapping, you must create a data package.
A data package includes the map layer information that Mobile Office users can access and modify when
they work offline. When Mobile Office users connect online, they can upload the changes to the Accela
Silverlight GIS Server.
The following are the required steps to set up a map integration environment for Mobile Office Offline
Mapping:
•Integrating Your Environment
•Setting up a Map Service Connection
•Defining User Groups and Permissions
•Managing Offline Map Data
When you configure a map integration environment, you can modify the configuration settings. For
example, you might want to add a map provider or modify user group permission levels. To modify map
integration environment settings, follow the steps described in Modifying Map Integration Settings.
Finally, you can access the Global Variable Settings page and modify the Accela Silverlight GIS
Administration site password, customize map labels to accommodate different languages, and configure
global display settings. For instructions on how to configure these settings, follow the steps described in
Configuring Agency Settings.
Configuring Accela Silverlight GIS for Citizen Access
To configure Accela Silverlight GIS for Citizen Access, you must define a map integration environment, set
up a connection to a map service, and define user groups and permissions.
The required steps to set up a map integration environment for Citizen Access are listed below, chapter by
chapter.
•Integrating Your Environment
•Setting up a Map Service Connection
•Defining User Groups and Permissions
Once you configure a map integration environment, you can modify the configuration settings. For
example, you might want to add a map provider or modify user group permission levels. To modify map
integration environment settings, follow the steps described in Modifying Map Integration Settings.
Finally, you can access the Global Variable Settings page and modify the Accela Silverlight GIS
Administration site password, customize map labels to accommodate different languages, and configure
global display settings. For instructions on how to configure these settings, follow the steps described in
Configuring Agency Settings.
| Configuring Accela Silverlight GIS | 15
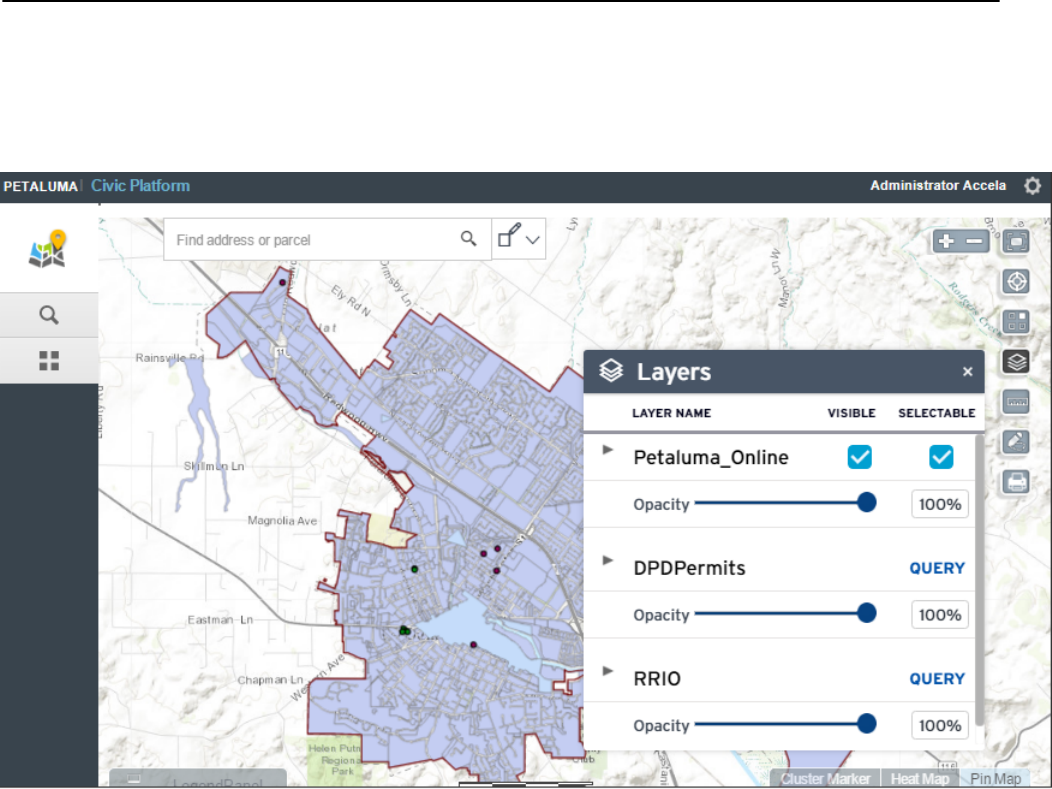
Navigating the Accela Silverlight GIS Administration Site
This topic explains how to access the Accela Silverlight GIS Administration site URL. When you access the
site, you can log in and create an integration environment or modify agency settings. When you complete
a session or leave your computer, you can log out. Accela Silverlight GIS is compatible with most browsers
including Internet Explorer and Firefox. See your agency administrator for more details.
If you frequently use the Accela Silverlight GIS Administration site, add the URL to your list of favorites
or frequently visited sites. You might also consider setting up a link to the Accela Silverlight GIS
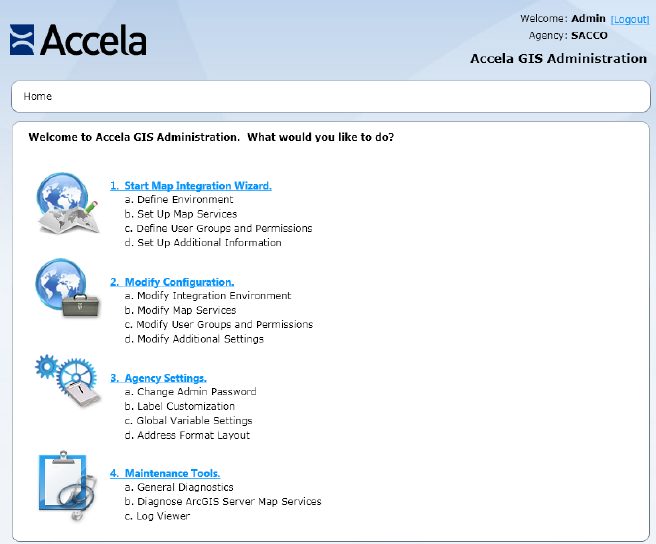
Administration site from your agency intranet or a secured area of your agency website. Figure 1: Accela
Silverlight GIS Administration Site describes the components of the Accela Silverlight GIS Administration
site. The related topics describes the login and logout procedures.
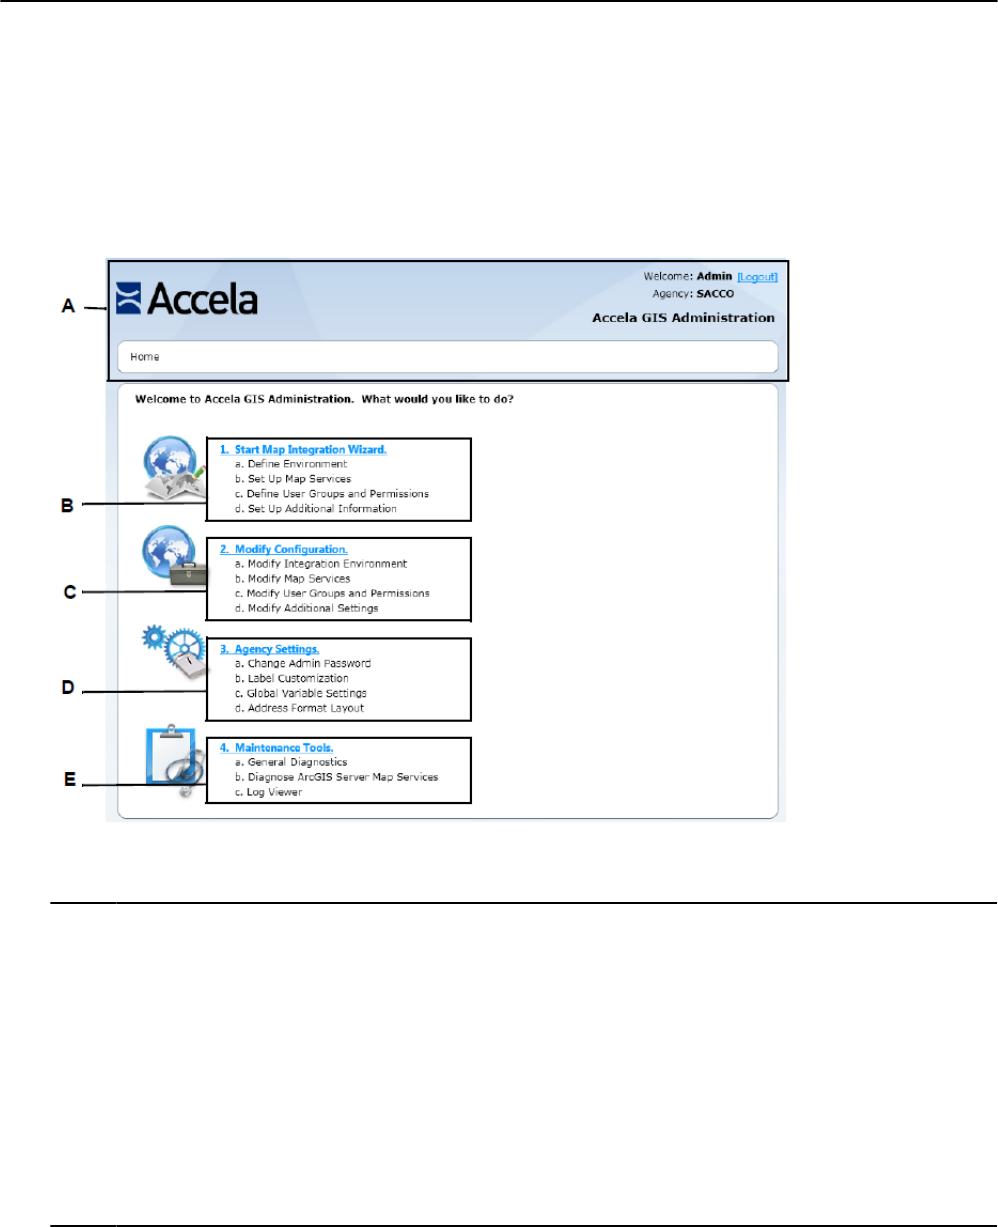
Figure 1: Accela Silverlight GIS Administration Site
A Navigation Bar. This section displays the Home page link, the agency name, the user name, and the Logout
link. As you navigate through the site, the Navigation bar displays breadcrumbs as a navigation aid
B Map Integration Wizard. This section displays the Map Integration Wizard link and the steps required to
configure Accela Silverlight GIS for your agency. Click the Start Map Integration Wizard link to define a map
integration environment, set up a map service connection, define user groups and their permissions, and
configure external address, parcel, and owner data and data export settings.
C Modify Configuration. This section displays the Modify Configuration link and the steps required to alter
existing configuration, including the map integration environment, the map service, and the user groups and
their permissions.
D Agency Settings. This section displays the Agency Settings link. Click this link to modify the Accela Silverlight
GIS Administration site password, customize map labels, and configure global variable settings.
E Maintenance Tools. This section displays the Maintenance Tools link. Click this link to run diagnostics on
Accela Silverlight GIS and view the log files.
Related Links
| Configuring Accela Silverlight GIS | 16
Logging in to the Accela Silverlight GIS Administration Site
Logging out of the Accela Silverlight GIS Administration Site
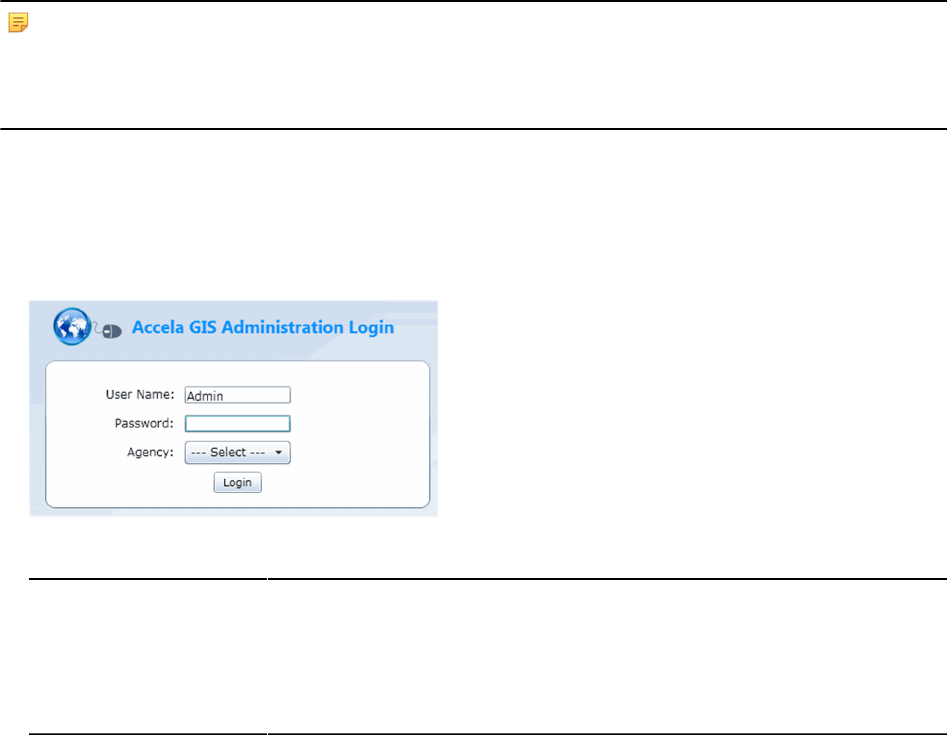
Logging in to the Accela Silverlight GIS Administration Site
To access the Accela Silverlight GIS Administration site, you must first log in with your user name and
password. Maintain site security by keeping your password confidential.
The administration site URL is: http://agisservername/virtualroot/admin/, where agisservername represents
the name or IP:Port of your IIS Web server where you installed Accela Silverlight GIS, and virtualroot
represents the virtual root that you entered for the Accela Silverlight GIS web application, such as agis.
If your IIS Web server is using the default port, you do not need to include it in the URL. For example, if
your IIS Web server is using the default port, your agency’s Accela Silverlight GIS Administration site URL
might be http://agisbridgeview/agis/admin/.
If your IIS Web server is not using the default port, you need to include the port in the URL.
In this example, your agency’s Accela Silverlight GIS Administration site URL might be http://
agisbridgeview:6080/agis/admin/.
Note:
You must install Silverlight to access the Accela Silverlight GIS Administration site and the Accela Silverlight
GIS map viewer. If you attempt to access the Accela Silverlight GIS Administration site or the Accela
Silverlight GIS map viewer without first installing Silverlight, a message appears, prompting you to download
and install Silverlight.
To log in to the Accela Silverlight GIS Administration site
1. Open your browser.
2. Enter the URL for the Accela administration site in the Address bar of your browser.
Accela Silverlight GIS displays the administration site Login page.
3. Complete the following fields:
User Name By default, the user name that populates this field is Admin. Accela Silverlight GIS
supports one administrative user per agency.
Password The first time you log in to the Accela Silverlight GIS Administration site, enter
“admin” as the password. After you log in for the first time, change the password.
Agency Select your agency’s name from the drop-down list. If you do not know your
agency’s name, contact your Accela Implementation team representative.
4. Click the Login button.
Accela Silverlight GIS displays the administration site home page.
| Configuring Accela Silverlight GIS | 17
Logging out of the Accela Silverlight GIS Administration Site
To maintain the site security, log out when you complete a session on the Accela Silverlight GIS
Administration site, or if you are away from your computer. To log out from the site, click the Logout link on
the Navigation bar.
| Configuring Accela Silverlight GIS | 18
Integrating Your Environment
The first step in configuring Accela Silverlight GIS is to define a map integration environment. When you
define a map integration environment, you identify the agency that uses Accela Silverlight GIS and Civic
Platform, such as the Civic Platform application, Mobile Office, or Citizen Access.
Related Links
Defining a Map Integration Environment
Configuring a Map Integration Environment for Creating GIS Features
Defining a Map Integration Environment
This topic applies to Accela Silverlight GIS.
A map integration environment connects your agency’s Civic Platform application and your agency’s GIS
system, such as ArcGIS Server or Bing Maps.
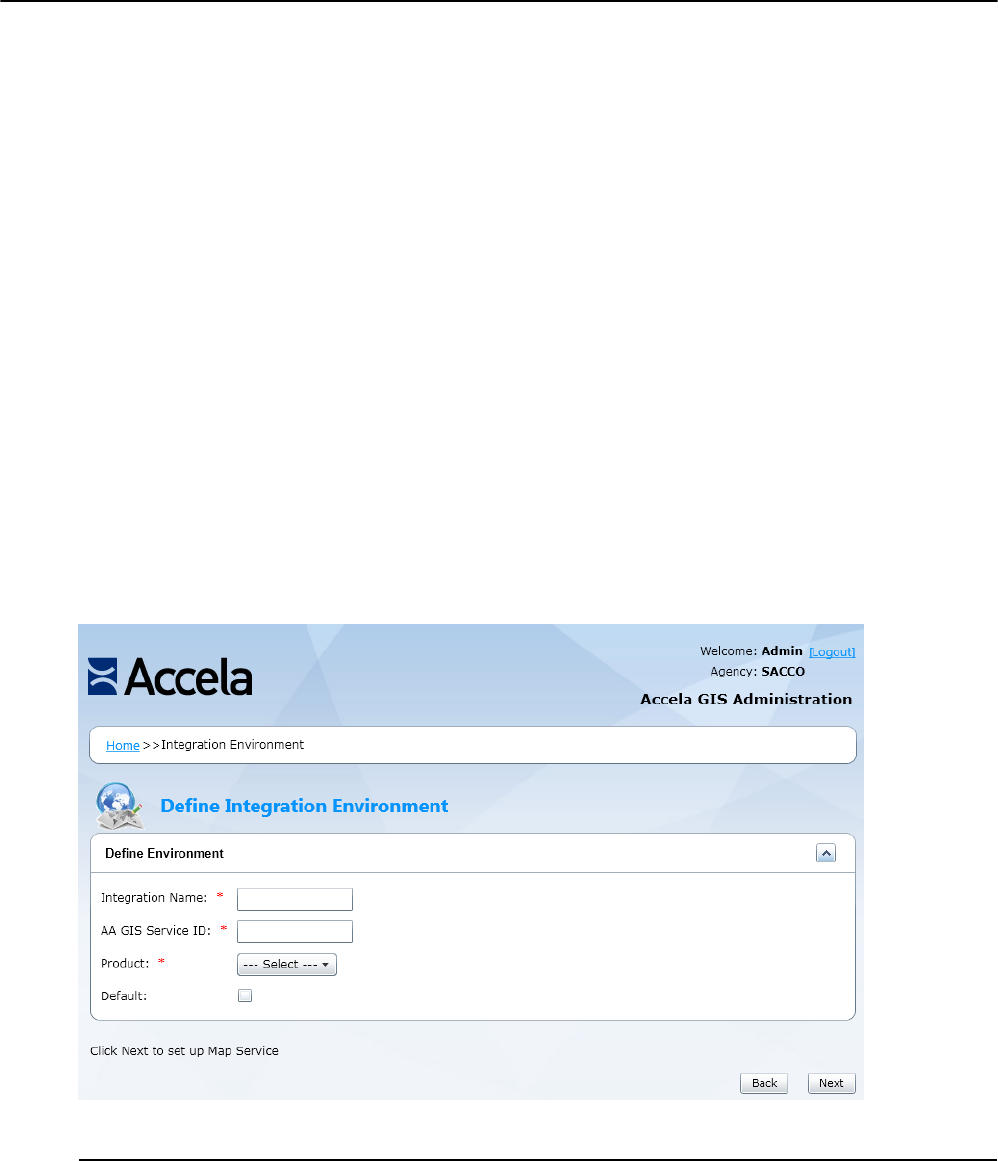
To define a map integration environment
1. If necessary, log in to the Accela Silverlight GIS Administration site.
The Accela Silverlight GIS Administration site displays the administration home page.
2. Click the Start Map Integration Wizard link.
The Accela Silverlight GIS Administration site displays the Define Integration Environment page.
3. Complete these fields:
AA GIS Service ID Enter the name of your GIS map service ID, as set in Civic Platform Classic
Administration. The field value you enter is case-sensitive.
Integration Name Enter the name of your map integration environment, such as Bridgeview - Mobile
Office Online Mapping or Bridgeview - Mobile Office Offline Mapping.
| Configuring Accela Silverlight GIS | 19
If you configure an integration environment for Mobile Office, the field value you enter
must match the one in the GIS Integration for Online Mapping or GIS Integration
for Offline Mapping field on the Mobile Office administration site. This includes
uppercase, lowercase, spaces, and any other punctuation.
For specific information on configuring an Mobile Office user group to use Accela
Silverlight GIS mapping, see “Managing General Settings” in the Mobile Office
Administrator Guide.
Product Use the drop-down list to select the target Civic Platform application. You can choose
Accela Automation V360, Mobile Office, or Citizen Access.
If you select Mobile Office, an Offline Mapping check box displays. Mark this check
box if you want to set up an integration environment for offline mapping. You can
only add one map service to the integration environment that you define for offline
mapping.
When you configure a map integration for Mobile Office Offline Mapping, you must
create a data package. A data package includes the map layer information that Mobile
Office users can access and modify when they work offline. When Mobile Office users
are online, they can upload the changes to the Accela Silverlight GIS Server.
If you mark the Offline Mapping check box, the Map Integration Wizard directs
you to the Offline Map Data Management page after you complete user group
configuration. For instructions on how to configure a data package for offline mapping,
see Managing Offline Map Data.
Default Mark this check box if you want the map integration environment to display by default.
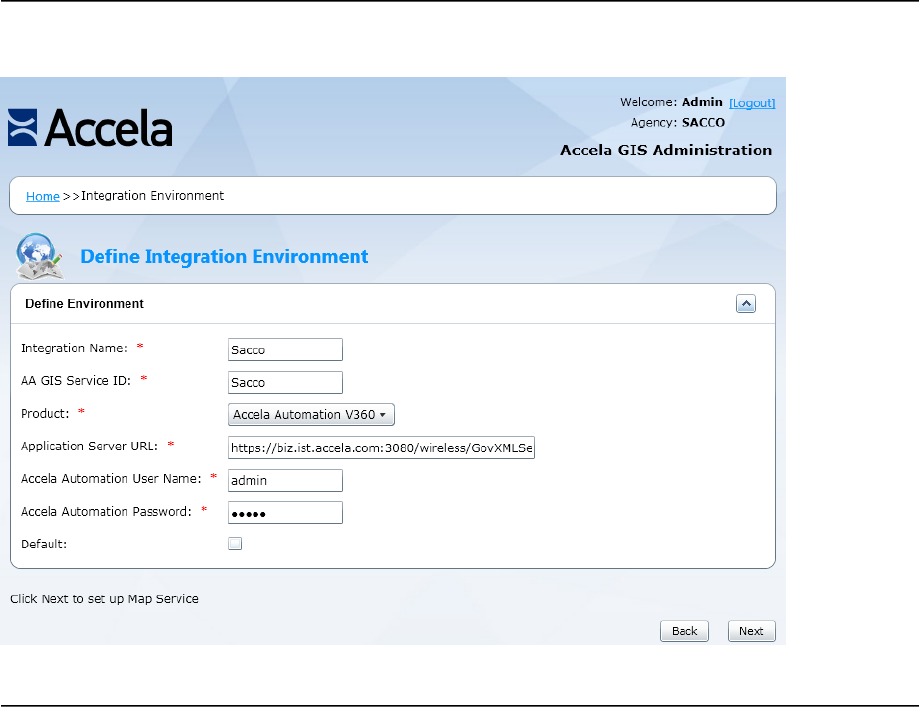
After selecting the product, the Accela Silverlight GIS Administration site displays the Application Server
URL, Accela Automation User Name, and Accela Automation User Password fields.
4. Complete these fields:
Application Server URL Enter the application server URL. For example, if you select Accela Automation
V360 from the Product drop-down list, then you must enter your Civic Platform
Application Server URL. In the image above, the Application Server URL is http://
biz.ist.accela.com:3080/wireless/GovXMLServlet where biz.ist.accela.com represents
your agency’s business application server name.
| Configuring Accela Silverlight GIS | 20
Accela Automation User
Name Enter a valid Civic Platform User Name. Accela Silverlight GIS uses the user name
that you entered to communicate with the Application Server.
Accela Automation
Password Enter a valid Civic Platform Password. Accela Silverlight GIS uses the password that
you entered to communicate with the Application Server.
5. Click the Next button.
The Accela Silverlight GIS Administration site displays the Map Service Connection page.
6. Set up a map service connection. For instructions on setting up a map service connection, see Setting
up a Map Service Connection.
Configuring a Map Integration Environment for Creating GIS
Features
If your agency uses ESRI ArcGIS Server map services, you can configure a map integration environment
that allows agency users to create and edit GIS features. When an agency user creates or edits a GIS
feature, the ArcGIS geodatabase and Accela database are updated.
This feature requires you to complete three configuration steps in the Accela Silverlight GIS Administration
site.
The first step is to configure map layers for editing. For more information on how to configure map layers
for editing, see Importing and Configuring Map Layer Settings.
The second step is to configure map layer attributes for editing. For more information on how to configure
map layer attributes for editing, see Importing and Configuring Map Layer Settings.
The third step is to configure the user group permissions that allow agency users to create and edit GIS
features and attributes. This requires user group configuration for map functions, map commands, and
map layers. For more information on how to configure user group permissions for these functions, see

| Configuring Accela Silverlight GIS | 21
Setting User Group Access to Map Functions, Setting User Group Access to Map Commands, and Setting
User Group Access to Map Layers.
Based on the Accela application your agency integrates with, you might need to complete additional
configuration steps. If your agency integrates with Civic Platform, configure Civic Platform to enable
agency users to modify records directly from Accela Silverlight GIS. See Managing Civic Platform
Application Intake Forms.
If your agency integrates with Mobile Office, you do not need to complete any additional configuration.
Managing Civic Platform Application Intake Forms
Agency users can associate one or many forms of data with an application intake form. This data includes
address, parcel, owner, and GIS feature details. Agency users can map and modify application intake form
data.
If you want to give agency users the option to map data that already exists in the Civic Platform Reference
Database, then configure the Standard Choice MULITPLE_APO_GIS_SELECTION with a value of Yes.
If you want to give agency users the option to map data that they enter, then configure the Standard
Choice MULTIPLE_APO_GIS_SELECTION with a value of No.
Table 1: Application Intake Form Commands shows how the configuration of the Standard Choice
MULTIPLE_APO_GIS_SELECTION determines how Accela Silverlight GIS maps data from an application
intake form.
Table 1: Application Intake Form Commands
Application Intake Form Command Standard Choice Configuration
Agency user enters an address in the Address
section and clicks the GIS button.
Accela Silverlight GIS displays the address when
MULTIPLE_APO_GIS_SELECTION is set to a value of No
Agency user looks up an existing address in the
Address section and clicks the GIS button.
Accela Silverlight GIS displays the address when
MULTIPLE_APO_GIS_SELECTION is set to a value of Yes.
Agency users enters or looks up a parcel in the
Parcel section and clicks the GIS button.
Accela Silverlight GIS displays the parcel when
MULTIPLE_APO_GIS_SELECTION is set to a value of Yes.
Agency users enters a GIS feature in the
Associated GIS Features section and clicks the GIS
button.
Accela Silverlight GIS displays the GIS feature when
MULTIPLE_APO_GIS_SELECTION is set to a value of No.
Agency user selects an existing GIS feature in the
Associated GIS Features section and clicks the GIS
button.
Accela Silverlight GIS displays the GIS feature when
MULTIPLE_APO_GIS_SELECTION is set to a value of Yes.

| Configuring Accela Silverlight GIS | 22
Setting up a Map Service Connection
The second step in configuring Accela Silverlight GIS is to set up a connection to a map service. When you
set up a connection to a map service, you connect Accela Silverlight GIS with your agency’s GIS system,
such as ArcGIS Server or Bing Maps.
Before you can set up a connection to a map service, you must define a map integration environment. For
instructions, see Integrating Your Environment.
The following topics explain how to set up a connection to a map service.
Related Links
Setting up a Connection to a Map Service
Configuring Additional Map Services
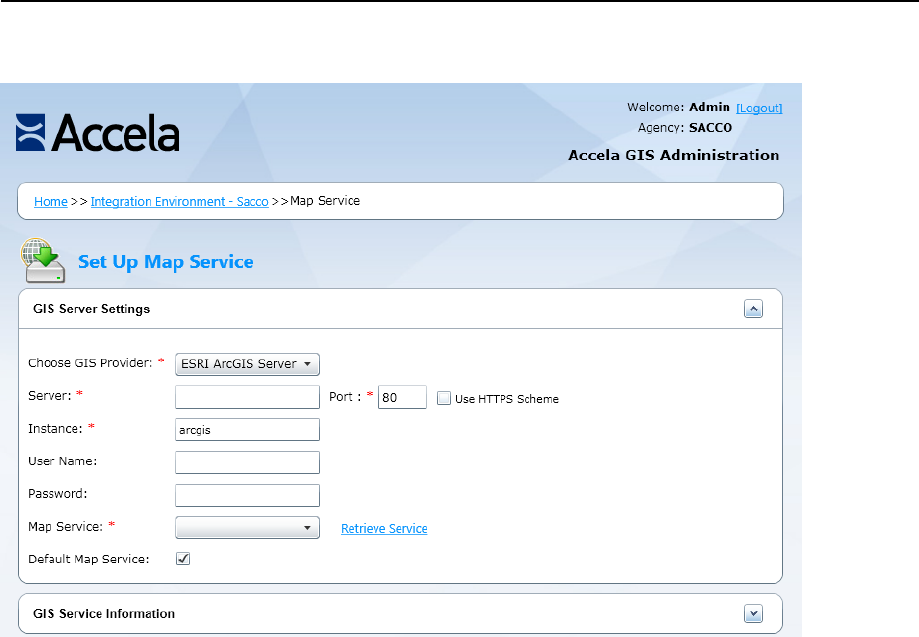
Setting up a Connection to a Map Service
This topic applies to Accela Silverlight GIS.
Connect Accela Silverlight GIS to your agency’s GIS system, or map provider, through a map service.
You can associate multiple map services with the same map integration environment, which allows agency
users the flexibility of working with different map services in the map viewer.
The Map Service Connection page provides sections where you can configure basic map viewer settings.
Use these sections to identify your map provider, set the initial extent of the map viewer, import map
layers, and retrieve Civic Platform Dynamic Themes. Optionally, you can also use this page to retrieve your
geocoding and routing services.
Topics
•Configuring GIS Server Settings
•Configuring GIS Service Information
•Importing and Configuring Map Layer Settings
•Configuring Map Style Settings
•Retrieving and Selecting a Geocoding Service
•Retrieving and Selecting a Routing Service
•Retrieving and Configuring Dynamic Themes in Accela Silverlight GIS
Configuring GIS Server Settings
Use the GIS Server Settings section to identify your map provider, such as Esri ArcGIS Engine, Esri
ArcGIS Server, Esri ArcGIS Online Base Map, Esri ArcGIS Online Web Map, Esri Image Server, Microsoft
Bing Maps, or your agency’s GIS server.
In addition, Accela Silverlight GIS supports map providers that meet the Open Geospatial Consortium
(OGC) Web Mapping Service (WMS) and the Web Feature Service (WFS) Interface Standards. The
Interface Standards support geospatial and location-based services.
Accela Silverlight GIS currently supports two map providers that meet the Open Geospatial Consortium
Standards: MapInfo MapXtreme 2008 7.0.0 and Intergraph GeoMedia WebMap 6.1. The two map

| Configuring Accela Silverlight GIS | 23
providers plug in to Accela Silverlight GIS and are compatible with current Accela Silverlight GIS map
functions. You can also use the map providers to create map mash-ups with Bing Maps.
Accela Silverlight GIS also support using HTTPS to communicate between the map viewer and Accela
Silverlight GIS Server, and between Accela Silverlight GIS Server and ArcGIS Server. For instructions
about how to secure communication, see Securing Communications.
If your agency’s ArcGIS Server map services are secured, then enter your User Name and Password to
access secured Web services in the GIS Server Settings section. By default, ArcGIS Server settings are
secured.
You must also enter credentials if the map service connection is for Mobile Office offline mapping
integration. Mobile Office offline mapping must download GIS data from the GIS server to the local device.
To download data, Accela Silverlight GIS connects to ArcGIS Server using ArcGIS Server local connection.
To connect locally, Accela Silverlight GIS must pass valid ArcGIS Server user credentials.
Before you can configure GIS server settings, you must define a map integration environment. For
instructions, see Integrating Your Environment.
To configure GIS server settings
1. Navigate to the Map Service Connection page.
The Accela Silverlight GIS Administration site displays the Map Service Connection page.
2. Select your map provider from the Choose GIS Provider drop-down list.
You can choose one from these options:
ESRI ArcGIS Engine Use ESRI ArcGIS Engine for Mobile Office offline mapping.
ESRI ArcGIS Server Use ESRI ArcGIS Server for online mapping in Civic Platform, Mobile Office, and
Citizen Access.
Microsoft Bing Maps Bing Maps is a Microsoft Web mapping service.
Note: As of June 30, 2016 Accela has deprecated the complimentary use of
Bing Maps with Accela Silverlight GIS. Continued use of Bing Maps as a map
service provider requires your agency to obtain a Bing Maps license key from
Microsoft, and enter it in the Bing Maps License Key masked field on the

| Configuring Accela Silverlight GIS | 24
Global Variable Settings page. (Alternatively, Accela has made available a
complimentary ArcGIS Online Account for geocoding and routing services.)
Intergraph OGC Select this option if your agency uses Intergraph GeoMedia WebMap 6.1 as a map
provider.
MapInfo OGC Select this option if your agency uses MapInfo MapXtreme 2008 7.0.0 as a map
provider.
ESRI Image Server ArcGIS Image Server is an enterprise-wide image distribution platform from Esri,
which provides fast access and visualization of large quantities of imagery, processed
on the fly and on demand. You can use ArcGIS Image Server to create map mash-
ups with dynamic and cached map services from Esri ArcGIS Server, with ArcGIS
Online map services, or with Microsoft Bing Maps.
ESRI ArcGIS Online Base
Map
ArcGIS Online is Esri’ system for organizations or individual users to manage and
share their GIS content, maps, and apps. Select this option if you want to use a
basemap provided by ArcGIS Online as the map service. You can use ArcGIS Online
Base Map to create mash-ups with dynamic map services that you publish to Esri
ArcGIS Server or with image services from ArcGIS Image Server.
ESRI ArcGIS Online Web
Map
Select this option if you want to use the web map hosted on ArcGIS Online as the
map service. The web map might contain tiled map services for map visualization
and feature services for Accela data querying and integration. You can use ArcGIS
Online Web Map to create mash-ups with dynamic map services that you publish to
Esri ArcGIS Server or with image services from ArcGIS Image Server.
3. Complete the fields according to your choice of the map provider:
• If you choose ESRI ArcGIS Engine, ESRI ArcGIS Server, or ESRI Image Server, complete the
fields in Table 2: GIS Server Settings Fields for ArcGIS Engine and Server.
• If you choose Microsoft Bing Maps, complete the fields in Table 3: GIS Server Settings Fields for
Bing Maps.
• If you choose Intergraph OGC or MapInfo OGC, complete the fields in Table 4: GIS Server Settings
Fields for OGC Map Providers.
• If you choose ESRI ArcGIS Online Base Map or ESRI ArcGIS Online Web Map, complete the
fields in Table 5: GIS Server Settings Fields for ArcGIS Online (Base Map and Web Map).
The Accela Silverlight GIS Administration site displays the map service settings in the GIS Service
Information section.
| Configuring Accela Silverlight GIS | 25
4. Complete the GIS Service Information section. For instructions on completing the GIS Service
Information section, see Configuring GIS Service Information.
Table 2: GIS Server Settings Fields for ArcGIS Engine and Server
Server Enter the ArcGIS Server name or IP address.
Port Enter the port number that corresponds to the map server’s IP address. The
default port number for the HTTP server is 80 while the default port number for
the HTTPS server is 443.
Use HTTPS Scheme Mark this check box to support using HTTPS to communicate between Accela
Silverlight GIS Server and ArcGIS Server.
Instance Enter the server instance in this field. The default value that populates this field is
arcgis.
User Name Enter your ArcGIS Server user name. If your agency’s map services are secured
or used for Mobile Office offline mapping, then you must enter your ArcGIS
Server user name. The user must belong to the “agsusers” group on the ArcGIS
Server machine.For more information about how to configure ArcGIS server
security, see ArcGIS Server documentation > Configuring ArcGIS Server
Security.
Password Enter your ArcGIS Server password. If your agency’s map services are secured
or used for Mobile Office offline mapping, then you must enter your ArcGIS
Server password. The user password must belong to the “agsusers” group on
the ArcGIS Server machine.For more information about how to configure ArcGIS
server security, see ArcGIS Server documentation > Configuring ArcGIS Server
Security.

| Configuring Accela Silverlight GIS | 26
Map Service If you retrieve a map service from ArcGIS Server, this drop-down list populates
with map services that you have published to the root folder or its subfolders
in ArcGIS Server. Select a map service from the drop-down list.For more
information about how to publish map services in ArcGIS Server, see “Setting up
Map Functionality” in the Accela Silverlight GIS for ArcGIS Server Configuration
Guide.
Retrieve Service Click this link to retrieve map service information from your map provider.
Default Map Service This check box applies to agencies that use multiple map services to create map
mashups in one integration environment.
Mark this check box to set a map service as the default. When you mark this
check box, common settings, such as the initial extent of the selected map
service, display in the map viewer.
If your agency uses map services from ArcGIS Server and Bing Maps or from
ArcGIS Server and ArcGIS Online Base Map, set an ArcGIS Server map
service as the default map service. You cannot set a map service from Bing
Maps or ArcGIS Online Base Map as the default map service in an integration
environment with the map mashups.
Only one map service can be the default.
Table 3: GIS Server Settings Fields for Bing Maps
Map Service This field is read-only and displays the Bing Map Service URL.
Note: As of June 30, 2016 Accela has deprecated the complimentary
use of Bing Maps with Accela Silverlight GIS. Continued use of Bing
Maps as a map service provider requires your agency to obtain a
Bing Maps license key from Microsoft, and enter it in the Bing Maps
License Key masked field on Accela Silverlight GIS Administration
> Global Variable Settings. (Alternatively, Accela has made available
a complimentary ArcGIS Online Account for geocoding and routing
services.)
Retrieve Service Click this link to retrieve map service information from your map provider.
Note: When you click the Retrieve Service link for a Bing Map service,
the map service thumbnail does not display. This is a known limitation
with Bing Maps REST Services.
Default Map Service This check box applies to agencies that use multiple map services to create map
mashups in one integration environment.
Mark this check box to set a map service as the default. When you mark this
check box, common settings, such as the initial extent of the selected map
service, display in the map viewer.
If your agency uses map services from ArcGIS Server and Bing Maps or from
ArcGIS Server and ArcGIS Online Base Map, set an ArcGIS Server map
service as the default map service. You cannot set a map service from Bing
Maps or ArcGIS Online Base Map as the default map service in an integration
environment with the map mashups.
Only one map service can be the default.
Table 4: GIS Server Settings Fields for OGC Map Providers
WMS Service URL Enter a Web Mapping Service URL for an Open Geospatial Consortium map
provider. The Web Mapping Service URL must come from the same data source
as the Web Feature Service URL.

| Configuring Accela Silverlight GIS | 27
WFS Service URL Enter a Web Feature Service URL for an Open Geospatial Consortium map
provider. The Web Feature Service URL must come from the same data source
as the Web Mapping Service URL.
User Name If you are using a MapInfo MapXtreme 2008 7.0.0 or GeoMedia WebMap 6.1
secured map service, then you must enter your user name.
Password If you are using a MapInfo MapXtreme 2008 7.0.0 or GeoMedia WebMap 6.1
secured map service, then you must enter your user name.
Map Service This field is read-only and displays the map service URL.
Retrieve Service Click this link to retrieve map service information from your map provider.
Default Map Service This check box applies to agencies that use multiple map services to create map
mashups in one integration environment.
Mark this check box to set a map service as the default. When you mark this
check box, common settings, such as the initial extent of the selected map
service, display in the map viewer.
Only one map service can be the default.
Table 5: GIS Server Settings Fields for ArcGIS Online (Base Map and Web Map)
Server For ESRI ArcGIS Online Base Map only: If you are using ESRI ArcGIS Online
Base Map as the map provider, select any of the ArcGIS Online servers:
services.arcgisonline.com
server.argisonline.com
ArcGIS Online provides two servers, which are exactly the same. In case one
server in your map integration environment goes down, you can use the other as
a backup server.
Note: Make sure the URL of the selected ArcGIS Online server is accessible from
a web browser.
If you are using ESRI ArcGIS Online Web Map as the map provider, this field
displays “maps.arcgis.com” in read-only.
Port For ESRI ArcGIS Online Base Map only: Enter the port number that
corresponds to the map server’s IP address. The default port number for the
HTTP server is 80 while the default port number for the HTTTPS server is 443.
Use HTTPS Scheme For ESRI ArcGIS Online Base Map only: Mark this check box to support using
HTTPS to communicate between the Accela Silverlight GIS Server and the
ArcGIS Online server.
User Name For ESRI ArcGIS Online Web Map only: If you are using ESRI ArcGIS Online
Web Map as the map provider, enter the user name for logging in to ArcGIS
Online.
Password For ESRI ArcGIS Online Web Map only: If you are using ESRI ArcGIS Online
Web Map as the map provider, enter the password for logging in to ArcGIS
Online.
Map Service If you retrieve a map service from ArcGIS Online Web Map, this drop-down list
populates with web maps that you have published to ArcGIS Online. Select a
web map from the drop-down list.
Retrieve Service Click this link to retrieve map service information from your map provider.
Default Map Service This check box applies to agencies that use multiple map services to create map
mashups in one integration environment.

| Configuring Accela Silverlight GIS | 28
Mark this check box to set a map service as the default. When you mark this
check box, common settings, such as the initial extent of the selected map
service, display in the map viewer.
If your agency uses map services from ArcGIS Server and Bing Maps or from
ArcGIS Server and ArcGIS Online Base Map, set an ArcGIS Server map
service as the default map service. You cannot set a map service from Bing
Maps or ArcGIS Online Base Map as the default map service in an integration
environment with the map mashups.
Only one map service can be the default.
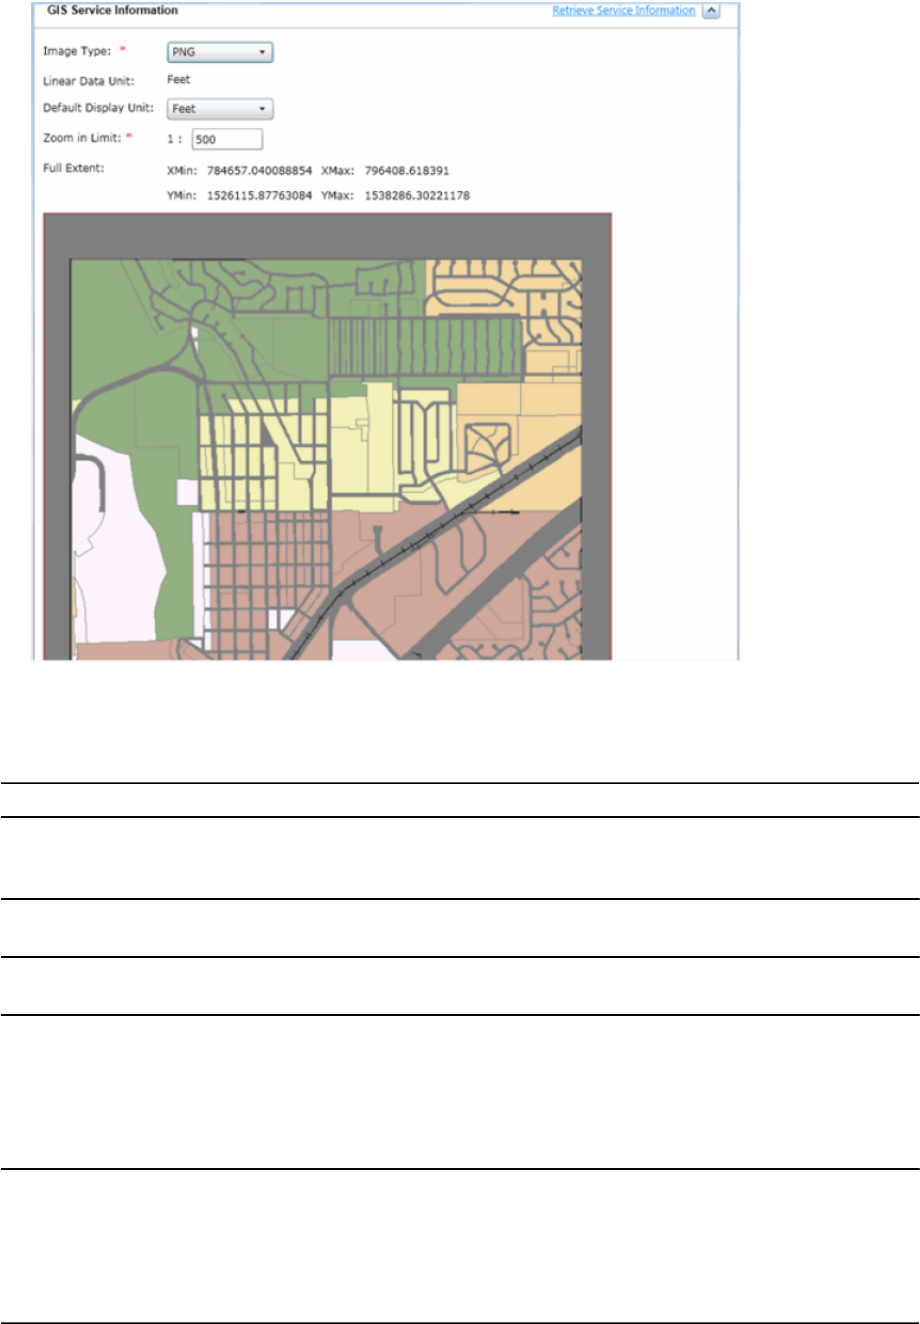
Configuring GIS Service Information
Once you retrieve and select your primary map service, you can configure additional map service settings.
The settings you configure in this section, such as the initial extent, determine how Accela Silverlight GIS
presents the map service in the map viewer.
Before you can configure GIS server settings, you must define a map integration environment. For
instructions, see Integrating Your Environment. Additionally, you must configure GIS Server settings. For
instructions, see Configuring GIS Server Settings.
To configure GIS Service Information:
1. Navigate to the GIS Service Information section on the Map Service Connection page.
The Accela Silverlight GIS Administration site displays the map service settings in the GIS Service
Information section.
2. Complete the fields in the GIS Service Information section.
For a complete list of fields, see Table 6: GIS Service Information Fields.

| Configuring Accela Silverlight GIS | 29
The Accela Silverlight GIS Administration site saves your GIS Service Information settings.
3. Continue with the map service setup according to your choice of the map provider.
• If you choose ESRI ArcGIS Engine, ESRI ArcGIS Server, or ESRI ArcGIS Online Web Map,
import and configure map layer settings. For instructions on how to import and configure map layer
settings, see Importing and Configuring Map Layer Settings.
• If you choose Microsoft Bing Maps or ESRI ArcGIS Online Base Map, set a default map style. For
instructions on the map style settings, see Configuring Map Style Settings.
Table 6: GIS Service Information Fields
Default Display Unit Select the default display unit from this drop-down list. The available map
measurement display units include meters, kilometers, feet, yards, and miles.
Full Extent The full extent is the complete map area zoomed out to its farthest point. The
XMin and XMax and YMin and YMax fields in this section display the map
coordinates at their full extent.
Image Type Select the map viewer image type from the drop-down list. By default, Accela
Silverlight GIS supports PNG8 image types.If you select Microsoft Bing Maps,
ESRI ArcGIS Online Base Map, or ESRI ArcGIS Online Web Map as the map
provider, this field is not available.
Initial Extent The initial extent is the default extent of the map when the map viewer is
opened. If you select a map provider other than ESRI ArcGIS Online Web
Map, you can draw a rectangle polygon on the map to define the initial extent.
The area you select, measured by numerical X and Y coordinates, populates
the XMin and XMax and YMin and YMax fields.
Initial Extent XMax The right most extent of the map when the map viewer is first opened.For
example, if you want agency users to initially view a zoomed area of the map,
this value is the right most extent of the zoomed area.
Initial Extent XMin The left most extent of the map when the map viewer is first opened.For
example, if you want agency users to initially view a zoomed area of the map,
this value is the left most extent of the zoomed area.The map area you select
with the polygon automatically populates this field.
Initial Extent YMax The top most extent of the map when the map viewer is first opened.For
example, if you want agency users to initially view a zoomed area of the map,
this value is the top most extent of the zoomed area.The map area you select
with the polygon automatically populates this field.
Initial Extent YMin The bottom most extent of the map when the map viewer is first opened.For
example, if you want agency users to initially view a zoomed area of the map,
this value is the bottom most extent of the zoomed area.The map area you
select with the polygon automatically populates this field.
Linear Data Unit This field is read-only and displays the units of measurement for the selected
map service. Accela Silverlight GIS users can switch the map units using the
Map Control.There are three possible values for this field:
Decimal - Degrees are based on the 360 degree circumference of the Earth.
Feet - US standard unit of measure for distance.
Meters - International standard unit of measure for distance.
Retrieve Service Information Click this link to replace the attribute settings of the selected map service with
the default map service attribute values.
Zoom in Limit Set the map zoom-in limit by entering a value in this field.
| Configuring Accela Silverlight GIS | 30
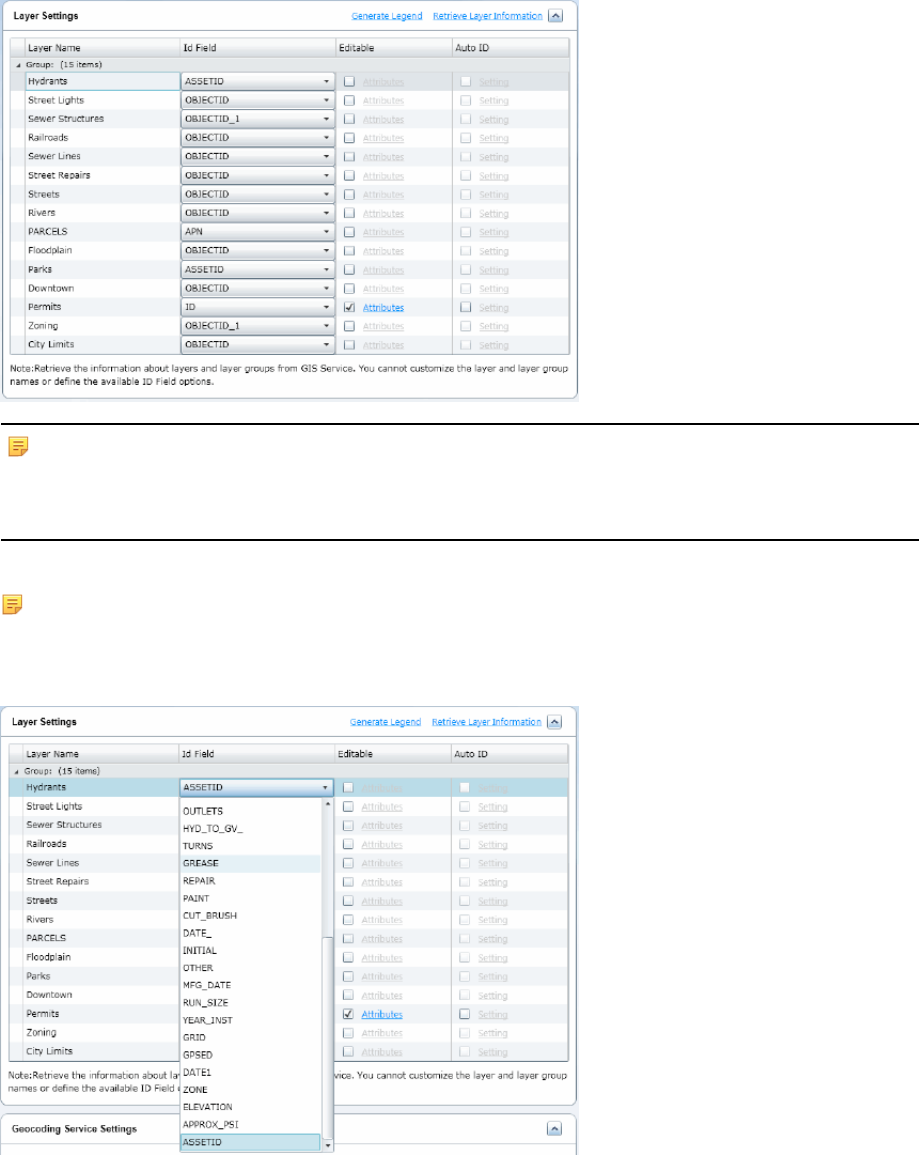
Importing and Configuring Map Layer Settings
Once you retrieve a map service, you can import map layer information from the map service. Use the Map
Layer Settings section to retrieve map layers and select the map layer ID Field. This section only displays if
you are configuring ArcGIS Server, ArcGIS Engine, ArcGIS Online Web Map, or OGC map services.
The ArcGIS Server map services can be either dynamic or cached. If you retrieve the dynamic map
service, you can use the Layer Settings section to configure map layers for editing. When you configure
a map layer for editing, mark a check box to indicate that a layer is editable. You also determine which
attributes for each layer are editable. Editable attributes display in the Edit Attributes dialog box in Accela
Silverlight GIS. As a prerequisite of configuring map layers for editing, you must enter the correct user
name and password in the GIS Server Settings section.
For example, you might configure a fire hydrant map layer for editing, and then determine which related
hydrant attributes are editable, such as the hydrant’s address, manufacturing date, model, and owner.
When you configure a map layer for editing, you must set the ID Field for the selected map layer as
editable. For example, if the ID Field for the Buildings map layer is BUILD_ID, then you must mark the
check box next to the BUILD_ID field when you configure the attributes.
Editable layers give agency users the option to create and edit GIS features. Agency users can only create
and edit features on editable map layers. Once you configure editable map layers and save the settings,
the Accela Silverlight GIS Administration site prompts you to enter your user name and password. You
must enter valid credentials.
When you select an ID Field for a map layer, you indicate the field within the geodatabase feature class
table that you want to map to the Accela Silverlight GIS database. The ID Field connects the map layer
in your map provider’s geodatabase to the Accela Silverlight GIS database. You can configure whether
Accela Silverlight GIS generates the ID automatically or asks users to enter the ID manually when they
create a GIS feature. If you want to auto-generate the ID, you need to set the map layer as editable and
then define the current sequence and the cache size for the ID field. The OBJECT_ID number cannot be
auto-generated because the OBJECT_ID field is maintained by ArcGIS.
For example, if you select HYD_NUMBER as the ID Field for Hydrants, then objects in the Hydrants map
layer are identified by the HYD_NUMBER field in the Accela Silverlight GIS database. The ID Field you
select for each feature class must be unique and fixed.
If your agency plans to synchronize a GIS layer with an Asset Type in Accela Asset Management, you
must select the same value in the Asset ID and ID Fields.
Before you can import and configure map layer settings, you must define a map integration environment.
For instructions, see Integrating Your Environment. Additionally, you must configure GIS Server settings
and GIS Service information. For instructions, see Configuring GIS Server Settings and Configuring GIS
Service Information.
To import and configure map layer settings
1. Navigate to the Layer Settings section on the Map Service Connection page.
The Accela Silverlight GIS Administration site displays the Layer Settings section.
| Configuring Accela Silverlight GIS | 31
Note:
Accela Silverlight GIS allows users to create or edit geometry only on the editable layer of a dynamic
ArcGIS Server map or an ArcGIS Engine map. So for an OGC map service or an ArcGIS Online Web
Map service, the Layer Settings section does not have the Editable or Auto ID column.
2. Expand the ID Field drop-down list for each map layer group.
Note: The selected Id Field value appears as the object name on the map viewer's Contents
Panel. The Id Field value must be no more than 70 characters.
For a complete list of fields, see Table 7: Map Layer Settings.
The Accela Silverlight GIS Administration site displays the attribute list.
3. Select a unique, fixed attribute field for each map layer from the ID Field drop-down list. If your agency
plans to synchronize a GIS layer with an Asset Type in Accela Asset Management, you must select the
same value in the Asset ID and ID Fields.
4. To configure a map layer for editing, mark the check box in the Editable column.
The Accela Silverlight GIS Administration site activates the Attributes link.
| Configuring Accela Silverlight GIS | 32
5. Click the Attributes link.
The Accela Silverlight GIS Administration site displays the Setup Attributes for the editing layer dialog
box.
6. Mark the check box next to each attribute that you want to be editable. You must set the ID Field for the
selected map layer as editable.
7. Click the OK button.
The Accela Silverlight GIS Administration site saves the attribute settings.
8. To auto-generate the feature ID when users create a GIS feature, mark the check box in the Auto ID
column.
The Accela Silverlight GIS Administration site activates the Setting link.
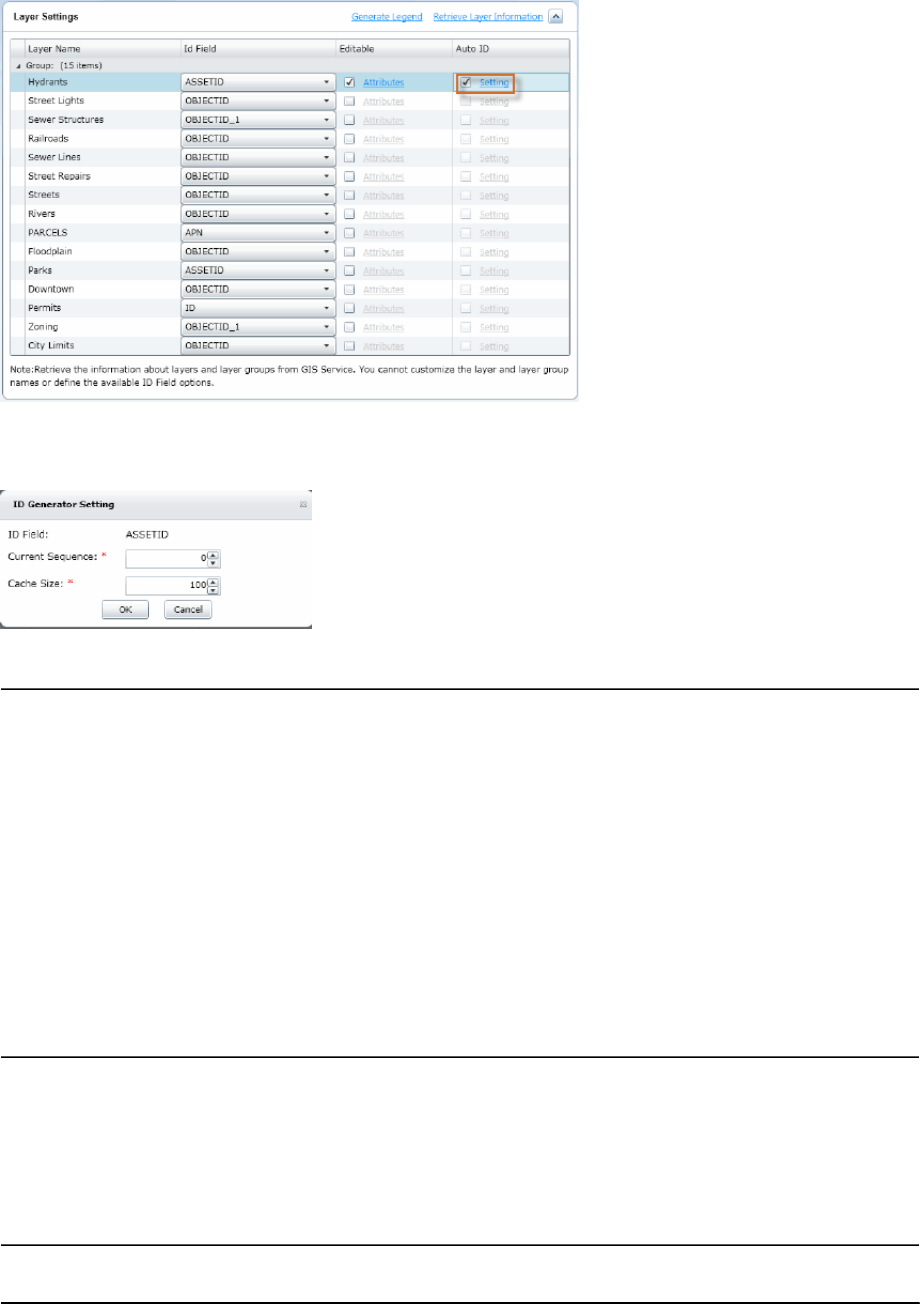
| Configuring Accela Silverlight GIS | 33
9. Click the Setting link.
The Accela Silverlight GIS Administration site displays the ID Generator Setting dialog box.
10.Complete these fields:
ID Field This is a read-only field. It displays the name of the ID field. The ID field is used to link
the Civic Platform data with the GIS data. Each feature created on the map layer must
have a unique ID field value. The ID field value can be populated either manually or
automatically based on the ID Generator setting.
Current Sequence It specifies the current sequence value of the ID field. The next ID field value is auto-
generated based on this value.
During initial setup, if the map layer does not have any features on it, this value can
be set to 1; if it already has some features, get the maximum ID field value from the
geodatabase and enter a greater value into this field. For example, the Road Repairs
layer is used as an editable layer and has some features on it, get the maximum ID
field value from the layer. If the maximum value is 1000, enter 1001 as the current
sequence number.
Cache Size It defines a set of sequence numbers in memory for auto-generating IDs in Mobile
Office Offline Mode. The default value is 100.
11.Click the OK button.
The Accela Silverlight GIS Administration site saves the ID Generator setting.
12.Retrieve and select a geocoding service. For instructions, see Retrieving and Selecting a Geocoding
Service.
Table 7: Map Layer Settings
Generate Legend Click this link to generate a map legend. When you click this link, a PNG image of
the map legend is generated and displays in the map viewer Table of Contents.
Retrieve Layer Information This link only appears when you edit map layer settings.

| Configuring Accela Silverlight GIS | 34
Click this link to retrieve all the layers in the selected map service. Use this link to
incorporate new layers added to the MXD (Map document). Similarly, if layers are
removed from the MXD, then you can update the layer groups and names when
you click this link.
Layer Name Layer groups and names are automatically retrieved when you select a map
service. By default, this column is expanded and displays all the layer groups and
names.
ID Field This drop-down list displays the available attribute fields for the selected map
layer. Select an identification field for each map layer.
Editable Mark the check box next to the map layer that you want to make editable, then
click the Attributes link to configure which attributes are editable.
Note: Cached map services do not support the Creating and Editing GIS
Features functionality, so the Editable column is not available on the Layer
Settings section for cached map services.
Auto ID Mark the check box next to the map layer if you want to auto-generate IDs for
the features created on the map layer, then click the Setting link to configure
the current sequence and cache size. When users create a feature in Accela
Silverlight GIS and submit it, Accela Silverlight GIS auto-generates the ID number
for the feature based on the ID Generator setting.
If you want users to enter the ID number when creating a GIS feature, clear the
check box. This way, the ID Field displays in the Edit Attributes dialog box.
Note: Public users cannot create or edit GIS features in Citizen Access, so the
Auto ID column is not available in the Layer Settings section for the Citizen
Access map integration.
Configuring Map Style Settings
Use this section to configure the default map style display for Microsoft Bing Maps or ArcGIS Online
basemaps. This section only appears if you are configuring a map service provided by Microsoft Bing Maps
or ESRI ArcGIS Online Base Map.
Before you can configure map style settings, you must define a map integration environment. For
instructions, see Integrating Your Environment. Additionally, you must configure GIS Server settings
and GIS Service information. For instructions, see Configuring GIS Server Settings and Configuring GIS
Service Information.
To configure map style settings
1. Navigate to the Map Style Settings section on the Map Service Connection page.
If you are configuring a map service provided by Microsoft Bing Maps, the Accela Silverlight GIS
Administration site displays the Map Style Settings section.
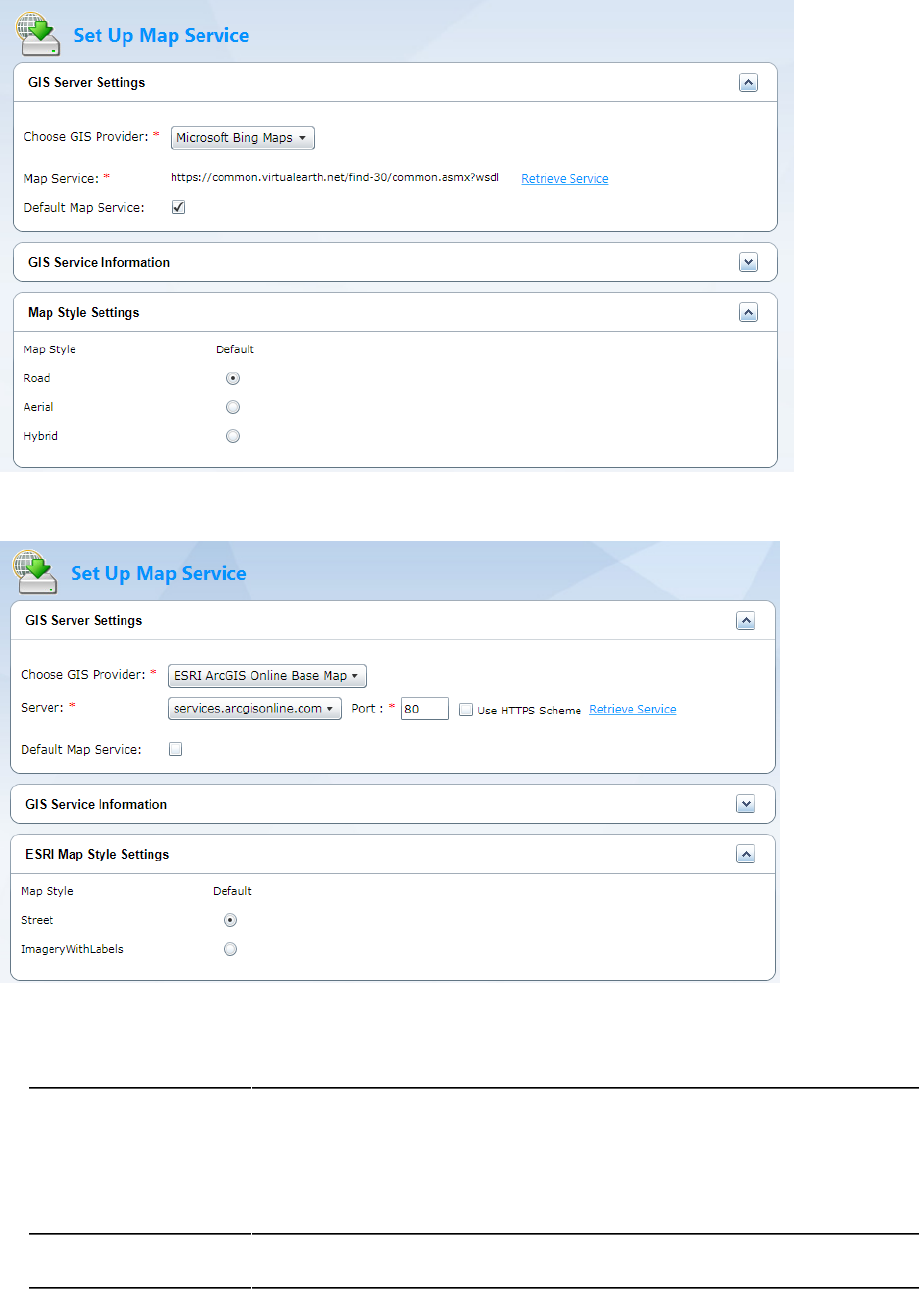
| Configuring Accela Silverlight GIS | 35
If you are configuring an ArcGIS Online basemap, the Accela Silverlight GIS Administration site
displays the ESRI Map Style Settings section.
2. Mark the option next to the map style you want to set as the default:
• For Microsoft Bing Maps:
Road Map this option if you want the default map display to be a road overlay. This is
the default map service display.
Aerial Mark this option if you want the default map display to be set at an aerial view.
Hybrid Mark this option if you want the default map display to be an aerial view with a
road overlay.
• For ArcGIS Online Base Map:
Street Map this option if you want the default map display to be Esri’s world street map.
This is the default map service display.

| Configuring Accela Silverlight GIS | 36
ImageryWithLabels Mark this option if you want the default map display to be Esri’s Imagery map.
3. Retrieve and select a geocoding service. For instructions, see Retrieving and Selecting a Geocoding
Service.
Retrieving and Selecting a Geocoding Service
Optionally, if you plan to use geocoding in your map integration environment, you can use the Geocoding
Service Settings section to retrieve a geocoding service. The geocoding service provider can be ArcGIS
Server, Bing Maps, ArcGIS Online, or a custom geocoding web service. For more information about
integrating a custom geocoding web service, see Accela Silverlight GIS Geocoding Web Service
Integration Guide. Contact Accela Customer Support for this supporting document.
You can select a unique geocoding service for your map integration environment. The geocoding service
you select can be different from the default map service. For example, you might want to use Bing Maps
for geocoding and an ArcGIS Server map service for mapping, visualization, and layer interaction.
Before you can retrieve and select a geocoding service, you must define a map integration environment.
For instructions, see Integrating Your Environment. Additionally, you must configure GIS Server settings
and GIS Service information. For instructions, see Configuring GIS Server Settings and Configuring GIS
Service Information.
To retrieve and select a geocoding service
1. Navigate to the Geocoding Service Settings section on the Map Service Connection page.
The Accela Silverlight GIS Administration site displays the Geocoding Service Settings section.
2. Select an option from the Geocoding Service Provider drop-down list. The available options are ESRI
ArcGIS Server, Microsoft Bing Map, Geocoding Web Service, and ESRI ArcGIS Online.
The Accela Silverlight GIS Administration site refreshes the Geocoding Service Settings section and
displays the associated fields based on your selection.
3. Do one of the following:
• For ESRI ArcGIS Server:
1. Edit the fields in the Geocoding Service Settings section as needed.
For a description of the fields, see Table 8: Esri Geocoding Service Fields.
2. Click the Retrieve Services link.
The Accela Silverlight GIS Administration site displays the geocoding services retrieved from
your geocoding server in the Geocoding Service drop-down list.

| Configuring Accela Silverlight GIS | 37
3. Select a geocoding service from the Geocoding Service drop-down list.
• For Microsoft Bing Map:
Mark the Using this geocoding service for this integration check box if you want the geocoding
service from Bing Maps to be the default geocoding service in your map integration environment.
Otherwise, clear this check box.
The Accela Silverlight GIS Administration site retrieves the geocoding service from Bing Maps.
• For Geocoding Web Service:
1. Edit these fields in the Geocoding Service Settings section as needed:
Web Service URL Enter the URL of a custom geocoding web service.
User Name Optionally, enter your user name along with the password for connecting to
the geocoding web service.
Password Optionally, enter your password along with the user name for connecting to
the geocoding web service.
Using this geocoding
service for this integration
Mark this check box if you want the geocoding web service to be the default
geocoding service in your map integration environment. Otherwise, clear this
check box.
2. If necessary, click the Test Connection link.
The Accela Silverlight GIS Administration site tries to connect to the geocoding web service and
displays an appropriate message for successful or unsuccessful connections.
• For ESRI ArcGIS Online:
1. To use Accela's complimentary ArcGIS Online account, choose Accela ArcGIS Online Account
as the Geocoding Service Provider. To use your agency's own ArcGIS Online account, choose
Agency ArcGIS Online Account as the Geocoding Service Provider.
2. If you selected Agency ArcGIS Online Account as the geocoding service provider, enter the
username and password of your agency's ArcGIS Online account.
For a description of the fields, see Table 8: Esri Geocoding Service Fields.
3. Click the Retrieve Services link.

| Configuring Accela Silverlight GIS | 38
The following example shows Accela ArcGIS Online Account as the geocoding service provider:
The following example shows Agency ArcGIS Online Account as the geocoding service provider:
4. Select a geocoding service from the Geocoding Service drop-down list.
4. Retrieve and select a routing service. For instructions, see Retrieving and Selecting a Routing Service.
Table 8: Esri Geocoding Service Fields
Geocoding Server Enter the name of your Geocoding Map Server. If you select Agency ArcGIS
Online Account as the geocoding service provider, this field displays the server
URL in read-only format.
Port Enter the port number that corresponds to your geocoding server’s IP address.
The default port number for the HTTP server is 80 while the default port number
for the HTTTPS server is 443.
Use HTTPS Scheme Mark this check box to support using HTTPS to communicate between Accela
Silverlight GIS Server and ArcGIS Server.
Instance Enter the server instance. If you select ArcGIS Online as the geocoding service
provider, this field is not available.
User Name If you select ESRI ArcGIS Server as the geocoding service provider, this field is
optional. Enter the user name for the geocoding service published to the ArcGIS
Server.
If you select Agency ArcGIS Online Account as the geocoding service provider,
this field is required. Enter the user name for the ArcGIS Online account. Please
contact Esri to obtain a user account.
Password If you select ESRI ArcGIS Server as the geocoding service provider, this field is
optional. Enter the password for the geocoding service published to the ArcGIS
Server.
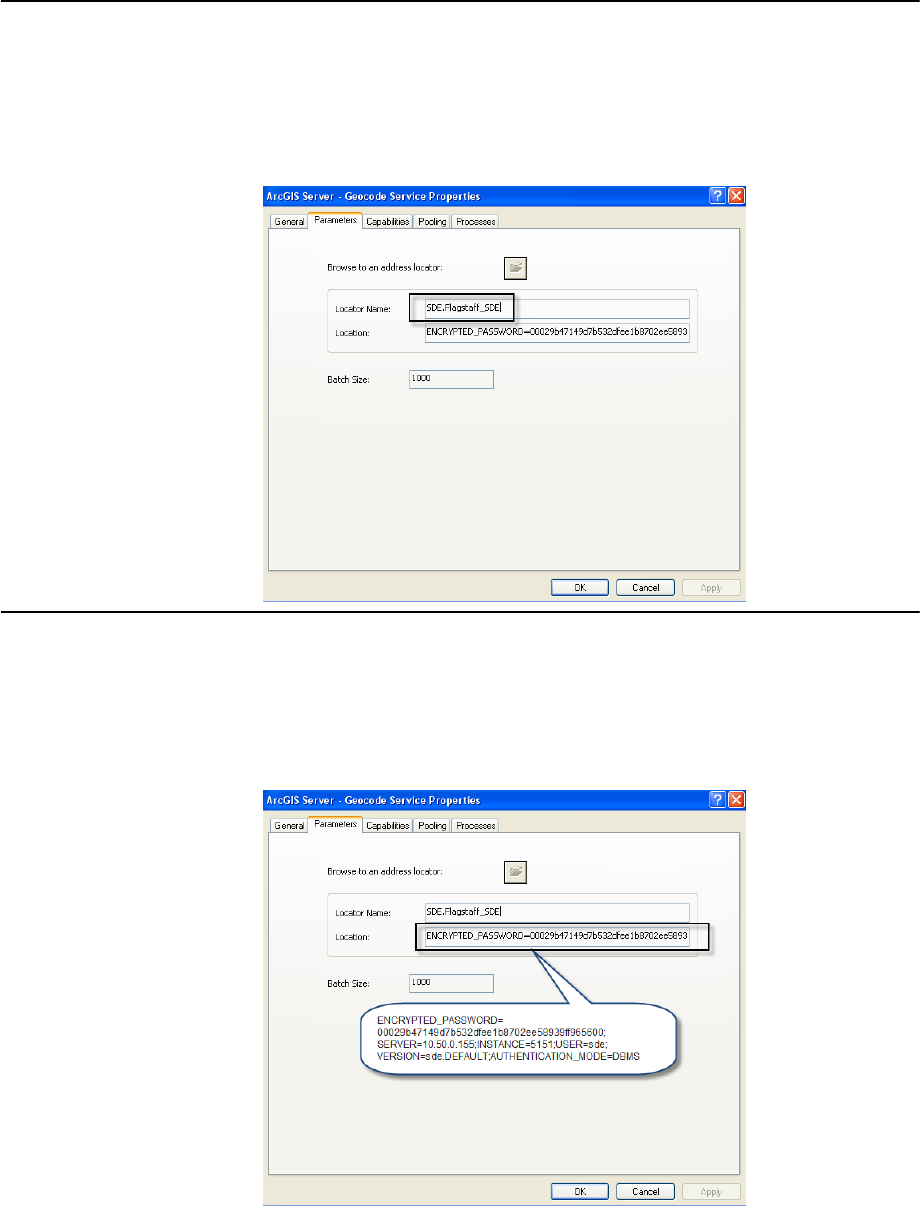
| Configuring Accela Silverlight GIS | 39
If you select Agency ArcGIS Online Account as the geocoding service provider,
this field is required. Enter the password for the ArcGIS Online account. Please
contact Esri to obtain a user account.
Locator Name Enter the name of the address locator that is published as the geocode service in
ArcGIS Server.
If you select ESRI ArcGIS Online as the geocoding service provider, this field is
not available. Note: To allow the Accela Silverlight GIS server to download a data
package from the ArcGIS Server for offline maps, you must enter the address
locator name and its location. You can go to the Parameters tab of the ArcGIS
Server - Geocode Service Properties window to get the locator name.
Location Enter the location of the address locator that is published as the geocode service
in ArcGIS Server. If you select ESRI ArcGIS Online as the geocoding service
provider, this field is not available. Note: To allow the Accela Silverlight GIS
server to download a data package from the ArcGIS Server for offline maps,
you must enter the address locator name and its location. You can go to the
Parameters tab of the ArcGIS Server - Geocode Service Properties window to
get the location.
If the geocoding service uses SDE as its data source, enter the location in the
format below.

| Configuring Accela Silverlight GIS | 40
<server>,<instance>,<database>,<user>,<password>,<version>
Here are two examples:
Direct Connection
“10.50.0.155,sde:sqlserver:10.50.0.155\sqlexpress,sde,sde,gisadmin,SDE.Default”
Connection with Port “10.50.0.155,5151,sde,sde,gisadmin,SDE.Default”
If the geocoding service uses a data source other than SDE, enter the location
just as shown in the Location field of the ArcGIS Server - Geocode Service
Properties window.
Geocoding Service When you click the Retrieve Services link, this drop-down list populates with the
all the geocoding services set up on your geocoding server. If you select ArcGIS
Online as the geocoding server, this drop-down list populates with the ArcGIS
Online geocoding services such as World.
Use this geocoding service for
integration
Mark this check box if you want the selected geocoding service to be the default
geocoding service in your map integration environment.
Retrieving and Selecting a Routing Service
Optionally, if you plan to use routing in your map integration environment, you can use the Routing Service
Settings section to retrieve a routing service.
You can select a unique routing service for your map integration environment. The routing service you
select can be different from the default map service. For example, you might want to use Bing Maps for
routing and an ArcGIS Server map service for mapping, visualization, and layer interaction.
Before you can retrieve and select a routing service, you must define a map integration environment.
For instructions, see Integrating Your Environment. Additionally, you must configure GIS Server settings
and GIS Service information. For instructions, see Configuring GIS Server Settings and Configuring GIS
Service Information.
To retrieve and select a routing service
1. Navigate to the Routing Service Settings section on the Map Service Connection page.
The Accela Silverlight GIS Administration site displays the Routing Service Settings section.
2. Select an option from the Routing Service Provider drop-down list. The available options are ESRI
ArcGIS Server, Microsoft Bing Map, and ESRI ArcGIS Online.
The Accela Silverlight GIS Administration site refreshes the Routing Service Settings section and
displays the associated fields based on your selection.
3. Do one of the following:
• For ESRI ArcGIS Server:
1. Edit the fields in the Routing Service Settings section as necessary.
For a description of the fields, see Table 9: Esri Routing Service Fields.
2. Click the Retrieve Services link.
The Accela Silverlight GIS Administration site displays the routing services retrieved from your
routing server in the Routing Service drop-down list.
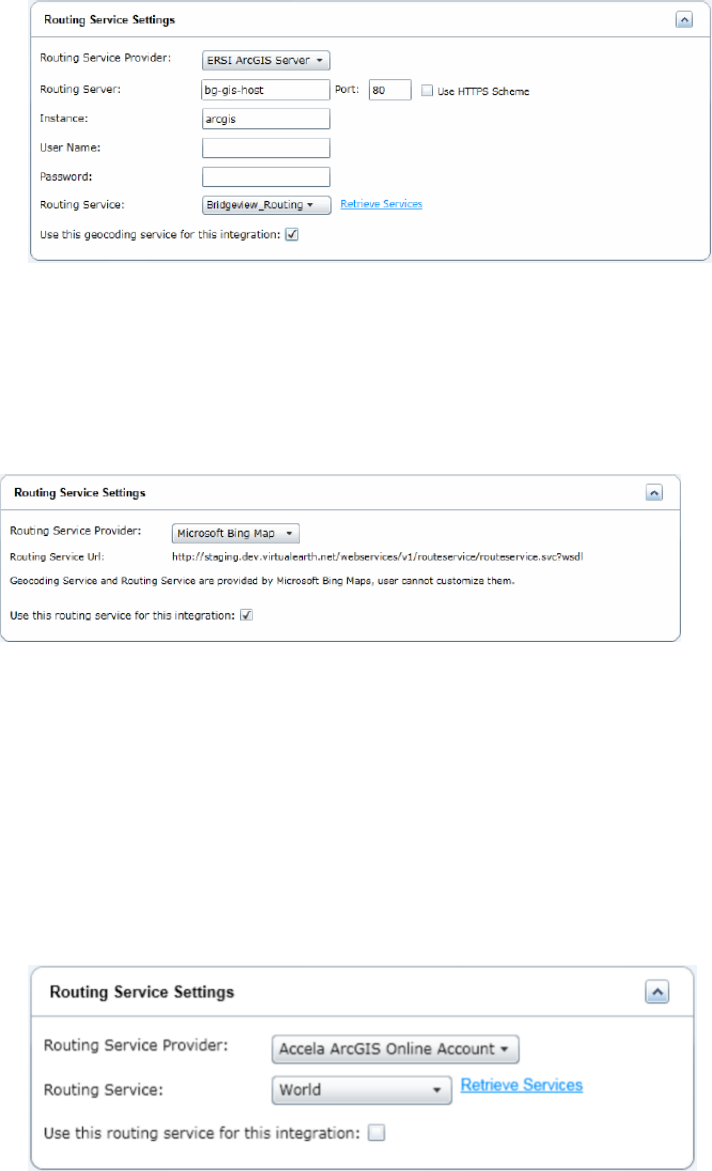
| Configuring Accela Silverlight GIS | 41
3. Select a routing service from the Routing Service drop-down list.
• For Microsoft Bing Map:
Mark the Using this routing service for this integration check box if you want the routing service
from Bing Maps to be the default routing service in your map integration environment. Otherwise,
clear this check box.
The Accela Silverlight GIS Administration site retrieves the routing service from Microsoft Bing Map.
• For ESRI ArcGIS Online:
1. To use Accela's complimentary ArcGIS Online account, choose Accela ArcGIS Online
Account as the Routing Service Provider. To use your agency's own ArcGIS Online account,
choose Agency ArcGIS Online Account as the Routing Service Provider.
2. If you selected Agency ArcGIS Online Account, enter the username and password of your
agency's ArcGIS Online account.
For a description of the fields, see Table 9: Esri Routing Service Fields.
3. Click the Retrieve Services link.
The following example shows Accela ArcGIS Online Account as the routing service provider:
The following example shows Agency ArcGIS Online Account as the routing service provider:

| Configuring Accela Silverlight GIS | 42
4. Select a routing service from the Routing Service drop-down list.
4. Click the Save button.
5. If you are configuring a dynamic map service published by Esri ArcGIS Server, you can retrieve and
configure dynamic themes.
For instructions on how to retrieve and configure dynamic themes, see Retrieving and Configuring
Dynamic Themes in Accela Silverlight GIS.
Table 9: Esri Routing Service Fields
Routing Server Enter the name of your routing server.
If you select ESRI ArcGIS Online as the routing service provider, this field displays the
server URL in read-only format.
Port Enter the port number that corresponds to your routing server’s IP address.
The default port number for the HTTP server is 80 while the default port number for the
HTTTPS server is 443.
Use HTTPS Scheme Mark this check box to support using HTTPS to communicate between Accela Silverlight
GIS Server and the routing server.
Instance Enter the server instance.
If you select ESRI ArcGIS Online as the routing service provider, this field is not available.
User Name If you select ESRI ArcGIS Server as the routing service provider, this field is optional.
Enter the user name for the routing service published to the ArcGIS Server.
If you select Agency ArcGIS Online Account as the routing service provider, this field
is required. Enter the user name for the ArcGIS Online account. Please contact Esri to
obtain a user account.
Password If you select ESRI ArcGIS Server as the routing service provider, this field is optional.
Enter the password for the routing service published to the ArcGIS Server.
If you select Agency ArcGIS Online Account as the routing service provider, this field is
required. Enter the password for the ArcGIS Online account. Please contact Esri to obtain
a user account.
Routing Service When you click the Retrieve Services link, this drop-down list populates with the all the
routing services set up on your routing server.
Use this routing service
for this integration
Mark this check box if you want the selected routing service to be the default routing
service in your map integration environment. Otherwise, clear this check box.
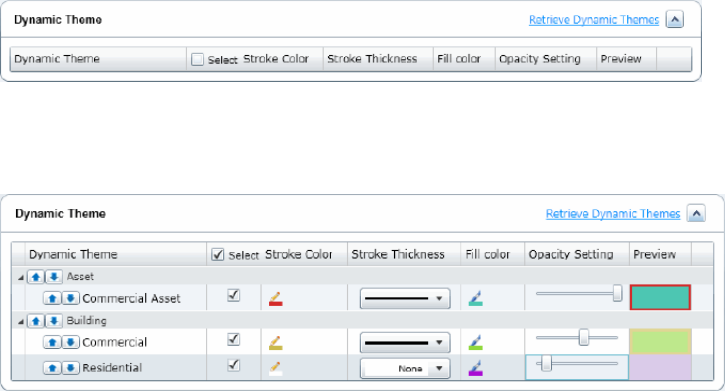
| Configuring Accela Silverlight GIS | 43
Retrieving and Configuring Dynamic Themes in Accela Silverlight GIS
You can retrieve dynamic themes from the Civic Platform application server, select dynamic themes that
belong to a map service, and define dynamic theme symbology in the Dynamic Themes section.
Once you retrieve dynamic themes, you can select the themes that belong to the map service and
determine how they display in the map viewer, including the display order, line color, line thickness, fill
color, and transparency.
Before you can retrieve and configure dynamic themes, you must define a map integration environment.
For instructions, see Integrating Your Environment. Additionally, you must configure GIS Server settings
and GIS Service information. For instructions, see Configuring GIS Server Settings and Configuring GIS
Service Information.
You must configure dynamic themes before you can associate them with a map service. For instructions
on how to configure dynamic themes, see Configuring Dynamic Themes in Civic Platform.
To retrieve and edit dynamic themes
1. Navigate to the Dynamic Themes section on the Map Service Connection page.
The Accela Silverlight GIS Administration site displays the Dynamic Themes section.
2. Click the Retrieve Dynamic Themes link.
The Accela Silverlight GIS Administration site connects to the Civic Platform application server and
retrieves the configured Dynamic Themes.
3. Click the up or down arrow buttons next to the dynamic theme group name to set the display order of
the theme groups or click the up or down arrow buttons next to the dynamic theme name to set the
display order of the themes within a group.
If two or more dynamic themes overlap a GIS feature, the GIS map viewer displays the dynamic themes
on the GIS feature in the specified order.
4. Edit the characteristics for each dynamic theme by completing the related fields. For a complete list of
fields, see Table 10: Dynamic Theme Fields.
5. Complete one of these steps:
• If you want to configure additional map services for your map integration environment, follow the
instructions described in Configuring Additional Map Services.
• If you do not want to configure additional map services for your map integration environment, click
the Next button to proceed to the next step in configuring a map integration environment. The next
step is to define user groups and their permissions. For instructions on how to define user groups
and their permissions, see Defining User Groups and Permissions.

| Configuring Accela Silverlight GIS | 44
Table 10: Dynamic Theme Fields
Dynamic Theme This column displays the dynamic themes, including both groups and names,
retrieved from the Civic Platform application server.
To collapse a dynamic theme group, click the “--” in the column next to each group
name.
Fill Color Click the paint bucket icon to access the fill color menu. Use the fill color menu to
choose a fill color for the selected dynamic theme.
Opacity Setting Drag the slider left or right to change the transparency of each dynamic theme. The
closer you drag the slider to the left, the more transparent the dynamic theme.
Setting the opacity to more or less transparent allows the map to display blended
colors when an overlap of dynamic themes occurs. In this way, users can see the
overlap on the map.
Preview This field displays a preview of each dynamic theme. Any changes you make to a
dynamic theme, such as the fill color or line thickness, are automatically updated to
the theme that displays in the Preview field.
Select Mark this check box next to each dynamic theme you want to associate with the
selected map service. Alternatively, you can mark the check box next to a dynamic
theme group to select all the dynamic themes within a group.
You can also mark the Select check box next to the column header to select all the
dynamic theme groups and names.
Stroke Color Click the pen icon to access the color menu. Use the color menu to choose a line
color for the selected dynamic theme. You can select a color or manually enter a
color value in the color menu.
Stroke Thickness Click the line icon to access the line menu. Use the line menu to choose the line
thickness for the selected dynamic theme.
Configuring Additional Map Services
Once you complete the configuration steps outlined above, you can configure additional map services for
the same map integration environment. This allows agency users to access and work with different map
services in one integration environment.
You must configure a default map service before you can configure additional map services. For
instructions on configuring a map service, see Setting up a Connection to a Map Service.
To configure additional map services
1. Click the Add More Services button at the bottom of the Map Service Connection page.
The Accela Silverlight GIS Administration site displays the Map Service Connection page.
2. Configure additional map services for your map integration environment. For instructions on how to
configure a map service, see Setting up a Connection to a Map Service.

| Configuring Accela Silverlight GIS | 45
Defining User Groups and Permissions
This topic applies to Accela Silverlight GIS.
The third step in configuring Accela Silverlight GIS is to define user groups and their permissions. Before
you can define a user group and then set its permission levels, you must define a map integration and then
set up a connection to a map service. For instructions, see Integrating Your Environment and Setting up a
Map Service Connection.
As an agency administrator, you can create and personalize user groups for each map integration
environment. When you create user groups, you determine user access to Accela Silverlight GIS features
in the map viewer, including navigation tools, map commands, and map layers. The user groups and their
permissions that you define for a map integration environment apply to all the map services configured for
the environment.
Accela Silverlight GIS automatically creates a default user group when you set up a map integration
environment. You cannot edit the default user group name or group description; however, you can edit the
default permission levels for the user group and add additional user groups. Multiple user groups can be
available for the same map integration.
When you configure an Accela Silverlight GIS user group, Accela recommends that you identify the
Civic Platform user group each user belongs to and make sure the permission levels for the user groups
correspond.
The following topics explain how to assign permissions to user groups and add additional user groups.
Related Links
Setting User Group Access to Map Functions
Setting User Group Access to Map Commands
Setting User Group Access to Map Layers
Creating an Additional User Group
Setting User Group Access to Map Functions
You can set user group permissions for map functions in the Map Functions section. The Map Functions
section includes the table of contents, map panels and related functions, and navigation tools. The map
functions available for configuration vary depending on the Civic Platform application that your agency
uses.
To set user group access to map functions
1. Navigate to the User Group Permissions page.
2. Click the arrow icon to expand the Map Functions section.
The Accela Silverlight GIS Administration site displays the default map functions selected for the user
group.
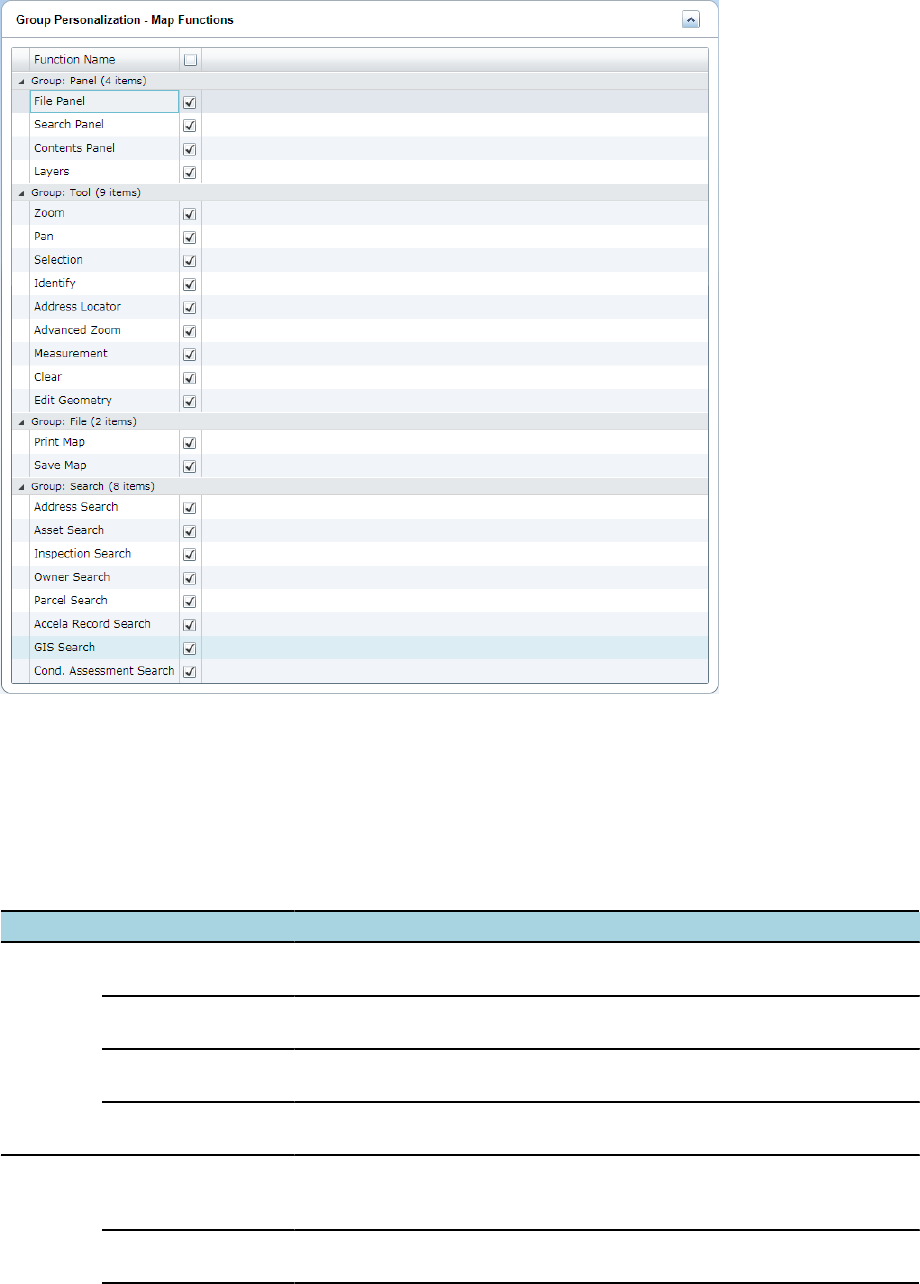
| Configuring Accela Silverlight GIS | 46
3. Mark the check box next to each map function you want to make accessible for the selected user group.
You can also mark the check box next to the Function Name column header to select all the map
functions. For a complete list of map functions, see Table 11: Group Personalization Map Functions.
4. Click the Save button.
The Accela Silverlight GIS Administration site saves the user group permissions for map functions.
Table 11: Group Personalization Map Functions
Group Function Name Description
File Panel Enables or disables the display of the File panel in the map viewer. By
default, the check box is cleared. Mark the check box to display the panel.
Search Panel Enables or disables the display of the Search panel in the map viewer. By
default, the check box is marked. Clear the check box to hide the panel.
Contents Panel Enables or disables the display of the Contents panel in the map viewer. By
default, the check box is marked. Clear the check box to hide the panel.
Panel
Layers Enables or disables the display of the Layers panel in the map viewer. By
default, the check box is marked. Clear the check box to hide the panel.
Zoom Enables or disables the display of the Zoom In and Zoom Out buttons in the
map viewer. By default, the check box is marked. Clear the check box to
hide the buttons.
Tool
Pan Enables or disables the display of the Pan button in the map viewer. By
default, the check box is marked. Clear the check box to hide the button.

| Configuring Accela Silverlight GIS | 47
Group Function Name Description
Selection Enables or disables the display of the Select by Rectangle, Select by
Polygon, and Select by Polyline buttons in the map viewer. By default, the
check box is marked. Clear the check box to hide the buttons.
Identify Enables or disables the display of the Identify button in the map viewer. By
default, the check box is marked. Clear the check box to hide the button.
Address Locator Enables or disables the display of the Geocoding Address Locator button in
the map viewer. By default, the check box is cleared. Mark the check box to
show the button.
Advanced Zoom Enables or disables the display of the Initial Extent, Full Extent, Zoom to
Active Layers, Zoom to Selected Objects, and Zoom to Scale buttons in the
map viewer. By default, the check box is marked. Clear the check box to
hide the buttons.
Measurement Enables or disables the display of the Measure Area and Measure Distance
buttons in the map viewer. By default, the check box is marked. Clear the
check box to hide the buttons.
GPS Locator Enables or disables the display of the GPS Locator button in the map viewer.
By default, the check box is cleared. Mark the check box to show the button.
Clear Enables or disables the display of the Clear button in the map viewer. By
default, the check box is marked. Clear the check box to hide the button.
Edit Geometry Enables or disables members of the selected user group to edit geometry
on a map layer. By default, the check box is cleared. Mark the check box to
enable this function.
Note:
Users are only allowed to edit simple geometry such as points,
lines, and polygons. This function is not applicable to complex
geometry or multi-part features.
To allow agency users to create or edit geometry on a map layer, you
must also set the map layer editable in the Layer Settings section for a
map service. See Importing and Configuring Map Layer Settings for more
information.
To make the map layer editable to certain user group while making it read-
only to another user group, define the Editable permission to the map layer
for each user group in the Group Personalization - Map Layers section for
the map service. See Setting User Group Access to Map Layers for more
information.
Print Map Enables or disables members of the selected user group to print maps. By
default, Accela Silverlight GIS disables this function. Mark the check box to
enable this function.
File
Save Map Enables or disables members of the selected user group to save maps. By
default, Accela Silverlight GIS disables this function. Mark the check box to
enable this function.
Address Search Enables or disables members of the selected user group to search for
addresses through the Search panel in the map viewer. By default, Accela
Silverlight GIS disables this function. Mark the check box to enable this
function.
Asset Search Enables or disables members of the selected user group to search for assets
through the Search panel in the map viewer. By default, Accela Silverlight
GIS disables this function. Mark the check box to enable this function.
Search
Inspection Search Enables or disables members of the selected user group to search for
inspections through the Search panel in the map viewer. By default, Accela
Silverlight GIS disables this function. Mark the check box to enable this
function.

| Configuring Accela Silverlight GIS | 48
Group Function Name Description
Owner Search Enables or disables members of the selected user group to search for
owners through the Search panel in the map viewer. By default, Accela
Silverlight GIS disables this function. Mark the check box to enable this
function.
Parcel Search Enables or disables members of the selected user group to search for
parcels through the Search panel in the map viewer. By default, Accela
Silverlight GIS disables this function. Mark the check box to enable this
function.
Accela Record Search Enables or disables members of the selected user group to search for
Accela records through the Search panel in the map viewer. By default,
Accela Silverlight GIS disables this function. Mark the check box to enable
this function.
GIS Feature Search Enables or disables members of the selected user group to search for GIS
features through the Search panel in the map viewer. By default, Accela
Silverlight GIS enables this function. Clear the check box to disable this
function.
Cond. Assessment
Search Enables or disables members of the selected user group to search for asset
condition assessments through the Search panel in the map viewer. By
default, Accela Silverlight GIS disables this function. Mark the check box to
enable this function.
Setting User Group Access to Map Commands
You can set user group permissions for map commands. The map commands available for configuration
and the default configuration for each map command vary depending on the Civic Platform application that
your agency uses.
To set user group access to map commands
1. Navigate to the User Group Permissions page.
2. Click the arrow icon to expand the Map Commands section.
The Accela Silverlight GIS Administration site displays the default map commands selected for the user
group.
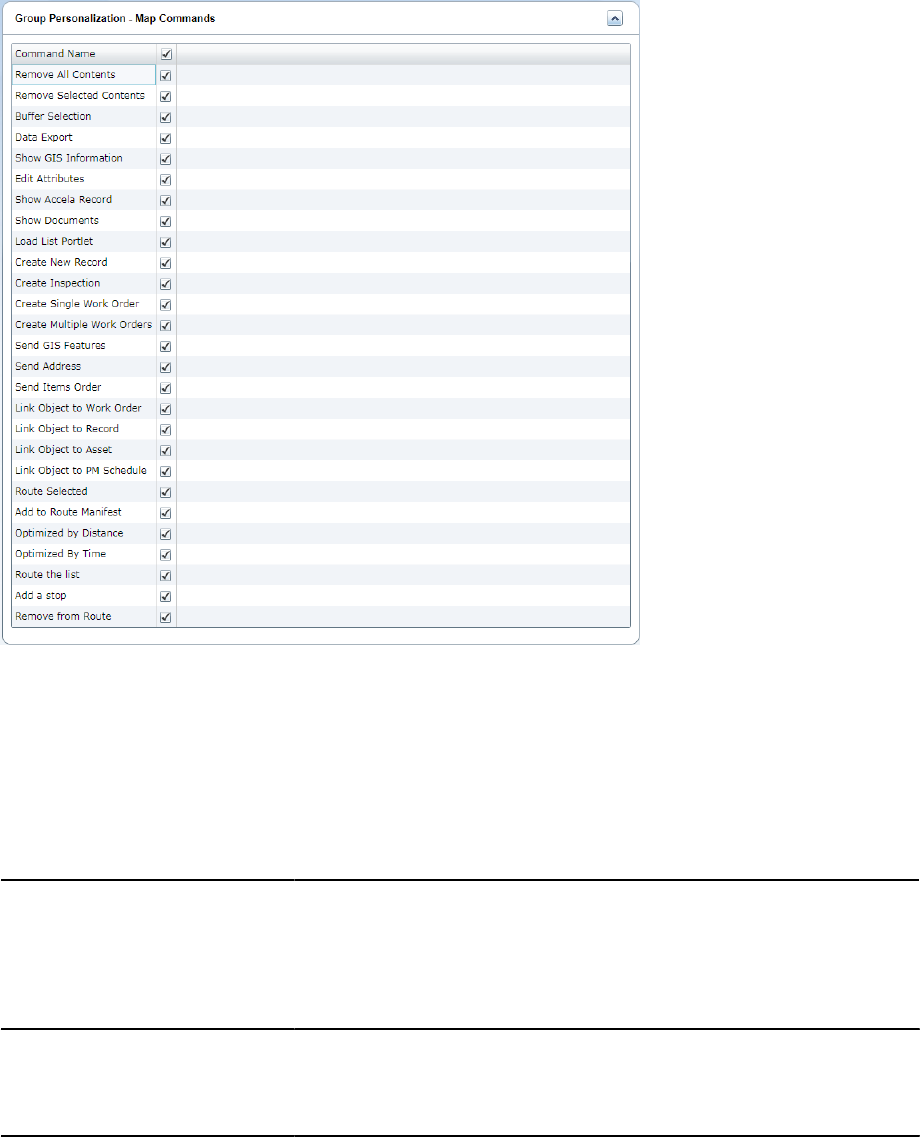
| Configuring Accela Silverlight GIS | 49
3. Mark the check box next to each map command you want to make accessible for the selected user
group. Alternatively, you can mark the check box next to the Command Name column header to select
all the map commands. For a complete list of map commands, see Table 12: Group Personalization
Map Command Fields.
4. Click the Save button.
The Accela Silverlight GIS Administration site saves the user group permissions for map commands.
Table 12: Group Personalization Map Command Fields
Add a stop When you enable this command, Accela Silverlight GIS users can add a
geopoint to a route list. For example, a field worker who uses Mobile Office
might need to add a stop to their route list when the stop does not relate to
an existing work order or an existing item in their route manifest.
Accela Silverlight GIS enables this command by default. Clear the check box
to disable this command.
Add to Route Manifest When you enable this command, Accela Silverlight GIS users can add GIS
objects, such as a work order or a service request, to the routing panel.
Accela Silverlight GIS enables this command by default. Clear the check box
to disable this command.
Buffer Selection When you enable this command, Accela Silverlight GIS users can use the
buffer selection tool to identify objects within a specific proximity to another
object.
Accela Silverlight GIS enables this command by default. Clear the check box
to disable this command.
Note: Buffering requires an ArcGIS Server geometry service. For more
information about geometry services, see “Publishing Services” in the

| Configuring Accela Silverlight GIS | 50
Setting Up Map Functionality chapter of the Accela Silverlight GIS for ArcGIS
Server Configuration Guide.
Create Asset Condition
Assessment When you enable this command, Accela Silverlight GIS users can create
an asset condition assessment from the map viewer. For example, a field
worker who uses Mobile Office completing asset condition assessments
for traffic lights might want to request an asset condition assessment for
additional traffic lights not included in his or her original scope of work.
Accela Silverlight GIS disables this command by default. Mark the check box
to enable this command.
Create Inspection When you enable this command, Accela Silverlight GIS users can create
inspections from the map viewer.
In the map integration with Citizen Access, the name of this map command
is Schedule Inspection.
Accela Silverlight GIS disables this command by default. Mark the check box
to enable this command.
Create Multiple Work Orders When you enable this command, Accela Silverlight GIS users can create
multiple work orders from the map viewer. For example, a field worker
might want to create multiple work orders for a group of assets in the same
location.
Accela Silverlight GIS disables this command by default. Mark the check box
to enable this command.
Create New Record When you enable this command, Accela Silverlight GIS users can create
records from the map viewer. For example, a field worker might want to
create a record for a parcel and request an inspection.
Accela Silverlight GIS disables this command by default. Mark the check box
to enable this command.
Create Single Work Order When you enable this command, Accela Silverlight GIS users can create
individual work orders from the map viewer.
Accela Silverlight GIS disables this command by default. Mark the check box
to enable this command.
Data Export When you enable this command, Accela Silverlight GIS users can export
data, such as address for mailing labels, in CSV format.
Accela Silverlight GIS disables this command by default. Mark the check box
to enable this command.
Get XY Location Accela Silverlight GIS disables this command by default. Mark the check box
to enable this command.
Edit Attributes When you enable this command, Accela Silverlight GIS users can edit GIS
feature attributes. If you want to give Accela Silverlight GIS users the option
to edit attributes and create GIS feature geometry, then you must enable this
command and the Edit Geometry command in the Map Functions section.
For more information on how to enable commands in the Map Functions
section, see Setting User Group Access to Map Functions. If you want to
give Accela Silverlight GIS users the option to edit attributes and exclude the
option to create GIS feature geometry, then you must only enable the Edit
Attributes command.
By default, the Edit Attributes command in the Map Functions section is
disabled.
Link Object to Asset When you enable this command, Accela Silverlight GIS users can link GIS
objects to assets. For example, users can link GIS objects that are mapped
to an asset type together and associate them with a parent asset.
Accela Silverlight GIS disables this command by default. Mark the check box
to enable this command.
Link Object to Work Order When you enable this command, Accela Silverlight GIS users can link GIS
objects to work orders.

| Configuring Accela Silverlight GIS | 51
Accela Silverlight GIS disables this command by default. Mark the check box
to enable this command.
Load List Portlet When you enable this command, Accela Silverlight GIS users can send the
items selected from the map to the list portlet where they open the map.
Accela Silverlight GIS disables this command by default. Mark the check box
to enable this command.
Optimize by Distance When you enable this command, Accela Silverlight GIS users can optimize
route lists. When a route list is optimized by distance, Accela Silverlight GIS
creates a route that minimizes the distance traveled.
Accela Silverlight GIS disables this command by default. Mark the check box
to enable this command.
Optimize by Time When you enable this command, Accela Silverlight GIS users can optimize
route lists by time. When a route list is optimized by time, Accela Silverlight
GIS creates a route that takes the least possible amount of travel time.
Accela Silverlight GIS enables this command by default. Clear the check box
to disable this command.
Remove from Route When you enable this command, Accela Silverlight GIS users can remove a
stop from a route list.
Accela Silverlight GIS enables this command by default. Clear the check box
to disable this command.
Remove Selected Contents When you enable this command, Accela Silverlight GIS users can remove
selected items from a route list.
Accela Silverlight GIS enables this command by default. Clear the check box
to disable this command.
Resume Application When you enable this command, Accela Silverlight GIS users can open the
application intake form for a partial record from the map viewer and resume
the application intake process.
Accela Silverlight GIS enables this command by default. Clear the check box
to disable this command.
Route the list When you enable this command, Accela Silverlight GIS users can execute
a command to route a list of tasks, which might include inspections, work
orders, and service requests.
Accela Silverlight GIS enables this command by default. Clear the check box
to disable this command.
Send Address When you enable this command, Accela Silverlight GIS users can send
address details to Civic Platform, Mobile Office, or Citizen Access. For
example, a field worker might want to attach a work order to an asset.
Accela Silverlight GIS disables this command by default. Mark the check box
to enable this command.
Send GIS Features When you enable this command, Accela Silverlight GIS users can send a
GIS feature to Civic Platform, Mobile Office, or Citizen Access. In the map
integration with Citizen Access, the name of this map command is Use
Property Information.
Accela Silverlight GIS disables this command by default. Mark the check box
to enable this command.
Send Items When you enable this command, Accela Silverlight GIS users can send a
route list to Civic Platform or Mobile Office.
Accela Silverlight GIS disables this command by default. Mark the check box
to enable this command.
Show Accela Record When you enable this command, Accela Silverlight GIS users can open the
Civic Platform reference form for a selected object, such as a work order for
an asset or a building permit for a parcel.

| Configuring Accela Silverlight GIS | 52
Accela Silverlight GIS disables this command by default. Mark the check box
to enable this command.
Show Documents When this commend is enabled, Accela Silverlight GIS users can get a
listing of documents attached to a GIS object.
Accela Silverlight GIS disables this command by default. Mark the check box
to enable this command.
View Documents When you enable this command, Accela Silverlight GIS users can view any
documents attached to a GIS object. For example, a field worker completing
work orders on fire hydrants might want to review a PDF schematic of the
fire hydrant attached to the work order.
Accela Silverlight GIS disables this command by default. Mark the check box
to enable this command.
View Related CAPs When you enable this command, Accela Silverlight GIS users can view any
records attached to a GIS object. For example, an agency user might to
search for and view any applications related to a specific application.
Accela Silverlight GIS disables this command by default. Mark the check box
to enable this command.
Setting User Group Access to Map Layers
You can set user group permissions for map layers. If you configure multiple map services for the same
integration environment, all of the related map layers display on the User Group Permissions page.
There are four permission levels for map layers: Available, Visible, Active, and Editable.
The first permission level, Available, determines whether Accela Silverlight GIS users can view a selected
map layer. If the Available check box is unmarked, the Visible, Active, and Editable check boxes are
disabled. Meanwhile, the map layer is not available either on the map or in the Layers panel of the map
viewer. If the Available check box is marked and the Visible and Active check boxes are marked, then
agency users can view and modify map layers in the map viewer. If you want to give agency users the
option to create and edit map layers in Accela Silverlight GIS, you must set the each map layer permission
level to Available. The Available check box is marked by default.
The second permission level, Visible, determines whether a selected map layer is visible on the map
viewer. Accela Silverlight GIS users can unmark map layers so that they are not visible on the map viewer.
The Visible check box is unmarked by default.
The third permission level, Active, determines whether a map layer is active in the Layers panel of the
map viewer. When a map layer is active, Accela Silverlight GIS users can select all of the GIS objects
associated with the active layer, such as Fire Hydrants, on the map viewer. The Active check box is
unmarked by default.
The fourth permission level, Editable, determines whether agency users can create or edit geometry on an
editable map layer. The Editable check box is unmarked by default.
To set user group access to map layers
1. Navigate to the User Group Permissions page.
2. Click the arrow icon to expand the Map Layers section.
The Accela Silverlight GIS Administration site displays the default map layers selected for the user
group.
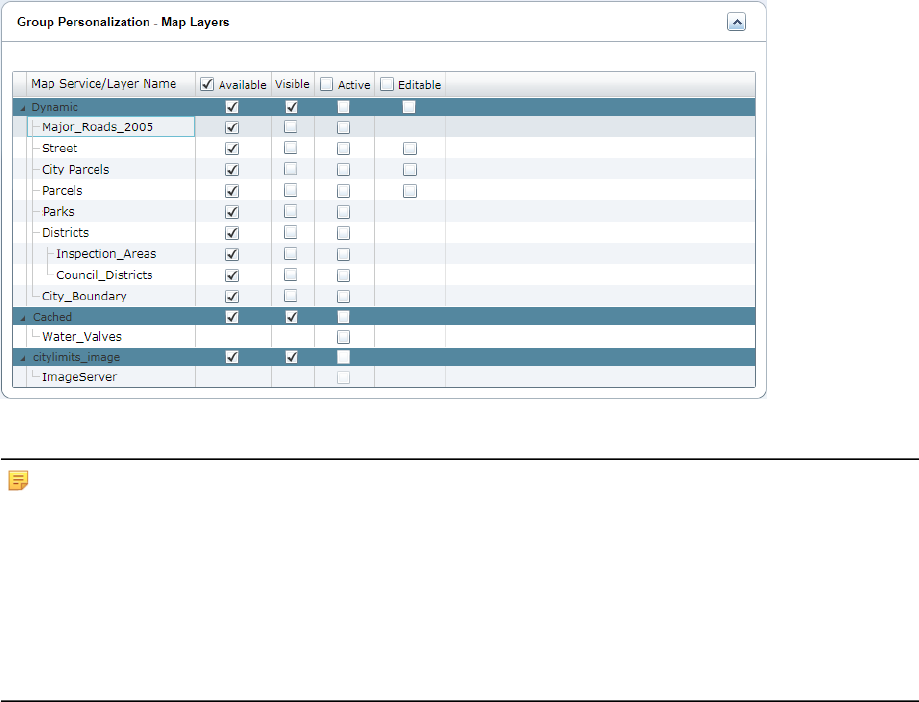
| Configuring Accela Silverlight GIS | 53
3. Mark the check box next to each map layer you want to make accessible for the selected user group.
Note:
For cached ArcGIS Server map services, ArcGIS Online Base Map services, and ArcGIS Image Server
image services, the Available and Visible check boxes only appear next to the map service name. For
cached ArcGIS Server map services, the Active check box appears next to the map service name and
each map layer name. But for the ArcGIS Online Base Map and ArcGIS Image Server services, the
Active check boxes are disabled.
The Editable check box only appears next to the map layers that are set to editable in the Layer Settings
for a dynamic ArcGIS Server map service or an ArcGIS Engine map service. If no map layers are set to
editable in the Layer Settings, then the Group Personalization - Map Layers section does not display the
Editable column.
4. Click the Save button.
The Accela Silverlight GIS Administration site saves the user group permissions for map layers.
Creating an Additional User Group
After you configure user group settings and permission levels for your default user group, you can create
an additional user group or groups.
When you create an additional user group, you must retrieve users from the Civic Platform application
server. Any users that you retrieve but do not assign to a specific user group are automatically assigned to
the default user group.
Users can belong to one or more groups. If a user belongs to multiple user groups, the user retains the
permission levels from all of his or her associated groups.
To create an additional user group
1. Navigate to the User Group Permissions page.
2. Click the Add More User Groups button.
The Accela Silverlight GIS Administration site displays the Create User Groups page.
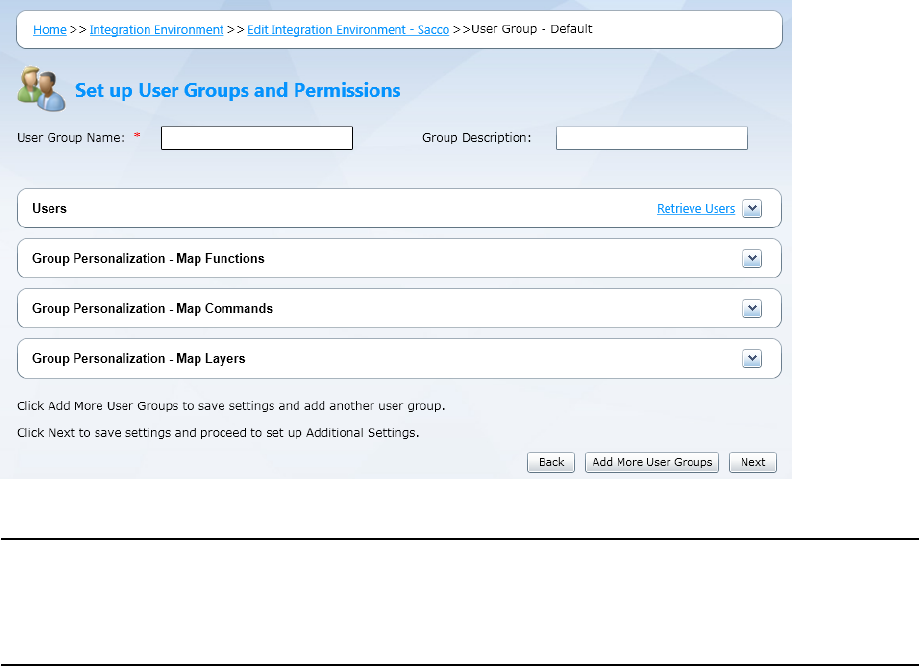
| Configuring Accela Silverlight GIS | 54
3. Complete these fields:
User Group Name Enter a unique name to identify the Accela Silverlight GIS user group, such as Asset
Management Accela Silverlight GIS users or Land Management Accela Silverlight GIS
users.
Group Description Enter a description of the Accela Silverlight GIS user group you create, such as Traffic
Light Maintenance Group.
4. Click the Retrieve Users link.
The Accela Silverlight GIS Administration site connects to the Civic Platform application server and
retrieves all Civic Platform users.
5. Mark the check box next to each user you want to assign to the user group you create.
You can also mark the check box in the column header to select all users.
6. Assign user group permissions to map functions, map commands, and map layers.
7. Click the Next button on the User Group Permissions page.
If you are creating an integration environment for Civic Platform, the Accela Silverlight GIS
Administration site displays the Additional Settings page. For more information, see Configuring
Additional Settings.
If you are creating an integration environment for Mobile Office offline mapping, the Accela Silverlight
GIS Administration site displays the Offline Map Data Management page. For more information, see
Managing Offline Map Data.
For instructions on how to configure default user group settings, see the following related topics.
Related Links
Setting User Group Access to Map Functions
Setting User Group Access to Map Commands
Setting User Group Access to Map Layers

| Configuring Accela Silverlight GIS | 55
Configuring Additional Settings
This topic applies to Accela Silverlight GIS additional configuration supporting the pre-8.x user interface of
Civic Platform. This topic does not apply to map integration environments created for Mobile Office.
You can configure external address, parcel, and owner data and data export settings for specific
integration environments set up for Civic Platform. Before you can configure additional settings, you must
define a map integration environment, set up a connection to a map service, and define user groups and
their permissions. For instructions on these tasks, see Setting up a Map Service Connection, and Defining
User Groups and Permissions.
After you configure any required additional settings, you can also configure dynamic themes. For more
information on how to configure dynamic themes, see Configuring Civic Platform.
Related Links
Configuring External Address, Parcel, and Owner Settings
Configuring Data Export Settings
Configuring Hotlink Settings
Configuring External Address, Parcel, and Owner Settings
This topic applies to Accela Silverlight GIS.
Civic Platform can integrate with an external address, parcel, and owner (APO) data source through
the external APO web service. One possible external data source is Accela Silverlight GIS. This section
describes one of the required configuration tasks that you must complete, if you want to integrate Accela
Silverlight GIS as the external APO data source of Civic Platform. For the other configuration tasks, see the
Accela Automation External APO Integration Guide in XAPO SDK.zip.
Your agency can have different map integrations. For example, one for Civic Platform, one for Citizen
Access, one for Mobile Office online mode, and one for Mobile Office offline mode. However, to use Accela
Silverlight GIS as your external APO data source, you must map each Civic Platform reference APO field
to an Accela Silverlight GIS map layer field for your agency’s Civic Platform map integration environment.
While you can configure multiple map services for the same integration environment, you can only
configure external address, parcel, and owner data for one map service.
To configure external address, parcel, and owner data settings
1. Navigate to the Additional Settings page.
The Accela Silverlight GIS Administration site displays the Additional Settings page.
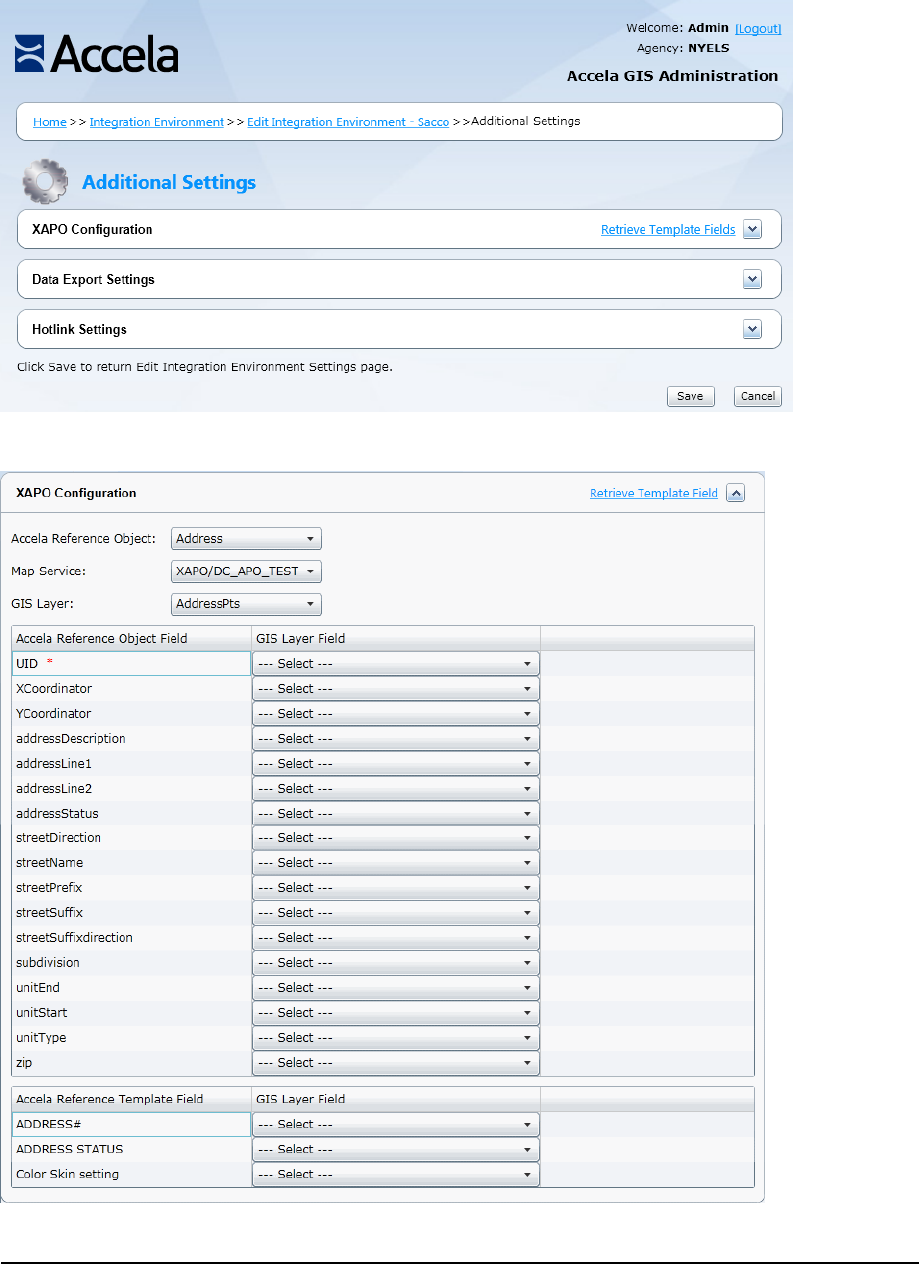
| Configuring Accela Silverlight GIS | 56
2. Navigate to the XAPO Configuration section.
3. Select a value for each of the following drop-down lists:
Accela Reference Object This drop-down list displays the Civic Platform reference objects, including Address,
Parcel, and Owner, that you can map to Accela Silverlight GIS.

| Configuring Accela Silverlight GIS | 57
Note: To use Accela Silverlight GIS as your XAPO data source, you must map all
reference objects to Accela Silverlight GIS.
GIS Layer This drop-down list displays all the map layers configured for the map service you
select in the Map Service drop-down list. After you select a map layer, the GIS Layer
Field drop-down list populates with all the related map layer fields. You must select a
map service before you can select a map layer.
Map Service This drop-down list displays all the map services configured for you map integration
environment. Select the map service for which you want to configure external
address, parcel, and owner data from this drop-down list. After you select a map
service, the GIS Layer drop-down list populates with all the related map layers. You
can only configure external address, parcel, and owner data for one map service.
The Accela Silverlight GIS Administration site populates the Accela Reference Object Field column and
the GIS Layer Field drop-down list for each reference object. See Table 13: Reference Object Fields for
a list of Civic Platform reference object fields.
4. Click the Retrieve Template Fields link.
The Accela Silverlight GIS Administration site populates the template fields retrieved from the APO
templates in the Accela Reference Template Field column.
Note: Your agency administrator defines and enables address, parcel, and owner (APO) templates in
Civic Platform. Active template attributes can display as Accela reference template fields in the Accela
Silverlight GIS Administration site. When you map each APO template attribute to a GIS map layer field,
users can retrieve the APO template data from the external APO data source.
5. Select a value from this drop-down list for each Accela reference object or each template field:
GIS Layer Field This drop-down list displays the layer fields associated with the selected map layer.
6. Complete one of these steps:
• If you want to configure your map integration environment with data export functionality, see
Configuring Data Export Settings. If you want to configure your map integration environment with
hotlinks, see Configuring Hotlink Settings.
• If you do not want to configure your map integration environment with data export functionality or
hotlink settings, click the Finish button.
The Accela Silverlight GIS Administration site displays a different page based on whether you are
creating or editing a map integration environment.
If you are creating a map integration environment, the Accela Silverlight GIS Administration
site displays the Integration Environment Settings page. If you are editing a map integration
environment, the Accela Silverlight GIS Administration site displays the Edit Integration Environment
page.
Table 13: Reference Object Fields
Reference Object Reference Object Fields
Address xCoordinator, yCoordinator, addressDescription, addressLine1, addressLine2,
addressStatus, addressTypeFlag, auditDate, auditID, auditStatus, city, country,
countryCode, county, distance, eventID, fullAddress, houseFractionEnd,
houseFractionStart, houseNumberAlphaEnd, houseNumberAlphaStart,
houseNumberEnd, houseNumberStart, inspectionDistrict, inspectionDistrictPrefix,
levelPrefix, levelNumberStart, levelNumberEnd, lot, neighborhood,
neighborhoodPrefix, primaryFlag, secondaryRoad, secondaryRoadNumber,
sourceFlag, state, streetDirection, streetName, streetPrefix, streetSuffix,
streetSuffixdirection, subdivision, unitEnd, unitStart, unitType, zip
Owner UID, address, address1, address2, address3, auditDate, auditID, auditStatus,
city, country, email, eventID, fax, faxCountryCode, isPrimary, ivrPinNumber,
| Configuring Accela Silverlight GIS | 58
Reference Object Reference Object Fields
ivrUserNumber, mailAddress, mailAddress1, mailAddress2, mailAddress3, mailCity,
mailCountry, mailState, mailZip, ownerFirstName, ownerFullName, ownerLastName,
ownerMiddleName, ownerStatus, ownerTitle, phone, phoneCountryCode,
sourceSeqNumber, state, taxID, zip
Parcel UID, auditDate, auditID, auditStatus, block, book, censusTract, councilDistrict,
eventID, exemptValue, improvedValue, inspectionDistrict, landValue, legalDesc,
lot, mapNo, mapRef, page, parcel, parcelArea, parcelNumber, parcelStatus,
primaryParcelFlag, planArea, range, section, sourceSeqNumber, subDivision,
supervisorDistrict, township, tract
Configuring Data Export Settings
You can configure data export settings for Accela Silverlight GIS users. When you configure data export
settings, you determine which GIS fields users can export to a .csv or .xml file. Configure data export
settings that reflect the data Accela Silverlight GIS users might want to export.
For example, Accela Silverlight GIS users might want to export data to create mailing labels. In this case,
you need to configure data export settings that include First and Last Name fields, along with Street
Number, City, State, and Zip Code fields.
To configure data export settings
1. Navigate to the Additional Settings page.
The Accela Silverlight GIS Administration site displays the Additional Settings page.
2. Navigate to the Data Export Settings section.
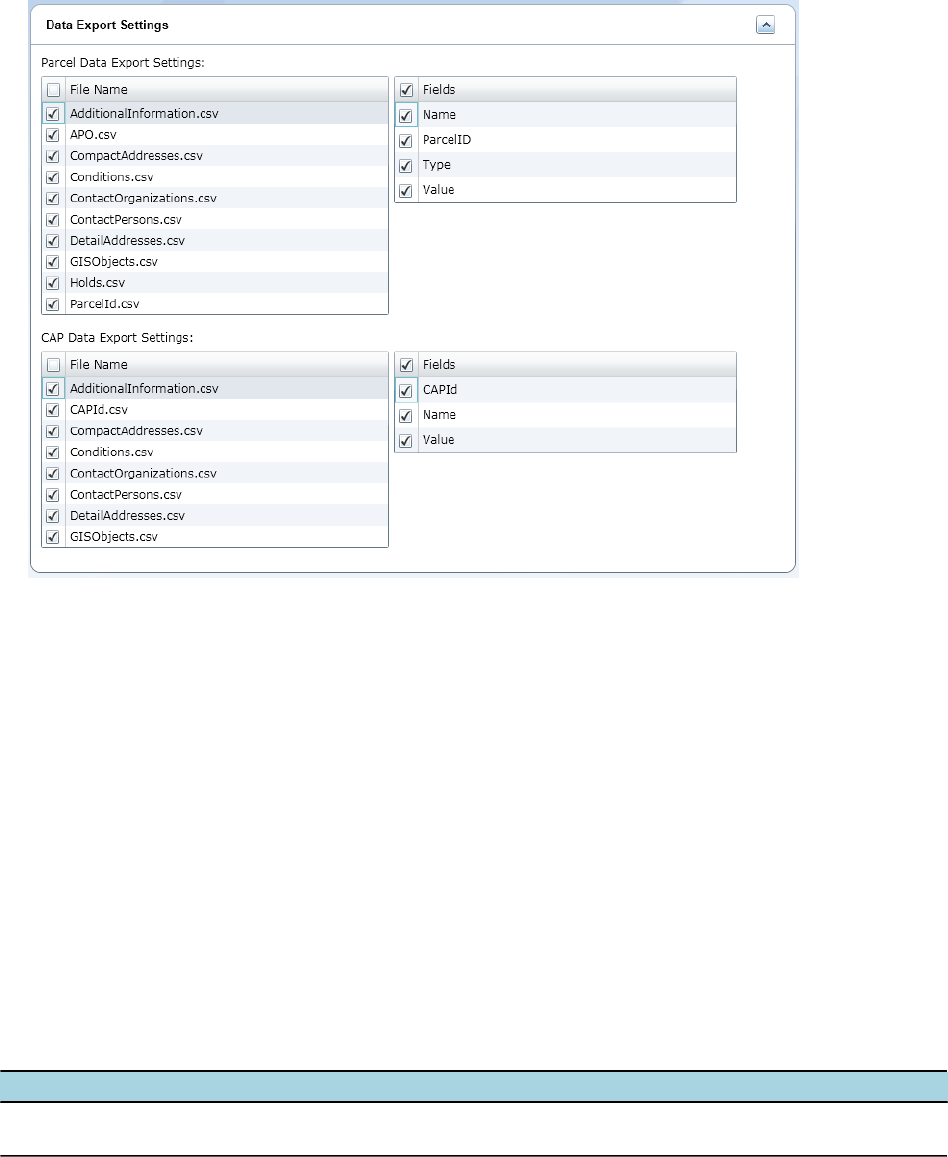
| Configuring Accela Silverlight GIS | 59
3. Mark the check box next to the name of the file that you want to create a data export file. For a
complete list of data export file types and file names, see Table 14: Data Export File Names.
4. Complete one of these steps:
• If you want to configure your map integration environment with external address, parcel, and owner
settings, see Configuring External Address, Parcel, and Owner Settings. If you want to configure
your map integration environment with hotlinks, see Configuring Hotlink Settings.
• If you do not want to configure your map integration environment with external APO settings or
hotlinks, click the Finish button.
The Accela Silverlight GIS Administration site displays a different page based on whether you are
creating or editing a map integration environment.
If you are creating a map integration environment, the Accela Silverlight GIS Administration
site displays the Integration Environment Settings page. If you are editing a map integration
environment, the Accela Silverlight GIS Administration site displays the Edit Integration Environment
page.
Table 14: Data Export File Names
File Type File Name
CSV AdditionalInformation, CompactAddresses, Conditions, ContactOrganizations,
ContactPersons, DetailAddresses, GISObjects, Holds, ParcelId
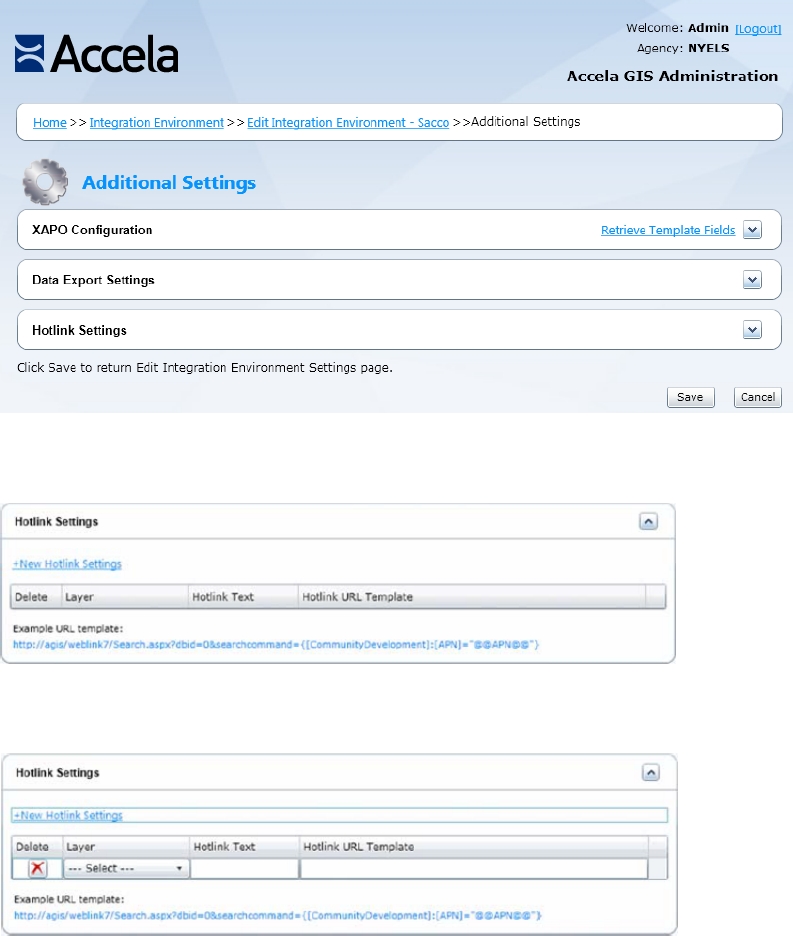
| Configuring Accela Silverlight GIS | 60
Configuring Hotlink Settings
You can configure hotlink settings for Accela Silverlight GIS. Hotlinks allow agency users to pass
parameters from the map control to a predefined URL.
For example, an agency user might want to view a building record stored in an application outside of Civic
Platform, such as Laserfiche. If you configure a hotlink for Laserfiche, then an agency user can open
Laserfiche directly from the map control.
When you configure hotlink settings, you determine the hotlink name and URL. You also indicate the map
layer on which hotlinks can be available to users.
To configure hotlink settings
1. Navigate to the Additional Settings page.
The Accela Silverlight GIS Administration site displays the Additional Settings page.
2. Navigate to the Hotlink Settings section.
The Accela Silverlight GIS Administration site displays the Hotlink Settings section.
3. Click the New Hotlink Settings link.
The Accela Silverlight GIS Administration site displays the New Hotlink Settings section.

| Configuring Accela Silverlight GIS | 61
4. Complete the fields that display. For a complete list of fields, see Table 15: Hotlink Settings.
5. Complete one of these steps:
• If you want to configure your map integration environment with data export functionality, see
Configuring Data Export Settings. If you want to configure your map integration environment with
external address, parcel, and owner settings, see Configuring External Address, Parcel, and Owner
Settings.
• If you do not want to configure your map integration environment with data export functionality or
external APO settings, click the Finish button.
The Accela Silverlight GIS Administration site displays a different page based on whether you are
creating or editing a map integration environment.
If you are creating a map integration environment, the Accela Silverlight GIS Administration
site displays the Integration Environment Settings page. If you are editing a map integration
environment, the Accela Silverlight GIS Administration site displays the Edit Integration Environment
page.
Table 15: Hotlink Settings
Hotlink Text Enter a brief description of the hotlink URL. The text that you enter here identifies
the hotlink on the Accela Silverlight GIS Actions and Context menus.
Hotlink URL Template Enter the hotlink URL and parameters. Parameters give agency users the option to
reference map layer attributes within a URL.
The format of the parameter name is @@ATTRIBUTE@@. For example, you
might enter apn=@@APN@@, where APN is the attribute name in the GIS
feature. For the URL template, you might enter http://server/Search.aspx?
dbid=0&APN=@@APN@@. The APN value is retrieved dynamically.
When an agency user opens a hotlink from the map control, the
@@ATTRIBUTE@@ value is replaced with the GIS feature attribute value and
passed to another application.
The following templates are supported:
• http://<url>/@@ATTRIBUTE@@
• http://<url>/@@ATTRIBUTE1@@/<xyz>/@@ATTRIBUTE2@
• @@@ATTRIBUTE1@@/<xyz>/@@ATTRIBUTE2@@
• @@ATTRIBUTE1@@@@ATTRIBUTE2@@
• "@@ATTRIBUTE1@@@@ATTRIBUTE2@@"
• "@@ATTRIBUTE@@"
Layer Select a map layer from the drop-down list. The map layer you select determines
where the hotlink displays.

| Configuring Accela Silverlight GIS | 62
Managing Offline Map Data
This topic applies to Accela Silverlight GIS.
To configure a map integration for Mobile Office Offline Mapping, you must create a data package. A data
package includes the map layer information that Mobile Office users can access and modify when they
work offline. When Mobile Office users are online, they can upload the changes to the Accela Silverlight
GIS Server.
Before you can configure a data package for offline mapping, you must define a map integration
environment, set up a connection to a map service, and define user groups and their permissions. For
instructions on these tasks, see Integrating Your Environment, Setting up a Map Service Connection, and
Defining User Groups and Permissions.
Related Links
Creating a Data Package for Offline Maps
Creating a Data Package for Offline Maps
This topic applies to Accela Silverlight GIS which supports Mobile Office.
When you configure an integration environment for Mobile Office offline mapping, you must create a data
package on the Accela Silverlight GIS server.
When Mobile Office users are online, they can check for updated data and downloads by clicking the
Update Map Data for Offline Use button. When users click this button, Mobile Office finds the user’s
corresponding Accela Silverlight GIS user group, checks the available layers for the user group, and then
downloads all available layers.
Before the download begins, Mobile Office verifies if the map layer data corresponds to current offline map
data on the Accela Silverlight GIS server. If there are updates to map layer data, Mobile Office downloads
the data asynchronously.
All map layer data that is available on the Accela Silverlight GIS server is downloaded to the map layers
in the Mobile Office offline map. After the download is complete, Mobile Office displays a confirmation
message.
After you create a data package, you can easily incorporate GIS layer updates. To update a map layer,
select the map layer and then click the Generate Offline Map Data link.
Before you can create a data package for an Mobile Office offline map, you must define an integration
environment, set up a connection to a map service, and define user groups and their permissions. For
instructions, see Integrating Your Environment, Setting up a Map Service Connection, and Defining User
Groups and Permissions.
To create a data package for offline map use
1. Navigate to the Offline Map Data Management page.
The Accela Silverlight GIS Administration site displays the Offline Map Data Management page.
| Configuring Accela Silverlight GIS | 63
2. In the Select column, mark the check boxes next to the map layers you want to include in the data
package for offline mapping.
You can also mark the Select check box in the column header to select all the map layers.
3. Mark the check boxes next to the geocoding and routing service data that you want to include in
the Accela Silverlight GIS server data package. If the integration environment does not include any
geocoding and routing service, then these sections do not display.
4. Click the Generate Offline Map Data link.
The Accela Silverlight GIS Administration site downloads the selected GIS map layers and map
data from ArcGIS Server and creates a data package on the Accela Silverlight GIS server. If Accela
Silverlight GIS generates the data package successfully, the Date Last Updated field displays an
updated date and time.
5. Click the Finish button.
The Accela Silverlight GIS Administration site displays the Integration Environment Settings page.
| Configuring Accela Silverlight GIS | 64
Modifying Map Integration Settings
This topic applies to Accela Silverlight GIS.
After you configure a map integration environment for Civic Platform, Mobile Office Online Mapping, Mobile
Office Offline Mapping, or Citizen Access, you can edit the integration environment settings.
You can modify specific elements of a map integration environment without navigating through the
Map Integration Wizard. For example, you might want to add a user group to an existing integration
environment. To complete this task, you can navigate directly to the User Groups section on the Integration
Environment page and add a user group. This way, you can easily update and modify integration
environment settings.
Before you can modify map integration settings, you must create a map integration environment. For
instructions, see Integrating Your Environment, Setting up a Map Service Connection and Defining User
Groups and Permissions.
The following topics explain how to modify map integration settings.
Related Links
Editing a Map Integration Environment
Adding a Map Service to an Integration Environment
Adding a User Group to an Integration Environment
Editing a Map Integration Environment
To edit a map integration environment
1. If necessary, log in to the Accela Silverlight GIS Administration site.
The Accela Silverlight GIS Administration site displays the Administration home page.
2. Click the Modify Configuration link.
The Accela Silverlight GIS Administration site displays the Integration Environment Settings page.
3. Click the pencil icon next to the map integration environment you want to modify.
The Accela Silverlight GIS Administration site displays the Edit Integration Environment page.

| Configuring Accela Silverlight GIS | 65
4. Identify the section you want to edit.
5. Complete one of these options:
• If you want to edit the defined environment settings:
Complete the fields that display in the Define Environment section. For a complete list of fields, see
Integrating Your Environment.
• If you want to edit the map service settings:
1. Click the pencil icon next to the map service you want to edit.
The Accela Silverlight GIS Administration site displays the Map Service Connection page.
2. Edit the fields as necessary.
For a complete list of fields, see Setting up a Map Service Connection.

| Configuring Accela Silverlight GIS | 66
• If you want to edit user group settings:
1. Click the pencil icon next to the user group you want to edit.
The Accela Silverlight GIS Administration site displays the User Group Permissions page.
2. Edit the fields as necessary. For a complete list of fields, see Defining User Groups and
Permissions.
• If you want to edit additional settings:
1. Click the Modify Additional Settings link.
The Accela Silverlight GIS Administration site displays the Additional Settings page.
2. Edit the fields as necessary.
For a complete list of fields, see Configuring Additional Settings.
• If you want to update or create a new data package to reflect changes to a GIS layer or verify that
Accela Silverlight GIS generates a data package successfully:
1. Click the Offline Map Data Management link.
The Accela Silverlight GIS Administration site displays the Offline Map Data Management page.
2. Complete the settings as necessary.
For details, see Managing Offline Map Data.
6. Click the Finish button.
The Accela Silverlight GIS Administration site displays the Integration Environment Settings page.
7. Click the Save button.
The Accela Silverlight GIS Administration site saves changes to the selected integration environment.
Adding a Map Service to an Integration Environment
You can add a map service to an existing integration environment. For example, you might want to add
a map service to an integration environment to create map mashups. You can mash up map services
from your agency’s GIS provider, such as Microsoft and Esri. In particular, Esri ArcGIS Server provides
two types of map services: cached map services and dynamic map services. You can only create map
mashups of Microsoft Bing Maps and dynamic ArcGIS Server maps, mashups of cached and dynamic
ArcGIS Server maps, or mashups of Microsoft Bing Maps and map services compliant with Open
Geospatial Consortium (OGC) Standards.
Note:
If you create map mashups using multiple Esri fused cached map services and a dynamic map service,
make sure the mashups meet the following requirements:
• Both dynamic and cached map services use the same spatial reference.
• All the cached map services in the same map view have the same tiling scheme and properties.
• The default map service is the cached map service that has the largest full extent.
The best practice is to set the same full extent for all the dynamic and cached map services in the map view.
To add a map service to an integration environment
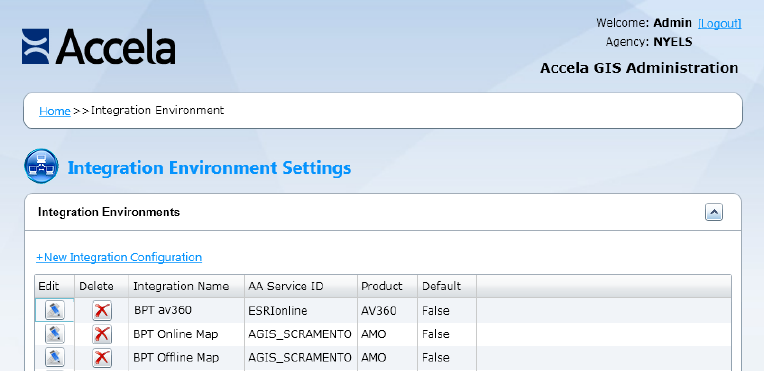
| Configuring Accela Silverlight GIS | 67
1. If necessary, log into the Accela Silverlight GIS Administration site.
2. Click the Modify Configuration link.
The Accela Silverlight GIS Administration site displays the Integration Environment Settings page.
3. Click the pencil icon next to the map integration environment to which you want to add a map service.
The Accela Silverlight GIS Administration site displays the Edit Integration Environment page.

| Configuring Accela Silverlight GIS | 68
4. Click the New Map Service link.
The Accela Silverlight GIS Administration site displays the Map Service Connection page.
5. Configure a new map service. For instructions, see Setting up a Map Service Connection.
Adding a User Group to an Integration Environment
You can add a user group to an existing integration environment. For example, you might want to refine
user group permissions by creating distinct user groups and limiting permissions based on user group
access.
To add a user group to an integration environment
1. If necessary, log in to the Accela Silverlight GIS Administration site.

| Configuring Accela Silverlight GIS | 69
2. Click the Modify Configuration link.
The Accela Silverlight GIS Administration site displays the Integration Environment Settings page.
3. Click the pencil icon next to the map integration environment to which you want to add a user group.
The Accela Silverlight GIS Administration site displays the Edit Integration Environment page.
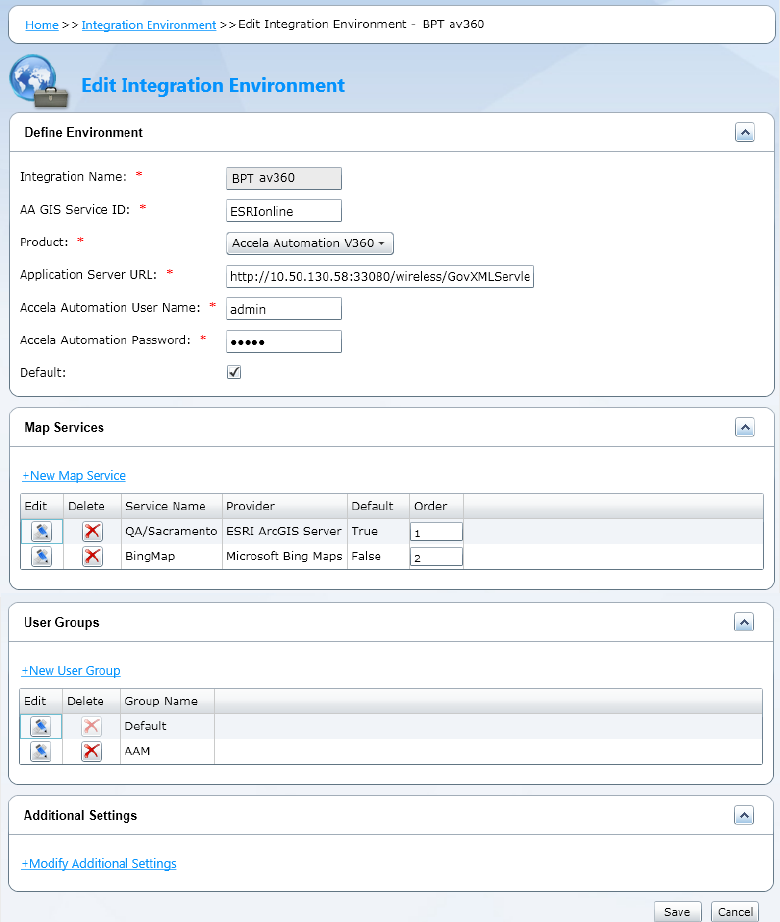
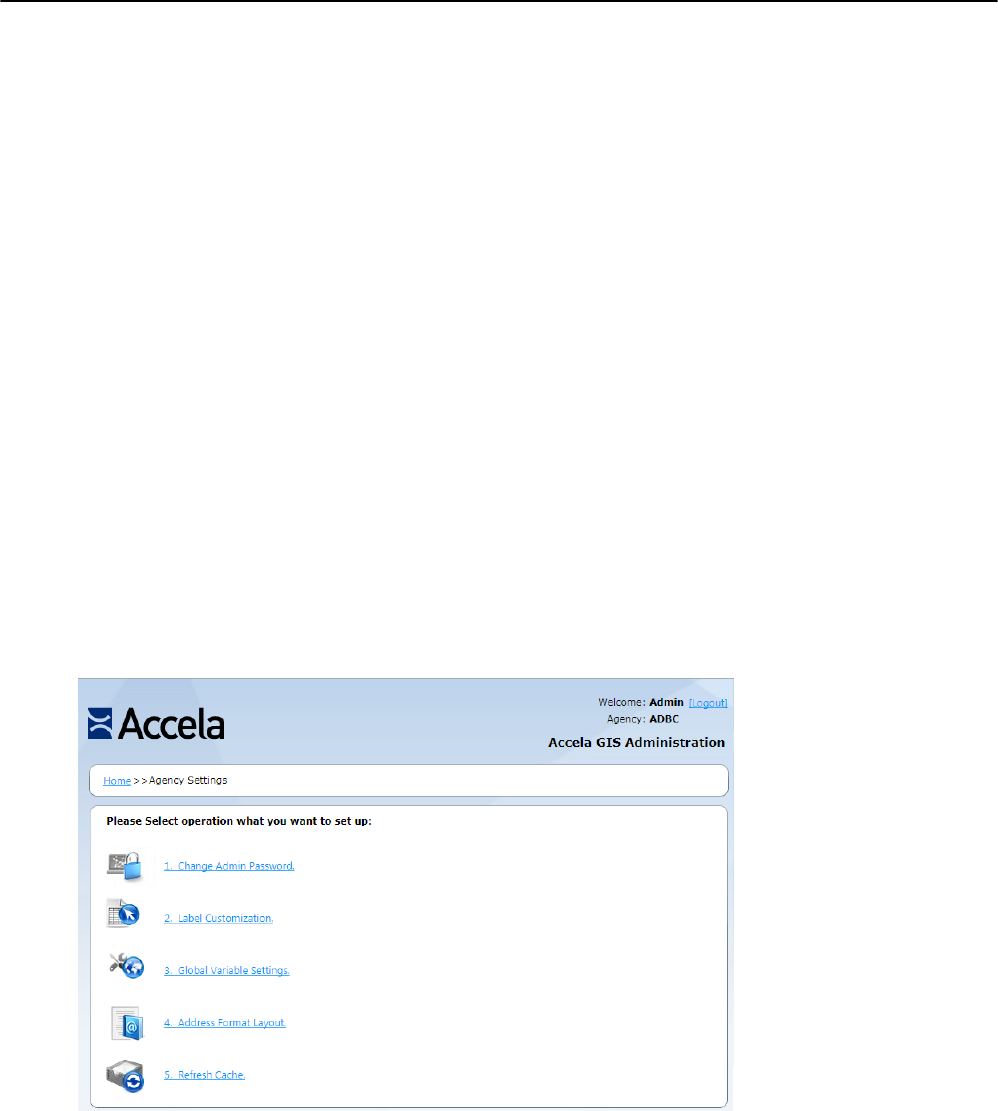
| Configuring Accela Silverlight GIS | 71
Configuring Agency Settings
This topic applies to Accela Silverlight GIS agency settings.
You can customize your agency’s Accela Silverlight GIS settings on the Global Variable Settings page.
Related Links
Changing the Administration Site Password
Customizing Labels
Configuring Global Variable Settings
Syncing Address Format and Address Form Layout
Clearing Cache Data Manually
Changing the Administration Site Password
You can change the administration site password to maintain site security. Change the administrator
password after you log in for the first time.
To change the administration site password
1. If necessary, log in to the Accela Silverlight GIS Administration site.
The Accela Silverlight GIS Administration site displays the Administration home page.
2. Click the Agency Settings link.
The Accela Silverlight GIS Administration site displays the Agency Settings page.
3. Click the Change Admin Password link.
The Accela Silverlight GIS Administration site displays the Change Admin Password page.
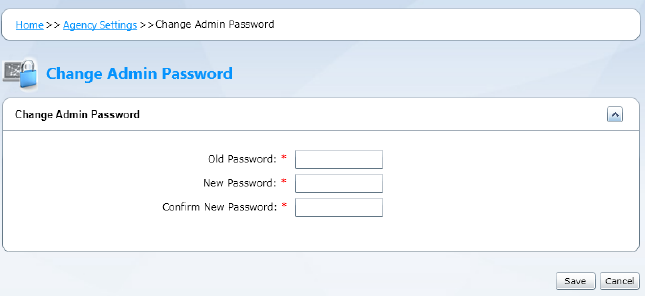
| Configuring Accela Silverlight GIS | 72
4. Complete these fields:
Old Password Enter the current Accela Silverlight GIS Administration site password.
New Password Enter the new Accela Silverlight GIS Administration site password.
Confirm New Password Re-enter the new Accela Silverlight GIS Administration site password.
5. Click the Save button.
The Accela Silverlight GIS Administration site saves the new administration site password.
Customizing Labels
This topic applies to Accela Silverlight GIS.
Based on the need for internationalization and localization, you can customize the display text for map
commands and map labels.
To customize labels
1. If necessary, log in to the Accela Silverlight GIS Administration site.
The Accela Silverlight GIS Administration site displays the Administration home page.
2. Click the Agency Settings link.
The Accela Silverlight GIS Administration site displays the Agency Settings page.
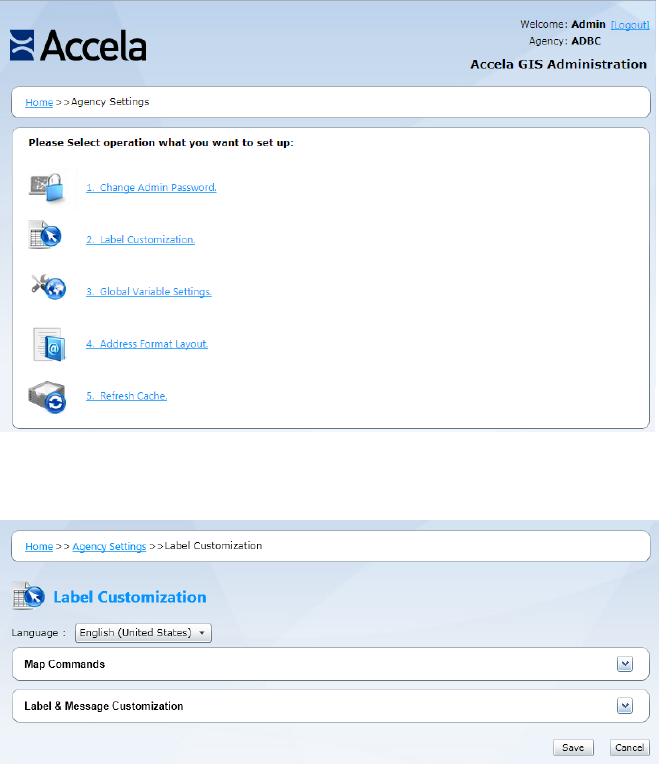
| Configuring Accela Silverlight GIS | 73
3. Click the Label Customization link.
The Accela Silverlight GIS Administration site displays the Label Customization page.
4. Select the target language from the Language drop-down list. Accela Silverlight GIS supports English,
Arabic, Australian English, and Traditional Chinese.
The Accela Silverlight GIS Administration site displays the labels for the selected language in the
Display Text column.
5. Select the Accela Automation (also known as "Civic Platform") application from the Product drop-down
list.
The Accela Silverlight GIS Administration site displays the map commands and their labels for the
selected application.
6. Edit the display text for each map command and map label as necessary.
7. Click the Save button.
The Accela Silverlight GIS Administration site saves the display map command and label display text.
Configuring Global Variable Settings
You can configure global variable settings, such as the feature edge distance and the initial extent
minimum width. These settings determine the scale and perspective of features when Accela Silverlight
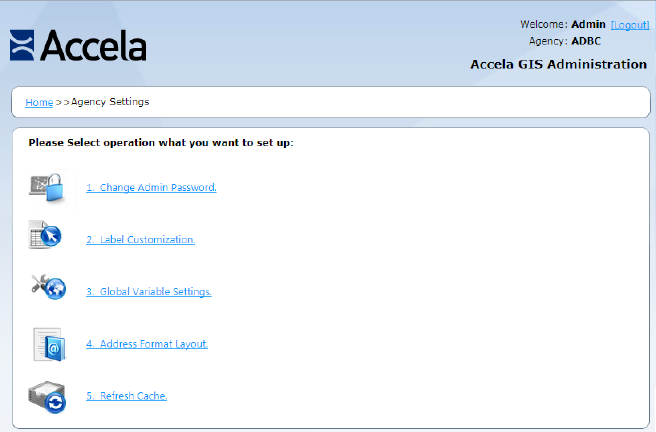
| Configuring Accela Silverlight GIS | 74
GIS users open the map viewer. Additionally, you can decide whether the map extent and the map layer
visibility is retained as it was when a user had previously accessed the map.
To configure global variable settings
1. If necessary, log in to the Accela Silverlight GIS Administration site.
The Accela Silverlight GIS Administration site displays the Administration home page.
2. Click the Agency Settings link.
The Accela Silverlight GIS Administration site displays the Agency Settings page.
3. Click the Global Variable Settings link.
The Accela Silverlight GIS Administration site displays the Global Variable Settings page.
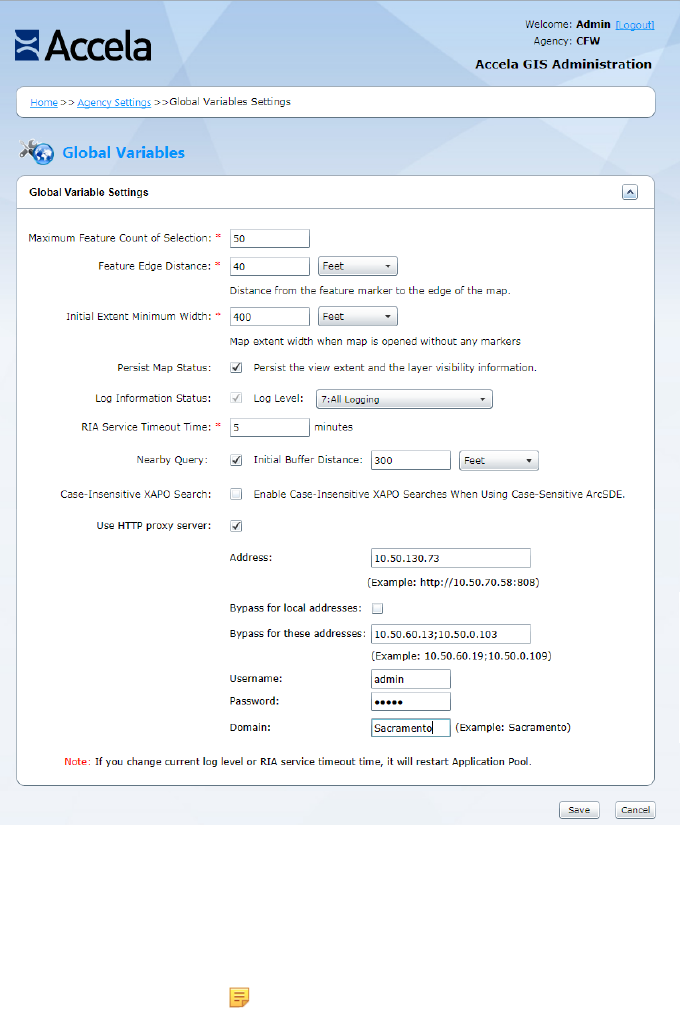
| Configuring Accela Silverlight GIS | 75
4. Complete these fields:
Maximum Feature Count
of Selection This field is required. The value you enter in this field determines the number of
features Accela Silverlight GIS users can select at any one time on the map viewer,
and the number of search results per page which can display on the Search panel.
Accela recommends that you enter a value between 50 and 200.
Note: A value greater than 200 affects the
MAX_ATTACHMENT_SELECTION_NUMBER standard choice
setting, which sets the maximum number of attachments when a user
attaches GIS objects to a record and chooses the Select All option.
If the Maximum Feature Count of Selection is greater than 200, the
MAX_ATTACHMENT_SELECTION_NUMBER value must be equal or
greater than the Maximum Feature Count of Selection value. Otherwise, all
selected GIS objects will not be attached to a record.
Feature Edge Distance The value you enter in this field determines the distance between a map marker and
the map edge. Enter a numeric value and select a distance measurement from the
drop-down list. Available map measurements include feet, meters, kilometers, yards,
and miles.
Initial Extent Minimum
Width The value you enter in this field determines the minimum extent width that displays
when users initialize the map. Enter a numeric value and select a distance
| Configuring Accela Silverlight GIS | 76
measurement from the drop-down list. Available map measurements include feet,
meters, kilometers, yards, and miles.
Persist Map Status If you mark this check box, users access the map with the same extent and the same
layer visibility as that of their previous map session. If you clear this check box, users
access the map with the initial extent and the default layer visibility you configured.
This check box is unmarked by default.
Log Information Status This read-only field indicates whether you have enabled or disabled the log function.
When you select “0: No Logging” from the Log Level drop-down list, Accela Silverlight
GIS clears this field automatically. When you select other options from the Log Level
drop-down list, Accela Silverlight GIS marks this field automatically.
Log Level Select an option from the drop-down list to set the log level. There are 8 options:
0: No Logging
1: Exception Log
2: Information Log
3: Exception and Information Log
4: Debug Log
5: Exception and Debug Log
6: Information and Debug Log
7: All Logging
RIA Service Timeout
Time Enter the maximum amount of time (in minutes) after which the RIA Service times out.
Nearby Query The check box enables or disables the display of the Search Scope drop-down list,
which contains the Within Map Extent, Within Selected Feature, and Near Selected
Feature options, in record, inspection, and asset condition assessment searches.
Accela Silverlight GIS clears this check box by default.
The Initial Buffer Distance field specifies the default search radius value and the
default unit of measurement that appears in the Search panel when users select the
Near Selected Feature option. It is 500 Feet by default. You can change the default
value and the default unit for the search radius through the Accela Silverlight GIS
Administration site. Users can also change the value and unit of measurement in the
Search panel, if necessary.
To enable users to search for records, inspections, and asset condition assessments
within the map extent, within one or more selected GIS features, or near one or more
selected GIS features, you need to do the following:
1- Run EnableNearbyQuery_<version number>.exe. Accela Customer Support has
access to the installer.
2- Mark this Nearby Query check box.
3- Define BATCH_JOB_SERVICE_CATEGORY for geotagging batch jobs in Civic
Platform. For more information, see “Configuring Nearby Query” in the Search chapter
of the Civic Platform Configuration Reference.
4- Create and run a batch job in Civic Platform to geotag all existing addresses
and GIS features in the Civic Platform database. For more information, see
“Creating a Geotagging Batch Job” in the Batch Engine chapter of the Civic Platform
Administrator Guide.
To disable users to perform nearby searches, you need to do the following:
1- Clear this Nearby Query check box.
2- Create Standard Choice DISABLE_GIS_NEARBY_QUERY with its value set to Y
or Yes in Civic Platform.
Case-Insensitive XAPO
Search When your agency uses Accela Silverlight GIS as the external address, parcel, and
owner (XAPO) data source and the XAPO data is stored in a case-sensitive Oracle
SDE (Spatial Database Engine) database, select this check box to enable users to
perform XAPO searches regardless of the letter case. Clear this check box to require
exact case matches. Accela Silverlight GIS clears this check box by default.
For example, there is an address with the street name “POLK” in the XAPO data
source. If you select this check box, users can find the address by street name “polk”,

| Configuring Accela Silverlight GIS | 77
“Polk”, or “POLK”. If you clear this check box, users can find the address by “POLK”
only.
Use HTTP Proxy Server Mark this check box when your agency policy enforces the use of a proxy server for
the Accela Silverlight GIS server to access the Internet. Then complete these fields:
Address - Enter the IP address and port number of your proxy server. Use this
format: http://<IP address>:<port number>.
Bypass for local addresses - Mark this check box if you want to access some IP
addresses directly instead of through the proxy server.
Bypass for these addresses - Enter the IP address that you want to access directly
instead of through the proxy server. Use this format: Address 1;Address 2;Address 3
Username - Enter the user name used to access the proxy server.
Password - Enter the password used to access the proxy server. The password
displays as encrypted in the web.config file of the Accela Silverlight GIS server.
Domain - Enter your domain.
Bing Maps License Key The agency's Bing Maps license key.
Note: As of June 30, 2016 Accela has deprecated the complimentary use of
Bing Maps with Accela Silverlight GIS. Continued use of Bing Maps as a map
service provider requires your agency to obtain a Bing Maps license key from
Microsoft, and enter it in the Bing Maps License Key masked field on the
Global Variable Settings page. (Alternatively, Accela has made available a
complimentary ArcGIS Online Account for geocoding and routing services.)
5. Click the Save button.
The Accela Silverlight GIS Administration site saves the display map command and label display text.
Syncing Address Format and Address Form Layout
Based on your agency’s specific address requirements, your agency may define the address format and
customize the layout of the Reference Address Form in Civic Platform. You can synchronize these settings
from Civic Platform to the Accela Silverlight GIS map viewer.
The layout of the Reference Address Form, including the availability, label, and display order of
address fields, applies to the Accela Silverlight GIS Search panel for addresses. If your agency enables
internationalization and localization in Civic Platform, the Reference Address Form supports multiple
languages. Thus the Accela Silverlight GIS Administration site allows you to select the preferred language
for the address form in the Accela Silverlight GIS Search panel.
The address format, which defines how to concatenate address fields, applies to everywhere the full
address appears in the Accela Silverlight GIS map viewer. For example, the Contents panel and the map
tip displays the concatenated address fields for full addresses. See Figure 2: Address in the Map Tip and
Figure 3: Address in the Contents Panel as illustrative examples. On the search panel, if a user chooses
Address from the Search by drop-down list, the user can specify the street number range (in the From
and To fields) to search for desired addresses. See Figure 4: Customized Address Search Panel as an
illustrative example.
Figure 2: Address in the Map Tip
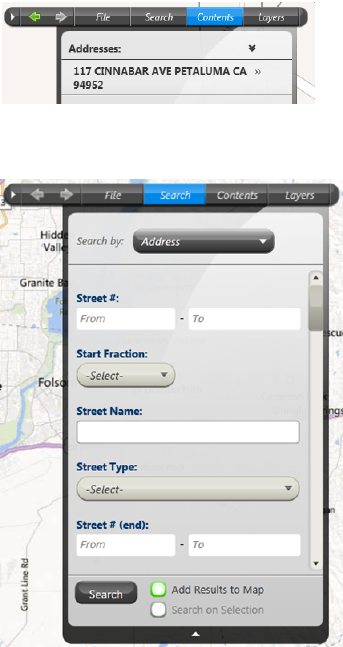
| Configuring Accela Silverlight GIS | 78
Figure 3: Address in the Contents Panel
Figure 4: Customized Address Search Panel
If you do not synchronize these settings from Civic Platform to Accela Silverlight GIS, then the Accela
Silverlight GIS map viewer uses the default address format and the default address form layout.
•Default address format. The full address comprises these fields in listed order: Street Number,
Fraction, Direction, Street Name, Street Type, Unit Type, Unit, City, State, Country, and Zip Code.
•Default address form layout. The Search panel for addresses displays the Street Number, Street
Prefix, Street Name, Street Type, Street Unit, and City fields in listed order.
To sync address format and address form layout
1. If necessary, log in to the Accela Silverlight GIS Administration site.
The Accela Silverlight GIS Administration site displays the Administration home page.
2. Click the Agency Settings link.
The Accela Silverlight GIS Administration site displays the Agency Settings page.
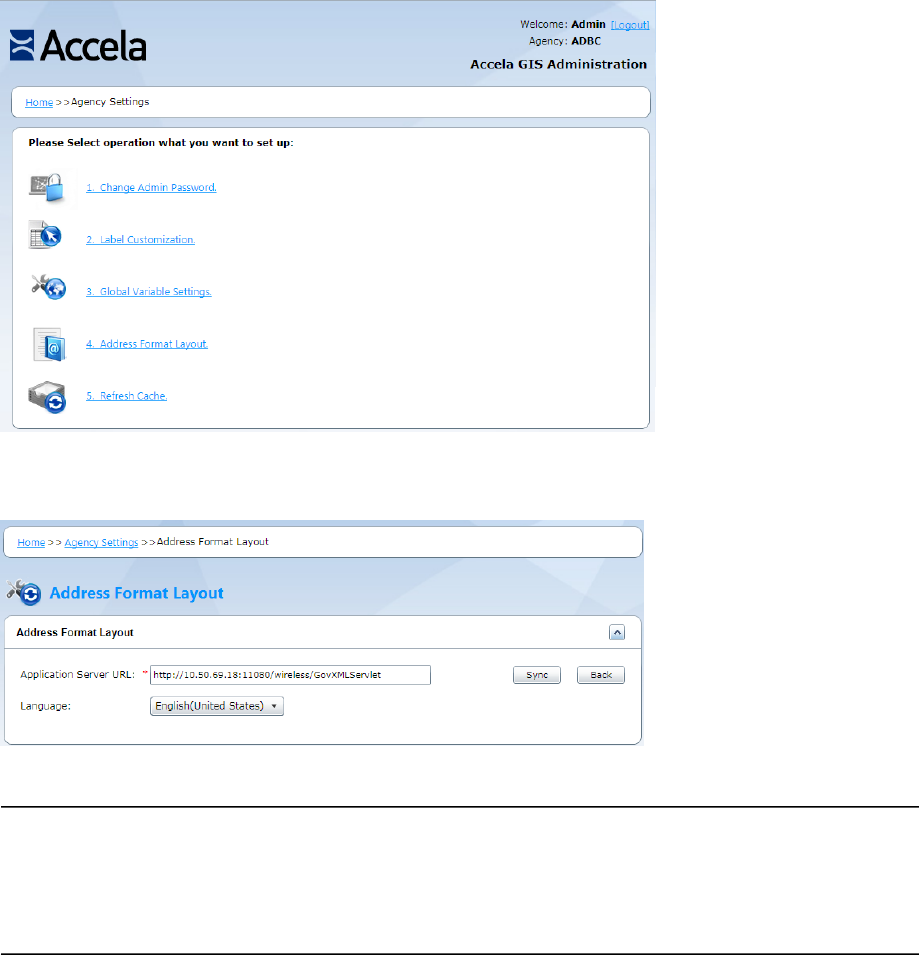
| Configuring Accela Silverlight GIS | 79
3. Click the Address Format Layout link.
The Accela Silverlight GIS Administration site displays the Address Format Layout page.
4. Complete these fields:
Application Server URL Enter the URL of the application server for Civic Platform where your agency defines
the address format and address form layout.
Language Select the preferred language for the address form on the Search panel in the Accela
Silverlight GIS map viewer. For example, select “English (United States)” if you want
the address form to display labels, options, and other user interface elements in
American English.
5. Click the Sync button.
The Accela Silverlight GIS Administration site retrieves the address form layout and address format
from Civic Platform.
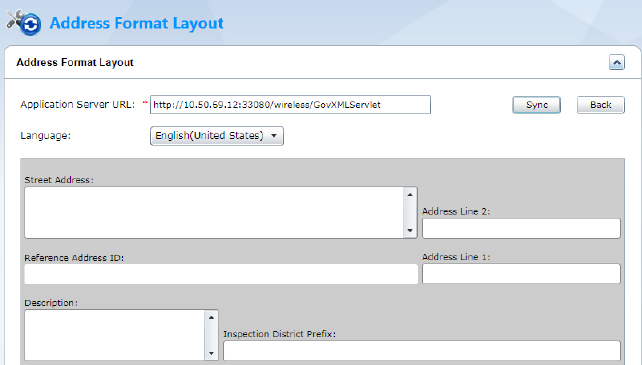
| Configuring Accela Silverlight GIS | 80
Clearing Cache Data Manually
The Accela Silverlight GIS cache temporarily stores the data that administrators have defined in Accela
Civic Platform. For example, record types, asset types, and parcel masks. You can clear cache data
manually or let Accela Silverlight GIS automatically clear cache data every hour. After cache data is
cleared, Accela Silverlight GIS can retrieve the most current data from Civic Platform.
Accela recommends that you manually clear the Accela Silverlight GIS cache after you change the cache
item data in Civic Platform (see Table 16: Cache Items). So Accela Silverlight GIS does not display
obsolete data or ignore new data. For example, if you add some new record types in Civic Platform but the
Accela Silverlight GIS cache is not cleared yet, the Record Type field in the Accela Silverlight GIS Search
panel does not show the new record types.
To clear cache data manually
1. Log in to the Accela Silverlight GIS Administration site.
The Accela Silverlight GIS Administration site displays the Administration home page.
2. Click the Agency Settings link.
The Accela Silverlight GIS Administration site displays the Agency Settings page.
| Configuring Accela Silverlight GIS | 81
3. Click the Refresh Cache link.
The Accela Silverlight GIS Administration site displays the Refresh Cache page.
4. Click the Refresh button.
The Accela Silverlight GIS Administration site clears all cache items.
Table 16: Cache Items
Cache Item Description
Record Type When you add or delete record types in Civic Platform, clear the cache to show
the most current options in the following windows:
Accela Silverlight GIS > Search panel > Search by Records > Type > Select
Record Type
Accela Silverlight GIS > Search panel > Search by Inspections > Record Type >
Select Record Type
Asset Type When you add or delete asset types in Civic Platform, clear the cache to show
the most current options in the following windows:

| Configuring Accela Silverlight GIS | 82
Cache Item Description
Accela Silverlight GIS > Search panel > Search by Assets > Type > Select
Asset Type
Accela Silverlight GIS > Search panel > Search by Condition Assessments >
Asset Type > Select Asset Type
Asset Status When you add or delete asset statuses in Civic Platform, clear the cache to
show the most current options in the following drop-down list:
Accela Silverlight GIS > Search panel > Search by Assets > Status
Street Direction When you add or delete street directions in Civic Platform, clear the cache to
show the most current options in the following drop-down list:
Accela Silverlight GIS > Search panel > Search by Address > Direction
Street Suffix When you add or delete street suffixes in Civic Platform, clear the cache to
show the most current options in the following drop-down list:
Accela Silverlight GIS > Search panel > Search by Address > Street Suffix
(Direction)
Parcel Mask When you modify the parcel number mask in the Standard Choice MASKS
through Civic Platform, clear the cache to apply the most current mask to parcel
numbers in Accela Silverlight GIS.
Inspection Type When you add or delete inspection types in Civic Platform, clear the cache to
show the most current options in the following window:
Accela Silverlight GIS > Search panel > Search by Inspections > Inspection
Type > Select Inspection Type
Record Status When you add or delete record statuses in Civic Platform, clear the cache to
show the most current options in the following drop-down list:
Accela Silverlight GIS > Search panel > Search by Records > Record Status
Department When you add or delete departments in Civic Platform, clear the cache to show
the most current options in the following windows:
Accela Silverlight GIS > Search panel > Search by Inspections > Inspector >
Select Inspector
Accela Silverlight GIS > Search panel > Search by Records > Staff > Select
Staff
Accela Silverlight GIS > Search panel > Search by Condition Assessments >
Staff > Select Staff
Condition Assessment Status When you add or delete condition assessment statuses in Civic Platform, clear
the cache to show the most current options in the following drop-down list:
Accela Silverlight GIS > Search panel > Search by Condition Assessments >
Status
Condition Assessment Type When you add or delete condition assessment types in Civic Platform, clear the
cache to show the most current options in the following drop-down list:
Accela Silverlight GIS > Search panel > Search by Condition Assessments >
Type
ACA Display Owner When you change the value description for the
DISPLAY_OWNER_INFORMATION value in the Standard Choice
ACA_CONFIGS through Civic Platform, clear the cache to make your changes
immediately take effect in Accela Silverlight GIS.

| Configuring Accela Silverlight GIS | 83
Using Maintenance Tools
The Accela Silverlight GIS Administration site provides diagnostics tools for you to verify that all the Accela
Silverlight GIS configuration is proper and that Accela Silverlight GIS can work with the ArcGIS Server
properly. The diagnostic tests can inform you about problems and might identify possible causes and
suggest solutions.
The Accela Silverlight GIS Administration site also provides a log viewer for you to view the log files
and their physical locations. The log files records all types of events, including GovXML requests and
responses, and exceptions, errors, and any other activities that occurred in Accela Silverlight GIS and
ArcGIS Server, which assists you in monitoring Accela Silverlight GIS and troubleshooting.
Related Links
Running General Diagnostics
Diagnosing ArcGIS Server Map Services
Viewing Log Files
Running General Diagnostics
The General Diagnostics tool provides you with a series of diagnostic tests on the Accela Silverlight GIS
server configuration and its communication with the Civic Platform application server and the ArcGIS
Server. The diagnostic tests include:
• Check for all common issues.
• Check if the Accela Silverlight GIS server can connect to the ArcGIS Server.
• Check if the Accela Silverlight GIS server can retrieve all the defined map services from the ArcGIS
Server.
• Check if the geometry service is running properly.
• Check if the Accela Silverlight GIS server can connect to the Civic Platform application server.
• Check if the Accela Silverlight GIS server can send GovXML requests and receive responses.
To run general diagnostics
1. If necessary, log in to the Accela Silverlight GIS Administration site.
The Accela Silverlight GIS Administration site displays the Administration home page.
2. Click the Maintenance Tools link.
The Accela Silverlight GIS Administration site displays the Maintenance Tools page.
| Configuring Accela Silverlight GIS | 84
3. Click the General Diagnostics link.
The Accela Silverlight GIS Administration site displays the General Diagnostics page.
4. Click the Diagnose button.
The Accela Silverlight GIS Administration site runs diagnostic tests and then displays the results in the
Diagnosis Result field.
Diagnosing ArcGIS Server Map Services
The Diagnose ArcGIS Server Map Services tool provides you with a series of diagnostic tests on the
ArcGIS Server services. You can run diagnostics for each service individually. The diagnostic tests include:
• Check if the Accela Silverlight GIS server can connect to the ArcGIS Server.
• Check if the map service information on the ArcGIS Server is different than what is cached in the
Accela Silverlight GIS server.
| Configuring Accela Silverlight GIS | 85
• Check if the geodata service information on the ArcGIS Server is different than what is cached in the
Accela Silverlight GIS server.
To run diagnostics on ArcGIS Server services
1. If necessary, log in to the Accela Silverlight GIS Administration site.
The Accela Silverlight GIS Administration site displays the Administration home page.
2. Click the Maintenance Tools link.
The Accela Silverlight GIS Administration site displays the Maintenance Tools page.
3. Click the Diagnose ArcGIS Server Map Services link.
The Accela Silverlight GIS Administration site displays the Diagnose ArcGIS Server Map Services
page.
4. Complete one of these fields:
Product Use the drop-down list to select the Civic Platform application. You can select Accela
Automation Vantage360, Citizen Access, or Mobile Office. After you select a product,
the Integration drop-down list populates with all the related map integrations.
| Configuring Accela Silverlight GIS | 86
Integration Use the drop-down list to select the map integration.This drop-down list displays all
the map integrations configured for the product you select in the Product drop-down
list. After you select a map integration, the Map Service drop-down list populates with
all the related map services.
Map Service Use the drop-down list to select the map service for which you want to run diagnostic
tests. This drop-down list displays all the map services that you have defined in the
map integration.
5. Click the Diagnose button.
The Accela Silverlight GIS Administration site runs diagnostic tests for the map service, displays the
results in the Diagnosis Result field, and provides possible causes and applicable solutions in the
Analysis Result field.
6. Do any of the following:
• If Accela Silverlight GIS does not work properly but the diagnostic tool does not find any problem,
clear the ArcGIS Server cache and run the tests again.
You can click the Clear ArcGIS Server Cache link to open the ArcGIS Server Constructed API
Admin Login page and clear the cache. For more information, see http://resources.arcgis.com/en/
help/rest/apiref/admin.html.
• If the diagnostic tool finds any problem about the geodata service, do the following to restart the
geodata service:
1. Click the Restart Geodata Service link.
The Accela Silverlight GIS Administration site displays the ArcGIS Server Administrator Login
window.
2. Enter the user name and password and click the OK button.
If ArcGIS Server hosts the geodata service, enter the same ArcGIS Server user name and
password you use when logging into ArcGIS Server Manager.
• If the diagnostic tool finds any problem about the map service, do the following to restart the map
service:
1. Click the Restart Map Service link.
The Accela Silverlight GIS Administration site displays the ArcGIS Server Administrator Login
window.
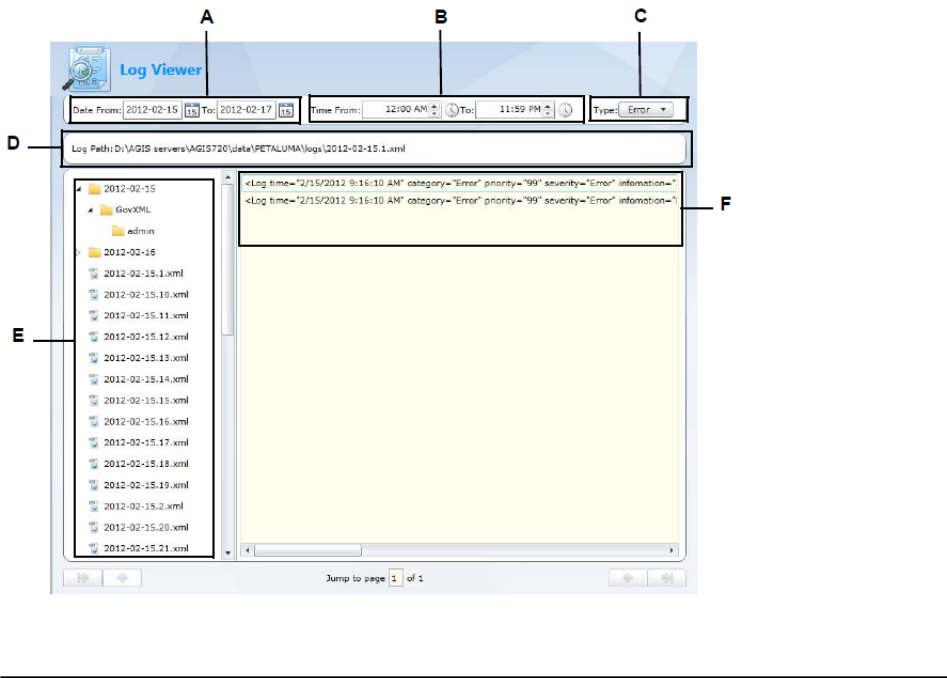
| Configuring Accela Silverlight GIS | 87
2. Enter the user name and password and click the OK button.
If ArcGIS Server hosts the map service, enter the same ArcGIS Server user name and password
you use when logging into ArcGIS Server Manager.
Viewing Log Files
The Log Viewer in the Accela Silverlight GIS Administration site shows you where the log files are located
or allows you to view the logs directly. For more information about the Log Viewer, see Figure 5: Accela
Silverlight GIS Log Viewer.
If there is no log available, check whether you have enabled the log function or have set the log levels
properly. For more information about the log function and the log levels, see Configuring Agency Settings.
Figure 5: Accela Silverlight GIS Log Viewer
A Filter by log date. Click the calendar icon next to the Date From and To fields and specify the date range when
the GovXML log folders and the Accela Silverlight GIS log files are generated. The navigation pane (the left
pane) displays the GovXML log folders and the Accela Silverlight GIS log files that are generated within the
date range
B Filter by log time. Click the clock icon next to the Time From and To fields and specify the time range when the
GovXML log files and the Accela Silverlight GIS log entries are created. The log pane (the right pane) displays
the GovXML log files or the Accela Silverlight GIS log entries that are created during the time range.
C Filter by log type. Select the type of the Accela Silverlight GIS log entry that you want to view from the drop-
down list. You can choose Info, Debug, and Error. The log pane displays the log entries of the specified type.
Note that you cannot filter the GovXML log files by log type.
D Log Path bar. The Log Path bar displays the physical location of the log that you choose to view.
| Configuring Accela Silverlight GIS | 88
E Navigation pane. The navigation pane displays the GovXML log folders and the Accela Silverlight GIS log files
that you filter by log date and log time. Expand a log folder to view all the GovXML log files in the log pane. Or
select an Accela Silverlight GIS log file to view all the log entries in the log pane.
F Log pane. The log pane displays the GovXML log files and the Accela Silverlight GIS log entries that you
choose to view. Double-click a GovXML log file to view the details of the GovXML request or response in the
View Details pop-up window. Or double-click an Accela Silverlight GIS log entry to view the log details in the
View Details pop-up window.
To access the Log Viewer
1. If necessary, log in to the Accela Silverlight GIS Administration site.
The Accela Silverlight GIS Administration site displays the Administration home page.
2. Click the Maintenance Tools link.
The Accela Silverlight GIS Administration site displays the Maintenance Tools page.
3. Click the Log Viewer link.
The Accela Silverlight GIS Administration site displays the Log Viewer page.
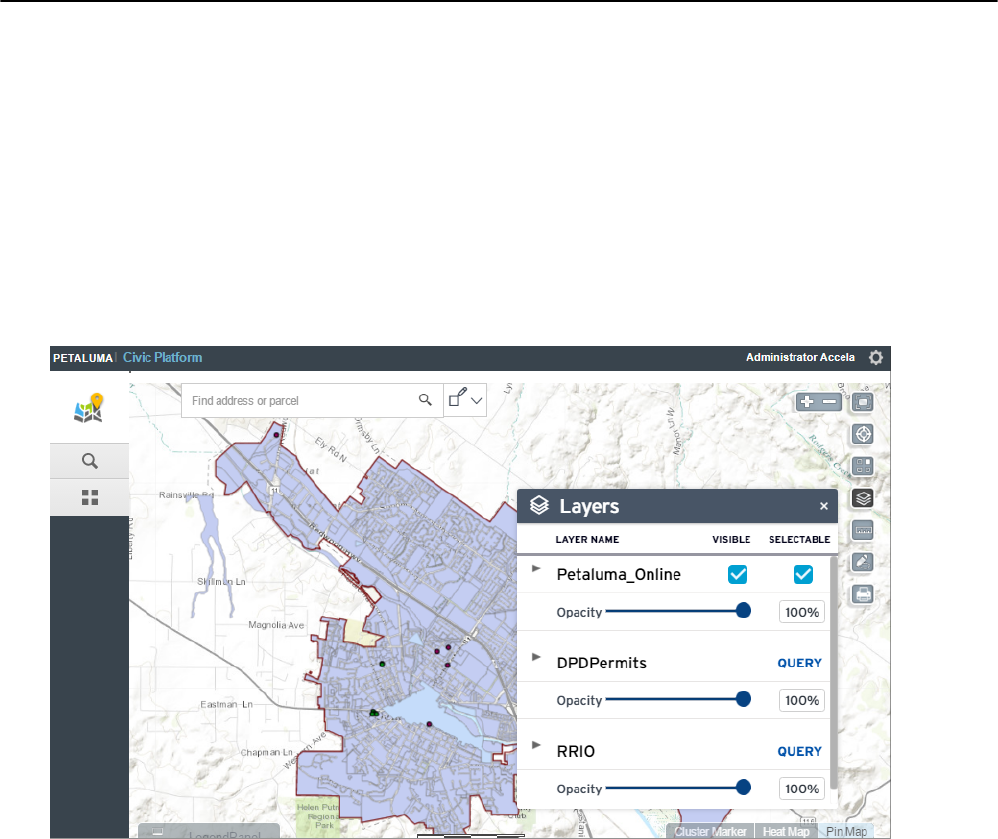
| Configuring Accela GIS | 89
Configuring Accela GIS
Accela GIS (JavaScript version) configuration tasks and tools are described in the following topics:
•Accela GIS Prerequisites and Configuration Summary
•The Accela GIS Admin Site
•Accela GIS Integrations
•Accela GIS System Administration
•Accela GIS Agency Administration
Accela GIS administrators enable agency users to use the Accela GIS map viewer:

| Configuring Accela GIS | 90
Accela GIS Prerequisites and Configuration Summary
The following table summarizes the prerequisites and required configurations for Accela GIS (JavaScript
version). Note that Accela GIS refers to the JavaScript version, while the Silverlight version is referred to as
Accela Silverlight GIS.
Important: To help you towards a successful Accela GIS installation and configuration, follow all the steps
listed in the prerequisite checklist. A missed prerequisite or configuration will require you to fully uninstall
and reinstall Accela GIS.
Prerequisite Required or optional? Reference information
Install Accela GIS. Required Accela GIS Installation Guide
Configure security settings. Required HTTPS Configuration
Securing Communications
Configure ArcGIS Server and ArcGIS
Engine Prerequisites. Required ArcGIS Server Prerequisites
Configure initial system
administration setup. Required Initial Setup for Accela GIS System
Administration
Configure Accela GIS integration with
Civic Platform. Required Civic Platform and Accela GIS
Integration
Accela GIS integration with Citizen
Access Required if agency is using Citizen
Access Citizen Access and Accela GIS
Integration
Configure Geocoding Map Service
Prerequisites. Required if agency is using
Geocoding map services. Geocoding Service Configuration
Configure Feature Service
Configuration. Required if agency provides GIS
features and layer editing capability
to your users
Feature Service Configuration
Configure APO and XAPO Features
in Civic Platform. Required if agency intends to
leverage APO and XAPO integration
features with Civic Platform. For
example, auto-populating and
synchronizing APO data with records.
Accela Civic Platform Configuration
Guide > Configuring and Enabling
APO and XAPO Features
ArcGIS Server Prerequisites
Accela GIS supports GIS services published to ArcGIS Server. To integrate with Accela GIS, you must
purchase a license for one of the aforementioned ArcGIS Server versions.
See the configuration prerequisites for ArcMap, ArcCatalog, ArcSDE, MXD, and ArcGIS Server in Accela
GIS for ArcGIS Server Configuration Guide.
Additionally, you must publish a map service in ArcGIS Server. ArcGIS Server hosts the map service for
Civic Platform 8.x and later.
Initial Setup for Accela GIS System Administration
After installing the Accela GIS server component, the system administrator must perform initial agency
setup on the the Accela GIS Administration site ("GIS Admin").
The Accela GIS system administrator is the first user of the GIS Admin site. The system administrator
account and password are defined during the installation of the Accela GIS server component. After the
Accela GIS installation, the system administrator must login to GIS Admin to perform the following initial
setup:
1. Change the system administration account password on the login page.
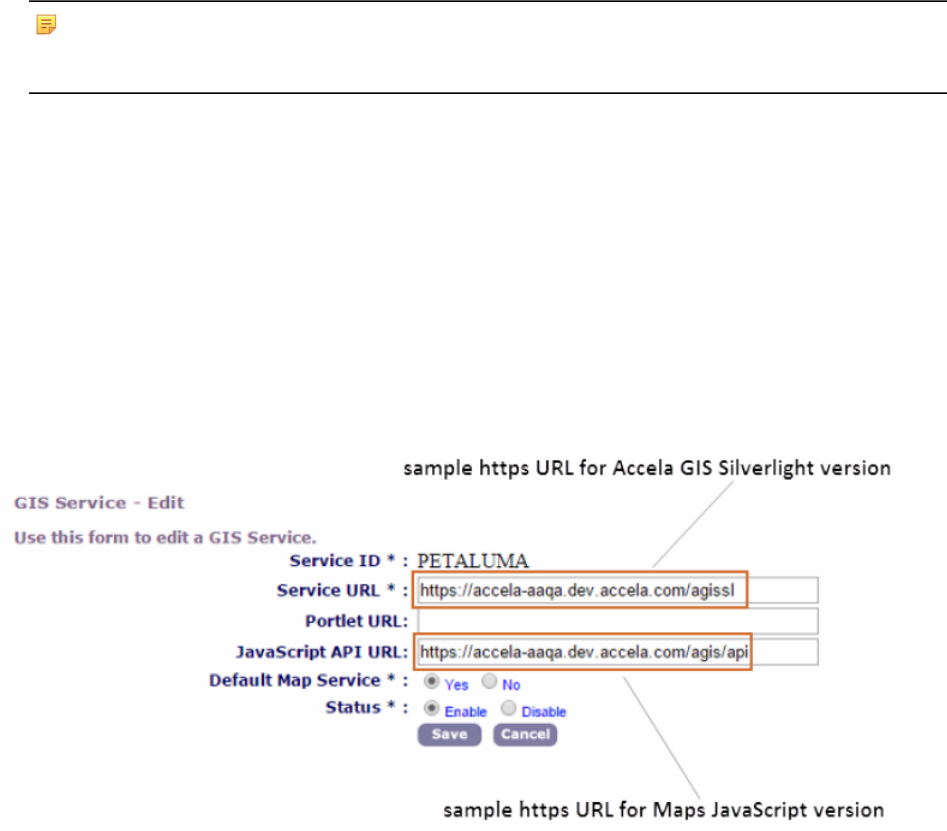
| Configuring Accela GIS | 91
2. Add the first agency on the Agency section of GIS Admin.
After adding the agency, the system administrator can either continue with configuring the agency’s
initial map profile and product integration, or assign this responsibility to the agency administrator (to be
created in the following step).
3. Add the first agency administrator on the User section of GIS Admin. An agency administrator can
manage Accela GIS configurations only for his or her assigned agency.
Note:
This step is optional. An agency administrator can register himself or herself on the GIS Admin login
page.
Related topics:
•Managing Agencies - for information about how to add the first agency
•Managing Agency Administrators - for information about how to add the first agency administrator
HTTPS Configuration
Civic Platform requires HTTPS connections with the Accela GIS (JavaScript) component. When
configuring a GIS service in Civic Platform, the service URLs for the JavaScript version must specify https.
If your agency uses Accela Silverlight GIS to support EMSE scripts, XAPO data sources, and proximity
alerts with Civic Platform 8.x, the Service URL for Accela Silverlight GIS must also use https.
The following diagram shows sample URL's using https on the Edit GIS Service configuration page:
For information about configuring the use of HTTPS, see Requiring the Use of HTTPS.
Geocoding Service Configuration
If your agency plans to use geocoding in your map integration environment, you must configure geocoding
map services.
Geocoding is the ability to find a location, such as a street address, based on existing geographic data.
For example, you might want to use to identify a specific street address and plot the address on the map.
can identify and plot the address using existing GIS data, such as the street name and the range of even-
numbered and odd-numbered addresses.
If you plan to use geodata for offline data mapping, then you must add the data to the geodatabase prior to
configuring.
| Configuring Accela GIS | 92
Feature Service Configuration
If your agency needs to provide GIS feature and layer editing capability to your users, you must set up
ESRI’s feature service on the ArcGIS Server. For details about how to configure a feature service and
publish it to ArcGIS Server, see ArcGIS Server documentation > Feature Services.

| Configuring Accela GIS | 93
Configuring Accela GIS Integrations
Accela GIS (JavaScript version) can be integrated with the following Accela applications:
•Civic Platform - Accela GIS integrates with the latest user interface of Civic Platform. See Civic
Platform and Accela GIS Integration .
•Citizen Access - Accela GIS integrates with Citizen Access. Starting in version 8.0.1, Citizen Access
displays the JavaScript version of the map viewer on the module's home and record detail pages. The
Accela Silverlight GIS is used on other pages while the JavaScript version is integrated with Citizen
Access in a phased approach. See Citizen Access and Accela GIS Integration .
Civic Platform and Accela GIS Integration
To integrate Accela GIS (JavaScript version) with Civic Platform:
1. Login Accela GIS Admin Site ("GIS Admin").
2. If you do not yet have a map profile with a map service connection definition:
1. From the agency's home page, select Map Profiles on the left navigation pane.
2. Click Add New Map Profile.
3. On the Map Profile page, add a map service to define your agency's GIS service connections.
Note: You will assign the map profile to a user group in a later step in this procedure.
3. Add a Civic Platform integration:
1. From the agency's home page, select Integrations on the left navigation pane.
2. Click Add New Integration.
3. On the Environment page:
a. Select "Accela Automation" on the Product dropdown list.
b. Enter the Civic Platform connection settings as described in Environment Integration Settings in
GIS Admin below.
c. Click Save.
4. On the User Groups page, either add a new user group or edit the Default user group. On the new
or Default user group page:
a. Enable the Map Commands and Map Widgets that should be available to the user group.
b. Under Map Settings, select the map profile you created at the start of this procedure. After you
select a map profile, the map layers from the map profile services will be displayed.
c. Set the Availability, Visibility, and Edit user permissions for the appropriate map layers.
d. Click Save.

| Configuring Accela GIS | 94
4. Login Civic Platform Classic Administration ("AA Admin").
5. Select Admin Tools > GIS > GIS Service.
6. Add a new service or search for an existing service.
7. Enter the GIS service settings as described in GIS Service configuration fields in Civic Platform Classic
Admin below.
Environment Integration Settings
Integration Name The descriptive name of the product integration
environment. For example, Bridgeview .
AA GIS Service ID The service ID.
For Civic Platform integration, this should match
the GIS Service ID defined in Civic Platform Classic
Administraton.
For Citizen Access integration, this should match the GIS
Service ID specified on the Citizen Access Administration
site.
Product The product to integrate with Accela GIS.
Note:
For Civic Platform (8.x), choose "Accela
Automation".
For Citizen Access (8.0.1 and later), choose
"Citizen Portal".
Application Server URL The business application serverURL. For example,
http://<host>:3080 where <host> represents
your agency’s business application server name.
Automation User Name A valid Civic Platform user name. uses the username to
connect to the Application Server.
Automation Password The password for the Civic Platform user name.
Default If checked, this integration displays by default
Test Connection Click the Test Connection link to test the server
connection using the server URL and account information
you provided. If Accela GIS successfully connected to
the specified server URL using the account information,
a confirmation message is displayed. Otherwise, consult
with the Accela product administrator to ensure the
connection parameters are correct.
GIS Service configuration fields in Civic Platform Classic Administration
Service ID The map service identifier. Enter the same value exactly as you entered in the AA GIS
Service ID field when defining a map integration environment for Civic Platform. See
Integrating Your Environment for more information.

| Configuring Accela GIS | 95
Service URL The URL that connects to the Accela GIS server (Silverlight version) that hosts the
desired GIS service. Specify the web site URL entered during the Accela GIS server
installation. For example:
http://myagency.host.com/agissl
Note:
Your URL should begin with “http://” so you can successfully retrieve GIS
attributes from the map service. If you publish the map service to Esri ArcGIS
Server and the URL begins with “https://”, you must import the Accela GIS
server certificate into the Civic Platform biz server before using the map service
in Civic Platform. See Importing the Accela GIS Server Certificate for more
information.
Portlet URL Leave this field blank.
JavaScript API URL The URL that connects to the Accela GIS (JavaScript version) server. Specify web site
URL entered during the Civic Platform Maps installation, and append /api to the URL.
For example:
https://myagency.host.com/agisjs/api
Note:
The URL for the Accela GIS (JavaScript version) server must use “https://”. To
support https connections, you must install the SSL certificate into the Maps
server. SeeRequiring the Use of HTTPS and Importing the Accela GIS Server
Certificate for more information.
Default Map Service Select Yes if you want this map service to be the default map service in Accela GIS. The
default map service displays at the top of the GIS service drop-down list for GIS users.
Related topics:
•Configuring Map Services - For details about map service provider configurations
•Product Integrations > Integration Environment- For details about defining environment integration
settings on GIS Admin
•Product Integrations > User Groups - For details about defining user group settings on GIS Admin
Citizen Access and Accela GIS Integration
To integrate Accela GIS (JavaScript version) with Citizen Access:
1. Login Accela GIS Admin Site ("GIS Admin").
2. If you do not yet have a map profile with a map service connection definition:
1. From the agency's home page, select Map Profiles on the left navigation pane.
2. Click Add New Map Profile.
3. On the Map Profile page, add a map service to define your agency's GIS service connections.
Note: You will assign the map profile to a user group in a later step in this procedure.

| Configuring Accela GIS | 96
3. Add a Citizen Access integration:
1. From the agency's home page, select Integrations on the left navigation pane.
2. Click Add New Integration.
3. On the Environment page:
a. Select "Citizen Portal" on the Product dropdown list.
b. Enter the Citizen Access connection settings as described in Environment Integration Settings on
GIS Admin Site below.
c. Click Save.
4. On the User Groups page, either add a new user group or edit the Default user group. On the new
or Default user group page:
a. Enable the Map Commands and Map Widgets that should be available to the user group.
b. Under Map Settings, select the map profile you created at the start of this procedure. After you
select a map profile, the map layers from the map profile services will be displayed.
c. Set the Availability, Visibility, and Edit user permissions for the appropriate map layers.
d. Click Save.
4. Login Citizen Access Administration ("ACA Admin"), and navigate to Global Settings.
5. Mark the Activate GIS Map Control checkbox.
6. Under GIS Settings, enter the GIS settings as described in GIS Settings in Citizen Access Admin
below.
Environment Integration Settings
Integration Name The descriptive name of the product integration
environment. For example, Bridgeview .
AA GIS Service ID The service ID.
For Civic Platform integration, this should match
the GIS Service ID defined in Civic Platform Classic
Administraton.
For Citizen Access integration, this should match the GIS
Service ID specified on the Citizen Access Administration
site.
Product The product to integrate with Accela GIS.
Note:
For Civic Platform (8.x), choose "Accela
Automation".
For Citizen Access (8.0.1 and later), choose
"Citizen Portal".
Application Server URL The business application serverURL. For example,
http://<host>:3080 where <host> represents
your agency’s business application server name.

| Configuring Accela GIS | 97
Automation User Name A valid Civic Platform user name. uses the username to
connect to the Application Server.
Automation Password The password for the Civic Platform user name.
Default If checked, this integration displays by default
Test Connection Click the Test Connection link to test the server
connection using the server URL and account information
you provided. If Accela GIS successfully connected to
the specified server URL using the account information,
a confirmation message is displayed. Otherwise, consult
with the Accela product administrator to ensure the
connection parameters are correct.
GIS Settings in Citizen Access Admin
Field Description
Set the GIS Server URL The Accela Silverlight GIS server URL. For example:
https://myagency.com/agissl
Note: The Set the GIS Server URL field for the Accela GIS (Silverlight) version is also
required to support other maps in Citizen Access that still use the legacy Accela GIS
(Silverlight) version.
GIS Service Url (JavaScript
version)
The Accela GIS (JavaScript version) server URL. For example:
https://myagency.com/agis/api
GIS Service ID The GIS Service ID defined for the Citizen Access integration on the Accela GIS
Administration site.
GIS Group The user group setting to be used with the specified GIS Service integration. "Default"
is the default user group if no specific group has been configured.
Related topics:
•Configuring Map Services - For details about map service provider configurations
•Product Integrations > Integration Environment - For details about defining environment integration
settings on GIS Admin
•Product Integrations > User Groups - For details about defining user group settings on GIS Admin
•Citizen Access Administration Guide > GIS Settings
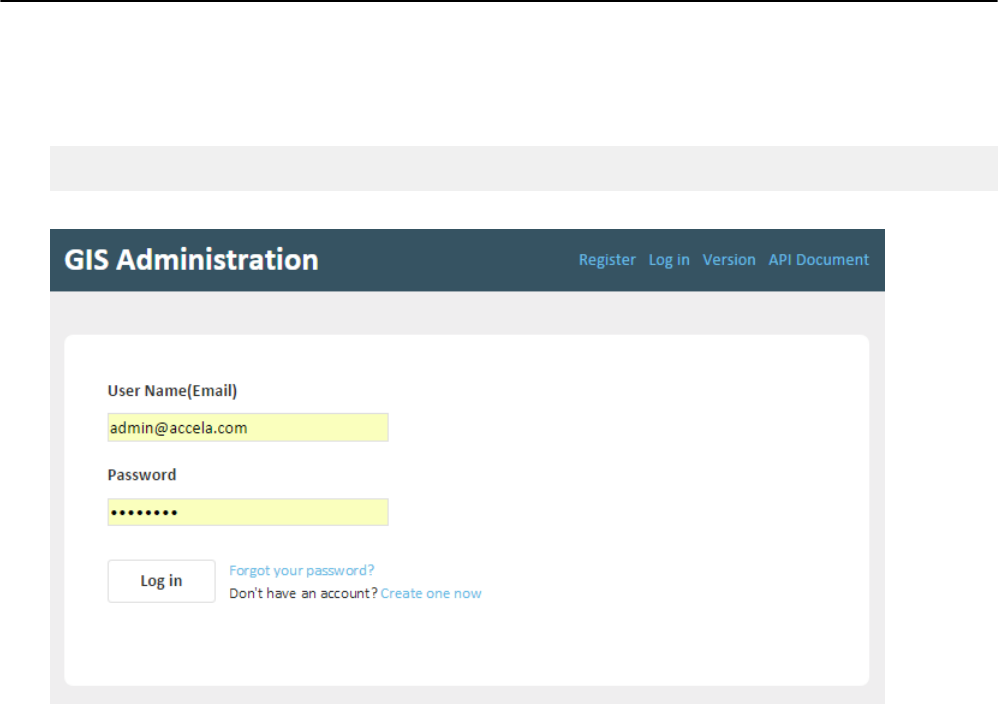
| Configuring Accela GIS | 98
The Accela GIS Administration Site
The Accela GIS Administration (“GIS Admin”) site supports the configuration and administration of
Accela GIS which is the JavaScript version of the Civic Platform map viewer. Use the GIS Admin site to
manage administrators, GIS service configurations, product integrations, user group settings, and other
administrative functions related to the tool.
To login GIS Admin, go to:
http://<hostname>/agis/admin
The following shows the GIS Admin login page:
From the GIS Admin login page:
• A system administrator can login and access all agencies' Accela GIS configurations. The system
administration username and password is set during the Accela GIS installation.
• An agency administrator can login and access only the agency's Accela GIS configuration.
• A new user can register as an agency administrator.
• An administrator can view the Accela GIS version information.
• An administrator or developer can view the Accela GIS developer documentation.
Related Links
Accela GIS System Administration
Accela GIS Agency Administration

| Configuring Accela GIS | 99
Accela GIS System Administration
Accela GIS system administration consists of the following tasks:
•Initial Setup
•Managing Agencies
•Managing Agency Administrators
•HTTP Request Timeout
An Accela GIS system administrator is typically the person who installs or upgrades the server components
of Accela GIS. The system administrator also performs initial Accela GIS administration setup and
administration tasks for multiple agencies on the GIS Administration site.
On the Home page, a system administrator can:
• Change password. The initial password is set during the Accela GIS server installation.
• Add, edit, and delete multiple agencies.
• Add, edit, and delete agency or system administrators.
Initial Setup
The Accela GIS system administrator is the first user of the GIS Admin site. The system administrator
account and password are defined during the installation of the Accela GIS server component. After the
Accela GIS installation, the system administrator must login to GIS Admin to perform the following initial
setup:
1. Change the system administration account password on the login page.
2. Add the first agency on the Agency section of GIS Admin.
After adding the agency, the system administrator can either continue with configuring the agency’s
initial map profile and product integration, or assign this responsibility to the agency administrator (to be
created in the following step).
3. Add the first agency administrator on the User section of GIS Admin. An agency administrator can
manage Accela GIS configurations only for his or her assigned agency.
Note:
This step is optional. An agency administrator can register himself or herself on the GIS Admin login
page.
Related topics:
•Managing Agencies - for information about how to add the first agency
•Managing Agency Administrators - for information about how to add the first agency administrator
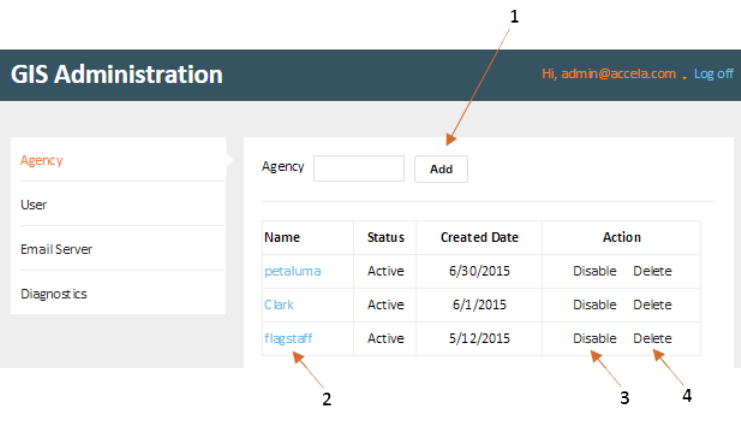
| Configuring Accela GIS | 100
Managing Agencies
A system administrator has administration access to all the agency configurations. The following diagram
shows a sample Agency page:
On the Agency page, a system administrator can:
1: Add an agency.
2: Edit an agency.
3: Disable an agency.
Disabling an agency keeps the agency’s map configuration information but prevents it from being used.
Before you can disable an agency, set the agency administrators to Inactive status.
4: Delete an agency.
Related topics:
•Accela GIS Agency Administration
Managing Agency Administrators
The User section of GIS Admin is used to manage agency administrators. Note that only the system
administrator has access to the User section. (An agency administrator cannot see the User section.)
The User page shows two types of roles:
• User - Indicates an agency administrator with an assigned agency. When this user logs in the GIS
Admin site, the user will login the GIS Administration pages for the assigned agency.
• Administrator - Indicates a system administrator with no assigned agency. A system administrator can
manage all agencies.
The following is a sample User page:
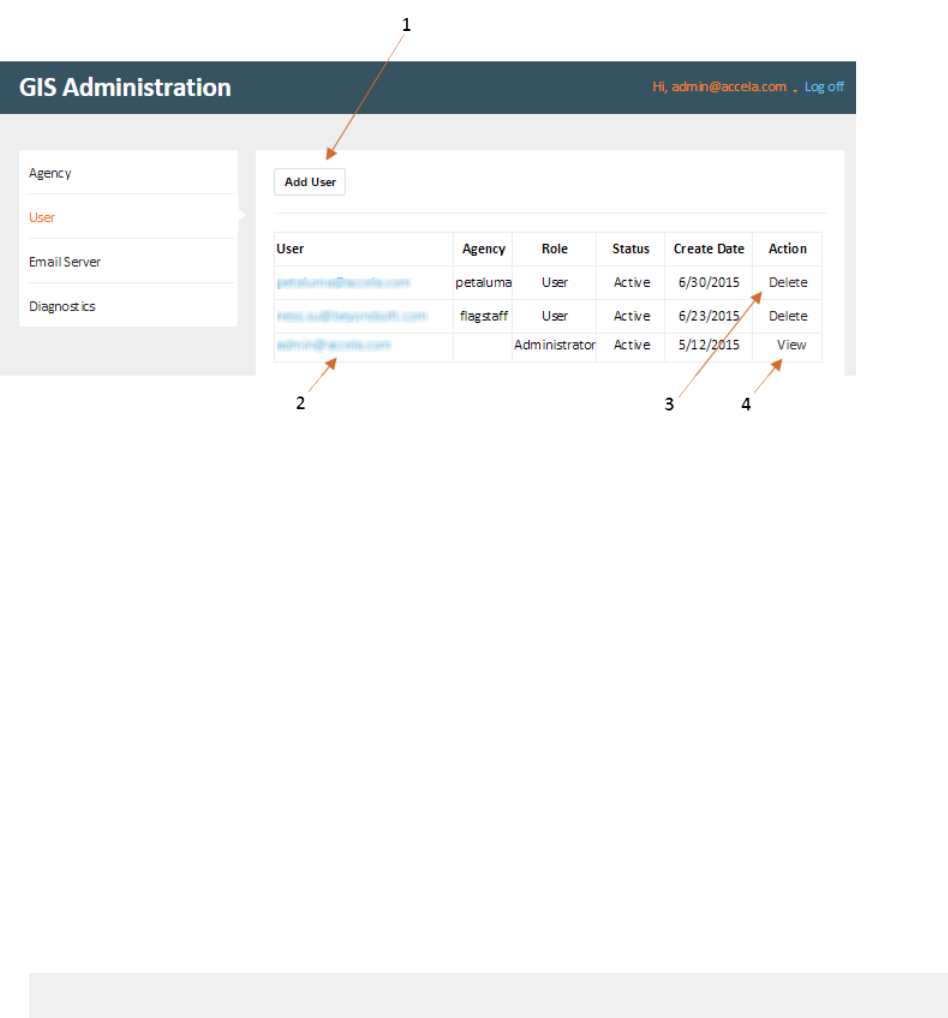
| Configuring Accela GIS | 101
On the User page, a system administrator can:
1: Add a user. To assign the new user as an agency administrator, select Administrator as the user's role.
2: Edit an agency administrator.
3: Delete an agency administrator.
4: View the system administrator profile and change the password.
HTTP Request Timeout
Administrators can set a time limit on HTTP requests from Accela GIS Admin site to retrieve and access
map services. The timeout setting is defined in the webconfig.file on the Accela GIS IIS server. The
default timeout setting is 30 seconds.
To set the HTTP request timeout:
1. Locate and open the webconfig.file on the Accela GIS IIS server.
2. Under the <appSettings> section, add or edit the HTTPRequestTimeout parameter. Specify the
timeout value in seconds. The following example shows the default timeout value of 30 seconds:
<add key="HTTPRequestTimeout" value="30" />
3. Save the changes. The web application restarts automatically after updating the web.config file.

| Configuring Accela GIS | 102
Accela GIS Agency Administration
A Accela GIS agency administrator configures agency settings for the following:
•Map Profiles
•Map Services
•Product Integrations
•User Groups
•Custom Widgets
•XAPO Configuration for Accela GIS
Accela GIS agency administration is made easier by allowing administrators to centrally define map
profiles that can be shared across product integrations and user groups, as illustrated by the following
diagram:

| Configuring Accela GIS | 103
In the preceding diagram, an Automation product integration configuration has two user groups: a read-
only group (“ReadOnlyPublic”) and another group who submits permit applications (“PermitGroup”).
The ReadOnlyPublic group shows restricted settings and the PermitGroup shows more enabled
settings. Although the two groups have different user settings, they both share the same map profile
(“Sacramento”). The Sacramento map profile is defined only once, with its set of map and geocoding
services. The agency administrator simply needs to assign the same map profile to the two user groups.
This configuration makes the same Sacramento map layers available and visible to both user groups, with
browse-only capability to one group, and editing and transactional record capabilities to another group.
The following diagram shows a sample Home page for an agency administrator:
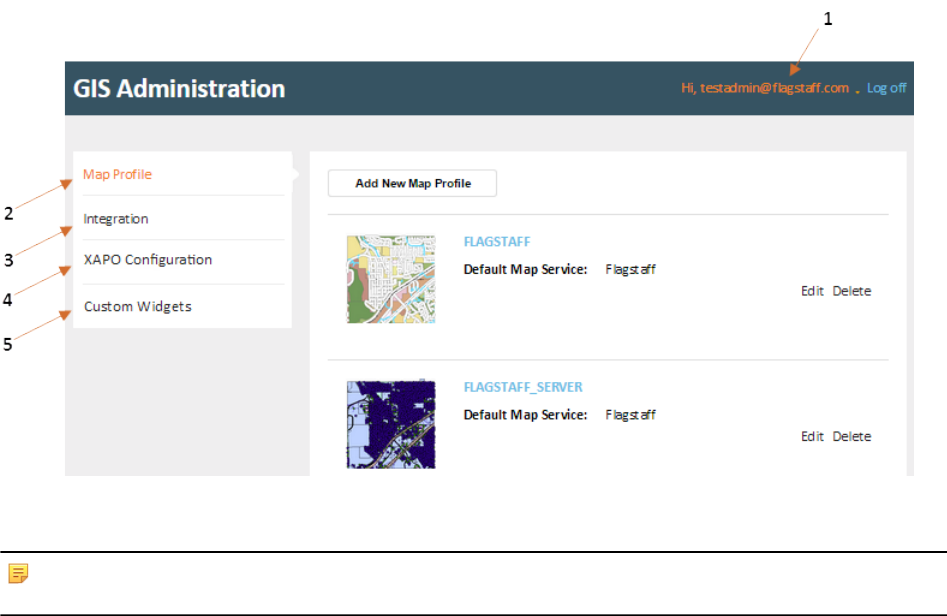
| Configuring Accela GIS | 104
On the Home page, an agency administrator can:
1: Edit the profile or change the password.
Note:
A user can self-register and create an agency administration account on the GIS Admin login page.
2: Add, edit, and delete map profiles.
3: Add, edit, and delete product integrations.
4: Configure XAPO settings and mappings between Accela GIS and the external map service.
5: Deploy custom widgets.
Map Profiles
A map profile:
• Is a collection of GIS map services and geocoding services that allow users to connect to the
agency’s GIS information providers. The configured GIS services in a map profile provide a mashup or
aggregation of map layers.
• Provides a centralized and streamlined configuration of GIS services. An administrator can define
service connection parameters only once within a map profile, and have the ability to assign the same
profile to multiple user groups across multiple product integrations.
• Is assigned to user groups. An administrator can set the availability, visibility, and edit permissions
of the map layers to the user group. The permission settings are configured on Integrations > User
Groups > Map Layer Settings.
The Map Profiles page shows an agency's configured map profiles and their default map service. The
following is a sample Map Profiles page:
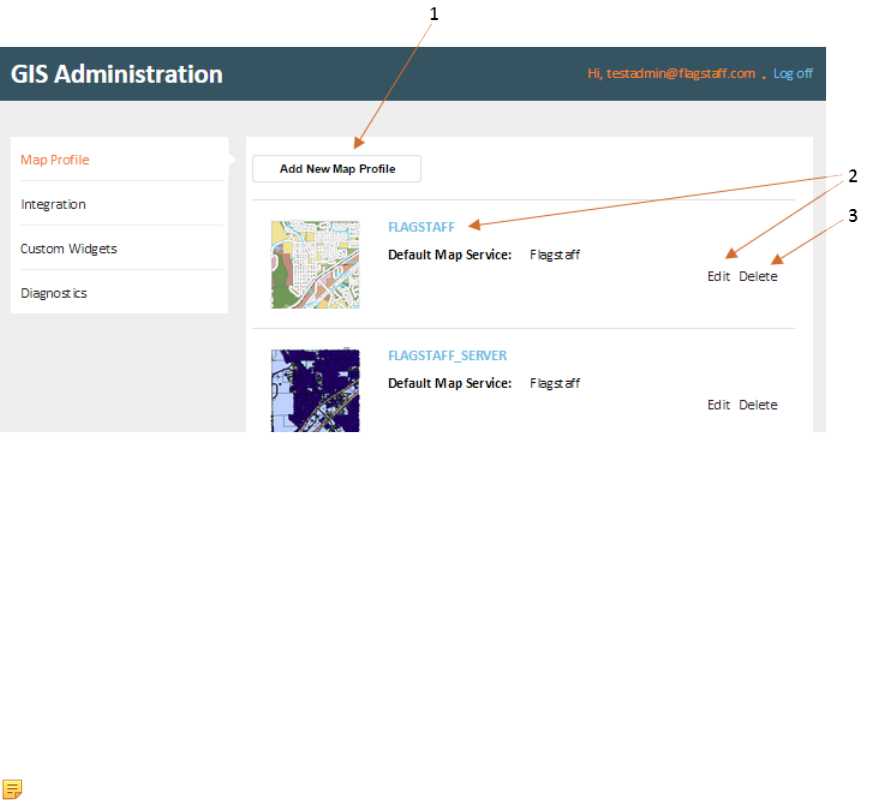
| Configuring Accela GIS | 105
On the Map Profiles page, an administrator can:
1: Add a map profile. Adding a new map profile opens the Map Profile Settings page.
2: Edit a map profile. Editing a map profile opens the Map Profile Settings page.
3: Delete a map profile.
The Map Profile Settings page has the following configuration sub-sections:
• Profile Info - contains the map profile name and link to the Initial Map Extent
•Map Services - a list of map service configurations
•Geocoding Services - a list of geocoding service configurations
Note: If a map service is not defined in a map profile, map users will see the default ArcGIS Online
base map. If an initial map extent has been defined for the map profile without a map service, map
users will see configured initial extent of the default ArcGIS Online base map.
The following is a sample Map Profile Settings page:
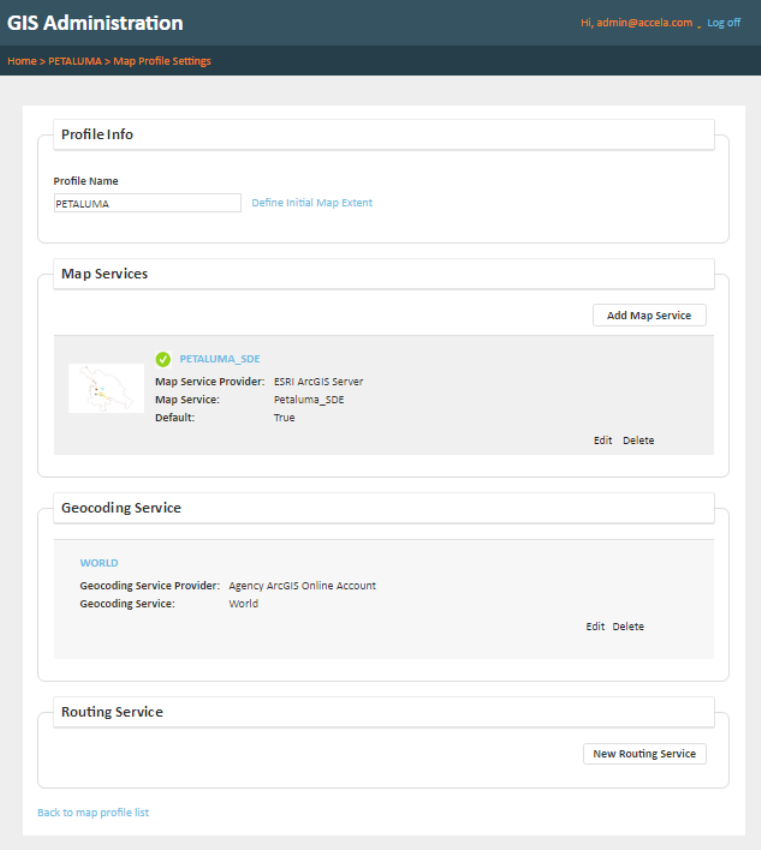
| Configuring Accela GIS | 106
Configuring the Initial Map Extent
Configuring an initial map extent allows an administrator to draw a rectangular area that defines the
initial map extent for the map users. The initial map extent displays as the users' default map view. The
initial map extent configuration on the GIS Administration site avoids the need to rely on the ArcGIS
administrator to define the GIS map extent in Civic Platform.
Default base map
If an agency does not have any configured map profile on the GIS Administration site, or its map profile
does not contain any map service, users will see the ArcGIS online base map as their default initial map
extent.
Defining the initial map extent
The initial map extent on a map service is defined at the map profile level. The following procedure
assumes you already created a map profile for which you want to define an initial map extent.
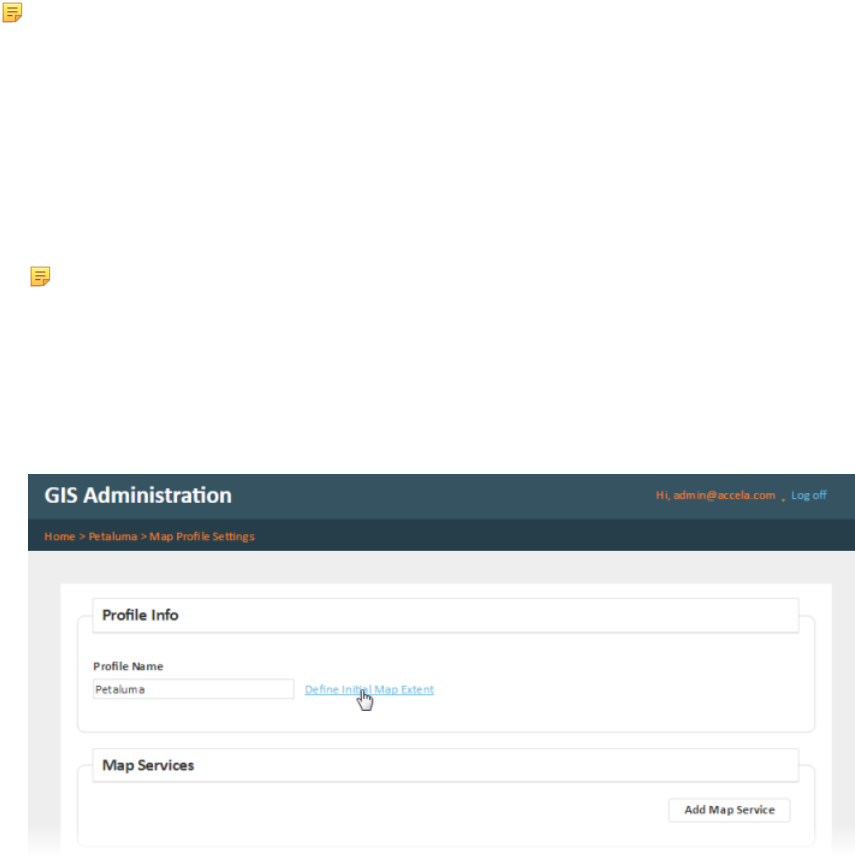
| Configuring Accela GIS | 107
Note: If the map profile does not contain any map service, you can only configure the initial map
extent for the default ArcGIS Online base map, which will display as the map users' default map
view.
To configure the initial map extent:
1. From the agency's Home page, click Integrations to see the list of product integrations.
2. Select the Accela Automation product integration.
3. On the Additional Settings page, un-check the Enable checkbox under Persist Map Status, and click
Save.
Note: If Persist Map Status is enabled, the initial map extent setting will always be overriden
by the user's persisted map settings. To allow users to use the agency's configured initial map
extent, disable Persist Map Status.
4. From the agency's Home page, click Map Profile to see the list of map profiles.
5. Select the map profile you want to configure the initial map extent for.
6. On the Map Profile Settings page, click Define initial map extent:
By default, the Initial Map Extent page shows the Esri ArcGIS Online base map.
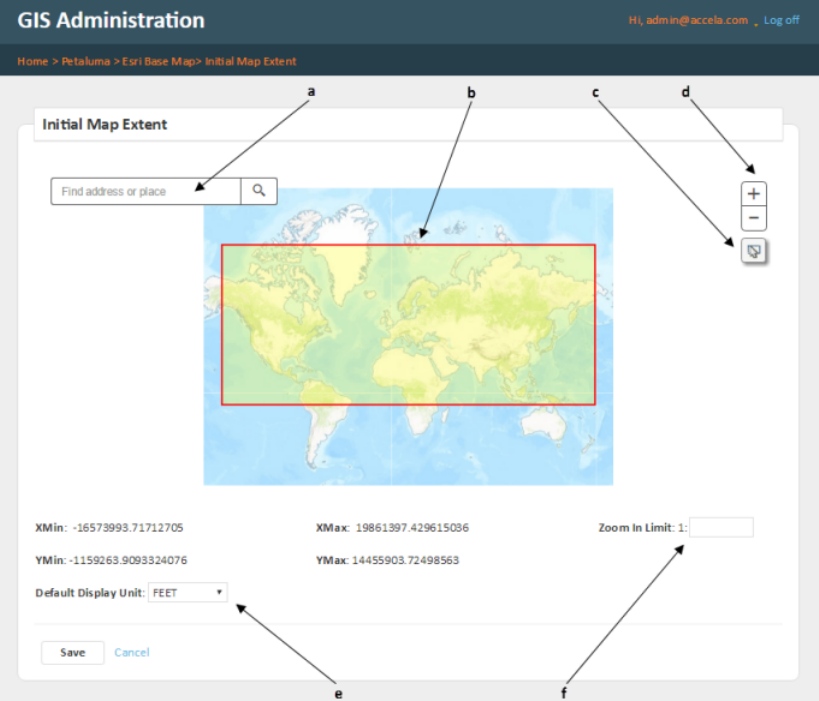
| Configuring Accela GIS | 108
On the Initial Map Extent page, you can:
a: Find and zoom to an address on the map. You can locate an address and use it and its surrounding
area as your initial map extent.
b: Click, drag, and pan the map.
c: Use a rectangular drawing tool to define the area of the initial map extent.
d: Zoom the map in or out. You can also double-click or use the mouse-wheel to zoom in or out.
e: Set the map display unit. This is useful for different map services that require different types of map
projections. For example, the Universal Transverse Mercator linear data unit is in meters while the
California State Plane linear data unit is in feet. The GIS Administrator can decide which unit is more
applicable to the map users. The map scale will automatically adjust to the selected display unit.
f: Restrict the zoom 1:x scale level for map users. Setting this limit restricts map users from zooming in
beyond the specified 1:x scale. The ability to restrict the zoom-in scale is especially important when a
map service publishes sensitive data.
7. After you have configured the above settings, click Save. Or, click Cancel to discard your changes.
Map Services
A map service provides map images, map layers, spatial and geographic information, and related mapping
capabilities. They support geospatial and location-based services. In GIS Admin, map services are
configuration components of a map profile which define access to an agency’s map service providers such
as ArcGIS Server or ArcGIS Online Web Map.
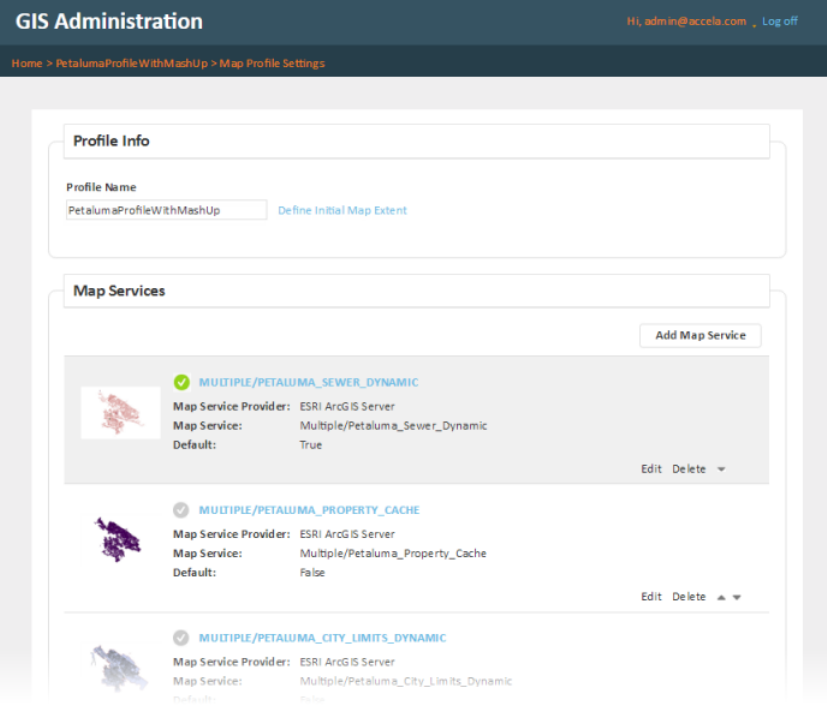
| Configuring Accela GIS | 109
Map service mash-ups
Accela GIS supports the mash-up of multiple ArcGIS Server map services on the map viewer. This allows
a user to see a dynamic mash-up of map layers from multiple ArcGIS Server map services. For example,
an agency user who needs to evaluate airplane noise and safety levels for a proposed airport expansion
project can see a mash-up view of the proposed airport expansion area, existing residential parcels, airline
flight paths and noise levels, each of which come from separate ArcGIS Server map services.
To create a map service mash-up:
1. From the agency's Home page, click Map Profile to see the list of map profiles.
2. Select the map profile that will contain the map service mash-up.
3. On the map profile's Map Services section, add a map service for each service in the mash-up. (See
Managing Map Services for information about adding and configuring map services.)
4. Add any other map service the agency needs to include in the map service mash-up.
By default, the map service that was added last displays on top of the previously added map services.
You can adjust the display order of the map services according to your agency's requirements.
The following example shows a Map Profile Settings page with two map services, virtually creating a
"service mash-up":
5. From the agency's Home page, click Integration to see the list of integrations.
6. Select the product integration for which the map service mash-up will be used.
7. On Integration Settings, click User Groups.

| Configuring Accela GIS | 110
8. Select the user group that will use the map service mash-up. If anyone should be able to use the map
service mash-up, select Default.
9. On the user group's Map Settings section, select the map profile containing the service mash-up.
The following example shows the Default user group page with the assigned map profile containing the
service mash-up:
Note: The map viewer performance might be affected as map services are added to the mash-up. Accela
tested up to four map services with no effect on performance. Additional services may have negative
impact on performance.
Managing Map Services
The following diagram shows the Map Services section on a Map Profile page:
On the Map Services section of a Map Profile page, an administrator can:
1: Add a map service.
If an existing map service provider is ESRI ArcGIS Online, another map service cannot be added. This is
because an ArcGIS Online map service is typically a mash-up of multiple services. Only one ArcGIS Online
map service is supported.
2: Edit a map service.
3: Delete a map service.

| Configuring Accela GIS | 111
Note: For ESRI map services, pre-processed map thumbnails are retrieved from ESRI and
displayed next to the ESRI map services on the Map Services page.
Related Links
Configuring Map Services
Map Service Provider Settings
Configuring Map Services
The Map Service settings vary according to the type of the selected Map Service provider. The following
are the supported Map Service providers:
Map Service Provider Description
ESRI ArcGIS Server Esri's core, on-premise ArcGIS Server map provider.
See Map Service Settings Fields for ESRI ArcGIS Server.
OGC Map Service An Open Geospatial Consortion (OGC) Web Mapping Service (WMS) or Web Feature
Service (WFS) published via AutoDesk Map Guide or other open-source map publishing
server such as GeoServer.
See Map Service Settings Fields for OGC Map Service .
ESRI ArcGIS Online Esri's cloud-based ArcGIS Online map provider. The ArcGIS Online web map might
contain tiled map services for map visualization and feature services for Accela data
querying and integration. You can use ArcGIS Online Web Map to create mash-ups with
dynamic map services published on Esri ArcGIS Server or with image services from
ArcGIS Image Server.
An ArcGIS Online map service is typically a mash-up of multiple services. For this
reason:
• Only one ESRI ArcGIS Online map service is supported.
• An ArcGIS Online map service cannot be added if an ArcGIS Server map service has
already been configured.
See Map Service Settings Fields for ArcGIS Online Web Map.
ESRI Image Server Esri ArcGIS Image Server. Agencies often manage individual images using raster
datasets. It is the simplest way to store a raster, and generally the fastest for smaller
applications. Accela GIS supports an image service that has been published using
ArcCatalog or the ArcGIS for Server manager.
Raster Datasets can have the following file formats:
• TIFF, GRID, Mrsid, JP2000, JPEG, NITF, CADRG, etc
• Geodatabses
Note: The display performance of an ArcGIS Image Server on Accela GIS
largely depends on your agency's network support for the size and usage of the
image server.
See Map Service Settings Fields for ESRI Image Server.
After configuring the Map Service Provider Settings, continue the Map Service configuration with the Map
service layers.

| Configuring Accela GIS | 112
Map Service Provider Settings
This topic describes the map service settings for each supported map service provider type:
•Map Service Settings Fields for ESRI ArcGIS Server
•Map Service Settings Fields for ArcGIS Online Web Map
•Map Service Settings Fields for OGC Map Service
•Map Service Settings Fields for ESRI Image Server
After configuring the map provider connection parameters, you can click the Retrieve Service link to
retrieve the available Map service layers and configure each layer's ID field.
Map Service Settings Fields for ESRI ArcGIS Server
Map Service Provider Choose ESRI ArcGIS Server.
Map Server The ArcGIS Server name or IP address
Port The port number that corresponds to the map server’s IP address. The default port
number for the HTTP server is 80 while the default port number for the HTTPS
server is 443.
Use HTTPS Scheme Indicates whether or not to support HTTPS to communicate between Accela GIS
Server and ArcGIS Image Server.
Instance The server instance. The default value that populates this field is arcgis.
User Name The ArcGIS Image Server user name.
For more information about how to configure ArcGIS server security, see
"Configuring ArcGIS Server security" on the ArcGIS Resources web site.
Password The ArcGIS Image Server password.
For more information about how to configure ArcGIS server security, see
"Configuring ArcGIS Server security" on the ArcGIS Resources web site.
Retrieve Service Click this link to see a list of map services on the Map Service drop-down list and to
retrieve map service information from your map provider.
Map Service If you retrieve a map service from ArcGIS Image Server, this drop-down list
populates with map services that you have published to the root folder or its
subfolders in ArcGIS Server. Select a map service from the drop-down list.
For more information about how to publish map services in ArcGIS Server, see
“Setting up Map Functionality” in the Accela GIS for ArcGIS Server Configuration
Guide.
Default This check box applies to agencies that use multiple map services to create map
mashups in one integration environment.
Mark this check box to set a map service as the default. When you mark this check
box, common settings, such as the initial extent of the selected map service, display
in the map viewer.
If your agency uses map services from ArcGIS Server and Bing Maps or from
ArcGIS Server and ArcGIS Online Base Map, set an ArcGIS Server map service as
the default map service. You cannot set a map service from Bing Maps or ArcGIS
Online Base Map as the default map service in an integration environment with the
map mashups. Only one map service can be the default.

| Configuring Accela GIS | 113
Note: In a map service, sets of raster (imagery) and vector (feature) data can be consolidated into
layers, and can be made available as one web service. User can add data from ArcGIS Server
as either map service layers or feature layers. Map service layers encapsulate all the data within
a map service and use the symbology that is defined by the service. A feature layer, on the other
hand, corresponds to one dataset or layer within a map service, and allows you to define its
symbology and other properties. To configure a map service containing vector and image datasets,
setup and publish the vector and image datasets on ArcGIS Server. For details, see Esri's ArcGIS
Server documentation.
Map Service Settings Fields for OGC Map Service
Map Service Provider Choose OGC Map Service.
OGC WMS Service The web mapping service URL for an Open Geospatial Consortium map provider.
The web mapping service URL must come from the same data source as the web
feature service URL.
OGC WFS Service The web feature service URL for an Open Geospatial Consortium map provider.
The web feature service URL must come from the same data source as the web
mapping service URL.
Retrieve Service Click this link to see a list of map services on the Map Service drop-down list and to
retrieve map service information from your map provider.
Default This check box applies to agencies that use multiple map services to create map
mashups in one integration environment.
Mark this check box to set a map service as the default. When you mark this check
box, common settings, such as the initial extent of the selected map service, display
in the map viewer.Only one map service can be the default.
Map Service Settings Fields for ArcGIS Online Web Map
Map Service Provider Choose ESRI ArcGIS Online.
User Name If you are using ESRI ArcGIS Online Web Map as the map provider, enter the
agency's subscription user account for ArcGIS Online.
Password The agency's subscription account password for ArcGIS Online Web Map.
Retrieve Service Retrieves the list of your published web maps from ArcGIS Online and populates
the Map Service drop-down list. See Map service layers.
Map Service A dropdown list that displays the web maps that you have published to ArcGIS
Online. Select a web map as the map service.
Map Service Settings Fields for ESRI Image Server
Map Service Provider Choose ESRI Image Server.
Map Server The ArcGIS Image Server name or IP address
Port The port number that corresponds to the map server’s IP address. The default port
number for the HTTP server is 80 while the default port number for the HTTPS
server is 443.
Use HTTPS Scheme Indicates whether or not to support HTTPS to communicate between Accela GIS
Server and ArcGIS Image Server.
Instance The server instance. The default value that populates this field is arcgis.

| Configuring Accela GIS | 114
User Name The ArcGIS Image Server user name.
For more information about how to configure ArcGIS server security, see
"Configuring ArcGIS Server security" on the ArcGIS Resources web site.
Password The ArcGIS Image Server password.
For more information about how to configure ArcGIS server security, see
"Configuring ArcGIS Server security" on the ArcGIS Resources web site.
Retrieve Service Clicking this link retrieves map service information from your map provider, and
populates theMap Service drop-down list.
Map Service If you retrieve a map service from ArcGIS Server, this drop-down list populates with
map services that you have published to the root folder or its subfolders in ArcGIS
Image Server. Select a map service from the drop-down list.
For more information about how to publish map image services in ArcGIS Server,
see “Publishing image services” on the ArcGIS Resources web site.
Default Applies to agencies using multiple map services to create map mashups in one
integration environment.
Mark this check box to set a map service as the default. When you mark this check
box, common settings such as the initial extent of the selected map service display
in the map viewer.
Map service layers
The Retrieve Service link on the Map Service Settings page retrieves the map services that are available
from the configured map service provider, and displays the map services on the Map Service dropdown
list.
When you select a Map Service, its map layers are listed. Each map layer has an ID field dropdown
list which displays the layer's available attribute fields. By default, the ID Field dropdown value is set to
OBJECTID, which indicates that Accela GIS uses the default ID on the map layer.
When you select an ID Field for a map layer:
• You specify the field within the geodatabase feature class table that you want to map to the Accela GIS
database. Accela GIS uses the ID field value to create the GIS object on the Accela GIS database.
• The ID Field connects the map layer in your map provider’s geodatabase to the Accela GIS database.
For example, if you select HYDRANT as the ID Field for Hydrants (as illustrated in Figure 6: Map
service layers and their ID fields), then objects in the Hydrants map layer are identified by the
HYD_NUMBER field in the Accela GIS database.
• The ID Field values for each feature class in the geodatabase must be unique and fixed.
• The ID Field value will be automatically displayed when a map user selects or edits a GIS object on the
map layer.
• The ID Field value is required on the GIS Object information panel.
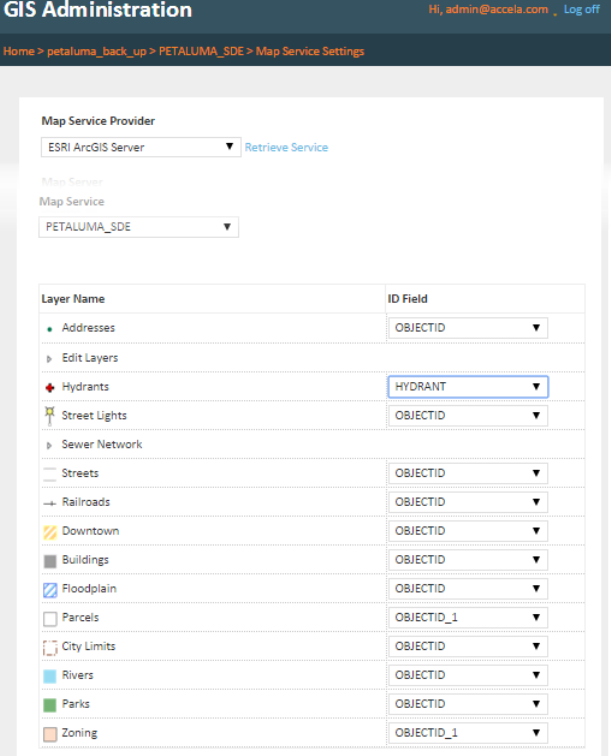
| Configuring Accela GIS | 115
Figure 6: Map service layers and their ID fields
The map layers from the configured map service become available, visible, and/or editable to the Accela
GIS users according to the Integration > User Groups settings.
Display Order of Map Services
The display order of map services dictates how map users see the map layers of the map service mash-
ups. By default, the map service that was added last appears on top of the previously added map service.
To change the display order of the map services:
1. From the agency's Home page, click Map Profiles to see the list of map profiles.
2. Select the map profile you want to reorder the map services for.
3. On the Map Profile Settings page, for the map service you intend to reposition, click the up-arrow to
move the service up or click the down-arrow to move it down. For example:
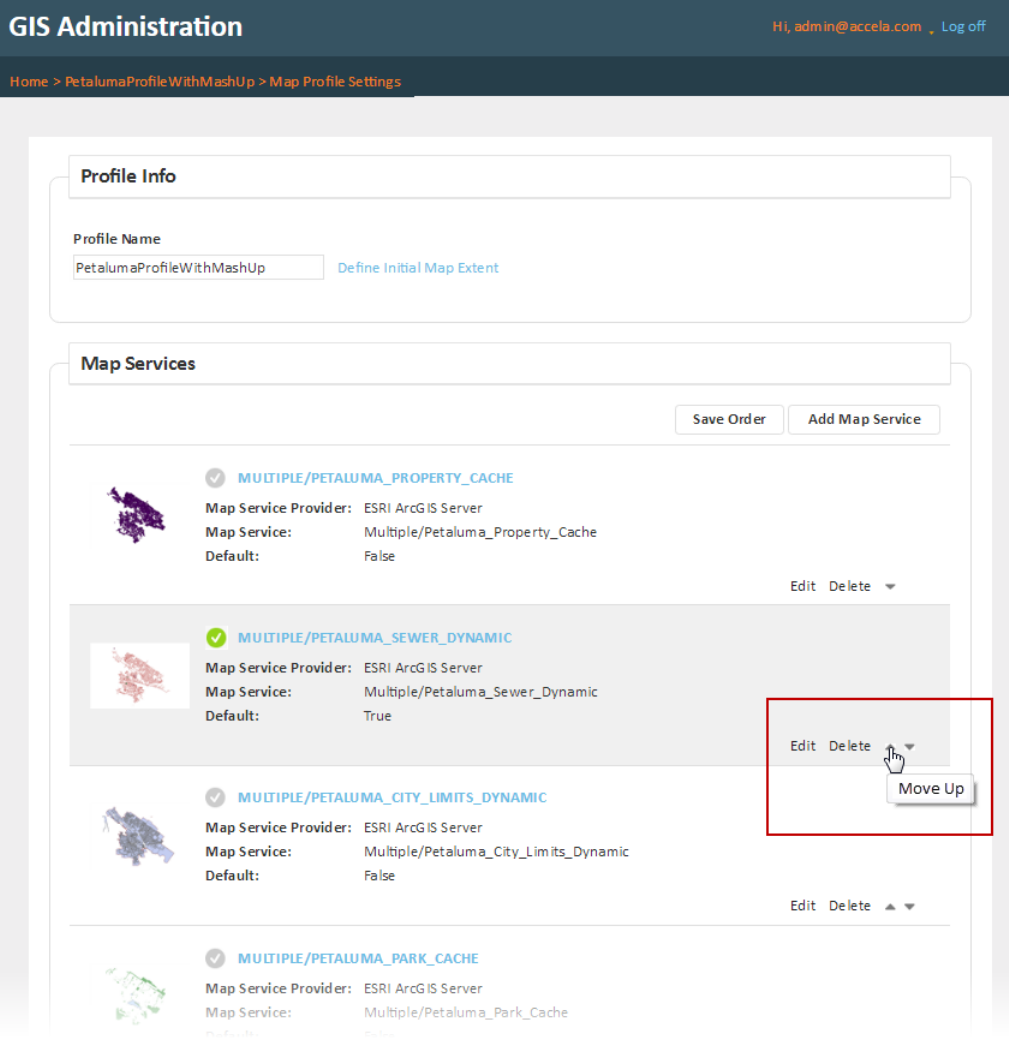
| Configuring Accela GIS | 116
4. After you are done re-arranging the map service order, click Save Order. For example:
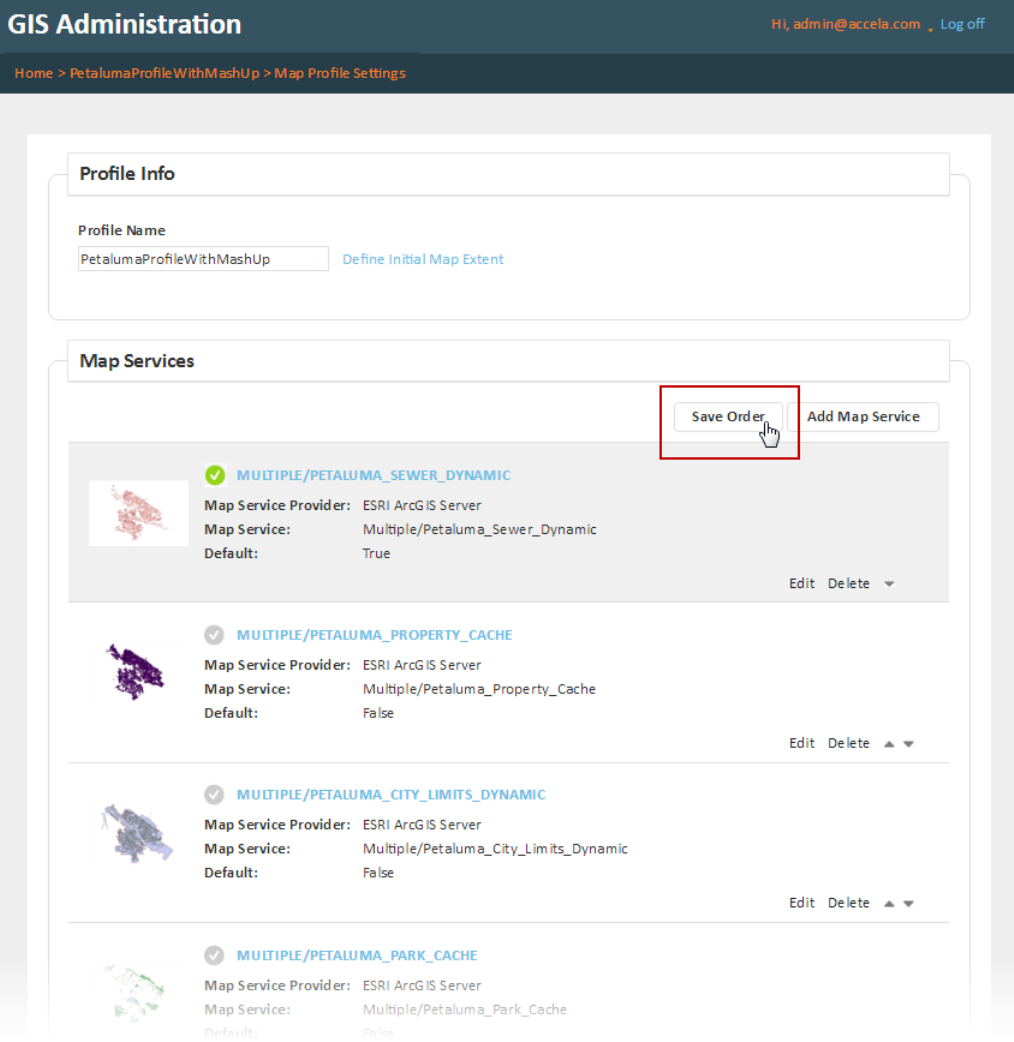
| Configuring Accela GIS | 117
Geocoding Services
A geocoding service controls the visualization of location attributes on a map. For example, a geocoding
service is responsible for displaying addresses as street number ranges along street centerlines. If the
agency plans to use geocoding in a product integration environment, configure a geocoding service.
Optionally, if you plan to use geocoding in your map integration environment, you can use the Geocoding
Service section to retrieve a geocoding service. The geocoding service provider can be ArcGIS Server,
ArcGIS Online, or a custom geocoding web service. For information about integrating a custom geocoding
web service, see Accela GIS Geocoding Web Service Integration Guide. Contact Accela Customer
Support for this supporting document.
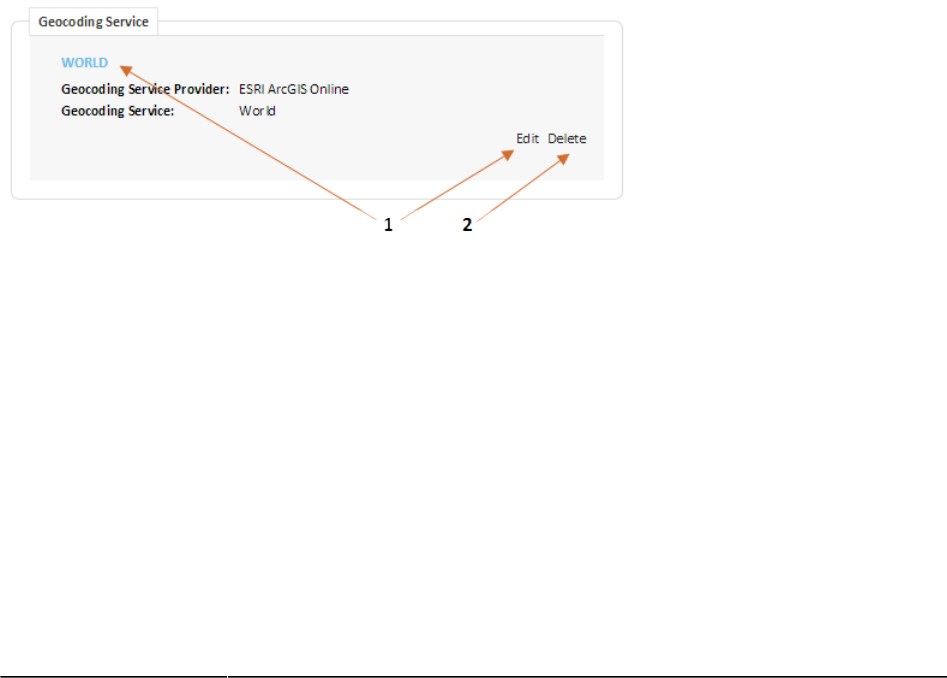
| Configuring Accela GIS | 118
The geocoding service you select can be different from the default map service. For example, you might
want to use ArcGIS Online for geocoding and an ArcGIS Server map service for mapping, visualization,
and layer interaction.
Managing the Geocoding Service
The following diagram shows the Geocoding Service section on a Map Profile page:
On the Geocoding Service section of a Map Profile page, an administrator can:
1: Edit a geocoding service.
2: Delete a geocoding service.
The New Geocoding Service button (not shown above) only appears if the Map Profile does not yet have a
geocoding service. Only one geocoding service can be configured in a Map Profile.
Related Links
Configuring Geocoding Services
Geocoding Service Provider Settings
Configuring Geocoding Services
An administrator configures a geocoding service either when adding or editing a Geocoding Service. The
Map Service settings vary according to the type of the selected Geocoding Service provider. The following
are the supported Geocoding Service providers:
ESRI ArcGIS Server Use ESRI ArcGIS Server for online mapping in Civic Platform, Mobile Office, and Citizen
Access.
For settings specific to ESRI ArcGIS Server, see Geocoding Service Settings Fields for
ESRI ArcGIS Server.
OGC Map Service Select this option if your agency uses a geocoding service that meets the Open
Geospatial Consortium (OGC) Web Mapping Service (WMS) and the Web Feature
Service (WFS) Interface standards.
For settings specific to OGC Map Service, see Geocoding Service Settings Fields for
OGC Map Service. For information about OGC map service configuration, see Accela
GIS 7.3 Open Geospatial Consortium (OGC) Map Service Configuration Guide.
Accela ArcGIS Online Select this option if you want to use Accela's complimentary ArcGIS Online account as
the geocoding service provider.
The web map might contain tiled map services for map visualization and feature services
for Accela data querying and integration. You can use ArcGIS Online Web Map to create
mash-ups with dynamic map services that you publish to Esri ArcGIS Server or with
image services from ArcGIS Image Server.
For settings specific to ESRI ArcGIS Online, see Geocoding Service Settings Fields for
Accela ArcGIS Online Account.

| Configuring Accela GIS | 119
Note: The Find Address (or place locator) widget on the map viewer always
uses ArcGIS Online, regardless of the geocoding service configuration. The
configured geocoding service is used when a user clicks anywhere else on the
map viewer.
Agency ArcGIS Online Select this option if you want to use your agency's ArcGIS Online account as the
geocoding service provider, for which you will need to provide your agency's ArcGIS
Online account's username and password.
The web map might contain tiled map services for map visualization and feature services
for Accela data querying and integration. You can use ArcGIS Online Web Map to create
mash-ups with dynamic map services that you publish to Esri ArcGIS Server or with
image services from ArcGIS Image Server.
For settings specific to ESRI ArcGIS Online, see Geocoding Service Settings Fields for
Agency ArcGIS Online Account.
Note: The Find Address (or place locator) widget on the map viewer always
uses ArcGIS Online, regardless of the geocoding service configuration. The
configured geocoding service is used when a user clicks anywhere else on the
map viewer.
Geocoding Service Provider Settings
Geocoding Service Settings Fields for ESRI ArcGIS Server
The following lists show the Map Service settings by provider type:
Geocoding Service Provider ESRI ArcGIS Server
Geocoding Server The Geocoding ArcGIS Server name or IP address.
Port The port number that corresponds to the geocoding server’s IP address. The default
port number for the HTTP server is 80 while the default port number for the HTTPS
server is 443.
Use HTTPS Scheme Indicates whether or not to support HTTPS to communicate between Accela GIS
Server and ArcGIS Server.
Instance The server instance. The default value that populates this field is arcgis.
User Name If you select ESRI ArcGIS Server as the geocoding service provider, this field is
optional. Enter the user name for the geocoding service published to the ArcGIS
Server.
Password If you select ESRI ArcGIS Server as the geocoding service provider, this field is
optional. Enter the password for the geocoding service published to the ArcGIS
Server.
Retrieve Service Click this link to retrieve geocoding service information from your geocoding service
provider.
Geocoding Service When you click the Retrieve Services link, this drop-down list populates with the all
the geocoding services set up on your geocoding server.
Geocoding Service Settings Fields for OGC Map Service
Geocoding Service Provider OGC Map Service

| Configuring Accela GIS | 120
OGC WMS Service The web mapping service URL for an Open Geospatial Consortium map provider.
The web mapping service URL must come from the same data source as the web
feature service URL.
OGC WFS Service The web feature service URL for an Open Geospatial Consortium map provider.
The web feature service URL must come from the same data source as the web
mapping service URL.
Retrieve Service Click this link to retrieve geocoding service information from your map provider.
Geocoding Service Settings Fields for Accela ArcGIS Online Account
Geocoding Service Provider Accela ArcGIS Online Account
Retrieve Service Click this link to retrieve geocoding service information from your geocoding service
provider.
Geocoding Service When you click the Retrieve Services link, this drop-down list shows the geocoding
services available with the complimentary Accela ArcGIS Online account such as
World.
Geocoding Service Settings Fields for Agency ArcGIS Online Account
Geocoding Service Provider Agency ArcGIS Online Account
User Name If you select Agency ArcGIS Online Account as the geocoding service provider, this
field is required. Enter the user name for the ArcGIS Online server. Please contact
Esri to obtain a user account.
Password If you select Agency ArcGIS Online Account as the geocoding service provider, this
field is required. Enter the password for the ArcGIS Online server. Please contact
Esri to obtain a user account.
Geocoding Service When you click the Retrieve Services link, this drop-down list populates with the
all the geocoding services set up on your geocoding server. If you select ArcGIS
Online as the geocoding server, this drop-down list populates with the ArcGIS
Online geocoding services such as World.
Retrieve Service Click this link to retrieve geocoding service information from your geocoding service
provider.
Product Integrations
A product integration (or “integration”) is a collection of configuration settings that integrate your agency’s
GIS services with a product environment such as Civic Platform. In addition to product environment
settings, an integration includes one or more user group configurations that define settings according to
a user group’s functions. A user group can use one of the Map Profiles with configured service mash-ups
that provide map layers and GIS data. Multiple user groups can be assigned unique map profiles or can
share the same map profile, depending on the group’s role and requirements.
Managing Integrations
The following diagram shows a sample Integrations page:
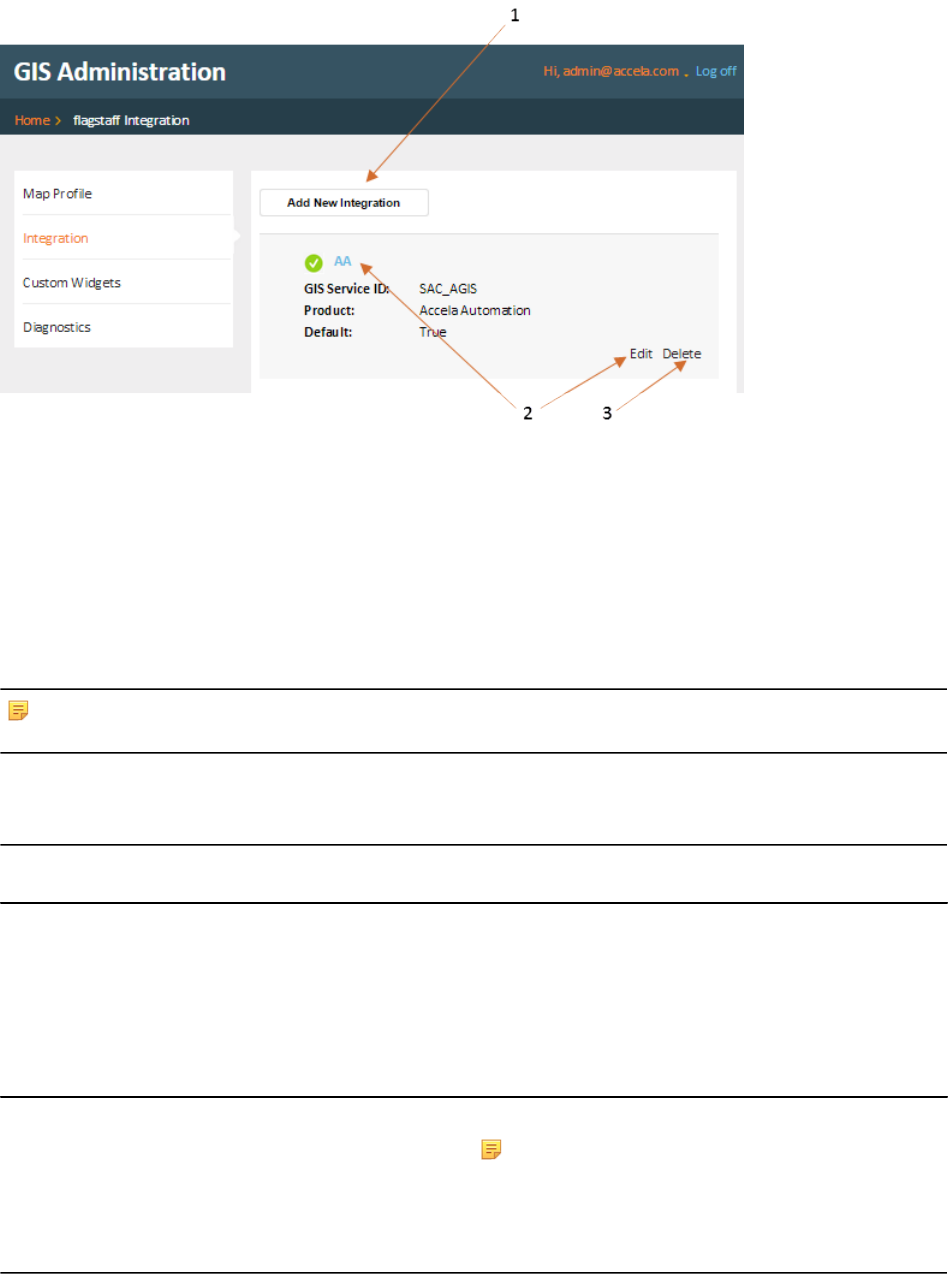
| Configuring Accela GIS | 121
On the Integrations page, an administrator can:
1: Add an integration.
2: Edit an integration.
3: Delete an integration.
Integration Environment
Integration environment settings define parameters for connecting to the product environment.
Note:
Accela GIS 8.x supports product integration with Civic Platform and Citizen Access.
Environment Integration Settings
Integration Name The descriptive name of the product integration
environment. For example, Bridgeview .
AA GIS Service ID The service ID.
For Civic Platform integration, this should match
the GIS Service ID defined in Civic Platform Classic
Administraton.
For Citizen Access integration, this should match the GIS
Service ID specified on the Citizen Access Administration
site.
Product The product to integrate with Accela GIS.
Note:
For Civic Platform (8.x), choose "Accela
Automation".
For Citizen Access (8.0.1 and later), choose
"Citizen Portal".

| Configuring Accela GIS | 122
Application Server URL The business application serverURL. For example,
http://<host>:3080 where <host> represents
your agency’s business application server name.
Automation User Name A valid Civic Platform user name. uses the username to
connect to the Application Server.
Automation Password The password for the Civic Platform user name.
Default If checked, this integration displays by default
Test Connection Click the Test Connection link to test the server
connection using the server URL and account information
you provided. If Accela GIS successfully connected to
the specified server URL using the account information,
a confirmation message is displayed. Otherwise, consult
with the Accela product administrator to ensure the
connection parameters are correct.
Dynamic Themes
A dynamic theme is a dynamic set of geographic features, which is a result of a query on Civic Platform
and GIS data. As the data in Civic Platform changes, the results of these queries change accordingly. For
example, if your agency performs routine safety inspections on buildings in an area, a dynamic theme can
show users which buildings have been inspected and which have not, or the dynamic theme can let you
see the results of the safety inspections.
The GIS Admin site allows an agency administrator to:
• Retrieve configured dynamic themes from Civic Platform
• Customize the map symbology of dynamic themes for an integration environment
• Set the availability and visibility of the dynamic themes for a user group
Dynamic themes are defined in Civic Platform administration. For details about how to configure dynamic
themes, see Configuring Dynamic Themes in Civic Platform.
Retrieving and Configuring Dynamic Themes in Accela GIS (JavaScript version)
To retrieve and edit dynamic themes in Accela GIS:
1. Login the GIS Admin site.
2. From the agency's home page, click Integrations.
3. On the list of integrations, select a Civic Platform integration.
4. On the Civic Platform integration page, click Dynamic Themes.
5. Click Retrieve Dynamic Themes to display all dynamic theme definitions from Civic Platform.
6. Customize the map symbology or display properties of the dynamic theme. The following diagram
shows a sample Dynamic Themes page with the dynamic themes' display properties:
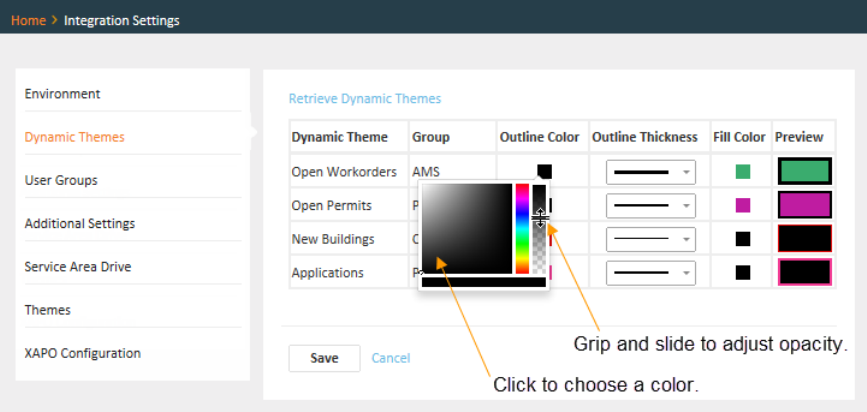
| Configuring Accela GIS | 123
• To customize the outline color and opacity for a specific dynamic theme, click its Outline Color icon.
• To customize the outline thickness for a specific dynamic theme, select the width from its line Outline
Thickness dropdown list.
• To customize the fill color and opacity for a specific dynamic theme, click its Fill Color icon using the
color picker and opacity slider widgets.
7. Click Save.
To set the availability and visibility of dynamic themes in GIS user groups:
1. On the Civic Platform integration page, click User Groups.
2. Select the user group to assign dynamic themes to.
3. Under the Map Settings pane, find the dynamic theme rows which are organized by the theme groups.
The following diagram shows a sample User Group page with the dynamic themes map settings:
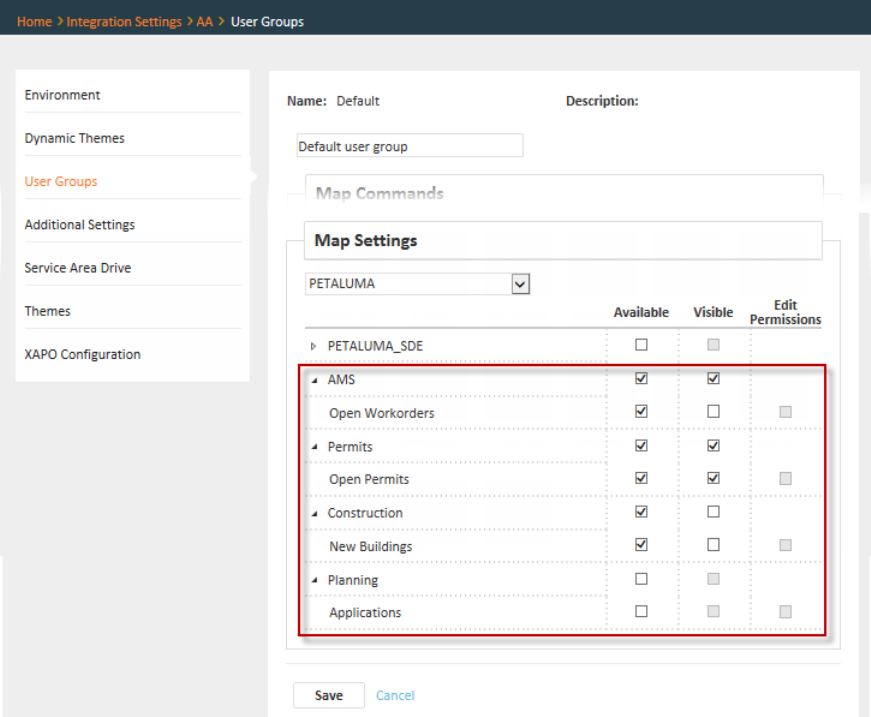
| Configuring Accela GIS | 124
• To make the dynamic theme available to the user group, mark the Available checkbox for that
dynamic theme layer. If a dynamic theme is marked as available, an end-user sees the dynamic
theme on the Layers widget and has the ability to show or hide the dynamic theme.
• To make the dynamic theme visible by default to the user group, mark the Visible checkbox for that
dynamic theme layer. If a dynamic theme is marked as visible, and the dynamic theme appears on
the Layers widget by default. An end-user can choose to hide it.
4. Click Save.
User Groups
User group settings define parameters that enable user group members to perform map commands, use
map widgets, and view/edit map layers. A product integration can have multiple user groups, each with a
set of permission settings according to the user group’s role and responsibilities. For example, a Building
user group can access one set of map commands, widgets, and map layers while a Planning user group
can access a different set of map commands, widgets, and layers.
When an administrator adds an integration, a default user group is automatically created. The Default
user group contains the default permissions for all map viewer users. The administrator must edit the
Default user group settings to assign the appropriate default user permissions. The administrator can
add user groups to grant custom permissions to different user groups according to the groups’ roles and
responsibilities.
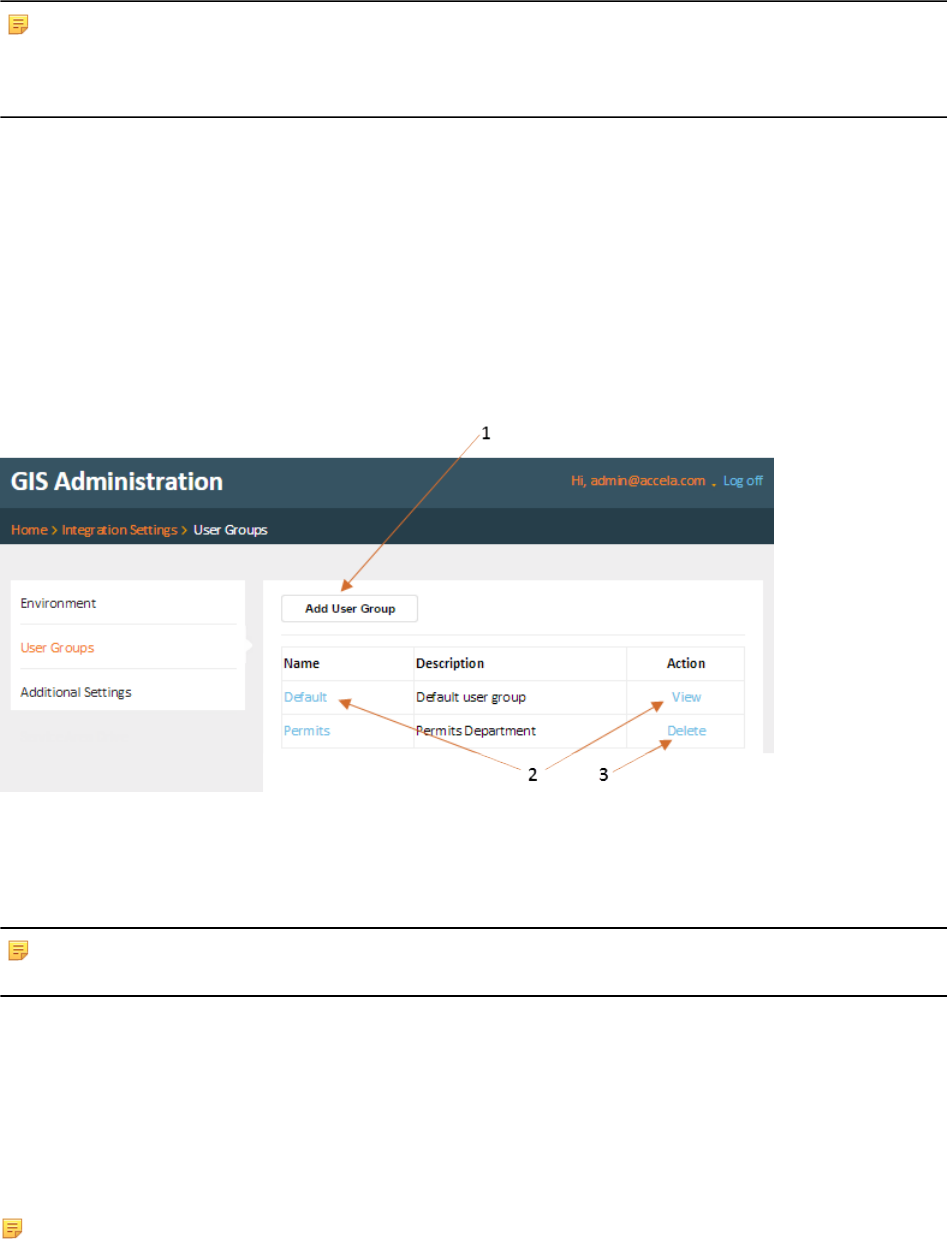
| Configuring Accela GIS | 125
Note:
In Civic Platform, a user can only belong to one user group per Civic Platform module. If a user belongs to
multiple user groups that have been configured for the Civic Platform product integration, the user group
permissions for the active Civic Platform module applies.
Topics:
•Managing User Groups
•Creating User Groups
•Configuring User Groups
Managing User Groups
The following diagram shows a sample User Groups page:
On the User Groups section of a product integration page, an administrator can:
1: Add a user group.
2: Configure the Default user group, or edit a user group.
3: Delete a user group.
Note:
The Default user group cannot be deleted.
Creating a User Group
A user group can be created to override the Default user group permissions and assign a specific set of
permissions according to the user group's role. A GIS user group can contain at least one user group that
has been defined in Civic Platform. When creating a GIS user group, you can click the Retrieve link to
retrieve all Civic Platform user groups. You can select from the list of retrieved user groups to add to the
GIS user group.
Note: A Civic Platform user group can only be included in one GIS user group. If a Civic Platform
user group has already been included in a GIS user group, that Civic Platform user group will be
disabled and cannot be selected from the list of retrieved user groups.
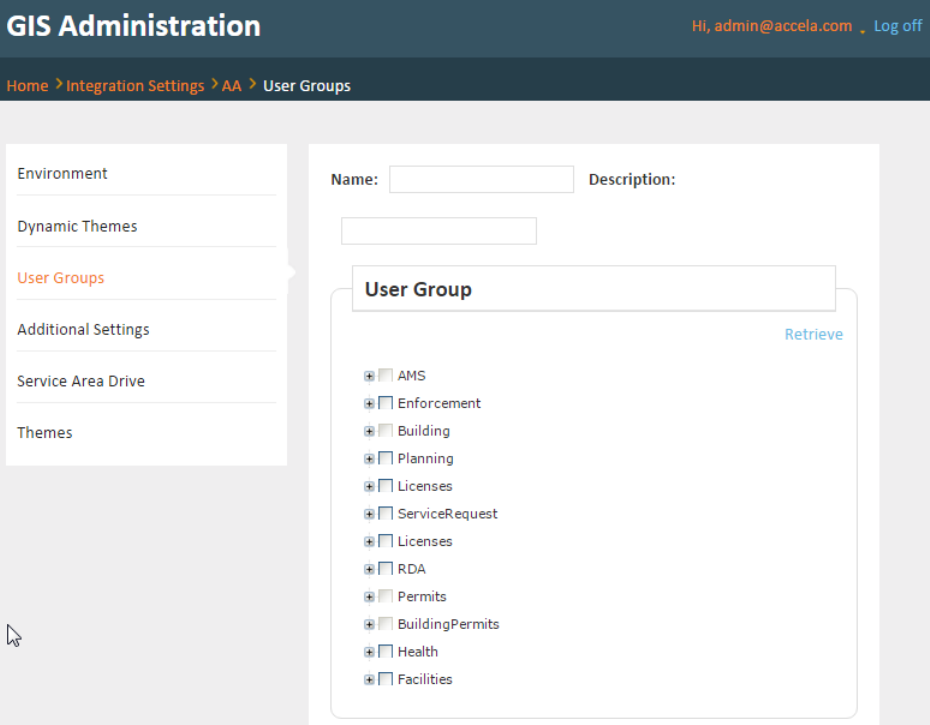
| Configuring Accela GIS | 126
The following diagram shows the Add User Group page with a sample list of retrieved Civic Platform user
groups. In this example, the groups AMS, Building, Permits, and BuildingPermits cannot be selected
because they already have been added to other GIS user groups:
Configuring a User Group
An administrator configures a user group either when adding or editing a user group. A user group
configuration consists of settings for:
•Map Commands
•Map Widgets
•Map Layer Settings
Map Commands
The Map Commands section allows the administrator to enable or disable map commands for the user
group. The available map commands and the default configuration for each map command vary depending
on the agency’s Civic Platform configuration.
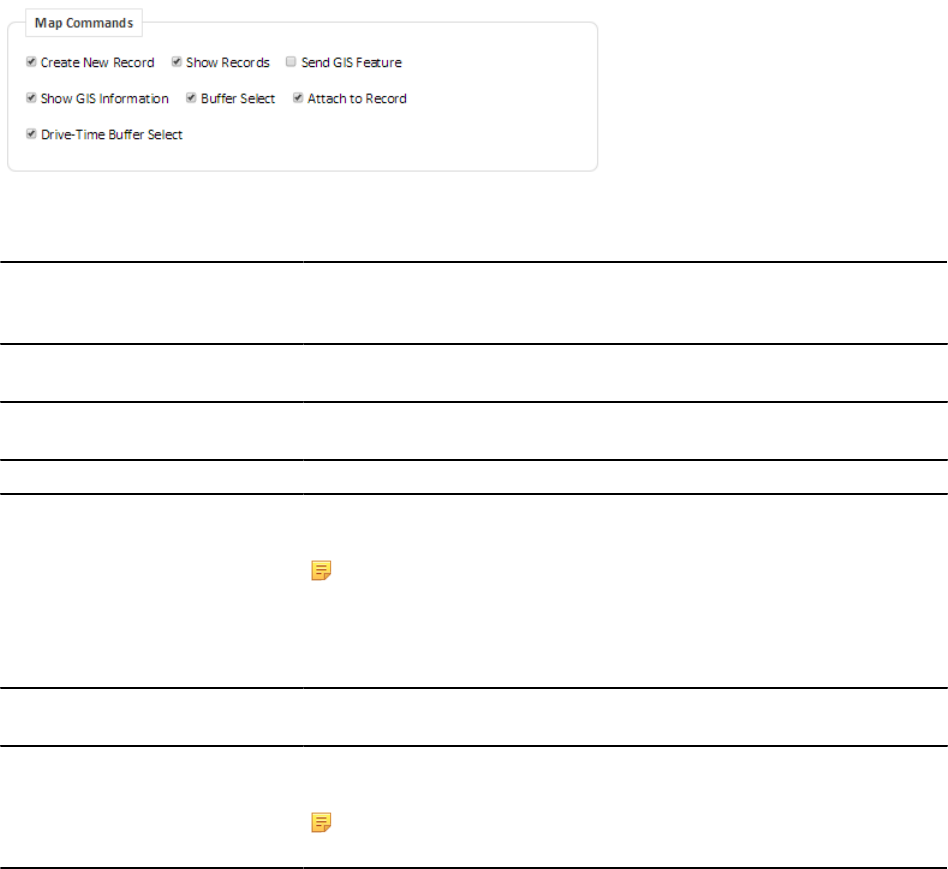
| Configuring Accela GIS | 127
The following table describes the map commands available in 8.x:
Table 17: Group Personalization Map Command Fields
Create New Record When you enable this command, users can create records from the map
viewer. For example, a field worker might want to create a record for a parcel
and request an inspection.
Show Records When you enable this command, users can view the Civic Platform record for
the selected GIS object on the slide-out panel.
Send GIS Feature When you enable this command, users can send a GIS feature to Civic
Platform.
Show GIS Information When you enable this command, users can view GIS object attributes.
Buffer Select When you enable this command, users can specify a distance buffer from a
map location to identify objects within a specific proximity to another object.
Note:
Buffering requires an ArcGIS Server geometry service. For more
information about geometry services, see “Publishing Services” in the
Setting Up Map Functionality chapter of the Accela GIS for ArcGIS
Server Configuration Guide.
Attach to Record When you enable this command, users can attach GIS objects to the current
record in Civic Platform.
Drive-Time Buffer Select When you enable this command, users can specify the number of driving
minutes to identify objects within a specific proximity to another object.
Note:
Drive-time buffering requires an ArcGIS Online service.
Map Widgets
A map widget is a tool that facilitates a specific function or task on a map. The Map Widgets section allows
the administrator to enable or disable map widgets for the user group. The available map widgets include
out-of-the-box Accela GIS widgets and custom widgets.
To enable or disable a map widget for a user group, check or uncheck its corresponding checkbox. Map
widgets without a checkbox are always available to users and are non-configurable.
The following diagram shows the Map Widgets section. In this example, MyLocation is a custom widget:
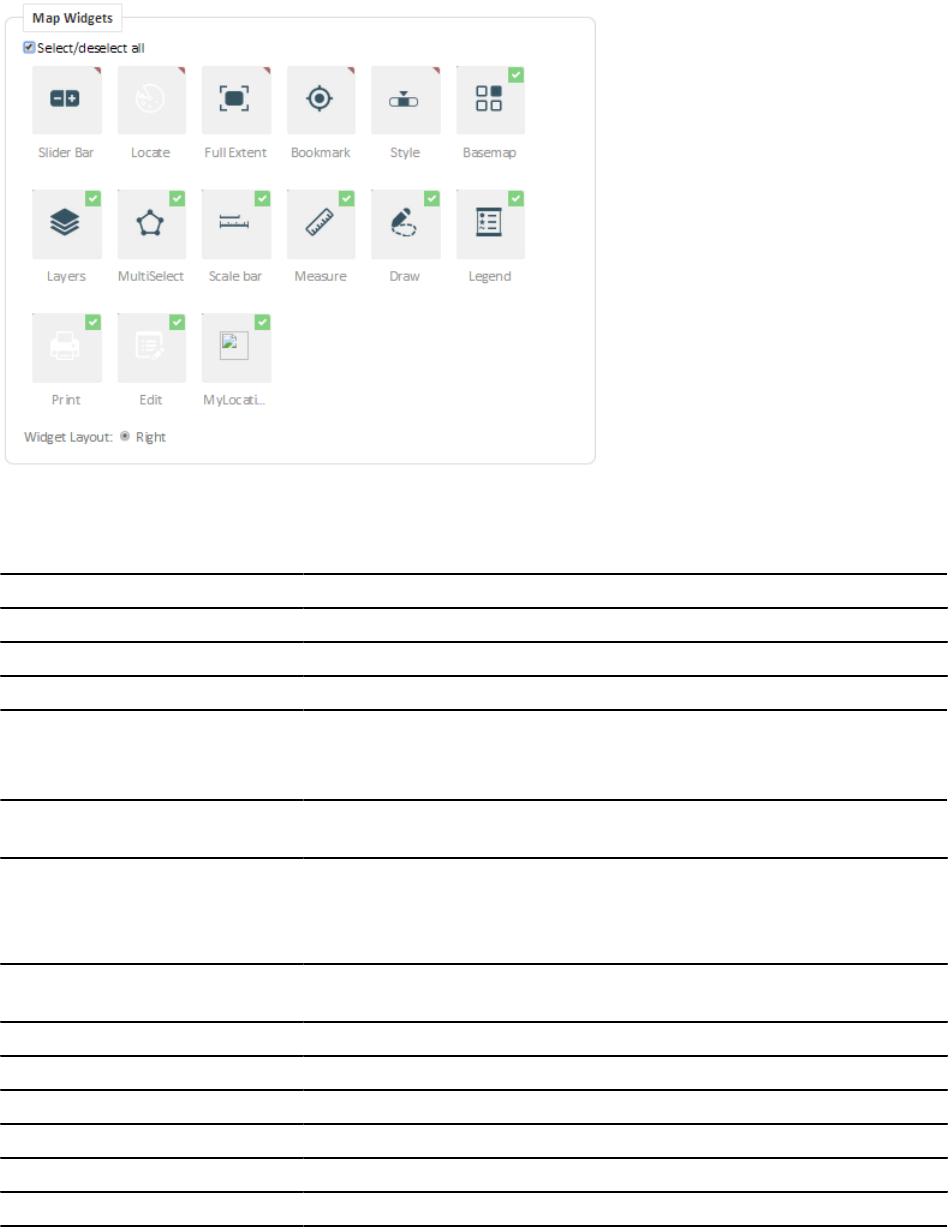
| Configuring Accela GIS | 128
The following table describes the out-of-the-box widgets. These widgets are always available and visible to
users.
Table 18: Non-configurable standard widgets
Slider Bar Zooms in and out.
Full Extent Resets the map display to the agency’s default location.
Bookmark Used for bookmarking locations and using the browser current location.
Style Displays cluster markers, heat map, or pin map.
The following table describes the configurable widgets which can be enabled or disabled for users.
Table 19: Configurable standard widgets
Basemap Shows a basemap gallery which allows users to choose a geographical
background.
Layers Shows the available and visible map layers provided by the map service. The
Layers panel allows users to manipulate the display of the map layers. Similar
to the Map Widget settings, the Map Layer Settings are configured on the User
Group page.
MultiSelect Selects multiple points on the map to allow users to select multiple GIS objects
for data viewing and analysis.
Scale bar Shows the map scale, as provided by the map service.
Measure Used for bookmarking locations and using the browser current location.
Draw Used for map redlining and annotations.
Legend Describes the symbols used on the map.
Print Exports the current map to a selected format.
Edit Used for editing and creating GIS objects on map layers.

| Configuring Accela GIS | 129
Map Layer Settings
The Map Settings section allows an administrator to enable or disable the availability, visibility, and
editability of map layers for the user group. The administrator must choose a map profile for the user
group. A map profile provides a mashup of map layers from various GIS service providers that have been
configured for the map profile. After the administrator selects a map profile, all map services and their
corresponding map layers display in a collapsible list.
Each map layer shows the permission attributes that apply to the user group members. To enable or
disable map layer attributes for a user group, check or uncheck the corresponding checkboxes for
the appropriate map layers. Checking a permission at the map service level automatically checks the
permissions for all its map layers. You can selectively uncheck or restrict any map layer from that map
service. Similarly, you can uncheck a permission at the map service level, and selectively check the
appropriate map layer(s) below it.
The following map layer permissions can be enabled or disabled:
Table 20: Map Layer attributes
Available Determines whether or not the user group members have the ability to enable
or disable the visibility of the map layer on the map viewer.
When an administrator checks the Available checkbox for a map layer, the
other permissions for that map layer can be set. If the Available checkbox is
not checked, the other permissions cannot be set.
Note that checking the Available checkbox does not allow the user group
members to see the map layer by default. It simply gives the user group
members the ability to show or hide the map layer on the map viewer (by
selecting or un-selecting it on the Layers widget).
To make the map layer visible to the user group members by default, check the
map layer’s Visible checkbox.
Visible Determines whether or not the map layer is visible on the map viewer.
An administrator cannot set the Visible checkbox unless the Available
checkbox is enabled. If the Visible checkbox is checked, the user group
members can see that map layer by default.
Note: This configuration defines the initial visibility setting for map
users. Map users can customize their own map layer Visible attributes
on the map Layers widget.
Edit Permissions Determines whether or not specified user group members can edit the map
layer.
When an administrator checks the User link under the Edit Permissions column
for a map layer, the administrator can assign individual edit permissions to the
group users.
Note:
To enable Edit Permissions configuration, the administrator must
enable the Create, Update, and Delete feature access operations on
the ArcGIS server. On the ArcGIS server administration site, go to
Capabilities > Feature Access > Operations allowed. Enable the
Create, Delete, and Update operations.
Additional Settings
The Additional Settings page contains miscellaneous configuration settings that can be defined for the
user group:
Persist Map Status If enabled, product integration users will view the map with the same extent
and the same layer visibility as that of their previous map session. This also
allows map users to keep their last map view and layer settings when they

| Configuring Accela GIS | 130
switch modules in Civic Platform. See Persisting Map Views and Layer
Settings.
If disabled, the map view will be reset with the default extent and default layer
visibility. By default, Persist Map Status is disabled.
Accela Parcel Layer Mapping Not currently used.
Feature Count Sets the maximum feature count for retrieving XAPO GIS features. If not set,
the default is 200.
Other miscellaneous integration settings:
•Service Area Drive - This setting is available from the Service Area Drive option from the left
navigation pane of the Integration Settings page. Service Area Drive defines the default drive time
(in minutes) for the Drive-Time Buffer Select map command, which allows user to find GIS objects
within the specified driving time originating from the selected map location. This setting requires ArcGIS
Online.
•Themes - Currently, only the default map theme is used.
Persisting Map Views and Layer Settings
A user belonging to multiple Civic Platform user groups with access to different Civic Platform modules can
see different map views based on the Accela GIS user group permissions. In Accela GIS Administration,
a GIS user group is defined by leveraging Civic Platform user group memberships, and map layer
permissions are assigned per GIS user group. Accela GIS 9.1.0 introduces the ability to persist a user's
map view and layer settings across multiple Civic Platform modules.
In the following illustration, suppose a back-office user has access to the Permits, Enforcement, and
Buildings Civic Platform modules, and respectively belongs to the Permits Admin, Enforcement Admin, and
Buildings Admin user groups. In Accela GIS Administration, the Permits Admin, Enforcement Admin, and
Buildings Admin user groups have been assigned their own map profile along with layer availability and
visibility permissions. Since the user belongs to all three user groups, when he switches modules across
Civic Platform, he sees the map view with only the visible layers that have been assigned to his user group
for the appropriate module.

| Configuring Accela GIS | 131
By default, a user's initial map view shows the map layers that have been assigned to the user group he
belongs to. If your agency wants to allow the back-office staff to adjust and retain their own map view and
settings, enable the Map Persist Status setting on the Integration > {product} > Additional Settings
page on the Accela GIS Administration site.
The following shows a sample Persist Map Status setting for a Civic Platform integration:
If the Persist Map Status setting is enabled, a back-office user's last map view and layer VISIBLE and
SELECTABLE settings on one module will be persisted when he switches back and forth across the
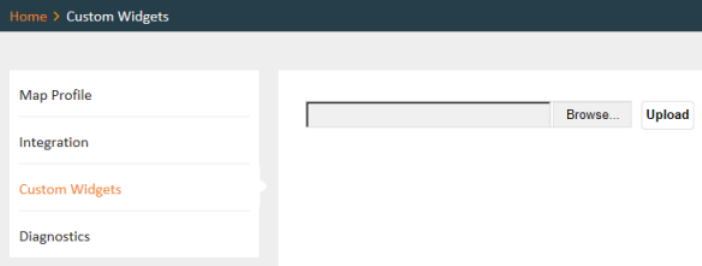
| Configuring Accela GIS | 132
Permits, Enforcements, and Buildings modules. His initial map view in one module shows his last map view
before he switched to a different module or before he logged off.
Custom Widgets
A custom widget extends a map widget to provide custom features that meet specific map viewing and
geospatial workflow requirements at your agency.
Building Custom Widgets
Accela GIS custom widgets must use the widget framework provided by ESRI’s ArcGIS WebApp Builder.
For details about how to develop a custom widget using the ArcGIS WebApp Builder, see ArcGIS WebApp
Builder Developer’s Guide > Widget Development. For an overview about widgets, see ArcGIS WebApp
Builder Developer’s Guide > Development overview.
For more information and an example about developing a Accela GIS custom widget, from the GIS Admin
login page, go to API Document > AGIS JavaScript API > Widget.
Deploying Custom Widgets
To deploy a custom widget on AGIS for a specific product integration:
1. Login to GIS Admin, select an integration, and click Custom Widgets:
2. Click Browse to select the custom widget zip file, and click Upload.
The following sample shows a custom widget named “MyMapNotes” which has been successfully
deployed:

| Configuring Accela GIS | 133
To delete a deployed custom widget, hover the mouse on the top-right corner of the custom widget icon,
and click X.
Enabling a Custom Widget
Deployed custom widgets can be enabled for user groups that have been configured for a product
integration. After a custom widget has been deployed, it becomes one of the configurable Map Widgets on
the Integration > User Group page.
The following diagram shows the Map Widgets section of a User Group page with a sample custom widget
named “MyMapNotes”.
To enable the custom widget for the user group, hover the mouse on the top-right corner of the custom
widget icon and click the checkbox. To disable the custom widget, clear the checkbox. Click Save to save
any changes.

| Configuring Accela GIS | 134
XAPO Configuration for Accela GIS
Civic Platform can integrate with an external address, parcel, and owner (XAPO) data source. Accela GIS
supports the mapping of reference object and custom fields between Civic Platform and an XAPO data
source via the agency's map service. Accela GIS supports XAPO integration with map services provided
by ArcGIS Server and ArcGIS Online.
The XAPO Configuration page on the GIS admin site allows an administrator to:
• Set the Feature Count Limit to control the maximum number of GIS records returned by an XAPO
query. The default Feature Count Limit is 200.
Note: Setting the Feature Count Limit helps prevent users from submitting long-running query
transactions. For example, if a user submits an address query on the XAPO data source which
returns a large amount of data, the user is prompted to narrow the search criteria if the search
results exceed the configured Feature Count Limit. When using a GIS REST API to query XAPO
data, the API caller should submit the query with a narrower search criteria or set the maxRows
page setting to a number less than the Feature Count Limit.
• Define the XAPO Configuration mapping of address, parcel, and owner data between Civic Platform
and an XAPO data source.
Civic Platform standard choices also need to be configured to point the Civic Platform environment to the
GIS (JavaScript version) data mappings. For details, see Configuring XAPO in Civic Platform.
Note: Users may get empty or incorrect XAPO results due to the pagination results from ArcGIS.
To support pagination with ArcGIS, the agency must upgrade their GIS data store to Oracle 12c
or SQL Server 2012. For details, see this Esri Technical Article.
Mapping XAPO fields to APO fields
1. Log into the GIS Administration site.
2. From the agency's home page, click XAPO Configuration on the left navigation pane.
3. On the XAPO Configuration pane, select the Accela Reference Object, either address, parcel, or
owner.
4. Select the Map Service and GIS Layer. Your selected map service provides the XAPO data to be
mapped to the Civic Platform APO object. After you select a Map Service, the GIS Layer drop-down
list populates with all the related map layers.
Note: Select the same Map Service across all Address, Parcel, and Owner objects.
5. For each of the object fields used in your agency's Civic Platform integration environment, select its
corresponding GIS Layer field from your XAPO data source.
Note: The UID field which is used as the object identifier must be mapped to the GIS layer's
identifier field. The other Civic Platform fields can be mapped according to your agency's data
requirements.
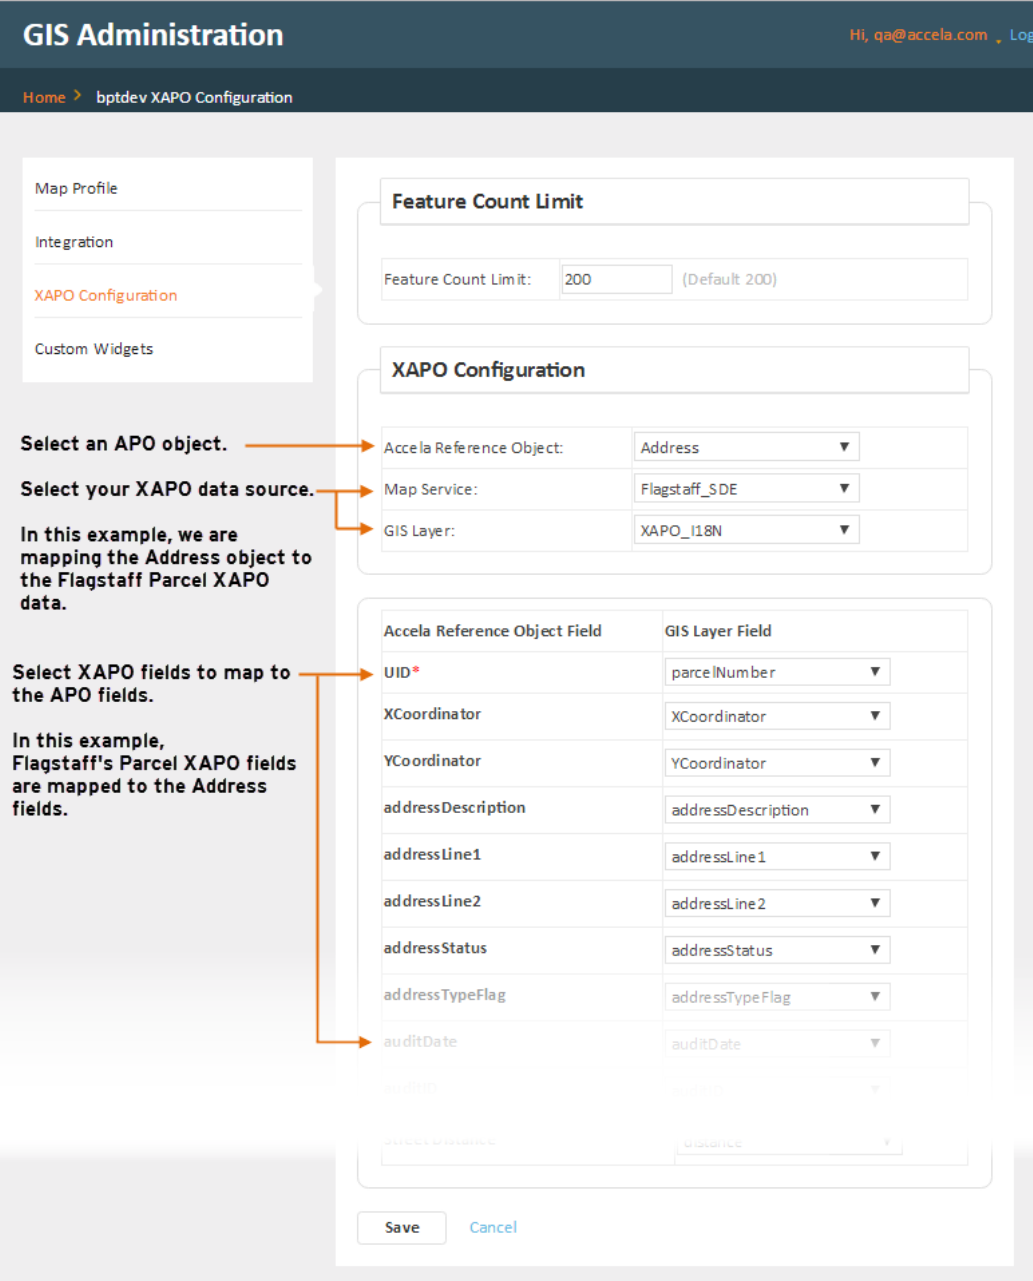
| Configuring Accela GIS | 135
The following diagram shows a sample mapping of the Address fields (fields
that are not mapped are not shown in the sample diagram for simplicity):

| Configuring Accela GIS | 136
6. After you are done with the Address object field mappings, click Save.
7. Repeat the above procedure for Address, Parcel, and Owner objects.
Note: Civic Platform standard choices also need to be configured to point the Civic Platform
environment to the GIS (JavaScript version) data mappings. For details, see Configuring XAPO in
Civic Platform.
Reference APO Object Fields
The following table lists the Civic Platform fields for each of the Accela reference objects (Address, Parcel,
and Owner):
Reference Object Reference Object Fields
Address xCoordinator, yCoordinator, addressDescription, addressLine1, addressLine2,
addressStatus, addressTypeFlag, auditDate, auditID, auditStatus, city, country,
countryCode, county, distance, eventID, fullAddress, houseFractionEnd,
houseFractionStart, houseNumberAlphaEnd, houseNumberAlphaStart,
houseNumberEnd, houseNumberStart, inspectionDistrict, inspectionDistrictPrefix,
levelPrefix, levelNumberStart, levelNumberEnd, lot, neighborhood, neighborhoodPrefix,
primaryFlag, secondaryRoad, secondaryRoadNumber, sourceFlag, state, streetDirection,
streetName, streetPrefix, streetSuffix, streetSuffixdirection, subdivision, unitEnd, unitStart,
unitType, zip
Owner UID, address, address1, address2, address3, auditDate, auditID, auditStatus,
city, country, email, eventID, fax, faxCountryCode, isPrimary, ivrPinNumber,
ivrUserNumber, mailAddress, mailAddress1, mailAddress2, mailAddress3, mailCity,
mailCountry, mailState, mailZip, ownerFirstName, ownerFullName, ownerLastName,
ownerMiddleName, ownerStatus, ownerTitle, phone, phoneCountryCode,
sourceSeqNumber, state, taxID, zip
Parcel UID, auditDate, auditID, auditStatus, block, book, censusTract, councilDistrict, eventID,
exemptValue, improvedValue, inspectionDistrict, landValue, legalDesc, lot, mapNo,
mapRef, page, parcel, parcelArea, parcelNumber, parcelStatus, primaryParcelFlag,
planArea, range, section, sourceSeqNumber, subDivision, supervisorDistrict, township,
tract
Mapping XAPO fields to APO template fields
An address, parcel, or owner (APO) template is a collection of custom fields that can be added to APO
reference data. For example, in addition to the standard Civic Platform reference address fields, your
agency can collect additional agency-specific information that is associated with each reference address.
As a GIS administrator, you can map the reference template fields to your agency's GIS map service fields
to enable automatic retrieval of your agency's data into the custom fields.
Note: APO templates are configuerd in Civic Platform Classic Administration. To see the APO
templates, login Civic Platform, and go to Classic Administration > Admin Tools > Properties >
APO Template. Filter the list of APO templates by Attribute Type (either by ADDRESS, PARCEL,
or OWNER). For details about how to configure an APO template and its custom fields, see Civic
Platform Administrator Guide > Land Management > Managing Property: APO > Maintaining APO
Templates.
To map your agency's GIS layer fields to the APO template fields:
1. Log into the GIS Administration site.
2. From the agency's home page, click XAPO Configuration on the left navigation pane.

| Configuring Accela GIS | 137
3. On the XAPO Configuration pane, select the Accela Reference Object: either address, parcel, or
owner.
4. Select the Map Service and GIS Layer. Your selected map service provides the XAPO data to be
mapped to the Civic Platform APO object. When you select a Map Service, the GIS Layer drop-down
list populates with the map layers from your selected map service.
Note: Select the same Map Service across all Address, Parcel, and Owner objects.
5. Click Retrieve Template Fields. When you click Retrieve Template Fields, Accela GIS fetches all
enabled reference templates from Civic Platform for the selected object type, and lists each template's
enabled custom fields.
6. For each of the custom fields used in your agency's Civic Platform integration environment, select its
corresponding GIS Layer field from your XAPO data source.
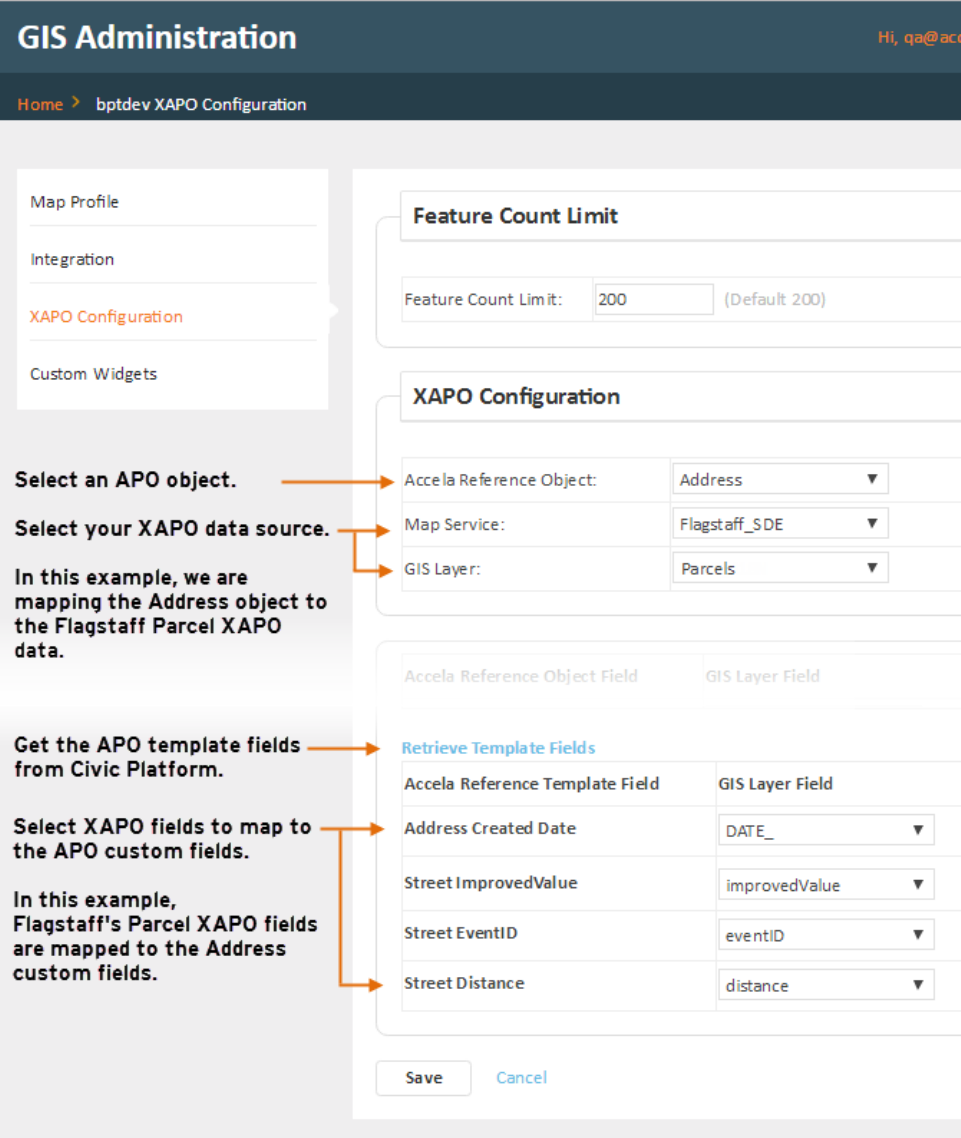
| Configuring Accela GIS | 138
The following diagram shows a sample mapping of the Address template custom fields:
7. After you are done with the template custom field mappings, click Save.
8. Repeat the above procedure for Address, Parcel, and Owner objects.
Related topics:
•Configuring XAPO in Civic Platform

| Appendices | 139
Appendices

| Appendices | 140
Configuring Civic Platform
This appendix explains the additional configuration tasks performed in Civic Platform Administration to
support GIS integration with Civic Platform:
•Configuring Dynamic Themes in Civic Platform
•Configuring GIS Services in Civic Platform
•Configuring XAPO in Civic Platform
•Enabling the GIS REST API in Civic Platform
•Creating Attribute Mapping
Related information
•Accela Civic Platform Configuration Guide > APO and XAPO > Configuring and Enabling APO and
XAPO Features
Configuring GIS Services in Civic Platform
For a Civic Platform integration, GIS services need to be configured in Civic Platform administration.
Topics
•Adding a GIS Service
•Editing or Disabling a GIS Service
Adding a GIS Service
To add a GIS service
1. From Civic Platform, navigate to Classic Administration (or "AA Admin").
2. Select Admin Tools > GIS > GIS Service.
Civic Platform displays the GIS Service - Search page.
3. Click the Add button.
Civic Platform displays the GIS Service-Add page.
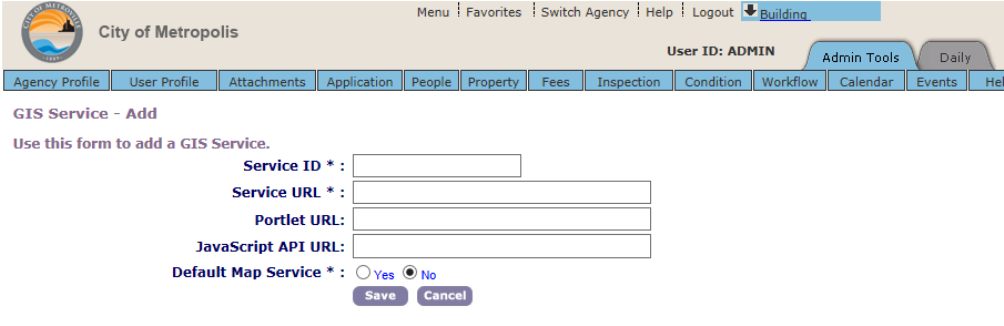
| Appendices | 141
4. Enter information as described in GIS Service configuration fields in Civic Platform below.
5. Click Save.
Civic Platform returns you to the GIS Service-Search page.
6. If you want to check out the newly-added GIS service (e.g., Control_Lines) in Civic Platform, do all of
the following:
a. Log in to Civic Platform.
b. Click the GIS main link.
c. Select the GIS service you just added and click the GIS button.
Civic Platform refreshes the GIS portlet to display the selected map.
Editing or Disabling a GIS Service
You can edit the properties of a map service at any time. Items that you can edit include the service URL,
the portlet URL, and the status of the map service. You should not edit the service URL unless you learn
that the original URL changed. Otherwise, you may lose access to a particular map.
You can only disable a GIS service by changing its status, instead of deleting it. The status of the map
decides if the map is available to users.
To edit or disable a GIS service
1. From Civic Platform, navigate to Classic Administration (or "AA Admin").
2. Select Admin Tools > GIS > GIS Service.
Civic Platform displays the GIS Service - Search page.
3. Enter the name of the map service you want to edit in the Service ID field and click Submit.
If you do not know the name of the map service, click the Submit button to view all available map
services.
4. On the Edit GIS Service page, modify the fields as appropriate. For field descriptions, see GIS Service
configuration fields in Civic Platform below.

| Appendices | 142
GIS Service configuration fields in Civic Platform Classic Administration
Service ID The map service identifier. Enter the same value exactly as you entered in the AA GIS
Service ID field when defining a map integration environment for Civic Platform. See
Integrating Your Environment for more information.
Service URL The URL that connects to the Accela GIS server (Silverlight version) that hosts the
desired GIS service. Specify the web site URL entered during the Accela GIS server
installation. For example:
http://myagency.host.com/agissl
Note:
Your URL should begin with “http://” so you can successfully retrieve GIS
attributes from the map service. If you publish the map service to Esri ArcGIS
Server and the URL begins with “https://”, you must import the Accela GIS
server certificate into the Civic Platform biz server before using the map service
in Civic Platform. See Importing the Accela GIS Server Certificate for more
information.
Portlet URL Leave this field blank.
JavaScript API URL The URL that connects to the Accela GIS (JavaScript version) server. Specify web site
URL entered during the Civic Platform Maps installation, and append /api to the URL.
For example:
https://myagency.host.com/agisjs/api
Note:
The URL for the Accela GIS (JavaScript version) server must use “https://”. To
support https connections, you must install the SSL certificate into the Maps
server. SeeRequiring the Use of HTTPS and Importing the Accela GIS Server
Certificate for more information.
Default Map Service Select Yes if you want this map service to be the default map service in Accela GIS. The
default map service displays at the top of the GIS service drop-down list for GIS users.
Configuring Dynamic Themes in Civic Platform
A dynamic theme is the result of a query that runs against your agency’s Civic Platform application and
applied to objects in the Accela GIS map viewer. As the information in your application changes, the
results of these queries change correspondingly so that the maps accurately reflect the information in the
application database. When configured with a product integration, user groups can see dynamic themes as
part of the Layers widget on the map viewer.
You must create dynamic themes before you can assign them to user groups. When you define a dynamic
theme, you can add or remove user parameters which allow users to add filter criteria to the query used
in dynamic themes. Accela Silverlight GIS map viewer users can apply predefined user parameters to
dynamic themes.
Note: The Accela GIS (JavaScript version) 8.0.2 does not yet support user parameters in dynamic
themes.
A user parameter is based on a predefined or "reference user parameter". An agency can create reference
user parameters as templates for user parameters to be added to dynamic theme queries. Before you can
add a user parameter to a dynamic theme, you must first create the reference user parameter.
Topics
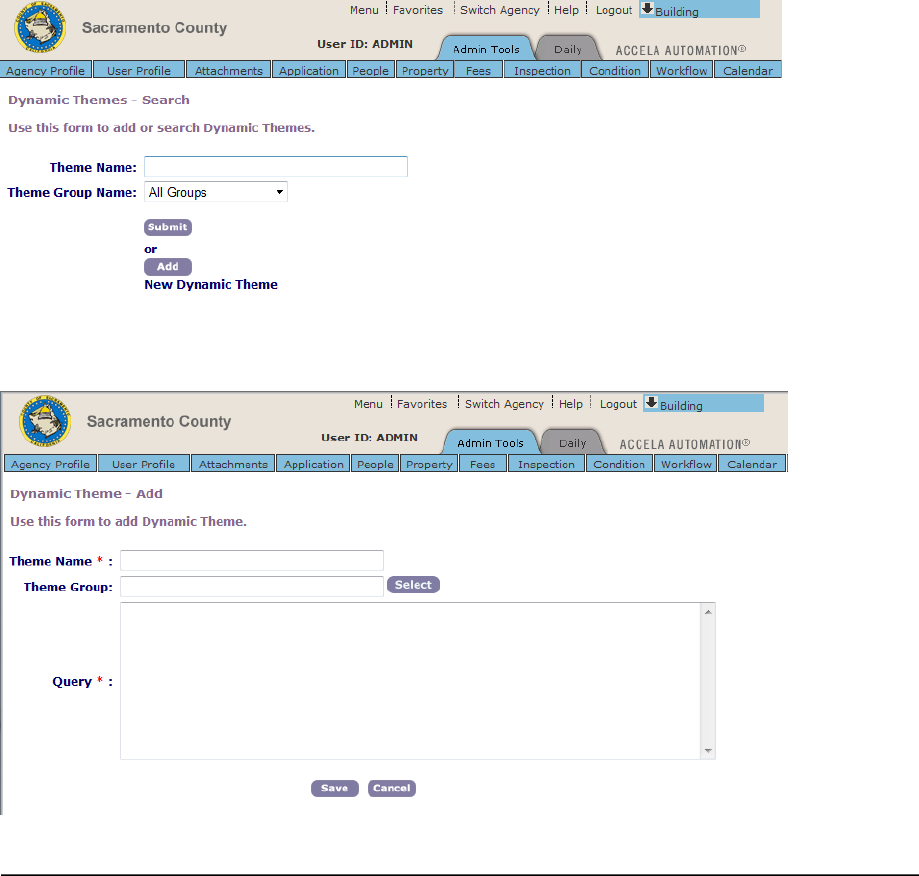
| Appendices | 143
•Creating a Dynamic Theme
•Editing a Dynamic Theme
•Creating Reference User Parameters
•Adding or Removing User Parameters for a Dynamic Theme
Creating a Dynamic Theme
To create a dynamic theme in Civic Platform
1. Navigate to Civic Platform.
2. Select Admin Tools > GIS > Dynamic Theme.
Civic Platform displays the Dynamic Themes - Search page.
3. Click the Add button.
Civic Platform displays the Dynamic Themes - Add page.
4. Complete these fields:
Theme Name Enter a unique name for the dynamic theme. For example, enter “All Building
Activities last 30 Days”.

| Appendices | 144
Theme Group Select the dynamic theme group to which you want to add the dynamic theme. Click
the Select button to select an existing theme group or add a new theme group.
Although not required, it is recommended to assign a theme group to help organize
multiple dynamic themes as they appear on the list of map layers on the Layers
widget.
Query Enter an SQL query string in a language that is compliant with your agency’s
database.
5. Click the Save button.
Civic Platform saves the dynamic theme.
Related topics:
•Retrieving and Configuring Dynamic Themes in Accela Silverlight GIS - to configure dynamic themes
for Accela Silverlight GIS
•Retrieving and Configuring Dynamic Themes in Accela GIS (JavaScript version) - to configure dynamic
themes for Accela GIS (JavaScript version)
Editing a Dynamic Theme
Civic Platform allows you to edit a dynamic theme. Possible values that you can edit include the theme
group, the user parameters, the query, and the status of the query.
To edit a dynamic theme
1. Navigate to Civic Platform.
2. Select Admin Tools > GIS > Dynamic Theme.
Civic Platform displays the Dynamic Themes - Search page.
3. Enter your search criteria in any of the following fields:
Theme Name Enter the name of the dynamic theme you want to search for.
Theme Group Name From the drop-down list, choose the group that contains the dynamic theme you are
searching for.
4. Click the Submit button.
Civic Platform displays a list of all themes that match your search criteria.
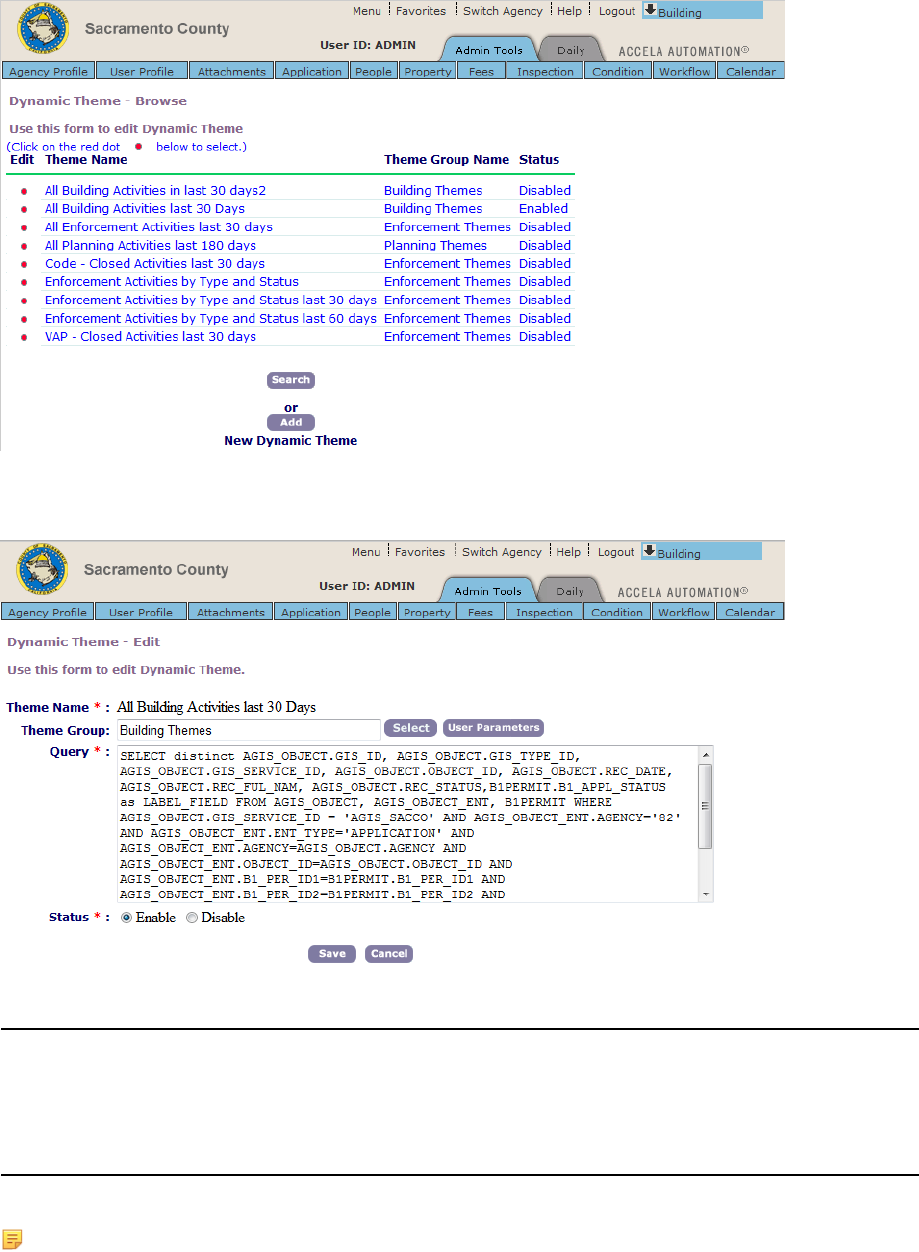
| Appendices | 145
5. Click the red dot that appears next to the name of the dynamic theme you want to edit.
Civic Platform displays the Dynamic Theme - Edit page.
6. Modify the fields as needed:
Theme Group Click the Select button to select an existing theme group or add a new theme group.
Query Update the SQL query as necessary.
Status Click Enable or Disable to determine whether the dynamic theme is available for GIS
use. When it is disabled, you cannot retrieve it from Civic Platform and apply it to your
map service through the GIS Administration site.
7. Click the User Parameters button to add reference user parameters to the dynamic theme.
Note: Accela GIS (JavaScript version) 8.0.2 does not yet support user parameters in dynamic
themes.
You can also directly enter an SQL Query string in a language that is compliant with your agency’s
database.
| Appendices | 146
8. Click the Save button.
If there is a need to delete a dynamic theme, instead of deleting a dynamic theme, set its status to
Disabled it so it remains in Civic Platform in case you want to use it at a later date.
Related topics:
•Retrieving and Configuring Dynamic Themes in Accela Silverlight GIS - to configure dynamic themes
for Accela Silverlight GIS
•Retrieving and Configuring Dynamic Themes in Accela GIS (JavaScript version) - to configure dynamic
themes for Accela GIS (JavaScript version)
•Adding or Removing User Parameters for a Dynamic Theme - to configure query user parameters.
Currently only applies to Accela Silverlight GIS.
Creating Reference User Parameters
A reference user parameter acts as a template user parameter that can be used by any dynamic theme.
Before you can add user parameters to a dynamic theme, you must first create the reference user
parameters.
Topics
•Creating a Reference User Parameter
•Assigning Values to a User Parameter
Creating a Reference User Parameter
To create a reference user parameter
1. Navigate to Civic Platform.
2. Select Admin Tools > GIS > Reference User Parameter.
Civic Platform displays the Reference User Parameter List page.
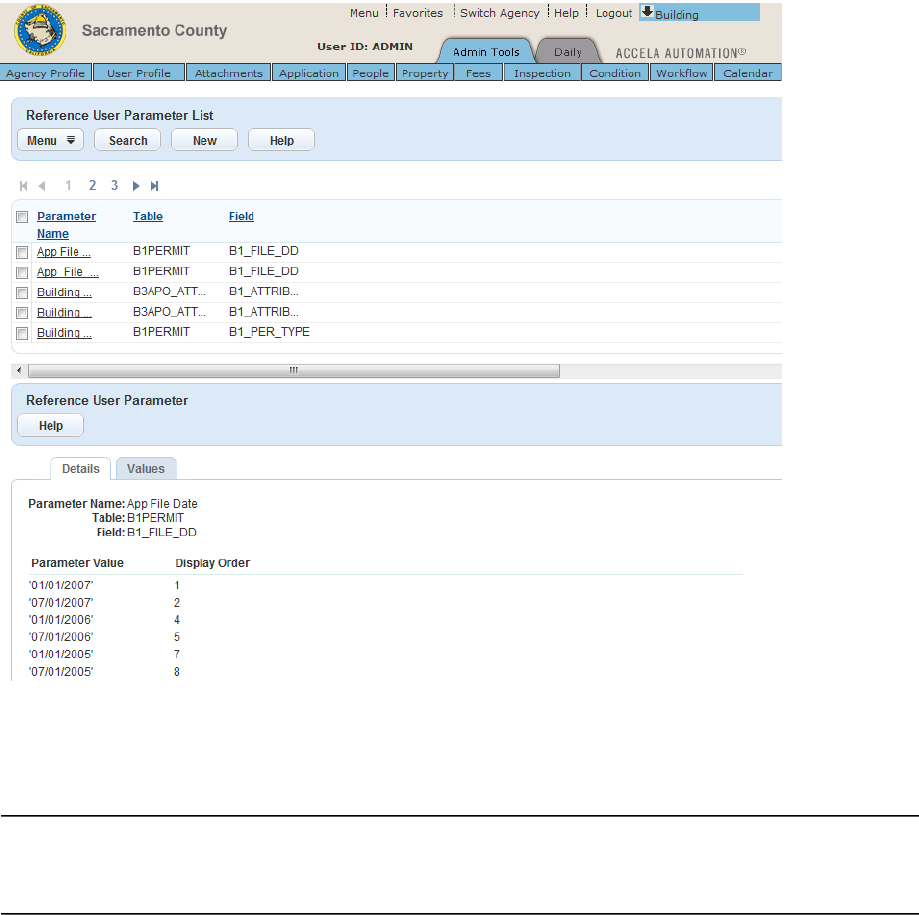
| Appendices | 147
3. Click the New button.
Civic Platform displays the Reference User Parameter - Add form.
4. Complete these fields:
Parameter Name Enter the parameter’s name.
Table Enter the name of the table you want an SQL query to run against.
Field Enter the field name in the table you want an SQL query to run against.
5. Click Submit.
Civic Platform adds the parameter to the list of existing parameters.
6. Add, edit, or remove parameter values as needed.
For more information, see Assigning Values to a User Parameter.
Assigning Values to a User Parameter
Assign possible filter values to each reference user parameter. For example, a Parcel Status parameter
can have the values Pending, Disabled, and Enabled. When you add the Parcel Status parameter to a
dynamic theme, GIS users can then select from these values to filter the dynamic theme results by parcel
status.
To assign values to a user parameter
1. Navigate to Civic Platform.

| Appendices | 148
2. Select Admin Tools > GIS > Reference User Parameter.
Civic Platform displays the Reference User Parameter List page.
3. Select a user parameter (you can search the user parameters).
4. Click the Values tab:
5. Click the New button.
6. On the Reference User Parameter Value - Add portlet, enter the value you want to query against in
the Parameter Value field.
7. Click Submit.
8. On the Display Order column, enter the order in which you want the parameter to display.
9. Click Save.
10.If you want to delete any existing values, mark the check box next to each desired value and click the
Delete button.
Adding or Removing User Parameters for a Dynamic Theme
You can add pre-defined reference user parameters to the dynamic theme or remove parameters from it.
These user parameters appear as options in the Accela GIS map viewer that allows users to use them as
filter criteria for the dynamic theme results.
Note: Accela GIS (JavaScript version) 8.0.2 does not yet support user parameters in dynamic
themes.
To add or remove user parameters for a dynamic theme
1. Navigate to Civic Platform.
2. Select Admin Tools > GIS > Dynamic Theme.
Civic Platform displays the Dynamic Themes - Search page.
3. On the Dynamic Themes - Search page, search for and select the dynamic theme that you want to
edit.
Civic Platform displays the Dynamic Theme - Edit page:
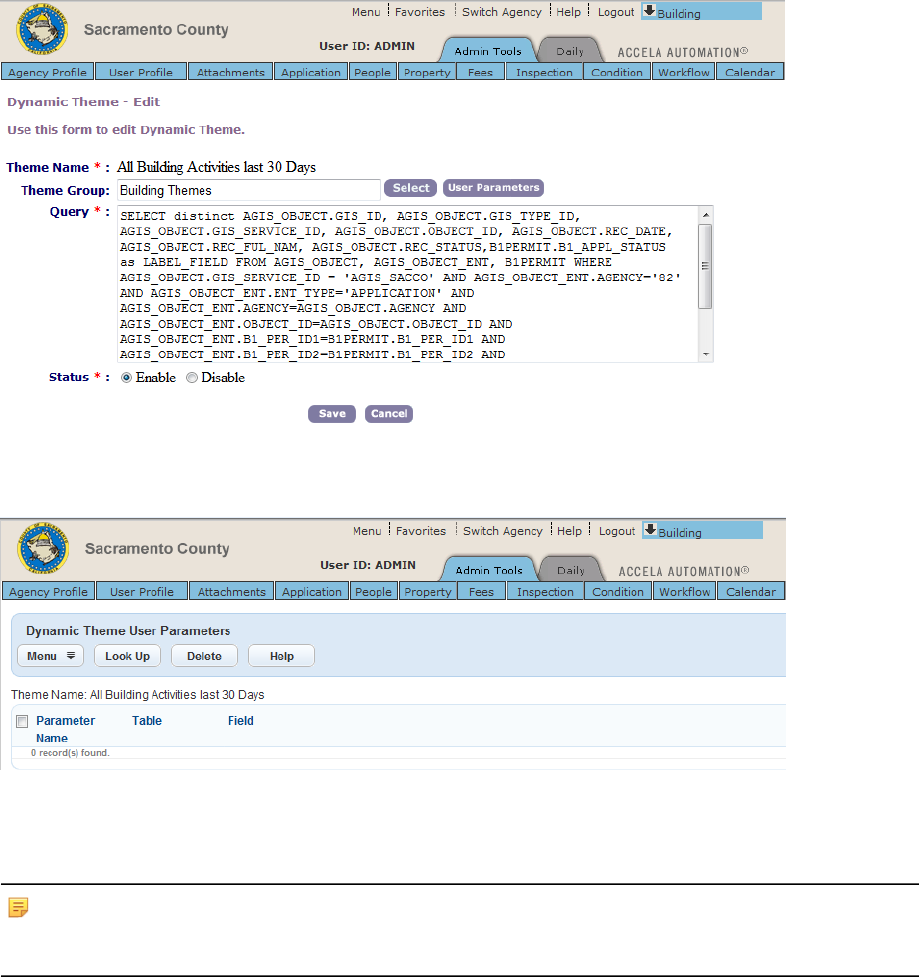
| Appendices | 149
4. Click the User Parameters button.
Civic Platform displays the Reference User Parameter - List page.
5. Click the Look Up button.
Civic Platform displays all pre-defined user parameters that you have not added yet in the Dynamic
Theme User Parameters - Add portlet.
Note:
If there is no user parameter, you can create desired reference user parameters through the Reference
User Parameter feature. See Creating Reference User Parameters for more information.
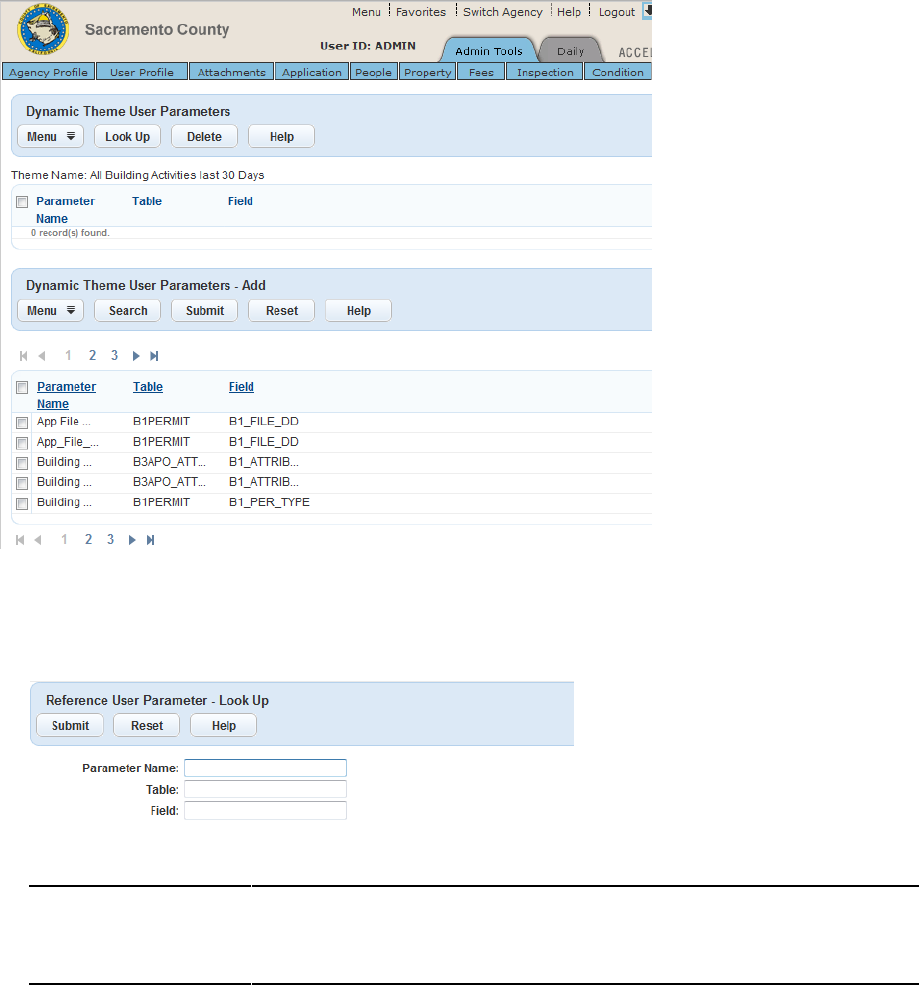
| Appendices | 150
6. If the parameter list is long, search for the user parameter that you want to add to the dynamic theme.
a. Click the Search button.
Civic Platform displays the Reference User Parameters - Look Up portlet.
b. Complete any of the following fields:
Parameter Name Enter the parameter name.
Table Enter the name of the database table that the parameter runs against.
Field Enter the field of the database table that the parameter runs against.
c. Click Submit.
Civic Platform displays the parameters that match your search criteria.
7. Mark the check box next to each parameter that you want to add.
8. Click Submit.
Civic Platform adds the parameter and refreshes the Dynamic Theme User Parameters list to reflect the
addition.
9. If you want to remove any user parameter from the dynamic theme, mark the check box next to each
desired parameter and click the Delete button.
Civic Platform removes the parameter and refreshes the Dynamic Theme User Parameters list to reflect
the removal.

| Appendices | 151
Configuring XAPO in Civic Platform
By default, Civic Platform uses address, parcel, and owner (APO) data from a database included in the
Civic Platform deployment. If your agency has a map service that provides APO data, your external APO
(XAPO) data source can be integrated with Civic Platform via Accela GIS. This section describes how to
configure Civic Platform to integrate to an XAPO data source via Accela GIS.
To configure the XAPO standard choices in Civic Platform:
1. Login Civic Platform Classic Administration.
2. Navigate to Agency Profile > Standard Choices.
3. On the Standard Choices Item search field, type "External" to look up the external APO standard
choices.
• If no standard choice records are found, click Add to create all of the following XAPO standard
choices:
•EXTERNAL_ADDRESS_SOURCE
•EXTERNAL_PARCEL_SOURCE
•EXTERNAL_OWNER_SOURCE
• If the XAPO standard choices are already configured and need to be updated, click the red dot next
to the standard choice to edit it.
4. Enter the appropriate values for each of the XAPO standard choices.
• For Accela GIS (JavaScript version), see the XAPO Standard Choice Values for Accela GIS
(JavaScript version).
• For Accela Silverlight GIS, see the XAPO Standard Choice Values for Accela Silverlight GIS.
5. For Accela GIS (JavaScript version): To enable the Accela GIS REST API for querying the XAPO
data source, add the USE_GIS_REST_API standard choice, and set the standard choice value to Yes.
Note: By default, Civic Platform uses the legacy SOAP-based XAPO API to execute XAPO
queries. If your agency wants to use the REST API for Accela GIS, set USE_GIS_REST_API to
Yes.
6. Click Save or Update to save your changes.
XAPO Standard Choice Values for Accela GIS (JavaScript version)
For Accela GIS (JavaScript version), the SOURCE_LOCATION and SOURCE_REST_API_URL
values are required for the EXTERNAL_ADDRESS_SOURCE, EXTERNAL_PARCEL_SOURCE, and
EXTERNAL_OWNER_SOURCE standard choices.
Note: If your agency has already defined the Accela Silverlight GIS standard choice
values for EXTERNAL_ADDRESS_SOURCE, EXTERNAL_PARCEL_SOURCE,
and EXTERNAL_OWNER_SOURCE, you can keep them and simply add the
SOURCE_REST_API_URL standard choice value.

| Appendices | 152
Table 21: Standard Choice Value for Accela GIS
Standard Choice Value Value Description Description
SOURCE_LOCATION External Set the SOURCE_LOCATION value
to External for an XAPO data source.
SOURCE_REST_API_URL http:// <host>/<agissl> The source URL for the Accela GIS
REST API. For example, https://
agency.com/agissl
XAPO Standard Choice Values for Accela Silverlight GIS
For Accela Silverlight GIS, the SOURCE_LOCATION and SOURCE_URL values are
required for the EXTERNAL_ADDRESS_SOURCE, EXTERNAL_PARCEL_SOURCE, and
EXTERNAL_OWNER_SOURCE standard choices. The rest of the standard choice values listed below are
optional.
Table 22: EXTERNAL_ADDRESS_SOURCE Standard Choice Values for Accela Silverlight GIS
Standard Choice Value Value Description Description
SOURCE_LOCATION
(Required for XAPO)
External Set SOURCE_LOCATION to
External for an XAPO data source.
SOURCE_URL
(Required for XAPO)
http:// <host>/<agissl>/<xapo.asmx?
wsdl>
The external APO source URL. For
example, https://agency.com/agissl/
xapo.asmx?WSDL
CAN_CONTAIN_ PARCELS Yes
No
This value specifies whether the
parcel information associated with the
selected address can populate within
the application. If you set the value
description to Yes, the Parcel tab of
the reference Address detail portlet
can list all the parcels related to the
address.
CAN_CONTAIN_ OWNERS Yes
No
This value specifies whether the
owner information associated with
the selected address can populate
within the application. If you set
the value description to Yes, the
Owner tab of the reference Address
detail portlet can list all the owners
related to the address. If you set
the value description fields for
CAN_CONTAIN_OWNERS and
CAN_CONTAIN_PARCELS to Yes
and you enable FID 8232 Get Parcel
And Owner, Accela Automation
exposes the Get Parcel & Owner
button on the Address section of the
application intake form.
SOURCE_ATTRIBUTES_
MAPPING_ENABLE
Yes
No
This value specifies whether the
external APO data source handles
the mapping between the address
template attributes and the GIS map
layer fields. When Civic Platform

| Appendices | 153
Standard Choice Value Value Description Description
uses Accela GIS as its external
APO data source and each APO
template attribute is mapped to a GIS
map layer field, users can search
for external APO data by template
attribute.
SOURCE_AUTH_PWD <webServiceAuthPassword> This is the user password for
accessing the web service.
SOURCE_AUTH_USER <webServiceAuthUsername> This is the user name for accessing
the web service.
SOURCE_ID <sourceId> This unique value identifies the
source in the code.
SOURCE_MAP_SERVICE _ID <mapServiceId> This value specifies the map service
from which you want to retrieve
geocoded addresses as external
addresses. The mapServiceId
must match the map service name
configured in Accela Silverlight GIS
Admin.
SOURCE_METHOD Web Service The APO source method to connect
to the external source. Accela
Automation only supports "Web
service".
SOURCE_NAME <xapoSourceName> The name of the external source.
WEB_SERVICE_SSL_SU
PPORTED
Yes
No
True
False
Default: Yes.
This value defines whether the web
service needs SSL data transfer.
IS_XML_DATA Yes
No
Default: No.
Specifies whether to use the XML
data source.
XAPO_CLIENT_VERSION 7.2.3 7.2.3 stands for Accela Automation
Version 7.2.0 Feature Pack 3.
In 7.2.0 Feature Pack 3, Accela
Automation added 5 address fields:
House # Alpha (start), House # Alpha
(end), Level Prefix, Level # (start),
and Level # (end). You must define
this Standard Choice value so users
can search for addresses by the 5
address fields in the external APO
source.

| Appendices | 154
Table 23: EXTERNAL_PARCEL_SOURCE Standard Choice Values for Accela Silverlight GIS
Standard Choice Value Value Description Description
SOURCE_LOCATION
(Required for XAPO)
External Set SOURCE_LOCATION to
External for an XAPO data source.
SOURCE_URL
(Required for XAPO)
http:// <host>/<agissl>/<xapo.asmx?
wsdl>
The external APO source URL. For
example, https://agency.com/agissl/
xapo.asmx?WSDL
CAN_CONTAIN_ ADDRESSES Yes
No
This value specifies whether the
address information associated with
the selected parcel can populate
within the application. If you set
the value description to Yes, then
the Address tab of the reference
Parcel detail portlet lists all the
addresses related to the parcel. If
you set the value description fields for
CAN_CONTAIN_ADDRESSES and
CAN_CONTAIN_OWNERS to Yes
and enable FID 8234 Get Address
And Owner, Accela Automation
exposes the Get Address & Owner
button on the Parcel section of the
application intake form.
CAN_CONTAIN_ OWNERS Yes
No
This value specifies whether the
owner information associated with the
selected parcel can populate within
the application. If you set the value
description to Yes, then the Owner
tab of the reference Parcel detail
portlet lists all the owners related to
the parcel.
SOURCE_MAP_SERVICE _ID <mapServiceId> This value specifies the map service
from which you want to retrieve
external parcels. The mapServiceId
must match the map service name
configured in Accela Silverlight GIS
Admin.
SOURCE_ATTRIBUTES_
MAPPING_ENABLE
Yes
No
This value specifies whether the
external APO data source handles
the mapping between the parcel
template attributes and the GIS map
layer fields. When Accela Automation
uses Accela GIS as its external
APO data source and each APO
template attribute is mapped to a GIS
map layer field, users can search
for external APO data by template
attribute.
SOURCE_AUTH_PWD <webServiceAuthPassword> This is the user password for
accessing the web service.

| Appendices | 155
Standard Choice Value Value Description Description
SOURCE_AUTH_USER <webServiceAuthUsername> This is the user name for accessing
the web service.
SOURCE_ID <sourceId> This unique value identifies the
source in the code.
SOURCE_METHOD Web Service The APO source method to connect
to the external source. Accela
Automation only supports "Web
Service".
SOURCE_NAME <xapoSourceName> The name of the external source.
WEB_SERVICE_SSL_SU PPORTED Yes
No
True
False
Default: Yes
This value defines whether the web
service needs SSL data transfer.
IS_XML_DATA Yes
No
Default: No
Specifies whether to use the XML
data source.
Table 24: EXTERNAL_OWNER_SOURCE Standard Choice Values for Accela Silverlight GIS
Standard Choice Value Value Description Description
SOURCE_LOCATION
(Required for XAPO)
External Set SOURCE_LOCATION to
External for an XAPO data source.
SOURCE_URL
(Required for XAPO)
http:// <host>/<agissl>/<xapo.asmx?
wsdl>
The external APO source URL. For
example, https://agency.com/agissl/
xapo.asmx?WSDL
SOURCE_METHOD Web Service The APO source method to connect
to the external source. Accela
Automation only supports "Web
Service".
SOURCE_NAME <xapoSourceName> The name of the external source.
WEB_SERVICE_SSL_SU PPORTED Yes
No
True
False
Default: Yes.
This value defines whether the web
service needs SSL data transfer.
IS_XML_DATA Yes
No
Default: No.
Specifies whether to use the XML
data source.
If your agency uses an external APO data source but not Accela GIS, a custom XAPO adapter can be
written to integrate with Civic Platform. For Accela Silverlight GIS, a custom adapter can use the AGIS
SOAP API methods to access the XAPO data source. For Accela GIS (JavaScript version), a custom
adapter can use the Accela GIS REST API to access the XAPO data source.
Related documentation:

| Appendices | 156
•Accela Automation External APO Integration Guide - for details about using the Accela GIS SOAP API
•Accela GIS API Reference > XAPO - for details about using the Accela GIS REST API
Configuring Proximity Alerts in Civic Platform
Proximity alerts facilitate location-based notifications sent to users in their workflow processes. For
example, an agency might want to create a proximity alert that checks whether a liquor store business
application is within a certain distance of a school. When a proximity alert is defined in Civic Platform, the
proximity alert can be added to a Civic Platform workflow process. Civic Platform internally calls either
Accela GIS (JavaScript version) or Accela Silverlight GIS to retrieve the GIS data for proximity alerts.
By default, Civic Platform internally uses Accela Silverlight GIS' SOAP-based API to process GIS proximity
alerts. Accela GIS (JavaScript version) provides an equivalent GIS REST API that supports proximity
alerts. To enable Civic Platform to use the new GIS REST API instead of the legacy SOAP-based API,
configure the following standard choice in Civic Platform Administration:
•USE_GIS_REST_API - A new system switch which enables the usage of the Accela GIS (JavaScript
version) REST API.
Add the following standard choice value:
Standard Choice Value Value Description Description
Yes Yes Uses the Accela GIS REST API to
process GIS proximity alerts.
The default value is No, which uses
the legacy SOAP-based API.
To configure a proximity alert on Civic Platform, go to Admin Tools > GIS > Proximity Alerts, and enter
values in the following fields:
Field Description
Service The GIS Service ID that has been configured on Civic Platform Administration >
Admin Tools > GIS Service. The specified GIS Service must also be configured
on the Accela GIS Admin Site.
Name The name of the proximity alert. This name will be included in the list of proximity
alerts when configuring workflow proximity alerts.
Description (optional) A description of the proximity alert.
Alert Message The message to be shown to the user when a workflow status change triggers a
match in the proximity query.
Trigger The proximity query to be triggered.
Distance The proximity distance (in feet) to use in the query.
Layer The map layer to query. The Layer name must be a valid map layer on the
specified GIS Service.
For example:
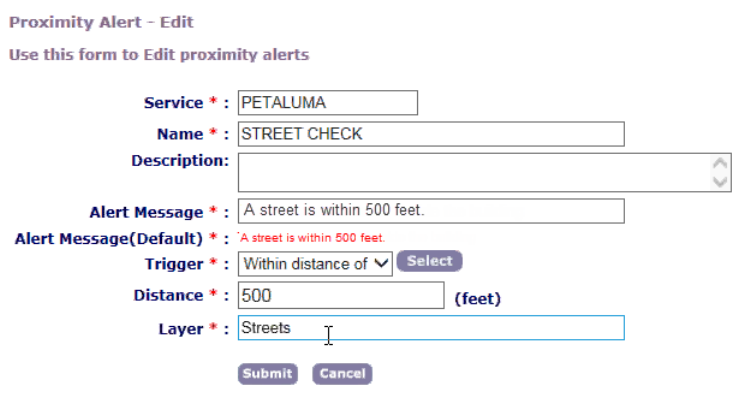
| Appendices | 157
Enabling the GIS REST API in Civic Platform
By default, Civic Platform uses the legacy Accela SOAP GovXML interface to call the functions related to
the following Civic Platform features:
• Proximity alerts
• GIS Master Scripts
• XAPO queries
The Accela GIS (JavaScript version) provides a REST API to replace the legacy SOAP API. To use the
REST API, configure the USE_GIS_REST_API standard choice item. The XAPO, proximity alert and GIS
Master Scripts funcionality should remain the same when the GIS REST API is used.
USE_GIS_REST_API is a system switch that replaces the use of SOAP GovXML API with the GIS REST
API that supports Accela GIS (JavaScript version). The USE_GIS_REST_API standard choice values are
as follows:
•Yes: Enables the usage of the Accela GIS REST API to perform the GIS-related Civic Platform features
•No: Uses the legacy Accela GIS SOAP GovXML API. This is the default behavior.
Related documentation:
•Accela Automation External APO Integration Guide - for details about using the Accela GIS SOAP API
•Accela GIS API Reference - for details about using the Accela GIS REST API
Creating Attribute Mapping
This topic applies to Accela Silverlight GIS.

| Appendices | 158
Associations between Accela GIS objects and application specific information fields can be created
to extract information from map layer objects in Accela GIS and display it in Civic Platform. Certain
application specific fields automatically populate with GIS object attribute values when a user adds an
asset or a parcel that associates with the Accela GIS object to an application intake form or adds an
associated GIS feature to the form. For example, if you create a mapping relationship between the Parcel
Area field in Civic Platform and the area of the parcel in Accela GIS, the Parcel Area field automatically
gets a value from the GIS object that represents a parcel when a user selects it from the GIS map viewer
and adds it to the application intake form.
To establish attribute mapping with Accela GIS map layer objects, you must have FID 0182 enabled on
your Civic Platform system.
Topics
•Searching for Attribute Mapping
•Creating Attribute Mapping
•Editing Attribute Mapping
•Deleting Attribute Mapping
Searching for Attribute Mapping
You can search for existing attribute mapping sets in order to verify which attributes are mapped, to edit
them, or to delete unnecessary attribute mapping sets.
To search for attribute mapping
1. From Civic Platform, navigate to Classic Administration (or "AA Admin").
2. Select the Admin Tools > GIS > GIS Map Object Attribute Mapping menu option.
Civic Platform displays the GIS Map Object Attribute Mapping—Search page.
3. Enter any search criteria.
For a list of field descriptions, see Table 25: Attribute Mapping Field Details.
4. Click the Submit button.
Civic Platform displays a list of attribute mapping sets that match your search criteria.
Creating Attribute Mapping
You can create a mapping relationship where attributes of GIS objects on the various map layers are
mapped to specific ASI fields.
To create attribute mapping

| Appendices | 159
1. From Civic Platform, navigate to Classic Administration (or "AA Admin").
2. Select the Admin Tools > GIS > GIS Map Object Attribute Mapping menu option.
Civic Platform displays the GIS Map Object Attribute Mapping—Search page.
3. Click the Add button.
Civic Platform displays the GIS Map Object Attribute Mapping—Add page.
4. Update the fields.
For a list of field descriptions, see Table 25: Attribute Mapping Field Details.
5. Click the Submit button.
Civic Platform displays your new Attribute Mapping set on the GIS Map Object Attribute Mapping—
Attribute List page.
Table 25: Attribute Mapping Field Details
Mapping Set Name Enter a name for the mapping set. Use a descriptive name that is specific to the
mapping set.
Map Service Use the drop-down menu to select the map service that contains the GIS map layer
objects that you want to associate with the application specific information.
Map Layer Enter the name of the map layer that contains the GIS objects.
Object Attribute Enter the name of the object attribute field from which you want Civic Platform to get
field values. For example, if you want Civic Platform to extract the area of a building,
and if the GIS map layer object attribute was named AREA, you would enter AREA in
this field.
App Specific Info Group
Code
Use the drop-down menu to select the application specific information group code that
you want to link to the GIS object.
App Specific Info Group
Name
Use the drop-down menu to select the application specific information group name that
you want to link to the GIS object.
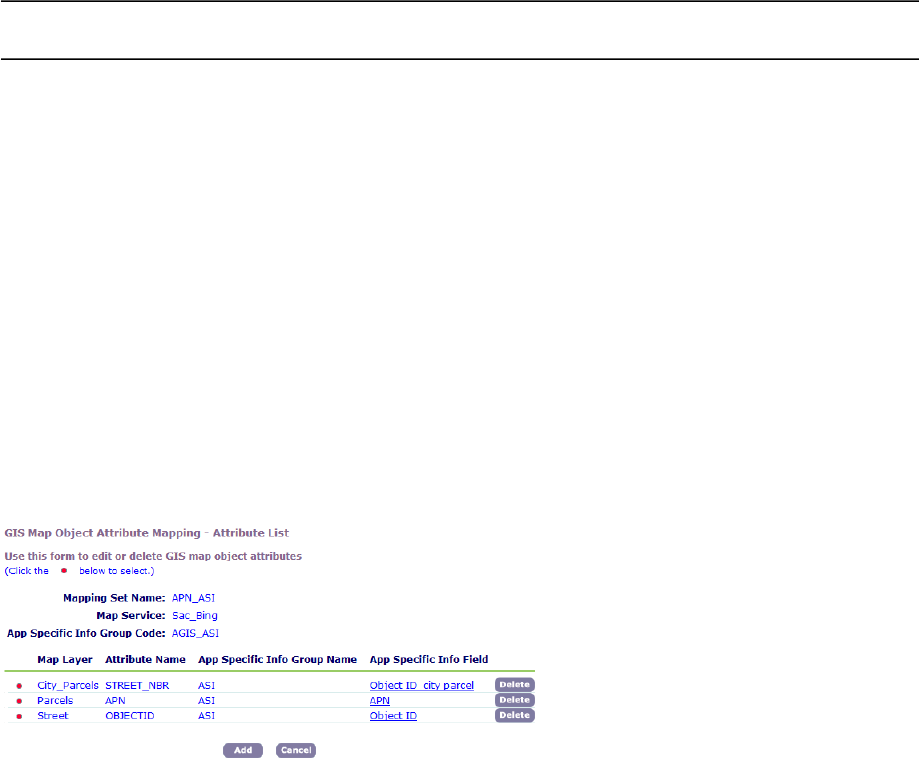
| Appendices | 160
App Specific Info Field Use the drop-down menu to select the application specific information field that you
want to be automatically populated by the attribute value of the GIS object.
Editing Attribute Mapping
Attribute mapping sets may need to be updated to correct problems or to adapt to new procedures.
Map layers, object attributes, application specific information group names, and application specific
information fields may be changed. If you need to change the set name, map service, or application
specific information group code, you should create a new attribute mapping set.
If application specific information is changed, the applications automatically populated with this information
remains unchanged. New applications created and automatically populated with the application specific
fields reflect the new changes.
To edit attribute mapping
1. Locate the attribute mapping set you want to edit.
For instructions, see Searching for Attribute Mapping.
2. From the GIS Map Object Attribute Mapping—Attribute List page, click the red dot next to the attribute
mapping set.
Civic Platform displays the GIS Map Object Attribute Mapping—Edit page.
3. Update the fields as necessary.
For a list of field descriptions, see Table 25: Attribute Mapping Field Details.
4. Click the Submit button.
Civic Platform saves your changes and displays the GIS Map Object Attribute Mapping—Attribute List
page.
Deleting Attribute Mapping
When you no longer need a certain attribute mapping set, you can delete it. Be certain that it is no longer
necessary because once a mapping is deleted, you can only get it back by recreating it.
To delete attribute mapping
1. Locate the attribute mapping set you want to delete.
For instructions, see Searching for Attribute Mapping.
2. From the GIS Map Object Attribute Mapping—Attribute List page, click the Delete button next to the
attribute mapping set you want to delete.
Civic Platform deletes the attribute mapping set.

| Appendices | 161
Securing Communications
This appendix explains how to secure communication between the Accela GIS client and server, and how
to secure communication between the Accela GIS server and the ArcGIS server.
If your agency uses Microsoft Bing Maps, instead of the ArcGIS map services, there is no need for a
specific configuration to secure connections between Accela GIS and Bing Maps because Bing Maps
supports both SSL and non-SSL communication. If users access the Accela GIS map viewer through an
HTTP URL, then the Accela GIS server retrieves HTTP images from Bing Maps. If users access Accela
GIS through an HTTPS URL, then the server retrieves HTTPS images. However, Accela GIS only supports
using Bing Maps geocoding and routing services through HTTP.
Related Links
Communication Security Overview
Importing the Accela GIS Server Certificate
Requiring the Use of HTTPS
Communication Security Overview
If your agency is using Accela GIS in Citizen Access or Mobile Office, then your agency installs Accela GIS
in a demilitarized zone (DMZ) on a separate machine than the ArcGIS server. It is likely that your agency
installs Citizen Access or Mobile Office on the same machine as Accela GIS, and that machine is publicly
accessible. However, if your agency is using Accela GIS in Civic Platform, then your agency installs Accela
GIS in an Intranet zone on a separate machine than the ArcGIS server. A tier of communication exists
between the Accela GIS client machine and the Accela GIS server, and another tier of communication
exists between the Accela GIS and ArcGIS servers. See Figure 7: Accela GIS Deployment for the
illustration that shows how an agency integrates the GIS system with Mobile Office.
There may be sensitive information or sensitive customer data that you want to protect on the machines.
Accela recommends that you implement security for each tier of communication to protect sensitive data.
Figure 7: Accela GIS Deployment
Topics
•Securing Communication between the Accela GIS Client and Server
•Securing Communication between the ArcGIS and Accela GIS Servers
| Appendices | 162
Securing Communication between the Accela GIS Client and Server
The Accela GIS server supports both secure (HTTPS) and insecure (HTTP) access from the Accela
GIS client either by an Internet browser or an Accela application. You must follow these steps to secure
communication between the Accela GIS client and server.
• Obtain an SSL certificate from a certificate authority and issue it to the Accela GIS web server.
For more information about how to obtain a certificate, see http://www.iis.net/learn/manage/configuring-
security/how-to-set-up-ssl-on-iis.
• Require the use of HTTPS for the Accela GIS server. See Requiring the Use of HTTPS.
• Import an SSL certificate from the Accela GIS Server to the Civic Platform biz server. See Importing the
Accela GIS Server Certificate.
Securing Communication between the ArcGIS and Accela GIS Servers
The Accela GIS server retrieves map services from the ArcGIS server. The communication between the
Accela GIS and ArcGIS servers supports both anonymous and non-anonymous access. To ensure the
security of sensitive information, you must disable anonymous access and choose an authentication
method such as Integrated Windows Authentication or Digest Authentication. You must follow these steps
to secure communication between the ArcGIS and Accela GIS servers.
• Obtain an SSL certificate from a certificate authority and install it on the ArcGIS server.
• Require the use of HTTPS for the ArcGIS server.
For more information about how to obtain an SSL certificate and configure the use of HTTPS, see the
ArcGIS Server documentation > Configure HTTPS on ArcGIS Server.
Importing the Accela GIS Server Certificate
To ensure that Accela GIS functions properly in Civic Platform, you must import the SSL certificate from
the Accela GIS server into the Civic Platform biz server. Follow the steps in this section to import the
Accela GIS server certificate.
Before you import the Accela GIS server certificate, you must set up a Certificate Server on the machine
which hosts the Accela GIS server. Make sure the Certificate Server issues the certificate to the Accela
GIS server. And then verify whether the Issue to field on the General tab of the certificate indicates the
same domain name with the service URL for a GIS map service in Civic Platform Classic Administration
Tools.
To import the Accela GIS server certificate
1. Export the Accela GIS certificate file in .cer format from IIS Manager or your browser.
• To export the certificate from IIS Manager, do these tasks:
1. In the Default Web Site Properties window, click the Directory Security tab.
2. On the Directory Security tab, click the View Certificate button.
3. In the Certificate dialog box, click the Details tab.
4. In the Details tab, click Copy to File... to export the certificate in the format that you want.
• To export the certificate from Internet Explorer, do these tasks:
| Appendices | 163
1. Open the SSL-enabled Accela GIS server.
2. At the top of the address bar, click Certificate Error.
3. In the Details tab of the certificate, click Copy to File... to export the certificate in the format that
you want.
2. Log in to the Civic Platform biz server.
3. Copy the certificate file to a directory on the biz server, such as E:\705IST_MSSQL_I18N_BIZ.
4. Open a command prompt window and then navigate to the certificate directory by typing in a command
such as cd/d E:\705IST_MSSQL_I18N_BIZ.
5. Call the batch script av-env.cmd in the certificate directory to set the environment by typing in a
command such as E:\705IST_MSSQL_I18N_BIZ\av.biz\bin\av-env.cmd.
In the script, you can set the JAVA_HOME and the AA_AS_HOME variables.
6. Import the certificate by typing in the following command: %JAVA_HOME%\bin\keytool -import -alias
AGIS -file “AGIS.cer” -keystore “%AA_AS_HOME%\conf\certs\trusted_cacerts” -storepass “changeit”.
Be sure to replace “AGIS.cer” in the command string with the file name of your Accela GIS certificate.
7. Enter “Y” when prompted to confirm.
8. Restart the server.
Requiring the Use of HTTPS
This section explains how to restrict the Accela GIS Administration site to HTTPS in IIS 7 or 8.
To require the use of HTTPS in IIS 7 or 8
1. Open IIS Manager from the Accela GIS server.
2. Expand the Web Sites folder and expand the Default Web Site node.
3. Right-click the Default Web Site node.
IIS Manager displays the corresponding available features and available actions.
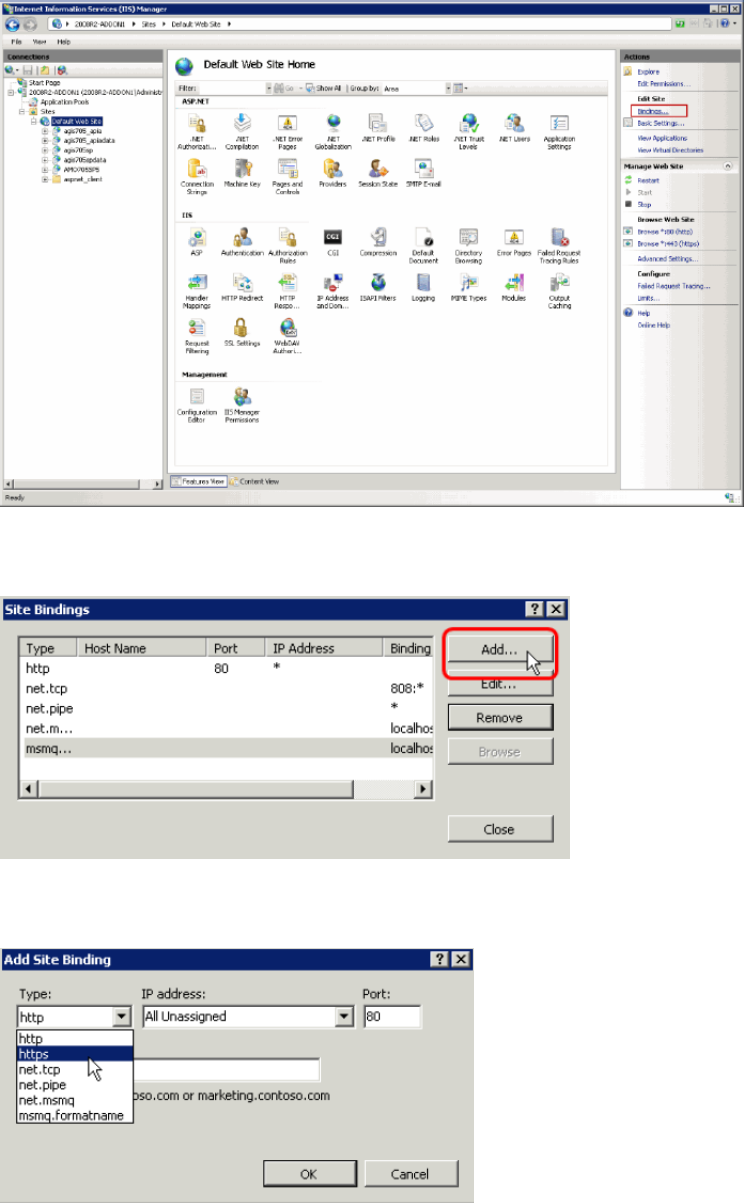
| Appendices | 164
4. In the Actions pane, click the Bindings link.
IIS Manager displays the Site Bindings dialog box.
5. In the Site Bindings dialog box, click the Add button.
IIS Manager displays the Add Site Binding dialog box.
6. In the Add Site Binding dialog box, complete these fields:
Type Select “https” from this drop-down list. Then IIS Manager refreshes and displays the
Add Site Binding dialog box as follows:

| Appendices | 165
IP addresses Select “All Unassigned” from this drop-down list.
Port Enter any desired port number. By default, it is 443.
SSL certificate Select the SSL certificate that you have obtained and installed from the certificate
authority.
7. Click the OK button to close the Site Bindings dialog box, and then click the Close button to close the
Add Site Binding dialog box.
IIS Manager displays the Browse *: 443 (https) link in the Browse Web Site area of the Actions pane.

| Appendices | 166
Application Pool Pipeline Mode in IIS Manager
After you install Accela GIS, set the managed pipeline mode of the Accela GIS Application Pool to
Integrated.
To verify Application Pool pipeline mode:
1. Open Internet Information Service (IIS) Manager.
2. In the Application Pools panel, right-click the application pool you want to work with and click Basic
Settings from the right-click menu.
3. Verify that the Managed pipeline mode drop-down list is set to Integrated.
4. Click OK.
