Client Plan Administrator User Guide
User Manual:
Open the PDF directly: View PDF ![]() .
.
Page Count: 35

Online Group Benefits Administration
November 2013
Plan Administrator’s
WEBS onlineTM User
Guide
Web-enabled Employee Benefit Management System (WEBS onlineTM)

Plan Administrator’s User Guide
Overview
Welcome to WEBS onlineTM, GroupHEALTH’s Web-enabled Employee Benefit Management System. WEBS
onlineTM is designed to simplify benefits administration by providing direct access to view, add, or modify
employee group benefits data; as well as view, print and download monthly billing statements, individual
employee benefits profiles and wallet cards.
WEBS onlineTM streamlines and/or eliminates the paper-based processing previously required.
Maintaining paper files is still important and the employee’s signed enrolment card and any
documentation requesting changes to their benefit coverage should be maintained in the employee’s
personnel file.
Our administration system is constantly evolving to meet your needs. If you have requirements that are
not being met, please contact your GroupHEALTH Benefits Administrator. Our clients' ideas are very
valuable in the continuing development of the system and this guide.

Plan Administrator’s User Guide i
Table of Contents
Overview ................................................................................................................... 1
Table of Contents ....................................................................................................... i
1.0 Introduction to WEBS onlineTM ................................................................... 1
1.1 Purpose of this User Guide .................................................................................................................. 1
1.2 WEBS onlineTM Security and Sign-In...................................................................................................... 1
1.3 System and Browser Requirements ...................................................................................................... 1
1.4 Getting Assistance .............................................................................................................................. 1
1.5 Navigating Within a Form .................................................................................................................... 2
1.6 Completing Forms On-line ................................................................................................................... 2
1.7 General Tips ....................................................................................................................................... 2
1.8 Mark WEBS online TM as a Favourite ..................................................................................................... 2
2.0 Working in WEBS onlineTM ......................................................................... 0
2.1 Welcome to WEBS onlineTM ................................................................................................................. 0
Forgot Your Password? .................................................................................................................. 0
Changing Your Temporary Password ............................................................................................... 0
Password Tips ............................................................................................................................... 1
2.2 WEBS onlineTM Main Menu ................................................................................................................. 1
List all Enrolled Employees ............................................................................................................. 2
Billing Statement ........................................................................................................................... 2
Booklets ....................................................................................................................................... 2
File Service ................................................................................................................................... 2
Change Employee Password ........................................................................................................... 2
Change Your Password .................................................................................................................. 2
Forms and Insurer Information ....................................................................................................... 3
Plan Administration ....................................................................................................................... 3
3.0 Benefits Administration ................................................................................ 4
3.1 Plan Administrator Responsibilities ...................................................................................................... 4
3.2 Getting Started ................................................................................................................................... 4
3.3 List All Enrolled Employees .................................................................................................................. 5
Screen Overview ........................................................................................................................... 5
Premium Preview for Employees .................................................................................................... 6
Benefits Card for Employees .......................................................................................................... 6
Notes feature ................................................................................................................................ 6
Future Change Indicator ................................................................................................................ 7
3.4 Adding a New Employee..................................................................................................................... 7
Employee Profile – Employee Enrolment Application Form ............................................................... 7
Benefits Profile – The Benefits Application Form ............................................................................ 10
Overview of Adding Dependents .................................................................................................. 11
Adding a Spouse .......................................................................................................................... 11
Adding a Dependent Child ............................................................................................................ 12
Beneficiary Designations .............................................................................................................. 14
Benefit Summary......................................................................................................................... 16
Alternate Coverage Information ................................................................................................... 17
Enrolment Application Confirmation ............................................................................................. 17
3.5 Making Changes to an Existing Employee .......................................................................................... 18
Salary Changes ............................................................................................................................ 20
Class Changes ............................................................................................................................. 21

Plan Administrator’s User Guide ii
Employees Returning to Work after Leave or Disability .................................................................. 21
Employees Absent from work due to Leave or Disability ................................................................. 22
Cancellation Due to Death ........................................................................................................... 23
Change of Termination Date ........................................................................................................ 23
Back-Dated Coverage Changes to a Terminated Employee ............................................................. 23
Reinstate an Employee’s Coverage ............................................................................................... 24
Employee’s Personal Information (Name, Address, Sex and Date of Birth) ....................................... 25
Add a new Spouse ....................................................................................................................... 25
Add a new dependent child .......................................................................................................... 26
Remove Existing Dependents ....................................................................................................... 27
Add an Employee’s Extended Health Care and/or Dental Care Coverage ......................................... 27
Cancel an Employee’s Extended Health Care and/or Dental Care Coverage ...................................... 27
Change an Employee’s Alternate Coverage.................................................................................... 28
Update Beneficiary Designations .................................................................................................. 28
Optional Benefits ........................................................................................................................ 28
Current Premiums Preview .......................................................................................................... 28

Plan Administrator’s User Guide 1
1.0 Introduction to WEBS onlineTM
1.1 Purpose of this User Guide
This document is intended for Plan Administrators using WEBS onlineTM. This user guide:
Describes how to administer employee benefits using WEBS online;
Provides tips and form requirements.
We regularly add new features and make adjustments to the application. Please check WEBS onlineTM
often for current release notes. A link to the release notes will appear above the main menu.
1.2 WEBS onlineTM Security and Sign-In
WEBS onlineTM was developed with 128-bit encryption and the highest security tools and hosting services
available. Some of the security features include:
HTTPS encryption through SSL;
User login requires three distinct pieces of information: Client, Employee Number (PIN) and
Password;
All login information and sensitive user information is encrypted on the server-side database and
is even unreadable internally to anyone browsing the database;
The applications programming includes security level checking, entry gate checking, and intrusion
detection.
WEBS onlineTM tracks who is accessing and making changes to information. Audit reports are available
upon request.
You will not be able to access WEBS onlineTM unless you enter a valid password. GroupHEALTH will
provide you with a temporary password which you can change at any time once logged into WEBS
onlineTM. This password should never be shared with or disclosed to anyone.
There are several security levels within WEBS onlineTM which allow access to various features within the
application. For the purpose of client administration of group benefits, the Plan Administrator level
allows employee information to be edited. A view only option is also available.
1.3 System and Browser Requirements
Internet Connection
Mozilla Firefox or Internet Explorer (Version 5.0 or greater) with JAVA enabled
Adobe Reader (http://www.adobe.com/products/acrobat/readstep2.html)
1.4 Getting Assistance
All of the WEBS onlineTM web pages have Help links near the top right corner of the screen. These Help
links describe exactly what is required to complete each screen, valid values, and in some cases, how to
interpret results.

Plan Administrator’s User Guide 2
To report a problem with WEBS onlineTM or if you have questions regarding the application, please
contact your GroupHEALTH Benefits Administrator or helpdesk@WEBS online.ca.
1.5 Navigating Within a Form
Some forms do not fit within a single viewing window. Use the scroll bar (sliding button right of window)
to view the entire screen.
Some menu items use more than one screen to collect data. Complete the screen and click the
<Continue>, <Submit> or <Save> buttons to move to the next screen.
1.6 Completing Forms On-line
Letters can be upper or lower case; most fields will automatically transpose the information into upper
case.
An * (asterisk) always denotes a mandatory field. If you try to submit a form with a mandatory field left
blank, you will receive an error message.
Most punctuation, including the following characters, may be invalid for certain fields:
, < > ; : { } ( ) * % $ # @ ! ~ ` ’ ? _ - | ^ \ &
1.7 General Tips
For security purposes, after 10 minutes of inactivity in the WEBS onlineTM system, you will
automatically be logged off. When you try to enter data after this time, you will be taken back to
the login screen.
While logged into WEBS onlineTM and applying for benefits, please try not to use your browser’s
Back button. You will be able to edit everything you have entered when you are at the summary
page. Because this application is in a secure environment, the system will prompt you with a
warning that the Page has Expired. If you receive this message, press your browser’s Refresh
button and click the Retry button. This should return you to the Main Menu.
To move from field to field within WEBS onlineTM, use the Tab key or your mouse to navigate.
Please try to avoid using the Enter key in WEBS onlineTM as it may return you to the Main Menu
without saving.
Please log off from WEBS onlineTM before closing your browser.
The WEBS onlineTM date standard format is YYYY-MM-DD (ie 2012-01-01). The fields can be
entered with or without the dashes.
The Notes link is found nearthe top right of the Employee Profile and Benefits Profile screens for
existing employees. This feature can be used and viewed by the Plan Administrator and
GroupHEALTH ’s Benefits Administrator to document missing information, special requests and
follow-up.
1.8 Mark WEBS online TM as a Favourite
When you first go to the login screen of WEBS onlineTM, mark this page as a Favourite (in Internet
Explorer), or a Bookmark (in Mozilla Firefox), for future, quick location of the site.

Plan Administrator’s User Guide 0
2.0 Working in WEBS onlineTM
2.1 Welcome to WEBS onlineTM
In your internet browser (Internet Explorer) go to: https://www.WEBS online.ca
This is the first screen you will see.
Enter your 3 character Client ID, your Personal ID number (PIN) and your temporary password (provided
by GroupHEALTH). Use the Tab key to move from field to field or your mouse to navigate. Please try to
avoid using the Enter key in WEBS onlineTM.
Click on <Login> to proceed.
The first time you login to WEBS onlineTM our Terms of Use will appear on the screen for your review and
agreement. This text may not fit within a single viewing window. Use the scroll bar (sliding button right
of the window) to view the entire screen.
To proceed after you have reviewed the information, click on <Agree> at the bottom of the screen.
Once logged on, the system will display the main menu.
Forgot Your Passwor d?
You can request a new one from the Log In screen. An email will be sent with a new password provided
your Employee Profile information in WEBS onlineTM includes a valid email address. If there is no email
address, you should contact your Benefits Administrator or info@WEBS online.ca. Once you receive the
email and logs into WEBS onlineTM you will be able to customize your password.
Changing Your Temporary Password
Once logged in for the first time, you should change your password. Use your mouse to click on the menu
item Change Your Password. The following screen will appear:
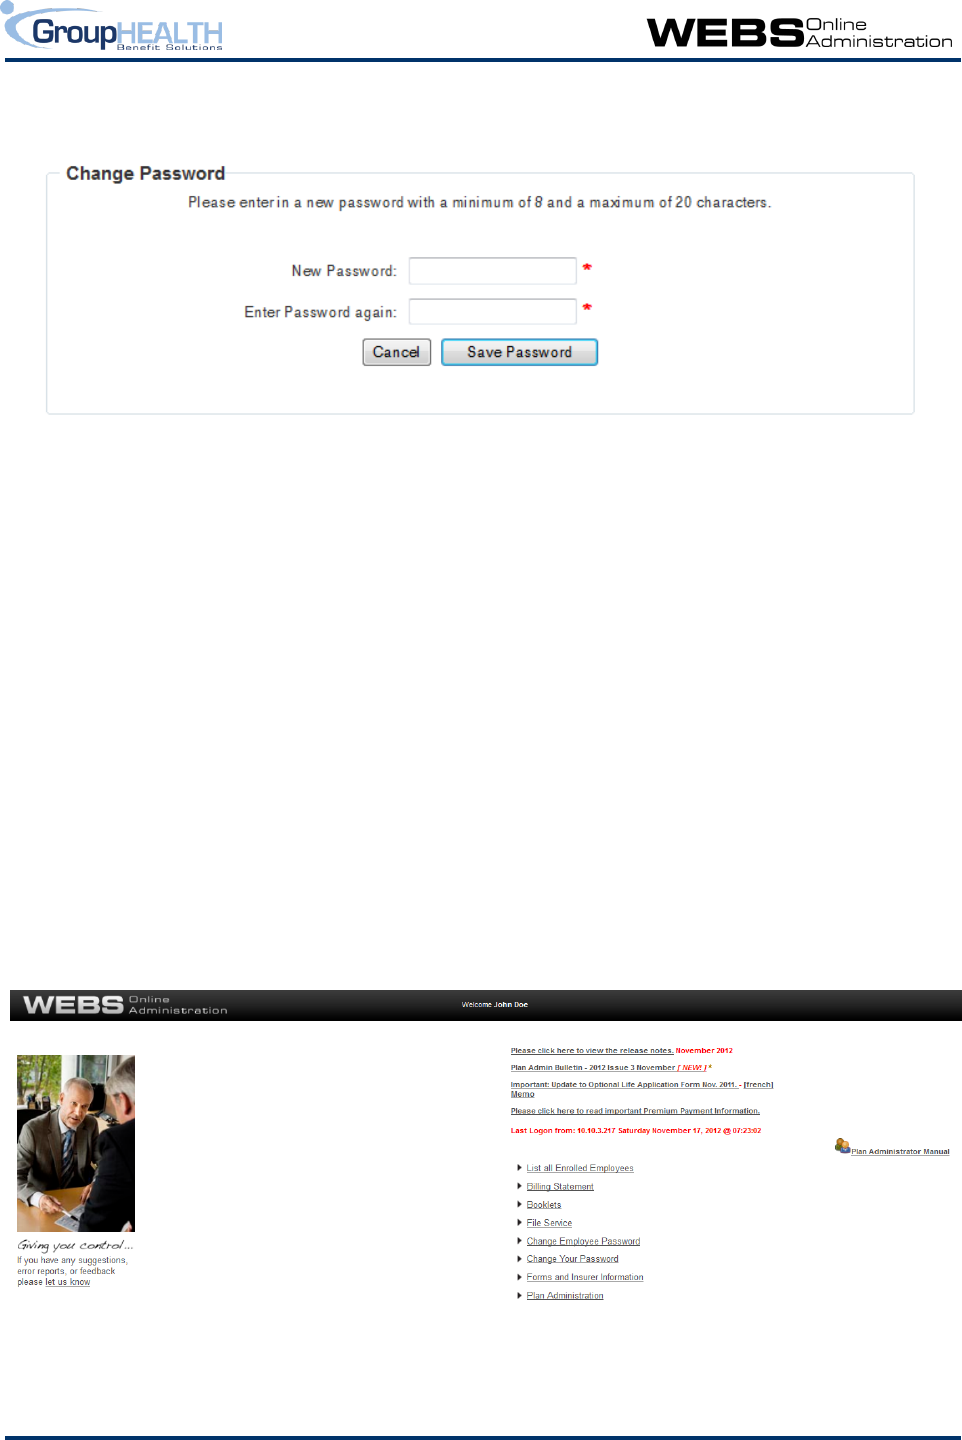
Plan Administrator’s User Guide 1
Click on <Save Password> when you have filled in the fields. You will be returned to the main menu
where the words ‘Password Changed’ will appear in red at the top of the screen. Your new password is
now in effect.
Any time that you feel your password has been compromised, or becomes known by someone, you
should make an immediate password change using the same steps as above.
Password Tips
Passwords must be at least 8 characters long.
Please use UPPER and lower case letters (A-Z, a-z), numbers (0-9) and special characters
(~!@#$%^*()_+=-`).
Please use a non-dictionary word.
Never disclose your password to another individual.
2.2 WEBS onlineTM Main Menu
The following screen shows the Plan Administrator’s main menu. You can reference this manual at any
time when you’re logged in by clicking on the link on the right side of the page. You may see links above
the menu items. These are links to recently posted or important bulletins that you should review.
The Last Log-on date and time is shown on this screen. If you notice that this last log-on date does not
correspond to the last time you used your user name and password, please contact your GroupHEALTH

Plan Administrator’s User Guide 2
Benefits Administrator to report this. It is important that you not disclose your password to another
individual.
The menu options on this screen are the links to administering your group benefits plan. Details on each
are provided below.
List all Enrolled Employees
This is the main link to administer your group benefits plan. More information on this menu item is found
under section 3.0.
Billing Statement
This link will allow you to display a billing statement in a PDF format. A screen will appear asking you to
choose which billing month you require. Once selected, the bill will appear on the screen.
You must have Adobe Reader on your system to view the statement. This program can be obtained free
at: http://www.adobe.com/products/acrobat/readstep2.html
Booklets
This link will allow you to display employee benefit handbooks. A screen will appear asking which class
you want to view.
As the booklets are displayed in a PDF format, you must have Adobe Reader on your system to view them.
This program can be obtained free at: http://www.adobe.com/products/acrobat/readstep2.html
File Service
This link enables the transfer of files to and from GroupHEALTH in a secure environment. For example,
you may wish to send a file containing a mass salary change. The screen indicates the various file types
that are permitted and there is room to enter comments for your GroupHEALTH Benefits Administrator.
Your Benefits Administrator is notified when you make an upload.
If your GroupHEALTH Benefits Administrator uploads a file for you, they will email you to advise it has
been loaded.
Change Employee Password
If another Plan Administrator in your office and has forgotten, misplaced or wishes to change their
password, this link will enable them to do so. By clicking on the link, a screen will appear requesting their
PIN and asking them to type in their new password and then confirm it. Once this information is
complete, they click on <Reset> and their new password would be in effect. They should not disclose this
password to anyone.
Change Your Password
When selected, this link will enable you to change your own password. A screen will appear for you to
enter your new password and then enter it again to confirm. Click on <Save Password> when you have

Plan Administrator’s User Guide 3
filled in the fields. You will be returned to the main menu where the words ‘Password Changed’ will
appear in red at the top of the screen. Your new password is now in effect.
Any time that you feel your password has been compromised, or becomes known by someone, you
should make an immediate password change using the same steps as above.
Forms and Insurer Information
This link is used to download claims forms, other insurer information or bulletins and GroupHEALTH
enrolment forms, change forms and bulletins. When you select this menu item, a list of the folders you
may choose from will appear on the screen. Click on the desired folder to view the contents and then
select the form or document you require.
You must have Adobe Reader on your system to view the claim forms. This program can be obtained free
at: http://www.adobe.com/products/acrobat/readstep2.html
Plan Administration
Notification reports that are generated with our monthly billing statement can be found here. These
reports include overage dependent forms, non-evidence maximum notifications and optional benefit
certificates. A number of these reports require action from you as the Plan Administrator. Refer to your
Plan Administration guide for more details or contact your GroupHEALTH Benefits Administrator for
assistance.

Plan Administrator’s User Guide 4
3.0 Benefits Administration
3.1 Plan Administrator Responsibilities
As Plan Administrator for your Group Benefits program, your responsibilities include:
Reporting all new enrolments, terminations and changes within 31 days of their effective date.
Keeping all records updated so that eligible employees are enrolled in the program and are
covered for the benefits to which they are entitled.
Should you have specific questions regarding class definitions, eligibility and other administrative rules,
please feel free to contact your GroupHEALTH Benefits Administrator.
All new employees added to WEBS onlineTM must be supported by an Employee Benefits Application,
signed and dated by the employee. The Plan Administrator must keep the signed documentation on
record. GroupHEALTH or the benefit carrier(s) may audit these records from time to time. In case of an
employee’s death, this original form must be submitted with the claim.
WEBS onlineTM does not replace ALL of your benefit plan administration procedures. Please continue to
contact your GroupHEALTH Benefits Administrator for submissions such as:
PIN Corrections or Changes
Optional Benefit Application Forms
Terminations Due to Death, and
Changes to your Company Name or Address
3.2 Getting Started
WEBS onlineTM breaks employee benefits administration down into two areas:
Employee Profile (EE), and
Benefits Profile (BP)
The Employee Profile features are the equivalent of the Employer’s section of the GroupHEALTH
Enrolment Card. It compiles the information known mainly by the Plan Administrator such as class, salary,
employment date and occupation.
The Benefits Profile contains the details regarding the employee’s personal information such as address,
marital status, gender, dependent information, beneficiary designations and eligible benefits.
Both profiles can be accessed from the first menu item in the main menu – List all Enrolled Employees.
Changes to the information on either screen are straightforward. Simply click on the screen you require
(either EE or BP) and click on the field that needs updating (or on an Edit button that may be beside the
field). Enter the new data and save the changes. These changes are then reviewed by GroupHEALTH,
usually within 24 hours. You will be contacted if further information is required. More specific
instructions on common changes are found later on in this guide.
Plan Administrator’s User Guide 5
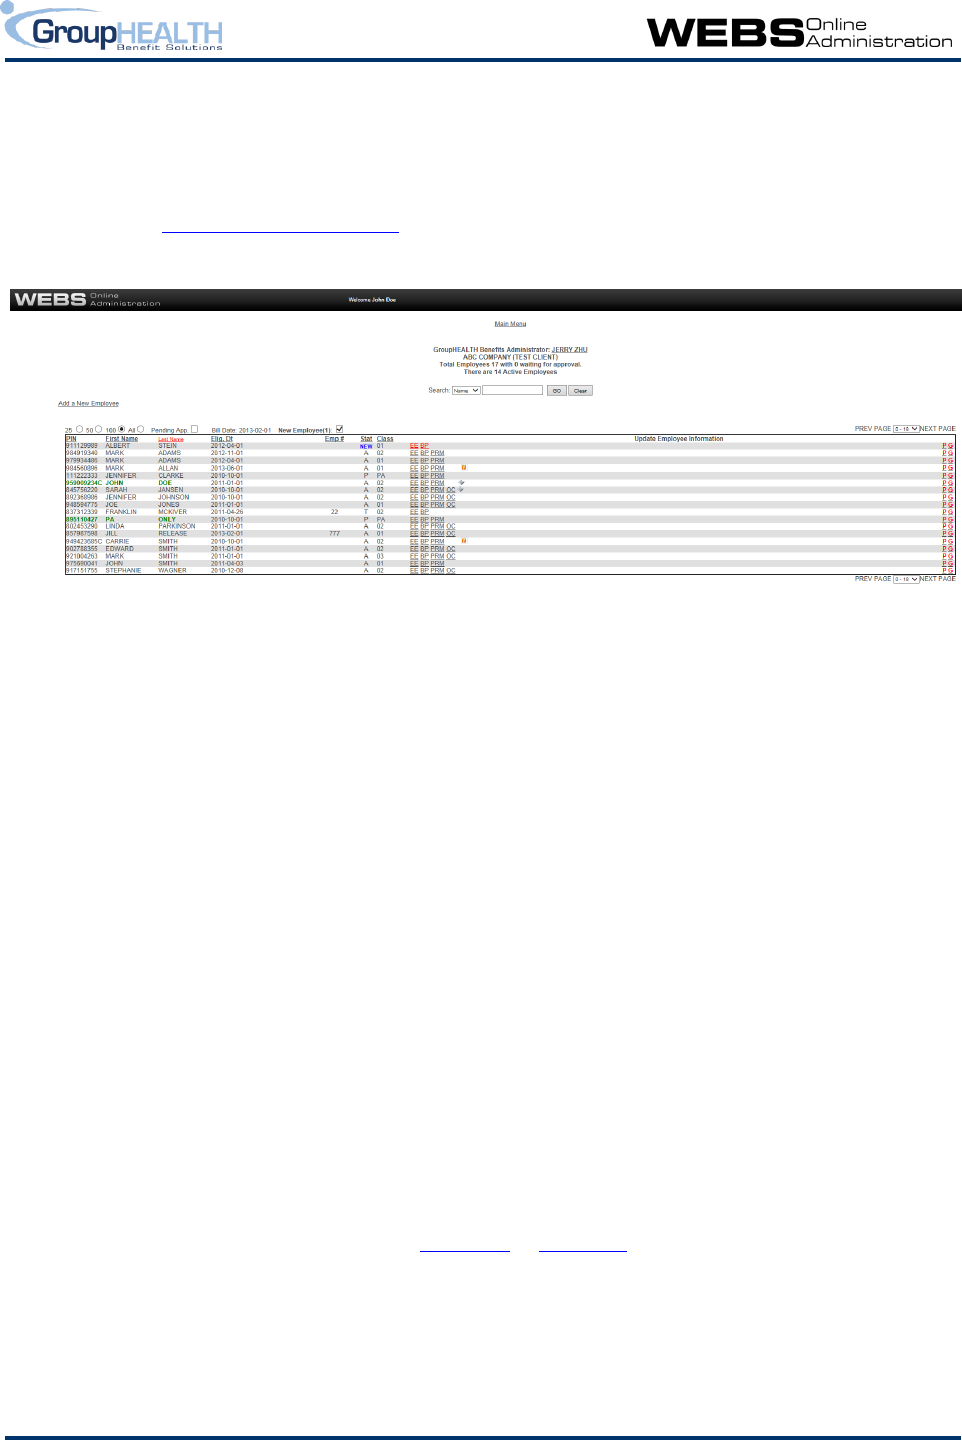
3.3 List All Enrolled Employees
Screen Overview
When you select List all Enrolled Employees from the main menu, a screen similar to the following will
appear listing your employees.
The top of your screen shows your company name along with the name of your assigned GroupHEALTH
Benefits Administrator. (Clicking on that name will take you to an email screen with their email address
filled in.) There will also be a message displayed noting the total number of your employees in our system
as well as how many active employees there are and how many changes are awaiting approval. Changes
and new enrolments are typically approved within 24 hours.
The screen shows a listing of all your employees with the following information for each: PIN, First and
Last Name, Eligibility Date (the date they were first eligible for benefits), Employee Number, Status and
Class. You may sort the data by PIN, First Name, Eligibility date, Employee #, Status or Class by clicking the
underlined text in the header row. New employees who have not yet been approved for coverage by
GroupHEALTH will appear at the top of the employee listing. You can hide those employees by clicking on
the New Employee tick box.
You can view all changes pending processing by GroupHEALTH by clicking the ‘Pending Approval’ box.
When this box is checked, the list of employees will only reflect those employees in a locked status and
waiting to be approved by GroupHEALTH. This feature allows you to sort the Pending Approvals by
clicking on the column headings. To refresh the list to show all employees, uncheck the box.
If you have employees who were terminated more than 12 months ago they will not appear in your listing
but you can view them by clicking on the message that appears on your screen.
The screen can display 25, 50, 100 or all employees or just those pending approval. You can change the
number displayed by clicking on the buttons beside each option on the left side of the screen. To move to
another page of the employee listing, click on Next Page or Prev Page.
If you have a large number of employees, you may use the Search feature to search the database for an
employee by Name (First, Last or Begins with), PIN, Class or Employee #.

Plan Administrator’s User Guide 6
Employees shown in green have full Plan Administrator access while those shown in bright blue have Plan
Administrator View Only access. If the EE or BP links are shown in red, this means there are changes
pending for that employee.
As you move your mouse over the list of employees, the cursor position will highlight the entire line in
yellow to allow easier navigation.
The employees’ status will show as one of the following:
A active
T terminated
D absent due to disability
L absent due to leave of absence (not disability related)
NEW new addition but not yet approved by GroupHEALTH
PA plan administrator (only used if the Plan Administrator is not eligible for benefits)
There are several links to the right of each employee:
EE – Employee Profile
BP – Benefits Profile
PRM – Premium Preview
OC or WC – oneCard or Wallet Card
P and G links - The red P link on the far right of each employee’s line is a shortcut to the Change Employee
Password screen. The red G link will generate a new password for an employee and display it on the
screen.
The EE link and the BP link are the main links to administering your employee benefits. They will be
discussed further in this guide.
Premium Preview for Employees
Clicking on the PRM link will bring up a view of last month’s coverage and premiums by benefit as well as
a preview of the employee’s expected coverage levels and premiums for the upcoming billing. Please
note that the preview is based on the employee information, rates and plan design coded in WEBS
onlineTM as of the current date. This information is subject to change prior to billing.
Benefits Card for Employees
Clicking on the OC or WC link will bring up the employee’s most recent oneCard or wallet card. These
cards are reposted after every billing statement run to ensure the most recent information is available to
you. You can print a copy to give to your employee if needed. If you wish to order a new card, use the
Notes feature or email your Benefits Administrator to request one. All new enrolments will receive a card
from GroupHEALTH.
Notes feature
You may see a small notepad beside the OC or WC link. This indicates that notes have been entered on
the employee’s record. By clicking on the notepad you see review or enter new notes. You can also use
this Notes feature for functions such as providing additional information you feel will assist GroupHEALTH
with processing an employee’s change, requesting changes to an employee’s benefits information, or
requesting that the normal waiting period be waived. Type in your comments and click the <Add Notes>

Plan Administrator’s User Guide 7
button on the right. An email of the note will be sent to the assigned GroupHEALTH Benefits
Administrator.
Future Change Indicator
A small “f” is shown on an employee’s line if there are future changes for the employee.
Click on the Main Menu link if you wish to return to the WEBS onlineTM main menu.
3.4 Adding a New Employee
This process will enable you to apply for benefits based on an employee’s completed GroupHEALTH
enrolment card. Alternatively, you may have a new employee in the office to ask and answer the
application questions for benefits and at the end of the process, save and print the WEBS onlineTM
generated Enrolment Card for the employee to sign and date. The completion of information in WEBS
onlineTM eliminates the need to forward a copy of the completed enrolment card to GroupHEALTH.
Before starting to add a new employee in WEBS onlineTM, ensure the employee is eligible for benefits
under your group plan and you have all necessary information in front of you. Some fields in WEBS
onlineTM are mandatory and the application will not be processed if information is missing.
From the List All Enrolled Employees screen, click on Add A New Employee.
Employee Profile – E mployee Enrolment Applicati on Form
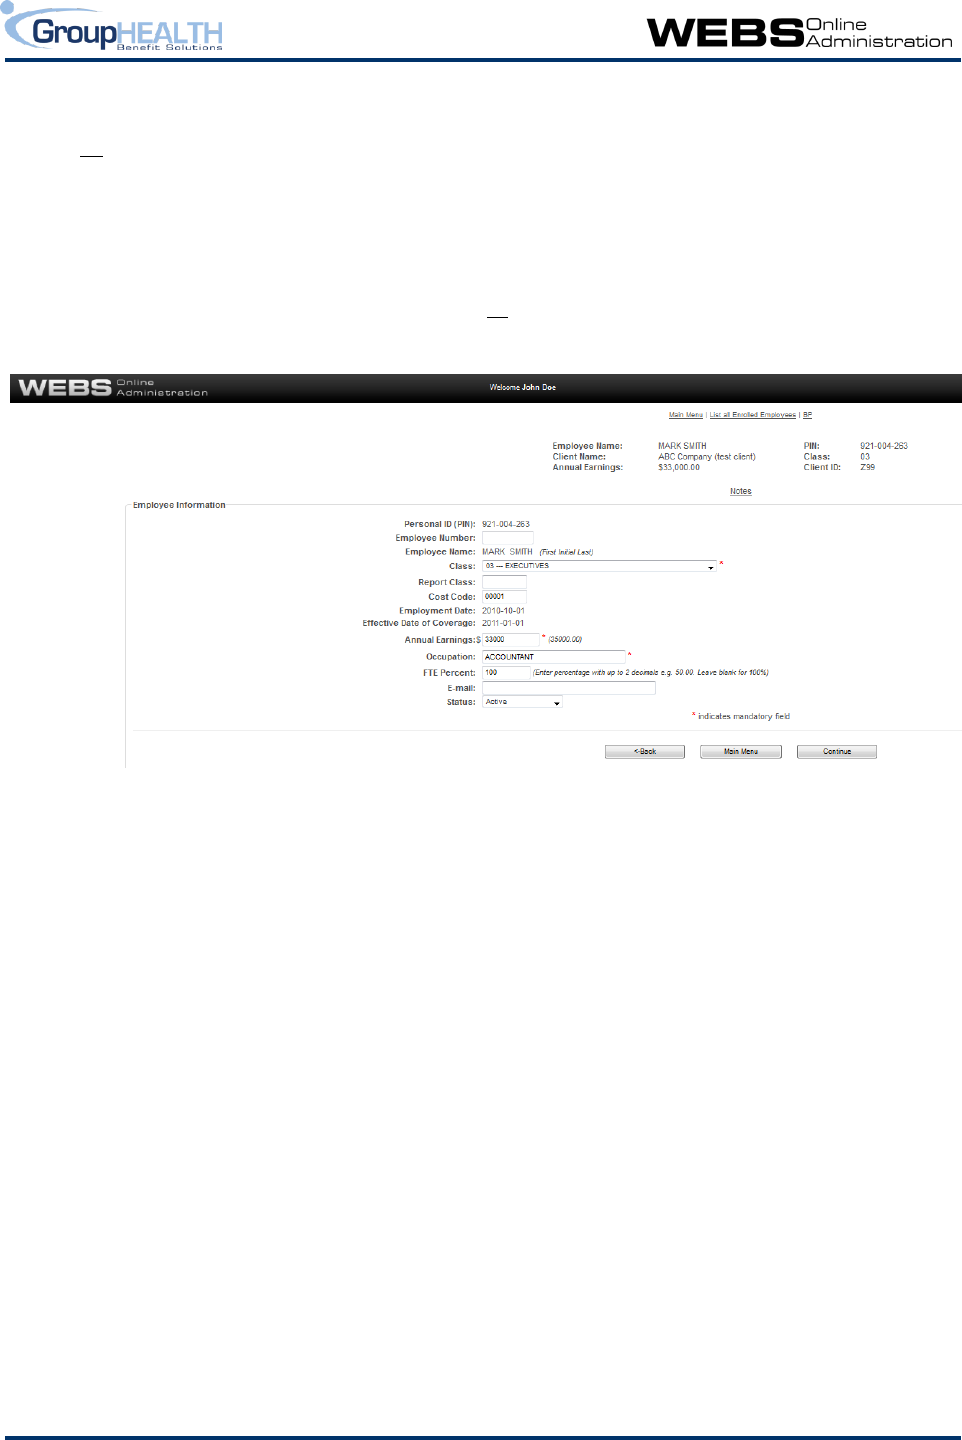
The Employee Information (EE) screen will appear. This screen is always the first step in setting up a new
employee for benefits in WEBS onlineTM. The Benefits Profile (BP) cannot be accessed until the Employee
Profile portion of the application is completed.
Using the Tab key to move between the fields, enter the information requested.

Plan Administrator’s User Guide 8
Personal ID (PIN)
Also referred to as the User ID. This is the number WEBS onlineTM and the benefit carrier(s) use to
identify an employee for billing and claim purposes.
Leave this field blank when entering a new employee and a PIN will be assigned when you save
the record. You may wish to assign a specific PIN however certain carriers have requirements
regarding PIN format and the PIN may be replaced when saving the record. The Employee
Number field may be a better spot to enter your employee’s in-house number. If you do wish to
enter your own 9 digit PIN click on the box beside Check to Edit.
Employee Number
This is an optional field used by some employers to reference specific employees or other internal
coding.
Employee Name (3 separate fields)
First Name, Initial and Last Name.
Class
Click on the dropdown arrow to see a list of available classes. Please use care when selecting or
changing an employee’s class as it determines the benefit levels an employee is eligible for.
If the desired class is not listed in the dropdown box, please contact your GroupHEALTH Benefits
Administrator for assistance.
Report Class
If your monthly billing statement is sorted by Report Class, this field must be completed.
Otherwise, the employee will appear at the beginning of the billing statement and will not sort
properly. Please contact your GroupHEALTH Benefits Administrator to verify if this field is
required.
Cost Code
This field is also known as the division and is required by the insurer. Your Benefits Administrator
can provide the cost codes for your organization.
Employment Date
This date is usually when the employee first commenced employment. However, if the employee
has been working less than the minimum number of hours required to be eligible for benefits or
did not previously meet the eligibility requirements, this field should indicate the first date the
employee met the eligibility requirements. After the initial enrolment, this field should not be
edited.
Effective Date of Coverage (system calculated)
WEBS will automatically calculate the effective date of coverage using the employee’s
Employment Date and Class once you have saved the information on this screen. This field will
reflect the earliest effective date of all eligible (mandatory) benefits.
Annual Earnings
An amount must be entered if Group Life and/or disability benefit levels are determined by the

Plan Administrator’s User Guide 9
salary, otherwise the field will accept ‘0’.
Occupation
The employee’s occupation or title.
FTE Percentage
This is an optional field used by some employers to identify employees working less than full-
time. Up to 2 decimal places will be accepted. For example, enter 45.57 for someone who has a
.4557 FTE.
E-mail
This field stores the employee’s email address if provided.
Status
New or Plan Admin Only. The default status is NEW as Plan Admin Only is used only if the plan
administrator is not eligible for benefits.
Once all necessary fields have been completed, click <Continue>. If there are any errors or missing
information on the page, a message in red text will appear.
The following screen will appear if all information was entered correctly. Please make note of the PIN
assigned to the employee.
Verify that the calculated “Effective Date of Coverage” field is correct. If the stated effective date of
coverage does not match the date you are anticipating, please use the Notes link to advise your
GroupHEALTH Benefits Administrator of the effective date of coverage you had calculated.
This new Employee Profile will now be locked until it has been reviewed and processed by GroupHEALTH.
If you require changes to the information you entered on this screen use the Notes link to advise your
GroupHEALTH Benefits Administrator. To proceed with the Benefits Profile, click on <Add/Update Benefit
Profile>.
Plan Administrator’s User Guide 10
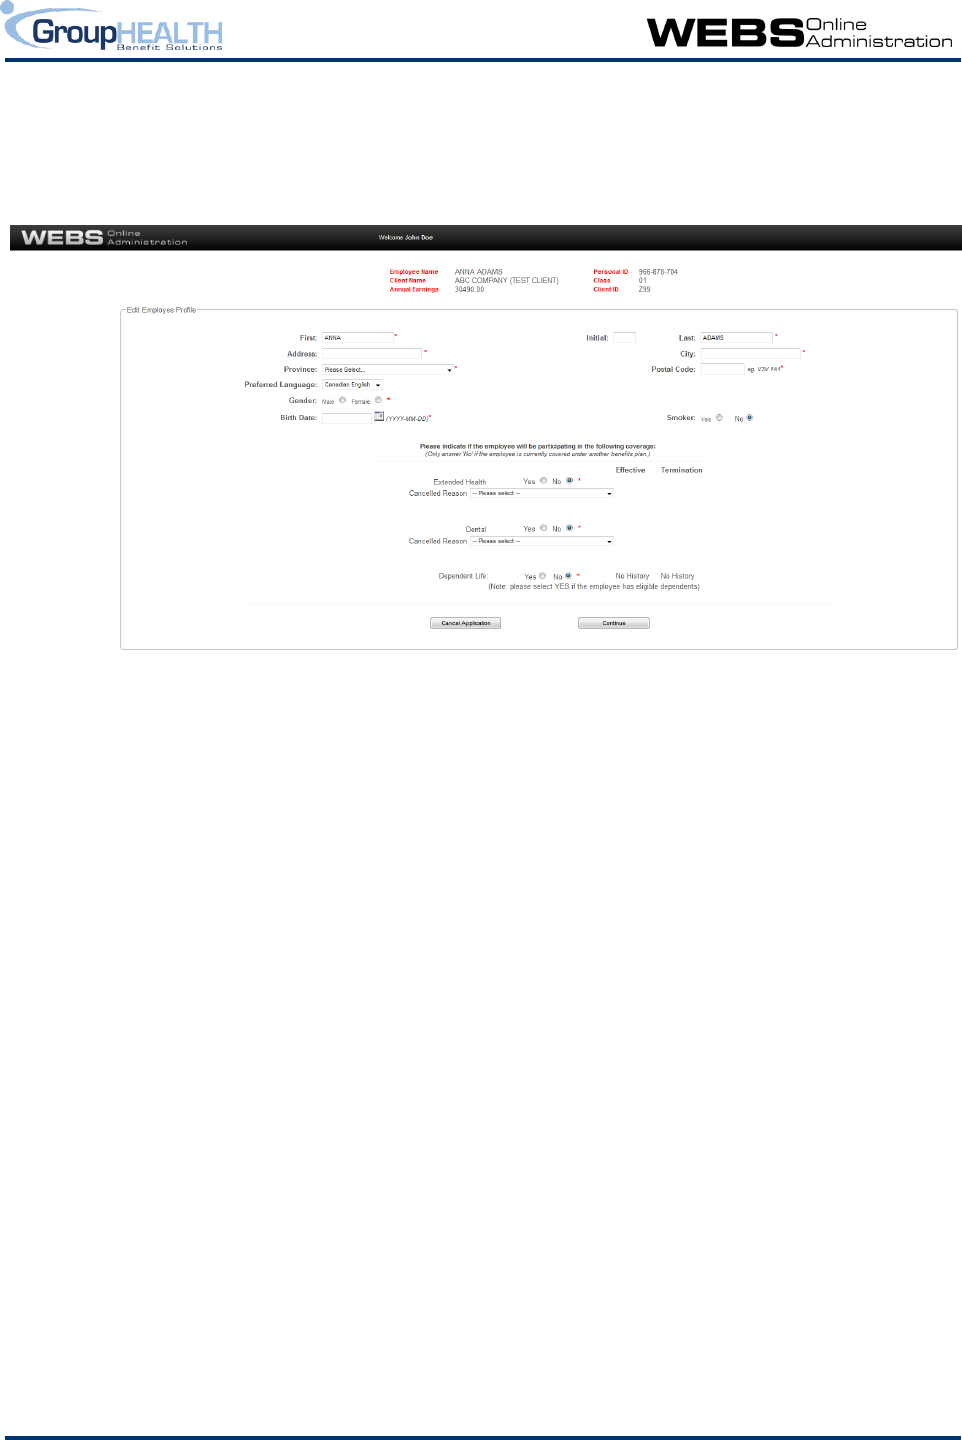
Benefits Profil e – The Benefits Application Form
There are several screens to the Benefits Profile which have been customized based on the benefits
available for the employee’s class. The first screen to appear is shown below:
This screen gathers information regarding the employee’s address, gender, birth date and their request
for Extended Health Care, Dental Care, MSP and Dependent Life coverage (if applicable).
You will notice that the Employee Profile information is displayed in the header section of the window.
Complete the fields on the screen by using the Tab key or your mouse to move from field to field.
All fields on this screen are mandatory with the exception of the middle initial field, the smoker status and
the MSP Information fields (if applicable). The Smoker Status field is used to determine rates for
employee Optional Life premiums. It is not required unless the employee is applying for Optional Life
benefits.
Extended Health and Dental coverage is usually mandatory for all employees, unless they have coverage
under their spouse's or other similar benefit plan. Set the choices for these benefits to Yes or if the
employee is waiving this coverage, enter the reason for refusal. If an employee chooses to waive
coverage under this plan, a “Waiver” screen for Extended Health and/or Dental Coverage will appear for
completion near the end of the application process so you may enter details of their alternate coverage.
Click on the Yes button beside Dependent Life (if applicable) if an employee has eligible dependents
(regardless of whether or not they are to be covered under Extended Health and/or Dental).
Click on <Continue> when you are finished entering the data.
If Extended Health, Dental, MSP or Dependent Life benefits were selected as Yes, a new screen (sample
below) will appear showing the calculated effective dates of coverage based on the waiting periods in the
insurance contracts. Should the calculated effective dates not correspond with your manual calculations
for the employee’s effective date of coverage, please contact your GroupHEALTH Benefits Administrator
or use the Notes link at the end of the enrolment to specify the effective date you had anticipated.
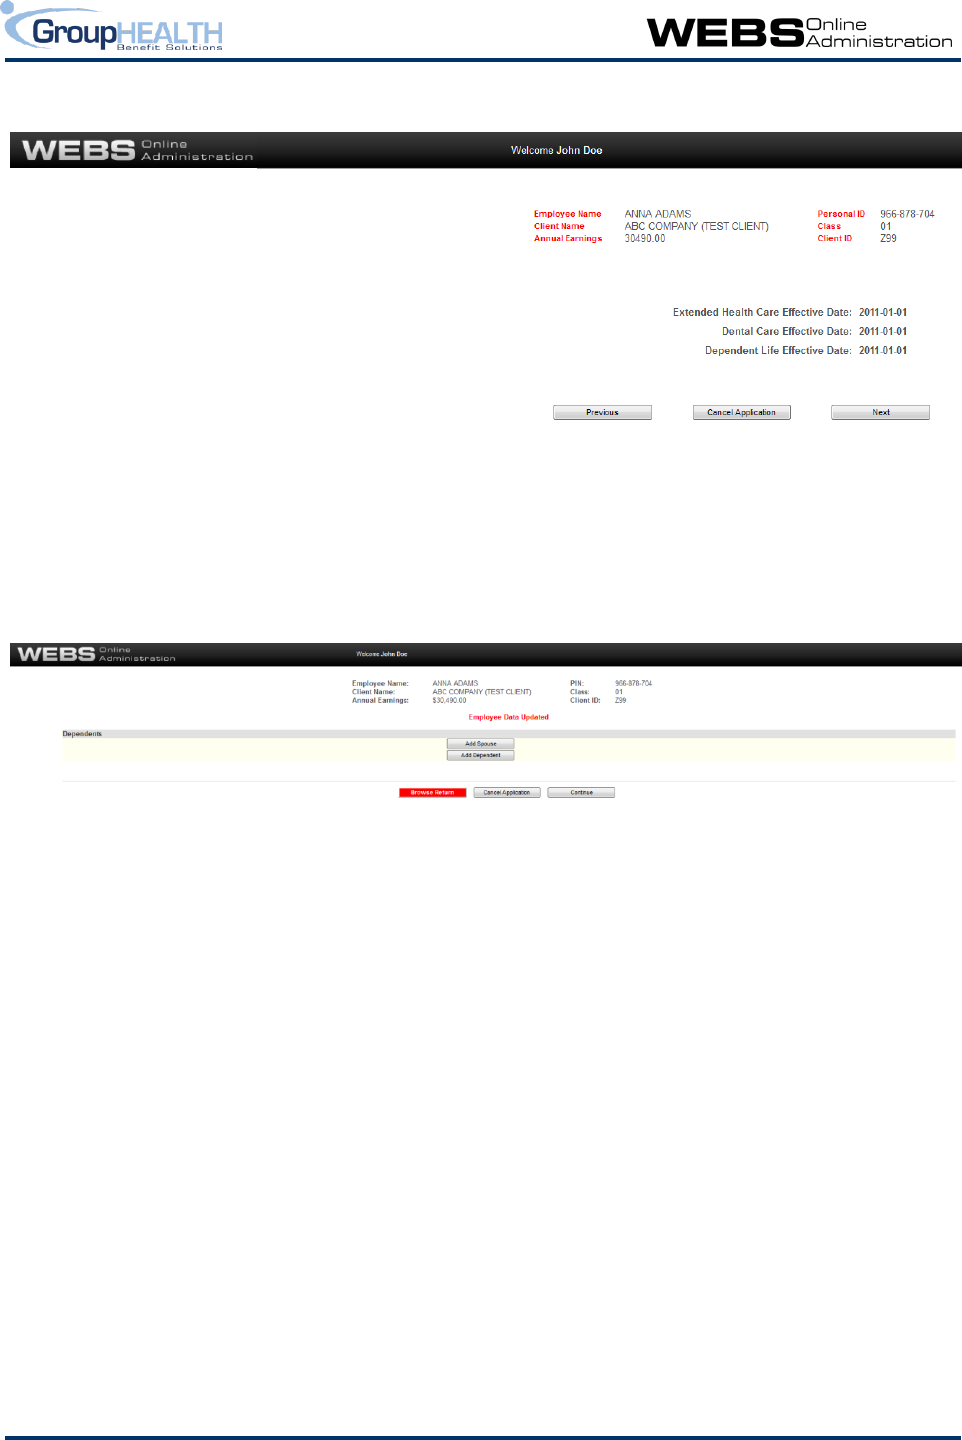
Plan Administrator’s User Guide 11
Click on <Next> to proceed with the enrolment.
Overview of Adding Depende nts
The following screen will appear for you to enter dependent information. All eligible dependents should
be entered into WEBS onlineTM regardless of whether or not they are to be covered for Extended Health,
Dental or MSP.
Click the button <Add Spouse> or <Add Dependent> to add dependents. Another screen will appear to
gather information. If there are no eligible dependents, click <Continue> to proceed.
WEBS onlineTM will partially adjudicate a dependent’s eligibility for benefits. Additional clarification
and/or documentation may be required prior to GroupHEALTH processing coverage for these dependents.
Please contact your GroupHEALTH Benefits Administrator should you require specific dependent eligibility
information.
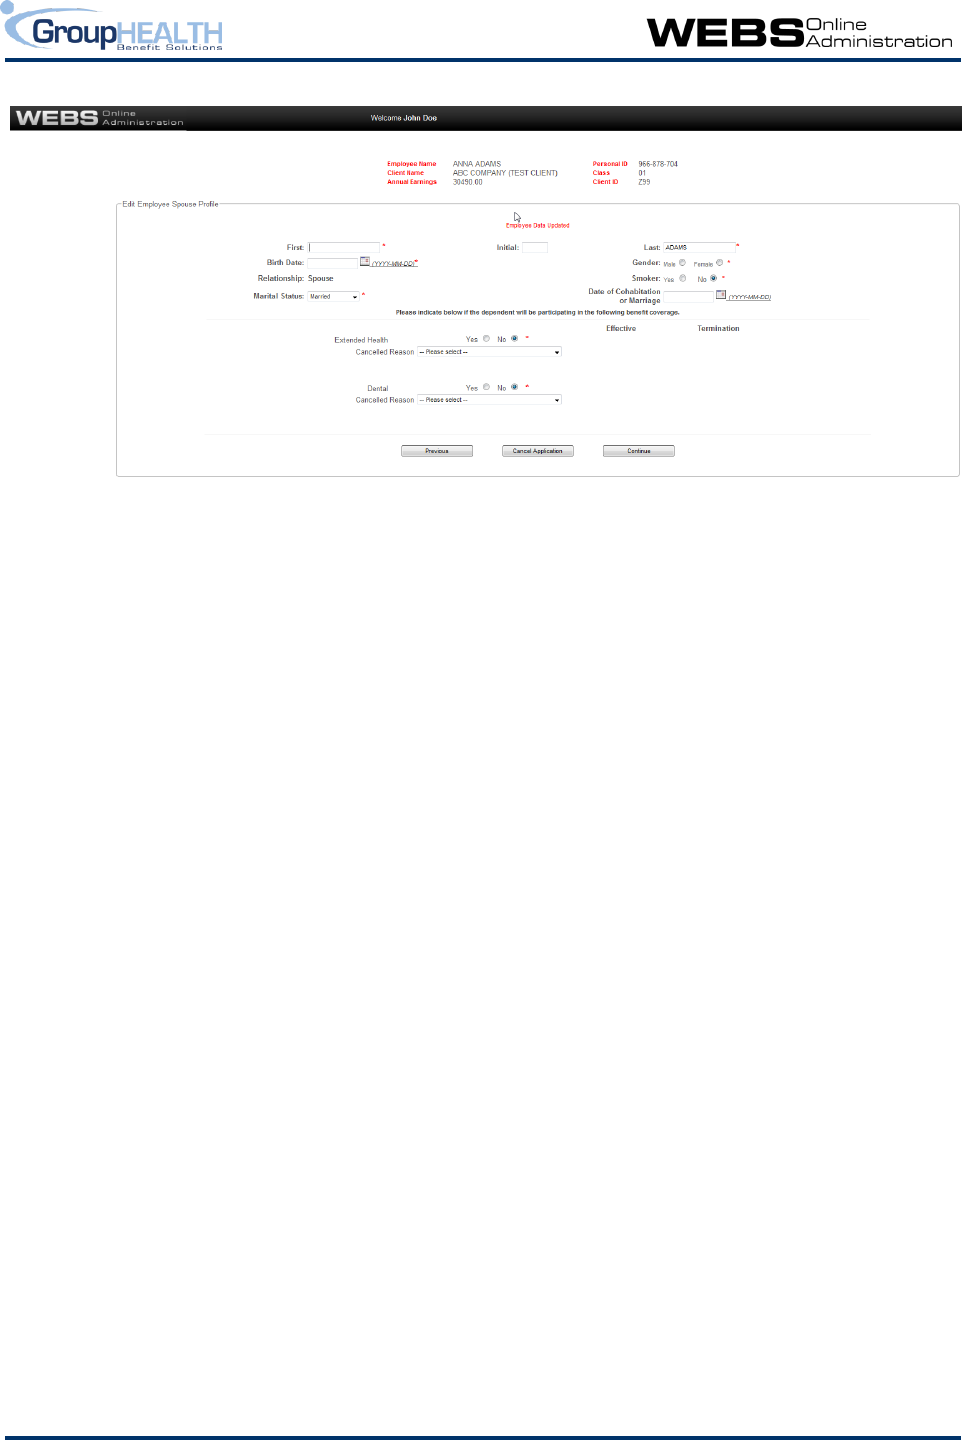
Adding a Spouse
After clicking the <Add Spouse> button, the following screen will appear.
Plan Administrator’s User Guide 12
All mandatory fields should be completed. The choice for Extended Health, Dental and MSP will default to
“No”. If the employee’s intention is to cover their spouse under this Group Benefits plan, change the
selections for the benefits to Yes. If the spouse is not being enrolled in Extended Health, Dental or MSP,
enter the reason for the decline of coverage. If you select “Other” as the reason for declining coverage, a
further box will appear to request more details.
If the employee has already said “No” to Extended Health, Dental or MSP for himself or herself, the option
for dependent coverage under these benefits will not be available.
If the spouse is enrolling for Extended Health and or Dental, Coordination of Benefits fields will appear.
This information assists the claims payor to ensure claims are forwarded to the correct carrier as the first
payor. If the spouse has coverage under their employer’s benefits plan, that level of coverage for
Extended Health and Dental Care should be indicated for Co-ordination of Benefits purposes.
Once all fields are completed, click on <Continue> to proceed with the enrolment. You will be returned to
the Dependent Summary screen to review the information you have entered and enter more dependents
if needed.
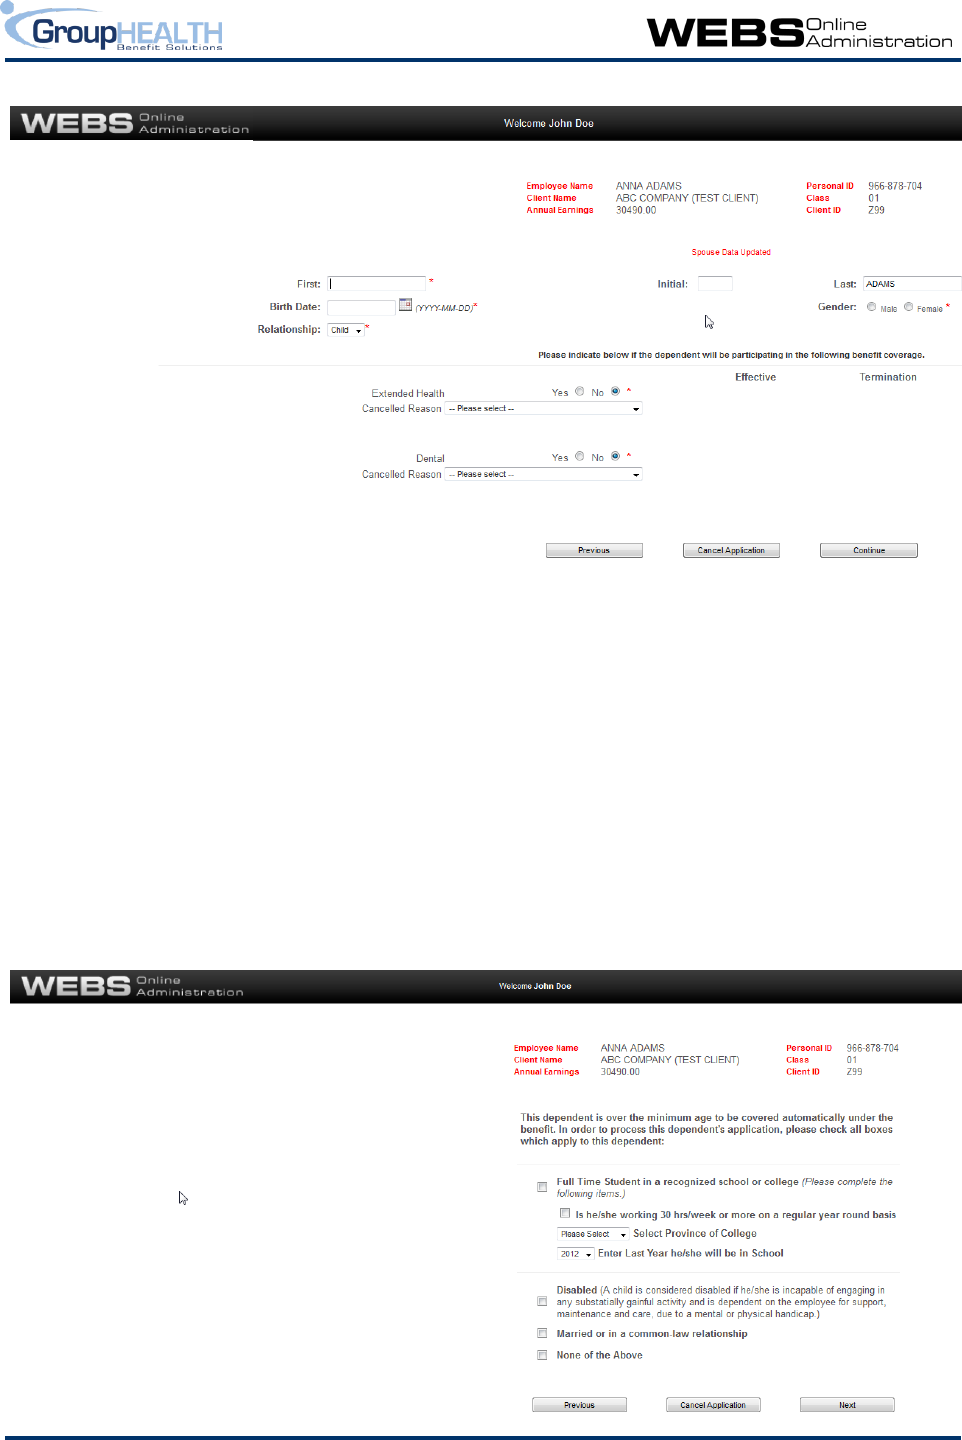
Adding a De pendent Child
From the Dependent summary screen, click the <Add Dependent> button and enter the child’s
information in the following screen.
Plan Administrator’s User Guide 13
Remember to change Extended Health, Dental and MSP to “Yes” if the employee’s intent is to cover their
dependent under this Group Benefits plan. If the employee has already said “No” to Extended Health,
Dental or MSP for himself or herself, the option for dependent coverage under these benefits will not be
available.
If you select No for any of the benefits, choose the reason the dependent is not to be covered from the
drop down box. If you select “Other” as the reason for declining coverage, a further box will appear to
request more details.
Once all fields are completed, click on <Continue>.
If the dependent you enrolled is over the age specified in your insurance contracts a screen will appear
requesting more information regarding the dependent.
Plan Administrator’s User Guide 14
Please click on the applicable boxes on the screen and then click <Next>. If an employee requests to enrol
an overage disabled child, additional documentation may be required by the carriers before the
dependent is added to benefits. You will be contacted by GroupHEALTH to explain any carrier
requirements.
You will be returned to the Dependent Summary screen. Note the addition of the dependent on this
screen. The dependent name will appear in red letters if he/she is not eligible. Dependents with a red dot
are over the maximum allowable age and are not eligible for coverage. Dependents with a blue dot are
eligible for coverage until they reach the maximum allowable age or until their student or disabled status
changes.
When all dependents are shown on the Dependent Summary screen, click on <Continue> to proceed with
the employee’s enrolment.
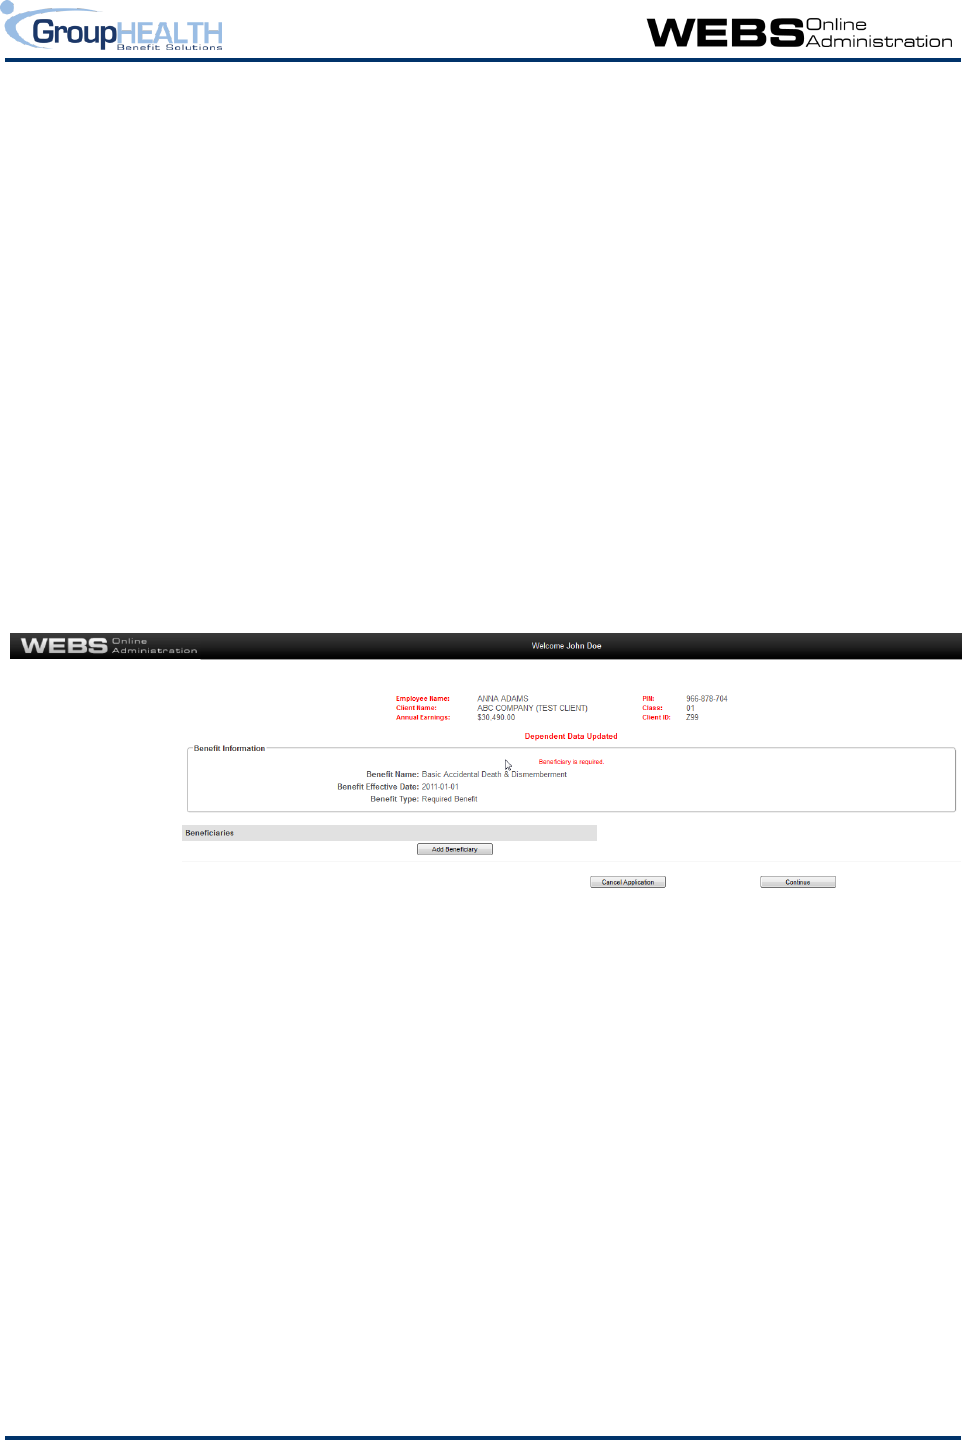
Beneficiary Designations
The next screens will request the beneficiary designations by benefit. WEBS onlineTM will not continue
past these windows until a beneficiary has been designated.
Click on <Add Beneficiary> and the following window will appear:

Plan Administrator’s User Guide 15
The name fields, relationship and birth date fields are only mandatory if Estate is not checked. The
beneficiary's full first and last name must be included. Initials or titles (i.e. Mrs. J. Doe) are not sufficient. If
only the beneficiary's birth date is entered, the age will be calculated and put into the age field. If only
the age field is entered, WEBS will estimate the date of birth. Please try to enter the date of birth if
possible.
If the employee wishes to designate Estate, click on the ‘Estate’ box.
Click on <Continue> to move back to the benefit screen where the beneficiary will now be displayed. Click
on <Continue> to move on to the next part of the enrolment.
In the event of an employee's death, the original signed enrolment card is required by the insurance
company in order to process the death claim; photocopies will not be accepted.
Appointing Multiple Beneficiaries
An employee may designate more than one beneficiary per benefit. To appoint multiple beneficiaries,
complete the name fields of the beneficiary and indicate a percentage less than 100 in the ‘Share’ field.
Click <Next>. Continue to click <Add Beneficiary> and add beneficiaries until the sum of the shares
between all beneficiaries equals 100%.
Appointing a Trustee
If a designated beneficiary is under 19, the "Declaration Appointing a Trustee" screen will appear for
completion. Once completed, the information will be reflected on the benefit screen along with the
beneficiary. Click <Continue> to proceed.

Plan Administrator’s User Guide 16
Other Benefits’ Beneficiaries
WEBS onlineTM allows separate beneficiary designations by benefit. The window and process is the same
for each. To streamline the entry process, it is possible to have the beneficiary copied to another benefit
by clicking on ‘Set beneficiaries the same as benefit:”. The beneficiaries from the named benefit are then
copied to this screen for your approval. Alternatively, you can click on Add Beneficiary and enter the
information as you did previously. Click on <Continue> to proceed to the next screen.
Benefit Summary
Once all the necessary information has been entered, the application data will appear on screen in a
summary format to be reviewed, edited if necessary, and confirmed. Please ensure all information has
been entered accurately because once you click <Save> no changes will be allowed to the employee’s
Benefits Profile until after it has been processed by GroupHEALTH .
This screen shows the employee’s personal information, dependents, benefits and beneficiary
designations. The screen is broken down into three main sections:
Employee – showing the employee’s personal information and the effective date of their
Extended Health, Dental, MSP and Dependent Life coverage
Dependents – showing the employee’s eligible dependents and their Extended Health, Dental and
MSP coverage along with their effective dates.
Benefits – showing the benefits the employee is covered for and their beneficiaries if required.
The carrier, claims payor and policy number also appear beside most benefits. The coverage
shown is as of the billing date shown in the Benefits section. If there are benefits that are still
in their waiting period, the benefit levels will show as W/P.

Plan Administrator’s User Guide 17
If a Non-Evidence Maximum exists on a benefit and if the salary level is high enough, the
employee will be able to apply for a higher level of coverage. This information is displayed
under Volume, Eligible Volume (the higher amount) and the status (Not Applied at this stage
as it is a new enrolment). If the employee wishes to apply for the higher level of coverage
they must complete a Medical Information form and submit it to GroupHEALTH. Contact your
GroupHEALTH Benefits Administrator for assistance.
WEBS onlineTM will not process Optional Benefits. These benefits must be administered via
paper, with applications and changes being forwarded to your GroupHEALTH Benefits
Administrator for processing on your monthly billing statement. Once in place, the coverage
will be reflected on the Benefits Profile screen for your review.
Click on < Save> to continue with the final steps of the enrolment.
Alternate C overage Informati on
If the employee waived Extended Health and/or Dental benefits for himself or for any of his dependents,
the following screen will appear identifying who has waived coverage and requesting information on their
alternate carrier.
After entering the information requested (only the Insurance Company field is mandatory), click the
signature box indicating that the employee understands the conditions that must be met if coverage is
later requested under your plan.
Click <Next> to finish the enrolment process.
Enrolment Applicati on Confirmati on
The following screen will appear confirming that the application has been sent to GroupHEALTH for
approval.

Plan Administrator’s User Guide 18
You may print the enrolment application if desired by clicking on the Print link. Links are shown on the
bottom of the screen to move you to different parts of the system such as back to the List All Enrolled
Employees screen.
Please ensure the employee signs and dates the application generated by WEBS onlineTM or that you
keep the employee’s completed GroupHEALTH Enrolment Card (paper version). These forms must be
kept in your files. Please note that in the event of a Group Life Insurance claim, the original application
bearing the employee’s signature must be produced. The original forms should be kept by the
Employer in a very secure place, as they are important documents.
The employee’s Benefits Profile will now be in a locked state until processed by GroupHEALTH (usually
within 24 hours).
3.5 Making Changes to an Existing Employee
Changes to an employee’s coverage can be initiated in two ways:
By the employer - These changes can include a change in salary, covered class, a new job title or a
termination of all benefits.
By the employee - The changes can include adding or removing coverage for a spouse or child, a
change in address or a change to their alternate coverage through their spouse. In these cases,
the employee should provide a request in writing for a change to benefits information, or
complete, sign and date an updated GroupHEALTH Enrolment or Employee Benefits Change form
prior to a change being made to their record. In general, employee requested changes should be
supported by a written request from the employee.
The following changes can be made on the employee’s EE link:
Employee Number
Class change
Report Class or Cost Code/Division change
Salary
Occupation
FTE Percent
Reinstating coverage when an employee had previously been terminated from all coverage.
Email address
Reporting an employee absence
Plan Administrator’s User Guide 19
Terminating an employee’s coverage (for terminating coverage for a specific benefit only, use the
BP link)
Please note that a Plan Administrator cannot make changes to an existing employee’s Personal ID or
Employment Date. Please contact your GroupHEALTH Benefits Administrator should a change be
required to either of these fields.
To begin with these changes, click on the employee’s EE link and the following window will open
containing the employee’s current Employee Profile:
If the window opens and there is text in red at the top of the screen stating the employee’s information is
locked, this means that there are already changes pending and no additional changes can be made at this
time. The record will be available for editing once GroupHEALTH has approved the previous change.
These approvals are normally done within 24 hours of the initial change. If you want to send the change
immediately, click on the Notes link and add your instructions to the screen that appears. This will send
an email directly to your GroupHEALTH Benefits Administrator advising them of the new information.
Otherwise, make the changes in the available open fields. Once the data has been updated, click the
<Continue> button. If there are any errors or missing information on the page, an error message in red
text will appear.
You may cancel the change at this screen by clicking the <Return> or <Main Menu> button.
Some changes required an effective date. If the employee’s Class, Annual Earnings, FTE Percent, Report
Class, Cost Code or Status fields have changed, a popup window will appear (sample below) requesting
the Effective Date of Change for each of these fields. Please ensure you use the WEBS onlineTM standard
date format of YYYY-MM-DD.
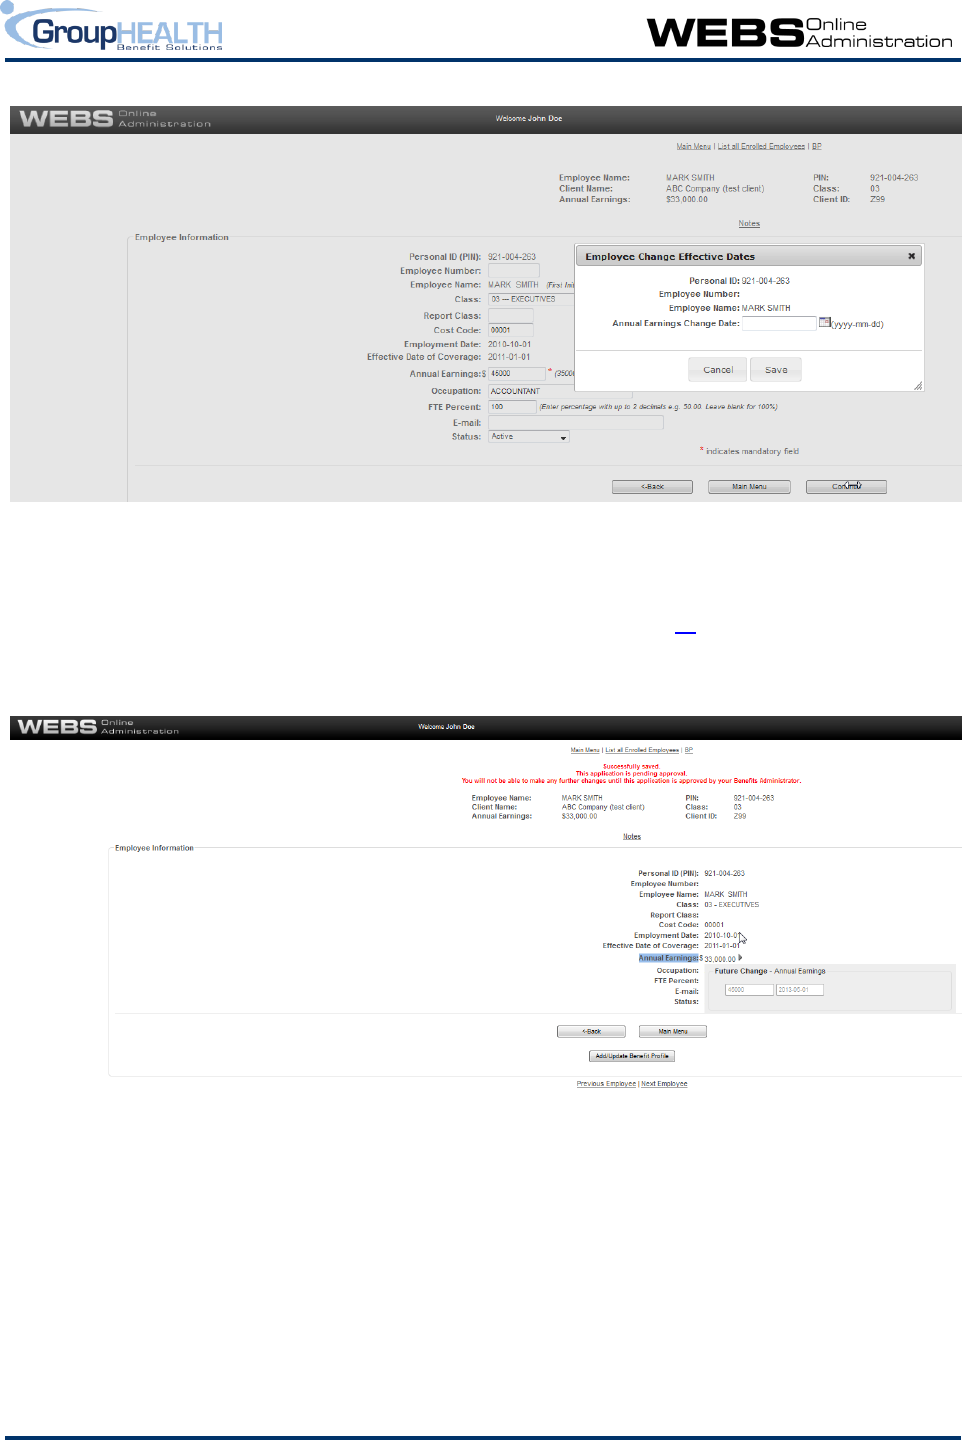
Plan Administrator’s User Guide 20
When you are finished, click <Save> and the Employee’s Profile will be locked until it has been processed
by GroupHEALTH . You will be able to see the information you changed highlighted on the screen until
your change is approved by GroupHEALTH. If the effective date of the change is in the future (later than
the current billing date), a blue arrow will be shown beside the field in the EE screen as shown below. You
may view this future change by clicking on the blue arrow. If you ever wish to make a change to a future
change, use the Notes features to advise your GroupHEALTH Benefits Administrator.
Changes requiring more explanation are shown below.
Salary Changes
To make a change to an employee’s salary, enter the new Annual Earnings and click <Continue>. A popup
window will appear requesting the date of the change. Please note that you cannot enter a date from the
past, only current or future dated salary changes are accepted in WEBS onlineTM as usually salary changes
are effective on the date reported. If there are special circumstances surrounding the salary change,
please use the Notes feature to advise your GropuHEALTH Benefits Administrator.
Plan Administrator’s User Guide 21
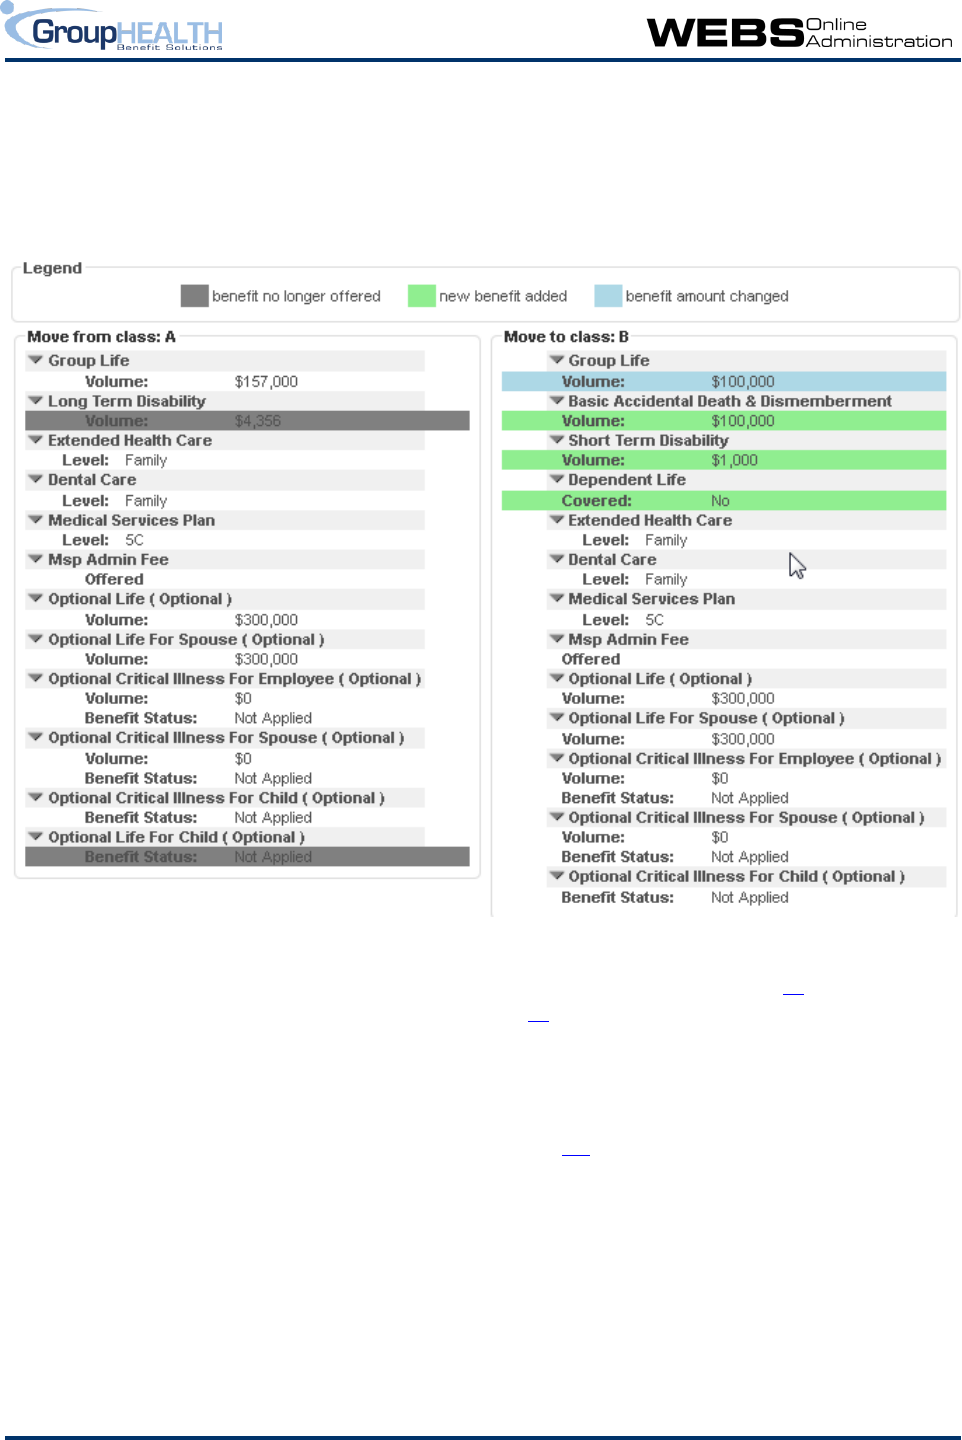
Class Changes
When you make a change to an employee’s class, a Preview button will appear beside the Class field.
Clicking on this Preview button will bring up a popup window showing a comparison of the benefits in the
current class and the benefits in the employee’s new class.
The popup window will identify coverage level changes, benefits that are being dropped and new benefits
that are being added. This button is only available prior to saving your changes on the EE screen. Click on
the X in the top right corner of the popup to return to the EE screen.
Once you click <Continue>, WEBS will advise of any newly added benefits and benefits terminated and if
you need to enter more data such as making a beneficiary designation for a newly added Life benefit or
enrolling the employee in the new Extended Health benefit. If no further data entry is required, your
change will be saved as is; otherwise, you will be taken to the BP screen to complete the class change by
entering the information requested and then clicking <Save>.
Employees Returning to Work after Leave or Disability
Once an employee returns to work after a leave or disability they should be returned to their regular class
and their status should be changed back to Active. Once you save this change you will be asked to
confirm their Return to Work date and their Class Change date. Normally these two dates would be the
same.
Plan Administrator’s User Guide 22
Employees Absent from work due to Leave or Disability
When an employee is on a leave of absence or off work due to medical reasons, it is very important to
change their status field to Leave of Disability or Leave of Absence and their Class should be changed to a
class ending in ~ if the employee is on leave or # if the employee is absent due to medical reasons. Once
you change their status other fields will appear to request more information regarding the absence.
After you save these changes, a popup window will appear to request the last day worked and the date of
the Class change. Normally these two dates would be the same.
Identifying employees as absent from work is important because:
Insurance contracts have specific guidelines on how long coverage can be continued while absent
from work
Employees absent from work are not eligible for salary adjustments to their pre-disability salary
GroupHEALTH can assist with their applications for disability and Waiver of Premiums benefits
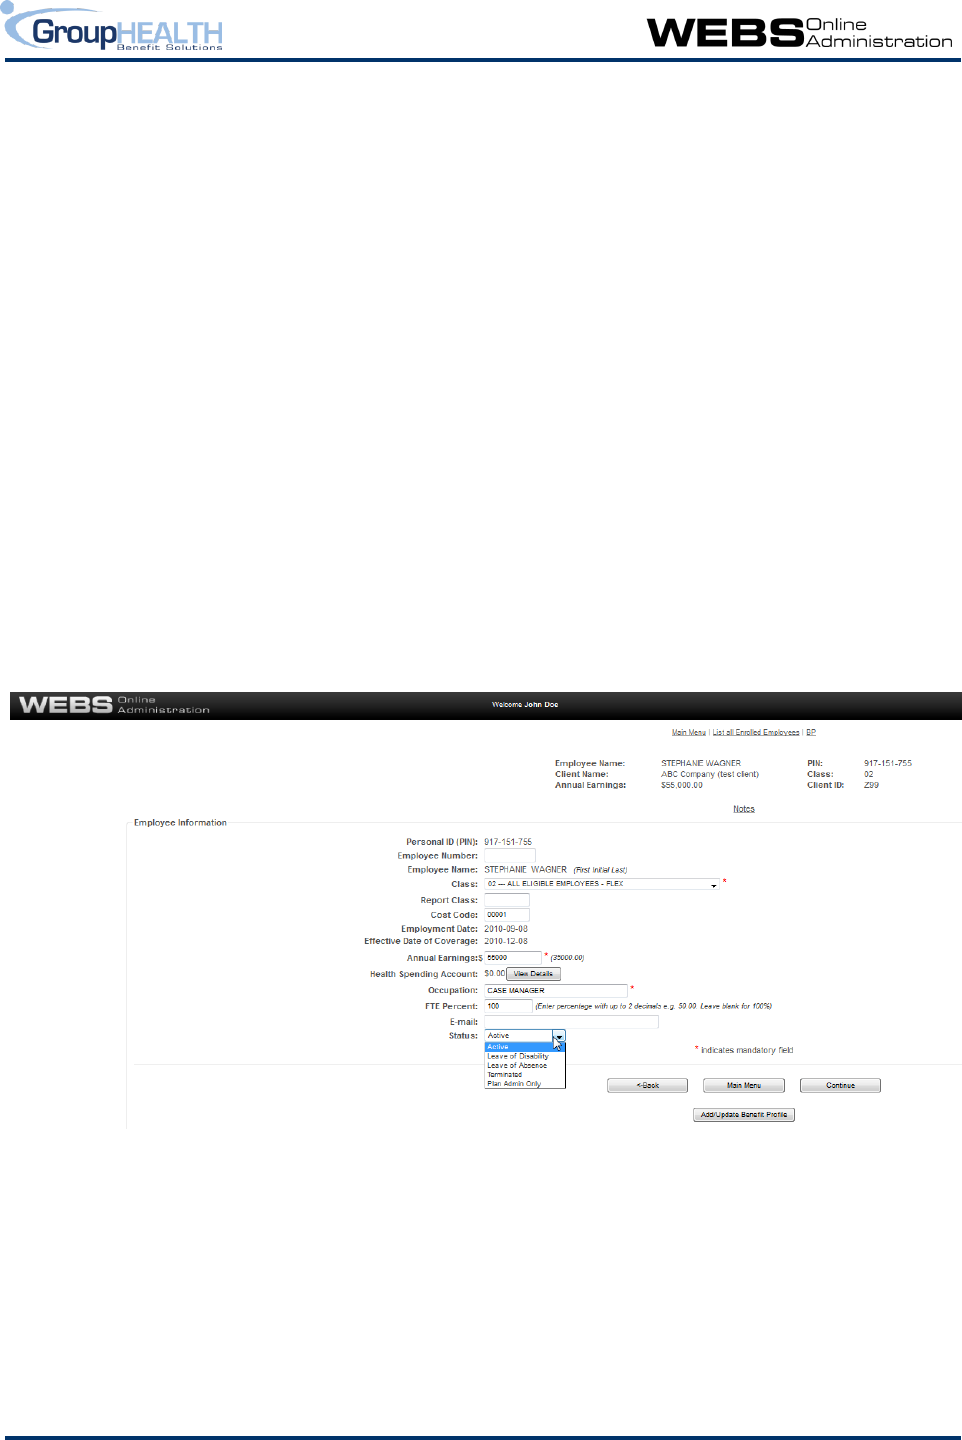
Terminating an Employee’s Cover age
An employee’s coverage is normally cancelled on the last day of employment. Terminations should be
reported as soon as possible so claims are not paid after the date of termination.
At the bottom of the window change the employee’s status from Active to Terminated and click
<Continue>.
A popup window will appear to request the termination date (the last day with coverage).
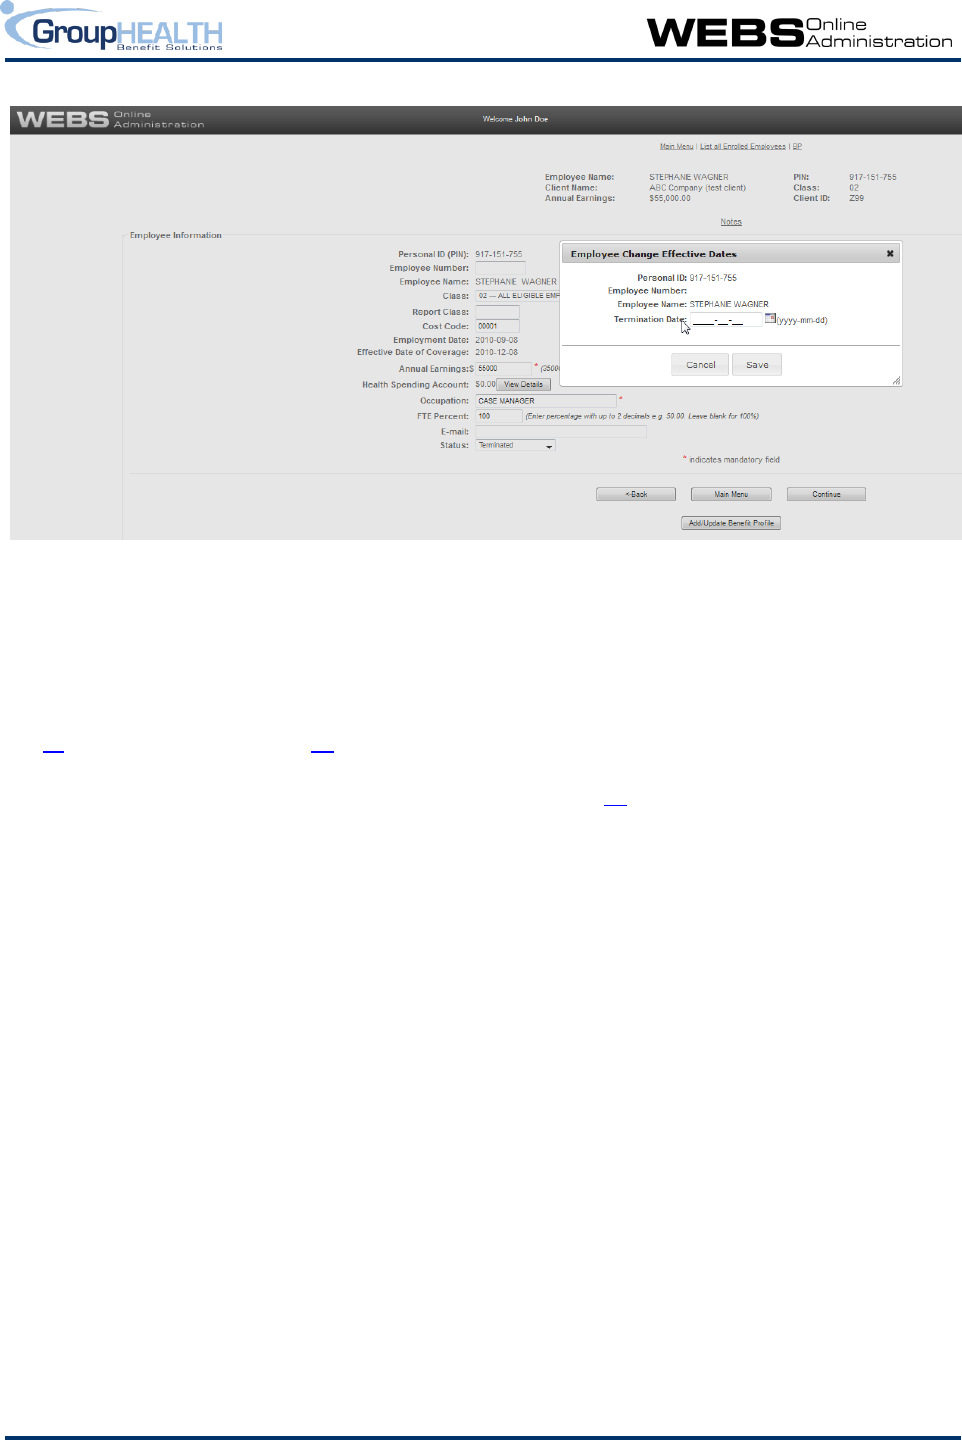
Plan Administrator’s User Guide 23
Enter the termination date and click on <Save> and the Employee Profile will be locked until processed by
GroupHEALTH. WEBS onlineTM will automatically update the employee’s Benefits Profile to add
termination dates for all the employee’s and dependents’ benefits (if these benefits were in place prior to
termination).
If the termination date is later than the current billing date, a blue arrow will be shown beside Status on
the EE screen. When viewing the BP screen, a message will appear near the top of the screen advising
that a termination is pending but all benefits levels will still show as current because the effective date of
the termination is in the future. Blue arrows will also show on the BP screen beside the Extended Health,
Dental, Dependent Life and MSP (if applicable) fields for the employee and their dependents. Clicking on
those arrows will show the future termination date.
Cancellation Du e to Death
Please contact your GroupHEALTH Benefits Administrator if you are canceling an employee’s coverage
due to their death. Dependents covered prior to the employee’s death may be entitled to a continuation
of coverage (Survivor Benefits). GroupHEALTH may be of assistance with the processing of the death
claim.
Change of T ermination Dat e
If an employee’s coverage under your group is already cancelled, the Plan Administrator cannot change
the termination date. To correct or change a termination date, contact your GroupHEALTH Benefits
Administrator or add a Note which will be emailed to the GroupHEALTH Benefits Administrator.
GroupHEALTH may be required to change the employee’s termination date if claims have been paid by
the carrier after the termination date due to the information being provided after that date.
Back-Dated Coverage Changes to a Terminated Employee
After an employee has been terminated, they are placed in ‘Terminated’ status. No changes will be
allowed to the employment data or application while in this status. Should an adjustment be required to
the employee’s coverage prior to their date of termination, please email the request to your
GroupHEALTH Benefits Administrator or use the Notes feature.

Plan Administrator’s User Guide 24
Reinst ate an Employee’s Cover age
On the EE screen, change the Status field from Terminated to Active and then change any other fields that
may require updating such as Annual Earnings, Class, etc. Click <Continue> to proceed. A popup window
will appear requesting the effective dates of these changes. Please note that you must always enter the
Annual Earnings change date as today’s date or a future date. The Benefits Administrator will adjust the
effective date if necessary. Once the effective dates are entered, click <Save>. You will automatically be
taken to their BP screen.
The Benefits Profile must be reviewed to ensure the information in this section is current (ie. address,
dependent information, beneficiary designations, etc.) and to reapply for Extended Health, Dental,
Dependent Life and MSP coverage (if applicable) for the employee and their dependents (change No to
Yes and input the Effective Date of Coverage, which should be the Reinstatement Date). Click on < Save>
when you have updated the Benefits Profile information.
If the reinstatement is for a future date (later than the current billing date), the benefit levels on the BP
screen will show as ‘W/P’ (waiting period) as the coverage is not effective yet. Blue arrows will appear
beside the benefits in the Employee section off the screen to indicate that there are future changes.
Please ensure a newly signed and dated Application form is kept in your records.
Benefits Profile (BP) Screen Changes
Changes can be made to employee, spouse and dependent information as well as to the employee’s
beneficiaries. Click on the employee’s BP link on the List all Enrolled Employees screen to view and edit
this data.
If the window opens and there is text in red at the top of the screen stating the employee’s information is
locked, this means that there are already changes pending and no additional changes can be made at this
time. The record will be available for editing once GroupHEALTH has approved the previous change.
These approvals are normally done within 24 hours of the initial change. If you want to send the new
change immediately, click on the Notes link and add your instructions to the screen that appears. This will
send an email directly to your GroupHEALTH Benefits Administrator advising them of the new
information.
The BP screen shows the employee’s personal information, dependents, benefits and beneficiary
designations. The screen is broken down into three main sections:
Employee – showing the employee’s personal information and the effective and termination
dates of their Extended Health, Dental, MSP and Dependent Life coverage
Dependents – showing their eligible dependents and their Extended Health, Dental and MSP
coverage along with any effective and Termination dates.
Benefits – showing the benefits the employee is covered for and their beneficiaries for Group Life,
AD&D/ASI and any Optional benefits. The carrier, claims payor and policy number for most
benefits also appear. The coverage shown is as of the billing date shown in the Benefits section.
If there have been dependent or benefit changes made that are effective on a future billing
date, they will not be reflected under this section until their effective date matches the billing
date.

Plan Administrator’s User Guide 25
The volume for each benefit is also shown. If a Waiting Period is not completed for a benefit,
the BP screen will show the benefit’s level as ‘W/P’.
If a Non-Evidence Maximum exists for a benefit and if the salary level is high enough, the
employee will be able to apply for a higher level of coverage. This information is displayed on
the BP screen under Volume, Eligible Volume (the higher amount) and the status (Not
Applied, Applied, Approved or Declined). If the employee wishes to apply for the higher level
of coverage they must complete a Medical Information form and submit it to GroupHEALTH.
Contact your GroupHEALTH Benefits Administrator for assistance.
Disabled employees who are approved for the Waiver of Premium benefit will show with the
words ‘Premium Waived’ beside the appropriate benefits.
For Optional Benefits – if the employee is not covered for an optional benefit, the benefit
Volume amount will show as 0 and the Benefit Status will appear as Not Applied. If the
employee is covered for an Optional benefit, the BP screen will display the benefit’s volume
and beneficiary if applicable.
For Terminated employees, this page will only show Termination Dates for all benefits.
After you enter and save changes on this screen, you will see a waiver screen if the employee or any
dependent waived coverage under Extended Health or Dental benefits. Once that screen is completed,
click on <Save>. A confirmation screen will appear and you can print the changes if required.
The employee’s record will now be in a pending status until it is reviewed by GroupHEALTH usually within
24 hours. You will be able to see the changes you made highlighted on the BP screen. A blue arrow
indicates that there is a future dated change for that field. To review the future change, click on the blue
arrow. If you ever wish to make a change to a future change, use the Notes features to advise your
GroupHEALTH Benefits Administrator.
Please see below for specifics on some commonly entered changes.
Employee’s Pers onal Information (Name, Address, Sex and Dat e of Birth)
Click the <Edit> button to the right of the employee’s name to change their personal information. Please
note that Date of Birth changes may affect eligibility for benefits and premium calculations. Click on
<Save> when you are finished and you will be returned to the BP screen. If there are no other changes to
be made, click on <Save> again.
Add a new Spouse
Newly acquired dependents should be enrolled on the plan within 31 days of becoming eligible for
coverage. If a dependent is not enrolled within this time frame, they may be considered a late applicant
and the carrier(s) may: restrict or decline coverage for the dependent; require payment of premiums
retroactive to the date that the dependent became eligible for coverage; or require Evidence of
Insurability, depending on the specific carrier’s guidelines.
To add a spouse, click the <Add Spouse> button on the Enrolment Summary in the Dependents section. A
new screen will appear requesting information on the spouse. All mandatory fields should be completed.
The Smoker Status field is used to determine rates for optional life premiums. It is not required unless the
spouse is applying for Optional Life benefits.

Plan Administrator’s User Guide 26
The choice for Extended Health, Dental and MSP will default to “No”. If the employee’s intention is to
cover their spouse under this Group Benefits plan, change the selections for the benefits to Yes. If the
spouse is not being enrolled in Extended Health, Dental or MSP, enter the reason for the decline of
coverage. If you select “Other” as the reason for declining coverage, a further box will appear to request
more details.
If the employee has already said “No” to Extended Health, Dental or MSP for himself or herself, the option
for dependent coverage under these benefits will not be available.
If the spouse is enrolling for Extended Health and or Dental coverage, Coordination of Benefits fields will
appear. This information assists the Extended Health and/or Dental Care carriers in ensuring claims are
forwarded to the correct carrier as the first payor. If the spouse has coverage under their employer’s
benefits plan, the level of coverage for Extended Health and Dental Care should be indicated for Co-
ordination of Benefits purposes.
Once all fields are completed, click on <Save> and a new screen will appear where you can enter the
effective date of the spouse’s coverage for each benefit. Click on <Save> again and you will be returned
to the BP screen to review the information you have entered. If the employee previously had no
dependents and they are eligible for Dependent Life make sure you add this coverage on the Employee
section of the screen.
The final step is to click <Save> on the BP screen.
Please note, an employee may only cover one spouse at a time. A change in spouse will be a two step
process. First, cancel the coverage of the initial spouse and have this change processed by GroupHEALTH .
Once the change has been processed you may proceed to add the new spouse to coverage.
Add a new dependent child
Newly acquired dependents should be enrolled on the plan within 31 days of becoming eligible for
coverage. If a dependent is not enrolled within this time frame, they may be considered a late applicant
and the carrier(s) may: restrict or decline coverage for the dependent; require payment of premiums
retroactive to the date that the dependent became eligible for coverage; or require Evidence of
Insurability, depending on the specific carrier’s guidelines.
To add a dependent, click the <Add Dependent> button on the Enrolment Summary in the Dependents
section. A new screen will appear requesting information on the dependent. All mandatory fields should
be completed.
The choice for Extended Health, Dental and MSP will default to “No”. If the employee’s intention is to
cover their dependent under this Group Benefits plan, change the selections for the benefits to Yes. If the
dependent is not being enrolled in Extended Health, Dental or MSP, enter the reason for the decline of
coverage. If you select “Other” as the reason for declining coverage, a further box will appear to request
more details.
If the employee has already said “No” to Extended Health, Dental or MSP for himself or herself, the option
for dependent coverage under these benefits will not be available.

Plan Administrator’s User Guide 27
Once all fields are completed, click on <Save> and a new screen will appear where you can enter the
effective date of the dependent’s coverage for each benefit. Click on <Save> again and you will be
returned to the BP screen to review the information you have entered. If the employee previously had no
dependents and they are eligible for Dependent Life make sure you add this coverage on the Employee
section of the screen.
The final step is to click <Save> on the BP screen.
Remove Existing De pendents
To cancel coverage for an existing dependent, click on <Edit> beside the Dependent’s name. Change the
benefit flags to No and then indicate the reason for the cancellation in the fields that appear. If you select
“Other” as the reason for declining coverage, a further box will appear to request more details. Now click
on <Save>. A new screen will appear asking for the termination date of those benefits. Once those dates
are entered click <Save> and you will be returned to the BP screen.
Save the full record on the BP screen by clicking on <Save>.
Add an Em ploye e’s Ex tended Health Care and/or Dental C are Coverage
Usually all benefits are mandatory for the employee except in the case of Extended Health and Dental
where coverage can be waived due to alternate coverage. Please check with your GroupHEALTH Benefits
Administrator if you have any questions regarding these guidelines.
If the employee wishes to add Extended Health and Dental coverage, click on the <Edit> button in the
Employee section of the BP screen. A new screen will appear and you can change the Extended Health,
Dental and/or MSP flags to Yes. Click on <Save> and a new screen will appear where you can enter the
effective date of the new benefits. Click on <Save> again and you will be returned to the BP screen.
If any dependents are to be added as well make those changes at this time. Once all changes have been
made to your satisfaction, click on the <Save> button on the BP screen.
Cancel an Employee’ s E xtend ed Health Car e and/or Dental Care Coverage
Usually all benefits are mandatory for the employee except in the case of Extended Health and Dental
where coverage can be waived due to alternate coverage. Please check with your GroupHEALTH Benefits
Administrator if you have any questions regarding these guidelines.
If the employee wishes to cancel their Extended Health and Dental coverage, click on the< Edit> button in
the Employee section of the BP screen. A new screen will appear and you can change the Extended
Health, Dental and/or MSP flags to No. New fields will appear to gather the more information as to the
reason for cancellation. If you select “Other” as the reason for declining coverage, a further box will
appear to request more details.
Click on <Save> and a new screen will appear where you can enter the termination date of the these
benefits (the last day of coverage). Click on <Save> again and you will be returned to the BP screen. If the
employee had covered dependents on his/her plan, you will notice that all the dependents’ coverage has
also been set to No.
Once all changes have been made to your satisfaction, click on the <Save> button on the BP screen.

Plan Administrator’s User Guide 28
Change an Em ploye e’s Alternate Coverag e
If an employee gains alternate coverage through their spouse or loses that alternate coverage, this
change is entered under the spouse’s record. Click on <Edit> beside the spouse’s name to view their
information. Make the necessary changes to the COB fields for Extended Health and Dental then click
<Save>. A screen will appear where you can enter the effective date of the change to this coverage. Click
on <Save> again and you will be returned to the BP screen.
Update Beneficiary Designations
If an employee wants to change their beneficiary designation, they may do by completing an Enrolment
Benefits Change form, a new Enrolment form or they may do so online and then print, sign and date the
updated Application. The printed Application, which includes the revised beneficiary designations, is a
legal document, so changes should not be made to this document with Liquid Paper or by crossing out
and re-writing the designation(s).
To update a beneficiary designation, click on <Update> beside the benefit the employee wishes to change.
Be sure to change all benefits’ designations if directed by the employee in writing. A trustee screen will
also appear if the beneficiary is under the age of majority. Once the beneficiary designation has been
saved you will be returned to the BP screen where you click <Save> to save the employee’s record.
Important: All beneficiary designations are to be signed and dated by the employee and kept in a safe
place. The originally signed designation must be produced in the case of a death claim.
Option al Benefits
WEBS onlineTM will not process Optional Benefits. These benefits must be administered via paper, with
applications and changes being forwarded to your GroupHEALTH Benefits Administrator for processing on
your monthly billing statement. Once approved, you will be able to view their coverage levels on the BP
screen.
Current Premiums Preview
A link exists on the BP screen for all active employees to bring up a view of their last month’s coverage
and premiums by benefit as well as a preview of their expected coverage levels and premiums for the
upcoming billing. Please note that the preview is based on the employee information, rates and plan
design coded in WEBS onlineTM as of the current date. This information is subject to change prior to
billing.
