Cocos2d.X.Example.Beginners.Guide.Second.812
User Manual:
Open the PDF directly: View PDF ![]() .
.
Page Count: 270 [warning: Documents this large are best viewed by clicking the View PDF Link!]
- Cover
- Copyright
- Credits
- About the Author
- About the Reviewers
- www.PacktPub.com
- Table of Contents
- Preface
- Chapter 1: Installing Cocos2d-x
- Downloading and installing Cocos2d-x
- Time for action – downloading, downloading, downloading
- Time for action – installing Cocos2d-x
- Hello-x World-x
- Time for action – creating an application
- Time for action – deploying to Android
- Finding more reference material
- Time for action – running the test samples
- The other tools
- Summary
- Chapter 2: You Plus C++ Plus Cocos2d-x
- Chapter 3: Your First Game – Air Hockey
- Game configurations
- Time for action – creating your game project
- Time for action – laying down the rules
- Supporting retina displays
- Time for action – adding the image files
- Time for action – adding retina support
- Adding sound effects
- Time for action – adding the sound files
- Extending Sprite
- Time for action – adding GameSprite.cpp
- Time for action – implementing GameSprite
- The actual game scene
- Time for action – coding the GameLayer interface
- Time for action – implementing init()
- Time for action – handling multitouches
- Time for action – adding our main loop
- Time for action – updating scores
- Time for action – running the game in Android
- Summary
- Chapter 4: Fun with Sprites – Sky Defense
- The game – sky defense
- Using sprite sheets in Cocos2d-x
- Time for action – creating a SpriteBatchNode
- Bitmap fonts in Cocos2d-x
- Time for action – creating bitmap font labels
- Time for action – adding the final screen sprites
- Time for action – creating our object pools
- Actions in a nutshell
- Time for action – creating actions with Cocos2d-x
- Animating a sprite in Cocos2d-x
- Time for action – creating animations
- Time to make our game tick!
- Time for action – handling touches
- Time for action – starting and restarting the game
- Time for action – updating the game
- Time for action – retrieving objects from the pool
- Play the game!
- Time for action – running the game in Android
- Summary
- Chapter 5: On the Line – Rocket Through
- The game – Rocket Through
- So what are particles?
- Time for action – creating particle systems
- Creating the grid
- Drawing primitives in Cocos2d-x
- Time for action – let's do some drawing!
- The rocket sprite
- Time for action – updating our rocket sprite
- Time for action – handling touches
- The game loop
- Time for action – adding the main loop
- Kill and reset
- Time for action – adding our resets and kills
- Time for action – running the game in Android
- Summary
- Chapter 6: Quick and Easy Sprite – Victorian Rush Hour
- The game – Victorian Rush Hour
- The game settings
- Rapid prototyping with Cocos2d-x
- Time for action – creating placeholder sprites
- The Player object
- The Block object
- The terrain object
- Time for action – coding the player
- Time for action – coding the Block object
- Time for action – initializing our Terrain class
- Time for action – initializing our Blocks object
- Time for action – moving and resetting
- Platform collision logic
- Time for action – adding collision detection
- Adding the controls
- Time for action – handling touches
- Time for action – coding the main loop
- Summary
- Chapter 7: Adding the Looks – Victorian
Rush Hour
- Victorian Rush Hour – the game
- Texturing our buildings with sprites
- Time for action – texturing the buildings
- Containers within containers
- Creating a parallax effect
- Time for action – creating a parallax effect
- Adding a menu to our game
- Time for action – creating Menu and MenuItem
- Adding a tutorial to our game
- Time for action – adding a tutorial
- Time for action – running the game in Android
- Summary
- Chapter 8: Getting Physical – Box2D
- Building a Box2D project with Cocos2d-x
- Time for action – using debug draw in your Box2D project
- So what is a physics engine?
- Our game – MiniPool
- Time for action – adding the touch events
- Time for action – adding the main loop
- Time for action – creating a timer
- Time for action – running the game in Android
- Summary
- Chapter 9: On The Level – Eskimo
- The game – Eskimo
- Using scenes in Cocos2d-x
- Time for action – creating a scene transition
- Time for action – creating transitions with a singleton Layer class
- Loading external data from a .plist file
- Time for action – creating a .plist file
- Loading the level data
- Time for action – retrieving data from the .plist file
- Saving game data
- Time for action – storing the completed levels
- Using events in your game
- Time for action – using the event dispatcher
- Using the accelerometer
- Time for action – reading accelerometer data
- Reusing b2Bodies
- Time for action – changing a b2Body fixture
- Time for action – running the game in Android
- Summary
- Chapter 10: Introducing Lua!
- So what is Lua like?
- The game – Stone Age
- Time for action – creating or importing a project
- Time for action – setting up our screen resolution
- Time for action – creating a menu scene
- Time for action – creating our game scene
- Time for action – building the gems
- Time for action – changing the grid with GridController
- Time for action – swapping the gems and looking for matches
- Time for action – collapsing the grid and repeating
- Time for action – animating matches and collapses
- Time for action – publishing the game with the Cocos IDE
- Summary
- Appendix A: Vector Calculations with Cocos2d-x
- Appendix B: Pop Quiz Answers
- Index

Cocos2d-x by Example Beginner's Guide
Second Edition
Copyright © 2015 Packt Publishing
All rights reserved. No part of this book may be reproduced, stored in a retrieval system,
or transmied in any form or by any means, without the prior wrien permission of the
publisher, except in the case of brief quotaons embedded in crical arcles or reviews.
Every eort has been made in the preparaon of this book to ensure the accuracy of the
informaon presented. However, the informaon contained in this book is sold without
warranty, either express or implied. Neither the author, nor Packt Publishing, and its dealers
and distributors will be held liable for any damages caused or alleged to be caused directly or
indirectly by this book.
Packt Publishing has endeavored to provide trademark informaon about all of the
companies and products menoned in this book by the appropriate use of capitals.
However, Packt Publishing cannot guarantee the accuracy of this informaon.
First published: April 2013
Second edion: March 2015
Producon reference: 1240315
Published by Packt Publishing Ltd.
Livery Place
35 Livery Street
Birmingham B3 2PB, UK.
ISBN 978-1-78528-885-2
www.packtpub.com
Cover image by Roger Engelbert (rengelbert@gmail.com)
www.it-ebooks.info

Credits
Author
Roger Engelbert
Reviewers
Saeed Afshari
Joni Mikkola
Michael Price
Vamsi Krishna Veligatla
Chatchai Mark Wangwiwaana
Commissioning Editor
Akram Hussain
Acquision Editor
Sam Wood
Content Development Editor
Rika Singh
Technical Editor
Mrunal M. Chavan
Copy Editors
Sonia Michelle Cheema
Aar Saldanha
Adithi Shey
Project Coordinator
Judie Jose
Proofreaders
Simran Bhogal
Maria Gould
Paul Hindle
Indexer
Priya Sane
Producon Coordinator
Nitesh Thakur
Cover Work
Nitesh Thakur
www.it-ebooks.info

About the Author
Roger Engelbert is a game developer, with over 10 years of experience developing online
games. He grew up surrounded by video games and thinks of classic, 8-bit, arcade tles as
a form of art. He is the author behind the blog Done With Computers, which is chock-full of
tutorials on game development and design. Roger sincerely hopes to soon live in a world
where people of all ages will be given the knowledge and opportunity to experience the joy
of building their own games.
I would like to thank the people from Packt Publishing that helped
me through the process of wring this book. And above all, my family,
who—once again!—had to see a bleary eyed and slightly surly version of
myself as I worked on this book long into the night.
www.it-ebooks.info
About the Reviewers
Saeed Afshari is an independent game developer and a researcher in the area of
human-computer interacon. He has published more than 20 tles on the iOS App Store
and Google Play under the brand Neat Games, and is focused on developing mobile games
for iOS and Android.
He is a member of the Games, Interacon and Novel Interface Technologies (IGNITE)
research collecve at the University of Luxembourg, working on natural and novel user
interfaces, and understanding how people interact with games and how games should
interact with people. His current research projects deal with interacon with mobile games,
virtual-reality head-mounted displays, and behavior change through serious gaming. He is
the game developer for the European Commission project, LiveCity, which deals with long
distance mulplayer gaming on multouch tables.
With over 15 years of experience in game development and interacve media, he has
built skills in plaorms, including OpenGL, DirectX, Unity, Cocos2d-x, and also interacon
design for natural user interfaces and virtual reality. He has invented an algorithm to track
permanent magnets for use in mobile games, in parcular in the form of a magnec joysck.
He is willing to consult and collaborate on creang games and interacve soware targeted
for educaon, entertainment, and social networks.
For more informaon about Saeed and Neat Games, you can contact pr@neat-games.com.
www.it-ebooks.info

Joni Mikkola is currently working on his next mobile game in northern Finland. He keeps
his game developing stamina up by training regularly at the gym and eang healthy. Among
developing games, he oen reads books, plays piano, or bakes buns to keep ideas owing
and mind focused. He constantly keeps challenging the status quo, which in turn helps in
learning new ways to create things.
He has developed games for over 4 years professionally mostly for mobile plaorms.
He targets casual games and focuses on creang simplisc designs. With one game released,
he is currently working on his next game, which will be released in early 2015 for Android
and iOS plaorms. Somemes he chills by parcipang in Ludum Dare game contests.
Michael Price has been working in the game industry since 2009. He studied game
development at Algonquin College in Oawa and has always had an interest in technology
and programming. He's been playing video games for as long as he can remember and now
uses that passion to build fun and excing games. He has extensive knowledge of building
games for the Web and mobile. He has his own website (http://www.michaelrjprice.
com) that shows all his past and current projects.
I would like to thank my parents for their support, and my girlfriend for
always being there for me.
www.it-ebooks.info

Vamsi Krishna Veligatla is the Director of engineering at Tiny Mogul games, which is
the gaming arm of Hike Messenger Pvt Ltd. He was the lead developer on some of the
most iconic games such as Shiva: The Time Bender and Dadi vs Jellies developed at Tiny
Mogul Games.
He has a master's degree in computer science from the Internaonal Instute of Informaon
Technology, Hyderabad. Previously, he worked at Nvidia Graphics Pvt Ltd, AMD (ATI),
and University of Groningen, Netherlands.
I would like to thank my family for their love and support.
Chatchai Mark Wangwiwaana is a game researcher, designer, and programmer.
Currently, he is pursuing a PhD in game-based learning and using video games to improve
health. As a freelancer in the gaming industry, Chatchai has been developing games
for entertaining and educaon. Kraven Manor was one of the award-winning games
at Intel University Showcase, 2014. More informaon about his works is available at
www.chatchaiwang.com.
www.it-ebooks.info

www.PacktPub.com
Support les, eBooks, discount offers, and more
For support les and downloads related to your book, please visit www.PacktPub.com.
Did you know that Packt oers eBook versions of every book published, with PDF and ePub
les available? You can upgrade to the eBook version at www.PacktPub.com and as a print
book customer, you are entled to a discount on the eBook copy. Get in touch with us at
service@packtpub.com for more details.
At www.PacktPub.com, you can also read a collecon of free technical arcles, sign up
for a range of free newsleers and receive exclusive discounts and oers on Packt books
and eBooks.
TM
https://www2.packtpub.com/books/subscription/packtlib
Do you need instant soluons to your IT quesons? PacktLib is Packt's online digital book
library. Here, you can search, access, and read Packt's enre library of books.
Why subscribe?
Fully searchable across every book published by Packt
Copy and paste, print, and bookmark content
On demand and accessible via a web browser
Free access for Packt account holders
If you have an account with Packt at www.PacktPub.com, you can use this to access
PacktLib today and view 9 enrely free books. Simply use your login credenals for
immediate access.
www.it-ebooks.info

[ i ]
Table of Contents
Preface vii
Chapter 1: Installing Cocos2d-x 1
Downloading and installing Cocos2d-x 1
Time for acon – downloading, downloading, downloading 2
Time for acon – installing Cocos2d-x 3
Hello-x World-x 4
Time for acon – creang an applicaon 4
Time for acon – deploying to Android 6
The folder structure 8
The iOS linkage classes 9
The AppDelegate class 9
The HelloWorldScene class 10
Who begets whom? 10
Finding more reference material 10
Time for acon – running the test samples 11
The other tools 12
Summary 13
Chapter 2: You Plus C++ Plus Cocos2d-x 15
Cocos2d-x – an introducon 15
Containers 16
The Director and cache classes 17
The other stu 17
Do you know C++? 18
The class interface 18
Time for acon – creang the interface 18
The class implementaon 20
Time for acon – creang the implementaon 20
Instanang objects and managing memory 22
www.it-ebooks.info

Table of Contents
[ ii ]
Using stac methods 22
The C++ and Cocos2d-x style 23
What you get with Ref 25
Summary 25
Chapter 3: Your First Game – Air Hockey 27
Game conguraons 28
Time for acon – creang your game project 28
Time for acon – laying down the rules 30
Supporng rena displays 30
Time for acon – adding the image les 30
Time for acon – adding rena support 31
Adding sound eects 32
Time for acon – adding the sound les 32
Extending Sprite 34
Time for acon – adding GameSprite.cpp 34
Time for acon – implemenng GameSprite 35
The actual game scene 36
Time for acon – coding the GameLayer interface 37
Time for acon – implemenng init() 38
Time for acon – handling multouches 41
Time for acon – adding our main loop 43
Time for acon – updang scores 47
Time for acon – running the game in Android 48
Summary 49
Chapter 4: Fun with Sprites – Sky Defense 51
The game – sky defense 51
The game sengs 52
The start project 52
Adding screen support for a universal app 52
Adding background music 53
Inializing the game 54
Using sprite sheets in Cocos2d-x 54
Batch drawing sprites 55
Time for acon – creang SpriteBatchNode 56
Bitmap fonts in Cocos2d-x 58
Time for acon – creang bitmap font labels 59
Time for acon – adding the nal screen sprites 60
Time for acon – creang our object pools 63
Acons in a nutshell 64
Time for acon – creang acons with Cocos2d-x 64
www.it-ebooks.info

Table of Contents
[ iii ]
Animang a sprite in Cocos2d-x 66
Time for acon – creang animaons 66
Time to make our game ck! 68
Time for acon – handling touches 68
Time for acon – starng and restarng the game 71
Time for acon – updang the game 73
Time for acon – retrieving objects from the pool 74
Play the game! 76
Time for acon – running the game in Android 77
Summary 79
Chapter 5: On the Line – Rocket Through 81
The game – Rocket Through 81
The game sengs 81
Play rst, work later 82
The start project 83
Screen sengs 83
So what are parcles? 84
Time for acon – creang parcle systems 84
Creang the grid 86
Drawing primives in Cocos2d-x 87
Time for acon – let's do some drawing! 87
The rocket sprite 89
Time for acon – updang our rocket sprite 90
Time for acon – handling touches 92
The game loop 96
Time for acon – adding the main loop 96
Kill and reset 99
Time for acon – adding our resets and kills 99
Time for acon – running the game in Android 101
Summary 102
Chapter 6: Quick and Easy Sprite – Victorian Rush Hour 103
The game – Victorian Rush Hour 103
The game sengs 104
Rapid prototyping with Cocos2d-x 104
Time for acon – creang placeholder sprites 105
The Player object 106
The Block object 106
The terrain object 106
Time for acon – coding the player 107
Time for acon – coding the Block object 110
www.it-ebooks.info

Table of Contents
[ iv ]
Planning the Terrain class 111
Building the terrain object 113
Time for acon – inializing our Terrain class 113
Time for acon – inializing our Blocks object 115
Time for acon – moving and reseng 119
Plaorm collision logic 121
Time for acon – adding collision detecon 122
Adding the controls 124
Time for acon – handling touches 124
Time for acon – coding the main loop 126
Summary 127
Chapter 7: Adding the Looks – Victorian Rush Hour 129
Victorian Rush Hour – the game 130
New sprites 130
Animaons 131
Texturing our buildings with sprites 131
Time for acon – texturing the buildings 132
Containers within containers 135
Creang a parallax eect 136
Time for acon – creang a parallax eect 137
Adding a menu to our game 138
Time for acon – creang Menu and MenuItem 139
Adding a tutorial to our game 141
Time for acon – adding a tutorial 142
Time for acon – running the game in Android 144
Summary 145
Chapter 8: Geng Physical – Box2D 147
Building a Box2D project with Cocos2d-x 147
Time for acon – using debug draw in your Box2D project 148
So what is a physics engine? 151
Meeng Box2D 151
Meeng the world 152
Running the simulaon 153
No Ref objects in Box2D 153
Meeng the bodies 154
Our game – MiniPool 155
Game sengs 156
Sprite plus b2Body equal to b2Sprite 156
Creang the pool table 157
Creang edges 158
www.it-ebooks.info

Table of Contents
[ v ]
Creang the ball objects 159
Creang collision lters 161
Creang the cue 161
Creang a contact listener 163
The game controls 165
Time for acon – adding the touch events 166
The main loop 170
Time for acon – adding the main loop 170
Adding a mer to our game 172
Time for acon – creang a mer 172
Time for acon – running the game in Android 173
Summary 175
Chapter 9: On the Level – Eskimo 177
The game – Eskimo 178
The game sengs 179
Organizing the game 180
Using scenes in Cocos2d-x 181
Time for acon – creang a scene transion 181
Time for acon – creang transions with a singleton Layer class 183
Loading external data from a .plist le 184
Time for acon – creang a .plist le 185
Loading the level data 186
Time for acon – retrieving data from the .plist le 187
Saving game data 189
Time for acon – storing the completed levels 189
Using events in your game 190
Time for acon – using the event dispatcher 191
Using the accelerometer 192
Time for acon – reading accelerometer data 192
Reusing b2Bodies 194
Time for acon – changing a b2Body xture 194
Time for acon – running the game in Android 195
Summary 196
Chapter 10: Introducing Lua! 197
So what is Lua like? 197
Debugging in Lua – the knights who say nil 199
The game – Stone Age 200
Time for acon – creang or imporng a project 201
Time for acon – seng up our screen resoluon 203
Time for acon – creang a menu scene 204
www.it-ebooks.info

Table of Contents
[ vi ]
Time for acon – creang our game scene 207
Time for acon – building the gems 209
Time for acon – changing the grid with GridController 211
Time for acon – swapping the gems and looking for matches 216
Time for acon – collapsing the grid and repeang 220
Time for acon – animang matches and collapses 226
Time for acon – publishing the game with the Cocos IDE 229
Summary 230
Appendix A: Vector Calculaons with Cocos2d-x 231
What are vectors? 231
The vector methods 232
Using ccp helper methods 233
Rotang the rocket around a point 233
Using the dot product of vectors 234
Moving from pixel-based speed to angular-based speed 236
Appendix B: Pop Quiz Answers 239
Index 241
www.it-ebooks.info
Preface
Cocos2d-x combines the benets of using one the most popular and test-proven 2D game
frameworks out there with the power and portability of C++. So, you get the best deal
possible. Not only is the framework built to be easy to use and quick to implement, it also
allows your code to target more than one system.
The book will show you how to use the framework to quickly implement your ideas, and let
Cocos2d-x help you with the translaon of all that OpenGL gobbledygook, leaving you with
the fun part: making sprites jump around and hit each other!
There are seven examples of games in this book with two of them being physics-based, using
Box2D and one using the Lua bindings and the new Cocos Code IDE. With each example,
you'll learn more about the framework and the magical lines that can quickly add parcle
eects, animaons, sounds, UI elements, and all sorts of wonderful things to your games.
Not only this, but you will also learn how to target both iOS and Android devices, and
mulple screen sizes.
What this book covers
Chapter 1, Installing Cocos2d-x, guides you through the download and installaon of the
Cocos2d-x framework. It also examines the ins and outs of a basic Cocos2d-x applicaon
and deployment to both iOS and Android devices.
Chapter 2, You Plus C++ Plus Cocos2d-x, explains the main elements in the framework.
It also covers the dierences in syntax when developing in C++, and the dierences in
memory management when developing with Cocos2d-x.
Chapter 3, Your First Game – Air Hockey, kick-starts our game development tutorials by
using Cocos2d-x to build an air hockey game. You will learn how to load the images for
your sprites, display text, manage touches, and add sounds to your game.
www.it-ebooks.info

Preface
[ viii ]
Chapter 4, Fun with Sprites – Sky Defense, demonstrates the power of acons in
Cocos2d-x, and shows how an enre game could be built with them. It also introduces
the concept of sprite sheets and the steps to build a universal applicaon targeng
dierent screen resoluons.
Chapter 5, On the Line – Rocket Through, adds two new elements to our game development
toolbox: how to draw primives, such as lines, curves, and circles, and how to use parcle
systems to improve the look of our game with special eects.
Chapter 6, Quick and Easy Sprite – Victorian Rush Hour, shows how you can use Cocos2d-x to
quickly implement game ideas for further tesng and development by rapidly building game
prototypes with placeholder sprites. In the game example used for this chapter, you'll also
learn how to build a side-scrolling plaorm game.
Chapter 7, Adding the Looks – Victorian Rush Hour, connues with the project from
the previous chapter adding the nal touches to the game including a menu and a
playable tutorial.
Chapter 8, Geng Physical – Box2D, introduces the popular Box2D API for a physics
simulaon, guiding you through the process of using Box2D in the development of a pool
game. You learn how to create bodies and manage the way they interact with each other.
Chapter 9, On the Level – Eskimo, teaches you how to load external data for game levels,
how to store game-related data locally as well as structure your games with mulple scenes.
We use a second Box2D game to illustrate these topics, plus a couple of new concepts, such
as using the event dispatcher to structure your games beer.
Chapter 10, Introducing Lua!, will guide you in the development of a mulplaorm
match-three game using Lua and the new Cocos Code IDE. You will see how similar the
calls are between the C++ version and its Lua bindings and how easy it is to develop a
game in Lua.
Appendix A, Vector Calculaons with Cocos2d-x, covers some of the math concepts used in
Chapter 5, On the Line – Rocket Through, in a lile more detail.
Appendix B, Pop Quiz Answers, provides answers to the pop quiz available in some chapters.
What you need for this book
In order to run the games developed in this book, you will need Xcode for iOS devices,
and Eclipse for Android, as well as the Cocos Code IDE for the Lua game. Although the
tutorials describe the development process using Xcode in each chapter of the book,
you will see how to import the code in Eclipse and develop and deploy from there.
www.it-ebooks.info

Preface
[ ix ]
Who this book is for
You have a passion for games. You may have used Cocos2d already (the Objecve-C version
of the framework) and are eager to learn its C++ port. Or, you know a lile bit of some other
C-based language, such as Java, PHP, or Objecve-C and you want to learn how to develop
2D games in C++. You may also be a C++ developer already and want to know what all the
hoopla about Cocos2d-x is. If you t any of these scenarios, welcome aboard!
Sections
In this book, you will nd several headings that appear frequently (Time for acon,
What just happened?, Pop quiz, and Have a go hero).
To give clear instrucons on how to complete a procedure or task, we use these secons
as follows:
Time for action – heading
1. Acon 1
2. Acon 2
3. Acon 3
Instrucons oen need some extra explanaon to ensure they make sense, so they are
followed with these secons:
What just happened?
This secon explains the working of the tasks or instrucons that you have just completed.
You will also nd some other learning aids in the book, for example:
Pop quiz – heading
These are short mulple-choice quesons intended to help you test your own
understanding.
Have a go hero – heading
These are praccal challenges that give you ideas to experiment with what you have learned.
www.it-ebooks.info

Preface
[ x ]
Conventions
You will also nd a number of text styles that disnguish between dierent kinds of
informaon. Here are some examples of these styles and an explanaon of their meaning.
Code words in text, database table names, folder names, lenames, le extensions,
pathnames, dummy URLs, user input, and Twier handles are shown as follows: "For
background music volume, you must use setBackgroundMusicVolume."
A block of code is set as follows:
CCScene* GameLayer::scene()
{
// 'scene' is an autorelease object
CCScene *scene = CCScene::create();
GameLayer *layer = GameLayer::create();
scene->addChild(layer);
return scene;
}
When we wish to draw your aenon to a parcular part of a code block, the relevant lines
or items are set in bold:
//add score display
_player1ScoreLabel = CCLabelTTF::create("0", "Arial", 60);
_player1ScoreLabel->setRotation(90);
this->addChild(_player1ScoreLabel);
Any command-line input or output is wrien as follows:
sudo ./install-templates-xcode.sh -u
New terms and important words are shown in bold. Words that you see on the screen,
in menus or dialog boxes for example, appear in the text like this: "In the dialog box select
cocos2d-x under the iOS menu and choose the cocos2dx template."
www.it-ebooks.info
Preface
[ xi ]
Warnings or important notes appear in a box like this.
Tips and tricks appear like this.
Reader feedback
Feedback from our readers is always welcome. Let us know what you think about this
book—what you liked or may have disliked. Reader feedback is important for us to develop
tles that you really get the most out of.
To send us general feedback, simply send an e-mail to feedback@packtpub.com, and
menon the book tle through the subject of your message.
If there is a topic that you have experse in and you are interested in either wring or
contribung to a book, see our author guide on www.packtpub.com/authors.
Customer support
Now that you are the proud owner of a Packt book, we have a number of things to help you
to get the most from your purchase.
Downloading the example code
You can download the example code les for all Packt books you have purchased from
your account at http://www.packtpub.com. If you purchased this book elsewhere, you
can visit http://www.packtpub.com/support and register to have the les e-mailed
directly to you.
Downloading the color images of this book
We also provide you with a PDF le that has color images of the screenshots/diagrams used
in this book. The color images will help you beer understand the changes in the output.
You can download this le from https://www.packtpub.com/sites/default/files/
downloads/8852OS_GraphicsBundle.pdf.
www.it-ebooks.info

Preface
[ xii ]
Errata
Although we have taken every care to ensure the accuracy of our content, mistakes do happen.
If you nd a mistake in one of our books—maybe a mistake in the text or the code—we
would be grateful if you could report this to us. By doing so, you can save other readers from
frustraon and help us improve subsequent versions of this book. If you nd any errata, please
report them by vising http://www.packtpub.com/submit-errata, selecng your book,
clicking on the Errata Submission Form link, and entering the details of your errata. Once your
errata are veried, your submission will be accepted and the errata will be uploaded to our
website or added to any list of exisng errata under the Errata secon of that tle.
To view the previously submied errata, go to https://www.packtpub.com/books/
content/support and enter the name of the book in the search eld. The required
informaon will appear under the Errata secon.
Piracy
Piracy of copyrighted material on the Internet is an ongoing problem across all media.
At Packt, we take the protecon of our copyright and licenses very seriously. If you come
across any illegal copies of our works in any form on the Internet, please provide us with the
locaon address or website name immediately so that we can pursue a remedy.
Please contact us at copyright@packtpub.com with a link to the suspected
pirated material.
We appreciate your help in protecng our authors and our ability to bring you
valuable content.
Questions
If you have a problem with any aspect of this book, you can contact us at
questions@packtpub.com, and we will do our best to address the problem.
www.it-ebooks.info
[ 1 ]
1
Installing Cocos2d-x
In this chapter, we'll get things up and running on your machine so you can
get the most out of the examples in this book. This will include information on
downloading the framework and creating a project as well as an overview of
the basic structure of a Cocos2d-x application.
I will also point you to some extra tools you should consider getting to help you
with the development process, such as tools to build sprite sheets, particle effects,
and bitmap fonts. Although these tools are optional, and you can still learn how
to use sprite sheets, particles, and bitmap fonts just by following the examples
given in this book, you might consider these tools for your own projects.
Things you will learn in this rst chapter are as follows:
How to download Cocos2d-x
How to run your rst mulplaorm applicaon
What the basic project looks like and how to nd your way around it
How to use the test project as a major reference source
Downloading and installing Cocos2d-x
All the examples in this book were developed in a Mac using Xcode and/or Eclipse.
The example in the nal chapter uses Cocos2d-x own IDE for scripng. Although you
can use Cocos2d-x to develop your games for other plaorms using dierent systems,
the examples were built in a Mac and deployed to both iOS and Android.
www.it-ebooks.info
Installing Cocos2d-x
[ 2 ]
Xcode is free and can be downloaded from the Mac App store (https://developer.
apple.com/xcode/index.php), but in order to test your code on an iOS device and publish
your games, you will need a developer account with Apple, which will cost you $99 a year. You
can nd more informaon on their website: https://developer.apple.com/.
For Android deployment, I recommend that you get the Eclipse and ADT bundle from
Google, which you can nd at http://developer.android.com/sdk/installing/
installing-adt.html. You will be able to test your games in an Android device for free.
So, assuming you have an Internet connecon, let's begin!
Time for action – downloading, downloading, downloading
We start by downloading the necessary SDKs, NDKs, and general bits and bobs:
1. Go to http://www.cocos2d-x.org/download and download the latest stable
version of Cocos2d-x. For this book, I'll be using version Cocos2d-x-3.4.
2. Uncompress the les somewhere in your machine you can remember later.
I recommend that you add all the les we're going to download now to the
same folder.
3. Go ahead and download the Code IDE as well. We'll be using this in the last chapter
in this book.
4. Then, go to http://developer.android.com/sdk/installing/
installing-adt.html and download the Eclipse ADT plugin (if you don't have
Eclipse or the Android SDK installed, download them at https://eclipse.org/
downloads/ and http://developer.android.com/sdk/installing/
index.html?pkg=tools, respecvely).
If you have any problems installing the ADT plugin, you will find complete
instructions at http://developer.android.com/sdk/
installing/installing-adt.html.
5. Now, for Apache Ant, go to http://ant.apache.org/bindownload.cgi and
look for the links to the compressed les, and download the .zip one.
6. Lastly, go to https://developer.android.com/tools/sdk/ndk/index.
html and download the latest version of the NDK for your target system. Follow
the installaon instrucons on this same page on how to extract the les as some
systems will not allow these to be self-extractable. A word of warning: you must use
a version of the NDK above r8e with Cocos2d-x 3.x.
www.it-ebooks.info

Chapter 1
[ 3 ]
What just happened?
You have successfully downloaded everything you'll need to set up Cocos2d-x in your
machine and start development. If you are using a Mac, you will probably need to change
your security sengs in System Preferences to allow Eclipse to run. Also, go ahead and open
the Android SDK Manager inside Eclipse by going to the Window-Android SDK Manager
menu, and install the packages for at least Version 2.3.3 and then anything above that you
might wish to target.
Also, make sure you have Python installed in your machine. Inside Terminal or command
prompt, just type the word python and hit enter. If you don't have it installed, visit
https://www.python.org/ and follow the instrucons there.
So by the end of this step you should have Cocos2d-x, CocosIDE, the Android SDK the NDK,
and Apache Ant all extracted inside a folder.
Now let's install Cocos2d-x.
Time for action – installing Cocos2d-x
Open Terminal or command prompt and navigate to the Cocos2d-x extracted folder:
1. You can do this by typing cd (that is, cd and a space) and then dragging the folder to
the Terminal window and hing Enter. In my machine this looks like:
cd /Applications/Dev/cocos2d-x-3.4
2. Next, type python setup.py.
3. Hit Enter. You will be prompted for the paths to the NDK, SDK and Apache ANT
root. You must drag each one of the folders to the Terminal window, making sure to
delete any extra spaces at the end of the path and hit Enter. So for the NDK I get:
/Applications/Dev/android-ndk-r10c
4. Next, it's the path for the SDK. Once again, I drag the folder that I have stored inside
Eclipse's folder:
/Applications/eclipse/sdk
5. Next, it's the path to ANT. If you have it properly installed on your machine, the
path will be something like usr/local/bin and the setup script will nd it for you.
Otherwise, you can use the one you downloaded and extracted. Just point to the
bin folder inside it:
/Applications/Dev/apache-ant-1.9.4/bin
www.it-ebooks.info

Installing Cocos2d-x
[ 4 ]
6. The last step is to add these paths to your system. Follow the last instrucon in the
window where it says: Please execute command: "source /Users/YOUR_USER_
NAME/.bash_prole" to make added system variables take eect. You can copy
the command inside the quotes, paste it, and hit Enter.
What just happened?
You now have Cocos2d-x installed on your machine and you're ready to go. Time to create
our rst project!
Hello-x World-x
Let's create that old chestnut in computer programming: the hello world example.
Time for action – creating an application
Open Terminal again and follow these easy steps:
1. You should have the path to the Cocos2d-x console already added to your system.
You can test this by using the cocos command inside Terminal. In order to create a
new project called HelloWorld, using C++ as its primary language and save it on
your desktop, you need to run the following command, replacing YOUR_BUNDLE_
INDETIFIER with a package name of your choice, and replacing PATH_TO_YOUR_
PROJECT with the path to wherever you wish to save your project:
cocos new HelloWorld -p YOUR_BUNDLE_IDENTIFIER -l cpp -d PATH_TO_
YOUR_PROJECT
2. As an example, in my machine this is the line I typed:
cocos new HelloWorld -p com.rengelbert.HelloWorld -l cpp -d /
Users/rengelbert/Desktop/HelloWorld
And hit Enter. If you choose not to give a directory parameter (-d), the Cocos
console will save the project inside the Cocos2d-x folder.
3. Now you can go to your desktop, or wherever you chose to save your project, and
navigate to the folder proj.ios_mac inside the HelloWorld project. Inside that
folder you'll nd the Xcode project le. Once you open the project inside Xcode,
you can click the Run buon and you're done.
www.it-ebooks.info
Chapter 1
[ 5 ]
When you run a cocos2d-x applicaon in Xcode, it is quite common for the
program to post some warnings regarding your code, or most likely, the
frameworks. These will mostly reference deprecated methods or statements
that do not precisely follow more recent and stricter rules of the current SDK.
But that's okay. These warnings, though certainly annoying, can be ignored.
What just happened?
You created your rst Cocos2d-x applicaon. The parameters used on the command line are:
-p for package or bundle idener
-l for language, and here, you have the opon cpp, lua, or JavaScript
Now let's run this app in Android.
Downloading the example code
You can download the example code les from your account at
http://www.packtpub.com for all the Packt Publishing books you
have purchased. If you purchased this book elsewhere, you can visit
http://www.packtpub.com/support and register to have the les
e-mailed directly to you.
www.it-ebooks.info
Installing Cocos2d-x
[ 6 ]
Time for action – deploying to Android
We're going to open the project inside Eclipse:
1. Open Eclipse.
2. We need to x the path to the NDK; this step may be oponal in your system, and in
any case, it must be done only once. Inside Eclipse, go to Eclipse-Preferences, then
inside the C/C++ opon select Build-Environment.
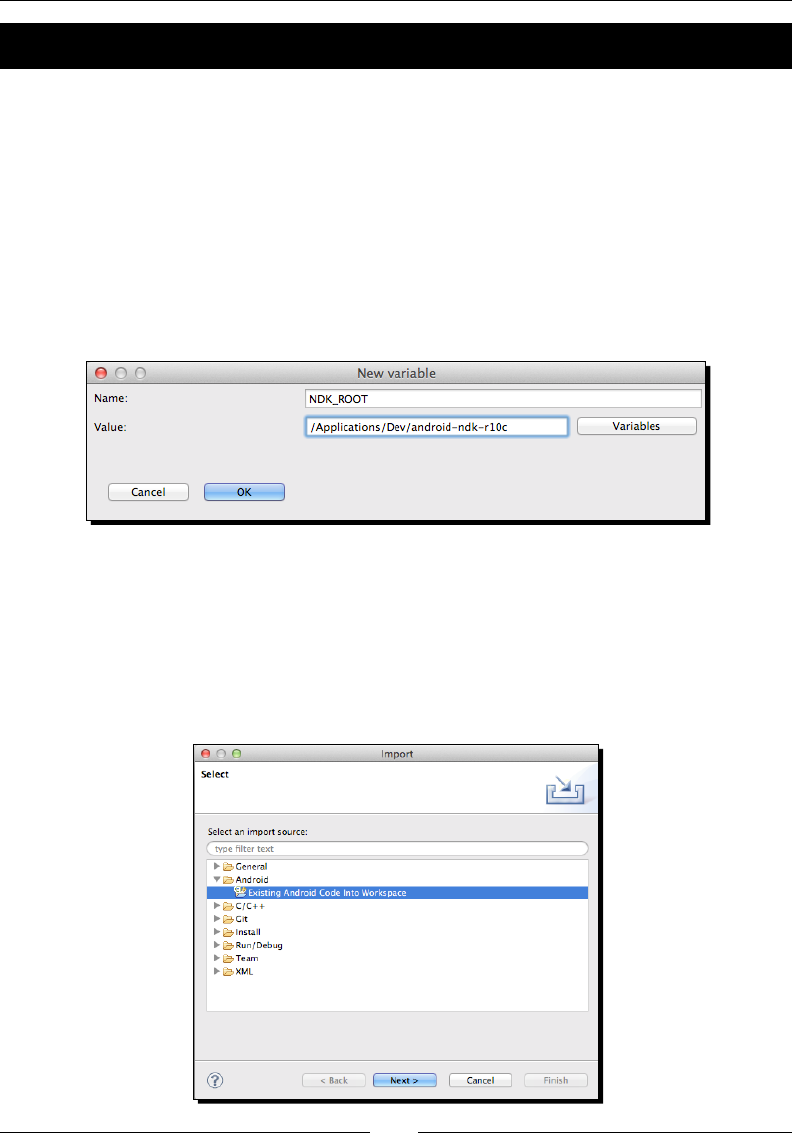
3. You need to add the NDK path and it must be called NDK_ROOT. In order to do this,
you must click Add…, and use NDK_ROOT as the name and then click inside the
Value eld to make sure the mouse cursor is acve inside it, and then drag the NDK
folder you downloaded inside the eld. On my machine the result looked like this:
4. Click Apply. It might be good to restart Eclipse. (If you do not see the C/C++ opon in
Preferences, it means you do not have the CDT plugins installed. Look for complete
instrucons at http://www.eclipse.org/cdt/ on how to install them.)
5. Now we're ready to bring our project inside Eclipse. Select File | Import….
6. In the dialog box, select the Android opon, and then select the Exisng Android
Code Into Workspace opon and click Next:
www.it-ebooks.info
Chapter 1
[ 7 ]
7. Click on the Browse buon and navigate to the HelloWorld project, and select the
proj.android folder inside it and hit Next.
8. You should see the project compiling. The enre framework library will be compiled
and so will the classes used in the base template.
9. Sadly, with Version 3.4 of the framework, we have an extra step here. It was gone in
Version 3.3, but now it's back. You must import the project's referenced Cocos2d-x
library into Eclipse's package explorer. Repeat step 8, but instead of selecng the
proj.android folder, select cocos2d/cocos/platform/android/java,
and hit Next.
10. This will select a library called libcocos2dx; click on Finish.
11. Once that's done, it might be good to run a build just in case your project failed
to generate the correct resource les. So, navigate to Project | Build All.
12. Now, connect your Android device and make sure Eclipse has recognized it.
You might need to turn on Development opons in your device, or restart your
device while connected to your computer and with Eclipse running.
13. Right-click on your project folder and select Run As | Android Applicaon.
What just happened?
You ran your rst Cocos2d-x applicaon in Android. Don't bother with the simulator for
your Android builds; it's a waste of me. If you don't have a device handy, consider
invesng in one.
Alternavely, you could open your project's root folder inside Terminal
(or command prompt) and use the Cocos2d-x console compile command:
cocos compile -p android
The people behind Cocos2d-x have announced they will get rid of the build Python script in the
future versions of the framework, so it's good to be prepared and know how to go without it.
While working with Eclipse, you might soon be faced with the dreaded java.lang.
NullPointerException error. This might be related to conicts in the ADT, CDT or NDK!
When you're faced with this error you have no opon other than reinstall
whatever Eclipse points to as the culprit. This might happen aer an update, or
if for some reason you have installed another framework that uses a path to the
NDK or ADT. If the error is ed to a parcular project or library, just remove all
projects from the package explorer in Eclipse and reimport them.
Now let's go over the sample applicaon and its les.
www.it-ebooks.info

Installing Cocos2d-x
[ 8 ]
The folder structure
First you have the Classes folder; this will contain the classes for your applicaon,
and are wrien enrely in C++. Below that is the Resources folder, where you nd the
images, fonts, and any kind of media used by the applicaon.
The ios folder has the necessary underlying connecon between your app and iOS.
For other plaorms, you will have their necessary linkage les in separate folders targeng
their respecve plaorm.
It is important to maintain this le structure. So your classes will go into the Classes folder
and all your images, sound les, fonts, level data should be placed in the Resources folder.
Now let's go over the main classes of the basic applicaon.
www.it-ebooks.info

Chapter 1
[ 9 ]
The iOS linkage classes
AppController and RootViewController are responsible to seng up OpenGL in
iOS as well as telling the underlying operang system that your applicaon is about to say
Hello... To the World.
These classes are wrien with a mix of Objecve-C and C++, as all the nice brackets and
the .mm extension show. You will change very lile, if anything, on these classes; and again
that will reect in changes to the way iOS handles your applicaon. So other targets would
require the same instrucons or none at all, depending on the target.
In AppController for instance, I could add support for multouch. And in
RootViewController, I could limit the screen orientaons supported by my applicaon,
for instance.
The AppDelegate class
This class marks the rst me your C++ app will talk to the underlying OS. It aempts to map
the main events mobile devices we want to dispatch and listen to. From here on, all your
applicaon will be wrien in C++ (unless you need something else for a specic target) and
from this point on, you can add condional code for dierent targets.
In AppDelegate, you should set up the Director object (it is the Cocos2d-x all powerful
singleton manager object), to run your applicaon just the way you want. You can:
Get rid of the applicaon status informaon
Change the frame rate of your applicaon
Tell Director where your high denion images are, and where your
standard denion images are, as well as which to use
You can change the overall scale of your applicaon, so it will best t
dierent screens
The AppDelegate class is also the best place to start any preloading process
And most importantly, it is here you tell the Director object what Scene to
begin your applicaon with
Here too, you will handle what happens to your applicaon if the OS decides to
kill it, push it aside, or hang it upside down to dry. All you need to do is place your
logic inside the correct event handler: applicationDidEnterBackground or
applicationWillEnterForeground.
www.it-ebooks.info

Installing Cocos2d-x
[ 10 ]
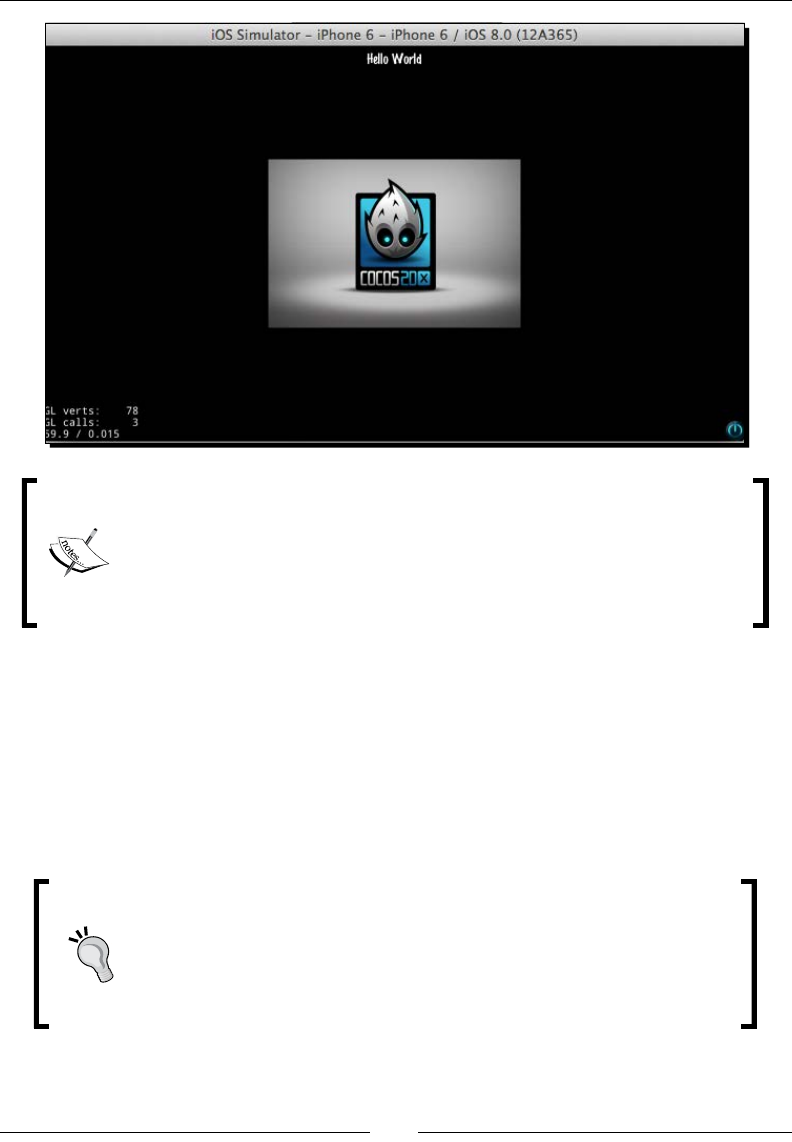
The HelloWorldScene class
When you run the applicaon, you get a screen with the words Hello World and a bunch
of numbers in one corner; those are the display stascs you decided you wanted around in
the AppDelegate class.
The actual screen is created by the oddly named HelloWorldScene class. It is a Layer
class that creates its own scene (don't worry if you don't know what a Layer or a Scene
class is; you will know soon).
When it inializes, HelloWorldScene puts a buon on the screen that you can press to
exit the applicaon. The buon is actually a Menu item part of a Menu object that only has
one buon, with two image states for the buon, and one call back event when the said
buon is pressed.
The Menu object automacally handles touch events targeng its members, so you don't
get to see any of that code oang about. Then, there is also the necessary Label object to
show the Hello World message and the background image.
Who begets whom?
If have you never worked with either Cocos2d or Cocos2d-x before, the way the inial
scene() method is instanated may lead to dizziness. To recap, in AppDelegate you have:
auto scene = HelloWorld::createScene();
director->runWithScene(scene);
Director needs a Scene object to run, which you can think of as being your applicaon,
basically. Scene needs something to show, and in this case, a Layer object will do. Scene is
then said to contain a Layer object.
Here a Scene object is created through a stac method scene inside a Layer derived
class. So the layer creates the scene, and the scene immediately adds the layer to itself.
Huh? Relax. This incestuous-like instanaon will most likely happen only once, and you get
nothing to do with it when it happens. So you can easily ignore all these funny goings-on and
look the other way. I promise instanaons will be a much easier task aer this rst one.
Finding more reference material
Follow these steps to access one of the best sources for reference material on Cocos2d-x:
its Test project.
www.it-ebooks.info
Chapter 1
[ 11 ]
Time for action – running the test samples
You can open the test project just like you would any other Xcode/Eclipse project:
1. In Eclipse, you can import the test project from inside the Cocos2d-x folder you
downloaded. You'll nd it in tests/cpp-tests/proj.android.
2. You can follow the same steps as before to build this project.
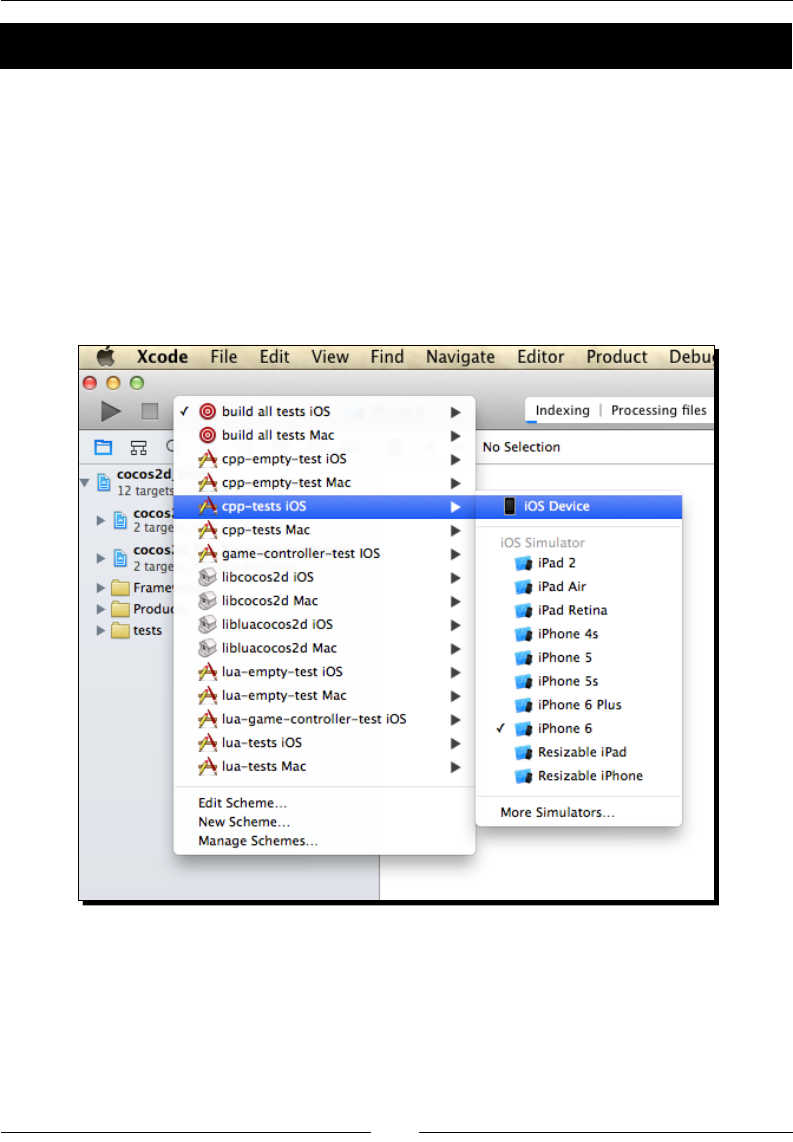
3. In Xcode, you must open the tests project le that you'll nd in the Cocos2d-x
framework folder inside the build folder: build/cocos2d_tests.xcodeproj.
4. Once the project is opened in Xcode, you must select the correct target next to the
Run buon as follows:
5. In order to actually review the code inside the tests, you may navigate to tests/
cpp-tests/Classes for the C++ tests or tests/lua-tests/src for the Lua
tests. Beer yet, if you have a program such as TextWrangler or an equivalent,
you can open these enre directories inside a Disk Browser window and have all
that informaon ready for referencing right at your desktop.
www.it-ebooks.info

Installing Cocos2d-x
[ 12 ]
What just happened?
With the test samples, you can visualize most features in Cocos2d-x, what they do, as well as
see some of the ways you can inialize and customize them.
I will refer to the code found in the tests quite oen. As usual with programming, there is
always a dierent way to accomplish the same task, so somemes, aer showing you one
way, I'll refer to a dierent one that you can nd (and by then easily understand) inside the
Test classes.
The other tools
Now comes the part where you may need to spend a bit more money to get some extremely
helpful tools (and do some extra bit of learning). In this book's examples, I use four of them:
A tool to help build sprite sheets: I'll use TexturePacker (http://www.
codeandweb.com/texturepacker). There are other alternaves, such as
Zwoptex (http://zwopple.com/zwoptex/), and they usually oer some
features for free. Cocos2d-x now oers a free program called CocosStudio, which is
somewhat similar to SpriteBuilder (previously CocosBuilder), and it oers ways to
build sprite sheets, bitmap fonts, as well as a number of other goodies. At the me
of wring this, the Windows version is somewhat superior to the Mac version, but
they are free!
A tool to help build parcle eects: I'll use Parcle Designer
(http://www.71squared.com/en/particledesigner). Depending on
your operang system, you may nd free tools online for this. Cocos2d-x comes
bundled with some common parcle eects that you can customize. But doing
it blindly is a process I do not recommend. CocosStudio also allows you to create
your own parcle eects, but you may nd its interface a bit daunng. It certainly
requires its own book of tutorials!
A tool to help build bitmap fonts: I'll use Glyph Designer
(http://www.71squared.com/en/glyphdesigner). But there are others:
bmGlyph (which is not as expensive) and FontBuilder (which is free). It is not
extremely hard to build a bitmap font—not nearly as hard as building a parcle
eect from scratch—but doing it once is enough to convince you to get one of
these tools fast. Once again, you might give CocosStudio a go.
A tool to produce sound eects: No contest—sfxr for Windows or its Mac
port cfxr. Both are free (http://www.drpetter.se/project_sfxr.html
and http://thirdcog.eu/apps/cfxr, respecvely).
www.it-ebooks.info

Chapter 1
[ 13 ]
Summary
You just learned how to install Cocos2d-x and create a basic applicaon. You also learned
enough of the structure of a basic Cocos2d-x applicaon to start building your rst game and
you know how to deploy to both iOS and Android.
Keep the Test classes by your side as you go over the examples in this book and you will be
a Cocos2d-x pro in no me!
But rst, let's go over a few things regarding the framework and its nave language.
www.it-ebooks.info
[ 15 ]
2
You Plus C++ Plus Cocos2d-x
This chapter will be aimed at two types of developers: the original Cocos2d
developer who is scared of C++ but won't admit it to his friends and the C++
coder who never even heard of Cocos2d and finds Objective-C funny looking.
I'll go over the main syntax differences Objective-C developers should
pay attention to and the few code style changes involved in developing
with Cocos2d-x that C++ developers should be aware of. But first, a quick
introduction to Cocos2d-x and what it is all about.
You will learn the following topics:
What Cocos2d-x is and what it can do for you
How to create classes in C++
How to memory manage your objects in Cocos2d-x and C++
What you get out of Ref
Cocos2d-x – an introduction
So what is a 2D framework? If I had to dene it in as few words as possible, I'd say
rectangles in a loop.
At the heart of Cocos2d-x, you nd the Sprite class and what that class does, in simple
terms, is keep a reference to two very important rectangles. One is the image (or texture)
rectangle, also called the source rectangle, and the other is the desnaon rectangle. If you
want an image to appear in the center of the screen, you will use Sprite. You will pass it
the informaon of what and where that image source is and where on the screen you want
it to appear.
www.it-ebooks.info

You Plus C++ Plus Cocos2d-x
[ 16 ]
There is not much that needs to be done to the rst rectangle, the source one; but there is a
lot that can be changed in the desnaon rectangle, including its posion on the screen, its
size, opacity, rotaon, and so on.
Cocos2d-x will then take care of all the OpenGL drawing necessary to display your image
where you want it and how you want it, and it will do so inside a render loop. Your code
will most likely tap into that same loop to update its own logic.
Prey much any 2D game you can think of can be built with Cocos2d-x with a few sprites
and a loop.
In Version 3.x of the framework, there was a mild separaon between
Cocos2d-x and its counterpart Cocos2d. It dropped the prex CC in favor
of namespaces, embraced C++11 features, and became that much nicer
to work with because of it.
Containers
Also important in Cocos2d-x is the noon of containers (or nodes). These are all the
objects that can have sprites inside them (or other nodes.) This is extremely useful at mes
because by changing aspects of the container, you automacally change aspects of its
children. Move the container and all its children will move with it. Rotate the container and
well, you get the picture!
The containers are: Scene, Layer, and Sprite. They all inherit from a base container
class called node. Each container will have its peculiaries, but basically you will arrange
them as follows:
Scene: This will contain one or more Node, usually Layer types. It is common to
break applicaons into mulple scenes; for instance, one for the main menu, one
for sengs, and one for the actual game. Technically, each scene will behave as a
separate enty in your applicaon, almost as subapplicaons themselves, and you
can run a series of transion eects when changing between scenes.
Layer: This will most likely contain Sprite. There are a number of specialized
Layer objects aimed at saving you, the developer, some me in creang things such
as menus for instance (Menu), or a colored background (LayerColor). You can have
more than one Layer per scene, but good planning makes this usually unnecessary.
www.it-ebooks.info

Chapter 2
[ 17 ]
Sprite: This will contain your images and be added as children to Layer derived
containers. To my mind, this is the most important class in all of Cocos2d-x, so much
so, that aer your applicaon inializes, when both a Scene and a Layer object are
created, you could build your enre game only with sprites and never use another
container class in Cocos2d-x.
Node: This super class to all containers blurs the line between itself and
Layer, and even Sprite at mes. It has its own set of specialized subclasses
(besides the ones menoned earlier), such as MotionStreak, ParallaxNode,
and SpriteBatchNode, to name a few. It can, with a few adjustments, behave
just as Layer. But most of the me you will use it to create your own specialized
nodes or as a general reference in polymorphism.
The Director and cache classes
Aer containers comes the all-knowing Director and all-encompassing cache objects.
The Director object manages scenes and knows all about your applicaon. You will make
calls to it to get to that informaon and to change some of the things such as screen size,
frame rate, scale factor, and so forth.
The caches are collector objects. The most important ones are TextureCache,
SpriteFrameCache, and AnimationCache. These are responsible for storing key
informaon regarding those two important rectangles I menoned about earlier. But every
type of data that is used repeatedly in Cocos2d-x will be kept in some sort of cache list.
Both Director and all cache objects are singletons. These are special sort of classes that
are instanated only once; and this one instance can be accessed by any other object.
The other stuff
Aer the basic containers, the caches and the Director object, comes the remaining
90 percent of the framework. Among all this, you will nd:
Acons: Animaons will be handled through these and what a treat they are!
Parcles: Parcles systems for your delight.
Specialized nodes: For things such as menus, progress bars, special eects,
parallax eect, le maps, and much, much more.
The macros, structures, and helper methods: Hundreds of me-saving, magical bits
of logic. You don't need to know them all, but chances are that you will be coding
something that can be easily replaced by a macro or a helper method and feel
incredibly silly when you nd out about it later.
www.it-ebooks.info

You Plus C++ Plus Cocos2d-x
[ 18 ]
Do you know C++?
Don't worry, the C part is easy. The rst plus goes by really fast, but that second plus, oh boy!
Remember, it is C. And if you have coded in Objecve-C with the original Cocos2d, you know
good old C already even if you saw it in between brackets most of the me.
But C++ also has classes, just like Objecve-C, and these classes are declared in the interface
les just like in Objecve-C. So let's go over the creaon of a C++ class.
The class interface
This will be done in a .h le. We'll use a text editor to create this le since I don't want any
code hinng and autocompleon features geng in the way of you learning the basics of
C++ syntax. So for now at least, open up your favorite text editor. Let's create a class interface!
Time for action – creating the interface
The interface, or header le, is just a text le with the .h extension.
1. Create a new text le and save it as HelloWorld.h. Then, enter the following
lines at the top:
#ifndef __HELLOWORLD_H__
#define __HELLOWORLD_H__
#include "cocos2d.h"
2. Next, add the namespace declaraon:
using namespace cocos2d;
3. Then, declare your class name and the name of any inherited classes:
class HelloWorld : public cocos2d::Layer {
4. Next, we add the properes and methods:
protected:
int _score;
public:
HelloWorld();
virtual ~HelloWorld();
virtual bool init();
static cocos2d::Scene* scene();
CREATE_FUNC(HelloWorld);
void update(float dt);
inline int addTwoIntegers (int one, int two) {
www.it-ebooks.info

Chapter 2
[ 19 ]
return one + two;
}
};
5. We nish by closing the #ifndef statement:
#endif // __HELLOWORLD_H__
What just happened?
You created a header le in C++. Let's go over the important bits of informaon:
In C++ you include, you do not import. The import statement in Objecve-C checks
whether something needs to be included; include does not. But we accomplish
the same thing through that clever use of denions at the top. There are other
ways to run the same check (with #pragma once, for instance) but this one is
added to any new C++ les you create in Xcode.
You can make your life easier by declaring the namespaces you'll use in the class.
These are similar to packages in some languages. You may have noced that all
the uses of cocos2d:: in the code are not necessary because of the namespace
declaraon. But I wanted to show you the bit you can get rid of by adding a
namespace declaraon.
So next you give your class a name and you may choose to inherit from some other
class. In C++ you can have as many super classes as you want. And you must declare
whether your super class is public or not.
You declare your public, protected and private methods and members
between the curly braces. HelloWorld is the constructor and ~HelloWorld is the
destructor (it will do what dealloc does in Objecve-C).
The virtual keyword is related to overrides. When you mark a method as
virtual, you are telling the compiler not to set in stone the owner of the method,
but to keep it in memory as execuon will reveal the obvious owner. Otherwise, the
compiler may erroneously decide that a method belongs to the super and not its
inhering class.
Also, it's good pracce to make all your destructors virtual. You only need use
the keyword once in the super class to mark potenal overrides, but it is common
pracce to repeat the virtual keyword in all subclasses so developers know which
methods are overrides (C++11 adds a tag override, which makes this disncon
even clearer, and you will see examples of it in this book's code). In this case, init
comes from Layer and HelloWorld wants to override it.
virtual bool init();
Oh yes, in C++ you must declare overrides in your interfaces. No excepons!
www.it-ebooks.info

You Plus C++ Plus Cocos2d-x
[ 20 ]
The inline method is something new to you, probably. These methods are added to the code
by the compiler wherever they are called for. So every me I make a call to addTwoIntegers,
the compiler will replace it with the lines for the method declared in the interface. So the
inline method works just as statements inside a method; they do not require their own bit
of memory in the stack. But if you have a two-line inline method called 50 mes in your
program, it means that the compiler will add a hundred lines to your code.
The class implementation
This will be done in a .cpp le. So let's go back to our text editor and create the
implementaon for our HelloWorld class.
Time for action – creating the implementation
The implementaon is a text le with the .cpp extension:
1. Create a new text le and save it as HelloWorld.cpp. At the top, let's start by
including our header le:
#include "HelloWorld.h"
2. Next, we implement our constructor and destructor:
HelloWorld::HelloWorld () {
//constructor
}
HelloWorld::~HelloWorld () {
//destructor
}
3. Then comes our stac method:
Scene* HelloWorld::scene() {
auto scene = Scene::create();
auto layer = HelloWorld::create();
scene->addChild(layer);
return scene;
}
www.it-ebooks.info

Chapter 2
[ 21 ]
4. And then come our two remaining public methods:
bool HelloWorld::init() {
// call to super
if ( !Layer::init() )
{
return false;
}
//create main loop
this->scheduleUpdate();
return true;
}
void HelloWorld::update (float dt) {
//the main loop
}
What just happened?
We created the implementaon for our HelloWorld class. Here are the most important
bits to take noce of:
The HelloWorld:: scope resoluon is not oponal here. Every single method
declared in your interface belongs to the new class that needs the correct scope
resoluon in the implementaon le.
You also need the scope resoluon when calling the super class like
Layer::init(). There is no built-in super keyword in the standard C++ library.
You use this instead of self. The -> notaon is used when you're trying to access
an object's properes or methods through a pointer to the object (a pointer is the
informaon of where you nd the actual object in memory). The . (dot) notaon
is used to access an object's methods and properes through its actual instance
(the blob of memory that comprises the actual object).
We create an update loop, which takes a oat for its delta me value simply
by calling scheduleUpdate. You will see more opons related to this later in
this book.
You can use the auto keyword as the type of an object if it's obvious enough to
the compiler which type an object is.
The inline methods, of course, are not implemented in the class since they exist
only in the interface.
www.it-ebooks.info

You Plus C++ Plus Cocos2d-x
[ 22 ]
And that's enough of syntax for now. C++ is one of the most extensive languages out there
and I do not wish to leave you with the impression that I have covered all of it. But it is a
language made by developers for developers. Trust me, you will feel right at home working
with it.
The informaon listed previously will become clearer once we move on to building the
games. But now, onwards to the big scary monster: memory management.
Instantiating objects and managing memory
There is no Automac Reference Counng (ARC) in Cocos2d-x, so Objecve-C developers
who have forgoen memory management might have a problem here. However, the rule
regarding memory management is very simple with C++: if you use new, you must delete.
C++11 makes this even easier by introducing special pointers that are memory-managed
(these are std::unique_ptr and std::shared_ptr).
Cocos2d-x, however, will add a few other opons and commands to help with memory
management, similar to the ones we have in Objecve-C (without ARC). This is because
Cocos2d-x, unlike C++ and very much like Objecve-C, has a root class. The framework is
more than just a C++ port of Cocos2d. It also ports certain noons of Objecve-C to C++ in
order to recreate its memory-management system.
Cocos2d-x has a Ref class that is the root of every major object in the framework.
It allows the framework to have autorelease pools and retain counts, as well other
Objecve-C equivalents.
When instanang Cocos2d-x objects, you have basically two opons:
Using stac methods
The C++ and Cocos2d-x style
Using static methods
Using stac methods is the recommended way. The three-stage instanaon process of
Objecve-C, with alloc, init, and autorelease/retain, is recreated here. So, for
instance, a Player class, which extends Sprite, might have the following methods:
Player::Player () {
this->setPosition ( Vec2(0,0) );
}
Player* Player::create () {
auto player = new Player();
www.it-ebooks.info

Chapter 2
[ 23 ]
if (player && player->initWithSpriteFrameName("player.png")) {
player->autorelease();
return player;
}
CC_SAFE_DELETE(player);
return nullptr;
}
For instanaon, you call the stac create method. It will create a new Player object
as an empty husk version of Player. No major inializaon should happen inside the
constructor, just in case you may have to delete the object due to some failure in the
instanaon process. Cocos2d-x has a series of macros for object deleon and release,
like the CC_SAFE_DELETE macro used previously.
You then inialize the super through one of its available methods. In Cocos2d-x, these init
methods return a boolean value for success. You may now begin lling the Player object
with some data.
If successful, then inialize your object with its proper data if not done in the previous step,
and return it as an autorelease object.
So in your code the object would be instanated as follows:
auto player = Player::create();
this->addChild(player);//this will retain the object
Even if the player variable were a member of the class (say, m_player), you wouldn't
have to retain it to keep it in scope. By adding the object to some Cocos2d-x list or cache,
the object is automacally retained. So you may connue to address that memory through
its pointer:
m_player = Player::create();
this->addChild(m_player);//this will retain the object
//m_player still references the memory address
//but does not need to be released or deleted by you
The C++ and Cocos2d-x style
In this opon, you would instanate the previous Player object as follows:
auto player = new Player();
player->initWithSpriteFrameName("player.png");
this->addChild(player);
player->autorelease();
www.it-ebooks.info

You Plus C++ Plus Cocos2d-x
[ 24 ]
Player could do without a stac method in this case and the player pointer will not
access the same memory in future as it's set to be autoreleased (so it would not sck around
for long). In this case, however, the memory would not leak. It would sll be retained by a
Cocos2d-x list (the addChild command takes care of that). You can sll access that memory
by going over the children list added to this.
If you needed the pointer to be a member property you could use retain() instead of
autorelease():
m_player = new Player();
m_player->initWithSpriteFrameName("player.png");
this->addChild(m_player);
m_player->retain();
Then someme later, you would have to release it; otherwise, it will leak:
m_player->release();
Hardcore C++ developers may choose to forget all about the autorelease pool and simply
use new and delete:
Player * player = new Player();
player->initWithSpriteFrameName("player.png");
this->addChild(player);
delete player;//This will crash!
This will not work. You have to use autorelease, retain, or leave the previous code
without the delete command and hope there won't be any leak.
C++ developers must keep in mind that Ref is managed by the framework. This means
that objects are being internally added to caches and the autorelease pool even though
you may not want this to happen. When you create that Player sprite, for instance, the
player.png le you used will be added to the texture cache, or the sprite frame cache.
When you add the sprite to a layer, the sprite will be added to a list of all children of
that layer, and this list will be managed by the framework. My advice is, relax and let the
framework work for you.
Non-C++ developers should keep in mind that any class not derived from Ref should
be managed the usual way, that is, if you are creang a new object you must delete it at
some point:
MyObject* object = new MyObject();
delete object;
www.it-ebooks.info

Chapter 2
[ 25 ]
What you get with Ref
With Ref you get managed objects. This means that Ref derived objects will have a
reference count property, which will be used to determine whether an object should be
deleted from memory or not. The reference count is updated every me an object is added
or removed from a Cocos2d-x collecon object.
For instance, Cocos2d-x comes with a Vector collecon object that extends the
funconality of the C++ standard library vector (std::vector) by increasing and decreasing
the reference count when objects are added and removed from it. For that reason, it can
only store Ref derived objects.
Once again, every Ref derived class can be managed the way things used to be managed in
Objecve-C before ARC- with retain counts and autorelease pools.
C++, however, comes packed with its own wonderful dynamic list classes, similar to the
ones you would nd in Java and C#. But for Ref derived objects, you would probably be
best served by Cocos2d-x managed lists, or else remember to retain and release each object
when applicable. If you create a class which does not extend Ref and you need to store
instances of this class in a list container, then choose the standard library ones.
In the examples that follow in this book I will code primarily from within the framework,
so you will get to see plenty of examples of cocos2d::Vector being used, for instance,
but I will also use a std::vector instance or two in some of the games.
Summary
Hopefully, non-C++ developers have now learned that there is nothing to be feared from the
language, and hardcore C++ developers have not scoed too much at the noon of a root
class and its retains and autoreleases.
All the stu that root classes have brought to languages such as Java and Objecve-C will
forever be a moot point. The creepy, underlying operaons that go on behind your back
with root objects cannot be shut down or controlled. They are not oponal, and this forceful
nature of root objects has bothered C++ developers ever since noons such as garbage
collectors rst surfaced.
Having said that, memory management of Ref objects is extremely helpful and I hope even
the most distrusul developers will soon learn to be thankful for it.
Furthermore, Cocos2d-x is awesome. So let's create a game already!
www.it-ebooks.info
[ 27 ]
3
Your First Game – Air Hockey
We are going to build an Air Hockey game to introduce you to all the main
aspects of building a project with Cocos2d-x. These include setting up the
project's configuration, loading images, loading sounds, building a game for
more than one screen resolution, and managing touch events.
Oh, and you will need to call a friend. This is a two player game. Go on,
I'll wait here.
By the end of this chapter, you will know:
How to build an iPad-only game
How to enable multouch
How to support both rena and non-rena displays
How to load images and sounds
How to play sound eects
How to create sprites
How to extend the Cocos2d-x Sprite class
How to create labels and update them
Without further ado...let's begin.
www.it-ebooks.info

Your First Game – Air Hockey
[ 28 ]
Game congurations
The game will have the following characteriscs:
It must support multouch since it's a two player game
It must be played on large screens since it's a two player game
It must support rena displays because we want to cash in on that
It must be played only in portrait mode because I built the art in portrait
So let's create our project!
Time for action – creating your game project
I'll build the game rst in Xcode and then show how to take the project to Eclipse, but
the folder structure remains the same, so you can work with any IDE you wish and the
instrucons here will be the same:
1. Open the terminal and create a new Cocos2d-x project called AirHockey that uses
C++ as its main language. I saved mine on the desktop, so the command I had to
enter looks like this:
cocos new AirHockey -p com.rengelbert.AirHockey -l cpp -d /Users/
rengelbert/Desktop/AirHockey
2. Once the project is created, navigate to its proj.ios_mac folder and double-click
on the AirHockey.xcodeproj le. (For Eclipse, you can follow the same steps we
did when we created the HelloWorld project to import the project.)
3. Select the top item in Project Navigator and making sure the iOS target is selected,
edit the informaon by navigang to General | Deployment info, seng the target
device to iPad and Device Orientaon to Portrait and Upside Down.
www.it-ebooks.info
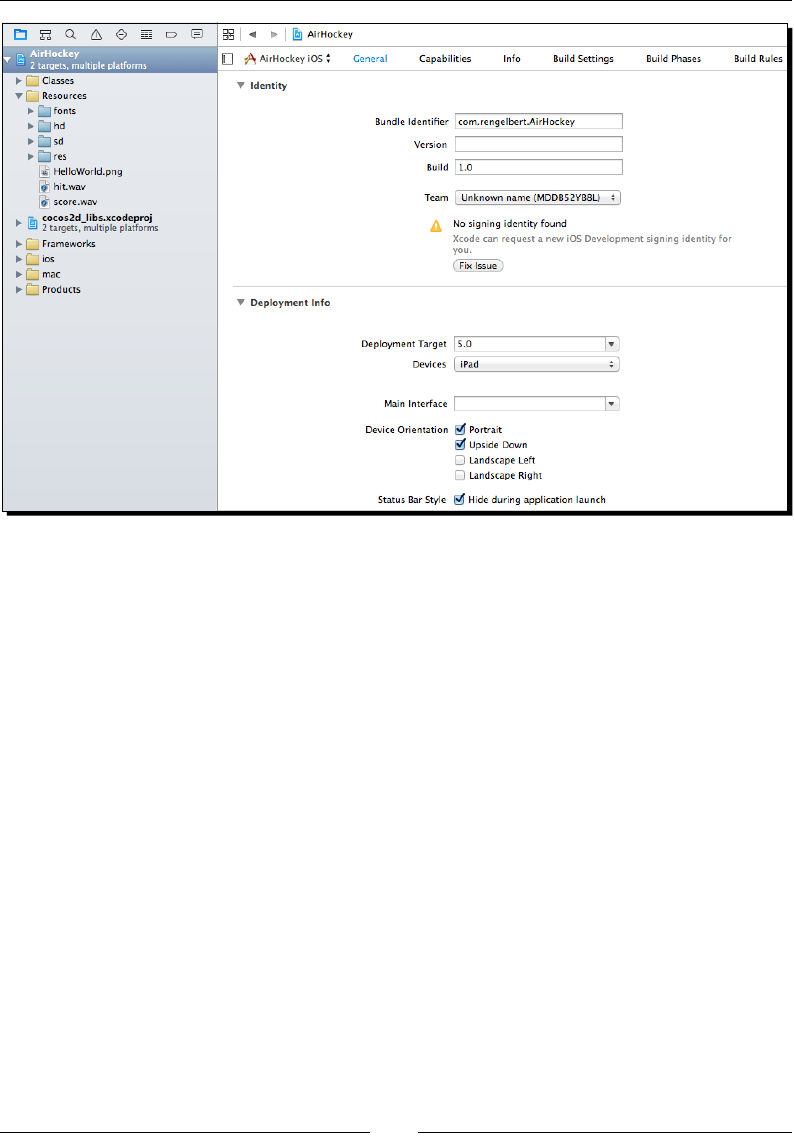

Your First Game – Air Hockey
[ 30 ]
Time for action – laying down the rules
We'll update the RootViewController.mm le.
1. Go to RootViewController.mm inside the ios folder and look for the
shouldAutorotateToInterfaceOrientation method. Change the line
inside the method to read:
return UIInterfaceOrientationIsPortrait( interfaceOrientation );
2. And a few lines below in the supportedInterfaceOrientations method,
change the line inside the condional to:
return UIInterfaceOrientationMaskPortrait;
What just happened?
We just told RootViewController we want our applicaon to play in any of the two
supported portrait modes.
Supporting retina displays
Now let's add the images to our project.
Time for action – adding the image les
First, we download the resources for this project, and then we add them in Xcode.
1. Go to this book's Support page (www.packtpub.com/support) and download
the 4198_03_RESOURCES.zip le. Inside it, you should nd three folders called
hd, sd, and fonts.
2. Go to your Project folder, the actual folder in your system. Drag the three folders
to the Resources folder inside your project.
3. Go back to Xcode. Select the Resources folder in your project navigaon panel.
Then go to File | Add Files to AirHockey.
4. In the File window, navigate to the Resources folder and select the sd, hd,
and fonts folders.
5. This is very important: make sure Create folder references for any added folders is
selected. Also make sure you selected AirHockey as the target. It wouldn't hurt to
make sure Copy items to desnaon... is also selected.
6. Click on Add.
www.it-ebooks.info

Chapter 3
[ 31 ]
What just happened?
You added the necessary image les for your Air Hockey game. These come in two versions:
one for rena displays (high denion) and one for non-rena displays (standard denion).
It is very important that references are added to the actual folders, only this way Xcode will
be able to have two les with the same name inside the project and sll keep them apart;
one in each folder. We also added the font we'll be using in the game.
Now let's tell Cocos2d-x where to look for the correct les.
Time for action – adding retina support
This me we'll work with the class AppDelegate.cpp:
1. Go to AppDelegate.cpp (you'll nd it in the Classes folder). Inside the
applicationDidFinishLaunching method, and below the director-
>setAnimationInterval(1.0 / 60) line, add the following lines:
auto screenSize = glview->getFrameSize();
auto designSize = Size(768, 1024);
glview->setDesignResolutionSize(designSize.width, designSize.
height, ResolutionPolicy::EXACT_FIT);
std::vector<std::string> searchPaths;
if (screenSize.width > 768) {
searchPaths.push_back("hd");
director->setContentScaleFactor(2);
} else {
searchPaths.push_back("sd");
director->setContentScaleFactor(1);
}
auto fileUtils = FileUtils::getInstance();
fileUtils->setSearchPaths(searchPaths);
2. Save the le.
What just happened?
An enre book could be wrien about this topic, although in this rst example, we have a very
simple implementaon on how to support mulple screen sizes since we are only targeng
iPads. Here we are saying: "Hey AppDelegate, I designed this game for a 768 x 1024 screen."
www.it-ebooks.info

Your First Game – Air Hockey
[ 32 ]
All the values for posioning and font size were chosen for that screen size. If the screen is
larger, make sure you grab the les from the hd folder and change the scale by which you
will mulply all my posioning and font sizes. If the screen has the same size I designed
the game for, use the les in the sd folder and set the scale to 1. (Android adds even more
complexity to this, but we'll tackle that in later in the book.)
FileUtils will look for every le you load for your game rst inside Resources | sd
(or hd). If it doesn't nd them there, it will try to nd them in Resources. This is a good
thing because les shared by both versions may be added only once to the project, inside
Resources. That is what we'll do now with the sound les.
Adding sound effects
This game has two les for sound eects. You will nd them in the same .zip le you
downloaded previously.
Time for action – adding the sound les
Assuming you have the sound les from the downloaded resources, let's add them to
the project.
1. Drag both the .wav les to the Resources folder inside your Project folder.
2. Then go to Xcode, select the Resources folder in the le navigaon panel and
select File | Add Files to AirHockey.
3. Make sure the AirHockey target is selected.
4. Go to AppDelegate.cpp again. At the top, add this include statement:
#include "SimpleAudioEngine.h"
5. Then below the USING_NS_CC macro (for using namespace cocos2d), add:
using namespace CocosDenshion;
6. Then just below the lines you added in the previous secon, inside
applicationDidFinishLaunching, add the following lines:
auto audioEngine = SimpleAudioEngine::getInstance();
audioEngine->preloadEffect( fileUtils->fullPathForFilename("hit.
wav").c_str() );
audioEngine->preloadEffect( fileUtils->fullPathForFilename("score.
wav").c_str() );
audioEngine->setBackgroundMusicVolume(0.5f);
audioEngine->setEffectsVolume(0.5f);
www.it-ebooks.info
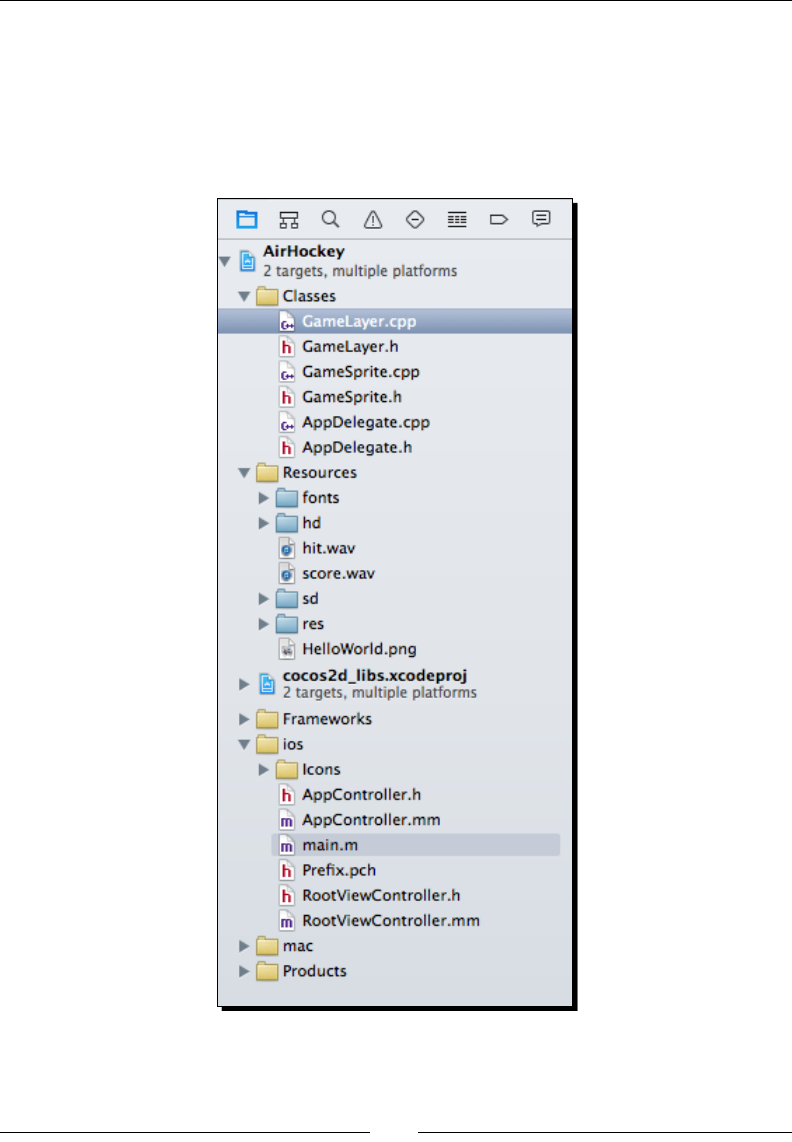
Chapter 3
[ 33 ]
What just happened?
With the preloadEffect method from CocosDenshion, you manage to preload the les
as well as instanate and inialize SimpleAudioEngine. This step will always take a toll on
your applicaon's processing power, so it's best to do it early on.
By now, the folder structure for your game should look like this:
www.it-ebooks.info

Your First Game – Air Hockey
[ 34 ]
Extending Sprite
No, there is nothing wrong with Sprite. I just picked a game where we need a bit more
informaon from some of its sprites. In this case, we want to store where a sprite is and
where it will be once the current iteraon of the game is completed. We will also need a
helper method to get the sprite's radius.
So let's create our GameSprite class.
Time for action – adding GameSprite.cpp
From here on, we'll create any new classes inside Xcode, but you could do it just as easily
in Eclipse if you remember to update the Make le. I'll show you how to do that later in
this chapter.
1. In Xcode, select the Classes folder and then go to File | New | File and navigate
to iOS | Source select C++ File.
2. Call it GameSprite and make sure the Also create a header le opon is selected.
3. Select the new GameSprite.h interface le and replace the code there with this:
#ifndef __GAMESPRITE_H__
#define __GAMESPRITE_H__
#include "cocos2d.h"
using namespace cocos2d;
class GameSprite : public Sprite {
public:
CC_SYNTHESIZE(Vec2, _nextPosition, NextPosition);
CC_SYNTHESIZE(Vec2, _vector, Vector);
CC_SYNTHESIZE(Touch*, _touch, Touch);
GameSprite();
virtual ~GameSprite();
static GameSprite* gameSpriteWithFile(const char*
pszFileName);
virtual void setPosition(const Vec2& pos) override;
float radius();
};
#endif // __GAMESPRITE_H__
www.it-ebooks.info

Chapter 3
[ 35 ]
What just happened?
In the interface, we declare the class to be a subclass of the public Sprite class.
Then we add three synthesized properes. In Cocos2d-x, these are macros to create geers
and seers. You declare the type, the protected variable name, and the words that will
be appended to the get and set methods. So in the rst CC_SYNTHESIZE method, the
getNextPosition and setNextPosition method will be created to deal with the Point
value inside the _nextPosition protected variable.
We also add the constructor and destructor for our class, and the ubiquitous stac method
for instanaon. This receives as a parameter, the image lename used by the sprite. We
nish o by overriding setPosition from Sprite and adding the declaraon for our
helper method radius.
The next step then is to implement our new class.
Time for action – implementing GameSprite
With the header out of the way, all we need to do is implement our methods.
1. Select the GameSprite.cpp le and let's start on the instanaon logic of
the class:
#include "GameSprite.h"
GameSprite::GameSprite(void){
_vector = Vec2(0,0);
}
GameSprite::~GameSprite(void){
}
GameSprite* GameSprite::gameSpriteWithFile(const char *
pszFileName) {
auto sprite = new GameSprite();
if (sprite && sprite->initWithFile(pszFileName)) {
sprite->autorelease();
return sprite;
}
CC_SAFE_DELETE(sprite);
return sprite = nullptr;
}
www.it-ebooks.info

Your First Game – Air Hockey
[ 36 ]
2. Next we need to override the Node method setPosition. We need to make sure
that whenever we change the posion of the sprite, the new value is also used by
_nextPosition:
void GameSprite::setPosition(const Point& pos) {
Sprite::setPosition(pos);
if (!_nextPosition.equals(pos)) {
_nextPosition = pos;
}
}
3. And nally, we implement our new method to retrieve the radius of our sprite,
which we determine to be half its texture's width:
float GameSprite::radius() {
return getTexture()->getContentSize().width * 0.5f;
}
What just happened?
Things only begin happening in the stac method. We create a new GameSprite class, then
we call initWithFile on it. This is a GameSprite method inherited from its super class;
it returns a Boolean value for whether that operaon succeeded. The stac method ends by
returning an autorelease version of the GameSprite object.
The setPosition override makes sure _nextPosition receives the posion informaon
whenever the sprite is placed somewhere. And the helper radius method returns half of
the sprite's texture width.
Have a go hero
Change the radius method to an inline method in the interface and remove it from the
implementaon le.
The actual game scene
Finally, we'll get to see all our work and have some fun with it. But rst, let's delete the
HelloWorldScene class (both header and implementaon les). You'll get a few errors in
the project so let's x these.
References to the class must be changed at two lines in AppDelegate.cpp. Go ahead and
change the references to a GameLayer class.
We'll create that class next.
www.it-ebooks.info

Chapter 3
[ 37 ]
Time for action – coding the GameLayer interface
GameLayer is the main container in our game.
1. Follow the steps to add a new le to your Classes folder. This is a C++ le
called GameLayer.
2. Select your GameLayer.h. Just below the rst define preprocessor
command, add:
#define GOAL_WIDTH 400
3. We dene the width of the goals in pixels.
4. Next, add the declaraons for our sprites and our score text labels:
#include "cocos2d.h"
#include "GameSprite.h"
using namespace cocos2d;
class GameLayer : public Layer
{
GameSprite* _player1;
GameSprite* _player2;
GameSprite* _ball;
Vector<GameSprite*> _players;
Label* _player1ScoreLabel;
Label* _player2ScoreLabel;
We have the GameSprite objects for two players (the weird looking things called
mallets), and the ball (called a puck). We'll store the two players in a Cocos2d-x
Vector. We also have two text labels to display the score for each player.
5. Declare a variable to store the screen size. We'll use this a lot for posioning:
Size _screenSize;
6. Add variables to store the score informaon and a method to update these scores
on screen:
int _player1Score;
int _player2Score;
void playerScore (int player);
www.it-ebooks.info

Your First Game – Air Hockey
[ 38 ]
7. Finally, let's add our methods:
public:
GameLayer();
virtual ~GameLayer();
virtual bool init();
static Scene* scene();
CREATE_FUNC(GameLayer);
void onTouchesBegan(const std::vector<Touch*> &touches,
Event* event);
void onTouchesMoved(const std::vector<Touch*> &touches,
Event* event);
void onTouchesEnded(const std::vector<Touch*> &touches,
Event* event);
void update (float dt);
};
#endif // __GAMELAYER_H__
There are constructor and destructor methods, then the Layer init methods, and nally
the event handlers for the touch events and our loop method called update. These touch
event handlers will be added to our class to handle when users' touches begin, when they
move across the screen, and when they end.
What just happened?
GameLayer is our game. It contains references to all the sprites we need to control and
update, as well as all game data.
In the class implementaon, all the logic starts inside the init method.
Time for action – implementing init()
Inside init(), we'll build the game screen, bringing in all the sprites and labels we'll need
for the game:
1. So right aer the if statement where we call the super Layer::init method,
we add:
_players = Vector<GameSprite*>(2);
_player1Score = 0;
_player2Score = 0;
_screenSize = Director::getInstance()->getWinSize();
www.it-ebooks.info

Chapter 3
[ 39 ]
2. We create the vector where we'll store both players, inialize the score values,
and grab the screen size from the singleton, all-knowing Director. We'll use the
screen size to posion all sprites relavely. Next we will create our rst sprite. It is
created with an image lename, which FileUtils will take care of loading from
the correct folder:
auto court = Sprite::create("court.png");
court->setPosition(Vec2(_screenSize.width * 0.5, _screenSize.
height * 0.5));
this->addChild(court);
3. Get into the habit of posioning sprites with relave values, and not absolute ones,
so we can support more screen sizes. And say hello to the Vec2 type denion used
to create points; you'll be seeing it a lot in Cocos2d-x.
4. We nish by adding the sprite as a child to our GameLayer (the court sprite does
not need to be a GameSprite).
5. Next we will use our spanking new GameSprite class, carefully posioning the
objects on screen:
_player1 = GameSprite::gameSpriteWithFile("mallet.png");
_player1->setPosition(Vec2(_screenSize.width * 0.5,
_player1->radius() * 2));
_players.pushBack(_player1);
this->addChild(_player1);
_player2 = GameSprite::gameSpriteWithFile("mallet.png");
_player2->setPosition(Vec2(_screenSize.width * 0.5, _screenSize.
height - _player1->radius() * 2));
_players.pushBack(_player2);
this->addChild(_player2);
_ball = GameSprite::gameSpriteWithFile("puck.png");
_ball->setPosition(Vec2(_screenSize.width * 0.5, _screenSize.
height * 0.5 - 2 * _ball->radius()));
this->addChild(_ball);
6. We will create TTF labels with the Label class createWithTTF stac method,
passing as parameters the inial string value (0), and the path to the font le.
We will then posion and rotate the labels:
_player1ScoreLabel = Label::createWithTTF("0",
"fonts/Arial.ttf", 60);
_player1ScoreLabel->setPosition(Vec2(_screenSize.width - 60,
_screenSize.height * 0.5 - 80));
_player1ScoreLabel->setRotation(90);
this->addChild(_player1ScoreLabel);
www.it-ebooks.info
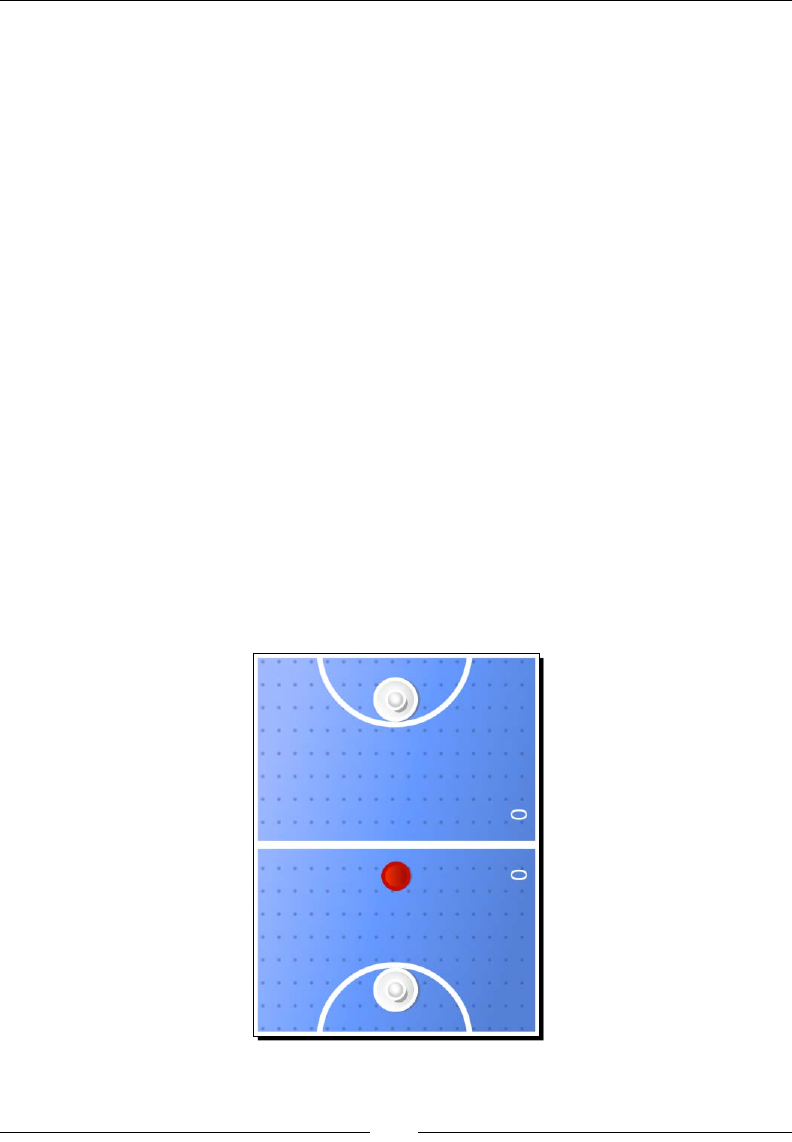
Your First Game – Air Hockey
[ 40 ]
_player2ScoreLabel = Label::createWithTTF("0",
"fonts/Arial.ttf", 60);
_player2ScoreLabel->setPosition(Vec2(_screenSize.width - 60,
_screenSize.height * 0.5 + 80));
_player2ScoreLabel->setRotation(90);
this->addChild(_player2ScoreLabel);
7. Then we turn GameLayer into a multouch event listener and tell the Director
event dispatcher that GameLayer wishes to listen to those events. And we nish by
scheduling the game's main loop as follows:
auto listener = EventListenerTouchAllAtOnce::create();
listener->onTouchesBegan =
CC_CALLBACK_2(GameLayer::onTouchesBegan, this);
listener->onTouchesMoved =
CC_CALLBACK_2(GameLayer::onTouchesMoved, this);
listener->onTouchesEnded =
CC_CALLBACK_2(GameLayer::onTouchesEnded, this);
_eventDispatcher->addEventListenerWithSceneGraphPriority(listener,
this);
//create main loop
this->scheduleUpdate();
return true;
What just happened?
You created the game screen for Air Hockey, with your own sprites and labels. The game
screen, once all elements are added, should look like this:
And now we're ready to handle the player's screen touches.
www.it-ebooks.info

Chapter 3
[ 41 ]
Time for action – handling multitouches
There are three methods we need to implement in this game to handle touches.
Each method receives, as one of its parameters, a vector of Touch objects:
1. So add our onTouchesBegan method:
void GameLayer::onTouchesBegan(const std::vector<Touch*> &touches,
Event* event)
{
for( auto touch : touches) {
if(touch != nullptr) {
auto tap = touch->getLocation();
for (auto player : _players) {
if (player->boundingBox().containsPoint(tap)) {
player->setTouch(touch);
}
}
}
}
}
Each GameSprite, if you recall, has a _touch property.
So we iterate through the touches, grab their locaon on screen, loop through
the players in the vector, and determine if the touch lands on one of the players.
If so, we store the touch inside the player's _touch property (from the
GameSprite class).
A similar process is repeated for onTouchesMoved and onTouchesEnded, so you
can copy and paste the code and just replace what goes on inside the _players
array for loop.
2. In TouchesMoved, when we loop through the players, we do this:
for (auto player : _players) {
if (player->getTouch() != nullptr && player->getTouch() ==
touch) {
Point nextPosition = tap;
if (nextPosition.x < player->radius())
nextPosition.x = player->radius();
if (nextPosition.x > _screenSize.width - player->radius())
nextPosition.x = _screenSize.width - player->radius();
if (nextPosition.y < player->radius())
www.it-ebooks.info

Your First Game – Air Hockey
[ 42 ]
nextPosition.y = player->radius();
if (nextPosition.y > _screenSize.height - player->radius())
nextPosition.y = _screenSize.height - player->radius();
//keep player inside its court
if (player->getPositionY() < _screenSize.height* 0.5f) {
if (nextPosition.y > _screenSize.height* 0.5 -
player->radius()) {
nextPosition.y = _screenSize.height* 0.5 -
player->radius();
}
} else {
if (nextPosition.y < _screenSize.height* 0.5 +
player->radius()) {
nextPosition.y = _screenSize.height* 0.5 +
player->radius();
}
}
player->setNextPosition(nextPosition);
player->setVector(Vec2(tap.x - player->getPositionX(),
tap.y - player->getPositionY()));
}
}
We check to see if the _touch property stored inside the player is the being moved
now. If so, we update the player's posion with the touch's current posion, but
we check to see if the new posion is valid: a player cannot move outside the
screen and cannot enter its opponent's court. We also update the player's vector of
movement; we'll need this when we collide the player with the puck. The vector is
based on the player's displacement.
3. In onTouchesEnded, we add this:
for (auto player : _players) {
if (player->getTouch() != nullptr && player->getTouch() ==
touch) {
//if touch ending belongs to this player, clear it
player->setTouch(nullptr);
player->setVector(Vec2(0,0));
}
}
We clear the _touch property stored inside the player if this touch is the one just ending.
The player also stops moving, so its vector is set to 0. Noce that we don't need the locaon
of the touch anymore; so in TouchesEnded you can skip that bit of logic.
www.it-ebooks.info

Chapter 3
[ 43 ]
What just happened?
When you implement logic for multouch this is prey much what you will have to do:
store the individual touches inside either an array or individual sprites, so you can keep
tracking these touches.
Now, for the heart and soul of the game—the main loop.
Time for action – adding our main loop
This is the heart of our game—the update method:
1. We will update the puck's velocity with a lile fricon applied to its vector
(0.98f). We will store what its next posion will be at the end of the iteraon,
if no collision occurred:
void GameLayer::update (float dt) {
auto ballNextPosition = _ball->getNextPosition();
auto ballVector = _ball->getVector();
ballVector *= 0.98f;
ballNextPosition.x += ballVector.x;
ballNextPosition.y += ballVector.y;
2. Next comes the collision. We will check collisions with each player sprite
and the ball:
float squared_radii = pow(_player1->radius() +
_ball->radius(), 2);
for (auto player : _players) {
auto playerNextPosition = player->getNextPosition();
auto playerVector = player->getVector();
float diffx = ballNextPosition.x - player->getPositionX();
float diffy = ballNextPosition.y - player->getPositionY();
float distance1 = pow(diffx, 2) + pow(diffy, 2);
float distance2 = pow(_ball->getPositionX() -
playerNextPosition.x, 2) + pow(_ball->getPositionY() -
playerNextPosition.y, 2);
www.it-ebooks.info
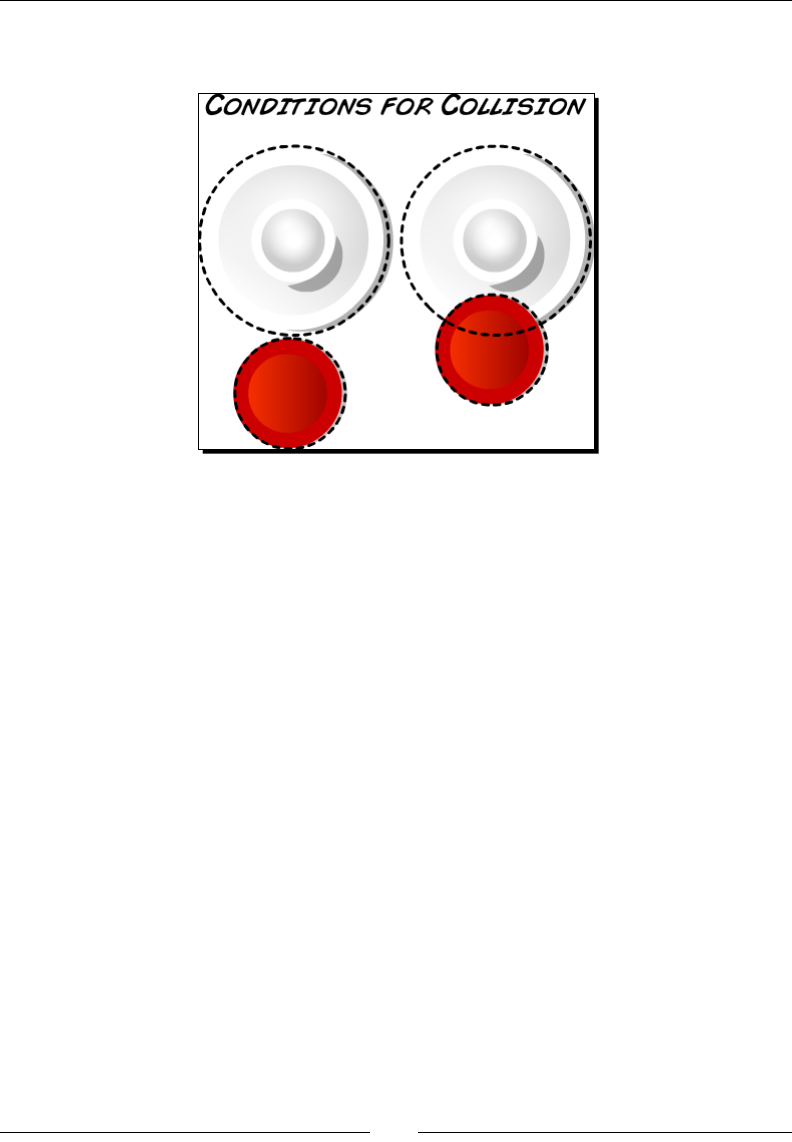
Your First Game – Air Hockey
[ 44 ]
Collisions are checked through the distance between ball and players.
Two condions will ag a collision, as illustrated in the following diagram:
3. If the distance between ball and player equals the sum of the radii of both sprites,
or is less than the sum of the radii of both sprites, we have a collision:
if (distance1 <= squared_radii ||
distance2 <= squared_radii) {
4. We use the squared radii values so we don't need to use costly square root
calculaons to get the values for distance. So all values in the previous condional
statement are squared, including the distances.
5. These condions are checked both with the player's current posion and its
next posion, so there is less risk of the ball moving "through" the player sprite
between iteraons.
6. If there is a collision, we grab the magnitudes of both the ball's vector and
the player's vector, and make the force with which the ball will be pushed
away. We update the ball's next posion in that case, and play a nice sound
eect through the SimpleAudioEngine singleton (don't forget to include
the SimpleAudioEngine.h header le and declare we're using the
CocosDenshion namespace):
float mag_ball = pow(ballVector.x, 2) + pow(ballVector.y,
2);
float mag_player = pow(playerVector.x, 2) + pow
(playerVector.y, 2);
www.it-ebooks.info

Chapter 3
[ 45 ]
float force = sqrt(mag_ball + mag_player);
float angle = atan2(diffy, diffx);
ballVector.x = force * cos(angle);
ballVector.y = (force * sin(angle));
ballNextPosition.x = playerNextPosition.x + (player-
>radius() + _ball->radius() + force) * cos(angle);
ballNextPosition.y = playerNextPosition.y + (player-
>radius() + _ball->radius() + force) * sin(angle);
SimpleAudioEngine::getInstance()-
>playEffect("hit.wav");
}
}
7. Next, we will check the collision between the ball and screen sides. If so, we will
move the ball back to the court and play our sound eect here as well:
if (ballNextPosition.x < _ball->radius()) {
ballNextPosition.x = _ball->radius();
ballVector.x *= -0.8f;
SimpleAudioEngine::getInstance()->playEffect("hit.wav");
}
if (ballNextPosition.x > _screenSize.width - _ball->radius()) {
ballNextPosition.x = _screenSize.width - _ball->radius();
ballVector.x *= -0.8f;
SimpleAudioEngine::getInstance()->playEffect("hit.wav");
}
8. At the top and boom sides of the court, we check to see whether the ball has
not moved through one of the goals through our previously dened GOAL_WIDTH
property as follows:
if (ballNextPosition.y > _screenSize.height - _ball->radius()) {
if (_ball->getPosition().x < _screenSize.width * 0.5f -
GOAL_WIDTH * 0.5f || _ball->getPosition().x >
_screenSize.width * 0.5f + GOAL_WIDTH * 0.5f) {
ballNextPosition.y = _screenSize.height - _ball-
>radius();
ballVector.y *= -0.8f;
SimpleAudioEngine::getInstance()-
>playEffect("hit.wav");
}
}
www.it-ebooks.info

Your First Game – Air Hockey
[ 46 ]
if (ballNextPosition.y < _ball->radius() ) {
if (_ball->getPosition().x < _screenSize.width * 0.5f -
GOAL_WIDTH * 0.5f || _ball->getPosition().x >
_screenSize.width * 0.5f + GOAL_WIDTH * 0.5f) {
ballNextPosition.y = _ball->radius();
ballVector.y *= -0.8f;
SimpleAudioEngine::getInstance()-
>playEffect("hit.wav");
}
}
9. We nally update the ball informaon, and if the ball has passed through the goal
posts (drum roll):
_ball->setVector(ballVector);
_ball->setNextPosition(ballNextPosition);
//check for goals!
if (ballNextPosition.y < -_ball->radius() * 2) {
this->playerScore(2);
}
if (ballNextPosition.y > _screenSize.height + _ball->radius() * 2)
{
this->playerScore(1);
}
10. We call our helper method to score a point and we nish the update with the
placement of all the elements, now that we know where the nextPosition
value is for each one of the elements in the game:
_player1->setPosition(_player1->getNextPosition());
_player2->setPosition(_player2->getNextPosition());
_ball->setPosition(_ball->getNextPosition());
What just happened?
We have just built the game's main loop. Whenever your gameplay depends on precise
collision detecon, you will undoubtedly apply a similar logic of posion now, posion next,
collision checks, and adjustments to posion next, if a collision has occurred. And we nish
the game with our helper method.
All that's le to do now is update the scores.
www.it-ebooks.info

Chapter 3
[ 47 ]
Time for action – updating scores
Time to type the last method in the game.
1. We start by playing a nice eect for a goal and stopping our ball:
void GameLayer::playerScore (int player) {
SimpleAudioEngine::getInstance()->playEffect("score.wav");
_ball->setVector(Vec2(0,0));
2. Then we update the score for the scoring player, updang the score label in the
process. And the ball moves to the court of the player against whom a point was
just scored:
char score_buffer[10];
if (player == 1) {
_player1Score++;
_player1ScoreLabel->setString(std::to_string(_player1Score));
_ball->setNextPosition(Vec2(_screenSize.width * 0.5,
_screenSize.height * 0.5 + 2 * _ball->radius()));
} else {
_player2Score++;
_player2ScoreLabel->setString(std::to_string(_player2Score));
_ball->setNextPosition(Vec2(_screenSize.width * 0.5,
_screenSize.height * 0.5 - 2 * _ball->radius()));
}
The players are moved to their original posion and their _touch properes
are cleared:
_player1->setPosition(Vec2(_screenSize.width * 0.5,
_player1->radius() * 2));
_player2->setPosition(Vec2(_screenSize.width * 0.5,
_screenSize.height - _player1->radius() * 2));
_player1->setTouch(nullptr);
_player2->setTouch(nullptr);
}
www.it-ebooks.info

Your First Game – Air Hockey
[ 48 ]
What just happened?
Well, guess what! You just nished your rst game in Cocos2d-x. We charged forward at
a brisk pace for our rst game, but we managed to touch on almost every area of game
development with Cocos2d-x in the process.
If you click Run now, you should be able to play the game. In the source code for this chapter,
you should also nd the complete version of the game if you run into any problems.
Time to take this to Android!
Time for action – running the game in Android
Time to deploy the game to Android.
1. Follow the instrucons from the HelloWorld example to import the game
into Eclipse.
2. Navigate to the proj.android folder and open the AndroidManifest.xml le in a
text editor. Then, go to the jni folder and open the Android.mk le in a text editor.
3. In the AndroidManifest.xml le, edit the following line in the activity tag:
android:screenOrientation="portrait"
4. And it's possible to target only tablets by adding these lines in the supports-
screens tag:
<supports-screens android:anyDensity="true"
android:smallScreens="false"
android:normalScreens="false"
android:largeScreens="true"
android:xlargeScreens="true"/>
5. Although if you want to target only tablets, you might also wish to target the later
versions of SDK, like this:
<uses-sdk android:minSdkVersion="11"/>
6. Next, let's edit the make le, so open the Android.mk le and edit the lines in
LOCAL_SRC_FILES to read:
LOCAL_SRC_FILES := hellocpp/main.cpp \
../../Classes/AppDelegate.cpp \
../../Classes/GameSprite.cpp \
../../Classes/GameLayer.cpp
7. Save it and run your applicaon (don't forget to connect an Android device,
in this case, a tablet if you used the sengs as explained here).
www.it-ebooks.info

Chapter 3
[ 49 ]
What just happened?
And that's it! You can edit these les inside Eclipse as well.
When you build a Cocos2d-x project in the command line, you see a message saying that the
hellocpp target is being renamed. But I think this is sll a bug in the build script and usually
correcng that in the make le and the folder structure creates a much bigger headache. So
for now, sck to the strangely named hellocpp in Android.mk.
Have a go hero
Make any changes to the code. For instance, add an extra label and then publish again from
Eclipse. You may nd that working with the project in this IDE is faster than Xcode.
Sadly, sooner or later, Eclipse will throw one of its infamous tantrums. A common problem
that occurs if you have many projects open in your navigator is for one or many of the
projects to report an error like Cannot nd the class le for java.lang.Object or The type
java.lang.Object cannot be resolved. Get into the habit of cleaning your project and building
it as soon as you open Eclipse and keeping only acve projects opened, but even that might
fail you. The soluon? Restart Eclipse, or beer yet, delete the project from the navigator
(but not from the disk!) and reimport it. Yeah, I know. Welcome to Eclipse!
Summary
You now know how to add sprites and labels, and how to add support for two screen
resoluons as well as support for multouch. There are quite a few ways to create sprites
other than by passing it an image lename, and I'll show examples of these in the games
to come.
LabelTTF won't be used as much in this book. Generally, they are good for large chunks of
text and text that is not updated too frequently; we'll use bitmap fonts from now on.
So, let's move on to the next game and animaons. I promise I won't make you type as
much. You should get your friend to do it for you!
www.it-ebooks.info
[ 51 ]
Fun with Sprites – Sky Defense
Time to build our second game! This time, you will get acquainted with the
power of actions in Cocos2d-x. I'll show you how an entire game could be built
just by running the various action commands contained in Cocos2d-x to make
your sprites move, rotate, scale, fade, blink, and so on. And you can also use
actions to animate your sprites using multiple images, like in a movie. So let's
get started.
In this chapter, you will learn:
How to opmize the development of your game with sprite sheets
How to use bitmap fonts in your game
How easy it is to implement and run acons
How to scale, rotate, swing, move, and fade out a sprite
How to load mulple .png les and use them to animate a sprite
How to create a universal game with Cocos2d-x
The game – sky defense
Meet our stressed-out city of...your name of choice here. It's a beauful day when
suddenly the sky begins to fall. There are meteors rushing toward the city and it is your
job to keep it safe.
4
www.it-ebooks.info

Fun with Sprites – Sky Defense
[ 52 ]
The player in this game can tap the screen to start growing a bomb. When the bomb is big
enough to be acvated, the player taps the screen again to detonate it. Any nearby meteor
will explode into a million pieces. The bigger the bomb, the bigger the detonaon, and the
more meteors can be taken out by it. But the bigger the bomb, the longer it takes to grow it.
But it's not just bad news coming down. There are also health packs dropping from the sky
and if you allow them to reach the ground, you'll recover some of your energy.
The game settings
This is a universal game. It is designed for the iPad rena screen and it will be scaled down to
t all the other screens. The game will be played in landscape mode, and it will not need to
support multouch.
The start project
Go ahead and download the le 4198_04_START_PROJECT.zip from this book's support
page (www.packtpub.com/support). When you uncompress the le, you will nd the
basic project already set up and ready for you to work on.
The steps involved in creang this project are similar to the ones I showed you in our
previous game. The command line I used was:
cocos new SkyDefense -p com.rengelbert.SkyDefense -l cpp -d /Users/
rengelbert/Desktop/SkyDefense
In Xcode you must set the Devices eld in Deployment Info to Universal, and the Device
Family eld is set to Universal. And in RootViewController.mm, the supported interface
orientaon is set to Landscape.
The game we are going to build requires only one class, GameLayer.cpp, and you will nd
that the interface for this class already contains all the informaon it needs.
Also, some of the more trivial or old-news logic is already in place in the implementaon le
as well. But I'll go over this as we work on the game.
Adding screen support for a universal app
In the previous game, we targeted iPad size screens only. Now things get a bit more
complicated as we add support for smaller screens in our universal game, as well as some
of the most common Android screen sizes.
www.it-ebooks.info

Chapter 4
[ 53 ]
So open AppDelegate.cpp. Inside the applicationDidFinishLaunching method,
we now have the following code:
auto screenSize = glview->getFrameSize();
auto designSize = Size(2048, 1536);
glview->setDesignResolutionSize(designSize.width, designSize.height,
ResolutionPolicy::EXACT_FIT);
std::vector<std::string> searchPaths;
if (screenSize.height > 768) {
searchPaths.push_back("ipadhd");
director->setContentScaleFactor(1536/designSize.height);
} else if (screenSize.height > 320) {
searchPaths.push_back("ipad");
director->setContentScaleFactor(768/designSize.height);
} else {
searchPaths.push_back("iphone");
director->setContentScaleFactor(380/designSize.height);
}
auto fileUtils = FileUtils::getInstance();
fileUtils->setSearchPaths(searchPaths);
Once again, we tell our GLView object (our OpenGL view) that we designed the game for
a certain screen size (the iPad rena screen) and once again, we want our game screen to
resize to match the screen on the device (ResolutionPolicy::EXACT_FIT).
Then we determine where to load our images from, based on the device's screen size.
We have art for iPad rena, then for regular iPad which is shared by iPhone rena,
and for the regular iPhone.
We end by seng the scale factor based on the designed target.
Adding background music
Sll inside AppDelegate.cpp, we load the sound les we'll use in the game, including a
background.mp3 (courtesy of Kevin MacLeod from incompetech.com), which we load
through the command:
auto audioEngine = SimpleAudioEngine::getInstance();
audioEngine->preloadBackgroundMusic(fileUtils->fullPathForFilename("backg
round.mp3").c_str());
We end by seng the eects' volume down a tad:
//lower playback volume for effects
audioEngine->setEffectsVolume(0.4f);
www.it-ebooks.info
Fun with Sprites – Sky Defense
[ 54 ]
For background music volume, you must use setBackgroundMusicVolume. If you create
some sort of volume control in your game, these are the calls you would make to adjust the
volume based on the user's preference.
Initializing the game
Now back to GameLayer.cpp. If you take a look inside our init method, you will see that
the game inializes by calling three methods: createGameScreen, createPools, and
createActions.
We'll create all our screen elements inside the rst method, and then create object pools
so we don't instanate any sprite inside the main loop; and we'll create all the main acons
used in our game inside the createActions method.
And as soon as the game inializes, we start playing the background music, with its should
loop parameter set to true:
SimpleAudioEngine::getInstance()-
>playBackgroundMusic("background.mp3", true);
We once again store the screen size for future reference, and we'll use a _running Boolean
for game states.
If you run the game now, you should only see the background image:
Using sprite sheets in Cocos2d-x
A sprite sheet is a way to group mulple images together in one image le. In order to
texture a sprite with one of these images, you must have the informaon of where in the
sprite sheet that parcular image is found (its rectangle).
Sprite sheets are oen organized in two les: the image one and a data le that describes
where in the image you can nd the individual textures.
www.it-ebooks.info
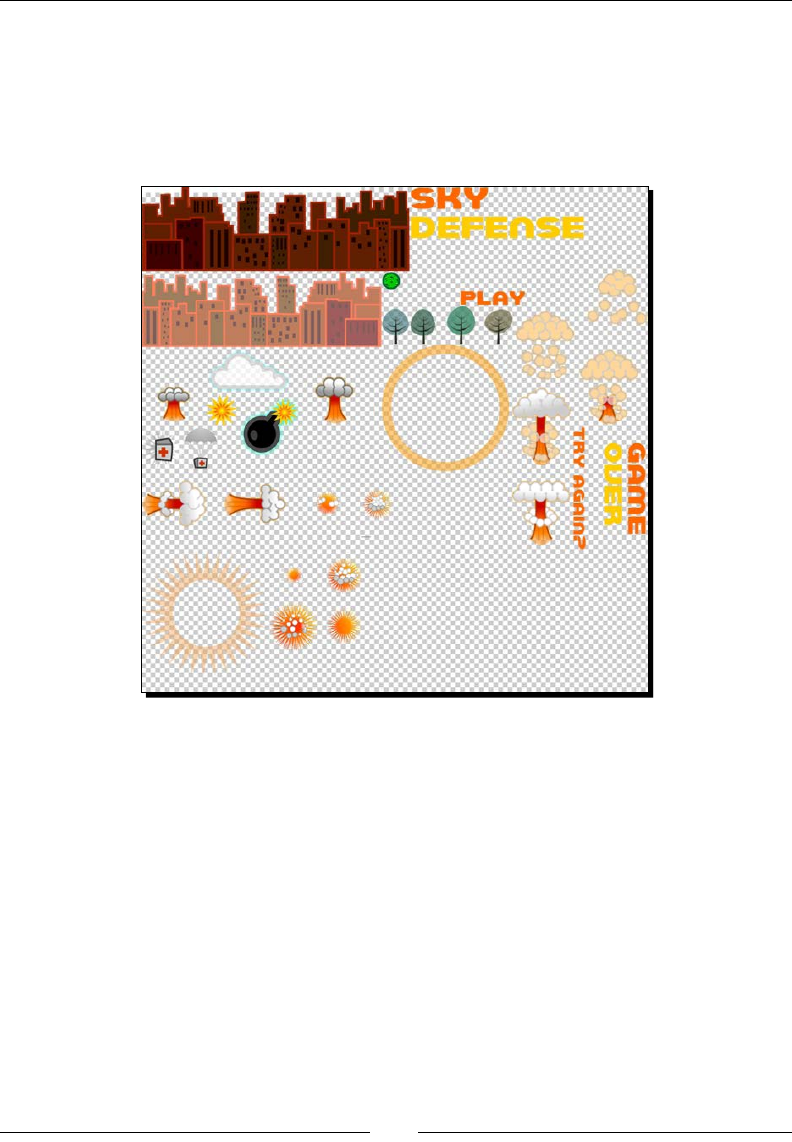
Chapter 4
[ 55 ]
I used TexturePacker to create these les for the game. You can nd them inside the
ipad, ipadhd, and iphone folders inside Resources. There is a sprite_sheet.png le
for the image and a sprite_sheet.plist le that describes the individual frames inside
the image.
This is what the sprite_sheet.png le looks like:
Batch drawing sprites
In Cocos2d-x, sprite sheets can be used in conjuncon with a specialized node, called
SpriteBatchNode. This node can be used whenever you wish to use mulple sprites that
share the same source image inside the same node. So you could have mulple instances of
a Sprite class that uses a bullet.png texture for instance. And if the source image is a
sprite sheet, you can have mulple instances of sprites displaying as many dierent textures
as you could pack inside your sprite sheet.
With SpriteBatchNode, you can substanally reduce the number of calls during the
rendering stage of your game, which will help when targeng less powerful systems,
though not noceably in more modern devices.
Let me show you how to create a SpriteBatchNode.
www.it-ebooks.info

Fun with Sprites – Sky Defense
[ 56 ]
Time for action – creating SpriteBatchNode
Let's begin implemenng the createGameScreen method in GameLayer.cpp. Just below
the lines that add the bg sprite, we instanate our batch node:
void GameLayer::createGameScreen() {
//add bg
auto bg = Sprite::create("bg.png");
...
SpriteFrameCache::getInstance()->
addSpriteFramesWithFile("sprite_sheet.plist");
_gameBatchNode = SpriteBatchNode::create("sprite_sheet.png");
this->addChild(_gameBatchNode);
In order to create the batch node from a sprite sheet, we rst load all the frame informaon
described by the sprite_sheet.plist le into SpriteFrameCache. And then we create
the batch node with the sprite_sheet.png le, which is the source texture shared by all
sprites added to this batch node. (The background image is not part of the sprite sheet, so
it's added separately before we add _gameBatchNode to GameLayer.)
Now we can start pung stu inside _gameBatchNode.
1. First, the city:
for (int i = 0; i < 2; i++) {
auto sprite = Sprite::createWithSpriteFrameName
("city_dark.png");
sprite->setAnchorPoint(Vec2(0.5,0));
sprite->setPosition(_screenSize.width * (0.25f + i *
0.5f),0));
_gameBatchNode->addChild(sprite, kMiddleground);
sprite = Sprite::createWithSpriteFrameName
("city_light.png");
sprite->setAnchorPoint(Vec2(0.5,0));
sprite->setPosition(Vec2(_screenSize.width * (0.25f + i *
0.5f),
_screenSize.height * 0.1f));
_gameBatchNode->addChild(sprite, kBackground);
}
www.it-ebooks.info
Chapter 4
[ 57 ]
2. Then the trees:
//add trees
for (int i = 0; i < 3; i++) {
auto sprite = Sprite::createWithSpriteFrameName("trees.png");
sprite->setAnchorPoint(Vec2(0.5f, 0.0f));
sprite->setPosition(Vec2(_screenSize.width * (0.2f + i *
0.3f),0));
_gameBatchNode->addChild(sprite, kForeground);
}
Noce that here we create sprites by passing it a sprite frame name. The IDs
for these frame names were loaded into SpriteFrameCache through our
sprite_sheet.plist le.
3. The screen so far is made up of two instances of city_dark.png ling at
the boom of the screen, and two instances of city_light.png also ling.
One needs to appear on top of the other and for that we use the enumerated
values declared in GameLayer.h:
enum {
kBackground,
kMiddleground,
kForeground
};
4. We use the addChild( Node, zOrder) method to layer our sprites on top of
each other, using dierent values for their z order.
So for example, when we later add three sprites showing the trees.png sprite
frame, we add them on top of all previous sprites using the highest value for z that
we nd in the enumerated list, which is kForeground.
Why go through the trouble of ling the images and not using one large
image instead, or combining some of them with the background image?
Because I wanted to include the greatest number of images possible inside
the one sprite sheet, and have that sprite sheet to be as small as possible, to
illustrate all the clever ways you can use and opmize sprite sheets. This is
not necessary in this parcular game.
www.it-ebooks.info
Fun with Sprites – Sky Defense
[ 58 ]
What just happened?
We began creang the inial screen for our game. We are using a SpriteBatchNode
to contain all the sprites that use images from our sprite sheet. So SpriteBatchNode
behaves as any node does—as a container. And we can layer individual sprites inside the
batch node by manipulang their z order.
Bitmap fonts in Cocos2d-x
The Cocos2d-x Label class has a stac create method that uses bitmap images for
the characters.
The bitmap image we are using here was created with the program GlyphDesigner,
and in essence, it works just as a sprite sheet does. As a maer of fact, Label extends
SpriteBatchNode, so it behaves just like a batch node.
You have images for all individual characters you'll need packed inside a PNG le
(font.png), and then a data le (font.fnt) describing where each character is.
The following screenshot shows how the font sprite sheet looks like for our game:
The dierence between Label and a regular SpriteBatchNode class is that the data le
also feeds the Label object informaon on how to write with this font. In other words,
how to space out the characters and lines correctly.
The Label objects we are using in the game are instanated with the name of the data le
and their inial string value:
_scoreDisplay = Label::createWithBMFont("font.fnt", "0");
And the value for the label is changed through the setString method:
_scoreDisplay->setString("1000");
www.it-ebooks.info
Chapter 4
[ 59 ]
Just as with every other image in the game, we also have dierent versions
of font.fnt and font.png in our Resources folders, one for each
screen denion. FileUtils will once again do the heavy liing of
nding the correct le for the correct screen.
So now let's create the labels for our game.
Time for action – creating bitmap font labels
Creang a bitmap font is somewhat similar to creang a batch node.
1. Connuing with our createGameScreen method, add the following lines to the
score label:
_scoreDisplay = Label::createWithBMFont("font.fnt", "0");
_scoreDisplay->setAnchorPoint(Vec2(1,0.5));
_scoreDisplay->setPosition(Vec2
(_screenSize.width * 0.8f, _screenSize.height * 0.94f));
this->addChild(_scoreDisplay);
And then add a label to display the energy level, and set its horizontal alignment
to Right:
_energyDisplay = Label::createWithBMFont("font.fnt", "100%",
TextHAlignment::RIGHT);
_energyDisplay->setPosition(Vec2
(_screenSize.width * 0.3f, _screenSize.height * 0.94f));
this->addChild(_energyDisplay);
2. Add the following line for an icon that appears next to the _energyDisplay label:
auto icon = Sprite::createWithSpriteFrameName
("health_icon.png");
icon->setPosition( Vec2(_screenSize.
width * 0.15f, _screenSize.height * 0.94f) );
_gameBatchNode->addChild(icon, kBackground);
What just happened?
We just created our rst bitmap font object in Cocos2d-x. Now let's nish creang our
game's sprites.
www.it-ebooks.info

Fun with Sprites – Sky Defense
[ 60 ]
Time for action – adding the nal screen sprites
The last sprites we need to create are the clouds, the bomb and shockwave, and our game
state messages.
1. Back to the createGameScreen method, add the clouds to the screen:
for (int i = 0; i < 4; i++) {
float cloud_y = i % 2 == 0 ? _screenSize.height * 0.4f : _
screenSize.height * 0.5f;
auto cloud = Sprite::createWithSpriteFrameName("cloud.png");
cloud->setPosition(Vec2 (_screenSize.width * 0.1f + i * _
screenSize.width * 0.3f, cloud_y));
_gameBatchNode->addChild(cloud, kBackground);
_clouds.pushBack(cloud);
}
2. Create the _bomb sprite; players will grow when tapping the screen:
_bomb = Sprite::createWithSpriteFrameName("bomb.png");
_bomb->getTexture()->generateMipmap();
_bomb->setVisible(false);
auto size = _bomb->getContentSize();
//add sparkle inside bomb sprite
auto sparkle = Sprite::createWithSpriteFrameName("sparkle.png");
sparkle->setPosition(Vec2(size.width * 0.72f, size.height *
0.72f));
_bomb->addChild(sparkle, kMiddleground, kSpriteSparkle);
//add halo inside bomb sprite
auto halo = Sprite::createWithSpriteFrameName
("halo.png");
halo->setPosition(Vec2(size.width * 0.4f, size.height *
0.4f));
_bomb->addChild(halo, kMiddleground, kSpriteHalo);
_gameBatchNode->addChild(_bomb, kForeground);
3. Then create the _shockwave sprite that appears aer the _bomb goes o:
_shockWave = Sprite::createWithSpriteFrameName
("shockwave.png");
_shockWave->getTexture()->generateMipmap();
_shockWave->setVisible(false);
_gameBatchNode->addChild(_shockWave);
www.it-ebooks.info
Chapter 4
[ 61 ]
4. Finally, add the two messages that appear on the screen, one for our intro state
and one for our gameover state:
_introMessage = Sprite::createWithSpriteFrameName
("logo.png");
_introMessage->setPosition(Vec2
(_screenSize.width * 0.5f, _screenSize.height * 0.6f));
_introMessage->setVisible(true);
this->addChild(_introMessage, kForeground);
_gameOverMessage = Sprite::createWithSpriteFrameName
("gameover.png");
_gameOverMessage->setPosition(Vec2
(_screenSize.width * 0.5f, _screenSize.height * 0.65f));
_gameOverMessage->setVisible(false);
this->addChild(_gameOverMessage, kForeground);
What just happened?
There is a lot of new informaon regarding sprites in the previous code. So let's go over
it carefully:
We started by adding the clouds. We put the sprites inside a vector so we can move
the clouds later. Noce that they are also part of our batch node.
Next comes the bomb sprite and our rst new call:
_bomb->getTexture()->generateMipmap();
With this we are telling the framework to create analiased copies of this texture
in diminishing sizes (mipmaps), since we are going to scale it down later. This is
oponal of course; sprites can be resized without rst generang mipmaps, but if
you noce loss of quality in your scaled sprites, you can x that by creang mipmaps
for their texture.
The texture must have size values in so-called POT (power of 2: 2, 4, 8, 16, 32,
64, 128, 256, 512, 1024, 2048, and so on). Textures in OpenGL must always be
sized this way; when they are not, Cocos2d-x will do one of two things: it will
either resize the texture in memory, adding transparent pixels until the image
reaches a POT size, or stop the execution on an assert. With textures used for
mipmaps, the framework will stop execution for non-POT textures.
www.it-ebooks.info
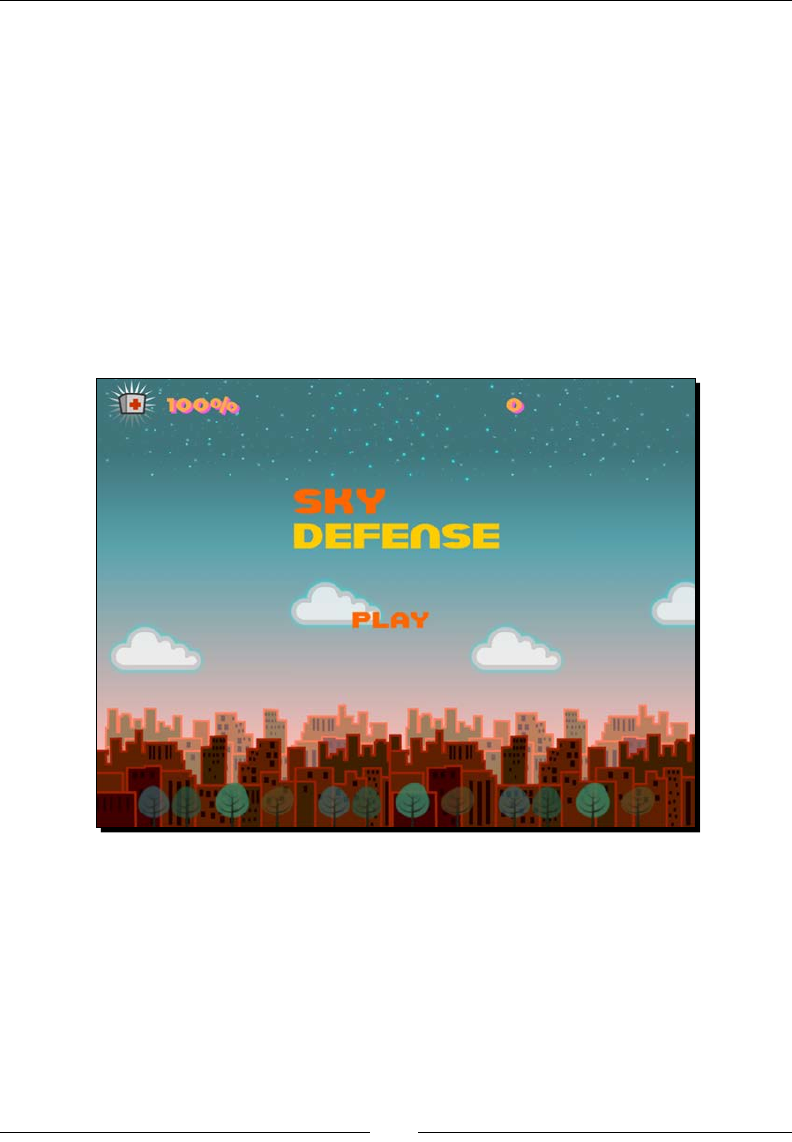
Fun with Sprites – Sky Defense
[ 62 ]
I add the sparkle and the halo sprites as children to the _bomb sprite. This will
use the container characterisc of nodes to our advantage. When I grow the bomb,
all its children will grow with it.
Noce too that I use a third parameter to addChild for halo and sparkle:
bomb->addChild(halo, kMiddleground, kSpriteHalo);
This third parameter is an integer tag from yet another enumerated list declared
in GameLayer.h. I can use this tag to retrieve a parcular child from a sprite
as follows:
auto halo = (Sprite *)
bomb->getChildByTag(kSpriteHalo);
We now have our game screen in place:
Next come object pools.
www.it-ebooks.info
Chapter 4
[ 63 ]
Time for action – creating our object pools
The pools are just vectors of objects. And here are the steps to create them:
1. Inside the createPools method, we rst create a pool for meteors:
void GameLayer::createPools() {
int i;
_meteorPoolIndex = 0;
for (i = 0; i < 50; i++) {
auto sprite = Sprite::createWithSpriteFrameName("meteor.png");
sprite->setVisible(false);
_gameBatchNode->addChild(sprite, kMiddleground, kSpriteMeteor);
_meteorPool.pushBack(sprite);
}
2. Then we create an object pool for health packs:
_healthPoolIndex = 0;
for (i = 0; i < 20; i++) {
auto sprite = Sprite::createWithSpriteFrameName("health.png");
sprite->setVisible(false);
sprite->setAnchorPoint(Vec2(0.5f, 0.8f));
_gameBatchNode->addChild(sprite, kMiddleground, kSpriteHealth);
_healthPool.pushBack(sprite);
}
3. We'll use the corresponding pool index to retrieve objects from the vectors as the
game progresses.
What just happened?
We now have a vector of invisible meteor sprites and a vector of invisible health sprites.
We'll use their respecve pool indices to retrieve these from the vector as needed as you'll
see in a moment. But rst we need to take care of acons and animaons.
With object pools, we reduce the number of instanaons during the
main loop, and it allows us to never destroy anything that can be reused.
But if you need to remove a child from a node, use ->removeChild or
->removeChildByTag if a tag is present.
www.it-ebooks.info

Fun with Sprites – Sky Defense
[ 64 ]
Actions in a nutshell
If you remember, a node will store informaon about posion, scale, rotaon, visibility, and
opacity of a node. And in Cocos2d-x, there is an Action class to change each one of these
values over me, in eect animang these transformaons.
Acons are usually created with a stac method create. The majority of these acons are
me-based, so usually the rst parameter you need to pass an acon is the me length for
the acon. So for instance:
auto fadeout = FadeOut::create(1.0f);
This creates a fadeout acon that will take one second to complete. You can run it on a
sprite, or node, as follows:
mySprite->runAction(fadeout);
Cocos2d-x has an incredibly exible system that allows us to create any combinaon of
acons and transformaons to achieve any eect we desire.
You may, for instance, choose to create an acon sequence (Sequence) that contains more
than one acon; or you can apply easing eects (EaseIn, EaseOut, and so on) to your
acons. You can choose to repeat an acon a certain number of mes (Repeat) or forever
(RepeatForever); and you can add callbacks to funcons you want called once an acon is
completed (usually inside a Sequence acon).
Time for action – creating actions with Cocos2d-x
Creang acons with Cocos2d-x is a very simple process:
1. Inside our createActions method, we will instanate the acons we can use
repeatedly in our game. Let's create our rst acons:
void GameLayer::createActions() {
//swing action for health drops
auto easeSwing = Sequence::create(
EaseInOut::create(RotateTo::create(1.2f, -10), 2),
EaseInOut::create(RotateTo::create(1.2f, 10), 2),
nullptr);//mark the end of a sequence with a nullptr
_swingHealth = RepeatForever::create( (ActionInterval *)
easeSwing );
_swingHealth->retain();
www.it-ebooks.info

Chapter 4
[ 65 ]
2. Acons can be combined in many dierent forms. Here, the retained
_swingHealth acon is a RepeatForever acon of Sequence that will rotate
the health sprite rst one way, then the other, with EaseInOut wrapping the
RotateTo acon. RotateTo takes 1.2 seconds to rotate the sprite rst to -10
degrees and then to 10. And the easing has a value of 2, which I suggest you
experiment with to get a sense of what it means visually. Next we add three
more acons:
//action sequence for shockwave: fade out, callback when
//done
_shockwaveSequence = Sequence::create(
FadeOut::create(1.0f),
CallFunc::create(std::bind(&GameLayer::shockwaveDone, this)),
nullptr);
_shockwaveSequence->retain();
//action to grow bomb
_growBomb = ScaleTo::create(6.0f, 1.0);
_growBomb->retain();
//action to rotate sprites
auto rotate = RotateBy::create(0.5f , -90);
_rotateSprite = RepeatForever::create( rotate );
_rotateSprite->retain();
3. First, another Sequence. This will fade out the sprite and call the shockwaveDone
funcon, which is already implemented in the class and turns the _shockwave
sprite invisible when called.
4. The last one is a RepeatForever acon of a RotateBy acon. In half a second, the
sprite running this acon will rotate -90 degrees and will do that again and again.
What just happened?
You just got your rst glimpse of how to create acons in Cocos2d-x and how the framework
allows for all sorts of combinaons to accomplish any eect.
It may be hard at rst to read through a Sequence acon and understand what's happening,
but the logic is easy to follow once you break it down into its individual parts.
But we are not done with the createActions method yet. Next come sprite animaons.
www.it-ebooks.info

Fun with Sprites – Sky Defense
[ 66 ]
Animating a sprite in Cocos2d-x
The key thing to remember is that an animaon is just another type of acon, one that
changes the texture used by a sprite over a period of me.
In order to create an animaon acon, you need to rst create an Animation object.
This object will store all the informaon regarding the dierent sprite frames you wish to
use in the animaon, the length of the animaon in seconds, and whether it loops or not.
With this Animation object, you then create a Animate acon. Let's take a look.
Time for action – creating animations
Animaons are a specialized type of acon that require a few extra steps:
1. Inside the same createActions method, add the lines for the two animaons we
have in the game. First, we start with the animaon that shows an explosion when a
meteor reaches the city. We begin by loading the frames into an Animation object:
auto animation = Animation::create();
int i;
for(i = 1; i <= 10; i++) {
auto name = String::createWithFormat("boom%i.png", i);
auto frame = SpriteFrameCache::getInstance()-
>getSpriteFrameByName(name->getCString());
animation->addSpriteFrame(frame);
}
2. Then we use the Animation object inside a Animate acon:
animation->setDelayPerUnit(1 / 10.0f);
animation->setRestoreOriginalFrame(true);
_groundHit =
Sequence::create(
MoveBy::create(0, Vec2(0,_screenSize.height * 0.12f)),
Animate::create(animation),
CallFuncN::create(CC_CALLBACK_1(GameLayer::animationDone,
this)), nullptr);
_groundHit->retain();
3. The same steps are repeated to create the other explosion animaon used when
the player hits a meteor or a health pack.
animation = Animation::create();
for(int i = 1; i <= 7; i++) {
www.it-ebooks.info

Chapter 4
[ 67 ]
auto name = String::createWithFormat("explosion_small%i.png", i);
auto frame = SpriteFrameCache::getInstance()-
>getSpriteFrameByName(name->getCString());
animation->addSpriteFrame(frame);
}
animation->setDelayPerUnit(0.5 / 7.0f);
animation->setRestoreOriginalFrame(true);
_explosion = Sequence::create(
Animate::create(animation),
CallFuncN::create(CC_CALLBACK_1(GameLayer::animationDone,
this)), nullptr);
_explosion->retain();
What just happened?
We created two instances of a very special kind of acon in Cocos2d-x: Animate. Here is
what we did:
First, we created an Animation object. This object holds the references to all the
textures used in the animaon. The frames were named in such a way that they
could easily be concatenated inside a loop (boom1, boom2, boom3, and so on).
There are 10 frames for the rst animaon and seven for the second.
The textures (or frames) are SpriteFrame objects we grab from
SpriteFrameCache, which as you remember, contains all the informaon from the
sprite_sheet.plist data le. So the frames are in our sprite sheet.
Then when all frames are in place, we determine the delay of each frame by
dividing the total amount of seconds we want the animaon to last by the total
number of frames.
The setRestoreOriginalFrame method is important here. If we set
setRestoreOriginalFrame to true, then the sprite will revert to its original
appearance once the animaon is over. For example, if I have an explosion
animaon that will run on a meteor sprite, then by the end of the explosion
animaon, the sprite will revert to displaying the meteor texture.
Time for the actual acon. Animate receives the Animation object as its
parameter. (In the rst animaon, we shi the posion of the sprite just before
the explosion appears, so there is an extra MoveBy method.)
And in both instances, I make a call to an animationDone callback already
implemented in the class. It makes the calling sprite invisible:
void GameLayer::animationDone (Node* pSender) {
pSender->setVisible(false);
}
www.it-ebooks.info
Fun with Sprites – Sky Defense
[ 68 ]
We could have used the same method for both callbacks (animationDone
and shockwaveDone) as they accomplish the same thing. But I wanted to
show you a callback that receives as an argument, the node that made the call
and one that did not. Respectively, these are CallFuncN and CallFunc,
and were used inside the action sequences we just created.
Time to make our game tick!
Okay, we have our main elements in place and are ready to add the nal bit of logic to run
the game. But how will everything work?
We will use a system of countdowns to add new meteors and new health packs, as well as a
countdown that will incrementally make the game harder to play.
On touch, the player will start the game if the game is not running, and also add bombs and
explode them during gameplay. An explosion creates a shockwave.
On update, we will check against collision between our _shockwave sprite (if visible) and all
our falling objects. And that's it. Cocos2d-x will take care of all the rest through our created
acons and callbacks!
So let's implement our touch events rst.
Time for action – handling touches
Time to bring the player to our party:
1. Time to implement our onTouchBegan method. We'll begin by handling the two
game states, intro and game over:
bool GameLayer::onTouchBegan
(Touch * touch, Event * event){
//if game not running, we are seeing either intro or
//gameover
if (!_running) {
//if intro, hide intro message
if (_introMessage->isVisible()) {
_introMessage->setVisible(false);
//if game over, hide game over message
} else if (_gameOverMessage->isVisible()) {
www.it-ebooks.info

Chapter 4
[ 69 ]
SimpleAudioEngine::getInstance()->stopAllEffects();
_gameOverMessage->setVisible(false);
}
this->resetGame();
return true;
}
2. Here we check to see if the game is not running. If not, we check to see if
any of our messages are visible. If _introMessage is visible, we hide it. If
_gameOverMessage is visible, we stop all current sound eects and hide the
message as well. Then we call a method called resetGame, which will reset
all the game data (energy, score, and countdowns) to their inial values, and set
_running to true.
3. Next we handle the touches. But we only need to handle one each me so we use
->anyObject() on Set:
auto touch = (Touch *)pTouches->anyObject();
if (touch) {
//if bomb already growing...
if (_bomb->isVisible()) {
//stop all actions on bomb, halo and sparkle
_bomb->stopAllActions();
auto child = (Sprite *) _bomb->getChildByTag(kSpriteHalo);
child->stopAllActions();
child = (Sprite *) _bomb->getChildByTag(kSpriteSparkle);
child->stopAllActions();
//if bomb is the right size, then create shockwave
if (_bomb->getScale() > 0.3f) {
_shockWave->setScale(0.1f);
_shockWave->setPosition(_bomb->getPosition());
_shockWave->setVisible(true);
_shockWave->runAction(ScaleTo::create(0.5f, _bomb-
>getScale() * 2.0f));
_shockWave->runAction(_shockwaveSequence->clone());
SimpleAudioEngine::getInstance()->playEffect("bombRelease.
wav");
} else {
www.it-ebooks.info

Fun with Sprites – Sky Defense
[ 70 ]
SimpleAudioEngine::getInstance()->playEffect("bombFail.
wav");
}
_bomb->setVisible(false);
//reset hits with shockwave, so we can count combo hits
_shockwaveHits = 0;
//if no bomb currently on screen, create one
} else {
Point tap = touch->getLocation();
_bomb->stopAllActions();
_bomb->setScale(0.1f);
_bomb->setPosition(tap);
_bomb->setVisible(true);
_bomb->setOpacity(50);
_bomb->runAction(_growBomb->clone());
auto child = (Sprite *) _bomb->getChildByTag(kSpriteHalo);
child->runAction(_rotateSprite->clone());
child = (Sprite *) _bomb->getChildByTag(kSpriteSparkle);
child->runAction(_rotateSprite->clone());
}
}
4. If _bomb is visible, it means it's already growing on the screen. So on touch,
we use the stopAllActions() method on the bomb and we use the
stopAllActions() method on its children that we retrieve through our tags:
child = (Sprite *) _bomb->getChildByTag(kSpriteHalo);
child->stopAllActions();
child = (Sprite *) _bomb->getChildByTag(kSpriteSparkle);
child->stopAllActions();
5. If _bomb is the right size, we start our _shockwave. If it isn't, we play a bomb failure
sound eect; there is no explosion and _shockwave is not made visible.
6. If we have an explosion, then the _shockwave sprite is set to 10 percent of the
scale. It's placed at the same spot as the bomb, and we run a couple of acons on it:
we grow the _shockwave sprite to twice the scale the bomb was when it went o
and we run a copy of _shockwaveSequence that we created earlier.
7. Finally, if no _bomb is currently visible on screen, we create one. And we run clones
of previously created acons on the _bomb sprite and its children. When _bomb
grows, its children grow. But when the children rotate, the bomb does not: a parent
changes its children, but the children do not change their parent.
www.it-ebooks.info

Chapter 4
[ 71 ]
What just happened?
We just added part of the core logic of the game. It is with touches that the player creates
and explodes bombs to stop meteors from reaching the city. Now we need to create our
falling objects. But rst, let's set up our countdowns and our game data.
Time for action – starting and restarting the game
Let's add the logic to start and restart the game.
1. Let's write the implementaon for resetGame:
void GameLayer::resetGame(void) {
_score = 0;
_energy = 100;
//reset timers and "speeds"
_meteorInterval = 2.5;
_meteorTimer = _meteorInterval * 0.99f;
_meteorSpeed = 10;//in seconds to reach ground
_healthInterval = 20;
_healthTimer = 0;
_healthSpeed = 15;//in seconds to reach ground
_difficultyInterval = 60;
_difficultyTimer = 0;
_running = true;
//reset labels
_energyDisplay->setString(std::to_string((int) _energy) +
"%");
_scoreDisplay->setString(std::to_string((int) _score));
}
2. Next, add the implementaon of stopGame:
void GameLayer::stopGame() {
_running = false;
//stop all actions currently running
int i;
www.it-ebooks.info

Fun with Sprites – Sky Defense
[ 72 ]
int count = (int) _fallingObjects.size();
for (i = count-1; i >= 0; i--) {
auto sprite = _fallingObjects.at(i);
sprite->stopAllActions();
sprite->setVisible(false);
_fallingObjects.erase(i);
}
if (_bomb->isVisible()) {
_bomb->stopAllActions();
_bomb->setVisible(false);
auto child = _bomb->getChildByTag(kSpriteHalo);
child->stopAllActions();
child = _bomb->getChildByTag(kSpriteSparkle);
child->stopAllActions();
}
if (_shockWave->isVisible()) {
_shockWave->stopAllActions();
_shockWave->setVisible(false);
}
if (_ufo->isVisible()) {
_ufo->stopAllActions();
_ufo->setVisible(false);
auto ray = _ufo->getChildByTag(kSpriteRay);
ray->stopAllActions();
ray->setVisible(false);
}
}
What just happened?
With these methods we control gameplay. We start the game with default values through
resetGame(), and we stop all acons with stopGame().
Already implemented in the class is the method that makes the game more dicult as me
progresses. If you take a look at the method (increaseDifficulty) you will see that it
reduces the interval between meteors and reduces the me it takes for meteors to reach
the ground.
All we need now is the update method to run the countdowns and check for collisions.
www.it-ebooks.info
Chapter 4
[ 73 ]
Time for action – updating the game
We already have the code that updates the countdowns inside the update. If it's me to
add a meteor or a health pack we do it. If it's me to make the game more dicult to play,
we do that too.
It is possible to use an acon for these mers: a Sequence acon with a
Delay acon object and a callback. But there are advantages to using these
countdowns. It's easier to reset them and to change them, and we can take
them right into our main loop.
So it's me to add our main loop:
1. What we need to do is check for collisions. So add the following code:
if (_shockWave->isVisible()) {
count = (int) _fallingObjects.size();
for (i = count-1; i >= 0; i--) {
auto sprite = _fallingObjects.at(i);
diffx = _shockWave->getPositionX() - sprite->getPositionX();
diffy = _shockWave->getPositionY() - sprite->getPositionY();
if (pow(diffx, 2) + pow(diffy, 2) <= pow(_shockWave-
>getBoundingBox().size.width * 0.5f, 2)) {
sprite->stopAllActions();
sprite->runAction( _explosion->clone());
SimpleAudioEngine::getInstance()->playEffect("boom.wav");
if (sprite->getTag() == kSpriteMeteor) {
_shockwaveHits++;
_score += _shockwaveHits * 13 + _shockwaveHits * 2;
}
//play sound
_fallingObjects.erase(i);
}
}
_scoreDisplay->setString(std::to_string(_score));
}
2. If _shockwave is visible, we check the distance between it and each sprite
in _fallingObjects vector. If we hit any meteors, we increase the value of
the _shockwaveHits property so we can award the player for mulple hits.
Next we move the clouds:
//move clouds
for (auto sprite : _clouds) {
www.it-ebooks.info

Fun with Sprites – Sky Defense
[ 74 ]
sprite->setPositionX(sprite->getPositionX() + dt * 20);
if (sprite->getPositionX() > _screenSize.width + sprite-
>getBoundingBox().size.width * 0.5f)
sprite->setPositionX(-sprite->getBoundingBox().size.width *
0.5f);
}
3. I chose not to use a MoveTo acon for the clouds to show you the amount of code
that can be replaced by a simple acon. If not for Cocos2d-x acons, we would have
to implement logic to move, rotate, swing, scale, and explode all our sprites!
4. And nally:
if (_bomb->isVisible()) {
if (_bomb->getScale() > 0.3f) {
if (_bomb->getOpacity() != 255)
_bomb->setOpacity(255);
}
}
5. We give the player an extra visual cue to when a bomb is ready to explode by
changing its opacity.
What just happened?
The main loop is prey straighorward when you don't have to worry about updang
individual sprites, as our acons take care of that for us. We prey much only need to run
collision checks between our sprites, and to determine when it's me to throw something
new at the player.
So now the only thing le to do is grab the meteors and health packs from the pools when
their mers are up. So let's get right to it.
Time for action – retrieving objects from the pool
We just need to use the correct index to retrieve the objects from their respecve vector:
1. To retrieve meteor sprites, we'll use the resetMeteor method:
void GameLayer::resetMeteor(void) {
//if too many objects on screen, return
if (_fallingObjects.size() > 30) return;
auto meteor = _meteorPool.at(_meteorPoolIndex);
_meteorPoolIndex++;
www.it-ebooks.info

Chapter 4
[ 75 ]
if (_meteorPoolIndex == _meteorPool.size())
_meteorPoolIndex = 0;
int meteor_x = rand() % (int) (_screenSize.width * 0.8f) +
_screenSize.width * 0.1f;
int meteor_target_x = rand() % (int) (_screenSize.width * 0.8f)
+ _screenSize.width * 0.1f;
meteor->stopAllActions();
meteor->setPosition(Vec2(meteor_x, _screenSize.height +
meteor->getBoundingBox().size.height * 0.5));
//create action
auto rotate = RotateBy::create(0.5f , -90);
auto repeatRotate = RepeatForever::create( rotate );
auto sequence = Sequence::create (
MoveTo::create(_meteorSpeed, Vec2(meteor_target_x,
_screenSize.height * 0.15f)),
CallFunc::create(std::bind(&GameLayer::fallingObjec
tDone, this, meteor) ), nullptr);
meteor->setVisible ( true );
meteor->runAction(repeatRotate);
meteor->runAction(sequence);
_fallingObjects.pushBack(meteor);
}
2. We grab the next available meteor from the pool, then we pick a random start
and end x value for its MoveTo acon. The meteor starts at the top of the screen
and will move to the boom towards the city, but the x value is randomly picked
each me.
3. We rotate the meteor inside a RepeatForever acon, and we use Sequence to
move the sprite to its target posion and then call back fallingObjectDone when
the meteor has reached its target. We nish by adding the new meteor we retrieved
from the pool to the _fallingObjects vector so we can check collisions with it.
4. The method to retrieve the health (resetHealth) sprites is prey much the same,
except that swingHealth acon is used instead of rotate. You'll nd that method
already implemented in GameLayer.cpp.
What just happened?
So in resetGame we set the mers, and we update them in the update method. We use
these mers to add meteors and health packs to the screen by grabbing the next available
one from their respecve pool, and then we proceed to run collisions between an exploding
bomb and these falling objects.
www.it-ebooks.info

Fun with Sprites – Sky Defense
[ 76 ]
Noce that in both resetMeteor and resetHealth we don't add new sprites if too many
are on screen already:
if (_fallingObjects->size() > 30) return;
This way the game does not get ridiculously hard, and we never run out of unused objects
in our pools.
And the very last bit of logic in our game is our fallingObjectDone callback, called
when either a meteor or a health pack has reached the ground, at which point it awards
or punishes the player for leng sprites through.
When you take a look at that method inside GameLayer.cpp, you will noce how we use
->getTag() to quickly ascertain which type of sprite we are dealing with (the one calling
the method):
if (pSender->getTag() == kSpriteMeteor) {
If it's a meteor, we decrease energy from the player, play a sound eect, and run the
explosion animaon; an autorelease copy of the _groundHit acon we retained earlier,
so we don't need to repeat all that logic every me we need to run this acon.
If the item is a health pack, we increase the energy or give the player some points,
play a nice sound eect, and hide the sprite.
Play the game!
We've been coding like mad, and it's nally me to run the game. But rst, don't forget to
release all the items we retained. In GameLayer.cpp, add our destructor method:
GameLayer::~GameLayer () {
//release all retained actions
CC_SAFE_RELEASE(_growBomb);
CC_SAFE_RELEASE(_rotateSprite);
CC_SAFE_RELEASE(_shockwaveSequence);
CC_SAFE_RELEASE(_swingHealth);
CC_SAFE_RELEASE(_groundHit);
CC_SAFE_RELEASE(_explosion);
CC_SAFE_RELEASE(_ufoAnimation);
CC_SAFE_RELEASE(_blinkRay);
_clouds.clear();
_meteorPool.clear();
_healthPool.clear();
_fallingObjects.clear();
}
www.it-ebooks.info
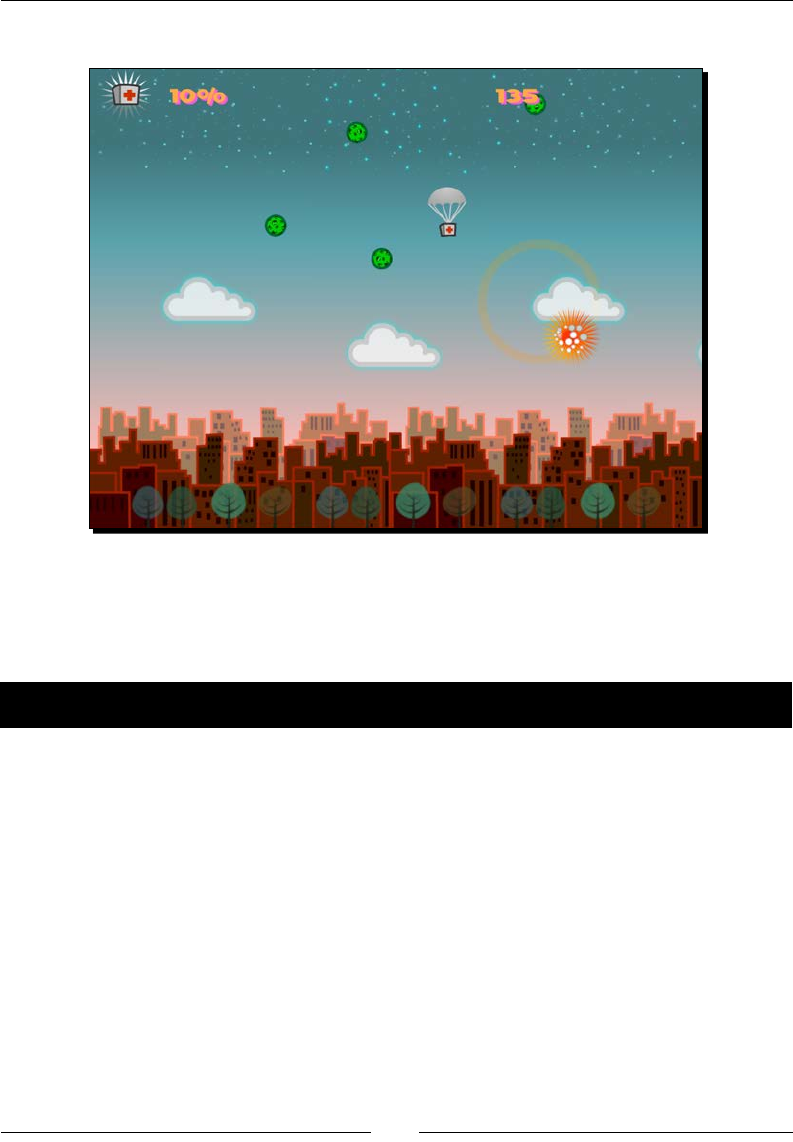
Chapter 4
[ 77 ]
The actual game screen will now look something like this:
Once again, you can refer to 4198_04_FINAL_PROJECT.zip if you nd any problems
running the code.
Now, let's take this to Android.
Time for action – running the game in Android
Follow these steps to deploy the game to Android:
1. This me, there is no need to alter the manifest because the default sengs are the
ones we want. So, navigate to proj.android and then to the jni folder and open
the Android.mk le in a text editor.
2. Edit the lines in LOCAL_SRC_FILES to read as follows:
LOCAL_SRC_FILES := hellocpp/main.cpp \
../../Classes/AppDelegate.cpp \
../../Classes/GameLayer.cpp
3. Follow the instrucons from the HelloWorld and AirHockey examples to import
the game into Eclipse.
4. Save it and run your applicaon. This me, you can try out dierent size screens if
you have the devices.
www.it-ebooks.info

Fun with Sprites – Sky Defense
[ 78 ]
What just happened?
You just ran a universal app in Android. And nothing could have been simpler.
As a bonus, I've added another version of the game with an extra type of enemy to deal with:
a UFO hell-bent on zapping the city! You may nd this in 4198_04_BONUS_PROJECT.zip.
Pop quiz – sprites and actions
Q1. A SpriteBatchNode can contain what types of elements?
1. Sprites using textures from two or more sprite sheets.
2. Sprites using the same source texture.
3. Blank sprites.
4. Sprites using textures from one sprite sheet and one other image.
Q2. In order to run an acon nonstop, what do I need to use?
1. RepeatForever.
2. Repeat.
3. The default behavior of an acon is to run nonstop.
4. Acons can't repeat forever.
Q3. In order to animate a sprite so that it would move to a certain point on the screen and
then fade out, what acons would I need?
1. A Sequence lisng an EaseIn and EaseOut acon.
2. A Sequence lisng a FadeOut and MoveTo acon.
3. A Sequence lisng a MoveTo or MoveBy and a FadeOut acon.
4. A Sequence lisng a RotateBy and FadeOut acon.
Q4. To create a sprite frame animaon, what group of classes are absolutely essenal?
1. Sprite, SpriteBatchNode, and EaseIn.
2. SpriteFrameCache, RotateBy, and ActionManager.
3. Sprite, Layer, and FadeOut.
4. SpriteFrame, Animation, and Animate.
www.it-ebooks.info

Chapter 4
[ 79 ]
Summary
In my opinion, aer nodes and all their derived objects, acons are the second best thing
about Cocos2d-x. They are me savers and can quickly spice things up in any project with
professional-looking animaons. And I hope with the examples found in this chapter, and
along with the ones found in the Cocos2d-x samples test project, you will be able to create
any acon you need with Cocos2d-x.
In the next chapter, I'll introduce you to another simple way you can spice things up in your
game: with parcles!
www.it-ebooks.info
[ 81 ]
On the Line – Rocket Through
In our third game, Rocket Through, we'll use particle effects to spice things up
a bit, and we'll use DrawNode to make our own OpenGL drawings on screen.
And be advised, this game uses quite a bit of vector math, but luckily for us,
Cocos2d-x comes bundled with a sweet pack of helper methods to deal with
that as well.
You will learn:
How to load and set up a parcle system
How to draw primives (lines, circles, and more) with DrawNode
How to use vector math helper methods included in Cocos2d-x
The game – Rocket Through
In this sci- version of the classic Snake game engine, you control a rocket ship that must
move around seven planets, collecng ny supernovas. But here's the catch: you can only
steer the rocket by rotang it around pivot points put in place through touch events. So the
vector of movement we set for the rocket ship is at mes linear and at mes circular.
The game settings
This is a universal game designed for the regular iPad and then scaled up and down to match
the screen resoluon of other devices. It is set to play in portrait mode and it does not
support multouches.
5
www.it-ebooks.info
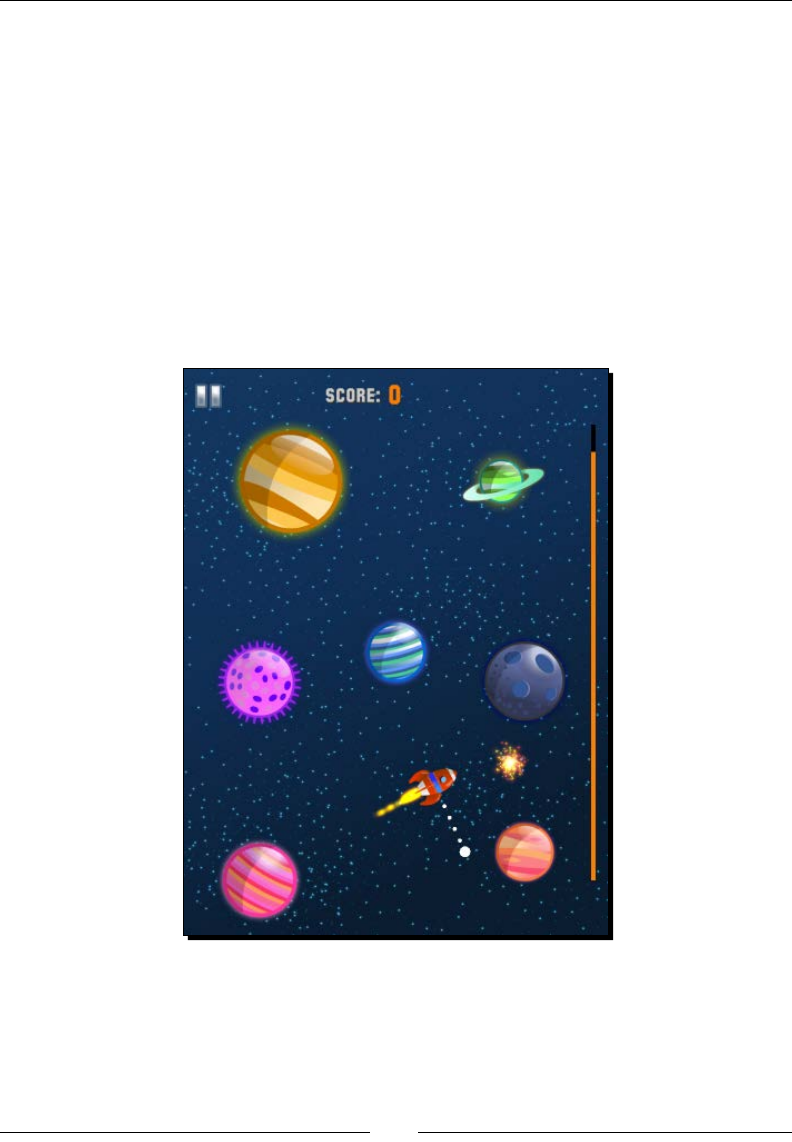
On the Line – Rocket Through
[ 82 ]
Play rst, work later
Download the 4198_05_START_PROJECT.zip and 4198_05_FINAL_PROJECT.zip les
from this book's Support page.
You will, once again, use the Start Project opon to work on; this way, you won't need to
type logic or syntax already covered in previous chapters. The Start Project opon contains
all the resource les and all the class declaraons as well as placeholders for all the methods
inside the classes' implementaon les. We'll go over these in a moment.
You should run the nal project version to acquaint yourself with the game. By pressing and
dragging your nger on the rocket ship, you draw a line. Release the touch and you create a
pivot point. The ship will rotate around this pivot point unl you press on the ship again to
release it. Your aim is to collect the bright supernovas and avoid the planets.
www.it-ebooks.info

Chapter 5
[ 83 ]
The start project
If you run the Start Project opon, you should see the basic game screen already in place.
There is no need to repeat the steps we've taken in our previous tutorial to create a batch
node and place all the screen sprites. We once again have a _gameBatchNode object and a
createGameScreen method.
But by all means, read through the code inside the createGameScreen method. What is of
key importance here is that each planet we create is stored inside the _planets vector. And
we also create our _rocket object (the Rocket class) and our _lineContainer object
(the LineContainer class) here. More on these soon.
In the Start Project opon, we also have our old friend GameSprite, which extends Sprite
here with an extra method to get the radius() method of our sprites. The Rocket object
and all the planets are GameSprite objects.
Screen settings
So if you have the Start Project opon opened in Xcode, let's review the screen sengs for
this game in AppDelegate.cpp. Inside the applicationDidFinishLaunching method,
you should see this:
auto designSize = Size(1536, 2048);
glview->setDesignResolutionSize(designSize.width, designSize.height,
ResolutionPolicy::EXACT_FIT);
std::vector<std::string> searchPaths;
if (screenSize.width > 768) {
searchPaths.push_back("ipadhd");
director->setContentScaleFactor(1536/designSize.width);
} else if (screenSize.width > 320) {
searchPaths.push_back("ipad");
director->setContentScaleFactor(768/designSize.width);
} else {
searchPaths.push_back("iphone");
director->setContentScaleFactor(380/designSize.width);
}
auto fileUtils = FileUtils::getInstance();
fileUtils->setSearchPaths(searchPaths);
So we basically start the same way we did in the previous game. The majority of sprites in
this game are circle-shaped and you may noce some distoron in dierent screens; you
should test the same conguraon but using dierent ResolutionPolicies, such as
SHOW_ALL.
www.it-ebooks.info

On the Line – Rocket Through
[ 84 ]
So what are particles?
Parcles or parcle systems are a way to add special eects to your applicaons. In general
terms this is achieved by the use of a large number of ny textured sprites (parcles), which
are animated and run through a series of transformaons. You can use these systems to
create smoke, explosions, sparks, lightening, rain, snow, and other such eects.
As I menoned in Chapter 1, Installing Cocos2d-x, you should seriously consider geng
yourself a program to help you design your parcle systems. In this game, the parcles
were created in ParcleDesigner.
It's me to add them to our game!
Time for action – creating particle systems
For parcles, all we need is the XML le describing the parcle system's properes.
1. So let's go to GameLayer.cpp.
2. The game inializes by calling createGameScreen, which is already in place, then
createParticles and createStarGrid, which is also implemented. So let's go
over the createParticles method now.
3. Go to that method in GameLayer.cpp and add the following code:
_jet = ParticleSystemQuad::create("jet.plist");
_jet->setSourcePosition(Vec2(-_rocket->getRadius() * 0.8f,0));
_jet->setAngle(180);
_jet->stopSystem();
this->addChild(_jet, kBackground);
_boom = ParticleSystemQuad::create("boom.plist");
_boom->stopSystem();
this->addChild(_boom, kForeground);
_comet = ParticleSystemQuad::create("comet.plist");
_comet->stopSystem();
_comet->setPosition(Vec2(0, _screenSize.height * 0.6f));
_comet->setVisible(false);
this->addChild(_comet, kForeground);
_pickup = ParticleSystemQuad::create("plink.plist");
_pickup->stopSystem();
this->addChild(_pickup, kMiddleground);
www.it-ebooks.info
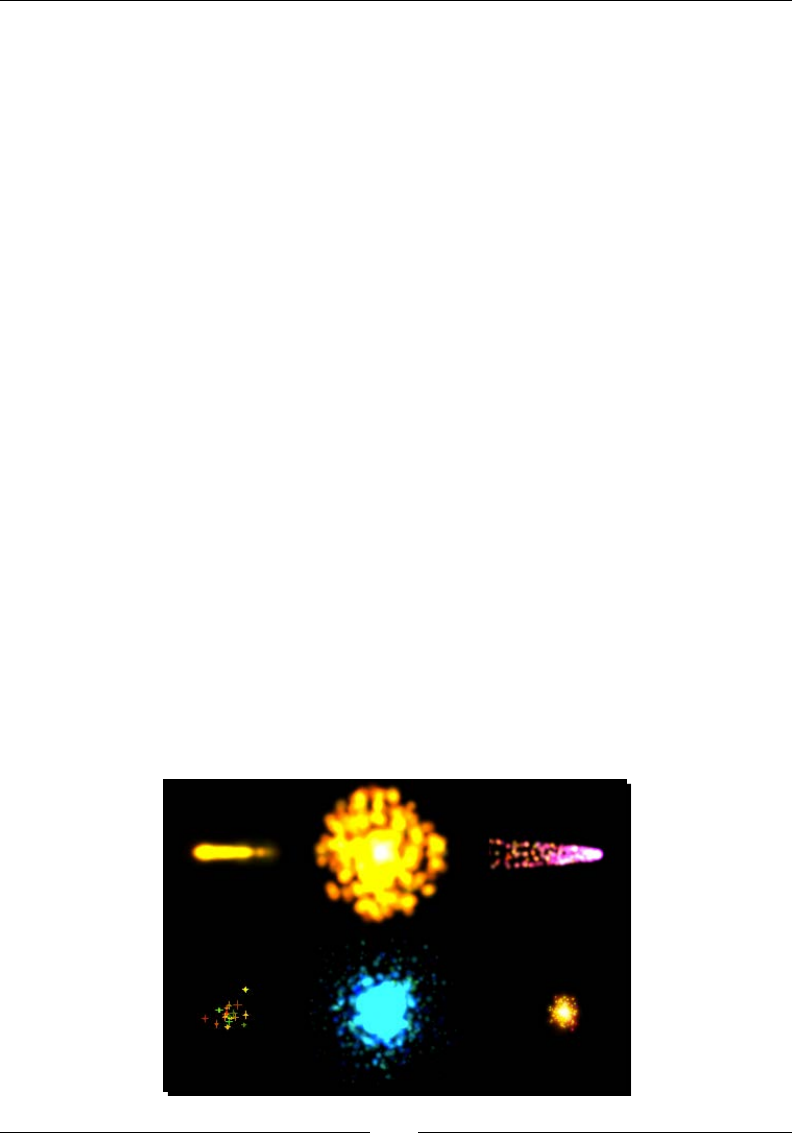
Chapter 5
[ 85 ]
_warp = ParticleSystemQuad::create("warp.plist");
_warp->setPosition(_rocket->getPosition());
this->addChild(_warp, kBackground);
_star = ParticleSystemQuad::create("star.plist");
_star->stopSystem();
_star->setVisible(false);
this->addChild(_star, kBackground, kSpriteStar);
What just happened?
We created our rst parcles. ParcleDesigner exports the parcle system data as a .plist
le, which we used to create our ParticleSystemQuad objects. You should open one
of these les in Xcode to review the number of sengs used in a parcle system. From
Cocos2d-x you can modify any of these sengs through seers inside ParticleSystem.
The parcles we'll use in this game are as follows:
_jet: This is aached to the _rocket object and it will trail behind the _rocket
object. We set the system's angle and source posion parameters to match the
_rocket sprite.
_boom: This is the parcle system used when _rocket explodes.
_comet: This is a parcle system that moves across the screen at set intervals and
can collide with _rocket.
_pickup: This is used when a star is collected.
_warp: This marks the inial posion of the rocket.
_star: This is the parcle system used for the star that the rocket must collect.
The following screenshot shows these various parcles:
www.it-ebooks.info
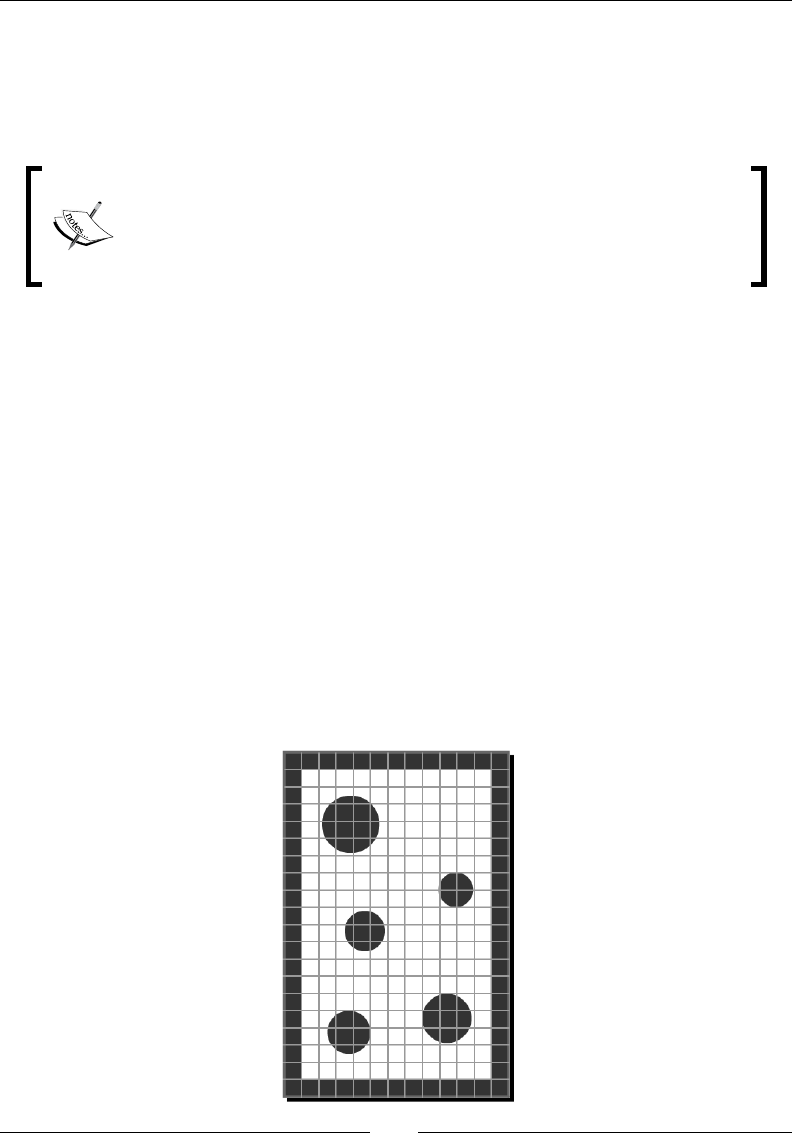
On the Line – Rocket Through
[ 86 ]
All parcle systems are added as children to GameLayer; they cannot be added to our
SpriteBatchNode class. And you must call stopSystem() on each system as they're
created otherwise they will start playing as soon as they are added to a node.
In order to run the system, you make a call to resetSystem().
Cocos2d-x comes bundled with some common parcle systems you can
modify for your own needs. If you go to the test folder at: tests/cpp-
tests/Classes/ParticleTest, you will see examples of these
systems being used. The actual parcle data les are found at: tests/
cpp-tests/Resources/Particles.
Creating the grid
Let's take some me now to review the grid logic in the game. This grid is created inside the
createStarGrid method in GameLayer.cpp. What the method does is determine all
possible spots on the screen where we can place the _star parcle system.
We use a C++ vector list called _grid to store the available spots:
std::vector<Point> _grid;
The createStarGrid method divides the screen into mulple cells of 32 x 32 pixels,
ignoring the areas too close to the screen borders (gridFrame). Then we check the distance
between each cell and the planet sprites stored inside the vector _planets. If the cell is far
enough from the planets, we store it inside the _grid vector as Point.
In the following gure, you can get an idea of the result we're aer. We want all the white
cells not overlapping any of the planets.
www.it-ebooks.info

Chapter 5
[ 87 ]
We output a message to the console with Log stang how many cells we end up with:
CCLOG("POSSIBLE STARS: %i", _grid.size());
This vector list will be shued at each new game, so we end up with a random sequence of
possible posions for our star:
std::random_shuffle(_grid.begin(), _grid.end());
This way we never place a star on top of a planet or so close to it that the rocket could not
reach it without colliding with the planet.
Drawing primitives in Cocos2d-x
One of the main elements in the game is the LineContainer.cpp class. It is a DrawNode
derived class that allows us to draw lines and circles on the screen.
DrawNode comes bundled with a list of drawing methods you can use to draw lines, points,
circles, polygons, and so on.
The methods we'll use are drawLine and drawDot.
Time for action – let's do some drawing!
Time to implement the drawing inside LineContainer.cpp. You will noce that this class
already has most of its methods implemented, so you can save a lile typing. I'll go over
what these methods represent once we add the game's main update method. But basically
LineContainer will be used to display the lines the player draws on screen to manipulate
_rocket sprite, as well as display an energy bar that acts as a sort of mer in our game:
1. What we need to change here is the update method. So this is what you need to
type inside that method:
_energy -= dt * _energyDecrement;
if (_energy < 0) _energy = 0;
clear();
switch (_lineType) {
case LINE_NONE:
break;
case LINE_TEMP:
drawLine(_tip, _pivot, Color4F(1.0, 1.0, 1.0, 1.0));
drawDot(_pivot, 5, Color4F(Color3B::WHITE));
break;
www.it-ebooks.info

On the Line – Rocket Through
[ 88 ]
case LINE_DASHED:
drawDot(_pivot, 5, Color4F(Color3B::WHITE));
int segments = _lineLength / (_dash + _dashSpace);
float t = 0.0f;
float x_;
float y_;
for (int i = 0; i < segments + 1; i++) {
x_ = _pivot.x + t * (_tip.x - _pivot.x);
y_ = _pivot.y + t * (_tip.y - _pivot.y);
drawDot(Vec2(x_, y_), 5, Color4F(Color3B::WHITE));
t += (float) 1 / segments;
}
break;
}
2. We end our drawing calls by drawing the energy bar in the same
LineContainer node:
drawLine(Vec2(_energyLineX, _screenSize.height * 0.1f),
Vec2(_energyLineX, _screenSize.height * 0.9f), Color4F(0.0, 0.0,
0.0, 1.0));
drawLine(Vec2(_energyLineX, _screenSize.height * 0.1f),
Vec2(_energyLineX, _screenSize.height * 0.1f + _energy *
_energyHeight ), Color4F(1.0, 0.5, 0.0, 1.0));
What just happened?
You just learned how to draw inside DrawNode. One important line in that code is the
clear() call. It clears all the drawings in that node before we update them with their
new state.
In LineContainer, we use a switch statement to determine how to draw the player's line.
If the _lineType property is set to LINE_NONE, we don't draw anything (this will, in eect,
clear the screen of any drawings done by the player).
If _lineType is LINE_TEMP, this means the player is currently dragging a nger away from
the _rocket object, and we want to show a white line from the _rocket current posion
to the player's current touch posion. These points are called tip and pivot, respecvely.
We also draw a dot right on the pivot point.
drawLine(_tip, _pivot, Color4F(1.0, 1.0, 1.0, 1.0));
drawDot(_pivot, 5, Color4F(Color3B::WHITE));
www.it-ebooks.info

Chapter 5
[ 89 ]
If _lineType is LINE_DASHED, it means the player has removed his or her nger from the
screen and set a new pivot point for the _rocket to rotate around. We draw a white doed
line, using what is known as the Bezier linear formula to draw a series of ny circles from the
_rocket current posion and the pivot point:
for (int i = 0; i < segments + 1; i++) {
x_ = _pivot.x + t * (_tip.x - _pivot.x);
y_ = _pivot.y + t * (_tip.y - _pivot.y);
drawDot(Vec2(x_, y_), 5, Color4F(Color3B::WHITE));
t += (float) 1 / segments;
}
And nally, for the energy bar, we draw a black line underneath an orange one. The orange
one resizes as the value for _energy in LineContainer is reduced. The black one stays the
same and it's here to show contrast. You layer your drawings through the order of your draw
calls; so the rst things drawn appear underneath the laer ones.
The rocket sprite
Time to tackle the second object in the game: the rocket.
Once again, I already put in place the part of the logic that's old news to you. But please
review the code already inside Rocket.cpp. We have a method to reset the rocket every
me a new game starts (reset), and a method to show the selected state of the rocket
(select(bool flag)) by changing its displayed texture:
if (flag) {
this->setDisplayFrame(SpriteFrameCache::getInstance()-
>getSpriteFrameByName("rocket_on.png"));
} else {
this->setDisplayFrame(SpriteFrameCache::getInstance()-
>getSpriteFrameByName("rocket.png"));
}
This will either show the rocket with a glow around it, or not.
And nally a method to check collision with the sides of the screen (collidedWithSides).
If there is a collision, we adjust the rocket so it moves away from the screen side it collided
with, and we release it from any pivot point.
What we really need to worry about here is the rocket's update method. And that's what
we'll add next.
www.it-ebooks.info

On the Line – Rocket Through
[ 90 ]
Time for action – updating our rocket sprite
The game's main loop will call the rocket's update method in every iteraon.
1. Inside the empty update method in Rocket.cpp, add the following lines:
Point position = this->getPosition();
if (_rotationOrientation == ROTATE_NONE) {
position.x += _vector.x * dt;
position.y += _vector.y * dt;
} else {
float angle = _angularSpeed * dt;
Point rotatedPoint = position.rotateByAngle(_pivot, angle);
position.x = rotatedPoint.x;
position.y = rotatedPoint.y;
float rotatedAngle;
Point diff = position;
diff.subtract(_pivot);
Point clockwise = diff.getRPerp();
if (_rotationOrientation == ROTATE_COUNTER) {
rotatedAngle = atan2 (-1 * clockwise.y, -1 * clockwise.x);
} else {
rotatedAngle = atan2 (clockwise.y, clockwise.x);
}
_vector.x = _speed * cos (rotatedAngle);
_vector.y = _speed * sin (rotatedAngle);
this->setRotationFromVector();
if (this->getRotation() > 0) {
this->setRotation( fmodf(this->getRotation(), 360.0f) );
} else {
this->setRotation( fmodf(this->getRotation(), -360.0f) );
}
}
www.it-ebooks.info
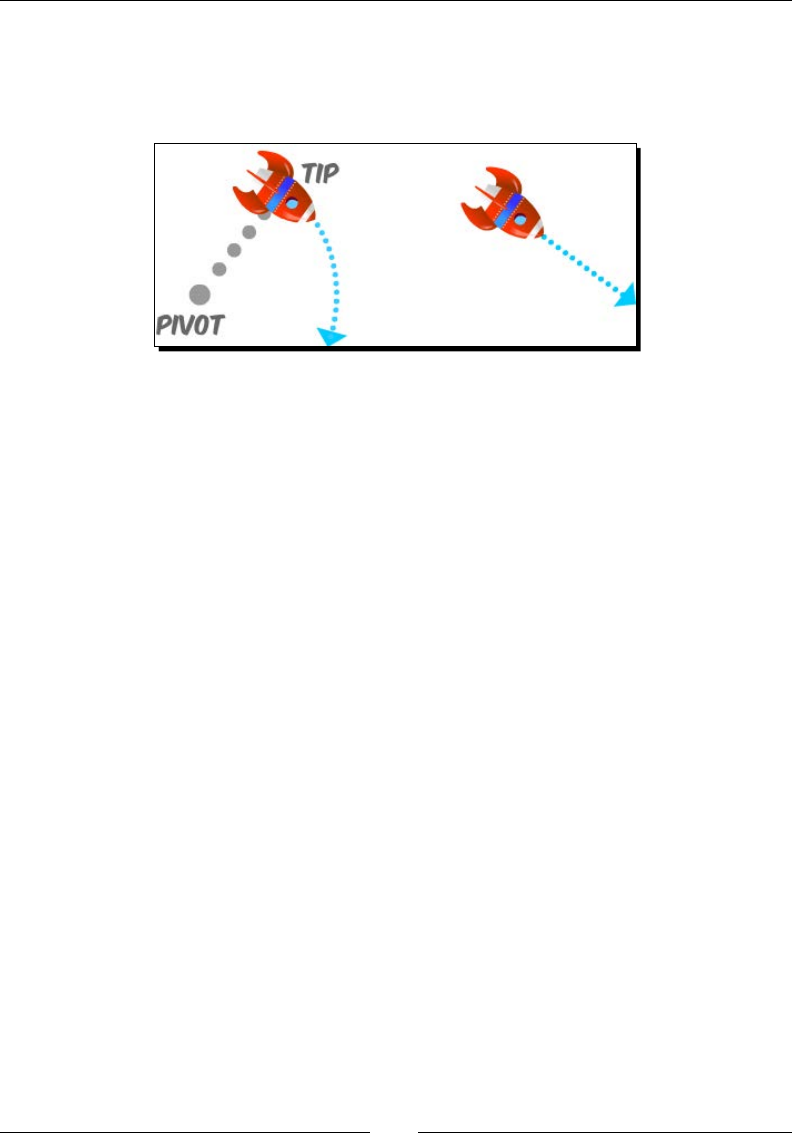
Chapter 5
[ 91 ]
2. Here we are saying, if the rocket is not rotang (_rotationOrientation ==
ROTATE_NONE), just move it according to its current _vector. If it is rotang, then
use the Cocos2d-x helper rotateByAngle method to nd its next posion around
its pivot point:
3. The method will rotate any point around a pivot by a certain angle. So we rotate
the rocket's updated posion around its pivot (determined by the player) using a
property of Rocket class called _angularSpeed; we'll see in a moment how it
gets calculated.
4. Based on whether the rocket is rotang clockwise or counterclockwise, we adjust its
rotaon so the rocket will be at a 90 degree angle with the line drawn between the
rocket and its pivot point. Then we change the rocket's movement vector based on
this rotated angle, and we wrap the value of that angle between 0 and 360.
5. Finish up the update method with these lines:
if (_targetRotation > this->getRotation() + 180) {
_targetRotation -= 360;
}
if (_targetRotation < this->getRotation() - 180) {
_targetRotation += 360;
}
this->setPosition(position);
_dr = _targetRotation - this->getRotation() ;
_ar = _dr * _rotationSpring;
_vr += _ar ;
_vr *= _rotationDamping;
float rotationNow = this->getRotation();
rotationNow += _vr;
this->setRotation(rotationNow);
6. With these lines we determine the new target rotaon of our sprite and we run an
animaon to rotate the rocket to its target rotaon (with a bit of a spring to it).
www.it-ebooks.info
On the Line – Rocket Through
[ 92 ]
What just happened?
We just wrote the logic that will move the rocket around the screen, whether the rocket is
rotang or not.
So when the player picks a pivot point for the _rocket sprite, this pivot point is passed to
both Rocket and LineContainer. The former will use it to rotate its vector around it and
the laer will use it to draw a doed line between _rocket and the pivot point.
We can't use Action to rotate the sprite because the target rotaon
is updated too many mes in our logic, and Action needs me to
inialize and run.
So it's me to code the touch events to make all that logic fall into place.
Time for action – handling touches
We need to implement onTouchBegan, onTouchMoved, and onTouchEnded.
1. Now in GameLayer.cpp, inside onTouchBegan, add the following lines:
if (!_running) return true;
Point tap = touch->getLocation();
float dx = _rocket->getPositionX() - tap.x;
float dy = _rocket->getPositionY() - tap.y;
if (dx * dx + dy * dy <= pow(_rocket->getRadius(), 2) ) {
_lineContainer->setLineType ( LINE_NONE );
_rocket->setRotationOrientation ( ROTATE_NONE );
_drawing = true;
}
return true;
When a touch begins, we only need to determine whether it's touching the ship.
If it is, we set our _drawing property to true. This will indicate we have a valid
point (one that began by touching the _rocket sprite).
2. We clear any lines we may be currently drawing in _lineContainer by calling
setLineType( LINE_NONE ), and we make sure _rocket will not rotate unl we
have a pivot point by releasing _rocket (setRotationOrientation ( ROTATE_
NONE )), so it will connue to move on its current linear trajectory (_vector).
www.it-ebooks.info

Chapter 5
[ 93 ]
3. From here, we begin drawing a new line with the next onTouchMoved method.
Inside that method, we add the following lines:
if (!_running) return;
if (_drawing) {
Point tap = touch->getLocation();
float dx = _rocket->getPositionX() - tap.x;
float dy = _rocket->getPositionY() - tap.y;
if (dx * dx + dy * dy > pow (_minLineLength, 2)) {
_rocket->select(true);
_lineContainer->setPivot ( tap );
_lineContainer->setLineType ( LINE_TEMP );
} else {
_rocket->select(false);
_lineContainer->setLineType ( LINE_NONE );
}
}
4. We'll handle touch moved only if we are using _drawing, which means the player
has pressed on the ship and is now dragging his or her nger across the screen.
Once the distance between the nger and _rocket is greater than the
_minLineLength distance we spulate in game init, then we give a visual
cue to the player by adding a glow around _rocket (_rocket->select(true)),
and we draw the new line in _lineContainer by passing it the touch's current
posion and seng the line type to LINE_TEMP. If the minimum length is not
reached, we don't show a line and nor do we show the player selected.
5. Next comes onTouchEnded. There is logic in place already inside our
onTouchEnded method which deals with game states. You should uncomment the
calls to resetGame and add a new else if statement inside the method:
} else if (_state == kGamePaused) {
_pauseBtn->setDisplayFrame(SpriteFrameCache::getInstance()-
>getSpriteFrameByName ("btn_pause_off.png"));
_paused->setVisible(false);
_state = kGamePlay;
_running = true;
return;
}
6. If the game is paused, we change the texture in the _pauseBtn sprite through
Sprite->setDisplayFrame, and we start running the game again.
www.it-ebooks.info

On the Line – Rocket Through
[ 94 ]
7. Now we begin handling the touch. First, we determine whether it's landing on the
Pause buon:
if (!_running) return;
if(touch != nullptr) {
Point tap = touch->getLocation();
if (_pauseBtn->getBoundingBox().containsPoint(tap)) {
_paused->setVisible(true);
_state = kGamePaused;
_pauseBtn->setDisplayFrame(SpriteFrameCache::getInstance()-
>getSpriteFrameByName ("btn_pause_on.png"));
_running = false;
return;
}
}
8. If so, we change the game state to kGamePaused, change the texture on the
_pauseBtn sprite (by retrieving another sprite frame from SpriteFrameCache),
stop running the game (pausing it), and return from the funcon.
9. We can nally do something about the rocket ship. So, connuing inside the same
if(touch != nullptr) { condional seen previously, add these lines:
_drawing = false;
_rocket->select(false);
if (_lineContainer->getLineType() == LINE_TEMP) {
_lineContainer->setPivot (tap);
_lineContainer->setLineLength ( _rocket->getPosition().
distance( tap ) );
_rocket->setPivot (tap);
10. We start by deselecng the _rocket sprite, and then we check whether we are
currently showing a temporary line in _lineContainer. If we are, this means we
can go ahead and create our new pivot point with the player's released touch. We
pass this informaon to _lineContainer with our setPivot method, along with
the line length. The _rocket sprite also receives the pivot point informaon.
Then, things get hairy! The _rocket sprite is moving at a pixel-based speed. Once
_rocket starts rotang, it will move at an angular-based speed through Point.
rotateByAngle. So the following lines are added to translate the _rocket current
pixel-based speed into angular speed:
float circle_length = _lineContainer->getLineLength() * 2 * M_PI;
int iterations = floor(circle_length / _rocket->getSpeed());
_rocket->setAngularSpeed ( 2 * M_PI / iterations);
www.it-ebooks.info

Chapter 5
[ 95 ]
11. It grabs the length of the circumference about to be described by _rocket (line
length * 2 * PI) and divides it by the rocket's speed, geng in return the
number of iteraons needed for the rocket to complete that length. Then the 360
degrees of the circle is divided by the same number of iteraons (but we do it in
radians) to arrive at the fracon of the circle that the rocket must rotate at each
iteraon: its angular speed.
12. What follows next is even more math, using the amazingly helpful methods from
Cocos2d-x related to vector math (Point.getRPerp, Point.dot, Point.
subtract, to name a few) some of which we've seen already in the Rocket class:
Vec2 diff = _rocket->getPosition();
diff.subtract(_rocket->getPivot());
Point clockwise = diff.getRPerp();
float dot =clockwise.dot(_rocket->getVector());
if (dot > 0) {
_rocket->setAngularSpeed ( _rocket->getAngularSpeed() * -1 );
_rocket->setRotationOrientation ( ROTATE_CLOCKWISE );
_rocket->setTargetRotation
( CC_RADIANS_TO_DEGREES( atan2(clockwise.y, clockwise.x) ) );
} else {
_rocket->setRotationOrientation ( ROTATE_COUNTER );
_rocket->setTargetRotation ( CC_RADIANS_TO_DEGREES
(atan2(-1 * clockwise.y, -1 * clockwise.x) ) );
}
_lineContainer->setLineType ( LINE_DASHED );
13. What they do here is determine which direcon the rocket should rotate to:
clockwise or counterclockwise, based on its current vector of movement.
14. The line the player just drew between _rocket and pivot point, which we get by
subtracng (Point.subtract) those two points, has two perpendicular vectors:
one to the right (clockwise) that you get through Point.getRPerp and one to the
le (counterclockwise) that you get through Point.getPerp. We use the angle
of one of these vectors as the _rocket target rotaon so the rocket will rotate to
be at 90 degrees with the line drawn in LineContainer. And we nd the correct
perpendicular through the dot product of the _rocket current vector and one of
the perpendiculars (Point.dot).
What just happened?
I know. A lot of math and all at once! Thankfully, Cocos2d-x made it all much easier to handle.
We just added the logic that allows the player to draw lines and set new pivot points for
the _rocket sprite.
www.it-ebooks.info

On the Line – Rocket Through
[ 96 ]
The player will steer the _rocket sprite through the planets by giving the rocket a pivot
point to rotate around. And by releasing the _rocket from pivot points, the player will make
it move in a straight line again. All that logic gets managed here in the game's touch events.
And don't worry about the math. Though understanding how to deal with vectors is a very
useful tool in any game developer's toolbox, and you should denitely research the topic,
there are countless games you can sll build with lile or no math; so cheer up!
The game loop
It's me to create our good old cker! The main loop will be in charge of collision detecon,
updang the points inside _lineContainer, adjusng our _jet parcle system to our
_rocket sprite, and a few other things.
Time for action – adding the main loop
Let's implement our main update method.
1. In GameLayer.cpp, inside the update method, add the following lines:
if (!_running || _state != kGamePlay) return;
if (_lineContainer->getLineType() != LINE_NONE) {
_lineContainer->setTip (_rocket->getPosition() );
}
if (_rocket->collidedWithSides()) {
_lineContainer->setLineType ( LINE_NONE );
}
_rocket->update(dt);
//update jet particle so it follows rocket
if (!_jet->isActive()) _jet->resetSystem();
_jet->setRotation(_rocket->getRotation());
_jet->setPosition(_rocket->getPosition());
We check to see if we are not currently on pause. Then, if there is a line for our ship
that we need to show in _lineContainer, we update the line's tip point with the
_rocket current posion.
We run collision checks between _rocket and the screen sides, update the
_rocket sprite, and posion and rotate our _jet parcle system to align it with
the _rocket sprite.
www.it-ebooks.info

Chapter 5
[ 97 ]
2. Next we update _comet (its countdown, inial posion, movement, and collision
with _rocket if _comet is visible):
_cometTimer += dt;
float newY;
if (_cometTimer > _cometInterval) {
_cometTimer = 0;
if (_comet->isVisible() == false) {
_comet->setPositionX(0);
newY =
(float)rand()/((float)RAND_MAX/_screenSize.height *
0.6f) + _screenSize.height * 0.2f;
if (newY > _screenSize.height * 0.9f)
newY = _screenSize.height * 0.9f;
_comet->setPositionY(newY);
_comet->setVisible(true);
_comet->resetSystem();
}
}
if (_comet->isVisible()) {
//collision with comet
if (pow(_comet->getPositionX() - _rocket->getPositionX(),
2) + pow(_comet->getPositionY() - _rocket->getPositionY(),
2) <= pow (_rocket->getRadius() , 2)) {
if (_rocket->isVisible()) killPlayer();
}
_comet->setPositionX(_comet->getPositionX() + 50 * dt);
if (_comet->getPositionX() > _screenSize.width * 1.5f) {
_comet->stopSystem();
_comet->setVisible(false);
}
}
3. Next we update _lineContainer, and slowly reduce the opacity of the _rocket
sprite based on the _energy level in _lineContainer:
_lineContainer->update(dt);
_rocket->setOpacity(_lineContainer->getEnergy() * 255);
This will add a visual cue for the player that me is running out as the _rocket
sprite will slowly turn invisible.
www.it-ebooks.info

On the Line – Rocket Through
[ 98 ]
4. Run collision with planets:
for (auto planet : _planets) {
if (pow(planet->getPositionX() - _rocket->getPositionX(),
2)
+ pow(planet->getPositionY() - _rocket->getPositionY(), 2)
<= pow (_rocket->getRadius() * 0.8f + planet->getRadius()
* 0.65f, 2)) {
if (_rocket->isVisible()) killPlayer();
break;
}
}
5. And collision with the star:
if (pow(_star->getPositionX() - _rocket->getPositionX(), 2)
+ pow(_star->getPositionY() - _rocket->getPositionY(), 2)
<=
pow (_rocket->getRadius() * 1.2f, 2)) {
_pickup->setPosition(_star->getPosition());
_pickup->resetSystem();
if (_lineContainer->getEnergy() + 0.25f < 1) {
_lineContainer->setEnergy(_lineContainer->getEnergy() +
0.25f);
} else {
_lineContainer->setEnergy(1.0);
}
_rocket->setSpeed(_rocket->getSpeed() + 2);
if (_rocket->getSpeed() > 70) _rocket->setSpeed(70);
_lineContainer->setEnergyDecrement(0.0002f);
SimpleAudioEngine::getInstance()->playEffect("pickup.
wav");
resetStar();
int points = 100 - _timeBetweenPickups;
if (points < 0) points = 0;
_score += points;
_scoreDisplay->setString(String::createWithFormat("%i",
_score)->getCString());
_timeBetweenPickups = 0;
}
When we collect _star, we acvate the _pickup parcle system on the spot
where _star was, we ll up the player's energy level, we make the game slightly
harder, and we immediately reset _star to its next posion to be collected again.
The score is based on the me it took the player to collect _star.
www.it-ebooks.info

Chapter 5
[ 99 ]
6. And we keep track of this me on the last lines of update where we also check the
energy level:
_timeBetweenPickups += dt;
if (_lineContainer->getEnergy() == 0) {
if (_rocket->isVisible()) killPlayer();
}
What just happened?
We added the main loop to our game and nally have all the pieces talking to each other.
But you probably noced quite a few calls to methods we have not implemented yet,
such as killPlayer and resetStar. We'll nish our game logic with these methods.
Kill and reset
It's that me again! Time to kill our player and reset the game! We also need to move the
_star sprite to a new posion whenever it's picked up by the player.
Time for action – adding our resets and kills
We need to add logic to restart our game and to move our pickup star to a new posion.
But rst, let's kill the player!
1. Inside the killPlayer method, add the following lines:
void GameLayer::killPlayer() {
SimpleAudioEngine::getInstance()->stopBackgroundMusic();
SimpleAudioEngine::getInstance()->stopAllEffects();
SimpleAudioEngine::getInstance()->playEffect("shipBoom.wav");
_boom->setPosition(_rocket->getPosition());
_boom->resetSystem();
_rocket->setVisible(false);
_jet->stopSystem();
_lineContainer->setLineType ( LINE_NONE );
_running = false;
_state = kGameOver;
_gameOver->setVisible(true);
_pauseBtn->setVisible(false);
}
www.it-ebooks.info

On the Line – Rocket Through
[ 100 ]
2. Inside resetStar, add the following lines:
void GameLayer::resetStar() {
Point position = _grid[_gridIndex];
_gridIndex++;
if (_gridIndex == _grid.size()) _gridIndex = 0;
//reset star particles
_star->setPosition(position);
_star->setVisible(true);
_star->resetSystem();
}
3. And nally, our resetGame method:
void GameLayer::resetGame () {
_rocket->setPosition(Vec2(_screenSize.width * 0.5f,
_screenSize.height * 0.1f));
_rocket->setOpacity(255);
_rocket->setVisible(true);
_rocket->reset();
_cometInterval = 4;
_cometTimer = 0;
_timeBetweenPickups = 0.0;
_score = 0;
_scoreDisplay->setString(String::createWithFormat("%i", _
score)->getCString());
_lineContainer->reset();
//shuffle grid cells
std::random_shuffle(_grid.begin(), _grid.end());
_gridIndex = 0;
resetStar();
_warp->stopSystem();
_running = true;
SimpleAudioEngine::getInstance()->playBackgroundMusic("backgro
und.mp3", true);
SimpleAudioEngine::getInstance()->stopAllEffects();
SimpleAudioEngine::getInstance()->playEffect("rocket.wav",
true);
}
www.it-ebooks.info

Chapter 5
[ 101 ]
What just happened?
That's it. We're done. It took more math than most people are comfortable with. But what
can I tell you, I just love messing around with vectors!
Now, let's move on to Android!
Time for action – running the game in Android
Follow these steps to deploy the game to Android:
1. Open the manifest le and set the app orientaon to portrait.
2. Next, open the Android.mk le in a text editor.
3. Edit the lines in LOCAL_SRC_FILES to read:
LOCAL_SRC_FILES := hellocpp/main.cpp \
../../Classes/AppDelegate.cpp \
../../Classes/GameSprite.cpp \
../../Classes/LineContainer.cpp \
../../Classes/Rocket.cpp \
../../Classes/GameLayer.cpp
4. Import the game into Eclipse and build it.
5. Save and run your applicaon. This me, you can try out dierent size screens
if you have the devices.
What just happened?
You now have Rocket Through running in Android.
Have a go hero
Add logic to the resetStar method so that the new posion picked is not too close to the
_rocket sprite. So, make the funcon a recurrent one unl a proper posion is picked.
And take the warp parcle system, which right now does not do a whole lot, and use it as a
random teleport eld so that the rocket may get sucked in by a randomly placed warp and
moved farther away from the target star.
www.it-ebooks.info

On the Line – Rocket Through
[ 102 ]
Summary
Congratulaons! You now have enough informaon about Cocos2d-x to produce awesome
2D games. First sprites, then acons, and now parcles.
Parcles make everything look shiny! They are easy to implement and are a very good way to
add an extra bit of animaon to your game. But it's very easy to overdo it, so be careful. You
don't want to give your players epilepc ts. Also, running too many parcles at once could
stop your game in its tracks.
In the next chapter, we'll see how to use Cocos2d-x to quickly test and develop game ideas.
www.it-ebooks.info

[ 103 ]
Quick and Easy Sprite – Victorian
Rush Hour
In our fourth example of a game built with Cocos2d-x, I'll show you a simple
technique for rapid prototyping. Often in game development, you want to test
the core ideas of your game as soon as possible, because a game may sound
fun in your head but in reality it just doesn't work. Rapid prototyping techniques
allow you to test your game as early as possible in the development process as
well as build up on the good ideas.
Here's what you'll learn:
How to quickly create placeholder sprites
How to code collisions for a plaorm game
How to create varied terrain for a side-scroller
The game – Victorian Rush Hour
In this game (Victorian Rush Hour), you control a cyclist in Victorian London trying to avoid
rush-hour trac on his way home. For reasons no one can explain, he's riding his bike on top
of the buildings. As the player, it is your job to ensure he makes it.
The controls are very simple: you tap the screen to make the cyclist jump and while he's in
the air, if you tap the screen again, the cyclist will open his trusty umbrella, either slowing
his descent or adding a boost to his jump.
6
www.it-ebooks.info
Quick and Easy Sprite – Victorian Rush Hour
[ 104 ]
This game is of a type commonly known as a dash game or endless runner, a genre that
has become increasingly popular online and on various app stores. Usually in these types
of games you, the developer, have two choices: either make the terrain the main obstacle
and challenge in the game, or make what's added to the terrain the main challenge
(enemies, pick-ups, obstacles, and so on). With this game, I decided on the rst opon.
So our challenge is to create a game where the terrain is the enemy but not an
unbeatable one.
The game settings
The game is a universal applicaon, designed for the iPad rena display but with support for
other display sizes. It is played in the landscape mode and it does not support multouch.
Rapid prototyping with Cocos2d-x
The idea behind this is to create sprites as placeholders for your game elements as quickly
as possible, so you can test your game ideas and rene them. Every game in this book was
inially developed in the way I'm about to show you, with simple rectangles in place of
textured sprites.
The technique shown here allows you to create rectangles of any size and of any color to be
used in your game logic:
www.it-ebooks.info

Chapter 6
[ 105 ]
Time for action – creating placeholder sprites
So let me show you how to do that:
1. Go ahead and download the 4198_06_START_PROJECT.zip le if you haven't
done so already.
2. When you open the project in Xcode, you will see all the classes we'll need for the
game, and we'll go over them in a second. But for now, just go to GameLayer.cpp.
3. Scroll down to the last createGameScreen method and add the following lines:
auto quickSprite = Sprite::create("blank.png");
quickSprite->setTextureRect(Rect(0, 0, 100, 100));
quickSprite->setColor(Color3B(255,255,255));
quickSprite->setPosition(Vec2(_screenSize.width * 0.5, _
screenSize.height * 0.5));
this->addChild(quickSprite);
And that's it. The sprite is created with a texture called blank.png. This is a 1 x 1
pixel white square you will nd in the Resources folder. Then we set the size of
the sprite's texture rectangle to 100 x 100 pixels (setTextureRect), and ll it with
a white color (setColor). By resizing the texture rectangle, we in eect resize the
sprite. If you run the game now, you should see a white square smack in the middle
of the screen.
4. Now delete the previous lines and replace them with these:
_gameBatchNode = SpriteBatchNode::create("blank.png", 200);
this->addChild(_gameBatchNode, kMiddleground);
This creates _gameBatchNode that uses as its source texture the same blank.png
le. Now we are ready to place as many rectangles inside _gameBatchNode
as we'd like, and set a dierent color for each one of them if we want. We can, in
other words, build an enre test game with one ny image. Which is what we'll
proceed to do now.
5. So, to nish up here, add these last lines:
_terrain = Terrain::create();
_gameBatchNode->addChild(_terrain, kMiddleground);
_player = Player::create();
_gameBatchNode->addChild(_player, kBackground);
www.it-ebooks.info

Quick and Easy Sprite – Victorian Rush Hour
[ 106 ]
What just happened?
We just created a placeholder sprite we can use to test gameplay ideas quickly and
painlessly. And we created our game's two main objects: the Player and Terrain object.
These are empty shells at the moment, but we'll start working on them next. But rst let's
go over the dierent game elements.
The Player object
This represents our cyclist. It will jump, oat, and collide with the _terrain object.
Its x speed is passed to the _terrain object causing the Terrain object to move,
side scrolling to the le of the screen.
The Player object derives, once again, from a GameSprite class. This one has geers
and seers for next posion, vector of movement, and the sprite's width and height.
The Player interface has inline helper methods to retrieve informaon about its rectangle
boundaries related to its current posion (le, right, top, boom), and its next posion
(next_left, next_right, next_top, next_bottom). These will be used in collision
detecon with the _terrain object.
The Block object
These objects form the individual pieces of the _terrain object. They can take the shape
of a building, or an empty gap between buildings. We'll have four dierent types of buildings,
which later will represent four dierent types of textures when we nally bring in our sprite
sheets. These blocks can have dierent widths and heights.
Block also derives from GameSprite and it also has inline helper methods to retrieve
informaon about its boundaries, but only in relaon to its current posion, since Block
doesn't technically move.
The terrain object
This object contains the individual Block objects that form the landscape. It contains just
enough Block objects to ll the screen, and as the _terrain object scrolls to the le, the
Block objects that leave the screen are moved to the far right side of the _terrain and
reused as new blocks, ensuring connuous scrolling.
www.it-ebooks.info

Chapter 6
[ 107 ]
The _terrain object is also responsible for collision checks with the _player object,
since it has quick access to all informaon we'll need for collision detecon; namely the list
of blocks currently on the screen, their size, type, and posion. Our main loop then will call
on the Terrain object to test for collision with the player object.
Let's work on these main objects, starng with the Player object.
Time for action – coding the player
Open up the Player.cpp class.
1. The _player object is created through a stac method that uses our blank.png
le to texture the sprite. That method also makes a call to initPlayer, and this is
what you should type for that method:
void Player::initPlayer () {
this->setAnchorPoint(Vec2(0.5f, 1.0f));
this->setPosition(Vec2(_screenSize.width * 0.2f, _
nextPosition.y));
_height = 228;
_width = 180;
this->setTextureRect(Rect(0, 0, _width, _height));
this->setColor(Color3B(255,255,255));
}
The _player object will have its registraon point at the top of the sprite.
The reason behind this top center anchor point has much more to do with the
way the _player object will be animated when oang, than with any collision
logic requirements.
2. Next comes setFloating:
void Player::setFloating (bool value) {
if (_floating == value) return;
if (value && _hasFloated) return;
_floating = value;
if (value) {
_hasFloated = true;
_vector.y += PLAYER_JUMP * 0.5f;
}
}
www.it-ebooks.info
Quick and Easy Sprite – Victorian Rush Hour
[ 108 ]
The _hasFloated property will ensure the player can only open the umbrella once
while in the air. And when we set _floating to true, we give the _player.y
vector a boost.
3. We begin the update method of _player with:
void Player::update (float dt) {
if (_speed + P_ACCELERATION <= _maxSpeed) {
_speed += P_ACCELERATION;
} else {
_speed = _maxSpeed;
}
_vector.x = _speed;
The game will increase _maxSpeed of the _player object as me goes on, making
the game more dicult. These rst lines make the change from the _players
current _speed up to _maxSpeed a bit smoother and not an immediate change.
Victorian Rush Hour has no levels, so it's important to figure out a way to
make it incrementally harder to play, and yet not impossible. Finding that
sweet spot in your logic may take some time and it's one more reason to
test game ideas as soon as possible. Here we make the game harder by
increasing the player's speed and the size of the gaps between buildings.
These are updated inside a countdown in the main loop.
4. Next, we update the _player object based on its _state of movement:
switch (_state) {
case kPlayerMoving:
_vector.y -= FORCE_GRAVITY;
if (_hasFloated) _hasFloated = false;
break;
case kPlayerFalling:
if (_floating ) {
_vector.y -= FLOATNG_GRAVITY;
_vector.x *= FLOATING_FRICTION;
} else {
_vector.y -= FORCE_GRAVITY;
_vector.x *= AIR_FRICTION;
_floatingTimer = 0;
}
break;
case kPlayerDying:
www.it-ebooks.info

Chapter 6
[ 109 ]
_vector.y -= FORCE_GRAVITY;
_vector.x = -_speed;
this->setPositionX(this->getPositionX() + _vector.x);
break;
}
We have dierent values for gravity and fricon depending on move state.
We also have a me limit for how long the _player object can be oang,
and we reset that mer when the _player object is not oang. If the _player
object is dying (collided with a wall), we move the _player object backward and
downward unl it leaves the screen.
5. We nish with:
if (_jumping) {
_state = kPlayerFalling;
_vector.y += PLAYER_JUMP * 0.25f;
if (_vector.y > PLAYER_JUMP ) _jumping = false;
}
if (_vector.y < -TERMINAL_VELOCITY)
_vector.y = -TERMINAL_VELOCITY;
_nextPosition.y = this->getPositionY() + _vector.y;
if (_floating) {
_floatingTimer += dt;
if (_floatingTimer > _floatingTimerMax) {
_floatingTimer = 0;
this->setFloating(false);
}
}
}
When the player presses the screen for a jump, we shouldn't make the sprite
jump immediately. Changes in state should always happen smoothly. So we have
a boolean property in _player called _jumping. It is set to true when the player
presses the screen and we slowly add the jump force to _vector.y. So the longer
the player presses the screen, the higher the jump will be and a quick tap will result
in a shorter jump. This is a nice feature to add to any plaorm game.
We next limit the y speed with a terminal velocity, update the next posion of the
_player object, and update the oang mer if _player is oang.
www.it-ebooks.info

Quick and Easy Sprite – Victorian Rush Hour
[ 110 ]
What just happened?
The _player object is updated through a series of states. Touching the screen will make
changes to this _state property, as will the results of collision checking with _terrain.
Now let's work on the Block class.
Time for action – coding the Block object
Once again a stac method, create, will use blank.png to create our Block sprite.
Only this me, we don't actually change the texture rectangle for Block inside create:
1. The Block object is properly textured inside the setupBlock method:
void Block::setupBlock (int width, int height, int type) {
_type = type;
_width = width * _tileWidth;
_height = height * _tileHeight;
this->setAnchorPoint(Vec2(0,0));
this->setTextureRect(Rect(0, 0, _width, _height));
A Block object's appearance will be based on its type, width, and height.
The Block sprite's registraon point is set to top le. And we nally change the
Block object's texture rectangle size here.
2. Then we set the Block object's color based on type:
switch (type) {
case kBlockGap:
this->setVisible(false);
return;
case kBlock1:
this->setColor(Color3B(200,200,200));
break;
case kBlock2:
this->setColor(Color3B(150,150,150));
break;
www.it-ebooks.info

Chapter 6
[ 111 ]
case kBlock3:
this->setColor(Color3B(100,100,100));
break;
case kBlock4:
this->setColor(Color3B(50,50,50));
break;
}
this->setVisible(true);
}
kBlockGap means there is no building, just a gap the _player object must jump.
We make the block invisible in that case and return from the funcon. So again,
gaps are actually types of blocks in our logic.
In this test version, the dierent types of buildings are represented with dierent colors.
Later we'll use dierent textures.
What just happened?
The Block object is very simple. We just need its values for _width and _height
whether it's a gap or not, so we can properly run collision detecon with these objects.
Planning the Terrain class
Before we jump to coding the Terrain class, we need to discuss a few things
regarding randomness.
It is a very common mistake among game developers to confuse randomness with
variableness, and very important to know when you need what.
A random number can be anything. 1234 is a random series of numbers. And the next
me you want a random series of numbers and you once again get 1234 this will be just
as random as the previous one. But not varied.
If you decide to build a random terrain, you will probably be disappointed in the result as
it won't necessarily be varied. Also, remember that we need to make the terrain the key
challenge of the game; but this means it can be neither too easy nor too dicult. True
randomness would not allow us enough control here, or worse, we would end up with a long
list of condionals to make sure we have the correct combinaon of blocks, and that would
result in at least one recurrent funcon inside our main loop, which is not a good idea.
www.it-ebooks.info

Quick and Easy Sprite – Victorian Rush Hour
[ 112 ]
We need instead to control the results and their variableness by applying our own
paerns to them.
So we'll apply this logic of paerns to our _terrain object, forming a kind of pool of
proper random choices. We'll use four arrays to store possible results in our decision
making, and we'll shue three of these arrays during the game to add the "randomness"
feel to our terrain.
These arrays are:
int patterns[] = {1,1,1,1,2,2,2,2,2,2,2,2,2,2,2,3,3,3};
This holds the informaon of how many buildings (Blocks) we have in a row, between gaps.
You can easily change the patterns value just by adding new values or by increasing or
reducing the number of mes one value appears. So here we're making a terrain with far
more groupings of two buildings between gaps, than groups of three or one.
Next, consider the following lines:
int widths[] = {2,2,2,2,2,3,3,3,3,3,3,4,4,4,4,4,4};
int heights[] =
{0,0,0,0,0,0,0,0,0,0,0,1,1,1,1,1,1,1,2,2,2,3,3,3,3,3,3,4};
The preceding lines specify the widths and heights of each new building. These will be
mulplied with the le size determined for our game to get the nal width and height
values as you saw in Block:setupBlock.
We'll use a 0 value for height to mean there is no change in height from the previous
building. A similar logic could be easily applied to widths.
And nally:
int types[] =
{1,2,3,4,1,3,2,4,3,2,1,4,2,3,1,4,2,3,1,2,3,2,3,4,1,2,4,3,1,3,1,4,2,4,
2,1,2,3};
These are building types and this array will not be shued unlike the three previous ones,
so this is the patterns array of types we'll use throughout the game and it will loop
connuously. You can make it as long as you wish.
www.it-ebooks.info

Chapter 6
[ 113 ]
Building the terrain object
So every me we need to create a new block, we'll set it up based on the informaon
contained in these arrays.
This gives us far more control over the terrain, so that we don't create impossible
combinaons of obstacles for the player: a common mistake in randomly-built terrain
for dash games.
But at the same me, we can easily expand this logic to t every possible need. For instance,
we could apply level logic to our game by creang mulple versions of these arrays, so as
the game gets harder, we begin sampling data from arrays that contain parcularly hard
combinaons of values.
And we can sll use a condional loop to rene results even further and I'll give you at
least one example of this.
The values you saw in the patterns arrays will be stored inside the lists called
_blockPattern, _blockWidths, _blockHeights, and _blockTypes.
The Terrain class then takes care of building the game's terrain in three stages.
First we inialize the _terrain object, creang among other things a pool for Block
objects. Then we add the rst blocks to the _terrain object unl a minimum width is
reached to ensure the whole screen is populated with Blocks. And nally we distribute
the various block objects.
Time for action – initializing our Terrain class
We'll go over these steps next:
1. The rst important method to implement is initTerrain:
void Terrain::initTerrain () {
_increaseGapInterval = 5000;
_increaseGapTimer = 0;
_gapSize = 2;
//init object pools
for (int i = 0; i < 20; i++) {
auto block = Block::create();
this->addChild(block);
_blockPool.pushBack(block);
}
www.it-ebooks.info

Quick and Easy Sprite – Victorian Rush Hour
[ 114 ]
_minTerrainWidth = _screenSize.width * 1.5f;
random_shuffle(_blockPattern.begin(), _blockPattern.end());
random_shuffle(_blockWidths.begin(), _blockWidths.end());
random_shuffle(_blockHeights.begin(), _blockHeights.end());
this->addBlocks(0);
}
We have a mer to increase the width of gaps (we begin with gaps two les long).
We create a pool for blocks so we don't instanate any during the game. And 20
blocks is more than enough for what we need.
The blocks we are currently using in the terrain will be stored inside a
_blocks vector.
We determine that the minimum width the _terrain object must have is 1.5
mes the screen width. We'll keep adding blocks unl the _terrain object
reaches this minimum width. We end by shuing the patterns arrays and
adding the blocks.
2. The addBlocks method should look like this:
void Terrain::addBlocks(int currentWidth) {
while (currentWidth < _minTerrainWidth)
{
auto block = _blockPool.at(_blockPoolIndex);
_blockPoolIndex++;
if (_blockPoolIndex == _blockPool.size()) {
_blockPoolIndex = 0;
}
this->initBlock(block);
currentWidth += block->getWidth();
_blocks.pushBack(block);
}
this->distributeBlocks();
}
The logic inside the while loop will connue to add blocks unl currentWidth
of the _terrain object reaches _minTerrainWidth. Every new block we
retrieve from the pool in order to reach _minTerrainWidth gets added to the
_blocks vector.
www.it-ebooks.info

Chapter 6
[ 115 ]
3. Blocks are distributed based on their widths:
void Terrain::distributeBlocks() {
int count = (int) _blocks.size();
int i;
for (i = 0; i < count; i++) {
auto block = _blocks.at(i);
if (i != 0) {
auto prev_block = _blocks.at(i - 1);
block->setPositionX( prev_block->getPositionX() + prev_
block->getWidth());
}
else
{
block->setPositionX ( 0 );
}
}
}
What just happened?
Terrain is a container of Blocks, and we just added the logic that will add a new block
object to this container. Inside addBlocks, we call an initBlock method, which will
use the informaon from our patterns arrays to inialize each block used in the terrain.
It is this method we'll implement next.
Time for action – initializing our Blocks object
Finally, we will discuss the method that inializes the blocks based on our patterns array:
1. So inside the Terrain class, we start the initBlock method as follows:
void Terrain::initBlock(Block * block) {
int blockWidth;
int blockHeight;
int type = _blockTypes[_currentTypeIndex];
_currentTypeIndex++;
if (_currentTypeIndex == _blockTypes.size()) {
_currentTypeIndex = 0;
}
www.it-ebooks.info
Quick and Easy Sprite – Victorian Rush Hour
[ 116 ]
Begin by determining the type of building we are inializing. See how we loop
through the _blockTypes array using the index stored in _currentTypeIndex.
We'll use a similar logic for the other patterns arrays.
2. Then, let's start building our blocks:
if (_startTerrain) {
//...
} else {
_lastBlockHeight = 2;
_lastBlockWidth = rand() % 2 + 2;
block->setupBlock (_lastBlockWidth, _lastBlockHeight, type);
}
The player must tap the screen to begin the game (_startTerrain). Unl then,
we show buildings with the same height (two les) and random width:
We will store _lastBlockHeight and _lastBlockWidth because the
more informaon we have about the terrain the beer we can apply our own
condions to it, as you will see in a moment.
3. Consider that we are set to _startTerrain:
if (_startTerrain) {
if (_showGap) {
int gap = rand() % _gapSize;
if (gap < 2) gap = 2;
block->setupBlock (gap, 0, kBlockGap);
_showGap = false;
} else {
//...
www.it-ebooks.info
Chapter 6
[ 117 ]
In the following screenshot, you can see the dierent widths used for our blocks:
The informaon inside _blockPattern determines how many buildings we
show in a row, and once a series is completed, we show a gap by seng the
boolean value of _showGap to true. A gap's width is based on the current value
of _gapSize, which may increase as the game gets harder and it can't be less than
two mes the le width.
4. If we are not creang a gap this me, we determine the width and height of the new
block based on the current indexed values of _blockWidths and _blockHeights:
} else {
blockWidth = _blockWidths[_currentWidthIndex];
_currentWidthIndex++;
if (_currentWidthIndex == _blockWidths.size()) {
random_shuffle(_blockWidths.begin(),
_blockWidths.end());
_currentWidthIndex = 0;
}
if (_blockHeights[_currentHeightIndex] != 0) {
//change height of next block
blockHeight = _blockHeights[_currentHeightIndex];
//if difference too high, decrease it
if (blockHeight - _lastBlockHeight > 2 && _gapSize ==
2)
www.it-ebooks.info

Quick and Easy Sprite – Victorian Rush Hour
[ 118 ]
{
blockHeight = 1;
}
} else {
blockHeight = _lastBlockHeight;
}
_currentHeightIndex++;
if (_currentHeightIndex == _blockHeights.size()) {
_currentHeightIndex = 0;
random_shuffle(_blockHeights.begin(),
_blockHeights.end());
}
block->setupBlock (blockWidth, blockHeight, type);
_lastBlockWidth = blockWidth;
_lastBlockHeight = blockHeight;
Noce how we reshue the arrays once we are done iterang through them
(random_shuffle).
We use _lastBlockHeight to apply an extra condion to our terrain. We don't
want the next block to be too tall in relaon to the previous building, at least not
in the beginning of the game, which we can determine by checking the value for
_gapSize, which is only increased when the game gets harder.
And if the value from _blockHeights is 0, we don't change the height of the new
building and use instead the same value from _lastBlockHeight.
5. We nish by updang the count in the current series of buildings to determine
whether we should show a gap next, or not:
//select next block series pattern
_currentPatternCnt++;
if (_currentPatternCnt > _blockPattern[_currentPatternIndex]) {
_showGap = true;
//start new pattern
_currentPatternIndex++;
if (_currentPatternIndex == _blockPattern.size()) {
random_shuffle(_blockPattern.begin(),
_blockPattern.end());
_currentPatternIndex = 0;
}
_currentPatternCnt = 1;
}
}
www.it-ebooks.info

Chapter 6
[ 119 ]
What just happened?
We nally got to use our patterns arrays and build the blocks inside the terrain.
The possibilies are endless here in how much control we can have in building our blocks.
But the key idea here is to make sure the game does not become ridiculously hard, and I
advise you to play some more with the values to achieve even beer results (don't take my
choices for granted).
Before we tackle collision, let's add the logic to move and reset the terrain.
Time for action – moving and resetting
We move the terrain inside the move method.
1. The move method receives as a parameter the amount of movement in the x axis:
void Terrain::move (float xMove) {
if (xMove < 0) return;
if (_startTerrain) {
if (xMove > 0 && _gapSize < 5)
_increaseGapTimer += xMove;
if (_increaseGapTimer > _increaseGapInterval) {
_increaseGapTimer = 0;
_gapSize += 1;
}
}
this->setPositionX(this->getPositionX() - xMove);
auto block = _blocks.at(0);
if (_position.x + block->getWidth() < 0) {
auto firstBlock = _blocks.at(0);
_blocks.erase(0);
_blocks.pushBack(firstBlock);
_position.x += block->getWidth();
float width_cnt = this->getWidth() - block->getWidth() - (
_blocks.at(0))->getWidth();
this->initBlock(block);
this->addBlocks(width_cnt);
}
}
www.it-ebooks.info

Quick and Easy Sprite – Victorian Rush Hour
[ 120 ]
The value for xMove comes from the _player speed.
We start by updang the mer that will make the gaps wider. Then we move the
terrain to the le. If aer moving the terrain, a block leaves the screen, we move
the block back to the end of the _blocks vector and reinialize it as a new block
through initBlock.
We make a call to addBlocks just in case the reinialized block made the total
width of the terrain less than the minimum width required.
2. Next, our reset method:
void Terrain::reset() {
this->setPosition(Vec2(0,0));
_startTerrain = false;
int currentWidth = 0;
for (auto block : _blocks) {
this->initBlock(block);
currentWidth += block->getWidth();
}
while (currentWidth < _minTerrainWidth) {
auto block = _blockPool.at(_blockPoolIndex);
_blockPoolIndex++;
if (_blockPoolIndex == _blockPool.size()) {
_blockPoolIndex = 0;
}
_blocks.pushBack(block);
this->initBlock(block);
currentWidth += block->getWidth();
}
this->distributeBlocks();
_increaseGapTimer = 0;
_gapSize = 2;
}
The reset method is called whenever we restart the game. We move _terrain
back to its starng point, and we reinialize all the current Block objects currently
inside the _terrain object. This is done because we are back to _startTerrain
= false, which means all blocks should have the same height and a random width.
If at the end of the reset we need more blocks to reach _minTerrainWidth,
we add them accordingly.
www.it-ebooks.info
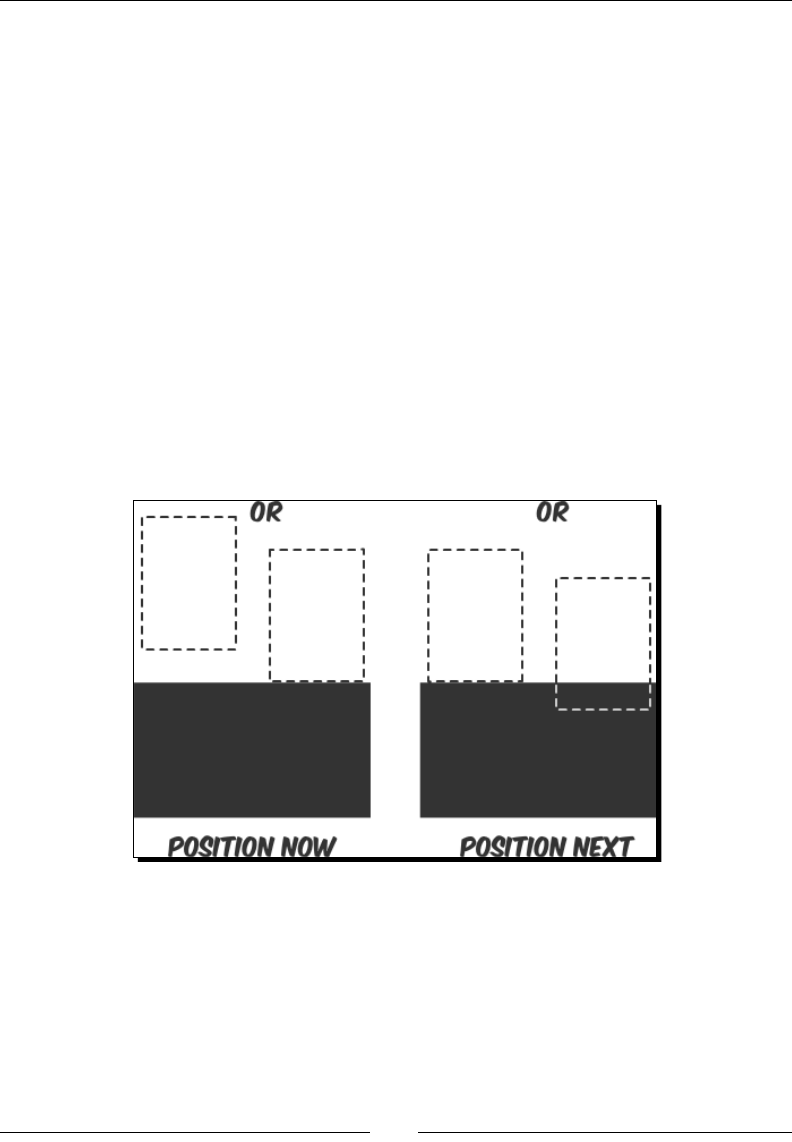
Chapter 6
[ 121 ]
What just happened?
We can now move the _terrain object and all the blocks it contains, and we can restart
the process all over again if we need to.
Once again, using the container behavior of nodes simplied our job tremendously.
When you scroll the terrain, you scroll all the Block objects it contains.
So we are nally ready to run collision logic.
Platform collision logic
We have in place all the informaon we need to check for collision through the inline
methods found in Player and Block.
In this game, we'll need to check collision between the _player object's boom side and
the block object's top side, and between the _player object's right side and the Block
class' le side. And we'll do that by checking the _player object's current posion and its
next posion. We are looking for these condions:
The diagram represents the condions for boom side collision, but the same idea applies
to right side collision.
In the current posion, the _player object must be above the top of the block or
touching it. In the next posion, the _player object must be either touching the top of
the block or already overlapping it (or has moved past it altogether). This would mean a
collision has occurred.
www.it-ebooks.info

Quick and Easy Sprite – Victorian Rush Hour
[ 122 ]
Time for action – adding collision detection
Let's see how that translates to code:
1. Sll in Terrain.cpp:
void Terrain::checkCollision (Player * player) {
if (player->getState() == kPlayerDying) return;
bool inAir = true;
for (auto block : _blocks) {
if (block->getType() == kBlockGap) continue;
//if within x, check y (bottom collision)
if (player->right() >= this->getPositionX() + block->left()
&& player->left() <= this->getPositionX() + block->right()) {
if (player->bottom() >= block->top() && player->next_
bottom() <= block->top() && player->top() > block->top()) {
player->setNextPosition(Vec2(player-
>getNextPosition().x, block->top() + player->getHeight()));
player->setVector ( Vec2(player->getVector().x, 0) );
player->setRotation(0.0);
inAir = false;
break;
}
}
}
First we state that the _player object is currently falling with inAir = true;
we'll let the collision check determine if this will remain true or not.
We don't check the collision if _player is dying and we skip collision checks with
any gap blocks.
We check collision on the y axis, which here means the boom of the _player and
top of the block. We rst need to determine if the _player object is within range of
the block we want to check against collision. This means the center of the _player
object must be between the le and right side of the block; otherwise, the block is
too far from the _player object and may be ignored.
Then we run a basic check to see if there is a collision between the _player
object's current posion and next posion, using the condions I explained earlier.
If so, we x the _player object's posion and change its y vector speed to 0 and
we determine that inAir = false aer all, the _player object has landed.
www.it-ebooks.info

Chapter 6
[ 123 ]
2. Next we check collision on the x axis, meaning the right side of the _player object
with the le side of the blocks:
for (auto block : _blocks) {
if (block->getType() == kBlockGap) continue;
//now if within y, check x (side collision)
if ((player->bottom() < block->top() && player->top() >
block->bottom()) || (player->next_bottom() < block->top() &&
player->next_top() > block->bottom())) {
if (player->right() >= this->getPositionX() + block-
>getPositionX()
&& player->left() < this->getPositionX() + block->getPositionX())
{
player->setPositionX( this->getPositionX() +
block->getPositionX() - player->getWidth() * 0.5f );
player->setNextPosition(Vec2(this->getPositionX() +
block->getPositionX() - player->getWidth() * 0.5f,
player->getNextPosition().y));
player->setVector ( Vec2(player->getVector().x * -0.5f,
player->getVector().y) );
if (player->bottom() + player->getHeight() * 0.2f <
block->top()) {
player->setState(kPlayerDying);
return;
}
break;
}
}
}
Similar steps are used to determine if we have a viable block or not.
If we do have a side collision, the _player state is changed to kPlayerDying,
we reverse its x speed so the _player state will move to the le and o the
screen, and we return from this method.
3. We end by updang the _player object's state based on our collision results:
if (inAir) {
player->setState(kPlayerFalling);
} else {
player->setState(kPlayerMoving);
player->setFloating (false);
}
}
www.it-ebooks.info

Quick and Easy Sprite – Victorian Rush Hour
[ 124 ]
What just happened?
We just added the collision logic to our plaorm game. As we did in our rst game,
Air Hockey, we test the player's current posion for collision as well as its next posion
to determine if a collision occurred between the current iteraon and the next one.
The test simply looks for overlaps between the player's and block's boundaries.
Adding the controls
It is fairly common in a dash game such as this to have very simple controls. Oen the player
must only press the screen for jumping. But we spiced things up a bit, adding a oang state.
And remember we want smooth transions between states, so pay aenon to how jumping
is implemented: not by immediately applying a force to the player's vector but by simply
changing a boolean property and leng the _player object's update method handle the
change smoothly.
We'll handle the touch events next.
Time for action – handling touches
Let's go back to GameLayer.cpp and add our game's nal touches (pun intended).
1. First we work on our onTouchBegan method:
bool GameLayer::onTouchBegan(Touch* touch, Event* event) {
if (!_running) {
if (_player->getState() == kPlayerDying) {
_terrain->reset();
_player->reset();
resetGame();
}
return true;
}
If we are not running the game and the _player object died, we reset the
game on touch.
www.it-ebooks.info

Chapter 6
[ 125 ]
2. Next, if the terrain has not started, insert the following:
if (!_terrain->getStartTerrain()) {
_terrain->setStartTerrain ( true );
return true;
}
Remember that at rst the buildings are all the same height and there are
no gaps. Once the player presses the screen, we begin changing that through
setStartTerrain.
3. We nish with:
if (touch) {
if (_player->getState() == kPlayerFalling) {
_player->setFloating ( _player->getFloating() ? false
: true );
} else {
if (_player->getState() != kPlayerDying) _player-
>setJumping(true);
}
return true;
}
return false;
}
Now we are in play, and if the _player object is falling, we either open or close
the umbrella, whichever the case may be, through a call to setFloating.
And if the _player object is not falling, nor dying, we make it jump with
setJumping(true).
4. With touches ended, we just need to stop any jumps:
void GameLayer::onTouchEnded(Touch* touch, Event* event) {
_player->setJumping(false);
}
What just happened?
We added the logic for the game's controls. The _player object will change to oang if
currently falling or to jumping if currently riding on top of a building.
It's me to add our main game loop.
www.it-ebooks.info

Quick and Easy Sprite – Victorian Rush Hour
[ 126 ]
Time for action – coding the main loop
Finally, it's me for the last part in our logic.
1. Inside GameLayer.cpp:
void GameLayer::update(float dt) {
if (!_running) return;
if (_player->getPositionY() < -_player->getHeight() ||
_player->getPositionX() < -_player->getWidth() * 0.5f)
{
_running = false;
}
If the _player object is o screen, we stop the game.
2. Now update all the elements, posions and check for collision:
_player->update(dt);
_terrain->move(_player->getVector().x);
if (_player->getState() != kPlayerDying)
_terrain->checkCollision(_player);
_player->place();
3. Move _gameBatchNode in relaon to the _player object:
if (_player->getNextPosition().y > _screenSize.height * 0.6f) {
_gameBatchNode->setPositionY( (_screenSize.height *
0.6f - _player->getNextPosition().y) * 0.8f);
} else {
_gameBatchNode->setPositionY ( 0 );
}
www.it-ebooks.info

Chapter 6
[ 127 ]
4. Make the game more dicult as me goes on by increasing the _player object's
maximum speed:
if (_terrain->getStartTerrain() && _player->getVector().x > 0) {
_speedIncreaseTimer += dt;
if (_speedIncreaseTimer > _speedIncreaseInterval) {
_speedIncreaseTimer = 0;
_player->setMaxSpeed (_player->getMaxSpeed() + 4);
}
}
}
What just happened?
We have our test game in place. From here, we can test our terrain paerns, our speeds,
and our general gameplay to nd spots where things could be improved.
We should check in parcular whether the game gets too hard too fast or whether we have
combinaons of buildings that are just impossible to get past.
I nd, for instance, that starng with larger groups of buildings, say four or ve, and then
slowly reducing them to two and one between gaps can make the game even more fun to
play, so the paerns could be changed to reect that idea.
Summary
Every game has a simple idea for its gameplay at its core. But oen, this idea needs a
whole lot of tesng and improvement before we can determine whether it's fun or not,
which is why rapid prototyping is vital.
We can use Cocos2d-x to quickly test core gameplay ideas and run them in the simulator
or on a device in a maer of minutes.
Also, the techniques shown here can be used to build interface elements (such as the
energy bar from our previous game) as well as an enre game! If you don't believe me,
check out the game Square Ball in an App Store near you.
Now, with all the logic for gameplay in its proper place, we can proceed to making this game
look good! We'll do that in the next chapter.
www.it-ebooks.info
[ 129 ]
Adding the Looks – Victorian
Rush Hour
Now that we have our test game, it's time to make it all pretty! We'll go over
the new sprite elements added to make the game look nice, and cover a new
topic or two. However, by now, you should be able to understand everything in
the final code of this project.
So you can sit back and relax a bit. This time, I won't make you type so
much. Promise!
In this chapter, you will learn:
How to use mulple sprites to texture a led terrain
How to use mulple containers inside SpriteBatchNode
How to create a parallax eect
How to add a menu to your game
How to build a game tutorial
7
www.it-ebooks.info

Adding the Looks – Victorian Rush Hour
[ 130 ]
Victorian Rush Hour – the game
Download the 4198_07_START_PROJECT.zip le from this book's Support page
(www.packtpub.com/support) and run the project in Xcode. You should be able to
recognize all the work we did in the test version, and pinpoint the few extra elements.
You will also see that nothing was added to the actual gameplay.
In Victorian Rush Hour, I wanted to make the terrain the main challenge in the game,
but I also wanted to show you how easily you can add new elements to the buildings
and interact with them.
You can later use the same logic to add enemies, obstacles, or pickups for the cyclist sprite.
All you need to do really is extend the collision detecon logic to check for the new items.
You could, for instance, add umbrellas as pickups, and every me the _player object
oated, he would be minus one umbrella.
Next, I'll list the new elements added to the game.
New sprites
Quite a few sprites were added to our game:
There is a group of cyclists at the beginning of the game represenng the trac.
We add a background layer (cityscape) and a foreground layer (lamp posts)
to help us with our parallax eect. The clouds in the background are also part of
the eect.
We add chimneys to the buildings. These pu smoke as the player taps the screen.
www.it-ebooks.info
Chapter 7
[ 131 ]
And, of course, the usual stu—score label, game logo, and a game over message.
In the following screenshot, you can see an image of the player sprite and the
group of cyclists:
Animations
Some of the sprites now run animaon acons:
The _player sprite runs an animaon showing him riding the bicycle
(_rideAnimation).
I also added our old friend, the swinging animaon, shown when the _player
sprite is oang (_floatAnimation). This is the reason for the odd registraon
point on the cyclist sprite, as the swing animaon looks beer if the sprite's anchor
point is not centered.
Our group of cyclists is also animated during the introducon secon of the game,
and is moved oscreen when the game starts (_jamAnimate, _jamMove).
We show a pu of smoke coming out of the chimneys whenever the player jumps.
This animaon is stored inside the new Block.cpp class and it's created through
a series of acons, including a frame animaon (_puffAnimation, _puffSpawn,
_puffMove, _puffFade, and _puffScale).
In GameLayer.cpp, when the _player object dies, we run a few acons on a _hat
sprite to make it rise in the air and drop down again, just to add some humor.
Now let's go over the added logic.
Texturing our buildings with sprites
So in the test version we just coded, our game screen was divided into les of 128 pixels in
the iPad rena screen. The width and height properes of the Block objects are based on
this measurement. So a building two les wide and three les tall would have, in eect, 256
pixels in width and 384 pixels in height. A gap too would be measured this way, though its
height is set to 0.
www.it-ebooks.info
Adding the Looks – Victorian Rush Hour
[ 132 ]
The logic we use to texture the buildings will take these les into account.
So let's take a look at the code to add texture to our buildings.
Time for action – texturing the buildings
There are a few changes to the way the initBlock method runs now:
1. Each block will store references to four dierent types of texture, represenng the
four types of buildings used in the game (_tile1, _tile2, _tile3, and _tile4).
So we now store that informaon in the initBlock method:
void Block::initBlock() {
_tile1 = SpriteFrameCache::getInstance()-
>getSpriteFrameByName ("building_1.png");
_tile2 = SpriteFrameCache::getInstance()-
>getSpriteFrameByName ("building_2.png");
_tile3 = SpriteFrameCache::getInstance()-
>getSpriteFrameByName ("building_3.png");
_tile4 = SpriteFrameCache::getInstance()-
>getSpriteFrameByName ("building_4.png");
2. Each block also stores references to two types of textures for the building roof le
(_roof1 and _roof2):
_roof1 = SpriteFrameCache::getInstance()->
getSpriteFrameByName ("roof_1.png");
_roof2 = SpriteFrameCache::getInstance()-
>getSpriteFrameByName ("roof_2.png");
3. Next, we create and distribute the various sprite les that form our building:
//create tiles
for (int i = 0; i < 5; i++) {
auto tile = Sprite::createWithSpriteFrameName("roof_1.png");
www.it-ebooks.info

Chapter 7
[ 133 ]
tile->setAnchorPoint(Vec2(0, 1));
tile->setPosition(Vec2(i * _tileWidth, 0));
tile->setVisible(false);
this->addChild(tile, kMiddleground, kRoofTile);
_roofTiles.pushBack(tile);
for (int j = 0; j < 4; j++) {
tile =
Sprite::createWithSpriteFrameName("building_1.png");
tile->setAnchorPoint(Vec2(0, 1));
tile->setPosition(Vec2(i * _tileWidth, -1 *
(_tileHeight * 0.47f + j * _tileHeight)));
tile->setVisible(false);
this->addChild(tile, kBackground, kWallTile);
_wallTiles.pushBack(tile);
}
}
A block comprises 20 sprites stored inside a _wallTiles vector and ve sprites
stored in a _roofTiles vector. So, when we inialize a Block object, we in eect
create a building that is ve les wide and four les tall. I made the decision that no
building in the game would exceed this size. If you decide to change this, then here
is where you would need to do it.
4. The initBlock method also creates ve chimney sprites and places them at the
top of the building. These will be spread out later according to the building type and
could be very easily turned into obstacles for our _player sprite. We also create
the animaon acons for the pus of smoke, here inside initBlock.
5. Moving on to our new setupBlock method, this is where the unnecessary les and
chimneys are turned invisible and where we spread out the visible chimneys. We
begin the method as follows:
void Block::setupBlock (int width, int height, int type) {
this->setPuffing(false);
_type = type;
_width = width * _tileWidth;
//add the roof height to the final height of the block
_height = height * _tileHeight + _tileHeight * 0.49f;
this->setPositionY(_height);
www.it-ebooks.info

Adding the Looks – Victorian Rush Hour
[ 134 ]
SpriteFrame * wallFrame;
SpriteFrame * roofFrame = rand() % 10 > 6 ? _roof1 :
_roof2;
int num_chimneys;
float chimneyX[] = {0,0,0,0,0};
6. Then, based on building type, we give dierent x posions for the chimney sprites
and determine the texture we'll use on the wall les:
switch (type) {
case kBlockGap:
this->setVisible(false);
return;
case kBlock1:
wallFrame = _tile1;
chimneyX[0] = 0.2f;
chimneyX[1] = 0.8f;
num_chimneys = 2;
break;
case kBlock2:
wallFrame = _tile2;
chimneyX[0] = 0.2f;
chimneyX[1] = 0.8f;
chimneyX[2] = 0.5f;
num_chimneys = 3;
break;
case kBlock3:
wallFrame = _tile3;
chimneyX[0] = 0.2f;
chimneyX[1] = 0.8f;
chimneyX[2] = 0.5f;
num_chimneys = 3;
break;
case kBlock4:
wallFrame = _tile4;
chimneyX[0] = 0.2f;
chimneyX[1] = 0.5f;
num_chimneys = 2;
break;
}
www.it-ebooks.info

Chapter 7
[ 135 ]
7. The method then proceeds to posion the visible chimneys. And we nally move
to texturing the building. The logic to texture the roof and wall les is the same; for
instance, here's how the walls are led by changing the texture of each wall sprite
through the setDisplayFrame method and then turning unused les invisible:
count = _wallTiles->count();
for (i = 0; i < count; i++) {
tile = (Sprite *) _wallTiles->objectAtIndex(i);
if (tile->getPositionX() < _width && tile
->getPositionY() > -_height) {
tile->setVisible(true);
tile->setDisplayFrame(wallFrame);
} else {
tile->setVisible(false);
}
}
}
What just happened?
When we instanate a block in initBlock, we create a 5 x 4 building made out of wall les
and roof les, each a sprite. And when we need to turn this building into a 3 x 2 building,
or a 4 x 4 building, or whatever, we simply turn the excess les invisible at the end of
setupBlock.
The texture used for the roof is picked randomly, but the one picked for the walls is based
on building type (from our patterns array). It is also inside this for loop that all the les
posioned at a point greater than the new building's width and height are turned invisible.
Containers within containers
Before we move to the parallax eect logic, there is something I wanted to talk about
related to the layering of our _gameBatchNode object, which you'll recall is a
SpriteBatchNode object.
If you go to the stac create method inside Terrain.cpp, you will noce that the object is
sll created with a reference to a blank.png texture:
terrain->initWithSpriteFrameName("blank.png")
www.it-ebooks.info

Adding the Looks – Victorian Rush Hour
[ 136 ]
In fact, the same 1 x 1 pixel image used in the test version is now in our sprite sheet,
only this me the image is transparent.
This is a bit of a hack, but necessary, because a sprite can only be placed inside a batch
node if its texture source is the same used to create the batch node. But Terrain is just a
container, it has no texture. However, by seng its blank texture to something contained
in our sprite sheet, we can place _terrain inside _gameBatchNode.
The same thing is done with the Block class, which now, in the nal version of the game,
behaves like another textureless container. It will contain the various sprites for the wall
and roof les as well as chimneys and pu animaons as its children.
The organizaon of the layers inside our _gameBatchNode object can seem complex and at
mes even absurd. Aer all, in the same node, we have a foreground "layer" of lampposts,
a middle-ground "layer" of buildings, and a background "layer" containing a cityscape. The
player is also placed in the background but on top of the cityscape. Not only that, but all
three layers are moved at dierent speeds to create our parallax eect, and all this inside
the same SpriteBatchNode!
But the amount of code this arrangement saves us juses any confusion we might have
at mes when aempng to keep the batch node organized. Now we can animate the
pus of smoke, for instance, and never worry about keeping them "aached" to their
respecve chimney sprite as the terrain scrolls to the le. The container will take care
of keeping things together.
Creating a parallax effect
Cocos2d-x has a special node called ParallaxNode, and one surprising thing about it is
how lile you get to use it! ParallaxNode helps create a parallax eect with nite layers,
or nite scrolling, which means that you can use it if your game screen has a limit to how
much it can scroll each way. Implemenng ParallaxNode to a game screen that can scroll
indenitely, such as the one in Victorian Rush Hour, usually requires more eort than it takes
to build your own eect.
A parallax eect is created by moving objects at dierent depths at dierent speeds.
The farther a layer appears from the screen, the slower its speed should be. In a game,
this usually means that the player sprite's speed is fraconed to all the layers that appear
behind it, and mulplied for the layers that appear in front of the player sprite:
www.it-ebooks.info
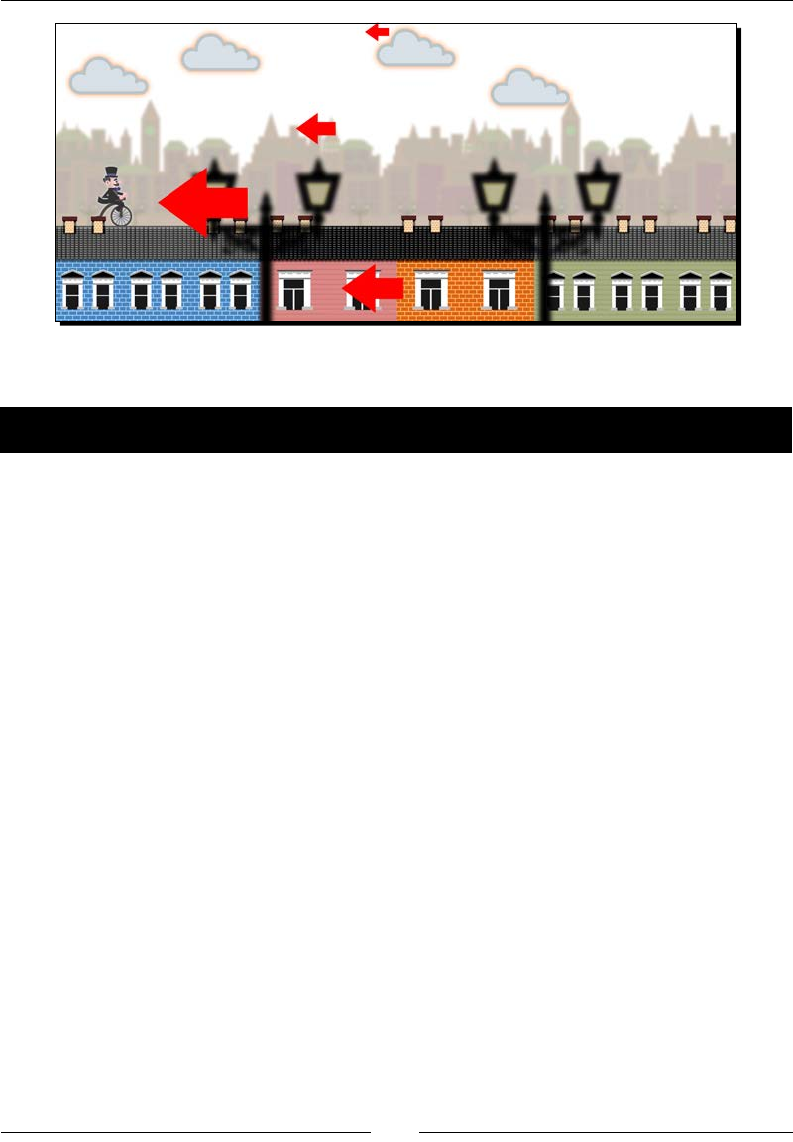
Chapter 7
[ 137 ]
Let's add this to our game.
Time for action – creating a parallax effect
The parallax eect in our game takes place inside the main loop:
1. So in our update method, you will nd the following lines of code:
if (_player->getVector().x > 0) {
_background->setPositionX(_background->getPosition().x -
_player->getVector().x * 0.25f);
First, we move the _background sprite, which contains the cityscape texture
repeated three mes along the x axis, and we move it at one-fourth of the speed
of the _player sprite.
2. The _background sprite scrolls to the le, and as soon as the rst cityscape texture
is o the screen, we shi the enre _background container to the right at precisely
the spot where the second cityscape texture would appear if allowed to connue.
We get this value by subtracng where the sprite would be from the total width of
the sprite:
float diffx;
if (_background->getPositionX() < -_background
->getContentSize().width) {
diffx = fabs(_background->getPositionX()) - _background
->getContentSize().width;
_background->setPositionX(-diffx);
}
So, in eect, we only ever scroll the rst texture sprite inside the container.
www.it-ebooks.info

Adding the Looks – Victorian Rush Hour
[ 138 ]
3. A similar process is repeated with the _foreground sprite and the three lamppost
sprites it contains. Only the _foreground sprite moves at four mes the speed of
the _player sprite. These are coded as follows:
_foreground->setPositionX(_foreground->getPosition().x - _player-
>getVector().x * 4);
if (_foreground->getPositionX() < -_foreground
->getContentSize().width * 4) {
diffx = fabs(_foreground->getPositionX()) - _foreground
->getContentSize().width * 4;
_foreground->setPositionX(-diffx);
}
4. We also employ our cloud sprites in the parallax eect. Since they appear behind
the cityscape, so even farther away from _player, the clouds move at an even
lower rate (0.15):
for (auto cloud : _clouds) {
cloud->setPositionX(cloud->getPositionX() - _player-
>getVector().x * 0.15f);
if (cloud->getPositionX() + cloud->getBoundingBox().size.width
* 0.5f < 0 ) {
cloud->setPositionX(_screenSize.width + cloud-
>getBoundingBox().size.width * 0.5f);
}
}
What just happened?
We just added the parallax eect in our game by simply using the player speed at dierent
raos at dierent depths. The only slightly complicated part of the logic is how to ensure the
sprites scroll connuously. But the math of it is very simple. You just need to make sure the
sprites align correctly.
Adding a menu to our game
Right now, we only see the game logo on our introducon screen. We need to add buons to
start the game and also for the opon to play a tutorial.
In order to do that, we'll use a special kind of Layer class, called Menu.
www.it-ebooks.info
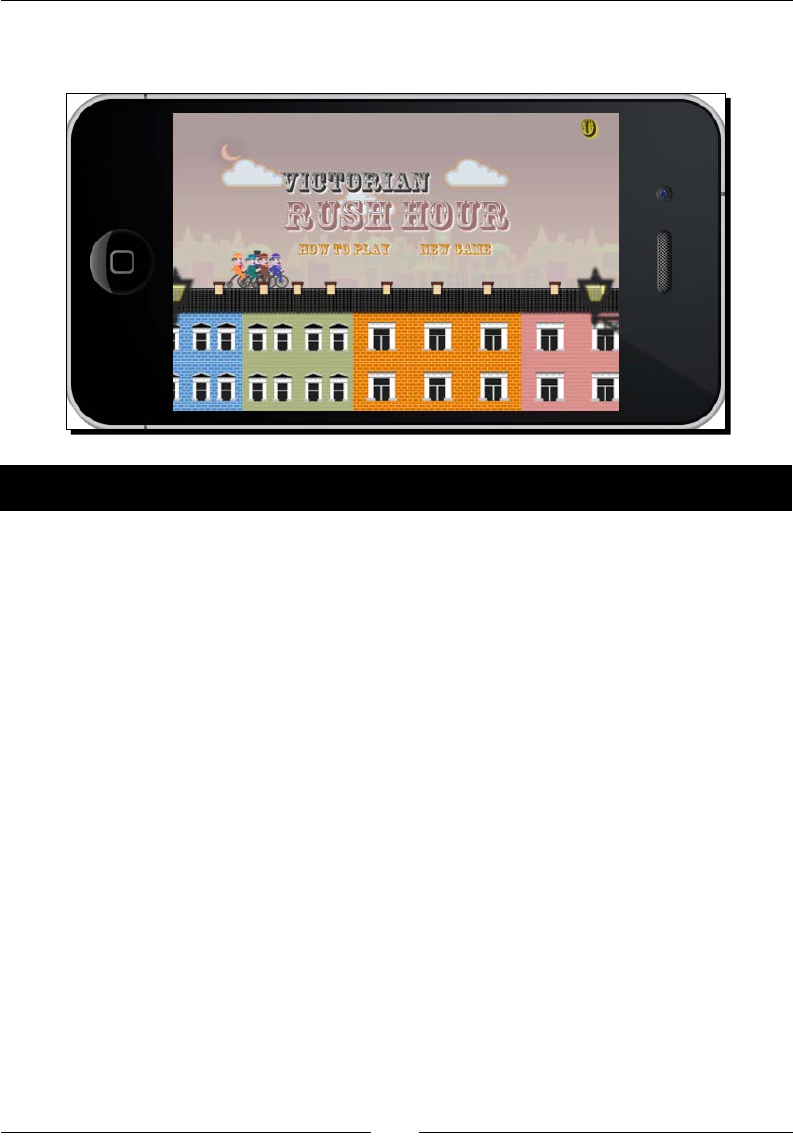
Chapter 7
[ 139 ]
Menu is a collecon of MenuItems. The layer is responsible for distribung its items as well
as tracking touch events on all items. Items can be sprites, labels, images, and so on.
Time for action – creating Menu and MenuItem
In GameLayer.cpp, scroll down to the createGameScreen method. We'll add the new
logic to the end of this method.
1. First, create the menu item for our start game buon:
auto menuItemOn =
Sprite::createWithSpriteFrameName("btn_new_on.png");
auto menuItemOff =
Sprite::createWithSpriteFrameName("btn_new_off.png");
auto starGametItem = MenuItemSprite::create( menuItemOff,
menuItemOn, CC_CALLBACK_1(GameLayer::startGame, this));
We create a MenuItemSprite object by passing it one sprite per state of the
buon. When the user touches a MenuItemSprite object, the o state sprite is
turned invisible and the on state sprite is turned visible, all inside the touch began
event. If the touch is ended or cancelled, the o state is displayed once again.
We also pass the callback funcon for this item; in this case,
GameLayer::StartGame.
www.it-ebooks.info

Adding the Looks – Victorian Rush Hour
[ 140 ]
2. Next, we add the tutorial buon:
menuItemOn =
Sprite::createWithSpriteFrameName("btn_howto_on.png");
menuItemOff =
Sprite::createWithSpriteFrameName("btn_howto_off.png");
auto howToItem = MenuItemSprite::create( menuItemOff,
menuItemOn, CC_CALLBACK_1(GameLayer::showTutorial, this));
3. Then it's me to create the menu:
_mainMenu = Menu::create(howToItem, starGametItem, nullptr);
_mainMenu->alignItemsHorizontallyWithPadding(120);
_mainMenu->setPosition(Vec2(_screenSize.width *
0.5f, _screenSize.height * 0.54));
this->addChild(_mainMenu, kForeground);
The Menu constructor can receive as many MenuItemSprite objects as you
wish to display. These items are then distributed with one of the following calls:
alignItemsHorizontally, alignItemsHorizontallyWithPadding,
alignItemsHorizontally, alignItemsVerticallyWithPadding,
alignItemsInColumns, and alignItemsInRows. And the items appear
in the order they are passed to the Menu constructor.
4. Then we need to add our callback funcons:
void GameLayer::startGame (Ref* pSender) {
_tutorialLabel->setVisible(false);
_intro->setVisible(false);
_mainMenu->setVisible(false);
_jam->runAction(_jamMove);
SimpleAudioEngine::getInstance()
->playEffect("start.wav");
_terrain->setStartTerrain ( true );
_state = kGamePlay;
}
void GameLayer::showTutorial (Ref* pSender) {
_tutorialLabel->setString
("Tap the screen to make the player jump.");
_state = kGameTutorialJump;
_jam->runAction(_jamMove);
_intro->setVisible(false);
_mainMenu->setVisible(false);
SimpleAudioEngine::getInstance()
->playEffect("start.wav");
www.it-ebooks.info
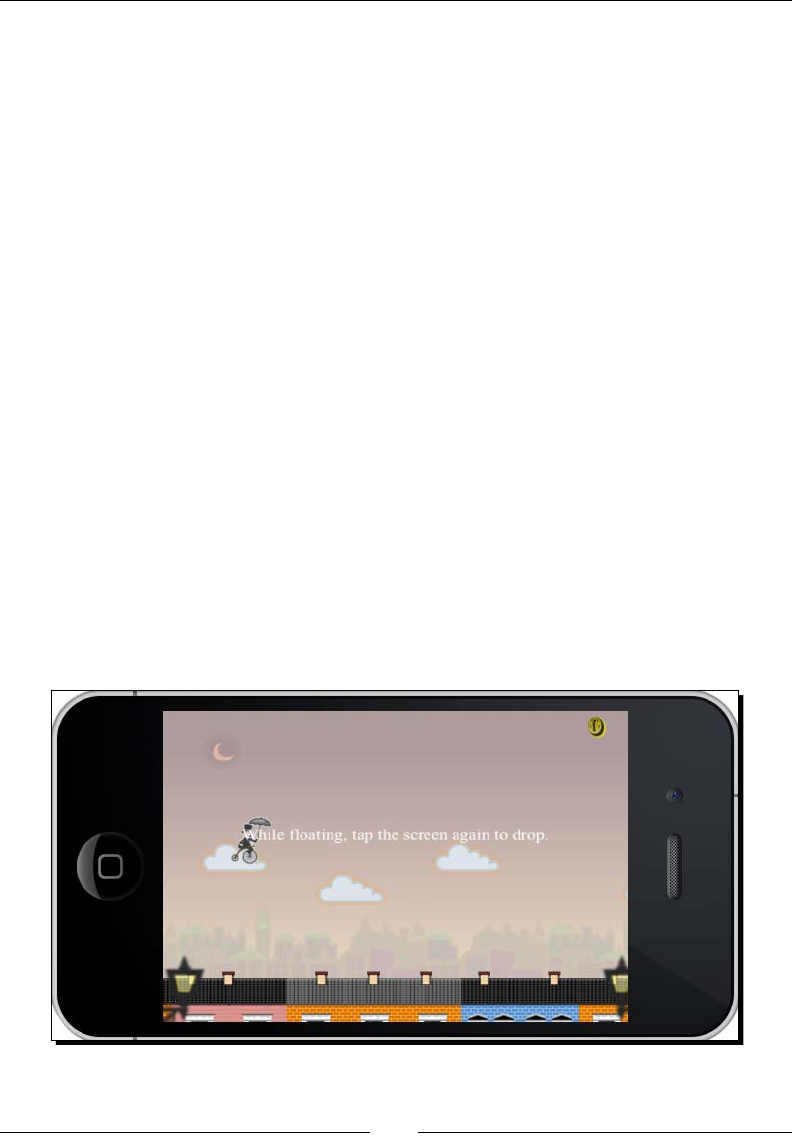
Chapter 7
[ 141 ]
_tutorialLabel->setVisible(true);
}
These are called when our menu buons are clicked on, one method to start the
game and one to show the tutorial.
What just happened?
We just created our game's main menu. Menu can save us a lot of me handling all the
interacvity logic of buons. Though it might not be as exible as other items in Cocos2d-x,
it's sll good to know it's there if we need it.
We'll tackle the tutorial secon next.
Adding a tutorial to our game
Let's face it. With the possible excepon of Air Hockey, every game so far in this book could
benet from a tutorial, or a "how to play" secon. With Victorian Rush Hour, I'm going to
show you a quick way to implement one.
The unspoken rule of game tutorials is—make it playable. And that's what we'll aempt to
do here.
We'll create a game state for our tutorial, and we'll add a Label object to our stage and
make it invisible unless the tutorial state is on. We'll use the Label object to display our
tutorial text, as shown in the image here:
Let's go over the steps necessary to create our game tutorial.
www.it-ebooks.info

Adding the Looks – Victorian Rush Hour
[ 142 ]
Time for action – adding a tutorial
Let's move back to our createGameScreen method.
1. Inside that method, add the following lines to create our Label object:
_tutorialLabel = Label::createWithTTF("", "fonts/Times.ttf", 60);
_tutorialLabel->setPosition(Vec2 (_screenSize.width *
0.5f, _screenSize.height * 0.6f) );
this->addChild(_tutorialLabel, kForeground);
_tutorialLabel->setVisible(false);
2. We add four states to our enumerated list of game states. These will represent the
dierent steps in our tutorial:
typedef enum {
kGameIntro,
kGamePlay,
kGameOver,
kGameTutorial,
kGameTutorialJump,
kGameTutorialFloat,
kGameTutorialDrop
} GameState;
The rst tutorial state, kGameTutorial, acts as a separator from all other game
states. So, if the value for _state is greater than kGameTutorial, we are in
tutorial mode.
Now, depending on the mode, we display a dierent message and we wait on a
dierent condion to change to a new tutorial state.
3. If you recall, our showTutorial method starts with a message telling the player to
tap the screen to make the sprite jump:
_tutorialLabel->setString
("Tap the screen to make the player jump.");
_state = kGameTutorialJump;
4. Then, at the end of the update method, we start adding the lines that will display
the rest of our tutorial informaon. First, if the player sprite is in the midst of a
jump and has just begun falling, we use the following:
if (_state > kGameTutorial) {
if (_state == kGameTutorialJump) {
www.it-ebooks.info

Chapter 7
[ 143 ]
if (_player->getState() == kPlayerFalling && _player
->getVector().y < 0) {
_player->stopAllActions();
_jam->setVisible(false);
_jam->stopAllActions();
_running = false;
_tutorialLabel->setString
("While in the air, tap the screen to float.");
_state = kGameTutorialFloat;
}
As you can see, we let the player know that another tap will open the umbrella and
cause the sprite to oat.
5. Next, as the sprite is oang, when it reaches a certain distance from the buildings,
we inform the player that another tap will close the umbrella and cause the sprite to
drop. Here's the code for these instrucons:
} else if (_state == kGameTutorialFloat) {
if (_player->getPositionY() < _screenSize.height *
0.95f) {
_player->stopAllActions();
_running = false;
_tutorialLabel->setString
("While floating, tap the screen again to drop.");
_state = kGameTutorialDrop;
}
6. Aer that, the tutorial will be complete and we show the message that the player
may start the game:
} else {
_tutorialLabel->setString
("That's it. Tap the screen to play.");
_state = kGameTutorial;
}
}
Whenever we change a tutorial state, we pause the game momentarily and wait for
a tap. We handle the rest of our logic inside onTouchBegan, so we'll add that next.
7. Inside onTouchBegan, in the switch statement, add the following cases:
case kGameTutorial:
_tutorialLabel->setString("");
_tutorialLabel->setVisible(false);
www.it-ebooks.info

Adding the Looks – Victorian Rush Hour
[ 144 ]
_terrain->setStartTerrain ( true );
_state = kGamePlay;
break;
case kGameTutorialJump:
if (_player->getState() == kPlayerMoving) {
SimpleAudioEngine::getInstance()
->playEffect("jump.wav");
_player->setJumping(true);
}
break;
case kGameTutorialFloat:
if (!_player->getFloating()) {
_player->setFloating (true);
_running = true;
}
break;
case kGameTutorialDrop:
_player->setFloating (false);
_running = true;
break;
What just happened?
We added a tutorial to our game! As you can see, we used quite a few new states.
But now we can incorporate the tutorial right into our game and have one ow smoothly
into the other. All these changes can be seen in acon in the nal version of this project,
4198_07_FINAL_PROJECT.zip, which you can nd on this book's Support page.
Now, you guessed it, let's run it in Android.
Time for action – running the game in Android
Follow these steps to deploy the game to Android:
1. Open your project's Android.mk le in a text editor.
2. Edit the lines in LOCAL_SRC_FILES to read:
LOCAL_SRC_FILES := hellocpp/main.cpp \
../../Classes/AppDelegate.cpp \
../../Classes/Block.cpp \
www.it-ebooks.info

Chapter 7
[ 145 ]
../../Classes/GameSprite.cpp \
../../Classes/Player.cpp \
../../Classes/Terrain.cpp \
../../Classes/GameLayer.cpp
3. Import the game into Eclipse and wait unl all classes are compiled.
4. That's it. Save it and run your applicaon.
What just happened?
You now have Victorian Rush Hour running in Android.
Summary
Aer we got all the gameplay details ironed out in our test game, bringing in a sprite sheet
and game states seems remarkably simple and easy.
But during this stage, we can also think of new ways to improve gameplay. For instance,
the realizaon that clouds of smoke coming out of chimneys would oer a nice visual cue
to the player to idenfy where the buildings were, if the cyclist happened to jump too high.
Or that a hat ying through the air could be funny!
Now it's me to bring physics to our games, so head on to the next chapter.
www.it-ebooks.info

[ 147 ]
Getting Physical – Box2D
It's time to tackle physics! Cocos2d-x comes bundled with Box2D and Chipmunk.
These are so-called 2D physics engines – the first written in C++ and the second
in C. Chipmunk has a more recent Objective-C port but Cocos2d-x must use the
original one written in C for portability.
We'll be using Box2D for the examples in this book. The next two games I'll
show you will be developed with that engine, starting with a simple pool game
to illustrate all the main points about using Box2D in your projects.
In this chapter, you will learn:
How to set up and run a Box2D simulaon
How to create bodies
How to use the debug draw feature to quickly test your concepts
How to use collision lters and listeners
Building a Box2D project with Cocos2d-x
With version 3.x of the framework, we no longer need to specify that we want to use a
physics engine. The projects add these APIs by default. So, all you need in order to create
a Box2D project is to create a regular Cocos2d-x project as we've been doing with the
examples so far.
There is, however, one extra step you need to perform if you wish to use something called a
debug draw in your project. So let's set that up now.
8
www.it-ebooks.info

Geng Physical – Box2D
[ 148 ]
Time for action – using debug draw in your Box2D project
Let's start by creang the project. In my machine, I created a game called MiniPool in my
desktop. Here are the steps:
1. Open Terminal and enter the following command:
cocos new MiniPool -p com.rengelbert.MiniPool -l cpp -d /Users/
rengelbert/Desktop/MiniPool
2. Open the new project in Xcode.
3. Now navigate to the Tests folder inside the Cocos2d-x framework folder. This can
be found in tests/cpp-tests/Classes. Then open the Box2DTestBed folder.
4. Drag the les GLES-Render.h and GLES-Render.cpp to your project in Xcode.
5. You can also open the Box2dTest.cpp class in the test folder Box2DTest,
as we're going to copy and paste a few of the methods from there.
6. In the HelloWorldScene.h header le, leave the includes in place, but change
the class declaraons to match these:
class HelloWorld : public cocos2d::Layer {
public:
virtual ~HelloWorld();
HelloWorld();
static cocos2d::Scene* scene();
void initPhysics();
void update(float dt);
virtual void draw(Renderer *renderer, const Mat4 &transform,
uint32_t flags) override;
private:
GLESDebugDraw * _debugDraw;
b2World* world;
Mat4 _modelViewMV;
void onDraw();
CustomCommand _customCommand;
};
7. Then add this include statement at the top:
#include "GLES-Render.h"
www.it-ebooks.info

Chapter 8
[ 149 ]
8. Then, in the HelloWorldScene.cpp implementaon le, replace the lines
between the using namespace CocosDenshion and HelloWorld::scene
methods with these:
#define PTM_RATIO 32
HelloWorld::HelloWorld()
{
this->initPhysics();
scheduleUpdate();
}
HelloWorld::~HelloWorld()
{
delete world;
world = nullptr;
delete _debugDraw;
_debugDraw = nullptr;
}
void HelloWorld::initPhysics() {
b2Vec2 gravity;
gravity.Set(0.0f, -10.0f);
world = new b2World(gravity);
// Do we want to let bodies sleep?
world->SetAllowSleeping(true);
world->SetContinuousPhysics(true);
_debugDraw = new (std::nothrow) GLESDebugDraw( PTM_RATIO );
world->SetDebugDraw(_debugDraw);
uint32 flags = 0;
flags += b2Draw::e_shapeBit;
// flags += b2Draw::e_jointBit;
// flags += b2Draw::e_aabbBit;
// flags += b2Draw::e_pairBit;
// flags += b2Draw::e_centerOfMassBit;
_debugDraw->SetFlags(flags);
}
www.it-ebooks.info

Geng Physical – Box2D
[ 150 ]
void HelloWorld::update(float dt)
{
world->Step(dt, 8, 1);
}
9. Now comes the implementaon of the draw methods. You can copy and paste
most of this code from the Box2DTest folder:
void GameLayer::draw(Renderer *renderer, const Mat4 &transform,
uint32_t flags)
{
//
// IMPORTANT:
// This is only for debug purposes
// It is recommended to disable it
//
Layer::draw(renderer, transform, flags);
GL::enableVertexAttribs( cocos2d::GL::VERTEX_ATTRIB_FLAG_
POSITION );
auto director = Director::getInstance();
CCASSERT(nullptr != director, "Director is null when setting
matrix stack");
director->pushMatrix(MATRIX_STACK_TYPE::MATRIX_STACK_
MODELVIEW);
_modelViewMV = director->getMatrix(MATRIX_STACK_TYPE::MATRIX_
STACK_MODELVIEW);
_customCommand.init(_globalZOrder);
_customCommand.func = CC_CALLBACK_0(GameLayer::onDraw, this);
renderer->addCommand(&_customCommand);
director->popMatrix(MATRIX_STACK_TYPE::MATRIX_STACK_
MODELVIEW);
}
void GameLayer::onDraw()
{
auto director = Director::getInstance();
Mat4 oldMV;
oldMV = director->getMatrix(MATRIX_STACK_TYPE::MATRIX_STACK_
MODELVIEW);
www.it-ebooks.info

Chapter 8
[ 151 ]
director->loadMatrix(MATRIX_STACK_TYPE::MATRIX_STACK_
MODELVIEW, _modelViewMV);
_world->DrawDebugData();
director->loadMatrix(MATRIX_STACK_TYPE::MATRIX_STACK_
MODELVIEW, oldMV);
}
What just happened?
The GLES-Render class is necessary to use the debug draw feature in Box2D. This will draw
all the elements from the simulaon on the screen. The debug draw object is created inside
the initPhysics method alongside the Box2D simulaon (b2World). We'll go over that
logic in a moment.
As the comment inside the draw method states, the debug draw feature should be switched
o once you're done developing your game. So all the lines pertaining to that object as well
as the draw method should be commented out when you're ready for a release version.
So what is a physics engine?
The famous Isaac Newton said, every acon has a reacon. Right aer he said, who the hell
threw that apple?
So far in our games, we have covered very simple collision systems, basically only ever
checking to see if simple shapes (circles and rectangles) overlapped each other. The reacons
from these collisions were also very simple in our games so far: with vector inversions or
simply by making things disappear once they touch. With Box2D, you get way more!
Box2D is a very robust collision detecon engine and can certainly be used just for that
purpose. But the simulaon will also process and return a bunch of informaon derived from
the collisions and the interacons between bodies, meaning how the objects should behave,
based on their shapes, mass, and all the forces at play in the simulaon.
Meeting Box2D
At the core of the engine, you have the b2World object. This is the simulaon.
You ll the world with b2Body objects, and then you step through the simulaon with
b2World->Step(). And you take the results of the simulaon and display them to the
user through your sprites, by grabbing a b2Body object's posion and rotaon and applying
them to a sprite.
The debug draw object allows you to see the simulaon without using any sprites. Sort of
like a version of our test project from Chapter 6, Quick and Easy Sprite – Victorian Rush Hour.
www.it-ebooks.info

Geng Physical – Box2D
[ 152 ]
Meeting the world
Most of the me, the physics simulaon will mean the creaon of a b2World object.
Note, however, that you can get interesng results managing more than one world
object in the same game, for mulple views for instance. But that's for another book.
In our simplied basic project, the world is created like this:
b2Vec2 gravity;
gravity.Set(0.0f, -10.0f);
world = new b2World(gravity);
// Do we want to let bodies sleep?
world->SetAllowSleeping(true);
world->SetContinuousPhysics(true);
_debugDraw = new (std::nothrow) GLESDebugDraw( PTM_RATIO );
world->SetDebugDraw(_debugDraw);
uint32 flags = 0;
flags += b2Draw::e_shapeBit;
// flags += b2Draw::e_jointBit;
// flags += b2Draw::e_aabbBit;
// flags += b2Draw::e_pairBit;
// flags += b2Draw::e_centerOfMassBit;
_debugDraw->SetFlags(flags);
Box2D has its own vector structure, b2Vec2, and we use it here to create the world's gravity.
The b2World object receives that as its parameter. A simulaon does not always require
gravity, of course; in that case, the argument will be a (0, 0) vector.
SetAllowSleeping means if objects are not moving and therefore not generang derived
data, skip checking for derived data from those objects.
SetContinuousPhysics means we have some fast objects in our hands, which we'll later
point out to the simulaon, so it can pay extra aenon for collisions.
Then we create the debug draw object. This is oponal, as I said before. The ags indicate
what you wish to see in the drawing. In the code we saw before, we only want to see the
shapes of the objects.
Then comes PTM_RATIO, the dened constant we passed as a parameter to the debug draw.
Box2D uses meters instead of pixels for a variety of reasons that are really enrely unnecessary
for anyone to know. Except for one reason, pixel to meter (PTM), so every pixel posion value
used in the game will be divided by this rao constant. If the result from this division ever gets
above 10 or below 0.1, increase or decrease the value for PTM_RATIO accordingly.
www.it-ebooks.info
Chapter 8
[ 153 ]
You have some leeway, of course. By all means, play with this value once your game is
completed, and pay special aenon to the subtle dierences in speed (another common
value for this rao is 100).
Running the simulation
As I said before, you use the Step method to run the simulaon, usually inside your main
loop, though not necessarily:
world->Step(dt, 8, 1);
You need to pass it the me step, here represented by the delta me in the main loop.
Then pass the number of velocity iteraons and posion iteraons in the step. This basically
means how many mes velocity and posion will be processed inside a step.
In the previous example, I'm using the default values from the Box2D template in Cocos2d-x.
Usually, a xed me step is beer than the delta, and a higher value for posion iteraon
may be necessary if things move really fast in your game. But always remember to play with
these values, aiming at nding the lowest possible ones.
No Ref objects in Box2D
Box2D does not use Ref objects. So, no memory management! Remember to get rid
of all the Box2D objects through delete and not release. If you knew it already... well,
you remember:
HelloWorld::~HelloWorld(){
delete world;
world = nullptr;
delete _debugDraw;
_debugDraw = nullptr;
}
As I menoned before, C++11 introduces smart pointers, which are
memory managed, meaning you don't have to delete these objects yourself.
However, the topic of shared pointers is beyond the scope of this book, and
using unique pointers in this chapter would add way too many lines that had
nothing to do with Box2D. And although smart pointers are amazing, their
syntax and usage is, well, let's say very "C++ish".
www.it-ebooks.info

Geng Physical – Box2D
[ 154 ]
Meeting the bodies
The b2Body object is the thing you'll spend most of your me dealing with inside a Box2D
simulaon. You have three main types of b2Bodies: dynamic, stac, and kinemac. The rst
two are of greater importance and are the ones we'll use in our game.
Bodies are created by combining a body denion with a body xture. The body denion
is a structure that holds informaon about type, posion, velocity, and angle, among
other things. The xture holds informaon about the shape, including its density,
elascity, and fricon.
So, to create a circle that is 40 pixels wide, you would use the following:
b2BodyDef bodyDef;
bodyDef.type = b2_dynamicBody;
//or make it static bodyDef.type = b2_staticBody;
b2Body * body = world->CreateBody(&bodyDef);
//create circle shape
b2CircleShape circle;
circle.m_radius = 20.0/PTM_RATIO;
//define fixture
b2FixtureDef fixtureDef;
fixtureDef.shape = &circle;
fixtureDef.density = 1;
fixtureDef.restitution = 0.7;
fixtureDef.friction = 0.4;
body->CreateFixture(&fixtureDef);
To create a box that is 40 pixels wide, you would use this:
//create body
b2BodyDef bodyDef;
bodyDef.type = b2_dynamicBody;
b2Body * body = world->CreateBody(&bodyDef);
//define shape
b2PolygonShape box;
box.SetAsBox(20 /PTM_RATIO, 20 / PTM_RATIO);
//Define fixture
b2FixtureDef fixtureDef;
www.it-ebooks.info
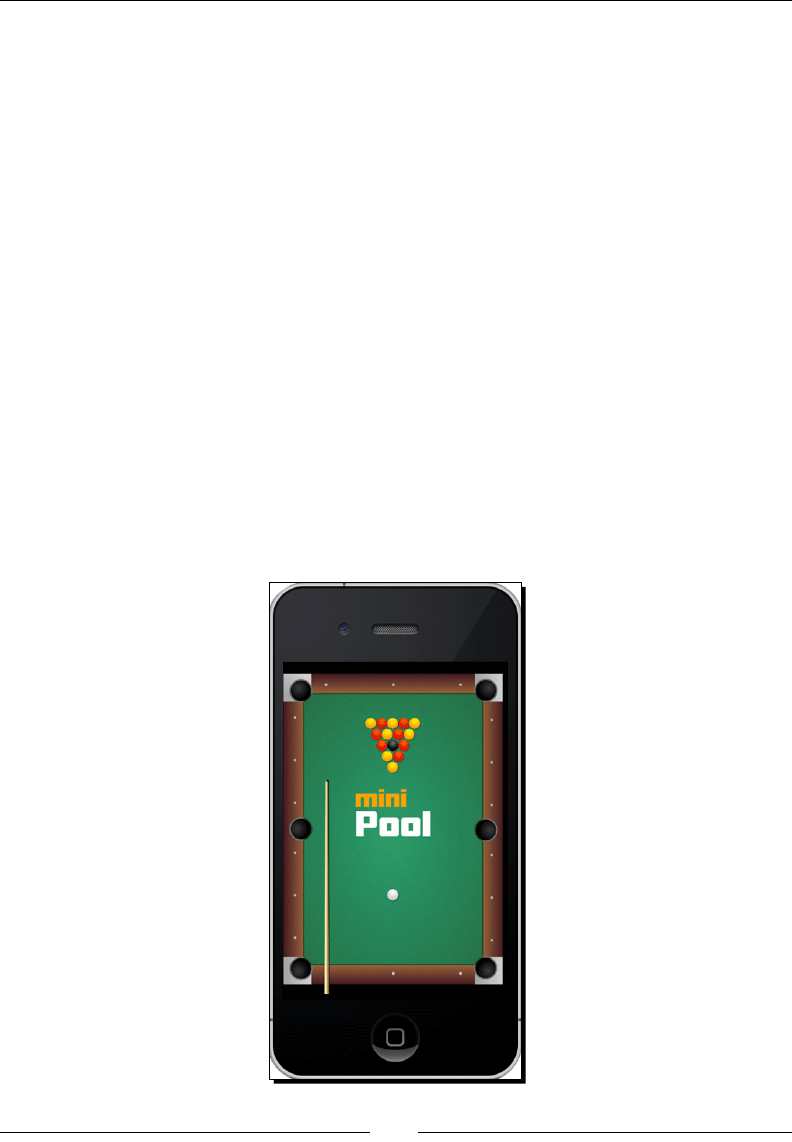
Chapter 8
[ 155 ]
fixtureDef.shape = &box;
fixtureDef.density = 2;
fixtureDef.restitution = 0;
body->CreateFixture(&fixtureDef);
Note that you use the world object to create the bodies. And also note that boxes are
created with half their desired width and height.
Density, fricon, and restuon all have default values, so you don't always need to
set these.
Our game – MiniPool
Our game consists of sixteen balls (circles), one cue (box), and a pool table made out of
six lines (edges) and six pockets (circles). This is all there is to it as far as the Box2D
simulaon is concerned.
Download the nal project from this book's Support page if you wish to follow along with the
nal code. Box2D is a complex API and it will be best to review and expose the logic rather than
work on it by doing a lot of typing. So there will be no start project to work from this me. You
may choose any manner to add les from the nished project to the one we started when I
showed you how to set up the debug draw object. The nal game will look like this:
www.it-ebooks.info

Geng Physical – Box2D
[ 156 ]
Game settings
This is a portrait-orientaon-only game, with no screen rotaon allowed, and universal
applicaon. The game is designed for the regular iPhone (320 x 480) and its resoluon size
is set to kResolutionShowAll. This will show borders around the main screen in devices
that do not match the 1.5 screen rao of the iPhone.
//in AppDelegate.cpp
auto screenSize = glview->getFrameSize();
auto designSize = Size(320, 480);
glview->setDesignResolutionSize(designSize.width, designSize.height,
ResolutionPolicy::SHOW_ALL);
std::vector<std::string> searchPaths;
if (screenSize.width > 640) {
searchPaths.push_back("ipadhd");
director->setContentScaleFactor(1280/designSize.width);
} else if (screenSize.width > 320) {
searchPaths.push_back("ipad");
director->setContentScaleFactor(640/designSize.width);
} else {
searchPaths.push_back("iphone");
director->setContentScaleFactor(320/designSize.width);
}
auto fileUtils = FileUtils::getInstance();
fileUtils->setSearchPaths(searchPaths);
Note that I use the iPhone's dimensions to idenfy larger screens. So the iPad and the
iPhone rena are considered to be two mes 320 x 480 and the rena iPad is considered
to be four mes 320 x 480.
Sprite plus b2Body equal to b2Sprite
The most common way to work with b2Body objects in Cocos2d-x is to combine them with
sprites. In the games I'll show you, I created a class called b2Sprite that extends sprite with
the addion of a _body member property that points to its very own b2Body. I also add a
few helper methods to deal with our pesky PTM_RATIO. Feel free to add as many of these as
you think necessary.
b2Body objects have an incredibly helpful property called userData. You can store anything
you wish inside it and the bodies will carry it with them throughout the simulaon. So, what
most developers do is that they store inside the body's userData property a reference to
the instance of sprite wrapping it. So b2Sprite knows about its body, and the body knows
about its b2Sprite.
www.it-ebooks.info

Chapter 8
[ 157 ]
As a maer of fact, composion is key when working with Box2D.
So, when designing your games, make sure every object knows of every
other object or can get to them quickly. This will help immensely.
Creating the pool table
In the debug draw view, this is what the table looks like:
All the elements seen here are created inside the initPhysics method in
GameLayer.cpp. The table has no visual representaon other than the background image
we use in the game. So there are no sprites aached to the individual pockets, for example.
The pocket bodies are created inside a for loop, with the best algorithm I could come up
with to distribute them correctly on screen. This logic is found in the initPhysics method,
so let's take a look at that and see how our rst b2Body objects are created:
b2Body * pocket;
b2CircleShape circle;
float startX = _screenSize.width * 0.07;
float startY = _screenSize.height * 0.92f;
for (int i = 0; i < 6; i++) {
bodyDef.type = b2_staticBody;
if (i < 3) {
bodyDef.position.Set(startX/PTM_RATIO,
(startY - i * (_screenSize.height * 0.84f * 0.5f))/PTM_RATIO);
} else {
www.it-ebooks.info
Geng Physical – Box2D
[ 158 ]
bodyDef.position.Set(
(startX + _screenSize.width * 0.85f)/PTM_RATIO,
(startY - (i-3) * (_screenSize.height * 0.84f *
0.5f))/PTM_RATIO);
}
pocket = _world->CreateBody(&bodyDef);
fixtureDef.isSensor = true;
circle.m_radius = (float) (1.5 * BALL_RADIUS) / PTM_RATIO;
fixtureDef.shape = &circle;
pocket->CreateFixture(&fixtureDef);
auto pocketData = new b2Sprite(this, kSpritePocket);
pocket->SetUserData(pocketData);
}
The pocket bodies are stac bodies and we determine in their xture denion that they
should behave like sensors:
fixtureDef.isSensor = true;
This switches o all the physics from an object and turns it into a collision hot spot. A sensor
serves only to determine if something is touching it or not.
It's almost always best to ignore Box2D sensors and use your own sprites
or points in your collision logic. One neat feature in sensors is that they
make it very easy to determine when something has just ceased touching
them, as you'll see once we cover contact listeners.
Creating edges
If a shape can only be hit on one side, an edge is probably what you need. Here is how we
create edges in our game:
b2BodyDef tableBodyDef;
tableBodyDef.position.Set(0, 0);
b2Body* tableBody = _world->CreateBody(&tableBodyDef);
// Define the table edges
b2EdgeShape tableBox;
// bottom edge
tableBox.Set(b2Vec2(_screenSize.width * 0.14f/PTM_RATIO, _screenSize.
height * 0.09f/PTM_RATIO),
www.it-ebooks.info

Chapter 8
[ 159 ]
b2Vec2(_screenSize.width * 0.86f/PTM_RATIO, _screenSize.height *
0.09f/PTM_RATIO));
tableBody->CreateFixture(&tableBox,0);
// top edge
tableBox.Set(b2Vec2(_screenSize.width * 0.14f/PTM_RATIO, _screenSize.
height * 0.91f/PTM_RATIO),
b2Vec2(_screenSize.width * 0.86f/PTM_RATIO, _screenSize.height *
0.91f/PTM_RATIO));
tableBody->CreateFixture(&tableBox,0);
So the same b2Body object can have as many edges as you need. You set an edge with its
start and end points (in this case, the b2Vec2 structures) and add it as a xture to the body,
with a density of 0.
Creating the ball objects
In the game, there is a class called Ball that extends b2Sprite, used for both the target
balls and the cue ball. These objects are also created inside the initPhysics method.
Here is the basic conguraon of that object:
//create Box2D body
b2BodyDef bodyDef;
bodyDef.type = b2_dynamicBody;
_body = _game->getWorld()->CreateBody(&bodyDef);
_body->SetLinearDamping(1.2f);
_body->SetAngularDamping(0.2f);
//create circle shape
b2CircleShape circle;
circle.m_radius = BALL_RADIUS/PTM_RATIO;
//define fixture
b2FixtureDef fixtureDef;
fixtureDef.shape = &circle;
fixtureDef.density = 5;
fixtureDef.restitution = 0.7f;
//add collision filters so only white ball can be hit by cue
if (_type == kSpriteBall) {
fixtureDef.filter.categoryBits = 0x0010;
} else if (_type == kSpritePlayer) {
www.it-ebooks.info

Geng Physical – Box2D
[ 160 ]
//white ball is tracked as bullet by simulation
_body->SetBullet(true);
fixtureDef.filter.categoryBits = 0x0100;
}
//set sprite texture
switch (_color) {
case kColorBlack:
this->initWithSpriteFrameName("ball_black.png");
break;
case kColorRed:
this->initWithSpriteFrameName("ball_red.png");
break;
case kColorYellow:
this->initWithSpriteFrameName("ball_yellow.png");
break;
case kColorWhite:
this->initWithSpriteFrameName("ball_white.png");
break;
}
_body->CreateFixture(&fixtureDef);
//store the b2Sprite as the body's userData
_body->SetUserData(this);
The friction xture property involves the reacon of two touching surfaces (two bodies).
In this case, we want to create "fricon" with the table surface, which is not a body at all.
So what we need to use instead is damping. This will apply a similar eect to fricon, but
without the need for an extra surface. Damping can be applied to the linear velocity vector
of a body as follows:
_body->SetLinearDamping(1.2);
And to the angular velocity as follows:
_body->SetAngularDamping(0.2);
Also, the white ball is set to be a bullet:
_body->SetBullet(true);
This will make the simulaon pay extra aenon to this object in terms of collision.
We could make all balls in the game behave as bullets, but this is not only unnecessary
(something revealed through tesng) but also not very processing-friendly.
www.it-ebooks.info

Chapter 8
[ 161 ]
Creating collision lters
In the ball object, there is a filter property inside the xture denion that we use
to mask collisions. Meaning we determine what bodies can collide with each other.
The cue ball receives a dierent value for categoryBits than the other balls.
fixtureDef.filter.categoryBits = 0x0100;
When we create the cue body, we set a maskBits property in its xture denion
as follows:
fixtureDef.filter.maskBits = 0x0100;
We set this to the same value as the white ball's categoryBits.
The result of all this? Now the cue can only hit bodies with the same categoryBits,
which here means the cue can only collide with the white ball.
It is possible to add more than one category to a mask with a bitwise | opon, as seen here:
fixtureDef.filter.maskBits = 0x0100 | 0x0010;
Or to collide with everything except the cue ball, for instance, as seen in the following line:
fixtureDef.filter.maskBits = 0xFFFF & ~0x0100;
Creating the cue
The cue ball also extends b2Sprite, and its body is set as a box.
//create body
b2BodyDef bodyDef;
bodyDef.type = b2_dynamicBody;
_body = _game->getWorld()->CreateBody(&bodyDef);
_body->SetLinearDamping(8);
_body->SetAngularDamping(5);
//Define shape
b2PolygonShape box;
box.SetAsBox(BALL_RADIUS * 21 /PTM_RATIO, BALL_RADIUS * 0.2 / PTM_
RATIO);
//Define fixture
b2FixtureDef fixtureDef;
fixtureDef.shape = &box;
www.it-ebooks.info
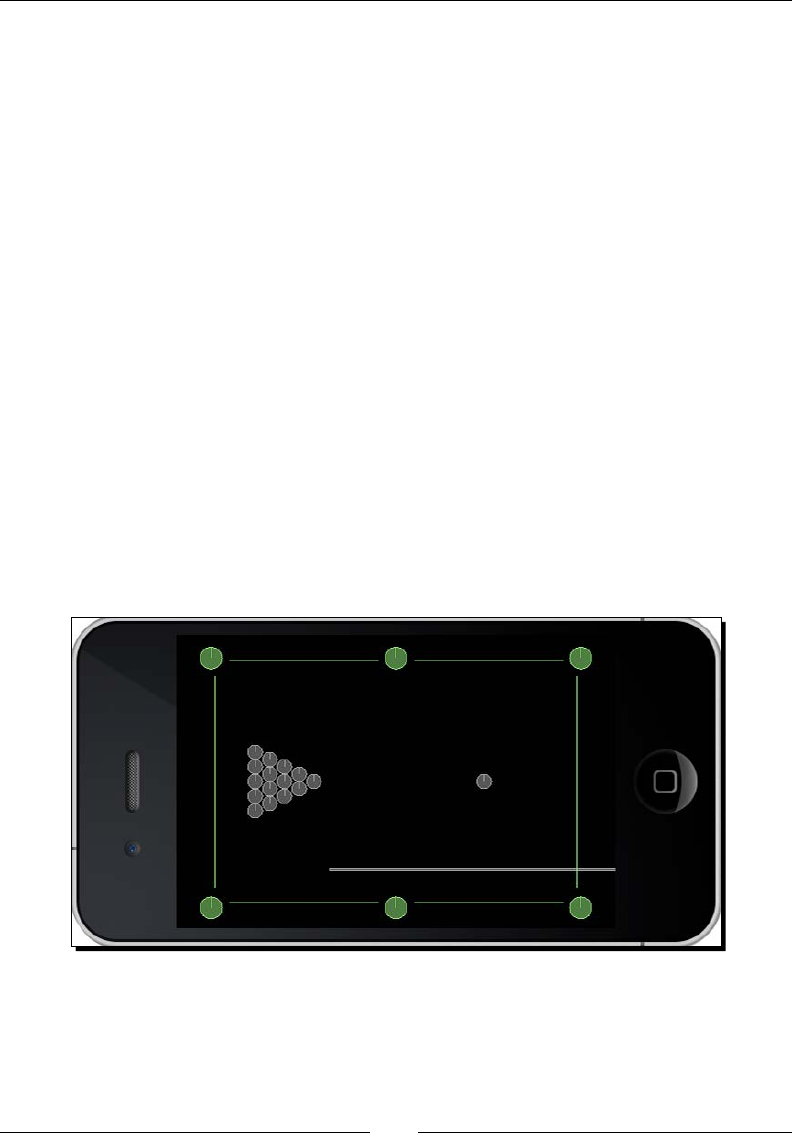
Geng Physical – Box2D
[ 162 ]
fixtureDef.filter.maskBits = 0x0100;
fixtureDef.density = 10;
fixtureDef.restitution = 1;
_body->CreateFixture(&fixtureDef);
_body->SetUserData(this);
It has very high damping values because, in the rare occasions when the player misses the
cue ball, the cue will not y o the screen but halt a few pixels from the white ball.
If we wanted to create the cue ball as a trapezium or a triangle, we would need to give the
b2PolygonShape opon the verces we want. Here's an example of this:
b2Vec2 vertices[3];
vertices[0].Set(0.0f, 0.0f);
vertices[1].Set(1.0f, 0.0f);
vertices[2].Set(0.0f, 1.0f);
int32 count = 3;
b2PolygonShape triangle;
triangle.Set(vertices, count);
And the verces must be added counterclockwise to the array. Meaning, if we add the top
vertex of the triangle rst, the next vertex must be the one to the le.
Once all the elements are in place, the debug draw looks like this:
www.it-ebooks.info
Chapter 8
[ 163 ]
Creating a contact listener
Besides collision lters, one other feature in Box2D that helps with collision management is
the creaon of a contact listener.
Inside the initPhysics method, we create the world object like this:
b2Vec2 gravity;
gravity.Set(0.0f, 0.0f);
_world = new b2World(gravity);
_world->SetAllowSleeping(true);
_world->SetContinuousPhysics(true);
_collisionListener = new CollisionListener();
_world->SetContactListener(_collisionListener);
Our CollisionListener class extends the Box2D b2ContactListener class, and it must
implement at least one of the following methods:
void BeginContact(b2Contact* contact);
void EndContact(b2Contact* contact);
void PreSolve(b2Contact* contact, const b2Manifold*
oldManifold);
void PostSolve(b2Contact* contact, const b2ContactImpulse*
impulse);
These events are all related to a contact (collision) and are red at dierent stages of
a contact.
Sensor objects can only ever re the BeginContact and
EndContact events.
In our game, we implement two of these methods. The rst is:
void CollisionListener::BeginContact(b2Contact* contact) {
b2Body * bodyA = contact->GetFixtureA()->GetBody();
b2Body * bodyB = contact->GetFixtureB()->GetBody();
b2Sprite * spriteA = (b2Sprite *) bodyA->GetUserData();
b2Sprite * spriteB = (b2Sprite *) bodyB->GetUserData();
if (spriteA && spriteB) {
www.it-ebooks.info

Geng Physical – Box2D
[ 164 ]
//track collision between balls and pockets
if (spriteA->getType() == kSpritePocket) {
spriteB->setVisible(false);
} else if (spriteB->getType() == kSpritePocket) {
spriteA->setVisible(false);
} else if (spriteA->getType() == kSpriteBall &&
spriteB->getType() == kSpriteBall) {
if (spriteA->mag() > 10 || spriteB->mag() > 10) {
SimpleAudioEngine::getInstance()-
>playEffect("ball.wav");
}
} else if ((spriteA->getType() == kSpriteBall &&
spriteB->getType() == kSpritePlayer) ||
(spriteB->getType() == kSpriteBall &&
spriteA->getType() == kSpritePlayer)) {
if (spriteA->mag() > 10 || spriteB->mag() > 10) {
SimpleAudioEngine::getInstance()-
>playEffect("ball.wav");
}
}
}
}
You can see now how important the userData property is. We can quickly access sprites
aached to the bodies listed in the b2Contact object through the userData property.
Besides that, all our sprites have a _type property that behaves like idenfying tags in our
logic. Note that you could certainly use the Cocos2d-x tags for that, but I nd that at mes,
if you can combine the Sprite tags with their _type value, you may produce interesng
sorng logic.
So, in BeginContact, we track the collisions between balls and pockets. But we also track
collision between balls. In the rst case, the balls are turned invisible when they touch the
pockets. And, in the second case, we play a sound eect whenever two balls touch each
other, but only if they are at a certain speed (we determine that through a b2Sprite helper
method that retrieves the squared magnitude of a sprite's velocity vector).
The other method in our listener is:
void CollisionListener::PreSolve(b2Contact* contact, const b2Manifold*
oldManifold) {
b2Body * bodyA = contact->GetFixtureA()->GetBody();
b2Body * bodyB = contact->GetFixtureB()->GetBody();
www.it-ebooks.info
Chapter 8
[ 165 ]
b2Sprite * spriteA = (b2Sprite *) bodyA->GetUserData();
b2Sprite * spriteB = (b2Sprite *) bodyB->GetUserData();
if (spriteA && spriteB) {
//track collision between player and cue ball
if (spriteA->getType() == kSpriteCue && spriteA->mag() > 2) {
if (spriteB->getType() == kSpritePlayer && spriteA-
>isVisible()) {
SimpleAudioEngine::getInstance()-
>playEffect("hit.wav");
spriteA->setVisible(false);
spriteB->getGame()->setCanShoot(false);
}
} else if (spriteB->getType() == kSpriteCue && spriteA->mag()
> 2) {
if (spriteA->getType() == kSpritePlayer && spriteB-
>isVisible()) {
SimpleAudioEngine::getInstance()-
>playEffect("hit.wav");
spriteB->setVisible(false);
spriteA->getGame()->setCanShoot(false);
}
}
}
}
Here, we listen to a collision before its reacons are calculated. If there is a collision between
the cue and white ball, we play a sound eect and we hide the cue.
If you want to force your own logic to the collision reacon and override
Box2D on this, you should do so in the PreSolve method. In this game,
however, we could have added all this collision logic to the BeginContact
method and it would work just as well.
The game controls
In the game, the player must click on the white ball and then drag his or her nger to
acvate the cue ball. The farther the nger gets from the white ball, the more powerful
the shot will be.
So let's add the events to handle user input.
www.it-ebooks.info

Geng Physical – Box2D
[ 166 ]
Time for action – adding the touch events
We'll deal with onTouchBegan rst.
1. In the onTouchBegan method, we start by updang the game state:
bool GameLayer::onTouchBegan(Touch * touch, Event * event) {
if (!_running) return true;
if (_gameState == kGameOver) {
if (_gameOver->isVisible()) _gameOver->setVisible(false);
resetGame();
return true;
}
2. Next, we check on the value of _canShoot. This returns true if the white ball
is not moving.
if (!_canShoot) return true;
3. Next, we determine whether the touch is landing on the white ball. If it is, we
start the game if it is not currently running yet and we make our mer visible.
Here's the code to do this:
if (touch) {
auto tap = touch->getLocation();
auto playerPos = _player->getPosition();
float diffx = tap.x - playerPos.x;
float diffy = tap.y - playerPos.y;
float diff = pow(diffx, 2) + pow(diffy, 2);
if (diff < pow(BALL_RADIUS * 4, 2)) {
if (_gameState != kGamePlay) {
_gameState = kGamePlay;
if (_intro->isVisible()) _intro->setVisible(false);
_timer->setVisible(true);
}
}
}
Note that we use a larger radius for the white ball in our logic (four mes larger).
This is because we don't want the target area to be too small, since this game will
run on both iPhones and iPads. We want the player to comfortably hit the white
ball with his or her nger.
www.it-ebooks.info
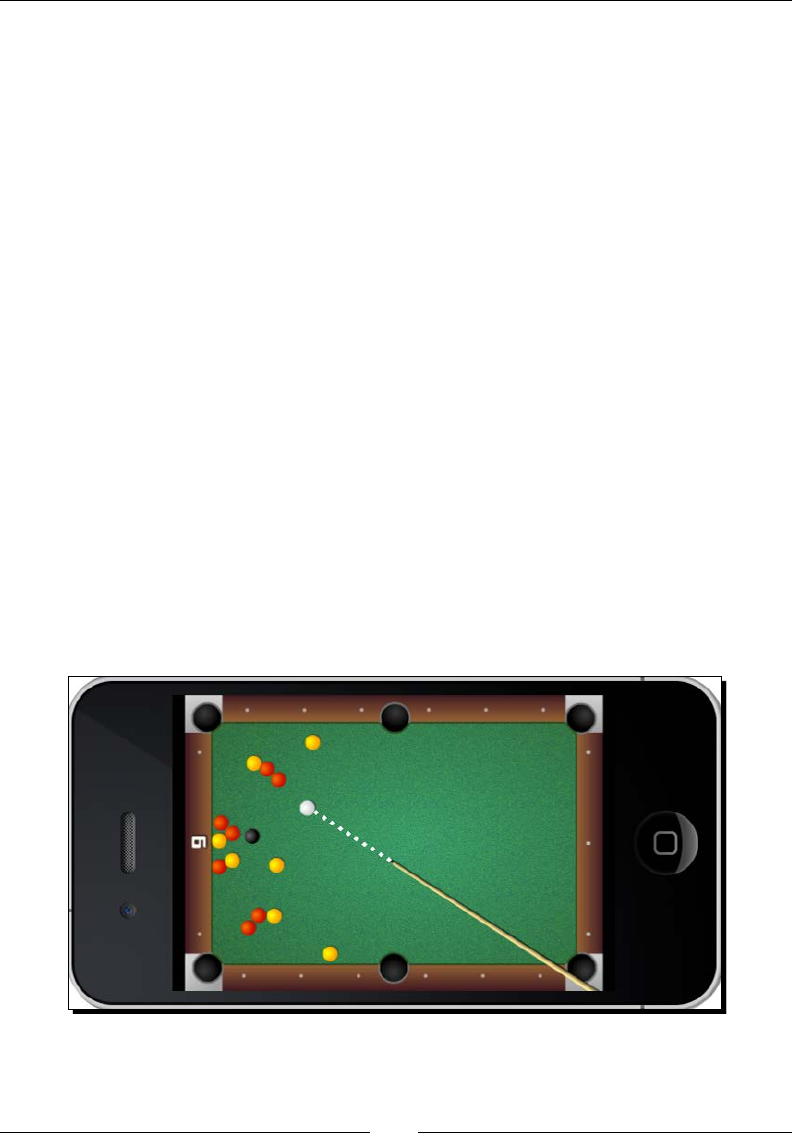
Chapter 8
[ 167 ]
4. We store where in the ball the point lies. This way, the player can hit the ball at
dierent spots, causing it to move at dierent angles:
//make point lie within ball
if (diff > pow(BALL_RADIUS * 2, 2)) {
float angle = atan2(diffy, diffx);
_cueStartPoint = Vec2(
playerPos.x + BALL_RADIUS * 0.8f * cos(angle),
playerPos.y + BALL_RADIUS * 0.8f * sin(angle));
} else {
_cueStartPoint = playerPos;
}
Since we made the white ball a much larger target for our touch event, now we
must make sure the actual point picked by the player lies within the ball. So we may
have to make some adjustments here.
5. We pass the point to our LineContainer object and we prepare the cue body to
be used, as follows:
_lineContainer->setBallPoint(_cueStartPoint);
_cue->getBody()->SetLinearVelocity(b2Vec2(0,0));
_cue->getBody()->SetAngularVelocity(0.0);
_touch = touch;
We once again have a LineContainer node so we can draw a dashed line between
the cue and the spot on the ball where the cue will hit. This serves as a visual aid for
the player to prepare his or her shot. The visual aid eect is demonstrated here:
www.it-ebooks.info

Geng Physical – Box2D
[ 168 ]
6. In onTouchMoved, we only need to move the cue body based on the posion of
the player's nger. So we calculate the distance between the moving touch and
the white ball. If the cue body is sll too close to the ball, we set its body object to
sleep and its texture object to invisible.
void GameLayer::onTouchMoved(Touch * touch, Event * event) {
if (touch && touch == _touch) {
Point tap = touch->getLocation();
float diffx = tap.x - _player->getPositionX();
float diffy = tap.y - _player->getPositionY();
if (pow(diffx,2) + pow(diffy,2) < pow(BALL_RADIUS * 2,2))
{
_usingCue = false;
_lineContainer->setDrawing(false);
_cue->setVisible(false);
_cue->getBody()->SetAwake(false);
} else {
_usingCue = true;
_cue->setVisible(true);
_lineContainer->setDrawing(true);
placeCue(tap);
_cue->getBody()->SetAwake(true);
}
}
}
7. Otherwise, we awaken the body and call the placeCue method as follows:
void GameLayer::placeCue(Point position) {
float diffx = _cueStartPoint.x - position.x;
float diffy = _cueStartPoint.y - position.y;
float angle = atan2(diffy, diffx);
float distance = sqrt(pow (diffx, 2) + pow(diffy, 2));
_pullBack = distance * 0.5f;
Point cuePosition = Vec2(
_cueStartPoint.x - (BALL_RADIUS * 21 + _pullBack) *
cos(angle),
_cueStartPoint.y - (BALL_RADIUS * 21 + _pullBack) *
sin(angle)
);
www.it-ebooks.info

Chapter 8
[ 169 ]
_cue->getBody()->SetTransform(
b2Vec2(cuePosition.x/PTM_RATIO,
cuePosition.y/PTM_RATIO),
angle);
_lineContainer->setCuePoint(Vec2(
_cueStartPoint.x - ( _pullBack) * cos(angle),
_cueStartPoint.y - ( _pullBack) * sin(angle)));
}
This method then calculates the angle and posion of the cue body and transforms
the cue's b2Body method accordingly. The SetTransform opon of a b2Body
method takes care of both its posion and angle.
8. Finally, in onTouchEnded, we let go of the cue body as follows:
void GameLayer::onTouchEnded(Touch* touch, Event* event) {
if (_usingCue && _touch) {
auto cueBody = _cue->getBody();
float angle = cueBody->GetAngle();
//release cue!
cueBody->ApplyLinearImpulse(
b2Vec2 (_pullBack * cos(angle) * SHOT_POWER,
_pullBack * sin(angle) * SHOT_POWER),
cueBody->GetWorldCenter());
}
_usingCue = false;
_touch = nullptr;
_lineContainer->setDrawing(false);
}
We use ApplyLinearImpulse. This method receives a vector for the impulse
to be applied and the posion on the body where this impulse should be applied.
The _pullback variable stores the informaon of how far the cue body was from
the ball when the player released the cue body. The farther it was, the strongest the
shot will be.
www.it-ebooks.info

Geng Physical – Box2D
[ 170 ]
What just happened?
We added the touch events that allow the player to hit the white ball with the cue body.
The process is a very simple one. We rst need to make sure the player is touching the white
ball; then we move the cue body as the player drags his or her nger. Finally, when the touch
is released, we make the cue spring towards the white ball with ApplyLinearImpulse.
We may also move a body in Box2D by using SetLinearVelocity or ApplyForce, each
with subtle and not-so-subtle dierences. I recommend that you play around with these.
The main loop
As I showed you before, the simulaon only requires that you call its Step() method inside
the main loop. Box2D takes care of all of its side of the bargain.
What remains usually is the rest of the game logic: scoring, game states, and updang your
sprites to match the b2Bodies method.
It's important to call the update method of each ball and cue. This is what our b2Sprite
update method looks like:
void b2Sprite::update(float dt) {
if (_body && this->isVisible()) {
this->setPositionX(_body->GetPosition().x * PTM_RATIO);
this->setPositionY(_body->GetPosition().y * PTM_RATIO);
this->setRotation(_RADIANS_TO_DEGREES(-1 * _body-
>GetAngle()));
}
}
All you need to do is make sure the Sprite method matches the informaon in the b2Body
object. And make sure that you convert meters back to pixels when you do so.
So let's add our main loop.
Time for action – adding the main loop
It's inside our main loop that we update our b2World object.
1. Start by updang the simulaon as follows:
void GameLayer::update(float dt) {
if (!_running) return;
if (_gameState == kGameOver) return;
_world->Step(dt, 10, 10);
www.it-ebooks.info

Chapter 8
[ 171 ]
2. Next, we need to determine if the game has nished by checking on the number of
balls currently in play. We use the following for that:
//track invisible objects
for (auto ball : _balls) {
if (!ball->isVisible() && ball->getInPlay()) {
ball->setInPlay(false);
ball->hide();
//count down balls
_ballsInPlay--;
SimpleAudioEngine::getInstance()-
>playEffect("drop.wav");
if (_ballsInPlay == 0) {
_gameState = kGameOver;
_gameOver->setVisible(true);
}
} else {
ball->update(dt);
}
}
3. Next, we connue to update the sprites as follows:
if (!_cue->isVisible()) {
_cue->hide();
} else {
_cue->update(dt);
}
if (!_player->isVisible()) {
_player->reset();
_player->setVisible(true);
SimpleAudioEngine::getInstance()-
>playEffect("whitedrop.wav");
}
_player->update(dt);
4. And we also determine when it's me to allow the player a new shot. I decided
to only let that happen if the white ball has stopped. And the quickest way to
determine that is to check on its vector. Here's how:
//check to see if player ball is slow enough for a new shot
if (_player->mag() < 0.5f && !_canShoot) {
_player->getBody()->SetLinearVelocity(b2Vec2_zero);
_player->getBody()->SetAngularVelocity(0);
_canShoot = true;
}
www.it-ebooks.info
Geng Physical – Box2D
[ 172 ]
What just happened?
We added our main loop. This will update the Box2D simulaon and then it's up to us to
take care of posioning our sprites based on the resulng informaon.
One very important aspect of Box2D is understanding what can be
changed inside a b2World::Step call and what can't.
For instance, a body cannot be made inacve (b2Body::SetActive)
or be destroyed (b2World::DestroyBody) inside a step. You will
need to check on condions outside the step to make these changes. For
instance, in our game, we check to see if the ball sprites are visible or not,
and if not then we set their bodies as inacve. And all this is done aer
the call to b2World::Step.
Adding a timer to our game
In MiniPool, we count the number of seconds it takes the player to clear the table.
Let me show you how to do that.
Time for action – creating a timer
We create mers in prey much the same way we create our main loop.
1. First, we add a second scheduled event by adding this line to our GameLayer
constructor:
this->schedule(CC_SCHEDULE_SELECTOR(GameLayer::ticktock), 1.5f);
2. With this, we create a separate mer that will run the ticktock method every 1.5
seconds (I decided in the end that 1.5 seconds looked beer).
3. The method keeps updang the value of the _time property and displaying it in
the _timer label.
void GameLayer::ticktock(float dt) {
if (_gameState == kGamePlay) {
_time++;
_timer->setString(std::to_string(_time));
}
}
www.it-ebooks.info

Chapter 8
[ 173 ]
What just happened?
We added a mer to our game by scheduling a second update—specifying the me interval
we wanted—using the schedule method.
If you wish to remove a mer, all you need to do is call the unschedule(SEL_SCHEDULE
selector) method of nodes anywhere in your class.
Now, let's take our Box2D game to Android.
Time for action – running the game in Android
Follow these steps to deploy a Box2D game to Android:
1. Open the Android.mk le in a text editor (you'll nd it in the folder
proj.android/jni).
2. Edit the lines in LOCAL_SRC_FILES to read:
LOCAL_SRC_FILES := hellocpp/main.cpp \
../../Classes/AppDelegate.cpp \
../../Classes/GLES-Render.cpp \
../../Classes/b2Sprite.cpp \
../../Classes/Ball.cpp \
../../Classes/CollisionListener.cpp \
../../Classes/Cue.cpp \
../../Classes/LineContainer.cpp \
../../Classes/GameLayer.cpp
3. Open the manifest le and set the app orientaon to portrait.
4. Import the game into Eclipse and wait ll all classes are compiled.
5. Build and run your applicaon.
What just happened?
That was it. There is no dierence between building a game that uses Box2D and one that
does not. The Box2D API is already included in the make le, in the line where the classes in
the external folder are imported.
And, of course, you don't need to add the GLES-Render class in your nal project.
www.it-ebooks.info

Geng Physical – Box2D
[ 174 ]
Have a go hero
A few changes to make gameplay more interesng could be: add a limit to the number of
mes the white ball can hit a pocket; and another opon is to have the mer work as a
countdown one, so the player has a limited me to clear the table before me runs out.
Also, this game could do with a few animaons. An Action method to scale down and fade
out a ball when it hits a pocket would look very nice.
Pop quiz
Q1. What is the main object in a Box2D simulaon?
1. b2Universe.
2. b2d.
3. b2World.
4. b2Simulation.
Q2. A b2Body object can be of which type?
1. b2_dynamicBody, b2_sensorBody, b2_liquidBody.
2. b2_dynamicBody, b2_staticBody, b2_kinematicBody.
3. b2_staticBody, b2_kinematicBody, b2_debugBody.
4. b2_kinematicBody, b2_transparentBody, b2_floatingBody.
Q3. Which of the following list of properes can be set in a xture denion?
1. Density, fricon, restuon, shape.
2. Posion, density, bullet state.
3. Angular damping, acve state, fricon.
4. Linear damping, restuon, xed rotaon.
Q4. If two bodies have the same unique value for their maskBits property in their xture
denion, this means:
1. The two bodies can never collide.
2. The two bodies will only trigger begin contact events.
3. The two bodies can only collide with each other.
4. The two bodies will only trigger end contact events.
www.it-ebooks.info

Chapter 8
[ 175 ]
Summary
Nowadays, it seems like everybody in the world has played or will play a physics-based game
at some point in their lives. Box2D is by far the most popular engine in the casual games
arena. The commands you learned here can be found in prey much every port of the
engine, including a JavaScript one that is growing in popularity as we speak.
Seng up the engine and geng it up and running is remarkably simple—perhaps too much
so. A lot of tesng and value tweaking goes into developing a Box2D game and prey soon
you learn that keeping the engine performing as you wish is the most important skill to
master when developing physics-based games. Picking the right values for fricon, density,
restuon, damping, me step, PTM rao, and so on can make or break your game.
In the next chapter, we'll connue to use Box2D, but we'll focus on what else Cocos2d-x can
do to help us organize our games.
www.it-ebooks.info
[ 177 ]
On the Level – Eskimo
In our next game, we'll go over some important features most games
require, but which are not directly related to gameplay. So we'll step over
the architecture side of things and talk about reading and writing data,
using scene transitions, and creating custom events that your whole
application can listen to.
But, of course, I'll add a few gameplay ideas as well!
This me, you'll learn how to:
Create scene transions
Load external data
Save data using UserDefault
Create your own game events with the dispatcher
Use the accelerometer
Reuse Box2D bodies
9
www.it-ebooks.info
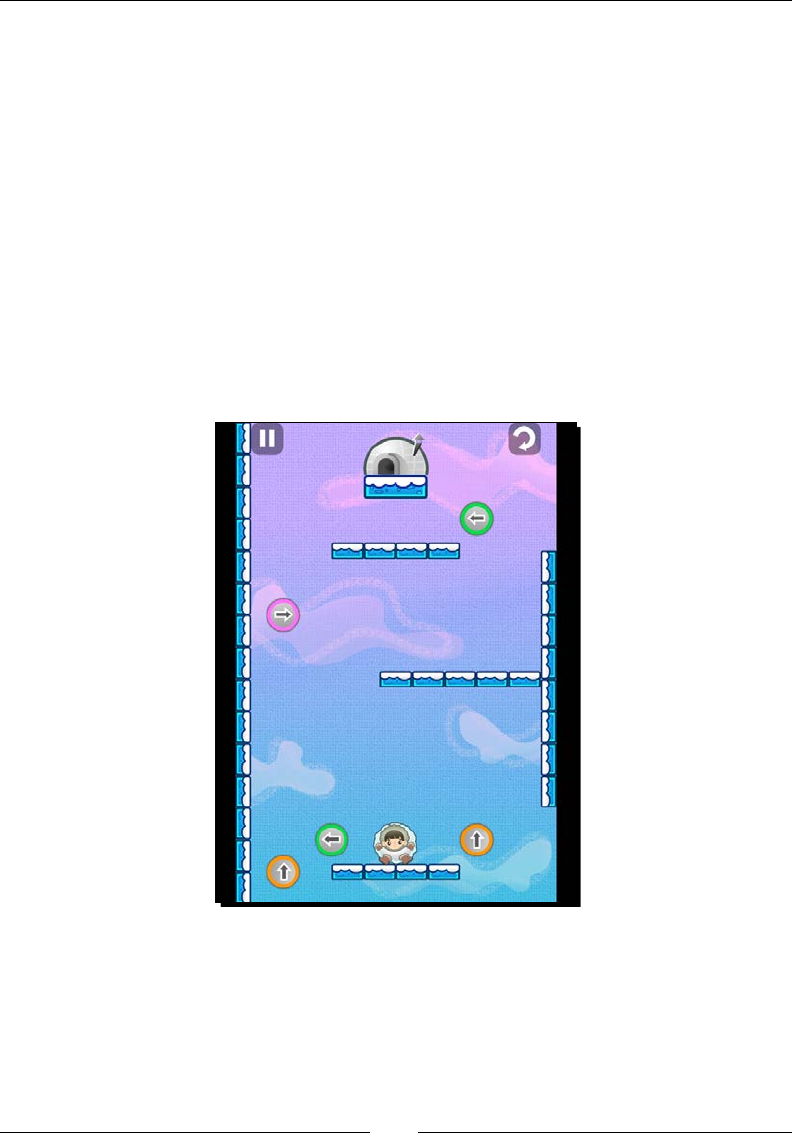
On the Level – Eskimo
[ 178 ]
The game – Eskimo
Lile Eskimo boy is late for supper. It is your mission, should you choose to accept it, to guide
the lile fella back to his igloo.
This is a Box2D game, and the controls are very simple. Tilt the device and the Eskimo
will move. If you tap the screen, the Eskimo switches shape between a snow ball and a
block of ice, each shape with its own physical characteriscs and degrees of maneuverability.
The ball has a higher fricon, for instance, and the block of ice has none.
And the only way the Eskimo may reach his desnaon is by hing the gravity switches
spread out all over the screen.
Eskimo combines elements from an arcade game with elements of a puzzle game, as each
level was planned with one perfect soluon in mind as to how to take the lile Eskimo home.
Note, however, that mulple soluons are possible.
Download the 4198_09_FINAL_PROJECT.zip le and run the game when you have a
chance. Once again, there is no need for extraneous typing as the logic used in the game is
prey much old news to you, and we'll go over the new bits in depth.
www.it-ebooks.info
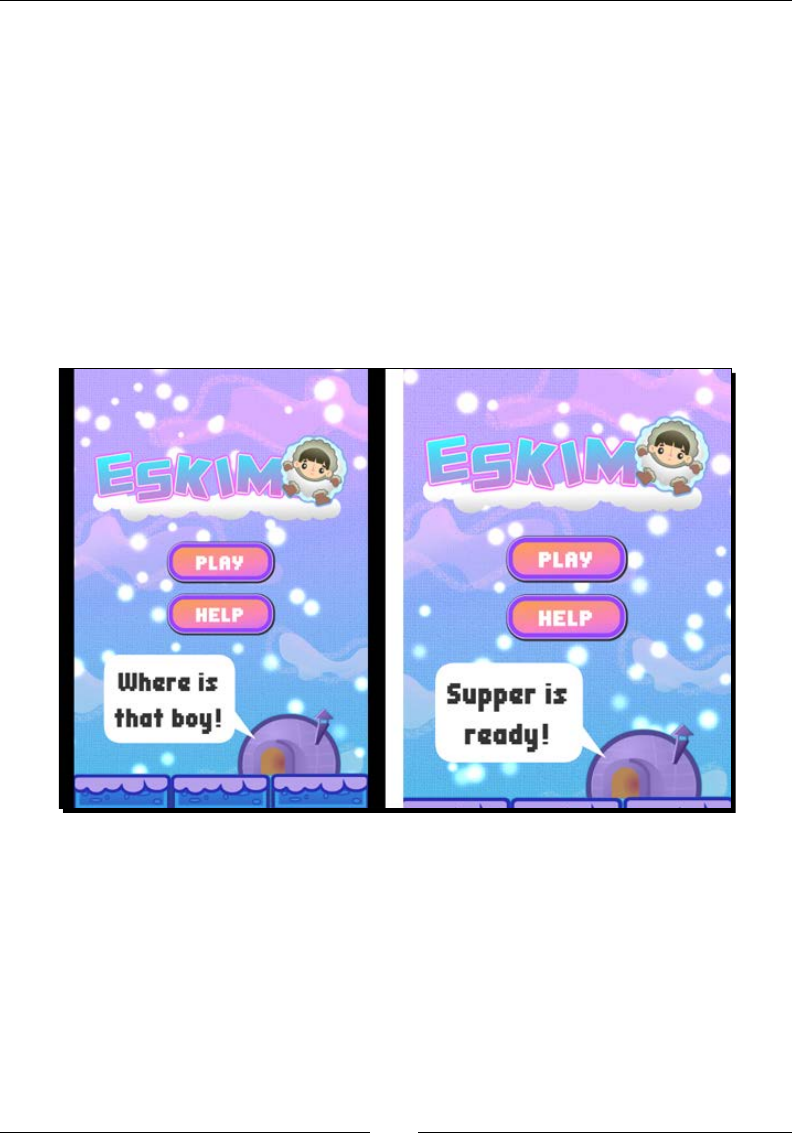
Chapter 9
[ 179 ]
The game settings
This is a portrait-only game and accelerometer-based, so it should not autorotate.
It was designed for the regular iPhone and its screen resoluon size is set to
kResolutionShowAll, so the screen sengs are similar to the ones in our previous game.
Designing a game for the iPhone screen and using the kResolutionShowAll parameter
will result in the so-called leerbox view when playing the game in screens that do
not match the iPhone's 1.5 rao. This means you see borders around the game screen.
Alternavely, you could use the kResolutionNoBorders parameter, which results in a
zoom-in eect, causing the game to play at full screen but the areas around the borders
will be cropped.
The following screenshot illustrates these two cases:
The one on the le is the game screen on the iPad, using kResolutionShowAll.
The one on the right uses kResolutionNoBorders. Note how the screen is zoomed in
and cropped on the second one. When using kResolutionNoBorders, it's important to
design your game so that no vital gameplay element appears too close to the borders as it
may not be displayed.
www.it-ebooks.info
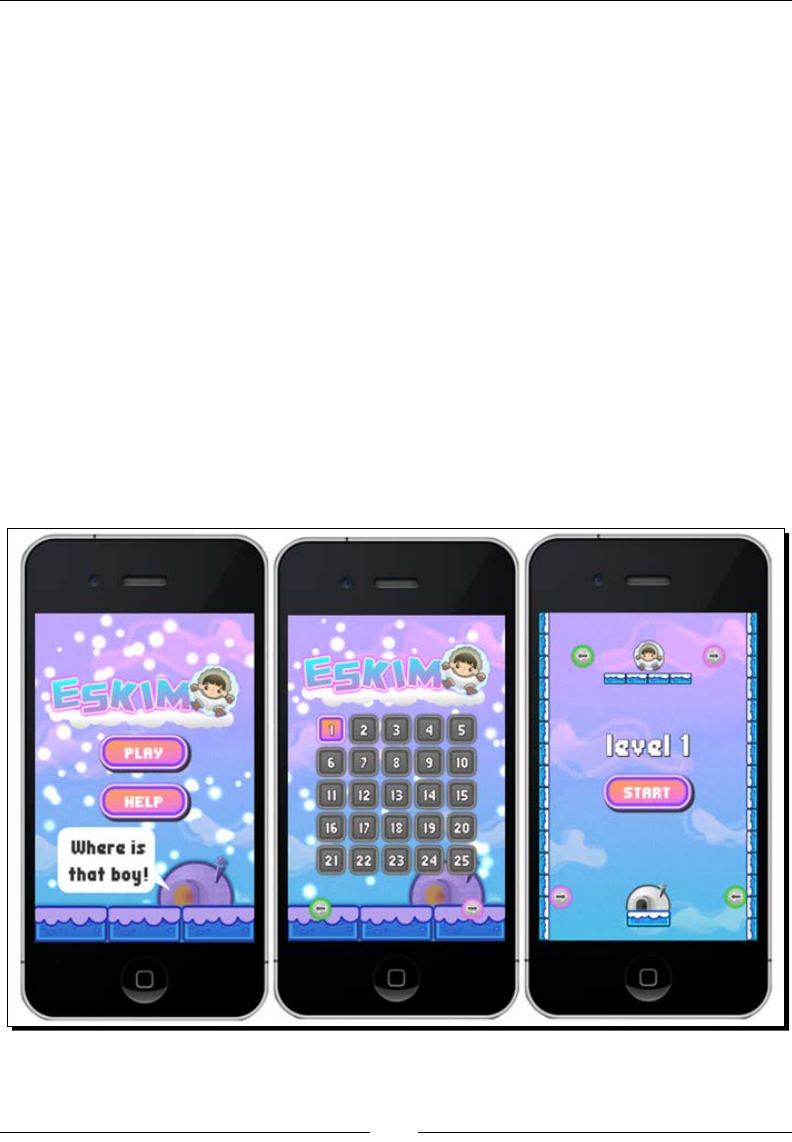
On the Level – Eskimo
[ 180 ]
Organizing the game
Once again, there is a b2Sprite class, and the Eskimo and Platform classes extend
b2Sprite. Then there are the regular Sprite classes, GSwitch (which stands for gravity
switch) and Igloo. The logic runs collision detecon between these last two and Eskimo, but
I chose not to have them as sensor bodies because I wanted to show you that 2D collision logic
for the Cocos2d-x elements can coexist with collision logic for the Box2D elements just ne.
But most importantly, this game now has three scenes. So far in this book, we've only used
one scene per game. This game's scene objects will wrap MenuLayer, LevelSelectLayer,
and GameLayer. Here's a brief note on all three:
In MenuLayer, you have the opon to play the game, which will take you to
LevelSelectLayer or to play a tutorial for the game, which will take you
to GameLayer.
In LevelSelectLayer, you may choose which available level you want to play,
and that will take you to GameLayer. Or you may go back to MenuLayer.
In GameLayer, you play the game, and may go back to MenuLayer upon game over.
The following image illustrates all three scenes in the game:
www.it-ebooks.info

Chapter 9
[ 181 ]
Using scenes in Cocos2d-x
Scenes are mini applicaons themselves. If you have experience as an Android developer,
you may think of scenes as acvies. Of all the classes based on node, the Scene applicaon
is the most architecturally relevant, because the Director class runs a scene, in eect
running your applicaon.
Part of the benet of working with scenes is also part of the drawback: they are wholly
independent and ignorant of each other. The need to share informaon between scenes
will be a major factor when planning your game class structure.
Also, memory management may become an issue. A currently running scene will not give up
its ghost unl a new scene is up and running. So, when you use transion animaons, keep
in mind that for a few seconds, both scenes will exist in memory.
In Eskimo, I inialize scenes in two dierent ways. With MenuLayer and
LevelSelectLayer, each me the user navigates to either one of these scenes, a new
layer object is created (either a new MenuLayer or a new LevelSelectLayer).
GameLayer, however, is dierent. It is a singleton Layer class that never stays out of memory
aer its rst instanaon, therefore speeding up the me from level selecon to the actual
playing. This may not work for every game, however. As I menoned earlier, when transioning
between scenes, both scenes stay in memory for a few seconds. But here we are adding to
that problem by keeping one layer in memory the whole me. Eskimo, however, is not very big
memory-wise. Note that we could sll have the opon of creang special condions for when
GameLayer should be destroyed, and condions when it should not.
So let me show you how to create scene transions. First, with a Scene class that creates a
fresh copy of its Layer each me it's created.
Time for action – creating a scene transition
You have, of course, been using scenes all along.
1. Hidden in AppDelegate.cpp, you've had lines like:
auto scene = GameLayer::scene();
// run
director->runWithScene(scene);
2. So, in order to change scenes, all you need to do is tell the Director class which
scene you wish it to run. Cocos2d-x will then get rid of all the content in the current
scene, if any (all their destructors will be called), and a new layer will be instanated
and wrapped inside the new Scene.
www.it-ebooks.info

On the Level – Eskimo
[ 182 ]
3. Breaking the steps down a lile further, this is how you usually create a new scene
for Director:
Scene* MenuLayer::scene()
{
// 'scene' is an autorelease object
auto scene = Scene::create();
// add layer as a child to scene
auto layer = new MenuLayer();
scene->addChild(layer);
layer->release();
return scene;
}
4. The stac MenuLayer::scene method will create a blank scene, and then create a
new instance of MenuLayer and add it as a child to the new scene.
5. Now you can tell Director to run it as follows:
Director::getInstance()->replaceScene(MenuLayer::scene());
6. The logic changes a lile if you wish to use a transion eect. So, inside our
MenuLayer.cpp class, this is how we transion to LevelSelectLayer:
auto newScene = TransitionMoveInR::create(0.2f,
LevelSelectLayer::scene());
Director::getInstance()->replaceScene(newScene);
The code just described creates a new transion object that will slide in the new
scene from the right-hand side of the screen to lie on top of the current one.
The transion will take 0.2 seconds.
What just happened?
You created a scene transion animaon with Cocos2d-x.
As I menoned earlier, this form of scene change will cause a new instance of the new layer
to be created each me, and destroyed each me it's replaced by a new scene. So, in our
game, MenuLayer and LevelSelectLayer are instanated and destroyed as many mes
as the user switches between them.
There is also the opon to use pushScene instead of replaceScene. This creates a stack
of scene objects and keeps them all in memory. This stack can be navigated with popScene
and popToRootScene.
Now let me show you how to do the same thing but with a singleton layer.
It should be no surprise to you by now that you will nd many examples of these transion
classes in the Tests, project at tests/cpp-tests/Classes/TransitionsTest.
www.it-ebooks.info

Chapter 9
[ 183 ]
Time for action – creating transitions with a singleton
Layer class
We rst need to make sure the layer in queson can only be instanated once.
1. The scene stac method in GameLayer looks like this:
Scene* GameLayer::scene(int level, int levelsCompleted)
{
// 'scene' is an autorelease object
auto scene = Scene::create();
// add layer as a child to scene
scene->addChild(GameLayer::create(level, levelsCompleted));
return scene;
}
This layer receives two parameters when created: the game level it should load and
the number of levels completed by the player. We create a new Scene object and
add GameLayer as its child.
2. But take a look at the stac create method in GameLayer:
GameLayer * GameLayer::create (int level, int levelsCompleted) {
if (!_instance) {
_instance = new GameLayer();
} else {
_instance->clearLayer();
}
_instance->setLevelsCompleted(levelsCompleted);
_instance->loadLevel(level);
_instance->scheduleUpdate();
return _instance;
}
3. An _instance stac property is declared at the top of GameLayer.cpp as follows:
static GameLayer* _instance = nullptr;
We can check, then, if the one instance of GameLayer is currently in memory and
instanate it if necessary.
4. The scene transion to GameLayer will look, on the surface, to be exactly like the
regular kind of transion. So, in LevelSelectLayer, we have the following:
auto newScene = TransitionMoveInR::create(0.2f,
GameLayer::scene(_firstIndex + i, _levelsCompleted));
Director::sharedDirector()->replaceScene(newScene);
www.it-ebooks.info
On the Level – Eskimo
[ 184 ]
What just happened?
We have created a Scene transion with a Layer class that never gets destroyed, so we
don't have to instanate new plaorm and gravity switch sprites with each new level.
There are, of course, problems and limitaons with this process. We cannot transion between
the two GameLayer objects, for instance, as we only ever have one of these objects.
There are also some special consideraons when leaving GameLayer and when geng
back to it. For instance, we must make sure we have our main loop running when we get
back to GameLayer.
The only way to do that is by unscheduling it whenever leaving GameLayer and scheduling
it again when returning, as follows:
//when leaving
unscheduleUpdate();
auto newScene = TransitionMoveInL::create(0.2f, MenuLayer::scene());
Director::sharedDirector()->replaceScene(newScene);
//when returning
_instance->scheduleUpdate();
Again, architecturally speaking, there are even beer opons. Possibly the
best one is creang your own game elements cache, or game manager, with
object pools and everything that needs instanang stored inside it. And then
have this cache be a singleton that every scene can access. This is also the
best way to share game-relevant data between scenes.
Loading external data from a .plist le
Eskimo has only ve game levels, plus a tutorial level (feel free to add more). The data for
these levels exist inside a levels.plist le, stored inside the Resources folder. A .plist
le is an XML-formaed data le, and as such can be created in any text editor. Xcode,
however, oers a nice GUI to edit the les.
Let me show you how to create them inside Xcode.
www.it-ebooks.info

Chapter 9
[ 185 ]
Time for action – creating a .plist le
You could, of course, create this in any text editor, but Xcode makes it extra easy to create
and edit .plist les.
1. Inside Xcode, go to New | File... and then select Resource and Property List.
When asked where to save the le, choose any locaon you want.
2. You need to decide what the Root element of your .plist le will be—either an
Array or a Diconary (the default) type. For Eskimo, the Root element is Array
containing a series of diconaries, each holding the data for a level in the game.
3. By selecng the Root element, you get a plus sign indicator right next to the Type
declaraon. Clicking on this plus sign will add an element to Root. You can then
pick the data type for this new item. The opons are Boolean, Data, Date, Number,
String, and again Array and Diconary. The last two can contain subitems in the
tree, just like the Root element.
www.it-ebooks.info
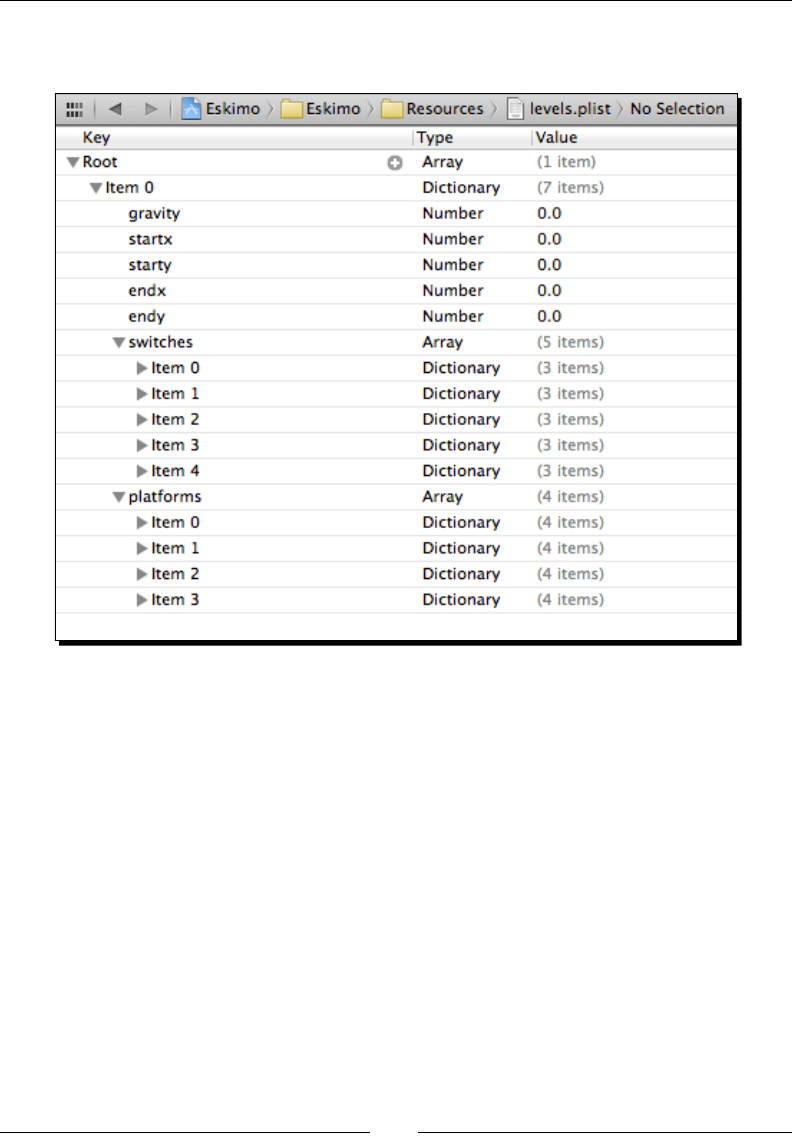
On the Level – Eskimo
[ 186 ]
4. Keep adding elements to the tree, trying to match the items in the
following screenshot:
What just happened?
You just created a property list le in Xcode. This is XML-structured data that Cocos2d-x can
load and parse. You've used them already when loading parcles and sprite sheet informaon.
Loading the level data
In Eskimo, since I only have ve levels, I chose to have one .plist le that contains all
levels. This may not be the best opon in a larger game.
Although Apple devices will load and parse the .plist les quickly, the same may not
be true for other targets. So limit the size of your .plist les by organizing the data into
mulple les. You've probably seen games that divide their levels into mulple groups or
packs. This is a simple way to create an extra preloading screen your game can use to parse
level data. This can also be used as a means to keep le sizes to a minimum.
www.it-ebooks.info
Chapter 9
[ 187 ]
In Eskimo, we could have the .plist les containing 10 levels each, for instance, and then
10 groups of these, totaling 100 levels.
So it's me to load our .plist le and parse the data for our levels.
Time for action – retrieving data from the .plist le
The level data is loaded in GameLayer.
1. Inside the GameLayer constructor, we load the data like this:
_levels = FileUtils::getInstance()-
>getValueVectorFromFile("levels.plist");
Cocos2d-x will take care of mapping FileUtils to the correct target. There is
FileUtils for each plaorm that is supported by the framework and they all can
be made to work with the .plist format. Sweet! If the data in the .plist le is an
Array, you must convert it to ValueVector; if it's Diconary, you must convert it to
a ValueMap. We'll do that next when we load the data for a specic level.
If we divide the levels into multiple .plist files, then we would need logic
to refresh the _levels array each time a new .plist file is loaded.
2. Inside the loadLevel method, we load the data for the level like this:
ValueMap levelData = _levels.at(_currentLevel).asValueMap();
Here, the data in the .plist le is Diconary, so we must convert the data
into a ValueMap.
And that's it for the loading and parsing. Now we can proceed to retrieving data
for our level.
Each level diconary starts with the data regarding the level's gravity (a level may
start with a dierent gravity value), the start point where the player should be
placed, and the end point where the igloo should be placed.
3. These values are retrieved like this in our code:
_gravity = levelData.at("gravity").asInt();
switch (_gravity) {
case kDirectionUp:
_world->SetGravity(b2Vec2(0,FORCE_GRAVITY));
break;
case kDirectionDown:
_world->SetGravity(b2Vec2(0,-FORCE_GRAVITY));
break;
www.it-ebooks.info

On the Level – Eskimo
[ 188 ]
case kDirectionLeft:
_world->SetGravity(b2Vec2(-FORCE_GRAVITY, 0));
break;
case kDirectionRight:
_world->SetGravity(b2Vec2(FORCE_GRAVITY, 0));
break;
}
_player->setSpritePosition(Vec2(
levelData.at("startx").asFloat() * TILE,
levelData.at("starty").asFloat() * TILE
));
_igloo->initIgloo(_gravity, Vec2(
levelData.at("endx").asFloat() * TILE,
levelData.at("endy").asFloat() * TILE
));
4. Inside this same diconary, we have an array for plaorms and an array for gravity
switches. These are retrieved like this:
ValueVector platforms =
levelData.at("platforms").asValueVector();
ValueVector switches =
levelData.at("switches").asValueVector();
5. These arrays contain even more diconaries containing data for the creaon
and placement of plaorms and gravity switches in each level. This data is passed
to the corresponding Platform and GSwitch classes, and boom—you've got
yourself a level.
for ( auto platformData : platforms){
ValueMap data = platformData.asValueMap();
platform->initPlatform ( data.at("width").asInt() * TILE,
data.at("angle").asFloat(),
Vec2(data.at("x").asFloat() * TILE,
data.at("y").asFloat() * TILE));
}
for (int i = 0; i < switches.size(); i++) {
auto gswitch = _gSwitchPool.at(i);
ValueMap data = switches.at(i).asValueMap();
gswitch->initGSwitch(data.at("gravity").asInt(),
Vec2(data.at("x").asFloat() * TILE,
data.at("y").asFloat() * TILE));
}
www.it-ebooks.info

Chapter 9
[ 189 ]
What just happened?
Parsing and retrieving data from a property list le is a breeze with Cocos2d-x. You will
always work with either an array of values or a diconary of values and map these to a
ValueVector or ValueMap respecvely.
Saving game data
When planning your games, you may soon decide you wish to store data related to your
applicaon, such as highest score or user preferences. In Cocos2d-x, you can do this by
simply accessing the UserDefault singleton.
With UserDefault, you can store integers, oats, doubles, strings, and Boolean with just
one simple call per each data type, as follows:
UserDefault::getInstance()->setIntegerForKey("levelsCompleted", _
levelsCompleted);
UserDefault::getInstance()->flush();
The other methods are setFloatForKey, setDoubleForKey, setStringForKey,
and setBoolForKey. To retrieve data, you use their respecve geers.
I'll show you next how to use that in our game.
Time for action – storing the completed levels
Open the LevelSelectLayer class.
1. This is how the number of levels completed is retrieved from inside the
layer's constructor:
_levelsCompleted = UserDefault::getInstance()-
>getIntegerForKey("levelsCompleted");
2. Inially, _levelsCompleted will equal 0 if no data is present. So we store level 1
as "unlocked". This is how that's done:
if (_levelsCompleted == 0) {
_levelsCompleted = 1;
UserDefault::getInstance()->setIntegerForKey("levelsComplet
ed", 1);
UserDefault::getInstance()->flush();
}
www.it-ebooks.info
On the Level – Eskimo
[ 190 ]
3. Then, whenever we start a new level, we update the number of levels completed if
the new level number is larger than the value stored.
if (_currentLevel > _levelsCompleted) {
_levelsCompleted = _currentLevel;
UserDefault::getInstance()->setIntegerForKey("levelsComplet
ed", _levelsCompleted);
UserDefault::getInstance()->flush();
}
You don't have to flush the data (using flush) each time you update
every single bit in it. You can group multiple updates under one flush,
or find a spot in your logic where you can safely flush updates before
exiting the app. Nodes come with extremely helpful methods for this:
onEnter, onExit, onEnterTransitionDidFinish, and
onExitTransitionDidStart.
What just happened?
For small bits of data related to your game, sengs, and preferences, UserDefault is an
excellent way to store informaon. Cocos2d-x once again will map this to whatever local
storage is available in each target system.
Using events in your game
Earlier versions of the framework used an Objecve-C-inspired feature of nocaons.
But this parcular API is already on its way to being deprecated. Instead, you should use
the all-knowing Director and its Dispatcher (the same object we've been talking to
when listening to touch events).
If you have ever worked with an MVC framework or developed a game AI system, you are
probably familiar with a design paern called the Observer Paern. This consists of a central
message dispatcher object other objects can subscribe to (observe) in order to listen to
special messages, or order it to dispatch their own messages to other subscribers. In other
words, it's an event model.
With Cocos2d-x, this is done very quickly and easily. Let me give you an example used
in Eskimo.
www.it-ebooks.info

Chapter 9
[ 191 ]
Time for action – using the event dispatcher
If we want the Platform sprite to listen to the special nocaon
NOTIFICATION_GRAVITY_SWITCH, all we need to do is add Platform as an observer.
1. Inside the Platform class, in its constructor, you will nd these lines:
auto onGravityChanged = [=] (EventCustom * event) {
if (this->isVisible()) {
switchTexture();
}
};
Director::getInstance()->getEventDispatcher()-
addEventListenerWithSceneGraphPriority(EventListenerCustom::create
(GameLayer::NOTIFICATION_GRAVITY_SWITCH, onGravityChanged), this);
And yes, it is one line of code! It is best to create a macro for both the dispatcher
and the add listener code; so, something like this:
#define EVENT_DISPATCHER Director::getInstance()-
>getEventDispatcher()
#define ADD_NOTIFICATION( __target__, __notification__,
__handler__) EVENT_DISPATCHER-
addEventListenerWithSceneGraphPriority(EventListenerCustom::create
(__notification__, __handler__), __target__);
This way the same line of code we used before would look like this:
ADD_NOTIFICATION(this, GameLayer::NOTIFICATION_GRAVITY_SWITCH,
onGravityChanged);
2. The message (or nocaon), NOTIFICATION_GRAVITY_SWITCH, is created as a
stac string in GameLayer:
const char* GameLayer::NOTIFICATION_GRAVITY_SWITCH =
"NOTIFICATION_GRAVITY_SWITCH";
The one-line call to the Director class's dispatcher tells it that the Platform
objects will listen to this dened message, and when such a message is dispatched,
every Platform object will call the onGravityChanged method. This method
does not need to be a block as I showed here, but it is more readable to have the
handler appear as close to the Add Listener call as possible. So, simple blocks are
a good way to organize listeners and their handlers.
www.it-ebooks.info

On the Level – Eskimo
[ 192 ]
3. In the game, each gravity switch is color coded, and when the Eskimo hits a switch,
the plaorm's texture changes to reect the new gravity by switching to the color
of the acvated gravity switch. This is all done through a simple nocaon we
dispatch inside GameLayer when a collision with a GSwitch object is detected
inside the main loop. This is how we do that:
Director::getInstance()->getEventDispatcher()-
>dispatchCustomEvent( GameLayer::NOTIFICATION_GRAVITY_SWITCH);
Or, if you are using the macro, use this:
EVENT_DISPATCHER->dispatchCustomEvent(
GameLayer::NOTIFICATION_GRAVITY_SWITCH);
4. You can also add a UserData object in the custom event as a second parameter in
the dispatch. This can be retrieved from the EventCustom * event in the event
handler, like this:
event->getUserData();
5. When Platform objects are destroyed, the Node destructor will take care of
removing the node as a listener.
What just happened?
You have just learned how to make your life as a developer much, much easier. Adding an
applicaon-wide event model to your game is such a powerful way to improve ow and
interacvity between objects and it's so simple to use that I'm sure you'll soon implement
this feature in all your games.
Using the accelerometer
Now let's move to the few new topics related to gameplay, the rst of which is the use of
accelerometer data. Again, nothing could be simpler.
Time for action – reading accelerometer data
Just as you do with touch events, you need to tell the framework you want to read
accelerometer data.
1. You tell the framework you wish to use the accelerometer with this one call inside
any Layer class:
Device::setAccelerometerEnabled(true);
www.it-ebooks.info
Chapter 9
[ 193 ]
2. Then, just as you've done with touch events, you subscribe to the accelerometer
events from the event dispatcher as follows:
auto listenerAccelerometer =
EventListenerAcceleration::create(CC_CALLBACK_2
(GameLayer::onAcceleration, this));
_eventDispatcher->addEventListenerWithSceneGraphPriority(listenerA
ccelerometer,
this);
3. In Eskimo, the accelerometer data changes the value of a Point vector
called _acceleration.
void GameLayer::onAcceleration(Acceleration *acc, Event *event) {
_acceleration = Vec2(acc->x * ACCELEROMETER_MULTIPLIER,
acc->y * ACCELEROMETER_MULTIPLIER);
}
This value is then read inside the main loop and used to move the Eskimo. In the
game, only one axis is updated at a me, depending on the current gravity. So you
can only ever move the Eskimo on the X axis or the Y axis with the accelerometer
data, but never both at the same me.
Keep in mind that there is also a Z axis value in the Acceleration data.
It might come in handy someday!
What just happened?
Yep. With a couple of lines, you added accelerometer controls to your game.
It is common pracce to add extra lters to these accelerometer values, as results may vary
between devices. These lters are raos you apply to acceleraon to keep values within a
certain range. You can also nd a variety of formulas for these raos online. But these will
depend on how sensive you need the controls to be or how responsive.
And, in the game, we only update the Eskimo with the accelerometer data if the sprite is
touching a plaorm. We can quickly ascertain that by checking whether or not the _player
body has a contact list, as follows:
if (_player->getBody()->GetContactList())
www.it-ebooks.info

On the Level – Eskimo
[ 194 ]
Reusing b2Bodies
In Eskimo, we have a pool of b2Bodies that are used inside the Platform objects and
we also change the shape of the lile Eskimo whenever the player taps the screen. This is
possible because Box2D makes it very easy to change the xture data of a b2Body xture
without having to destroy the actual body.
Let me show you how.
Time for action – changing a b2Body xture
All you have to do is make a call to body->DestroyFixture. Not surprisingly, this should
be done outside the simulaon step.
1. Inside the methods makeCircleShape and makeBoxShape in the Eskimo class,
you will nd these lines:
if (_body->GetFixtureList() ) {
_body->DestroyFixture(_body->GetFixtureList());
}
Here we just state that if there is a xture for this body, destroy it. We can then
switch from a box to a circle xture when the player taps the screen, but use the
same body throughout.
2. We use this feature with plaorms too. Plaorms inside the pool that are not being
used in the current level are set to inacve as follows:
_body->SetActive(false);
This removes them from the simulaon.
3. And when they are reinialized to be used in a level, we destroy their exisng
xture, update it to match the data from the .plist le, and set the body to
acve once again. This is how we do that:
//Define shape
b2PolygonShape box;
box.SetAsBox(width * 0.5f /PTM_RATIO, PLATFORM_HEIGHT *
0.5f / PTM_RATIO);
//Define fixture
b2FixtureDef fixtureDef;
fixtureDef.shape = &box;
fixtureDef.density = 1;
www.it-ebooks.info

Chapter 9
[ 195 ]
fixtureDef.restitution = 0;
//reutilize body from the pool: so destroy any existent fixture
if (_body->GetFixtureList()) {
_body->DestroyFixture(_body->GetFixtureList());
}
_body->CreateFixture(&fixtureDef);
_body->SetTransform(b2Vec2(position.x / PTM_RATIO, position.y /
PTM_RATIO), _DEGREES_TO_RADIANS(-angle));
_body->SetActive(true);
What just happened?
So, just as we've been doing with pools of sprites, we can apply the same logic to b2Bodies
and never instanate anything inside the main loop.
Now, let's see how Android handles all this level-loading business.
Time for action – running the game in Android
Time to deploy the game to Android.
1. Navigate to the proj.android folder and open the le AndroidManifest.xml
in a text editor. Then go to the folder jni and open the le Android.mk in a
text editor.
2. In the AndroidManifest.xml le, edit the following line in the activity
tag as follows:
android:screenOrientation="portrait"
3. Next, let's edit the make le, so open the Android.mk le and edit the lines in
LOCAL_SRC_FILES to read:
LOCAL_SRC_FILES := hellocpp/main.cpp \
../../Classes/AppDelegate.cpp \
../../Classes/b2Sprite.cpp \
../../Classes/Eskimo.cpp \
../../Classes/GSwitch.cpp \
../../Classes/Igloo.cpp \
../../Classes/Platform.cpp \
../../Classes/LevelSelectLayer.cpp \
../../Classes/MenuLayer.cpp \
../../Classes/GameLayer.cpp
4. Now import the project into Eclipse and build it.
5. You can now save it and run the game in your Android device.
www.it-ebooks.info

On the Level – Eskimo
[ 196 ]
What just happened?
By now, you should be an expert at running your code in Android and hopefully your
experience with Eclipse has been a good one.
And that's all folks!
Play the game. Check out the source code (which is chock-full of comments). Add some
new levels and make the lile Eskimo's life a living hell!
Have a go hero
The gameplay for Eskimo could be further improved with a few new ideas that would force
the player to make more errors.
It is a common feature in these types of games to evaluate the degree of "completeness"
in which a level was played. There could be a me limit for each level and pick-up items
for the Eskimo, and the player could be evaluated at the end of each level and awarded a
bronze, silver, or golden star based on his or her performance. And new groups of levels
may only be unlocked if a certain number of golden stars were acquired.
Summary
Yes, you have a cool idea for a game, great! But a lot of eort will go into structuring and
opmizing it. Cocos2d-x can help with both sides of the job.
Yes, scenes can be a bit cumbersome depending on your needs, but they are undisputed
memory managers. When Director kills a scene, it kills it dead.
Loading external data can not only help with memory size, but also bring in more
developers into your project, focusing specically on level design and the external data
les that create them.
And events can quickly become a must in the way you structure your games. Prey soon,
you will nd yourself thinking in terms of events to handle game states and menu
interacvity, among other things.
Now, let's move to a whole new language!
www.it-ebooks.info

[ 197 ]
Introducing Lua!
In our last game, we'll move to the new Cocos IDE and develop an entire game
using the Lua scripting language. You'll get to know and use the Lua bindings
for the Cocos2d-x API, which is not much different from what we've been using
in C++; if anything, it's just a lot easier!
This me, you'll learn how to:
Create and publish a project in Cocos IDE
Code an enre game in Lua
Use sprites, parcles, labels, menus, and acons, but this me with the
Lua bindings
Build a match-three game
So what is Lua like?
At the heart of Lua (which means moon in Portuguese), you have the table. You may think
of it as being similar to a JavaScript object, only it's much more than that. It plays the part
of arrays, diconaries, enumeraons, structures, and classes, among other things. It makes
Lua the perfect language to manage large sets of data. You write a script that handles the
data, and then keep feeding it dierent "stu." An inventory or shop system, an interacve
children's book—these types of projects could all benet from Lua's table-centric power,
as they can be built around a xed template with a data table at its core.
10
www.it-ebooks.info
Introducing Lua!
[ 198 ]
Its syntax, for those not used to a scripng language, can be a lile odd, with its dos,
thens, and ends. But once you get past this inial hurdle, you'll nd Lua quite user-friendly.
Here are some of the "oddies" in its syntax:
-- a comment
--[[
a
multiline
comment
]]
-- a table declared as a local variable
local myTable = {}
-- the length of a table
local len = #myTable
-- looping the table (starting with index 1!)
for i = 1, #myTable do
local element = myTable[i]
-- an if elseif else statement
if (element ~= true ) then
-- do something
elseif (element == true) then
-- do something else
else
-- we'll never get here!
end
end
Semicolons are oponal.
A table can be turned into a template to generate instances of it, in other words, a class.
Methods of the instance of the table must be accessed with a : notaon:
myTableClassObject:myMethod()
From inside the method, you refer to the instance of the class as self:
self.myProperty = 1
self:myOtherMethod()
Alternavely, you can call the template's method with a dot notaon, passing the instance of
that template to it as the rst parameter:
myTableClassObject.myMethod(myTableClassObject)
www.it-ebooks.info
Chapter 10
[ 199 ]
I admit, it's weird, but it can be useful at mes as prey much every method you write in
Lua can be made available for other parts of your code—sort of the way stac methods are
used in tradional OOP languages.
Debugging in Lua – the knights who say nil
Debugging your Lua code can be frustrang at mes. But you soon learn to disnguish
between the minute subtlees in Lua's runme errors. The compiler will say something is
nil (Lua's null) in about 99.9 percent of cases. It's up to you to gure out why. Here are
the main culprits:
You are referencing an object's own property without prepending self. or self:.
You are calling an instance method with a dot notaon, and not passing the
instance as the rst parameter; something like myObject.myMethod() instead of
myObject.myMethod(myObject). Use myObject:myMethod() instead.
You are referencing a variable from a place outside its scope. For example, a local
variable declared inside an if statement is being referenced outside the condional.
You forgot to return the class object at the end of your class or
module/table declaraon.
You tried to access the zero index of an array.
You forgot to add a few dos and thens or ends.
And nally, maybe you're just having one of those days. A nil sort of day.
The Cocos IDE will show errors in bold; the same bold it uses for global variables, which is
confusing at mes. But it helps nonetheless. Just make a habit of scanning your code for
bold text!
You might need to increase the heap memory inside the IDE. The quickest
way to accomplish this is to nd the le called eclipse.ini inside the
Cocos IDE applicaon folder. On a Mac, this means inside the Cocos IDE
app package: right-click on the app icon, select Show Package Contents,
and then navigate to Contents/MacOS/eclipse.ini.
Then nd the line where you read -Xmx256m or -Xmx512m and change
it to -Xmx1024m.
This might help in slower computers. My laptop crashed a lot while
running the IDE.
www.it-ebooks.info
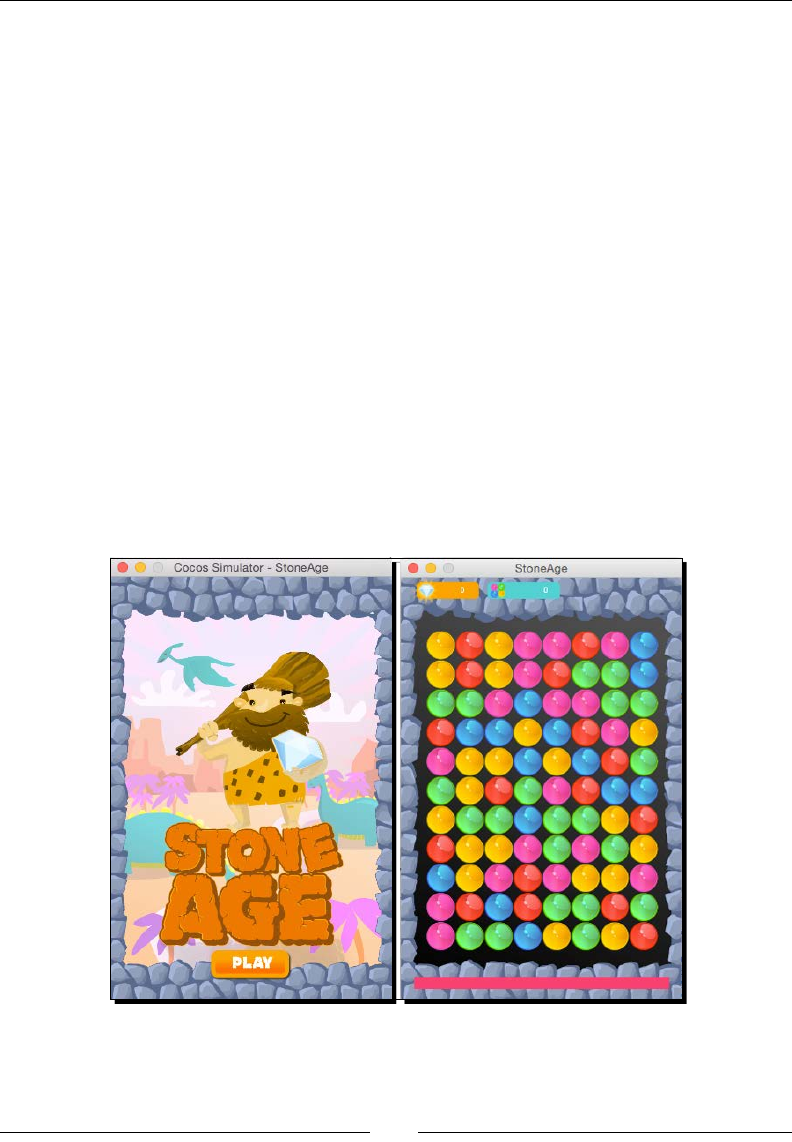
Introducing Lua!
[ 200 ]
The game – Stone Age
This is a match-three game. You know, the kind of game that is making a couple of companies
a gazillion dollars and making a gazillion other companies clone those games in order to earn
a couple of dollars. Yes, that game!
You must match three or more gems. If you match more than three, a random gem bursts
and turns into a diamond, which you collect for more points.
The game has a mer, and when me runs out, it's game over.
I used prey much the same structure as in the previous games in this book. But I broke it
into separate modules so it's easier for you to use the code as a reference.
We have a MenuScene and a GameScene item. I have prey much all Cocos2d-x acons in
one module called GridAnimations and most of the interacvity inside another module
called GridController. And all object pools are kept inside a class called ObjectPools.
This is a grid game, so it's perfect to illustrate working with table arrays in Lua, and its main
advantages over C++: it's much easier to create and memory manage dynamic lists (arrays) in
Lua. This exibility, aligned with Cocos2d-x's awesomeness, make for very rapid prototyping
and development. The actual game will look like this:
But before you import the starter project, let me show you how to create a new project
inside the Cocos IDE.
www.it-ebooks.info
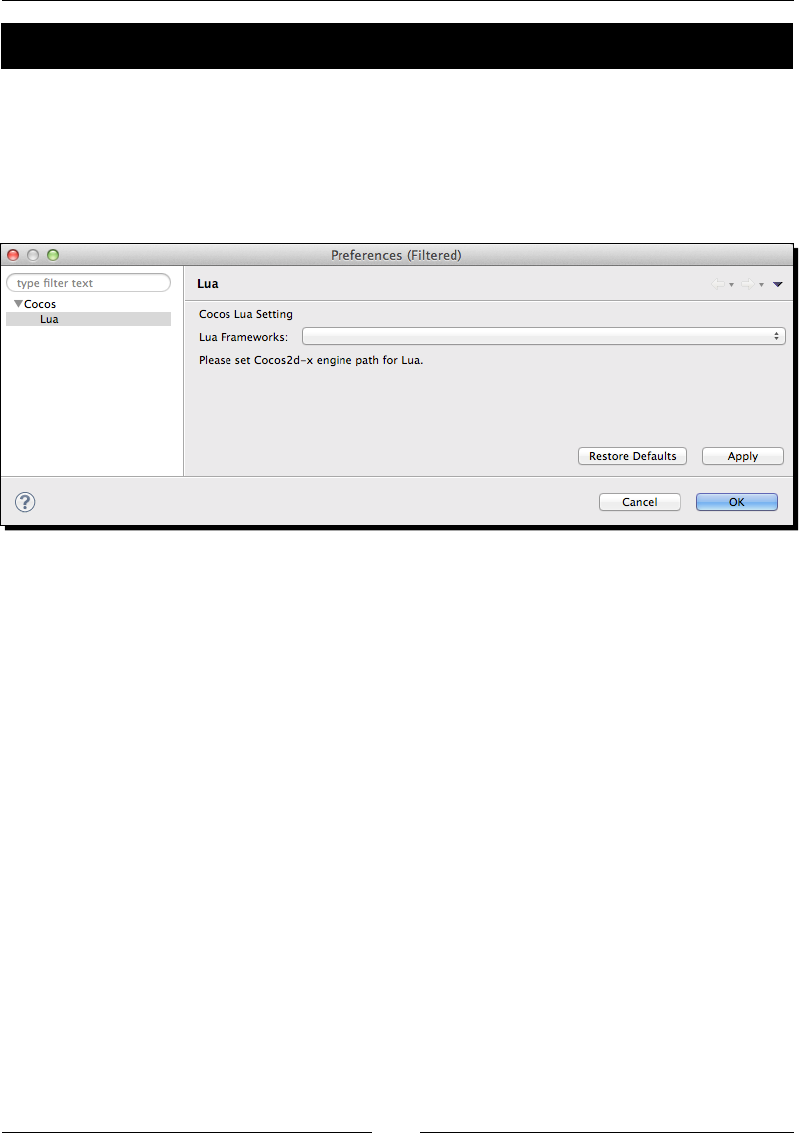
Chapter 10
[ 201 ]
Time for action – creating or importing a project
Nothing could be simpler; since the IDE is based on Eclipse, you know most of its main
funconalies already:
1. First let's set up the IDE to use the Lua bindings. Go to Preferences | Cocos | Lua,
and in the drop-down menu for Lua Frameworks, nd the Cocos2d-x framework
folder you downloaded:
2. Select File | New | Cocos Lua Project, if that opon is already available, or select
File | New | Other | Cocos Lua | Cocos Lua Project.
3. In the New Cocos Project wizard, give your project a name and click Next.
4. In the next dialogue, you can choose your project's orientaon and design size.
And that's it. Click Finish.
5. In order to import a project, click File | Import then Cocos | Import Cocos
Project, and navigate to the project start folder for this chapter. The game is called
StoneAge. (Download this chapter's source les from this book's website if you
haven't done so already. There is a starter project and a nal project that you can
run and test.)
What just happened?
You learned to create and import a project into the Cocos IDE. Since the IDE is an
Eclipse-based program, the steps should be familiar to you by now.
You may also wish to change the sengs for the simulator. For that, all you need to do
is right-click on your project and select either Run As... or Debug As..., and then Run or
Debug Conguraons.
www.it-ebooks.info
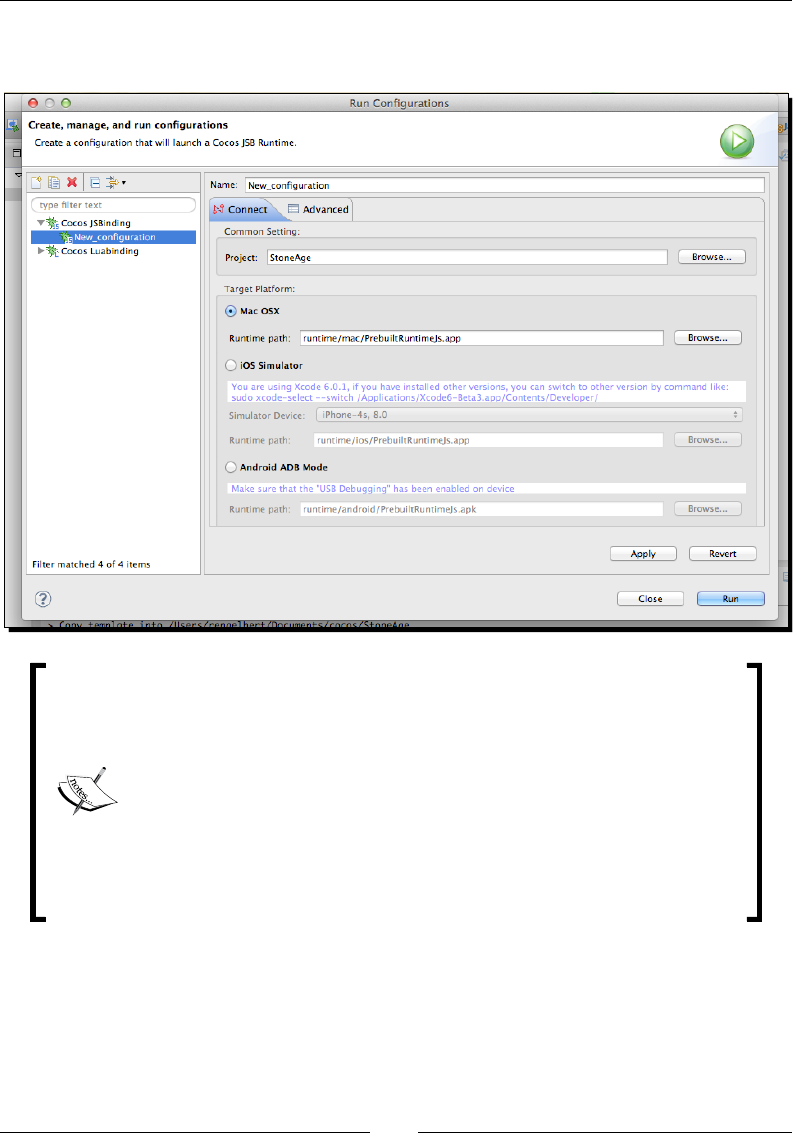
Introducing Lua!
[ 202 ]
It's best to leave the default for the Mac OSX runme (if you're on a Mac of course), as this is
the fastest opon. But if you wish to change the simulator, here is where you do it:
On my machine, version 3.4 of the framework threw compile errors. I
had to add two xes in order to run Stone Age. In cocos-cocos2d-
Cocos2dConstants.lua, just before the last table is declared, I added
this line:
cc.AsyncTaskPool = {}
Similarly, in cocos-ui-GuiConstants.lua, I added ccui.
LayoutComponent = {} before new tables are added to
LayoutComponent, also near the end of the le.
If you run into problems, switch to version 3.3, which was much more stable
for Lua development.
www.it-ebooks.info

Chapter 10
[ 203 ]
Time for action – setting up our screen resolution
The old AppDelegate class logic now exists inside a le called main.lua:
1. In the IDE, open the main.lua le inside the src folder.
2. Aer the line where we set the animaon interval, type the following:
cc.Director:getInstance():getOpenGLView():
setDesignResolutionSize(640, 960,
cc.ResolutionPolicy.SHOW_ALL)
local screenSize =
cc.Director:getInstance():getVisibleSize()
local designSize = cc.size(640, 960)
if (screenSize.width > 320) then
cc.Director:getInstance():setContentScaleFactor(640/
designSize.width)
cc.FileUtils:getInstance():addSearchPath("res/hd/")
else
cc.Director:getInstance():setContentScaleFactor(320/
designSize.width)
cc.FileUtils:getInstance():addSearchPath("res/sd/")
end
3. I designed the game for iPhone rena, and here we set the appropriate scale
and asset folder for both rena and non-rena phones. Next, let's preload the
sound les:
local bgMusicPath =
cc.FileUtils:getInstance():fullPathForFilename("background.mp3")
cc.SimpleAudioEngine:getInstance():preloadMusic(bgMusicPa
th)
local effectPath =
cc.FileUtils:getInstance():fullPathForFilename("match.wav")
cc.SimpleAudioEngine:getInstance():preloadEffect(effectPa
th)
effectPath =
cc.FileUtils:getInstance():fullPathForFilename("diamond.wav")
cc.SimpleAudioEngine:getInstance():preloadEffect(effectPa
th)
effectPath =
cc.FileUtils:getInstance():fullPathForFilename("diamond2.wav")
cc.SimpleAudioEngine:getInstance():preloadEffect(effectPa
th)
effectPath =
cc.FileUtils:getInstance():fullPathForFilename("wrong.wav")
cc.SimpleAudioEngine:getInstance():preloadEffect(effectPath)
www.it-ebooks.info

Introducing Lua!
[ 204 ]
4. And nally, let's set the ball rolling by creang and running our rst scene:
--create scene
local scene = require("MenuScene")
local menuScene = scene.create()
if cc.Director:getInstance():getRunningScene() then
cc.Director:getInstance():replaceScene(menuScene)
else
cc.Director:getInstance():runWithScene(menuScene)
end
What just happened?
Like we've done in prey much every game so far, we set the resoluon policy and scale
factor for our applicaon and preloaded the sounds we'll be using.
The game was designed only for phones this me, and it was designed with the iPhone 4
screen in mind, and it resizes to older phones.
But don't run the game just yet. Let's create our menu scene. It has a lile of everything in it
and it will be a perfect introducon to the Cocos2d-x API in Lua.
Time for action – creating a menu scene
Let's create a new le and add a menu scene to our game:
1. Right-click on the src folder and select New | Lua File; call the new le
MenuScene.lua.
2. Let's create a class that extends a scene. We rst load our own module of all the
game's constants (this le already exists in the starter project):
local constants = require ("constants")
3. Then we build our class:
local MenuScene = class("MenuScene", function()
return cc.Scene:create()
end)
function MenuScene.create()
local scene = MenuScene.new()
return scene
end
function MenuScene:ctor()
www.it-ebooks.info

Chapter 10
[ 205 ]
self.visibleSize =
cc.Director:getInstance():getVisibleSize()
self.middle = {x = self.visibleSize.width * 0.5,
y = self.visibleSize.height * 0.5}
self.origin = cc.Director:getInstance():getVisibleOrigin()
self:init()
end
return MenuScene
We'll add the methods next, including the init method we called in the class
constructor (always called ctor), but I wanted to stress the importance of returning
the class at the end of its declaraon.
4. So moving just below the constructor, let's connue building up our scene:
function MenuScene:init ()
local bg = cc.Sprite:create("introbg.jpg")
bg:setPosition(self.middle.x, self.middle.y)
self:addChild(bg)
--create pterodactyl animation
local pterodactyl = cc.Sprite:create("ptero_frame1.png")
pterodactyl:setPosition(cc.p(self.visibleSize.width + 100,
self.visibleSize.height * 0.8))
self:addChild(pterodactyl)
local animation = cc.Animation:create()
local number, name
for i = 1, 3 do
number = i
name = "ptero_frame"..number..".png"
animation:addSpriteFrameWithFile(name)
end
animation:setDelayPerUnit(0.5 / 3.0)
animation:setRestoreOriginalFrame(true)
animation:setLoops(-1)
local animate = cc.Animate:create(animation)
pterodactyl:runAction( animate )
local moveOut = cc.MoveTo:create(0, cc.p(self.visibleSize.width
+ 100, self.visibleSize.height *
0.8))
local moveIn = cc.MoveTo:create(4.0, cc.p(-100,
self.visibleSize.height * 0.8))
local delay = cc.DelayTime:create(2.5)
pterodactyl:runAction(cc.RepeatForever:create
(cc.Sequence:create(moveOut, moveIn, delay) ) )
www.it-ebooks.info

Introducing Lua!
[ 206 ]
local character = cc.Sprite:create("introCharacter.png")
character:setPosition(self.middle.x, self.middle.y + 110)
self:addChild(character)
local frame = cc.Sprite:create("frame.png")
frame:setPosition(self.middle.x, self.middle.y)
self:addChild(frame)
end
With this, we added a background and two other sprites, plus an animaon of a
pterodactyl ying in the background. Once again, the calls are remarkably similar
to the ones in C++.
5. Now let's add a menu with a play buon (all this sll inside the init method):
--create play button
local function playGame()
local bgMusicPath = cc.FileUtils:getInstance():fullPathForFi
lename("background.mp3")
cc.SimpleAudioEngine:getInstance():playMusic(bgMusicPath, true)
local scene = require("GameScene")
local gameScene = scene.create()
cc.Director:getInstance():replaceScene(gameScene)
end
local btnPlay = cc.MenuItemImage:create("playBtn.png",
"playBtnOver.png")
btnPlay:setPosition(0,0)
btnPlay:registerScriptTapHandler(playGame)
local menu = cc.Menu:create(btnPlay)
menu:setPosition(self.middle.x, 80)
self:addChild(menu)
Typing the buon's callback inside the same method where the callback is referenced is
similar to wring a block or even a lambda funcon in C++.
What just happened?
You created a scene in Lua with Cocos2d-x using a menu, a few sprites, and an animaon.
It's easy to see how similar the calls are in the Lua bindings to the original C++ ones.
And with code compleon inside the IDE, nding the correct methods is a breeze.
Now let's tackle the GameScene class.
www.it-ebooks.info
Chapter 10
[ 207 ]
One of the nicest features of Lua is something called live coding, and it's
switched on by default in the Cocos IDE. To see what I mean by live coding,
do this: while the game is running in the simulator, change the posion of the
character sprite in your code and save it. You should see the change taking
eect in the simulator. This is a great way to build UI and game scenes.
Time for action – creating our game scene
The GameScene class is already added to the start project and some of the code is already in
place. We'll focus rst on building the game's interface and listening to touches:
1. Let's work on the addTouchEvents method:
function GameScene:addTouchEvents()
local bg = cc.Sprite:create("background.jpg")
bg:setPosition(self.middle.x, self.middle.y)
self:addChild(bg)
local function onTouchBegan(touch, event)
self.gridController:onTouchDown(touch:getLocation())
return true
end
local function onTouchMoved(touch, event)
self.gridController:onTouchMove(touch:getLocation())
end
local function onTouchEnded(touch, event)
self.gridController:onTouchUp(touch:getLocation())
end
local listener = cc.EventListenerTouchOneByOne:create()
listener:registerScriptHandler
(onTouchBegan,cc.Handler.EVENT_TOUCH_BEGAN )
listener:registerScriptHandler
(onTouchMoved,cc.Handler.EVENT_TOUCH_MOVED )
listener:registerScriptHandler
(onTouchEnded,cc.Handler.EVENT_TOUCH_ENDED )
local eventDispatcher = bg:getEventDispatcher()
eventDispatcher:addEventListenerWithSceneGraphPriority
(listener, bg)
end
www.it-ebooks.info

Introducing Lua!
[ 208 ]
2. Once again, we register the events with the node's instance of the event dispatcher.
The actual touches are handled by our GridController object. We'll go over
those later; rst, let's build the UI. Time to work on the init method:
function GameScene:init ()
self.gridController = GridController:create()
self.gridAnimations = GridAnimations:create()
self.objectPools = ObjectPools.create()
self.gridAnimations:setGameLayer(self)
self.gridController:setGameLayer(self)
self.objectPools:createPools(self)
Create our special objects, one to handle user interacvity, another for animaons,
and our good old object pool.
3. Next, we add a couple of nodes and our score labels:
self:addChild( self.gemsContainer )
self.gemsContainer:setPosition( 25, 80)
--build interface
local frame = cc.Sprite:create("frame.png")
frame:setPosition(self.middle.x, self.middle.y)
self:addChild(frame)
local diamondScoreBg = cc.Sprite:create("diamondScore.png")
diamondScoreBg:setPosition(100, constants.SCREEN_HEIGHT - 30)
self:addChild(diamondScoreBg)
local scoreBg = cc.Sprite:create("gemsScore.png")
scoreBg:setPosition(280, constants.SCREEN_HEIGHT - 30)
self:addChild(scoreBg)
local ttfConfig = {}
ttfConfig.fontFilePath="fonts/myriad-pro.ttf"
ttfConfig.fontSize=20
self.diamondScoreLabel = cc.Label:createWithTTF(ttfConfig,
"0", cc.TEXT_ALIGNMENT_RIGHT , 150)
self.diamondScoreLabel:setPosition
(140, constants.SCREEN_HEIGHT - 30)
self:addChild(self.diamondScoreLabel)
self.scoreLabel = cc.Label:createWithTTF(ttfConfig,
"0", cc.TEXT_ALIGNMENT_RIGHT , 150)
self.scoreLabel:setPosition (330, constants.SCREEN_HEIGHT - 30)
self:addChild(self.scoreLabel)
end
The main dierence when compared to the C++ implementaon of Label:createWithTTF
is that, in Lua, we have a conguraon table for the font.
www.it-ebooks.info

Chapter 10
[ 209 ]
What just happened?
This me, we saw how to register for touch events and how to create true type font labels.
Next, we'll go over creang a typical grid for a match-three game.
Time for action – building the gems
There are basically two types of match-three games, those in which the selecon of
matches takes place automacally and those in which the matches are selected by the
player. Candy Crush is a good example of the former, and Diamond Dash of the laer.
When building the rst type of game, you must add extra logic to ensure you start the
game with a grid that contains no matches. This is what we'll do now:
1. We start with the buildGrid method:
function GameScene:buildGrid ()
math.randomseed(os.clock())
self.enabled = false
local g
for c = 1, constants.GRID_SIZE_X do
self.grid[c] = {}
self.gridGemsColumnMap[c] = {}
for r = 1, constants.GRID_SIZE_Y do
if (c < 3) then
self.grid[c][r] =
constants.TYPES[ self:getVerticalUnique(c,r) ]
else
self.grid[c][r] =
constants.TYPES[ self:getVerticalHorizontalUnique(c,r) ]
end
g = Gem:create()
g:setType( self.grid[c][r] )
g:setPosition ( c * (constants.TILE_SIZE +
constants.GRID_SPACE),
r * (constants.TILE_SIZE +
constants.GRID_SPACE))
self.gemsContainer:addChild(g)
self.gridGemsColumnMap[c][r] = g
table.insert(self.allGems, g)
end
end
self.gridAnimations:animateIntro()
end
www.it-ebooks.info

Introducing Lua!
[ 210 ]
Ensure that we generate a dierent random series of gems each me we run
the game by changing the randomseed value.
The enabled property will stop user interacons while the grid is being altered
or animated.
The grid is a two-dimensional array of columns of gems. The magic happens in
the getVerticalUnique and getVerticalHorizontalUnique methods.
2. To ensure that none of the gems will form a three-gem-match on the rst two
columns, we check them vercally:
function GameScene:getVerticalUnique (col, row)
local type = math.floor (math.random () *
#constants.TYPES + 1 )
if (self.grid[col][row-1] == constants.TYPES[type] and
self.grid[col][row-2] ~= nil and self.grid[col][row-2] ==
constants.TYPES[type]) then
type = type + 1;
if (type == #constants.TYPES + 1) then type = 1 end
end
return type
end
All this code is doing is checking a column to see if any gem is forming a string of
three connected gems of the same type.
3. Then, we check both vercally and horizontally, starng with column 3:
function GameScene:getVerticalHorizontalUnique (col, row)
local type = self:getVerticalUnique (col, row)
if (self.grid[col - 1][row] == constants.TYPES[type] and
self.grid[col - 2][row] ~= nil and self.grid[col - 2][row] ==
constants.TYPES[type]) then
local unique = false
while unique == false do
type = self:getVerticalUnique (col, row)
if (self.grid[col-1][row] == constants.TYPES[type] and
self.grid[col - 2 ][row] ~= nil and self.grid[col -
2 ][row] == constants.TYPES[type]) then
--do nothing
else
unique = true
end
end
end
return type
end
This algorithm is doing the same thing we did previously with the columns, but it's also
checking on individual rows.
www.it-ebooks.info

Chapter 10
[ 211 ]
What just happened?
We created a grid of gems, free of any three-gem matches. Again, if we had built the
sort of match-three game where the user must select clusters of matched gems to have
these removed from the grid (like Diamond Dash), we would not have to bother with this
logic at all.
Next, let's manipulate the grid with gem swaps, idencaon of matches, and grid collapse.
Time for action – changing the grid with GridController
The GridController object iniates all grid changes since it's where we handle touches.
In the game, the user can drag a gem to swap places with another, or rst select the gem
they want to move and then select the gem they want to swap places with in a two-touch
process. Let's add the touch handling for that:
1. In GridController, let's add the logic to onTouchDown:
function GridController:onTouchDown (touch)
if (self.gameLayer.running == false) then
local scene = require("GameScene")
local gameScene = scene.create()
cc.Director:getInstance():replaceScene(gameScene)
local bgMusicPath =
cc.FileUtils:getInstance():fullPathForFilename("background.mp3")
cc.SimpleAudioEngine:getInstance():playMusic(bgMusicPath,
true)
return
end
If we are displaying the game over screen, restart the scene.
2. Next, we nd the gem the user is trying to select:
self.touchDown = true
if (self.enabled == false) then return end
local touchedGem = self:findGemAtPosition (touch)
if (touchedGem.gem ~= nil ) then
if (self.gameLayer.selectedGem == nil) then
self:selectStartGem(touchedGem)
else
if (self:isValidTarget(touchedGem.x,
touchedGem.y, touch) == true) then
self:selectTargetGem(touchedGem)
else
www.it-ebooks.info

Introducing Lua!
[ 212 ]
if (self.gameLayer.selectedGem ~= nil)
then self.gameLayer.selectedGem:deselect() end
self.gameLayer.selectedGem = nil
self:selectStartGem (touchedGem)
end
end
end
end
We nd the gem closest to the touch posion. If the user has not selected a gem
yet (selectedGem = nil), we set the one just touched as the rst gem selected.
Otherwise, we determine whether the second gem selected can be used for a swap.
Only gems above and below the rst selected gem, or the ones to the le and right
of it, can be swapped with. If that is valid, we use the second gem as the target gem.
3. Before moving on to onTouchMove and onTouchUp, let's see how we determine
which gem is being selected and which gem is a valid target gem. So let's work on
the findGemAtPosition value. Begin by determining where in the grid container
the touch landed:
function GridController:findGemAtPosition (position)
local mx = position.x
local my = position.y
local gridWidth = constants.GRID_SIZE_X *
(constants.TILE_SIZE + constants.GRID_SPACE)
local gridHeight = constants.GRID_SIZE_Y *
(constants.TILE_SIZE + constants.GRID_SPACE)
mx = mx - self.gameLayer.gemsContainer:getPositionX()
my = my - self.gameLayer.gemsContainer:getPositionY()
if (mx < 0) then mx = 0 end
if (my < 0) then my = 0 end
if (mx > gridWidth) then mx = gridWidth end
if (my > gridHeight) then my = gridHeight end
4. Here is where the magic happens. We use the x and y posion of the touch inside
the grid to determine the index of the gem inside the array:
local x = math.ceil ((mx - constants.TILE_SIZE * 0.5) /
(constants.TILE_SIZE + constants.GRID_SPACE))
local y = math.ceil ((my - constants.TILE_SIZE * 0.5) /
(constants.TILE_SIZE + constants.GRID_SPACE))
if (x < 1) then x = 1 end
if (y < 1) then y = 1 end
if (x > constants.GRID_SIZE_X) then x =
constants.GRID_SIZE_X end
www.it-ebooks.info

Chapter 10
[ 213 ]
if (y > constants.GRID_SIZE_Y) then y =
constants.GRID_SIZE_Y end
return {x = x, y = y, gem =
self.gameLayer.gridGemsColumnMap[x][y]}
end
We nish by checking whether the touch is out of array bounds.
5. And now let's see the logic to determine whether the target gem is a valid target:
function GridController:isValidTarget (px, py, touch)
local offbounds = false
if (px > self.gameLayer.selectedIndex.x + 1) then
offbounds = true end
if (px < self.gameLayer.selectedIndex.x - 1) then
offbounds = true end
if (py > self.gameLayer.selectedIndex.y + 1) then
offbounds = true end
if (py < self.gameLayer.selectedIndex.y - 1) then
offbounds = true end
We rst check to see whether the target gem is at the top, boom, le, or right of
the selected gem:
local cell = math.sin (math.atan2
(math.pow( self.gameLayer.selectedIndex.x - px, 2),
math.pow( self.gameLayer.selectedIndex.y- py, 2) ) )
if (cell ~= 0 and cell ~= 1) then
offbounds = true
end
if (offbounds == true) then
return false
end
We next use a bit of trig magic to determine whether the selected target gem is
diagonal to the selected gem:
local touchedGem = self.gameLayer.gridGemsColumnMap[px][py]
if (touchedGem.gem == self.gameLayer.selectedGem or
(px == self.gameLayer.selectedIndex.x and
py == self.gameLayer.selectedIndex.y)) then
self.gameLayer.targetGem = nil
return false
end
return true
end
We nish by checking whether the target gem is not the same as the previously
selected gem.
www.it-ebooks.info

Introducing Lua!
[ 214 ]
6. Now, let's move on to the onTouchUp event handling:
function GridController:onTouchUp (touch)
if (self.gameLayer.running == false) then return end
self.touchDown = false
if (self.enabled == false) then return end
if (self.gameLayer.selectedGem ~= nil) then
self.gameLayer:dropSelectedGem() end
end
Prey simple! We just change the z layering of the selected gem, as we want to
make sure that the gem is shown above the others when the swap takes place.
So when we release the gem, we push it back to its original z level (which is what
the dropSelectedGem method does, and we'll see how it does this soon).
7. The onTouchMove event handles the opon of dragging the selected gem unl it
swaps places with another gem:
function GridController:onTouchMove (touch)
if (self.gameLayer.running == false) then return end
if (self.enabled == false) then return end
--track to see if we have a valid target
if (self.gameLayer.selectedGem ~= nil and
self.touchDown == true) then
self.gameLayer.selectedGem:setPosition(
touch.x - self.gameLayer.gemsContainer:getPositionX(),
touch.y - self.gameLayer.gemsContainer:getPositionY())
local touchedGem = self:findGemAtPosition (touch)
if (touchedGem.gem ~= nil and self:isValidTarget(touchedGe
m.x, touchedGem.y, touch) == true ) then
self:selectTargetGem(touchedGem)
end
end
end
We run most of the same logic as we did with onTouchDown. We move the
selectedGem object unl a suitable target gem is idened, and then we pick
the second one as the target. This is when the swap happens. Let's do that now.
www.it-ebooks.info

Chapter 10
[ 215 ]
8. First, the logic that sets our selected gem:
function GridController:selectStartGem (touchedGem)
if (self.gameLayer.selectedGem == nil) then
self.gameLayer.selectedGem = touchedGem.gem
self.gameLayer.targetGem = nil
self.gameLayer.targetIndex = nil
touchedGem.gem:setLocalZOrder(constants.Z_SWAP_2)
self.gameLayer.selectedIndex = {x = touchedGem.x,
y = touchedGem.y}
self.gameLayer.selectedGemPosition =
{x = touchedGem.gem:getPositionX(),
y =
touchedGem.gem:getPositionY()}
self.gameLayer.gridAnimations:animateSelected
(touchedGem.gem)
end
end
We start the swapping process; we have a selected gem but no target gem.
We change the layering of the selected gem through setLocalZOrder.
We also make the selected gem rotate 360 degrees.
9. Then, we're ready to select the target gem:
function GridController:selectTargetGem (touchedGem)
if (self.gameLayer.targetGem ~= nil) then return end
self.enabled = false
self.gameLayer.targetIndex = {x = touchedGem.x,
y = touchedGem.y}
self.gameLayer.targetGem = touchedGem.gem
self.gameLayer.targetGem:setLocalZOrder(constants.Z_SWAP_1)
self.gameLayer:swapGemsToNewPosition()
end
It is now that we nally call our GameScene class and ask it to swap the gems.
What just happened?
We just added the logic to handle all the user interacvity. Now, all that's le for us to do is
handle the swaps, checking for matches and collapsing the grid. Let's do it!
www.it-ebooks.info

Introducing Lua!
[ 216 ]
Time for action – swapping the gems and looking for matches
The swapping logic is found in GameScene in the swapGemsToNewPosition method:
1. The swapGemsToNewPosition method makes one call to GridAnimations to
animate the swap between the selected and target gem. Once this animaon is
complete, we re a onNewSwapComplete method. The majority of the logic takes
place in there:
function GameScene:swapGemsToNewPosition ()
local function onMatchedAnimatedOut (sender)
self:collapseGrid()
end
local function onReturnSwapComplete (sender)
self.gridController.enabled = true
end
local function onNewSwapComplete (sender)
self.gridGemsColumnMap[self.targetIndex.x][self.
targetIndex.y]
= self.selectedGem
self.gridGemsColumnMap[self.selectedIndex.x][self.
selectedIndex.y] =
self.targetGem
self.grid[self.targetIndex.x][self.targetIndex.y] =
self.selectedGem.type
self.grid[self.selectedIndex.x][self.selectedIndex.y] =
self.targetGem.type
The call back switches the gems around inside the grid array.
self.combos = 0
self.addingCombos = true
Combos are used to track if we have more than 3 gems matched
after the player's move.
--check for new matches
if (self.gridController:checkGridMatches() == true) then
2. If we have a match, we run animaons on the matched gems, otherwise we
play a swap back animaon and play a sound eect to represent a wrong move
by the player:
--animate matched gems
if (#self.gridController.matchArray > 3) then
self.combos = self.combos + (#self.gridController.matchArray -
3) end
www.it-ebooks.info

Chapter 10
[ 217 ]
self.gridAnimations:animateMatches
(self.gridController.matchArray, onMatchedAnimatedOut)
self:showMatchParticle
(self.gridController.matchArray)
self:setGemsScore(#self.gridController.matchArray *
constants.POINTS)
self:playFX("match2.wav")
else
--no matches, swap gems back
self.gridAnimations:swapGems (self.targetGem,
self.selectedGem, onReturnSwapComplete)
self.gridGemsColumnMap[self.targetIndex.x][self.
targetIndex.y]
= self.targetGem
self.gridGemsColumnMap[self.selectedIndex.x][self.
selectedIndex.y]
= self.selectedGem
self.grid[self.targetIndex.x][self.targetIndex.y] =
self.targetGem.type
self.grid[self.selectedIndex.x][self.selectedIndex.y]
=
self.selectedGem.type
self:playFX("wrong.wav")
end
At the end of each new animaon, be it the match one or the swap back one,
we once again run callbacks listed at the top of the method. The most important
thing these do is the call to collapseGrid done when the matched gems nish
animang inside the onMatchedAnimatedOut callback:
self.selectedGem = nil
self.targetGem = nil
end
We end the callback by clearing the selected gems and start with a clean slate.
3. And here, at the end of the funcon, we call the swap gems animaon with
onNewSwapComplete as its callback:
self.gridAnimations:swapGems (self.selectedGem, self.targetGem,
onNewSwapComplete)
end
www.it-ebooks.info

Introducing Lua!
[ 218 ]
4. Let's move back to GridController and add the checkGridMatches method.
This is broken into three parts:
function GridController:checkGridMatches ()
self.matchArray = {}
for c = 1, constants.GRID_SIZE_X do
for r = 1, constants.GRID_SIZE_Y do
self:checkTypeMatch(c,r)
end
end
if (#self.matchArray >= 2) then
self.gameLayer:addToScore()
return true
end
print("no matches")
return false
end
This method starts the check by running checkTypeMatch on each cell.
5. The checkTypeMatch method searches around the current index and looks for
matches at the top, boom, le, and right of the index:
function GridController:checkTypeMatch (c, r)
local type = self.gameLayer.grid[c][r]
local stepC = c
local stepR = r
local temp_matches = {}
--check top
while stepR -1 >= 1 and self.gameLayer.grid[c][stepR-1] ==
type do
stepR = stepR - 1
table.insert (temp_matches, {x = c, y = stepR})
end
if (#temp_matches >= 2) then self:addMatches (temp_matches)
end
temp_matches = {}
--check bottom
stepR = r
while stepR + 1 <= constants.GRID_SIZE_Y
and self.gameLayer.grid[c][stepR + 1] == type do
stepR = stepR + 1
table.insert (temp_matches, {x = c, y= stepR})
end
www.it-ebooks.info

Chapter 10
[ 219 ]
if (#temp_matches >= 2) then self:addMatches (temp_matches)
end
temp_matches = {}
--check left
while stepC - 1 >= 1 and self.gameLayer.grid[stepC - 1][r]
== type do
stepC = stepC - 1
table.insert (temp_matches, {x = stepC, y= r})
end
if (#temp_matches >= 2) then self:addMatches (temp_matches)
end
temp_matches = {}
--check right
stepC = c;
while stepC + 1 <= constants.GRID_SIZE_X and
self.gameLayer.grid[stepC + 1][r] == type do
stepC = stepC + 1
table.insert (temp_matches, {x = stepC, y = r})
end
if (#temp_matches >= 2) then self:addMatches (temp_matches)
end
end
If any matches are found, they are added to the matches array.
6. But rst we need to make sure there are no duplicates listed there, so when we
add a gem to the matches array, we check whether it has not been added already:
function GridController:addMatches (matches)
for key, value in pairs(matches) do
if (self:find(value, self.matchArray) == false) then
table.insert(self.matchArray, value)
end
end
end
7. And the simple method to look for duplicates:
function GridController:find (np, array)
for key, value in pairs(array) do
if (value.x == np.x and value.y == np.y) then return true
end
end
return false
end
www.it-ebooks.info

Introducing Lua!
[ 220 ]
What just happened?
Finding matches is more than half the necessary logic for any match-three game. All you
need to do is traverse the grid as eecvely as you can and look for repeated paerns.
The rest of the logic concerns the grid collapse. We'll do that next and then we're ready to
publish the game.
Time for action – collapsing the grid and repeating
So the ow of the game is move pieces around, look for matches, remove those,
collapse the grid and add new gems, look for matches again, and if necessary, do the
whole process in a loop:
1. This is the longest method in the game, and again, most of the logic happens inside
callbacks. First we tag the gems being removed by seng their type data to -1.
All the gems inside matchArray will be removed:
function GameScene:collapseGrid ()
for i = 1, #self.gridController.matchArray do
self.grid[self.gridController.matchArray[i].x]
[self.gridController.matchArray[i].y] = -1
end
local column = nil
local newColumn = nil
local i
2. Next, we traverse the grid's columns and rearrange the gems whose type is not
equal to -1 inside the column arrays. Essenally, we update the data here so that
gems above the ones removed "fall down". The actual change will take place in the
animateCollapse method:
for c = 1, constants.GRID_SIZE_X do
column = self.grid[c]
newColumn = {}
i = 1
while #newColumn < #column do
if (#column > i) then
if (column[i] ~= -1) then
--move gem
table.insert(newColumn, column[i])
end
else
www.it-ebooks.info

Chapter 10
[ 221 ]
--create new gem
table.insert(newColumn, 1, column[i])
end
i = i+1
end
self.grid[c] = newColumn
end
self.gridAnimations:animateCollapse
(onGridCollapseComplete)
end
3. But now, let's code the callback of that animaon called
onGridCollapseComplete. So above the code we've entered already inside
collapseGrid, we add the local funcon:
local function onGridCollapseComplete (sender)
local function onMatchedAnimatedOut (sender)
self:collapseGrid()
end
for i = 1, #self.allGems do
local gem = self.allGems[i]
local xIndex = math.ceil ((gem:getPositionX() -
constants.TILE_SIZE * 0.5) / (constants.TILE_SIZE +
constants.GRID_SPACE))
local yIndex = math.ceil ((gem:getPositionY() -
constants.TILE_SIZE * 0.5) / (constants.TILE_SIZE +
constants.GRID_SPACE))
self.gridGemsColumnMap[xIndex][yIndex] = gem
self.grid[xIndex][yIndex] = gem.type
end
First, we update the array of sprites, sorng them by the new x and y indexes
of the grid.
4. Then, we check for matches again. Remember that this callback runs aer the grid
collapse animaon has nished, which means new gems have been added already
and these may create new matches (we'll look at the logic soon):
if (self.gridController:checkGridMatches () == true) then
--animate matched games
if (self.addingCombos == true) then
if (#self.gridController.matchArray > 3) then
self.combos = self.combos + (#self.gridController.matchArray -
3) end
end
www.it-ebooks.info

Introducing Lua!
[ 222 ]
self.gridAnimations:animateMatches
(self.gridController.matchArray, onMatchedAnimatedOut)
self:showMatchParticle (self.gridController.matchArray)
self:setGemsScore(#self.gridController.matchArray *
constants.POINTS)
self:playFX("match.wav")
5. Then, if we nd no more matches, we replace some random gems with diamonds
if the value for combos is above 0 (meaning we had more than a 3 gem match in
the last player's move):
else
--no more matches, check for combos
if (self.combos > 0) then
--now turn random gems into diamonds
local diamonds = {}
local removeGems = {}
local i = 0
math.randomseed(os.clock())
while i < self.combos do
i = i + 1
local randomGem = nil
local randomX,randomY = 0
while randomGem == nil do
randomX = math.random(1, constants.GRID_SIZE_X)
randomY = math.random(1, constants.GRID_SIZE_Y)
randomGem = self.gridGemsColumnMap[randomX][randomY]
if (randomGem.type == constants.TYPE_GEM_WHITE)
then randomGem = nil end
end
6. And we pick random gems for the diamonds:
local diamond = self.objectPools:getDiamond()
diamond:setPosition(randomGem:getPositionX(),
randomGem:getPositionY())
local diamondParticle =
self.objectPools:getDiamondParticle()
diamondParticle:setPosition(randomGem:getPositionX(),
randomGem:getPositionY())
table.insert(diamonds, diamond)
table.insert(removeGems, {x=randomX, y=randomY})
end
self:setDiamondScore(#diamonds *
constants.DIAMOND_POINTS)
www.it-ebooks.info

Chapter 10
[ 223 ]
Animate the diamonds being collected, and at the end of that animaon, call back
onMatchedAnimatedOut, which will collapse the grid once more now that we had
gems "burst" into diamonds:
self.gridAnimations:animateMatches(removeGems,
onMatchedAnimatedOut)
self.gridAnimations:collectDiamonds(diamonds)
self.combos = 0
self:playFX("diamond2.wav")
else
self.gridController.enabled = true
end
self.addingCombos = false
end
end
7. Here's the whole collapseGrid method:
function GameScene:collapseGrid ()
local function onGridCollapseComplete (sender)
local function onMatchedAnimatedOut (sender)
self:collapseGrid()
end
for i = 1, #self.allGems do
local gem = self.allGems[i]
local xIndex = math.ceil ((gem:getPositionX() -
constants.TILE_SIZE * 0.5) / (constants.TILE_SIZE +
constants.GRID_SPACE))
local yIndex = math.ceil ((gem:getPositionY() -
constants.TILE_SIZE * 0.5) / (constants.TILE_SIZE +
constants.GRID_SPACE))
self.gridGemsColumnMap[xIndex][yIndex] = gem
self.grid[xIndex][yIndex] = gem.type
end
if (self.gridController:checkGridMatches () == true) then
--animate matched games
if (self.addingCombos == true) then
if (#self.gridController.matchArray > 3) then
self.combos = self.combos + (#self.gridController.matchArray -
3) end
end
self.gridAnimations:animateMatches
(self.gridController.matchArray, onMatchedAnimatedOut)
self:showMatchParticle
(self.gridController.matchArray)
www.it-ebooks.info

Introducing Lua!
[ 224 ]
self:setGemsScore(#self.gridController.matchArray *
constants.POINTS)
self:playFX("match.wav")
else
--no more matches, check for combos
if (self.combos > 0) then
--now turn random gems into diamonds
local diamonds = {}
local removeGems = {}
local i = 0
math.randomseed(os.clock())
while i < self.combos do
i = i + 1
local randomGem = nil
local randomX,randomY = 0
while randomGem == nil do
randomX =
math.random(1, constants.GRID_SIZE_X)
randomY =
math.random(1, constants.GRID_SIZE_Y)
randomGem =
self.gridGemsColumnMap[randomX][randomY]
if (randomGem.type ==
constants.TYPE_GEM_WHITE) then randomGem = nil end
end
local diamond =
self.objectPools:getDiamond()
diamond:setPosition(randomGem:getPositionX(),
randomGem:getPositionY())
local diamondParticle =
self.objectPools:getDiamondParticle()
diamondParticle:setPosition(randomGem:getPosit
ionX(),
randomGem:getPositionY())
table.insert(diamonds, diamond)
table.insert(removeGems, {x=randomX,
y=randomY})
end
self:setDiamondScore(#diamonds *
constants.DIAMOND_POINTS)
self.gridAnimations:animateMatches(removeGems,
onMatchedAnimatedOut)
self.gridAnimations:collectDiamonds(diamonds)
self.combos = 0
www.it-ebooks.info

Chapter 10
[ 225 ]
self:playFX("diamond2.wav")
else
self.gridController.enabled = true
end
self.addingCombos = false
end
end
for i = 1, #self.gridController.matchArray do
self.grid[self.gridController.matchArray[i].x]
[self.gridController.matchArray[i].y] = -1
end
local column = nil
local newColumn = nil
local i
for c = 1, constants.GRID_SIZE_X do
column = self.grid[c]
newColumn = {}
i = 1
while #newColumn < #column do
if (#column > i) then
if (column[i] ~= -1) then
--move gem
table.insert(newColumn, column[i])
end
else
--create new gem
table.insert(newColumn, 1, column[i])
end
i = i+1
end
self.grid[c] = newColumn
end
self.gridAnimations:animateCollapse
(onGridCollapseComplete)
end
What just happened?
The collapseGrid method collects all the gems aected by matches or gems which
exploded into diamonds. The resulng array is sent to GridAnimations for the proper
animaons to be performed.
We'll work on those next and nish our game.
www.it-ebooks.info

Introducing Lua!
[ 226 ]
Time for action – animating matches and collapses
Now for the last bit of logic: the nal animaons:
1. We'll start with the easy ones:
function GridAnimations:animateSelected (gem)
gem:select()
gem:stopAllActions()
local rotate = cc.EaseBounceOut:create (
cc.RotateBy:create(0.5, 360) )
gem:runAction(rotate)
end
This rotates a gem; we use this animaon when a gem is rst selected.
2. Next is the swap animaon:
function GridAnimations:swapGems
(gemOrigin, gemTarget, onComplete)
gemOrigin:deselect()
local origin = self.gameLayer.selectedGemPosition
local target = cc.p(gemTarget:getPositionX(),
gemTarget:getPositionY())
local moveSelected =
cc.EaseBackOut:create(cc.MoveTo:create(0.8, target) )
local moveTarget =
cc.EaseBackOut:create(cc.MoveTo:create(0.8, origin) )
local callback = cc.CallFunc:create(onComplete)
gemOrigin:runAction(moveSelected)
gemTarget:runAction (cc.Sequence:create(moveTarget, callback))
end
All this does is swap the places of the rst selected gem and the target gem.
3. Then, we add the animaons we run for matched gems:
function GridAnimations:animateMatches (matches, onComplete)
local function onCompleteMe (sender)
self.animatedMatchedGems = self.animatedMatchedGems - 1;
if (self.animatedMatchedGems == 0) then
if (onComplete ~= nil) then onComplete() end
end
end
self.animatedMatchedGems = #matches
local gem = nil
for i, point in ipairs(matches) do
gem = self.gameLayer.gridGemsColumnMap[point.x]
[point.y]
gem:stopAllActions()
www.it-ebooks.info

Chapter 10
[ 227 ]
local scale = cc.EaseBackOut:create
( cc.ScaleTo:create(0.3, 0))
local callback = cc.CallFunc:create(onCompleteMe)
local action = cc.Sequence:create (scale, callback)
gem.gemContainer:runAction(action)
end
end
This will scale down a gem to nothing, and only re the nal callback when all gems
have nish scaling.
4. Next is the collect diamonds animaon:
function GridAnimations:collectDiamonds(diamonds)
local function removeDiamond (sender)
sender:setVisible(false)
end
for i = 1, #diamonds do
local delay = cc.DelayTime:create(i * 0.05)
local moveTo = cc.EaseBackIn:create( cc.MoveTo:create
( 0.8, cc.p(50, constants.SCREEN_HEIGHT - 50) ) )
local action = cc.Sequence:create
(delay, moveTo, cc.CallFunc:create(removeDiamond))
diamonds[i]:runAction(action)
end
end
This moves the diamonds to where the diamond score label is.
5. And now, nally, add the grid collapse:
function GridAnimations:animateCollapse ( onComplete )
self.animatedCollapsedGems = 0
local gem = nil
local drop = 1
for c = 1, constants.GRID_SIZE_X do
drop = 1
for r = 1, constants.GRID_SIZE_Y do
gem = self.gameLayer.gridGemsColumnMap[c][r]
--if this gem has been resized, move it to the top
if (gem.gemContainer:getScaleX() ~= 1) then
gem:setPositionY((constants.GRID_SIZE_Y +
(drop)) * (constants.TILE_SIZE + constants.GRID_SPACE))
self.animatedCollapsedGems =
self.animatedCollapsedGems + 1
gem:setType ( self.gameLayer:getNewGem() )
gem:setVisible(true)
local newY = (constants.GRID_SIZE_Y -
(drop - 1)) * (constants.TILE_SIZE + constants.GRID_SPACE)
www.it-ebooks.info

Introducing Lua!
[ 228 ]
self:dropGemTo (gem, newY, 0.2, onComplete)
drop = drop + 1
else
if (drop > 1) then
self.animatedCollapsedGems =
self.animatedCollapsedGems + 1
local newY = gem:getPositionY() -
(drop - 1) * (constants.TILE_SIZE + constants.GRID_SPACE)
self:dropGemTo (gem, newY, 0, onComplete)
end
end
end
end
end
We loop through all the gems and idenfy the ones that have been scaled down,
meaning the ones which were removed. We move these above the column,
so they will fall down as new gems, and we pick a new type for them:
gem:setType ( self.gameLayer:getNewGem() )
The ones which were not removed will drop to their new posions. The way we
do this is simple. We count how many gems were removed unl we reached a
gem which has not been removed. That count is stored in the local variable drop,
which is reset to 0 with every column.
That way, we know how many gems were removed below other gems. We use that
to nd the new y posion.
6. The dropGemTo new posion looks like this:
function GridAnimations:dropGemTo (gem, y, delay, onComplete)
gem:stopAllActions()
gem:reset()
local function onCompleteMe (sender)
self.animatedCollapsedGems =
self.animatedCollapsedGems - 1;
if ( self.animatedCollapsedGems == 0 ) then
if (onComplete ~= nil) then onComplete() end
end
end
local move = cc.EaseBounceOut:create
(cc.MoveTo:create (0.6, cc.p(gem:getPositionX(), y) ) )
local action = cc.Sequence:create
(cc.DelayTime:create(delay), move,
cc.CallFunc:create(onCompleteMe))
gem:runAction(action)
end
Again, we only re the nal callback once all gems have collapsed. This nal callback will run
another check for matches, as we've seen earlier, starng the whole process again.
www.it-ebooks.info
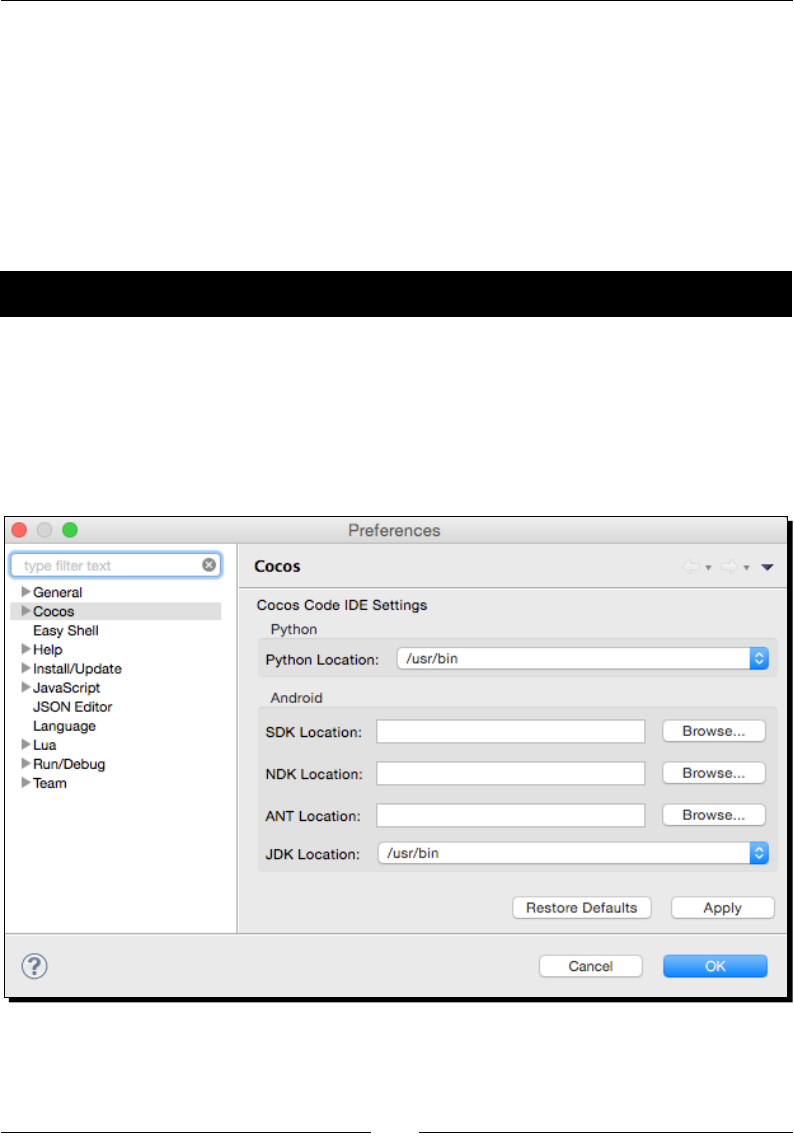
Chapter 10
[ 229 ]
What just happened?
That's it; we have the three main parts of a match-three game: the swap, the matches,
and the collapse.
There is only one animaon we haven't covered, which is already included in the code
for this chapter, and that is the column drop for the intro animaon when the grid is rst
created. But there's nothing new with that one. Feel free to review it, though.
Now, it's me to publish the game.
Time for action – publishing the game with the Cocos IDE
In order to build and publish the game, we'll need to tell the IDE a few things. I'll show you how
to publish the game for Android, but the steps are very similar for any of the other targets:
1. First, let's tell the IDE where to nd the Android SDK, NDK, and ANT, just as we did
when we installed the Cocos2d-x console. In the IDE, open the Preferences panel.
Then, under Cocos, enter the three paths just like we did before (remember that for
ANT, you need to navigate to its bin folder).
www.it-ebooks.info
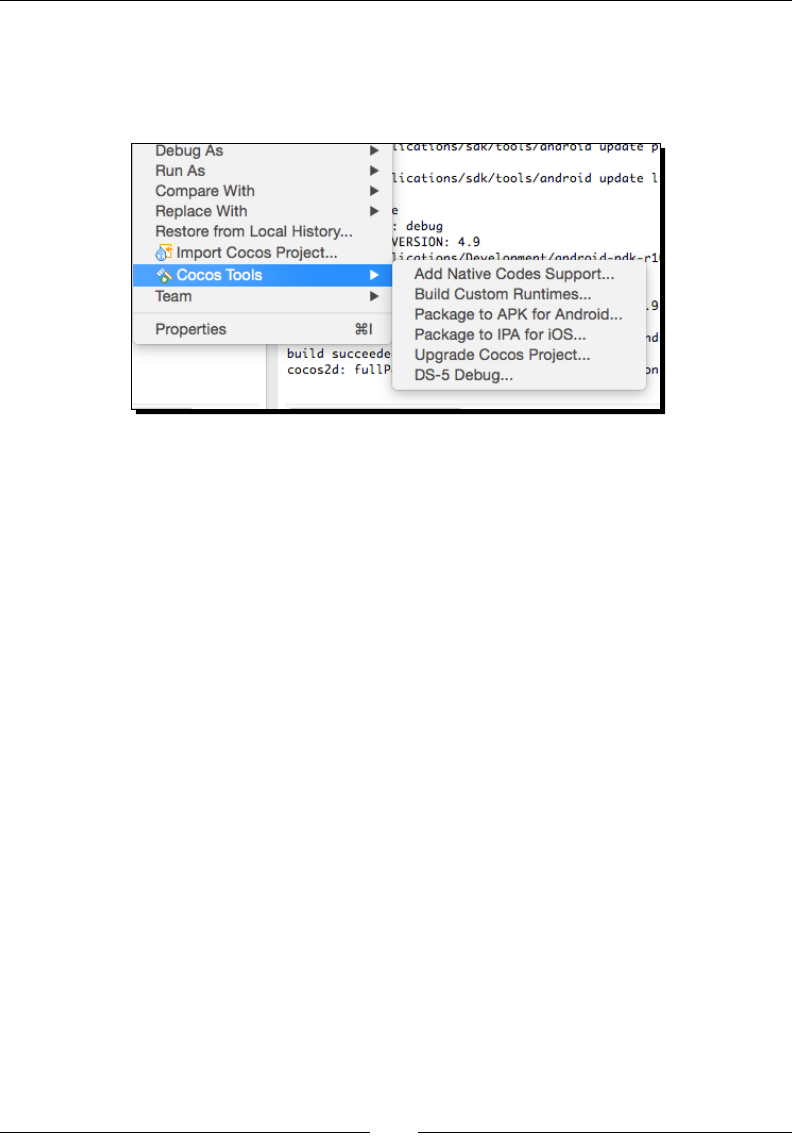
Introducing Lua!
[ 230 ]
2. Now, in order to build the project, you need to select the fourth buon at the top
of the IDE (from the le-hand side), or right-click on your project and select Cocos
Tools. You'll have dierent opons available depending on which stage you are at in
the deployment process.
First, the IDE needs to add the nave code support, and then it builds the
project inside a folder called frameworks (it will contain an iOS, Mac OS, Windows,
Android, and Linux version of your project just as if you had created it through the
Cocos console).
3. You can then choose to package the applicaon into an APK or IPA, which you can
transfer to your phone. Or, you can use the generated project inside Eclipse or Xcode.
What just happened?
You just built your Lua game to Android, or iOS, or Windows, or Linux, or Mac OS, or all of
them! Well done.
Summary
That's it. You can now choose between C++ or Lua to build your games. The whole API can
be accessed either way. So, every game created in this book can be done in either language
(and yes, that includes the Box2D API.)
And this is it for the book. I hope you're not too red to start working on your own ideas.
And I hope to see your game someme soon in an App Store near me!
www.it-ebooks.info
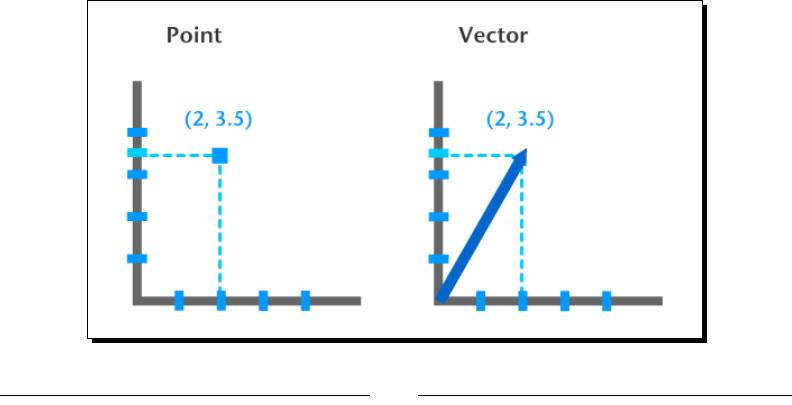
[ 231 ]
Vector Calculations with Cocos2d-x
This appendix will cover some of the math concepts used in Chapter 5, On the Line – Rocket
Through, in a lile more detail.
What are vectors?
First, let's do a quick refresh on vectors and the way you can use Cocos2d-x to deal
with them.
So what is the dierence between a vector and a point? At rst, they seem to be
the same. Consider the following point and vector:
Point (2, 3.5)
Vec2 (2, 3.5)
The following gure illustrates a point and a vector:
A
www.it-ebooks.info

Vector Calculaons with Cocos2d-x
[ 232 ]
In this gure, they each have the same value for x and y. So what's the dierence?
With a vector, you always have extra informaon. It is as if, besides those two values for x
and y, we also have the x and y of the vector's origin, which in the previous gure we can
assume to be point (0, 0). So the vector is moving in the direcon described from point
(0, 0) to point (2, 3.5). The extra informaon we can derive then from vectors is direcon
and length (usually referred to as magnitude).
It's as if a vector is a person's stride. We know how long each step is, and we know the
direcon in which the person is walking.
In game development, vectors can be used, among other things, to describe movement
(speed, direcon, acceleraon, fricon, and so on) or the combining forces acng upon a body.
The vector methods
There is a lot you can do with vectors, and there are many ways to create them and
manipulate them. And Cocos2d-x comes bundled with helper methods that will take
care of most of the calculaons for you. Here are some examples:
You have a vector, and you want to get its angle—use getAngle()
You want the length of a vector—use getLength()
You want to subtract two vectors; for example, to reduce the amount of movement
of a sprite by another vector—use vector1 - vector2
You want to add two vectors; for example, to increase the amount of movement
of a sprite by another vector—use vector1 + vector2
You want to mulply a vector; for example, applying a fricon value to the amount
of movement of a sprite—use vector1 * vector2
You want the vector that is perpendicular to another (also known as a vector's
normal)—use getPerp() or getRPerp()
And, most importantly for our game example, you want the dot product of two
vectors—use dot(vector1, vector2)
Now let me show you how to use these methods in our game example.
www.it-ebooks.info

Appendix
[ 233 ]
Using ccp helper methods
In the example of Rocket Through, the game we developed in Chapter 5, On the Line – Rocket
Through, we used vectors to describe movement, and now I want to show you the logic
behind some of the methods we used to handle vector operaons and what they mean.
Rotating the rocket around a point
Let's start, as an example, with the rocket sprite moving with a vector of (5, 0):
We then draw a line from the rocket, say from point A to point B:
Now we want the rocket to rotate around point B. So how can we change the rocket's vector
to accomplish that? With Cocos2d-x, we can use the helper point method rotateByAngle
to rotate a point around any other point. In this case, we rotate the rocket's posion point
around point B by a certain angle.
www.it-ebooks.info
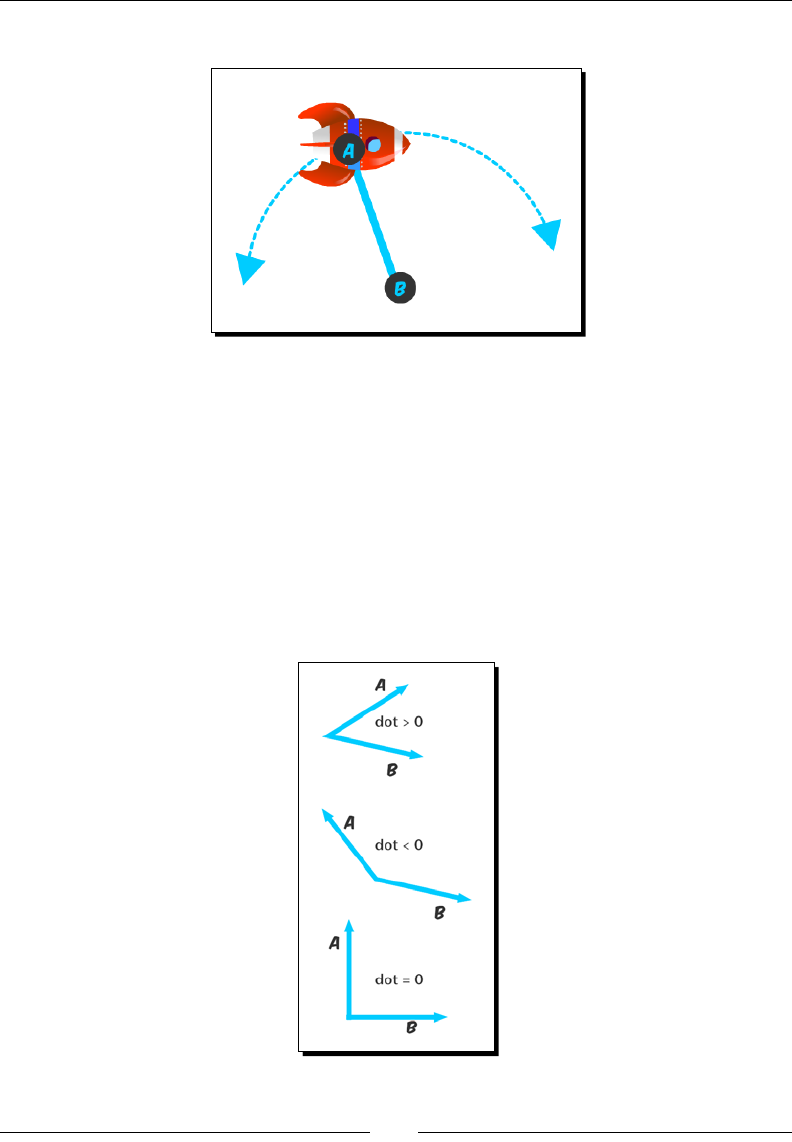
Vector Calculaons with Cocos2d-x
[ 234 ]
But here's a queson – in which direcon should the rocket rotate?
By looking at this gure, you know that the rocket should rotate clockwise, since it's moving
towards the right. But programmacally, how could we determine that, and in the easiest
way possible? We can determine this by using vectors and another property derived from
them: the dot product.
Using the dot product of vectors
The dot product of two vectors describes their angular relaonship. If their dot product
is greater than zero, the two vectors form an angle smaller than 90 degrees. If it is less
than zero, the angle is greater than 90 degrees. And if it is equal to zero, the vectors are
perpendicular. Have a look at this descripve gure:
www.it-ebooks.info
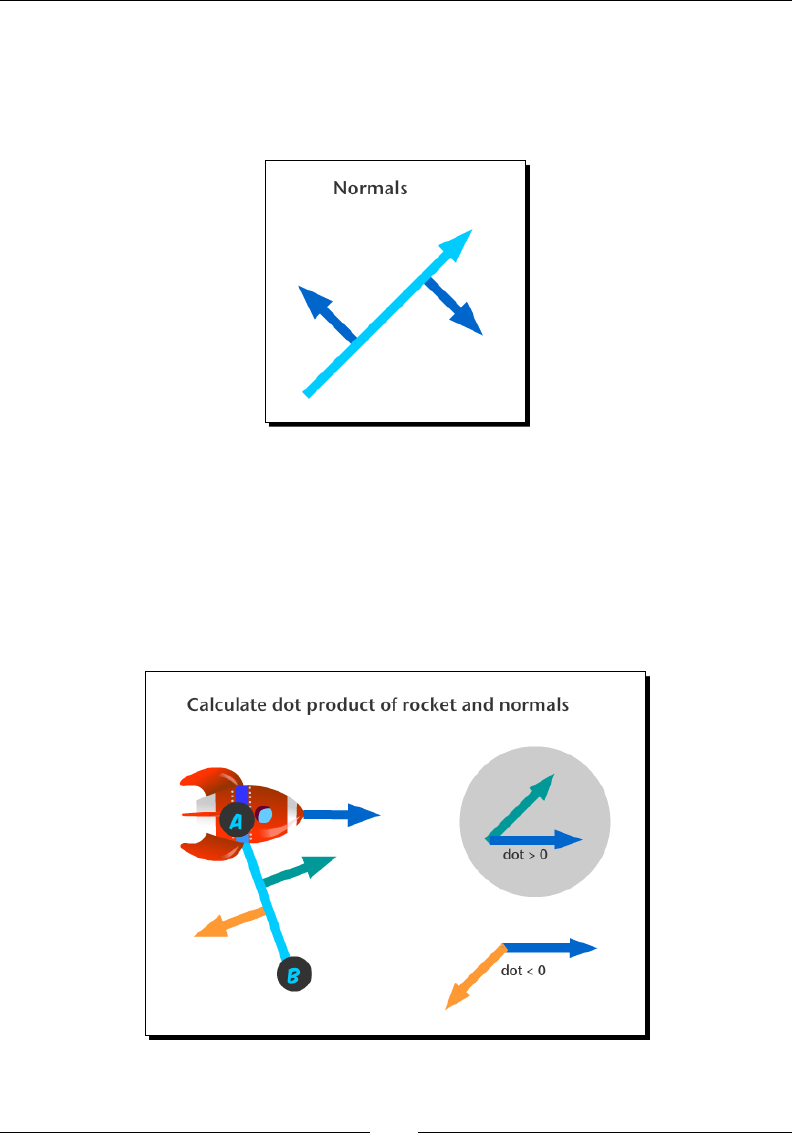
Appendix
[ 235 ]
But one other way to think about this is that if the dot product is a posive value, then the
vectors will "point" in the same direcon. If it is a negave value, they point in opposite
direcons. How can we use that to help us?
A vector will always have two perpendiculars, as shown in the following gure:
These perpendiculars are oen called right and le, or clockwise and counterclockwise
perpendiculars, and they are themselves vectors, known as normals.
Now, if we calculate the dot product between the rocket's vector and each of the
perpendiculars on line AB, you can see that we can determine the direcon the rocket
should rotate in. If the dot product of the rocket and the vector's right perpendicular is a
posive value, it means the rocket is moving towards the right (clockwise). If not, it means
the rocket is moving towards the le (counterclockwise).
www.it-ebooks.info
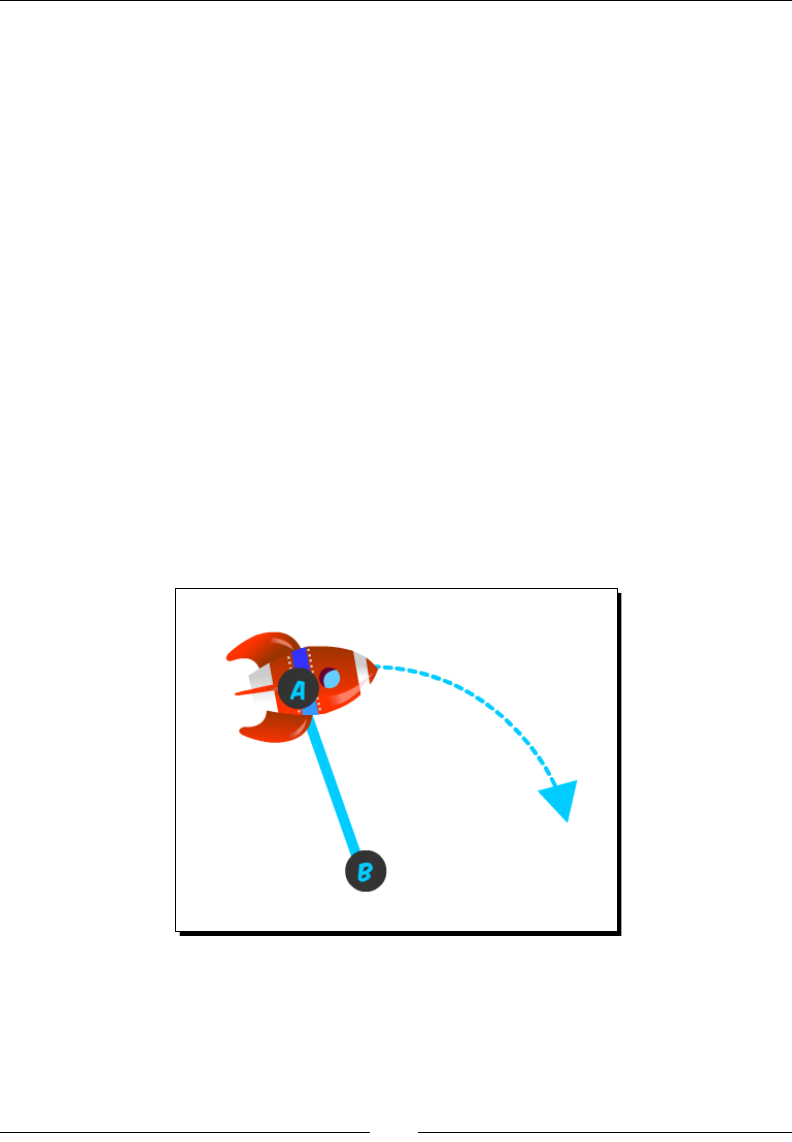
Vector Calculaons with Cocos2d-x
[ 236 ]
The dot product is very easy to calculate. We don't even need to bother with the formula
(though it's a simple one), because we can use the dot(vector1, vector2) method.
So we have the vector for the rocket already. How do we get the vector for the normals?
First, we get the vector for the AB line. We use another method for this – point1 - point2.
This will subtract points A and B and return a vector represenng that line.
Next, we can get the le and right perpendiculars of that line vector with the getPerp()
and getRPerp() methods respecvely. However, we only need to check one of these.
Then we get the dot product with dot(rocketVector, lineNormal).
If this is the correct normal, meaning the value for the dot product is a posive one, we can
rotate the rocket to point to this normal's direcon; so the rocket will be at a 90-degree
angle with the line at all mes as it rotates. This is easy, because we can convert the normal
vector to an angle with the getAngle() method. All we need to do is apply that angle to
the rocket.
But how fast should the rocket rotate? We'll see how to calculate that next.
Moving from pixel-based speed to angular-based speed
When rotang the rocket, we sll want to show it moving at the same speed as it was when
moving in a straight line, or as close to it as possible. How do we do that?
www.it-ebooks.info
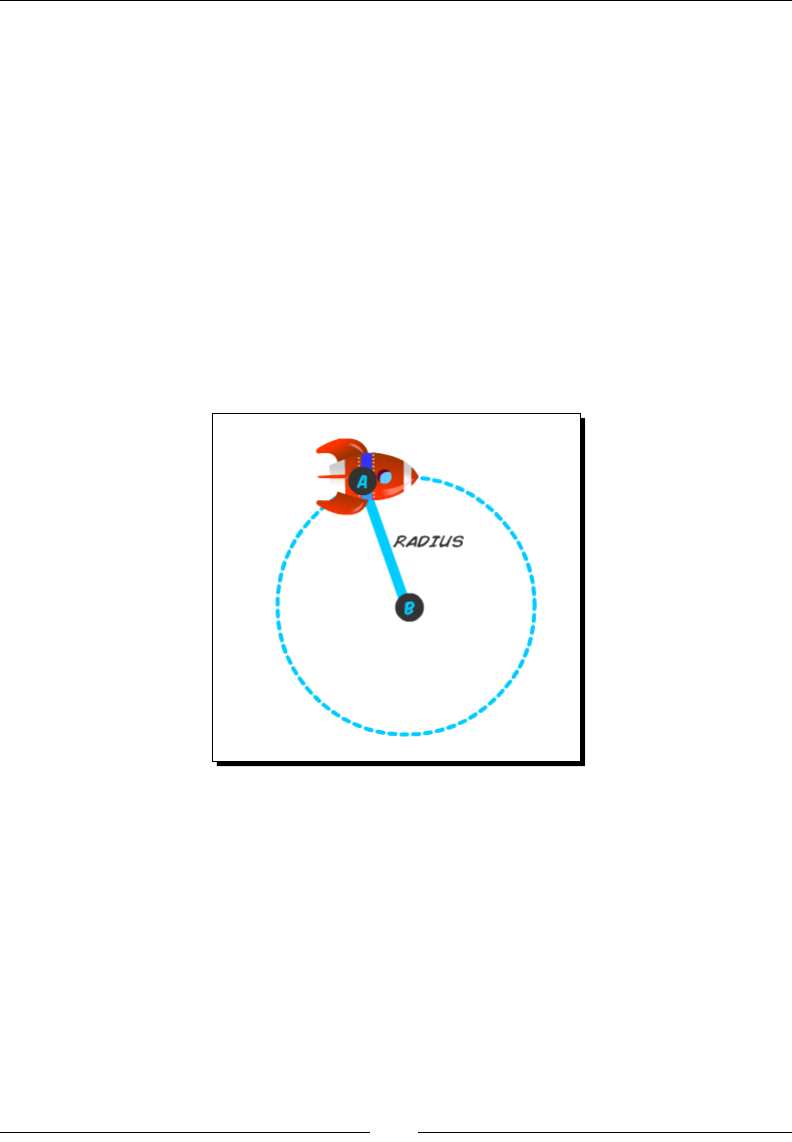
Appendix
[ 237 ]
Remember that the vector is being used to update the rocket's posion in every iteraon.
In the example I gave you, the (5, 0) vector is currently adding 5 pixels to the x posion of
the rocket in every iteraon.
Now let's consider an angular speed. If the angular speed were 15 degrees, and we kept
rotang the rocket's posion by that angle, it would mean the rocket would complete a full
circle in 24 iteraons. Because 360 degrees of a full circle divided by 15 degrees equals 24.
But we don't have the correct angle yet; we only have the amount in pixels the rocket moves
in every iteraon. But math can tell us a lot here.
Math says that the length of a circle is twice the value of Pi, mulplied by the radius of the
circle, usually wrien as 2πr.
We know the radius of the circle we want the rocket to describe. It is the length of the line
we drew.
With that formula, we can get the length in pixels of that circle, also known as its
circumference. Let's say the line has a length of 100 pixels; this would mean the circle about
to be described by the rocket has a length (or circumference) of 628.3 pixels (2 * π * 100).
www.it-ebooks.info
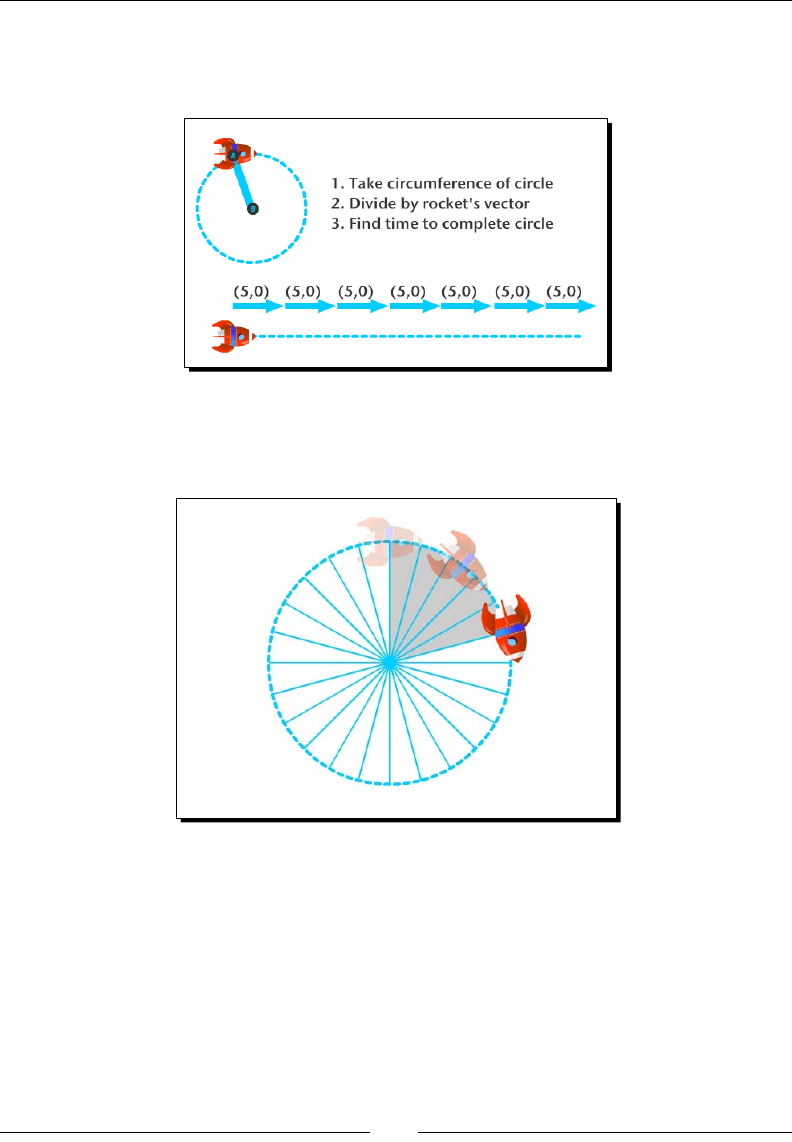
Vector Calculaons with Cocos2d-x
[ 238 ]
With the speed described in the vector (5, 0), we can determine how long it would take the
rocket to complete that pixel length. We don't need this to be absolutely precise; the last
iteraon will most likely move beyond that total length, but it's good enough for our purposes.
When we have the total number of iteraons to complete the length, we can convert that
to an angle. So, if the iteraon value is 125, the angle would be 360 degrees divided by 125;
that is, 2.88. That would be the angle required to describe a circle in 125 iteraons.
Now the rocket can change from pixel-based movement to angular-based movement
without much visual change.
www.it-ebooks.info


[ 241 ]
Index
A
acons
about 64
creang, with Cocos2d-x 64, 65
ADT bundle
URL, for obtaining from Google 2
ADT plugin
URL, for installaon instrucons 2
Android NDK
URL, for downloading latest version 2
Android SDK
URL, for downloading 2
animaons
creang 66, 67
Apache Ant
URL, for downloading 2
AppDelegate class
about 9, 10
Apple
URL 2
Automac Reference Counng (ARC) 22
B
b2Body object 154
batch drawing sprites
about 55
SpriteBatchNode, creang 56, 57
bitmap fonts, Cocos2d-x
about 58
nal screen sprites, adding 60, 61
labels, creang 59
object pools, creang 63
Block object 106
Box2D project
about 151
building, with Cocos2d-x 147
debug draw, using 148-151
C
C++ 18, 23, 24
ccp helper methods
dot product, using of vectors 234-236
pixel-based speed, moving to angular-based
speed 236-238
rocket, rotang around point 233
using 233
CDT plugins, Eclipse
URL, for installaon instrucons 6
class implementaon
about 20
creang 20-22
class interface
about 18
creang 18-20
Cocos2d-x
about 15, 16, 24
acons 17
www.it-ebooks.info

[ 242 ]
acons, creang with 64, 65
batch drawing sprites 55
Box2D project, building with 147
cache classes 17
containers 16, 17
Director object 17
downloading 1-3
helper methods 17
installing 3, 4
macros 17
parcles 17
primives, drawing 87
references 12
scenes, using 181
scene transion, creang 181, 182
specialized nodes 17
sprite, animang 66
sprite sheets, using 54
structures 17
test samples, running 11
transions, creang with singleton
Layer class 183, 184
URL, for latest stable version 2
Cocos2d-x objects, instanang
C++ 24
stac methods, using 22, 23
CocosBuilder 12
CocosStudio 12
CollisionListener class
methods 163
containers
about 16
Layer 16
Node 17
Scene 16
Sprite 17
controls, Victorian Rush Hour
adding 124
main loop, coding 126, 127
touches, handling 124, 125
D
damping 160
E
Eclipse ADT plugin
URL, for downloading 2
Eskimo, game
.plist le, creang 185, 186
about 178
accelerometer data, reading 192, 193
accelerometer, using 192
b2Bodies, reusing 194
b2Body xture, changing 194
completed levels, storing 189, 190
data, retrieving from .plist le 187-189
event dispatcher, using 191, 192
events, using 190
external data, loading from .plist le 184
level data, loading 186, 187
organizing 180
running, in Android 195, 196
saving 189
sengs 179
G
game
reseng 99-101
game conguraons
about 28
game project, creang 28, 29
rules, laying down 30
GameLayer interface
coding 37, 38
game, running in Android 48, 49
init(), implemenng 38-40
main loop, adding 43-46
mul-touches, handling 41, 42
scores, updang 47, 48
game loop
about 96
main loop, adding 96-99
Glyph Designer
URL 12
www.it-ebooks.info

[ 243 ]
H
hello world example
about 4
AppDelegate class 9
applicaon, creang 4, 5
folder structure 8
HelloWorldScene class 10
iOS linkage classes 9
project, opening in Eclipse 6, 7
HelloWorldScene class
about 10
deleng 36
I
iOS linkage classes 9
L
leerbox 179
LineContainer node
drawing in 87-89
live coding 207
Lua
about 197, 198
code, debugging 199
M
Mac port cfxr
URL 12
main loop, MiniPool game
about 170
adding 170-172
memory
managing 22
MiniPool game
about 155
ball objects, creang 159, 160
collision lters, creang 161
contact listener, creang 163-165
cue, creang 161
edges, creang 158
pool table, creang 157, 158
sengs 156
with b2Body objects, combining with
sprites 156
MiniPool game, controls
about 165
touch events, adding 166-170
N
Node 16
O
objects
instanang 22
Observer Paern 190
P
parallax eect
creang 137, 138
Parcle Designer
URL 12
parcles
about 84
parcle systems, creang 84-86
physics engine
about 151
b2Body object 154
b2World object, creang 152
Box2D 151
Ref objects, avoiding in Box2D 153
simulaon, running 153
pixel to meter (PTM) 152
plaorm collision
about 121
collision detecon, adding 122-124
player
killing 99-101
Player object 106
primives
drawing, in Cocos2d-x 87
Python
URL 3
www.it-ebooks.info

[ 244 ]
R
Ref 25
rena displays
image les, adding 30
rena support, adding 31, 32
supporng 30
rocket sprite
about 89
touches, handling 92-95
updang 90, 91
Rocket Through, game
about 81
game sengs 81
grid, creang 86, 87
parcles 85
project, starng 83
running, in Android 101
screen sengs 83
Start Project opon, using 82
S
sfxr, for Windows
URL 12
sky defense, game
about 51
background music, adding 53
game sengs 52
inializing 54
objects, retrieving from pool 74, 75
playing 76, 77
restarng 71, 72
running 68
running, in Android 77
screen support, adding for universal app 52, 53
starng 71, 72
start project 52
touches, handling 68-70
updang 73
sound eects
adding 32
sound les, adding 32, 33
Sprite
animaons, creang 66, 67
animang, in Cocos2d-x 66
extending 34
GameSprite.cpp, adding 34, 35
GameSprite, implemenng 35, 36
SpriteBuilder 12
sprite sheets
used, in Cocos2d-x 54
stac methods
using 22, 23
Stone Age game
about 200
collapses, animang 226-228
game scene, creang 207, 208
gems, building 209, 210
gems, swapping 216-219
grid, changing with GridController 211-215
grid collapse process, repeang 220- 225
grid, collapsing 220-225
matches, animang 226-228
menu scene, creang 204-206
project, creang 201, 202
project, imporng 201, 202
publishing, with Cocos IDE 229, 230
screen resoluon, seng up 203, 204
T
terrain object
about 106
Block object, coding 110, 111
Blocks object, inializing 115-119
building 113
moving 119, 120
player, coding 107-109
reseng 119, 120
Terrain class, inializing 113-115
Terrain class, planning 111, 112
TexturePacker
URL 12
mer, MiniPool game
adding 172
creang 172
running, in Android 173
www.it-ebooks.info

[ 245 ]
X
Xcode
about 2
URL, for downloading 2
Z
zoom-in eect 179
Zwoptex
URL 12
V
vectors
about 231, 232
vector methods 232
Victorian Rush Hour, game
about 103, 104, 130
animaons 131
buildings, texturing 132-135
buildings, texturing with sprites 131
containers, within containers 135
menu, adding to 138
menu, creang 139-141
MenuItem, creang 139-141
parallax eect, creang 136-138
placeholder sprites, creang 105
rectangles, creang 104
running, in Android 144
sengs 104
sprites, adding 130
tutorial, adding 141-144
www.it-ebooks.info

Thank you for buying
Cocos2d-x by Example Beginner's Guide
Second Edition
About Packt Publishing
Packt, pronounced 'packed', published its rst book, Mastering phpMyAdmin for Eecve
MySQL Management, in April 2004, and subsequently connued to specialize in publishing
highly focused books on specic technologies and soluons.
Our books and publicaons share the experiences of your fellow IT professionals in adapng
and customizing today's systems, applicaons, and frameworks. Our soluon-based books
give you the knowledge and power to customize the soware and technologies you're
using to get the job done. Packt books are more specic and less general than the IT books
you have seen in the past. Our unique business model allows us to bring you more focused
informaon, giving you more of what you need to know, and less of what you don't.
Packt is a modern yet unique publishing company that focuses on producing quality,
cung-edge books for communies of developers, administrators, and newbies alike.
For more informaon, please visit our website at www.packtpub.com.
About Packt Open Source
In 2010, Packt launched two new brands, Packt Open Source and Packt Enterprise, in order
to connue its focus on specializaon. This book is part of the Packt Open Source brand,
home to books published on soware built around open source licenses, and oering
informaon to anybody from advanced developers to budding web designers. The Open
Source brand also runs Packt's Open Source Royalty Scheme, by which Packt gives a royalty
to each open source project about whose soware a book is sold.
Writing for Packt
We welcome all inquiries from people who are interested in authoring. Book proposals
should be sent to author@packtpub.com. If your book idea is sll at an early stage and
you would like to discuss it rst before wring a formal book proposal, then please contact
us; one of our commissioning editors will get in touch with you.
We're not just looking for published authors; if you have strong technical skills but no wring
experience, our experienced editors can help you develop a wring career, or simply get
some addional reward for your experse.
www.it-ebooks.info
Cocos2d-X by Example Beginner's Guide
ISBN: 978-1-78216-734-1 Paperback: 246 pages
Make fun games for any plaorm using C++,
combined with one of the most popular open
source frameworks in the world
1. Learn to build mul-device games in simple, easy
steps, leng the framework do all the heavy liing.
2. Spice things up in your games with easy to apply
animaons, parcle eects, and physics simulaon.
3. Quickly implement and test your own gameplay
ideas, with an eye for opmizaon and portability.
Learning Cocos2d-x Game Development
ISBN: 978-1-78398-826-6 Paperback: 266 pages
Learn cross-plaorm game development
with Cocos2d-x
1. Create a Windows Store account and upload
your game for distribuon.
2. Develop a game using Cocos2d-x by going
through each stage of game development
process step by step.
Please check www.PacktPub.com for information on our titles
www.it-ebooks.info
Cocos2d-x Game Development Essentials
ISBN: 978-1-78398-786-3 Paperback: 136 pages
Create iOS and Android games from scratch
using Cocos2d-x
1. Create and run Cocos2d-x projects on iOS and
Android plaorms.
2. Find praccal soluons to many real-world game
development problems.
3. Learn the essenals of Cocos2d-x by wring code
and following step-by-step instrucons.
Learning Cocos2d-JS Game Development
ISBN: 978-1-78439-007-5 Paperback: 188 pages
Learn to create robust and engaging cross-plaorm
HTML5 games using Cocos2D-JS
1. Create HTML5 games running both on desktop
and mobile devices, played with both mouse and
touch controls.
2. Add advanced features such as realisc physics,
parcle eects, scrolling, tweaking, sound eects,
background music, and more to your games.
3. Build excing cross-plaorm games and build
a memory game, an endless runner and a
physics-driven game.
Please check www.PacktPub.com for information on our titles
www.it-ebooks.info
