.Vue.js.2.Web.Development.Practical.guide.to.building.end To End.web.development.solutions.with.Vue.js.2
.Vue.js.2.Web.Development.Practical.guide.to.building.end-to-end.web.development.solutions.with.Vue.js.2
User Manual:
Open the PDF directly: View PDF ![]() .
.
Page Count: 693 [warning: Documents this large are best viewed by clicking the View PDF Link!]
- Cover
- Title Page
- Copyright
- About Packt
- Contributors
- Table of Contents
- Preface
- Chapter 1: Getting Started with Vue.js
- Chapter 2: Displaying, Looping, Searching, and Filtering Data
- Chapter 3: Optimizing your App and Using Components to Display Data
- Chapter 4: Getting a List of Files Using the Dropbox API
- Chapter 5: Navigating through the File Tree and Loading Folders from the URL
- Chapter 6: Caching the Current Folder Structure Using Vuex
- Chapter 7: Pre-Caching Other Folders and Files for Faster Navigation
- Chapter 8: Introducing Vue-Router and Loading URL-Based Components
- Chapter 9: Using Vue-Router Dynamic Routes to Load Data
- Chapter 10: Building an E-Commerce Store - Browsing Products
- Listing the products
- Creating pagination
- Creating the ListProducts component
- Creating a curated list for the home page
- Showing more information
- Creating categories
- Displaying the categories
- Displaying products in a category
- Ordering products in a category
- Creating Vuex getters
- Building the filtering component based on products
- Updating the URL on checkbox filter change
- Filtering the products
- Summary
- Chapter 11: Building an E-Commerce Store - Adding a Checkout
- Creating the basket array placeholder
- Adding product information to the store
- Updating the Add to basket button when adding an item
- Showing the product count in the header of the app
- Finalizing the Shop Vue-router URLs
- Building the Order process and ListProducts component
- Creating an Order Checkout page
- Creating an editable basket
- Completing the shop SPA
- Summary
- Chapter 12: Using Vue Dev Tools and Testing Your SPA
- Chapter 13: Transitions and Animations
- Introduction
- Integrating with third-party CSS animation libraries such as animate.css
- Adding your own transition classes
- Animating with JavaScript instead of CSS
- Transitioning on the initial render
- Transitioning between elements
- Letting an element leave before the enter phase in a transition
- Adding entering and leaving transitions for elements of a list
- Transitioning elements that move in a list
- Animating the state of your components
- Packaging reusable transitions into components
- Dynamic transitions
- Chapter 14: Vue Communicates with the Internet
- Introduction
- Sending basic AJAX requests with Axios
- Validating user data before sending it
- Creating a form and sending data to your server
- Recovering from an error during a request
- Creating a REST client (and server!)
- Implementing infinite scrolling
- Processing a request before sending it out
- Preventing XSS attacks to your app
- Chapter 15: Single Page Applications
- Introduction
- Creating an SPA with vue-router
- Fetching data before switching route
- Using named dynamic routes
- Having more than one router-view in your page
- Compose your routes hierarchically
- Using route aliases
- Adding transitions between your routes
- Managing errors for your routes
- Adding a progress bar to load pages
- How to redirect to another route
- Saving scrolling position when hitting back
- Chapter 16: Organize + Automate + Deploy = Webpack
- Introduction
- Extracting logic from your components to keep the code tidy
- Bundling your component with Webpack
- Organizing your dependencies with Webpack
- Using external components in your Webpack project
- Developing with continuous feedback with hot reloading
- Using Babel to compile from ES6
- Running a code linter while developing
- Using only one command to build both a minified and a development .js file
- Releasing your components to the public
- Chapter 17: Advanced Vue.js - Directives, Plugins, and Render Functions
- Chapter 18: Large Application Patterns with Vuex
- Chapter 19: Integrating with Other Frameworks
- Chapter 20: Vue Router Patterns
- Chapter 21: State Management with Vuex
- Other Books You May Enjoy
- Index


Complete Vue.js 2 Web
Development
Practical guide to building end-to-end web development
solutions with Vue.js 2
Mike Street
Andrea Passaglia
Paul Halliday
BIRMINGHAM - MUMBAI
Complete Vue.js 2 Web Development
Copyright © 2018 Packt Publishing
All rights reserved. No part of this book may be reproduced, stored in a retrieval system, or
transmitted in any form or by any means, without the prior written permission of the
publisher, except in the case of brief quotations embedded in critical articles or reviews.
Every effort has been made in the preparation of this book to ensure the accuracy of the
information presented. However, the information contained in this book is sold without
warranty, either express or implied. Neither the authors nor Packt Publishing or its dealers
and distributors will be held liable for any damages caused or alleged to have been caused
directly or indirectly by this book.
Packt Publishing has endeavored to provide trademark information about all of the
companies and products mentioned in this book by the appropriate use of capitals.
However, Packt Publishing cannot guarantee the accuracy of this information.
First Published: December 2018
Production Reference: 1211218
Published by Packt Publishing Ltd.
Livery Place, 35 Livery Street
Birmingham, B3 2PB, U.K.
ISBN 978-1-78995-990-1
www.packtpub.com

mapt.io
Mapt is an online digital library that gives you full access to over 5,000 books and videos, as
well as industry-leading tools to help you plan your personal development and advance
your career. For more information, please visit our website.
Why Subscribe?
Spend less time learning and more time coding with practical eBooks and Videos
from over 4,000 industry professionals
Improve your learning with Skill Plans built especially for you
Get a free eBook or video every month
Mapt is fully searchable
Copy and paste, print, and bookmark content
Packt.com
Did you know that Packt offers eBook versions of every book published, with PDF and
ePub files available? You can upgrade to the eBook version at www.packt.com and as a print
book customer, you are entitled to a discount on the eBook copy. Get in touch with us at
customercare@packtpub.com for more details.
At www.packt.com, you can also read a collection of free technical articles, sign up for a
range of free newsletters, and receive exclusive discounts and offers on Packt books and
eBooks.
Contributors
About the Authors
Mike Street (aka mikestreety) is a frontend developer from Brighton, UK. Specializing in
Gulp, SCSS, HTML, and Vue, he has been developing websites professionally since 2010.
After making his first Vue app as an experimental side project, he's been hooked ever since.
When not developing on the web, Mike likes to explore the Sussex countryside on his
bike, start a new side-project without finishing the last, or heading to the cinema.
Andrea Passaglia was born in Genoa, in northern Italy. Interested in technology since his
parents gave him a toy computer when he was a boy, he started studying web technologies
at an early age. After obtaining his master's degree in computer engineering he worked on
the design and implementation of web interfaces for companies of various sizes and in
different industries (healthcare, fashion, tourism, and transport).
In 2016 he moves in the silicon valley of Europe to tackle new problems in the banking
industry at the Edgeverve Dublin Research and Development Labs.
A backend technologist by trade, Vue.js is his first tool to bring to life his creations when it
comes to the frontend.
Andrea is married to a lovely Russian girl from Siberia and they often cook together mixing
culinary traditions.
Paul Halliday (BSc Hons) is a Developer Advocate with a focus on fast-
moving technologies. His online courses have taught over 25,000 students across a wide
variety of software development subjects. He's also a Progress Developer Expert with
expertise in NativeScript and Kendo UI.
Packt Is Searching for Authors Like You
If you're interested in becoming an author for Packt, please visit authors.packtpub.com
and apply today. We have worked with thousands of developers and tech professionals,
just like you, to help them share their insight with the global tech community. You can
make a general application, apply for a specific hot topic that we are recruiting an author
for, or submit your own idea.

Table of Contents
Preface 1
Chapter 1: Getting Started with Vue.js 7
Creating the workspace 8
Application space 8
Vue library 9
Initializing Vue and displaying the first message 9
Computed values 12
Methods and reusable functions 15
Summary 18
Chapter 2: Displaying, Looping, Searching, and Filtering Data 19
HTML declarations 20
v-html 20
Declarative rendering 21
Conditional rendering 22
v-if 22
v-else 23
v-for and displaying our data 25
Creating links using v-html 27
Format balance 28
Format registered date 28
Filtering our data 29
Building the form 29
Binding the inputs 31
Showing and hiding Vue content 32
Filtering our content 34
Filtering our filters 39
Changing CSS classes 40
Filtering and custom classes 44
Summary 48
Chapter 3: Optimizing your App and Using Components to Display Data 49
Optimizing the code 49
Reducing the number of filter variables and grouping logically 51
Combining the format functions 54
Autodetection formatting 54
Passing in a second variable 55
Creating the method 56

Table of Contents
[ ii ]
Reducing the number of hard-coded variables and properties, and reducing
redundancy 58
Creating Vue components 61
Creating and initializing your component 62
Using your component 63
Using component data and methods 64
Passing data to your component – props 65
Passing data to your component – slots 68
Creating a repeatable component 73
Creating component methods and computed functions 76
CSS class functions 76
Formatted value functions 77
Making the filtering work again with props 81
Making the filters a component 85
Creating the component 85
Resolving JavaScript errors 87
Using custom events to change the filter field 87
Updating the filter query 89
Summary 94
Chapter 4: Getting a List of Files Using the Dropbox API 95
Getting started—loading the libraries 96
Creating a Dropbox app and initializing the SDK 97
Displaying your data and using Vue to get it 98
Create the component 98
Retrieve the Dropbox data 99
The Vue life cycle hooks 100
Displaying the Dropbox data 102
More file meta information 104
Formatting the file sizes 105
Adding a loading screen 106
Animating between states 109
Summary 111
Chapter 5: Navigating through the File Tree and Loading Folders from
the URL 112
Separating out files and folders 113
Making file and folder components 115
Linking folders and updating the structure 116
Creating a breadcrumb from the current path 120
Adding the ability to download files 127
Updating the URL hash and using it to navigate through the folders 129
Showing the folder based on the URL 131
Displaying an error message 131
Using the back and forward buttons in your browser 133

Table of Contents
[ iii ]
Removing unneeded code 133
Updating the structure with a URL change and setting Vue data outside of the
instance 135
Final Code 139
Summary 143
Chapter 6: Caching the Current Folder Structure Using Vuex 144
Including and initializing Vuex 146
Utilizing the store 147
Retrieving the message 148
Updating the message 149
Using the Vuex store for the folder path 149
Updating the path methods to use store commits 150
Using the path variable 151
Updating the breadcrumb component 151
Updating the dropbox-viewer component to work with Vuex 152
Caching the folder contents 155
Loading data from the store if it exists 159
Loading the data from the store 159
Only storing new data 160
Summary 165
Chapter 7: Pre-Caching Other Folders and Files for Faster Navigation 166
Caching subfolders 167
Planning app methods 168
Creating the getFolderStructure method 169
Showing the data with the displayFolderStructure method 173
Set the loading state to true and create an empty structure object 174
Load the contents of the getFolderStructure method 174
Loop through the result and add each item to either the folders or files array 175
Update the global structure object and remove the loading state 176
Instigating the method 176
Caching the subfolders 178
Alternative caching method 179
Caching parent folders 181
Caching parent folders once 184
Caching download links on files 187
The complete code—with added documentation 189
Summary 198
Chapter 8: Introducing Vue-Router and Loading URL-Based
Components 199
Installing and initializing Vue-router 200
Changing the folder for Vue-router 204
Linking to the different routes 204
Linking to sub-routes 206

Table of Contents
[ iv ]
Dynamic routes with parameters 207
GET parameters 212
Using props 212
Setting prop defaults 214
Using static props 216
Nested routes 217
Creating a 404 page 220
Naming components, routes, and views 221
Naming components 221
Naming routes 222
Named views 224
Programmatically navigating with, redirecting, and adding an alias 226
Navigating programmatically 227
Redirecting 227
Alias routes 228
Summary 229
Chapter 9: Using Vue-Router Dynamic Routes to Load Data 230
Outline and plan your app 230
Components 231
Route components 231
HTML components 232
Paths 232
Create initial files 233
Server setup 236
Storing the file locally 236
Using a remote server 237
Setting up local server 237
Loading CSV 238
Loading a CSV with d3 239
Loading a CSV with CSV Parser 241
Unifying Shopify CSV data 241
Storing the products 243
Displaying a single product 245
Page Not Found 246
Selecting the right product 247
Catching products not found 250
Displaying product information 253
Product images 255
Product variations 261
Variations display table 261
Using a key with loops 261
Displaying the variations in a table 262
Displaying variations in a select box 269
Updating the product details when switching URLs 276

Table of Contents
[ v ]
Summary 280
Chapter 10: Building an E-Commerce Store - Browsing Products 281
Listing the products 281
Adding a new route 282
Looping through products 283
Creating pagination 283
Calculating the values 283
Displaying a paginated list 287
Creating paginating buttons 288
Updating the URL on navigation 290
Creating pagination links 291
Updating the items per page 294
Creating the ListProducts component 295
Creating a curated list for the home page 299
Showing more information 301
Creating categories 304
Creating a category list 304
Creating a "miscellaneous" category 309
Displaying the categories 311
Displaying products in a category 314
Code optimization 317
Ordering products in a category 319
Store the product price 320
Wiring up the ordering 322
Creating Vuex getters 324
Building the filtering component based on products 329
Dynamically creating filters 337
Resetting filters 339
Updating the URL on checkbox filter change 340
Preselecting filters on page load 341
Filtering the products 342
Summary 346
Chapter 11: Building an E-Commerce Store - Adding a Checkout 347
Creating the basket array placeholder 347
Adding product information to the store 349
Creating the store mutation to add products to the basket 349
Updating the Add to basket button when adding an item 352
Showing the product count in the header of the app 354
Calculating the basket quantity 355
Finalizing the Shop Vue-router URLs 356
Building the Order process and ListProducts component 358
Order Confirmation screen 359
Using Vue filters to format the price 361

Table of Contents
[ vi ]
Calculating a total price 362
Creating an Order Checkout page 364
Copying details between addresses 366
Creating an editable basket 369
Creating editable fields 370
Removing items from your cart 372
Completing the shop SPA 373
Summary 374
Chapter 12: Using Vue Dev Tools and Testing Your SPA 375
Using the Vue.js developer tools 376
Inspecting Vue components data and computed values 376
Viewing Vuex mutations and time-travel 377
Previewing event data 379
Testing your SPA 380
Command-line unit testing 380
Browser automation 381
Summary 382
Chapter 13: Transitions and Animations 383
Introduction 383
Integrating with third-party CSS animation libraries such as
animate.css 384
Getting ready 384
How to do it... 385
How does it work... 387
Adding your own transition classes 388
Getting ready 388
How to do it... 388
How it works... 389
Animating with JavaScript instead of CSS 390
Getting ready 391
How to do it... 391
How it works... 392
There's more... 394
Transitioning on the initial render 396
Getting ready 396
How to do it... 396
How it works... 398
Transitioning between elements 399
Getting ready 399
How to do it... 399
How it works... 401
There's more... 402
Transitioning between more than two elements 402
Setting the key attribute dynamically 403

Table of Contents
[ vii ]
Letting an element leave before the enter phase in a transition 404
Getting ready 404
How to do it... 404
The two elements problem 404
Transition modes 406
How it works... 406
Adding entering and leaving transitions for elements of a list 407
Getting ready 407
How to do it... 407
How it works... 409
Transitioning elements that move in a list 409
Getting ready 410
How to do it... 410
How it works... 412
Animating the state of your components 413
Getting ready 414
How to do it... 414
How it works... 416
Packaging reusable transitions into components 417
Getting ready 418
How to do it... 418
Building the basic web page 418
Building the reusable transition 420
Using our transition with the elements in our page 420
How it works... 421
Dynamic transitions 422
Getting ready 422
How to do it... 422
How it works... 425
Chapter 14: Vue Communicates with the Internet 426
Introduction 426
Sending basic AJAX requests with Axios 427
Getting ready 427
How to do it... 427
How it works... 428
Validating user data before sending it 431
Getting ready 431
How to do it... 431
How it works... 432
Creating a form and sending data to your server 433
Getting ready 433
How to do it... 433
How it works... 436
There's more... 437
Recovering from an error during a request 437

Table of Contents
[ viii ]
Getting ready 438
How to do it... 438
How it works... 442
Creating a REST client (and server!) 442
Getting ready 443
How to do it... 443
How it works... 446
Implementing infinite scrolling 447
Getting ready 447
How to do it... 447
How it works... 449
Processing a request before sending it out 450
Getting ready 450
How to do it... 450
How it works... 452
Preventing XSS attacks to your app 453
Getting ready 453
How to do it... 453
How it works... 454
Chapter 15: Single Page Applications 456
Introduction 456
Creating an SPA with vue-router 457
Getting ready 457
How to do it… 457
How it works… 460
There's more… 460
Fetching data before switching route 461
Getting ready 461
How to do it… 461
How it works… 463
Using named dynamic routes 464
Getting ready 464
How to do it… 465
How it works… 467
Having more than one router-view in your page 468
Getting ready 468
How to do it… 468
How it works… 470
Compose your routes hierarchically 471
Getting ready 471
How to do it... 471
How it works… 474
Using route aliases 475
Getting ready 475

Table of Contents
[ ix ]
How to do it… 476
How it works… 478
Adding transitions between your routes 478
Getting ready 478
How to do it… 478
How it works… 480
Managing errors for your routes 480
Getting ready 480
How to do it… 481
How it works… 483
Adding a progress bar to load pages 483
Getting ready 483
How to do it… 483
How it works… 485
How to redirect to another route 486
Getting ready 486
How to do it… 486
How it works… 488
There's more… 488
Redirecting to 404s 488
Named redirecting 488
Redirecting with parameters 489
Dynamic redirecting 489
Saving scrolling position when hitting back 489
Getting ready 490
How to do it… 490
How it works… 494
Chapter 16: Organize + Automate + Deploy = Webpack 495
Introduction 495
Extracting logic from your components to keep the code tidy 495
Getting ready 496
How to do it... 496
Creating a clean Webpack project 496
Building the compound interest calculator 497
How it works... 500
Bundling your component with Webpack 500
Getting ready 500
How to do it... 501
How it works... 508
There's more... 508
Organizing your dependencies with Webpack 509
Getting ready 509
How to do it... 509
How it works... 513
Using external components in your Webpack project 513

Table of Contents
[ x ]
Getting ready 513
How to do it... 513
How it works... 516
Developing with continuous feedback with hot reloading 518
Getting ready 518
How to do it... 519
How it works... 522
Using Babel to compile from ES6 523
Getting ready 523
How to do it... 523
How it works... 525
Running a code linter while developing 526
Getting ready 526
How to do it... 526
How it works... 529
Using only one command to build both a minified and a
development .js file 530
Getting ready 530
How to do it… 530
How it works... 532
Releasing your components to the public 532
Getting ready 533
How to do it... 533
How it works... 538
Chapter 17: Advanced Vue.js - Directives, Plugins, and Render
Functions 541
Introduction 541
Creating a new directive 542
Getting ready 542
How to do it... 542
How it works… 544
Using WebSockets in Vue 544
Getting ready 544
How to do it... 545
How it works... 547
Writing a plugin for Vue 549
Getting ready 549
How to do it... 549
How it works... 553
Rendering a simple component manually 553
Getting ready 553
How to do it... 554
How it works... 554
Rendering a component with children 555

Table of Contents
[ xi ]
Getting ready 555
How to do it... 556
How it works... 558
Using JSX to render a component 559
Getting ready 559
How to do it... 559
How it works... 560
There's more... 560
Creating a functional component 561
Getting ready 561
How to do it... 561
How it works... 564
Building a responsive table with higher-order components 565
Getting ready 565
How to do it... 565
How it works... 569
Chapter 18: Large Application Patterns with Vuex 571
Introduction 571
Dynamically loading pages in your vue-router 572
Getting ready 572
How to do it... 572
How it works... 575
There's more... 576
Building a simple storage for the application state 576
Getting ready 576
How to do it... 577
How it works... 581
Understanding Vuex mutations 581
Getting ready 581
How to do it... 581
How it works... 583
There's more... 584
Listing your actions in Vuex 585
Getting ready 586
How to do it... 586
How it works... 588
Separating concerns with modules 589
Getting ready 589
How to do it... 589
How it works... 592
Building getters to help retrieve your data 593
Getting ready 593
How to do it... 594
How it works... 595

Table of Contents
[ xii ]
Accessing other getters 595
Passing an argument 596
Testing your store 596
Getting ready 596
How to do it... 596
Software requirements 597
Testing mutations 597
Testing actions 599
How it works... 601
Chapter 19: Integrating with Other Frameworks 602
Introduction 602
Building universal applications with Electron 602
Getting ready 603
How to do it... 603
How it works... 606
Using Vue with Firebase 606
Getting ready 606
How to do it... 607
How it works... 609
Creating a real-time app with Feathers 610
Getting ready 610
How to do it... 610
How it works... 613
Creating a reactive app with Horizon 613
Getting ready 614
How to do it... 615
How it works... 620
Chapter 20: Vue Router Patterns 621
Single Page Applications 621
Using the router 622
Creating routes 623
Dynamic routes 624
Route props 625
Component Navigation Guards 626
beforeRouteUpdate 626
beforeRouteEnter 627
beforeRouteLeave 627
Global router hooks 627
beforeEach 627
beforeResolve 628
afterEach 628
Resolution stack 629
Programmatic navigation 630
router.replace 631
router.go 631
Table of Contents
[ xiii ]
Lazy loading routes 632
An SPA project 635
Enabling the router 636
Defining routes 636
Creating the UserList route 637
Getting data from an API 638
Creating a detail page 639
Child routes 642
Summary 646
Chapter 21: State Management with Vuex 647
What is Vuex? 647
State Management Pattern (SMP) 648
Thinking about state 650
Using Vuex 651
Creating a new store 651
Defining action types 652
Actions 652
Mutations 653
Getters 653
Combining elements 654
Payloads 656
Vuex and Vue devtools 660
Modules and scalability 662
Summary 664
Other Books You May Enjoy 665
Index 668
Preface
This Learning Path is divided into three sections, with each section bringing you closer to
developing high-end modern web applications with Vue.js 2. It starts with building
example applications to get well versed with the Vue.js ecosystem. You will learn to use
Vue.js by creating three single page applications that explore Vuex and vue-router, the
standard Vue tools for caching data and routing URLs for your applications. Going further,
the Learning Path will address some of the challenges in designing web applications with
Vue.js.
The Learning Path will have easy-to-follow recipes to help you tackle the challenges and
craft dynamic front end. You will learn to integrate web utilities like Babel and Webpack to
enhance your development workflow. Finally, towards the end, the course will introduce
you to several design patterns to help you write clean, maintainable, and reusable codes
with Vue framework.
At the end of the Learning Path, you will be confident with expertise in leveraging all the
components and productivity features of Vue.js and will be on your way to design your
web applications and execute it by writing clean code.
Who This Book Is For
The Learning Path is intended for JavaScript developers at any level of expertise who wants
to learn Vue.js and develop productive web applications with the power of the latest Vue.js.
What This Book Covers
Chapter 1, Getting Started with Vue.js, shows how to get started with Vue by including the
JavaScript file. We then move onto initializing your first Vue instance and looking at the
data object along with examining computed functions and properties and finally learning
about Vue methods.
Chapter 2, Displaying, Looping, Searching, and Filtering Data, describes how to display lists
and more complex data with Vue using v-if , v-else and v-for. It then looks at how to
filter the lists using form elements, followed by applying conditional CSS classes based on
the data.

Preface
[ 2 ]
Chapter 3, Optimizing Our App and Using Components to Display Data, is about optimizing
our Vue.js code by reducing the repetition and logically organizing our code. Once
complete, it looks at how to create Vue components and use them with Vue, how to use
props and slots with components, and utilizing events to transfer data between
components.
Chapter 4, Getting a List of Files Using the Dropbox API, presents loading and querying the
Dropbox API and listing the directories and files from your Dropbox account. It then looks
at adding a load state to your app along with using Vue animations.
Chapter 5, Navigating through the File Tree and Loading Folders from the URL, explains how to
create a component for both files and folders, and add links to the folder component to
update the directory listing. it also covers how to add a download button to the file
component and create a breadcrumb component so the user can easily navigate back up the
tree and dynamically update the browser URL, so if a folder is bookmarked or a link is
shared, the correct folder loads.
Chapter 6, Caching the Current Folder Structure Using Vuex, shows how to get started
with Vuex along with storing and retrieving data from the Vuex Store. It then looks at how
to integrate Vuex with our Dropbox app, how to cache the current Dropbox folder's
contents, and loading data from the store if required.
Chapter 7, Pre-Caching Other Folders and Files for Faster Navigation, describes the
process of pre-caching folders, storing the parent folder's contents, and how to cache the
download links for the files.
Chapter 8, Introducing Vue-Router and Loading URL-Based Components, explores Vue-Router
initialization and its options and how to create links with Vue-Router. It then looks at how
to make dynamic routes to update the View based on the URL. From there, it describes how
to use props with URLs, nest and name routes, and navigate programmatically.
Chapter 9, Using Vue-Router Dynamic Routes to Load Data, is about outlining our
components and routes, loading a product CSV file and creating an individual product
page with images and product variations.
Chapter 10, Building an E-Commerce Store, Browsing Products, describes how to create a
homepage listing page with specific products, create a category page with a reusable
component, create an ordering mechanism, create filters dynamically, and allow the user to
filter the products.

Preface
[ 3 ]
Chapter 11, Building an E-Commerce Store, Adding a Checkout, is about building the
functionality to allow the user to add and remove products to their basket, allow a user to
check out and add an order confirmation page.
Chapter 12, Using Vue Dev Tools and Testing Your SPA, covers the usage of the Vue
developer tools with the applications we've developed and has an overview of testing tools
and applications.
Chapter 13, Transitions and Animations, where you learn how transitions and animations
work to bring more life to your apps. You will also integrate with external CSS libraries.
Chapter 14, Vue Communicates with the Internet, is where you make your first AJAX call and
create forms and a full-fledged REST client (and server!).
Chapter 15, Single Page Applications, is where you use vue-router to create static and
dynamic routes to create a modern SPA.
Chapter 16, Organize + Automate + Deploy = Webpack, is where you actually publish your
accurately crafted components to npm and learn how Webpack and Vue play together in
the process.
Chapter 17, Advanced Vue.js, is where you explore directives, plugins, functional
components, and JSX.
Chapter 18, Large Application Patterns with Vuex, is where you structure your application
with tested patterns using Vuex to make sure your apps are maintainable and performant.
Chapter 19, Integrating with Other Frameworks, is where you build four different
applications with Vue and Electron, Firebase, Feathers, and Horizon.
Chapter 20, Vue Router Patterns, describes how routing is a vitally important part of any
SPA. This chapter focuses on the Vue route and looks at routing a user between multiple
pages. It goes through everything from matching paths and components to dynamic
matching with navigation parameters, regular expressions, and more.
Chapter 21, State Management with Vuex, demonstrates state management with Vuex. It
starts by looking at the Flux architecture and unidirectional data flow. Then, it takes a look
at Vuex, a state management system for Vue. The chapter also looks at implementing this in
an application, as well as common pitfalls and usage patterns. It goes on to the Vue-
devtools to capture actions and Vue instance data.
Preface
[ 4 ]
To Get the Most out of This Book
For this book, the reader will need the following:
A text editor or IDE to write code. It can be as simple as Notepad or TextEdit, but
one with syntax highlighting such as Sublime Text, Atom, or Visual Studio
Code is recommended.
A web browser.
A Dropbox user account with files and folders.
Download the Example Code Files
You can download the example code files for this book from your account at
www.packt.com. If you purchased this book elsewhere, you can visit
www.packt.com/support and register to have the files emailed directly to you.
You can download the code files by following these steps:
Log in or register at www.packt.com.1.
Select the SUPPORT tab.2.
Click on Code Downloads & Errata.3.
Enter the name of the book in the Search box and follow the onscreen4.
instructions.
Once the file is downloaded, please make sure that you unzip or extract the folder using the
latest version of:
WinRAR/7-Zip for Windows
Zipeg/iZip/UnRarX for Mac
7-Zip/PeaZip for Linux
The code bundle for the book is also hosted on GitHub at https://github.com/
PacktPublishing/Complete-Vue.js-2-Web-Development. In case there's an update to the
code, it will be updated on the existing GitHub repository.
We also have other code bundles from our rich catalog of books and videos available
at https://github.com/PacktPublishing/. Check them out!
Preface
[ 5 ]
Conventions Used
In this book, you will find a number of text styles that distinguish between different kinds
of information. Here are some examples of these styles and an explanation of their
meaning.
Code words in the text, database table names, folder names, filenames, file extensions,
pathnames, dummy URLs, user input, and Twitter handles are shown as follows: "Just
assign the names of the layers you want to activate to
the VK_INSTANCE_LAYERS environment variable."
A block of code is set as follows:
<div id="app">
{{ calculateSalesTax(shirtPrice) }}
</div>
Any command-line input or output is written as follows:
$ npm install
$ npm run dev
Bold: New terms and important words are shown in bold. Words that you see on the
screen, for example, in menus or dialog boxes, appear in the text like this: "Select System
info from the Administration panel."
Warnings or important notes appear like this.
Tips and tricks appear like this.
Get in Touch
Feedback from our readers is always welcome.
General feedback: If you have questions about any aspect of this book, mention the book
title in the subject of your message and email us at customercare@packtpub.com.

Preface
[ 6 ]
Errata: Although we have taken every care to ensure the accuracy of our content, mistakes
do happen. If you have found a mistake in this book, we would be grateful if you would
report this to us. Please visit www.packt.com/submit-errata, selecting your book, clicking
on the Errata Submission Form link, and entering the details.
Piracy: If you come across any illegal copies of our works in any form on the Internet, we
would be grateful if you would provide us with the location address or website name.
Please contact us at copyright@packt.com with a link to the material.
If you are interested in becoming an author: If there is a topic that you have expertise in
and you are interested in either writing or contributing to a book, please visit
authors.packtpub.com.
Reviews
Please leave a review. Once you have read and used this book, why not leave a review on
the site that you purchased it from? Potential readers can then see and use your unbiased
opinion to make purchase decisions, we at Packt can understand what you think about our
products, and our authors can see your feedback on their book. Thank you!
For more information about Packt, please visit packt.com.

1
Getting Started with Vue.js
Vue (pronounced view) is a very powerful JavaScript library created for building
interactive user interfaces. Despite having the ability to handle large single-page
applications, Vue is also great for providing a framework for small, individual use cases. Its
small file size means it can be integrated into existing ecosystems without adding too much
bloat.
It was built to have a simple API, which makes it easier to get started in comparison with
its rivals: React and Angular. Although it borrows some of the logic and methodologies
from these libraries, it has identified a need for developers for a simpler library for building
applications.
Unlike React or Angular, one of the benefits of Vue is the clean HTML output it produces.
Other JavaScript libraries tend to leave the HTML scattered with extra attributes and classes
in the code, whereas Vue removes these to produce clean, semantic output.
In this chapter, we will look at:
How to get started with Vue by including the JavaScript file
How to initialize your first Vue instance and look at the data object
Examining computed functions and properties
Learning about Vue methods

Getting Started with Vue.js Chapter 1
[ 8 ]
Creating the workspace
To use Vue, we first need to include the library in our HTML and initialize it. For the
examples in the first section of this book, we are going to be building our application in a
single HTML page. This means the JavaScript to initialize and control Vue will be placed at
the bottom of our page. This will keep all our code contained, and means it will easily run
on your computer. Open your favorite text editor and create a new HTML page. Use the
following template as a starting point:
<!DOCTYPE html>
<html>
<head>
<meta charset="utf-8">
<title>Vue.js App</title>
</head>
<body>
<div id="app">
</div>
<script src="https://unpkg.com/vue"></script>
<script type="text/javascript">
// JS Code here
</script>
</body>
</html>
The main HTML tags and structure should be familiar to you. Let's run over a few of the
other aspects.
Application space
This is the container for your application and provides a canvas for Vue to work in. All the
Vue code will be placed within this tag. The actual tag can be any HTML element -
main, section, and so on. The ID of the element needs to be unique, but again, can be
anything you wish. This allows you to have multiple Vue instances on one page or identify
which Vue instance relates to which Vue code:
<div id="app">
</div>
During the tutorials, this element with the ID will be referred to as the app space or view. It
should be noted that all HTML and tags and code for your application should be placed
within this container.

Getting Started with Vue.js Chapter 1
[ 9 ]
Although you can use most HTML tags for your application space, you
cannot initialize Vue on the <body> or <HTML> tags - if you do so, Vue
will throw a JavaScript error and will fail to initialize. You will have to use
an element inside your body.
Vue library
For the examples in this book, we are going to be using a hosted version of Vue.js from a
CDN (Content Delivery Network) unpkg. This ensures that we have the latest version of
Vue in our application, and also means we do not need to create and host other JavaScript
files. Unpkg is an independent site that hosts popular libraries. It enables you to quickly
and easily add a JavaScript package to your HTML, without having to download and host
the file yourself:
<script src="https://unpkg.com/vue"></script>
When deploying your code, it is a good practice to serve up your libraries from local files
rather than relying on CDNs. This ensures that your implementation will work with the
currently - saved version, should they release an update. It will also increase the speed of
your application, as it will not need to request the file from another server.
The script block following the library include is where we are going to be writing all our
JavaScript for our Vue application.
Initializing Vue and displaying the first
message
Now that we have a template set up, we can initialize Vue and bind it to the HTML app
space by using the following code:
const app = new Vue().$mount('#app');
This code creates a new instance of Vue and mounts it on the HTML element with the ID of
app. If you save your file and open it up in a browser, you will notice nothing has
happened. However, under the hood, this one line of code has linked the div with the
app variable, which is an instance of a Vue application.

Getting Started with Vue.js Chapter 1
[ 10 ]
Vue itself has many objects and properties that we can now use to build our app. The first
one you will encounter is the el property. Using an HTML ID, this property tells Vue
which element it should bind to and where the app is going to be contained. This is the
most common way of mounting your Vue instance and all Vue code should happen within
this element:
const app = new Vue({
el: '#app'
});
When the el property isn't specified in the instance, Vue initializes in an unmounted
state—this allows any functions or methods you may have specified to run before
mounting, to run and complete. You can then independently call the mounting function
when ready. Behind the scenes, when using the el property, Vue is mounting the instance
using a $.mount function. If you do want to wait, the $mount function can be called
separately, for example:
const app = new Vue();
// When ready to mount app:
app.$mount('#app');
However, as we will not need to delay the execution of our mount timing throughout the
book, we can use the el element with the Vue instance. Using the el property is also the
most common way of mounting the Vue app.
Alongside the el value, Vue has a data object that contains any data we need to access the
app or app space. Create a new data object within the Vue instance and assign a value to a
property by doing the following:
const app = new Vue({
el: '#app',
data: {
message: 'Hello!'
}
});
Within the app space, we now have access to the message variable. To display data within
the app, Vue uses the Mustache templating language to output data or variables. This is
achieved by placing the variable name between double curly brackets {{ variable }}.
Logic statements, such as if or foreach, get HTML attributes, which will be covered later
in the chapter.

Getting Started with Vue.js Chapter 1
[ 11 ]
Within the app space, add the code to output the string:
<div id="app">
{{ message }}
</div>
Save the file, open it up in your browser, and you should be presented with your
Hello! string.
If you don't see any output, check the JavaScript console to see if there are
any errors. Ensure the remote JavaScript file is loading correctly, as some
browsers and operating systems require additional security steps before
allowing some remote files to be loaded when viewing pages locally on
your computer.
The data object can handle multiple keys and data types. Add some more values to the
data object and see what happens - make sure you add a comma after each value. Data
values are simple JavaScript and can handle basic math, too - try adding a new price key
and setting the value to 18 + 6 to see what happens. Alternatively, try adding a JavaScript
array and printing it out:
const app = new Vue({
el: '#app',
data: {
message: 'Hello!',
price: 18 + 6,
details: ['one', 'two', 'three']
}
});
In your app space, you can now output each of those values - {{ price }} and {{
details }} now output data - although the list may not be quite what you had expected.
We'll cover using and displaying lists in Chapter 2, Displaying, Looping, Searching, and
Filtering Data.
All the data in Vue is reactive and can be updated by either the user or the application. This
can be tested by opening up the browser's JavaScript console and updating the content
yourself. Try typing app.message = 'Goodbye!'; and pressing Enter - your app's
content will update. This is because you are referencing the property directly - the first app
refers to the const app variable that your app is initialized to in your JavaScript. The
period denotes a property within there, and the message refers to the data key. You could
also update app.details or price to anything you want!

Getting Started with Vue.js Chapter 1
[ 12 ]
Computed values
The data object in Vue is great for storing and retrieving data directly, however, there may
be times where you want to manipulate the data before outputting it in your applications.
We can do that using the computed object in Vue. Using this technique, we are able to start
adhering to the MVVM (Model-View-ViewModel) methodology.
MVVM is a software architectural pattern where you separate out various parts of your
application into distinct sections. The Model (or data) is your raw data input - be it from an
API, database, or hardcoded data values. In the context of Vue, this is typically the data
object we used earlier.
The view is the frontend of your application. This should just be used for outputting the
data from the Model, and should not contain any logic or data manipulation, with the
exception of some unavoidable if statements. For the Vue applications, this is all the code
placed within the <div id="app"></div> tags.
The ViewModel is the bridge between the two. It allows you to manipulate the data from
the Model before it is output by the view. Examples of this could range from changing a
string to uppercase or prefixing a currency symbol, up to filtering out discounted products
from a list or calculating the total value of a field across an array. In Vue, this is where the
computed object comes in.
The computed object can have as many properties as required - however, they must be
functions. These functions can utilize data already on the Vue instance and return a value,
be it a string, number, or array that can then be used in the view.
The first step is to create a computed object within our Vue application. In this example, we
are going to use a computed value to convert our string to lowercase, so set the value of
message back to a string:
const app = new Vue({
el: '#app',
data: {
message: 'Hello Vue!'
},
computed: {
}
});

Getting Started with Vue.js Chapter 1
[ 13 ]
Don't forget to add a comma (,) after the closing curly bracket (}) of your
data object so Vue knows to expect a new object.
The next step is to create a function inside the computed object. One of the hardest parts of
development is naming things - make sure the name of your function is descriptive. As our
application is quite small and our manipulation basic, we'll name it messageToLower:
const app = new Vue({
el: '#app',
data: {
message: 'HelLO Vue!'
},
computed: {
messageToLower() {
return 'hello vue!';
}
}
});
In the preceding example, I've set it to return a hardcoded string, which is a lowercased
version of the contents of the message variable. Computed functions can be used exactly as
you would use a data key in the view. Update the view to output {{ messageToLower }}
instead of {{ message }} and view the result in your browser.
There are a few issues with this code, however. Firstly, if the value of messageToLower
was being hardcoded, we could have just added it to another data property. Secondly, if the
value of message changes, the lowercase version will now be incorrect.
Within the Vue instance, we are able to access both data values and computed values using
the this variable - we'll update the function to use the existing message value:
computed: {
messageToLower() {
return this.message.toLowerCase();
}
}
The messageToLower function now references the existing message variable and, using a
native JavaScript function, converts the string to lower case. Try updating the message
variable in your application, or in the JavaScript console, to see it update.

Getting Started with Vue.js Chapter 1
[ 14 ]
Computed functions are not just limited to basic functionality - remember, they are
designed to remove all logic and manipulations from the view. A more complex example
might be the following:
const app = new Vue({
el: '#app',
data: {
price: 25,
currency: '$',
salesTax: 16
},
computed: {
cost() {
// Work out the price of the item including
salesTax
let itemCost = parseFloat(
Math.round((this.salesTax / 100) *
this.price) + this.price).toFixed(2);
// Add text before displaying the currency and
amount
let output = 'This item costs ' +
this.currency + itemCost;
// Append to the output variable the price
without salesTax
output += ' (' + this.currency + this.price +
' excluding salesTax)';
// Return the output value
return output;
}
}
});
Although this might seem advanced at first glance, the code is taking a fixed price and
calculating what it would be with sales tax added. The price, salesTax, and currency
symbol are all stored as values on the data object and accessed within the cost()
computed function. The view outputs {{ cost }}, which produces the following:
This item costs $29.00 ($25 excluding sales tax)
Computed functions will recalculate and update if any data is updated, by either the user
or the application itself. This allows for our function to dynamically update based on the
price and salesTax values. Try one of the following commands in the console in your
browser:
app.salesTax = 20
app.price = 99.99

Getting Started with Vue.js Chapter 1
[ 15 ]
The paragraph and prices will update instantly. This is because computed functions are
reactive to the data object and the rest of the application.
Methods and reusable functions
Within your Vue application, you may wish to calculate or manipulate data in a consistent
or repetitive way or run tasks that require no output to your view. For example, if you
wanted to calculate the sales tax on every price or retrieve some data from an API before
assigning it to some variables.
Rather than creating computed functions for each time, we need to do this, Vue allows you
to create functions or methods. These get declared in your application and can be accessed
from anywhere - similar to the data or computed functions.
Add a method object to your Vue application and note the updates to the data object:
const app = new Vue({
el: '#app',
data: {
shirtPrice: 25,
hatPrice: 10,
currency: '$',
salesTax: 16
},
methods: {
}
});
Within the data object, the price key has been replaced with two prices - shirtPrice
and hatPrice. We'll create a method to calculate the sales tax for each of these prices.
Similar to creating a function for the computed object, create a method function title
called calculateSalesTax. This function needs to accept a single parameter, which will
be the price. Inside, we will use the code from the previous example to calculate the sales
tax. Remember to replace this.price with just the parameter name: price, as shown
here:
methods: {
calculateSalesTax(price) {
// Work out the price of the item including
sales tax
return parseFloat(
Math.round((this.salesTax / 100) * price)
+ price).toFixed(2);

Getting Started with Vue.js Chapter 1
[ 16 ]
}
}
Pressing save will not do anything to our application - we need to call the function. In your
view, update the output to use the function and pass in the shirtPrice variable:
<div id="app">
{{ calculateSalesTax(shirtPrice) }}
</div>
Save your documents and check the result in the browser - is it what you expected? The
next task is to prepend the currency. We can do that by adding a second method that
returns the parameter passed into the function with the currency at the beginning of the
number:
methods: {
calculateSalesTax(price) {
// Work out the price of the item including
sales tax
return parseFloat(
Math.round((this.salesTax / 100) * price) +
price).toFixed(2);
},
addCurrency(price) {
return this.currency + price;
}
}
In our view, we then update our output to utilize both methods. Rather than assigning to a
variable, we can pass the first function, calculateSalesTax, as the parameter for the
second addCurrency function. This works because of the first method,
calculateSalesTax, accepts the shirtPrice parameter and returns the new amount.
Instead of saving this as a variable and passing the variable into the addCurrency method,
we pass the result directly into this function, which is the calculated amount:
{{ addCurrency(calculateSalesTax(shirtPrice)) }}
However, it would start to get tiresome having to write these two functions every time we
needed to output the price. From here, we have two options:
We can create a third method, titled cost() - which accepts the price parameter
and passes the input through the two functions
Create a computed function, such as shirtCost, which uses this.shirtPrice
instead of having a parameter passed in

Getting Started with Vue.js Chapter 1
[ 17 ]
We could, alternatively, create a method titled shirtCost that does the same as our
computed function; however, it's better to practice to use computed in this case.
This is because computed functions are cached, whereas method functions are not. If you
imagine our methods being a lot more complicated than they currently are, calling function
after function repeatedly (for example, if we wanted to display the price in several
locations) could have a performance impact. With computed functions, as long as the data
does not change, you can call it as many times as you want, with the result being cached by
the application. If the data does change, it only needs to recalculate once, and re-cache that
result.
Make a computed function for both the shirtPrice and hatPrice, so that both variables
can be used in the view. Don't forget that to call the functions internally you must use
the this variable - for example, this.addCurrency(). Use the following HTML code as
the template for your view:
<div id="app">
<p>The shirt costs {{ shirtCost }}</p>
<p>The hat costs {{ hatCost }}</p>
</div>
Have a go at creating the computed functions yourself before comparing against the
following code. Don't forget that there are many ways to do things in development, so don't
worry if your code works but doesn't match the following example:
const app = new Vue({
el: '#app',
data: {
shirtPrice: 25,
hatPrice: 10,
currency: '$',
salesTax: 16
},
computed: {
shirtCost() {
returnthis.addCurrency(this.calculateSalesTax(
this.shirtPrice))
},
hatCost() {
return this.addCurrency(this.calculateSalesTax(
this.hatPrice))
},
},
methods: {
calculateSalesTax(price) {
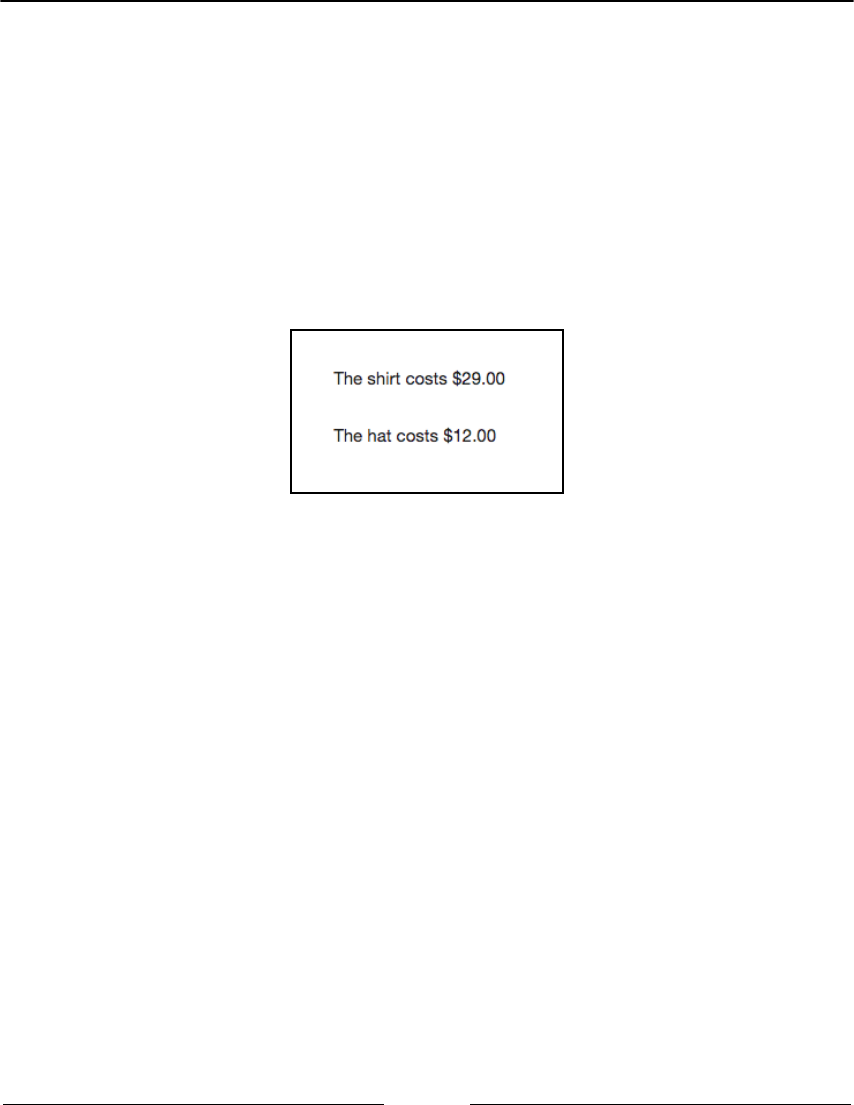
Getting Started with Vue.js Chapter 1
[ 18 ]
// Work out the price of the item including
sales tax
return parseFloat(
Math.round((this.salesTax / 100) * price) +
price).toFixed(2);
},
addCurrency(price) {
return this.currency + price;
}
}
});
The result, although basic, should look like the following:
Summary
In this chapter, we learned how to get started with the Vue JavaScript framework. We
examined the data, computed, and methods objects within the Vue instance. We covered
how to use each one within the framework and utilize each of its advantages.

2
Displaying, Looping, Searching,
and Filtering Data
In Chapter 1, Getting Started with Vue.js, we covered the data, computed, and method
objects within Vue and how to display static data values. In this chapter, were are going to
cover:
Displaying lists and more complex data with Vue using v-if, v-else, and v-
for
Filtering the lists using form elements
Applying conditional CSS classes based on the data
The data we are going to be using is going to be randomly generated by the JSON generator
service (http://www.json-generator.com/). This website allows us to get dummy data to
practice with. The following template was used to generate the data we will be using. Copy
the following into the left-hand side to generate data of the same format so the attributes
match with the code examples, as follows:
[
'{{repeat(5)}}',
{
index: '{{index()}}',
guid: '{{guid()}}',
isActive: '{{bool()}}',
balance: '{{floating(1000, 4000, 2, "00.00")}}',
name: '{{firstName()}} {{surname()}}',
email: '{{email()}}',
registered: '{{date(new Date(2014, 0, 1), new Date(), "YYYY-
MM-ddThh:mm:ss")}}'
}
]

Displaying, Looping, Searching, and Filtering Data Chapter 2
[ 20 ]
Before we get into building our simple app and displaying our users, we'll cover some
more of the features of Vue and the HTML-specific attributes available in your view. These
range from dynamically rendering content to looping through arrays.
HTML declarations
Vue allows you to use HTML tags and attributes to control and alter the view of your
application. This involves setting attributes dynamically, such as alt and href. It also
allows you to render tags and components based on data in the application. These
attributes begin with a v- and, as mentioned at the beginning of this book, get removed
from the HTML on render. Before we start outputting and filtering our data, we'll run
through a few of the common declarations.
v-html
The v-html directive allows you to output content without using the mustache-style curly
bracket syntax. It can also be used if your output contains HTML tags – it will render the
output as HTML instead of plain text. The value of the HTML attribute is that of the data
key or computed function name:
View:
In your view app space, add the v-html attribute to an element:
<div id="app">
<div v-html="message"></div>
</div>
JavaScript:
In the JavaScript, set the message variable to a string which contains some HTML elements:
const app = new Vue({
el: '#app',
data: {
message: '<h1>Hello!</h1>'
}
});

Displaying, Looping, Searching, and Filtering Data Chapter 2
[ 21 ]
You should try and avoid adding HTML to your Vue instance, as it starts to mix up the
View in the ViewModel and Model of our MVVM structure. There is also the danger you
output an invalid HTML tag inside another. You should only use v-html with data you
trust, because using it with an external API could be a security concern as it would allow
the API to have control over your application. A potentially malicious API could use v-
html to inject undesired content and HTML. Only use v-html with data you can fully
trust.
Declarative rendering
Regular HTML attributes, such as the src of the <img> tag, can be dynamically populated
with Vue using the v-bind: attribute. This allows you to populate any existing attribute
with data from your Vue application. This might be an image source or element ID.
The bind option gets used by prepending the attribute you wish to populate. For example,
if you wished to populate an image source with the value of a data key called
imageSource, you would do the following:
View:
Create an img tag in your view app space, with a dynamic src attribute, using v-bind and
a variable called imageSource.
<div id="app">
<img v-bind:src="imageSource">
</div>
JavaScript:
Create a variable in your Vue JavaScript code called imageSource. Add the URL to the
desired image:
const app = new Vue({
el: '#app',
data: {
imageSource: 'http://via.placeholder.com/350x150'
}
});
The v-bind: attribute can be shortened to just :, so, for example, v-bind:src would
become :src.

Displaying, Looping, Searching, and Filtering Data Chapter 2
[ 22 ]
Conditional rendering
Using custom HTML declarations, Vue allows you to render elements and contents
conditionally based on data attributes or JavaScript declarations. These include v-if, for
showing a container whether a declaration equates to true, and v-else, to show an
alternative.
v-if
The most basic example of this would be the v-if directive – determining a value or
function if the block should be displayed.
Create a Vue instance with a single div inside the view and a data key, isVisible, set to
false.
View:
Start off with the view code as the following:
<div id="app">
<div>Now you see me</div>
</div>
JavaScript:
In the JavaScript, initialize Vue and create an isVisible data property:
const app = new Vue({
el: '#app',
data: {
isVisible: false
}
});
Right now, your Vue app would be displaying the contents of your element. Now add the
v-if directive to your HTML element with the value of isVisible:
<div id="app">
<div v-if="isVisible">Now you see me</div>
</div>

Displaying, Looping, Searching, and Filtering Data Chapter 2
[ 23 ]
Upon pressing save, your text should disappear. That is because the tag is being
conditionally rendered based on the value, which is currently false. If you open up your
JavaScript console and run the following code, your element should reappear:
app.isVisible = true
v-if doesn't just work with Boolean true/false values. You can check whether a data
property is equal to a specific string:
<div v-if="selected == 'yes'">Now you see me</div>
For example, the preceding code checks whether a selected data property is equal to the
value of yes. The v-if attribute accepts JavaScript operators, so can check not equals,
bigger, or less than.
The danger here is that your logic starts to creep into your View away from your
ViewModel. To combat this, the attribute also takes functions as a value. The method can be
as complicated as required but ultimately must return a true if you wish to show the code
and a false if not. Bear in mind that if the function returns anything other than a false
value (such as 0 or false) then the result will be interpreted as true.
This would look something like this:
<div v-if="isSelected">Now you see me</div>
And your method could be as this:
isSelected() {
return selected == 'yes';
}
If you don't wish to completely remove the element and only hide it, there is a more
appropriate directive, v-show. This applies a CSS display property rather than
manipulating the DOM – v-show is covered later in the chapter.
v-else
v-else allows you to render an alternative element based on the opposite of the v-if
statement. If that results in true, the first element will be displayed; otherwise, the element
containing v-else will.

Displaying, Looping, Searching, and Filtering Data Chapter 2
[ 24 ]
The element with v-else needs to directly follow the one containing v-
if; otherwise, your application will throw an error.
v-else has no value and is placed within the element tag.
<div id="app">
<div v-if="isVisible">
Now you see me
</div>
<div v-else>
Now you don't
</div>
</div>
Adding the preceding HTML to your app space will only show one of the <div> elements –
toggling the value in your console as we did earlier will reveal the other container. You can
also use v-else-if should you wish to chain your conditions. An example of v-else-if
is as follows:
<div id="app">
<div v-if="isVisible">
Now you see me
</div>
<div v-else-if="otherVisible">
You might see me
</div>
<div v-else>
Now you don't
</div>
</div>
You might see me will be displayed if the isVisible variable equates to false,
but the otherVisible variable equates to true.
v-else should be used sparingly as can be ambiguous and might lead to false positive
situation.

Displaying, Looping, Searching, and Filtering Data Chapter 2
[ 25 ]
v-for and displaying our data
The next HTML declaration means we can start displaying our data and putting some of
these attributes into practice. As our data is an array, we will need to loop through it to
display each element. To do this, we will use the v-for directive.
Generate your JSON and assign it to a variable called people. During these examples, the
generated JSON loop will be displayed in the code blocks as [...]. Your Vue app should
look like the following:
const app = new Vue({
el: '#app',
data: {
people: [...]
}
});
We now need to start displaying each person's name in our View as a bulleted list. This is
where the v-for directive comes in:
<div id="app">
<ul>
<li v-for="person in people">
{{ person }}
</li>
</ul>
</div>
The v-for loops through the JSON list and for every entry temporarily assigns it
the person variable. We can then output the value or attributes of the variable.
The v-for loop needs to be applied to the HTML element you want to be repeated, in this
case, <li>. If you don't have a wrapping element or don't wish to use the HTML you can
use the Vue <template> elements. These get removed at runtime while still creating a
container for you to output the data with:
<div id="app">
<ul>
<template v-for="person in people">
<li>
{{ person }}
</li>
</template>
</ul>
</div>

Displaying, Looping, Searching, and Filtering Data Chapter 2
[ 26 ]
The template tag also hides the contents until the app has initialized, which may be handy
if your network is slow or your JavaScript takes a while to fire.
Just leaving our view to output {{ person }} will create a long string of information,
without any use to us. Update the output to target the name property of the person object:
<li v-for="person in people">
{{ person.name }}
</li>
Viewing the result in the browser should reveal a list of the user's names. Update the
HTML to list the users in a table showing their names, email addresses, and balance. Apply
the v-for to the <tr> element:
<table>
<tr v-for="person in people">
<td>{{ person.name }}</td>
<td>{{ person.email }}</td>
<td>{{ person.balance }}</td>
<td>{{ person.registered }}</td>
</tr>
</table>
Add an extra cell to your table. This is going to display Active if they are active and
Inactive if not, using the isActive property on the person object. This can be achieved in
two ways – using the v-if directive or alternatively using a ternary if. Ternary ifs are in-
line if statements that can be placed within the curly brackets of your View. We would use
the v-if if we wanted to use HTML elements to apply some styling.
If we were using a ternary 'if', the cell would look like the following:
<td>{{ (person.isActive) ? 'Active' : 'Inactive' }}</td>
And if we opted for the v-if option with v-else, allowing us to use the HTML we wish, it
would look like this:
<td>
<span class="positive" v-if="person.isActive">Active</span>
<span class="negative" v-else>Inactive</span>
</td>
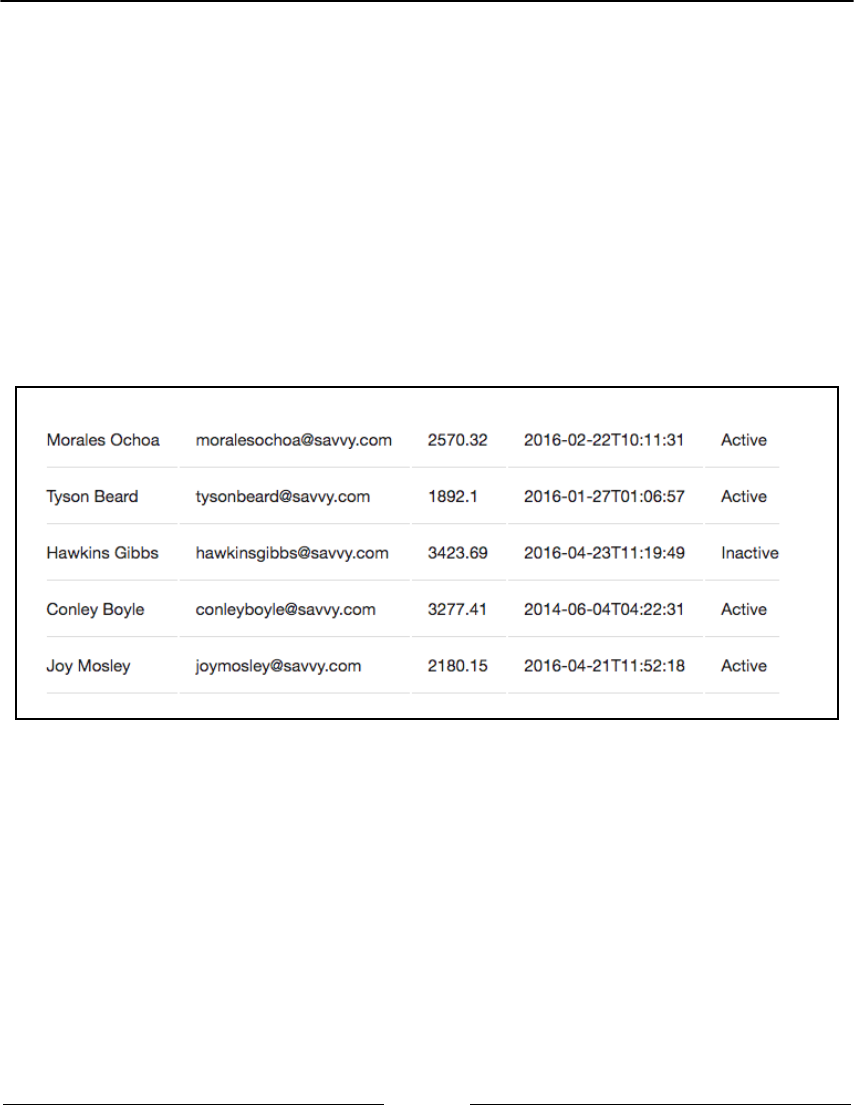
Displaying, Looping, Searching, and Filtering Data Chapter 2
[ 27 ]
This active element is a perfect example of where a Vue Component would be ideal – we'll
cover that in Chapter 3, Optimizing our App and Using Components to Display Data. As an
alternative that is more in keeping with our MVVM methodology, we could create a
method, which returns the status text. This would tidy up our view and moves the logic to
our app:
<td>{{ activeStatus(person) }}</td>
Our method would then carry out the same logic as our view was:
activeStatus(person) {
return (person.isActive) ? 'Active' : 'Inactive';
}
Our table will now look like the following:
Creating links using v-html
The next step is to link the email address so that it is clickable for users viewing the list of
people. In this instance, we need to concatenate strings by adding a mailto: before the
email address.
The first instinct is to do the following:
<a href="mailto:{{person.email}}">{{ person.email }}</a>

Displaying, Looping, Searching, and Filtering Data Chapter 2
[ 28 ]
But Vue doesn't allow interpolation inside attributes. Instead, we must use the v-bind
directive on the href attribute. This turns the attribute into a JavaScript variable, so any
raw text must be written in quotes, and the concatenated with the desired variable:
<a v-bind:href="'mailto:' + person.email">{{ person.email }}</a>
Note the addition of v-bind:, the single quotes and concatenation + identifier.
Format balance
Before we move on to filtering the users, add a method to correctly format the balance,
prepending a currency symbol defined in the data object and ensuring there are two
numbers after the decimal point. We can adapt our method from Chapter 1, Getting Started
with Vue.js, to achieve this. Our Vue application should now look like this:
const app = new Vue({
el: '#app',
data: {
people: [...],
currency: '$'
},
methods: {
activeStatus(person) {
return (person.isActive) ? 'Active' : 'Inactive';
},
formatBalance(balance) {
return this.currency + balance.toFixed(2);
}
}
});
We can utilize this new method in our View:
<td>{{ formatBalance(person.balance) }}</td>
Format registered date
The registered date field in the data is computer friendly, which is not very human-friendly
to read. Create a new method titled formatDate that takes one parameter — similar to the
formatBalance method previously.

Displaying, Looping, Searching, and Filtering Data Chapter 2
[ 29 ]
If you want full customization of the display of your date, there are several libraries
available, such as moment.js, that give you much more flexibility over the output of any
date and time-based data. For this method, we are going to use a native JavaScript function,
to LocaleString():
formatDate(date) {
let registered = new Date(date);
return registered.toLocaleString('en-US');
}
With the registered date, we pass it to the native Date() function so JavaScript knows to
interpret the string as a date. Once stored in the registered variable, we return the object as
a string with the toLocaleString() function. This function accepts a huge array of
options (as outlined on MDN) to customize the output of your date. For now, we'll pass it
the locale we wish to display and use the defaults for that location. We can now utilize our
method in the view:
<td>{{ formatDate(person.registered) }}</td>
Each table row should now look like the following:
Filtering our data
With our data being listed out, we are now going to build filtering ability. This will allow a
user to select a field to filter by and a text field to enter their query. The Vue application will
then filter the rows as the user types. To do this, we are going to bind some form inputs to
various values in the data object, create a new method, and use a new directive on the
table rows; v-show.
Building the form
Start off by creating the HTML in your view. Create a <select> box with an <option> for
each field you want to filter, an <input> for the query, and a pair of radio buttons – we'll
use these to filter active and non-active users. Make sure the value attribute of each
<option> reflects the key in the user data – this will save on code required and will make
the purpose of the select box more obvious.

Displaying, Looping, Searching, and Filtering Data Chapter 2
[ 30 ]
The data you are filtering by does not need to be displayed for our filtering to work,
although a user experience consideration needs to come into play here. Would it make
sense if a table row was being displayed without the data you're filtering it on?
Create the form that will be used for filtering:
<form>
<label for="fiterField">
Field:
<select id="filterField">
<option value="">Disable filters</option>
<option value="isActive">Active user</option>
<option value="name">Name</option>
<option value="email">Email</option>
<option value="balance">Balance</option>
<option value="registered">Date registered</option>
</select>
</label>
<label for="filterQuery">
Query:
<input type="text" id="filterQuery">
</label>
<span>
Active:
<label for="userStateActive">
Yes:
<input type="radio" value="true" id="userStateActive"
selected>
</label>
<label for="userStateInactive">
No:
<input type="radio" value="false" id="userStateInactive">
</label>
</span>
</form>
This form includes a select box for selecting a field a filter by, an input box that would
allow the user to enter a query to filter on, and a pair of radio buttons for when we wish to
filter by active and non-active users. The imagined user flow is this: the user would select
the field they wish to filter the data by and either enter their query or select the radio
buttons. When the isActive (Active user) option is selected in the select box, the radio
buttons will be displayed and the input box will be hidden. We have ensured the first radio
button is selected by default to help.

Displaying, Looping, Searching, and Filtering Data Chapter 2
[ 31 ]
The filtering inputs do not need to be included in a form to work; however, it is good
practice to retain semantic HTML, even in a JavaScript application.
Binding the inputs
To bind inputs to a variable that can be accessed through your Vue instance requires an
HTML attribute to be added to the fields and a corresponding key added to the data object.
Create a variable in the data object for each of the fields so we can bind the form elements
to them:
data: {
people: [...],
currency: '$',
filterField: '',
filterQuery: '',
filterUserState: ''
}
The data object now has three additional keys: filterField, which will be used for
storing the value of the dropdown; filterQuery, the placeholder for data entered into the
textbox; and filterUserState, which allows us to store the radio button checkboxes.
Now there are data keys to utilize, we are able to bind form elements to them. Apply a v-
model="" attribute to each form field, with the value of the data key.
Here's an example:
<input type="text" id="filterQuery" v-model="filterQuery">
Make sure the two radio buttons have exactly the same v-model="" attribute: this is so
they can update the same value. To verify that it has worked, you can now output the data
variables and get the value of the fields.
Try outputting filterField or filterQuery and changing the fields.
{{ filterField }}

Displaying, Looping, Searching, and Filtering Data Chapter 2
[ 32 ]
One thing you may notice if you were to output the filterUserState variable is it
appears to be in working, But, it is not getting the actual results desired. The output of the
variable would be true and falseas set in the value attributes.
On closer inspection, the values are actually strings, rather than a Boolean value. A Boolean
value is a hard true or false, 1 or 0, which you can easily compare against, whereas a
string would require exact checking on a hardcoded string. This can be verified by
outputting the typeof variable that it is:
{{ typeof filterUserState }}
This can be resolved by binding the values of the radio buttons with the v-
bind:value attribute. This attribute allows you to specify the value for Vue to interpret
and can take Boolean, string, or object values. For now, we'll pass it true and false, as we
were already doing with the standard value attribute, but Vue will know to interpret it as
Boolean:
<span>
Active:
<label for="userStateActive">
Yes:
<input type="radio" v-bind:value="true" id="userStateActive"
v-model="filterUserState" selected>
</label>
<label for="userStateInactive">
No:
<input type="radio" v-bind:value="false"
id="userStateInactive" v-model="filterUserState">
</label>
</span>
The next step is to show and hide the table rows based on these filters.
Showing and hiding Vue content
Along with v-if for showing and hiding content, you can also use the v-show=""
directive. v-show is very similar to v-if; they both get added to the HTML wrapper and
can both accept the same parameters, including a function.

Displaying, Looping, Searching, and Filtering Data Chapter 2
[ 33 ]
The difference between the two is v-if alters the markup, removing and adding HTML
elements as required, whereas v-show renders the element regardless, hiding and showing
the element with inline CSS styles. v-if is much more suited to runtime renders or
infrequent user interactivities as it could potentially be restructuring the whole page. v-
show is favorable when lots of elements are quickly coming in and out of view, for
example, when filtering!
When using v-show with a method, the function needs to return just a true or false. The
function has no concept of where it is being used, so we need to pass in the current person
being rendered to calculate if it should be shown.
Create a method on your Vue instance titled filterRow() and inside, set it to return
true:
filterRow(person) {
return true;
}
The function takes one parameter, which is the person will we pass in from though from
the HTML. In your view, add the v-show attribute to the <tr> element with filterRow as
the value while passing in the person object:
<table>
<tr v-for="person in people" v-show="filterRow(person)">
<td>{{ person.name }}</td>
...
As a simple test, return the isActive value to the person. This should instantly filter out
anyone who is inactive, as their value will return false:
filterRow(person) {
return person.isActive;
}

Displaying, Looping, Searching, and Filtering Data Chapter 2
[ 34 ]
Filtering our content
Now we have control over our people rows and some filter controls in our view, we need to
make our filters work. We are already filtering by our isActive key, so the radio buttons
will be the first to be wired up. We already have the value in a Boolean form for both the
radio buttons values and the key we will be filtering by. For this filter to work, we need to
compare the isActive key with the radio button's value.
If the filterUserState value is true, show users where isActive is true
If the filterUserState value is false, however, only show users where their
isActive value is false as well
This can be written in one line by comparing the two variables:
filterRow(person) {
return (this.filterUserState === person.isActive);
}
On page load, no users will be shown as the filterUserState key is set to neither true
nor false. Clicking one of the radio buttons will reveal the corresponding users.
Let's make the filter work only if the active user option is selected in the dropdown:
filterRow(person) {
let result = true;
if(this.filterField === 'isActive') {
result = this.filterUserState === person.isActive;
}
return result;
}
This code sets a variable to true as a default. We can then return the variable immediately
and our row will show. Before returning, however, it checks the value of the select box and
if is the desired value, will then filter by our radio buttons. As our select box is bound to the
filterField value, as with the filterUserState variable, it updates while we interact
with the app. Try selecting the Active user option in the select box and changing the radio
buttons.

Displaying, Looping, Searching, and Filtering Data Chapter 2
[ 35 ]
The next step is to use the input query box when the active user option is not selected. We
also want our query to be a fuzzy search — for example, to match words containing the
search query rather than matching exactly. We also want it to be case insensitive:
filterRow(person) {
let result = true;
if(this.filterField) {
if(this.filterField === 'isActive') {
result = this.filterUserState === person.isActive;
} else {
let query = this.filterQuery.toLowerCase(),
field = person[this.filterField].toString().toLowerCase();
result = field.includes(query);
}
}
return result;
}
There are a few things we had to add to this method in order to work. The first step is to
check that our select field has a value to begin the filtering. As the first option in our select
field has a value="", this equates to false. If this is the case, the method returns the
default of true.
If it does have a value, it then goes to our original if statement. This checks on the specific
value to see whether it matches isActive – if it does, it runs the code we wrote previously.
If not, we start our alternate filtering. A new variable of query is established, which takes
the value of the input and converts it to lowercase.
The second variable is the data we are going to be filtering against. This uses the value of
the select box, which is the field key on the person, to extract the value to filter with. This
value is converted to a string (in the case of the date or balance), converted to lowercase
and stored as the field variable. Lastly, we then use the includes function to check
whether the field includes the query entered. If it does, we return true and the row is
shown if; not, the row is hidden.
The next issue we can address is when filtering with numbers. It is not intuitive for the user
to enter the exact balance of the user they are after — a much more natural way of
searching is to find users with a balance under or over a certain amount, for example, <
2000.

Displaying, Looping, Searching, and Filtering Data Chapter 2
[ 36 ]
The first step in doing this is to only apply this type of filtering when it is the balance
field. We can approach this two ways – we can either check that the field name is balance,
similar to how we check the isActive field, or we can check the type of data we are
filtering on.
Checking against the field name is simpler. We can do an else if() in our method or
even migrate to a switch statement for easier reading and expansion. The alternative of
checking the field type, however, is more scalable. It means we can expand our dataset with
more numeric fields without having to extend or change our code. It does mean, however,
that there will be further if statements in our code.
What we will do first is alter our storing method, as we don't want to necessarily lowercase
the field or query:
if(this.filterField === 'isActive') {
result = this.filterUserState === person.isActive;
} else {
let query = this.filterQuery,
field = person[this.filterField];
}
The next step is to establish the type of data in the field variable. This can be established by,
once again, using the typeof operator. This can be used in an if statement, to check
whether the type of field is a number:
if(this.filterField === 'isActive') {
result = this.filterUserState === person.isActive;
} else {
let query = this.filterQuery,
field = person[this.filterField];
if(typeof field === 'number') {
// Is a number
} else {
// Is not a number
field = field.toLowerCase();
result = field.includes(query.toLowerCase());
}
}

Displaying, Looping, Searching, and Filtering Data Chapter 2
[ 37 ]
Once our check is complete, we can default back to our original query code. It will use this
if the select option is not isActive and the data were are filtering on is not a number. If this
is the case, then it will lowercase the field and see if it includes what has been written in the
query box when converted to lowercase as before.
The next stage is to actually compare our numbered data against what has been written in
the query box. To do this, we are going to use the native JavaScript eval function.
The eval function can be a potentially dangerous function and should not be used in
production code without some serious input sanitizing checks, plus, it is less performant
than lengthier alternatives. It runs everything inside as native JavaScript and so can be open
to abuse. However, as we are using this for a dummy application, with the focus being on
Vue itself rather than creating a fully web-safe application, it is fine in this instance. You
can read more about eval in 24 ways:
if(this.filterField === 'isActive') {
result = this.filterUserState === person.isActive;
} else {
let query = this.filterQuery,
field = person[this.filterField];
if(typeof field === 'number') {
result = eval(field + query);
} else {
field = field.toLowerCase();
result = field.includes(query.toLowerCase());
}
}
This passes both the field and the query to the eval() function and passes the result (either
true or false) to our result variable to determine the visibility of the row. The eval
function literally evaluates the expression and determines if it is true or false. Here's an
example:
eval(500 > 300); // true
eval(500 < 400); // false
eval(500 - 500); // false
In this example, the number 500 is our field, or in this specific example, balance.
Anything that is after that is what is written by our user. Your filtering code is now ready to
go. Try selecting the balance from the dropdown and filtering for users with a balance
higher than 2000.

Displaying, Looping, Searching, and Filtering Data Chapter 2
[ 38 ]
Before we move on, we need to add some error checking. If you have your JavaScript
console open, you may have noticed an error when you typed the first greater or less than.
This was because the eval function is unable to evaluate X > (where X is the balance). You
may have also been tempted to type $2000 with the currency and realized this doesn't
work. This is because the currency is applied while rendering the view, whereas we are
filtering the data before this is rendered.
In order to combat these two errors, we must remove any currency symbols typed in the
query and test our eval function before relying on it to return the results. Remove the
currency symbol with the native JavaScript replace() function. If it changes, uses the
currency symbol stored in the app, rather than hardcoding the currently used one.
if(typeof field == 'number') {
query = query.replace(this.currency, '');
result = eval(field + query);
}
We now need to test the eval function so it does not throw an error with every key
pressed. To do this, we use a try...catch statement:
if(typeof field == 'number') {
query = query.replace(this.currency, '');
try {
result = eval(field + query);
} catch(e) {}
}
As we don't want to output anything when an error is entered, we can leave the catch
statement empty. We could put the field.includes(query) statement in here, so it falls
back to the default functionality. Our full filterRow() method now looks like this:
filterRow(person) {
let result = true;
if(this.filterField) {
if(this.filterField === 'isActive') {
result = this.filterUserState === person.isActive;
} else {
let query = this.filterQuery,
field = person[this.filterField];
if(typeof field === 'number') {
query = query.replace(this.currency, '');
try {

Displaying, Looping, Searching, and Filtering Data Chapter 2
[ 39 ]
result = eval(field + query);
} catch (e) {}
} else {
field = field.toLowerCase();
result = field.includes(query.toLowerCase());
}
}
}
return result;
}
Filtering our filters
Now we have our filtering in place, we need to only show the radio buttons when the
isActive option is selected in our dropdown. Using the knowledge we've learned, this
should be relatively straightforward.
Create a new method that checks the select box value and returns true when Active User
is selected in our dropdown:
isActiveFilterSelected() {
return (this.filterField === 'isActive');
}
We can now use v-show for both the input and radio buttons, reversing the effect when on
the query box:
<label for="filterQuery" v-show="!isActiveFilterSelected()">
Query:
<input type="text" id="filterQuery" v-model="filterQuery">
</label>
<span v-show="isActiveFilterSelected()">
Active:
<label for="userStateActive">
Yes:
<input type="radio" v-bind:value="true" id="userStateActive"
v-model="filterUserState">
</label>
<label for="userStateInactive">
No:
<input type="radio" v-bind:value="false" id="userStateInactive" v-

Displaying, Looping, Searching, and Filtering Data Chapter 2
[ 40 ]
model="filterUserState">
</label>
</span>
Take note of the exclamation point before the method call on the input field. This means
not, and effectively reverses the result of the function, for example not true is the same as
false and vice versa.
To improve user experience, we can also check that the filtering is active at all before
showing either of the inputs. This can be added by including a secondary check in our v-
show attribute:
<label for="filterQuery" v-show="this.filterField &&
!isActiveFilterSelected()">
Query:
<input type="text" id="filterQuery" v-model="filterQuery">
</label>
This now checks that filterField has a value and that the select box is not set to
isActive. Make sure you add this to the radio buttons too.
A further user experience enhancement would be to ensure all the users don't disappear
when the isActive option is chosen. This currently happens because the default is set to a
string, which does not match with either the true or false values of the field. Before
filtering in this field, we should check that the filterUserState variable is either true or
false, that is a Boolean. We can do this by using typeof once more:
if(this.filterField === 'isActive') {
result = (typeof this.filterUserState === 'boolean') ?
(this.filterUserState === person.isActive) : true;
}
We are using a ternary operator to check that the result to filter on is boolean. If it is, then
filter as we were; if it is not then simply show the row.
Changing CSS classes
As with any HTML attribute, Vue is able to manipulate CSS classes. As with everything in
Vue, this can be done in a myriad of ways ranging from attributes on the object itself to
utilizing methods. We'll start off adding a class if the user is active.

Displaying, Looping, Searching, and Filtering Data Chapter 2
[ 41 ]
Binding a CSS class is similar to other attributes. The value takes an object that can calculate
logic from within the view or be abstracted out into our Vue instance. This all depends on
the complexity of the operation.
First, let's add a class to the cell containing the isActive variable if the user is active:
<td v-bind:class="{ active: person.isActive }">
{{ activeStatus(person) }}
</td>
The class HTML attribute is first prepended by v-bind: to let Vue know it needs to
process the attribute. The value is then an object, with the CSS class as the key and the
condition as the value. This code toggles the active class on the table cell if the
person.isActive variable equates to true. If we wanted to add an inactive class if the
user was not active, we could add it to the object:
<td v-bind:class="{ active: person.isActive, inactive:
!person.isActive }">
{{ activeStatus(person) }}
</td>
Here's we've used the exclamation point again to reverse the status. If you run this app, you
should find the CSS classes applied as expected.
If we're just applying two classes based on one condition, a ternary if statement can be
used inside of the class attribute:
<td v-bind:class="person.isActive ? 'active' : 'inactive'">
{{ activeStatus(person) }}
</td>
Note the single quotes around the class names. Once again, however, logic has started to
creep into our View and, should we wish to also use this class elsewhere, is not very
scalable.
Create a new method on our Vue instance called activeClass and abstract the logic into
that — not forgetting to pass the person object in:
activeClass(person) {
return person.isActive ? 'active' : 'inactive';
}

Displaying, Looping, Searching, and Filtering Data Chapter 2
[ 42 ]
We can now call that method in our view:
<td v-bind:class="activeClass(person)">
{{ activeStatus(person) }}
</td>
I appreciate this is quite a simple execution; let's try a slightly more complex one. We want
to add a conditional class to the balance cell depending on the value. If their balance is
under $2000, we will add an error class. If it is between $2000 and $3000, a warning class
will be applied and if it is over $3000 a success class will be added.
Along with the error, warning and success classes, a class of increasing will be added
if the balance is over $500. For example, a balance of $2,600 will get both the warning, and
increasing classes, whereas $2,400 would only receive the warning class.
As this contains several bits of logic, we will create a use a method in our instance. Create a
balanceClass method and bind it to the class HTML attribute of the cell containing the
balance. To begin with, we'll add the error, warning and success classes.
<td v-bind:class="balanceClass(person)">
{{ formatBalance(person.balance) }}
</td>
In the method, we need to access the balance property of the person passed in and return
the name of the class we wish to add. For now, we'll return a fixed result to verify that it's
working:
balanceClass(person) {
return 'warning';
}
We now need to evaluate our balance. As it's already a number, comparing it against our
criteria won't involve any conversions:
balanceClass(person) {
let balanceLevel = 'success';
if(person.balance < 2000) {
balanceLevel = 'error';
} else if (person.balance < 3000) {
balanceLevel = 'warning';
}
return balanceLevel;
}

Displaying, Looping, Searching, and Filtering Data Chapter 2
[ 43 ]
In the preceding method, the class output gets set to success by default, as we only need
to change the output if it is less than 3000. The first if checks whether the balance is below
our first threshold – if it does, it sets the output to error. If not, it tries the second
condition, which is to check whether the balance is below 3000. If successful, the class
applied becomes warning. Lastly, it outputs the chosen class, which applies directly to the
element.
We now need to consider how we can do the increasing class. To get it to output
alongside the existing balanceLevel class, we need to convert the output from a single
variable to an array. To verify that this works, hardcode the extra class to the output:
balanceClass(person) {
let balanceLevel = 'success';
if(person.balance < 2000) {
balanceLevel = 'error';
} else if (person.balance < 3000) {
balanceLevel = 'warning';
}
return [balanceLevel, 'increasing'];
}
This adds the two classes to the element. Convert the string to a variable and set to false
by default. Vue won't output anything for a false value passed in the array.
To work out if we need the increasing class, we need to do some calculations on the
balance. As we want the increasing class if the balance is above 500 no matter what range it
is in, we need to round the number and compare:
let increasing = false,
balance = person.balance / 1000;
if(Math.round(balance) == Math.ceil(balance)) {
increasing = 'increasing';
}
Initially, we set the increasing variable to false as a default. We also store a version of
the balance divided by 1000. The means our balances turn out to be 2.45643 instead of
2456.42. From there, we compare the number after it has been rounded by JavaScript (For
example 2.5 becomes 3, whereas 2.4 becomes 2) to the number that has been forced to
round up (example 2.1 becomes 3, along with 2.9).

Displaying, Looping, Searching, and Filtering Data Chapter 2
[ 44 ]
If the number output is the same, the increasing variable is set to the string of the class
we want to set. We can then pass this variable along with the balanceLevel variable out
as an array. The full method now looks like the following:
balanceClass(person) {
let balanceLevel = 'success';
if(person.balance < 2000) {
balanceLevel = 'error';
} else if (person.balance < 3000) {
balanceLevel = 'warning';
}
let increasing = false,
balance = person.balance / 1000;
if(Math.round(balance) == Math.ceil(balance)) {
increasing = 'increasing';
}
return [balanceLevel, increasing];
}
Filtering and custom classes
We now have a fully fledged user list/register that has filtering on selected fields and
custom CSS classes depending on the criteria. To recap, this is what our view looks like
now we have the filter in place:
<div id="app">
<form>
<label for="fiterField">
Field:
<select id="filterField" v-model="filterField">
<option value="">Disable filters</option>
<option value="isActive">Active user</option>
<option value="name">Name</option>
<option value="email">Email</option>
<option value="balance">Balance</option>
<option value="registered">Date registered</option>
</select>
</label>
<label for="filterQuery" v-show="this.filterField &&
!isActiveFilterSelected()">

Displaying, Looping, Searching, and Filtering Data Chapter 2
[ 45 ]
Query:
<input type="text" id="filterQuery" v-model="filterQuery">
</label>
<span v-show="isActiveFilterSelected()">
Active:
<label for="userStateActive">
Yes:
<input type="radio" v-bind:value="true" id="userStateActive" v-
model="filterUserState">
</label>
<label for="userStateInactive">
No:
<input type="radio" v-bind:value="false" id="userStateInactive"
v-model="filterUserState">
</label>
</span>
</form>
<table>
<tr v-for="person in people" v-show="filterRow(person)">
<td>{{ person.name }}</td>
<td>
<a v-bind:href="'mailto:' + person.email">{{ person.email }}
</a>
</td>
<td v-bind:class="balanceClass(person)">
{{ formatBalance(person.balance) }}
</td>
<td>{{ formatDate(person.registered) }}</td>
<td v-bind:class="activeClass(person)">
{{ activeStatus(person) }}
</td>
</tr>
</table>
</div>
And the JavaScript for our Vue app should look something like this:
const app = new Vue({
el: '#app',
data: {
people: [...],
currency: '$',

Displaying, Looping, Searching, and Filtering Data Chapter 2
[ 46 ]
filterField: '',
filterQuery: '',
filterUserState: ''
},
methods: {
activeStatus(person) {
return (person.isActive) ? 'Active' : 'Inactive';
},
activeClass(person) {
return person.isActive ? 'active' : 'inactive';
},
balanceClass(person) {
let balanceLevel = 'success';
if(person.balance < 2000) {
balanceLevel = 'error';
} else if (person.balance < 3000) {
balanceLevel = 'warning';
}
let increasing = false,
balance = person.balance / 1000;
if(Math.round(balance) == Math.ceil(balance)) {
increasing = 'increasing';
}
return [balanceLevel, increasing];
},
formatBalance(balance) {
return this.currency + balance.toFixed(2);
},
formatDate(date) {
let registered = new Date(date);
return registered.toLocaleString('en-US');
},
filterRow(person) {
let result = true;
if(this.filterField) {
if(this.filterField === 'isActive') {
result = (typeof this.filterUserState === 'boolean') ?
(this.filterUserState === person.isActive) : true;
} else {
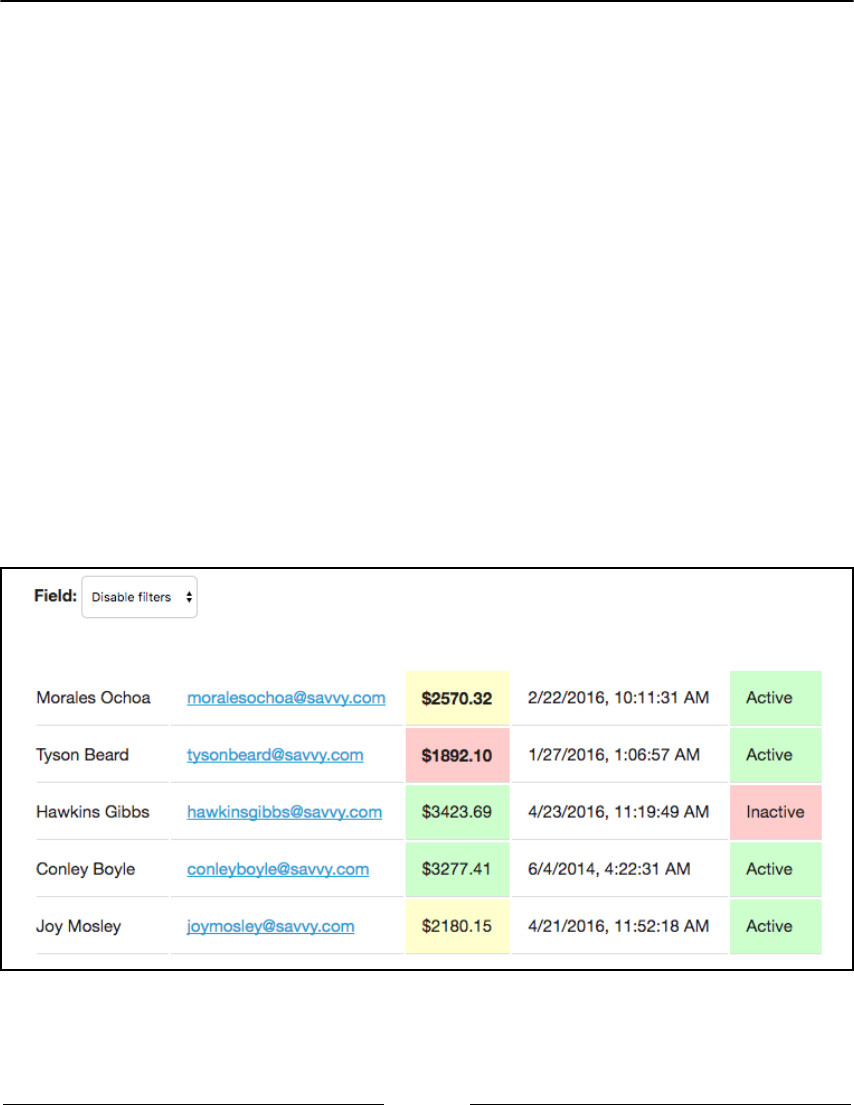
Displaying, Looping, Searching, and Filtering Data Chapter 2
[ 47 ]
let query = this.filterQuery,
field = person[this.filterField];
if(typeof field === 'number') {
query.replace(this.currency, '');
try {
result = eval(field + query);
} catch(e) {}
} else {
field = field.toLowerCase();
result = field.includes(query.toLowerCase());
}
}
}
return result;
},
isActiveFilterSelected() {
return (this.filterField === 'isActive');
}
}
});
With a small amount of CSS, our people filtering app now looks like the following:

Displaying, Looping, Searching, and Filtering Data Chapter 2
[ 48 ]
Summary
In this chapter, we looked at Vue HTML declarations, conditionally rendering our HTML
and showing an alternative if required. We also put into practice what we learned about
methods. Lastly, we built a filtering component for our table, allowing us to show active
and inactive users, find users with specific names and emails, and filter out rows based on
the balance.
Now we've got to a good point in our app, it's a good opportunity to take a look at our code
to see if it can be optimized in any way. By optimizations, I mean reducing repetition,
making the code simpler if possible, and abstracting logic out into smaller, readable, and
reusable chunks.
In Chapter 3, Optimizing Our App and Using Components to Display Data, we will optimize
our code and look at Vue components as a way of separating out logic into separate
segments and sections.

3
Optimizing your App and Using
Components to Display Data
In Chapter 2, Displaying, Looping, Searching, and Filtering Data, we got our Vue app
displaying our people directory, we can use this opportunity to optimize our code and
separate it out into components. This makes the code more manageable, easier to
understand, and makes it easier for other developers to work out the flow of data (or you,
when you come back and look at your code in a few months!).
This chapter is going to cover:
Optimizing our Vue.js code by reducing the repetition, and logically organizing
our code
How to create Vue components and use them with Vue
How to use props and slots with components
Utilizing events to transfer data between components
Optimizing the code
As we wrote the code while we were figuring out the problem, there comes a point when
you need to take a step back and look at your code to optimize it. This could include
reducing the number of variables and methods or creating methods, to reduce repeating
functionality. Our current Vue app looks like the following:
const app = new Vue({
el: '#app',
data: {
people: [...],
currency: '$',
filterField: '',
filterQuery: '',
filterUserState: ''

Optimizing your App and Using Components to Display Data Chapter 3
[ 50 ]
},
methods: {
activeStatus(person) {
return (person.isActive) ? 'Active' :
'Inactive';
},
activeClass(person) {
return person.isActive ? 'active' :
'inactive';
},
balanceClass(person) {
let balanceLevel = 'success';
if(person.balance < 2000) {
balanceLevel = 'error';
} else if (person.balance < 3000) {
balanceLevel = 'warning';
}
let increasing = false,
balance = person.balance / 1000;
if(Math.round(balance) ==
Math.ceil(balance)) {
increasing = 'increasing';
}
return [balanceLevel, increasing];
},
formatBalance(balance) {
return this.currency + balance.toFixed(2);
},
formatDate(date) {
let registered = new Date(date);
return registered.toLocaleString('en-US');
},
filterRow(person) {
let result = true;
if(this.filterField) {
if(this.filterField === 'isActive') {
result = (typeof this.filterUserState
=== 'boolean') ? (this.filterUserState
=== person.isActive) : true;
} else {
let query = this.filterQuery,
field = person[this.filterField];
if(typeof field === 'number') {
query.replace(this.currency, '');
try {
result = eval(field + query);
} catch(e) {}
} else {
Optimizing your App and Using Components to Display Data Chapter 3
[ 51 ]
field = field.toLowerCase();
result =
field.includes(query.toLowerCase());
}
}
}
return result;
},
isActiveFilterSelected() {
return (this.filterField === 'isActive');
}
}
});
Looking at the preceding code, there are some improvements we can make. These include:
Reducing the number of filter variables and grouping logically
Combining the format functions
Reducing the number of hard-coded variables and properties
Re-ordering methods into a more logical order
We'll cover these points individually so we have a clean code base for building components
with.
Reducing the number of filter variables and
grouping logically
The filtering currently uses up three variables, filterField, filterQuery,
and filterUserState. The only thing that currently links these variables is the name,
rather than being in an object of their own to link them systematically. Doing this avoids
any ambiguity as to whether they are related to the same component or just coincidentally
the same. In the data object, create a new object titled filter and move each variable
inside:
data: {
people: [..],
currency: '$',
filter: {
field: '',
query: '',
userState: '',
}
}

Optimizing your App and Using Components to Display Data Chapter 3
[ 52 ]
To access the data, update any references of filterField to this.filter.field. Note
the extra dot, denoting it is a key of the filter object. Don't forget to update filterQuery
and filterUserState references as well. For example, the
isActiveFilterSelected method would become:
isActiveFilterSelected() {
return (this.filter.field === 'isActive');
}
You will also need to update the v-model and v-show attributes in your view—there are
five occurrences of the various variables.
While updating the filtering variables, we can take this opportunity to remove one. With
our current filtering, we can only have one filter active at a time. This means the
query and userState variables are only being used at any one time, which gives us the
opportunity to combine these two variables. To do so, we'll need to update the view and
application code to cater for this.
Remove the userState variable from your filter data object and update any occurrence of
filter.userState in your view to filter.query. Now do a find and replace in your Vue
JavaScript code for filter.userState, again replacing it with filter.query.
Viewing your app in the browser, it will appear to initially work, being able to filter users
by the field. However, if you filter by status, then switch to any other field, the query field
won't show. This is because using the radio buttons sets the value to a Boolean which,
when trying to convert to lowercase for the query field, fails to do so. To tackle this, we can
convert whatever value is in the filter.query variable to a string using the native
JavaScript String() function. This ensures that our filtering function can work with any
filtering input:
if(this.filter.field === 'isActive') {
result = (typeof this.filter.query ===
'boolean') ? (this.filter.query ===
person.isActive) : true;
} else {
let query = String(this.filter.query),
field = person[this.filter.field];
if(typeof field === 'number') {
query.replace(this.currency, '');
try {
result = eval(field + query);
} catch(e) {}
} else {

Optimizing your App and Using Components to Display Data Chapter 3
[ 53 ]
field = field.toLowerCase();
result = field.includes(query.toLowerCase());
}
Adding this to our code now ensures our query data is usable no matter what the value.
The issue this now creates is when the user is switching between fields to filter. If you select
the Active user and chose a radio button, the filtering works as expected, however, if you
now switch to Email, or another field, the input box is prepopulated with either true or
false. This instantly filters and will often return no results. This also occurs when
switching between two text filtering fields, which is not the desired effect.
What we want is, whenever the select box is updated, the filter query should clear. Whether
it is the radio buttons or input box, selecting a new field should reset the filter query, this
ensures a new search can begin.
This is done by removing the link between the select box and the filter.field variable
and creating our own method to handle the update. We then trigger the method when the
select box is changed. This method will then clear the query variable and set the field
variable to the select box value.
Remove the v-model attribute on the select box and add a new v-on:change attribute. We
will pass a method name into this that will fire every time the select box is updated.
v-on is a new Vue binding that we've not encountered before. It allows you to bind actions
from elements to Vue methods. For example, v-on:click is one that is used the most
commonly - which allows you to bind a click function to the element. We'll cover more on
this in the next section of the book.
Where v-bind can be abbreviated to just a colon, v-on can be shortened to an @ symbol,
allowing you to use @click="", for example:
<select v-on:change="changeFilter($event)"
id="filterField">
<option value="">Disable filters</option>
<option value="isActive">Active user</option>
<option value="name">Name</option>
<option value="email">Email</option>
<option value="balance">Balance</option>
<option value="registered">Date
registered</option>
</select>

Optimizing your App and Using Components to Display Data Chapter 3
[ 54 ]
This attribute is firing the changeFilter method on every update and passing it the
$event data of the change. This default Vue event object contains a lot of information that
we could utilize, but the target.value data is the key we are after.
Create a new method in your Vue instance that accepts the event parameter and updates
both the query and field variables. The query variable needs to be cleared, so set it to an
empty string, whereas the field variable can be set to the value of the select box:
changeFilter(event) {
this.filter.query = '';
this.filter.field = event.target.value;
}
Viewing your application now should clear whatever the filter query is, while still
operating as expected.
Combining the format functions
Our next optimization will be to combine the formatBalance and formatDate methods
in our Vue instance. This would then allow us to scale our format functions without
bloating the code with several methods with similar functionality. There are two ways to
approach a format style function—we can either auto-detect the format of the input or pass
the desired format option in as a second option. Both have their pros and cons, but we'll
walk through both.
Autodetection formatting
Autodetection of the variable type, when passed into a function, is great for cleaner code. In
your view, you could invoke the function and pass the one parameter you wish to format.
For example:
{{ format(person.balance) }}
The method would then contain a switch statement and format the variable based on the
typeof value. A switch statement can evaluate a single expression and then execute
different code based on the output. Switch statements can be very powerful as they allow
clauses to be built up—utilizing several different bits of code based on the result. More can
be read about switch statements on MDN.

Optimizing your App and Using Components to Display Data Chapter 3
[ 55 ]
Switch statements are a great alternative to if statements if you are comparing the same
expression. You are also able to have several cases for one block of code and even include a
default if none of the previous cases was met. As an example of one in use, our format
method might look like:
format(variable) {
switch (typeof variable) {
case 'string':
// Formatting if the variable is a string
break;
case 'number':
// Number formatting
break;
default:
// Default formatting
break;
}
}
The important thing to note is the break; lines. These finish each switch case. If a break
was omitted, the code would carry on and execute the following case—which sometimes is
the desired effect.
Autodetecting the variable type and formatting is a great way of simplifying your code.
However, for our app, it is not a suitable solution as we are formatting the date, which
when outputting the typeof results in a string, and would not be identifiable from other
strings we may wish to format.
Passing in a second variable
The alternative to the preceding autodetection is to pass the second variable into the
format function. This gives us greater flexibility and scalability should we wish to format
other fields. With the second variable, we can either pass in a fixed string that matches a
preselected list in our switch statement or we could pass in the field itself. An example of
the fixed string approach in the view would be:
{{ format(person.balance, 'currency') }}
This would work perfectly and would be great if we had several different fields that all
needed to be formatted like balance currently does, but there seems to be some slight
repetition in using the balance key and currency format.

Optimizing your App and Using Components to Display Data Chapter 3
[ 56 ]
As a compromise, we are going to pass the person object as the first parameter, so we can
access all the data, and the name of the field as the second parameter. We will then use this
for both identifying the format method required and to return the specific data.
Creating the method
In your view, replace both the formatDate and formatBalance functions with a singular
format one, passing in the person variable as the first parameter, and the field enclosed
quotes as the second:
<td v-bind:class="balanceClass(person)">
{{ format(person, 'balance') }}
</td>
<td>
{{ format(person, 'registered') }}
</td>
Create a new format method inside your Vue instance, which accepts two
parameters: person and key. As the first step, retrieve the field using the person object and
the key variable:
format(person, key) {
let field = person[key],
output = field.toString().trim();
return output;
}
We have also created a second variable inside the function titled output—this will be what
is returned at the end of the function and is set to the field by default. This ensures that if
our formatting key does not match the one passed in, the untouched field data is
returned—we do, however, convert the field to a string and trim any whitespace from the
variable. Running the app now will return the fields without any formatting.
Add a switch statement, setting the expression to be just the key. Add two cases to the
switch statement—one being balance and the other registered. As we do not wish for
anything to happen to our input when it does not match a case, there is no need for us to
have a default statement:
format(person, key) {
let field = person[key],
output = field.toString().trim();
switch(key) {
case 'balance':

Optimizing your App and Using Components to Display Data Chapter 3
[ 57 ]
break;
case 'registered':
break;
}
return output;
}
We now just need to copy the code from our original formatting functions into the
individual cases:
format(person, key) {
let field = person[key],
output = field.toString().trim();
switch(key) {
case 'balance':
output = this.currency + field.toFixed(2);
break;
case 'registered':
let registered = new Date(field);
output = registered.toLocaleString('en-US');
break;
}
return output;
}
This format function is now a lot more flexible. We can add more switch cases should we
need to cater for more fields (process the name field, for example) or we can add new cases
to existing code. An example of this would be if our data contained a field that detailed the
date on which the user deactivated their account, we could easily display it in the same
format as registered:
case 'registered':
case 'deactivated':
let registered = new Date(field);
output = registered.toLocaleString('en-US');
break;

Optimizing your App and Using Components to Display Data Chapter 3
[ 58 ]
Reducing the number of hard-coded variables
and properties, and reducing redundancy
When looking at the Vue JavaScript, it is quickly evident that it can be optimized by
introducing global variables and setting more local variables in the functions to make it
more readable. We can also use existing functionality to stop repeating ourselves.
The first optimization is in our filterRow() method where we check
whether filter.field is active. This is also repeated in the isActiveFilterSelected
method we use to show and hide our radio buttons. Update the if statement to use this
method instead, so the code is as follows:
...
if(this.filter.field === 'isActive') {
result = (typeof this.filter.query === 'boolean') ?
(this.filter.query === person.isActive) : true;
} else {
...
The preceding code has the this.filter.field === 'isActive' code removed and
replaced with the isActiveFilterSelected() method. It should now look like this:
...
if(this.isActiveFilterSelected()) {
result = (typeof this.filter.query === 'boolean') ?
(this.filter.query === person.isActive) : true;
} else {
...
While we're in the filterRow method, we can reduce the code by storing the query and
field as variables at the start of the method. result is also not the right keyword for this,
so let's change it to visible. First, create and store our two variables at the start and
rename result to visible:
filterRow(person) {
let visible = true,
field = this.filter.field,
query = this.filter.query;
...

Optimizing your App and Using Components to Display Data Chapter 3
[ 59 ]
Replace all instances in that function of the variables, for example, the first part of the
method would look like this:
if(field) {
if(this.isActiveFilterSelected()) {
visible = (typeof query === 'boolean') ?
(query === person.isActive) : true;
} else {
query = String(query),
field = person[field];
Save your file and open the app in the browser to ensure your optimizations haven't broken
the functionality.
The last stage is to reorder the methods into an order that makes sense to you. Feel free to
add comments to separate out the different method types—for example, ones that relate to
CSS classes or filtering. I have also removed the activeStatus method, as we are able to
utilize our format method to format the output of this field. After the optimizations, the
JavaScript code now looks like the following:
const app = new Vue({
el: '#app',
data: {
people: [...],
currency: '$',
filter: {
field: '',
query: ''
}
},
methods: {
isActiveFilterSelected() {
return (this.filter.field === 'isActive');
},
/**
* CSS Classes
*/
activeClass(person) {
return person.isActive ? 'active' :
'inactive';
},
balanceClass(person) {
let balanceLevel = 'success';
if(person.balance < 2000) {
balanceLevel = 'error';
} else if (person.balance < 3000) {
balanceLevel = 'warning';

Optimizing your App and Using Components to Display Data Chapter 3
[ 60 ]
}
let increasing = false,
balance = person.balance / 1000;
if(Math.round(balance) ==
Math.ceil(balance)) {
increasing = 'increasing';
}
return [balanceLevel, increasing];
},
/**
* Display
*/
format(person, key) {
let field = person[key],
output = field.toString().trim();
switch(key) {
case 'balance':
output = this.currency +
field.toFixed(2);
break;
case 'registered':
let registered = new Date(field);
output = registered.toLocaleString('en-US');
break;
case 'isActive':
output = (person.isActive) ? 'Active' :
'Inactive';
}
return output;
},
/**
* Filtering
*/
changeFilter(event) {
this.filter.query = '';
this.filter.field = event.target.value;
},
filterRow(person) {
let visible = true,
field = this.filter.field,
query = this.filter.query;
if(field) {
if(this.isActiveFilterSelected()) {
visible = (typeof query === 'boolean') ?
(query === person.isActive) : true;
} else {
query = String(query),
field = person[field];

Optimizing your App and Using Components to Display Data Chapter 3
[ 61 ]
if(typeof field === 'number') {
query.replace(this.currency, '');
try {
visible = eval(field + query);
} catch(e) {}
} else {
field = field.toLowerCase();
visible =
field.includes(query.toLowerCase());
}
}
}
return visible;
}
}
});
Creating Vue components
Now we're confident our code is cleaner, we can move on to making Vue components for
the various parts of our app. Put aside your code for now and open a new document while
you get to grips with components.
Vue components are extremely powerful and a great addition to any Vue app. They allow
you to make packages of reusable code that include their own data, methods, and
computed values.
For our app, we have the opportunity to create two components: one for each person and
one for the filtering section of our app. I would encourage you to always look at breaking
your app into components where possible—this helps group your code into related
functions.
Components look like mini Vue instances as each one has its own data, methods, and
computed objects—along with some component-specific options that we will cover shortly.

Optimizing your App and Using Components to Display Data Chapter 3
[ 62 ]
When a component is registered, you create a custom HTML element to use in your view,
for example:
<my-component></my-component>
When naming your component, you can use kebab-case (hyphens), PascalCase (no
punctuation, but each word is capitalized) or camelCase (similar to Pascal but the first word
is not capitalized). Vue components are not restricted by, or associated with, the W3C web
components/custom element rules, but it is good practice to follow this convention of using
kebab-case.
Creating and initializing your component
Vue components are registered using the Vue.component(tagName, options) syntax.
Each component must have an associated tag name. The Vue.component registration must
happen before you initialize your Vue instance. As a minimum, each component should
have a template property—denoting what should be displayed when the component is
used. Templates must always have a single wrapping element; this is so the custom HTML
tag can be replaced with the parent container.
For example, you couldn't have the following as your template:
<div>Hello</div><div>Goodbye</div>
If you do pass a template of this format, Vue will throw an error in the browser's JavaScript
console warning you.
Create a Vue component yourself, with a simple fixed template:
Vue.component('my-component', {
template: '<div>hello</div>'
});
const app = new Vue({
el: '#app',
// App options
});
With this component declared, it would now give us a <my-component></my-
component> HTML tag to use in our view.

Optimizing your App and Using Components to Display Data Chapter 3
[ 63 ]
You can also specify components on the Vue instance itself. This would be used if you had
multiple Vue instances on one site and wished to contain a component to one instance. To
do this, create your component as a simple object and assign the tagName within the
components object of your Vue instance:
let Child = {
template: '<div>hello</div>'
}
const app = new Vue({
el: '#app',
// App options
components: {
'my-component': Child
}
});
For our app though, we are going to stick with the Vue.component() method of
initializing our components.
Using your component
In your view, add your custom HTML element component:
<div id="app">
<my-component></my-component>
</div>
Viewing this in the browser should replace the <my-component> HTML tag with a <div>
and a hello message.
There may be some cases where a custom HTML tag won't be parsed and accepted - these
cases tend to be in <table>, <ol>, <ul>, and <select> elements. If this is the case, you
can use the is="" attribute on a standard HTML element:
<ol>
<li is="my-component"></li>
</ol>

Optimizing your App and Using Components to Display Data Chapter 3
[ 64 ]
Using component data and methods
As Vue components are self-contained elements of your Vue app, they each have their own
data and functions. This helps when re-using components on the same page, as the
information is self-contained per instance of a component. methods and computed
functions are declared the same as you would on the Vue app, however, the data key
should be a function that returns an object.
The data object of a component must be a function. This is so that each
component has its own self-contained data, rather than getting confused
and sharing data between different instances of the same component. The
function must still return an object as you would in your Vue app.
Create a new component called balance, add a data function and computed object to
your component and an empty <div> to the template property for now:
Vue.component('balance', {
template: '<div></div>',
data() {
return {
}
},
computed: {
}
});
Next, add a key/value pair to your cost data object with an integer and add the variable to
your template. Add the <balance></balance> custom HTML element to your view and
you should be presented with your integer:
Vue.component('balance', {
template: '<div>{{ cost }}</div>',
data() {
return {
cost: 1234
}
},
computed: {
}
});

Optimizing your App and Using Components to Display Data Chapter 3
[ 65 ]
As with our Vue instance in Chapter 1, Getting Started with Vue.js, add a function to the
computed object that appends a currency symbol to the integer and ensures there are two
decimal places. Don't forget to add the currency symbol to your data function.
Update the template to output the computed value instead of the raw cost:
Vue.component('balance', {
template: '<div>{{ formattedCost }}</div>',
data() {
return {
cost: 1234,
currency: '$'
}
},
computed: {
formattedCost() {
return this.currency + this.cost.toFixed(2);
}
}
});
This is a basic example of a component, however, it is quite restricted with the fixed cost
on the component itself.
Passing data to your component – props
Having the balance as a component is great, but not very good if the balance is fixed.
Components really come into their own when you add the ability to pass in arguments and
properties via HTML attributes. In the Vue world, these are called props. Props can be
either static or variable. In order for your component to expect these properties, you need to
create an array on the component by using the props property.
An example of this would be if we wanted to make a heading component:
Vue.component('heading', {
template: '<h1>{{ text }}</h1>',
props: ['text']
});

Optimizing your App and Using Components to Display Data Chapter 3
[ 66 ]
The component would then be used in the view like so:
<heading text="Hello!"></heading>
With props, we don't need to define the text variable in the data object, as defining it in
the props array automatically makes it available for use in the template. The props array
can also take further options, allowing you to define the type of input expected, whether it
is required or a default value to use if omitted.
Add a prop to the balance component so we can pass the cost as an HTML attribute. Your
view should now look like this:
<balance cost="1234"></balance>
We can now add the cost prop to the component in the JavaScript, and remove the fixed
value from our data function:
template: '<div>{{ formattedCost }}</div>',
props: ['cost'],
data() {
return {
currency: '$'
}
},
Running this in our browser, however, will throw an error in our JavaScript console. This is
because, natively, props being passed in are interpreted as strings. We can address this in
two ways; we can either convert our prop to a number in our formatCost() function or,
alternatively, we can use the v-bind: HTML attribute to tell Vue to accept the input for
what it is.
If you remember, we used this technique with our filters for the true and false
values—allowing them to be used as Boolean instead of strings. Add v-bind: in front of
your cost HTML attribute:
<balance v-bind:cost="15234"></balance>
There is an extra step we can do to ensure Vue knows what kind of input to expect and
informs other users of your code as to what they should be passing to the component. This
can be done in the component itself and, along with the format, allows you to specify
default values along with whether the prop is required or not.

Optimizing your App and Using Components to Display Data Chapter 3
[ 67 ]
Convert your props array to an object, with cost as the key. If you are just defining the
field type, you can use the Vue shorthand for declaring this by setting the value as the field
type. These can be String, Number, Boolean, Function, Object, Array, or Symbol. As our
cost attribute should be a number, add that as the key:
props: {
cost: Number
},
It would be nice if, rather than throwing an error when nothing is defined, our component
rendered $0.00. We can do this by setting the default to just 0. To define a default we need
to convert our prop into an object itself - containing a type key that has the value of
Number. We can then define another default key and set the value to 0:
props: {
cost: {
type: Number,
default: 0
}
},
Rendering the component in the browser should show whatever value is passed into the
cost attribute—but removing this will render $0.00.
To recap, our component looks like :
Vue.component('balance', {
template: '<div>{{ formattedCost }}</div>',
props: {
cost: {
type: Number,
default: 0
}
},
data() {
return {
currency: '$'
}
},
computed: {
formattedCost() {
return this.currency +
this.cost.toFixed(2);
}

Optimizing your App and Using Components to Display Data Chapter 3
[ 68 ]
}
});
We should be able to expand on this example when we make theperson component of our
listing app.
Passing data to your component – slots
There are times when you may need to pass chunks of HTML to your component that are
not stored in a property or that you want to format before appearing in the component.
Rather than trying to pre-format in a computed variable or similar, you can use slots with
your component.
Slots are like placeholders and allow you to place content between the opening and closing
tags of your component and determine where they are going to display.
A perfect example of this would be a modal window. These normally have several tags and
often consist of a lot of HTML to copy and paste if you wish to use it in your application
multiple times. Instead, you can create a modal-window component and pass your HTML
with a slot.
Create a new component titled modal-window. This accepts one prop of visible, which
accepts a Boolean value and is false by default. For the template, we'll use the HTML
from the Bootstrap modal as a good example of how a component using slots can easily
simplify your application. To ensure the component is styled, make sure you include the
bootstrap asset files in your document:
Vue.component('modal-window', {
template: `<div class="modal fade">
<div class="modal-dialog" role="document">
<div class="modal-content">
<div class="modal-header">
<button type="button" class="close"
data-dismiss="modal" aria-label="Close">
<span aria-hidden="true">×</span>
</button>
</div>
<div class="modal-body">
</div>
<div class="modal-footer">
<button type="button" class="btn btn-
primary">Save changes</button>
<button type="button" class="btn btn-
secondary" data-dismiss="modal">Close

Optimizing your App and Using Components to Display Data Chapter 3
[ 69 ]
</button>
</div>
</div>
</div>
</div>`,
props: {
visible: {
type: Boolean,
default: false
}
}
});
We will be using the visible prop to determine whether the modal window is open or not.
Add a v-show attribute to your outer container that accepts the visible variable:
Vue.component('modal-window', {
template: `<div class="modal fade" v-
show="visible">
...
</div>`,
props: {
visible: {
type: Boolean,
default: false
}
}
});
Add your modal-window component to the app, specifying visible to be true for now,
so we can understand and see what is going on:
<modal-window :visible="true"></modal-window>
We now need to pass some data to our modal box. Add a heading and some paragraphs
between the two tags:
<modal-window :visible="true">
<h1>Modal Title</h1>
<p>Lorem ipsum dolor sit amet, consectetur
adipiscing elit. Suspendisse ut rutrum ante, a
ultrices felis. Quisque sodales diam non mi
blandit dapibus. </p>
<p>Lorem ipsum dolor sit amet, consectetur
adipiscing elit. Suspendisse ut rutrum ante, a
ultrices felis. Quisque sodales diam non mi

Optimizing your App and Using Components to Display Data Chapter 3
[ 70 ]
blandit dapibus. </p>
</modal-window>
Pressing refresh in the browser won't do anything, as we need to tell the component what
to do with the data. Inside your template, add a <slot></slot> HTML tag where you
want your content to appear. Add it to the div with the modal-body class:
Vue.component('modal-window', {
template: `<div class="modal fade" v-
show="visible">
<div class="modal-dialog" role="document">
<div class="modal-content">
<div class="modal-header">
<button type="button" class="close" data-
dismiss="modal" aria-label="Close">
<span aria-hidden="true">×</span>
</button>
</div>
<div class="modal-body">
<slot></slot>
</div>
<div class="modal-footer">
<button type="button" class="btn btn-
primary">Save changes</button>
<button type="button" class="btn btn-
secondary" data-
dismiss="modal">Close</button>
</div>
</div>
</div>
</div>`,
props: {
visible: {
type: Boolean,
default: false
}
}
});
Viewing your app will now reveal the content you passed in inside the modal window.
Already, the app is looking cleaner with this new component.

Optimizing your App and Using Components to Display Data Chapter 3
[ 71 ]
Viewing the Bootstrap HTML, we can see there is space for a header, body, and footer. We
can identify these sections with named slots. This allows us to pass specific content to
specific areas of our component.
Create two new <slot> tags in the header and footer of the modal window. Give these
new ones a name attribute, but leave the existing one empty:
template: `<div class="modal fade" v-
show="visible">
<div class="modal-dialog" role="document">
<div class="modal-content">
<div class="modal-header">
<slot name="header"></slot>
<button type="button" class="close" data-
dismiss="modal" aria-label="Close">
<span aria-hidden="true">×</span>
</button>
</div>
<div class="modal-body">
<slot></slot>
</div>
<div class="modal-footer">
<slot name="footer"></slot>
<button type="button" class="btn btn-
primary">Save changes</button>
<button type="button" class="btn btn-
secondary" data-
dismiss="modal">Close</button>
</div>
</div>
</div>
</div>`,
In our app, we can now specify what content goes where by specifying a slot attribute in
the HTML. This can either go on a specific tag or a container around several tags. Any
HTML without a slot attribute will also default to your unnamed slot:
<modal-window :visible="true">
<h1 slot="header">Modal Title</h1>
<p>Lorem ipsum dolor sit amet, consectetur
adipiscing elit. Suspendisse ut rutrum ante, a
ultrices felis. Quisque sodales diam non mi
blandit dapibus. </p>
<p slot="footer">Lorem ipsum dolor sit amet,
consectetur adipiscing elit. Suspendisse ut
rutrum ante, a ultrices felis. Quisque sodales

Optimizing your App and Using Components to Display Data Chapter 3
[ 72 ]
diam non mi blandit dapibus. </p>
</modal-window>
We can now specify and direct our content to specific places.
The last thing you can do with slots is specified a default value. For example, you may want
to display the buttons in the footer most of the time, but want to have the ability to replace
them if desired. With a <slot>, any content placed between the tags will be displayed
unless overwritten when specifying the component in your app.
Create a new slot titled buttons, and place the buttons in the footer inside. Try replacing
them with some other content.
The template becomes:
template: `<div class="modal fade" v-
show="visible">
<div class="modal-dialog" role="document">
<div class="modal-content">
<div class="modal-header">
<slot name="header"></slot>
<button type="button" class="close" data-
dismiss="modal" aria-label="Close">
<span aria-hidden="true">×</span>
</button>
</div>
<div class="modal-body">
<slot></slot>
</div>
<div class="modal-footer">
<slot name="footer"></slot>
<slot name="buttons">
<button type="button" class="btn btn-
primary">Save changes</button>
<button type="button" class="btn btn-
secondary" data-
dismiss="modal">Close</button>
</slot>
</div>
</div>
</div>
</div>`,

Optimizing your App and Using Components to Display Data Chapter 3
[ 73 ]
And the HTML:
<modal-window :visible="true">
<h1 slot="header">Modal Title</h1>
<p>Lorem ipsum dolor sit amet, consectetur
adipiscing elit. Suspendisse ut rutrum ante, a
ultrices felis. Quisque sodales diam non mi blandit
dapibus. </p>
<p slot="footer">Lorem ipsum dolor sit amet,
consectetur adipiscing elit. Suspendisse ut rutrum
ante, a ultrices felis. Quisque sodales diam non mi
blandit dapibus. </p>
<div slot="buttons">
<button type="button" class="btn btn-
primary">Ok</button>
</div>
</modal-window>
Although we won't be utilizing slots with our people listing app, it's good to be aware of
the capabilities of a Vue component. If you wished to use a modal box like this, you can set
the visibility to a variable that is false by default. You can then add a button with a click
method that changes the variable from false to true—displaying the modal box.
Creating a repeatable component
The beauty of components is being able to use them multiple times in the same view. This
gives you the ability to have one single "source of truth" for the layout of that data. We're
going to make a repeatable component for our people list and a separate component for the
filtering section.
Open your people listing code you created in the last couple of chapters and create a new
component titled team-member. Don't forget to define the component before your Vue app
is initialized. Add a prop to the component to allow the person object to be passed in. For
validation purposes, only specify that it can be an Object:
Vue.component('team-member', {
props: {
person: Object
}
});

Optimizing your App and Using Components to Display Data Chapter 3
[ 74 ]
We now need to integrate our template into the component, which is everything inside
(and including) the tr in our View.
The template variable in the component just accepts a normal string without new lines, so
we need to do one of the following:
inline our HTML template—great for small templates but in this case will
sacrifice readability
add new lines with the + string concatenation—great for one or two lines, but
would bloat our JavaScript
create a template block—Vue gives us the option to use external templates that
are defined in the view using the text/x-template syntax and an ID
As our template is quite big, we are going to choose the third option of declaring our
template at the end of our view.
In your HTML, outside of your app, create a new script block and add a type and ID
attribute:
<script type="text/x-template" id="team-member-
template">
</script>
We can then move our person template into this block and remove the v-for
attribute—we'll still use that in the app itself:
<script type="text/x-template" id="team-member-
template">
<tr v-show="filterRow(person)">
<td>
{{ person.name }}
</td>
<td>
<a v-bind:href="'mailto:' + person.email">{{
person.email }}</a>
</td>
<td v-bind:class="balanceClass(person)">
{{ format(person, 'balance') }}
</td>
<td>
{{ format(person, 'registered') }}
</td>
<td v-bind:class="activeClass(person)">
{{ format(person, 'isActive') }}

Optimizing your App and Using Components to Display Data Chapter 3
[ 75 ]
</td>
</tr>
</script>
We now need to update the view to use the team-member component instead of the fixed
code. To make our view cleaner and easier to understand, we are going to utilize the
<template> HTML attribute mentioned earlier. Create a <template> tag and add the v-
for loop we had before. To avoid confusion, update the loop to use individual as the
variable for each person. They can be the same, but it makes the code easier to read if the
variables, components, and props have different names. Update the v-for to be v-
for="individual in people":
<table>
<template v-for="individual in people">
</template>
</table>
Inside the template tags of your view, add a new instance of the team-member
component, passing the individual variable to the person prop. Don't forget to add v-
bind: to the person prop, otherwise, the component will interpret it as a fixed string with
the value of the individual:
<table>
<template v-for="individual in people">
<team-member v-bind:person="individual"></team-
member>
</template>
</table>
We now need to update the component to use the template we have declared using the
template property and the ID of the script block as the value:
Vue.component('team-member', {
template: '#team-member-template',
props: {
person: Object
}
});

Optimizing your App and Using Components to Display Data Chapter 3
[ 76 ]
Viewing the app in the browser will create several errors in the JavaScript console. This is
because we are referencing several methods that are no longer available - as they are on the
parent Vue instance, not on the component. If you want to verify that your component is
working, change the code to only output the name of the person, and press refresh:
<script type="text/x-template" id="team-member-
template">
<tr v-show="filterRow()">
<td>
{{ person.name }}
</td>
</tr>
</script>
Creating component methods and computed
functions
We now need to create the methods we had created on the Vue instance on the child
component, so they are available to use. One thing we could do is cut and paste the
methods from the parent into the child in the hope they would work; however, those
methods rely on parent properties (such as filtering data) and we also have the
opportunity to utilize computed properties, which cache the data and can speed up your
app.
For now, remove the v-show attribute from the tr element—as this involves the filtering,
and that will be covered once we have our rows displaying correctly. We'll step through the
errors and resolve them one at a time to help you understand problem-solving with Vue.
CSS class functions
The first error we encounter when viewing the application in the browser is:
Property or method "balanceClass" is not defined
The first error is with regards to both the balanceClass and activeClass functions we
use. Both of these functions add CSS classes based on the data of the person, which does
not change once the component has been rendered.
Because of this, we are able to use the caching found in Vue. Move the methods across to
the component but put them in a new computed object, instead of the methods one.

Optimizing your App and Using Components to Display Data Chapter 3
[ 77 ]
With components, a new instance is created every time it is called, so we can rely on the
person object we passed in via a prop and no longer need to pass the person into the
function. Remove the parameter from the function and the view—also update any reference
to person inside the function to this.person to reference the object stored on the
component:
computed: {
/**
* CSS Classes
*/
activeClass() {
return this.person.isActive ? 'active' :
'inactive';
},
balanceClass() {
let balanceLevel = 'success';
if(this.person.balance < 2000) {
balanceLevel = 'error';
} else if (this.person.balance < 3000) {
balanceLevel = 'warning';
}
let increasing = false,
balance = this.person.balance / 1000;
if(Math.round(balance) == Math.ceil(balance)) {
increasing = 'increasing';
}
return [balanceLevel, increasing];
}
},
The part of our component template that utilizes this function should now look like:
<td v-bind:class="balanceClass">
{{ format(person, 'balance') }}
</td>
Formatted value functions
When it comes to moving the format() function to the component for formatting our data,
we are faced with two options. We can move it like-for-like and put it in the methods
object, or we can take advantage of the Vue caching and conventions and create a
computed function for each value.

Optimizing your App and Using Components to Display Data Chapter 3
[ 78 ]
We are building this app for scalability, so it's advisable to make computed functions for
each value—it will also have the advantage of tidying up our template. Create three
functions in the computed object titled balance, dateRegistered, and status. Copy the
corresponding parts of the format function across to each one, updating the reference of
person to this.person once more.
Where we were retrieving the field using a function parameter, you can now fix the value
in each function. You will also need to add a data object with the currency symbol for the
balance function—add this after the props:
data() {
return {
currency: '$'
}
},
As the team-member component is the only place our currency symbol is used, we can
remove it from the Vue app itself. We can also remove the format function from our parent
Vue instance.
In total, our Vue team-member component should look like:
Vue.component('team-member', {
template: '#team-member-template',
props: {
person: Object
},
data() {
return {
currency: '$'
}
},
computed: {
/**
* CSS Classes
*/
activeClass() {
return this.person.isActive ? 'active' :
'inactive';
},
balanceClass() {
let balanceLevel = 'success';
if(this.person.balance < 2000) {
balanceLevel = 'error';
} else if (this.person.balance < 3000) {
balanceLevel = 'warning';

Optimizing your App and Using Components to Display Data Chapter 3
[ 79 ]
}
let increasing = false,
balance = this.person.balance / 1000;
if(Math.round(balance) == Math.ceil(balance))
{
increasing = 'increasing';
}
return [balanceLevel, increasing];
},
/**
* Fields
*/
balance() {
return this.currency +
this.person.balance.toFixed(2);
},
dateRegistered() {
let registered = new
Date(this.person.registered);
return registered.toLocaleString('en-US');
},
status() {
return (this.person.isActive) ? 'Active' :
'Inactive';
}
}
});
And our team-member-template should look fairly simple in comparison to what it did
look like:
<script type="text/x-template" id="team-member-
template">
<tr v-show="filterRow()">
<td>
{{ person.name }}
</td>
<td>
<a v-bind:href="'mailto:' + person.email">{{
person.email }}</a>
</td>
<td v-bind:class="balanceClass">
{{ balance }}
</td>
<td>
{{ dateRegistered }}
</td>
<td v-bind:class="activeClass">

Optimizing your App and Using Components to Display Data Chapter 3
[ 80 ]
{{ status }}
</td>
</tr>
</script>
And lastly, our Vue instance should look significantly smaller:
const app = new Vue({
el: '#app',
data: {
people: [...],
filter: {
field: '',
query: ''
}
},
methods: {
isActiveFilterSelected() {
return (this.filter.field === 'isActive');
},
/**
* Filtering
*/
filterRow(person) {
let visible = true,
field = this.filter.field,
query = this.filter.query;
if(field) {
if(this.isActiveFilterSelected()) {
visible = (typeof query === 'boolean') ?
(query === person.isActive) : true;
} else {
query = String(query),
field = person[field];
if(typeof field === 'number') {
query.replace(this.currency, '');
try {
visible = eval(field + query);
} catch(e) {}
} else {
field = field.toLowerCase();
visible =
field.includes(query.toLowerCase())
}
}
}
return visible;
}

Optimizing your App and Using Components to Display Data Chapter 3
[ 81 ]
changeFilter(event) {
this.filter.query = '';
this.filter.field = event.target.value;
}
}
});
Viewing the app in the browser, we should be presented with our list of people with the
correct classes added to the table cells and formatting added to the fields.
Making the filtering work again with props
Re-add the v-show="filterRow()" attribute to the containing tr element in your
template. As our component has the person cached on each instance, we no longer need to
pass the person object to the method. Refreshing the page will give you a new error in your
JavaScript console:
Property or method "filterRow" is not defined on the instance but
referenced during render
This error is because our component has the v-show attribute, showing and hiding based
on our filtering and properties, but not the corresponding filterRow function. As we don't
use it for anything else, we can move the method from the Vue instance to the component,
adding it to the methods component. Remove the person parameter and update the
method to use this.person:
filterRow() {
let visible = true,
field = this.filter.field,
query = this.filter.query;
if(field) {
if(this.isActiveFilterSelected()) {
visible = (typeof query === 'boolean') ?
(query === this.person.isActive) : true;
} else {
query = String(query),
field = this.person[field];
if(typeof field === 'number') {
query.replace(this.currency, '');
try {
visible = eval(field + query);
} catch(e) {}
} else {
field = field.toLowerCase();
visible =

Optimizing your App and Using Components to Display Data Chapter 3
[ 82 ]
field.includes(query.toLowerCase());
}
}
}
return visible;
}
The next error in the console is:
Cannot read property 'field' of undefined
The reason the filtering does not work is that the filterRow method is looking for
this.filter.field and this.filter.query on the component, not the parent Vue
instance where it belongs.
As a quick fix, you can use this.$parent to reference data on the parent
element—however, this is not recommended and should only be used in
extreme circumstances or to quickly pass the data through.
To pass the data through to the component we are going to use another prop - similar to
how we are passing the person into the component. Fortunately, we had grouped our
filtering data already, so we are able to pass that one object instead of individual properties
of query or field. Create a new prop on your component titled filter and ensure you
only allow an Object to be passed through:
props: {
person: Object,
filter: Object
},
We can then add the prop to the team-member component, allowing us to pass the data:
<table>
<template v-for="individual in people">
<team-member v-bind:person="individual" v-
bind:filter="filter"></team-member>
</template>
</table>

Optimizing your App and Using Components to Display Data Chapter 3
[ 83 ]
In order for our filtering to work, we need to pass in one more property-
the isActiveFilterSelected() function. Create another prop, titled statusFilter,
allowing only a Boolean to be the value (as this is what the function equates to), and pass
the function through. Update the filterRow method to use this new value. Our
component now looks like:
Vue.component('team-member', {
template: '#team-member-template',
props: {
person: Object,
filter: Object,
statusFilter: Boolean
},
data() {
return {
currency: '$'
}
},
computed: {
/**
* CSS Classes
*/
activeClass() {
return this.person.isActive ? 'active' :
'inactive';
},
balanceClass() {
let balanceLevel = 'success';
if(this.person.balance < 2000) {
balanceLevel = 'error';
} else if (this.person.balance < 3000) {
balanceLevel = 'warning';
}
let increasing = false,
balance = this.person.balance / 1000;
if(Math.round(balance) == Math.ceil(balance)) {
increasing = 'increasing';
}
return [balanceLevel, increasing];
},
/**
* Fields
*/
balance() {
return this.currency +
this.person.balance.toFixed(2);
},

Optimizing your App and Using Components to Display Data Chapter 3
[ 84 ]
dateRegistered() {
let registered = new Date(this.registered);
return registered.toLocaleString('en-US');
},
status() {
return output = (this.person.isActive) ?
'Active' : 'Inactive';
}
},
methods: {
filterRow() {
let visible = true,
field = this.filter.field,
query = this.filter.query;
if(field) {
if(this.statusFilter) {
visible = (typeof query === 'boolean') ?
(query === this.person.isActive) : true;
} else {
query = String(query),
field = this.person[field];
if(typeof field === 'number') {
query.replace(this.currency, '');
try {
visible = eval(field + query);
} catch(e) {
}
} else {
field = field.toLowerCase();
visible = field.includes(query.toLowerCase());
}
}
}
return visible;
}
}
});
And the component within the View with the extra props now looks like the following.
Note that the camel-cased prop becomes snake case (hyphenated) when used as an HTML
attribute:
<template v-for="individual in people">
<team-member v-bind:person="individual" v-
bind:filter="filter" v-bind:status-
filter="isActiveFilterSelected()"></team-
member>
</template>

Optimizing your App and Using Components to Display Data Chapter 3
[ 85 ]
Making the filters a component
We now need to make the filtering section its own component. This isn't strictly necessary
in this scenario, but it's good practice and gives us more challenges.
The problem we face in making the filtering a component is a challenge of transferring filter
data between the filtering component and the team-member component. Vue addresses
this with custom events. These let you pass (or "emit") data to the parent or other
components from the child component.
We are going to create a filtering component which, on filtering change, passes the data
back to the parent Vue instance. This data is already passed through to the team-member
component to filter.
Creating the component
As with the team-member component, declare a new Vue.component() in your
JavaScript, referencing a template ID of #filtering-template. Create a new <script>
template block in your view and give it the same ID. Replace the filtering form in the view
with a <filtering> custom HTML template and put the form inside your filtering-
template script block.
Your view should look like the following:
<div id="app">
<filtering></filtering>
<table>
<template v-for="individual in people">
<team-member v-bind:person="individual" v-
bind:filter="filter" v-
bind:statusfilter="isActiveFilterSelected()"> </team-
member>
</template>
</table>
</div>
<script type="text/x-template" id="filtering-
template">
<form>
<label for="fiterField">
Field:
<select v-on:change="changeFilter($event)"
id="filterField">
<option value="">Disable filters</option>

Optimizing your App and Using Components to Display Data Chapter 3
[ 86 ]
<option value="isActive">Active user</option>
<option value="name">Name</option>
<option value="email">Email</option>
<option value="balance">Balance</option>
<option value="registered">Date
registered</option>
</select>
</label>
<label for="filterQuery" v-show="this.filter.field
&& !isActiveFilterSelected()">
Query:
<input type="text" id="filterQuery" v-
model="filter.query">
</label>
<span v-show="isActiveFilterSelected()">
Active:
<label for="userStateActive">
Yes:
<input type="radio" v-bind:value="true"
id="userStateActive" v-model="filter.query">
</label>
<label for="userStateInactive">
No:
<input type="radio" v-bind:value="false"
id="userStateInactive" v-model="filter.query">
</label>
</span>
</form>
</script>
<script type="text/x-template" id="team-member-
template">
// Team member template
</script>
And you should have the following in your JavaScript:
Vue.component('filtering', {
template: '#filtering-template'
});

Optimizing your App and Using Components to Display Data Chapter 3
[ 87 ]
Resolving JavaScript errors
As with the team-member component, you are going to experience some errors in your
JavaScript console. These can be resolved by copying the filter data object and both the
changeFilter and isActiveFilterSelected methods from the parent instance. We'll
leave them in both the component and parent instance for now, but we'll remove the
duplication later:
Vue.component('filtering', {
template: '#filtering-template',
data() {
return {
filter: {
field: '',
query: ''
}
}
},
methods: {
isActiveFilterSelected() {
return (this.filter.field === 'isActive');
},
changeFilter(event) {
this.filter.query = '';
this.filter.field = event.target.value;
}
}
});
Running the app will show both the filters and person listing, but the filters won't update
the people list as they are not communicating yet.
Using custom events to change the filter field
With custom events, you can pass data back up to the parent instances using the $on and
$emit functions. For this app, we are going to store the filtering data on the parent Vue
instance and update it from the component. The team-member component can then read
the data from the Vue instance and filter accordingly.

Optimizing your App and Using Components to Display Data Chapter 3
[ 88 ]
The first step is to utilize the filter object on the parent Vue instance. Remove the data
object from your component and pass in the parent one via a prop - just as we did with the
team-member component:
<filtering v-bind:filter="filter"></filtering>
We are now going to modify the changeFilter function to emit the event data so the
parent instance, so it can update the filter object.
Remove the existing changeFilter method from the filtering component and create a
new one called change-filter-field. Within this method, we just need to $emit the
name of the field selected in the drop-down menu. The $emit function takes two
parameters: a key and the value. Emit a key of change-filter-field and pass the
event.target.value as the data. When using variables with multiple words (For
example, changeFilterField), ensure these are hyphenated for the event name (the first
parameter of the $emit function) and the HTML attribute:
changeFilterField(event) {
this.$emit('change-filter-field',
event.target.value);
}
In order to then pass the data to the changeFilter method on our parent Vue instance, we
need to add a new prop to our <filtering> element. This uses v-on and binds to the
custom event name. It then has the parent method name as the attribute value. Add the
attribute to your element:
<filtering v-bind:filter="filter" v-on:change-filter-
field="changeFilter"></filtering>
This attribute preceding tells Vue to trigger the changeFilter method when a change-
filter-field event is emitted. We can then tweak our method to accept the parameter as
the value:
changeFilter(field) {
this.filter.query = '';
this.filter.field = field;
}
This then clears the filters and updates the field value, which then ripples down to our
components via props.

Optimizing your App and Using Components to Display Data Chapter 3
[ 89 ]
Updating the filter query
To emit the query field, we are going to use a new Vue key that we have not used before,
called watch. The watch function tracks a data property and can run methods based on the
output. The other thing it is able to do is to emit events. As both, our text field and radio
buttons are set to update the field.query variable, we will create a new watch function on
this.
Create a new watch object after the methods on your component:
watch: {
'filter.query': function() {
}
}
The key is the variable you wish to watch. As ours contains a dot, it needs to be wrapped in
quotes. Within this function, create a new $emit event of change-filter-query that
outputs the value of filter.query:
watch: {
'filter.query': function() {
this.$emit('change-filter-query',
this.filter.query)
}
}
We now need to bind this method and custom event to the component in the view, so it is
able to pass the data to the parent instance. Set the value of the attribute
to changeQuery—we'll make a method to handle this:
<filtering v-bind:filter="filter" v-on:change-
filter-field="changeFilter" v-on:change-filter-
query="changeQuery"></filtering>
On the parent Vue instance, make a new method, titled changeQuery, that simply updates
the filter.query value based on the input:
changeQuery(query) {
this.filter.query = query;
}
Our filtering is now working again. Both updating the select box and the input box (or
radio buttons) will now update our person list. Our Vue instance is significantly smaller
and our templates and methods are contained with separate components.

Optimizing your App and Using Components to Display Data Chapter 3
[ 90 ]
The last step is to avoid the repetition of the isActiveFilterSelected() method, as this
is only used once on the team-member component, but several times on the filtering
component. Remove the method from the parent Vue instance, the prop from the team-
member HTML element, and replace the statusFilter variable in the filterRow method
within the team-member component with the contents of the function being passed
through.
The final JavaScript now looks like:
Vue.component('team-member', {
template: '#team-member-template',
props: {
person: Object,
filter: Object
},
data() {
return {
currency: '$'
}
},
computed: {
/**
* CSS Classes
*/
activeClass() {
return this.person.isActive ? 'active' :
'inactive';
},
balanceClass() {
let balanceLevel = 'success';
if(this.person.balance < 2000) {
balanceLevel = 'error';
} else if (this.person.balance < 3000) {
balanceLevel = 'warning';
}
let increasing = false,
balance = this.person.balance / 1000;
if(Math.round(balance) == Math.ceil(balance)) {
increasing = 'increasing';
}
return [balanceLevel, increasing];
},
/**
* Fields
*/
balance() {
return this.currency +

Optimizing your App and Using Components to Display Data Chapter 3
[ 91 ]
this.person.balance.toFixed(2);
},
dateRegistered() {
let registered = new Date(this.registered);
return registered.toLocaleString('en-US');
},
status() {
return output = (this.person.isActive) ?
'Active' : 'Inactive';
}
},
methods: {
filterRow() {
let visible = true,
field = this.filter.field,
query = this.filter.query;
if(field) {
if(this.filter.field === 'isActive') {
visible = (typeof query === 'boolean') ?
(query === this.person.isActive) : true;
} else {
query = String(query),
field = this.person[field];
if(typeof field === 'number') {
query.replace(this.currency, '');
try {
visible = eval(field + query);
} catch(e) {}
} else {
field = field.toLowerCase();
visible = field.includes(query.toLowerCase());
}
}
}
return visible;
}
}
});
Vue.component('filtering', {
template: '#filtering-template',
props: {
filter: Object
},
methods: {
isActiveFilterSelected() {
return (this.filter.field === 'isActive');
},
changeFilterField(event) {

Optimizing your App and Using Components to Display Data Chapter 3
[ 92 ]
this.filedField = '';
this.$emit('change-filter-field',
event.target.value);
},
},
watch: {
'filter.query': function() {
this.$emit('change-filter-query', this.filter.query)
}
}
});
const app = new Vue({
el: '#app',
data: {
people: [...],
filter: {
field: '',
query: ''
}
},
methods: {
changeFilter(field) {
this.filter.query = '';
this.filter.field = field;
},
changeQuery(query) {
this.filter.query = query;
}
}
});
And the view is now:
<div id="app">
<filtering v-bind:filter="filter" v-on:change-
filter-field="changeFilter" v-on:change-filter-
query="changeQuery"></filtering>
<table>
<template v-for="individual in people">
<team-member v-bind:person="individual" v-
bind:filter="filter"></team-member>
</template>
</table>
</div>
<script type="text/x-template" id="filtering-
template">
<form>

Optimizing your App and Using Components to Display Data Chapter 3
[ 93 ]
<label for="fiterField">
Field:
<select v-on:change="changeFilterField($event)"
id="filterField">
<option value="">Disable filters</option>
<option value="isActive">Active user</option>
<option value="name">Name</option>
<option value="email">Email</option>
<option value="balance">Balance</option>
<option value="registered">Date
registered</option>
</select>
</label>
<label for="filterQuery" v-
show="this.filter.field &&
!isActiveFilterSelected()">
Query:
<input type="text" id="filterQuery" v-
model="filter.query">
</label>
<span v-show="isActiveFilterSelected()">
Active:
<label for="userStateActive">
Yes:
<input type="radio" v-bind:value="true"
id="userStateActive" v-model="filter.query">
</label>
<label for="userStateInactive">
No:
<input type="radio" v-bind:value="false"
id="userStateInactive" v-model="filter.query">
</label>
</span>
</form>
</script>
<script type="text/x-template" id="team-member-
template">
<tr v-show="filterRow()">
<td>
{{ person.name }}
</td>
<td>
<a v-bind:href="'mailto:' + person.email">{{
person.email }}</a>
</td>
<td v-bind:class="balanceClass">
{{ balance }}
</td>

Optimizing your App and Using Components to Display Data Chapter 3
[ 94 ]
<td>
{{ dateRegistered }}
</td>
<td v-bind:class="activeClass">
{{ status }}
</td>
</tr>
</script>
Summary
Over the last three chapters, you have learned how to initialize a new Vue instance, what
the meaning behind computed, method, and data objects are, and how to list out data from
an object and manipulate it to be displayed correctly. You have also learned how to make
components and what benefits there are to keeping your code clean and optimized.
In the next section of the book, we are going to introduce Vuex, something which helps us
store and manipulate stored data better.

4
Getting a List of Files Using the
Dropbox API
Over the next few chapters, we are going to be building a Vue-based Dropbox browser.
This app will take your Dropbox API key and allow you to navigate to folders and
download files. You will learn about interacting with an API within a Vue app, the Vue life
cycle hooks, including the created() method, and finally we will introduce a library
called Vuex to handle the caching and state of the app. The app will have shareable URLs
and retrieve the contents of the folder passed in via the # URL parameter.
This kind of app would be useful if you wanted to give users access to the contents of your
Dropbox without giving out a username and password. Be warned, however, a tech-savvy
user could find your API key in the code and abuse it, so don't publish this code to the
World Wide Web.
This chapter is going to cover:
Loading and querying the Dropbox API
Listing the directories and files from your Dropbox account
Adding a loading state to your app
Using Vue animations
You will need a Dropbox account to follow these next few chapters. If you don't have one,
sign up and add a few dummy files and folders. The contents of the Dropbox don't matter,
but having folders to navigate through will help with understanding the code.

Getting a List of Files Using the Dropbox API Chapter 4
[ 96 ]
Getting started—loading the libraries
Create a new HTML page for your app to run in. Create the HTML structure required for a
web page and include your app view wrapper:
<!DOCTYPE html>
<html>
<head>
<title>Dropbox App</title>
</head>
<body>
<div id="app">
</div>
</body>
</html>
It's called #app here, but call it whatever you want - just remember to update the
JavaScript.
As our app code is going to get quite chunky, make a separate JavaScript file and include it
at the bottom of the document. You will also need to include Vue and the Dropbox API
SDK.
As with before, you can either reference the remote files or download a local copy of the
library files. Download a local copy for both speed and compatibility reasons. Include your
three JavaScript files at the bottom of your HTML file:
<script src="js/vue.js"></script>
<script src="js/dropbox.js"></script>
<script src="js/app.js"></script>
Create your app.js and initialize a new Vue instance, using the el tag to mount the
instance onto the ID in your view.
new Vue({
el: '#app'
});

Getting a List of Files Using the Dropbox API Chapter 4
[ 97 ]
Creating a Dropbox app and initializing the
SDK
Before we interact with the Vue instance, we need to connect to the Dropbox API through
the SDK. This is done via an API key that is generated by Dropbox itself to keep track of
what is connecting to your account and where Dropbox requires you to make a custom
Dropbox app.
Head to the Dropbox developers area and select Create your app. Choose Dropbox API
and select either a restricted folder or full access. This depends on your needs, but for
testing, choose Full Dropbox. Give your app a name and click the button Create app.
Generate an access token to your app. To do so, when viewing the app details page, click
the Generate button under the Generated access token. This will give you a long string of
numbers and letters - copy and paste that into your editor and store it as a variable at the
top of your JavaScript. In this book, the API key will be referred to as XXXX:
/**
* API Access Token
*/
let accessToken = 'XXXX';
Now that we have our API key, we can access the files and folders from our Dropbox.
Initialize the API and pass in your accessToken variable to the accessToken property of
the Dropbox API:
/**
* Dropbox Client
* @type {Dropbox}
*/
const dbx = new Dropbox({
accessToken: accessToken
});
We now have access to Dropbox via the dbx variable. We can verify our connection to
Dropbox is working by connecting and outputting the contents of the root path:
dbx.filesListFolder({path: ''})
.then(response => {
console.log(response.entries);
})
.catch(error => {
console.log(error);
});

Getting a List of Files Using the Dropbox API Chapter 4
[ 98 ]
This code uses JavaScript promises, which are a way of adding actions to code without
requiring callback functions. If you are unfamiliar with promises, check out this blog post
from Google (https://developers.google.com/web/fundamentals/primers/promises).
Take a note of the first line, particularly the path variable. This lets us pass in a folder path
to list the files and folders within that directory. For example, if you had a folder called
images in your Dropbox, you could change the parameter value to /images and the file
list returned would be the files and folders within that directory.
Open your JavaScript console and check the output; you should get an array containing
several objects - one for each file or folder in the root of your Dropbox.
Displaying your data and using Vue to get it
Now that we can retrieve our data using the Dropbox API, it's time to retrieve it within our
Vue instance and display in our view. This app is going to be entirely built using
components so we can take advantage of the compartmentalized data and methods. It will
also mean the code is modular and shareable, should you want to integrate into other apps.
We are also going to take advantage of the native Vue created() function - we'll cover it
when it gets triggered in a bit.
Create the component
First off, create your custom HTML element, <dropbox-viewer>, in your View. Create a
<script> template block at the bottom of the page for our HTML layout:
<div id="app">
<dropbox-viewer></dropbox-viewer>
</div>
<script type="text/x-template" id="dropbox-viewer-
template">
<h1>Dropbox</h1>
</script>
Initialize your component in your app.js file, pointing it to the template ID:
Vue.component('dropbox-viewer', {
template: '#dropbox-viewer-template'
});

Getting a List of Files Using the Dropbox API Chapter 4
[ 99 ]
Viewing the app in the browser should show the heading from the template. The next step
is to integrate the Dropbox API into the component.
Retrieve the Dropbox data
Create a new method called dropbox. In there, move the code that calls the Dropbox class
and returns the instance. This will now give us access to the Dropbox API through the
component by calling this.dropbox():
Vue.component('dropbox-viewer', {
template: '#dropbox-viewer-template',
methods: {
dropbox() {
return new Dropbox({
accessToken: this.accessToken
});
}
}
});
We are also going to integrate our API key into the component. Create a data function that
returns an object containing your access token. Update the Dropbox method to use the local
version of the key:
Vue.component('dropbox-viewer', {
template: '#dropbox-viewer-template',
data() {
return {
accessToken: 'XXXX'
}
},
methods: {
dropbox() {
return new Dropbox({
accessToken: this.accessToken
});
}
}
});

Getting a List of Files Using the Dropbox API Chapter 4
[ 100 ]
We now need to add the ability for the component to get the directory list. For this, we are
going to create another method that takes a single parameter—the path. This will give us
the ability later to request the structure of a different path or folder if required.
Use the code provided earlier - changing the dbx variable to this.dropbox():
getFolderStructure(path) {
this.dropbox().filesListFolder({path: path})
.then(response => {
console.log(response.entries);
})
.catch(error => {
console.log(error);
});
}
Update the Dropbox filesListFolder function to accept the path parameter passed in,
rather than a fixed value. Running this app in the browser will show the Dropbox heading,
but won't retrieve any folders because the methods have not been called yet.
The Vue life cycle hooks
This is where the created() function comes in. The created() function gets called once
the Vue instance has initialized the data and methods, but has yet to mount the instance on
the HTML component. There are several other functions available at various points in the
life cycle; more about these can be read at Alligator.io. The life cycle is as follows:
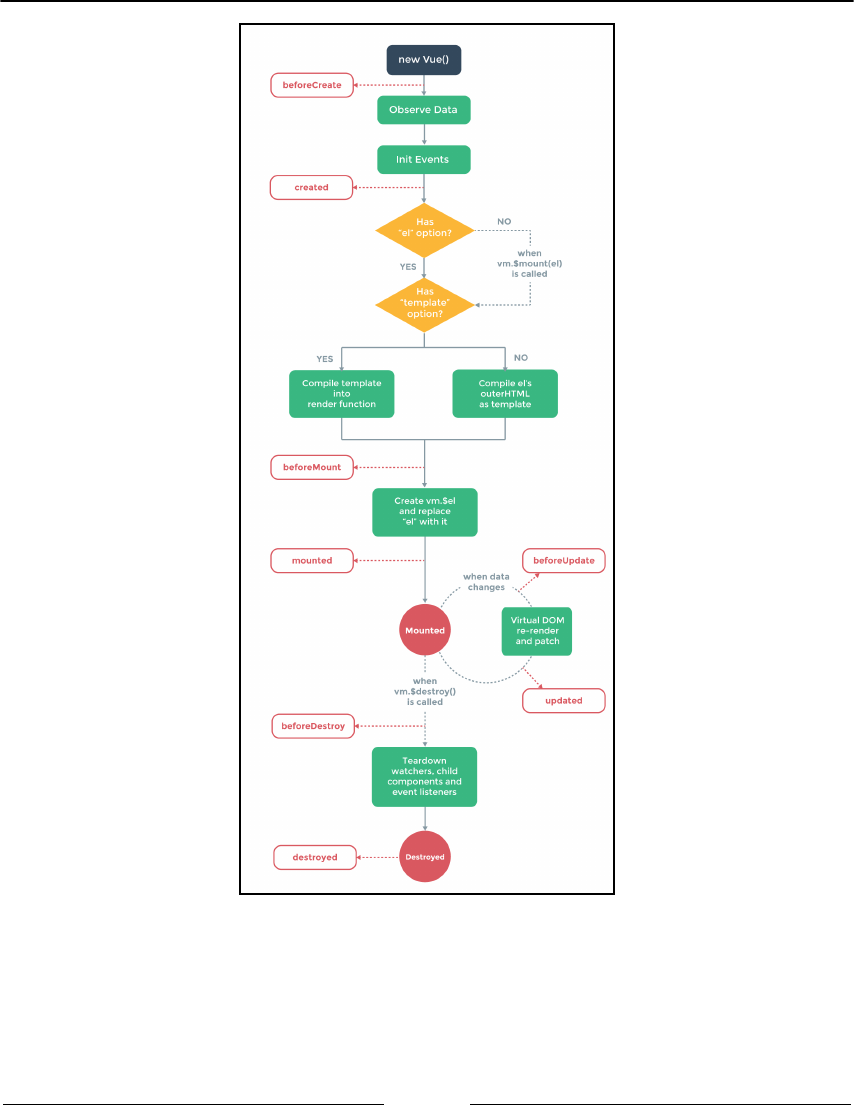
Getting a List of Files Using the Dropbox API Chapter 4
[ 101 ]
Using the created() function gives us access to the methods and data while being able to
start our retrieval process as Vue is mounting the app. The time between these various
stages is split-second, but every moment counts when it comes to performance and creating
a quick app. There is no point waiting for the app to be fully mounted before processing
data if we can start the task early.

Getting a List of Files Using the Dropbox API Chapter 4
[ 102 ]
Create the created() function on your component and call the getFolderStructure
method, passing in an empty string for the path to get the root of your Dropbox:
Vue.component('dropbox-viewer', {
template: '#dropbox-viewer-template',
data() {
return {
accessToken: 'XXXX'
}
},
methods: {
...
},
created() {
this.getFolderStructure('');
}
});
Running the app now in your browser will output the folder list to your console, which
should give the same result as before.
We now need to display our list of files in the view. To do this, we are going to create an
empty array in our component and populate it with the result of our Dropbox query. This
has the advantage of giving Vue a variable to loop through in the view, even before it has
any content.
Displaying the Dropbox data
Create a new property in your data object titled structure, and assign this to an empty
array. In the response function of the folder retrieval, assign response.entries to
this.structure. Leave console.log as we will need to inspect the entries to work out
what to output in our template:
Vue.component('dropbox-viewer', {
template: '#dropbox-viewer-template',
data() {
return {
accessToken: 'XXXX',
structure: []
}
},
methods: {
dropbox() {
return new Dropbox({
accessToken: this.accessToken

Getting a List of Files Using the Dropbox API Chapter 4
[ 103 ]
});
},
getFolderStructure(path) {
this.dropbox().filesListFolder({path: path})
.then(response => {
console.log(response.entries);
this.structure = response.entries;
})
.catch(error => {
console.log(error);
});
}
},
created() {
this.getFolderStructure('');
}
});
We can now update our view to display the folders and files from your Dropbox. As the
structure array is available in our view, create a <ul> with a repeatable <li> looping
through the structure.
As we are now adding a second element, Vue requires templates to have one containing the
element, wrap your heading and list in a <div>:
<script type="text/x-template" id="dropbox-viewer-
template">
<div>
<h1>Dropbox</h1>
<ul>
<li v-for="entry in structure">
</li>
</ul>
</div>
</script>
Viewing the app in the browser will show a number of empty bullet points when the array
appears in the JavaScript console. To work out what fields and properties you can display,
expand the array in the JavaScript console and then further for each object. You should
notice that each object has a collection of similar properties and a few that vary between
folders and files.
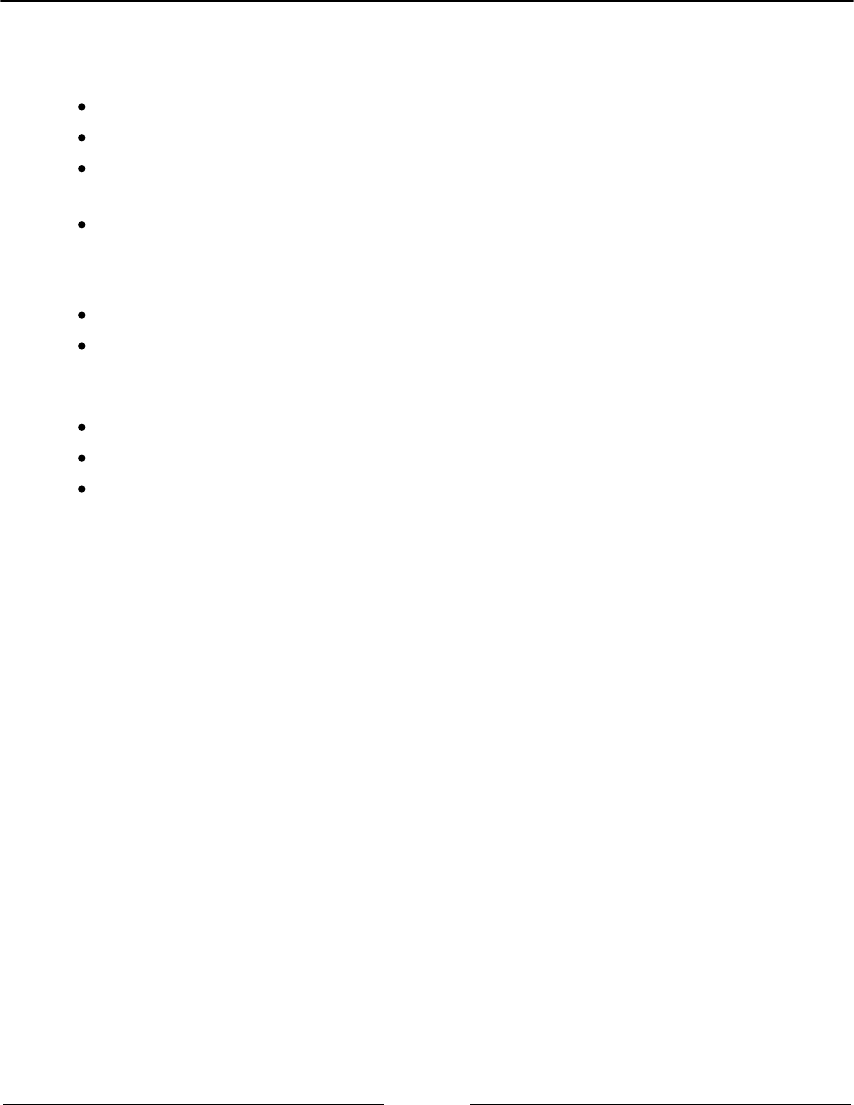
Getting a List of Files Using the Dropbox API Chapter 4
[ 104 ]
The first property, .tag, helps us identify whether the item is a file or a folder. Both types
then have the following properties in common:
id: A unique identifier to Dropbox
name: The name of the file or folder, irrespective of where the item is
path_display: The full path of the item with the case matching that of the files
and folders
path_lower: Same as path_display but all lowercase
Items with a .tag of a file also contain several more fields for us to display:
client_modified: This is the date when the file was added to Dropbox.
content_hash: A hash of the file, used for identifying whether it is different
from a local or remote copy. More can be read about this on the Dropbox
website.
rev: A unique identifier of the version of the file.
server_modified: The last time the file was modified on Dropbox.
size: The size of the file in bytes.
To begin with, we are going to display the name of the item and the size, if present. Update
the list item to show these properties:
<li v-for="entry in structure">
<strong>{{ entry.name }}</strong>
<span v-if="entry.size"> - {{ entry.size }}</span>
</li>
More file meta information
To make our file and folder view a bit more useful, we can add more rich content and
metadata to files such as images. These details are available by enabling
the include_media_info option in the Dropbox API.
Head back to your getFolderStructure method and add the parameter after path. Here
are some new lines of readability:
getFolderStructure(path) {
this.dropbox().filesListFolder({
path: path,
include_media_info: true
})
.then(response => {

Getting a List of Files Using the Dropbox API Chapter 4
[ 105 ]
console.log(response.entries);
this.structure = response.entries;
})
.catch(error => {
console.log(error);
});
}
Inspecting the results from this new API call will reveal the media_info key for videos and
images. Expanding this will reveal several more pieces of information about the file, for
example, dimensions. If you want to add these, you will need to check that the
media_info object exists before displaying the information:
<li>
<strong>{{ f.name }}</strong>
<span v-if="f.size"> - {{ bytesToSize(f.size) }}
</span> -
<span v-if="f.media_info">
[
{{ f.media_info.metadata.dimensions.width }}px x
{{ f.media_info.metadata.dimensions.height }}px
]
</span>
</li>
Try updating the path when retrieving the data from Dropbox. For example, if you have a
folder called images, change the this.getFolderStructure parameter to /images. If
you're not sure what the path is, analyze the data in the JavaScript console and copy the
value of the path_lower attribute of a folder, for example:
created() {
this.getFolderStructure('/images');
}
Formatting the file sizes
With the file size being output in plain bytes it can be quite hard for a user to dechiper. To
combat this, we can add a formatting method to output a file size which is more user-
friendly, for example displaying 1kb instead of 1024.
First, create a new key on the data object that contains an array of units called byteSizes:
data() {
return {
accessToken: 'XXXX',

Getting a List of Files Using the Dropbox API Chapter 4
[ 106 ]
structure: [],
byteSizes: ['Bytes', 'KB', 'MB', 'GB', 'TB']
}
}
This is what will get appended to the figure, so feel free to make these properties either
lowercase or full words, for example, megabyte.
Next, add a new method, bytesToSize, to your component. This will take one parameter
of bytes and output a formatted string with the unit at the end:
bytesToSize(bytes) {
// Set a default
let output = '0 Byte';
// If the bytes are bigger than 0
if (bytes > 0) {
// Divide by 1024 and make an int
let i = parseInt(Math.floor(Math.log(bytes) /
Math.log(1024)));
// Round to 2 decimal places and select the
appropriate unit from the array
output = Math.round(bytes / Math.pow(1024, i),
2) + ' ' + this.byteSizes[i];
}
return output
}
We can now utilize this method in our view:
<li v-for="entry in structure">
<strong>{{ entry.name }}</strong>
<span v-if="entry.size"> - {{
bytesToSize(entry.size) }}</span>
</li>
Adding a loading screen
The last step of this chapter is to make a loading screen for our app. This will tell the user
the app is loading, should the Dropbox API be running slowly (or you have a lot of data to
show!).

Getting a List of Files Using the Dropbox API Chapter 4
[ 107 ]
The theory behind this loading screen is fairly basic. We will set a loading variable to true
by default that then gets set to false once the data has loaded. Based on the result of this
variable, we will utilize view attributes to show, and then hide, an element with the loading
text or animation in and also reveal the loaded data list.
Create a new key in the data object titled isLoading. Set this variable to true by default:
data() {
return {
accessToken: 'XXXX',
structure: [],
byteSizes: ['Bytes', 'KB', 'MB', 'GB', 'TB'],
isLoading: true
}
}
Within the getFolderStructure method on your component, set the isLoading variable
to false. This should happen within the promise after you have set the structure:
getFolderStructure(path) {
this.dropbox().filesListFolder({
path: path,
include_media_info: true
})
.then(response => {
console.log(response.entries);
this.structure = response.entries;
this.isLoading = false;
})
.catch(error => {
console.log(error);
});
}
We can now utilize this variable in our view to show and hide a loading container.
Create a new <div> before the unordered list containing some loading text. Feel free to add
a CSS animation or an animated gif—anything to let the user know the app is retrieving
data:
<h1>Dropbox</h1>
<div>Loading...</div>
<ul>
...

Getting a List of Files Using the Dropbox API Chapter 4
[ 108 ]
We now need to only show the loading div if the app is loading and the list once the data
has loaded. As this is just one change to the DOM, we can use the v-if directive. To give
you the freedom of rearranging the HTML, add the attribute to both instead of using v-
else.
To show or hide, we just need to check the status of the isLoading variable. We can
prepend an exclamation mark to the list to only show if the app is not loading:
<div>
<h1>Dropbox</h1>
<div v-if="isLoading">Loading...</div>
<ul v-if="!isLoading">
<li v-for="entry in structure">
<strong>{{ entry.name }}</strong>
<span v-if="entry.size">- {{
bytesToSize(entry.size) }}</span>
</li>
</ul>
</div>
Our app should now show the loading container once mounted, and then it should show
the list once the app data has been gathered. To recap, our complete component code now
looks like this:
Vue.component('dropbox-viewer', {
template: '#dropbox-viewer-template',
data() {
return {
accessToken: 'XXXX',
structure: [],
byteSizes: ['Bytes', 'KB', 'MB', 'GB', 'TB'],
isLoading: true
}
},
methods: {
dropbox() {
return new Dropbox({
accessToken: this.accessToken
});
},
getFolderStructure(path) {
this.dropbox().filesListFolder({
path: path,
include_media_info: true
})
.then(response => {

Getting a List of Files Using the Dropbox API Chapter 4
[ 109 ]
console.log(response.entries);
this.structure = response.entries;
this.isLoading = false;
})
.catch(error => {
console.log(error);
});
},
bytesToSize(bytes) {
// Set a default
let output = '0 Byte';
// If the bytes are bigger than 0
if (bytes > 0) {
// Divide by 1024 and make an int
let i = parseInt(Math.floor(Math.log(bytes)
/ Math.log(1024)));
// Round to 2 decimal places and select the
appropriate unit from the array
output = Math.round(bytes / Math.pow(1024,
i), 2) + ' ' + this.byteSizes[i];
}
return output
}
},
created() {
this.getFolderStructure('');
}
});
Animating between states
As a nice enhancement for the user, we can add some transitions between components and
states. Helpfully, Vue includes some built-in transition effects. Working with CSS, these
transitions allow you to add fades, swipes, and other CSS animations easily when DOM
elements are being inserted. More information about transitions can be found in the Vue
documentation.
The first step is to add the Vue custom HTML <transition> element. Wrap both your
loading and list with separate transition elements and give it an attribute of name and a
value of fade:
<script type="text/x-template" id="dropbox-viewer-
template">
<div>
<h1>Dropbox</h1>
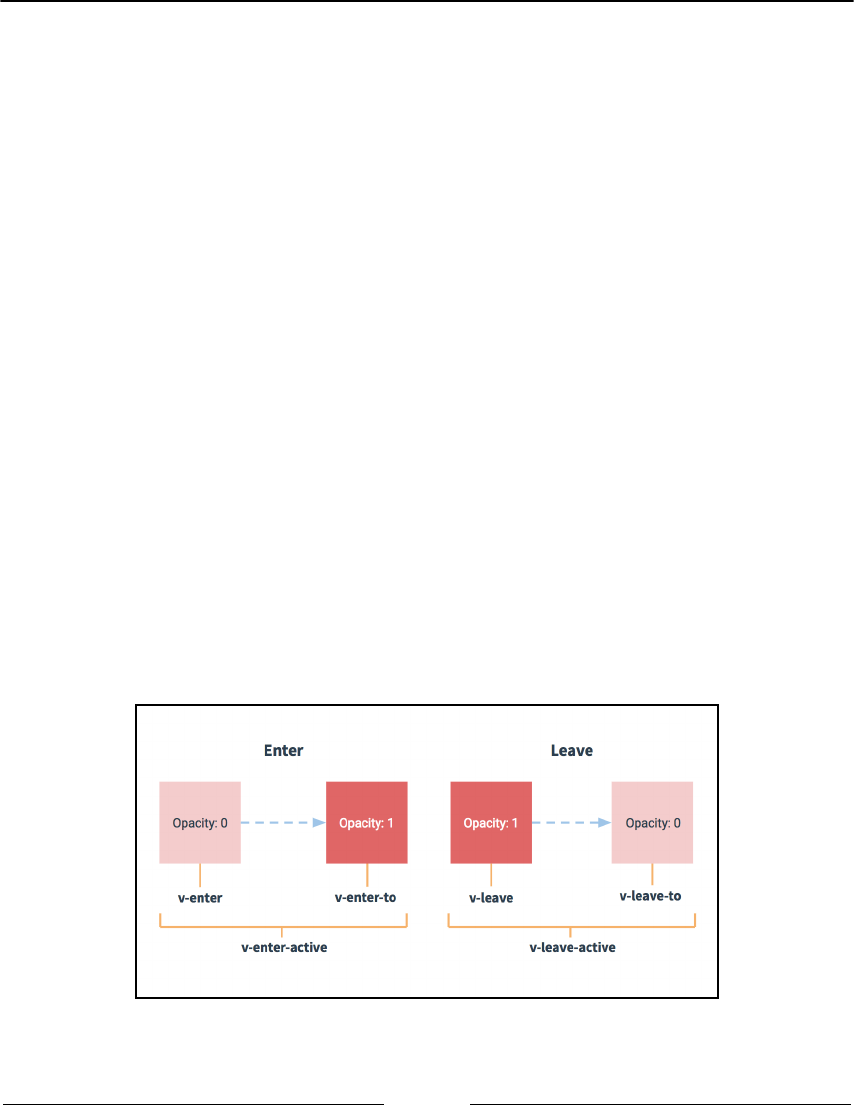
Getting a List of Files Using the Dropbox API Chapter 4
[ 110 ]
<transition name="fade">
<div v-if="isLoading">Loading...</div>
</transition>
<transition name="fade">
<ul v-if="!isLoading">
<li v-for="entry in structure">
<strong>{{ entry.name }}</strong>
<span v-if="entry.size">- {{
bytesToSize(entry.size) }}</span>
</li>
</ul>
</transition>
</div>
</script>
Now add the following CSS to either the head of your document or a separate style sheet if
you already have one:
.fade-enter-active,
.fade-leave-active {
transition: opacity .5s
}
.fade-enter,
.fade-leave-to {
opacity: 0
}
With the transition element, Vue adds and removes various CSS classes based on the state
and time of the transition. All of these begin with the name passed in via the attribute and
are appended with the current stage of transition:

Getting a List of Files Using the Dropbox API Chapter 4
[ 111 ]
Try the app in your browser, you should notice the loading container fading out and the
file list fading in. Although in this basic example, the list jumps up once the fading has
completed, it's an example to help you understand using transitions in Vue.
Summary
In this chapter, we learned how to make a Dropbox viewer, which is a single-page
application that lists out files and folders from our Dropbox account and allows us to show
different folder contents by updating the code. We have learned how to add a basic loading
state to our apps and use the Vue animations for navigation.
In Chapter 5, Navigating through the File Tree and Loading Folders from the URL, we are going
to navigate through our app folders and add download links to our files.

5
Navigating through the File
Tree and Loading Folders from
the URL
In Chapter 4, Getting a List of Files Using the Dropbox API, we created an app that listed the
file and folder contents of a specified Dropbox folder. We now need to make our app easy
to navigate. This means the user will be able to click the folder names to navigate into and
list the contents of, and also give the user the ability to download the file.
Before you proceed, ensure you have the Vue and Dropbox JavaScript files included in
your HTML.
In this chapter, we are going to be:
Creating a component for both files and folders
Adding links to the folder component to update the directory listing
Adding a download button to the file component
Creating a breadcrumb component, so the user can easily navigate back up the
tree
Dynamically updating the browser URL, so if a folder is bookmarked or a link
shared, the correct folder loads

Navigating through the File Tree and Loading Folders from the URL Chapter 5
[ 113 ]
Separating out files and folders
Before we create the components, we need to separate our files and folders in our structure,
so we can easily identify and display our different types. Thanks to the .tag attribute on
each item, we can split up our folders and files.
First, we need to update our structure data property to be an object containing both
the files and the folders array:
data() {
return {
accessToken: 'XXXX',
structure: {
files: [],
folders: []
},
byteSizes: ['Bytes', 'KB', 'MB', 'GB', 'TB'],
isLoading: true
}
}
This gives us the ability to append our files and folders to different arrays, meaning we can
display them differently in our view.
The next step is to populate these arrays with the data of the current folder. All the
following code takes place in the first then() function of
the getFolderStructure method.
Create a JavaScript loop to cycle through the entries and check the .tag property of the
item. If it is equal to folder, append it to the structure.folder array, otherwise, add it
to the structure.files array:
getFolderStructure(path) {
this.dropbox().filesListFolder({
path: path,
include_media_info: true
})
.then(response => {
for (let entry of response.entries) {
// Check ".tag" prop for type
if(entry['.tag'] === 'folder') {
this.structure.folders.push(entry);
} else {
this.structure.files.push(entry);
}
}

Navigating through the File Tree and Loading Folders from the URL Chapter 5
[ 114 ]
this.isLoading = false;
})
.catch(error => {
console.log(error);
});
},
This code loops through the entries, as we were in the view and checks the .tag attribute.
As the attribute itself begins with a ., we are unable to use the object style notation to
access the property like we would, for example, do for the name - entry.name. We then
append the entry to either the files or folders array using JavaScript push, depending
on the type.
To display this new data, we need to update the view to loop through both types of array.
This is a perfect use case for using the <template> tag as we want to append both arrays to
the same unordered list.
Update the view to list the two arrays separately. We can remove the size option from the
folder display section, as it will never feature a size property:
<ul v-if="!isLoading">
<template v-for="entry in structure.folders">
<li>
<strong>{{entry.name }}</strong>
</li>
</template>
<template v-for="entry in structure.files">
<li>
<strong>{{ entry.name }}</strong>
<span v-if="entry.size">- {{ bytesToSize(entry.size) }}</span>
</li>
</template>
</ul>
This now gives us the opportunity to create components for both types.

Navigating through the File Tree and Loading Folders from the URL Chapter 5
[ 115 ]
Making file and folder components
With our data types separated out, we can create individual components to
compartmentalize the data and methods. Create a folder component that accepts a single
property, allowing the folder object variable to be passed through. As the template is so
small, there is no need for a view or <script> block-based template; instead, we can pass
it in as a string on the component:
Vue.component('folder', {
template: '<li><strong>{{ f.name }}</strong>
</li>',
props: {
f: Object
},
});
To make our code smaller and less repetitive, the prop is called f. This tidies up the view
and lets the component name determine the display type without repeating the word
folder several times.
Update the view to use the folder component, and pass in the entry variable to the f
property:
<template v-for="entry in structure.folders">
<folder :f="entry"></folder>
</template>
Repeat the process with files by creating a file component. When creating the file
component, we can move both the bytesToSize method and byteSizes data property
from the parent dropbox-viewer component as it would only ever be used when
displaying files:
Vue.component('file', {
template: '<li><strong>{{ f.name }}</strong><span v-
if="f.size"> - {{ bytesToSize(f.size) }}</span> </li>',
props: {
f: Object
},
data() {
return {
byteSizes: ['Bytes', 'KB', 'MB', 'GB', 'TB']
}
},
methods: {
bytesToSize(bytes) {
// Set a default

Navigating through the File Tree and Loading Folders from the URL Chapter 5
[ 116 ]
let output = '0 Byte';
// If the bytes are bigger than 0
if (bytes > 0) {
// Divide by 1024 and make an int
let i = parseInt(Math.floor(Math.log(bytes)
/ Math.log(1024)));
// Round to 2 decimal places and select the
appropriate unit from the array
output = Math.round(bytes / Math.pow(1024, i),
2) + ' ' + this.byteSizes[i];
}
return output
}
}
});
Once again, we can use f for the prop name to reduce repetition (and the file size of our
app). Update the view once again to use this new component:
<template v-for="entry in structure.files">
<file :f="entry"></file>
</template>
Linking folders and updating the structure
Now that we have our folders and files separated, we can transform our folder names into
links. These links will then update the structure to show the contents of the selected folder.
For this, we are going to use the path_lower property in each folder to build the link
target.
Create a dynamic link to each folder name, linking to the folder's path_lower. As we are
getting more familiar with Vue, the v-bind property has been shortened to just the colon
notation:
Vue.component('folder', {
template: '<li><strong><a :href="f.path_lower">{{
f.name }}</a></strong></li>',
props: {
f: Object
},
});

Navigating through the File Tree and Loading Folders from the URL Chapter 5
[ 117 ]
We now need to add a click listener for this link. When clicked, we need to trigger
the getFolderStructure method on the dropbox-viewer component. Although the
click method will use the f variable on each instance to get the data, it's good practice to
have the href attribute set to the folder URL.
Using what we learned in the early chapters of the book, create a method on the folder
component that, when triggered, emits the folder path to the parent component. The
dropbox-viewer component also needs a new method to update the structure with the
given parameter when fired.
Create the new method on the folder component and add the click event to the folder
link. As with the v-bind directive, we are now using the shorthand notation for v-on,
represented by an @ symbol:
Vue.component('folder', {
template: '<li><strong><a
@click.prevent="navigate()" :href="f.path_lower">{{
f.name }}</a></strong></li>',
props: {
f: Object
},
methods: {
navigate() {
this.$emit('path', this.f.path_lower);
}
}
});
Along with defining the click event, an event modifier has also been added. Using
.prevent after the click event adds preventDefault to the link action, this stops the link
from actually going to the specified URL and instead lets the click method handle
everything. More event modifiers and details about them can be found in the Vue
documentation.
When clicked, the navigate method is fired, which emits the folder's lower path using the
path variable.
Now that we have our click handler and the variable being emitted, we need to update
the view to trigger a method on the parent dropbox-viewer component:
<template v-for="entry in structure.folders">
<folder :f="entry" @path="updateStructure">
</folder>
</template>

Navigating through the File Tree and Loading Folders from the URL Chapter 5
[ 118 ]
Create a new method on the Dropbox component with the same name as the value of the
v-on attribute, in this case updateStructure. This method will have one parameter,
which is the path we emitted earlier. From here, we can trigger our original
getFolderStructure method using the path variable:
updateStructure(path) {
this.getFolderStructure(path);
}
Viewing our app in the browser should now list the folders and links and, when clicked,
show the contents of the new folder.
When doing so, however, there are a couple of issues that are raised. Firstly, the files and
folders are appended to the existing list rather than replacing it. Secondly, there is no
feedback to the user that the app is loading the next folder.
The first issue can be resolved by clearing the folder and file arrays before appending the
new structure. The second can be addressed by utilizing the loading screen we used at the
beginning of the app - this will give the user some feedback.
To address the first issue, create a new structure object inside the success promise
function for the getFolderStructure method. This object should replicate that of the
structure object in the data object. This should set blank arrays for both files and folders.
Update the for loop to use the local structure arrays rather than the component ones.
Lastly, update the component structure object with the new version, including the
updated files and folders:
getFolderStructure(path) {
this.dropbox().filesListFolder({
path: path,
include_media_info: true
})
.then(response => {
const structure = {
folders: [],
files: []
}
for (let entry of response.entries) {
// Check ".tag" prop for type
if(entry['.tag'] == 'folder') {
structure.folders.push(entry);
} else {
structure.files.push(entry);
}
}
this.structure = structure;

Navigating through the File Tree and Loading Folders from the URL Chapter 5
[ 119 ]
this.isLoading = false;
})
.catch(error => {
console.log(error);
});
}
As this method gets called when the app gets mounted and creates its own version of the
structure object, there is no need to declare the arrays in the data function. Update the data
object to just initialize the structure property as an object:
data() {
return {
accessToken: 'XXXX',
structure: {},
isLoading: true
}
}
Running the app now will render the file list, which will be cleared and updated when a
new folder is clicked into. To give the user some feedback and let them know the app is
working, let's toggle the loading screen after each click.
Before we do this, however, let's fully understand where the delay comes from and where
is best to trigger the loading screen.
The click on the link is instantaneous, which triggers the navigate method on the folder
component, which in turn fires the updateStructure method on the Dropbox component.
The delay comes when the app gets to the filesListFolder function on the Dropbox
instance, inside the getFolderStructure method. As we may want to fire the
getFolderStucture method at a later date without triggering the loading screen, set the
isLoading variable to true inside the updateStructure method:
updateStructure(path) {
this.isLoading = true;
this.getFolderStructure(path);
}
With the animations in place, the app fades between both the loading screen and folder
structure when navigating through folders.

Navigating through the File Tree and Loading Folders from the URL Chapter 5
[ 120 ]
Creating a breadcrumb from the current
path
When navigating through folders or a nested structure of any kind, it's always nice to have
a breadcrumb available so the user knows where they are, how far they've gone, and also
so they can get back to a previous folder easily. We are going to make a component for the
breadcrumb as it is going to feature various properties, computed functions, and methods.
The breadcrumb component is going to list each folder depth as a link to a folder icon.
Clicking the link will take the user directly to that folder - even if it is several layers up. To
achieve this, we will need to have a list of links we can loop through, each with two
properties - one being the full path to the folder and the other just being the folder name.
For example, if we had the folder structure of /images/holiday/summer/iphone, we
would want to be able to click on Holiday and for the app to navigate to
/images/holiday.
Create your breadcrumb component — for now, add an empty <div> to the template
property:
Vue.component('breadcrumb', {
template: '<div></div>'
});
Add the component to your view. We're going to want the breadcrumb to fade in and out
with the structure list, so we need to tweak the HTML to wrap both the list and
breadcrumb component in a container that has the v-if declaration:
<transition name="fade">
<div v-if="!isLoading">
<breadcrumb></breadcrumb>
<ul>
<template v-for="entry in structure.folders">
<folder :f="entry" @path="updateStructure">
</folder>
</template>
<template v-for="entry in structure.files">
<file :f="entry"></file>
</template>
</ul>
</div>
</transition>

Navigating through the File Tree and Loading Folders from the URL Chapter 5
[ 121 ]
We now need to make a variable available to us that stores the current folder path. We can
then manipulate this variable within the breadcrumb component. This will be stored and
updated on the Dropbox component and passed down to the breadcrumb component.
Create a new property called path on the dropbox-viewer component:
data() {
return {
accessToken: 'XXXXX',
structure: {},
isLoading: true,
path: ''
}
}
We now need to ensure this path gets updated whenever the structure is retrieved from the
Dropbox API. Do this within the getFolderStructure method, just before the
isLoading variable is disabled. This ensures it only gets updated once the structure has
been loaded, but before the files and folders are displayed:
getFolderStructure(path) {
this.dropbox().filesListFolder({
path: path,
include_media_info: true
})
.then(response => {
const structure = {
folders: [],
files: []
}
for (let entry of response.entries) {
// Check ".tag" prop for type
if(entry['.tag'] == 'folder') {
structure.folders.push(entry);
} else {
structure.files.push(entry);
}
}
this.path = path;
this.structure = structure;
this.isLoading = false;
})
.catch(error => {
console.log(error);
});
},

Navigating through the File Tree and Loading Folders from the URL Chapter 5
[ 122 ]
Now that we have a variable populated with the current path, we can pass it through to the
breadcrumb component as a prop. Add a new attribute to the breadcrumb with the path
variable as the value:
<breadcrumb :p="path"></breadcrumb>
Update the component to accept the prop as a string:
Vue.component('breadcrumb', {
template: '<div></div>',
props: {
p: String
}
});
The p attribute now contains the full path of where we are (for example
/images/holiday/summer). We want to break up this string so we can identify the folder
name and build the breadcrumb for the component to render.
Create a computed object on the component and create a new function titled folders().
This is going to create the breadcrumb array for us to loop through in the template:
computed: {
folders() {
}
}
We now need to set up some variables for us to use. Create a new, empty array called
output. This is where we are going to build up our breadcrumb. We also need an empty
variable titled slug as a string. The slug variable refers to a part of a URL and its use was
made popular by WordPress. The last variable is the path created as an array. As we know,
each folder is separated by a /, we can use this to explode or split the string into various
parts:
computed: {
folders() {
let output = [],
slug = '',
parts = this.p.split('/');
}
}
If we were to look at the parts variable for our Summer folder, it would look like the
following:
['images', 'holiday', 'summer']

Navigating through the File Tree and Loading Folders from the URL Chapter 5
[ 123 ]
We can now loop through the array to create the breadcrumb. Each breadcrumb item is
going to be an object with the name of the individual folder, for example, holiday or
summer, and the slug, which would be /images/holiday for the former and
/images/holiday/summer for the latter.
Each object will be constructed and then added to the output array. We can then return the
output for our template to use:
folders() {
let output = [],
slug = '',
parts = this.p.split('/');
for (let item of parts) {
slug += item;
output.push({'name': item, 'path': slug});
slug += '/';
}
return output;
}
This loop creates our breadcrumb by taking the following steps. For this example, we'll
assume we are in the /images/holiday folder:
parts will now be an array containing three items, ['', 'images',1.
holiday']. If the string you split on begins with the item you're splitting, an
empty item will be made as the first item.
At the beginning of the loop, the first slug variable will be equal to '', as it is the2.
first item.
The output array will have a new item appended to it with the object of3.
{'name': '', 'path': ''}.
The slug variable then has a / added to the end.4.
Looping through the next item, the slug variable gets the name of the item5.
(images) added to it.
output now has a new object added, with the value of {'name': 'images',6.
'path': '/images'}.
For the last item, another / is added along with the next name, holiday.7.
output gets the last object added, the value being {'name': 'holiday',8.
'path': '/images/holiday'} - note the path is building up whereas the
name remains the singular folder name.

Navigating through the File Tree and Loading Folders from the URL Chapter 5
[ 124 ]
We now have our breadcrumb output array that we can loop through in the view.
The reason we add the slash after we've appended to the output array is
that the API states that to get the root of the Dropbox we pass in an empty
string, whereas all other paths must begin with a /.
The next step is to output the breadcrumb into our view. As this template is small, we are
going to use the multiline JavaScript notation. Loop through the items within the folders
computed variable, outputting a link for each of the items. Don't forget to keep a containing
element around all the links:
template: '<div>' +
'<span v-for="f in folders">' +
'<a :href="f.path">{{ f.name }}</a>' +
'</span>' +
'</div>'
Rendering this app in the browser should reveal a breadcrumb - albeit a bit squished
together and missing a home link (as the first item didn't have a name). Head back to the
folders function and add an if statement - checking whether the item has a name and, if
it doesn't, adding a hard-coded value:
folders() {
let output = [],
slug = '',
parts = this.p.split('/');
console.log(parts);
for (let item of parts) {
slug += item;
output.push({'name': item || 'home', 'path':
slug});
slug += '/';
}
return output;
}
The other option is to add the if statement in the template itself:
template: '<div>' +
'<span v-for="f in folders">' +
'<a :href="f.path">{{ f.name || 'Home' }}</a>' +
'</span>' +
'</div>'

Navigating through the File Tree and Loading Folders from the URL Chapter 5
[ 125 ]
If we wanted to display a divider between the folder names, such as a slash or chevron, this
can be easily added. However, a slight hurdle arises when we want to display the separator
between the links, but not at the beginning or end. To resolve this, we are going to utilize
the index keyword available when doing a loop. We are then going to compare this against
the length of the array and operate a v-if declaration on an element.
When looping through an array, Vue allows you to utilize another variable. This, by
default, is the index (the position of the item in the array); however, the index may be set to
a value if your array is constructed in a key/value fashion. If this is the case, you can still
access the index by adding a third variable. As our array is a simple list, we can easily use
this variable:
template: '<div>' +
'<span v-for="(f, i) in folders">' +
'<a :href="f.path">{{ f.name || 'Home' }}</a>' +
'<span v-if="i !== (folders.length - 1)"> »
</span>' +
'</span>' +
'</div>',
Update the f variable to a pair of brackets containing an f and an i, comma separated. The
f variable is the current folder in the loop, while the i variable that has been created is the
index of the item. Bear in mind that the array indexes start at 0 instead of 1.
The separator we've added is contained in a span tag with a v-if attribute, the contents of
which could look confusing. This is confusing the current index with the length of the
folders array (how many items it has) minus 1. The - 1 is because of the index starting at
0 and not 1, as you would expect. If the numbers do not match, then the span element is
displayed.
The last thing we need to do is make our breadcrumb navigate to the selected folder. We
can do this by adapting the navigate function we wrote for the folder component.
However, because our whole component is the breadcrumb and not each individual link,
we need to alter it so it accepts a parameter.
Start off by adding the click event to the link, passing in the folder object:
template: '<div>' +
'<span v-for="(f, i) in folders">' +
'<a @click.prevent="navigate(f)"
:href="f.path">
{{ f.name || 'Home' }}</a>' +
'<i v-if="i !== (folders.length - 1)"> »
</i>' +
'</span>' +

Navigating through the File Tree and Loading Folders from the URL Chapter 5
[ 126 ]
'</div>',
Next, create the navigate method on your breadcrumb component, making sure you
accept the folder parameter and emit the path:
methods: {
navigate(folder) {
this.$emit('path', folder.path);
}
}
The last step is to trigger the parent method when the path gets emitted. For this, we can
utilize the same updateStructure method on the dropbox-viewer component:
<breadcrumb :p="path" @path="updateStructure">
</breadcrumb>
We now have a fully operational breadcrumb that allows the user to navigate down the
folder structure using the folder links and back up via breadcrumb links.
Our full breadcrumb component looks like is:
Vue.component('breadcrumb', {
template: '<div>' +
'<span v-for="(f, i) in folders">' +
'<a @click.prevent="navigate(f)"
:href="f.path">{{
f.name || 'Home' }}</a>' +
'<i v-if="i !== (folders.length - 1)"> »
</i>' + '</span>' +
'</div>',
props: {
p: String
},
computed: {
folders() {
let output = [],
slug = '',
parts = this.p.split('/');
console.log(parts);
for (let item of parts) {
slug += item;
output.push({'name': item || 'home', 'path':
slug});
slug += '/';
}

Navigating through the File Tree and Loading Folders from the URL Chapter 5
[ 127 ]
return output;
}
},
methods: {
navigate(folder) {
this.$emit('path', folder.path);
}
}
});
Adding the ability to download files
Now that our users can navigate through the folder structure, we need to add the ability to
download the files. Unfortunately, this isn't as simple as accessing a link attribute on the
file. To get the download link, we have to query the Dropbox API for each file.
We will query the API on the creation of the file component, this will asynchronously get
the download link and show it once available. Before we can do this, we need to make the
Dropbox instance available to the file component.
Add a new attribute to the file component in the view, and pass the Dropbox method
through as the value:
<file :d="dropbox()" :f="entry"></file>
Add the d variable to the props object of your component accepting an Object:
props: {
f: Object,
d: Object
},
We are now going to add a data attribute of link. This should be set to false by default,
so we can hide the link, and we'll populate it with the download link once the API has
returned with the value.
Add the created() function to the file component, and inside add the API call:
created() {
this.d.filesGetTemporaryLink({path:
this.f.path_lower}).then(data => {
this.link = data.link;
});
}

Navigating through the File Tree and Loading Folders from the URL Chapter 5
[ 128 ]
This API method accepts an object, similar to the filesListFolder function. We're
passing the path of the current file. Once the data is returned, we can set the component's
link attribute to the download link.
We can now add a download link to the template of the component. Add a v-if to only
show the <a> once the download link has been retrieved:
template: '<li><strong>{{ f.name }}</strong><span v-
if="f.size"> - {{ bytesToSize(f.size) }}</span><span
v-if="link"> - <a :href="link">Download</a></span>
</li>'
Browsing through the files, we can now see a download link appearing next to each file, the
speed of which will depend on your internet connection and the API speed.
The full file component, with the download link added, now looks like:
Vue.component('file', {
template: '<li><strong>{{ f.name }}</strong><span v-
if="f.size"> - {{ bytesToSize(f.size) }}</span><span
v-if="link"> - <a :href="link">Download</a></span>
</li>',
props: {
f: Object,
d: Object
},
data() {
return {
byteSizes: ['Bytes', 'KB', 'MB', 'GB', 'TB'],
link: false
}
},
methods: {
bytesToSize(bytes) {
// Set a default
let output = '0 Byte';
// If the bytes are bigger than 0
if (bytes > 0) {
// Divide by 1024 and make an int
let i = parseInt(Math.floor(Math.log(bytes) /
Math.log(1024)));
// Round to 2 decimal places and select the
appropriate unit from the array
output = Math.round(bytes / Math.pow(1024, i), 2)
+ ' ' + this.byteSizes[i];
}
return output

Navigating through the File Tree and Loading Folders from the URL Chapter 5
[ 129 ]
}
},
created() {
this.d.filesGetTemporaryLink({path:
this.f.path_lower}).then(data => {
this.link = data.link;
});
},
});
Updating the URL hash and using it to
navigate through the folders
With our Dropbox web app now fully navigable via both the structure list and breadcrumb,
we can now add and update the browser URL for quick folder access and sharing. We can
do this in two ways: we can either update the hash, for example,
www.domain.com/#/images/holiday/summer, or we can redirect all the paths to the
single page and handle the routing without the hash in the URL.
For this app, we will use the # method in the URL. We'll cover the URL routing technique
in the third section of the book when we introduce vue-router.
Before we get the app to show the corresponding folder of the URL, we first need to get the
URL to update when navigating to a new folder. We can do this using the native
window.location.hash JavaScript object. We want to update the URL as soon as the user
clicks a link, rather than waiting for the data to load to update.
As the getFolderStructure method gets fired whenever we update the structure, add
the code to the top of this function. This would mean the URL gets updated and then the
Dropbox API is called to update the structure:
getFolderStructure(path) {
window.location.hash = path;
this.dropbox().filesListFolder({
path: path,
include_media_info: true
})
.then(response => {
const structure = {
folders: [],
files: []
}

Navigating through the File Tree and Loading Folders from the URL Chapter 5
[ 130 ]
for (let entry of response.entries) {
// Check ".tag" prop for type
if(entry['.tag'] == 'folder') {
structure.folders.push(entry);
} else {
structure.files.push(entry);
}
}
this.path = path;
this.structure = structure;
this.isLoading = false;
})
.catch(error => {
console.log(error);
});
}
As you navigate through your app, it should be updating the URL to include the current
folder path.
However, what you will find when you press refresh with a folder; is that the URL resets to
just having a hash with no folder afterward as it is being reset by the empty path passed in
via the method in the created() function.
We can remedy this by passing in the current hash to the getFolderStructure within the
created function, however, there will be a few checks and error catching we will need to
do if we do this.
First, when calling window.location.hash, you also get the hash returned as part of the
string, so we will need to remove that. Second, we need to handle the instance of an
incorrect URL, should the user enter an incorrect path or the folder gets moved. Lastly, we
need to let the user use the back and forward buttons (or keyboard shortcuts) in their
browsers.

Navigating through the File Tree and Loading Folders from the URL Chapter 5
[ 131 ]
Showing the folder based on the URL
When our app mounts, it already calls a function to request the structure for the base
folder. We wrote this function to allow the path to be passed in and, within the created()
function, we have fixed the value to be the root folder of ''. This gives us the flexibility to
adapt this function to pass in the hash from the URL, instead of a fixed string.
Update the function to accept the hash of the URL and, if it doesn't have one, the original
fixed string:
created() {
let hash = window.location.hash.substring(1);
this.getFolderStructure(hash || '');
}
Create a new variable called hash and assign window.location.hash to it. Becuase the
variable starts with #, which is not needed for our app, use the substring function to
remove the first character from the string. We can then use a logical operator to use either
the hash variable, or if that equates to nothing, the original fixed string.
You should now be able to still navigate through your app with the URL updating. If you
press refresh at any time or copy and paste the URL into a different browser window, the
folder you were in should load.
Displaying an error message
With our app accepting URLs, we need to handle a case where someone is entering a URL
and makes a mistake, or a folder is shared that has since been moved.
As this error is an edge case, we are going to hijack the isLoading parameter if there is an
error in loading the data. In the getFolderStructure function, we have a catch function
returned as a promise that gets fired if there is an error with the API call. In this function,
set the isLoading variable to 'error':
getFolderStructure(path) {
window.location.hash = path;
this.dropbox().filesListFolder({
path: path,
include_media_info: true
})
.then(response => {
const structure = {
folders: [],
files: []

Navigating through the File Tree and Loading Folders from the URL Chapter 5
[ 132 ]
}
for (let entry of response.entries) {
// Check ".tag" prop for type
if(entry['.tag'] == 'folder') {
structure.folders.push(entry);
} else {
structure.files.push(entry);
}
}
this.path = path;
this.structure = structure;
this.isLoading = false;
})
.catch(error => {
this.isLoading = 'error';
console.log(error);
});
}
The console.log has been left in, should we need to diagnose a problem beyond a wrong
file path. Although the API can throw several different errors, we are going to assume for
this app that the error is due to a wrong path. If you wanted to cater for other errors in the
app, you can identify the error type by its status_code attribute. More details on this can
be found in the Dropbox API documentation.
Update your view to handle this new isLoading variable property. When set to error, the
isLoading variable is still "true," so within your loading element, add a new v-if to check
whether the loading variable is set to error:
<transition name="fade">
<div v-if="isLoading">
<div v-if="isLoading === 'error'">
<p>There seems to be an issue with the URL entered.
</p>
<p><a href="">Go home</a></p>
</div>
<div v-else>
Loading...
</div>
</div>
</transition>

Navigating through the File Tree and Loading Folders from the URL Chapter 5
[ 133 ]
This is set to display the first element of the isLoading variable is set to error; otherwise,
show the loading text. In the error text, a link is included to send the user back to the
current URL without any URL hash. This will "reset" them back to the top of the document
tree so they can navigate back down. An improvement could be to break the current URL
down and suggest the same URL with the last folder removed.
Verify the error code is loading by adding a nonexistent path to the end of your URL and
ensuring the error message is displayed. Bear in mind your user may experience a false
positive on this error message in the sense that if the Dropbox API throws any kind of
error, this message will be displayed.
Using the back and forward buttons in your
browser
To use the back and forward buttons in our browser, we are going to need to update our
code significantly. Currently, when the user clicks on a folder from either the structure or
breadcrumb, we prevent the default behavior of the browser by using .prevent on our
click handlers. We then immediately update the URL before we process the folder.
However, if we allow the app to update the URL using native behavior, we can then watch
for a hash URL update and use this to retrieve our new structure. Using this methodology,
the back and forward buttons would work without any further intervention, as they would
be updating the URL hash.
This would also improve the readability of our app, and reduce code weight as we would
be able to remove the navigate methods and click handlers on the links.
Removing unneeded code
The first step, before we add more code, is to remove the unnecessary code from our
components. Starting with the breadcrumb, remove the navigate method from the
component and the @click.prevent attribute from the link in the template.

Navigating through the File Tree and Loading Folders from the URL Chapter 5
[ 134 ]
We also need to update the slug of each of the items to prepend a # - this ensures the app
doesn't try and navigate to a brand new page when clicked. As we are looping through our
breadcrumb items in the folders computed function, add a hash to each slug when
pushing the object to the output array:
Vue.component('breadcrumb', {
template: '<div>' +
'<span v-for="(f, i) in folders">' +
'<a :href="f.path">{{ f.name || 'Home' }}</a>' +
'<i v-if="i !== (folders.length - 1)"> »
</i>' + '</span>' +
'</div>',
props: {
p: String
},
computed: {
folders() {
let output = [],
slug = '',
parts = this.p.split('/');
for (let item of parts) {
slug += item;
output.push({'name': item || 'home', 'path':
'#' + slug});
slug += '/';
}
return output;
}
}
});
We can also remove the v-on declaration on the breadcrumb component in the dropbox-
viewer-template. It should only have the path being passed in as a prop:
<breadcrumb :p="path"></breadcrumb>
We can now repeat the same pattern for the folder component. Remove the
@click.prevent declaration from the link and delete the navigate method.
As we are not looping through or editing the folder object before displaying it, we can
prepend the # in the template. As we are telling Vue the href is bound to a JavaScript
object (with the colon), we need to encapsulate the hash in quotes and concatenate it with
the folder path using the JavaScript + notation.

Navigating through the File Tree and Loading Folders from the URL Chapter 5
[ 135 ]
We are already inside both single and double quotes, so we need to inform JavaScript
we literally mean a single quote and this is done by using a backslash in front of the single
quote character:
Vue.component('folder', {
template: '<li><strong><a :href="\'#\' +
f.path_lower">{{ f.name }}</a></strong></li>',
props: {
f: Object
}
});
We can also remove the @path attribute from the <folder> component in the view:
<template v-for="entry in structure.folders">
<folder :f="entry"></folder>
</template>
Already our code is looking cleaner, less cluttered, and smaller in file size. Viewing the app
in the browser will render the structure of the folder you are in; however, clicking links will
update the URL but not change what is displayed.
Updating the structure with a URL change and setting
Vue data outside of the instance
Now that we have our URL updating correctly, we can get the new structure whenever the
hash changes. This can be done natively with JavaScript with the onhashchange function.
We are going to create a function that fires whenever the hash of the URL updates, which,
in turn, will update a path variable on the parent Vue instance. This variable will be passed
to the child dropbox-viewer component as a prop. This component will be watching for a
change in the variable and, upon update, it will retrieve the new structure.
To begin with, update the parent Vue instance to have a data object with a path key - set to
the empty string property. We are also going to assign our Vue instance to a constant
variable of app—this allows us to set data and call methods outside of the instance:
const app = new Vue({
el: '#app',
data: {
path: ''
}
});

Navigating through the File Tree and Loading Folders from the URL Chapter 5
[ 136 ]
The next step is to update this data property every time the URL gets updated. This is done
using window.onhashchange, which is a native JavaScript function that fires every time
the hash changes in the URL.
Copy and paste the hash modifier from the created function on the Dropbox component,
and use that to modify the hash and store the value on the Vue instance. If the hash doesn't
exist, we will pass an empty string to the path variable:
window.onhashchange = () => {
let hash = window.location.hash.substring(1);
app.path = (hash || '');
}
We now need to pass this path variable through to the Dropbox component. Add a prop of
p with the path variable as the value in your view:
<div id="app">
<dropbox-viewer :p="path"></dropbox-viewer>
</div>
Add the props object to the Dropbox component to accept a string:
props: {
p: String
},
We are now going to add a watch function to the dropbox-viewer component. This
function will watch the p prop and, when updated, call the updateStructure() method
with the modified path:
watch: {
p() {
this.updateStructure(this.p);
}
}
Heading back to the browser we should now be able to navigate through our Dropbox
structure, as before, using both the folder links and breadcrumb as navigation. We should
now be able to use the back and forward browser buttons, plus any keyboard shortcuts, to
also navigate back through the folders.
Before we head to Chapter 6, Caching the Current Folder Structure Using Vuex, and introduce
folder caching to our app using vuex, there are a few optimizations we can make to our
Dropbox component.

Navigating through the File Tree and Loading Folders from the URL Chapter 5
[ 137 ]
First, in the getFolderStructure function, we can remove the first line where the URL
hash gets set to the path. This is because the URL has already been updated when the link
is used. Remove this line from your code:
window.location.hash = path;
Second, there is now repetition in the Dropbox component with the this.path variable
and the p prop. Eliminating this requires some slight reworking, as you are not allowed to
modify a prop directly as you are with the path; however, it needs to be kept in sync so the
breadcrumb can be correctly rendered.
Remove the path property from the data object in the Dropbox component, and also delete
the this.path = path line from the getFolderStructure function.
Next, update the prop to be equal to path, not p. This will also require the watch function
to be updated to watch the path variable and not p().
Update the created method to just use this.path as the parameter to the function. The
Dropbox component should now look like this:
Vue.component('dropbox-viewer', {
template: '#dropbox-viewer-template',
props: {
path: String
},
data() {
return {
accessToken: 'XXXX',
structure: {},
isLoading: true
}
},
methods: {
dropbox() {
return new Dropbox({
accessToken: this.accessToken
});
},
getFolderStructure(path) {
this.dropbox().filesListFolder({
path: path,
include_media_info: true
})
.then(response => {
const structure = {
folders: [],

Navigating through the File Tree and Loading Folders from the URL Chapter 5
[ 138 ]
files: []
}
for (let entry of response.entries) {
// Check ".tag" prop for type
if(entry['.tag'] == 'folder') {
structure.folders.push(entry);
} else {
}
}
this.structure = structure;
this.isLoading = false;
})
.catch(error => {
this.isLoading = 'error';
console.log(error);
});
},
updateStructure(path) {
this.isLoading = true;
this.getFolderStructure(path);
}
},
created() {
this.getFolderStructure(this.path);
},
watch: {
path() {
this.updateStructure(this.path);
}
},
});
Update the view to accept the prop as path:
<dropbox-viewer :path="path"></dropbox-viewer>
We now need to ensure the parent Vue instance has the correct path on both page load and
hash change. To avoid repetition, we are going to extend our Vue instance with both a
method and a created function.
Keep the path variable set to an empty string. Create a new method titled
updateHash() that removes the first character from the window hash and then sets the
path variable either to the hash or an empty string. Next, create a created() function that
runs the updateHash method.

Navigating through the File Tree and Loading Folders from the URL Chapter 5
[ 139 ]
The Vue instance now looks like this:
const app = new Vue({
el: '#app',
data: {
path: ''
},
methods: {
updateHash() {
let hash = window.location.hash.substring(1);
this.path = (hash || '');
}
},
created() {
this.updateHash()
}
});
Lastly, to remove repetition, we can fire the updateHash method when the hash changes in
the address bar:
window.onhashchange = () => {
app.updateHash();
}
Final Code
With our code now complete your view and JavaScript file should look like the following.
Firstly, the view should look like this:
<div id="app">
<dropbox-viewer :path="path"></dropbox-viewer>
</div>
<script type="text/x-template" id="dropbox-viewer-
template">
<div>
<h1>Dropbox</h1>
<transition name="fade">
<div v-if="isLoading">
<div v-if="isLoading == 'error'">
<p>There seems to be an issue with the URL
entered.</p>
<p><a href="">Go home</a></p>
</div>
<div v-else>

Navigating through the File Tree and Loading Folders from the URL Chapter 5
[ 140 ]
Loading...
</div>
</div>
</transition>
<transition name="fade">
<div v-if="!isLoading">
<breadcrumb :p="path"></breadcrumb>
<ul>
<template v-for="entry in structure.folders">
<folder :f="entry"></folder>
</template>
<template v-for="entry in structure.files">
<file :d="dropbox()" :f="entry"></file>
</template>
</ul>
</div>
</transition>
</div>
</script>
The accompanying JavaScript app should look like this:
Vue.component('breadcrumb', {
template: '<div>' +
'<span v-for="(f, i) in folders">' +
'<a :href="f.path">{{ f.name || 'Home' }}</a>' +
'<i v-if="i !== (folders.length - 1)"> »
</i>' + '</span>' +
'</div>',
props: {
p: String
},
computed: {
folders() {
let output = [],
slug = '',
parts = this.p.split('/');
for (let item of parts) {
slug += item;
output.push({'name': item || 'home', 'path':
'#' + slug});
slug += '/';
}
return output;
}
}
});

Navigating through the File Tree and Loading Folders from the URL Chapter 5
[ 141 ]
Vue.component('folder', {
template: '<li><strong><a :href="\'#\' +
f.path_lower">{{ f.name }}</a></strong></li>',
props: {
f: Object
}
});
Vue.component('file', {
template: '<li><strong>{{ f.name }}</strong><span
v-if="f.size"> - {{ bytesToSize(f.size) }}</span>
<span v-if="link"> - <a :href="link">Download</a>
</span></li>',
props: {
f: Object,
d: Object
},
data() {
return {
byteSizes: ['Bytes', 'KB', 'MB', 'GB', 'TB'],
link: false
}
},
methods: {
bytesToSize(bytes) {
// Set a default
let output = '0 Byte';
// If the bytes are bigger than 0
if (bytes > 0) {
// Divide by 1024 and make an int
let i = parseInt(Math.floor(Math.log(bytes) /
Math.log(1024)));
// Round to 2 decimal places and select the
appropriate unit from the array
output = Math.round(bytes / Math.pow(1024, i), 2)
+ ' ' + this.byteSizes[i];
}
return output
}
},
created() {
this.d.filesGetTemporaryLink({path:
this.f.path_lower}).then(data => {
this.link = data.link;
});
},
});
Vue.component('dropbox-viewer', {
template: '#dropbox-viewer-template',

Navigating through the File Tree and Loading Folders from the URL Chapter 5
[ 142 ]
props: {
path: String
},
data() {
return {
accessToken: 'XXXX',
structure: {},
isLoading: true
}
},
methods: {
dropbox() {
return new Dropbox({
accessToken: this.accessToken
});
},
getFolderStructure(path) {
this.dropbox().filesListFolder({
path: path,
include_media_info: true
})
.then(response => {
const structure = {
folders: [],
files: []
}
for (let entry of response.entries) {
// Check ".tag" prop for type
if(entry['.tag'] == 'folder') {
structure.folders.push(entry);
} else {
structure.files.push(entry);
}
}
this.structure = structure;
this.isLoading = false;
})
.catch(error => {
this.isLoading = 'error';
console.log(error);
});
},
updateStructure(path) {
this.isLoading = true;
this.getFolderStructure(path);
}
},
created() {

Navigating through the File Tree and Loading Folders from the URL Chapter 5
[ 143 ]
this.getFolderStructure(this.path);
},
watch: {
path() {
this.updateStructure(this.path);
}
},
});
const app = new Vue({
el: '#app',
data: {
path: ''
},
methods: {
updateHash() {
let hash = window.location.hash.substring(1);
this.path = (hash || '');
}
},
created() {
this.updateHash()
}
});
window.onhashchange = () => {
app.updateHash();
}
Summary
We now have a fully functioning Dropbox viewer app featuring navigation for folders and
download links for files. We can use either the folder links or breadcrumb for navigation
and use the back and/or forward buttons. We can also share or bookmark a link and load
the contents of that folder.
In Chapter 6, Caching the Current Folder Structure Using Vuex, we are going to speed up the
navigation process by caching the current folder contents using Vuex.

6
Caching the Current Folder
Structure Using Vuex
In this chapter, we are going to introduce an official Vue plugin called Vuex. Vuex is a state
management pattern and library that allows you to have a centralized store for all your Vue
components, irrelevant of whether they are child components or a Vue instance. It gives us
a centralized, simple way of keeping our data in sync across the whole app.
This chapter is going to cover:
Getting started with Vuex
Storing and retrieving data from the Vuex store
Integrating Vuex with our Dropbox app
Caching the current Dropbox folder contents and loading data from the store if
required
Instead of requiring custom events and the $emit functions on every component, and
trying to keep components and child components up to date, every part of your Vue app
can update the central store, and others can react and update their data and state based on
that information. It also gives us a common place to store data so, rather than trying to
decide whether it is more semantic to place the data object on the component, a parent
component, or the Vue instance, we can use the Vuex store.
Vuex is also integrated into the Vue dev tools—something that is covered in Chapter
12, Using Vue Dev Tools and Testing Your SPA. With the integration of the library, it makes
debugging and viewing the current and past states of the store easy. The dev tools reflect
state changes, or data updates, and allow you to inspect each part of the store.
Caching the Current Folder Structure Using Vuex Chapter 6
[ 145 ]
As mentioned, Vuex is a state management pattern, which is the source of truth for your
Vue app. For example, keeping track of a shopping basket or logged in user is vital for
some apps and could wreak havoc if this data got out of sync between components. It is
also impossible to pass data between child components without using the parent to handle
the exchange. Vuex removes this complication by handling the storage, mutation, and
actions on the data.
When initially using Vuex, it may seem quite verbose and like overkill for what is required;
however, this is a great example of getting to grips with the library. More information
about Vuex can be found in their documentation.
For our Dropbox app, the Vuex store can be utilized to store the folder structure, file list,
and download links. This means if a user visits the same folder more than once, the API
will not need to be queried as all the information is stored already. This will speed up the
navigation of the folders.

Caching the Current Folder Structure Using Vuex Chapter 6
[ 146 ]
Including and initializing Vuex
The Vuex library is included the same way as Vue itself. You can either use a hosted
version by using the previously mentioned unpkg service (https://unpkg.com/vuex) or
you can download the JavaScript library from their https://github.com/vuejs/vuex.
Add a new <script> block to the bottom of your HTML file. Ensure the Vuex library is
included after your vue.js library but before your application JavaScript:
<script type="text/javascript" src="js/vue.js"></script>
<script type="text/javascript" src="js/vuex.js"></script>
<script type="text/javascript" src="js/dropbox.js"></script>
<script type="text/javascript" src="js/app.js"></script>
If you are deploying an app with several JavaScript files, it is worth
investigating whether it is more efficient to combine and compress them
into one file or configure your server to use HTTP/2 push.
With the library included, we can initialize and include the store within our app. Create a
new variable called a store and initialize the Vuex.Store class, assigning it to the
variable:
const store = new Vuex.Store({
});
With the Vuex store initialized, we can now utilize its functionality with the store
variable. Using store, we can access the data within and alter that data with mutations.
With an independent store, many Vue instances could update the same store; this may
be desired in some instances, but, it could be an undesirable side effect in others.
To circumvent this, we can associate a store with a specific Vue instance. This is done by
passing the store variable to our Vue class. Doing this also injects the store instance into
all our child components. Although not strictly required for our app, it's good practice to
get into the habit of associating the store with the app:
const app = new Vue({
el: '#app',
store,
data: {
path: ''
},
methods: {
updateHash() {

Caching the Current Folder Structure Using Vuex Chapter 6
[ 147 ]
let hash = window.location.hash.substring(1);
this.path = (hash || '');
}
},
created() {
this.updateHash()
}
});
With the store variable added, we can now access the store in our components using the
this.$store variable.
Utilizing the store
To help us get to grips with how to use the store, let's move the path variable that is
currently stored on the parent Vue instance. Before we start writing and moving code, there
are a few phrases and words that are different when using the Vuex store and we should
familiarize ourselves with them:
state: This is the store's equivalent of the data object; the raw data is stored
within this object.
getters: These are the Vuex equivalent of computed values; the function of the
store that may process the raw state value before returning it for use in a
component.
mutations: Vuex doesn't allow modification of the state object directly outside
of the store and this must be done via a mutation handler; these are functions
on the store that then allow the state to be updated. They always take state as
the first parameter.
These objects belong directly in the store. Updating the store, however, is not as simple
as calling store.mutationName(). Instead, we must call the method by using a new
commit() function. This function accepts two parameters: the name of the mutation and
the data being passed to it.
Although initially difficult to understand, the verbose nature of the Vuex store allows for
powerful capabilities. An example of the store in action, adapting the original example
from Chapter 1, Getting Started with Vue.js, is as follows:
const store = new Vuex.Store({
state: {
message: 'HelLO Vue!'
},

Caching the Current Folder Structure Using Vuex Chapter 6
[ 148 ]
getters: {
message: state => {
return state.message.toLowerCase();
}
},
mutations: {
updateMessage(state, msg) {
state.message = msg;
}
}
});
The preceding store example includes the state object, which is our raw data store; a
getters object, which includes our processing of the state; and finally, a mutations
object, which allows us to update the message. Notice how both the message getter and
the updateMessage mutation have the store's state as the first parameter.
To use this store, you could do the following:
new Vue({
el: '#app',
store,
computed: {
message() {
return this.$store.state.message
},
formatted() {
return this.$store.getters.message
}
}
});
Retrieving the message
In the {{ message }} computed function, we have retrieved the raw, unprocessed
message from the state object and used the following path:
this.$store.state.message

Caching the Current Folder Structure Using Vuex Chapter 6
[ 149 ]
This is literally accessing the store, then the state object, followed by the message object
key.
In a similar vein, the {{ formatted }} computed value uses the getter from the store,
which lowercases the string. This is retrieved by accessing the getters object instead:
this.$store.getters.message
Updating the message
To update the message, you need to call the commit function. This accepts the method
name as the first parameter with the payload, or data, being the second. The payload can be
either a simple variable, an array, or an object if several variables need to be passed.
The updateMessage mutation in the store accepts a single parameter and sets the
message to equal that, so to update our message the code would be:
store.commit('updateMessage', 'VUEX Store');
This can be run anywhere in the app and will automatically update the previous values
used, as they all rely on the same store.
Returning our message getter now would return VUEX Store, as we've updated the state.
With that in mind, let's update our app to use a path variable in the store, rather than the
Vue instance.
Using the Vuex store for the folder path
The first step in using the Vue store for our global Dropbox path variable is to move the
data object from the Vue instance to the Store, and rename it to state:
const store = new Vuex.Store({
state: {
path: ''
}
});

Caching the Current Folder Structure Using Vuex Chapter 6
[ 150 ]
We also need to create a mutation to allow the path to be updated from the hash of the
URL. Add a mutations object to the store and move the updateHash function from the
Vue instance—don't forget to update the function to accept the store as the first parameter.
Also, change the method so it updates state.path rather than this.path:
const store = new Vuex.Store({
state: {
path: ''
},
mutations: {
updateHash(state) {
let hash = window.location.hash.substring(1);
state.path = (hash || '');
}
}
});
By moving the path variable and mutation to the store, it makes the Vue instance
significantly smaller, with both the methods and data objects being removed:
const app = new Vue({
el: '#app',
store,
created() {
this.updateHash()
}
});
We now need to update our app to use the path variable from the store, instead of on the
Vue instance. We also need to ensure we call the store mutation function to update the
path variable instead of the method on the Vue instance.
Updating the path methods to use store commits
Start with the Vue instance, changing this.Updatehash to
store.commit('updateHash') instead. Don't forget to also update the method in the
onhashchange function. The second function should reference the store object on our
Vue instance, rather than the store directly. This is done by accessing the Vue instance
variable, app, and then referencing the Vuex store in this instance.

Caching the Current Folder Structure Using Vuex Chapter 6
[ 151 ]
When referring to the Vuex store on a Vue instance, it is saved under the variable as
$store, regardless of the variable name it was initially declared against:
const app = new Vue({
el: '#app',
store,
created() {
store.commit('updateHash');
}
});
window.onhashchange = () => {
app.$store.commit('updateHash');
}
Using the path variable
We now need to update the components to use the path from the store, rather than one
passed down through components. Both breadcrumb and dropbox-viewer need to be
updated to accept this new variable. We can also remove unnecessary props from the
components.
Updating the breadcrumb component
From the HTML, remove the :p prop, leaving a simple breadcrumb HTML tag:
<breadcrumb></breadcrumb>
Next, remove the props object from the component in the JavaScript file. The parts
variable will also need to be updated to use this.$store.state.path, instead of
this.p:
Vue.component('breadcrumb', {
template: '<div>' +
'<span v-for="(f, i) in folders">' +
'<a :href="f.path">[F] {{ f.name }}</a>' +
'<i v-if="i !== (folders.length - 1)"> » </i>' +
'</span>' +
'</div>',
computed: {
folders() {
let output = [],
slug = '',

Caching the Current Folder Structure Using Vuex Chapter 6
[ 152 ]
parts = this.$store.state.path.split('/');
for (let item of parts) {
slug += item;
output.push({'name': item || 'home', 'path': '#' + slug});
slug += '/';
}
return output;
}
}
});
Updating the dropbox-viewer component to work with
Vuex
As with the breadcrumb component, the first step is to remove the HTML prop from the
view. This should simplify the view of your app even more and you should be left with a
handful of HTML tags:
<div id="app">
<dropbox-viewer></dropbox-viewer>
</div>
The next step is to clean up the JavaScript, removing any unnecessary function parameters.
Remove the props object from the dropbox-viewer component. Next, update
the filesListFolder Dropbox method located inside getFolderStructure to use the
store path, instead of using the path variable:
this.dropbox().filesListFolder({
path: this.$store.state.path,
include_media_info: true
})
As this method is now using the store, instead of a function parameter, we can remove the
variable from the method declaration itself, along with removing it from the
updateStructure method and from whenever these two functions get called. For
example:
updateStructure(path) {
this.isLoading = true;
this.getFolderStructure(path);
}

Caching the Current Folder Structure Using Vuex Chapter 6
[ 153 ]
This would become the following:
updateStructure() {
this.isLoading = true;
this.getFolderStructure();
}
We do, however, still need to store the path as a variable on this component. This is due to
our watch method, which calls the updateStructure function. To do this, we need to
store our path as a computed value, rather than a fixed variable. This is so it can
dynamically update when the store updates, rather than a fixed value when the
component gets initialized.
Create a computed object on the dropbox-viewer component with a method called
path—this should just return the store path:
computed: {
path() {
return this.$store.state.path
}
}
We now have it as a local variable, so the Dropbox filesListFolder method can be
updated to once again use this.path.
The newly-updated dropbox-viewer component should look like the following. Viewing
the app in your browser, it should appear as though nothing has changed—however, the
inner workings of the app are now reliant on the new Vuex store, rather than a variable
stored on the Vue instance:
Vue.component('dropbox-viewer', {
template: '#dropbox-viewer-template',
data() {
return {
accessToken: 'XXXX',
structure: {},
isLoading: true
}
},
computed: {
path() {
return this.$store.state.path
}
},
methods: {
dropbox() {

Caching the Current Folder Structure Using Vuex Chapter 6
[ 154 ]
return new Dropbox({
accessToken: this.accessToken
});
},
getFolderStructure() {
this.dropbox().filesListFolder({
path: this.path,
include_media_info: true
})
.then(response => {
const structure = {
folders: [],
files: []
}
for (let entry of response.entries) {
// Check ".tag" prop for type
if(entry['.tag'] == 'folder') {
structure.folders.push(entry);
} else {
structure.files.push(entry);
}
}
this.structure = structure;
this.isLoading = false;
})
.catch(error => {
this.isLoading = 'error';
console.log(error);
});
},
updateStructure() {
this.isLoading = true;
this.getFolderStructure();
}
},
created() {
this.getFolderStructure();
},
watch: {
path() {
this.updateStructure();
}
},
});

Caching the Current Folder Structure Using Vuex Chapter 6
[ 155 ]
Caching the folder contents
Now that we have Vuex in our app and are utilizing it for the path, we can begin to look at
storing the contents of the currently-displayed folder so that if the user returns to the same
place, the API does not need to be queried to retrieve the results. We are going to do this by
storing the object returned by the API the Vuex store.
When the folder gets requested, the app will check whether the data exists in the store. If it
does, the API call will be omitted and the data loaded from the storage. If it doesn't exist,
the API will be queried and the results saved in the Vuex store.
The first step is to separate out the data processing into its own method. This is because the
files and folders are going to need to be split regardless of whether the data comes from the
store or API.
Create a new method in the dropbox-viewer component titled
createFolderStructure() and move the code from inside the then() function,
following the Dropbox filesListFolder method. Call the new method inside this
function instead.
Your two methods should now look like the following, and your app should still be
working as it was before:
createFolderStructure(response) {
const structure = {
folders: [],
files: []
}
for (let entry of response.entries) {
// Check ".tag" prop for type
if(entry['.tag'] == 'folder') {
structure.folders.push(entry);
} else {
structure.files.push(entry);
}
}
this.structure = structure;
this.isLoading = false;
},
getFolderStructure() {
this.dropbox().filesListFolder({
path: this.path,
include_media_info: true
})

Caching the Current Folder Structure Using Vuex Chapter 6
[ 156 ]
.then(this.createFolderStructure)
.catch(error => {
this.isLoading = 'error';
console.log(error);
});
}
Using promises, we can use createFolderStructure as the action for the API call.
The next step is to store the data we are processing. To do this, we are going to take
advantage of the ability to pass an object to the commit function of the store and use the
path as the key in the storage object. Rather than nest the file structures, we are going to
store the information in a flat structure. For example, after we've navigated through a few
folders, our store would look like this:
structure: {
'images': [{...}],
'images-holiday': [{...}],
'images-holiday-summer': [{...}]
}
There will be several transformations made to the path to make it object key-friendly. It will
be lowercased and any punctuation will be removed. We will also replace all spaces and
slashes with hyphens.
To begin, create an empty object in the Vuex store state object titled structure; this is
where we are going to store the data:
state: {
path: '',
structure: {}
}
We now need to create a new mutation, to allow us to store the data as we load it. Create a
new function inside the mutations object. Call it structure; it needs to accept the state
as a parameter, plus a payload variable which will be an object passed in:
structure(state, payload) {
}

Caching the Current Folder Structure Using Vuex Chapter 6
[ 157 ]
The path object will consist of a path variable, plus the data returned from the API. For
example:
{
path: 'images-holiday',
data: [{...}]
}
With this object being passed in, we can use the path as the key and the data as the value.
Store the data with a key of the path inside the mutation:
structure(state, payload) {
state.structure[payload.path] = payload.data;
}
We can now commit this data at the end of our new createFolderStructure method in
our component:
createFolderStructure(response) {
const structure = {
folders: [],
files: []
}
for (let entry of response.entries) {
// Check ".tag" prop for type
if(entry['.tag'] == 'folder') {
structure.folders.push(entry);
} else {
structure.files.push(entry);
}
}
this.structure = structure;
this.isLoading = false;
this.$store.commit('structure', {
path: this.path,
data: response
});
}
This will now store each folder's data when navigating through the app. This can be
verified by adding a console.log(state.structure) inside the structure mutation.

Caching the Current Folder Structure Using Vuex Chapter 6
[ 158 ]
Although this works as is, it would be good practice to sanitize the path when using it as
the key in an object. To do this, we are going to remove any punctuation, replace any
spaces and slashes with hyphens, and change the path to lowercase.
Create a new computed function called slug on the dropbox-viewer component. The
term slug is often used for sanitized URLs and originates from newspapers and how editors
used to reference stories. This function will run several JavaScript replace methods to
create a safe object key:
slug() {
return this.path.toLowerCase()
.replace(/^\/|\/$/g, '')
.replace(/ /g,'-')
.replace(/\//g,'-')
.replace(/[-]+/g, '-')
.replace(/[^\w-]+/g,'');
}
The slug function carries out the following operations. An example path of
/images/iPhone/mom's Birthday - 40th would be affected in the following way:
Convert the string to lowercase: /images/iphone/mom's birthday - 40th
Remove any slashes at the beginning and end of the path: images/iphone/mom
birthday - 40th
Replace any spaces with hyphens: images/iphone/mom-birthday---40th
Replace any slashes with hyphens: images-iphone-mom-birthday---40th
Replace any multiple hyphens with just a singular hyphen: images-iphone-
mom-birthday-40th
Finally, remove any punctuation: images-iphone-moms-birthday-40th
With the slug now created, we can use this as the key when storing the data:
this.$store.commit('structure', {
path: this.slug,
data: response
});
With our folder contents now being cached in the Vuex store, we can add a check to see
whether the data exists in the store and if it does, load it from there.

Caching the Current Folder Structure Using Vuex Chapter 6
[ 159 ]
Loading data from the store if it exists
Loading our data from the store requires a couple of changes to our code. The first step is to
check whether the structure exists in the store and if it does, load it. The second step is to
only commit the data to storage if it is new data—calling the
existing createFolderStructure method will update the structure but also re-commit
the data to storage. Although not detrimental to the user as it currently stands,
unnecessarily writing data to the store could cause issues when your app grows. This will
also help us when we come to precaching the folders and files.
Loading the data from the store
As a store is a JavaScript object and our slug variable is a consistent computed value on
our component, we can check whether the object key exists with an if statement:
if(this.$store.state.structure[this.slug]) {
// The data exists
}
This gives us the flexibility to load the data from the store if it exists, using the
createFolderStructure method and, if not, trigger the Dropbox API call.
Update the getFolderStructure method to include the if statement and add the
method call if the data exists:
getFolderStructure() {
if(this.$store.state.structure[this.slug]) {
this.createFolderStructure(this.$store.state.structure[this.slug]);
} else {
this.dropbox().filesListFolder({
path: this.path,
include_media_info: true
})
.then(this.createFolderStructure)
.catch(error => {
this.isLoading = 'error';
console.log(error);
});
}
}

Caching the Current Folder Structure Using Vuex Chapter 6
[ 160 ]
The path to the data is quite long and can make our code unreadable. To make it easier to
understand, assign the data to a variable, which allows us to check whether it exists and
returns the data with cleaner, smaller, and less repeatable code. It also means we only have
to update one line if the path to our data changes:
getFolderStructure() {
let data = this.$store.state.structure[this.slug];
if(data) {
this.createFolderStructure(data);
} else {
this.dropbox().filesListFolder({
path: this.path,
include_media_info: true
})
.then(this.createFolderStructure)
.catch(error => {
this.isLoading = 'error';
console.log(error);
});
}
}
Only storing new data
As mentioned earlier, the current createFolderStructure method both displays the
structure and caches the response in the store, thus re-saving the structure even when the
data is loaded from the cache.
Create a new method that the Dropbox API will fire once the data has loaded. Call
it createStructureAndSave. This should accept the response variable as its only
parameter:
createStructureAndSave(response) {
}
We can now move the store commit function from the createFolderStructure method
into this new one, along with a call to fire the existing method with the data:
createStructureAndSave(response) {
this.createFolderStructure(response)
this.$store.commit('structure', {
path: this.slug,
data: response
});
}

Caching the Current Folder Structure Using Vuex Chapter 6
[ 161 ]
Lastly, update the Dropbox API function to call this method:
getFolderStructure() {
let data = this.$store.state.structure[this.slug];
if(data) {
this.createFolderStructure(data);
} else {
this.dropbox().filesListFolder({
path: this.path,
include_media_info: true
})
.then(this.createStructureAndSave)
.catch(error => {
this.isLoading = 'error';
console.log(error);
});
}
},
Open your app in the browser and navigate through the folders. When you navigate back
up using the breadcrumb, the response should be a lot quicker—as it is now loading from
the cache you've created instead of querying the API every time.
In Chapter 7, Pre-Caching Other Folders and Files for Faster Navigation, we will be looking at
precaching the folders to try and preempt where the user is heading next. We will also look
at caching the download links for the files.
Our full app JavaScript should now look like:
Vue.component('breadcrumb', {
template: '<div>' +
'<span v-for="(f, i) in folders">' +
'<a :href="f.path">[F] {{ f.name }}</a>' +
'<i v-if="i !== (folders.length - 1)"> » </i>' +
'</span>' +
'</div>',
computed: {
folders() {
let output = [],
slug = '',
parts = this.$store.state.path.split('/');
for (let item of parts) {
slug += item;
output.push({'name': item || 'home', 'path': '#' + slug});
slug += '/';
}

Caching the Current Folder Structure Using Vuex Chapter 6
[ 162 ]
return output;
}
}
});
Vue.component('folder', {
template: '<li><strong><a :href="\'#\' + f.path_lower">{{ f.name
}}</a></strong></li>',
props: {
f: Object
}
});
Vue.component('file', {
template: '<li><strong>{{ f.name }}</strong><span v-if="f.size"> - {{
bytesToSize(f.size) }}</span> - <a v-if="link"
:href="link">Download</a></li>',
props: {
f: Object,
d: Object
},
data() {
return {
byteSizes: ['Bytes', 'KB', 'MB', 'GB', 'TB'],
link: false
}
},
methods: {
bytesToSize(bytes) {
// Set a default
let output = '0 Byte';
// If the bytes are bigger than 0
if (bytes > 0) {
// Divide by 1024 and make an int
let i = parseInt(Math.floor(Math.log(bytes) / Math.log(1024)));
// Round to 2 decimal places and select the appropriate unit from
the array
output = Math.round(bytes / Math.pow(1024, i), 2) + ' ' +
this.byteSizes[i];
}
return output
}
},
created() {
this.d.filesGetTemporaryLink({path: this.f.path_lower}).then(data => {
this.link = data.link;
});
},
});
Vue.component('dropbox-viewer', {

Caching the Current Folder Structure Using Vuex Chapter 6
[ 163 ]
template: '#dropbox-viewer-template',
data() {
return {
accessToken: 'XXXX',
structure: {},
isLoading: true
}
},
computed: {
path() {
return this.$store.state.path
},
slug() {
return this.path.toLowerCase()
.replace(/^\/|\/$/g, '')
.replace(/ /g,'-')
.replace(/\//g,'-')
.replace(/[-]+/g, '-')
.replace(/[^\w-]+/g,'');
}
},
methods: {
dropbox() {
return new Dropbox({
accessToken: this.accessToken
});
},
createFolderStructure(response) {
const structure = {
folders: [],
files: []
}
for (let entry of response.entries) {
// Check ".tag" prop for type
if(entry['.tag'] == 'folder') {
structure.folders.push(entry);
} else {
structure.files.push(entry);
}
}
this.structure = structure;
this.isLoading = false;
},

Caching the Current Folder Structure Using Vuex Chapter 6
[ 164 ]
createStructureAndSave(response) {
this.createFolderStructure(response)
this.$store.commit('structure', {
path: this.slug,
data: response
});
},
getFolderStructure() {
let data = this.$store.state.structure[this.slug];
if(data) {
this.createFolderStructure(data);
} else {
this.dropbox().filesListFolder({
path: this.path,
include_media_info: true
})
.then(this.createStructureAndSave)
.catch(error => {
this.isLoading = 'error';
console.log(error);
});
}
},
updateStructure() {
this.isLoading = true;
this.getFolderStructure();
}
},
created() {
this.getFolderStructure();
},
watch: {
path() {
this.updateStructure();
}
},
});
const store = new Vuex.Store({
state: {
path: '',
structure: {}
},
mutations: {
updateHash(state) {
let hash = window.location.hash.substring(1);

Caching the Current Folder Structure Using Vuex Chapter 6
[ 165 ]
state.path = (hash || '');
},
structure(state, payload) {
state.structure[payload.path] = payload.data;
}
}
});
const app = new Vue({
el: '#app',
store,
created() {
store.commit('updateHash');
}
});
window.onhashchange = () => {
app.$store.commit('updateHash');
}
Summary
After this chapter, your app should now be integrated with Vuex and be caching the
contents of the Dropbox folders. The Dropbox folder path should also be utilizing the
store to make the app more efficient. We are also querying the API only when we need to.
In Chapter 7, Pre-Caching Other Folders and Files for Faster Navigation, we will look at
precaching the folders—actively querying the API in advance to speed up the app
navigation and usability.

7
Pre-Caching Other Folders and
Files for Faster Navigation
In this chapter, the last of this section, we are going to look at speeding up our Dropbox file
explorer further by introducing, even more, caching to the app. So far, we have built an app
that can query the Dropbox API, and return files and folders. From there, we added folder
navigation, including updating the URL for link sharing and being able to use the back and
forward buttons. With that in place, in Chapter 6, Caching the Current Folder Structure Using
Vuex, we introduced Vuex for storing the current folder path and the contents of the folders
we had visited.
This chapter is going to look at:
Pre-caching not only the folder the user is currently in but also the child folders.
This will be done by looping through the folders in the current display and
checking if they have been cached yet. If not, we can gather the data from the
API.
Storing the parent folder's contents, should the user have entered via a direct
URL. This will be done by utilizing the breadcrumb path to traverse up the tree.
Cache the download links for the files. This currently requires an API for every
file encountered, regardless of whether the folder has been cached by our code or
not.
With these improvements, we can ensure the app only contacts the API once for every item,
rather than the countless times it was originally doing.
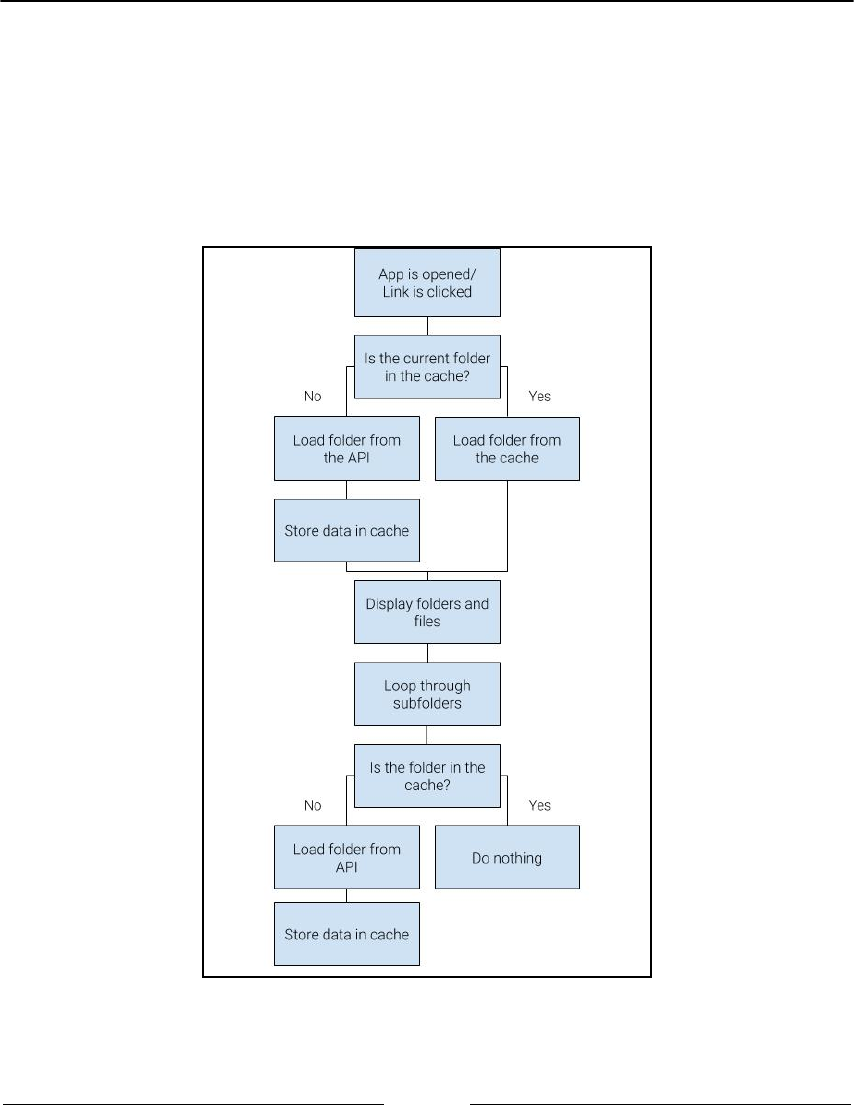
Pre-Caching Other Folders and Files for Faster Navigation Chapter 7
[ 167 ]
Caching subfolders
With both the subfolder and parent folder caching, we won't necessarily be writing new
code, but reorganizing and repurposing the existing code into a more modular system, so
that each part can be called separately.
The following flowchart should help you visualize the steps required to cache the current
folder and subfolders:

Pre-Caching Other Folders and Files for Faster Navigation Chapter 7
[ 168 ]
When looking at the flowchart, you can immediately see some duplication in events
required for the app. At two points the app needs to decide whether a folder exists in the
cache and, if it does not, query the API to get the data and store the result. Although it
appears only twice on the flowchart, this functionality is required several times, once for
every folder in the current location.
We will also need to separate out our displaying logic from our querying and storing logic,
as we may need to load from the API and store, without updating the view.
Planning app methods
With the previous section in mind, we can take the opportunity to revise and refactor the
methods on our dropbox-viewer app, ensuring each action has its own method. This
would allow us to call each action as and when we want to. Before we head into the code,
let's plan out the methods we need to create based on the preceding flowchart.
The first thing to note is that every time the API is queried, we need to store the result in
the cache. As we don't need to store anything in the cache unless the API is called, we can
combine these two actions in the same method. We also often need to check whether there
are contents in the cache for a particular path and either load it or retrieve it from the API.
We can add this to its own method that returns the data.
Let's map out the methods we need to create:
getFolderStructure: This method will accept a single parameter of the path
and return an object of the folder entries. This will be responsible for checking if
the data is in the cache and, if not, querying the Dropbox API.
displayFolderStructure: This method will fire the preceding function and
use the data to update the structure object on the component to display the
files and folders in the View.
cacheFolderStructure: This method will include the getFolderStructure
method to cache each subfolder—we'll explore a couple of ways this can be
triggered.
We may need to create more methods than this, but these three will be the backbone of the
component. We will keep the path and slug-computed properties, along with the
dropbox() method. Remove the rest of the objects, methods, and functions so your
dropbox-viewer is back to basics:
Vue.component('dropbox-viewer', {
template: '#dropbox-viewer-template',
data() {

Pre-Caching Other Folders and Files for Faster Navigation Chapter 7
[ 169 ]
return {
accessToken: 'XXXX',
structure: {},
isLoading: true
}
},
computed: {
path() {
return this.$store.state.path
},
slug() {
return this.path.toLowerCase()
.replace(/^\/|\/$/g, '')
.replace(/ /g,'-')
.replace(/\//g,'-')
.replace(/[-]+/g, '-')
.replace(/[^\w-]+/g,'');
}
},
methods: {
dropbox() {
return new Dropbox({
accessToken: this.accessToken
});
},
}
});
Creating the getFolderStructure method
Create a new method on your component called getFolderStructure. As mentioned
previously, this method needs to accept a single path parameter. This is so we can use with
both the current path and children paths:
getFolderStructure(path) {
}
This method needs to check the cache and return the data. Make a new variable, titled
output, inside the method and return it:
getFolderStructure(path) {
let output;
return output;
}

Pre-Caching Other Folders and Files for Faster Navigation Chapter 7
[ 170 ]
When caching the data in Chapter 6, Caching the Current Folder Structure Using Vuex, we
were using the slug as the key in the store. The slug was generated by using the current
path; however, we cannot use this in the new methods as it is fixed to its current location.
Create a new method called generateSlug. This will accept one parameter, the path, and
return a converted string using the replacements from the slug-computed function:
generateSlug(path) {
return path.toLowerCase()
.replace(/^\/|\/$/g, '')
.replace(/ /g,'-')
.replace(/\//g,'-')
.replace(/[-]+/g, '-')
.replace(/[^\w-]+/g,'');
}
We can now delete the computed slug function, so we don't have any repeating code.
Going back to our getFolderStructure method, create a new variable that stores the slug
version of the path using the new method. For this, we are going to use const to create a
variable that cannot be changed:
getFolderStructure(path) {
let output;
const slug = this.generateSlug(path);
return output;
}
The last variable we will create is the data path, as we did in Chapter 8, Introducing Vue-
Router and Loading URL-Based Components. This will use the new slug variable we've just
created:
getFolderStructure(path) {
let output;
const slug = this.generateSlug(path),
data = this.$store.state.structure[slug];
return output;
}

Pre-Caching Other Folders and Files for Faster Navigation Chapter 7
[ 171 ]
We can now use the data if statement from the previous code inside of here, with space
for the Dropbox function call. We can assign the data to output straight away if it exists in
the store:
getFolderStructure(path) {
let output;
const slug = this.generateSlug(path),
data = this.$store.state.structure[slug];
if(data) {
output = data;
} else {
}
return output;
}
With the Dropbox API call, however, we can tweak it to suit this new code. Previously, it
was retrieving the data from the API and then firing a method that then saved and
displayed the structure. As we need to store the data retrieved in the output variable, we
are going to alter the flow of data. Instead of firing a method, we are going to use this
opportunity to first store the response in the cache and then return the data to the output
variable.
As we only use the entries from the API call, we are also going to update the store to only
cache this part of the response. This will reduce the code and complexity of the app:
getFolderStructure(path) {
let output;
const slug = this.generateSlug(path),
data = this.$store.state.structure[slug];
if(data) {
output = data;
} else {
output = this.dropbox().filesListFolder({
path: path,
include_media_info: true
})
.then(response => {
let entries = response.entries;
this.$store.commit('structure', {
path: slug,
data: entries
});

Pre-Caching Other Folders and Files for Faster Navigation Chapter 7
[ 172 ]
return entries;
})
.catch(error => {
this.isLoading = 'error';
console.log(error);
});
}
return output;
}
The Dropbox filesListFolder method uses the passed-in path variable, rather than the
global one it was previously using. The entries from the response are then stored in a
variable before being cached in the Vuex store using the same mutation. The entries
variable is then returned from the promise, which stores the result in output. The catch()
function is the same as before.
With the data being returned from either the cache or the API, we can trigger and process
this data when the component is created and when the path is updated. Before we do that,
however, we have a mix of data types to deal with.
When returned from the API, the data is still a promise that needs to be resolved; assigning
it to a variable merely passes on the promise to be resolved later. Data from the store,
however, is a plain array that is handled very differently. To give us a single data type to
deal with, we are going to resolve the stored array as a promise, meaning
the getFolderStructure returns a promise, regardless of where the data is loaded from:
getFolderStructure(path) {
let output;
const slug = this.generateSlug(path),
data = this.$store.state.structure[slug];
if(data) {
output = Promise.resolve(data);
} else {
output = this.dropbox().filesListFolder({
path: path,
include_media_info: true
})
.then(response => {
let entries = response.entries;
this.$store.commit('structure', {
path: slug,

Pre-Caching Other Folders and Files for Faster Navigation Chapter 7
[ 173 ]
data: entries
});
return entries;
})
.catch(error => {
this.isLoading = 'error';
console.log(error);
});
}
return output;
}
With this getFolderStructure method, we now have the ability to load some data from
the API and store the result in the global cache without updating the view. The function
does, however, return the information should we wish to process it further with a
JavaScript promise.
We can now proceed with creating our next method, displayFolderStructure, which
will take the result of the method we have just created and update our View, so the app is
navigable once again.
Showing the data with the displayFolderStructure
method
With our data now ready to be cached and served up from the store, we can go ahead and
actually display the data with our new method. Create a new method in your dropbox-
viewer component labeled displayFolderStructure:
displayFolderStructure() {
}
This method will borrow a lot of code from the previous incarnation of this component.
Remember, this method is used purely for displaying the folder and has nothing to do with
caching the contents.

Pre-Caching Other Folders and Files for Faster Navigation Chapter 7
[ 174 ]
The process of the method will be:
Set the loading state as active in the app. This lets the user know something is1.
happening.
Create an empty structure object.2.
Load the contents of the getFolderStructure method.3.
Loop through the result and add each item to either the folders or files array.4.
Set the global structure object to the new one created.5.
Set the loading state to false so the contents can be displayed.6.
Set the loading state to true and create an empty
structure object
The first step of this method is to hide the structure tree and show the loading message.
This can be done as before, by setting the isLoading variable to true. We can also create
our empty structure object here, ready to be populated by the data:
displayFolderStructure() {
this.isLoading = true;
const structure = {
folders: [],
files: []
}
}
Load the contents of the getFolderStructure method
As the getFolderStructure method returns a promise, we need to resolve the result
before proceeding on to manipulate it. This is done with the .then() function; we have
already used this with the Dropbox class. Call the method and then assign the result to a
variable:
displayFolderStructure() {
this.isLoading = true;
const structure = {
folders: [],
files: []
}

Pre-Caching Other Folders and Files for Faster Navigation Chapter 7
[ 175 ]
this.getFolderStructure(this.path).then(data => {
});
}
This code passes the path object of the component into the method. This path is the current
path that the user is trying to view. Once the data is returned, we can assign it to the data
variable, which can then be used inside the function.
Loop through the result and add each item to either the
folders or files array
We are already familiar with the code that loops through the entries and examines the .tag
attribute of each one. If this results in a folder, it is added to the structure.folders
array, otherwise it is appended to structure.files.
We are only storing the entries in the cache, so make sure the for loop is updated to use the
data as is, rather than accessing the property of entries:
displayFolderStructure() {
this.isLoading = true;
const structure = {
folders: [],
files: []
}
this.getFolderStructure(this.path).then(data => {
for (let entry of data) {
// Check ".tag" prop for type
if(entry['.tag'] == 'folder') {
structure.folders.push(entry);
} else {
structure.files.push(entry);
}
}
});
}

Pre-Caching Other Folders and Files for Faster Navigation Chapter 7
[ 176 ]
Update the global structure object and remove the
loading state
The last task in this method is to update the global structure and remove the loading state.
This code is unchanged from before:
displayFolderStructure() {
this.isLoading = true;
const structure = {
folders: [],
files: []
}
this.getFolderStructure(this.path).then(data => {
for (let entry of data) {
// Check ".tag" prop for type
if(entry['.tag'] == 'folder') {
structure.folders.push(entry);
} else {
structure.files.push(entry);
}
}
this.structure = structure;
this.isLoading = false;
});
}
We now have a method that will display the result of our data retrieval.
Instigating the method
This method can now be called when the dropbox-viewer component gets created. The
path will already be populated, thanks to the created function on the global Vue instance
that commits the URL hash to the store, thus creating the path variable. Because of this, we
don't need to pass anything to the function. Add the created function to your component
and call the new method inside:
Vue.component('dropbox-viewer', {
template: '#dropbox-viewer-template',
data() {
return {
accessToken: 'XXXX',
structure: {},
isLoading: true
}

Pre-Caching Other Folders and Files for Faster Navigation Chapter 7
[ 177 ]
},
computed: {
...
},
methods: {
...
},
created() {
this.displayFolderStructure();
}
});
Refreshing the app now will load your folder contents. Updating the URL hash and
reloading the page will also show the contents of that folder; however, clicking any folder
links will update the breadcrumb, but not the data structure. This can be resolved by
watching the computed path variable. This will get updated when the hash updates and so
can trigger a function in the watch object. Add a function that watches for the path
variable to update and fires the new method when it has:
created() {
this.displayFolderStructure();
},
watch: {
path() {
this.displayFolderStructure();
}
}
With this, we have created an app that, once again, caches any folder you have visited.
Clicking through the structure the first time will seem quite slow, but once you navigate
back up the tree and re-enter subfolders you will barely see the loading screen.
Despite the app having the same functionality as it did at the beginning of the chapter, we
have refactored the code to separate out the retrieval and caching and the displaying of the
data. Let's move on to enhancing our app further by pre-caching the subfolders of the
selected path.

Pre-Caching Other Folders and Files for Faster Navigation Chapter 7
[ 178 ]
Caching the subfolders
Now that we have the ability to cache a folder without updating the Vue, we can use our
structure object to get the contents of the subfolders. Using the folders array in the
structure object, we can loop through this and cache each folder in turn.
We have to make sure we do not hinder the performance of the app; the caching must be
done asynchronously, so the user is not aware of this process. We also need to make sure
we aren't running the caching unnecessarily.
To achieve this, we can watch the structure object. This only gets updated once the data
has been loaded from the cache or the API and the Vue has updated. With the user viewing
the contents of the folder, we can proceed with looping through the folders to store their
contents.
There is a slight issue, however. If we watch the structure variable, our code will never
run as the direct contents of the object does not update, despite the fact we replace the
structure object with a new one every time. From folder to folder, the structure object
always has two keys, of files and folders, which are both arrays. As far as Vue and
JavaScript are concerned, the structure object never changes.
Vue can, however, detect nested changes with the deep variable. This can be enabled on a
per variable basis. Similar to the props on a component, to enable more options on a watch
property, you pass it an object instead of a direct function.
Create a new watch key for structure, which is an object with two values, deep and
handler. The deep key will be set to true, while the handler will be the function fired
when the variable is changed:
watch: {
path() {
this.displayFolderStructure();
},
structure: {
deep: true,
handler() {
}
}
}

Pre-Caching Other Folders and Files for Faster Navigation Chapter 7
[ 179 ]
Inside this handler, we can now loop through each of the folders and run
the getFolderStructure method for each one, using the path_lower property of each
one as the function argument:
structure: {
deep: true,
handler() {
for (let folder of this.structure.folders) {
this.getFolderStructure(folder.path_lower);
}
}
}
With this simple piece of code, our app appears to speed up tenfold. Every subfolder you
navigate to loads instantly (unless you have a particularly long folder list and you navigate
to the last one very quickly). To give you an idea of the speed and timing of the caching,
add a console.log() inside your getFolderStructure method and open the browser
developer tools:
if(data) {
output = Promise.resolve(data);
} else {
console.log(`API query for ${path}`);
output = this.dropbox().filesListFolder({
path: path,
include_media_info: true
})
.then(response => {
console.log(`Response for ${path}`);
...
This allows you to see all the API calls are done asynchronously too—the app isn't waiting
for the previous folder to be loaded and cached before moving on to the next one. This has
the advantage of allowing smaller folders to be cached without waiting for bigger ones to
be returned from the API.
Alternative caching method
As with everything, when making an app, there are many approaches to achieving the
same result. The downside with this method is that even if your folder contains only files,
this function will trigger—albeit with nothing to do.

Pre-Caching Other Folders and Files for Faster Navigation Chapter 7
[ 180 ]
An alternative approach would be to use our created function once again, this time on the
folder component itself, triggering the parent method with the path as the argument.
One way of doing this is using the $parent property. When in the folder component,
using this.$parent will allow access to the variables, methods, and computed values on
the dropbox-viewer component.
Add a created function to the folder component and delete the structure watch
property from the Dropbox component. From there, call the parent getFolderStructure
method:
Vue.component('folder', {
template: '<li><strong><a :href="\'#\' + f.path_lower">{{ f.name
}}</a></strong></li>',
props: {
f: Object
},
created() {
this.$parent.getFolderStructure(this.f.path_lower);
}
});
Previewing the app proves the validity of this method. Only triggering when there are
folders in the structure, this cleaner technique ties the folder-caching with the folder itself,
rather than getting mixed in with the Dropbox code.
However, this.$parent should be avoided unless necessary, and should only be used in
edge cases. As we have the opportunity to use props, we should do so. It also gives us the
chance to give the function a more meaningful name in the folder context.
Navigate to your HTML view and update the folder component to accept a new prop. We'll
call the prop cache and pass the function in as the value. As the property is dynamic, don't
forget to add a preceding colon:
<folder :f="entry" :cache="getFolderStructure"></folder>
Add the cache keyword to the props key in the JavaScript folder component. Inform Vue
that the input will be a function:
Vue.component('folder', {
template: '<li><strong><a :href="\'#\' + f.path_lower">{{ f.name
}}</a></strong></li>',
props: {
f: Object,
cache: Function
}

Pre-Caching Other Folders and Files for Faster Navigation Chapter 7
[ 181 ]
});
Lastly, we can call our new cache() method in the created function:
Vue.component('folder', {
template: '<li><strong><a :href="\'#\' + f.path_lower">{{ f.name
}}</a></strong></li>',
props: {
f: Object,
cache: Function
},
created() {
this.cache(this.f.path_lower);
}
});
The caching can be verified, once again, by using the console logs as before. This creates
cleaner code that is easier for yourself, and any other developers, to read.
With our Dropbox app now progressing, we can move on to caching parent folders, should
you enter a subfolder using a hash in the URL.
Caching parent folders
Caching the parent structure is the next preemptive thing we can do to help speed up our
app. Say we had navigated to our images directory, /images/holiday/summer, and
wished to share this with a friend or colleague. We would send them the URL with this in
the URL hash and, on page load, they would see the contents. If they then navigated up the
tree using the breadcrumb to /images/holiday, for example, they would need to wait for
the app to retrieve the contents.
Using the breadcrumb component, we can cache the parent directories and so, on
navigating to the holiday folder, the user would be presented instantly with its contents.
While the user is then browsing this folder, all of its subfolders are being cached with the
previous methods.
To cache the parent folders, we already have a component displaying the path with access
to the slugs of all the parent folders we can loop through—the breadcrumb.

Pre-Caching Other Folders and Files for Faster Navigation Chapter 7
[ 182 ]
Before we start the caching process, we need to update the folders computed function
within the component. This is because currently, we store the path with the hash
prepended, which creates an invalid path for the Dropbox API. Remove the hash from the
object being pushed to the output array and add it in the template, in a similar fashion to
the folder component:
Vue.component('breadcrumb', {
template: '<div>' +
'<span v-for="(f, i) in folders">' +
'<a :href="\'#\' + f.path">{{ f.name || 'Home' }}</a>' +
'<i v-if="i !== (folders.length - 1)"> » </i>' +
'</span>' +
'</div>',
computed: {
folders() {
let output = [],
slug = '',
parts = this.$store.state.path.split('/');
for (let item of parts) {
slug += item;
output.push({'name': item || 'home', 'path': slug});
slug += '/';
}
return output;
}
}
});
We can now use the output for both displaying the breadcrumb and caching the parent
structure.
The first step is to allow the breadcrumb component access to the caching function. In a
similar fashion to the folder component, add the function as a prop to the breadcrumb
component in your View:
<breadcrumb :cache="getFolderStructure"></breadcrumb>
Add the props object to the component in the JavaScript code. Declare the cache prop as a
function so Vue knows what to expect:
Vue.component('breadcrumb', {
template: '...',
props: {
cache: Function
},
computed: {

Pre-Caching Other Folders and Files for Faster Navigation Chapter 7
[ 183 ]
folders() {
...
}
});
The parent structure is going to be on the creation of the breadcrumb component.
However, as we don't want this to hold up the loading process, we are going to trigger it
when the component is mounted, not created.
Add a mounted function to your component and assign the folder's computed value to a
variable:
Vue.component('breadcrumb', {
template: '...',
props: {
cache: Function
},
computed: {
folders() {
...
}
},
mounted() {
let parents = this.folders;
}
});
We now need to start caching the folders; however, we can be smart in the order that we do
it. We can assume that the user will generally go back up the folder tree, so we should
ideally cache the direct parent before moving onto its parent, and so on and so forth. As our
folder's variable goes from the top down, we need to reverse it.
The other thing we can do to improve performance is to remove the current folder; as we
are already in it, the app would have cached it already. In your component, reverse the
array and remove the first item:
mounted() {
let parents = this.folders;
parents.reverse().shift();
}

Pre-Caching Other Folders and Files for Faster Navigation Chapter 7
[ 184 ]
If we add a console log to the function of the parent's variable, we can see it contains the
folders we now wish to cache. We can now loop through this array, calling the cache
function for each item in the array:
mounted() {
let parents = this.folders;
parents.reverse().shift();
for(let parent of parents) {
this.cache(parent.path);
}
}
With this, our parent and child folders are being cached by the app, making navigation
both up and down the tree lightning fast. However, running a console.log() inside the
mounted function reveals the breadcrumb gets re-mounted every time a folder gets
navigated to. This is because of the v-if statements in the View, which removes and adds
the HTML each time.
As we only need to cache the parent folders once, on initial app load, let's look at changing
where it gets triggered. We only need to run this function the first time; once the user has
started navigating up and back down the tree, all the folders visited will be cached along
the way.
Caching parent folders once
To ensure we are using the least amount of resources, we can keep the array of folders used
for the breadcrumb in the store. This means that both the breadcrumb component and our
parent caching function can access the same array.
Add a breadcrumb key to your store state—this is where we will store the array:
const store = new Vuex.Store({
state: {
path: '',
structure: {},
breadcrumb: []
},
mutations: {
updateHash(state) {
let hash = window.location.hash.substring(1);
state.path = (hash || '');
},
structure(state, payload) {

Pre-Caching Other Folders and Files for Faster Navigation Chapter 7
[ 185 ]
state.structure[payload.path] = payload.data;
}
}
});
Next, move the code from the breadcrumb component into the updateHash mutation so
we can update both the path and breadcrumb variables:
updateHash(state) {
let hash = window.location.hash.substring(1);
state.path = (hash || '');
let output = [],
slug = '',
parts = state.path.split('/');
for (let item of parts) {
slug += item;
output.push({'name': item || 'home', 'path': slug});
slug += '/';
}
state.breadcrumb = output;
},
Note that rather than returning the output array, it is getting stored in the state object.
We can now update the folder's computed function on the breadcrumb component to
return the store data:
computed: {
folders() {
return this.$store.state.breadcrumb;
}
}
With the data now available globally, we can create a new method on the dropbox-viewer
component, cacheParentFolders, which triggers the code we wrote for the breadcrumb
component.
Create a new method on the Dropbox component and move your code to it. Update the
location of the parents and ensure you are firing the correct path:
cacheParentFolders() {
let parents = this.$store.state.breadcrumb;
parents.reverse().shift();

Pre-Caching Other Folders and Files for Faster Navigation Chapter 7
[ 186 ]
for(let parent of parents) {
this.getFolderStructure(parent.path);
}
}
We can now fire this method once when the Dropbox component gets created. Add it after
the existing method call in the created function:
created() {
this.displayFolderStructure();
this.cacheParentFolders();
}
We can now do some housekeeping and delete the mounted method from the breadcrumb
component, along with the props object and the :cache prop from the view. This means
our breadcrumb component is now simpler than it was before:
Vue.component('breadcrumb', {
template: '<div>' +
'<span v-for="(f, i) in folders">' +
'<a :href="\'#\' + f.path">{{ f.name || 'Home' }}</a>' +
'<i v-if="i !== (folders.length - 1)"> » </i>' +
'</span>' +
'</div>',
computed: {
folders() {
return this.$store.state.breadcrumb;
}
}
});
The HTML returns to what it was:
<breadcrumb></breadcrumb>
We can also tidy up the updateHash mutation in the store to be a bit neater and more
understandable:
updateHash(state, val) {
let path = (window.location.hash.substring(1) || ''),
breadcrumb = [],
slug = '',
parts = path.split('/');
for (let item of parts) {
slug += item;
breadcrumb.push({'name': item || 'home', 'path': slug});
slug += '/';

Pre-Caching Other Folders and Files for Faster Navigation Chapter 7
[ 187 ]
}
state.path = path
state.breadcrumb = breadcrumb;
}
All the variables are now being declared at the top, with the state being updated at the
bottom. The number of variables has also been reduced.
Viewing the app now, it appears to work correctly; however, upon closer inspection, the
breadcrumb seems to lag a bit with the folder structure on initial page load. Once a folder
has been navigated to, it catches up but on the first load it seems to have one fewer item,
and when viewing the root of the Dropbox none at all.
This is because the store has not been fully initialized before we are committing the
updateHash mutation. If we remember back to the Vue instance lifecycle, covered in
Chapter 4, Getting a List of Files Using the Dropbox API, we can see the created function gets
fired very early on. Updating the main Vue instance to trigger the mutation on mounted
instead resolves the issue:
const app = new Vue({
el: '#app',
store,
mounted() {
store.commit('updateHash');
}
});
With all the folders being cached as well as they can be, we can move on to caching more
API calls by storing the download link for each file.
We could also look into caching subfolders of subfolders, looping through the contents of
each cached folder to eventually cache the whole tree. We won't go into that, but feel free to
give it a go yourself.
Caching download links on files
When the user is navigating around the document tree, the Dropbox API is still being
queried more than necessary. This is because every time a file is displayed, we query the
API to retrieve the download link. Extra API queries can be negated by storing the
download link response in the cache and re-displaying the folder it is navigated back into.

Pre-Caching Other Folders and Files for Faster Navigation Chapter 7
[ 188 ]
Every time a file is displayed, a new component gets initialized using data from the store.
We can use this to our advantage as it means we only need to update the component
instance and then the result gets cached.
In your file component, update the API response to not only save the result on the link
property of the data attribute but the on the file instance, f, as well. This will be stored as a
new key, download_link.
When storing the data, rather than having two separate commands, we can combine them
into one with two equal signs:
Vue.component('file', {
template: '<li><strong>{{ f.name }}</strong><span v-if="f.size"> - {{
bytesToSize(f.size) }}</span> - <a v-if="link"
:href="link">Download</a></li>',
props: {
f: Object,
d: Object
},
data() {
return {
byteSizes: ['Bytes', 'KB', 'MB', 'GB', 'TB'],
link: false
}
},
methods: {
bytesToSize(bytes) {
// Set a default
let output = '0 Byte';
// If the bytes are bigger than 0
if (bytes > 0) {
// Divide by 1024 and make an int
let i = parseInt(Math.floor(Math.log(bytes) / Math.log(1024)));
// Round to 2 decimal places and select the appropriate unit from
the array
output = Math.round(bytes / Math.pow(1024, i), 2) + ' ' +
this.byteSizes[i];
}
return output
}
},
created() {
this.d.filesGetTemporaryLink({path: this.f.path_lower})
.then(data => {

Pre-Caching Other Folders and Files for Faster Navigation Chapter 7
[ 189 ]
this.f.download_link = this.link = data.link;
});
}
});
This essentially means this.f.download_link is equal to this.link, which is also
equal to data.link, the download link from the API. With this being stored and displayed
when the folder is navigated to, we can add an if statement to see whether the data exists
and, if not, query the API to get it.
created() {
if(this.f.download_link) {
this.link = this.f.download_link;
} else {
this.d.filesGetTemporaryLink({path: this.f.path_lower})
.then(data => {
this.f.download_link = this.link = data.link;
});
}
}
Doing this on file creation saves the API being queried unnecessarily. If we obtained this
information when caching the folders, we could slow down the app and be storing non-
essential information. Imagine a folder with hundreds of photos in it—we wouldn't want to
query the API for every one of these just on the off chance the user might enter that folder.
This means everything in our app only needs to query the API once to get the information.
The user can navigate up and down folder structures as many times as they want, with the
app only getting faster as they do so.
The complete code—with added
documentation
With our app complete, we can now add some much-needed documentation. It's always
good to document your code as this gives it reasoning and explanation. Good
documentation should not just say what the code does, but why it does it, what is allowed,
and what is not allowed.

Pre-Caching Other Folders and Files for Faster Navigation Chapter 7
[ 190 ]
A popular method for documentation is the JavaScript DocBlock standard. This set of
conventions lays out style guide-like rules for you to follow when documenting your code.
DocBlock is formatted in a comment block and features keywords starting with an @, such
as @author, @example, or listing what parameters a function can accept with the @param
keyword. An example would be:
/**
* Displays a folder with a link and cache its contents
* @example <folder :f="entry" :cache="getFolderStructure"></folder>
*
* @param {object} f The folder entry from the tree
* @param {function} cache The getFolderStructure method from the dropbox-
viewer component
*/
Starting off with a description, DocBlock has several keywords to help lay out the
documentation. We'll walk through our completed Dropbox app with added
documentation.
Let us first take a look at the breadcrumb component:
/**
* Displays the folder tree breadcrumb
* @example <breadcrumb></breadcrumb>
*/
Vue.component('breadcrumb', {
template: '<div>' +
'<span v-for="(f, i) in folders">' +
'<a :href="\'#\' + f.path">{{ f.name || 'Home' }}</a>' +
'<i v-if="i !== (folders.length - 1)"> » </i>' +
'</span>' +
'</div>',
computed: {
folders() {
return this.$store.state.breadcrumb;
}
}
});
Moving on to the folder component:
/**
* Displays a folder with a link and cache its contents
* @example <folder :f="entry" :cache="getFolderStructure"></folder>
*
* @param {object} f The folder entry from the tree
* @param {function} cache The getFolderStructure method from the dropbox-

Pre-Caching Other Folders and Files for Faster Navigation Chapter 7
[ 191 ]
viewer component
*/
Vue.component('folder', {
template: '<li><strong><a :href="\'#\' + f.path_lower">{{ f.name
}}</a></strong></li>',
props: {
f: Object,
cache: Function
},
created() {
// Cache the contents of the folder
this.cache(this.f.path_lower);
}
});
Next, in line, we see the file component:
/**
* File component display size of file and download link
* @example <file :d="dropbox()" :f="entry"></file>
*
* @param {object} f The file entry from the tree
* @param {object} d The dropbox instance from the parent component
*/
Vue.component('file', {
template: '<li><strong>{{ f.name }}</strong><span v-if="f.size"> - {{
bytesToSize(f.size) }}</span> - <a v-if="link"
:href="link">Download</a></li>',
props: {
f: Object,
d: Object
},
data() {
return {
// List of file size
byteSizes: ['Bytes', 'KB', 'MB', 'GB', 'TB'],
// The download link
link: false
}
},
methods: {
/**
* Convert an integer to a human readable file size
* @param {integer} bytes
* @return {string}
*/
bytesToSize(bytes) {

Pre-Caching Other Folders and Files for Faster Navigation Chapter 7
[ 192 ]
// Set a default
let output = '0 Byte';
// If the bytes are bigger than 0
if (bytes > 0) {
// Divide by 1024 and make an int
let i = parseInt(Math.floor(Math.log(bytes) / Math.log(1024)));
// Round to 2 decimal places and select the appropriate unit from
the array
output = Math.round(bytes / Math.pow(1024, i), 2) + ' ' +
this.byteSizes[i];
}
return output
}
},
created() {
// If the download link has be retrieved from the API, use it
// if not, aquery the API
if(this.f.download_link) {
this.link = this.f.download_link;
} else {
this.d.filesGetTemporaryLink({path: this.f.path_lower})
.then(data => {
this.f.download_link = this.link = data.link;
});
}
}
});
Now we take a look at the dropbox-viewer component:
/**
* The dropbox component
* @example <dropbox-viewer></dropbox-viewer>
*/
Vue.component('dropbox-viewer', {
template: '#dropbox-viewer-template',
data() {
return {
// Dropbox API token
accessToken: 'XXXX',
// Current folder structure
structure: {},
isLoading: true
}
},
computed: {
// The current folder path

Pre-Caching Other Folders and Files for Faster Navigation Chapter 7
[ 193 ]
path() {
return this.$store.state.path
}
},
methods: {
/**
* Dropbox API instance
* @return {object}
*/
dropbox() {
return new Dropbox({
accessToken: this.accessToken
});
},
/**
* @param {string} path The path to a folder
* @return {string} A cache-friendly URL without punctuation/symbals
*/
generateSlug(path) {
return path.toLowerCase()
.replace(/^\/|\/$/g, '')
.replace(/ /g,'-')
.replace(/\//g,'-')
.replace(/[-]+/g, '-')
.replace(/[^\w-]+/g,'');
},
/**
* Retrieve the folder structure form the cache or Dropbox API
* @param {string} path The folder path
* @return {Promise} A promise containing the folder data
*/
getFolderStructure(path) {
let output;
const slug = this.generateSlug(path),
data = this.$store.state.structure[slug];
if(data) {
output = Promise.resolve(data);
} else {
output = this.dropbox().filesListFolder({
path: path,
include_media_info: true
})
.then(response => {
let entries = response.entries;

Pre-Caching Other Folders and Files for Faster Navigation Chapter 7
[ 194 ]
this.$store.commit('structure', {
path: slug,
data: entries
});
return entries;
})
.catch(error => {
this.isLoading = 'error';
console.log(error);
});
}
return output;
},
/**
* Display the contents of getFolderStructure
* Updates the output to display the folders and folders
*/
displayFolderStructure() {
// Set the app to loading
this.isLoading = true;
// Create an empty object
const structure = {
folders: [],
files: []
}
// Get the structure
this.getFolderStructure(this.path).then(data => {
for (let entry of data) {
// Check ".tag" prop for type
if(entry['.tag'] == 'folder') {
structure.folders.push(entry);
} else {
structure.files.push(entry);
}
}
// Update the data object
this.structure = structure;
this.isLoading = false;
});
},
/**

Pre-Caching Other Folders and Files for Faster Navigation Chapter 7
[ 195 ]
* Loop through the breadcrumb and cache parent folders
*/
cacheParentFolders() {
let parents = this.$store.state.breadcrumb;
parents.reverse().shift();
for(let parent of parents) {
this.getFolderStructure(parent.path);
}
}
},
created() {
// Display the current path & cache parent folders
this.displayFolderStructure();
this.cacheParentFolders();
},
watch: {
// Update the view when the path gets updated
path() {
this.displayFolderStructure();
}
}
});
Let us also check the Vuex store:
/**
* The Vuex Store
*/
const store = new Vuex.Store({
state: {
// Current folder path
path: '',
// The current breadcrumb
breadcrumb: [],
// The cached folder contents
structure: {},
},
mutations: {
/**
* Update the path & breadcrumb components
* @param {object} state The state object of the store
*/
updateHash(state) {

Pre-Caching Other Folders and Files for Faster Navigation Chapter 7
[ 196 ]
let path = (window.location.hash.substring(1) || ''),
breadcrumb = [],
slug = '',
parts = path.split('/');
for (let item of parts) {
slug += item;
breadcrumb.push({'name': item || 'home', 'path': slug});
slug += '/';
}
state.path = path
state.breadcrumb = breadcrumb;
},
/**
* Cache a folder structure
* @param {object} state The state objet of the store
* @param {object} payload An object containing the slug and data to
store
*/
structure(state, payload) {
state.structure[payload.path] = payload.data;
}
}
});
We furthermore move to the Vue app:
/**
* The Vue app
*/
const app = new Vue({
el: '#app',
// Initialize the store
store,
// Update the current path on page load
mounted() {
store.commit('updateHash');
}
});

Pre-Caching Other Folders and Files for Faster Navigation Chapter 7
[ 197 ]
And in the end, we go through the window.onhashchange function:
/**
* Update the path & store when the URL hash changes
*/
window.onhashchange = () => {
app.$store.commit('updateHash');
}
Finally, the HTML from the view looks like this:
<div id="app">
<dropbox-viewer></dropbox-viewer>
</div>
And the template for the Dropbox viewer looks like this:
<script type="text/x-template" id="dropbox-viewer-template">
<div>
<h1>Dropbox</h1>
<transition name="fade">
<div v-if="isLoading">
<div v-if="isLoading == 'error'">
<p>There seems to be an issue with the URL entered.</p>
<p><a href="">Go home</a></p>
</div>
<div v-else>
Loading...
</div>
</div>
</transition>
<transition name="fade">
<div v-if="!isLoading">
<breadcrumb></breadcrumb>
<ul>
<template v-for="entry in structure.folders">
<folder :f="entry" :cache="getFolderStructure"></folder>
</template>
<template v-for="entry in structure.files">
<file :d="dropbox()" :f="entry"></file>
</template>
</ul>
</div>
</transition>
</div>
</script>

Pre-Caching Other Folders and Files for Faster Navigation Chapter 7
[ 198 ]
You will notice not everything has been documented. A simple function or variable
assignment doesn't need to re-explain what it does, but a note of the main variables will
help anyone looking at it in the future.
Summary
In this section of the book, we've covered quite a lot! We started with querying the Dropbox
API to get a list of files and folders. We then moved on to adding navigation, allowing the
user to click on folders and download files. We then introduced Vuex and the store into our
app, which meant we could centralize the path, breadcrumb, and most importantly, cache
the folder contents. Lastly, we looked at caching sub-folders and the file download link.
In the next section of the book, we are going to look at making a shop. This will include
browsing products in a category and product pages using a new Vue plugin called Vue
router. We will also look at adding products to a basket and storing both the product list
and preferences in the Vuex store.

8
Introducing Vue-Router and
Loading URL-Based
Components
In the next few chapters, we are going to be creating a shop interface. This shop is going to
combine everything we have learned so far while introducing some more techniques,
plugins, and functionality. We are going to look at retrieving a list of products from a CSV
file, displaying them and their variations, and filtering the products by manufacturer or
tags. We will also look at creating a product detail view and allowing the user to add and
remove products and product variations, such as size or color, to their online shopping
basket.
All of this will be achieved using Vue, Vuex, and a new Vue plugin, Vue-router. Vue-router
is used for building Single Page Applications (SPAs) and allows you to map components
to URLs, or in VueRouter terms, routes, and paths. This is an extremely powerful plugin
and handles a lot of the intricate details required for the processing of URLs.
This chapter is going to cover:
Initializing Vue-router and its options
Creating links with Vue-router
Making dynamic routes to update the View based on URL
Using props with URLs
Nesting and naming routes
How to navigate programmatically with Vue-router

Introducing Vue-Router and Loading URL-Based Components Chapter 8
[ 200 ]
Installing and initializing Vue-router
Similar to how we added Vue and Vuex to our applications, you can either directly include
the library from unpkg, or head to the following URL and download a local copy for
yourself: https://unpkg.com/Vue-router. Add the JavaScript to a new HTML document,
along with Vue, and your application's JavaScript. Create an application container element,
your view, as well. In the following example, I have saved the Vue-router JavaScript file as
router.js:
<!DOCTYPE html>
<html>
<head>
<title></title>
</head>
<body>
<div id="app"></div>
<script type="text/javascript" src="js/vue.js"></script>
<script type="text/javascript" src="js/router.js"></script>
<script type="text/javascript" src="js/app.js"></script>
</body>
</html>
Initialize a new Vue instance in your application JavaScript:
new Vue({
el: '#app'
});
We are now ready to add VueRouter and utilize its power. Before we do that, however, we
need to create some very simple components which we can load and display based on the
URL. As we are going to be loading the components with the router, we don't need to
register them with Vue.component, but instead create JavaScript objects with the same
properties as we would a Vue component.
For this first exercise, we are going to create two pages—Home and About pages. Found on
most websites, these should help give you context as to what is loading where and when.
Create two templates in your HTML page for us to use:
<script type="text/x-template" id="homepage">
<div>
<h1>Hello & Welcome</h1>
<p>Welcome to my website. Feel free to browse around.</p>
</div>
</script>

Introducing Vue-Router and Loading URL-Based Components Chapter 8
[ 201 ]
<script type="text/x-template" id="about">
<div>
<h1>About Me</h1>
<p>Lorem ipsum dolor sit amet, consectetur adipiscing elit. Vivamus sed
metus magna. Vivamus eget est nisi. Phasellus vitae nisi sagittis, ornare
dui quis, pharetra leo. Nullam eget tellus velit. Sed tempor lorem augue,
vitae luctus urna ultricies nec. Curabitur luctus sapien elit, non pretium
ante sagittis blandit. Nulla egestas nunc sit amet tellus rhoncus, a
ultrices nisl varius. Nam scelerisque lacus id justo congue maximus. Etiam
rhoncus, libero at facilisis gravida, nibh nisi venenatis ante, sit amet
viverra justo urna vel neque.</p>
<p>Curabitur et arcu fermentum, viverra lorem ut, pulvinar arcu. Fusce
ex massa, vehicula id eros vel, feugiat commodo leo. Etiam in sem rutrum,
porttitor velit in, sollicitudin tortor. Interdum et malesuada fames ac
ante ipsum primis in faucibus. Donec ac sapien efficitur, pretium massa at,
vehicula ligula. Vestibulum turpis quam, feugiat sed orci id, eleifend
pretium urna. Nullam faucibus arcu eget odio venenatis ornare.</p>
</div>
</script>
Don't forget to encapsulate all your content in one "root" element
(represented here by the wrapping <div> tags). You also need to ensure
you declare the templates before your application JavaScript is loaded.
We've created a Home page template, with the id of homepage, and an About page,
containing some placeholder text from lorem ipsum, with the id of about. Create two
components in your JavaScript which reference these two templates:
const Home = {
template: '#homepage'
};
const About = {
template: '#about'
};
The next step is to give the router a placeholder to render the components in the view. This
is done by using a custom <router-view> HTML element. Using this element gives you
control over where your content will render. It allows us to have a header and footer right
in the app view, without needing to deal with messy templates or includes the components
themselves.

Introducing Vue-Router and Loading URL-Based Components Chapter 8
[ 202 ]
Add a header, main, and footer element to your app. Give yourself a logo in the header
and credits in the footer; in the main HTML element, place the router-view placeholder:
<div id="app">
<header>
<div>LOGO</div>
</header>
<main>
<router-view></router-view>
</main>
<footer>
<small>© Myself</small>
</footer>
</div>
Everything in the app view is optional, except the router-view, but it gives you an idea of
how the router HTML element can be implemented into a site structure.
The next stage is to initialize the Vue-router and instruct Vue to use it. Create a new
instance of VueRouter and add it to the Vue instance—similar to how we added Vuex in
the previous section:
const router = new VueRouter();
new Vue({
el: '#app',
router
});
We now need to tell the router about our routes (or paths), and what component it should
load when it encounters each one. Create an object inside the Vue-router instance with a
key of routes and an array as the value. This array needs to include an object for each
route:
const router = new VueRouter({
routes: [
{
path: '/',
component: Home
},
{

Introducing Vue-Router and Loading URL-Based Components Chapter 8
[ 203 ]
path: '/about',
component: About
}
]
});
Each route object contains a path and component key. The path is a string of the URL that
you want to load the component on. Vue-router serves up components based on a first-
come-first-served basis. For example, if there are several routes with the same path, the first
one encountered is used. Ensure each route has the beginning slash—this tells the router it
is a root page and not a sub-page, we will cover sub-pages later on in the chapter.
Press save and view your app in the browser. You should be presented with the content of
the Home template component. If you observe the URL, you will notice that on page load a
hash and forward slash (#/) is appended to the path. This is the router creating a method
for browsing the components and utilizing the address bar. If you change this to the path of
your second route, #/about, you will see the contents of the About component.
Vue-router is also able to use the JavaScript history API to create prettier URLs. For
example, yourdomain.com/index.html#about would
become yourdomain.com/about. This is activated by adding mode: 'history' to your
VueRouter instance:
const router = new VueRouter({
mode: 'history',
routes: [
{
path: '/',
component: Home
},
{
path: '/about',
component: About
}
]
});
However, it also requires some server configuration to catch all requests and redirect them
to your index.html page, which is beyond the scope of this book but is fully outlined in
the Vue-router documentation.

Introducing Vue-Router and Loading URL-Based Components Chapter 8
[ 204 ]
Changing the folder for Vue-router
There may be scenarios where you want to host your Vue app in a sub-folder of your
website. In this instance, you will need to declare the base folder of your project so Vue-
router can construct, and listen out for, the correct URLs.
For example, if your app was based on a /shop/ folder, you would declare it using the
base parameter on the Vue-router instance:
const router = new VueRouter({
base: '/shop/',
routes: [
{
path: '/',
component: Home
},
{
path: '/about',
component: About
}
]
});
The value of this needs the slash at both the beginning and end.
Along with base, there are several other configuration options available for Vue-router—it
is well worth being familiar with them, as they may solve a problem you have later on.
Linking to the different routes
With the router working as expected, we can now proceed with adding links into our
application, allowing the user to navigate around the website. Links can be achieved in two
ways: we can use a conventional <a href="#/about"> tag, or alternatively we can utilize
a new HTML element provided with the router of <router-link to="/about">. When
using the router-link element, it works the same as an <a> tag, and in fact gets converted to
one when running in the browser, but allows a lot more customization and integration with
the router.

Introducing Vue-Router and Loading URL-Based Components Chapter 8
[ 205 ]
It is highly advised to use the router-link element wherever possible, as it carries several
advantages over the standard link:
Mode changes: The first advantage is linked to the mode of the router. Using the
router link allows you to change the mode of your router, say from hash to
history, and not have to change every single link in your app.
CSS classes: Another advantage that comes with using the router link is a CSS
class that gets applied to links active in the "tree" and pages which are currently
being viewed. Links in the tree are parent pages which also include the root page
(for example, any links to "/" will always have the active class). This is one of the
big benefits of using the router, as adding and removing these classes manually
would require complex coding. These classes can be customized and we will do
that later.
URL parameters and named routes: The other advantage to using the router
element is the power it gives you over using named routes and passing URL
parameters. This further allows you to have one source of truth for the URL of a
page and use names and shortcuts to reference a route. More on this will be
covered later in the chapter.
Add the links to your pages within your view so you can navigate between pages. Within
the <header> of your website, create a new <nav> element that contains an unordered list.
For each page, add a new list item with a router-link element inside. Add a to attribute
to the link path:
<nav>
<ul>
<li>
<router-link to="/">Home</router-link>
</li>
<li>
<router-link to="/about">About</router-link>
</li>
</ul>
</nav>
Viewing the app in the browser should show your two links, allowing you to switch
between the two content pages. You will also notice that, by clicking the link, the URL
updates too.

Introducing Vue-Router and Loading URL-Based Components Chapter 8
[ 206 ]
If you inspect the links with the browser's HTML inspector, you will notice the change in
CSS classes. The Home link will always have a class of router-link-active—this is
because it is either active itself, or it has an active child, such as the About page. There is
another CSS class which gets added and removed as you navigate between the two
pages—router-link-exact-active. This only gets applied to the links on the currently
active page.
Let's customize the classes that get applied to the view. Head to the initialization of the
router in your JavaScript and add two new keys to the object - linkActiveClass
and linkExactActiveClass:
const router = new VueRouter({
routes: [
{
path: '/',
component: Home
},
{
path: '/about',
component: About
}
],
linkActiveClass: 'active',
linkExactActiveClass: 'current'
});
The keys should be fairly self-explanatory, but linkExactActiveClass gets applied to the
current page, the one being viewed, while linkActiveClass is the class that gets applied
when the page, or one of its children, is active.
Linking to sub-routes
There may be times you want to have links to children pages. For example /about/meet-
the-team. Fortunately, there is not much work required to get this working. Create a new
object in the routes array, pointing to a new component with a template:
const router = new VueRouter({
routes: [
{
path: '/',
component: Home
},
{
path: '/about',

Introducing Vue-Router and Loading URL-Based Components Chapter 8
[ 207 ]
component: About
},
{
path: '/about/meet-the-team',
component: MeetTheTeam
}
],
linkActiveClass: 'active',
linkExactActiveClass: 'current'
});
When navigating to this page, you will notice both the Home and About links have the
active class and neither have the current class we created. If you were to create a link in
your navigation to this page, a current class would be applied to that.
Dynamic routes with parameters
Vue router easily allows you to have dynamic URLs. A dynamic URL allows you to use the
same component to display different data while using the same template. An example of
this would be for a shop, where all the category pages look the same but display different
data based on the URL. Another example would be a product detail page—you don't want
to have to create a component for every product, so instead, you use one component with a
URL parameter.
URL parameters can appear anywhere in the path, and there can be one or many. Each
parameter gets assigned a key, so it can be created and accessed consistently. We'll go into
dynamic routes and parameters in more detail during Chapter 9, Using Vue-Router Dynamic
Routes to Load Data. For now, we'll build a basic example.
Before we head into creating the component, let's examine a new variable available to
us—this.$route. In a similar way to how we accessed the global store with Vuex, this
variable allows us to access a lot of information about the routes, URLs, and parameters.
In your Vue instance, as a test, add a mounted() function. Inside console.log, insert the
this.$route parameter:
new Vue({
el: '#app',
router,
mounted() {
console.log(this.$route);
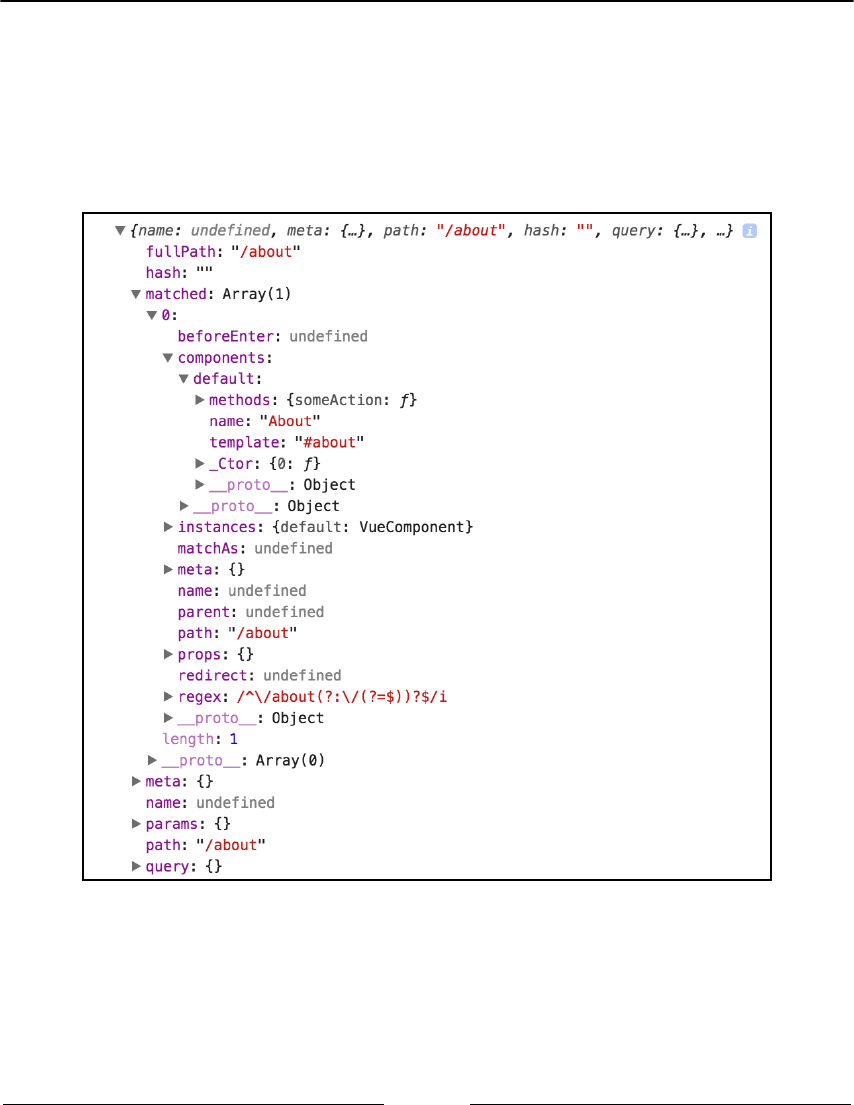
Introducing Vue-Router and Loading URL-Based Components Chapter 8
[ 208 ]
}
});
If you open up your browser and look at the developer tools, you should see an object
being output. Viewing this object will reveal several bits of information, such as the path
and the components which match the current path. Heading to the /about URL will reveal
different information about the object:

Introducing Vue-Router and Loading URL-Based Components Chapter 8
[ 209 ]
Let's create a component that uses the parameters from this object. Create a new object in
your routes array:
const router = new VueRouter({
routes: [
{
path: '/',
component: Home
},
{
path: '/about',
component: About
},
{
path: '/user/:name',
component: User
}
],
linkActiveClass: 'active',
linkExactActiveClass: 'current'
});
The thing you'll notice that is different with this path is the colon preceding the name in the
path. This tells Vue-router that this part of the URL is dynamic, but the variable name for
that section is name.
Now create a new component called User, and create a template for it. For this example,
our template will be inline and we will be using the ES2015 template syntax. This uses
backticks and allows the passing of variables and new lines directly into the template
without the need to escape them:
const User = {
template: `<h1>Hello {{ $route.params.name }}</h1>`
};
The variable being output within the template is from the global router instance and is the
name variable within the parameters object. The variable name references the
variable preceded by the colon in the route path, within the routes array. Within the
component template, we can also omit this variable from the $route.

Introducing Vue-Router and Loading URL-Based Components Chapter 8
[ 210 ]
Head back to your browser and enter #/user/sarah at the end of your URL. You should
see Hello sarah in the main body of your web page. Viewing the JavaScript browser
console, you should see the params object has a key/value pair of name: sarah within it:
This variable is also available to us within the component itself. For example, if we wanted
to capitalize the first letter of our user's name, we could make a computed variable which
takes the route parameter and transforms it:
const User = {
template: `<h1>Hello {{ name }}</h1>`,
computed: {
name() {
let name = this.$route.params.name;
return name.charAt(0).toUpperCase() + name.slice(1);
}
}
};
If you're not familiar with what the preceding code is doing, it takes the first character of
the string and makes it uppercase. It then splits the string after the first character (that is,
the rest of the word) and appends it on the uppercase letter.
Adding this computed function and refreshing the app will yield Hello sarah.
As mentioned, the route can accept as many parameters as you want and can be separated
by static or dynamic variables.
Changing the path to the following (while keeping the component name the same):
/:name/user/:emotion

Introducing Vue-Router and Loading URL-Based Components Chapter 8
[ 211 ]
Would mean you would need to go to /sarah/user/happy to see the user component.
You would, however, have access to a new parameter titled emotion, which means you
could use the following template to render sarah is happy!:
const User = {
template: `<h1>{{ name }} is {{ $route.params.emotion }}</h1>`,
computed: {
name() {
let name = this.$route.params.name;
return name.charAt(0).toUpperCase() + name.slice(1);
}
}
};
const router = new VueRouter({
routes: [
{
path: '/',
component: Home
},
{
path: '/about',
component: About
},
{
path: '/:name/user/:emotion',
component: User
}
],
linkActiveClass: 'active',
linkExactActiveClass: 'current'
});
Dynamic routes will come in handy when we come to build our shop over the next few
chapters, as we'll be using it for both products and categories.
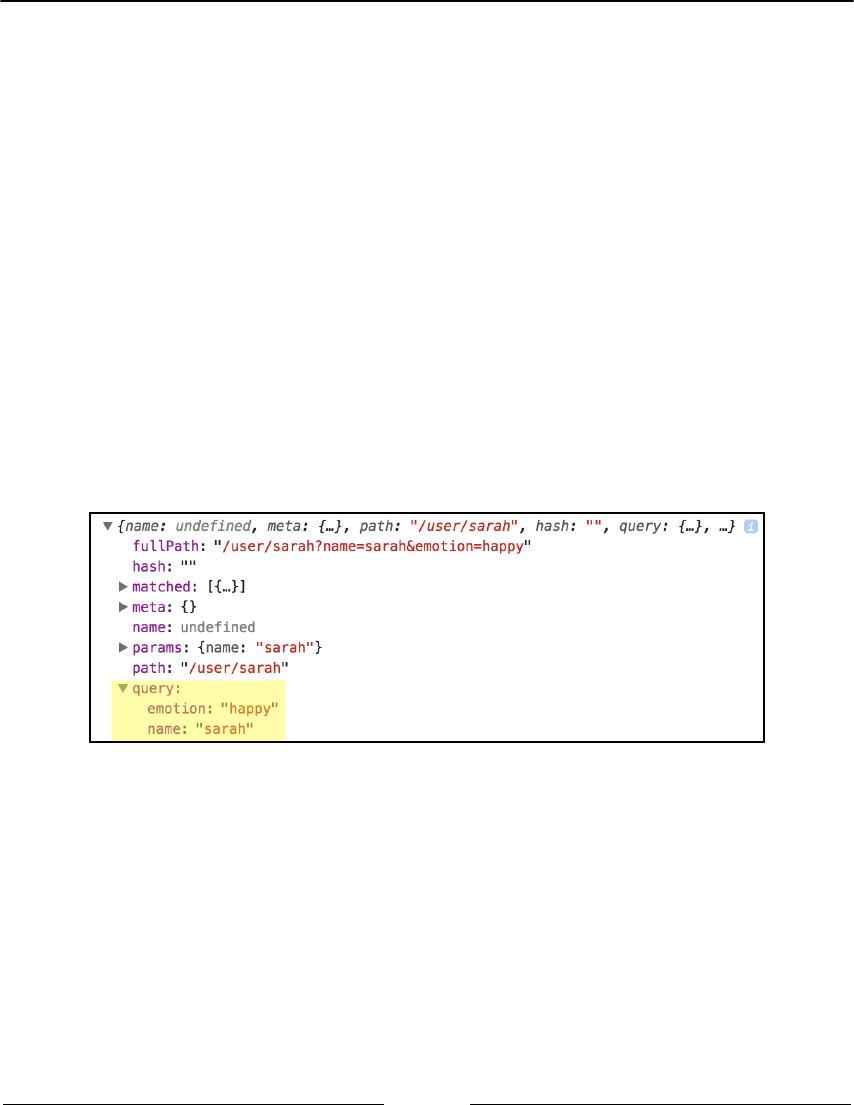
Introducing Vue-Router and Loading URL-Based Components Chapter 8
[ 212 ]
GET parameters
Along with the dynamic routes, Vue-router handles GET parameters in a really simple way.
GET parameters are extra URL parameters you can pass to a web page that appear as
key/value pairs. With GET parameters, the first one is preceded by a ?—this tells the
browser to expect parameters. Any further parameters are separated by an ampersand. An
example would be:
example.com/?name=sarah&emotion=happy
This URL would yield sarah as the value of name and happy as the value for emotion.
They are normally used for filtering or search—next time you search for something on
Google, take a look at the URL and you will notice ?q=Your+search+query in the address
bar.
Vue router makes these parameters available to the developer within the query object in
the this.$route variable. Try adding ?name=sarah to the end of your URL and opening
the JavaScript developer tool. Inspecting the query object will reveal an object with name as
the key and sarah as the value:
We'll be using the query object when we build the filtering in our shop categories.
Using props
Although using router parameters directly within the component works perfectly fine, it is
not good practice as it ties the component directly to the route. Instead, props should be
used—in the same way, we used them earlier in the book for HTML components. When
enabled and declared, the parameter passed in via the URL becomes available to use as
though it had been passed in via an HTML attribute.

Introducing Vue-Router and Loading URL-Based Components Chapter 8
[ 213 ]
Using props for your route component is a better way to pass options and parameters into
your route, as it has many benefits. Firstly, it decouples the component from a specific URL
structure—as you'll see, we can pass props straight to the component itself. It also helps
make your route component clearer; the incoming parameters are clearly laid out within
the component itself, and the code is cleaner throughout the component.
Props only work with the dynamic routes—GET parameters would still be accessed with
the preceding technique.
Using the preceding example, declare the props for both the name and emotion
parameters. When using props with a URL-based variable, you will want to use the String
data type:
const User = {
template: `<h1>{{ name }} is {{ $route.params.emotion }}</h1>`,
props: {
name: String,
emotion: String
},
computed: {
name() {
let name = this.$route.params.name;
return name.charAt(0).toUpperCase() + name.slice(1);
}
}
};
We now have this.name available to us twice—through the props and through the
computed value. However, as we have this.name and this.emotion via the props, we
can update our component to use these variables, rather than the $route parameters.
To avoid conflicts with the prop, update the computed function to be called
formattedName(). We can also remove the variable declaration from the function, as the
new variable is a lot more readable:
const User = {
template: `<h1>{{ formattedName }} is {{ this.emotion }}</h1>`,
props: {
name: String,
emotion: String
},
computed: {
formattedName() {
return this.name.charAt(0).toUpperCase() + this.name.slice(1);
}
}

Introducing Vue-Router and Loading URL-Based Components Chapter 8
[ 214 ]
};
Before the props work, Vue-router needs to be told to use them with a particular route.
This is enabled within the routes array, on a route-by-route basis and, initially, is set with
a props: true value:
const router = new VueRouter({
routes: [
{
path: '/',
component: Home
},
{
path: '/about',
component: About
},
{
path: '/:name/user/:emotion',
component: User,
props: true
}
],
linkActiveClass: 'active',
linkExactActiveClass: 'current'
});
Setting prop defaults
With the route parameters now available as props, this gives us the flexibility of easily
creating a default. If we had wanted to make a parameter optional, we would have needed
to add several if() statements to check the existence of the variables.
With props, however, we can declare defaults as we did earlier. Add a default for the
emotion variable:
const User = {
template: `<h1>{{ formattedName }} is {{ this.emotion }}</h1>`,
props: {
name: String,
emotion: {
type: String,
default: 'happy'
}
},
computed: {

Introducing Vue-Router and Loading URL-Based Components Chapter 8
[ 215 ]
formattedName() {
return this.name.charAt(0).toUpperCase() + this.name.slice(1);
}
}
};
We can now create a new route within our router, which uses the same component without
the final variable. Don't forget to enable props for the new route too:
const router = new VueRouter({
routes: [
{
path: '/',
component: Home
},
{
path: '/about',
component: About
},
{
path: '/:name/user',
component: User,
props: true
},
{
path: '/:name/user/:emotion',
component: User,
props: true
}
],
linkActiveClass: 'active',
linkExactActiveClass: 'current'
});
Now, by visiting /sarah/user, we should be presented with text that declares sarah is
happy.

Introducing Vue-Router and Loading URL-Based Components Chapter 8
[ 216 ]
Using static props
Along with a Boolean value, the props parameter in the route can also accept an object with
a list of the props to pass. This allows you to utilize the same component and alter its state
based on the URL, without requiring the variables to be passed via the path for example, if
you want to activate or deactivate part of the template.
When passing the props object in via the URL, it overwrites the whole
props object, meaning you either have to declare none or all of them. The
props variables will also take priority over the dynamic, URL-based
variables.
Update your new /:name/user path to include the props in the route - remove the :name
variable from the path so it becomes just /user:
const router = new VueRouter({
routes: [
{
path: '/',
component: Home
},
{
path: '/about',
component: About
},
{
path: '/user',
component: User,
props: {
name: 'Sarah',
emotion: 'happy'
}
},
{
path: '/:name/user/:emotion',
component: User,
props: true
}
],
linkActiveClass: 'active',
linkExactActiveClass: 'current'
});

Introducing Vue-Router and Loading URL-Based Components Chapter 8
[ 217 ]
Navigating to /user should reveal the same sentence as we had before. Passing props
"behind the scenes" (not using the URL) is ideal in some scenarios where you may not want
the user to share the specific URL or alter the app's state based on easily altered parameters.
Nested routes
Nested routes differ from sub-routes as they exist within a component already matching the
beginning part of a route. This allows you to show different content within an existing
view.
A good example of this would be Twitter. If you visit a Twitter user's profile page, you are
able to view who they are following, who follows them, and what lists they've created. If
you observe the URL while you navigate through the pages, you will notice a recurring
pattern: the username followed by the different page. The difference between nested routes
and sub-routes is that nested routes allow you to keep components the same throughout
the different sub-pages (for example, the header and sidebar).
The advantages of this are that the user can bookmark and share the link, it makes the page
more accessible, and is good for SEO reasons. None of these advantages could be easily
achieved using simple toggle or tab boxes to show different content in the view.
To reproduce the Twitter pattern into a Vue route, it would look like the following:
https://twitter.com/:user/:page
If we were to create this with the previous route method, we would have to build
components for each page which contain the header and user information in the sidebar in
their templates—that would be a pain if you needed to update the code!
Let's make some nested routes for our About page. We won't be using nested routes in our
shop app, but it's important to understand the capabilities of Vue router.
Create two new components—AboutContact, which will display contact information, and
AboutFood, a component that will detail the food you like to eat! Although not required,
it's a good idea to keep a reference to the parent component (in this case, About) in the
component name—this ties together the components when you come to look at them later
on! Give each component a template with some fixed content:
const AboutContact = {
template: `<div>
<h2>This is some contact information about me</h2>
<p>Find me online, in person or on the phone</p>
</div>`

Introducing Vue-Router and Loading URL-Based Components Chapter 8
[ 218 ]
};
const AboutFood = {
template: `<div>
<h2>Food</h2>
<p>I really like chocolate, sweets and apples.</p>
</div>`
};
The next step is to create the placeholder in your #about template for the nested routes to
render in. The element is exactly the same as one we've seen before—the <router-view>
element. To demonstrate that this can be placed anywhere, add it between two paragraphs
in your template:
<script type="text/x-template" id="about">
<div>
<h1>About Me</h1>
<p>Lorem ipsum dolor sit amet, consectetur adipiscing elit. Vivamus sed
metus magna. Vivamus eget est nisi. Phasellus vitae nisi sagittis, ornare
dui quis, pharetra leo. Nullam eget tellus velit. Sed tempor lorem augue,
vitae luctus urna ultricies nec. Curabitur luctus sapien elit, non pretium
ante sagittis blandit. Nulla egestas nunc sit amet tellus rhoncus, a
ultrices nisl varius. Nam scelerisque lacus id justo congue maximus. Etiam
rhoncus, libero at facilisis gravida, nibh nisi venenatis ante, sit amet
viverra justo urna vel neque.</p>
<router-view></router-view>
<p>Curabitur et arcu fermentum, viverra lorem ut, pulvinar arcu. Fusce
ex massa, vehicula id eros vel, feugiat commodo leo. Etiam in sem rutrum,
porttitor velit in, sollicitudin tortor. Interdum et malesuada fames ac
ante ipsum primis in faucibus. Donec ac sapien efficitur, pretium massa at,
vehicula ligula. Vestibulum turpis quam, feugiat sed orci id, eleifend
pretium urna. Nullam faucibus arcu eget odio venenatis ornare.</p>
</div>
</script>
Viewing the About page in the browser won't render anything, nor will it break the app.
The next step is to add the nested routes for these components to the router. Rather than
adding them to the top level routes array, we create an array inside the /about
route—with the key of children. The syntax of this array is an exact replica of the main
array—that is, an array of route objects.

Introducing Vue-Router and Loading URL-Based Components Chapter 8
[ 219 ]
Add an object for each of the routes containing the path and component keys. The thing
to note about the path is that it shouldn't start with a / if you want the path to be added to
the end of the parent.
For example, if you wanted the URL to be /about/contact to render the AboutContact
component, you would make the route component like the following:
const router = new VueRouter({
routes: [
{
path: '/',
component: Home
},
{
path: '/about',
component: About,
children: [
{
path: 'contact',
component: AboutContact
},
{
path: 'food',
component: AboutFood
}
]
}
],
linkActiveClass: 'active',
linkExactActiveClass: 'current'
});
However, if you wanted the URL to be simply /contact, but still render the
AboutContact component inside the About component, you could add the preceding
slash. Try viewing the app without the slash, and then with it added, to see the difference it
makes. If you wanted a sub-route to show when the parent is loaded without a second part
of the URL, you would use an empty path—path: ''.
For now, leave it without the slash and add the preceding children array. Head to your
browser and navigate to the About page. Add /contact or /food to the end of the URL,
and notice the new content appear in place of the <router-link> element you added to
the template earlier.

Introducing Vue-Router and Loading URL-Based Components Chapter 8
[ 220 ]
Links can be created to these components from anywhere, in the same fashion that you
linked the Home and About pages. You can either add them to the about template, so they
only appear when that page has been navigated to, or add them to the main navigation in
your app view.
Creating a 404 page
When building an app or website, despite all good intentions, problems, issues, and
mistakes do happen. For this reason, it's a good idea to have error pages in place. The most
common page would be a 404 page—a message displayed when a link is incorrect or a page
has moved. 404 is the official HTTP code for page not found.
As mentioned earlier, Vue-router will match the routes based on a first-come-first-served
principle. We can use this to our advantage by using a wildcard (*) character as the last
route. As the wildcard matches every route, only URLs which have not matched a previous
route will be caught by this one.
Create a new component titled PageNotFound with a simple template, and add a new
route which uses the wildcard character as the path:
const PageNotFound = {
template: `<h1>404: Page Not Found</h1>`
};
const router = new VueRouter({
routes: [
{
path: '/',
component: Home
},
{
path: '/about',
component: About,
children: [
{
path: 'contact',
component: AboutContact
},
{
path: 'food',
component: AboutFood
}
]
},
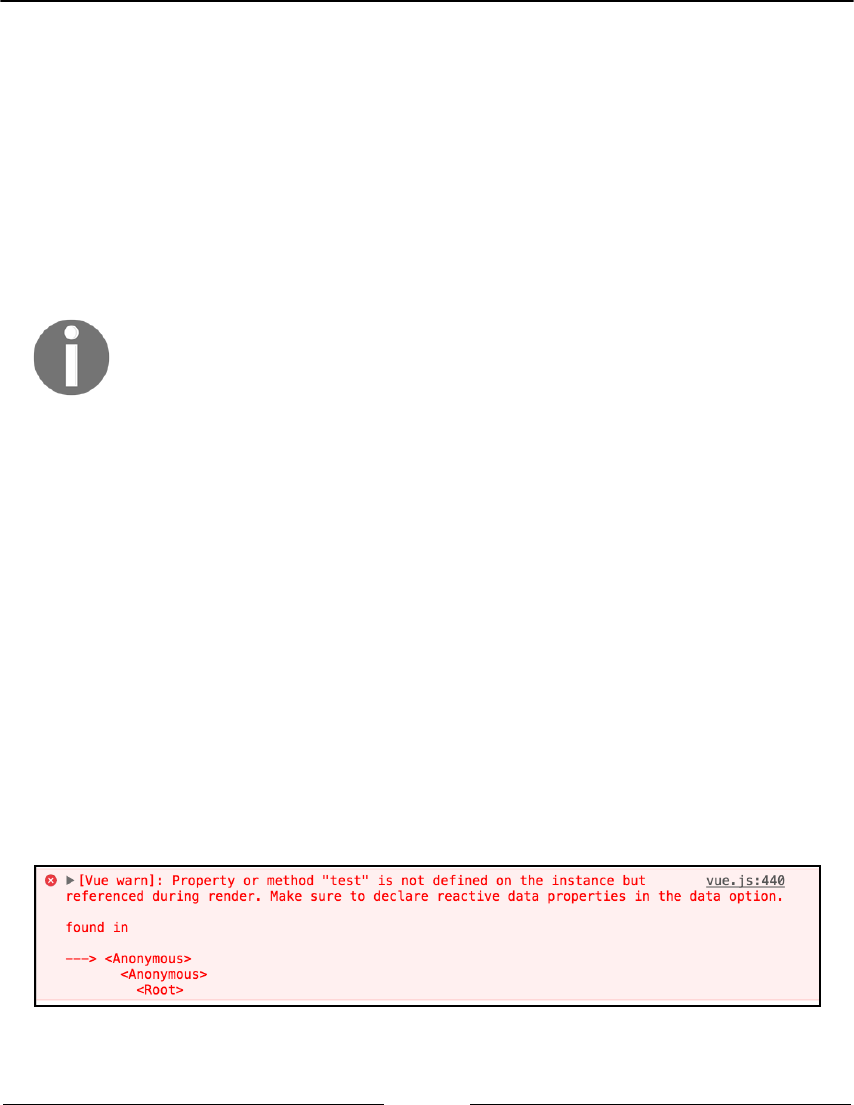
Introducing Vue-Router and Loading URL-Based Components Chapter 8
[ 221 ]
{
path: '*',
component: PageNotFound
}
],
linkActiveClass: 'active',
linkExactActiveClass: 'current'
});
Open the app up in the browser and type anything at the end of the URL (except about)
and press Enter—you should be presented with the 404 heading.
Although this is simulating a page not found request, it is not actually
sending the correct HTTP code to the browser. If you are using a Vue web
app in production it is a good idea to set up server-side error checking, so
in the instance of an incorrect URL the browser can be correctly notified.
Naming components, routes, and views
Adding names to your routes and components is not required when using Vue-router,
but is good practice to do so and a good habit to get into.
Naming components
Components with names allow you to debug your errors more easily. In Vue, when a
JavaScript error is thrown from a component, it will give you the name of that component,
rather than listing Anonymous as the component.
An example of this would be if you tried to output a variable of {{ test }} in the food
component—one that isn't available. By default, a JavaScript console error would look like
the following:
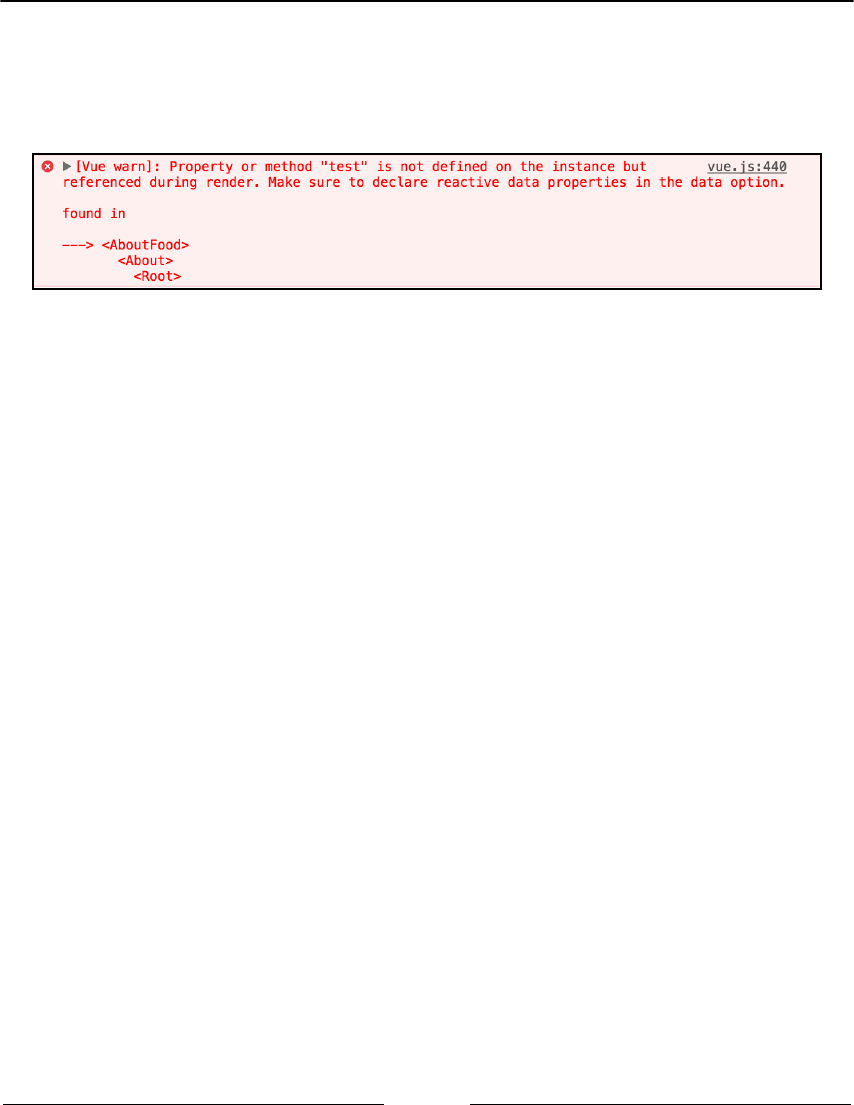
Introducing Vue-Router and Loading URL-Based Components Chapter 8
[ 222 ]
Note the two <Anonymous> components in the stack.
By adding names to our components, we can easily identify where the problem lies. Names
have been added to both the About and AboutFood components in the following example:
You can easily see the error is in the <AboutFood> component.
Adding a name to a component is as simple as adding a key of name to your object, with
the name as the value. These names adhere to the same rules as to when we were creating
our HTML element components: no spaces, but hyphens and letters are allowed. To allow
me to quickly identify the code, I chose to name my component the same as the variable
defining it:
const About = {
name: 'About',
template: '#about'
};
const AboutFood = {
name: 'AboutFood',
template: `<div>
<h2>Food</h2>
<p>I really like chocolate, sweets and apples.</p>
</div>`
}
Naming routes
Another object you are able to name when using VueRouter is the route itself. This gives
you the ability to simplify a route's location and update the path, without needing to find
and replace all the instances in the app.

Introducing Vue-Router and Loading URL-Based Components Chapter 8
[ 223 ]
Add the name key to your routes, as shown in the following example:
const router = new VueRouter({
routes: [
{
path: '/',
component: Home
},
{
path: '/about',
component: About,
children: [
{
name: 'contact',
path: 'contact',
component: AboutContact
},
{
name: 'food',
path: 'food',
component: AboutFood
}
]
},
{
path: '*',
component: PageNotFound
}
],
linkActiveClass: 'active',
linkExactActiveClass: 'current'
});
You can now use that name when creating your router-link component, like so:
<router-link :to="{name: 'food'}">Food</router-link>
Note the colon before the to attribute. This ensures the contents are parsed as an object, not
a literal string. Another advantage of using named routes is being able to pass specific
attributes to our dynamic paths. Using the example from earlier in this chapter, we can
build the URL in a programmatic way, abstracting the data away from the path
construction. This is where named routes really come into their own. Say we had the
following path:
{ name: 'user', path: '/:name/user/:emotion', component: User }

Introducing Vue-Router and Loading URL-Based Components Chapter 8
[ 224 ]
We need to pass in a name and emotion variable to the URL for the component to render.
We can pass in as we did before, directly to the URL or, alternatively, use the to object
notation with a named route:
<router-link :to="{name: 'user', params: { name: 'sarah', emotion: 'happy'
}}">
Sarah is Happy
</router-link>
Viewing this in the browser will show the anchor link has been generated correctly:
/sarah/user/happy
This gives us the flexibility to rearrange the URL, using the variables, without needing to
update the rest of the app. If you wanted to pass parameters at the end of the URL (for
example, ?name=sarah), the params key can be changed to query, as it follows the same
format:
<router-link :to="{name: 'user', query: { name: 'sarah', emotion: 'happy'
}}">
Sarah is Happy
</router-link>
With the path reconfigured not to accept parameters, it will generate the following link:
/user?name=sarah&emotion=happy
Be careful when interchanging params and query - as they can affect
whether you use path or name. When using path, the params object will
be ignored, whereas the query one will not. To use the params object, you
need to use a named route. Alternatively, pass the parameters into the
path with the $ variable.
Named views
Vue router also allows you to name the views, letting you pass in different components to
different sections of the app. An example of this might be a shop, where you have a sidebar
and main content area. Different pages may utilize these areas in different ways.
The About page may use the main content to show the About content while using the
sidebar to show contact details. The shop page, however, will use the main content to list
the products and the sidebar for displaying the filters.

Introducing Vue-Router and Loading URL-Based Components Chapter 8
[ 225 ]
To do this, create a second router-view element as a sibling to your original one. Leave
the original one in place, but add a name attribute to the second, with an appropriate title:
<main>
<router-view></router-view>
</main>
<aside>
<router-view name="sidebar"></router-view>
</aside>
When declaring your routes in the router instance, we are now going to use a new
key, components, and remove the previous singular component key. This accepts an object
with key-value pairs of the name of the view and the name of the component.
It's advisable to leave your main route unnamed, so you don't need to
update every route. If you decide to name your main route, you would be
required to do this next step for every route in your app.
Update the About route to use this new key and make it into an object. The next step is to
tell the code where each component will go.
Using default as the key, set the About component as the value. This puts the content from
the About component in your unnamed router-view, the main one. This is also what
using the singular component key is shorthand for:
const router = new VueRouter({
routes: [
{
path: '/',
component: Home
},
{
path: '/about',
components: {
default: About
}
},
{
path: '*',
component: PageNotFound
}
],
linkActiveClass: 'active',

Introducing Vue-Router and Loading URL-Based Components Chapter 8
[ 226 ]
linkExactActiveClass: 'current'
});
Next, add a second key-value, specifying the name of the second router-view, sidebar.
Name the component you want to populate this area when the /about URL is navigated
to. For this, we will use the AboutContact component:
const router = new VueRouter({
routes: [
{
path: '/',
component: Home
},
{
path: '/about',
components: {
default: About,
sidebar: AboutContact
}
},
{
path: '*',
component: PageNotFound
}
],
linkActiveClass: 'active',
linkExactActiveClass: 'current'
});
Running the app in your browser will render both components, with the contents of the
contact component appearing in the sidebar.
Programmatically navigating with,
redirecting, and adding an alias
While building your app, there may be situations that require some different navigation
techniques. These may be navigating programmatically, for example in a component or the
main Vue instance, redirecting users when they hit a specific URL, or loading the same
component with various URLs.

Introducing Vue-Router and Loading URL-Based Components Chapter 8
[ 227 ]
Navigating programmatically
You may want to alter the path, URL, or user flow from the code, a component, or action.
An example of this might be sending the user to the basket after they've added an item.
To do this, you use a push() function on the router instance. The value of push can either
be a string for a direct URL or it can accept an object to pass named routes or route
parameters. The allowed contents of the push function are exactly the same as the to=""
attribute on the router-link element. For example:
const About = {
name: 'About',
template: '#about',
methods: {
someAction() {
/* Some code here */
// direct user to contact page
this.$router.push('/contact');
}
}
};
Alternatively, you could direct to a named route with parameters:
this.$router.push({name: 'user', params: { name: 'sarah', emotion: 'happy'
}});
Redirecting
Redirecting using VueRouter is fairly straightforward. An example of a redirect might be if
you move your /about page to the /about-us URL. You will want to redirect the first
URL to the second, in case anyone has shared or bookmarked your link, or in case a search
engine has cached the URL.
You may be tempted to create a basic component which, when created, uses the
router.push() function to send the user to the new URL.

Introducing Vue-Router and Loading URL-Based Components Chapter 8
[ 228 ]
Instead, you can add a route and specify the redirect within that:
const router = new VueRouter({
routes: [
{
path: '/',
component: Home
},
{
path: '/about',
redirect: '/about-us'
},
{
path: '/about-us',
component: About
},
{
path: '*',
component: PageNotFound
}
],
linkActiveClass: 'active',
linkExactActiveClass: 'current'
});
Once again, the contents of the redirect key can be a literal string or an object—much like
the push() function. With the preceding, if the user visits /about, they will instantly be
redirected to /about-us and the About component shown.
Alias routes
There may be circumstances where you want to show the same component under two
URLs. Although not recommended as standard practice, there are some edge cases where
this is required.

Introducing Vue-Router and Loading URL-Based Components Chapter 8
[ 229 ]
The alias key gets added to an existing route and accepts just a string of the path. Using the
preceding example, the following will show the About component, whether the user visits
/about or /about-us:
const router = new VueRouter({
routes: [
{
path: '/',
component: Home
},
{
path: '/about',
alias: '/about-us',
component: About,
},
{
path: '*',
component: PageNotFound
}
],
linkActiveClass: 'active',
linkExactActiveClass: 'current'
});
Summary
You should now be familiar with Vue-router, how to initialize it, what options are
available, and how to create new routes—both static and dynamic. In the next few chapters,
we'll begin creating our shop, starting with loading some shop data and creating a product
page.

9
Using Vue-Router Dynamic
Routes to Load Data
In Chapter 8, Introducing Vue-Router and Loading URL-Based Components, we explored Vue-
router and its capabilities and functionality. With that knowledge, we can now progress on
to making our shop with Vue. Before we jump into the code and start creating, we should
first plan how our shop is going to work, what URLs we need, and what components we
need to make. Once we've planned our app we can move on to creating a product page.
In this chapter, we are going to:
Outline our components and routes, and create placeholder files
Load a product CSV file, process it, and cache in Vuex
Create an individual product page with images and product variations
Outline and plan your app
First, let's think about the overall app and the user flow.
We are going to be creating a shop without a payment processing gateway. The shop
homepage will display a hand-picked list of products. The user will be able to browse the
products using categories and narrow down the selection using filters we've made. They
will be able to select a product and view more details about it. The product will have
variations (size, color, and such) and may have several product images. The user will be
able to add a variation to their basket. From there, they can either continue browsing the
products and add more to their basket, or proceed to checkout, where they will be asked for
their name and address, and to pay. An order confirmation screen will be shown.
Using Vue-Router Dynamic Routes to Load Data Chapter 9
[ 231 ]
The whole shop app will be created in Vue and will run client-side. This will not cover any
server-side code needed for payment, user accounts, stock management, or validation.
The app will use Vue-router for handling URLs and Vuex for storing products, basket
contents, and user details.
Components
With a user flow outlined, we need to plan which components we need to make for our
shop and what they will be called. This helps with developing the app, as we have a clear
idea of what components we need to create. We will also decide on the component names.
Following the Vue style guide (https://vuejs.org/v2/style-guide/index.html), all our
components will consist of two names.
Route components
The following components will be used in conjunction with Vue-router to form the pages
for our app:
Shop homepage—HomePage: The shop homepage will display a list of products
that are curated by the shop owner. This will use a pre-selected list of product
handles to display.
Category page—CategoryPage: This will list the products from a specific
category. The category listing page will also have filters.
Product page—ProductPage: The product page will display product details,
images, and variations of the product.
Basket—OrderBasket: In the basket, the user will be able to review the
products they've added, remove unwanted items, and alter the quantity of each
item. It will also show the overall cost of the order.
Checkout—OrderCheckout: The checkout will lock down the basket – taking
away the ability to remove and update products, and will have a form for the
user to enter their address.
Order confirmation—OrderConfirmation: This component will be displayed
after the order has been placed, confirming the products purchased, the delivery
address, and the total price.
404 page—PageNotFound: An error page when an incorrect URL is entered.
Using Vue-Router Dynamic Routes to Load Data Chapter 9
[ 232 ]
HTML components
The HTML components will be used within the page components to help reduce repetition
in our code for recurring layouts:
Product in a list—ListProducts: This will display a paginated list of products
when viewing in a list view – such as in the HomePage or CategoryPage
components.
Category listing—ListCategories: This will create a list of categories for
navigation.
List of Purchases—ListPurchases: This component will appear in the basket,
checkout, and order confirmation page; it will list the products in a table form –
detailing the variation, price, and quantity. It will also feature the total price of all
the products in the basket.
Filtering—ProductFiltering: A component used on the side of a category
page will offer the user the ability to filter and will update the URL, using the
GET parameters we covered in Chapter 8, Introducing Vue-Router and Loading
URL-Based Components.
Paths
With our components outlined, we can plan the paths and URLs to our shop, and which
components or actions they are going to take. We also need to consider erroneous URLs
and whether we should redirect the user to a suitable place or display an error message:
/: Home
/category/:slug: CategoryPage, using the :slug unique identifier to
identify which products to show
/category: This will redirect to /
/product/:slug: ProductPage – once again, using the :slug to identify the
product
/product: This will redirect to /
/basket: OrderBasket
/checkout: OrderCheckout – if there are no products, however, it will redirect
the user to /basket
/complete: OrderConfirmation – if the user did not come from
the OrderCheckout component, then they will be redirected to /basket
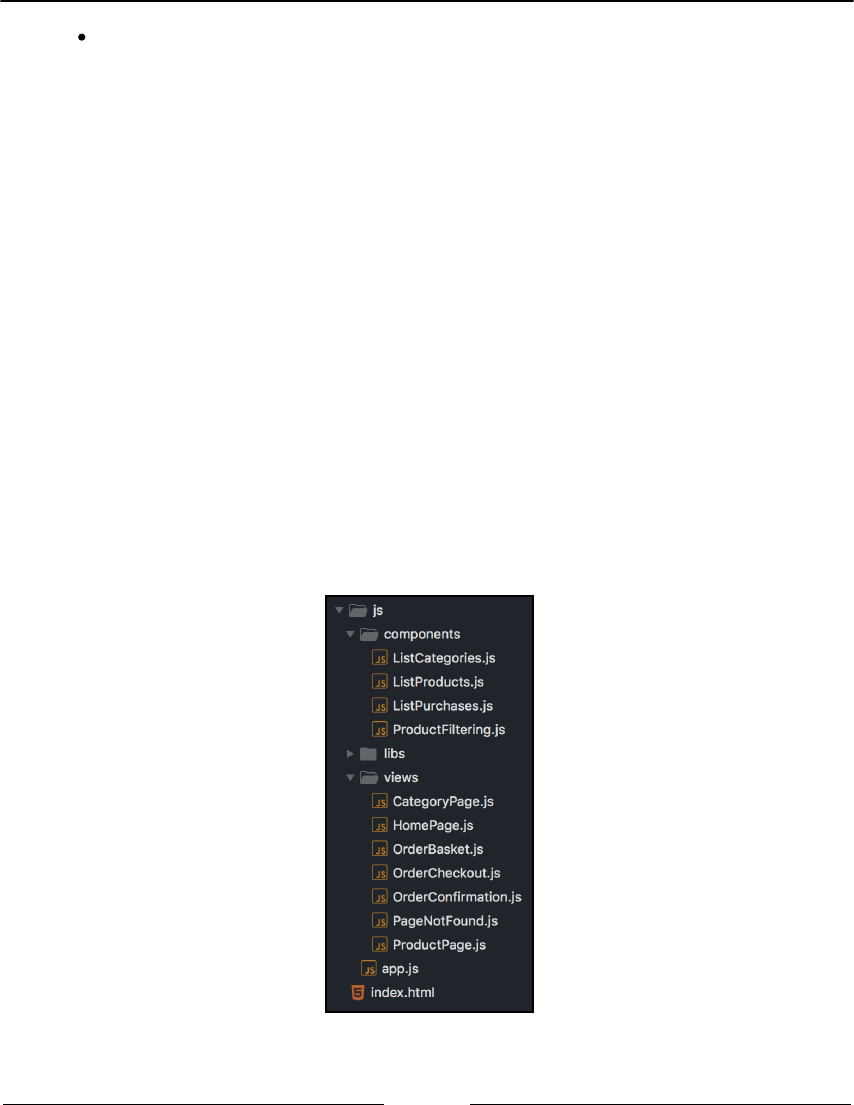
Using Vue-Router Dynamic Routes to Load Data Chapter 9
[ 233 ]
*: PageNotFound – this will catch any unspecified routes
With our routes and components decided upon, we can begin to create our app.
Create initial files
With the app outlined in the preceding section, we can create the skeletons for our file
structure and components. With this app being a large-scale app, we are going to split our
files into individual files for each component. This means our files are much more
manageable and our main app JavaScript file does not grow out of control.
Although acceptable for development, deploying an app with this number of files could
potentially increase your load times depending on how your server is set up. With the
traditional HTTP/1.1, browsers have to request and load each file – which is a hindrance if
there are multiple files. However, with HTTP/2, you are able to push several files to the
user at the same time – in which case, multiple files can somewhat improve the
performance of your app.
Whichever method you choose to use with your deployment, it is highly advised you
minify your JavaScript when deploying the code to a production environment. This ensures
your code is as small as possible when being served up to your user:

Using Vue-Router Dynamic Routes to Load Data Chapter 9
[ 234 ]
Create a file for each component, view, and library, such as Vue, Vuex, and Vue-router.
Then, create a folder for each type of file. Finally, add an app.js—which is where the
libraries will be initialized.
You may also consider using the
vue-cli (https://github.com/vuejs/vue-cli) for building your app.
Beyond the scope of this book, as we only cover building a Vue app using
the included JavaScript files, the vue-cli application allows you to develop
your app in a more modular way and, once developed, deploy it in a
similar fashion to how we have been developing the app.
Create an index.html and include your JavaScript files, ensuring Vue is loaded first and
your app's JavaScript last. Add a container for your app to form the view of our shop:
<!DOCTYPE html>
<html>
<head>
<title>Vue Shop</title>
</head>
<body>
<div id="app"></div>
<!-- Libraries -->
<script type="text/javascript" src="js/libs/vue.js"></script>
<script type="text/javascript" src="js/libs/vuex.js"></script>
<script type="text/javascript" src="js/libs/router.js"></script>
<!-- Components -->
<script src="js/components/ListCategories.js"></script>
<script src="js/components/ListProducts.js"></script>
<script src="js/components/ListPurchases.js"></script>
<script src="js/components/ProductFiltering.js"></script>
<!-- Views -->
<script src="js/views/PageNotFound.js"></script>
<script src="js/views/CategoryPage.js"></script>
<script src="js/views/HomePage.js"></script>
<script src="js/views/OrderBasket.js"></script>
<script src="js/views/OrderCheckout.js"></script>
<script src="js/views/OrderConfirmation.js"></script>
<script src="js/views/ProductPage.js"></script>
<!-- App -->
<script type="text/javascript" src="js/app.js"></script>
</body>
</html>

Using Vue-Router Dynamic Routes to Load Data Chapter 9
[ 235 ]
Ensure the PageNotFound component is loaded first, as we are going to
be utilizing it within other components, as well as specifying it as the 404
page in our routes.
Within each file, initialize the type of component it's going to be by either declaring a
variable or using Vue.component. For the views, add a name attribute too – to help with
debugging later on.
For example, all of the files located in the js/components/ folder should be initialized like
the following. Make sure these components are lowercase and are hyphenated:
Vue.component('list-products', {
});
Whereas the components for the routes and views, located in js/views, should look like
the following:
const OrderConfirmation = {
name: 'OrderConfirmation'
};
The last step is to initialize our Vuex store, Vue-router, and Vue application. Open app.js
and initialize the libraries:
const store = new Vuex.Store({});
const router = new VueRouter({});
new Vue({
el: '#app',
store,
router
});
With the Vue components and routes ready to go, our store, route, and app initialized, let's
look at setting up a server (if required) and loading in data.

Using Vue-Router Dynamic Routes to Load Data Chapter 9
[ 236 ]
Server setup
With our shop, we are going to be loading in a CSV of products on page load. This will
simulate gathering stock and product data from a database or API from a point-of-sale
system, something online shops with a physical shop might have to deal with.
In a similar way to our Dropbox app earlier in the book, we will be loading external data
and saving it into the Vuex store. The issue we will face, however, is when loading a
resource via JavaScript; the browsers demand the protocol for the file being requested is via
HTTP, HTTPS, or is a CORS request.
This means that we are unable to load a local file using the fetch() technique we used
with the Dropbox API as, when viewing our app in the browser, we are loading local assets
over the file:// protocol.
We can resolve this issue in a few different ways – which one you choose depends on your
circumstance. We are going to be loading a CSV file and, using two plugins, converting it
into a useable JSON object. The three options you have are:
Storing the file locally1.
Using a remote server or2.
Using a local server3.
Let's run through each option, with the advantages and disadvantages for each.
Storing the file locally
The first option is to convert the CSV to JSON appropriately once, and then save the output
in a file. You'll need to assign it to a variable in the file and load the JSON before your
libraries. An example might be creating a data.json and updating it to be assigned to a
variable:
const products = {...}
You can then load the JSON file in your HTML:
<script type="text/javascript" src="data.json"></script>
Using Vue-Router Dynamic Routes to Load Data Chapter 9
[ 237 ]
You then have the products variable available to you in your app.js.
Advantages:
Less load in your code
No need to load the extra files required for processing the CSV
No extra steps required
Disadvantages:
Does not simulate the real world
If you want to update the CSV data, you need to convert, save, and assign to a
variable
Using a remote server
Another option is to upload the files to a remote, existing server and develop your app
there.
Advantages:
Simulates real-world development of loading CSV
Can be developed anywhere, with any machine
Disadvantages:
Can be slow
Needs to be connected to the internet
Needs to either set up a deployment process or edit files on a live server
Setting up local server
The last option is to set up a local server on your machine. There are several small,
lightweight, zero configuration modules, and applications, or there are bigger, beefier
applications too. If you have npm installed on your machine, the node HTTP server is
recommended. If not, there are other options available.
The other option would be to use a more heavyweight application, which can provide you
with an SQL database and the ability to run PHP applications. An example of this would be
MAMP or XAMPP.
Using Vue-Router Dynamic Routes to Load Data Chapter 9
[ 238 ]
Advantages:
Simulates real-world development of loading CSV
Quick, instant updates
Can be developed offline
Disadvantages:
Requires installing software
May require some configuration and/or command-line knowledge
The option we are going to choose is the last one, using an HTTP server. Let's load and
process the CSV so we can start creating our shop.
Loading CSV
To simulate gathering data from a shop database or point-of-sale, our app is going to load
product data from a CSV. CSV, or Comma Separated Values, is a file format often used for
sharing data in a database-style way. Think of how you would lay out a list of products in
excel or numbers: that is how a CSV file is formatted.
This next step is going to require downloading and including a couple more JavaScript
files. If you chose option 1 in the Server setup section – to have your files stored in a JSON
file locally – you can skip this step.
The data we're going to be using is example shop data from Shopify. These CSVs have a
wide selection of product types and different data, which will test our Vue skills. Shopify
has made their example data available for download from a GitHub repository (https://
github.com/shopifypartners/shopify-product-csvs-and-images). Download any CSV
file that takes your interest and save it in a data/ folder in your file system. For this app, I
will be using the bicycles.csv file.
JavaScript cannot natively load and process CSV files without a significant amount of
coding and processing of comma-separated and quote-encapsulated values. To save this
book digressing into how to load, parse, and process CSV files, we are going to use a library
to do the heavy lifting for us. There are two noteworthy libraries, CSV Parser (https://
github.com/okfn/csv.js) and d3 (https://d3js.org/). CSV Parser simply does CSV
parsing and nothing else, while d3 has the ability to generate charts and data visualizations.

Using Vue-Router Dynamic Routes to Load Data Chapter 9
[ 239 ]
It is worth considering which one suits you best; CSV Parser only adds just over 3 KB of
weight to your app, whereas d3 is around 60 KB. Unless you anticipate adding
visualizations later, it is recommended you go to the smaller library – especially as they
execute the same function. However, we'll run through examples for both libraries.
We want to load our product data when the app loads, so our CSV will be loaded and
parsed by the time our components require the data. Because of this, we will be loading our
data in the created() method of Vue.
Loading a CSV with d3
Both plugins load the data in a very similar way, but the data returned varies somewhat –
however, we'll deal with that once we have loaded our data.
Load the d3 library – if you want to try it out, you can use the hosted version:
<script src="https://d3js.org/d3.v4.min.js"></script>
Using d3, we use a function on the d3 object of csv(), which accepts one parameter – the
path to the CSV file. Add the created() function to your Vue instance and initialize the
CSV loader:
new Vue({
el: '#app',
store,
router,
created() {
d3.csv('./data/csv-files/bicycles.csv', (error, data) => {
console.log(data);
});
}
});
Remember the path to your file is relative to the HTML file which is
including your JavaScript file – in this case, index.html.
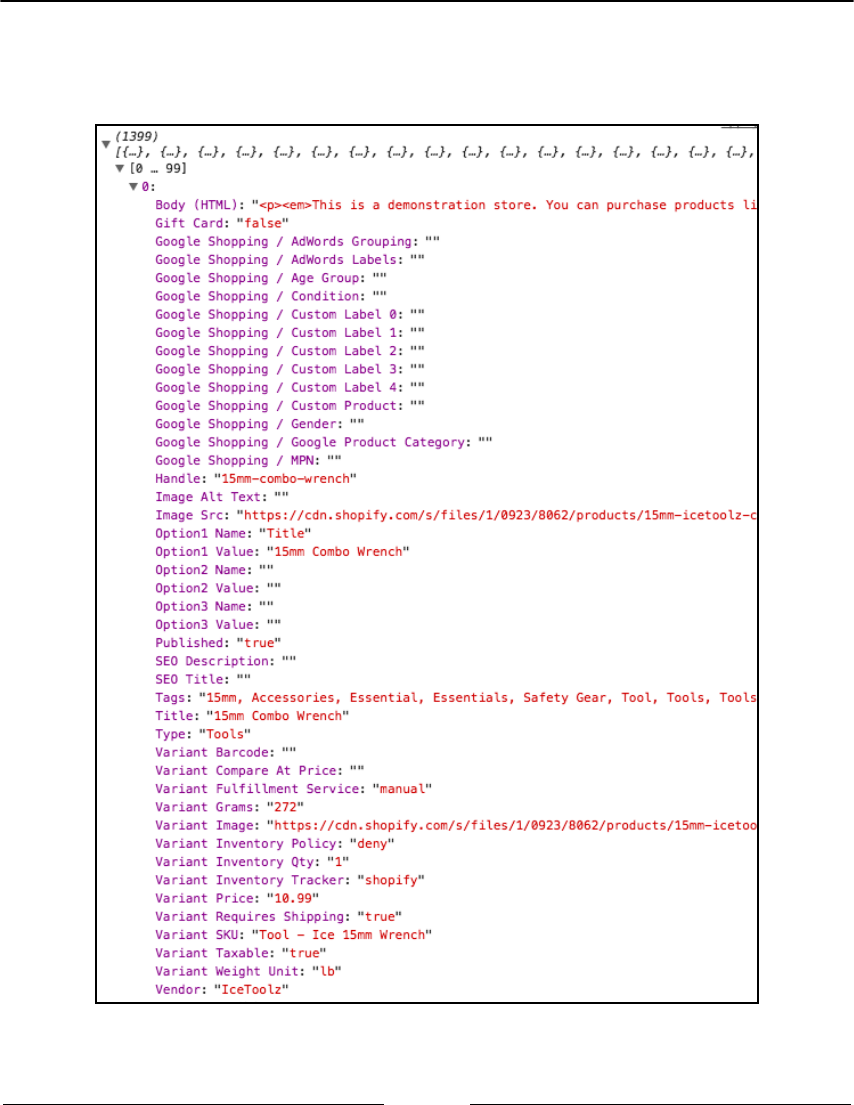
Using Vue-Router Dynamic Routes to Load Data Chapter 9
[ 240 ]
Opening the file in your browser will not render any output. However, if you open the
Javascript console and expand the object being output, you will see something similar to
this:

Using Vue-Router Dynamic Routes to Load Data Chapter 9
[ 241 ]
This gives you a breakdown of all of the properties available on each product in a key:
value format. This allows us to access each value in red, using a consistent key found on
each product. For example, if we wanted 15mm-combo-wrench from the product above, we
could use the Handle key. More on this will be covered later
Loading a CSV with CSV Parser
CSV Parser works in a slightly different way, in that it can accept many different
parameters and the library contains several different methods and functions. The data
output is also in a different format, providing a table/CSV style structure in return, with a
headers and fields object:
new Vue({
el: '#app',
store,
router,
created() {
CSV.fetch({url: './data/csv-files/bicycles.csv'}).then(data => {
console.log(data);
});
}
});
Viewing the output this time will reveal a much different structure and will require
matching up the key of the fields, with the index of the headers object.
Unifying Shopify CSV data
Before we can save and utilize the Shopify data, we need to unify the data and manipulate
it into a more manageable state. If you inspect the data being output by either library, you
will notice there is an entry for each variation or additional image of a product, with the
handle being the linking factor between each entry. For example, there are around 12
entries with the handle of pure-fix-bar-tape, each one a different color. Ideally, we
would like each variation grouped under the same item, also showing the images as a list of
one product.

Using Vue-Router Dynamic Routes to Load Data Chapter 9
[ 242 ]
The other issue with the Shopify CSV data is that the punctuation and grammar of the field
headings do not make great object keys. Ideally object keys would be like URL slugs,
lowercase and contain no spaces. For example, Variant Inventory Qty should ideally
be variant-inventory-qty.
To save manually processing the data ourselves and updating the keys, we can use a Vue
plugin to process the output from either loading library and return an object of products
formatted exactly how we want. The plugin is vue-shopify-products and is available
from unpkg:
https://unpkg.com/vue-shopify-products
Download and include the library into your index.html file. The next step is to tell Vue to
use this plugin – at the top of your app.js file, include the following line:
Vue.use(ShopifyProducts);
This now exposes a new method on the Vue instance of $formatProducts(), which
allows us to pass in the output of our CSV loading library and get a more useful collection
of objects:
Vue.use(ShopifyProducts);
const store = new Vuex.Store({});
const router = new VueRouter({});
new Vue({
el: '#app',
store,
router,
created() {
CSV.fetch({url: './data/csv-files/bicycles.csv'}).then(data => {
let products = this.$formatProducts(data);
console.log(products);
});
}
});
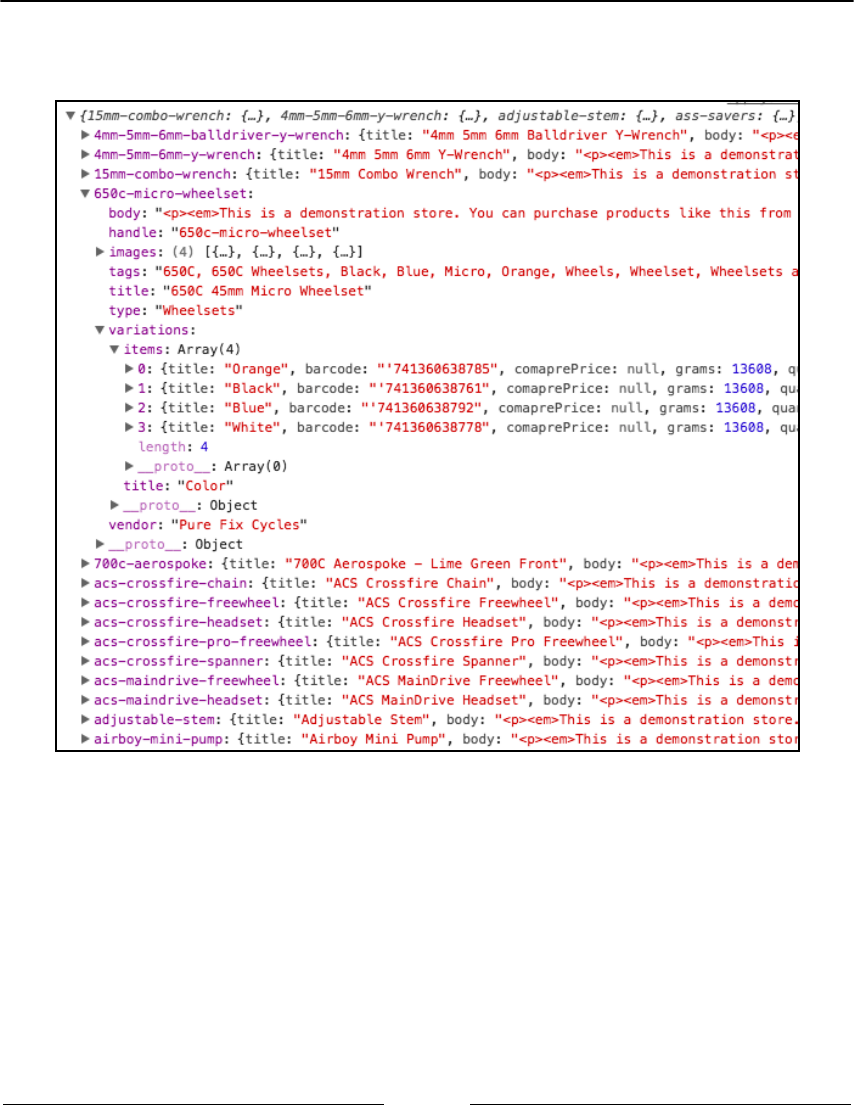
Using Vue-Router Dynamic Routes to Load Data Chapter 9
[ 243 ]
Inspecting the output now reveals a collection grouped by handle, with variations and
images as objects:
With our products grouped more effectively, we can proceed with storing and recalling as
desired.
Storing the products
Once we have retrieved and formatted the CSV data, we can cache the contents in the Vuex
store. This will be done via a simple mutation that takes a payload and stores it without any
modifications.

Using Vue-Router Dynamic Routes to Load Data Chapter 9
[ 244 ]
Create a state and mutations object in your store. Add a key of products as an object in
the state, and create a function in the mutations object, also titled products. The
mutation should accept two parameters – the state and a payload:
const store = new Vuex.Store({
state: {
products: {}
},
mutations: {
products(state, payload) {
}
}
});
Update the state.products object to the contents of the payload:
const store = new Vuex.Store({
state: {
products: {}
},
mutations: {
products(state, payload) {
state.products = payload;
}
}
});
Replace the console.log in the main Vue instance with a commit function, calling the
new mutation and passing in the formatted product data:
new Vue({
el: '#app',
store,
router,
created() {
CSV.fetch({url: './data/csv-files/bicycles.csv'}).then(data => {
let products = this.$formatProducts(data);
this.store.commit('products', products);
});
}
});

Using Vue-Router Dynamic Routes to Load Data Chapter 9
[ 245 ]
This can be reduced somewhat, by passing the $formatProducts function directly into the
store commit() function, rather than storing it as a variable:
new Vue({
el: '#app',
store,
router,
created() {
CSV.fetch({url: './data/csv-files/bicycles.csv'}).then(data => {
this.$store.commit('products', this.$formatProducts(data));
});
}
});
Displaying a single product
With our data stored, we can now begin making our components and displaying content on
the frontend. We're going to start by making a product view – displaying product details,
variations, and images. We'll move on to creating the category listing page in Chapter 10,
Building an E-Commerce Store – Browsing Products.
The first step in making our product view is to create the route, to allow the component to
be displayed via a URL. Referring back to our notes at the beginning of the chapter, the
product component is to be loaded on the /product/:slug path.
Create a routes array in your Vue-router, with the path and component specified:
const router = new VueRouter({
routes: [
{
path: '/product/:slug',
component: ProductPage
}
]
});
With the layout of the products object explained, we can start to understand how the
route and products link. We will pass the handle of the product into the URL. This will
select the product with that handle and display the data. This means we do not need to
explicitly link slug with products.

Using Vue-Router Dynamic Routes to Load Data Chapter 9
[ 246 ]
Page Not Found
With our first route created, we should also create our PageNotFound route, to catch any
URLs that are non-existent. We can also redirect to this page when there is no product that
matches.
We're going to create the PageNotFound component in a slightly different way than we did
before. Rather than having the component on *, we're going to create a /404 path as a
named route. This allows us to alias and redirect several different routes as required.
Add a new object to the routes array, with /404 as the path, the PageNotFound
component as the specified component. Add a name to your route, so we can utilize if
required, and lastly, add an alias attribute, which contains our global, catchall route.
Don't forget to put this at the end of the routes array – to catch any previously unspecified
route. When adding new routes, always remember to put them before the PageNotFound
route:
const router = new VueRouter({
routes: [
{
path: '/product/:slug',
component: ProductPage
},
{
path: '/404',
alias: '*',
component: PageNotFound
}
]
});
Add a template to your PageNotFound component. For now, give it some basic content –
we can improve it later, once we have the rest of our app set out:
const PageNotFound = {
name: 'PageNotFound',
template: `<div>
<h1>404 Page Not Found</h1>
<p>Head back to the <router-link to="/">home page</router-link> and
start again.</p>
</div>`
};

Using Vue-Router Dynamic Routes to Load Data Chapter 9
[ 247 ]
Note the use of the router link in the content. The last thing we need to do to get our app
started is to add the <router-view> element inside our app. Head to the view, and
include it in the app space:
<div id="app">
<router-view></router-view>
</div>
Load up the app in your browser, not forgetting to start the HTTP server if required. You
should be, at first, presented with your PageNotFound component contents. Navigating to
the following product URL should result in a JavaScript error instead of the 404 page. This
shows the route is correctly picking up the URL but the error is because our ProductPage
component does not contain a template:
#/product/15mm-combo-wrench
If you are presented with the PageNotFound component, check your route's code, as it
means the ProductPage route is not being picked up.
Selecting the right product
With our initial routes set up, we can now proceed with loading the desired product and
displaying the information from the store. Open views/Product.js and create a template
key. To begin with, create a simple <div> container that displays the title of the product:
const ProductPage = {
name: 'ProductPage',
template: `<div>{{ product.title }}</div>`
};
Viewing this in the browser will instantly throw a JavaScript error as Vue is expecting
the product variable to be an object – but it is currently undefined as we have yet to
declare it. Although the fix for this seems fairly simple at the moment, we need to consider
the case where the product is not yet defined.
Our shop app loads the data CSV asynchronously. This means that the execution of the rest
of the app does not stop while the products are being loaded. Overall, this increases the
speed of our app at the moment we have the products, we can start manipulating and
displaying the list, without waiting for the rest of the app to start.

Using Vue-Router Dynamic Routes to Load Data Chapter 9
[ 248 ]
Because of this, there is a distinct possibility that the user could visit the product details
page, be it from a link that was shared or a search result, without the product list being
loaded. To prevent the app trying to display the product data without being fully
initialized, add a conditional attribute to the template to check if the product variable exists
before trying to display any of its attributes.
When loading our product data, we can then ensure the product variable is set to false,
until everything is fully loaded. Add the v-if attribute to the containing element in your
template:
const ProductPage = {
name: 'ProductPage',
template: `<div v-if="product">{{ product.title }}</div>`
};
We can now start loading the correct product from the store and assign it to a variable.
Create a computed object with a product() function inside. Within that, create a blank
variable of the product, and return it afterward. This now defaults to returning false,
which means our template will not generate the <div>:
const ProductPage = {
name: 'ProductPage',
template: `<div v-if="product">{{ product.title }}</div>`,
computed: {
product() {
let product;
return product;
}
}
};
Selecting the product is now a fairly simple procedure, thanks to our helpfully-formatted
product store and the slug variable, available to us within the Product component. The
products object in the store is formatted with the handle as the key and the product
details object as the value. With this in mind, we can select the desired product using the
square bracket format. For example:
products[handle]

Using Vue-Router Dynamic Routes to Load Data Chapter 9
[ 249 ]
Using the router params object, load the desired product from the store and assign it to the
product variable to be returned:
const ProductPage = {
name: 'ProductPage',
template: `<div v-if="product">{{ product.title }}</div>`,
computed: {
product() {
let product;
product = this.$store.state.products[this.$route.params.slug];
return product;
}
}
};
The reason we don't assign the value of product straightaway is so we can add some
conditional statements. To ensure we are only loading the product if the store has the data
available, we can add an if() statement to make sure the product's object has keys
available; in other words, has the data loaded?
Add an if statement checking the length of the store product keys. If they exist, assign the
data from the store to the product variable to be returned:
const ProductPage = {
name: 'ProductPage',
template: `<div v-if="product">{{ product.title }}</div>`,
computed: {
product() {
let product;
if(Object.keys(this.$store.state.products).length) {
product = this.$store.state.products[this.$route.params.slug];
}
return product;
}
}
};

Using Vue-Router Dynamic Routes to Load Data Chapter 9
[ 250 ]
Viewing the app in the browser now, you will be presented with the title of the product –
once the data has loaded. This should only take a split second to load and should be
gracefully handled by our if statement.
Before proceeding with displaying all our product data, we need to handle the situation
where a product does not exist with the handle in the URL. Because our ProductPage
route is picking up anything after /product in the URL, the PageNotFound wildcard path
will not be able to be used – as it is our ProductPage component that is loading the data
and determining whether the product exists.
Catching products not found
In order to show the PageNotFound page when a product is not available, we are going to
load the component with our ProductPage component and display it conditionally.
To do this, we need to register the component so we can use it in our template. We need to
register it since our PageNotFound component currently lives as an object and not a Vue
component (for example, when we use Vue.component).
Add a components object to your ProductPage component and include PageNotFound:
const ProductPage = {
name: 'ProductPage',
template: `<div v-if="product"><h1>{{ product.title }}</h1></div>`,
components: {
PageNotFound
},
computed: {
product() {
let product;
if(Object.keys(this.$store.state.products).length) {
product = this.$store.state.products[this.$route.params.slug];
}
return product;
}
}
};

Using Vue-Router Dynamic Routes to Load Data Chapter 9
[ 251 ]
This now gives us a new HTML element to use in the form of <page-not-found>. Add
this element to your template after the existing <div>. As our templates need a single root
element, wrap both of them in an extra container:
const ProductPage = {
name: 'ProductPage',
template: `<div>
<div v-if="product"><h1>{{ product.title }}</h1></div>
<page-not-found></page-not-found>
</div>`,
components: {
PageNotFound
},
computed: {
product() {
let product;
if(Object.keys(this.$store.state.products).length) {
product = this.$store.state.products[this.$route.params.slug];
}
return product;
}
}
};
Viewing this in the browser will render the 404page template and, once the data has
loaded, the product title above that. We now need to update the component to only show
the PageNotFound component when there is no data to show. We could use the existing
product variable with a v-if attribute and, if false, show the error message like so:
<page-not-found v-if="!product"></page-not-found>
However, this would mean that if the user visited the product page without the product
data loading yet, they would see a flash of the 404 information before being replaced with
the product information. This isn't a very good user experience, so we should only show
the error if we are sure the product data has loaded and that there isn't a matching item.

Using Vue-Router Dynamic Routes to Load Data Chapter 9
[ 252 ]
To combat this, we will create a new variable which will determine if the component
displays. Create a data function in the ProductPage component that returns an object with
a key of productNotFound, set to false. Add a v-if condition to the <page-not-found>
element, checking against the new productNotFound variable:
const ProductPage = {
name: 'ProductPage',
template: `<div>
<div v-if="product"><h1>{{ product.title }}</h1></div>
<page-not-found v-if="productNotFound"></page-not-found>
</div>`,
components: {
PageNotFound
},
data() {
return {
productNotFound: false
}
},
computed: {
product() {
let product;
if(Object.keys(this.$store.state.products).length) {
product = this.$store.state.products[this.$route.params.slug];
}
return product;
}
}
};
The last step is to set the variable to true if a product doesn't exist. As we only want to do
this once the data has loaded, add the code to the $store.state.products check. We are
already assigning the data to the product variable, so we can add a check to see if this
variable exists – if not, change the polarity of our productNotFound variable:
const ProductPage = {
name: 'ProductPage',
template: `<div>
<div v-if="product"><h1>{{ product.title }}</h1></div>
<page-not-found v-if="productNotFound"></page-not-found>
</div>`,

Using Vue-Router Dynamic Routes to Load Data Chapter 9
[ 253 ]
components: {
PageNotFound
},
data() {
return {
productNotFound: false
}
},
computed: {
product() {
let product;
if(Object.keys(this.$store.state.products).length) {
product = this.$store.state.products[this.$route.params.slug];
if(!product) {
this.productNotFound = true;
}
}
return product;
}
}
};
Try entering an erroneous string at the end of the URL – you should be faced with our, now
familiar, 404error page.
Displaying product information
With our product loading, filtering, and error-catching in place, we can proceed with
displaying the information we need for our product. Each product could contain one or
many images, and one or many variations and any combination in-between – so we need to
make sure we cater for each of these scenarios.
To see the data available to us, add a console.log(product) just before the return:
product() {
let product;
if(Object.keys(this.$store.state.products).length) {
product = this.$store.state.products[this.$route.params.slug];
if(!product) {
this.productNotFound = true;

Using Vue-Router Dynamic Routes to Load Data Chapter 9
[ 254 ]
}
}
console.log(product);
return product;
}
Open up the JavaScript console and inspect the object that should now be there. Familiarize
yourself with the keys and values available to you. Take note that the images key is an
array and the variations an object, containing a string and a further array.
Before we tackle the variations and images – let's output the simple stuff. What we need to
remember is that every field we output might not exist on every product – so it's best to
wrap it in conditional tags where necessary.
Output the body, type, and vendor.title from the product details. Prepend both the
vendor.title and type with a description of what they are, but make sure you only
render that text if it exists in the product details:
template: `<div>
<div v-if="product">
<h1>{{ product.title }}</h1>
<div class="meta">
<span>
Manufacturer: <strong>{{ product.vendor.title }}</strong>
</span>
<span v-if="product.type">
Category: <strong>{{ product.type }}</strong>
</span>
</div>
{{ product.body }}
</div>
<page-not-found v-if="productNotFound"></page-not-found>
</div>`,
Notice we've got the flexibility to prepend the type and vendor with more user-friendly
names. Once we have our categories and filtering set up, we can link both the vendor and
type to appropriate product listing.

Using Vue-Router Dynamic Routes to Load Data Chapter 9
[ 255 ]
Viewing this in the browser will reveal the body outputting all HTML tags as text –
meaning we can see them on the page. If you cast your mind back to the beginning of the
book where we were discussing output types, we need to use v-html to tell Vue to render
the block as raw HTML:
template: `<div>
<div v-if="product">
<h1>{{ product.title }}</h1>
<div class="meta">
<span>
Manufacturer: <strong>{{ product.vendor.title }}</strong>
</span>
<span v-if="product.type">
Category: <strong>{{ product.type }}</strong>
</span>
</div>
<div v-html="product.body"></div>
</div>
<page-not-found v-if="productNotFound"></page-not-found>
</div>`,
Product images
The next step is to output the images for our product. If you are using the bicycles CSV file,
a good product to test with is 650c-micro-wheelset – navigate to this product as it has
four images. Don't forget to go back to your original product to check that it works with
one image.
The images value will always be an array, whether there is one image or 100, so to display
them, we will always need to do a v-for. Add a new container and loop through the
images. Add a width to each image so it doesn't take over your page.
The images array contains an object for each image. This has an alt and source key that
can be input directly into your HTML. There are some instances, however, where the alt
value is missing – if it is, insert the product title instead:
template: `<div>
<div v-if="product">
<div class="images" v-if="product.images.length">
<template v-for="img in product.images">
<img
:src="img.source"
:alt="img.alt || product.title"

Using Vue-Router Dynamic Routes to Load Data Chapter 9
[ 256 ]
width="100">
</template>
</div>
<h1>{{ product.title }}</h1>
<div class="meta">
<span>
Manufacturer: <strong>{{ product.vendor.title }}</strong>
</span>
<span v-if="product.type">
Category: <strong>{{ product.type }}</strong>
</span>
</div>
<div v-html="product.body"></div>
</div>
<page-not-found v-if="productNotFound"></page-not-found>
</div>`,
With our images displaying, it would be a nice addition to create a gallery. Shops often
show one big image, with a set of thumbnails underneath. Clicking each thumbnail then
replaces the main image so the user can get a better look at the bigger image. Let's recreate
that functionality. We also need to ensure we don't show the thumbnails if there is only one
image.
We do this, by setting an image variable to the first image in the images array, this is the
one that will form the big image. If there is more than one image in the array, we will show
the thumbnails. We will then create a click method that updates the image variable with the
selected image.
Create a new variable in your data object and update it with the first item from the images
array when the product has loaded. It's good practice to ensure the images key is, in fact,
an array of items before trying to assign a value:
const ProductPage = {
name: 'ProductPage',
template: `<div>
<div v-if="product">
<div class="images" v-if="product.images.length">
<template v-for="img in product.images">
<img
:src="img.source"
:alt="img.alt || product.title"
width="100">

Using Vue-Router Dynamic Routes to Load Data Chapter 9
[ 257 ]
</template>
</div>
<h1>{{ product.title }}</h1>
<div class="meta">
<span>
Manufacturer: <strong>{{ product.vendor.title }}</strong>
</span>
<span v-if="product.type">
Category: <strong>{{ product.type }}</strong>
</span>
</div>
<div v-html="product.body"></div>
</div>
<page-not-found v-if="productNotFound"></page-not-found>
</div>`,
components: {
PageNotFound
},
data() {
return {
productNotFound: false,
image: false
}
},
computed: {
product() {
let product;
if(Object.keys(this.$store.state.products).length) {
product = this.$store.state.products[this.$route.params.slug];
this.image = (product.images.length) ? product.images[0] : false;
if(!product) {
this.productNotFound = true;
}
}
console.log(product);
return product;
}
}
};

Using Vue-Router Dynamic Routes to Load Data Chapter 9
[ 258 ]
Next, update your existing images loop in your template to only display when there is
more than one image in the array. Also, add the first image as the main image in your
template – not forgetting to check whether it exists first:
template: `<div>
<div v-if="product">
<div class="images" v-if="image">
<div class="main">
<img
:src="image.source"
:alt="image.alt || product.title">
</div>
<div class="thumbnails" v-if="product.images.length > 1">
<template v-for="img in product.images">
<img
:src="img.source"
:alt="img.alt || product.title"
width="100">
</template>
</div>
</div>
<h1>{{ product.title }}</h1>
<div class="meta">
<span>
Manufacturer: <strong>{{ product.vendor.title }}</strong>
</span>
<span v-if="product.type">
Category: <strong>{{ product.type }}</strong>
</span>
</div>
<div v-html="product.body"></div>
</div>
<page-not-found v-if="productNotFound"></page-not-found>
</div>`,
The last step is to add a click handler to each of the thumbnail images, to update the image
variable when interacted with. As the images will not natively have the cursor: pointer
CSS attribute, it might be worth considering adding this.

Using Vue-Router Dynamic Routes to Load Data Chapter 9
[ 259 ]
The click handler will be a method that accepts each image in the thumbnail loop as a
parameter. On click, it will simply update the image variable with the object passed
through:
const ProductPage = {
name: 'ProductPage',
template: `<div>
<div v-if="product">
<div class="images" v-if="image">
<div class="main">
<img
:src="image.source"
:alt="image.alt || product.title">
</div>
<div class="thumbnails" v-if="product.images.length > 1">
<template v-for="img in product.images">
<img
:src="img.source"
:alt="img.alt || product.title"
width="100"
@click="updateImage(img)">
</template>
</div>
</div>
<h1>{{ product.title }}</h1>
<div class="meta">
<span>
Manufacturer: <strong>{{ product.vendor.title }}</strong>
</span>
<span v-if="product.type">
Category: <strong>{{ product.type }}</strong>
</span>
</div>
<div v-html="product.body"></div>
</div>
<page-not-found v-if="productNotFound"></page-not-found>
</div>`,
components: {
PageNotFound
},
data() {
return {

Using Vue-Router Dynamic Routes to Load Data Chapter 9
[ 260 ]
productNotFound: false,
image: false
}
},
computed: {
product() {
let product;
if(Object.keys(this.$store.state.products).length) {
product = this.$store.state.products[this.$route.params.slug];
this.image = (product.images.length) ? product.images[0] : false;
if(!product) {
this.productNotFound = true;
}
}
console.log(product);
return product;
}
},
methods: {
updateImage(img) {
this.image = img;
}
}
};
Load the product up in your browser and try clicking on any of the thumbnails - you
should be able to update the main image. Don't forget to validate your code on a product
with one image or even zero images, to make sure the user isn't going to encounter any
errors.
Don't be afraid of whitespace and adding new lines for readability. Being
able to easily understand your code is better than the few bytes you
would have saved on file load. When deploying to production, files
should be minified, but during development white space takes
precedence.

Using Vue-Router Dynamic Routes to Load Data Chapter 9
[ 261 ]
Product variations
With this particular dataset, each of our products contains at least one variation but can
contain several. This normally goes hand-in-hand with the number of images but does not
always correlate. Variations can be things such as color or size.
On our Product object, we have two keys which are going to help us display the
variations. These are variationTypes, which list the names of the variations such as size
and color, and variationProducts,which contains all of the variations. Each product
within the variationProducts object has a further object of variant, which lists all of
the changeable properties. For example, if a jacket came in two colors and each color had
three sizes, there would be six variationProducts, each with two variant properties.
Every product will contain at least one variation, although if there is only one variation, we
may need to consider the UX of the product page. We are going to display our product
variations in both a table and drop-down, so you can experience creating both elements.
Variations display table
Create a new container in your product template that will display the variations. Within
this container, we can create a table to display the different variations of the product. This
will be achieved with a v-for declaration. However, now that you are more familiar with
the functionality, we can introduce a new attribute.
Using a key with loops
When using loops in Vue, it is advised you use an extra attribute to identify each item,
:key. This helps Vue identify the elements of the array when re-ordering, sorting, or
filtering. An example of :key use would be:
<div v-for="item in items" :key="item.id">
{{ item.title }}
</div>
The key attribute should be a unique attribute of the item itself and not the index of the
item in the array, to help Vue identify the specific object. More information about using a
key with a loop is available in the official Vue documentation.
We'll be utilizing the key attribute when displaying our variations, but using the barcode
attribute.

Using Vue-Router Dynamic Routes to Load Data Chapter 9
[ 262 ]
Displaying the variations in a table
Add a table element to your variations container and loop through the items array. For
now, display the title, quantity and price. Add an additional cell that contains a
button with the value of Add to basket. We'll configure that in Chapter 11, Building an E-
commerce Store – Adding a Checkout. Don't forget to add a $ currency symbol in front of your
price, as it's currently just a "raw" number.
Watch out – when using the $ sign within the template literals, JavaScript will try and
interpret it, along with the curly brackets, as a JavaScript variable. To counteract this,
prepend the currency with a backslash – this tells JavaScript that the next character is
literal, and should not be interpreted in any other way:
template: `<div>
<div v-if="product">
<div class="images" v-if="image">
<div class="main">
<img
:src="image.source"
:alt="image.alt || product.title">
</div>
<div class="thumbnails" v-if="product.images.length > 1">
<template v-for="img in product.images">
<img
:src="img.source"
:alt="img.alt || product.title"
width="100"
@click="updateImage(img)">
</template>
</div>
</div>
<h1>{{ product.title }}</h1>
<div class="meta">
<span>
Manufacturer: <strong>{{ product.vendor.title }}</strong>
</span>
<span v-if="product.type">
Category: <strong>{{ product.type }}</strong>
</span>
</div>
<div class="variations">
<table>

Using Vue-Router Dynamic Routes to Load Data Chapter 9
[ 263 ]
<tr v-for="variation in product.variationProducts"
:key="variation.barcode">
<td>{{ variation.quantity }}</td>
<td>\${{ variation.price }}</td>
<td><button>Add to basket</button></td>
</tr>
</table>
</div>
<div v-html="product.body"></div>
</div>
<page-not-found v-if="productNotFound"></page-not-found>
</div>`,
Although we're displaying the price and quantity, we aren't outputting the actual variant
properties of the variation (such as color). To do this, we are going to need to do some
processing on our variation with a method.
The variant object contains a child object for each variation type, with a name and a value
for each type. They are also stored with a slug-converted key within the object. See the
following screenshot for more details:

Using Vue-Router Dynamic Routes to Load Data Chapter 9
[ 264 ]
Add a new cell at the beginning of the table that passes the variation to a method titled
variantTitle():
<div class="variations">
<table>
<tr v-for="variation in product.variationProducts"
:key="variation.barcode">
<td>{{ variantTitle(variation) }}</td>
<td>{{ variation.quantity }}</td>
<td>\${{ variation.price }}</td>
<td><button>Add to basket</button></td>
</tr>
</table>
</div>
Create the new method within your methods object:
methods: {
updateImage(img) {
this.image = img;
},
variantTitle(variation) {
}
}
We now need to construct a string with the title of the variant, displaying all available
options. To do this, we are going to construct an array of each of the types and then join
them into a string.
Store the variants as a variable and create an empty array. We can now loop through the
keys available within the variants object and create a string to output. If you decide to
add HTML into the string, as shown in the following example, we will need to update our
template to output HTML instead of a raw string:
variantTitle(variation) {
let variants = variation.variant,
output = [];
for(let a in variants) {
output.push(`<b>${variants[a].name}:</b> ${variants[a].value}`);
}
}

Using Vue-Router Dynamic Routes to Load Data Chapter 9
[ 265 ]
Our output array will have an item for each variant, formatted like the following:
["<b>Color:</b> Alloy", "<b>Size:</b> 49 cm"]
We can now join each one together, which transforms the output from an array to a string.
The character, string, or HTML you choose to join it with is up to you. For now, use a /
with spaces on either side. Alternatively, you could use </td><td> tags to create a new
table cell. Add the join() function and update the template to use v-html:
const ProductPage = {
name: 'ProductPage',
template: `<div>
<div v-if="product">
<div class="images" v-if="image">
<div class="main">
<img
:src="image.source"
:alt="image.alt || product.title">
</div>
<div class="thumbnails" v-if="product.images.length > 1">
<template v-for="img in product.images">
<img
:src="img.source"
:alt="img.alt || product.title"
width="100"
@click="updateImage(img)">
</template>
</div>
</div>
<h1>{{ product.title }}</h1>
<div class="meta">
<span>
Manufacturer: <strong>{{ product.vendor.title }}</strong>
</span>
<span v-if="product.type">
Category: <strong>{{ product.type }}</strong>
</span>
</div>
<div class="variations">
<table>
<tr v-for="variation in product.variationProducts"
:key="variation.barcode">
<td v-html="variantTitle(variation)"></td>

Using Vue-Router Dynamic Routes to Load Data Chapter 9
[ 266 ]
<td>{{ variation.quantity }}</td>
<td>\${{ variation.price }}</td>
<td><button>Add to basket</button></td>
</tr>
</table>
</div>
<div v-html="product.body"></div>
</div>
<page-not-found v-if="productNotFound"></page-not-found>
</div>`,
components: {
PageNotFound
},
data() {
return {
productNotFound: false,
image: false
}
},
computed: {
...
},
methods: {
updateImage(img) {
this.image = img;
},
variantTitle(variation) {
let variants = variation.variant,
output = [];
for(let a in variants) {
output.push(`<b>${variants[a].name}:</b> ${variants[a].value}`);
}
return output.join(' / ');
}
}
};

Using Vue-Router Dynamic Routes to Load Data Chapter 9
[ 267 ]
Attach a click event to the Add to basket button and create a new method on the
component. This method will require the variation object to be passed in, so the correct
one could be added to the basket. For now, add a JavaScript alert() to confirm you have
the right one:
const ProductPage = {
name: 'ProductPage',
template: `<div>
<div v-if="product">
<div class="images" v-if="image">
<div class="main">
<img
:src="image.source"
:alt="image.alt || product.title">
</div>
<div class="thumbnails" v-if="product.images.length > 1">
<template v-for="img in product.images">
<img
:src="img.source"
:alt="img.alt || product.title"
width="100"
@click="updateImage(img)">
</template>
</div>
</div>
<h1>{{ product.title }}</h1>
<div class="meta">
<span>
Manufacturer: <strong>{{ product.vendor.title }}</strong>
</span>
<span v-if="product.type">
Category: <strong>{{ product.type }}</strong>
</span>
</div>
<div class="variations">
<table>
<tr v-for="variation in product.variationProducts"
:key="variation.barcode">
<td v-html="variantTitle(variation)"></td>
<td>{{ variation.quantity }}</td>
<td>\${{ variation.price }}</td>
<td><button @click="addToBasket(variation)">Add to

Using Vue-Router Dynamic Routes to Load Data Chapter 9
[ 268 ]
basket</button></td>
</tr>
</table>
</div>
<div v-html="product.body"></div>
</div>
<page-not-found v-if="productNotFound"></page-not-found>
</div>`,
components: {
PageNotFound
},
data() {
return {
productNotFound: false,
image: false
}
},
computed: {
product() {
let product;
if(Object.keys(this.$store.state.products).length) {
product = this.$store.state.products[this.$route.params.slug];
this.image = (product.images.length) ? product.images[0] : false;
if(!product) {
this.productNotFound = true;
}
}
console.log(product);
return product;
}
},
methods: {
updateImage(img) {
this.image = img;
},
variantTitle(variation) {
let variants = variation.variant,
output = [];

Using Vue-Router Dynamic Routes to Load Data Chapter 9
[ 269 ]
for(let a in variants) {
output.push(`<b>${variants[a].name}:</b> ${variants[a].value}`);
}
return output.join(' / ');
},
addToBasket(variation) {
alert(`Added to basket: ${this.product.title} -
${this.variantTitle(variation)}`);
}
}
};
Note the template literals used within the alert box – this allows us to use Javascript
variables without having to use string concatenation techniques. Clicking on the Add to
basket button will now generate a popup listing of the name of the product and the
variation clicked.
Displaying variations in a select box
A more common interface pattern on product pages is to have a drop-down list, or select
box, with your variations displayed and available for selecting.
When using a select box, we will have a variation which has either been selected by default
or that the user has interacted with and chosen specifically. Because of this, we can change
the image when the user changes the select box and display other pieces of information
about the variant on the product page, including price and quantity.
We won't be relying on passing through the variant to the addToBasket method, as it will
exist as an object on the product component.
Update your <table> element to be a <select>, and the <tr> to an <option>. Move the
button outside of this element and remove the parameter from the click event. Remove
any HTML from the variantTitle() method. Because it is now inside a select box it is
not required:
<div class="variations">
<select>
<option
v-for="variation in product.variationProducts"
:key="variation.barcode"
v-html="variantTitle(variation)"

Using Vue-Router Dynamic Routes to Load Data Chapter 9
[ 270 ]
></option>
</select>
<button @click="addToBasket()">Add to basket</button>
</div>
The next step is to create a new variable available to use on the component. In a similar vein
to the images, this will be completed with the first item of the variationProducts array
and updated when the select box changes.
Create a new item in the data object, titled variation. Populate this variable when the
data is loaded into the product computed variable:
const ProductPage = {
name: 'ProductPage',
template: `...`,
components: {
PageNotFound
},
data() {
return {
productNotFound: false,
image: false,
variation: false
}
},
computed: {
product() {
let product;
if(Object.keys(this.$store.state.products).length) {
product = this.$store.state.products[this.$route.params.slug];
this.image = (product.images.length) ? product.images[0] : false;
this.variation = product.variationProducts[0];
if(!product) {
this.productNotFound = true;
}
}
console.log(product);
return product;
}

Using Vue-Router Dynamic Routes to Load Data Chapter 9
[ 271 ]
},
methods: {
...
}
};
Update the addToBasket method to use the variation variable of the ProductPage
component and not rely on a parameter:
addToBasket() {
alert(`Added to basket: ${this.product.title} -
${this.variantTitle(this.variation)}`);
}
Try clicking the Add to basket button – it should add the first variation, regardless of what
is selected in the dropdown. To update the variable on change, we can bind the
variations variable to the select box – in the same way, that we did our textbox filtering
at the beginning of this book.
Add a v-model attribute to the select element. We will also need to tell Vue what to bind
to this variable when selecting. By default, it will do the contents of the <option>, which is
currently our custom variant title. However, we want to bind the whole variation object.
Add a :value property to the <option> element:
<div class="variations">
<select v-model="variation">
<option
v-for="variation in product.variationProducts"
:key="variation.barcode"
:value="variation"
v-html="variantTitle(variation)"
></option>
</select>
<button @click="addToBasket()">Add to basket</button>
</div>
Changing the select box and clicking the Add to basket button will now produce the
correct variation. This method gives us much more flexibility over displaying the variations
in a table.

Using Vue-Router Dynamic Routes to Load Data Chapter 9
[ 272 ]
It allows us to display variation data in other places on the product. Try adding the price
next to the product title and the quantity within the meta container:
template: `<div>
<div v-if="product">
<div class="images" v-if="image">
<div class="main">
<img
:src="image.source"
:alt="image.alt || product.title">
</div>
<div class="thumbnails" v-if="product.images.length > 1">
<template v-for="img in product.images">
<img
:src="img.source"
:alt="img.alt || product.title"
width="100"
@click="updateImage(img)">
</template>
</div>
</div>
<h1>{{ product.title }} - \${{ variation.price }}</h1>
<div class="meta">
<span>
Manufacturer: <strong>{{ product.vendor.title }}</strong>
</span>
<span v-if="product.type">
Category: <strong>{{ product.type }}</strong>
</span>
<span>
Quantity: <strong>{{ variation.quantity }}</strong>
</span>
</div>
<div class="variations">
<select v-model="variation">
<option
v-for="variation in product.variationProducts"
:key="variation.barcode"
:value="variation"
v-html="variantTitle(variation)"
></option>
</select>
<button @click="addToBasket()">Add to basket</button>

Using Vue-Router Dynamic Routes to Load Data Chapter 9
[ 273 ]
</div>
<div v-html="product.body"></div>
</div>
<page-not-found v-if="productNotFound"></page-not-found>
</div>`,
These two new attributes will update when changing the variation. We can also update the
image to the selected variation if it has one. To do this, add a watch object to your
component, which watches the variation variable. When updated, we can check if the
variation has an image and, if so, update the image variable with this property:
const ProductPage = {
name: 'ProductPage',
template: `...`,
components: {
...
},
data() {
...
},
computed: {
...
},
watch: {
variation(v) {
if(v.hasOwnProperty('image')) {
this.updateImage(v.image);
}
}
},
methods: {
...
}
};

Using Vue-Router Dynamic Routes to Load Data Chapter 9
[ 274 ]
When using watch, the function passes the new item as the first parameter. Rather than
referring to the one on the component, we can use this to gather the image information.
Another enhancement we can make is to disable the Add to basket button and add a note
in the dropdown if the variation is out of stock. This information is gathered from the
variation quantity key.
Check the quantity and, if less than one, display an out of stock message in the select box
and disable the Add to basket button using the disabled HTML attribute. We can also
update the value of the button:
template: `<div>
<div v-if="product">
<div class="images" v-if="image">
<div class="main">
<img
:src="image.source"
:alt="image.alt || product.title">
</div>
<div class="thumbnails" v-if="product.images.length > 1">
<template v-for="img in product.images">
<img
:src="img.source"
:alt="img.alt || product.title"
width="100"
@click="updateImage(img)">
</template>
</div>
</div>
<h1>{{ product.title }} - \${{ variation.price }}</h1>
<div class="meta">
<span>
Manufacturer: <strong>{{ product.vendor.title }}</strong>
</span>
<span v-if="product.type">
Category: <strong>{{ product.type }}</strong>
</span>
<span>
Quantity: <strong>{{ variation.quantity }}</strong>
</span>
</div>
<div class="variations">
<select v-model="variation">

Using Vue-Router Dynamic Routes to Load Data Chapter 9
[ 275 ]
<option
v-for="variation in product.variationProducts"
:key="variation.barcode"
:value="variation"
v-html="variantTitle(variation) + ((!variation.quantity) ? ' -
out of stock' : '')"
></option>
</select>
<button @click="addToBasket()" :disabled="!variation.quantity">
{{ (variation.quantity) ? 'Add to basket' : 'Out of stock' }}
</button>
</div>
<div v-html="product.body"></div>
</div>
<page-not-found v-if="productNotFound"></page-not-found>
</div>`,
If using the bicycles.csv dataset, the Keirin Pro Track Frameset product
(/#/product/keirin-pro-track-frame) contains several variations, some without
stock. This allows you to test the out of stock functionality along with the image
changing.
Another thing we can do to the product page is only show the dropdown when there is
more than one variation. An example of a product with only one is the 15 mm Combo
Wrench (#/product/15mm-combo-wrench). In this instance, it is not worth showing the
<select> box. As we are setting the variation variable on the Product component on
load, we are not relying on the selection to initially set the variable. Because of this, we can
completely remove the select box with a v-if="" when there is only one alternate product.
Like we did with the images, check if the length of the array is more than one, this time the
variationProducts array:
<div class="variations">
<select v-model="variation" v-if="product.variationProducts.length > 1">
<option
v-for="variation in product.variationProducts"
:key="variation.barcode"
:value="variation"
v-html="variantTitle(variation) + ((!variation.quantity) ? ' - out of
stock' : '')"
></option>
</select>

Using Vue-Router Dynamic Routes to Load Data Chapter 9
[ 276 ]
<button @click="addToBasket()" :disabled="!variation.quantity">
{{ (variation.quantity) ? 'Add to basket' : 'Out of stock' }}
</button>
</div>
By removing elements when they are not needed, we now have a less cluttered interface.
Updating the product details when switching
URLs
While navigating through the different product URLs to check variations, you may have
noticed that clicking back and forward doesn't update the product data on the page.
This is because Vue-router realizes the same component is being used between the pages,
and so, rather than destroying and creating a new instance, it reuses the component. The
downside to this is that the data does not get updated; we need to trigger a function to
include the new product data. The upside is that the code is more efficient.
To tell Vue to retrieve the new data, we need to create a watch function; instead of
watching a variable, we are going to watch the $route variable. When this gets updated,
we can load new data.
Create a new variable in the data instance of slug, and set the default to be the route
parameter. Update the product computed function to use this variable instead of the route:
const ProductPage = {
name: 'ProductPage',
template: `...`,
components: {
PageNotFound
},
data() {
return {
slug: this.$route.params.slug,
productNotFound: false,
image: false,
variation: false
}
},
computed: {

Using Vue-Router Dynamic Routes to Load Data Chapter 9
[ 277 ]
product() {
let product;
if(Object.keys(this.$store.state.products).length) {
product = this.$store.state.products[this.slug];
this.image = (product.images.length) ? product.images[0] : false;
this.variation = product.variationProducts[0];
if(!product) {
this.productNotFound = true;
}
}
console.log(product);
return product;
}
},
watch: {
...
},
methods: {
...
}
};
We can now create a watch function, keeping an eye on the $route variable. When this
changes, we can update the slug variable, which in turn will update the data being
displayed.
When watching a route, the function has two parameters passed to it: to and from. The to
variable contains everything about the route we are going to, including parameters and the
component used. The from variable contains everything about the current route.
By updating the slug variable to the new parameter when the route changes, we are
forcing the component to redraw with new data from the store:
const ProductPage = {
name: 'ProductPage',
template: `<div>
<div v-if="product">
<div class="images" v-if="image">
<div class="main">

Using Vue-Router Dynamic Routes to Load Data Chapter 9
[ 278 ]
<img
:src="image.source"
:alt="image.alt || product.title">
</div>
<div class="thumbnails" v-if="product.images.length > 1">
<template v-for="img in product.images">
<img
:src="img.source"
:alt="img.alt || product.title"
width="100"
@click="updateImage(img)">
</template>
</div>
</div>
<h1>{{ product.title }} - \${{ variation.price }}</h1>
<div class="meta">
<span>
Manufacturer: <strong>{{ product.vendor.title }}</strong>
</span>
<span v-if="product.type">
Category: <strong>{{ product.type }}</strong>
</span>
<span>
Quantity: <strong>{{ variation.quantity }}</strong>
</span>
</div>
<div class="variations">
<select v-model="variation" v-if="product.variationProducts.length
> 1">
<option
v-for="variation in product.variationProducts"
:key="variation.barcode"
:value="variation"
v-html="variantTitle(variation) + ((!variation.quantity) ? ' -
out of stock' : '')"
></option>
</select>
<button @click="addToBasket()" :disabled="!variation.quantity">
{{ (variation.quantity) ? 'Add to basket' : 'Out of stock' }}
</button>
</div>
<div v-html="product.body"></div>

Using Vue-Router Dynamic Routes to Load Data Chapter 9
[ 279 ]
</div>
<page-not-found v-if="productNotFound"></page-not-found>
</div>`,
components: {
PageNotFound
},
data() {
return {
slug: this.$route.params.slug,
productNotFound: false,
image: false,
variation: false
}
},
computed: {
product() {
let product;
if(Object.keys(this.$store.state.products).length) {
product = this.$store.state.products[this.slug];
this.image = (product.images.length) ? product.images[0] : false;
this.variation = product.variationProducts[0];
if(!product) {
this.productNotFound = true;
}
}
return product;
}
},
watch: {
variation(v) {
if(v.hasOwnProperty('image')) {
this.updateImage(v.image);
}
},
'$route'(to) {
this.slug = to.params.slug;
}
},

Using Vue-Router Dynamic Routes to Load Data Chapter 9
[ 280 ]
methods: {
updateImage(img) {
this.image = img;
},
variantTitle(variation) {
let variants = variation.variant,
output = [];
for(let a in variants) {
output.push(`${variants[a].name}: ${variants[a].value}`);
}
return output.join(' / ');
},
addToBasket() {
alert(`Added to basket: ${this.product.title} -
${this.variantTitle(this.variation)}`);
}
}
};
With our product page completed, we can move on to creating a category listing for both
the type and vendor variables. Remove any console.log() calls you have in your code,
too, to keep it clean.
Summary
This chapter has covered a lot. We loaded and stored a CSV file of products into our Vuex
store. From there, we created a product detail page that used a dynamic variable in the URL
to load a specific product. We have created a product detail view that allows the user to
look through a gallery of images and choose a variation from a drop-down list. If the
variation has an associated image, the main image updates.
In Chapter 10, Building an E-Commerce Store – Browsing Products,
we will create a category page, creating filtering and ordering functions – helping the user
to find the product they want.

10
Building an E-Commerce Store
- Browsing Products
In Chapter 9, Using Vue-Router Dynamic Routes to Load Data, we loaded our product data
into the Vuex store and created a product detail page where a user could view the product
and its variations. When viewing the product detail page, a user could change the variation
from the drop-down and the price and other details would update.
In this chapter, we are going to:
Create a home page listing page with specific products
Create a category page with a reusable component
Create an ordering mechanism
Create filters dynamically and allow the user to filter the products
Listing the products
Before we create any filtering, curated lists, ordering components, and functionality, we
need to create a basic product list – showing all the products first, and then we can create a
paginated component that we can then reuse throughout the app.

Building an E-Commerce Store - Browsing Products Chapter 10
[ 282 ]
Adding a new route
Let us add a new route to our routes array. For now, we'll work on the HomePage
component, which will have the / route. Make sure you add it to the top of the routes
array, so it doesn't get overridden by any of the other components:
const router = new VueRouter({
routes: [
{
path: '/',
name: 'Home',
component: HomePage
},
{
path: '/product/:slug',
component: ProductPage
},
{
path: '/404',
alias: '*',
component: PageNotFound
}
]
});
Within the HomePage component, create a new computed property and gather all the
products from the store. Ensure the products have loaded before displaying anything in
the template. Populate the HomePage component with the following code:
const HomePage = {
name: 'HomePage',
template: `<div v-if="products"></div>`,
computed: {
products() {
return this.$store.state.products;
}
}
};

Building an E-Commerce Store - Browsing Products Chapter 10
[ 283 ]
Looping through products
When looking at a category listing for any shop, the data displayed tends to have a
recurring theme. It normally consists of an image, title, price, and manufacturer.
Add an ordered list to your template – as the products are going to have an order to them,
it makes semantic sense to place them in an ordered list. Within the <ol>, add a v-for
looping through the products and displaying a title for each one, as shown here. It's also
good practice to ensure the product variable exists before proceeding with displaying it:
template: `<div v-if="products">
<ol>
<li v-for="product in products" v-if="product">
<h3>{{ product.title }}</h3>
</li>
</ol>
</div>`,
When viewing the page in your browser, you may notice that the product list is very long.
Loading images for every one of these products would be a huge load on the user's
computer, along with overwhelming the user with that many products on display. Before
we add more information, such as price and images, to our template, we'll look at
paginating the products, allowing the data to be accessed in more manageable chunks.
Creating pagination
Creating pagination, initially, seems quite simple – as you only need to return a fixed
number of products. However, if we wish to make our pagination interactive and reactive
to the product list – it needs to be a bit more advanced. We need to build our pagination to
be able to handle different lengths of products – in the case where our product list has been
filtered into fewer products.
Calculating the values
The arithmetic behind creating a pagination component and displaying the correct
products relies on four main variables:
Items per page: This is usually set by the user; however, we'll use a fixed number
of 12, to begin with
Total items: This is the total number of products to display

Building an E-Commerce Store - Browsing Products Chapter 10
[ 284 ]
Number of pages: This can be calculated by dividing the number of products by
the items per page
Current page number: This, combined with the others, will allow us to return
exactly which products we need
From these numbers, we can calculate everything needed for our pagination. This includes
what products to display, whether to show next/previous links and, if desired, a
component to skip to different links.
Before we proceed, we are going to convert our products object into an array. This allows
us to use the split method on it, which will allow us to return a specific list of products. It
also means we can easily count the total number of items.
Update your products computed function to return an array instead of an object. This
is done by using the map() function – which is an ES2015 replacement for a simple for
loop. This function now returns an array containing the product objects:
products() {
let products = this.$store.state.products;
return Object.keys(products).map(key => products[key]);
},
Create a new function in the computed object titled pagination. This function will return
an object with various figures about our pagination, for example, the total number of pages.
This will allow us to create a product list and update the navigation components. We need
to only return the object if our products variable has data. The function is shown in the
following code snippet:
computed: {
products() {
let products = this.$store.state.products;
return Object.keys(products).map(key => products[key]);
},
pagination() {
if(this.products) {
return {
}
}
}
},

Building an E-Commerce Store - Browsing Products Chapter 10
[ 285 ]
We now need to keep track of two variables – items perPage and the currentPage. Create
a data function on your HomePage component and store these two variables. We'll give the
user the ability to update the perPage variable later on. The highlighted code portion
shows our data function:
const HomePage = {
name: 'HomePage',
template: `...`,
data() {
return {
perPage: 12,
currentPage: 1
}
},
computed: {
...
}
};
You may be wondering when to use local data on a component and when
to store the information in the Vuex store. This all depends on where you
are going to be using the data and what is going to manipulating it. As a
general rule, if only one component uses the data and manipulate it, then
use the local data() function. However, if more than one component is
going to be interacting with the variable, save it in the central store.
Back to the pagination() computed function, store a variable with the length of the
products array. With this as a variable, we can now calculate the total pages. To do this,
we are going to do the following equation:
total number of products / items per page
Once we have this result, we need to round it up to the nearest integer. This is because if
there is any hangover, we need to create a new page for it.

Building an E-Commerce Store - Browsing Products Chapter 10
[ 286 ]
For example, if you were showing 12 items per page and you had 14 products, that would
yield a result of 1.1666 pages – which is not a valid page number. Rounding this up ensures
we have two pages to display our products. To do this, use the Math.ceil() JavaScript
function. We can also add the total number of products to our output. Check the following
code for using the Math.ceil() function:
pagination() {
if(this.products) {
let totalProducts = this.products.length;
return {
totalProducts: totalProducts,
totalPages: Math.ceil(totalProducts / this.perPage)
}
}
}
The next calculation we need to do is work out what the current range of products for the
current page is. This is a little more complicated, as not only do we need to work out what
we need from the page number, but the array slicing is based on the item index – which
means the first item is 0.
To work out where to take our slice from, we can use the following calculation:
(current page number * items per page) – items per page
The final subtraction may seem odd, but it means on page 1, the result is 0. This allows us
to work out at which index we need to slice the products array.
As another example, if we were on page three, the result would be 24, which is where the
third page would start. The end of the slice is then this result plus the number of items per
page. The advantage of this means we can update the items per page and all of our
calculations will update.
Create an object inside the pagination result with these two results – this will allow us to
access them later easily:
pagination() {
if(this.products) {
let totalProducts = this.products.length,
pageFrom = (this.currentPage * this.perPage) - this.perPage;
return {
totalProducts: totalProducts,
totalPages: Math.ceil(totalProducts / this.perPage),
range: {
from: pageFrom,

Building an E-Commerce Store - Browsing Products Chapter 10
[ 287 ]
to: pageFrom + this.perPage
}
}
}
}
Displaying a paginated list
With our pagination properties calculated, we are now able to manipulate our products
array using the start and end points. Rather than use a hardcoded value, or use another
computed function, we are going to use a method to truncate the product list. This has the
advantage of being able to pass on any list of products while also meaning Vue does not
cache the result.
Create a new method object inside your component with a new method of paginate. This
should accept a parameter that will be the array of products for us to slice. Within the
function, we can use the two variables we calculated previously to return the right number
of products:
methods: {
paginate(list) {
return list.slice(
this.pagination.range.from,
this.pagination.range.to
);
}
}
Update the template to use this method when looping through the products:
template: `<div v-if="products">
<ol>
<li v-for="product in paginate(products)" v-if="product">
<h3>{{ product.title }}</h3>
</li>
</ol>
</div>`,
We can now view this in our browser and note it returns the first 12 products from our
object. Updating the currentPage variable within the data object to two or three will
reveal different lists of products, depending on the number.

Building an E-Commerce Store - Browsing Products Chapter 10
[ 288 ]
To continue our semantic approach to listing our products, we should update the start
position of our ordered list when not on page one. This can be done using the HTML
attribute of start – this allows you to specify with which number you should start an
ordered list.
Use the pagination.range.from variable to set the starting point of our ordered list –
remembering to add 1 as on the first page it will be 0:
template: `<div v-if="products">
<ol :start="pagination.range.from + 1">
<li v-for="product in paginate(products)" v-if="product">
<h3>{{ product.title }}</h3>
</li>
</ol>
</div>`
When incrementing the page numbers in the code now, you will notice the ordered list
starts at the appropriate place for each page.
Creating paginating buttons
Updating the page number via the code isn't user-friendly – so we should add some pages
to increment and decrement the page number variable. To do this, we'll create a function
that changes the currentPage variable to its value. This allows us to use it for both
the Next page and Previous page buttons, plus a numbered page list if desired.
Begin by creating two buttons within your pagination container. We want to disable
these buttons if we are at the extremities of the navigations – for example, you don't want to
be able to go below 1 when going back, and past the maximum number of pages when
going forward. We can do this by setting the disabled attribute on the button – like we
did on the product detail page and comparing the current page against these limits.
Add a disabled attribute and, on the Previous page, the button checks if the current page
is one. On the Next page button, compare it to the totalPages value of our pagination
method. The code for implementing the previously mentioned attributes is shown here:
<button :disabled="currentPage == 1">Previous page</button>
<button :disabled="currentPage == pagination.totalPages">Next page</button>

Building an E-Commerce Store - Browsing Products Chapter 10
[ 289 ]
Set the currentPage variable back to 1 and load the home page up in the browser. You
should notice the Previous page button is disabled. If you change the currentPage
variable, you will notice the buttons become active and inactive as desired.
We now need to create a click method for the buttons to update the currentPage. Create a
new function titled toPage(). This should accept a single variable – this will directly
update the currentPage variable:
methods: {
toPage(page) {
this.currentPage = page;
},
paginate(list) {
return list.slice(this.pagination.range.from,
this.pagination.range.to);
}
}
Add the click handlers to the buttons, passing through currentPage + 1 for the Next
page button, and currentPage - 1 for the Previous page button:
template: `<div v-if="products">
<button @click="toPage(currentPage - 1)" :disabled="currentPage ==
1">Previous page</button>
<button @click="toPage(currentPage + 1)" :disabled="currentPage ==
pagination.totalPages">Next page</button>
<ol :start="pagination.range.from + 1">
<li v-for="product in paginate(products)" v-if="product">
<h3>{{ product.title }}</h3>
</li>
</ol>
</div>`
We can now navigate back and forth through the products. As a nice addition to the user
interface, we could give an indication of the page number and how many pages remain,
using the variables available to us by using the code mentioned here:
template: `<div v-if="products">
<p>
Page {{ currentPage }} out of {{ pagination.totalPages }}
</p>
<button @click="toPage(currentPage - 1)" :disabled="currentPage ==
1">Previous page</button>
<button @click="toPage(currentPage + 1)" :disabled="currentPage ==
pagination.totalPages">Next page</button>

Building an E-Commerce Store - Browsing Products Chapter 10
[ 290 ]
<ol :start="pagination.range.from + 1">
<li v-for="product in paginate(products)" v-if="product">
<h3>{{ product.title }}</h3>
</li>
</ol>
</div>`
Updating the URL on navigation
Another improvement to the user experience would be to update the URL on page
navigation – this would allow the user to share the URL, bookmark it, and return to it later.
When paginating, the pages are a temporary state and should not be the main endpoint of a
URL. Instead, we can take advantage of the query parameters with Vue router.
Update the toPage method to add the parameter to the URL on page change. This can be
achieved using $router.push, however, we need to be careful not to remove any
existing parameters that may be in use for filtering in the future. This can be achieved by
combining the current query object from the route with a new one containing the page
variable:
toPage(page) {
this.$router.push({
query: Object.assign({}, this.$route.query, {
page
})
});
this.currentPage = page;
},
While navigating from page to page, you will notice the URL obtaining a new parameter of
?page= equal to the current page name. However, pressing refresh will not yield the
correct page results but, instead, page one again. This is because we need to pass the
current page query parameter to the currentPage variable on our HomePage component.

Building an E-Commerce Store - Browsing Products Chapter 10
[ 291 ]
This can be done using the created() function – updating the variables – ensuring we've
checked for its existence first. The created function is part of the Vue life cycle and was
covered in Chapter 4, Getting a List of Files Using the Dropbox API:
created() {
if(this.$route.query.page) {
this.currentPage = parseInt(this.$route.query.page);
}
}
We need to ensure the currentPage variable is an integer, to help us with any arithmetic
we need to do later on as a string is not a fan of calculations.
Creating pagination links
When viewing paginated products, it's often good practice to have a truncated list of page
numbers, allowing the user to jump several pages. We already have the mechanism for
navigating between pages – this can extend that.
As a simple entry point, we can create a link to every page by looping through until we
reach the totalPages value. Vue allows us to do this without any JavaScript. Create a nav
element at the bottom of the component with a list inside. Using a v-for, and create a
variable of page for every item in the totalPages variable:
<nav>
<ol>
<li v-for="page in pagination.totalPages">
<button @click="toPage(page)">{{ page }}</button>
</li>
</ol>
</nav>
This will create a button for every page – for example, if there are 24 pages in total, this will
create 24 links. This is not the desired effect, as we want a few pages before and after the
current page. An example of this would be, if the current page is 15, the page links should
be 12, 13, 14, 15, 16, 17 and 18. This means there are fewer links and it is less overwhelming
for the user.

Building an E-Commerce Store - Browsing Products Chapter 10
[ 292 ]
To begin with, create a new variable in the data object, which will note how many pages to
show either side of the selected page – a good value to start with is three:
data() {
return {
perPage: 12,
currentPage: 1,
pageLinksCount: 3
}
},
Next, create a new computed function titled pageLinks. This function will need to take the
current page and work out what page numbers are three less and three more than that.
From there, we need to check that the lower range is not less than one, and the upper is not
more than the total number of pages. Check that the products array has items before
proceeding:
pageLinks() {
if(this.products.length) {
let negativePoint = parseInt(this.currentPage) - this.pageLinksCount,
positivePoint = parseInt(this.currentPage) + this.pageLinksCount;
if(negativePoint < 1) {
negativePoint = 1;
}
if(positivePoint > this.pagination.totalPages) {
positivePoint = this.pagination.totalPages;
}
return pages;
}
}
The last step is to create an array and a for loop that loops from the lower range to the
higher range. This will create an array containing, at most, seven numbers with the page
range:
pageLinks() {
if(this.products.length) {
let negativePoint = parseInt(this.currentPage) - this.pageLinksCount,
positivePoint = parseInt(this.currentPage) + this.pageLinksCount,
pages = [];
if(negativePoint < 1) {

Building an E-Commerce Store - Browsing Products Chapter 10
[ 293 ]
negativePoint = 1;
}
if(positivePoint > this.pagination.totalPages) {
positivePoint = this.pagination.totalPages;
}
for (var i = negativePoint; i <= positivePoint; i++) {
pages.push(i)
}
return pages;
}
}
We can now replace the pagination.totalPages variable in our navigation component
with the new pageLinks variable and the correct number of links will be created, as shown
here:
<nav>
<ul>
<li v-for="page in pageLinks">
<button @click="toPage(page)">{{ page }}</button>
</li>
</ul>
</nav>
Viewing this in the browser, however, will render some odd behavior. Although the correct
number of links will be generated, clicking on them or using the next/previous buttons will
cause the buttons to remain the same – even if you navigate out of the range of the buttons.
This is because the computed value is cached. We can combat this in two ways – either
move the function into the method object or, alternatively, add a watch function to watch
the route and update the current page.
Opting for the second option means we can ensure no other results and outputs get cached
and are updated accordingly. Add a watch object to your component and update the
currentPage variable to that of the page query variable. Ensure it exists, otherwise default
to one. The watch method is as shown here:
watch: {
'$route'(to) {
this.currentPage = parseInt(to.query.page) || 1;
}
}

Building an E-Commerce Store - Browsing Products Chapter 10
[ 294 ]
This ensures all the computed variables update when a different page is navigated to. Open
your HomePage component and ensure all your pagination components work accordingly
and update the list.
Updating the items per page
The last user interface addition we need to create is allowing the user to update the number
of products per page. To initially set this up, we can create a <select> box with a v-model
attribute that updates the value directly. This works as expected and updates the product
list accordingly, as shown:
template: `<div v-if="products">
<p>
Page {{ currentPage }} out of {{ pagination.totalPages }}
</p>
Products per page:
<select v-model="perPage">
<option>12</option>
<option>24</option>
<option>48</option>
<option>60</option>
</select>
<button @click="toPage(currentPage - 1)" :disabled="currentPage ==
1">Previous page</button>
<button @click="toPage(currentPage + 1)" :disabled="currentPage ==
pagination.totalPages">Next page</button>
<ol :start="pagination.range.from + 1">
<li v-for="product in paginate(products)" v-if="product">
<h3>{{ product.title }}</h3>
</li>
</ol>
<nav>
<ul>
<li v-for="page in pageLinks">
<button @click="toPage(page)">{{ page }}</button>
</li>
</ul>
</nav>
</div>

Building an E-Commerce Store - Browsing Products Chapter 10
[ 295 ]
The issue with this is if the user is on a page higher than is possible once the value has
changed. For example, if there are 30 products with 12 products per page, this would create
three pages. If the user navigates to page three and then selects 24 products per page, there
would only be two pages needed and page three would be empty.
This can be resolved, once again, with a watch function. When the perPage variable
updates, we can check if the current page is higher than the totalPages variable. If it is,
we can redirect it to the last page:
watch: {
'$route'(to) {
this.currentPage = parseInt(to.query.page);
},
perPage() {
if(this.currentPage > this.pagination.totalPages) {
this.$router.push({
query: Object.assign({}, this.$route.query, {
page: this.pagination.totalPages
})
})
}
}
}
Creating the ListProducts component
Before we proceed with creating the filtering and ordering, we need to extract our product
listing logic and template it into our component – allowing us to easily reuse it. This
component should accept a prop of products, which it should be able to list and paginate.
Open up the ListProducts.js file and copy the code from the HomePage.js file into the
component. Move the data object and copy the pagination and pageLinks computed
functions. Move the watch and methods objects, as well as the created() function, from
the HomePage to the ListProducts file.
Update the HomePage template to use the <list-products> components with a
products prop, passing in the products computed value. In comparison, the HomePage
component should now be significantly smaller:
const HomePage = {
name: 'HomePage',
Building an E-Commerce Store - Browsing Products Chapter 10
[ 296 ]
template: `<div>
<list-products :products="products"></list-products>
</div>`,
computed: {
products() {
let products = this.$store.state.products;
return Object.keys(products).map(key => products[key]);
}
}
};
Within the ListProducts component, we need to add a props object, to let the component
know what to expect. This component is now significant. There are a few more things we
need to add to this component to make it more versatile. They include:
Showing the next/previous links if there is more than one page
Showing the "products per page" component if there are more than 12 products,
and only showing each step if there are more products than in the preceding step
Only showing the pageLinks component if it's more than our pageLinksCount
variable
All of these additions have been added to the following component code as follows. We
have also removed the unnecessary products computed value:
Vue.component('list-products', {
template: `<div v-if="products">
<p v-if="pagination.totalPages > 1">
Page {{ currentPage }} out of {{ pagination.totalPages }}
</p>
<div v-if="pagination.totalProducts > 12">
Products per page:
<select v-model="perPage">
<option>12</option>
<option>24</option>
<option v-if="pagination.totalProducts > 24">48</option>
<option v-if="pagination.totalProducts > 48">60</option>
</select>
</div>
<button
@click="toPage(currentPage - 1)"
:disabled="currentPage == 1"
v-if="pagination.totalPages > 1"
>

Building an E-Commerce Store - Browsing Products Chapter 10
[ 297 ]
Previous page
</button>
<button
@click="toPage(currentPage + 1)"
:disabled="currentPage == pagination.totalPages"
v-if="pagination.totalPages > 1"
>
Next page
</button>
<ol :start="pagination.range.from + 1">
<li v-for="product in paginate(products)" v-if="product">
<h3>{{ product.title }}</h3>
</li>
</ol>
<nav v-if="pagination.totalPages > pageLinksCount">
<ul>
<li v-for="page in pageLinks">
<button @click="toPage(page)">{{ page }}</button>
</li>
</ul>
</nav>
</div>`,
props: {
products: Array
},
data() {
return {
perPage: 12,
currentPage: 1,
pageLinksCount: 3
}
},
computed: {
pagination() {
if(this.products) {
let totalProducts = this.products.length,
pageFrom = (this.currentPage * this.perPage) - this.perPage,
totalPages = Math.ceil(totalProducts / this.perPage);
return {
totalProducts: totalProducts,
totalPages: Math.ceil(totalProducts / this.perPage),
range: {
from: pageFrom,

Building an E-Commerce Store - Browsing Products Chapter 10
[ 298 ]
to: pageFrom + this.perPage
}
}
}
},
pageLinks() {
if(this.products.length) {
let negativePoint = this.currentPage - this.pageLinksCount,
positivePoint = this.currentPage + this.pageLinksCount,
pages = [];
if(negativePoint < 1) {
negativePoint = 1;
}
if(positivePoint > this.pagination.totalPages) {
positivePoint = this.pagination.totalPages;
}
for (var i = negativePoint; i <= positivePoint; i++) {
pages.push(i)
}
return pages;
}
}
},
watch: {
'$route'(to) {
this.currentPage = parseInt(to.query.page);
},
perPage() {
if(this.currentPage > this.pagination.totalPages) {
this.$router.push({
query: Object.assign({}, this.$route.query, {
page: this.pagination.totalPages
})
})
}
}
},
created() {
if(this.$route.query.page) {
this.currentPage = parseInt(this.$route.query.page);

Building an E-Commerce Store - Browsing Products Chapter 10
[ 299 ]
}
},
methods: {
toPage(page) {
this.$router.push({
query: Object.assign({}, this.$route.query, {
page
})
});
this.currentPage = page;
},
paginate(list) {
return list.slice(this.pagination.range.from,
this.pagination.range.to)
}
}
});
You can verify your conditional rendering tags are working by temporarily truncating the
products array in the HomePage template – don't forget to remove it once you're done:
products() {
let products = this.$store.state.products;
return Object.keys(products).map(key => products[key]).slice(1, 10);
}
Creating a curated list for the home page
With our product listing component in place, we can proceed with making a curated list of
products for our home page, and add more information to the product listing.
In this example, we are going to hardcode an array of product handles on our home page
component that we want to display. If this were in development, you would expect this list
to be controlled via a content management system or similar.

Building an E-Commerce Store - Browsing Products Chapter 10
[ 300 ]
Create a data function on your HomePage component, that which includes an array
titled selectedProducts:
data() {
return {
selectedProducts: []
}
},
Populate the array with several handles from the product list. Try and get about six, but if
you go over 12, remember it will paginate with our component. Add your selected handles
to the selectedProducts array:
data() {
return {
selectedProducts: [
'adjustable-stem',
'colorful-fixie-lima',
'fizik-saddle-pak',
'kenda-tube',
'oury-grip-set',
'pure-fix-pedals-with-cages'
]
}
},
With our selected handles, we can now filter the product list to only include a list of
products included in our selectedProducts array. The initial instinct might be to use the
JavaScript filter() function on the products array combined with includes():
products() {
let products = this.$store.state.products;
products = Object.keys(products).map(key => products[key]);
products = products.filter(product =>
this.selectedProducts.includes(product.handle));
return products;
}
The issue with this is that, although it appears to work, it does not respect the ordering of
the selected products. The filter function simply removes any items that do not match and
leaves the remaining products in the order they are loaded.
Fortunately, our products are saved in a key/value pair with the handle as the key. Using
this, we can utilize the products object and return an array using a for loop.
Building an E-Commerce Store - Browsing Products Chapter 10
[ 301 ]
Create an empty array, output, within the computed function. Looping through
the selectedProducts array, find each required product and add to the output array:
products() {
let products = this.$store.state.products,
output = [];
if(Object.keys(products).length) {
for(let featured of this.selectedProducts) {
output.push(products[featured]);
}
return output;
}
}
This creates the same product list but, this time, in the correct order. Try re-ordering,
adding, and deleting items to ensure your list reacts accordingly.
Showing more information
We can now work on showing more product information in our ListProduct component.
As mentioned near the beginning of the chapter, we should display:
Image
Title
Price
Manufacturer
We're already displaying the title, and the image and manufacturer can easily be pulled out
from the product information. Don't forget to always retrieve the first image from the
images array. Open up the ListProducts.js file and update the product to display this
information – making sure you check whether the image exists before displaying it.
The manufacturer title is listed under the vendor object in the product data:
<ol :start="pagination.range.from + 1">
<li v-for="product in paginate(products)" v-if="product">
<img v-if="product.images[0]" :src="product.images[0].source"
:alt="product.title" width="120">
<h3>{{ product.title }}</h3>
<p>Made by: {{ product.vendor.title }}</p>
</li>
</ol>

Building an E-Commerce Store - Browsing Products Chapter 10
[ 302 ]
The price is going to be a little more complicated to work out. This is because each variation
on the product can have a different price, however, these are often the same. If there are
different prices we should display the cheapest one with a from prepended.
We need to create a function that loops through the variations and works out the cheapest
price and, if there is a price range, add the word from. To achieve this, we are going to loop
through the variations and build up an array of unique prices – if the price does not already
exist in the array. Once complete, we can check the length – if there is more than one price,
we can add the prefix, if not, it means all variations are the same price.
Create a new method on the ListProducts component called productPrice. This
accepts one parameter, which will be the variations. Inside, create an empty array, prices:
productPrice(variations) {
let prices = [];
}
Loop through the variations and append the price to the prices array if it does not exist
already. Create a for loop that uses the includes() function to check if the price exists in
the array:
productPrice(variations) {
let prices = [];
for(let variation of variations) {
if(!prices.includes(variation.price)) {
prices.push(variation.price);
}
}
}
With our array of prices, we can now extract the lowest number and check whether there is
more than one item.
To extract the lowest number from an array, we can use the JavaScript Math.min()
function. Use the .length property to check the length of the array. Lastly, return the
price variable:
productPrice(variations) {
let prices = [];
for(let variation of variations) {
if(!prices.includes(variation.price)) {
prices.push(variation.price);
}
}

Building an E-Commerce Store - Browsing Products Chapter 10
[ 303 ]
let price = '$' + Math.min(...prices);
if(prices.length > 1) {
price = 'From: ' + price;
}
return price;
}
Add your productPrice method to your template, remembering to
pass product.variationProducts into it. The last thing we need to add to our template
is a link to the product:
<ol :start="pagination.range.from + 1">
<li v-for="product in paginate(products)" v-if="product">
<router-link :to="'/product/' + product.handle">
<img v-if="product.images[0]" :src="product.images[0].source"
:alt="product.title" width="120">
</router-link>
<h3>
<router-link :to="'/product/' + product.handle">
{{ product.title }}
</router-link>
</h3>
<p>Made by: {{ product.vendor.title }}</p>
<p>Price {{ productPrice(product.variationProducts) }}</p>
</li>
</ol>
Ideally, the product links should use a named route and not a hardcoded link, in case the
route changes. Add a name to the product route and update the to attribute to use the
name instead:
{
path: '/product/:slug',
name: 'Product',
component: ProductPage
}

Building an E-Commerce Store - Browsing Products Chapter 10
[ 304 ]
Update the template to now use the route name, with the params object:
<ol :start="pagination.range.from + 1">
<li v-for="product in paginate(products)" v-if="product">
<router-link :to="{name: 'Product', params: {slug: product.handle}}">
<img v-if="product.images[0]" :src="product.images[0].source"
:alt="product.title" width="120">
</router-link>
<h3>
<router-link :to="{name: 'Product', params: {slug: product.handle}}">
{{ product.title }}
</router-link>
</h3>
<p>Made by: {{ product.vendor.title }}</p>
<p>Price {{ productPrice(product.variationProducts) }}</p>
</li>
</ol>
Creating categories
A shop is not really a usable shop if it does not have categories to navigate by. Fortunately,
each of our products has a type key that indicates a category for it to be shown in. We can
now create a category page that lists products from that particular category.
Creating a category list
Before we can display the products in a particular category, we first need to generate a list
of available categories. To help with the performance of our app, we will also store the
handles of the products in each category. The categories structure will look like the
following:
categories = {
tools: {
name: 'Tools',
handle: 'tools',
products: ['product-handle', 'product-handle'...]
},
freewheels: {
name: 'Freewheels',
handle: 'freewheels',
products: ['another-product-handle', 'product'...]
}
};

Building an E-Commerce Store - Browsing Products Chapter 10
[ 305 ]
Creating the category list like this means we readily have available the list of products
within the category while being able to loop through the categories and output the title
and handle to create a list of links to categories. As we already have this information, we
will create the category list once we've retrieved the product list.
Open up app.js and navigate to the created() method on the Vue instance. Rather than
creating a second $store.commit underneath the products storing method, we are going
to utilize a different functionality of Vuex – actions.
Actions allow you to create functions in the store itself. Actions are unable to mutate the
state directly – that is still down to mutations, but it allows you to group several mutations
together, which in this instance, suits us perfectly. Actions are also perfect if you want to
run an asynchronous operation before mutating the state – for example with a setTimeout
JavaScript function.
Navigate to your Vuex.Store instance and, after the mutations, add a new object of
actions. Inside, create a new function titled initializeShop:
const store = new Vuex.Store({
state: {
products: {}
},
mutations: {
products(state, payload) {
state.products = payload;
}
},
actions: {
initializeShop() {
}
}
});
With action parameters, the first parameter is the store itself, which we need to use in order
to utilize the mutations. There are two ways of doing this, the first is to use a single variable
and access its properties within the function. For example:
actions: {
initializeShop(store) {
store.commit('products');
}
}

Building an E-Commerce Store - Browsing Products Chapter 10
[ 306 ]
However, with ES2015, we are able to use argument destructuring and utilize the
properties we need. For this action, we only need the commit function, like so:
actions: {
initializeShop({commit}) {
commit('products');
}
}
If we wanted the state from the store as well, we could add it to the curly brackets:
actions: {
initializeShop({state, commit}) {
commit('products');
// state.products
}
}
Using this "exploded" method of accessing the properties makes our code cleaner and less
repetitive. Remove the state property and add a second parameter after the curly brackets
labeled products. This will be our formatted product's data. Pass that variable directly to
the product's commit function:
initializeShop({commit}, products) {
commit('products', products);
}
Using actions is as simple as using mutations, except instead of using $store.commit,
you use $store.dispatch. Update your created method – not forgetting to change the
function name too, and check your app still works:
created() {
CSV.fetch({url: './data/csv-files/bicycles.csv'}).then(data => {
this.$store.dispatch('initializeShop', this.$formatProducts(data));
});
}
The next step is to create a mutation for our categories. As we may want to update our
categories independently of our products – we should create a second function within the
mutations. It should also be this function that loops through the products and creates the
list of categories.

Building an E-Commerce Store - Browsing Products Chapter 10
[ 307 ]
First, make a new property in the state object titled categories. This should be an object
by default:
state: {
products: {},
categories: {}
}
Next, create a new mutation called categories. Along with the state, this should take a
second parameter. To be consistent, title it payload – as this is what Vuex refers to it as:
mutations: {
products(state, payload) {
state.products = payload;
},
categories(state, payload) {
}
},
Now for the functionality. This mutation needs to loop through the products. For every
product, it needs to isolate the type. Once it has the title and slug, it needs to check if an
entry exists with that slug; if it does, append the product handle to the products array, if
not – it needs to create a new array and details.
Create an empty categories object and loop through the payload, setting a variable for
both the product and type:
categories(state, payload) {
let categories = {};
Object.keys(payload).forEach(key => {
let product = payload[key],
type = product.type;
});
}
We now need to check if an entry exists with the key of the current type.handle. If it does
not, we need to create a new entry with it. The entry needs to have the title, handle, and an
empty products array:
categories(state, payload) {
let categories = {};
Object.keys(payload).forEach(key => {
let product = payload[key],
type = product.type;

Building an E-Commerce Store - Browsing Products Chapter 10
[ 308 ]
if(!categories.hasOwnProperty(type.handle)) {
categories[type.handle] = {
title: type.title,
handle: type.handle,
products: []
}
}
});
}
Lastly, we need to append the current product handle onto the products array of the entry:
categories(state, payload) {
let categories = {};
Object.keys(payload).forEach(key => {
let product = payload[key],
type = product.type;
if(!categories.hasOwnProperty(type.handle)) {
categories[type.handle] = {
title: type.title,
handle: type.handle,
products: []
}
}
categories[type.handle].products.push(product.handle);
});
}
You can view the categories output by adding console.log to the end of the function:
categories(state, payload) {
let categories = {};
Object.keys(payload).forEach(key => {
...
});
console.log(categories);
}

Building an E-Commerce Store - Browsing Products Chapter 10
[ 309 ]
Add the mutation to the initializeShop action:
initializeShop({commit}, products) {
commit('products', products);
commit('categories', products);
}
Viewing the app in the browser, you will be faced with a JavaScript error. This is because
some products do not contain a "type" for us to use to categorize them. Even with the
JavaScript error resolved, there are still a lot of categories that get listed out.
To help with the number of categories, and to group the uncategorized products, we
should make an "Miscellaneous" category. This will collate all the categories with two or
fewer products and group the products into their own group.
Creating a "miscellaneous" category
The first issue we need to negate is the nameless category. When looping through our
products, if no type is found, we should insert a category, so everything is categorized.
Create a new object in the categories method that contains the title and handle for a new
category. For the handle and variable call it other. Make the title a bit more user-friendly by
calling it Miscellaneous.
let categories = {},
other = {
title: 'Miscellaneous',
handle: 'other'
};
When looping through products, we can then check to see whether the type key exists, if
not, create an other category and append to it:
Object.keys(payload).forEach(key => {
let product = payload[key],
type = product.hasOwnProperty('type') ? product.type : other;
if(!categories.hasOwnProperty(type.handle)) {
categories[type.handle] = {
title: type.title,
handle: type.handle,
products: []
}
}

Building an E-Commerce Store - Browsing Products Chapter 10
[ 310 ]
categories[type.handle].products.push(product.handle);
});
Viewing the app now will reveal all the categories in the JavaScript console – allowing you
to see the magnitude of how many categories there are.
Let's combine any categories with two or fewer products into the "other" category – not
forgetting to remove the category afterward. After the product loop, loop through the
categories, checking the count of the products available. If fewer than three, add them to
the "other" category:
Object.keys(categories).forEach(key => {
let category = categories[key];
if(category.products.length < 3) {
categories.other.products =
categories.other.products.concat(category.products);
}
});
We can then delete the category we've just stolen the products from:
Object.keys(categories).forEach(key => {
let category = categories[key];
if(category.products.length < 3) {
categories.other.products =
categories.other.products.concat(category.products);
delete categories[key];
}
});
And with that, we have a much more manageable list of categories. One more
improvement we can make is to ensure the categories are in alphabetical order. This helps
users find their desired category much quicker. In JavaScript, arrays can be sorted a lot
more easily than objects, so once again, we need to loop through an array of the object keys
and sort them. Create a new object and add the categories as they are sorted to it.
Afterward, store this on the state object so we have the categories available to us:
categories(state, payload) {
let categories = {},
other = {
title: 'Miscellaneous',
handle: 'other'
};
Object.keys(payload).forEach(key => {

Building an E-Commerce Store - Browsing Products Chapter 10
[ 311 ]
let product = payload[key],
type = product.hasOwnProperty('type') ? product.type : other;
if(!categories.hasOwnProperty(type.handle)) {
categories[type.handle] = {
title: type.title,
handle: type.handle,
products: []
}
}
categories[type.handle].products.push(product.handle);
});
Object.keys(categories).forEach(key => {
let category = categories[key];
if(category.products.length < 3) {
categories.other.products =
categories.other.products.concat(category.products);
delete categories[key];
}
});
let categoriesSorted = {}
Object.keys(categories).sort().forEach(key => {
categoriesSorted[key] = categories[key]
});
state.categories = categoriesSorted;
}
With that, we can now add a list of categories to our HomePage template. For this, we'll
create named router-view components – allowing us to put things in the sidebar of the
shop on selected pages.
Displaying the categories
With our categories stored, we can now proceed with creating our ListCategories
component. We want to display our category navigation in a sidebar on the home page,
and also on a shop category page. As we want to show it in several places, we have a
couple of options as to how we display it.

Building an E-Commerce Store - Browsing Products Chapter 10
[ 312 ]
We can use the component in the template as we have with the <list-
products> component. The issue with this is that if we want to display our list in a sidebar
and our sidebar needs to be consistent across the site, we would have to copy and paste a
lot of HTML between views.
A better approach would be to use named routes and set the template once in our
index.html.
Update the app template to contain a <main> and an <aside> element. Within these, create
a router-view, leaving the one inside main unnamed, while giving the one inside the
aside element a name of sidebar:
<div id="app">
<main>
<router-view></router-view>
</main>
<aside>
<router-view name="sidebar"></router-view>
</aside>
</div>
Within our routes object, we can now add different components to different named views.
On the Home route, change the component key to components, and add an object -
specifying each component and its view:
{
path: '/',
name: 'Home',
components: {
default: HomePage,
sidebar: ListCategories
}
}
The default indicates that the component will go into the unnamed router-view. This
allows us to still use the singular component key if required. For the component to be
correctly loaded into the sidebar view, we need to alter how the ListCategories
component is initialized. Instead of using Vue.component, initialize it as you would a
view component:
const ListCategories = {
name: 'ListCategories'
};

Building an E-Commerce Store - Browsing Products Chapter 10
[ 313 ]
We can now proceed with making the template for the category list. As our categories are
saved in the store, loading and displaying them should be familiar by now. It is advised
you load the categories from the state into a computed function - for cleaner template code
and easier adaptation should you need to manipulate it in any way.
Before we create the template, we need to create a route for the category. Referring back to
our plan in Chapter 9, Using Vue-Router Dynamic Routes to Load Data, we can see the route
is going to be /category/:slug – add this route with a name and enable props, as we'll
utilize them for the slug. Ensure you have made the CategoryPage file and initialized the
component.
const router = new VueRouter({
routes: [
{
path: '/',
name: 'Home',
components: {
default: HomePage,
sidebar: ListCategories
}
},
{
path: '/category/:slug',
name: 'Category',
component: CategoryPage,
props: true
},
{
path: '/product/:slug',
name: 'Product',
component: ProductPage
},
{
path: '/404',
alias: '*',
component: PageNotFound
}
]
});

Building an E-Commerce Store - Browsing Products Chapter 10
[ 314 ]
Back to our ListCategories component; loop through the stored categories and create a
link for each one. Show the product count in brackets after each name:
const ListCategories = {
name: 'ListCategories',
template: `<div v-if="categories">
<ul>
<li v-for="category in categories">
<router-link :to="{name: 'Category', params: {slug:
category.handle}}">
{{ category.title }} ({{ category.products.length }})
</router-link>
</li>
</ul>
</div>`,
computed: {
categories() {
return this.$store.state.categories;
}
}
};
With the links to our categories now showing on the home page, we can head on to make a
category page.
Displaying products in a category
Clicking one of the category links (that is, /#/category/grips) will navigate to a blank
page – thanks to our route. We need to create a template and set up the category page to
show the products. As a starting base, create the CategoryPage component in a similar
vein to the product page.
Create a template with an empty container and the PageNotFound component inside.
Create a data variable titled categoryNotFound, and ensure the PageNotFound
component displays if this is set to true. Create a props object, which allows the slug
property to be passed and, lastly, create a category computed function.
The CategoryPage component should look like the following:
const CategoryPage = {
name: 'CategoryPage',

Building an E-Commerce Store - Browsing Products Chapter 10
[ 315 ]
template: `<div>
<div v-if="category"></div>
<page-not-found v-if="categoryNotFound"></page-not-found>
</div>`,
components: {
PageNotFound
},
props: {
slug: String
},
data() {
return {
categoryNotFound: false,
}
},
computed: {
category() {
}
}
};
Inside the category computed function, load the correct category from the store based on
the slug. If it is not on the list, mark the categoryNotFound variable to true - similar to
what we did in the ProductPage component:
computed: {
category() {
let category;
if(Object.keys(this.$store.state.categories).length) {
category = this.$store.state.categories[this.slug];
if(!category) {
this.categoryNotFound = true;
}
}
return category;
}
}

Building an E-Commerce Store - Browsing Products Chapter 10
[ 316 ]
With our category loaded, we can output the title in the template:
template: `<div>
<div v-if="category">
<h1>{{ category.title }}</h1>
</div>
<page-not-found v-if="categoryNotFound"></page-not-found>
</div>`,
We can now proceed with displaying the products on our category page. To do this, we can
use the code from the HomePage component as we have exactly the same scenario – an
array of product handles.
Create a new computed function that takes the current category products and processes
them as we did on the home page:
computed: {
category() {
...
},
products() {
if(this.category) {
let products = this.$store.state.products,
output = [];
for(let featured of this.category.products) {
output.push(products[featured]);
}
return output;
}
}
}
We don't need to check whether the products exist in this function as we are checking
whether the category exists, and that would only return true if the data had been loaded.
Add the component to the HTML and pass in the products variable:
template: `<div>
<div v-if="category">
<h1>{{ category.title }}</h1>
<list-products :products="products"></list-products>
</div>
<page-not-found v-if="categoryNotFound"></page-not-found>
</div>`

Building an E-Commerce Store - Browsing Products Chapter 10
[ 317 ]
With that, we have our category products listed out for each category.
Code optimization
With our CategoryPage component complete, we can see a lot of similarities between that
and the home page – the only difference being the home page has a fixed product array. To
save repetition, we can combine these two components – meaning we only have to ever
update one if we need to.
We can address the fixed array issue by displaying it when we identify that we are on the
home page. The way of doing that is to check if the slug prop has a value. If not, we can
assume we are on the home page.
First, update the Home route to point to the CategoryPage component and enable props.
When using named views, you have to enable props for each of the views. Update the
props value to be an object with each of the named views, enabling the props for each:
{
path: '/',
name: 'Home',
components: {
default: CategoryPage,
sidebar: ListCategories
},
props: {
default: true,
sidebar: true
}
}
Next, create a new variable in the data function of the CategoryPage, titled
categoryHome. This is going to be an object that follows the same structure as the category
objects, containing a products array, title, and handle. Although the handle won't be used,
it is good practice to follow conventions:
data() {
return {
categoryNotFound: false,
categoryHome: {
title: 'Welcome to the Shop',
handle: 'home',
products: [
'adjustable-stem',
'fizik-saddle-pak',

Building an E-Commerce Store - Browsing Products Chapter 10
[ 318 ]
'kenda-tube',
'colorful-fixie-lima',
'oury-grip-set',
'pure-fix-pedals-with-cages'
]
}
}
}
The last thing we need to do is check whether the slug exists. If not, assign our new object
to the category variable within the computed function:
category() {
let category;
if(Object.keys(this.$store.state.categories).length) {
if(this.slug) {
category = this.$store.state.categories[this.slug];
} else {
category = this.categoryHome;
}
if(!category) {
this.categoryNotFound = true;
}
}
return category;
}
Head to the home page and verify your new component is working. If it is, you can delete
HomePage.js and remove it from index.html. Update the category route to also include
the category list in the sidebar and use the props object:
{
path: '/category/:slug',
name: 'Category',
components: {
default: CategoryPage,
sidebar: ListCategories
},
props: {
default: true,
sidebar: true
}
},
Building an E-Commerce Store - Browsing Products Chapter 10
[ 319 ]
Ordering products in a category
With our category pages displaying the right products, it's time to add some ordering
options within our ListProducts component. When viewing a shop online, you can
normally order the products by the following:
Title: Ascending (A - Z)
Title: Descending (Z - A)
Price: Ascending ($1 - $999)
Price: Descending ($999 - $1)
However, once we have the mechanism in place, you can add any ordering criteria you
want.
Start off by creating a select box in your ListProducts component with each of the
preceding values. Add an extra first one of Sort products by...:
<div class="ordering">
<select>
<option>Order products</option>
<option>Title - ascending (A - Z)</option>
<option>Title - descending (Z - A)</option>
<option>Price - ascending ($1 - $999)</option>
<option>Price - descending ($999 - $1)</option>
</select>
</div>
We now need to create a variable for the select box to update in the data function. Add a
new key titled ordering and add a value to each option, so interpreting the value is easier.
Construct the value by using the field and order, separated by a hyphen. For
example, Title - ascending (A - Z) would become title-asc:
<div class="ordering">
<select v-model="ordering">
<option value="">Order products</option>
<option value="title-asc">Title - ascending (A - Z)</option>
<option value="title-desc">Title - descending (Z - A)</option>
<option value="price-asc">Price - ascending ($1 - $999)</option>
<option value="price-desc">Price - descending ($999 - $1)</option>
</select>
</div>

Building an E-Commerce Store - Browsing Products Chapter 10
[ 320 ]
And the updated data function becomes:
data() {
return {
perPage: 12,
currentPage: 1,
pageLinksCount: 3,
ordering: ''
}
}
To update the order of the products we now need to manipulate the product list. This
needs to be done before the list gets split for pagination - as the user would expect the
whole list to be sorted, not just the current page.
Store the product price
Before we proceed, there is an issue we need to address. To sort by price, the price needs to
ideally be available on the product itself, not calculated specifically for the template, which
it currently is. To combat this, we are going to calculate the price before the products get
added to the store. This means it will be available as a property on the product itself, rather
than being dynamically created.
The details we need to know are the cheapest price and whether the product has many
prices within its variations. The latter means we know whether we need to display the
"From:" when listing the products out. We will create two new properties for each
product: price and hasManyPrices.
Navigate to the products mutation in the store and create a new object and a loop of the
products:
products(state, payload) {
let products = {};
Object.keys(payload).forEach(key => {
let product = payload[key];
products[key] = product;
});
state.products = payload;
}

Building an E-Commerce Store - Browsing Products Chapter 10
[ 321 ]
Copy the code from the productPrice method on the ListProducts component and
place it within the loop. Update the second for loop so it loops
through product.variationProducts. Once this for loop has completed, we can add
the new properties to the product. Lastly, update the state with the new products object:
products(state, payload) {
let products = {};
Object.keys(payload).forEach(key => {
let product = payload[key];
let prices = [];
for(let variation of product.variationProducts) {
if(!prices.includes(variation.price)) {
prices.push(variation.price);
}
}
product.price = Math.min(...prices);
product.hasManyPrices = prices.length > 1;
products[key] = product;
});
state.products = products;
}
We can now update the productPrice method on the ListProducts component. Update
the function so it accepts the product, instead of variations. Remove the for loop from the
function, and update the variables so they use the price and hasManyPrices properties of
the product instead:
productPrice(product) {
let price = '$' + product.price;
if(product.hasManyPrices) {
price = 'From: ' + price;
}
return price;
}
Update the template so the product is passed to the function:
<p>Price {{ productPrice(product) }}</p>

Building an E-Commerce Store - Browsing Products Chapter 10
[ 322 ]
Wiring up the ordering
With our price readily available, we can proceed with wiring up the ordering. Create a new
computed function titled orderProducts that returns this.products. We want to
ensure we are always sorting from the source and not ordering something that has
previously been ordered. Call this new function from within the paginate function and
remove the parameter from this method and from the template:
computed: {
...
orderProducts() {
return this.products;
},
},
methods: {
paginate() {
return this.orderProducts.slice(
this.pagination.range.from,
this.pagination.range.to
);
},
}
To determine how we need to sort the products, we can use the this.ordering value. If it
exists, we can split the string on the hyphen, meaning we have an array containing the field
and order type. If it does not exist, we need to simply return the existing product array:
orderProducts() {
let output;
if(this.ordering.length) {
let orders = this.ordering.split('-');
} else {
output = this.products;
}
return output;
}
Sort the products array based on the value of the first item of the ordering array. If it is a
string, we will use localCompare, which ignores cases when comparing. Otherwise, we
will simply subtract one value from the other – this is what the sort function expects:
orderProducts() {
let output;

Building an E-Commerce Store - Browsing Products Chapter 10
[ 323 ]
if(this.ordering.length) {
let orders = this.ordering.split('-');
output = this.products.sort(function(a, b) {
if(typeof a[orders[0]] == 'string') {
return a[orders[0]].localeCompare(b[orders[0]]);
} else {
return a[orders[0]] - b[orders[0]];
}
});
} else {
output = this.products;
}
return output;
}
Lastly, we need to check if the second item in the orders array is asc or desc. By default,
the current sort function will return the items sorted in an ascending order, so if the value
is desc, we can reverse the array:
orderProducts() {
let output;
if(this.ordering.length) {
let orders = this.ordering.split('-');
output = this.products.sort(function(a, b) {
if(typeof a[orders[0]] == 'string') {
return a[orders[0]].localeCompare(b[orders[0]]);
} else {
return a[orders[0]] - b[orders[0]];
}
});
if(orders[1] == 'desc') {
output.reverse();
}
} else {
output = this.products;
}
return output;
}
Head to your browser and check out the ordering of products!

Building an E-Commerce Store - Browsing Products Chapter 10
[ 324 ]
Creating Vuex getters
The last step to making our category page just like any other shop is the introduction of
filtering. Filtering allows you to find products that have particular sizes, colors, tags, or
manufacturers. Our filtering options are going to be built from the products on the page.
For example, if none of the products have an XL size or a blue color, there is no point
showing that as a filter.
To achieve this, we are going to need to pass the products of the current category to the
filtering component as well. However, the products get processed on the CategoryPage
component. Instead of repeating this processing, we can move the functionality to a Vuex
store getter. Getters allow you to retrieve data from the store and manipulate it like you
would in a function on a component. Because it is a central place, however, it means several
components can benefit from the processing.
Getters are the Vuex equivalent of computed functions. They are declared as functions but
called as variables. However, they can be manipulated to accept parameters by returning a
function inside them.
We are going to move both the category and products functions from the
CategoryPage component into the getter. The getter function will then return an object
with the category and products.
Create a new object in your store titled getters. Inside, create a new function called
categoryProducts:
getters: {
categoryProducts: () => {
}
}
Getters themselves receive two parameters, the state as the first, and any other getters as
the second. To pass a parameter to a getter, you have to return a function inside of the
getter that receives the parameter. Fortunately, in ES2015, this can be achieved with the
double arrow (=>) syntax. As we are not going to be using any other getters in this function,
we do not need to call the second parameter.

Building an E-Commerce Store - Browsing Products Chapter 10
[ 325 ]
As we are abstracting all of the logic out, pass in the slug variable as the parameter of the
second function:
categoryProducts: (state) => (slug) => {
}
As we are transferring the logic for selecting and retrieving the categories and products into
the store, it makes sense to store the HomePage category content in the state itself:
state: {
products: {},
categories: {},
categoryHome: {
title: 'Welcome to the Shop',
handle: 'home',
products: [
'adjustable-stem',
'fizik-saddle-pak',
'kenda-tube',
'colorful-fixie-lima',
'oury-grip-set',
'pure-fix-pedals-with-cages'
]
}
}
Move category-selecting logic from the category computed function in the CategoryPage
component into the getter. Update the slug and categoryHome variables to use the
content from the relevant places:
categoryProducts: (state) => (slug) => {
if(Object.keys(state.categories).length) {
let category = false;
if(slug) {
category = this.$store.state.categories[this.slug];
} else {
category = state.categoryHome;
}
}
}

Building an E-Commerce Store - Browsing Products Chapter 10
[ 326 ]
With a category assigned, we can now load the products based on the handles stored in the
category. Move the code from the products computed function into the getter. Combine
the variable assignments together and remove the store product retrieval variable, as we
have the state readily available. Ensure the code that checks to see whether the category
exists is still in place:
categoryProducts: (state) => (slug) => {
if(Object.keys(state.categories).length) {
let category = false,
products = [];
if(slug) {
category = this.$store.state.categories[this.slug];
} else {
category = state.categoryHome;
}
if(category) {
for(let featured of category.products) {
products.push(state.products[featured]);
}
}
}
}
Lastly, we can add a new productDetails array on the category with the fleshed-out
product data. Return the category at the end of the function. If the slug variable input
exists as a category, we will get all of the data back. If not, it will return false – from
which we can display our PageNotFound component:
categoryProducts: (state) => (slug) => {
if(Object.keys(state.categories).length) {
let category = false,
products = [];
if(slug) {
category = state.categories[slug];
} else {
category = state.categoryHome;
}
if(category) {
for(let featured of category.products) {
products.push(state.products[featured]);
}
category.productDetails = products;

Building an E-Commerce Store - Browsing Products Chapter 10
[ 327 ]
}
return category;
}
}
In our CategoryPage component, we can remove the products() computed function and
update the category() function. To call a getter function, you refer to
this.$store.getters:
computed: {
category() {
if(Object.keys(this.$store.state.categories).length) {
let category = this.$store.getters.categoryProducts(this.slug);
if(!category) {
this.categoryNotFound = true;
}
return category;
}
}
}
Unfortunately, we are still having to check whether the categories exist before proceeding.
This is so we can tell that there is no category with the name, rather than an unloaded one.
To make this neater, we can extract this check into another getter and utilize it in both our
other getter and the component.
Create a new getter titled categoriesExist, and return the contents of the if statement:
categoriesExist: (state) => {
return Object.keys(state.categories).length;
},
Update the categoryProducts getter to accept getters in the arguments of the first
function and to use this new getter to indicate its output:
categoryProducts: (state, getters) => (slug) => {
if(getters.categoriesExist) {
...
}
}

Building an E-Commerce Store - Browsing Products Chapter 10
[ 328 ]
In our CategoryPage component, we can now call on the new getter with
this.$store.getters.categoriesExist(). To save having this.$store.getters
repeated twice in this function, we can map the getters to be locally accessed. This allows us
to call this.categoriesExist() as a more readable function name.
At the beginning of the computed object, add a new function
titled ...Vuex.mapGetters(). This function accepts an array or an object as a parameter
and the three dots at the beginning ensure the contents are expanded to be merged with the
computed object.
Pass in an array containing the names of the two getters:
computed: {
...Vuex.mapGetters([
'categoryProducts',
'categoriesExist'
]),
category() {
...
}
}
This now means we have this.categoriesExist and this.categoryProducts at our
disposal. Update the category function to use these new functions:
computed: {
...Vuex.mapGetters([
'categoriesExist',
'categoryProducts'
]),
category() {
if(this.categoriesExist) {
let category = this.categoryProducts(this.slug);
if(!category) {
this.categoryNotFound = true;
}
return category;
}
}
}

Building an E-Commerce Store - Browsing Products Chapter 10
[ 329 ]
Update the template to reflect the changes in the computed data:
template: `<div>
<div v-if="category">
<h1>{{ category.title }}</h1>
<list-products :products="category.productDetails"></list-products>
</div>
<page-not-found v-if="categoryNotFound"></page-not-found>
</div>`,
Building the filtering component based on
products
As mentioned, all our filters are going to be created from the products in the current
category. This means if there are no products made by IceToolz, it won't appear as an
available filter.
To begin with, open the ProductFiltering.js component file. Our product filtering is
going to go in our sidebar, so change the component definition from Vue.component to an
object. We still want our categories to display after the filtering, so add the
ListCategories component as a declared component within ProductFiltering. Add a
template key and include the <list-categories> component:
const ProductFiltering = {
name: 'ProductFiltering',
template: `<div>
<list-categories />
</div>`,
components: {
ListCategories
}
}
Update the category route to include the ProductFiltering component in the sidebar
instead of ListCategories:
{
path: '/category/:slug',
name: 'Category',
components: {
default: CategoryPage,

Building an E-Commerce Store - Browsing Products Chapter 10
[ 330 ]
sidebar: ProductFiltering
},
props: {
default: true,
sidebar: true
}
}
You should now have the Home route, which includes the CategoryPage
and ListCategories components, and the Category route, which includes the
ProductFiltering component instead.
From the CategoryPage component, copy the props and computed objects - as we are
going to be utilizing a lot of the existing code. Rename the category computed function to
filters. Remove both the return and the componentNotFound if statement. Your
component should now look like the following:
const ProductFiltering = {
name: 'ProductFiltering',
template: `<div>
<list-categories />
</div>`,
components: {
ListCategories
},
props: {
slug: String
},
computed: {
...Vuex.mapGetters([
'categoriesExist',
'categoryProducts'
]),
filters() {
if(this.categoriesExist) {
let category = this.categoryProducts(this.slug);
}
}
}
}

Building an E-Commerce Store - Browsing Products Chapter 10
[ 331 ]
We now need to construct our filters, based on the products in the category. We will be
doing this by looping through the products, collecting information from preselected values,
and displaying them.
Create a data object that contains a key of topics. This will be an object containing child
objects with a, now familiar, pattern of 'handle': {} for each of the properties we want
to filter on.
Each child object will contain a handle, which is the value of the product of which to filter
(for example, vendor), a title, which is the user-friendly version of the key, and an array
of values, which will be populated.
We'll start off with two, vendor and tags; however, more will be dynamically added as we
process the products:
data() {
return {
topics: {
vendor: {
title: 'Manufacturer',
handle: 'vendor',
values: {}
},
tags: {
title: 'Tags',
handle: 'tags',
values: {}
}
}
}
},
We will now begin looping through the products. Along with the values, we are going to
keep track of how many products have the same value, allowing us to indicate to the user
how many products will be revealed.
Loop through the products on the category within the filters method and, to begin
with, find the vendor of each product. For every one encountered, check whether it exists
within the values array.

Building an E-Commerce Store - Browsing Products Chapter 10
[ 332 ]
If it does not, add a new object with the name, handle, and a count, which is an array of
product handles. We store an array of handles so that we can verify that the product has
already been seen. If we were keeping a raw numerical count, we could encounter a
scenario where the filters get triggered twice, doubling the count. By checking whether the
product handle exists already, we can check it's only been seen once.
If a filter of that name does exist, add the handle to the array after checking it does not exist:
filters() {
if(this.categoriesExist) {
let category = this.categoryProducts(this.slug),
vendors = this.topics.vendor;
for(let product of category.productDetails) {
if(product.hasOwnProperty('vendor')) {
let vendor = product.vendor;
if(vendor.handle) {
if(!vendor.handle.count.includes(product.handle)) {
category.values[item.handle].count.push(product.handle);
}
} else {
vendors.values[vendor.handle] = {
...vendor,
count: [product.handle]
}
}
}
}
}
}
}
This utilizes the previously-used object-expanding ellipsis (...), which saves us from
having to write:
vendors.values[product.vendor.handle] = {
title: vendor.title,
handle: vendor.handle,
count: [product.handle]
}

Building an E-Commerce Store - Browsing Products Chapter 10
[ 333 ]
Although, feel free to use this if you are more comfortable with it.
Duplicate the code to work with tags, however as tags are an array themselves, we need
to loop through each tag and add accordingly:
for(let product of category.productDetails) {
if(product.hasOwnProperty('vendor')) {
let vendor = product.vendor;
if(vendor.handle) {
if(!vendor.handle.count.includes(product.handle)) {
category.values[item.handle].count.push(product.handle);
}
} else {
vendors.values[vendor.handle] = {
...vendor,
count: [product.handle]
}
}
}
if(product.hasOwnProperty('tags')) {
for(let tag of product.tags) {
if(tag.handle) {
if(topicTags.values[tag.handle]) {
if(!topicTags.values[tag.handle].count.includes(product.handle))
{
topicTags.values[tag.handle].count.push(product.handle);
}
} else {
topicTags.values[tag.handle] = {
...tag,
count: [product.handle]
}
}
}
}
}
}
Our code is already getting repetitive and complex, let's simplify it by creating a method to
handle the repetitive code.

Building an E-Commerce Store - Browsing Products Chapter 10
[ 334 ]
Create a methods object with a function of addTopic. This will take two parameters: the
object to append to and the singular item. For example, its usage would be:
if(product.hasOwnProperty('vendor')) {
this.addTopic(this.topics.vendor, product.vendor, product.handle);
}
Create the function and abstract out the logic from inside the hasOwnProperty if
declaration. Name the two parameters category and item, and update the code
accordingly:
methods: {
addTopic(category, item, handle) {
if(item.handle) {
if(category.values[item.handle]) {
if(!category.values[item.handle].count.includes(handle)) {
category.values[item.handle].count.push(handle);
}
} else {
category.values[item.handle] = {
...item,
count: [handle]
}
}
}
}
}
Update the filters computed function to use the new addTopic method. Remove the
variable declarations at the top of the function, as they are being passed directly into the
method:
filters() {
if(this.categoriesExist) {
let category = this.categoryProducts(this.slug);
for(let product of category.productDetails) {
if(product.hasOwnProperty('vendor')) {
this.addTopic(this.topics.vendor, product.vendor, product.handle);
}
if(product.hasOwnProperty('tags')) {

Building an E-Commerce Store - Browsing Products Chapter 10
[ 335 ]
for(let tag of product.tags) {
this.addTopic(this.topics.tags, tag, product.handle);
}
}
}
}
}
At the end of this function, return this.topics. Although we could reference topics
directly in the template, we need to ensure the filters computed property gets triggered:
filters() {
if(this.categoriesExist) {
...
}
return this.topics;
}
Before we proceed to create our dynamic filters based on the various types, let's display the
current filters.
Due to how the topics object is set up, we can loop through each of the child objects and
then through the values of each one. We are going to make our filters out of checkboxes,
with the value of the input being the handle of each of the filters:
template: `<div>
<div class="filters">
<div class="filterGroup" v-for="filter in filters">
<h3>{{ filter.title }}</h3>
<label class="filter" v-for="value in filter.values">
<input type="checkbox" :value="value.handle">
{{ value.title }} ({{ value.count }})
</label>
</div>
</div>
<list-categories />
</div>`,
In order to keep track of what is checked, we can use a v-model attribute. If there are
checkboxes with the same v-model, Vue creates an array with each item.

Building an E-Commerce Store - Browsing Products Chapter 10
[ 336 ]
Add an array of checked to each of the topic objects in the data object:
data() {
return {
topics: {
vendor: {
title: 'Manufacturer',
handle: 'vendor',
checked: [],
values: {}
},
tags: {
title: 'Tags',
handle: 'tags',
checked: [],
values: {}
}
}
}
}
Next, add a v-model attribute to each checkbox, referencing this array on the filter
object along with a click binder, referencing an updateFilters method:
<div class="filters">
<div class="filterGroup" v-for="filter in filters">
<h3>{{ filter.title }}</h3>
<label class="filter" v-for="value in filter.values">
<input type="checkbox" :value="value.handle" v-model="filter.checked"
@click="updateFilters">
{{ value.title }} ({{ value.count }})
</label>
</div>
</div>
Create an empty method for now - we'll configure it later:
methods: {
addTopic(category, item) {
...
},
updateFilters() {
}
}

Building an E-Commerce Store - Browsing Products Chapter 10
[ 337 ]
Dynamically creating filters
With our fixed filters created and being watched, we can take the opportunity to create
dynamic filters. These filters will observe the variationTypes on the products (for
example, color, and size) and list out the options – again with the count of each one.
To achieve this, we need to first loop through the variationTypes on the products. Before
adding anything, we need to check to see if that variation type exists on the topics object,
if not – we need to add a skeleton object. This expands the variation (which contains the
title and handle) and also includes empty checked and value properties:
filters() {
if(this.categoriesExist) {
let category = this.categoryProducts(this.slug);
for(let product of category.productDetails) {
if(product.hasOwnProperty('vendor')) {
this.addTopic(this.topics.vendor, product.vendor);
}
if(product.hasOwnProperty('tags')) {
for(let tag of product.tags) {
this.addTopic(this.topics.tags, tag);
}
}
Object.keys(product.variationTypes).forEach(vkey => {
let variation = product.variationTypes[vkey];
if(!this.topics.hasOwnProperty(variation.handle)) {
this.topics[variation.handle] = {
...variation,
checked: [],
values: {}
}
}
});
}
}
return this.topics;
}

Building an E-Commerce Store - Browsing Products Chapter 10
[ 338 ]
With our empty object created, we can now loop through the variationProducts on the
product object. For each one, we can access the variant with the handle of the current
variation. From there, we can use our addTopic method to include the value (for example,
Blue or XL) within the filters:
Object.keys(product.variationTypes).forEach(vkey => {
let variation = product.variationTypes[vkey];
if(!this.topics.hasOwnProperty(variation.handle)) {
this.topics[variation.handle] = {
...variation,
checked: [],
values: {}
}
}
Object.keys(product.variationProducts).forEach(pkey => {
let variationProduct = product.variationProducts[pkey];
this.addTopic(
this.topics[variation.handle],
variationProduct.variant[variation.handle],
product.handle
);
});
});
We do need to update our addTopic method, however. This is because the dynamic
properties have a value, instead of a title.
Add an if statement to your addTopic method to check whether a value exists, if it does
– set it to the title:
addTopic(category, item, handle) {
if(item.handle) {
if(category.values[item.handle]) {
if(!category.values[item.handle].count.includes(handle)) {
category.values[item.handle].count.push(handle);
}
} else {
if(item.hasOwnProperty('value')) {
item.title = item.value;
}

Building an E-Commerce Store - Browsing Products Chapter 10
[ 339 ]
category.values[item.handle] = {
...item,
count: [handle]
}
}
}
}
Viewing the app in the browser should reveal your dynamically-added filters, along with
the original ones we had added.
Resetting filters
When navigating between categories you will notice that, currently, the filters do not reset.
This is because we are not clearing the filters between each navigation, and the arrays are
persisting. This is not ideal, as it means they get longer as you navigate around and do not
apply to the products listed.
To remedy this, we can create a method that returns our default topic object and, when the
slug updates, call the method to reset the topics object. Move the topics object to a new
method titled defaultTopics:
methods: {
defaultTopics() {
return {
vendor: {
title: 'Manufacturer',
handle: 'vendor',
checked: [],
values: {}
},
tags: {
title: 'Tags',
handle: 'tags',
checked: [],
values: {}
}
}
},
addTopic(category, item) {
...
}
updateFilters() {

Building an E-Commerce Store - Browsing Products Chapter 10
[ 340 ]
}
}
Within the data function, change the value of topics to be this.defaultTopics() to call
the method:
data() {
return {
topics: this.defaultTopics()
}
},
Lastly, add a watch function to reset the topics key when the slug gets updated:
watch: {
slug() {
this.topics = this.defaultTopics();
}
}
Updating the URL on checkbox filter change
Our filtering component, when interacted with, is going to update the URL query
parameters. This allows the user to see the filters in effect, bookmark them, and share the
URL if needed. We already used query parameters for our pagination, and it makes sense
to put the user back on page one when filtering – as there may only be one page.
To construct our query parameters of filters, we need to loop through each filter type and
add a new parameter for each one that has items in the checked array. We can then call a
router.push() to update the URL and, in turn, change the products displayed.
Create an empty object in your updateFilters method. Loop through the topics and
populate the filters object with the items checked. Set the query parameters in the
router to the filters object:
updateFilters() {
let filters = {};
Object.keys(this.topics).forEach(key => {
let topic = this.topics[key];
if(topic.checked.length) {
filters[key] = topic.checked;
}
});

Building an E-Commerce Store - Browsing Products Chapter 10
[ 341 ]
this.$router.push({query: filters});
}
Checking and unchecking the filters on the right should update the URL with the items
checked.
Preselecting filters on page load
When loading a category with filters already in the URL, we need to ensure the checkboxes
are checked on the right-hand side. This can be done by looping through the existing query
parameters and adding any matching keys and arrays to the topics parameter. As the
query can either be an array or a string, we need to ensure the checked property is an array
no matter what. We also need to ensure the query key is, indeed, a filter and not a page
parameter:
filters() {
if(this.categoriesExist) {
let category = this.categoryProducts(this.slug);
for(let product of category.productDetails) {
...
}
Object.keys(this.$route.query).forEach(key => {
if(Object.keys(this.topics).includes(key)) {
let query = this.$route.query[key];
this.topics[key].checked = Array.isArray(query) ? query : [query];
}
});
}
return this.topics;
}
On page load, the filters in the URL will be checked.

Building an E-Commerce Store - Browsing Products Chapter 10
[ 342 ]
Filtering the products
Our filters are now being created and appended to dynamically, and activating a filter
updates the query parameter in the URL. We can now proceed with showing and hiding
products based on the URL parameters. We are going to be doing this by filtering the
products before being passed into the ListProducts component. This ensures the
pagination works correctly.
As we are filtering, open up ListProducts.js and add a :key attribute to each list item,
with the value of the handle:
<ol :start="pagination.range.from + 1">
<li v-for="product in paginate(products)" :key="product.handle">
...
</li>
</ol>
Open up the CategoryPage view and create a method within the methods object titled
filtering() and add a return true to begin with. The method should accept two
parameters, a product and query object:
methods: {
filtering(product, query) {
return true;
}
}
Next, within the category computed function, we need to filter the products if there is a
query parameter. However, we need to be careful that we don't trigger the filters if the page
number is present – as that is also a query.
Create a new variable called filters, which is a copy of the query object from the route.
Next, if the page parameter is present, delete it from our new object. From there, we can
check whether the query object has any other contents and if so, run the native JavaScript
filter() function on our product array – passing in the product and new query/filters
object to our method:
category() {
if(this.categoriesExist) {
let category = this.categoryProducts(this.slug),
filters = Object.assign({}, this.$route.query);
if(Object.keys(filters).length && filters.hasProperty('page')) {
delete filters.page;

Building an E-Commerce Store - Browsing Products Chapter 10
[ 343 ]
}
if(Object.keys(filters).length) {
category.productDetails = category.productDetails.filter(
p => this.filtering(p, filters)
);
}
if(!category) {
this.categoryNotFound = true;
}
return category;
}
}
Refresh your app to ensure the products still show.
To filter products, there is quite a complex process involved. We want to check whether an
attribute is in the query parameters; if it is, we set a placeholder value of false. If the
attribute on the product matches that of the query parameter, we set the placeholder to
true. We then repeat this for each of the query parameters. Once complete, we then only
show products that have all of the criteria.
The way we are going to construct this allows products to be OR within the categories, but
AND with different sections. For example, if the user were to pick many colors (red and
green) and one tag (accessories), it will show all products that are red or green accessories.
Our filtering is created with the tags, vendor, and then dynamic filters. As two of the
properties are fixed, we will have to check these first. The dynamic filters will be verified by
reconstructing the way they were built.
Create a hasProperty object, which will be our placeholder object for keeping track of the
query parameters the product has. We'll begin with the vendor – as this is the simplest
property.
We start by looping through the query attributes – in case there is more than one (for
example, red and green). Next, we need to confirm that the vendor exists in the query – if
it does, we then set a vendor attribute in the hasProperty object to false. We then check
whether the vendor handle is the same as the query attribute. If this matches, we change
our hasProperty.vendor property to true:
filtering(product, query) {
let display = false,
hasProperty = {};
Object.keys(query).forEach(key => {

Building an E-Commerce Store - Browsing Products Chapter 10
[ 344 ]
let filter = Array.isArray(query[key]) ? query[key] : [query[key]];
for(attribute of filter) {
if(key == 'vendor') {
hasProperty.vendor = false;
if(product.vendor.handle == attribute) {
hasProperty.vendor = true;
}
}
}
});
return display;
}
This will update the hasProperty object with whether the vendor matches the selected
filter. We can row replicate the functionality with the tags – remembering that tags on a
product are an object we need to filter.
The dynamic properties constructed by the filters will also need to be checked. This is done
by checking the variant object on each variationProduct, and updating the
hasProperty object if it matches:
filtering(product, query) {
let display = false,
hasProperty = {};
Object.keys(query).forEach(key => {
let filter = Array.isArray(query[key]) ? query[key] : [query[key]];
for(attribute of filter) {
if(key == 'vendor') {
hasProperty.vendor = false;
if(product.vendor.handle == attribute) {
hasProperty.vendor = true;
}
} else if(key == 'tags') {
hasProperty.tags = false;
product[key].map(key => {
if(key.handle == attribute) {
hasProperty.tags = true;
}

Building an E-Commerce Store - Browsing Products Chapter 10
[ 345 ]
});
} else {
hasProperty[key] = false;
let variant = product.variationProducts.map(v => {
if(v.variant[key] && v.variant[key].handle == attribute) {
hasProperty[key] = true;
}
});
}
}
});
return display;
}
Lastly, we need to check each of the properties of the hasProperty object. If all the values
are set to true, we can set the display of the product to true – meaning it will show. If one
of them is false, the product will not show as it does not match all of the criteria:
filtering(product, query) {
let display = false,
hasProperty = {};
Object.keys(query).forEach(key => {
let filter = Array.isArray(query[key]) ? query[key] : [query[key]];
for(attribute of filter) {
if(key == 'vendor') {
hasProperty.vendor = false;
if(product.vendor.handle == attribute) {
hasProperty.vendor = true;
}
} else if(key == 'tags') {
hasProperty.tags = false;
product[key].map(key => {
if(key.handle == attribute) {
hasProperty.tags = true;
}
});
} else {
hasProperty[key] = false;

Building an E-Commerce Store - Browsing Products Chapter 10
[ 346 ]
let variant = product.variationProducts.map(v => {
if(v.variant[key] && v.variant[key].handle == attribute) {
hasProperty[key] = true;
}
});
}
}
if(Object.keys(hasProperty).every(key => hasProperty[key])) {
display = true;
}
});
return display;
}
We now have a successful filtering product list. View your app in the browser and update
the filters – noting how products show and hide with each click. Note how even when you
press refresh, only the filtered products display.
Summary
In this chapter, we created a category listing page, allowing the user the view all the
products in a category. This list is able to be paginated, along with the order changing. We
also created a filtering component, allowing the user to narrow down the results.
With our products now browseable, filterable, and viewable, we can proceed on to making
a Cart and Checkout page.

11
Building an E-Commerce Store
- Adding a Checkout
Over the last couple of chapters, we have been creating an e-commerce store. So far, we
have created a product page that allows us to view the images and product variations,
which may be size or style. We have also created a category page with filters and
pagination—including a homepage category page that features specific, selected products.
Our users can browse and filter products and view more information about a specific
product. We are now going to:
Build the functionality to allow the user to add and remove products to their
basket
Allow a user to Checkout
Add an Order Confirmation page
As a reminder—we won't be taking any billing details but we will make an Order
Confirmation screen.
Creating the basket array placeholder
To help us persist the products in the basket throughout the app, we are going to be storing
the user's selected products in the Vuex store. This will be in the form of an array of objects.
Each object will contain several key pieces of information that will allow us to display the
products in the basket without having to query the Vuex store each time. It also allows us
to store details about the current state of the product page—remembering the image
updates when a variant is selected.
Building an E-Commerce Store - Adding a Checkout Chapter 11
[ 348 ]
The details we're going to store for each product added to the basket are as follows:
Product title
Product handle, so we can link back to the product
Selected variation title (as it appears in the select box)
Currently selected image, so we can show an appropriate image in the Checkout
Variation details, this contains price and weight along with other details
Variation SKU, this will help us identify whether the product has already been
added
Quantity, how many items the user has added to their basket
As we will be storing all this information within an object, contained in an array, we need
to create a placeholder array within the store. Add a new key to the state object within the
store titled basket and make it a blank array:
const store = new Vuex.Store({
state: {
products: {},
categories: {},
categoryHome: {
title: 'Welcome to the Shop',
handle: 'home',
products: [
...
]
},
basket: []
},
mutations: {
...
},
actions: {
...
},
getters: {
...
}
});

Building an E-Commerce Store - Adding a Checkout Chapter 11
[ 349 ]
Adding product information to the store
With our basket array ready to receive data, we can now create a mutation to add the
product object. Open the ProductPage.js file and update the addToBasket method to
call a $store commit function, instead of the alert we put in place.
All of the information we require for products to be added to the basket is stored on the
ProductPage component—so we can pass the component instance through to the
commit() function using the this keyword. This will become clear when we build the
mutation.
Add the function call to the ProductPage method:
methods: {
...
addToBasket() {
this.$store.commit('addToBasket', this);
}
}
Creating the store mutation to add products to
the basket
Navigate to the Vuex store and create a new mutation titled addToBasket. This will accept
the state as the first parameter and the component instance as the second. Passing the
instance through allows us to access the variables, methods, and computed values on the
component:
mutations: {
products(state, payload) {
...
},
categories(state, payload) {
...
},
addToBasket(state, item) {
}
}

Building an E-Commerce Store - Adding a Checkout Chapter 11
[ 350 ]
We can now proceed with adding the products to the basket array. The first step is to add
the product object with the mentioned properties. As it's an array, we can use the push()
function to add the object.
Next, add an object to the array, using the item and its properties to build the object. With
access to the ProductPage component, we can construct the variant title as it appears in
the select box, using the variantTitle method. Set the quantity to 1 by default:
addToBasket(state, item) {
state.basket.push({
sku: item.variation.sku,
title: item.product.title,
handle: item.slug,
image: item.image,
variationTitle: item.variantTitle(item.variation),
variation: item.variation,
quantity: 1
});
}
This now adds the product to the basket array. An issue appears, however, when you add
two of the same item to the basket. Rather than increasing the quantity, it simply adds a
second product.
This can be remedied by checking if the sku exists within the array already. If it does, we
can increment the quantity on that item, if not we can add a new item to the basket array.
The sku is unique for each variation of each product. Alternatively, we could use the
barcode property.
Using the native find JavaScript function, we can identify any products that have an SKU
matching that of the one being passed in:
addToBasket(state, item) {
let product = state.basket.find(p => {
if(p.sku == item.variation.sku) {
}
});
state.basket.push({
sku: item.variation.sku,
title: item.product.title,
handle: item.slug,
image: item.image,

Building an E-Commerce Store - Adding a Checkout Chapter 11
[ 351 ]
variationTitle: item.variantTitle(item.variation),
variation: item.variation,
quantity: 1
});
}
If it matches, we can increment the quantity by one on that object, using the ++ notation in
JavaScript. If not, we can add the new object to the basket array. When using the find
function, we can return the product if it exists. If not, we can add a new item:
addToBasket(state, item) {
let product = state.basket.find(p => {
if(p.sku == item.variation.sku) {
p.quantity++;
return p;
}
});
if(!product) {
state.basket.push({
sku: item.variation.sku,
title: item.product.title,
handle: item.slug,
image: item.image,
variationTitle: item.variantTitle(item.variation),
variation: item.variation,
quantity: 1
});
}
}
We now have a basket being populated as the item is added to the basket, and
incrementing when it exists already.
To improve the usability of the app, we should give the user some feedback when they
have added an item to the basket. This can be done by updating the Add to Basket button
briefly and showing a product count with a link to the basket in the header of the site.

Building an E-Commerce Store - Adding a Checkout Chapter 11
[ 352 ]
Updating the Add to basket button when
adding an item
As a usability improvement to our shop, we are going to update the Add to basket button
when a user clicks it. This will change to Added to your basket and apply a class for a set
period of time, for example, two seconds, before returning to its previous state. The CSS
class will allow you to style the button differently—for example, changing the background
to green or transforming it slightly.
This will be achieved by using a data property on the component—setting it to true and
false as the item gets added. The CSS class and text will use this property to determine
what to show and a setTimeout JavaScript function will change the state of the property.
Open the ProductPage component and add a new key to the data object titled
addedToBasket. Set this to false by default:
data() {
return {
slug: this.$route.params.slug,
productNotFound: false,
image: false,
variation: false,
addedToBasket: false
}
}
Update the button text to allow for this variation. As there is already a ternary if, within
this, we are going to nest them with another one. This could be abstracted into a method if
desired.
Replace the Add to basket condition in your button with an additional ternary operator,
dependent on whether the addedToBasket variable is true. We can also add a conditional
class based on this property:
<button
@click="addToBasket()"
:class="(addedToBasket) ? 'isAdded' : ''"
:disabled="!variation.quantity"
>
{{
(variation.quantity) ?
((addedToBasket) ? 'Added to your basket' : 'Add to basket') :
'Out of stock'

Building an E-Commerce Store - Adding a Checkout Chapter 11
[ 353 ]
}}
</button>
Refresh the app and navigate to a product to ensure the correct text is being shown. Update
the addedToBasket variable to true to make sure everything is displaying as it should.
Set it back to false.
Next, within the addToBasket() method, set the property to true. This should update the
text when the item is added to the basket:
addToBasket() {
this.$store.commit('addToBasket', this);
this.addedToBasket = true;
}
When you click the button, the text will now update, however it will never reset. Add a
setTimeout JavaScript function afterward, which sets it back to false after a certain
period of time:
addToBasket() {
this.$store.commit('addToBasket', this);
this.addedToBasket = true;
setTimeout(() => this.addedToBasket = false, 2000);
}
The timing for setTimeout is in milliseconds, so 2000 is equal to two seconds. Feel free to
tweak and play with this figure as much as you see fit.
One last addition would be to reset this value back to false if the variation is updated or
the product is changed. Add the statement to both watch functions:
watch: {
variation(v) {
if(v.hasOwnProperty('image')) {
this.updateImage(v.image);
}
this.addedToBasket = false;
},
'$route'(to) {
this.slug = to.params.slug;
this.addedToBasket = false;
}
}

Building an E-Commerce Store - Adding a Checkout Chapter 11
[ 354 ]
Showing the product count in the header of
the app
It's common practice for a shop to show a link to the cart in the site's header—along with
the number of items in the cart next to it. To achieve this, we'll use a Vuex getter to calculate
and return the number of items in the basket.
Open the index.html file and add a <header> element to the app HTML and insert a
placeholder, span—we'll convert this to a link once we've set up the routes. Within the
span, output a cartQuantity variable:
<div id="app">
<header>
<span>Cart {{ cartQuantity }}</span>
</header>
<main>
<router-view></router-view>
</main>
<aside>
<router-view name="sidebar"></router-view>
</aside>
</div>
Navigate to your Vue instance and create a computed object containing a cartQuantity
function:
new Vue({
el: '#app',
store,
router,
computed: {
cartQuantity() {
}
},
created() {
CSV.fetch({url: './data/csv-files/bicycles.csv'}).then(data => {
this.$store.dispatch('initializeShop', this.$formatProducts(data));
});
}
});

Building an E-Commerce Store - Adding a Checkout Chapter 11
[ 355 ]
If our header were to feature more items than our cart link, it would be advisable to
abstract it out into a separate component to keep the methods, layout, and functions
contained. However, as it is only going to feature this one link in our example app, adding
the function to the Vue instance will suffice.
Create a new getter in the store titled cartQuantity. As a placeholder, return 1. The
state will be required to calculate the quantity, so ensure that is passed into the function
for now:
getters: {
...
cartQuantity: (state) => {
return 1;
}
}
Head back to your Vue instance and return the result of the getter. Ideally, we want to show
the count of the basket in brackets, but we only want to show the brackets if there are
items. Within the computed function, check the result of this getter and output the result
with brackets if the result exists:
cartQuantity() {
const quantity = this.$store.getters.cartQuantity;
return quantity ? `(${quantity})` : '';
}
Changing the result within the Vuex getter should reveal either the number in brackets or
nothing at all.
Calculating the basket quantity
With the display logic in place, we can now proceed with calculating how many items are
in the basket. We could count the number of items in the basket array, however, this will
only tell us how many different products are there now and not if the same product was
added many times.
Building an E-Commerce Store - Adding a Checkout Chapter 11
[ 356 ]
Instead, we need to loop through each product in the basket and add the quantities
together. Create a variable called quantity and set it to 0. Loop through the basket items
and add the item.quantity variable to the quantity variable. Lastly, return our variable
with the right sum:
cartQuantity: (state) => {
let quantity = 0;
for(let item of state.basket) {
quantity += item.quantity;
}
return quantity;
}
Navigate to the app and add some items to your basket to verify the basket count is being
calculated correctly.
Finalizing the Shop Vue-router URLs
We're now at a stage where we can finalize the URLs for our shop - including creating the
redirects and Checkout links. Referring back to Chapter 8, Introducing Vue-Router and
Loading URL-Based Components, we can see which ones we are missing. These are:
/category -redirect to /
/product - redirect to /
/basket - load OrderBasket component
/checkout- load OrderCheckout component
/complete- load OrderConfirmation component
Create the redirects in the appropriate places within the routes array. At the bottom of the
routes array, create three new routes for the Order components:
routes: [
{
path: '/',
name: 'Home',
...
},
{
path: '/category',
redirect: {name: 'Home'}
},
{
path: '/category/:slug',

Building an E-Commerce Store - Adding a Checkout Chapter 11
[ 357 ]
name: 'Category',
...
},
{
path: '/product',
redirect: {name: 'Home'}
},
{
path: '/product/:slug',
name: 'Product',
component: ProductPage
},
{
path: '/basket',
name: 'Basket',
component: OrderBasket
},
{
path: '/checkout',
name: 'Checkout',
component: OrderCheckout
},
{
path: '/complete',
name: 'Confirmation',
component: OrderConfirmation
},
{
path: '/404',
alias: '*',
component: PageNotFound
}
]
We can now update the placeholder <span> in the header of our app with a router-link:
<header>
<router-link :to="{name: 'Basket'}">Cart {{ cartQuantity }}</router-link>
</header>

Building an E-Commerce Store - Adding a Checkout Chapter 11
[ 358 ]
Building the Order process and
ListProducts component
For the three steps of the Checkout, we are going to be utilizing the same component in all
three: the ListProducts component. In the OrderCheckout, and OrderConfirmation
components, it will be in a fixed, uneditable state, whereas when it is in the OrderBasket
component, the user needs to be able to update quantities and remove items if desired.
As we're going to be working at the Checkout, we need products to exist in the basket
array. To save us having to find products and add them to the basket every time we refresh
the app, we can ensure there are some products in the basket array by hardcoding an
array in the store.
To achieve this, navigate to a few products and add them to your basket. Ensure there is a
good selection of products and quantities for testing. Next, open your JavaScript console in
the browser and enter the following command:
console.log(JSON.stringify(store.state.basket));
This will output a string of your products array. Copy this and paste it into your
store—replacing the basket array:
state: {
products: {},
categories: {},
categoryHome: {
title: 'Welcome to the Shop',
handle: 'home',
products: [
...
]
},
basket: [{"sku":...}]
},
On page load, your Cart count in the header should update to be the correct number of
items you added.

Building an E-Commerce Store - Adding a Checkout Chapter 11
[ 359 ]
We can now proceed with building our Checkout process. The product display in the
basket is more complicated than the Checkout and Order Confirmation screens so,
unusually, we'll work backward. Starting with the Order Confirmation page and moving
to the Checkout page, adding more complexity before we head to the basket, adding the
ability to exit the products.
Order Confirmation screen
The Order Confirmation screen is one that is shown once the order is complete. This
confirms the items purchased and may include the expected delivery date.
Create a template within the OrderConfirmation.js file with a <h1> and some relevant
content relating to the order being complete:
const OrderConfirmation = {
name: 'OrderConfirmation',
template: `<div>
<h1>Order Complete!</h1>
<p>Thanks for shopping with us - you can expect your products within 2
- 3 working days</p>
</div>`
};
Open up the application in your browser, add a product to your basket and complete an
order to confirm it's working. The next step is to include the ListProducts component.
First, ensure the ListProducts component is correctly initialized and features an initial
template:
const ListPurchases = {
name: 'ListPurchases',
template: `<table></table>`
};
Add the components object to the OrderConfirmation component and include the
ListProducts component. Next, include it in the template:
const OrderConfirmation = {
name: 'OrderConfirmation',
template: `<div>
<h1>Order Complete!</h1>
<p>Thanks for shopping with us - you can expect your products within 2
- 3 working days</p>

Building an E-Commerce Store - Adding a Checkout Chapter 11
[ 360 ]
<list-purchases />
</div>`,
components: {
ListPurchases
}
};
Open the ListPurchases component once more to start displaying the products. The
default state of this component will be to list the products in the basket, along with the
variation selected. The price for each product will be displayed, along with the price if the
quantity is more than one. Lastly, a grand total will be shown.
The first step is to get the basket list into our component. Create a computed object with a
products function. This should return the basket products:
const ListPurchases = {
name: 'ListPurchases',
template: `<table></table>`,
computed: {
products() {
return this.$store.state.basket;
}
}
};
With the products in the basket now available to us, we can loop through them in the table
displaying the information required. This includes a thumbnail image, the product and
variation title, price, quantity, and the total price of the item. Add a header row to the table
too, so the user knows what the column is:
template: `<table>
<thead>
<tr>
<th></th>
<th>Title</th>
<th>Unit price</th>
<th>Quantity</th>
<th>Price</th>
</tr>
</thead>
<tbody>
<tr v-for="product in products">
<td>
<img

Building an E-Commerce Store - Adding a Checkout Chapter 11
[ 361 ]
:src="product.image.source"
:alt="product.image.alt || product.variationTitle"
width="80"
>
</td>
<td>
<router-link :to="{name: 'Product', params: {slug:
product.handle}}">
{{ product.title }}
</router-link><br>
{{ product.variationTitle }}
</td>
<td>{{ product.variation.price }}</td>
<td>{{ product.quantity }}</td>
<td>{{ product.variation.price * product.quantity }}</td>
</tr>
</tbody>
</table>`,
Note that the price for each row is simply the unit price multiplied by the quantity. We now
have a standard product list of the items the user has purchased.
Using Vue filters to format the price
The price is currently an integer, as that it is in the data. On the product page, we just
prepended a $ sign to represent a price, however, this is now the perfect opportunity to
utilize Vue filters. Filters allow you to manipulate the data in the template without using a
method. Filters can be chained and are used to carry out, generally, a single
modification—for example converting a string to lowercase or formatting a number to be a
currency.
Filters are used with the pipe (|) operator. If, for example, we had a filter to lowercase text,
it would be used like the following:
{{ product.title | lowercase }}
Filters are declared within a filters object on the component and accept a single
parameter of the output preceding it.

Building an E-Commerce Store - Adding a Checkout Chapter 11
[ 362 ]
Create a filters object within the ListPurchases component and create a function
inside titled currency(). This function accepts a single parameter of val and should
return the variable inside:
filters: {
currency(val) {
return val;
}
},
We can now use this function to manipulate the price integers. Add the filter to both the
unit and total price within the template:
<td>{{ product.variation.price | currency }}</td>
<td>{{ product.quantity }}</td>
<td>{{ product.variation.price * product.quantity | currency }}</td>
You won't notice anything in the browser, as we have yet to manipulate the value. Update
the function to ensure the number is fixed to two decimal places and has a $ preceding it:
filters: {
currency(val) {
return ' + val.toFixed(2);
}
},
Our prices are now nicely formatted and displaying correctly.
Calculating a total price
The next addition to our purchase list is a total value of the basket. This will need to be
calculated in a similar way to the basket count we did earlier.
Create a new computed function title: totalPrice. This function should loop through the
products and add the price up, taking into consideration any multiple quantities:
totalPrice() {
let total = 0;
for(let p of this.products) {
total += (p.variation.price * p.quantity);
}
return total;
}

Building an E-Commerce Store - Adding a Checkout Chapter 11
[ 363 ]
We can now update our template to include the total price—ensuring we pass it through
the currency filter:
template: `<table>
<thead>
<tr>
<th></th>
<th>Title</th>
<th>Unit price</th>
<th>Quantity</th>
<th>Price</th>
</tr>
</thead>
<tbody>
<tr v-for="product in products">
<td>
<img
:src="product.image.source"
:alt="product.image.alt || product.variationTitle"
width="80"
>
</td>
<td>
<router-link :to="{name: 'Product', params: {slug:
product.handle}}">
{{ product.title }}
</router-link><br>
{{ product.variationTitle }}
</td>
<td>{{ product.variation.price | currency }}</td>
<td>{{ product.quantity }}</td>
<td>{{ product.variation.price * product.quantity | currency }}</td>
</tr>
</tbody>
<tfoot>
<td colspan="4">
<strong>Total:</strong>
</td>
<td>{{ totalPrice | currency }}</td>
</tfoot>
</table>`,

Building an E-Commerce Store - Adding a Checkout Chapter 11
[ 364 ]
Creating an Order Checkout page
Our OrderCheckout page will have a similar makeup to the OrderConfirmation page -
however, in a real shop, this would be the page before payment. This page would allow the
user to fill in their billing and delivery details before navigating to the payment page. Copy
the OrderConfirmation page and update the title and info text:
const OrderCheckout = {
name: 'OrderCheckout',
template: '<div>;
<h1>Order Confirmation</h1>
<p>Please check the items below and fill in your details to complete
your order</p>
<list-purchases />
</div>',
components: {
ListPurchases
}
};
Below the <list-purchases /> component, create a form with several fields so we can
collect the billing and delivery name and addresses. For this example, just collect the name,
first line of the address, and ZIP code:
template: '<div>
<h1>Order Confirmation</h1>
<p>Please check the items below and fill in your details to complete your
order</p>
<list-purchases />
<form>
<fieldset>
<h2>Billing Details</h2>
<label for="billingName">Name:</label>
<input type="text" id="billingName">
<label for="billingAddress">Address:</label>
<input type="text" id="billingAddress">
<label for="billingZipcode">Post code/Zip code:</label>
<input type="text" id="billingZipcode">
</fieldset>
<fieldset>
<h2>Delivery Details</h2>
<label for="deliveryName">Name:</label>
<input type="text" id="deliveryName">
<label for="deliveryAddress">Address:</label>

Building an E-Commerce Store - Adding a Checkout Chapter 11
[ 365 ]
<input type="text" id="deliveryAddress">
<label for="deliveryZipcode">Post code/Zip code:</label>
<input type="text" id="deliveryZipcode">
</fieldset>
</form>
</div>',
We now need to create a data object and bind each field to a key. To help group each set,
create an object for both delivery and billing and create the fields inside with the
correct names:
data() {
return {
billing: {
name: '',
address: '',
zipcode: ''
},
delivery: {
name: '',
address: '',
zipcode: ''
}
}
}
Add a v-model to each input, linking it to the appropriate data key:
<form>
<fieldset>
<h2>Billing Details</h2>
<label for="billingName">Name:</label>
<input type="text" id="billingName" v-model="billing.name">
<label for="billingAddress">Address:</label>
<input type="text" id="billingAddress" v-model="billing.address">
<label for="billingZipcode">Post code/Zip code:</label>
<input type="text" id="billingZipcode" v-model="billing.zipcode">
</fieldset>
<fieldset>
<h2>Delivery Details</h2>
<label for="deliveryName">Name:</label>
<input type="text" id="deliveryName" v-model="delivery.name">
<label for="deliveryAddress">Address:</label>
<input type="text" id="deliveryAddress" v-model="delivery.address">
<label for="deliveryZipcode">Post code/Zip code:</label>
<input type="text" id="deliveryZipcode" v-model="delivery.zipcode">
</fieldset>
</form>

Building an E-Commerce Store - Adding a Checkout Chapter 11
[ 366 ]
The next step is to create a submit method and collate the data to be able to pass it on to
the next screen. Create a new method titled submitForm(). As we are not handling
payment in this example, we can route to the confirmation page in the method:
methods: {
submitForm() {
// this.billing = billing details
// this.delivery = delivery details
this.$router.push({name: 'Confirmation'});
}
}
We can now bind a submit event to the form and add a submit button. Like the v-
bind:click attribute (or @click), Vue allows you to bind a submit event to a method
using a @submit="" attribute.
Add the declaration to the <form> element and create a submit button in your form:
<form @submit="submitForm()">
<fieldset>
...
</fieldset>
<fieldset>
...
</fieldset>
<input type="submit" value="Purchase items">
</form>
On submitting your form, the app should redirect you to our Confirmation page.
Copying details between addresses
One feature that several shops have is the ability to mark the delivery address to be the
same as the billing address. There are several ways we could approach this, and how you
choose to do it is up to you. The immediate options are:
Have a "copy details" button—this copies the details from billing to delivery but
does not keep them in sync

Building an E-Commerce Store - Adding a Checkout Chapter 11
[ 367 ]
Have a checkbox that keeps the two in sync—checking the box disables the
delivery box fields but populates them with the billing details
For this example, we are going to code the second option.
Create a checkbox between the two fieldsets that is bound to a property in the data object
via v-model called sameAddress:
<form @submit="submitForm()">
<fieldset>
...
</fieldset>
<label for="sameAddress">
<input type="checkbox" id="sameAddress" v-model ="sameAddress">
Delivery address is the same as billing
</label>
<fieldset>
...
</fieldset>
<input type="submit" value="Purchase items">
</form>
Create a new key in the data object and set it to false by default:
data() {
return {
sameAddress: false,
billing: {
name: '',
address: '',
zipcode: ''
},
delivery: {
name: '',
address: '',
zipcode: ''
}
}
},

Building an E-Commerce Store - Adding a Checkout Chapter 11
[ 368 ]
The next step is to disable the delivery fields if the checkbox is checked. This can be done by
activating the disabled HTML attribute based on the checkbox result. In a similar way to
how we disabled the "Add to cart" button on the product page, bind the disabled attribute
on the delivery fields to the sameAddress variable:
<fieldset>
<h2>Delivery Details</h2>
<label for="deliveryName">Name:</label>
<input type="text" id="deliveryName" v-model="delivery.name"
:disabled="sameAddress">
<label for="deliveryAddress">Address:</label>
<input type="text" id="deliveryAddress" v-model="delivery.address"
:disabled="sameAddress">
<label for="deliveryZipcode">Post code/Zip code:</label>
<input type="text" id="deliveryZipcode" v-model="delivery.zipcode"
:disabled="sameAddress">
</fieldset>
Checking the box will now deactivate the fields - making the user unable to enter any data.
The next step is to replicate the data across the two sections. As our data objects are the
same structure, we can create a watch function to set the delivery object to the same as
the billing object when the checkbox is checked.
Create a new watch object and function for the sameAddress variable. If it is true, set the
delivery object to the same as the billing one:
watch: {
sameAddress() {
if(this.sameAddress) {
this.delivery = this.billing;
}
}
}
With the watch function added, we can enter data into the billing address, check the box,
and the delivery address gets populated. The best thing about this is that they now stay in
sync, so if you update the billing address, the delivery address updates on the fly. The
problem arises when you uncheck the box and edit the billing address—the delivery
address still updates. This is because we have bound the objects together.

Building an E-Commerce Store - Adding a Checkout Chapter 11
[ 369 ]
Add an else statement to make a copy of the billing address when the box is unchecked:
watch: {
sameAddress() {
if(this.sameAddress) {
this.delivery = this.billing;
} else {
this.delivery = Object.assign({}, this.billing);
}
}
}
We now have a functioning Order Confirmation page, which collects billing and delivery
details.
Creating an editable basket
We now need to create our basket. This needs to show the products in a similar fashion to
the Checkout and Confirmation, but it needs to give the user the ability to edit the basket
contents—either to delete an item or update the quantity.
As a starting point, open OrderBasket.js and include the list-purchases component,
as we did on the confirmation page:
const OrderBasket = {
name: 'OrderBasket',
template: `<div>
<h1>Basket</h1>
<list-purchases />
</div>`,
components: {
ListPurchases
}
};

Building an E-Commerce Store - Adding a Checkout Chapter 11
[ 370 ]
The next thing we need to do is edit the list-purchases component. To ensure we can
differentiate between the views, we are going to add an editable prop. This will be set to
false by default and true in the basket. Add the prop to the component in the basket:
template: `<div>
<h1>Basket</h1>
<list-purchases :editable="true" />
</div>`,
We now need to tell the ListPurchases component to accept this parameter so we can do
something with it within the component:
props: {
editable: {
type: Boolean,
default: false
}
},
Creating editable fields
We now have a prop determining if our basket should be editable or not. This allows us to
show the delete links and make the quantity an editable box.
Create a new table cell next to the quantity one in the ListPurchases component and
make it visible only when the purchases are visible. Make the static quantity hidden in this
state too. In the new cell, add an input box with the value set to the quantity. We are also
going to bind a blur event to the box. The blur event is a native JavaScript event that
triggers when the input is unfocused. On blur, trigger an updateQuantity method. This
method should accept two arguments; the event, which will contain the new quantity, and
the SKU for that particular product:
<tbody>
<tr v-for="product in products">
<td>
<img
:src="product.image.source"
:alt="product.image.alt || product.variationTitle"
width="80"
>
</td>
<td>
<router-link :to="{name: 'Product', params: {slug: product.handle}}">
{{ product.title }}
</router-link><br>

Building an E-Commerce Store - Adding a Checkout Chapter 11
[ 371 ]
{{ product.variationTitle }}
</td>
<td>{{ product.variation.price | currency }}</td>
<td v-if="!editable">{{ product.quantity }}</td>
<td v-if="editable">
<input
type="text"
:value="product.quantity"
@blur="updateQuantity($event, product.sku)"
>
</td>
<td>{{ product.variation.price * product.quantity | currency }}</td>
</tr>
</tbody>
Create the new method on the component. This method should loop through the products,
locating the one with a matching SKU and updating the quantity to an integer. We also
need to update the store with the result - so that the quantity can be updated at the top of
the page. We'll create a general mutation that accepts the full basket array back with new
values to allow the same one to be used for the product deletion.
Create the mutation that updates the quantity and commits a mutation
titled updatePurchases:
methods: {
updateQuantity(e, sku) {
let products = this.products.map(p => {
if(p.sku == sku) {
p.quantity = parseInt(e.target.value);
}
return p;
});
this.$store.commit('updatePurchases', products);
}
}
In the store, create the mutation that sets the state.basket equal to the payload:
updatePurchases(state, payload) {
state.basket = payload;
}
Updating the quantity should now update the total price of the item and the basket count at
the top of the page.

Building an E-Commerce Store - Adding a Checkout Chapter 11
[ 372 ]
Removing items from your cart
The next step is to give the user the ability to remove items from their cart. Create a button
in the ListPurchases component with a click binding. This button can go anywhere you
want - our example shows it as an extra cell at the end of the row. Bind the click action to a
method titled removeItem. This just needs to accept a single parameter of the SKU. Add
the following to the ListPurchases component:
<tbody>
<tr v-for="product in products">
<td>
<img
:src="product.image.source"
:alt="product.image.alt || product.variationTitle"
width="80"
>
</td>
<td>
<router-link :to="{name: 'Product', params: {slug: product.handle}}">
{{ product.title }}
</router-link><br>
{{ product.variationTitle }}
</td>
<td>{{ product.variation.price | currency }}</td>
<td v-if="!editable">{{ product.quantity }}</td>
<td v-if="editable"><input
type="text"
:value="product.quantity"
@blur="updateQuantity($event, product.sku)"
></td>
<td>{{ product.variation.price * product.quantity | currency }}</td>
<td v-if="editable">
<button @click="removeItem(product.sku)">Remove item</button>
</td>
</tr>
</tbody>

Building an E-Commerce Store - Adding a Checkout Chapter 11
[ 373 ]
Create the removeItem method. This method should filter the basket array, only
returning the objects that don't match the SKU passed in. Once the result is filtered, pass the
result to the same mutation we used in the updateQuantity() method:
removeItem(sku) {
let products = this.products.filter(p => {
if(p.sku != sku) {
return p;
}
});
this.$store.commit('updatePurchases', products);
}
One last enhancement we can make is to trigger the removeItem method if the quantity is
set to 0. Within the updateQuantity method, check the value before looping through the
products. If it is 0, or doesn't exist, run the removeItem method - passing the SKU through:
updateQuantity(e, sku) {
if(!parseInt(e.target.value)) {
this.removeItem(sku);
} else {
let products = this.products.map(p => {
if(p.sku == sku) {
p.quantity = parseInt(e.target.value);
}
return p;
});
this.$store.commit('updatePurchases', products);
}
},
Completing the shop SPA
The last step is to add a link from the OrderBasket component to the OrderCheckout
page. This can be done by linking to the Checkout route. With that, your checkout is
complete, along with your shop! Add the following link to the basket:
template: `<div>
<h1>Basket</h1>
<list-purchases :editable="true" />
<router-link :to="{name: 'Checkout'}">Proceed to Checkout</router-link>
</div>`,
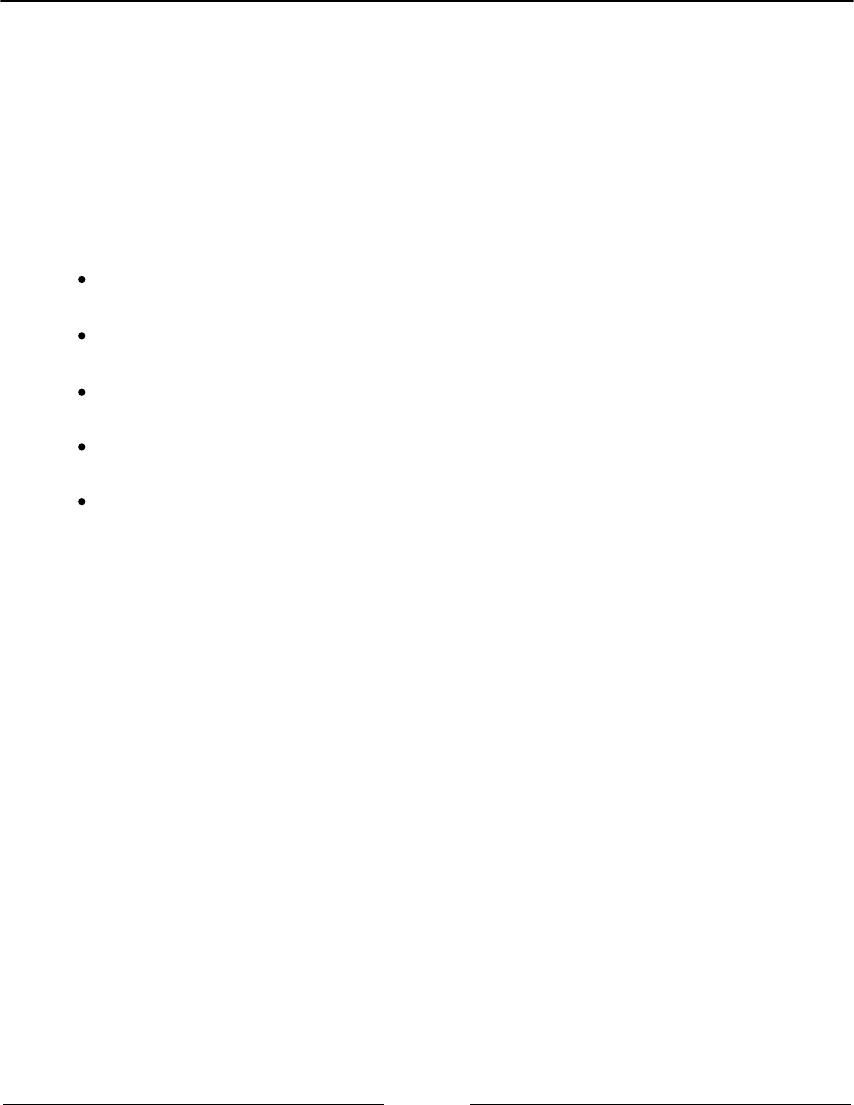
Building an E-Commerce Store - Adding a Checkout Chapter 11
[ 374 ]
Summary
Well done! You have created a full shop single-page application using Vue.js. You have
learned how to list products and their variations, along with adding specific variations to
the basket. You've learned how to create shop filters and category links, along with creating
an editable shopping basket.
As with everything, there are always improvements to be made. Why don't you give some
of these ideas a go?
Persisting the basket using localStorage—so products added to the basket are
retained between visits and the user pressing refresh
Calculating shipping based on the weight attribute of the products in the
basket—use a switch statement to create bands
Allowing products without variations to be added to the basket from the
category listing page
Indicating which products have items out of stock when filtered on that variation
on the category page
Any ideas of your own!

12
Using Vue Dev Tools and
Testing Your SPA
Over the last 11 chapters, we've been developing several Single-Page Applications (SPAs)
using Vue.js. Although development is a big chunk of creating an SPA, testing also forms
a significant part of creating any JavaScript web app.
The Vue developer tools, available in Chrome and Firefox, provide great insights into the
components being used within a certain view or the current state of the Vuex store – along
with any events being emitted from the JavaScript. These tools allow you to check and
validate the data within your app while developing to ensure everything is as it should be.
The other side of SPA testing is with automated tests. Conditions, rules, and routes you
write to automate tasks within your app, allow you to then specify what the output should
be and the test runs the conditions to verify whether the results match.
In this chapter, we will:
Cover the usage of the Vue developer tools with the applications we've
developed
Have an overview of testing tools and applications

Using Vue Dev Tools and Testing Your SPA Chapter 12
[ 376 ]
Using the Vue.js developer tools
The Vue developer tools are available for Chrome and Firefox and can be downloaded from
GitHub (https://github.com/vuejs/vue-devtools). Once installed, they become an
extension of the browser developer tools. For example, in Chrome, they appear after the
Audits tab.
The Vue developer tools will only work when you are using Vue in development mode. By
default, the unminified version of Vue has the development mode enabled. However, if
you are using the production version of the code, the development tools can be enabled by
setting the devtools variable to true in your code:
Vue.config.devtools = true
Throughout the book, we've been using the development version of Vue, so the dev tools
should work with all three of the SPAs we have developed. Open the Dropbox example
and open the Vue developer tools.
Inspecting Vue components data and computed
values
The Vue developer tools give a great overview of the components in use on the page. You
can also drill down into the components and preview the data in use on that particular
instance. This is perfect for inspecting the properties of each component on the page at any
given time.
For example, if we inspect the Dropbox app and navigate to the Components tab, we can
see the <Root> Vue instance and we can see the <DropboxViewer> component. Clicking
this will reveal all of the data properties of the component – along with any computed
properties. This lets us validate whether the structure is constructed correctly, along with
the computed path property:
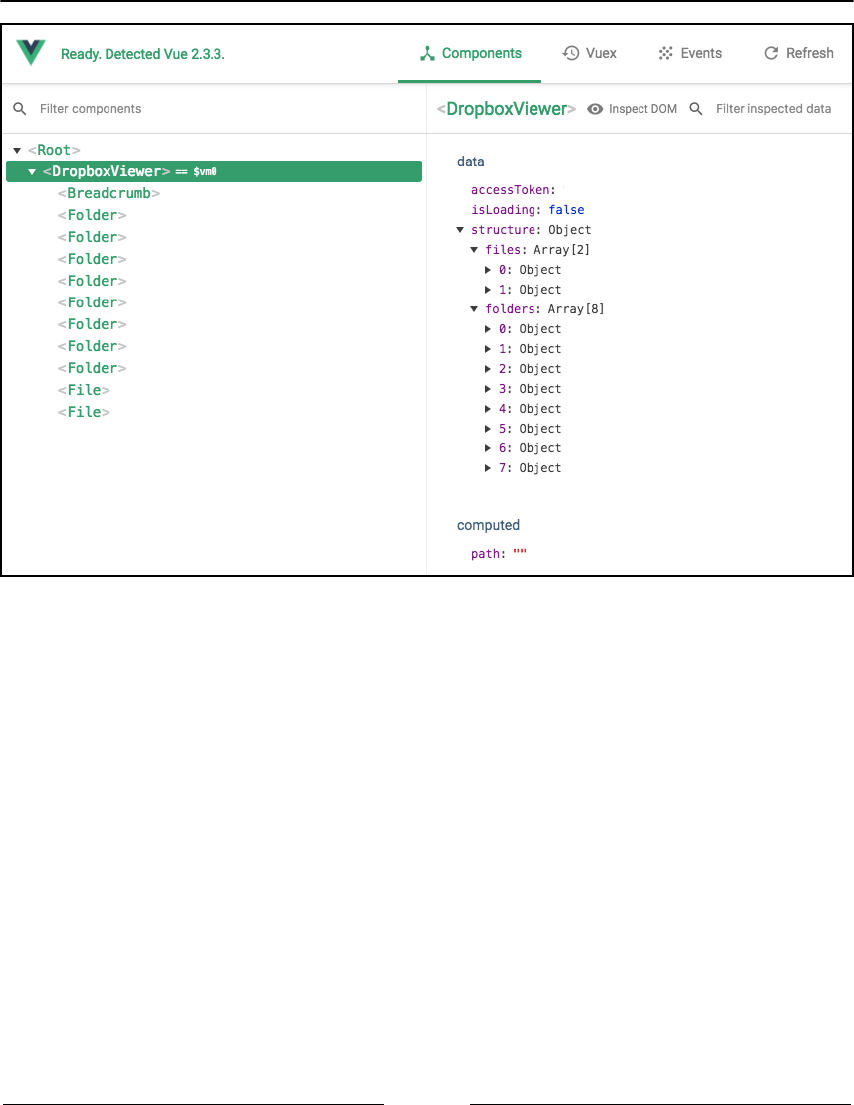
Using Vue Dev Tools and Testing Your SPA Chapter 12
[ 377 ]
Drilling down into each component, we can access individual data objects and computed
properties.
Using the Vue developer tools for inspecting your application is a much more efficient way
of validating data while creating your app, as it saves having to place several
console.log() statements.
Viewing Vuex mutations and time-travel
Navigating to the next tab, Vuex, allows us to watch store mutations taking place in real
time. Every time a mutation is fired, a new line is created in the left-hand panel. This
element allows us to view what data is being sent, and what the Vuex store looked like
before and after the data had been committed.

Using Vue Dev Tools and Testing Your SPA Chapter 12
[ 378 ]
It also gives you several options to revert, commit, and time-travel to any point. Loading
the Dropbox app, several structure mutations immediately populate within the left-hand
panel, listing the mutation name and the time they occurred. This is the code pre-caching
the folders in action. Clicking on each one will reveal the Vuex store state – along with a
mutation containing the payload sent. The state display is after the payload has been sent
and the mutation committed. To preview what the state looked like before that mutation,
select the preceding option:
On each entry, next to the mutation name, you will notice three symbols that allow you to
carry out several actions and directly mutate the store in your browser:
Commit this mutation: This allows you to commit all the data up to that point.
This will remove all of the mutations from the dev tools and update the Base State
to this point. This is handy if there are several mutations occurring that you wish
to keep track of.
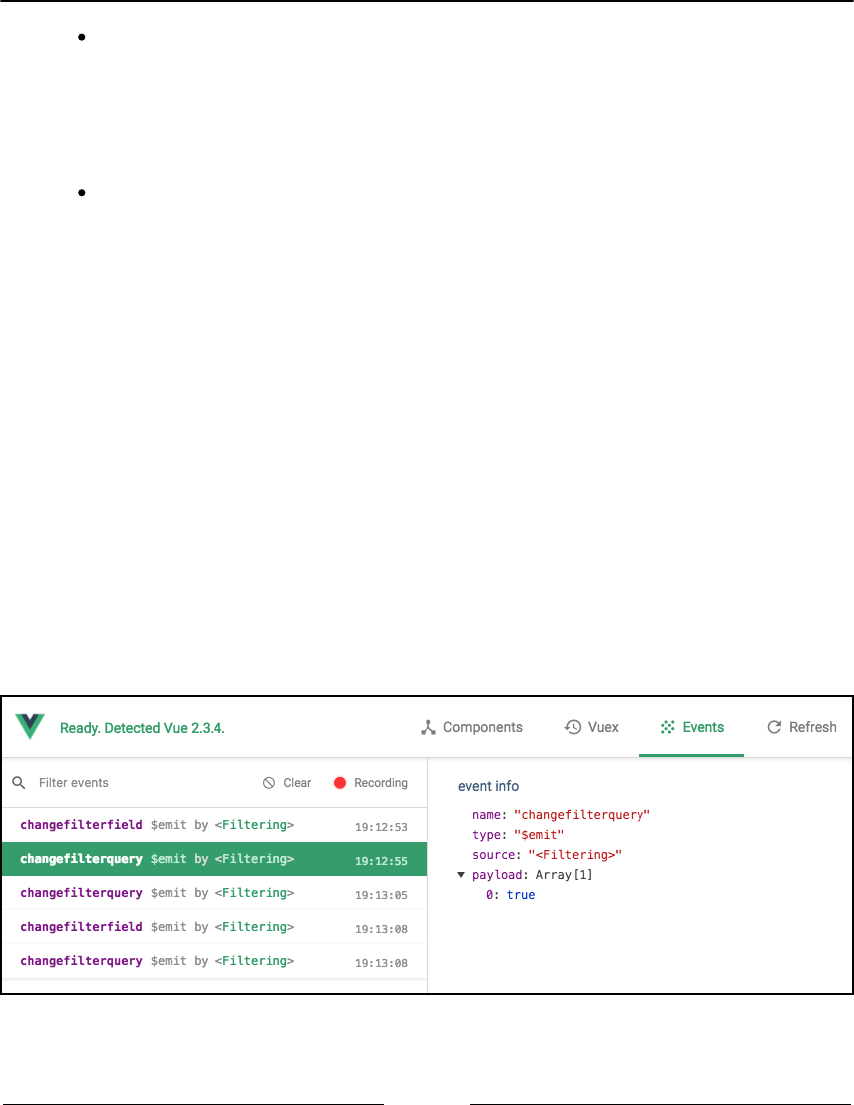
Using Vue Dev Tools and Testing Your SPA Chapter 12
[ 379 ]
Revert this mutation: This will undo the mutation and all mutations after this
point. This allows you to carry out the same actions again and again without
pressing refresh or losing your current place. For example, when adding a
product to the basket in our shop app, a mutation occurs. Using this would allow
you to remove the product from the basket and undo any following mutations
without navigating away from the product page.
Time-travel to this state: This allows you to preview the app and state at that
particular mutation, without reverting any mutations that occur after the selected
point.
The mutations tab also allows you to commit or revert all mutations at the top of the left-
hand panel. Within the right-hand panel, you can also import and export a JSON encoded
version of the store's state. This is particularly handy when you want to re-test several
circumstances and instances without having to reproduce several steps.
Previewing event data
The Events tab of the Vue developer tools works in a similar way to the Vuex tab, allowing
you to inspect any events emitted throughout your app. Our Dropbox app doesn't use
events, so open up the people-filtering app we created in Chapter 2, Displaying, Looping,
Searching, and Filtering Data, and Chapter 3, Optimizing our App and Using Components to
Display Data, of this book.
Changing the filters in this app emits an event each time the filter type is updated, along
with the filter query:

Using Vue Dev Tools and Testing Your SPA Chapter 12
[ 380 ]
The left-hand panel again lists the name of the event and the time it occurred. The right
panel contains information about the event, including its component origin and payload.
This data allows you to ensure the event data is as you expected it to be and, if not, helps
you locate where the event is being triggered.
The Vue dev tools are invaluable, especially as your JavaScript application gets bigger and
more complex. Open the shop SPA we developed and inspect the various components and
Vuex data to get an idea of how this tool can help you create applications that only commit
mutations they need to and emit the events they have to.
Testing your SPA
The majority of Vue testing suites revolve around having command-line knowledge and
creating a Vue application using the CLI (command-line interface). Along with creating
applications in frontend-compatible JavaScript, Vue also has a CLI that allows you to create
applications using component-based files. These are files with a .vue extension and contain
the template HTML along with the JavaScript required for the component. They also allow
you to create scoped CSS – styles that only apply to that component. If you chose to create
your app using the CLI, all of the theory and a lot of the practical knowledge you have
learned in this book can easily be ported across.
Command-line unit testing
Along with component files, the Vue CLI allows you to integrate with command-line unit
tests easier, such as Jest, Mocha, Chai, and TestCafe (https://testcafe.devexpress.com/).
For example, TestCafe allows you to specify several different tests, including checking
whether content exists, to clicking buttons to test functionality. An example of a TestCafe
test checking to see if our filtering component in our first app contains the work Field
would be:
test('The filtering contains the word "filter"', async testController => {
const filterSelector = await new Selector('body > #app > form >
label:nth-child(1)');
await testController.expect(paragraphSelector.innerText).eql('Filter');
});

Using Vue Dev Tools and Testing Your SPA Chapter 12
[ 381 ]
This test would then equate to true or false. Unit tests are generally written in
conjunction with components themselves, allowing components to be reused and tested in
isolation. This allows you to check that external factors have no bearing on the output of
your tests.
Most command-line JavaScript testing libraries will integrate with Vue.js; there is a great
list available in the awesome Vue GitHub repository (https://github.com/vuejs/
awesome-vue#test).
Browser automation
The alternative to using command-line unit testing is to automate your browser with a
testing suite. This kind of testing is still triggered via the command line, but rather than
integrating directly with your Vue application, it opens the page in the browser and
interacts with it like a user would. A popular tool for doing this is Nightwatch.js (http:/
/nightwatchjs.org/).
You may use this suite for opening your shop and interacting with the filtering component
or product list ordering and comparing the result. The tests are written in very colloquial
English and are not restricted to being on the same domain name or file network as the site
to be tested. The library is also language agnostic – working for any website regardless of
what it is built with.
The example Nightwatch.js gives on their website is for opening Google and ensuring
the first result of a Google search for rembrandt van rijn is the Wikipedia entry:
module.exports = {
'Demo test Google' : function (client) {
client
.url('http://www.google.com')
.waitForElementVisible('body', 1000)
.assert.title('Google')
.assert.visible('input[type=text]')
.setValue('input[type=text]', 'rembrandt van rijn')
.waitForElementVisible('button[name=btnG]', 1000)
.click('button[name=btnG]')
.pause(1000)
.assert.containsText('ol#rso li:first-child',
'Rembrandt - Wikipedia')
.end();
}
};

Using Vue Dev Tools and Testing Your SPA Chapter 12
[ 382 ]
An alternative to Nightwatch is Selenium (http://www.seleniumhq.org/). Selenium has
the advantage of having a Firefox extension that allows you to visually create tests and
commands.
Testing, especially for big applications, is paramount – especially when deploying your
application to a development environment. Whether you choose unit testing or browser
automation, there is a host of articles and books available on the subject.
Summary
Till now, we created a mock shop. Using real data from Shopify CSV files, we created an
application that allowed products to be viewed individually. We also created a category
listing page that could be filtered and ordered, allowing the user to find specifically the
products they wanted. To complete the experience, we built an editable Basket, Checkout,
and Order Confirmation screen. In this chapter, we covered the use of the Vue dev tools,
followed by how to build tests.

13
Transitions and Animations
In this chapter, the following recipes will be covered:
Integrating with third-party CSS animation libraries such as animate.css
Adding your own transition classes
Animating with JavaScript instead of CSS
Transitioning on the initial render
Transitioning between elements
Letting an element leave before the enter phase in a transition
Adding entering and leaving transitions for elements of a list
Transitioning elements that move in a list
Animating the state of your components
Packaging reusable transitions into components
Dynamic transitions
Introduction
This chapter contains recipes related to transitions and animations. Vue has its own tags for
dealing with transitions intended for when an element enters or leaves the scene:
<transition> and <transition-group>. You will learn all about them and how to use
them to give your customers a better user experience.

Transitions and Animations Chapter 13
[ 384 ]
Vue transitions are pretty powerful in that they are completely customizable and can easily
combine JavaScript and CSS styling while having very intuitive defaults that will let you
write less code in case you don't want all the frills.
You can animate a great deal of what happens in your components even without transition
tags since all you have to do is bind your state variables to some visible property.
Finally, once you have mastered everything that there is to know about Vue transitions and
animations, you can easily package these in layered components and reuse them
throughout your application. This is what makes them not only powerful, but also easy to
use and maintain.
Integrating with third-party CSS animation
libraries such as animate.css
Graphical interfaces not only need to be usable and easy to understand; they should also
provide affordability and be pleasant to use. Having transitions can help a great deal by
giving cues of how a website works in a fun way. In this recipe, we will examine how to use
a CSS library with our application.
Getting ready
Before starting, you can take a look at https://daneden.github.io/animate.css/, as
shown, just to get an idea of the available animations, but you don't really need any special
knowledge to proceed:
Transitions and Animations Chapter 13
[ 385 ]
How to do it...
Imagine that you are creating an app to book taxis. The interface we will create will be
simple and fun.
First of all, add the animate.css library to the list of dependencies (refer to the Choosing a
development environment recipe to learn how to do it).
To proceed, we need our usual wrapper:
<div id="app">
</div>
Inside, we will put a button to call for a taxi:
<button @click="taxiCalled = true">
Call a cab
</button>
Transitions and Animations Chapter 13
[ 386 ]
You can already tell that we will use the taxiCalled variable to keep track of whether the
button has been pressed or not
Let's add an emoji that will confirm to the user when the taxi is called:
<p v-if="taxiCalled"> </p>
At this point, we can add some JavaScript:
new Vue({
el: '#app',
data: {
taxiCalled: false
}
})
Run the application and you will see the taxi appear instantly when you press the button.
We are a cool taxi company, so let's make the taxi drive to us with a transition:
<transition
enter-active-class="animated slideInRight">
<p v-if="taxiCalled"> </p>
</transition>
Now run your application; if you call the taxi, it will get to you by sliding from the right:
The taxi will slide from right to left, as shown:

Transitions and Animations Chapter 13
[ 387 ]
How does it work...
Every transition applies four classes. Two are applied when the element enters the
scene and the other two are applied when it leaves:
Name Applied when Removed when
v-enter Before the element is inserted After one frame
v-enter-active Before the element is inserted When transition ends
v-enter-to After one frame When transition ends
v-leave Transition starts After one frame
v-leave-active Transition starts When transition ends
v-leave-to After one frame When transition ends
Here, the initial v stands for the name of your transition. If you don't specify a name, v will
be used.
While the beginning of the transition is a well-defined instant, the end of
the transition is a bit of work for the browser to figure out. For example, if
a CSS animation loops, the duration of the animation will only be one
iteration. Also, this may change in future releases, so keep this in mind.
In our case, we wanted to provide a third-party v-enter-active instead of writing our
own. The problem is that our library already has a different name for the class of the
animation we want to use (slideInRight). Since we can't change the name of the class, we
tell Vue to use slideInRight instead of looking for a v-enter-active class.
To do this, we used the following code:
<transition enter-active-class="animated slideInRight">
This means that our v-enter-active is called animated slideInRight now. Vue will
append those two classes before the element is inserted and drop them when the transition
ends. Just note that animated is a kind of helper class that comes with animate.css.

Transitions and Animations Chapter 13
[ 388 ]
Adding your own transition classes
If your application is rich in animations and you would like to reuse your CSS classes in
other projects by mixing and matching them, this is the recipe for you. You will also
understand an important technique for performant animations, called FLIP (First Last
Invert Play). While the latter technique is normally triggered automatically by Vue, we will
implement it manually to get a better understanding of how it works.
Getting ready
To complete this recipe, you should understand how CSS animations and transitions work.
This is out of the scope of this book, but you can find a good primer
at http://css3.bradshawenterprises.com/. This website is also great because it will
explain when you can use animations and transitions.
How to do it...
We will build an interface for a taxi company (similar to the preceding recipe) that will
enable users to call a taxi at the click of a button and will provide a nice animated feedback
when the taxi is called.
To code the button, write the following HTML:
<div id="app">
<button @click="taxiCalled = true">
Call a cab
</button>
<p v-if="taxiCalled"> </p>
</div>
Then, you initialize the taxiCalled variable to false, as shown in the following
JavaScript:
new Vue({
el: '#app',
data: {
taxiCalled: false
}
})

Transitions and Animations Chapter 13
[ 389 ]
At this point, we will create our own custom transition in CSS:
.slideInRight {
transform: translateX(200px);
}
.go {
transition: all 2s ease-out;
}
Wrap your car emoji in a Vue transition:
<transition
enter-class="slideInRight"
enter-active-class="go">
<p v-if="taxiCalled"> </p>
</transition>
When you run your code and hit the Call a cab button, you will see a taxi stopping by.
How it works...
When we click on the button, the taxiCalled variable turns true and Vue inserts the taxi
into your page. Before actually doing this, it reads the classes you specified in enter-
class (in this case, only slideInRight) and applies it to the wrapped element (the <p>
element with the taxi emoji). It also applies the classes specified in enter-class-active
(in this case, only go).
The classes in enter-class are removed after the first frame, and the classes in enter-
class-active are also removed when the animation ends.
The animation created here follows the FLIP technique that is composed of four points:
First (F): You take the property as it is in the first frame of your animation; in our
case, we want the taxi to start somewhere from the right of the screen.
Last (L): You take the property as it is in the last frame of your animation, which
is the taxi at the left of the screen in our case.
Invert (I): You invert the property change you registered between the first and
last frame. Since our taxi moved to the left, at the final frame it will be at say -200
pixel offset. We invert that and set the slideInRight class to have transform
as translateX(200px) so that the taxi will be at +200 pixel offset when it
appears.

Transitions and Animations Chapter 13
[ 390 ]
Play (P): We create a transition for every property we have touched. In the taxi
example, we use the transform property and so, we use writetransition:
all 2s ease-out to tween the taxi smoothly.
This technique is used automatically by Vue under the cover to make transitions work
inside the <transition-group> tag. More on that in the Adding entering and leaving
transition for elements of a list recipe.
Animating with JavaScript instead of CSS
It's a common misconception that animating with JavaScript is slower and that animations
should be done in CSS. The reality is that if used correctly, animation in JavaScript can have
similar or superior performance. In this recipe, we will create an animation with the help of
the simple but powerful Velocity.js (http://velocityjs.org/) library:

Transitions and Animations Chapter 13
[ 391 ]
Getting ready
This recipe, while it presupposes no knowledge of the Velocity library, assumes that you
are quite familiar with animations either in CSS or with JavaScript libraries, such as jQuery.
If you've never seen a CSS animation and you want a speedy introduction, just complete
the two preceding recipes and you should be able to follow along.
How to do it...
We're still looking for the perfect transition for a taxi company (the same as in the
preceding recipe) that will entertain our clients while waiting for a taxi. We have a button
to call a cab and a little taxi emoji that will appear when we make a reservation.
Before anything else, add the Velocity library as a dependency to your project--https://
cdnjs.cloudflare.com/ajax/libs/velocity/1.2.3/velocity.min.js.
Here is the HTML to create the skeleton of our interface:
<div id="app">
<button @click="taxiCalled = true">
Call a cab
</button>
<p v-if="taxiCalled"> </p>
</div>
Our Vue model is very simple and consists only of the taxiCalled variable:
new Vue({
el: '#app',
data: {
taxiCalled: false
}
})
Create the animation by wrapping the little taxi in a Vue transition:
<transition
@enter="enter"
:css="false"
>
<p v-if="taxiCalled"> </p>
</transition>

Transitions and Animations Chapter 13
[ 392 ]
The enter method will be called as soon as the taxi emoji is inserted at the press of a button.
The enter method, which you have to add to your Vue instance, looks like this:
methods: {
enter (el) {
Velocity(el,
{ opacity: [1, 0], translateX: ["0px", "200px"] },
{ duration: 2000, easing: "ease-out" })
}
}
Run your code and press the button to book your taxi!
How it works...
As you may have noted, there is no CSS in your code. The animation is purely driven by
JavaScript. Let's dissect our Vue transition a little:
<transition
@enter="enter"
:css="false"
>
<p v-if="taxiCalled"> </p>
</transition>
Although this is still a transition that could use CSS, we want to tell Vue to shut down the
CSS and save precious CPU cycles by setting :css="false". This will make Vue skip all
the code related to CSS animation and will prevent CSS from interfering with our pure
JavaScript animation.
The juicy part is in the @enter="enter" bit. We are binding the hook that triggers when
the element is inserted in to the enter method. The method itself is as follows:
enter (el) {
Velocity(el,
{ opacity: [1, 0], translateX: ["0px", "200px"] },
{ duration: 2000, easing: "ease-out" }
)
}
Here, we are calling the Velocity library. The el parameter is passed for free by Vue, and it
refers to the element that was inserted (in our case, the <p> element containing the emoji of
the car).

Transitions and Animations Chapter 13
[ 393 ]
The syntax of the Velocity function is as illustrated:
Velocity( elementToAnimate, propertiesToAnimate, [options] )
Other syntaxes are possible, but we will stick to this one.
In our call to this function, we passed our paragraph element as the first argument; we then
said that the opacity should change from 0 to 1 and, at the same time, the element should
move from a starting position of 200 pixels on the x axis toward its origin. As options, we
specified that the animation should last for two seconds and that we want to ease the
animation near the end.
I think everything is pretty clear maybe except how we are passing the opacity and
translateX parameters.
This is what Velocity calls forcefeeding--we are telling Velocity that the opacity should
start from 0 and go to 1. Likewise, we are telling Velocity that the translateX property
should start at 200 pixels, ending at 0 pixels.
In general, we can avoid passing arrays to specify the initial value for the properties;
Velocity will calculate how to transition.
For example, we could have had the following CSS class:
p {
opacity: 0;
}
If we rewrite the Velocity call as follows:
Velocity(el,
{ opacity: 1 }
)
The car will slowly appear. Velocity queried the DOM for the initial value of the element
and then transitioned it to 1. The problem with this approach is that since a query to the
DOM is involved, some animations could be slower, especially when you have a lot of
concurrent animations.
Another way we can obtain the same effect as force-feeding is by using the begin option,
like so:
Velocity(el,
{ opacity: 1 },
{ begin: () => { el.style.opacity = 0 } }
)
Transitions and Animations Chapter 13
[ 394 ]
This will set the opacity to zero just before the animation begins (and hence, before the
element is inserted). This will help in slower browsers in which forcefeeding will still
display a flash of the car before bringing it all the way to the right and starting the
animation.
The possible hooks for JavaScript animations are summarized in this table:
Attribute Description
@before-enter This function is called before the element is inserted.
@enter This function is called when the element is inserted.
@after-enter This function is called when the element is inserted and the animation is finished.
@enter-cancelled
This function is called when the animation is still in progress, but the element has
to leave. If you use Velocity you can do something like Velocity(el,
"stop").
@before-leave This function is called before the leave function is triggered.
@leave This function is called when the element leaves.
@after-leave This function is called when the element leaves the page.
@leave-cancelled This is called in case the element has to be inserted before the leave call is
finished. It works only with v-show.
Just be reminded that these hooks are valid for any library, not just
Velocity.
There's more...
We can try another take with this interface by implementing a cancel button. If the user
booked a cab by mistake, hitting cancel will delete the reservation, and it will be apparent
by the fact that the little taxi emoji disappears.
First, let's add a cancel button:
<button @click="taxiCalled = false">
Cancel
</button>

Transitions and Animations Chapter 13
[ 395 ]
That was easy enough; now we add our leave transition:
<transition
@enter="enter"
@leave="leave"
:css="false"
>
<p v-if="taxiCalled"> </p>
</transition>
That brings us to our leave method:
leave (el) {
Velocity(el,
{ opacity: [0, 1], 'font-size': ['0.1em', '1em'] },
{ duration: 200})
}
What we are doing is making the emoji disappear while scaling it down.
If you try to run your code, you will encounter some problems.
When you click on the cancel button, what should happen is the leave animation should
start and the taxi should become smaller and eventually disappear. Instead, nothing
happens and the taxi disappears abruptly.
The reason the cancel animation doesn't play as planned is because since the animation is
written in JavaScript instead of CSS, Vue has no way to tell when the animation is finished.
In particular, what happens is that Vue thinks that the leave animation is finished before it
even starts. That is what makes our car disappear.
The trick lies in the second argument. Every hook calls a function with two arguments. We
have already seen the first, el, which is the subject of the animation. The second is a
callback that when called, tells Vue that the animation is finished.
We will leverage the fact that Velocity has an option called complete, which expects a
function to call when the animation (from the Velocity perspective) is complete.
Let's rewrite our code with this new information:
leave (el, done) {
Velocity(el,
{ opacity: [0, 1], 'font-size': ['0.1em', '1em'] },
{ duration: 200 })
}

Transitions and Animations Chapter 13
[ 396 ]
Adding the done arguments to our function lets Vue know that we want a callback to call
when the animation is finished. We don't need to explicitly use the callback as Vue will
figure it out by itself, but since it's always a bad idea to rely on default behaviors (they can
change if they are not documented), let's call the done function when the animation is
finished:
leave (el, done) {
Velocity(el,
{ opacity: [0, 1], 'font-size': ['0.1em', '1em'] },
{ duration: 200, complete: done })
}
Run your code and press the Cancel button to cancel your taxi!
Transitioning on the initial render
With the appear keyword, we are able to package transition for elements when they are
first loaded. This helps the user experience in that it gives the impression that the page is
more responsive and faster to load when you apply it to many elements.
Getting ready
This recipe doesn't assume any particular knowledge, but if you have completed at least
the Adding some fun to your app with CSS transitions recipe, it will be a piece of cake.
How to do it...
We will build a page about the American actor Fill Murray; no, not Bill Murray. You can
find more information about him at http://www.fillmurray.com. We will use images from
this site to fill our page about him.
In our HTML, let's write a header as the title of our page:
<h1>
The Fill Murray Page
</h1>
After the title, we will place our Vue application:
<div id="app">
<img src="https://fillmurray.com/50/70">

Transitions and Animations Chapter 13
[ 397 ]
<p>
The internet was missing the ability to
provide custom-sized placeholder images of Bill Murray.
Now it can.
</p>
</div>
Which when rendered in a browser would appear like the following:
Our page is very plain right now. We want the Fill Murray picture to fade in. We have to
wrap it inside a transition:
<transition appear>
<img src="https://fillmurray.com/50/70">
</transition>
The following are the CSS classes:
img {
float: left;
padding: 5px
}
.v-enter {
opacity: 0
}
.v-enter-active {
transition: opacity 2s
}
Running our page now will make the image appear slowly, but it will also move the text.
To fix it, we have to specify the image size in advance:
<transition appear>
<img src="https://fillmurray.com/50/70" width="50" height="70">
</transition>
This way, our browser will set aside some space for the image that will appear slowly.

Transitions and Animations Chapter 13
[ 398 ]
How it works...
The appear directive in the transition tag will make the components appear for the first
time with an associated transition (if it is found).
There are many possible ways to specify a transition on the first rendering of the
component. In all cases, the appear directive must be specified.
The first things Vue will look for when this directive is present are JavaScript hooks or CSS
classes specified in the tag:
<transition
appear
@before-appear="customBeforeAppearHook"
@appear="customAppearHook"
@after-appear="customAfterAppearHook"
appear-class="custom-appear-class"
appear-active-class="custom-appear-active-class"
>
<p>My element</p>
</transition>
After that, if a name is specified, Vue will look for an entrance transition for that element:
<transition appear name="myTransition">
<p>My element</p>
</transition>
The preceding code will look for classes named as follows:
.myTransition-enter {...}
.myTransition-enter-active {...}
Vue will look for the default CSS classes for the element insertion (v-enter and v-enter-
active) if everything else fails. Incidentally, this is what we have done in our recipe.
Relying on these defaults is not a good practice; here, we have done it just
as a demonstration. You should always give names to your transitions.
Transitions and Animations Chapter 13
[ 399 ]
Maybe it's worth mentioning why we had to add the width and height to our image. The
reason is that when we specify an image URL in our HTML, the browser doesn't know the
size of the image in advance, so it doesn't reserve any space for it by default. Only by
specifying the size of the image in advance, the browser is able to correctly compose the
page even before an image is loaded.
Transitioning between elements
Everything on a web page is an element. You can easily make them appear and disappear,
thanks to Vue v-if and v-show directives. With transitions, you can easily control how
they appear and even add magic effects. This recipe explains how to do it.
Getting ready
For this recipe, you should have some familiarity with Vue transitions and how CSS works.
How to do it...
Since we talked about magic, we will turn a frog into a princess. The transformation itself
will be a transition.
We will instantiate a button that, when pressed, will represent a kiss to the frog:
<div id="app">
<button @click="kisses++"> Kiss!</button>
</div>
Every time the button is pressed, the variable kisses increases. The variable will be
initialized to zero, as the following code shows:
new Vue({
el: '#app',
data: {
kisses: 0
}
})
Transitions and Animations Chapter 13
[ 400 ]
Next, we need the frog and the princess that we will add immediately after the button:
<transition name="fade">
<p v-if="kisses < 3" key="frog"> frog</p>
<p v-if="kisses >= 3" key="princess"> princess</p>
</transition>
The fade transition is the following CSS:
.fade-enter-active, .fade-leave-active {
transition: opacity .5s
}
.fade-enter, .fade-leave-active {
opacity: 0
}
To make it work properly, we need a last CSS selector to add:
p {
margin: 0;
position: absolute;
font-size: 3em;
}
If you run the application and click enough times the kiss button, you should see your frog
turn into a princess:
This transition will have a fade effect:
Transitions and Animations Chapter 13
[ 401 ]
The frog emoji will turn into a princess emoji:
How it works...
When we wrote the two elements, we used the key attribute specifying who is the frog and
who is the princess. This is because, Vue optimization system will kick in otherwise. It will
see that the content of the two elements can be swapped without swapping the elements
themselves and no transition will ensue since the element was the same and only the
content changed.
If we remove the key attribute, we can see for ourselves that the frog and the princess will
change, but without any transition:
<transition name="fade">
<p v-if="kisses < 3"> frog</p>
<p v-if="kisses >= 3"> princess</p>
</transition>
Consider that we use two different elements, as shown:
<p v-if="kisses < 3" > frog</p>
<span v-if="kisses >= 3"> princess</span>
Also, we modify our CSS selector for <p> accordingly:
p, span {
margin: 0;
position: absolute;
font-size: 3em;
display: block;
}
Transitions and Animations Chapter 13
[ 402 ]
Now if we launch our application again, everything works without using any key attribute.
Using keys is generally recommended even when not necessary, like in
the preceding case. This is especially true when items have a different
semantic meaning. There are a couple of reasons for this. The main reason
is that when multiple people work on the same line of code, modifying the
key attribute will not break the application as easily as switching a span
element back into a p element, which will ruin the transition as we just
saw.
There's more...
Here, we cover two subcases of the preceding recipe: switching between more than two
elements and binding the key attribute.
Transitioning between more than two elements
We can expand on the recipe we just completed in a straightforward manner.
Let's suppose that if we kiss the princess too many times, she will turn into Santa Claus,
which may or may not be appealing, depending on your age I guess.
First, we add the third element:
<transition name="fade">
<p v-if="kisses < 3" key="frog"> frog</p>
<p v-else-if="kisses >= 3 && kisses <= 5" key="princess"> princess</p>
<p v-else key="santa"> santa</p>
</transition>
We can launch the application immediately and when we kiss the princess/frog more than
five times, Santa will appear with the same fading transition:
Transitions and Animations Chapter 13
[ 403 ]
Using this setup, we are limited in using the same transition we used between the first two
elements.
There is a workaround for this explained in the Dynamic transitions recipe.
Setting the key attribute dynamically
We don't have to write the key for all our elements if we already have some data available.
Another way we could write the same app, but without repeating the element is as follows:
<transition name="fade">
<p :key="transformation">{{emoji}}{{transformation}}</p>
</transition>
This, of course, means that we have to provide a sensible value for the transformation
and emoji variables, depending on the number of kisses.
To do this, we will tie them to computed properties:
computed: {
transformation () {
if (this.kisses < 3) {
return 'frog'
}
if (this.kisses >= 3 && this.kisses <= 5) {
return 'princess'
}
if (this.kisses > 5) {
return 'santa'
}
},
emoji () {
switch (this.transformation) {
case 'frog': return ' '
case 'princess': return ' '
case 'santa': return ' '
}
}
}
We traded off some complexity in the template for some more logic in our Vue instance.
This can be good in the long run if we expect more complex logic in the future or if the
number of transformation rises.

Transitions and Animations Chapter 13
[ 404 ]
Letting an element leave before the enter
phase in a transition
In the Transitioning between elements recipe, we explored how to make the transition
between two elements. The default behavior of Vue is to start the transition of the element
that is entering at the same time that the first element is leaving; this is not always
desirable.
You will learn about this important corner case and how to work around it in this recipe.
Getting ready
This recipe builds on top of the transitioning between two elements and solves a specific
problem. If you don't know what we are talking about, go back one recipe and you'll be on
track in no time.
How to do it...
First, you will see the problem if you have not encountered it yet. Next, we'll see what Vue
offers us to solve it.
The two elements problem
Let's create a carousel effect on our website. The user will view one product at a time and
then he will swipe to the next product. To swipe to the next product the user will need to
click a button.
First, we need our list of products in the Vue instance:
new Vue({
el: '#app',
data: {
product: 0,
products: [' umbrella', ' computer', ' ball', ' camera']
}
})
Transitions and Animations Chapter 13
[ 405 ]
In our HTML, we will only need a button and the view of an element:
<div id="app">
<button @click="product++">next</button>
<transition name="slide">
<p :key="products[product % 4]">{{products[product % 4]}}</p>
</transition>
</div>
The modulo 4 (product % 4) is only because we want to start all over again when the list of
products finishes.
To set up our sliding transition, we will need the following rules:
.slide-enter-active, .slide-leave-active {
transition: transform .5s
}
.slide-enter {
transform: translateX(300px)
}
.slide-leave-active {
transform: translateX(-300px);
}
Also, to make everything look good, we finish up with the following:
p {
position: absolute;
margin: 0;
font-size: 3em;
}
If you run the code now, you will see a nice carousel:
Now, let's try to remove the position: absolute from the last rule:
p {
margin: 0;
font-size: 3em;
}
Transitions and Animations Chapter 13
[ 406 ]
If you try your code now, you will see a weird jumping from the products:
This is the problem we are trying to solve. The second transition starts before the first
product has left. If the positioning is not absolute, we will see some weird effects.
Transition modes
To fix this problem, we will change the transition mode. Let's modify the <transition>
code:
<transition name="slide" mode="out-in">
<p :key="products[product%4]">{{products[product%4]}}</p>
</transition>
Now run your program and you will see the products taking a little more time before
sliding inside the screen. They are waiting for the previous item to go away before entering.
How it works...
To recapitulate, you have two different ways to manage transitions between components in
Vue. The default way is to start the in transition at the same time with the out transition. We
can make that explicit with the following:
<transition mode="in-out">
<!-- elements -->
</transition>
We can change this default behavior by waiting for the out part to be finished before
starting the in animation. We achieved it with the following:
<transition mode="out-in">
<!-- elements -->
</transition>

Transitions and Animations Chapter 13
[ 407 ]
While the former is useful when elements have the absolute style position, the latter is more
relevant when we really need to wait to have a clear way before putting more stuff on the
page.
Absolute positioning won't care about having elements on top of each other because they
don't follow the flow of the page. On the other hand, static positioning will append the
second element after the first, making the transition awkward if both the elements are
shown at the same time.
Adding entering and leaving transitions for
elements of a list
Here, we will try to add a visual way to suggest that an element is added or removed from
the list. This can add a lot to UX since you have an opportunity to suggest to the user why
an element was added or removed.
Getting ready
Some familiarity with CSS and transition will help. If you feel like this is needed, just
browse the other recipes in this chapter.
How to do it...
We'll build a syllabus to study programming. When we are done with a topic, we'll feel
relieved and we want to incorporate that feeling in our app by making the topic float away
from the syllabus as we learn it.
The data of the list will be in our Vue instance:
new Vue({
el: '#app',
data: {
syllabus: [
'HTML',
'CSS',
'Scratch',
'JavaScript',
'Python'
]
}

Transitions and Animations Chapter 13
[ 408 ]
})
The list will be printed in our HTML with the following code:
<div id="app">
<h3>Syllabus</h3>
<ul>
<li v-for="topic in syllabus">
{{topic}}
</li>
</ul>
</div>
When we press a button, we want the topic to disappear from the list. For this to happen,
we need to modify the code we have written.
First, let's add a Done button before each topic:
<li v-for="topic in syllabus">
<button @click="completed(topic)">Done</button>{{topic}}
</li>
Here, the completed method will look like this:
methods: {
completed (topic) {
let index = this.syllabus.indexOf(topic)
this.syllabus.splice(index, 1)
}
}
Running the code now will reveal a simple application for checking off the topics we
already studied. What we want though is an animation that will make us feel relieved.
For that, we need to edit the container of our list. We remove the <ul> tag and, instead, tell
the <transition-group> to compile to a <ul> tag:
<transition-group tag="ul">
<li v-for="topic in syllabus" :key="topic">
<button @click="completed(topic)">Done</button>{{topic}}
</li>
</transition-group>
Transitions and Animations Chapter 13
[ 409 ]
Note that we also added a key to each list element according to the topic. The last thing we
need is adding the transition rules to our CSS:
.v-leave-active {
transition: all 1s;
opacity: 0;
transform: translateY(-30px);
}
Now, the subjects will disappear with the transition on clicking the Done button, as shown:
How it works...
The <transition-group> tag represents a container for a group of elements that will be
displayed at the same time. By default, it represents the <span> tag, but by setting the tag
attribute to ul, we made it represent an unordered list.
Every element in the list must have a unique key or the transitions won't work. Vue will
take care of applying a transition to every element that enters or leaves.
Transitioning elements that move in a list
In this recipe, you will build a list of elements that move according to how the list changes.
This particular animation is useful when you want to tell your user that something has
changed and the list is now updated accordingly. It will also help the user identify the point
in which the element was inserted.

Transitions and Animations Chapter 13
[ 410 ]
Getting ready
This recipe is a little advanced; I would suggest you complete some of the recipes in this
chapter if you are not very familiar with transitions in Vue. If you can complete the Adding
entering and leaving transitions for elements of a lists recipe without much difficulty, you are
good to go.
How to do it...
You will build a little game--a bus station simulator!
Whenever a bus--represented by its emoji--leaves the station, all the other buses will drive a
little ahead to take its place. Every bus is identified by a number, as you can see from the
Vue instance data:
new Vue({
el: '#app',
data: {
buses: [1,2,3,4,5],
nextBus: 6
}
})
Whenever a new bus arrives, it will have a progressive number assigned. We want a new
bus to leave or go every two seconds. We can achieve this by hooking a timer when our
component is mounted on screen. Immediately after data, write the following:
mounted () {
setInterval(() => {
const headOrTail = () => Math.random() > 0.5
if (headOrTail()) {
this.buses.push(this.nextBus)
this.nextBus += 1
} else {
this.buses.splice(0, 1)
}
}, 2000)
}
The HTML of our app will look like this:
<div id="app">
<h3>Bus station simulator</h3>
<transition-group tag="p" name="station">
<span v-for="bus in buses" :key="bus"> </span>
Transitions and Animations Chapter 13
[ 411 ]
</transition-group>
</div>
To make the buses move around, we need to specify some CSS rules under the prefix
station:
.station-leave-active, .station-enter-active {
transition: all 2s;
position: absolute;
}
.station-leave-to {
opacity: 0;
transform: translateX(-30px);
}
.station-enter {
opacity: 0;
transform: translateX(30px);
}
.station-move {
transition: 2s;
}
span {
display: inline-block;
margin: 3px;
}
Launching the app now will result in an orderly queue of buses in which one leaves or
arrives every two seconds:

Transitions and Animations Chapter 13
[ 412 ]
How it works...
The core of our app is the <transition-group> tag. It manages all the buses identified by
their key:
<transition-group tag="p" name="station">
<span v-for="bus in buses" :key="bus"> </span>
</transition-group>
Whenever a bus enters or leaves the scenes, a FLIP animation (see the Adding your own
transition classes recipe) will be automatically triggered by Vue.
To fix ideas, let's say we have buses [1, 2, 3] and bus 1 leaves the scene. What happens next
is that the properties of the first bus's <span> element will be memorized before the
animation actually starts. So we may retrieve the following object describing the properties:
{
bottom:110.4375
height:26
left:11
right:27
top:84.4375
width:16
}
Vue does this for all the elements keyed inside the <transition-group> tag.
After this, the station-leave-active class will be applied to the first bus. Let's briefly
review what the rules are:
.station-leave-active, .station-enter-active {
transition: all 2s;
position: absolute;
}
We note that the position becomes absolute. This means that the element is removed from
the normal flow of the page. This in turn means that all the buses behind him will suddenly
move to fill the space left blank. Vue records all the properties of the buses at this stage also
and this is considered the final frame of the animation. This frame is not actually a real
displayed frame; it is just used as an abstraction to calculate the final position of the
elements:
Transitions and Animations Chapter 13
[ 413 ]
Vue will calculate the difference between the final frame and the starting frame and will
apply styles to make the buses appear in the initial frame even if they are not. The styles
will be removed after one frame. The reason the buses slowly crawl to their final frame
position instead of immediately moving in their new position is that they are span
elements and we specified that any transform style (the one used by Vue to fake their
position for one frame) must be transitioned for two seconds:
.station-move {
transition: 2s;
}
In other words, at frame -1, the three buses are all in place and their position is recorded.
At frame 0, the first bus is removed from the flow of the page and the other buses are
instantaneously moved behind it. In the very same frame, Vue records their new position
and applies a transform that will move the buses back to where they were at frame -1
giving the appearance that nobody moved.
At frame 1, the transform is removed, but since we have a transition, the buses will slowly
move to their final position.
Animating the state of your components
In computers, everything is a number. In Vue, everything that is a number can be animated
in one way or other. In this recipe, you will control a bouncy ball that will smoothly
position itself with a tween animation.

Transitions and Animations Chapter 13
[ 414 ]
Getting ready
To complete this recipe, you will need at least some familiarity with JavaScript. The
technicalities of JavaScript are out of the scope of this book, but I will break the code down
for you in the How it works... section, so don't worry too much about it.
How to do it...
In our HTML, we will add only two elements: an input box in which we will enter the
desired position of our bouncy ball and the ball itself:
<div id="app">
<input type="number">
<div class="ball"></div>
</div>
To properly render the ball, write this CSS rule and it will appear on the screen:
.ball {
width: 3em;
height: 3em;
background-color: red;
border-radius: 50%;
position: absolute;
left: 10em;
}
We want to control the bar Y position. To do that, we will bind the top property of the ball:
<div id="app">
<input type="number">
<div class="ball" :style="'top: ' + height + 'em'"></div>
</div>
Height will be part of our Vue instance model:
new Vue({
el: '#app',
data: {
height: 0
}
})
Transitions and Animations Chapter 13
[ 415 ]
Now, since we want the ball to animate in the new position whenever the enteredHeight
changes, one idea would be to bind the @change event of the input element:
<div id="app">
<input type="number" @input="move">
<div class="ball" :style="'top: ' + height + 'em'"></div>
</div>
The move method will be the one responsible for taking the current height of the ball and
slowly transitioning it to the specified value.
Before doing this, you will add the Tween.js library as a dependency. The official
repository is at https://github.com/tweenjs/tween.js. You can add the CDN link
specified in the README.md page if you are using JSFiddle.
Add the move method after adding the library, like this:
methods: {
move (event) {
const newHeight = Number(event.target.value)
const _this = this
const animate = (time) => {
requestAnimationFrame(animate)
TWEEN.update(time)
}
new TWEEN.Tween({ H: this.height })
.easing(TWEEN.Easing.Bounce.Out)
.to({ H: newHeight }, 1000)
.onUpdate(function () {
_this.height = this.H
})
.start()
animate()
}
}
Try to launch the app and see the ball bounce while you edit its height:

Transitions and Animations Chapter 13
[ 416 ]
When we change the height, the position of the ball also changes:
How it works...
The general principle here is that you have a state for an element or component. When the
state is numeric in nature, you can "tween" (from between) from one value to the other
following a specific curve or acceleration.
Let's break down the code, shall we?
The first thing we do is to take the specified new height for the ball and save it to the
newHeight variable:
const newHeight = Number(event.target.value)
In the next line, we are also saving our Vue instance in a _this helper variable:
const _this = this
The reason we do so will be clear in a minute:
const animate = (time) => {
requestAnimationFrame(animate)
TWEEN.update(time)
}
In the preceding code, we are wrapping all of our animation in a function. This is idiomatic
to the Tween.js library and identifies the main loop we will use to animate. If we have other
tweens, this is the place to trigger them:
new TWEEN.Tween({ H: this.height })
.easing(TWEEN.Easing.Bounce.Out)
.to({ H: newHeight }, 1000)
.onUpdate(function () {
_this.height = this.H
})
.start()

Transitions and Animations Chapter 13
[ 417 ]
This is the API call to our library. First, we are creating an object that will hold a copy of the
height value in lieu of our component. Normally, here you put the object that represents the
state itself. Due to Vue limitations (or Tween.js limitations), we are using a different
strategy; we are animating a copy of the state and we are syncing the true state for every
frame:
Tween({ H: this.height })
The first line initializes this copy to be equal to the current actual height of the ball:
easing(TWEEN.Easing.Bounce.Out)
We choose the easing to resemble a bouncy ball:
.to({ H: newHeight }, 1000)
This line sets the target height and the number of milliseconds the animation should last
for:
onUpdate(function () {
_this.height = this.H
})
Here, we are copying the height of the animation back to the real thing. As this function
binds this to the copied state, we are forced to use ES5 syntax to have access to it. This is
why we had a variable ready to reference the Vue instance. Had we used the ES6 syntax,
we would not have any way to get the value of H directly.
Packaging reusable transitions into
components
We may have a significant transition in our website that we want to reuse throughout the
user funnel. Packaging transition into components can be a good strategy if you are trying
to keep your code organized. In this recipe, you will build a simple transition component.

Transitions and Animations Chapter 13
[ 418 ]
Getting ready
Following this recipe makes sense if you have already worked your way through the
transition with Vue. Also, since we are working with components, you should at least have
an idea of what they are. Skim through the next chapter for a primer on components. In
particular, we will create a functional component, the anatomy of which is detailed in
the Creating a functional component recipe.
How to do it...
We will build a signature transition for a news portal. Actually, we will use a premade
transition in the excellent magic library (https://github.com/miniMAC/magic), so you
should add it to your project as a dependency. You can find the CDN link at
https://cdnjs.com/libraries/magic (go to the page to find the link, don't copy
it as a link).
First, you will build the website page, then you will build the transition itself. Lastly, you
will just add the transition to different elements.
Building the basic web page
Our web page will consist of two buttons each that will display a card: one is a recipe and
the other is the last breaking news:
<div id="app">
<button @click="showRecipe = !showRecipe">
Recipe
</button>
<button @click="showNews= !showNews">
Breaking News
</button>
<article v-if="showRecipe" class="card">
<h3>
Apple Pie Recipe
</h3>
<p>
Ingredients: apple pie. Procedure: serve hot.
</p>
</article>
<article v-if="showNews" class="card">
<h3>
Breaking news
</h3>
Transitions and Animations Chapter 13
[ 419 ]
<p>
Donald Duck is the new president of the USA.
</p>
</article>
</div>
The cards will have their unique touch, thanks to the following CSS rule:
.card {
position: relative;
background-color: FloralWhite;
width: 9em;
height: 9em;
margin: 0.5em;
padding: 0.5em;
font-family: sans-serif;
box-shadow: 0px 0px 10px 2px rgba(0,0,0,0.3);
}
The JavaScript part will be a very simple Vue instance:
new Vue({
el: '#app',
data: {
showRecipe: false,
showNews: false
}
})
Running this code will already display your web page:

Transitions and Animations Chapter 13
[ 420 ]
Building the reusable transition
We decided that our website will feature a transition whenever a card is displayed. Since
we intend to reuse the animation with everything in our website, we'd better package it in a
component.
Before the Vue instance, we declare the following component:
Vue.component('puff', {
functional: true,
render: function (createElement, context) {
var data = {
props: {
'enter-active-class': 'magictime puffIn',
'leave-active-class': 'magictime puffOut'
}
}
return createElement('transition', data, context.children)
}
})
The puffIn and puffOut animations are defined in magic.css.
Using our transition with the elements in our page
Now, we will just edit our web page to add the <puff> component to our cards:
<div id="app">
<button @click="showRecipe = !showRecipe">
Recipe
</button>
<button @click="showNews = !showNews">
Breaking News
</button>
<puff>
<article v-if="showRecipe" class="card">
<h3>
Apple Pie Recipe
</h3>
<p>
Ingredients: apple pie. Procedure: serve hot.
</p>
</article>
</puff>
<puff>
<article v-if="showNews" class="card">

Transitions and Animations Chapter 13
[ 421 ]
<h3>
Breaking news
</h3>
<p>
Donald Duck is the new president of the USA.
</p>
</article>
</puff>
</div>
The cards will now appear and disappear when pressing the button with a "puff" effect.
How it works...
The only tricky part in our code is building the <puff> component. Once we have that in
place, whatever we put inside will appear and disappear according to our transition. In our
example, we used an already made transition. In the real world, we may craft a seriously
complex animation that can be difficult to apply every time in the same manner. Having it
packaged in a component is much easier and maintainable.
Two things make the <puff> component work as a reusable transition:
props: {
'enter-active-class': 'magictime puffIn',
'leave-active-class': 'magictime puffOut'
}
Here, we specify the classes the component must adopt when entering and leaving; there is
nothing too special here, we have already done it in the Integrating with third-party CSS
animation libraries such as animate.css recipe.
At the end we return the actual element:
return createElement('transition', data, context.children)
This line creates the root of our element that is a <transition> tag with only one child--
context.children. This means that the child is unspecified; the component will put as
child whatever actual child is passed in the template. In our examples, we passed some
cards that were promptly displayed.

Transitions and Animations Chapter 13
[ 422 ]
Dynamic transitions
In Vue, a constant theme is reactivity and, of course, transitions can be dynamic because of
that. Not only the transition themselves, but all their properties can be bound to reactive
variables. This gives us a lot of control over which transition to use at any given moment.
Getting ready
This recipe builds on top of the Transitioning between elements recipe. You don't need to go
back if you already know about transitions, but if you feel like you're missing something, it
might be a good idea to complete that first.
How to do it...
We will transform a frog into a princess with some kisses, but if we kiss too much the
princess will turn into Santa. Of course, we are talking about emojis.
Our HTML setup is very simple:
<div id="app">
<button @click="kisses++"> Kiss!</button>
<transition :name="kindOfTransformation" :mode="transformationMode">
<p :key="transformation">{{emoji}}{{transformation}}</p>
</transition>
</div>
Just note that most of the attributes here are bound to variables. Here is how the JavaScript
unfolds.
First, we will create a simple Vue instance with all of our data:
new Vue({
el: '#app',
data: {
kisses: 0,
kindOfTransformation: 'fade',
transformationMode: 'in-out'
}
})
Transitions and Animations Chapter 13
[ 423 ]
The fade transformation we are referring to is the following CSS:
.fade-enter-active, .fade-leave-active {
transition: opacity .5s
}
.fade-enter, .fade-leave-active {
opacity: 0
}
The variables transformation and emoji are defined by two computed properties:
computed: {
transformation () {
if (this.kisses < 3) {
return 'frog'
}
if (this.kisses >= 3 && this.kisses <= 5) {
return 'princess'
}
if (this.kisses > 5) {
return 'santa'
}
},
emoji () {
switch (this.transformation) {
case 'frog': return ' '
case 'princess': return ' '
case 'santa': return ' '
}
}
}
While we are using the fade transition between the frog and the princess, we want
something else between the princess and the frog. We will use the following transition
classes:
.zoom-leave-active, .zoom-enter-active {
transition: transform .5s;
}
.zoom-leave-active, .zoom-enter {
transform: scale(0)
}

Transitions and Animations Chapter 13
[ 424 ]
Now, since we bound the name of the transition to a variable, we can easily switch that
programmatically. We can do that by adding the following highlighted lines to the
computed property:
transformation () {
if (this.kisses < 3) {
return 'frog'
}
if (this.kisses >= 3 && this.kisses <= 5) {
this.transformationMode = 'out-in'
return 'princess'
}
if (this.kisses > 5) {
this.kindOfTransformation = 'zoom'
return 'santa'
}
}
The first added line is to avoid having an overlap while the zoom transition starts (more on
that in the Letting an element leave before the enter phase in a transition recipe).
The second added line switches the animation to "zoom".
To make everything appear the right way, we need one more CSS rule:
p {
margin: 0;
position: absolute;
font-size: 3em;
}
This is much nicer.
Now run the app and see how the two different transitions are used dynamically:
Transitions and Animations Chapter 13
[ 425 ]
As the number of kisses increase, the princess zooms out:
With this, the Santa zooms in:
How it works...
If you understand how reactivity works in Vue, there is not much to add. We bound the
name of the transition to the kindOfTransformation variable and switched from fade to
zoom in our code. We also demonstrated that the other attributes of the <transition> tag
can be changed on the fly as well.

14
Vue Communicates with the
Internet
In this chapter, the following recipes will be covered:
Sending basic AJAX request with Axios
Validating user data before sending it
Creating a form and sending data to your server
Recovering from an error during a request
Creating a REST client (and server!)
Implementing infinite scrolling
Processing a request before sending it out
Preventing XSS attacks to your app
Introduction
Web applications rarely work all by themselves. What makes them interesting is actually
the fact that they enable us to communicate with the world in innovative ways that didn't
exist just a few years ago.
Vue, by itself, doesn't contain any mechanism or library to make AJAX requests or open
web sockets. In this chapter, we will, therefore, explore how Vue interacts with built-in
mechanisms and external libraries to connect to external services.
You will start by making basic AJAX requests with the help of an external library. Then,
you'll explore some common patterns with sending and getting data in forms. Finally, there
are some recipes with real-world applications and how to build a RESTful client.

Vue Communicates with the Internet Chapter 14
[ 427 ]
Sending basic AJAX requests with Axios
Axios is the recommended library for Vue for making HTTP requests. It's a very simple
library, but it has some built-in features that help you in carrying out common operations.
It implements a REST pattern for making requests with HTTP verbs and can also deal with
concurrency (spawning multiple requests at the same time) in a function call. You can find
more information at https://github.com/mzabriskie/axios.
Getting ready
For this recipe, you don't need any particular knowledge of Vue. We will use Axios, which
itself uses JavaScript promises. If you have never heard of promises, you can have a primer
at https://developers.google.com/web/fundamentals/getting-started/primers/
promises.
How to do it...
You will build a simple application that gives you a wise piece of advice every time you
visit the web page.
The first thing you will need is to install Axios in your application. If you are using npm,
you can just issue the following command:
npm install axios
If you are working on a single page, you can import the following file from CDN,
at https://unpkg.com/axios/dist/axios.js.
Unfortunately, the advise slip service we will use will not work with
JSFiddle because while the service runs on HTTP, JSFiddle is on HTTPS
and your browser will most likely complain. You can run this recipe on a
local HTML file.
Our HTML looks like this:
<div id="app">
<h2>Advice of the day</h2>
<p>{{advice}}</p>
</div>
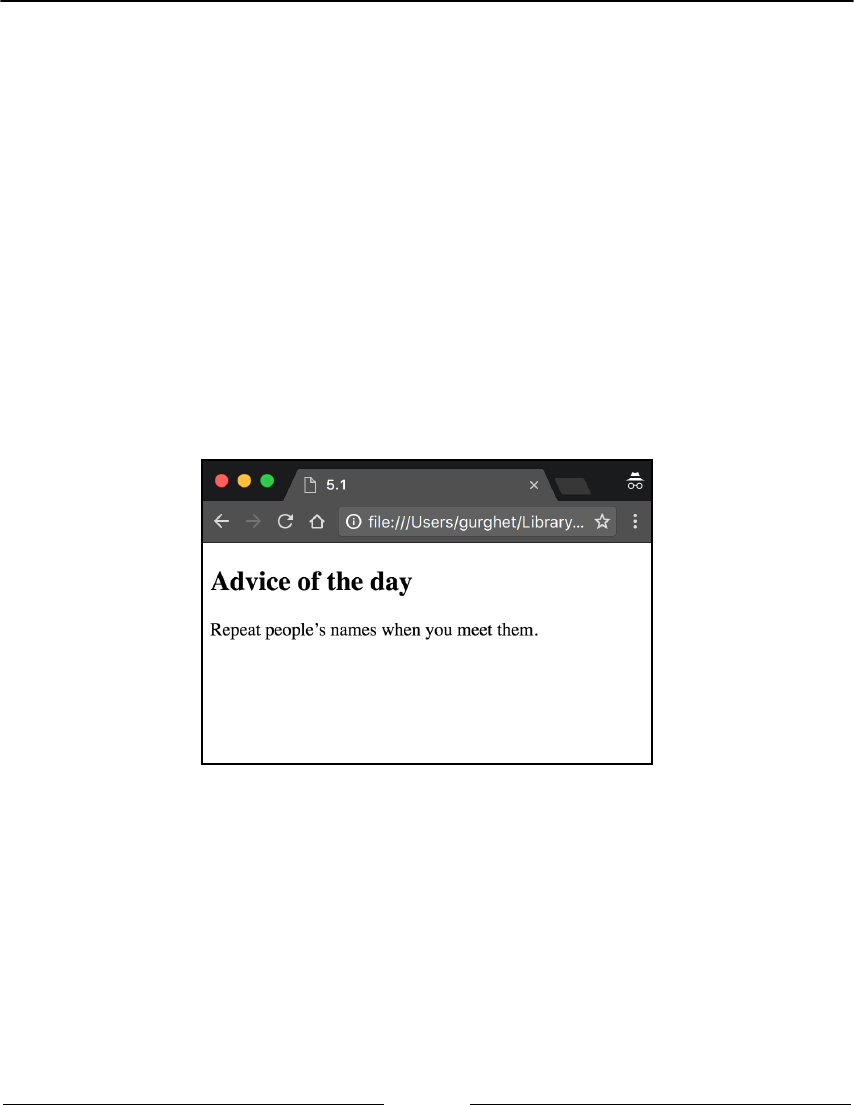
Vue Communicates with the Internet Chapter 14
[ 428 ]
Our Vue instance is as follows:
new Vue({
el: '#app',
data: {
advice: 'loading...'
},
created () {
axios.get('http://api.adviceslip.com/advice')
.then(response => {
this.advice = response.data.slip.advice
})
.catch(error => {
this.advice = 'There was an error: ' + error.message
})
}
})
Open your app to have a refreshingly wise slip of advice:
How it works...
When our application starts up, the created hook is engaged and will run the code with
Axios. The first line performs a GET request to the API endpoint:
axios.get('http://api.adviceslip.com/advice')

Vue Communicates with the Internet Chapter 14
[ 429 ]
This will return a promise. We can use the then method on any promise to act on the result
if the promise resolves successfully:
.then(response => {
this.advice = response.data.slip.advice
})
The response object will contain some data about the result of our request. A possible
response object is the following:
{
"data": {
"slip": {
"advice": "Repeat people's name when you meet them.",
"slip_id": "132"
}
},
"status": 200,
"statusText": "OK",
"headers": {
"content-type": "text/html; charset=UTF-8",
"cache-control": "max-age=0, no-cache"
},
"config": {
"transformRequest": {},
"transformResponse": {},
"timeout": 0,
"xsrfCookieName": "XSRF-TOKEN",
"xsrfHeaderName": "X-XSRF-TOKEN",
"maxContentLength": -1,
"headers": {
"Accept": "application/json, text/plain, */*"
},
"method": "get",
"url": "http://api.adviceslip.com/advice"
},
"request": {}
}
We navigate to the property we want to interact with; in our case, we want
response.data.slip.advice, which is the string. We copied the string in the variable
advice in the instance state.

Vue Communicates with the Internet Chapter 14
[ 430 ]
The last part is when something wrong happens to our request or to our code inside the
first branch:
.catch(error => {
this.advice = 'There was an error: ' + error.message
})
We will explore error handling more in depth in the Recovering from an error during a
request recipe. For now, let's trigger an error by hand, just to see what happens.
The cheapest way to trigger an error is to run the app on JSFiddle. Since the browser detects
JSFiddle on a secure connection and our API is on HTTP (which is not secure), modern
browsers will complain and will block the connection. You should see the following text:
There was an error: Network Error
This is just one of the many possible errors you can experiment with. Consider that you edit
the GET endpoint to some non-existent page:
axios.get('http://api.adviceslip.com/non-existent-page')
In this case, you will get a 404 error:
There was an error: Request failed with status code 404
Interestingly, you will end up in the error branch even if the request goes well but there is
an error in the first branch.
Change the then branch to this:
.then(response => {
this.advice = undefined.hello
})
As everybody knows, JavaScript cannot read "hello" property of an undefined object:
There was an error: Cannot read property 'hello' of undefined
It's just as I told you.

Vue Communicates with the Internet Chapter 14
[ 431 ]
Validating user data before sending it
Generally, users hate forms. While we can't do much to change that, we can make it less
frustrating for them by providing relevant instructions on how to fill them in. In this recipe,
we will create a form, and we will leverage HTML standards to provide the user with a nice
guidance on how to complete it.
Getting ready
This recipe does not need previous knowledge to be completed. While we will build a form
(the Sending basic AJAX requests with Axios recipe), we will fake the AJAX
call and concentrate on the validation.
How to do it...
We will build a very simple form: one field for the username and one for the user e-mail,
plus one button to submit the information.
Type in this HTML:
<div id="app">
<form @submit.prevent="vueSubmit">
<div>
<label>Name</label>
<input type="text" required>
</div>
<div>
<label>Email</label>
<input type="email" required>
</div>
<div>
<label>Submit</label>
<button type="submit">Submit</button>
</div>
</form>
</div>
The Vue instance is trivial, as shown:
new Vue({
el: '#app',
methods: {
vueSubmit() {
Vue Communicates with the Internet Chapter 14
[ 432 ]
console.info('fake AJAX request')
}
}
})
Run this app and try to submit the form with an empty field or wrong e-mail. You should
see help from the browser itself:
Then, if you try to enter an invalid e-mail address, you will see the following:
How it works...
We are using a native HTML5 validation API, which internally uses pattern matching to
check whether what we are typing is conformant to certain rules.
Consider the attribute required in the following line:
<input type="text" required>
This ensures that when we submit the form, the field is actually populated while having
type="email" in the other input element ensures that the content resembles an e-mail
format.
This API is very rich and you can read more at
https://developer.mozilla.org/en-US/docs/Web/Guide/HTML/Forms/Data_form_validat
ion.

Vue Communicates with the Internet Chapter 14
[ 433 ]
Many a time, the problem is that to leverage this API, we need to trigger the native
validation mechanism. This means that we are not allowed to prevent the default behavior
of the Submit button:
<button type="submit" @click.prevent="vueSubmit">Submit</button>
This will not trigger the native validation and the form will always be submitted. On the
other hand, if we do the following:
<button type="submit" @click="vueSubmit">Submit</button>
The form will get validated but, since we are not preventing the default behavior of the
submit button, the form will be sent to another page, which will destroy the one-page
application experience.
The trick is to intercept the submit at form level:
<form @submit.prevent="vueSubmit">
This way, we can have form native validation and all the modern browsing experience we
really like.
Creating a form and sending data to your
server
HTML forms are a standard way to interact with your user. You can gather their data to
register within the site, make them log in, or even carry out more advanced interactions. In
this recipe, you will build your first form with Vue.
Getting ready
This recipe is very easy, but it assumes that you already know about AJAX and you want to
apply your knowledge on Vue.
How to do it...
Let's pretend that we have a blog, and we want to write a new post. For that, we need a
form. Here is how you lay out the HTML:
<div id="app">

Vue Communicates with the Internet Chapter 14
[ 434 ]
<h3>Write a new post</h3>
<form>
<div>
<label>Title of your post:</label>
<input type="text" v-model="title">
</div>
<div>
<label>Write your thoughts for the day</label>
<textarea v-model="body"></textarea>
</div>
<div>
<button @click.prevent="submit">Submit</button>
</div>
</form>
</div>
We have a box for the title, one for the body of our new post, and a button to send our post.
In our Vue instance, those three things along with a user ID will be part of the state of the
app:
new Vue({
el: '#app',
data: {
userId: 1,
title: '',
body: ''
}
})
At this point, we just need to add a method to send the data to our server when we click on
the Submit button. Since we don't have a server, we will use a very useful service by
Typicode. It's basically a fake REST server. We will send a request and the server will
respond in a realistic manner, even if nothing will really happen.
Here's our method:
methods: {
submit () {
const xhr = new XMLHttpRequest()
xhr.open('post', 'https://jsonplaceholder.typicode.com/posts')
xhr.setRequestHeader('Content-Type',
'application/json;charset=UTF-8')
xhr.onreadystatechange = () => {
const DONE = 4
const CREATED = 201
if (xhr.readyState === DONE) {
if (xhr.status === CREATED) {

Vue Communicates with the Internet Chapter 14
[ 435 ]
this.response = xhr.response
} else {
this.response = 'Error: ' + xhr.status
}
}
}
xhr.send(JSON.stringify({
title: this.title,
body: this.body,
userId: this.userId
}))
}
}
To see the actual response of the server, we will add the response variable to our status:
data: {
userId: 1,
title: '',
body: '',
response: '...'
}
After the form in our HTML, add the following:
<h3>Response from the server</h3>
<pre>{{response}}</pre>
When you launch your page, you should be able to interact with your server. When you
write a post, the server will echo the post and answer with the post ID:

Vue Communicates with the Internet Chapter 14
[ 436 ]
How it works...
Most of the magic happens in the submit method. In the first line, we are creating an
XMLHttpRequest object, which is a native JavaScript mechanism to make AJAX requests:
const xhr = new XMLHttpRequest()
We then use the open and setRequestHeader methods to configure a new connection; we
want to send a POST request, and we will send some JSON along with it:
xhr.open('post', 'http://jsonplaceholder.typicode.com/posts')
xhr.setRequestHeader('Content-Type', 'application/json;charset=UTF-8')
Since we are interacting with a RESTful interface, the POST method means that we expect
our request to modify data on the server (in particular, create a new post), and that issuing
the same request more than one time will get different results every time (namely we will
create a new, different post ID each time).
This is different from the more common GET request that will not modify data on the
server (except logs maybe) and this will always yield the same results (provided that data
on the server does not change between requests).
For more details about REST, take a look at the Creating a REST client (and server!) recipe.
The following lines are all about the response:
xhr.onreadystatechange = () => {
const DONE = 4
const CREATED = 201
if (xhr.readyState === DONE) {
if (xhr.status === CREATED) {
this.response = xhr.response
} else {
this.response = 'Error: ' + xhr.status
}
}
}
This will install a handler whenever we get some kind of change in our object. If the
readyState is changed to DONE it means, that we have our response from the server. Next,
we check the status code, which should be 201 to signal that a new resource (our new post)
has been created. If that is the case, we set the variable we put in the mustaches to get a
quick feedback. Otherwise, we put the error message we received in the same variable.

Vue Communicates with the Internet Chapter 14
[ 437 ]
The last thing we need to do, after setting up the event handlers, is to actually send the
request along with the data of our new post:
xhr.send(JSON.stringify({
title: this.title,
body: this.body,
userId: this.userId
}))
There's more...
Another way to approach the same problem is to use Axios for sending the AJAX request. If
you need to brush up on what Axios is, take a look at the Sending basic AJAX requests with
Axios recipe.
The code for the submit method will become as follows (remember to add Axios as a
dependency):
submit () {
axios.post('http://jsonplaceholder.typicode.com/posts', {
title: this.title,
body: this.body,
userId: this.userId
}).then(response => {
this.response = JSON.stringify(response,null,' ')
}).catch(error => {
this.response = 'Error: ' + error.response.status
})
}
This code is perfectly equivalent, but it's much more expressive and concise than using
native browser objects.
Recovering from an error during a request
Requests to an external service take ages from the perspective of a computer. In human
terms, it would be like sending a satellite to Jupiter and waiting for it to come back to Earth.
You can't be 100% sure that the travel will ever be complete and how much time will the
travel actually take. Networks are notoriously flaky and it's better to come prepared in case
our request does not complete successfully.

Vue Communicates with the Internet Chapter 14
[ 438 ]
Getting ready
This recipe is a little complex, but, does not use advanced concepts. You are expected,
nonetheless, to be familiar with using Vue.
We will be using Axios for this recipe. You can complete the Sending basic AJAX requests
with Axios recipe if you are unsure of what it exactly entails.
How to do it...
You will build a website for ordering pizzas on Mt. Everest. The area has a notoriously poor
Internet connection, so we may want to retry a couple of times before giving up on our
pizza.
This is what our HTML looks like:
<div id="app">
<h3>Everest pizza delivery</h3>
<button @click="order"
:disabled="inProgress">Order pizza!</button>
<span class="spinner" v-show="inProgress"> </span>
<h4>Pizza wanted</h4>
<p>{{requests}}</p>
<h4>Pizzas ordered</h4>
<span v-for="pizza in responses">
{{pizza.id}}:{{pizza.req}}
</span>
</div>
We have a button to place orders that will be disabled while an order is in progress--a list of
orders in progress (that will contain only one order for the moment) and a list of pizzas
already ordered.
We can add a spinner to make the waiting a bit more pleasant. Add this CSS to make the
little pizza spin:
@keyframes spin {
100% {transform:rotate(360deg);}
}
.spinner {
width: 1em;
height: 1em;
padding-bottom: 12px;
display: inline-block;
animation: spin 2s linear infinite;

Vue Communicates with the Internet Chapter 14
[ 439 ]
}
Our Vue instance will keep track of a few things; write this code to start building the
instance:
new Vue({
el: '#app',
data: {
inProgress: false,
requests: new Object(null),
responses: new Object(null),
counter: 0,
impatientAxios: undefined
}
})
I would like to use JavaScript sets for the requests and responses; unfortunately, sets are not
reactive in Vue; the closest thing we can use is an object, which is empty for now, that is, we
are initializing requests and responses to an empty object.
The impatientAxios variable will be filled upon creation. Normally, Axios waits as long
as the browser will wait for a response. Since we are impatient, we will create an Axios that
will drop the connection after 3 seconds:
created () {
this.impatientAxios = axios.create({
timeout: 3000
})
}
The last thing we need to build is the order method. Since we don't have a web server to
make actual requests to, we will use the http://httpstat.us/200 endpoint that simply
answers 200 OK to all our requests:
methods: {
order (event, oldRequest) {
let request = undefined
if (oldRequest) {
request = oldRequest
} else {
request = { req: ' ', id: this.counter++}
}
this.inProgress = true
this.requests[request.id] = request
this.impatientAxios.get('http://httpstat.us/200')
.then(response => {
this.inProgress = false
Vue Communicates with the Internet Chapter 14
[ 440 ]
this.responses[request.id] = this.requests[request.id]
delete this.requests[request.id]
})
.catch(e => {
this.inProgress = false
console.error(e.message)
console.error(this.requests.s)
setTimeout(this.order(event, request), 1000)
})
}
To run this program as intended, open it in Chrome and open the Developer Tools with
Cmd + Opt + I (F12 on Windows):
Vue Communicates with the Internet Chapter 14
[ 441 ]
Switch the tab to Network and open the dropdown where you see No Throttling:
Click on it to display the drop-down menu:

Vue Communicates with the Internet Chapter 14
[ 442 ]
Add a new custom throttling called Everest with 1kb/s for download and upload and a
latency of 1,000 milliseconds, as in the following screenshot:
You can then select that type of throttling and try to order some pizzas. If you are lucky,
you should eventually be able to order some, thanks to the persistency of Axios.
If you are not getting success or if all your pizzas are ordered correctly, try to adjust the
parameters; much of this process is actually random and highly dependent on the machine.
How it works...
There are many ways to deal with flaky connections and there are many libraries out there
that integrate with Axios and have more advanced retry and reattempt strategies. Here, we
have seen only one basic strategy, but libraries such as Patience JS have more advanced
ones and they are not difficult to use.
Creating a REST client (and server!)
In this recipe, we will learn about REST and how to build a REST client. To build a REST
client, we will need a server that exposes a REST interface; we will build that also. Wait a
minute! A whole REST server is a side note in a recipe in a book about Vue? Just follow
along and you won't be disappointed.

Vue Communicates with the Internet Chapter 14
[ 443 ]
Getting ready
This recipe is fairly advanced in the sense that you will need to be comfortable with the
architecture of client and server and at least have heard or read about REST interfaces. You
will also need to be familiar with the command line and have npm installed. You can read
all about it in the Choosing a development environment recipe.
Axios will also need to be installed; read more about this in the first recipe of this chapter.
How to do it...
I remember when some years ago, building a REST server could take days or weeks. You
can use Feather.js, and it will be quick and (hopefully painless). Open a command line
and install it through npm with the following command:
npm install -g feathers-cli
After that, create a directory where you will run the server, go inside it, and launch
Feathers:
mkdir my-server
cd my-server
feathers generate app
Answer all the questions with default values. When the process finishes, type in the
following command to create a new resource:
feathers generate service
One of the questions is the name of the resource; call it messages, but other than that, use
the default for all the other questions.
Exit from the feathers-cli with the exit command and start your new server with the
following command:
npm start
After some seconds, your REST server should be started and should be listening on port
3030. Can you honestly say it was difficult?
The preceding sequence of commands works with Feathers version 2.0.0
It's totally possible that you may be using another version but it should
still be easy to get the same result with a later version; check the online
install guide at https://feathersjs.com/.

Vue Communicates with the Internet Chapter 14
[ 444 ]
Next, you'll build a Vue app that communicates with the server seamlessly. Now, since the
server is running in your local environment through HTTP, you will not be able to use
JSFiddle because it works on HTTPS and considers HTTP insecure. You can either use other
methods described earlier or use services on HTTP, such as codepen.io or others.
You will code an app that manages sticky messages. We want to be able to view, add, edit,
and delete them.
Type the following in this HTML:
<div id="app">
<h3>Sticky messages</h3>
<ol>
<li v-for="message in messages">
<button @click="deleteItem(message._id)">Delete</button>
<button @click="edit(message._id, message.text)">
edit
</button>
<input v-model="message.text">
</li>
</ol>
<input v-model="toAdd">
<button @click="add">add</button>
</div>
Our Vue instance state will consist of a list of recorded messages, plus a temporary message
to be added to the list:
new Vue({
el: '#app',
data: {
messages: [],
toAdd: ''
},
})
The first thing that we want to do is ask the server for a list of messages. Write the created
hook for this:
created () {
axios.get('http://localhost:3030/messages/')
.then(response => {
this.messages = response.data.data
})
},

Vue Communicates with the Internet Chapter 14
[ 445 ]
For creating a new message, write a method that binds to the click of the add button and
send what's written in the input box to the server:
methods: {
add () {
axios.post('http://localhost:3030/messages/', {
text: this.toAdd
})
.then(response => {
if (response.status === 201) {
this.messages.push(response.data)
this.toAdd = ''
}
})
}
}
Similarly, write a method for deleting a message and for editing a message:
deleteItem (id) {
console.log('delete')
axios.delete('http://localhost:3030/messages/' + id)
.then(response => {
if (response.status < 400) {
this.messages.splice(
this.messages.findIndex(e => e.id === id), 1)
}
})
},
edit (id, text) {
axios.put('http://localhost:3030/messages/' + id, {
text
})
.then(response => {
if (response.status < 400) {
console.info(response.status)
}
})
}

Vue Communicates with the Internet Chapter 14
[ 446 ]
Launch your application and you will be able to manage your board of sticky messages:
To prove to yourself that you are really communicating with the server, you can refresh the
page or close and reopen the browser and your notes will still be there.
How it works...
REST means REpresentational State Transfer, as in you will transfer a representation of
the state of some resource. In practice, we are using a set of verbs to transfer the
representation of the state of our messages.
Using the HTTP protocol, we have at our disposal the following verbs:
Verb Properties Description
GET Idempotent, safe Used to retrieve the representation of a resource
POST Used to upload a new resource
PUT Idempotent Used to upload an existing resource (to modify it)
DELETE Idempotent Used to delete a resource
Idempotent means that if we use the same verb twice, nothing will happen to the resource,
and safe means that nothing will happen at all.
In our application, we use the GET verb only at the beginning during creation. When we
see the list changing as a result of the other actions, it is only because we are mirroring the
actions on the server on the frontend.

Vue Communicates with the Internet Chapter 14
[ 447 ]
The POST verb is used to add a new message to the list. Note how it's not idempotent, as
even with the same text in the sticky message, we nonetheless create a new message that
differs in ID when pressing the add button.
Pressing the edit button triggers a PUT and the Delete button, well, you can imagine that it
uses the DELETE verb.
Axios makes this very clear by naming the methods of its API with the verbs themselves.
Implementing infinite scrolling
Infinite scrolling is a fine example of what you can do with Vue and AJAX. It is also quite
popular and can improve interaction for some kind of content. You will build a random
word generator that works with infinite scrolling.
Getting ready
We will use Axios. Take a look at the Sending basic AJAX requests with Axios recipe to know
how to install it and its basic functionality. Other than that, you don't need to know much
to follow along.
How to do it...
To make our app work, we will ask random words from the http://www.setgetgo.com/
randomword/get.php endpoint. Every time you point the browser at this address, you will
get a random word.
The whole page will consist solely of an infinite list of words. Write the following HTML:
<div id="app">
<p v-for="word in words">{{word}}</p>
</div>
The list of words needs to grow as we scroll down. So we need two things: understanding
when the user reaches the bottom of the page, and getting new words.

Vue Communicates with the Internet Chapter 14
[ 448 ]
To know when the user has reached the bottom of the page, we add a method in our Vue
instance:
new Vue({
el: '#app',
methods: {
bottomVisible () {
const visibleHeight = document.documentElement.clientHeight
const pageHeight = document.documentElement.scrollHeight
const scrolled = window.scrollY
const reachedBottom = visibleHeight + scrolled >= pageHeight
return reachedBottom || pageHeight < visibleHeight
}
}
})
This will return true if either the page is scrolled until the bottom of the page itself is
smaller than the browser.
Next, we need to add a mechanism to bind the result of this function to a state variable
bottom and update it every time the user scrolls the page. We can do that in the created
hook:
created () {
window.addEventListener('scroll', () => {
this.bottom = this.bottomVisible()
})
}
The state will be composed of the bottom variable and the list of random words:
data: {
bottom: false,
words: []
}
We now need a method to add words to the array. Add the following method to the
existing method:
addWord () {
axios.get('http://www.setgetgo.com/randomword/get.php')
.then(response => {
this.words.push(response.data)
if (this.bottomVisible()) {
this.addWord()
}
})
}

Vue Communicates with the Internet Chapter 14
[ 449 ]
The method will recursively call itself until the page has enough words to fill the whole
browser view.
Since this method needs to be called every time we reach the bottom, we will watch for the
bottom variable and fire the method if it's true. Add the following option to the Vue
instance just after the data:
watch: {
bottom (bottom) {
if (bottom) {
this.addWord()
}
}
}
We also need to call the addWord method in the created hook to kick-start the page:
created () {
window.addEventListener('scroll', () => {
this.bottom = this.bottomVisible()
})
this.addWord()
}
If you launch the page now, you will have an infinite stream of random words, which is
useful when you need to create a new password!
How it works...
In this recipe, we used an option called watch, which uses the following syntax:
watch: {
'name of sate variable' (newValue, oldValue) {
...
}
}
This is the counterpart of computed properties when we are not interested in a result after
some reactive variable changes. As a matter of fact, we used it to just fire another method.
Had we been interested in the result of some calculations, we would have used a computed
property.

Vue Communicates with the Internet Chapter 14
[ 450 ]
Processing a request before sending it out
This recipe teaches you how to use interceptors to edit your request before it goes out to the
Internet. This can be useful in some cases, such as when you need to supply an
authorization token along with all the requests to your server or when you need a single
point to edit how your API calls are performed.
Getting ready
This recipe uses Axios (the Sending basic AJAX requests with Axios recipe); apart from that, it
will be useful to have completed the How to validate user data before sending it recipe since we
will build a small form for demonstration.
How to do it...
In this recipe, you will build a filter for curse words for a hypothetical comment system.
Suppose there's an article on our website that can potentially start a flame war:
<div id="app">
<h3>Who's better: Socrates or Plato?</h3>
<p>Technically, without Plato we wouldn't have<br>
much to go on when it comes to information about<br>
Socrates. Plato ftw!</p>
After that article, we place a comment box:
<form>
<label>Write your comment:</label>
<textarea v-model="message"></textarea>
<button @click.prevent="submit">Send!</button>
</form>
<p>Server got: {{response}}</p>
</div>
We also added a line after the form to debug the response that we will get from the server.

Vue Communicates with the Internet Chapter 14
[ 451 ]
In our Vue instance, we write all the support code to send the comment to our server,
which, in this case, will be http://jsonplaceholder.typicode.com/comments, a fake REST
interface that will behave like a real server.
Here's the submit method that is triggered by the press of the Submit button:
methods: {
submit () {
axios.post('http://jsonplaceholder.typicode.com/comments',
{
body: this.message
}).then(response => {
this.response = response.data
})
}
}
The state of the Vue instance will only be two variables:
data: {
message: '',
response: '...'
}
As usual, we want to mount it to the <div> app:
new Vue({
el: '#app',
...
As soon as the instance is mounted, we want to install the word filter in Axios; for this, we
tap into the mounted hook of Vue:
mounted () {
axios.interceptors.request.use(config => {
const body = config.data.body.replace(/punk/i, '***')
config.data.body = body
return config
})
}
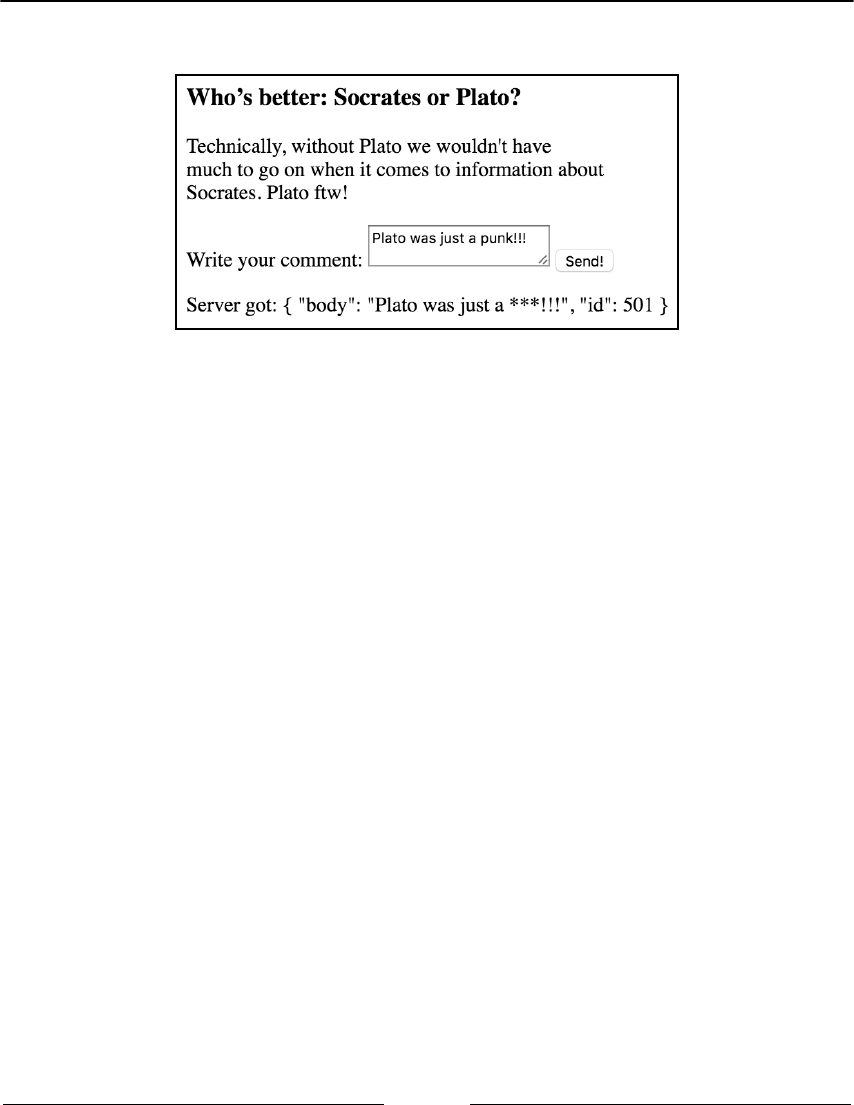
Vue Communicates with the Internet Chapter 14
[ 452 ]
We can launch our application now and try to write our salty comment:
How it works...
In the mounted hook, we are installing a so-called interceptor. In particular, it is a
request interceptor, which means it will take our request and manipulate it before sending
it out to the Internet:
axios.interceptors.request.use(config => {
const body = config.data.body.replace(/punk/i, '***')
config.data.body = body
return config
})
The config object contains a lot of things we can edit. It contains the headers and URL
parameters. It also contains Axios configuration variables. You can check out the Axios
documentation for an up-to-date list.
We are taking what's inside the data part that got sent along with the POST request and
sniffing if the punk word is found. If that is the case, it will get substituted with asterisks.
The returned object will be the new config for the current request.

Vue Communicates with the Internet Chapter 14
[ 453 ]
Preventing XSS attacks to your app
Writing applications without thinking about security will inevitably lead to vulnerabilities,
especially if it has to run on a web server. Cross site scripting (XSS) is among the most
popular security issues nowadays; even if you are not a security expert, you should be
aware of how it works and how to prevent it in a Vue application.
Getting ready
This recipe does not need any previous knowledge except for Axios. You can find more on
Axios and how to install it in the Sending basic AJAX requests with Axios recipe.
How to do it...
The first thing you should do is to discover how your backend is giving you the CSRF
token (more on this in the next paragraph). We will suppose that the server will place a
cookie in your browser with the name, XSRF-TOKEN.
You can simulate your server, setting a cookie with the
document.cookie = 'XSRF-TOKEN=abc123' command issued in the
browser console (in the developer tools).
Axios automatically reads such a cookie and transmits it in the next request.
Consider that we call an Axios get request in our code, as follows:
methods: {
sendAllMoney () {
axios.get('/sendTo/'+this.accountNo)
}
}
Axios will pick up that cookie and add a new header to the request called X-XSRF-TOKEN.
You can see such headers in the Network tab of the Developer Tools in Chrome by clicking
on the name of the request:
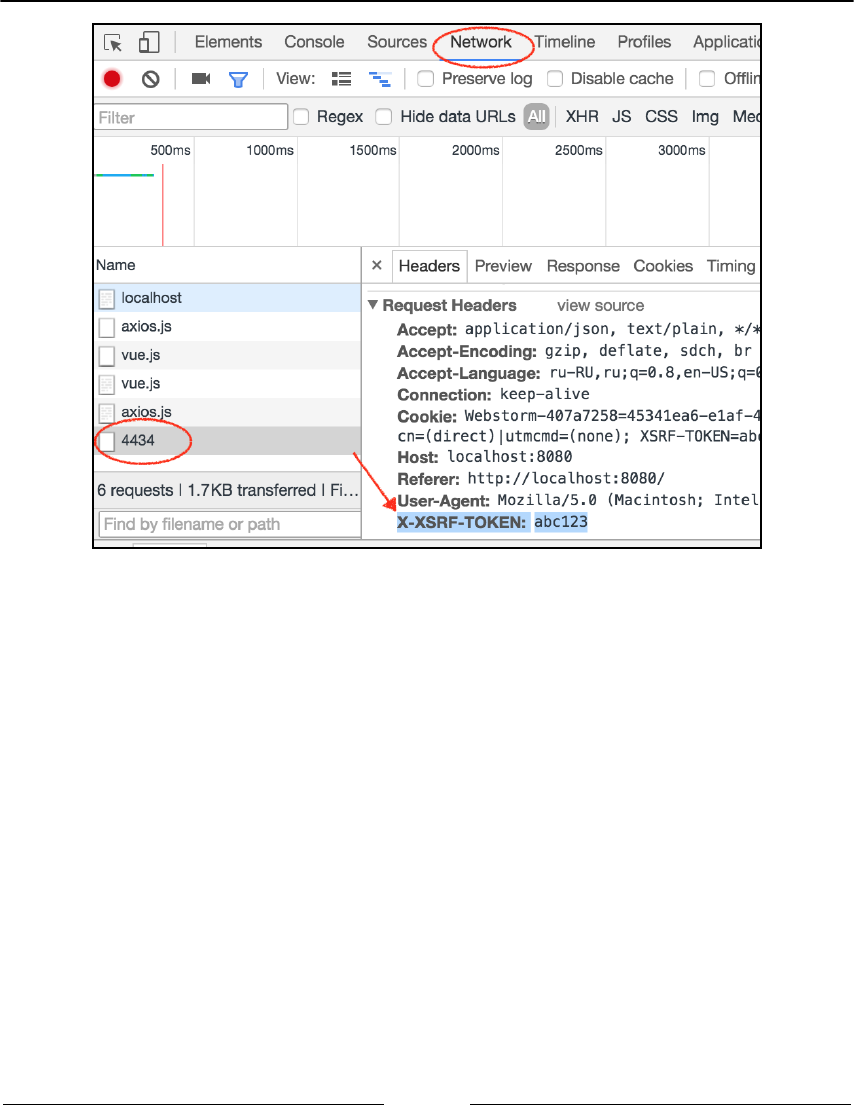
Vue Communicates with the Internet Chapter 14
[ 454 ]
How it works...
To prevent XSS attacks, you must ensure that no user input can appear as code in your app.
This means you must be very careful about using the v-html attribute (the Output raw
HTML recipe).
Unfortunately, you can't control what happens outside your page. If one of your users
receives a fake e-mail that contains a link that corresponds to an action in your application,
clicking on the link in the e-mail will trigger the action.
Let's make a concrete example; you developed a bank app, VueBank, and a user of your app
receives the following fake e-mail:
Hello user!
Click here to read the latest news.

Vue Communicates with the Internet Chapter 14
[ 455 ]
As you can see, the mail is not even about our application and the here hyperlink is hidden
in the HTML of the mail itself. In reality, it points to
the http://vuebank.com?give_all_my_money_to_account=754839534 address.
If we are logged in to VueBank, the link may work right away. It does not look good for our
finances.
To prevent these kinds of attacks, we should have our backend generate a CSRF (Cross Site
Request Forgery) token for us. We will take the token and send it along the request to
prove that the request originated from the user. The preceding link will become
http://vuebank.com?give_all_my_money_to_account=754839534&csrf=s83Rnj.
Since the token is generated randomly every time, the link in the mail cannot be forged
correctly because the attacker does not know the token that the server gave to the web
page.
In Vue, we use Axios to send the token. Usually, we won't send it as part of the link, but in
a header of the request; in fact, Axios does this for us and puts in the token in the next
request automatically.
You can change the name of the cookie that Axios will pick up by setting the
axios.defaults.xsrfCookieName variable, and you can edit the name of the header
that will return the token acting on the axios.defaults.xsrfHeaderName variable.

15
Single Page Applications
In this chapter, the following recipes will be covered:
Creating an SPA with vue-router
Fetching data before switching route
Using named dynamic routes
Having more than one router-view in your page
Composing your routes hierarchically
Using route aliases
Adding transitions between your routes
Managing errors for your routes
Adding a progress bar to load pages
How to redirect to another route
Saving scrolling position when hitting back
Introduction
Many modern applications are based on the SPA or Single Page Application model. From
the users perspective, this means that the whole website looks similar to an application in a
single page.
This is good because, if done correctly, it enhances the user experience, mainly reducing
waiting times, because there are no new pages to load--the whole website is on a single
page. This is how Facebook, Medium, Google, and many other websites work.

Single Page Applications Chapter 15
[ 457 ]
URLs don't point to HTML pages anymore, but to particular states of your application (that
most often look like different pages). In practice, on a server, assuming that your
application is inside the index.html page, this is implemented by redirecting the user that
is requesting ,say, about me to index.html.
The latter page will take the suffix of the URL and will interpret it as a route, which in turn
will create a page-like component with biographical information.
Creating an SPA with vue-router
Vue.js implements the SPA pattern through its core plugin, vue-router. To vue-router,
every route URL corresponds to a component. This means that we will tell vue-router how
to behave when the user goes to a particular URL in terms of its component. In other
words, every component in this new system is a page in the old system.
Getting ready
For this recipe, you will only need to install vue-router and have some knowledge about
Vue components.
To install vue-router, follow the instructions
at https://router.vuejs.org/en/installation.html.
If you are using JSFiddle to follow along, you can add a link similar to https://unpkg.com/
vue-router/dist/vue-router.js.
How to do it…
We are preparing a modern website for a restaurant and we will use the SPA pattern.
The website will consist of three pages: a home page, the restaurant menu, and the bar
menu.
The whole HTML code will be like this:
<div id="app">
<h1>Choppy's Restaurant</h1>
<ul>
<li>Home</li>
<li>Menu</li>

Single Page Applications Chapter 15
[ 458 ]
<li>Bar</li>
</ul>
<router-view></router-view>
</div>
The <router-view> component is the entry point for vue-router. It's where the
components are displayed as pages.
The list elements will become the link. For now, they are only list elements; to turn them
into links, we can use two different syntaxes. Wrap the first link as in the following line:
<li><router-link to="/">Home</router-link></li>
Another example is as follows:
<li><router-link to="/menu">Menu</router-link></li>
Another syntax we can use is the following (for the Bar link):
<li>
<router-link
tag="li" to="/bar"
:event="['mousedown', 'touchstart']"
>
<a>Bar</a>
</router-link>
</li>
This, more verbose but more explicit, syntax can be used to bind a custom event to a
particular routing.
To instruct Vue that we want to use the vue-router plugin, write the following in the
JavaScript:
Vue.use(VueRouter)
The part of three pages we listed at the beginning will be played by these three dummy
components (add them to the JavaScript):
const Home = { template: '<div>Welcome to Choppy's</div>' }
const Menu = { template: '<div>Today we have cookies</div>' }
const Bar = { template: '<div>We serve cocktails</div>' }

Single Page Applications Chapter 15
[ 459 ]
Now, you can finally create the router. The code for it is as follows:
const router = new VueRouter({})
This router doesn't do much; we have to add routes (which correspond to URLs) and their
associated components:
const router = new VueRouter({
routes: [
{ path: '/', component: Home },
{ path: '/menu', component: Menu },
{ path: '/bar', component: Bar }
]
})
Now our application is almost complete; we only need to declare a simple Vue instance:
new Vue({
router,
el: '#app'
})
Our application will now work; before launching it, add this CSS rule to have slightly better
feedback:
a.router-link-active, li.router-link-active>a {
background-color: gainsboro;
}
When you open your app and click on the Bar link, you should see something similar to the
following screenshot:

Single Page Applications Chapter 15
[ 460 ]
How it works…
The first thing your program does is to register vue-router as a plugin. The vue-router, in
turn, registers the routes (which are parts of URLs) and connects components to each of
them.
When we visit the application for the first time, the URL on the browser (you won't be able
to see it changing inside JSFiddle because it is inside an iframe) will end
with index.html/#/. Everything after the hash symbol is a route for the vue-router. In
this case, it is only a slash (/) and so it matches the first home route.
When we click on the links, the content of the <router-view> changes according to the
component we associated with that route.
There's more…
The astute reader will certainly find what can be interpreted as a bug--we added a couple of
CSS styles before running the application. The .router-link-active class is
automatically injected in the <router-link> component whenever the page corresponds
to the link actually pointed to.
When we click on Menu and Bar, the background color changes but it seems that it remains
stuck to be selected for the Home link. This is because the matching performed by the
<router-link> component is not exact. In other words, /bar and /menu contain the /
string and, for this reason, / is always matched.
A quick fix for this is to add the attribute exactly the same as the first <router-link>:
<li><router-link to="/" exact>Home</router-link></li>
Now, the Home link is highlighted only when the route exactly matches the home page link.
Another thing to note is the rule itself:
a.router-link-active, li.router-link-active>a {
background-color: gainsboro;
}

Single Page Applications Chapter 15
[ 461 ]
Why do we match two different things? It depends on how you wrote the router link.
<li><router-link to="/" exact>Home</router-link></li>
The preceding code will be translated in the following DOM portion:
<li><a href="#/" class="router-link-active">Home</a></li>
While:
<router-link tag="li" to="/" exact>Home</router-link>
Becomes:
<li class="router-link-active">Home</li>
Note how in the first case, the class is applied to the child anchor element; in the second
case, it is applied to the parent element.
Fetching data before switching route
In the previous version of Vue, we had a dedicated method to fetch data from the Internet
before changing the route. With Vue 2, we have a more general method that will take care
of this and possibly other things before switching route.
Getting ready
To complete this recipe, you are expected to already know the basics of vue-router and how
to make AJAX requests (more on this in the last chapter).
How to do it…
We will write a simple web portfolio composed of two pages: a home page and an about
me page.
For this recipe, we will need to add Axios as a dependency.
The basic layout is clear from the following HTML code:
<div id="app">
<h1>My Portfolio</h1>
<ul>

Single Page Applications Chapter 15
[ 462 ]
<li><router-link to="/" exact>Home</router-link></li>
<li><router-link to="/aboutme">About Me</router-link></li>
</ul>
<router-view></router-view>
</div>
In the JavaScript, you can start building your AboutMe component:
const AboutMe = {
template: `<div>Name:{{name}}<br>Phone:{{phone}}</div>`
}
It will display only a name and a telephone number. Let's declare the two variables in the
data option of the component, as follows:
data () {
return {
name: undefined,
phone: undefined
}
}
The vue-router, before actually loading the component onto the scene, will look for an
option in our object, called beforeRouteEnter; we will use this to load the name and
phone from a server. The server we are using will provide fake data just for the purpose of
displaying something, which is as follows:
beforeRouteEnter (to, from, next) {
axios.post('https://schematic-ipsum.herokuapp.com/', {
"type": "object",
"properties": {
"name": {
"type": "string",
"ipsum": "name"
},
"phone": {
type": "string",
"format": "phone"
}
}
}).then(response => {
next(vm => {
vm.name = response.data.name
vm.phone = response.data.phone
})
})
}

Single Page Applications Chapter 15
[ 463 ]
For the other component, the home page, we will just write a small component as a
placeholder:
const Home = { template: '<div>This is my home page</div>' }
Next thing is that you have to register the router and its paths:
Vue.use(VueRouter)
const router = new VueRouter({
routes: [
{ path: '/', component: Home },
{ path: '/aboutme', component: AboutMe },
]
})
Also, of course, you have to register a Vue root instance, which is as follows:
new Vue({
router,
el: '#app'
})
When you launch your application and click on the About Me link, you should see
something similar to this:
You will note that there is no page reload when you click on the link, but it still takes quite
some time to display the bio. This is because it is fetching the data from the Internet.
How it works…
The beforeRouteEnter hook takes three parameters:
to: This is a Route object that represents the route requested by the user.
from: This is also a Route object that represents the current route. This is the
route the user will be kept at in case of errors.

Single Page Applications Chapter 15
[ 464 ]
next: This is a function we can use when we are ready to go on with the
switching of the route. Calling this function with false will prevent the route
from being changed, and it is useful in case of errors.
When the preceding functions are called, we made a call with Axios to a web service that
provided a string for a name and a string for a phone number.
When we are inside this hook, it's important to remember that we don't have access to this.
It's because this hook runs before the component is actually instantiated, so there is no this
to refer to.
When the server responds, we are inside the then function and want to assign the name
and phone returned from the server but, as said, we don't have access to this. The next
function receives a reference to our component as an argument. We use this to set the
variables to the received value:
...
}).then(response => {
next(vm => {
vm.name = response.data.name
vm.phone = response.data.phone
})
})
Using named dynamic routes
Registering all the routes by hand can be time consuming and, when the routes are not
known in advance, it is impossible. vue-router lets you register routes with an argument so
that you can have links for all the objects in a database and cover other use-cases where the
user chooses a route, following some pattern that will result in too many routes to be
registered by hand.
Getting ready
Except for the basics on vue-router (refer to the Creating an SPA with vue-router recipe), you
won't need any additional information to complete this recipe.

Single Page Applications Chapter 15
[ 465 ]
How to do it…
We will open an online restaurant with ten different dishes. We will create a route for every
dish.
The HTML layout of our website is the following:
<div id="app">
<h1>Online Restaurant</h1>
<ul>
<li>
<router-link :to="{ name: 'home' }" exact>
Home
</router-link>
</li>
<li v-for="i in 10">
<router-link :to="{ name: 'menu', params: { id: i } }">
Menu {{i}}
</router-link>
</li>
</ul>
<router-view class="view"></router-view>
</div>
This will create 11 links, one for the home page and ten for the dishes.
After registering the VueRouter in the JavaScript part, the code is as follows:
Vue.use(VueRouter)
Create two components; one will be a placeholder for the home page:
const Home = { template: `
<div>
Welcome to Online Restaurant
</div>
` }
The other routes will be connected to a Menu component:
const Menu = { template: `
<div>
You just ordered
<img :src="'http://lorempixel.com/200/200/food/' + $route.params.id">
</div>
` }
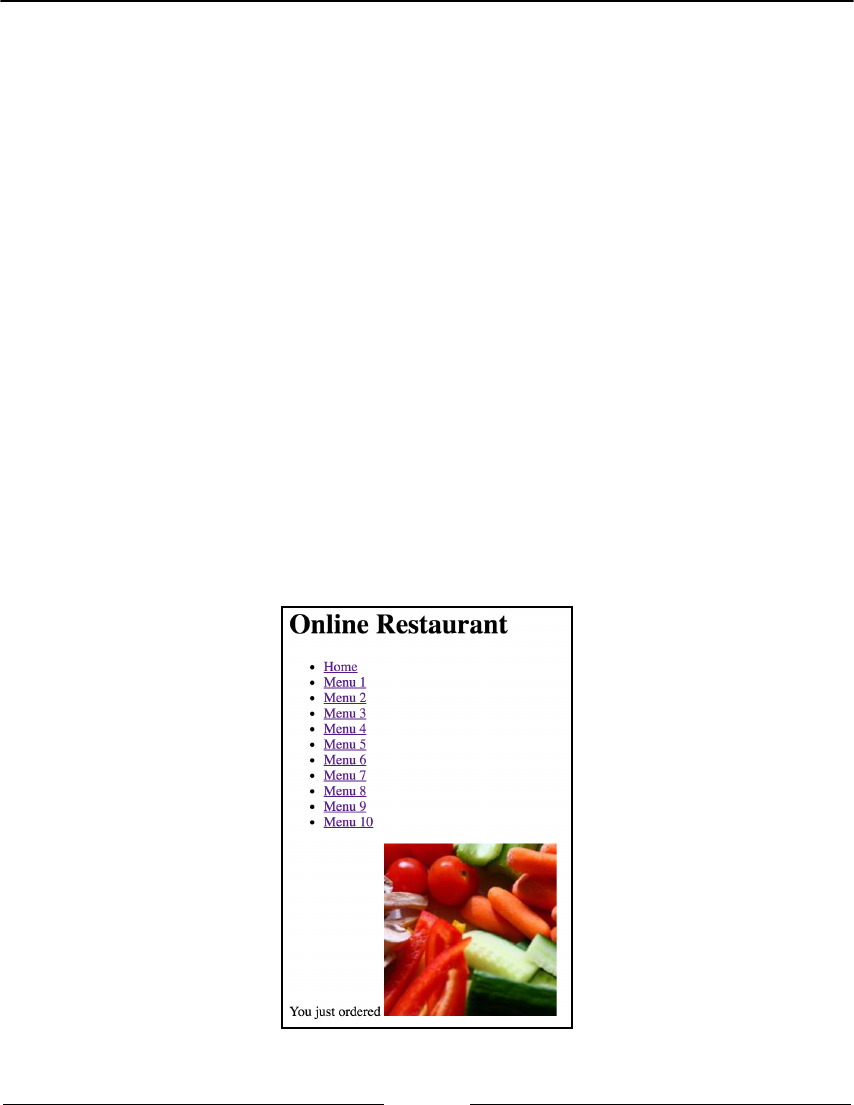
Single Page Applications Chapter 15
[ 466 ]
In the preceding component, we refer to the global router object with $route, and we take
the id parameter from the URL. Lorempixel.com is a website that provides sample
images. We are connecting a different image for every id.
Finally, create the router itself using the following code:
const router = new VueRouter({
routes: [
{ path: '/', name:'home', component: Home },
{ path: '/menu/:id', name: 'menu', component: Menu },
]
})
You can see that the path for the menu contains /:id, which is a placeholder for the id
parameter that will appear in the URL.
At last, write a root Vue instance:
new Vue({
router,
el: '#app'
})
You can launch the application now and should be able to see all the menu items. Clicking
on any one of them should order a different dish:

Single Page Applications Chapter 15
[ 467 ]
How it works…
There are two main parts of the code that contribute to creating the routes for the different
dishes.
First, we registered a generic route using the colon syntax and assigned a name to it, which
is as follows code:
{ path: '/menu/:id', name: 'menu', component: Menu }
This means that we can have a URL that ends in /menu/82, and the Menu component will
be displayed with the $route.params.id variable set to 82. So, the following line
should be changed as per the following:
<img :src="'http://lorempixel.com/200/200/food/' + $route.params.id">
The preceding line will be replaced by the following line in the rendered DOM:
<img src="'http://lorempixel.com/200/200/food/82">
Never mind the fact that there is no such image in real life.
Note that we also gave a name to this route. This is not strictly necessary, but it enabled us
to write the second main part of the code, as shown:
<router-link :to="{ name: 'menu', params: { id: i } }">
Menu {{i}}
</router-link>
Instead of writing a string, we can pass an object to the to prop and specify the params. In
our case, the param is given by the v-for wrapping. This means that, for example, at
the fourth cycle of the v-for:
<router-link :to="{ name: 'menu', params: { id: 4} }">
Menu 4
</router-link>
This will result in the DOM as follows:
<a href="#/menu/4" class="">Menu 4</a>

Single Page Applications Chapter 15
[ 468 ]
Having more than one router-view in your
page
Having multiple <router-view> enables you to have pages that can be organized with
more complex layouts. For example, you can have a sidebar and the main view. This recipe
is all about that.
Getting ready
This recipe doesn't use any advanced concept. You are advised to familiarize yourself with
the vue-router and learn how to install it, though. Go to the first recipe in the chapter to
find out more.
How to do it…
This recipe will use a lot of code to drive the point home. Don't be discouraged though, the
mechanism is really simple.
We will build a second-hand hardware store. We will have a main view and a sidebar;
these will be our router-views. The sidebar will contain our shopping list so that we always
know what we are shopping for and will have no distractions.
The whole HTML code is quite short because it only contains a title and the two router-
view components:
<div id="app">
<h1>Second-Hand Hardware</h1>
<router-view name="list"></router-view>
<router-view></router-view>
</div>
In this case, the list is named router-view. The second one does not have a name; thus, it
gets named as Vue by default.
Register the vue-router in the JavaScript:
Vue.use(VueRouter)

Single Page Applications Chapter 15
[ 469 ]
After that, register the routes:
const router = new VueRouter({
routes: [
{ path: '/',
components: {
default: Parts,
list: List
}
},
{ path: '/computer',
components: {
default: ComputerDetail,
list: List
}
}
]
})
Components is not a single object anymore; it's become an object with two components
inside it: one for the list and the other for the default router-view.
Write the list component, as illustrated, before the router code:
const List = { template: `
<div>
<h2>Shopping List</h2>
<ul>
<li>Computer</li>
</ul>
</div>
` }
This will display just the computer as an item we ought to remember to buy.
The parts component is the following; write it before the router code:
const Parts = { template: `
<div>
<h2>Computer Parts</h2>
<ul>
<li><router-link to="/computer">Computer</router-link></li>
<li>CD-ROM</li>
</ul>
</div>
` }
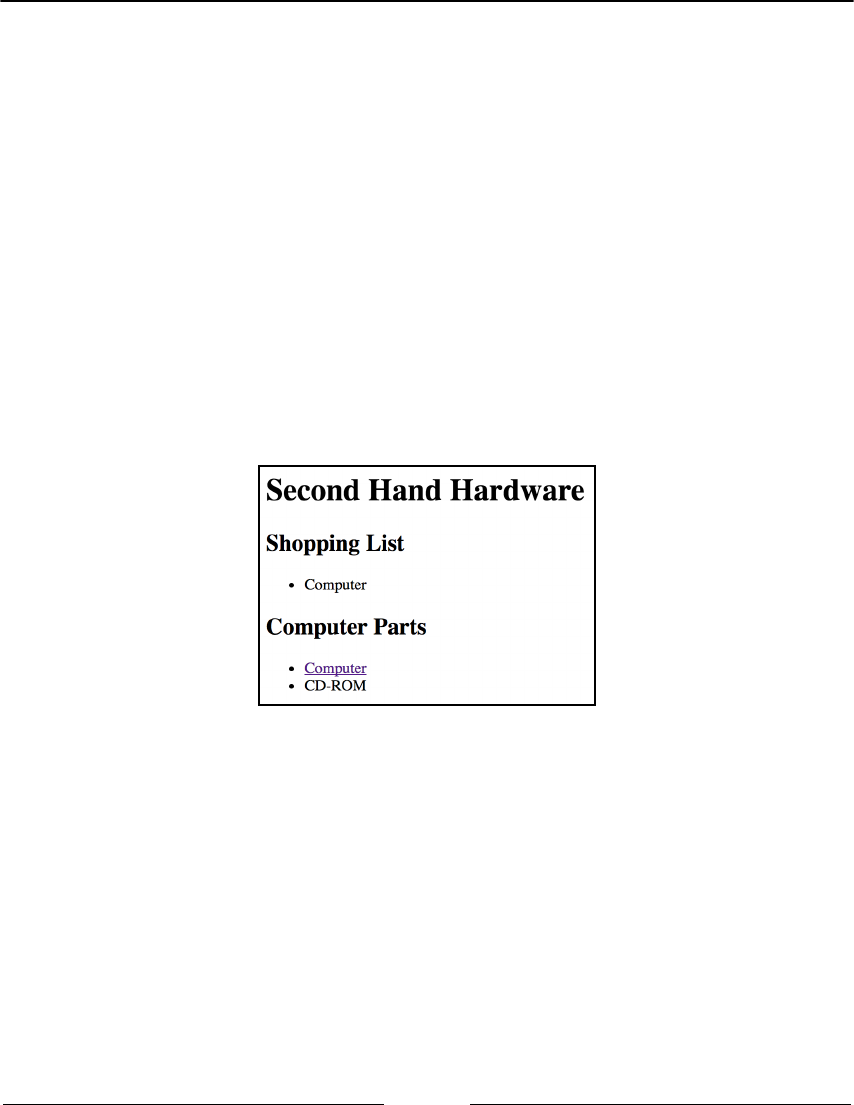
Single Page Applications Chapter 15
[ 470 ]
This contains a link to see more about the computer on sale; the next component is bound
to that page, so write it before the router code:
const ComputerDetail = { template: `
<div>
<h2>Computer Detail</h2>
<p>Pentium 120Mhz, CDs sold separately</p>
</div>
` }
Of course, don't forget to add the Vue instance:
new Vue({
router,
el: '#app'
})
When you launch the app, you should see the two router views one above the other. If you
want them side by side, you can add some CSS styles:
How it works…
When adding the <router-view> components to the page, you just have to remember to
add a name to refer to it later during route registration:
<router-view name="view1"></router-view>
<router-view name="view2"></router-view>
<router-view></router-view>

Single Page Applications Chapter 15
[ 471 ]
If you don't specify a name, the route will be referred to as default:
routes: [
{ path: '/',
components: {
default: DefaultComponent,
view1: Component1,
view2: Component2
}
}
]
This way, the components will be displayed in their respective router-view elements.
If you don't specify one or more components for a named view, the
router-view associated with that name will be empty.
Compose your routes hierarchically
In many cases, the organization tree of your website may be complex. In some cases, there
is a clear hierarchical organization that you can follow and with nested routes, vue-routes
helps you keep everything orderly. The best situation is if there is an exact correspondence
with how URLs are organized and how components are nested.
Getting ready
In this recipe, you will use components and other basic features of Vue. You will also use
dynamic routes. Go to the Using named dynamic routes recipe to find out more about them.
How to do it...
In this recipe, you will build an online accounting website for an imaginary world. We will
have two users--Stark and Lannister--and we will be able to see how much gold and
how many soldier these two have.

Single Page Applications Chapter 15
[ 472 ]
The HTML layout of our website is as follows:
<div id="app">
<h1>Kindoms Encyclopedia</h1>
<router-link to="/user/Stark/">Stark</router-link>
<router-link to="/user/Lannister/">Lannister</router-link>
<router-view></router-view>
</div>
We have a title and two links--one for Stark and one for Lannister--and, finally, the
router-view element.
We add the VueRouter to the plugins:
Vue.use(VueRouter)
Then, we register the routes:
const router = new VueRouter({
routes: [
{ path: '/user/:id', component: User,
children: [
{
path: 'soldiers',
component: Soldiers
},
{
path: 'gold',
component: Gold
}
]
}
]
})
What we've said is to register a dynamic route, /user/:id, and inside the
User component, there will be another router-view that will have the nested paths for gold
and soldiers.
The three components just mentioned are written as shown; add them before the routing
code:
const User = { template: `
<div class="user">
<h1>Kindoms Encyclopedia</h1>
User {{$route.params.id}}
<router-link to="gold">Gold</router-link>

Single Page Applications Chapter 15
[ 473 ]
<router-link to="soldiers">Soldiers</router-link>
<router-view></router-view>
</div>
`}
As anticipated, there is another router-view entry point inside the User component that
will contain the nested routes components.
Then, write the Soldiers and Gold components, always before the routing code:
const Soldiers = { template: `
<div class="soldiers">
<span v-for="soldier in $root[$route.params.id].soldiers">
</span>
</div>
`}
const Gold = { template: `
div class="gold">
<span v-for="coin in $root[$route.params.id].gold">
</span>
</div>
`}
These components will just display as many emojis as the gold or soldiers variable inside
the Vue root instance data option.
This is what the Vue root instance looks like:
new Vue({
router,
el: '#app',
data: {
Stark: {
soldiers: 100,
gold: 50
},
Lannister: {
soldiers: 50,
gold: 100
}
}
})
Single Page Applications Chapter 15
[ 474 ]
Launching the application will enable you to have a visual representation of the gold and
the number of soldiers of the two users:
How it works…
To understand how nested routes work better, it's useful to take a look at the following
diagram:
There are only two levels in our recipe. The first level, which is the top level, is represented
by the the big wrapping rectangle that corresponds to the /user/:id route, meaning that
every potential matching ID will be on the same level.
The inner rectangle instead is a nested route and a nested component. It corresponds to the
route gold and to the Gold component.
When nested routes correspond to nested components, this is the right choice. There are
two other cases to consider.
When we have nested components but don't have nested routes, we can just prefix the
nested route with a slash, /. This will make it behave like a top-level route.

Single Page Applications Chapter 15
[ 475 ]
For example, consider that we change our code to the following:
const router = new VueRouter({
routes: [
{ path: '/user/:id', component: User,
children: [
{
path: 'soldiers',
component: Soldiers
},
{
path: '/gold',
component: Gold
}
]
}
]
})
Prefixing the /gold route will make the Gold component appear when we point the
browser to the /gold URL instead of /user/Lannister/gold (which will result in an
error and an empty page in this case because the user is not specified).
The other, opposite, case is when having nested routes but no components on the same
level. In this case, just use the regular syntax to register routes.
Using route aliases
Sometimes it's necessary to have multiple URLs that point to the same page. This may be
because the page has changed name or because the page is referred to differently in
different parts of the site.
In particular, when a page changes its name, it is very important to also leave the former
name in many settings. Links may break and the page may become unreachable from some
parts of the website. In this recipe, you will prevent exactly that.
Getting ready
For this recipe, you are only required to have some knowledge of the vue-router
component (how to install it and basic operations). More information about vue-router will
start from the Creating a SPA with vue-router recipe.

Single Page Applications Chapter 15
[ 476 ]
How to do it…
Let's imagine that we have a fashion website and Lisa, the employee responsible for giving
titles to dresses, creates two new links for two pieces of clothing:
<router-link to="/green-dress-01/">Valentino</router-link>
<router-link to="/green-purse-A2/">Prada</router-link>
The developers create the corresponding routes in the vue-router:
const router = new VueRouter({
routes: [
{
path: '/green-dress-01',
component: Valentino01
},
{
path: '/green-purse-A2',
component: PradaA2
}
]
})
Later, it is discovered that the two items are not green but red. Lisa is not to blame since she
is color-blind.
You are now in charge of changing all the links to reflect the true color of the listing. The
first thing you do is change the links themselves. Here's what the HTML layout looks like
after you edit it:
<div id="app">
<h1>Clothes Shop</h1>
<router-link to="/red-dress-01/">Valentino</router-link>
<router-link to="/red-purse-A2/">Prada</router-link>
<router-view></router-view>
</div>
You add the VueRouter plugin to Vue:
Vue.use(VueRouter)
Then, register the new routes as well as aliases for the old ones:
const router = new VueRouter({
routes: [
{
path: '/red-dress-01',
component: Valentino01,
Single Page Applications Chapter 15
[ 477 ]
alias: '/green-dress-01'
},
{
path: '/red-purse-A2',
component: PradaA2,
alias: '/green-purse-A2'
}
]
})
Here's what the mentioned components look like:
const Valentino01 = { template: '<div class="emoji"> </div>' }
const PradaA2 = { template: '<div class="emoji"> </div>' }
Before launching the app, remember to instantiate a Vue instance:
new Vue({
router,
el: '#app'
})
You can add a CSS rule to make the emojis look like images, as shown in the following
screenshot:
.emoji {
font-size: 3em;
}

Single Page Applications Chapter 15
[ 478 ]
How it works…
Even if we changed all of our links, we cannot control how other entities are linked to our
page. For search engines, such as Google, there is no way to tell them to remove their link
to the old page and use the new one. This means that if we weren't to use aliases, we may
have a lot of bad publicity in the form of broken links and 404 pages; in some cases, even
from advertisers, we are paying to link to a non-existent page.
Adding transitions between your routes
We explored transitions in detail in Transitions and Animations. Here, we will use them
when changing routes instead of changing elements or components. The same observations
apply here as well.
Getting ready
Before trying this recipe, I highly suggest that you complete some recipes in Transitions and
Animations, as well as this one. This recipe is a mixture of concepts learned up to now.
How to do it…
In this recipe, we will build a website for a restaurant for ghosts. It won't be much different
from the website of a regular restaurant, except for the requirements that the pages must
fade instead of appearing instantly.
Let's put down some HTML layout, shall we:
<div id="app">
<h1>Ghost's Restaurant</h1>
<ul>
<li><router-link to="/">Home</router-link></li>
<li><router-link to="/menu">Menu</router-link></li>
</ul>
<transition mode="out-in">
<router-view></router-view>
</transition>
</div>

Single Page Applications Chapter 15
[ 479 ]
Note how we wrapped the main router display port with a transition tag. The mode
out-in is set because we want the animation for the disappearing component to finish
before the other component appears. If we hadn't we set that, the two fading components
would be stacked for a brief time. For a more detailed discussion, you can refer to the
Letting an element leave before the enter phase in a transition recipe.
Let's create the two pages/components:
const Home = { template: '<div>Welcome to Ghost's</div>' }
const Menu = { template: '<div>Today: invisible cookies</div>' }
Now, let's register routes:
Vue.use(VueRouter)
const router = new VueRouter({
routes: [
{ path: '/', component: Home },
{ path: '/menu', component: Menu }
]
})
Before launching the application, instantiate a Vue object:
new Vue({
router,
el: '#app'
})
For the transition to work, you have to add a few CSS rules:
.v-enter-active, .v-leave-active {
transition: opacity .5s;
}
.v-enter, .v-leave-active {
opacity: 0
}
Launch your application now. You successfully added a fade transition between page
changes.

Single Page Applications Chapter 15
[ 480 ]
How it works…
Wrapping the whole <router-view> inside a transition tag will perform the same
transition for all the components.
If we want a different transition for every component, we have an alternate option: we have
to wrap the individual components inside transitions themselves.
Let's say, for example, that we have two transitions: spooky and delicious. We want to
apply the first when the Home component appears, and the second when the Menu
component appears.
We need to modify our components, as follows:
const Home = { template: `
<transition name="spooky">
<div>Welcome to Ghost's</div>
</transition>
` }
const Menu = { template: `
<transition name="delicious">
<div>Today: insisible cookies!</div>
</transition>
` }
Managing errors for your routes
It does not make much sense to go to a link if the page we go to is not found or is not
working. Traditionally, we are presented with an error page when this happens. In an SPA,
we are more powerful and we can prevent the user from going there altogether, displaying
a little courtesy message stating that the page is not available. This greatly enhances the UX
since the user can immediately take another action without the need to go back.
Getting ready
In order to follow along, you should complete the Fetching data before switching route recipe.
This recipe will build up on top of it and I'll assume that you already have all the relevant
code in place.

Single Page Applications Chapter 15
[ 481 ]
How to do it…
As said, we will edit the resulting code from the Fetching data before switching route recipe to
manage errors. Just so you remember, when going to the /aboutme page, we were loading
information from the Internet. We want to avoid going to that page in case the information
is not available.
For this recipe, add Axios as a dependency, as done in the previous recipes.
First, enrich the HTML layout with the highlighted code:
<div id="app">
<h1>My Portfolio</h1>
<ul>
<li><router-link to="/" exact>Home</router-link></li>
<li><router-link to="/aboutme">About Me</router-link></li>
</ul>
<router-view></router-view>
<div class="toast" v-show="showError">
There was an error
</div>
</div>
This is a toast message that will appear on the screen whenever there is an error. Add some
style to it with this CSS rule:
div.toast {
width: 15em;
height: 1em;
position: fixed;
bottom: 1em;
background-color: red;
color: white;
padding: 1em;
text-align: center;
}
The next thing you want to do is have a global mechanism to set showError to true. At
the top of the JavaScript code, declare the vm variable:
let vm

Single Page Applications Chapter 15
[ 482 ]
Then, assign our Vue root instance to it:
vm = new Vue({
router,
el: '#app',
data: {
showError: false
}
})
We also added the showError variable to the data option.
The last thing to do is actually manage the error on the retrieval of our data, before
displaying the bio information.
Add the highlighted code to the beforeRouteEnter hook:
beforeRouteEnter (to, from, next) {
axios.post('http://example.com/', {
"type": "object",
"properties": {
"name": {
"type": "string",
"ipsum": "name"
},
"phone": {
"type": "string",
"format": "phone"
}
}
}).then(response => {
next(vm => {
vm.name = response.data.name
vm.phone = response.data.phone
})
}).catch(error => {
vm.showError = true
next(false)
})
}
Single Page Applications Chapter 15
[ 483 ]
The next (false) command will make the user stay where they are, and we also edited the
endpoint to example.com, which will return an error code on a POST request:
How it works…
Axios will receive an error from example.com and this will trigger a rejection of the
promise created when we called post. The rejection of a promise will, in turn, trigger the
function passed inside the catch.
It's worth noting that at this point in the code, vm is referring to the root Vue instance; this is
because the code is always executed after the Vue instance is initialized and assigned to vm.
Adding a progress bar to load pages
It's true that with an SPA the user does not have to wait for a new page to load, but he still
has to wait for the data to load. In the Fetching data before switching route recipe, we had to
wait a while longer after we clicked on the button to the /aboutme page. There was
nothing to suggest that the data was loading, and then suddenly the page appeared.
Wouldn't it be great if the user had at least some feedback that the page is loading?
Getting ready
In order to follow along, you should complete the Fetching data before switching route recipe.
This recipe will build up on top of it and I'll assume that you have all the relevant code in
place already.

Single Page Applications Chapter 15
[ 484 ]
How to do it…
As stated earlier, I will assume that you have all the code resulting from the Fetching data
before switching route recipe in place and working.
For this recipe, we will use an additional dependency--NProgress, a small utility to
display a loading bar on top of the screen.
Add the following two lines inside the head of your page or the list of dependencies in
JSFiddle (there is also a package for npm):
<link rel="stylesheet"
href="https://cdn.bootcss.com/nprogress/X/nprogress.css">
<script src="https://cdn.bootcss.com/nprogress/X/nprogress.js"></script>
Here, X is the version of NProgress. At writing time it was 0.2.0, but you can look it up
online.
After we've done this, the next step is to define the behavior we want from the progress bar.
First, we'd like the progress bar to appear as soon as we click on the link. For this, we can
add an event listener to the click event, but it will be a poor design if we had, say, a
hundred links. A much more sustainable and clean way to do it is by creating a new hook
for the router and connecting the appearance of the progress bar with the switching of the
route. This will also have the advantage of offering a consistent experience throughout the
application:
router.beforeEach((to, from, next) => {
NProgress.start()
next()
})
In a similar fashion, we want the bar to disappear when loading is completed successfully.
This means that we want to do it inside the callback:
beforeRouteEnter (to, from, next) {
axios.post('http://schematic-ipsum.herokuapp.com/', {
"type": "object",
"properties": {
"name": {
"type": "string",
"ipsum": "name"
},
"phone": {
"type": "string",
"format": "phone"
Single Page Applications Chapter 15
[ 485 ]
}
}
}).then(response => {
NProgress.done()
next(vm => {
vm.name = response.data.name
vm.phone = response.data.phone
})
})
}
You can now launch the application and your progress bar should already work:
How it works…
This recipe also demonstrates that it is not at all difficult to leverage external libraries,
provided they are easy to install.
Since the NProgress component is so simple and useful, I report its API as a reference
here:
NProgress.start(): Shows the progress bar
NProgress.set(0.4): Sets a percentage of the progress bar
NProgress.inc(): Increments the progress bar by a little
NProgress.done(): Completes the progress
We have used two of the preceding functions.
As a precaution, I would also suggest not relying on the done() function being called by
the individual components. We are calling it in the then function, but what if the next
developer forgets? After all, we are starting the progress bar before any switch in route.

Single Page Applications Chapter 15
[ 486 ]
It would be better to add a new hook to the router:
router.afterEach((to, from) => {
NProgress.done()
})
Since the done function is idempotent, we can call it as many times as we want. This will,
therefore, not modify the behavior of our application and will ensure that even if future
developers forget to close the progress bar, it will disappear by itself once the route has
changed.
How to redirect to another route
There are infinite reasons you may wish to redirect the user. You may want the user to log
in before accessing a page, or maybe a page has moved and you want your user to take
note of the new link. In this recipe, you will redirect the user to a new home page as a way
to quickly modify the website.
Getting ready
This recipe will only use basic knowledge about vue-router. If you have completed
the Creating a SPA with vue-router recipe, you are good to go.
How to do it…
Suppose that we have an online clothing shop.
This will be the HTML layout of the site:
<div id="app">
<h1>Clothes for Humans</h1>
<ul>
<li><router-link to="/">Home</router-link></li>
<li><router-link to="/clothes">Clothes</router-link></li>
</ul>
<router-view></router-view>
</div>

Single Page Applications Chapter 15
[ 487 ]
It's just a page with a link to a clothes listing.
Let's register the VueRouter:
Vue.use(VueRouter)
We have three pages in our website, represented by the following components:
const Home = { template: '<div>Welcome to Clothes for Humans</div>' }
const Clothes = { template: '<div>Today we have shoes</div>' }
const Sales = { template: '<div>Up to 50% discounts! Buy!</div>' }
They represent the home page, the clothes listing, and a page we used last year with some
discounts.
Let's register some routes:
const router = new VueRouter({
routes: [
{ path: '/', component: Home }
{ path: '/clothes', component: Clothes },
{ path: '/last-year-sales', component: Sales }
]
})
Finally, we add a root Vue instance:
new Vue({
router,
el: '#app'
})
You can launch the application, and it should work without any problems.
Black Friday is tomorrow and we forgot that it's the biggest event in fashion around the
world. We don't have time to rewrite the home page, but there's that page from last year's
sales that can do the trick. What we will do is redirect users who visit our home page to that
page.
To implement this, we need to modify how we registered our routes:
const router = new VueRouter({
routes: [
{ path: '/', component: Home, redirect: '/last-year-sales' },
{ path: '/clothes', component: Clothes },
{ path: '/last-year-sales', component: Sales }
]
})

Single Page Applications Chapter 15
[ 488 ]
Only by adding that redirect we did save the day. Now, you will be presented with the
sales page whenever you visit the home page.
How it works…
When the root route is matched, the Home component won't be loaded. The path of /last-
year-sales will be matched instead. We can also omit the component altogether since it
will never be loaded:
{ path: '/', redirect: '/last-year-sales' }
There's more…
Redirecting in vue-router is more powerful than what we just saw. Here, I will try to enrich
the application we just created with more functionality from redirecting.
Redirecting to 404s
Redirecting not found pages is done by adding a catch-all as the last route. It will match
everything that is not matched by the other routes:
...
{ path: '/404', component: NotFound },
{ path: '*', redirect: '/404' }
Named redirecting
Redirection can be combined with named routes (refer to the Using named dynamic
routes recipe). We can specify the destination by name:
...
{ path: '/clothes', name: 'listing', component: Clothes },
{ path: '/shoes', redirect: { name: 'listing' }}

Single Page Applications Chapter 15
[ 489 ]
Redirecting with parameters
You can also retain the parameters while redirecting:
...
{ path: '/de/Schuh/:size', redirect: '/en/shoe/:size' },
{ path: '/en/shoe/:size', component: Shoe }
Dynamic redirecting
This is the ultimate redirect. You can access the route the user is trying to access and decide
where you want to redirect him (you can't cancel the redirection though):
...
{ path: '/air', component: Air },
{ path: '/bags', name: 'bags', component: Bags },
{ path: '/super-shirt/:size', component: SuperShirt },
{ path: '/shirt/:size?', component: Shirt},
{ path: '/shirts/:size?',
redirect: to => {
const { hash, params, query } = to
if (query.colour === 'transparent') {
return { path: '/air', query: null }
}
if (hash === '#prada') {
return { name: 'bags', hash: '' }
}
if (params.size > 10) {
return '/super-shirt/:size'
} else {
return '/shirt/:size?'
}
}
}
Saving scrolling position when hitting back
In vue-router, there are two modes of navigation: hash and history. The default mode
and the one used in the previous recipes is previouslye. Traditionally, when you visit a
website, scroll down a bit and click on a link to another page; the new page displays from
the top. When you click on the browser's back button, the page displays from the previous
scrolled height and the link you just clicked on is visible.

Single Page Applications Chapter 15
[ 490 ]
This is not true when you are in an SPA, or at least is not automatic. The vue-router history
mode lets you simulate this or, even better, have fine-grained control of what happens to
your scrolling.
Getting ready
To complete this recipe, we will need to switch to history mode. History mode only works
when the app is running on a properly configured server. How to configure a server for
SPA is out of the scope of this book (but the principle is that every route gets redirected
from the server side to index.html).
We will use an npm program to launch a small server; you are expected to have
npm installed .
How to do it…
First, you'll install a compact server for SPAs so that history mode will work.
In your favorite command line, go inside the directory that will contain your application.
Then, type the following commands:
npm install -g history-server
history-server .
After the server is run, you will have to point your browser to http://localhost:8080
and if you have a file called index.html in your directory, it will be shown; otherwise, you
won't see much.
Create a file called index.html and fill in some boilerplate, like in the Choosing a
development environment recipe. We want an empty page with only Vue and vue-router as
dependencies. Our empty canvas should look like this:
<!DOCTYPE html>
<html>
<head>
<script src="https://unpkg.com/vue/dist/vue.js"></script>
<script src="https://unpkg.com/vue-router/dist/vue-router.js"></script>
</head>
<body>
<div id="app">
</div>
<script>
new Vue({

Single Page Applications Chapter 15
[ 491 ]
router,
el: '#app'
})
</script>
</body>
</html>
As HTML layout, put this in the body:
<div id="app">
<h1>News Portal</h1>
<ul>
<li><router-link to="/">Home</router-link></li>
<li><router-link to="/sports">Sports</router-link></li>
<li><router-link to="/fashion">Fashion</router-link></li>
</ul>
<router-view></router-view>
</div>
We have a heading with three links and a router-view entry point. We will create two long
pages for the sports and fashion pages:
const Sports = { template: `
<div>
<p v-for="i in 30">
Sample text about sports {{i}}.
</p>
<router-link to="/fashion">Go to Fashion</router-link>
<p v-for="i in 30">
Sample text about sports {{i + 30}}.
</p>
</div>
` }
const Fashion = { template: `
<div>
<p v-for="i in 30">
Sample text about fashion {{i}}.
</p>
<router-link to="/sports">Go to Sports</router-link>
<p v-for="i in 30">
Sample text about fashion {{i + 30}}.
</p>
</div>
` }
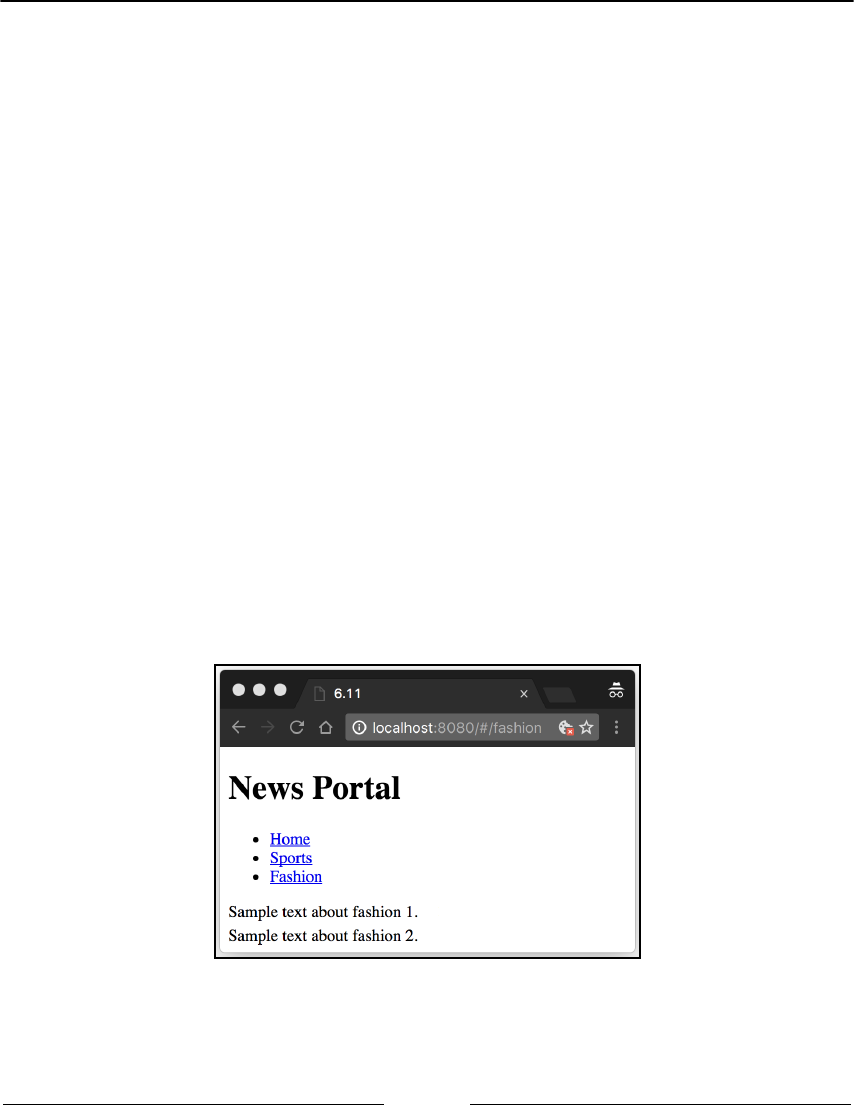
Single Page Applications Chapter 15
[ 492 ]
We only need a stub for the home page component:
const Home = { template: '<div>Welcome to BBCCN</div>' }
Write a reasonable router for this news website:
Vue.use(VueRouter)
const router = new VueRouter({
routes: [
{ path: '/', component: Home },
{ path: '/sports', component: Sports },
{ path: '/fashion', component: Fashion }
]
})
If you go with your browser now to the address specified earlier, you should see the site
live.
Go to the sports page, scroll down until you see the link, and click on it.
Note how the page you are visiting is not displayed from the beginning. This will not
happen with a traditional website and is not desirable.
Click on the back button and note how we are where we last left the page; we want to
retain this behavior.
Lastly, note how the URL of the page does not look natural but has the hash symbol inside;
we would like the URL to look better:
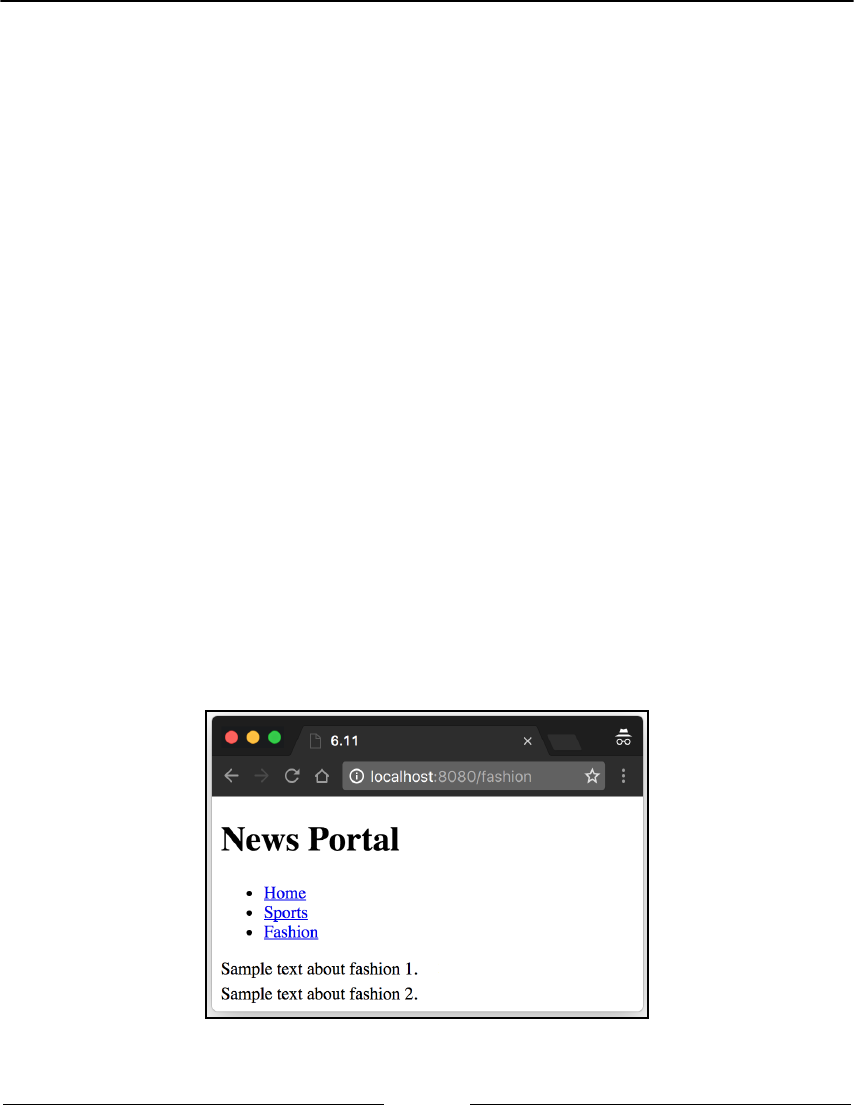
Single Page Applications Chapter 15
[ 493 ]
To accomplish this, let's modify our router code to the following:
const router = new VueRouter({
mode: 'history',
routes: [
{ path: '/', component: Home },
{ path: '/sports', component: Sports },
{ path: '/fashion', component: Fashion }
],
scrollBehavior (to, from, savedPosition) {
if (savedPosition) {
return savedPosition
} else {
return { x: 0, y: 0 }
}
}
})
We added a line that specifies the new mode to be history (no hash in the link) and we
defined the scrollBehavior function to go back to the last position if present; if it's a new
page, it should scroll to the top-left corner.
You can try this by refreshing the browser and going back to the home page.
Open the sports page and click on the link in the middle of the page. The new page now
displays from the beginning.
Click on back and the savedPosition gets restored.
Note how the URL looks much nicer now:

Single Page Applications Chapter 15
[ 494 ]
How it works…
When you use a URL that contains the hash symbol in the browser, the browser will send a
request for the URL without the suffix after the hash, that is, when you have an event inside
a page that goes to the same page but with a different hash suffix:
http://example.com#/page1 on http://example.com#/page2
The browser will not reload the page; this is why vue-router can modify the content of the
page when the user clicks on a link that only modifies the hash, without the page being
reloaded.
When you change the mode from hash to history, vue-router will drop the hash notation
and will leverage the history.pushState() function.
This function adds another virtual page and changes the URL to something else:
http://example.com/page1 =pushState=> http://example.com/page2
The browser will not send a GET request to look for page2 though; in fact, it won't do
anything.
When you press the back button, the browser reverts the URL and vue-router receives an
event. It will then read the URL (which is now page1) and match the associated route.
The role of our compact history server is to redirect every GET request to the
index.html page. This is why when we try to go to http://localhost:8080/fashion
directly, we don't get a 404 error.

16
Organize + Automate + Deploy
= Webpack
In this chapter, we will talk about the following topics:
Extracting logic from your components to keep the code tidy
Bundling your component with Webpack
Organizing your dependencies with Webpack
Using external components in your Webpack project
Developing with continuous feedback with hot reloading
Using Babel to compile from ES6
Running a code linter while developing
Using only one command to build both a minified and a development .js file
Releasing your components to the public
Introduction
Webpack coupled with npm is a very powerful tool. In essence, it's just a bundler that takes
some files along with their dependencies and bundles everything into one or more
consumable files. It's now in its second version and represents much more than before,
especially for Vue developers.
Webpack will enable you to write components conveniently isolated in single files and
shippable on command. It will enable you to use different JavaScript standards, such
as ES6, but also other languages altogether, all thanks to loaders, a concept that will recur
in the following recipes.

Organize + Automate + Deploy = Webpack Chapter 16
[ 496 ]
Extracting logic from your components to
keep the code tidy
Vue components can become very complex sometimes. In these cases, it's better to split
them up and try to hide some complexity with abstraction. The best place to put such
complexity is external JavaScript files. This way you have the added benefit that, if
necessary, it's easier to share the extracted logic with additional components.
Getting ready
This recipe is of intermediate level. Before coming here, you know how to set up a project
with npm.
Also, ensure that you have the vue-cli package installed globally with the following
command:
npm install -g vue-cli
How to do it...
We will build a calculator for compound interest; you will discover how much money you
will have after an initial investment.
Creating a clean Webpack project
Create a new directory and a new Vue project inside it with the following command:
vue init webpack
You can choose the default values for the questions asked.
Run npm install to install all the required dependencies.

Organize + Automate + Deploy = Webpack Chapter 16
[ 497 ]
Then, navigate to src/App.vue in the directory structure and delete pretty much
everything inside the file.
The final result should be as follows:
<template>
<div id="app">
</div>
</template>
<script>
export default {
name: 'app'
}
</script>
<style>
</style>
I've already done this for you, and, you can use another template with the
following command instead:
vue init gurghet/webpack
Building the compound interest calculator
To build the compound interest calculator, you need three fields: the initial capital or
principal, the yearly interest rate, and the investment length. You will then add an output
field to display the final result. Here's the corresponding HTML code:
<div id="app">
<div>
<label>principal capital</label>
<input v-model.number="principal">
</div>
<div>
<label>Yearly interestRate</label>
<input v-model.number="interestRate">
</div>
<div>
<label>Investment length (timeYears)</label>
<input v-model.number="timeYears">
</div>
<div>
You will gain:
<output>{{final}}</output>

Organize + Automate + Deploy = Webpack Chapter 16
[ 498 ]
</div>
</div>
We put the .number modifier, or otherwise the numbers we put inside will be converted to
strings by JavaScript.
In the JavaScript part, declare the three model variables by writing the following code:
export default {
name: 'app',
data () {
return {
principal: 0,
interestRate: 0,
timeYears: 0
}
}
}
To calculate the compound interest, we take the math formula for it:
In JavaScript, it can be written as follows:
P * Math.pow((1 + r), t)
You have to add this to the Vue component as a computed property, as shown:
computed: {
final () {
const P = this.principal
const r = this.interestRate
const t = this.timeYears
return P * Math.pow((1 + r), t)
}
}
You can run your application with the following command (launched from your directory):
npm run dev
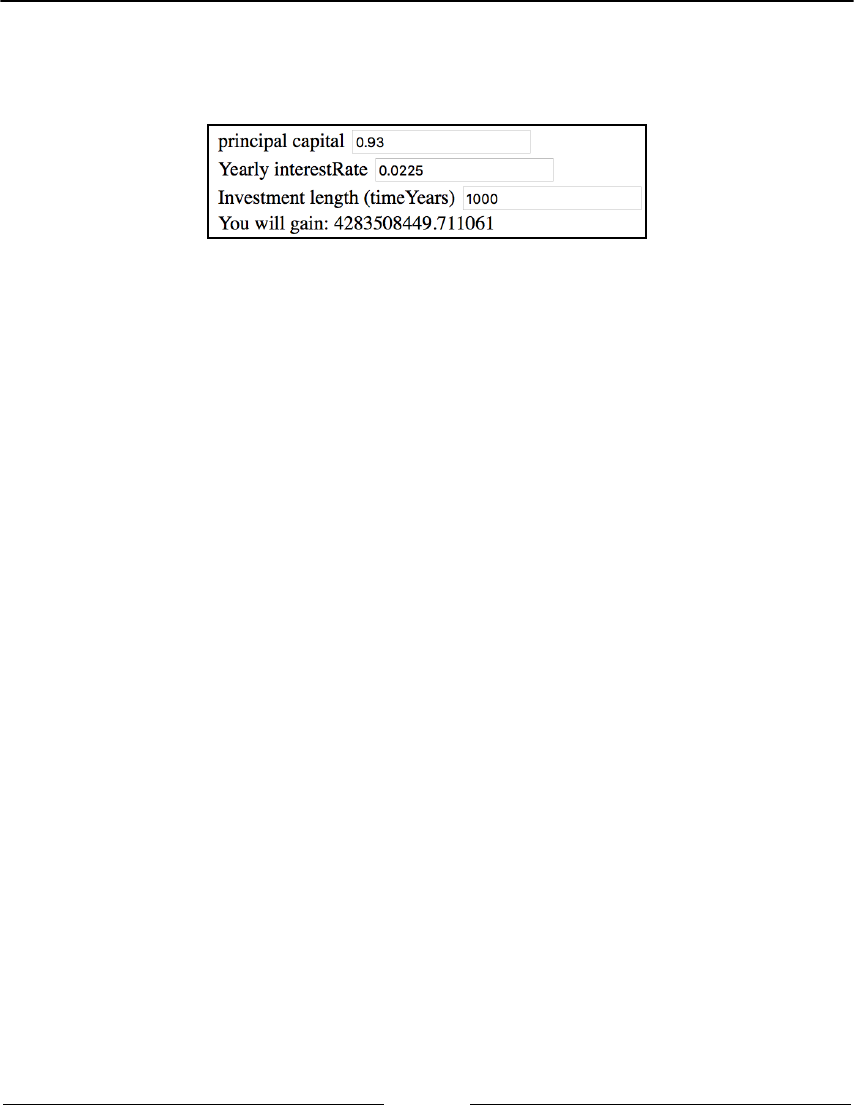
Organize + Automate + Deploy = Webpack Chapter 16
[ 499 ]
Now that our application works, you can see how much we will gain by putting 0.93
dollars into a bank account with 2.25 percent interest and hibernating for 1,000 years (4.3
billion dollars!):
The formula inside the code is not much of a bother right now. Still, what if we had another
component that also does the same calculation? We would also like to make it more explicit
that we are computing the compound interest and we don't actually care what the formula
does in this scope.
Create a new file, named compoundInterest.js, inside the src folder; write the
following code inside it:
export default function (Principal, yearlyRate, years) {
const P = Principal
const r = yearlyRate
const t = years
return P * Math.pow((1 + r), t)
}
We then modify the code in App.vue accordingly:
computed: {
final () {
return compoundInterest(
this.principal,
this.interestRate,
this.timeYears
)
}
}
Also, remember to import the file we just created at the top of the JavaScript part:
<script>
import compoundInterest from './compoundInterest'
export default {
...

Organize + Automate + Deploy = Webpack Chapter 16
[ 500 ]
How it works...
When working in a component or when programming in general, it's much better to reduce
the scope of the code to only one layer of abstraction. When we write a computed function
that returns the final capital value, we should only worry about calling the right function--
the one that does the right calculation for our purpose. The internals of the formula are on a
lower layer of abstraction and we don't want to deal with that.
What we have done is that we brought all the nitty gritty of the calculations in a separate
file. We then exported the function from the file with the following line:
export default function (Principal, yearlyRate, years) {
...
This makes the function available by default when we import the file from our Vue
component:
import compoundInterest from './compoundInterest'
...
So, now compoundInterest is the function we defined in the other file. Furthermore, this
separation of concerns allow us to use this function to compute compound interest
everywhere in our code, even in other files (potentially other projects too).
Bundling your component with Webpack
Webpack lets you package your project in minified JavaScript files. You can then distribute
these files or use them yourself. When you use the inbuilt templates that come with vue-
cli, Webpack is configured to build an entire working application with it. Sometimes we
want to build a library to publish or use in another project. In this recipe, you will tweak
the default configuration of the Webpack template to release a component instead.
Getting ready
This recipe will make sense to you only after you have installed npm and got familiar with
vue-cli and the Webpack template.

Organize + Automate + Deploy = Webpack Chapter 16
[ 501 ]
How to do it...
For this recipe, you will build a reusable component that shakes whatever you put into it;
for this, we will use the excellent CSShake library.
Create a new clean project based on the Webpack template. You can take a look at the
previous recipe to see how to do that, or you can use the prebuilt template I made. You can
use my template by creating a new directory and running this command:
vue init gurghet/webpack
Choose the default answers if you don't know what they mean. Remember to run npm
install to bring in the dependencies.
Let's first rename a couple of things: rename the App.vue file to Shaker.vue.
Inside it, write the following as the HTML template:
<template>
<span id="shaker" class="shake">
<link rel="stylesheet" type="text/css"
href="https://csshake.surge.sh/csshake.min.css">
<slot></slot>
</span>
</template>
Note how we changed the <div> into a <span> with respect to the original template. That's
because we want our shaker to be an inline component.
The component is complete as it is; we just need a minor cosmetic edit in the JavaScript
part:
<script>
export default {
name: 'shaker'
}
</script>
To manually test our application, we can modify the main.js file in the following way (the
highlighted text is the modified code):
// The Vue build version to load with the `import` command
// (runtime-only or standalone) has been set in webpack.base.conf with an
alias.
import Vue from 'vue'
import Shaker from './Shaker'
Organize + Automate + Deploy = Webpack Chapter 16
[ 502 ]
/* eslint-disable no-new */
new Vue({
el: '#app',
template: `
<div>
This is a <Shaker>test</Shaker>
</div>
`,
components: { Shaker }
})
This will create a sample page as shown in the following screenshot, in which we can
prototype our component with hot-reloading. Launch it by running the
following command:
npm run dev
Placing the cursor over the word test should make it shake.
Now, we would like to package this component in a single JavaScript file that can be reused
in the future.
There is no configuration present for this in the default template, but it's easy enough to
add one.
First of all, you have to do some hammering in the webpack.prod.js file inside the build
folder.
Organize + Automate + Deploy = Webpack Chapter 16
[ 503 ]
Let's get rid of some plugins that we don't need for releasing a library; find the plugins
array inside the file. It's an array containing plugins in the form of the following code:
plugins: [
new Plugin1(...),
new Plugin2(...),
...
new PluginN(...)
]
We only need the following plugins:
webpack.DefinePlugin
webpack.optimize.UglifyJsPlugin
webpack.optimize.OccurrenceOrderPlugin
Get rid of all the other plugins as we don't need them; the final array should look like this:
plugins: [
new webpack.DefinePlugin({
'process.env': env
}),
new webpack.optimize.UglifyJsPlugin({
compress: {
warnings: false
}
}),
new webpack.optimize.OccurrenceOrderPlugin()
]
The first one allows you to add some more configuration, the second plugin minifies the
file, and the third one will optimize the size of the resulting file.
Another property we need to edit is output, as we want to simplify the output path.
The original property looks like this:
output: {
path: config.build.assetsRoot,
filename: utils.assetsPath('js/[name].[chunkhash].js'),
chunkFilename: utils.assetsPath('js/[id].[chunkhash].js')
}

Organize + Automate + Deploy = Webpack Chapter 16
[ 504 ]
What it does originally is, it creates a series of output files inside a js directory. There are
variables in square parentheses; we won't need them because you only have one self-
contained module for our application, which we'll call shaker. We need to obtain the
following code:
output: {
path: config.build.assetsRoot,
filename: utils.assetsPath('shaker.js')
}
Since, as just said, you want the component to be self-contained, we need some more
modifications, which will also depend on your needs.
If you want the component to have any CSS styling built-in (we have none in our case as
we are using an external CSS library), you should disable the ExtractTextPlugin; we
already deleted the plugin from the list but some other files are still using it. Find the
extract option inside the vue-loader.conf.js file (the vue section of the same file in
some versions) and replace it with the following code:
... {
loaders: utils.cssLoaders({
...
extract: false
})
}
Our component will normally contain the Vue library inside; if you want to use the
component in a Vue project, you don't need this, as it would be duplicated code. You can
tell Webpack to just search for dependencies externally and not include them. Add the
following property in the webpack.prod.js file you just modified before plugins:
externals: {
'vue': 'Vue'
}
This will tell Webpack not to write the Vue library into the bundle but to just take a global,
named Vue, and use it wherever the vue dependency is imported in our code. The
Webpack configuration is almost done; we just need to add another property before the
module property:
var webpackConfig = merge(baseWebpackConfig, {
entry: {
app: './src/dist.js'
},
module: {
...
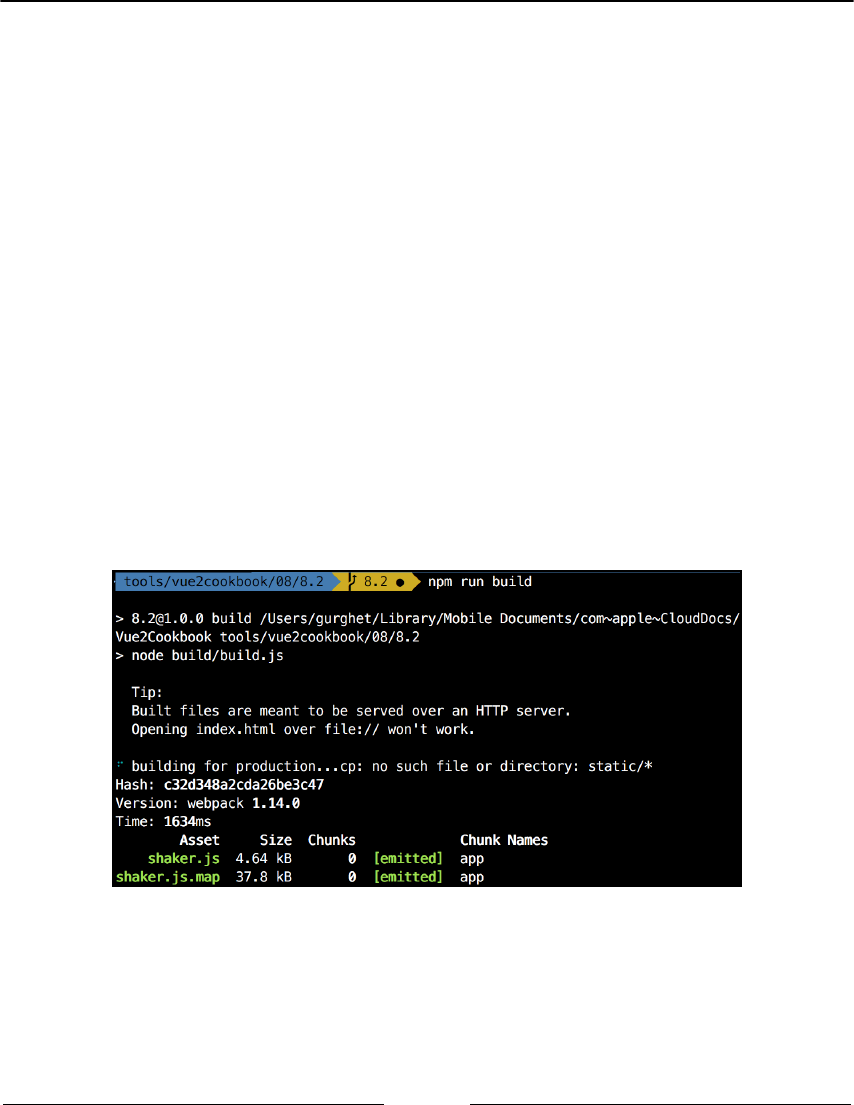
Organize + Automate + Deploy = Webpack Chapter 16
[ 505 ]
This will start the compilation reading code from the dist.js file. Wait a minute, this file
doesn't exist yet. Let's create it and add the following code inside:
import Vue from 'vue'
import Shaker from './Shaker'
Vue.component('shaker', Shaker)
In the final JavaScript minified file, the Vue dependency will be taken externally, and then
we register the component globally.
As the last change, I would suggest modifying the folder in which the minified file gets
saved. In the config/index.js file, edit the following line:
assetsSubDirectory: 'static',
Swap the preceding line with the following code:
assetsSubDirectory: '.',
Now run the command to build the minified file with npm:
npm run build
You will see an output that looks like this:
To test our file, we can use JSFiddle
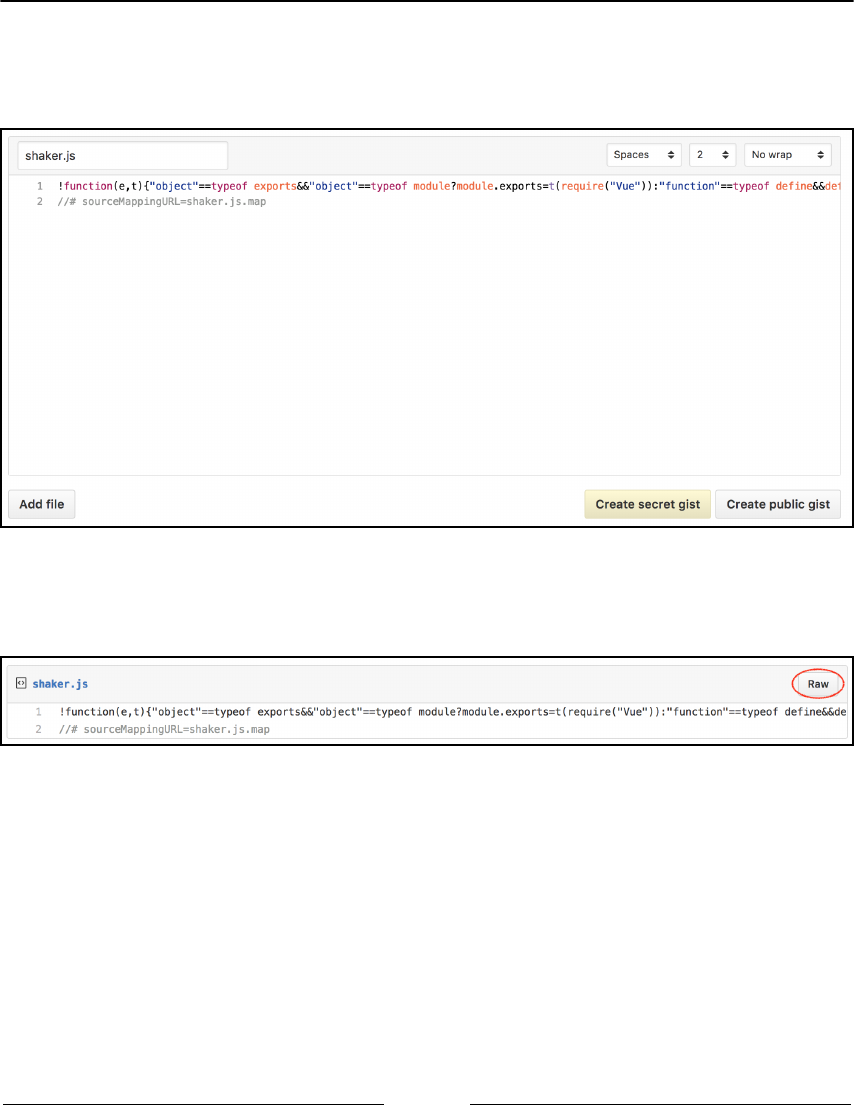
Organize + Automate + Deploy = Webpack Chapter 16
[ 506 ]
Copy the content of the file you created inside dist/shaker.js, then go to https://gist.
github.com/ (you may need to register) and paste the content of the file inside the text area.
Name it shaker.js:
Since the text is a single line, you will not see much with the No wrap option on. Click on
Create public gist and when you are presented with the next page, click on Raw, as shown
in the following screenshot:
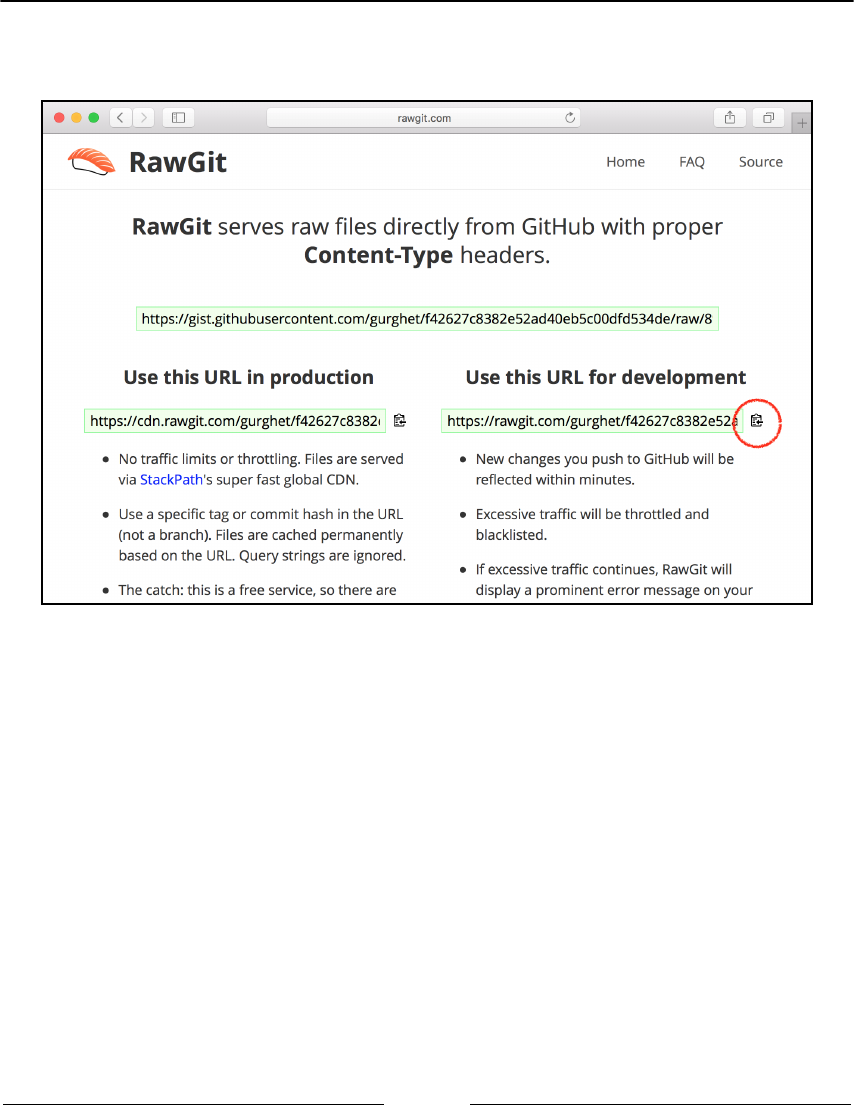
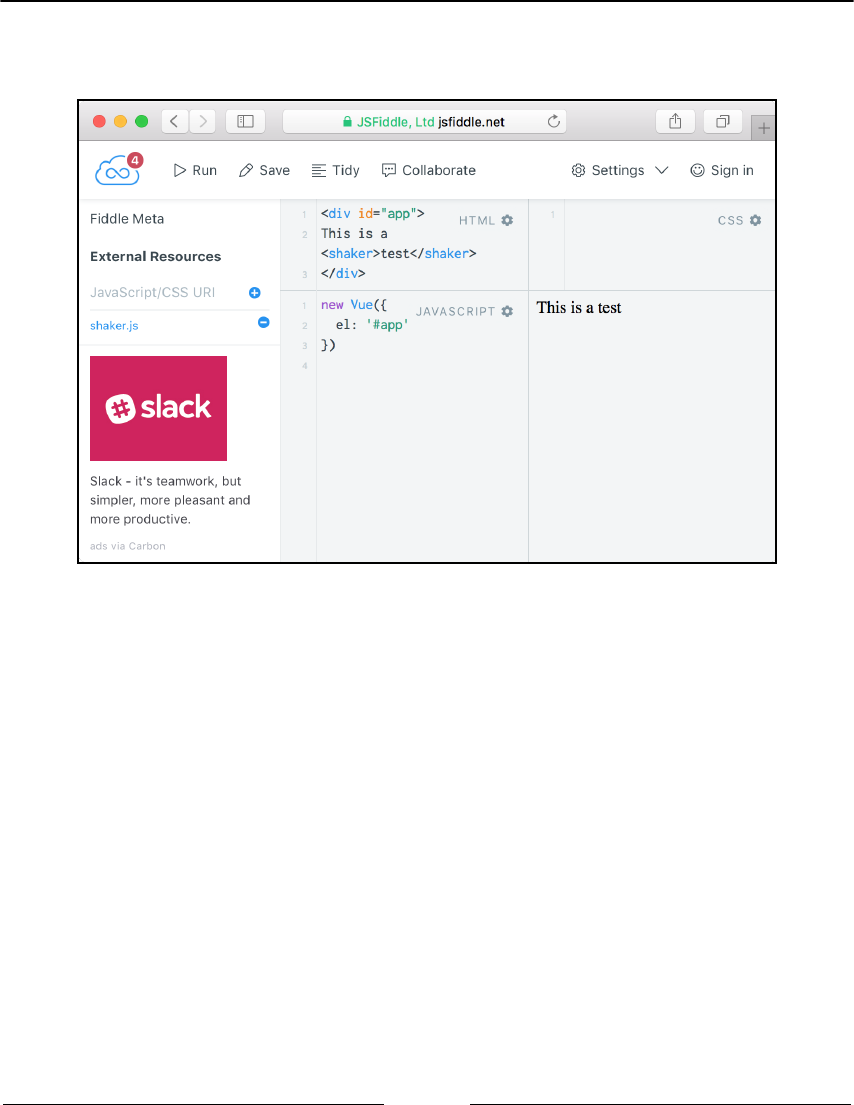
Organize + Automate + Deploy = Webpack Chapter 16
[ 508 ]
Now head to JSFiddle and pick Vue as a library. You can now add the link you copied in
the left and you have your component available to use:
How it works...
Webpack configuration in the official templates is quite involved. On the other hand, don't
try to understand everything straight away, or you will get stuck and not learn much
anyway.
We created a UMD (Universal Module Definition) module that will try and see
whether there is a Vue dependency available and install itself as a component.
You can even add CSS and styling to your component and, the way we configured
Webpack, the styles will still ship with your component.
There's more...
In the Releasing your components to the public recipe in this chapter, you will learn how
to publish your component in the npm publish registry. We'll use a different approach than
this, but you'll find there the missing steps to publish it to the registry.

Organize + Automate + Deploy = Webpack Chapter 16
[ 509 ]
Organizing your dependencies with
Webpack
Webpack is a tool for organizing your code and dependencies. Furthermore, it gives you a
way to develop and build with JavaScript files that embed all the dependencies and
modules that we pass to them. We'll use this in this recipe to build a small Vue application
and bundle everything in a single file.
Getting ready
This recipe doesn't require any particular skill except the use of npm and some knowledge
of the command line. You can find out more in the Organizing your dependencies with
Webpack recipe in this chapter.
How to do it...
Create a new folder for your recipe and create a package.json file with the following
content inside it:
{
"name": "recipe",
"version": "1.0.0"
}
This defines an npm project in our folder. You can, of course, use npm init or yarn init
if you know what you're doing.
We will install Webpack 2 for this recipe. To add it to your project dependencies, run the
following command:
npm install --save-dev webpack@2
The --save-dev option means that we will not ship the code for Webpack in our final
product, but we will use it only for development purposes.
Create a new app directory and an App.vue file inside it.

Organize + Automate + Deploy = Webpack Chapter 16
[ 510 ]
This file will be a simple Vue component; it can be as simple as the following:
<template>
<div>
{{msg}}
</div>
</template>
<script>
export default {
name: 'app',
data () {
return {
msg: 'Hello world'
}
}
}
</script>
<style>
</style>
We need to tell Webpack how to turn .vue files into .js files. To do that, we create a
configuration file in the root folder, named webpack.config.js; this file will be
automatically picked up by Webpack. Inside this file, write as follows:
module.exports = {
module: {
rules: [
{test: /.vue$/, use: 'vue-loader'}
]
}
}
The line inside rules says the following:
Hey Webpack, when you see a file that ends in .vue, use the vue-loader to turn it into a
JavaScript file.
We need to install such a loader with npm using the following command:
npm install --save-dev vue-loader
This loader internally uses other dependencies that will not be installed automatically; we
need to do it manually by running the following command:
npm install --save-dev vue-template-compiler css-loader

Organize + Automate + Deploy = Webpack Chapter 16
[ 511 ]
Let's also take this opportunity to install Vue itself:
npm install --save vue
Now our Vue component is ready. We need to write a page in which to place it and try it.
Create a file called index.js inside the app folder. We will instantiate the component in a
Vue instance. Inside index.js, write the following:
import Vue from 'vue'
import App from './App.vue'
new Vue({
el: '#app',
render: h => h(App)
})
This will mount the Vue instance inside an element with id="app", and it will contain a
single component--our App.vue.
We need one more file--an HTML file. In the root directory, create index.html with this
code:
<!DOCTYPE html>
<html>
<head>
<title>Webpack 2 demo</title>
</head>
<body>
<div id="app"></div>
<script src="dist/bundle.js"></script>
</body>
</html>
We don't want to refer to app/index.js directly here; this is because index.js itself
doesn't contain much. It has an import statement that won't be recognized by the browser.
Webpack can instead easily create dist/bundle.js with index.js inside, along with all
its dependencies. To do it, run this command:
./node_modules/webpack/bin/webpack.js app/index.js dist/bundle.js
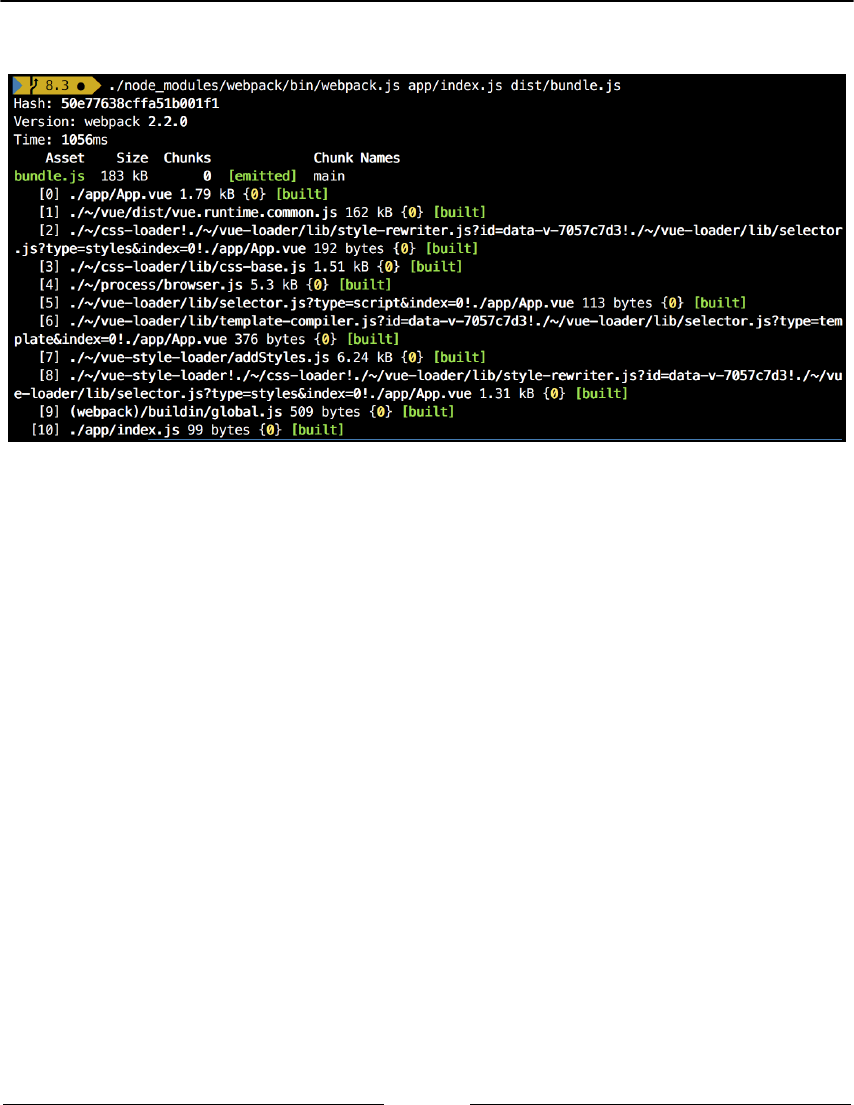
Organize + Automate + Deploy = Webpack Chapter 16
[ 512 ]
This should generate an output similar to this:
You can now open index.html and you'll see the component working.
However, it's not so much fun to launch this long command every time. Webpack and npm
can do better.
In webpack.config.js, add the following properties:
module.exports = {
entry: './app/index.js',
output: {
filename: 'bundle.js',
path: __dirname + '/dist'
},
module: {
...
This will specify the entry point of Webpack and where the resulting file should be saved.
We can also add a script to package.json:
"scripts": {
"build": "webpack"
}
Now, launching npm run build will have the same effect as the long command we used.

Organize + Automate + Deploy = Webpack Chapter 16
[ 513 ]
How it works...
In this recipe, we basically created a JavaScript file (bundle.js) that simultaneously
contains Vue and the component we wrote. In the index.html, there is no trace of Vue
because it's embedded in bundle.js.
This way of working is much better when we have a lot of dependencies. We don't need to
add a lot of tags in the head or the body of the page anymore. Also, we don't have to be
afraid to load a dependency that we don't need.
As an added bonus, Webpack has the power and flexibility to minify our final file and other
advanced optimizations that are simply not possible by loading the dependencies
manually.
Using external components in your
Webpack project
Using external Vue components in your own project is usually straightforward. Sometimes
though, things aren't so simple. In particular, there are some configurations in the official
templates with Webpack that (weirdly) actually prevent you from using some external
components. In this recipe, we will install a modal dialog component from the Bulma
project.
Getting ready
In this recipe, we will tweak the Webpack configuration. It is suggested to have completed
the Organizing your dependencies with Webpack recipe before taking up this task.
How to do it...
We will start with a fresh Webpack project. You can create a new one using the vue-cli
and the official Webpack template. My suggestion, however, is, to begin with my Webpack
template, which is a clean slate. To do it, run the following command in a new directory:
vue init gurghet/webpack

Organize + Automate + Deploy = Webpack Chapter 16
[ 514 ]
We will install vue-bulma-modal, which is a component written in Vue with the Bulma
CSS framework:
npm install --save vue-bulma-modal bulma
In the preceding command, we installed bulma too, which contains the actual CSS styles.
To actually make the styles work, we need to turn them into JavaScript for Webpack; this
means we need to install a couple of loaders:
npm install --save-dev node-sass sass-loader
The SASS loader is already configured, so there is no need to touch anything. What we will
touch though, is the Webpack configuration related to the Babel loader (learn more about it
in the Developing with continuous feedback with hot reloading recipe).
In the official template (but this may change, watch out), there is a line that prevents
Webpack from compiling dependencies. Go to build/webpack.base.conf.js and find
this block:
{
test: /.js$/,
loader: 'babel-loader',
include: [
path.join(projectRoot, 'src')
],
exclude: /node_modules/
},
Depending on the version of Webpack you are using, you may need to
slightly tweak the loader syntax. In older versions of Webpack, for
example, you would write babel instead of babel-loader.
You have to remove the highlighted line and, instead, write the following:
{
test: /.js$/,
loader: 'babel-loader',
include: [
path.join(projectRoot, 'src'),
path.join(projectRoot, 'node_modules/vue-bulma-modal')
]
},
This is telling Webpack to compile the component we just installed with babel-loader.

Organize + Automate + Deploy = Webpack Chapter 16
[ 515 ]
Now, write the following HTML layout in App.vue:
<template>
<div id="app">
<card-modal
@ok="accept"
ok-text="Accept"
:visible="popup"
@cancel="cancel"
>
<div class="content">
<h1>Contract</h1>
<p>
I hereby declare I have learned how to
install third party components in my
own Vue project.
</p>
</div>
</card-modal>
<p v-if="signed">It appears you signed!</p>
</div>
</template>
Then, you can write the logic, as shown, in the JavaScript:
<script>
import { CardModal } from 'vue-bulma-modal'
export default {
name: 'app',
components: { CardModal },
data () {
return {
signed: false,
popup: true
}
},
methods: {
accept () {
this.popup = false
this.signed = true
},
cancel () {
this.popup = false
}
}
}
</script>
Organize + Automate + Deploy = Webpack Chapter 16
[ 516 ]
To actually use the Bulma styles, we need to kick in the SASS loader and import the bulma
file. Add the following lines:
<style lang="sass">
@import '~bulma';
</style>
Note how we are specifying the language of our styles in the first line (we are writing SCSS,
but in this case we write it as it is).
If you now try to run your app with the npm run dev command, you will see the Bulma
modal dialog in all its splendor:
How it works...
The official Webpack template contains the configuration rule to never compile files inside
the node_modules directory. This means that authors of web components are encouraged
to distribute an already compiled file because otherwise, users will import raw JavaScript
files (since Webpack won't compile them) in their projects, causing all sorts of errors in
browsers. Personally, I don't think this is good engineering. One problem with this setup is
that since the files you are importing in your project are compiled against one version of
Vue, the component might not work (this actually happened in the past) if you use a newer
version of Vue.

Organize + Automate + Deploy = Webpack Chapter 16
[ 517 ]
A better approach is to import the raw files and components and let Webpack compile
them in a single file. Unfortunately, the majority of components available in the wild
are distributed already compiled, so while it's very quick to import them given the official
template, you're more likely to encounter compatibility problems.
When importing external components, the first thing to do is to examine their
package.json file. Let's see what the vue-bulma-modal package contains in this file:
{
"name": "vue-bulma-modal",
"version": "1.0.1",
"description": "Modal component for Vue Bulma",
"main": "src/index.js",
"peerDependencies": {
"bulma": ">=0.2",
"vue": ">=2"
},
...
"author": "Fangdun Cai <cfddream@gmail.com>",
"license": "MIT"
}
The file referred to by the main property is the file we are importing when we write the
following line in JavaScript:
import { CardModal } from 'vue-bulma-modal'
The src/index.js file, in turn, contains the following code:
import Modal from './Modal'
import BaseModal from './BaseModal'
import CardModal from './CardModal'
import ImageModal from './ImageModal'
export {
Modal,
BaseModal,
CardModal,
ImageModal
}

Organize + Automate + Deploy = Webpack Chapter 16
[ 518 ]
This is not a compiled file; it's raw ES6 and we know it because import is not defined in
regular JavaScript. That's why we need Webpack to compile this for us.
On the other hand, consider that we write the following:
<style lang="sass">
@import '~bulma';
</style>
With the tilde sign (~), we tell Webpack to resolve the style like it was a module and so,
what we are really importing is the file referred to by the main in the package.json of the
bulma package, which, if we check, looks as follows:
{
"name": "bulma",
"version": "0.3.1",
...
"main": "bulma.sass",
...
}
Since we are importing a SASS with the SASS syntax, we need to specify in the Vue
component that we are using lang="sass".
Developing with continuous feedback with
hot reloading
Hot reloading is a really useful technology that lets you develop while looking at the results
in the browser, without even refreshing the page. It's a very tight loop and can really speed
up your development process. In the official Webpack template, hot reloading is installed
by default. In this recipe, you will learn how to install it yourself.
Getting ready
Before attempting this recipe, you should have at least a vague idea of how Webpack
works; the Organizing your dependencies with Webpack recipe in this chapter will have you
covered.

Organize + Automate + Deploy = Webpack Chapter 16
[ 519 ]
How to do it...
Create a new npm project in a new directory, either with npm init -y or yarn init -y.
I personally prefer the second one because the resulting package.json is much more
compact.
To install Yarn, you can use the npm install -g yarn command. The
main benefit of Yarn is that you will be able to lock your dependencies to
a known version. This prevents bugs when working in teams and the
application gets cloned from Git with slightly different versions that
introduce incompatibilities.
You will create a digital swear jar. For every swear word you pronounce, you donate
an amount of money to a swear jar for a long-term objective.
Create a new file, named SwearJar.vue, and add the following code inside it:
<template>
<div>
Swears: {{counter}} $$
<button @click="addSwear">+</button>
</div>
</template>
<script>
export default {
name: 'swear-jar',
data () {
return {
counter: 0
}
},
methods: {
addSwear () {
this.counter++
}
}
}
</script>
You will insert this component on a web page.

Organize + Automate + Deploy = Webpack Chapter 16
[ 520 ]
Create a file named index.html in the same directory and write the following code:
<!DOCTYPE html>
<html>
<head>
<title>Swear Jar Page</title>
</head>
<body>
<div id="app"></div>
<script src="bundle.js"></script>
</body>
</html>
The bundle.js file will be created (in memory) by Webpack for us.
The last app file you need is a JavaScript file that will contain our Vue root instance. Create
it in the same directory and name it index.js; put the following content in it:
import Vue from 'vue'
import SwearJar from './SwearJar.vue'
new Vue({
el: '#app',
render: h => h(SwearJar)
})
Now you need to create a file, webpack.config.js, to tell Webpack a couple of things.
The first thing is the entry point of our application (index.js) and where we would like to
place the compiled files:
module.exports = {
entry: './index.js',
output: {
path: 'dist',
filename: 'bundle.js'
}
}
Next, we will tell Webpack to turn .vue files into JavaScript with vue-loader:
module.exports = {
entry: './index.js',
output: {
path: 'dist',
filename: 'bundle.js'
},
module: {
rules: [
{

Organize + Automate + Deploy = Webpack Chapter 16
[ 521 ]
test: /.vue$/,
use: 'vue-loader'
}
]
}
}
To make everything work, we still need to install the dependencies we implied in our code.
We can install them with the following two commands:
npm install --save vue
npm install --save-dev vue-loader vue-template-compiler webpack webpack-
dev-server
The last one in particular--webpack-dev-server--is a development server that will help us
develop with hot reloading.
Run the following command to start the server:
./node_modules/webpack-dev-server/bin/webpack-dev-server.js --output-path /
--inline --hot --open
Actually, let's put this command in an npm script.
Open package.json and add the following lines:
"scripts": {
"dev": "webpack-dev-server --output-path / --inline --hot --open"
}
We can now run npm run dev and we'll get the same result--a browser will pop up--as
illustrated in the following screenshot:

Organize + Automate + Deploy = Webpack Chapter 16
[ 522 ]
Clicking on the plus button will make the counter go up, but what about the style of this
application? Let's make it more attractive.
Open your code editor and the window side by side and make the following modifications
to SwearJar.vue:
<template>
<div>
<p>Swears: {{counter}} $$</p>
<button @click="addSwear">Add Swear</button>
</div>
</template>
Save the file, and you will see the page updating itself. Even better, the state will be
retained if the counter was already set above zero, and this means that if you have a
complex component you don't have to bring it manually into the same state again after each
modification. Try to set the swear count to some number and edit the template. Most of the
time, the counter will not get reset to zero.
How it works...
The Webpack dev server is very helpful software that lets you develop with a very tight
feedback loop. We used plenty of arguments to make it run:
webpack-dev-server --output-path / --inline --hot --open
All these parameters are the same inside the webpack.config.js. Instead, we are putting
these parameters in the command line for convenience. The --output-path is where the
Webpack server will serve bundle.js; in our case, we said that we want it served at the
root path, so it will effectively bind the /bundle.js path to the actual bundle.js file.
The second parameter, --inline, will inject some JavaScript code in our browser so that
our app can communicate with the Webpack dev server.
The --hot parameter will activate the Hot Module Replacement plugin, which will
communicate with the vue-loader (actually with the vue-hot-reload-api, which is
inside it) and will either restart or rerender (preserving the state) each Vue model inside the
page.
Finally, --open just opens the default browser for us.

Organize + Automate + Deploy = Webpack Chapter 16
[ 523 ]
Using Babel to compile from ES6
ES6 has a lot of useful features, and in this recipe, you will learn how you can use it in your
projects. It's worth noting that ES6 currently has very good browser support. You won't
have compatibility issues with 80% of the browsers in the wild, but you may need to even
reach people who're still using Internet Explorer 11, depending on your audience, or you
may just want to maximize your audience. Moreover, some tools for development and
Node.js still don't fully support ES6, deeming Babel necessary even for development.
Getting ready
In this recipe, we will use npm and the command line.
How to do it...
Create a new directory with an empty npm project. You can use the npm init -y
command or, if you have Yarn installed, you can use yarn init -y inside the directory.
This command will create a new package.json inside the directory. (Refer to the note in
the Developing with continuous feedback with hot reloading recipe on Yarn.)
For this npm project, we will need a couple of dependencies other than Vue: Webpack, and
Babel in the form of a loader for Webpack. Oh yes, we will need the vue-loader as well
for Webpack. To install them, launch the following two commands:
npm install --save vue
npm install --save-dev webpack babel-core babel-loader babel-preset-es2015
vue-loader vue-template-compiler
In the same directory, let's write a component that uses ES6 syntax; let's call it myComp.vue:
<template>
<div>Hello</div>
</template>
<script>
var double = n => n * 2
export default {
beforeCreate () {
console.log([1,2,3].map(double))
}
}
</script>

Organize + Automate + Deploy = Webpack Chapter 16
[ 524 ]
This component doesn't do much except print the [2,4,6] array to the console, but it does
it with arrow syntax at the following line:
var double = n => n * 2
This is not understood by some browsers and tools; we need to compile this component
with Webpack, but we need to do it with the Babel loader.
Create a new webpack.config.js file and write the following inside it:
module.exports = {
entry: 'babel-loader!vue-loader!./myComp.vue',
output: {
filename: 'bundle.js',
path: 'dist'
}
}
This will tell Webpack to start compiling from our myComp.vue file, but before that, it will
be processed by the vue-loader to turn it into a js file and then by the babel-loader to
turn the arrow function into something simpler and more compatible.
We can achieve the same thing with a different and more standard configuration:
module.exports = {
entry: './myComp.vue',
output: {
filename: 'bundle.js'
},
module: {
rules: [
{
test: /.vue$/,
use: 'vue-loader'
},
{
test: /.js$/,
use: 'babel-loader'
}
]
}
}

Organize + Automate + Deploy = Webpack Chapter 16
[ 525 ]
This is a more general configuration and it says that whenever we encounter a file that ends
with .vue, it should be parsed and processed with the vue-loader and .js files with the
babel-loader.
To configure the Babel loader, there are a couple of options; we'll follow the recommended
way. Create a file called .babelrc inside your project folder (note the initial point) and to
specify that we want the es2015 preset applied, we write the following code:
{
"presets": ["es2015"]
}
Lastly, I always like to add a new script to the package.json file to make launching
commands easier. Add the following line at the end of the file (but before the last curly
brace):
"scripts": {
"build": "webpack"
}
Then run npm run build. This creates a file inside the dist directory, named bundle.js;
open it and search for a line that contains, for example, double. You should find something
like this:
...
var double = function double(n) {
return n * 2;
};
...
This was our var double = n => n * 2, transformed from ES6 to regular JavaScript.
How it works...
The es2015 Babel preset is a collection of Babel plugins that aims to transform
ECMAScript2015 (ES6) syntax into simpler JavaScript. For example, it contains the babel-
plugin-transform-es2015-arrow-functions plugin, which as you may have guessed,
transforms arrow functions:
var addOne = n => n + 1

Organize + Automate + Deploy = Webpack Chapter 16
[ 526 ]
Transform the arrow functions into simpler JavaScript as follows:
var addOne = function addOne(n) {
return n + 1
}
To select the files and their respective loaders, we filled the test field
inside webpack.config.js and to match the .vue files, we wrote the following:
test: /\.vue$/
This syntax is a regular expression and it always starts with a forward slash and ends with
another forward slash. The first character it matches is the point, which is expressed as \.
because the . character is already taken for other purposes. The point has to be followed
by the vue string and the end of string character is expressed as a dollar sign. If you put
them all together, it will match all the strings that end with .vue. A similar thing is
followed for the .js files.
Running a code linter while developing
Linting your code drastically reduces small bugs and inefficiencies that accumulate during
development, it guarantees that the coding style is consistent across a team or organization,
and it makes your code more readable. Instead of running the linter once in a while, it's
useful to have it constantly running. This recipe teaches you how to do it with Webpack.
Getting ready
In this recipe, we will play with Webpack once again. You will build a tight loop with
webpack-dev-server, which is covered in the Developing with continuous feedback with hot
reloading recipe.
How to do it...
In a new folder, create a new npm project (you can use npm init -y or yarn init -y).
Inside the folder, create a new directory named src and put a file inside it, called
MyComp.vue. Let the file contain the following code:
<template>
<div>

Organize + Automate + Deploy = Webpack Chapter 16
[ 527 ]
Hello {{name}}!
</div>
</template>
<script>
export default {
data () {
return {
name: 'John',
name: 'Jane'
}
}
}
</script>
We can already spot a problem--the John name property will be overwritten by the later
property, Jane, with the same key. Let's pretend that we didn't notice this and put the
component inside a web page. For this, we need another file, named index.js, in the src
directory. Write the following code inside it:
import Vue from 'vue'
import MyComp from './MyComp.vue'
new Vue({
el: '#app',
render: h => h(MyComp)
})
In the root directory, place an index.html file with the following code:
<!DOCTYPE html>
<html>
<head>
<title>Hello</title>
</head>
<body>
<div id="app"></div>
<script src="bundle.js"></script>
</body>
</html>
We now need a webpack.config.js file to tell Webpack how to compile our files; write
the following inside it:
module.exports = {
entry: './src/index.js',
module: {
rules: [
{
test: /.vue$/,

Organize + Automate + Deploy = Webpack Chapter 16
[ 528 ]
use: 'vue-loader'
}
]
}
}
This just tells Webpack to start compiling from the index.js file and, whenever it finds a
.vue file, to turn it into JavaScript with the vue-loader. Beyond this, we want to scan all
our files with a linter to ensure that we didn't make silly mistakes in our code.
Add the following loader to the rules array:
{
test: /.(vue|js)$/,
use: 'eslint-loader',
enforce: 'pre'
}
The enforce: 'pre' property will run this loader before the others, so it will apply to the
code you wrote and not a transformation of it.
The last thing we need is to configure ESLint. Create a new file in the root directory named
.eslintrc.js, and add the following inside it:
module.exports = {
"extends": "eslint:recommended",
"parser": "babel-eslint",
plugins: [
'html'
]
}
We are saying a couple of things here. First is the set of rules we want to apply to our code;
in other words, our set of rules (which is empty now) is extending the recommended set of
rules. Second, we are using the babel-eslint parser instead of the default one. Finally,
we are using the HTML ESLint plugin, which will help us to deal with the .vue files and
will extract the JavaScript code in them.
We are now ready to launch our development machinery, but first, we need to install the
dependencies using the following command:
npm install --save vue
npm install --save-dev babel-eslint eslint eslint-loader eslint-plugin-html
vue-loader vue-template-compiler webpack webpack-dev-server

Organize + Automate + Deploy = Webpack Chapter 16
[ 529 ]
We can launch the Webpack dev server directly, but I highly suggest adding the following
code to the package.json file:
"scripts": {
"dev": "webpack-dev-server --entry ./src/index.js --inline --hot --open"
}
Now, if we launch npm run dev, a browser should open with the component incorrectly
displaying the following:
Hello Jane!
You should also be able to see the problem in the console:
11:7 error Duplicate key 'name' no-dupe-keys
This means that we have two keys with the same name. Correct the error by removing the
property:
data () {
return {
name: 'John'
}
}
In the console, after you save the Vue component, you should note that Webpack already
performed the compilation again, this time with no errors.
How it works...
Basically, what happens here is that the linter loader processes the files before other
compilation steps and writes the errors in the console. This way, you will be able to see
imperfections in your code while you develop continuously.
ESLint and Webpack are available in the Vue official template. You now know that if for
some reason, you want to modify the ESLint rules, you can do it from the .eslintrc.js
file and that if you want to use another linter altogether, you can use another loader in the
Webpack configuration file.

Organize + Automate + Deploy = Webpack Chapter 16
[ 530 ]
Using only one command to build both a
minified and a development .js file
While working on the release of your components, you may need a reliable process to issue
your built files. A common operation is to release two versions of a library/component: one
for development purposes and one to be consumed in production code, usually minified. In
this recipe, you will tweak the official template to release both a minified and a
development JavaScript file at the same time.
Getting ready
This recipe makes sense if you are already building and distributing your own components.
If you want to learn more, I suggest you refer to the Bundling your component with
Webpack recipe.
How to do it…
We'll start with a project with the official Webpack template. You can use your own, or you
can spin up a new project with vue init webpack and install the dependencies with npm
isntall.
Go inside the build directory. When you launch the npm run build command, you are
effectively launching the build.js file in this directory.
If you examine the file, you will find something like this near the end:
webpack(webpackConfig, function (err, stats) {
...
})
This is equivalent to launching Webpack from the command line using the same
configuration specified in the first argument, webpackConfig. To have a minified and non-
minified file, we have to bring the webpackConfig to a common denominator, then we
will specify only the differences between the development and production versions of the
files.
To do this, go inside webpack.prod.conf.js in the same directory. Here, you can see the
configuration we are passing; in particular, you will find UglifyJsPlugin, which is
responsible for minifying the file if you look at the plugin array. Remove the plugin since it
represents the main difference between the two distributions.

Organize + Automate + Deploy = Webpack Chapter 16
[ 531 ]
Now, write the following in build.js before the Webpack command:
const configs = [
{
plugins: [
new webpack.optimize.UglifyJsPlugin({
compress: {
warnings: false
},
sourceMap: true
})
]
},
{
plugins: []
}
]
You now have an array with two different configurations, one with the plugin required to
minify the file and one without it. If you merge each of them with the configuration inside
the webpack.prod.conf.js, you will obtain a different result.
To merge the two configurations, we will use the webpack-merge package. Add the
following line to the top of the file:
var merge = require('webpack-merge')
Then, modify the first line of the Webpack command to the following:
configs.map(c => webpack(merge(webpackConfig, c), function (err, stats) {
...
This will launch as many different merged configurations as we specify in the configs
array.
You can launch the npm run build command now, but the problem is that the files will
have the same name. Cut the output property from the webpack.prod.conf.js and paste
it in the config array, which should now look like this:
const configs = [
{
output: {
path: <whatever is your path>,
filename: 'myFilename.min.js'),
<other options you may have>
},
plugins: [

Organize + Automate + Deploy = Webpack Chapter 16
[ 532 ]
new webpack.optimize.UglifyJsPlugin({
compress: {
warnings: false
}
})
]
},
{
output: {
path: <whatever is your path>,
filename: 'myFilename.js'),
<other options you may have>
},
plugins: []
}
]
If you build your project now, you will have both a minified and a development file. You
can, of course, personalize your configurations to grow very different. For example, you
can add source maps in one and leave the other as is.
How it works...
We first created an array of objects that represent differences in the Webpack configuration.
We then mapped each piece of configuration into a larger, common configuration with the
help of webpack-merge. When we now call the npm run build command, both the
configurations run one after the other.
It's a common convention to postfix the name of the file with min to signal that the file is
minified and ready to be used in production.
Releasing your components to the public
At a certain point, there comes a moment when you want to give back to the community.
Maybe you built a "fart button" or maybe you built an automates stock options trader;
whatever it is that you've built, the JavaScript and Vue community will be happy to
welcome you. There is a big chunk of things to be done on the side of marketing and
licensing, but in this recipe you will concentrate on the more technical aspects.
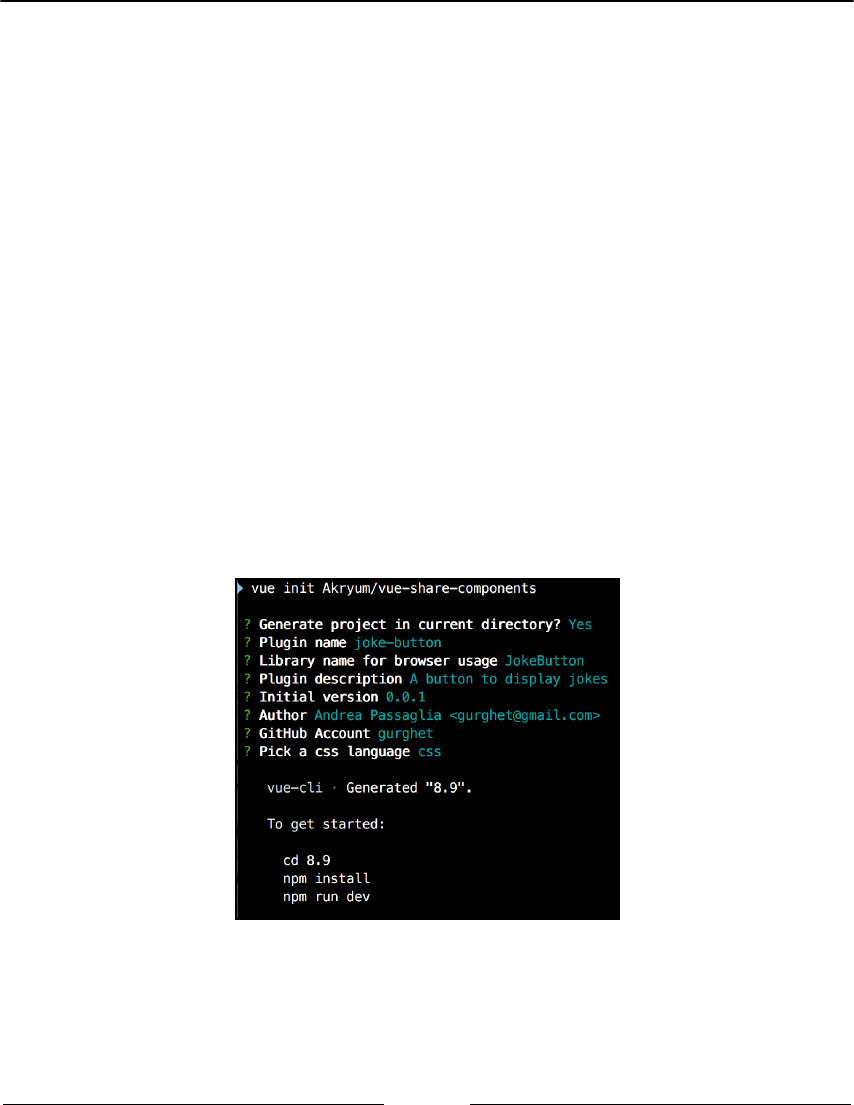
Organize + Automate + Deploy = Webpack Chapter 16
[ 533 ]
Getting ready
This recipe is directed at those who want to share their work in Vue with the rest of the
community. In the Bundling your component with Webpack recipe, you will find how to tweak
the official Webpack template to bundle your component correctly; this recipe can be
thought of as a second part. We will not use the official template though.
How to do it...
The approach I will take for this recipe is to use the excellent vue-share-components
template by Guillaume Chau. We'll build a joke button from that starting point.
In your command line, create a new directory and type the following command inside it:
vue init Akryum/vue-share-components
It will ask you some questions; you can copy the responses from the following image. The
only thing to note is that you (sadly) cannot use the joke-button name for your project
because I have already registered it while writing this recipe. However, you can come up
with a similar sounding name (you may want to check whether the name is available in the
npm registry before moving ahead):

Organize + Automate + Deploy = Webpack Chapter 16
[ 534 ]
Once the project is created, you can install the dependencies with npm install, just as in
the console output.
Inside the project, let's create the joke button component. Inside the component folder, you
will find a Test.vue component; rename it to JokeButton.vue and make it look like the
following code:
<template>
<div class="test">
<button @click="newJoke">New Joke</button>
<p>{{joke}}</p>
</div>
</template>
<script>
const jokes = [
'Chuck Norris/'s keyboard has the Any key.',
'Chuck Norris can win at solitaire with only 18 cards.',
'Chuck Norris/' first job was as a paperboy. There were no survivors.',
'When Chuck Norris break the build, you can/'t fix it.',
]
export default {
name: 'joke-button',
data () {
return {
joke: '...',
}
},
methods: {
newJoke () {
this.joke = jokes[Math.floor(Math.random() * jokes.length)]
},
},
}
</script>
Obviously, you can create the component you prefer; this is just an example.
In the index.js file, you will see the Test component imported and installed; you will
need to install the JokeButton instead. The lines you need to change are highlighted:
import JokeButton from './components/JokeButton.vue'
// Install the components
export function install (Vue) {
Vue.component('jokeButton', JokeButton)
/* -- Add more components here -- */
}
// Expose the components

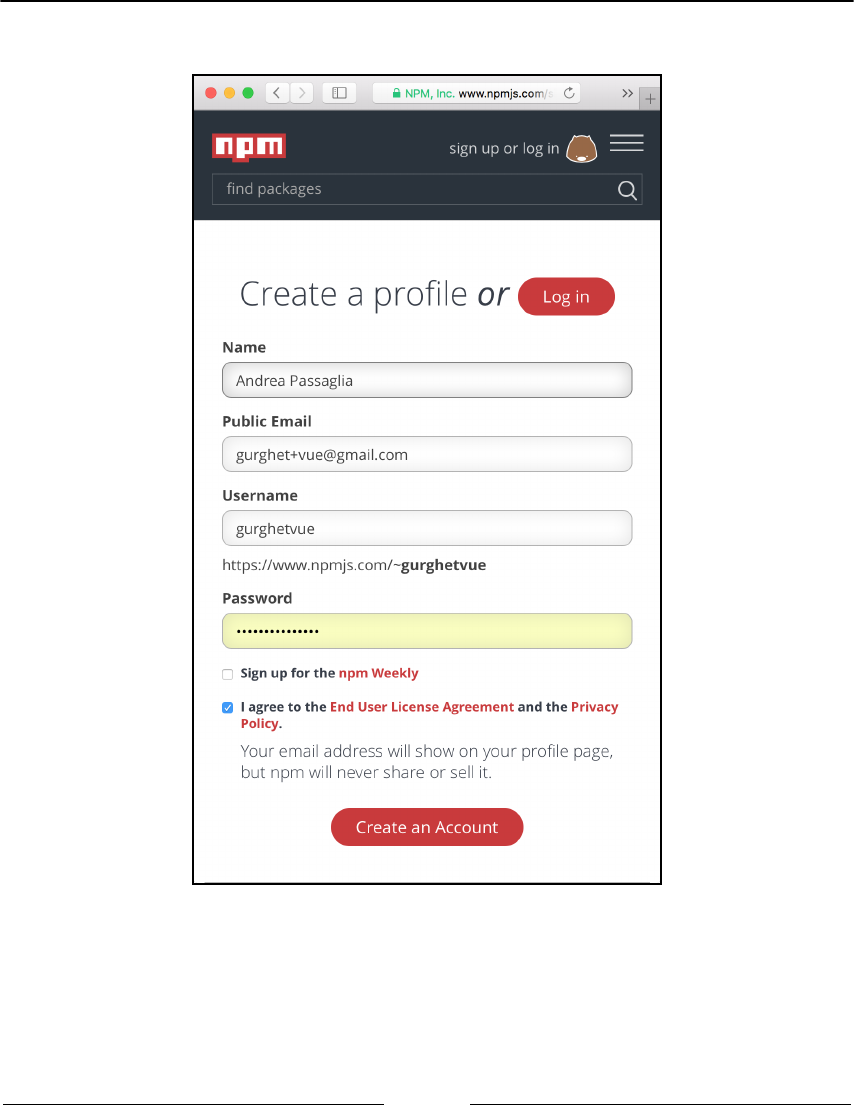
Organize + Automate + Deploy = Webpack Chapter 16
[ 536 ]
Click on sign up and enter your details, like I did here:
Of course, you can subscribe to the npm weekly newsletter if you like.
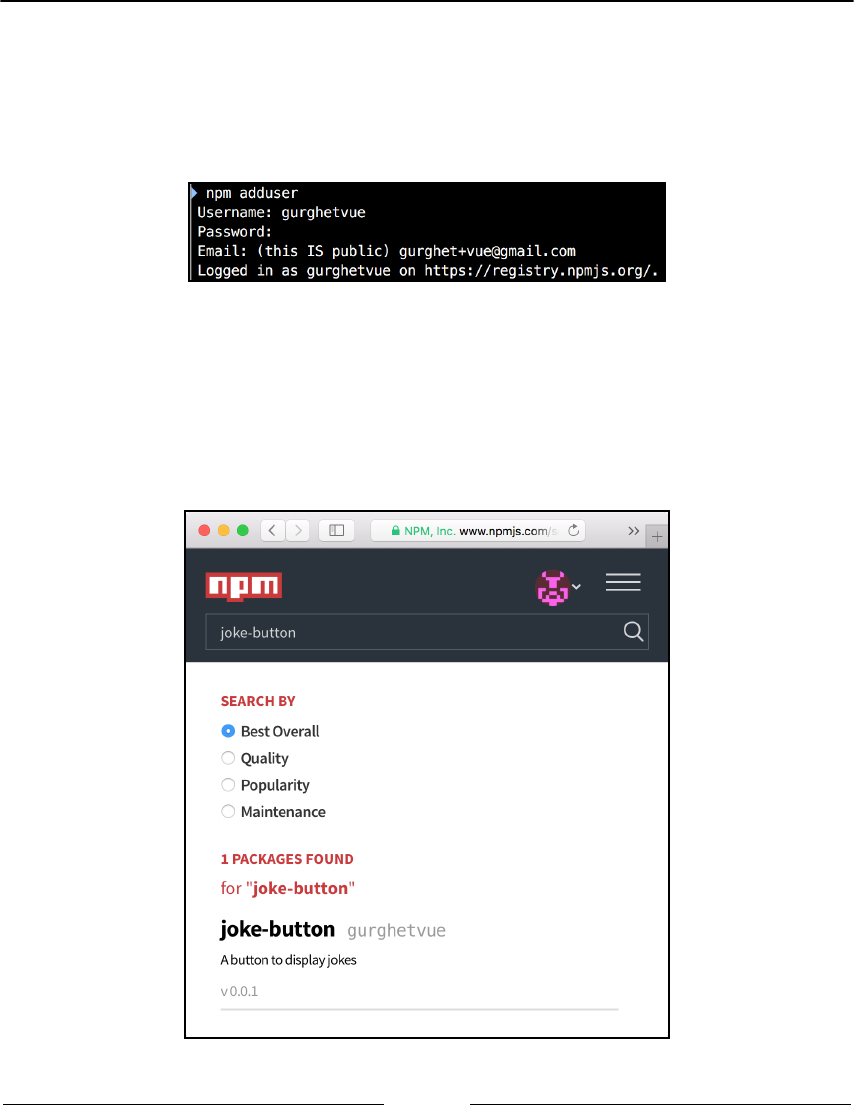
Organize + Automate + Deploy = Webpack Chapter 16
[ 537 ]
Once registered, you're done and can come back to the command line. You must log in to
the npm registry from the terminal with the following command:
npm adduser
You will see something like this:
You will have to enter the password you just entered for the npm website.
The next command will publish your library in the public repository:
npm publish
Now you can even look up your package and, sure enough, you will find it as shown in the
following screenshot:

Organize + Automate + Deploy = Webpack Chapter 16
[ 538 ]
To try it, you can find the instructions in your own README, how cool is that?
How it works...
The vue-share-components is simpler than the official template, so it's a good way to
learn by examining it.
The first thing we can take a look at is the package.json file. The following lines are
relevant:
...
"main": "dist/joke-button.common.js",
"unpkg": "dist/joke-button.browser.js",
"module": "index.js",
"scripts": {
"dev": "cross-env NODE_ENV=development webpack --config
config/webpack.config.dev.js --progress --watch",
"build": "npm run build:browser && npm run build:common",
"build:browser": "cross-env NODE_ENV=production webpack --config
config/webpack.config.browser.js --progress --hide-modules",
"build:common": "cross-env NODE_ENV=production webpack --config
config/webpack.config.common.js --progress --hide-modules",
"prepublish": "npm run build"
},
...
The main property is what we actually get when we write the following command in our
programs:
import JokeButton from 'JokeButton'
Alternatively, we get it when we add the following code:
var JokeButton = require("JokeButton")
So, the JokeButton variable will actually contain what is exported in our joke-
button.common.js.

Organize + Automate + Deploy = Webpack Chapter 16
[ 539 ]
You can edit the main property of package.json to point directly to a
.vue component. This way, you give the user the responsibility to
compile the component. While this is more work for the user, it also helps
when one wants the freedom to compile against the most recent version of
Vue.
In the latter case, if you have some logic of your component exported in
external.js files (like in the first recipe of this chapter), always
remember to add the directory in the Webpack rules, like so:
{
test: /.js$/,
loader: 'babel-loader',
include: [resolve('src'), resolve('test'),
resolve('node_modules/myComponent')]
},
The unpkg is particular of unpkg.com, which is a CDN. This is very nice because as soon as
we publish our project, we will have our script published at https://unpkg.com/joke-
button, and it will point to the joke-button.browser.js file that is suited for the
browser.
The prepublish script is a special script that will be called before publishing the project to
npm with the npm publish command. This eliminates the possibility that you forget to
build the files before publishing your component (it happened to me many times, so I was
forced to increase the version of the software artificially, build the files manually, and
publish again).
Another interesting fact to note is the difference between webpack.config.common.js,
which outputs the joke-button.common.js file, and webpack.config.browser.js,
which outputs the joke-button.browser.js file.
The first file has the output set to the following:
output: {
path: './dist',
filename: outputFile + '.common.js',
libraryTarget: 'commonjs2',
},
target: 'node',

Organize + Automate + Deploy = Webpack Chapter 16
[ 540 ]
So, it will output a library that will expose a commonJS interface; this is tailored for non-
browser environments, and you will have to require or import this library to use it. On the
other hand, the second file for the browser has the following output:
output: {
path: './dist',
filename: outputFile + '.browser.js',
library: globalName,
libraryTarget: 'umd',
},
A UMD will expose itself in a global scope, no need to import anything, so it's perfect for
the browser because we can include the file in a Vue webpage and use the component
freely. This is also possible, thanks to the index.js auto-install feature:
/* -- Plugin definition & Auto-install -- */
/* You shouldn't have to modify the code below */
// Plugin
const plugin = {
/* eslint-disable no-undef */
version: VERSION,
install,
}
export default plugin
// Auto-install
let GlobalVue = null
if (typeof window !== 'undefined') {
GlobalVue = window.Vue
} else if (typeof global !== 'undefined') {
GlobalVue = global.Vue
}
if (GlobalVue) {
GlobalVue.use(plugin)
}
What this code is doing is packaging the install function (which registers the component(s)
with Vue) inside the plugin constant and exporting it in the meantime. Then, it checks
whether there is either window or global defined, in that case, it gets hold of the Vue
variable that represents the Vue library and uses the plugin API to install the component(s).

17
Advanced Vue.js - Directives,
Plugins, and Render Functions
In this chapter, we will talk about the following topics:
Creating a new directive
Using WebSockets in Vue
Writing a plugin for Vue
Rendering a simple component manually
Rendering a component with children
Using JSX to render a component
Creating a functional component
Building a responsive table with higher-order components
Introduction
Directives and plugins are ways to package functionality in a reusable way and also make it
easily shareable across apps and teams; you will build a few of them in this chapter. Render
functions are how Vue really works under the hood to turn templates into the Vue
language and then into HTML and JavaScript again; they become useful if you need to
optimize the performance of your apps and work in some corner cases.
In general, you should avoid using these advanced functions when possible as they have
been a little overused in the past. Usually, many problems can be solved by simply writing
a good component and distributing the component itself; you should look at advanced
features only when this is not true.

Advanced Vue.js - Directives, Plugins, and Render Functions Chapter 17
[ 542 ]
This chapter is for the slightly more experienced, and you probably won't find the level of
step-by-step detail found in other recipes, but I have strived to make them complete
nonetheless.
Creating a new directive
Directives are like mini functions that you can use to quickly drop into your code, mainly to
improve the user experience, and to add new low-level features to your graphic interface.
Getting ready
This recipe, although found in the advanced chapter, is really easy to complete. The main
reason directives are advanced is because you should usually prefer composition to add
functionality and style to your apps. When components won't cut it, use directives.
How to do it...
We will build a v-pony directive that will turn any element into a pony element. A pony
element is created with a pink background and changes color when you click on it.
The HTML code for the pony element is as follows:
<div id="app">
<p v-pony>I'm a pony paragraph!</p>
<code v-pony>Pony code</code>
<blockquote>Normal quote</blockquote>
<blockquote v-pony>I'm a pony quote</blockquote>
</div>
Just to show the difference, I've included a normal blockquote element. In our JavaScript
section, write the following:
Vue.directive('pony', {
bind (el) {
el.style.backgroundColor = 'hotpink'
}
})
Advanced Vue.js - Directives, Plugins, and Render Functions Chapter 17
[ 543 ]
This is how you declare a new directive. The bind hook is called when the directive is
bound to the element. The only thing we are doing now is setting the background color. We
also want to make it change color after each click. To do this, you have to add this code:
Vue.directive('pony', {
bind (el) {
el.style.backgroundColor = 'hotpink'
el.onclick = () => {
const colGen = () =>
Math.round(Math.random()*255 + 25)
const cols =
[colGen() + 100, colGen(), colGen()]
const randRGB =
`rgb(${cols[0]}, ${cols[1]}, ${cols[2]})`
el.style.backgroundColor = randRGB
}
}
})
Here, we are creating an onclick listener that will generate a random color with a bias
toward red and assign it as a new background color.
At the end of our JavaScript, remember to create a Vue instance:
new Vue({
el: '#app'
})
You can launch your application to see your directive in action:
Don't forget to click on the text to change the background color!
Advanced Vue.js - Directives, Plugins, and Render Functions Chapter 17
[ 544 ]
How it works…
The syntax to declare a new directive is as illustrated:
Vue.directive(<name: String>, {
// hooks
})
This will register a new global directive. Inside the hooks object, you can define two
important functions: bind, which you used in this recipe, and update, which is triggered
every time a component contained in it is updated.
Every hook function is called with at least three arguments:
el: The HTML element
binding: Directives can receive an argument; binding is an object that will
contain the value of the argument
vnode: the Vue internal representation of this element
We used the el parameter to edit the appearance of our element, manipulating it directly.
Using WebSockets in Vue
WebSockets is a new technology that enables two-way communication between the user
and the server where the app is hosted. Before this technology, only the browser could
initiate a request and, thus, a connection. If some update on the page was expected, the
browser had to continuously poll the server. With WebSockets, this is no longer necessary;
after the connection is established, the server can send updates only when there is a need.
Getting ready
You don't need any preparation for this recipe, just the basics of Vue. If you don't know
what WebSockets are, you don't really need to, just think about them as a channel of
continuous two-way communication between a server and browser.

Advanced Vue.js - Directives, Plugins, and Render Functions Chapter 17
[ 545 ]
How to do it...
For this recipe, we need a server and a browser that will act a client. We will not build a
server; instead, we'll use an already existing server that just echoes whatever you send to it
via WebSockets. So, if we were to send the Hello message, the server would respond with
Hello.
You will build a chat app that will talk to this server. Write the following HTML code:
<div id="app">
<h1>Welcome</h1>
<pre>{{chat}}</pre>
<input v-model="message" @keyup.enter="send">
</div>
The <pre> tag will help us render a chat. As we don't need the <br/> element to break a
line, we can just use the n special character that means a new line.
For our chat to work, we first have to declare our WebSocket in the JavaScript:
const ws = new WebSocket('ws://echo.websocket.org')
After that, we declare our Vue instance that will contain a chat string (to contain the chat
so far) and a message string (to contain the message we are currently writing):
new Vue({
el: '#app',
data: {
chat: '',
message: ''
}
})
We still need to define the send method, which is called upon pressing Enter in the textbox:
new Vue({
el: '#app',
data: {
chat: '',
message: ''
},
methods: {
send () {
this.appendToChat(this.message)
ws.send(this.message)
this.message = ''
},
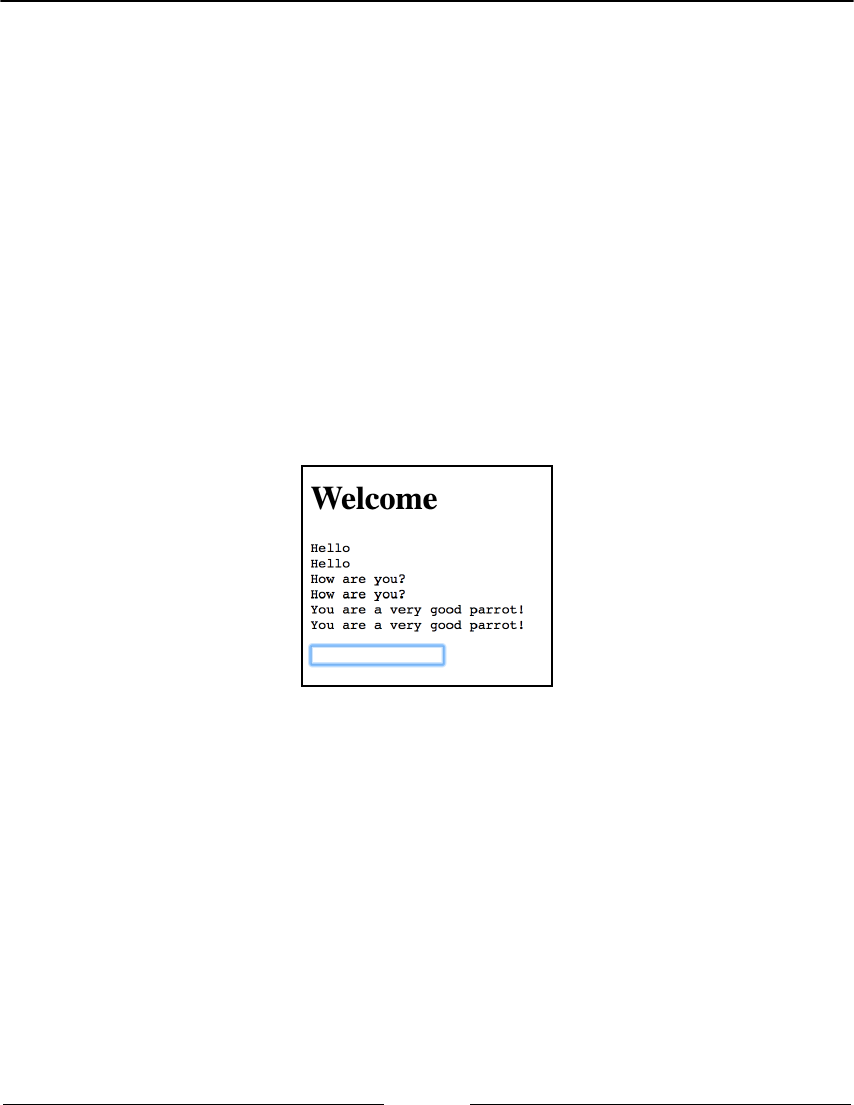
Advanced Vue.js - Directives, Plugins, and Render Functions Chapter 17
[ 546 ]
appendToChat (text) {
this.chat += text + 'n'
}
}
}
We factored out the appendToChat method because we will use it to append all the
messages we'll receive. To do this, we must wait for the component to be instantiated. The
created hook is a safe place for that:
...
created () {
ws.onmessage = event => {
this.appendToChat(event.data)
}
}
...
Now launch the application to chat with your personal echo chamber:
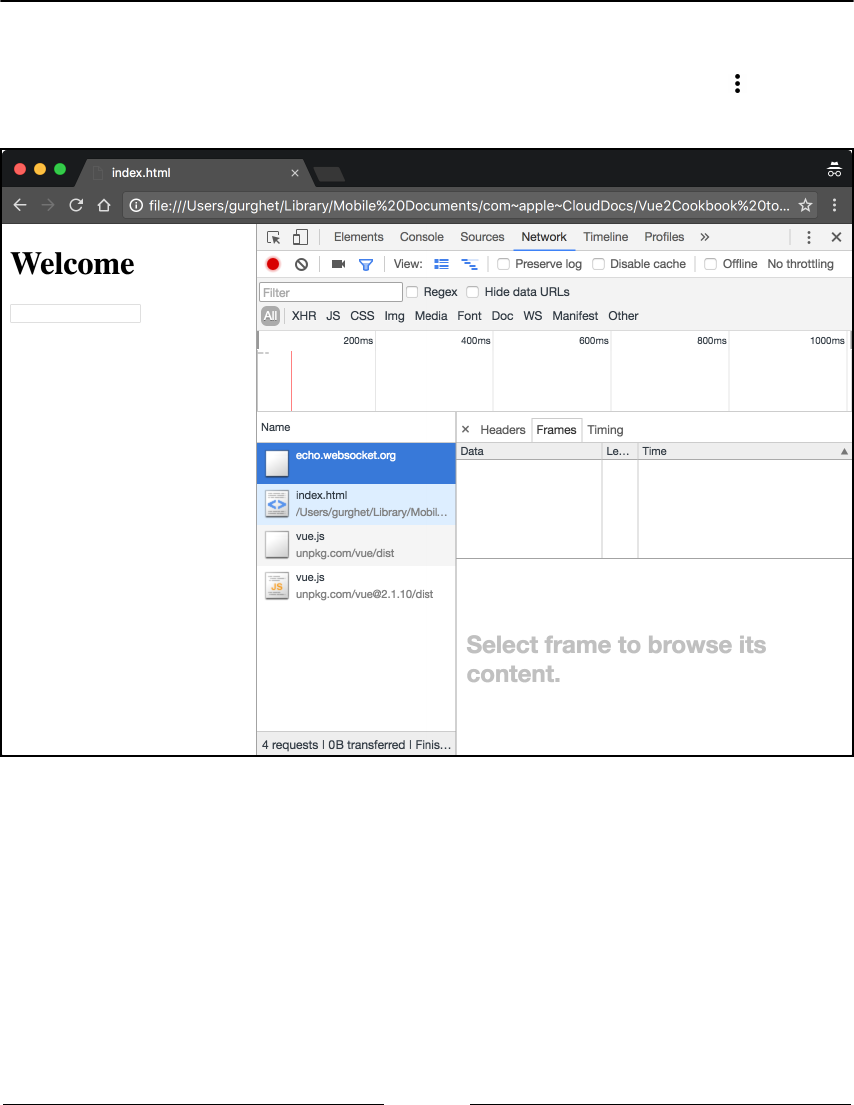
Advanced Vue.js - Directives, Plugins, and Render Functions Chapter 17
[ 547 ]
How it works...
To see the internals of what you have built, open the Chrome developer tools ( | More
tools | Developer tools or Opt + Cmd + I):
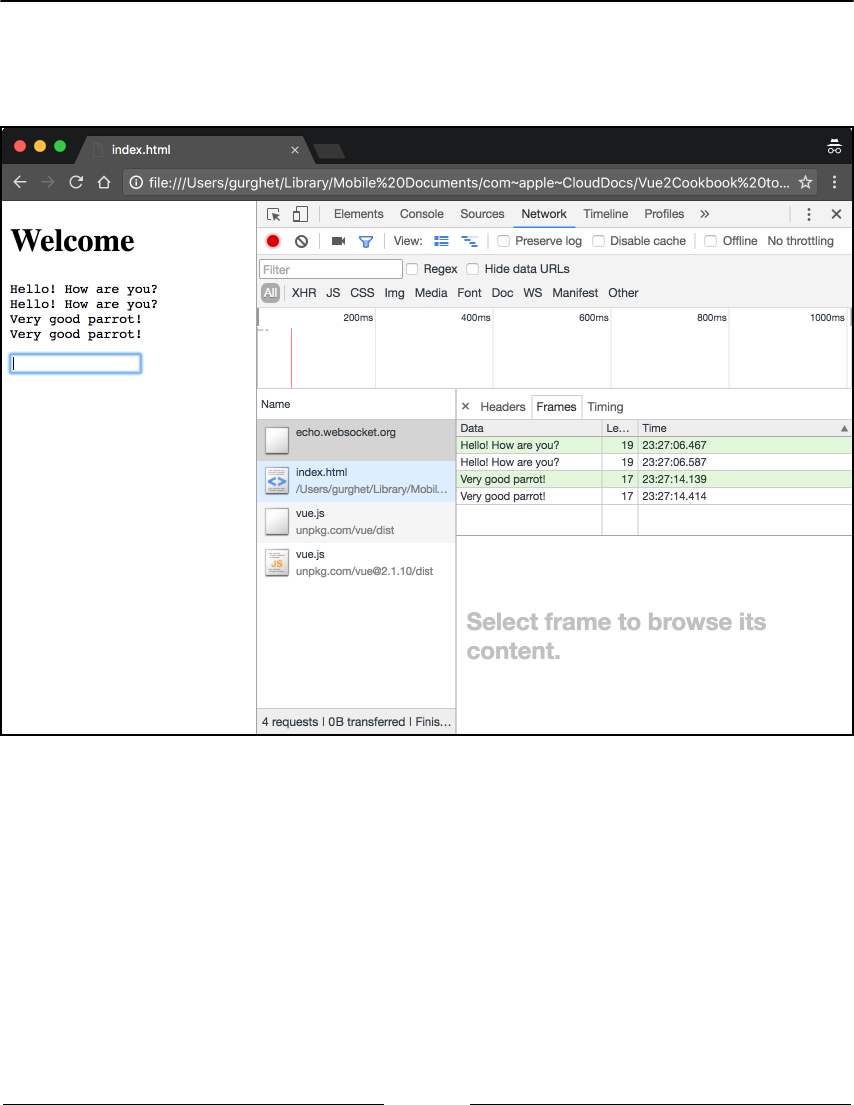
Advanced Vue.js - Directives, Plugins, and Render Functions Chapter 17
[ 548 ]
Go to the Network tab and reload the page; you should see the
echo.websocket.orl WebSocket, as seen in the screenshot. Write something and
messages will appear in the frame tab, like so:
The green messages are sent from you while the white messages are the ones you receive.
You can also examine the message length (in bytes) and the exact time they were sent or
received.

Advanced Vue.js - Directives, Plugins, and Render Functions Chapter 17
[ 549 ]
Writing a plugin for Vue
A plugin is a collection of utilities or a global new behavior that we want in our application.
Vuex and vue-router are two famous examples of Vue plugins. A plugin can really be
anything, since writing one means acting at a very low level. There are different kinds of
plugins you can write. For this recipe, we will concentrate on building a directive with
global properties.
Getting ready
This recipe will be based on Creating a new directive, except that we will add some features
for global coordination.
How to do it...
For this recipe, we will build a website for a kangaroo appreciation club. The layout of the
home page HTML looks like this:
<div id="app">
<h1>Welcome to the Kangaroo club</h1>
<img src="https://goo.gl/FVDU1I" width="300px" height="200px">
<img src="https://goo.gl/U1Hvez" width="300px" height="200px">
<img src="https://goo.gl/YxggEB" width="300px" height="200px">
<p>We love kangaroos</p>
</div>
You can change the link to the images of kangaroos with the one you prefer.
In the JavaScript part, we instantiate an empty Vue instance for now:
new Vue({
el: '#app'
})

Advanced Vue.js - Directives, Plugins, and Render Functions Chapter 17
[ 550 ]
If we open the page now, we get this:
Now we want to add a fun note to our website. We want the elements of the page, except
the title, to jump at random intervals.
To do this, the strategy you will implement is to register all the elements that will need to
jump in an array, and then, periodically take a random element and make it jump.

Advanced Vue.js - Directives, Plugins, and Render Functions Chapter 17
[ 551 ]
The first thing we need to define is the jump animation in CSS:
@keyframes generateJump {
20%{transform: translateY(0);}
40%{transform: translateY(-30px);}
50%{transform: translateY(0);}
60%{transform: translateY(-15px);}
80%{transform: translateY(0);}
}
.kangaroo {
animation: generateJump 1.5s ease 0s 2 normal;
}
What this does is create a class named kangaroo that, when applied to an element, makes
it jump twice by translating it along the y axis.
Next, write a function that adds this class to a specified element in the JavaScript:
const jump = el => {
el.classList.add('kangaroo')
el.addEventListener('animationend', () => {
el.classList.remove('kangaroo')
})
}
The jump function adds the kangaroo class and then removes it when the animation is
finished.
We want to perform this action on a random element picked from the ones registered:
const doOnRandomElement = (action, collection) => {
if (collection.length === 0) {
return
}
const el =
collection[Math.floor(Math.random()*collection.length)]
action(el)
}
The doOnRandomElement function takes an action and a collection and applies the action
to a drawn element. We then need to schedule it at random intervals:
const atRandomIntervals = action => {
setTimeout(() => {
action()
atRandomIntervals(action)
}, Math.round(Math.random() * 6000))
}

Advanced Vue.js - Directives, Plugins, and Render Functions Chapter 17
[ 552 ]
The atRandomIntervals function takes the specified function and calls it at random
intervals shorter than 6 seconds.
We now have all the functions we need to actually build a plugin that will make our
element jump:
const Kangaroo = {
install (vueInstance) {
vueInstance.kangaroos = []
vueInstance.directive('kangaroo', {
bind (el) {
vueInstance.kangaroos.push(el)
}
})
atRandomIntervals(() =>
doOnRandomElement(jump, vueInstance.kangaroos))
}
}
The Kangaroo plugin, when installed, creates an empty array; it declares a new
directive, kangaroo which will register all the elements with it inside the array.
Then at random intervals, one random element is drawn from the array and the jump
function is called on it.
To activate the plugin, we need one line before declaring the Vue instance (but after
declaring Kangaroo):
Vue.use(Kangaroo)
new Vue({
el: '#app'
})
We have to choose the elements that jump, that is, everything except the title:
<div id="app">
<h1>Welcome to the Kangaroo club</h1>
<img v-kangaroo src="https://goo.gl/FVDU1I" width="300px"
height="200px">
<img v-kangaroo src="https://goo.gl/U1Hvez" width="300px"
height="200px">
<img v-kangaroo src="https://goo.gl/YxggEB" width="300px"
height="200px">
<p v-kangaroo>We love kangaroos</p>
</div>

Advanced Vue.js - Directives, Plugins, and Render Functions Chapter 17
[ 553 ]
If you run your app now, you will see that an image or the text jumps just like a kangaroo
every few seconds.
How it works...
In its essence, a Vue plugin is just a way to group some functionalities. There are not many
restrictions and all you have to do to create a plugin is to declare an install function. The
general syntax to do that is as follows:
MyPlugin.install = (vueInstance, option) => {
// ...
}
To use the plugin you just made, write the following:
Vue.use(MyPlugin, { /* any option you need */ })
Here, the second parameter is the optional object that gets passed to the install function.
Since plugins are global entities, you should use them sparsely and only for features that
you foresee will affect your app throughout.
Rendering a simple component manually
Vue turns your HTML templates into render functions. Usually, you should stick to
templates because they are much simpler. There are a couple of cases in which render
functions become in handy. Here, we show a simple example in which render functions are
useful.
Getting ready
This is the first recipe on render functions. If you already understand the basics of Vue, you
will understand everything.

Advanced Vue.js - Directives, Plugins, and Render Functions Chapter 17
[ 554 ]
How to do it...
The first use case for render functions is whenever you just want a Vue instance that
displays another component.
Write an empty HTML layout, as follows:
<div id="app"></div>
We have a Greeter component somewhere that we want to show as the main Vue instance.
In the JavaScript part, add the following code:
const Greeter = {
template: '<p>Hello World</p>'
}
Here, we have to imagine that we are taking the Greeter component from somewhere else
and, since the component is nicely packaged, we don't want to modify it. Instead, we
will pass it to the Vue main instance:
const Greeter = {
template: '<p>Hello World</p>'
}
new Vue({
el: '#app',
render: h => h(Greeter)
})
If we launch the application now, we will only see the Greeter component. The main Vue
instance will only act as a wrapper.
How it works...
The render function replaces the template in the Vue instance. When render is called, the
passed argument is the so-called createElement function. We named it h for brevity. This
function accepts three arguments, but for now, just note how the first argument we are
passing (the only one we are passing) is the Greeter component.
Advanced Vue.js - Directives, Plugins, and Render Functions Chapter 17
[ 555 ]
In theory, you can write the component inline, inside the h function. In a
real project, this is not always possible depending on the presence of the
Vue template compiler at runtime. When you use the official Webpack
template, one of the questions you are asked is whether you want to
include the Vue template compiler when distributing your software.
The arguments for the createElement function are listed here:
As the first argument, the only required one, you have the option to pass three1.
different things:
The options of a Vue component, like in our recipe
A string representing an HTML tag (such as div, h1, and p)
A function that returns an options object for a Vue component or a
string representing an HTML tag
The second argument must be an object called Data Object. This object is2.
explained in the next recipe.
The third argument is an array or a string:3.
The array represents a list of elements, text, or components to put
inside the component
You can write a string that will be rendered to text
Rendering a component with children
In this recipe, you will build a simple web page with a few elements and components
completely using render functions. This will give you a close-up view of how Vue compiles
your templates and components. It may be useful if you want to build an advanced
component and you want a full example to kick start.
Getting ready
This is a complete recipe on how to build components through render functions. Usually,
you don't need to do this in practice; it's recommended only for advanced readers.
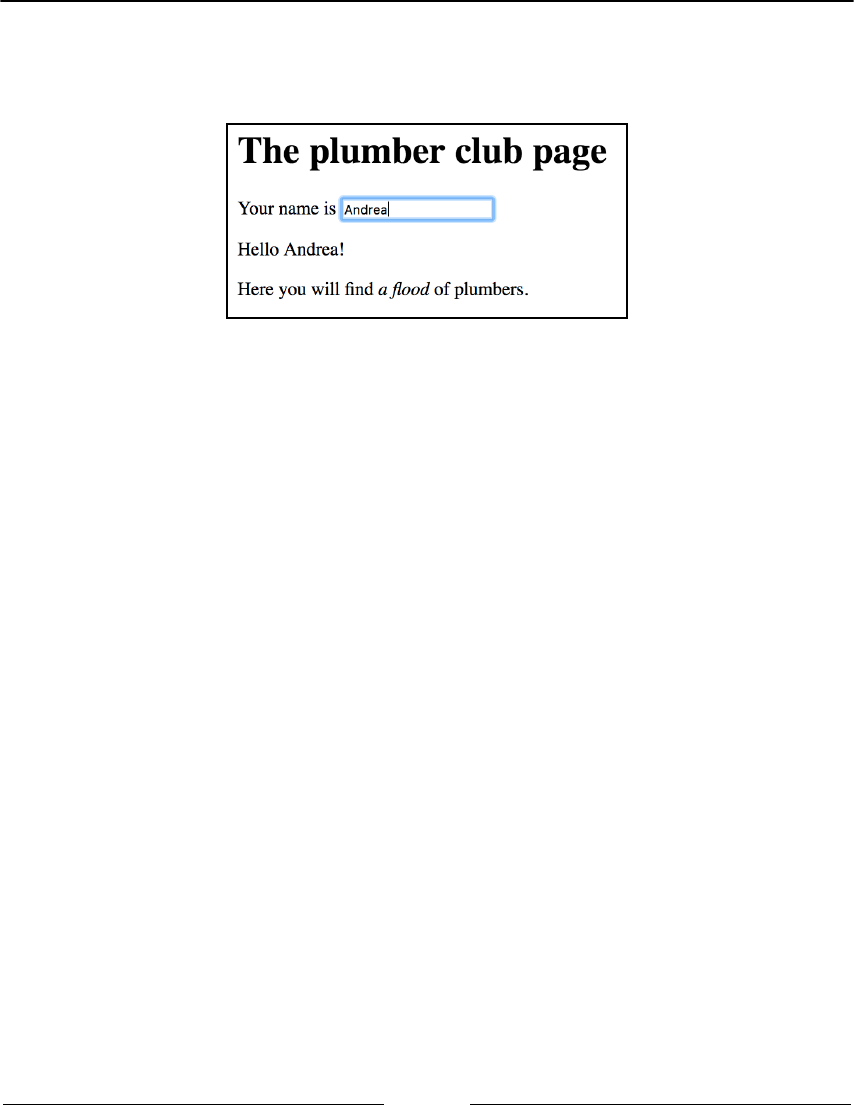
Advanced Vue.js - Directives, Plugins, and Render Functions Chapter 17
[ 556 ]
How to do it...
You will build a page for a plumber club. The page will look like this:
Whenever we write a name inside the name textbox, it will be written in the greeting
exactly like the v-model directive.
For this recipe, we are starting from the end instead of the beginning because usually when
you have to resort to the render function, you have a pretty clear idea of what you are
trying to get.
In the HTML side of our app, let's start with an empty tag:
<div id="app"></div>
In the JavaScript, write an empty <div> element in the render function:
new Vue({
el: '#app',
render: h => h('div')
})
The first thing we'll put inside is the title, like so:
new Vue({
el: '#app',
render: h => h(
'div',
[
h('h1', 'The plumber club page')
]
)
})

Advanced Vue.js - Directives, Plugins, and Render Functions Chapter 17
[ 557 ]
All the other elements and components will fit inside the array we have just created for the
title.
We need an <input> element that will take the value and display a greeting. For this, we
can build a Vue component.
In the following code, we are using a regular JavaScript function instead of an arrow
function; this is because we want a reference to the component itself. Arrow functions don't
allow you to modify the scope of this, while this depends on how the function is called
and can be optionally bound to any variable in regular functions. In our case, it will be
bound to the instance component.
After the title of the page, we add the following component in the same array:
h(
{
render: function (h) {
const self = this
return h('div', [
'Your name is ',
h('input', {
domProps: {
value: self.name
},
on: {
input (event) {
self.name = event.target.value
}
}
}),
h(
'p',
'Hello ' + self.name +
(self.exclamation ? '!' : ''))
])
},
data () { return { name: '' } },
props: ['exclamation']
},
{
props: {
exclamation: true
}
}
)
The component has three options: the render, data, and props functions.

Advanced Vue.js - Directives, Plugins, and Render Functions Chapter 17
[ 558 ]
The second parameter of the createElement function is to actually assign values to our
props:
{
props: {
exclamation: true
}
}
This will be equivalent to writing :exclamation="true" when declaring the component.
You can easily understand the data and props options of the component. Let's examine
what we wrote in the render function.
In the first line of the function, we set self = this as a convenient way to refer to the
component were we to add any nested functions. Then, we return the result of a
createElement function (h) that, inside a div tag, places three things in the DOM. The first
is the raw text Your name is and then two elements: an input and a paragraph.
We don't have a direct equivalent of the v-model directive when working with render
functions. Instead, we implement it manually. We bind the value to the name, and then we
add a listener to the input event that will set the value of the state variable, name, to
whatever is inside the textbox.
We then insert a paragraph element that will compose the greeting phrase, adding an
exclamation point based on the value of the exclamation prop.
After the component, we can add the following, as illustrated, in the same array:
'Here you will find ', h('i', 'a flood '), 'of plumbers.'
If you have done things right, you should be able to run the application and see the whole
page.
How it works...
In this example, we've seen a glimpse of what happens behind the curtains when Vue
compiles our templates; again, you are not advised to do this with regular components.
Most of the time, the result will be just more verbose with little or no gain. On the other
hand, there are a couple of cases in which writing the render function may actually result in
better or more robust code and cover some functionality that is difficult to express with
templates.

Advanced Vue.js - Directives, Plugins, and Render Functions Chapter 17
[ 559 ]
Using JSX to render a component
JSX is very popular in the React community. In Vue, you don't have to use JSX to build
templates for your components; you can use the much more familiar HTML. JSX, however,
is the next best thing you can do if you are forced to write a lot of render functions.
Getting ready
Before venturing into this recipe, you better play a little with the render function. The
previous recipes provide some exercises.
How to do it...
JSX needs a Babel plugin to work. For this recipe, I will assume that you are working within
the webpack template.
To install the babel plugin, you can run the following command:
npm install
babel-plugin-syntax-jsx
babel-plugin-transform-vue-jsx
babel-helper-vue-jsx-merge-props
--save-dev
Inside the .babelrc file, add the following in the plugins array:
"plugins": [
...
"transform-vue-jsx"
]
Run npm install, as usual, to actually install all the dependencies.
Now, open the main.js and delete everything inside. Replace it with the following code:
import Vue from 'vue'
/* eslint-disable no-new */
new Vue({
el: '#app',
render (h) {
return <div>{this.msg}</div>
},
data: {

Advanced Vue.js - Directives, Plugins, and Render Functions Chapter 17
[ 560 ]
msg: 'Hello World'
}
})
The highlighted line is the weird bit if you have never seen JSX. Just note that we didn't use
the arrow function in the render option in the preceding code. That's because we are using
this inside and we want it to be bound to the component.
You can already see your page working using the npm run dev command.
How it works...
The babel plugin will turn the JSX code into a JavaScript render function.
I wouldn't recommend using JSX with Vue. The only time I can see it being useful is
whenever you need to intermix render functions with JavaScript and you need a quick
and readable way of defining templates. Other than that, there are not many advantages
to using JSX.
There's more...
Let's complicate the code a little bit to at least have a flavor of how JSX plays with props.
Define a new component before the main Vue instance:
const myComp = {
render (h) {
return <p>{this.myProp}</p>
},
props: ['myProp']
}
Let's use this component in our Vue instance and pass the msg variable via props:
new Vue({
el: '#app',
render (h) {
return <div>
<myComp myProp={this.msg}/>
</div>
},
data: {
msg: 'Hello World'
},

Advanced Vue.js - Directives, Plugins, and Render Functions Chapter 17
[ 561 ]
components: {
myComp
}
})
The syntax is slightly different from an HTML template. In particular, note how props are
passed and how we can use camelCase and self-closing tags.
Creating a functional component
A lighter version of a component is a functional component. The functional component
doesn't have instance variables (so no this) and has no state. In this recipe, we will write a
simple functional component that takes some instructions via HTML and turns them into a
drawing.
Getting ready
Before attempting this recipe, you should at least become familiar with the render function
in Vue. You can use the previous recipes to do that.
How to do it...
When you are writing an <svg> element, you usually have to put data in the attributes of
elements inside it to actually draw shapes. For example, if you want to draw a triangle, you
have to write the following:
<svg>
<path d="M 100 30 L 200 30 L 150 120 z"/>
</svg>
The text inside the d attribute is a series of instructions that make a virtual cursor move to
draw: M moves the cursor to the (100, 30) coordinate inside the <svg>, then L traces a line
up until (200, 30) and then again to the (150, 120) coordinate. Finally, z closes the path we
are drawing, and the result is always a triangle.

Advanced Vue.js - Directives, Plugins, and Render Functions Chapter 17
[ 562 ]
We would like to write a triangle with a component, but we don't like attributes and we
want to write in our own language, so we would write the following to get the same result:
<orange-line>
moveTo 100 30 traceLine 200 30 traceLine 150 120 closePath
</orange-line>
This is a perfect job for a functional component because there is no state to manage, only a
translation from one component to one element.
Your HTML layout will simply look like this:
<div id="app">
<orange-line>
moveTo 100 30 traceLine 200 30 traceLine 150 120 closePath
</orange-line>
</div>
Then, lay out your functional component in your JavaScript:
const OrangeLine = {
functional: true,
render (h, context) {
return h('svg',
[]
)
}
}
You have to specify that the component will be functional with functional: true; then
the render function is slightly different than usual. The first argument is still the
createElement function, but the second passed is the context of our component.
We can access the text written inside the HTML of our component (the commands to draw)
through context.children.
You can see that I already added an empty <svg> element. Inside this, there is an empty
array of children; we will put only the <path> element there, which is as follows:
render (h, context) {
return h('svg',
[
h('path', {
attrs: {
d: context.children.map(c => {
return c.text
.replace(/moveTo/g, 'M')
Advanced Vue.js - Directives, Plugins, and Render Functions Chapter 17
[ 563 ]
.replace(/traceLine/g, 'L')
.replace(/closePath/g, 'z')
}).join(' ').trim(),
fill: 'black',
stroke: 'orange',
'stroke-width': '4'
}
})
]
)
}
The highlighted code creates a path element and then sets some attributes, such as fill
and stroke. The d attribute takes the text from inside the component, makes some
substitutions, and then returns it.
We just need to create the Vue instance in the JavaScript:
new Vue({
el: '#app',
components: {
OrangeLine
}
})
Now, loading the app, we should see a triangle, which is shown in the following
screenshot:
Advanced Vue.js - Directives, Plugins, and Render Functions Chapter 17
[ 564 ]
How it works...
Vue lets you create components that are very lightweight as they don't have any internal
state. With this come some limitations, for example, the only place where we can put some
logic to process user input (in the form of children of the element or props) is in the render
function.
The context we passed contains the following properties:
props: This is passed by the user.
children: This is really an array of virtual nodes, children of our component in
the template. We don't have the actual HTML element here but only a
representation of it by Vue.
slots: This is a function returning the slots (can be used instead of children in
some cases).
data: This is the entire data object passed to the component.
parent: This is a reference to the parent component.
In our code, we extracted the text inside the component by doing the following:
context.children.map(c => {
return c.text
.replace(/moveTo/g, 'M')
.replace(/traceLine/g, 'L')
.replace(/closePath/g, 'z')
}).join(' ').trim()
We are taking the array of virtual nodes contained in children and mapping each node to
its text. Since we put only some text in our HTML, the array of nodes will be a singleton,
with only one node: the text we entered. Therefore, in this particular case, doing var a =
children.map(c => someFunction(c)) is then equivalent of doing var a =
[someFunction(children[0])].
We are not only extracting the text though, but we are also replacing some terms I invented
to describe svg commands, with the real commands. The join function will sew together
all the strings in the array (just one in our case) and trim will remove all the white spaces
and line breaks.

Advanced Vue.js - Directives, Plugins, and Render Functions Chapter 17
[ 565 ]
Building a responsive table with higher-
order components
Functional components are very good wrappers when we have to decide which component
to actually wrap. In this recipe, you'll write a responsive table that will display different
columns depending on the browser width.
Getting ready
This recipe is about functional components. If you want to warm up, you can try and
complete the previous recipe.
How to do it...
For this recipe, we will use the excellent semantic UI CSS framework. To use it, you have to
include the CSS library as a dependency or as a <link> tag. For example, you can put the
following code in the <head> of your HTML:
<link rel="stylesheet"
href="https://cdnjs.cloudflare.com/ajax/libs/semantic-ui/2.2.7/semantic.css
" />
If you are using JSFiddle, the link inside should be sufficient.
Another tag you have to add to your page for it to look good on mobile is this:
<meta name="viewport" content="width=device-width">
This tells the mobile browser that the width of the page is equal to the width of the device.
If you don't put this, the mobile may assume that the page is much larger than the phone
and, trying to display all of it, show a miniaturized version of your app.
We will design a table of cat breeds. You can see all the data in the Vue instance status.
Write it in your JavaScript:
new Vue({
el: '#app',
data: {
width: document.body.clientWidth,
breeds: [
{ name: 'Persian', colour: 'orange', affection: 3, shedding: 5 },
{ name: 'Siberian', colour: 'blue', affection: 5, shedding: 4 },

Advanced Vue.js - Directives, Plugins, and Render Functions Chapter 17
[ 566 ]
{ name: 'Bombay', colour: 'black', affection: 4, shedding: 2 }
]
},
created() {
window.onresize = event => {
this.width = document.body.clientWidth
}
},
components: {
BreedTable
}
})
We are declaring the width variable to change the layout of the page and since the width of
the page is not reactive by nature, we're also installing a listener on window.onresize.
For a real project, you'll probably want something a bit more sophisticated, but for this
recipe, this will suffice.
Also, note how we are using the BreedTable component, which we write like this:
const BreedTable = {
functional: true,
render(h, context) {
if (context.parent.width > 400) {
return h(DesktopTable, context.data, context.children)
} else {
return h(MobileTable, context.data, context.children)
}
}
}
What our component is doing is just passing all the context.data and
context.children to another component, which will be DesktopTable or
MobileTable, depending on the resolution.
Our HTML layout is the following:
<div id="app">
<h1>Breeds</h1>
<breed-table :breeds="breeds"></breed-table>
</div>

Advanced Vue.js - Directives, Plugins, and Render Functions Chapter 17
[ 567 ]
The breeds props will be passed on to the selected component in the context.data.
Our desktop table will look pretty regular for a table:
const DesktopTable = {
template: `
<table class="ui celled table unstackable">
<thead>
<tr>
<th>Breed</th>
<th>Coat Colour</th>
<th>Level of Affection</th>
<th>Level of Shedding</th>
</tr>
</thead>
<tbody>
<tr v-for="breed in breeds">
<td>{{breed.name}}</td>
<td>{{breed.colour}}</td>
<td>{{breed.affection}}</td>
<td>{{breed.shedding}}</td>
</tr>
</tbody>
</table>
`,
props: ['breeds']
}
The classes at the top are part of semantic UI and they will make our table look much
better. The unstackable class, in particular, disables the automatic stacking performed by
CSS. We will cover more on this in the next section.
For the mobile table, we'd like to edit not only the styling, but we'd also like to group the
columns themselves. The breed will go along with the color and the affection with the
shedding. Also, we want to express them in a compact style. The table head will look like
this:
const MobileTable = {
template: `
<table class="ui celled table unstackable">
<thead>
<tr>
<th>Breed</th>
<th>Affection & Shedding</th>
</tr>
</thead>
...

Advanced Vue.js - Directives, Plugins, and Render Functions Chapter 17
[ 568 ]
Instead of just spelling the coat color, we draw a little circle of that color:
...
<tbody>
<tr v-for="breed in breeds">
<td>{{breed.name}}
<div
class="ui mini circular image"
:style="'height:35px;background-color:'+breed.colour"
></div>
</td>
...
Also, instead of using numbers like in the desktop table for the affection and shedding
level, we put a heart and star rating:
...
<td>
<div class="ui heart rating">
<i
v-for="n in 5"
class="icon"
:class="{ active: n <= breed.affection }"
></i>
</div>
<div class="ui star rating">
<i
v-for="n in 5"
class="icon"
:class="{ active: n <= breed.shedding }"
></i>
</div>
</td>
</tr>
</tbody>
</table>
Also, don't forget to declare the breeds prop like in the DesktopTable component.
Advanced Vue.js - Directives, Plugins, and Render Functions Chapter 17
[ 569 ]
Now launch your application in a browser. You can see how the table groups the column
when squished enough:
The following screenshot shows that numbers are replaced by hearts and star rating:
How it works...
A responsive page changes its layout according to the width of the browser and this is very
important when the user is using a tablet or smartphone to browse the website.
Advanced Vue.js - Directives, Plugins, and Render Functions Chapter 17
[ 570 ]
Most of the components have to be developed only once for a responsive page, and only
the styling is done multiple times according to different sizes. This can save a lot of
development time if compared to having a separate site optimized for mobile.
Normally, in a responsive page table, go from columnar to stacked, as shown in the
following illustration:
I never liked this approach, but the objective disadvantage is that if you make your table
look good on one side, it will look not so good on the other. This is because you have to
style the cells in the same way and what the responsiveness does is that it stacks them up.
What our BreedTable component does is to dynamically switch between the two
components instead of simply relying on the CSS. Since it's a functional component, it has
the advantage of being very lightweight compared to a full-fledged component.
In a real application, using the onresize event is questionable, mainly because of the
performance hit. In a production system, the solutions for responsiveness via JavaScript
need to be more structured. For example, consider using a timer or using matchMedia.
As a last thing, note how the Vue instance never registers the two subcomponents; this is
because they never appear in a template but are referenced directly in the code as objects.

18
Large Application Patterns with
Vuex
In this chapter, we'll cover the following recipes:
Dynamically loading pages in your vue-router
Building a simple storage for the application state
Understanding Vuex mutations
Listing your actions in Vuex
Separating concerns with modules
Building getters to help retrieve your data
Testing your store
Introduction
In this chapter, you will learn how Vuex works and how to use it to support a scalable
application. Vuex implements a pattern that is popular in frontend frameworks and
consists of dividing the different concerns to manage a big global application state. The
mutations are the only things that can change the state, so you have only one place to look
for that. Much of the logic, along with all the asynchronous logic, is contained in the
actions; finally, getters and modules further help to spread the cognitive load when it
comes to computing the derived state and splitting your code into different files.
Along with recipes, you will find grains of wisdom that I found useful when developing
real large applications; some have to do with naming conventions and others with little
tricks to avoid bugs.
If you complete all the recipes, you will be ready to develop big frontend applications with
fewer bugs and seamless collaboration.

Large Application Patterns with Vuex Chapter 18
[ 572 ]
Dynamically loading pages in your vue-
router
Soon, you will build huge Vue websites with loads of components. Loading a lot of
JavaScript may generate wasteful and useless upfront delay.
Getting ready
This recipe requires knowledge of vue-router.
How to do it...
Create a new project with vue-cli by making a new directory and running the following
command:
vue init webpack
You can answer the question as you prefer, as long as you add the vue-router to the
template when asked.
We will create two components: one will be our home page and it will be small and light,
the other component will be very big and very slow to load. What we want to achieve is to
load the home page immediately, without having to wait for the huge component to be
downloaded by the browser.
Open the Hello.vue file in the components folder. Delete everything and only leave the
following:
<template>
<div>
Lightweight hello
</div>
</template>
In the same folder, create another file named Massive.vue and write the following inside
it:
<template>
<div>
Massive hello
</div>
</template>

Large Application Patterns with Vuex Chapter 18
[ 573 ]
<script>
/* eslint-disable no-unused-vars */
const a = `
Leave an open back tick at the last line because we have to bloat the file with a lot of useless
data. Save and close Massive.vue.
In a console, go to the same directory where the file is stored and use the following file to
put a lot of garbage into it:
yes "XXX" | head -n $((10**6)) >> Massive.vue
What this command does is append the XXX line to the file repeatedly 106 times; this will
add 4 million bytes to the file, making it too huge for a fast browsing experience.
Now we need to close the back tick we opened. Don't try to open the file now, as your text
editor may not be capable of opening such a big file; instead, use the following command:
echo '`</script>' >> Massive.vue
Our Massive component is now complete.
Open the index.js inside the router folder and add the component and its route:
import Massive from '@/components/Massive'
...
export default new Router({
routes: [
{
path: '/',
name: 'Hello',
component: Hello
},
{
path: '/massive',
name: 'Massive',
component: Massive
}
]
})
Large Application Patterns with Vuex Chapter 18
[ 574 ]
After installing all the dependencies with npm install, we are now ready to launch our
very large app with the npm run dev command.
The app will load quite fast, but that's because it's loading directly from your local storage;
to simulate a more realistic scenario, open the developer tools at the Network tab and select
network throttling. Pick something slow, such as GPRS or maybe good 3G, which most of
us may have:
Large Application Patterns with Vuex Chapter 18
[ 575 ]
Now right-click on the refresh button and select Hard Reload to bypass the cache (or press
Shift + Cmd + R):
You will notice that the page doesn't load for a few minutes. You can stop the loading of the
page by clicking on the refresh button again when it becomes an X.
To fix this, go back to the index.js file in the router folder. Delete the following
line, where you import the Massive component:
import Massive from '@/components/Massive'
The preceding line is telling Webpack to include all the code contained in the Massive
component in a single js bundle. Instead, we want to tell Webpack to keep the Massive
component as a separate bundle and to load it only when necessary.
Instead of directly importing the component, declare Massive with the following code:
const Massive = resolve =>
require(['../components/Massive.vue'], resolve)
Webpack will turn this special syntax into a separate file that will be loaded lazily. Save and
do another hard refresh with the throttling still set to slow speed (like GPRS to good 3G).
After a few seconds, you should be able to see the hello page. If you want to load the
Massive component, just add massive to the URL, but you'll be in for some waiting.
How it works...
Now you obviously won't have such a big component in a real application, but you can
easily see that if the Massive component represents all the other components of your app,
they can quickly amount to such a big size.

Large Application Patterns with Vuex Chapter 18
[ 576 ]
The trick here is to load them asynchronously; Webpack will help you separate them into
smaller bundles so that they will be loaded only if and when required.
There's more...
There is an alternative syntax to import components lazily. It may become an ECMA
standard in the future, so you should be aware of it. Open index.js inside the router
directory and completely remove the import of the Massive component or the Massive
constant line we added in this recipe.
Inside the routes, try the following when specifying the component for the /massive route:
routes: [
{
path: '/',
name: 'Hello',
component: Hello
},
{
path: '/massive',
name: 'Massive',
component: import('@/components/Massive')
}
]
This will be equivalent to what we have done before because Webpack will take the line
and instead of directly importing the code of the Massive component, it will create a
different js file, loaded lazily.
Building a simple storage for the application
state
In this recipe, you will understand the fundamentals of Vuex when building a big
application. This recipe is a little unorthodox because to understand how Vuex's store
work, we will manipulate it directly; you should never do that in a real application.
Getting ready
Before trying this recipe, you should know how to make components talk with Vuex.

Large Application Patterns with Vuex Chapter 18
[ 577 ]
How to do it...
Create a new project based on the Webpack template with the following command run in a
new directory:
vue init webpack
How you answer the question is not relevant. Run npm intall and install Vuex with npm
install vuex --save or yarn add vuex if you use yarn.
Open the main.js file inside the src folder and add the following highlighted lines to
finish installing Vuex:
import Vue from 'vue'
import App from './App'
import router from './router'
import store from './store'
/* eslint-disable no-new */
new Vue({
el: '#app',
router,
store,
template: '<App/>',
components: { App }
})
Of course, there is no store module right now, so you need to create one. To do this, create
a folder just under the src folder and call it store. Inside it, create a file named index.js.
In the main.js file, we didn't specify to use the index.js file, but that's the default
behavior when no file is specified but only the folder.
What we will implement is a simplified stock market. We have three assets: stars (STAR),
lamps (LAMP), and diamonds (DIAM). We will define two routes: one for the STAR/LAMP
market and another for the LAMP/DIAM market.
Inside the index.js file in the store folder, write the following:
import Vue from 'vue'
import Vuex from 'vuex'
Vue.use(Vuex)
const store = new Vuex.Store({
state: {
STAR: 100,
LAMP: 100,
DIAM: 100,

Large Application Patterns with Vuex Chapter 18
[ 578 ]
rate: {
STAR: {
LAMP: 2
},
LAMP: {
DIAM: 0.5
}
}
}
})
export default store
We are creating a new Vuex store that will hold our balance. Initially, we have 100 of each
asset; in the store, the exchange rate between stars and lamps and between lamps and
diamonds is also fixed.
Create a new component under the components directory, named Market.vue. It will
have the following template:
<template>
<div class="market">
<h2>{{symbol1}}/{{symbol2}} Stock Exchange</h2>
<div class="buy-sell">
<input v-model.number="amount">{{symbol1}}
<button @click="buy">
Buy for {{rate*amount}} {{symbol2}}
</button>
<button @click="sell">
Sell for {{rate*amount}} {{symbol2}}
</button>
</div>
</div>
</template>
symbol1 and symbol2 represent the two assets traded. In the JavaScript of this component,
where we define the sell and buy methods, we operate directly on the global Vuex store:
<script>
export default {
name: 'market',
data () {
return {
amount: 0
}
},
computed: {
rate () {

Large Application Patterns with Vuex Chapter 18
[ 579 ]
return this.$store.state.rate[this.symbol1][this.symbol2]
}
},
props: ['symbol1', 'symbol2'],
methods: {
buy () {
this.$store.state[this.symbol1] += this.amount
this.$store.state[this.symbol2] -= this.amount * this.rate
},
sell () {
this.$store.state[this.symbol1] -= this.amount
this.$store.state[this.symbol2] += this.amount * this.rate
}
}
}
</script>
You should never touch the state directly like I've done here. You should
always use mutations. Here, we are skipping the middleman to keep the
recipe minimalistic. There's more on mutations in the next recipe.
You have to use this component in index.js, inside the router folder, in the following
way:
import Vue from 'vue'
import Router from 'vue-router'
import Market from '@/components/Market'
Vue.use(Router)
export default new Router({
routes: [
{
path: '/',
redirect: '/STAR/LAMP'
},
{
path: '/:symbol1/:symbol2',
component: Market,
props: true
}
]
})
In the preceding code, we are using the Market component for any route that contains a
couple of trade symbols. As a home page, we are using the STAR/LAMP market.
Large Application Patterns with Vuex Chapter 18
[ 580 ]
To display some navigation links to a different market and our current balance, we can edit
the App.vue component with the following template:
<template>
<div id="app">
<nav>
<ul>
<li>
<router-link to="/STAR/LAMP">STAR/LAMP Market</router-link>
</li><li>
<router-link to="/LAMP/DIAM">LAMP/DIAM Market</router-link>
</li>
</ul>
</nav>
<router-view></router-view>
<div class="balance">
Your balance is:
<ul>
<li>{{$store.state.STAR}} stars</li>
<li>{{$store.state.LAMP}} lamps</li>
<li>{{$store.state.DIAM}} diamonds</li>
</ul>
</div>
</div>
</template>
We don't need any JavaScript for this component, so you can delete the <script> tag.
Our app is now ready; launch it and start trading with it. The following image is our
completed app without the styles contained in App.vue:

Large Application Patterns with Vuex Chapter 18
[ 581 ]
How it works...
The balance in the bottom is like a summary of the global state. With Vuex, we were able to
affect other components by accessing the $store variable that gets injected into every
component by the Vuex plugin. You can easily imagine how to use this strategy in a big
application when you want to basically expand the scope of a variable beyond the
component itself.
Some of the states may be local, for example, if you need some animations or you need
some variables to show modal dialogs for the component; it's perfectly okay to not put
these values in the store. Otherwise, having a structured centralized state in one place helps
a lot. In the subsequent recipes, you'll use more advanced techniques to exploit the power
of Vuex better.
Understanding Vuex mutations
The proper way to mutate the state in a Vuex application is with the help of mutations.
Mutations are a very useful abstraction to decompose state changes in the atomic unit. In
this recipe, we will explore just that.
Getting ready
This recipe can be completed without knowing too much about Vuex, but completing the
previous recipe first is suggested.
How to do it...
Add Vuex as a dependency to your project (the CDN address is
https://unpkg.com/vuex). I will assume that you are using JSFiddle to follow along;
otherwise, just remember to put Vue.use(Vuex) before the store code.
The sample application we will build is to broadcast notifications to the users of the
website.

Large Application Patterns with Vuex Chapter 18
[ 582 ]
The HTML layout looks as shown:
<div id="app">
<div v-for="(message, index) in messages">
<p style="cursor:pointer">{{message}}
<span @click="close(index)">[x]</span>
</p>
</div>
<input v-model="newMessage" @keyUp.enter="broadcast">
<button @click="broadcast">Broadcast</button>
</div>
The idea is to have a textbox to write messages and the broadcasted messages will be
displayed on the top with the most recent appearing first. The messages can be dismissed
by clicking on the little x.
First, let's build a store that will hold the list of broadcasted messages and enumerate the
possible mutations we can make to said list:
const store = new Vuex.Store({
state: {
messages: []
},
mutations: {
pushMessage (state, message) {
state.messages.push(message)
},
removeMessage (state, index) {
state.messages.splice(index, 1)
}
}
})
So, we have a list of messages; we can push one to the top of the list or we can remove a
message by knowing its index.
Next, we need to write the logic of the application itself:
new Vue({
store,
el: '#app',
data: {
newMessage: ''
},
computed: Vuex.mapState(['messages']),
methods: {
broadcast () {
store.commit('pushMessage', this.newMessage)
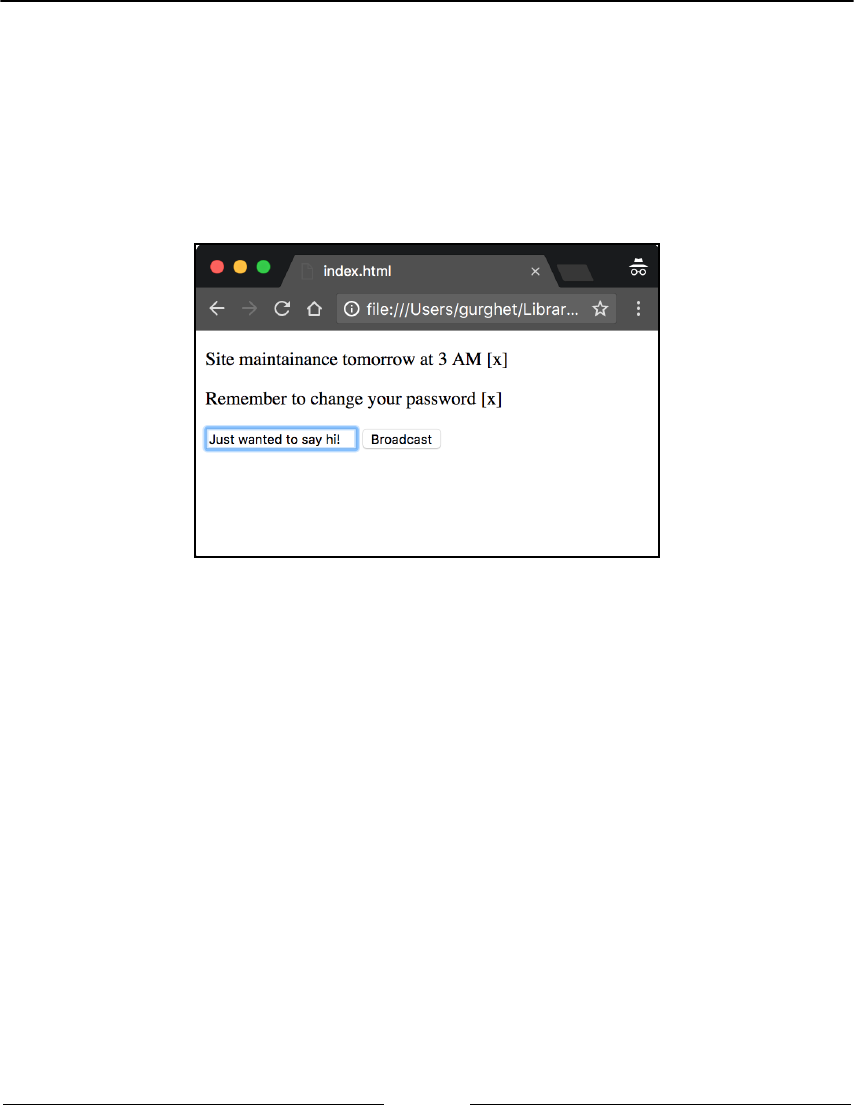
Large Application Patterns with Vuex Chapter 18
[ 583 ]
this.newMessage = ''
},
close (index) {
store.commit('removeMessage', index)
}
}
})
You can now launch the app and start broadcasting messages to our imaginary users:
How it works...
I think it's important to note the names of the mutations; they are called pushMessage and
removeMessage, but what they really do in this application is show the message in a stack
on the screen and (fictionally) broadcast messages to users. Would it be better to call them
showMessage, or broadcastMessage and hideMessage? No, that's because there has to
be a clear separation of intent between the mutation itself and the particular effects of that
mutation. The problem becomes clear when, for example, we decide to give users the
ability to ignore these notifications or we introduce a delay before actually broadcasting the
notifications. Then we will have a showMessage mutation that does not actually show a
message.
The computed syntax we have used is as illustrated:
computed: Vuex.mapState(['messages'])
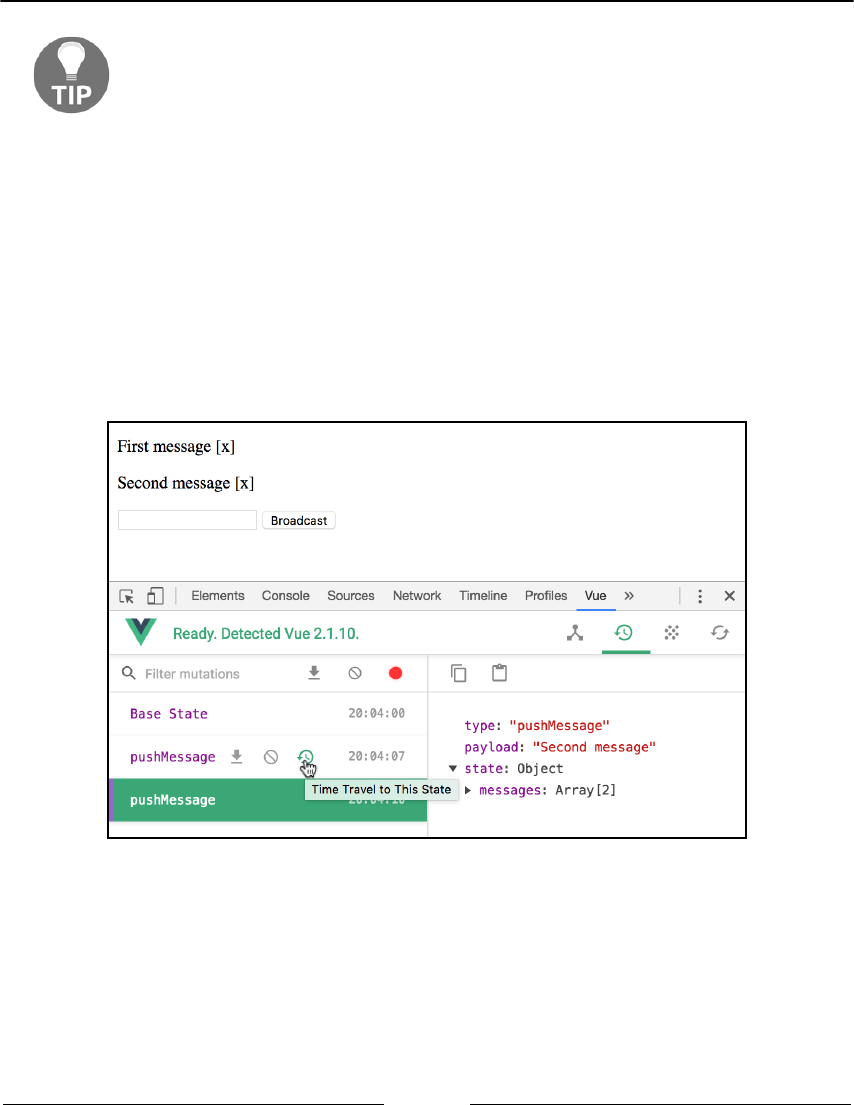
Large Application Patterns with Vuex Chapter 18
[ 584 ]
You don't have to explicitly use Vuex in your expression when you are
importing Vuex as an ES6 module. You just need to write
import { mapState } from 'Vuex'.
Then, the mapState function will be available.
The mapState method takes an array of strings as a parameter, looks for a state variable
in the store with the same name as the string, and creates a computed property with the
same name. You can do this with as many variables as you want.
There's more...
If you followed along on a local npm project, open the Vue developer tools (unfortunately
Vue developer tools is not available when using JSFiddle) and you will see that a new
mutation is issued with each message. Consider that you click on the little clock:
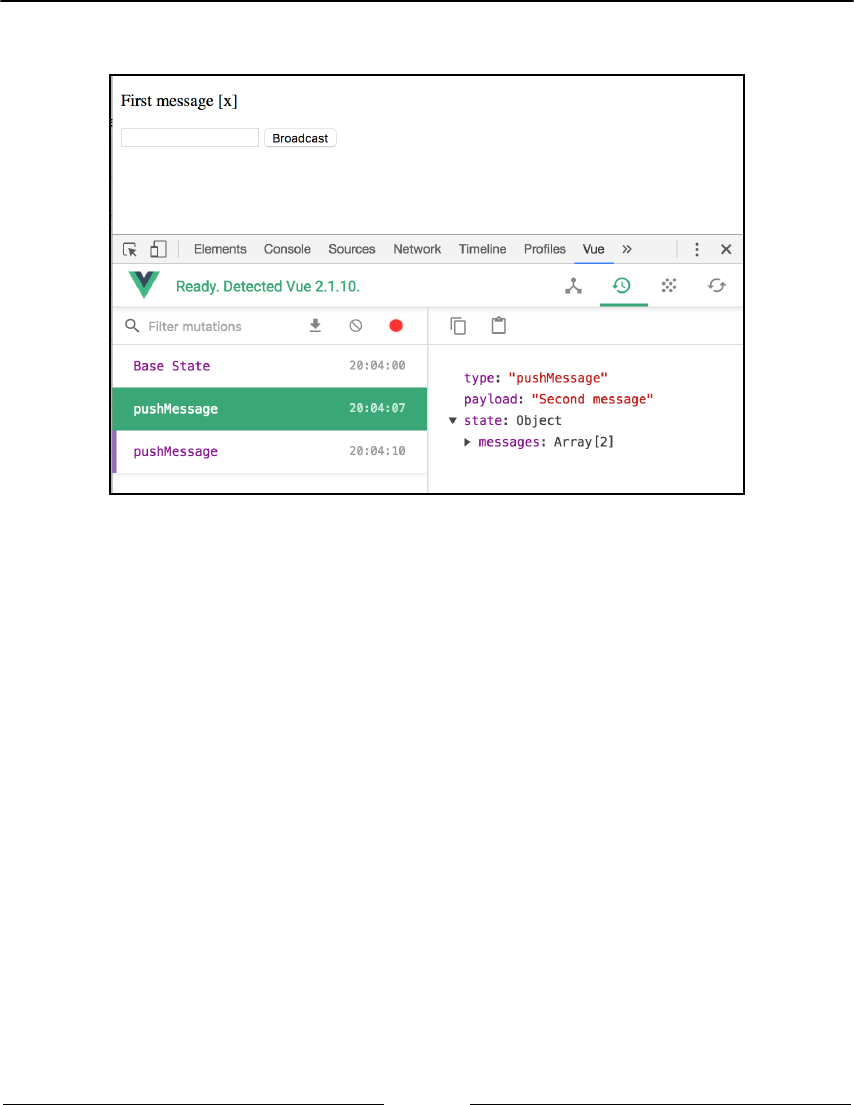
Large Application Patterns with Vuex Chapter 18
[ 585 ]
You can actually undo the mutation with that, as shown in the following illustration:
Note how the state didn't change when clicking the time travel option; that's because the
purple ribbon is still at the last state. To examine a different state, just click on the name of
the mutation itself.
This debug mechanism is possible because mutations are always synchronous; this means
that it's possible to take a snapshot of the state before and after the mutation and navigate
through time. In the next recipe, you will learn how to use Vuex to perform asynchronous
actions.
Listing your actions in Vuex
All your mutations must be synchronous, so how do you do things such as waiting for a
timeout or using Axios for an AJAX request? Actions are the next level of abstraction that
will help you with this. Inside an action, you can commit multiple mutations and make
asynchronous operations.

Large Application Patterns with Vuex Chapter 18
[ 586 ]
Getting ready
Mutations are the building blocks of actions, so it's highly suggested you complete the
preceding recipe before trying this.
We will be using the setup from the Building a simple storage for the application state recipe;
you can use your own as well, but in any case, this recipe is based on a slight modification
of the official Webpack template.
How to do it...
You will build a clone of the popular Xkcd website. Actually, it will be a wrapper more
than a real clone, since we will reuse the panels from the website.
Create a Vue project based on the Webpack template with vue init webpack. The first
thing we will do is wire up the API to the Xkcd website in the index.js inside the config
folder. Put the following lines inside the proxyTable object:
module.exports = {
...
dev: {
proxyTable: {
'/comic': {
target: 'https://xkcd.com',
changeOrigin: true,
pathRewrite: (path, req) => {
const num = path.split('/')[2]
return `/${num}/info.0.json`
}
}
},
...
This will redirect all the requests we make to /comic to the Xkcd website.
Inside src, make a new store directory and an index.js inside it; here, start building the
application store:
import Vue from 'vue'
import Vuex from 'vuex'
Vue.use(Vuex)
const store = new Vuex.Store({
state: {

Large Application Patterns with Vuex Chapter 18
[ 587 ]
currentPanel: undefined,
currentImg: undefined,
errorStack: []
},
actions: {},
mutations: {}
}
export default store
You should import this inside main.js like in previous recipes. We want to trace the
current panel number, the link to the panel image, and the possible errors. The only way to
modify the state is through mutations, while actions can perform asynchronous work.
When the app is loaded, we plan to display the latest comic. For this, we create an action:
actions: {
goToLastPanel ({ commit }) {
axios.get(endpoint)
.then(({ data }) => {
commit('setPanel', data.num)
commit('setImg', data.img)
}).catch(error => {
commit('pushError', error)
})
}
...
For this code to work, we need to declare the endpoint and install Axios:
...
import axios from 'axios'
...
const endpoint = '/comic/'
It should be easy for you to write the corresponding mutations:
mutations: {
setPanel (state, num) {
state.currentPanel = num
},
setImg (state, img) {
state.currentImg = img
},
pushError (state, error) {
state.errorStack.push(error)
}
}

Large Application Patterns with Vuex Chapter 18
[ 588 ]
We'll recycle the Hello.vue component and put the following template inside it:
<template>
<div class="hello">
<h1>XKCD</h1>
<img :src="currentImg">
</div>
</template>
To make the last panel appear on loading you can use the following JavaScript in the
component:
<script>
import { mapState } from 'vuex'
export default {
name: 'hello',
computed: mapState(['currentImg']),
created () {
this.$store.dispatch('goToLastPanel')
}
}
</script>
Also, you can delete most of the App.vue template and leave only the following:
<template>
<div id="app">
<router-view></router-view>
</div>
</template>
How it works...
The proxyTable object will configure the http-proxy-middleware. This is useful every
time we are developing the UI of a bigger web application and we launch our developer
server on localhost, but our API responds to another web server. This is especially
relevant when we want to use CORS and we don't allow other websites to use our API. The
Xkcd API doesn't allow localhost to consume the web service. This is why, even if we try
to use the Xkcd API directly, our browser won't let us. The changeOrigin option will send
the request with Xkcd as host, making CORS unnecessary.
To call an action from a component, we used the dispatch function. It's also possible to
pass the second argument, the first being the name of the action itself. The second argument
is then passed when you define the action as the second parameter.

Large Application Patterns with Vuex Chapter 18
[ 589 ]
A last note on the naming--it being implicit that actions are asynchronous while mutations
are synchronous, there is no need, in my opinion, to make the asynchronicity in the name of
the actions explicit.
Separating concerns with modules
When building big applications, the Vuex store can become crowded. Luckily, it's possible
to divide the different concerns of the applications into separate compartments with
modules.
Getting ready
This recipe can be a reference if you want to use modules. You are expected to already
know enough about Vuex.
For this recipe, you will have to be a little familiar with Webpack.
How to do it...
In this recipe, we will model a fully functional human body in a slightly simplified manner.
Every organ will have a separate module.
Create a new Webpack template with vue init webpack and npm install vuex.
Create a new directory with the src/store/index.js file in it. Inside, write the following:
import Vue from 'vue'
import Vuex from 'vuex'
Vue.use(Vuex)
const store = new Vuex.Store({
modules: {
brain,
heart
}
})
export default store

Large Application Patterns with Vuex Chapter 18
[ 590 ]
The heart module is like this; put it before the store declaration:
const heart = {
state: { loves: undefined },
mutations: {
love (state, target) {
state.loves = target
},
unlove (state) {
state.loves = undefined
}
}
}
Note how the state passed inside the mutations is not the root state, but the local state of the
module.
Then comes the brain, which is divided into the left and right lobes; write the following
before the store:
const brain = {
modules: {
left: leftLobe,
right: rightLobe
}
}
You can implement them as simple Boolean states (write them before the brain on which
they depend):
const leftLobe = {
namespaced: true,
state: { reason: true },
mutations: {
toggle (state) { state.reason = !state.reason }
}
}
const rightLobe = {
namespaced: true,
state: { fantasy: true },
mutations: {
toggle (state) { state.fantasy = !state.fantasy }
}
}

Large Application Patterns with Vuex Chapter 18
[ 591 ]
Setting namespaced to true modifies the way you can call the mutator. Since they are both
called toggle, now you can specify which lobe, for example, for the left lobe the mutation
string becomes left/toggle, where left says it is the key used in the brain to refer to the
left lobe.
To see your store in action, you can create a component that uses all the mutations. For the
brain, we can have two pictures of the lobes, like so:
<img
:class="{ off: !$store.state.brain.left.reason }"
src="http://i.imgur.com/n8B6wuY.png"
@click="left"><img
:class="{ off: !$store.state.brain.right.fantasy }"
src="http://i.imgur.com/4BbfVur.png"
@click="right">
This will create two drawings of brain lobes in red pencil; note the use of the name of the
modules in a nested way. The following off CSS rule grays the lobes out:
.off {
filter: grayscale(100%)
}
To call the mutations, we use the aforementioned strings in the right methods:
methods: {
left () {
this.$store.commit('left/toggle')
},
right () {
this.$store.commit('right/toggle')
}
}
You can also create an input textbox and call the other two mutations, as follows:
...
love () {
this.$store.commit('love', this.partner)
},
clear () {
this.$store.commit('unlove')
this.partner = undefined
}
...
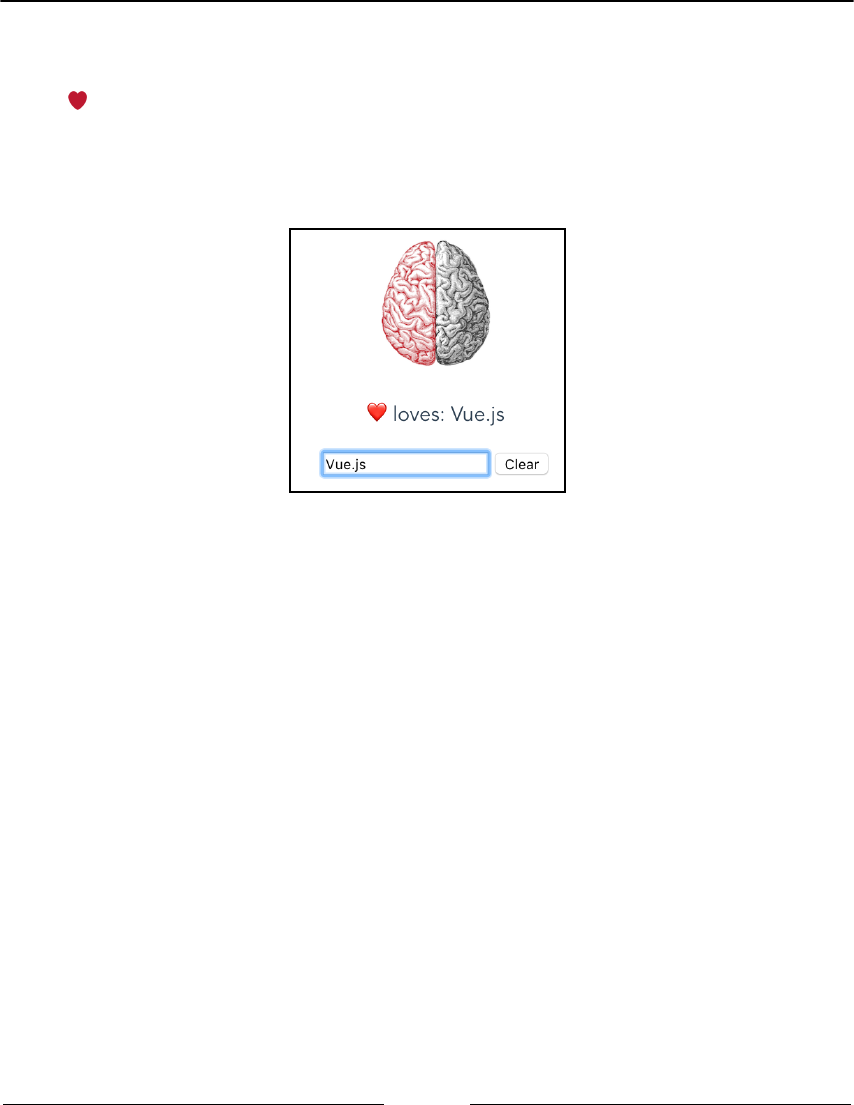
Large Application Patterns with Vuex Chapter 18
[ 592 ]
This was very easy, but how do you retrieve the loved name? You can put these mustachios
in your template:
<p> loves: {{$store.state.heart.loves}}</p>
<input v-model="partner" @input="love">
<button @click="clear">Clear</button>
You obviously have to declare the partner variable on your Vue instance:
How it works...
We have seen how to use modules to split your application concerns into different units.
This ability may become important as the project grows in size.
The common pattern is that while inside a mutation, you have direct access to the local
state:
const leftLobe = {
namespaced: true,
state: { reason: true },
mutations: {
toggle (state) {
// here state is the left lobe state
state.reason = !state.reason
}
}
}

Large Application Patterns with Vuex Chapter 18
[ 593 ]
In a mutation, it makes sense to have access only to the local state. The brain, for example,
cannot change the heart and vice versa, but what about actions? If we declare an action
inside a module, we are passed an object called context that looks like this:
{
"getters":{},
"state":{
"reason":true
},
"rootGetters":{},
"rootState":{
"brain":{
"left":{
"reason":true
},
"right":{
"fantasy":false
}
},
"heart":{
"loves": "Johnny Toast"
}
}
}
So, if we want to declare an action in the left lobe and we want to affect the heart, we have
to do something like the following:
actions: {
beNerd ({ rootState }) {
rootState.heart.loves = 'Math & Physics'
}
}
Building getters to help retrieve your data
You don't want to keep too much data in your state. It can be especially dangerous to keep
duplicate or derivative data because it can be brought out of sync very easily. Getters help
you with this without shifting the burden onto the components by keeping all the logic in
one place.

Large Application Patterns with Vuex Chapter 18
[ 594 ]
Getting ready
This recipe is for you if you already have some Vuex knowledge and want to expand your
horizons.
How to do it...
Imagine that you are building a Bitcoin wallet. You want to give your users an overview of
their balance, and you want them to see how many Euros it corresponds to.
Create a new Webpack template with vue init webpack and npm install vuex.
Create a new src/store/index.js file and write the following inside it:
import Vue from 'vue'
import Vuex from 'vuex'
Vue.use(Vuex)
const store = new Vuex.Store({
state: {
bitcoin: 600,
rate: 1000,
euro: 600000
}
})
export default store
This code is prone to errors. The first error can be a miscalculation of the Euro amount if we
don't get the multiplication right. The second kind of error can be that we tell the user the
bitcoin and euro balance during a transaction, resulting in a stale and wrong amount for
one of the two.
To tackle these issues, we use getters:
const store = new Vuex.Store({
state: {
bitcoin: 600,
rate: 1000
},
getters: {
euro: state => state.bitcoin * state.rate
}
})

Large Application Patterns with Vuex Chapter 18
[ 595 ]
This way the euro amount is never in the state but always computed. Moreover, it is
centralized in the store, so we don't need to add anything to our components.
Now, it's easy to retrieve the two amounts from a template:
<template>
<div>
<h1>Balance</h1>
<ul>
<li>{{$store.state.bitcoin}}฿</li>
<li>{{$store.getters.euro}}€</li>
</ul>
</div>
</template>
Here, ฿ ; is the HTML entity for the Bitcoin symbol.
How it works...
Having a getter for derived data is always a good idea if we are not talking about input
data. A notable feature of getters we have not yet discussed is their ability to interact with
other getters and take an argument.
Accessing other getters
The second argument passed to a getter when called is the object that contains the other
getters:
getters: {
...
getCatPictures: state => state.pictures.filter(pic => isCat(pic))
getKittens: (state, getters) => {
return getters.getCatPictures().filter(cat => !isAdult(cat))
}
}
In our recipe, we could call the euro getter to have some more derived data, like roughly
how many houses we can buy with our Bitcoin given an average price of 150,000 euros:
const store = new Vuex.Store({
state: {
bitcoin: 600,
rate: 1000
},

Large Application Patterns with Vuex Chapter 18
[ 596 ]
getters: {
euro: state => state.bitcoin * state.rate,
houses: (state, getters) => getters.euro() / 150000
})
Passing an argument
If a getter returns a function with an argument, that argument will be the argument of the
getter:
getters: {
...
getWorldWonder: state => nth => state.worldWonders[nth]
}
In our recipe, a practical example could specify the average cost of a house in the getter
from the previous paragraph:
const store = new Vuex.Store({
state: {
bitcoin: 600,
rate: 1000
},
getters: {
euro: state => state.bitcoin * state.rate,
houses: (state, getters) => averageHousePrice => {
return getters.euro() / averageHousePrice
}
})
Testing your store
In this recipe, you will write tests for a Vuex store.
Getting ready
This recipe requires knowledge of Unit testing and End-To-End testing and little familiarity
with Vuex.

Large Application Patterns with Vuex Chapter 18
[ 597 ]
How to do it...
First, I'll define some features that our store must implement; then you will write tests that
prove that the features are present and working.
Software requirements
Our store consists of items in a to-do list, like the following:
state: {
todo: [
{ id: 43, text: 'Buy iPhone', done: false },
...
],
archived: [
{ id: 2, text: 'Buy gramophone', done: true },
...
]
}
We have two requirements:
We must have an MARK_ITEM_AS_DONE mutation that changes the done field
from false to true
We must have a downloadNew action that downloads the latest items from our
server and adds them to the list
Testing mutations
To be able to test your mutations, you have to make them available for your test files. To do
this, you have to extract the mutation object from your store. Consider something like this:
import Vuex from 'vuex'
import Vue from 'vue'
Vue.use(Vuex)
const store = new Vuex.Store({
...
mutations: {
...
MARK_ITEM_AS_DONE (state, itemId) {
state.todo.filter(item => {
return item.id === itemId

Large Application Patterns with Vuex Chapter 18
[ 598 ]
}).forEach(item => {
item.done = true
})
state.archived.filter(item => {
return item.id === itemId
}).forEach(item => {
item.done = true
})
}
}
})
export default store
You have to extract it to something similar to this:
export const mutations = { ... }
const store = new Vuex.Store({ ... })
export default store
This way, you can import the mutations in your test files with the following line:
import { mutations } from '@/store'
The test for requirement number 1 can be written as follows:
describe('mutations', () => {
it(`MARK_ITEM_AS_DONE mutation must change the
done field from false to true for a todo`, () => {
const state = {
todo: [
{ id: 43, text: 'Buy iPhone', done: false }
],
archived: [
{ id: 40, text: 'Buy cat', done: false }
]
}
mutations.MARK_ITEM_AS_DONE(state, 43)
expect(state.todo[0].done).to.be.true
})
})

Large Application Patterns with Vuex Chapter 18
[ 599 ]
If you are using the official Webpack template, you can run your tests
with npm run unit. This uses PhantomJS by default, which doesn't
implement some features. You can either use Babel polyfills or simply go
into karma.conf.js and write Chrome instead of PhantomJS in the
browsers array. Remember to install the Chrome launcher with npm
install karma-chrome-launcher --save-dev.
Testing actions
Testing actions means testing that the action commits the expected mutations. We are not
interested in the mutations themselves (not in unit tests at least) because they are already
tested separately. We might, though, need to mock some dependencies.
To avoid any dependencies from Vue or Vuex (since we don't need them and they may
pollute the tests), we create a new actions.js file inside the store directory. Install Axios
with npm install axios. The actions.js file can look like the following:
import axios from 'axios'
export const actions = {
downloadNew ({ commit }) {
axios.get('/myNewPosts')
.then(({ data }) => {
commit('ADD_ITEMS', data)
})
}
}
To test for requirement number 2, we start by mocking the call to the server that should
download the new to-do items:
describe('actions', () => {
const actionsInjector =
require('inject-loader!@/store/actions')
const buyHouseTodo = {
id: 84,
text: 'Buy house',
done: true
}
const actions = actionsInjector({
'axios': {
get () {
return new Promise(resolve => {
resolve({
data: [buyHouseTodo]

Large Application Patterns with Vuex Chapter 18
[ 600 ]
})
})
}
}
}).default
}
This will ensure that any call to the get method of axios will always return a new to-do
item.
Then, we want to ensure that the ADD_ITEMS mutation is called upon dispatch:
describe('actions', () => {
const actionsInjector =
require('inject-loader!@/store/actions')
const buyHouseTodo = {
id: 84,
text: 'Buy house',
done: true
}
const actions = actionsInjector({
'axios': {
get () {
return new Promise(resolve => {
resolve({ data: [buyHouseTodo] })
})
}
}
}).default
it(`downloadNew should commit ADD_ITEMS
with the 'Buy house' todo when successful`, done => {
const commit = (type, payload) => {
try {
expect(type).to.equal('ADD_ITEMS')
expect(payload).to.deep.equal([buyHouseTodo])
done()
} catch (error) {
done(error)
}
}
actions.downloadNew({ commit })
})
})

Large Application Patterns with Vuex Chapter 18
[ 601 ]
How it works...
While the testing of the mutations is pretty straightforward, I think the testing of the actions
deserves some more explaining.
Since we didn't want to depend on external services for actions, we had to mock the axios
service. We used the inject-loader, which takes the original library and mocks the parts
we specify with arbitrary code (the @ symbol is a shorthand for src); in our case, we
mocked the axios library and, precisely, the get method. We had to use the CommonJS
syntax (with the require) because that's the only way to tell Webpack to use loaders in
imports.
What we have done in the test is that we also mocked the commit function. Normally, this
function calls a mutation that modifies the state. We just want to know if the correct
mutation is called and with the right arguments. Moreover, we had to wrap everything in a
try block; without it, the test would fail over a timeout and we'd lose the error. Instead,
now we fail immediately and we can read, from the console, what error caused the test to
fail.

19
Integrating with Other
Frameworks
In this chapter, we'll explore the following topics:
Building universal applications with Electron
Using Vue with Firebase
Creating a real-time app with Feathers
Creating a reactive app with Horizon
Introduction
Vue is powerful, but if you need a backend, it can't do much alone; at a minimum you will
need a server to deploy your software. In this section, you will actually build small, but
complete and working, applications with popular frameworks. Electron is used to bring
Vue apps to the desktop. Firebase is a modern cloud backend and, finally, FeatherJS is a
minimalistic but full-featured JavaScript backend. When you are finished with these, you
will have all the tools required to interact with them and quickly build professional
applications.
Building universal applications with
Electron
Electron is a framework for creating universal applications that run on Mac, Linux, and
Windows. At it's core is a stripped down version of a web browser. It has been used to
create widely used applications such as Slack and Visual Studio Code, among others. In this
recipe, you'll build a simple app with Electron.
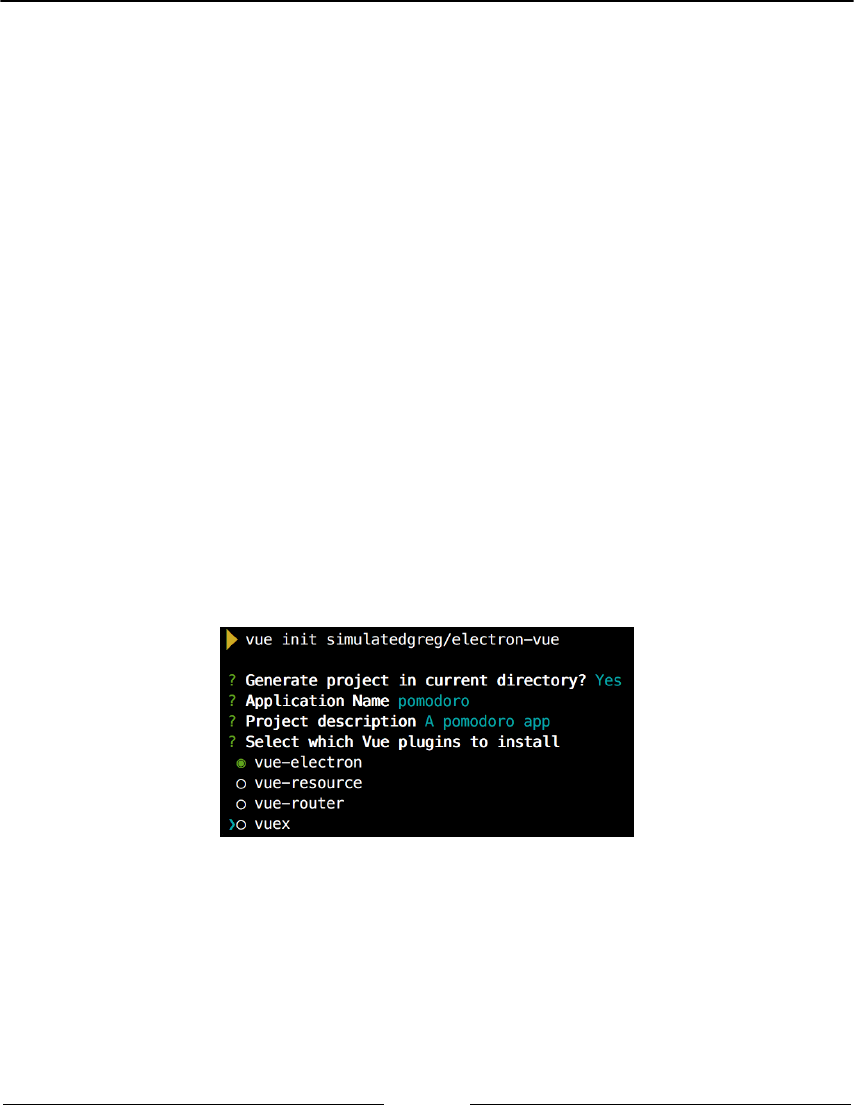
Integrating with Other Frameworks Chapter 19
[ 603 ]
Getting ready
To build this app, we will use only basic Vue functionalities. Electron is out of scope for this
book, but for this recipe no knowledge of Electron is required; in fact, this is a good starting
point to learn more about Electron.
How to do it...
In this recipe, we will build a small but complete app--a pomodoro application. A
pomodoro is an interval of about 25 units of time, in which you should concentrate on
doing work. It's called this because you usually use a tomato-shaped kitchen timer to
measure that. This app will track the time instead, so you don't have to buy an expensive
kitchen timer.
The best way to spin up a Vue project with Electron is to use the Electron-Vue boilerplate
(you don't say!). This can be easily achieved with the following command:
vue init simulatedgreg/electron-vue pomodoro
You can answer with the default values, but when asked which plugin to install, just select
vue-electron. Install all the dependencies with npm intall and, if you like, you can
keep the application open with hot-reloading while you make the necessary modifications
with npm run dev. You can hide the dev tools by just clicking on the x in the corner:
First of all, we want our app to be small-ish. Let's go to the app/src/main/index.js file;
this file controls the life cycle of our application. Change the window size to the following:
mainWindow = new BrowserWindow({
height: 200,
width: 300
})

Integrating with Other Frameworks Chapter 19
[ 604 ]
Then, we don't really want the boilerplate components in the
app/src/render/components folder, so you can delete everything. Instead, create a
Pomodoro.vue file and put this template inside:
<template>
<div class="pomodoro">
<p>Time remaining: {{formattedTime}}</p>
<button v-if="remainingTime === 1500" @click="start">Start</button>
<button v-else @click="stop">Stop</button>
</div>
</template>
To make it work, we also have to write the JavaScript part, as follows:
<script>
export default {
data () {
return {
remainingTime: 1500,
timer: undefined
}
},
methods: {
start () {
this.remainingTime -= 1
this.timer = setInterval(() => {
this.remainingTime -= 1
if (this.remainingTime === 0) {
clearInterval(this.timer)
}
}, 1000)
},
stop () {
clearInterval(this.timer)
this.remainingTime = 1500
}
}
}
</script>
This way, clicking on the start button in the program will subtract 1 second every second.
Clicking on the stop button will clear the timer and reset the remaining time to 1500
seconds (25 minutes). The timer object is basically the result of the setInterval operation,
and clearInterval just stops whatever the timer was doing.
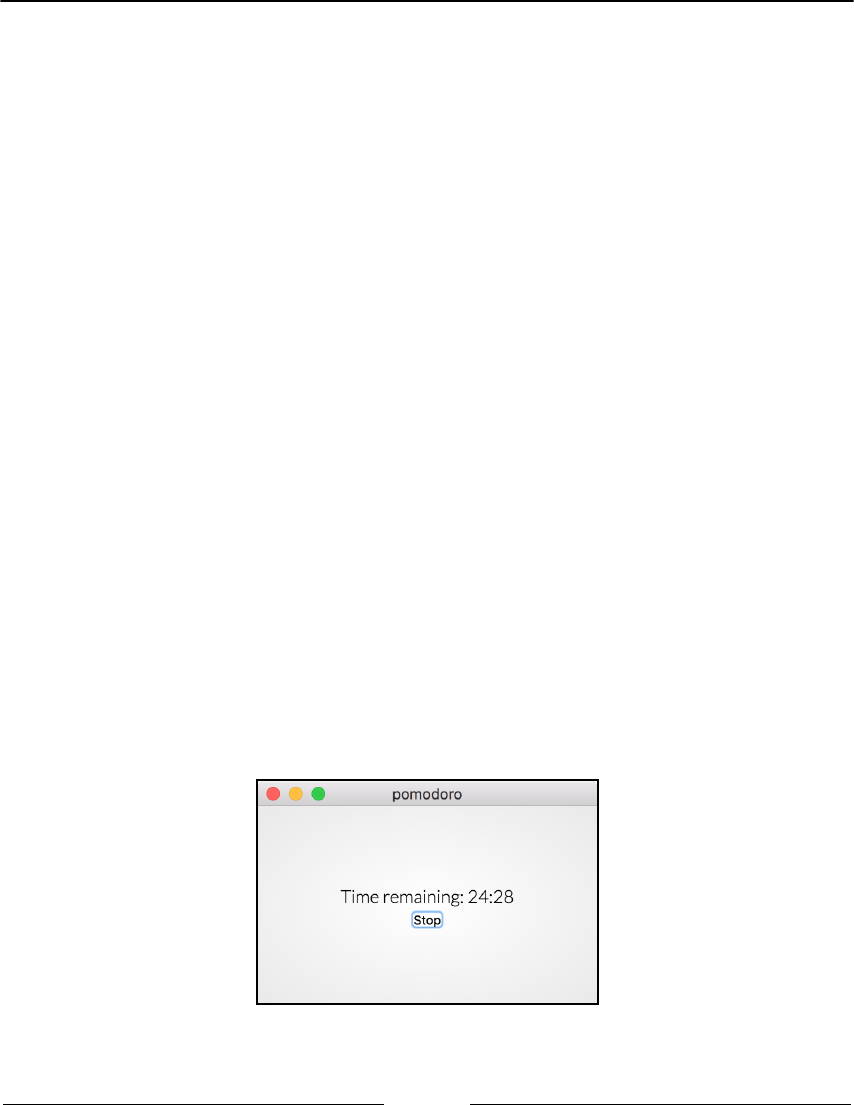
Integrating with Other Frameworks Chapter 19
[ 605 ]
In our template, we want a formattedTime method in the sense that we'd like to see the
time in mm:ss format, which is much more human-readable than just the number of
remaining seconds (even if that's more geeky), so we need to add the computed function:
computed: {
formattedTime () {
const pad = num => ('0' + num).substr(-2)
const minutes = Math.floor(this.remainingTime / 60)
const seconds = this.remainingTime - minutes * 60
return `${minutes}:${pad(seconds)}`
}
}
To add this component to the app, go to the App.vue file and edit the following lines,
replacing the landingPage placeholder element:
<template>
<div id="#app">
<pomodoro></pomodoro>
</div>
</template>
<script>
import Pomodoro from 'components/Pomodoro'
export default {
components: {
Pomodoro
}
}
</script>
Launching the app with npm run dev, you should now be able to track the time while
working or studying:

Integrating with Other Frameworks Chapter 19
[ 606 ]
You can even build a distributable version of the application with the npm run
build command.
How it works...
The way we implemented the timer is not particularly accurate for time tracking. Let's
review the code:
this.timer = setInterval(() => {
this.remainingTime -= 1
if (this.remainingTime === 0) {
clearInterval(this.timer)
}
}, 1000)
This means that we decrease the remaining time every second. The problem is that the
setInterval function itself is not 100% accurate and may fire the function a bit before or
after 1000 milliseconds, depending on the machine's computational load; this way, the
margin of error can accumulate and become a considerable amount. A better approach
would be to check the clock every time the function gets called and adjust for the error at
each loop, though we won't cover that here.
Using Vue with Firebase
Using Vue with Firebase as a backend is very easy, thanks to VueFire--a plugin that
contains bindings for Firebase. In this recipe, you will develop a fully functional database of
smells.
Getting ready
Firebase is out of the scope of this book, but I will assume, for this recipe, that you have a
familiarity with the basic concepts. Except for this, there is really not much you need to
know, as we will build a very basic Vue application on top of that.
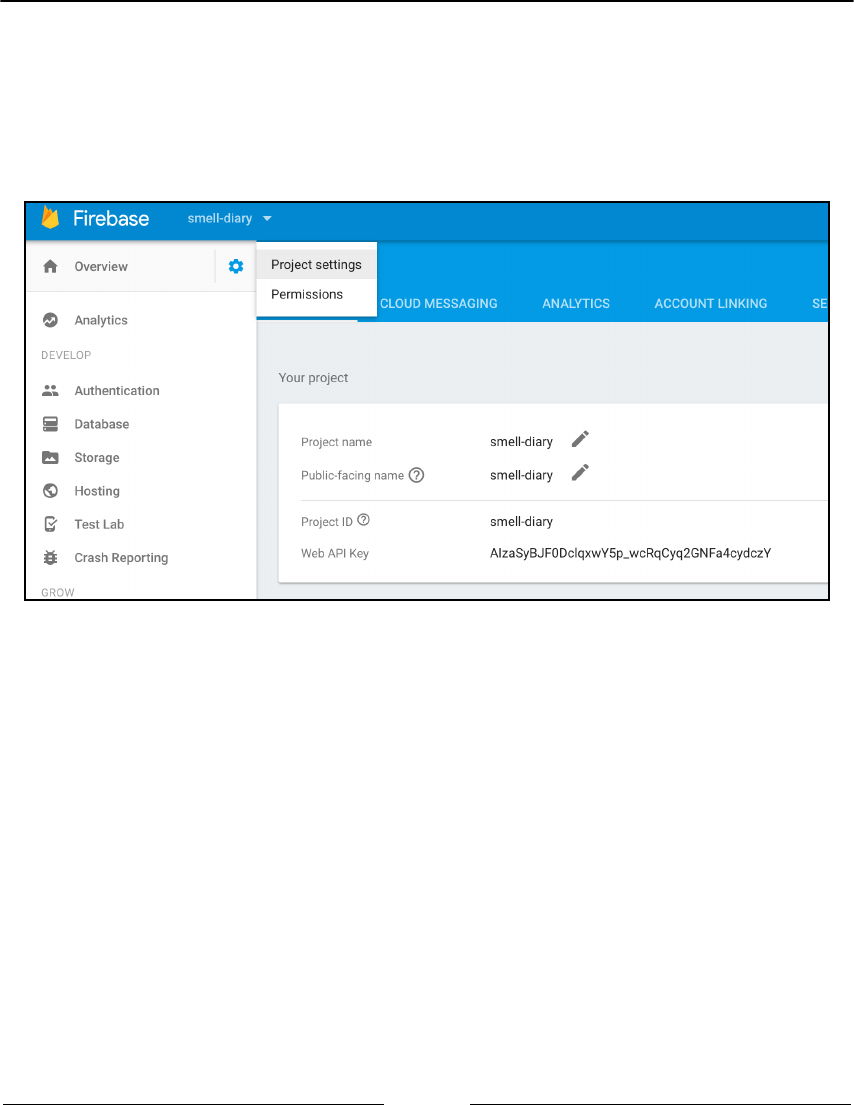
Integrating with Other Frameworks Chapter 19
[ 607 ]
How to do it...
Before starting to write code, we need to create a new Firebase application. To do this, you
have to log in at https://firebase.google.com/ and create a new application. In our case,
it will be called smell-diary. You will also need to take note of your API key, which is
found in the project settings:
Also, you will need to disable authentication; go to the Database section and, in the Rules
tab, set both read and write to true:
{
"rules": {
".read": true,
".write": true
}
}
We are finished with the Firebase configuration.
Open a clean HTML5 boilerplate or JSFiddle, with Vue as a library. We will need the
following dependencies expressed as script tags inside the head of the file:
<script src="https://unpkg.com/vue/dist/vue.js"></script>
<script
src="https://www.gstatic.com/firebasejs/3.6.9/firebase.js"></script>
<script src="https://unpkg.com/vuefire/dist/vuefire.js"></script>

Integrating with Other Frameworks Chapter 19
[ 608 ]
VueFire will automatically detect Vue (so the order is important) and install itself as a
plugin. We will build a very simple database to keep track of the odor of things that
surround us. The following is the HTML layout of our app:
<div id="app">
<ul>
<li v-for="item in items">
{{item.name}}: {{item.smell}}
<button @click="removeItem(item['.key'])">X</button>
</li>
</ul>
<form @submit.prevent="addItem">
<input v-model="newItem" />
smells like
<input v-model="newSmell" />
<button>Add #{{items.length}}</button>
</form>
</div>
In the JavaScript part of our app, we need to specify the API key to authenticate with
Firebase, write the following:
const config = {
databaseURL: 'https://smell-diary.firebaseio.com/'
}
Then, we feed the configuration to Firebase and get a hold of the database:
const firebaseApp = firebase.initializeApp(config)
const db = firebaseApp.database()
This can be done outside the Vue instance. The VueFire plugin installs a new option in the
Vue instance, named firebase; we have to specify that we want to access the /items in
the Firebase app with the item variable:
new Vue({
el: '#app',
firebase: {
items: db.ref('/items')
}
})
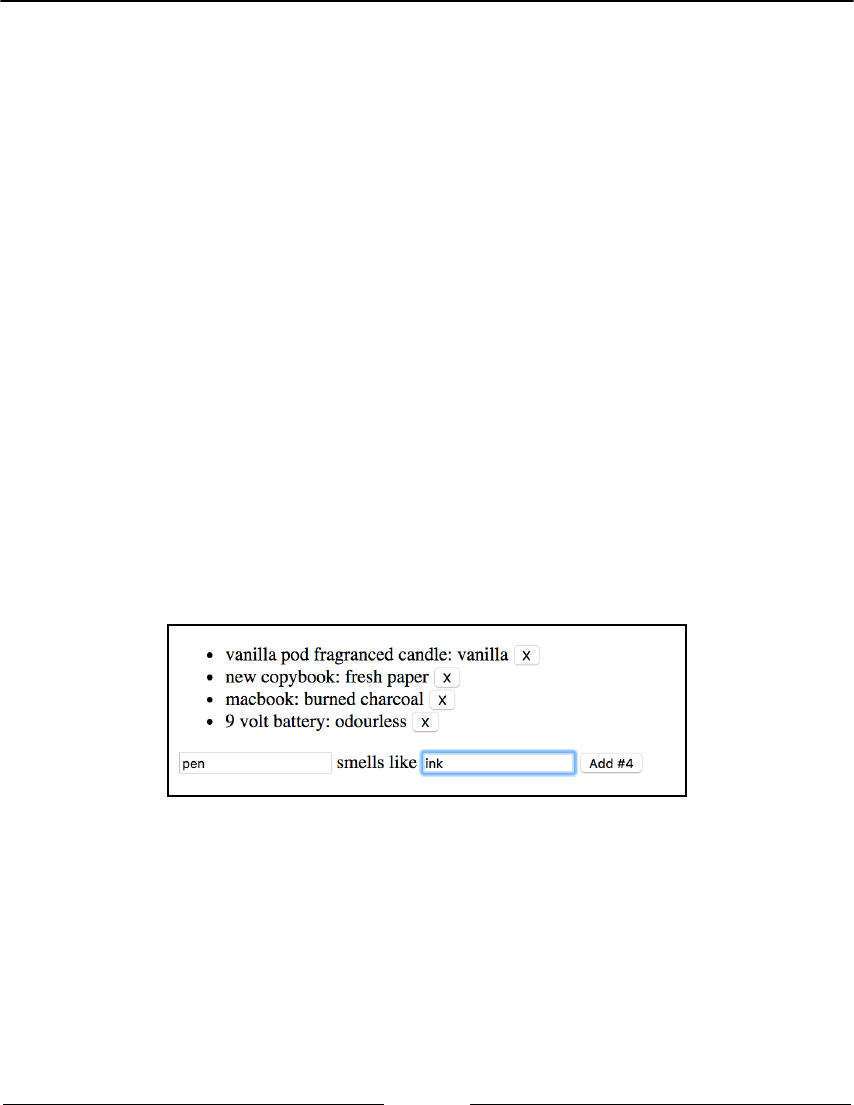
Integrating with Other Frameworks Chapter 19
[ 609 ]
The newItem and newSmell variables will temporarily hold the values we entered in the
input boxes; then, the addItem and removeItem methods will publish and remove data
from our database:
data: {
newItem: '',
newSmell: ''
},
methods: {
addItem () {
this.$firebaseRefs.items
.push({
name: this.newItem,
smell: this.newSmell
})
this.newItem = ''
this.newSmell = ''
},
removeItem (key) {
this.$firebaseRefs.items
.child(key).remove()
}
}
If you launch your app now, you'll already be able to add your favorite scents and what to
sniff to find them:
How it works...
Firebase works as a simple key value store. In our case, we are never storing values but
always adding children; you can take a look at what you've created in the Firebase console:
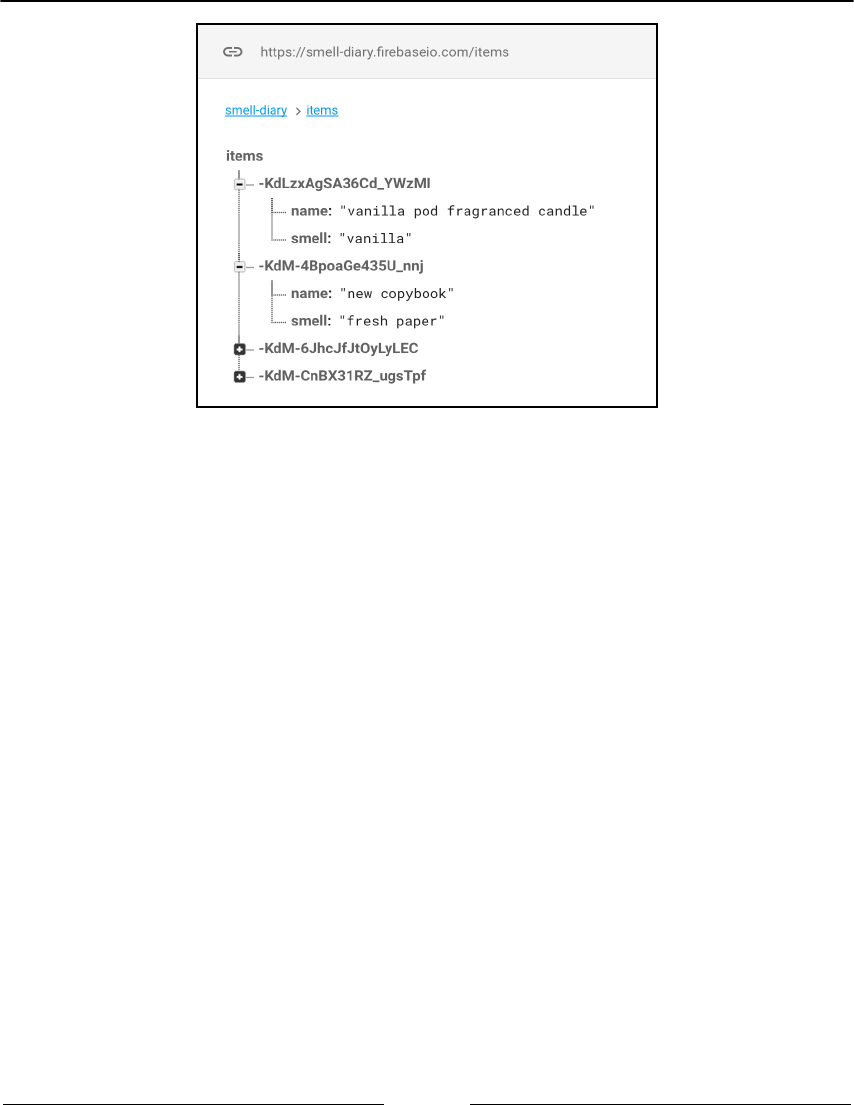
Integrating with Other Frameworks Chapter 19
[ 610 ]
The keys are created automatically and they contain empty values and 32 levels of nested
data. We are using one level of nesting to insert the name and the smell for each object.
Creating a real-time app with Feathers
Most modern applications are real time, not in the traditional sense, but in the sense that
they don't need the page to reload for them to be updated. The most common way to
implement this is through WebSockets. In this recipe, we will leverage Feathers and
Socket.io to build a cat database.
Getting ready
There is no prerequisite for this recipe, but you can complete the Creating a REST client (and
server!) recipe before starting this one if you want to have more context.
How to do it...
To complete this recipe, you'll need the Feathers' command line; install it with the
following command:
npm install -g feathers-cli
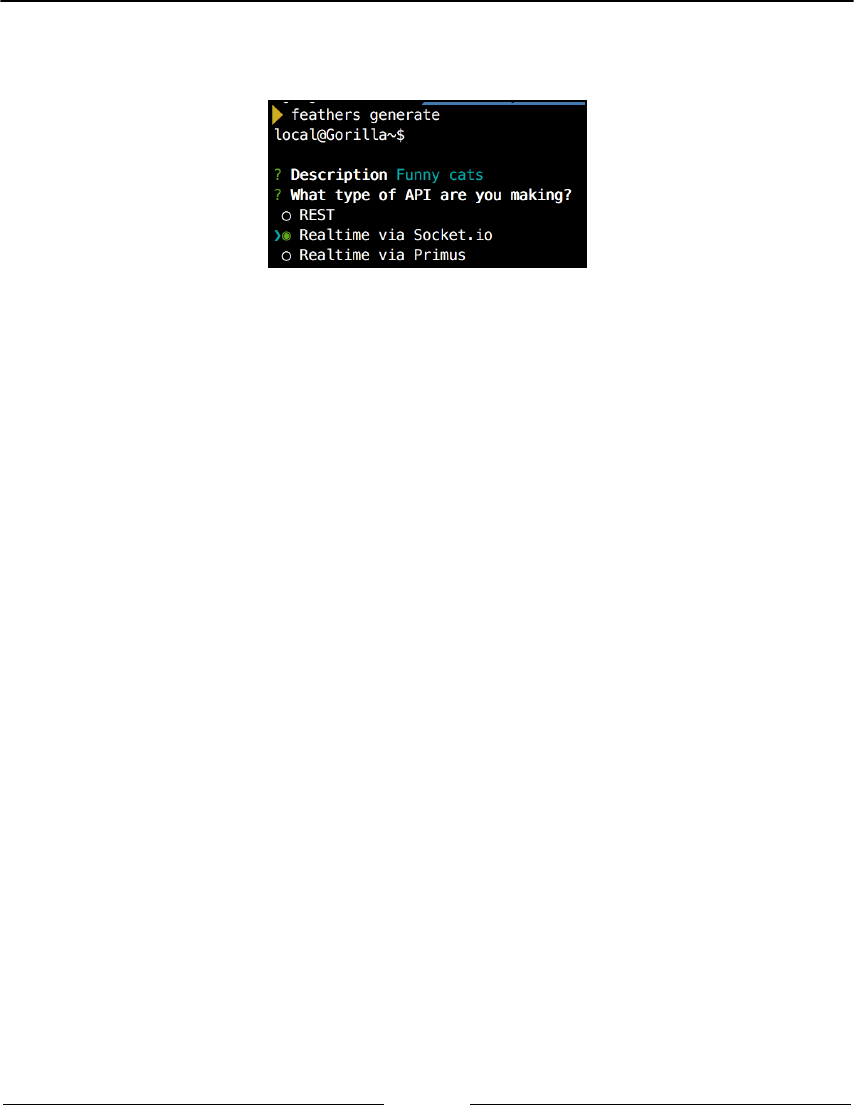
Integrating with Other Frameworks Chapter 19
[ 611 ]
Now, run feathers generate, which will create all the boilerplate for you. When asked
about the API, select Socket.io:
All the other questions can be left to the default value. While still in the Feather console,
type generate service to create a new service. You can call it cats and leave the other
questions to their default values.
Inside the public folder, open index.html and delete everything except a HTML5
boilerplate. You will need three dependencies in the head:
<script src="//cdnjs.cloudflare.com/ajax/libs/vue/2.1.10/vue.js"></script>
<script
src="//cdnjs.cloudflare.com/ajax/libs/socket.io/1.7.3/socket.io.js"></scrip
t>
<script src="//unpkg.com/feathers-
client@^1.0.0/dist/feathers.js"></script>
Write the HTML layout, as follows, in the body tag:
<div id="app">
<div v-for="cat in cats" style="display:inline-block">
<img width="100" height="100" :src="cat.url" />
<p>{{cat.name}}</p>
</div>
<form @submit.prevent="addCat">
<div>
<label>Cat Name</label>
<input v-model="newName" />
</div>
<div>
<label>Cat Url</label>
<input v-model="newUrl" />
</div>
<button>Add cat</button>
<img width="30" height="30" :src="newUrl" />
</form>
</div>

Integrating with Other Frameworks Chapter 19
[ 612 ]
The first <div> tag is a gallery of cats. Then, build a form to add new images of the cats you
collect.
In the body tag, you can always configure the Feathers service with the following lines:
<script>
const socket = io('http://localhost:3030')
const app = feathers()
.configure(feathers.socketio(socket))
const catService = app.service('cats')
This is for configuring the client for the browser that will connect to the WebSockets.
The catService method is a handle to the cat database. Next, we write the Vue instance:
new Vue({
el: '#app',
data: {
cats: [],
newName: '',
newUrl: ''
},
methods: {
addCat () {
catService.create({
name: this.newName,
url: this.newUrl
})
this.newName = ''
this.newUrl = ''
}
},
Finally, we need to ask for all the cats in the database on startup, while installing a listener
in case new cats are created (even by other users):
mounted () {
catService.find()
.then(page => {
this.cats = page.data
})
catService.on('created', cat => {
this.cats.push(cat)
})
}
})
</script>
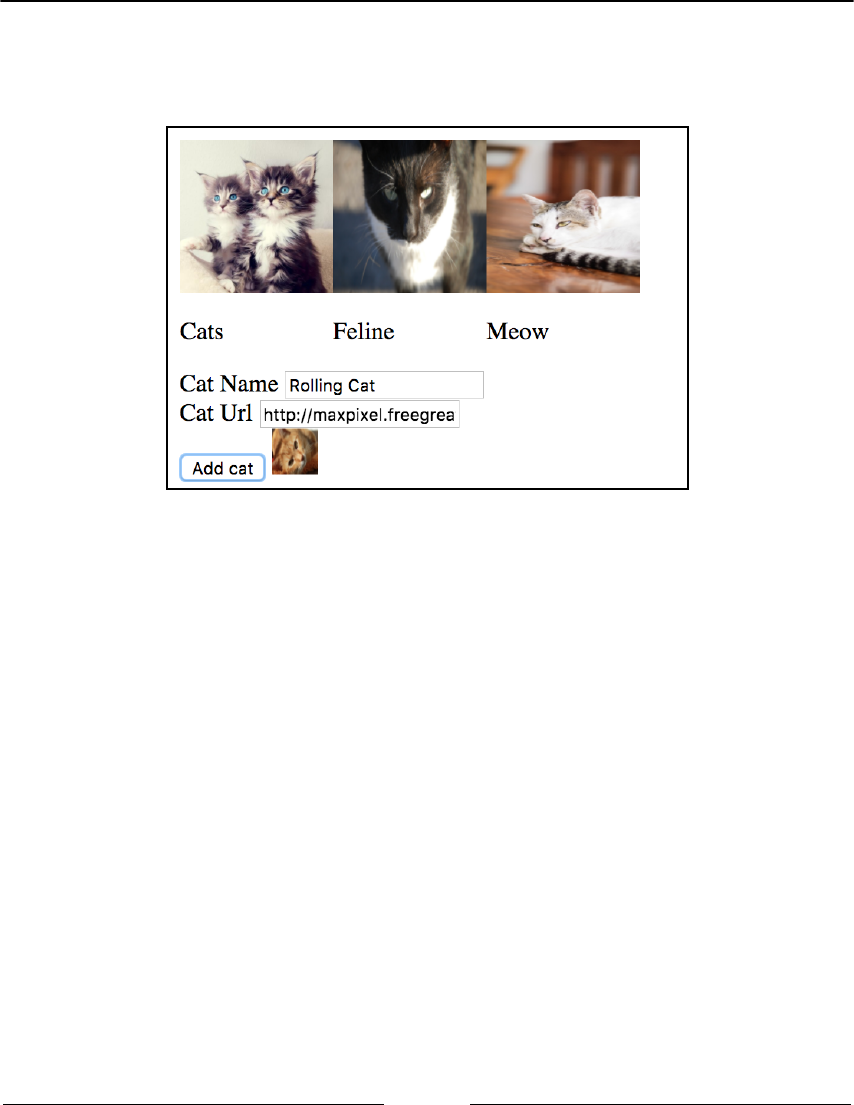
Integrating with Other Frameworks Chapter 19
[ 613 ]
If you run your application with npm start, you can navigate to the URL written in the
console to view your new app. Open another browser window and see how it changes in
real-time:
How it works...
Seeing the cats added in real time is clearly the way to go for modern applications. Feathers
let you create them in a snap and with a fraction of the code, thanks to the underlying
Socket.io, which in turn uses WebSockets.
WebSockets are really not that complex and what Feathers do, in this case, is just listen for
messages in the channel and associate them with actions like adding something to the
database.
The power of Feathers is visible when you can just swap database and WebSocket provider,
or switch to REST, without even touching your Vue code.
Creating a reactive app with Horizon
Horizon is a platform to build reactive, real-time scalable apps. It uses RethinkDB internally
and is immediately compatible with Vue. In this recipe, you'll build an automatic personal
diary.
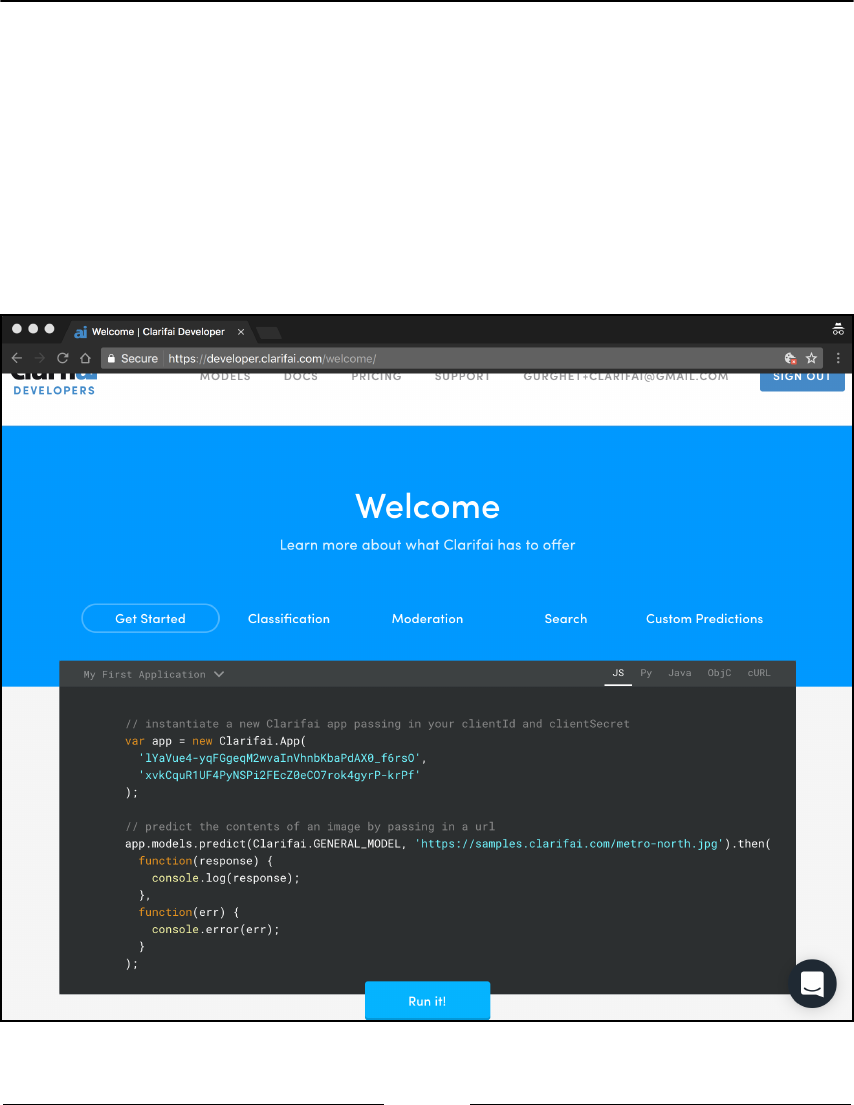
Integrating with Other Frameworks Chapter 19
[ 614 ]
Getting ready
This recipe just requires a bit of Vue fundamentals, but really not much else.
Before starting though, ensure that you install RethinkDB. You can find more info on this
on their website (https://www.rethinkdb.com/docs/install/). If you have Homebrew,
you can install it with brew install rethinkdb.
Also, you will need a Clarifai token. To get one for free, go to https://developer.
clarifai.com/ and sign up. You'll be presented with the code you are supposed to write in
your application, like in the following image:
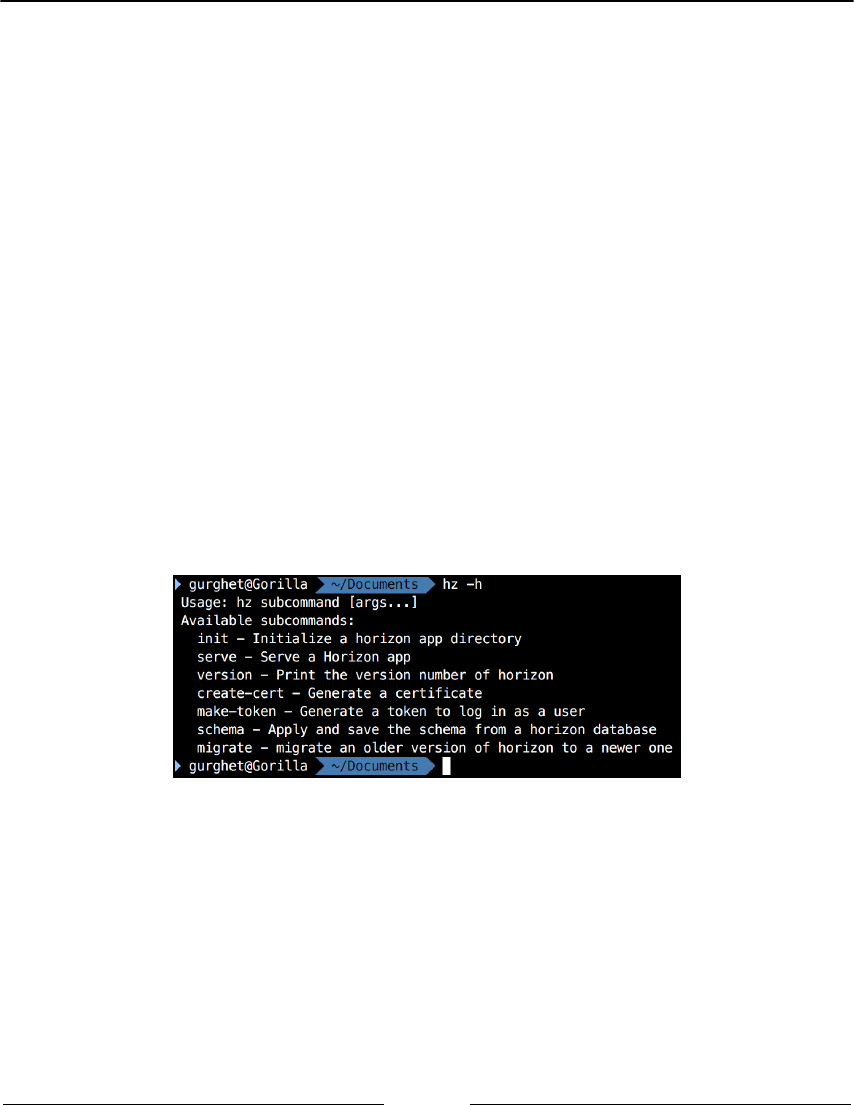
Integrating with Other Frameworks Chapter 19
[ 615 ]
In particular, you will need the clientId and the clientSecret, which are displayed in
this fashion:
var app = new Clarifai.App(
'your client id would be printed here',
'your client secret would be here'
);
Take note of this code or be ready to copy and paste it into your application.
How to do it...
Writing a journal is a difficult task, you have to write a lot every day. In this recipe, we'll
build an automatic journal that will write for us, based on pictures we take during the day.
Horizon will help us to memorize everything and to sync the diary between our devices.
After installing RethinkDB, install Horizon with the following command:
npm install -g horizon
Now, you'll have the new command, hz, available. Check it by typing hz -h; you should
see something like the following:
To create a directory that will host our new app, type the following:
hz init vue_app

Integrating with Other Frameworks Chapter 19
[ 616 ]
Then, enter the newly create vue_app directory and take a look at the index.html in the
dist folder. This is the file that will be the entry point to our server, open it with an editor.
You can clear everything and leave only an empty HTML5 boilerplate with an empty
<head> and <body>. In the head section, we need to declare dependencies on Vue,
Horizon, and Clarifai, as illustrated:
<script src="https://unpkg.com/vue"></script>
<script src="/horizon/horizon.js"></script>
<script src="https://sdk.clarifai.com/js/clarifai-latest.js"></script>
Just note how Horizon doesn't come from a CDN but from a local dependency.
We start by laying out a template for our journal. We have two parts. In the first, we will
list what we did in the past. Write the following in the body of the HTML:
<div id="app">
<div>
<h3>Dear diary...</h3>
<ul>
<li v-for="entry in entries">
{{ entry.datetime.toLocaleDateString() }}:
{{ entry.text }}
</li>
</ul>
</div>
...
In the second part, we will enter new entries:
...
<h3>New Entry</h3>
<img
style="max-width:200px;max-height:200px"
:src="data_uri"
/>
<input type="file" @change="selectFile" ref="file">
<p v-if="tentativeEntries.length">Choose an entry</p>
<button v-for="tentativeEntry in tentativeEntries"
@click="send(tentativeEntry)">
{{tentativeEntry}}
</button>
</div>
After this, open a <script> tag in which we'll write all of the following JavaScript.

Integrating with Other Frameworks Chapter 19
[ 617 ]
First, we need to log in to Clarifai:
var app = new Clarifai.App(
'7CDIjv_VqEYfmFi_ygwKsKAaDe-LwEzc78CcW1sA',
'XC0S9GHxS0iONFsAdiA2xOUuBsOhAT0jZWQTx4hl'
)
Obviously, you want to enter your clientId and clientSecret from Clarifai.
Then, we need to spin up Horizon and have a handle to the entries collection that we
will create:
const horizon = new Horizon()
const entries = horizon('entries')
Now, we finally write our Vue instance with three state variables:
new Vue({
el: '#app',
data: {
tentativeEntries: [],
data_uri: undefined,
entries: []
},
...
The tentativeEntries array will contain a list of possible entries for the diary we can
choose from; data_uri will contain the (base64 code of the) image we want to use as a
reference for what we did today; entries are all the past entries.
When we load an image, we ask Clarifai to come up with possible entries:
...
methods: {
selectFile(e) {
const file = e.target.files[0]
const reader = new FileReader()
if (file) {
reader.addEventListener('load', () => {
const data_uri = reader.result
this.data_uri = data_uri
const base64 = data_uri.split(',')[1]
app.models.predict(Clarifai.GENERAL_MODEL, base64)
.then(response => {
this.tentativeEntries =
response.outputs[0].data.concepts
.map(c => c.name)
})

Integrating with Other Frameworks Chapter 19
[ 618 ]
})
reader.readAsDataURL(file)
}
},
...
Then when we press the send button, we tell the Horizon collection of entries to store this
new one:
...
send(concept) {
entries.store({
text: concept,
datetime: new Date()
}).subscribe(
result => console.log(result),
error => console.log(error)
)
this.tentativeEntries = []
this.$refs.file.value = ''
this.data_uri = undefined
}
}
})
Finally, we want to ensure that we have the last ten entries on the screen when the page
loads and that every time a new entry is added, it pops up in real time. Add the following
hook inside the Vue instance, after the methods:
created() {
entries.order('datetime', 'descending').limit(10).watch()
.subscribe(allEntries => {
this.entries = [...allEntries].reverse()
})
}
To run the Horizon server, use the following command:
hz serve --dev
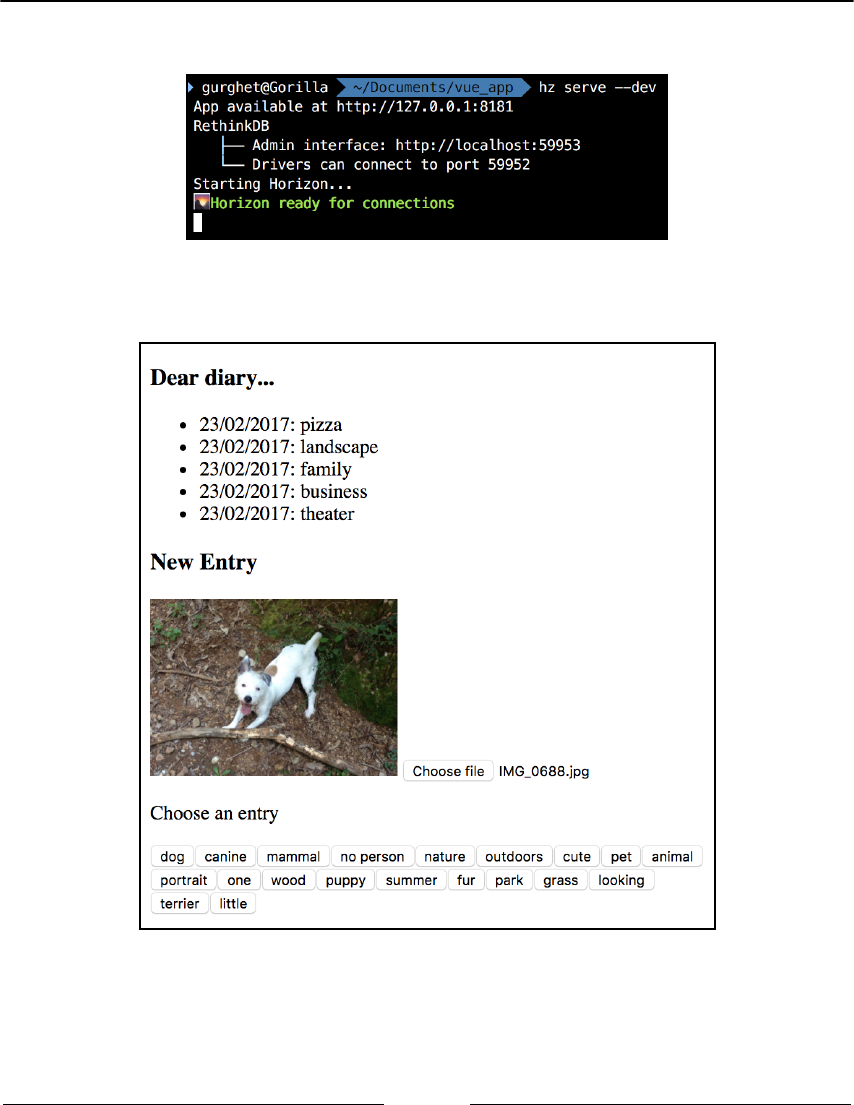
Integrating with Other Frameworks Chapter 19
[ 619 ]
The output for the preceding code is as follows:
Go to the specified address (the first line, not the admin interface), and you will see the
following:
You will note that if you have other browser windows open, they will be updated in real
time. Now you can finally write a journal every day without typing!

Integrating with Other Frameworks Chapter 19
[ 620 ]
How it works...
Our application uses a pattern called reactive. Its core can be clearly seen in the handle
created:
entries.order('datetime', 'descending').limit(10).watch()
.subscribe(allEntries => {
this.entries = [...allEntries].reverse()
})
The first line returns what is called an observable in reactive. An observable can be thought
of as a source of events. Every time an event is fired, the subscriber to that source will
process it. In our case, we are taking the whole entries collection and the events thrown are
modifications to that collection. Every time we receive an event of this type, we update the
entries array.
I will not provide a deep explanation of reactive programming here, but I would like to
highlight that this pattern is very helpful for scalability because of the ease with which you
can implement controls for your data flow; limit(10) is an example this.

20
Vue Router Patterns
Routing is a vitally important part of any Single Page Application (SPA). This chapter
focuses on maximizing the Vue router and looks at everything from routing a user between
pages, to parameters, to optimal configuration.
By the end of this chapter, we will have covered the following:
Implementing routing in a Vue.js application
Using dynamic route matching to create route parameters
Passing route parameters as component props
Single Page Applications
Modern JavaScript applications implement a pattern known as an SPA. In its most
simplistic form, it can be thought of as an application that displays components based on a
URL. As the templates are mapped to routes, there is no need for a page reload, as they can
be injected depending on where the user navigated.
This is the job of the router.
By creating our application this way, we're able to increase both perceived and actual
speed, because our application is much more dynamic.

Vue Router Patterns Chapter 20
[ 622 ]
Using the router
Let's spin up a playground project and install the vue-router library. This allows us to
take advantage of routing inside our application and give us the power of a modern SPA.
Run the following commands in your Terminal:
# Create a new Vue project
$ vue init webpack-simple vue-router-basics
# Navigate to directory
$ cd vue-router-basics
# Install dependencies
$ npm install
# Install Vue Router
$ npm install vue-router
# Run application
$ npm run dev
As we're using webpack as part of our build system, we've installed the router with npm.
We can then initialize the router inside of src/main.js:
import Vue from 'vue';
import VueRouter from 'vue-router';
import App from './App.vue';
Vue.use(VueRouter);
new Vue({
el: '#app',
render: h => h(App)
});
This effectively registers VueRouter as a global plugin. A plugin simply is just a function
that receives Vue and options as parameters and allows libraries such as VueRouter to
add functionality to our Vue application.

Vue Router Patterns Chapter 20
[ 623 ]
Creating routes
We can then define two small components inside our main.js file that simply have a
template that shows h1 with some text inside:
const Hello = { template: `<h1>Hello</h1>` };
const World = { template: `<h1>World</h1>`};
Then, in order to display these components on screen at particular URLs (such as /hello
and /world), we can define routes inside our application:
const routes = [
{ path: '/hello', component: Hello },
{ path: '/world', component: World }
];
Now that we've defined what components we want to use as well as the routes inside of
our application, we'll need to create a new instance of VueRouter and pass along the
routes.
Although we've used Vue.use(VueRouter), we still need to create a new instance of
VueRouter and initialize our routes. This is because merely registering VueRouter as a
plugin gives us access to the router option within our Vue instance(s):
const router = new VueRouter({
routes
});
We then need to pass the router to our root Vue instance:
new Vue({
el: '#app',
router,
render: h => h(App)
});
Finally, to display our routed components inside of our App.vue component, we need to
add the router-view component inside the template:
<template>
<div id="app">
<router-view/>
</div>
</template>
Vue Router Patterns Chapter 20
[ 624 ]
If we then navigate to /#/hello/ or /#/world, the appropriate component is displayed:
Dynamic routes
We can also dynamically match routes depending on a particular parameter. This is done
by specifying a route with a colon before the parameter name. Here's an example using a
similar greeting component:
// Components
const Hello = { template: `<h1>Hello</h1>` };
const HelloName = { template: `<h1>Hello {{ $route.params.name}}` }
// Routes
const routes = [
{ path: '/hello', component: Hello },
{ path: '/hello/:name', component: HelloName },
]
If our user navigates to /hello, they'll see h1 with the text Hello. Otherwise, if they
navigate to /hello/{name} (that is, Paul), they'll see h1 with the text Hello Paul.
We've made a lot of progress, but it's important to know that when we navigate to
parameterized URLs, component lifecycle hooks aren't fired again if the parameter changes
(that is, from /hello/paul to /hello/katie). We'll look at this soon!
Vue Router Patterns Chapter 20
[ 625 ]
Route props
Let's change our /hello/name route to pass the name parameter as a component prop,
which can be done by adding the props: true flag to the route:
const routes = [
{ path: '/hello', component: Hello },
{ path: '/hello/:name', component: HelloName, props: true},
]
We can then update our component to take in a prop with an id of name and also log this
to the console within the life cycle hook:
const HelloName = {
props: ['name'],
template: `<h1>Hello {{ name }}</h1>`,
created() {
console.log(`Hello ${this.name}`)
}
}
If we then try and navigate to different dynamic routes, we'll see that the created hook only
fires once (unless we refresh the page) even though our page shows the correct name:

Vue Router Patterns Chapter 20
[ 626 ]
Component Navigation Guards
How do we fix the lifecycle hook problem? In this instance, we can use what's known as a
Navigation Guard. This allows us to hook into different lifecycles of the router, such as the
beforeRouteEnter, beforeRouteUpdate, and beforeRouteLeave methods.
beforeRouteUpdate
Let's use the beforeRouteUpdate method to access information about the route change:
const HelloName = {
props: ['name'],
template: `<h1>Hello {{ name }}</h1>`,
beforeRouteUpdate(to, from, next) {
console.log(to);
console.log(from);
console.log(`Hello ${to.params.name}`)
},
}
If we check the JavaScript console after navigating to a different route under
/hello/{name}, we'll be able to see which route the user is going to and where they are
coming from. The to and from objects also give us access to params, queries, the full path,
and much more.
While we correctly get the log statements, if we try and navigate between routes, you'll note
that our application doesn't update with the parameter name prop. This is because we
haven't used the next function after we've finished doing any computations within the
guard. Let's add that in:
beforeRouteUpdate(to, from, next) {
console.log(to);
console.log(from);
console.log(`Hello ${to.params.name}`)
next();
},

Vue Router Patterns Chapter 20
[ 627 ]
beforeRouteEnter
We can also take advantage of beforeRouteEnter to perform actions prior to entering the
component route. Here's an example:
beforeRouteEnter(to, from, next) {
console.log(`I'm called before entering the route!`)
next();
}
We still have to call next to pass the stack down to the next route handler.
beforeRouteLeave
We can also hook into beforeRouteLeave to perform actions whenever we're navigating
away from a route. As we're already on this route within the context of this hook, we have
access to the component instance. Let's look at an example:
beforeRouteLeave(to, from, next) {
console.log(`I'm called before leaving the route!`)
console.log(`I have access to the component instance, here's proof!
Name: ${this.name}`);
next();
}
Once again, we have to call next in this instance.
Global router hooks
We've looked at component Navigation Guards and while these work on a component-by-
component basis, you may want to establish global hooks that listen to navigation events.
beforeEach
We can use router.beforeEach to listen for routing events globally across the
application. This is worth using if you have authentication checks or other pieces of
functionality that should be used in every route.

Vue Router Patterns Chapter 20
[ 628 ]
Here's an example that simply logs out the route the user is going to and coming from.
Each one of the following examples assume that the router exists in scope similar to the
following:
const router = new VueRouter({
routes
})
router.beforeEach((to, from, next) => {
console.log(`Route to`, to)
console.log(`Route from`, from)
next();
});
Once again, we have to call next() to trigger the next route guard.
beforeResolve
The beforeResolve global route guard is triggered just before navigation is confirmed,
but it's important to know that this is only after all component-specific guards and async
components have been resolved.
Here's an example:
router.beforeResolve((to, from, next) => {
console.log(`Before resolve:`)
console.log(`Route to`, to)
console.log(`Route from`, from)
next();
});
afterEach
We can also hook into the global afterEach function that allows us to perform the
action(s), but we can't affect navigation and thus only have access to the to and from
parameters:
router.afterEach((to, from) => {
console.log(`After each:`)
console.log(`Route to`, to)
console.log(`Route from`, from)
});

Vue Router Patterns Chapter 20
[ 629 ]
Resolution stack
Now that we've familiarized ourselves with the various different route lifecycle hooks on
offer, it's worth investigating the entire resolution stack whenever we attempt to navigate
to another route:
Trigger a route change:1.
This is the first stage of any route lifecycle and is triggered any time we attempt to
navigate to a new route. An example would be going from /hello/Paul to
/hello/Katie. No Navigation Guards have been triggered at this point.
Trigger component leave guards:2.
Next, any leave guards are triggered, such as beforeRouteLeave, on loaded
components.
Trigger global beforeEach guards:3.
As global route middleware can be created with beforeEach, these functions
will be called prior to any route update.
Trigger local beforeRouteUpdate guards in reused components:4.
As we saw earlier, whenever we navigate to the same route with a different
parameter, the lifecycle hooks aren't fired twice. Instead, we use
beforeRouteUpdate to trigger lifecycle changes.
Trigger beforeRouteEnter in components:5.
This is called each time prior to navigating to any route. At this stage, the
component isn't rendered, so it doesn't have access to the this component
instance.
Resolve asynchronous route components:6.
It then attempts to resolve any asynchronous components in your project. Here's
an example of one:
const MyAsyncComponent = () => ({
component: import ('./LazyComponent.vue'),
loading: LoadingComponent,
error: ErrorComponent,
delay: 150,
timeout: 3000
})
Trigger beforeRouteEnter in successfully activated components:7.
We now have access to the beforeRouteEnter hook and can perform any
action(s) prior to resolving the route.

Vue Router Patterns Chapter 20
[ 630 ]
Trigger global beforeResolve hooks:8.
Providing in-component guards and async route components have been
resolved, we can now hook into the global router.beforeResolve method that
allows us to perform action(s) at this stage.
Navigation:9.
All prior Navigation Guards have been fired, and the user is now successfully
navigated to a route.
Trigger afterEach hooks:10.
Although the user has been navigated to the route, it doesn't stop there. Next, the
router triggers a global afterEach hook that has access to the to and from
parameters. As the route has already been resolved at this stage, it doesn't have
the next parameter and thus cannot affect navigation.
Trigger DOM updates:11.
Routes have been resolved, and Vue can appropriately trigger DOM updates.
Trigger callbacks within next in beforeRouteEnter:12.
As beforeRouteEnter does not have access to the component's this context,
the next parameter takes a callback that resolves to the component instance on
navigation. An example can be seen here:
beforeRouteEnter (to, from, next) {
next(comp => {
// 'comp' inside this closure is equal to the component instance
})
Programmatic navigation
We're not limited to template navigation using router-link; we can also
programmatically navigate the user to different routes from within our JavaScript. Inside of
our App.vue, let's expose the <router-view> and give the user the ability to select a
button that will navigate them to either the /hello or /hello/:name route:
<template>
<div id="app">
<nav>
<button @click="navigateToRoute('/hello')">/Hello</button>
<button
@click="navigateToRoute('/hello/Paul')">/Hello/Name</button>
</nav>
<router-view></router-view>
</div>
</template>

Vue Router Patterns Chapter 20
[ 631 ]
We can then add a method that pushes a new route onto the route stack:
<script>
export default {
methods: {
navigateToRoute(routeName) {
this.$router.push({ path: routeName });
},
},
};
</script>
At this point, any time we select a button, it should subsequently navigate the user to the
appropriate route. The $router.push() function can take a variety of different
arguments, depending on how you have your routes set up. Here are some examples:
// Navigate with string literal
this.$router.push('hello')
// Navigate with object options
this.$router.push({ path: 'hello' })
// Add parameters
this.$router.push({ name: 'hello', params: { name: 'Paul' }})
// Using query parameters /hello?name=paul
this.$router.push({ path: 'hello', query: { name: 'Paul' }})
router.replace
Instead of pushing a navigation item on the stack, we can also replace the current history
stack with router.replace. Here's an example of this:
this.$router.replace({ path: routeName });
router.go
If we want to navigate the user backward or forward, we can use router.go; this is
essentially an abstraction over the window.history API. Let's take a look at some
examples:
// Navigate forward one record
this.$router.go(1);
// Navigate backward one record

Vue Router Patterns Chapter 20
[ 632 ]
this.$router.go(-1);
// Navigate forward three records
this.$router.go(3);
// Navigate backward three records
this.$router.go(-3);
Lazy loading routes
We can also lazy load our routes to take advantage of code splitting with webpack. This
allows us to have greater performance than when eagerly loading our routes. To do this, we
can create a small playground project. Run the following in your Terminal:
# Create a new Vue project
$ vue init webpack-simple vue-lazy-loading
# Navigate to directory
$ cd vue-lazy-loading
# Install dependencies
$ npm install
# Install Vue Router
$ npm install vue-router
# Run application
$ npm run dev
Let's start off by creating two components, named Hello.vue and World.vue, inside
src/components:
// Hello.vue
<template>
<div>
<h1>Hello</h1>
<router-link to="/world">Next</router-link>
</div>
</template>
<script>
export default {};
</script>

Vue Router Patterns Chapter 20
[ 633 ]
Now we have created our Hello.vue component, let's create the second World.vue like
so:
// World.vue
<template>
<div>
<h1>World</h1>
<router-link to="/hello">Back</router-link>
</div>
</template>
<script>
export default {};
</script>
We can then initialize our router as we usually do, inside main.js:
import Vue from 'vue';
import VueRouter from 'vue-router';
Vue.use(VueRouter);
The main difference has to do with the way in which to import our components. This
requires the use of the syntax-dynamic-import Babel plugin. Install it into your project
by running the following in your Terminal:
$ npm install --save-dev babel-plugin-syntax-dynamic-import
We can then update .babelrc to use the new plugin:
{
"presets": [["env", { "modules": false }], "stage-3"],
"plugins": ["syntax-dynamic-import"]
}
Finally, this allows us to import our components asynchronously, like this:
const Hello = () => import('./components/Hello');
const World = () => import('./components/World');
We can then define our routes and initialize the router, this time referencing the
asynchronous import:
const routes = [
{ path: '/', redirect: '/hello' },
{ path: '/hello', component: Hello },
{ path: '/World', component: World },
];
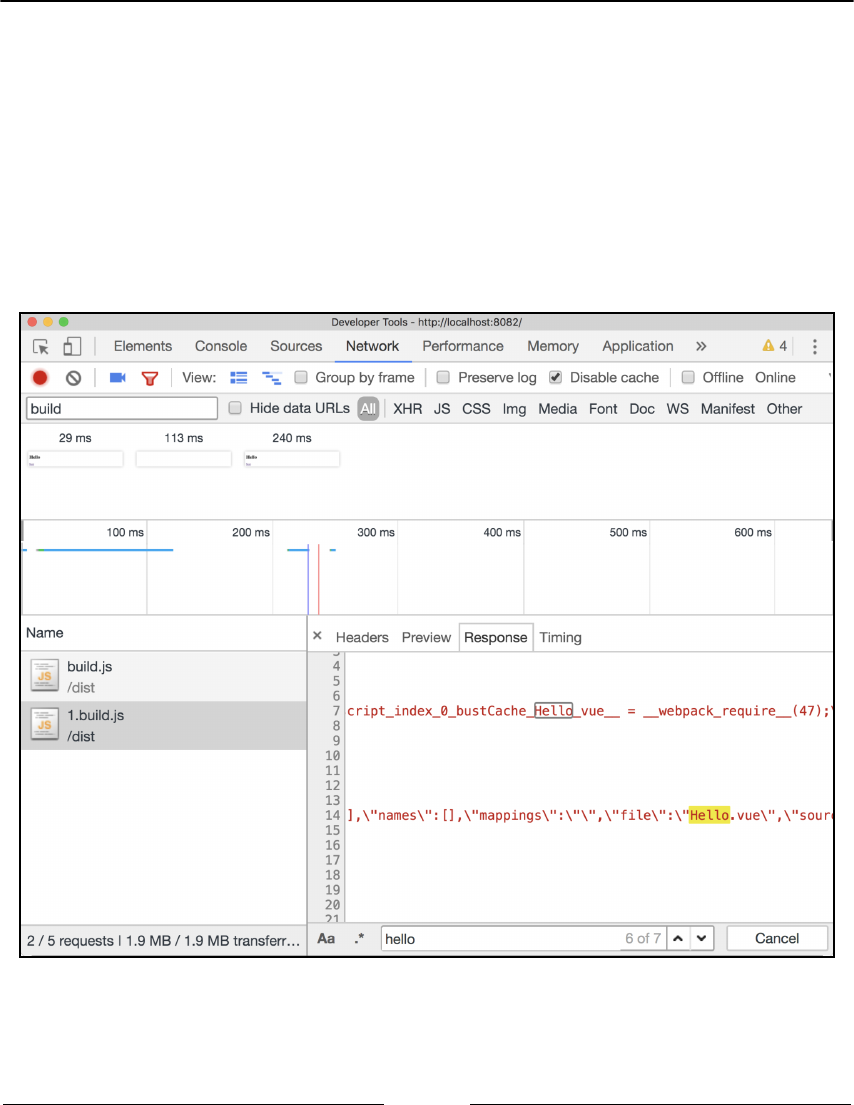
Vue Router Patterns Chapter 20
[ 634 ]
const router = new VueRouter({
routes,
});
new Vue({
el: '#app',
router,
render: h => h(App),
});
We can then see its results by looking in Chrome via Developer Tools | Network tab while
navigating through our application:

Vue Router Patterns Chapter 20
[ 635 ]
Each route is added to its own bundle file and subsequently gives us an improved
performance as the initial bundle is much smaller:
An SPA project
Let's create a project that uses a RESTful API and the routing concepts that we've just
learned. Create a new project by running the following in your Terminal:
# Create a new Vue project
$ vue init webpack-simple vue-spa
# Navigate to directory

Vue Router Patterns Chapter 20
[ 636 ]
$ cd vue-spa
# Install dependencies
$ npm install
# Install Vue Router and Axios
$ npm install vue-router axios
# Run application
$ npm run dev
Enabling the router
We can start off by enabling the VueRouter plugin within our application. To do this, we
can create a new file inside src/router named index.js. We'll use this file to contain all
the router-specific configuration, but we'll separate out each route into different files
depending on the underlying feature.
Let's import and add the router plugin:
import Vue from 'vue';
import VueRouter from 'vue-router';
Vue.use(VueRouter)
Defining routes
To separate out the routes into different files within our application, we can first create a
file under src/components/user named user.routes.js. Each time we have a different
feature set (that requires routes), we can create our own *.routes.js file that can be
imported into the router's index.js.
For now, we can just export a new empty array:
export const userRoutes = [];
We can then add the routes to our index.js (even though we have none defined yet):
import { userRoutes } from '../components/user/user.routes';
const routes = [...userRoutes];
We're using the ES2015+ spread operator, which allows us to use each object in the array
instead of the array itself.

Vue Router Patterns Chapter 20
[ 637 ]
To then initialize the router, we can then create a new VueRouter and pass along the
routes, as follows:
const router = new VueRouter({
// This is ES2015+ shorthand for routes: routes
routes,
});
Finally, let's export the router so that it can be used inside our main Vue instance:
export default router;
Inside main.js, let's import the router and add it to the instance, as shown:
import Vue from 'vue';
import App from './App.vue';
import router from './router';
new Vue({
el: '#app',
router,
render: h => h(App),
});
Creating the UserList route
The first section of our application will be a home page that displays a list of users from an
API. We've used this example in the past, so you should be familiar with the steps
involved. Let's create a new component under src/components/user named
UserList.vue.
The component will look something like this:
<template>
<ul>
<li v-for="user in users" :key="user.id">
{{user.name}}
</li>
</ul>
</template>
<script>
export default {
data() {
return {
users: [

Vue Router Patterns Chapter 20
[ 638 ]
{
id: 1,
name: 'Leanne Graham',
}
],
};
},
};
</script>
Feel free to add your own test data at this point. We'll be requesting this data from the API
momentarily.
As we've created our component, we can then add a route to user.routes.js, which
displays this component whenever the '/' (or a path of your choice) is activated:
import UserList from './UserList';
export const userRoutes = [{ path: '/', component: UserList }];
In order to show this route, we need to update App.vue to subsequently inject the content
into a router-view node. Let's update App.vue to handle this:
<template>
<div>
<router-view></router-view>
</div>
</template>
<script>
export default {};
</script>
<style>
</style>
Our application should then display a single user. Let's create an HTTP utility to get data
from an API.
Getting data from an API
Create a new file under src/utils named api.js. This will be used to create a base
instance of Axios, which we can then perform HTTP requests on:
import axios from 'axios';
Vue Router Patterns Chapter 20
[ 639 ]
export const API = axios.create({
baseURL: `https://jsonplaceholder.typicode.com/`
})
We can then use the beforeRouteEnter Navigation Guard to get user data whenever
someone navigates to the '/' route:
<template>
<ul>
<li v-for="user in users" :key="user.id">
{{user.name}}
</li>
</ul>
</template>
<script>
import { API } from '../../utils/api';
export default {
data() {
return {
users: [],
};
},
beforeRouteEnter(to, from, next) {
API.get(`users`)
.then(response => next(vm => (vm.users = response.data)))
.catch(error => next(error));
},
};
</script>
We then find that we get a list of users on screen, as illustrated in the following screenshot,
each represented as a different list item. The next step is to create a detail component,
register the detail route, and find a way to link to that route:

Vue Router Patterns Chapter 20
[ 640 ]
Creating a detail page
In order to create a detail page, we can create UserDetail.vue and follow steps similar to
the previous component:
<template>
<div class="container">
<div class="user">
<div class="user__name">
<h1>{{userInfo.name}}</h1>
<p>Person ID {{$route.params.userId}}</p>
<p>Username: {{userInfo.username}}</p>
<p>Email: {{userInfo.email}}</p>
</div>
<div class="user__address" v-if="userInfo && userInfo.address">
<h1>Address</h1>
<p>Street: {{userInfo.address.street}}</p>
<p>Suite: {{userInfo.address.suite}}</p>
<p>City: {{userInfo.address.city}}</p>
<p>Zipcode: {{userInfo.address.zipcode}}</p>
<p>Lat: {{userInfo.address.geo.lat}} Lng:
{{userInfo.address.geo.lng}} </p>
</div>
<div class="user__other" >
<h1>Other</h1>
<p>Phone: {{userInfo.phone}}</p>
<p>Website: {{userInfo.website}}</p>
<p v-if="userInfo && userInfo.company">Company:
{{userInfo.company.name}}</p>
</div>
</div>
</div>
</template>
<script>
import { API } from '../../utils/api';
export default {
data() {
return {
userInfo: {},
};
},
beforeRouteEnter(to, from, next) {
next(vm =>
API.get(`users/${to.params.userId}`)
.then(response => (vm.userInfo = response.data))

Vue Router Patterns Chapter 20
[ 641 ]
.catch(err => console.error(err))
)
},
};
</script>
<style>
.container {
line-height: 2.5em;
text-align: center;
}
</style>
As there should never be more than one user inside of our detail page, the userInfo
variable has been created as a JavaScript object rather than an array.
We can then add the new component to our user.routes.js:
import UserList from './UserList';
import UserDetail from './UserDetail';
export const userRoutes = [
{ path: '/', component: UserList },
{ path: '/:userId', component: UserDetail },
];
In order to link to this component, we can add router-link within our UserList
component:
<template>
<ul>
<li v-for="user in users" :key="user.id">
<router-link :to="{ path: `/${user.id}` }">
{{user.name}}
</router-link>
</li>
</ul>
</template>
Vue Router Patterns Chapter 20
[ 642 ]
If we then take a look in our browser we can see that there is only one user listed with the
information underneath coming from the user detail linked to that one user:
Child routes
We can also access posts from our API, and as a result, we can display both the posts'
information alongside our user information. Let's create a new component named
UserPosts.vue:
<template>

Vue Router Patterns Chapter 20
[ 643 ]
<div>
<ul>
<li v-for="post in posts" :key="post.id">{{post.title}}</li>
</ul>
</div>
</template>
<script>
import { API } from '../../utils/api';
export default {
data() {
return {
posts: [],
};
},
beforeRouteEnter(to, from, next) {
next(vm =>
API.get(`posts?userId=${to.params.userId}`)
.then(response => (vm.posts = response.data))
.catch(err => console.error(err))
)
},
};
</script>
This allows us to get posts based on our userId route parameter. In order to display this
component as a child view, we'll need to register it as such within the user.routes.js:
import UserList from './UserList';
import UserDetail from './UserDetail';
import UserPosts from './UserPosts';
export const userRoutes = [
{ path: '/', component: UserList },
{
path: '/:userId',
component: UserDetail,
children: [{ path: '/:userId', component: UserPosts }],
},
];

Vue Router Patterns Chapter 20
[ 644 ]
We can then add another <router-view> tag inside our UserDetail.vue component to
display the child route. The template now looks like this:
<template>
<div class="container">
<div class="user">
// Omitted
</div>
<div class="posts">
<h1>Posts</h1>
<router-view></router-view>
</div>
</div>
</template>
To top it off, we've also added some styles that display the user information on the left and
posts on the right:
<style>
.container {
line-height: 2.5em;
text-align: center;
}
.user {
display: inline-block;
width: 49%;
}
.posts {
vertical-align: top;
display: inline-block;
width: 49%;
}
ul {
list-style-type: none;
}
</style>
Vue Router Patterns Chapter 20
[ 645 ]
If we then head to our browser, we can see how the data appears just as we had planned,
with the user information displaying on the left and the posts on the right:
Ta-da! We've now created a Vue application with multiple routes, child routes, parameters,
and more!

Vue Router Patterns Chapter 20
[ 646 ]
Summary
In this section, we learned about the Vue Router and how we can use it to create Single
Page Applications. As a result, we covered everything from initializing the router plugin to
defining routes, components, Navigation Guards, and much more. We now have the
necessary knowledge to create Vue applications that scale past a singular component.
Now that we have expanded our knowledge and understand how to use the Vue Router,
we can move on to handling state management with Vuex in the next chapter.

21
State Management with Vuex
In this chapter, we'll be looking at State Management Patterns with Vuex. Vuex may not be
needed for every application created, but it is extremely important that you have an
understanding of what it is when it becomes appropriate to use it, and how to implement it.
By the end of this chapter, you will have done the following:
Understood what Vuex is and why you should use it
Created your first Vuex store
Investigated actions, mutations, getters, and modules
Used the Vue devtools to step through Vuex mutations as they happen
What is Vuex?
State management is an important part of modern-day web applications, and managing
this state as the application grows is a problem every project faces. Vuex looks to help us
achieve better state management by enforcing a centralized store, essentially a single source
of truth within our application. It follows design principles similar to that of Flux and
Redux and also integrates with the official Vue devtools for a great development
experience.

State Management with Vuex Chapter 21
[ 648 ]
Let's define these terms in a little more depth.
State Management Pattern (SMP)
We can define a state as the current value(s) of a variable/object within our component or
application. If we think about our functions as simple INPUT -> OUTPUT machines, the
values stored outside of these functions make up the current condition (state) of our
application.
Note how I've made a distinction between component level and application level state.
The component level state can be defined as state confined to one component (that is, the
data function within our component). Application level state is similar but is often used
across multiple components or services.
As our application continues to grow, passing state across multiple components gets more
difficult. We saw earlier in the book that we can use an Event bus (that is, a global Vue
instance) to pass data around, and while this works, it's much better to define our state as
part of a singular centralized store. This allows us to reason about the data in our
application much easier, as we can start defining actions and mutations that always
generate a new version of state, and managing state becomes much more systemized.
Event bus is a simple approach to state management relying on a singular view instance
and may be beneficial in small Vuex projects, but in the majority of cases, Vuex should be
used. As our application becomes larger, clearly defining our actions and intended side
effects with Vuex allows us to better manage and scale the project.
A great example of how all this fits together can be seen in the following screenshot
(https://vuex.vuejs.org/en/intro.html):

State Management with Vuex Chapter 21
[ 649 ]
Vuex state flow
Let's break down this example into a step-by-step process:
Initial State is rendered inside of a Vue component.1.
A Vue component dispatches an Action to get some data from a Backend API.2.
This then fires a Commit event that is handled by a Mutation. This Mutation3.
returns a new version of the state containing the data from the Backend API.
The process can then be seen in the Vue Devtools, and you have the ability to4.
"time travel" between different versions of the previous state that takes place
within the application.
The new State is then rendered inside of the Vue Components.5.
State Management with Vuex Chapter 21
[ 650 ]
The main component of our Vuex application(s) is, therefore, the store, our single source of
truth across all component(s). The store can be read but not directly altered; it must have
mutation functions to carry out any changes. Although this pattern may seem strange at
first, if you've never used a state container before, this design allows us to add new features
to our application in a consistent manner.
As Vuex is natively designed to work with Vue, the store is reactive by default. This means
any changes that happen from within the store can be seen in real time without the need for
any hacks.
Thinking about state
As a thought exercise, let's start off by defining the goals for our application as well as any
state, actions, and potential mutations. You don't have to add the following code to your
application just yet, so feel free to read on, and we'll bring it all together at the end.
Let's start off by considering the state as a collection of key/value pairs:
const state = {
count: 0 // number
}
For our counter application, we just need one element of state—the current count. This will
likely have a default value of 0 and will be of type number. As this is likely the only state
inside of our application, you can consider this state to be application level at this point.
Next, let's think about any action types that the user may want to take our counter
application.
These three action types can then be dispatched to the store and thus we can perform the
following mutations, returning a new version of state each time:
Increment: Add one to the current count (0 -> 1)
Decrement: Remove one from the current count (1 -> 0)
Reset: Set the current count back to zero (n -> 0)
We can imagine that at this point, our user interface will be updated with the correct bound
version of our count. Let's implement this and make it a reality.

State Management with Vuex Chapter 21
[ 651 ]
Using Vuex
Now that we've had a detailed look at what makes up an application driven by Vuex, let's
make a playground project to take advantage of these features!
Run the following in your Terminal:
# Create a new Vue project
$ vue init webpack-simple vuex-counter
# Navigate to directory
$ cd vuex-counter
# Install dependencies
$ npm install
# Install Vuex
$ npm install vuex
# Run application
$ npm run dev
Creating a new store
Let's start off by creating a file named index.js inside src/store. This is the file we'll use
to create our new store and bring together the various components.
We can start by importing both Vue and Vuex as well as telling Vue that we'd like to use the
Vuex plugin:
import Vue from 'vue';
import Vuex from 'vuex';
Vue.use(Vuex);
We can then export a new Vuex.Store with a state object that contains all of our
application states. We're exporting this so that we can import the state in other components
when necessary:
export default new Vuex.Store({
state: {
count: 0,
},
});

State Management with Vuex Chapter 21
[ 652 ]
Defining action types
We can then create a file inside src/store named mutation-types.js, which contains
the various actions that the user may take within our application:
export const INCREMENT = 'INCREMENT';
export const DECREMENT = 'DECREMENT';
export const RESET = 'RESET';
Although we don't have to explicitly define our actions like this, it's a good idea to use
constants where possible. This allows us to take better advantage of tooling and linting
techniques, as well as allowing us to infer the actions within our entire application at a
glance.
Actions
We can use these action types to commit a new action to be subsequently handled by our
mutations. Create a file inside src/store named actions.js:
import * as types from './mutation-types';
export default {
[types.INCREMENT]({ commit }) {
commit(types.INCREMENT);
},
[types.DECREMENT]({ commit }) {
commit(types.DECREMENT);
},
[types.RESET]({ commit }) {
commit(types.RESET);
},
};
Inside each method, we're destructuring the returned store object to only take the commit
function. If we didn't do this, we'd have to call the commit function like this:
export default {
[types.INCREMENT](store) {
store.commit(types.INCREMENT);
}
}
If we revisit our state diagram, we can see that after committing an action, the action is
picked up by the mutator.

State Management with Vuex Chapter 21
[ 653 ]
Mutations
A mutation is the only method in which the state of the store can be changed; this is done
by committing/dispatching an action, as seen earlier. Let's create a new file inside
src/store named mutations.js and add the following:
import * as types from './mutation-types';
export default {
[types.INCREMENT](state) {
state.count++;
},
[types.DECREMENT](state) {
state.count--;
},
[types.RESET](state) {
state.count = 0;
},
};
You'll note that once again, we're using our action types to define the method names; this is
possible with a new feature from ES2015+ named computed property names. Now, any
time that an action is committed/dispatched, the mutator will know how to handle this and
return a new state.
Getters
We can now commit actions and have these actions return a new version of the state. The
next step is to create getters so that we can return sliced parts of our state across our
application. Let's create a new file inside src/store named getters.js and add the
following:
export default {
count(state) {
return state.count;
},
};

State Management with Vuex Chapter 21
[ 654 ]
As we have a minuscule example, the use of a getter for this property isn't entirely
necessary, but as we scale our application(s), we'll need to use getters to filter state. Think
of these as computed properties for values in the state, so if we wanted to return a modified
version of this property for the view-layer, we could as follows:
export default {
count(state) {
return state.count > 3 ? 'Above three!' : state.count;
},
};
Combining elements
In order to pull this all together, we have to revisit our store/index.js file and add the
appropriate state, actions, getters, and mutations:
import Vue from 'vue';
import Vuex from 'vuex';
import actions from './actions';
import getters from './getters';
import mutations from './mutations';
Vue.use(Vuex);
export default new Vuex.Store({
state: {
count: 0,
},
actions,
getters,
mutations,
});
In our App.vue, we can create a template that will give us the current count as well as
some buttons to increment, decrement, and reset state:
<template>
<div>
<h1>{{count}}</h1>
<button @click="increment">+</button>
<button @click="decrement">-</button>
<button @click="reset">R</button>
</div>
</template>

State Management with Vuex Chapter 21
[ 655 ]
Whenever the user clicks on a button, an action is dispatched from within one of the
following methods:
import * as types from './store/mutation-types';
export default {
methods: {
increment() {
this.$store.dispatch(types.INCREMENT);
},
decrement() {
this.$store.dispatch(types.DECREMENT);
},
reset() {
this.$store.dispatch(types.RESET);
},
},
}
Once again, we're using constants to make for a better development experience. Next, in
order to take advantage of the getter we created earlier, let's define a computed property:
export default {
// Omitted
computed: {
count() {
return this.$store.getters.count;
},
},
}
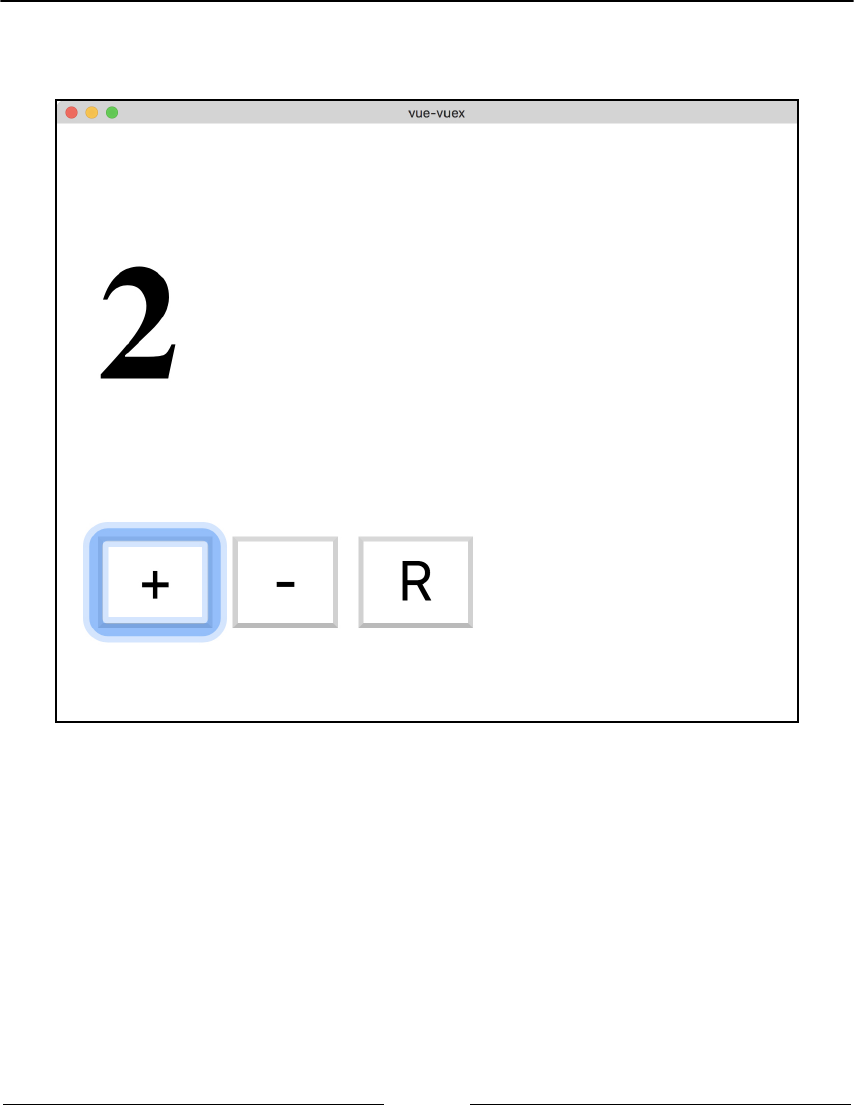
State Management with Vuex Chapter 21
[ 656 ]
We then have an application that displays the current count and can be incremented,
decremented, or reset:
Payloads
What if we wanted to let the user decide how much they wanted to increment the count?
Let's say we had a textbox that we could add a number and increment the count by that
much. If the textbox was set to 0 or was empty, we'd increment the count by 1.

State Management with Vuex Chapter 21
[ 657 ]
Our template would, therefore, look like this:
<template>
<div>
<h1>{{count}}</h1>
<input type="text" v-model="amount">
<button @click="increment">+</button>
<button @click="decrement">-</button>
<button @click="reset">R</button>
</div>
</template>
We'd place the amount value on our local component state, as this doesn't necessarily need
to be part of the main Vuex Store. This is an important realization to make, as it means we
can still have local data/computed values if necessary. We can also update our methods to
pass the amount through to our actions/mutations:
export default {
data() {
return {
amount: 0,
};
},
methods: {
increment() {
this.$store.dispatch(types.INCREMENT, this.getAmount);
},
decrement() {
this.$store.dispatch(types.DECREMENT, this.getAmount);
},
reset() {
this.$store.dispatch(types.RESET);
},
},
computed: {
count() {
return this.$store.getters.count;
},
getAmount() {
return Number(this.amount) || 1;
},
},
};

State Management with Vuex Chapter 21
[ 658 ]
We then have to update actions.js as this now receives both the state object and our
amount as an argument. When we use commit, let's also pass the amount through to the
mutation:
import * as types from './mutation-types';
export default {
[types.INCREMENT]({ commit }, amount) {
commit(types.INCREMENT, amount);
},
[types.DECREMENT]({ commit }, amount) {
commit(types.DECREMENT, amount);
},
[types.RESET]({ commit }) {
commit(types.RESET);
},
};
Therefore, our mutations look similar to before, but this time we increment/decrement
based on the amount:
export default {
[types.INCREMENT](state, amount) {
state.count += amount;
},
[types.DECREMENT](state, amount) {
state.count -= amount;
},
[types.RESET](state) {
state.count = 0;
},
};
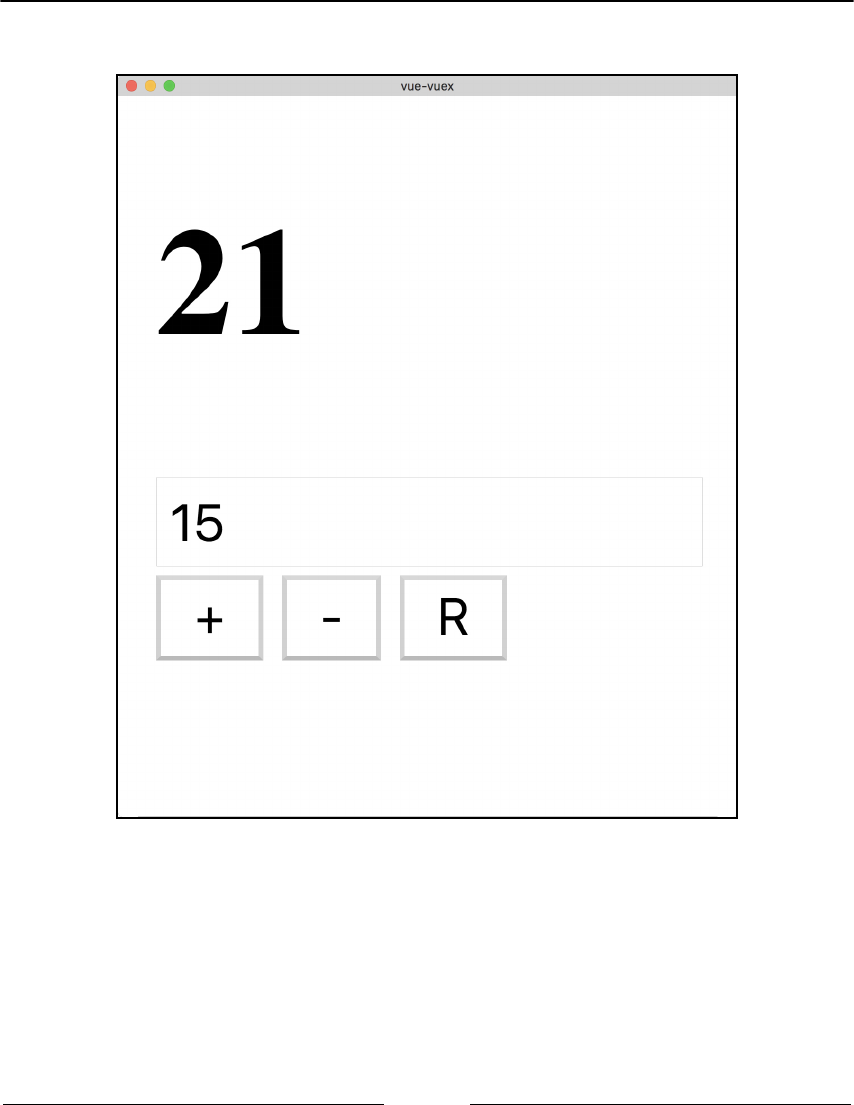
State Management with Vuex Chapter 21
[ 659 ]
Ta-da! We can now increment the count based on a text value:
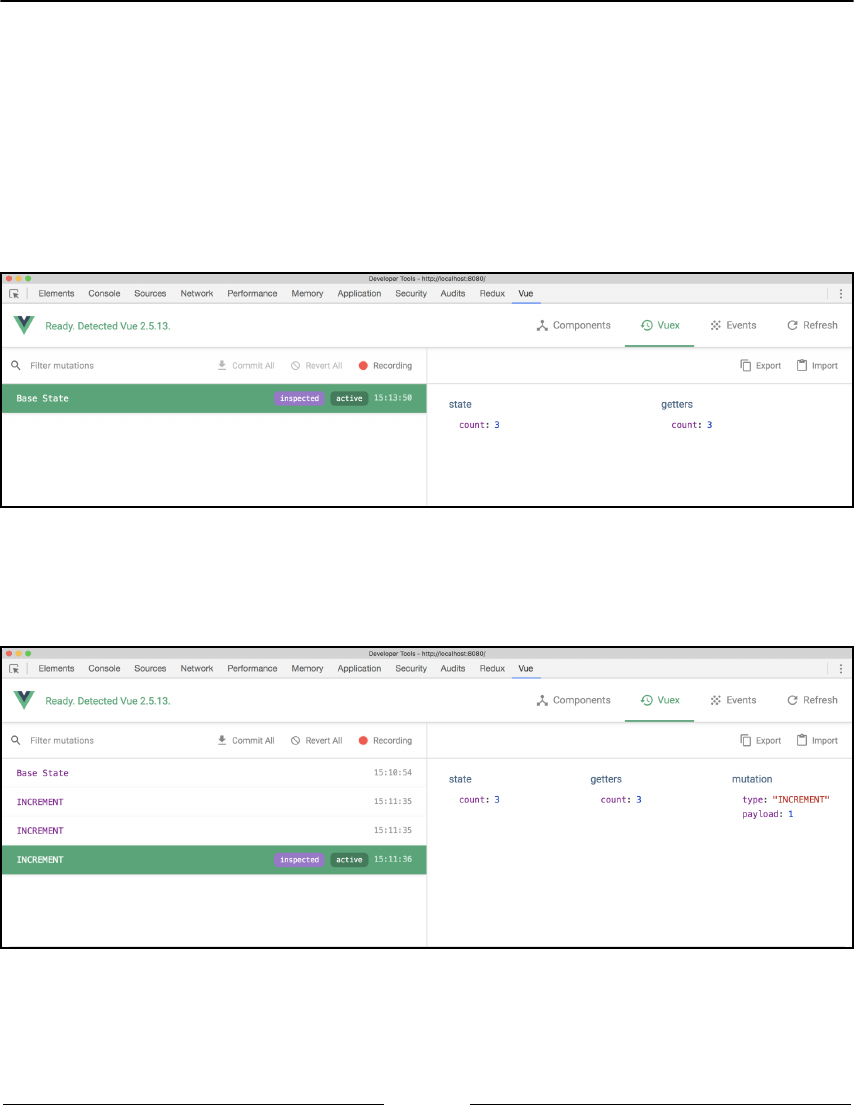
State Management with Vuex Chapter 21
[ 660 ]
Vuex and Vue devtools
Now that we have a consistent way of interacting with our store via actions, we can take
advantage of the Vue devtools to see our state over time.
We'll be using the counter application as an example, to ensure that you have this project
running, and right click on Inspect Element from within Chrome (or your browser's
equivalent). If we head over to the Vue tab and select Vuex, we can see that the counter has
been loaded with the initial application state:
From the preceding screenshot, you can see the count state member as well as the value of
any getters. Let's click on the increment button a few times and see what happens:
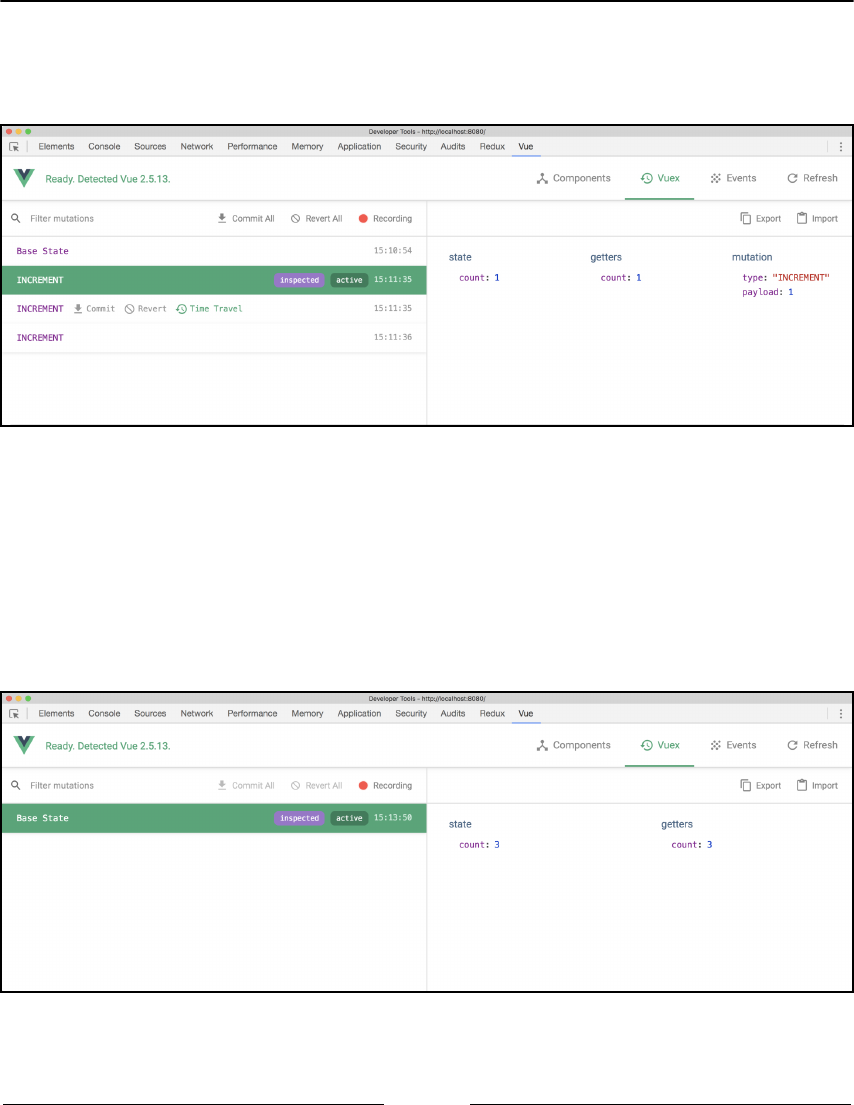
State Management with Vuex Chapter 21
[ 661 ]
Awesome! We can see the INCREMENT action as well as a subsequent change to the state
and getters, and more information about the mutation itself. Let's see how we can time
travel throughout our state:
In the preceding screenshot, I've selected the time travel button on the first action. You can
then see that our state is reverted to count: 1, and this is reflected in the rest of the
metadata. The application is then updated to reflect this change in state, so we can literally
step through each action and see the results on screen. Not only does this help with
debugging, but any new state that we add to our application will follow the same process
and be visible in this manner.
Let's hit the commit button on an action:

State Management with Vuex Chapter 21
[ 662 ]
As you can see, this merges all of our actions up to when we hit commit to then be part of
our Base State. As a result, the count property is then equal to the action you committed to
Base State.
Modules and scalability
At the moment, we have everything in root state. As our application gets larger, it would be
a good idea to take advantage of modules so that we can appropriately split our container
into different chunks. Let's turn our counter state into its own module by creating a new
folder inside store named modules/count.
We can then move the actions.js, getters.js, mutations.js, and mutation-
types.js files into the count module folder. After doing so, we can create an index.js
file inside the folder that exports the state, actions, getters, and mutations for this
module only:
import actions from './actions';
import getters from './getters';
import mutations from './mutations';
export const countStore = {
state: {
count: 0,
},
actions,
getters,
mutations,
};
export * from './mutation-types';
I've also elected to export the mutation types from the index.js file, so we can use these
within our components on a per-module basis by importing from store/modules/count
only. As we're importing more than one thing within this file, I gave the store the name of
countStore. Let's define the new module inside store/index.js:
import Vue from 'vue';
import Vuex from 'vuex';
import { countStore } from './modules/count';
Vue.use(Vuex);
export default new Vuex.Store({
modules: {

State Management with Vuex Chapter 21
[ 663 ]
countStore,
},
});
Our App.vue then changes slightly; instead of referencing the types object, we reference the
types specifically from this module:
import * as fromCount from './store/modules/count';
export default {
data() {
return {
amount: 0,
};
},
methods: {
increment() {
this.$store.dispatch(fromCount.INCREMENT, this.getAmount);
},
decrement() {
this.$store.dispatch(fromCount.DECREMENT, this.getAmount);
},
reset() {
this.$store.dispatch(fromCount.RESET);
},
},
computed: {
count() {
return this.$store.getters.count;
},
getAmount() {
return Number(this.amount) || 1;
},
},
};
We can then add more modules to our application by having the same files/structure as our
count example. This allows us to scale as our application continues to grow.

State Management with Vuex Chapter 21
[ 664 ]
Summary
In this chapter, we took advantage of the Vuex library for consistent state management
within Vue. We defined what state is as well as component state and application-level state.
We learned how to appropriately split our actions, getters, mutations, and store between
different files for scalability as well as how to call these items within our components.
We also looked at using the Vue devtools with Vuex to step through mutations as they
happened within our application. This gives us the ability to better debug/reason about the
decisions we make when developing applications.
Other Books You May Enjoy
If you enjoyed this book, you may be interested in these other books by Packt:
Full-Stack Vue.js 2 and Laravel 5
Anthony Gore
ISBN: 978-1-78829-958-9
Core features of Vue.js to create sophisticated user interfaces
Build a secure backend API with Laravel
Learn a state-of-the-art web development workflow with Webpack
Full-stack app design principles and best practices
Learn to deploy a full-stack app to a cloud server and CDN
Managing complex application state with Vuex
Securing a web service with Laravel Passport
Other Books You May Enjoy
[ 666 ]
Vue.js 2.x by Example
Mike Street
ISBN: 978-1-78829-346-4
Looping through data with Vue.js
Searching and filtering data
Using components to display data
Getting a list of files using the dropbox API
Navigating through a file tree and loading folders from a URL
Caching with Vuex
Pre-caching for faster navigation
Introducing vue-router and loading components
Using vue-router dynamic routes to load data
Using vue-router and Vuex to create an ecommerce store

Other Books You May Enjoy
[ 667 ]
Leave a review - let other readers know what
you think
Please share your thoughts on this book with others by leaving a review on the site that you
bought it from. If you purchased the book from Amazon, please leave us an honest review
of this book's Amazon page. This is vital so that other potential readers can see and use
your unbiased opinion to make purchasing decisions, we can understand what our
customers think about our products, and our authors can see your feedback on the title that
they have worked with Packt to create. It will only take a few minutes of your time but is
valuable to other potential customers, our authors, and Packt. Thank you!
Index
4
404 page
creating 220
A
Add to basket button
updating, on item addition 352
alias routes 228, 229
animate.css integration
performing 384, 386
working 387
animating
between states 109
animations
creating, with JavaScript 390, 391, 392, 393,
394, 395, 396
app enhancement
unneeded code, removing 133, 134
app
outlining 230, 231
planning 230, 231
application level 648
application space 8
application
integrating, with animate.css 384, 386
autodetection formatting 54, 55
Axios
about 427
used, for sending basic AJAX request 427, 428,
429, 430
B
Babel
used, for compiling from ES6 523, 525, 526
back and forward buttons
using, in browser 133
balance
formatting 28
basic AJAX requests
sending, with Axios 427, 428, 430
basic web pages
building 418
basket array placeholder
creating 347, 348
basket quantity
calculating 355
basket
products, adding to 349, 350
breadcrumb
creating, from current path 120, 121, 122, 123,
124, 125
updating 151
browser automation 381
C
caching
alternative method 179, 180
categories
creating 304
displaying 311, 313
products, displaying in 314
products, ordering in 319
category list
creating 304
CDN (Content Delivery Network) 9
checkbox filter change
URL, updating on 340
clean Webpack project
creating 496
code linter
running, while developing 526, 529
code
optimizing 49

[ 669 ]
command line unit testing 380
component data
using 64, 65
component level 648
component methods
using 64, 65
Component Navigation Guards
about 626
beforeRouteEnter 627
beforeRouteLeave 627
beforeRouteUpdate 626
components
about 231
bundling, with Webpack 500, 501, 503, 504,
506, 507
creating 98
data, passing to 65, 67, 71
HTML component 232
naming 221, 222
releasing, to public 532, 533, 534, 536, 537,
538, 540
rendering, JSX used 559
rendering, with children 555, 556, 557, 558
route component 231
compound interest calculator
building 497, 499
computed functions 14
computed values
about 12, 13
inspecting 376
concerns
separating, with modules 589, 590, 591, 592,
593
conditional rendering
about 22
v-else directive 23, 24
v-if directive 22, 23
content
filtering 34, 35, 36, 37, 38
cross site scripting (XSS) 453
CSS classes
modifying 40, 42, 43, 44
CSV
loading 238, 239
loading, with CSV Parser 241
loading, with d3 library 239, 241
products, storing 243, 244, 245
curated list
creating, for home page 299
current path
breadcrumb, creating from 120, 121, 122, 123,
124, 125
custom classes 44
custom transition classes
adding 388, 389
D
Data Object 555
data
displaying 25, 98
fetching, before switching route 461, 463, 464
filtering 29
loading, from store 159, 160
passing, to components 65, 67, 71
storing 160, 161
declarative rendering 21
dependencies
organizing, with Webpack 509, 510, 511, 512,
513
directive
about 542
creating 542, 543
working 544
DocBlock 190
download links
caching, on files 187, 188
Dropbox app
creating 97, 98
Dropbox data
displaying 102, 104
retrieving 99, 100
dropbox-viewer component
updating, to work with Vuex 152, 153
dynamic routes, with parameters
about 207, 209, 210, 211
GET parameters 212
props, using 212, 213
dynamic routes
route props 625
dynamic transitions

[ 670 ]
about 422
performing 422, 423, 424
working 425
E
editable basket
creating 369, 370
editable fields, creating 370
items, removing from cart 372
Electron
about 602
used, for building universal applications 602,
606
element
entering and leaving transitions, adding 409
key attribute, setting dynamically 403
letting leave, before enter phase in transition
404, 406
transitioning between 399, 400, 401, 402
two elements problem 404, 405, 406
elements, moving in list
transitioning 409, 410, 412
error, in request
recovering from 437, 438, 441, 442
ES6 523
event data
previewing 379
F
Feathers
used, for creating real-time app 610, 612, 613
file components
making 115
file download ability
adding 127
file meta information 104
file size
formatting 105
files
download links, caching on 187, 188
separating 113
storing 236, 237
filter variables
grouping, logically 51
replacing 51
filtering 44
filtering component
building, based on products 329, 330, 332, 334,
335
filters, making component
about 85
component, creating 85
custom events, used for modifying filter field 87,
88
filter query, updating 89, 90
JavaScript errors, resolving 87
filters
creating, dynamically 337, 338
filtering 39
preselecting, on page load 341
resetting 339
Firebase
about 606
Vue, using with 607, 608, 609
FLIP (First Last Invert Play) 388, 389
folder components
making 115
folder contents
caching 155, 157, 158
folder structure
updating 116, 117, 118
folders
displaying, based on URL 131
linking 116, 117, 118
modifying, for Vue-router 204
separating 113
forcefeeding 393
form
building 29, 30
creating, for sending data to server 433, 436,
437
format functions
combining 54
second variable, passing into 55
format method
creating 56
functional component
creating 561, 562
working 564

[ 671 ]
G
getters
accessing 595
argument, passing 596
building, for retrieving data 593, 595
global router hooks
afterEach 628
beforeEach 627, 628
beforeResolve 628
resolution stack 629, 630
H
home page
curated list, creating for 299
HomePage component
routes, adding 282
Horizon
used, for creating reactive app 614, 615, 618
hot reloading
development process, speeding up with 518,
519, 520, 522
HTML components 232
HTML declarations
about 20
declarative rendering 21
v-html directive 20, 21
I
infinite scrolling
implementing 447, 448, 449
working 449
initial files
creating 233, 234
initial render
transitioning on 396, 397, 398
inputs
binding, to variables 31, 32
J
JavaScript promises
reference 427
JSX
about 559
used, for rendering component 559, 560, 561
L
lazy loading routes 632, 633, 635
libraries
loading 96
linking
to sub-routes 206
links
adding, to routes 204
creating, v-html used 27, 28
ListProduct component
product information, displaying 301
ListProducts component
building 358
creating 295
loading screen
adding 106, 107, 108
local server
setting up 237, 238
logic
extracting, from components 496, 500
M
message
displaying 10, 11
methods 15
minified and development .js file
building, with one command 530, 531, 532
modules 662
multiple router-view
adding, in pages 468, 469, 470, 471
MVVM (Model-View-ViewModel) methodology 12
N
named dynamic routes
using 464, 465, 466
working 467
named views 224, 225
navigation techniques
about 226
alias routes 228, 229
navigating programmatically 227
redirection 227, 228
nested routes 217, 219
Nightwatch.js

[ 672 ]
reference 381
O
Order Checkout page
creating 364
details, copying between addresses 366, 367,
368
Order Confirmation screen 359
Order process
building 358
P
page load
filters, preselecting on 341
PageNotFound route 246, 247
pagination component
items per page, updating 294
paginated list, displaying 287
paginating buttons, creating 288
pagination links, creating 291
URL, updating on navigation 290
values, calculating 283
pagination
creating 283
parent folders
caching 181, 182, 184
path variable
breadcrumb component, updating 151
dropbox-viewer component, updating to work with
Vuex 152, 153
using 151
paths 232
Patience JS 442
plugin
about 549
writing, for Vue 549, 550, 551
product count
displaying, in app header 354, 355
product details
updating, on switching URLs 276
product images 255, 258
product information
adding, to store 349
displaying 253, 255
product images 260
product order
wiring up 322
product price
storing 320
product variations
about 261
variations display table 261
variations, displaying in select box 269, 273,
274
products not found
catching 250, 251, 252
products
adding, to basket 349, 350
displaying, in category 314
filtering 342, 343, 345
listing 281
looping through 283
ordering, in category 319
programmatic navigation
about 630, 631
router.go 631
router.replace 631
progress bar
adding, to load pages 483, 485, 486
promises
reference 98
prop defaults
setting 214
props
about 65
static props 216
using 212, 213
R
reactive app
creating, with Horizon 613, 615, 618, 619
working 620
real-time app
creating, with Feathers 610, 612
working 613
redirecting, routes
dynamic redirect 489
named redirect 488
redirecting to 404s 488
registered date field

[ 673 ]
formatting 28, 29
remote server
used 237
repeatable component
computed functions, creating 76
creating 73, 74, 76
CSS class functions 76, 77
filtering, working with props 81, 83
formatted value functions 77, 78
methods, creating 76
request
processing, before sending 450, 451, 452
responsive table
building, with higher-order components 565,
566, 567, 569, 570
REST (REpresentational State Transfer) 446
REST client
creating 442, 443, 444, 445, 446
REST server
creating 442, 443, 444, 445, 446
reusable functions 15
reusable transitions
building 420
packaging, into components 417, 418, 421
using, with elements in web page 420
right product
selecting 247, 248, 249, 250
route aliases
using 475, 476
working 478
route component 231
router-link element
advantages, over standard link 205
router
Component Navigation Guards 626
dynamic routes 624
global router hooks 627
lazy loading routes 632, 633, 635
programmatic navigation 630
routes, creating 623, 624
using 622
routes
composing, hierarchically 471, 472, 474, 475
errors, managing 480, 481, 482, 483
naming 222, 223, 224
redirecting 486, 487, 488
S
scalability 662
scrolling position
saving, when hitting back 489, 490, 491, 492,
493, 494
SDK
initializing 97, 98
Selenium
reference 382
server setup
about 236
file, storing 236, 237
local server 238
local server, setting up 237
remote server, used 237
Shop Vue-router URLs
finalizing 356
Shopify CSV data
unifying 241, 242, 243
simple component
rendering manually 553, 554, 555
simple storage, for application
building 576, 577, 579, 580, 581
Single Page Application (SPA) 621
single product
displaying 245
Page Not Found route 246
PageNotFound route 247
products not found, catching 250, 251, 252
right product, selecting 247, 248, 249, 250
slots 68
SPA (Single Page Applications)
about 456
creating, with vue-router 457, 459, 460, 461
SPA project
about 635
child routes 642, 644, 645
data, obtaining from API 638, 639
detail page, creating 640, 641
router, enabling 636
routes, defining 636, 637
UserList route, creating 637
SPA

[ 674 ]
testing 380
state, of components
animating 413, 414, 415, 416
states
animating between 109
static props
using 216
store mutation
creating 349, 350
sub-routes
linking to 206
subfolders, caching
about 167, 178
app methods, planning 168
data, displaying with displayFolderStructure
method 173
displayFolderStructure method 174
getFolderStructure method 169, 170, 171
T
time-travel
viewing 378
transitions
adding, between routes 478, 479, 480
Tween.js library 415
Typicode 434
U
UMD (Universal Module Definition) module 508
universal applications
building, with Electron 602, 604, 606
unpkg service
reference 146
URL change
structure, updating with 135, 136, 137
URL hash
error message, displaying 131
updating 129
used, for navigating through folders 129
URL
updating, on checkbox filter change 340
user data
validating, before sending 431, 432, 433
V
v-else directive 23, 24
v-for directive 25
v-html directive
about 20, 21
used, for creating links 27, 28
v-if directive 22, 23
variations display table
about 261
key, used with loops 261
variations, displaying in table 262, 264, 265,
267
variations
displaying, in select box 269, 274
Velocity.js
URL 390
Vue components data
inspecting 376
Vue components
creating 61, 62
initializing 62, 63
Vue content
displaying 32, 33
hiding 32, 33
Vue data
setting, outside of instance 135, 136, 137
Vue devtools
about 660, 662
Vue JavaScript
number of hard-coded variables, reducing 58
redundancy, reducing 58
Vue library 9
Vue life cycle hooks 100, 102
Vue plugin
working 553
Vue-router
folder, modifying for 204
initializing 200, 202
installing 200, 202
vue-router
pages, loading dynamically 572, 573, 575, 576
used, for creating SPA 457
Vue.js developer tools
using 376
Vue
initializing 9
message, displaying 10, 11
used, for obtaining data 98
using, with Firebase 606, 607, 609
Vuex getters
creating 324, 326, 327
Vuex mutations
about 581, 582, 585
viewing 377
working 583
Vuex store
actions, testing 599
message, retrieving 148, 149
message, updating 149
mutations, testing 597
path methods, updating to use store commits
150, 151
software requisites 597
used, for folder path 149, 150
utilizing 147
working 601
Vuex
about 647, 660
action types, defining 652
actions 652
actions, listing 585, 586, 587, 588
elements, combining 654
getters 653
initializing 146
mutations 653
payloads 656, 659
state 650
State Management Pattern (SMP) 648
store, creating 651
URL 648
using 651
W
Webpack project
external components, using 513, 514, 515, 517,
518
Webpack
components, bundling with 500
dependencies, organizing with 509, 510, 511,
512
working 508
WebSockets
about 544
using, in Vue 544, 545
working 547, 548
workspace
application space 8
creating 8
Vue library 9
X
XSS attacks
preventing, to app 453, 454, 455
