CryptoServer Csadm Manual For System Administrators Crypto Server Systemadministrators
User Manual:
Open the PDF directly: View PDF ![]() .
.
Page Count: 222 [warning: Documents this large are best viewed by clicking the View PDF Link!]
- 1 Introduction
- 2 Fundamentals
- 3 Security Management
- 3.1 Life Cycle and Global States of the CryptoServer
- 3.2 Access Control, User Concept and Secure Messaging
- 3.3 Auditing
- 3.4 Alarm
- 3.5 The Clear Functionality
- 3.6 Temperature-dependent Behavior of the CryptoServer
- 3.7 System Keys
- 3.8 Backup of Keys and Users
- 3.9 Firmware Module Management
- 3.10 Signed Configuration Files
- 4 The Batteries of CryptoServer/CryptoServer LAN
- 5 Administration of CryptoServer with csadm
- 5.1 General
- 5.2 Basic Commands
- 5.3 Commands for Authentication
- 5.4 Commands for Administration
- 5.4.1 GetState
- 5.4.2 SetAdminMode
- 5.4.3 SetStartupMode
- 5.4.4 GetStartupMode
- 5.4.5 GetBattState
- 5.4.6 StartOS
- 5.4.7 RecoverOS
- 5.4.8 GetTime
- 5.4.9 SetTime
- 5.4.10 GetBootLog
- 5.4.11 GetAuditLog
- 5.4.12 ClearAuditLog
- 5.4.13 GetAuditConfig
- 5.4.14 SetAuditConfig
- 5.4.15 MemInfo
- 5.4.16 Test
- 5.4.17 ResetAlarm
- 5.4.18 GetModel
- 5.4.19 Reset
- 5.4.20 ResetToBL
- 5.4.21 Restart
- 5.4.22 GetInfo
- 5.5 Commands for Managing the User Authentication Keys
- 5.6 Commands for User Management
- 5.7 Commands for Managing the Master Backup Keys
- 5.8 Commands for Firmware Management
- 5.9 Commands for Firmware Packaging
- 5.10 Commands for Administration of CryptoServer LAN
- 5.10.1 CSLGetConnections
- 5.10.2 CSLScanDevices
- 5.10.3 CSLGetVersion
- 5.10.4 CSLGetStatus
- 5.10.5 CSLGetLogFile
- 5.10.6 CSLGetConfigFile
- 5.10.7 CSLPutConfigFile
- 5.10.8 CSLSetTracelevel
- 5.10.9 CSLShutdown
- 5.10.10 CSLReboot
- 5.10.11 CSLGetTime
- 5.10.12 CSLSetTime
- 5.10.13 CSLGetSerial
- 5.10.14 CSLGetLoad
- 5.10.15 CSLListPPApps
- 6 Typical Administration Tasks
- 7 Advanced Administration Tasks
- 8 Troubleshooting
- Appendix A Built-in Elliptic Curves
- References

CryptoServer LAN
CryptoServer
CryptoServer Command-line Administration Tool - csadm
Manual for System Administrators

Imprint
Copyright 2017
Utimaco IS GmbH
Germanusstr. 4
D-52080 Aachen
Germany
Phone
+49 (0)241 / 1696-200
Fax
+49 (0)241 / 1696-199
Internet
http://hsm.utimaco.com
e-mail
hsm@utimaco.com
Document Version
2.1.1
Date
2017-02-14
Status
Final
Document No.
2009-0003
All Rights reserved
No part of this documentation may be reproduced in any form (printing, photocopy or
according to any other process) without the written approval of Utimaco IS GmbH or be
processed, reproduced or distributed using electronic systems.
Utimaco IS GmbH reserves the right to modify or amend the documentation at any time
without prior notice. Utimaco IS GmbH assumes no liability for typographical errors and
damages incurred due to them.
All trademarks and registered trademarks are the property of their respective owners.

Table of Contents
Page 3 of 222
Table of Contents
1 Introduction ................................................................................................................................ 9
1.1 About This Manual...................................................................................................................... 9
1.1.1 Target Audience for this Manual ...........................................................................................9
1.1.2 Contents of this Manual ........................................................................................................9
1.1.3 Document Conventions ...................................................................................................... 10
1.2 Other Manuals .......................................................................................................................... 10
2 Fundamentals ........................................................................................................................... 13
2.1 Hardware .................................................................................................................................. 13
2.1.1 IRAM ................................................................................................................................... 14
2.1.2 Key-RAM ............................................................................................................................ 14
2.2 Software ................................................................................................................................... 14
2.2.1 Bootloader .......................................................................................................................... 15
2.2.2 Firmware Modules .............................................................................................................. 15
2.2.2.1 Operating System – SMOS ......................................................................................... 19
2.2.2.2 Further Standard Firmware Modules ......................................................................... 19
2.2.3 Signed Licence File ............................................................................................................ 23
2.2.4 CryptoServer’s Boot Process ............................................................................................. 23
2.2.4.1 Boot Phase Controlled by Bootloader ........................................................................ 23
2.2.4.2 Start OS ...................................................................................................................... 24
2.2.4.3 Boot Phase Controlled by Operating System SMOS .................................................. 24
2.2.4.4 Watching the Boot Process and Analyzing Errors ..................................................... 25
2.2.4.5 Start Backup Copies of Firmware (SYS Firmware Modules) ...................................... 26
2.2.4.6 Commands to Reset the CryptoServer ....................................................................... 26
2.2.5 Operating Modes of the CryptoServer ................................................................................ 27
3 Security Management ................................................................................................................ 29
3.1 Life Cycle and Global States of the CryptoServer .................................................................... 29
3.1.1 State INITIALIZED .............................................................................................................. 29
3.1.2 State DEFECT ..................................................................................................................... 30
3.2 Access Control, User Concept and Secure Messaging ............................................................. 30
3.2.1 Users .................................................................................................................................. 30
3.2.2 Authentication.................................................................................................................... 31
3.2.2.1 Authentication Status and User Permissions ............................................................ 32
3.2.2.2 User Groups and Access to Commands ..................................................................... 32
3.2.2.3 Authentication Mechanisms ...................................................................................... 33
3.2.3 Maximum for Failed Authentication Attempts ................................................................... 35
3.2.4 User Groups for Administration ......................................................................................... 35

Table of Contents
Page 4 of 222
3.2.4.1 Default User ADMIN ................................................................................................... 36
3.2.5 Secure Messaging .............................................................................................................. 38
3.2.6 Mutual Authentication ....................................................................................................... 40
3.3 Auditing .................................................................................................................................... 41
3.4 Alarm ........................................................................................................................................ 44
3.4.1 External Erase .................................................................................................................... 47
3.5 The Clear Functionality ............................................................................................................ 47
3.6 Temperature-dependent Behavior of the CryptoServer ........................................................... 49
3.7 System Keys ............................................................................................................................. 50
3.7.1 Default Administrator Key .................................................................................................. 50
3.7.2 Module Signature Key ........................................................................................................ 51
3.7.3 Alternative Module Signature Key ..................................................................................... 52
3.7.4 Firmware Encryption Key ................................................................................................... 53
3.7.5 The Master Key of the CryptoServer .................................................................................. 54
3.8 Backup of Keys and Users ........................................................................................................ 55
3.9 Firmware Module Management ................................................................................................ 56
3.9.1 Firmware Containers: MTC/MMC, MSC, SYS...................................................................... 56
3.9.2 Encrypted Firmware Modules ............................................................................................ 57
3.9.3 Package Files ..................................................................................................................... 58
3.10 Signed Configuration Files ....................................................................................................... 58
3.10.1 Sample Configuration File cmds_sample.cfg .................................................................... 60
3.10.2 Interface Hardening by Disabling Selected Functions ....................................................... 60
3.10.3 Configurable Role-based Access ....................................................................................... 61
3.10.4 List of External Firmware Functions .................................................................................. 62
4 The Batteries of CryptoServer/CryptoServer LAN ...................................................................... 68
5 Administration of CryptoServer with csadm .............................................................................. 69
5.1 General ..................................................................................................................................... 69
5.1.1 System Requirements ........................................................................................................ 69
5.1.2 Installation of csadm ......................................................................................................... 69
5.1.3 Syntax of csadm ................................................................................................................ 71
5.1.4 Key Specifiers .................................................................................................................... 72
5.1.5 Password Entry .................................................................................................................. 75
5.1.6 Command Execution with the csadm Tool......................................................................... 76
5.2 Basic Commands ...................................................................................................................... 78
5.2.1 Help .................................................................................................................................... 79
5.2.2 More ................................................................................................................................... 79
5.2.3 PrintError ............................................................................................................................ 79
5.2.4 StrError ............................................................................................................................... 80

Table of Contents
Page 5 of 222
5.2.5 Version ............................................................................................................................... 80
5.2.6 SetTimeout ......................................................................................................................... 81
5.2.7 Cmd .................................................................................................................................... 82
5.2.8 CmdFile .............................................................................................................................. 83
5.2.9 CSterm ............................................................................................................................... 84
5.2.10 Sleep .................................................................................................................................. 85
5.2.11 ConnTimeout ...................................................................................................................... 85
5.3 Commands for Authentication ................................................................................................. 86
5.3.1 LogonSign .......................................................................................................................... 87
5.3.2 LogonPass ......................................................................................................................... 88
5.3.3 ShowAuthState .................................................................................................................. 89
5.3.4 GetHSMAuthKey ................................................................................................................ 90
5.4 Commands for Administration ................................................................................................. 91
5.4.1 GetState ............................................................................................................................. 92
5.4.2 SetAdminMode ................................................................................................................... 95
5.4.3 SetStartupMode ................................................................................................................. 96
5.4.4 GetStartupMode ................................................................................................................. 97
5.4.5 GetBattState ...................................................................................................................... 98
5.4.6 StartOS ............................................................................................................................... 99
5.4.7 RecoverOS ........................................................................................................................ 100
5.4.8 GetTime ............................................................................................................................ 101
5.4.9 SetTime ............................................................................................................................ 102
5.4.10 GetBootLog ...................................................................................................................... 103
5.4.11 GetAuditLog ..................................................................................................................... 104
5.4.12 ClearAuditLog ................................................................................................................... 104
5.4.13 GetAuditConfig ................................................................................................................. 105
5.4.14 SetAuditConfig ................................................................................................................. 106
5.4.15 MemInfo ........................................................................................................................... 108
5.4.16 Test .................................................................................................................................. 109
5.4.17 ResetAlarm ....................................................................................................................... 110
5.4.18 GetModel .......................................................................................................................... 111
5.4.19 Reset ................................................................................................................................ 112
5.4.20 ResetToBL ........................................................................................................................ 113
5.4.21 Restart.............................................................................................................................. 114
5.4.22 GetInfo ............................................................................................................................. 115
5.5 Commands for Managing the User Authentication Keys ....................................................... 117
5.5.1 GenKey ............................................................................................................................. 117
5.5.2 SaveKey............................................................................................................................ 118

Table of Contents
Page 6 of 222
5.5.3 BackupKey ....................................................................................................................... 120
5.5.4 CopyBackupCard .............................................................................................................. 121
5.5.5 GetCardInfo ...................................................................................................................... 122
5.5.6 ChangePassword ............................................................................................................. 123
5.5.7 ChangePIN ....................................................................................................................... 124
5.5.8 BackupDatabase .............................................................................................................. 124
5.5.9 RestoreDatabase .............................................................................................................. 125
5.6 Commands for User Management .......................................................................................... 126
5.6.1 ListUser ............................................................................................................................ 130
5.6.2 AddUser ............................................................................................................................ 131
5.6.3 ChangeUser ...................................................................................................................... 134
5.6.4 DeleteUser ........................................................................................................................ 136
5.6.5 BackupUser ...................................................................................................................... 136
5.6.6 RestoreUser ..................................................................................................................... 137
5.6.7 SetMaxAuthFails .............................................................................................................. 138
5.6.8 GetMaxAuthFails .............................................................................................................. 139
5.7 Commands for Managing the Master Backup Keys ............................................................... 139
5.7.1 MBKListKeys .................................................................................................................... 141
5.7.2 MBKGenerateKey ............................................................................................................. 142
5.7.3 MBKImportKey ................................................................................................................. 144
5.7.4 MBKCopyKey .................................................................................................................... 145
5.7.5 MBKCardInfo .................................................................................................................... 146
5.7.6 MBKCardCopy .................................................................................................................. 148
5.7.7 MBKPINChange ................................................................................................................ 148
5.8 Commands for Firmware Management .................................................................................. 149
5.8.1 ListFirmware .................................................................................................................... 149
5.8.2 ListFiles ............................................................................................................................ 152
5.8.3 LoadFile ............................................................................................................................ 155
5.8.4 LoadPkg ........................................................................................................................... 157
5.8.5 DeleteFile ......................................................................................................................... 160
5.8.6 Pack ................................................................................................................................. 161
5.8.7 Unpack ............................................................................................................................. 161
5.8.8 ListPkg ............................................................................................................................. 162
5.8.9 CheckPkg ......................................................................................................................... 163
5.8.10 ModuleInfo ....................................................................................................................... 164
5.8.11 Clear ................................................................................................................................. 166
5.9 Commands for Firmware Packaging ...................................................................................... 167
5.9.1 MakeMTC ......................................................................................................................... 168

Table of Contents
Page 7 of 222
5.9.2 RemoveMTC ..................................................................................................................... 171
5.9.3 VerifyMTC ......................................................................................................................... 171
5.9.4 VerifyPkg .......................................................................................................................... 172
5.9.5 RenameToVersion ............................................................................................................ 174
5.9.6 LoadFWDecKey ................................................................................................................ 174
5.9.7 LoadAltMdlSigKey ............................................................................................................ 175
5.9.8 SignConfig ........................................................................................................................ 176
5.10 Commands for Administration of CryptoServer LAN ............................................................. 178
5.10.1 CSLGetConnections ......................................................................................................... 178
5.10.2 CSLScanDevices .............................................................................................................. 179
5.10.3 CSLGetVersion ................................................................................................................. 181
5.10.4 CSLGetStatus ................................................................................................................... 181
5.10.5 CSLGetLogFile .................................................................................................................. 182
5.10.6 CSLGetConfigFile ............................................................................................................. 183
5.10.7 CSLPutConfigFile ............................................................................................................. 184
5.10.8 CSLSetTracelevel ............................................................................................................. 185
5.10.9 CSLShutdown ................................................................................................................... 186
5.10.10 CSLReboot ....................................................................................................................... 187
5.10.11 CSLGetTime ..................................................................................................................... 187
5.10.12 CSLSetTime ...................................................................................................................... 188
5.10.13 CSLGetSerial .................................................................................................................... 188
5.10.14 CSLGetLoad ..................................................................................................................... 189
5.10.15 CSLListPPApps ................................................................................................................ 189
6 Typical Administration Tasks .................................................................................................. 192
6.1 Generating a User Authentication Token ............................................................................... 192
6.2 Setting-Up a New CryptoServer .............................................................................................. 194
6.3 Checking the Battery State ..................................................................................................... 198
6.4 Performing a Complete Clear of the CryptoServer ................................................................. 198
7 Advanced Administration Tasks ............................................................................................. 203
7.1 Creating Self-Signed/Encrypted Firmware Modules .............................................................. 203
7.2 Loading a Self-Signed Encrypted Firmware Module into the CryptoServer ........................... 205
7.3 Creating and Using the Signed Configuration File cmds.scf .................................................. 208
7.4 Enabling Mutual Authentication ............................................................................................. 210
8 Troubleshooting ...................................................................................................................... 213
8.1 Checking the Operativeness and the State of the CryptoServer ............................................ 213
8.2 Alarm Treatment .................................................................................................................... 215
Appendix A Built-in Elliptic Curves ............................................................................................. 218
References ...................................................................................................................................... 221

Table of Contents
Page 8 of 222

Introduction
Page 9 of 222
1 Introduction
Thank you for purchasing our CryptoServer security system. We hope you are satisfied with
our product. Please do not hesitate to contact us if you have any questions or comments.
1.1 About This Manual
This manual provides information about the fundamentals of Utimaco's hardware security
module CryptoServer and its security mechanisms. Furthermore, here you find information
about the installation requirements and procedure of the CryptoServer's command-line
administration tool (csadm), detailed descriptions of all csadm commands provided with
csadm version 2.0.1 and higher, and their usage. The manual guides you through the basic
and most important administration tasks, and explains the usage of some advanced
administration functions, enabling you to extend the standard functionality of the
CryptoServer with self-developed firmware modules.
1.1.1 Target Audience for this Manual
This manual is primarily intended for system administrators who use csadm, command-line
utility provided by Utimaco, to set up, administer and maintain the CryptoServer CSe-Series,
Se-Series and Se-Series Gen2 (with Bootloader version 2.5.0.0 or later).
1.1.2 Contents of this Manual
Chapter 2 describes the fundamentals of the hardware security module CryptoServer and its
environment.
Chapter 3 provides the necessary background information about the various security
mechanisms of the CryptoServer, like, for example, user authentication, secure messaging, or
alarm treatment.
Chapter 4 provides some basic information about the batteries of the CryptoServer PCIe-plug-
in card and the CryptoServer LAN.
Chapter 5 contains detailed descriptions of the csadm commands that should be used in
practice for the CryptoServer administration.
Chapter 6 provides instructions for certain typical administrative situations.
Chapter 7 describes advanced administration functions primarily addressing customers who
want to extend the standard functionality of the CryptoServer with self-developed firmware
modules.
Chapter 8 gives help and practical guidance in critical situations like an alarm or in case the
CryptoServer is not reacting as expected or not reacting at all.
Introduction
Page 10 of 222
1.1.3 Document Conventions
We use the following conventions in this manual:
Convention
Usage
Example
Bold
Items of the Graphical User Interface
(GUI), e.g., menu options
Press the OK button.
Monospaced
File names, folder and directory
names, commands, file outputs,
programming code samples
You will find the file example.conf in
the /exmp/demo/ directory.
Italic
References and important terms
See Chapter 3, "Sample Chapter" in the
CryptoServer LAN/CryptoServer
CryptoServer Command-line
Administration Tool -csadm -Manual for
System Administrators.
Table 1: Document conventions
We have used icons to highlight the most important notes and information.
Here you find additional notes or supplementary information.
Here you find important safety information that should be followed.
1.2 Other Manuals
The CryptoServer is supplied as PCI-Express (PCIe) plug-in card in the following series:
■ CryptoServer CSe-Series
■ CryptoServer Se-Series
■ CryptoServer Se-Series Gen2
The CryptoServer LAN (appliance) is supplied in the following series:

Introduction
Page 11 of 222
■ CryptoServer LAN CSe-Series
■ CryptoServer LAN Se-Series
■ CryptoServer Se-Series Gen2
We provide the following manuals on the product CD for all series CryptoServer plug-in cards
and for all series CryptoServer LAN (appliance):
Quick Start Guides
You will find these Manuals in the main folder of the SecurityServer product CD. They are
available only in English, do not cover all possible scenarios, and are intended as a
supplement to the product documentation provided on the SecurityServer product CD.
■ CryptoServer LAN - Quick Start Guide
If you are looking for step-by-step instructions on how to bring the CryptoServer LAN into
service, how to prepare a computer (Windows 7) for the CryptoServer administration and
how to start administrating your CryptoServer with the Java-based GUI CryptoServer
Administration Tool (CAT), read this document.
■ CryptoServer PCIe - Quick Start Guide
If you are looking for step-by-step instructions on how to bring the CryptoServer PCIe plug-
in card into service, how to install the CryptoServer driver on a computer with minimal
RHEL 7.0 installation and how to start administrating your CryptoServer with the
CryptoServer Command-line Administration Tool (csadm), read this document.
Manuals for System Administrators
You will find the manuals on the product CD in the following folder:
…Documentation\Administration Guides\
■ CryptoServer - Manual for System Administrators
If you need to administer a CryptoServer PCIe plug-in card or a CryptoServer LAN using
the CAT, read this manual. Furthermore, this manual provides a detailed description of the
CryptoServer functions, required for the correct and effective operation of the product.
■ CryptoServer LAN - Manual for System Administrators
If you need to administer a CryptoServer LAN (appliance), read this manual. Since a
CryptoServer plug-in card is integrated into the CryptoServer LAN, please read the manual
for System Administrators CryptoServer, as well.
■ CryptoServer LAN/CryptoServer - Troubleshooting
If problems occur while you are using a CryptoServer PCIe plug-in card or a CryptoServer
LAN (appliance), read this manual.
■ CryptoServer LAN/CryptoServer
PKCS#11 CryptoServer Administration Tool - Manual for Systemadministrators

Introduction
Page 12 of 222
If you need to administer the PKCS#11 R2 interface with the PKCS#11 CryptoServer
Administration Tool (P11CAT), read this manual.
Operating Manuals
You will find the manuals on the product CD in the following folder:
…Documentation\Operating Manuals\. In these manuals you will find all the necessary
information for using appropriately the CryptoServer PCIe plug-in card hardware and the
CryptoServer LAN (appliance) hardware.

Fundamentals
Page 13 of 222
2 Fundamentals
This chapter describes the fundamentals of the hardware security module CryptoServer and
its environment.
2.1 Hardware
Utimaco’s hardware security modules CryptoServer are physically protected specialized
computer units designed to perform sensitive cryptographic tasks and to securely manage
cryptographic keys.
Utimaco provides different series of CryptoServer. In general, they offer the same
functionality, but differ in their level of physical security:
■ CryptoServer CSe (CSe-Series) are designed for the highest requirements regarding
physical security, as e.g. required in banking and governmental environments. Its
extensive sensory mechanism, which includes the usage of a sensory-protection foil,
reacts on all kind of mechanical, chemical and physical attacks and erases sensitive keys
and data actively and within shortest time from CryptoServer’s internal memory. This
mechanism meets the requirements of FIPS 140-2 highest level 4 in area “Physical
Security”, and is certified according to this security standard.
■ CryptoServer Se (Se-Series) is designed for most typical security requirements in
commercial environments. All security-relevant hardware components are encapsulated
and completely covered by potting material (epoxy resin). This hard, opaque enclosure
protects the sensitive CryptoServer hardware components from physical attacks on
sensitive keys and data. This mechanism meets the requirements of FIPS 140-2 level 3 in
area “Physical Security”.
CryptoServer Se may be delivered with a hardware accelerator chip which provides
highest performance for RSA operations.
■ CryptoServer Se Gen2 (Se-Series Gen2) is the successor for the CryptoServer Se-Series. It
fulfills the same security requirements as the CryptoServer Se-Series, and has been
designed to meet the requirements of FIPS 140-2 level 3 in the area "Physical Security".
CryptoServer Se-Series Gen2 may be delivered with a crypto accelerator chip which
provides highest performance for RSA and ECC operations.
All CryptoServer series come with the same software architecture. In this document they will
henceforward only be named CryptoServer.
All models in the CryptoServer CSe-Series, Se-Series and Se-Series Gen2 are available in two
variants:
■ CryptoServer as a plug-in card with a PCI Express bus. This is referred to below as the
CryptoServer.

Fundamentals
Page 14 of 222
■ CryptoServer LAN as a network component (appliance), which can be easily integrated
into a network. This is referred to below as CryptoServer LAN.
On the CryptoServer plug-in card there are two memory areas, which are highly relevant for
CryptoServer’s security architecture, because they can be used to store sensitive data in clear
text:
■ IRAM
■ Key-RAM
2.1.1 IRAM
The CPU of the CryptoServeris equipped with internal RAM (IRAM) for code, data and cache.
The IRAM can be used to hold sensitive data in plain on runtime. It is guaranteed that the
IRAM is erased actively within a very short time in case of an alarm triggered by the sensory
(each memory cell of the IRAM will be overwritten), see chapter 3.4. If the CryptoServer goes
down on power-off, the IRAM will be erased, too.
2.1.2 Key-RAM
The Key-RAM is a non-volatile RAM, which is protected by the sensory: In case that an alarm is
registered the Key-RAM will be actively erased within less than two milliseconds. Within this
timeframe the Key-RAM will be overwritten five times, alternately with 00h and FFh patterns.
Since the sensory-protection holds on runtime and in retention (i.e. if power supply is switched
off) the Key-RAM is used to store the internal Master Key of the CryptoServer (which is
needed to encrypt the data inside the CryptoServer, see chapter 3.7.5). Independently from the
mode of operation the mechanism to detect an attack is active: An internal power supply will
in any case provide enough power to erase the Key-RAM and so the CryptoServer's Master
Key in case of an alarm.
2.2 Software
During the boot process and the life cycle of a CryptoServer several parts of its software come
into action. This chapter only lists these different software components and gives a rough
description of their functionality.
Inside the CryptoServer different kinds of software will run to different times:
■ Bootloader,
■ Operating system (SMOS) with firmware modules.
The Bootloader is an independent firmware part that runs only partially on the CryptoServer
whereas SMOS and the other modules run on the CryptoServer during its normal Operational
Mode.
Fundamentals
Page 15 of 222
2.2.1 Bootloader
The Bootloader is an independent software module running before the real operating system
and the firmware modules are started. The Bootloader is the first software started inside the
CryptoServer after a reboot.
If during the boot process the Bootloader finds itself initialized (i.e., the CryptoServer’s public
Production Key has been found) and the operating system module SMOS is present in the
CryptoServer, the latter will be started by the Bootloader. A more detailed description of the
boot process follows in chapter 2.2.4.
2.2.2 Firmware Modules
This chapter describes the firmware that is normally running – SMOS and the firmware
modules.
Software module or firmware module in the context of this documentation denotes an
encapsulated software part running inside the CryptoServer. A module can have an external
interface which can be used by an application from outside the CryptoServer device, and an
internal C interface which can be called by other firmware modules.
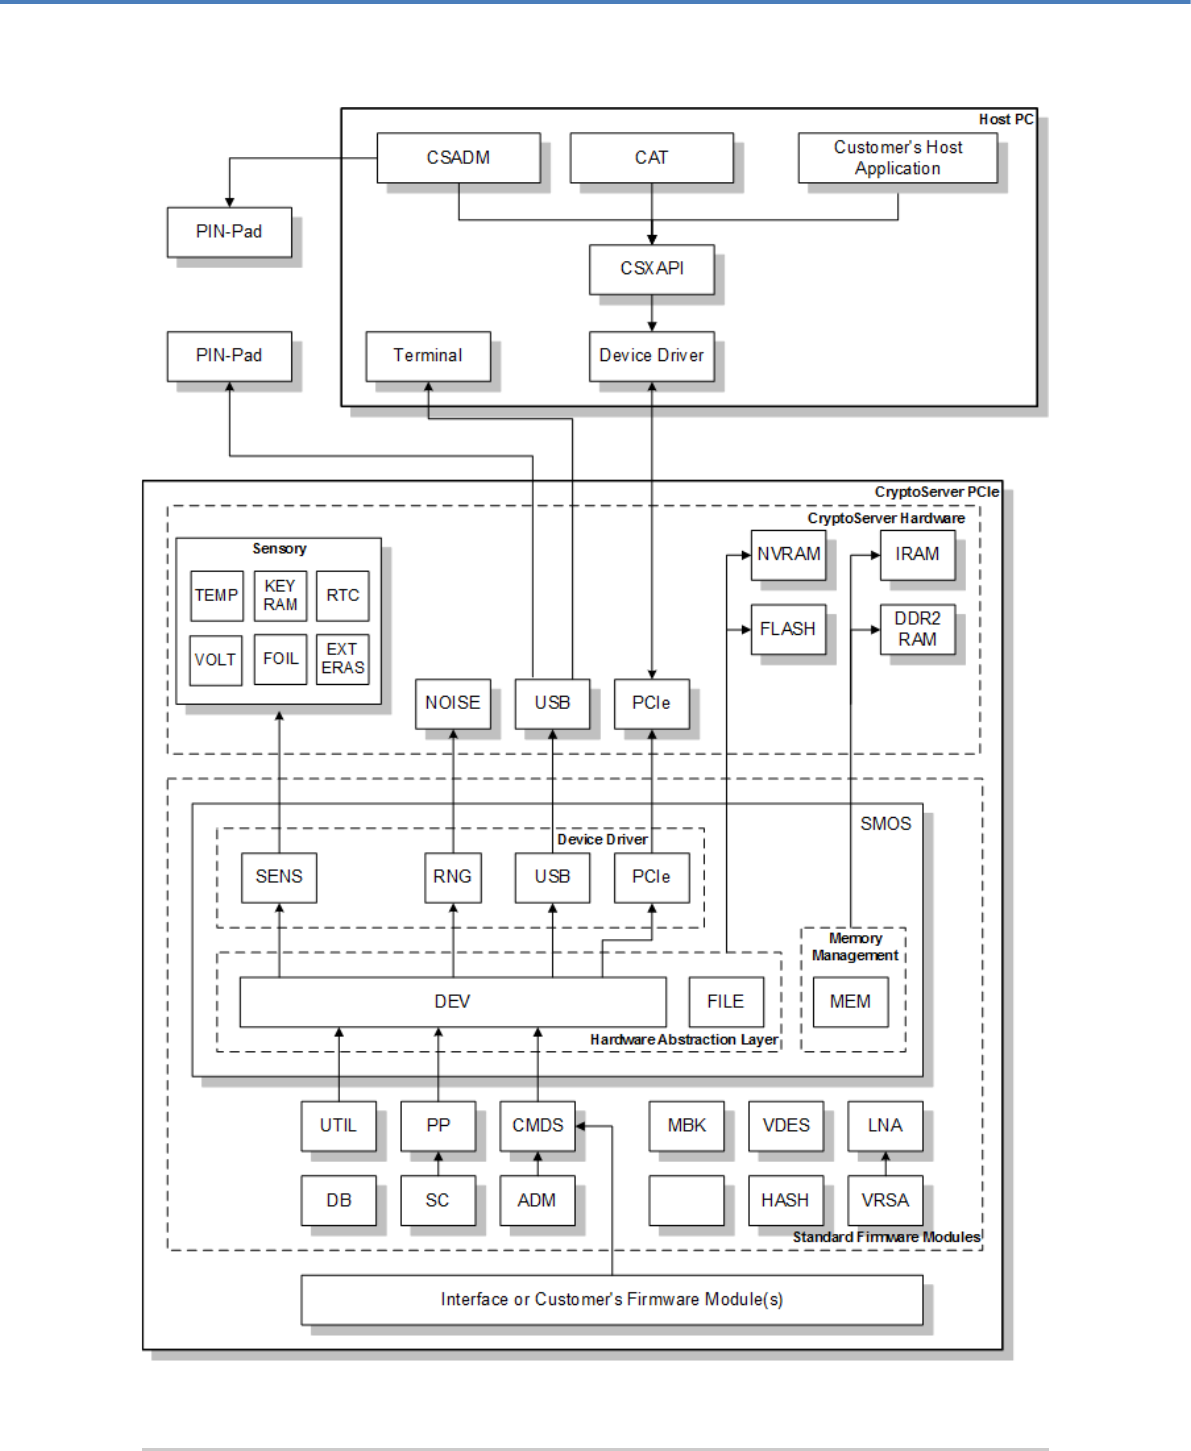
The following figures give a general overview of the various software parts of all CryptoServer
series (including the software running on the host PC), how they are divided into modules and
– in a rough way – where the communication paths pass.
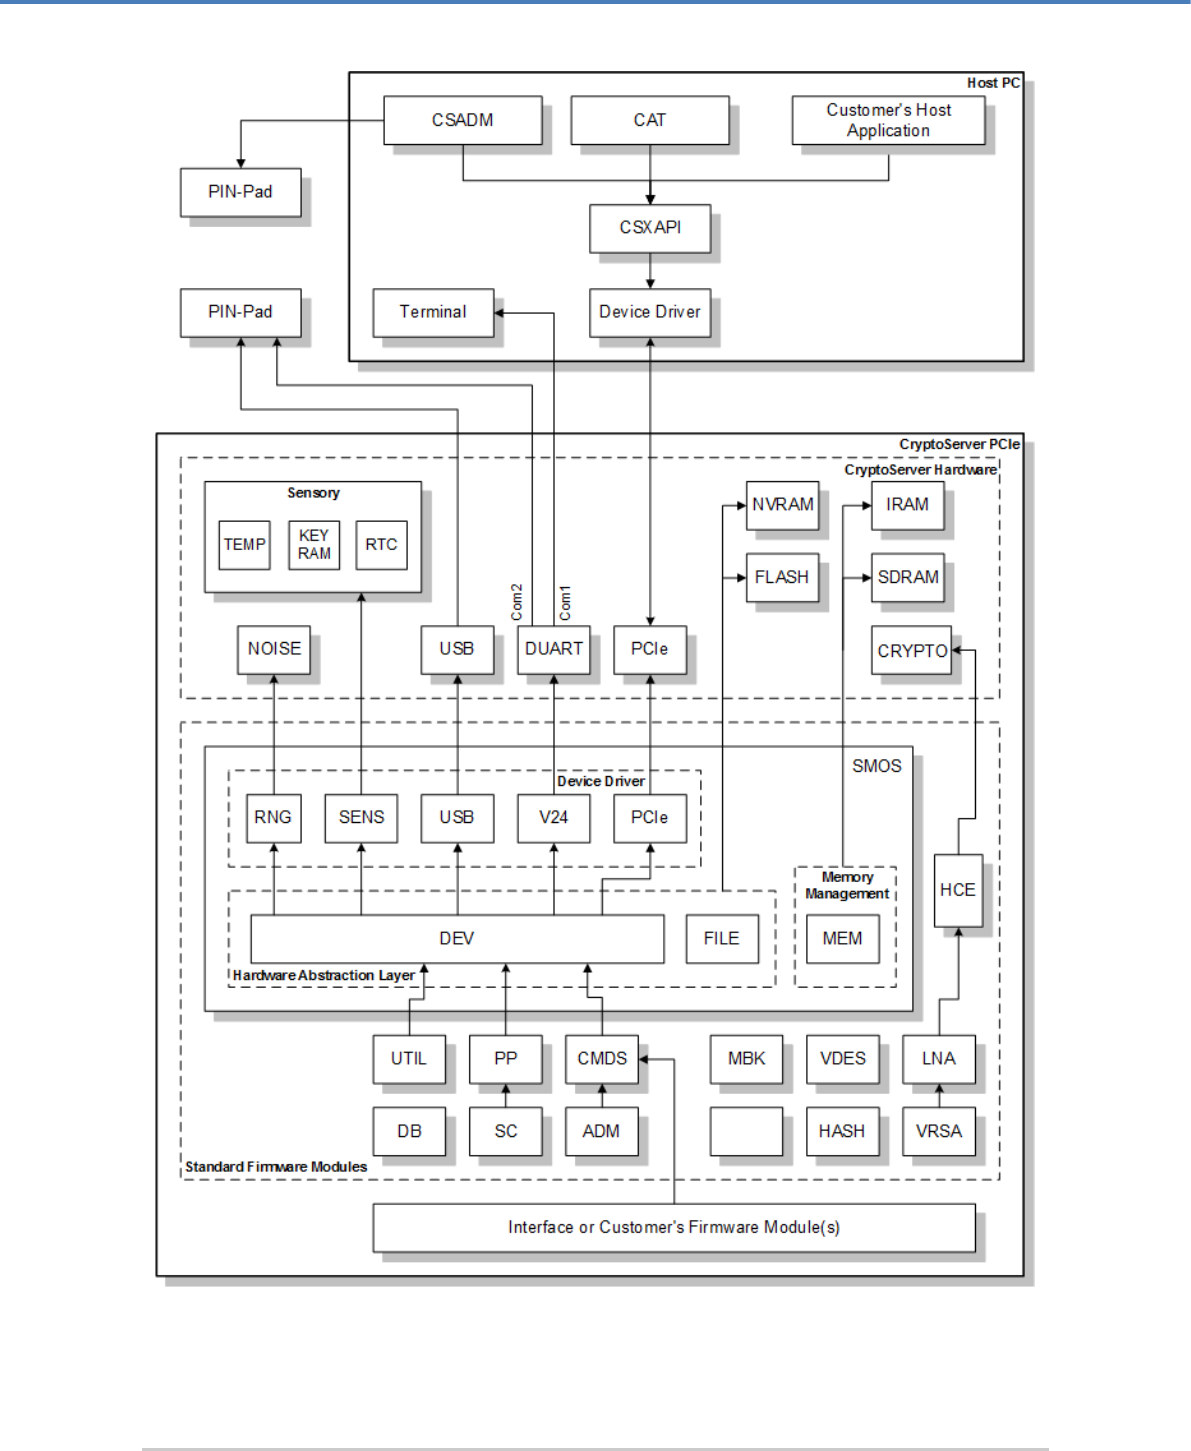
Fundamentals
Page 16 of 222
Figure 1: Software architecture of the CryptoServer Se Series
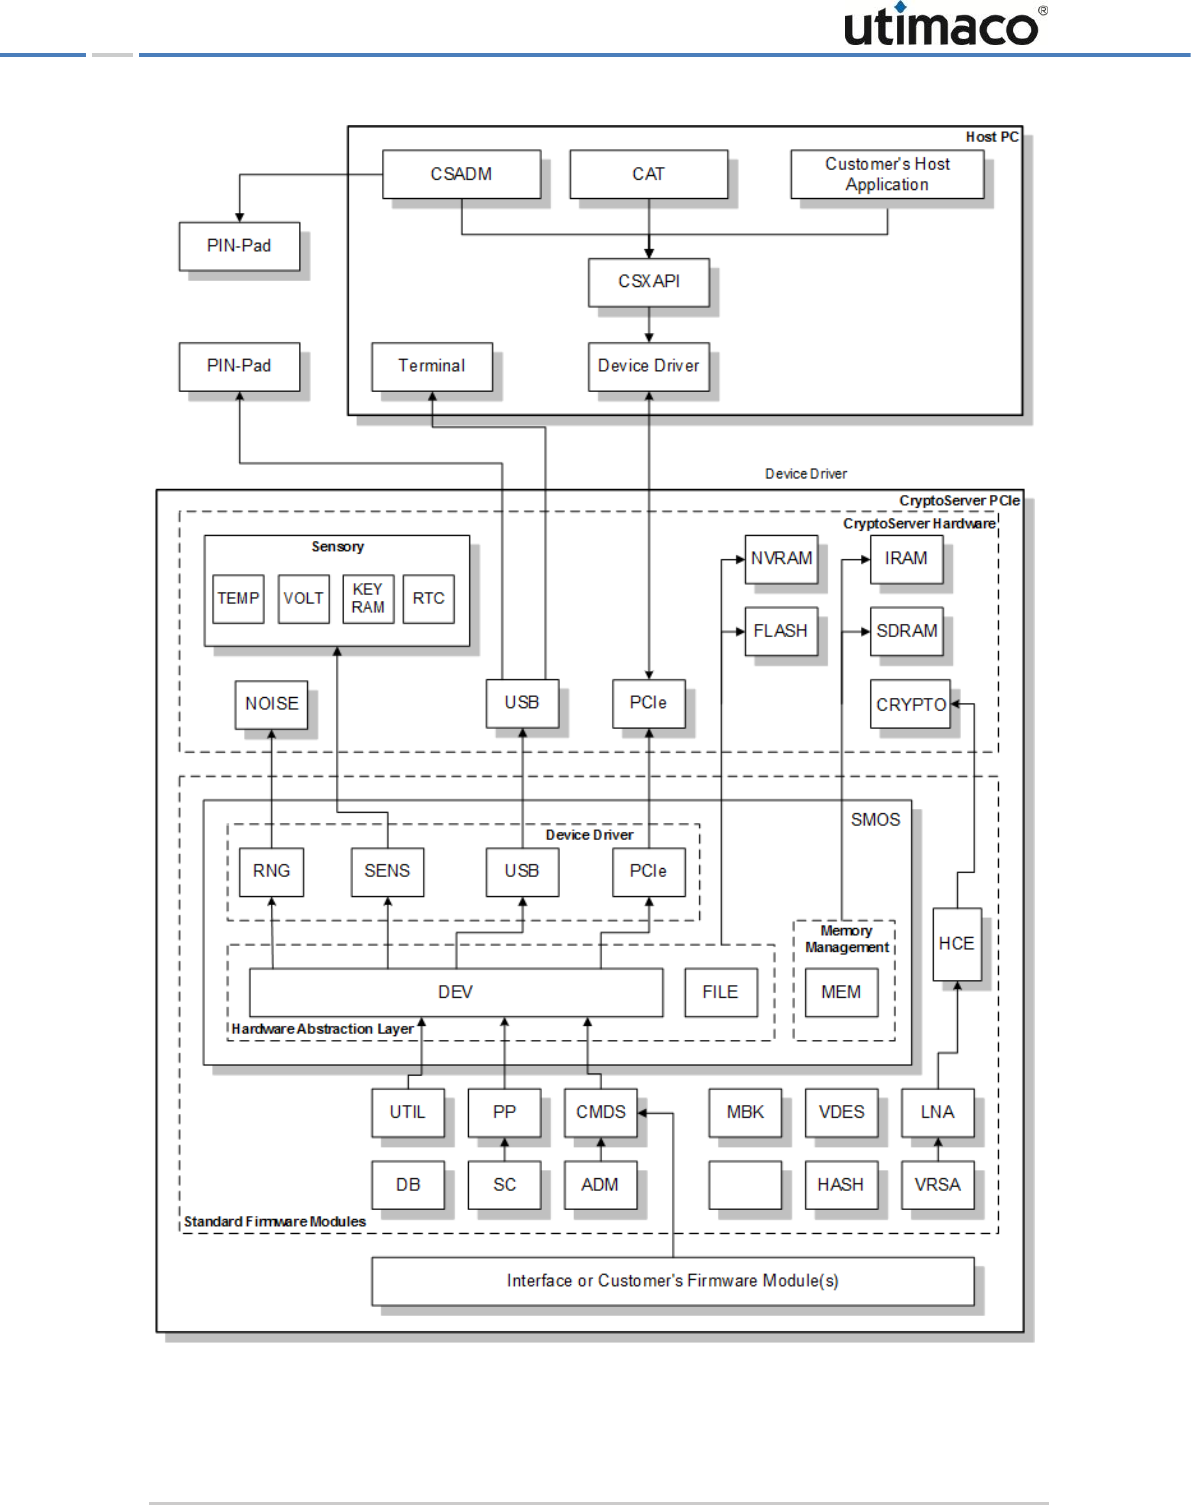
Fundamentals
Page 17 of 222
Figure 2: Software architecture of the CryptoServer Se-Series Gen2
Fundamentals
Page 18 of 222
Figure 3: Software architecture of the CryptoServer CSe-Series

Fundamentals
Page 19 of 222
The figures above provide an overview of the software modular parts of a CryptoServer
system, including the software on the host PC like the CryptoServer administration tools:
CryptoServer Command-line Administration Tool (CSADM) and CryptoServer Administration
Tool (CAT), the PCI Express driver (Device Driver) and CryptoServer’s Extended Application
Programming Interface (CSXAPI).
The modular software parts inside the CryptoServer are called firmware modules. The firmware
modules can be divided into several classes:
■ Operating system (SMOS)
■ Further standard firmware modules (CMDS, UTIL, ADM, VDES, ...) provided by Utimaco
(which are realized in order to get a running CryptoServer with basic functionality, for
example, for administration, cryptographic routines and data management) and
■ Other application firmware modules (cryptographic interfaces like CXI provided by
Utimaco, or as developed by customer).
Customer firmware modules may use all functionality that is CryptoServer-internally provided
by Utimaco’s standard firmware modules.
The role and functionality of these standard firmware modules is explained in the following
subchapters.
2.2.2.1 Operating System – SMOS
The CryptoServer’s operating system SMOS (Secure Module Operating System) provides
mechanisms for task handling, inter process communication, memory management and file
handling.
Furthermore, SMOS realizes access to CryptoServer’s internal hardware components like
memory areas, RTC, physical interfaces etc. and offers appropriate access command
interfaces to the other firmware modules. In particular, based on the included device drivers
SMOS provides through its hardware abstraction layer a high level access to the physical
interfaces of the CryptoServer device (PCI express, USB and V.24), for read and write
operations on the devices.
2.2.2.2 Further Standard Firmware Modules
The following modules are implemented as CryptoServer’s standard firmware modules,
providing the described functionality. Most of these firmware modules have no external
interface and can only be accessed by other firmware modules via an internal public C
interface.
■ SMOS (Secure Module Operating System): operating system
■ CMDS (Command Scheduler): command processing incl. protocol stack, user
management

Fundamentals
Page 20 of 222
■ ADM (Administration): general administration of CryptoServer, incl. firmware module
management and management of audit log file
■ UTIL (Utilities): internal access to random number generator and real time clock
■ VDES: DES algorithm (key generation, encryption/decryption, MAC)
■ AES: AES algorithm (key generation, encryption/decryption, MAC)
■ VRSA and LNA (Long Number Arithmetic): RSA algorithm (incl. key pair generation)
■ ECDSA and ECA: elliptic curve algorithm (incl. ECDSA signature generation/verification,
key pair generation)
■ DSA (Digital Signature Algorithm)
■ HASH: Various hash algorithms
■ DB: database management (for example, secure storage of keys and other sensitive data)
■ MBK: Management of Master Backup Key (MBK), incl. generation, export and import of
MBK
■ ASN1 (Abstract Syntax Notation One)
■ NTP: Time management using an NTP (Network Time Protocol) client
■ HCE (Hardware Crypto Engine): interface for accessing the crypto accelerator chip,
Broadcom, of the CryptoServer Se and, Exar, of the CryptoServer Se-Series Gen2
1
BCM: Driver for the Broadcom crypto accelerator chip of the CryptoServer Se; this firmware
module can only provide its full functionality if the HCE firmware module is available and fully
functional.
EXAR: Driver for the Exar crypto accelerator chip of the CryptoServer Se-Series Gen2; this
firmware module can only provide its full functionality if the HCE firmware module is available
and fully functional.
PP: PIN pad driver
■ SC: driver for the communication with a smartcard (using ISO 7816 commands)
■ CXI: Utimaco’s proprietary cryptographic HSM interface which is used by the host libraries
for the CXI API, PKCS#11 (CXI module version 2.0.0.0 or later), CSP/CNG, JCE, OpenSSL
and EKM.
1
The HCE module will only start up if the Broadcom hardware crypto accelerator chip is built into the CryptoServer
Se or the Exar hardware crypto accelerator chip is built into the CryptoServer Se-Series Gen2. If this is not the case,
the initialization state of HCE and BCM for a CryptoServer Se, and HCE and EXAR for a CryptoServer Se-Series
Gen2 will be set to INIT_INACTIVE, and no services of HCE, BCM resp. EXAR firmware modules are available.
Fundamentals
Page 21 of 222
Only the firmware modules ADM, CMDS, CXI, PP, NTP and MBK provide external interfaces
that can be used by applications outside the CryptoServer and customized firmware
modules developed with the CryptoServer SDK (Software Development Kit).
The CryptoServer is usually delivered with all above listed firmware modules loaded (firmware
package of the SecurityServer), and stored as *.msc files.
Additionally, during production at the manufacturer’s site, a subset of these firmware modules
is loaded into the CryptoServer as so-called system firmware modules.
2
The purpose of these
system firmware modules is to provide a backup-copy of every system-relevant firmware
module.
In general, the CryptoServer stores a firmware module in form of a
MSC
(
Module Storage
Container
). The MSC format is for CryptoServer-internal use only. It stores the module
code together with certain module information and the check value for the module code’s
integrity (SHA-512 hash value over the module code which will be verified at every startup).
Firmware modules that are loaded during an early phase of production, at the
manufacturer’s site, will be stored as SYS files (CryptoServer system files), which is exactly
the same format as a MSC, just with another extension *.sys. These system firmware
modules cannot be deleted and thereby offer anytime a fallback possibility for firmware.
The firmware modules that are loaded as system firmware modules are those that are needed
to do all necessary administration tasks to set up the CryptoServer (for example, load,
replacement and deletion of further firmware modules, administration functions).
The following firmware modules are loaded as system firmware modules:
■ ADM
■ AES
■ CMDS
■ DB
2
For this a specialized LoadFile Bootloader command will be used which stores the firmware modules as *.sys files
(system firmware modules). The Bootloader command LoadFile is not available for any CryptoServer after delivery,
i.e., it is not available at the customer’s site.
Fundamentals
Page 22 of 222
■ ECA
■ ECDSA
■ HASH
■ LNA
■ SMOS
■ UTIL
■ VDES
■ VRSA
Even if the operating system or other firmware modules is later on deleted or replaced by
newer versions, or if the CryptoServer is cleared by the customer, all system firmware
modules (*.sys) will be preserved.
Therefore, in case of buggy or incompatible new firmware modules, a fallback to this first set
of system firmware modules can always be made in order to reconfigure the whole system.
Additionally, to these system firmware modules, which are always loaded inside the
CryptoServer and can be used as backup system of firmware modules for emergency cases, a
complete set of all wanted firmware modules should be loaded. This may include Utimaco’s
standard firmware modules including specialized application-specific firmware modules (e.g.,
CXI) or further customer-specific firmware modules which may provide the actual
CryptoServer functionality through an appropriate external interface, for example, for key
management, cryptographic algorithms or time stamping.
In addition to the above mentioned standard firmware modules, which are provided by
Utimaco, it is possible to load further firmware modules into the CryptoServer.
The functional design of each standard firmware module and its interface is specified in more
detail in the respective module specific documentation.
The functionality and interface of application firmware is not a subject of this document but will
be described in separate documents.

Fundamentals
Page 23 of 222
2.2.3 Signed Licence File
The CryptoServer uses a Signed Licence File concept to regulate the availablity of certain
features and performances (for instance the speed of certain cryptographic algorithms) in a
customer-specific way.
These regulations do not cause any security-relevant changes to the software.
A Signed Licence File (SLF) is a customer-specific licence file *.slf which is generated by
Utimaco and signed by Utimaco’s Module Signature Key (RSA signature, see chapter 3.7.2).
The SLF can be loaded with the LoadFile command. During loading the signature is verified,
and a check value for the SLF’s integrity (SHA-512 hash value over the SLF) is calculated. The
SLF is stored together with this check value which replaces the signature. With every startup
the operating system SMOS searches for the SLF and verifies its hash value during the-boot
process.
If a SLF is missing or its integrity cannot be verified, the CryptoServer’s firmware modules
always use their default values concerning the execution of certain functions. These are in any
case the most restrictive options, i.e., without SLF the CryptoServer will for instance perform
certain algorithms only with lowest speed.
2.2.4 CryptoServer’s Boot Process
CryptoServer’s boot procedure is divided into two phases, each of them being controlled by
one firmware part:
■ first boot phase, which is controlled by the Bootloader
■ second boot phase, which is controlled by the operating system SMOS
2.2.4.1 Boot Phase Controlled by Bootloader
After any reset (power-up or hardware reset) the CryptoServer starts with the program code
that is stored in the BL code area, which is located in the flash device
3
. This is the Bootloader
firmware code. The Bootloader does the first necessary start procedures, including self-tests,
and offers some basic commands like status queries.
3
On a CryptoServer CSe, the CryptoServer starts with the First Stage BL which is stored in the FPGA and which
itself starts the (second stage) Boot Code as stored in the BL code area.

Fundamentals
Page 24 of 222
At the end of the Bootloader-controlled boot phase, after the initialization of the PCIe interface,
there is an open time window for command.
If the Bootloader does not receive any command within the defined time window (3 seconds),
and if the operating system module SMOS is loaded and its integrity can be verified (SHA-512
hash value), the Bootloader starts SMOS automatically. If this was successful, the
CryptoServer is considered to be in Operational Mode (or Maintenance Mode) and the
Bootloader terminates itself.
2.2.4.2 Start OS
The operating system of the CryptroServer (firmware module SMOS) can be started in two
ways – either in the regular way or by starting the failsafe backup copy of SMOS:
At the end of the Bootloader-controlled phase of the boot procedure the Bootloader always
tries at first to search for and start the OS as smos.msc. Only if this fails, it tries to start the
smos.sys system module.
Both modalities to start the OS can also be explicitly chosen by the user if the respective
external CryptoServer command is performed:
■ The command StartOS (see chapter 5.4.6) corresponds to the usual way of starting
SMOS (i.e., starting smos.msc) whereas
■ The command RecoverOS (see chapter 5.4.7) corresponds to the start of the backup copy
of SMOS (i.e., start of the system module smos.sys).
If the OS start fails in both modalities the CryptoServer remains in Bootloader Mode. The
Bootloader is active and further Bootloader commands (like, for example, status queries) can
be performed.
If starting SMOS is successful the CryptoServer enters Operational or Maintenance Mode (see
below), and the Bootloader terminates.
2.2.4.3 Boot Phase Controlled by Operating System SMOS
After the Bootloader has passed the control to the operating system, SMOS roughly performs
the following steps:
1. Initialize the memory.
2. Initialize the flash file system.
3. Initialize all hardware peripherals (including serial, PCIe and USB interfaces).
4. Search for firmware modules in the flash file system depending on its own starting mode:
▣ If SMOS itself has been started as smos.msc, and if there is no alarm present, it will
start all *.msc firmware modules.
Fundamentals
Page 25 of 222
▣ If SMOS is started as smos.sys module, or if an alarm is present, it will start all *.sys
system firmware modules.
5. Verify the integrity of all firmware modules (see chapter 3.9.1).
6. Start all firmware modules.
2.2.4.4 Watching the Boot Process and Analyzing Errors
During startup of SMOS and other firmware modules the CryptoServer writes log messages to
its log interface:
■ On a CryptoServer Se log messages are written to one of the serial interfaces, usually the
COM1 interface (if the network appliance CryptoServer LAN is used). If the FLASH file
system contains a file named \FLASH\ then the messages are redirected to the COM2
interface (this should be the case if the CryptoServer plug-in card is used). To watch these
messages a terminal (for example, a PC running a terminal program or the csadm tool,
see chapter 5.2.9) has to be connected to the serial line of the CryptoServer, using the
following interface settings: 115200 baud, 8 bits, no parity.
■ To output the log messages of the CryptoServer CSe and the CryptoServer Se-Series Gen2
a special USB-To-Serial Adapter (Prolific PL2303) has to be connected to one of the two
USB ports available. The CryptoServer CSe and the CryptoServer Se-Series Gen2 do not
have a serial port.
To watch the log messages on a PC a terminal program (for example, csadm tool) has to
be connected to the USB-To-Serial Adapter (115000 baud, 8 data bits, 1 stop bit, no parity).
For every error or warning that occurs during the startup of SMOS, an appropriate message
is output. Additionally, the log messages contain a list of all firmware modules that have
been found by SMOS, and the information whether these modules could have been started
successfully or not.
If the boot process is stopped due to a fatal error, connecting a terminal to the log interface
may be the only way to get information about the problem.
If no fatal error occurs during the boot phase (i.e., if all basic firmware modules could be
started successfully) the log messages can be retrieved later using the csadm administration
command GetBootLog (see chapter 5.4.10).
Fundamentals
Page 26 of 222
2.2.4.5 Start Backup Copies of Firmware (SYS Firmware Modules)
If the CryptoServer hangs-up during the boot phase, it cannot be accessed anymore over the
command interface. This may happen, for example, if the administrator has deleted one of the
base firmware modules or loaded buggy or incompatible software.
In such a situation of hang-up the backup copies of the base firmware modules (i.e., all
system firmware modules *.sys) can be started to get the CryptoServer in Operational Mode
again. This has to be done by issuing the command ResetToBL followed by the command
RecoverOS (see chapters 0 and 5.4.7).
After that only the system firmware modules are running, which is sufficient to administrate
the CryptoServer. The bad/missing firmware can now be replaced/loaded using the normal
administration command LoadFile (see chapter 5.8.3). After that the CryptoServer can be put
again in normal Operational Mode (running all firmware modules *.msc) with a Restart
command.
2.2.4.6 Commands to Reset the CryptoServer
There are three different driver commands that reset the CryptoServer and start the boot
process:
■ The Reset command (see chapter 5.4.19) causes a hardware reset. The boot process
described in the previous chapters is performed including the 3 second time window for
command of the Bootloader.
It is strongly recommended not to use the Reset command.
■ The Restart command (see chapter 5.4.21) causes a hardware reset, waits for the
beginning of the time window for Bootloader commands and immediately issues a
StartOS command. Like this the boot process is sped up by skipping the 3 second time
window of the Bootloader. Additionally, the Restart command waits for all firmware
modules to be started by the operating system SMOS. After the Restart command has
been successfully completed, the CryptoServer is in Operational Mode, and ready to
accept commands.
Fundamentals
Page 27 of 222
■ The ResetToBL command (see chapter 5.4.20) causes a hardware reset, waits for the
beginning of the time window of the Bootloader and issues a GetState command. The
boot process is stopped and the CryptoServer remains in Bootloader Mode (see chapter
2.2.5). After the ResetToBL command has been successfully completed, the CryptoServer
is immediately ready to accept Bootloader commands.
Use the ResetToBL command only if Bootloader commands should be performed, while the
CryptoServer is in Bootloader Mode.
2.2.5 Operating Modes of the CryptoServer
Basically the CryptoServer can be operated (if the respective software is loaded) in four
different modes, depending on which firmware is currently active:
■ The CryptoServer is in Bootloader Mode if the Bootloader is active, i.e., the Bootloader is
powered up and running but the operating system SMOS of the CryptoServer (if loaded at
all) has not yet been started.
■ The CryptoServer is in Operational Mode if the operating system SMOS and further
firmware modules (*.msc modules) could have been started successfully and are active.
The CryptoServer can be explicitly configured to boot into restricted Operational Mode
(Operational Mode – Administration-Only). In this special kind of Operational Mode all
cryptogtaphic functions are blocked, and only administration functions can be executed.
See chapter 5.4.3 for how to configure this special startup mode.
■ The CryptoServer is in Maintenance Mode if the backup system firmware modules (SYS
modules: *.sys files) have been started successfully and are active.
■ The CryptoServer is in power down mode if no firmware is active (CryptoServer is
shutdown). In power down mode the CryptoServer is not able to receive any commands. A
hardware reset has to be performed to get the CryptoServer active again.
If the CryptoServer is in Operational or Maintenance Mode, further load, replacement, deletion of
firmware modules and other administrative work can be done by using the respective
administrative commands (see chapter 5.4).
■ With the
■ ResetToBL command the CryptoServer can be set to Bootloader Mode. This may be useful
for diagnostic purposes.

Fundamentals
Page 28 of 222
■ With the Restart command or (if the CryptoServer is in Bootloader Mode) the StartOS
command the CryptoServer can be set to Operational Mode (if the respective firmware
modules are loaded and not defect).
■ With the Restart command a CryptoServer that is in the special Operational Mode –
Administration-Only can be set back to the standard Operational Mode again, if the start-up
mode has been previously defined with the SetStartupMode command.
■ With the SetAdminMode command a CryptoServer that is currently in the special
Operational Mode – Administration-Only can be set back to the standard Operational Mode
again. This means that the cryptographic functions are no longer blocked.
■ With the
■ ResetToBL command followed by the RecoverOS command the CryptoServer can be set
to Maintenance Mode.
With the GetState command the operating mode and state can be retrieved. It can be
executed in all CryptoServer operating modes except for the power down mode.
Security Management
Page 29 of 222
3 Security Management
This chapter describes the various security mechanisms of the CryptoServer, like, for example,
user authentication, secure messaging, or alarm treatment.
3.1 Life Cycle and Global States of the CryptoServer
In error-free operation throughout its life cycle, the CryptoServer runs through the following
states:
BLANK -> MANUFACTURED -> INITIALIZED
Additionally, the CryptoServer can be in DEFECT state.
For a CryptoServer in BLANK state, there is no housing present yet and the CryptoServer
board is neither covered with potting material nor tamper-protected, no software is loaded. If
the CryptoServer is in MANUFACTIRED state the Bootloader code is loaded, the CryptoServer
is wrapped and/or potted and the mechanical housing of the CryptoServer is closed.
At the customer’s site, only CryptoServer devices in state INITIALIZED or DEFECT will
normally appear. The states BLANK and MANUFACTURED are only relevant for the
production process and for maintenance work done by the manufacturer. Utimaco IS GmbH
does not deliver the CryptoServer in one of these states.
If the CryptoServer is in DEFECT state or in any other state but INITIALIZED, contact the
manufacturer Utimaco IS GmbH.
Information about CryptoServer’s state can be retrieved via the csadm command GetState.
3.1.1 State INITIALIZED
Any CryptoServer leaving the manufacturer’s secure environment and being delivered to the
customer is in INITIALIZED state.
As a minimum, in initialized state the Bootloader program code and all standard firmware
modules are loaded as *.sys-files, as well as all (manufacturer-owned) system keys (public
parts) like Module Signature Key, Default Administrator Key and the Production Key.
Any CryptoServer supplied to the customer is in INITIALIZED state.
Security Management
Page 30 of 222
3.1.2 State DEFECT
If the Bootloader’s hardware self test fails during the starting phase, the CryptoServer will be
in the DEFECT state. This test is always run at the beginning of the boot process.
In DEFECT state the CryptoServer exclusively accepts the commands GetState and
GetBootLog (if yet technically possible), which do not require any authentication. The alarm
mechanism of the CryptoServer remains unchanged.
If the CryptoServer is in DEFECT state, contact the manufacturer Utimaco IS GmbH.
3.2 Access Control, User Concept and Secure Messaging
To control and restrict the access to security-relevant commands, the CryptoServer
implements the concept of users. Security-relevant external commands sent to the
CryptoServer may only be performed if the sender has authenticated the command. Only
users, who are registered at the CryptoServer, and are equipped with the relevant permissions
are permitted to authenticate and execute security-relevant commands.
Additionally, the SecurityServer/CryptoServer SDK 4.10 introduces the CryptoServer's ability to
authenticate itself towards host applications at the beginning of a secure messaging session,
if requested by the corresponding application. CryptoServer's concept of HSM authentication
implements a new HSM Authentication Key described in Chapter 3.2.6 and used for mutual
authentication.
3.2.1 Users
Commands can only be successfully authenticated by authorized users. For the management
of these users, the CryptoServer stores and administrates a user database. In this database,
the following data is stored for each user:
■ Name (which serves as a unique identifier for the user), 8 bytes long.
■ Long name (optional, which serves as a unique identifier for the user), up to 255 bytes
long.
■ Permissions of the user. The structure of these user permissions corresponds to the
structure of the authentication status (as explained in chapter 3.2.2.1, “Authentication
Status and User Permissions” below), i.e., it consists of eight values in the range from 0 to
15 (0xF).

Security Management
Page 31 of 222
■ Flags that determine if secure messaging is allowed for this user.
■ The authentication mechanism that has to be used by the user (see chapter 3.2.2.3
below).
■ Authentication data like cryptographic keys, passwords or other, see below.
■ User Attributes (optional).
For a more detailed description of the possible user data see chapter 5.6.
The CryptoServer provides also the appropriate commands to create or delete a user or to
change his/her authentication token/data, see chapter 5.6.3.
For every authentication to be performed, the user name and the authentication token have to
be specified. Further necessary data depend from the authentication mechanism of the user.
After a successful authentication the authentication status of the CryptoServer will be
augmented by the permissions of the user. The authentication concept is explained in the
following chapter.
3.2.2 Authentication
The CryptoServer accepts certain external commands only after one (or more) appropriate
user(s) have successfully authenticated themselves.
Inside the CryptoServer, the firmware module CMDS is responsible for managing the
authentication of commands.
Certain external commands that are sent to the CryptoServer may only be executed if the
sender has authenticated the command and a certain authentication status has been reached
(see next chapter). For this purpose, one or more authentication header data blocks can be
added to the command data block. These authentication headers are processed completely
by CMDS (including verification of the authentication), and, depending on the result, CMDS
increments the authentication status. The firmware module that was addressed by the
command checks this authentication status later on.
The CryptoServer requires all security-relevant commands to be always authenticated
separately. That is, the authentication holds only for a single command and must be
performed together with the corresponding command. After the execution of the command
the authentication status is automatically set back to the previous value.
The following subchapters explain the authentication mechanisms and their usage in detail.

Security Management
Page 32 of 222
3.2.2.1 Authentication Status and User Permissions
The CMDS firmware module internally stores an authentication status. The stored value is
incremented after every successfull authentication. Depending on the currently reached
authentication status, the command is performed or not.
The authentication status consists of eight values, each in the range from 0 to 15 (0xF). These
eight values represent eight different user groups (user group 0 to 7). Each value, called
authentication level, gives the height (sum) of the rights/permissions gained through the
authentications of various users from this specific user group. Each authentication level can
vary from 0 (no permission/authentication) to 15 (highest level of permission/authentication).
Example:
Authentication status:
2
0
0
1
0
3
0
1
User group
7
6
5
4
3
2
1
0
In this example, the CryptoServer has reached authentication level 2 in user group 7, level 0 in
user group 6, (...), and authentication level 1 in user group 0.
After a user has been successfully authenticated to the CryptoServer, the authentication
status is augmented by the permissions of the user (see Chapter 3.2.1, “Users”):
Example:
Initial authentication status (no user logged in):
00000000
Permissions of the AdminUser1:
21000000
Permissions of the AdminUser2:
33000000
Permissions of the AdminUser3:
51000000
Permissions of the AdminUser4:
51000000
Permissions of the CryptoUser:
00000002
Authentication status: AdminUser1, AdminUser2, AdminUser3 and CryptoUser logged in:
F6000002
3.2.2.2 User Groups and Access to Commands
Depending on the application, the eight different user groups/permissions can be used to
control the access to sensitive commands.
For each command in an application firmware module it can be individually defined (as part of
the source code implementation) whether an authentication is necessary to perform this
command, and if yes, which authentication status is mandatory. The command
implementation decides, which user group is allowed to access the command and which
authentication level within this user group must be reached at least.
Security Management
Page 33 of 222
Using these access control mechanisms, and if it is wanted for security reasons, it is for
example possible to determine that a specific command is only available after an
authentication following the two-person rule: If for instance the necessary authentication
status for this command demands the authentication level 2 in some user group ‘x’, and if for
this group ‘x’ only users with permission 1 are registered, then the specific command must be
authenticated by two users of this group ‘x’. Thus, the command is only accessible if the two-
person rule is obeyed.
The implementation of security rules for the authentication of commands within a specific
CryptoServer application depends on the application firmware as well as on the user
management.
With the concrete implementation of application firmware modules, the framework for the
security rules for command authentication will be determined. In particular, it will be fixed
which commands have to be authenticated and which not.
Within this framework, with setting rules for user administration, the customer-individual
security rules for command authentication can be realized. This can be done by setting the
specific permissions and authentication mechanisms for any user, when the user is created.
3.2.2.3 Authentication Mechanisms
The following authentication mechanisms are implemented:
■ HMAC Password Authentication
The password will not be submitted in clear text and thus cannot be scanned.
Because of the random value the authentication data block cannot be scanned and
replayed at a later time. A ‘Playback’-attack of the command becomes impossible.
The command data are protected against unnoticed manipulation.
For this mechanism a password of arbitrary length is used (minimum 4 bytes).
First the host demands an 8-byte random value from the CryptoServer. Then the host
calculates the HMAC value over this random value and the command data block using the
password as the HMAC key. This HMAC hash value is transfered to the CryptoServer
together with the command data. The CryptoServer recalculates and checks the hash with
by using the password stored in the user database.
The default hash algorithm for the HMAC calculation is SHA-256. Other hash algorithms
can be used on demand.
This authentication mechanism has the following advantages:
▣ The password is not submitted in clear text and thus cannot be scanned.

Security Management
Page 34 of 222
▣ Because of the random value the authentication data block cannot be scanned and
replayed at a later time. A ‘Playback’-attack of the command becomes impossible.
▣ The command data are protected against unnoticed manipulation.
Therefore, this authentication mechanism is also qualified for the communication via
Ethernet (CryptoServer LAN).
■ RSA Signature Authentication
For this mechanism first the host demands an 8-byte random value from the
CryptoServer. Then the host (or RSA smartcard) calculates an RSA signature over this
random value and the command data block with the user’s private RSA key (PKCS#1
signature format). This command signature will then be transmitted to the CryptoServer
together with the command data. The CryptoServer will verify the signature with the help
of the RSA key’s public part, which is stored in the user database. The default hash
algorithm for the signature calculation is SHA-1. Other hash algorithms can be used on
demand.
This mechanism is particularly qualified for communication via Ethernet (CryptoServer
LAN) and therefore recommended for secure applications.
■ ECDSA Signature Authentication
For this mechanism the host first demands an 8-byte random value from the
CryptoServer. Then the host (or ECDSA smartcard) calculates an ECDSA signature over
this random value and the command data block with the user’s private ECDSA key. This
command signature will then be transmitted to the CryptoServer which will verify it with
the help of the public part of the ECDSA key which is stored in the user database.
The default hash algorithm for the signature calculation is SHA-256. Other hash
algorithms can be used on demand.
Just as the RSA signature authentication, this mechanism is particularly qualified for
communication via Ethernet (CryptoServer LAN) and therefore recommended for secure
applications.
■ RSA Smartcard Authentication
For this mechanism the entire authentication is performed within the CryptoServer, by
using an RSA signature smartcard.
The user’s smartcard (containing the user’s RSA authentication key) has to be inserted
into the PIN pad which is directly connected to the CryptoServer (serial port 2, at a
CryptoServer LAN port CS COM). The CryptoServer can now check the authentication of
commands by requesting over this PIN pad a signature created with the private part of the
user’s RSA key. The CryptoServer verifies the signature using the public part of the user’s
RSA key, which is stored in the user database.

Security Management
Page 35 of 222
This mechanism is only applicable for local applications because direct access to the
CryptoServer is necessary. It is not applicable if the CryptoServer is used remotely.
For the syntax to be used in the context of the csadm tool, see chapter 5.3.
3.2.3 Maximum for Failed Authentication Attempts
In CryptoServer the number of consecutive failed authentication attempts for every user is
automatically counted and stored as a user attribute (counter for failed authentication
attempts, AuthenticationFailureCounter, denoted as Z[n]). If the authentication of a user fails,
the AuthenticationFailureCounter for the user is incremented by one. On successful
authentication the AuthenticationFailureCounter is reset to zero.
A maximum value for the number of failed authentication attempts (MaxAuthFails) can be set
by using the csadm command SetMaxAuthFails (see chapter 5.6.7), where 0 ≤ MaxAuthFails
≤ 255. To retrieve the defined value for MaxAuthFails the csadm command GetMaxAuthFails
should be used. By default, MaxAuthFails = 0 which means that the number of failed
authentication attempts for all CryptoServer users is not limited. Any other value for
MaxAuthFails means that for each user there are only MaxAuthFails-1 consecutive failed
authentication attempts allowed. The user is locked automatically after MaxAuthFails
consecutive failed authentication attempts, i.e., if the AuthenticationFailureCounter of the user
equals the value of MaxAuthFailures.
If a user is locked no further authentication is possible for her/him, consequently this user
cannot perform any command which has to be authenticated. Only a user with user
management permission (permission 2 in user group 7, 20000000) can unlock a locked user
by setting her/his AuthenticationFailureCounter back to zero by using the csadm command
ChangeUser (see chapter 5.6.3).
3.2.4 User Groups for Administration
There are two user groups predefined for the access to the external commands of the
standard firmware modules.
User groups 6 and 7 are reserved and should not be used by application firmware modules.
User groups 0 to 5 are available for user-defined applications.
User groups 6 and 7 are reserved for the following tasks:
■ User group 6: users with rights for CryptoServer administration (loading, replacing or
deleting a module or file, setting the RTC, clear CryptoServer), clear audit logfile and to
reset alarm.
Security Management
Page 36 of 222
■ User group 7: users with user management rights (creating or deleting a user or changing
the rights of a user in the user database, backup or restore a user), rights to manage the
audit log file (clear audit log file, load audit.cfg file, see chapter 3.3) and to reset alarm.
Here, the command for creating a user who has the rights for CryptoServer administration, i.e.,
a user with permission at least 1 or 2 in user group 6, is an exception. Such a user may only be
created, if the authentication status is at least 21000000, i.e., the command has not only to be
authenticated by a user with user management rights (20000000) but additionally by a user
who himself has the permission to administrate the CryptoServer (01000000 or 02000000).
To perform these commands, authentication level 2 within the respective user group is
mandatory. Optionally, a higher authentication level in the respective user group can be
configured by using a signed configuration file, cmds.scf, as explained in chapter 7.3.
The implementation of the standard firmware requires, by default, authentication level 2 in
user group 6 resp. 7 for the execution of the administrative and user management
commands. This allows the realization of customer-individual security rules by setting rules
for the creation of users, for example:
If the customer’s security rules allow execution of these commands after authentication of
one authorized user, then users with permission 2 in user groups 6 and 7 (i.e., user
permission 22000000) may be created.
If the customer’s security rules allow execution of these commands only after authentication
of two independent authorized users (i.e., according to the two-person rule), then only users
with permission 1 in user groups 6 and 7 should be created.
Every other security rule that requires authentication according to the two-person rule only
for specific commands or specific users, can be realized that way by setting respective
organisational rules for the user management.
3.2.4.1 Default User ADMIN
Before delivery Utimaco creates a default user ADMIN on every CryptoServer which enables
the customer to do initial administration tasks. The ADMIN is allowed to perform all
standard administration and user management commands.
The authentication mechanism of the default user ADMIN is RSA Signature. He is granted
permission 2 for the user groups 6 and 7. A Default Administrator Key ADMIN.key (described in
chapter 3.7.1) for the user ADMIN is delivered on the SecurityServer product CD
Security Management
Page 37 of 222
(…\Software\All_Supported_Operating_Systems\Administration\key) and on each of
the delivered smartcards, enabling the user ADMIN to authenticate himself towards the
CryptoServer. Since the ADMIN.key is not customer-individual, it should either be changed by
the customer, or the ADMIN user should be replaced by other users with administrator rights:
After delivery the user ADMIN should as soon as possible perform one of the following
actions:
Replace his Default Administrator Key ADMIN.key by an individual authentication token, i.e.,
by an individual RSA key.
In case the two-person rule is required for the administration tasks (company security
policy) the user ADMIN must be replaced by two (or more) new users with the necessary
user permissions. Details on this procedure can be found in chapter 6.2.
If the default user ADMIN shall be replaced by two or more users, the sum of the permissions
of the newly created users who use a RSA or ECDSA key as authentication token has to be at
least 21000000. Only if this permission is reached, the CryptoServer allows the deletion of the
default user ADMIN.
The reason for this precaution is that in any situation the CryptoServer must remain
administrable. Whenever an alarm occurs on the CryptoServer, or when the Clear command is
performed (see chapters 3.4 and 3.5), all users with password authentication mechanism are
deleted from the user database. The remaining users should be able to setup the
CryptoServer again. In particular, there must be enough users left, who are able to
authenticate the commands to reset the alarm and to create new users.
Additional administrator users with password mechanism may be created, but they will be
deleted in case of an alarm.
Any user with password authentication mechanism is deleted if an alarm has occurred, and
if the Clear command is executed on the CryptoServer.
Also at any later date, the CryptoServer will only allow to delete a user with user management
rights if the following two conditions are fulfilled:
■ In the specific user group 7 the sum of the permissions of all remaining users who use a
public key as authentication token is still above the minimum permission level of 2.
■ In the specific user group 6 the sum of the permissions of all remaining users who use a
public key as authentication token is still above the minimum permission level of 1.
Security Management
Page 38 of 222
These are the necessary conditions to retain an administrable CryptoServer. Otherwise, the
command for user deletion will be rejected with an error code.
In an emergency case, when the administration key is lost (e.g. smartcard(s) with private
part of customer-inidividual administrator key is lost), the CryptoServer can be reset by
executing the csadm Clear=DEFAULT command. In this case, the CryptoServer deletes the
user database and creates a new one that contains the default ADMIN user described above.
See chapter 3.5 for details.
3.2.5 Secure Messaging
The CryptoServer uses a secure channel for the communication with the host/host
applications. Secure messaging ensures that commands sent to the CryptoServer and all
answer data received from the CryptoServer are AES encrypted and integrity-protected with
an AES MAC. For this purpose, a secure messaging header data block is added to the
command and the answer data block. The detailed structure of the header data blocks is
described in [CSCMDS] provided on the CryptoServer SDK product CD.
The secure messaging functionality implements the following steps that are transparent for
the csadm user since performed within one csadm command, see LogonSign or LogonPass:
1. The host and the CryptoServer use the Diffie-Hellman key agreement scheme to agree
upon an AES session key.
First the external CryptoServer function GetSessionKey is called to generate an AES
session key.
The session key can be negotiated in one of the following ways:
▣ With the Diffie-Hellman key establishment protocol (see [PKCS#3])
▣ With the anonymous Elliptic curve Diffie-Hellman key establishment protocol (see
[ANSI-X9.63] chapter 6.2)
▣ By using the key or the password (also referred to below as the secret) of a user
registered in the CryptoServer.
If one of the Diffie-Hellman key agreements is used, no user account is necessary to
generate the session key.
In the other cases, the user’s secret will be used to encrypt or to establish the session key.
Therefore, Secure Messaging shall be allowed for the selected user by setting the
appropriate user flag, as described in chapter 5.6, on user creation. The CryptoServer also
returns a session ID and a starting value of a sequence counter.
Security Management
Page 39 of 222
The exchange of the session key is done in one of the following ways:
▣ For users with password authentication, the CryptoServer calculates the SHA-256
hash value over the user’s password and the current sequence counter. Using this 32-
byte result value as key encryption key, the CryptoServer returns the session key to the
host in an encrypted form.
▣ For users using RSA signature authentication, the CryptoServer will encrypt the
session key with the public part of the user’s RSA key and send it to the host.
▣ For users using ECDSA authentication, the session key will be negotiated over the
Elliptic curve Diffie-Hellman key establishment protocol with the user’s ECDSA key pair
(according to [ANSI-X9.63], chapter 6.2).
2. The host and the CryptoServer exchange encrypted commands in a Secure Messaging
session.
The host can now send commands to the CryptoServer that are AES-encrypted and
integrity-protected with an AES MAC. The respective answers to these commandsthat are
sent back to the host by the CryptoServer, are always encrypted and protected with a
MAC, too. The sequence counter is used as initialization vector for the AES encryption and
MAC calculation and is incremented after every command to prevent unauthorized replays
of the commands.
The session key is identified by a session ID. All commands using the same session ID and
the same session key belong to one and the same session. In this way a secure channel can
be established between the CryptoServer and the host application using the Secure
Messaging mechanism.
The CryptoServer accepts commands that do not require authentication (i.e., in cleartext),
sent to it over an unprotected connection, in parallel to commands sent to it within a
protected Secure Messaging session. If the CryptoServer receives an encrypted command
(i.e., a command using the Secure Messaging layer of CryptoServer’s protocol stack), it checks
the MAC. The command is rejected, if the MAC is invalid.

Security Management
Page 40 of 222
A session key automatically becomes invalid if it is not used for 15 minutes.
The SecurityServer/CryptoServer SDK 4.10 supports a maximum of 40964 session keys that
can be active simultaneously and can be used by different host applications (each key
identified by its session ID). If a host application requests a new session key while the
maximum of 4096 sessions are already active, the oldest session is closed and the session
key associated with it becomes invalid.
If the GetSessionKey function is authenticated by one or more users using single
command authentication, the permissions of the corresponding user(s) will be granted to
the established Secure Messaging session. All commands that are protected with this
session key have the permissions of these users without any extra authentication being
necessary. However, outside this session the former authentication status is preserved.
The steps explained above for the usage of Secure Messaging remain transparent to the user
of the csadm tool. The user just has to perform one of the authentication commands
LogonSign or LogonPass, together in one command line with the command(s) for which
Secure Messaging should be used. Then, csadm will automatically open an authenticated
Secure Messaging session, perform the specific command(s) with Secure Messaging (i.e.,
encrypted and MAC-secured) and close the Secure Messaging session on the CryptoServer
again.
For details on the usage and syntax of LogonSign or LogonPass, see chapters 5.3.1 and 5.3.2.
3.2.6 Mutual Authentication
Mutual authentication is a security feature introduced with the SecurityServer/CryptoServer
SDK 4.10. It requires that both communicating parties, i.e., the host application and the
CryptoServer device, prove their respective identities to each other before performing any
application functions. Securiy-relevant commands are sent to the CryptoServer by host
applications, within a Secure Messaging session, that must be always authenticated by one or
more users with appropriate permissions. The CryptoServer does not authenticate itself to the
host applications by default. It can be configured to do so as described in chapter 7.4.
To control and restrict the access on the host side to security-relevant commands on the
CryptoServer, the CryptoServer implements the concept of users, which is described in
chapter 3.2.1.
4
The SecurityServer/CryptoServer SDK 4.01 and earlier support a maximum of 256 session keys active at the
same time that can be used by different host applications (each key identified by its session ID). If a host
application requests a new session key while the maximum of 256 sessions are already active, the oldest session
is closed and its session key is invalidated.
Security Management
Page 41 of 222
For the CryptoServer to be able to authenticate itself to requesting host applications, the
concept of the HSM Authentication Key (HSMAuthKey) has been introduced. This is a device-
individual 3072-bit RSA key pair, automatically generated on request and owned by the
CryptoServer. Once created, the key cannot be modified or deleted by any CryptoServer user.
It is used by the CryptoServer to authenticate itself in the initialization phase of a Secure
Messaging session if requested by the respective host application. Both the private and the
public part of the HSMAuthKey are securely stored inside the CryptoServer's FLASH memory in
the authkey.db database. The private part of the HSMAuthKey is encrypted with the
CryptoServer's Master Key and cannot be exported outside the HSM. The public part of the
key can be retrieved with the dedicated csadm command, GetHSMAuthKey, and exported into
a file, for example, HSMauth.keys, maintained by the CryptoServer administrator. Thus, it can
be used to verify the authenticity of a Secure Messaging session originating from the HSM.
The HSMAuthKey resp. the authkey.db is deleted when an alarm has occured or a Clear
command has been executed. A new HSM Authentication Key is generated the next time the
csadm GetHSMAuthKey command is executed.
3.3 Auditing
The CryptoServer offers extensive audit functionality.
Some events will always and automatically be audited. Other events can be optionally
audited if the CryptoServer is configured accordingly.
If an auditable event occurs, the operating system SMOS automatically adds an entry to the
audit log file. The audit log entry always includes:
■ A timestamp with date and time of the event (if the RTC is running),
■ User name of all users who authenticated the audited command (if appropriate),
■ Function code (FC) and subfunction code (SFC) of the audited command (if appropriate),
■ Error code which indicates if the action has been successfully performed or if an error had
occurred (if appropriate).
Additionally, event-individual information may be stored, too.
The following events are always logged:
Event
Audit log entry contains additional information about:
alarm
alarm reason

Security Management
Page 42 of 222
Event
Audit log entry contains additional information about:
extremely high temperature
measured temperature
Clear command performed
ResetAlarm command performed
Table 2: Events that are always logged into the audit log
Additionally, many more events may be logged if the CryptoServer’s audit system is
accordingly configured. In the last column it is indicated, if the listed event is audited by a
CryptoServer in default configuration:
Auditable event
Message
Class No.
Audited by
default?
Firmware and file management (e.g., commands to load or delete a
file/firmware module, or load the Firmware Encryption Key)
1
yes
User management actions (e.g., commands to add or delete a user
or to change the user’s authentication token)
2
yes
Setting of the system clock of the CryptoServer
3
yes
CryptoServer startup
4
yes
Audit Log file management (e.g., deletion the audit log file, any
changes in the audit configuration)
5
yes
Master Backup Key management (e.g., create or import a Master
Backup Key)
6
yes
Key management (e.g., key management functions of the firmware
module CXI)
7
no
Successful authentications/logins
8
no
Failed authentications/logins
9
yes
Backup and restore operations (e.g., backup database or restore
database)
10
yes
Audit message classes reserved for future use
11 – 24
no
Customer-defined audit message classes
25 - 30
no
Table 3: List of auditable events
Security Management
Page 43 of 222
Auditing may also be configured in a way that only some (or none) of the above listed “default”
events, or some of the “non-default” events are logged. For this purpose, a list with all audit
event classes that shall be logged (identified by their message class number) may be
submitted to the CryptoServer with the SetAuditConfig command described in chapter
5.4.14.
Additionally, the following parameters of CryptoServer’s audit functionality may be configured:
■ Write logfiles rotatingly or not?
5
(default: write rotatingly),
■ Number of audit log files (2 – 10) (default: 3)
■ Length of one logfile (4,000 ≤ length ≤ 240,000 bytes) (default: 200,000 bytes).
Further auditing may be implemented application-dependent. Customer-individual firmware
modules can use the audit functionality, for example, for auditing security-relevant actions like
key management actions and others more. If this is wanted, the individual firmware module
has to call the appropriate CMDS function cmds_audit_write(), which writes a message
into the CryptoServer’s audit log file. Furthermore, the audit log system has to be configured
as described above, i.e., by adding the respective message classes.
A CryptoServer audit log file can be read at any time and in any mode with the csadm
command GetAuditLog, see chapter 5.4.11.
A CryptoServer audit audit log file can be deleted with the csadm command ClearAuditLog (if
appropriately authenticated), see chapter 5.4.12.
The current configuration of the CryptoServer audit functionality can be retrieved with the
csadm command GetAuditConfig, see chapter 5.4.13 and it can be changed with the
command SetAuditConfig, see chapter 5.4.14
The audit log files are stored in the FLASH memory of the CryptoServer. Regarding the
configuration of auditing, it should always be kept in mind that a too extensive auditing may
result in a great wear and tear of the FLASH memory and therefore in a decreased lifetime of
the CryptoServer.
5
The audit log file is organized in several files. If configured to be written rotatinglyand in case the last audit log file
is full, the CryptoServer starts overwriting the first (oldest) existing logfile, etc. If the audit log file is configured to
not rotating, and in case the last audit log file is full, the CryptoServer refuses executing any auditable functions
except for deleting the audit log file. If the audit log file is deleted, this is logged as first new audit log entry.

Security Management
Page 44 of 222
3.4 Alarm
Alarm state is caused by certain extraordinary physical circumstances. It has not to be mixed
up with the above mentioned global states (initialized, defect) the CryptoServer can be in.
Anytime a physical alarm occurs in the CryptoServer, it will be detected immediately by the
sensory, which triggers the defined alarm mechanism (see below for details). Part of this
mechanism is a restart of the CryptoServer. Alarm is given if the operating system SMOS
detects an alarm condition in the alarm status register during the boot process. The
CryptoServer responds with the current alarm condition and a ResetAlarm command is
required to reset the alarm status register. The alarm reason can be output via the GetState
command.
Generally, two different kinds of alarm are possible:
■ temporary alarms (alarm can be reset)
■ permanent alarms (alarm cannot be reset)
Permanent alarms occur in case of a damage of the inner or outer tamper-protecting foil,
whereas usually all other possible alarms are temporary.
Possible reasons for alarm are:
Abbreviation
Description
Temp_low
Temperature too low (see also chapter 3.6)
Temp_high
Temperature too high (see also chapter 3.6)
Pow_high
Voltage / tension too high (CryptoServer-internal battery)
Pow_low
Voltage / tension too low (CryptoServer-internal battery)
In_foil
Internal foil damaged6
Out_foil
External foil damaged6
ext_Erase
External deleting / clearing done
inval_MK
Invalid (corrupted) device-internal Master Key (reason for this
is usually an empty battery, see below)
Power failed
Sensory controller without power
6
This alarm reason is only relevant for CryptoServer CSe-Series.

Security Management
Page 45 of 222
Abbreviation
Description
Sensory Controller failed
No reaction from sensory controller
Table 4: Possible alarm reasons
Whenever a physical alarm occurs (noticed by the sensory), a dedicated Alarm-Bit in the alarm
status sensory register will be set immediately, together with bits which indicate the alarm
reason.
The CryptoServer’s internal Master Key will be deleted immediately (i.e., the Key-RAM will be
actively erased by the sensory controller) and the CryptoServer will be restarted.
Independently from the occurrence of an alarm, the CPU’s internal RAM (IRAM) will be erased
at the very beginning of the boot procedure. A Clearing of Key-RAM and IRAM will be finished
within less than 4 msec after the occurrence of the alarm.
If during the (following) boot process the operating system SMOS finds an alarm in the alarm
status register which is not yet logged (i.e., the Alarm-Bit is still set), all security-relevant data
inside the CryptoServer is deleted. In particular, all data that is stored, and encrypted with the
CryptoServer’s Master Key, as well as the Master Key itself, is deleted. Only some specific
data like firmware and the system keys remains.
■ All firmware modules, except those which had been loaded and stored in encrypted form
(see chapter 3.9.2)
■ The user database, except for all users who use a password authentication mechanism
(i.e., in particular all passwords have been deleted)
■ All system keys (Module Signature Key, Default Administrator Key, Production Key and, if
loaded by customer, the Alternative Module Signature Key)
■ The audit log file audit.log and its configuration file audit.cfg
■ Bootloader configuration file bl.cfg, including the EID (Extended ID)
■ Any signed licence files *.slf
■ The signed configuration file cmds.scf (if available).
After the deletion of all other data SMOS continues to start all system firmware modules
(*.sys), which means that in alarm state the CryptoServer is running in Maintenance Mode:
only the backup copies *.sys of the basic firmware modules are running. No secret or private
key is left. Since the firmware module DB for database management is blocked without the
Master Key, no further keys can be loaded in alarm state. Most CryptoServer functionality is
blocked.
Security Management
Page 46 of 222
Commands that are available in alarm state comprise only all administrative commands
which do not have to be authenticated (like all commands which return non-sensitive
information), plus the commands ResetAlarm and SetTime.
If possible, please try to eliminate the physical cause of the alarm.
To regain full functionality, the ResetAlarm csadm command has to be performed and the
CryptoServer has to be restarted. After that the CryptoServer will react again on further
commands.
Thus, each alarm must be explicitly reset by the user using the command ResetAlarm
(chapter 5.4.17) before the CryptoServer can accept further sensitive commands.
As part of the command ResetAlarm, the alarm is logged into the audit log file
audit_<number>.log), including date and time (up to seconds), alarm reason, and the user
name of the user who authenticated the command. This log file can be read out anytime and
in any mode with the GetAuditLog command. With ResetAlarm the Alarm-Bit is set back (to
demonstrate that the alarm has already been logged) and a new CryptoServer's Master Key is
generated.
Since the ResetAlarm command has to be authenticated by a user with administrative rights,
it is ensured that for any alarm at least one responsible person has been aware about the
occurence of the alarm.
In case of a physical alarm, which is still present (for example, temperature still too high) the
Alarm-Bit will immediately be set again. The Key-RAM will be erased and the CryptoServer
will be restarted. Thus, the procedure described above will be repeated, if the cause of the
alarm is not eliminated.
Therefore, in case of a permanent alarm, for which the reason can’t be eliminated (for
example, Power Failed, or damaged foil) the CryptoServer has to be sent back to the
manufacturer. Please contact Utimaco IS GmbH.
If the CryptoServer is stored for a long period of time without voltage supply and the battery
gets empty, the CryptoServer-internal Master Key will be deleted according to the alarm
mechanism. However, information about this alarm state will be lost, too, as the content of
the sensors register is also lost in the absence of voltage. Therefore, the Bootloader
additionally checks at each boot process the integrity of the loaded Master Key. If the
verification fails, the Bootloader will then activate a ‘virtual’ alarm. This alarm is displayed as
Inval_MK, see above.
Security Management
Page 47 of 222
For the accurate procedure "What to do?" in case of an alarm see chapter 8.2.
3.4.1 External Erase
To offer the possibility for deliberate and manual erasure of all sensitive data inside the
CryptoServer, an alarm may artificially be triggered by performing an External Erase.
The execution of an External Erase is the precondition for a ClearToFactoryDefaults (csadm
command Clear=DEFAULT) to be performed, see chapter 3.5.
■ For a CryptoServer PCIe plug-in card, External Erase has to be performed on the PCIe plug-
in card as described in chapter "Performing an External Erase" of the [CSMSADM].
■ For a CryptoServer LAN V3, an External Erase has to be performed by pressing the sealed
delete switch inside the battery compartment of the device as described in chapter
"Performing an External Erase on a CryptoServer LAN V3" in [CSLAN]).
■ For a CryptoServer LAN V4, an External Erase has to be performed by pressing the ERASE
pushbutton behind the front door of the device as described in chapter "Performing an
External Erase on a CryptoServer LAN V4" in [CSLAN]).
3.5 The Clear Functionality
The CryptoServer provides with its Clear function the possibility to erase the CryptoServer to a
previous state.
For various purposes there are two variants of the Clear function implemented.
ClearToInit function
The ClearToInit function is triggered by the execution of the csadm command Clear=INIT
described in chapter 5.8.11 and should be authenticated by a user with administrative rights.
This function
■ Erases the CryptoServer's Master Key
Security Management
Page 48 of 222
■ Erases all firmware modules (except for the Bootloader code and system firmware
modules *.sys),
■ Erases the signed configuration file cmds.scf if available
■ Erases all data except for
▣ The public parts of the Production Key, Default Administrator Key, Module Signature
Key and Alternatve Module Signature Key,
▣ The alarm state file (alarm.sens)
▣ The audit log file,
▣ Users with public keys as authentication token (as stored in user database)
▣ Any Signed Licence File *.slf (if present)
▣ The Bootloader configuration file bl.cfg.
Afterwards the CryptoServer must be rebooted.
ClearToFactoryDefaults
If a customer has lost his customer-individual administrator keys and the CryptoServer cannot
be administrated anymore, the ClearToFactoryDefaults function (syntax csadm
Clear=DEFAULT, see chapter 5.8.11) command has to be used instead.
The ClearToFactoryDefaults function offers the possibility to get an administrable
CryptoServer again. However, all customer’s data is erased.
The usage of this command should be restricted to this emergency case only.
After a
ClearToFactoryDefaults
the user database will be empty, except for the
default administrator user ADMIN who will be restored with the Default Administrator’s Key
as authentication token.
This ClearToFactoryDefaults command does not need to be authenticated, but it can be
executed only immediately after an External Erase was performed, see chapter 3.4.1. This
assures that only persons with physical access to the CryptoServer hardware have the
possibility to clear the CryptoServer from all non-default users.
Then a reboot must be performed, and the alarm (emerging from the External Erase) has to be
reset (ResetAlarm command). The CryptoServer is now in the factory default settings in

Security Management
Page 49 of 222
which it is usually delivered (only all basic firmware modules are loaded as *.sys-files, and
the single user available is the default administrator ADMIN with his ADMIN.key as the
authentication key).
3.6 Temperature-dependent Behavior of the CryptoServer
The CryptoServer is fully operational only if its internal temperature does not exceed or fall
below a well-defined operational temperature range. The next table shows how the
CryptoServer's behaviour changes depending on its internal temperature.
Temperature
Behavior of the CryptoServer
below –13 °C
Alarm is triggered, all sensitive data in the CryptoServer are deleted, and the
CryptoServer is restarted. After the restart CryptoServer’s processor is
suspended, commands are not executed any longer.
–13 °C to 3 °C
CryptoServer’s processor is suspended; a new entry is written into the audit log
file; commands are not executed any longer. After being back to the normal
operational temperature (4 °C to 62 °C) the CryptoServer has to be restarted in
order to be operational again.
4 °C to 62 °C
Normal operation
63 °C to 66 °C
CryptoServer’s processor is suspended; a new entry is written into the audit log
file; commands are not executed any longer. After being back to the normal
operational temperature (4 °C to 62 °C) the CryptoServer has to be restarted in
order to be operational again.
above 66 °C
An alarm is triggered, all sensitive data in the CryptoServer are deleted and the
security module is restarted. After the restart CryptoServer’s processor is
suspended, commands will not be executed any longer.
Table 5: Operational temperature of the CryptoServer
All temperature values in the table are approximate values. The exact temperature values may
vary a little because of tolerances of the electronic components and the use of a hysteresis by
the comparators.
Note that only the internal temperature of the CryptoServer device is relevant, not the
environmental temperature. The actual value of the inner temperature can be retrieved with
the GetState administration command.

Security Management
Page 50 of 222
Once the CryptoServer’s processor is suspended (i.e., its internal temperature exceeded or
fell below the operational temperature range), it does not respond to any request. Any
attempt to connect to the CryptoServer will usually result in a kind of timeout error from the
device driver.
Before the CryptoServer’s processor is suspended the Bootloader writes an entry into the
audit log file which can be read out with the administration command GetAuditLog.
The only way for the CryptoServer to leave the suspend mode is to reset it by using the
Restart or the ResetToBL command.
Resetting the CryptoServer has no effect if its internal temperature still exceeds or is below
the operational temperature range. In case of CryptoServer’s suspend mode caused by high
temperature, it is recommended to switch off the power supply for some time in order to
cool down the CryptoServer.
3.7 System Keys
This chapter describes the system keys used in and around a CryptoServer, how they are
generated, who is responsible for storing them, and the way they are handled and used.
The user keys (user’s authentication token) and the Master Backup Key (MBK) are not
described herein.
3.7.1 Default Administrator Key
After shipping the Default Administrator Key ought to be used as soon as possible to perform
first administrative tasks, including to set up a customer-individual CryptoServer.
In case that the customer has lost his customer-individual administrator authentication
token(s), the Default Administrator Key offers a fall-back possibility to get an administrable
CryptoServer again.
You will find the key (incl. private part) on the product CD stored in the keyfile
\Software\All_Supported_Operating_Systems\Administration\key\ADMIN.key, and
on the delivered smartcards.
The following table contains detailed information about the Default Administrator Key.

Security Management
Page 51 of 222
Type
The Default Administrator Key is an RSA key of at least 1024 bits size.
Generation
The Default Administrator Key is generated by the manufacturer Utimaco, outside
the CryptoServer.
The key is manufacturer-specific, but it is a default key and therefore neither
customer-individual nor CryptoServer-individual.
As part of CryptoServer shipment, the manufacturer hands over the key (public and
private part) to the customer.
Usage
The key is needed to offer first administration possibilities:
The key can be used by default administrator user ADMIN to authenticate the
security relevant administration commands (commands, for example, for firmware
and user management, reset alarm, set CryptoServer time) as long as the
CryptoServer is still in factory default setting.
The key ought to be used immediately after shipping to set up a customer-individual
CryptoServer, either by replacing the default authentication token of user ADMIN
(who by default uses the Default Administrator Key as authentication token) by a
customer-individual key, or by replacing the default administrator user ADMIN by
customer-individual users with sufficient administrator rights.
Life cycle
The key is imported into the CryptoServer by the manufacturer as part of the
production process.
One copy of the public part of the Default Administrator Key is stored in the user
database as default authentication token of the administrator user ADMIN. This
copy can be overwritten (csadm command ChangeUser, which has to be
authenticated by the ADMIN himself) or deleted (csadm command DeleteUser,
which can only be performed after sufficent further users with administrator rights
have been created before, see 3.2.4.1).
One of these options should be done by the customer as soon as possible after
receiving the CryptoServer.
A second copy of the public key is stored in the flash device (file init.key). This
copy can neither be changed nor deleted, but it will be used to restore the default
administrator user ADMIN with his Default Administrator Key as authentication token
(using the Clear = DEFAULT (ClearFactoryDefaults) command, see chapter 3.5).
Even in case of an alarm this copy of the key will not be deleted.
Table 6: Details about the Default Administrator Key ADMIN.key
3.7.2 Module Signature Key
The Module Signature Key is used only by the CryptoServer to verify the integrity and
authenticity of the firmware modules, i.e., its origin is by the manufacturer. This system key is
not used by the customer.

Security Management
Page 52 of 222
The following table contains detailed information about the Module Signature Key.
Type
The Module Signature Key is an RSA key of at least 4096-bit size.
Generation
It is generated by the manufacturer, outside the CryptoServer.
Usage
The private part of the Module Signature Key is used by the manufacturer for the
signature of any MMC (Module Manufacturer Container, see chapter 3.9.1). A MMC
contains the executable of a CryptoServer firmware module. The signature is used
to protect the integrity and authenticity of the MMC during load process, i.e., its
origin by the manufacturer.
The public part of the Module Signature Key is stored inside the CryptoServer.
During firmware load process, this key or the customer-specific Alternative Module
Signature Key (if present, see chapter 3.7.3) will be used to verify the MMC
signature.
The private part of the Module Signature Key will as well be used by the
manufacturer for the signature of any Signed Licence File (SLF, see chapter 2.2.3 for
details). Whenever an *.slf file is loaded, the public part of the Module Signature
Key will be used to verify the SLF signature, and thus to verify the integrity and
authenticity of the SLF, i.e., its origin by the manufacturer.
Life cycle
The private part of the Module Signature Key is stored in a safe environment at the
manufacturer’s site, where only authorized personnel has access.
The public part of the key is imported into the CryptoServer by the manufacturer as
part of the production process. It is stored in the file system area of the
CryptoServer flash file (mdlsig.key).
The Module Signature Key can neither be exported nor changed nor deleted by the
customer.
In case of an alarm, or a Clear command being executed, the key will not be
deleted.
Table 7: Details about the Module Signature Key
3.7.3 Alternative Module Signature Key
The Alternative Module Signature Key is optional. It has to be used only if the customer would
like to develop and load his own CryptoServer firmware modules (respectively if he wants to
use firmware modules that do not come from the manufacturer/¬Utimaco IS GmbH).
The following table contains detailed information about the Alternative Module Signature Key.
Type
The Alternative Module Signature Key is an RSA key of variable length.

Security Management
Page 53 of 222
Generation
It is generated by the customer, e.g., by using the csadm command GenKey,
outside the CryptoServer. The csadm command SaveKey can be used to store
the new key on a smartcard. We recommend to create at least one backup copy of
the smartcard/keyfile containing the Alternative Module Signature Key with the
csadm command SaveKey. The customer is responsible for using and storing the
key pair.
Usage
In case that this key shall be used:
The private part of the Alternative Module Signature Key is used for the signature
of the MMC (Module Manufacturer Container, see chapter 3.9.1) of any
CryptoServer firmware module that the customer develops of his own. The
signature is used to protect the integrity and authenticity of the MMC during load
process, i.e., its origin by the customer.
The public part of the Alternative Module Signature Key is stored inside the
CryptoServer. During firmware load process, this key or the manufacturer’s
Module Signature Key (see previous chapter) will be used to verify the MMC
signature.
Life cycle
The public part of the Alternative Module Signature Key mdlsigalt.key may be
imported in the CryptoServer with the csadm command LoadAltMdlSigKey. In
this case this command has to be authenticated by a user with sufficient
administrator and user management rights (authentication level 2 in user groups 6
and 7, see chapter 3.2.2).
If this key has been imported into the CryptoServer, it remains stored inside
CryptoServer’s flash device (file mdlsigalt.key) and will be used for MMC
signature verification (in parallel to the manufacturer’s Module Signature Key, file
mdlsig.key).
The key can be changed/overwritten (by loading another mdlsigalt.key file,
see above) and deleted (with command DeleteFile).
The Alternative Module Signature Key cannot be exported from the CryptoServer,
and it will not be deleted in case of an alarm.
Table 8: Details about the Alternative Module Signature Key
3.7.4 Firmware Encryption Key
The usage of the Firmware Encryption Key is optional.
It shall be used only if the customer would like to store and load encrypted firmware modules.
The following table contains detailed information about the Firmware Encryption Key.
Type
The Firmware Encryption Key is an RSA key of variable length.

Security Management
Page 54 of 222
Generation
The generation shall be done by the customer, outside the CryptoServer. The
customer is responsible for using and storing the key pair, and for loading the private
part of the key into the CryptoServer.
Usage
The usage of the Firmware Encryption Key is optional. It shall be used only in case
that the customer wants to load and store encrypted firmware modules.
In case that this key shall be used:
The public part of the Firmware Encryption Key, which remains outside the
CryptoServer, is used by the developer to encrypt the executable firmware module.
The encrypted executable, wrapped in a MMC/MTC structure, may be loaded into the
CryptoServer. After being loaded it will be decrypted by using the private part of the
Firmware Encryption Key which is stored inside the CryptoServer.
Even if the private part of the Firmware Encryption Key is loaded the CryptoServer
accepts also cleartext firmware modules for load.
For more details see chapter 3.9.2.
Life cycle
The private part of the Module Encryption Key may be imported in the CryptoServer
with the command LoadFWDecKey. This command has to be authenticated by a
user with sufficient administrator rights (authentication level 2 in user group 6, see
chapter 3.2.2).
The private part of the key will be stored in an appropriate key database
fw_dec_key.db, encrypted with CryptoServer’s Master Key. The export of the key is
not possible.
The key can be changed/overwritten (by loading another private key part with
command LoadFWDecKey) and deleted (command DeleteFile). Both commands have
to be authenticated by a user with sufficient administrator rights (authentication level
2 in user group 6).
The (encrypted) key will also be deleted in case of an alarm and with all Clear
commands, see chapters 3.4 and 3.5.
Table 9: Details about the Firmware Encryption Key
3.7.5 The Master Key of the CryptoServer
The customer will never use CryptoServer’s Master Key directly. The CryptoServer itself is
responsible for the generation, usage and erasure (in case of alarm) of this key.
The Master Key is CryptoServer-individual and will never leave the CryptoServer.
The following table contains detailed information about the CryptoServer's Master Key.
Type
The internal Master Key of the CryptoServer is a 32 bytes AES key (default) or a
24 bytes Triple DES key (in case that the firmware module AES is not loaded).

Security Management
Page 55 of 222
Generation
The key is generated automatically inside the CryptoServer, as part of the production
process. The CryptoServer security module itself is responsible for usage and life
cycle of this key.
Usage
The Master Key is needed to encrypt the data stored inside the CryptoServer.7 For
this purpose, it will be used internally by other firmware modules.
The database firmware module (module DB) facilitates the usage of the key. This DB
module provides an internal public interface for secure data storage to other
application firmware modules. DB will use the internal Master Key in full length.
Life cycle
The Master Key cannot be imported; it is generated inside the CryptoServer.
After generation, the key is stored inside the CryptoServer in the sensory-protected
Key-RAM (see chapter 2.1.2). The Master Key cannot be exported; hense it will never
be available outside the CryptoServer.
The life cycle of this key ends when an alarm occurs on the CryptoServer. If any
alarm cause (temperature, foil, voltage, etc.) is detected by CryptoServer’s sensory,
the memory area in which the key is stored is automatically erased. A new Master
Key is generated during the next boot process after successful execution of the
ResetAlarm command.
Additionaly, the Master key is erased by executing the Clear command, see chapter
3.5. Any Clear command erases the CryptoServer's Master Key by generating and
storing a new one (the previous one is overwritten).
Table 10: Details about the CryptoServer's Master Key
3.8 Backup of Keys and Users
In many applications, for security reasons or to set up a redundant CryptoServer with identical
data, there is a need to create a backup of the cryptographic keys that are stored in a
hardware security module, and/or to create a backup of the registered users and their user
data including their authentication data (public key or password). To support backup
functionality, CryptoServer provides the possibility to use Master Backup Keys.
A Master Backup Key is used to encrypt secret data which is exported from the CryptoServer
(for example, create a key backup), or to decrypt data, which is imported into the CryptoServer
(for example, restore a key backup). This is done, for example, by Utimaco’s application
firmware module CXI. It can also be used to backup and restore a user and his user data (see
7
This is necessary in order to be able to store sensitive data also in memory areas which are not sensory-
protected, i.e., which will not be erased within a very short time after an alarm has occurred. These are, for example,
the flash device, NV-RAM and SD-RAM (CryptoServer CSe: DDR2 RAM).

Security Management
Page 56 of 222
commands BackupUser and RestoreUser in chapters 5.6.5 and 5.6.6) or database records
(see commands BackupDtabase and RestoreDatabase in chapters 5.5.8 and 5.5.9).
The CryptoServer is able to store up to four Master Backup Keys (slot 0...3) to be used by
various applications. Each Master Backup Key (MBK) can either be a DES key (16-byte or 24-
byte length) or an AES key (32 bytes).
The handling of such Master Backup Keys is implemented over the CryptoServer firmware
module MBK. The csadm commands for MBK management are described in chapter 5.7 of
this manual.
3.9 Firmware Module Management
This chapter describes the management of the firmware modules of the CryptoServer from a
security point of view.
With the aim to link the firmware with administrative information (for example, module name
and version number) and to add check values for the authenticity and integrity of the
firmware, every firmware module is enveloped into a so called container. These containers
allow also the load and storage of encrypted firmware.
For easier handling, Utimaco IS GmbH offers also so-called package files in which a set of
firmware modules (the containers described below) is bundled, ready for loading. Please see
chapter 3.9.3 of this manual for the concept and usage of these firmware packages.
3.9.1 Firmware Containers: MTC/MMC, MSC, SYS
A raw firmware module (RFM) is the executable module compiled for the CryptoServer
platform, i.e., ready for interpretation of the CryptoServer operating system SMOS. This can be
in COFF format (*.out), as used by the CryptoServer hardware, in DLL format (*.dll), as
used by the CryptoServer Simulator/SDK (Software Development Kit) for Windows or in ELF
format (*.so) as used by the CryptoServer Simulator/SDK for Linux.
For various purposes (firmware transport, loading, and storage inside the CryptoServer) this
RFM are enveloped in so-called firmware module containers:
■ For firmware loading the RFM is enveloped into a MTC (Module Transport Container). This
MTC contains an MMC (Module Manufacturer Container) which has to be signed
mandatorily.
■ For secure and authentic transport, the MTC may optionally be signed.
■ After the MTC has been loaded in the CryptoServer, the CryptoServer unwraps the RFM
from the MMC/MTC and stores it in form of a MSC (Module Storage Container).
The MMC adds a header with module information to the RFM and a signature that guarantees
for the integrity and authenticity of the module. The signature has to be calculated with either

Security Management
Page 57 of 222
Utimaco’s Module Signature Key, or with the customer’s Alternative Module Signature Key, which
is verified during firmware loading. The RFM may be encrypted.
The MTC adds a second header to the MMC (which contains additional module transport
information) and optionally a second signature which is calculated over the complete MMC.
The MTC structure and signature can be used to secure the transport of the firmware module
from the developer to the customer (to guarantee the authenticity of the module during
delivery).
The MSC format is for CryptoServer-internal use only. It stores the module code together with
certain module information and the check value for the module code’s integrity (SHA-512
hash value over the module code).
Backup-copies of all system-relevant firmware modules are always stored in every
CryptoServer as SYS modules (system firmware modules). SYS files have the same format as
MSC, but will be stored with file extension *.sys. It is impossible to delete a SYS file.
3.9.2 Encrypted Firmware Modules
Optionally, firmware modules may be loaded and stored inside the CryptoServer in an
encrypted way.
This procedure requires that the private part of an appropriate RSA key, the Firmware
Encryption Key, is imported into the CryptoServer. For importing the key the csadm command
LoadFWDecKey is used which shall be authenticated with administrative user rights
(permission 2 in the user group 6, see chapter 5.9.6). The Firmware Encryption Key is
encrypted with the CryptoServer-internal Master Key, and is stored inside the CryptoServer.
Outside the CryptoServer the public part of the Firmware Encryption Key is now used as a Key
Encryption Key (KEK) for a 32 Byte AES key. The raw firmware module itself is encrypted with
this AES key. The AES-encrypted firmware module, the KEK-encrypted AES key (encryption
according to PKCS#1 block 02) and some key type information are embedded in the MMC
structure.
During the load procedure of a firmware module the CryptoServer searches the MMC
structure for the field with the encrypted AES key. If the field is found and the Firmware
Encryption Key is already stored, CryptoServer uses its private part to decrypt the AES key.
After that the CryptoServer decrypts the firmware module with the AES key and checks its
integrity. Before the firmware module is stored (now as an MSC) inside the CryptoServer it is
encrypted again, this time with the CryptoServer-internal Master Key. A flag in the MMC-
header indicates that the contained firmware module is encrypted.
All other internal steps of the firmware load (for example, checking module integrity with SHA-
512 hash) are the same as decribed above.
If an encrypted firmware module *.mtc is loaded in the CryptoServer but the Firmware
Encryption Key is not yet stored inside the CryptoServer, the firmware module is stored in the
Security Management
Page 58 of 222
FLASH file system with the file extension *.emc for later decryption, as part of the
LoadFWDecKey command.
3.9.3 Package Files
In order to simplify the firmware management Utimaco IS GmbH offers firmware also in the
so-called package files. A *.mpkg package file can contain several firmware modules (e.g.,
MTCs) as well as other files in a packed form.
Package files are intended to give the user a facile possibility to load or update a set of
several firmware modules and/or files into the CryptoServer in only one step.
For this purpose, the CryptoServer Administration Tool csadm offers the LoadPkg command
(see chapter 5.8.4) which can replace a series of succeeding csadm commands. The LoadPkg
command loads the contents of the given *.mpkg package file into the CryptoServer, adding
to or replacing existing firmware.
Furthermore, the csadm tool offers commands to create a package file from a collection of
MTCs or to list its contents, to retrieve the contained firmware modules from a *.mpkg file,
and to compare the contents of a package file with the firmware that is already stored in the
CryptoServer (commands Pack, see chapter 5.8.6, ListPkg, see chapter 5.8.8, Unpack, see
chapter 5.8.7, CheckPkg, see chapter 5.8.9). Additionally, you can also check the MMC
signature of each firmware module contained in a package (VerifyPkg, see chapter 5.9.4).
3.10 Signed Configuration Files
The CryptoServer software supports the use of signed configuration files with the.scf file
extension. In such a signed configuration file you can define specific firmware module
configuration settings, for example, to disable selected CryptoServer functions which enables
the hardening of this functions, and to define elevated permission/authentication
requirements for specific CryptoServer functions.
The signed configuration files are protected with a signature using an Alternative Module
Signature Key, and can only be loaded into the CryptoServer by a user with system
administrator permission (2 in the user group 6). Like this setting, changing or removing
additional security rules defined in a signed configuration file requires the same permissions
and protection as those for loading and changing the CryptoServer firmware.
The signed configuration files are supported for the CryptoServer-Series listed in the table
below, and starting with the given minimum versions of the firmware modules making this
functionality available:

Security Management
Page 59 of 222
Minimum versions of
required firmware
modules
CryptoServer-Series
CSe
Se
Se Gen2
SMOS
≥ 4.4.0.0
≥ 3.3.0.3
≥ 5.1.0.0
CMDS
≥ 3.2.0.2
≥ 3.2.0.2
≥ 3.2.0.2
ADM
≥ 3.0.12.0
≥ 3.0.12.0
≥ 3.0.12.0
Table 11: Firmware requirements for the support of signed configuration files
A signed configuration file is originally created as a configuration file with any file extension,
for example, *.cfg, *.txt. This configuration file is then signed with the Module Signature Key
or the Alternative Module Signature Key by using the csadm command SignConfig (see
chapter 5.9.8). The Alternative Module Signature Key is created by the customer outside the
CryptoServer and imported into it (by using the csadm commands GenKey and
LoadAltMdlSigKey). The .scf file is loaded into the CryptoServer with the csadm command
LoadFile. While loading it into the CryptoServer the signature of the .scf file is verified by the
ADM firmware module. After successful signature verification and before the signed
configuration file is stored on the CryptoServer's file system, the signature is replaced by a
SHA-512 hash value. On every startup this hash value is recalculated and compared with the
previously stored one, in order to check the integrity of the signed configuration file.
Syntax
The syntax of a signed configuration file is as follows:
■ Sections are defined as [Section name].
■ Global configuration items should be specified above the first section definition.
■ Configuration items are defined as combination of a key and a value:
<key> = <value_1>,<value_2>,…,<value_n>
Rules
■ Leading and trailing space characters are stripped on <keys> and <values>.
■ A <key> should not contain any space characters.
■ The character # should be used for commenting out a line.
■ Lines with an invalid syntax are ignored.
■ One [Section] should be used only once in the current configuration file.
■ A <key> should be used only once in the current [Section].

Security Management
Page 60 of 222
■ The <value> might be split over several lines which should end with a backslash "\".
Deleting and Replacing Signed Configuration Files
Signed configuration files are only deleted when:
■ Executing the csadm command Clear or as described in chapter 5.3 of the CryptoServer
Manual for System Administrators,
■ Loading a new firmware package into the CryptoServer (by using the csadm command
LoadPkg with parameter ForceClear or as described in chapter 5.5.1 of the CryptoServer
Manual for System Administrators)
■ Executing a Clear-to-Factory-Defaults by performing an External Erase as described in
chapter 5.4 of the CryptoServer Manual for System Administrators.
Signed configuration files cannot be deleted by using the csadm command DeleteFile, and
are not deleted when an alarm has occurred.
You can load a new signed configuration file into the CryptoServer with the csadm command
LoadFile. The existing one is then overwritten.
3.10.1 Sample Configuration File cmds_sample.cfg
Utimaco provides a sample configuration file cmds_sample.cfg on the SecurityServer 4.0
product CD in the folder
\Software\All_Supported_Operating_Systems\Administration. It contains a list of the
CryptoServer firmware modules, providing external interfaces, and their unique module IDs
(function code (FC)), as well as complete list of their external functions/interfaces
(subfunction codes (SFC)). You can use this sample configuration file as a basis for your own
configuration/signed configuration file. After editing the sample configuration file to fit to your
requirements, you should rename it to cmds.cfg so that it can be interpreted by the
CryptoServer.
You will find step-by-step instructions on how to create/edit, sign, load and activate your
configuration file in chapter 7.3.
3.10.2 Interface Hardening by Disabling Selected Functions
With release 4.0 of the SecurityServer product CD the CryptoServer software offers the
possibility to additionally secure the CryptoServer interfaces by disabling selected
CryptoServer functions. These functions have to be defined in the signed configuration file
cmds.scf.
For that purpose, the configuration file cmds_sample.cfg has to contain the dedicated
section [DiasableSFC] specifying which functions should be disabled. The syntax is as
follows:

Security Management
Page 61 of 222
[DiasableSFC]
<FC> = <SFC1>,<SFC2>,…,<SFCn>
or for better readability
<FC> = <SFC1>,\
<SFC2>,\
…,\
<SFCn>
FC is the function code (ID) of the firmware module, which is exactly three hex digits with
leading 0x, e.g., "0x012".
SFC is the specific decimal sub-function code (ID), specifying a function within a firmware
module, which is disabled. The SFCs do not have to be ordered numerically.
The disabled firmware module functions are listed during CryptoServer's startup in the Boot
Log in specific entries with the syntax
CMDS/DSOM: <FC> – disabled <SFC1> <SFC2> … <SFCn>.
For example, CMDS/DSOM: 0x083 – disabled 0 1 17 means that in the firmware module
CMDS (with function code FC = 0x83) the functions Echo (with SFC = 0), Reverse Echo (with
SFC = 1) and Set Maximum Authentication Failures (with SFC = 17) are disabled, and
cannot be used by external applications.
If you try to access a disabled CryptoServer function the following error message is returned
by the CryptoServer:
Error B0830061
This function is not available in this HSM configuration
See chapter 7.3 for step-by-step instructions on how to create/edit, sign, load and activate
your signed configuration file cmds.scf.
3.10.3 Configurable Role-based Access
With release 4.0 of the SecurityServer product CD the CryptoServer provides the possibility to
increase the necessary authentication level for selected CryptoServer functions, and thus, to
even further restrict the access to the system to users with customized roles/permissions.
The CryptoServer maximal possible authentication status that can be reached for selected
functions in the different user groups has been increased to 15 (0xF).
The increased permission level enabling specific users to execute specific functions can be
individually configured by the customer for the CryptoServer external functions with help of
the signed configuration file cmds.scf.
In order to do so the configuration file cmds_sample.cfg, has to contain a section
[Permissions] specifying the increased permissions required for specific functions in the
defined firmware modules. The syntax is as follows:
[Permissions]
<FC> = <SFC1>:<permissions>,<SFC2>:<permissions>,…,<SFCn>:<permissions>

Security Management
Page 62 of 222
or for better readability
[Permissions]
<FC> = <SFC1>:<permissions>,\
<SFC2>:<permissions>,\
…,\
<SFCn>:<permissions>
FC is the function code (ID) of the firmware module which is exactly three hex digits with
leading 0x, e.g., 0x012.
SFC is the decimal sub-function code and permissions is a hexadecimal number (maximum 8
bytes without leading 0x, e.g., FF00F000) denoting the permission in each of the eight user
groups as described in chapter 3.2.1,"Users". The SFCs do not have to be ordered numerically.
The permissions defined in the signed configuration file can only be used to extend the
permission required, by default, for the execution of the corresponding firmware module
function. For security reasons it is not possible to suspend the required default permissions
for the specified functions for external interfaces.
The signed configuration file cmds.scf is evaluated during startup, while all firmware modules
register with their FC and SFCs at the CMDS module. In case there is an entry for a given
firmware module, identified by its FC, found in the cmds.scf file, the reguired permissions for
each specified SFC are set according to that definition. The list of customized permissions
that are enforced after registration, is included in the audit log only if the log event "Startup
messages" is activated, as by default (see chapter 5.9.10 of the the CryptoServer Manual for
System Administrators). An entry in the Audit Log contains the following information:
<date> <time> <FC:0xXXX> <SFC:XX> Configured Permission=<permission>.
For example
16.12.2015 13:20:45 FC:0x068 SFC:17 Configured Permission=6F000000
During command execution, the currently reached authentication level for the CryptoServer
function, identified by its FC and SFC, is compared to the required permission in the
configuration file. If they are equal or no permission restrictions list exists for this module
(FC), the command is executed normally performing the default (unchanged) permissions
check for the command.
If the required customized permissions are not reached or in case the check of the default
permissions fails, the error message B0830001 permission denied is returned.
See chapter 7.3 for step-by-step instructions on how to create/edit, sign, load and activate
your signed configuration file cmds.scf.
3.10.4 List of External Firmware Functions
The following table is a list of the FC and SFC of all external firmware functions that can be
blocked, and the default permisions required for their execution, which might be increased on
demand.
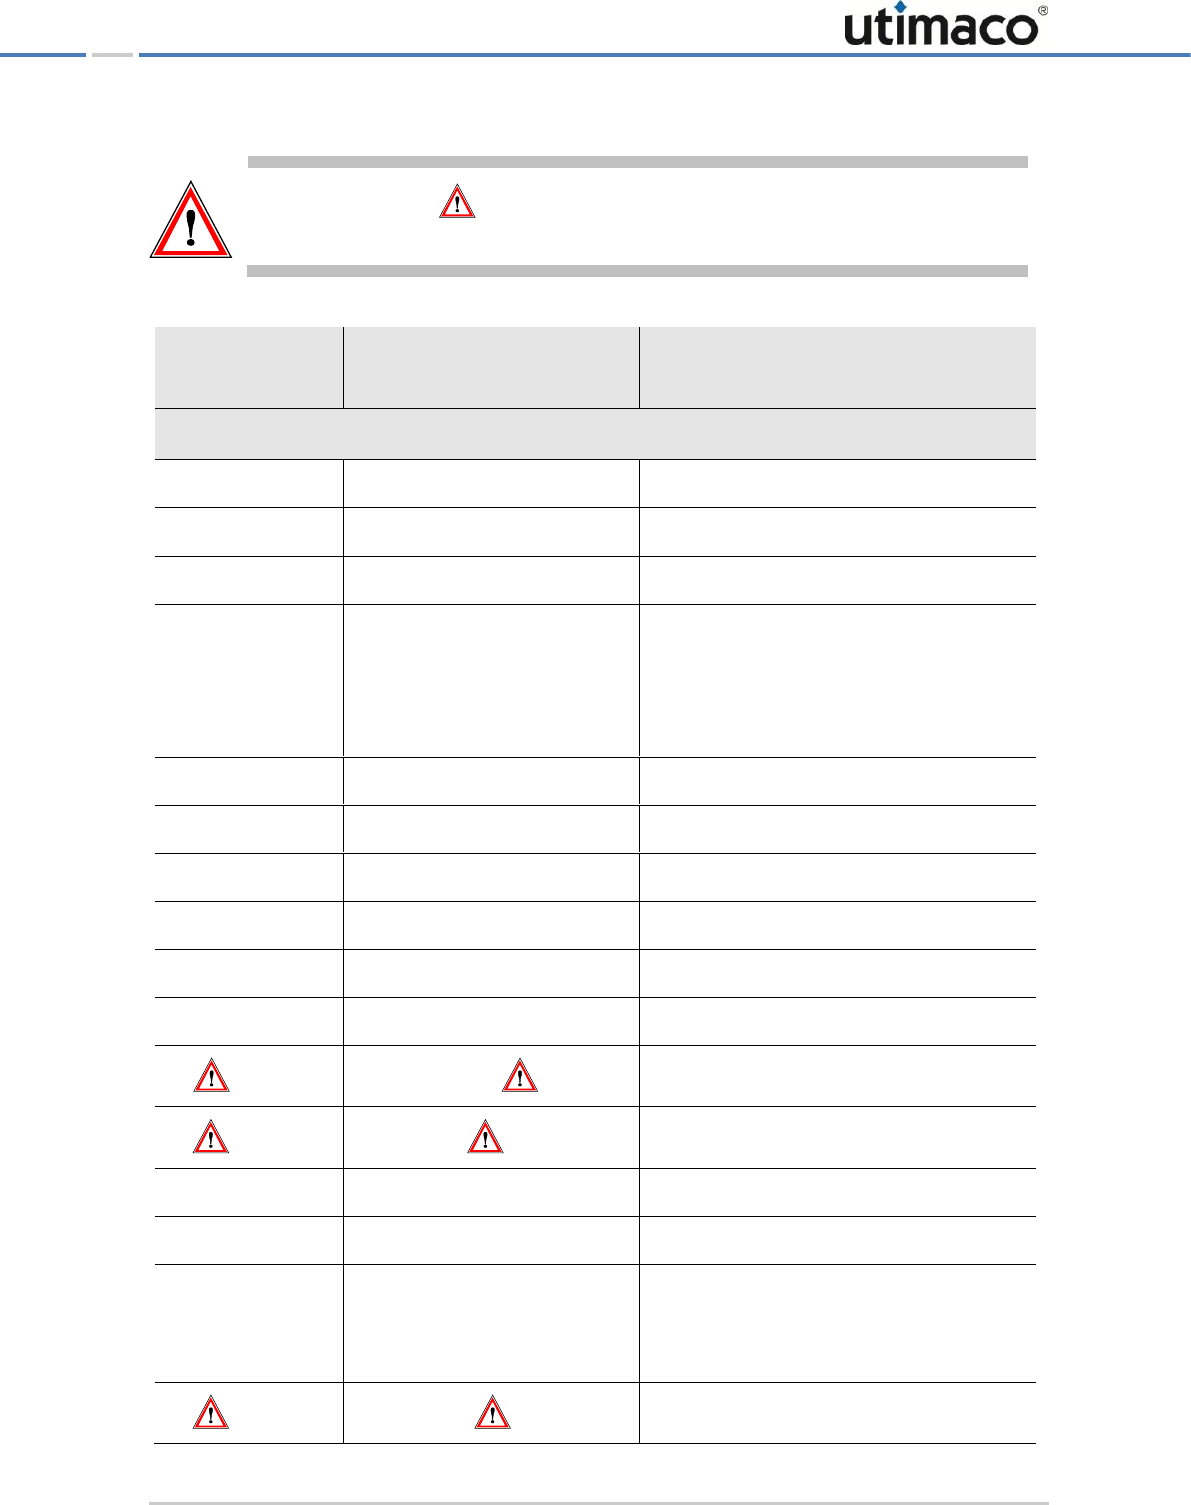
Security Management
Page 63 of 222
Functions denoted by should not be disabled in order to keep essential functionality
available.
Subfunction code
(SFC)
Function Name
Default Required Permissions
FC = 0x083 (Firmware Module CMDS)
0
Echo
00000000
1
Reverse Echo
00000000
2
List Registered Functions
00000000
3
Add User
■ 20000000
■ 21000000 required to create a user
with permission > 0 in the user group
6
4
List All Users
00000000
5
Delete User
20000000
6
Change User
20000000
7
Get Authentication State
00000000
8
Get Boot Log
00000000
9
List PIN Pad Applications
00000000
10
Get Session Key
00000000
11
End Session
00000000
12
Backup User
20000000
13
Restore User
20000000
14
Add User Extended
20000000
21000000 required to create a user with
permission > 0 in the user group 6
15
Get User Info
00000000

Security Management
Page 64 of 222
Subfunction code
(SFC)
Function Name
Default Required Permissions
17
Set Maximum Authentication
Failures
20000000
18
Get Maximum Authentication
Failures
00000000
19
Set Administration-Only Mode
02000000
20
Set Startup Mode
02000000
21
Get Startup Mode
00000000
FC = 0x068 (Firmware Module CXI)
0
Verify Genuineness
00000000
1
Get Info
00000000
2
Get Pers Key
00000000
5
Init Key Group
00000200
7
Generate DSA Param
00000002
8
Backup Key
■ 00000002 for backup of keys and
storage objects
■ 00000200 for backup of local
configuration objects
■ 20000000 for backup of global
configuration objects
9
Restore Key
■ 00000002 for restoring keys
■ 00000200 for restoring local
configuration objects
■ 20000000 for restoring global
configuration objects
10
List Keys
■ 00000002 lists keys and storage
objects
■ 00000200 lists local (group specific)
configuration objects
■ 20000000 lists the global
configuration object

Security Management
Page 65 of 222
Subfunction code
(SFC)
Function Name
Default Required Permissions
11
Generate Key
00000002
12
Open Key
■ 00000002 opens keys and storage
objects
■ 00000002, 00000200 or 20000000
required to open configuration objects
13
Delete Key
■ 00000002 for deleting keys
■ 00000200 for deleting configuration
objects assigned to a group
■ 20000000 for deleting global
configuration objects, not assigned to
a specific group
14
Get Key Prop
■ 00000002 on keys and storage
objects
■ 00000002, 00000200 or 20000000
on configuration objects
15
Set Key Prop
■ 00000002 for keys and storage
objects
■ 00000200 for local configuration
objects
■ 20000000 for global configuration
objects
16
Export Key
00000002
17
Import Key
00000002
18
Compute Hash
00000002
20
Crypt
00000002
21
Sign
00000002
22
Verivy
00000002
23
Generate Random
00000002
24
Agree Secret
00000002
25
Create Object (PKCS#11)
00000002
Security Management
Page 66 of 222
Subfunction code
(SFC)
Function Name
Default Required Permissions
26
Generate Key Pair (PKCS#11)
00000002
27
Copy Object (PKCS#11)
00000002
28
Derive Key (PCS#11)
00000002
29
Wrap Key (PKCS#11)
00000002
30
Unwrap Key (PKCS#11)
00000002
33
Add User (PKCS#11)
■ 20000000 on creation of an SO
■ 00000200 on creation of a User
34
Delete User (PKCS#11)
■ 20000000 on deletion of an SO
■ 00000200 on deletion of a User
35
Generate DSA Param PQ
00000002
36
Generate DSA Param G
00000002
FC = 0x087 (Firmware Module ADM)
0
Echo
00000000
1
Get State
00000000
2
List Files
00000000
3
Load File
■ 02000000
■ 22000000 is required to load the
auditlog.cfg and the
mdlsigalt.key file
4
Delete File
02000000
5
List Modules Active
00000000
6
Get Time
00000000
7
Set Time
02000000
10
Get Audit Log
00000000
11
Clear Audit Log
02000000 or 20000000
Security Management
Page 67 of 222
Subfunction code
(SFC)
Function Name
Default Required Permissions
14
Mem Info
00000000
18
Check Boot Code
00000000
19
Load Firmware Decrption Key
02000000
20
Reset Alarm
02000000 or 20000000
21
Clear
02000000
22
Set Time Rel
02000000
23
List DB Search Keys
22000000
24
Export DB Entry
22000000
25
Import DB Entry
22000000
26
Config Param Set
22000000
27
Config Param Get
00000000
28
Ram Mem Info
00000000
FC = 0x096 (Firmware Module MBK)
4
Generate MBK
02000000
5
Import MBK
02000000
6
List Keys
00000000
FC = 0x082 (Firmware Module PP)
0
Set/Get PIN Pad Type
00000000
FC = 0x09a (Firmware Module NTP)
1
Set Time delay
00000000
2
Change Activation State
00200000
3
Get Settings
00000000
4
Set Settings
00200000
5
Set Time
00200000
Table 12: List of firmware modules (FCs) and their external functions (SFCs)

The Batteries of CryptoServer/CryptoServer LAN
Page 68 of 222
4 The Batteries of CryptoServer/CryptoServer LAN
CryptoServer Se/CSe/Se-Series Gen2
The CryptoServer plug-in card is equipped with one battery - Carrier Battery - placed on its
carrier that ensures that the sensors of the hardware security module are always able to
function correctly, and that no security-critical information is lost or deleted, even if the
computer where the CryptoServer plug-in card is installed in, is switched off. If the device is
not used over a prolonged period, i.e., during storage or if the computer, where the device is
installed in, is turned off, the battery will have a durability of half a year at a minimum. If the
CryptoServer is permanently powered on, the battery is not discharged and the lifetime of the
battery increases.
For a step-by-step instructions how to exchange the carrier battery depending on the
CryptoServer series, read chapter 6, "Replacing the Battery" of the [CSCSe-OM], the [CSSe-OM]
or the [CSSe2-OM].
CryptoServer LAN Se/CSe/Se-Series Gen2
The CryptoServer LAN is equipped with two batteries to ensure that no security-critical
information is lost or deleted on the hardware security module when the device is switched
off, or if operation is interrupted due to a power failure.
■ The Carrier Battery is placed on the carrier of the integrated CryptoServer plug-in card.
If the CryptoServer plug-in card is not used over a prolonged period, i.e., during storage or
if the CryptoServer LAN, where it is installed in, is turned off, this battery will have a
durability of half a year at a minimum. If the CryptoServer is permanently powered on, the
battery is not discharged and the lifetime of the battery increases.
For a step-by-step instructions how to exchange the carrier battery depending on the
CryptoServer series, read chapter 6, "Replacing the Battery" of the [CSCSe-OM], the [CSSe-
OM] or the [CSSe2-OM].
■ The External Battery is located in the battery compartment of the CryptoServer LAN.
In this case the carrier battery is used only after the external battery is exhausted. The
CryptoServer LAN is always equipped with an external battery with a durability of 1.5 years
at a minimum.
For a step-by-step instructions how to exchange the external battery of the CryptoServer
LAN, read Chapter "Replacing the External Battery" of the [CSLAN4-OM] .
These batteries are not rechargeable.
The state of the batteries must be checked regularly.
In case both batteries are exhausted, an alarm is triggered and all sensitive data stored in
the CryptoServer is deleted.

Administration of CryptoServer with csadm
Page 69 of 222
5 Administration of CryptoServer with csadm
The CryptoServer Administration Tool (csadm) is a command-line utility designed for being
called from the command line or in a batch file. It offers functions either to execute
administrative commands on the CryptoServer (addressing the Bootloader, administration
module ADM or CMDS module) or the CryptoServer LAN. In addition, it contains utility
functions which are processed without a connection to a CryptoServer (for example,
preparation of firmware modules).
This chapter contains general information about installation requirements and installation of
the csadm tool. Additionally, it can be used as a detailed reference to all commands included
in csadm version 2.0.0.1 and higher, and their usage.
5.1 General
This chapter provides general information about requirements for the host computers where
csadm will be installed on, the csadm installation procedure on host computers running
Windows and Linux operating systems, and the csadm syntax rules in general.
5.1.1 System Requirements
The following requirements have to be fulfilled prior to the installation of csadm.
Hardware requirements (PC):
■ No special requirements as far as memory and CPU performance are concerned.
■ Network interface card to access CryptoServer LAN.
■ A free USB or serial port is needed to connect the PIN pad (smartcard reader with
keyboard and display).
Software requirements (OS):
You will find the list of all currently supported operating systems in the document
CS_PD_SecurityServer_Supported_Platforms.pdf on the SecurityServer product CD in
the folder …\Documentation\Product Details.
5.1.2 Installation of csadm
This chapter describes how to install csadm on a host computer. The csadm installation file is
provided on the SecurityServer product CD.

Administration of CryptoServer with csadm
Page 70 of 222
Installing csadm on a computer with a Windows operating system
On a host computer running a Windows operating system csadm is installed by default during
the installation of the CryptoServer software provided on the SecurityServer product CD. The
installation procedure of the CryptoServer host-software is described in detail in Chapter
"Installing the CryptoServer Host-Software" of the CryptoServer Manual for System Administrators.
The following steps describe how to install csadm on a Windows host-computer without
using the CryptoServer installer file, CryptoServerSetup_<version>.exe, provided on the
SecurityServer product CD.
You will find the csadm installation file for Windows, csadm.exe, on the SecurityServer
product CD here:
■ For Windows 32-bit operating systems
Software\Windows\x86-32\Administration\
■ For Windows 64-bit operating systems
Software\Windows\x86-64\Administration\
1. Copy the file csadm.exe to a well-chosen directory.
2. Add this directory to the PATH environment variable to be able to call the Administration
Tool from any other directory.
3. If you do not want to set the Dev= parameter with each execution of a csadm command: It
is possible to set an environment variable CRYPTOSERVER (e.g., with the value PCI:0)
which sets the CryptoServer address permanently (unless a Dev= parameter is explicitly
set for a specific command, see chapter 5.1.3).
Installing csadm on a computer with a UNIX like operating system
You will find the csadm installation file for UNIX-like operating systems, csadm, on the
SecurityServer product CD here:
■ For Linux 32-bit operating systems
Software\Linux\x86-32\Administration\
■ For Linux 64-bit operating systems
Software\Linux\x86-64\Administration\
1. Copy the executable file csadm to a well-chosen bin directory.
2. If you do not want to set the Dev= parameter with each execution of a csadm command. It
is possible to set an environment variable CRYPTOSERVER (e.g., with the value
/dev/cs2), which definesthe CryptoServer address permanently (unless a Dev= parameter
is explicitly set for a specific command, see chapter 5.1.3).
Administration of CryptoServer with csadm
Page 71 of 222
5.1.3 Syntax of csadm
The syntax of a csadm command is according to the following scheme:
csadm [Dev=...] <param1>[=...] <param2>[=...] ... <command1>[=...]
<command2>[=...] ...
Please note:
■ Parameters and commands are processed from left to right.
■ If a subsequent command requires to set a parameter or to run another command prior to
its own execution, it will have to be entered rightmost.
■ Expressions in squared brackets [ ] are optional.
■ In the syntax describing line of the individual command descriptions all parameters are
shown in angle brackets < > and are explained later.
■ Some parameters or commands require an assigned value (‘=...’), some do not.
■ Some commands use a default value if none is given (‘[=...]’).
Certain types of shell processes treat certain characters (commas, colons, semi-colons)
differently. If the execution of a csadm command fails with an error message from the shell
about an illegal parameter format, quoting parameter values may be necessary.
The following is an example for a correct csadm command entry in the Microsoft
PowerShell:
csadm [Dev=<device>] LogonSign="<user>,<keyspec>" <command>
Examples:
csadm dev=PCI:0 GetState
csadm dev=TCP:192.168.1.98
… LogonSign=ADMIN,d:\keys\cs2\ADMIN.key …
… LoadFile=c:\firmware\exmp.mtc
csadm dev=192.168.1.1 LogonPass=paul,ask
… AddUser=bob,00000002,hmacpwd,sma,ask
csadm dev=TCP:288@154.54.2.23 LogonSign=ADMIN,:cs2:cyb:COM2
... SetTime=20020602111532
Every command running on CryptoServer or CryptoServer LAN requires the device parameter
Dev= which sets the address of the CryptoServer or CryptoServer LAN. Commands running

Administration of CryptoServer with csadm
Page 72 of 222
locally without using a CryptoServer (like module preparation commands, see chapter 5.2.6)
do not need this parameter. Possible values are:
Device address
Description
/dev/cs2
Local CryptoServer No. 1 on a UNIX system
PCI:1
Local CryptoServer No. 2 on a Windows system
TCP:288@194.168.4.107
IP address and port number of a CryptoServer LAN
TCP:194.168.4.107
IP address of a CryptoServer LAN (default: port=288)
194.168.4.107
IP address of a CryptoServer LAN (default: protocol=TCP,
port=288)
TCP:288@cslan01
Host name and port number of a CryptoServer LAN (using DNS
request to resolve host name)
TCP:cslan01
Host name of a CryptoServer LAN (using DNS request to resolve
host name, default: port=288)
cslan01
Host name of a CryptoServer LAN (using DNS request to resolve
host name, default: protocol=TCP, port=288)
TCP:3001@127.0.0.1
Local CryptoServer simulator for Windows/Linux (SDK)
Table 13: Example values for the Device parameter
If the environment variable CRYPTOSERVER is set according to the above mentioned syntax,
the ‘Dev=’ parameter can be skipped (see also chapter 5.1.2).
Using the ‘Dev=’ parameter overrides the CRYPTOSERVER environment variable in any case
for the specific command.
5.1.4 Key Specifiers
Some of the csadm commands use a private or public RSA or ECDSA key to sign a command
or a file, or to verify a signature. The csadm can handle these keys in three different ways:
■ RSA/ECDSA keys stored in a keyfile *.key (as plain text)
■ RSA/ECDSA keys stored in an encrypted keyfile *.key (private key part stored encrypted,
public key part stored as plain text)
■ RSA/ECDSA keys stored on a smartcard.
Administration of CryptoServer with csadm
Page 73 of 222
If a command needs a public key, it can be read from a file or from a smartcard. If a command
needs a private key, it can either be read from a file, or a smartcard can be used to calculate
the signature. In the latter case the key will not be read out of the smartcard. A PIN has to be
entered via the PIN pad to enable the smartcard to generate signatures.
For security reasons private RSA or ECDSA keys should normally be used only from
smartcards or encrypted keyfiles. In a test environment, where the private key does not need
to be kept secret, it may be useful to store the keys in (plaintext) files.
Encrypted RSA keyfiles are protected by a 168-bit Triple-DES key that is derived from a
password with the SHA-256 hashing algorithm. Encrypted ECDSA keyfiles are protected by a
256 bit AES key that is derived from a password with the SHA-256 hashing algorithm. In both
cases the password can be changed with the ChangePassword command (see chapter 5.5.6).
With the same command a plaintext keyfile can be changed in an encrypted keyfile and vice
versa (by omitting the old respectively the new password).
Apart from test environments, it is strongly recommended to store private keys on
smartcards. Only in this case the private key will never leave the secure token and not be
used for calculations on the host.
For all commands that use RSA or ECDSA keys a key specifier is required in the command
syntax. A key specifier is either a name of a keyfile (*.key) or a smartcard specifier.
Keyfile Specifiers
In case that the private part of the key is needed for the command and is given in an
encrypted keyfile, the password of the keyfile has to be given in the command syntax, too.
This can be done by appending the password in cleartext (Example 1) directly after the
filename separated by a ‘#’ or by using a hidden password entry (Example 2):
Example1:
csadm LogonSign=ADMIN,c:\keys\myKey.key#sIlEnCe ResetAlarm
Example 2:
csadm LogonSign=ADMIN,c:\keys\myKey.key#ask ResetAlarm
If no password is given (or the password is replaced by the string 'ask'), hidden password
entry will be performed for encrypted keyfiles, which is strongly recommended.

Administration of CryptoServer with csadm
Page 74 of 222
Smartcard Specifiers
A smartcard specifier always starts with a colon and consists of three strings separated by
colons (for example, :cs2:cyb:USB0):
■ The first string identifies the type of the smartcard.
■ The second string identifies the type of the smartcard reader (PIN pad).
■ The last string is the name of the serial device or the USB device the reader is connected
to.
Currently, only the CryptoServer smartcards of type TC30 and JavaCard, with the identifier
cs2, are supported:
The following types of smartcard readers (PIN pads) are supported:
Smartcard Identifier
PIN pad Identifier
Smartcard reader type (PIN pad)
cs2
cyb
REINER SCT cyberJack
cjo
REINER SCT cyberJack One
cp8
Ingenico/Bull SafePad
Table 14: Supported PIN pads
Key specifier examples:
Key specifier
Description
C:\my_keys\myKey.key
Keyfile
:cs2:cyb:COM1
Key from a CryptoServer smartcard using a PIN pad REINER
SCT cyberJack connected to the seral port COM1 of a Windows
PC
:cs2:cyb:USBn
or
:cs2:auto:USBn
where n = {0, 1, 2, …}
Key from a CryptoServer smartcard using a PIN pad REINER
SCT cyberJack connected to a USB port of a Windows PC/Linux
machine
:cs2:cjo:USB0
Key from a CryptoServer smartcard using a PIN pad REINER
SCT cyberJack One connected to a USB port of a Windows
PC/Linux machine
Table 15: Examples for key specifiers
Administration of CryptoServer with csadm
Page 75 of 222
5.1.5 Password Entry
To authenticate a security-relevant administration command, an operator who uses a
password-based authentication mechanism (SHA-1-Hashed Password Authentication or HMAC
Password Authentication, see chapter 3.2.2.3) has to enter his user name and password to the
csadm tool (see chapter 5.3). At this and other opportunities it is possible to read the
password on the monitor which is connected to the PC on which csadm is running.
As from SecurityServer 4.01 SHA-1 hashed password is not supported as authentication
mechanism for new users. Existing users, who use a SHA-1 password to authenticate
themselves to the CryptoServer, can still do that.
To avoid the password being reflected as plaintext on the monitor, csadm offers the
possibility for hidden password entry.
For hidden password entry, instead of the password first the string ‘ask’ has to be entered.
Then, csadm will prompt for the password separately, before starting to process the
authentication (and the rest of the command).
Example:
csadm LogonPass=paul,ask SetTime=GMT
Enter Passphrase:
If now the password is entered over the keyboard, it is not reflected in clear text on the
monitor, but is replaced by default characters on the display.
The hidden password entry mechanism can also be used to protect the password of an
encrypted keyfile (see chapter 5.1.4) or the root password of the CryptoServer LAN from being
displayed on the monitor.
The usage of hidden password entry is strongly recommended.

Administration of CryptoServer with csadm
Page 76 of 222
5.1.6 Command Execution with the csadm Tool
If the CryptoServer is installed on the local computer (as a PCIe plug-in card) commands are
sent from the host to the CryptoServer via the PCIe interface. The CryptoServer processes the
command and sends the answer (answer data or error code) back to the host.
If the CryptoServer is part of a CryptoServer LAN, commands are sent from the host to the
CryptoServer via a TCP connection. Generally, the TCP server (daemon) running on the
CryptoServer LAN (csxlan) forwards incoming commands to the integrated CryptoServer, but
a few commands are responded by the CryptoServer LAN itself (for example, setting of the
TCP timeout).
The following figure shows how commands are executed on a local CryptoServer PCIe plug-in
card or on a remote CryptoServer LAN:
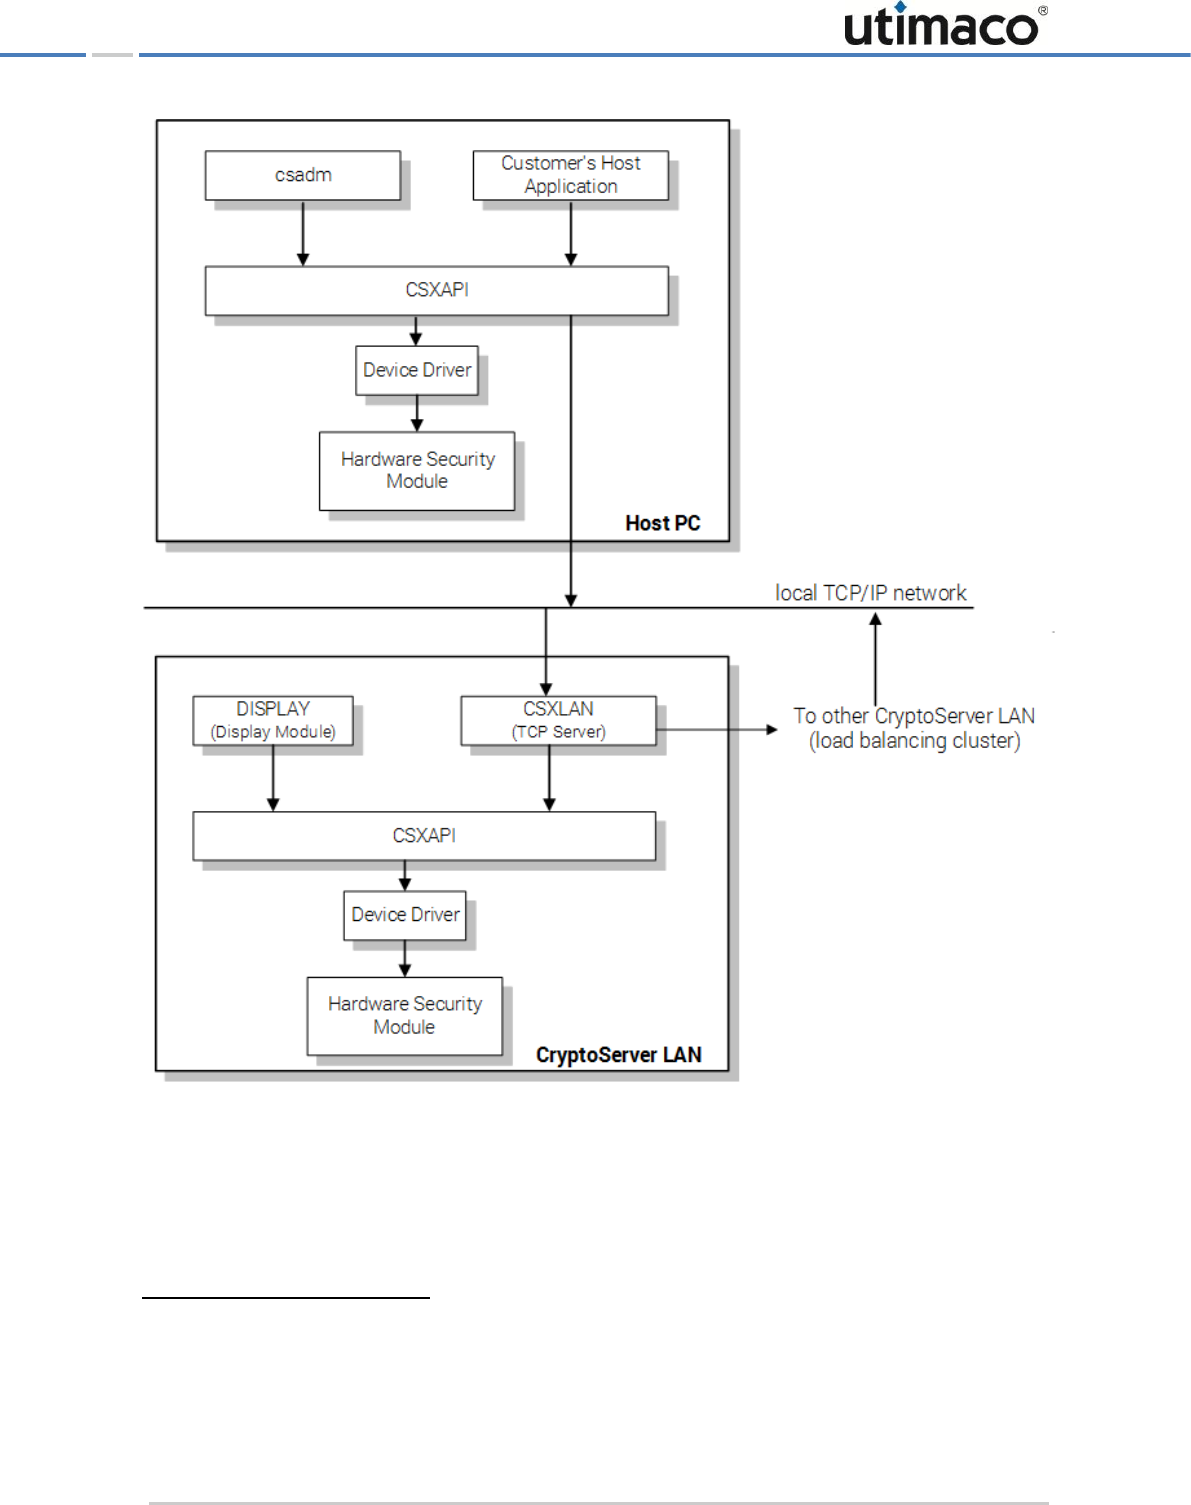
Administration of CryptoServer with csadm
Page 77 of 222
Figure 4: Command Execution
An application on the host PC can use the command execution library CSXAPI to execute any
command on a CryptoServer PCIe plug-in card or CryptoServer LAN.
8
8
CSXAPI (CryptoServer Extended Application Programming Interface) is a software running on the host (see Figure
1, Figure 2 and Figure 3) that has the task to generate a C-interface out of the external CryptoServer byte stream
interface.
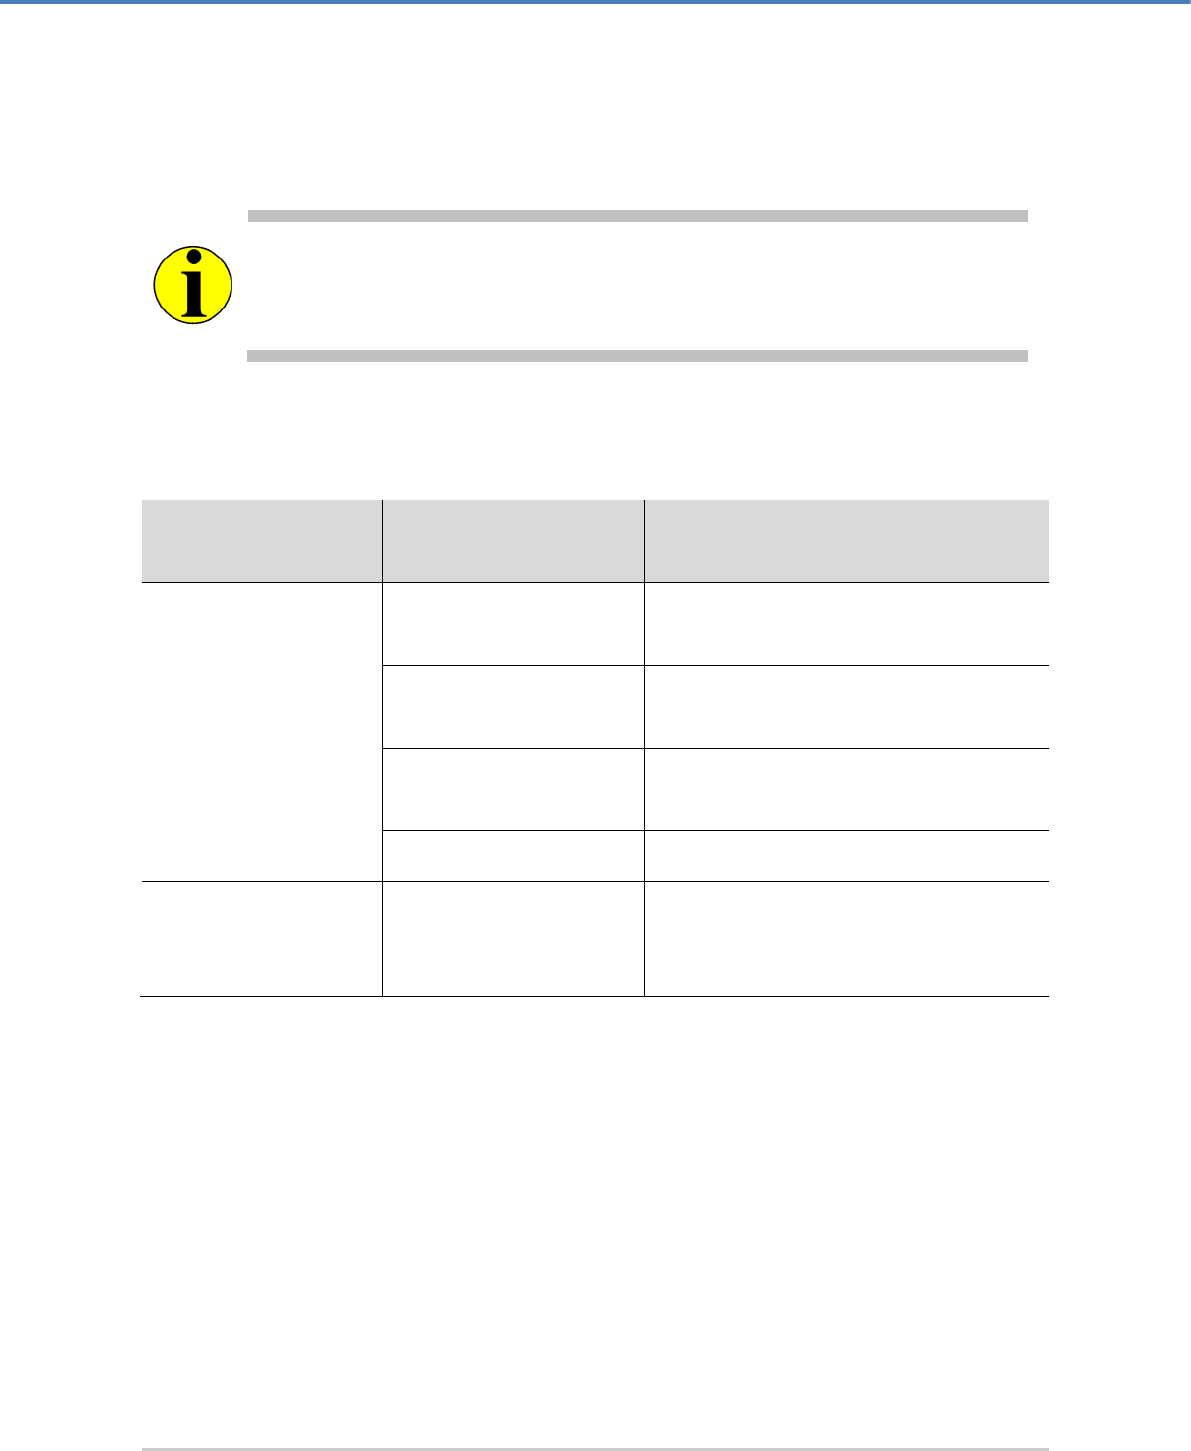
Administration of CryptoServer with csadm
Page 78 of 222
As a standard application the CryptoServer Administration Tool csadm provides any kind of
basic administration like file loading or deletion, setting the CryptoServer’s clock, user
management, etc. (see the following subchapters).
From the user’s point of view, it makes no difference whether he/she accesses a local
CryptoServer PCIe plug-in card or a remote CryptoServer LAN. The CryptoServer
Administration Tool csadm is able to send commands either to the local CryptoServer or to
the remote CryptoServer LAN (by choosing the appropriate device address).
Commands can be divided into the following groups:
Command Destination
Counterpart on the
CryptoServer
Command Group
CryptoServer
Command Scheduler
Module (CMDS)
authentication, user management
Administration Module
(ADM)
administration of CryptoServer card
MBK Management
Module (MBK)
management of Master Backup Keys
other firmware modules
project specific (not realized in csadm)
TCP Server of the
CryptoServer LAN
Control module of the
TCP Server (daemon)
csxlan
administration (configuration) of the
TCP Server (‘daemon’) csxlan
Table 16: csadm command groups
All csadm commands are described in detail in the following chapters.
5.2 Basic Commands
These basic commands are csadm internal functions.
For their execution no connection to the CryptoServer is established.

Administration of CryptoServer with csadm
Page 79 of 222
5.2.1 Help
If called without any parameter, this command shows a list of all available csadm commands
(except for deprecated and rarely used csadm commands, see below). If a command name is
given as a parameter, specific help will be provided.
Syntax
csadm Help
csadm Help=<command>
Parameter
<command>
specific csadm command
Example
csadm Help=ListFiles
Output
List File(s) from FLASH/SYS/NVRAM Directory
csadm ListFiles[=FLASH | SYS | NVRAM]
5.2.2 More
This command shows a list of the csadm commands which are used for the load preparation
of firmware modules.
Syntax
csadm More
Parameter
None
Example
csadm More
Output
The list of all rarely used csadm commands for firmware packaging, mostly used
by CryptoServer SDK customers who create individual firmware modules. These
commands are described in more detail in chapter 5.9.
5.2.3 PrintError
This command displays the corresponding error message text to an error code. The csadm
has a built-in list with all standard error messages of the CryptoServer, CryptoServer LAN, PCI-
Driver and Host-API (CSXAPI). Error messages for special customer application software are
not included in this list and therefore not displayed.

Administration of CryptoServer with csadm
Page 80 of 222
Syntax
csadm PrintError=<errorcode>
Parameter
<errorcode>
error code (hexadecimal)
Example
csadm PrintError=B901306F
Output
Error B901306F
CryptoServer API LINUX
can't get connection
errno = 111
5.2.4 StrError
This command displays the corresponding error message text to an error number (which
might be system specific).
Syntax
csadm StrError=<errornumber>
Parameter
<errornumber>
error number
Example
csadm StrError=7
Output
error message text to given error number
5.2.5 Version
This command shows the version numbers of the csadm tool and the included libraries.
Syntax
csadm Version
Output
csadm 2.0.1
csadm_lib (global) 3.0.0
csadm_lib (ADM section) 1.2.3
csadm_lib (AUDIT section) 1.1.2
csadm_lib (CSL section) 1.2.0
csadm_lib (MMC section) 2.3.1

Administration of CryptoServer with csadm
Page 81 of 222
csadm_lib (MTC section) 2.1.5
csadm_lib (SLF section) 1.0.5
csadm_lib (SCF section) 1.0.3
csadm_lib (AUTH/SM section) 1.4.0
csadm_lib (BL3 section) 1.0.5
csadm_lib (UTL section) 1.3.10
csadm_lib (PKG section) 1.5.0
csadm_lib (MBK section) 1.4.0
csadm_lib (SMC section) 1.0.9
csadm_lib (CLONE section) 1.0.5
csapi 1.8.7 (Apr 6 2016)
pp_api 1.3.2 (Mar 18 2016)
sl 1.1.3
yacl 1.7.12
yacl (VRSA section) 1.3.3
yacl (HASH section) 1.2.0
yacl (DES section) 1.0.2
yacl (ECC section) 1.1.1
yacl (AES section) 1.1.0
5.2.6 SetTimeout
With this command the maximum time that the driver waits for a response from the
CryptoServer can be changed for the subsequent commands.
Syntax
csadm [Dev=<device>] SetTimeout=<timeout> <commands>
Parameters
■ <device>
Device address of the CryptoServer or the CryptoServer LAN (see chapter 5.1.3
for some examplary values).
This parameter can be omitted if the device address has been set as the
CRYPTOSERVER environment variable.
■ <timeout>
new timeout to be set in milliseconds
■ <commands>
subsequent commands which should be executed with the new timeout
Example
csadm Dev=PCI:0 settimeout=10000 GetState
Administration of CryptoServer with csadm
Page 82 of 222
Output
default timeout: 600000 ms
chosen timeout: 10000 ms
The new timeout is valid for the current connection. Next time csadm is executed, the
deafult timeout=600000 ms will be used.
5.2.7 Cmd
The Cmd command provides a generic command interface. This makes it possible to send a
command as a byte stream to any firmware module without having (developed) a special tool
on the host PC.
Certain types of shell processes treat certain characters (commas, colons, semi-colons)
differently. If the execution of the csadm Cmd command fails with an error message from
the shell about an illegal parameter format, quoting parameter values may be necessary.
An example for the Microsoft PowerShell:
csadm [Dev=<device>] LogonSign="<user>,<keyspec>" Cmd="0x87,0x05,1,2,3"
Syntax
csadm [Dev=<device>] [<Authentication>]
…Cmd=<fc>,<sfc>,<byte_n>,...
Parameter
■ <device>
device address of the CryptoServer or the CryptoServer LAN (see chapter 5.1.3
for some examplary values).
This parameter can be omitted if the device address has been set as the
environment variable CRYPTOSERVER.
■ <fc>
function code (module ID of the firmware module)
(can be either in hexadecimal format 0x00, ..., 0x3FF or in decimal format 0, ...,
1023)
■ <sfc>
sub function code (number of the called function)
(can be either in hexadecimal format 0x00, ..., 0xFF, or in decimal format 0, ...,
255)
Administration of CryptoServer with csadm
Page 83 of 222
■ <byte_n>
nth data byte (dependent on the command)
(can be either in hexadecimal format 0x00, ..., 0xFF or in decimal format 0, ...,
255)
Authentication
depending on the command
Example
csadm Dev=PCI:0 LogonPass=paul,ask
Cmd=0x123,0x05,1,2,3,4,5,6,7,8
Output
depending on the command
Although in theory it is possible to send commands of up to 256 kB to the CryptoServer
using Cmd=, there is a restriction in praxis by the maximal command line length that can be
entered if running the csadm tool on a Windows system. If a longer command byte stream
shall be executed, use the CmdFile command as described in chapter 5.2.8.
5.2.8 CmdFile
The CmdFile command provides a generic command interface. Unlike the Cmd command it
reads the input data from a file. The length of the command contained in the file may be up to
256 kBytes.
This file may contain the following characters and strings:
Character
Name
Description
#
hash sign
rest of line is comment
,
comma
separator
space
separator
TAB
tabulator
separator
CRLF
new line
separator
hex
tag
interpret all values as hexadecimal from now on, even if ‘0x’ is
omitted
dec
tag
return to normal mode (i.e., hexadecimal interpretation requires a
leading ‘0x’)
"..."
string
string which can reach the end of the line
Table 17: Characters and strings allowed in a command file

Administration of CryptoServer with csadm
Page 84 of 222
Example:
#
# demo command file
#
0x123 # function code / module ID
0x05 # sub function code
0x00,0,0x00,11 # hexadecimal and decimal notation may be mixed
“Hello World” # strings are framed with quotation marks
hex 0F,1E,2D,3C,4B,5A,60,59 # leading hex-tag allows omitting of ‘0x’!
68,77,86,95,A4,B3,C2,D1 # still understood as hexadecimal values
dec # return to normal notation
11,22,33 # decimal values
Syntax
csadm [Dev=<device>] [<Authentication>] CmdFile=<file>
Parameters
■ <device>
device address of the CryptoServer or the CryptoServer LAN (see chapter 5.1.3
for some examplary values).
This parameter can be omitted if the device address has been set as the
environment variable CRYPTOSERVER.
■ <file>
file (name and extension of the file do not matter)
Authentication
depending on the command
Example
csadm LogonPass=paul,swordfish CmdFile=demo.cmd
Output
depends on the command
5.2.9 CSterm
This command retrieves messages from a serial port and displays them on the screen. It can
be used instead of a terminal program to view the log output generated by the CryptoServer at
startup (see chapter 2.2.4.4). The correct interface parameters (115200 baud, 8 bit, no parity)
are set automatically.
This command is executed locally without sending commands to a CryptoServer. It just
listens to a serial port.
Syntax
csadm CSterm=<port>
Administration of CryptoServer with csadm
Page 85 of 222
Parameter
<port>
serial port of the computer (for example, COM1 or /dev/ttyS0)
Example
csadm CSterm=COM1
Output
messages read from the serial port
The serial port of the CryptoServer Se or of the USB-To-Serial Adapter has to be connected
to a serial port of the computer where the csadm tool is running.
5.2.10 Sleep
The Sleep command delays the further command processing by the time given.
Syntax
csadm Sleep=<time> <commands>
Parameter
■ <time>
time delay in seconds
■ <commands>
further command whose execution should be delayed by the given time
Example
In the following example a delay of 3 seconds is inserted between the execution of
the StartOS and the GetState commands.
csadm StartOS Sleep=3 GetState
Output
None
5.2.11 ConnTimeout
With this command the CryptoServer connection timeout can be changed for the subsequent
commands. The new timeout is valid for the current connection. Next time csadm is executed,
it will use the default connection timeout setting.
Syntax
csadm [Dev=<device>] ConnTimeout=<timeout> <commands>
Parameters
■ <device>
Device address of the CryptoServer or the CryptoServer LAN (see chapter 5.1.3
for some examplary values);
Administration of CryptoServer with csadm
Page 86 of 222
This parameter can be omitted if the device address has been set as the
CRYPTOSERVER environment variable.
■ <timeout>
new connection timeout to be set in milliseconds
■ <commands>
subsequent commands which should be executed with the new connection
timeout
Example
csadm dev=3001@127.0.0.1 conntimeout=10000 GetState
Output
None
5.3 Commands for Authentication
The CryptoServer provides a variety of command authentication mechanisms. See chapter
3.2.2 for a detailed explanation of the authentication concept.
Most pre-defined security-relevant commands require the authentication level 2 in a specific
user group. Since each user usually has only permission 1 in one or more user groups (apart
from the pre-defined user ADMIN who has permission 2 in the user groups 7 and 6, i.e., for the
user management and for the administrative commands), this means that two users of the
specific user group are necessary to authenticate the command. For this reason, the specific
command requires authentication according to the two-person rule, i.e., authentication by two
independent users is required for the command to be executed.
If a command requires multi-user authentication according to the n-person rule (n=1...16), all
n users have to apply their authentication prior to command execution:
csadm <Authentication_1> <Authentication_2> … <Authentication_n> <command>
The users may even use different authentication mechanisms.
Example:
csadm LogonSign=roberta,:cs2:cyb:USB0 LogonPass=paul,ask DeleteFile=example.mtc
The authentication commands LogonSign (described in chapter 5.3.1) and LogonPass
(described in chapter 5.3.2) do not only perform command authentication, but provide also a
Secure Messaging session for the protection of the confidentiality of the command data.
In the following chapters the syntax of all authentication mechanisms is explained. These
authentication commands (leading to the necessary authentication status) can be inserted for
Administration of CryptoServer with csadm
Page 87 of 222
the placeholder <Authentication> which are given in the syntax of all security relevant
commands described in the current chapter.
Certain types of shell processes treat certain characters (commas, colons, semi-colons)
differently. If the execution of a csadm command fails with an error message from the shell
about an illegal parameter format, quoting parameter values may be necessary.
5.3.1 LogonSign
With this command a user with signature-based authentication mechanism (i.e.,
authentication mechanism RSA Signature, ECDSA Signature or RSA Smartcard) opens an
authenticated Secure Messaging session for the given command. The session key (32 bytes
AES) is generated by using the Diffie-Hellman key agreement (according to [PKCS#3]).
The authenticated Secure Messaging session is automatically closed after the command
execution and csadm ends.
For any further csadm command which needs authentication and/or confidentiality a new
authenticated Secure Messaging session has to be opened.
Syntax
csadm [Dev=<device>] … LogonSign=<user>,<keyspec> [<further
Authentication>] <command>

Administration of CryptoServer with csadm
Page 88 of 222
Parameters
■ <device>
Device address of the CryptoServer or the CryptoServer LAN (see chapter 5.1.3
for some examplary values);
This parameter can be omitted if the device address has been set as the
CRYPTOSERVER environment variable.
■ <user>
user name
■ <keyspec>
Key specifier where the private part of the user’s authentication key should be
loaded from (key specifier of smartcard or keyfile, see chapter 5.1.4)
▣ smartcard specifier: for example, :cs2:cyb:USB0
▣ Storage location and name of the keyfile (*.key)
In case of an encrypted keyfile: *.key[#<password>] where <password>
is the password used for protecting the keyfile. It might be entered:
□ in clear text, for example, MyKey.key#mypwd or
□ as string ask for hidden password entry, for example, MyKey.key#ask
(see also chapter 5.1.5).
■ <command>
command which has to be authenticated
Examples
csadm LogonSign=paul,:cs2:cyb:USB0 DeleteFile=example.mtc
csadm LogonSign=paul,E:\myKeys\myRSA.key#ask
LogonPass=pauline,ask DeleteFile=example.mtc
Output
None on success, or error message
If the private part of the user’s authentication key is stored on a smartcard, the user will be
prompted at the PIN pad to insert his smartcard and enter the PIN. The PIN pad has to be
connected to the computer where the csadm tool is running (serial line or USB).
A user with RSA Smartcard authentication mechanism is prompted at the PIN pad to insert
her/his smartcard and enter the PIN. The PIN pad has to be connected directly to the serial
line COM2 of the CryptoServer device.
5.3.2 LogonPass
With this command a user with password-based authentication mechanism (i.e.,
authentication mechanism Clear Password, SHA-1 hashed Password or HMAC Password)
opens an authenticated Secure Messaging session for the given command. The session key
(32 bytes AES session key) is generated using the Diffie-Hellman key agreement (according to
[PKCS#3]).

Administration of CryptoServer with csadm
Page 89 of 222
The authenticated Secure Messaging session is automatically closed after command
execution and/or when csadm is closed.
For any further csadm command which needs authentication and/or confidentiality a new
authenticated Secure Messaging session has to be opened.
Syntax
csadm [Dev=<device>] LogonPass=<user>,<password> ...
[<further Authentication>] <command>
Parameters
■ <device>
Device address of the CryptoServer or the CryptoServer LAN (see chapter 5.1.3
for some examplary values);
This parameter can be omitted if the device address has been set as the
CRYPTOSERVER environment variable.
■ <user>
user name
■ <password>
user password
▣ String ask if hidden password entry should be used (see chapter 5.1.5). The
usage of hidden password entry is strongly recommended. In this case
csadm requests password input (Enter Passphrase:) and does not
echo the input.
▣ User password entry in plain text
■ <command>
command which has to be authenticated
Examples
csadm LogonPass=paul,swordfish DeleteFile=example.mtc
csadm LogonPass=paul,ask LogonPass=paula,ask DeleteFile=
example.mtc
Output
None on success, or error message
5.3.3 ShowAuthState
This command displays the current authentication status on the CryptoServer and a list of the
users who are currently logged on to the CryptoServer.
The authentication status is displayed as the sum of permissions of all users, who are
currently logged on to the CryptoServer. For the meaning of the authentication status, see
chapter 3.2.2.
Administration of CryptoServer with csadm
Page 90 of 222
Syntax
csadm [Dev=<device>] <Authentication> ShowAuthState
Parameter
<device>
device address of the CryptoServer or the CryptoServer LAN (see chapter
5.1.3 for some examplary values).
This parameter can be omitted if the device address has been set as the
environment variable CRYPTOSERVER.
Authentication
Depends on the specific user’s authentication mechanism: LogonSign or
LogonPass described in the previous chapters.
Example
csadm Dev=10.1.7.1 LogonSign=Adm1,:cs2:cyb:USB0
LogonPass=Adm2,ask ShowAuthState
Output
current AUTH state: 23000000
user: Adm1, Adm2
5.3.4 GetHSMAuthKey
This command has been first introduced with the csadm tool provided on the SecurityServer
and CryptoServer SDK product CD 4.10. The use of the
GetHSMAuthKey
command
requires that at least version 3.5.3.x of the firmware module CMDS has been loaded on the
CryptoServer and successfully initialized.
The GetHSMAuthKey command retrieves the public part of the HSM Authentication Key which
is used for the establishment of a mutually authenticated Secure Messaging session for the
communication between the CryptoServer and the host applications.
Syntax
csadm [Dev=<device>] GetHSMAuthKey
Parameter
<device>
Device address of the CryptoServer or the CryptoServer LAN (see chapter 5.1.3 for
some exemplary values);
This parameter can be omitted if the device address has been set as the
CRYPTOSERVER environment variable.
Authentication
None
Example
csadm Dev=10.1.7.1 GetHSMAuthKey
Output
<Serial number of the CryptoServer plug-in card>=<public part of the HSM
Authentication Key mixed with other CryptoServer internal data>

Administration of CryptoServer with csadm
Page 91 of 222
The serial number of the CryptoServer plug-in card is in format CS<XXXXXX>.
CS505156=AC5D8198246C4FF407F7E11B4E53C4AFF326BDF350FF531CB26
E0A250DA7CD5C0AE06C69CA8846D75102B80C3D59E06C6CC98130D27EA26
0CB0836A486EBE5A29A288EDFFCA4307A6F3A9EF0549D343FDAB57012502
050BC40AF8A71F41
914402DE917427D976DB719802BFECA96FCCABEF32A7EF79296A4B5C79D3
0FC545A6C7ACE585B48890E243BC9A664E58E9992969DA1A234581083A18
C62DB9FEB3B05BB29E4E68C282220DF3939120F125AEC9F6D9533C8A9BC3
C890433B218444C81A1379A671DEDF92273E6128
2B345E23ECE82AF964E96BD4681678A59077C1CE5F17A58D620D72FE845F
B68D249BA7E25D924A98269E050D57F4558A29B6BCDE07C30D6914BF6A06
DF5FE9014C8AF3BE1040A96B36D3583976D180520DAF994E3A0A9C9D5DEE
836F1ACD606A3B8FAD186ED6AC0FC34C974FCCB5
194F87EB3971F8A8DF728B02ECC2F21ECA4BCB71748435540EF92EDE0A69
CA74E070D38857661D63538C64C4169F6EEE972D0B455734F40435B7B927
BFF8982F5AD3C998D304D
If an alarm has occured on the CryptoServer, the execution of the GetHSMAuthKey command
fails with an error message.
For enabling the mutual authentication some additional steps are required as described in
chapter 7.4 of this manual.
5.4 Commands for Administration
In this chapter the commands for the administration of the CryptoServer device are described,
like status requests, alarm treatment and audit management.
The CryptoServer has to be either in Operational Mode or in Maintenance Mode.
Some of the commands have to be authenticated (for example, LoadFile), some do not (for
example, ListFiles).
Command authentication is based on a sophisticated user management concept, which
allows the creation of various users with different permissions, authentication mechanisms
and other properties. For a detailed description of the possible authentication mechanisms
and the user concept see chapter 3.2.2. The commands for user management can be found in
chapter 5.6.
Although command authentication is implemented in a very generic way, the way a command
has to be authenticated depends on the user, i.e., on his/her special authentication
mechanism. Therefore, (in this and the following chapters) the description of the command
syntax for commands in Operational Mode, which have to be authenticated, does not specify
each possibility of authentication. Instead, a placeholder (<Authentication>) is inserted, and
the command example shows one possibility of authenticating the command.
Administration of CryptoServer with csadm
Page 92 of 222
If the syntax of one of the commands described in the following chapters contains the
placeholder <Authentication>, it has to be replaced by one or more authentication
commands according to the required authentication status and depending on the specific
user’s permissions and authentication mechanism.
The exact syntax of the authentication commands (LogonSign, LogonPass) can be found in
chapter 5.3.
Certain types of shell processes treat certain characters (commas, colons, semi-colons)
differently. If the execution of a csadm command fails with an error message from the shell
about an illegal parameter format, quoting parameter values may be necessary.
5.4.1 GetState
This command returns the status of the CryptoServer (see chapter 3.1), its temperature, alarm
state, hardware information and set-up information.
The GetState command is responded by the CryptoServer in any mode (Bootloader,
Maintenance Mode as well as Operational Mode) and therefore should be executed as first
diagnostic measure in case of problems.
Please prepare the output of GetState in case of a support request.
Syntax
csadm [Dev=<device>] GetState
Parameter
<device>
Device address of the CryptoServer or the CryptoServer LAN (see chapter 5.1.3 for
some examplary values);
This parameter can be omitted if the device address has been set as the
CRYPTOSERVER environment variable.
Authentication
None
Output
Example 1:
mode = Operational Mode – Administration-Only
state = INITIALIZED (0x00100004)
temp = 39.8 [C]
alarm = OFF
bl_ver = 4.00.1.3 (Model: CSe-Series)

Administration of CryptoServer with csadm
Page 93 of 222
hw_ver = 4.00.3.0
uid = b0000011 0c310101 | 1
adm1 = 43536531 30202020 43533539 30303032 | CSe10 CS590002
adm2 = 5554494d 41434f20 43533539 30303032 | UTIMACO CS590002
adm3 = 494e5354 414c4c45 44000000 00000000 | INSTALLED
Example 2:
mode = Operational Mode
state = INITIALIZED (0x08100004)
temp = 39.8 [C]
alarm = OFF
bl_ver = 4.00.1.3 (Model: CSe-Series)
hw_ver = 4.00.3.0
uid = b0000011 0c310101 | 1
adm1 = 43536531 30202020 43533539 30303032 | CSe10 CS590002
adm2 = 5554494d 41434f20 43533539 30303032 | UTIMACO CS590002
adm3 = 494e5354 414c4c45 44000000 00000000 | INSTALLED
Example 3:
mode = Maintenance Mode
state = INITIALIZED (0x000a7f84)
temp = 39.8 [C]
alarm = ON
sens = 027f
- Alarm has occurred
- external Erase is executed
bl_ver = 4.00.1.3 (Model: CSe-Series)
hw_ver = 4.00.3.0
uid = b0000011 0c310101 | 1
adm1 = 43536531 30202020 43533539 30303032 | CSe10 CS590002
adm2 = 5554494d 41434f20 43533539 30303032 | UTIMACO CS590002
adm3 = 494e5354 414c4c45 44000000 00000000 | INSTALLED
The displayed fields have the following meaning:

Administration of CryptoServer with csadm
Page 94 of 222
Field
Description
state
Operating state of the CryptoServer (should be INITIALIZED - see also chapter
3.1):
■ MANUFACTURED
This state is only relevant during production process
■ INITIALIZED
Firmware modules and all system keys (Production Key, Module Signature
Key, default Administrator Key (ADMIN.key)) are loaded.
■ DEFECT
CryptoServer is defect – please contact the manufacturer/Utimaco
mode
Operating mode of the CryptoServer (see also chapter 2.2.5 for firther details):
■ Operational
The regular set of firmware modules (*.msc) is started. All administration
and cryptographic functions are available.
■ Operational Mode – Administration-Only
The regular set of firmware modules (*.msc) is started. All administration
functions are available. All cryptographic functions are blocked.
■ Maintenance
Backup set of firmware modules (*.sys) is started (e.g., in alarm state)
■ Bootloader
Bootloader is running (operating system and regular set of firmware
modules have not been started yet)
temp
Temperature of the CryptoServer.
Please find detailed information about the CryptoServer's behavior depending on
its internal temperature in chapter 3.6 of this manual.
alarm
Can be either ON or OFF
If ON (see also chapter 3.4) the following reasons are possible and shown in case
of an alarm state:
■ Power is too low (empty battery)
■ Power is too high
■ Temperature too high (> 66°C)
■ Temperature too low (< -13 °C)

Administration of CryptoServer with csadm
Page 95 of 222
Field
Description
■ Outer foil is broken9
■ Inner foil is broken9
■ External Erase is executed (manually by a short-circuit of the corresponding
pins on the PCIe plug-in card)
■ Invalid/Corrupted Master Key
■ Communication to Sensory Controller failed
In addition it is shown if the alarm reason is still present or if it has been
removed in the meantime (for example, empty battery has been replaced).
bl_ver
Version of the Bootloader
hw_ver
Version of the hardware for the CryptoServer CSe-Series and CryptoServer Se-
Series Gen2.
Not available for CryptoServer Se-Series
UID
Unique ID of the CryptoServer (as a hardware property)
adm1
Unique serial number of the CryptoServer PCIe plug-in card which is assigned
during the production process by the manufacturer Utimaco IS GmbH.
adm2
Field is assigned during the production process by the manufacturer Utimaco IS
GmbH. This field may be empty.
adm3
Field is assigned during the production process by the manufacturer Utimaco IS
GmbH. For CryptoServer Se-Series, Se-Series Gen2 and CSe-Series, the value
INSTALLED is recorded here.
Table 18: Meaning of the information fileds output by the GetState command
5.4.2 SetAdminMode
This command enables the CryptoServer to switch temporarily between the normal
Operational Mode and the restricted Operational Mode – Administration-Only without being
restarted. In Operational Mode – Administration-Only only functions needed for the CryptoServer
administration are available, and all cryptographic functions are blocked.
The SetAdminMode command can only be executed if the CryptoServer is currently operating
in either Operational Mode or Operational Mode –Administration-Only. It cannot be executed if
the CryptoServer is currently in Maintenance Mode.
9
This alarm is only relevant for CryptoServer CS- and CSe-Series.
Administration of CryptoServer with csadm
Page 96 of 222
The operating mode set with this command is only relevant until the next time the
CryptoServer is restarted. To define the restricted Operational Mode – Administration-Only
This command can only be executed with csadm version 1.9.0 or higher on CryptoServer all
series, and with CMDS firmware module version 3.3.0.0 or higher.
Syntax
csadm [Dev=<device>] SetAdminMode=<mode>
Parameter
■ <device>
Device address of the CryptoServer or the CryptoServer LAN (see chapter 5.1.3
for some examplary values);
This parameter can be omitted if the device address has been set as the
CRYPTOSERVER environment variable.
■ <mode>
▣ 1 – Sets the CryptoServer operating mode to restricted Operational Mode –
Administration-Only. All cryptographic services are disabled.
▣ 0 – Sets the CryptoServer operating mode back to Operational. The
complete functional interface of the CryptoServer can be used again.
Authentication
This command should be authenticated by one or more users with system
administrator permissions, i.e., min. required permission 2 in the user group 6
(02000000).
Example
Switch the CryptoServer's operating modetemporariliy to restricted Opeartional Mode
– Administration-Only
csadm Dev=PCI:0 LogonSign=adminUsr,:cs2:cyb:USB0
SetAdminMode=1
Output
None on success, or error message (see the document CryptoServer Error Reference
provided on the SecurityServer product CD in the \Documentation\Error
Reference folder)
5.4.3 SetStartupMode
With this command you can disable the automatic activation of CryptoServers's
cryptographic interfaces. The CryptoServer starts, by default, in Operational Mode, which
means without any restrictions on the cryptographic functions.
The SetStartupMode command defines the operating mode of the CryptoServer – either
Operational Mode or Operational Mode – Administration-Only - after a restart has been executed.
Administration of CryptoServer with csadm
Page 97 of 222
This command can only be executed with csadm version 1.9.0 or higher on CryptoServer all
series, and with CMDS firmware module version 3.3.0.0 or higher.
Syntax
csadm [Dev=<device>] SetStartupMode=<mode>
Parameters
■ <device>
Device address of the CryptoServer or the CryptoServer LAN (see chapter 5.1.3
for some examplary values);
This parameter can be omitted if the device address has been set as the
CRYPTOSERVER environment variable.
■ <mode>
▣ 1 – After a restart the CryptoServer starts in Operational Mode –
Administration-Only. All cryptographic functions are disabled.
▣ 0 – After a restart the CryptoServer starts in Operational Mode, and all
cryptographic functions are available again.
Authentication
This command should be authenticated by one or more users with system
administrator permissions, i.e., min. required permission 2 in the user group 6
(02000000).
Example
csadm Dev=PCI:0 LogonSign=adminUsr,:cs2:cyb:USB0
SetStartupMode=1
Output
None on success, or error message (see the document CryptoServer Error Reference
provided on the SecurityServer product CD in the \Documentation\Error
Reference folder)
5.4.4 GetStartupMode
This command displays the operating mode – Operational or Operational Mode –
Administration-Only - in which the CryptoServer will boot after the next restart (evtl. previously
set with the GetStartupMode command). For details about the operating modes of the
CryptoServer see chapter 2.2.5 in this manual.
■ If Operational Mode is displayed this implies that the full functional interface of the
CryptoServer will be available after a restart.
■ If Operational Mode – Administration-Only is displayed this implies that the cryptographic
interface of the CryptoServer will be deactivated after a restart, and only administration
services will be available. To make the full functional interface of the CryptoServer
Administration of CryptoServer with csadm
Page 98 of 222
temporarily available again, without restaring the CryptoServer, use the command
SetAdminMode described in chapter 5.4.2.
This command can only be executed with csadm version 1.9.0 or higher on CryptoServer all
series, and with CMDS firmware module version 3.3.0.0 or higher.
Syntax
csadm [Dev=<device>] GetStartupMode
Parameter
<device>
Device address of the CryptoServer or the CryptoServer LAN (see chapter 5.1.3 for
some examplary values);
This parameter can be omitted if the device address has been set as the
CRYPTOSERVER environment variable.
Authentication
None
Example
csadm Dev=PCI:0 GetStartupMode
Output
on success:
■ Operational Mode (0)
■ Operational Mode – Administration-Only (1)
Otherwise, an error message is returned (see the document CryptoServer Error
Reference provided on the SecurityServer product CD in the
\Documentation\Error Reference folder)
5.4.5 GetBattState
This command shows the state of the two CryptoServer batteries – the Carrier Battery and the
External Battery. The state ‘low’ indicates that the battery should be renewed as soon as
possible to avoid a power low alarm.
The External Battery is only relevant for a Cryptoserver LAN.
Syntax
csadm [Dev=<device>] GetBattState
Administration of CryptoServer with csadm
Page 99 of 222
Parameter
<device>
Device address of the CryptoServer or the CryptoServer LAN (see chapter 5.1.3 for
some examplary values);
This parameter can be omitted if the device address has been set as the
CRYPTOSERVER environment variable.
Authentication
None
Example
csadm Dev=PCI:0 GetBattState
Output
Carrier Battery: ok (3.055 V)
External Battery: absence
For a CryptoServer PCIe plug-in card the External Battery is not present, and thus the state
'absence' for the External Battery is no reason to worry.
5.4.6 StartOS
This command starts the operating system in normal mode, i.e., the regular set of firmware
modules (*.msc) will be started. These firmware modules can be managed (loaded, updated
or deleted) by the customer.
See chapter 2.2.4.2 for more detailed information about this process.
On startup of the CryptoServer (power-on, or after the Reset command) the StartOS
command is automatically executed by the Bootloader if it doesn’t receive any command
within 3 seconds (see chapter 2.2.4.1)
Syntax
csadm [Dev=<device>] StartOS
Parameter
<device>
Device address of the CryptoServer or the CryptoServer LAN (see chapter 5.1.3 for
some examplary values);
This parameter can be omitted if the device address has been set as the
CRYPTOSERVER environment variable.
Authentication
None
Output
None on success, or error message

Administration of CryptoServer with csadm
Page 100 of 222
If no operating system SMOS is present (SMOS has not been loaded onto CryptoServer
before), an error message is displayed.
SMOS checks the integrity of every firmware module. A firmware module is started only after
successful verification.
If an error occurs during the startup of a firmware module, the corresponding error message
is added to the boot log file (see GetBootLog in chapter 5.4.10).
This command can only be performed in Bootloader Mode. After it is successfully
performed, the CryptoServer is in Operational Mode (see chapter 2.2.5).
If this command is called in any other but the Bootloader Mode (Operational Mode,
Maintenance Mode) it will be ignored.
5.4.7 RecoverOS
This command starts the operating system in Maintenance Mode, i.e., the set of backup
copies of the firmware modules (*.sys) is started. This set of basic firmware modules has
been loaded during the production process and can’t be modified or deleted by the customer.
See chapter 2.2.4.5 for more detailed information.
The backup set of the firmware modules has to be started explicitly by the user, using this
RecoverOS command.
This prodedure may be necessary if it is no longer possible to start the regular set of
firmware modules (*.msc files), for example because one or more indispensable modules
(for example, SMOS, CMDS, ADM, UTIL) have been deleted by mistake, or because a defect
firmware module has been loaded.
Syntax
csadm [Dev=<device>] RecoverOS
Parameter
<device>
Device address of the CryptoServer or the CryptoServer LAN (see chapter 5.1.3 for
some examplary values);
This parameter can be omitted if the device address has been set as the
CRYPTOSERVER environment variable.
Authentication
None
Output
None on success or error message
Administration of CryptoServer with csadm
Page 101 of 222
If no operating system SMOS is present (SMOS has not been loaded onto CryptoServer
before), an error message is displayed.
SMOS checks the integrity of every firmware module, a firmware module is started only after
successful verification.
If an error occurs during the startup of a firmware module, the corresponding error message
will be added to the boot log file (see GetBootLog in chapter 5.4.10).
This command can only be performed in Bootloader Mode. After it is successfully
performed, the CryptoServer is in Maintenance Mode (see chapter 2.2.5).
If this command is called in any other mode but Bootloader Mode (Operational Mode,
Maintenance Mode) it will be ignored.
5.4.8 GetTime
This command displays the system time of the CryptoServer.
Syntax
csadm [Dev=<device>] GetTime
Parameter
<device>
Device address of the CryptoServer or the CryptoServer LAN (see chapter 5.1.3 for
some examplary values);
This parameter can be omitted if the device address has been set as the
CRYPTOSERVER environment variable.
Authentication
None
Example
csadm Dev=PCI:0 GetTime
Output
date: 06.11.2012 time: 15:35:49.400 <local time>
date: 06.11.2012 time: 13:35:49.412 <UTC/internal>
The system clock of the CryptoServer has a resolution of 1/1000 second (one millisecond).
Date and time are given in the time zone of the system time of the host PC.
The necessary transformation from the internal system time of the CryptoServer (in
Greenwich Mean Time, GMT) to the system time zone of the host PC is done automatically by
csadm.

Administration of CryptoServer with csadm
Page 102 of 222
5.4.9 SetTime
This command sets the system clock of the CryptoServer.
Syntax
csadm [Dev=<device>] <Authentication> SetTime=<time>
Parameters
■ <device>
Device address of the CryptoServer or the CryptoServer LAN (see chapter 5.1.3
for some examplary values);
This parameter can be omitted if the device address has been set as the
CRYPTOSERVER environment variable.
■ <time>
▣ Set the time manually in format YYYYMMDDhhmmss. The time will be
converted to GMT time zone automatically.
▣ GMT (recommended)
use the system time of the host PC to set the time of the CryptoServer. The
time will be converted to GMT time zone automatically.
Authentication
The command must be authenticated with permission 2 in the user group 6 (see
chapters 3.2.2 and 5.3).
Examples
csadm LogonSign=ADMIN,:cs2:cyb:USB0 SetTime=GMT
csadm LogonPass=paul,ask SetTime=20020602115500
Output
None on success or error message
The system clock of the CryptoServer is assumed to run in Greenwich Mean Time (GMT).
Whenever the command SetTime is performed, the necessary transformation from the time
zone of the host PC’s system to GMT is done automatically by csadm.
Any changes of the clock are taken down on the audit log file. The new entry contains the old
time, as well as the new time value. The GetAuditLog command (see chapter 5.4.11) can be
used in any mode to view this file.
The command is not sent to the CryptoServer until authentication is done. If this requires a
lot of time (for example, insertion of a smartcard and PIN input) there is a gap between the
given time and the actual time. If the time of the CryptoServer has to be set very precisely,
you can enter a future time and perform the last step (for example, pressing ‘OK’ after PIN
entry on the PIN pad) when this time is reached.
Administration of CryptoServer with csadm
Page 103 of 222
5.4.10 GetBootLog
GetBootLog returns the boot log file, which contains log messages that are made during the
boot process. The log messages are made by the operating system and other firmware
modules or by the Bootloader if the command is called in Bootloader Mode. The boot log is
held in working memory and is not written into a permanent file. In this way the content of the
previous boot log file is cleared every time the operating system starts.
Log messages can be watched externally by connecting a PC’s serial port with a crossed
serial cable to the serial port 1 of the CryptoServer (at the bracket of the PCIe plug-in card).
Use terminal tool (e.g. the ‘csadm CSTerm=’ command) to view the log messages (see
chapter 5.2.9).
On a CryptoServer CSe a special USB-To-Serial adapter (Prolific PL2303) has to be
connected to one of the CryptoServer’s USB ports before (see 2.2.4.4).
Syntax
csadm [Dev=<device>] GetBootLog
Parameter
<device>
Device address of the CryptoServer or the CryptoServer LAN (see chapter 5.1.3 for
some examplary values);
This parameter can be omitted if the device address has been set as the
CRYPTOSERVER environment variable.
Authentication
None
Output
SMOS Ver. 3.0.1.0 started
module 0x83 (CMDS) initialized successfully
module 0x89 (HASH) initialized successfully
module 0x82 (PP) initialized successfully
module 0x86 (UTIL) initialized successfully
module 0x8e (LNA) initialized successfully
module 0x81 (VDES) initialized successfully
module 0x87 (ADM) initialized successfully
module 0x84 (VRSA) initialized successfully
module 0x98 (EMV) initialized successfully
module 0x85 (SC) initialized successfully
module 0x91 (ASN1) initialized successfully
module MBK can't find module DB (00000000)

Administration of CryptoServer with csadm
Page 104 of 222
FATAL: module 0x96 (MBK) initialization failed (err =
b096fe01)
5.4.11 GetAuditLog
The GetAuditLog command shows the contents of all audit log files. The function can be
called in any mode and does not need any authentication.
Syntax
csadm [Dev=<device>] GetAuditLog
Parameter
<device>
Device address of the CryptoServer or the CryptoServer LAN (see chapter 5.1.3 for some
examplary values);
This parameter can be omitted if the device address has been set as the CRYPTOSERVER
environment variable.
Authentication
None
Example
csadm Dev=PCI:0 GetAuditLog
Output
27.09.16 09:34:47 SMOS Ver. 5.4.6.0 successfully started
27.09.16 10:14:17 'ADMIN ' authentication(0) failed, failure counter: 1 [b0830013]
27.09.16 10:14:56 'ADMIN ' authentication(0) failed, failure counter: 2 [b0830013]
27.09.16 10:15:21 'ADMIN ' authentication(0) failed, failure counter: 3 [b0830013]
27.09.16 10:19:10 'ADMIN ' authentication(0) failed, failure counter: 4 [b0830013]
27.09.16 10:23:37 [ADMIN] FC:0x083 SFC:0x06 Change User 'ADMIN ' [0]
27.09.16 10:25:41 [ADMIN] FC:0x096 SFC:0x04 mbk_key_generate: AES-32 'TSMBK' 2-out-of-3
[0]
27.09.16 10:25:41 [ADMIN] FC:0x096 SFC:0x05 mbk_key_import: AES(32) 'TSMBK', 2 parts,
slot 3 [0]
27.09.16 10:32:52 [ADMIN] FC:0x083 SFC:0x0E Add User 'TS-SO1 ' (0,00000100) [0]
27.09.16 10:33:54 [ADMIN] FC:0x083 SFC:0x0E Add User 'TS-SO2 ' (0,00000100) [0]
27.09.16 10:36:29 [ADMIN] FC:0x087 SFC:0x07 Set Time from 160927083609Z [0]
27.09.16 12:35:56 [TS-SO1] FC:0x083 SFC:0x06 Change User 'TS-SO1 ' [0]
27.09.16 12:36:18 [TS-SO2] FC:0x083 SFC:0x06 Change User 'TS-SO2 ' [0]
5.4.12 ClearAuditLog
This function erases the content of audit logfiles. For a continuous auditing the newest
logfile(s) can be kept. See also chapter 3.3.
Syntax
csadm [Dev=<device>] <Authentication> ClearAuditLog[=<n>]

Administration of CryptoServer with csadm
Page 105 of 222
Parameters
■ <device>
Device address of the CryptoServer or the CryptoServer LAN (see chapter 5.1.3
for some examplary values);
This parameter can be omitted if the device address has been set as the
CRYPTOSERVER environment variable.
■ <n>
n newest logfiles will not be deleted
Authentication
The command must be authenticated with permission 2 in the user group 7 or in the
user group 6 (see chapters 3.2.2 and 5.3).
Example
csadm LogonSign=ADMIN,:cs2:cyb:USB0 ClearAuditLog=2
Output
None on success or error message
5.4.13 GetAuditConfig
This command shows the configuration setting for the audit functionality of the CryptoServer.
See also chapter 3.3 for details on audit configuration.
Syntax
csadm [Dev=<device>] GetAuditConfig
Parameter
<device>
Device address of the CryptoServer or the CryptoServer LAN (see chapter 5.1.3 for
some examplary values);
This parameter can be omitted if the device address has been set as the
CRYPTOSERVER environment variable.
Authentication
None
Example
csadm GetAuditConfig
Output
Audit log configuration parameters:
Number of log files:
5
Rotate logfiles:
yes
Max. filesize
200000
Events:
0x00000007
(Bits 1:2:3)
The audit log configuration parameters have the following meaning (see also chapter 3.3):

Administration of CryptoServer with csadm
Page 106 of 222
Audit configuration
parameter
Meaning
Number of log files
Maximal number n of audit log files (2 ≤ n ≤ 10 allowed)
Rotate logfiles
■ yes (default)
Audit log files will be written rotatingly, i.e., once all existing audit
log files are full, the CryptoServer starts overwriting the first
(oldest) one, etc.
■ no
Audit log files will NOT be written rotatingly, i.e., once all existing
audit log file are full, the CryptoServer refuses executing any
auditable functions except for deleting the audit log file.
Max. filesize
Maximum length of one audit log file in bytes
Events
Class mask of the configured audit message classes:
An event with audit message class no. n will be audited if and only if
the bit n is set. In the example above (class mask 0x00000007, i.e.,
bits 1, 2 and 3 set), all events from the message classes firmware/file
management, user management and time management will be
audited.
See chapter 3.3 for a list of all audit message class numbers.
Table 19: List of audit configuration parameters
5.4.14 SetAuditConfig
With this command the configuration of the audit functionality of the CryptoServer can be
changed. See also chapter 3.3 for details on audit configuration.
Syntax
csadm [Dev=<device>] <Authentication> …
SetAuditConfig=<param1=value1>[,<param2=value2>,<param3=value
3>, …]
Parameters
■ <device>
Device address of the CryptoServer or the CryptoServer LAN (see chapter 5.1.3
for some examplary values);
This parameter can be omitted if the device address has been set as the
CRYPTOSERVER environment variable.
■ <param>
configuration parameter
Administration of CryptoServer with csadm
Page 107 of 222
▣ MaxFileCount
Maximal number n of audit log files (2 ≤ n ≤ 10 allowed)
▣ RotateLogfiles
□ yes (set by default; strongly recommended)
Audit log files will be written rotatingly, i.e., once all existing audit log
files are full, the CryptoServer starts overwriting the first (oldest) one,
etc.
□ no
Audit log files will NOT be written rotatingly, i.e., once all existing audit
log file are full, the CryptoServer refuses executing any auditable
functions except for deleting the audit log file.
▣ MaxFileSize
Maximum size of one of the audit log files in bytes (only 4,000 ≤ len ≤
240,000 bytes allowed)
▣ Events
Class mask of the audit message classes to be configured. Coded either as
a list of bits (the class numbers) separated by a colon (for example, ‘1:2:3’),
or as an eight digits long hexadecimal (same example: 0x00000007):
An event with audit message class number n will be audited, if and only if
the bit n is set. If e.g. class mask 0x00000007 is set, i.e. bits 1, 2 and 3 are
set, all events from the message classes firmware/file management, user
management and time management will be audited.
See chapter 3.3 for a list of all audit message class numbers.
Authentication
The command must be authenticated with level 2 in user group 7 and level 2 in user
group 6 (see chapters 3.2.2 and 5.3).
Examples
csadm LogonPass=paul,swordfish …
SetAuditConfig=MaxFileCount=5,RotateLogfiles=yes,Events=1:2:3
csadm LogonSign=paula,:cs2:cyb:USB0 …
SetAuditConfig=MaxFileCount=3,MaxFileSize=200000,Events=0x000
00007
Output
None on success or error message
If a configuration parameter is not set, it remains unchanged.

Administration of CryptoServer with csadm
Page 108 of 222
5.4.15 MemInfo
This function displays information about the current usage of the non-volatile memory of the
CryptoServer.
The desired directory (FLASH or NVRAM) may be passed as command parameter. If none of the
above directories is given, memory information about all directories will be returned.
Syntax
csadm [Dev=<device>] MemInfo[=<dir>]
Parameters
■ <device>
Device address of the CryptoServer or the CryptoServer LAN (see chapter 5.1.3
for some examplary values);
This parameter can be omitted if the device address has been set as the
CRYPTOSERVER environment variable.
■ <dir>
directory on the CryptoServer (FLASH or NVRAM)
Authentication
None
Example
csadm MemInfo=FLASH
Output
FLASH\
max_size
used_size
free_size
available_size
= 33292288
= 1832960
= 30753280
= 31459328
The displayed information hast he following meaning:
■ max_size
maximum size of the directory
■ used_size
currently used size
■ free_size
Current free size regarding only already formatted blocks. This value is returned only for
diagnostic purposes. It does only show a part of the space that is available for the user.
■ available_size
size available for the user regarding already free blocks as well as unused space, which
could be freed if needed

Administration of CryptoServer with csadm
Page 109 of 222
5.4.16 Test
With this command a communication test (echo loopback test) with the CryptoServer is
executed. For each loop it sends random test patterns to the CryptoServer, beginning with the
minimum data length, which will be incremented until the maximum data length is reached.
The CryptoServer echoes the received command. On the host side the received answer is
compared with the command originally sent.
Syntax
csadm [Dev=<device>] Test=[<datalength>,]<loopcount>
csadm [Dev=<device>]
Test=<min_datalength>,<max_datalength>[,<increment>],<loopcount>
Parameters
■ <device>
Device address of the CryptoServer or the CryptoServer LAN (see chapter 5.1.3 for
some examplary values);
This parameter can be omitted if the device address has been set as the
CRYPTOSERVER environment variable.
■ <datalength>
data length [bytes] of the used pattern.
▣ if a value is set:
min_datalength = max_datalength = value
▣ if omitted:
min_datalength = 0,
max_datalength = 131072 (128kB)
■ <min_datalength>
minimum data length [bytes] of the used pattern
■ <max_datalength>
maximum data length [bytes] of the used pattern
(max: 131072)
■ <increment>
data length increment [bytes]; default = 1
■ <loopcount>
number of execution cycles
Authentication
None
Examples
csadm Test=256,10000
csadm Test=0,128,2,10
Output
data type : random
data length (min) : 256

Administration of CryptoServer with csadm
Page 110 of 222
data length (max) : 256
increment : 1
loop count : 10000
len count
256 10000
execution time : 329 ms
data throughput : 7781155 bytes/s
transaction time : 0.032900 ms
A little time is needed to create the test patterns for each loop. A pure benchmark test leads to
slightly better results.
5.4.17 ResetAlarm
This command manually resets the alarm state if the physical reason for the alarm is no
longer present.
If an alarm occurs on the CryptoServer, the internal Master Key and other sensitive data will
be erased and an entry will be made into the udit log file (see Chapter 3.4 "Alarm"). The
occurrence of the alarm will be stored as a special alarm state. Even if the physical reason for
an alarm has been removed (for example, a low battery was exchanged), the alarm state is
still active and has to be manually reset by an authenticated user with ResetAlarm. With the
command ResetAlarm also a new internal Master Key will be generated.
In alarm state the CryptoServer is running in Maintenance Mode (i.e., only the set of backup
copies of the base firmware modules (*.sys) is running) and there is no secret or private key
left. Since the firmware module DB for database management is blocked, no further keys can
be loaded in alarm state. Most CryptoServer functionality is blocked.
On reset of a pending alarm a new Master Key will be generated and the CryptoServer will be
restarted. Afterwards the CryptoServer is running in Operational Mode again.
If the reason for the alarm is still pending (for example, temperature still too high), any
attempt to reset the alarm state will cause the automatic execution of a reset of the
CryptoServer (in the same way the Reset command does).
See chapter 8.2 for more details about what to do in case of an alarm.

Administration of CryptoServer with csadm
Page 111 of 222
Syntax
csadm [Dev=<device>] [<Authentication>] ResetAlarm
Parameter
<device>
Device address of the CryptoServer or the CryptoServer LAN (see chapter 5.1.3 for
some examplary values).
This parameter can be omitted if the device address has been set as the
CRYPTOSERVER environment variable.
Authentication
The command must be authenticated with permission 2 in either user group 6 or
user group 7 (see chapters 3.2.2 and 5.3).
Example
csadm LogonSign=ADMIN,:cs2:cyb:USB0 ResetAlarm
Output
None on success or error message
If the reason for the (physical) alarm is still present, an error message will be returned and the
CryptoServer does not leave the alarm state.
Any new alarm is written into the audit.log file, together with the date and time when the
alarm appeared. The GetAuditLog command (see chapter 5.4.11) can be used to view this
file.
5.4.18 GetModel
This command displays the model information (hardware and software architecture) of the
CryptoServer.
Syntax
csadm [Dev=<device>] GetModel
Parameter
<device>
Device address of the CryptoServer or the CryptoServer LAN (see chapter 5.1.3 for
some examplary values);
This parameter can be omitted if the device address has been set as the
CRYPTOSERVER environment variable.
Authentication
None
Example
csadm Dev=192.168.4.101 GetModel
Output
Model of the addressed CryptoServer device, for example,
CryptoServer Se-Series
i.e., CryptoServer Se-Series with bootloader version 3.0.0.0 or later

Administration of CryptoServer with csadm
Page 112 of 222
CryptoServer Se-Series Gen2
i.e., CryptoServer Se-Series with bootloader version 5.0.0.1 or later
CryptoServer CSe-Series
i.e., CryptoServer CSe-Series with bootloader version 4.0.1.2 or later
CryptoServer C/S-Series (NQ3)
i.e., CryptoServer CS-Series or S-Series with bootloader version 2.5.0.0 and later
5.4.19 Reset
This command performs a hardware reset (like Power Off-On) of the CryptoServer on PCIe
level.
After executing Reset it takes up to 15 seconds until the Bootloader window is timed out and
the operating system is restarted again (see chapter 2.2.4).
It is therefore recommended NOT to use the Reset command but to use instead
■ Restart (chapter 5.4.21) to restart the CryptoServer as fast as possible (3 – 5 sec) or
■ ResetToBL (chapter 5.4.20) to reset the CryptoServer and to get into Bootloader Mode.
Syntax
csadm [Dev=<device>] Reset[=<password>]
Parameters
■ <device>
Device address of the CryptoServer or the CryptoServer LAN (see chapter 5.1.3
for some examplary values);
This parameter can be omitted if the device address has been set as the
CRYPTOSERVER environment variable.
■ <password>
root password of CryptoServer LAN
This parameter is only relevant if the driver commands Reset, Restart and
ResetToBL are password protected, which depends on the settings in the
CryptoServer LAN configuration file csxlan.conf. You can find detailed
information about the content of the csxlan.conf file in the CryptoServer LAN
Manual for System Administrators, Chapter "The Configuration File csxlan.conf".
▣ for hidden password entry the string 'ask' is used (see chapter 5.1.5)
The usage of hidden password entry is strongly recommended.
▣ root password of the CryptoServer LAN in clear text
Output
None on success, or error message
Administration of CryptoServer with csadm
Page 113 of 222
5.4.20 ResetToBL
This command will reset the CryptoServer and get it into Bootloader Mode (see chapter 2.2.5):
First a reset of the CryptoServer is performed in the same way as using the Reset command.
Immediately after the Reset command a dummy command is sent to the CryptoServer. The
Bootloader now remains active and will not start the operating system SMOS. Thus, the
CryptoServer is in Bootloader Mode now.
If the CryptoServer is in Bootloader Mode, the operating system (SMOS) and all other
firmware modules can be started using the StartOS command (see chapter 5.4.6). This way
the CryptoServer can be put into Operational Mode again.
The RecoverOS command (see chapter 5.4.7) on the other hand starts the recovery copies
of the firmware modules, which were loaded into the CryptoServer during production.
In Bootloader Mode no application (no other firmware modules) is running.
Syntax
csadm [Dev=<device>] ResetToBL[=<password>]
Parameters
■ <device>
Device address of the CryptoServer or the CryptoServer LAN (see chapter 5.1.3
for some examplary values);
This parameter can be omitted if the device address has been set as the
CRYPTOSERVER environment variable.
■ <password>
root password of CryptoServer LAN
This parameter is only relevant if the driver commands Reset, Restart and
ResetToBL are password protected, which depends on the settings in the
CryptoServer LAN configuration file csxlan.conf. You can find detailed
information about the content of the csxlan.conf file in the CryptoServer LAN
Manual for System Administrators, Chapter "The Configuration File csxlan.conf".
▣ for hidden password entry the string 'ask' is used (see chapter 5.1.5)
The usage of hidden password entry is strongly recommended.
▣ root password of the CryptoServer LAN in clear text
Authentication
None
Output
None on success, or error message
In Bootloader Mode any command sent to the CryptoServer is responded by the Bootloader.
The Bootloader remains active until the CryptoServer is reset again or the StartOS or
RecoverOS command is sent to the CryptoServer.
Administration of CryptoServer with csadm
Page 114 of 222
5.4.21 Restart
This command will reset/restart the CryptoServer and get it into Operational Mode. Please read
chapter 2.2.5 for detailed information about CryptoServer's operating modes.
In a first step a reset of the CryptoServer is performed in the same way as using the Reset
command. In addition to the Reset command the StartOS command is sent to the
CryptoServer immediately.
Executing the Restart command is the fastest way to restart the operating system of the
CryptoServer. If it has been successfully executed, the CryptoServer is in Operational Mode
afterwards.
Syntax
csadm [Dev=<device>] Restart[=<password>]
Parameters
■ <device>
Device address of the CryptoServer or the CryptoServer LAN (see chapter 5.1.3
for some examplary values);
This parameter can be omitted if the device address has been set as the
CRYPTOSERVER environment variable.
■ <password>
root password of CryptoServer LAN
This parameter is only relevant if the driver commands Reset, Restart and
ResetToBL are password protected, which depends on the settings in the
CryptoServer LAN configuration file csxlan.conf. You can find detailed
information about the content of the csxlan.conf file in the CryptoServer LAN
Manual for System Administrators, Chapter "The Configuration File csxlan.conf".
▣ for hidden password entry the string 'ask' is used (see chapter 5.1.5)
The usage of hidden password entry is strongly recommended.
▣ root password of the CryptoServer LAN in clear text
Authentication
None
Output
None on success, or error message
As a general rule, the CryptoServer has to be restarted after the loading (or replacement) of a
new firmware module: The firmware module only becomes active after the CryptoServer has
been restarted.
Administration of CryptoServer with csadm
Page 115 of 222
5.4.22 GetInfo
This command retrieves information from the PCI/PCIe driver of the CryptoServer and is used
for diagnostic purposes in error case. It will be executed even if the CryptoServer does not
respond to any other command.
The information provided by the GetInfo command might help to identify low level problems
of the CryptoServer. However, the interpretation of the output requires extensive knowledge of
the CryptoServer and is not explained in detail here.
Please prepare the output of the csadm GetInfo command in case of a support request.
Syntax
csadm [Dev=<device>] GetInfo
Parameter
<device>
Device address of the CryptoServer or the CryptoServer LAN (see chapter 5.1.3 for
some examplary values);
This parameter can be omitted if the device address has been set as the
CRYPTOSERVER environment variable.
Authentication
None
Output
■ Example output for a CryptoServer Se-Series Gen2 in a Windows host system:
vers 2.4.1.0 (15.07.2015)
fwver 5.1.0.6
slot 0
model 5
state idle
spm 00000000
irq b 1 f f
txlen 00000010 00000000
rxlen 00000064 00000000
count 00000001 00000001
crc 00000000 00000000
■ Example output for a CryptoServer CSe-Series in a Linux host system:
vers 3.2.13

Administration of CryptoServer with csadm
Page 116 of 222
slot 0000:02:00.0
model 4
state idle
spm 00000000
count 1 1
crc 0 0
irq b 1 f f
txlen 00000010 00000000
rxlen 00000064 00000000
fwver 1.1.0.7...
The following table explains selected information fields that are part of the command output.
The output fields missing in this table provide CryptoServer internal information that might
only be helpful in specific error cases. Therefore, these fields will be analysed by Utimaco's
support team if necessary.
GetInfo output field
Description
vers
Version of CryptoServer's PCI/PCIe driver installed on the Linux or
Windows host system
fwver
Version of CryptoServer's control logic unit FPGA (Field Programmable
Gate Array)
slot
PCI or PCIe slot number of the host computer where the CryptoServer
PCI/PCIe plug-in card is installed
model
CryptoServer series:
■ 1: CryptoServer C/S-Series (Classic)
■ 2: CryptoServer Se-Series
■ 4: CryptoServer CSe-Series
■ 5: CryptoServer Se-Series Gen2
state
Status of the CryptoServer driver (host side):
■ idle: Ready
■ wait/read/write: Expecting a response/acknowledgment from the
CryptoServer
Table 20: Meaning of selected information fields of the GetInfo command output
Administration of CryptoServer with csadm
Page 117 of 222
5.5 Commands for Managing the User Authentication Keys
In this chapter the csadm commands for generation, administration and backup of user’s
authentication keys (or tests keys) are described. The generated keys may be stored either on
a smartcard or in a keyfile.
The following command group contains internal functions of csadm. No connection to a
CryptoServer will be established.
Certain types of shell processes treat certain characters (commas, colons, semi-colons)
differently. If the execution of a csadm command fails with an error message from the shell
about an illegal parameter format, quoting parameter values may be necessary.
5.5.1 GenKey
This command generates a keyfile *.key, which contains a RSA or ECDSA key pair of given
size (for keyfiles see chapter 5.1.4). This can be used, for example, to generate a user key.
It can be chosen if the generated keyfile is in plaintext or encrypted (see chapter 5.1.4 for
details about encrypted keyfiles).
This command is executed locally without a connection to a CryptoServer. Therefore, the
state or mode of any underlying CryptoServer is irrelevant for the command execution, and no
authentication at any CryptoServer is necessary.
Syntax
For generating a new RSA key:
csadm [KeyType=RSA]
GenKey=<file>[#<password>][,<bitsize>],<owner>
For generating a new ECDSA key:
csadm KeyType=EC GenKey=<file>[#<password>]
[,<curve>],<owner>
Parameters
■ <password>
Password to protect encrypted keyfile; if omitted the keyfile is in plain text:
▣ for hidden password entry: string ask (see chapter 5.1.4; hidden
password entry is strongly recommended);
▣ password entry in clear text

Administration of CryptoServer with csadm
Page 118 of 222
■ <file>
name of the keyfile (with path, filename extension *.key)
■ <bitsize>
bit length of the generated RSA key:
512 ≤ bitsize ≥ 8192 (default value: 1024 bit)
■ <curve>
name of the elliptic curve to be used for ECDSA key generation (see chapter
Appendix A)
■ <owner>
key owner
Authentication
none
Examples
■ Generates an encrypted keyfile which contains an RSA key pair
csadm GenKey=C:\my_keys\testkey1.key#ask,2048,TestKey
■ Generates an encrypted keyfile which contains an ECDSA key pair
csadm KeyType=EC
GenKey=C:\my_keys\testkey2.key#123456,secp256k1,ECkey
Output
■ For the example csadm
GenKey=C:\my_keys\testkey1.key,2048,TestKey
generating RSA key: C:\my_keys\testkey1.key#ask, 2048
bits, owner: TestKey
■ For the example csadm KeyType=EC
GenKey=C:\my_keys\testkey2.key#123456,secp256k1,ECkey
generating EC key: C:\my_keys\testkey2.key, curve
secp256k1, owner: ECKey
or error message
■ If the password parameter is given, the command generates an encrypted keyfile,
protected by the given password (see 5.1.4 for encrypted keyfiles). If the parameter is
omitted, the command generates a plaintext keyfile.
■ As default, i.e., if the KeyType parameter is omitted, an RSA key will be generated. If an
ECDSA key shall be generated, the parameter KeyType=EC has to be specified.
■ For the RSA key length the size 1024 bits is the default value.
5.5.2 SaveKey
This command reads a key from one storage medium and stores it to another storage
medium. The key may either be the public or private part of a key pair or one half of a backup
key set.
Administration of CryptoServer with csadm
Page 119 of 222
The following table shows the possible combinations of source and target mediums:
Key Type
Source Medium
Target Medium
Public
keyfile
keyfile
smartcard
keyfile
Private + Public
keyfile
keyfile or smartcard
Backup
smartcard
keyfile or smartcard
Table 21: Possible source and target medium combinations
It is neither possible to transfer the private key part out of a smartcard to any other medium,
nor to transfer only a public key part to a smartcard.
This command is executed locally without any connection to a CryptoServer. Therefore, the
state or mode of any underlying CryptoServer is irrelevant for the command execution, and no
authentication at any CryptoServer is necessary.
Syntax
■ For a public key:
csadm [KeyType=<keytype>] PubKey=<source> SaveKey=<target>
■ For a private key:
csadm [KeyType=<keytype>] PrvKey=<source> SaveKey=<target>
■ For a backup key:
csadm [KeyType=<keytype>] BckKey=<source> SaveKey=<target>
Parameters
■ <keytype>
key type: RSA (default) or EC
■ <source>
filename or key specifier (see chapter 5.1.4) where the key should be read from:
▣ For a public key: smartcard specifier or keyfile
▣ For private key: keyfile
□ In case of an encrypted keyfile, the password has to be appended after
the filename, separated by a '#'. If no password is given (or the password
is 'ask'), hidden password entry is performed.

Administration of CryptoServer with csadm
Page 120 of 222
□ For backup key: Smartcard specifier where the two XOR parts of the
backup key are read from two smartcards
■ <target>
filename or key specifier defining where the key should be stored:
▣ For public key: keyfile
▣ For private key or backup key: smartcard specifier or keyfile
In case of an encrypted keyfile, the password has to be appended after the filename,
separated by a '#'. If the password is given as 'ask', hidden password entry is
performed.
Authentication
None
Examples
■ Read an RSA public key from a smartcard and store in a keyfile
csadm PubKey=:cs2:cyb:USB0 SaveKey=C:\keys\pubkey1.key
■ Read an ECDSA private key from an encrypted keyfile and store it on a
smartcard
csadm KeyType=EC PrvKey=C:\keys\prvECkey1.key#ask
SaveKey=:cs2:cyb:USB0
■ Read an ECDSA private key from a keyfile and store it in an encrypted keyfile
csadm KeyType=EC PrvKey=C:\keys\prvECkey1.key SaveKey=
C:\keys\prvECkey1_enc.key#ask
■ Read an ECDSA backup key from two smartcards (two XOR parts) and store it
on another smartcard
csadm KeyType=EC BckKey=:cs2:cyb:USB0
SaveKey=:cs2:cyb:USB0
■ Read an RSA backup key from two smartcards (two XOR parts) and store it in
an encrypted keyfile
csadm BckKey=:cs2:cyb:USB0
SaveKey=C:\keys\RSApubkey1_enc.key#ask
Output
None on success, or error message
If smartcards are used, a PIN pad has to be connected to the computer where the csadm tool
is running (serial line or USB).
Watch the display of the PIN pad for instructions on further command processing.
5.5.3 BackupKey
This command reads a key from a keyfile, splits it into two XOR parts and saves the parts on
two smartcards for backup matters.

Administration of CryptoServer with csadm
Page 121 of 222
This command is executed locally without a connection to a CryptoServer. Therefore, the
state or mode of any underlying CryptoServer is irrelevant for the command execution, and no
authentication at any CryptoServer is necessary.
Syntax
csadm [KeyType=<keytype>] PrvKey=<keyfile>
BackupKey=<cardspec>
Parameters
■ <keytype>
key type: RSA (default ) or EC
■ <keyfile>
file where the key is stored (*.key, see chapter 5.1.4)
■ <cardspec>
smartcard specifier of the back-up smartcards (see chapter 5.1.4)
Authentication
None
Examples
csadm PrvKey=C:\my_keys\prvkey1.key BackupKey=:cs2:cyb:USB0
csadm KeyType=EC PrvKey=C:\my_keys\myprvkey.key#mypassword
BackupKey=:cs2:cyb:USB0
Output
None on success, or error message
If smartcards are used, a PIN pad has to be connected to the computer where the csadm tool
is running (serial line or USB).
Watch the display of the PIN pad for instructions on further command processing.
5.5.4 CopyBackupCard
This command copies one XOR-half of a key-backup (backup of user’s authentication key)
from one smartcard to another.
This command is executed locally without a connection to a CryptoServer. Therefore, the
state or mode of any underlying CryptoServer is irrelevant for the command execution, and no
authentication at any CryptoServer is necessary.
Syntax
csadm CopyBackupCard=<keyspec>
Parameter
<keyspec>
key specifier of the backup-smartcards (see chapter 5.1.4), source and target
Authentication
None
Example
csadm CopyBackupCard=:cs2:cyb:USB0
Administration of CryptoServer with csadm
Page 122 of 222
Output
None on success, or error message
A PIN pad has to be connected to the computer where the csadm tool is running (serial line
or USB).
Watch the display of the PIN pad for instructions on further command processing.
5.5.5 GetCardInfo
This command reads information about keys eventually stored on a smartcard. The info
records of the user’s authentication key (e.g., Default Administrator Key) and backup key will be
scanned and output.
The GetCardInfo command is executed locally without a connection to a CryptoServer.
Therefore, the state or mode of any underlying CryptoServer is irrelevant for the command
execution, and no authentication at any CryptoServer is necessary.
Syntax
csadm GetCardInfo=<keyspec>
Parameter
<keyspec>
key specifier of the smartcard (see chapter 5.1.4)
Authentication
None
Example
csadm GetCardInfo=:cs2:cyb:USB0
Output
Example:
RSA-Key: Utimaco IS GmbH / ADMIN-Key
ECC-Key: Utimaco IS GmbH / Default_EC_Key
RSA-Backup:
ECC-Backup:
MBK:
A PIN pad has to be connected to the computer where the csadm tool is running (serial line
or USB port).
Watch the display of the PIN pad for instructions on further command processing.

Administration of CryptoServer with csadm
Page 123 of 222
5.5.6 ChangePassword
This command changes the password of an encrypted keyfile (*.key, see chapter 5.1.4 for
encrypted keyfiles).
This command is executed locally without a connection to a CryptoServer. Therefore, the
state or mode of any underlying CryptoServer is irrelevant for the command execution, and no
authentication at any CryptoServer is necessary.
Syntax
csadm [KeyType=<keytype>] NewPassword=<new_password>
ChangePassword=<keyfile>[#old_password]
Parameters
■ <keytype>
key type: RSA (default) or EC
■ <old_password>
old password of the encrypted keyfile
▣ If no old_password is given (or old_password is 'ask'), hidden password
entry is possible, which is strongly recommended see chapter 5.1.4)
▣ old password in plain text
■ <new_password>
new password for the encrypted keyfile
▣ string ask that defines that hidden password entry is used which is strongly
recommended (see chapter 5.1.4)
▣ new password in plain text
■ <keyfile>
encrypted keyfile (*.key)
Examples
■ csadm NewPassword=ask
ChangePassword=C:\my_keys\mykey1.key#123456
■ csadm NewPassword=ask
ChangePassword=C:\my_keys\privatekey1.key#ask
Output
None on success or error message
This command can also be used to convert a plaintext keyfile into an encrypted keyfile and
vice versa:
■ If the command shall be used to encrypt a keyfile that has been a plaintext keyfile before,
the parameter <old_password> has to be omitted and only the
NewPassword=<new_password> parameter has to be given.
Administration of CryptoServer with csadm
Page 124 of 222
■ If the command shall be used to decrypt a keyfile, i.e., to turn an encrypted keyfile into a
plaintext keyfile the parameter NewPassword=<new_password> has to be omitted and
only the <old_password> parameter has to be given.
5.5.7 ChangePIN
This command changes the PIN of a given smartcard. A PIN pad must be used for this
command.
The PIN pad must be connected to the computer where the csadm tool is running (serial line
or USB port). Follow the instructions on the display of the PIN pad for further processing.
This command is executed locally without a connection to a CryptoServer. Therefore, the
state or mode of any underlying CryptoServer is irrelevant for the command execution, and no
authentication at any CryptoServer is necessary.
Syntax
csadm ChangePIN=<keyspec>
Parameter
<keyspec>
specifier for smartcard type, reader type and serial port (see chapter 5.1.4)
Example
csadm ChangePIN=:cs2:cyb:USB0
Output
None on success or error message
5.5.8 BackupDatabase
This command creates a backup of all entries of the given CryptoServer database (for
example, key database or user database).
The function creates a file with the name of the database and stores it in the current directory.
Each database entry in the created backup file is encrypted with the Master Backup Key
(MBK) of the CryptoServer. Due to a check value (MAC calculated with the MBK) over each
database record it is not possible to change any item (for example, database index, key
record).
Syntax
csadm [Dev=<device>] <Authentication> BackupDatabase=<name of
database>
Administration of CryptoServer with csadm
Page 125 of 222
Parameter
■ <device>
Device address of the CryptoServer or the CryptoServer LAN (see chapter 5.1.3
for some examplary values);
This parameter can be omitted if the device address has been set as the
CRYPTOSERVER environment variable.
■ <name of database>
name of the CryptoServer database
Authentication
The command must be authenticated with permission 2 in the user group 7 and in
the user group 6 (see chapters 3.2.2 and 5.3).
Example
csadm LogonSign=ADMIN,:cs2:cyb:COM1 BackupDatabase=CXIKEY.db
Output
None on success or error message
The database for which the backup shall be created must have the file extension *.db.
The function creates a file with ASCII characters and additional information about the used
MBK.
If a file with the name of the database already exists in the current directory, it will be
overwritten.
It is not possible to backup the MBK database or the database with the secure messaging
session keys.
5.5.9 RestoreDatabase
This command restores a database on the CryptoServer from a backup file, which was
created with the BackupDatabase command.
For the restore procedure the function takes each record from the backup file, decrypts it
inside the CryptoServer with the Master Backup Key (MBK), verifies the MAC and stores it
under the given database index. If an entry with the given database index already exists, it will
be overwritten.
The same Master Backup Key (MBK) which has been used to create the backup file has to be
stored on the target CryptoServer.
Syntax
csadm [Dev=<device>] <Authentication> …
RestoreDatabase=<backup_file>
Administration of CryptoServer with csadm
Page 126 of 222
Parameters
■ <device>
Device address of the CryptoServer or the CryptoServer LAN (see chapter 5.1.3
for some examplary values);
This parameter can be omitted if the device address has been set as the
CRYPTOSERVER environment variable.
■ <backup_file>
name of the backup database file (eventually with path)
Authentication
The command must be authenticated with permission 2 in the user group 7 and in
the user group 6 (see chapters 3.2.2 and 5.3).
Example
csadm LogonSign=ADMIN,:cs2:cyb:COM1 RestoreDatabase=CXIKEY.db
Output
None on success or error message
The backup file must have the file extension *.db.
If a database record (identified by its index) to be restored already exists in the given
database, it will be overwritten.
It is not possible to restore the MBK database or the database with the secure messaging
session keys.
It is recommended to perform a csadm Restart after executing the RestoreDatabase
command:
If in the restored database any configuration items are stored (e.g. a configuration object of
firmware module CXI), any configuration changes will not become effective until a
CryptoServer restart has been performed.
5.6 Commands for User Management
The CryptoServer provides a sophisticated user management in order to maintain different
users with different authentication mechanisms and permissions.
User's credentials are stored in the user database user.db, which is hosted on the
CryptoServer.
The respective commands to create, change or delete users are described in this chapter.
Within this user management, the following properties can be assigned to each user:

Administration of CryptoServer with csadm
Page 127 of 222
Property
Description
Name
user name, up to 255 printable characters (must not contain a ‘~’)
Permission
A user’s permission, for example, 2A000000, is an eight-digit sequence of
hexadecimal values between 0 and F (15). Each digit stands for one of the eight
CryptoServer's specific user groups. Each user group is assigned a specific group of
functions/commands, and is uniquely identified by a number in the range from 0 to
7. User's permission in the user group 7 is displayed as the most left one, and the
permission in user group 0 as the most right one. This means, user's permission in
a specific user group defines the rights a user is granted on creation, allowing him
to execute security-relevant functions on the CryptoServer that always require user
authentication. See chapter 3.2.2 for more details.
The value 0 means that the user has no rights in that particular user group.
■ 1 means two-person rule: although the user can authenticate commands to the
CryptoServer, a second user is also required to do this.
■ 2 means that the user is entitled to authenticate commands on his own.
Values 3 to F mean that the user can authenticate commands on his own as well as
can participate in performing the n-person rule authentication (n > 2), and M-of-N
users authentication (where N is the number of all CryptoServer users with the
same role-based user profile, M is the number of users with the same role-based
user profile required to authenticate specific command/function).
2 is the highest possible permission required by the CryptoServer's
functions/commands by default. 3 to F might be required by functions with custom
permissions defined in a signed configuration file cmds.scf as described in
chapter 3.10.
Some user groups are reserved by Utimaco for applications and their corresponding
role-based user profiles as shown in the next table.
User
Group
Application
Role-based user profile
and permissions
0
All cryptographic Interfaces
Cryptographic User und PKCS#11
User; 00000002
2
PKCS#11
PKCS#11 Security Officer (SO)
00000200
5
NTP Administration
NTP Manager; 00200000
6
System Administration
System Manager; 02000000
7
User Management
User Manager; 20000000

Administration of CryptoServer with csadm
Page 128 of 222
Property
Description
All other user groups (4, 3 and 1) can be used for customer’s specific applications.
Mechanism
■ RSA signature
■ ECDSA signature
■ SHA-1 hashed password
IMPORTANT NOTE:
As from SecurityServer 4.01 this authentication mechanism is not supported for
creating new users. Existing users, who use a SHA-1 password to authenticate
themselves to the CryptoServer, can still do that.
■ HMAC password
■ local RSA smartcard (i.e., local confirmation of command execution, using a
RSA signature smartcard over a smartcard reader which is directly connected
to the CryptoServer)
See chapter 3.2.2 for more details about the mechanisms and their advantages /
disadvantages.
Flags
■ sm
The user may open a secure messaging session, with or without authentication.
■ sma
The user may open a secure messaging session if he/she authenticates the
command.
Attributes
A string containing a list of assignments with syntax:
<AttrName>=<AttrValue>,<AttrName1>=<AttrValue1>,…,
<AttrNameN>=<AttrValueN>
Examples:
■ CXI_GROUP=msk*, CXI_GROUP=*_mbk
These attributes define that the cryptographic users they have been
assigned to are permitted to generate, use, delete, export and import
keys belonging to the CXI groups msk_1, msk_2, msk3 and so on, and to
the groups A_mbk, B_mbk and so on.
■ CXI_GROUP=SLOT_XXXX This attribute must be set for PKCS#11 users of
PKCS#11 slot X
The meaning of the Attributes depends on the application loaded into the
CryptoServer.
The permission of a user may be restricted to a group of objects (keys,
configuration and storage objects) that matches the user attribute CXI_GROUP.
This means, a user is only allowed to access keys within his key group, and has no
access to keys from other groups. If the user group attribute contains wildcards (‘?’

Administration of CryptoServer with csadm
Page 129 of 222
Property
Description
or ‘*’), the user may access multiple key groups; as example 2 above shows,
CXI_GROUP=msk* allows the user to access msk01 as well as msk02.
If a user was created without a user group attribute, he is only allowed to access
global objects that don’t belong to any group of objects.
If a user was created with the attribute CXI_GROUP=*, he is allowed to access all
objects regardless of their group property.
The defined value is assigned to the user as the attribute A[], e.g.
A[CXI_GROUP=SLOT_0000], and can be displayed by executing the command
ListUser.
HashAlgo
Hash algorithm to be used for RSA, ECDSA or HMAC authentication mechanism (in
case that not the default hash algorithm shall be used for this user, which is SHA-1
for RSA signatures and SHA-256 for ECDSA signatures and HMAC).
Value can be one of the following algorithms:
■ SHA-1, SHA-224, SHA-256, SHA-384 or SHA-512,
■ MD5,
■ RIPEMD-160
The defined value, in case different as the default SHA-1, is assigned to the user as
the attribute H[], e.g. H[SHA-256].
Table 22: User properties
The creation of new users also requires an authentication:
■ In general, authentication by one or two users with the permission to manage users (i.e.,
authentication level 2 in user group 7) is required.
■ If a user with administrative rights shall be created: additionally, the authentication of one
user with the permission to administrate the CryptoServer is required (i.e., authentication
level 2 in user group 7 and level 1 in user group 6).
For this reason, one initial user ADMIN is preconfigured and uses the RSA-Signature
authentication mechanism with the Initialization Key. ADMIN has the exclusive permission of
user management and administration (22000000) and does not require a second user to
authenticate administrative commands.
The user ADMIN may be deleted from the user database only if one or more other users have
been created, who – alone or in combination – possess the minimum permission to create
users, including a user with administrative rights.
Administration of CryptoServer with csadm
Page 130 of 222
CryptoServer’s user management checks if the sum of the permissions of the remaining
users with signature authentication mechanism (RSA, ECDSA) still allows user management
and the creation of a user with administrative rights (i.e., resulting permission ≥ 21000000)
and denies the deletion of a user eventually.
By this means users can never- accidentally - lock out themselves from the CryptoServer.
Certain types of shell processes treat certain characters (commas, colons, semi-colons)
differently. If the execution of a csadm command fails with an error message from the shell
about an illegal parameter format, quoting parameter values may be necessary.
5.6.1 ListUser
This command lists all existing users from the user.db database.
Syntax
csadm [Dev=<device>] ListUser
Parameter
<device>
Device address of the CryptoServer or the CryptoServer LAN (see chapter 5.1.3 for
some examplary values);
This parameter can be omitted if the device address has been set as the
CRYPTOSERVER environment variable.
Authentication
None
Example
csadm Dev=PCI:0 ListUser
Output
Name
ADMIN
sm
paul
SO_0007
CryptU
Permission
22000000
00000022
22000022
00000201
00000002
Mechanism
RSA sign
HMAC passwd
HMAC passwd
HMAC passwd
RSA sign
Flags
sma
sm
sma
sma
sma
Attributes
Z[0]H[SHA-256]
Z[1]
A[CXI_GROUP=SLOT_0007]L[0007]
A[CXI_GROUP=msk]
The initial user ADMIN is always displayed even if the database user.db is not yet present.
Attributes might be:
■ A[] - Application-depending attributes, for example, A[CXI_GROUP=SLOT_0007]
Administration of CryptoServer with csadm
Page 131 of 222
■ H[] - Non-default hash algorithms used for the authentication mechanism of that user, for
example, H[SHA-256]; see Table 22 in chapter 5.6 for a list of possible hash algorithms.
■ Z[] - Counter for the number of consequtively failed authentication attempts marked by
the tag Z, e.g. Z[1]. The attribute Z is set for every user on first authentication attempt to
the default Z[0]. If the authentication succeded Z remains Z[0], otherwise the counter is
incremented by one.
■ L[] – PKCS#11 slot label which is assigned to the slot's Security Offices (SO) during slot
initialization. By default, this attribute is set to CryptoServer PKCS11 Token. It can be
changed by the default CryptoServer Administrator ADMIN or a user administrator during
PKCS#11 slot initialization using one of the CryptoServer PKCS#11 administrtation tools
– P11CAT or p11tool2.
The attribute L is only set when the user with role SO is created during slot initialization with
one of the CryptoServer PKCS#11 administrtation tools – P11CAT or p11tool2. It cannot be
set in case you create the SO for a specific PKCS#11 slot with CAT or csadm.
5.6.2 AddUser
With this command a new user is added to the user database of the CryptoServer.
■ User with password-based authentication mechanism
As from SecurityServer 4.01 SHA-1 is not supported anymore as authentication mechanism
for new users. Existing users, who use a SHA-1 password to authenticate themselves to the
CryptoServer, can still do that.
In case a user with password-based authentication mechanism (HMAC Password) is
created, the entered password is stored in the user database of the CryptoServer. Please
be aware of the following security advice:
■ User with signature-based authentication mechanism
In case a user with signature-based authentication mechanism (RSA Signature, ECDSA
Signature, RSA Smartcard) is created, the given user’s authentication token (public RSA or
ECDSA key) is stored in the user database of the CryptoServer. Therefore, the user needs
an ECDSA or RSA key pair either on a smartcard or in a keyfile (keyfile optionally

Administration of CryptoServer with csadm
Page 132 of 222
encrypted). In case of the ‘RSA Smartcard’ mechanism only an RSA smartcard can be
used.
During execution of the AddUser command the public part of the RSA or ECDSA key is read
from the smartcard or keyfile and stored in the user database of the CryptoServer.
Syntax
csadm [Dev=<device>] <Authentication> …
AddUser=<user>,<permission>,<mechanism>,<flag>,<auth_token>
Parameters
■ <device>
Device address of the CryptoServer or the CryptoServer LAN (see chapter 5.1.3 for
some examplary values);
This parameter can be omitted if the device address has been set as the
CRYPTOSERVER environment variable.
■ <user>
user name
■ <permission>
user’s permissions (see chapter 3.2.2):
Eight digits, XXXXXXXX, each representing a permission in a specific user group as
described in chapter 5.6.
A list of attributes, put into curly braces { }, can be appended to the permission digits,
see Table 22 in chapter 5.6 above and the example below.
■ <mechanism>
user’s authentication mechanism:
▣ rsasign
means RSA Signature
▣ ecdsa
means ECDSA Signature
▣ rsasc
means RSA Smartcard
▣ hmacpwd
means HMAC Password
■ <flag>
▣ sm
The user may open a secure messaging session with or without authenticating
the command
▣ sma
The user may open a secure messaging session only if she/he has authenticated
the command.

Administration of CryptoServer with csadm
Page 133 of 222
■ <auth_token>
User’s authentication token (key specifier or password), depending on user’s
authentication mechanism:
▣ rsasign, rsasc or ecdsa:
The key specifier for the public part of the user’s RSA or ECDSA key (see chapter
5.1.4)
In case of rsasign or ecdsa, a name of a hash algorithm, put into curly
brackets { }, can be appended or prepended to the key specifier. See in chapter
5.6 above and example below.
▣ hmacpwd
new user’s password (length between 4 and 1024 characters). A name of a hash
algorithm, put into curly braces { }, can be appended or prepended to the
password, see Table 22 in chapter 5.6 and the examples below.
For hidden password entry the string ‘ask’ is used as a placeholder (see chapter
5.1.5 and below).
The usage of hidden password entry is strongly recommended.
If hidden password entry is used, the csadm will ask for the new user’s password
separately (i.e., a request ‘Enter Passphrase:’ follows in the next command line)
and hide the entrance on the monitor by the display of default characters.
Authentication
The command must be authenticated with permission 2 in user group 7 (see chapters
3.2.2 and 5.3).
IMPORTANT:
If a user with permission for administrating the CryptoServer is created (i.e., a user with
permission 1 in user group 6), the command must be authenticated with permission 2 in
the user group 7 and permission 1 in the user group 6.
Examples
■ Add a user with RSA Signature authentication
csadm LogonSign=ADMIN,:cs2:cyb:USB0
AddUser=Eve,01000000,rsasign,sm,{SHA-256}key1.key
■ Add a user with RSA Smartcard authentication
csadm LogonSign=ADMIN,:cs2:cyb:USB0
AddUser=USR2,00000010,rsasc,sma,:cs2:cyb:USB0
■ Add a user with ECDSA Signature authentication
csadm LogonSign=ADMIN,:cs2:cyb:USB0
AddUser=paul,01000000,ecdsa,sm,key1.key
■ Add a user with PKCS#11 Key Manager role in PKC#11 slot 4 and HMAC password
authentication
csadm LogonSign=ADMIN,:cs2:cyb:USB0
AddUser=KM_0004,020{CXI_GROUP=SLOT_004},hmacpwd,sma,ask
Output
None on success or error message
Administration of CryptoServer with csadm
Page 134 of 222
The PIN pad (if needed) has to be connected to the computer where the csadm tool is running
(serial line or USB port).
If the authentication of the command AddUser requires a smartcard and the source of the
new user’s public key is a smartcard too, follow the insructions on the display of the PIN pad.
You'll have to insert the smartcard for the command authentication (old key) first, and then
the smartcard containing the user’s new authentication key.
5.6.3 ChangeUser
With the command ChangeUser a user can change his/her own authentication key or
password, or a user with user management rights can change the authentication credentials
of another user. Furthermore, the failed authentication counter of the user whose
authentication credentials are to be changed is reset. If the user has been blocked for
authentication because the number of failed authentication attempts has exceeded the
maximum number of allowed failed authentication attempts, he/she is unblocked again.
A user is not allowed to change his authentication mechanism, permissions or flags.
In case the user’s authentication key shall be changed, the user needs a new RSA or ECDSA
authentication key (on smartcard or as a keyfile) as well as his/her old RSA or ECDSA
authentication key pair.
Syntax
csadm [Dev=<device>] <Authentication>
ChangeUser=<user>,<auth_token>
Parameters
■ <device>
Device address of the CryptoServer or the CryptoServer LAN (see chapter 5.1.3
for some examplary values);
This parameter can be omitted if the device address has been set as the
CRYPTOSERVER environment variable.

Administration of CryptoServer with csadm
Page 135 of 222
■ <user>
existing user name
■ <auth_token>
user’s new authentication token (key specifier or password), depending on the
user’s authentication mechanism:
▣ In case of a user with signature-based authentication mechanism: key
specifier for public part of the user’s new RSA or ECDSA key (see chapter
5.1.4)
▣ In case of a user with password-based authentication mechanism: the
user’s new password (minimum length 4 characters, for user with ‘SHA-1
hashed Password’ mechanism maximum length 16 characters, for user with
HMAC Password mechanism maximum length 1024 characters);
for hidden password entry: string ‘ask’ (see chapter 5.1.5; hidden password
entry is strongly recommended)
Authentication
The command must be authenticated by the existing user according to his/her
authentication mechanism (see chapter 5.3).
Examples
csadm LogonSign=paul,:cs2:cyb:USB0
ChangeUser=paul,:cs2:cyb:USB0
csadm LogonPass=paul,swordfish ChangeUser=paul,sesame
csadm LogonPass=paula,ask ChangeUser=paula,ask
Output
None on success or error message
■ In case of a user with RSA Signature or ECDSA Signature authentication mechanism:
If the authentication of this command requires a smartcard and the source of the user’s
new public key is a smartcard too, follow the instructions on the display of the PIN pad.
You'll have to insert the smartcard for the command authentication (old key) first, and then
the smartcard containing the user’s new authentication key.
■ In case of a user with RSA Smartcard authentication mechanism:
▣ If the user’s new RSA key is read from a smartcard, then two PIN pads are needed:
□ One PIN pad connected to the computer, where the csadm tool is running to insert
the smartcard containing the user’s new RSA key,
□ A second PIN pad connected to the CryptoServer to insert the smartcard for the
command authentication (with user’s old key).
▣ If the user’s new RSA key is read from a file, only one PIN pad is necessary for
authentication with the old key. This PIN pad has to be connected directly to the
CryptoServer.

Administration of CryptoServer with csadm
Page 136 of 222
■ In case that the authentication key of a user with password-based authentication
mechanism shall be changed, the usage of hidden password entry is strongly
recommended (see chapter 5.1.5).
5.6.4 DeleteUser
This function deletes a user from the user database.
In order to prevent the CryptoServer from getting non-administrable, the sum of the
permissions of the remaining users, who use a signature-based authentication mechanism,
has to be at least level 2 in user group 7 and level 1 in group 6. If this is not the case, the
function will refuse execution and return an error code.
Syntax
csadm [Dev=<device>] <Authentication> DeleteUser=<user>
Parameters
■ <device>
Device address of the CryptoServer or the CryptoServer LAN (see chapter 5.1.3
for some examplary values);
This parameter can be omitted if the device address has been set as the
CRYPTOSERVER environment variable.
■ <user>
existing user
Authentication
This command must be authenticated with permission 2 in the user group 7 (see
chapters 3.2.2 and 5.3).
Example
csadm LogonSign=ADMIN,:cs2:cyb:COM1 DeleteUser=paul
Output
None on success or error message
5.6.5 BackupUser
This command creates a file with a backup of all users that currently exist on the
CryptoServer. Each user entry in the created backup file is encrypted with the CryptoServer’s
Master Backup Key (MBK) and therefore can be handled without additional security
measures.
The user ADMIN is not included in the backed up file.
Administration of CryptoServer with csadm
Page 137 of 222
Syntax
csadm [Dev=<device>] <Authentication>
BackupUser=<file>[,<flags>]
Parameters
■ <device>
Device address of the CryptoServer or the CryptoServer LAN (see chapter 5.1.3
for some examplary values);
This parameter can be omitted if the device address has been set as the
CRYPTOSERVER environment variable.
■ <file>
path and file name of the backup file to be created
■ <flags>
Overwrite (Optional)
backup file will be overwritten if already existing
Authentication
The command must be authenticated with permission 2 in the user group 7 (see
chapters 3.2.2 and 5.3).
Example
csadm LogonSign=ADMIN,:cs2:cyb:USB0 ...
BackupUser=d:\temp\cs123456-20051212.ubk,overwrite
Output
None on success or error message
If the 'overwrite' flag is not set and the backup file already exists, no backup is performed
and the existing backup file is not overwritten.
5.6.6 RestoreUser
This command restores the users on the CryptoServer from a backup file (see command
BackupUser).
The same Master Backup Key (MBK) which has been used to create the backup file must be
stored on the CryptoServer.
Syntax
csadm [Dev=<device>] <Authentication> …
RestoreUser=<file>[,<flags>]
Parameters
■ <device>
Device address of the CryptoServer or the CryptoServer LAN (see chapter 5.1.3
Administration of CryptoServer with csadm
Page 138 of 222
for some examplary values);
This parameter can be omitted if the device address has been set as the
CRYPTOSERVER environment variable.
■ <file>
path and file name of the backup file
■ <flags>
overwrite (optional)
a user with one of the given user names who already exists on the CryptoServer
will be overwritten
Authentication
The command must be authenticated with permission 2 in the user group 7 (see
chapters 3.2.2 and 5.3).
Example
csadm LogonSign=ADMIN,:cs2:cyb:USB0
RestoreUser=d:\temp\cs123456-20051212.ubk,overwrite
Output
None on success or error message
If the 'overwrite' flag is not set and one of the users (identified by its user name) already
exists on the CryptoServer the command RestoreUser fails and returns an error code.
5.6.7 SetMaxAuthFails
This command defines the maximum number (n) of consecutive failed authentication
attempts for each user (see chapter 3.2.3).
If this maximum number is reached the user is blocked. A blocked user is not able to
authenticate towards the CryptoServer anymore.
A blocked user can be unblocked by a user with user management rights (minimum
permission 2 in the user group 7; 20000000) who is logged on to the CryptoServer.
Syntax
csadm [Dev=<device>] <Authentication> SetMaxAuthFails=<n>
Parameters
■ <device>
Device address of the CryptoServer or the CryptoServer LAN (see chapter 5.1.3
for some examplary values);
This parameter can be omitted if the device address has been set as the
CRYPTOSERVER environment variable.
■ <n>
Defines the maximum number of consecutive failed authentication attempts for

Administration of CryptoServer with csadm
Page 139 of 222
each user.
The allowed range for n is from 0 to 255.
A value of 0 means that an unlimited number of consecutive failed
authentication attempts is allowed for each user.
The default for n is 0.
Authentication
The command must be authenticated with permission 2 in the user group 7 (see
chapters 3.2.2 and 5.3).
Example
csadm Dev=196.163.1.2 LogonSign=ADMIN,:cs2:cyb:USB0
SetMaxAuthFails=3
csadm LogonPass=Anita,ask SetMaxAuthFails=4
Output
None on success or error message
5.6.8 GetMaxAuthFails
This command displays the maximum number (n) of consecutive failed authentication
attempts for each user (see chapter 3.2.3).
Syntax
csadm [Dev=<device>] GetMaxAuthFails
Parameter
<device>
Device address of the CryptoServer or the CryptoServer LAN (see chapter 5.1.3 for
some examplary values);
This parameter can be omitted if the device address has been set as the
CRYPTOSERVER environment variable.
Authentication
None
Example
csadm Dev=192.168.1.2 GetMaxAuthFails
Output
n (0…255): the maximum number (n) of consecutive failed authentication attempts
for each user. If this number is reached the user is blocked and unable to
authenticate towards the CryptoServer anymore.
5.7 Commands for Managing the Master Backup Keys
In order to provide backup functionality (see chapter 3.8), CryptoServer is able to store up to
four Master Backup Keys (in slot 0...3) to be used by various applications. Each Master
Backup Key (MBK) can either be a DES key (16 or 24 bytes) or an AES key (16, 24 or 32 bytes).
An MBK can be generated on the CryptoServer and — split into key parts (key shares) —
externally stored on two or more smartcards. The key parts of a MBK can be imported into the
Administration of CryptoServer with csadm
Page 140 of 222
CryptoServer either from smartcards or they can be manually keyed in at the smartcard
reader (PIN pad). If a new key should be imported into a key slot which already contains an
MBK, the old MBK has to be imported too, in order to be verified. The CryptoServer compares
the existing key with the key to be verified. The CryptoServer overwrites the existing key with
the new key only if they match.
In addition to the local management of Master Backup Keys, where the PIN pad has to be
directly connected to the CryptoServer, the MBK can also be managed remotely, without
having direct physical access to the CryptoServer (which perhaps is located in a data center).
To protect the key parts during transmission from/to the CryptoServer, they are encrypted
with the session key (DES or AES) that was exchanged on establishment of the secure
messaging session with the CryptoServer. A secure messaging session is therefore necessary
for remote MBK management.
This chapter describes how Master Backup Keys (MBK) can be managed remotely.
In order to unify the MBK storage all applications of Utimaco IS GmbH (e.g. CXI) use the
following convention:
Slot 0
DES key
Slot 1
Intermediate key (for example, while key is copied)
Slot 2
not used
Slot 3
AES key
It is recommended to use slot 3 exclusively for any MBK storage (AES key). If the MBK shall
be used to backup keys from firmware module CXI, then the MBK in slot 3 is mandatory: an
MBK from any other slot is not accepted by CXI.
Certain types of shell processes treat certain characters (commas, colons, semi-colons)
differently. If the execution of a csadm command fails with an error message from the shell
about an illegal parameter format, quoting parameter values may be necessary.

Administration of CryptoServer with csadm
Page 141 of 222
5.7.1 MBKListKeys
This command lists all MBKs currently stored on a CryptoServer.
Syntax
csadm [Dev=<device>] MBKListKeys
Parameter
<device>
Device address of the CryptoServer or the CryptoServer LAN (see chapter 5.1.3 for
some examplary values);
This parameter can be omitted if the device address has been set as the
CRYPTOSERVER environment variable.
Authentication
None
Example
csadm Dev=194.167.1.3 MBKListKeys
Output
slot name len algo type k generation date key check value
----------------------------------------------------------
0 MyDES_01 16 DES SHARE 3 10/09/22 13:08:45 148EF5C582FD87C7
3 <NoName> 32 AES XOR 2 07/08/06 10:35:50 106B5E4E84031BDE
For each MBK the following information is listed out:
■ slot
Gives the slot number
■ name
Gives the key name (or <NoName> if no key name is given)
■ len
Gives the MBK key size in bytes
■ algo
Gives the key algorithm
■ type
Indicates if the MBK was exported in two XOR halves (XOR) or in more than two key
shares (SHARE)
■ k
Gives the number of shares that is needed to recombine the MBK (with k=2 in case of
export in two XOR halves)
■ generation date
This is the date and time of generation of the MBK (up to seconds)
Administration of CryptoServer with csadm
Page 142 of 222
■ key check value
This is a key check value (ISO-hash MDC2 over MBK) which can be used to identify the
MBK
If an older firmware package is used (firmware module MBK version later than 2.2.1.0) the
values of
k
,
generation
date
and
key check value
are not shown.
5.7.2 MBKGenerateKey
This command generates an MBK on the CryptoServer, splits it into n key shares and
transmits the encrypted key shares to the host (encryption done with the session key). The
key shares are decrypted on the host and stored either on n smartcards or in n keyfiles.
Syntax
csadm [Dev=<device>] <Authentication> <Session> Key=<keyspec>
... MBKGenerateKey=<keytype>,<keylen>[,<n>,<k>,<keyname>]
Parameters
■ <device>
Device address of the CryptoServer or the CryptoServer LAN (see chapter 5.1.3
for some examplary values);
This parameter can be omitted if the device address has been set as the
CRYPTOSERVER environment variable.
■ <keyspec>
key specifier where the generated MBK shares should be stored (see chapter
5.1.4 for more details on keyfile specifiers):
▣ <smartcard,record number>, e.g. :cs2:cyb:USB0,15
□ the default record number for AES keys is 15
□ the default record number for DES keys is 1
▣ list of filenames and (if the key should be password protected) passwords-
<file#password> (for example, file1#pwd1,file2#pwd2).
□ If password is given as the string ask, hidden password entry is
performed
□ If no password is given, the keyfile is strored in plain text
■ <keytype>
key type of MBK: either DES or AES
■ <keylen>
key size of MBK: 16, 24 (DES, AES) or 32 bytes (AES only)
Administration of CryptoServer with csadm
Page 143 of 222
■ <n>
number of key shares to be generated (default: 2)
■ <k>
number of key shares required to recombine key (default: 2)
■ <keyname>
Key name (up to 8 characters with ANSI / ISO-8859-1 encoding)
Authentication
The command must be authenticated with permission 2 in the user group 6 (see
chapters 3.2.2 and 5.3).
Additionally, it is mandatory to execute the command within a secure messaging
session.This is automatically fulfilled if the authentication command LogonSign or
LogonPass is used.
Examples
■ csadm LogonSign=ADMIN,:cs2:cyb:COM3 Key=:cs2:cyb:COM3,1
MBKGenerateKey=DES,24,2,2,MyDESKey
■ csadm LogonPass=Paul,mypassword
Key=mbk1.key#swordfish,mbk2.key#sesame
MBKGenerateKey=AES,32,2,2,MyAESKey
■ csadm LogonPass=Paul,ask Key=:cs2:cyb:COM3,15
MBKGenerateKey=AES,32,5,3,AES_new
Output
None on success or error message
■ If smartcards are used (recommended):
The PIN pad has to be connected to the computer where the csadm tool is running (serial
line or USB).
Watch the display of the PIN pad for instructions on further command processing.
■ If keyfiles are used:
The usage of encrypted keyfiles is strongly recommended.
The newly generated MBK is not stored on the CryptoServer. To store the MBK on the
CryptoServer it has to be imported with the command MBKImportKey described in chapter
5.7.3.
To protect the key parts during transmission from/to the CryptoServer, they are encrypted
with the session key (DES or AES) that was exchanged on establishment of the secure
messaging session with the CryptoServer.
A secure messaging session is therefore necessary for remote MBK management.

Administration of CryptoServer with csadm
Page 144 of 222
5.7.3 MBKImportKey
This command imports the key shares of an MBK either from two or more smartcards or from
two or more keyfiles.
Syntax
csadm [Dev=<device>] <Authentication> Key=<keyspec>
MBKImportKey=<slot_no>
Parameters
■ <device>
Device address of the CryptoServer or the CryptoServer LAN (see chapter 5.1.3
for some examplary values);
This parameter can be omitted if the device address has been set as the
CRYPTOSERVER environment variable.
■ <keyspec>
Key specifier, where the new MBK should be loaded from (see chapter 5.1.4 for
more details on keyfile specifiers)
▣ <smartcard,record number>, e.g. :cs2:cyb:USB0,15
□ The default record number for AES keys is 15.
□ The default record number for DES keys is 1.
▣ list of filenames and (if the key should be password protected) passwords-
<file#password> (for example, file1#pwd1,file2#pwd2).
□ If password is given as the string ask, hidden password entry is
performed
□ If no password is given, the keyfile is strored in plain text
■ <slot_no>
slot number on the CryptoServer, where the key should be imported too; must
be 3 for AES key (recommended; even mandatory for usage with firmware
module CXI) and 0 for DES key
Authentication
The command must be authenticated with permission 2 in the user group 6 (see
chapters 3.2.2 and 5.3).
Examples
■ csadm LogonSign=ADMIN,:cs2:cyb:USB0 Key=:cs2:cyb:USB0,1
MBKImportKey=3
■ csadm LogonPass=Paul,mypassword
Key=mbk1.key#swordfish,mbk2.key#sesame MBKImportKey=3
■ csadm LogonPass=Paul,ask Key=:cs2:cyb:USB0,15
MBKImportKey=3
Output
None on success or error message
Administration of CryptoServer with csadm
Page 145 of 222
■ If smartcards are used:
A PIN pad has to be connected to the computer, where the csadm tool is running (serial
line or USB port).
Watch the display of the PIN pad for instructions on further command processing.
■ If keyfiles are used:
The usage of encrypted keyfiles, and of hidden password entry, is strongly recommended.
To protect the key parts during transmission from/to the CryptoServer, they are encrypted
with the session key (DES or AES) that was exchanged on establishment of the secure
messaging session with the CryptoServer.
A secure messaging session is therefore necessary for remote MBK management.
5.7.4 MBKCopyKey
This command copies one key share of a MBK from one storage location to another.
This command is executed locally without a connection to a CryptoServer. Therefore, the
state or mode of any underlying CryptoServer is irrelevant for the command execution, and no
authentication at any CryptoServer is necessary.
Syntax
csadm Key=<keyspec_source> MBKCopyKey=<keyspec_target>

Administration of CryptoServer with csadm
Page 146 of 222
Parameters
■ <keyspec_source>
Key specifier, where the key share should be loaded from (see chapter 5.1.4):
■ <keyspec>
Key specifier where the generated MBK shares should be stored (see chapter
5.1.4 for more details on keyfile specifiers):
▣ <smartcard,record number>, e.g. :cs2:cyb:USB0,15
□ The default record number for AES keys is 15.
□ The default record number for DES keys is 1.
▣ List of filenames and (if the key should be password protected) passwords-
<file#password> (for example, file1#pwd1,file2#pwd2).
□ If password is given as the string ask, hidden password entry is
performed
□ If no password is given, the keyfile is strored in plain text
■ <keyspec_target>
Key specifier, where key share should be stored (see chapter 5.1.4 and above)
Authentication
None
Examples
csadm Key= mbk1.key#swordfish MBKCopyKey=:cs2:cyb:USB0,15
csadm Key=:cs2:cyb:USB0,15 MBKCopyKey=mbk2.key#ask
Output
None on success or error message
With this command the storage location of an MBK can be migrated from a smartcard to a
keyfile or vice versa.
■ If smartcards are used:
A PIN pad including a smartcard reader has to be connected to the computer, where the
csadm tool is running (serial line or USB).
Watch the display of the PIN pad for instructions on further command processing.
■ If keyfiles are used:
The usage of encrypted keyfiles is strongly recommended.
If encrypted keyfiles are used, the usage of hidden password entry is strongly
recommended.
5.7.5 MBKCardInfo
This command lists the contents of an MBK smartcard. Here, every MBK key share is stored
in a separate record.
Administration of CryptoServer with csadm
Page 147 of 222
The PIN pad must be connected to the host computer (serial line or USB), where the csadm
tool is running.
This command is executed locally without a connection to a CryptoServer. Therefore, the
state or mode of any underlying CryptoServer is irrelevant for the command execution, and no
authentication at any CryptoServer is necessary.
Syntax
csadm MBKCardInfo=<cardspec>
Parameters
<cardspec>
smartcard specifier of the MBK smartcard (see chapter 5.1.4)
Authentication
None
Example
csadm MBKCardInfo=:cs2:cyb:USB0
Output
REC TYPE ALG LEN NAME TIMEGEN K ID HASH
----------------------------------------------------------------------------------------------------------------------------------------
01: XOR DES 168 DESKEY 22.01.2007 13:52:01 00 00 C3C2A3F1C9E83A6D
02: SHARE DES 168 <NoName> 13.04.2007 13:41:58 00 00 6A7D994A662B4D22
03: SHARE AES 256 Test 13.04.2007 16:17:01 03 02 397620CEB7C61DBE
An MBK smartcard may contain up to 16 records/MBK parts.
For each stored key share the following information is given:
■ REC
record number
■ TYPE
share type
XOR: XOR-half
SHARE: key share
■ ALG
MBK algorithm
■ LEN
key length (in bits)
■ NAME
name of an MBK (or <NoName> if no key name is given)
Administration of CryptoServer with csadm
Page 148 of 222
■ TIMEGEN
date and time of generation
■ K
number of shares that are necessary to recombine MBK (only relevant if TYPE is SHARE)
■ ID
ID of this share
■ HASH: check value over MBK (usually: first 8 bytes of ISO-hash MDC2 over MBK; if ID= 0 or
1: first respectively second 8 bytes of ISO-hash MDC2 over MBK).
5.7.6 MBKCardCopy
This command copies the whole content of one MBK smartcard to another.
This command is executed locally without a connection to a CryptoServer. Therefore, the
state or mode of any underlying CryptoServer is irrelevant for the command execution, and no
authentication at any CryptoServer is necessary.
Syntax
csadm MBKCardCopy=<cardspec>
Parameters
<cardspec>
smartcard specifier of the smartcard to be copied (see chapter 5.1.4)
Authentication
None
Example
csadm MBKCardCopy=:cs2:cyb:USB0
Output
None on success or error message
If records on the target smartcard already exist they will be overwritten without additional
query.
5.7.7 MBKPINChange
This command changes the PIN on a smartcard where an MBK is stored.
This command is executed locally without a connection to a CryptoServer. Therefore, the
state or mode of any underlying CryptoServer is irrelevant for the command execution, and no
authentication at any CryptoServer is necessary.
Administration of CryptoServer with csadm
Page 149 of 222
Syntax
csadm MBKPINChange=<cardspec>
Parameters
<cardspec>
smartcard specifier of the smartcard (see chapter 5.1.4)
Authentication
None
Example
csadm MBKPINChange=:cs2:cyb:USB0
Output
None on success or error message
The PIN pad has to be connected to the computer where the csadm tool is running (serial
line or USB).
Please follow the instructions on the display of the PIN pad.
5.8 Commands for Firmware Management
This chapter describes the commands to be used for managing the firmware on the
CryptoServer, i.e., for showing the list of firmware modules and their versions currently loaded
on the CryptoServer, loading and deleting firmware modules, updating the firmware, etc.
For performing these commands, the CryptoServer has to be either in Operational Mode or in
Maintenance Mode.
Certain types of shell processes treat certain characters (commas, colons, semi-colons)
differently. If the execution of a csadm command fails with an error message from the shell
about an illegal parameter format, quoting parameter values may be necessary.
5.8.1 ListFirmware
This function returns a list with information about all firmware modules which are currently
running, giving the firmware module ID, abbreviated name, CPU target type the firmware
module is compiled for (C64+ for CryptoServer CSe-Series, C64 for CryptoServer CS-, Se- and
Se-Series Gen2, SDK for CryptoServer Simulator for Windows and SIM for CryptoServer
Simulator for Linux), version number and the respective firmware module initialization
level.

Administration of CryptoServer with csadm
Page 150 of 222
If a module cannot be started or fully initialized, the GetBootLog command (see chapter
5.4.10) provides more detailed information about the reason.
Syntax
csadm [Dev=<device>] ListFirmware
Parameter
<device>
Device address of the CryptoServer or the CryptoServer LAN (see chapter 5.1.3 for
some examplary values);
This parameter can be omitted if the device address has been set as the
CRYPTOSERVER environment variable.
Authentication
None
Example
csadm Dev=11.43.5.200 ListFirmware
Output
ID name type version initialization level
-----------------------------------------------------
0 SMOS C64 3.1.1.2 INIT_OK
a HCE C64 1.0.1.0 INIT_OK
e BCM C64 1.0.2.0 INIT_OK
64 PKCS11 C64 1.1.3.0 INIT_OK
68 CXI C64 2.1.0.1 INIT_OK
81 VDES C64 1.0.4.0 INIT_OK
82 PP C64 1.2.3.6 INIT_OK
83 CMDS C64 3.0.3.5 INIT_OK
84 VRSA C64 1.1.1.2 INIT_OK
85 SC C64 1.2.0.0 INIT_OK
86 UTIL C64 3.0.1.2 INIT_OK
87 ADM C64 3.0.7.1 INIT_OK
88 DB C64 1.1.2.4 INIT_OK
89 HASH C64 1.0.7.0 INIT_OK
8b AES C64 1.0.5.0 INIT_OK
8d DSA C64 1.0.0.0 INIT_OK
8e LNA C64 1.1.0.0 INIT_OK
8f ECA C64 1.1.2.0 INIT_OK
91 ASN1 C64 1.0.3.3 INIT_OK
96 MBK C64 2.2.3.2 INIT_OK
Administration of CryptoServer with csadm
Page 151 of 222
9a NTP C64 1.2.0.6 INIT_OK
9c ECDSA C64 1.1.1.1 INIT_OK
If for a firmware module no entry is found, the module is not loaded.
After loading or replacing a firmware module, the CryptoServer has to be restarted with the
Restart
command as described in chapter 5.4.21 before the firmware module becomes
active.
During the boot process of the CryptoServer, first the operating system SMOS performs its
own initialization. Afterwards SMOS starts all other firmware modules. The module start is a
complex process: Every module that is found (*.msc files or *.sys files in Maintenance Mode)
and started by SMOS will run through the above given states of initialization, in case of
success ending with the INIT_OK state.
The meaning of the initialization levels is the following:
Initialization level
Description
INIT_NONE
The module is present but the initialization of the module has not
been started yet. This entry will be made by the OS when loading the
module into the SD-RAM memory (for CryptoServer CSe-Series: DDR2
RAM memory).
INIT_INTERNAL
The module has finished its internal initialization (first step of
initialization). “Internal” means all initialization tasks that can be done
without using services from other modules like memory allocation,
FIFO creation, global data initialization, etc.
INIT_DEP_OK
The module has successfully completed the check of dependencies
on other modules (second step of initialization). “Dependencies on
other modules” means that the module depends on services provided
by other modules in order to run correctly. Example: the SC
(Smartcard) module requires the PP (PIN pad) module to do its work.
INIT_OK
This is the highest possible level: The initialization of the module is
successfully completed (third step of initialization). Possible calls to
services from other modules are done successfully.
INIT_FAILED
Module initialization failed. Services provided by this module are not
available.
INIT_INACTIVE
Module is loaded but cannot supply services, for example, because of
not-installed hardware components. This initialization level is
Administration of CryptoServer with csadm
Page 152 of 222
Initialization level
Description
currently only used by the firmware modules HCE, BCM and EXAR
(relevant for CryptoServer Se-Series and CryptoServer Se-Series Gen2
only).
SUSPENDED
Module was shutdown and cannot supply services any more.
Table 23: CryptoServer initialization levels
5.8.2 ListFiles
This command lists all files stored on the CryptoServer. The following directories are available
on the different storage devices:
Device
Directory
Size
Description
FLASH
\FLASH
32 MByte
Every firmware module has read and write access to
this working directory.
The regular set of firmware modules and any other
kind of application data (databases, configuration or
log files) is stored here.
NVRAM
(non volatile
RAM)
\NVRAM
512 kByte
Every firmware module has read and write access to
this directory.Frequently changing data, which shall
be stored non-volatile, should be stored here.
Table 24: Directories on the CryptoServer
Don’t use the \FLASH directory to store often changing data (for example, counter). This will
result in a great wear and tear of the flash-component and therefore in a decreased lifetime
of the CryptoServer.
Use the \NVRAM directory instead to store this data non-volatile.
Syntax
csadm [Dev=<device>] ListFiles[=<mode>]
Parameters
■ <device>
Device address of the CryptoServer or the CryptoServer LAN (see chapter 5.1.3 for
some examplary values);
This parameter can be omitted if the device address has been set as the
CRYPTOSERVER environment variable.
■ <mode>

Administration of CryptoServer with csadm
Page 153 of 222
▣ <none> - show all non-hidden files
▣ FLASH - only non-hidden files in the \FLASH directory are listed
▣ SYS - only hidden files in the \FLASH directory are listed
▣ NVRAM - only files in the \NVRAM directory are listed
Examples
csadm ListFiles
csadm ListFiles=FLASH
csadm ListFiles=NVRAM
csadm ListFiles=SYS
Authentication
None
Output
csadm ListFiles=FLASH
file name size module: ID type version name
-------------------------------------------------------------------------------------------------------------------------
FLASH\CXIKEY.db 4762 -
FLASH\VMBK1.db 97 -
FLASH\adm.msc 37548 ADM 0x087 SDK 3.0.17.1 Administration Module SDK
FLASH\aes.msc 36524 AES 0x08b SDK 1.3.6.0 AES Module SDK
FLASH\asn1.msc 13996 ASN1 0x091 SDK 1.0.3.4 Asn1 Module SDK
FLASH\audit_00.log 6015 -
FLASH\cmds.msc 58540 CMDS 0x083 SDK 3.5.1.4 Command Scheduler (SDK)
FLASH\cxi.msc 134316 CXI 0x068 SDK 2.1.11.1 Crypto. eXtended Interface SDK
FLASH\db.msc 21164 DB 0x088 SDK 1.3.1.1 Database module (SDK)
FLASH\dsa.msc 26284 DSA 0x08d SDK 1.2.2.1 DSA Module SDK
FLASH\eca.msc 58028 ECA 0x08f SDK 1.1.7.6 Elliptic Curve Arith. (SDK)
FLASH\ecdsa.msc 22700 ECDSA 0x09c SDK 1.1.8.7 ECDSA Module SDK
FLASH\hash.msc 30892 HASH 0x089 SDK 1.0.10.1 Hash Module SDK
FLASH\lna.msc 34988 LNA 0x08e SDK 1.2.3.3 Long Number Arithmetic (SDK)
FLASH\mbk.msc 33964 MBK 0x096 SDK 2.2.4.4 Master Backup Key Module SDK
FLASH\pp.msc 34988 PP 0x082 SDK 1.2.5.1 PIN pad Driver (SDK)
FLASH\sc.msc 20140 SC 0x085 SDK 1.2.0.3 Smartcard module (SDK)
FLASH\smos.msc 97452 SMOS 0x000 SDK 5.4.4.0 SMOS Operating System (SDK)
FLASH\user.db 4963 -
FLASH\util.msc 12460 UTIL 0x086 SDK 3.0.3.0 Utility Module SDK
FLASH\vdes.msc 21164 VDES 0x081 SDK 1.0.9.1 DES Module SDK
FLASH\vrsa.msc 45740 VRSA 0x084 SDK 1.3.0.6 RSA Module SDK
22 files 756725 bytes, 65636352 bytes available

Administration of CryptoServer with csadm
Page 154 of 222
If a directory does not contain any file, it is not displayed.
The ListFiles command displays the following information:
■ file name
Path\name of the file
■ size
Size of the file
If the file is a firmware module, additionally the following information is displayed:
■ module
Abbreviation of the name of the firmware module)
■ ID (FC)
Firmware module ID
▣ type
CPU target type:
▣ C64 for CryptoServer Se- and Se-Series Gen2,
▣ C64+ for CryptoServer CSe-Series,
▣ SDK for CryptoServer Simulator for Windows
▣ SIM for CryptoServer Simulator for Linux)
■ version
Version number in format x.y.z.w:
▣ x: One byte in decimal format
▣ y: One byte in hexadecimal format
▣ z: One byte in decimal format
▣ w: One byte in decimal format
■ name
Full name of the corresponding firmware module
If the file is a cryptographic key (*.key), additionally the following information is displayed:
■ First five bytes of the SHA-512 hash calculated over the modulus of the key
The file system of the CryptoServer is case sensitive.
Administration of CryptoServer with csadm
Page 155 of 222
5.8.3 LoadFile
This command loads a file (firmware module or other file) onto the working directory (FLASH)
or the non-volatile directory (NVRAM) of the CryptoServer.
If the file is a firmware module (*.mtc) the MMC signature of the firmware module will be
checked. If it can’t be successfully verified the loading of the module will be rejected.
If the firmware module is encrypted the CryptoServer looks for the private part of the
Firmware Encryption Key (see chapter 3.9.2) and tries to decrypt the module. If the firmware
module could be successfully decrypted, it is encrypted with the CryptoServer’s internal
Master Key before it is stored in the working directory \FLASH (with extension .msc).
Otherwise, it is stored by default in the \FLASH directory with the extension .emc, and will be
decrypted later while loading the Firmware Encryption Key (see chapter 5.9.6). Firmware
modules with the .emc file extension cannot be executed. For details on how to load an
encrypted firmware module into the CryptoServer, see chapter 7.2.
For security reasons, some files and file types cannot be loaded into the CryptoServer. Any
try to load a file/file type, which is listed below, into the CryptoServer will cause an error.
■ prod*.key
■ init*.key
■ mdlsig*.key
■ alarm.sens
■ *.mt_
■ *.sl_
■ *.msc
■ *.sys
■ *.emc
■ *.db
■ *.log
If the given file already exists, it will be replaced.
A loaded/replaced firmware module does not become active until the CryptoServer has been
restarted (see
Restart
command, chapter 5.4.21).
Syntax
csadm [Dev=<device>] <Authentication> LoadFile=<file>[,<dir>]
Administration of CryptoServer with csadm
Page 156 of 222
Parameter
■ <device>
Device address of the CryptoServer or the CryptoServer LAN (see chapter 5.1.3
for some examplary values);
This parameter can be omitted if the device address has been set as the
CRYPTOSERVER environment variable.
■ <file>
filename (eventually with path)
■ <dir>
CryptoServer directory, where the file should be stored (FLASH or NVRAM). If
omitted, the \FLASH directory is used as default.
Examples
csadm LogonSign=ADMIN,d:\keys\myKey.key#ask
LoadFile=exmp_dbg_1.0.2.3.mtc
csadm dev=PCI:0 LogonPass=paul,swordfish
LoadFile=usage.cnt,NVRAM
Authentication
This command must be authenticated with level 2 in user group 6.
If the audit configuration file audit.cfg is loaded, the command must be
authenticated with level 2 in user groups 6 and 7.
Output
None on success or error message
If the filename of a firmware module contains an underscore character ('_') the rest of the
name up to the file extension is stripped before loading (for example, exmp_dbg.mtc will be
loaded as exmp.mtc, adm_1.0.0.1.mtc will be loaded as adm.mtc).
The length of the file name (without directory) may not exceed 15 characters (here only those
characters count that will not be stripped, i.e., characters before any underscore character '_').
If no path is given with the <file> parameter, the file from the current directory is used. If the
file to be loaded is stored in another directory (e.g., on an USB flash drive) the respective path
must be given.
The file system of the CryptoServer is case sensitive.
Filenames of firmware modules (with extension *.mtc) are converted to lower case letter
before being loaded onto the CryptoServer.

Administration of CryptoServer with csadm
Page 157 of 222
If several files shall be loaded in one step, the last part of the command
(LoadFile==<file>[,<dir>]) has to be repeated for every wanted file.
5.8.4 LoadPkg
This command provides to the user a comfortable and easy-to-use possibility to load or
update a set of several firmware modules and/or files into the CryptoServer in only one step. It
can replace a series of succeeding csadm commands (see example below).
The LoadPkg command loads the contents of the given package file (archive *.mpkg, see also
chapter 3.9.3) into the CryptoServer. Depending on the given command line flags the load
procedure can also perform a Clear if needed (csadm clear=INIT).
Syntax
csadm [Dev=<device>] <Authentication>
[SignedLicenseFile=<license_file>] ……
LoadPkg=<package>[,<flags>[,<password>]]
Parameters
■ <device>
Device address of the CryptoServer or the CryptoServer LAN (see chapter 5.1.3
for some examplary values);
This parameter can be omitted if the device address has been set as the
CRYPTOSERVER environment variable.
■ <licence_file>
signed license file to be loaded in addition to the firmware package
■ <package>
Input package file containing CryptoServer firmware modules and files (filename
must have extension *.mpkg)
■ <flags>
Flags can be added (+) if this makes sense.
▣ NoClear (default)
CryptoServer will not be cleared prior to package loading
▣ ForceClear
CryptoServer will be cleared prior to package loading in any case (Clear
command with option INIT, see chapter 5.8.11). In particular, all firmware
modules and all sensitive data inside the CryptoServer will be deleted before
the contents of the package file are loaded.
▣ SwapComCreate
Creates the file swap.com in the FLASH memory of the CryptoServer CS-
and Se-Series; The swap.com file is only needed on CryptoServer plug-in
cards. Detailes about the swap.com file can be found in chapter 2.2.4.4.
Administration of CryptoServer with csadm
Page 158 of 222
▣ SwapComDelete
Deletes the file FLASH\swap.com in the CryptoServer (if available). The
swap.com file should not be present on CryptoServer LAN appliances.
▣ SwapComDetect
If the addressed CryptoServer is a CryptoServer LAN, the file
FLASH\swap.com will be deleted. For all other CryptoServer cards this file
will be created.
■ <password>
root password of CryptoServer LAN
This parameter is only relevant if the driver commands Reset, Restart and
ResetToBL are password protected, which depends on the settings in the
CryptoServer LAN configuration file csxlan.conf. You can find detailed
information about the content of the csxlan.conf file in the CryptoServer LAN
Manual for System Administrators, Chapter "The Configuration File csxlan.conf".
▣ for hidden password entry the string 'ask' is used (see chapter 5.1.5)
The usage of hidden password entry is strongly recommended.
▣ root password of the CryptoServer LAN in clear text
Authentication
This command has to be authenticated with permission 2 in the user group 6 (see
chapters 3.2.2 and 5.3).
Example
csadm LogonSign=ADMIN,:cs2:cyb:USB0
LoadPkg=firmware.mpkg,NoClear+NoDelete
Output
Information about all actually performed steps and changes in status, mode or
firmware module versions (see examples below).
The modules stored inside the CryptoServer but not contained in the given package file will
remain on the CryptoServer. To delete them, the option ‘ForceClear’ has to be used.
Example 1
The firmware, which is currently stored in the CryptoServer shall be completely replaced by
the firmware (and other files) contained in a cxi_1.3.1.3.mpkg package file. In this case a
Clear should be performed as part of the LoadPkg command, i.e., the ForceClear-flag must
be set. During command execution information about all currently performed steps, the state
and the mode of the CryptoServer is displayed:
csadm LogonSign=ADMIN,:cs2:cyb:COM3
LoadPKG=d:\temp\cxi_1.3.1.3.mpkg,ForceClear
I: Reading package...
I: Perform authentication and create session

Administration of CryptoServer with csadm
Page 159 of 222
I: Going to delete all files/modules inside the CryptoServer (perform
Clear)
I: Load file smos_3.0.1.0_c86.mtc
I: Load file util_3.0.0.1_c86.mtc
I: Load file cmds_3.0.0.2_c86.mtc
I: Load file adm_3.0.0.2_c86.mtc
I: Load file db_1.1.2.2_c86.mtc
I: Load file pp_1.2.3.0_c86.mtc
I: Load file sc_1.2.0.0_c86.mtc
I: Load file asn1_1.0.3.3_c86.mtc
I: Load file hash_1.0.6.0_c86.mtc
I: Load file aes_1.0.4.1_c86.mtc
I: Load file vdes_1.0.3.0_c86.mtc
I: Load file lna_1.1.0.0_c86.mtc
I: Load file vrsa_1.1.0.1_c86.mtc
I: Load file eca_1.1.1.0_c86.mtc
I: Load file ecdsa_1.0.1.0_c86.mtc
I: Load file dsa_1.0.0.0_c86.mtc
I: Load file mbk_2.1.2.3_c86.mtc
I: Load file hce_1.0.0.0_c86.mtc
I: Load file cxi_1.3.1.3_c86.mtc
I: Restarting CryptoServer
Package d:\temp\cxi_1.3.1.3.mpkg successfully loaded
Example 2
In the following example only some firmware modules are upgraded (AES, CMDS), modules
with higher version on the CryptoServer remain unchanged and others that have not been yet
available on the CryptoServer are loaded.
csadm LogonSign=ADMIN,ADMIN.key LoadPkg=fw1.mpkg
I: Reading package...
I: Perform authentication and create session
I: Retrieving file list from CryptoServer
I: Load file exmp_1.0.1.0.mtc
I: Load file pkcs11_1.0.6.1.mtc
I: Load file cmds_3.0.0.2_c86.mtc
I: Load file aes_1.0.5.0_c86.mtc
I: Restarting CryptoServer
Package fw1.mpkg successfully loaded
Administration of CryptoServer with csadm
Page 160 of 222
5.8.5 DeleteFile
With this command a file or a group of files can be deleted from the working directory
(\FLASH) or non-volatile directory (\NVRAM) of the CryptoServer.
The following files or file types cannot be deleted due to security restrictions:
■ prod*.key
■ init*.key
■ mdlsig*.key
■ alarm.sens
■ *.sys
■ *.log
■ *.scf
This command can also be used to delete firmware modules (*.msc files). However, the set
of backup copies of the basis firmware modules (system firmware modules *.sys) cannot be
deleted.
Even if already deleted from the working directory, a firmware module is still running (for
CryptoServer Se-Series and Se-Series Gen2: in SD-RAM memory; for CryptoServer CSe-
Series: in DDR2 RAM memory). The firmware module will only become inactive after the
CryptoServer has been restarted.
Syntax
csadm [Dev=<device>] <Authentication>
DeleteFile=[<dir>\]<file>
Parameters
■ <device>
Device address of the CryptoServer or the CryptoServer LAN (see chapter 5.1.3
for some examplary values);
This parameter can be omitted if the device address has been set as the
CRYPTOSERVER environment variable.
■ <file>
filename
■ <dir>
CryptoServer directory (FLASH or NVRAM). If omitted, the working directory
(FLASH) is used as default.
Examples
csadm LogonPass=paul,swordfish DeleteFile=exmp.msc
csadm LogonSign=sm,:cs2:cyb:USB0 DeleteFile=FLASH\eexmp.msc
Authentication
This command must be authenticated with level 2 in user group 6 (see chapters
3.2.2 and 5.3).
Administration of CryptoServer with csadm
Page 161 of 222
Output
None on success or error message
The file system of the CryptoServer is case sensitive.
5.8.6 Pack
This command creates a CryptoServer package file (*.mpkg, see chapter 3.9.3) from the
content of the given directory. All files contained in the given directory will be added to the
package file (which has the same name as the given directory, plus .mpkg file extension).
This package file can later be used to load a set of several firmware modules and files into the
CryptoServer within one command (LoadPkg command, see chapter 5.8.4).
Syntax
csadm Pack=<directory>
Parameter
<directory>
Input directory containing CryptoServer firmware modules and files
Authentication
None
Example
csadm Pack=C:\firmware\release-1.0.0
Output
For the given example on success:
Package C:\firmware\release-1.0.0.mpkg created
Otherwise, error message
The resulting .mpkg package file will be stored in the same directory as the given input
directory. Any existing file with the same name will be overwritten.
5.8.7 Unpack
This command extracts all files contained in a CryptoServer package file *.mpkg (see chapter
3.9.3). The files will be extracted in a new directory which will have the same name as the
given package file but without the .mpkg extension.
Syntax
csadm Unpack=<package>

Administration of CryptoServer with csadm
Page 162 of 222
Parameter
<package>
Input package file (*.mpkg) containing CryptoServer firmware modules and files
Authentication
None
Example
csadm Unpack= C:\firmware\release-1.0.0.mpkg
Output
For the given example on success:
Package C:\firmware\release-1.0.0.mpkg unpacked successfully
Otherwise, error message
The resulting directory firmware containing the extracted firmware modules and files will be
created in the same directory where the given firmware.mpkg package file is located.
If a directory of that name already exists, the extraction is denied.
5.8.8 ListPkg
This command lists the content of a CryptoServer package file (*.mpkg, see chapter 3.9.3),
i.e., the filenames of all contained files. If firmware modules are contained in the package the
version numbers of the modules and long names are also listed.
Syntax
csadm ListPkg=<package>
Parameter
<package>
Input package file (* .mpkg) containing CryptoServer firmware modules and files
Authentication
None
Example
csadm ListPkg= C:\firmware\release-1.0.0.mpkg
Output
For the given xample:
Archive release-1.0.0.mpkg contains:
1. - adm_1.0.1.1.mtc (Administration Module version 1.0.1.1)
2. - asn1_1.0.1.2.mtc (ASN1 Module version 1.0.1.2)
3. - cmds_1.0.6.0.mtc (Command Scheduler version 1.0.6.0)
4. - db_1.0.1.1.mtc (Database module version 1.0.1.1)
5. - hash_1.0.1.0.mtc (Hash Module version 1.0.1.0)
6. - lna_1.0.3.0.mtc (Long Number Arithmetic version 1.0.3.0)
7. - smos_1.0.3.5.mtc (SMOS Operating System version 1.0.3.5)

Administration of CryptoServer with csadm
Page 163 of 222
8. - util_1.0.5.0.mtc (Utility Module version 1.0.5.0)
9. - vdes_1.0.0.3.mtc (DES Module version 1.0.0.3)
10. - vrsa_1.0.4.0.mtc (RSA Module version 1.0.4.0)
Otherwise, error message
5.8.9 CheckPkg
This command compares the firmware modules contained in a given package file (archive
*.mpkg, see chapter 3.9.3) against the firmware currently loaded on a CryptoServer. It
announces if the package file contents differ from the loaded firmware and gives detailed
information about which modules had to be loaded or deleted (in case the package file is
loaded) and about differences in firmware module versions. If a Clear command would be
unavoidable in case the given package file is loaded, this would be announced, too.
Information about differences concerning files other than firmware is not given.
Syntax
csadm [Dev=<device>] CheckPkg=<package>[,<password>]
Parameters
■ <device>
Device address of the CryptoServer or the CryptoServer LAN (see chapter 5.1.3
for some examplary values);
This parameter can be omitted if the device address has been set as the
CRYPTOSERVER environment variable.
■ <package>
Input package file (*.mpkg) containing CryptoServer firmware modules and
files
■ <password>
root password of CryptoServer LAN
This parameter is only relevant if the driver commands Reset, Restart and
ResetToBL are password protected, which depends on the settings in the
CryptoServer LAN configuration file csxlan.conf. You can find detailed
information about the content of the csxlan.conf file in the CryptoServer LAN
Manual for System Administrators, Chapter "The Configuration File csxlan.conf".
▣ for hidden password entry the string 'ask' is used (see chapter 5.1.5)
The usage of hidden password entry is strongly recommended.
▣ root password of the CryptoServer LAN in clear text
Authentication
None
Example
csadm CheckPkg=firmware.mpkg

Administration of CryptoServer with csadm
Page 164 of 222
Output
information about differences between loaded firmware and firmware contained in
given package file (see example below)
Example:
I: Reading package...
I: Retrieving file list from CryptoServer
Package d:\temp\cxi_1.3.1.3.mpkg successfully checked
5.8.10 ModuleInfo
This command shows the module information of a firmware module. MTC, MMC or raw
binary files can be given as input file.
Syntax
csadm ModuleInfo=<file>
Parameter
<file>
firmware module (*.mtc, *.mmc, *.out, *.dll or *.so)
Authentication
None
Example
csadm ModuleInfo=cmds.mtc
Output
Module 'CMDS'
ID 83
Version 3.5.2.0
Name Command Scheduler'
Module type ‘CS2-COFF’
MMC header vers. 1.1.0.0
Target CPU type ‘C64x’
Hardware type ‘C50’
Sig. algorithm RSA
Hash algorithm SHA512
Key hash -2B975A1976-
If multiple firmware modules shall be processed in one step, the last part of the command
(ModuleInfo=<file>) will have to be repeated for each firmware module.

Administration of CryptoServer with csadm
Page 165 of 222
The meaning of the output information is as follows:
Field
Description
Module
Name of the firmware module, e.g., 'CMDS'
ID
Unique identifier (ID) also called function code (FC) of the firmware
module, e.g., 83
Version
Version number of the firmware module, e.g., 3.3.0.1
Name
Extended (full) name of the firmware module, e.g., 'Command
Scheduler'
Module type
Type of the raw binary file that is contained in MTC/MMC:
■ CS2-COFF if binary is compiled for CryptoServer hardware,
■ SDK-DLL if binary is compiled for CryptoServer Simulator for
Windows
■ SDK-SO if binary is compiled for CryptoServer Simulator for Linux
■ unknown if the input file is a binary file.
MMC header vers.
Version of MMC header (will be returned only for MTC or MMC file):
1.1.0.0: current version (Note: SMOS version ≥ 2.1.0.0 is needed for
interpretation of MMC header)
Target CPU type
CPU type of target platform:
■ C64+ for CryptoServer CSe-Series
■ C64x for CryptoServer Se- and Se-Series Gen2
■ SDK for CryptoServer simulator for Windows
■ SIM for CryptoServer simulator for Linux
Hardware type
Hardware type/software architecture type:
■ C50 for CryptoServer Se-Series Gen2 (Bootloader version ≥
5.0.0.0)
■ C57 for CryptoServer CSe-Series (bootloader version ≥ 4.0.0.0)
■ C86 for all CryptoServer Se-Series (CryptoServer firmware for
bootloader version ≥ 2.5.0.0)
Sig. algorithm
RSA
Signature algorithm used for the generation of Utimaco's Module
Signature Kek.

Administration of CryptoServer with csadm
Page 166 of 222
Field
Description
Hash algorithm
SHA512
Hash algorithm used for calculating the hash value of the Module
Signature Key
Key hash
Hash value of the RSA Module Signature Key
Table 25: Meaning of ModuleInfo fields
5.8.11 Clear
The Clear command erases all sensitive data from the CryptoServer. Only the data of users
with public key authentication mechanisms remain in the user database, depending on the
used variant of the command. For a detailed description in which case this command should
be used, please refer also to chapter 3.5.
Syntax
csadm [Dev=<device>] [<Authentication>] Clear[=<flag>]
Parameters
■ <device>
Device address of the CryptoServer or the CryptoServer LAN (see chapter
5.1.3 for some examplary values);
This parameter can be omitted if the device address has been set as the
CRYPTOSERVER environment variable.
■ <flag>
command flag which can be set to:
▣ INIT
The internal Master Key of the CryptoServer and other sensitive data
are erased, as well as all users with a password authentication
mechanism are deleted from the user database. Users with a public
key authentication mechanism remain stored in the user database.
The following files are not deleted:
□ public parts of the Production Key, Default Administrator Key,
Module Signature Key and Alternative Module Signature Key
□ Bootloader code and system firmware modules (*.sys)
□ alarm state file (alarm.sens)
□ audit log file (audit.log)
□ audit configuration file (audit.cfg)
□ Signed Licence File *.slf (if present)
□ Bootloader configuration file bl.cfg.
Administration of CryptoServer with csadm
Page 167 of 222
▣ DEFAULT
restores the factory default settings and resets the CryptoServer into
delivery state. The Master Key of the CryptoServer and other sensitive
data are erased. The user database is deleted and recreated with the
default user ADMIN and the corresponding Default Administrator Key.
If the command parameter <flag> is omitted, the INIT version of the
command is executet by default.
Authentication
The command Clear=INIT must be authenticated with permission 2 in the
user group 6 (see chapters 3.2.2 and 5.3).
For the command Clear=DEFAULT no authentication is required. An external
erase must have been initiated just before.
Examples
csadm LogonSign=ADMIN,c:\keys\myKey.key Clear=INIT
csadm Clear=DEFAULT
Output
None on success or error message
With the command Clear=DEFAULT the CryptoServer is reset to factory defaults, i e. the
CryptoServer can be restored in case the user has locked out himself from administration
(for example, lost smartcard or forgotten password).
The command can only be executed if the user has proven physical presence by triggering
an external erase (which can only be performed locally, i.e., directly at the CryptoServer
device).
5.9 Commands for Firmware Packaging
These commands are used for the load preparation of firmware modules, in particular the
making, verification and removing of the Module Transport Container (MTC).
Furthermore, commands are offered to create a *.mpkg firmware package file or to see its
contents, or to retrieve the contained modules from a *.mpkg file.
More details about the concepts of MTCs and package files can also be found in chapter 3.9.
All firmware modules are packed into a signed data container before they are loaded into the
CryptoServer:
Module Transport Container – MTC
MTC Header
MMC Header
Binary
(*.out, *.dll, *.so)
MMC Signature
(Module Signature Key)

Administration of CryptoServer with csadm
Page 168 of 222
The Module Transport Container is signed with the private part of the Module Signature Key.
This signature is mandatory and is intended to be created by the author of the firmware
module. The CryptoServer - and anyone else - is able to check the authenticity of the firmware
module’s origin.
When a firmware module is loaded into the CryptoServer the operating system (SMOS)
checks the signature in the following order:
1. First SMOS tries to verify the signature with the public part of the Module Signature Key
of Utimaco IS GmbH, which is stored in every CryptoServer.
2. If the verification fails and if an Alternative Module Signature Key has been loaded by
the customer (see LoadAltMdlSigKey command in chapter 5.9.7), the operating system
also tries to verify the signature with the Alternative Module Signature Key. By this means, a
customer is able to load a self-programmed and self-signed firmware module.
Optionally, a firmware module can also be encrypted with the public part of a Firmware
Encryption Key. In this case the private part of the Firmware Encryption Key has to be loaded
into the CryptoServer, so that the operating system is able to decrypt the firmware module
(see command LoadFWDecKey in chapter 5.9.6).
The structure and signature of a firmware module container can be checked manually
(outside the CryptoServer) using the command VerifyMTC (see chapter 5.9.3).
The following command group contains internal functions of csadm. No connection to a
CryptoServer is established. To see the list of these commands in the in-tool csadm help,
execute csadm More in the command shell.
Certain types of shell processes treat certain characters (commas, colons, semi-colons)
differently. If the execution of a csadm command fails with an error message from the shell
about an illegal parameter format, quoting parameter values may be necessary.
5.9.1 MakeMTC
This command builds the Module Transport Container file (MTC, *.mtc) from a raw, binary
firmware module (*.out, *.dll, *.so) or from a Module Manufacturer Container file (MMC,
*.mmc).
Administration of CryptoServer with csadm
Page 169 of 222
Firmware modules created by Utimaco IS GmbH are always signed with the private part of
the Manufacturer’s Module Signature Key. As the corresponding public key part is loaded
into every CryptoServer, these firmware modules can be loaded without additional
measures.
Firmware modules created (programmed) by the customer have to be signed with an
Alternative Module Signature Key, which is also created by the customer. In order to be able
to load a self-signed firmware module into the CryptoServer, the public part of the Alternative
Module Signature Key has to be stored inside the CryptoServer.
From SecurityServer 4.00 resp. CryptoServer SDK 4.00 only signing of firmware modules
using SHA-512 is supported.
Firmware modules that have been built using the administration tool csadm provided with
CryptoServer SDK 3.30 (or previous) do not need to be re-compiled but must be re-signed
with csadm MakeMTC (csadm version 2.0.0.1 and higher) to run on CryptoServer with
SecurityServer 4.00 resp. CryptoServer SDK 4.00 firmware.
Syntax
csadm [Model=<model>] [MMCSignKey=<keyspec>]
[FWEncKey=<keyspec>] MakeMTC=<file>
If the Module Signature Key is stored in a CryptoServer device:
csadm [Dev=<device>] <Authentication> [Model=<model>]
[MMCSignKey=<keyspec>] [FWEncKey=<keyspec>] MakeMTC=<file>
Parameters
■ <device>
Device address of the CryptoServer or the CryptoServer LAN where the Module
Signature Key is stored on (see chapter 5.1.3 for some examplary values);
This parameter can be omitted if the device address has been set as the
CRYPTOSERVER environment variable.
■ <keyspec>
MMCSignKey = private part of Module Signature Key
FWEncKey = public part of Firmware Encryption Key
See chapter 5.1.4 for possible key specifiers.
▣ If the keyfile is stored on a smartcard
<keyfile>/<smartcard specifier>,
for example, my_mdl_sign.key/:cs2:cyb:USB0
▣ <keyfile>[#password],
for example, my_mdl_sign.key,#ask
password is needed in case of an encrypted keyfile.
If no password is given (or the password is replaced by the string 'ask'),

Administration of CryptoServer with csadm
Page 170 of 222
hidden password entry will be performed for encrypted keyfiles, which is
strongly recommended.
▣ If the Module Signature Key is stored in the key database, CXIKEY.db, of a
CryptoServer/CryptoServer LAN device:
Dev:<keyname>[,<key_spec(version)>],
for example, Dev:CS_MSK,1
Dev: references the device address defined in the parameter
Dev=<device> or in the environment variable CRYPTOSERVER. Do not
change this string.
The key name is the name of the keyfile without file extension *.key. It
should be followed by the key specifier key_spec(version), if any was defined
on key generation. See chapter 5.5.1 for further details on key
generation.<file>
firmware module (*.out, *.dll, *.mmc, *.so)
■ <model>
hardware type (including signature type):
Note that the <model>-entry is case-sensitive.
c50: Se-Series Gen2 (SMOS ≥ 5.0.0.0)
c57: CSe-Series (SMOS ≥ 4.0.0.0)
c86: Se-Series or C/S-Series NQ3 (SMOS ≥ 2.5.0.0)
Authentication
If the Module Signature Key is stored in the key database, CXIKEY.db, of a
CryptoServer device this command must be authenticated by one or more users
with min. resulting permission 2 in the user group 0. Additionally, the CXI_GROUP
user attribute of the user(s) authenticating the command has to match the
CXI_GROUP attribute of the Module Signature Key. For further details about user
attributes, see Table 22 in chapter 5.6.
Examples
■ Example 1:
Build an MTC file by using a Module Signature Key stored in an encrypted keyfile.
csadm Model=c86 MMCSignKey=c:\keys\my_mdl_sign.key,#ask
MakeMTC=c:\firmware\exmp.out
■ Example 2:
Build an MTC file by using a Module Signature Key stored in a CryptoServer LAN
device.
csadm Dev=112.111.1.13 LogonPass=CSUser,ask
LogonPass=CSUser1,ask Model=c57 MMCSignKey=Dev:CS_MSK,1
MakeMTC=C:\firmware\exmp.out
■ If the device address has been set as the environment variable
CRYPTOSERVER:

Administration of CryptoServer with csadm
Page 171 of 222
csadm LogonPass=CSUser,ask LogonPass=CSUser1,ask Model=c57
MMCSignKey=Dev:CS_MSK,1 MakeMTC=C:\firmware\exmp.out
Output
On success:
building MMC ... OK
building MTC ... OK
Otherwise, error message
5.9.2 RemoveMTC
This command removes the header and signature of a given MTC container and restores the
contained binary firmware module file (*.out, *.dll or *.so).
Syntax
csadm RemoveMTC=<file>
Parameter
<file>
firmware module as MTC (*.mtc)
Authentication
None
Example
csadm RemoveMTC=c:\firmware\exmp.mtc
Output
removing MMC ... OK
removing MTC ... OK
(on success, or error message)
The unpacked file is stored in the current directory.
csadm also creates a temporary file (*.mmc) in the current directory.
Removing the MTC container of a firmware module is only necessary if the firmware module
should be re-signed with a customer-generated Alternative Module Signature Key. In this
case, the public part of this key has to be loaded into the CryptoServer as Alternative Module
Signature Key (see LoadAltMdlSigKey command in chapter 5.9.7).
5.9.3 VerifyMTC
This command verifies the signature of the Module Transport Containers MTC (*.mtc).
Administration of CryptoServer with csadm
Page 172 of 222
Here you find additional notes or supplementary information. While verifying an MTC, csadm
creats a temporary file (
*.mmc
) in the current directory.
Syntax
csadm MMCPubKey=<keyspec> VerifyMTC=<file>
Parameter
■ <keyspec>
public part of the Module Signature Key (see chapter 5.1.4 for more details on
possible key specifiers)
▣ Smartcard specifier, e.g. :cs2:cyb:USB0
▣ Keyfile name, e.g., mykey.key.
■ <file>
firmware module as MTC (*.mtc) or MMC (*.mmc)
Authentication
None
Example
csadm MMCPubKey=:cs2:cyb:USB0
VerifyMTC=c:\firmware\exmp.mtc
Output
on success
Verifying MTC ...OK
Removing MTC ... OK
Verifying MMC ...OK
Otherwise, error message
If multiple MTCs shall be verified in one step, the last part of the command
(VerifyMTC=<file>) has to be repeated for each firmware module.
5.9.4 VerifyPkg
This command verifies the signature of the Module Transport Container MTC (*.mtc) of each
firmware module that is contained in the given package file (archive *.mpkg, see chapter
3.9.3).
This command can be performed without any access to a CryptoServer.

Administration of CryptoServer with csadm
Page 173 of 222
Syntax
csadm MMCPubKey=<keyspec> VerifyPkg=<package>
Parameters
■ <keyspec>
public part of the Module Signature Key (see also chapter 5.1.4 for detail about
key specifiers)
▣ If the key is stored on a smartcard
<keyfile>/<smartcard specifier>,
for example, my_mdl_sign.key/:cs2:cyb:USB0
▣ If the key is stored in a keyfile
<keyfile>[#<password>],
for example, my_mdl_sign.key,#ask
password is needed in case of an encrypted keyfile.
If no password is given (or the password is replaced by the string 'ask'),
hidden password entry will be performed for encrypted keyfiles, which is
strongly recommended.
■ <package>
input package file containing CryptoServer firmware modules and files (*.mpkg)
Authentication
None
Example
csadm MMCPubKey=:cs2:cyb:USB0 VerifyPkg=c:\firmware\release-
1.0.0.mpkg
Output
Information about the firmware module signature (verification results, see example
below).
csadm MMCPubKey=:cs2:cyb:USB0 VerifyPkg=c:\firmware\fw-
1.0.0.mpkg
I: Verifying db_1.1.0.0_c64.mtc MTC OK - MMC OK
I: Verifying vdes_1.0.1.1_c64.mtc MTC OK - MMC OK
I: Verifying aes_1.0.3.0_c64.mtc MTC OK - MMC OK
I: Verifying asn1_1.0.3.3_c64.mtc MTC OK - MMC OK
I: Verifying smos_2.0.0.6_c64.mtc MTC OK - MMC OK
I: Verifying hash_1.0.5.0_c64.mtc MTC OK - MMC OK
I: Verifying eca_1.1.0.4_c64.mtc MTC OK - MMC OK
I: Verifying ecdsa_1.0.1.0_c64.mtc MTC OK - MMC OK
I: Verifying dsa_1.0.0.0_c64.mtc MTC OK - MMC OK
I: Verifying util_2.1.0.0_c64.mtc MTC OK - MMC OK
I: Verifying adm_2.0.0.3_c64.mtc MTC OK - MMC OK
I: Verifying cmds_1.1.1.0_c64.mtc MTC OK - MMC OK
I: Verifying pkcs11_1.0.5.1_c64.mtc MTC OK - MMC OK
I: Verifying vrsa_1.0.6.0_c64.mtc MTC OK - MMC OK
I: Verifying lna_1.0.4.3_c64.mtc MTC OK - MMC OK
Package c:\firmware\release-1.0.0.mpkg successfully verified

Administration of CryptoServer with csadm
Page 174 of 222
5.9.5 RenameToVersion
This command expands the filename of a firmware module by inserting the version number of
the firmware module.
On loading onto the CryptoServer this added version number will be automatically removed.
Syntax
csadm RenameToVersion=<file>
Parameter
<file>
firmware module (*.mtc, *.out, *.dll or *.so)
Authentication
None
Example
csadm RenameToVersion=C:\modules\vdes.mtc
For example, the file C:\modules\vdes.mtc is renamed to
C:\modules\vdes_1.0.1.0.mtc depending on the current firmware module
version
Output
None on success, or error message
5.9.6 LoadFWDecKey
This command loads a private RSA key into the CryptoServer which is used to decrypt
encrypted firmware modules (private part of Firmware Encryption Key, see chapter 3.9.2).
Syntax
csadm [Dev=<device>] <Authentication> LoadFWDecKey=<keyspec>
Parameters
■ <device>
device address of the CryptoServer or the CryptoServer LAN (see chapter 5.1.3
for some examplary values).
This parameter can be omitted if the device address has been set as the
environment variable CRYPTOSERVER.
■ <keyspec>
key specifier (see chapter 5.1.4) of Firmware Encryption Key.
May be either a path name to a file containing the private key, or a smartcard
descriptor if the key is stored as two XOR-halves on back-up smartcards.
Authentication
The command must be authenticated with permission 2 in the user group 6 (see
chapters 3.2.2 and 5.3).
Examples
csadm LogonSign=ADMIN,d:\keys\myKey.key
…LoadFWDecKey=C:\keys\fw_dec.key
csadm LogonPass=paul,swordfish … LoadFWDecKey=:cs2:cyb:COM1

Administration of CryptoServer with csadm
Page 175 of 222
Output
None on success or error message
5.9.7 LoadAltMdlSigKey
This command loads the public part of the customer’s Alternative Module Signature Key into the
CryptoServer. This key is later used to verify the authenticity of self-programmed firmware
modules during the load process, which are signed by the customer with the private part of
his Alternative Module Signature Key.
Syntax
csadm [Dev=<device>] <Authentication>
LoadAltMdlSigKey=<keyspec>
Parameters
■ <device>
Device address of the CryptoServer or the CryptoServer LAN (see chapter 5.1.3
for some examplary values);
This parameter can be omitted if the device address has been set as the
CRYPTOSERVER environment variable.
■ <keyspec>
key specifier of the public part of the customer’s Alternative Module Signature Key
(see chapter 5.1.4)
Authentication
The command must be authenticated with permission 2 in the user groups 6 and 7
(see chapters 3.2.2 and 5.3).
Example
csadm LogonSign=ADMIN,:cs2:cyb:USB0
LoadAltMdlSigKey=MyMdlSig.key
Output
None on success or error message
The key will be stored in the CryptoServer as file
mdlsigalt.key
. If the key already exists,
it will be overwritten.
Firmware modules created by Utimaco IS GmbH are always signed with the Utimaco Module
Signature Key. Since the public part of this key is loaded into every CryptoServer the
operating software is always able to verify the signature on load of any firmware module
which is created by Utimaco IS GmbH.
Administration of CryptoServer with csadm
Page 176 of 222
5.9.8 SignConfig
This command is only available in csadm version 1.8.11 and higher.
The SignConfig command signs a self created configuration file cmds.cfg (or any other file
extension) with the Alternative Module Signature Key. The signed configuration file is specified
by the file extension *.scf, and allows you to define specific firmware module configuration
settings, for example, to disable some selected CryptoServer functions. The syntax of the
signed configuration file follows the syntax of configuration files as described in Chapter 3.10
"Signed Configuration Files" of this manual.
The use of signed configuration files is supported for the CryptoServer CSe-Series, Se-Series
and Se-Series Gen2 with the following min. versions of the firmware modules SMOS, ADM
and CMDS:
For the CryptoServer Se-Series:
ADM version 3.0.12.0
CMDS version 3.2.0.2
SMOS version 3.3.0.3
For the CryptoServer CSe-Series:
ADM version 3.0.12.0
CMDS version 3.2.0.2
SMOS version 4.4.0.0
For the CryptoServer Se-Series Gen2:
ADM version 3.0.12.0
CMDS version 3.2.0.2
SMOS version 5.1.0.0
Syntax
■ csadm MdlSignKey=<keyspec> SignConfg=<file>
■ If the Module Signature Key is stored in a CryptoServer device:
csadm [Dev=<device>] <Authentication> MdlSignKey=<keyspec>
SignConfg=<file>

Administration of CryptoServer with csadm
Page 177 of 222
Parameter
■ <keyspec>
Key specifier for the MdlSignKey which is the private part of the Module
Signature Key or the Alternative Module Signature Key. Can be defined as:
▣ Smartcard specifier
If the Module Signature Key or the Alternative Module Signature Key is stored
on a smartcard, for example, :cs2:cyb:USB0
▣ Keyfile specifier (keyfile name and, if needed, file path)
If the Module Signature Key or the Alternative Module Signature Key is stored in
a keyfile
In case an encrypted keyfile is used, the correct password for the keyfile is
required, i.e., <keyfile>#password.
password is needed in case of an encrypted keyfile.
If no password is given (or the password is replaced by the string 'ask'),
hidden password entry will be performed for encrypted keyfiles, which is
strongly recommended.
▣ If the Module Signature Key is stored in the key database, CXIKEY.db, of a
CryptoServer/CryptoServer LAN device:
Dev:<keyname>[,<key_spec(version)>],
for example, Dev:CS_MSK,1
Dev: references the device address defined in the parameter
Dev=<device> or in the environment variable CRYPTOSERVER. Do not
change this string.
The keyname is the name of the keyfile without file extension *.key. It
should be followed by the key specifier key_spec(version), if any was
defined on key generation. See chapter 5.5.1 for further details on key
generation.
■ <file>
Name and storage location of the configuration file (cmds.*) to be signed
Examples
■ Sign a configuration file by using a Module Signature Key stored in a keyfile.
csadm MdlSignKey=D:\keys\myMDLSign.key
SignConfig=C:\myConfig\cmds.cfg
■ Sign a configuration file by using a Module Signature Key stored on a smartcard.
csadm MdlSignKey=:cs2:cyb:USB0
SignConfig=C:\myConfig\cmds.txt
■ Sign a configuration file by using a Module Signature Key stored in a CryptoServer
LAN device.
csadm Dev=192.168.0.1 LogoSign=SysAdmin,:cs2:cyb:USB0
MdlSignKey=Dev:CS_MSK,1 SignConfig=C:\myConfig\cmds.txt
Authentication
None
Output
None on success or error message
Administration of CryptoServer with csadm
Page 178 of 222
Please find detailed information on how to use a signed configuration file for disabling
selected CryptoServer functions or for increasing the authentication requirements for selected
CryptoServer functions in chapter 7.3.
5.10 Commands for Administration of CryptoServer LAN
This command group explicitly addresses the CryptoServer LAN appliance itself; commands
will not be forwarded to the integrated CryptoServer PCIe plug-in card. Instead they will be
processed by the control module of the TCP-Server (csxlan-daemon) and responded in the
same way a firmware module would respond to a command.
These commands are used to administrate a CryptoServer LAN remotely (for example, to
get/set its configuration).
Since the commands of this group are not directed to any CryptoServer PCIe plug-in card but
only to the CryptoServer LAN, the presence, mode or state of eventually underlying
CryptoServers are not relevant for their performance. For the same reason, none of these
commands have to be authenticated using the CryptoServer’s authentication mechanism.
Nevertheless, some commands of this group are protected against unauthorized use with an
own authentication mechanism: these commands have to be authenticated with the root
password of the CryptoServer LAN. See also [CSLAN].
Certain types of shell processes treat certain characters (commas, colons, semi-colons)
differently. If the execution of a csadm command fails with an error message from the shell
about an illegal parameter format, quoting parameter values may be necessary.
5.10.1 CSLGetConnections
This command lists all current connections to the CryptoServer LAN.
Syntax
csadm [Dev=<device>] CSLGetConnections
Parameter
<device>
Device address of the CryptoServer LAN (see chapter 5.1.3 for some examplary
values);
This parameter can be omitted if the device address has been set as the
CRYPTOSERVER environment variable.
Administration of CryptoServer with csadm
Page 179 of 222
Authentication
none
Example
csadm Dev=10.17.1.9 CSLGetConnections
Output
current connections to CryptoServer LAN
# prot port address
--------------------------------------------------
1 TCP 1131 193.168.4.122
2 TCP 2563 194.169.4.098
3 TCP 1137 195.170.4.122
The following information is displayed:
■ #
connection number
■ prot
used protocol (either UDP or TCP)
■ port
port on the host PC used to open the connection
■ address
IP address of the host PC
Up to 10,000 connections can be established to one CryptoServer LAN simultaneously.
5.10.2 CSLScanDevices
The CSLScanDevices command returns the internal configuration of one or more
CryptoServer LAN as set up in the configuration file /etc/csxlan.conf on each CryptoServer
LAN (see [CSLAN]). If the command is called using the dedicated IP address (as
Dev=<device>) of a CryptoServer LAN, only the configuration of this single CryptoServer LAN
will be shown.
However, CSLScanDevices can also be used to scan the whole network for all CryptoServer
LAN currently available. Therefore, this command has to be sent as Multicast Message by
using the special IP address UDP:224.1.0.1 as device parameter (Dev= UDP:224.1.0.1). It

Administration of CryptoServer with csadm
Page 180 of 222
will be responded by every CryptoServer LAN which has been set up to respond to Multicast
Messages (see [CSLAN]).
CSLScanDevices does only find such CryptoServer LAN which have been configured to
respond Multicast Messages.
Syntax
csadm [Dev=<device>] CSLScanDevices[=<timeout>]
Parameters
■ <device>
Device address of the CryptoServer LAN (see chapter 5.1.3 for some examplary
values);
This parameter can be omitted if the device address has been set as the
CRYPTOSERVER environment variable.
<device> = UDP:224.1.0.1 (Multicast) if the whole network shall be
scanned.
■ <timeout>
timeout in ms (default: 3000)
Authentication
None
Output
dev name prot port address
---------------------------------------------------------
1 PCI:/dev/cs2a TCP 288 10.17.1.9
1 PCI:/dev/cs2a TCP 288 192.168.5.203
1 PCI:/dev/cs2a TC6 288 fe80::0203:2dff:fe1c:6e8c
On a CryptoServer LAN the included CryptoServer PCIe plug-in card is accessible by setting up
several parameters:
■ name
either a local CryptoServer PCIe plug-in card or a second CryptoServer LAN (TCP)
■ prot
used protocol; either TCP or UDP (UDP has a packet size limitation)
■ port
port the TCP-Server (daemon) listens to (default: 288, each device can be set up with
multiple ports)
Administration of CryptoServer with csadm
Page 181 of 222
■ address
interface address (either the TCP/IP address of the CryptoServer LAN, the localhost
address 127.0.0.1 or the Multicast address 224.1.0.1)
5.10.3 CSLGetVersion
This command displays the version number of the CryptoServer LAN.
Syntax
csadm [Dev=<device>] CSLGetVersion
Parameter
<device>
Device address of the CryptoServer LAN (see chapter 5.1.3 for some examplary
values);
This parameter can be omitted if the device address has been set as the
CRYPTOSERVER environment variable.
Authentication
None
Example
csadm Dev=10.17.1.9 CSLGetVersion
Output
CSLAN 4.1.0
5.10.4 CSLGetStatus
The CSLGetStatus command displays status information about the CryptoServer LAN.
This command is only implemented for CryptoServer LAN with version 3.3.0 and later. For
older versions of CryptoServer LAN the output of this status information is not supported.
Most of the information is only available for CryptoServer LAN V4 and later (see below for
details).
Syntax
csadm [Dev=<device>] CSLGetStatus
Parameter
<device>
Device address of the CryptoServer LAN (see chapter 5.1.3 for some examplary
values);
This parameter can be omitted if the device address has been set as the
CRYPTOSERVER environment variable.
Authentication
None
Example
csadm Dev=10.17.1.9 CSLGetStatus

Administration of CryptoServer with csadm
Page 182 of 222
Output
uptime
fan speed [rpm]
CPU temperature [C]
redundant power supply
= 0 day(s), 04:16
= 3308, 2636, 2960
= 31.0
= OK
The following status information is displayed:
■ uptime
System uptime (days, hours)
■ fan speed [rpm]
Fan speed for all fans (CPU fan, first internal fan, second internal fan) as rotation per
minute (rpm).
This status information is only available for CryptoServer LAN V4 and later.
■ CPU temperature [C]
CPU temperature for CPU of the CryptoServer LAN motherboard in degree Celsius.
This status information is only available for CryptoServer LAN V4 and later.
■ redundant power supply
Status of the redundant power supply units which can be OK or FAILED.
This status information is only available for CryptoServer LAN V4 and later
5.10.5 CSLGetLogFile
This command displays the log file of the CryptoServer LAN.
Syntax
csadm [Dev=<device>] CSLGetLogFile[=<fileno>]
Parameters
■ <device>
Device address of the CryptoServer LAN (see chapter 5.1.3 for some examplary
values);
This parameter can be omitted if the device address has been set as the
CRYPTOSERVER environment variable.
■ <fileno>
number of the log file on the CryptoServer LAN which shall be between 1 and 9.
If omitted the first log file (number 0, /var/log/csxlan.log) is retrieved.
Authentication
None
Output
content of log file on success, or error message

Administration of CryptoServer with csadm
Page 183 of 222
Use '>' to dump the output into a file, for example,
csadm GetConfigFile > c:\temp\csxlan.conf
The log file is formatted according to the UNIX style. Use an appropriate editor, for example,
WordPad on a Windows system.
The content of the log file depends on the trace level setting of the CryptoServer LAN. See
[CSLAN] for a description of how to set up logging on the CryptoServer LAN.
5.10.6 CSLGetConfigFile
This command displays the content of the configuration file /etc/csxlan.conf of the
CryptoServer LAN.
Syntax
csadm [Dev=<device>] CSLGetConfigFile
Parameter
<device>
Device address of the CryptoServer LAN (see chapter 5.1.3 for some examplary
values);
This parameter can be omitted if the device address has been set as the
CRYPTOSERVER environment variable.
Authentication
None
Example
csadm Dev=10.17.1.9 CSLGetConfigFile
Output
content of configuration file on success, or error message
Use '>' to dump the output into a file, for example,
csadm GetConfigFile > c:\temp\csxlan.conf
The configuration file is formatted according to the UNIX style. Use an appropriate editor, for
example, WordPad, on a Windows system.
Administration of CryptoServer with csadm
Page 184 of 222
See [CSLAN] for a description of how to configure the CryptoServer LAN.
5.10.7 CSLPutConfigFile
This command imports a new configuration file into a CryptoServer LAN.
Syntax
csadm [Dev=<device>] CSLPutConfigFile=<password>,<file>
Parameters
■ <device>
Device address of the CryptoServer LAN (see chapter 5.1.3 for some examplary
values);
This parameter can be omitted if the device address has been set as the
CRYPTOSERVER environment variable.
■ <password>
root password of the CryptoServer LAN
▣ for hidden password entry use the string ask (see chapter 5.1.5.
The usage of hidden password entry is strongly recommended.
▣ root password of the CryptoServer LAN in clear text
■ <file>
configuration file to be imported
Authentication
Special password authentication using the root password of the CryptoServer LAN
Output
None on success, or error message
Independently from the given file name the configuration file is imported as
/etc/csxlan.conf.
The imported file may also be formatted according to the Windows style. On the CryptoServer
LAN the file is reformatted automatically to the UNIX format style.
See [CSLAN] for a description of how to configure the CryptoServer LAN.
Administration of CryptoServer with csadm
Page 185 of 222
5.10.8 CSLSetTracelevel
This command sets the trace level (== log level) of a CryptoServer LAN. Depending on the
trace level more or less information is written into the log file /var/log/csxlan.log. Each
level is independent from the others and is set as a specific value.
Trace Level
Value
Description
Info
0x80
Informational messages like connection establishment,
termination and the execution of functions of the control module
are written to the log file.
Verbose
0x40
Details about the state machine are logged.
Packet Data
0x20
The content of request and reply packets is logged (max. 256
bytes per packet).
Table 26: Trace levels o the CryptoServer LAN
Any ‘added’ combination of the following values can be used:
Trace Level Combination
Value
Info + Verbose
0xC0
Info + Packet Data
0xA0
Verbose + Packet Data
0x60
Info + Verbose + Packet Data
0xFO
Table 27: Allowed trace level combinations
Syntax
csadm [Dev=<device>] CSLSetTraceLevel=<password>,<level>
Parameters
■ <device>
Device address of the CryptoServer LAN (see chapter 5.1.3 for some examplary
values);
This parameter can be omitted if the device address has been set as the
CRYPTOSERVER environment variable.
■ <password>
root password of the CryptoServer LAN:
Administration of CryptoServer with csadm
Page 186 of 222
▣ For hidden password entry use the string 'ask' (see chapter 5.1.5.
The usage of hidden password entry is strongly recommended.
▣ root password of the CryptoServer LAN in clear text
■ <level>
desired trace level or a combination of trace levels as stated in Table 26 and
Table 27 above.
Authentication
Special password authentication using the root password of the CryptoServer LAN
Output
None on success or error message
The new trace level is only a temporary setting. The next time CryptoServer LAN is
(re)started, the level specified in the /etc/csxlan.conf configuration file is used again.
5.10.9 CSLShutdown
This command shuts down the CryptoServer LAN as the Linux command shutdown -h would
do at the local console. All programs and services are stopped, all devices are unmounted and
the system is put into RunLevel 0. The CryptoServer LAN can then be powered off.
Syntax
csadm [Dev=<device>] CSLShutdown=<password>
Parameters
■ <device>
Device address of the CryptoServer LAN (see chapter 5.1.3 for some examplary
values);
This parameter can be omitted if the device address has been set as the
CRYPTOSERVER environment variable.
■ <password>
root password of the CryptoServer LAN:
▣ for hidden password entry: string 'ask' (see chapter 5.1.5; hidden password
entry is strongly recommended);
▣ otherwise: root password
Authentication
Special password authentication using the root password of the CryptoServer LAN
Output
None on success or error message

Administration of CryptoServer with csadm
Page 187 of 222
5.10.10 CSLReboot
This command reboots the CryptoServer LAN the same way the Linux command shutdown -
r would do at the local console. All programs and services are stopped, all devices are
unmounted and the system is rebooted again.
Syntax
csadm [Dev=<device>] CSLReboot=<password>
Parameters
■ <device>
Device address of the CryptoServer LAN (see chapter 5.1.3 for some examplary
values);
This parameter can be omitted if the device address has been set as the
CRYPTOSERVER environment variable.
■ <password>
root password of the CryptoServer LAN:
▣ For hidden password entry use the string 'ask' (see chapter 5.1.5.
The usage of hidden password entry is strongly recommended.
▣ root password of the CryptoServer LAN in clear text
Authentication
Special password authentication using the root password of the CryptoServer LAN
Output
None on success or error message
5.10.11 CSLGetTime
This command reads the local system time and UTC time of the CryptoServer LAN (not the
clock of the CryptoServer PCIe plug-in card) and outputs the date and time.
Syntax
csadm [Dev=<device>] CSLGetTime
Parameter
<device>
Device address of the CryptoServer LAN (see chapter 5.1.3 for some examplary
values);
This parameter can be omitted if the device address has been set as the
CRYPTOSERVER environment variable.
Authentication
None
Output
date: 03.03.2015 time: 10:58:50 (local time)
date: 03.03.2015 time: 10:58:50 (UTC time)

Administration of CryptoServer with csadm
Page 188 of 222
5.10.12 CSLSetTime
This command sets the local system time of the CryptoServer LAN (not the clock of the
CryptoServer PCIe plug-in card)
Syntax
csadm [Dev=<device>] CSLSetTime=<password>,<time>
Parameters
■ <device>
Device address of the CryptoServer LAN (see chapter 5.1.3 for some examplary
values);
This parameter can be omitted if the device address has been set as the
CRYPTOSERVER environment variable.
■ <password>
root password of the CryptoServer LAN:
▣ For hidden password entry use the string ask (see chapter 5.1.5.
The usage of hidden password entry is strongly recommended.
▣ root password of the CryptoServer LAN in clear text
■ <time>
▣ YYYYMMDDhhmmss
The time is set manually by using the format sample YYYYMMDDhhmmss
YYYY=year, MM=month, DD=day, hh=hour, mm=minute, ss=second
▣ SYSTEM
The system time of the host PC is used
Authentication
Special password authentication using the root password of the CryptoServer LAN
Output
None on success or error message
5.10.13 CSLGetSerial
This command reads and outputs the serial number of the CryptoServer LAN appliance (not
the serial number of the integrated CryptoServer PCIe plug-in card).
Syntax
csadm [Dev=<device>] CSLGetSerial
Parameter
<device>
Device address of the CryptoServer LAN (see chapter 5.1.3 for some examplary
values);
Administration of CryptoServer with csadm
Page 189 of 222
This parameter can be omitted if the device address has been set as the
CRYPTOSERVER environment variable.
Authentication
None
Output
serial number of the CryptoServer LAN (if available)
5.10.14 CSLGetLoad
This command reads and outputs the work load of the CryptoServer PCIe plug-in card in
percent.
Syntax
csadm [Dev=<device>] CSLGetLoad
Parameter
<device>
Device address of the CryptoServer LAN (see chapter 5.1.3 for some examplary
values);
This parameter can be omitted if the device address has been set as the
CRYPTOSERVER environment variable.
Authentication
None
Output
Work load of the CryptoServer (ratio of the time that requests/commands spend in
the CryptoServer PCIe plug-in card to the total time).
The information of the work load of the CryptoServer is read from the display module of the
CryptoServer LAN. If the display module is busy (i.e. an operator is working at the display)
this information is not available and the command does not output any value.
The value returned by the command is not the work load at that time but is an average value
of the last 60 seconds. It is recalculated and updated every 5 seconds.
5.10.15 CSLListPPApps
Some applications (firmware modules) require a PIN pad directly connected to a serial port or
USB port of the CryptoServer, for example, for a secure input of a Master Backup Key. To
easily execute such a command on a CryptoServer LAN, the corresponding function of the
Administration of CryptoServer with csadm
Page 190 of 222
firmware module can be registered as a PIN pad application. Now the command is listed in the
PIN Pad Applications menu of the CryptoServer LAN.
CSLListPPApps shows all commands that have been registered in this way.
PIN pad applications are intended to be used on a CryptoServer LAN without the need of
connecting a monitor and keyboard to it. A specific PIN pad application can be selected via
the CryptoServer LAN menu as a sub menu item of the
PIN Pad Applications
menu
item. For further user guidance the instructions on the PIN pad display are to be followed.
Alternatively, PIN pad applications can be executed like any other command using the
function code FC (module ID) and subfunction code SFC (command ID) returned by the
command CSLListPPApps. Watch the PIN pad display for the further user guidance.
Syntax
csadm [Dev=<device>] CSLListPPApps
Parameter
<device>
Device address of the CryptoServer LAN (see chapter 5.1.3 for some examplary
values);
This parameter can be omitted if the device address has been set as the
CRYPTOSERVER environment variable.
Authentication
None
Example
csadm Dev=10.17.1.9 CSLListPPApps
Output
1. PIN pad test
FC=0x82 SFC=1 Data=00
2. Import AES MBK from smartcard
FC=0x69 SFC=2 Data=
3. Generate AES MBK on smartcard
FC=0x69 SFC=4 Data=
4. List MBKs on smartcard
FC=0x69 SFC=5 Data=
5. Copy MBK smartcard
FC=0x69 SFC=6 Data=
6. Change MBK smartcard PIN
FC=0x69 SFC=7 Data=
7. Import MBK from PIN pad & write to SC
FC=0x69 SFC=8 Data=
8. Generate AES Key Shares & store on SC
Administration of CryptoServer with csadm
Page 191 of 222
FC=0x69 SFC=10 Data=
9. Import MBK from PIN pad
FC=0x69 SFC=0 Data=
10. Import DES MBK from smartcard
FC=0x69 SFC=1 Data=
Note
You can start a PIN pad application by using the csadm command csadm
Cmd=FC,SFC,Data (see also chapter 5.2.7).
FC, SFC and Data are the parameters included in the list of PIN pad applications.
The registration of a PIN pad application shall be implemented during the development of
the firmware module.
You can start a PIN pad application by using the csadm command
csadm
Cmd=FC,SFC,Data
(see also chapter 5.2.7).
FC
,
SFC
and
Data
are the parameters included in the list of PIN pad applications.

Typical Administration Tasks
Page 192 of 222
6 Typical Administration Tasks
This chapter explains the basic and most important administration tasks step-by-step.
Please keep in mind that most administration tasks can only be performed by one or more
users with sufficient administrative and user management rights (resulting permission 2 in
user groups 6 and 7). All system and user administration tasks may for instance be performed
by the default user ADMIN. The examples provided in the following chapters assume that
csadm is installed on a computer with Windows operating system.
All user(s) who want to perform the administrative tasks should have their authentication
token at hand.
For the first setup of the CryptoServer in particular the Default Administrator Key
ADMIN.key is needed.
6.1 Generating a User Authentication Token
For every user who shall authenticate himself towards the CryptoServer with an RSA or
ECDSA signature, an authentication token has to be generated. Basically, the private part of
the user key can either be stored in a keyfile, which optionally is password-protected, or on a
smartcard. As the private part of the key cannot be read out from the smartcard, the usage of
smartcards is more secure and therefore recommended.
Before delivery Utimaco IS GmbH creates the default user ADMIN on every CryptoServer as
the default administrator. The authentication token of the user ADMIN is shipped by
Utimaco as clear text keyfile (ADMIN.key) and is initially stored on every smartcard that is
shipped by Utimaco IS GmbH (with default PIN 123456).
The customer should either replace the authentication token of the user ADMIN with a self-
generated RSA key (see command ChangeUser) or create other users with sufficient
permissions on the CryptoServer and then delete the user ADMIN.
Preconditions
■ If smartcards shall be used, at least one smartcard per user has to be at hand. If the
smartcard already contains a key (RSA-Key or ECC-Key), this key will be overwritten.
Typical Administration Tasks
Page 193 of 222
■ A PIN pad has to be connected to the serial line or USB port of the computer where csadm
is installed.
It is strongly recommended to generate the new authentication token directly on a
trustworthy USB flash drive, to copy the generated keyfile on as many smartcards (provided
by Utimaco) as required by the security policy of your company, and to store the USB flash
drive and the smartcards in a secure safe.
Steps to do:
1. Create a new RSA or ECDSA key pair as an encrypted keyfile by using the csadm
command GenKey (see chapter 5.5.1).
Example:
csadm NewPassword=ask KeyType=RSA GenKey=E:\myKeys\myRSA.key,2048,Admin1
generating RSA key: E:\myKeys\myRSA.key, 2048 bits, owner: Admin1
Enter New Passphrase:
Repeat New Passphrase:
The generated keyfile can already be used to authenticate towards the CryptoServer.
If the key shall not be copied on a smartcard the following steps can be skipped.
2. Store the key on a smartcard by using the command SaveKey (see chapter 5.5.2).
Example:
csadm KeyType=RSA PrvKey=E:\myKeys\myRSA.key#ask SaveKey=:cs2:cyb:USB0
Enter Passphrase:
3. Follow the instructions on the PIN pad.
4. Check that the key is stored on the smartcard by using the csadm command
GetCardInfo (see chapter 5.5.5).
Example:
csadm GetCardInfo=:cs2:cyb:USB0
5. Follow the instructions on the PIN pad display.
6. Change the PIN of the smartcard by using the csadm command ChangePIN (see chapter
5.5.7).
Example:

Typical Administration Tasks
Page 194 of 222
csadm ChangePIN=:cs2:cyb:USB0
7. Follow the instructions on the PIN pad display.
Depending on your security policy, the following step can be omitted, if steps 2 to 7 will be
performed several times. The additional smartcards that will be created that way, have to
be used as a backup for the generated key.
8. Create a backup of the private key on two smartcards with the command BackupKey
described in chapter 5.5.3.
A backup smartcard is used for key storage only. It cannot be used for authentication
towards the CryptoServer. A backup smartcard contains only one XOR-half of a key, so
two backup cards are necessary to regain the complete key. The key halves can be read
out of the smartcard to generate new administration smartcards containing the stored key
at a later time with the command SaveKey described in see chapter 5.5.2.
Example:
csadm KeyType=RSA PrvKey=E:\myKeys\MyRSA.key#ask BackupKey=:cs2:cyb:USB0
9. Follow the instructions on the PIN pad.
10. Change the PIN of the backup smartcard by using the csadm command ChangePIN (see
chapter 5.5.7).
Example:
csadm ChangePIN=:cs2:cyb:USB0
11. Follow the instructions on the PIN pad display.
12. Store the keyfile at a protected place (for example, on a USB flash drive in a safe) or delete
it (in case you made a backup copy on minimum two smartcards).
The new authentication key can now be assigned to every new CryptoServer user on creation
(see the AddUser command, see chapter 5.6.2) who shall use RSA or ECDSA signature
authentication. Furthermore, the key can be assigned to existing CryptoServer users using
RSA or ECDSA signature authentication with the ChangeUser command, see chapter 5.6.3.
The PIN pad (if needed) has to be connected to the computer where the csadm tool is running
(serial line or USB port).
If the authentication of the command AddUser requires a smartcard and the source of the
new user’s public key is a smartcard too, follow the insructions on the display of the PIN pad.
You'll have to insert the smartcard for the command authentication (old key) first, and then
the smartcard containing the user’s new authentication key.
6.2 Setting-Up a New CryptoServer
After the CryptoServer's shipment the customer has to perform some initial steps to set up
the CryptoServer system, mainly:

Typical Administration Tasks
Page 195 of 222
■ Change the authentication token of the default user ADMIN
■ Create other users
■ Generate a Master Backup Key (MBK)
■ Import the MBK into the CryptoServer
Preconditions
■ The CryptoServer/CryptoServer LAN and the csadm tool are installed and running.
■ The authentication key of the default user ADMIN is at hand (either as keyfile ADMIN.key
provided on the SecurityServer/CryptoServer SDK product CD, or on the delivered
smartcards with default PIN 123456).
■ For every new user who shall be created on the CryptoServer, the previously generated
individual authentication token has to be at hand. See chapter 6.1 for the creation of
customer-individual administration keys.
■ As many smartcards as required for the MBK generation and import (according to the
company security policy) have to be at hand.
Steps to do:
1. Perform the GetState command.
Example:
csadm Dev=111.112.1.13 GetState
The CryptoServer should be in Operational or in Maintenance Mode. If this is not the case,
see chapter 8.1 for help.
Alarm should be OFF. If this is not the case, see chapter 8.2 for help.
Example:
mode = Operational Mode
state = INITIALIZED (0x00100004)
temp = 39.9 [C]
alarm = OFF
bl_ver = 3.00.2.1 (Model: Se-Series)
uid = db000017 189d4401 | D
adm1 = 53653130 20202020 43533434 32353938 | Se10 CS442598
adm2 = 53656375 72697479 53657276 65720000 | SecurityServer
adm3 = 494e5354 414c4c45 44000000 00000000 | INSTALLED
2. Replace the ADMIN.key of the default user ADMIN by the previously generated new
authentication token. Use the csadm command ChangeUser described in chapter 5.6.3,
which has to be authenticated by the ADMIN himself.
Typical Administration Tasks
Page 196 of 222
Example:
csadm LogonSign=ADMIN,:cs2:cyb:USB0 ChangeUser=ADMIN,:cs2:cyb:USB0
You can skip this step, and the following one if your company's security policy requires
authentication according to the two-person rule.
3. Follow the instructions on the PIN pad.
First you are prompted to insert the smartcard where the default ADMIN.key is stored on
into the PIN pad, and to enter the smartcard PIN. After that that you are prompted to insert
the smartcard where the new authentication token is stored on, and to enter the
smartcard PIN.
For the implementation of the two-person rule, instead of only replacing the authentication
key ADMIN.key for the user ADMIN by an individual one, the user ADMIN can be deleted
after one or more user with sufficient permissions (minimum resulting permission
21000000) have been created.
To implement the two-person rule perform step 4 instead of step 2. Doing this, please pay
attention to the restrictions in chapter 3.2.4.1.
4. Create other users on the CryptoServer by using the csadm command AddUser described
in chapter 5.6.2, possibly replacing the default user ADMIN.
Example:
Creating two users who can replace the default user ADMIN;
one user for user management (two-person rule) and a cryptographic user
csadm LogonSign=ADMIN,:cs2:cyb:USB0
AddUser=Admin1,11000000,rsasign,sma,E:\myKeys\myRSA.key
AddUser=Admin2,10000000,rsasign,sma,E:\myKeys\myRSA.key
AddUser=Admin3,11000000,rsasign,sma,:cs2:cyb:USB0
AddUser=CryptoUser,20000001{CXI_GROUP=*},hmacpwd,sma,ask
5. Follow the instructions on the PIN pad.
After you have successfully created at least two users with resulting minimum permission
21000000 you can optionally delete the default ADMIN user.

Typical Administration Tasks
Page 197 of 222
6. Set the time of the CryptoServer’s clock with the csadm command SetTime (see chapter
5.4.9).
Example:
csadm LogonSign=Admin1,:cs2:cyb:USB0 LogonSign=Admin3,:cs2:cyb:USB0
SetTime=GMT
7. Follow the instructions on the PIN pad display to authenticate the command SetTime.
8. Generate a Master Backup Key for the CryptoServer by using the csadm command
MBKGenerateKey as described in chapter 5.7.2. For the following example you have to
keep three smartcards at hand for the MBK generation as well as the smartcads of both
users who have to authenticate the command.
Example:
csadm Dev=PCI:0 LogonSign=Admin1,:cs2:cyb:USB0
LogonSign=Admin3,:cs2:cyb:USB0
Key=:cs2:cyb:USB0,1,:cs2:cyb:USB0,2,:cs2:cyb:USB0,3
MBKGenerateKey=AES,32,3,2,cs2MBK
9. Follow the instructions on the PIN pad display to authenticate the command
MBKGenerateKey, and then to generate the MBK.
10. Change the PIN of all smartcards whereon a share of the MBK is stored by using the
csadm command MBKPINChange described in chapter 5.7.7.
Example:
The three generated MBK shares are stored on three smartcards, so the following
command shal be repeated for all three smartcards.
csadm MBKPINChange=:cs2:cyb:USB0
11. Follow the instructions on the PIN pad display.
12. Import the MBK into the CryptoServer by using the csadm command MBKImportKey
described in chapter 5.7.3.
Example:
csadm Dev=PCI:0 LogonSign=Admin1,:cs2:cyb:USB0
LogonSign=Admin3,:cs2:cyb:USB0 Key=:cs2:cyb:USB0,1,:cs2:cyb:USB0,2
MBKImportKey=3
13. Execute the csadm command MBKListKeys (see chapter 5.7.1) to make sure that the
MBK has been successfully imported into the CryptoServer.
Example:
csadm Dev=PCI:0 MBKListKeys

Typical Administration Tasks
Page 198 of 222
6.3 Checking the Battery State
The CryptoServer LAN is equipped with two batteries: External Battery and Carrier Battery.
The CryptoServer PCIe plug-in card is delivered only with a Carrier Battery.
You can check the state of the CryptoServer/CryptoServer LAN batteries with the csadm
command GetBattState (see chapter 5.4.5). The output of this command shows the state of
the batteries:
csadm Command
Output (examples)
Meaning
csadm
Dev=112.111.1.13
GetbattState
Carrier Battery: ok
(3.070 V)
External Battery: ok
(3.553 V)
All connected batteries of a
CryptoServer LAN contain
sufficient charge.
csadm
Dev=112.111.1.14
GetbattState
Carrier Battery: low
(2.650 V)
External Battery: ok
(3.553 V)
The carrier battery of a
CryptoServer LAN has low power
and must be exchanged.
csadm
Dev=112.111.1.15
GetbattState
Carrier Battery: ok
(3.070 V)
External Battery: low
(3.100 V)
The external battery of a
CryptoServer LAN has low power
and must be exchanged.
csadm Dev=PCI:0
GetbattState
Carrier Battery: ok
(3.068 V)
External Battery:
absence
No external battery connected to
the CryptoServer PCIe plug-in
card.
The carrier battery of a
CryptoServer PCIe plug-in card
contains sufficient charge.
Table 28: Examples for the output of the GetBattState command
6.4 Performing a Complete Clear of the CryptoServer
You want to clear all data stred inside the CryptoServer and reload the complete firmware.
This may be useful, for example, in the following situations:
Case 1:
Typical Administration Tasks
Page 199 of 222
You want to securely clear all secret data inside a CryptoServer.
Case 2 (Emergency-only):
You have lost your customer-individual administrator keys and want to regain an
administrable CryptoServer system.
Please be aware that in any case you will lose all your customer-specific data that are
stored inside the CryptoServer, in particular all stored keys.
In emergency case 2 you will have to set the CryptoServer back to the factory default
settings in which it usually is delivered.
Follow the instructions for case 2 only if this emergency case is given, i.e., if you have lost
your customer-individual administrator keys.
If you follow the instructions for case 1, you will get a similar result as with the instructions
for case 2, but with the exception that all users in the user database that use a public key
as authentication token will remain (i.e. only users with password mechanisms will be
erased).
See also chapter 3.5 for an explanation of the different clear options.
Preconditions
Case 1:
A user with sufficient administrative rights (permission 2 in user group 6) is required for
command authentication. His/her authentication token has to be at hand.
Case 2:
In case of a CryptoServer PCIe plug-in card direct physical access to the CryptoServer PCIe
plug-in card is needed as the external erase circuit has to be short-cut.
Steps to do:
Case 1:
1. Perform the normal Clear command (csadm Clear=INIT, see chapter 5.8.11). This
command has to be authenticated by a user with administrative rights.
All secret data (e.g. databases) and all users with password authentication on the
CryptoServer are deleted. Users with signature authentication (for example, the default
user ADMIN) remained because only the public key part of their authentication key is
stored on the CryptoServer.

Typical Administration Tasks
Page 200 of 222
2. Restart the CryptoServer (command Restart, see chapter 5.4.21).
3. Load the firmware module package *.mpkg by using the csadm command LoadPkg, 5.8.4)
Example:
csadm LogonSign=ADMIN,:cs2:cyb:USB0
LoadPkg=E:\SecurityServer\Firmware\SecurityServer-Se-Series\SecurityServer-
Se-Series-3.21.0.mpkg
4. Follow the instructions on the PIN pad display to authenticate the command LoadPkg.
5. Execute the ListFirmware command (see chapter 5.8.1).
Example:
csadm Dev=PCI:0 ListFirmware
6. Check if all firmware modules have been successfully initialized (initialization level is
shown as INIT_OK).
7. Verify the correct versions of the firmware modules. If some firmware modules have not
been initialized yet, use the GetBootLog command (see chapter 5.4.10) to analyze the
problem.
8. Optionally, load individual firmware modules (*.mtc, see command LoadFile in chapter
5.8.3).
Example:
csadm LogonSign=ADMIN,:cs2:cyb:USB0 LoadFile=C:\myModules\myModule-
0.9.9.9.mtc
9. Follow the instructions on the PIN pad display to authenticate the command LoadFile.
10. Restart the CryptoServer to activate the newly loaded firmware modules.
Example:
csadm Dev=PCI:0 Restart
11. This step is optional and only for customers who develop their own firmware modules:
Load your customer-specific Alternative Module Signature Key with the command
LoadAltMdlSigKey (see chapter 5.9.7). This key is stored in parallel to Utimaco’s Module
Signature Key and does not replace it.
Example:
csadm LogonSign=ADMIN,:cs2:cyb:USB0 … LoadAltMdlSigKey=MyMdlmSig.key
12. Follow the instructions on the PIN pad display.
13. This step is optional and only for customers who develop their own firmware modules:
Load the private part of the Module Encryption Key (command LoadFWDecKey, see
chapter 5.9.6).
Typical Administration Tasks
Page 201 of 222
Example:
csadm LogonSign=ADMIN,:cs2:cyb:USB0 LoadFwDecKey=MyFwDec.key
14. Follow the instructions on the PIN pad display.
Case 2:
1. Execute an External Erase on the CryptoServer (see chapter 3.4.1).
2. Perform the ClearToFactoryDefaults command (csadm Clear=DEFAULT, see chapter
5.8.11). This command does not have to be authenticated.
3. Restart the CryptoServer (command Restart, see chapter 5.4.21).
4. Reset the CryptoServer alarm (command ResetAlarm, see chapter 5.4.17).
The CryptoServer is cleared into delivery state and the default administrator ADMIN is
restored with his initial authentication key (ADMIN.key).
5. Load the firmware module package *.mpkg by using the csadm command LoadPkg, see
chapter 5.8.4)
Example:
csadm LogonSign=ADMIN,:cs2:cyb:USB0
LoadPkg=E:\SecurityServer\Firmware\SecurityServer-Se-Series\SecurityServer-
Se-Series-3.21.0.mpkg
6. Follow the instructions on the PIN pad display to authenticate the command LoadPkg.
7. Execute the ListFirmware command (see chapter 5.8.1).
Example:
csadm Dev=PCI:0 ListFirmware
8. Check if all firmware modules have been successfully initialized (initialization level is
shown as INIT_OK).
9. Verify the correct versions of the firmware modules. If some firmware modules have not
been initialized yet, use the GetBootLog command (see chapter 5.4.10) to analyze the
problem.
10. Optionally, load individual firmware modules (*.mtc, see command LoadFile in chapter
5.8.3).
Example:

Typical Administration Tasks
Page 202 of 222
csadm LogonSign=ADMIN,:cs2:cyb:USB0 LoadFile=C:\myModules\myModule-
0.9.9.9.mtc
11. Follow the instructions on the PIN pad display to authenticate the command LoadFile.
12. Restart the CryptoServer to activate the newly loaded firmware modules.
Example:
csadm Dev=PCI:0 Restart
13. This step is optional and only for customers who develop their own firmware modules:
Load your customer-specific Alternative Module Signature Key with the command
LoadAltMdlSigKey (see chapter 5.9.7). This key is stored in parallel to Utimaco’s Module
Signature Key and does not replace it.
Example:
csadm LogonSign=ADMIN,:cs2:cyb:USB0 … LoadAltMdlSigKey=MyMdlmSig.key
14. Follow the instructions on the PIN pad display.
15. This step is optional and only for customers who develop their own firmware modules:
Load the private part of the Module Encryption Key (command LoadFWDecKey, see
chapter 5.9.6).
Example:
csadm LogonSign=ADMIN,:cs2:cyb:USB0 LoadFwDecKey=MyFwDec.key
16. Follow the instructions on the PIN pad display.
Advanced Administration Tasks
Page 203 of 222
7 Advanced Administration Tasks
This chapter describes advanced administration functions of the CryptoServer primarily
addressing customers who want to extend the standard functionality of the CryptoServer with
self-developed firmware modules providing specific cryptographic functions and commands.
7.1 Creating Self-Signed/Encrypted Firmware Modules
Self-programmed firmware modules have to be signed with a customer-individual Alternative
Module Signature Key. The public part of this key has to be loaded into the CryptoServer (see
command LoadAltMdlSigKey described in chapter 5.9.7), before the firmware module can be
loaded into the CryptoServer.
Firmware modules created by Utimaco IS GmbH are always signed with Utimaco’s Module
Signature Key. As the public part of this key is stored by every CryptoServer the operating
software is always able to verify the signature on load of any firmware module that was
created by Utimaco IS GmbH.
Optionally, firmware modules can be encrypted with the public part of a customer-specific
RSA key (Firmware Encryption Key).
Firmware modules created by Utimaco IS GmbH are not encrypted, because they do not
contain any secret.
Customers who want to encrypt their self-programmed firmware modules should keep in
mind that good cryptography relies on the confidentiality of keys but not on the
confidentiality of algorithms.
Preconditions
■ The firmware module has been compiled and exists as executable file (COFF format,
*.out, *.dll or *.so) or already within a module container (*.mtc).
■ You have generated your own Module Signature Key, i.e., the Alternative Module Signature
Key (see Chapter 3.7.3 "Alternative Module Signature Key").
■ If you want to encrypt your firmware module, you have generated your own Firmware
Encryption Key (see Chapter 3.7.4 "Firmware Encryption Key").

Advanced Administration Tasks
Page 204 of 222
Steps to do:
1. If still necessary, unwrap the executable from the Module Transport Container (MTC) and
the - signed - Module Manufacturer Container (MMC) with command RemoveMTC, see
chapter 5.9.2.
Example:
csadm RemoveMTC=C:\Utimaco\firmware\demo_mdl.mtc
Example output:
removing MTC ... OK
removing MMC ... OK
The resulting executable file *.out is stored in the same folder as the given *.mtc file.
This step can be omitted if the firmware module is provided as executable (*.out, *.dll
or *.so).
2. Create the new (encrypted) container with the command MakeMTC, see chapter 5.9.1.
If you want to create an encrypted and self-signed firmware module
Example:
csadm Model=c86 MMCSignKey=C:\Utimaco\keys\MyMdlSign_enc.key#ask
FWEncKey=C:\Utimaco\keys\MyFwEnc.key
MakeMTC=C:\Utimaco\firmware\demo_mdl.out
Example output:
demo_mdl.out:
building MMC ...
Enter Passphrase:
OK
building MTC ...
OK
If you want to create non-encrypted self-signed firmware module
Example:
csadm Model=c86 MMCSignKey=C:\Utimaco\keys\MyMdlSign_enc.key#ask
MakeMTC=C:\Utimaco\firmware\demo.out
Example output:
demo_mdl.out:
building MMC ...
Enter Passphrase:
OK
building MTC ...
OK

Advanced Administration Tasks
Page 205 of 222
The resulting firmware module file *.mtc is stored in the same folder as the given
executable *.out (*.dll or *.so) file.
7.2 Loading a Self-Signed Encrypted Firmware Module into the
CryptoServer
This chapter guides you through the steps which are necessary for loading your own self-
signed and optionally encrypted firmware module into the CryptoServer.
Preconditions:
■ The self-generated Alternative Module Signature Key is at hand.
■ If you want to use encrypted firmware modules, your self-generated Firmware Encryption
Key is at hand.
Steps to do:
To load your self-signed and optionally encrypted firmware module into the CryptoServer
proceed as follows:
1. Load the public part of the Alternative Module Signature Key into the CryptoServer with the
csadm command LoadAltMdlSigKey (see chapter 5.9.7).
Example:
csadm Dev=PCI:0 LogonSign=SysADM,C:\Utimaco\keys\sysadm.key#ask
LoadAltMdlSigKey=C:\Utimaco\keys\MdlSignRSA.key
2. If you want to use encrypted firmware modules, load the private part of the Firmware
Decryption Key into the CryptoServer by using the csadm command LoadFWDecKey (see
chapter 5.9.6).
Example:
csadm Dev=PCI:0 LogonSign=SysADM,C:\Utimaco\keys\sysadm.key#ask
LoadFWDecKey=C:\Utimaco\keys\FWencRSA.key
3. Load the (encrypted) firmware module into the CryptoServer with the csadm command
LoadFile (see chapter 5.8.3).
Example:
csadm Dev=PCI:0 LogonSign=SysADM,C:\Utimaco\keys\sysadm.key#ask
LoadFile=C:\Utimaco\firmware\demo.mtc
Please find details on how to create your own, optionally encrypted, firmware module
(*.mtc) in chapter 7.1 of this manual.

Advanced Administration Tasks
Page 206 of 222
4. Make sure that the firmware module has been successfully loaded in the CryptoServer by
using the csadm command ListFiles (see chapter 5.8.2). The firmware module is listed
as <mdlname>.msc
Example:
csadm Dev=PCI:0 ListFiles
Example output:
file size module: ID type version name
------------------------------------------------------------------------------
FLASH\CXIKEY.db 202 -
FLASH\NTP.db 232 -
FLASH\VMBK1.db 20 -
FLASH\adm.msc 71084 ADM 0x087 C64 3.0.12.0 Administration Module
FLASH\aes.msc 52028 AES 0x08b C64 1.3.4.0 AES Module
FLASH\asn1.msc 15436 ASN1 0x091 C64 1.0.3.3 Asn1 Module
FLASH\audit.cfg 56 -
FLASH\audit_00.log 15451 -
FLASH\cmds.msc 106780 CMDS 0x083 C64 3.2.0.2 Command Scheduler
FLASH\cmds.scf 100 -
FLASH\cxi.msc 250140 CXI 0x068 C64 2.1.4.6 Crypto. eXtended
Interface
FLASH\db.msc 34700 DB 0x088 C64 1.1.2.6 Database module
FLASH\demo.msc 32940 DEMO 0x100 C64 1.0.0.0
FLASH\dsa.msc 47452 DSA 0x08d C64 1.2.2.0 DSA Module
FLASH\eca.msc 113020 ECA 0x08f C64 1.1.5.2 Elliptic Curve Arith.
FLASH\ecdsa.msc 26540 ECDSA 0x09c C64 1.1.6.0 ECDSA Module
FLASH\hash.msc 35356 HASH 0x089 C64 1.0.9.0 Hash Module
FLASH\hce.msc 23340 HCE 0x00a C64 1.0.1.2 Hardware Crypto
Engine
FLASH\lna.msc 64972 LNA 0x08e C64 1.2.2.0 Long Number
Arithmetic
FLASH\mbk.msc 63292 MBK 0x096 C64 2.2.4.1 Master Backup Key
Module
FLASH\ntp.msc 12620 NTP 0x09a C64 1.2.0.6 TimeAdjust Module
FLASH\pp.msc 53036 PP 0x082 C64 1.2.5.0 PIN pad Driver
FLASH\sc.msc 57916 SC 0x085 C64 1.2.0.1 Smartcard module
FLASH\se50.slf 200 -
FLASH\smos.msc 133068 SMOS 0x000 C64 3.3.0.3 SMOS Operating
System
FLASH\swap.com 0 -
FLASH\user.db 1351 -
FLASH\util.msc 14380 UTIL 0x086 C64 3.0.2.0 Utility Module
FLASH\vdes.msc 25932 VDES 0x081 C64 1.0.9.0 DES Module
FLASH\vrsa.msc 85724 VRSA 0x084 C64 1.2.0.0 RSA Module
30 files 1337368 bytes, 31029076 bytes available

Advanced Administration Tasks
Page 207 of 222
5. Restart the CryptoServer with csadm Restart (see chapter 5.4.21 for details) to start
using the newly loaded firmware module.
Example:
csadm Dev=PCI:0 Restart
6. Make sure that the firmware module has been successfully initialized and can be used by
the CryptoServer. Use the csadm command ListFirmware (see chapter 5.8.1).
Example:
csadm Dev=PCI:0 ListFirmware
Example output:
ID name type version initialization level
----------------------------------------------------------
0 SMOS C64 3.3.0.3 INIT_OK
a HCE C64 1.0.1.2 INIT_INACTIVE
68 CXI C64 2.1.4.6 INIT_OK
81 VDES C64 1.0.9.0 INIT_OK
82 PP C64 1.2.5.0 INIT_OK
83 CMDS C64 3.2.0.2 INIT_OK
84 VRSA C64 1.2.0.0 INIT_OK
85 SC C64 1.2.0.1 INIT_OK
86 UTIL C64 3.0.2.0 INIT_OK
87 ADM C64 3.0.12.0 INIT_OK
88 DB C64 1.1.2.6 INIT_OK
89 HASH C64 1.0.9.0 INIT_OK
8b AES C64 1.3.4.0 INIT_OK
8d DSA C64 1.2.2.0 INIT_OK
8e LNA C64 1.2.0.0 INIT_OK
8f ECA C64 1.1.5.2 INIT_OK
90 EXMP C64 2.0.3.0 INIT_OK
91 ASN1 C64 1.0.3.3 INIT_OK
96 MBK C64 2.2.4.1 INIT_OK
9a NTP C64 1.2.0.6 INIT_OK
9c ECDSA C64 1.1.6.0 INIT_OK
100 DEMO C64 1.0.0.0 INIT_OK
Advanced Administration Tasks
Page 208 of 222
Alternatively, you can first load the new encrypted firmware module into the CryptoServer,
and afterwards load the private part of the Firmware Encryption Key into the CryptoServer. In
this case the encrypted firmware module is not decrypted during loading, but internally
marked as an *.emc file which will be decrypted and converted into an *.msc file as soon as
the private part of the Firmware Encryption Key is loaded into the CryptoServer with the
csadm command LoadFWDecKey (see chapter 5.9.6).
7.3 Creating and Using the Signed Configuration File cmds.scf
You can use the signed configuration file cmds.scf to disable some specific external
firmware interfaces or/and to set specific permission requirements (higher than the
permissions required by default) for some external CryptoServer functions.
This chapter shows you by means of examples how to create and use the file cmds.scf.
Preconditions:
■ The required min. versions of the firmware modules ADM, CMDS and SMOS, as noted in
Chapter 5.9.8, "SignConfig", are loaded in the CryptoServer.
■ You have created a configuration file cmds.cfg (or any other file extension) with the
correct syntax. The syntax of the signed configuration file follows the syntax of
configuration files as described in Chapter 3.10 "Signed Configuration Files" of this
manual.
Example:
If the configuration file should be used for hardening the CryptoServer's interface (see
chapter 3.10.2 for details), and for configuring role-based access to selected Cryptoserver
functions (details in chapter 3.10.3), it has to contain exactly one section [DisableSFC]
and one section [Permissions] in the following format:
[DisableSFC]
0x083 = 0,1 # disable Echo and Reverse Echo in CMDS module
0x068 = 0 # disable VerifyGenuineness in CXI module
[Permissions]
0x083 = 12:FF000000,\ # CMDS module, increased authentication
# requirements for BackupUser
6:FF000000,\ # CMDS module, increased authentication
# requirements for ChangeUser
5:FF000000 # CMDS module, increased authentication
# requirements for DeleteUser
0x068 = 17:6F000000 # CXI module, increased authentication
# requirements for ImportKey

Advanced Administration Tasks
Page 209 of 222
0x087 = 10:22000000 # ADM module,
# authentication required for GetAuditLog
■ The version of the csadm tool installed on your host computer is at least 1.8.11b.
■ You have generated your own Alternative Module Signature Key (see chapter 3.7.3).
■ You have loaded the public part of your Alternative Module Signature Key into the
CryptoServer with the csadm command LoadAltMdlSigKey described in chapter 5.9.7.
Steps to do:
1. Sign the configuration file with the private part of the Alternative Module Signature Key.
Example:
csadm MdlSignKey=D:\keys\myMDLSign.key#password
SignConfig=N:\User\Utimaco\cmds.cfg
The signed configuration file is created and stored as file cmds.scf in the same folder as
the unsigned configuration file version.
2. Load the signed configuration file into the CryptoServer.
Example:
csadm Dev=PCI:0 LogonSign=ADMIN,D:\keys\ADMIN.key#ask LoadFile=
N:\User\Utimaco\cmds.scf
3. Check that the signed configuration file cmds.scf has been successfully loaded into the
CryptoServer.
Example:
csadm Dev=PCI:0 ListFiles
4. Restart the CryptoServer.
Example:
csadm Dev=PCI:0 Restart
5. Check the corresponding log file entries to ensure the signed configuration file has been
loaded and the provided settings are used.
a) Check the boot log file to ensure the settings configured in section [DisableSFC] are
used:
Example:
csadm Dev=PCI:0 GetBootLog
You should see an entry for the functions that have been disabled.
Example:
CMDS/DSOM: 0x083 – disabled 0 1
Check that the functions you wanted to be disabled are blocked:

Advanced Administration Tasks
Page 210 of 222
Example:
csadm Dev=PCI:0 cmd=0x083,0,1
You should see the following error message.
Error B0830061
CryptoServer module CMDS, Command scheduler
This function is not available in this HSM configuration
b) Check the audit log file to ensure the settings configured in section [Permissons] are
used:
Example:
By default, the csadm command GetAuditLog does not have to be authenticated.
csadm Dev=PCI:0 GetAuditLog
Since the command now has to be authenticated with min. permission 00200000 the
CryptoServer now returns an error message:
Error B0830001
CryptoServer module CMDS, Command scheduler
permission denied
With the appropriate authentication you should see the following audit log entries for
the cmds.cfg used as example in the preconditions:
csadm dev=PCI:0 LogonPass=demo,ask GetAuditLog
19.02.16 14:10:43 SMOS Ver. 3.3.4.1 successfully started
19.02.16 14:10:44 FC:0x083 SFC:5 Configured Permission=FF000000
19.02.16 14:10:44 FC:0x083 SFC:6 Configured Permission=FF000000
19.02.16 14:10:44 FC:0x083 SFC:12 Configured Permission=FF000000
19.02.16 14:10:44 FC:0x087 SFC:10 Configured Permission=00200000
19.02.16 14:10:44 FC:0x068 SFC:17 Configured Permission=6F000000
7.4 Enabling Mutual Authentication
Mutual authentication including the authentication of the CryptoServer to the host
application has been first introduced with the SecurityServer/CryptoServer SDK 4.10. The
feature is disabled by default and must be manually enabled on demand.
To use mutual authentication, at least version 3.5.3.x of the firmware module CMDS shall be
loaded on the CryptoServer and successfully initialized. Aditionally, the csadm tool provided
on the SecurityServer/CryptoServer SDK 4.10 product CD must be used for the CryptoServer
administration.
Advanced Administration Tasks
Page 211 of 222
To enable the CryptoServer to prove its authenticity at the beginning of a Secure Messaging
session, the following steps are required:
1. Execute the csadm GetState command to ensure that the CryptoServer is in Operational
Mode and no alarm is present.
Example:
mode = Operational Mode
state = INITIALIZED (0x00100004)
temp = 31.9 [C]
alarm = OFF
bl_ver = 4.00.3.0 (Model: CSe-Series)
hw_ver = 4.00.3.0
uid = dd000016 be1eac01 |
adm1 = 43536531 30302020 43533530 35313536 | CSe100 CS505156
adm2 = 53656375 72697479 53657276 65720000 | SecurityServer
adm3 = 494e5354 414c4c45 44000000 00000000 | INSTALLED
2. Execute the csadm GetHSMAuthKey command to retrieve the public part of the HSM
Authentication Key.
Example:
CS505156=AC5D8198246C4FF407F7E11B4E53C4AFF326BDF350FF531CB26E0A250DA7CD5C0AE06C69CA
8846D75102B80C3D59E06C6CC98130D27EA260CB0836A486EBE5A29A288EDFFCA4307A6F3A9EF0549D3
43FDAB57012502050BC40AF8A71F41914402DE917427D9
76DB719802BFECA96FCCABEF32A7EF79296A4B5C79D30FC545A6C7ACE585B48890E243BC9A664E58E99
92969DA1A234581083A18C62DB9FEB3B05BB29E4E68C282220DF3939120F125AEC9F6D9533C8A9BC3C8
90433B218444C81A1379A671DEDF92273E61282B345E23ECE82AF9
64E96BD4681678A59077C1CE5F17A58D620D72FE845FB68D249BA7E25D924A98269E050D57F4558A29B
6BCDE07C30D6914BF6A06DF5FE9014C8AF3BE1040A96B36D3583976D180520DAF994E3A0A9C9D5DEE83
6F1ACD606A3B8FAD186ED6AC0FC34C974FCCB5194F87EB3971F8A8
DF728B02ECC2F21ECA4BCB71748435540EF92EDE0A69CA74E070D38857661D63538C64C4169F6EEE972
D0B455734F40435B7B927BFF8982F5AD3C998D304D
Additionaly, the command output contains the CryptoServer's serial number (in format
CS<xxxxxx>) that is the same as the one included in the adm1 line of the GetState
command output.
Example:
GetHSMAuthKey output:
CS505156
=AC5D8................
GetState output:
adm1 = 43536531 30302020 43533530 35313536 |
CSe100
CS505156
3. Copy the complete and unchanged output of the csadm GetHSMAuthKey command to an
empty text file.

Advanced Administration Tasks
Page 212 of 222
This file may contain multiple entries separated by a blank line, for example, if a
CryptoServer cluster is deployed.
4. Save the text file, for example, under the file name HSMauth.keys, at a well-chosen
location on the computer where the host application is installed.
5. Distribute the file containing the public part of the HSM Authentication Key, for example
HSMauth.keys, to all host computers/persons in your organization that want to
communicate with the CryptoServer in a mutually authenticated way. Choose a
trustworthy and authentic procedure for the file distribution.
6. Set the permissions for the file, so that only predefined system administrators are
permitted to maintain the file content.
▣ On a Linux machine, use the chmod command.
▣ On a Windows computer, right-click the file, select Properties and then click the
Security tab. If necessary, consult the appropriate Microsoft help for further details.
7. Create the system environment variable CS_AUTH_KEYS to contain the path to the
previously created text file (for example, HSMauth.keys) on all corresponding hosts, this
all computers where the previously created text file has been distributed to.
Example:
set CS_AUTH_KEYS=C:\ProgrammData\Utimaco\HSM.keys
From now on every Secure Messaging session established between the CryptoServer and any
host application is mutually authenticated.
In case the content of the file containing the public part of the HSM Authentication Key has
been modified, that is the HSMAuthKey verification failed or the file could not be found at the
location specified by the environment variable CS_AUTH_KEYS, the Secure Messaging session
fails to be established with an appropriate error message.
An error message is also returned if all sensive data has been erased from the CryptoServer
as a consequence of an alarm or the execution of the Clear command, or if the CryptoServer
device has been exchanged or removed. This way, any changes to the device will be noticed.
To set up mutual authentication again the CryptoServer shall be inspected and, if trusted, the
procedure described above shall be repeated.

Troubleshooting
Page 213 of 222
8 Troubleshooting
This chapter provides solutions to some possible trouble cases when using the CryptoServer.
8.1 Checking the Operativeness and the State of the CryptoServer
This chapter deals with the situation where it is not known whether the CryptoServer works at
all, and in which mode/state it is. The following steps should be systematically performed to
check CryptoServer’s operativeness and, if possible, to get the CryptoServer working again.
Preconditions
■ If the CryptoServer plug-in card is installed on your local computer, make sure that the
PCIe driver is running and the administration tool csadm is installed on the computer.
■ If the CryptoServer is a part of a CryptoServer LAN, make sure that the CryptoServer LAN
and the host PC, whereon the administration tool csadm is installed, are properly
connected to the network (try to ‘ping’ the CryptoServer LAN from the host PC).
Steps to do:
1. Perform the GetState command (see also chapter 5.4.1).
csadm Dev=PCI:0 GetState
Example Output:
mode = Operational Mode
state = INITIALIZED (0x00100004)
temp = 24.6 [C]
alarm = OFF
bl_ver = 3.00.2.1 (Model: Se-Series)
uid = 8c000011 0c1a3201 | 2
adm1 = 53653530 20202020 43533434 33303133 | Se50 CS443013
adm2 = 53656375 72697479 53657276 65720000 | SecurityServer
adm3 = 494e5354 414c4c45 44000000 00000000 | INSTALLED
In the following table the operativeness check is done by considering the output data for
the mode, state and alarm of the GetState command.
Result
Explanation/Reason/Adjustment
mode = Operational Mode
state = INITIALIZED
alarm = OFF
Everything Ok,
Continue with step 2.

Troubleshooting
Page 214 of 222
Result
Explanation/Reason/Adjustment
mode = Operational Mode
Administration-Only
state = INITIALIZED
alarm = OFF
Everything is Ok,
Continue with step 2.
mode = Maintenance Mode
state = INITIALIZED
alarm = OFF
Only the backup set of system firmware modules (*.sys)
has been started (see chapter 2.2.5). No cryptographic
services like CXI, JCE, etc., are available.
Restart the CryptoServer (step 3). If the CryptoServer is
still in Maintenance Mode, load the wanted firmware
module package (*.mpkg, see command LoadPKG,
chapter 5.8.4).
Restart the CryptoServer (step 3).
mode = Bootloader Mode
state = INITIALIZED
alarm = ON
CryptoServer is in Bootloader Mode.
Restart the CryptoServer (step 3)
csadm Dev=PCI:0 restart
An alarm has occurred (and is possibly physically still
present)
See chapter 8.2 for alarm treatment. In chapter 3.4 you
find more information about the CryptoServer alarms).
If state is not INITIALIZED
The CryptoServer is not correctly initialized or even defect.
Please get in contact with the Utimaco IS GmbH.
If error: B9011xxx, B9015xxx,
B9016xxx, B9017xxx or
B9021xxx until B9024xxx
The PCIe plug-in card of the CryptoServer does not react.
Try a restart (step 3).
other errors:
B901xxxx or B902xxxx
No connection to the CryptoServer/CryptoServer LAN,
communication problem, wrong host or device name,
problem with the network.
Check parameters.
Perform ping at CryptoServer LAN.
Check state/configuration of the TCP daemon on the
CryptoServer LAN.
2. Perform the ListFirmware command (see chapter 5.8.1).
csadm Dev=PCI:0 ListFirmware

Troubleshooting
Page 215 of 222
Result
Explanation/Reason/Adjustment
All necessary modules are
listed and initialized
(INIT_OK).
Everithing OK. CryptoServer is in Operational and ready to use.
Some necessary modules
are missing in the given list.
Modules are not loaded into the CryptoServer.
Check presence of modules with ListFiles command.
Load the missing modules with LoadFile and restart the
CryptoServer.
If the modules cannot be started:
Perform the GetBootLog command and search the boot log
for errors.
At least one module is not
initialized (i.e., not INIT_OK
or INIT_INACTIVE).
Firmware module(s) cannot be started (for example, module
dependencies cannot be resolved).
Perform the GetBootLog command and search the boot log
for errors
3. Perform the Restart command (see chapter 5.4.21).
csadm Dev=PCI:0 Restart
Result
Explanation/Reason/Adjustment
no error
OK go back to step 1
other error
Switch CryptoServer’s power off and on again, then go back
to step 1
If this does not help: may be hardware problem
Please contact Utimaco IS GmbH
8.2 Alarm Treatment
An alarm can be triggered on the CryptoServer for various physical reasons, like for example,
the temperature being too high or too low, empty battery, or after an External Erase had been
executed. See chapter 3.4 for a list of all possible alarm reasons and a detailed description of
the alarm mechanism of the CryptoServer.
Most alarm reasons can be removed (for example, exchange low battery or cool down high
temperature). The GetState command shows the reason for an alarm, and whether the alarm
is still present (see chapter 5.4.1). If the reason for an alarm cannot be removed (for example,
Troubleshooting
Page 216 of 222
defect foil) then please get in contact with the manufacturer/Utimaco IS GmbH. Otherwise
you can reset the pending alarm state (see below).
Preconditions
An alarm has occurred to the CryptoServer. This will be announced with the GetState
command (alarm = ON). If GetState additionally answers with Alarm is present, then the
alarm is physically still present. But it is also possible that in the meantime the alarm cause
has been removed.
Steps to do:
1. If the alarm is physically still present:
Remove the alarm cause if possible. Then restart the CryptoServer (command Restart,
see chapter 5.4.21).
2. Execute GetState again (see chapter 5.4.1). Even if the reason for the alarm has been
removed, the alarm state will still be ON, but the alarm should no longer be shown as
present (only as has occurred).
3. Depending on the alarm state proceed as follows:
If the alarm is still shown as present Please contact the manufacturer Utimaco.
If the alarm is shown as has occurred
a) Perform the ResetAlarm command (see chapter 5.4.17)
b) Restart the CryptoServer (command Restart, see chapter 5.4.21).
c) Execute GetState again. The alarm state should now be OFF.
Please be aware that all users who have used a password authentication mechanism are
lost after an alarm. These users have to be replaced, if needed.
If self-developed encrypted firmware modules have been loaded and stored in the
CryptoServer, all they are deleted after an alarm. In this case you have to do the following
steps:
4. Load the private part of Firmware Encryption Key into the CryptoServer again
(command LoadFWDecKey, see chapter 5.9.6).
5. Load all necessary (encrypted) firmware modules or your firmware module package again.

Troubleshooting
Page 217 of 222

Built-in Elliptic Curves
Page 218 of 222
Appendix A Built-in Elliptic Curves
The CryptoServer offers a collection of elliptic curves which can be used for ECDSA signature
generation by the firmware module CXI. Each curve is specified by elliptic curve domain
parameters and is identified by a name.
The following table lists all built-in elliptic curves by their name, denotes the bit size of their
domain parameters (i.e. the key size) and references the specification where the respective
curve and its domain parameters are defined.
Name(s)
Size
Defined in:
secp112r1
112
[SEC2]
secp112r2
112
[SEC2]
sect113r1
113
[SEC2]
sect113r2
113
[SEC2]
secp128r1
128
[SEC2]
secp128r2
128
[SEC2]
sect131r1
131
[SEC2]
sect131r2
131
[SEC2]
brainpoolP160r1
160
[BP]
brainpoolP160t1
160
[BP]
secp160k1
160
[SEC2]
secp160r1
160
[SEC2]
secp160r2
160
[SEC2]
NIST-K163 / sect163k1
163
[FIPS186-2], [ANSI-X9.62], [SEC2]
sect163r1
163
[SEC2]
NIST-B163 / sect163r2
163
[FIPS186-2], [ANSI-X9.62], [SEC2]
brainpoolP192r1
192
[BP]
brainpoolP192t1
192
[BP]
NIST-P192 / secp192r1
192
[FIPS186-2], [ANSI-X9.62], [SEC2]
secp192k1
192
[SEC2]

Built-in Elliptic Curves
Page 219 of 222
Name(s)
Size
Defined in:
sect193r1
193
[SEC2]
sect193r2
193
[SEC2]
brainpoolP224r1
224
[BP]
brainpoolP224t1
224
[BP]
NIST-P224 / secp224r1
224
[FIPS186-2], [ANSI-X9.62], [SEC2]
secp224k1
224
[SEC2]
NIST-K233 / sect233k1
233
[FIPS186-2], [ANSI-X9.62], [SEC2]
NIST-B233 / sect223r1
233
[FIPS186-2], [ANSI-X9.62], [SEC2]
sect239k1
239
[SEC2]
brainpoolP256r1
256
[BP]
brainpoolP256t1
256
[BP]
NIST-P256 / secp256r1
256
[FIPS186-2], [ANSI-X9.62], [SEC2]
secp256k1
256
[SEC2]
FRP256v1
256
[ANSSI]
NIST-K283 / sect283k1
283
[FIPS186-2], [ANSI-X9.62], [SEC2]
NIST-B283 / sect283r1
283
[FIPS186-2], [ANSI-X9.62], [SEC2]
brainpoolP320r1
320
[BP]
brainpoolP320t1
320
[BP]
brainpoolP384r1
384
[BP]
brainpoolP384t1
384
[BP]
NIST-P384 / secp384r1
384
[FIPS186-2], [ANSI-X9.62], [SEC2]
NIST-K409 / sect409k1
409
[FIPS186-2], [ANSI-X9.62], [SEC2]
NIST-B409 / sect409r1
409
[FIPS186-2], [ANSI-X9.62], [SEC2]
brainpoolP512r1
512
[BP]
brainpoolP512t1
512
[BP]
NIST-P521 / secp521r1
521
[FIPS186-2], [ANSI-X9.62], [SEC2]


References
Page 221 of 222
References
Reference
Title/Company
Doc.-No.
[AIS20]
AIS 20, Version 1: “Functionality classes and evaluation
methodology for deterministic random number
generators, Version 2.0 of 2.12.1999”; BSI (Bundesamt
für Sicherheit in der Informationstechnik - Federal Office
for Information Security; Germany).
[AIS31]
AIS 31, Version 1: “Functionality classes and evaluation
methodology for true (physical) random number
generators, Version 3.1 of 25.9.2001”; BSI (Bundesamt
für Sicherheit in der Informationstechnik - Federal Office
for Information Security; Germany)
[ANSI-X9.62]
ANS X9.62-2005: Public Key Cryptography for the
Financial Services Industry,
The Elliptic Curve Digital Signature Algorithm (ECDSA) /
ANSI (American National Standards Institute)
[ANSI-X9.63]
ANSI X9.63-2001: Public Key Cryptography for the
Financial Services Industry, Key Agreement and Key
Transport Using Elliptic Curve Cryptography /
ANSI (American National Standards Institute)
[ANSSI]
JORF n° 0241 of October 16, 2011 page 17533
text n° 30 Opinion on elliptic curve parameters set by the
French government
NOR: PRMD1123151V
[BP]
ECC Brainpool Standard Curves and Curve Generation,
v1.0, 19.10.2005. Available: www.ecc-brainpool.org
[CSAPI]
CryptoServer Application Interface
(CSAPI)/Utimaco IS GmbH.
2002-0005
[CSCMDS]
CryptoServer - Firmware Module CMDS - Interface
Specification - CMDS Version ≥
3.0.0.0/Utimaco IS GmbH.
2009-0002
[CSCSe-OM]
CryptoServer PCIe CSe-Series Operating Manual/
Utimaco IS GmbH.
M013-0002-en

References
Page 222 of 222
Reference
Title/Company
Doc.-No.
[CSLAN]
CryptoServer LAN - Manual for System
Administrators/Utimaco IS GmbH.
M010-0002-en
[CSLAN4-OM]
CryptoServer LAN V4 Operating
Manual/Utimaco IS GmbH.
M012-0002-en
[CSMSADM]
CryptoServer Manual for System
Administrators/Utimaco IS GmbH.
M010-0001-en
[CSSe-OM]
CryptoServer PCIe Se-Series Operating
Manual/Utimaco IS GmbH.
M010-0004-en
[CSSe2-OM]
CryptoServer PCIe Se-Series Gen2 Operating
Manual/Utimaco IS GmbH.
M015-0001-en
[FIPS186-2]
FIPS PUB 186-2, Digital Signature Standard/National
Institute of Standards and Technology (NIST), January
2000.
[PKCS#1]
PKCS#1: RSA Cryptography Standard v2.1,
June 14, 2002/RSA Laboratories. Available:
http://www.emc.com/emc-plus/rsa-labs/standards-
initiatives/pkcs-rsa-cryptography-standard.htm
[PKCS#3]
PKCS#3: Diffie-Hellman Key Agreement Standard v1.4,
November 1, 1993/RSA Laboratories. Available:
http://www.emc.com/emc-plus/rsa-labs/standards-
initiatives/pkcs-3-diffie-hellman-key-agreement-standar.htm
[SEC2]
SEC2: Recommended Elliptic Curve Domain Parameters
– Certicom Research – September 20, 2000, Version 1.0.
