Cyber Centurion Guide
Cyber%20Centurion%20Guide
User Manual:
Open the PDF directly: View PDF ![]() .
.
Page Count: 18
Cyber Centurion Guide
1
1. Ubuntu
1.1 Overview
Ubuntu is an open-source unix based system. Most of the settings are
controlled through the terminal so it is useful to know the basic terminal
command.
1.2 Basic Console Terminology
sudo [command] – run command as superuser
cd [directory] – change directory (cd .. to go to parent directory, cd / to go to
root directory)
ls – list all files and folders in current directory
mkdir [name] – create folder
grep [keywords] – search for file using keywords
poweroff – shutdown computer
apt install [program] – install program/service
apt remove [program] – uninstall program/service
cp [source] [destination] – Copy file
sudo gedit [file] – edit file
pwd – Shows the full directory currently open
df – Displays info about current file system
[command] -help – Displays help on said command
chmod [U (user), G (group of User) and O (everyone][+ or - privilege][R (read),
W (write) or E (execute)] [file directory] – gives files permissions
find . -type f -name “*.[file extenstion]” - finds files with given extension
1.3.1.1 Background
Having a strong password is important and to ensure users all have strong
passwords, you can enforce a password policy to ensure password complexity.
1.3.1.2 How to Perform
Firstly open terminal (ctrl + alt + T) and type:
sudo gedit /etc/pam.d/common-password
Cyber Centurion Guide
2
Go down to the line “password [success=1 default=ignore] pam_unix.so
obscure sha512” and add “remember = 10” – This will stop the user using the
same password for at least 5 password changes.
Then go to line “password requisite pam_deny.so” and add “retry=5
minlen=10 difok=3 ucredit=-1 lcredit=-2 dcredit=-1 ocredit=-1” – This will
ensure the users password is long and complex enough.
Then save and close the file and go back to the terminal and type:
sudo gedit /etc/login.defs
Then go to “LOGIN_RETRIES” and add “5” – This will make sure the user only
has 5 attempts to enter their password.
Then go to “Password aging controls” and set “PASS_MAX_DAYS” TO “30” –
This will make sure the user has to change their password every 30 days.
Then save and close the file and go back to the terminal and type:
sudo gedit /etc/pam.d/common-auth
.
Add “auth required pam_tally2.so deny=5 onerr=fail unlock_time=1800” to the
bottom of the file and then save and close the file
1.3.2 Firewall
1.3.2.1 Background
Firewalls protect computers from malicious packets.
1.3.2.2 How to Perform
Firstly open terminal (ctrl + alt + T) and type:
sudo apt-get install ufw
Then wait for all the commands to run and then type:
sudo ufw enable
Cyber Centurion Guide
3
If you get the message “Firewall is active and enabled on system startup” then
you have successfully enabled the firewall.
1.3.2.3 Other Commands
sudo ufw allow [port] – This will open said port
sudo ufw deny [port] – This will close said port (packet discarded)
sudo ufw reject [port] – This will close said port (port unreachable packet sent
to source computer)
sudo ufw delete [rule number] – This will delete said rule
sudo ufw reset – This resets all rules for the firewall
sudo ufw app list – The services currently operating on the firewall
1.3.2.4 GUI firewall
If you don’t want to use terminal you can install a GUI firewall by typing into
terminal (ctrl + alt + T):
sudo apt-get install gufw
Then to open the gui, type:
sudo gufw
1.3.3 Root User
1.3.3.1 Background
A root user is a very powerful user and has very extensive permissions and so
most systems should disable the root user.
1.3.3.2 How to Perform
To disable the root user open terminal (ctrl + alt + T) and type:
sudo passwd -l root
Cyber Centurion Guide
4
1.3.4 SSH Server
1.3.4.1 Background
Sometimes systems uses an SSH server which is primarily used for remote
logon.
1.3.4.2 How to Perform
Firstly, you need to install SSH. Open terminal (ctrl + alt + T) and type:
sudo apt-get install ssh
If SSH is pre-installed, you should update it so the security updates are up to
date, to do this type:
sudo apt-get upgrade ssh
Now to secure the SSH server, firstly disable the root user. In terminal type:
sudo gedit /etc/ssh/sshd_config
Then go to the line “PermitRootLogin” and set it to “no” – This will stop root
login through SSH.
In this file, if you are required to, you can change the port SSH uses (standard
port for SSH is 22) by setting the “Port” setting to a different port.
1.3.5 Services
1.3.5.1 Background
Services are programs which involve data transfer in and out of a computer for
example FTP (file transfer protocol) and SSH (secure shell). To secure a
computer, we can disable unnessary services.
Cyber Centurion Guide
5
1.3.5.2 How to Perform
Firstly, you need to find all enabled services. Open terminal (ctrl + alt + T) and
type:
sudo service --status-all
This will list all the services. Now look at this list and decide what services are
not necessary and disable them by typing this into the terminal:
sudo apt remove [insert name of service]
If you need to reenable a service, type this into the terminal:
sudo apt install [insert name of service]
1.3.6 Users
To get a list of users, type this into the terminal:
sudo users
To get the id of a user, type this into the terminal:
sudo id -u [username]
To add, delete, change password or change account type of a user click on the
settings icon on the sidebar. Then navigate to user accounts.
1.3.7 Automatic Updates
1.3.7.1 Background
Automatic updates can provide urgent security updates to your computing and
so should be enabled.
Cyber Centurion Guide
6
1.3.7.2 How to Perform
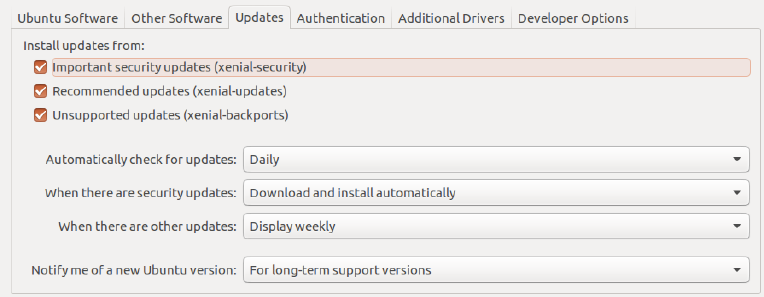
Click on the settings icon on the sidebar and navigate Software and Update
page and click on the Update tab.
Make sure all the options are ticked and that automatic updates are set to
daily and downloaded automatically
1.3.8 Deleting and Installing Program
1.3.8.1 Background
Some programs may be prohibited on a system and so needs to be uninstalled
i.e. hacking programs like nmap and wireshark.
1.3.8.2 How to Perform
To install a program, open terminal (ctrl + alt + T) and type:
sudo apt install [name of program]
To uninstall a program, type:
sudo apt remove [name of program]
Cyber Centurion Guide
7
1.3.9 Update the System
1.3.9.1 Background
Update the system to the most up to date security software.
1.3.9.2 How to Perform
open terminal (ctrl + alt + T) and type:
sudo apt-get update && apt-get upgrade
1.3.10 Guest User
1.3.10.1 Background
A guest account is an account anyone can login to but it can’t save any files.
1.3.10.2 How to Perform
To disable the guest user open terminal (ctrl + alt + T) and type:
sudo gedit /etc/lightdm/lightdm.conf.d
Then go to the bottom and the line “allow-guest: false” – This will stop guest
login.
1.3.11 Audit Policy
1.3.11.1 Background
An audit policy defines account limits for users of one or more resources.
1.3.11.2 How to Perform
To set up audit policies, open terminal (ctrl + alt + T) and type:
Cyber Centurion Guide
8
sudo apt-get install auditd
Then type:
sudo auditctl -e 1
The audit policies are now setup if you need to edit them, type this into the
terminal:
sudo gedit /etc/audit/auditd.conf
Cyber Centurion Guide
9
2. Windows
2.1 Overview
Windows is probably the most common operating system, for Cyber Centurion
they used Windows 8/10 and Windows Server 2008/2016.
2.2.1 Password Policy
2.2.1.1 Background
Having a strong password is important and to ensure users all have strong
passwords, you can enforce a password policy to ensure password complexity.
2.2.1.2 How to Perform
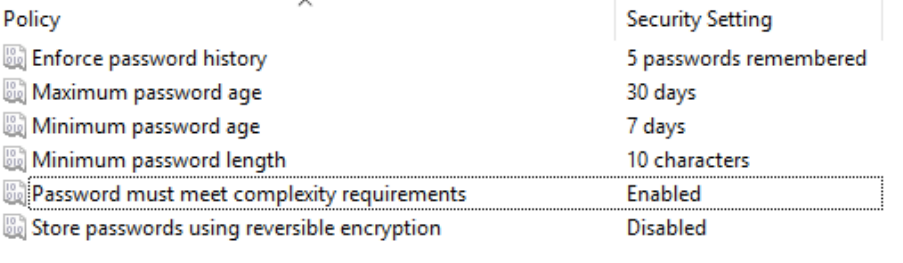
Open search and type “administrative tools”. Then click on “Local Security
Policy” then click on “Account Policies” then “Password Policy”.
Set the following settings to:
Enforce password history – 5 passwords remembered
Maximum password age – 30 days
Minimum password age – 7 days
Minimum password length – 10 characters
Password must meet complexity requirements – Enabled
Store passwords using reversible encryption – Disabled
Then click on “Account Lockout Policy”.

Cyber Centurion Guide
10
Set the following settings to:
Account lock duration – 30 minutes
Account lockout threshold – 5 invalid logon attempts
Reset account lockout counter after – 30 minutes
2.2.2 Other Security Options
2.2.2.1 Background
Requiring CTRL + ALT + DELETE is a more secure login system.
2.2.2.2 How to Perform
Open search and type “administrative tools”. Then click on “Local Security
Policy” then click on “Local Policies” then “Security Options”. Go to “Interactive
Login, Do not require CTRL + ALT + DELETE” and set it to Disabled.
2.2.3 Firewall
2.2.3.1 Background
Firewalls protect computers from malicious packets.
2.2.3.2 How to Perform
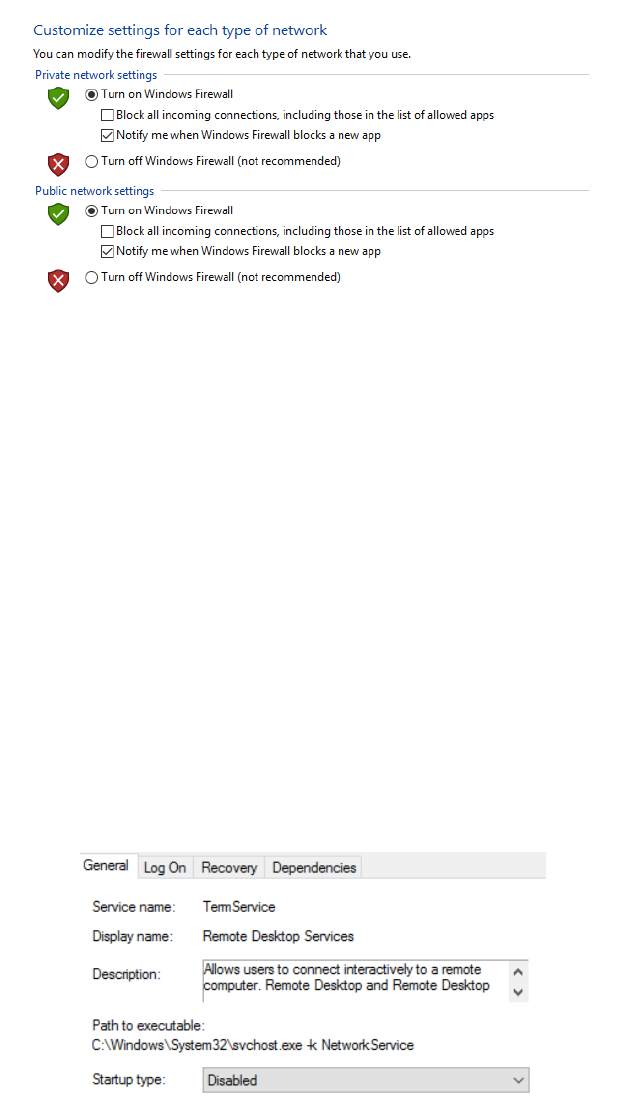
Open search and type “control panel”. Then click on “System and Security”
then click on “Windows Firewall” then click on “Turn firewall on or off”. Make
sure firewall is on and notifying the user for both public and private networks.
Cyber Centurion Guide
11
2.2.4 Services
2.2.4.1 Background
Services are programs which involve data transfer in and out of a computer for
example FTP (file transfer protocol) and SSH (secure shell). To secure a
computer, we can disable unnessary services.
2.2.4.2 How to Perform
Firstly, open search and Open search and type “administrative tools”. Then
click on “Services”. Find the service you need to disable, right click and click
stop. Then right click and click properties:
Then set “Startup type” to Disabled.
2.2.4.3 Services that should (maybe) be disabled:
• Telnet
• FTP
• SSH
• Samba
Cyber Centurion Guide
12
• Avahi Server
• SNMP
2.2.4.4 Windows Features:
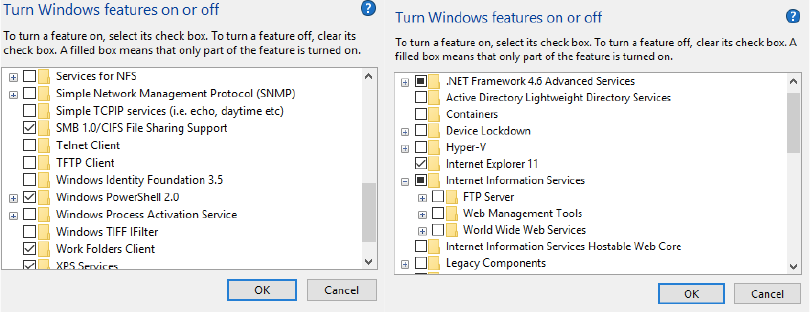
Open search and type “control panel”. Then click on “Programs” then click on
“Programs and Features” then click on “Turn windows features on or off”.
Then check that services like “Telnet client” and “FTP Server” are disabled.
2.2.5 Users
2.2.5.1 Basic Settings
Open search and type “control panel”. Then click on “User Accounts” then click
on “User Accounts”. Here you can add users, remove users, change passwords
and change account type.
2.2.5.2 Advanced Settings
Firstly, open search and Open search and type “administrative tools”. Then
click on “Computer Management”, then click on “Local Users and Group” then
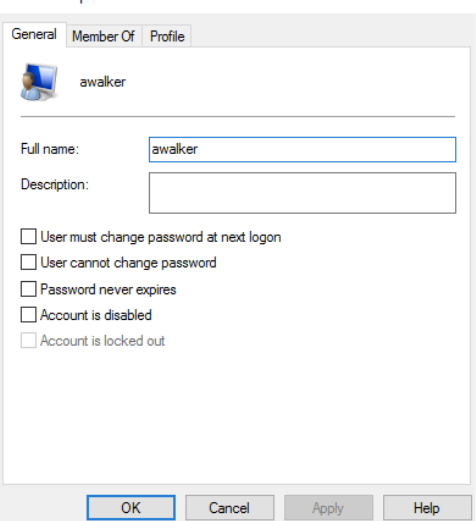
click on “Users”. Find the user you want to edit, right click and click properties.
Here you can disable an account, make sure they can’t change the password,
make them change the password on the next login.
Cyber Centurion Guide
13
2.2.6 Clean Host File
2.2.6.1 Background:
A host file is used by operating systems to map connections between an IP
address and domain names.
2.2.6.2 How to Perform:
To clean the host file, open the file from directory:
“C:\Windows\System32\drivers\etc\host.txt“
Then replace the all the text with the following:
Cyber Centurion Guide
14
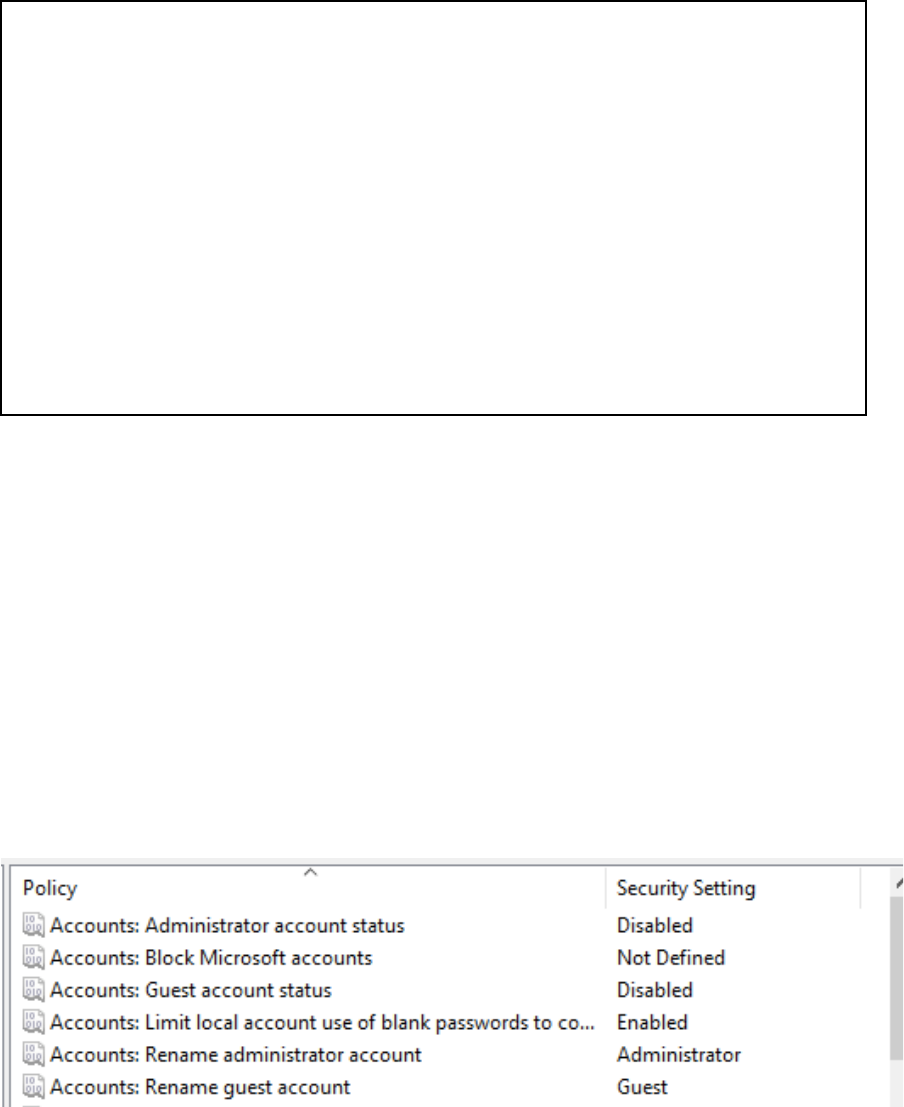
2.2.7 Guest/Admin Account Management
2.2.7.1 Background:
The admin account is a superuser, the guest account is an account that anyone
can use but doesn’t save any files.
2.2.7.2 How to Perform:
Open search and type “administrative tools”. Then click on “Local Security
Policy” then click on “Local Policies” then “Security Options”.
Set Guest and Administrator account status to Disabled
Rename the guest and administrator accounts to a different name.
# Copyright (c) 1993-2006 Microsoft Corp.
#
# This is a sample HOSTS file used by Microsoft TCP/IP for Windows.
#
# This file contains the mappings of IP addresses to host names. Each
# entry should be kept on an individual line. The IP address should
# be placed in the first column followed by the corresponding host name.
# The IP address and the host name should be separated by at least one
# space.
#
# Additionally, comments (such as these) may be inserted on individual
# lines or following the machine name denoted by a '#' symbol.
#
# For example:
#
# 102.54.94.97 rhino.acme.com # source server
# 38.25.63.10 x.acme.com # x client host
# localhost name resolution is handle within DNS itself.
# 127.0.0.1 localhost
# ::1 localhost
Cyber Centurion Guide
15
2.2.8 Updates
Install all necessary updates by searching for “Settings” and clicking “Windows
Update” and install all necessary updates available.
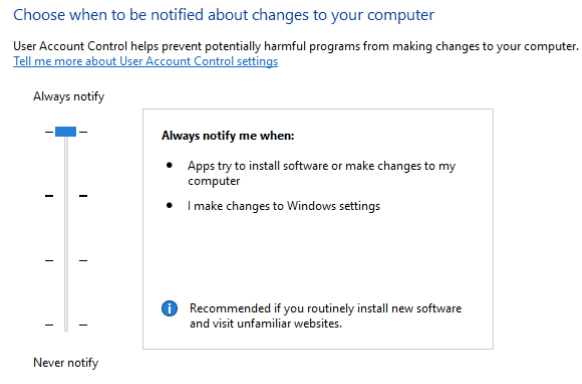
2.2.9 Windows Access Control
2.2.9.1 Background:
UAC (User Account Control) alerts the user if programs attempt to make
changes to the computer.
2.2.9.2 How to Perform:
Open search and type “control panel”. Then click on “System and Security”
then click on “Security and Maintenance”. Set the dial up to the maximum
security setting.
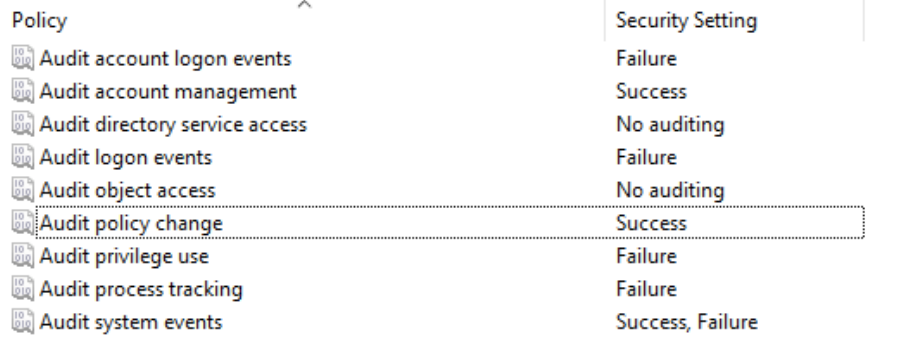
2.2.10 Audit Policy
2.2.10.1 Background:
An audit policy defines account limits for users of one or more resources.
Cyber Centurion Guide
16
2.2.10.2 How to Perform:
Open search and type “administrative tools”. Then click on “Local Security
Policy” then click on “Local Policies” then “Audit Policy”.
Set the audit settings:
Audit Account Logon Events - Failure
Audit Account Management - Success
Audit Directory Service - ND
Audit Logon Events - Failure
Audit Objects Access - ND
Audit Policy Change - Success
Audit Privilege use success - Failure
Audit Process tracking Success - Failure
Audit System Event – Success, Failure
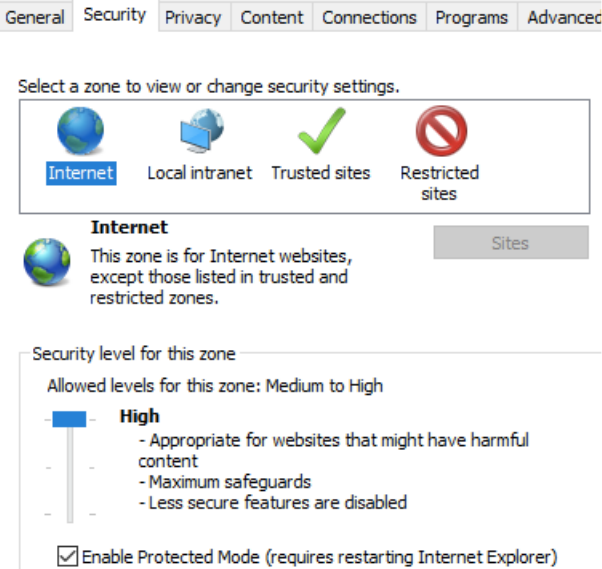
2.2.11 Secure Internet Connection
2.2.11.1 How to Perform:
Open search and type “Control Panel”. Then click on “Network and Internet”
then click on “Internet Options” then select the “Security” tab and set the dial
up to the maximum security setting.
Cyber Centurion Guide
17
2.2.12 Disable File Sharing for C Drive
2.2.11.1 How to Perform:
Open search and type “administrative tools”. Then click on “Computer
Management” then click on “Shared Folders” then right click on c-drive and
select disable sharing.
3. Using this Guide
Red – signifies line in a config file
Blue – signifies terminal commands
Green – signifies what a setting should be set to
4. Advice on Cyber Centurion
• Always answer forensics first to avoid affecting the answers

Cyber Centurion Guide
18
• Always read the readme before attempting to edit any settings
• Don’t just disable things in this guide, double check the readme first
• Not everything in this guide will get you points
• If you want to search for a file type, type *.[file type] i.e. *.png – to
search for all PNGs
5. Additional Resources
https://neprisstore.blob.core.windows.net/sessiondocs/doc_362f4940-9202-
4477-9f45-b271bc2a9877.pdf - document of security procedures for ubuntu
https://s3.amazonaws.com/cpvii/Training+materials/Unit+Eight+-
+Ubuntu+Security.pdf – PowerPoint on ubuntu security
