PicoP Gen4 Windows SDK Getting Started Guide DA0140033 Pico P
User Manual:
Open the PDF directly: View PDF ![]() .
.
Page Count: 12
- 1. Abstract
- 2. Table of Contents
- 3. Acquiring and Installing the PicoP Windows SDK
- 4. Accessing SDK Documentation
- 5. Using the PicoP Application Programming Interface (API)
- 6. “Hello, World“ - Program
- 7. PicoP_Console Sample Project

Getting Started with PicoP® Gen4 SDK for Windows
PicoP Gen4 Windows SDK Ver. 1.3 Getting Started Guide
MVIS #: DA0140033 May 2019 Revision A.3
© 2018 MicroVision, Inc. All rights reserved.
Page 1 of 12
MicroVision.com
PicoP® is a registered trademark of MicroVision, Inc.
Specifications subject to change without notice.
1. Abstract
This guide explains how to get started with the MicroVision Windows Software Development Kit
(SDK) for its 4th Generation PicoP Scanning Engines (PSE). The PicoP Windows SDK allows
developers to quickly and easily integrate PicoP Scanning Engine control into a Windows
application. The Windows Application can communicate with PSE over USB or UART. The SDK
package includes the C Application Programming Interface (API), SDK libraries, documentation,
and sample projects that demonstrate use of some basic (PSE) functions. The sample applications
have been developed and built using Microsoft Visual Studio 2017.
2. Table of Contents
1. ABSTRACT ......................................................................................................................................................... 1
2. TABLE OF CONTENTS ................................................................................................................................... 1
3. ACQUIRING AND INSTALLING THE PICOP WINDOWS SDK .............................................................. 2
4. ACCESSING SDK DOCUMENTATION ........................................................................................................ 4
5. USING THE PICOP APPLICATION PROGRAMMING INTERFACE (API) .......................................... 5
5.1. SDK VERSION CONTROL .............................................................................................................................. 5
5.2. STEP 1: LINK SDK LIBRARY TO THE APPLICATION ....................................................................................... 5
5.3. STEP 2: INITIALIZE THE SDK LIBRARY ......................................................................................................... 5
5.4. STEP 3: CONNECT TO PICOP .......................................................................................................................... 6
5.5. STEP 4: CONFIGURE AND CONTROL PICOP .................................................................................................... 6
5.5.1. Connection Management ..................................................................................................................... 6
5.5.2. Display Control Functions .................................................................................................................. 7
5.5.3. System Management Functions ........................................................................................................... 8
5.5.4. Input Control Functions ...................................................................................................................... 8
5.5.1. 3D Sensing Functions .......................................................................................................................... 8
5.5.2. Rendering Functions ........................................................................................................................... 8
5.6. STEP 5: EXIT APPLICATION ........................................................................................................................... 9
6. “HELLO, WORLD“ - PROGRAM ................................................................................................................ 10
7. PICOP_CONSOLE SAMPLE PROJECT ..................................................................................................... 11
7.1. PREREQUISITES ........................................................................................................................................... 12
7.2. BUILDING THE PICOP_CONSOLE SAMPLE APPLICATION ............................................................................. 12
Getting Started with PicoP® Gen4 SDK for Windows
PicoP Gen4 Windows SDK Ver. 1.3 Getting Started Guide
MVIS #: DA0140033 May 2019 Revision A.3
© 2018 MicroVision, Inc. All rights reserved.
Page 2 of 12
MicroVision.com
PicoP® is a registered trademark of MicroVision, Inc.
Specifications subject to change without notice.
3. Acquiring and Installing the PicoP Windows SDK
The latest PicoP Windows SDK can be cloned or downloaded from:
https://github.com/MicroVision-Inc/Interactive_Projection/tree/master/PicoP_Windows_SDK
Alternatively, the SDK may be delivered as a compressed zip file named
PicoP_Windows_SDK_Ver_X_Y_Z.zip. The X_Y_Z postfix of the file name represents the version
number of the SDK (X equals the major version, Y the minor version, and Z the patch number of the
SDK). To install the SDK, simply unzip the file into c:\PicoP_Windows_SDK or another directory
of your choice.
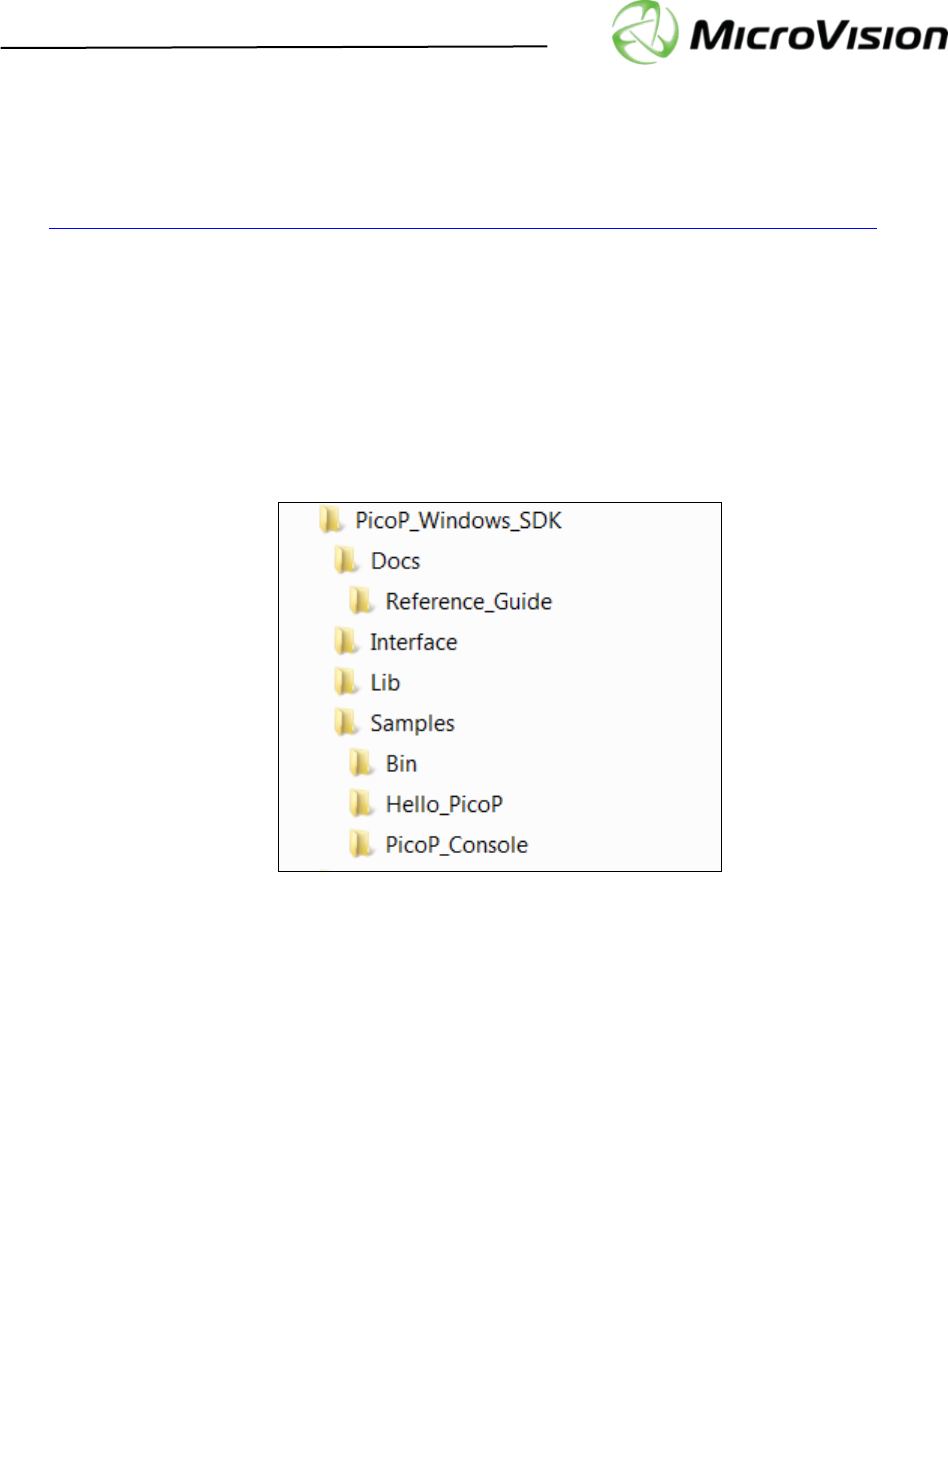
The downloaded or unzipped destination folder will contain the following subfolders:
Getting Started with PicoP® Gen4 SDK for Windows
PicoP Gen4 Windows SDK Ver. 1.3 Getting Started Guide
MVIS #: DA0140033 May 2019 Revision A.3
© 2018 MicroVision, Inc. All rights reserved.
Page 3 of 12
MicroVision.com
PicoP® is a registered trademark of MicroVision, Inc.
Specifications subject to change without notice.
The files/folders included in the SDK distribution package are described in more detail below:
PicoP_Windows_SDK
SDK Root folder
Docs
Reference_Guide
Detailed Programmer’s Reference Guide
index.html
Programmer’s Reference Guide entry point
*.html
Programmer’s Reference Guide documentation
DA0140028_PicoP_Gen4_Progra
mmers_Guide.pdf
High-Level Programmer’s Guide
EULA.pdf
SDK End User License Agreement
Interface
PicoP SDK API Interface
picop_api.h
PicoP SDK header file with function prototypes
picop_def.h
PicoP SDK definitions files
picop_rc.h
PicoP SDK return codes
Lib
PicoP SDK Windows libraries (64-bit)
PicoP_rpc.dll
PicoP SDK dynamic link library
PicoP_rpc.lib
PicoP SDK import library
PicoP_rpc.exp
PicoP SDK library export
Samples
Bin
Contains the 64-bit executables for the sample
applications.
Hello_PicoP
Simplest “Hello, World” application
demonstrating how to communicate with PSE.
PicoP_Console
Simple Console Application demonstrating the
basic usage of sample C APIs for Display
functions
DA0140033_PicoP_Gen4_Windows_SDK_Gett
ing_Started_Guide.pdf
This Getting Started guide for PicoP Windows
SDK.

Getting Started with PicoP® Gen4 SDK for Windows
PicoP Gen4 Windows SDK Ver. 1.3 Getting Started Guide
MVIS #: DA0140033 May 2019 Revision A.3
© 2018 MicroVision, Inc. All rights reserved.
Page 4 of 12
MicroVision.com
PicoP® is a registered trademark of MicroVision, Inc.
Specifications subject to change without notice.
4. Accessing SDK Documentation
For high level description of functions/commands supported by the PSE Application Programming
Interface (API), please refer to the DA0140028_PicoP_Gen4_Programmers_Guide.pdf .
For detailed description of the C-language API, please refer to the Programmer’s Reference Guide at
Docs\Reference_Guide\index.html. The Reference Guide is a set of hyperlinked HTML files
containing detailed description of all Function interfaces and definitions provided by the API.

Getting Started with PicoP® Gen4 SDK for Windows
PicoP Gen4 Windows SDK Ver. 1.3 Getting Started Guide
MVIS #: DA0140033 May 2019 Revision A.3
© 2018 MicroVision, Inc. All rights reserved.
Page 5 of 12
MicroVision.com
PicoP® is a registered trademark of MicroVision, Inc.
Specifications subject to change without notice.
5. Using the PicoP Application Programming Interface (API)
The PicoP SDK for Windows allows you to easily interface your application software with the PicoP
Scanning Engine. This section explains the steps of the integration process.
5.1. SDK Version Control
The SDK API version can be queried with the PicoP_GetLibraryInfo() function. The
Library info returns the major (X), minor (Y), and patch number (Z) for the SDK Version X.Y.Z.
The library information also includes capability flags which can differentiate library implementation
enhancements that are compatible with the same API and header files.
// Library information
typedef struct {
UINT8 majorVersion; // Contains the major version of the library
UINT8 minorVersion; // Contains the minor version of the library
UINT8 patchVersion; // Contains the patch version of the library
UINT32 capabilityFlags; // Flags that describe the capability of the library
} PicoP_LibraryInfoS;
5.2. Step 1: Link SDK Library to the application
To include the PicoP Windows SDK to an application, include the picop_api.h header file into
the application source code and link the PicoP_rpc.lib library to the application executable:
// Include this into source code …
#include "picop_api.h"
<!-- Make sure Visual studio project file includes the proper -->
<!-- dependencies to the PicoP_rpc.lib library and include paths -->
<!--See chapter 7.2 on how to configure Visual Studio Project properties -->
<Link>
<AdditionalDependencies>PicoP_rpc.lib;%(AdditionalDependencies)
</AdditionalDependencies>
<AdditionalLibraryDirectories>../../Lib</AdditionalLibraryDirectories>
</Link>
<ClCompile>
<AdditionalIncludeDirectories>../../Interface</AdditionalIncludeDirectories>
</ClCompile>
5.3. Step 2: Initialize the SDK Library
The first step in connecting to a PicoP is to initialize the PicoP library by calling
PicoP_OpenLibrary(). The PicoP_OpenLibrary() function returns a handle to the library
that can be used to open a connections to the PicoP device.

Getting Started with PicoP® Gen4 SDK for Windows
PicoP Gen4 Windows SDK Ver. 1.3 Getting Started Guide
MVIS #: DA0140033 May 2019 Revision A.3
© 2018 MicroVision, Inc. All rights reserved.
Page 6 of 12
MicroVision.com
PicoP® is a registered trademark of MicroVision, Inc.
Specifications subject to change without notice.
5.4. Step 3: Connect to PicoP
After successful initialization of the library, the next step is to create a connection to the PicoP
device. The connection can be established using either Universal Serial Bus (USB) or Universal
Asynchronous Receiver-Transmitter (UART) physical interfaces. To create a connection to the PicoP
Scanning Engine, call either the PicoP_OpenConnection(), PicoP_OpenConnectionUSB(),
or PicoP_OpenConnectionUart() functions. Upon successful connection, the library will
return a connection handle to be used with subsequent library calls. The connection handle identifies
the connected system.
5.5. Step 4: Configure and Control PicoP
The PicoP API is split into the following functional categories:
• Connection & Library Management: Connect to PicoP over USB or Serial (UART)
interface.
• Display Control: Configure and control the PicoP Display.
• System Management: Manage the PicoP System, Firmware upgrades, Event Log, etc.
• Input Control: Configure the PicoP Input Video.
• 3D Sensing: Configure and control PicoP 3D Sensing interface.
• Rendering: Display test patterns by rendering them into the Framebuffer.
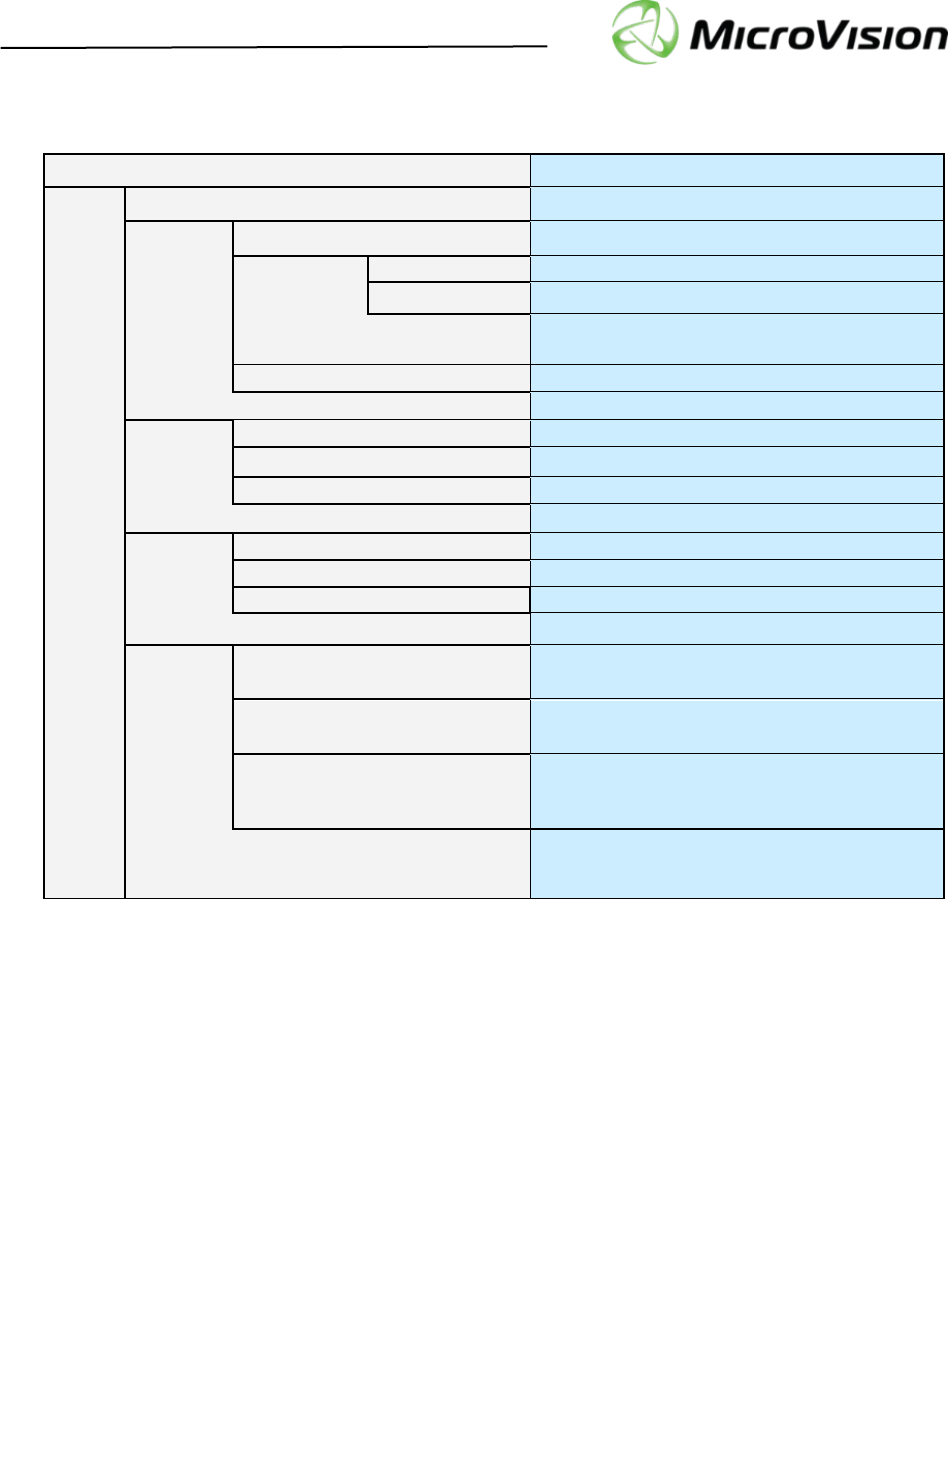
5.5.1. Connection Management
The Connection Management Functions are used to connect to the PicoP Display Engine using USB
or UART.
Function Description
PicoP_OpenLibrary( )
Opens the library and allocates resources necessary for
operation. It returns a handle to the library that must be
used in subsequent calls
PicoP_GetLibraryInfo( )
Retrieves the version and capability information of the SDK
Library
PicoP_CloseLibrary( )
Closes the library and releases all resources. It also closes
all the open connections.
PicoP_OpenConnection( )
Opens a connection to the PicoP Display Engine using
either USB or UART.
PicoP_OpenConnectionUart( )
Opens a connection to the PicoP Display Engine using
UART.
PicoP_CloseConnection( )
Closes a previously opened connection to the PicoP Display
Engine.
Getting Started with PicoP® Gen4 SDK for Windows
PicoP Gen4 Windows SDK Ver. 1.3 Getting Started Guide
MVIS #: DA0140033 May 2019 Revision A.3
© 2018 MicroVision, Inc. All rights reserved.
Page 7 of 12
MicroVision.com
PicoP® is a registered trademark of MicroVision, Inc.
Specifications subject to change without notice.
5.5.2. Display Control Functions
The Display Control Functions can be used to configure the output display.
Function
Description
PicoP_SetBrightness( )
Sets brightness for the output display.
PicoP_GetBrightness( )
Returns brightness setting of the output display.
PicoP_SetColorMode( )
Sets color mode for the output display.
PicoP_GetColorMode( )
Returns color mode setting of the output display.
PicoP_SetGamma( )
Sets gamma value for the output display.
PicoP_GetGamma( )
Returns gamma value setting of the output display.
PicoP_SetVideoGammaBoostMode( )
Set the color specific video gamma boost mode.
PicoP_GetVideoGammaBoostMode( )
Return the color specific video gamma boost mode.
PicoP_SetMicroWeaveMode( )
Select the MicroWeave mode.
PicoP_GetMicroWeaveMode( )
Return the MicroWeave mode.
PicoP_SetFlipState()
Sets the flip state of the image to horizontal, vertical,
both horizontal and vertical or none.
PicoP_GetFlipState()
Returns the current flip state of the output display.
PicoP_SetOutputVideoState( )
Set the video output state to enabled or disabled.
PicoP_GetOutputVideoState( )
Returns the current video output state.
PicoP_GetOutputVideoProperties( )
Return output video properties.
PicoP_SetBiPhase( )
Sets the scan line phase delay to align the forward and
reverse scan video.
PicoP_GetBiPhase( )
Returns the scan line phase delay setting.
PicoP_SetColorAlignment()
Performs vertical or horizontal color alignment for the
selected color
PicoP_GetColorAlignment()
Gets the color alignment offset of the chosen color
PicoP_SetColorConverter()
Sets the color converter values
PicoP_GetColorConverter()
Gets the color converter values
PicoP_SetFrameRateMode( )
Sets the output frame rate mode (frame rate vs. vertical
display and sensing resolutions) and display scaling.
PicoP_GetFrameRateMode( )
Returns the output frame rate mode (frame rate vs.
vertical display and sensing resolutions) and display
scaling
Getting Started with PicoP® Gen4 SDK for Windows
PicoP Gen4 Windows SDK Ver. 1.3 Getting Started Guide
MVIS #: DA0140033 May 2019 Revision A.3
© 2018 MicroVision, Inc. All rights reserved.
Page 8 of 12
MicroVision.com
PicoP® is a registered trademark of MicroVision, Inc.
Specifications subject to change without notice.
5.5.3. System Management Functions
The System Management Functions are used to control the PicoP System and to access the system
information.
Function Description
PicoP_GetSystemInfo( )
Retrieves system information.
PicoP_GetSystemStatus( )
Retrieves the system status.
PicoP_GetEventLog( )
Retrieves the system event log.
PicoP_RestoreFactoryConfig( )
Restores System Settings to Factory Configuration.
PicoP_CommitAll( )
Commits all user settings to flash.
PicoP_UpgradeSoftwareEx( )
Upgrades the embedded Software.
5.5.4. Input Control Functions
The Input Control functions are used to configure the PicoP Input Video.
Function
Description
PicoP_GetInputVideoProperties( )
Returns detected input video Frame Rate and Lines per
Frame.
PicoP_SetInputVideoState( )
Enables or Disables the input video. When input video is
disabled, the framebuffer will not be updated and the
output video will contain the last captured frame.
PicoP_GetInputVideoState( )
Returns the current state of the input video.
5.5.1. 3D Sensing Functions
The 3D Sensing functions are used to configure the 3D sensor as well as to retrieve the 3D depth
data.
Function
Description
PicoP_SetSensingState( )
Turns the 3D Sensing function on or off. When the 3D
Sensing function is off, the IR laser is not pulsing and no
3D sensing data is sent over the USB or MIPI-CSI.
PicoP_GetSensingState( )
Returns the current Sensing state.
5.5.2. Rendering Functions
The Rendering function allows the host system to render information into the PicoP On-Screen
Display (OSD) or FrameBuffer.

Getting Started with PicoP® Gen4 SDK for Windows
PicoP Gen4 Windows SDK Ver. 1.3 Getting Started Guide
MVIS #: DA0140033 May 2019 Revision A.3
© 2018 MicroVision, Inc. All rights reserved.
Page 9 of 12
MicroVision.com
PicoP® is a registered trademark of MicroVision, Inc.
Specifications subject to change without notice.
Function
Description
PicoP_DrawTestPattern( )
Displays one of the built-in test patterns.
5.6. Step 5: Exit Application
To gracefully exit the host application, call the PicoP_CloseConnection() and
PicoP_CloseLibrary() functions to shut down the connection to PicoP and to release all
resources used by the library.

Getting Started with PicoP® Gen4 SDK for Windows
PicoP Gen4 Windows SDK Ver. 1.3 Getting Started Guide
MVIS #: DA0140033 May 2019 Revision A.3
© 2018 MicroVision, Inc. All rights reserved.
Page 10 of 12
MicroVision.com
PicoP® is a registered trademark of MicroVision, Inc.
Specifications subject to change without notice.
6. “Hello, World“ - Program
The below listing shows the simplest “Hello, World” sample program with a PicoP connected to the USB
port. This Hello_PicoP.cpp sample program simply flips the display.
//! \file Hello_PicoP.cpp
#include <SDKDDKVer.h>
#include <stdio.h>
#include "../../interface/picop_api.h"
int main()
{
PicoP_HANDLE hLibraryHandle = NULL; // Library handle
PicoP_HANDLE hConnectionHandle = NULL; // Connection handle
PicoP_ConnectionInfoS connectionInfo;
const PicoP_USBInfoS sUsbInfo= { 0x0004, "123456789" }; // USB Info
PicoP_ReturnStatus eResult;
// Open the SDK library
eResult = PicoP_OpenLibrary(&hLibraryHandle);
if (eResult != ePICOP_RETURN_SUCCESS) {
printf("*** ERROR: PicoP_OpenLibrary() failed, rc = 0x%x\n", eResult);
return eResult;
}
connectionInfo.connectionType = eUSB;
memcpy(&connectionInfo.usbInfo, &sUsbInfo, sizeof(PicoP_USBInfoS));
// Connect to PSE with USB
eResult= PicoP_OpenConnection(hLibraryHandle, connectionInfo, &hConnectionHandle);
if (eResult != ePICOP_RETURN_SUCCESS) {
printf("** ERROR: PicoP_OpenConnection() failed, rc = 0x%x\n", eResult);
PicoP_CloseLibrary(hLibraryHandle);
return eResult;
}
// Flip the display horizontally and vertically
eResult = PicoP_SetFlipState(hConnectionHandle, eFLIP_BOTH, eCURRENT_VALUE);
if (eResult == ePICOP_RETURN_SUCCESS) {
printf("Display flipped!\n");
} else {
printf("** ERROR: PicoP_SetFlipState() failed, rc = 0x%x\n", eResult);
}
// Close connection & library
PicoP_CloseConnection(hConnectionHandle);
PicoP_CloseLibrary(hLibraryHandle);
return 0;
}
Getting Started with PicoP® Gen4 SDK for Windows
PicoP Gen4 Windows SDK Ver. 1.3 Getting Started Guide
MVIS #: DA0140033 May 2019 Revision A.3
© 2018 MicroVision, Inc. All rights reserved.
Page 11 of 12
MicroVision.com
PicoP® is a registered trademark of MicroVision, Inc.
Specifications subject to change without notice.
This Hello_PicoP sample project is located in the PicoP_Windows_SDK\samples\Hello_PicoP
directory.
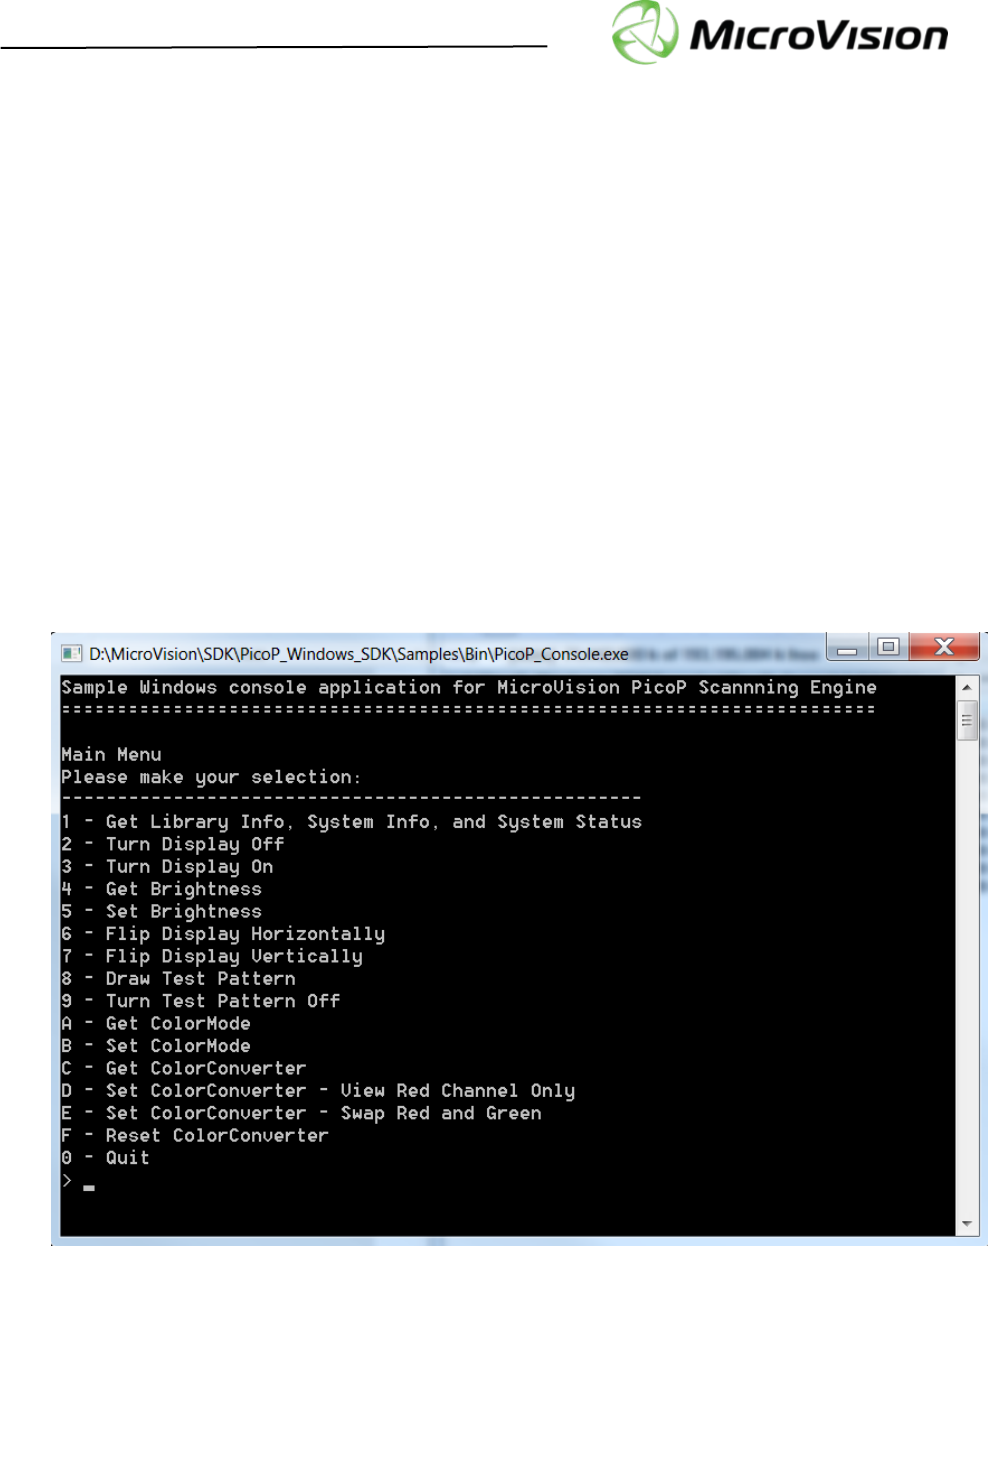
7. PicoP_Console Sample Project
The PicoP_Console.sln sample project is a simple Windows console application developed in
C. It demonstrates the use of SDK interfaces to communicate with the PicoP device and to control
basic Projector functions. The application can control the following PicoP operations:
• Retrieve library info and PSE system status
• Turn display off
• Turn display on
• Retrieve display color mode setting
• Change display color mode
• Flip display horizontally
• Flip display vertically
The basic PicoP_Console app user interface is shown below. The desired function can be selected by
pressing the corresponding number 1-9 on the keyboard.

Getting Started with PicoP® Gen4 SDK for Windows
PicoP Gen4 Windows SDK Ver. 1.3 Getting Started Guide
MVIS #: DA0140033 May 2019 Revision A.3
© 2018 MicroVision, Inc. All rights reserved.
Page 12 of 12
MicroVision.com
PicoP® is a registered trademark of MicroVision, Inc.
Specifications subject to change without notice.
7.1. Prerequisites
The System Requirements for running and compiling the PicoP_Console sample project are:
• 64-bit Windows operating system: Windows 7 or later
• 1.8 GHz of faster processor, minimum 4GB of RAM
• Microsoft Visual Studio 2017 or later.
7.2. Building the PicoP_Console Sample Application
To build and run the PicoP_Console app, please follow the steps below:
1. Open the Solution/Project file
• Navigate to ‘PicoP_Windows_SDK\samples\PicoP_Console’ and double
click on the ‘PicoP_Console.sln’ solution file.
• This solution is created using Visual Studio 2017. If you are using a newer version of
Visual studio, conversion wizard will assist you to convert it to the newer version.
2. Check Dependencies
• This solution assumes SDK header files are available at relative path
‘PicoP_Windows_SDK\Interface’ and library at ‘PicoP_Windows_SDK\Lib’.
• If you are running the Console demo from a different path, update following project property
settings.
• SDK header file path at: ProjectPropertiesC/C++Additional
Include directories
• SDK lib path at: ProjectPropertiesLinkerAdditional
Dependencies
3. Build and Run the application
• For running the application, the PicoP_rpc.dll needs to be copied to the same directory
where the executable ‘PicoP_Console.exe‘ is located.
