DF450 Tel/Fax User Giude Fax
User Manual: DF450
Open the PDF directly: View PDF ![]() .
.
Page Count: 56
DF450 plain paper
fax machine
User guide
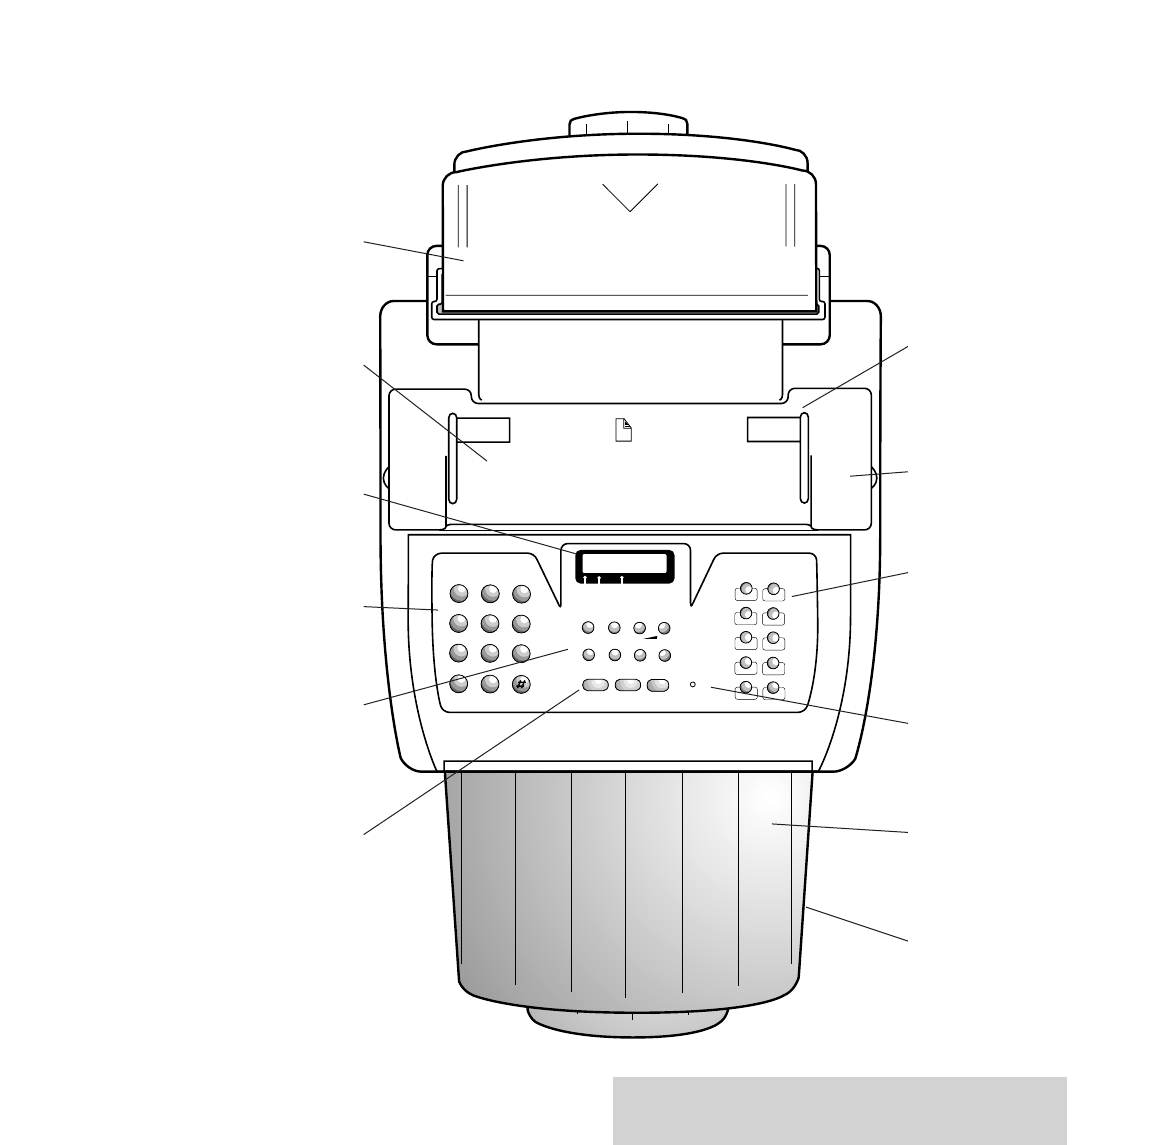
Top view
❍❍❍❍❍❍❍❍❍❍❍❍❍❍❍❍❍❍❍❍❍❍❍❍❍❍❍❍❍❍
❍❍❍❍❍❍❍❍❍❍❍❍❍❍❍❍❍❍❍❍❍❍❍❍❍❍❍❍❍❍
❍❍❍❍❍❍❍❍❍❍❍❍❍❍❍❍❍❍❍❍❍❍❍❍❍
A4 I
STD FINE HALF TONE
123
456
789
0
✱
P - TB SYMBOLS
FUNCTION
QUICKDIAL
CLEAR
LAST TX
RX MODE RESOL. CONTRAST
§©
- +
EXTERNAL HOLD
A - aREDIAL PAUSE 2. TONE
MONITOR START STOP
1
A
B
C
D
E
F
G
H
I
J
K
L
M
N
O
P
R
S
T
U
V
W
X
Y
Q
Z
2
34
56
78
910
ERROR
DF 450
Adjustable paper
guide. Place documents
face down to ensure
straight feeding into the
machine for fax
transmission.
Printer cover. Open to
install the print cartridge.
One touch memory
buttons. Use to dial your
most frequently used
numbers with one touch.
Error indication light.
Comes on when there is a
fault in fax transmission
or reception.
Sent document tray.
Holds the original copies
of documents that have
been faxed or copied.
Received document
tray (beneath sent
document tray). Holds
received faxes and copies
of documents.
Automatic sheet
feeder. Holds up to 70
A4 sheets of plain paper
for copies and incoming
faxes.
Automatic document
feeder. Holds up to 10
sheets to be faxed or
copied.
LCD display. Shows
dialled numbers, time
and date and function
information.
Keypad. Press to dial fax
or phone numbers and to
input names and numbers
into the memory.
Control panel. Use to
access the features of the
DF450. Seven buttons
have dual functions.
Monitor button. Use for
making telephone calls
when you have a
telephone connected.
Please open this page for a further ‘at a glance’
guide to your DF450 plain paper fax machine.
At a glance
1
At a glance
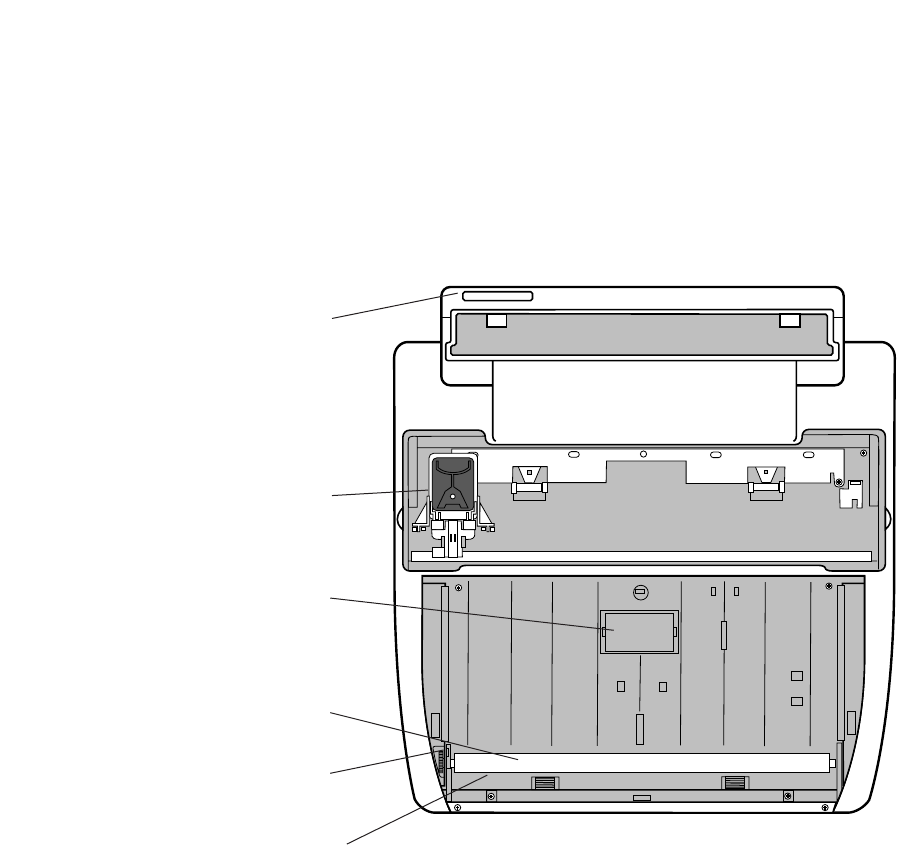
Top view with the printer cover and control panel open.
❍❍❍❍❍❍❍❍❍❍❍❍❍❍❍❍❍❍❍❍❍❍❍❍❍❍❍❍❍❍
❍❍❍❍❍❍❍❍❍❍❍❍❍❍❍❍❍❍❍❍❍❍❍❍❍❍❍❍❍❍
❍❍❍❍❍❍❍❍❍❍❍❍❍❍❍❍❍❍❍❍❍❍❍❍❍
BT telephone line
cord socket.
Print head with
interchangeable ink
cartridge.
Black paper feed
roller.
White paper feed
roller.
Green release lever
for paper feed roller.
Optical scanner
(beneath white paper
roller).

FUNCTION Press to access the various menus.
CLEAR Deletes incorrect entries.
RX MODE Changes document reception settings.
§
Scrolls through settings available
under the function button.
RESOL Selects the resolution for scanning
documents to be sent or copied.
-Decreases the speaker volume (after
pressing the MONITOR button)
©
Scrolls through settings available
under the function button.
CONTRAST
Selects the contrast for scanning
documents to be sent or copied.
+Increases the speaker volume (after
pressing the MONITOR button)
QUICKDIAL Sets the machine for you to dial out
numbers stored under the Quickdial
function.
A-a Selects capital or lower case letters
when storing names in the memory.
LAST TX Prints a status report on last fax sent.
REDIAL Redials the last number.
EXTERNAL(If connected to a switchboard): can be
programmed to give you an outside
line, ready to dial.
PAUSE Inserts a pause in a number.
HOLD Puts a telephone call on hold.
2. TONE Use this key to detect secondary dial
tone on certain PBXs. When this
function is activated, a colon will
appear in the display.
MONITOR Allows you to dial a telephone number
without lifting the handset. You can
hear the line tone and dialling tone
through the internal loudspeaker.
A telephone will need to be connected
for you to be able to hold a
conversation.
START Use to send or copy a document.
Confirms the choices and selections
you make on the FUNCTION button.
STOP Stops any current operation; resets the
machine if there is an operating error.
FUNCTION
QUICKDIAL
CLEAR
LAST TX
RX MODE RESOL. CONTRAST
§©
- +
EXTERNAL HOLD
A - aREDIAL PAUSE 2. TONE
MONITOR START STOP
Control panel

2
In this guide
In this guide
At a glance 1
Introduction to your DF450 3
Setting up 4
Using your DF450 14
Additional features 25
Maintenance 34
Help 36
Technical specifications 46
Technical information 47
Index 49
Hints and tips boxes
In this user guide, we’ve included helpful tips and
useful notes. They are shown in a grey box.

3
Introduction Your DF450 fax machine is designed
for ease of use and made to the high standards set by BT.
We thank you for making the right choice and
expect that the machine will give you many
years of quality service.
Please read the instructions carefully before
use, and retain this User Guide for future
reference.
For your records
Date of purchase:
Place of purchase:
Serial number (on base of facsimile):
Purchase price:
(For warranty purposes, proof of purchase is
required, so please keep your receipt. See also
page 38.)
Introduction
Customer Helpline
If you have problems with your
machine, call the DF450 Helpline Service,
Freefone 0800 215 200.

Check that your DF450 is complete. When
you unpack you must have:
•DF450 plain paper fax with attached
mains lead.
•Automatic sheet feeder cassette.
•Sent document tray.
•Received document tray.
•Telephone line cord.
•Print cartridge (print head with ink
cartridge attached).
4
Setting up
Setting upFollow these steps to get your DF450 ready.
Electrical storm warning
Note 1.
Please note that during periods of electrical
storm, you should disconnect your DF450
because damage may occur.
Note 2.
If a fault occurs during the 12-month warranty
period and it is due to accidental or wilful
damage (including lightning and electrical
damage), BT will not replace or repair the
equipment free of charge. Should any damage of
this nature occur, you are advised to claim
against your home contents insurance.
If you do not have a BT socket, call BT* and
ask for a BT engineer to come and fit the right
socket. This is a chargeable service.
*Call 150 if you are a residential customer or
152 if you are a business customer.
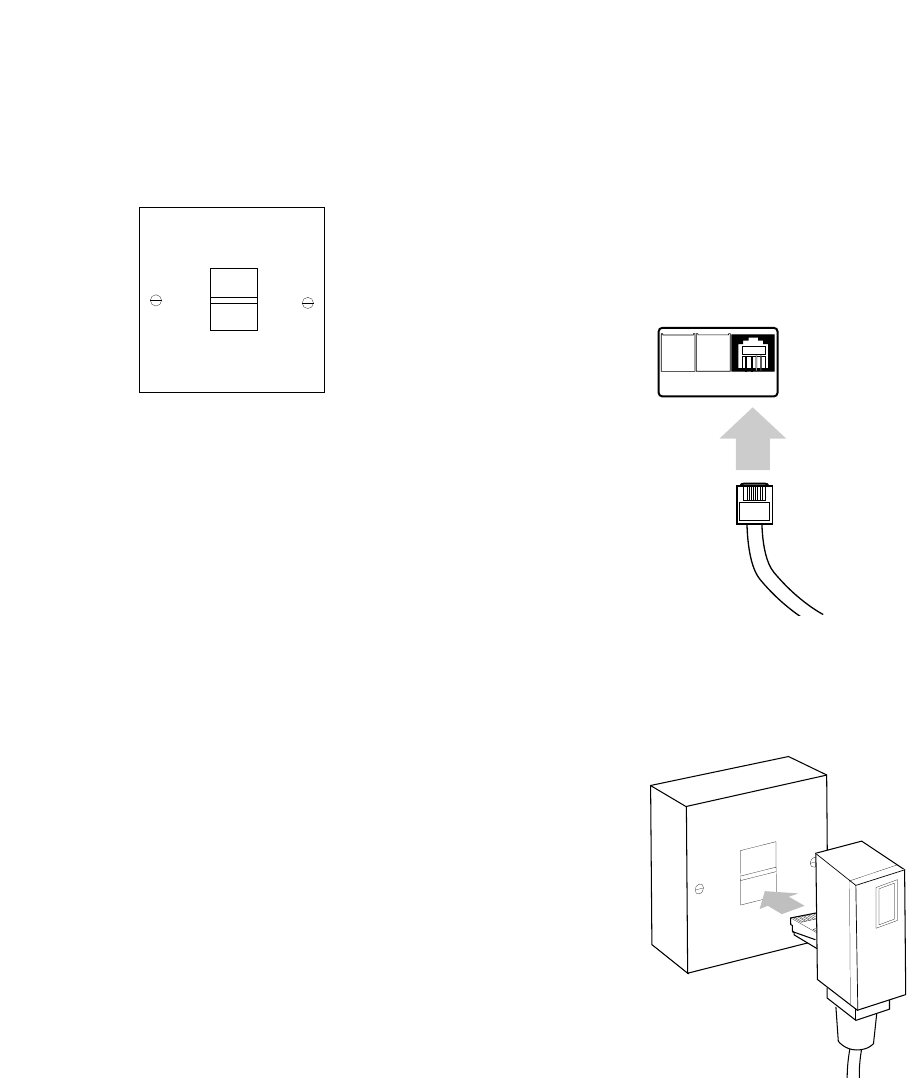
1 Check your telephone wall
socket
5
3 Plug into the BT socket
Plug the telephone line cord into
your socket
2 Plug the telephone line cord
into the socket on back of the
machine
When fitted correctly, the line cord should
click into place.
Setting up
TEL2 TEL1 LINE
6
Setting up
4 Plug the mains lead into a
convenient socket
Your DF450 automatically performs a quick
self test. The Liquid Crystal Display shows
AUTOMATIC RX and ADD PAPER.
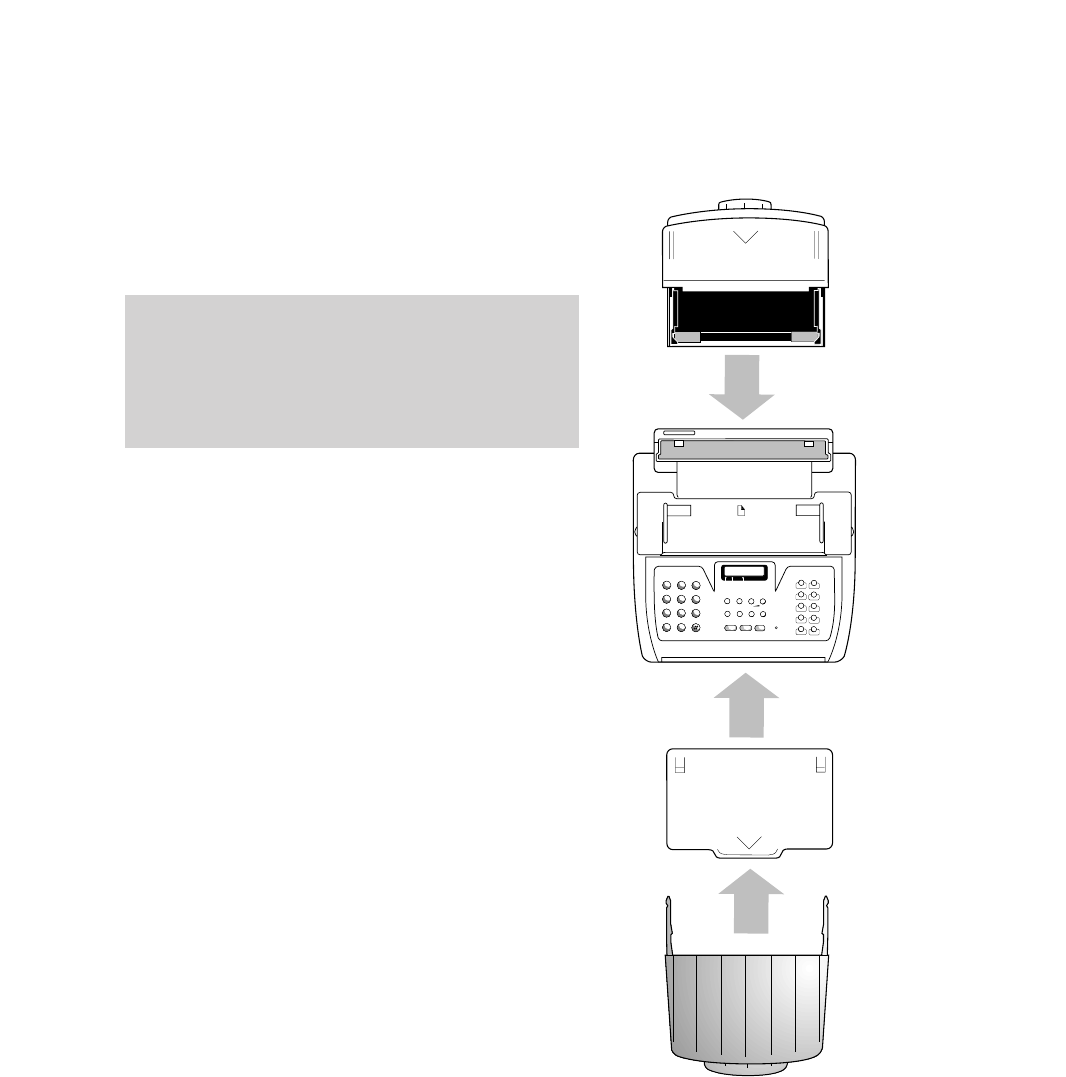
5 Fit your DF450 attachments
to the main unit
❍❍❍❍❍❍❍❍❍❍❍❍❍❍❍❍❍❍❍❍❍❍❍❍❍❍❍❍❍❍
❍❍❍❍❍❍❍❍❍❍❍❍❍❍❍❍❍❍❍❍❍❍❍❍❍❍❍❍❍❍
❍❍❍❍❍❍❍❍❍❍❍❍❍❍❍❍❍❍❍❍❍❍❍❍❍
A4 I
STD FINE HALF TONE
123
456
789
0
✱
P - TB SYMBOLS
FUNCTION
QUICKDIAL
CLEAR
LAST TX
RX MODE RESOL. CONTRAST
§©
- +
EXTERNAL HOLD
A - aREDIAL PAUSE 2. TONE
MONITOR START STOP
1
A
B
C
D
E
F
G
H
I
J
K
L
M
N
O
P
R
S
T
U
V
W
X
Y
Q
Z
2
34
56
78
910
ERROR
DF 450
Received document
tray
Sent document tray
Automatic sheet
feeder cassette
The DF450 is designed to be permanently
connected, ready to receive and send faxes 24
hours a day. If you need to turn the machine off,
switch off at the mains power plug. The machine
does not have an on/off switch.
d
d
d
d
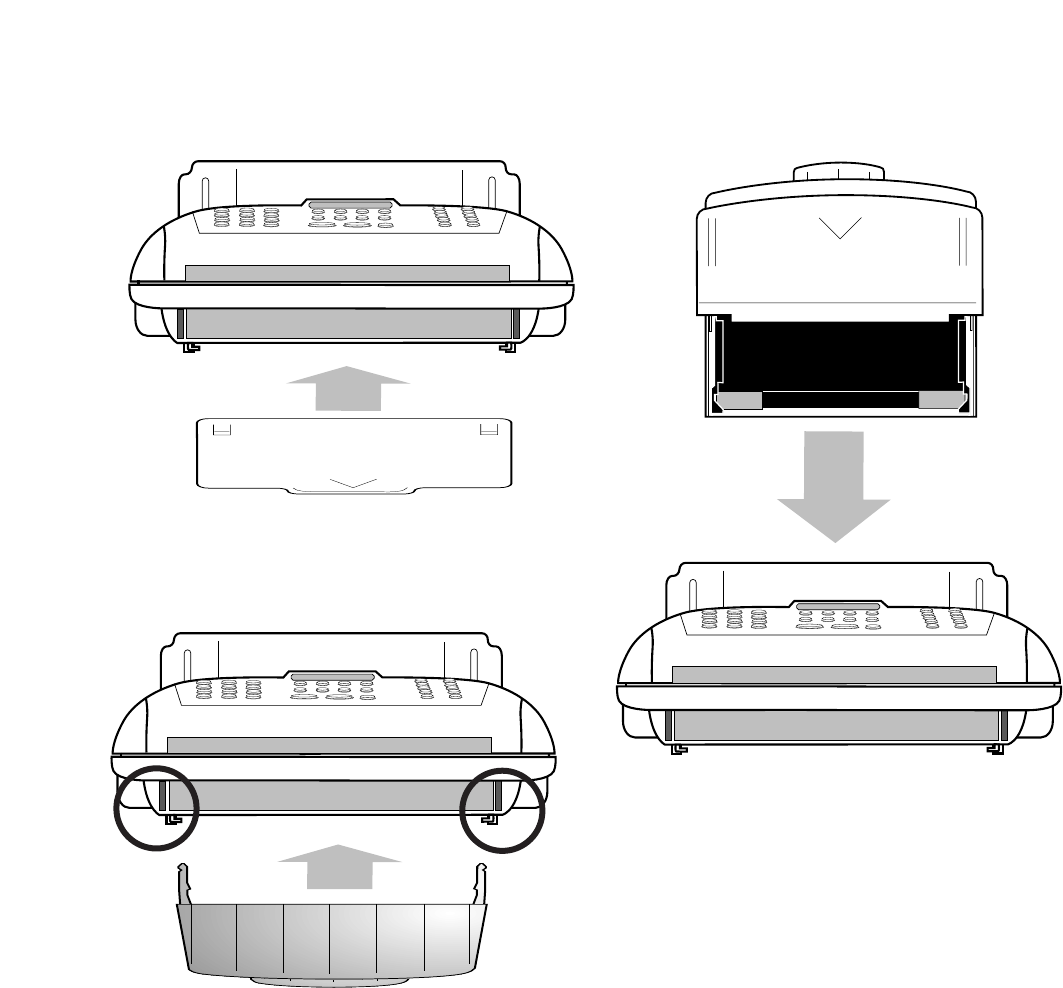
•Slide the received document tray into the
slots on the base of the main unit.
To fit the sent document tray
•Slot the automatic sheet feeder cassette into
the main unit. Make sure it is fully inserted.
•Slot the sent document tray into the front of
the main unit. It will click into place.
Setting up
7
To fit the received document tray To fit the automatic sheet feeder
8
Setting up
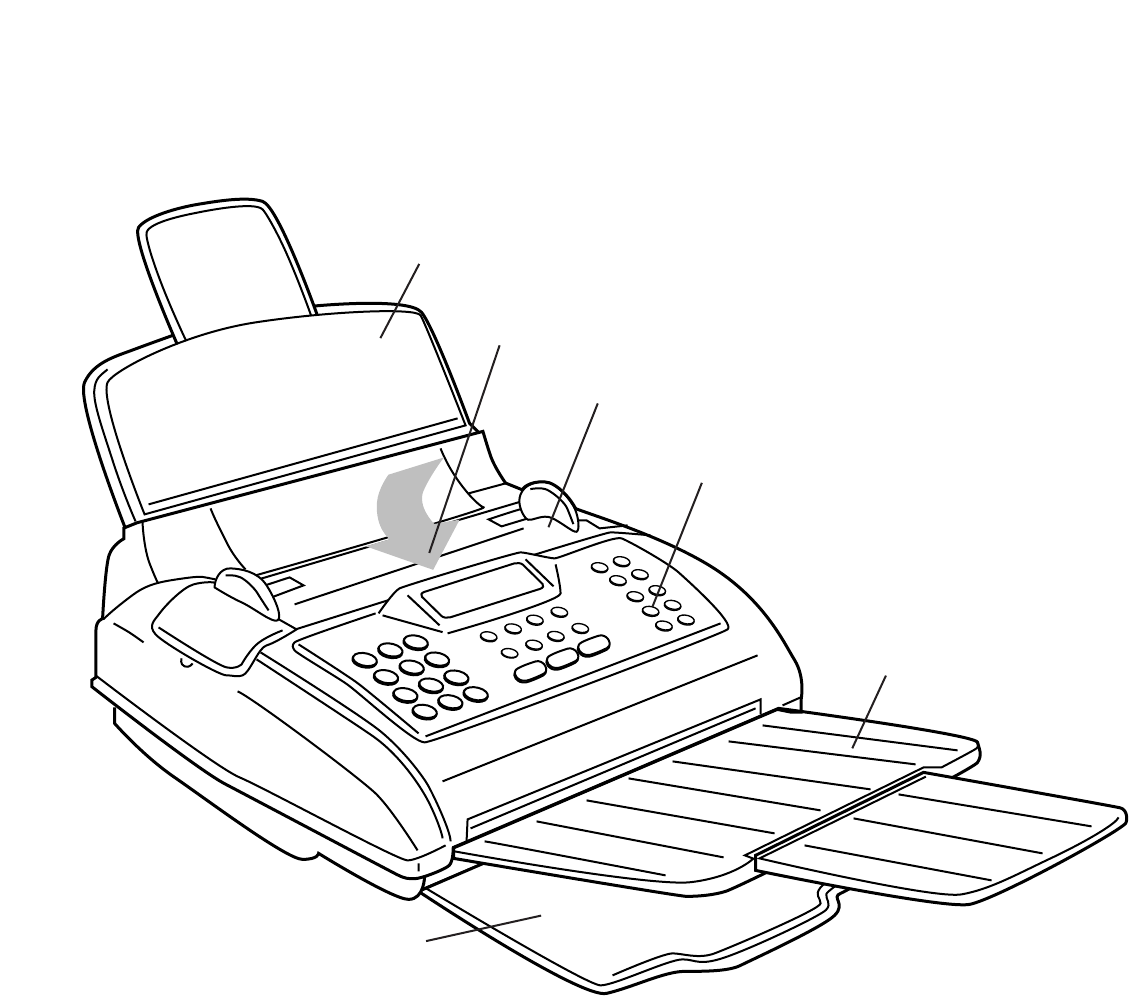
Fully assembled DF450 with attachments fitted
Automatic sheet feeder
(with document support
fully extended)
Sent document tray (with
document support fully
extended)
Printer cover
Control panel
Received document tray
Automatic document feeder
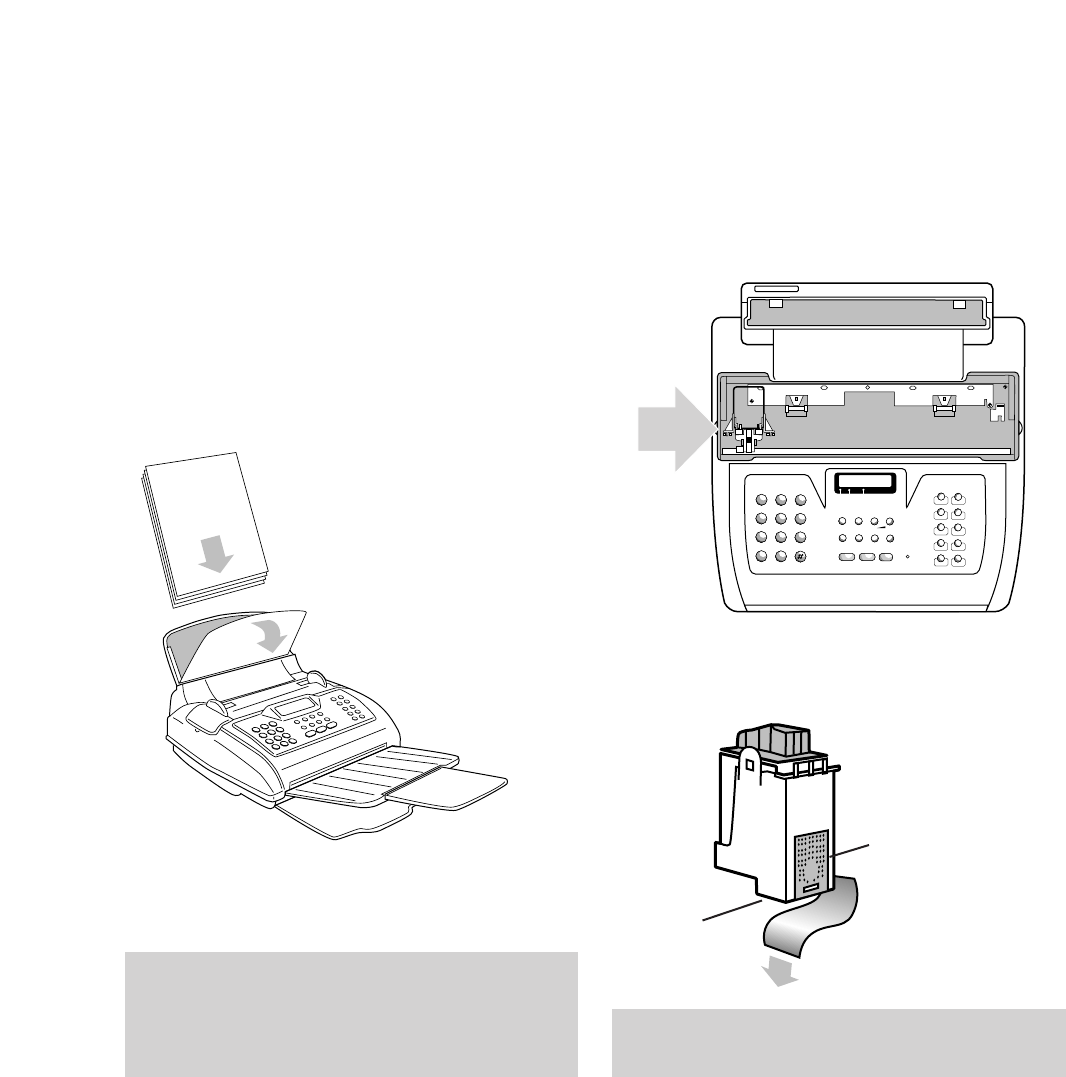
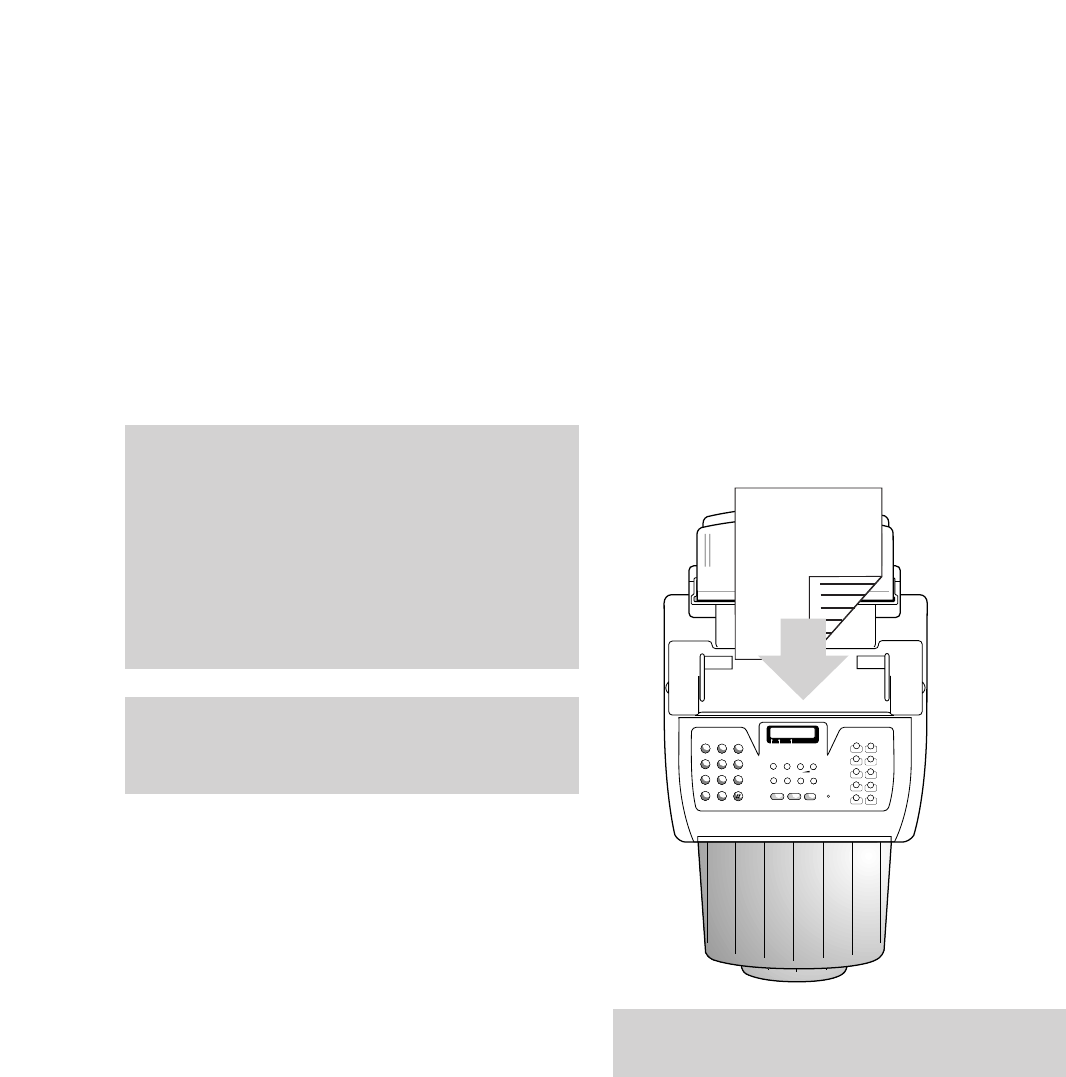
6 Place paper in the automatic
sheet feeder
The DF450 can hold up to 70 sheets of plain
paper for incoming faxes and copying. Paper
sizes can range from A4 (210 x 297mm) to US
Legal (216 x 349mm).
•Open the front cover of the sheet feeder by
pulling it forward.
•Making sure the cover is fully open, slide the
paper into the feeder, then close the cover.
When adding more paper before the feeder is
empty, load the new paper behind the existing
pages in the cassette.
Setting up
9
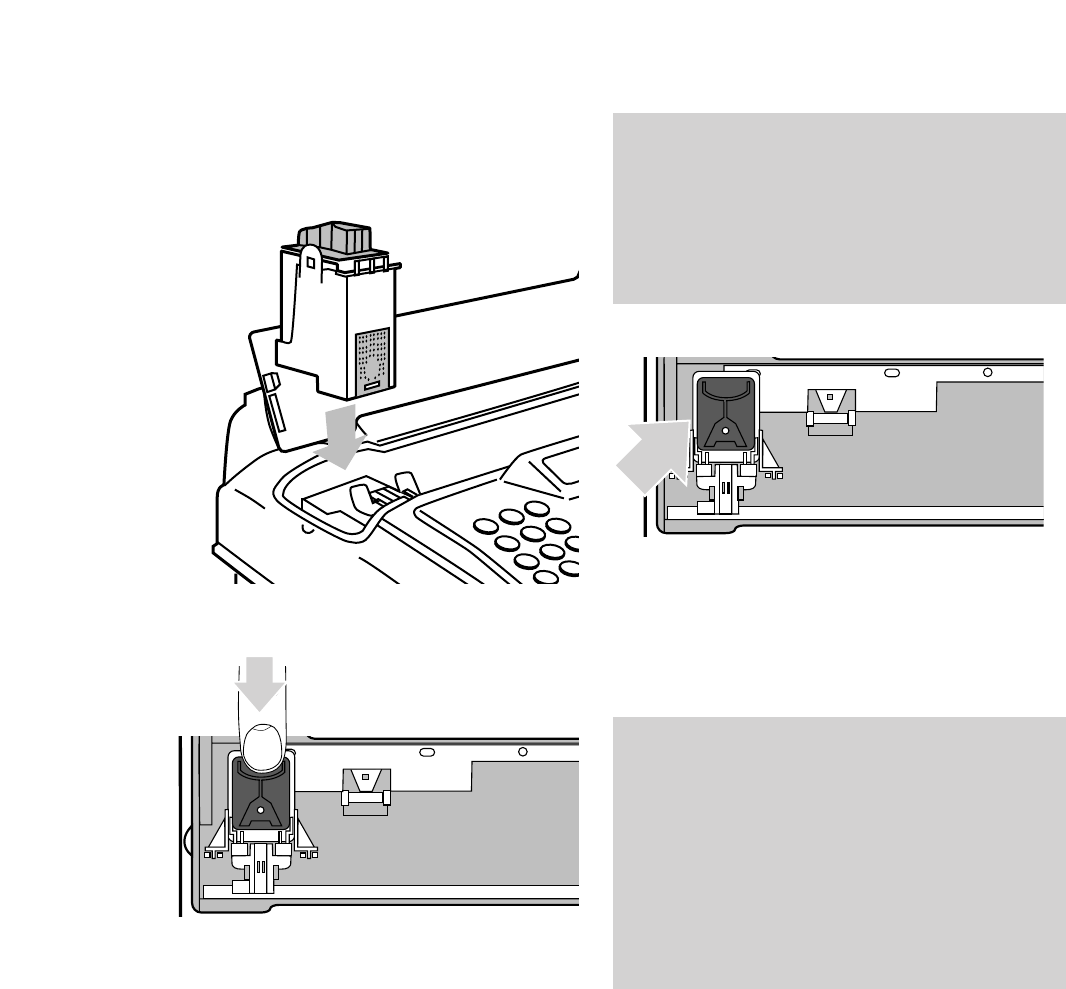
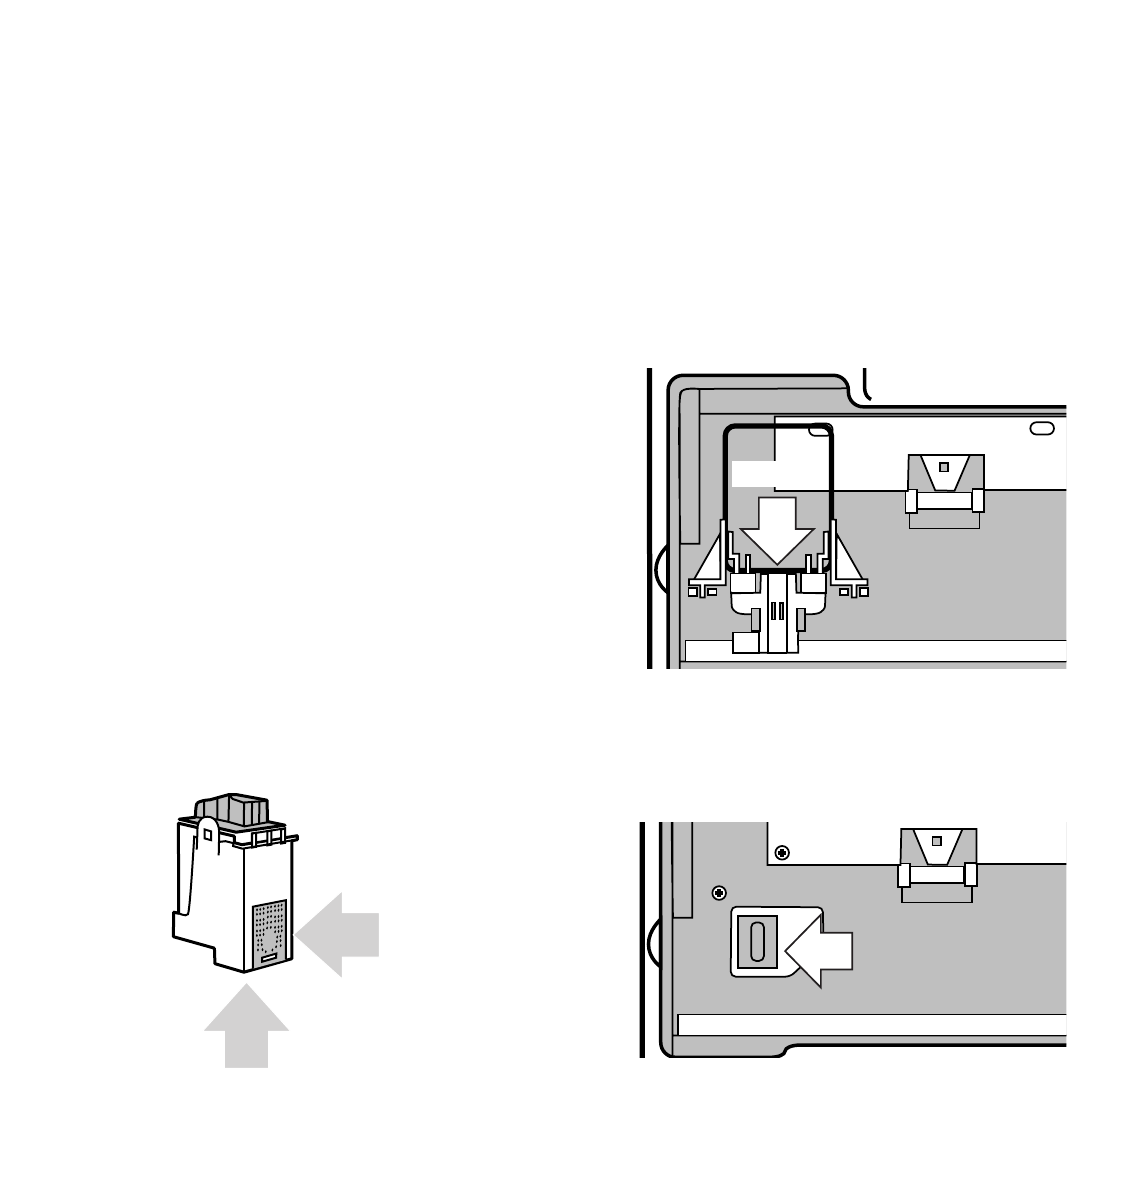
7 Install the print cartridge
•Open the printer cover on the top of the
main unit to reveal the print cartridge
housing.
•Remove the print cartridge from its box and
remove the protective film from the nozzle.
Avoid touching the print nozzle or the electrical
contacts, as this may damage the print cartridge.
Once paper is inserted in the automatic sheet
feeder, the display will show check the print head.
If the print head has been installed the display
will show the date and time.
❍❍❍❍❍❍❍❍❍❍❍❍❍❍❍❍❍❍❍❍❍❍❍❍❍❍❍❍❍❍
❍❍❍❍❍❍❍❍❍❍❍❍❍❍❍❍❍❍❍❍❍❍❍❍❍❍❍❍❍❍
❍❍❍❍❍❍❍❍❍❍❍❍❍❍❍❍❍❍❍❍❍❍❍❍❍
STD FINE HALF TONE
123
456
789
0
✱
P - TB SYMBOLS
FUNCTION
QUICKDIAL
CLEAR
LAST TX
RX MODE RESOL. CONTRAST
§©
- +
EXTERNAL HOLD
A - aREDIAL PAUSE 2. TONE
MONITOR START STOP
1
A
B
C
D
E
F
G
H
I
J
K
L
M
N
O
P
R
S
T
U
V
W
X
Y
Q
Z
2
34
56
78
910
ERROR
DF 450
Contacts
Do not touch
Nozzle
Do not touch
10
Setting up
•Slot the cartridge into the housing, with
the electrical contacts facing the front of
your DF450.
•Push the cartridge towards the front of
the machine until it clicks into place.
•Close cover.
•Your DF450 will automatically run a print
test. Display shows: CHECK PRINT OUT.
•Press 1to return to standby mode or press 0
to repeat the print test.
•To remove the print head , pull back the two
green tabs to release the catch and lift the
cartridge out.
If the display shows CHECK PRINT HEAD,
remove and re-install the print cartridge, making
sure that the protective film is removed from
the nozzle. If you keep getting the same message,
call the BT DF450 Helpline service, Freefone
0800 215 200.
Replacement ink cartridges.
You can buy replacement ink cartridges
separately, saving the cost of a complete print
cartridge.
A new print head is recommended after every
eight ink cartridges. The Maintenance section in
this guide covers print cartridge maintenance
and replacement. To order print cartridges
Freefone 0800 590009.
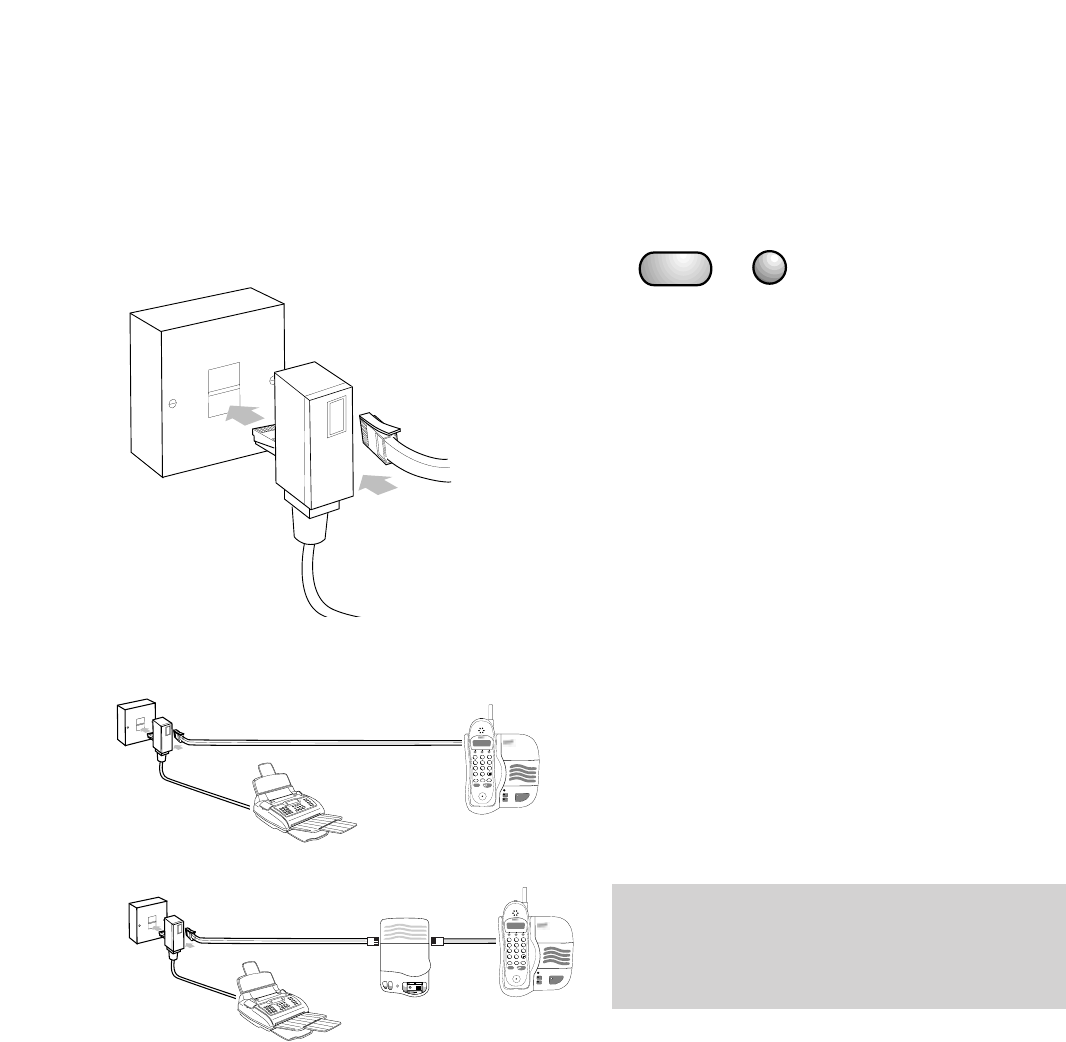
8 Connecting a phone or an
answering machine to your DF450
Connect a phone or an answering machine to
your DF450 by plugging it into the socket on
your DF450’s line cord.
•Connect a telephone or answering machine
as shown below.
11
9 Setting the time and date
If your DF450 does not show the correct date
and time when you switch it on, you can
change the setting.
•Press the FUNCTION button; display shows
the FAX SET UP menu.
•Press the START button; display shows
VARIOUS SETTINGS FUNC/START/STOP.
•Press the FUNCTION button until display
shows DATE AND TIME.
•Press the START button; display shows the
format for the day, month and year, ie,
DD/MM/YY.
•Press the START button again; display
shows the 24-hour format, ie, 24H.
To switch the clock between the 12-hour and
24-hour setting, press the
§ ©
buttons.
•Press the START button; display shows the
date and time, eg: DD/MM/YY HH/MM
01 - 01 - 96 09.22
•Cursor flashes on the first digit of the date.
Setting up
START FUNCTION
DF450 line cord
Answering
machine
or phone
line cord
BT
socket
DF450 Phone or answering
machine
Answering
machine
Freestyle 320
INTERCOM
POWER
IN USE
CHARGING
Network
Services OPTIONS SELECT
12
A
B
C
3
D
E
F
4
G
H
I
5
J
K
L
6
M
N
O
7
P
Q
R
S
8
T
U
V
9
W
X
Y
Z
0
✱
MEMORY SECRECY REDIAL
INTERCOM TALK
2-WAY
REC. MEMO
STOP
PAUSE
–+
SAVE MESSAGES
REW FF
ANSWER
ON/OFF PLAY
High Capacity Answering Machine
with Time Day Stamp
BT
socket
DF450
Phone
If you are using the 12-hour clock, ensure the
correct morning or afternoon time is shown by
pressing FUNCTION to display either Pfor pm
or Afor am.
Freestyle 320
INTERCOM
POWER
IN USE
CHARGING
Network
Services OPTIONS SELECT
12
A
B
C
3
D
E
F
4
G
H
I
5
J
K
L
6
M
N
O
7
P
Q
R
S
8
T
U
V
9
W
X
Y
Z
0
✱
MEMORY SECRECY REDIAL
INTERCOM TALK

12
Setting up
•Press the correct NUMBER button to enter
the day you want. The cursor automatically
moves onto the next number selection.
•If you make a mistake, use the
§ ©
buttons
to scroll back and forth along the line to
change any number.
•Press the START button to confirm the
setting. The date and time will be
updated automatically.
•Press the STOP button to finish or cancel
the setting and return to the original
operating mode. Or, if you wait, your DF450
will automatically return to standby.
The date and time will be printed at the top of
every fax page you send.
When adjusting the settings, if you do not touch
any buttons for over a minute, the DF450 will
automatically reset itself to standby mode.
10 Setting your name and fax
number
Your name and fax number can be printed at
the top of every fax page you send.
•Press the FUNCTION button until the display
shows INSTALLATION. (If you make a
mistake, press the STOP button to reset.)
•Press the START button; the display shows
TEL. LINE SET-UP.
•Press the FUNCTION button until the display
shows STATION NAME.
•Press the START button; the display shows
TYPE YOUR NAME.
Use the keypad to type in the letters you
want. Do this by pressing the number button
which shows the letter you want. Pressing
the button changes the letter you require. For
example, if your want to store the name JOHN:
•Press 5 on the keypad until Jappears in the
display.
•Press the
©
button to advance the cursor.
•Press 6on the keypad until the display
shows O.
•Press the
©
button to advance the cursor.
•Enter the letter Hby pressing 4 on the
keypad until Happears on the display.
•Press the
©
button to advance the cursor.
456
G
H
I
J
K
L
M
N
O
START FUNCTION

13
Setting up
International codes
You can display your number as an international
number. Press the ✱button. This is printed on
your header as a +.
For example, +44 171 123 1234.
•Press the START button to confirm your
selection; the display shows PHONE NUMBER.
•Press the START button again; the display
shows TYPE YOUR NUMBER. Dial in your
number.
•To enter a space, press the
©
button.
You can scroll back and forth to change any
digits using the
§ ©
buttons.
•Press the START button to confirm your
number. Display shows DIAGNOSTICS. To
return to the DF450’s standby mode, press
the STOP button. Or if you wait, the DF450
will automatically return to standby.
You can move back and forth to the letters you
want by pressing the
§ ©
buttons. Delete the
whole name by pressing the CLEAR button. Press
the A - a button to change between CAPITAL
LETTERS and small letters.
Your DF450 has back-up batteries fitted. In case
of a power cut or disconnection from the mains, it
will remember the date and time as well as any
numbers and names stored in the memory.
•Press 6 on the keypad until Nappears on the
display. The whole name is now entered.
•To enter a space, press the
©
button.
11 Name and fax number
position
Your name and fax number can be printed
inside or outside the image area of a sent
document. Your DF450 is pre-set to print this
information inside.
To change header position
•Press the FUNCTION button until the display
shows FAX SET-UP.
•Press the START button until the display
shows HEADER INSIDE.
•Press the
©
button; the display shows
HEADER OUTSIDE.
•Press the START button to confirm setting.
•Press the STOP button to return to standby.
START FUNCTION
When entering a name, you can insert various
symbols, such as &, using the ✱and
#
buttons
to scroll through the options.
14
Using your DF450
To load documents for faxing
•Feed up to 10 pages at a time, face down,
into the automatic document feeder.
•The first page is automatically drawn a little
way into the feeder.
•Display shows: DOCUMENT READY
Your DF450 fax lets you set the functions to
suit the way you work. The most commonly
preferred settings are pre-selected as standard.
You can alter or choose new settings as desired.
Warning - do not try to send or copy
documents which are:
•still wet with ink or correcting fluid
•very thick or very thin (paper should be
between 70-90 gsm for best results)
•stapled or clipped together
•torn, folded, crumpled or with punched holes
•on carbon paper or glossy paper
❍❍❍❍❍❍❍❍❍❍❍❍❍❍❍❍❍❍❍❍❍❍❍❍❍❍❍❍❍❍
❍❍❍❍❍❍❍❍❍❍❍❍❍❍❍❍❍❍❍❍❍❍❍❍❍❍❍❍❍❍
❍❍❍❍❍❍❍❍❍❍❍❍❍❍❍❍❍❍❍❍❍❍❍❍❍
A4 I
STD FINE HALF TONE
123
456
789
0
✱
P - TB SYMBOLS
FUNCTION
QUICKDIAL
CLEAR
LAST TX
RX MODE RESOL. CONTRAST
§©
- +
EXTERNAL HOLD
A - aREDIAL PAUSE 2. TONE
MONITOR START STOP
1
A
B
C
D
E
F
G
H
I
J
K
L
M
N
O
P
R
S
T
U
V
W
X
Y
Q
Z
2
34
56
78
910
ERROR
DF 450
Using your DF450
If you make a mistake, press the STOP button to
cancel the operation and return to standby mode.
When adjusting the settings, if you do not touch
any buttons for over a minute, the DF450 will
automatically reset itself to standby mode.

Using your DF450
15
To send a fax
You have a choice of ways to dial a fax number:
Normal dialling
•Load document
•Dial the number you want. (Press the
§ ©
buttons to move the cursor to change
any number you press by mistake.)
•Press the START button.
•After the last page has been sent, the display
shows TX COMPLETED and you hear a beep.
One-touch dialling
•Load document
•Press the one-touch button you want (1-10),
display shows the name and number stored.
•Your fax is sent automatically.
•After the last page has been sent, the display
shows TX COMPLETED and you hear a beep.
Quick dialling
•Load document
•Press the QUICKDIAL button.
•Using the keypad, dial the two digit short
code (01 - 32) you want; the display shows
the name and number you have stored in
the memory.
•Your fax is sent automatically.
•After the last page has been sent, display
shows TX COMPLETED for a few seconds.
If the number you are calling is engaged or the
connection is not made, your DF450 will
automatically redial the number every two
minutes up to three times.
Sending small text or pages with pictures.
If you are sending small print, illustrations or
photographs, you can alter the RESOLUTION and
CONTRAST settings to ensure the clearest possible
transmission. See Additional Features, page 25.
To see the numbers and names stored in the
Quickdial memory, press the QUICKDIAL button
then the
§ ©
buttons to scroll backward and
forward through the list.
If your fax stops for any reason, you will hear a
three-second beep and the ERROR light comes
on. Press the STOP button remove any
remaining paper and begin the process again.
If pre-selected, an error report will be
automatically printed (see page 26).
To redial the last number
Your DF450 will redial a fax number for you.
•Press the REDIAL button; the display shows
last number dialled.
•Press the REDIAL button again; number is
dialled.
To stop a fax you are sending
If you choose, you can stop a fax during
transmission.
•Press the STOP button once to halt the
transmission and once again to eject a
page currently being scanned.
•Press the STOP button again to return
the machine to standby.

16
Using your DF450
Delaying a fax
This allows you to transmit a fax automatically
at a pre-set time. This can be useful if you want
to send a fax abroad or at a time when call
charges are lower.
•Insert the document to be faxed in the
Automatic Document Feeder.
•If necessary, adjust contrast and resolution
(see Additional Features, page 25)
•Press the FUNCTION button until the
display shows DELAYED TX.
•Press the START button and enter the fax
number.
•Press the START button, display shows
TYPE TIME.
•Set the time you want the document to be
sent, using the keypad.
•Press the START button to confirm the
setting.
•Your DF450 will print a report confirming
the details. Do not remove the document.
•Your fax will be sent at the time you have
specified.
If a delayed sending has already been set, you can
cancel the number by press the CLEAR button.
If using the 12-hour clock, press the FUNCTION
button to switch between am and pm.
If the document is removed before sending, the
DELAYED TX setting is cancelled.
To receive a fax
Your DF450 is pre-set to AUTOMATIC RX which
means it is ready to receive faxes automatically.
Remember to make sure there is plenty of
paper in the automatic sheet feeder.
•When a call is received, your DF450 display
shows CONNECTING.
The fax is received and printed.
•After the last sheet is printed, display
reverts to AUTOMATIC RX.
See Setting the answer mode on page 17 for
details of reception modes and operation with a
phone or answering machine
To copy documents
Your DF450 can be used to copy a document.
•Place document face down in the document
feeder and press the START button.
•If you need more than one copy of a
document, simply repeat the process.
•Press the STOP button to halt copying.
•Press the STOP button again to eject page.
During reception, if the paper or ink runs out, a
paper jam occurs or the printer cover is opened,
then printing will be interrupted, reception will
continue and your DF450 will store the incoming
fax in its memory*. When the problem has been
rectified, your DF450 will print out the
documents stored in the memory.
*See page 38 for document memory capacity.

Using your DF450
17
Setting the answer mode
Your DF450 will operate in one of four modes:
MANUAL RX,PHONE/FAX RX,TAD/FAX RX or
AUTOMATIC RX.
To change the answer mode:
•Press the RX MODE button until display
shows the required mode.
Which mode is correct for you?
MANUAL RX
A telephone should be connected to your
DF450 when using this mode.
Incoming calls will ring the attached phone.
When the phone rings
•Pick up the handset. If you hear fax tones,
press the START button on your DF450 and
replace the handset. The fax will be received.
PHONE FAX RX
A telephone should be connected to your
DF450 when using this mode.
Incoming calls will ring the attached phone.
When a call is received, the phone will ring
twice and, if the handset is not picked up,
your DF450 will take the call and check fo
fax tones.
•If your DF450 hears fax tones, it will receive
the fax normally.
•If it does not hear fax tones, your DF450
will beep to indicate an incoming phone call,
the display will show LIFT HANDSET.
•Lift the handset in order to speak.
•Your DF450 will beep for up to 20 seconds.
(to adjust the time see Additional Features,
page 25). If the handset is not lifted after this
time, your DF450 will assume it is a fax.
It will stay in fax reception mode for about 30
seconds or, if it is a fax call, until the fax has
been received.
•If you pick up the phone within the first two
rings and you hear fax tones, press the
START button, replace the handset and your
DF450 will receive the fax.
If a call is not answered after 7 rings, your
DF450 will automatically switch to fax reception
and answer the incoming call.

18
Using your DF450
Using a phone or answering
machine with your DF450
To make a call from an attached phone
You can make a phone call in a number of ways
either
•By using the phone as normal.
or
•Press the MONITOR button on the DF450
and dial the number, pick up the handset
and wait for the number to answer.
or
•You can use the telephone numbers stored
in your DF450’s memories. To dial a phone
number, make sure the Automatic
Document Feeder is empty. Select the One
Touch buttons or Quickdial codes. Press the
START button, pick up the handset to speak.
Using the HOLD button
When using a telephone with the DF450, you
may not want your caller to hear your
conversation with someone else in the room. Press
the HOLD button and you can talk without your
caller hearing. Your caller will only hear a
regular tone to show that the line is open. Press
the HOLD button again to return to your caller.
TAD FAX RX (telephone answering device)
This allows your DF450 and a connected
answering machine to take phone and fax calls.
When a phone call is received, the answering
machine will take it and the display will show
OFF HOOK.
If the call is a fax, your DF450 will override the
answering machine and automatically receive
the fax
-
normally after the outgoing message
has been played.
AUTOMATIC RX
This mode is for use when you are using your
DF450 as a fax machine only. Faxes are
received and printed automatically.
There is no audible indication of an incoming
call in this mode.

Using your DF450
19
To send a fax using the phone to dial
You can dial a fax number using the phone
connected to your DF450.
•Insert the document to be faxed in the
Automatic Document Feeder.
•Dial the number you want on the phone.
•Press the START button on your DF450. (To
cancel at any time, press the STOP button.)
•Replace the handset.
To use with an answer machine
With your DF450 set to TAD/FAX mode, your
connected answer machine will take all calls as
normal. Your DF450 will respond after the
outgoing message if it hears fax tones and will
override the answer machine to automatically
receive the incoming fax.
To enable the reception of faxes from a fax
machine which does not send fax tones, your
DF450 is pre-set to switch to fax reception if,
when it is called, it detects up to 6 seconds of
silence. You may need to adjust this time to suit
your answering machine. Shorten the time if
your DF450 fails to cut in, or lengthen it if it
cuts in while a caller is leaving a message (see
Additional Features, page 25).
Remote control from an extension
If your DF450 is connected to a telephone
network which has other telephone
extensions, it is possible to take the call on an
extension and, if it is a fax call, transfer the call
to your DF450.
To transfer a fax call from a telephone
extension
•Press the ✱button on your telephone twice
and replace the handset. Your DF450 will
automatically take the call.
If the ✱✱ command conflicts with other
equipment or services connected to the line,
you can alter the second digit of the remote
start command as follows:
•Press the FUNCTION button until the display
shows INSTALLATION.
•Press the START button until the display
shows REMOTE START:ON. (If the display
shows REMOTE START:OFF, press the
§ ©
buttons to select ON.)
•Press the START button display
shows TYPE CODE.
CODE (0/9, ✱)
The ✱will flash; you can now replace it with
another character (0and 9) using the keypad.
•Enter the new digit then press the START
button to confirm your choice.
•Press the STOP button to return to standby.
As a precaution, to prevent your DF450 cutting in
during a voice call, press the ✱and
#
buttons
before starting a conversation. This will immobilise
your DF450 during the call and may be necessary
as there are rare occasions where certain voice
tones or pitches can be mistaken for fax tones,
which would set off a fax response.

Polling
This allows another fax machine to retrieve a
document from your DF450 or for your DF450
to retrieve a document from another fax
machine at a time that’s convenient to them.
To set up a fax document to be polled by
another machine
•Insert the document.
•Press the FUNCTION button until the display
shows POLLING TX.
•Press the START button until the display
shows POLLING TX SET.
Your fax will then be sent when another fax
machine calls your DF450.
•To cancel the POLLING settings press the
STOP button.
Polling calls are charged to the machine which
retrieves the document.
START FUNCTION
20
Using your DF450
To poll a document from another fax
machine
You can retrieve a document from another fax
machine. The other fax machine must be set,
ready for polling.
•Press the FUNCTION button until
POLLING RX is displayed.
•Press the START button; the display shows
TYPE FAX NUMBER.
•Enter the fax number you wish to poll.
•Press the START button; the display shows
TYPE TIME.
•Press the START button to poll immediately
or use the keypad to set the time when you
want your DF450 to begin polling.
Your DF450 is now set to poll at the time you
have specified.
START FUNCTION

Using your DF450
21
Storing one-touch and Quickdial
numbers and names
To store one-touch numbers and names
You can store a fax number, phone number and
a name under each of the 10 One-Touch
buttons. Each number can be up to 38 digits
long and each name up to16 characters long.
To enter a fax number
•Press the FUNCTION button, display
shows FAX SET-UP.
•Press the START button.
•Press the FUNCTION button until the display
shows ONE TOUCH DIAL.
•Press the START button and then the (1-10)
button under which you want to store the
number/name; the display shows FAX NO:
START/STOP/< >.
•Press the START button.
•Dial the fax number you want.
•Press the START button to confirm the
setting.
After confirming the number, the display
shows SPEED. This is already set to the fastest
possible transmission speed and you will not
normally need to adjust it. Press the START
button, display shows OVERSEAS.
If you have entered an overseas number, press
the
§ ©
buttons to select ON from the display
as this ensures clearer transmission.
•Press the START button to confirm setting;
the display shows: NAME
You can now key in the name of the person or
company whose number you have just entered.
If you are connected to a switchboard, you may
also need to store a pause or PBX access code
using the EXTERNAL/PAUSE button, see page 31,
Connecting to a switchboard.
If you make a mistake when keying in a number,
you can delete it by pressing the CLEAR button.
START
FUNCTION

22
Using your DF450
To enter a name
Use the keypad to enter the name. To do this,
press the number button which shows the
letter you want. By pressing the button you can
change the letter. For example, if you want to
store the name JOHN:
•Press 5 on the keypad, until display shows J.
•Press the
©
button to advance the cursor.
•Press 6on the keypad until the display
shows O.
•Press the
©
button to advance the cursor.
•Press 4 on the keypad until Happears on the
display.
•Press the
©
button to advance the cursor.
•Press 6 on the keypad until Nappears on the
display. The whole name is now entered.
•To enter a space, press the
©
button.
456
G
H
I
J
K
L
M
N
O
•Press the START button to confirm your
selection. The display asks if you want to
enter another one-touch number.
•To enter another number/name, press the
START button again followed by the
one-touch button you want and repeat the
previous sequence.
•Press the STOP button to return the DF450
to standby mode.
To enter a phone number
•Press the FUNCTION button; the display
shows FAX SET-UP.
•Press the START button.
•Press the FUNCTION button until the display
shows ONE TOUCH DIAL.
•Press the START button and then the (1-10)
button under which you want to store the
number/name; the display shows FAX NO:
START/STOP/< >.
•Press
©
to change the display to TEL
NO: START/STOP/< >.
•Press the START button.
•Dial the phone number you want.
•Press the START button to confirm.
•Display shows: NAME.
If a name has already been entered, press the
START button to continue or the STOP button
to return to standby. To enter or edit a name
see To enter a name.
If you want to change your entry, you can move
back and forth to the letters you want by pressing
the
§ ©
buttons. Delete the whole name by
pressing the CLEAR button. Press the A - a button
to change between capital letters and small letters.
START
FUNCTION
When entering a name you can insert various
symbols, such as &, using the ✱and # buttons to
scroll through the options.

Using your DF450
23
To store Quickdial numbers and names
Your DF450 can store up to 32 names and
numbers which can be accessed by the
Quickdial facility. Names can be up to 16 letters
long and numbers up to 38 digits long.
To enter a fax number
•Press the FUNCTION button; the display
shows FAX SET-UP.
•Press the START button.
•Press the FUNCTION button until the display
shows CODED SPEED DIAL.
•Press the START button; the display shows
TYPE SPEED NO.(01-32)
•Using the keypad, type in the two-digit code
you want.
•Press the START button.
•Dial in the fax number you want.
•Press the START button to confirm.
To change transmission speed
After confirming a fax number, the display
shows SPEED. This is already set to the fastest
possible transmission speed and you will not
normally need to adjust it. To change it for an
overseas transmission, press the START
button; the display shows OVERSEAS. Press
the
§ ©
buttons to select ON from the display.
This ensures clearer transmission.
•Press the START button to confirm setting,
display shows: NAME
If you make a mistake when keying in a number,
you can delete it by pressing the CLEAR button.
You can now key in the name of the person or
company whose number you have just entered.
To enter a name
Use the keypad to enter the name. To do this,
press the number button which shows the
letter you want. By pressing the button, you
can change the letter. For example, if you want
to store the name JOHN:
•Press 5 on the keypad, until display shows J.
•Press the
©
button to advance the cursor.
•Press 6on the keypad until the display
shows O.
•Press the
©
button to advance the cursor.
•Press 4 on the keypad until Happears on the
display.
•Press the
©
button to advance the cursor.
•Press 6 on the keypad until Nappears on the
display. The whole name is now entered.
•To enter a space, press the
©
button.
•Press the START button to confirm your
selection. The display asks if you want to
enter another one-touch number.
•To enter another number/name, press the
START button again followed by the
two-digit code you want and repeat the
previous sequence.
•Press the STOP button to return the DF450
to standby mode.
456
G
H
I
J
K
L
M
N
O

If a name has already been entered, press the
START button to continue or the STOP button
to return to standby. To enter or edit a name
see “To enter a name”.
•Press the START button to confirm your
selection. The display asks if you want to
enter another Quickdial number.
•To enter another number/name, press the
START button again followed by the
two-digit code you want and repeat the
previous sequence.
•Press the STOP button to return the DF450
to standby mode.
24
Using your DF450
To enter a phone number
•Press the FUNCTION button, display
shows FAX SET-UP.
•Press the START button.
•Press the FUNCTION button until the display
shows CODED SPEED DIAL.
•Press the START button and the display
shows TYPE SPEED (01-32).
•Using the keypad, type in the two-digit code
you want; the display shows FAX NO:
START/STOP/< >.
•Press
©
to change the display to TEL
NO: START/STOP/< >.
•Using the keypad, type in the two-digit code
you want.
•Press the START button.
•Dial the phone number you want.
•Press the START button to confirm.
•Display shows: NAME.
Keep a list handy of all the numbers and names
you have stored on the memory. Your DF450 can
print out a list of all the names and numbers you
have stored. See ‘Print outs’ on page 26.
If you want to change your entry, you can move
back and forth to the letters you want by pressing
the
§ ©
buttons. Delete the whole name by
pressing the CLEAR button. Press the A - a button
to change between capital letters and small letters.
When entering a name you can insert various
symbols, such as &, using the ✱and # buttons to
scroll through the options.
Additional features
25
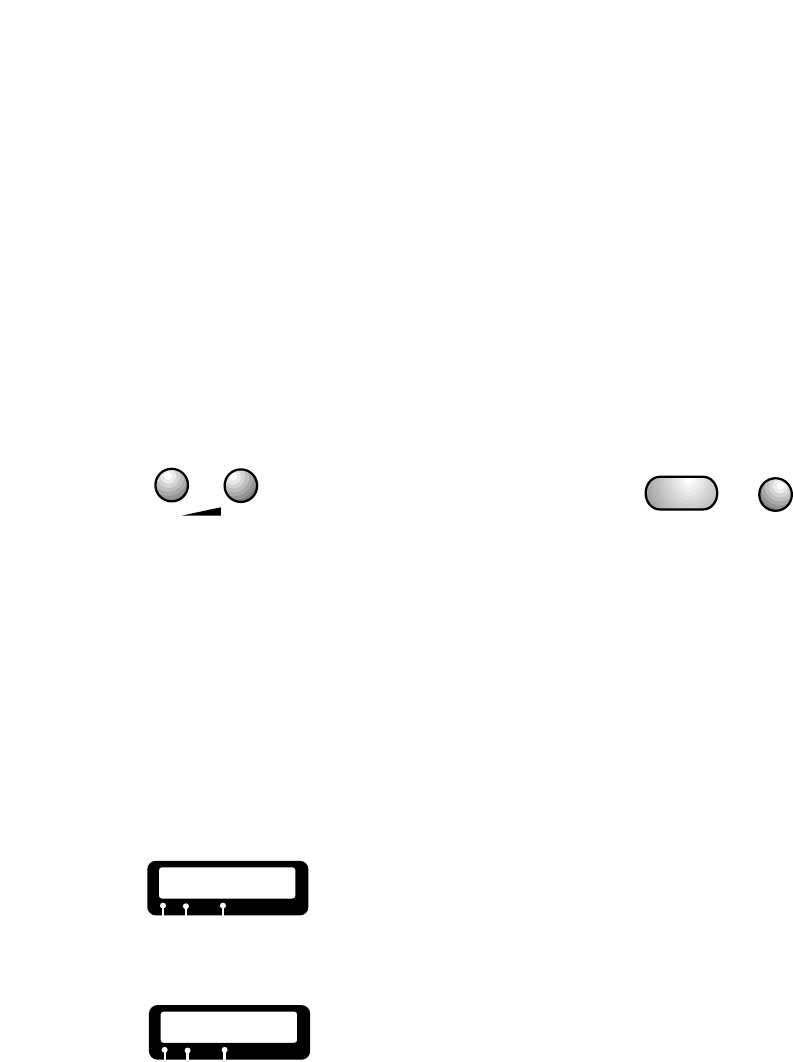
Adjusting the resolution and
contrast
You can choose different settings to ensure
improved quality when sending or copying a
document.
•Insert the document to be faxed or copied
•Press the CONTR button three times to view
the options. You can choose LIGHT,
NORMAL or DARK. For light documents in
pencil or thin print quality, select the DARK
setting. For documents with a dark
background, select the LIGHT setting.
•Press the RESOL button and the display will
move the arrow between the settings STD,
FINE and HALF TONES.
For small or hard-to-read text, select the
FINE setting.
For pages containing pictures, photographs
or drawings, select HALF TONES.
Fax monitor
Your DF450 is pre-set to allow you to hear the
signals exchanged during a fax call in the initial
connection phase via its in-built speaker.
To switch off the fax monitor
•Press the FUNCTION button until the display
shows INSTALLATION.
•Press the START button.
•Press the FUNCTION button until the display
shows DIAGNOSTICS.
•Press the START button until the display
shows LINE MONITOR: ON.
•Press the
©
buttons to switch the display
to LINE MONITOR: OFF.
•Press the START button to confirm setting.
•Press the STOP button to return to standby.
To change the speaker volume
You can change the volume of your DF450’s
in-built speaker.
•Press the MONITOR button.
•Press the
§ ©
buttons to adjust the volume.
Additional featuresYour DF450 has a range
of extra features which you can set to suit the way you work
RESOL. CONTRAST
§©
- +
STD FINE HALF TONES
➔
STD FINE HALF TONES
➔
➔
START
FUNCTION

26
Additional features
To print manual reports
•Press the FUNCTION button until the display
shows PRINT OUT REPORT.
•Press the START button, display shows:
PRINT:TX REPORT.
•Pressing the
§ ©
buttons will display the
other options: PRINT:JOURNAL and
PRINT OUT:EXIT.
•Press the START button to select your
option.
PRINT:TX REPORT will give an activity report
for the last fax sent.
PRINT:JOURNAL will give an activity report for
the last 32 transactions.
PRINT OUT:EXIT returns your DF450 to
standby mode without printing.
Power failure report
Your DF450 will print a status report
automatically when power is restored after a
power failure during transmission or reception.
The report includes the number of pages which
were sent or received before the failure occurred.
Print-outs
Automatic print-outs
Your DF450 will automatically print an activity
report after every 32 transactions. It can also
be programmed to print individual reports after
every successful or failed transmission.
To automatically print individual reports
•Press the FUNCTION button until the display
shows FAX SET UP.
•Press the START button until the display
shows one of the three options available:
FAILED TX REPORT, TX REPORT:OFF, or
TX REPORT:ALWAYS.
•Pressing the
§ ©
buttons will display each
of the three options.
•Press the START button to select your
option.
TX REPORT:ALWAYS - Your DF450 will
automatically print an individual activity report
after every transmission.
FAILED TX REPORT - an individual activity
report is automatically printed after every
failed transmission.
TX REPORT:OFF - no individual reports will be
automatically printed.
START
FUNCTION
START
FUNCTION

Additional features
27
To print a list of stored names, numbers and
settings
•Press the FUNCTION button until the display
shows FAX SET UP.
•Press the START button.
•Press the FUNCTION button until the display
shows PRINT OUT SET-UP.
•Press the START button; the display shows
PRINT SETTINGS.
•Pressing the
§ ©
buttons will display the
other options: PRINT: ONE TOUCH,
PRINT: SPEED DIAL, PRINT OUT: EXIT
•Press the START button to select your
option.
PRINT SETTINGS will print out a list of
the option settings you have selected on
your DF450.
PRINT: ONE TOUCH will print out a list of
names and numbers stored under the
one-touch buttons.
PRINT: SPEED DIAL will print out a list of
names and numbers stored in the Quickdial
memory.
PRINT OUT: EXIT returns you to standby mode
without printing.
If no one-touch or Quickdial codes have been
programmed, display shows EMPTY DIRECTORY
and the print-out will have the symbol “-”.
To print a list of installation parameters
You can print out a list of your DF450’s current
settings (answer mode, header position etc.)
•Press the FUNCTION button until the display
shows INSTALLATION.
•Press the START button; the display shows
TEL. LINE SET UP.
•Press the FUNCTION button until the display
shows PRINT INSTALL.
•Press the START button; the display shows
PRINT OUT: START.
•Pressing the
§ ©
buttons will display the
other option: PRINT OUT: EXIT.
•Press the START button to select your
option.
START will print a list of your DF450’s
installation parameters.
EXIT returns you to standby mode without
printing.
START
FUNCTION
START
FUNCTION
28
Additional features
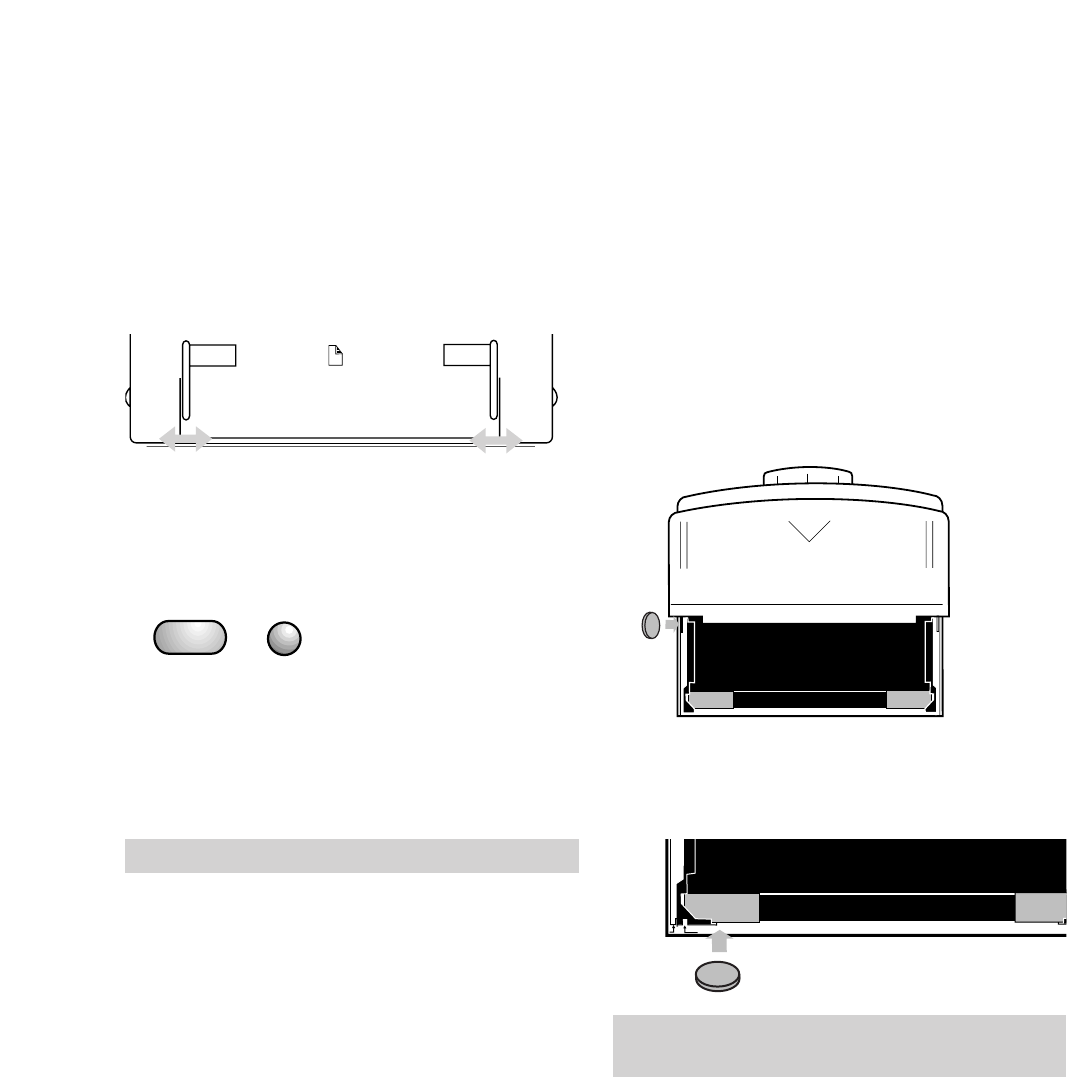
Adjusting for different-size paper
To send a different-size document
Your DF450 can send documents from
148 x 148mm up to 216 x 600mm in size. Adjust
the document feeder (if necessary) by moving
the side supports.
To receive a different-size document
The automatic sheet feeder is pre-set to take
A4 (210mm wide) paper, but can be adjusted to
take paper 216mm wide also.
•Press the FUNCTION button.
•Press the START button until the display
reads SIZE:
•Press the
§ ©
buttons to select between
SIZE:A4, SIZE: LETTER and SIZE: LEGAL.
•Press the START button to confirm your
selection.
•Press the STOP button to return the DF450
to standby.
To change the automatic sheet feeder
cassette to take different-size paper
Your DF450 automatic sheet feeder can hold
A4 (210mm wide) or Legal (216mm wide)
paper. Adjust the automatic sheet feeder (if
necessary) by moving the side supports.
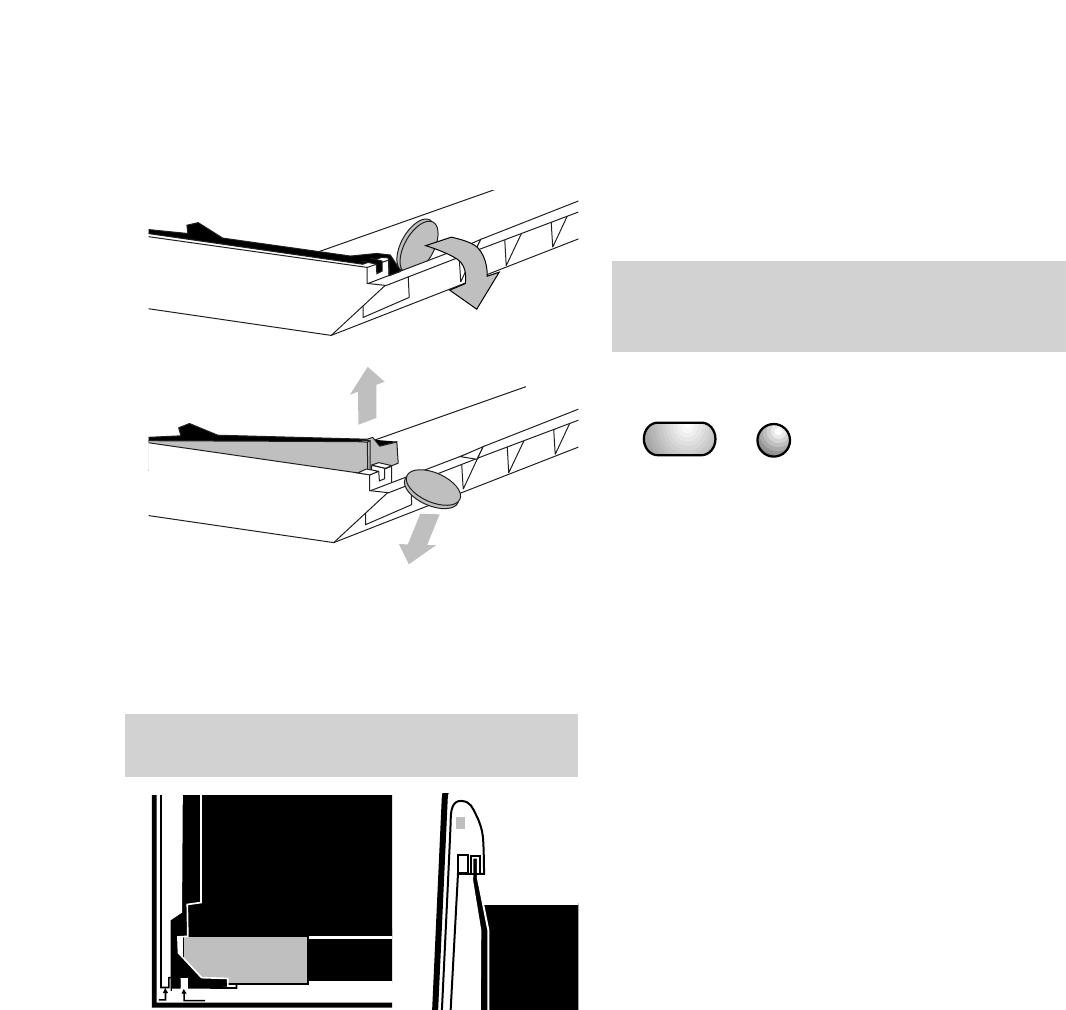
•First remove the paper cover from the front
of the automatic sheet feeder.
•Insert a small coin into the small groove just
in front of the hinge, this will release the
hinge to allow you to pull out the cover.
•Insert a small coin in the groove at the
bottom of the automatic sheet feeder to
release the black side supports.
A4 I
Repeat this action for both sides of the automatic
sheet feeder.
A4 - 210mm wide, Legal and letter - 216mm wide.
LA4
START
FUNCTION
Additional features
29
Changing the size of incoming
faxes
Your DF450 can reduce incoming faxes onto a
smaller page area.
To change the standard 94% setting:
•Press the FUNCTION button.
•Press the START button until the display
shows REDUCTION: 94%.
•Press the
§ ©
buttons to display the
reduction options: 80%, 76%, 70% and OFF.
•Press the START button to select your
chosen option.
The DF450 display now shows SURPLUS. This
enables you to receive faxes of a longer page
length than the paper you are printing on.
•Press the
§ ©
buttons to view the available
settings: SURPLUS: ON, SURPLUS: OFF or
SURPLUS: AUTO
SURPLUS: ON means any overlapping text will
be printed onto a separate page.
SURPLUS: OFF means any overlapping text will
not be printed.
•Gently pull back the coin to lift out the side
supports.
•Remove the black side supports and put
them in the correct slot:
L = Legal (216mm wide)
A4 = 210mm wide
•Replace the paper cover on the front
of the automatic sheet feeder.
The standard setting is 94% reduction which
allows you to print a document and the fax header
onto an A4 sheet.
Repeat this action for both sides of the automatic
sheet feeder.
LA4
L
➔
START
FUNCTION

30
Additional features
To change the beep volume
•Press the FUNCTION button until the display
shows: FAX SET-UP.
•Press the START button until the display
shows: BUZZER VOL.: LOW.
•Press the
§ ©
buttons to select between
LOW and HI.
•Press the START button to confirm the
setting.
•Press the STOP button to return to standby.
Adjusting the silence lapse time
This is the silent period which your DF450 will
interpret as an indication to switch to fax
reception mode.
To set the silence lapse time
•Press the FUNCTION button until the display
shows: INSTALLATION.
•Press the START button until the display
shows: SILENCE LAPSE. Pressing the
§ ©
buttons displays the available options.
•Press the START button to confirm your
selection.
•Press the STOP button to return to standby.
SURPLUS: AUTO is similar to SURPLUS: ON
but means that your DF450 will not print an
additional sheet if the received page is only
slightly longer than A4 (297mm). This prevents
the printing of unwanted pages and is your
DF450’s default setting.
•Press the START button to confirm your
selection.
•Press the STOP button to return your DF450
to standby.
Adjusting the beep in phone/fax
mode
You can adjust the volume and the length of
time the DF450 will beep before reverting to
answering the call.
To change the beep length
•Press the FUNCTION button until the display
shows INSTALLATION.
•Press the START button until the display
shows TEL LINE SET-UP.
•Press the START button; the display shows
FAX/TEL TIMER: 20.
•Press the
§ ©
buttons to display the beep
options: 15, 20, 30 or 40 seconds.
•Press the START button to confirm your
selection.
•Press the STOP button to return to standby.
START
FUNCTION
START
FUNCTION

Additional features
31
Connecting your DF450 to a
direct exchange line
Your DF450 is pre-set to TONE dial for
connection to direct exchange lines. In the
unlikely event that you need to change this
setting to PULSE dialling:
•Press the FUNCTION button until
the display shows INSTALLATION.
•Press the START button until the display
shows PSTN DIAL: TONE.
•Press the
©
button to select PULSE.
•Press the START button to confirm the
setting.
•Press the STOP button to return to standby.
Connecting your DF450 to a
private switchboard
For the DF450 to use the functions of a
switchboard, you may need to change the
TONE/PULSE setting and the PUBL. LINE to
the PRIV. LINE setting. If in doubt, ask your
communications manager or switchboard
supplier.
•Press the FUNCTION button until
the display shows INSTALLATION.
•Press the START button until the display
shows TEL LINE SET-UP.
•Press the START button. Display shows
PUBL. LINE (PSTN).
•Press the
©
button to select PRIV.LINE (PBX)
•Press the START button to confirm the
setting; the display shows PBX DIAL:TONE.
To select PBX DIAL: PULSE, press
the
©
button.
•Press the START button to confirm the
setting.
•Press the STOP button to return to standby.
Inserting a pause
Some switchboards require a delay between
dialling the access code and the fax/phone
number. You can press the PAUSE button to
insert this delay before dialling the number.
START
FUNCTION
START
FUNCTION

Additional features
32
Error correction mode (ECM)
Error correction mode ensures that fax
transmissions are of the best possible standard
when sending or receiving from another
machine with a similar feature. When it is
selected and in use, an Eis shown in the
display at the end of the called number. It is
recommended that this facility is left on.
To switch off error correction mode
•Press the FUNCTION button until
the display shows FAX SET UP.
•Press the START button, display
shows VARIOUS SETTINGS.
•Press the START button until display shows
ECM: ON.
•Press the
©
button to change display to
ECM: OFF.
•Press the START button to confirm setting.
•Press the STOP button to return to standby.
Setting the external button
Your switchboard may require an access
code in order to give you an outside line.
This external line command can be stored
under the EXTERNAL button.
•Press the FUNCTION button until the display
shows INSTALLATION.
•Press the START button until the display
shows PRIV.LINE:(PSTN).
•Press the
§ ©
buttons until the display
shows PRIV.LINE:(PBX).
•Press the START button, display
shows PBX DIAL:TONE.
•Press the START button, display
shows EXT LINE PREFIX.
•Press the
§ ©
buttons to display the
external line options PREFIX,EARTH or
FLASH.
•Press the START button to confirm the
setting.
•If you chose PREFIX,the display shows:
TYPE PREFIX (0-9).
•Enter your access code (up to three digits).
•Press the START button to confirm the
setting.
•Press the STOP button to return to standby.
Your access code is now programmed and can
be dialled by pressing the EXTERNAL button
before dialling a number.
EARTH = Earth recall FLASH = Time break recall
The EXTERNAL feature can also be stored as part
of a one-touch or Quickdial entry.
START
FUNCTION
START
FUNCTION

Maintenance
33
Speed
This feature controls the fax transmission
speed at the start of a transmission. It is pre-set
to 9600 for optimum performance, but it can
sometimes help with overseas calls to change
the speed to 4800.
To change the speed
•Press the FUNCTION button until
the display shows FAX SET UP.
•Press the START button until the display
shows VARIOUS SETTINGS.
•Press the START button, display shows
TX SPEED: 9600.
•Press the
©
button to change display to
TX SPEED: 4800.
•Press the START button to confirm setting.
•Press the STOP button to return to standby.
Diagnostics
This feature allows an engineer to remotely
test your machine in the event of a problem.
Your DF450 is pre-set to Diagnostics: On.
To switch off diagnostics
•Press the FUNCTION button until
the display shows INSTALLATION.
•Press the START button until the display
shows DIAGNOSTICS.
•Press the START button; the display shows
REMOTE DIAG: ON.
•Press the
©
button to change display to
REMOTE DIAG: OFF.
•Press the START button to confirm setting.
•Press the STOP button to return to standby.
START
FUNCTION
START
FUNCTION
34
Maintenance
Maintenance
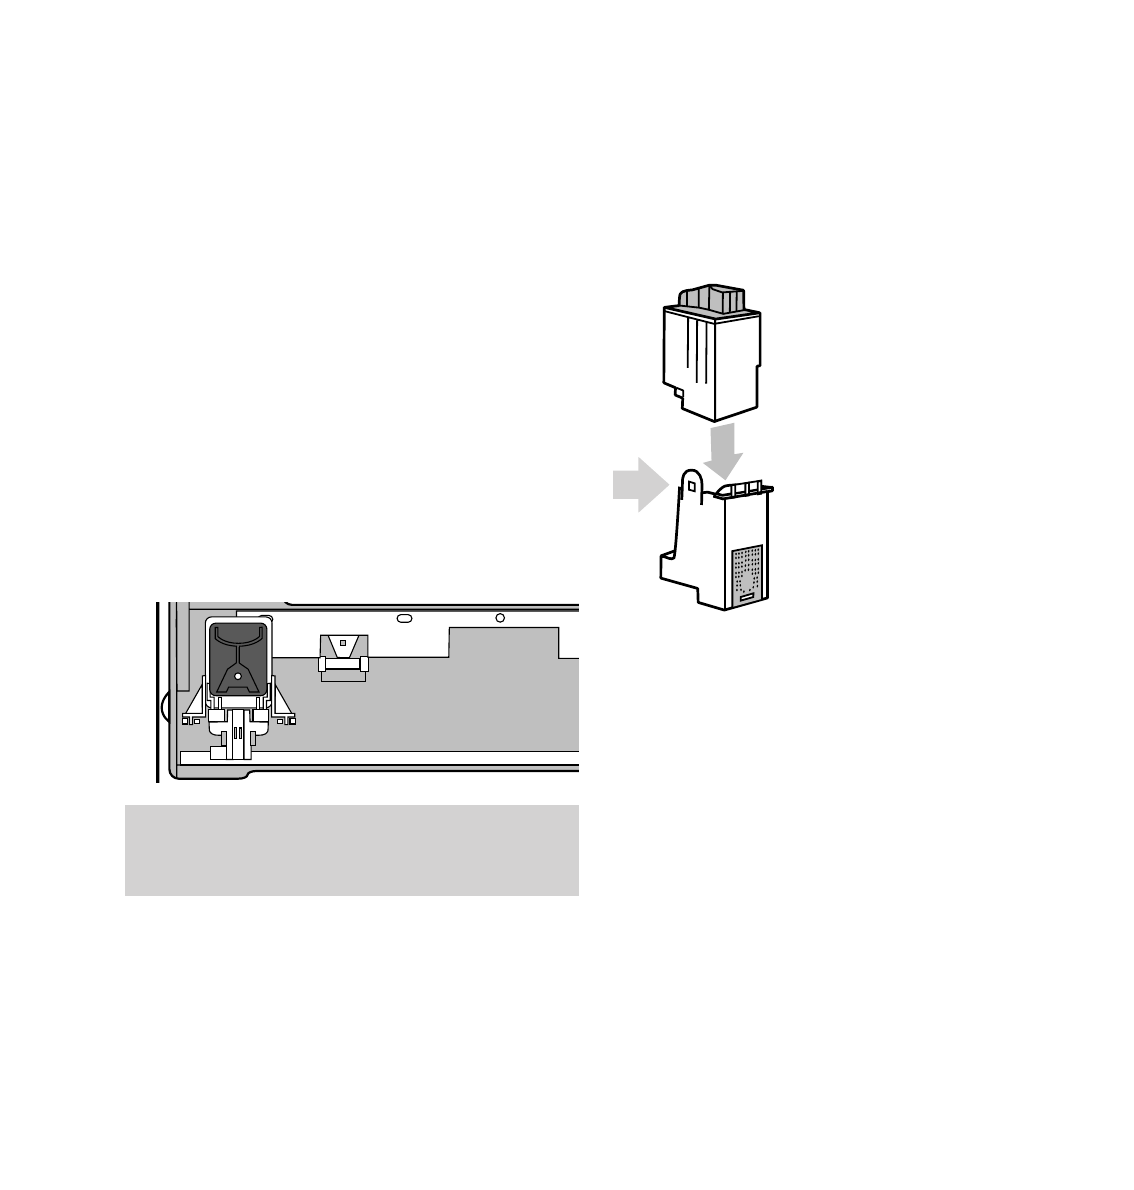
To fit a new print head
You can buy a ready assembled ink cartridge
and print head and install it as shown in the
Setting Up section.
To fit a new ink cartridge
It is less expensive to simply replace the ink
cartridge. One print head should last for eight
ink cartridges.
•Open the printer cover.
1 Pull back the clip on
the side of the print
head to release the ink
cartridge and remove
it from the print head.
2 Remove the protective
film from the nozzle of the
new ink cartridge and push
it into the print head until it
clicks into place.
Close the printer cover.
The DF450 will automatically test and clean the
print nozzles, and then generate a test print-out
containing a graduated scale, graphic images
and text. Following the print-out, the display
will show CHECK PRINT OUT.
If the graduated scale is uninterrupted and the
dark areas do not contain white lines, the print
quality is to be considered satisfactory. If not,
repeat the procedure.
•Press 1if the test print is acceptable.
•Press 0to repeat the test.
If the print head is still unsatisfactory after a
number of tests, replace the printhead.
1
2
The ink cartridge is located inside the print head.
The print head does not need to be removed while
changing the ink cartridge.
Help
35
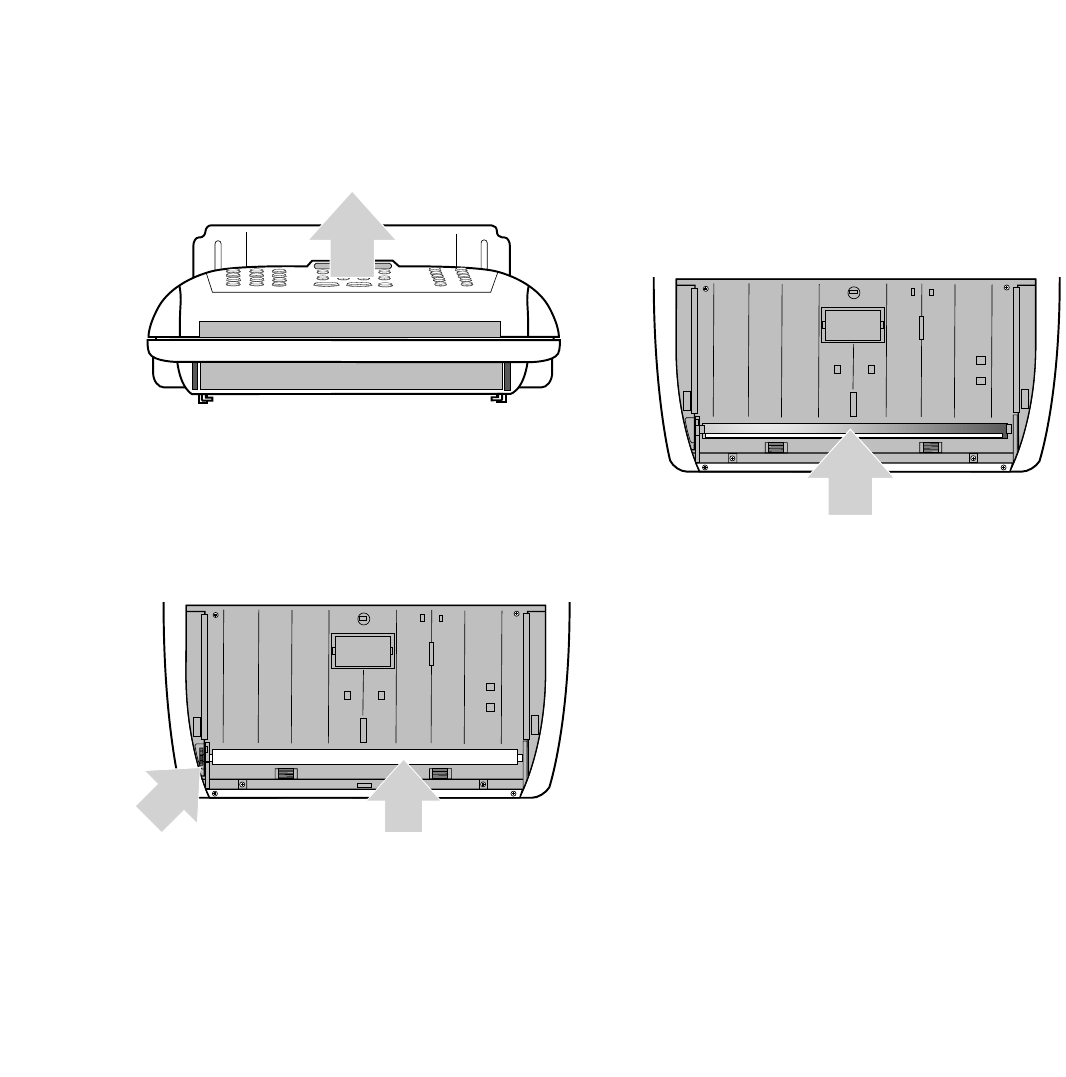
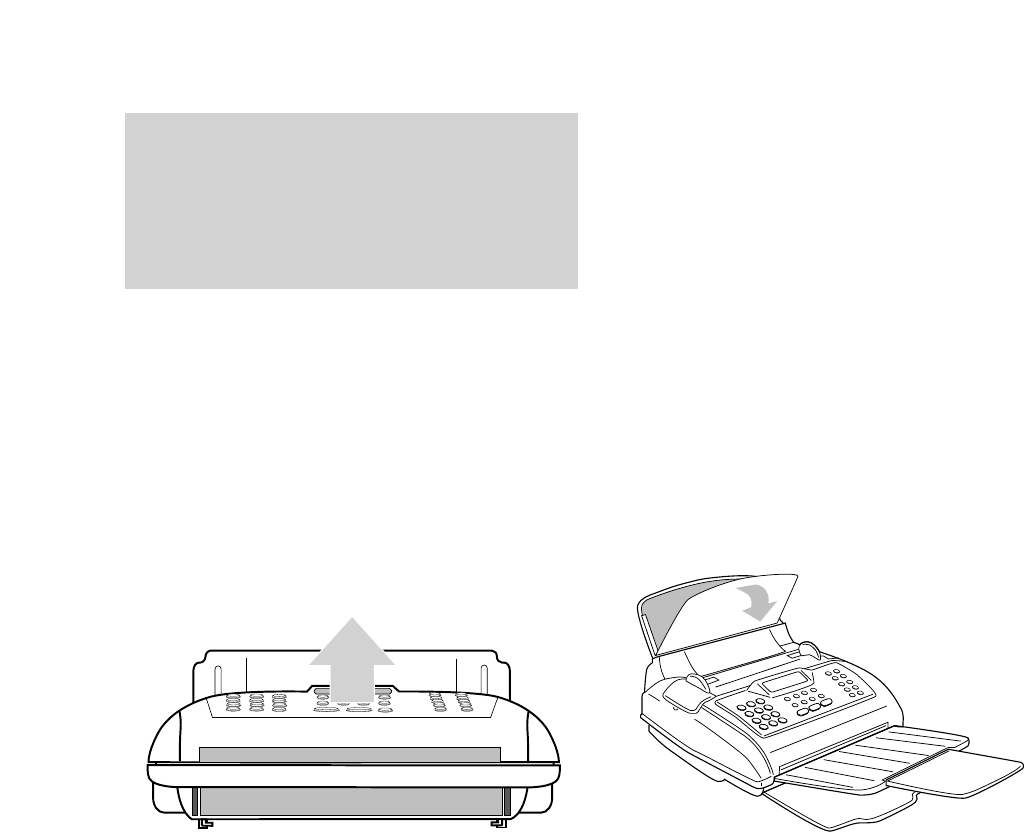
Cleaning the optical scanner
•Raise the operator console. •Clean the glass of the optical scanner with
cloth such as a VDU Screen Wipe or cloth
dampened with a specific glass-cleaning
product. Dry the glass carefully. Do not pour
or spray cleaning product onto the glass.
•Put the roller back and close the console.
•Test that the scanner is clean by copying a
blank sheet of paper. If the copy is not clear,
check the glass again. If copies are still not
clear, call the DF450 Helpline Service
on Freefone 0800 215 200.
•Release the green lever on the left-hand side
of the white roller. Lift out the white roller.
Clean the white roller with a lint-free cloth to
remove any dirt.
White paper feed rollerGreen release lever
36
Help
DF450 doesn’t print properly
Have you removed the protective film from the
ink cartridge or print head or both?
The print head nozzle may need cleaning.
Lifting the print cover and closing it again
makes the DF450 perform an automatic test
procedure, which cleans the nozzle
The electrical contacts for the ink cartridge
may need cleaning.
•Open the printer cover.
•Remove the print cartridge.
•Clean the electrical contacts on the ink
cartridge with a dry cotton wool bud.
Caution: Do not touch the nozzles or contacts.
Contacts
Do not touch
Nozzles
Do not touch
Contacts
•Clean the electrical contacts on the print
cartridge in the same way.
•The print cartridge cleaning head
may need wiping.
•Wipe the head with a dry cotton wool bud
Cleaning
head
HelpIf you have any problems using your DF450, this section
will give you the most common solutions.
Help
37
Document jam
•If a document you are sending gets jammed,
the display shows REMOVE DOCUMENT.
•Press the STOP button; this may clear the
problem. If not, remove any paper still in the
document tray, raise the operator console
(the section with the keypad and function
buttons) and remove any documents.
•Raise the operator console.
Printing paper jam
If printing paper is jammed:
•Display shows: PAPER ERROR. PRESS
STOP.
•Pressing the STOP button may clear the jam.
•If the jam is not cleared, remove the
automatic sheet feeder cassette, and ensure
paper is inserted correctly. Pull out any
paper jammed in the cassette housing or
received document tray.
If the paper is jammed in the automatic
sheet feeder
•Open the tray cover
•Remove the jammed sheet and close the
cover. You may need to remove the whole
paper tray.
•Remove the jammed paper. If necessary,
release the white roller (see: “Cleaning the
optical scanner”, page 35).
•Refit the white roller (if necessary), then
lower the console, replace the document and
try again.
When the printer cover is opened, the ink
cartridge automatically moves to the centre of the
machine. However, if your DF450 is not
connected to the mains, you can move the printer
head by gently pushing it along its runner to
reveal the print cartridge cleaning head.

38
Help
Error light
If the ERROR light on the console lights up:
•The called party is disconnected or has not
responded or
•The called fax machine is incompatible
with your DF450 or
•Errors have been detected during
transmission/reception.
To switch off the ERROR light, press the
STOP button.
To reset your DF450
If you encounter a problem and your DF450 will
not respond to any button presses, turn the
power switch off for ten seconds. Turning the
power back on will reset your DF450 to standby
mode. Your personalised settings and memorised
numbers will be maintained.
Document memory
If your DF450 runs out of ink or paper while
receiving a fax, the document will continue to be
received and stored in your DF450’s memory, to
be printed out when ink/paper is replenished. No
further documents can be received until the
ink/paper is replenished and the documents
stored in the memory have been printed. The
maximum storage capacity is about ten pages of
the industry standard test sheet (shown on page
39).
The capacity may be less depending on the
document content.
In the event of power failure, the data retained in
the document memory will be maintained for
several hours.
Print cartridge life
The replacement ink cartridge contains sufficient
ink to produce 500 copies of the industry standard
test sheet (shown on page 39, which has about 6%
black on white coverage of an A4 sheet).
If your average black on white coverage exceeds
this standard then, the number of printed sheets
will be reduced.
To order fax consumables:
Freefone 0800 590009
Warranty
For details of the Terms and Conditions of your
warranty, please refer to the documentation
supplied by your retailer.
No dialling tone when using monitor button
Is your DF450 line cord plugged into the
phone socket? Ensure that the speaker volume is
not set to the minimum (see page 25).
Poor print quality
If there is a problem with the quality of a fax you
have sent, or a document you have copied, the
optical scanner may need cleaning (see “Cleaning
the optical scanner”, page 35).
ERROR
Help
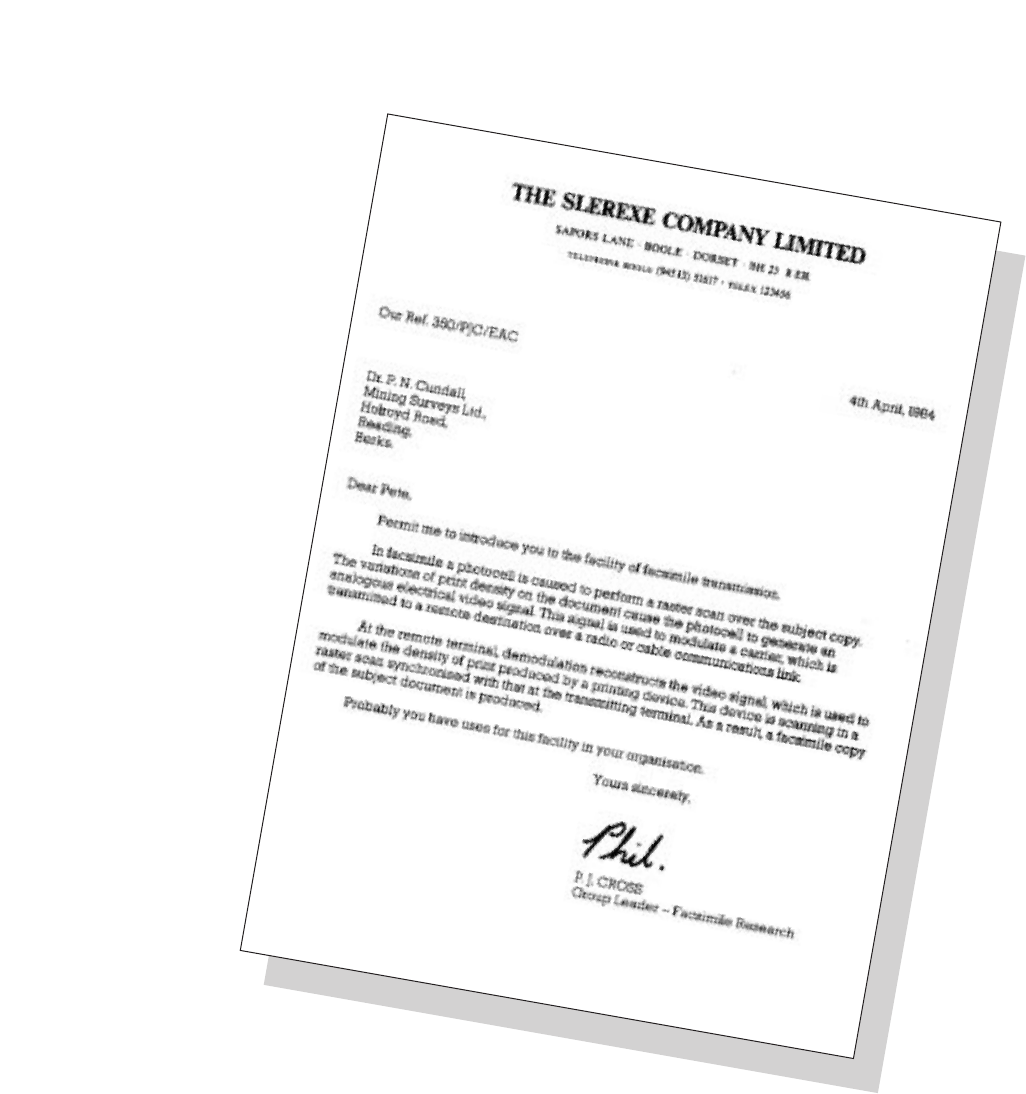
39
Industry standard test sheet

40
Help
Display messages
MESSAGE INTERPRETATION ACTION
DOC. IN MEM. Incoming documents have Check nature of problem
been stored in the memory (no paper or ink) and remedy.
because there was a problem
during reception which
prevented immediate printing.
REC. IN MEM. Reception continues with Check nature of problem and
storage in memory because remedy.
of paper error or ink out.
OUT OF INK No ink in cartridge. Change cartridge.
ADD PAPER! No paper in the sheet feeder. Insert paper in sheet feeder.
CHECK PRINT HEAD Print head is not present or Check presence of print head.
some print nozzles are Replace print head.
clogged so print quality is
affected.
REMOVE DOCUMENT Document scanning Remove document by pressing
PRESS STOP interrupted. STOP and re-insert correctly.
PRINT. COVER OPEN The printer cover is open or Close cover.
not correctly closed.
KEYBOARD OPEN Console is open or not Remove document and close
correctly closed. console.
PAPER ERROR Paper jam. Check and insert paper
PRESS STOP correctly – press STOP.
SYSTEM ERROR nn A fatal system error has been Switch off fax and switch it on
detected. again. If problem persists, call
Customer Service.
CHECK PRINT OUT Print head has just been Check print quality and select
1=EXIT 0=REPEAT replaced. 1 or 0.

Help
41
MESSAGE INTERPRETATION ACTION
CLEANING: ON Automatic test procedure in No action.
operation.
NEW PRINT HEAD? Print head has been refitted. Select 1 or 2 as appropriate. If
1=YES 2=NO you enter 1 and the print head
is not new, the fax machine will
not generate a message when
the ink runs out.
TX COMPLETED Transmission has ended No action.
successfully.
TX ERROR Transmission was Press STOP and repeat
PRESS STOP unsuccessful. transmission.
RX COMPLETED! Document has been No action.
received correctly.
RX ERROR The document reception was Press STOP.
PRESS STOP unsuccessful.
TX INTERRUPTED Procedure interrupted by user. Press STOP.
PRESS STOP
RX INTERRUPTED Procedure interrupted by user. Press STOP.
PRESS STOP
AUTOREDIAL nnn Fax is redialling to get a No action.
connection.
DOCUMENT READY Document correctly inserted. No action.
LIFT HANDSET Displayed on receiving a Lift handset and answer.
phone call.
OFF HOOK Following a telephone call. Replace the telephone handset.
NOT PROGRAMMED Displayed when you choose Program the one-touch key or
a one-touch key or Quickdial Quickdial code.
code that has not been
programmed.

42
Help
MESSAGE INTERPRETATION ACTION
LINE ON HOLD Line has been put on hold Press hold to restore normal
PRESS HOLD during telephone connection. operating mode.
TX POLL ERR Polling transmission Press STOP and reset
PRESS STOP unsuccessful. polling TX.
RX POLL ERR Polling reception unsuccessful. Press STOP and reset
PRESS STOP polling RX.
Transmission report messages
02: IMPOSSIBLE Line tone is not detected Make sure the fax is connected
CONNECTION or the machine is receiving correctly to the telephone line
incorrect tones. and that the telephone handset
has not been lifted. Contact the
receiving party and retry.
03: RECEIVER DOES NOT Remote fax machine not Contact destination party.
ANSWER answering.
04: ERRORS WHILE Error has been detected Repeat transmission from
TRANSMITTING RESEND during transmission (nn = the the page indicated on the
FROM PAGE nn page number on which the transmission report.
error was detected).
05: RESEND PAGES Certain pages have been Re-transmit the pages shown
nn,.......nn received unclearly on the on the transmission report.
remote fax machine (nn=page
number on which error is
detected.
06: LINE ENGAGED Engaged tone detected before Redial.
or after dialling.
07: DOCUMENT Time taken for Divide the document.
TOO LONG transmission exceeds
permitted limits.

Help
43
MESSAGE INTERPRETATION ACTION
08: CHECK THE Scanning error during Remove document from
DOCUMENT document transmission. automatic document feeder and
re-insert it before attempting
another transmission.
09: TX INTERRUPTED User has pressed STOP No action.
WITH STOP to interrupt the procedure.
13: ERROR WHILE Remote fax machine is Check with the other party.
POLLING without a document for polling
transmission.
16: POWER FAILURE Transmission unsuccessful Re-transmit the document
ON PAGE (NN) due to power failure. starting from page indicated
by (nn).
Journal report messages
MESSAGE IN “RESULT” INTERPRETATION ACTION
FIELD
02 Fax machine does not detect Check that the machine is
line tone or receives incorrect connected correctly to the line
signals. and that the handset is on the
hook. Contact other party and
retry connection.
03 No answer from remote fax. Contact other party.
04 Anomaly was detected during Repeat transmission starting
transmission (nn = page from page shown in PAGE field.
number on which error
occurred).
05 Unclear reception of certain Repeat transmission.
pages by remote fax.
07 Document is too long, Divide document.
transmission time exceeds
permitted limit.

44
Help
MESSAGE IN “RESULT” INTERPRETATION ACTION
FIELD
08 Optical scanner could not Remove document from the
read document. automatic document feeder
and re-insert it before
repeating transmission.
09 User has pressed STOP No action.
during procedure.
10 Fax has detected anomaly Contact other party and ask
during reception. them to repeat transmission.
11 Printer anomaly during Remedy problem and wait until
reception. The rest of the the memorised document has
document is stored in the been printed.
memory but memory capacity
was exhausted before the
end of the procedure.
13 Remote fax has no document Contact other party.
for polling transmission.
16 Power failure during In the case of transmission,
transmission or reception. repeat from the page
indicated (nn).

45
Help
MESSAGE IN “RESULT” INTERPRETATION ACTION
FIELD
OK Successful transmission. No action.
(OK) Errors detected during Check quality of received
reception. document printing.
OCC Engaged tone detected before Repeat transmission.
or after dialling.
MESSAGE IN “TYPE” FIELD INTERPRETATION
TX Transaction is a transmission.
TX ECM Transaction is a transmission with ECM error
correction.
RX Transaction is a document reception.
RX ECM Transaction is a document reception with ECM
error correction.
TX POLL Transaction is a polling transmission.
TX POLL ECM Transaction is a polling transmission with ECM
error correction.
RX POLL Transaction is a polling reception.
RX POLL ECM Transaction is a polling reception with ECM
error correction.
RD READ ECM Procedure is a reception from a telediagnostic
centre with ECM error correction. During the
reception the telediagnostic centre has read
your fax machine’s set-up data.
RD SET ECM Procedure is a reception from remote
diagnostic centre with ECM error correction.
During reception the telediagnostic centre
transmitted set-up data to your fax machine.

Technical
46
Technical Specifications and General Characteristics
MODEL Desktop transceiving unit
DISPLAY LCD (16 + 16 characters)
COMPATIBILITY G3 CCITT
RESOLUTION Horizontal scanning: 8 pixels/mm
Vertical scanning:Standard 3.85 lines/mm Fine 7.7 lines/mm
MODEM SPEED 9600/7200/4800/2400 bps
DATA COMPRESSION MH, MR, Proprietary
SCANNING METHOD CCD
AUTOMATIC DOCUMENT FEEDER 10 sheets of A4, A5, Letter, Legal
PRINTING SYSTEM Plain paper with bubble ink jet technology
MAX. PRINTING WIDTH 208mm
PRINTING PAPER A4 (210mm x 297 mm), Letter, Legal
PAPER FEED Plain paper sheet feeder
(70 sheets of 70-90gsm paper)
REN 3
Dimensions
WIDTH 324 mm DEPTH 325 mm (421mm max.)
WEIGHT 6.3 kg HEIGHT 140.5 mm (230mm max.)
Electrical characteristics
POWER SUPPLY 230 VAC, 50Hz
POWER CONSUMPTION
STAND-BY 14W
TRANSMISSION 25W
RECEPTION 20W
COPYING 25W
Environmental conditions
TEMPERATURE 5°C (operating) +35°C
-15°C to +45°C (transport)
0°C to +45°C (storage)
RELATIVE HUMIDITY 15% - 85% (operating, storage and non-operating)
(without condensation) 5% - 95% (transport)

47
Technical
Choosing a position
Your DF450 should be kept clear of dust, moisture, high
temperature and vibration and should not be exposed to direct
sunlight. Don’t install it close to radiators or air-conditioning
outlets or in excessively warm, humid or dusty places.
Warning
The apparatus is only designed to be operated in a normal office
or domestic environment where the relative humidity does not
exceed 60%. It should not be used in bathrooms or near water.
Connecting to the UK network
DF450 is tested and approved for connection to the UK network,
provided that it is used in accordance with the guidelines in this
booklet.
Approval number
BABT Certificate Number/Approval Number for the DF450
503727 APPROVED for connection to telecommunication
systems specified in the instructions for use subject to conditions
set out in them. CE compliant to 89/336/CEE (EMC Directive)
Approval for use
This apparatus has been approved for use with the following
facilities:
Storage of telephone numbers for retrieval by a predetermined
code. (If problems occur, verify stored number).
Automatic call initiation.
Use on a PBX which returns secondary proceed indication.
Operation in the presence or absence of initial or secondary
proceed indication.
Automatic dialling facilities.
Automatic storage of last number dialled.
Automatic repeat attempt facilities.
Auto clear from the originating end.
Series connection facility.
Call progress monitor.
You may connect it:
• to direct exchange lines:
• to extensions with new plug and socket arrangements provided
with these direct exchange lines;
• to compatible switchboards.
You may NOT connect it:
• to shared service (party) lines.
The connection to the telecommunication system must be
unplugged before the earth is disconnected. The connection to
the telecommunication system must not be hardwired.
This apparatus may be used on telecommunications systems
employing loop disconnect or MF signalling.
Any other usage will invalidate the approval of the apparatus if, as
a result, it then ceases to conform to the standards against which
approval was granted.
How many phones you can have
Your exchange line provides only a small current to make your
telephone ring. Although you may have any number of sockets it
is important to limit the number of telephones and other items of
apparatus connected to the line by these sockets. This ensures
that each telephone will receive enough current to ring.
Every telephone or item of apparatus has a Ringer Equivalence
Number (REN)
In most cases a standard line should provide enough current for
two or more telephones or items of apparatus, if the RENs add up
to no more than 4.
DF450 has a REN of 3. Any telephone provided by BT may be
assumed to have a REN of 1 unless otherwise stated on the base.
Even where the number of telephones has been limited, there is
no guarantee that the different types of telephone on the same
line will ring.
Technical information

Technical
48
Voltage drop
The voltage drop introduced by the apparatus between the PSTN
and the associated telephone/answering machine is 0.4 Volts at
40mA dc.
The introduction of this voltage drop may occasionally cause
difficulties in making calls from the associated telephone or
problems in telephone conversations being experienced by both
parties to the call.
While operation may be possible initially, changes to or
modernisation of the network taking place in the normal course
of events may result in the apparatus being connected to a
network service with which it is not designed to be compatible.
Failure of the apparatus to work under these circumstances may
not be the responsibility of the network operator.
In the unlikely event of any such problems occurring, the user
should contact the supplier or maintainer of the apparatus.
Difficulty may be experienced when making calls from other
apparatus. Such difficulties may include:
• difficulties in making a call;
• problems in telephone conversation being experienced by both
parties to the call.
Note - The definition of a RBS (Relevant Branch System) from
PSTN lines is given in BS6789 section 6.1 (1986) clause 2.4
Connecting to switchboards
Your DF450 is approved only for use with a compatible
switchboard including those which do not provide secondary
proceed indication.
If you do have a compatible switchboard, it cannot be guaranteed
that the DF450 will operate correctly under all possible
conditions of connection.
If you have any difficulties, contact BT on
Freefone 0800 800 152.
Safety warning
Interconnection circuits should be such that the equipment
continues to comply with the requirements of 4.2 of EN 41003 for
TNV circuits and 2.3 of EN 60950 for SELV circuits, after making
connections between circuits.
Interconnection directly, or by way of other apparatus, of ports
marked Safety Warning. See instructions for use. Ports marked
or not so marked may produce hazardous conditions on the
network. Advice should be obtained from a competent engineer
before such a connection is made.

49
Index
Index
Access codes 32
Additional features 25
Answer machine/fax mode 18
Answer machine use 18
Attachments 6
Automatic document feeder 8
Automatic print-outs 26
Automatic RX 18
Automatic sheet feeder 7
Beeper 30
BT socket 5
Capital letters 22
Cleaning 35, 36
Clear button 21
Connecting - your DF450 5
telephone 11
answering machine 11
Contrast button 25
Copying 16
Customer help line 3
Date and time setting 11
Delayed TX 16
Delaying a fax 16
Diagnostics 33
Dialling - fax numbers 15
- telephone numbers 18
Direct exchange connection 31
Display messages 40
Document jam 37
Document memory 38
Error correction mode (ECM) 32
Error light 38
External button 32
Fax monitor 25
Fine resolution 25
Half tones resolution 25
Header position 13
Help 36
Hold button 18
Ink cartridge fitting 34
Installation parameters 27
Journal report messages 43
Last number redial 15
Line cord - connecting 5
Line monitor 25
Loading a document 14
Loading paper 9
Mains power 6
Maintenance 34
Manual dialling 15
Manual reception 17
Memory - back-up 13
- document 38
- names and numbers 21
Monitor - speaker volume 25
Name and fax number setting 12

Index
50
Normal dialling 15
One-touch dialling 15
One-touch number storing 21
Optical scanner 35
Paper 9
Paper jam 37
Paper size adjustment 28
Pause button 31
PBX - connecting to 31
Phone calls 18
Phone/fax RX 17
Polling 20
Power failure - memory back-up 13, 38
- report 26
Print cartridge installation 9
Print cartridge replacements 38
Print cartridge life 38
Print head fitting 34
Print outs 26
Private switchboard connection 31
Pulse dialling 31
Quickdial number storing 23
Quickdialling 15
Received document tray 6, 7, 8
Receiving a fax 16
Receiving with an
answering machine 18
Reception modes 17
Redial 15
Remote diagnostics 33
REN 47
Replacing - ink cartridge 34
- paper 9
- print head 34
Reports 26
Resolution 25
RX mode 17
Scanner - cleaning 35
Sending a fax 15
Sent document tray 7
Setting time and date 11
Settings - print-out 27
Speed 33
Silence lapse time 30
STD resolution 25
Storing names and numbers
- one touch 21
- Quickdial 23
- your name & number12
Surplus setting 29
Switchboard - connecting to 31
Symbols 13, 22, 24
Technical specifications 46
TAD/fax RX 18
Telephone line cord 5
Time and date 11
Tone dialling 31
Transmission report messages 42
Transmitting - see sending 15
Technical information 46
Using your DF450 14
Volume setting - Beeper 30
Volume setting - Speaker 25
Warranty 38
TAD/Fax RX 18
Telephone line cord 5
Time and date 11
Tone dialling 31

51
Index
Transmission report messages 42
Transmitting - see sending 15
Technical information 47
Technical specification 46
Using your DF450 14
Volume setting - beeper 30
Volume setting - speaker 25
Warranty 38

APPROVED for connection to
telecommunication systems specified
in the instructions for use subject to
the conditions set out in them
CE compliant to 89/336/EEC
(EMC Directive) & 73/23/EEC
(Low Voltage Directive)
Offices in Europe, North America,
Japan and Asia Pacific.
The telecommunications services described in this publication
are subject to availability and may be modified from time to time.
Services and equipment are provided subject to British
Telecommunications plc’s respective standard conditions of contract.
Nothing in this publication forms any part of any contract.
© British Telecommunications plc 1996.
Registered Office: 81 Newgate Street, London EC1A 7AJ.
Registered in England No. 1800000.
Printed in Thailand. Issue No.2 (10/96).
Designed by The Art & Design Partnership Limited.
