528 503 Rev B Bins DHB3PT 44D Spm
User Manual: Bins
Open the PDF directly: View PDF ![]() .
.
Page Count: 9
528-503revC Printed in USA 4/06 © 2006
Operation
Manual
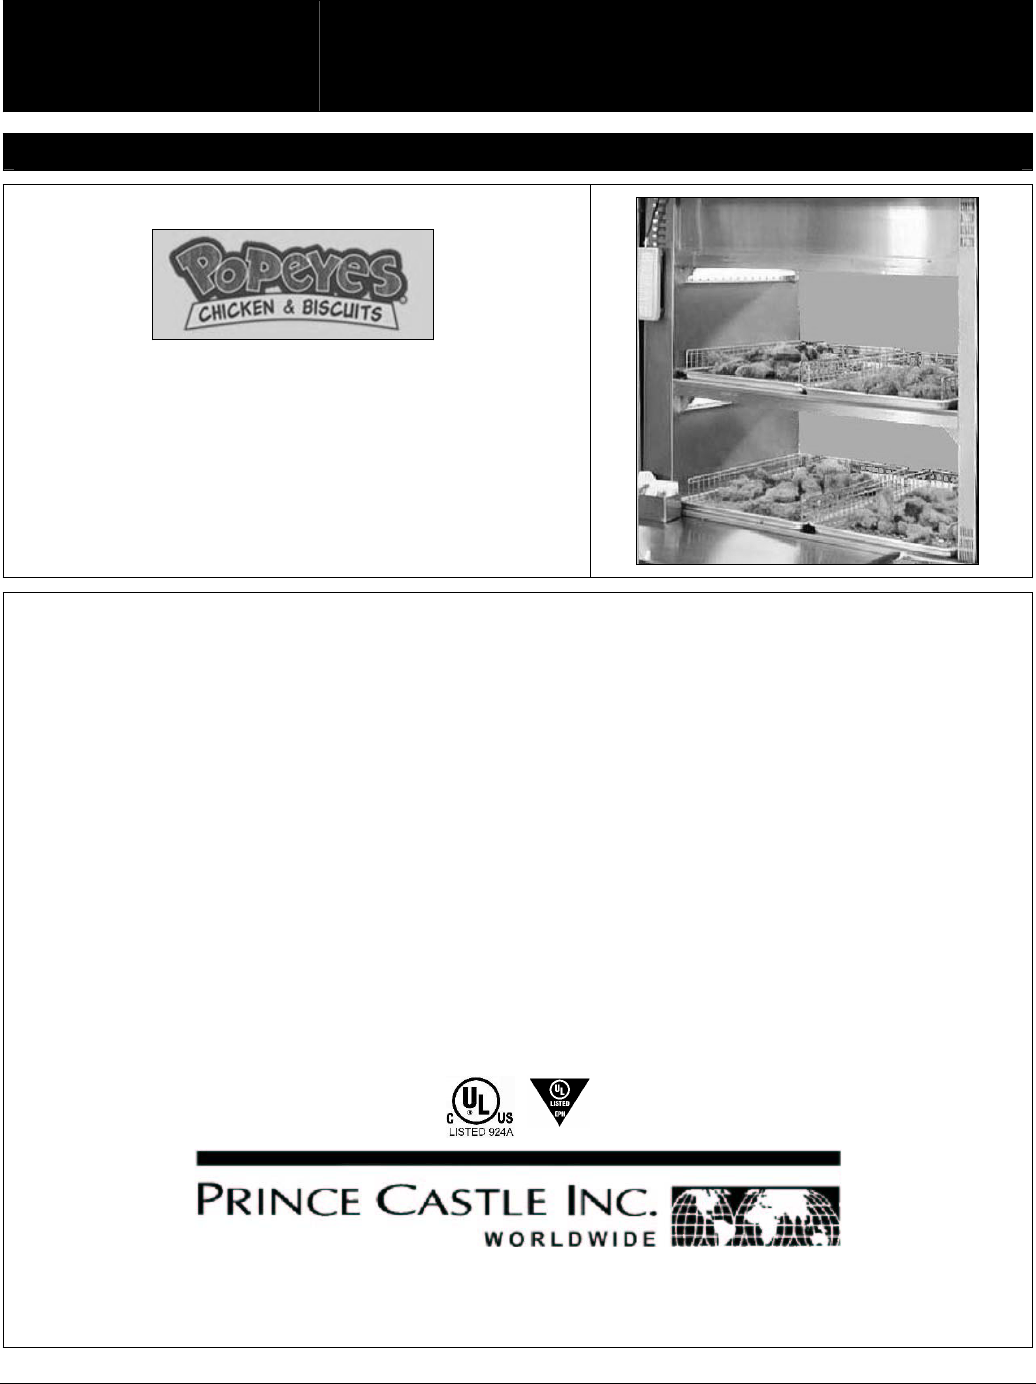
Popeyes Chicken Holding Bin
DHB3PT-44D
Product Identification
Prince Castle's DHB3PT-44D Chicken Holding Bin is
designed for the Popeyes system to hold all your
bone-in fried chicken better than ever before. Capable of
holding up to 360 pieces of chicken, the DHB3PT-44D is
designed to both hold and merchandise Popeyes’
chicken in a dual line store format.
TABLE OF CONTENTS
355 East Kehoe Blvd. • Carol Stream, IL 60188
Phone: 630-462-8800 • Toll Free: 1-800-PCASTLE
Fax: 630-462-1460 • www.PrinceCastle.com
Product Identification ........................................... 1
Safety Information ............................................... 2
Important!.......................................................... 2
I n s t a l l ati on / Setup . . . . . . . . . . . . . . . . . . . . . . . . . . . . . . . . . . . . . . . . . . . . . . 2
I n i t i a l S t a r t u p . . . . . . . . . . . . . . . . . . . . . . . . . . . . . . . . . . . . . . . . . . . . . . . . . . . . . . 3
R e c o m m e n d e d S e t t i n g s . . . . . . . . . . . . . . . . . . . . . . . . . . . . . . . . . . . . . . . . 3
R e s e t t i n g to F a c t o r y D e f a u l t s . . . . . . . . . . . . . . . . . . . . . . . . . . . . . . . . 3
C o n t r o l P a n el . . . . . . . . . . . . . . . . . . . . . . . . . . . . . . . . . . . . . . . . . . . . . . . . . . . . . . 4
P r o g r a m m i n g . . . . . . . . . . . . . . . . . . . . . . . . . . . . . . . . . . . . . . . . . . . . . . . . . . . . . . . 5
C l e a n i n g . . . . . . . . . . . . . . . . . . . . . . . . . . . . . . . . . . . . . . . . . . . . . . . . . . . . . . . . . . . . . 6
T r o u b l e s h o o t i n g . . . . . . . . . . . . . . . . . . . . . . . . . . . . .. . . ... . . .... .... .. . .. . 6
P a r t s & S e rvice . . . . . . . . . . . . . . . . . . . . . . . . . . . . . . . . . . . . . . . . . . . . . . . . . . . 7
W i r i n g D i a g ram . . . . . . . . . . . . . . . . . . . . . . . . . . . . . . . . . . . . . . . . . . . . . . . . . . . . 9
LIMITED WARRANTY
This product is warranted to be free from defects in material and/or
workmanship for a period of 1 year from date of original installation, not
to exceed 18 months from the date of manufacture.
Any component which proves to be faulty in material and/or workmanship
will be replaced or repaired (at the option of Prince Castle, Inc.) without cost
to the customer for parts and labor. This warranty covers on-location service
(i.e. trip charges and/or mileage). Travel mileage is limited to 100 miles
(200 Kilometers) round trip (one trip warranty) from an authorized service
agency or its sub-service agency.
This warranty is subject to the following exceptions/conditions:
• Use of any non-genuine Prince Castle parts voids this warranty.
• All labor to be performed during regular work hours. Overtime
premium (the incremental amount) will be charged to the customer.
•
Damage caused by carelessness, neglect and/or abuse (e.g., dropping,
tampering or altering parts, equipment damaged in shipment, by fire,
flood or an act of God) is not covered under this warranty.
• All problems due to operation at voltages other than that specified on
equipment nameplates are not covered by this warranty. Conversion
to correct voltage is the customer’s responsibility.
•
This equipment must be serviced by Prince Castle Authorized Service
Agency or a Prince Castle Service Technician during the warranty period.
Popeyes Chicken Holding Bin
DHB3PT-44D
Printed in USA 4/06 © 2006 2 528-503revC
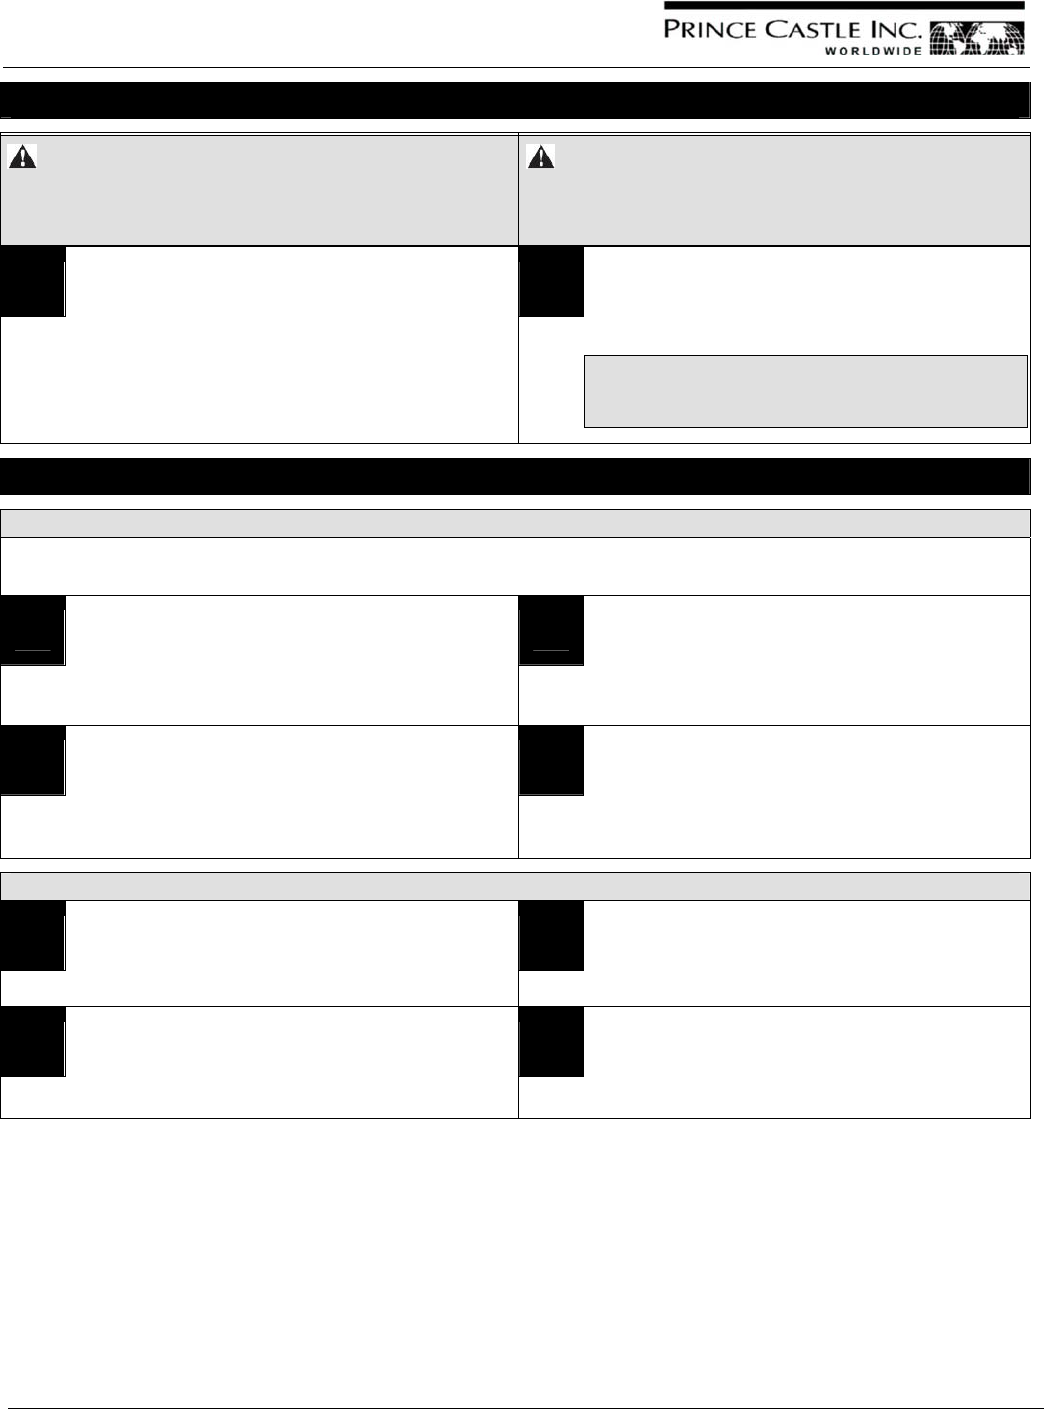
Safety Information Important!
WARNING
Indicates information important to the proper operation of the
unit. Failure to observe may result in damage to the equipment
and/or severe bodily injury or death.
CAUTION
Indicates information important to the operation of the unit.
Failure to observe may result in damage to the equipment.
Prince Castle reserves the right to change specifications and
product design without notice. Such revisions do not entitle the
buyer to corresponding changes, improvements, additions or
replacements for previously purchased equipment.
Installation / Setup
Remove the unit from the carton and inspect for signs of
damage. If there is damage to the unit:
• Notify the carrier within 24 hours of delivery,
• Save carton and packaging materials for inspection purposes,
• Contact your local dealer, or if purchased directly, the Prince
Castle Sales Department at 1-800-722-7853 or 630-462-8800 to
arrange for a replacement unit.
NOTE: When installing this unit, the ambient temperature at the
mounting site should not exceed 37.8°C (100°F).
CAUTION
All electrical connections must be in accordance with local
electrical codes and any other applicable codes.
Plug the unit into an applicable electrical receptacle.
1
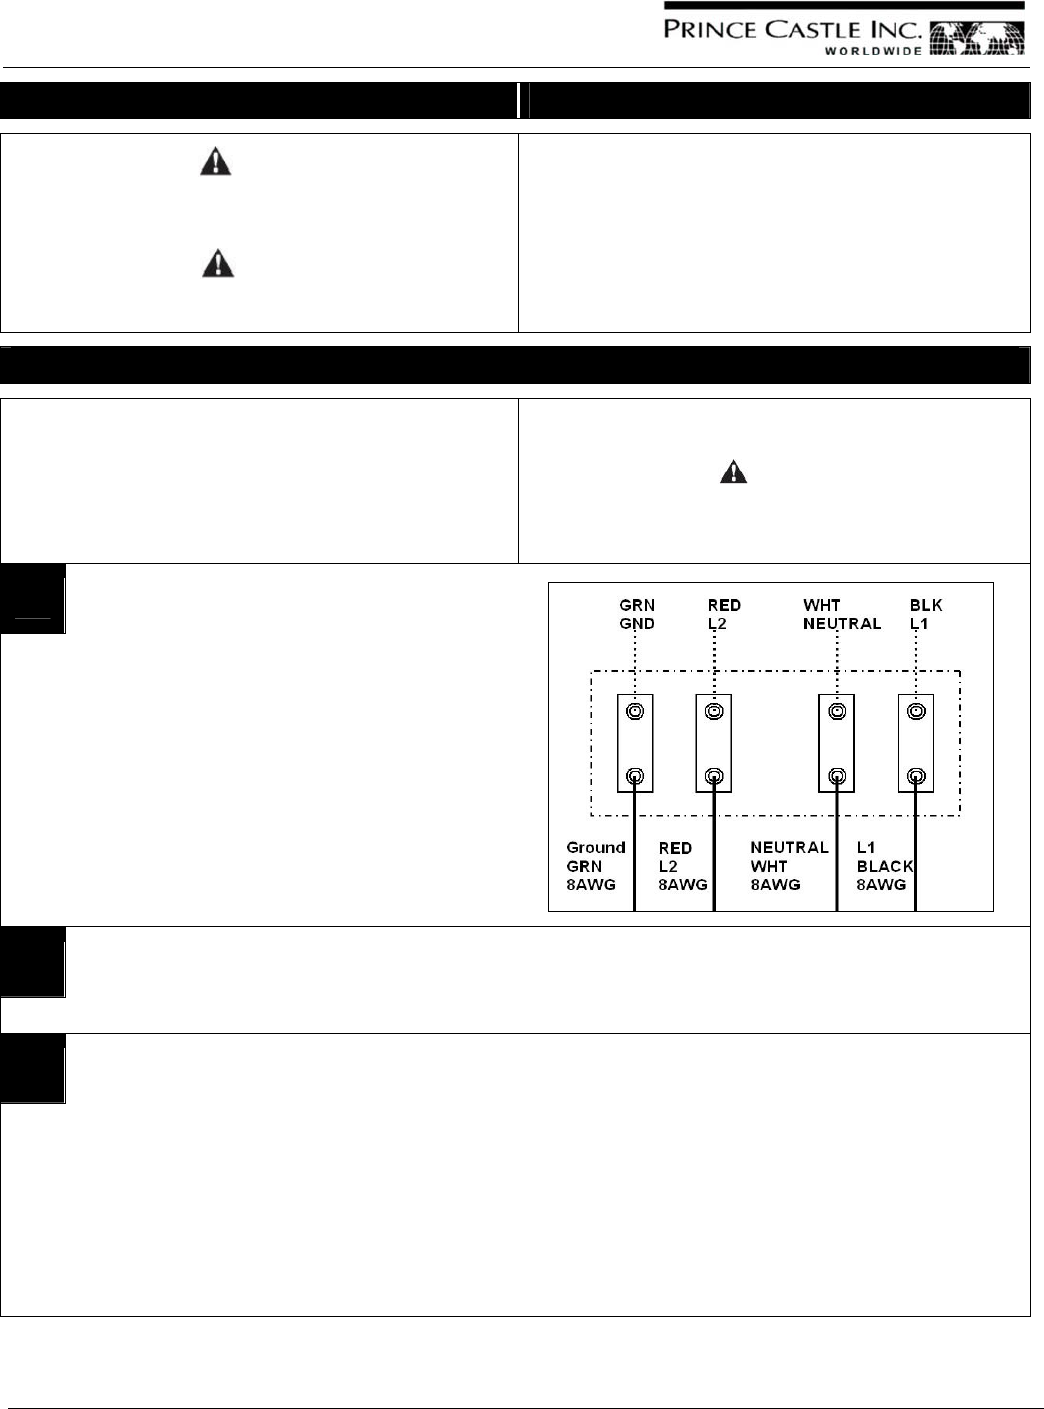
A. Place the bin on a counter or workstation.
B. Make power connection to the terminal block on
the top of the bin. Required voltage is 120/208 TO
240 VOLTS SINGLE PHASE, and the connections
are L1, L2, Neutral, and Earth Ground (see figure
of wiring diagram).
The bin draws 31 amps at 120/208 or 35 amps at
120/240 volts during the 35 min. warm-up.
The current drops to approximately half when the
heaters reach the set-point temperature.
2
A. Turn the power switches ON.
B. Allow 35 mins. for warm-up.
3
Environmental Issues
Airflow through the bin will adversely affect the
performance of the bin. Sources of airflow include:
• Air conditioning vents
• Air currents
• Make-up air Inflows
• Drive-through window
None of the above should be directing airflow towards the
bin or through the cavities of the bin. To check for airflow,
remove a pan from a hot steam table and watch the
direction of the steam coming out of the steam table.
The direction the steam flows is an indicator of the airflow
direction and its intensity. There is no airflow if the steam
flows straight up as it dissipates. There is an intense airflow
if the steam quickly changes direction and flows parallel to
the floor.
If there is airflow, check for the source(s). It is recommended
that air diverters be installed to direct the airflow away from
the bin.
Do NOT reduce the amount of cooled air brought into the
building. Direct the flow of air away from the cavities of the
Chicken Holding Bin.
Popeyes Chicken Holding Bin
DHB3PT-44D
528-503revC 3 Printed in USA 4/06 © 2006
Initial Startup
#
#
#
During the first few hours of operation, you may notice a
faint odor. This is normal, and the odor disappears after the
first few hours of use.
The bin is tested and calibrated at the factory before shipment.
However, due to temperature and climate changes during
shipment, the insulation in bin can absorb moisture.
The odor during the first few hours of use is from the drying out
of the insulation (moisture is driven from the insulation’s
binders, a starch-like material).
If the florescent lights do not turn on, verify that the bulbs are
seated in their sockets.
Recommended Settings
The recommended settings listed below are starting points only.
The final setting for each cavity is influenced by the airflow
through the cavity.
The airflow is influenced by the bins location relative to the
Drive-Through window, the front door, and/or the air
conditioning vents.
The final setting must achieve the required serving temperature
at the end of the hold time.
Therefore, the setting of each cavity may have to be adjusted up
or down from the recommended starting points listed below to
meet the quality and temperature requirements.
#
#
#
A higher setting yields hotter chicken, but in achieving a
hotter temperature, more moisture is driven from the
chicken. Thus, there must be a balance at the end of the
maximum hold time, where the chicken is above a
minimum serving temperature and all quality requirements
are met.
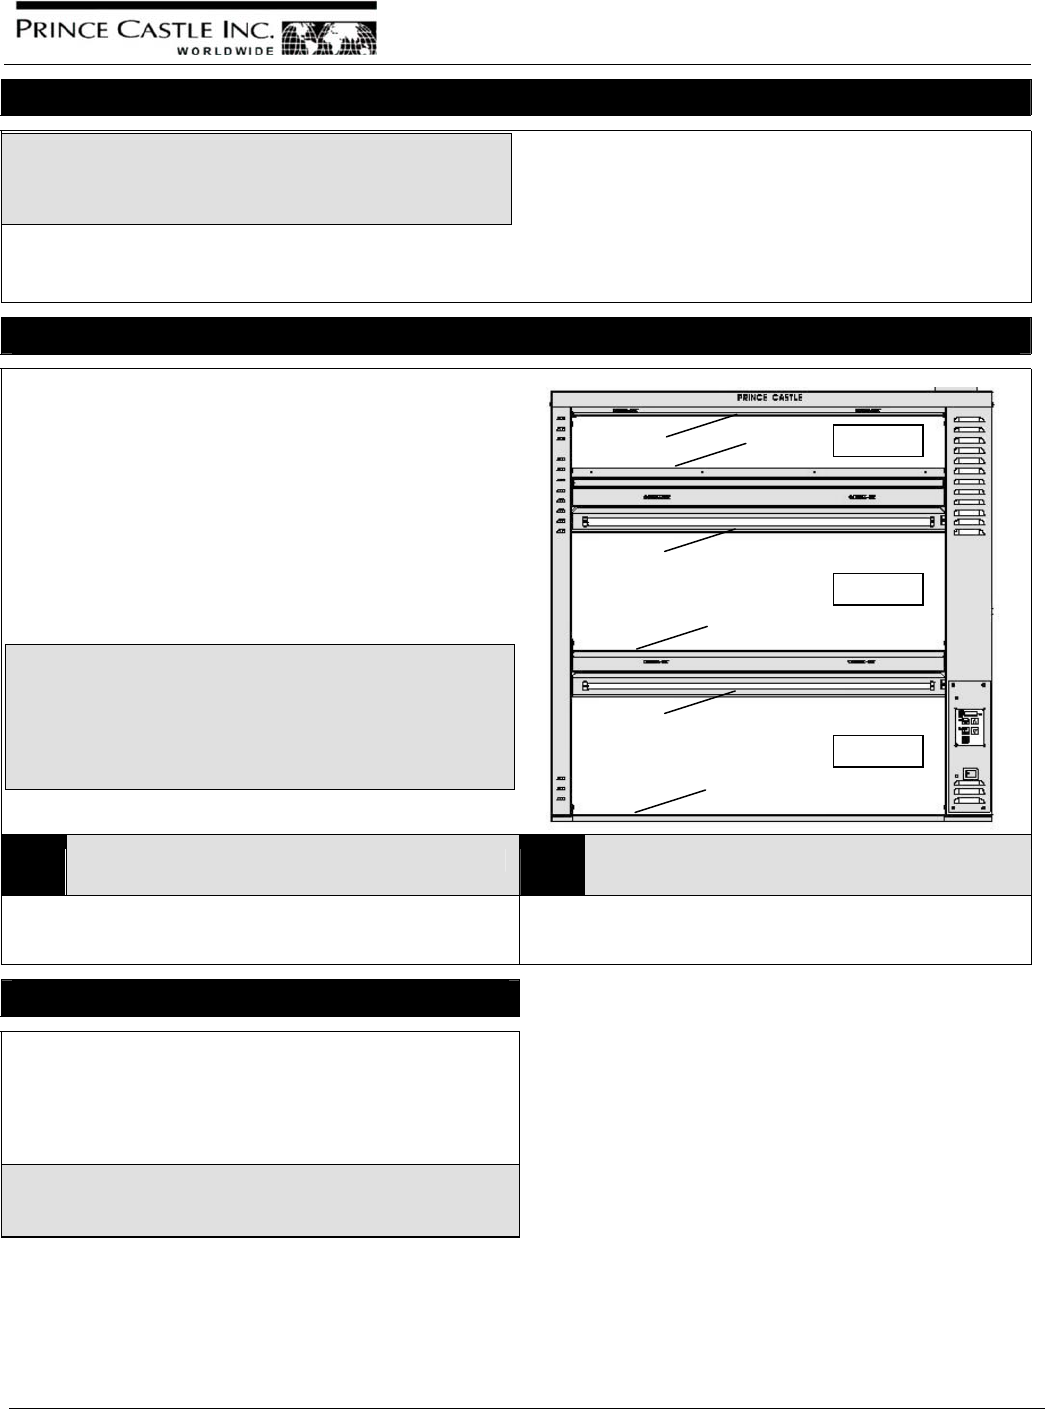
1 Cavity A Factory Settings 2 Cavity B & C Factory Settings
The recommended setting for the Upper Heater is 235°F and
180°F for the Lower Heater.
The default Set-Point for the Upper Heater is 35%.
The Lower Heater default is OFF.
Resetting to Factory Defaults
To revert all settings back to the original factory defaults:
A. Turn the unit off.
B. Press and hold both UP and DOWN arrows.
C. Turn the unit back on and wait 5 secs.
D. Release UP and DOWN arrows.
#
#
#
All previously saved settings are lost upon resetting the
defaults! Use with caution.
Cavity A
Upper
Heater
Cavity B
Cavity C
Lower
Heater
Upper
Heater
Upper
Heater
Lower
Heaters
Lower
Heater
Popeyes Chicken Holding Bin
DHB3PT-44D
Printed in USA 4/06 © 2006 4 528-503revC
Control Panel
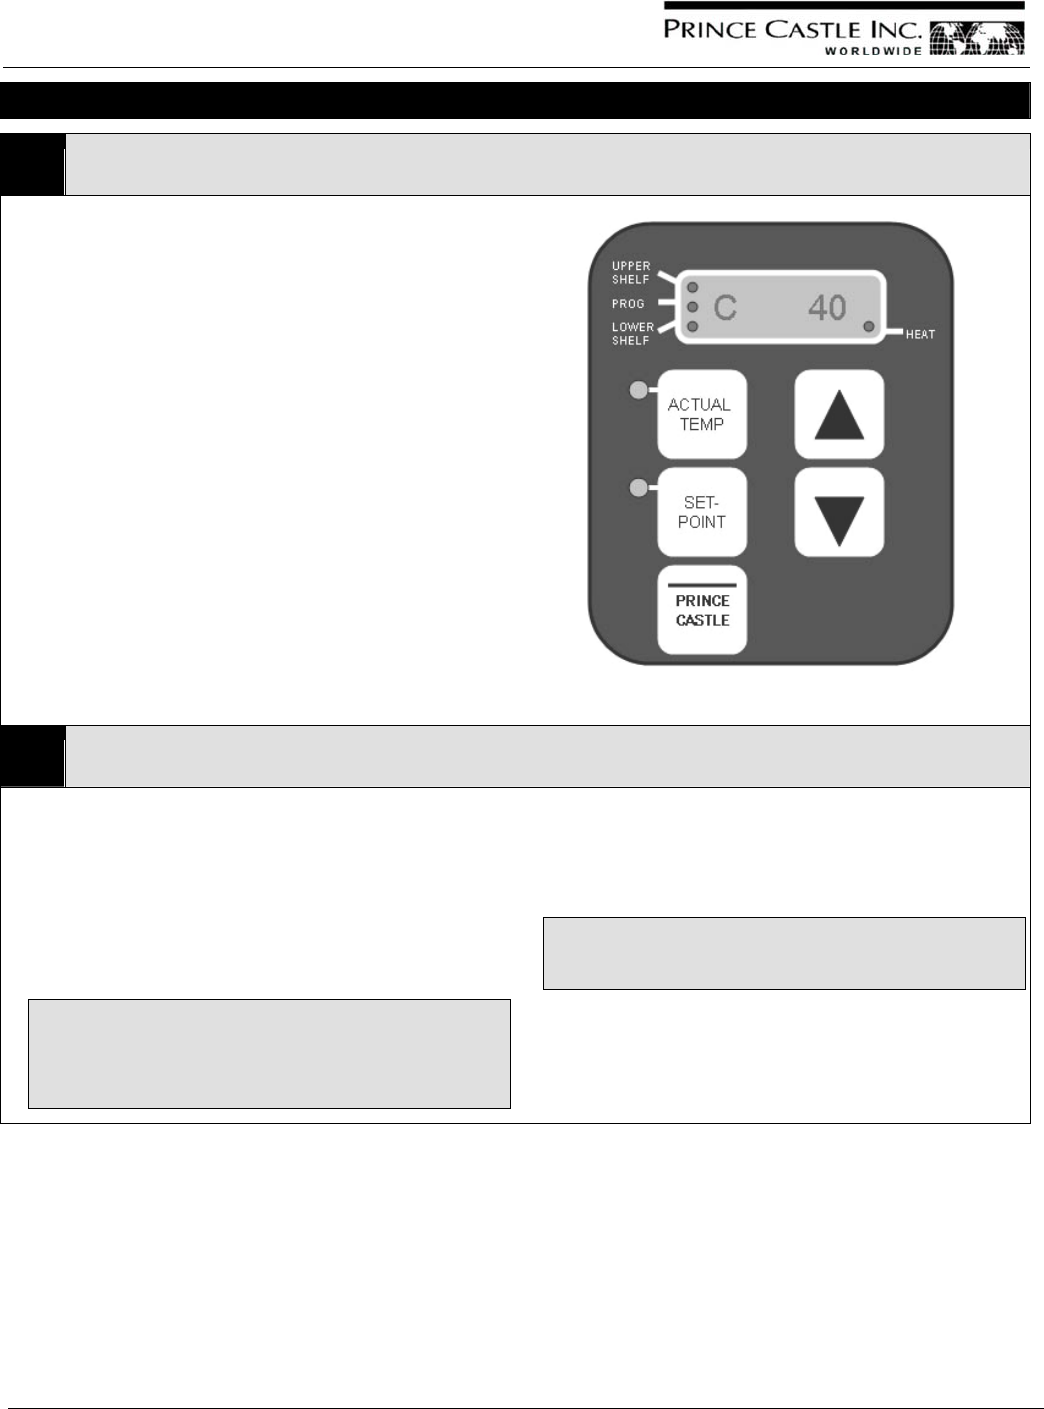
1 Displays & Indicators
• The red indicator light next to the UPPER SHELF label
indicates that the temperature being displayed is for the
Upper Heater of the selected cavity.
• The red indicator light next to the PROG label is on when in
the Programming Mode.
• The red indicator light next to the LOWER SHELF label
indicates that the temperature being displayed is for the
Lower Heater of the selected cavity.
• The red indicator light next to the HEAT label is on when
power is applied to the heater zone being displayed on the
control panel.
• The red indicator light next to ACTUAL TEMP label is on when
the Actual Temperature is being displayed for the heater zone
being displayed on the control panel.
• The red indicator light next to SET-POINT TEMP label is on
when the Set-Point Temperature is being displayed for the
heater zone being displayed on the control panel.
• The digital display shows the cavity and the associated
temperature or Power On control values, for example:
For Cavity A, the display may show A235 for the UPPER
HEATER
For Cavity B, the display may show B035 (percentage of
heater capacity for the Upper Heater).
For Cavity C, the display may show C040 (percentage of
heater capacity for the Upper Heater).
Control Panel
2 Control Panel Buttons
• SET-POINT: The Set-Point temperature is displayed for the
selected heaters when this button is pressed during the
operating mode. The SET-POINT indicator light is on when the
Set-point mode is selected.
To Program a heater, press and hold the PRINCE CASTLE
button then press and hold the SET-POINT button for 5 secs.
or until the PROG indicator light turns on. Use the UP and
DOWN arrows to change the Set-Point temperature (Cavity A)
or the percentage of heater value for the Upper and Lower
Heaters in Cavities B and C.
#
#
#
The Percentage of Power relates to utilities, and while
increased percentage may be required to hold the
product properly, it should be kept at the lowest
possible setting to save utility consumption.
• ACTUAL TEMP: The Actual temperature is displayed only for
the selected heaters of Cavity A when this button is pressed
during the operating mode. ACTUAL TEMP BUTTON DOES
NOT FUNCTION FOR THE UPPER HEATER OF CAVITY B & C.
The ACTUAL TEMP LED indicator light is on when not in the
Set-Point mode.
#
#
#
This is not the actual air temperature, nor will it be the
actual product temperature.
• UP ARROW & DOWN ARROW: When pressed in the operating
mode, selects which heater zone is in the display on the
control panel. The indicator light next to the UPPER SHELF or
LOWER SHELF is on to indicate which heater in the cavity is
selected.

Popeyes Chicken Holding Bin
DHB3PT-44D
528-503revC 5 Printed in USA 4/06 © 2006
Programming
1 Cavity A – Programmed for Temperature
The temperature of the Upper and Lower Heaters can be
adjusted from 150 to 260°F in one-degree increments. The
recommended interval for Cavity A is ± 5°.
1. Use the UP or DOWN arrow buttons to select Cavity A and
either the UPPER or LOWER SHELF.
2. Press the SET-POINT button. When the SET-POINT
indicator light is on, the digital display shows the Set-Point
temperature.
3. To change the temperature setting, press and hold the
PRINCE CASTLE button; then press and hold the SET-
POINT button. Hold both buttons until the PROG indicator
light turns on.
4. Use the UP and DOWN arrow buttons to change the
temperature.
5. Press the PRINCE CASTLE button to store the new value
and to exit the PROGRAMMING mode.
2 Cavity B & C Upper or Lower Heaters – Programmed for Percentage of Power
The Upper and Lower Heaters may be adjusted from 0% (OFF)
to 100% of power. The temperature adjustment for the Upper
Cavities B & C is an electronic Infinite Control. Use the UP or
DOWN arrow buttons to select the Cavity B or C and the UPPER
or LOWER Shelf. The recommended interval for Cavity B & C is
± 5%.
1. Press the SET-POINT button. When the SET-POINT
indicator light is on, the digital display shows the Set-Point
percentage of power value.
2. To change the Heater Power Percentage setting, press and
hold the PRINCE CASTLE button then press and hold the
SET-POINT button. Hold both buttons until the PROG
indicator light appears.
3. Use the UP and DOWN arrow buttons to change the value.
4. Press the PRINCE CASTLE button to store the new value
and to exit the PROGRAMMING mode.
Popeyes Chicken Holding Bin
DHB3PT-44D
Printed in USA 4/06 © 2006 6 528-503revC
Cleaning
WARNING!
SHOCK/DAMAGE HAZARD! This bin is not watertight. Do not
clean with Water Jet / Jet Spray hose. Before cleaning,
ensure all power switches are in the OFF position.
CAUTION!
Do NOT use any abrasive cleaners/scrubbers or any
unapproved chemicals.
1 2
A. Turn the power switch to the OFF position.
B. Allow the bin to cool down (approximately
35 mins.).
C. When the unit has cooled, wipe down thoroughly
with a damp cloth soaked in dishwashing solution.
A. Use a second damp cloth to rinse the dishwashing
solution.
B. Spray with a sanitizer and wipe dry.
C. Allow surfaces to dry thoroughly.
#
#
#
Do NOT turn power ON again until all surfaces are
completely dry.
Troubleshooting
Testing for Proper Unit Temperature
Temperature settings may vary, subject to location, elevation, weather, etc.
To determine if the factory settings of the unit are right for your location, follow these steps.
1 2
Check the temperature of the chicken after it is pulled
from the fryer and drained.
The proper temperature should be 190-195°F for white
meat or 195-200°F for dark meat.
Check the chicken by probing the meaty portion of one
breast and one thigh.
Ensure that the probe is not touching the bone. Record
the time and temperature of the chicken and place the
pieces in the holding bin.
3 4
After 15 mins. and 30 mins., check the same two pieces
of chicken again.
If the temperature of the chicken drops by more than
40°F from the fryer to the end of the holding time, the
unit temperature should be adjusted.
After 30 mins., the internal temperature of the chicken
should be 160°F or higher.
If not, adjust the temperature or percentage of power
accordingly.
Adjusting the Unit Temperature
1 2
CAVITY A
To adjust the temperature of Cavity A, follow the
instructions for Programming (see Page 5).
Increase the temperature by 5°F, and allow the unit 30
mins. to adjust.
Repeat the test for proper unit temperature in Cavity A.
3 4
CAVITY B & C
To adjust the temperature of Cavity B & C, follow the
instructions for Programming (see Page 5).
Increase the percentage of power by 5%, and allow the
unit 30 mins. to adjust.
Repeat the test for proper unit temperature in Cavities
B & C.
Popeyes Chicken Holding Bin
DHB3PT-44D
528-503revC 7 Printed in USA 4/06 © 2006
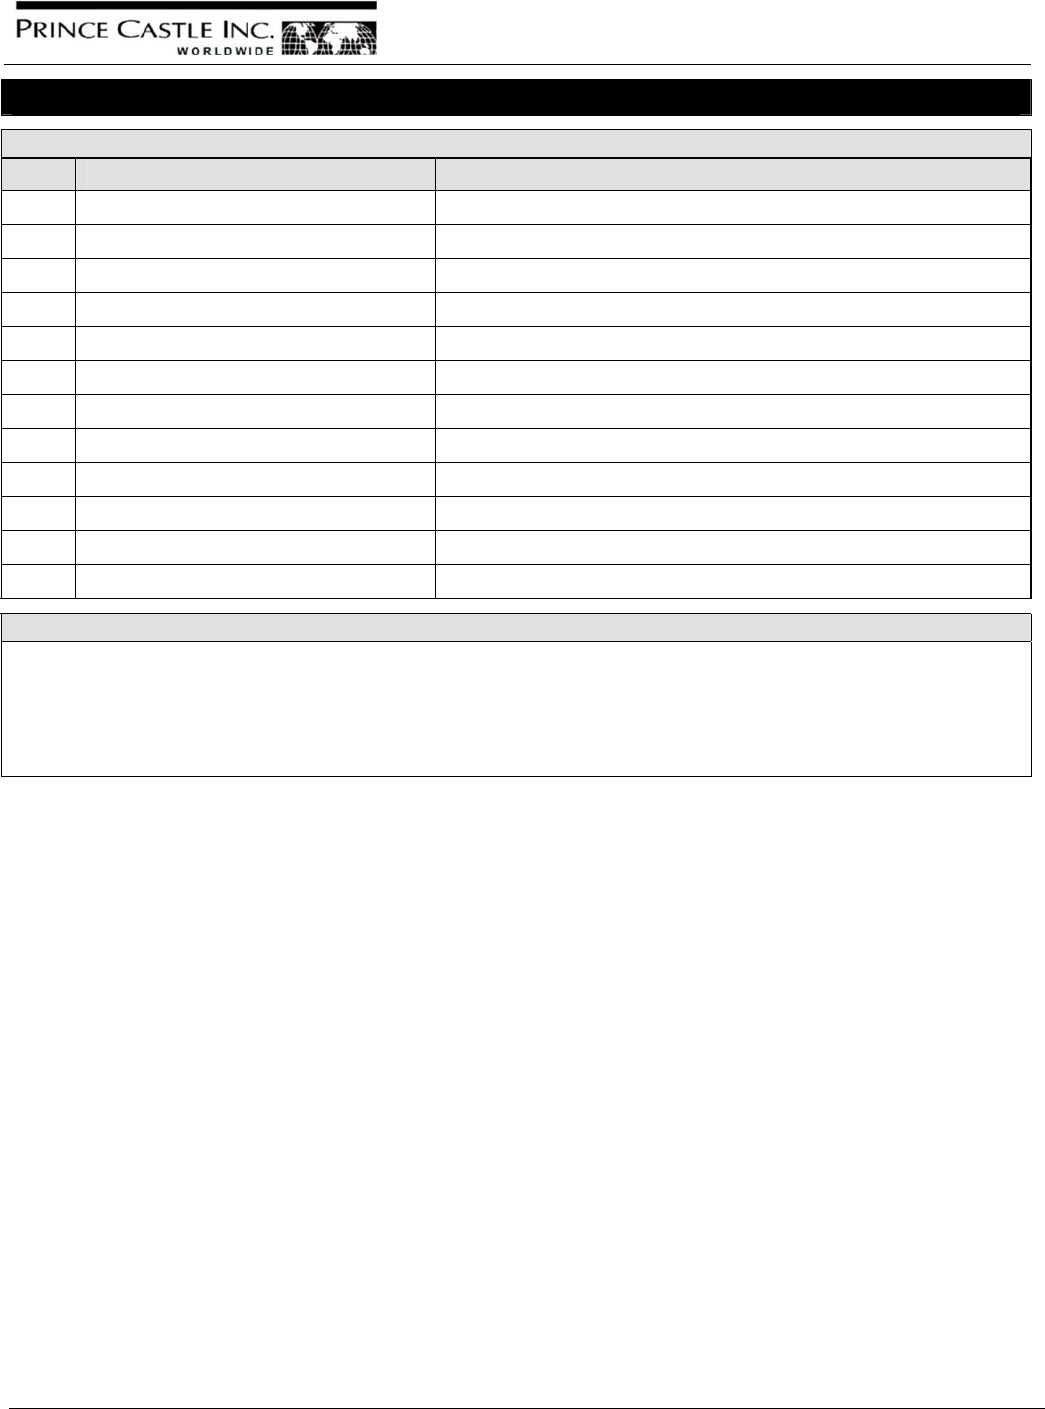
Parts & Service
Parts List
Item Part No. Description
1. 88-793-02S Fluorescent Lamp
2. 541-719S Display Board
3. 528-280S Power Board
4. 88-682S Lamp Holder
5. 528-101S IR Heater Panel
6. 65-048-07S Relay
7. 65-058S Relay
8. 536-802S Overlay Display
9. 78-184S Power Switch
10. 528-085S Heater (Cavity A)
11. 528-264S Ballast
12. 528-298S Lower Heater Panel
Contact Information for Parts/Service
TO ORDER PARTS & SERVICE
Prince Castle, Inc.
355 East Kehoe Blvd., Carol Stream, IL 60188
Phone: 630-462-8800, Toll Free: 1-800-PCASTLE
Fax: 630-462-1460
www.PrinceCastle.com
OR refer to your Service Directory for an authorized
Service Provider in your area.

Popeyes Chicken Holding Bin
DHB3PT-44D
Printed in USA 4/06 © 2006 8 528-503revC
Exploded View of Parts
10
5
4
1
6
7
11
3
2
8
9
12
Popeyes Chicken Holding Bin
D H B 3 P T- 4 4 D
528-503revC 9 Printed in USA 4/06 © 2006
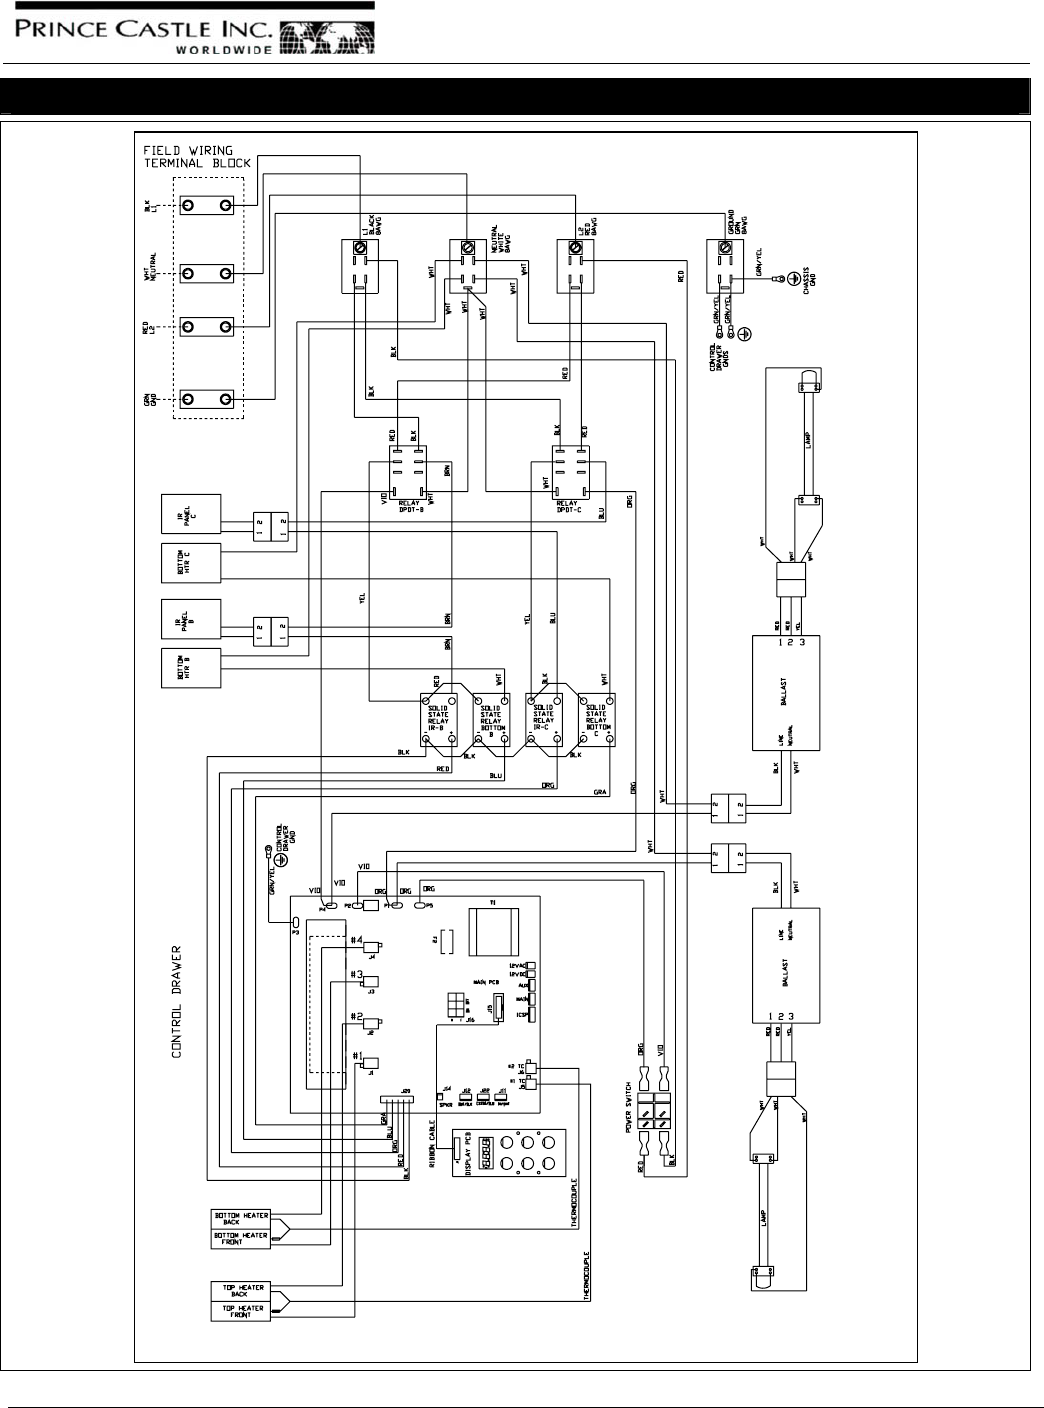
Wiring Diagram
