DIRBS Core Release 8.0.0 Installation Guide
DIRBS_Installation_Guide
User Manual:
Open the PDF directly: View PDF ![]() .
.
Page Count: 14

Qualcomm Technologies, Inc.
Copyright (c) 2018 Qualcomm Technologies, Inc.
This work is licensed under a Creative Commons Attribution-NoDerivatives 4.0
International License.
DIRBS Core Release 8.0.1
Installation Guide
80-GD079-1 Rev. D
July 30, 2018

80-GD079-1 Rev. D Copyright (c) 2018 Qualcomm Technologies, Inc. 2
This work is licensed under a Creative Commons Attribution-NoDerivatives 4.0 International License.
Revision history
Revision
Date
Description
A
November 2017
Initial release
B
April 2018
Updates for DIRBS 7.0.0 Release
C
May 2018
Updates for DIRBS 8.0.0 Release
D
July 2018
Updates for DIRBS 8.0.1 Release

80-GD079-1 Rev. D Copyright (c) 2018 Qualcomm Technologies, Inc. 3
This work is licensed under a Creative Commons Attribution-NoDerivatives 4.0 International License.
Contents
1 Introduction ........................................................................................................................... 4
1.1 Purpose ..................................................................................................................................................... 4
1.2 Getting started ........................................................................................................................................... 4
2 Installation ............................................................................................................................. 5
2.1 Extracting software release ........................................................................................................................ 5
2.2 Docker installation...................................................................................................................................... 5
2.2.1 Building Docker images ............................................................................................................ 5
2.2.2 Running Docker images ........................................................................................................... 5
2.3 Advanced topics......................................................................................................................................... 7
2.3.1 API and Data Processing blades .............................................................................................. 7
2.3.2 Operator Upload and Data Processing blades ......................................................................... 8
2.4 Database ................................................................................................................................................... 8
2.4.1 Installation ................................................................................................................................ 8
2.4.2 Upgrading the database schema ............................................................................................ 11
3 Configuration .......................................................................................................................12
4 Installation Verification ........................................................................................................13
4.1 Running the automated regression test suite ........................................................................................... 13
4.2 Checking status of the database version ................................................................................................. 14
Tables
Table 2-1 Roles and functions ..................................................................................................................................... 10

80-GD079-1 Rev. D Copyright (c) 2018 Qualcomm Technologies, Inc. 4
This work is licensed under a Creative Commons Attribution-NoDerivatives 4.0 International License.
1 Introduction
1.1 Purpose
This document provides:
■ Installation instructions for the Device, Identification, Registration, and Blocking System
(DIRBS) Core 8.0.0 software
■ Instructions for running automated tests to verify DIRBS Core installation
1.2 Getting started
The instructions provided in this document assume that the recommended equipment has been
installed and configured with Ubuntu 16.04. Refer to the Ubuntu Installation Guide for additional
installation help.
The installer should be familiar with Linux command line.

80-GD079-1 Rev. D Copyright (c) 2018 Qualcomm Technologies, Inc. 5
This work is licensed under a Creative Commons Attribution-NoDerivatives 4.0 International License.
2 Installation
This installation guide builds a new Docker image by downloading a base Ubuntu 16.04 image
and downloading and installing required third party software modules into the image as a
convenience to the end user.
NOTE: The reader acknowledges and agrees that it is entirely and solely responsible for the selection and
use of all third-party software modules downloaded and installed by this installation method,
including securing all appropriate and proper rights of use to any of such third-party software
modules and to comply fully with any terms of use that may apply to or accompany any such
third-party software modules.
Qualcomm Technologies, Inc. does not undertake any obligations, duties, or other responsibilities
in connection with the selection or use by the reader of any of such third-party software modules.
2.1 Extracting software release
The DIRBS software release is distributed as a tar.gz file. To extract the contents of the
distribution, run:
tar xvzf dirbs-8.0.0.tar.gz
2.2 Docker installation
Docker installation can be run on any platform Docker supports.
For instructions on installing Docker on a specific host platform, see
https://docs.docker.com/engine/installation
2.2.1 Building Docker images
If you are in the root folder for the distributables, run the following command to build all sample
Docker images:
make -f docker/prd/Makefile
2.2.2 Running Docker images
This section shows basic commands that run each type of container, assuming the config file
contained all settings at the time the config file was built.

DIRBS Core Release 8.0.1 Installation Guide Installation
80-GD079-1 Rev. D Copyright (c) 2018 Qualcomm Technologies, Inc. 6
This work is licensed under a Creative Commons Attribution-NoDerivatives 4.0 International License.
2.2.2.1 Data Processing blade image
After Docker images have been built, start the Data Processing blade image by running:
docker run --rm --tmpfs /tmp -e DIRBS_OPERATORS=<operator_list> -p 2222:22
\dirbs-processing
This docker run command uses the following standard Docker options:
■ –-rm: Instructs Docker to remove the container from the system once it has been stopped.
■ --tmpfs: Mounts a temporary filesystem (tmpfs) to /tmp in the container. Used during the
lifetime of the container.
■ –e: Sets an environment variable inside the container.
■ -p 2222:22: Maps the SSH port (22) inside the container to port 2222 on the host system.
2.2.2.2 Operator Upload blade image
After Docker images have been built, start the Operator Upload blade image by running
docker run --rm --tmpfs /tmp -e DIRBS_OPERATORS=<operator_list> -p 2222:22
dirbs-upload
This docker run command uses the following standard Docker options:
■ –-rm: Instructs Docker to remove the container from the system once it has been stopped.
■ --tmpfs: Mounts a temporary filesystem (tmpfs) to /tmp in the container. Used during the
lifetime of the container.
■ –e: Sets an environment variable inside the container.
■ -p 2222:22: Maps SSH port (22) inside the container to port 2222 on the host system.
<operator_list> should be a comma-separated list of operator IDs that match the list of
operators configured in the config file.
2.2.2.3 API blade image
After Docker images have been built, start the API blade image by running
docker run --sysctl net.core.somaxconn=4096 --rm --tmpfs /tmp -p 5000:5000
dirbs-api
■ –sysctl: Modifies the kernel settings on the blade to specify the number of connections
that can be waiting in a queue on an individual socket.
■ –-rm: Instructs Docker to remove the container from the system once it has been stopped.
■ --tmpfs: Mounts a temporary filesystem (tmpfs) to /tmp in the container. Used during the
lifetime of the container.
■ -p 5000:5000: Maps webserver port (5000) inside the container to port 5000 on the host
system.

DIRBS Core Release 8.0.1 Installation Guide Installation
80-GD079-1 Rev. D Copyright (c) 2018 Qualcomm Technologies, Inc. 7
This work is licensed under a Creative Commons Attribution-NoDerivatives 4.0 International License.
2.3 Advanced topics
2.3.1 API and Data Processing blades
2.3.1.1 Mounting a config file inside a container
To mount a config file from the host into the Data Processing and API blade containers so that
DIRBS configuration can be modified after build time, use the following option to the docker
run command for those images:
-v <abs_path_to_config_on_host.yml>:/home/dirbs/.dirbs.yml:ro
This option mounts the file located at abs_path_to_config_on_host.yml to
/home/dirbs/.dirbs.yml inside the container. This will be read-only inside the container.
Changes made on the host will be reflected inside the container.
2.3.1.2 Mounting a .pgpass file inside a container
While database credentials can be edited directly inside the /home/dirbs/.dirbs.yml file, a
.pgpass file (standard PostgreSQL connection string file) can be mounted inside the container as
well.
Advantages are:
■ The person responsible for editing the config YML does not automatically get access to DB
credentials.
■ A .pgpass file can configure a password for multiple users, not just one.
Use the following option to the docker run command for the Data Processing and API blade
containers:
-v <abs_pgpass_file_on_host>:/home/dirbs/.pgpass:ro
This option mounts the file located at abs_pgpass_file_on_host.yml to
/home/dirbs/.pgpass inside the container. This will be read-only inside the container.
NOTE: The .pgpass file will be ignored if UNIX file permissions are not stricter than 0700.
2.3.1.3 Passing in environment variables for StatsD and PostgreSQL connection
If set, the following environment variables override configuration file settings. If there is a
command-line argument specified, this continues to override environment variables:
■ DIRBS_DB_HOST: Host that PostgreSQL database runs on (default: localhost)
■ DIRBS_DB_PORT: Port that PostgreSQL database runs on (default: 5432)
■ DIRBS_DB_DATABASE: PostgreSQL database name to connect to
■ DIRBS_DB_USER: PostgreSQL user to connect as
■ DIRBS_DB_PASSWORD: PostgreSQL password for DIRBS_DB_USER
■ DIRBS_STATSD_HOST: Host that StatsD run on (default: localhost)
■ DIRBS_STATSD_PORT: Port that StatsD listens on (default: 8125)

DIRBS Core Release 8.0.1 Installation Guide Installation
80-GD079-1 Rev. D Copyright (c) 2018 Qualcomm Technologies, Inc. 8
This work is licensed under a Creative Commons Attribution-NoDerivatives 4.0 International License.
■ DIRBS_ENV: Unique environment string used by StatsD to distinguish between different hosts
or environments when sending metrics
The values of these environment variables can be passed through to Docker containers in two
ways:
■ Populate a file with a list of the above KEY=VALUE lines
□ This file can then be passed to the docker run command via the --env-file
command-line option
■ Specify each key-value pair on the docker run command-line using the -e command-line
option
2.3.1.4 Mounting a persistent log directory
To ensure that logs are persisted between container restarts, the following CLI option should be
provided to docker run:
-v <abs_log_dir_on_host>:/var/log/dirbs
This option mounts the host directory located at abs_log_dir_on_host to /var/log/dirbs in
the container.
2.3.2 Operator Upload and Data Processing blades
2.3.2.1 Mounting a persistent data directory
For Operator Upload and Data Processing blades, the data directory should be persistent between
container restarts.
To ensure this is the case, a host directory can be mounted into the container using the following
CLI option to docker run:
-v <abs_data_dir_on_host>:/data
This option mounts the host directory located at abs_data_dir_on_host to /data in the
container.
2.4 Database
2.4.1 Installation
NOTE: Creating a new database from scratch assumes that you are already running a PostgreSQL
instance.
1. Install PostgreSQL HLL extension
DIRBS Core requires the PostgreSQL HLL extension to function.
If using our provided Docker image for PostgreSQL, it is already installed.
If on RDS in AWS, this extension should also be optionally available.
Otherwise, you must build and install the extension (see README in the GitHub repo).

DIRBS Core Release 8.0.1 Installation Guide Installation
80-GD079-1 Rev. D Copyright (c) 2018 Qualcomm Technologies, Inc. 9
This work is licensed under a Creative Commons Attribution-NoDerivatives 4.0 International License.
2. Create a PostgreSQL role with superuser privileges
If you are using the provided Docker image for PostgreSQL, the environment variables
DB_ROOT_USER and DB_ROOT_PASSWORD can be used the first time the container is started to
automatically create a superuser account.
If you would rather not supply these environment variables, are not using our Docker image,
or have an existing PostgreSQL database server, the following SQL command can be run as a
superuser to create an appropriate role:
CREATE ROLE <username> WITH SUPERUSER LOGIN ENCRYPTED PASSWORD
'<password>';
This account should only be used to create databases and new roles. It is necessary to be a
superuser account as the HLL extension cannot be created in a new database by a non-
superuser. It should not be used as a general account given the privileges granted to it.
3. Install base roles
After creating a superuser, create the base roles that DIRBS requires. These are all marked
NOLOGIN, meaning it is not possible to login as these roles – they are just abstract roles that
can be GRANT'ed to real users with LOGIN privilege.
These roles must exist before the database can be created or installed.
a. Run the following command on the DIRBS processing blade:
dirbs-db --db-user <username> --db-password-prompt install_roles
where <username> is the name of the superuser created in Step 2.
You will be prompted for your password.
Since this is a high privilege database account and this is a one-off command, it is more
secure to enter the password manually via the prompt than to store it in a config file.
4. Create an empty database
Ownership of the database is important as we must ensure that every power user has rights to
do everything, rather than just the user creating the DB.
To create an empty database owned by dirbs_core_power_user role:
a. Use the psql command to login to the postgres database on the PostgreSQL server
using the superuser role created in Step 2.
b. Run the following SQL command to create the empty database:
CREATE DATABASE <database_name> OWNER dirbs_core_power_user;
c. Connect to the new database using the following command in psql:
\c <database_name>
d. Run the following SQL commands to install the HLL extension in the new database:
CREATE SCHEMA hll;
GRANT USAGE ON SCHEMA hll TO dirbs_core_base;
CREATE EXTENSION hll SCHEMA hll;
DIRBS Core Release 8.0.1 Installation Guide Installation
80-GD079-1 Rev. D Copyright (c) 2018 Qualcomm Technologies, Inc. 10
This work is licensed under a Creative Commons Attribution-NoDerivatives 4.0 International License.
5. Create user accounts
With an empty database, we can create user accounts while still logged into the PostgreSQL
database as the superuser. This can also be done later.
e. Create an initial power user (can do everything):
CREATE USER <username> WITH LOGIN ENCRYPTED PASSWORD '<password>' IN
ROLE dirbs_core_power_user;
Optionally, extra users with lower privileges can be created to perform specific tasks with
minimum required privileges:
CREATE USER <username> WITH LOGIN ENCRYPTED PASSWORD '<password>' IN
ROLE <role_name>;
Roles can be GRANT'ed or REVOKE'd after user creation:
GRANT <role_name> TO <username>;
REVOKE <role_name> FROM <username>;
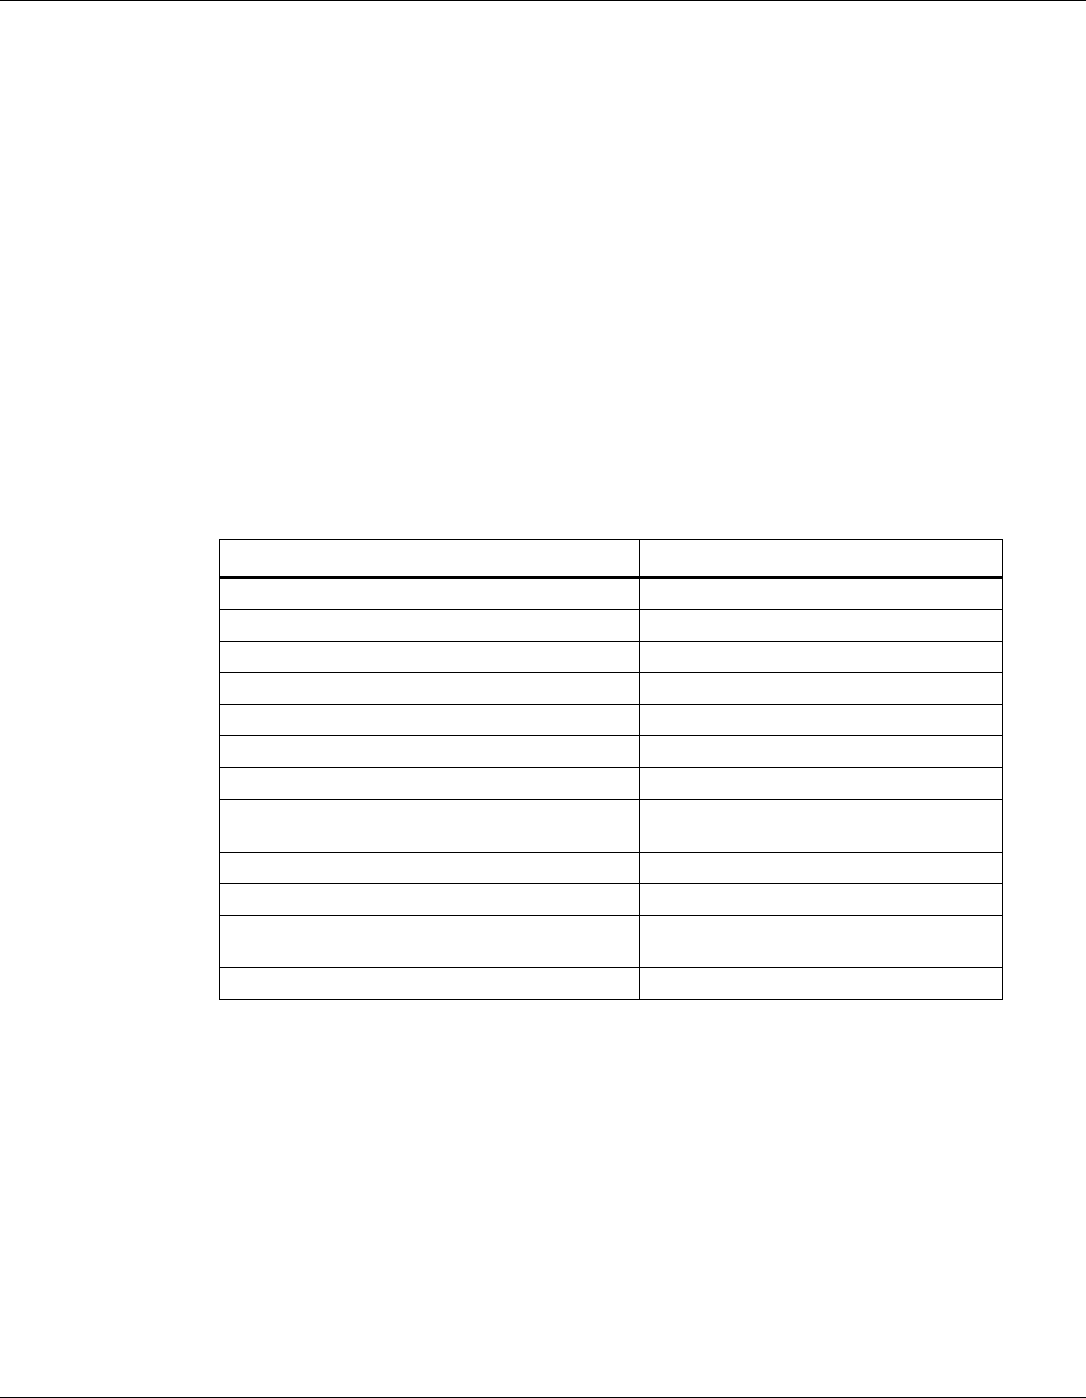
Table 2-1 provides a complete list of roles and their functions.
Table 2-1 Roles and functions
Role
Function
dirbs_core_api
Runs REST-ful APIs
dirbs_core_catalog
Runs dirbs-catalog
dirbs_core_classify
Runs dirbs-classify
dirbs_core_import_golden_list
Runs dirbs-import golden_list
dirbs_core_import_gsma
Runs dirbs-import gsma_tac
dirbs_core_import_operator
Runs dirbs-import operator
dirbs_core_import_pairing_list
Runs dirbs-import pairing_list
dirbs_core_import_registration_list
Runs dirbs-import
registration_list
dirbs_core_import_stolen_list
Runs dirbs-import stolen_list
dirbs_core_listgen
Runs dirbs-listgen
dirbs_core_poweruser
Can do everything (only user that can do
dirbs-db and dirbs-prune)
dirbs_core_report
Runs dirbs-report
A user can be in multiple roles. To see a list of which users are on the system and which
roles they have, we recommend using the psql command \du to view the list of database
users.
6. Install a schema
Once user accounts have been created and the connection details configured for DIRBS,
install the DB schema:
dirbs-db --db-user <username_of_power_user> --db-password-prompt install
NOTE: This DB user should be the power user created in Step 5a and not the superuser created in Step 2
for security reasons. We do not recommend storing passwords for power users in config files or
environment variables for additional security.

DIRBS Core Release 8.0.1 Installation Guide Installation
80-GD079-1 Rev. D Copyright (c) 2018 Qualcomm Technologies, Inc. 11
This work is licensed under a Creative Commons Attribution-NoDerivatives 4.0 International License.
7. Choose a number of physical shards
Many DIRBS Core tables are split into multiple physical partitions based on their IMEI. The
default number of partitions is 4. For larger deployments, it is recommended to increase the
number of partitions to achieve higher potential parallelism and performance.
This is done via the command:
dirbs-db --db-user <username_of_power_user> --db-password-prompt
repartition --num-physical-shards <num_shards>
This can be done at any time, but we recommend initially avoiding a lengthy re-write of all
existing tables later.
2.4.2 Upgrading the database schema
To upgrade a schema from a previous release, run:
dirbs-db --db-user <super_user> --db-password-prompt install_roles
dirbs-db --db-user <power_user> --db-password-prompt upgrade
where
■ <super_user> is the superuser (see Step 2 of Section 2.4.1)
■ <power_user> is the power user (see Step 5a of Section 2.4.1)

80-GD079-1 Rev. D Copyright (c) 2018 Qualcomm Technologies, Inc. 12
This work is licensed under a Creative Commons Attribution-NoDerivatives 4.0 International License.
3 Configuration
An annotated config file etc/config.yml was distributed with this release. For information on
the available settings and what they mean, refer to the comments in the annotated sample config
file.
This annotated config file is automatically copied into built Docker images and is in both files:
■ /opt/dirbs/etc/config.yml
■ /home/dirbs/.dirbs.yml
When DIRBS Core software runs, it looks for a config file in ~/.dirbs.yml. If that file is not
found, it looks in the system location /opt/dirbs/etc/config.yml.
Once the Docker image has been built, the configuration can be modified by mounting a config
file as a volume to ~/.dirbs.yml to override the config file that the Docker image was
originally built with (see Section 2.3.1.1).

80-GD079-1 Rev. D Copyright (c) 2018 Qualcomm Technologies, Inc. 13
This work is licensed under a Creative Commons Attribution-NoDerivatives 4.0 International License.
4 Installation Verification
4.1 Running the automated regression test suite
If you have built the Docker processing blade image, use the following command to run the
automated regression test suite:
docker run --rm --tmpfs /tmp dirbs-processing:${BUILD_TAG} gosu dirbs
py.test -v /home/dirbs/tests/*.py
Alternatively, if a container based off the dirbs-processing image is already running, you can SSH
into it to run the tests. Once you are SSH’ed in, use the following command to run tests:
py.test -v /home/dirbs/tests/*.py
(dirbs-venv) dirbs@8d98750dc5aa:~$ py.test -v /home/dirbs/tests/*.py
==========================================================================
test session starts
===========================================================================
platform linux -- Python 3.5.2, pytest-3.0.0, py-1.4.34, pluggy-0.3.1 --
/home/dirbs/dirbs-venv/bin/python3.5
cachedir: tests/.cache
rootdir: /home/dirbs/tests, inifile: pytest.ini
plugins: mock-1.6.0
collected 266 items
tests/app_logging.py::test_exception_logging_api PASSED
tests/app_logging.py::test_exception_logging_cli PASSED
…
…
…
tests/tac_api.py::test_method_post_not_allowed PASSED
tests/tac_api.py::test_method_delete_not_allowed PASSED
====================================================================== 266
passed in 247.90 seconds
======================================================================
(dirbs-venv) dirbs@8d98750dc5aa:~$
A successful install is one where all run test cases have passed.

DIRBS Core Release 8.0.1 Installation Guide Installation Verification
80-GD079-1 Rev. D Copyright (c) 2018 Qualcomm Technologies, Inc. 14
This work is licensed under a Creative Commons Attribution-NoDerivatives 4.0 International License.
4.2 Checking status of the database version
Verify that the DIRBS Code schema version is equivalent to the DB schema version:
dirbs-db check
2017-10-29 00:38:56,683 - dirbs.db - INFO - Querying DB schema version for
DB dirbs on host <DB_HOST>
2017-10-29 00:38:56,706 - dirbs.db - INFO - Code schema version: 53
2017-10-29 00:38:56,706 - dirbs.db - INFO - DB schema version: 53
2017-10-29 00:38:56,707 - dirbs.db - INFO - Schema versions match between
code and DB.
