User Guide DPDK Qdma Driver
User Manual:
Open the PDF directly: View PDF ![]() .
.
Page Count: 19
Xilinx
User Guide QDMA DPDK Driver
$Date: 2018/12/10 $ Version $Revision: #8 $ Page 1 of 19
XILINX confidential
File DPDK_qdma_driver_user_guide.pdf
User Guide
For
QDMA DPDK Driver
The information contained herein is proprietary to Xilinx Inc and may not be
divulged to any third party without the express written consent of Xilinx Inc.
Copyright 2018 - present Xilinx, Inc. All rights reserved.

Xilinx
User Guide QDMA DPDK Driver
$Date: 2018/12/10 $ Version $Revision: #8 $ Page 2 of 19
XILINX confidential
File DPDK_qdma_driver_user_guide.pdf
CONTENTS
1 Introduction ................................................................................................................... 4
1.1 Document Overview .............................................................................................................................. 4
1.2 Document References .......................................................................................................................... 4
1.3 Glossary ................................................................................................................................................ 4
2 QDMA DPDK Driver ...................................................................................................... 5
2.1 System Setup ........................................................................................................................................ 5
2.2 Environment .......................................................................................................................................... 6
2.3 Modifying the driver for your own PCIe device ID ................................................................................. 6
2.4 Building the QDMA DPDK Software ..................................................................................................... 6
2.5 Running the DPDK software test application ...................................................................................... 10
2.6 Controlling and Configuring the QDMA IP .......................................................................................... 12
2.7 VM Testing .......................................................................................................................................... 18
3 Document Revision History ....................................................................................... 19

Xilinx
User Guide QDMA DPDK Driver
$Date: 2018/12/10 $ Version $Revision: #8 $ Page 3 of 19
XILINX confidential
File DPDK_qdma_driver_user_guide.pdf
LIST OF TABLES
Table 1-1: Document References ....................................................................................................................... 4
Table 1-2: Glossary ............................................................................................................................................ 4
Table 2-1: System Configuration ........................................................................................................................ 5
Table 2-2: DPDK software database content ..................................................................................................... 7
Table 2-3: Device arguments supported by DPDK driver ................................................................................ 14
Table 2-4: qdma_testapp CLI Commands format and usage .......................................................................... 16
Table 3-1: Document Review History ............................................................................................................... 19
Xilinx
User Guide QDMA DPDK Driver
$Date: 2018/12/10 $ Version $Revision: #8 $ Page 4 of 19
XILINX confidential
File DPDK_qdma_driver_user_guide.pdf
1 Introduction
1.1 Document Overview
The Xilinx PCI Express Multi Queue DMA (QDMA) IP provides high-performance direct memory
access (DMA) via PCI Express. The PCIe QDMA can be implemented in UltraScale devices.
Xilinx provides a DPDK software release that incorporates the low-level driver functionality that
runs on a PCI Express root port host PC to interact with the QDMA endpoint IP via PCI Express.
This User Guide provides the setup procedure and software usage instructions.
1.2 Document References
Document References
Version
[1] QDMA Subsystem for PCI Express (PG302)
2.0
[2] https://github.com/Xilinx/dma_ip_drivers/QDMA/DPDK
Table 1-1: Document References
1.3 Glossary
Acronym
/ Term
Description
BDF
Bus, Device, Function of a PCIe device
C2H
Card to Host
CLI
Command Line Interface
FPGA
Field Programmable Gate Array
H2C
Host to Card
IP
Intellectual Property
MM
Memory Mapped Mode
PF
Physical Function
PMD
Poll Mode Driver
QDMA
Multi Queue Direct Memory Access
ST
Streaming Mode
VF
Virtual Function
VM
Virtual Machine
Table 1-2: Glossary
Xilinx
User Guide QDMA DPDK Driver
$Date: 2018/12/10 $ Version $Revision: #8 $ Page 5 of 19
XILINX confidential
File DPDK_qdma_driver_user_guide.pdf
2 QDMA DPDK Driver
This User Guide document describes the following for QDMA DPDK Driver that will be generally
available for customers:
• System Setup
• Compiling and loading the driver and test application
• Sample commands to use the driver and test application
2.1 System Setup
This release was tested with the following system configuration.
Directory
Description
Host System
Configuration
Operating System
Ubuntu 16.04.3 LTS
Linux Kernel
4.4.0-93-generic
RAM
32GB on local NUMA node
Qemu version
QEMU emulator version 2.5.0 (Debian 1:2.5+dfsg-
5ubuntu10.15)
Guest System
(VM)
Configuration
Operating System
Ubuntu 18.04 LTS
Linux Kernel
4.15.1-20-generic
RAM
4GB
Cores
4
Table 2-1: System Configuration
The following modifications must be made to the /boot/grub/grub.cfg on the Host system:
• Add hugepages for DPDK
o Add following parameter to /etc/default/grub file
GRUB_CMDLINE_LINUX="default_hugepagesz=1GB hugepagesz=1G
hugepages=20"
The example below adds 20 1GB hugepages, which is required to support 2048
queues, with descriptor ring of 1024 entries and each descriptor buffer length of
4KB.
The number of hugepages required should be changed if the above configuration
(queues, ring size, buffer size) changes.
• Enable IOMMU for VM testing.
o Update /etc/default/grub file as below.
GRUB_CMDLINE_LINUX="default_hugepagesz=1GB hugepagesz=1G
hugepages=20 iommu=pt intel_iommu=on"

Xilinx
User Guide QDMA DPDK Driver
$Date: 2018/12/10 $ Version $Revision: #8 $ Page 6 of 19
XILINX confidential
File DPDK_qdma_driver_user_guide.pdf
• Execute the following command to modify the /boot/grub/grub.cfg with the configuration
set in the above steps and permanently add them to the kernel command line:
o update-grub
Reboot host after making the above modifications.
2.2 Environment
To execute the QDMA DPDK driver and test application on the example design, following system
requirements are to be met:
1. Host System with at least one Gen 3 x16 PCIe slot and minimum 32GB RAM on same
CPU node for 2K queues. For VM testing, host system must support virtualization and it
must be enabled in the BIOS.
2. Execution of the steps mentioned in section 2.1
3. TULVU9P or VCU1525 FPGA Board
4. USB digilent cables to connect to the chosen board to the Host System.
5. Xilinx 2018.3 Vivado tools for programming the FPGA.
2.3 Modifying the driver for your own PCIe device ID
During the PCIe DMA IP customization in Vivado user can specify a PCIe Device ID. This Device
ID must be recognized by the driver to properly recognize the PCIe QDMA device. The current
driver is designed to recognize the PCIe Device IDs that get generated with the PCIe example
design when this value has not been modified. If the PCIe Device ID is modified during IP
customization, one needs to modify QDMA PMD to recognize this new ID.
User can also remove PCIe Device IDs that will not be used by the end solution. To modify the
PCIe Device ID in the driver,
Update struct rte_pci_id qdma_pci_id_tbl[] inside
drivers/net/qdma/qdma_ethdev.c for PF devices.
Update struct rte_pci_id qdma_vf_pci_id_tbl[] inside
drivers/net/qdma/qdma_vf_ethdev.c for VF devices.
Also add the device IDs in usertools/dpdk-devbind.py in
xilinx_qdma_pf for PF device and xilinx_qdma_vf for VF device as
specified in section 2.4.
Once modified, the driver and application must be recompiled.
2.4 Building the QDMA DPDK Software
DPDK requires certain packages to be installed on host system. For a full list, refer to the official
DPDK documentation:
https://doc.dpdk.org/guides/linux_gsg/sys_reqs.html.
Note: If the NUMA library is missing, it should be installed. For example:
ubuntu:> sudo apt-get install libnuma-dev
red hat:> sudo yum install numactl-devel

Xilinx
User Guide QDMA DPDK Driver
$Date: 2018/12/10 $ Version $Revision: #8 $ Page 7 of 19
XILINX confidential
File DPDK_qdma_driver_user_guide.pdf
Below Table describes the DPDK software database structure and its contents on the Xilinx
GitHub (https://github.com/Xilinx/dma_ip_drivers/QDMA/DPDK).
Directory
Description
drivers/net/qdma
Xilinx QDMA DPDK Poll mode driver
examples/qdma_testapp
Xilinx CLI based test application for QDMA
tools/0001-PKTGEN-3.4.7-Patch-to-add-
Jumbo-packet-support.patch
dpdk-pktgen patch based on dpdk-pktgen
v3.4.7. This patch extends dpdk-pktgen
application to handle packets with packet sizes
more than 1518 bytes and it disables the
packet size classification logic to remove
application overhead in performance
measurement. This patch is used for
performance testing with dpdk-pktgen
application.
tools/DPDK_qdma_driver_user_guide.pdf
This document (User guide)
RELEASE.txt
Release Notes
Table 2-2: DPDK software database content
2.4.1 Setup: Download and modifications
The reference driver code requires DPDK version 17.11.1. Follow the steps below to download
the proper version of DPDK and apply driver code and test application supplied in the GitHub.
Extract the DPDK software database from GitHub to the server where VCU1525 is installed.
Henceforth, this area is referred as <dpdk_sw_database>.
Create a directory for the DPDK download on the server where the VCU1525 is installed and move
to this directory.
mkdir <server_dir>/<dpdk_test_area>
cd <server_dir>/<dpdk_test_area>
git clone http://dpdk.org/git/dpdk-stable
cd dpdk-stable
git checkout v17.11.1
cp -r <dpdk_sw_database>/drivers/net/qdma ./drivers/net/
cp -r <dpdk_sw_database>/examples/qdma_testapp ./examples/
Additionally, make below changes to the DPDK 17.11.1 tree to build QDMA driver, support 2K
queues and populate Xilinx devices for binding.
1. To build QDMA driver

Xilinx
User Guide QDMA DPDK Driver
$Date: 2018/12/10 $ Version $Revision: #8 $ Page 8 of 19
XILINX confidential
File DPDK_qdma_driver_user_guide.pdf
a. Add below lines to ./config/common_base in DPDK 17.11.1 tree
#
#Complie Xilinx QDMA PMD driver
#
CONFIG_RTE_LIBRTE_QDMA_PMD=y
CONFIG_RTE_LIBRTE_QDMA_DEBUG_DRIVER=n
To enable driver debug logs, set
CONFIG_RTE_LIBRTE_QDMA_DEBUG_DRIVER=y
b. Add below lines to drivers/net/Makefile, where PMDs are added
DIRS-$(CONFIG_RTE_LIBRTE_QDMA_PMD) += qdma
c. Add below lines to mk/rte.app.mk, where PMDs are added
_LDLIBS-$(CONFIG_RTE_LIBRTE_QDMA_PMD) += -lrte_pmd_qdma
2. To add Xilinx devices for device binding, add below lines to ./usertools/dpdk-
devbind.py after cavium_pkx class, where PCI base class for devices are listed.
xilinx_qdma_pf = {'Class': '05', 'Vendor': '10ee',
'Device':
'9011,9111,9211,9311,9014,9114,9214,9314,9018,9118,9218,
9318,901f,911f,921f,931f,9021,9121,9221,9321,9024,9124,9
224,9324,9028,9128,9228,9328,902f,912f,922f,932f,9031,91
31,9231,9331,9034,9134,9234,9334,9038,9138,9238,9338,903
f,913f,923f,933f,9041,9141,9241,9341,9044,9144,9244,9344
,9048,9148,9248,9348',
'SVendor': None, 'SDevice': None}
xilinx_qdma_vf = {'Class': '05', 'Vendor': '10ee',
'Device':
'a011,a111,a211,a311,a014,a114,a214,a314,a018,a118,a218,
a318,a01f,a11f,a21f,a31f,a021,a121,a221,a321,a024,a124,a
224,a324,a028,a128,a228,a328,a02f,a12f,a22f,a32f,a031,a1
31,a231,a331,a034,a134,a234,a334,a038,a138,a238,a338,a03
f,a13f,a23f,a33f,a041,a141,a241,a341,a044,a144,a244,a344
,a048,a148,a248,a348',
'SVendor': None, 'SDevice': None}
Update entries in network devices class in ./usertools/dpdk-devbind.py to
add Xilinx devices
network_devices = [network_class, cavium_pkx,
xilinx_qdma_pf, xilinx_qdma_vf]
3. To support 2K queues and 256 PCIe functions, update below configurations in
./config/common_base
CONFIG_RTE_MAX_MEMZONE=7680
CONFIG_RTE_MAX_ETHPORTS=256
CONFIG_RTE_MAX_QUEUES_PER_PORT=2048
Xilinx
User Guide QDMA DPDK Driver
$Date: 2018/12/10 $ Version $Revision: #8 $ Page 9 of 19
XILINX confidential
File DPDK_qdma_driver_user_guide.pdf
2.4.2 Setup: Huge Pages
DPDK requires that hugepages are setup on the server. Perform steps outlined in section 2.1 to
reserve hugepages.
2.4.3 Setup: Make Commands
Execute the following to compile the driver:
cd <server_dir>/<dpdk_test_area>/dpdk-stable
make config T=x86_64-native-linuxapp-gcc
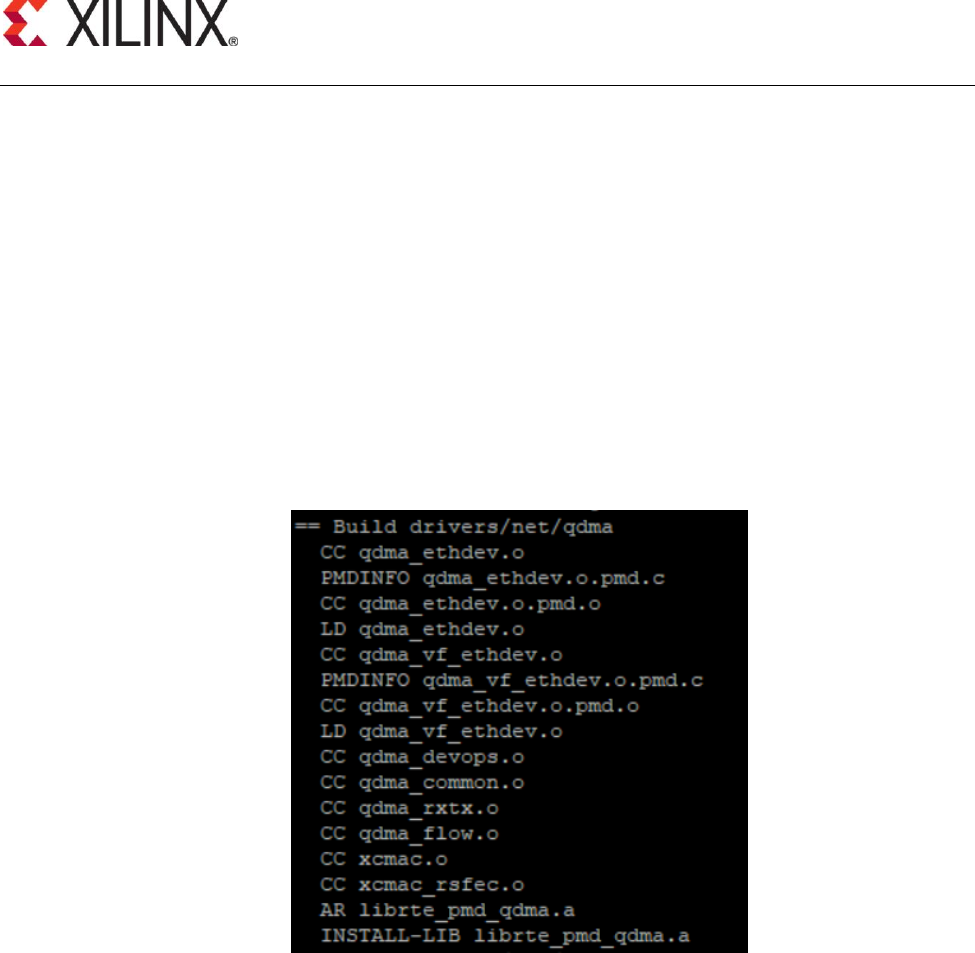
make
#In the make output, verify that the QDMA files are being
built. Below figure shows the QDMA files that are built as
part of make.
#The following should appear when make completes:
Build complete [x86_64-native-linuxapp-gcc]
#Verify that librte_pmd_qdma.a is installed in ./build/lib
directory.
Additionally, for memory mapped mode, BRAM size can be configured with make command.
Default BRAM size is set to 512KB in the driver makefile.
make BRAM_SIZE=<BRAM size in bytes in decimal>
Change to root user and compile the application:
sudo su
cd examples/qdma_testapp
make RTE_SDK=`pwd`/../.. RTE_TARGET=build

Xilinx
User Guide QDMA DPDK Driver
$Date: 2018/12/10 $ Version $Revision: #8 $ Page 10 of 19
XILINX confidential
File DPDK_qdma_driver_user_guide.pdf
#The following should appear when make completes:
INSTALL-MAP qdma_testapp.map
Additionally, for memory mapped mode, BRAM size can be configured with make command.
Default BRAM size is set to 512KB in the driver makefile.
make BRAM_SIZE=<BRAM size in bytes in decimal> RTE_SDK=`pwd`/../..
RTE_TARGET=build
#*NOTE: If any of above steps are missed and require code
modifications, perform ‘make clean’ before re-running make.
2.5 Running the DPDK software test application
The below steps describe the step by step procedure to run the DPDK QDMA Test
Application and to interact with the QDMA PCIe device.
1. Navigate to examples/qdma_testapp directory.
# cd <server_dir>/<dpdk_test_area>/dpdk-
stable/examples/qdma_testapp
2. Run the ‘lspci’ command on the console and verify that the PFs are detected as shown
below. Here, ‘81’ is the PCIe bus number on which Xilinx QDMA device is installed.
# lspci | grep Xilinx
81:00.0 Memory controller: Xilinx Corporation Device 903f
81:00.1 Memory controller: Xilinx Corporation Device 913f
81:00.2 Memory controller: Xilinx Corporation Device 923f
81:00.3 Memory controller: Xilinx Corporation Device 933f
3. Execute the following commands required for running the DPDK application:
# mkdir /mnt/huge
# mount -t hugetlbfs nodev /mnt/huge
# modprobe uio
# insmod ../../build/kmod/igb_uio.ko
4. Bind PF ports to the igb_uio module as shown below:
# ../../usertools/dpdk-devbind.py -b igb_uio 81:00.0
# ../../usertools/dpdk-devbind.py -b igb_uio 81:00.1
# ../../usertools/dpdk-devbind.py -b igb_uio 81:00.2
# ../../usertools/dpdk-devbind.py -b igb_uio 81:00.3
5. The execution of steps 3 and 4 creates a max_vfs file entry in
/sys/bus/pci/devices/0000:<bus>:<device>.<function>. Enable VFs for each PF by writing
the number of VFs to enable to this file as shown below. This example adds 8 VFs to each
PF.
# echo 8 > /sys/bus/pci/devices/0000\:81\:00.0/max_vfs
# echo 8 > /sys/bus/pci/devices/0000\:81\:00.1/max_vfs
# echo 8 > /sys/bus/pci/devices/0000\:81\:00.2/max_vfs
# echo 8 > /sys/bus/pci/devices/0000\:81\:00.3/max_vfs

Xilinx
User Guide QDMA DPDK Driver
$Date: 2018/12/10 $ Version $Revision: #8 $ Page 11 of 19
XILINX confidential
File DPDK_qdma_driver_user_guide.pdf
6. Run the lspci command on the console and verify that the VFs are listed in the output as
shown below:
# lspci | grep Xilinx
81:00.0 Memory controller: Xilinx Corporation Device 903f
81:00.1 Memory controller: Xilinx Corporation Device 913f
81:00.2 Memory controller: Xilinx Corporation Device 923f
81:00.3 Memory controller: Xilinx Corporation Device 933f
81:00.4 Memory controller: Xilinx Corporation Device a03f
81:00.5 Memory controller: Xilinx Corporation Device a03f
81:00.6 Memory controller: Xilinx Corporation Device a03f
81:00.7 Memory controller: Xilinx Corporation Device a03f
81:01.0 Memory controller: Xilinx Corporation Device a03f
81:01.1 Memory controller: Xilinx Corporation Device a03f
81:01.2 Memory controller: Xilinx Corporation Device a03f
81:01.3 Memory controller: Xilinx Corporation Device a03f
81:01.4 Memory controller: Xilinx Corporation Device a13f
81:01.5 Memory controller: Xilinx Corporation Device a13f
81:01.6 Memory controller: Xilinx Corporation Device a13f
81:01.7 Memory controller: Xilinx Corporation Device a13f
81:02.0 Memory controller: Xilinx Corporation Device a13f
81:02.1 Memory controller: Xilinx Corporation Device a13f
81:02.2 Memory controller: Xilinx Corporation Device a13f
81:02.3 Memory controller: Xilinx Corporation Device a13f
81:02.4 Memory controller: Xilinx Corporation Device a23f
81:02.5 Memory controller: Xilinx Corporation Device a23f
81:02.6 Memory controller: Xilinx Corporation Device a23f
81:02.7 Memory controller: Xilinx Corporation Device a23f
81:03.0 Memory controller: Xilinx Corporation Device a23f
81:03.1 Memory controller: Xilinx Corporation Device a23f
81:03.2 Memory controller: Xilinx Corporation Device a23f
81:03.3 Memory controller: Xilinx Corporation Device a23f
81:03.4 Memory controller: Xilinx Corporation Device a33f
81:03.5 Memory controller: Xilinx Corporation Device a33f
81:03.6 Memory controller: Xilinx Corporation Device a33f
81:03.7 Memory controller: Xilinx Corporation Device a33f
81:04.0 Memory controller: Xilinx Corporation Device a33f
81:04.1 Memory controller: Xilinx Corporation Device a33f
81:04.2 Memory controller: Xilinx Corporation Device a33f
81:04.3 Memory controller: Xilinx Corporation Device a33f
In total, 36 ports are serially arranged as shown above, where 81.0.0 represents port 0,
81.0.1 represents port 1 and so on. Therefore, 81.04.3 being the last one which represents
port 35.
7. Execute the following commands to bind the VF ports to igb_uio module
# ../../usertools/dpdk-devbind.py -b igb_uio 81:00.4
# ../../usertools/dpdk-devbind.py -b igb_uio 81:00.5
# ../../usertools/dpdk-devbind.py -b igb_uio 81:00.6
# ../../usertools/dpdk-devbind.py -b igb_uio 81:00.7
# ../../usertools/dpdk-devbind.py -b igb_uio 81:01.0
# ../../usertools/dpdk-devbind.py -b igb_uio 81:01.1
# ../../usertools/dpdk-devbind.py -b igb_uio 81:01.2
# ../../usertools/dpdk-devbind.py -b igb_uio 81:01.3

Xilinx
User Guide QDMA DPDK Driver
$Date: 2018/12/10 $ Version $Revision: #8 $ Page 12 of 19
XILINX confidential
File DPDK_qdma_driver_user_guide.pdf
# ../../usertools/dpdk-devbind.py -b igb_uio 81:01.4
# ../../usertools/dpdk-devbind.py -b igb_uio 81:01.5
# ../../usertools/dpdk-devbind.py -b igb_uio 81:01.6
# ../../usertools/dpdk-devbind.py -b igb_uio 81:01.7
# ../../usertools/dpdk-devbind.py -b igb_uio 81:02.0
# ../../usertools/dpdk-devbind.py -b igb_uio 81:02.1
# ../../usertools/dpdk-devbind.py -b igb_uio 81:02.2
# ../../usertools/dpdk-devbind.py -b igb_uio 81:02.3
# ../../usertools/dpdk-devbind.py -b igb_uio 81:02.4
# ../../usertools/dpdk-devbind.py -b igb_uio 81:02.5
# ../../usertools/dpdk-devbind.py -b igb_uio 81:02.6
# ../../usertools/dpdk-devbind.py -b igb_uio 81:02.7
# ../../usertools/dpdk-devbind.py -b igb_uio 81:03.0
# ../../usertools/dpdk-devbind.py -b igb_uio 81:03.1
# ../../usertools/dpdk-devbind.py -b igb_uio 81:03.2
# ../../usertools/dpdk-devbind.py -b igb_uio 81:03.3
# ../../usertools/dpdk-devbind.py -b igb_uio 81:03.4
# ../../usertools/dpdk-devbind.py -b igb_uio 81:03.5
# ../../usertools/dpdk-devbind.py -b igb_uio 81:03.6
# ../../usertools/dpdk-devbind.py -b igb_uio 81:03.7
# ../../usertools/dpdk-devbind.py -b igb_uio 81:04.0
# ../../usertools/dpdk-devbind.py -b igb_uio 81:04.1
# ../../usertools/dpdk-devbind.py -b igb_uio 81:04.2
# ../../usertools/dpdk-devbind.py -b igb_uio 81:04.3
8. Run the qdma_testapp using the following command:
#./build/app/qdma_testapp -c 0xf -n 4
“-c” is for processor mask
“-n” for number memory channels.
2.6 Controlling and Configuring the QDMA IP
2.6.1 Supported Device arguments (module parameters)
Device specific parameters can be passed to a device by using the ‘-w’ EAL option. Xilinx supports
following device arguments to configure PCIe device.
Devargs options
Description
queue_base
Absolute base queue id to use for the given PCIe
function. User needs to make sure that the queue
belonging to different PCIe functions do not share same
absolute queue id. Default value of queue base is 0.
Example usage:
./build/app/qdma_testapp -c 0x1f -n 4 -w
81:00.0,queue_base=0 -w
81:00.1,queue_base=64

Xilinx
User Guide QDMA DPDK Driver
$Date: 2018/12/10 $ Version $Revision: #8 $ Page 13 of 19
XILINX confidential
File DPDK_qdma_driver_user_guide.pdf
Devargs options
Description
In this example, the device "81:00.0" uses absolute
queue id starting from 0, and the device "81:00.1" uses
absolute queue id starting from 64.
config_bar
Specifies the PCIe BAR number where QDMA
configuration register space is mapped. Valid values are
0 to 5. Default is set to 0 i.e. BAR 0 in the driver.
Example usage:
./build/app/qdma_testapp -c 0x1f -n 4 -w
81:00.0,queue_base=0,config_bar=2 -w
81:00.1,queue_base=64,config_bar=4
This example configures BAR 2 as QDMA configuration
BAR for device "81:00.0" and BAR 4 as QDMA
configuration BAR for device "81:00.1".
desc_prefetch
Enable or disable descriptor prefetch on C2H streaming
(ST-mode) queues. Default is prefetch disabled.
Example usage:
./build/app/qdma_testapp -c 0x1f -n 4 -w
81:00.0,queue_base=0,desc_prefetch=1 -w
81:00.1,queue_base=64,desc_prefetch=0
This example enables descriptor prefetch on all the
streaming C2H queues of the device "81:00.0", and
disables descriptor prefetch on all the streaming C2H
queues of the device "81:00.1".
cmpt_desc_len
Sets the completion entry length of the completion
queue. Valid lengths are 8, 16 and 32 bytes. Default
length is 8 bytes.
Example usage:
./build/app/qdma_testapp -c 0x1f -n 4 -w
81:00.0,queue_base=0,cmpt_desc_len=8 -w
81:00.1,queue_base=64,cmpt_desc_len=32
This example sets completion entry length to 8 bytes on
all the completion queues of the device "81:00.0", and to
32 bytes on all the completion queues of the device
"81:00.1".
trigger_mode
Sets the trigger mode for completion. Possible values
for trigger_mode is:
0 - DISABLE
1 – Trigger on EVERY event
2 – Trigger when USER_COUNT threshold is reached
3 – Trigger when USER defined event is reached
4 - Trigger when USER_TIMER threshold is reached

Xilinx
User Guide QDMA DPDK Driver
$Date: 2018/12/10 $ Version $Revision: #8 $ Page 14 of 19
XILINX confidential
File DPDK_qdma_driver_user_guide.pdf
Devargs options
Description
5 - Trigger when either of USER_TIMER or COUNT is
reached.
Default value configured in the driver is 5.
Example usage:
./build/app/qdma_testapp -c 0x1f -n 4 -w
81:00.0,queue_base=0, trigger_mode=1
This example sets the trigger mode to every event for all
the completion queues of the device “81:00.0”.
wb_acc_int
Sets the interval at which completions are generated for
for MM or H2C stream queues running in non-bypass
mode.
Supported values are 0 to 7. Completions are generated
4 * 2 ^ (configured wb_acc_int) number of descriptors
are available. Default value configured in the driver is 4
i.e. 64 descriptors.
Example usage:
./build/app/qdma_testapp -c 0x1f -n 4 -w
81:00.0,queue_base=0, wb_acc_int=5
This example sets the completion interval to 128
descriptors for all the MM or H2C stream queues of the
device “81:00.0”.
c2h_byp_mode
Sets the C2H stream mode. Valid values are 0 (Bypass
disabled), 1 (Cache bypass mode) and 2 (Simple
bypass mode). Default is internal mode i.e. bypass
disabled.
Example usage:
./build/app/qdma_testapp -c 0x1f -n 4 -w
81:00.0,c2h_byp_mode=2
This example sets simple bypass mode on all the C2H
queues belonging to the PCIe device "81:00.0".
h2c_byp_mode
Sets the H2C bypass mode. Valid values are 0 (Bypass
disabled) and 1 (Bypass enabled). Default is Bypass
disabled.
Example usage:
./build/app/qdma_testapp -c 0x1f -n 4 -w
81:00.0,h2c_byp_mode=1
This example sets bypass mode on all the H2C queues
belonging to the PCIe device "81:00.0".
Table 2-3: Device arguments supported by DPDK driver

Xilinx
User Guide QDMA DPDK Driver
$Date: 2018/12/10 $ Version $Revision: #8 $ Page 15 of 19
XILINX confidential
File DPDK_qdma_driver_user_guide.pdf
2.6.2 CLI support in qdma_testapp
After running the qdma_testapp as described in section 2.5, command line prompt appears on the
console like below:
#./build/app/qdma_testapp -c 0xf -n 4
======Sample output log of the testapp execution on command-line interface=====
QDMA testapp rte eal init...
EAL: Detected 8 lcore(s)
EAL: Probing VFIO support...
EAL: PCI device 0000:01:00.0 on NUMA socket -1
EAL: probe driver: 10ee:903f net_qdma
EAL: PCI device 0000:01:00.1 on NUMA socket -1
EAL: probe driver: 10ee:913f net_qdma
Ethernet Device Count: 1
Logical Core Count: 4
Setting up port :0.
xilinx-app>
Commands supported by the qdma_testapp CLI:
xilinx-app> help
Command
Format
Description
port_init
<port-id> <base-queue-id>
<num-queues> <num-st-
queues> <ring-depth> <pkt-
buff-size>
Port initialization, queue allocation
and programming
port_close
<port-id>
Port close, queue clear and
deallocation
reg_read
<port-id> <bar-num>
<address>
Reads specified register
reg_write
<port-id> <bar-num>
<address> <value>
Writes specified register
dma_to_device
<port-id> <num-queues>
<input-filename> <dst_addr>
<size> <iterations>
Transfer data to the queues
dma_from_device
<port-id> <num-queues>
<output-filename> <src_addr>
<size> <iterations>
Receive data from queues
reg_dump
<portid>
Dumps all valid registers
queue_dump
<port-id> <queue-id>
Dumps queue-context of the
specified queue number
Xilinx
User Guide QDMA DPDK Driver
$Date: 2018/12/10 $ Version $Revision: #8 $ Page 16 of 19
XILINX confidential
File DPDK_qdma_driver_user_guide.pdf
Command
Format
Description
desc_dump
<port-id> <queue-id>
Dumps descriptor fields of the
specified queue number
load_cmds
<file_name>
Executes the list of commands from
the file
help
Help menu
Ctrl-D
Quit the command line interface and
application
Table 2-4: qdma_testapp CLI Commands format and usage
2.6.2.1 Example usage of the commands
2.6.2.1.1 port_init command
This command is used to allocate the required memory and configure all the queues associated
with the port. It accepts the following parameters:
port_init <port-id> <base-queue-id> <num-queues> <num-st-queues> <ring-depth> <pkt-buff-
size>
port-id: Port number. Port number represents a logical numbering for PCIe functions in the
order they are bind to igb_uio driver. The first PCIe function that is bound will have port number
as 0.
base-queue-id: The hardware queue-id from where the assignment of the queues to the port
<port-id> starts
num-queues: Total number of queues to be assigned to port <port-id>
num-st-queues: Number of queues to be configured in streaming mode.
ring-depth: Length of the C2H and H2C queues
pkt-buff-size: Size of the packet that a single C2H or H2C descriptor can support
The number of queues that are configured in memory mapped mode are (num-queues - st-
queues)
For example:
• port_init 0 0 32 32 1024 4096
o Initializes PF-0 with 32 queues in ST-mode, in queue-range 0-to-31
• port_init 1 32 32 16 1024 4096
o Initializes PF-1 with First 16-queues in ST-mode and remaining 16-queues
configured in MM-mode, in queue-range 32-to-63
2.6.2.1.2 dma_to_device command
This command is used to transmit the data to DMA. This command accepts following parameters:
dma_to_device <port-id> <num-queues> <input-filename> <dst-addr> <size> <iterations>
port-id: Port Number to transmit the data.

Xilinx
User Guide QDMA DPDK Driver
$Date: 2018/12/10 $ Version $Revision: #8 $ Page 17 of 19
XILINX confidential
File DPDK_qdma_driver_user_guide.pdf
num-queues: Number of queues to use for transmitting the data.
input-filename: Valid existing input file, with proper size.
dst-addr: Destination address (in offset) of the BRAM. (This parameter is ignored for streaming
mode)
size: size of data to be transferred from the above input-file.
iterations: number of loops, to repeat the same transfer.
For example:
• dma_to_device 0 2048 mm_datafile_1MB.bin 0 524288 0
o Segments the 524288 bytes from the mm_datafile_1MB.bin file equally to 2048
queues and transmits the segmented data on each queue starting at destination
BRAM offset 0 for 1st queue, offset 1*524288/2048 for 2nd queue, and so on.
2.6.2.1.3 dma_from_device command
This command is used to receive data from DMA. This command accepts following parameters:
dma_from_device <port-id> <num-queues> <output-filename> <src-addr> <size> <iterations>
port-id: Port Number to receive the data from
num-queues: Number of queues used to receive the data
output-filename: Output file to dump the received data
src-addr: Source address of the BRAM. (This parameter is ignored for streaming mode)
size: size of data to be received
iterations: number of loops, to re-peat the same transfer.
• dma_from_device 0 2048 port0_qcount2048_size524288.bin 0 524288 0
o Receives the 524288 bytes from 2048 queues and writes to
port0_qcount2048_size524288.bin file. 1st queue receives data from BRAM offset
0, 2nd queue receives data from BRAM offset 1*524288/2048, and so on.
2.6.2.1.4 port_close command
This command frees up all the allocated memory and de-configures the queues associated with
the port. This command accepts following parameters:
port_close <port-id>
port-id: Port number
For example:
• port_close 0
o closes the PF-0.

Xilinx
User Guide QDMA DPDK Driver
$Date: 2018/12/10 $ Version $Revision: #8 $ Page 18 of 19
XILINX confidential
File DPDK_qdma_driver_user_guide.pdf
2.7 VM Testing
This section assumes that the VM image has been created with the Guest system configuration
outlined in Table 2-1: System Configuration.
Follow below steps to execute and test qdma_testapp on VMs
1. Enable the VFs on host system by writing the number of VFs to enable to ‘max_vfs’ file
under /sys/bus/pci/devices/0000:<bus>:<device>.<function>.
# echo 8 > /sys/bus/pci/devices/0000\:81\:00.0/max_vfs
lspci should show new entries for VFs.
81:00.4 Memory controller: Xilinx Corporation Device a03f
81:00.5 Memory controller: Xilinx Corporation Device a03f
81:00.6 Memory controller: Xilinx Corporation Device a03f
81:00.7 Memory controller: Xilinx Corporation Device a03f
81:01.0 Memory controller: Xilinx Corporation Device a03f
81:01.1 Memory controller: Xilinx Corporation Device a03f
81:01.2 Memory controller: Xilinx Corporation Device a03f
81:01.3 Memory controller: Xilinx Corporation Device a03f
2. Start the VM using below command by attaching the VF (81:00.4 in this example)
qemu-system-x86_64 -cpu host -enable-kvm -m 4096 -object
memory-backend-file,id=mem,size=4096M,mem-
path=/mnt/huge,share=on -numa node,memdev=mem -mem-prealloc
-smp sockets=2,cores=4 -hda <vm_image.qcow2> -device pci-
assign,host=81:00.4
3. Bind all the PFs for the VFs being tested on VM with the igb_uio driver and start
qdma_testapp application on the host system.
4. Once the VM is launched, repeat steps in section 2.3 to build the DPDK on VM.
5. Bind the VF device in VM to igb_uio driver and execute qdma_testapp in VM as per
Section 2.5 and 2.6. Make sure to use the queue_base such that none of the queues
assigned to a function overlaps with other function.
Xilinx
User Guide QDMA DPDK Driver
$Date: 2018/12/10 $ Version $Revision: #8 $ Page 19 of 19
XILINX confidential
File DPDK_qdma_driver_user_guide.pdf
3 Document Revision History
Version
Date
Description
State
5
19-Sep-2018
DPDK user guide for QDMA 2018.2 release
Released
8
10-Dec-2018
Updates for 2018.3 QDMA DPDK driver release
Released
Table 3-1: Document Review History
