Presentation Daikin CIty User Guide
DaikinCItyUserGuide
User Manual:
Open the PDF directly: View PDF ![]() .
.
Page Count: 27

DAIKIN CITY USERGUIDE
Version 0.2
DAIKIN CITY USERGUIDE
Daikin City
•Navigation
•Application Buildings
•Functional Buildings
Index
Project Office
•Signing In
•Registration
•Overview Dashboard
•Managing Users
•Edit User
•User Groups
•Managing Businesses
•Edit a Business
•User Approvals
•Tools
•Browse Products
Projects
•Project List
•Create a new project
•Project Overview
•Create a new quote
•Quote Overview
•Quote List
•Add Products
•View and Modify Quote Products
•Import Products
•Transferring a Project
•Creating a Submittal Package
DAIKIN CITY USERGUIDE
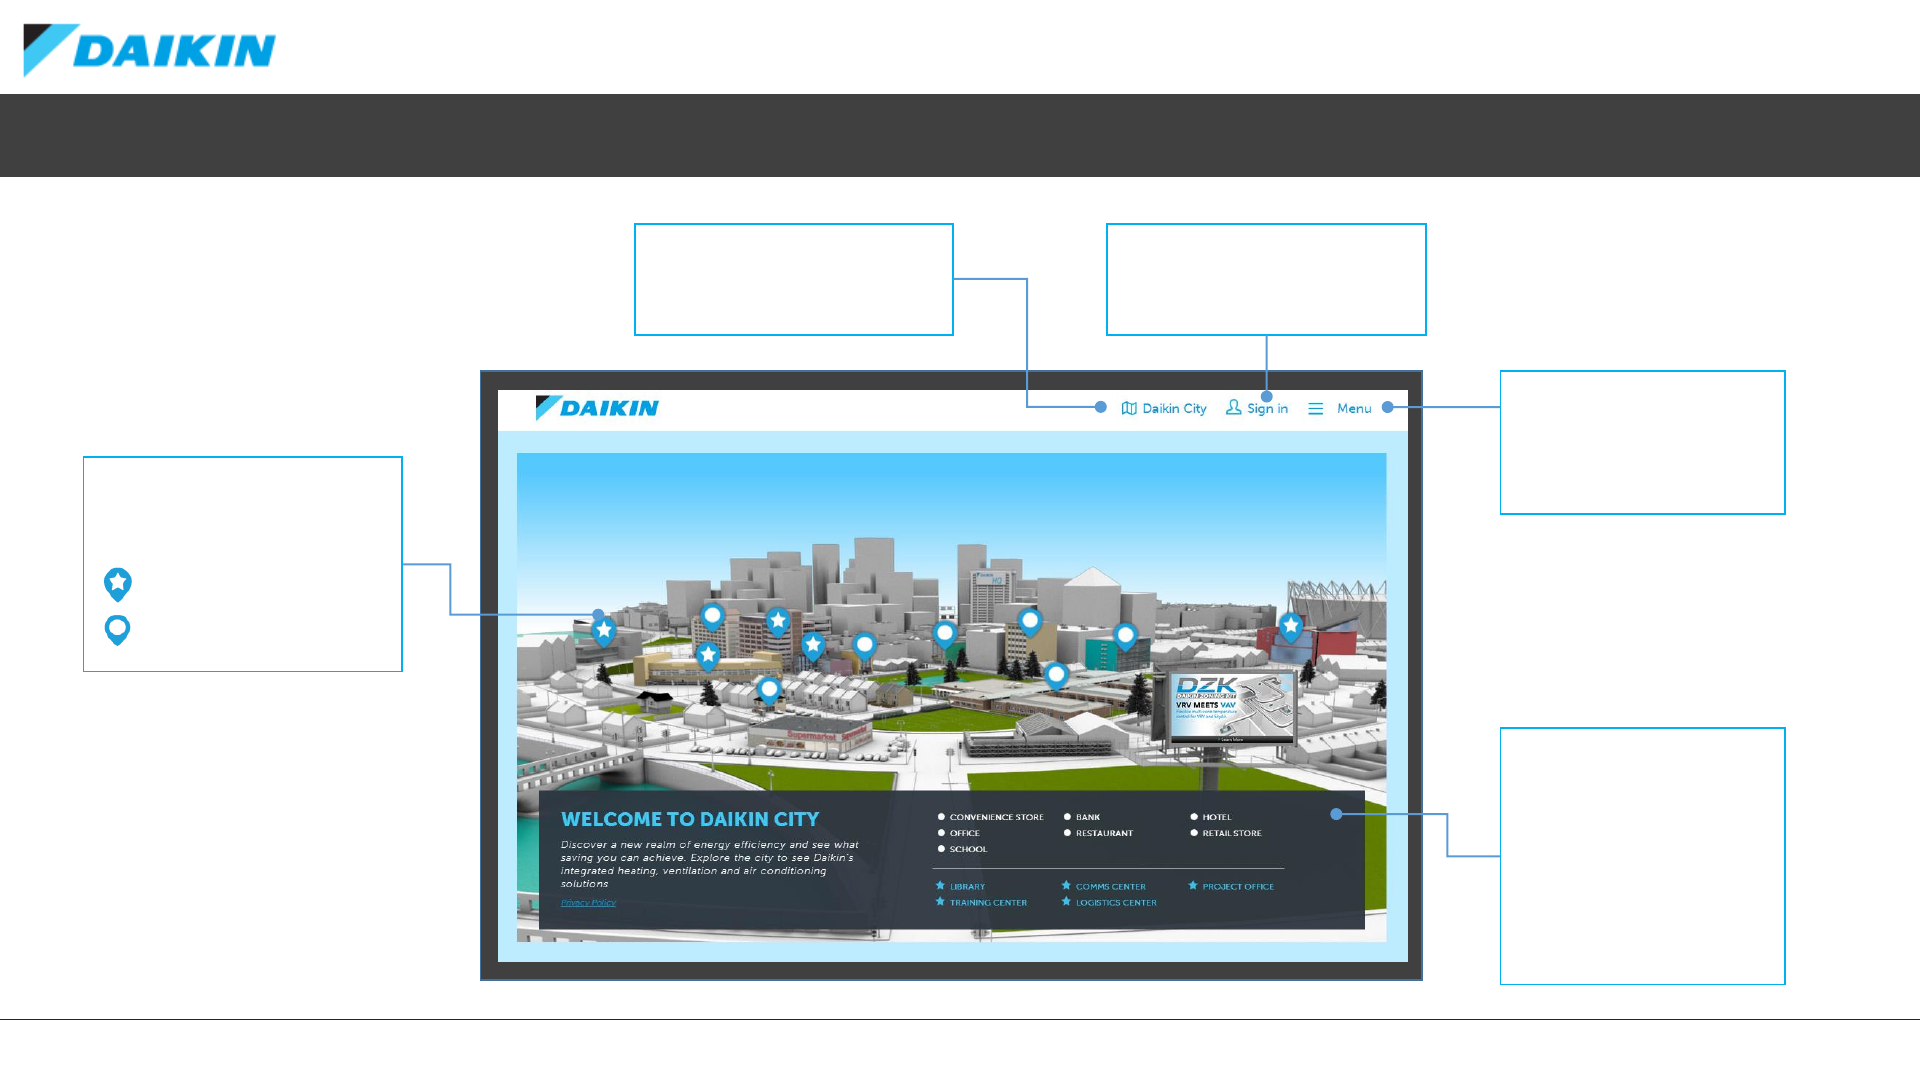
Daikin City - Navigation
QUICK LINKS
The buildings within the city
are grouped into functional
and application types.
Use these quick links to
jump straight into the
buildings without any
animation.
CITY HOME
Click here to return to this City
overview screen at any time.
NAVIGATION PINS
Click each pin to access
buildings via a zoom animation.
Functional Buildings
Application Buildings
PROJECT OFFICE SIGN-IN
Click here to sign into Project
Office from any screen.
MENU
Navigate between Buildings
from any screen from this
drop down menu.
DAIKIN CITY USERGUIDE
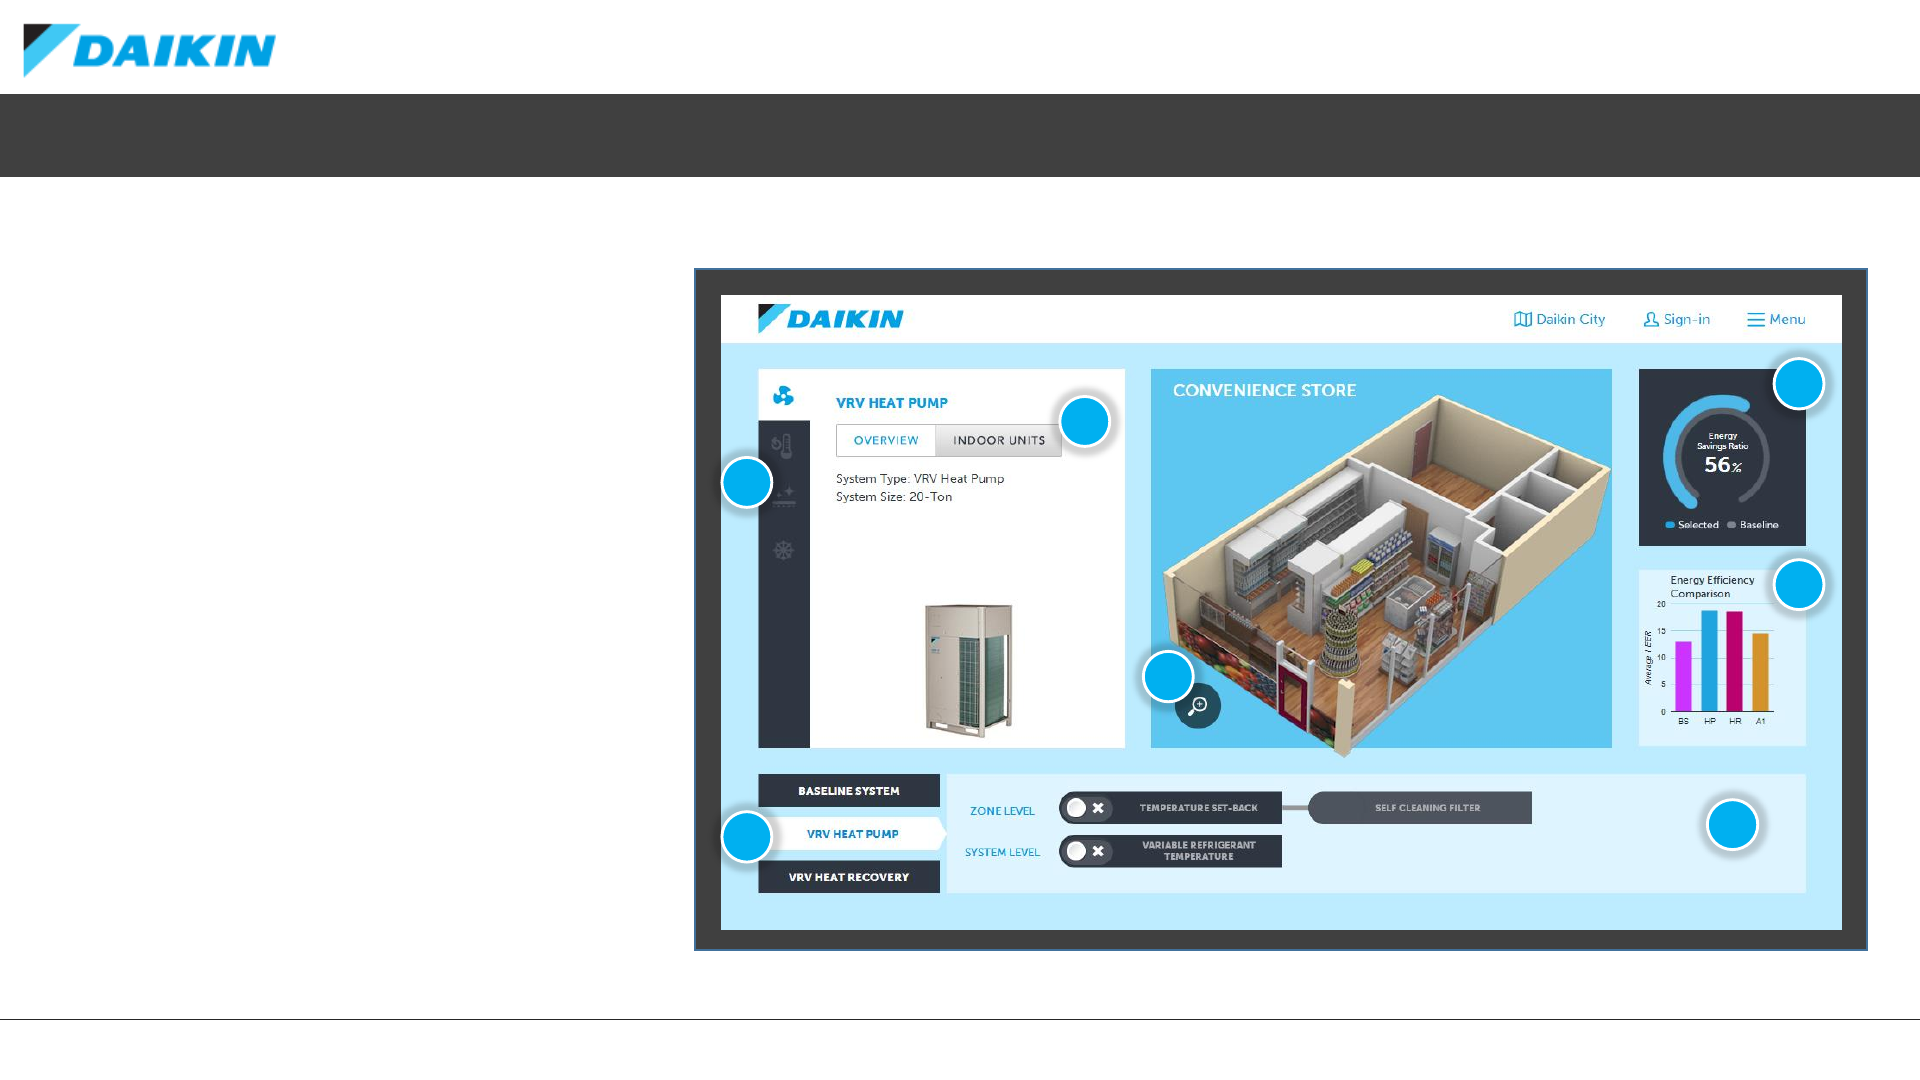
Daikin City –Application Buildings
Application buildings allow you to select and
compare the energy efficiency of various Daikin
systems and accessories in a given application.
1) Select a system (Baseline, VRV Heat Pump or
VRV Heat Recovery)
2) View the indoor (Overview) and Outdoor
components of the system
3) Compare the VRV systems’ energy efficiency
against the baseline system
4) Compare the average IEER values of the VRV
and Baseline systems against some alternatives
(Hover over each bar for a description)
5) Add accessories to the system for an
explanation and an possible additional saving
6) Select these icons to recap the accessory and
system information
7) Select this zoom icon for a closer look at the
building and selected system
1
2
3
4
5
7
6
DAIKIN CITY USERGUIDE
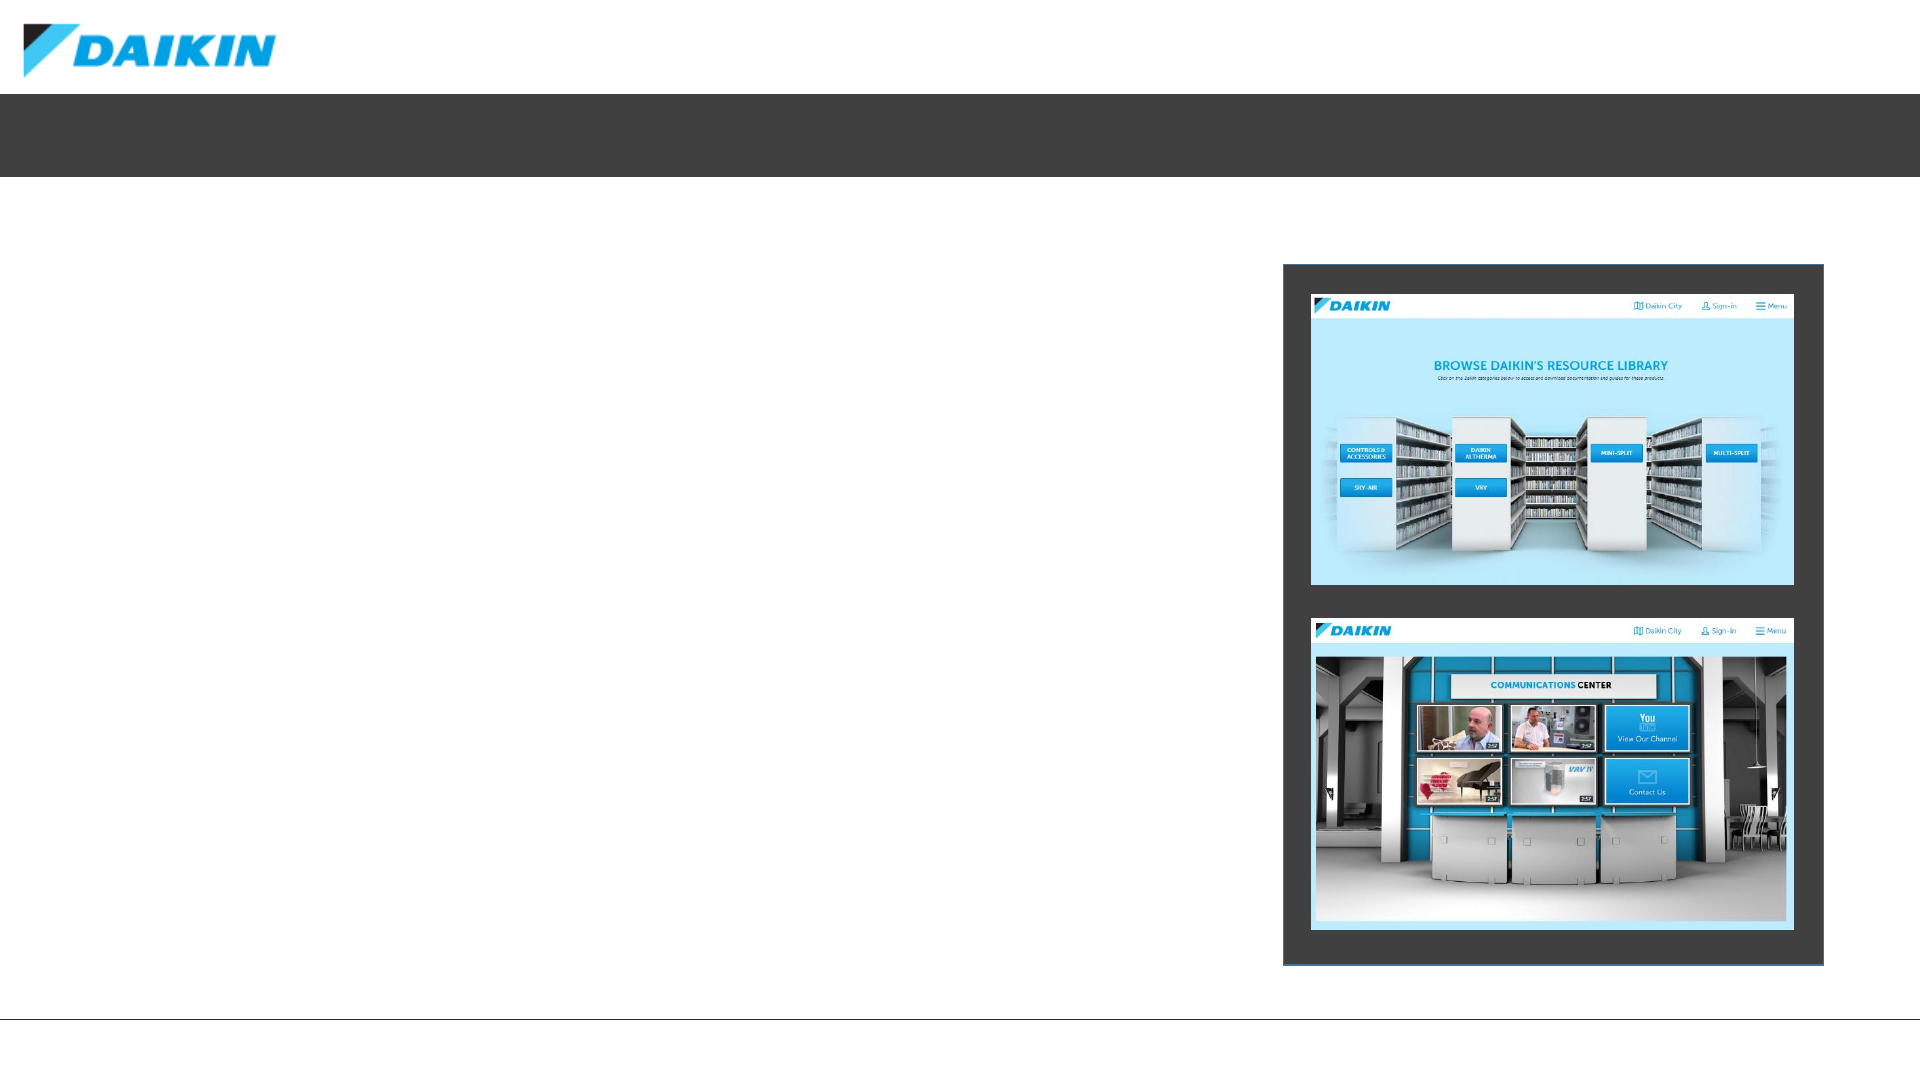
Daikin City –Functional Buildings
Functional Building represent various aspects of the Daikin ecosystem and allow direct access
to other portals and media assets.
•Communication Center
Visit the communication centre to access some video highlight, the Daikin YouTube channel
and contact Daikin directly
•Library
Browse Daikin’s resource library via product family. If signed into Project Office, various other
assets become available to download.
•Logistics Center
Access the Spare Parts and Inventory portals form the logistics centre.
•Training Center
Links directly to Daikin University for further learning opportunities.
•Project Office
Create and Manage all your Daikin projects from one central hub.
DAIKIN CITY USERGUIDE
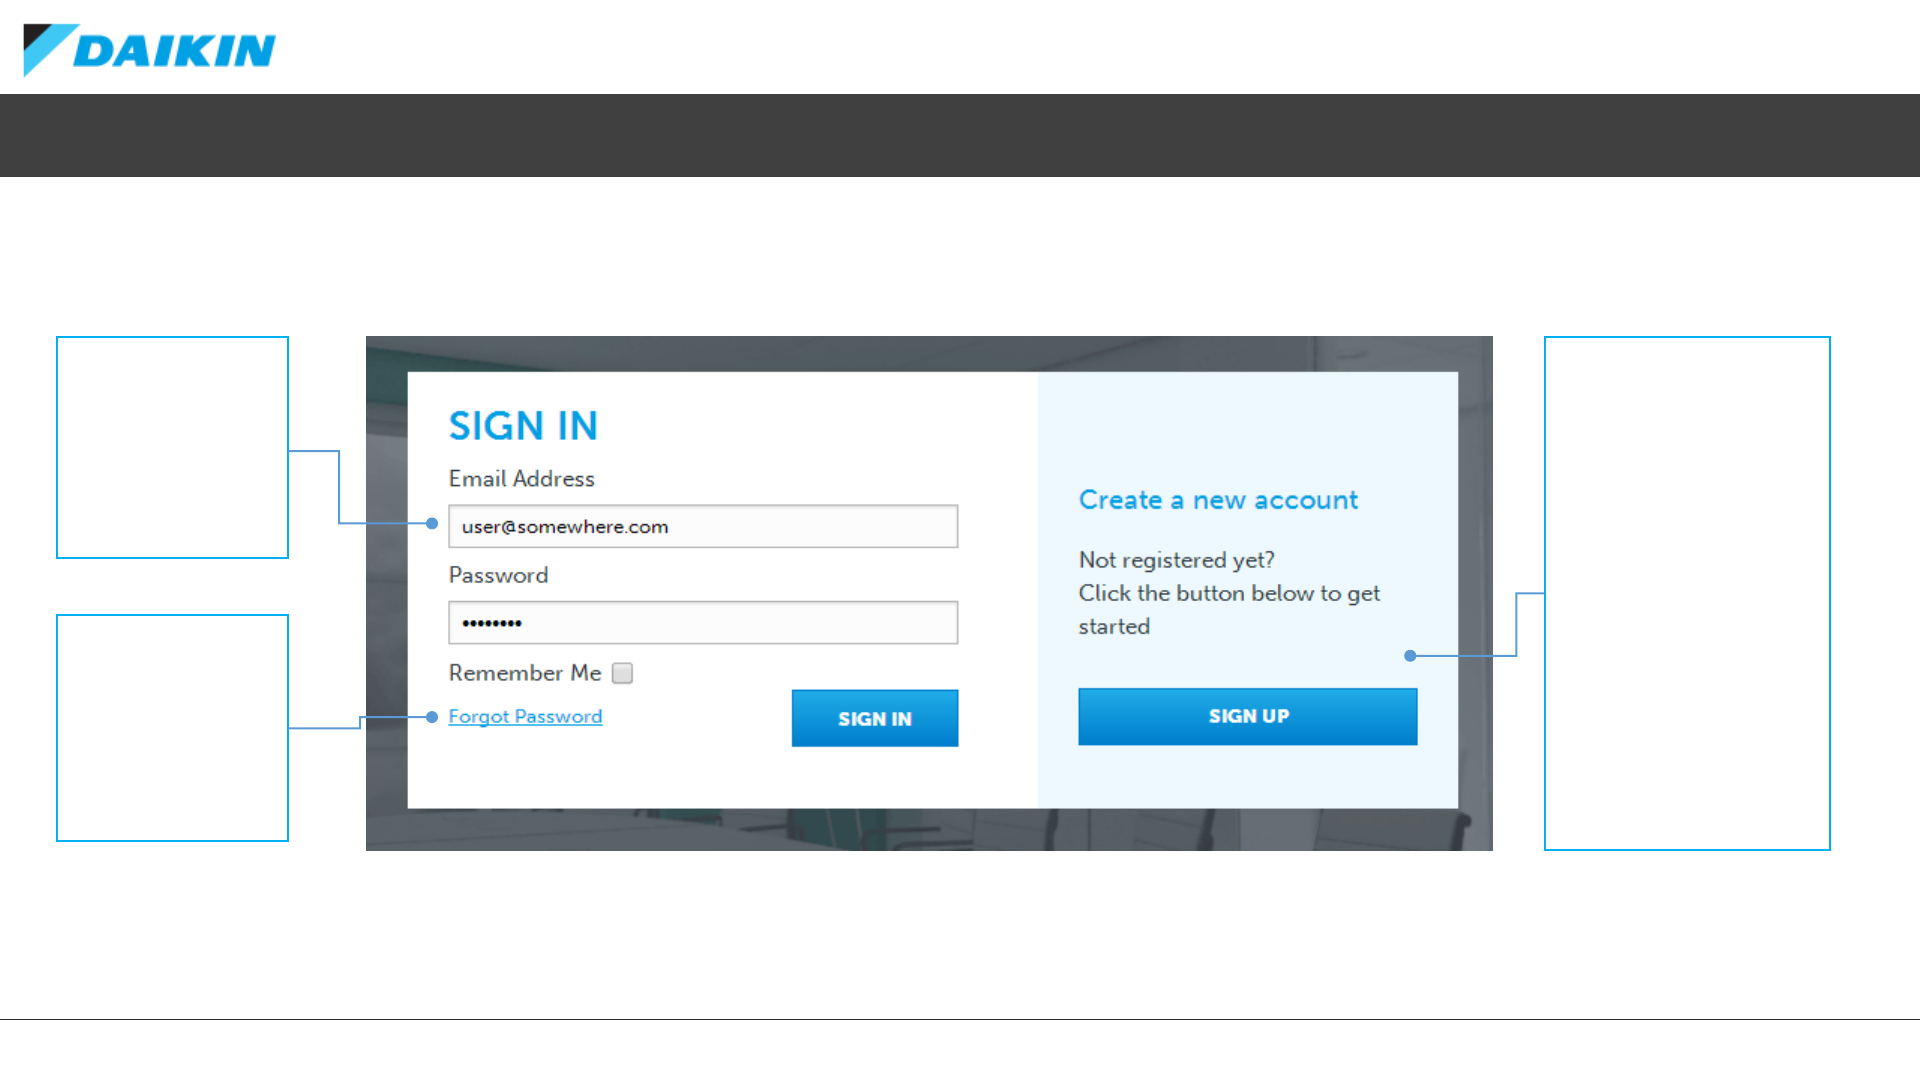
Project Office –Signing In
REGISTRATION
New users should click the
SIGN UP button to create
an account.
Please note, all users
must be approved before
having access to Project
Office.
If you are from a business
that is already registered,
your Administrator will be
able to approve you.
If you are from a new
business, Daikin will assess
you application and
approve you if appropriate.
SIGN IN
If already registered
with Project Office
and approved by
Daikin, enter your
email address and
password then click
SIGN IN to enter.
FORGOT
PASSWORD
If you cant remember
you log-in details,
click here to have
your password reset
and be sent an email.
DAIKIN CITY USERGUIDE
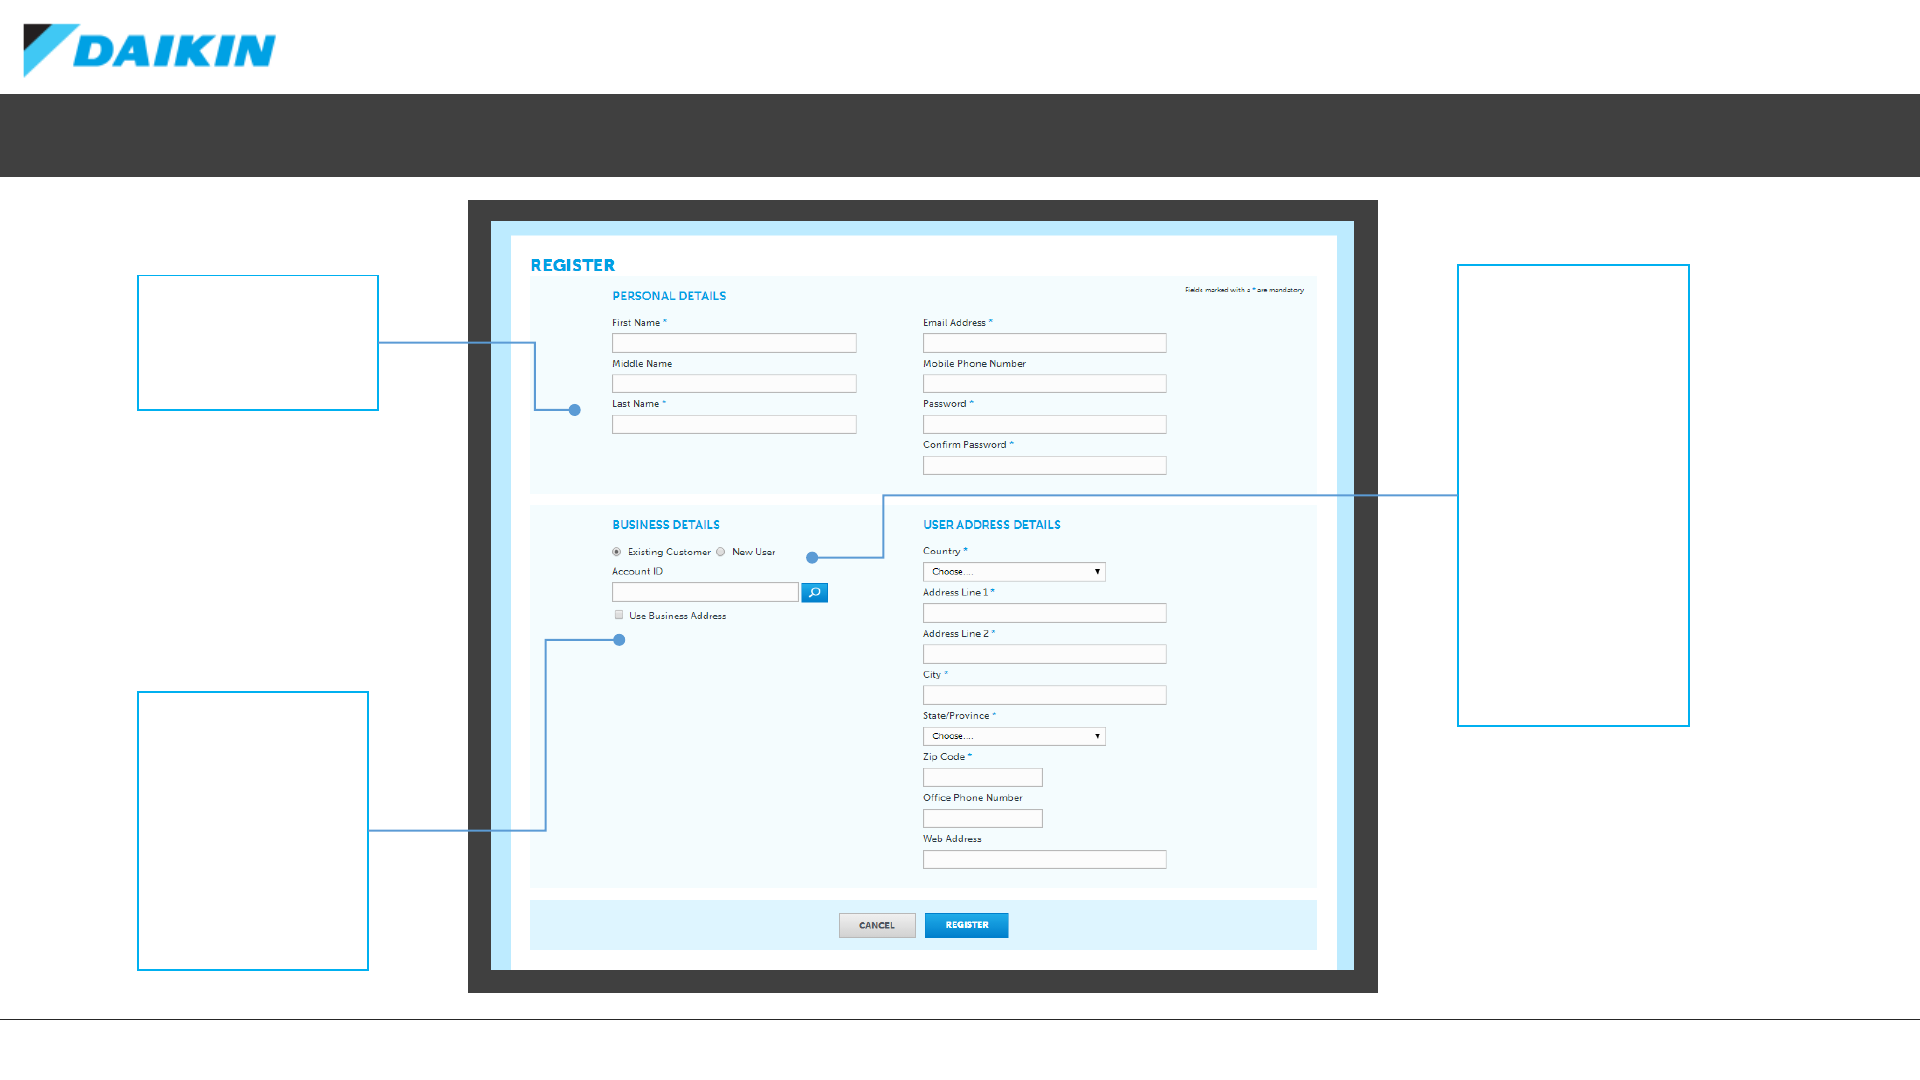
Project Office –Registration
PERSONAL DETAILS
Complete this section
of the form with your
personal details.
BUSINESS DETAILS
All users of Project
Office must be
associated to a
business. If you are
an existing Daikin
customer enter your
Account ID here. This
will allow your
registration to be
approved by your
administrator.
If you are a new
customer or don’t
know your account ID
your registration will
need to be approved
by Daikin Admin.
USE BUSINESS
ADDRESS
Once you have
entered your Account
ID, select this option
to use the existing
business address
details.
DAIKIN CITY USERGUIDE
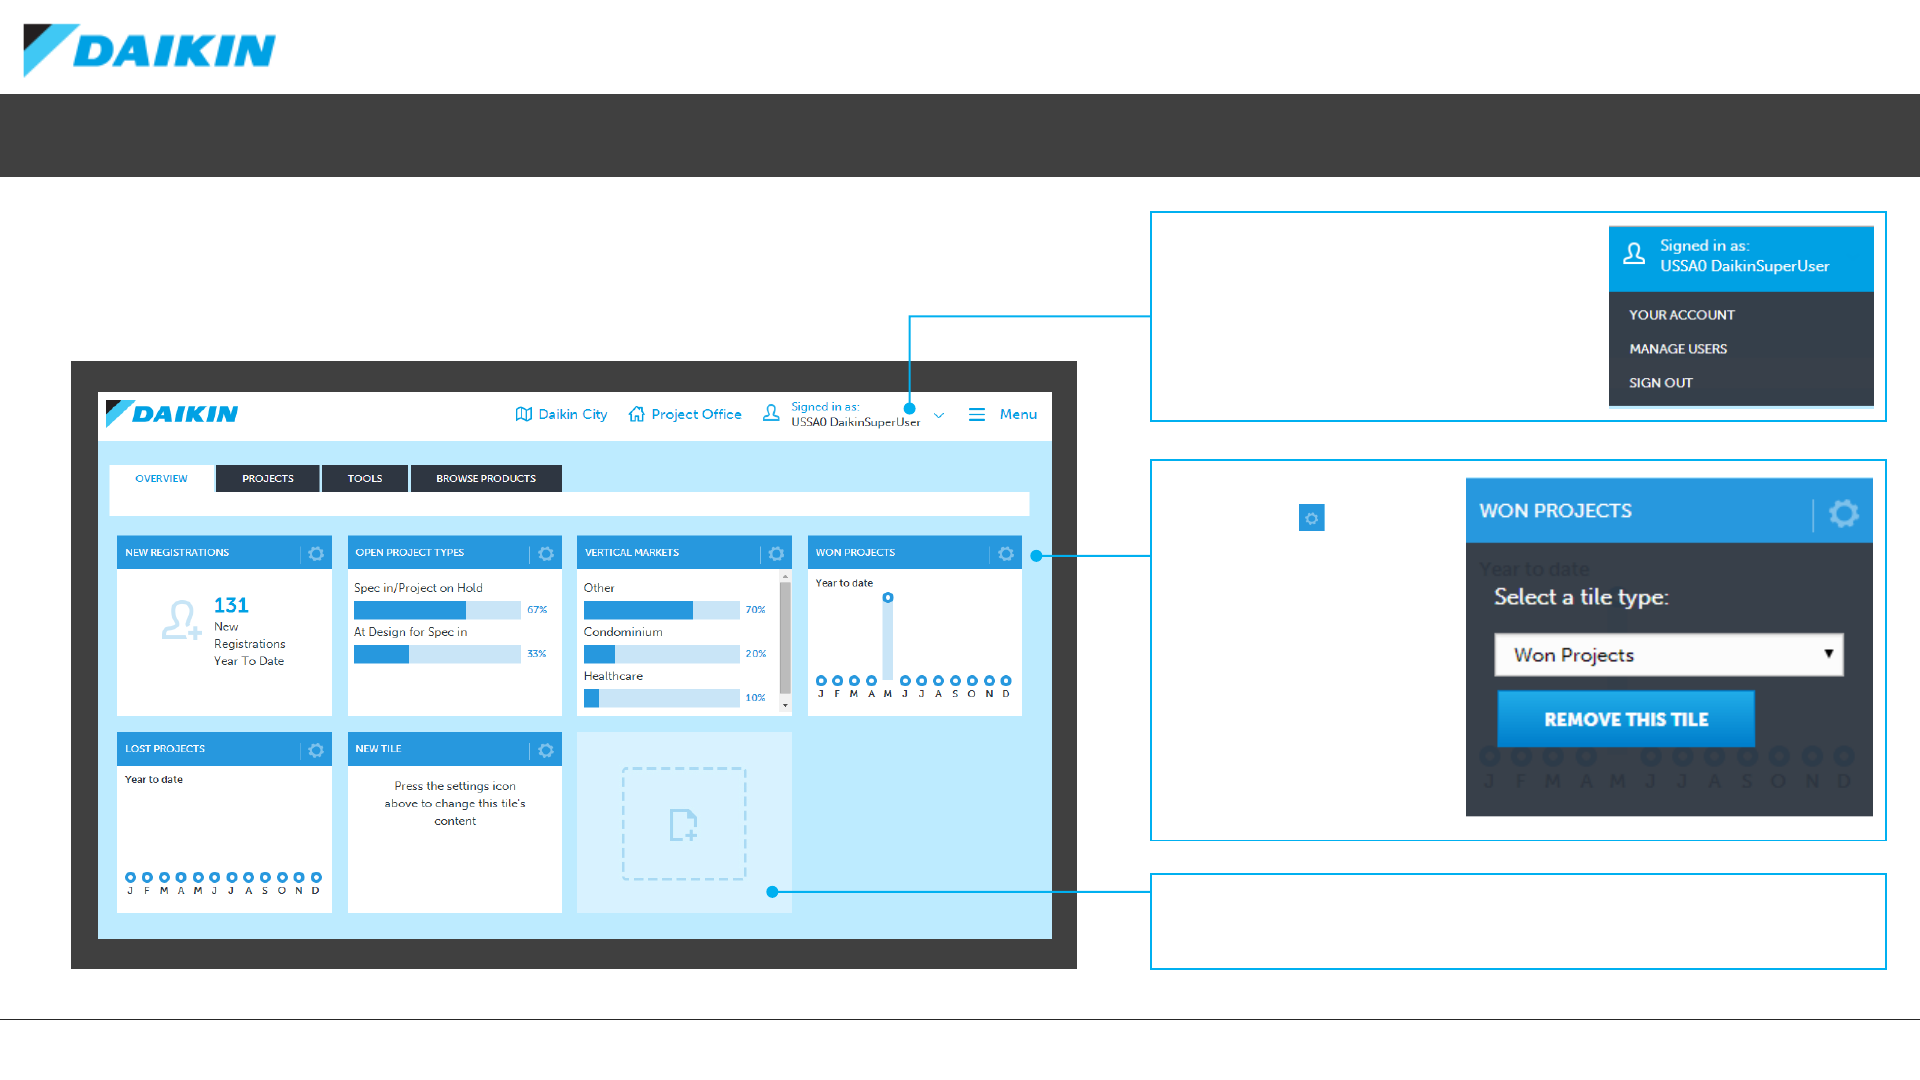
CUSTOMIZE TILE
By clicking the icon, you
can select the tile type to
display the information of
your choice.
Removing the tile all
together is also available
from this menu.
Project Office –Overview Dashboard
Once approved and successfully sign-in to Daikin Project Office, you will arrive at the
Overview Dashboard screen. This tile-based, customisable screen allows you to view your
selected data at a glance.
ADD NEW TILE
Click the empty tile to select which content you would like to appear.
USER DROP-DOWN MENU
When signed into Project Office, the user
menu becomes active. From here you can
edit your account details, manage other
users (If applicable) and sign out.
DAIKIN CITY USERGUIDE
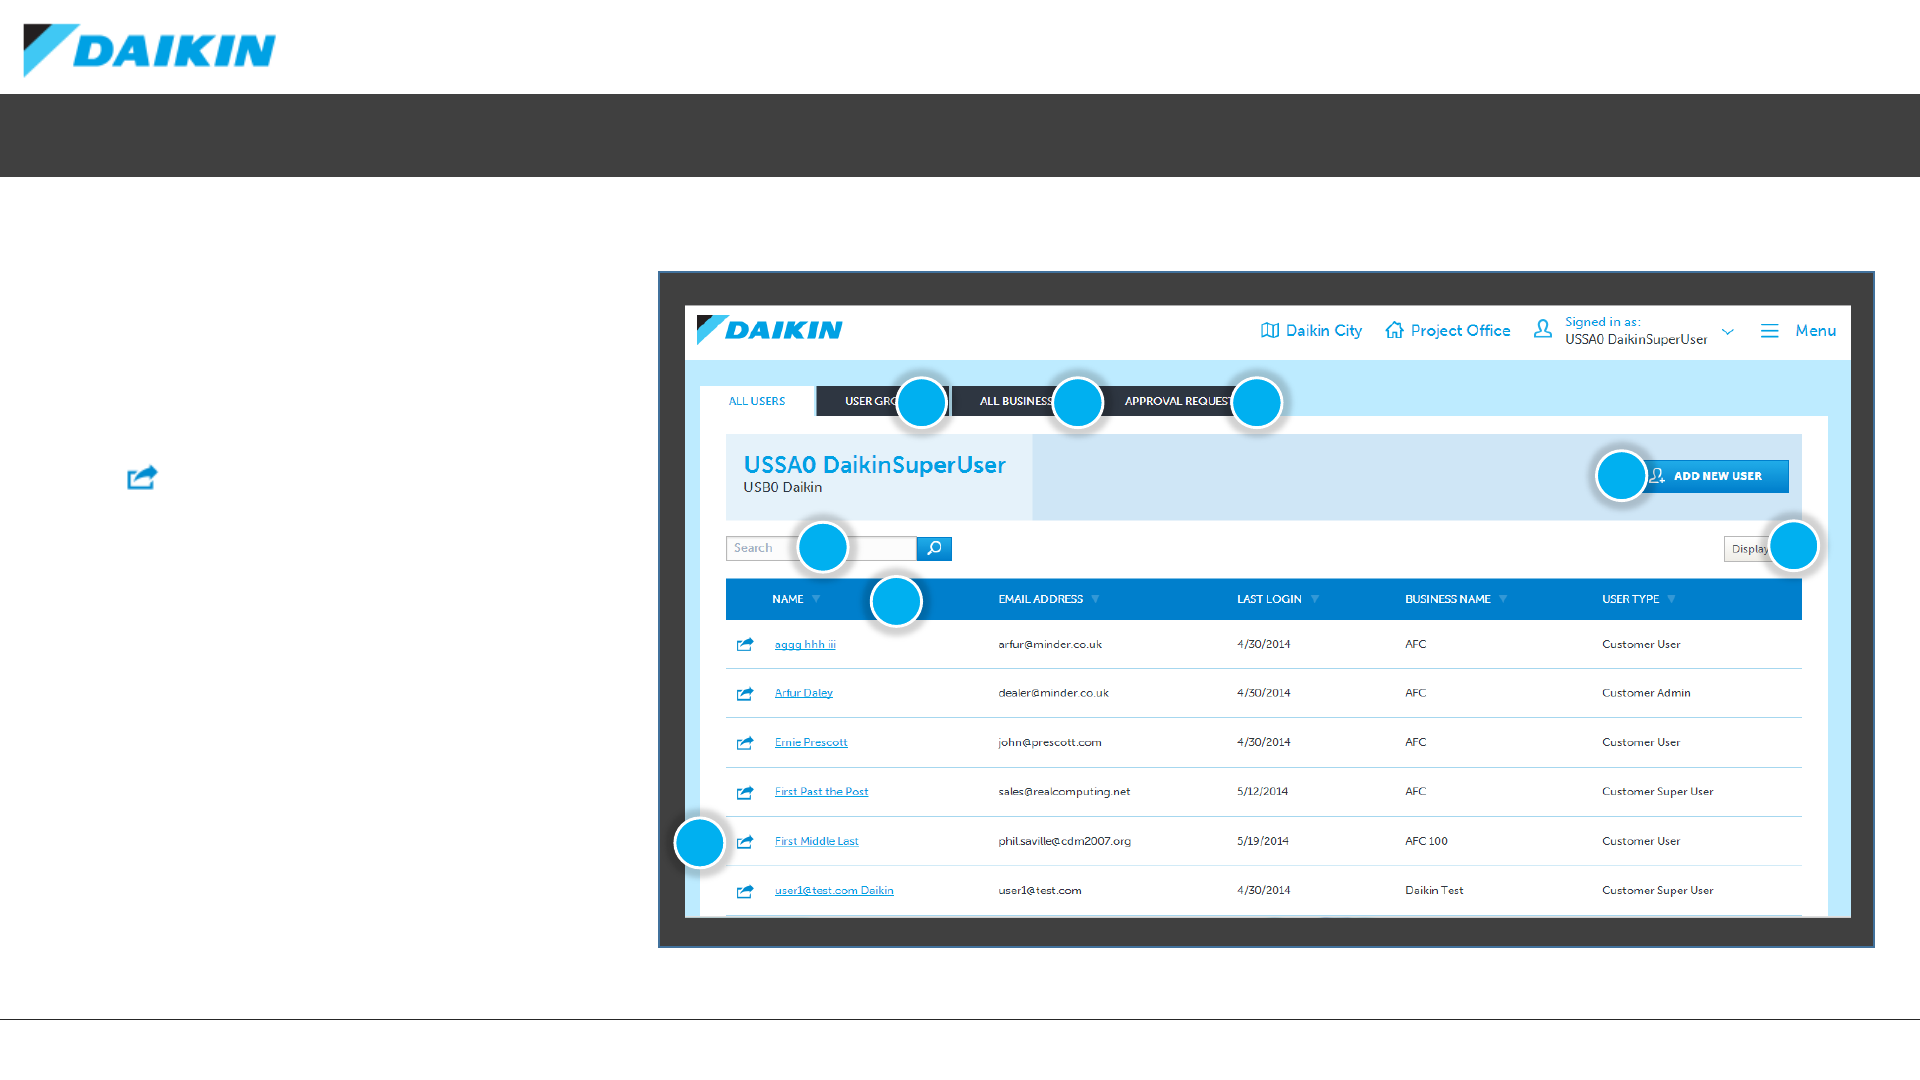
Project Office –Managing Users
If your user type permits, selecting MANAGE
USERS from the user menu takes you to the ALL
USERS screen of the Users section of Project
Office. Here you can add, view, edit and disable
users.
1) Select the User Action button to edit or
disable a user
2) Click the column header to sort by that field
3) Search for a user by name or email address
4) Customize which columns are visible and
how many rows to show on each page
5) Add new users to Project Office
6) View User Groups
7) View Businesses
8) View Approval Requests 1
2
34
5
76 8
DAIKIN CITY USERGUIDE
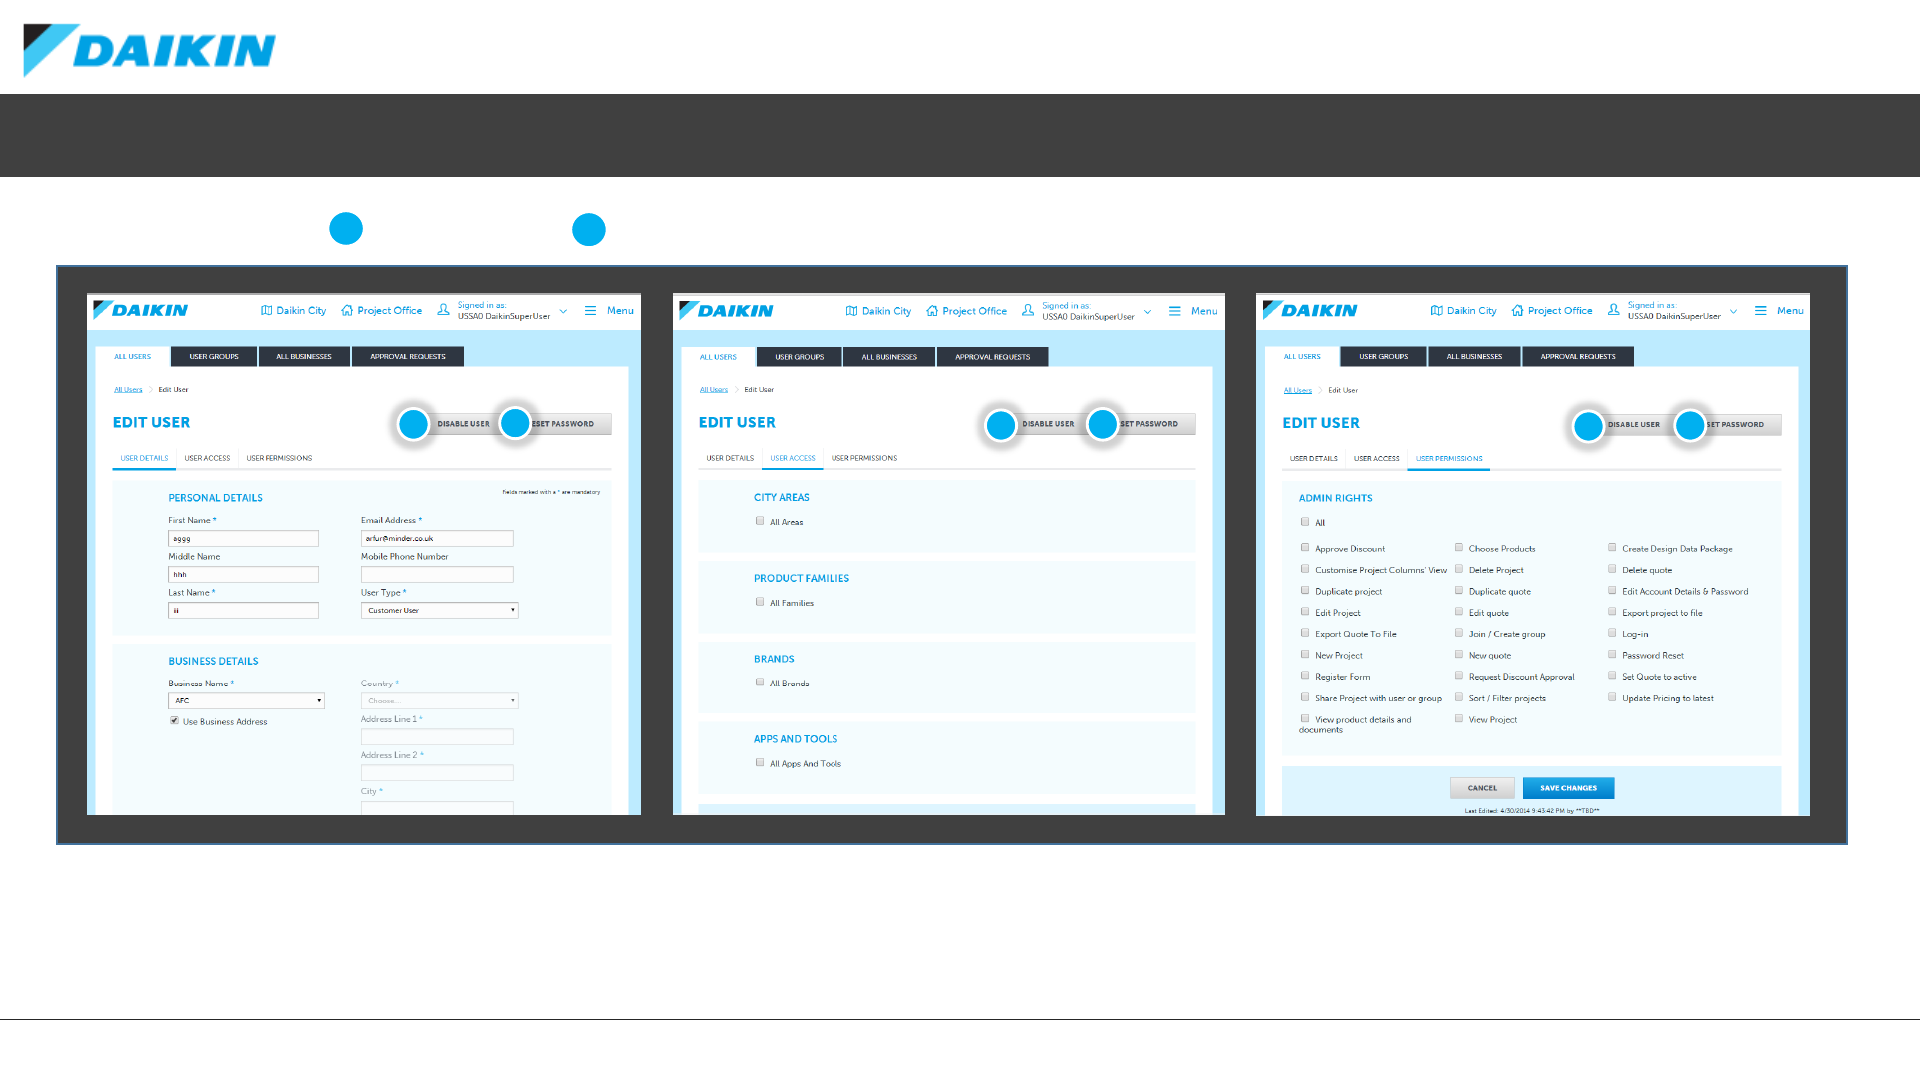
Project Office –Edit User
User Details
Use this tab to update the users personal details as well
as which business they are associated with. You can also
add a different address than the business default here.
As well as being able to 1) DISABLE users and reset their password, the EDIT USER screen also consists of three tabs:
User Access
Under this tab you can set which features the user has
access to. The defaults are based on BUSINESS TYPE.
User Permission
This tab enable you to set which actions the user is able
to perform. The defaults are based on USER TYPE.
121212
12
DAIKIN CITY USERGUIDE
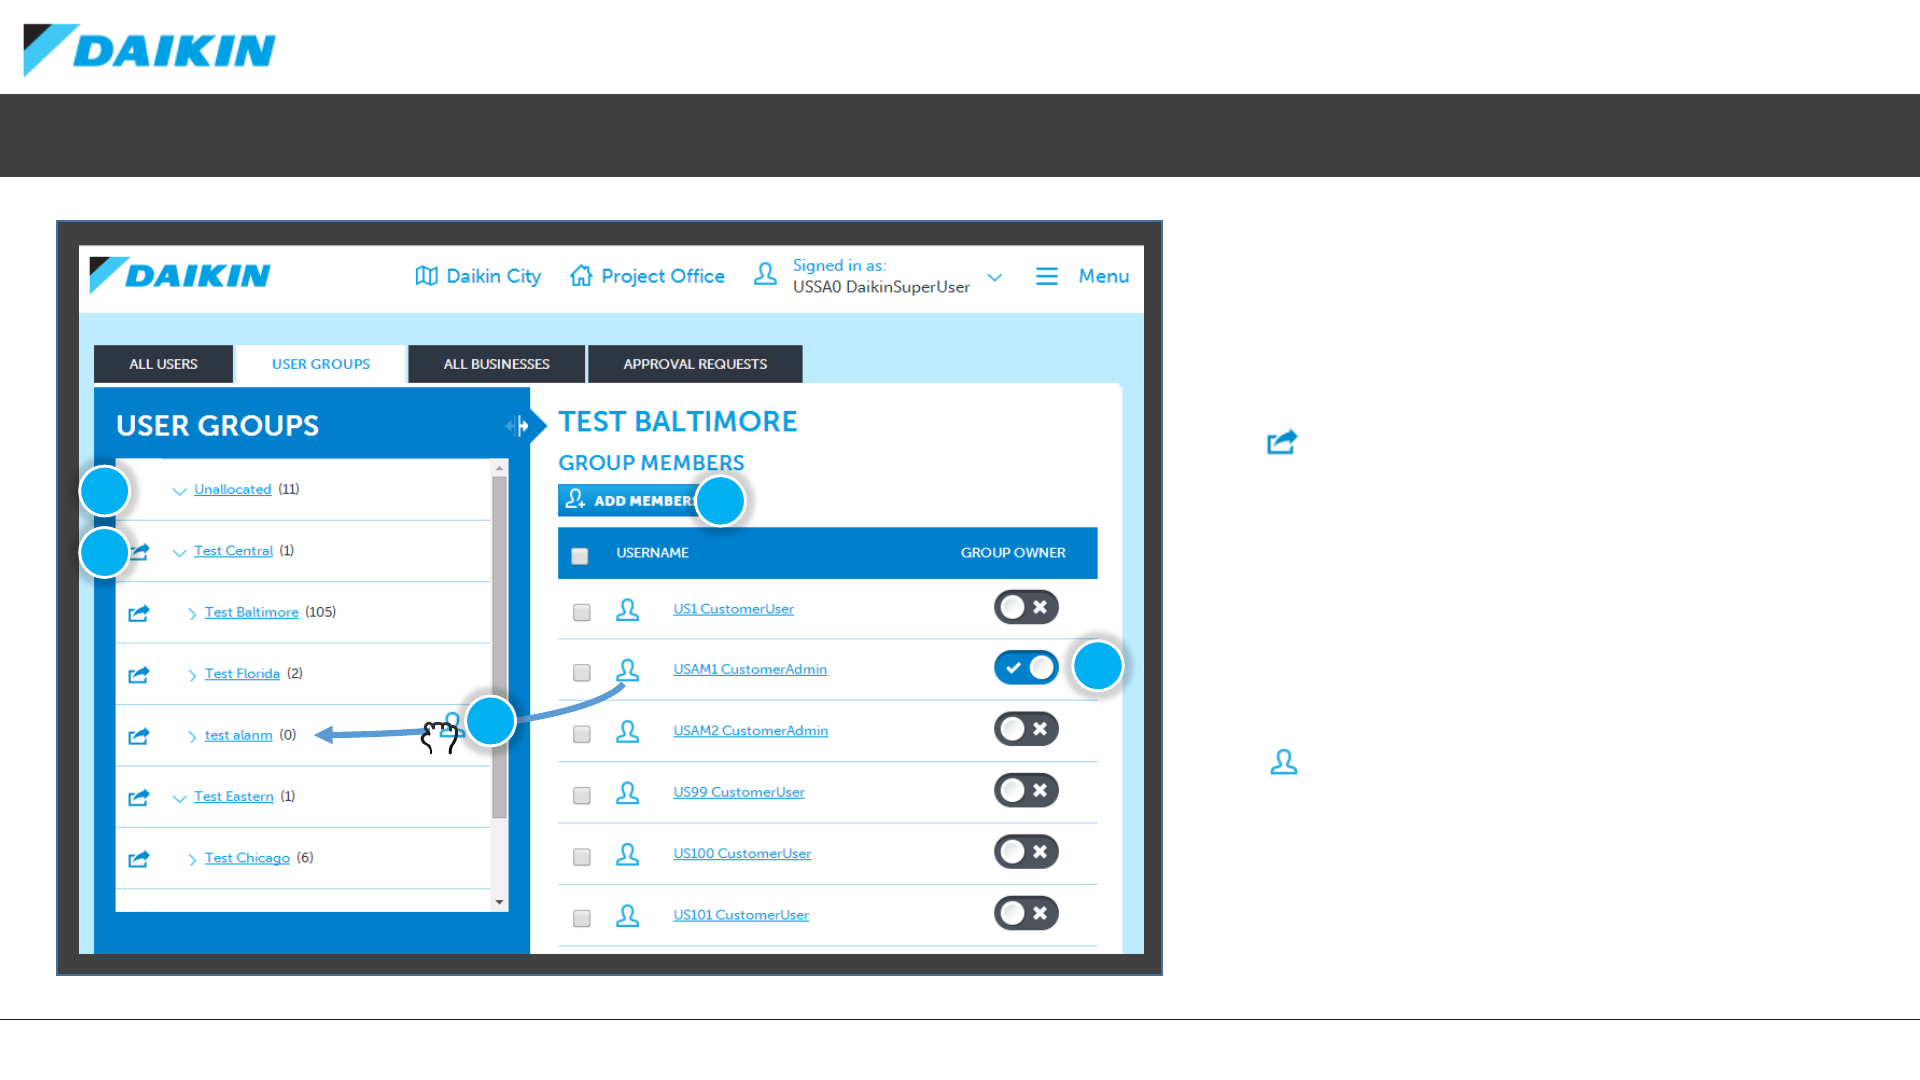
Project Office –User Groups
All users of Project Office must be part of a
group. Select USER GROUPS from the USERS
portal to manage groups and their users.
1) By default, all newly added users are placed
in the Unallocated group
2) Click the action button to move or edit
groups or add a subgroup
3) Click the ADD MEMBERS button to add users
to the currently selected group
4) Each group can have multiple owners,
allowing them to edit their group and all
groups within it. Select the owner of the
currently selected group here
5) To move a user to a different group, drag the
icon from the members list into a
different group in the group list
1
2
3
4
5
DAIKIN CITY USERGUIDE
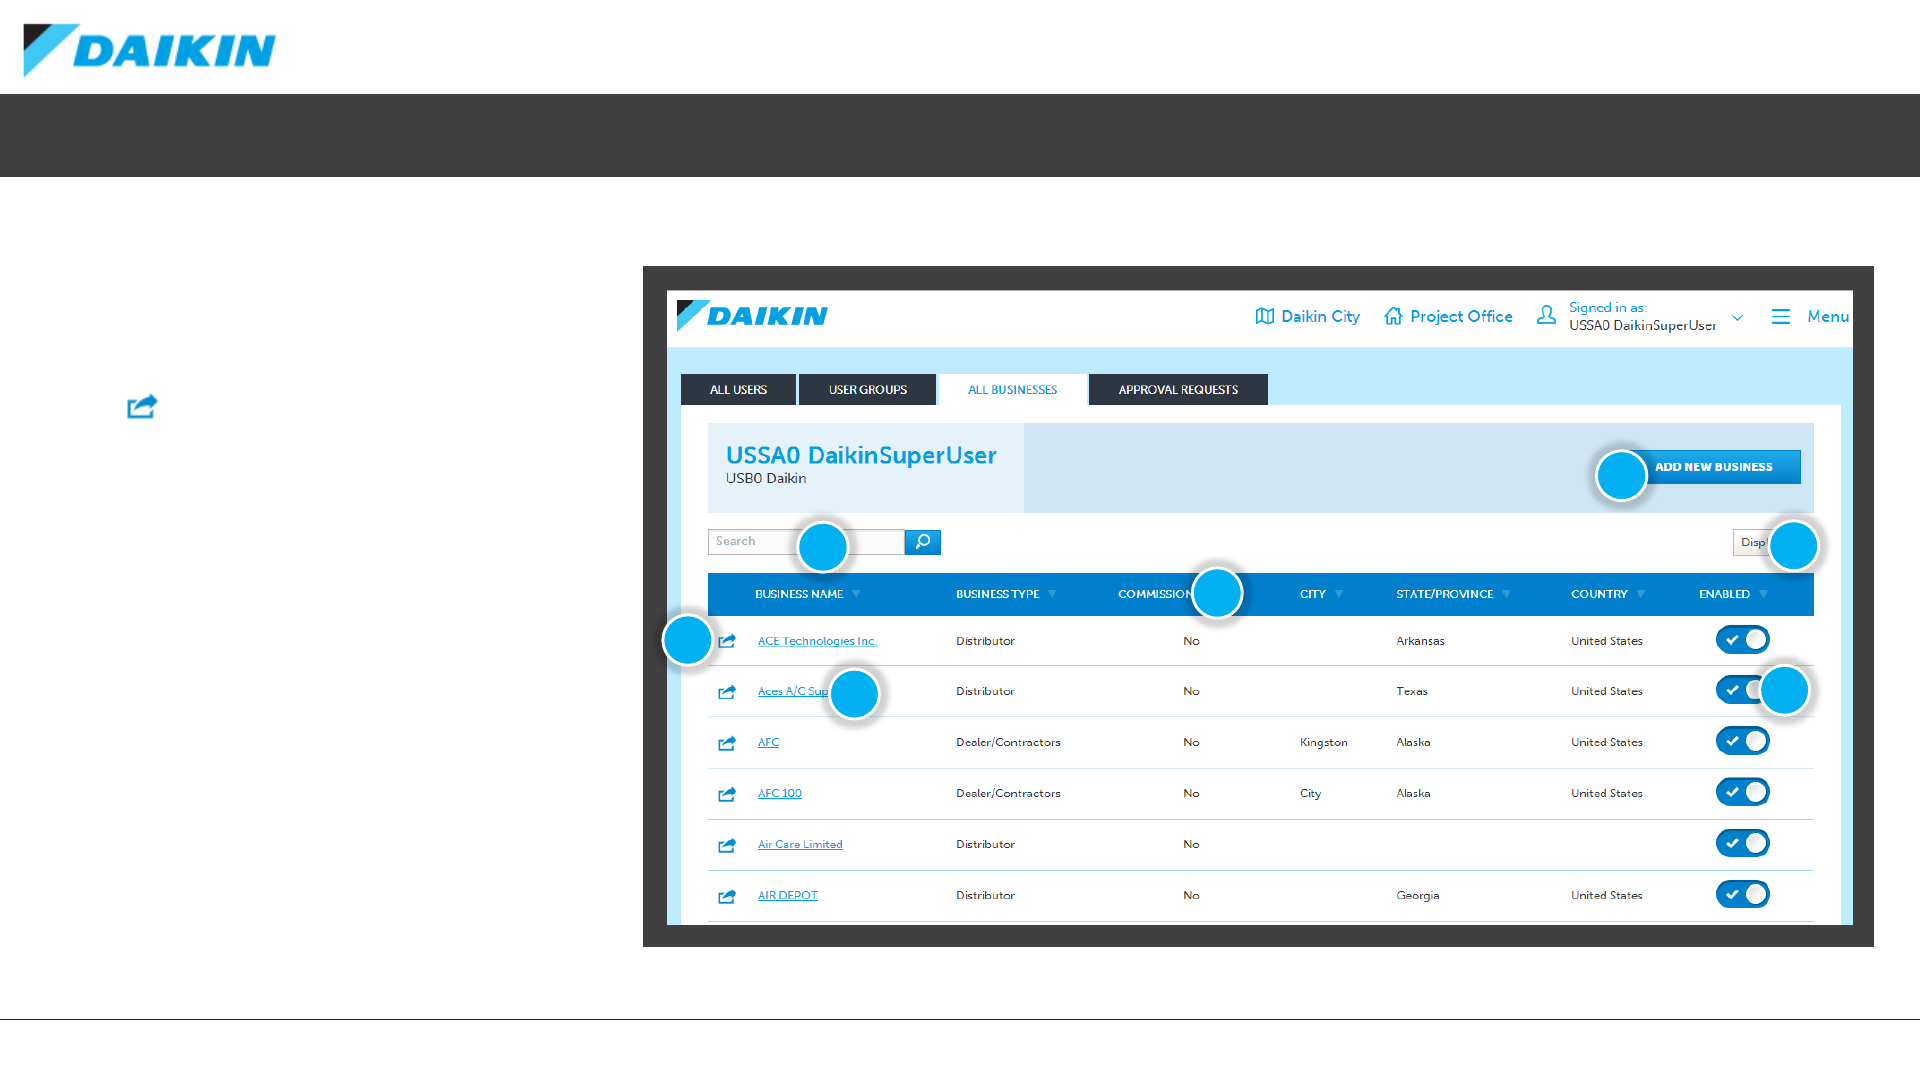
Project Office –Managing Businesses
Users of Project Office must be associated to a
business. Select ALL BUSINESSES from the
USERS portal to manage businesses.
1) Select the Action button or click the
business name to edit a business
2) Click the column header to sort by that
field
3) Search for a business by name
4) Customize which columns are visible and
how many rows to show on each page
5) Add new businesses to Project Office
6) You can enable/disable businesses and all
associated users from here
1
2
34
5
16
DAIKIN CITY USERGUIDE
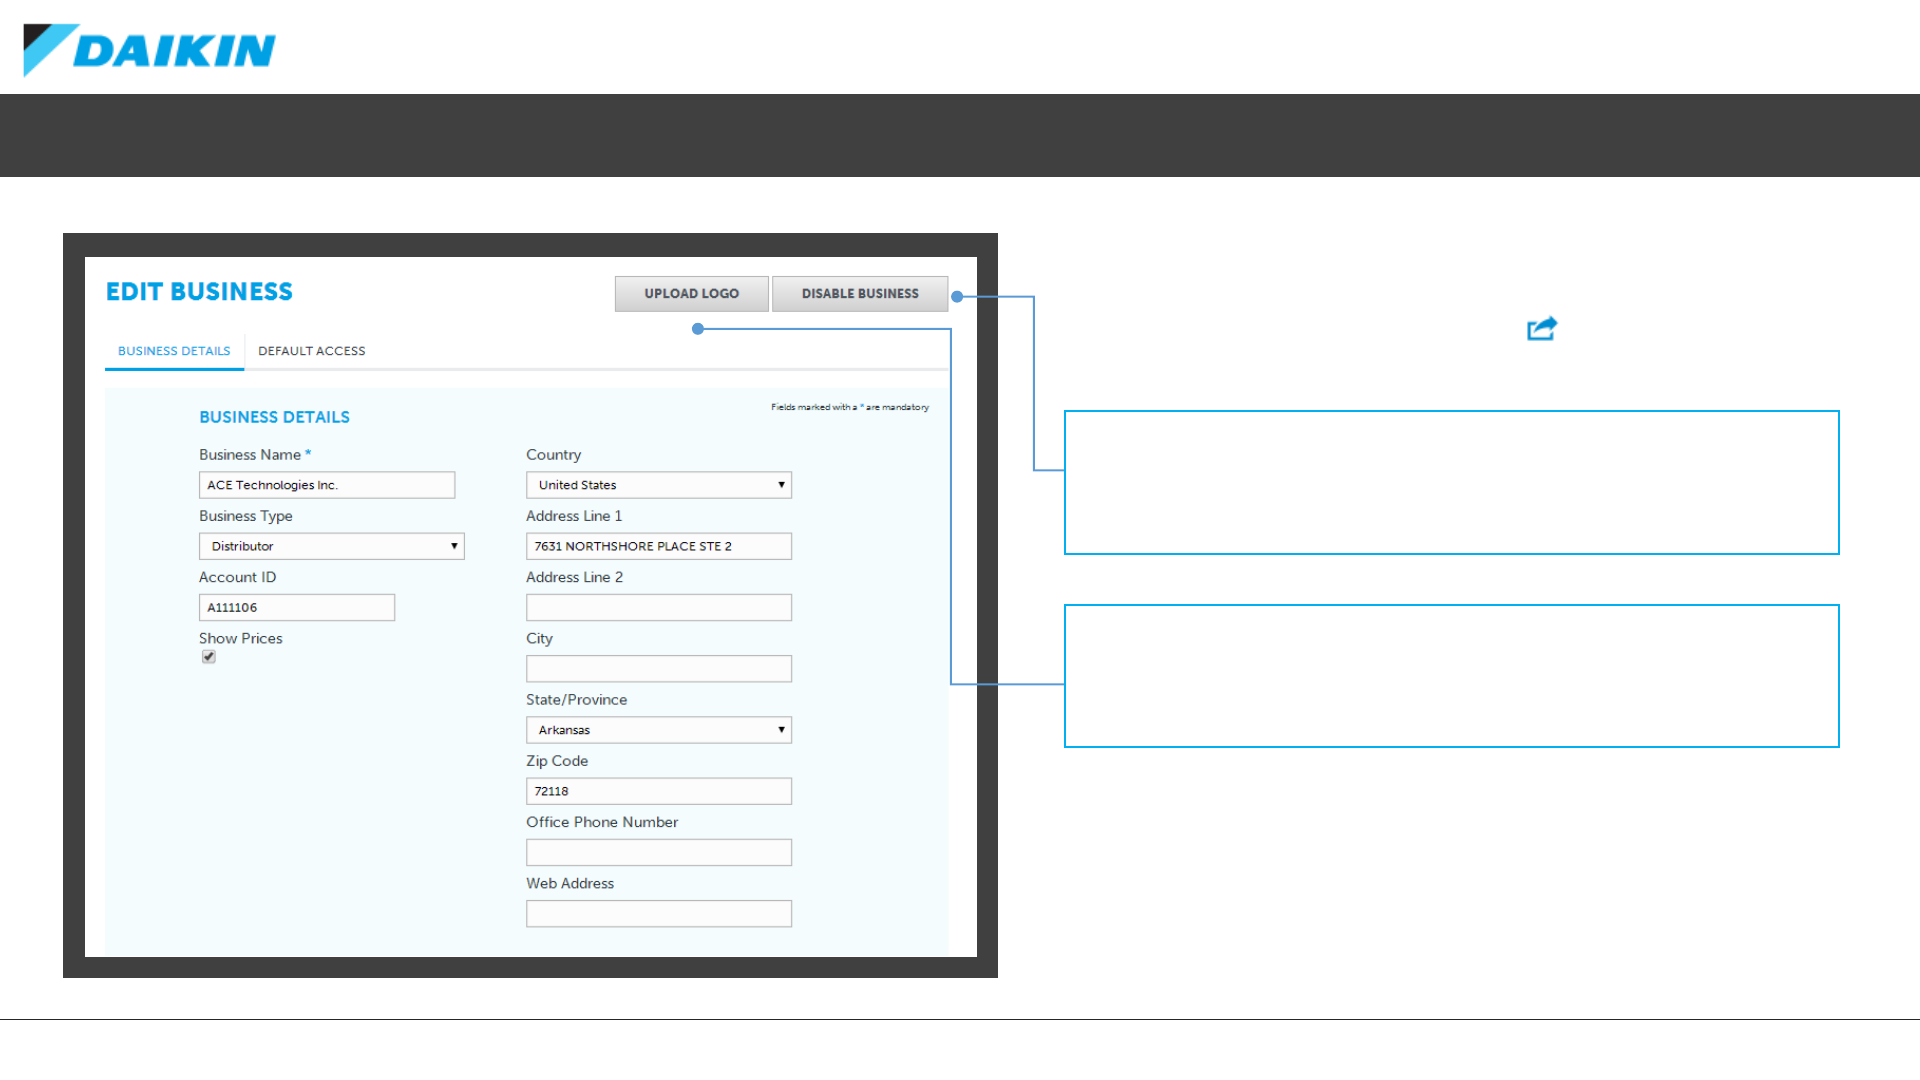
Project Office –Editing a Business
To edit the details of a business, click the name of the business from
ALL BUSINESSES or use the action menu
DISABLE BUSINESS
Use this option to disable the business and all associated users from Daikin City
Project Office. Daikin Admin will be required to re-enable the businesss.
UPLOAD LOGO
Use this option to upload a business logo to be used on submittal packages.
The maximum file size for Business Logos on 75kb.
DAIKIN CITY USERGUIDE
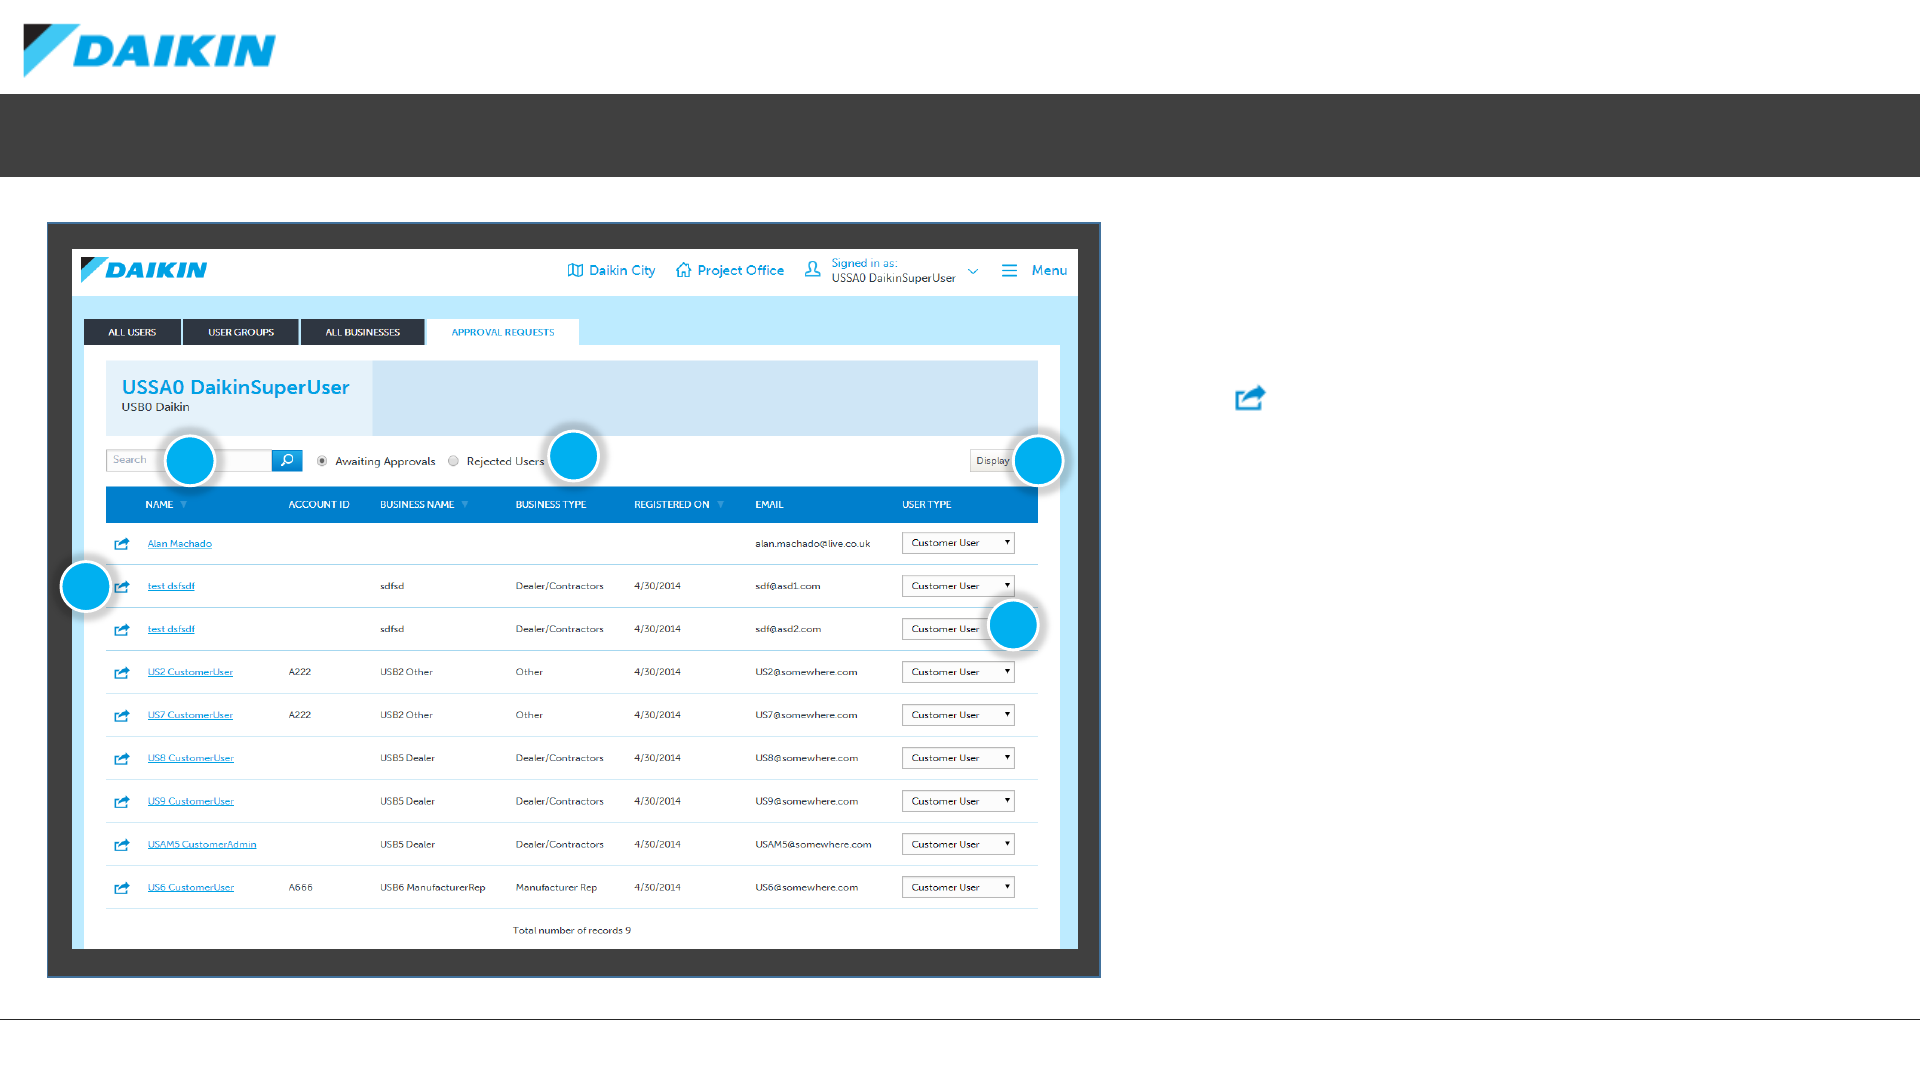
Project Office –User Approvals
All users of Project Office must be approved before
they can gain access. Depending on your USER TYPE,
you can APPROVE or REJECT user from the APPROVAL
REQUEST screen.
1) Click the action button to edit, approve or reject
users
2) Search for users by name or email address
3) Toggle the users list between Awaiting Approval or
Rejected Users
4) customize the view by Showing/Hiding Columns
and set the Row Amount visible per page
5) Set the User Type of each user from these
dropdown menus
1
2 4
5
3
DAIKIN CITY USERGUIDE
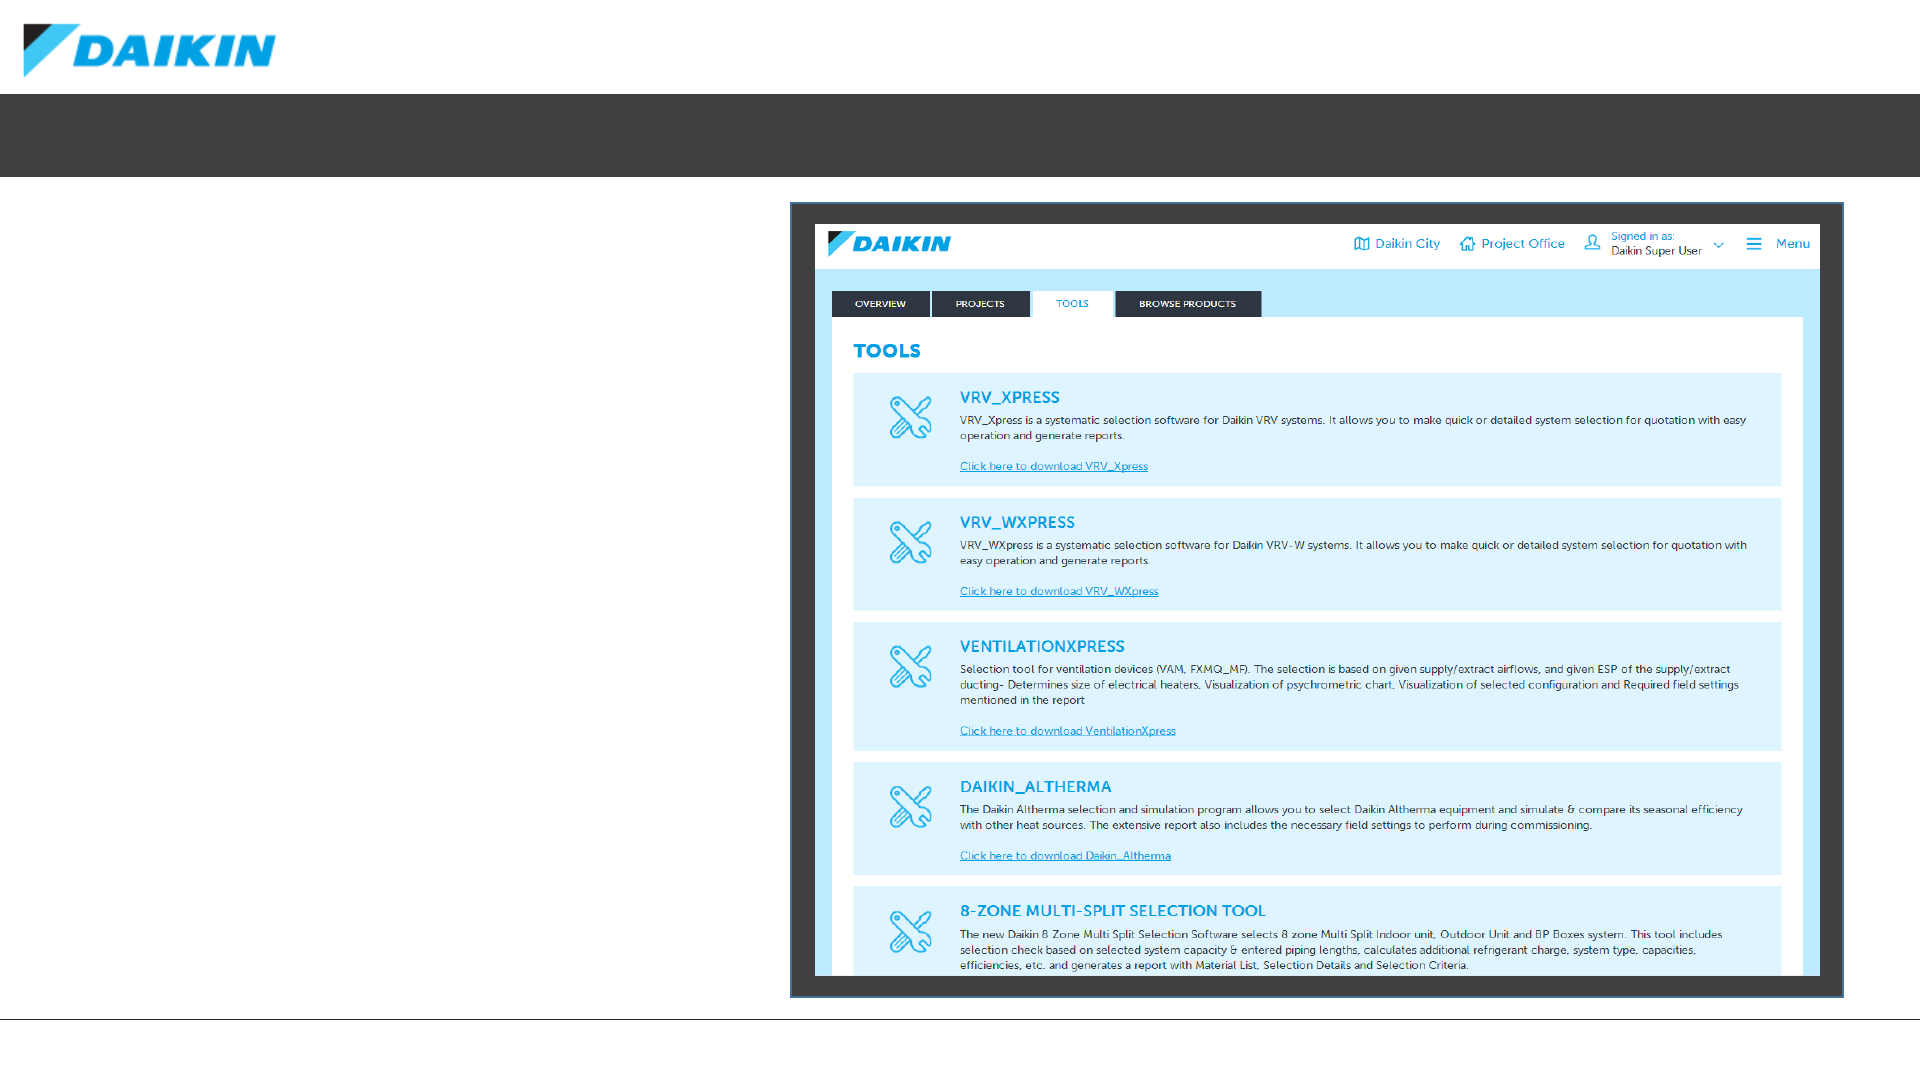
Project Office –Tools
The tools tabs gives access to a range of useful
Daikin tools, including a short descriptions and
download links.
Tools Include:
•VRV Xpress
•VRV Wxpress
•Ventilation Express
•Daikin Altherma
•8-Zone Multi-Split Selection Tool
•Psychometric
•Unit Convertor
DAIKIN CITY USERGUIDE
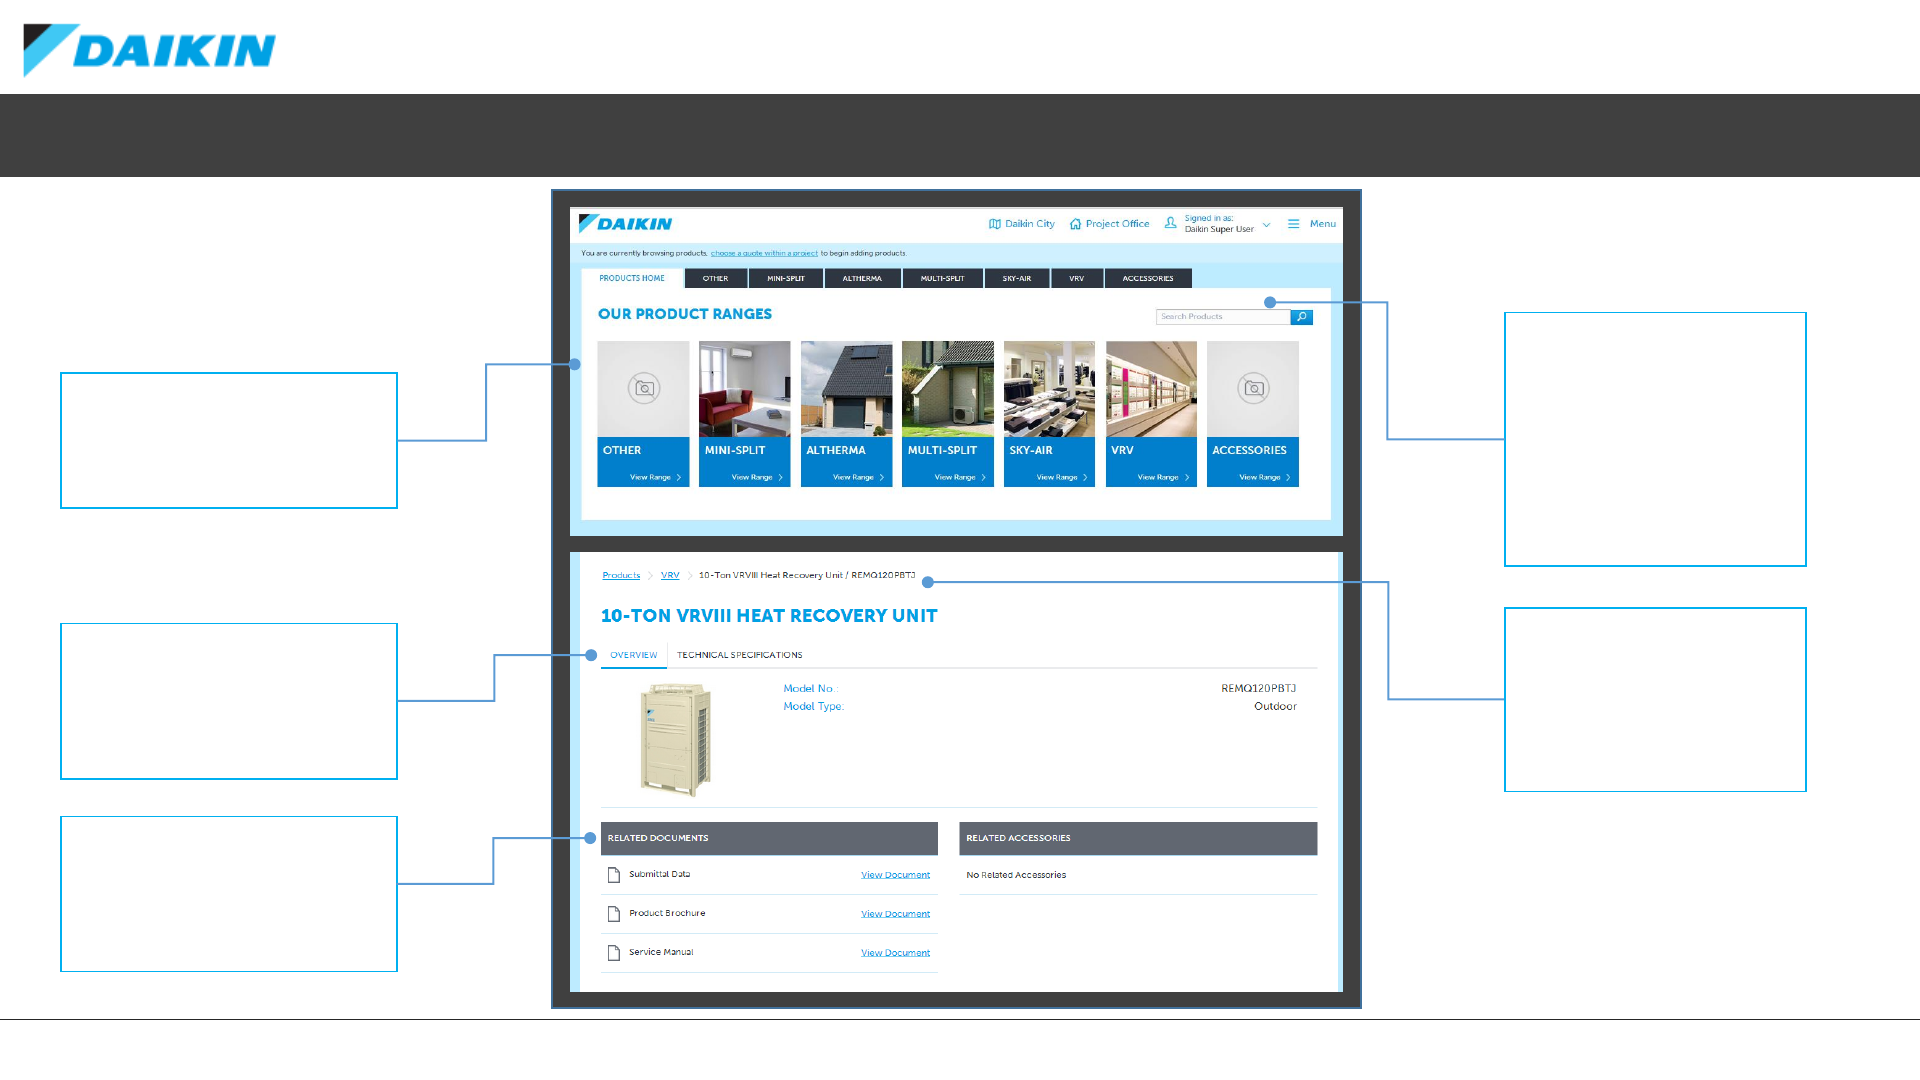
Project Office –Browse Products
The Browse Products tab allows
you to view the entire Daikin range,
outside of a creating a quote.
PRODUCT RANGES
Filter your view by product range
or chose to view accessories or
other products.
PRODUCT TABS
Use these tabs to navigate
between product overview,
technical specifications and
related accessories.
RELATED DOCUMENTS
Links to useful related documents
such as submittal sheets and
product brochures.
PRODUCT SEARCH
Search for a product by name
or ID.
To search across all products,
use the search box on the
Products Home screen. To
filter by product range, first
select the relevant tab or tile.
BREADCRUMB LINKS
View your current position in
the product hierarchy and
use the quick links to jump
back to product home or
product range.
DAIKIN CITY USERGUIDE
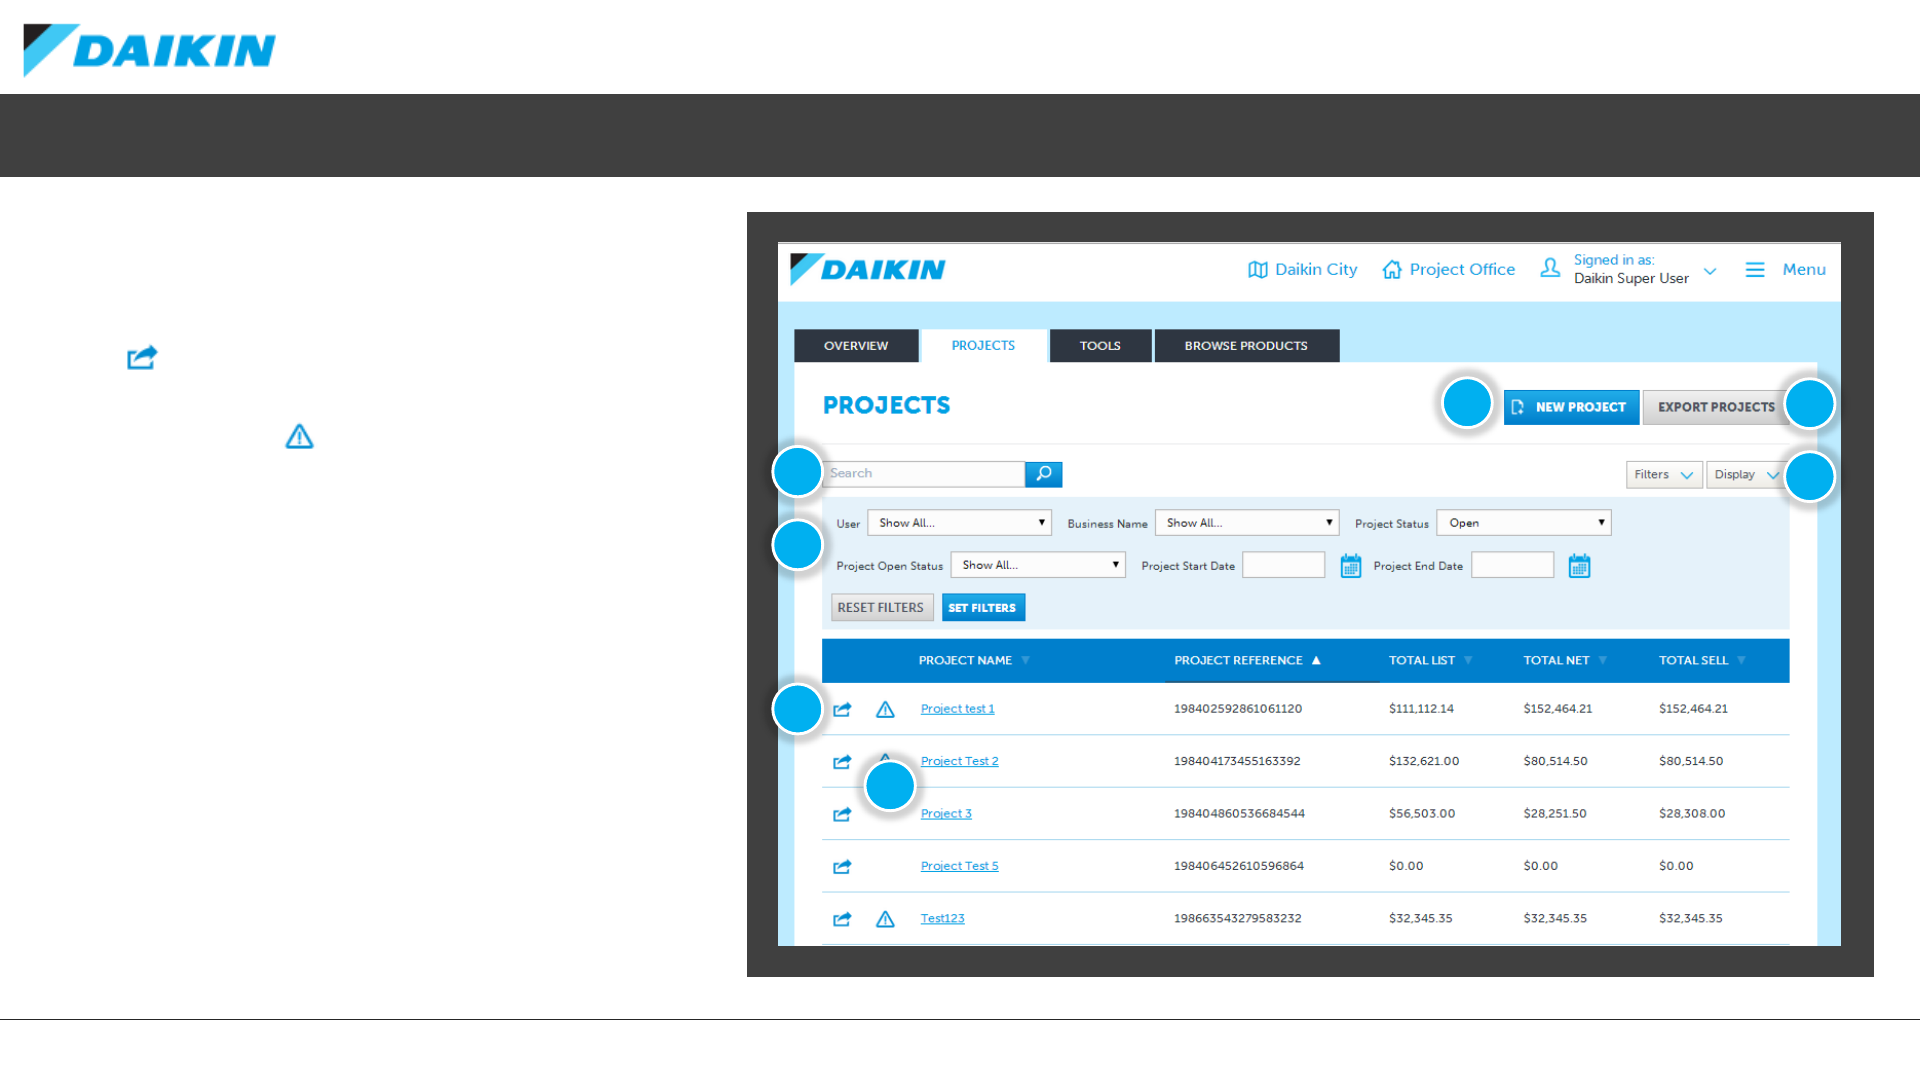
Project Office –Project List
The Project List screen list all projects that are
viewable for your user type and user group
position.
1) Select the Action button Export, Edit,
Transfer, Delete or Duplicate a Project
2) The Alert Icon indicates that the prices
contained with the quotes of the project
have changed since your last visit and
require a recalculation
3) Search for a project by name
4) Various options allow you to filter the
currently listed projects
5) Create a new Project
6) Export all currently viewable projects in
.csv format
7) Configure the viewable columns of the
project list
1
3
6
5
2
7
4

DAIKIN CITY USERGUIDE
Project Office –New Project
Selecting New Project form the Project List allows
you to enter various details for the new project,
spread over multiple tabs.
TABS
Enter Engineers details as well as Dealer/
Contractor, Seller and Ship To address information.
PROJECT DETAILS
Use these fields to enter the details for your project
and any additional notes.
Fields marked with a * are mandatory.
CREATE
Once all required information is entered, Click here
to create your new project within Project Office.
DAIKIN CITY USERGUIDE
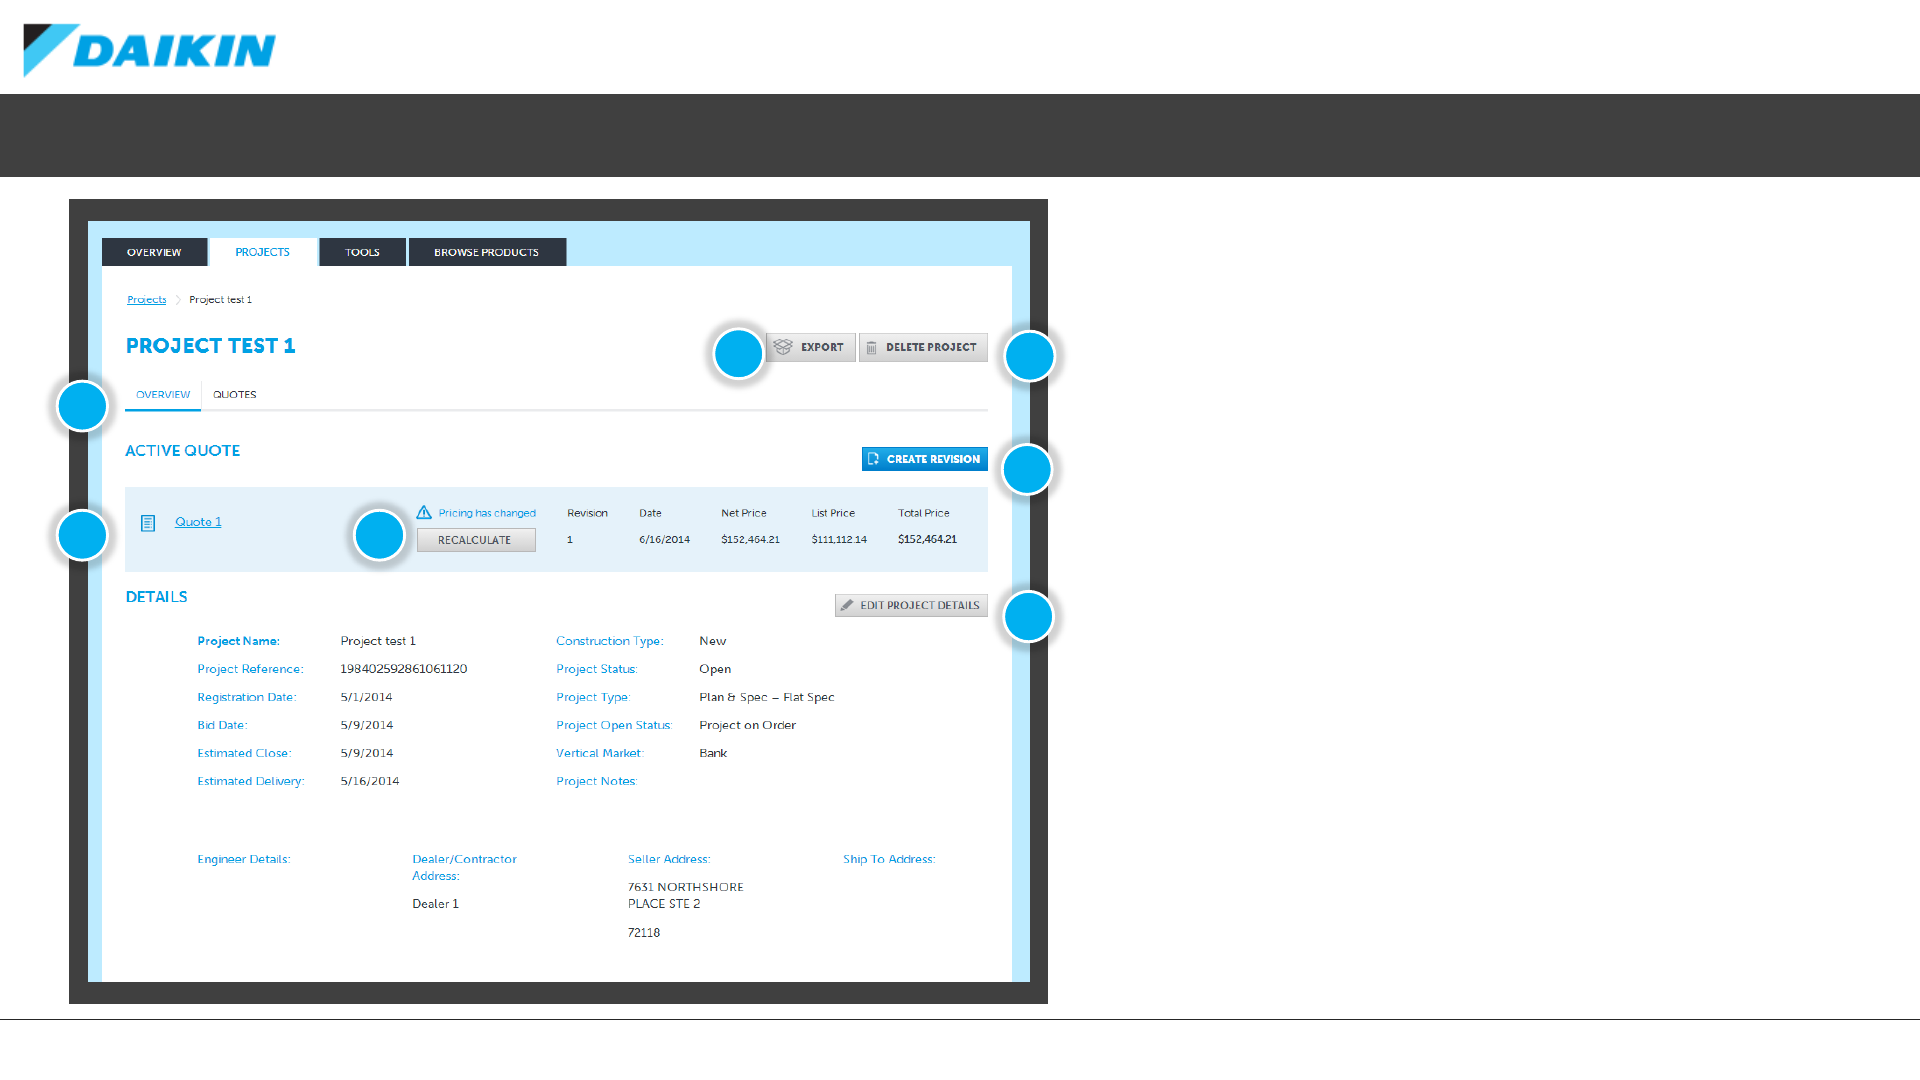
Project Office –Project Overview
The Project Overview gives you an at-a-glance view of
the project details as well as links to various actions.
1) Use these tabs to navigate between the project
overview details and all quotes associated with the
project
2) Each project can only have one active quote, and
the overview of this can been viewed here
3) If pricing has changed and a recalculation is
required, you can action this by selecting the
RECALCULATE button
4) Click here to export the current project in .csv
format
5) To delete the project entirely click this button
6) Select CREATE REVISION a to make a duplicate of
the currently active quote. If no quote yet exists,
this option will be ADD NEW QUOTE.
7) Edit the current project details
1
2
45
3
6
7
DAIKIN CITY USERGUIDE
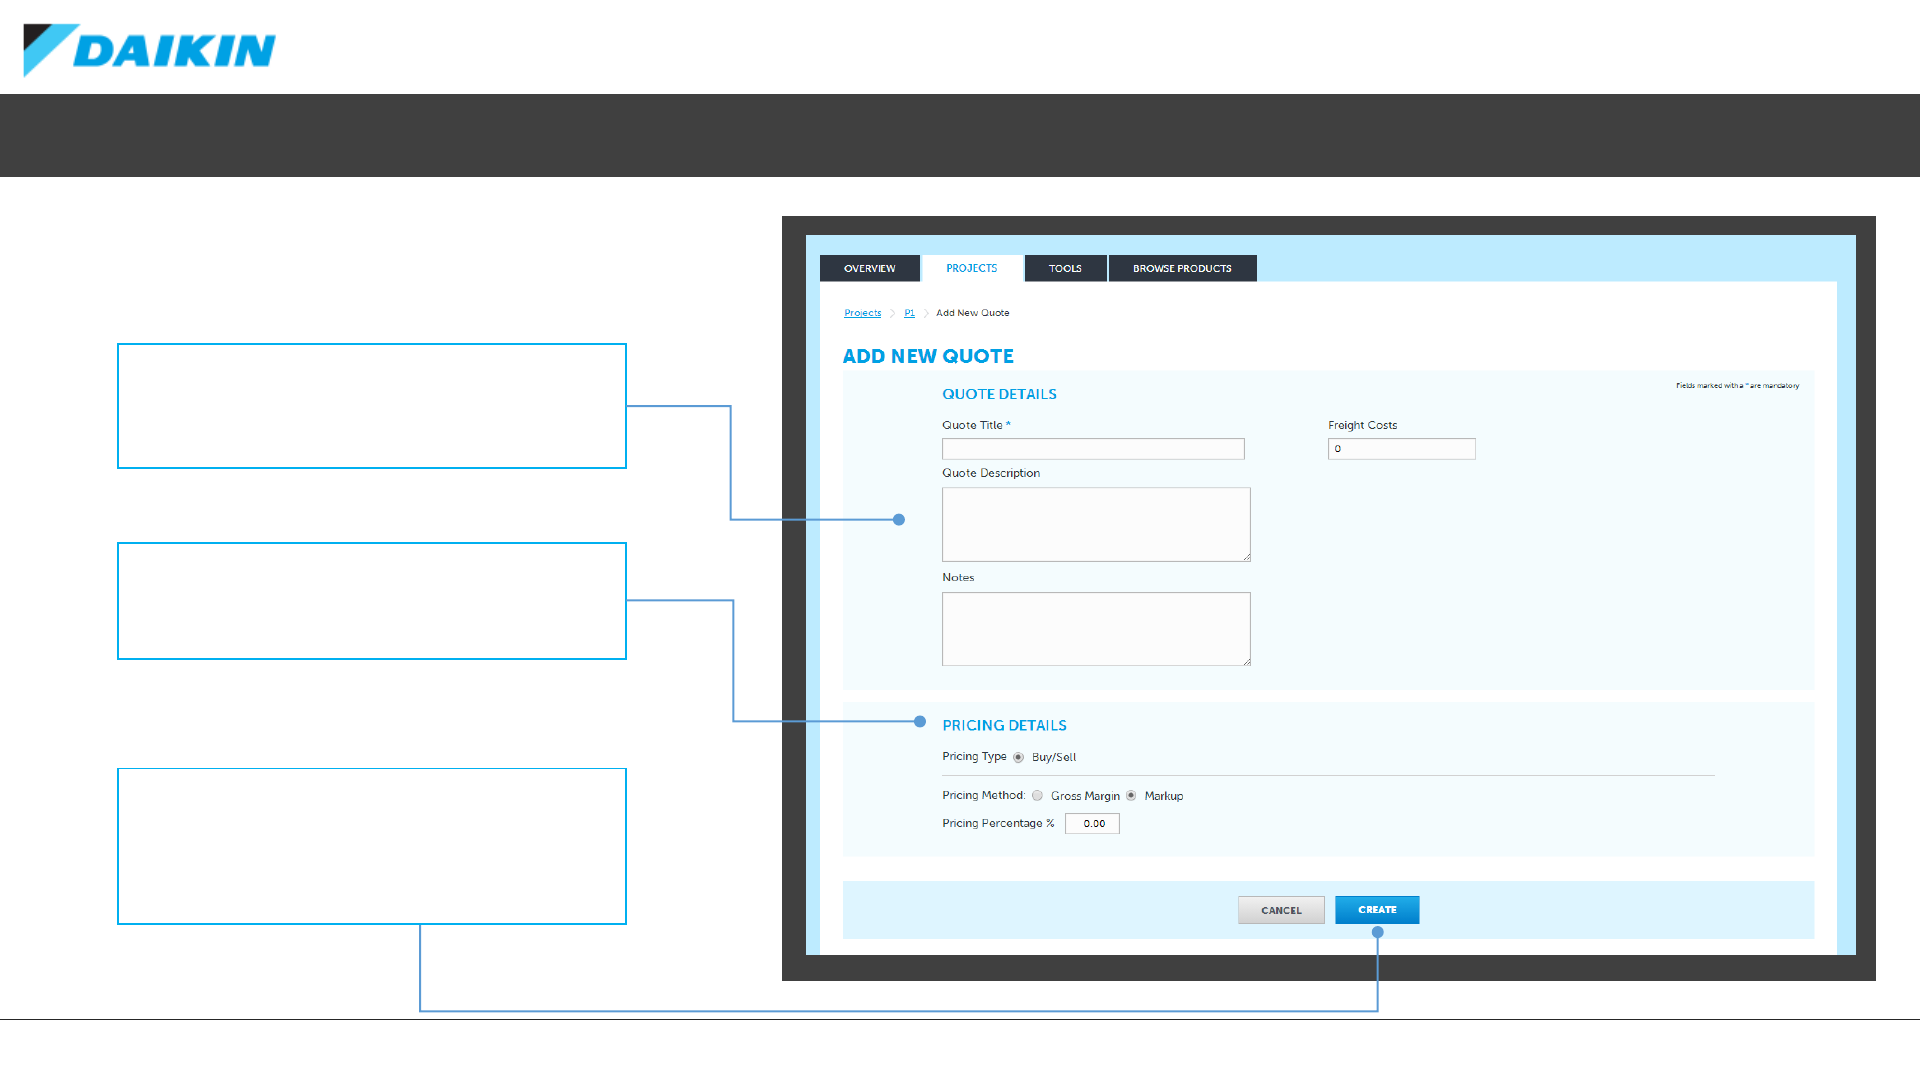
Project Office –Creating a New Quote
When adding a new quote, various details
are required.
QUOTE DETAILS
Enter a quote title, optional description and notes as
well as estimated Freights Coats id appropriate.
PRICING DETAILS
Select your pricing type. The options available will
depend on your user type.
CREATE
Once all required information is entered, Click here
to create your new quote within the Project.
DAIKIN CITY USERGUIDE
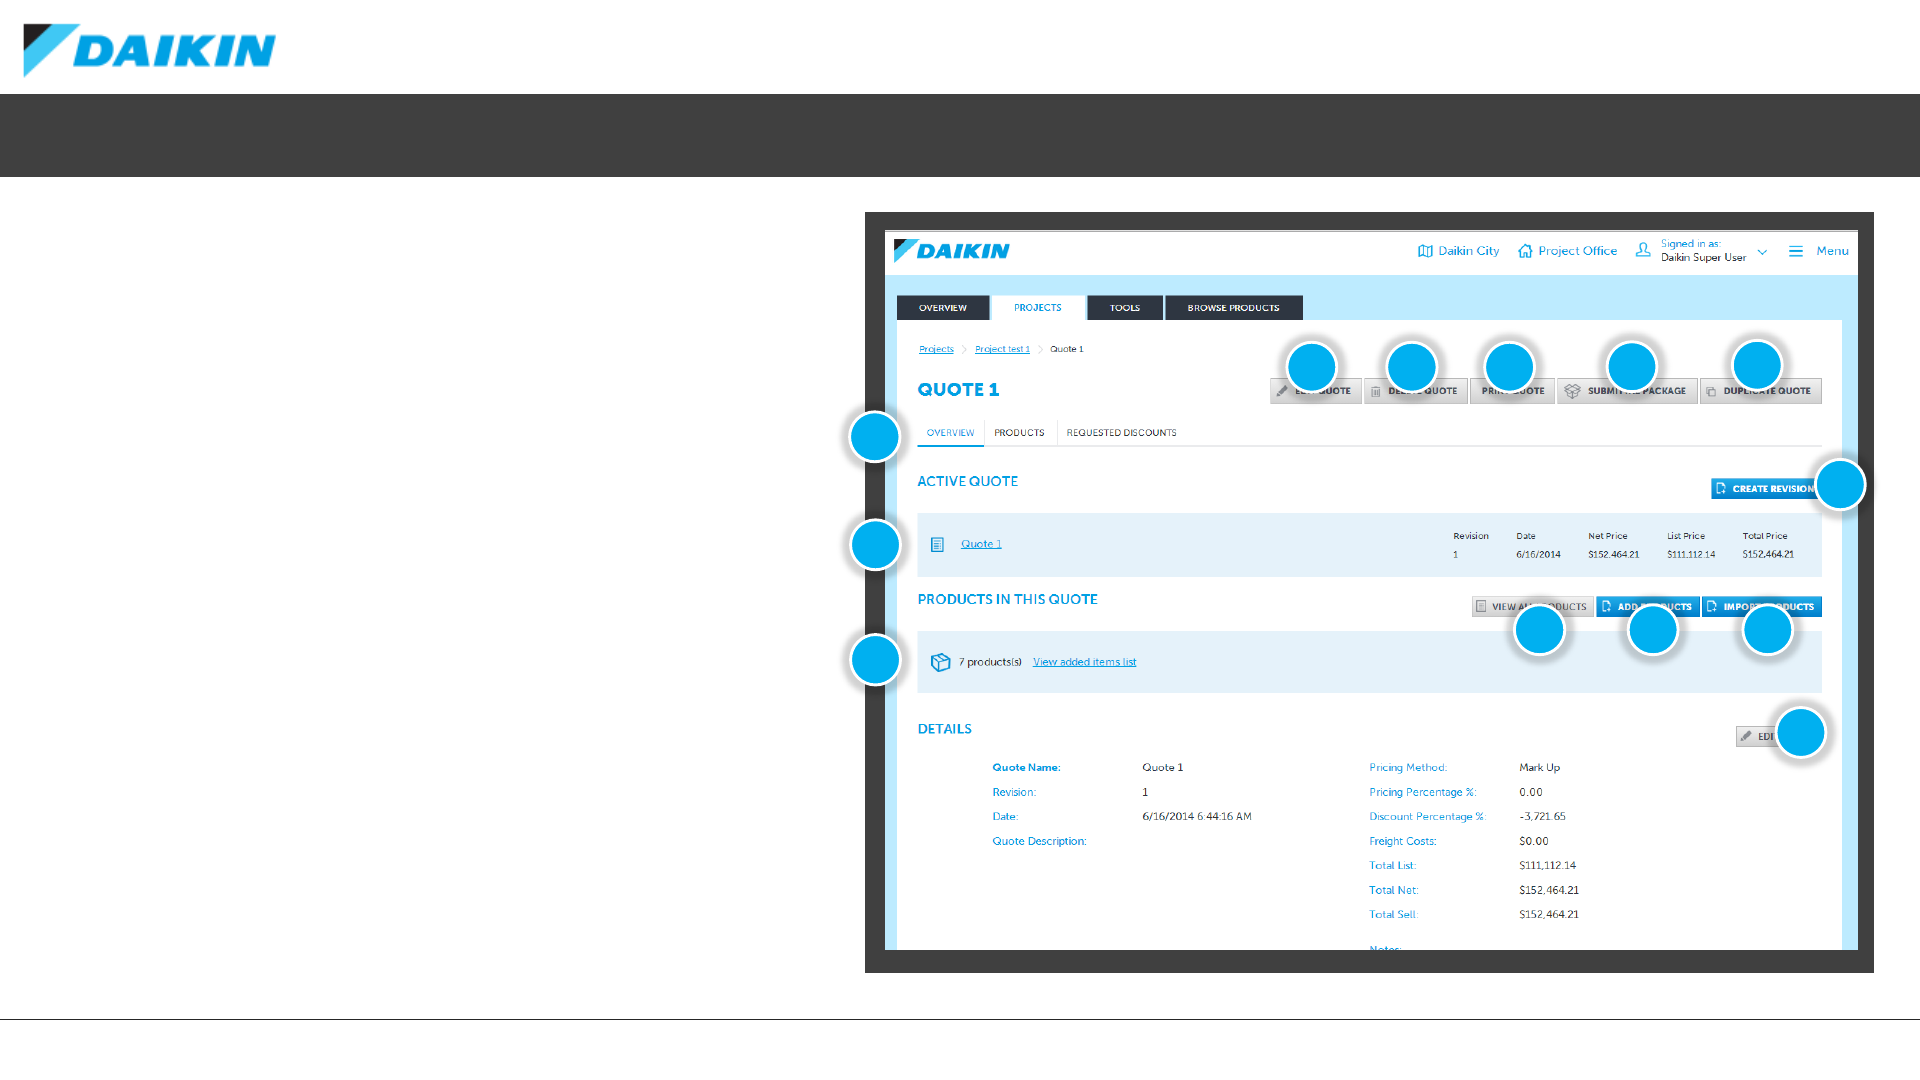
Project Office –Quote Overview
The Project List screen list all projects that are viewable for your
user type and user group position.
1) Use these tabs to switch between quote overview, products
within the quote and requested discounts associated with
the quote
2) Details for the active quote
3) Number of products in the active quote and a shortcut to
view all products
4) Click to edit the quote
5) Click to delete the quote
6) Click to view a printable PDF overview of the quote
7) Create a Submittal Package
8) Duplicate the quote
9) Create a revision of the existing quote
10) Click of view a list of all the products in the active quote
11) Add products to the quote
12) Import a product list created in an external tool
1
58
4
3
9
2
67
10 11 12
4

DAIKIN CITY USERGUIDE
Project Office –Quote List
The Quotes Tab on the Project Overview screen lists all
the quotes that have been associated to the current
project.
1) Select the QUOTES tab to view the quote list
2) Use the action button to export, edit, duplicate
or delete the relevant quote
3) The Alert Icon indicates that the prices
contained with the quotes of the project have
changed since your last visit and require a
recalculation
4) Select the active quote (Every project must only
have one active quote)
5) Create a new revision of the active quote
6) The active quote overview
7) Search for a quote by name
8) Configure the viewable fields of the quote list
1
6
5
2 43
78
DAIKIN CITY USERGUIDE
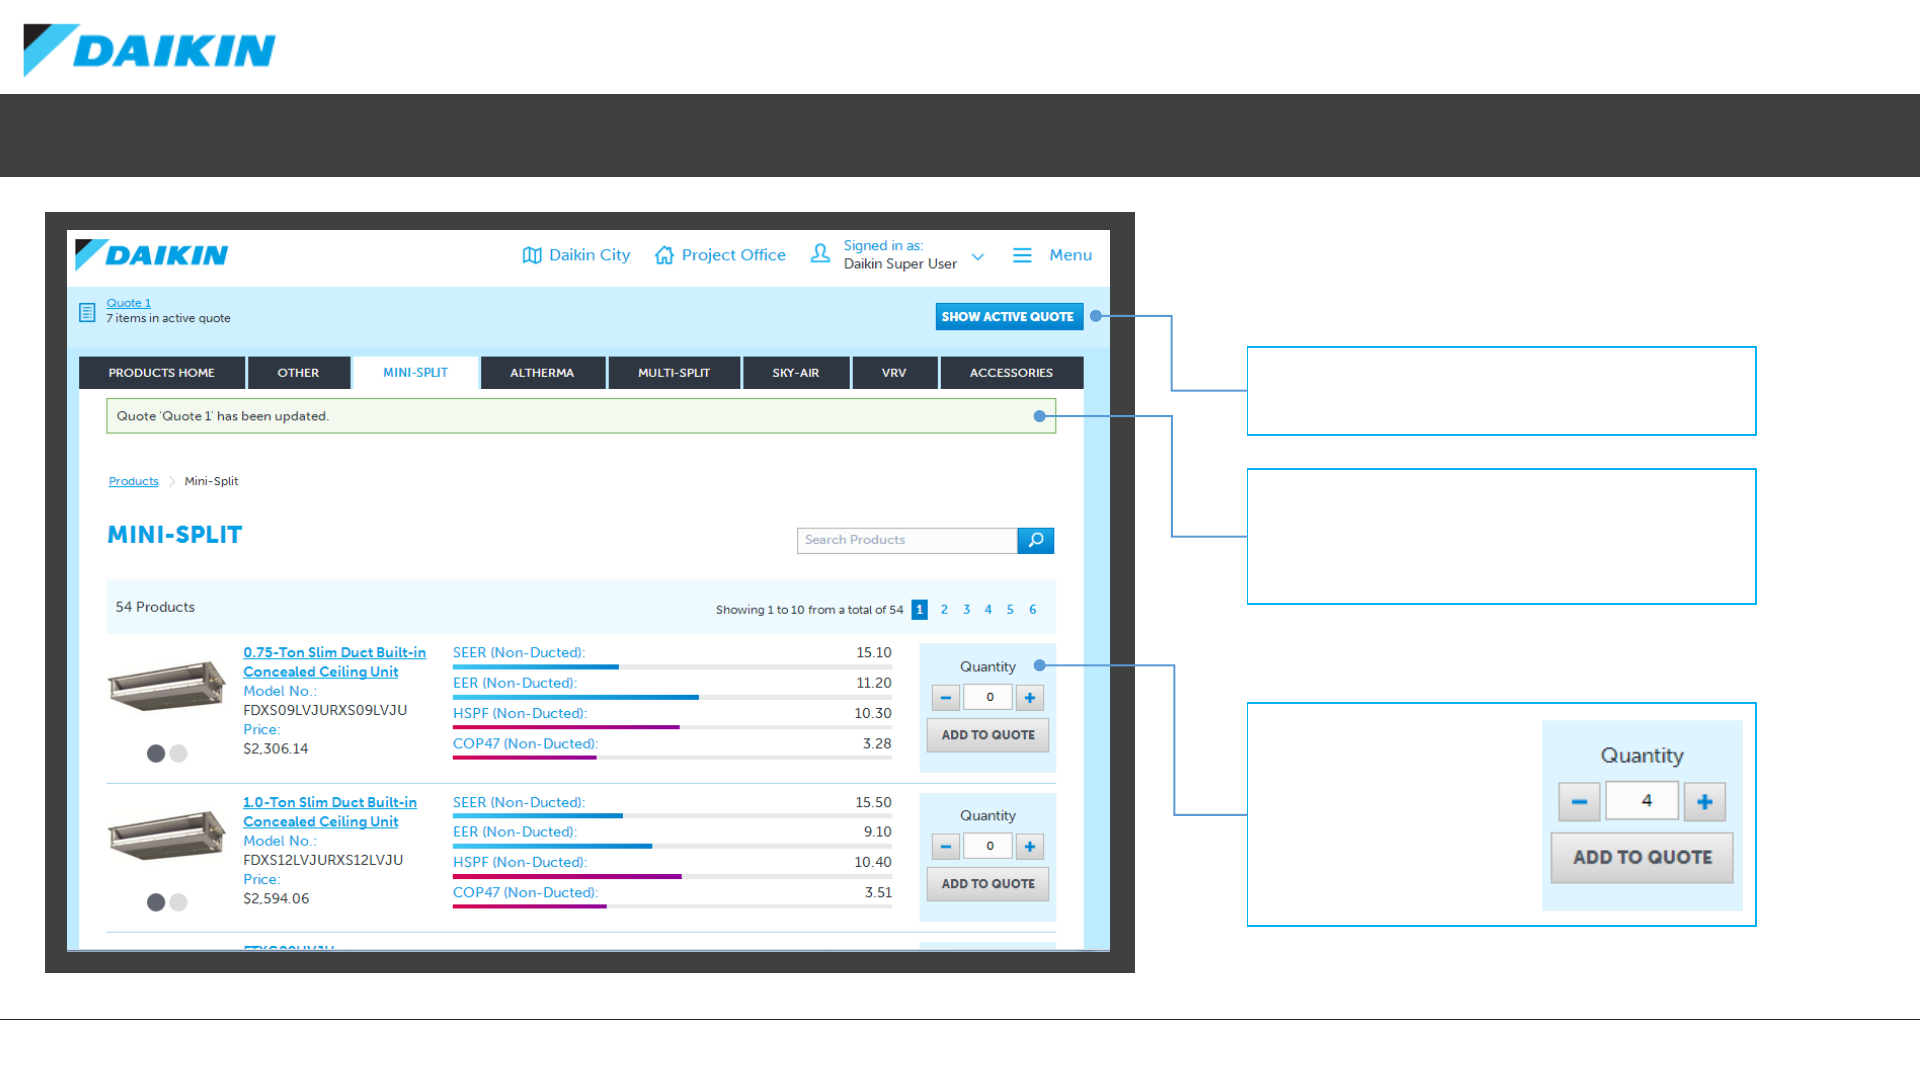
Project Office –Add Products
To add products to your quote, browse the
product ranges in the same way as via the Browse
Products tab.
SHOW ACTIVE QUOTE
A quick link back to the currently active quote.
QUOTE UPDATE NOTIFICATION
Once products are added, this confirmation alert will
let you know the quote has been successfully
updated.
ADD TO QUOTE
Use the +and –buttons,
or type in the required
quantity of the selected
product before clicking
ADD TO QUOTE.
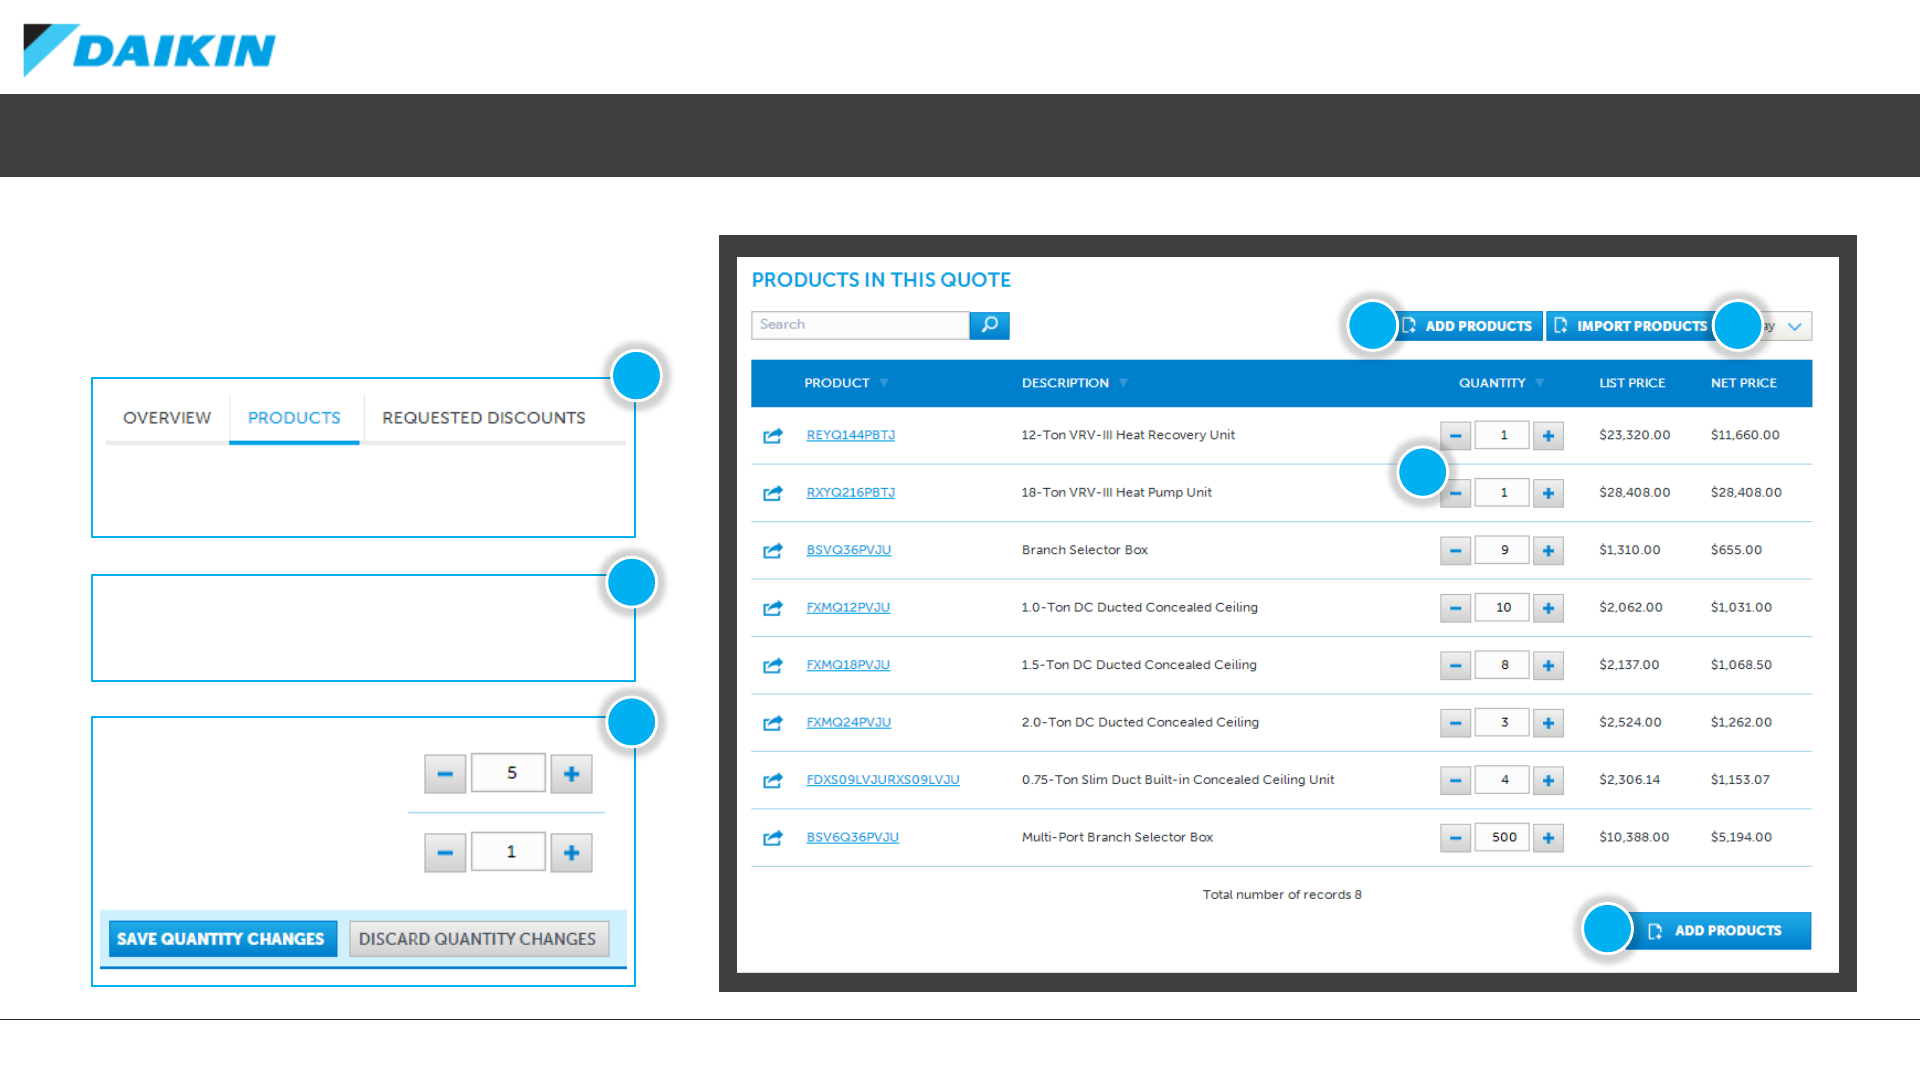
DAIKIN CITY USERGUIDE
To view this screen, select the PRODUCTS tab on the
quote overview screen.
Project Office –View and Modify Quote Products
Once you have added products to your quote, you
can review your selections, view list and net pricing
and modify quantities directly in the Products list.
ADD / IMPORT ADDITIONAL PRODUCTS
Select these options to add more products to the exiting
quote.
MODIFY QUANTITIES
Use the +and –buttons,
or type in the required
quantity of the selected
product before clicking
SAVE QUANTITY CHANGES.
1
3
2
2
2
3
2
DAIKIN CITY USERGUIDE
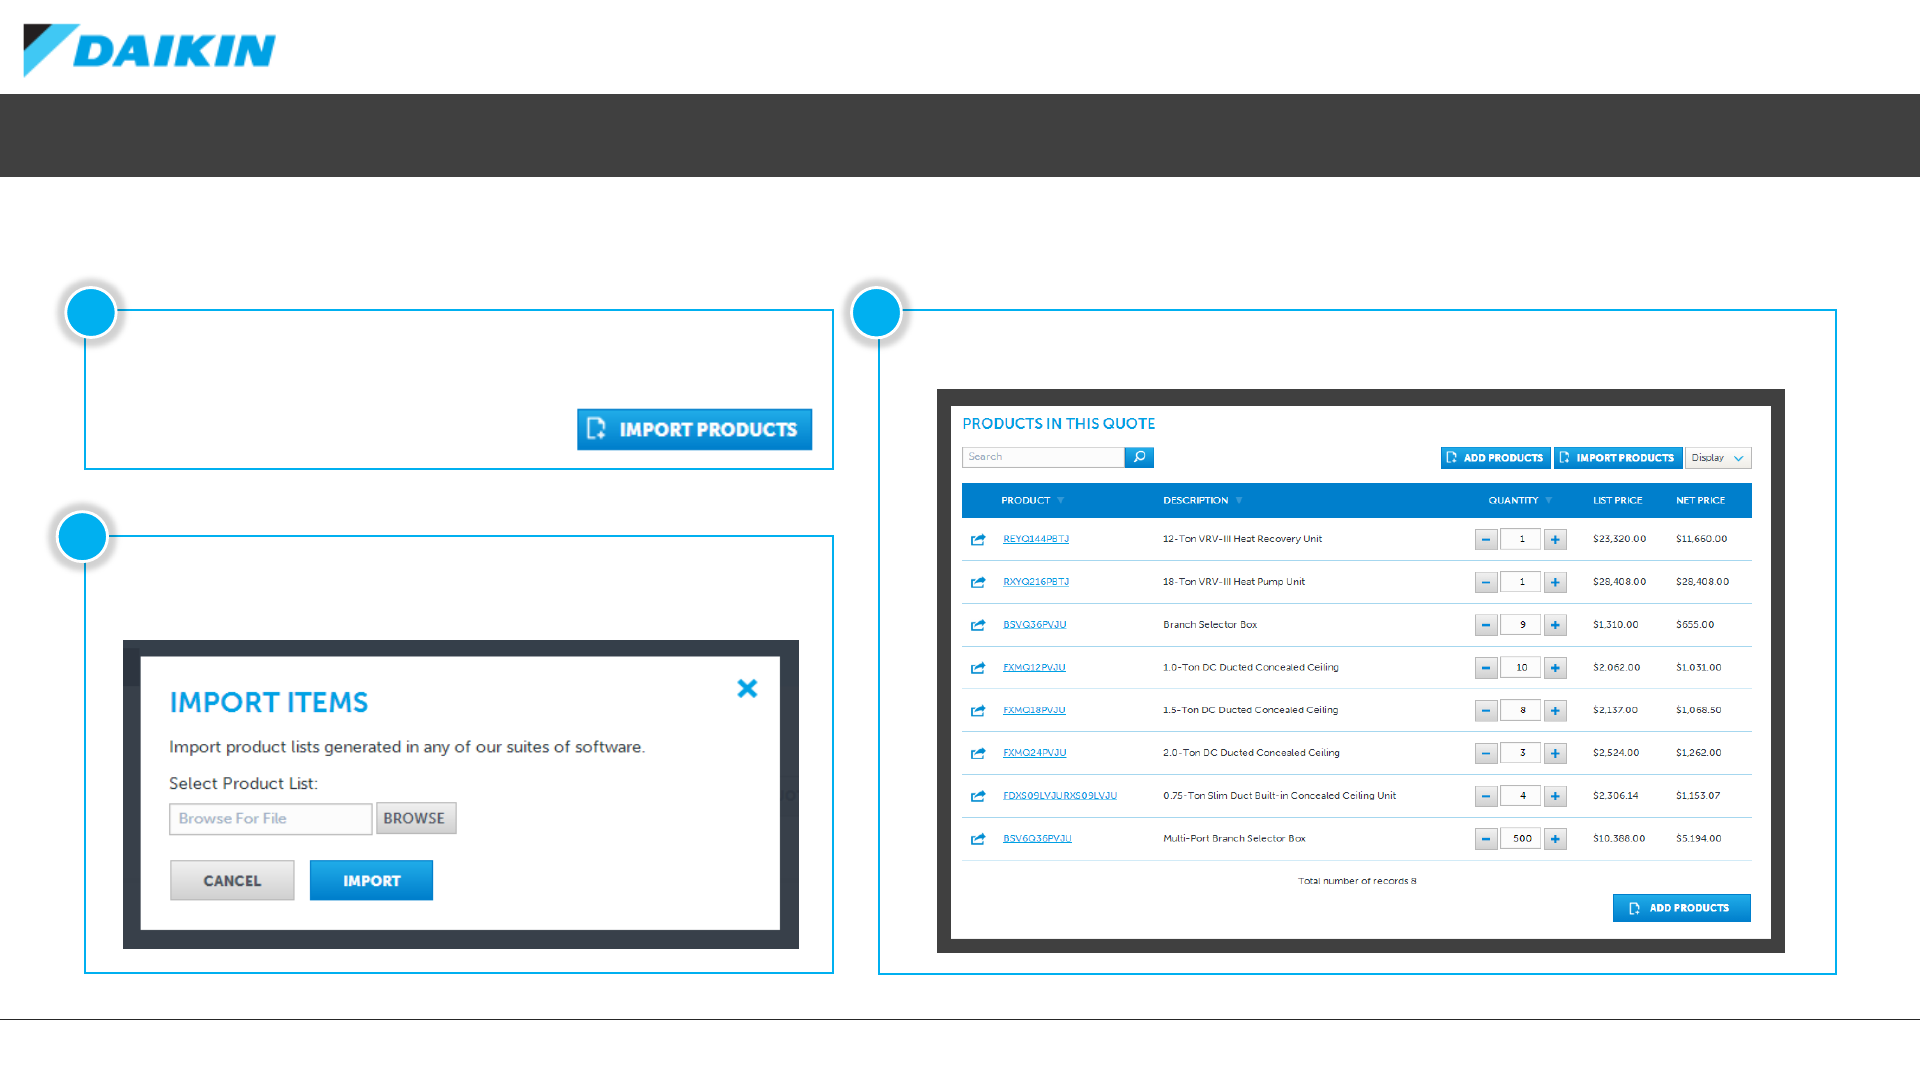
The Product List in the quote will be updated with the imported products.Click IMPORT PRODUCTS to start the import process.
Project Office –Import Products
Use the IMPORT PRODUCTS function to add a list of products that has been generated in any of the Daikin suite of product selection software.
Select BROWSE to selected the exported file on your local computer and
then click IMPORT to add the products to your current quote.
1
2
3

DAIKIN CITY USERGUIDE
Enter the email address of the user you wish to transfer the project to in the pop-up window.
If the entered email address is recognised as a registered user of Daikin City Project Office, the
selected project will transfer ownership and editing right to the new user.
You will still be able to monitor the status of the project but no longer be able to make any edits
until such a time as the project is transferred back to you.
On the project list screen, select the action button next to the project
you wish to transfer and select TRANSFER PROJECT to start the transfer
process.
Project Office –Transferring Projects
Project Office allows you to transfer a project to another user of the system. NB: You will not be able to edit the project once it is transferred to its new owner.
12
DAIKIN CITY USERGUIDE
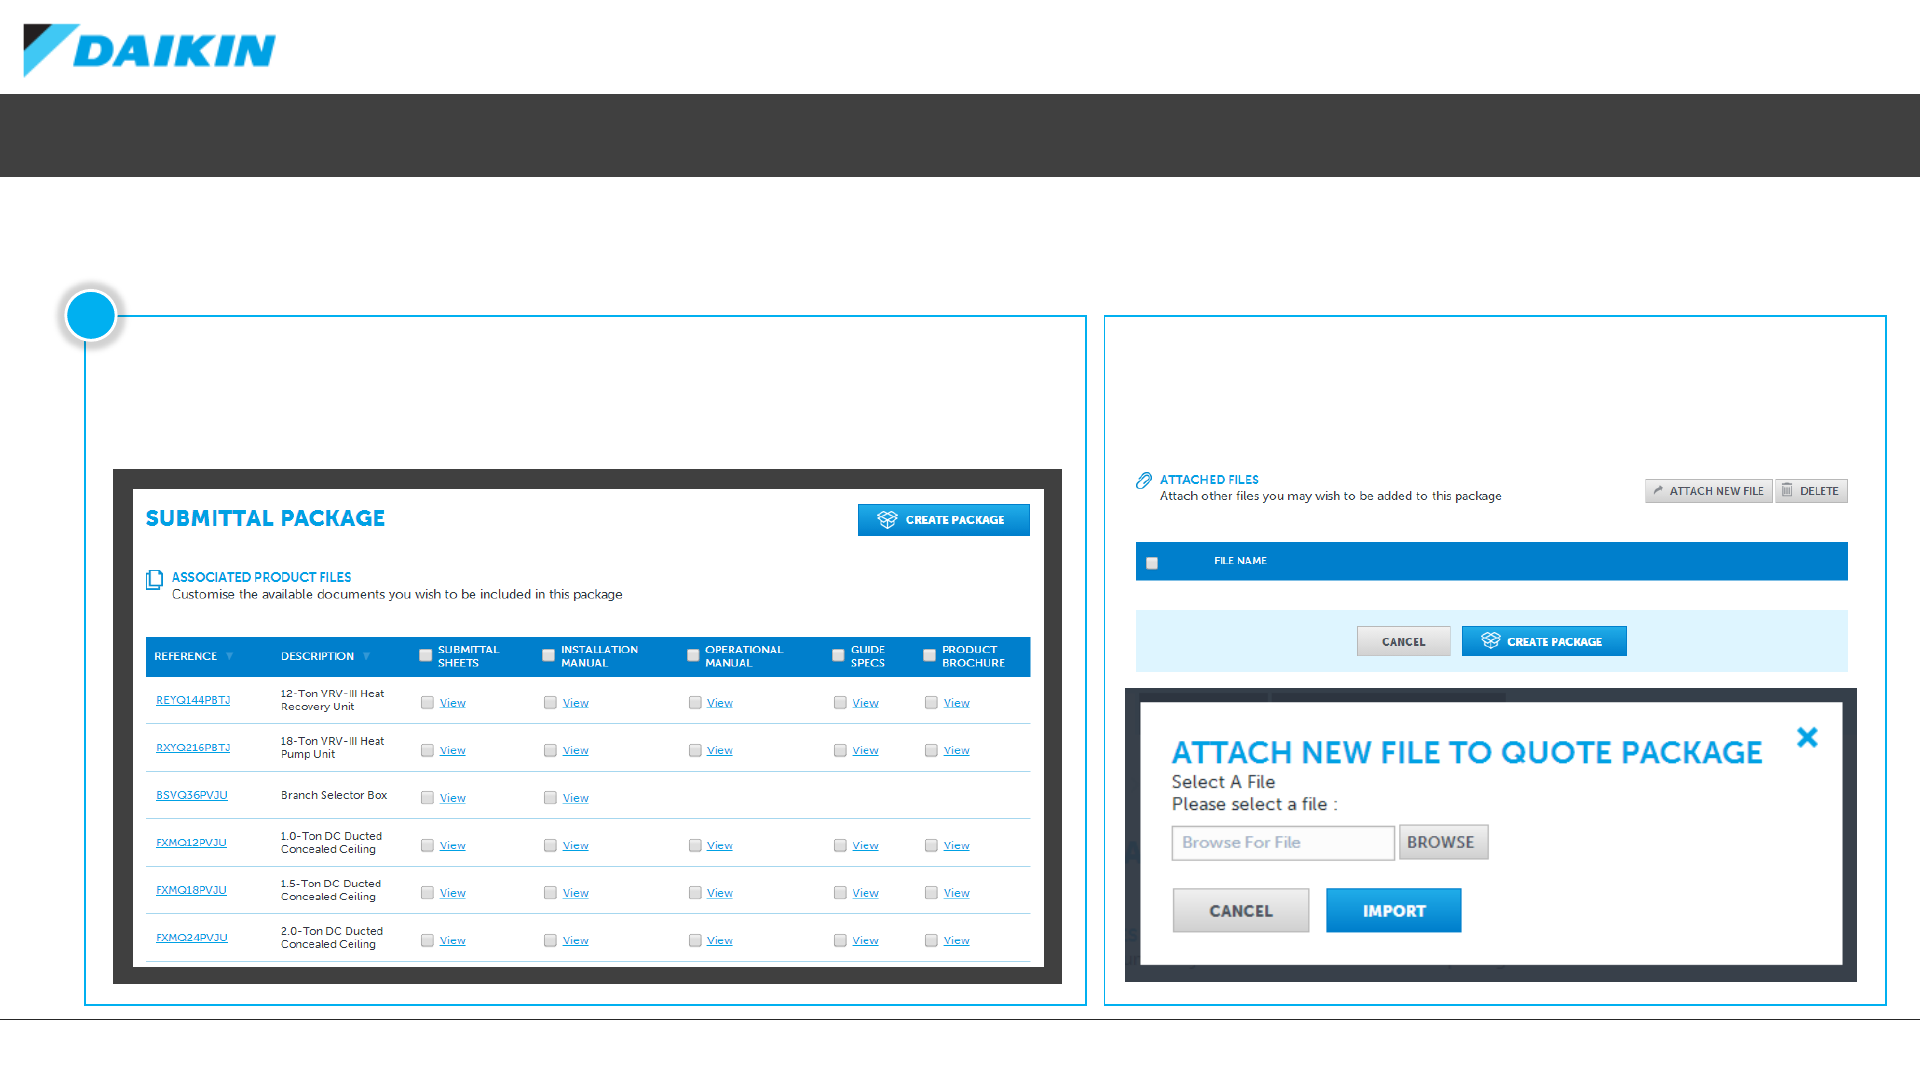
Project Office –Creating a Submittal Package
Select SUBMITTAL PACKAGE from the quote overview screen to create a submittal package in .zip format.
On the SUBMITTAL PACKAGE screen, you can select exactly what is included in the package from the list
that of available documents by using the checkboxes next to each product.
Selecting the checkbox in the table header will auto-select all documents in that column.
1
You can also include any other files you wish in the package by selected
ATTACH NEW FILE and then browsing to the file on your local PC.
