Data Synchronization Instructions
User Manual:
Open the PDF directly: View PDF ![]() .
.
Page Count: 15
Prerequisites
The following prerequisites (software and tasks) should be installed/completed on the local machine/server
intended for housing and running the script and the associated configuration INI file.
Software
ArcGIS API for Python
https://developers.arcgis.com/python/guide/install-and-set-up/
This SDK and the associated Python package/environment manager Conda are generally
provided along with the ArcGIS Pro. The latest version of ArcGIS Pro is recommended, but any
version after and including 2.0 should work fine.
You can list the conda environments on your machine in the Python Command Prompt (Start
Menu > ArcGIS > Python Command Prompt) using the following:
conda env list
There will likely just be the file paths to the arcgispro-py3 and root folders, but new
environments
1
can always be created if necessary. You'll need to become a bit familiar with Conda,
so this section will assist you in setting things up. However, it would be wise to check out the
Understanding Conda section
2
of the ArcGIS API for Python documentation for more in-depth
instructions should you need them.
To find out which version of the ArcGIS API for Python version you have, type the following into
the Python Command Prompt:
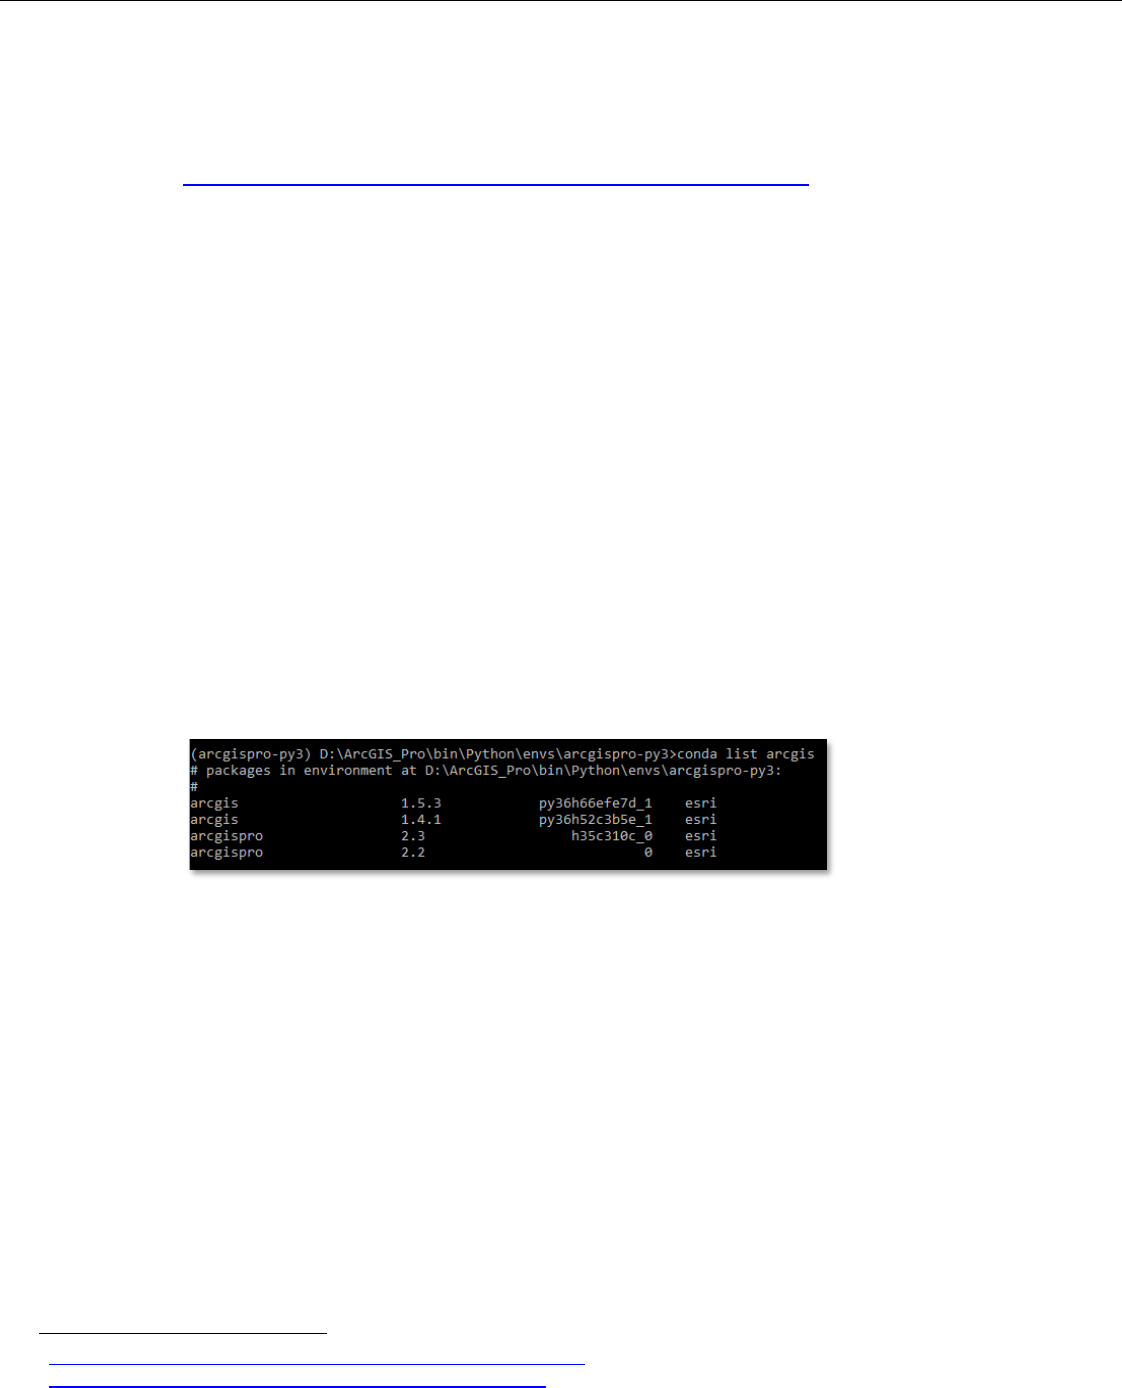
conda list arcgis
If there are updates ready for ArcGIS Pro (and its packages/libraries), you will have those listed
here as well. For example, this local machine has ArcGIS Pro 2.2 and ArcGIS API for Python 1.4.1
installed, but there is an update to ArcGIS Pro 2.3 and ArcGIS API for Python 1.5.3:
If you need/want to update all of these packages, you can either run ArcGIS Pro and do it through
the UI or you can simply type the following into the Python Command Prompt:
conda upgrade -c esri arcgis
With this option, you'll be able to see exactly what has been updated. As with all updates to any
software, make sure to refer to the release notes and perform the necessary research before
updating.
If you would like to see what libraries, modules, etc., are currently installed, type the following for
a local machine:
pip list --local
- or the following for a virtual environment:
pip list --virtualenv
1
https://pro.arcgis.com/en/pro-app/arcpy/get-started/what-is-conda.htm
2
https://developers.arcgis.com/python/guide/understanding-conda/

pyodbc module
https://github.com/mkleehammer/pyodbc/blob/master/docs/index.md
One module not likely to be installed on the machine is the pyodbc module. This open source
Python module allows the script to access ODBC databases (such as MS SQL Server).
Installing the module is easy enough. You can type this from any Windows DOS shell including
the Python Command Prompt (which is preferred):
pip install pyodbc
Once installed, the script will be able to make connections to an MS SQL Server database using
Python. For all pyodbc errors, make sure to refer to the Issues section of the pyodbc GitHub as
well as the Wiki documentation.
pandas module
https://pandas.pydata.org/pandas-docs/stable/
The pandas module is truly a remarkable Python package. It provides "fast, flexible, and
expressive data structures designed to make working with 'relational' or 'labeled' data both easy
and intuitive." Take a moment to read over the package overview
3
to see just what it can do,
especially in concert with Python (it is built on top of NumPy
4
).
This module plays a pivotal role in the communication between SQL and ArcGIS Online (AGOL)
by
1 Easily converting a CSV into a size-mutable tabular data structure called a
Dataframe (the primary pandas data structure) that can be inserted into a SQL
table, thereby allowing the initial SQL statement analysis within this script, and
2 Easily converting a SQL table back into a CSV through, again, the Dataframe data
structure, thereby allowing for updated records to be pushed to the participating
AGOL feature layer for record update(s)
Installing pandas can be complicated, but with ArcGIS Pro and its associated modules and
libraries, the package manager pip makes it easy:
pip install pandas
For troubleshooting of any pandas-related errors, refer to the documentation associated with the
link above.
MS ODBC Driver for SQL Server
https://docs.microsoft.com/en-us/sql/connect/odbc/download-odbc-driver-for-sql-
server?view=sql-server-2017
If MS SQL Server is either installed or is easily-accessible from the current workstation, it's likely
that an ODBC driver is already installed for it. For new development (such as this script), it is
recommended to have the latest drivers installed. As of this document's creation, the Microsoft
ODBC Driver 17 for SQL Server is the latest version. The instructions on how to download the
driver are provided in the link above.
Tasks
Ensure that the feature layer has editing capabilities and the ability to export allowed in the feature layer's
settings. Also, the user logged in via the script must be part of an organizational account and be either the
service item owner or an administrator. Ensure that the feature layer also provides XY coordinates – not
just GlobalIDs.
3
https://pandas.pydata.org/pandas-docs/stable/getting_started/overview.html
4
https://www.numpy.org/

Configuration file
Purpose and Use
The purpose of the provided configuration template and the subsequent configuration file is to provide
the user with the ability to supply the script with as much organization-specific information with minimal
interaction with the script directly including creating and modifying SQL statements. This file will also
be able to keep sensitive organizational information out of the script.
When editing the configuration template, make sure to use Notepad++ with the language set to INI. This
can be set by opening the template document in Notepad++ and navigating to Language > I > INI file.
Before making any edits to the .template document, save the template as an .ini file in your
preferred location. The file path to this INI configuration file will be used within the script to access
all the associated information.
The inclusion of this file and how it will be accessed will be covered in the Data Synchronization script
section.
Notes
The configparser library reads input for INI configuration files as strings, so the need for quotation marks
or apostrophes are not necessary. For example, an ArcGIS Online (AGOL) password should be input as
password and not 'password'.
For any file paths, use double-backslashes. For example, the file path for the compressed file location of
the downloaded feature layer data, the path should be written as C:\\Folder\\data.zip.
There are also keys provided as references for associated SQL Server databases. For each key, a user can
find and replace the key with the name of the SQL database associated with that key. For example, x1x
refers to the temporary SQL table that will store the AGOL data exported from the feature layer.
For more information on these notes, please refer to the configuration template provided.
AGOL section
ArcGIS Online credentials are the main focus of this section. Below are descriptions of each input. These
inputs play a role in accessing the participating ArcGIS Online (AGOL) Organizational/Portal account
5
.
1 AGOL URL: the ArcGIS Online (AGOL) URL where the login credentials will be passed through
The main ArcGIS website URL (www.arcgis.com) is recommended, but any ArcGIS URL that
accepts login credentials can be used.
2 AGOL username: the participating ArcGIS Online account's username
5
https://developers.arcgis.com/python/guide/using-the-gis/
3 AGOL password: the participating ArcGIS Online account's password
SQL section
Microsoft (MS) SQL Server authentication credentials are the main focus of this section. Below are
descriptions of each input. These inputs play a role in accessing the participating MS SQL Server database
management system. This connection is possible using the open source Python module pyodbc. The
methods used in this section of the configuration file/script are detailed in the pyodbc documentation
6
.
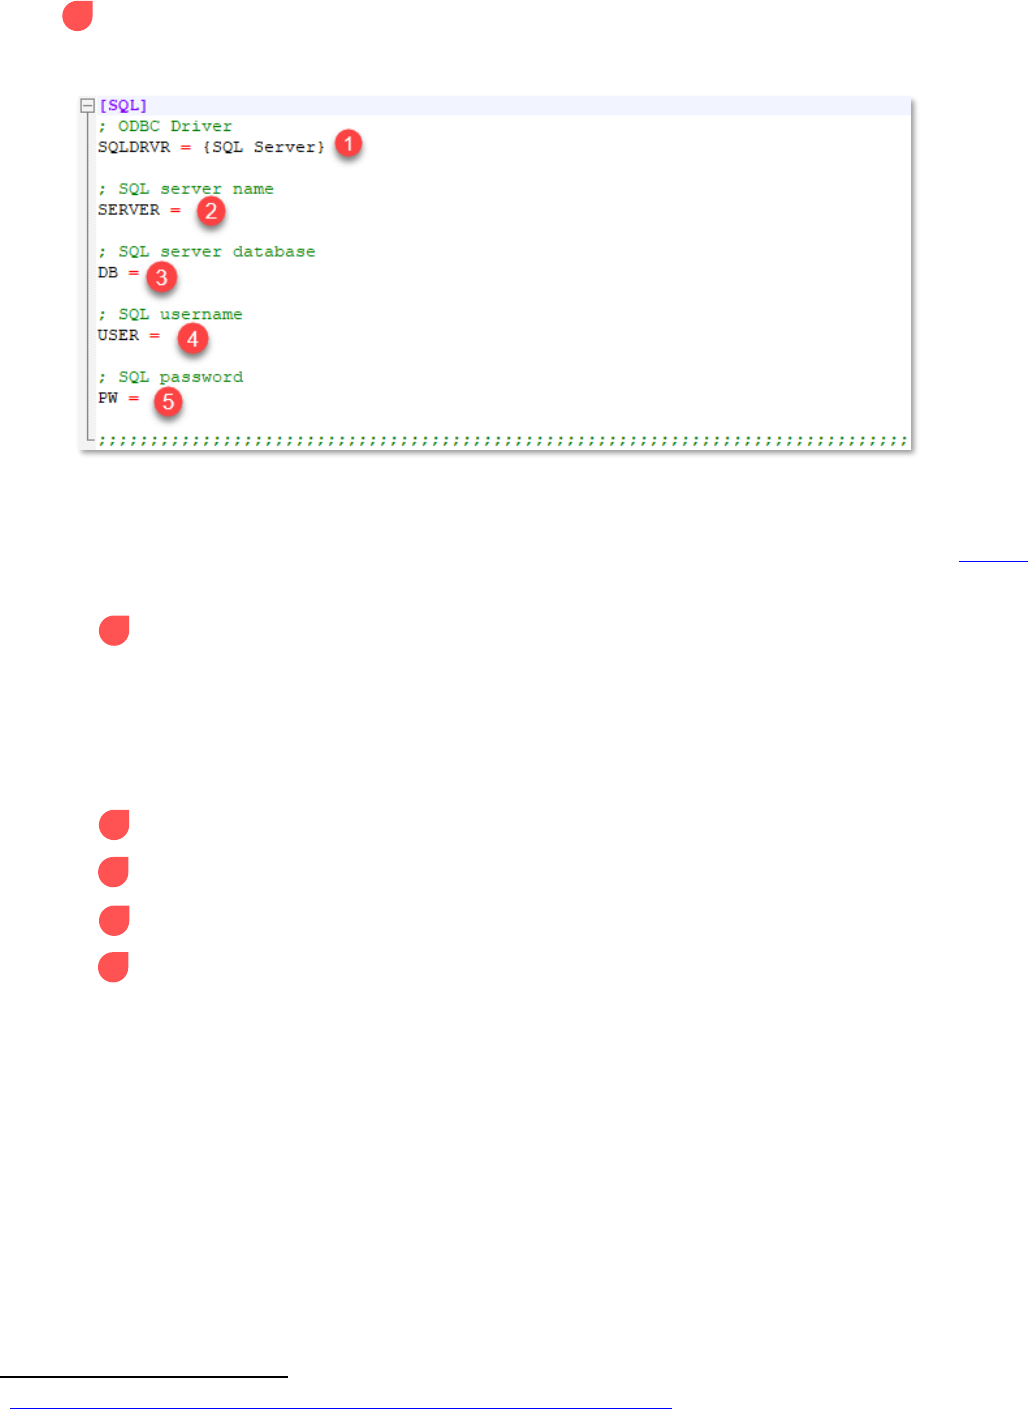
1 ODBC Driver: the reference to the distributed ODBC driver for SQL Server
It is preferred to have the latest ODBC driver (version 17 as of this document's creation),
but the generic {SQL Server} is used as default. However, it is not recommended to use
this driver for new development.
Refer to pyodbc documentation concerning syntax in updating this section. The curled
brackets are required as shown in the pyodbc documentation.
2 SQL server name: the server name of the participating MS SQL Server
3 SQL server database: the database name of the participating MS SQL Server
4 SQL username: the participating MS SQL Server username
5 SQL password: the participating MS SQL Server password
6
https://github.com/mkleehammer/pyodbc/wiki/Connecting-to-SQL-Server-from-Windows
SCRIPT section
This section of the configuration file focuses on the variables that have direct effect on the script itself,
including various file paths and SQL statements. These variables will be discussed in depth, explaining
what each variable represents within the script and breaking down what portions of each variable
(especially SQL statements) can be freely modified. Remember: keys are automatically read as strings
within the INI file – do not place quotations or apostrophes around any keys.
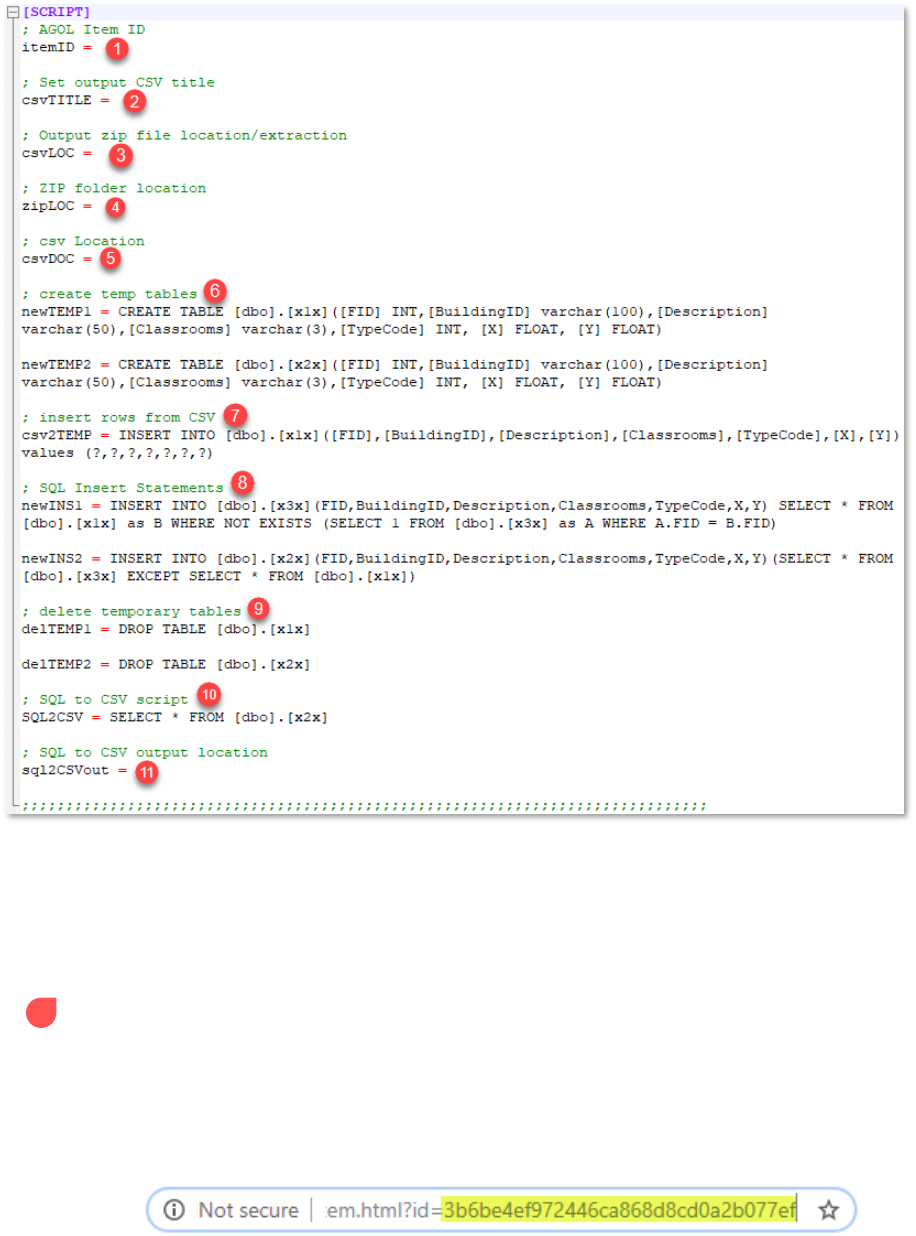
1 AGOL Item ID: itemID – the ArcGIS Online feature layer item ID
Each AGOL item (feature layer, feature layer collection, csv collection, etc.) has an item ID
that can be called via ArcGIS API for Python. This ID is most easily obtained by navigating
to the feature layer within the ArcGIS Online Content, viewing the item details by click on
the feature layer, and copying the ID at the end of the feature layer item URL (see image
below):
Copy and paste this ID to the configuration file.
2 Set output CSV title: csvTITLE – the file name of the ZIP folder containing the feature layer CSV
This variable can literally be any name. It is simply the name of the container of the CSV
being downloaded from the ArcGIS Online environment. This ZIP folder will eventually
be deleted; it's best to keep this name simple and concise while still making clear what the
contents of the compressed folder represents.
Example: featureLayer
3 Output zip file location/extraction: csvLOC – the output file path for the saved ZIP folder
The file path contained in this variable will be the location of the saved ZIP folder
containing the feature layer table data as CSV. Remember that file paths should have either
a single forward slash or a double backslash separating each part of the file path.
Example: C:\\Data\\
4 ZIP folder location: zipLOC – the full file path of ZIP folder location
This file path will basically be the concatenation of both the zip file location (#3) and the
output CSV title (#2). This file path should include the ZIP file extension at its end.
Example: C:\\Data\\featureLayer.zip
5 CSV Location: csvDOC – the location of the extracted CSV file
This variable is the desired location of the extracted CSV file (previously contained within
the ZIP folder). The important aspect of this variable is the knowledge of the automatically
generated title for the CSV downloaded from AGOL. Generally, this title includes the name
of the feature layer followed by an underscore and the specific layer being downloaded.
For example, if the feature layer name is Address Points and the first layer within the
feature layer collection is being downloaded, the file name for the CSV would be
Address_Points_0.csv.
Example: C:\\Data\\Address_Points_0.csv
6 Create temp tables: newTEMP1, newTEMP2 – SQL statements creating the two temporary tables
needed for the script
The purpose and function of these tables will be detailed in the Data Synchronization
section later in this document. The basic structure of these two tables are nearly exactly
the same: one should contain the same fields/data types as the other. The only difference
is the names of the two tables.
These tables will eventually be deleted, so the specific names of each table are not
necessarily important except for consistency across other SQL statements. An image below
details the statements:
The vital part of this section (and will be a vital part of many of the SQL statements) are
the inclusions of the columns contained within. These columns will eventually contain the
column data contained within the downloaded CSV. Therefore, the knowledge of the CSV
column names and their data types are essential to completing this section. These columns
need to match and the data types need to accommodate appropriate lengths for the
incoming data.
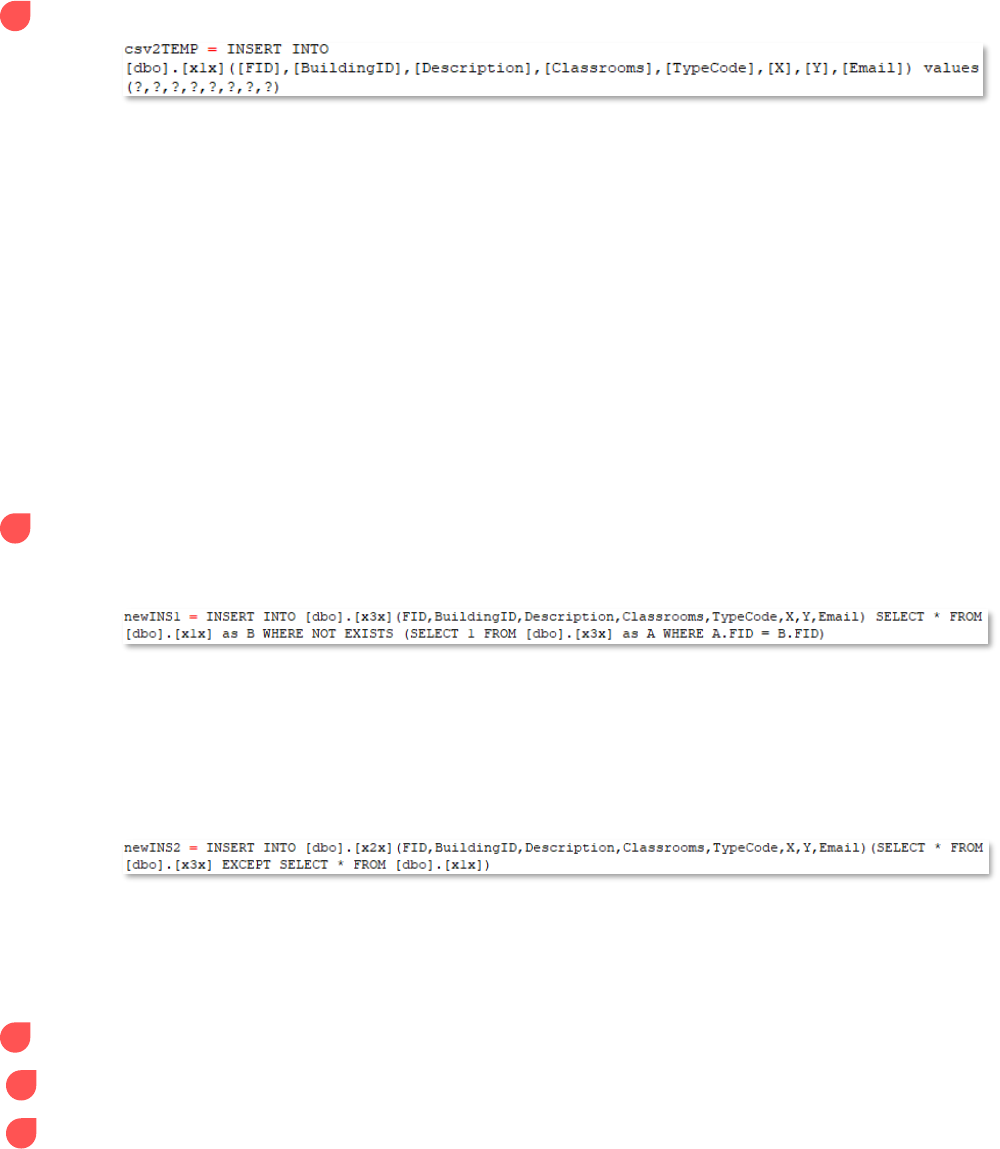
7 Insert rows from CSV: csv2TEMP – inserts the CSV data by column/field into temporary table 1
This portion of the configuration file inserts the downloaded CSV of feature layer data as
CSV) into temporary table 1. Due to the nature of how configparser reads files, only half
of the SQL statement is included here; the other half cannot be read as a string input when
there are strings already embedded within, so that half of the statement will need to be
dealt within the script itself (which will be handled in the Data Synchronization part of the
document).
The fields shown in the image above are referencing the columns of the SQL temporary
table 1 and not the CSV. While the names of the columns don't need to match between the
incoming CSV and temporary table 1, the number of columns/fields between the two does
need to match. This is assisted by the question marks (?) in the parantheses – each
question marks represents a column/field. If both tables have 10 columns, there should
be 10 question marks separated by commas.
Only the number/names of columns and the number of question marks should be
edited in this statement.
8 SQL Insert statements: newINS1, newINS2 – two INSERT statements that 1) insert new records
from the CSV to the SQL table and 2) insert updated records from the SQL table to temporary
table 2
The first INSERT statement compares temporary table 1 (containing potentially new
records) to the production table (containing current records). If any records in temporary
table 1 are not in the production table, the new record(s) from temporary table 1 will be
inserted into the production table. This is achieved using a WHERE NOT EXISTS clause on
each table's primary unique key. This method is used to ensure there are no duplicates
within the table (which can happen when using JOIN methods).
The second INSERT statement inserts records from the production table containing
potentially updated column values to the empty temporary table 2. These are the records
that will be pushed up to AGOL and used to update existing records within the feature
layer.
9 Delete temporary tables: delTEMP1, delTEMP2 – deletes temporary tables 1 and 2
10 SQL to CSV script: SQL2CSV – selects all records from temporary table 2 to be converted to CSV
11 SQL to CSV output location: sql2CSVout – file output location of the CSV used in updating AGOL
records
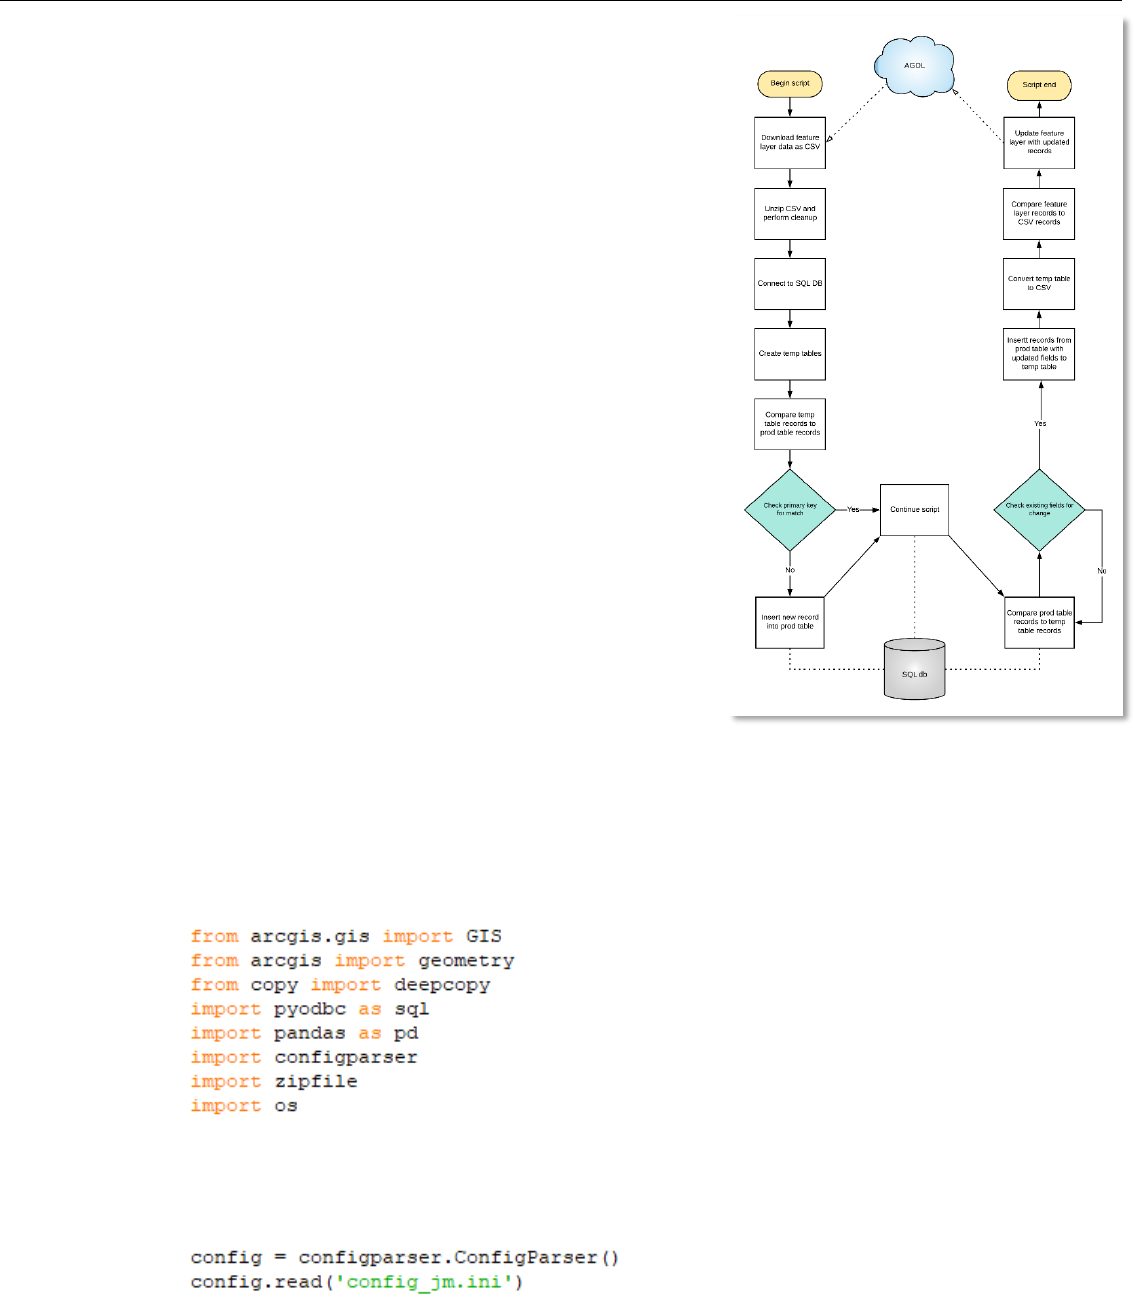
ArcGIS Online/SQL Server Data Synchronization script
This portion of the document focuses on the actual data
synchronization script itself. The configuration file discussed
previously is represented within this script using the ConfigParser
module, where each key from the configuration will be assigned to a
variable for the script.
The image on the right details the workflow of the script, while the
rest of this section will focus on the format of the script itself. The
basic workflow is listed below in order of process:
• Download feature layer table (FLt) data as a CSV
• Insert the FLt data into an empty SQL table
• Add new records from FLt table to production SQL table
• Copy updated records from production SQL table to empty
SQL table
• Convert new records from SQL to CSV
• Push CSV to ArcGIS Online and update relevant records to
FLt
The script is separated into four different sections dependent upon
the purpose of each section. The four sections are listed below:
1 Accessing feature layer data and preparing CSV for the SQL
database
2 Connect to SQL and perform data analysis
3 Convert SQL updates to CSV, push to AGOL, perform updates
4 Clean up data within SQL and local machine
The rest of the document deals with the script breakdown of each
section. The images shown may not match the provided script; the images below show a completed script. Some
of the file paths, fields, and other input will have to be manually placed into the script. These inputs will be
discussed in their relevant subsections and highlighted with a red asterisk.
SECTION 1 – ACCESS FEATURE LAYER DATA, PREPARE CSV FOR SQL DATABASE
Import all necessary modules
All modules, classes, and libraries necessary to run the script are imported. Ensure that all of the
prerequisites listed earlier in the document have been met before attempting to run the script.
Read config file*
Using the ConfigParser class
7
, the configuration INI file detailed earlier in the document can be
interpreted via the read object.
The full file path location to a completed configuration INI file should be the parameter through
which the ConfigParser object read is passed.
Assign config variables
While this section may seem relatively complicated, there isn't really any editing to be done here.
Each variable is assigned to the section and subkey assigned within the configuration file – the
method for this was obtained from a 2017 Hackernoon article
8
under the section "Use external
configuration file".
Sign into AGOL acct
This section is the first to use the configuration file. This is how the API connects to an ArcGIS
Online organization/Portal account
9
. The variables represent the login URL, username, and
password for ArcGIS Online. This will be assigned to a variable called 'gis'.
Get feature layer in question
Using the get() method of the API's ContentManager helper class, the feature layer is accessed
using the item ID provided within the configuration file.
Export feature layer as a CSV (ZIP file)
Using the export() and download() methods of the Item class, the feature layer accessed in the
previous step will have its table downloaded as a CSV in a compressed folder. The csvNAME variable
7
https://docs.python.org/3/library/configparser.html
8
https://hackernoon.com/4-ways-to-manage-the-configuration-in-python-4623049e841b
9
https://developers.arcgis.com/python/guide/using-the-gis/
is the csvTITLE's key from the configuration file while the csvLOC variable identifies where the ZIP
folder will be downloaded locally. This process is only allowed for service item owners or
administrators with an organizational subscription.
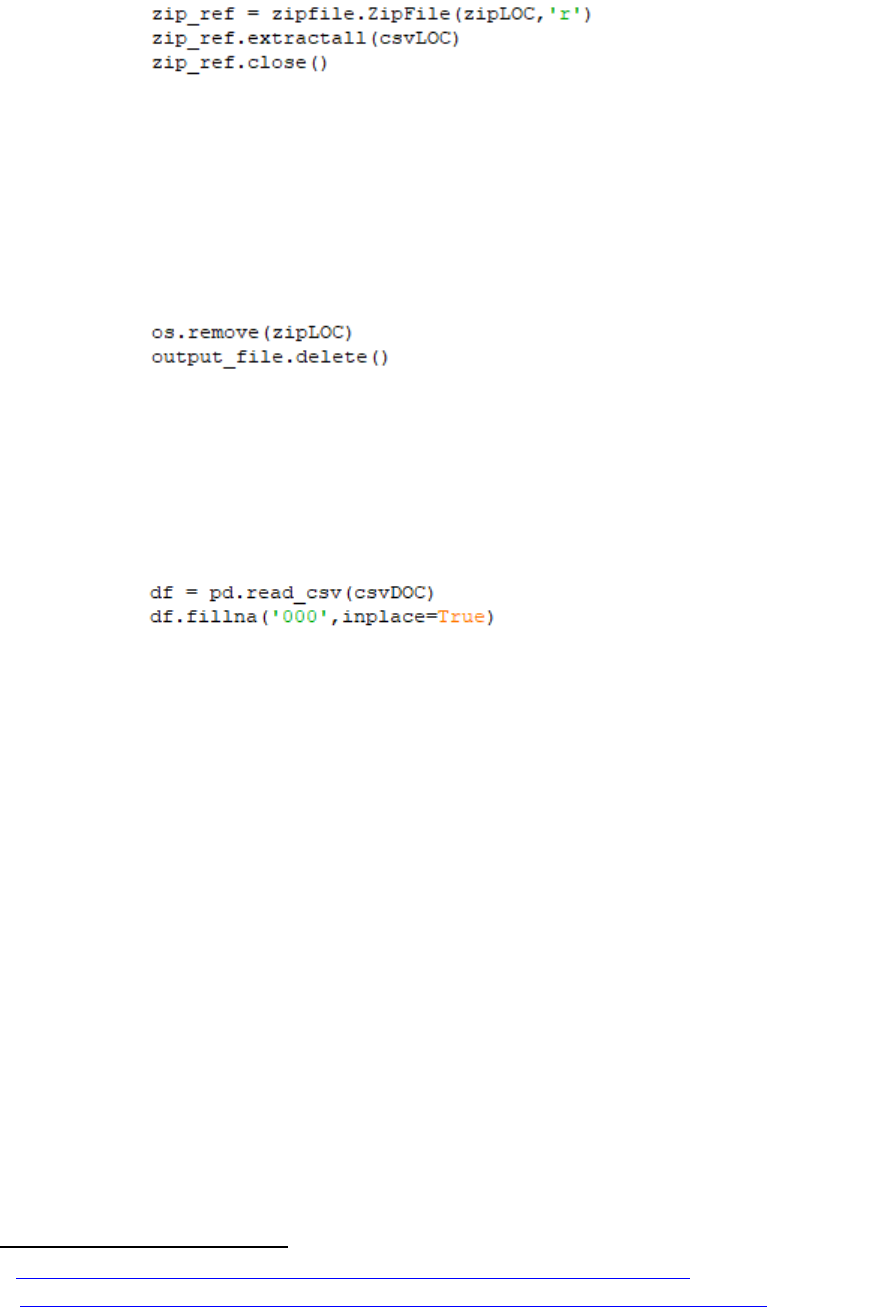
Unzip downloaded ZIP folder containing feature layer as CSV
The ZipFile class of the ZipFile library opens a compressed (zipped) folder. The location for this
folder is provided by the zipLOC variable with the mode parameter set to read, 'r'. This opened
ZIP folder is assigned to the variable zip_ref.
The opened ZIP folder has its contents extracted using the extractall() method and placed in
the location provided by the csvLOC variable.
Once completed, the opened ZIP folder is then closed using the close() method.
Delete ZIP folder on disk and CSV collection file in AGOL
In a bit of early cleanup, the ZIP folder will be deleted using the os module's remove() method.
In the process of downloading the feature layer as a CSV, a new item (CSV collection) is added to
the ArcGIS Online account. With this script intended to run frequently, these items can quickly
add up. The delete() method of the Item class removes the created CSV collection from the
ArcGIS Online organization's Content.
Read CSV, replace NaNs with '000'
The read_csv() reader function of the pandas I/O API returns a pandas object – in this case, an
object of the CSV denoted by the variable csvDOC is converted to a pandas Dataframe.
Since SQL does not inherently understand Not A Number (NaN) values, the fillna() method of
the Dataframe class is used to replace any NaN values with three zeros. Numbers are used because
some columns/fields may be integer only; if a string/text value is used, the script will error.
This means that any NULL/NaN values in the production table in SQL and the feature layer will
have to have the same integer value (three zeros) or the script will see those records as updates to
push to AGOL. This value can be changed but be wary of possible errors that may arise. Review
the API reference for this method
10
for more information.
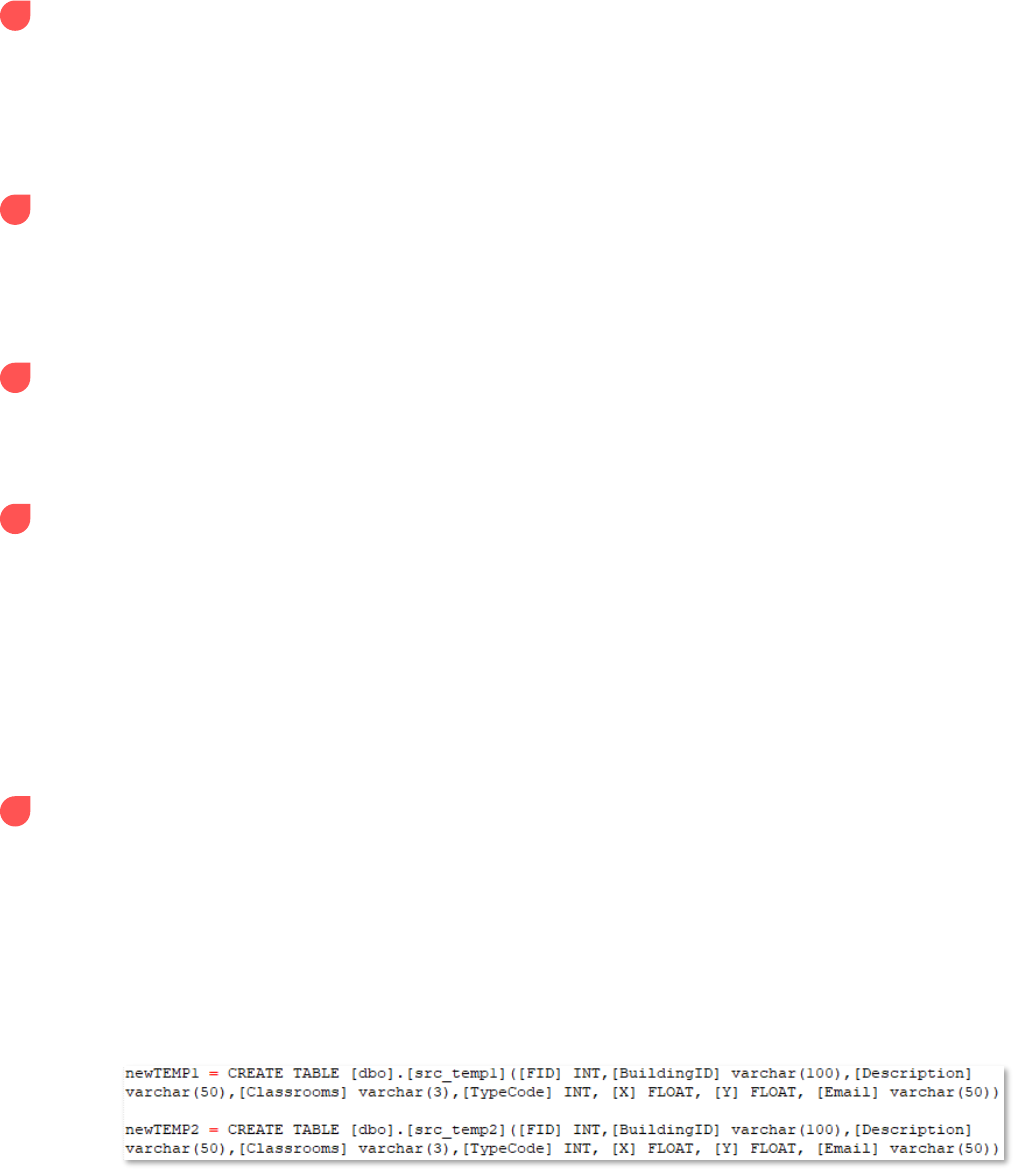
The one way around this is to edit the script to apply the fillna() method to each individual
column/field according to its data type rather than using a blanket value for the entire table. For
example, this could be done for the following fields
11
:
df["Email"].fillna("None", inplace=True) <- text field
df["Phone"].fillna("0", inplace=True) <- integer/float field
10
https://pandas.pydata.org/pandas-docs/stable/reference/api/pandas.DataFrame.fillna.html
11
https://www.geeksforgeeks.org/python-pandas-dataframe-fillna-to-replace-null-values-in-dataframe/
SECTION 2 – CONNECT TO SQL, PERFORM DATA ANALYSIS
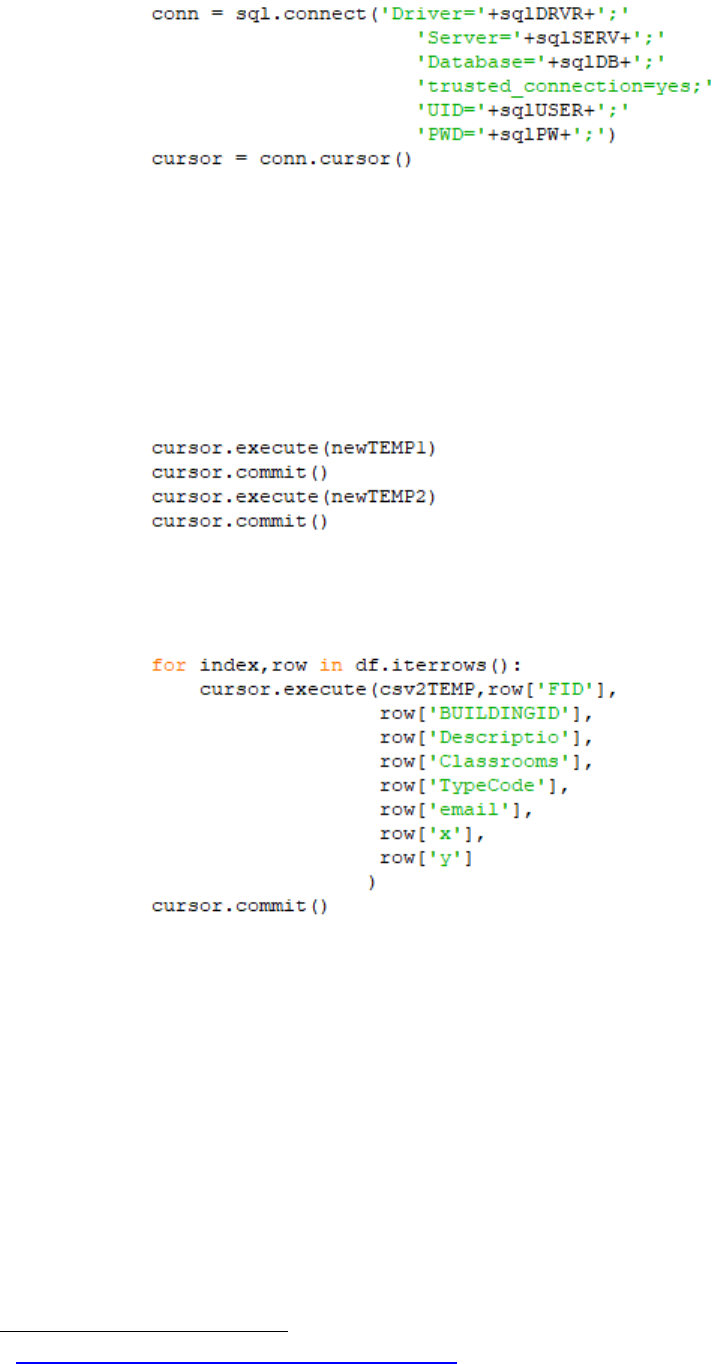
Connect to SQL db and assign cursor
Using the pyodbc module as the variable sql, this portion handles the connection between the
script and your SQL database using the connect() function
12
. The SQL section of the configuration
file provides the driver (sqlDRVR), server name (sqlSERV), database name (sqlDB), user ID
(sqlUSER), and password (sqlPW) of the participation MS SQL Server.
Using the cursor() function, a temporary work area is created, allowing the user to review and
update records within selected database tables in a row-by-row manner via statements committed
in the following steps.
Create temporary tables in SQL db
The temporary tables needed for this synchronization process are created in this section of the
script. The SQL statements required to create the tables are stored in the configuration file.
Insert CSV into temporary table*
This section deals with inserting the CSV into the first temporary table. This table (containing the
feature layer data) will be used to compare new and updated records to the production SQL table.
A for loop is used to iterate through each row in the CSV and insert that row into the table (refer
to the csv2TEMP key from the configuration file for the rest of the SQL statement). Remember: it
is not the CSV itself but the pandas Dataframe object of the CSV that is being iterated upon.
This section requires you to update the number of and values for the row parameters.
For each column in the CSV, there should be a row[] parameter and the exact name of the column
as a string/text item within the bracket. The column names should be listed in the order they are
listed in the CSV, from left to right.
For example, if your CSV has just two fields, Email and phone, then after the csv2TEMP variable,
there should be a row['Email'] and row['phone'] parameter.
12
https://github.com/mkleehammer/pyodbc/wiki/Connection
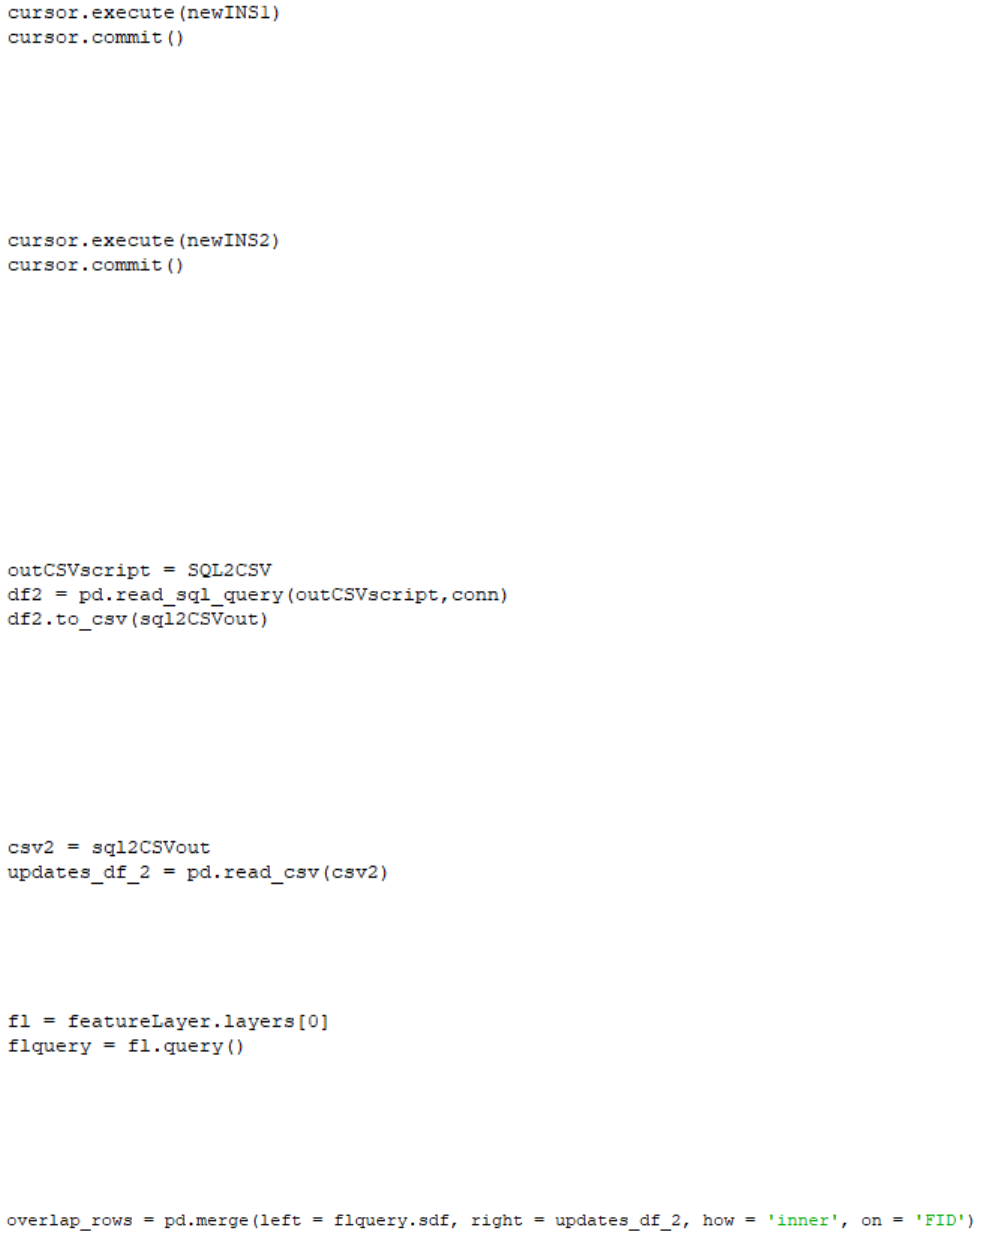
Compare tables and look for non-duplicated FIDs
The newINS1 SQL INSERT statement from the configuration file is performed here. This is where
the unique key feature IDs (FIDs) from the feature layer data (via a temporary SQL table) and
production SQL tables are compared. If an FID exists in the feature layer data that does not exist
in the SQL table, the record it represents will be appended to the SQL table as a new record.
Compare tables and look for any updated records in prod table
The newINS2 SQL INSERT statement from the configuration file is performed here. The same
comparison between FIDs of the two datasets are performed here; however, the WHERE clause in
this statement is looking for records that may have been updated on the SQL side. These are the
records that need to be pushed up and updated to the ArcGIS Online (AGOL) feature layer.
Therefore, the potential output records from the SQL statement are inserted into a second
temporary SQL table.
SECTION 3 – CONVERT SQL UPDATES TO CSV, PUSH TO AGOL, PERFORM UPDATES
Export SQL data to CSV
The SELECT * SQL statement provided by the SQL2CSV configuration file variable will be used to
populate a pandas Dataframe using the read_sql_query() function. Using the to_csv() method,
the file path/name to the new CSV will be provided through the sql2CSVout configuration
variable. This CSV containing the updated records from the production SQL table will be used to
update records within the target feature layer.
Read the SQL update CSV
The updated CSV is assigned to the script variable csv2, which is then read into a new pandas
Dataframe and assigned the script variable updates_df_2.
Query all features in target AGOL feature layer
To perform the following steps of the script, the feature layer data must be provided and available
for query. Since the top layer of the Feature Layer Collection (0) is what is needed for comparison,
that is the layer chosen as part of the layers property.
Determine which features overlap between update CSV and AGOL feature layer using an INNER join
The next step is to compare any rows that overlap between the feature layer and the CSV of
updated SQL records. An INNER JOIN is performed using the pandas merge() method, where
the join is performed on FIDs. This will create a table containing the relevant records' columns
from both tables to be used in a for loop to prepare the CSV data to update the feature layer
records.
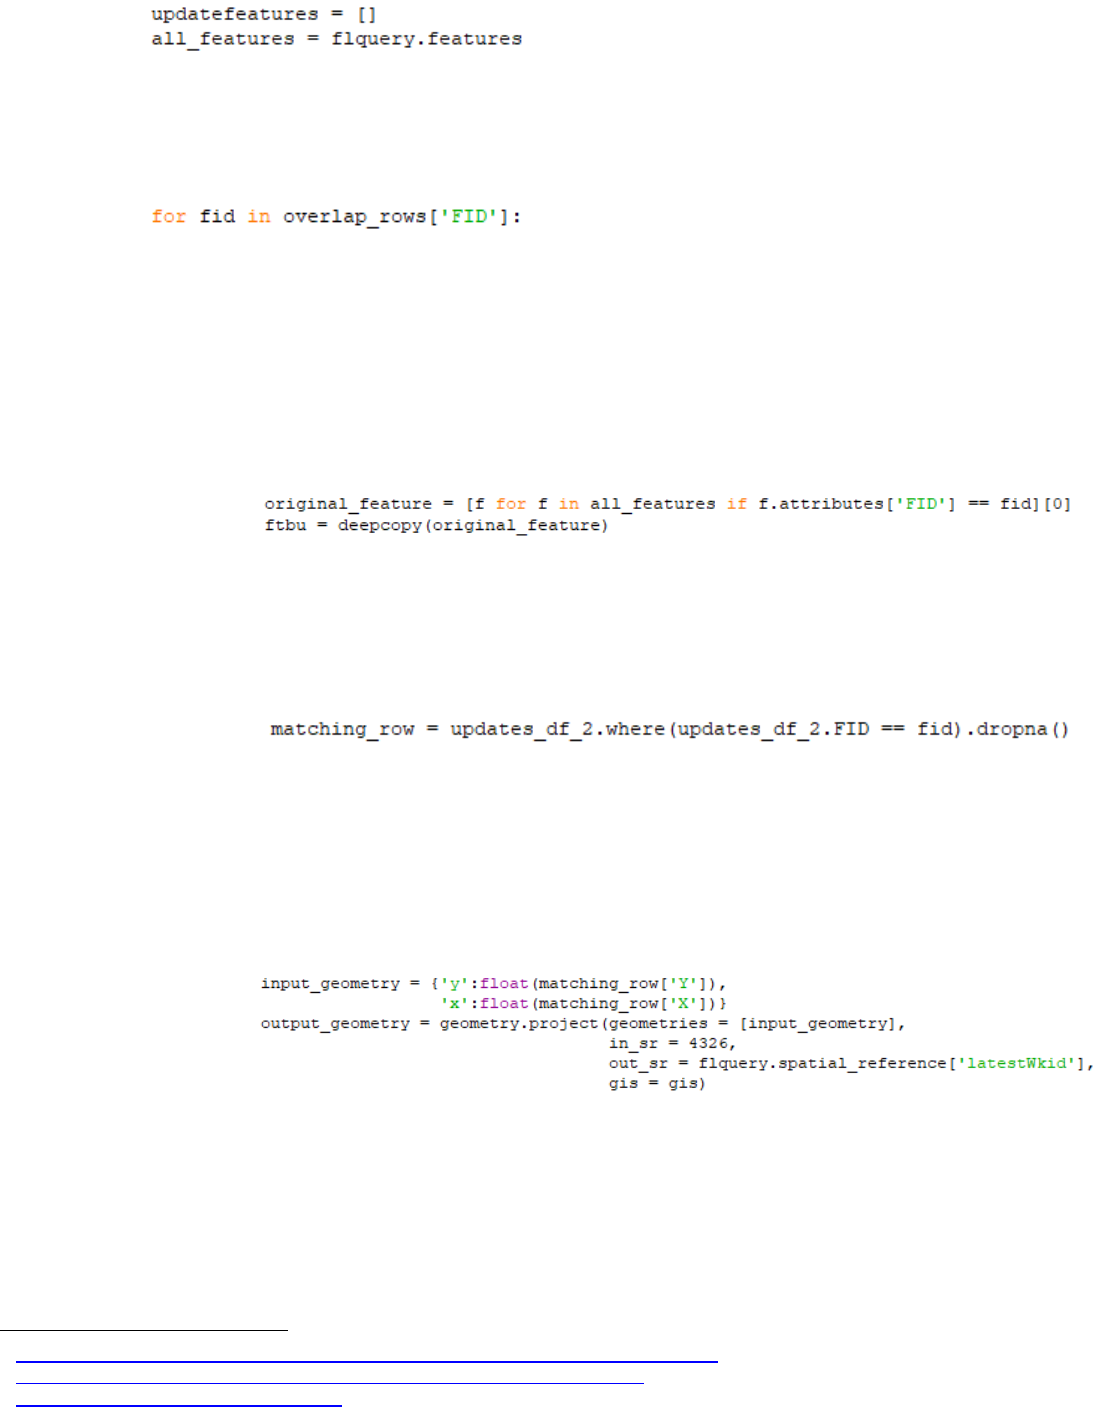
Create list containing corrected features
An empty list updatefeatures is created to house the modified records for the feature layer
update. The all_features variable is relatively self-explanatory: it represents each of the features
in the feature layer accessed by the previous query.
For loop to prepare updated geometries and attributes for each of the updated features
The beginning of a for loop, this section is going to break down the process into specifics. This
method
13
is not especially self-explanatory but is necessary to perform row-specific updates. At a
later time, it may be useful to determine if the possibility to overwrite the entire feature layer with
an updated CSV is a more appropriate method
14
, but for now, this method will work.
The preferred unique key is the FID (feature layer ID) of every record. This is a standard unique
value for all ArcGIS features. Therefore, it is the column name 'FID' that is required for this for
loop.
Get the feature to be updated
The original_feature variable represents the records from the feature layer that match
the records identified as overlapping in the overlap_rows Dataframe. Those records are
then copied using the deepcopy Python operation
15
and assigned to the variable ftbu
(features to be updated).
Get the matching row from CSV
The matching_row variable represents records from the updated CSV that match he
records identified as overlapping in the overlap_rows Dataframe. Much like a WHERE
clause, the pandas where() method finds records that match the conditions provided – in
this case, where the FID of an updated record in the CSV match the FID of a record in the
overlap_rows Dataframe. The dropna() method will ensure records with an FID value of
NULL or NaN are dropped. This is highly unlikely to occur and is just used as a precaution.
Get geometries in the destination coordinate system*
The prerequisite task of ensuring the feature layer has XY fields for a feature layer come
into play here. The input_geometry variable looks for the XY fields in the updated CSV.
These fields don't have to be labeled 'X' and 'Y' – they can be 'long' and 'lat', 'x' and
'y', etc. Whatever they are, those field names are represented in the input_geometry
section after the matching_row variable in each of the relevant brackets.
13
https://developers.arcgis.com/python/sample-notebooks/updating-features-in-a-feature-layer/
14
https://developers.arcgis.com/python/sample-notebooks/overwriting-feature-layers/
15
https://docs.python.org/3/library/copy.html
The rest of this section doesn't need any alteration, but it is important to note that the
input spatial reference assumes the use of WKID 4326 or the geographic coordinate
system WGS 84. Since the data is being projected in ArcGIS Online, the output_geometry
variable will project the geographic coordinates to a projected coordinate system. The
coordinate system is chosen via the script by the spatial reference of the feature layer on
AGOL. In this case, it will likely be the web-based projection standard Web Mercator
Auxiliary Sphere (WKID 3857).
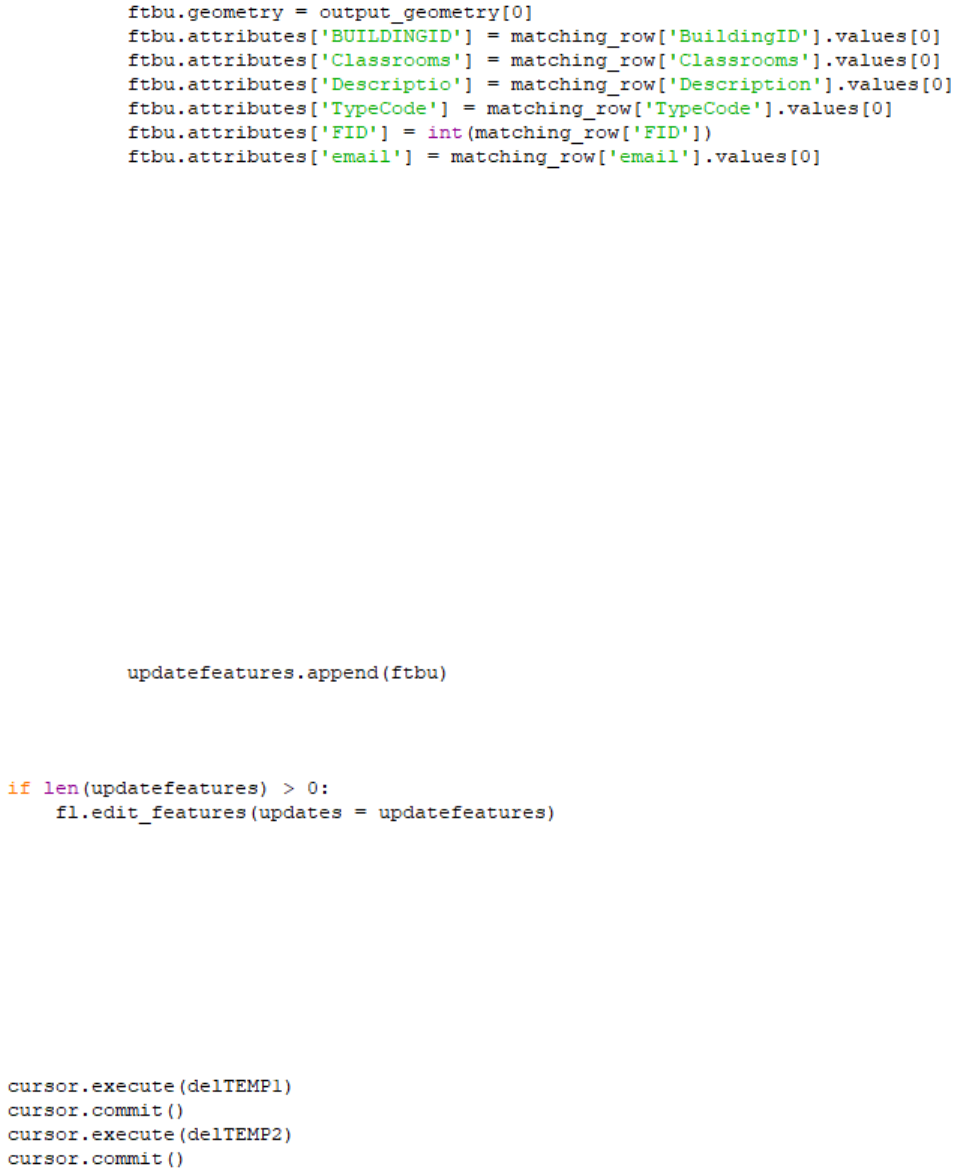
Assign the updated values*
In this section, the attribute values of the ftbu variable will be updated with the attribute
values of target feature layer. The ftbu.attributes columns/fields represent the fields of
the updated CSV created from SQL. Again, these field names must exactly match in both
case and spelling.
The matching_row values represent the columns/fields of the target AGOL feature layer.
Notice how columns with data type INTEGER and data type TEXT are handled. A
matching_row item with a text data type will be formatted with a .values[0] after the
column name, while a matching_row item with an integer data type will simply have the
int() method applied to turn the value into an integer. Make sure these data types match
the target AGOL feature layer. For example, if 'TypeCode' is a text-based field in the CSV
but the 'TypeCode' in the AGOL feature layer is an integer field, then make sure to apply
the int() method for that column.
Also notice that since the two columns/fields are being directly compared, the order in
which the fields are placed within this section are not necessary. However, do not alter the
ftbu.geometry variable in any way.
Add this to the list of features to be updated
The ftbu items will be appended to the empty list updatefeatures.
Call the edit_features() method of Feature Layer object and pass features to the updates parameter
Now outside of the for loop, this part of the script checks to see if there are any records to update.
If not, the script will finish running with no major change to the feature layer. If there is at least
one (1) record to update, the edit_feature() method is called and pushes the updates to the
feature layer. Here, each record in question will be entirely overwritten, while all others are left
untouched.
SECTION 4 – CLEAN UP DATA WITHIN SQL AND LOCAL MACHINE
Delete temporary tables
Deletes the two temporary tables created in the MS SQL Server.
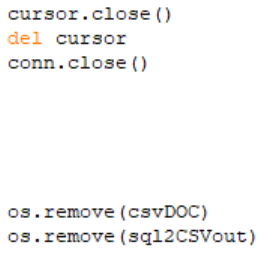
Close and delete cursor; close SQL db connection
Closes and deletes the SQL cursor created for the script and closes the connection the SQL Server
database.
Remove all CSVs
Deletes the downloaded feature layer data as CSV (csvDOC) and the updated SQL records as CSV
(sql2CSVout) from the local/server machine.
