DevOps For Blockchain Smart Contracts Implementation Guide Dev Ops
User Manual:
Open the PDF directly: View PDF ![]() .
.
Page Count: 49
DevOps for Blockchain Smart Contracts– Implementation Guide
Ben Burns, Head of Blockchain Development, Truffle
David Burela, Sr. Software Engineer, CSE, Microsoft
Marc Mercuri, Principal Program Manager, Blockchain Engineering, Microsoft
Introduction
Microsoft and Truffle co-published a paper named “DevOps for Blockchain Smart Contracts” which
covered a number of key considerations and patterns for establishing a DevOps process on Blockchain.
This document is a companion piece that looks at implementing those patterns for the Ethereum
blockchain using a mix of the Truffle Suite, VS Code, and Azure DevOps.
Smart Contract Business Scenario
The code we’ll be using in this guide is a set of smart contracts for a vehicle registry, similar to what you
might have at the department of motor vehicles.
The scope of this project is to deliver an attestable registry of vehicles. Vehicles are created in individual
Item contracts and then associated with a BasicItemRegistry contract.
Each Item contract contains property values that represent attributes of a car, e.g. make, model, etc.
In addition to being a widely applicable scenario, it is also a scenario that involves multiple connected
contracts which forces additional consideration. One contract represents a registry and then multiple
contracts will be deployed of a contract that represents an item that is included in that registry.
For those less familiar with blockchain, a registry is a common multi-party scenario that is applicable to
multiple industries. For public sector, there are registries for land and vehicles. For manufacturers
there may be registries of certifications. For video games, there may registries of “in game” items that
you’ve purchased.
The files for this application have been posted in Github at this location.
Pre-Requisites
To prepare for the implementation, you will first want to install and configure the tools, extensions and
infrastructure required.
Installing VS Code and Extensions
Install Visual Studio Code, a free download that provides an integrated development environment on
Windows, Mac, and Linux.
Visual Studio Code provides out of the box support for Git. It also has a wide assortment of extensions
that can be downloaded for additional language support, extended integration with your source code
repository, in tool management of pull requests, monitoring of builds, etc.
Install the VS Code extensions for your target smart contract language
Solidity for Ethereum
Java and Kotlin for Corda
Go for Hyperledger Fabric
In this paper we will be demonstrating the patterns on the Ethereum blockchain, so the smart contracts
will be focused on Solidity. Within VS Code, click on the Extensions icon in the left hand side and then
download the Solidity extension by Juan Blanco.
For source code control, this paper focuses on code stored in Github or Azure Repos. For GitHub, you’ll
want to install the extension for GitHub Pull Requests for Visual Studio Code. There is also an extension
for Azure Repos that will allow you to monitor builds and manage pull requests. You can find both of
these within VS Code as well.
Install Truffle Suite
Truffle Suite, specifically Truffle and Ganache, will be used for compiling, testing, debugging, and
deploying smart contracts. This will include usage in different ways, e.g. a desktop usage for an
individual developer and pipeline usage within Azure DevOps. Within Azure DevOps, Ganache will also
be hosted in a function for consortium and consortium member testing.
Install Windows Subsystem for Linux
While not required, we recommend installing the Windows Subsystem for Linux. This will provide you
the bash shell which many other online samples assume.
Install Windows Subsystem for Linux.
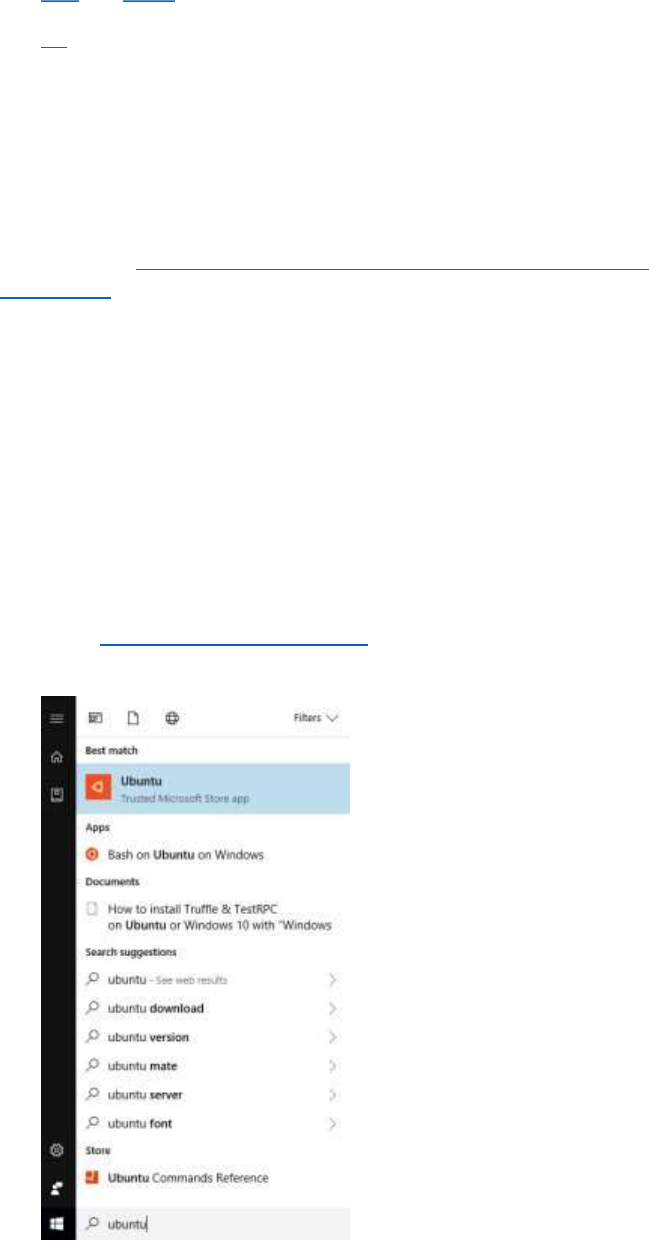
Once installed, start the Ubuntu bash shell

Install Truffle on a machine that does not have node installed
If installing on a machine that does not have node already installed, use the following script –
# Make sure Ubuntu is up to date
sudo apt-get update -y && sudo apt-get upgrade -y
# Install build essentials & python. lots of NPM libraries require these
sudo apt install build-essential python -y
# install nvm https://github.com/creationix/nvm#install-script (the below command is a single
line)
curl -o- https://raw.githubusercontent.com/creationix/nvm/v0.33.11/install.sh | bash
# restart bash to enable nvm (saves you restarting your terminal)
exec bash
# install latest nodejs and tell NVM to make it active on your system
nvm install node
nvm use node
# install beta release of Truffle 5 and latest ganache-cli
# note, once Truffle v5 is released you no longer need the @beta below
npm install -g truffle@beta ganache-cli
Install Truffle on a machine that already has node installed
If installing on a machine that already has node installed, use the following script –
# Install the dist-upgrade package and run it to update to the latest node version
sudo npm -g install dist-upgrade
sudo dist-upgrade
# install beta release of Truffle 5 and latest ganache-cli
# note, once Truffle v5 is released you no longer need the @beta below
npm install -g truffle@beta ganache-cli
Install Ganache
In the previous section we installed the truffle and ganache-cli command line tools. The ganache-cli tool
is useful for automated testing, but the graphical version of Ganache is a great tool to use when you’re
first starting out. This version of the tool shows you the state of the Ganache blockchain in real time, so
you can see exactly what is changing as you develop and test your code. Like the rest of the Truffle tools,
Ganache runs on Windows, macOS, and Linux. To get it, just visit the Ganache page of Truffle’s website,
and click the orange download button in the middle of the page. This will automatically download the
correct installer for your OS.
Increase the Gas Limit on Ganache for Private Chain Development
If you are developing for a private chain, one consideration is the appropriate gas limit for your needs. In
our experience, many private chain developers apply object oriented programming which can exceed
the defaults for a blockchain deployment. Enterprise customers typically increase the gas amount
substantially. For Azure Blockchain Workbench, we increase this amount to 50,000,000 and that is what
we will change the configuration to in Ganache.
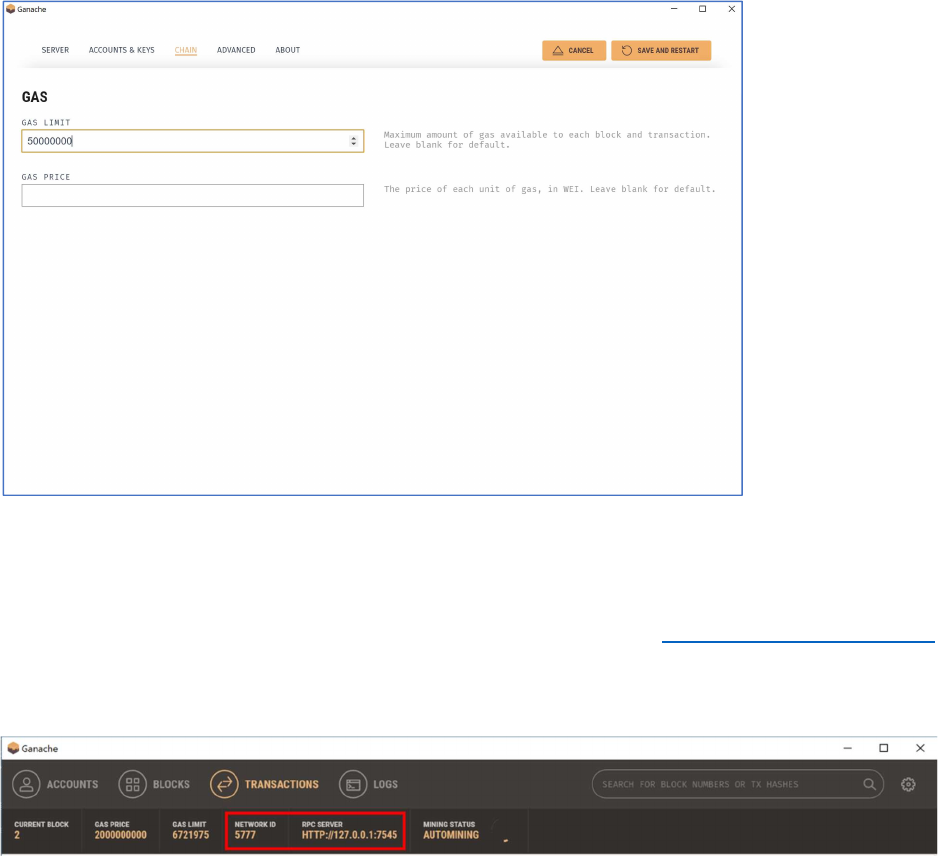
To make this change, click on the gear icon in the upper left to get to the settings screen. Click on the
“CHAIN” menu item, set the value to 50,000,000 (without commas), and then click the “Save and
Restart” button.
If developing for the public chain, it is not advised to change this limit as you will want to account for
these limits early in the development process vs. having to refactor later when deploying the public
chain.
Record Information Needed for Testing
The next step is to retrieve RPC endpoint information and network ID from Ganache that will be needed
for development and testing. We will refer back to this information in the Create a new project in Truffle
section below.
On the main screen within Ganache, copy the RPC Server and Network ID.
Set up Azure DevOps
Within Azure DevOps, your first steps will be to set up a project and specify your source code control.
Creating a Project
The approach reflected in this whitepaper will use Azure DevOps Pipelines to continuously build, test,
and deploy the smart contracts. It will optionally use Azure DevOps Repos or connect to other github
services such as GitHub.
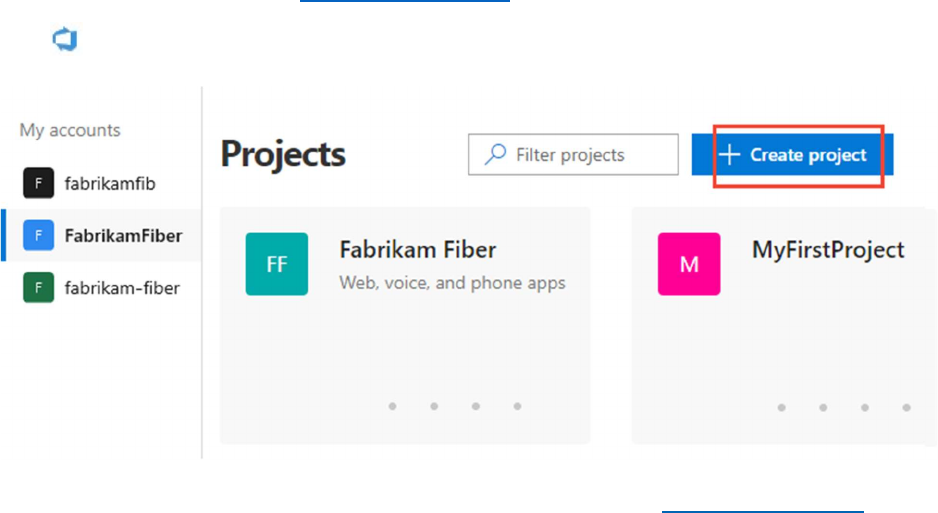
Begin by navigating to Azure DevOps at https://dev.azure.com/.
Choose the Azure DevOps logo to open the Projects page, and then choose Create Project.
Enter information into the form provided. Provide a name for your project, and choose the visibility,
initial source control type, work item process. For details on public projects, see Create a public project.
If the Public option is grayed out, you need to change the policy.
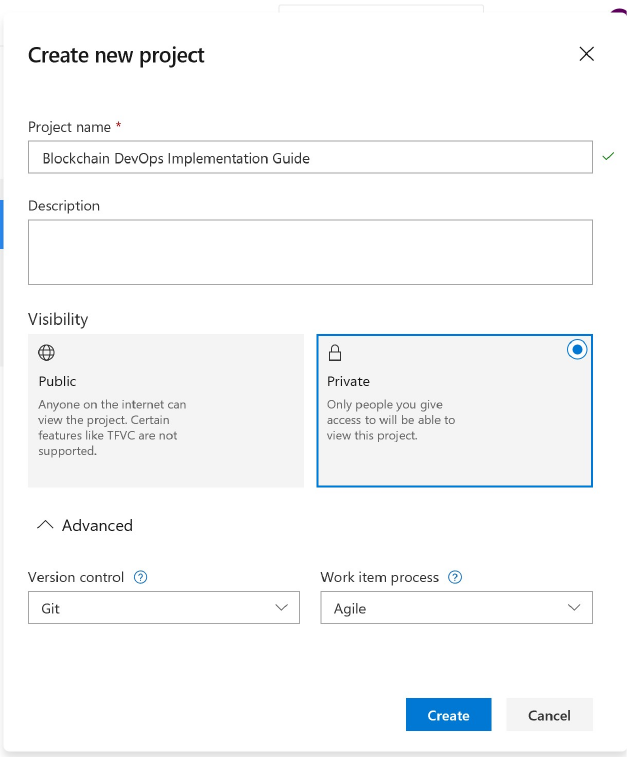
Click the Create button to finish creating your project.
Source Code
Once the project is created, the next step will be to determine where you source code will reside.
Starting a New Repo in Azure Repos
Azure DevOps Repos provides free hosting of private repos and can connect to existing local or git, or
VSTS source code repositories.
If you will be starting a new project and will be using a new repository in Azure Repos, the next step
would be to right click on the Repos icon on the left of the screen.
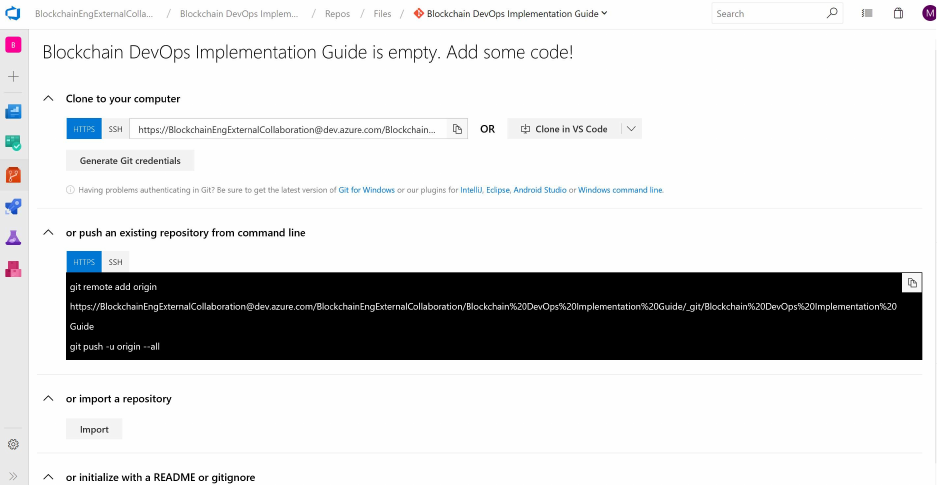
Once selected, you will see options to push an existing repository from the command line, import a
repository, or initialize a new repo.
Selecting an existing source code repository
An alternate option is to specify an existing repo from GitHub or Azure DevOps.
Once created, navigate to the Repos section in the UI. This is where you can clone code to VS Code,
push an existing repository, or import an existing repository.
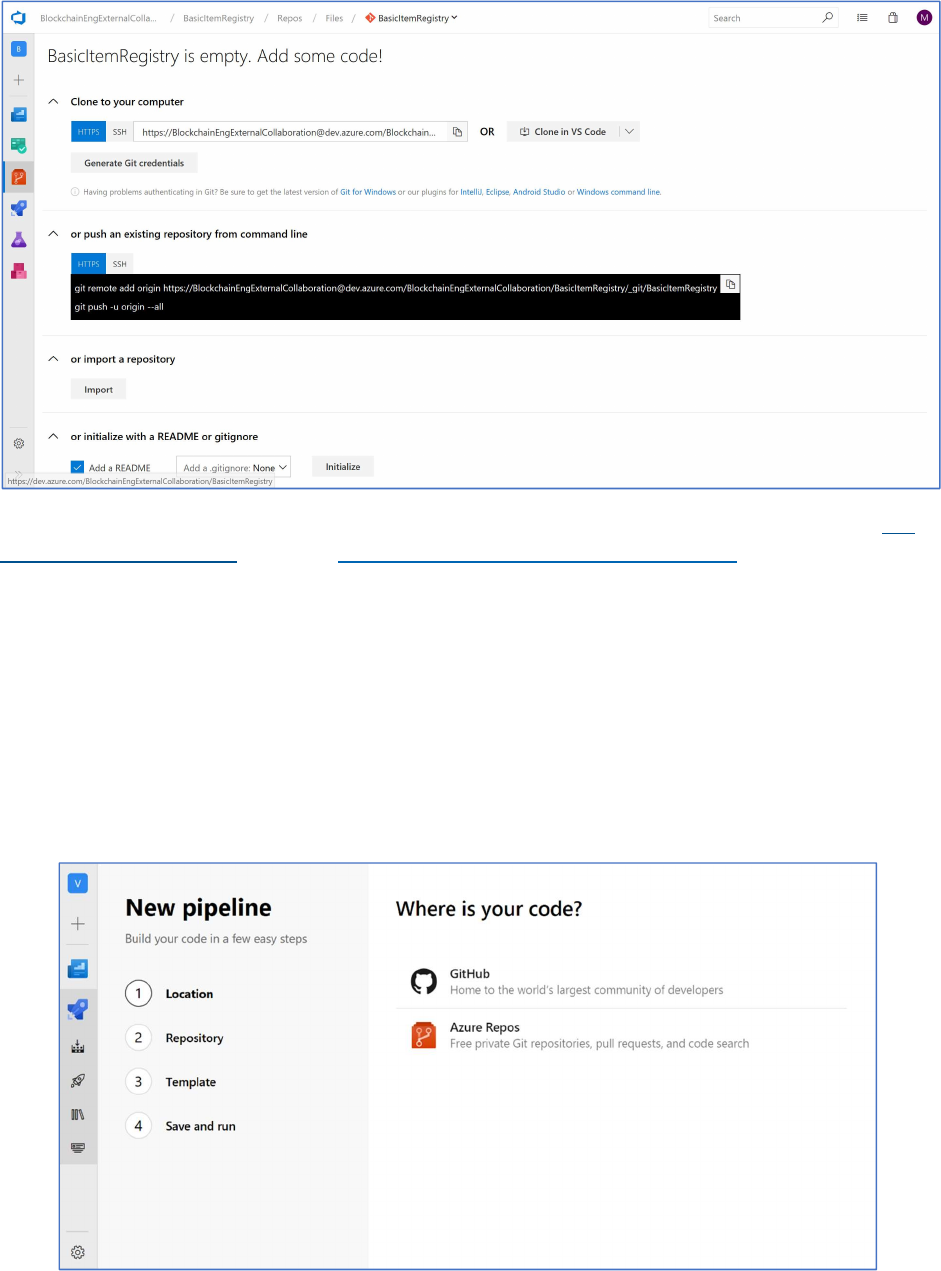
If starting a new project, you can also initialize the project with a README or gitignore.
In this walkthrough, you’ll be creating a new repo so click the “Initialize” button next to the section titled
“or initialize with a README or gitignore”
Note – There is an alternate path to do this directly from within GitHub. Within Github, there is an app
in the GitHub Marketplace and offers unlimited CI/CD minutes and 10 parallel jobs for open source
projects.
Configure a build pipeline in Azure DevOps
To create a build pipeline, you will take the following two steps -
1. In your project, navigate to the Pipelines page and then choose New pipeline.
2. Walk through the steps of the wizard by first selecting GitHub or Azure Repos as the location of
your source code.
If you selected Github, do the following -
1. Choose to Authorize with OAuth by selecting Authorize. You might be redirected to GitHub to
sign in. Enter your GitHub credentials.
2. When you're redirected back to Azure Pipelines, select the sample app repository.
3. For the next step, Azure Pipelines analyzes the code in your repository. If your repository
already contains an azure-pipelines.yml file, which is the case for all sample repositories, then
this step is skipped. Or else, Azure Pipelines recommends a starter template based on the code
in your repository.
4. In the final step, you're shown the YAML file that will be used.
5. Select Save and run. Choose the option to Commit directly to the master branch.
6. The YAML file is now pushed to your GitHub repository, and a new build is automatically started.
7. Wait for the build to finish.
If you selected Azure Repos, you’ll be asked to select an existing Repo.
Opening the Project in VS Code
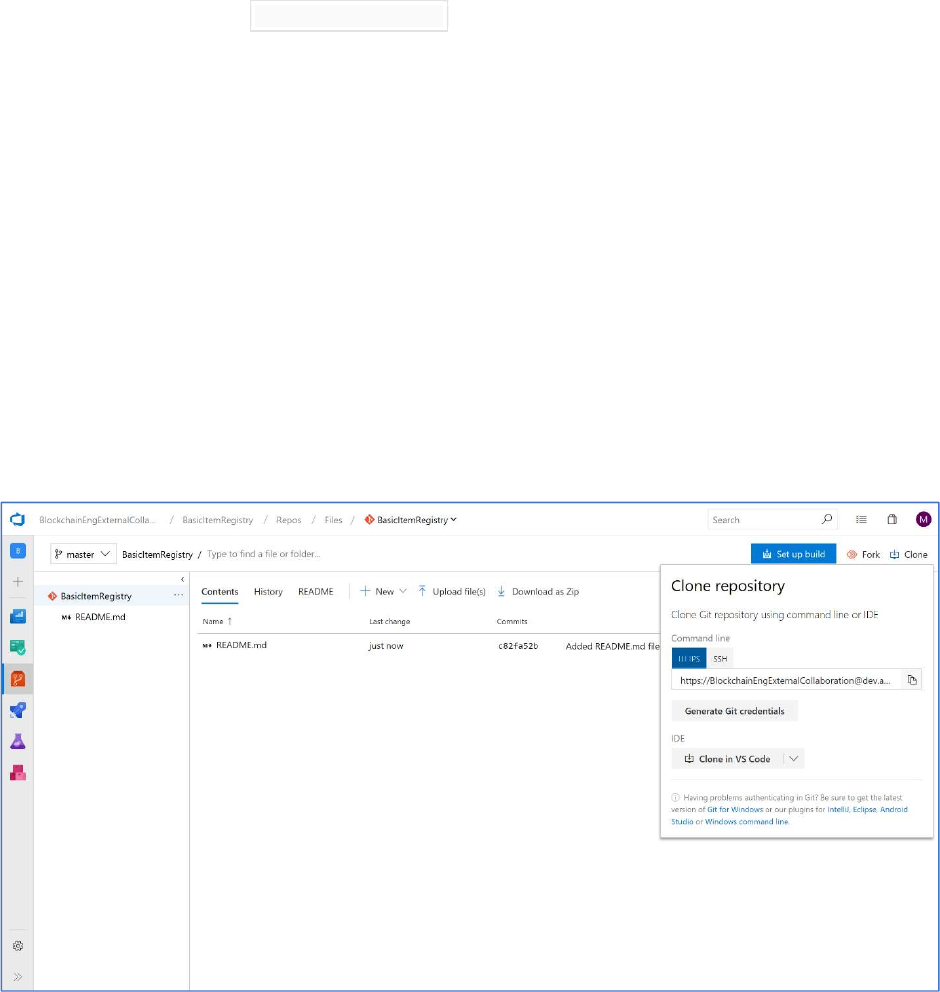
Within the Repos section, click the “Clone” button in the upper right.
Select the “Clone in VSCode” to get a local copy and have it within the VS Code IDE.
Create a new project in Truffle
Open the terminal in VS Code and navigate to the root directory for your cloned repo and type –
truffle init
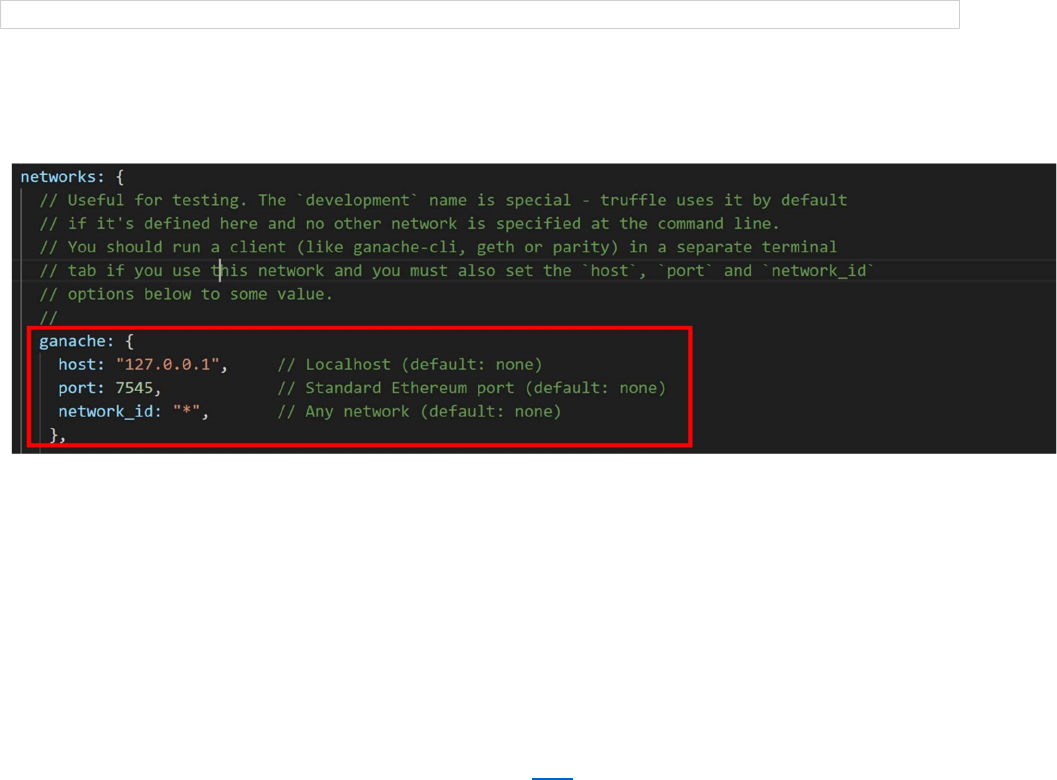
Once the command completes, edit the truffle-config.js file that was created.
Under ‘networks’, uncomment the ‘development’ section and rename it to ‘ganache’ Next, populate it
with the values previously recorded for the host and port.
Note - Tests can be run without pointing Truffle at Ganache, but it is done here to ensure you can see
the details of your transactions in the Ganache UI.
Associate sample files
Copy existing contracts into the contracts folder.
The Vehicle Registry records details for the Item contracts, including the contract location on the
blockchain. The Vehicle Registry also contains look ups on unique values within the contracts. For
vehicles there are two unique values the Vehicle Identification Number (VIN) and the vehicle registration
number.
These contracts, tests, and other files can be downloaded here.
When overlaid into the directory for the project, the git icon in VS Code should identify the number of
changes and the list of files will be shown to the right.
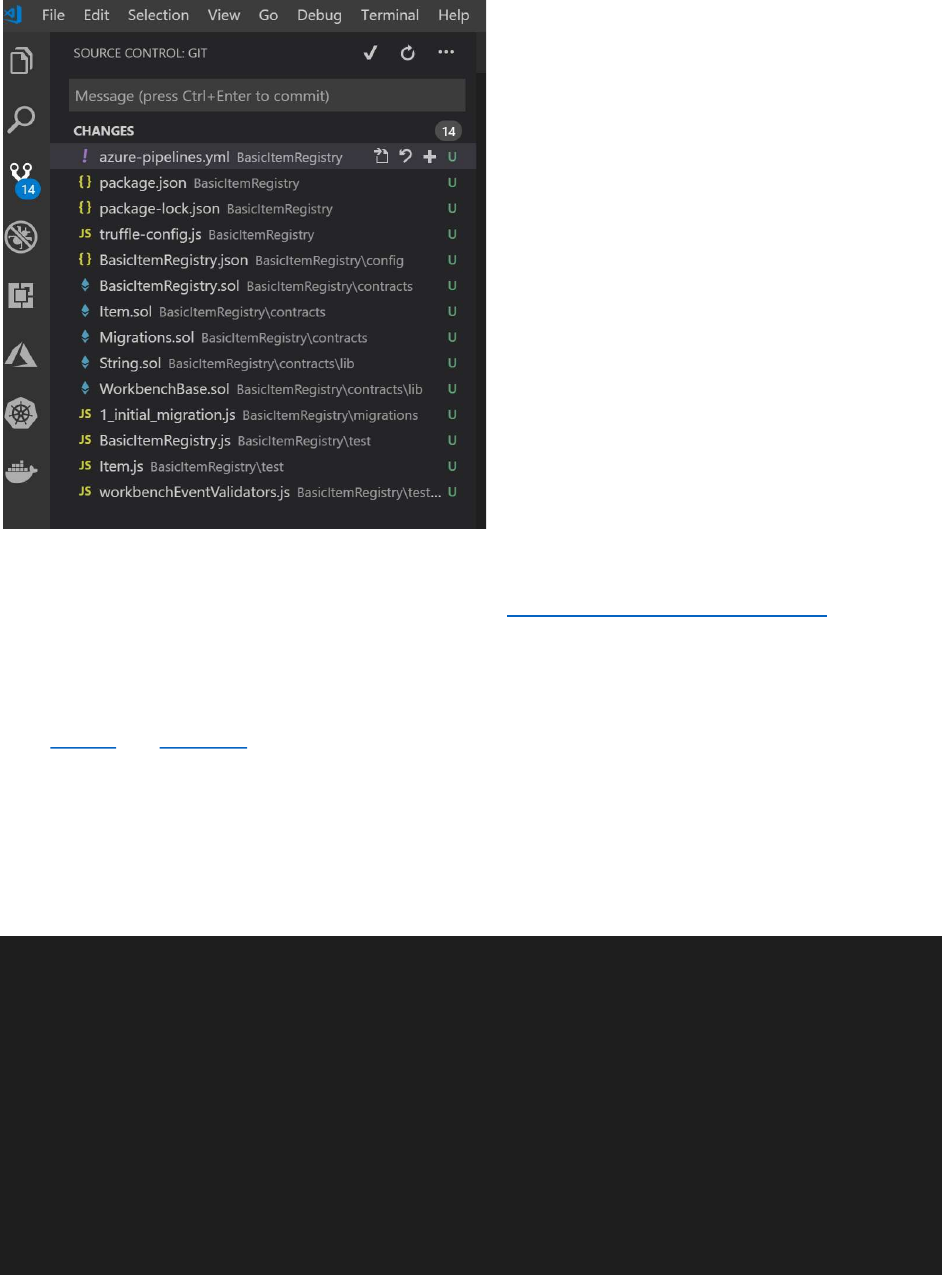
Note – this sample focuses on a vehicle registry, but the blockchain accelerator for registries can be used
to easily create similar contracts specific to your scenario.
A Closer Look at the Tests
On their website, Truffle provides details and considerations on how to write tests for smart contacts in
both Solidity and Javascript.
Double click on the file Item.js to see how the tests are written for the sample project.
You can see that the name of the two contracts are assigned to constants, the workbench specific
validators are referenced, and an array is created that maps to the enum within the contract.
const BasicItemRegistry = artifacts.require("BasicItemRegistry");
const Item = artifacts.require("Item");
// Grab truffle-contract's decodeLogs helper function. It expects to be bound
// to the contract constructor, so we do that here as well
const decodeLogs = require('truffle-
contract/lib/utils').decodeLogs.bind(BasicItemRegistry);
// augment assert with workbench event validators
require("./helpers/workbenchEventValidators.js")(assert);
// helper enum description object, as enums aren't included in a contract's

// ABI, so we can't decode them from the compiler output... yet.
const StateType = {
0: "Active",
1: "Retired",
Active: 0,
Retired: 1,
}
The test then describes the constructor, passes values into it, and then validates a set of assertions
based on expectations related to state.
It checks both the properties that are assigned inside of the constructor as well as the Azure Blockchain
Workbench event that tracks contract creation was fired.
contract("Item", function (accounts) {
describe("constructor", function () {
let item;
before("deploy fresh contract", async function () {
item = await Item.new(
accounts[0],
"item0",
"microsoft",
"windows",
"blue",
"1985-11-20",
"redmond"
);
});
it("should have a manufacturer address", async function () {
const manufacturer = await item.Manufacturer();
assert.strictEqual(manufacturer, accounts[0]);
});
it("should have an itemId", async function () {
const itemId = await item.ItemId();
assert.strictEqual(itemId, "item0");
});
it("should have a make", async function () {
const make = await item.Make();
assert.strictEqual(make, "microsoft");
});

it("should have a model", async function () {
const model = await item.Model();
assert.strictEqual(model, "windows");
});
it("should have a color", async function () {
const color = await item.Color();
assert.strictEqual(color, "blue");
});
it("should have a manufactureDate", async function () {
const manufactureDate = await item.ManufactureDate();
assert.strictEqual(manufactureDate, "1985-11-20");
});
it("should have a factoryId", async function () {
const factoryId = await item.FactoryId();
assert.strictEqual(factoryId, "redmond");
});
it("should be created in the Active state", async function () {
const state = await item.State();
assert.strictEqual(StateType[state], "Active");
});
it("should emit a WorkbenchContractCreated event", async function () {
const receipt = await web3.eth.getTransactionReceipt(item.transactionHash);
const logs = decodeLogs(receipt.logs);
assert.eventIsWorkbenchContractCreated(logs[0], "BasicItemRegistry",
"Item", accounts[0]);
});
});
That is then followed by descriptions and tests of other functions in the contract, as can be seen below.
describe("RegisterItem", function () {
let item;
beforeEach("deploy fresh contract", async function () {
item = await Item.new(
accounts[0],
"item0",
"microsoft",

"windows",
"blue",
"1985-11-20",
"redmond"
);
});
it ("should register itself successfully", async function() {
const basicItemRegistry = await BasicItemRegistry.new("MyRegistry",
"Description goes here.");
await basicItemRegistry.OpenRegistry();
// assert precondition: Item address not registered
let isRegisteredItemContractAddress = await
basicItemRegistry.IsRegisteredItemContractAddress(item.address);
assert (!isRegisteredItemContractAddress)
// assert precondition: Item Id not registered
let isRegisteredItemId = await
basicItemRegistry.IsRegisteredItemId("item0");
assert (!isRegisteredItemId)
await item.RegisterItem(basicItemRegistry.address);
// assert postcondition: Item address is registered
isRegisteredItemContractAddress = await
basicItemRegistry.IsRegisteredItemContractAddress(item.address);
assert (isRegisteredItemContractAddress)
// assert postcondition: Item Id is registered
isRegisteredItemId = await basicItemRegistry.IsRegisteredItemId("item0");
assert (isRegisteredItemId)
});
it("should emit a WorkbenchContractUpdated event", async function () {
const basicItemRegistry = await BasicItemRegistry.new("MyRegistry",
"Description goes here.");
await basicItemRegistry.OpenRegistry();
// assert precondition: Item address not registered
let isRegisteredItemContractAddress = await
basicItemRegistry.IsRegisteredItemContractAddress(item.address);
assert (!isRegisteredItemContractAddress)
// assert precondition: Item Id not registered

let isRegisteredItemId = await
basicItemRegistry.IsRegisteredItemId("item0");
assert (!isRegisteredItemId)
const { logs } = await item.RegisterItem(basicItemRegistry.address);
assert.eventIsWorkbenchContractUpdated(logs[logs.length - 1],
"BasicItemRegistry", "Item", "RegisterItem", accounts[0]);
});
it("should not change Item state", async function () {
const basicItemRegistry = await BasicItemRegistry.new("MyRegistry",
"Description goes here.");
await basicItemRegistry.OpenRegistry();
// assert precondition: Item address not registered
let isRegisteredItemContractAddress = await
basicItemRegistry.IsRegisteredItemContractAddress(item.address);
assert (!isRegisteredItemContractAddress)
// assert precondition: Item Id not registered
let isRegisteredItemId = await
basicItemRegistry.IsRegisteredItemId("item0");
assert (!isRegisteredItemId)
// assert precondition: Item state is Active
let state = await item.State();
assert.strictEqual(StateType[state], "Active");
await item.RegisterItem(basicItemRegistry.address);
// assert postcondition: Item state is still Active
state = await item.State();
assert.strictEqual(StateType[state], "Active");
});
it("should revert if item is retired", async function () {
const basicItemRegistry = await BasicItemRegistry.new("MyRegistry",
"Description goes here.");
await basicItemRegistry.OpenRegistry();
// assert precondition: Item address not registered
let isRegisteredItemContractAddress = await
basicItemRegistry.IsRegisteredItemContractAddress(item.address);
assert (!isRegisteredItemContractAddress)

// assert precondition: Item Id not registered
let isRegisteredItemId = await
basicItemRegistry.IsRegisteredItemId("item0");
assert (!isRegisteredItemId)
// set up precondition: retire item
await item.Retire();
// assert precondition: Item state is Retired
let state = await item.State();
assert.strictEqual(StateType[state], "Retired");
try {
await item.RegisterItem(basicItemRegistry.address);
assert.fail("previous line should have thrown!");
} catch (err) {
assert(
/revert/.test(err.message),
`Expected revert error. Got '${err.message}', instead.`
);
}
});
});
describe("Retire", function () {
beforeEach("deploy fresh contract", async function () {
item = await Item.new(
accounts[0],
"item0",
"microsoft",
"windows",
"blue",
"1985-11-20",
"redmond"
);
});
it("should change state to Retired", async function () {
// assert precondition: Item state is Active
state = await item.State();
assert.strictEqual(StateType[state], "Active");
// retire item
await item.Retire();
// assert postcondition: Item state is Retired
state = await item.State();
assert.strictEqual(StateType[state], "Retired");
});
it("should emit a WorkbenchContractUpdated event", async function () {
const { logs } = await item.Retire();
assert.eventIsWorkbenchContractUpdated(logs[0], "BasicItemRegistry",
"Item", "Retire", accounts[0]);
});
});
});
Local Testing
Within the Terminal in VS Code, type the following commands –
truffle -compile
truffle -test
This will execute the tests in the “\tests” folder of sample project provided. These tests create instances
of the contracts, provide sample values to the constructors of the contracts and validate that the state
and outputs of functions on the contract returns what’s expected.
Truffle Deploy to Ganache
Truffle refers to deployments as migrations. The initial deployment is a migration that effectively
migrates from a “null state” to a first time deployment. Subsequent migrations can be used to both
deploy new contract versions and migrate state, similar to how many data developers are familiar with
from SQL migrations.
Open the terminal in VS Code and navigate to the root directory for your cloned repo and type –
truffle migrate --network=ganache
Test Against Production Blockchain Data Locally with Forking
Good DevOps processes attempt to eliminate or minimize the difference between test environments
and production. Blockchains facilitate this goal in a way that other software cannot via the ability to fork
a chain. Forking a chain is a process where a new blockchain network is created from the state of an
existing chain, but blocks added to the new chain do not get appended back to the original. With tools
like ganache-cli, instantaneous forking can be achieved by deferring back to the original network for
reads of old state information.
Setting up a forked network is easy using the ganache-cli that we installed previously.
Point ganache-cli at the RPC endpoint of the node you wish to fork by running it with the --fork flag. If
you are using a private chain for a consortium or the public Ethereum network, the approach is the
same.
An example command line would be the following -
ganache-cli --fork https://mynode.mynetwork.local:8545
Once the above command is executed, the ganache-cli will expose its own local network on port 8545
which will refer back to the original chain for reads of state that existed prior to the fork. There is no
delay for this to happen, Ganache will be available immediately.
If you wish to fork from a previous block, you can specify the block number by appending @BlockNumber
to the end of the node URL.
An example command line would be the following -
ganache-cli --fork https://mynode.mynetwork.local:8545@12345
Note - This is especially useful for testing migrations, especially complex migrations which move state
from an old contract version to a new one.
Using Truffle in Build Pipelines
The build pipeline in this document focuses on the compilation and testing of smart contracts.
Often, at the consortium and consortium member levels, where there will also be custom code that
interacts with the smart contract(s). This can be code running in compute (VM, Logic Apps, Flow,
Functions, etc.) or a web app communicating directly using the native blockchain API endpoints or client
libraries, e.g. Nethereum, that wrap them.
This is consortium specific code that impacts all members of the consortium and may manifest itself in
the communication of data and events to and from the smart contract from backend systems, web or
mobile clients for end users, etc.
While not a focus of this document, build pipelines should incorporate this additional code as
appropriate. The approach for doing this follows the standard approach for setting up build pipelines in
Azure DevOps.
The build pipeline definition for Azure DevOps is contained within the azure-pipelines.yaml file.
# Node.js
# Build a general Node.js project with npm.
# Add steps that analyze code, save build artifacts, deploy, and more:
# https://docs.microsoft.com/azure/devops/pipelines/languages/javascript
pool:
vmImage: 'Ubuntu 16.04'
steps:
- task: NodeTool@0
inputs:
versionSpec: '8.x'
displayName: 'Install Node.js'
- script: |
npm install

cd function-app/GanacheFunction
npm install
displayName: 'Install project dependencies'
- script: |
npx truffle compile
npx truffle test
displayName: 'Truffle Compile & Test'
# azure-pipelines.js - Publish Test Results in
- task: PublishTestResults@2
condition: always()
inputs:
testResultsFormat: 'JUnit'
testResultsFiles: '**/TEST-*.xml'
- task: ArchiveFiles@2
inputs:
rootFolderOrFile: '$(System.DefaultWorkingDirectory)'
includeRootFolder: false
archiveType: 'zip'
archiveFile: '$(Build.ArtifactStagingDirectory)/full-$(Build.BuildId).zip'
- task: ArchiveFiles@2
inputs:
rootFolderOrFile: '$(System.DefaultWorkingDirectory)/function-app'
includeRootFolder: false
archiveType: 'zip'
archiveFile: '$(Build.ArtifactStagingDirectory)/function-app-$(Build.BuildId).zip'
- task: PublishBuildArtifacts@1
inputs:
pathToPublish: '$(Build.ArtifactStagingDirectory)'
As can be seen in the yaml file, the following activities are executed. -
Installs Node.js
Installs NPM
Runs truffle compile
Runs truffle test
Installs Node.js dependencies
Installs Mocha
Publishes test results
Places the files in a uniquely named zip file
Places the function app in a uniquely named zip file
Copies files (post build)
Publishes build artifacts
Automated Tests
The tests executed by the consortium and consortium member organizations will include the same tests
run locally. These organizations should additionally determine what tests should be written to validate
that the smart contracts have not changed in a way that will break compatibility with their existing
integration points.
If build pipelines for these dependent applications do not already exist, then these additional tests
should then be incorporated in build pipelines.
When defining your release pipeline(s), you should also incorporate the dependent applications so that
the resulting test environment represents production for the consortium member. If manual testing is
required for that, Azure DevOps has capabilities to support that as well, as defined here.
Upgrade requirements and scenarios, if any, should also be reflected in testing.
The same unit tests that were performed locally are performed automatically when code is checked into
the repo.
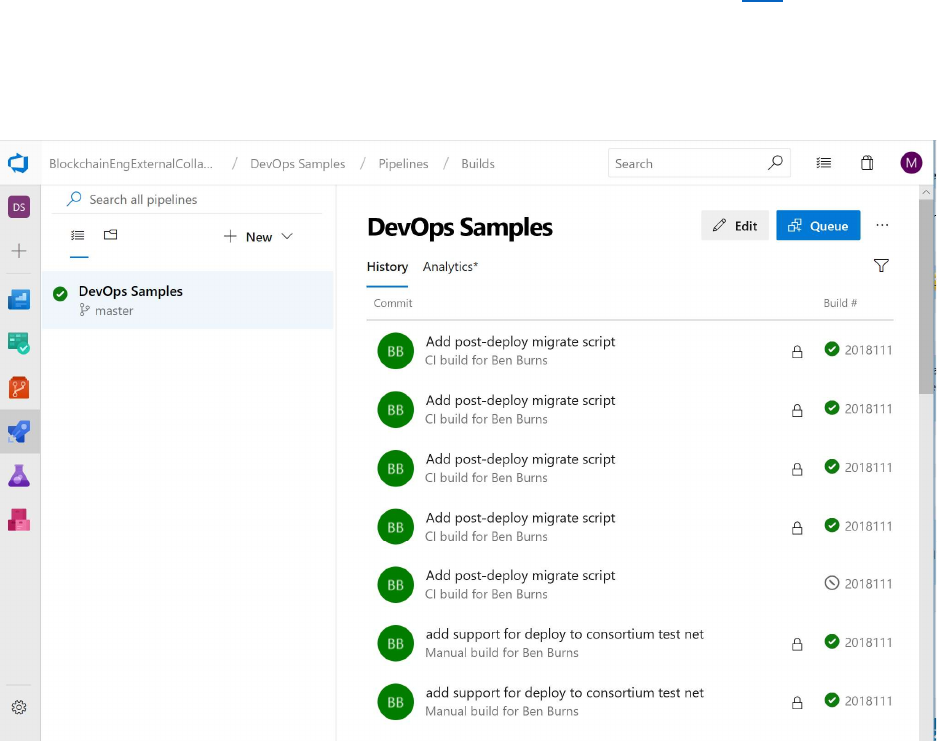
After a build pipeline is executed, select the build in the Builds section of Azure Pipelines to show the
outcome of the tests. Azure Pipelines will identify –
What changes were incorporated in the build
Whether the build was successful (identifying any errors that may have occurred)
Whether the tests were successful (identifying any failed tests that may have occurred)
What deployments were triggered as a result of these tests.
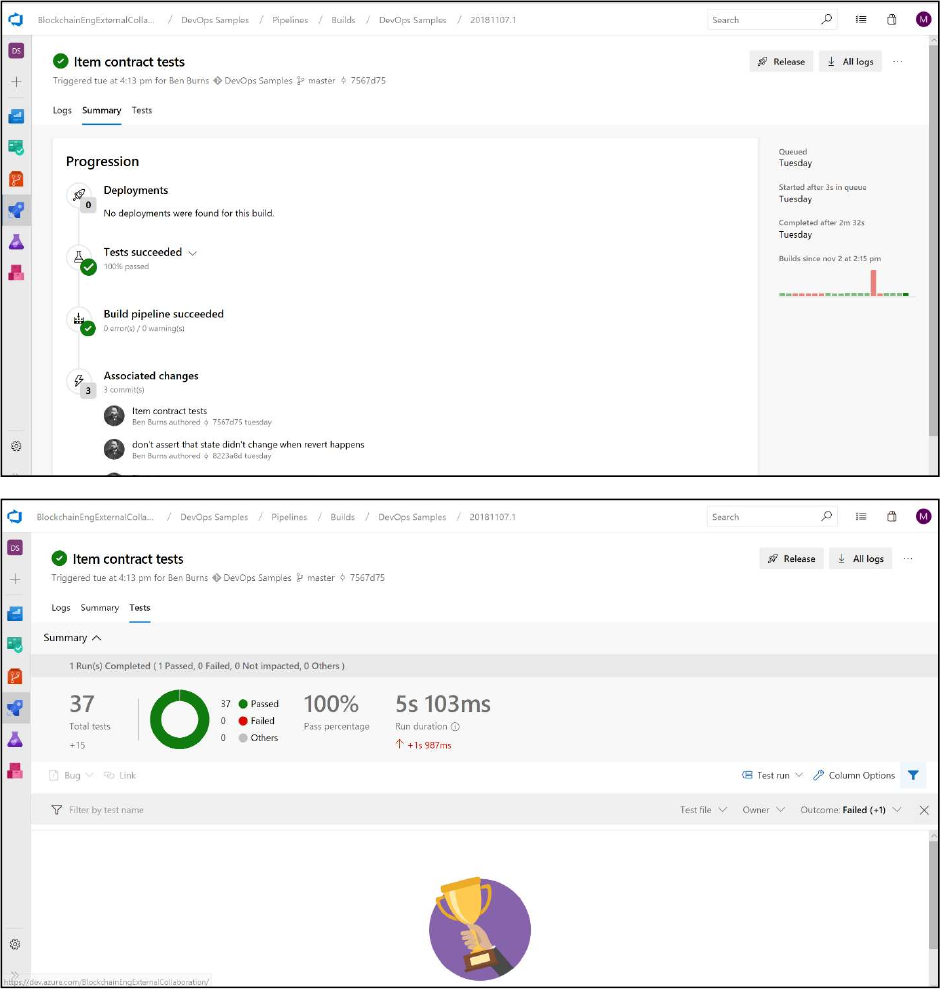
The Summary and Test pages for a build of the sample project can be found below.
At the consortium member level, there will be custom code that interacts with the smart contract. This
can be code running in compute (VM, Logic Apps, Flow, Functions, etc.) or a web app communicating
directly using the native blockchain API endpoints or client libraries, e.g. Nethereum, that wrap them.
Configure a Release Pipeline in Azure DevOps
Release Pipelines will be used to deploy the smart contracts into test and production environments. For
testing, deployment can be to Ganache or a full deployment of an Ethereum ledger done as
infrastructure as code.
As with the deployment pipeline for the consortium member, in this paper we will focus on using
Ganache in a function as it is a lower cost option that still represents a production chain. For public
chains, this is the most appropriate option. For private chains, whether you use Ganache or a
deployment of a blockchain, e.g. Ethereum, is a decision to be made by the consortium member.
Note – some chains, e.g. Quorum, are based on Ethereum but have extended the functionality of it.
Ganache does not yet support this extended functionality and infrastructure as code should be used to
represent the chain in these cases.
In addition to the smart contracts and the ledger, there are often consortium specific applications that
must be tested to ensure compatibility and identify any breaking changes. In the previous section, this
was done for applications specific to a consortium member, e.g. Contoso’s back end applications. In this
instance, what will be deployed are the applications provided for the entire consortium that have a
dependency on this smart contract, if any.
Upgrade requirements and scenarios reflected in testing, if any, should also be incorporated into the
release pipeline
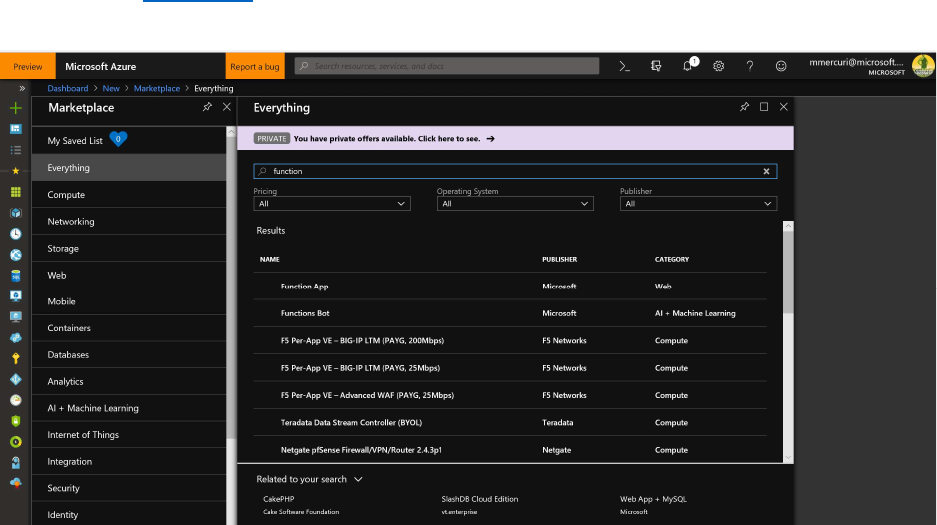
Creating an Azure Function
As mentioned previously, the testing will utilize Ganache running in an Azure function.
In this section, we’ll walk through creating a new Function within the Azure Portal.
Navigate to the Azure Portal, click the plus sign in the upper left corner of the portal and search for the
Function App resource type.
Populate the values for function app and select Javascript as the runtime stack.
Click the Create button and wait for the notification from the portal that the resource was created.
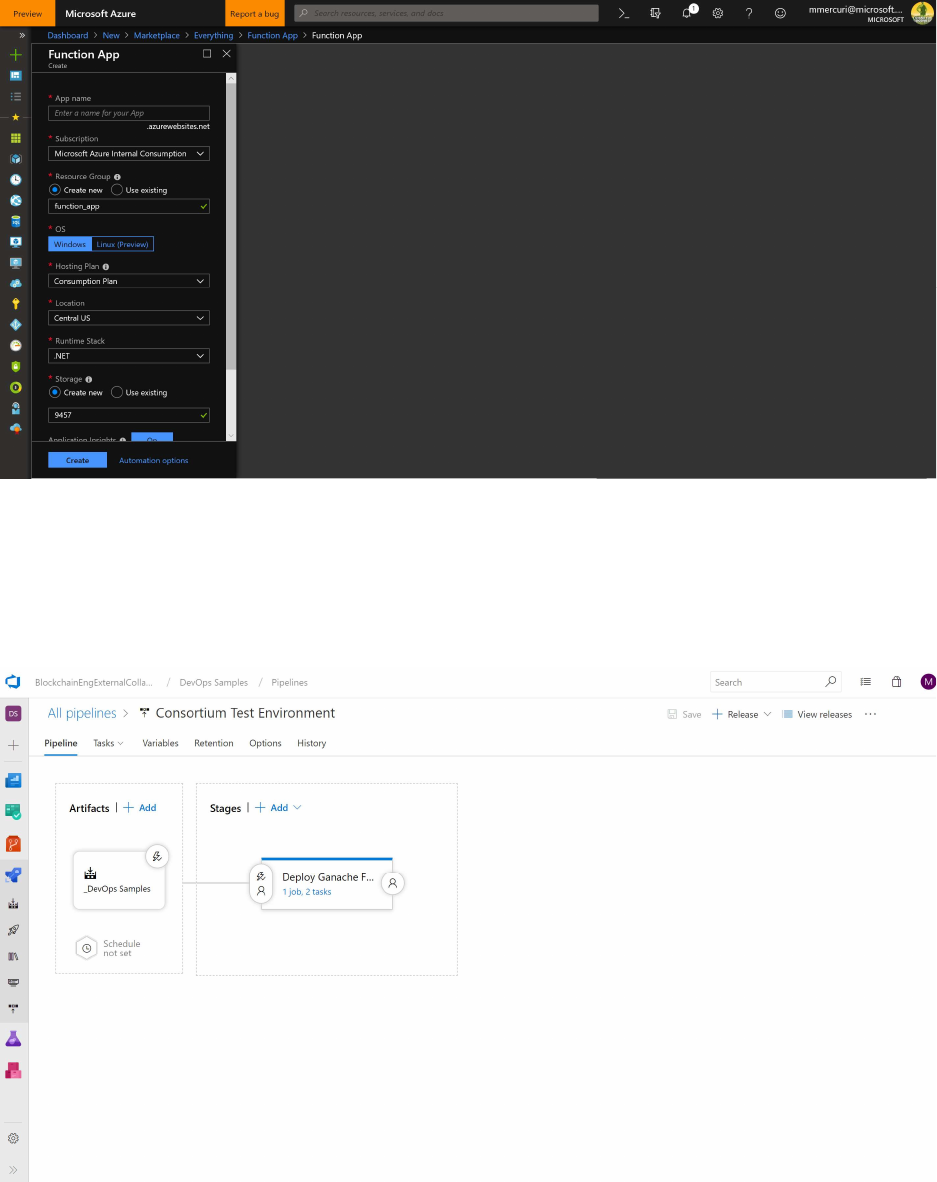
Creating the Release Pipeline
Right click on the Pipelines icon and select Releases
From the menu select New.
In this paper we will focus on using Ganache in a function as it is a lower cost option that still represents
a production chain. For public chains, this is the most appropriate option. For private chains, whether

you use Ganache or a deployment of a ledger, e.g. Quorum, is a decision to be made by the consortium
member.
The deployment pipeline will have three tasks – one will deploy the function with Ganache.
The second will unzip the files using the Extract Files task.
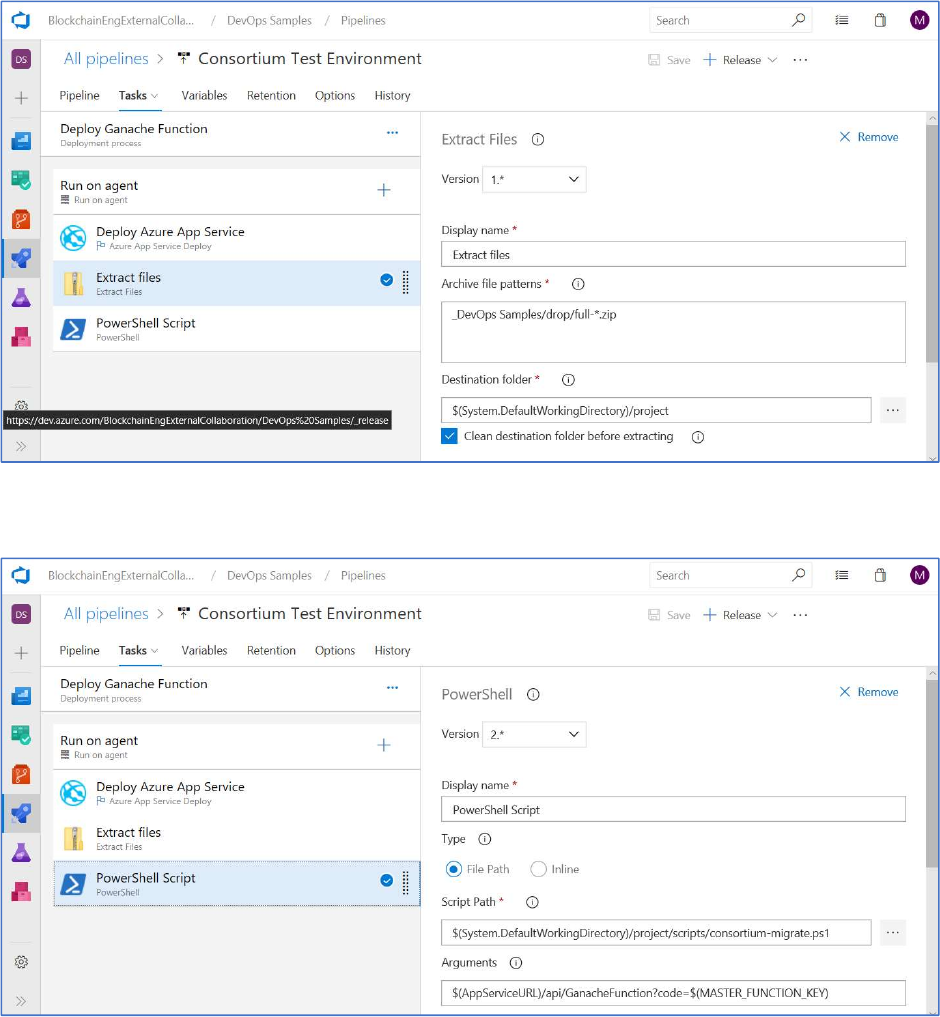
The last will use a Powershell script to deploy the smart contracts that were compiled and tested in the
build pipeline.
Add Artifacts.
The next step is to add an Artifact for your pipeline.
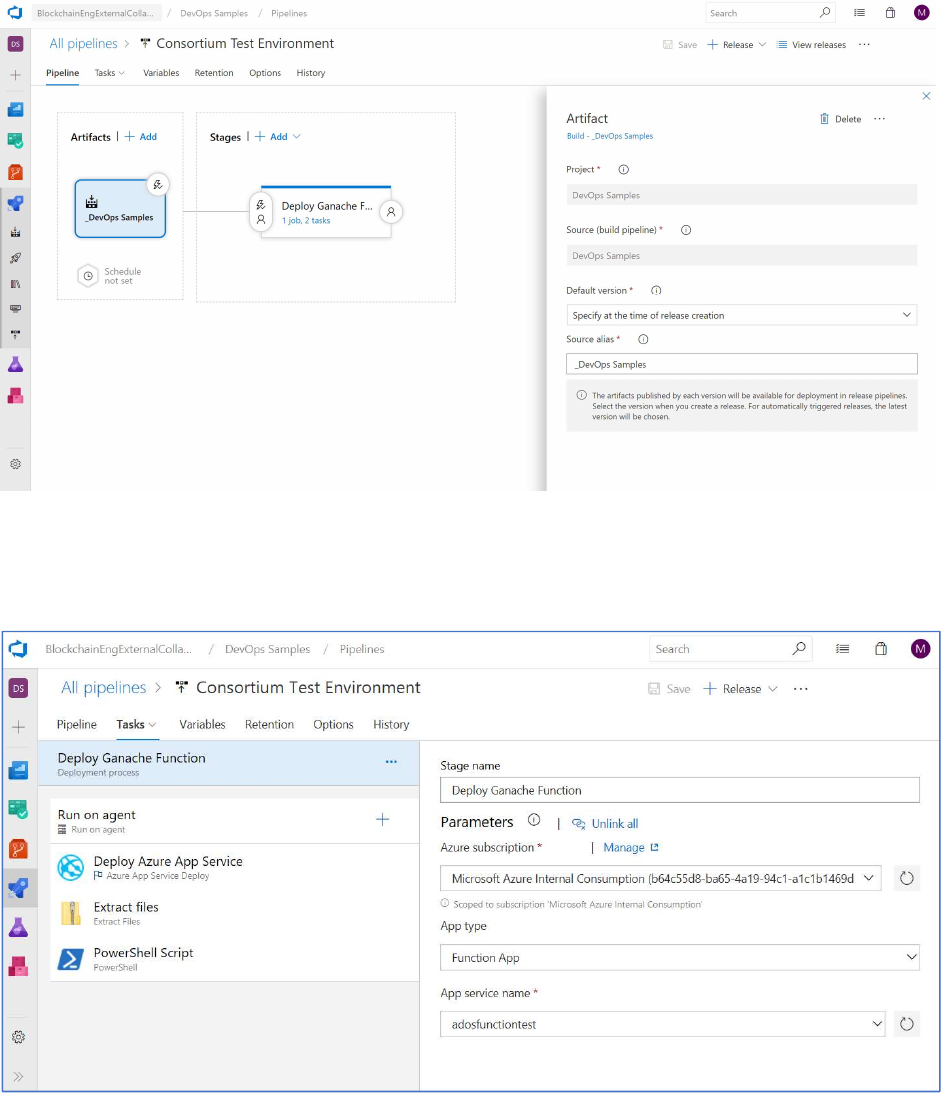
Add an artifact in the visual designer and accept all of the default values.
Next click on the Stage that is provided by default and named “Stage 1.”
Rename the stage to “Deploy Ganache Function”, select “Function App”, and then select the App Service
name specified earlier when creating the Azure Function.
Click the “+” to the right of “Run on Agent” to add a task.
Select “Azure App Service Deploy.”
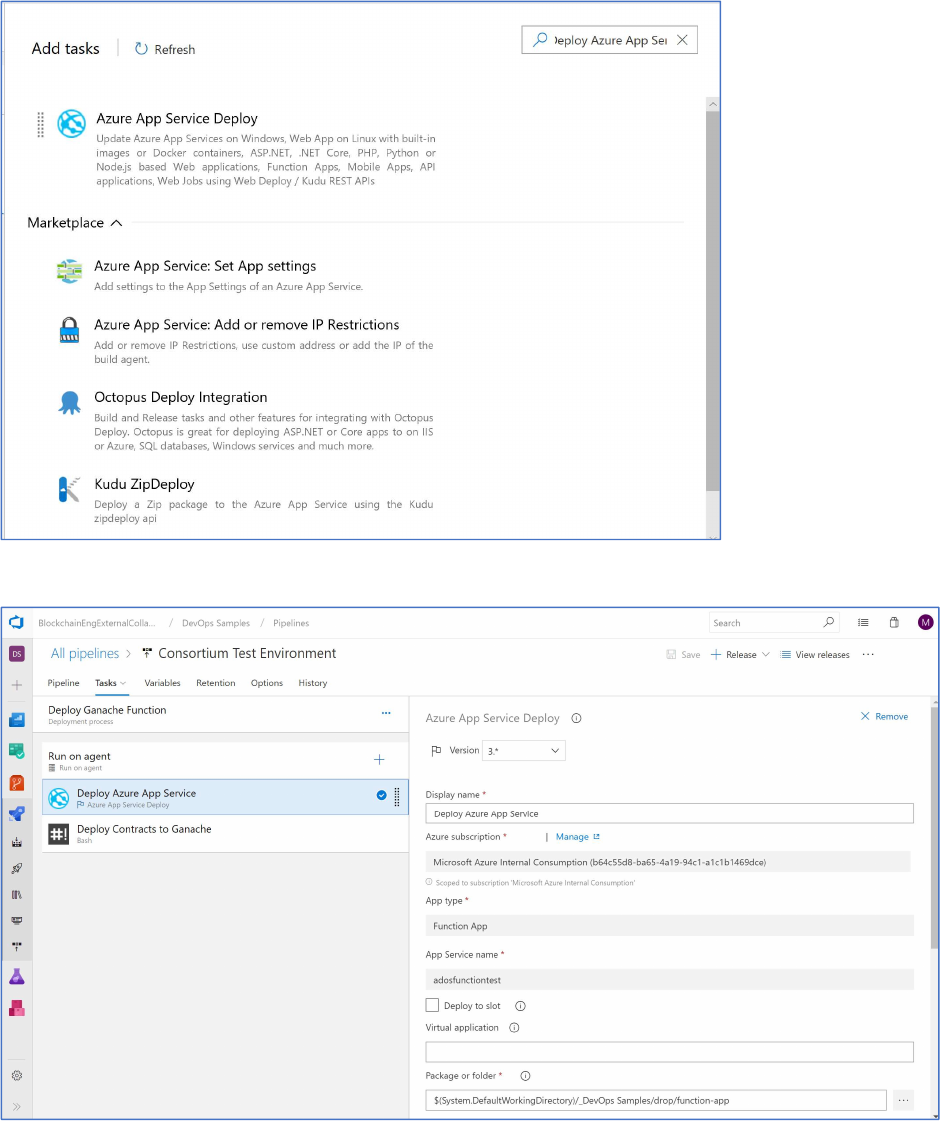
Select authorize the subscription, “Function App”, and specify the App Service Name.
Next, add another task and select “Extract files” as the task type.
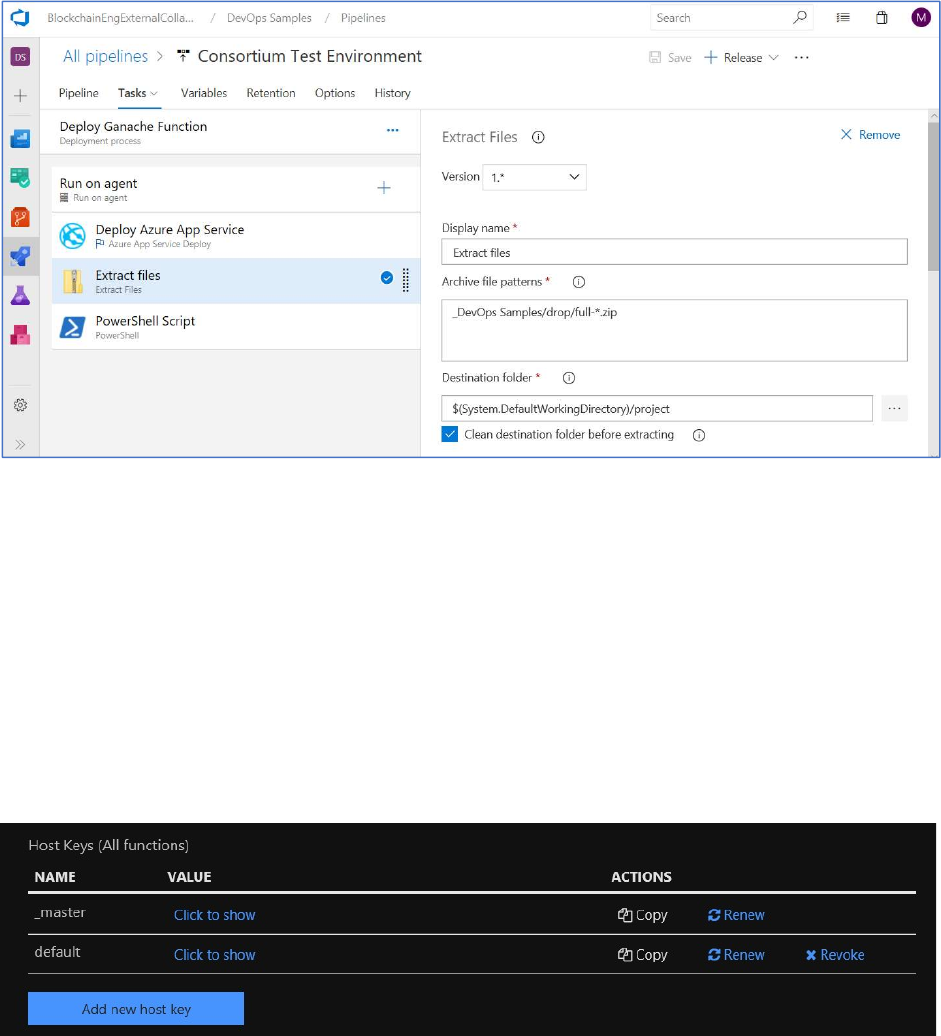
Change the “Display name” for the task to “Extract files.”
Next, insert the following text into the text box for “Archive file patterns.”
_DevOps Samples/drop/full-*.zip
Insert the following text into the text box for “Destination folder”
$(System.DefaultWorkingDirectory)/project
Next, click the check box named “Clean destination folder before extracting.”
For the function created earlier, navigate to the “Function app settings” tab and click the Copy link
under Actions for the “_master” key.
Next, go back to Azure DevOps and click the Variables tab.
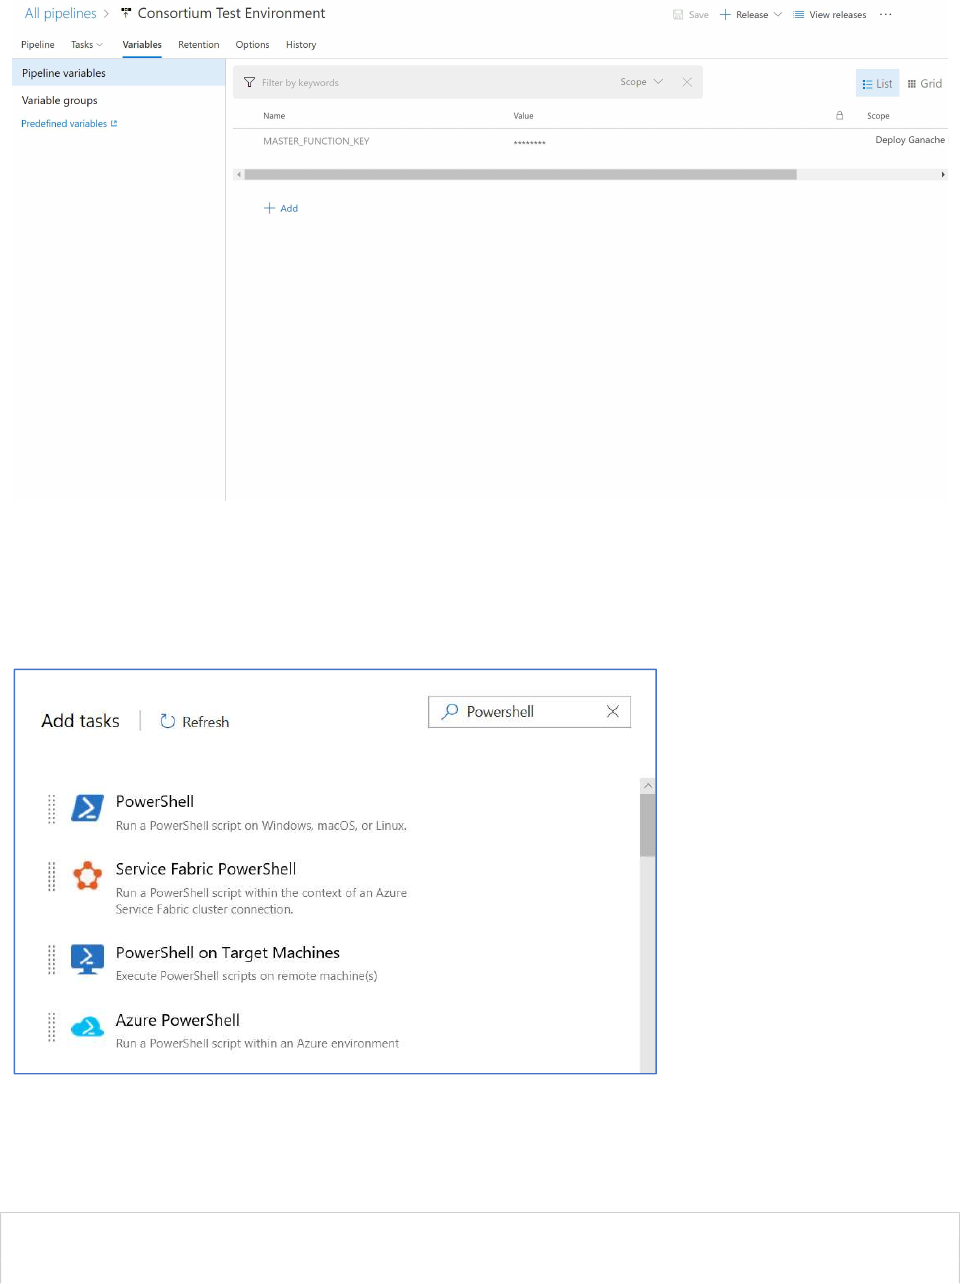
Create a new variable named “MASTER_FUNCTION_KEY” and populate it with the key for the function
captured earlier.
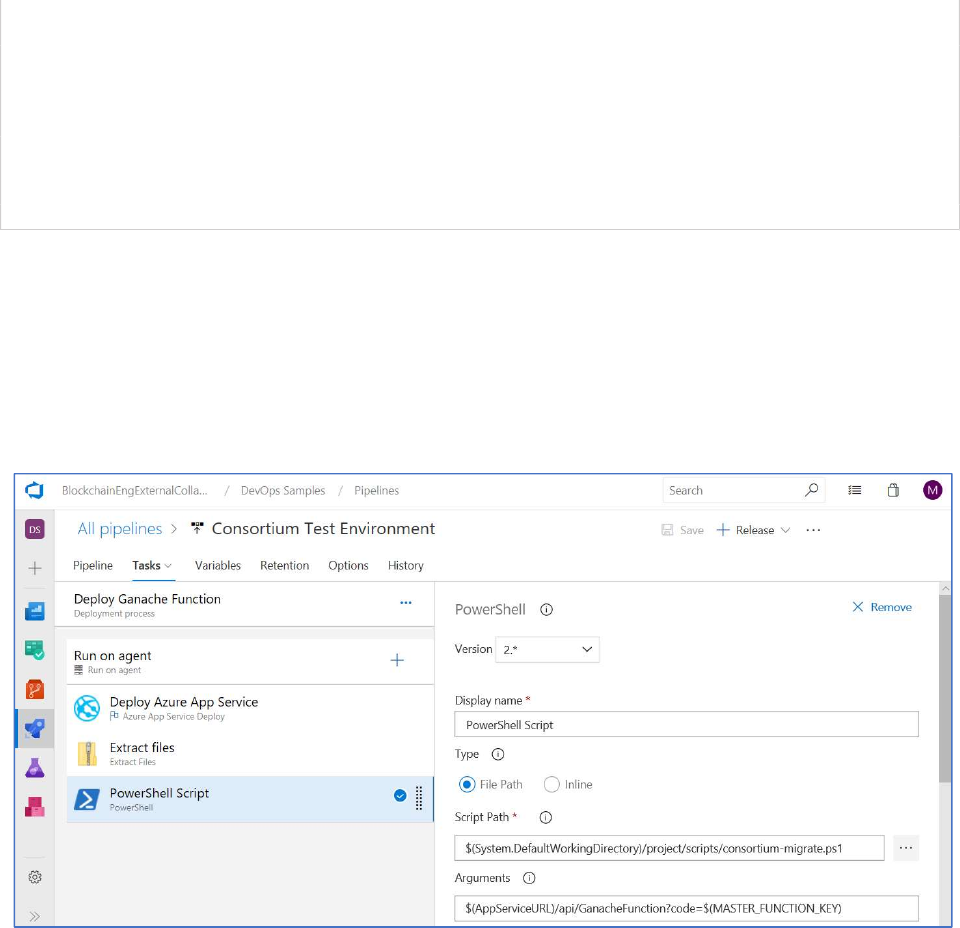
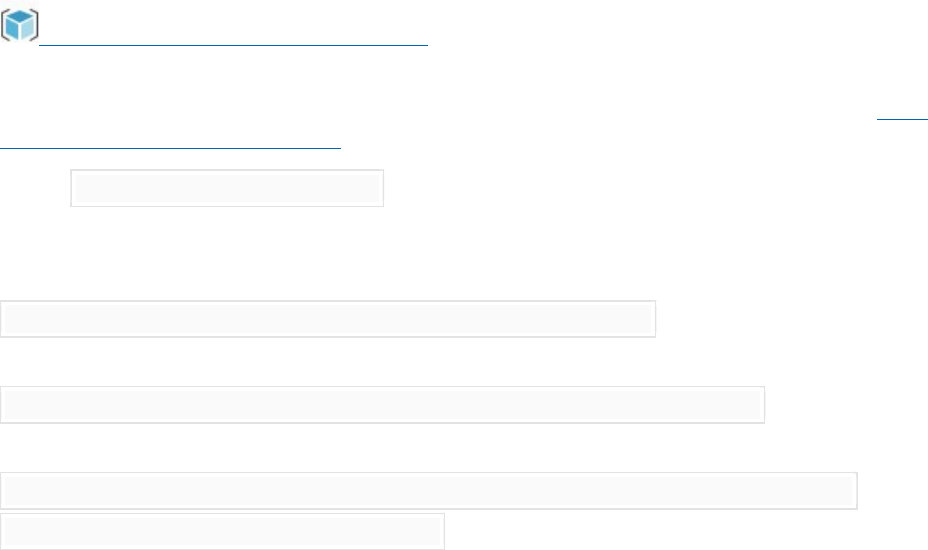
Next, go back to the Pipeline and add another task.
Select the Powershell task.
This task will execute the Powershell script named consortium-migrate.ps1 that can be found in the
/scripts directory.
The script, displayed below, compiles and migrates the contracts.
param (
[Parameter(Position=0)]
[string]$url
)
$env:APP_SVC_URL="$url"
echo "migrating to $env:APP_SVC_URL"
npm install
node_modules/.bin/truffle compile
node_modules/.bin/truffle migrate --network=consortiumTest
Within the task, specify the following value in the Script Path.
$(System.DefaultWorkingDirectory)/project/scripts/consortium-migrate.ps1
Provide the following text in the Arguments field -
$(AppServiceURL)/api/GanacheFunction?code=$(MASTER_FUNCTION_KEY)
Infrastructure as Code
Ganache has been used to provide a forked version of a production chain.
For some consortiums, there is a desire to deploy infrastructure as code that represents the topology
and specific ledger stack that they will deploy in production. For the very first deployment, there is no
notion yet of production, and it may also be desirable to deploy a full node or network.
In these cases, the deployments should be consistent, predictable and with an infrastructure as code
approach.
The recommended approach is to use an automation template. On Azure, this is done using an Azure
Resource Manager (ARM) template.
Adding an ARM Template to a Release Pipeline
In the Blockchain DevOps paper, one of the topics covered the need to deploy full blockchain
infrastructure vs. Ganache in a function.
Typically, this is done via an Azure Resource Manager template. The below detail specifies how to
include an arm template to deploy your blockchain network using infrastructure as code.
In the release pipeline, select + Add tasks and add an Azure Resource Group Deployment task.
Optionally edit the name to help identify the task, such as Provision Blockchain Node.
Configure the Azure Resource Group Deployment task as follows:
Deploy: Azure Resource Group Deployment - Deploy files to an Azure Resource Group.
Azure Subscription: Select a connection from the list under Available Azure Service Connections or
create a more restricted permissions connection to your Azure subscription. For more details, see Azure
Resource Manager service connection.
Action: Create or Update Resource Group
Resource Group: The name for a new resource group, or an existing resource group name.
Template location: The path of the Resource Manager template; for example:
$(System.DefaultWorkingDirectory)\Templates\BlockchainNetwork.json
Template Parameters: The path of the Resource Manager template parameters file; for example:
$(System.DefaultWorkingDirectory)\Templates\BlockchainNetwork.parameters.json
Override Template Parameters: A list of values for the parameters in the template; for example:
-adminUsername $(vmuser) -adminPassword (ConvertTo-SecureString -String $(vmpassword) -
AsPlainText -Force) -dnsNameForPublicIP $(dns)'
Use the ... button to open the parameters editor dialog.
Enable Deployment Prerequisites: Checked.
Output - Resource Group: The name of the Resource Group output from the task as a value that can be
used as an input to further deployment tasks.
Checking the Enable Deployment Prerequisites checkbox configures an agent on the virtual machine,
e.g. Win RM on Windows, and enables execution of remote PowerShell scripts, which may be required
to deploy an application. Also notice the use of ConvertTo-SecureString to specify the value for
adminPassword. You must do this because adminPassword is defined as a SecureString type in the
Resource Manager template file.

If you used variables in the parameters of the Azure Resource Group Deployment task, such as vmuser,
vmpassword, and dns, set the values for them in the stage configuration variables. Encrypt the value of
vmpassword by selecting the "padlock" icon.
Branch Policies and Security
Not discussed up to this point was how to handle the realities of a blockchain network involving multiple
participants.
This section looks at the creation of branch policies and branch security. For consortiums, policies can
help enforce how many members of the consortium should have to sign off on changes and if specific
members need to review changes to specific files.
Also contained below are details on how to assign users to roles, configure the project to require that
changes be tied to work items, limiting the ability for members to delete a branch, etc.
Branch Policies
Branch policies help teams protect their important branches of development. Policies enforce your
team's code quality and change management standards.
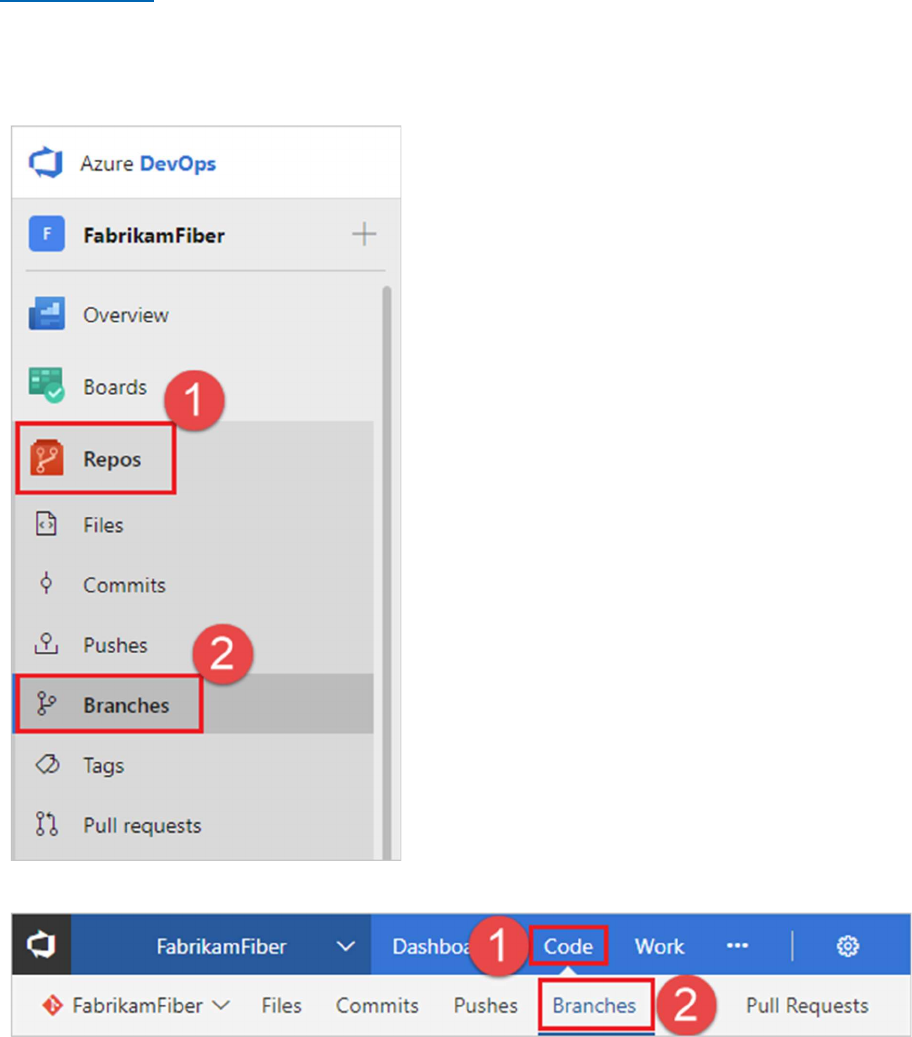
Configure branch policies
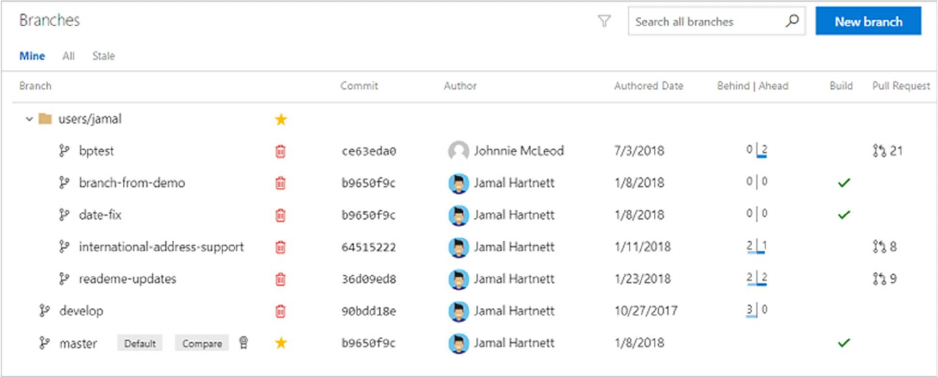
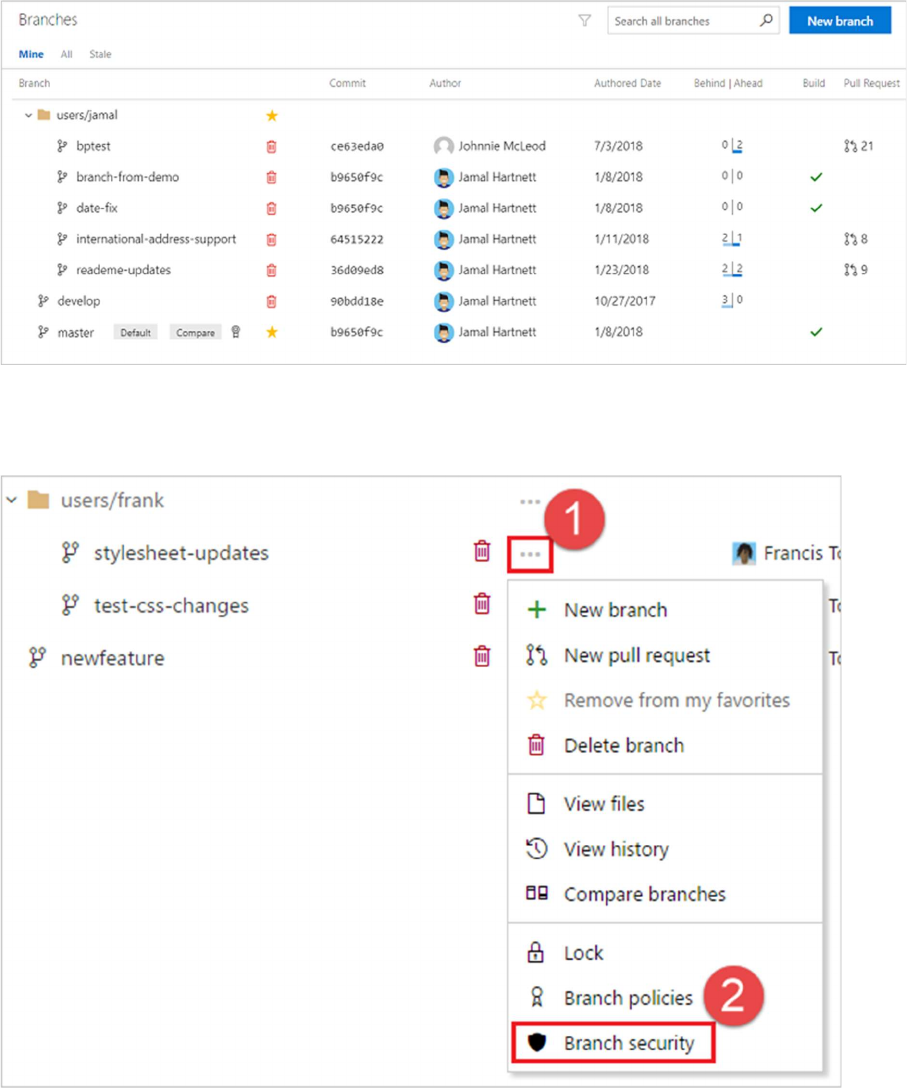
1. Open the Branches page by navigating to your project in the web portal and selecting Repos,
Branches.

If you're not using the new navigation preview, select Code, Branches.
1. Locate your branch in the page. You can browse the list or you can search for your branch
using the Search all branches box in the upper right.
2. Open the context menu for the branch by selecting the ... icon. Select Branch policies from
the context menu
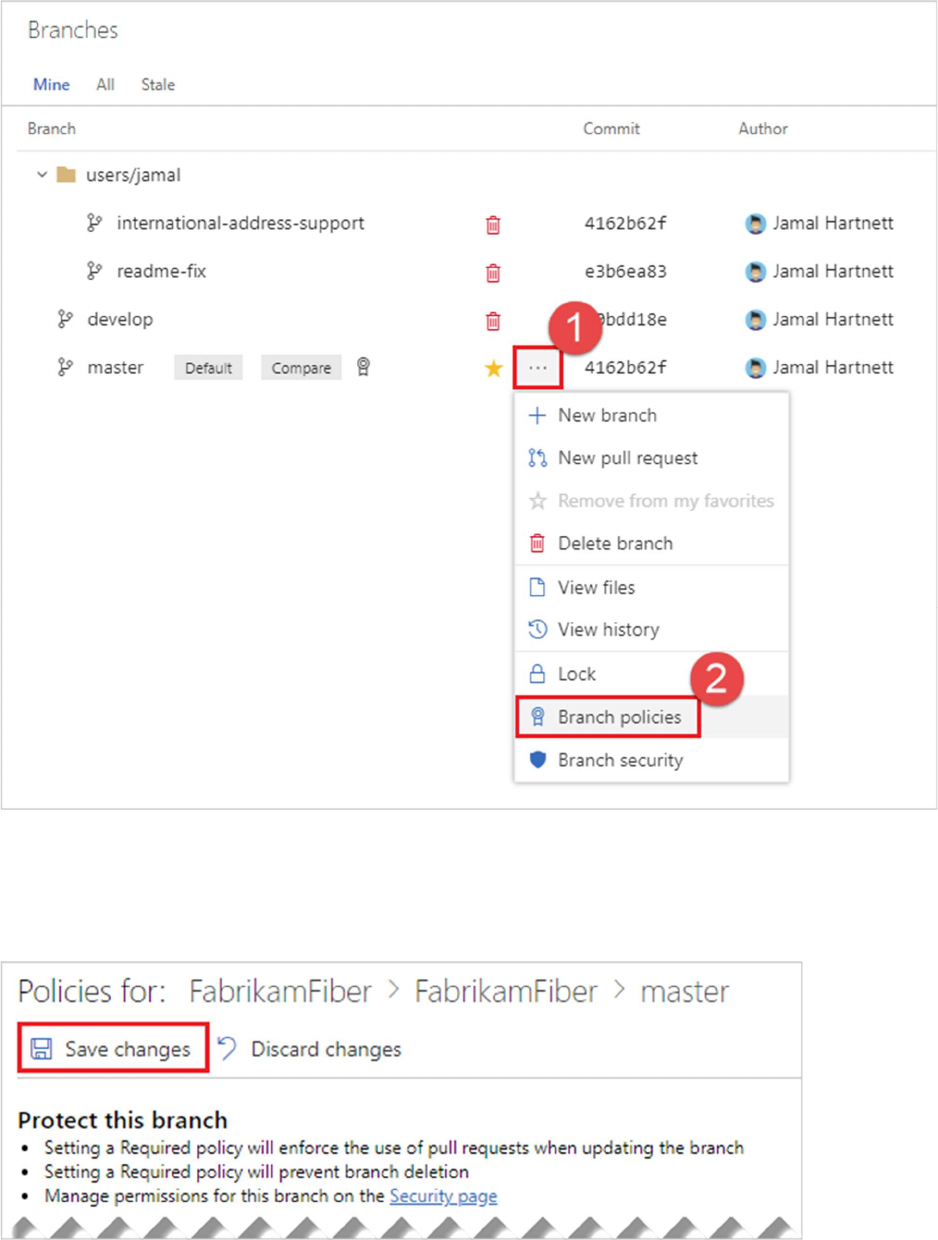
Configure your desired policies in the Policies page. See the following sections in this article for
descriptions for each policy type. Once your policies are configured, select Save changes to apply your
new policy configuration.
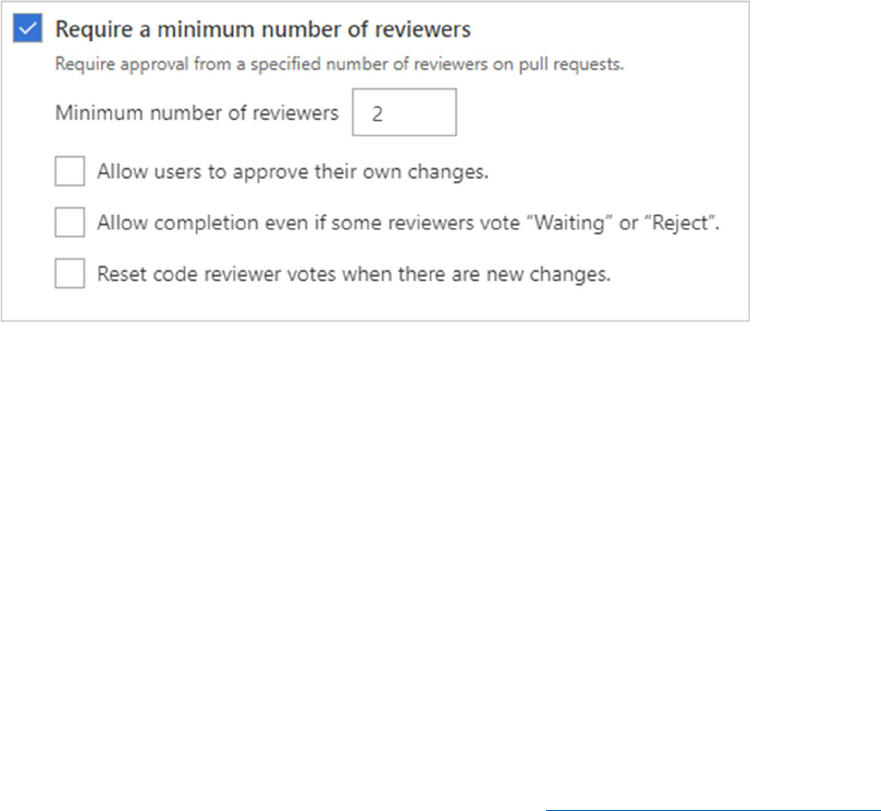
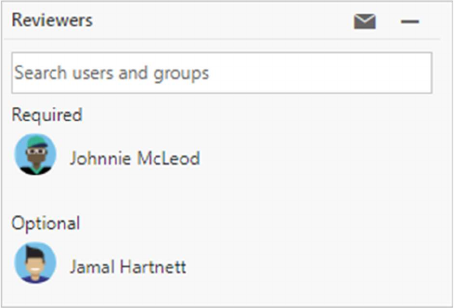
Require a minimum number of reviewers
Code reviews are a best practice for most software development projects. To require teams to review
their changes before completing a pull request, check Require a minimum number of reviewers.
The basic policy requires that a certain number of reviewers approve the code with no rejections.
If Allow users to approve their own changes is not selected, the creator of the pull request can
still vote Approve on their pull request, but their vote won't count toward the Require a
minimum number of reviewers policy.
If any reviewer rejects the changes, the pull request cannot be completed unless the Allow
completion even if some reviewers vote "Waiting" or "Reject" is selected.
To reset code reviewer votes when new changes are pushed to the source branch, check Reset
code reviewer votes when there are new changes.
When the required number of reviewers approve the pull request, it can be completed.
Note
The Allow users to approve their own changes setting only applies to the Require a minimum number
of reviewers policy, and doesn't affect other policies such as Automatically include code reviewers. For
example, Jamal Hartnett creates a pull request with the following policies configured:
Require a minimum number of reviewers is configured with two required reviewers.
Allow users to approve their own changes is not set.
The Fabrikam Team group is a required reviewer, and Jamal is a member of that group.
In this example, since Jamal is part of the Fabrikam Team group, his Approve vote satisfies the required
reviewer policy, but the pull request still requires two additional Approve votes to satisfy the Require a
minimum number of reviewers policy, since his vote doesn't count toward that policy because Allow
users to approve their own changes is not set.
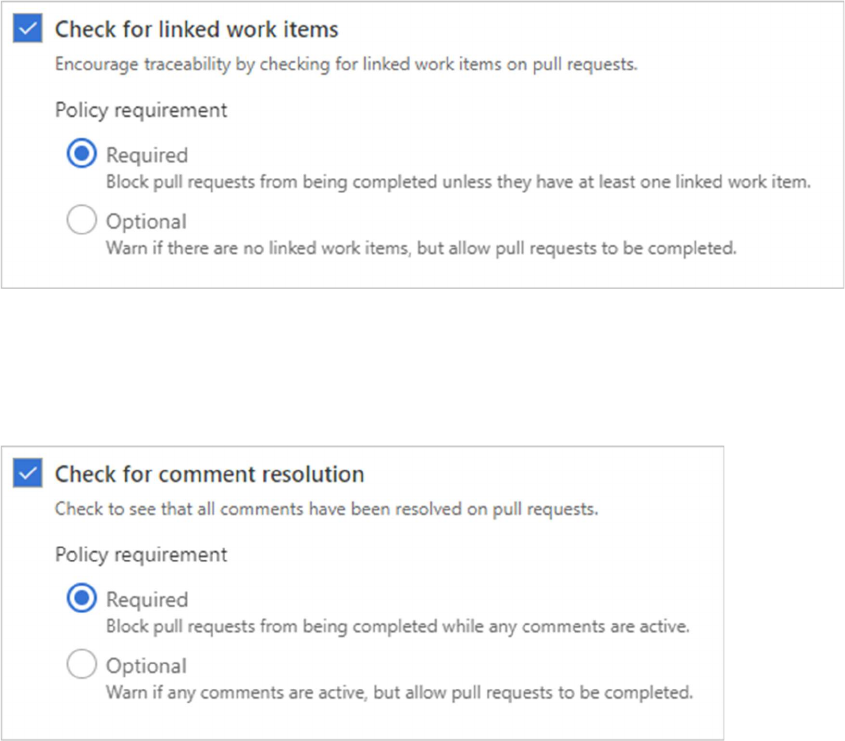
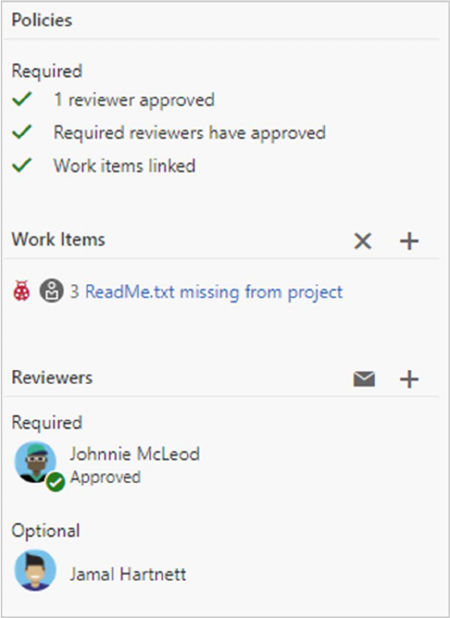
Check for linked work items
Require associations between pull requests and a work item to ensure that changes to your branch have
work item management tracking. Linking work items provides additional context for your changes and
ensures that updates go through your work item tracking process.
For consortiums which can span tens of companies and multiple individuals engaged across companies,
forcing linked work items can ensure that the work being done by partner organizatiosn is legitimate
work that has been discussed and is part of the overall consortium plan.
Check for comment resolution
Configure a comment resolution policy for your branch by selecting Check for comment resolution.
For more information on working with pull request comments, see Pull requests - leave comments.

Enforce a merge strategy
Maintain a consistent branch history by enforcing a merge strategy when a pull request is completed.
Select Enforce a merge strategy and pick an option to require that pull requests merge using that
strategy.
No fast-forward merge - This merges the commit history of the source branch when the pull
request closes and creates a merge commit in the target branch.
Squash merge - Complete all pull requests with a squash merge, creating a single commit in the
target branch with the changes from the source branch. Learn more about squash merging and
how it affects your branch history.
Build validation
Set a policy requiring changes in a pull request to build successfully with the protected branch before
the pull request can be completed. Even if you're using continuous integration (CI) on your development
branches to catch problems early, build policies reduce build breaks and keep your tests results passing.
When a build validation policy is enabled, a new build is queued when a new pull request is created or
when changes are pushed to an existing pull request targeting this branch. The build policy then
evaluates the results of the build to determine whether the pull request can be completed.
Important
Before specifying a build validation policy, you must have a build definition. If you don't have one, see
Create a build definition and choose the type of build that matches your project type.
Choose Add build policy and configure the desired options in the Add build policy window.

Select the build definition from the Build definition drop-down.
Choose the type of Trigger - either Automatic (whenever the source branch is updated) or
Manual.
Configure the Policy requirement. If set to Required, builds must complete successfully in order
to complete pull requests. Choose Optional to provide a notification of the build failure but still
allow pull requests to complete.
Set a build expiration to make sure that updates to your protected branch don't break changes
in open pull requests.
3. Immediately when branch name is updated: This option sets the build policy status in a
pull request to failed when the protected branch is updated. You must requeue a build to
refresh the build status. This setting ensures that the changes in pull requests build
successfully even as the protected branch changes. This option is best for teams that have
important branches with a lower volume of changes. Teams working in busy development
branches may find it disruptive to wait for a build to complete every time the protected
branch is updated.
After n hours if branch name has been updated: This option expires the current policy status when the
protected branch updates if the passing build is older than the threshold entered. This option is a
compromise between always requiring a build when the protected branch updates and never requiring
one. This choice is excellent for reducing the number of builds when your protected branch has frequent
updates.
Never: Updates to the protected branch do not change the policy status. This reduces the number of
builds for your branch, but can cause problems when closing pull requests that haven't been updated
recently.
Choose an optional Display name for this build policy which is used to identify the policy on the Branch
policies page. If you don't specify a display name, the build definition name is used.
When the owner pushes changes that build successfully, the policy status is updated. If you have an
Immediately when branch name is updated or After n hours if branch name has been updated build
policy chosen, the policy status updates when the protected branch is updated if the most recent build
is no longer valid.
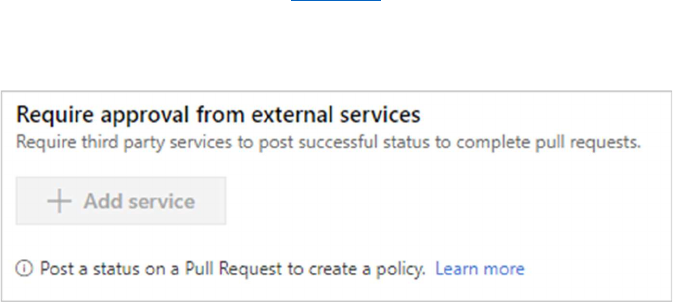
Require approval from external services
External services can use the PR Status API to post detailed status to your PRs. The branch policy for
external services brings the ability for those 3rd party services to participate in the PR workflow and
establish policy requirements.
For instructions on configuring this policy, see Configure a branch policy for an external service.
Automatically include code reviewers
Designate reviewers for specific directories and files in your repo.
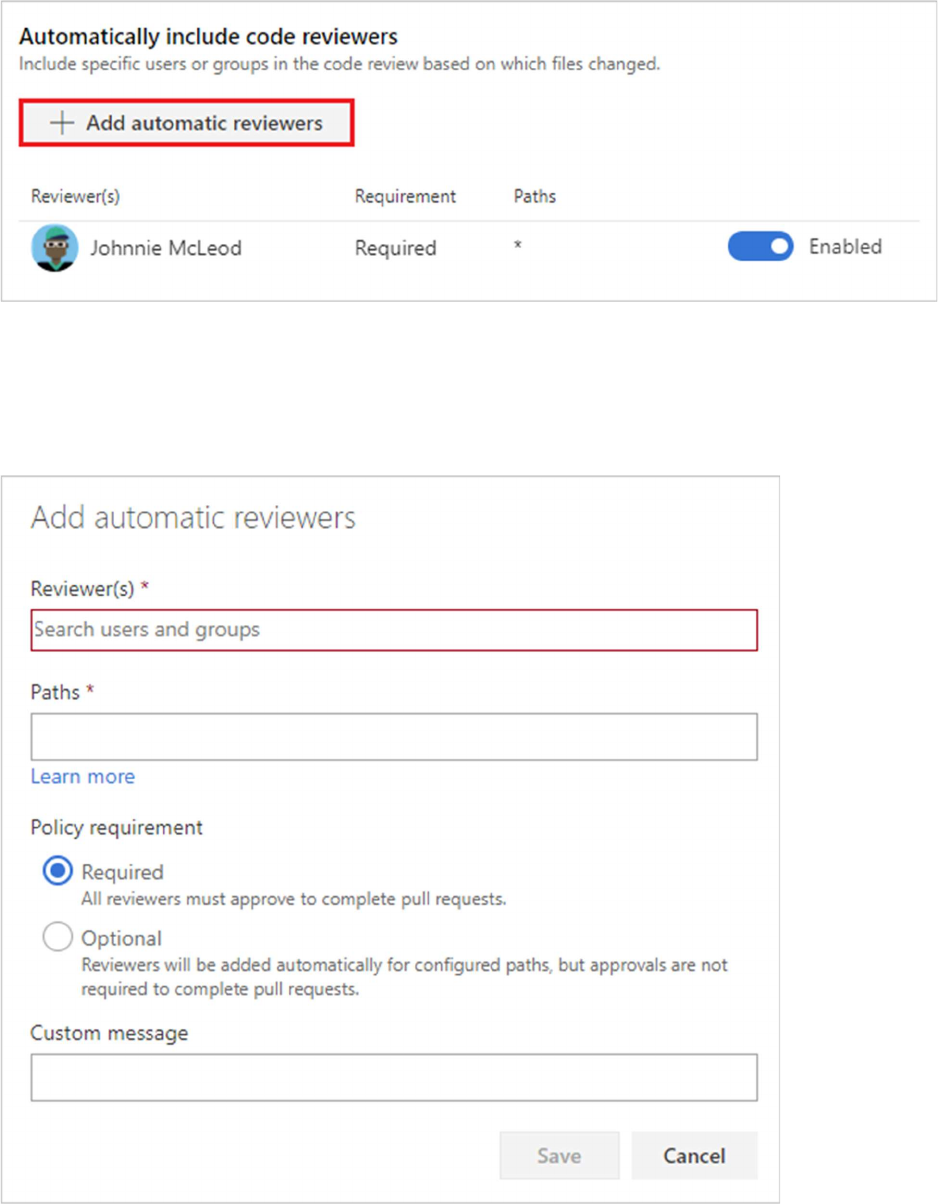
These reviewers are automatically added to pull requests that change files along those
paths.
If you select Required next to a path entry, then the pull request cannot be completed
until:
Every user added as a reviewer for the path approves the changes.
At least one person in every group added to the path approves the changes.
Select Optional if you want to add reviewers automatically, but not require their
approval to complete the pull request.
When the required reviewers approve the code, you can complete the pull request.
Bypass branch policies
Note
There are several permissions that allow users to bypass branch policy. In TFS 2015 through TFS 2018
Update 2, the Exempt from policy enforcement permission allows users with this permission to perform
the following actions:
When completing a pull request, opt-in to override policies and complete a pull request even if
the current set of branch policies is not satisfied.
Push directly to a branch even if that branch has branch policies set. Note that when a user with
this permission makes a push that would override branch policy, the push automatically
bypasses branch policy with no opt-in step or warning.
In Azure DevOps Services, the Exempt from policy enforcement permission is removed and its
functionality divided into the following two new permissions:
Bypass policies when completing pull requests
Bypass policies when pushing

Users that previously had Exempt from policy enforcement enabled now have the two
new permissions enabled instead.
In some cases, you need to bypass policy requirements so you can push changes to the branch directly
or complete a pull request even if branch policies are not satisfied. For these situations, grant the the
desired permission from the previous list to a user or group. You can scope this permission to an entire
project, a repo, or a single branch. Manage this permission along the with other Git permissions.
Important
Use caution when granting these permissions, especially at the repo and project level.
Branch Security
Set up permissions to control who can read and update the code in a branch on your Git repo. You can
set permissions for individual users and groups, and inherit and override permissions as needed from
your repo permissions.
Use the branches view to configure security
Open the Branches page by navigating to your project in the web portal and selecting Repos, Branches.
If you're not using the new navigation preview, select Code, Branches.
Locate your branch in the page. You can browse the list or you can search for your branch using the
Search all branches box in the upper right.
1. Open the context menu by selecting the ... icon next to the branch name. Select
Branch security from the menu.
Add users or groups
Avoid trouble: You can only add permissions for users and groups already in your Project. Add new users
and groups to your Project before setting branch permissions.
Add users or groups to your branch permissions by selecting Add Enter the sign-in address or group
alias, then select Save Changes.
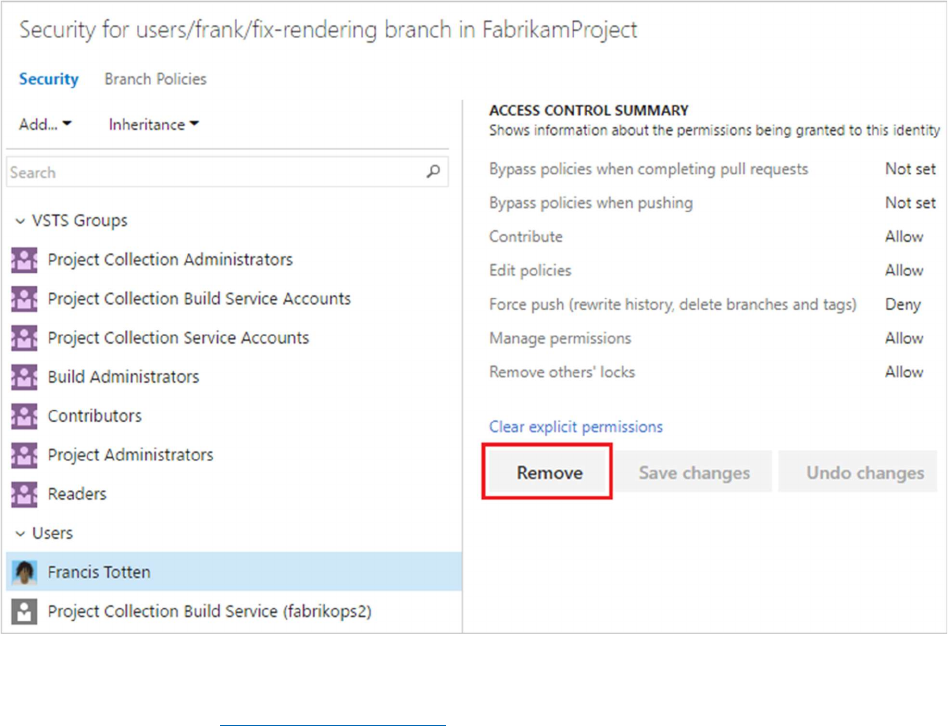
Remove users or groups
Remove permissions for a user or group by selecting the user or Azure DevOps group, then selecting
Remove. The user or group will still exist in your Project and this change will not affect other
permissions for the user or group.
Set permissions
Control branch permission settings from the branch permission view. Users and groups with permissions
set at the repo level will inherit those permissions by default.
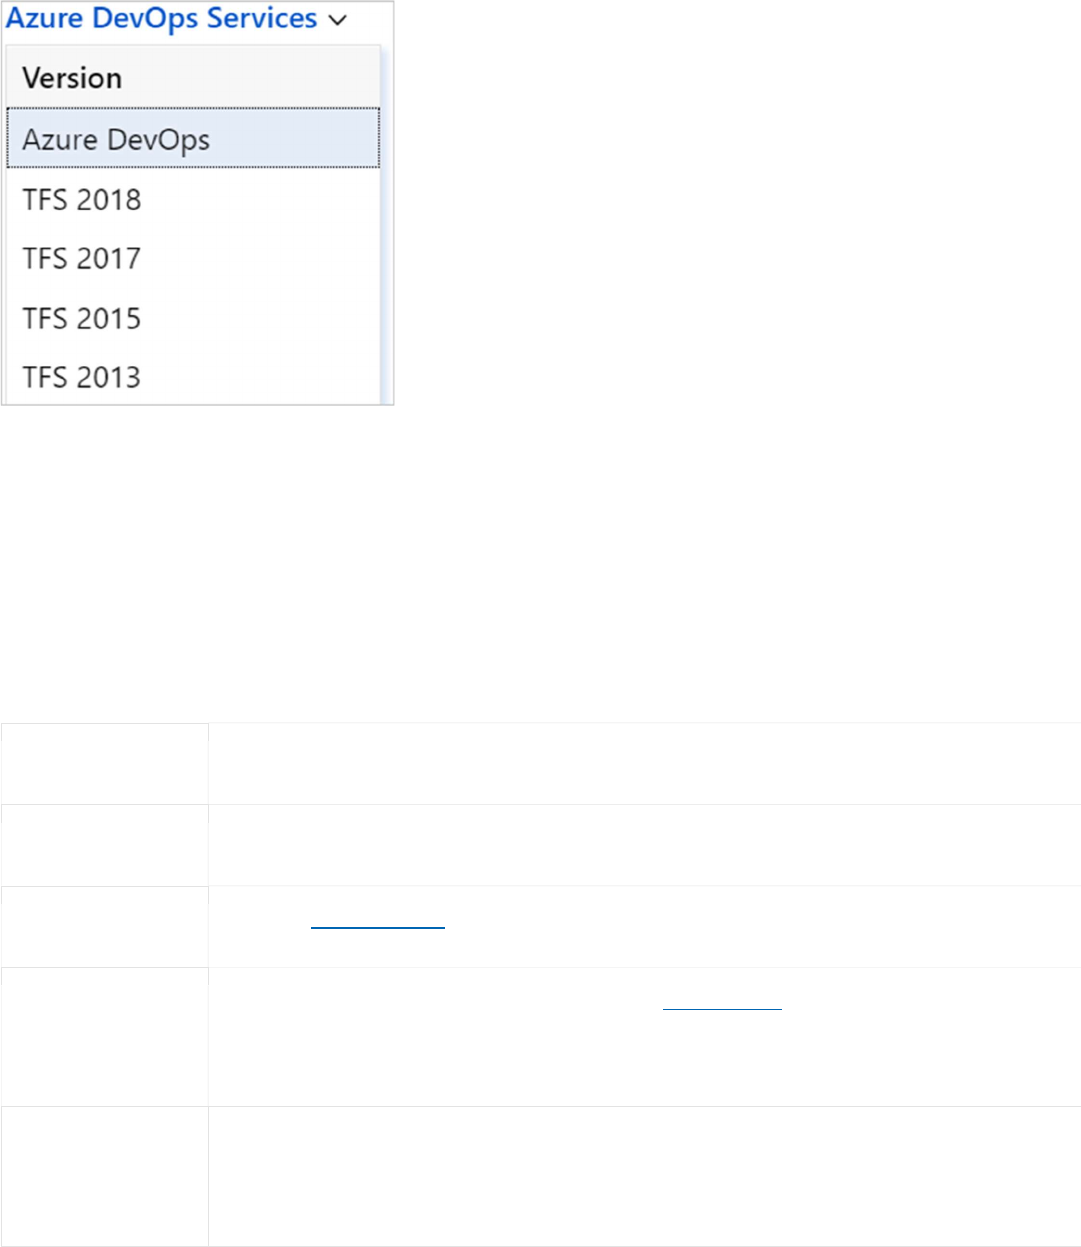
Note
These permissions have changed in TFS 2017 Update 1 and Azure DevOps Services. Ensure you are
viewing the correct version of this documentation for permissions by choosing your product version in
the upper left corner of the window.
Permissions in Azure DevOps Services
In Azure DevOps Services, the Exempt from policy enforcement permission (which is still available in TFS
2015 through TFS 2018 Update 2) was removed and its functionality divided into the following two new
permissions:
Bypass policies when completing pull requests
Bypass policies when pushing
Users that previously had Exempt from policy enforcement enabled now have the two new permissions
enabled instead. See the following table for more details on these two new permissions.
Permission
Description
Contribute
Users with this permission can push new commits to the branch and
lock the branch.
Edit Policies
Can edit
branch policies
.
Bypass policies
when completing
pull requests
Users with this permission are exempt from the
branch policy
set for the branch when
completing pull requests and can opt-in to override the policies by checking Override branch
policies and enable merge when completing a PR.
By
pass policies
when pushing
Users with this permission can push to a branch that has branch policies enabled. Note that
when a user with this permission makes a push that would override branch policy, the push
automatically bypasses branch policy with no opt-in step or warning.

Permission
Description
Force Push
(Rewrite History
and Delete
Branches)
Can force push to a branch, which can rewrite history. This permission is also required to delete
a branch.
Manage
Permissions
Can set permissions for the branch.
R
emove
Others'
Locks
Can remove
locks
set on branches by other users.
