Amazon CloudFront Developer Guide
User Manual:
Open the PDF directly: View PDF ![]() .
.
Page Count: 382 [warning: Documents this large are best viewed by clicking the View PDF Link!]
- Amazon CloudFront
- Table of Contents
- What Is Amazon CloudFront?
- AWS Billing and Usage Reports for CloudFront
- CloudFront Reports
- Getting Started with CloudFront
- Working with Distributions
- Overview of Web and RTMP Distributions
- Creating Web and RTMP Distributions
- Listing, Viewing, and Updating CloudFront Distributions
- Deleting a Distribution
- Using Alternate Domain Names (CNAMEs)
- Choosing the Price Class for a CloudFront Distribution
- Using CloudFront with Amazon S3
- Changes to the CloudFront API
- Working with Web Distributions
- Task List for Creating a Web Distribution
- Creating or Updating a Web Distribution Using the CloudFront Console
- Testing Your Web Distribution
- Using Amazon S3 Origins and Custom Origins for Web Distributions
- Values that You Specify When You Create or Update a Web Distribution
- Delivery Method
- Origin Settings
- Origin Domain Name
- Origin Path
- Origin ID
- Restrict Bucket Access (Amazon S3 Only)
- Origin Access Identity (Amazon S3 Only)
- Comment for New Identity (Amazon S3 Only)
- Your Identities (Amazon S3 Only)
- Grant Read Permissions on Bucket (Amazon S3 Only)
- Origin SSL Protocols (Amazon EC2 and Other Custom Origins Only)
- Origin Protocol Policy (Amazon EC2 and Other Custom Origins Only)
- HTTP Port (Amazon EC2 and Other Custom Origins Only)
- HTTPS Port (Amazon EC2 and Other Custom Origins Only)
- Origin Custom Headers
- Cache Behavior Settings
- Path Pattern
- Origin (Existing Distributions Only)
- Viewer Protocol Policy
- Allowed HTTP Methods
- Cached HTTP Methods
- Forward Headers
- Whitelist Headers
- Object Caching
- Minimum TTL
- Default TTL
- Maximum TTL
- Forward Cookies (Amazon EC2 and Other Custom Origins Only)
- Whitelist Cookies (Amazon EC2 and Other Custom Origins Only)
- Forward Query Strings
- Smooth Streaming
- Restrict Viewer Access (Use Signed URLs)
- Trusted Signers
- AWS Account Numbers
- Compress Objects Automatically
- Distribution Details
- Custom Error Pages and Error Caching
- Restrictions
- Values that CloudFront Displays in the Console When You Create or Update a Web Distribution
- Requirements and Recommendations for Using Amazon EC2 and Other Custom Origins
- Using AWS WAF to Control Access to Your Content
- Restricting the Geographic Distribution of Your Content
- Configuring On-Demand Smooth Streaming
- Configuring On-Demand Progressive Downloads
- Configuring On-Demand Apple HTTP Live Streaming (HLS)
- Working with RTMP Distributions
- How RTMP Distributions Work
- Task List for Streaming Media Files Using RTMP
- Creating an RTMP Distribution Using the CloudFront Console
- Values that You Specify When You Create or Update an RTMP Distribution
- Origin Domain Name (Amazon S3 Bucket)
- Restrict Bucket Access (Amazon S3 Only)
- Origin Access Identity (Amazon S3 Only)
- Comment for New Identity(Amazon S3 Only)
- Your Identities (Amazon S3 Only)
- Grant Read Permissions on Bucket (Amazon S3 Only)
- Price Class
- Alternate Domain Names (CNAMEs)
- Logging
- Bucket for Logs
- Log Prefix
- Comment
- Distribution State
- Restrict Viewer Access (Use Signed URLs)
- Trusted Signers
- AWS Account Numbers
- Values that CloudFront Displays in the Console When You Create or Update an RTMP Distribution
- Configuring the Media Player
- Using an Amazon S3 Bucket as the Origin for an RTMP Distribution
- Creating Multiple RTMP Distributions for an Origin Server
- Restricting Access Using Crossdomain.xml
- Error Codes for RTMP Distributions
- Troubleshooting RTMP Distributions
- Working with Objects
- Format of URLs for CloudFront Objects
- How CloudFront Processes HTTP and HTTPS Requests
- Increasing the Proportion of Requests that Are Served from CloudFront Edge Caches
- Configuring CloudFront to Cache Based on Query String Parameters
- Configuring CloudFront to Cache Objects Based on Cookies
- Configuring CloudFront to Cache Objects Based on Request Headers
- Headers and Web Distributions
- Selecting the Headers on Which You Want CloudFront to Base Caching
- Configuring CloudFront to Respect Cross-Origin Resource Sharing (CORS) Settings
- Configuring CloudFront to Cache Objects Based on the Device Type
- Configuring CloudFront to Cache Objects Based on the Language of the Viewer
- Configuring CloudFront to Cache Objects Based on the Location of the Viewer
- Configuring CloudFront to Cache Objects Based on the Protocol of the Request
- How Caching Based on Headers Affects Performance
- How the Case of Headers and Header Values Affects Caching
- Headers that CloudFront Returns to the Viewer
- Headers and RTMP Distributions
- Headers and Web Distributions
- Forwarding Custom Headers to Your Origin (Web Distributions Only)
- Adding, Removing, or Replacing Objects in a Distribution
- Adding Objects that You Want CloudFront to Distribute
- Updating Existing Objects Using Versioned Object Names
- Updating Existing Objects Using the Same Object Names
- Specifying How Long Objects Stay in a CloudFront Edge Cache (Expiration)
- Invalidating Objects (Web Distributions Only)
- Choosing Between Invalidating Objects and Using Versioned Object Names
- Determining Which Objects to Invalidate
- Specifying the Objects to Invalidate
- Invalidating Objects and Displaying Information about Invalidations
- Invalidating Objects Using the CloudFront Console
- Copying, Editing, and Rerunning an Existing Invalidation Using the CloudFront Console
- Listing Invalidations Using the CloudFront Console
- Displaying Information about an Invalidation Using the CloudFront Console
- Invalidating Objects and Displaying Information about Invalidations Using the CloudFront API
- Third-Party Tools for Invalidating Objects
- Invalidation Limits
- Paying for Object Invalidation
- Customizing Error Responses
- How CloudFront Processes Partial Requests for an Object (Range GETs)
- Specifying a Default Root Object (Web Distributions Only)
- Serving Compressed Files
- Request and Response Behavior
- Request and Response Behavior for Amazon S3 Origins
- How CloudFront Processes and Forwards Requests to Your Amazon S3 Origin Server
- Caching Duration and Minimum TTL
- Client IP Addresses
- Conditional GETs
- Cookies
- Cross-Origin Resource Sharing (CORS)
- GET Requests that Include a Body
- HTTP Methods
- HTTP Request Headers that CloudFront Removes or Updates
- Maximum Length of a Request and Maximum Length of a URL
- OCSP Stapling
- Protocols
- Query Strings
- Request Timeout
- Simultaneous Requests for the Same Object (Traffic Spikes)
- How CloudFront Processes Responses from Your Amazon S3 Origin Server
- How CloudFront Processes and Forwards Requests to Your Amazon S3 Origin Server
- Request and Response Behavior for Custom Origins
- How CloudFront Processes and Forwards Requests to Your Custom Origin Server
- Authentication
- Caching Duration and Minimum TTL
- Client IP Addresses
- Client-Side SSL Authentication
- Compression
- Conditional Requests
- Cookies
- Cross-Origin Resource Sharing (CORS)
- Encryption
- GET Requests that Include a Body
- HTTP Methods
- HTTP Request Headers and CloudFront Behavior
- HTTP Version
- Maximum Length of a Request and Maximum Length of a URL
- OCSP Stapling
- Persistent Connections
- Protocols
- Query Strings
- Request Timeout
- Simultaneous Requests for the Same Object (Traffic Spikes)
- User-Agent Header
- How CloudFront Processes Responses from Your Custom Origin Server
- How CloudFront Processes and Forwards Requests to Your Custom Origin Server
- How CloudFront Processes HTTP 3xx Status Codes from Your Origin
- How CloudFront Processes and Caches HTTP 4xx and 5xx Status Codes from Your Origin
- Request and Response Behavior for Amazon S3 Origins
- Serving Private Content through CloudFront
- Overview of Private Content
- Using an HTTP Server for Private Content
- Task List: Serving Private Content
- Using an Origin Access Identity to Restrict Access to Your Amazon S3 Content
- Specifying the AWS Accounts That Can Create Signed URLs and Signed Cookies (Trusted Signers)
- Choosing Between Signed URLs and Signed Cookies
- Using Signed URLs
- Choosing Between Canned and Custom Policies for Signed URLs
- How Signed URLs Work
- Choosing How Long Signed URLs Are Valid
- When Does CloudFront Check the Expiration Date and Time in a Signed URL?
- Sample Code and Third-Party Tools
- Creating a Signed URL Using a Canned Policy
- Creating a Signed URL Using a Custom Policy
- Using Signed Cookies
- Choosing Between Canned and Custom Policies for Signed Cookies
- How Signed Cookies Work
- Preventing Misuse of Signed Cookies
- When Does CloudFront Check the Expiration Date and Time in a Signed Cookie?
- Sample Code and Third-Party Tools
- Setting Signed Cookies Using a Canned Policy
- Setting Signed Cookies Using a Custom Policy
- Using a Linux Command and OpenSSL for Base64-Encoding and Encryption
- Code Examples for Creating a Signature for a Signed URL
- Using an HTTPS Connection to Access Your Objects
- How CloudFront Works with HTTPS Connections
- How to Require HTTPS for Communication between Viewers, CloudFront, and Your Origin
- Supported Protocols and Ciphers
- Using Alternate Domain Names and HTTPS
- Choosing How CloudFront Serves HTTPS Requests
- Requirements and Limits on Using SSL/TLS Certificates with CloudFront
- To use alternate domain names with HTTPS
- Determining the Size of the Public Key in an SSL/TLS Certificate
- Rotating SSL/TLS Certificates
- Reverting from a Custom SSL/TLS Certificate to the Default CloudFront Certificate
- Switching from a Custom SSL/TLS Certificate with Dedicated IP Addresses to SNI
- Charges for HTTPS Connections
- Authentication and Access Control for CloudFront
- Authentication
- Access Control
- Overview of Managing Access Permissions to Your CloudFront Resources
- Using Identity-Based Policies (IAM Policies) for CloudFront
- CloudFront API Permissions: Actions, Resources, and Conditions Reference
- Access Logs
- Monitoring CloudFront Activity Using CloudWatch
- Using AWS CloudTrail to Capture Requests Sent to the CloudFront API
- Tagging Amazon CloudFront Distributions
- Troubleshooting
- Load Testing CloudFront
- CloudFront Streaming Tutorials
- Live Streaming
- On-Demand Streaming
- RTMP Streaming
- Live HTTP Streaming Using CloudFront and Adobe Media Server 5.0
- Overview
- Steps to Configure Live Streaming
- Creating an Amazon Web Services Account
- Creating an Amazon EC2 Key Pair
- Subscribing to Adobe Media Server
- Creating an AWS CloudFormation Stack for Live Streaming
- Verifying that Adobe Media Server Is Running
- Setting Up Adobe Flash Media Live Encoder to Publish a Live Stream
- Embedding Strobe Media Playback for an Amazon CloudFront Live HTTP Stream in a Web Application
- Deleting an AWS CloudFormation Stack and an Amazon EBS Volume for Live Streaming
- Frequently Asked Questions
- How can I use Secure Shell (SSH) to connect to my Amazon EC2 instance that is running Adobe Media Server 5.0?
- How do I update crossdomain.xml for a Flash-based stream hosted on my own domain?
- What is the price for live HTTP streaming using CloudFront and Adobe Media Server 5.0?
- How can I create a CNAME alias for my Amazon EC2 instance or for my CloudFront distribution?
- How can I connect to the Adobe Media Server Administration Console?
- Can I stream my live event both to Apple devices and to Flash Player–compatible devices?
- Does Adobe Media Server 5.0 support HTML5?
- Does Adobe Media Server have logging?
- How can I enable authentication on Adobe Media Server?
- What are the default cache-control settings on HDS- and HLS-related files?
- What is the difference between HLS and HDS?
- How do I troubleshoot my Amazon EC2 instance if streaming doesn't start?
- Where can I find the documentation for live streaming using Adobe Flash Media Server 4.5?
- Additional Documentation
- Live Smooth Streaming Using Amazon CloudFront and IIS Media Services 4.1
- Overview of Live Smooth Streaming with Amazon Web Services
- Creating an Amazon Web Services Account
- Creating an Amazon EC2 Key Pair
- Creating an AWS CloudFormation Stack for Live Smooth Streaming
- Verifying that Your Amazon EC2 Windows Server Instance Is Running
- Getting Your Windows Password
- Encoding Your Live Stream
- Viewing Your Live Smooth Stream
- Deleting Your AWS CloudFormation Live Smooth Streaming Stack
- Frequently Asked Questions
- What is the price for Live Smooth Streaming using CloudFront?
- Can I deliver my live streaming video to both Smooth Streaming clients and Apple devices?
- How can I set-up a CNAME alias for my Amazon EC2 instance or my CloudFront distribution?
- How can I enable access to the Windows server?
- How can I securely connect to my Amazon EC2 instance running Windows IIS Media Services?
- How can I restrict access to my Live Smooth Streaming content from another domain?
- Additional Documentation
- Live HTTP Streaming Using Wowza Streaming Engine 4.2
- Creating an Amazon Web Services Account
- Creating an Amazon EC2 Key Pair
- Getting a License for Wowza Streaming Engine 4.2
- Subscribing to Wowza Streaming Engine 4.2 through AWS Marketplace
- Creating an AWS CloudFormation Stack for Live Streaming
- Verifying that Wowza Streaming Engine 4.2 Is Running
- Setting Up an Encoder to Publish a Live Stream
- Playing the Live Stream in a Web Application
- Deleting an AWS CloudFormation Stack for Live Streaming
- Frequently Asked Questions
- What is the price for live HTTP streaming using CloudFront and Wowza Streaming Engine 4.2?
- How can I use Secure Shell (SSH) to connect to my Amazon EC2 instance that is running Wowza Streaming Engine 4.2?
- How can I create a CNAME alias for my Amazon EC2 instance or for my CloudFront distribution?
- Can I stream my live event to Flash Player–compatible devices, Apple devices, and Smooth Streaming players at the same time?
- Does Wowza Streaming Engine 4.2 support HTML5?
- Can I serve private live streams using Wowza and CloudFront?
- Additional Documentation
- Live HTTP Streaming Using CloudFront and Any HTTP Origin
- On-Demand Media Streaming with Unified Streaming
- Creating an Amazon Web Services Account
- Creating an Amazon EC2 Key Pair
- Subscribing to Unified Streaming
- Creating an AWS CloudFormation Stack for On-Demand Streaming
- Verifying that Unified Streaming Server Is Running
- Uploading Your Media Files to Amazon S3
- Playing the On-Demand Stream In a Test Web Application
- Deleting the AWS CloudFormation Stack and Amazon S3 Bucket for On-Demand Streaming
- Frequently Asked Questions
- What is the price for on-demand HTTP streaming using CloudFront and Unified Streaming?
- How can I use Secure Shell (SSH) to connect to my Amazon EC2 instance that is running Unified Streaming?
- How can I create a CNAME alias for my Amazon EC2 instance or for my CloudFront distribution?
- Can I stream my media in multiple formats to a variety of devices simultaneously?
- How can I secure my content?
- Additional Documentation
- On-Demand Video Streaming Using CloudFront and Adobe Flash Player
- On-Demand Video Streaming Using CloudFront and Flowplayer for Adobe Flash
- On-Demand Video Streaming Using CloudFront and JW Player
- Limits
- Amazon CloudFront Resources
- Additional Amazon CloudFront Documentation
- Getting Support
- CloudFront Developer Tools and SDKs
- Using CloudFront Logging
- Additional Tips from the Amazon Web Services Blog
- Invalidating Objects
- Distributing Streaming Media
- Tools and Code Examples for Configuring Private Content
- Using CloudFront with a Content Management System
- Document History
- AWS Glossary

Amazon CloudFront
Developer Guide
API Version 2016-08-01

Amazon CloudFront: Developer Guide
Copyright © 2016 Amazon Web Services, Inc. and/or its affiliates. All rights reserved.
Amazon's trademarks and trade dress may not be used in connection with any product or service that is not Amazon's, in any manner
that is likely to cause confusion among customers, or in any manner that disparages or discredits Amazon. All other trademarks not
owned by Amazon are the property of their respective owners, who may or may not be affiliated with, connected to, or sponsored by
Amazon.
Amazon CloudFront Developer Guide

Table of Contents
What Is Amazon CloudFront? .......................................................................................................... 1
How CloudFront Delivers Content ............................................................................................. 4
Locations and IP Address Ranges of CloudFront Edge Servers ..................................................... 6
PCI DSS Compliance ............................................................................................................. 6
AWS Billing and Usage Reports for CloudFront ................................................................................... 8
AWS Billing Report for CloudFront .......................................................................................... 10
AWS Usage Report for CloudFront ......................................................................................... 11
Interpreting Your AWS Bill and the AWS Usage Report for CloudFront ........................................... 12
CloudFront Reports ...................................................................................................................... 15
CloudFront Cache Statistics Reports ....................................................................................... 16
Downloading Data in CSV Format .................................................................................. 17
How Cache Statistics Charts Are Related to Data in the CloudFront Access Logs ................... 19
CloudFront Popular Objects Report ......................................................................................... 20
Downloading Data in CSV Format .................................................................................. 21
How Data in the Popular Objects Report Is Related to Data in the CloudFront Access Logs ...... 22
CloudFront Top Referrers Report ............................................................................................ 23
Downloading Data in CSV Format .................................................................................. 24
How Data in the Top Referrers Report Is Related to Data in the CloudFront Access Logs ......... 25
CloudFront Usage Reports .................................................................................................... 25
Downloading Data in CSV Format .................................................................................. 26
How the Usage Charts Are Related to Data in the CloudFront Usage Report .......................... 28
CloudFront Viewers Reports .................................................................................................. 29
Displaying Viewers Charts and Reports ........................................................................... 30
Downloading Data in CSV Format .................................................................................. 31
How Data in the Locations Report Is Related to Data in the CloudFront Access Logs ............... 35
Getting Started ............................................................................................................................ 37
Step 1: Sign up for Amazon Web Services ................................................................................ 37
Step 2: Upload your content to Amazon S3 and grant object permissions ...................................... 38
Step 3: Create a CloudFront Web Distribution ........................................................................... 39
Step 4: Test your links ........................................................................................................... 45
Working with Distributions ............................................................................................................. 46
Overview of Web and RTMP Distributions ................................................................................ 47
Web Distributions ........................................................................................................ 47
RTMP Distributions ...................................................................................................... 48
Creating Web and RTMP Distributions ..................................................................................... 48
Listing, Viewing, and Updating CloudFront Distributions .............................................................. 48
Deleting a Distribution .......................................................................................................... 49
Using Alternate Domain Names (CNAMEs) .............................................................................. 50
Using the * Wildcard in Alternate Domain Names .............................................................. 50
Restrictions on Using Alternate Domain Names ................................................................ 51
Adding an Alternate Domain Name ................................................................................. 51
Choosing the Price Class for a CloudFront Distribution ............................................................... 54
Using CloudFront with Amazon S3 .......................................................................................... 54
Adding CloudFront When You're Distributing Content from Amazon S3 .................................. 55
Moving an Amazon S3 Bucket to a Different Region ........................................................... 56
Changes to the CloudFront API .............................................................................................. 56
Working with Web Distributions ...................................................................................................... 58
Task List for Creating a Web Distribution .................................................................................. 58
Creating or Updating a Web Distribution Using the CloudFront Console ......................................... 59
Testing Your Web Distribution ................................................................................................. 60
Using Amazon S3 Origins and Custom Origins for Web Distributions ............................................ 61
Using Amazon S3 Buckets for Your Origin ........................................................................ 61
Using Amazon EC2 or Other Custom Origins .................................................................... 62
Values that You Specify When You Create or Update a Web Distribution ........................................ 63
Delivery Method .......................................................................................................... 64
API Version 2016-08-01
iii
Amazon CloudFront Developer Guide

Origin Settings ............................................................................................................ 64
Cache Behavior Settings ............................................................................................... 68
Distribution Details ....................................................................................................... 75
Custom Error Pages and Error Caching ........................................................................... 79
Restrictions ................................................................................................................ 79
Values that CloudFront Displays in the Console When You Create or Update a Web Distribution ........ 80
Distribution ID (General Tab) .......................................................................................... 80
Distribution Status (General Tab) .................................................................................... 80
Last Modified (General Tab) ........................................................................................... 81
Domain Name (General Tab) ......................................................................................... 81
Requirements and Recommendations for Using Amazon EC2 and Other Custom Origins ................ 81
Using AWS WAF to Control Access to Your Content ................................................................... 82
Restricting the Geographic Distribution of Your Content .............................................................. 82
Using CloudFront Geo Restriction ................................................................................... 83
Using a Third-Party Geolocation Service .......................................................................... 84
Configuring On-Demand Smooth Streaming ............................................................................. 85
Configuring On-Demand Progressive Downloads ...................................................................... 86
Configuring On-Demand Apple HTTP Live Streaming (HLS) ....................................................... 86
Working with RTMP Distributions .................................................................................................... 87
How RTMP Distributions Work ............................................................................................... 87
Task List for Streaming Media Files Using RTMP ....................................................................... 89
Creating an RTMP Distribution Using the CloudFront Console ..................................................... 90
Values that You Specify When You Create or Update an RTMP Distribution .................................... 90
Origin Domain Name (Amazon S3 Bucket) ....................................................................... 91
Restrict Bucket Access (Amazon S3 Only) ....................................................................... 92
Origin Access Identity (Amazon S3 Only) ......................................................................... 92
Comment for New Identity(Amazon S3 Only) .................................................................... 92
Your Identities (Amazon S3 Only) ................................................................................... 92
Grant Read Permissions on Bucket (Amazon S3 Only) ....................................................... 92
Price Class ................................................................................................................. 92
Alternate Domain Names (CNAMEs) ............................................................................... 93
Logging ..................................................................................................................... 93
Bucket for Logs ........................................................................................................... 93
Log Prefix ................................................................................................................... 93
Comment ................................................................................................................... 93
Distribution State ......................................................................................................... 93
Restrict Viewer Access (Use Signed URLs) ...................................................................... 94
Trusted Signers ........................................................................................................... 94
AWS Account Numbers ................................................................................................ 94
Values that CloudFront Displays in the Console When You Create or Update an RTMP
Distribution ......................................................................................................................... 95
Distribution ID ............................................................................................................. 95
Status ........................................................................................................................ 95
Last Modified .............................................................................................................. 95
Domain Name ............................................................................................................. 95
Configuring the Media Player ................................................................................................. 96
MPEG Files ................................................................................................................ 96
Using an Amazon S3 Bucket as the Origin for an RTMP Distribution ............................................. 96
Creating Multiple RTMP Distributions for an Origin Server ........................................................... 97
Restricting Access Using Crossdomain.xml .............................................................................. 97
Error Codes for RTMP Distributions ........................................................................................ 98
Troubleshooting RTMP Distributions ........................................................................................ 98
Working with Objects .................................................................................................................... 99
Format of URLs for CloudFront Objects ................................................................................... 99
Format of Public URLs for Objects in Amazon S3 ............................................................ 100
Format of Public URLs for Objects in a Custom Origin ...................................................... 101
How Public URLs Affect the Invalidation of Directories ...................................................... 101
Format of Signed URLs ............................................................................................... 101
API Version 2016-08-01
iv
Amazon CloudFront Developer Guide

How CloudFront Processes HTTP and HTTPS Requests .......................................................... 102
Increasing the Proportion of Requests that Are Served from CloudFront Edge Caches ................... 102
Specifying How Long CloudFront Caches Your Objects ..................................................... 102
Caching Based on Query String Parameters ................................................................... 103
Caching Based on Cookie Values ................................................................................. 103
Caching Based on Request Headers ............................................................................. 104
Serving Media Content by Using HTTP .......................................................................... 104
Configuring CloudFront to Cache Based on Query String Parameters ......................................... 105
Query String Parameters and Web Distributions .............................................................. 105
Query String Parameters and RTMP Distributions ............................................................ 106
Configuring CloudFront to Cache Objects Based on Cookies ..................................................... 106
Configuring CloudFront to Cache Objects Based on Request Headers ........................................ 108
Headers and Web Distributions .................................................................................... 108
Headers and RTMP Distributions .................................................................................. 112
Forwarding Custom Headers to Your Origin (Web Distributions Only) ........................................... 112
Configuring CloudFront to Forward Custom Headers to Your Origin ..................................... 112
Custom Headers that CloudFront Can't Forward to Your Origin ........................................... 113
Using Custom Headers for Cross-Origin Resource Sharing (CORS) ................................... 113
Using Custom Headers to Restrict Access to Your Content on a Custom Origin ..................... 113
Adding, Removing, or Replacing Objects in a Distribution .......................................................... 114
Adding Objects that You Want CloudFront to Distribute ..................................................... 114
Updating Existing Objects Using Versioned Object Names ................................................ 115
Updating Existing Objects Using the Same Object Names ................................................. 115
Specifying How Long Objects Stay in a CloudFront Edge Cache (Expiration) ........................ 116
Invalidating Objects (Web Distributions Only) .................................................................. 121
Customizing Error Responses .............................................................................................. 127
Creating or Updating a Cache Behavior for Custom Error Pages ........................................ 129
Changing Response Codes ......................................................................................... 129
Controlling How Long CloudFront Caches Errors ............................................................. 129
How CloudFront Responds When a Custom Error Page Is Unavailable ................................ 130
Pricing for Custom Error Pages .................................................................................... 130
Configuring Error Response Behavior ............................................................................ 131
How CloudFront Processes Partial Requests for an Object (Range GETs) ................................... 132
Specifying a Default Root Object (Web Distributions Only) ........................................................ 132
Serving Compressed Files ................................................................................................... 135
Using CloudFront to Compress Your Content ................................................................... 135
Using a Custom Origin to Compress Your Content ........................................................... 137
Request and Response Behavior .................................................................................................. 139
Request and Response Behavior for Amazon S3 Origins .......................................................... 139
How CloudFront Processes and Forwards Requests to Your Amazon S3 Origin Server ........... 139
How CloudFront Processes Responses from Your Amazon S3 Origin Server ........................ 144
Request and Response Behavior for Custom Origins ............................................................... 145
How CloudFront Processes and Forwards Requests to Your Custom Origin Server ................ 146
How CloudFront Processes Responses from Your Custom Origin Server ............................. 155
How CloudFront Processes HTTP 3xx Status Codes from Your Origin ......................................... 158
How CloudFront Processes and Caches HTTP 4xx and 5xx Status Codes from Your Origin ............ 158
How CloudFront Processes Errors When You Have Configured Custom Error Pages .............. 158
How CloudFront Processes Errors When You Have Not Configured Custom Error Pages ........ 160
HTTP 4xx and 5xx Status Codes that CloudFront Caches ................................................. 161
Serving Private Content through CloudFront ................................................................................... 162
Overview of Private Content ................................................................................................. 162
Restricting Access to Objects in CloudFront Edge Caches ................................................ 163
Restricting Access to Objects in Amazon S3 Buckets ....................................................... 163
Using an HTTP Server for Private Content .............................................................................. 164
Task List: Serving Private Content ......................................................................................... 165
Using an Origin Access Identity to Restrict Access to Your Amazon S3 Content ............................ 166
Creating a CloudFront Origin Access Identity and Adding it to Your Distribution ..................... 166
API Version 2016-08-01
v
Amazon CloudFront Developer Guide

Granting the Origin Access Identity Permission to Read Objects in Your Amazon S3
Bucket ..................................................................................................................... 168
Using an Origin Access Identity in Amazon S3 Regions that Support Only Signature Version
4 Authentication ......................................................................................................... 170
Specifying the AWS Accounts That Can Create Signed URLs and Signed Cookies (Trusted
Signers) ........................................................................................................................... 171
Creating CloudFront Key Pairs for Your Trusted Signers ..................................................... 172
Reformatting the CloudFront Private Key (.NET and Java Only) .......................................... 173
Adding Trusted Signers to Your Distribution ..................................................................... 174
Verifying that Trusted Signers Are Active (Optional) .......................................................... 176
Rotating CloudFront Key Pairs ...................................................................................... 176
Choosing Between Signed URLs and Signed Cookies .............................................................. 178
Using Both Signed URLs and Signed Cookies ................................................................ 178
Using Signed URLs ............................................................................................................ 179
Choosing Between Canned and Custom Policies for Signed URLs ..................................... 179
How Signed URLs Work .............................................................................................. 180
Choosing How Long Signed URLs Are Valid ................................................................... 180
When Does CloudFront Check the Expiration Date and Time in a Signed URL? .................... 181
Sample Code and Third-Party Tools .............................................................................. 181
Creating a Signed URL Using a Canned Policy ............................................................... 182
Creating a Signed URL Using a Custom Policy ................................................................ 189
Using Signed Cookies ......................................................................................................... 198
Choosing Between Canned and Custom Policies for Signed Cookies .................................. 198
How Signed Cookies Work .......................................................................................... 198
Preventing Misuse of Signed Cookies ............................................................................ 199
When Does CloudFront Check the Expiration Date and Time in a Signed Cookie? ................. 200
Sample Code and Third-Party Tools .............................................................................. 200
Setting Signed Cookies Using a Canned Policy ............................................................... 200
Setting Signed Cookies Using a Custom Policy ............................................................... 205
Using a Linux Command and OpenSSL for Base64-Encoding and Encryption .............................. 213
Code Examples for Creating a Signature for a Signed URL ....................................................... 214
Create a URL Signature Using Perl ............................................................................... 214
Create a URL Signature Using PHP .............................................................................. 216
Create a URL Signature Using C# and the .NET Framework .............................................. 218
Create a URL Signature Using Java .............................................................................. 226
Using an HTTPS Connection to Access Your Objects ....................................................................... 229
How CloudFront Works with HTTPS Connections .................................................................... 230
How to Require HTTPS for Communication between Viewers, CloudFront, and Your Origin ............. 230
Supported Protocols and Ciphers ......................................................................................... 233
Using Alternate Domain Names and HTTPS ........................................................................... 234
Choosing How CloudFront Serves HTTPS Requests ........................................................ 234
Requirements and Limits on Using SSL/TLS Certificates with CloudFront ............................ 236
To use alternate domain names with HTTPS ................................................................... 238
Determining the Size of the Public Key in an SSL/TLS Certificate ....................................... 239
Rotating SSL/TLS Certificates ...................................................................................... 240
Reverting from a Custom SSL/TLS Certificate to the Default CloudFront Certificate ............... 241
Switching from a Custom SSL/TLS Certificate with Dedicated IP Addresses to SNI ............... 241
Charges for HTTPS Connections .......................................................................................... 242
Authentication and Access Control ................................................................................................ 243
Authentication ................................................................................................................... 243
Access Control .................................................................................................................. 244
Overview of Managing Access ............................................................................................. 245
ARNs for CloudFront Resources ................................................................................... 245
Understanding Resource Ownership ............................................................................. 245
Managing Access to Resources .................................................................................... 246
Specifying Policy Elements: Resources, Actions, Effects, and Principals .............................. 247
Specifying Conditions in a Policy ................................................................................... 247
Using IAM Policies for CloudFront ......................................................................................... 248
API Version 2016-08-01
vi
Amazon CloudFront Developer Guide

Permissions Required to Use the CloudFront Console ...................................................... 248
AWS Managed (Predefined) Policies for CloudFront ......................................................... 250
Customer Managed Policy Examples ............................................................................. 250
CloudFront API Permissions Reference ................................................................................. 253
Required Permissions for Actions on Web Distributions ..................................................... 253
Required Permissions for Actions on RTMP Distributions .................................................. 254
Required Permissions for Actions on Invalidations ........................................................... 255
Required Permissions for Actions on Origin Access Identities ............................................ 255
Required Permissions for Actions on Tags ...................................................................... 255
Access Logs ............................................................................................................................. 256
How Logging Works ........................................................................................................... 256
Choosing an Amazon S3 Bucket for Your Access Logs ............................................................. 257
Amazon S3 Permissions Required to Access Your Log Files ...................................................... 258
File Name Format .............................................................................................................. 258
Timing of Log File Delivery .................................................................................................. 258
Analyzing Access Logs ....................................................................................................... 259
Editing Your Logging Settings ............................................................................................... 259
Deleting Log Files from an Amazon S3 Bucket ........................................................................ 260
Log File Format ................................................................................................................. 260
Web Distribution Log File Format .................................................................................. 261
RTMP Distribution Log File Format ................................................................................ 267
Charges for Access Logs ..................................................................................................... 269
Monitoring CloudFront Activity Using CloudWatch ............................................................................ 270
Downloading Data in CSV Format ......................................................................................... 271
Information About the Report ....................................................................................... 272
Data in the CloudWatch Metrics Report ......................................................................... 272
Capturing API Requests with CloudTrail ......................................................................................... 274
CloudFront Information in CloudTrail Log Files ......................................................................... 274
Understanding CloudFront Log File Entries ............................................................................. 275
Tagging Amazon CloudFront Distributions ...................................................................................... 280
Tag Restrictions ................................................................................................................. 281
Adding, Editing, and Deleting Tags for Distributions .................................................................. 281
Troubleshooting ......................................................................................................................... 282
I can't view the files in my web distribution. ............................................................................. 282
Did you sign up for both CloudFront and Amazon S3? ...................................................... 282
Are your Amazon S3 bucket and object permissions set correctly? ..................................... 282
Is your alternate domain name (CNAME) correctly configured? .......................................... 283
Are you referencing the correct URL for your CloudFront distribution? ................................. 283
Do you need help troubleshooting a custom origin? .......................................................... 283
I can't view the files in my RTMP distribution. .......................................................................... 284
Error Message: Certificate: <certificate-id> is being used by CloudFront. ...................................... 284
Load Testing CloudFront .............................................................................................................. 285
Streaming Tutorials ..................................................................................................................... 286
Live Streaming .................................................................................................................. 286
On-Demand Streaming ....................................................................................................... 286
RTMP Streaming ............................................................................................................... 286
Live HTTP Streaming Using CloudFront and Adobe Media Server 5.0 ......................................... 286
Overview .................................................................................................................. 287
Steps to Configure Live Streaming ................................................................................ 288
Creating an Amazon Web Services Account ................................................................... 288
Creating an Amazon EC2 Key Pair ................................................................................ 288
Subscribing to Adobe Media Server .............................................................................. 289
Creating an AWS CloudFormation Stack for Live Streaming .............................................. 290
Verifying that Adobe Media Server Is Running ................................................................. 291
Setting Up Adobe Flash Media Live Encoder to Publish a Live Stream ................................ 292
Embedding Strobe Media Playback for an Amazon CloudFront Live HTTP Stream in a Web
Application ................................................................................................................ 295
Deleting an AWS CloudFormation Stack and an Amazon EBS Volume for Live Streaming ....... 296
API Version 2016-08-01
vii
Amazon CloudFront Developer Guide

Frequently Asked Questions ........................................................................................ 297
Additional Documentation ............................................................................................ 303
Live Smooth Streaming Using Amazon CloudFront and IIS Media Services 4.1 ............................. 304
Overview of Live Smooth Streaming with Amazon Web Services ........................................ 304
Creating an Amazon Web Services Account ................................................................... 305
Creating an Amazon EC2 Key Pair ................................................................................ 305
Creating an AWS CloudFormation Stack for Live Smooth Streaming ................................... 306
Verifying that Your Amazon EC2 Windows Server Instance Is Running ................................. 309
Getting Your Windows Password ................................................................................... 309
Encoding Your Live Stream .......................................................................................... 310
Viewing Your Live Smooth Stream ................................................................................. 311
Deleting Your AWS CloudFormation Live Smooth Streaming Stack ..................................... 311
Frequently Asked Questions ........................................................................................ 311
Additional Documentation ............................................................................................ 313
Live Streaming with Wowza Streaming Engine 4.2 ................................................................... 314
Creating an Amazon Web Services Account ................................................................... 314
Creating an Amazon EC2 Key Pair ................................................................................ 315
Getting a License for Wowza Streaming Engine 4.2 ......................................................... 315
Subscribing to Wowza Streaming Engine 4.2 through AWS Marketplace .............................. 315
Creating an AWS CloudFormation Stack for Live Streaming .............................................. 316
Verifying that Wowza Streaming Engine 4.2 Is Running .................................................... 318
Setting Up an Encoder to Publish a Live Stream .............................................................. 318
Playing the Live Stream in a Web Application .................................................................. 319
Deleting an AWS CloudFormation Stack for Live Streaming ............................................... 321
Frequently Asked Questions ........................................................................................ 321
Additional Documentation ............................................................................................ 322
Live HTTP Streaming Using CloudFront and Any HTTP Origin ................................................... 324
Creating a New CloudFront Distribution for Live Streaming ................................................ 324
Configuring Web Players to Play the Live Stream ............................................................. 325
(Optional) Deleting an AWS CloudFormation Stack for Live Streaming ................................ 325
On-Demand Media Streaming with Unified Streaming .............................................................. 325
Creating an Amazon Web Services Account ................................................................... 326
Creating an Amazon EC2 Key Pair ................................................................................ 327
Subscribing to Unified Streaming .................................................................................. 327
Creating an AWS CloudFormation Stack for On-Demand Streaming ................................... 328
Verifying that Unified Streaming Server Is Running .......................................................... 330
Uploading Your Media Files to Amazon S3 ..................................................................... 330
Playing the On-Demand Stream In a Test Web Application ................................................ 331
Deleting the AWS CloudFormation Stack and Amazon S3 Bucket for On-Demand
Streaming ................................................................................................................. 333
Frequently Asked Questions ........................................................................................ 334
Additional Documentation ............................................................................................ 336
On-Demand Video Streaming Using CloudFront and Adobe Flash Player ..................................... 338
Creating an Amazon S3 Bucket .................................................................................... 338
Creating CloudFront Web and RTMP Distributions ........................................................... 338
Creating a Flash Project Using Adobe Flash Builder ......................................................... 340
Uploading Media and Flash Builder Files to an Amazon S3 Bucket ..................................... 341
Playing the Media File ................................................................................................. 342
On-Demand Video Streaming Using CloudFront and Flowplayer for Adobe Flash .......................... 343
Uploading Media and Flowplayer Files to an Amazon S3 Bucket ........................................ 343
Creating CloudFront Web and RTMP Distributions ........................................................... 344
Embedding Video in an HTML Page .............................................................................. 345
On-Demand Video Streaming Using CloudFront and JW Player ................................................. 348
Uploading Media and JW Player Files to an Amazon S3 Bucket ......................................... 348
Creating CloudFront Web and RTMP Distributions ........................................................... 349
Embedding Video in a Web Page .................................................................................. 350
Uploading the HTML File and Playing the Video .............................................................. 352
Limits ....................................................................................................................................... 353
API Version 2016-08-01
viii
Amazon CloudFront Developer Guide

Resources ................................................................................................................................ 355
Additional Amazon CloudFront Documentation ........................................................................ 355
Getting Support ................................................................................................................. 356
CloudFront Developer Tools and SDKs ................................................................................... 356
Using CloudFront Logging ................................................................................................... 356
Additional Tips from the Amazon Web Services Blog ................................................................ 356
Invalidating Objects ............................................................................................................ 357
Distributing Streaming Media ............................................................................................... 357
Tools and Code Examples for Configuring Private Content ........................................................ 357
Using CloudFront with a Content Management System ............................................................. 358
Document History ...................................................................................................................... 359
AWS Glossary ........................................................................................................................... 373
API Version 2016-08-01
ix
Amazon CloudFront Developer Guide

What Is Amazon CloudFront?
Topics
•How CloudFront Delivers Content (p. 4)
•Locations and IP Address Ranges of CloudFront Edge Servers (p. 6)
•PCI DSS Compliance (p. 6)
CloudFront is a web service that speeds up distribution of your static and dynamic web content, for
example, .html, .css, .php, and image files, to end users. CloudFront delivers your content through a
worldwide network of data centers called edge locations.When a user requests content that you're serving
with CloudFront, the user is routed to the edge location that provides the lowest latency (time delay), so
content is delivered with the best possible performance. If the content is already in the edge location with
the lowest latency, CloudFront delivers it immediately. If the content is not currently in that edge location,
CloudFront retrieves it from an Amazon S3 bucket or an HTTP server (for example, a web server) that
you have identified as the source for the definitive version of your content.
This concept is best illustrated by an example. Suppose you're serving the following image from a traditional
web server, not from CloudFront:
API Version 2016-08-01
1
Amazon CloudFront Developer Guide

(The image is owned by NASA and comes from the Visible Earth website, http://visibleearth.nasa.gov/.)
You're serving the image using the URL http://example.com/globe_west_540.png.Your users
can easily navigate to this URL and see the image, but they probably don't know that their request was
routed from one network to another—through the complex collection of interconnected networks that
comprise the Internet—until the image was found.
Further suppose that the web server from which you're serving the image is in Seattle, Washington, USA,
and that a user in Austin, Texas, USA requests the image. The traceroute list below (courtesy of
www.WatchMouse.com) shows one way that this request could be routed.
API Version 2016-08-01
2
Amazon CloudFront Developer Guide
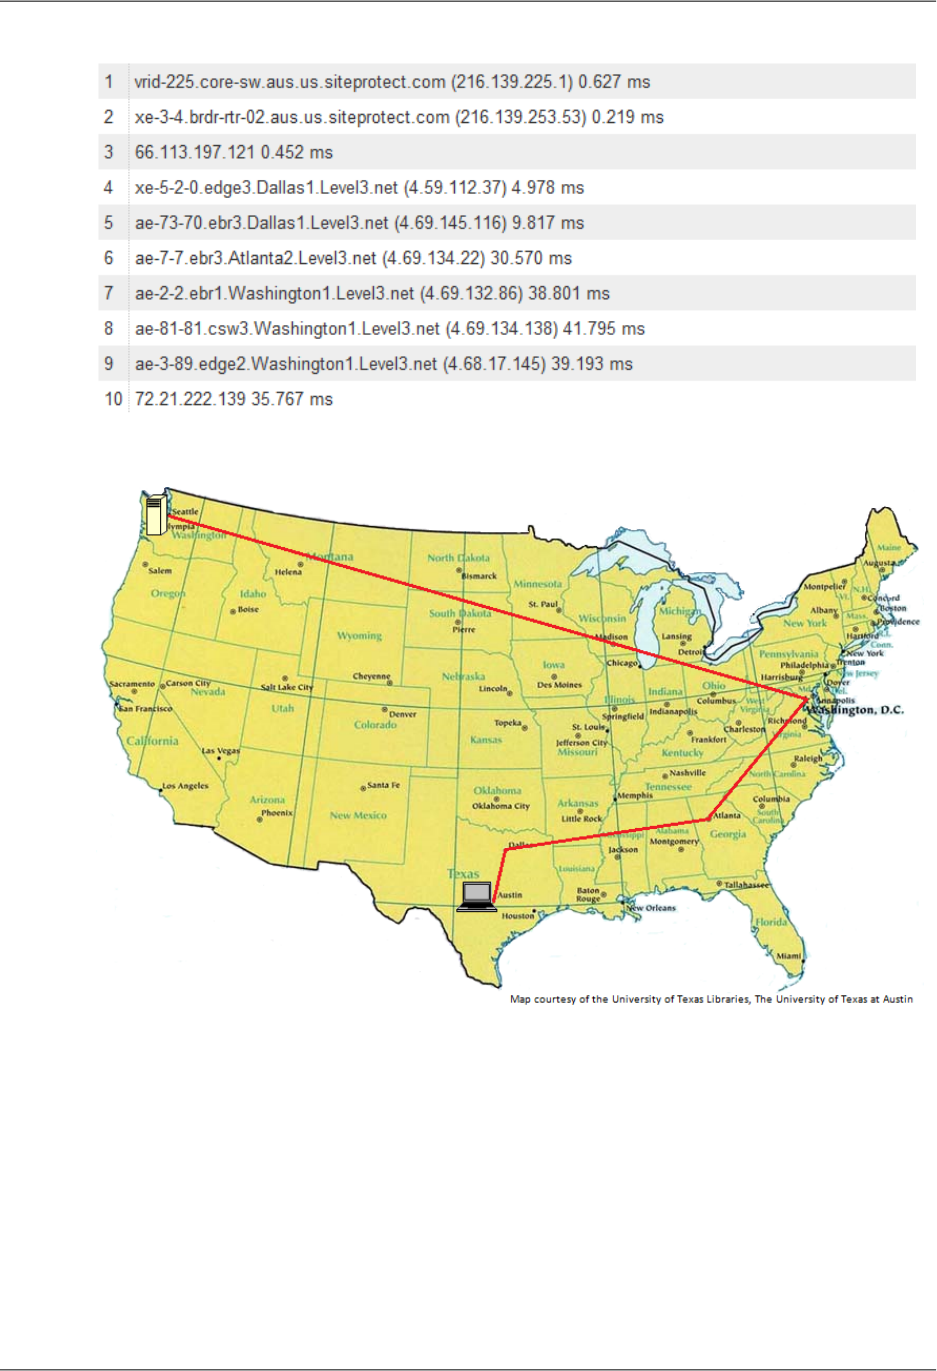
In this example, the request was routed 10 times within the United States before the image was retrieved,
which is not an unusually large number of hops. If your user were in Europe, the request would be routed
through even more networks to reach your server in Seattle. The number of networks and the distance
that the request and the image must travel have a significant impact on the performance, reliability, and
availability of the image.
CloudFront speeds up the distribution of your content by routing each user request to the edge location
that can best serve your content.Typically, this is the CloudFront edge location that provides the lowest
latency. This dramatically reduces the number of networks that your users' requests must pass through,
which improves performance. Users get lower latency—the time it takes to load the first byte of the
object—and higher data transfer rates.You also get increased reliability and availability because copies
of your objects are now held in multiple edge locations around the world.
API Version 2016-08-01
3
Amazon CloudFront Developer Guide

For a list of the locations of CloudFront edge servers, see The Amazon CloudFront Global Edge Network
on the CloudFront Product Details page.
How CloudFront Delivers Content
After some initial setup, CloudFront works invisibly to speed up delivery of your content. This overview
includes both the steps you perform before your first user accesses your application or website and how
CloudFront serves your content when configuration is complete.
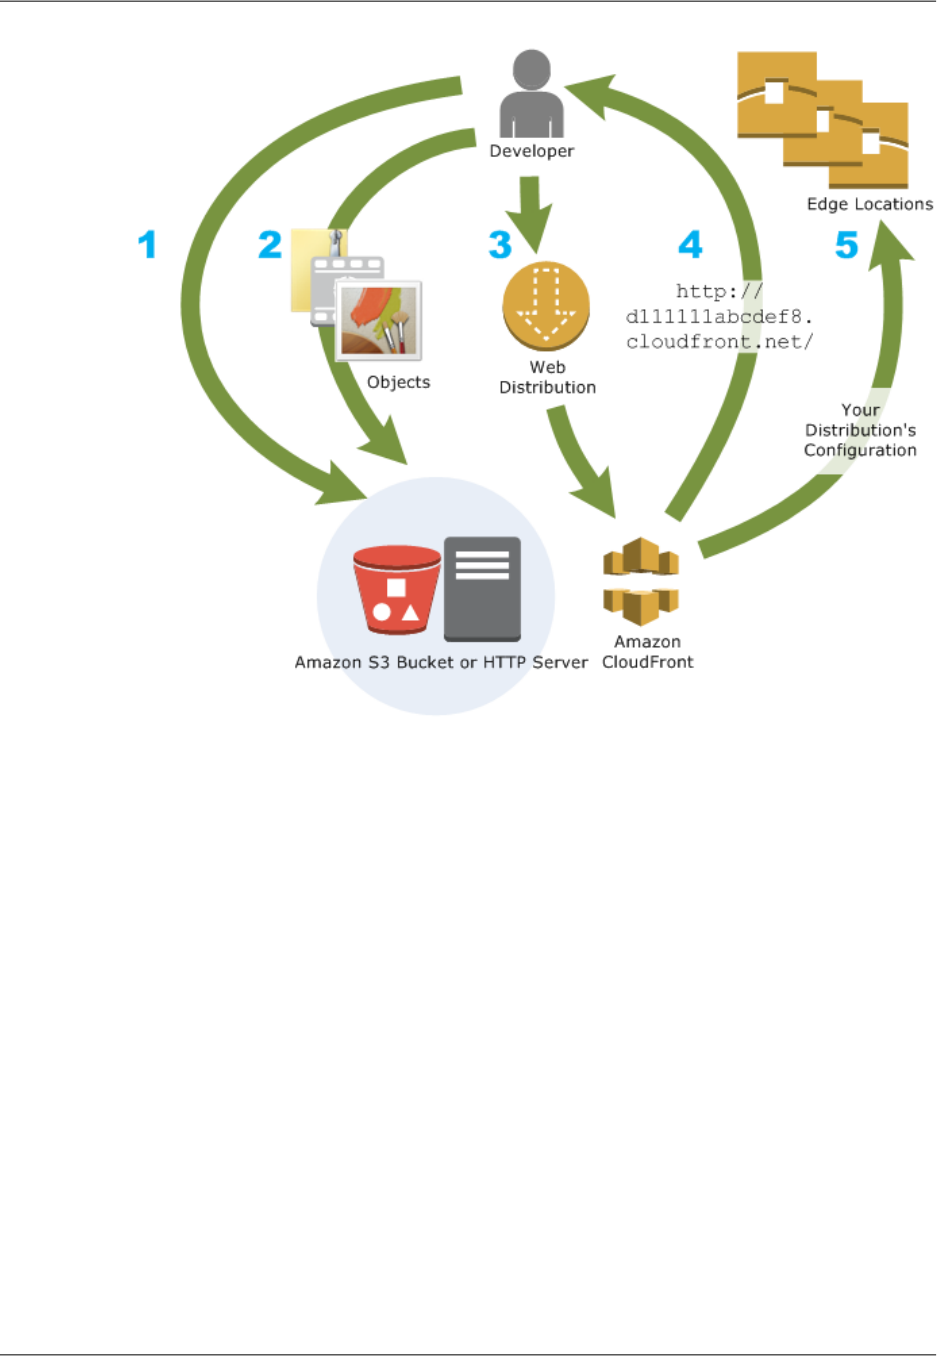
Setting up CloudFront involves a few simple steps:
How You Configure CloudFront to Deliver Your Content
1. You configure your origin servers, from which CloudFront gets your files for distribution from
CloudFront edge locations all over the world.
An origin server stores the original, definitive version of your objects. If you're serving content over
HTTP, your origin server is either an Amazon S3 bucket or an HTTP server, such as a web server.
Your HTTP server can be running on an Amazon Elastic Compute Cloud (Amazon EC2) instance
or on a server that you manage; these servers are also known as custom origins.
If you're distributing media files on demand using the Adobe Media Server RTMP protocol, your
origin server is always an Amazon S3 bucket.
2. You upload your files to your origin servers.Your files, also known as objects, typically include web
pages, images, and media files, but can be anything that can be served over HTTP or a supported
version of Adobe RTMP, the protocol used by Adobe Flash Media Server.
If you're using an Amazon S3 bucket as an origin server, you can make the objects in your bucket
publicly readable, so anyone who knows the CloudFront URLs for your objects can access them.
You also have the option of keeping objects private and controlling who accesses them. See Serving
Private Content through CloudFront (p. 162).
3. You create a CloudFront distribution, which tells CloudFront which origin servers to get your files
from when users request the files through your web site or application. At the same time, you specify
details such as whether you want CloudFront to log all requests and whether you want the distribution
to be enabled as soon as it's created.
4. CloudFront sends your distribution's configuration (but not your content) to all of its edge
locations—collections of servers in geographically dispersed data centers where CloudFront caches
copies of your objects.
5. As you develop your website or application, you use the domain name that CloudFront provides for
your URLs. For example, if CloudFront returns d111111abcdef8.cloudfront.net as the domain
name for your distribution, the URL for logo.jpg in your Amazon S3 bucket (or in the root directory
on an HTTP server) will be http://d111111abcdef8.cloudfront.net/logo.jpg.
You can also configure your CloudFront distribution so you can use your own domain name. In that
case, the URL might be http://www.example.com/logo.jpg.
6. Optionally, you can configure your origin server to add headers to the files; the headers indicate how
long you want the files to stay in the cache in CloudFront edge locations. By default, each object
stays in an edge location for 24 hours before it expires.The minimum expiration time is 0 seconds;
there isn't a maximum expiration time limit. For more information, see Specifying How Long Objects
Stay in a CloudFront Edge Cache (Expiration) (p. 116).
API Version 2016-08-01
4
Amazon CloudFront Developer Guide
How CloudFront Delivers Content
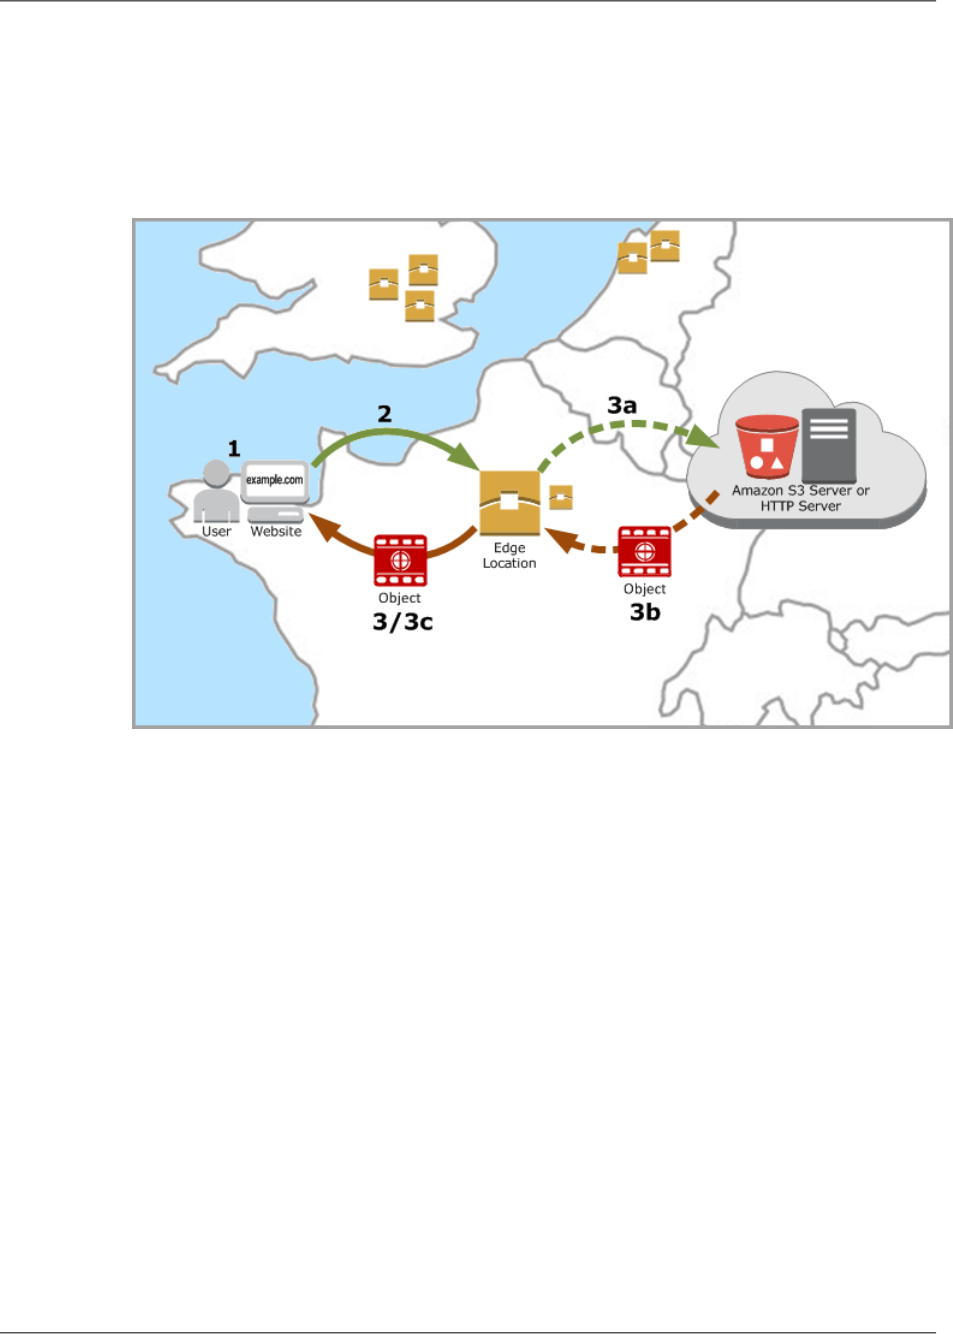
How CloudFront Delivers Content to Your Users
Once you configure CloudFront to deliver your content, here's what happens when users request your
objects:
1. A user accesses your website or application and requests one or more objects, such as an image
file and an HTML file.
2. DNS routes the request to the CloudFront edge location that can best serve the user's request,
typically the nearest CloudFront edge location in terms of latency, and routes the request to that
edge location.
3. In the edge location, CloudFront checks its cache for the requested files. If the files are in the cache,
CloudFront returns them to the user. If the files are not in the cache, it does the following:
a. CloudFront compares the request with the specifications in your distribution and forwards the
request for the files to the applicable origin server for the corresponding file type—for example,
to your Amazon S3 bucket for image files and to your HTTP server for the HTML files.
b. The origin servers send the files back to the CloudFront edge location.
c. As soon as the first byte arrives from the origin, CloudFront begins to forward the files to the
user. CloudFront also adds the files to the cache in the edge location for the next time someone
requests those files.
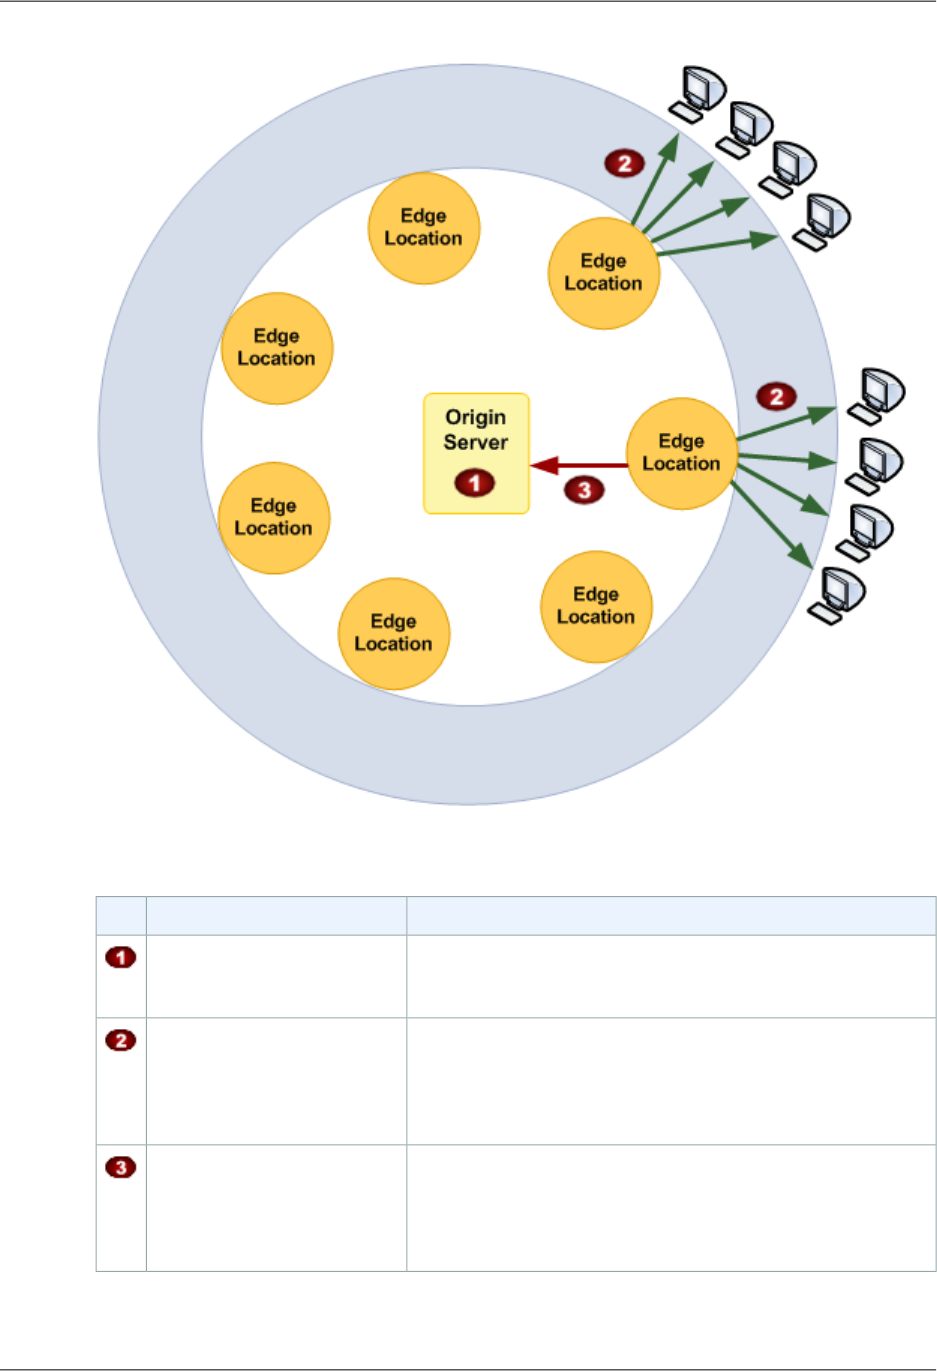
4. After an object has been in an edge cache for 24 hours or for the duration specified in your file
headers, CloudFront does the following:
API Version 2016-08-01
5
Amazon CloudFront Developer Guide
How CloudFront Delivers Content
a. CloudFront forwards the next request for the object to your origin to determine whether the edge
location has the latest version.
b. If the version in the edge location is the latest, CloudFront delivers it to your user.
If the version in the edge location is not the latest, your origin sends the latest version to
CloudFront, and CloudFront delivers the object to your user and stores the latest version in the
cache at that edge location.
Locations and IP Address Ranges of CloudFront
Edge Servers
For a list of the locations of CloudFront edge servers, see The Amazon CloudFront Edge Network on the
Amazon CloudFront detail page.
Amazon Web Services (AWS) publishes its current IP address ranges in JSON format.To view the current
ranges, download ip-ranges.json. For more information, see AWS IP Address Ranges in the Amazon
Web Services General Reference.
To find the IP address ranges that are associated with CloudFront edge servers, search ip-ranges.json
for the following string:
"service": "CLOUDFRONT"
PCI DSS Compliance
CloudFront supports the processing, storage, and transmission of credit card data by a merchant or
service provider, and has been validated as being compliant with Payment Card Industry (PCI) Data
API Version 2016-08-01
6
Amazon CloudFront Developer Guide
Locations and IP Address Ranges of CloudFront Edge
Servers

Security Standard (DSS). For more information about PCI DSS, including how to request a copy of the
AWS PCI Compliance Package, see PCI DSS Level 1.
As a security best practice we recommend that you don't cache credit card information in CloudFront
edge caches. For example, you can configure your origin to include a
Cache-Control:no-cache="field-name" header in responses that contain credit card information
such as the last four digits of a credit card number and the card owner's contact information.
API Version 2016-08-01
7
Amazon CloudFront Developer Guide
PCI DSS Compliance

AWS Billing and Usage Reports for
CloudFront
Amazon CloudFront is designed so you don't have to pay any up-front fees or commit to how much content
you'll have. As with the other AWS services, you pay as you go and pay only for what you use.
The following diagram and table summarize the charges to use CloudFront.
API Version 2016-08-01
8
Amazon CloudFront Developer Guide
Your monthly bill from AWS separates your usage and dollar amounts by AWS service and function. The
following table lists the charges that are illustrated in the previous graphic.
CommentsCharge
You pay normal Amazon S3 storage charges to store objects in
your bucket; the charges appear in the Amazon S3 portion of
your AWS statement.
Storage in an Amazon S3
bucket
You incur CloudFront charges when CloudFront responds to re-
quests for your objects.These charges are lower than the corres-
ponding Amazon S3 charges. The CloudFront charges appear
in the CloudFront portion of your AWS statement. For more in-
formation, see Amazon CloudFront Pricing.
Serving objects from edge loc-
ations
You incur CloudFront charges when users transfer data to your
origin, which includes DELETE, OPTIONS, PATCH, POST, and PUT
requests.The CloudFront charges appear in the CloudFront
portion of your AWS statement. For more information, see
Amazon CloudFront Pricing.
Submitting data to your origin
API Version 2016-08-01
9
Amazon CloudFront Developer Guide

Note
You also incur a surcharge for HTTPS requests. For more information, see Amazon CloudFront
Pricing.
AWS provides two usage reports for CloudFront:
•The billing report is a high-level view of all of the activity for the AWS services that you're using, including
CloudFront. For more information, see AWS Billing Report for CloudFront (p. 10).
• The usage report is a summary of activity for a specific service, aggregated by hour, day, or month.
For more information, see AWS Usage Report for CloudFront (p. 11).
In addition, you can view usage charts that provide a graphical representation of your CloudFront usage.
For more information, see CloudFront Usage Reports (p. 25).
AWS Billing Report for CloudFront
You can view a summary of your AWS usage and charges, listed by service, on the Bills page in the AWS
Management Console.
You can also download a more detailed version of the report in CSV format. The detailed billing report
includes the following values that are applicable to CloudFront:
•ProductCode — AmazonCloudFront
•UsageType — One of the following values
• A code that identifies the type of data transfer
•Invalidations
•SSL-Cert-Custom
For more information, see Interpreting Your AWS Bill and the AWS Usage Report for CloudFront (p. 12).
•ItemDescription — A description of the billing rate for the UsageType.
•Usage Start Date/Usage End Date — The day that the usage applies to, in Coordinated Universal
Time (UTC).
•Usage Quantity — One of the following values:
• The number of requests during the specified time period
• The amount of data transferred in gigabytes
• The number of objects invalidated
• The sum of the prorated months that you had SSL certificates associated with enabled CloudFront
distributions. For example, if you have one certificate associated with an enabled distribution for an
entire month and another certificate associated with an enabled distribution for half of the month,
this value will be 1.5.
To display summary billing information and download the detailed billing report
1. Sign in to the AWS Management Console at https://console.aws.amazon.com/console/home.
2. In the title bar, click your IAM user name, and click Billing & Cost Management.
3. In the navigation pane, click Bills.
4. To view summary information for CloudFront, under Details, click CloudFront.
5. To download a detailed billing report in CSV format, click Download CSV, and follow the on-screen
prompts to save the report.
API Version 2016-08-01
10
Amazon CloudFront Developer Guide
AWS Billing Report for CloudFront

AWS Usage Report for CloudFront
AWS provides a CloudFront usage report that is more detailed than the billing report but less detailed
than CloudFront access logs. The usage report provides aggregate usage data by hour, day, or month;
and it lists operations by region and usage type, such as data transferred out of the Australia region.
The CloudFront usage report includes the following values:
•Service — AmazonCloudFront
•Operation — HTTP method. Values include DELETE, GET, HEAD, OPTIONS, PATCH, POST, and PUT.
•UsageType — One of the following values
• A code that identifies the type of data transfer
•Invalidations
•SSL-Cert-Custom
For more information, see Interpreting Your AWS Bill and the AWS Usage Report for CloudFront (p. 12).
•Resource — Either the ID of the CloudFront distribution associated with the usage or the certificate
ID of an SSL certificate that you have associated with a CloudFront distribution.
•StartTime/EndTime — The day that the usage applies to, in Coordinated Universal Time (UTC).
•UsageValue — (1) The number of requests during the specified time period or (2) the amount of data
transferred in bytes.
If you're using Amazon S3 as the origin for CloudFront, consider running the usage report for Amazon
S3, too. However, if you use Amazon S3 for purposes other than as an origin for your CloudFront
distributions, it might not be clear what portion applies to your CloudFront usage.
Tip
For detailed information about every request that CloudFront receives for your objects, turn on
CloudFront access logs for your distribution. For more information, see Access Logs (p. 256).
To download the usage report for CloudFront or Amazon S3
1. Sign in to the AWS Management Console at https://console.aws.amazon.com/console/home.
2. In the title bar, click your IAM user name, and click Billing & Cost Management.
3. In the navigation pane, click Reports.
4. Under AWS Usage Report, click AWS Usage Report.
5. In the Service list, click CloudFront or Amazon Simple Storage Service.
6. Select the applicable settings:
•Usage Types — For a detailed explanation of CloudFront usage types, see the section called
“Interpreting Your AWS Bill and the AWS Usage Report for CloudFront” (p. 12).
For Amazon S3, select All Usage Types.
•Operation — Select All Operations.
•Time Period — Select the time period that you want the report to cover.
•Report Granularity — Select whether you want the report to include subtotals by the hour, by the
day, or by the month.
7. Click the download button for the desired format.
8. Follow the on-screen prompts to view or save the report.
API Version 2016-08-01
11
Amazon CloudFront Developer Guide
AWS Usage Report for CloudFront

Interpreting Your AWS Bill and the AWS Usage
Report for CloudFront
Your AWS bill for CloudFront service includes codes and abbreviations that might not be immediately
obvious. The first column in the following table lists items that appear in your bill and explains what each
means.
In addition, you can get an AWS usage report for CloudFront that contains more detail than the AWS bill
for CloudFront.The second column in the table lists items that appear in the usage report and shows the
correlation between bill items and usage report items.
Most codes in both columns include a two-letter abbreviation that indicates the location of the activity. In
the following table, region in a code is replaced by one of the following two-letter abbreviations in your
AWS bill and in the usage report:
•AP: Hong Kong, Philippines, South Korea, Singapore, and Taiwan (Asia Pacific)
•AU: Australia
•CA: Canada
•EU: Europe
•IN: India
•JP: Japan
•SA: South America
•US: United States
For more information about pricing by region, see Amazon CloudFront Pricing.
Note
This table doesn't include charges for transferring your objects from an Amazon S3 bucket to
CloudFront edge locations. These charges, if any, appear in the AWS Data Transfer portion of
your AWS bill.
API Version 2016-08-01
12
Amazon CloudFront Developer Guide
Interpreting Your AWS Bill and the AWS Usage Report
for CloudFront

Values in the Usage Type Column in the CloudFront Us-
age Report
Items in Your CloudFront Bill
Web distributions:
•region-Out-Bytes-HTTP-Static: Bytes served via HTTP
for objects with TTL ≥ 3600 seconds
•region-Out-Bytes-HTTPS-Static: Bytes served via HT-
TPS for objects with TTL ≥ 3600 seconds
•region-Out-Bytes-HTTP-Dynamic: Bytes served via
HTTP for objects with TTL < 3600 seconds
•region-Out-Bytes-HTTPS-Dynamic: Bytes served via
HTTPS for objects with TTL < 3600 seconds
•region-Out-Bytes-HTTP-Proxy: Bytes returned from
CloudFront to viewers via HTTP in response to DELETE,
OPTIONS, PATCH, POST, and PUT requests.
•region-Out-Bytes-HTTPS-Proxy: Bytes returned from
CloudFront to viewers via HTTPS in response to DELETE,
OPTIONS, PATCH, POST, and PUT requests.
RTMP distributions:
•region-FMS-Out-Bytes
region-DataTransfer-Out-Bytes
Sum of bytes that CloudFront served for
web and RTMP distributions:
•Web distributions: Total bytes
served from CloudFront edge loca-
tions in region in response to user
GET and HEAD requests
•RTMP distributions: Total bytes
transferred from CloudFront edge
locations in region to end users
region-Out-OBytes-HTTP-Proxy
Total bytes transferred via HTTP from CloudFront edge loca-
tions to your origin in response to DELETE, OPTIONS, PATCH,
POST, and PUT requests.
region-Out-OBytes-HTTPS-Proxy
Total bytes transferred via HTTPS from CloudFront edge
locations to your origin in response to DELETE, OPTIONS,
PATCH, POST, and PUT requests.
region-DataTransfer-Out-OBytes
Web distributions only: Total bytes
transferred from CloudFront edge loca-
tions to your origin in response to DE-
LETE, OPTIONS, PATCH, POST, and PUT
requests.
region-Requests-HTTP-Static
Number of HTTP GET and HEAD requests served for objects
with TTL ≥ 3600 seconds
region-Requests-HTTP-Dynamic
Number of HTTP GET and HEAD requests served for objects
with TTL < 3600 seconds
region-Requests-Tier1
Web distributions only: Number of
HTTP GET and HEAD requests
region-Requests-HTTPS-Static
Number of HTTPS GET and HEAD requests served for objects
with TTL ≥ 3600 seconds
region-Requests-HTTPS-Dynamic
Number of HTTPS GET and HEAD requests served for objects
with TTL < 3600 seconds
region-Requests-Tier2-HTTPS
Web distributions only: Number of
HTTPS GET and HEAD requests
API Version 2016-08-01
13
Amazon CloudFront Developer Guide
Interpreting Your AWS Bill and the AWS Usage Report
for CloudFront

Values in the Usage Type Column in the CloudFront Us-
age Report
Items in Your CloudFront Bill
region-Requests-HTTP-Proxy
Same as the corresponding item in your CloudFront bill
region-Requests-HTTP-Proxy
Web distributions only: Number of
HTTP DELETE, OPTIONS, PATCH, POST,
and PUT requests that CloudFront for-
wards to your origin
region-Requests-HTTPS-Proxy
Same as the corresponding item in your CloudFront bill
region-Requests-HTTPS-Proxy
Web distributions only: Number of
HTTPS DELETE, OPTIONS, PATCH,
POST, and PUT requests that CloudFront
forwards to your origin
Invalidations
Same as the corresponding item in your CloudFront bill
Invalidations
Web distributions only:The charge for
invalidating objects (removing the ob-
jects from CloudFront edge locations);
for more information, see Paying for
Object Invalidation (p. 127)
SSL-Cert-Custom
Same as the corresponding item in your CloudFront bill
SSL-Cert-Custom
Web distributions only:The charge for
using an SSL certificate with a Cloud-
Front alternate domain name such as
example.com instead of using the default
CloudFront SSL certificate and the do-
main name that CloudFront assigned to
your distribution
API Version 2016-08-01
14
Amazon CloudFront Developer Guide
Interpreting Your AWS Bill and the AWS Usage Report
for CloudFront

CloudFront Reports
The CloudFront console includes a variety of reports:
•CloudFront Cache Statistics Reports (p. 15)
•CloudFront Popular Objects Report (p. 15)
•CloudFront Top Referrers Report (p. 16)
•CloudFront Usage Reports (p. 16)
•CloudFront Viewers Reports (p. 16)
Most of these reports are based on the data in CloudFront access logs, which contain detailed information
about every user request that CloudFront receives.You don't need to enable access logs to view the
reports. For more information, see Access Logs (p. 256). The CloudFront usage report is based on the
AWS usage report for CloudFront, which also doesn't require any special configuration. For more
information, see AWS Usage Report for CloudFront (p. 11).
CloudFront Cache Statistics Reports
The CloudFront cache statistics report includes the following information:
•Total Requests – Shows the total number of requests for all HTTP status codes (for example, 200 or
404) and all methods (for example, GET, HEAD, or POST)
•Percentage of Viewer Requests by Result Type – Shows hits, misses, and errors as a percentage
of total viewer requests for the selected CloudFront distribution
•Bytes Transferred to Viewers – Shows total bytes and bytes from misses
•HTTP Status Codes – Shows viewer requests by HTTP status code
•Percentage of GET Requests that Didn't Finish Downloading– Shows viewer GET requests that
didn't finish downloading the requested object as a percentage of total requests
For more information, see CloudFront Cache Statistics Reports (p. 16).
CloudFront Popular Objects Report
The CloudFront popular objects report lists the 50 most popular objects and statistics about those objects,
including the number of requests for the object, the number of hits and misses, the hit ratio, the number
of bytes served for misses, the total bytes served, the number of incomplete downloads, and the number
of requests by HTTP status code (2xx, 3xx, 4xx, and 5xx).
API Version 2016-08-01
15
Amazon CloudFront Developer Guide

For more information, see CloudFront Popular Objects Report (p. 20).
CloudFront Top Referrers Report
The CloudFront top referrers report includes the top 25 referrers, the number of requests from a referrer,
and the number of requests from a referrer as a percentage of the total number of requests during the
specified period.
For more information, see CloudFront Top Referrers Report (p. 23).
CloudFront Usage Reports
The CloudFront usage reports include the following information:
•Number of Requests – Shows the number of HTTP and HTTPS requests that CloudFront responds
to from edge locations in the selected region during each time interval for the specified CloudFront
distribution
•Data Transferred by Protocol – Shows the total amount of data transferred over HTTP and HTTPS
from CloudFront edge locations in the selected region during each time interval for the specified
CloudFront distribution
•Data Transferred by Destination– Shows the total amount of data transferred over HTTP and HTTPS
from CloudFront edge locations in the selected region during each time interval for the specified
CloudFront distribution
For more information, see CloudFront Usage Reports (p. 25).
CloudFront Viewers Reports
The CloudFront viewers reports include the following information:
•Devices – Shows the types of devices (for example, Desktop or Mobile) that your users use to access
your content
•Browsers – Shows the name (or the name and version) of the browsers that your users use most
frequently to access your content, for example, Chrome or Firefox
•Operating Systems – Shows the name (or the name and version) of the operating system that viewers
run on most frequently when accessing your content, for example, Linux, Mac OS X, or Windows
•Locations – Shows the locations, by country or by U.S. state/territory, of the viewers that access your
content most frequently
For more information, see CloudFront Viewers Reports (p. 29).
CloudFront Cache Statistics Reports
You can use the Amazon CloudFront console to display a graphical representation of statistics related
to CloudFront edge locations. Data for these statistics are drawn from the same source as CloudFront
access logs.You can display charts for a specified date range in the last 60 days, with data points every
hour or every day.You can usually view data about requests that CloudFront received as recently as an
hour ago, but data can occasionally be delayed by as much as 24 hours.
Note
You don't need to enable access logging to view cache statistics.
API Version 2016-08-01
16
Amazon CloudFront Developer Guide
CloudFront Cache Statistics Reports

To display CloudFront cache statistics
1. Sign in to the AWS Management Console and open the CloudFront console at https://
console.aws.amazon.com/cloudfront/.
2. In the navigation pane, click Cache Statistics.
3. In the CloudFront Cache Statistics Reports pane, for Start Date and End Date, select the date
range for which you want to display cache statistics charts. Available ranges depend on the value
that you select for Granularity:
•Daily – To display charts with one data point per day, select any date range in the previous 60
days.
•Hourly – To display charts with one data point every hour, select any date range of up to 14 days
within the previous 60 days.
Dates and times are in Coordinated Universal Time (UTC).
4. For Granularity, specify whether to display one data point per day or one data point per hour in the
charts. If you specify a date range greater than 14 days, the option to specify one data point per hour
is not available.
5. For Viewer Location, choose the continent from which viewer requests originated, or choose All
Locations. Cache statistics charts include data for requests that CloudFront received from the
specified location.
6. In the Distribution list, select the distributions for which you want to display data in the usage charts:
•An individual web distribution – The charts display data for the selected CloudFront web
distribution.The Distribution list displays the distribution ID and alternate domain names (CNAMEs)
for the distribution, if any. If a distribution has no alternate domain names, the list includes origin
domain names for the distribution.
•All Web Distributions – The charts display summed data for all web distributions that are
associated with the current AWS account, excluding web distributions that you have deleted.
7. Click Update.
8. To view data for a daily or hourly data point within a chart, move your mouse pointer over the data
point.
9. For charts that show data transferred, note that you can change the vertical scale to gigabytes,
megabytes, or kilobytes for each chart.
Topics
•Downloading Data in CSV Format (p. 17)
•How Cache Statistics Charts Are Related to Data in the CloudFront Access Logs (p. 19)
Downloading Data in CSV Format
You can download the Cache Statistics report in CSV format. This section explains how to download the
report and describes the values in the report.
To download the Cache Statistics report in CSV format
1. While viewing the Cache Statistics report, click CSV.
2. In the Opening file name dialog box, choose whether to open or save the file.
API Version 2016-08-01
17
Amazon CloudFront Developer Guide
Downloading Data in CSV Format

Information About the Report
The first few rows of the report include the following information:
Version
The version of the format for this CSV file.
Report
The name of the report.
DistributionID
The ID of the distribution that you ran the report for, or ALL if you ran the report for all distributions.
StartDateUTC
The beginning of the date range for which you ran the report, in Coordinated Universal Time (UTC).
EndDateUTC
The end of the date range for which you ran the report, in Coordinated Universal Time (UTC).
GeneratedTimeUTC
The date and time on which you ran the report, in Coordinated Universal Time (UTC).
Granularity
Whether each row in the report represents one hour or one day.
ViewerLocation
The continent that viewer requests originated from, or ALL, if you chose to download the report for
all locations.
Data in the Cache Statistics Report
The report includes the following values:
DistributionID
The ID of the distribution that you ran the report for, or ALL if you ran the report for all distributions.
FriendlyName
An alternate domain name (CNAME) for the distribution, if any. If a distribution has no alternate
domain names, the list includes an origin domain name for the distribution.
ViewerLocation
The continent that viewer requests originated from, or ALL, if you chose to download the report for
all locations.
TimeBucket
The hour or the day that data applies to, in Coordinated Universal Time (UTC).
RequestCount
The total number of requests for all HTTP status codes (for example, 200 or 404) and all methods
(for example, GET, HEAD, or POST).
HitCount
The number of viewer requests for which the object is served from a CloudFront edge cache.
MissCount
The number of viewer requests for which the object isn't currently in an edge cache, so CloudFront
must get the object from your origin.
ErrorCount
The number of viewer requests that resulted in an error, so CloudFront didn't serve the object.
IncompleteDownloadCount
The number of viewer requests for which the viewer started but didn't finish downloading the object.
HTTP2xx
The number of viewer requests for which the HTTP status code was a 2xx value (succeeded).
API Version 2016-08-01
18
Amazon CloudFront Developer Guide
Downloading Data in CSV Format

HTTP3xx
The number of viewer requests for which the HTTP status code was a 3xx value (additional action
is required).
HTTP4xx
The number of viewer requests for which the HTTP status code was a 4xx value (client error).
HTTP5xx
The number of viewer requests for which the HTTP status code was a 5xx value (server error).
TotalBytes
The total number of bytes served to viewers by CloudFront in response to all requests for all HTTP
methods.
BytesFromMisses
The number of bytes served to viewers for objects that were not in the applicable edge cache at the
time of the request. This value is a good approximation of bytes transferred from your origin to
CloudFront edge caches. However, it excludes requests for objects that are already in the edge
cache but that have expired.
How Cache Statistics Charts Are Related to Data
in the CloudFront Access Logs
The following table shows how cache statistics charts in the CloudFront console correspond with values
in CloudFront access logs. For more information about CloudFront access logs, see Access Logs (p. 256).
Total Requests
This chart shows the total number of requests for all HTTP status codes (for example, 200 or 404)
and all methods (for example, GET, HEAD, or POST).Total requests shown in this chart equal the total
number of requests in the access log files for the same time period.
Percentage of Viewer Requests by Result Type
This chart shows hits, misses, and errors as a percentage of total viewer requests for the selected
CloudFront distribution:
•Hit – A viewer request for which the object is served from a CloudFront edge cache. In access
logs, these are requests for which the value of x-edge-response-result-type is Hit.
•Miss – A viewer request for which the object isn't currently in an edge cache, so CloudFront must
get the object from your origin. In access logs, these are requests for which the value of
x-edge-response-result-type is Miss.
•Error – A viewer request that resulted in an error, so CloudFront didn't serve the object. In access
logs, these are requests for which the value of x-edge-response-result-type is Error,
LimitExceeded, or CapacityExceeded.
The chart does not include refresh hits—requests for objects that are in the edge cache but that have
expired. In access logs, refresh hits are requests for which the value of
x-edge-response-result-type is RefreshHit.
Bytes Transferred to Viewers
This chart shows two values:
•Total Bytes – The total number of bytes served to viewers by CloudFront in response to all requests
for all HTTP methods. In CloudFront access logs, Total Bytes is the sum of the values in the
sc-bytes column for all of the requests during the same time period.
•Bytes from Misses – The number of bytes served to viewers for objects that were not in the
applicable edge cache at the time of the request. In CloudFront access logs, Bytes from Misses
is the sum of the values in the sc-bytes column for requests for which the value of
x-edge-result-type is Miss.This value is a good approximation of bytes transferred from your
origin to CloudFront edge caches. However, it excludes requests for objects that are already in
the edge cache but that have expired.
API Version 2016-08-01
19
Amazon CloudFront Developer Guide
How Cache Statistics Charts Are Related to Data in the
CloudFront Access Logs

HTTP Status Codes
This chart shows viewer requests by HTTP status code. In CloudFront access logs, status codes
appear in the sc-status column:
•2xx – The request succeeded.
•3xx – Additional action is required. For example, 301 (Moved Permanently) means that the
requested object has moved to a different location.
•4xx – The client apparently made an error. For example, 404 (Not Found) means that the client
requested an object that could not be found.
•5xx – The origin server didn't fill the request. For example, 503 (Service Unavailable) means that
the origin server is currently unavailable.
Percentage of GET Requests that Didn't Finish Downloading
This chart shows viewer GET requests that didn't finish downloading the requested object as a
percentage of total requests.Typically, downloading an object doesn't complete because the viewer
canceled the download, for example, by clicking a different link or by closing the browser. In CloudFront
access logs, these requests have a value of 200 in the sc-status column and a value of Error in
the x-edge-result-type column.
CloudFront Popular Objects Report
The Amazon CloudFront console can display a list of the 50 most popular objects for a distribution during
a specified date range in the previous 60 days.
Data for the Popular Objects report is drawn from the same source as CloudFront access logs.To get
an accurate count of the top 50 objects, CloudFront counts the requests for all of your objects in 10-minute
intervals beginning at midnight and keeps a running total of the top 150 objects for the next 24 hours.
(CloudFront also retains daily totals for the top 150 objects for 60 days.) Near the bottom of the list, objects
constantly rise onto or drop off of the list, so the totals for those objects are approximations. The fifty
objects at the top of the list of 150 objects may rise and fall within the list, but they rarely drop off of the
list altogether, so the totals for those objects typically are more reliable.
When an object drops off of the list of the top 150 objects and then rises onto the list again over the course
of a day, CloudFront adds an estimated number of requests for the period that the object was missing
from the list. The estimate is based on the number of requests received by whichever object was at the
bottom of the list during that time period. If the object rises into the top 50 objects later in the day, the
estimates of the number of requests that CloudFront received while the object was out of the top 150
objects usually causes the number of requests in the Popular Objects report to exceed the number of
requests that appear in the access logs for that object.
Note
You don't need to enable access logging to view a list of popular objects.
To display popular objects for a distribution
1. Sign in to the AWS Management Console and open the CloudFront console at https://
console.aws.amazon.com/cloudfront/.
2. In the navigation pane, click Popular Objects.
3. In the CloudFront Popular Objects Report pane, for Start Date and End Date, select the date
range for which you want to display a list of popular objects.You can choose any date range in the
previous 60 days.
Dates and times are in Coordinated Universal Time (UTC).
4. In the Distribution list, select the distribution for which you want to display a list of popular objects.
5. Click Update.
API Version 2016-08-01
20
Amazon CloudFront Developer Guide
CloudFront Popular Objects Report

Topics
•Downloading Data in CSV Format (p. 21)
•How Data in the Popular Objects Report Is Related to Data in the CloudFront Access Logs (p. 22)
Downloading Data in CSV Format
You can download the Popular Objects report in CSV format. This section explains how to download the
report and describes the values in the report.
To download the Popular Objects report in CSV format
1. While viewing the Popular Objects report, click CSV.
2. In the Opening file name dialog box, choose whether to open or save the file.
Information About the Report
The first few rows of the report include the following information:
Version
The version of the format for this CSV file.
Report
The name of the report.
DistributionID
The ID of the distribution that you ran the report for.
StartDateUTC
The beginning of the date range for which you ran the report, in Coordinated Universal Time (UTC).
EndDateUTC
The end of the date range for which you ran the report, in Coordinated Universal Time (UTC).
GeneratedTimeUTC
The date and time on which you ran the report, in Coordinated Universal Time (UTC).
Data in the Popular Objects Report
The report includes the following values:
DistributionID
The ID of the distribution that you ran the report for.
FriendlyName
An alternate domain name (CNAME) for the distribution, if any. If a distribution has no alternate
domain names, the list includes an origin domain name for the distribution.
Object
The last 500 characters of the URL for the object.
RequestCount
The total number of requests for this object.
HitCount
The number of viewer requests for which the object is served from a CloudFront edge cache.
MissCount
The number of viewer requests for which the object isn't currently in an edge cache, so CloudFront
must get the object from your origin.
HitCountPct
The value of HitCount as a percentage of the value of RequestCount.
API Version 2016-08-01
21
Amazon CloudFront Developer Guide
Downloading Data in CSV Format

BytesFromMisses
The number of bytes served to viewers for this object when the object was not in the applicable edge
cache at the time of the request.
TotalBytes
The total number of bytes served to viewers by CloudFront for this object in response to all requests
for all HTTP methods.
IncompleteDownloadCount
The number of viewer requests for this object for which the viewer started but didn't finish downloading
the object.
HTTP2xx
The number of viewer requests for which the HTTP status code was a 2xx value (succeeded).
HTTP3xx
The number of viewer requests for which the HTTP status code was a 3xx value (additional action
is required).
HTTP4xx
The number of viewer requests for which the HTTP status code was a 4xx value (client error).
HTTP5xx
The number of viewer requests for which the HTTP status code was a 5xx value (server error).
How Data in the Popular Objects Report Is Related
to Data in the CloudFront Access Logs
The following list shows how values in the Popular Objects report in the CloudFront console correspond
with values in CloudFront access logs. For more information about CloudFront access logs, see Access
Logs (p. 256).
URLThe last 500 characters of the URL that viewers use to access the object.
Requests
The total number of requests for the object.This value generally corresponds closely with the number
of GET requests for the object in CloudFront access logs.
HitsThe number of viewer requests for which the object was served from a CloudFront edge cache. In
access logs, these are requests for which the value of x-edge-response-result-type is Hit.
Misses
The number of viewer requests for which the object wasn't in an edge cache, so CloudFront retrieved
the object from your origin. In access logs, these are requests for which the value of
x-edge-response-result-type is Miss.
Hit Ratio
The value of the Hits column as a percentage of the value of the Requests column.
Bytes from Misses
The number of bytes served to viewers for objects that were not in the applicable edge cache at the
time of the request. In CloudFront access logs, Bytes from Misses is the sum of the values in the
sc-bytes column for requests for which the value of x-edge-result-type is Miss.
Total Bytes
The total number of bytes that CloudFront served to viewers in response to all requests for the object
for all HTTP methods. In CloudFront access logs, Total Bytes is the sum of the values in the
sc-bytes column for all of the requests during the same time period.
Incomplete Downloads
The number of viewer requests that did not finish downloading the requested object.Typically, the
reason that a download doesn't complete is that the viewer canceled it, for example, by clicking a
API Version 2016-08-01
22
Amazon CloudFront Developer Guide
How Data in the Popular Objects Report Is Related to
Data in the CloudFront Access Logs

different link or by closing the browser. In CloudFront access logs, these requests have a value of
200 in the sc-status column and a value of Error in the x-edge-result-type column.
2xx The number of requests for which the HTTP status code is 2xx, Successful. In CloudFront access
logs, status codes appear in the sc-status column.
3xx The number of requests for which the HTTP status code is 3xx, Redirection.3xx status codes
indicate that additional action is required. For example, 301 (Moved Permanently) means that the
requested object has moved to a different location.
4xx The number of requests for which the HTTP status code is 4xx, Client Error.4xx status codes
indicate that the client apparently made an error. For example, 404 (Not Found) means that the client
requested an object that could not be found.
5xx The number of requests for which the HTTP status code is 5xx, Server Error.5xx status codes
indicate that the origin server didn't fill the request. For example, 503 (Service Unavailable) means
that the origin server is currently unavailable.
CloudFront Top Referrers Report
The CloudFront console can display a list of the 25 domains of the websites that originated the most
HTTP and HTTPS requests for objects that CloudFront is distributing for a specified distribution. These
top referrers can be search engines, other websites that link directly to your objects, or your own website.
For example, if http://example.com/index.html links to 10 graphics, example.com is the referrer for all 10
graphics.You can display the Top Referrers report for any date range in the previous 60 days.
Note
If a user enters a URL directly into the address line of a browser, there is no referrer for the
requested object.
Data for the Top Referrers report is drawn from the same source as CloudFront access logs. To get an
accurate count of the top 25 referrers, CloudFront counts the requests for all of your objects in 10-minute
intervals and keeps a running total of the top 75 referrers. Near the bottom of the list, referrers constantly
rise onto or drop off of the list, so the totals for those referrers are approximations.The 25 referrers at
the top of the list of 75 referrers may rise and fall within the list, but they rarely drop off of the list altogether,
so the totals for those referrers typically are more reliable.
Note
You don't need to enable access logging to view a list of top referrers.
To display top referrers for a distribution
1. Sign in to the AWS Management Console and open the CloudFront console at https://
console.aws.amazon.com/cloudfront/.
2. In the navigation pane, click Top Referrers.
3. In the CloudFront Top Referrers Report pane, for Start Date and End Date, select the date range
for which you want to display a list of top referrers.
Dates and times are in Coordinated Universal Time (UTC).
4. In the Distribution list, select the distribution for which you want to display a list of top referrers.
5. Click Update.
Topics
•Downloading Data in CSV Format (p. 24)
API Version 2016-08-01
23
Amazon CloudFront Developer Guide
CloudFront Top Referrers Report

•How Data in the Top Referrers Report Is Related to Data in the CloudFront Access Logs (p. 25)
Downloading Data in CSV Format
You can download the Top Referrers report in CSV format. This section explains how to download the
report and describes the values in the report.
To download the Top Referrers report in CSV format
1. While viewing the Top Referrers report, click CSV.
2. In the Opening file name dialog box, choose whether to open or save the file.
Information About the Report
The first few rows of the report include the following information:
Version
The version of the format for this CSV file.
Report
The name of the report.
DistributionID
The ID of the distribution that you ran the report for, or ALL if you ran the report for all distributions.
StartDateUTC
The beginning of the date range for which you ran the report, in Coordinated Universal Time (UTC).
EndDateUTC
The end of the date range for which you ran the report, in Coordinated Universal Time (UTC).
GeneratedTimeUTC
The date and time on which you ran the report, in Coordinated Universal Time (UTC).
Data in the Top Referrers Report
The report includes the following values:
DistributionID
The ID of the distribution that you ran the report for, or ALL if you ran the report for all distributions.
FriendlyName
An alternate domain name (CNAME) for the distribution, if any. If a distribution has no alternate
domain names, the list includes an origin domain name for the distribution.
Referrer
The domain name of the referrer.
The total number of requests from the domain name in the Referrer column.
RequestsPct
The number of requests submitted by the referrer as a percentage of the total number of requests
during the specified period.
API Version 2016-08-01
24
Amazon CloudFront Developer Guide
Downloading Data in CSV Format

How Data in the Top Referrers Report Is Related
to Data in the CloudFront Access Logs
The following list shows how values in the Top Referrers report in the CloudFront console correspond
with values in CloudFront access logs. For more information about CloudFront access logs, see Access
Logs (p. 256).
Referrer
The domain name of the referrer. In access logs, referrers are listed in the cs(Referer) column.
Request Count
The total number of requests from the domain name in the Referrer column.This value generally
corresponds closely with the number of GET requests from the referrer in CloudFront access logs.
Request %
The number of requests submitted by the referrer as a percentage of the total number of requests
during the specified period. If you have more than 25 referrers, then you can't calculate Request %
based on the data in this table because the Request Count column doesn't include all of the requests
during the specified period.
CloudFront Usage Reports
The Amazon CloudFront console can display a graphical representation of your CloudFront usage that
is based on a subset of the usage report data.You can display charts for a specified date range in the
last 60 days, with data points every hour or every day.You can usually view data about requests that
CloudFront received as recently as four hours ago, but data can occasionally be delayed by as much as
24 hours.
For more information, see How the Usage Charts Are Related to Data in the CloudFront Usage
Report (p. 28).
To display CloudFront usage charts
1. Sign in to the AWS Management Console and open the CloudFront console at https://
console.aws.amazon.com/cloudfront/.
2. In navigation pane, click Usage Reports.
3. In the CloudFront Usage Reports pane, for Start Date and End Date, select the date range for
which you want to display usage charts. Available ranges depend on the value that you select for
Granularity:
•Daily — To display charts with one data point per day, select any date range in the previous 60
days.
•Hourly — To display charts with one data point every hour, select any date range of up to 14 days
within the previous 60 days.
Dates and times are in Coordinated Universal Time (UTC).
4. For Granularity, specify whether to display one data point per day or one data point per hour in the
charts. If you specify a date range greater than 14 days, the option to specify one data point per hour
is not available.
5. For Billing Region, choose the CloudFront billing region that has the data you want to view, or
choose All Regions. Usage charts include data for requests that CloudFront processes in edge
locations in the specified region. The region where CloudFront processes requests might or might
not correspond with the location of your users.
API Version 2016-08-01
25
Amazon CloudFront Developer Guide
How Data in the Top Referrers Report Is Related to Data
in the CloudFront Access Logs

Select only regions that are included in the price class for your distribution; otherwise, the usage
charts probably won't contain any data. For example, if you chose Price Class 200 for your distribution,
the South America and Australia billing regions are not included, so CloudFront generally won't
process your requests from those regions. For more information about price classes, see Choosing
the Price Class for a CloudFront Distribution (p. 54).
6. In the Distribution list, select the distributions for which you want to display data in the usage charts:
•An individual web distribution — The charts display data for the selected CloudFront distribution.
The Distribution list displays the distribution ID and alternate domain names (CNAMEs) for the
distribution, if any. If a distribution has no alternate domain names, the list includes origin domain
names for the distribution.
•All Web Distributions (excludes deleted) — The charts display summed data for all web
distributions that are associated with the current AWS account, excluding web distributions that
you have deleted.
•All Deleted Distributions — The charts display summed data for all web distributions that are
associated with the current AWS account and that were deleted in the last 60 days.
7. Click Update Graphs.
8. To view data for a daily or hourly data point within a chart, move your mouse pointer over the data
point.
9. For charts that show data transferred, note that you can change the vertical scale to gigabytes,
megabytes, or kilobytes for each chart.
Topics
•Downloading Data in CSV Format (p. 26)
•How the Usage Charts Are Related to Data in the CloudFront Usage Report (p. 28)
Downloading Data in CSV Format
You can download the Usage report in CSV format. This section explains how to download the report
and describes the values in the report.
To download the Usage report in CSV format
1. While viewing the Usage report, click CSV.
2. In the Opening file name dialog box, choose whether to open or save the file.
Information About the Report
The first few rows of the report include the following information:
Version
The version of the format for this CSV file.
Report
The name of the report.
DistributionID
The ID of the distribution that you ran the report for, ALL if you ran the report for all distributions, or
ALL_DELETED if you ran the report for all deleted distributions.
StartDateUTC
The beginning of the date range for which you ran the report, in Coordinated Universal Time (UTC).
API Version 2016-08-01
26
Amazon CloudFront Developer Guide
Downloading Data in CSV Format

EndDateUTC
The end of the date range for which you ran the report, in Coordinated Universal Time (UTC).
GeneratedTimeUTC
The date and time on which you ran the report, in Coordinated Universal Time (UTC).
Granularity
Whether each row in the report represents one hour or one day.
BillingRegion
The continent that viewer requests originated from, or ALL, if you chose to download the report for
all billing regions.
Data in the Usage Report
The report includes the following values:
DistributionID
The ID of the distribution that you ran the report for, ALL if you ran the report for all distributions, or
ALL_DELETED if you ran the report for all deleted distributions.
FriendlyName
An alternate domain name (CNAME) for the distribution, if any. If a distribution has no alternate
domain names, the list includes an origin domain name for the distribution.
BillingRegion
The CloudFront billing region that you ran the report for, or ALL.
TimeBucket
The hour or the day that data applies to, in Coordinated Universal Time (UTC).
HTTP
The number of HTTP requests that CloudFront responded to from edge locations in the selected
region during each time interval for the specified CloudFront distribution. Values include:
• The number of GET and HEAD requests, which cause CloudFront to transfer data to your users
• The number of DELETE, OPTIONS, PATCH, POST, and PUT requests, which cause CloudFront to
transfer data to your origin
HTTPS
The number of HTTPS requests that CloudFront responded to from edge locations in the selected
region during each time interval for the specified CloudFront distribution. Values include:
• The number of GET and HEAD requests, which cause CloudFront to transfer data to your users
• The number of DELETE, OPTIONS, PATCH, POST, and PUT requests, which cause CloudFront to
transfer data to your origin
HTTPBytes
The total amount of data transferred over HTTP from CloudFront edge locations in the selected billing
region during the time period for the specified CloudFront distribution.Values include:
• Data transferred from CloudFront to your users in response to GET and HEAD requests
• Data transferred from CloudFront to your origin for DELETE, OPTIONS, PATCH, POST, and PUT
requests
•Data transferred from CloudFront to your users in response to DELETE, OPTIONS, PATCH, POST,
and PUT requests
HTTPSBytes
The total amount of data transferred over HTTPS from CloudFront edge locations in the selected
billing region during the time period for the specified CloudFront distribution.Values include:
• Data transferred from CloudFront to your users in response to GET and HEAD requests
• Data transferred from CloudFront to your origin for DELETE, OPTIONS, PATCH, POST, and PUT
requests
API Version 2016-08-01
27
Amazon CloudFront Developer Guide
Downloading Data in CSV Format

•Data transferred from CloudFront to your users in response to DELETE, OPTIONS, PATCH, POST,
and PUT requests
BytesIn
The total amount of data transferred from CloudFront to your origin for DELETE, OPTIONS, PATCH,
POST, and PUT requests in the selected region during each time interval for the specified CloudFront
distribution.
BytesOut
The total amount of data transferred over HTTP and HTTPS from CloudFront to your users in the
selected region during each time interval for the specified CloudFront distribution. Values include:
• Data transferred from CloudFront to your users in response to GET and HEAD requests
• Data transferred from CloudFront to your users in response to DELETE, OPTIONS, PATCH, POST,
and PUT requests
How the Usage Charts Are Related to Data in the
CloudFront Usage Report
The following list shows how the usage charts in the CloudFront console correspond with values in the
Usage Type column in the CloudFront usage report.
Topics
•Number of Requests (p. 28)
•Data Transferred by Protocol (p. 28)
•Data Transferred by Destination (p. 29)
Number of Requests
This chart shows the number of HTTP and HTTPS requests that CloudFront responds to from edge
locations in the selected region during each time interval for the specified CloudFront distribution.
Number of HTTP Requests
•region-Requests-HTTP-Static: Number of HTTP GET and HEAD requests served for objects with
TTL ≥ 3600 seconds
•region-Requests-HTTP-Dynamic: Number of HTTP GET and HEAD requests served for objects
with TTL < 3600 seconds
•region-Requests-HTTP-Proxy: Number of HTTP DELETE, OPTIONS, PATCH, POST, and PUT
requests that CloudFront forwards to your origin
Number of HTTPS Requests
•region-Requests-HTTPS-Static: Number of HTTPS GET and HEAD requests served for objects
with TTL ≥ 3600 seconds
•region-Requests-HTTPS-Dynamic: Number of HTTPS GET and HEAD requests served for objects
with TTL < 3600 seconds
•region-Requests-HTTPS-Proxy: Number of HTTPS DELETE, OPTIONS, PATCH, POST, and PUT
requests that CloudFront forwards to your origin
Data Transferred by Protocol
This chart shows the total amount of data transferred over HTTP and HTTPS from CloudFront edge
locations in the selected region during each time interval for the specified CloudFront distribution.
API Version 2016-08-01
28
Amazon CloudFront Developer Guide
How the Usage Charts Are Related to Data in the
CloudFront Usage Report

Data Transferred over HTTP
•region-Out-Bytes-HTTP-Static: Bytes served via HTTP for objects with TTL ≥ 3600 seconds
•region-Out-Bytes-HTTP-Dynamic: Bytes served via HTTP for objects with TTL < 3600 seconds
•region-Out-Bytes-HTTP-Proxy: Bytes returned from CloudFront to viewers via HTTP in response
to DELETE, OPTIONS, PATCH, POST, and PUT requests
•region-Out-OBytes-HTTP-Proxy: Total bytes transferred via HTTP from CloudFront edge
locations to your origin in response to DELETE, OPTIONS, PATCH, POST, and PUT requests
Data Transferred over HTTPS
•region-Out-Bytes-HTTPS-Static: Bytes served via HTTPS for objects with TTL ≥ 3600 seconds
•region-Out-Bytes-HTTPS-Dynamic: Bytes served via HTTPS for objects with TTL < 3600
seconds
•region-Out-Bytes-HTTPS-Proxy: Bytes returned from CloudFront to viewers via HTTPS in
response to DELETE, OPTIONS, PATCH, POST, and PUT requests
•region-Out-OBytes-HTTPS-Proxy: Total bytes transferred via HTTPS from CloudFront edge
locations to your origin in response to DELETE, OPTIONS, PATCH, POST, and PUT requests
Data Transferred by Destination
This chart shows the total amount of data transferred over HTTP and HTTPS from CloudFront edge
locations in the selected region during each time interval for the specified CloudFront distribution.
Data Transferred from CloudFront to Your Users
•region-Out-Bytes-HTTP-Static: Bytes served via HTTP for objects with TTL ≥ 3600 seconds
•region-Out-Bytes-HTTPS-Static: Bytes served via HTTPS for objects with TTL ≥ 3600 seconds
•region-Out-Bytes-HTTP-Dynamic: Bytes served via HTTP for objects with TTL < 3600 seconds
•region-Out-Bytes-HTTPS-Dynamic: Bytes served via HTTPS for objects with TTL < 3600
seconds
•region-Out-Bytes-HTTP-Proxy: Bytes returned from CloudFront to viewers via HTTP in response
to DELETE, OPTIONS, PATCH, POST, and PUT requests
•region-Out-Bytes-HTTPS-Proxy: Bytes returned from CloudFront to viewers via HTTPS in
response to DELETE, OPTIONS, PATCH, POST, and PUT requests
Data Transferred from CloudFront to Your Origin
•region-Out-OBytes-HTTP-Proxy: Total bytes transferred via HTTP from CloudFront edge
locations to your origin in response to DELETE, OPTIONS, PATCH, POST, and PUT requests
•region-Out-OBytes-HTTPS-Proxy: Total bytes transferred via HTTPS from CloudFront edge
locations to your origin in response to DELETE, OPTIONS, PATCH, POST, and PUT requests
CloudFront Viewers Reports
The CloudFront console can display four reports about the physical devices (desktop computers, mobile
devices) and about the viewers (typically web browsers) that are accessing your content:
•Devices – The type of the devices that your users use most frequently to access your content, for
example, Desktop or Mobile.
•Browsers – The name (or the name and version) of the browsers that your users use most frequently
to access your content, for example, Chrome or Firefox.The report lists the top 10 browsers.
•Operating Systems – The name (or the name and version) of the operating system that viewers run
on most frequently when accessing your content, for example, Linux, Mac OS X, or Windows. The
report lists the top 10 operating systems.
API Version 2016-08-01
29
Amazon CloudFront Developer Guide
CloudFront Viewers Reports

•Locations – The locations, by country or by U.S. state/territory, of the viewers that access your content
most frequently. The report lists the top 50 countries or U.S. states/territories.
You can display all four Viewers reports for any date range in the previous 60 days. For the Locations
report, you can also display the report with data points every hour for any date range of up to 14 days in
the previous 60 days.
Note
You don't need to enable access logging to view Viewers charts and reports.
Topics
•Displaying Viewers Charts and Reports (p. 30)
•Downloading Data in CSV Format (p. 31)
•How Data in the Locations Report Is Related to Data in the CloudFront Access Logs (p. 35)
Displaying Viewers Charts and Reports
To display CloudFront Viewers charts and reports, perform the following procedure.
To display CloudFront Viewers charts and reports
1. Sign in to the AWS Management Console and open the CloudFront console at https://
console.aws.amazon.com/cloudfront/.
2. In the navigation pane, click Viewers.
3. In the CloudFront Viewers pane, for Start Date and End Date, select the date range for which you
want to display viewer charts and reports.
For the Locations chart, available ranges depend on the value that you select for Granularity:
•Daily – To display charts with one data point per day, select any date range in the previous 60
days.
•Hourly – To display charts with one data point every hour, select any date range of up to 14 days
within the previous 60 days.
Dates and times are in Coordinated Universal Time (UTC).
4. (Browsers and Operating Systems charts only) For Grouping, specify whether you want to group
browsers and operating systems by name (Chrome, Firefox) or by name and version (Chrome 40.0,
Firefox 35.0).
5. (Locations chart only) For Granularity, specify whether to display one data point per day or one data
point per hour in the charts. If you specify a date range greater than 14 days, the option to specify
one data point per hour is not available.
6. (Locations chart only) For Details, specify whether to display the top locations by countries or by
U.S. states.
7. In the Distribution list, select the distribution for which you want to display data in the usage charts:
•An individual web distribution – The charts display data for the selected CloudFront web
distribution. The Distribution list displays the distribution ID and an alternate domain name
(CNAME) for the distribution, if any. If a distribution has no alternate domain names, the list includes
an origin domain name for the distribution.
•All Web Distributions (excludes deleted) – The charts display summed data for all web
distributions that are associated with the current AWS account, excluding web distributions that
you have deleted.
API Version 2016-08-01
30
Amazon CloudFront Developer Guide
Displaying Viewers Charts and Reports

8. Click Update.
9. To view data for a daily or hourly data point within a chart, move your mouse pointer over the data
point.
Downloading Data in CSV Format
You can download each of the Viewer reports in CSV format. This section explains how to download the
reports and describes the values in the report.
To download the Viewer reports in CSV format
1. While viewing the applicable Viewer report, click CSV.
2. Choose the data that you want to download, for example, Devices or Devices Trends.
3. In the Opening file name dialog box, choose whether to open or save the file.
Topics
•Information About the Reports (p. 31)
•Devices Report (p. 32)
•Device Trends Report (p. 32)
•Browsers Report (p. 32)
•Browser Trends Report (p. 33)
•Operating Systems Report (p. 33)
•Operating System Trends Report (p. 34)
•Locations Report (p. 34)
•Location Trends Report (p. 35)
Information About the Reports
The first few rows of each report includes the following information:
Version
The version of the format for this CSV file.
Report
The name of the report.
DistributionID
The ID of the distribution that you ran the report for, or ALL if you ran the report for all web distributions.
StartDateUTC
The beginning of the date range for which you ran the report, in Coordinated Universal Time (UTC).
EndDateUTC
The end of the date range for which you ran the report, in Coordinated Universal Time (UTC).
GeneratedTimeUTC
The date and time on which you ran the report, in Coordinated Universal Time (UTC).
Grouping (Browsers and Operating Systems Reports Only)
Whether the data is grouped by the name or by the name and version of the browser or operating
system.
Granularity
Whether each row in the report represents one hour or one day.
Details (Locations Report Only)
Whether requests are listed by country or by U.S. state.
API Version 2016-08-01
31
Amazon CloudFront Developer Guide
Downloading Data in CSV Format

Devices Report
The report includes the following values:
DistributionID
The ID of the distribution that you ran the report for, or ALL if you ran the report for all distributions.
FriendlyName
An alternate domain name (CNAME) for the distribution, if any. If a distribution has no alternate
domain names, the list includes an origin domain name for the distribution.
Requests
The number of requests that CloudFront received from each type of device.
RequestsPct
The number of requests that CloudFront received from each type of device as a percentage of the
total number of requests that CloudFront received from all devices.
Device Trends Report
The report includes the following values:
DistributionID
The ID of the distribution that you ran the report for, or ALL if you ran the report for all distributions.
FriendlyName
An alternate domain name (CNAME) for the distribution, if any. If a distribution has no alternate
domain names, the list includes an origin domain name for the distribution.
TimeBucket
The hour or the day that the data applies to, in Coordinated Universal Time (UTC).
Desktop
The number of requests that CloudFront received from desktop computers during the period.
Mobile
The number of requests that CloudFront received from mobile devices during the period. Mobile
devices can include both tablets and mobile phones. If CloudFront can't determine whether a request
originated from a mobile device or a tablet, it's counted in the Mobile column.
Smart-TV
The number of requests that CloudFront received from smart TVs during the period.
Tablet
The number of requests that CloudFront received from tablets during the period. If CloudFront can't
determine whether a request originated from a mobile device or a tablet, it's counted in the Mobile
column.
Unknown
Requests for which the value of the User-Agent HTTP header was not associated with one of the
standard device types, for example, Desktop or Mobile.
Empty
The number of requests that CloudFront received that didn't include a value in the HTTP User-Agent
header during the period.
Browsers Report
The report includes the following values:
DistributionID
The ID of the distribution that you ran the report for, or ALL if you ran the report for all distributions.
API Version 2016-08-01
32
Amazon CloudFront Developer Guide
Downloading Data in CSV Format

FriendlyName
An alternate domain name (CNAME) for the distribution, if any. If a distribution has no alternate
domain names, the list includes an origin domain name for the distribution.
Group
The browser or the browser and version that CloudFront received requests from, depending on the
value of Grouping. In addition to browser names, possible values include the following:
•Bot/Crawler – primarily requests from search engines that are indexing your content.
•Empty – requests for which the value of the User-Agent HTTP header was empty.
•Other – browsers that CloudFront identified but that aren't among the most popular. If
Bot/Crawler, Empty, and/or Unknown don't appear among the first nine values, then they're
also included in Other.
•Unknown – requests for which the value of the User-Agent HTTP header was not associated
with a standard browser. Most requests in this category come from custom applications or scripts.
Requests
The number of requests that CloudFront received from each type of browser.
RequestsPct
The number of requests that CloudFront received from each type of browser as a percentage of the
total number of requests that CloudFront received during the time period.
Browser Trends Report
The report includes the following values:
DistributionID
The ID of the distribution that you ran the report for, or ALL if you ran the report for all distributions.
FriendlyName
An alternate domain name (CNAME) for the distribution, if any. If a distribution has no alternate
domain names, the list includes an origin domain name for the distribution.
TimeBucket
The hour or the day that the data applies to, in Coordinated Universal Time (UTC).
(Browsers)
The remaining columns in the report list the browsers or the browsers and their versions, depending
on the value of Grouping. In addition to browser names, possible values include the following:
•Bot/Crawler – primarily requests from search engines that are indexing your content.
•Empty – requests for which the value of the User-Agent HTTP header was empty.
•Other – browsers that CloudFront identified but that aren't among the most popular. If
Bot/Crawler, Empty, and/or Unknown don't appear among the first nine values, then they're
also included in Other.
•Unknown – requests for which the value of the User-Agent HTTP header was not associated
with a standard browser. Most requests in this category come from custom applications or scripts.
Operating Systems Report
The report includes the following values:
DistributionID
The ID of the distribution that you ran the report for, or ALL if you ran the report for all distributions.
FriendlyName
An alternate domain name (CNAME) for the distribution, if any. If a distribution has no alternate
domain names, the list includes an origin domain name for the distribution.
API Version 2016-08-01
33
Amazon CloudFront Developer Guide
Downloading Data in CSV Format

Group
The operating system or the operating system and version that CloudFront received requests from,
depending on the value of Grouping. In addition to operating system names, possible values include
the following:
•Bot/Crawler – primarily requests from search engines that are indexing your content.
•Empty – requests for which the value of the User-Agent HTTP header was empty.
•Other – operating systems that CloudFront identified but that aren't among the most popular. If
Bot/Crawler, Empty, and/or Unknown don't appear among the first nine values, then they're
also included in Other.
•Unknown – requests for which the value of the User-Agent HTTP header was not associated
with a standard browser. Most requests in this category come from custom applications or scripts.
Requests
The number of requests that CloudFront received from each type of operating system.
RequestsPct
The number of requests that CloudFront received from each type of operating system as a percentage
of the total number of requests that CloudFront received during the time period.
Operating System Trends Report
The report includes the following values:
DistributionID
The ID of the distribution that you ran the report for, or ALL if you ran the report for all distributions.
FriendlyName
An alternate domain name (CNAME) for the distribution, if any. If a distribution has no alternate
domain names, the list includes an origin domain name for the distribution.
TimeBucket
The hour or the day that the data applies to, in Coordinated Universal Time (UTC).
(Operating systems)
The remaining columns in the report list the operating systems or the operating systems and their
versions, depending on the value of Grouping. In addition to operating system names, possible
values include the following:
•Bot/Crawler – primarily requests from search engines that are indexing your content.
•Empty – requests for which the value of the User-Agent HTTP header was empty.
•Other – operating systems that CloudFront identified but that aren't among the most popular. If
Bot/Crawler, Empty, and/or Unknown don't appear among the first nine values, then they're
also included in Other.
•Unknown – requests for which the operating system isn't specified in the User-Agent HTTP
header.
Locations Report
The report includes the following values:
DistributionID
The ID of the distribution that you ran the report for, or ALL if you ran the report for all distributions.
FriendlyName
An alternate domain name (CNAME) for the distribution, if any. If a distribution has no alternate
domain names, the list includes an origin domain name for the distribution.
API Version 2016-08-01
34
Amazon CloudFront Developer Guide
Downloading Data in CSV Format

LocationCode
The abbreviation for the location that CloudFront received requests from. For more information about
possible values, see the description of Location in How Data in the Locations Report Is Related to
Data in the CloudFront Access Logs (p. 35).
LocationName
The name of the location that CloudFront received requests from.
Requests
The number of requests that CloudFront received from each location.
RequestsPct
The number of requests that CloudFront received from each location as a percentage of the total
number of requests that CloudFront received from all locations during the time period.
TotalBytes
The number of bytes that CloudFront served to viewers in this country or state, for the specified
distribution and period.
Location Trends Report
The report includes the following values:
DistributionID
The ID of the distribution that you ran the report for, or ALL if you ran the report for all distributions.
FriendlyName
An alternate domain name (CNAME) for the distribution, if any. If a distribution has no alternate
domain names, the list includes an origin domain name for the distribution.
TimeBucket
The hour or the day that the data applies to, in Coordinated Universal Time (UTC).
(Locations)
The remaining columns in the report list the locations that CloudFront received requests from. For
more information about possible values, see the description of Location in How Data in the Locations
Report Is Related to Data in the CloudFront Access Logs (p. 35).
How Data in the Locations Report Is Related to
Data in the CloudFront Access Logs
The following list shows how data in the Locations report in the CloudFront console corresponds with
values in CloudFront access logs. For more information about CloudFront access logs, see Access
Logs (p. 256).
Location
The country or U.S. state that the viewer is in. In access logs, the c-ip column contains the IP
address of the device that the viewer is running on.We use geolocation data to identify the geographic
location of the device based on the IP address.
If you're displaying the Locations report by country, note that the country list is based on ISO 3166-2,
Codes for the representation of names of countries and their subdivisions – Part 2: Country subdivision
code. The country list includes the following additional values:
•Anonymous Proxy – The request originated from an anonymous proxy.
•Satellite Provider – The request originated from a satellite provider that provides Internet service
to multiple countries. Users might be in countries with a high risk of fraud.
•Europe (Unknown) – The request originated from an IP in a block that is used by multiple European
countries. The country that the request originated from cannot be determined. CloudFront uses
Europe (Unknown) as the default.
API Version 2016-08-01
35
Amazon CloudFront Developer Guide
How Data in the Locations Report Is Related to Data in
the CloudFront Access Logs

•Asia/Pacific (Unknown) – The request originated from an IP in a block that is used by multiple
countries in the Asia/Pacific region.The country that the request originated from cannot be
determined. CloudFront uses Asia/Pacific (Unknown) as the default.
If you're displaying the Locations report by U.S. state, note that the report can include U.S. territories
and U.S. Armed Forces regions.
Request Count
The total number of requests from the country or U.S. state that the viewer is in, for the specified
distribution and period. This value generally corresponds closely with the number of GET requests
from IP addresses in that country or state in CloudFront access logs.
Request %
One of the following, depending on the value that you selected for Details:
•Countries – The requests from this country as a percentage of the total number of requests.
•U.S. States – The requests from this state as a percentage of the total number of requests from
the United States.
If requests came from more than 50 countries, then you can't calculate Request % based on the
data in this table because the Request Count column doesn't include all of the requests during the
specified period.
Bytes
The number of bytes that CloudFront served to viewers in this country or state, for the specified
distribution and period. To change the display of data in this column to KB, MB, or GB, click the link
in the column heading.
API Version 2016-08-01
36
Amazon CloudFront Developer Guide
How Data in the Locations Report Is Related to Data in
the CloudFront Access Logs

Getting Started with CloudFront
The example in this topic gives you a quick overview of how to use CloudFront to:
•Store the original versions of your objects in one Amazon Simple Storage Service (Amazon S3) bucket.
• Distribute download content such as text or graphics.
• Make your objects accessible to everyone.
• Use the CloudFront domain name in URLs for your objects (for example,
http://d111111abcdef8.cloudfront.net/image.jpg) instead of your own domain name (for
example, http://www.example.com/image.jpg).
• Keep your objects in CloudFront edge locations for the default duration of 24 hours. (The minimum
duration is 0 seconds.)
For information about how to use CloudFront when you want to use other options, see Task List for
Creating a Web Distribution (p. 58) or Task List for Streaming Media Files Using RTMP (p. 89).
You only need to perform a few basic steps to start delivering your content using CloudFront. The first
step is signing up. After that, you create a CloudFront distribution, and then use the CloudFront domain
name to reference content in your web pages or applications.
Topics
•Step 1: Sign up for Amazon Web Services (p. 37)
•Step 2: Upload your content to Amazon S3 and grant object permissions (p. 38)
•Step 3: Create a CloudFront Web Distribution (p. 39)
•Step 4: Test your links (p. 45)
Step 1: Sign up for Amazon Web Services
If you haven't already done so, sign up for Amazon Web Services at http://aws.amazon.com. Just choose
Sign Up Now and enter any required information.
API Version 2016-08-01
37
Amazon CloudFront Developer Guide
Step 1: Sign up for Amazon Web Services

Step 2: Upload your content to Amazon S3 and
grant object permissions
An Amazon S3 bucket is a container that can contain objects or folders. CloudFront can distribute almost
any type of object for you using an Amazon S3 bucket as the source, for example, text, images, and
videos.You can create multiple buckets, and there is no limit to the amount of data that you can store on
Amazon S3.
By default, your Amazon S3 bucket and all of the objects in it are private—only the AWS account that
created the bucket has permission to read or write the objects in it. If you want to allow anyone to access
the objects in your Amazon S3 bucket using CloudFront URLs, you must grant public read permissions
to the objects. (This is one of the most common mistakes when working with CloudFront and Amazon
S3.You must explicitly grant privileges to each object in an Amazon S3 bucket.)
Note
If you want to restrict who can download your content, you can use the CloudFront private content
feature. For more information about distributing private content, see Serving Private Content
through CloudFront (p. 162).
To upload your content to Amazon S3 and grant read permission to everyone
1. Sign in to the AWS Management Console and open the Amazon S3 console at https://
console.aws.amazon.com/s3/.
2. In the Amazon S3 console, choose Create Bucket.
3. In the Create Bucket dialog, enter a bucket name.
Important
For your bucket to work with CloudFront, the name must conform to DNS naming
requirements. For more information, go to Bucket Restrictions and Limitations in the Amazon
Simple Storage Service Developer Guide.
4. Select a region for your bucket. By default, Amazon S3 creates buckets in the US East (N. Virginia)
region. We recommend that you choose a region close to you to optimize latency, minimize costs,
or to address regulatory requirements.
5. Choose Create.
6. Select your bucket in the Buckets pane, and choose Upload.
7. On the Upload - Select Files page, choose Add Files, and choose the files that you want to upload.
API Version 2016-08-01
38
Amazon CloudFront Developer Guide
Step 2: Upload your content to Amazon S3 and grant
object permissions
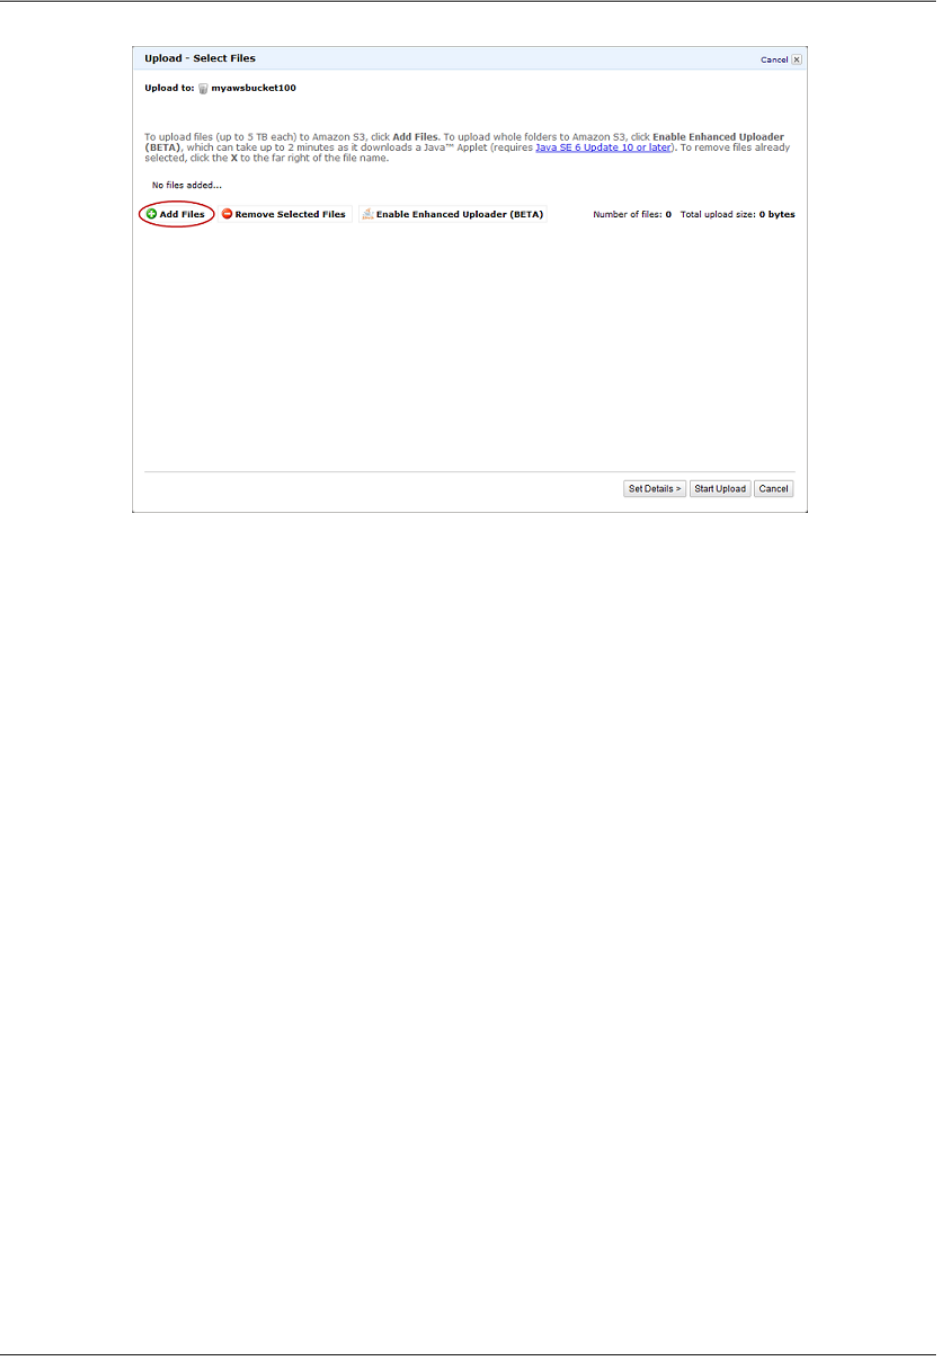
8. Enable public read privileges for each object that you upload to your Amazon S3 bucket.
a. Choose Set Details.
b. On the Set Details page, choose Set Permissions.
c. On the Set Permissions page, choose Make everything public.
9. Choose Start Upload.
After the upload completes, you can navigate to this item by its URL. In the case of the previous
example, the URL would be:
http://s3.amazonaws.com/example-myawsbucket/filename
Use your Amazon S3 URL to verify that your content is publicly accessible, but remember that this
is not the URL you will use when you are ready to distribute your content.
Step 3: Create a CloudFront Web Distribution
To create a CloudFront web distribution
1. Open the CloudFront console at https://console.aws.amazon.com/cloudfront/.
2. Choose Create Distribution.
3. On the Select a delivery method for your content page, in the Web section, choose Get Started.
API Version 2016-08-01
39
Amazon CloudFront Developer Guide
Step 3: Create a CloudFront Web Distribution
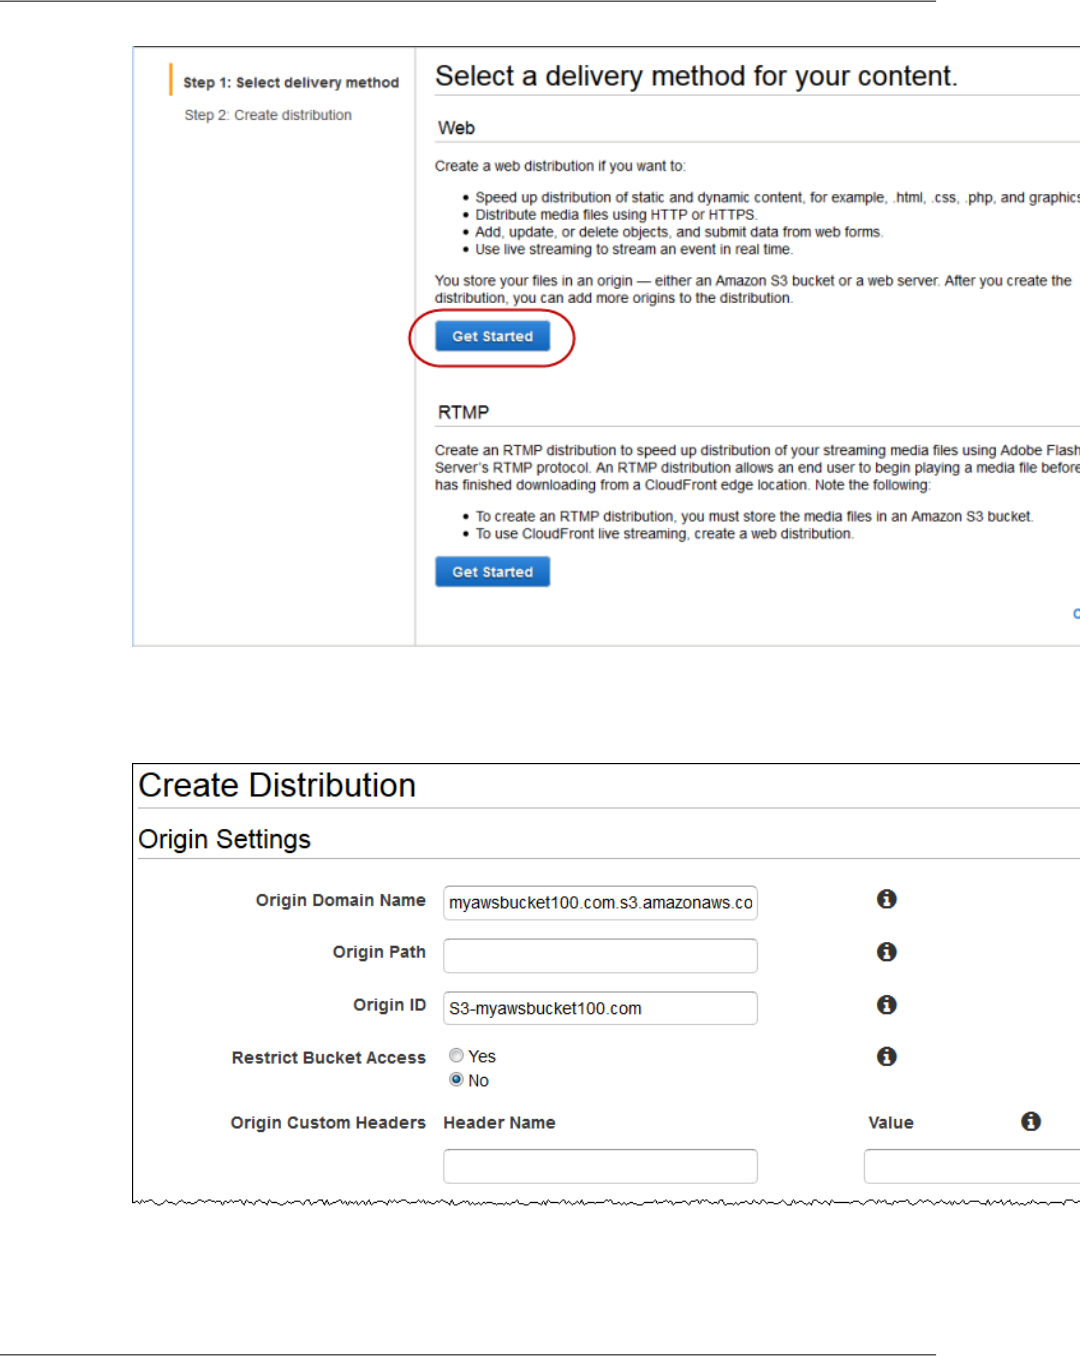
4. On the Create Distribution page, under Origin Settings, choose the Amazon S3 bucket that you
created earlier. For Origin ID, Origin Path, Restrict Bucket Access, and Origin Custom Headers,
accept the default values.
5. Under Default Cache Behavior Settings, accept the default values, and CloudFront will:
API Version 2016-08-01
40
Amazon CloudFront Developer Guide
Step 3: Create a CloudFront Web Distribution

• Forward all requests that use the CloudFront URL for your distribution (for example,
http://d111111abcdef8.cloudfront.net/image.jpg) to the Amazon S3 bucket that you
specified in Step 4.
• Allow end users to use either HTTP or HTTPS to access your objects.
• Respond to requests for your objects.
• Cache your objects at CloudFront edge locations for 24 hours.
• Forward only the default request headers to your origin and not cache your objects based on the
values in the headers.
•Exclude cookies and query string parameters, if any, when forwarding requests for objects to your
origin. (Amazon S3 doesn't process cookies and processes only a limited set of query string
parameters.)
• Not be configured to distribute media files in the Microsoft Smooth Streaming format.
• Allow everyone to view your content.
• Not automatically compress your content.
For more information about cache behavior options, see Cache Behavior Settings (p. 68).
API Version 2016-08-01
41
Amazon CloudFront Developer Guide
Step 3: Create a CloudFront Web Distribution
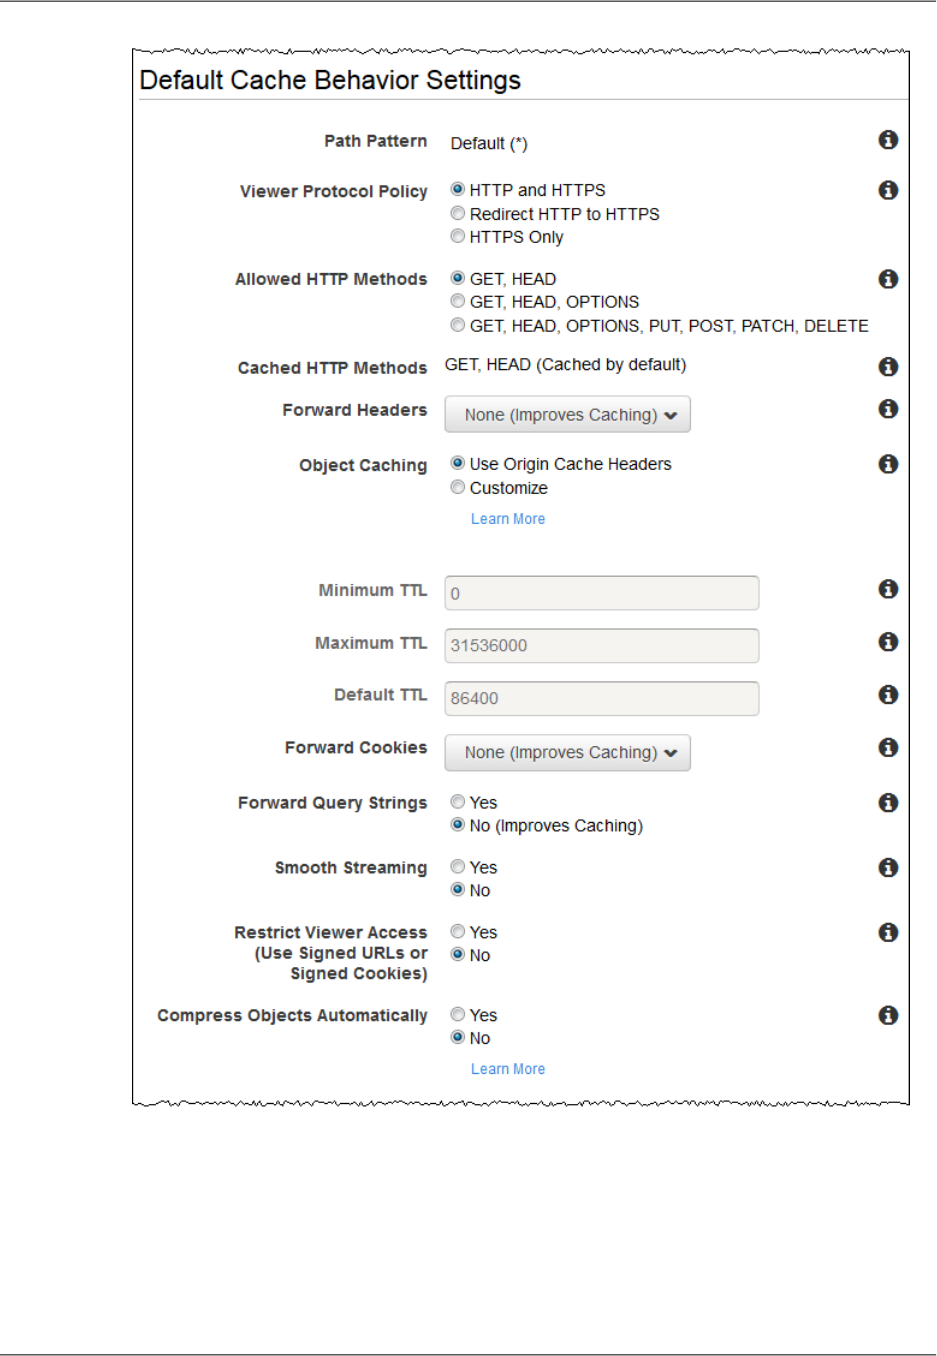
6. Under Distribution Settings, enter the applicable values:
Price Class
Select the price class that corresponds with the maximum price that you want to pay for
CloudFront service. By default, CloudFront serves your objects from edge locations in all
CloudFront regions.
API Version 2016-08-01
42
Amazon CloudFront Developer Guide
Step 3: Create a CloudFront Web Distribution

For more information about price classes and about how your choice of price class affects
CloudFront performance for your distribution, go to Choosing the Price Class for a CloudFront
Distribution (p. 54). For information about CloudFront pricing, including how price classes map
to CloudFront regions, go to Amazon CloudFront Pricing.
AWS WAF Web ACL
If you want to use AWS WAF to allow or block HTTP and HTTPS requests based on criteria that
you specify, choose the web ACL to associate with this distribution. For more information about
AWS WAF, see the AWS WAF Developer Guide.
Alternate Domain Names (CNAMEs) (Optional)
Specify one or more domain names that you want to use for URLs for your objects instead of
the domain name that CloudFront assigns when you create your distribution. For example, if
you want the URL for the object:
/images/image.jpg
to look like this:
http://www.example.com/images/image.jpg
instead of like this:
http://d111111abcdef8.cloudfront.net/images/image.jpg
you would create a CNAME for www.example.com.
Important
If you add a CNAME for www.example.com to your distribution, you also need to create
(or update) a CNAME record with your DNS service to route queries for
www.example.com to d111111abcdef8.cloudfront.net.You must have permission
to create a CNAME record with the DNS service provider for the domain. Typically, this
means that you own the domain, but you may also be developing an application for the
domain owner. For more information about CNAMEs, see Using Alternate Domain
Names (CNAMEs) (p. 50).
For the current limit on the number of alternate domain names that you can add to a distribution,
see Amazon CloudFront Limits in the Amazon Web Services General Reference.To request a
higher limit, go to https://console.aws.amazon.com/support/home#/case/
create?issueType=service-limit-increase&limitType=service-code-cloudfront-distributions.
SSL Certificate
Accept the default value, Default CloudFront Certificate.
Default Root Object (Optional)
The object that you want CloudFront to request from your origin (for example, index.html)
when a viewer requests the root URL of your distribution (http://www.example.com/) instead
of an object in your distribution (http://www.example.com/product-description.html).
Specifying a default root object avoids exposing the contents of your distribution.
Logging (Optional)
If you want CloudFront to log information about each request for an object and store the log files
in an Amazon S3 bucket, select On, and specify the bucket and an optional prefix for the names
of the log files.There is no extra charge to enable logging, but you accrue the usual Amazon
S3 charges for storing and accessing the files. CloudFront doesn't delete the logs automatically,
but you can delete them at any time.
Cookie Logging
In this example, we're using Amazon S3 as the origin for your objects, and Amazon S3 doesn't
process cookies, so we recommend that you select Off for the value of Cookie Logging.
Comment (Optional)
Enter any comments that you want to save with the distribution.
API Version 2016-08-01
43
Amazon CloudFront Developer Guide
Step 3: Create a CloudFront Web Distribution
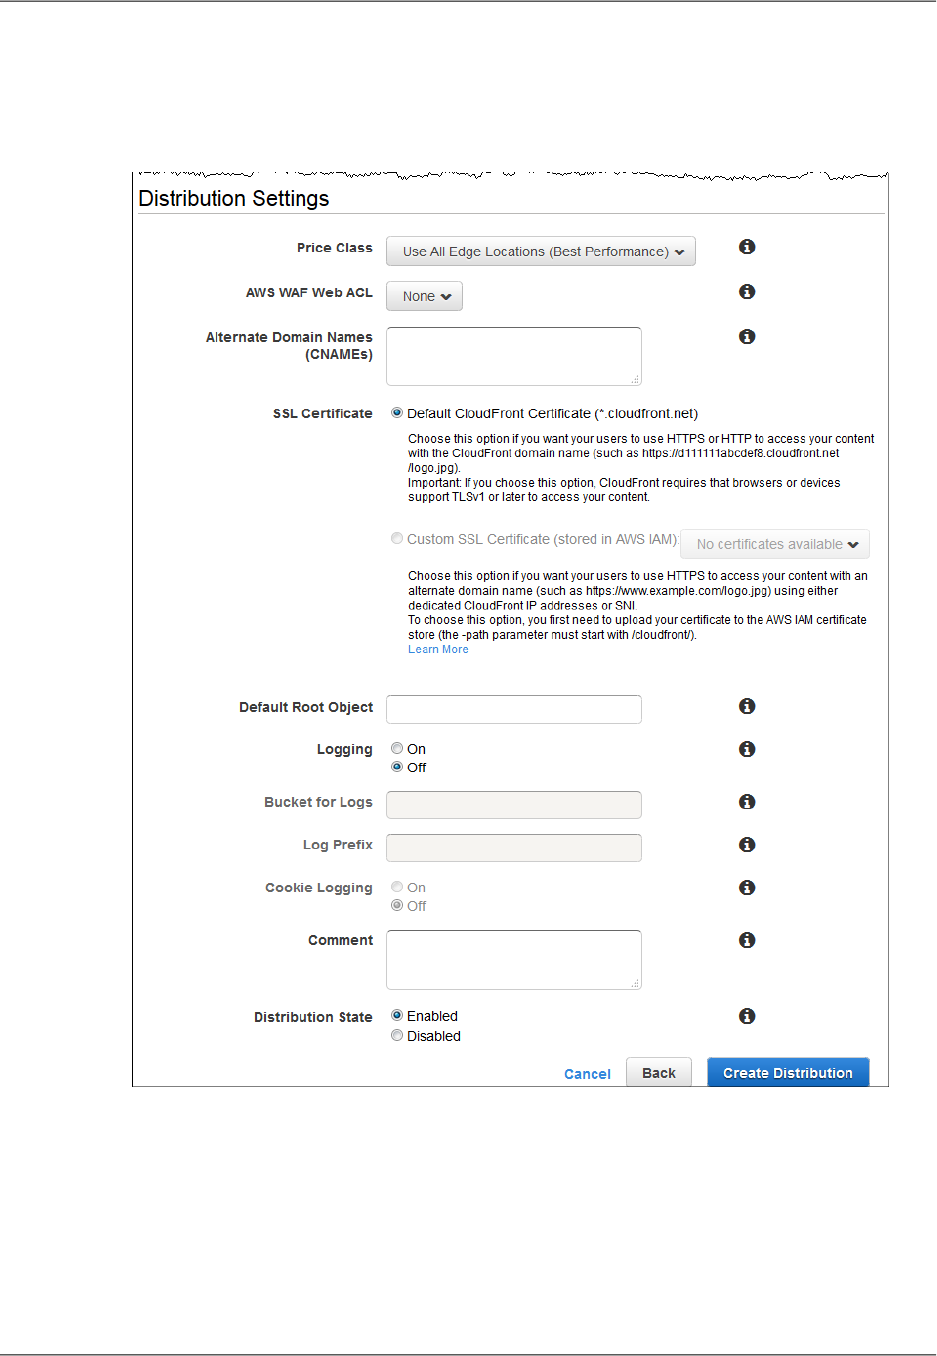
Distribution State
Select Enabled if you want CloudFront to begin processing requests as soon as the distribution
is created, or select Disabled if you do not want CloudFront to begin processing requests after
the distribution is created.
7. Choose Create Distribution.
8. After CloudFront has created your distribution, the value of the Status column for your distribution
will change from InProgress to Deployed. If you chose to enable the distribution, it will then be ready
to process requests.This should take less than 15 minutes.
The domain name that CloudFront assigns to your distribution appears in the list of distributions. (It
also appears on the General tab for a selected distribution.)
API Version 2016-08-01
44
Amazon CloudFront Developer Guide
Step 3: Create a CloudFront Web Distribution

Step 4:Test your links
After you've created your distribution, CloudFront knows where your Amazon S3 origin server is, and you
know the domain name associated with the distribution.You can create a link to your Amazon S3 bucket
content with that domain name, and have CloudFront serve it.
Note
You must wait until the status of your distribution changes to Deployed before testing your links.
To link to your objects
1. Copy the following HTML into a new file:
• Replace <domain name> with the domain name that CloudFront assigned to your distribution.
• Replace <object name> with the name of a file in your Amazon S3 bucket.
<html>
<head>My CloudFront Test</head>
<body>
<p>My text content goes here.</p>
<p><img src="http://domain name/object name" alt="my test image"/>
</body>
</html>
For example, if your domain name was d111111abcdef8.cloudfront.net and your object was
image.jpg, the URL for the link would be:
http://d111111abcdef8.cloudfront.net/image.jpg.
If your object is in a folder within your bucket, include the folder in the URL. For example, if image.jpg
is located in an images folder, then the URL would be:
http://d111111abcdef8.cloudfront.net/images/image.jpg
2. Save the text in a file that has a .html filename extension.
3. Open your web page in a browser to ensure that you can see your content. If you cannot see the
content, confirm that you have performed all of the steps correctly.You can also see the tips in
Troubleshooting (p. 282).
The browser returns your page with the embedded image file, served from the edge location that CloudFront
determined was appropriate to serve the object.
For more information on using CloudFront, go to Amazon CloudFront Resources (p. 355).
API Version 2016-08-01
45
Amazon CloudFront Developer Guide
Step 4:Test your links

Working with Distributions
Topics
•Overview of Web and RTMP Distributions (p. 47)
•Creating Web and RTMP Distributions (p. 48)
•Listing, Viewing, and Updating CloudFront Distributions (p. 48)
•Deleting a Distribution (p. 49)
•Using Alternate Domain Names (CNAMEs) (p. 50)
•Choosing the Price Class for a CloudFront Distribution (p. 54)
•Using CloudFront with Amazon S3 (p. 54)
•Changes to the CloudFront API (p. 56)
The following table lists the actions you can perform on a distribution and provides links to the
corresponding documentation on how to perform the actions using the CloudFront console and the
CloudFront API.
Using the CloudFront
API: RTMP Distribu-
tions
Using the CloudFront
API:Web Distributions
Using the CloudFront
Console
Action
Go to POST Streaming
Distribution
Go to POST DistributionWeb Distributions: See
Task List for Creating a
Web Distribution (p. 58)
RTMP Distributions:
See Task List for
Streaming Media Files
Using RTMP (p. 89)
Create a distribution
Go to GET Streaming
Distribution List
Go to GET Distribution
List
See Listing, Viewing,
and Updating Cloud-
Front Distribu-
tions (p. 48)
List your distributions
Go to GET Streaming
Distribution
Go to GET DistributionSee Listing, Viewing,
and Updating Cloud-
Front Distribu-
tions (p. 48)
Get all information about
a distribution
API Version 2016-08-01
46
Amazon CloudFront Developer Guide

Using the CloudFront
API: RTMP Distribu-
tions
Using the CloudFront
API:Web Distributions
Using the CloudFront
Console
Action
Go to GET Streaming
Distribution Config
Go to GET Distribution
Config
See Listing, Viewing,
and Updating Cloud-
Front Distribu-
tions (p. 48)
Get the distribution con-
figuration
Go to PUT Streaming
Distribution Config
Go to PUT Distribution
Config
See Listing, Viewing,
and Updating Cloud-
Front Distribu-
tions (p. 48)
Update a distribution
Go to DELETE Stream-
ing Distribution
Go to DELETE Distribu-
tion
See Deleting a Distribu-
tion (p. 49)
Delete a distribution
Overview of Web and RTMP Distributions
When you want to use CloudFront to distribute your content, you create a distribution and specify
configuration settings such as:
• Your origin, which is the Amazon S3 bucket or HTTP server from which CloudFront gets the files that
it distributes.You can specify any combination of up to 10 Amazon S3 buckets and/or HTTP servers
as your origins.
•Whether you want the files to be available to everyone or you want to restrict access to selected users.
• Whether you want CloudFront to require users to use HTTPS to access your content.
• Whether you want CloudFront to forward cookies and/or query strings to your origin.
• Whether you want CloudFront to prevent users in selected countries from accessing your content.
• Whether you want CloudFront to create access logs.
For the current limit on the number of web and RTMP distributions that you can create for each AWS
account, see Amazon CloudFront Limits in the Amazon Web Services General Reference.To request a
higher limit, go to https://console.aws.amazon.com/support/home#/case/
create?issueType=service-limit-increase&limitType=service-code-cloudfront-distributions.
The number of files that you can serve per distribution is unlimited.
Web Distributions
You can use web distributions to serve the following content over HTTP or HTTPS:
• Static and dynamic download content, for example, .html, .css, .php, and image files, using HTTP or
HTTPS.
• Multimedia content on demand using progressive download and Apple HTTP Live Streaming (HLS).
For more information, see the applicable topic in Working with Web Distributions (p. 58).
You can't serve Adobe Flash multimedia content over HTTP or HTTPS, but you can serve it using a
CloudFront RTMP distribution. See RTMP Distributions (p. 48) below.
•A live event, such as a meeting, conference, or concert, in real time. For live streaming, you create the
distribution automatically by using an AWS CloudFormation stack. For more information, see the
applicable live-streaming tutorial in CloudFront Streaming Tutorials (p. 286).
API Version 2016-08-01
47
Amazon CloudFront Developer Guide
Overview of Web and RTMP Distributions

For web distributions, your origin can be either an Amazon S3 bucket or an HTTP server, for example,
a web server. For more information about how web distributions work, including the values that you specify
when you create a web distribution, see Working with Web Distributions (p. 58). For information about
creating a web distribution, see Task List for Creating a Web Distribution (p. 58).
RTMP Distributions
RTMP distributions stream media files using Adobe Media Server and the Adobe Real-Time Messaging
Protocol (RTMP). An RTMP distribution must use an Amazon S3 bucket as the origin.
For information about the values you specify when you create an RTMP distribution, see Working with
RTMP Distributions (p. 87). For information about creating an RTMP distribution, see Task List for
Streaming Media Files Using RTMP (p. 89).
Creating Web and RTMP Distributions
Web distributions: For information about creating web distributions using the CloudFront console, see
Task List for Creating a Web Distribution (p. 58). For information about creating web distributions using
the CloudFront API, see POST Distribution in the Amazon CloudFront API Reference.
RTMP distributions: For information about creating RTMP distributions using the CloudFront console,
see Task List for Streaming Media Files Using RTMP (p. 89). For information about creating RTMP
distributions using the CloudFront API, see POST Streaming Distribution in the Amazon CloudFront API
Reference.
Listing,Viewing, and Updating CloudFront
Distributions
You can use the CloudFront console to list the CloudFront distributions that are associated with your
AWS account, view the settings for a distribution, and update most settings.
When you save changes to your distribution configuration, CloudFront starts to propagate the changes
to all edge locations. Until your configuration is updated in an edge location, CloudFront continues to
serve your content from that location based on the previous configuration. After your configuration is
updated in an edge location, CloudFront immediately starts to serve your content from that location based
on the new configuration.
Your changes don't propagate to every edge location instantaneously; propagation to all edge locations
should take less than 15 minutes. When propagation is complete, the status of your distribution changes
from InProgress to Deployed. While CloudFront is propagating your changes to edge locations, we
cannot determine whether a given edge location is serving your content based on the previous configuration
or the new configuration.
To List, View, and Update CloudFront Distributions Using the CloudFront Console
1. Sign in to the AWS Management Console and open the CloudFront console at https://
console.aws.amazon.com/cloudfront/.
2. In the top pane of the CloudFront console, select the distribution that you want to view or update.
Note
The top pane lists all of the distributions that are associated with the AWS account that you
used when you signed in to the CloudFront console.
API Version 2016-08-01
48
Amazon CloudFront Developer Guide
RTMP Distributions

3. To view or edit RTMP distribution settings, skip to Step 4.
To view or edit settings for a web distribution, perform the following steps.
a. In the Distribution Settings pane, click the tab for the settings that you want to change: General,
Origins, or Behaviors.
b. For general settings, click Edit.
For origins or cache behaviors, click the origin or cache behavior, and click Edit.
c. Enter or update the applicable values. For information about the fields, see the following topics:
•General settings: Distribution Details (p. 75)
•Origin settings: Origin Settings (p. 64)
•Cache behavior settings: Cache Behavior Settings (p. 68)
d. Click Yes, Edit.
4. To edit or view settings for an RTMP distribution:
a. In the Distribution Details pane, click Edit.
b. Enter or update the applicable values. For information about the fields, see Values that You
Specify When You Create or Update an RTMP Distribution (p. 90).
c. Click Yes, Edit.
Deleting a Distribution
If you no longer want to use a distribution, use the following procedure to delete it using the CloudFront
console.
You can also delete a distribution using the CloudFront API:
•To delete a web distribution, use the DELETE Distribution API action. For more information, go to
DELETE Distribution in the Amazon CloudFront API Reference.
• To delete an RTMP distribution, use the DELETE Streaming Distribution API action. For more
information, go to DELETE Streaming Distribution in the Amazon CloudFront API Reference.
Note
CloudFront lets you create a combined total of up to 100 web and RTMP distributions for an
AWS account.
To Delete a CloudFront Distribution Using the CloudFront Console
1. Sign in to the AWS Management Console and open the CloudFront console at https://
console.aws.amazon.com/cloudfront/.
2. In the right pane of the CloudFront console, find the distribution that you want to delete.
3. If the value of the State column is Disabled, skip to Step 7.
If the value of State is Enabled and the value of Status is Deployed, continue with Step 4 to disable
the distribution before deleting it.
API Version 2016-08-01
49
Amazon CloudFront Developer Guide
Deleting a Distribution

If the value of State is Enabled and the value of Status is InProgress, wait until Status changes
to Deployed. Then continue with Step 4 to disable the distribution before deleting it.
4. In the right pane of the CloudFront console, check the check box for the distribution that you want
to delete.
5. Click Disabled to disable the distribution, and click Yes, Disable to confirm. Then click Close.
6. The value of the State column immediately changes to Disabled. Wait until the value of the Status
column changes to Deployed.
7. Check the check box for the distribution that you want to delete.
8. Click Delete, and click Yes, Delete to confirm. Then click Close.
Using Alternate Domain Names (CNAMEs)
In CloudFront, an alternate domain name, also known as a CNAME, lets you use your own domain name
(for example, www.example.com) for links to your objects instead of using the domain name that
CloudFront assigns to your distribution. Both web and RTMP distributions support alternate domain
names.
When you create a distribution, CloudFront returns a domain name for the distribution, for example:
d111111abcdef8.cloudfront.net
When you use the CloudFront domain name for your objects, the URL for an object called
/images/image.jpg is:
http://d111111abcdef8.cloudfront.net/images/image.jpg
If you want to use your own domain name, such as www.example.com, instead of the cloudfront.net
domain name that CloudFront assigned to your distribution, you can add an alternate domain name to
your distribution for www.example.com.You can then use the following URL for /images/image.jpg:
http://www.example.com/images/image.jpg
Topics
•Using the * Wildcard in Alternate Domain Names (p. 50)
•Restrictions on Using Alternate Domain Names (p. 51)
•Adding an Alternate Domain Name (p. 51)
Using the * Wildcard in Alternate Domain Names
When you add alternate domain names, you can use the * wildcard at the beginning of a domain name
instead of specifying subdomains individually. For example, with an alternate domain name of
*.example.com, you can use any domain name that ends with example.com in your object URLs, such
as www.example.com, product-name.example.com, and marketing.product-name.example.com.
The name of an object is the same regardless of the domain name, for example:
www.example.com/images/image.jpg
product-name.example.com/images/image.jpg
marketing.product-name.example.com/images/image.jpg
The alternate domain name must begin with an asterisk and a dot ( *. ).You cannot use a wildcard to
replace part of a subdomain name, like this: *domain.example.com, and you cannot replace a subdomain
in the middle of a domain name, like this: subdomain.*.example.com.
API Version 2016-08-01
50
Amazon CloudFront Developer Guide
Using Alternate Domain Names (CNAMEs)

A wildcard alternate domain name, such as *.example.com, can include another alternate domain
name, such as example.com, as long as they're both in the same CloudFront distribution or they're in
distributions that were created by using the same AWS account.
Restrictions on Using Alternate Domain Names
Note the following restrictions on using alternate domain names:
Maximum Number of Alternate Domain Names
For the current limit on the number of alternate domain names that you can add to a distribution, see
Amazon CloudFront Limits in the Amazon Web Services General Reference.To request a higher
limit, go to https://console.aws.amazon.com/support/home#/case/
create?issueType=service-limit-increase&limitType=service-code-cloudfront-distributions.
Permission to Change DNS Configuration
If you're adding alternate domain names to your distribution, you need to create CNAME records to
route DNS queries for the domain names to your CloudFront distribution.You must have permission
to create CNAME records with the DNS service provider for the corresponding domains. Typically,
this means that you own the domains, but you may also be developing an application for the domain
owner.
Duplicate and Overlapping Alternate Domain Names
You cannot add an alternate domain name to a CloudFront distribution if the alternate domain name
already exists in another CloudFront distribution, even if your AWS account owns the other distribution.
However, you can add a wildcard alternate domain name, such as *.example.com, that includes
(that overlaps with) a non-wildcard alternate domain name, such as www.example.com. Overlapping
domain names can be in the same distribution or in separate distributions as long as both distributions
were created by using the same AWS account.
Alternate Domain Names at the Zone Apex for a Domain
When you add an alternate domain name to a distribution, you need to create a CNAME record in
your DNS configuration to route DNS queries for the domain name to your CloudFront distribution.
However, you can't create a CNAME record for the top node of a DNS namespace, also known as
the zone apex; the DNS protocol doesn't allow it. For example, if you register the DNS name
example.com, the zone apex is example.com.You can't create a CNAME record for example.com,
but you can create CNAME records for www.example.com, newproduct.example.com, and so
on.
If you're using Amazon Route 53 as your DNS service, you can create an alias resource record set
instead of a CNAME.You can create an alias resource record set for a domain name at the zone
apex (example.com). In addition, with an alias resource record set, you don't pay for Amazon Route 53
queries. For more information, go to Routing Queries to an Amazon CloudFront Distribution in the
Amazon Route 53 Developer Guide.
Alternate Domain Names and HTTPS
If you want viewers to use HTTPS with an alternate domain names, additional configuration is required.
For more information, see Using Alternate Domain Names and HTTPS (p. 234).
Adding an Alternate Domain Name
The following task list describes the process for using the CloudFront console to add an alternate domain
name to your distribution so you can use your own domain name in your links instead of the CloudFront
domain name that is associated with your distribution.
Note
If you want viewers to use HTTPS with your alternate domain name, see Using Alternate Domain
Names and HTTPS (p. 234).
API Version 2016-08-01
51
Amazon CloudFront Developer Guide
Restrictions on Using Alternate Domain Names

For information about updating your distribution using the CloudFront API, see Working with
Distributions (p. 46).
Adding an Alternate Domain Name Using the CloudFront Console
1. Sign in to the AWS Management Console and open the CloudFront console at https://
console.aws.amazon.com/cloudfront/.
2. In the CloudFront console, use the steps below to update your distribution to include your domain
name as an alternate domain name in the Alternate Domain Names (CNAMEs) field.
a. In the top pane of the CloudFront console, select the distribution that you want to update, and
click Distribution Settings.
b. On the General tab, click Edit.
c. Add the applicable alternate domain names in the Alternate Domain Names (CNAMEs) field.
Separate domain names with commas or put each one on a new line.
d. Web distributions only: For SSL Certificate, choose the applicable option:
•If you don't want to use SSL – Click Default CloudFront Certificate.
•If you do want to use SSL – Click Custom SSL Certificate, and choose a certificate from
the list. Note that the list can include both certificates provisioned by AWS Certificate Manager
and certificates that you purchased from another certificate authority and uploaded to the IAM
certificate store.
If you uploaded a certificate to the IAM certificate store but it doesn't appear in the list, review
the procedure To use alternate domain names with HTTPS (p.238) to confirm that you correctly
uploaded the certificate to the IAM certificate store.
If you choose this setting, we recommend that you use only an alternate domain name in your
object URLs (https://example.com/logo.jpg). If you use your CloudFront distribution domain
name (https://d111111abcdef8.cloudfront.net/logo.jpg) and the viewer supports SNI, then
CloudFront behaves normally. However, a viewer that does not support SNI exhibits one of
the following behaviors, depending on the value of Clients Supported:
•All Clients: If the viewer doesn't support SNI, it displays a warning because the CloudFront
domain name doesn't match the domain name in your SSL certificate.
•Only Clients that Support Server Name Indication (SNI): CloudFront drops the connection
with the viewer without returning the object.
e. Web distributions only: Choose the applicable option for Clients Supported:
•All Clients: CloudFront serves your HTTPS content using dedicated IP addresses. If you
select this option, you incur additional charges when you associate your SSL certificate with
a distribution that is enabled. For more information, see http://aws.amazon.com/cloudfront/
pricing.
•Only Clients that Support Server Name Indication (SNI): Older browsers or other clients
that don't support SNI must use another method to access your content.
For more information, see Choosing How CloudFront Serves HTTPS Requests (p. 234).
f. Click Yes, Edit.
3. In the CloudFront console, on the General tab for your distribution, confirm that the status of your
distribution has changed to Deployed. If you try to use an alternate domain name before the updates
to your distribution have been deployed, the links you create in the following steps might not work.
4. Using the method provided by your DNS service provider, add a CNAME resource record set to the
hosted zone for your domain. This new CNAME resource record set will redirect DNS queries from
API Version 2016-08-01
52
Amazon CloudFront Developer Guide
Adding an Alternate Domain Name

your domain (for example, www.example.com) to the CloudFront domain name for your distribution
(for example, d111111abcdef8.cloudfront.net). For more information, see the documentation provided
by your DNS service provider.
If you're using Amazon Route 53 as your DNS service, you can create an alias resource record set
instead of a CNAME.With an alias resource record set, you don't pay for Amazon Route 53 queries.
In addition, you can create an alias resource record set for a domain name at the zone apex
(example.com), which DNS doesn't allow for CNAMEs. For more information, go to Routing Queries
to an Amazon CloudFront Distribution in the Amazon Route 53 Developer Guide.
Important
If you already have an existing CNAME record for your domain name, update that resource
record set or replace it with a new one that points to the CloudFront domain name for your
distribution.
In addition, confirm that your CNAME resource record set points to your distribution's domain
name and not to one of your origin servers.
5. Using dig or a similar tool, confirm that the CNAME resource record set that you created in Step 4
points to the domain name for your distribution. For more information about dig, go to http://
www.kloth.net/services/dig.php.
The following example shows a dig request on the images.example.com domain, as well as the
relevant part of the response.
[prompt]> dig images.example.com
; <<> DiG 9.3.3rc2 <<> images.example.com
;; global options: printcmd
;; Got answer:
;; ->>HEADER<<- opcode: QUERY, status: NOERROR, id: 15917
;; flags: qr rd ra; QUERY: 1, ANSWER: 9, AUTHORITY: 2, ADDITIONAL: 0
;; QUESTION SECTION:
;images.example.com. IN A
;; ANSWER SECTION:
images.example.com. 10800 IN CNAME d111111abcdef8.cloudfront.net.
...
...
The line in the Answer Section shows a CNAME resource record set that routes queries for
images.example.com to the CloudFront distribution domain name d111111abcdef8.cloudfront.net.
The CNAME resource record set is configured correctly if the name on the right side of CNAME is the
domain name for your CloudFront distribution. If that is any other value, for example, the domain
name for your Amazon S3 bucket, then the CNAME resource record set is configured incorrectly. In
that case, go back to Step 4 and correct the CNAME record to point to the domain name for your
distribution.
6. Test the alternate domain name by creating some test links that use your domain name in the URL
instead of the CloudFront domain name for your distribution.
7. In your application, change the links for your objects to use your alternate domain name instead of
the domain name of your CloudFront distribution.
API Version 2016-08-01
53
Amazon CloudFront Developer Guide
Adding an Alternate Domain Name

Choosing the Price Class for a CloudFront
Distribution
CloudFront has edge locations all over the world. Our cost for each edge location varies and, as a result,
the price that we charge you varies depending on the edge location from which CloudFront serves your
requests.
CloudFront edge locations are grouped into geographic regions, and we've grouped regions into price
classes.The default price class includes all regions. Another price class includes most regions (the United
States; Europe; Hong Kong, Korea, and Singapore; Japan; and India regions) but excludes the
most-expensive regions. A third price class includes only the least-expensive regions (the United States
and Europe regions).
By default, CloudFront responds to requests for your objects based only on performance: objects are
served from the edge location for which latency is lowest for that viewer. If you're willing to accept higher
latency for your viewers in some geographic regions in return for lower cost, you can choose a price class
that doesn't include all CloudFront regions. Although CloudFront will serve your objects only from the
edge locations in that price class, it still serves content from the edge location that has the lowest latency
among the edge locations in your selected price class. However, some of your viewers, especially those
in geographic regions that are not in your price class, may see higher latency than if your content were
being served from all CloudFront edge locations. For example, if you choose the price class that includes
only the United States and Europe, viewers in Australia and in Asia may experience higher latency than
if you choose the price class that includes Australia and Asia.
If you choose a price class that does not include all edge locations, CloudFront may still occasionally
serve requests for your content from an edge location in a region that is not included in your price class.
When this happens, you are not charged the rate for the more expensive region from which your objects
were served. Instead, you're charged the rate for the least-expensive region in your selected price class.
You can choose a price class when you create or update a CloudFront web distribution or RTMP
distribution. To find the applicable topic about creating or updating a web or an RTMP distribution using
the CloudFront console or API, see Working with Distributions (p. 46).
If you're creating or updating a distribution by using the CloudFront API, one of the AWS SDKs, or AWS
CloudFormation, see the applicable topic for a list of valid values (search for PriceClass):
•Web distributions – DistributionConfig Complex Type
•RTMP distributions – StreamingDistributionConfig Complex Type
For more information about CloudFront pricing and price classes, go to Amazon CloudFront Pricing.
Using CloudFront with Amazon S3
You can store your content in an Amazon S3 bucket and use CloudFront to distribute the content. This
topic explains how to use CloudFront with your S3 bucket, and how to update your CloudFront distribution
if you move the S3 bucket to a different region.
Topics
•Adding CloudFront When You're Distributing Content from Amazon S3 (p. 55)
•Moving an Amazon S3 Bucket to a Different Region (p. 56)
API Version 2016-08-01
54
Amazon CloudFront Developer Guide
Choosing the Price Class for a CloudFront Distribution

Adding CloudFront When You're Distributing
Content from Amazon S3
If you store your objects in an Amazon S3 bucket, you can either have your users get your objects directly
from S3, or you can configure CloudFront to get your objects from S3 and distribute them to your users.
Using CloudFront can be more cost effective if your users access your objects frequently because, at
higher usage, the price for CloudFront data transfer is lower than the price for Amazon S3 data transfer.
In addition, downloads are faster with CloudFront than with Amazon S3 alone because your objects are
stored closer to your users.
Note
If you want CloudFront to respect Amazon S3 cross-origin resource sharing settings, configure
CloudFront to forward the Origin header to Amazon S3. For more information, see Configuring
CloudFront to Cache Objects Based on Request Headers (p. 108).
If you currently distribute content directly from your Amazon S3 bucket using your own domain name
(such as example.com) instead of the domain name of your Amazon S3 bucket (such as
MyAWSBucket.s3.amazonaws.com), you can add CloudFront with no disruption by using the following
procedure.
To add CloudFront when you're already distributing your content from Amazon S3
1. Create a CloudFront distribution using the procedure described in the applicable topic:
•Task List for Creating a Web Distribution (p. 58)
•Task List for Streaming Media Files Using RTMP (p. 89)
When you create the distribution, specify the name of your Amazon S3 bucket as the origin server.
Important
For your bucket to work with CloudFront, the name must conform to DNS naming
requirements. For more information, see Bucket Restrictions and Limitations in the Amazon
Simple Storage Service Developer Guide.
If you're using a CNAME with Amazon S3, specify the CNAME for your distribution, too.
2. Create a test web page that contains links to publicly readable objects in your Amazon S3 bucket,
and test the links. For this initial test, use the CloudFront domain name of your distribution in the
object URLs, for example, http://d111111abcdef8.cloudfront.net/images/image.jpg.
For more information about the format of CloudFront URLs, see Format of URLs for CloudFront
Objects (p. 99).
3. If you're using Amazon S3 CNAMEs, your application uses your domain name (for example,
example.com) to reference the objects in your Amazon S3 bucket instead of using the name of your
bucket (for example, myawsbucket.s3.amazonaws.com). To continue using your domain name to
reference objects instead of using the CloudFront domain name for your distribution (for example,
d111111abcdef8.cloudfront.net), you need to update your settings with your DNS service provider.
For Amazon S3 CNAMEs to work, your DNS service provider must have a CNAME resource record
set for your domain that currently routes queries for the domain to your Amazon S3 bucket. For
example, if a user requests this object:
http://example.com/images/image.jpg
the request is automatically rerouted, and the user sees this object:
http://myawsbucket.s3.amazonaws.com/images/image.jpg
API Version 2016-08-01
55
Amazon CloudFront Developer Guide
Adding CloudFront When You're Distributing Content
from Amazon S3

To route queries to your CloudFront distribution instead of your Amazon S3 bucket, you need to use
the method provided by your DNS service provider to update the CNAME resource record set for
your domain.This updated CNAME record will start to redirect DNS queries from your domain to the
CloudFront domain name for your distribution. For more information, see the documentation provided
by your DNS service provider.
Note
If you're using Amazon Route 53 as your DNS service, you can use either a CNAME resource
record set or an alias resource record set. For information about editing resource record
sets, see Editing Resource Record Sets. For information about alias resource record sets,
see Choosing Between Alias and Non-Alias Resource Record Sets. Both topics are in the
Amazon Route 53 Developer Guide.
For more information about using CNAMEs with CloudFront, see Using Alternate Domain Names
(CNAMEs) (p. 50).
After you update the CNAME resource record set, it can take up to 72 hours for the change to
propagate throughout the DNS system, although it usually happens faster. During this time, some
requests for your content will continue to be routed to your Amazon S3 bucket, and others will be
routed to CloudFront.
Moving an Amazon S3 Bucket to a Different Region
If you're using Amazon S3 as the origin for a CloudFront distribution and you move the bucket to a different
region, CloudFront can take up to an hour to update its records to include the change of region when
both of the following are true:
• You're using a CloudFront origin access identity (OAI) to restrict access to the bucket
• You move the bucket to an Amazon S3 region that requires Signature Version 4 for authentication
When you're using OAIs, CloudFront uses the region (among other values) to calculate the signature that
it uses to request objects from your bucket. For more information about OAIs, see Using an Origin Access
Identity to Restrict Access to Your Amazon S3 Content (p. 166). For a list of Amazon S3 regions and the
signature versions that they support, see Amazon Simple Storage Service (Amazon S3) in the "Regions
and Endpoints" chapter of the Amazon Web Services General Reference.
To force a faster update to CloudFront's records, you can update your CloudFront distribution, for example,
by updating the Comment field on the General tab in the CloudFront console. When you update a
distribution, CloudFront immediately checks on the region that your bucket is in; propagation of the change
to all edge locations should take less than 15 minutes.
Changes to the CloudFront API
Beginning with the 2012-05-05 version of the CloudFront API, we made substantial changes to the format
of the XML document that you include in the request body when you create or update a web distribution
or an RTMP distribution, and when you invalidate objects.With previous versions of the API, we discovered
that it was too easy to accidentally delete one or more values for an element that accepts multiple values,
for example, CNAMEs and trusted signers. Our changes for the 2012-05-05 release are intended to
prevent these accidental deletions and to notify you when there's a mismatch between the number of
values you say you're specifying in the Quantity element and the number of values you're actually
specifying.
Note the following about using the 2012-05-05 API version or later with web and RTMP distributions that
were created using earlier API versions:
API Version 2016-08-01
56
Amazon CloudFront Developer Guide
Moving an Amazon S3 Bucket to a Different Region

• You cannot use versions of the API earlier than 2012-05-05 to update a web distribution that was
created or updated using the 2012-05-05 or later CloudFront API.
• You can use the new API version to get a list of distributions, get information about a distribution, or
get distribution configuration. CloudFront returns an XML document in the new XML format.
• To update a distribution that was created using an earlier API version, use the 2012-05-05 or later
version of GET Distribution or GET Streaming Distribution to get an XML document in the new XML
format, change the data as applicable, and use the 2012-05-05 or later version of PUT Distribution
Config or PUT Streaming Distribution Config to submit the changes to CloudFront.
• You can use the new API to delete a distribution that was created using an earlier API version.The
distribution must already be disabled.
API Version 2016-08-01
57
Amazon CloudFront Developer Guide
Changes to the CloudFront API

Working with Web Distributions
This section describes how you configure and manage CloudFront web distributions. For a basic
explanation of distributions, see Working with Distributions (p. 46). For information about CloudFront
RTMP distributions, see Working with RTMP Distributions (p. 87).
Topics
•Task List for Creating a Web Distribution (p. 58)
•Creating or Updating a Web Distribution Using the CloudFront Console (p. 59)
•Testing Your Web Distribution (p. 60)
•Using Amazon S3 Origins and Custom Origins for Web Distributions (p. 61)
•Values that You Specify When You Create or Update a Web Distribution (p. 63)
•Values that CloudFront Displays in the Console When You Create or Update a Web Distribution (p. 80)
•Requirements and Recommendations for Using Amazon EC2 and Other Custom Origins (p. 81)
•Using AWS WAF to Control Access to Your Content (p. 82)
•Restricting the Geographic Distribution of Your Content (p. 82)
•Configuring On-Demand Smooth Streaming (p. 85)
•Configuring On-Demand Progressive Downloads (p. 86)
•Configuring On-Demand Apple HTTP Live Streaming (HLS) (p. 86)
Task List for Creating a Web Distribution
The following task list summarizes the process for creating a web distribution.
To Create a Web Distribution
1. Create one or more Amazon S3 buckets or configure HTTP servers as your origin servers. An origin
is the location where you store the original version of your web content. When CloudFront gets a
request for your files, it goes to the origin to get the files that it distributes at edge locations.You can
use any combination of Amazon S3 buckets and HTTP servers as your origin servers.
If you're using Amazon S3, note that the name of your bucket must be all lowercase and cannot
contain spaces.
If you're using an Amazon EC2 server or another custom origin, review Requirements and
Recommendations for Using Amazon EC2 and Other Custom Origins (p. 81).
API Version 2016-08-01
58
Amazon CloudFront Developer Guide
Task List for Creating a Web Distribution

For the current limit on the number of origins that you can create for a distribution, see Amazon
CloudFront Limits in the Amazon Web Services General Reference. To request a higher limit, go to
https://console.aws.amazon.com/support/home#/case/
create?issueType=service-limit-increase&limitType=service-code-cloudfront-distributions.
2. Upload your content to your origin servers. If you don't want to restrict access to your content using
CloudFront signed URLs, make the objects publicly readable.
Caution
You are responsible for ensuring the security of your origin server. You must ensure that
CloudFront has permission to access the server and that the security settings are appropriate
to safeguard your content.
3. Create your CloudFront web distribution:
•For more information about creating a web distribution using the CloudFront console, see Creating
or Updating a Web Distribution Using the CloudFront Console (p. 59).
•For information about creating a web distribution using the CloudFront API, go to POST Distribution
in the Amazon CloudFront API Reference.
4. Optional: If you created your distribution using the CloudFront console, create more cache behaviors
or origins for your distribution. For more information, see To List, View, and Update CloudFront
Distributions Using the CloudFront Console (p. 48).
5. Test your web distribution. For more information, see Testing Your Web Distribution (p. 60).
6. Develop your website or application to access your content using the domain name that CloudFront
returned after you created your distribution in Step 3. For example, if CloudFront returns
d111111abcdef8.cloudfront.net as the domain name for your distribution, the URL for the file
image.jpg in an Amazon S3 bucket or in the root directory on an HTTP server will be
http://d111111abcdef8.cloudfront.net/image.jpg.
If you specified one or more alternate domain names (CNAMEs) when you created your distribution,
you can use your own domain name. In that case, the URL for image.jpg might be
http://www.example.com/image.jpg.
Note the following:
• If you want to use signed URLs to restrict access to your content, see Serving Private Content
through CloudFront (p. 162).
• If you want to serve compressed content, see Serving Compressed Files (p. 135).
• For information about CloudFront request and response behavior for Amazon S3 and custom
origins, see Request and Response Behavior (p. 139).
Creating or Updating a Web Distribution Using
the CloudFront Console
The procedures in this topic explain how to create or update a web distribution using the CloudFront
console. If you want to create a web distribution using the CloudFront API, go to POST Distribution in the
Amazon CloudFront API Reference. If you want to update a web distribution using the CloudFront API,
go to PUT DistributionConfig in the Amazon CloudFront API Reference.
For the current limit on the number of web distributions that you can create for each AWS account, see
Amazon CloudFront Limits in the Amazon Web Services General Reference.To request a higher limit,
API Version 2016-08-01
59
Amazon CloudFront Developer Guide
Creating or Updating a Web Distribution Using the
CloudFront Console

go to https://console.aws.amazon.com/support/home#/case/
create?issueType=service-limit-increase&limitType=service-code-cloudfront-distributions.
•To create a CloudFront web distribution using the CloudFront console (p. 60)
•To update a CloudFront web distribution using the CloudFront console (p. 60)
To create a CloudFront web distribution using the CloudFront console
1. Sign in to the AWS Management Console and open the CloudFront console at https://
console.aws.amazon.com/cloudfront/.
2. Choose Create Distribution.
3. On the first page of the Create Distribution Wizard, in the Web section, choose Get Started.
4. Specify settings for the distribution. For more information, see Values that You Specify When You
Create or Update a Web Distribution (p. 63).
5. Choose Create Distribution.
6. After CloudFront creates your distribution, the value of the Status column for your distribution will
change from InProgress to Deployed. If you chose to enable the distribution, it will then be ready
to process requests.This should take less than 15 minutes.
The domain name that CloudFront assigns to your distribution appears in the list of distributions. (It
also appears on the General tab for a selected distribution.)
7. When your distribution is deployed, confirm that you can access your content using your new
CloudFront URL or CNAME. For more information, see Testing Your Web Distribution (p. 60).
To update a CloudFront web distribution using the CloudFront console
1. Sign in to the AWS Management Console and open the CloudFront console at https://
console.aws.amazon.com/cloudfront/.
2. Choose the ID for the distribution that you want to update.
3. Update the applicable values. For more information, see Values that You Specify When You Create
or Update a Web Distribution (p. 63).
4. Choose Create Distribution.
5. After you change settings, the value of the Status column for your distribution changes to InProgress
while CloudFront propagates the changes to edge locations. When Status changes to Deployed,
the distribution is ready to process requests. (The value of the State column for the distribution must
also be Enabled.) This should take less than 15 minutes after you save the last change.
Testing Your Web Distribution
After you've created your distribution, CloudFront knows where your origin server is, and you know the
domain name associated with the distribution.You can create links to your objects using the CloudFront
domain name, and CloudFront will serve the objects to your web page or application.
Note
You must wait until the status of the distribution changes to Deployed before you can test your
links.
To create links to objects in a web distribution
1. Copy the following HTML code into a new file, replace domain-name with your distribution's domain
name, and replace object-name with the name of your object.
API Version 2016-08-01
60
Amazon CloudFront Developer Guide
Testing Your Web Distribution

<html>
<head>My CloudFront Test</head>
<body>
<p>My text content goes here.</p>
<p><img src="http://domain-name/object-name" alt="my test image"
</body>
</html>
For example, if your domain name were d111111abcdef8.cloudfront.net and your object were
image.jpg, the URL for the link would be:
http://d111111abcdef8.cloudfront.net/image.jpg.
If your object is in a folder on your origin server, then the folder must also be included in the URL.
For example, if image.jpg were located in the images folder on your origin server, then the URL would
be:
http://d111111abcdef8.cloudfront.net/images/image.jpg
2. Save the HTML code in a file that has a .html filename extension.
3. Open your web page in a browser to ensure that you can see your object.
The browser returns your page with the embedded image file, served from the edge location that CloudFront
determined was appropriate to serve the object.
Using Amazon S3 Origins and Custom Origins
for Web Distributions
When you create a web distribution, you specify where CloudFront sends requests for the files that it
distributes to edge locations. CloudFront supports using Amazon S3 buckets and HTTP servers (for
example, web servers) as origins.
Using Amazon S3 Buckets for Your Origin
When you use Amazon S3 as an origin for your distribution, you place any objects that you want CloudFront
to deliver in an Amazon S3 bucket.You can use any method that is supported by Amazon S3 to get your
objects into Amazon S3, for example, the Amazon S3 console or API, or a third-party tool.You can create
a hierarchy in your bucket to store the objects, just as you would with any other Amazon S3 bucket.
Using an existing Amazon S3 bucket as your CloudFront origin server doesn't change the bucket in any
way; you can still use it as you normally would to store and access Amazon S3 objects at the standard
Amazon S3 price.You incur regular Amazon S3 charges for storing the objects in the bucket. For more
information about the charges to use CloudFront, see CloudFront Reports (p. 15).
Important
For your bucket to work with CloudFront, the name must conform to DNS naming requirements.
For more information, go to Bucket Restrictions and Limitations in the Amazon Simple Storage
Service Developer Guide.
When you specify the Amazon S3 bucket that you want CloudFront to get objects from, how you specify
the bucket name depends on whether you have configured the bucket as a website endpoint:
The bucket is not configured as a website endpoint
In general, use the following format:
API Version 2016-08-01
61
Amazon CloudFront Developer Guide
Using Amazon S3 Origins and Custom Origins for Web
Distributions

bucket-name.s3.amazonaws.com
If your bucket is in the US Standard region and you want Amazon S3 to route requests to a facility
in Northern Virginia, use the following format:
bucket-name.s3-external-1.amazonaws.com
When you specify the bucket name in this format, you can use the following CloudFront features:
•Configure CloudFront to communicate with your Amazon S3 bucket using SSL. For more information,
see Using an HTTPS Connection to Access Your Objects (p. 229).
• Use an origin access identity to require that your users access your content using CloudFront
URLs, not by using Amazon S3 URLs. For more information, see Using an Origin Access Identity
to Restrict Access to Your Amazon S3 Content (p. 166).
• Update the content of your bucket by submitting POST and PUT requests to CloudFront. For more
information, see HTTP Methods (p. 141) in the topic How CloudFront Processes and Forwards
Requests to Your Amazon S3 Origin Server (p. 139).
The bucket is configured as a website endpoint
Enter the Amazon S3 static website hosting endpoint for your bucket. This value appears in the
Amazon S3 console, on the Properties page under Static Website Hosting.
When you specify the bucket name in this format, you can use Amazon S3 redirects and Amazon
S3 custom error documents. (CloudFront also provides custom error pages. For more information,
see Customizing Error Responses (p. 127).) For more information about Amazon S3 features, see
the Amazon S3 documentation.
Do not specify the bucket using the following formats:
• The Amazon S3 path style, s3.amazonaws.com/bucket-name
• The Amazon S3 CNAME, if any
Using Amazon EC2 or Other Custom Origins
A custom origin is an HTTP server, for example, a web server. The HTTP server can be an Amazon EC2
instance or an HTTP server that you manage privately. When you use a custom origin, you specify the
DNS name of the server, along with the HTTP and HTTPS ports and the protocol that you want CloudFront
to use when fetching objects from your origin.
Most CloudFront features are supported when you use a custom origin with the following exceptions:
•RTMP distributions—Not supported.
•Private content—Although you can use a signed URL to distribute content from a custom origin, for
CloudFront to access the custom origin, the origin must remain publicly accessible. For more information,
see Serving Private Content through CloudFront (p. 162).
For information about requirements and recommendations when using custom origins, see Requirements
and Recommendations for Using Amazon EC2 and Other Custom Origins (p. 81).
API Version 2016-08-01
62
Amazon CloudFront Developer Guide
Using Amazon EC2 or Other Custom Origins

Values that You Specify When You Create or
Update a Web Distribution
When you create a new web distribution or update an existing distribution, you specify the following
values. For information about creating or updating a web distribution using the CloudFront console, see
the applicable topic:
•Working with Web Distributions (p. 58)
•Listing, Viewing, and Updating CloudFront Distributions (p. 48)
Delivery Method (p. 64)
Origin Settings (p. 64)
•Origin Domain Name (p. 65)
•Origin Path (p. 66)
•Origin ID (p. 66)
•Restrict Bucket Access (Amazon S3 Only) (p. 66)
•Origin Access Identity (Amazon S3 Only) (p. 66)
•Comment for New Identity (Amazon S3 Only) (p. 67)
•Your Identities (Amazon S3 Only) (p. 67)
•Grant Read Permissions on Bucket (Amazon S3 Only) (p. 67)
•Origin SSL Protocols (Amazon EC2 and Other Custom Origins Only) (p. 67)
•Origin Protocol Policy (Amazon EC2 and Other Custom Origins Only) (p. 67)
•HTTP Port (Amazon EC2 and Other Custom Origins Only) (p. 68)
•HTTPS Port (Amazon EC2 and Other Custom Origins Only) (p. 68)
•Origin Custom Headers (p. 68)
Cache Behavior Settings (p. 68)
•Path Pattern (p. 69)
•Origin (Existing Distributions Only) (p. 70)
•Viewer Protocol Policy (p. 70)
•Allowed HTTP Methods (p. 71)
•Cached HTTP Methods (p. 71)
•Forward Headers (p. 71)
•Whitelist Headers (p. 72)
•Object Caching (p. 72)
•Minimum TTL (p. 72)
•Default TTL (p. 73)
•Maximum TTL (p. 73)
•Forward Cookies (Amazon EC2 and Other Custom Origins Only) (p. 73)
•Whitelist Cookies (Amazon EC2 and Other Custom Origins Only) (p. 73)
•Forward Query Strings (p. 74)
•Smooth Streaming (p. 74)
•Restrict Viewer Access (Use Signed URLs) (p. 74)
•Trusted Signers (p. 74)
API Version 2016-08-01
63
Amazon CloudFront Developer Guide
Values that You Specify When You Create or Update a
Web Distribution

•AWS Account Numbers (p. 75)
•Compress Objects Automatically (p. 75)
Distribution Details (p. 75)
•Price Class (p. 75)
•AWS WAF Web ACL (p. 75)
•Alternate Domain Names (CNAMEs) (p. 76)
•SSL Certificate (p. 76)
•Clients Supported (p. 77)
•Minimum SSL Protocol Version (p. 77)
•Default Root Object (p. 77)
•Logging (p. 77)
•Bucket for Logs (p. 78)
•Log Prefix (p. 78)
•Cookie Logging (p. 78)
•Comment (p. 78)
•Distribution State (p. 78)
Custom Error Pages and Error Caching (p. 79)
•Error Code (p. 79)
•Response Page Path (p. 79)
•Response Code (p. 79)
•Error Caching Minimum TTL (p. 79)
Restrictions (p. 79)
•Enable Geo Restriction (p. 79)
•Restriction Type (p. 80)
•Countries (p. 80)
Delivery Method
You specify the delivery method when you create a distribution. For a web distribution, this value is always
Web.You can't change the delivery method for an existing distribution.
Origin Settings
When you create or update a distribution, you provide information about one or more locations—known
as origins—where you store the original versions of your web content. CloudFront gets your web content
from your origins and serves it to viewers via a world-wide network of edge servers. Each origin is either
an Amazon S3 bucket or an HTTP server, for example, a web server.
For the current limit on the number of origins that you can create for a distribution, see Amazon CloudFront
Limits in the Amazon Web Services General Reference.To request a higher limit, go to https://
console.aws.amazon.com/support/home#/case/
create?issueType=service-limit-increase&limitType=service-code-cloudfront-distributions.
API Version 2016-08-01
64
Amazon CloudFront Developer Guide
Delivery Method

If you want to delete an origin, you must first edit or delete the cache behaviors that are associated with
that origin.
Caution
If you delete an origin, confirm that files that were previously served by that origin are available
in another origin and that your cache behaviors are now routing requests for those files to the
new origin.
When you create or update a distribution, you specify the following values for each origin.
Origin Domain Name
The DNS domain name of the Amazon S3 bucket or HTTP server from which you want CloudFront to
get objects for this origin, for example:
•Amazon S3 bucket – myawsbucket.s3.amazonaws.com
•Amazon EC2 instance – ec2-203-0-113-25.compute-1.amazonaws.com
•Elastic Load Balancing load balancer –
my-load-balancer-1234567890.us-west-2.elb.amazonaws.com
If your origin is an HTTP server, type the domain name of the resource.The files must be publicly readable.
If your origin is an Amazon S3 bucket, in the CloudFront console, choose in the Origin Domain Name
field, and a list enumerates the Amazon S3 buckets that are associated with the current AWS account.
Note the following:
• If the bucket is configured as a website, enter the Amazon S3 static website hosting endpoint for your
bucket; do not select the bucket name from the list in the Origin Domain Name field.The static website
hosting endpoint appears in the Amazon S3 console, on the Properties page under Static Website
Hosting.
•If you configured Amazon S3 Transfer Acceleration for your bucket, do not specify the s3-accelerate
endpoint for Origin Domain Name.
•If you're using a bucket from a different AWS account and if the bucket is not configured as a website,
type the name in the following format:
bucket-name.s3.amazonaws.com
If your bucket is in the US Standard region and you want Amazon S3 to route requests to a facility in
Northern Virginia, use the following format:
bucket-name.s3-external-1.amazonaws.com
If your bucket is in the EU (Frankfurt) region, you can also use the following format:
bucket-name.s3.eu-central-1.amazonaws.com
•The files must be publicly readable unless you secure your content in Amazon S3 by using a CloudFront
origin access identity. For more information, see Using an Origin Access Identity to Restrict Access to
Your Amazon S3 Content (p. 166).
Important
If the origin is an Amazon S3 bucket, the bucket name must conform to DNS naming requirements.
For more information, go to Bucket Restrictions and Limitations in the Amazon Simple Storage
Service Developer Guide.
When you change the value of Origin Domain Name for an origin, CloudFront immediately begins
replicating the change to CloudFront edge locations. Until the distribution configuration is updated in a
given edge location, CloudFront will continue to forward requests to the previous HTTP server or Amazon
API Version 2016-08-01
65
Amazon CloudFront Developer Guide
Origin Settings

S3 bucket. As soon as the distribution configuration is updated in that edge location, CloudFront begins
to forward requests to the new HTTP server or Amazon S3 bucket.
Changing the origin does not require CloudFront to repopulate edge caches with objects from the new
origin. As long as the viewer requests in your application have not changed, CloudFront will continue to
serve objects that are already in an edge cache until the TTL on each object expires or until
seldom-requested objects are evicted.
Origin Path
If you want CloudFront to request your content from a directory in your Amazon S3 bucket or your custom
origin, enter the directory path, beginning with a /. CloudFront appends the directory path to the value of
Origin Domain Name, for example, cf-origin.example.com/production/images. Do not add a / at the
end of the path.
For example, suppose you've specified the following values for your distribution:
•Origin Domain Name – An Amazon S3 bucket named myawsbucket
•Origin Path – /production
•Alternate Domain Names (CNAMEs) – example.com
When a user enters example.com/index.html in a browser, CloudFront sends a request to Amazon S3
for myawsbucket/production/index.html.
When a user enters example.com/acme/index.html in a browser, CloudFront sends a request to Amazon
S3 for myawsbucket/production/acme/index.html.
Origin ID
A string that uniquely distinguishes this origin from other origins in this distribution. If you create cache
behaviors in addition to the default cache behavior, you use the origin ID that you specify here to identify
the origin to which you want CloudFront to route a request when the request matches the path pattern
for that cache behavior. For more information, see Cache Behavior Settings (p. 68).
Restrict Bucket Access (Amazon S3 Only)
Choose Yes if you want to require users to access objects in an Amazon S3 bucket by using only
CloudFront URLs, not by using Amazon S3 URLs. Then specify the applicable values.
Choose No if you want users to be able to access objects using either CloudFront URLs or Amazon S3
URLs.
For more information, see Using an Origin Access Identity to Restrict Access to Your Amazon S3
Content (p. 166).
For information about how to require users to access objects on a custom origin by using only CloudFront
URLs, see Using Custom Headers to Restrict Access to Your Content on a Custom Origin (p. 113).
Origin Access Identity (Amazon S3 Only)
If you chose Yes for Restrict Bucket Access, choose whether to create a new origin access identity or
use an existing one that is associated with your AWS account. If you already have an origin access
identity, we recommend that you reuse it to simplify maintenance. For more information about origin
access identities, see Using an Origin Access Identity to Restrict Access to Your Amazon S3
Content (p. 166).
API Version 2016-08-01
66
Amazon CloudFront Developer Guide
Origin Settings

Comment for New Identity (Amazon S3 Only)
If you chose Create a New Identity for Origin Access Identity, enter a comment that identifies the new
origin access identity. CloudFront will create the origin access identity when you create this distribution.
Your Identities (Amazon S3 Only)
If you chose Use an Existing Identity for Origin Access Identity, choose the origin access identity that
you want to use.You cannot use an origin access identity that is associated with another AWS account.
Grant Read Permissions on Bucket (Amazon S3 Only)
If you want CloudFront to automatically grant the origin access identity the permission to read objects in
your Amazon S3 bucket, choose Yes, Update Bucket Policy.
Important
If you choose Yes, Update Bucket Policy, CloudFront updates the bucket policy to grant the
specified origin access identity the permission to read objects in your bucket. However, CloudFront
does not remove existing permissions in the bucket policy or permissions on individual objects.
If users currently have permission to access the objects in your bucket using Amazon S3 URLs,
they will still have that permission after CloudFront updates your bucket policy.To view or change
the existing bucket policy and the existing permissions on the objects in your bucket, use a
method provided by Amazon S3. For more information, see Granting the Origin Access Identity
Permission to Read Objects in Your Amazon S3 Bucket (p. 168).
If you want to update permissions manually, for example, if you want to update ACLs on your objects
instead of updating bucket permissions, choose No, I will Update Permissions.
Origin SSL Protocols (Amazon EC2 and Other Custom
Origins Only)
Choose the SSL protocols that CloudFront can use when establishing an HTTPS connection with your
origin. The SSLv3 protocol is less secure, so we recommend that you choose SSLv3 only if your origin
doesn't support TLSv1 or later.
If the origin is an Amazon S3 bucket, CloudFront always uses TSLv1.2.
Origin Protocol Policy (Amazon EC2 and Other Custom
Origins Only)
The protocol policy that you want CloudFront to use when fetching objects from your origin server.
Important
If your Amazon S3 bucket is configured as a website endpoint, you must specify HTTP Only.
Amazon S3 doesn't support HTTPS connections in that configuration.
Choose the applicable value:
•HTTP Only: CloudFront uses only HTTP to access the origin.
•HTTPS Only: CloudFront uses only HTTPS to access the origin.
•Match Viewer: CloudFront communicates with your origin using HTTP or HTTPS, depending on the
protocol of the viewer request. CloudFront caches the object only once even if viewers make requests
using both HTTP and HTTPS protocols.
API Version 2016-08-01
67
Amazon CloudFront Developer Guide
Origin Settings

Important
For HTTPS viewer requests that CloudFront forwards to this origin, one of the domain names
in the SSL certificate on your origin server must match the domain name that you specify for
Origin Domain Name. Otherwise, CloudFront responds to the viewer requests with an HTTP
status code 502 (Bad Gateway) instead of the requested object. For more information, see
How to Require HTTPS for Communication between Viewers, CloudFront, and Your
Origin (p. 230).
HTTP Port (Amazon EC2 and Other Custom Origins Only)
Optional. The HTTP port that the custom origin listens on. Valid values include ports 80, 443, and 1024
to 65535. The default value is port 80.
HTTPS Port (Amazon EC2 and Other Custom Origins Only)
Optional.The HTTPS port that the custom origin listens on. Valid values include ports 80, 443, and 1024
to 65535. The default value is port 443.
Origin Custom Headers
If you want CloudFront to include custom headers whenever it forwards a request to your origin, specify
the following values:
Header Name
The name of a header that you want CloudFront to forward to your origin.
Value
The value for the header that you specified in the Custom Header field.
For more information, see Forwarding Custom Headers to Your Origin (Web Distributions Only) (p. 112).
For the current limit on the maximum number of custom headers that you can forward to the origin, the
maximum length of a custom header name and value, and the total length of all header names and values,
see Limits (p. 353).
Cache Behavior Settings
A cache behavior lets you configure a variety of CloudFront functionality for a given URL path pattern for
files on your website. For example, one cache behavior might apply to all .jpg files in the images directory
on a web server that you're using as an origin server for CloudFront. The functionality you can configure
for each cache behavior includes:
• The path pattern.
•If you have configured multiple origins for your CloudFront distribution, which origin you want CloudFront
to forward your requests to.
• Whether to forward query strings to your origin.
• Whether accessing the specified files requires signed URLs.
• Whether to require users to use HTTPS to access those files.
• The minimum amount of time that those files stay in the CloudFront cache regardless of the value of
any Cache-Control headers that your origin adds to the files.
When you create a new distribution, you specify settings for the default cache behavior, which automatically
forwards all requests to the origin that you specify when you create the distribution. After you create a
distribution, you can create additional cache behaviors that define how CloudFront responds when it
API Version 2016-08-01
68
Amazon CloudFront Developer Guide
Cache Behavior Settings

receives a request for objects that match a path pattern, for example, *.jpg. If you create additional
cache behaviors, the default cache behavior is always the last to be processed. Other cache behaviors
are processed in the order in which they're listed in the CloudFront console or, if you're using the CloudFront
API, the order in which they're listed in the DistributionConfig element for the distribution. For more
information, see Path Pattern (p. 69).
When you create a cache behavior, you specify the one origin from which you want CloudFront to get
objects. As a result, if you want CloudFront to distribute objects from all of your origins, you must have
at least as many cache behaviors (including the default cache behavior) as you have origins. For example,
if you have two origins and only the default cache behavior, the default cache behavior will cause
CloudFront to get objects from one of the origins, but the other origin will never be used.
For the current limit on the number of cache behaviors that you can add to a distribution, see Amazon
CloudFront Limits in the Amazon Web Services General Reference.To request a higher limit, go to https://
console.aws.amazon.com/support/home#/case/
create?issueType=service-limit-increase&limitType=service-code-cloudfront-distributions.
Path Pattern
A path pattern (for example, images/*.jpg) specifies which requests you want this cache behavior to
apply to. When CloudFront receives an end-user request, the requested path is compared with path
patterns in the order in which cache behaviors are listed in the distribution. The first match determines
which cache behavior is applied to that request. For example, suppose you have three cache behaviors
with the following three path patterns, in this order:
•images/*.jpg
•images/*
•*.gif
Note
You can optionally include a slash (/) at the beginning of the path pattern, for example,
/images/*.jpg. CloudFront behavior is the same with or without the leading /.
A request for the file images/sample.gif doesn't satisfy the first path pattern, so the associated cache
behaviors are not be applied to the request.The file does satisfy the second path pattern, so the cache
behaviors associated with the second path pattern are applied even though the request also matches
the third path pattern.
Note
When you create a new distribution, the value of Path Pattern for the default cache behavior is
set to * (all files) and cannot be changed. This value causes CloudFront to forward all requests
for your objects to the origin that you specified in the Origin Domain Name (p. 65) field. If the
request for an object does not match the path pattern for any of the other cache behaviors,
CloudFront applies the behavior that you specify in the default cache behavior.
Caution
Define path patterns and their sequence carefully or you may give users undesired access to
your content. For example, suppose a request matches the path pattern for two cache behaviors.
The first cache behavior does not require signed URLs and the second cache behavior does
require signed URLs. Users will be able to access the objects without using a signed URL
because CloudFront processes the cache behavior associated with the first match.
The path you specify applies to requests for all files in the specified directory and in subdirectories below
the specified directory. CloudFront does not consider query strings or cookies when evaluating the path
pattern. For example, if an images directory contains product1 and product2 subdirectories, the path
pattern images/*.jpg applies to requests for any .jpg file in the images, images/product1, and
images/product2 directories. If you want to apply a different cache behavior to the files in the
images/product1 directory than the files in the images and images/product2 directories, create a
API Version 2016-08-01
69
Amazon CloudFront Developer Guide
Cache Behavior Settings
separate cache behavior for images/product1 and move that cache behavior to a position above
(before) the cache behavior for the images directory.
You can use the following wildcard characters in your path pattern:
•* matches 0 or more characters.
•? matches exactly 1 character.
The following examples show how the wildcard characters work:
Files that match the path patternPath pattern
All .jpg files*.jpg
All .jpg files in the images directory and in subdirectories under the images direct-
ory
images/*.jpg
•All .jpg files for which the filename begins with a, for example, apple.jpg and
appalachian_trail_2012_05_21.jpg
• All .jpg files for which the file path begins with a, for example,
abra/cadabra/magic.jpg.
a*.jpg
All .jpg files for which the filename begins with a and is followed by exactly two
other characters, for example, ant.jpg and abe.jpg
a??.jpg
All files for which the filename extension begins with .doc, for example, .doc,
.docx, and .docm files.You can't use the path pattern *.doc? in this case, be-
cause that path pattern wouldn't apply to requests for .doc files; the ? wildcard
character replaces exactly one character.
*.doc*
The maximum length of a path pattern is 255 characters. The value can contain any of the following
characters:
• A-Z, a-z
Path patterns are case sensitive, so the path pattern *.jpg doesn't apply to the file LOGO.JPG.
• 0-9
• _ - . * $ / ~ " ' @ : +
• &, passed and returned as &
Origin (Existing Distributions Only)
Enter the value of Origin ID for an existing origin. This identifies the origin that you want CloudFront to
route requests to when a request (such as http://example.com/logo.jpg) matches the path pattern for a
cache behavior (such as *.jpg) or for the default cache behavior (*).
Viewer Protocol Policy
Choose the protocol policy that you want viewers to use to access your content in CloudFront edge
locations:
•HTTP and HTTPS: Viewers can use both protocols.
API Version 2016-08-01
70
Amazon CloudFront Developer Guide
Cache Behavior Settings

•Redirect HTTP to HTTPS: Viewers can use both protocols, but HTTP requests are automatically
redirected to HTTPS requests.
•HTTPS Only: Viewers can only access your content if they're using HTTPS.
For more information, see Using an HTTPS Connection to Access Your Objects (p. 229).
Allowed HTTP Methods
Specify the HTTP methods that you want CloudFront to process and forward to your origin:
•GET, HEAD: You can use CloudFront only to get objects from your origin or to get object headers.
•GET, HEAD, OPTIONS:You can use CloudFront only to get objects from your origin, get object headers,
or retrieve a list of the options that your origin server supports.
•GET, HEAD, OPTIONS, PUT, POST, PATCH, DELETE: You can use CloudFront to get, add, update,
and delete objects, and to get object headers. In addition, you can perform other POST operations
such as submitting data from a web form.
Note
CloudFront caches responses to GET and HEAD requests and, optionally, OPTIONS requests.
CloudFront does not cache responses to requests that use the other methods.
If you use an Amazon S3 bucket as the origin for your distribution and if you use CloudFront origin access
identities, POST requests aren't supported in some Amazon S3 regions and PUT requests in those regions
require an additional header. For more information, see Using an Origin Access Identity in Amazon S3
Regions that Support Only Signature Version 4 Authentication (p. 170).
Caution
If you choose GET, HEAD, OPTIONS or GET, HEAD, OPTIONS, PUT, POST, PATCH, DELETE,
you might need to restrict access to your Amazon S3 bucket or to your custom origin to prevent
users from performing operations that you don't want them to perform. The following examples
explain how to restrict access:
•If you're using Amazon S3 as an origin for your distribution: Create a CloudFront origin
access identity to restrict access to your Amazon S3 content, and grant the origin access
identity the applicable permissions. For example, if you configure CloudFront to accept and
forward these methods only because you want to use PUT, you must still configure Amazon
S3 bucket policies or ACLs to handle DELETE requests appropriately. For more information,
see Using an Origin Access Identity to Restrict Access to Your Amazon S3 Content (p. 166).
•If you're using a custom origin: Configure your origin server to handle all methods. For
example, if you configure CloudFront to accept and forward these methods only because you
want to use POST, you must still configure your origin server to handle DELETE requests
appropriately.
Cached HTTP Methods
Specify whether you want CloudFront to cache the response from your origin when a viewer submits an
OPTIONS request. CloudFront always caches the response to GET and HEAD requests.
Forward Headers
Specify whether you want CloudFront to forward request headers to your origin server and to cache
objects based on header values:
•All – CloudFront forwards all headers to your origin for a cache behavior.
API Version 2016-08-01
71
Amazon CloudFront Developer Guide
Cache Behavior Settings

Important
If you configure CloudFront to forward all headers to your origin, CloudFront doesn't cache
the objects associated with this cache behavior. Instead, it sends every request to the origin.
•Whitelist – CloudFront forwards only the specified headers to the origin. Use Whitelist Headers to
choose the headers that you want CloudFront to forward.
•None (Improves Caching) – CloudFront forwards default headers to the origin, but it doesn't cache
your objects based on the header values.
If you're using an Amazon S3 bucket as your origin, note that Amazon S3 processes only three headers:
Access-Control-Request-Headers, Access-Control-Request-Method, and Origin. It ignores
all other headers in a request.
For more information about forwarding headers to the origin, see Configuring CloudFront to Cache Objects
Based on Request Headers (p. 108). For a list of HTTP headers and information about whether CloudFront
forwards the header to the origin by default, see HTTP Request Headers and CloudFront Behavior (p. 149).
Whitelist Headers
Specify the headers that you want CloudFront to consider when caching your objects. Select headers
from the list of available headers and choose Add. To forward a custom header, enter the name of the
header in the field, and choose Add Custom.
For the current limit on the number of headers that you can whitelist for each cache behavior, see Amazon
CloudFront Limits in the Amazon Web Services General Reference.To request a higher limit, go to https://
console.aws.amazon.com/support/home#/case/
create?issueType=service-limit-increase&limitType=service-code-cloudfront-distributions.
Object Caching
If your origin server is adding a Cache-Control header to your objects to control how long the objects
stay in the CloudFront cache and if you don't want to change the Cache-Control value, choose Use
Origin Cache Headers.
To specify a minimum and maximum time that your objects stay in the CloudFront cache regardless of
Cache-Control headers, and a default time that your objects stay in the CloudFront cache when the
Cache-Control header is missing from an object, choose Customize. Then, in the Minimum TTL,
Default TTL, and Maximum TTL fields, specify the applicable value.
For more information, see Specifying How Long Objects Stay in a CloudFront Edge Cache
(Expiration) (p. 116).
Minimum TTL
Specify the minimum amount of time, in seconds, that you want objects to stay in CloudFront caches
before CloudFront forwards another request to your origin to determine whether the object has been
updated. The default value for Minimum TTL is 0 seconds.
Important
If you configure CloudFront to forward all headers to your origin for a cache behavior, CloudFront
never caches the associated objects. Instead, CloudFront forwards all requests for those objects
to the origin. In that configuration, the value of Minimum TTL must be 0.
To specify a value for Minimum TTL, you must choose the Customize option for the Object Caching
setting.
For more information, see Specifying How Long Objects Stay in a CloudFront Edge Cache
(Expiration) (p. 116).
API Version 2016-08-01
72
Amazon CloudFront Developer Guide
Cache Behavior Settings

Default TTL
Specify the default amount of time, in seconds, that you want objects to stay in CloudFront caches before
CloudFront forwards another request to your origin to determine whether the object has been updated.
The value that you specify for Default TTL applies only when your origin does not add HTTP headers
such as Cache-Control max-age, Cache-Control s-maxage, or Expires to objects. For more
information, see Specifying How Long Objects Stay in a CloudFront Edge Cache (Expiration) (p. 116).
To specify a value for Default TTL, you must choose the Customize option for the Object Caching
setting.
The default value for Default TTL is 86400 seconds (one day). If you change the value of Minimum TTL
to more than 86400 seconds, then the default value of Default TTL changes to the value of Minimum
TTL.
Maximum TTL
Specify the maximum amount of time, in seconds, that you want objects to stay in CloudFront caches
before CloudFront queries your origin to see whether the object has been updated. The value that you
specify for Maximum TTL applies only when your origin adds HTTP headers such as Cache-Control
max-age, Cache-Control s-maxage, or Expires to objects. For more information, see Specifying
How Long Objects Stay in a CloudFront Edge Cache (Expiration) (p. 116).
To specify a value for Maximum TTL, you must choose the Customize option for the Object Caching
setting.
The default value for Maximum TTL is 31536000 seconds (one year). If you change the value of Minimum
TTL or Default TTL to more than 31536000 seconds, then the default value of Maximum TTL changes
to the value of Default TTL.
Forward Cookies (Amazon EC2 and Other Custom Origins
Only)
Specify whether you want CloudFront to forward cookies to your origin server and, if so, which ones. If
you choose to forward only selected cookies (a whitelist of cookies), enter the cookie names in the
Whitelist Cookies field. If you choose All, CloudFront forwards all cookies regardless of how many your
application uses.
Amazon S3 doesn't process cookies, and forwarding cookies to the origin reduces cacheability. For cache
behaviors that are forwarding requests to an Amazon S3 origin, choose None for Forward Cookies.
For more information about forwarding cookies to the origin, go to Configuring CloudFront to Cache
Objects Based on Cookies (p. 106).
Whitelist Cookies (Amazon EC2 and Other Custom Origins
Only)
If you chose Whitelist in the Forward Cookies list, then in the Whitelist Cookies field, enter the names
of cookies that you want CloudFront to forward to your origin server for this cache behavior. Enter each
cookie name on a new line.
You can specify the following wildcards to specify cookie names:
•* matches 0 or more characters in the cookie name
•? matches exactly one character in the cookie name
API Version 2016-08-01
73
Amazon CloudFront Developer Guide
Cache Behavior Settings

For example, suppose viewer requests for an object include a cookie named:
userid_member-number
where each of your users has a unique value for member-number.You want CloudFront to cache a
separate version of the object for each member.You could accomplish this by forwarding all cookies to
your origin, but viewer requests include some cookies that you don't want CloudFront to cache. Alternatively,
you could specify the following value as a cookie name, which causes CloudFront to forward to the
applicable origin all of the cookies that begin with userid_:
userid_*
For the current limit on the number of cookie names that you can whitelist for each cache behavior, see
Amazon CloudFront Limits in the Amazon Web Services General Reference.To request a higher limit,
go to https://console.aws.amazon.com/support/home#/case/
create?issueType=service-limit-increase&limitType=service-code-cloudfront-distributions.
Forward Query Strings
If your origin server returns different versions of an object based on a query string in the URL, choose
Yes. If your origin returns the same version of an object regardless of the query string, choose No. This
increases the likelihood that CloudFront can serve a request from the cache, which improves performance
and reduces the load on your origin. For more information about query strings, see Configuring CloudFront
to Cache Based on Query String Parameters (p. 105).
Smooth Streaming
Choose Yes if you want to distribute media files in the Microsoft Smooth Streaming format using the origin
that is associated with this cache behavior. Otherwise, choose No.
Note
If you specify Yes, you can still distribute other content using this cache behavior if the content
matches the value of Path Pattern.
For more information, see Configuring On-Demand Smooth Streaming (p. 85).
Restrict Viewer Access (Use Signed URLs)
If you want requests for objects that match the PathPattern for this cache behavior to use public URLs,
choose No.
If you want requests for objects that match the PathPattern for this cache behavior to use signed URLs,
choose Yes.Then specify the AWS accounts that you want to use to create signed URLs; these accounts
are known as trusted signers.
For more information about trusted signers, see Specifying the AWS Accounts That Can Create Signed
URLs and Signed Cookies (Trusted Signers) (p. 171).
Trusted Signers
Choose which AWS accounts you want to use as trusted signers for this cache behavior:
•Self: Use the account with which you're currently signed into the AWS Management Console as a
trusted signer. If you're currently signed in as an IAM user, the associated AWS account is added as
a trusted signer.
•Specify Accounts: Enter account numbers for trusted signers in the AWS Account Numbers field.
API Version 2016-08-01
74
Amazon CloudFront Developer Guide
Cache Behavior Settings

To create signed URLs, an AWS account must have at least one active CloudFront key pair.
Caution
If you're updating a distribution that you're already using to distribute content, add trusted signers
only when you're ready to start generating signed URLs for your objects. After you add trusted
signers to a distribution, users must use signed URLs to access the objects that match the
PathPattern for this cache behavior.
AWS Account Numbers
If you want to create signed URLs using AWS accounts in addition to or instead of the current account,
enter one AWS account number per line in this field. Note the following:
•The accounts that you specify must have at least one active CloudFront key pair. For more information,
see Creating CloudFront Key Pairs for Your Trusted Signers (p. 172).
• You can't create CloudFront key pairs for IAM users, so you can't use IAM users as trusted signers.
•For information about how to get the AWS account number for an account, see How Do I Get Security
Credentials? in the Amazon Web Services General Reference.
• If you enter the account number for the current account, CloudFront automatically checks the Self
checkbox and removes the account number from the AWS Account Numbers list.
Compress Objects Automatically
If you want CloudFront to automatically compress files of certain types when viewer requests include
Accept-Encoding: gzip in the request header, choose Yes. When CloudFront compresses your
content, downloads are faster because the files are smaller, and your web pages render faster for your
users. For more information, see Serving Compressed Files (p. 135).
Distribution Details
The following values apply to the entire distribution.
Price Class
Choose the price class that corresponds with the maximum price that you want to pay for CloudFront
service. By default, CloudFront serves your objects from edge locations in all CloudFront regions.
For more information about price classes and about how your choice of price class affects CloudFront
performance for your distribution, see Choosing the Price Class for a CloudFront Distribution (p. 54). For
information about CloudFront pricing, including how price classes map to CloudFront regions, go to
Amazon CloudFront Pricing.
AWS WAF Web ACL
If you want to use AWS WAF to allow or block requests based on criteria that you specify, choose the
web ACL to associate with this distribution.
AWS WAF is a web application firewall that lets you monitor the HTTP and HTTPS requests that are
forwarded to CloudFront, and lets you control access to your content. Based on conditions that you
specify, such as the IP addresses that requests originate from or the values of query strings, CloudFront
responds to requests either with the requested content or with an HTTP 403 status code (Forbidden).
You can also configure CloudFront to return a custom error page when a request is blocked. For more
information about AWS WAF, see the AWS WAF Developer Guide.
API Version 2016-08-01
75
Amazon CloudFront Developer Guide
Distribution Details

Alternate Domain Names (CNAMEs)
Optional. Specify one or more domain names that you want to use for URLs for your objects instead of
the domain name that CloudFront assigns when you create your distribution. For example, if you want
the URL for the object:
/images/image.jpg
to look like this:
http://www.example.com/images/image.jpg
instead of like this:
http://d111111abcdef8.cloudfront.net/images/image.jpg
add a CNAME for www.example.com.
Important
If you add a CNAME for www.example.com to your distribution, you also need to create (or
update) a CNAME record with your DNS service to route queries for www.example.com to
d111111abcdef8.cloudfront.net.You must have permission to create a CNAME record
with the DNS service provider for the domain. Typically, this means that you own the domain,
but you may also be developing an application for the domain owner.
For the current limit on the number of alternate domain names that you can add to a distribution, see
Amazon CloudFront Limits in the Amazon Web Services General Reference.To request a higher limit,
go to https://console.aws.amazon.com/support/home#/case/
create?issueType=service-limit-increase&limitType=service-code-cloudfront-distributions.
For more information about alternate domain names, see Using Alternate Domain Names
(CNAMEs) (p. 50). For more information about CloudFront URLs, see Format of URLs for CloudFront
Objects (p. 99).
SSL Certificate
If you want viewers to use HTTPS to access your objects, choose the applicable setting. In addition, if
you choose Custom SSL Certificate, choose the certificate that you want to use:
•Default CloudFront Certificate (*.cloudfront.net) – If you want to use the CloudFront domain name
in the URLs for your objects, such as https://d111111abcdef8.cloudfront.net/image1.jpg,
choose this option. Also choose this option if you want viewers to use HTTP to access your objects.
•Custom SSL Certificate – If you want to use your own domain name in the URLs for your objects,
such as https://example.com/image1.jpg, choose this option and then choose the applicable
certificate. Note that the list can include both certificates provisioned by AWS Certificate Manager and
certificates that you purchased from another certificate authority and uploaded to the IAM certificate
store. For more information, see Using Alternate Domain Names and HTTPS (p. 234).
If you choose this setting, we recommend that you use only an alternate domain name in your object
URLs (https://example.com/logo.jpg). If you use your CloudFront distribution domain name
(https://d111111abcdef8.cloudfront.net/logo.jpg) and the viewer supports SNI, then CloudFront behaves
normally. However, a viewer that does not support SNI exhibits one of the following behaviors, depending
on the value of Clients Supported:
•All Clients: If the viewer doesn't support SNI, it displays a warning because the CloudFront domain
name doesn't match the domain name in your SSL certificate.
•Only Clients that Support Server Name Indication (SNI): CloudFront drops the connection with
the viewer without returning the object.
API Version 2016-08-01
76
Amazon CloudFront Developer Guide
Distribution Details

Clients Supported
If you specified one or more alternate domain names and you specified an SSL certificate in the IAM
certificate store, choose how you want CloudFront to serve HTTPS requests, either a method that works
for all clients or one that works for most clients:
•All Clients: Any client can access your content. However, you must request permission to use this
feature, and you incur additional monthly charges.
•Only Clients that Support Server Name Indication (SNI): All modern browsers can access your
content because they all support SNI. However, some browsers still in use don't support SNI. Users
with these browsers must access your content using some other method, for example, by getting your
objects directly from the origin.
For more information, see Using Alternate Domain Names and HTTPS (p. 234).
Minimum SSL Protocol Version
Specify the minimum version of the SSL protocol that you want CloudFront to use—SSLv3 or TLSv1—for
HTTPS connections. CloudFront will serve your objects only to browsers or devices that support at least
the SSL version that you specify. The TLSv1 protocol is more secure, so we recommend that you specify
SSLv3 only if your users are using browsers or devices that don't support TLSv1.
If you selected Custom SSL Certificate and you selected Only Clients that Support Server Name
Indication (SNI), CloudFront uses TLSv1, which is the minimum allowed SSL protocol for SNI.
Default Root Object
Optional. The object that you want CloudFront to request from your origin (for example, index.html)
when a viewer requests the root URL of your distribution (http://www.example.com/) instead of an
object in your distribution (http://www.example.com/product-description.html). Specifying a
default root object avoids exposing the contents of your distribution.
The maximum length of the name is 255 characters.The name can contain any of the following characters:
• A-Z, a-z
• 0-9
• _ - . * $ / ~ " '
• &, passed and returned as &
When you specify the default root object, enter only the object name, for example, index.html. Do not
add a / before the object name.
For more information, see Specifying a Default Root Object (Web Distributions Only) (p. 132).
Logging
Whether you want CloudFront to log information about each request for an object and store the log files
in an Amazon S3 bucket.You can enable or disable logging at any time.There is no extra charge if you
enable logging, but you accrue the usual Amazon S3 charges for storing and accessing the files in an
Amazon S3 bucket.You can delete the logs at any time. For more information about CloudFront access
logs, see Access Logs (p. 256).
API Version 2016-08-01
77
Amazon CloudFront Developer Guide
Distribution Details

Bucket for Logs
If you chose On for Logging, the Amazon S3 bucket that you want CloudFront to store access logs in,
for example, myawslogbucket.s3.amazonaws.com. If you enable logging, CloudFront records
information about each end-user request for an object and stores the files in the specified Amazon S3
bucket.You can enable or disable logging at any time. For more information about CloudFront access
logs, see Access Logs (p. 256).
Log Prefix
Optional. If you chose On for Logging, specify the string, if any, that you want CloudFront to prefix to
the access log filenames for this distribution, for example, exampleprefix/. The trailing slash ( / ) is
optional but recommended to simplify browsing your log files. For more information about CloudFront
access logs, see Access Logs (p. 256).
Cookie Logging
If you want CloudFront to include cookies in access logs, choose On. If you choose to include cookies
in logs, CloudFront logs all cookies regardless of how you configure the cache behaviors for this distribution:
forward all cookies, forward no cookies, or forward a specified list of cookies to the origin.
Amazon S3 doesn't process cookies, so unless your distribution also includes an Amazon EC2 or other
custom origin, we recommend that you choose Off for the value of Cookie Logging.
For more information about cookies, go to Configuring CloudFront to Cache Objects Based on
Cookies (p. 106).
Comment
Optional. When you create a distribution, you can include a comment of up to 128 characters.You can
update the comment at any time.
Distribution State
Indicates whether you want the distribution to be enabled or disabled once it's deployed:
•Enabled means that as soon as the distribution is fully deployed you can deploy links that use the
distribution's domain name and users can retrieve content. Whenever a distribution is enabled,
CloudFront accepts and handles any end-user requests for content that use the domain name associated
with that distribution.
When you create, modify, or delete a CloudFront distribution, it takes time for your changes to propagate
to the CloudFront database. An immediate request for information about a distribution might not show
the change. Propagation usually completes within minutes, but a high system load or network partition
might increase this time.
•Disabled means that even though the distribution might be deployed and ready to use, users can't use
it. Whenever a distribution is disabled, CloudFront doesn't accept any end-user requests that use the
domain name associated with that distribution. Until you switch the distribution from disabled to enabled
(by updating the distribution's configuration), no one can use it.
You can toggle a distribution between disabled and enabled as often as you want. Follow the process
for updating a distribution's configuration. For more information, see Listing, Viewing, and Updating
CloudFront Distributions (p. 48).
API Version 2016-08-01
78
Amazon CloudFront Developer Guide
Distribution Details

Custom Error Pages and Error Caching
You can have CloudFront return an object to the viewer (for example, an HTML file) when your Amazon
S3 or custom origin returns an HTTP 4xx or 5xx status code to CloudFront.You can also specify how
long an error response from your origin or a custom error page is cached in CloudFront edge caches.
For more information, see Customizing Error Responses (p. 127).
Note
The following values aren't included in the Create Distribution wizard, so you can configure
custom error pages only when you update a distribution.
Error Code
The HTTP status code for which you want CloudFront to return a custom error page.You can configure
CloudFront to return custom error pages for none, some, or all of the HTTP status codes that CloudFront
caches.
Response Page Path
The path to the custom error page (for example, /4xx-errors/403-forbidden.html) that you want
CloudFront to return to a viewer when your origin returns the HTTP status code that you specified for
Error Code (for example, 403). If you want to store your objects and your custom error pages in different
locations, your distribution must include a cache behavior for which the following is true:
• The value of Path Pattern matches the path to your custom error messages. For example, suppose
you saved custom error pages for 4xx errors in an Amazon S3 bucket in a directory named
/4xx-errors.Your distribution must include a cache behavior for which the path pattern routes
requests for your custom error pages to that location, for example, /4xx-errors/*.
•The value of Origin specifies the value of Origin ID for the origin that contains your custom error pages.
Response Code
The HTTP status code that you want CloudFront to return to the viewer along with the custom error page.
Error Caching Minimum TTL
The minimum amount of time that you want CloudFront to cache error responses from your origin server.
Restrictions
If you need to prevent users in selected countries from accessing your content, you can configure your
CloudFront distribution either to allow users in a whitelist of specified countries to access your content or
to not allow users in a blacklist of specified countries to access your content. For more information, see
Restricting the Geographic Distribution of Your Content (p. 82).
Note
The following values aren't included in the Create Distribution wizard, so you can configure geo
restrictions only when you update a distribution.
Enable Geo Restriction
Whether you want to prevent users in selected countries from accessing your content. There is no
additional charge for configuring geo restriction.
API Version 2016-08-01
79
Amazon CloudFront Developer Guide
Custom Error Pages and Error Caching

Restriction Type
How you want to specify the countries from which your users can access your content:
•Whitelist: The Countries list includes all of the countries from which you do want your users to access
your content.
•Blacklist: The Countries list includes all of the countries from which you do not want your users to
access your content.
Countries
The countries that you want to add to your whitelist or blacklist. To add a country, select it in the list on
the left and choose Add. Note the following:
• To add multiple consecutive countries, select the first country, press and hold the Shift key, select the
last country, and choose Add.
• To add multiple non-consecutive countries, select the first country, press and hold the Ctrl key, select
the remaining countries, and choose Add.
• To find a country in the left list, enter the first few characters of the country's full name.
• The two-letter code before the name of each country is the value that you enter if you want to create
or update a distribution by using the CloudFront API. We use the International Organization for
Standardization country codes. For an easy-to-use list, sortable by code and by country name, see the
Wikipedia entry ISO 3166-1 alpha-2.
Values that CloudFront Displays in the Console
When You Create or Update a Web Distribution
When you create a new web distribution or update an existing distribution, CloudFront displays the
following information in the CloudFront console.
Note
Active trusted signers, the AWS accounts that have an active CloudFront key pair and can be
used to create valid signed URLs, are currently not visible in the CloudFront console.
Distribution ID (General Tab)
When you perform an action on a distribution using the CloudFront API, you use the distribution ID to
specify which distribution you want to perform the action on, for example, EDFDVBD6EXAMPLE.You can't
change the distribution ID.
Distribution Status (General Tab)
The possible status values for a distribution are listed in the following table.
DescriptionValue
The distribution is still being created or updated.InProgress
The distribution has been created or updated and the changes have been fully
propagated through the CloudFront system.
Deployed
API Version 2016-08-01
80
Amazon CloudFront Developer Guide
Values that CloudFront Displays in the Console When
You Create or Update a Web Distribution

Note
In addition to ensuring that the status for a distribution is Deployed, you must enable the
distribution before users can use CloudFront to access your content. For more information, see
Distribution State (p. 78).
Last Modified (General Tab)
The date and time that the distribution was last modified, using ISO 8601 format, for example,
2012-05-19T19:37:58Z. For more information, go to http://www.w3.org/TR/NOTE-datetime.
Domain Name (General Tab)
You use the distribution's domain name in the links to your objects. For example, if your distribution's
domain name is d111111abcdef8.cloudfront.net, the link to /images/image.jpg would be
http://d111111abcdef8.cloudfront.net/images/image.jpg.You can't change the CloudFront
domain name for your distribution. For more information about CloudFront URLs for links to your objects,
see Format of URLs for CloudFront Objects (p. 99).
If you specified one or more alternate domain names (CNAMEs), you can use your own domain names
for links to your objects instead of using the CloudFront domain name. For more information about
CNAMEs, see Alternate Domain Names (CNAMEs) (p. 76).
Note
CloudFront domain names are unique.Your distribution's domain name was never used for a
previous distribution and will never be reused for another distribution in the future.
Requirements and Recommendations for Using
Amazon EC2 and Other Custom Origins
Follow these guidelines for using Amazon EC2 instances and other custom origins with CloudFront.
• Host and serve the same content on all servers.
•Log the X-Amz-Cf-Id header entries on all servers; CloudFront requires this information for debugging.
• Restrict access requests to the HTTP and HTTPS ports that your custom origin listens on.
• Synchronize the clocks of all servers in your implementation.
• Use redundant servers to handle failures.
• For information about using a custom origin to serve private content, see Using an HTTP Server for
Private Content (p. 164).
• For information about request and response behavior and about supported HTTP status codes, see
Request and Response Behavior (p. 139).
If you use Amazon Elastic Compute Cloud for your custom origins, we recommend that you do the
following:
1. Use an Amazon Machine Image that automatically installs the software for a web server. For more
information, see the Amazon EC2 documentation.
2. Use an Elastic Load Balancing load balancer to handle traffic across multiple Amazon EC2 instances
and to isolate your application from changes to Amazon EC2 instances. For example, if you use a
load balancer, you can add and delete Amazon EC2 instances without changing your application.
For more information, see the Elastic Load Balancing documentation.
API Version 2016-08-01
81
Amazon CloudFront Developer Guide
Last Modified (General Tab)

3. When you create your CloudFront distribution, specify the URL of the load balancer for the domain
name of your origin server. For more information, see Working with Web Distributions (p. 58).
Using AWS WAF to Control Access to Your
Content
AWS WAF is a web application firewall that lets you monitor the HTTP and HTTPS requests that are
forwarded to CloudFront, and lets you control access to your content. Based on conditions that you
specify, such as the IP addresses that requests originate from or the values of query strings, CloudFront
responds to requests either with the requested content or with an HTTP 403 status code (Forbidden).
You can also configure CloudFront to return a custom error page when a request is blocked. For more
information about AWS WAF, see the AWS WAF Developer Guide.
After you create an AWS WAF web access control list (web ACL), you create or update a web distribution
and associate the distribution with a web ACL.You can associate as many CloudFront distributions as
you want with the same web ACL or with different web ACLs. For information about creating a web
distribution and associating it with a web ACL, see Creating or Updating a Web Distribution Using the
CloudFront Console (p. 59).
To associate or disassociate a web ACL and an existing distribution, or change the web ACL that is
associated with a distribution, perform the following procedure.
To associate or disassociate an AWS WAF web ACL and an existing CloudFront distribution
by using the CloudFront console
1. Sign in to the AWS Management Console and open the CloudFront console at https://
console.aws.amazon.com/cloudfront/.
2. Choose the ID for the distribution that you want to update.
3. On the General tab, choose Edit.
4. On the Distribution Settings page, in the AWS WAF Web ACL list, choose the web ACL that you
want to associate with this distribution.
If you want to disassociate the distribution from all web ACLs, choose None. If you want to associate
the distribution with a different web ACL, choose the new web ACL.
5. Choose Yes, Edit.
6. Repeat steps 2 through 5 for other distributions, if any, for which you want to add, delete, or change
associations with AWS WAF web ACLs.
7. After you change settings, the value of the Status column for the distributions that you updated
changes to InProgress while CloudFront propagates the changes to edge locations. When Status
changes to Deployed for a distribution, the distribution is ready to use AWS WAF when it processes
requests. (The value of the State column for the distribution must also be Enabled.) This should
take less than 15 minutes after you save the last change to a distribution.
Restricting the Geographic Distribution of Your
Content
You can use geo restriction, also known as geoblocking, to prevent users in specific geographic locations
from accessing content that you're distributing through a CloudFront web distribution.To use geo restriction,
you have two options:
API Version 2016-08-01
82
Amazon CloudFront Developer Guide
Using AWS WAF to Control Access to Your Content

• Use the CloudFront geo restriction feature. Use this option to restrict access to all of the files that are
associated with a distribution and to restrict access at the country level.
•Use a third-party geolocation service. Use this option to restrict access to a subset of the files that are
associated with a distribution or to restrict access at a finer granularity than the country level.
Topics
•Using CloudFront Geo Restriction (p. 83)
•Using a Third-Party Geolocation Service (p. 84)
Using CloudFront Geo Restriction
When a user requests your content, CloudFront typically serves the requested content regardless of
where the user is located. If you need to prevent users in specific countries from accessing your content,
you can use the CloudFront geo restriction feature to do one of the following:
•Allow your users to access your content only if they're in one of the countries on a whitelist of approved
countries.
•Prevent your users from accessing your content if they're in one of the countries on a blacklist of banned
countries.
For example, if a request comes from a country where, for copyright reasons, you are not authorized to
distribute your content, you can use CloudFront geo restriction to block the request.
Note
CloudFront determines the location of your users by using a third-party GeoIP database. The
accuracy of the mapping between IP addresses and countries varies by region. Based on recent
tests, the overall accuracy is 99.8%.
Here's how geo restriction works:
1. Suppose you have rights to distribute your content only in Liechtenstein.You update your CloudFront
web distribution and add a whitelist that contains only Liechtenstein. (Alternatively, you could add a
blacklist that contains every country except Liechtenstein.)
2. A user in Monaco requests your content, and DNS routes the request to the CloudFront edge location
in Milan, Italy.
3. The edge location in Milan looks up your distribution and determines that the user in Monaco is not
allowed to download your content.
4. CloudFront returns an HTTP status code of 403 (Forbidden) to the user.
You can optionally configure CloudFront to return a custom error message to the user, and you can
specify how long you want CloudFront to cache the error response for the requested object; the default
value is five minutes. For more information, see Customizing Error Responses (p. 127).
Geo restriction applies to an entire web distribution. If you need to apply one restriction to part of your
content and a different restriction (or no restriction) to another part of your content, you must either create
separate CloudFront web distributions or use a third-party geolocation service.
If you enable CloudFront access logging, you can identify the requests that CloudFront rejected by
searching for the log entries for which the value of sc-status (the HTTP status code) is 403. However,
using only the access logs, you can't distinguish a request that CloudFront rejected based on the location
of the user from a request that CloudFront rejected because the user didn't have permission to access
the object for another reason. If you have a third-party geolocation service such as Digital Element or
MaxMind, you can identify the location of requests based on the IP address in the c-ip (client IP) column
in the access logs. For more information about CloudFront access logs, see Access Logs (p. 256).
API Version 2016-08-01
83
Amazon CloudFront Developer Guide
Using CloudFront Geo Restriction

The following procedure explains how to use the CloudFront console to add geo restriction to an existing
web distribution. For information about how to use the console to create a web distribution, see Working
with Web Distributions (p. 58).
To use the CloudFront console to add geo restriction to your CloudFront web distribution
1. Sign in to the AWS Management Console and open the CloudFront console at https://
console.aws.amazon.com/cloudfront/.
2. Select the distribution that you want to update.
3. In the Distribution Settings pane, choose the Restrictions tab.
4. Choose Edit.
5. Enter the applicable values. For more information, see Restrictions (p. 79).
6. Choose Yes, Edit.
Using a Third-Party Geolocation Service
The CloudFront geo restriction feature lets you control distribution of your content at the country level for
all files that you're distributing with a given web distribution. If you have geographic restrictions on where
your content can be distributed and the restrictions don't follow country boundaries, or if you want to limit
access to only some of the files that you're distributing through CloudFront, you can combine CloudFront
with a third-party geolocation service.This can allow you to control access to your content based not only
on country but also based on city, zip or postal code, or even latitude and longitude.
When you're using a third-party geolocation service, we recommend that you use CloudFront signed
URLs, which let you specify an expiration date and time after which the URL is no longer valid. In addition,
we recommend that you use an Amazon S3 bucket as your origin because you can then use a CloudFront
origin access identity to prevent users from accessing your content directly from the origin. For more
information about signed URLs and origin access identities, see Serving Private Content through
CloudFront (p. 162).
The following task list explains how to control access to your files by using a third-party geolocation
service.
Task list for restricting access to files in a CloudFront distribution based on geographic
location
1. Get an account with a geolocation service.
2. Upload your content to an Amazon Simple Storage Service (S3) bucket. For more information, see
the Amazon S3 documentation.
3. Configure Amazon CloudFront and Amazon S3 to serve private content. For more information, see
Serving Private Content through CloudFront (p. 162).
4. Write your web application to do the following:
a. Send the IP address for each user request to the geolocation service.
b. Evaluate the return value from the geolocation service to determine whether the user is in a
location to which you want CloudFront to distribute your content.
c. Based on whether you want to distribute your content to the user's location, either generate a
signed URL for your CloudFront content, or return HTTP status code 403 (Forbidden) to the
user. Alternatively, you can configure CloudFront to return a custom error message. For more
information, see Customizing Error Responses (p. 127).
For more information, refer to the documentation for the geolocation service that you're using.
API Version 2016-08-01
84
Amazon CloudFront Developer Guide
Using a Third-Party Geolocation Service

You can use a web server variable to get the IP addresses of the users who are visiting your website.
Note the following caveats:
• If your web server is not connected to the Internet through a load balancer, you can use a web server
variable to get the remote IP address. However, this IP address isn't always the user's IP address—it
can also be the IP address of a proxy server, depending on how the user is connected to the Internet.
• If your web server is connected to the Internet through a load balancer, a web server variable might
contain the IP address of the load balancer, not the IP address of the user. In this configuration, we
recommend that you use the last IP address in the X-Forwarded-For http header.This header typically
contains more than one IP address, most of which are for proxies or load balancers.The last IP address
in the list is the one most likely to be associated with the user's geographic location.
If your web server is not connected to a load balancer, we recommend that you use web server variables
instead of the X-Forwarded-For header to avoid IP address spoofing.
Configuring On-Demand Smooth Streaming
You can use CloudFront for on-demand streaming of media files that you've transcoded into the Microsoft
Smooth Streaming format. To distribute Smooth Streaming content on demand, you have two options:
•As the origin for your distribution, specify a web server that can stream files that have been transcoded
into Microsoft Smooth Streaming format.
• Enable Smooth Streaming in a CloudFront distribution. Smooth Streaming is a property of cache
behaviors, which means that you can use one distribution to distribute Smooth Streaming media files
as well as other content.
If you enable Smooth Streaming, note the following:
• You can still distribute other content using the same cache behavior if the content matches the value
of Path Pattern for that cache behavior.
•CloudFront can use either an Amazon S3 bucket or a custom origin for Smooth Streaming media files.
However, CloudFront cannot use a Microsoft IIS Server as an origin if the server is configured for
Smooth Streaming.
• You cannot invalidate media files in the Smooth Streaming format. If you want to update files before
they expire, you must rename them. For more information, see Adding, Removing, or Replacing Objects
in a Distribution (p. 114).
For information about Smooth Streaming clients, see Smooth Streaming Primer on the Microsoft website.
To use CloudFront to stream media files that have been encoded in the Microsoft Smooth Streaming
format without using a web server that can stream files in Smooth Streaming format, perform the following
tasks:
1. Transcode your media files into Smooth Streaming fragmented-MP4 format. For a list of applications
that can transcode into Smooth Streaming format, see Smooth Streaming Primer on the Microsoft
website.
2. Do one of the following:
•If you're using the CloudFront console: When you create a web distribution, enable Smooth
Streaming in the default cache behavior. Alternatively, you can enable Smooth Streaming in the
default cache behavior and/or one or more custom cache behaviors in an existing CloudFront web
distribution.
API Version 2016-08-01
85
Amazon CloudFront Developer Guide
Configuring On-Demand Smooth Streaming

•If you're using the CloudFront API: Add the SmoothStreaming element to the
DistributionConfig complex type for the default cache behavior and/or one or more custom
cache behaviors.
3. Upload the files in your Smooth Streaming presentations to the applicable origin.
4. Create either a clientaccesspolicy.xml or a crossdomainpolicy.xml file, and add it to a
location that is accessible at the root of your distribution, for example,
http://d111111abcdef8.cloudfront.net/clientaccesspolicy.xml. For more information,
see Making a Service Available Across Domain Boundaries on the Microsoft Developer Network
website.
5. For links in your application, specify the client manifest in the following format:
http://d111111abcdef8.cloudfront.net/video/presentation.ism/Manifest
Configuring On-Demand Progressive Downloads
To use CloudFront to distribute media files using progressive download, perform the following tasks:
1. Transcode your media files, if applicable.
2. Create a CloudFront web distribution. No special settings are required.
3. Upload your files to the origin that you specified when you created your distribution.
4. For links in your application (for example, a media player), specify the name of the media file in the
same format that you use for other objects that you're distributing using CloudFront. For more
information, see Format of URLs for CloudFront Objects (p. 99).
Configuring On-Demand Apple HTTP Live
Streaming (HLS)
To use CloudFront to stream media files in Apple HTTP Live Streaming (HLS) format, perform the following
tasks:
1. Transcode your media files into HLS format.You can use any transcoding application that supports
HLS format, for example, Amazon Elastic Transcoder.
2. Create a CloudFront web distribution. No special settings are required.
3. Upload your files to the origin that you specified when you created your distribution.
4. For links in your application (for example, a media player), specify the master playlist in the same
format that you use for other objects that you're distributing using CloudFront. For more information,
see Format of URLs for CloudFront Objects (p. 99).
API Version 2016-08-01
86
Amazon CloudFront Developer Guide
Configuring On-Demand Progressive Downloads

Working with RTMP Distributions
Topics
•How RTMP Distributions Work (p. 87)
•Task List for Streaming Media Files Using RTMP (p. 89)
•Creating an RTMP Distribution Using the CloudFront Console (p. 90)
•Values that You Specify When You Create or Update an RTMP Distribution (p. 90)
•Values that CloudFront Displays in the Console When You Create or Update an RTMP
Distribution (p. 95)
•Configuring the Media Player (p. 96)
•Using an Amazon S3 Bucket as the Origin for an RTMP Distribution (p. 96)
•Creating Multiple RTMP Distributions for an Origin Server (p. 97)
•Restricting Access Using Crossdomain.xml (p. 97)
•Error Codes for RTMP Distributions (p. 98)
•Troubleshooting RTMP Distributions (p. 98)
This section describes how you configure and manage RTMP distributions. For information about how
to create an RTMP distribution, see Task List for Streaming Media Files Using RTMP (p. 89).
How RTMP Distributions Work
To stream media files using CloudFront, you provide two types of files to your end users:
• Your media files
• A media player, for example, JW Player, Flowplayer, or Adobe Flash
End users view your media files using the media player that you provide for them; they do not use the
media player (if any) that is already installed on their computer or other device.
When an end user streams your media file, the media player begins to play the content of the file while
the file is still being downloaded from CloudFront. The media file is not stored locally on the end user's
system.
API Version 2016-08-01
87
Amazon CloudFront Developer Guide
How RTMP Distributions Work
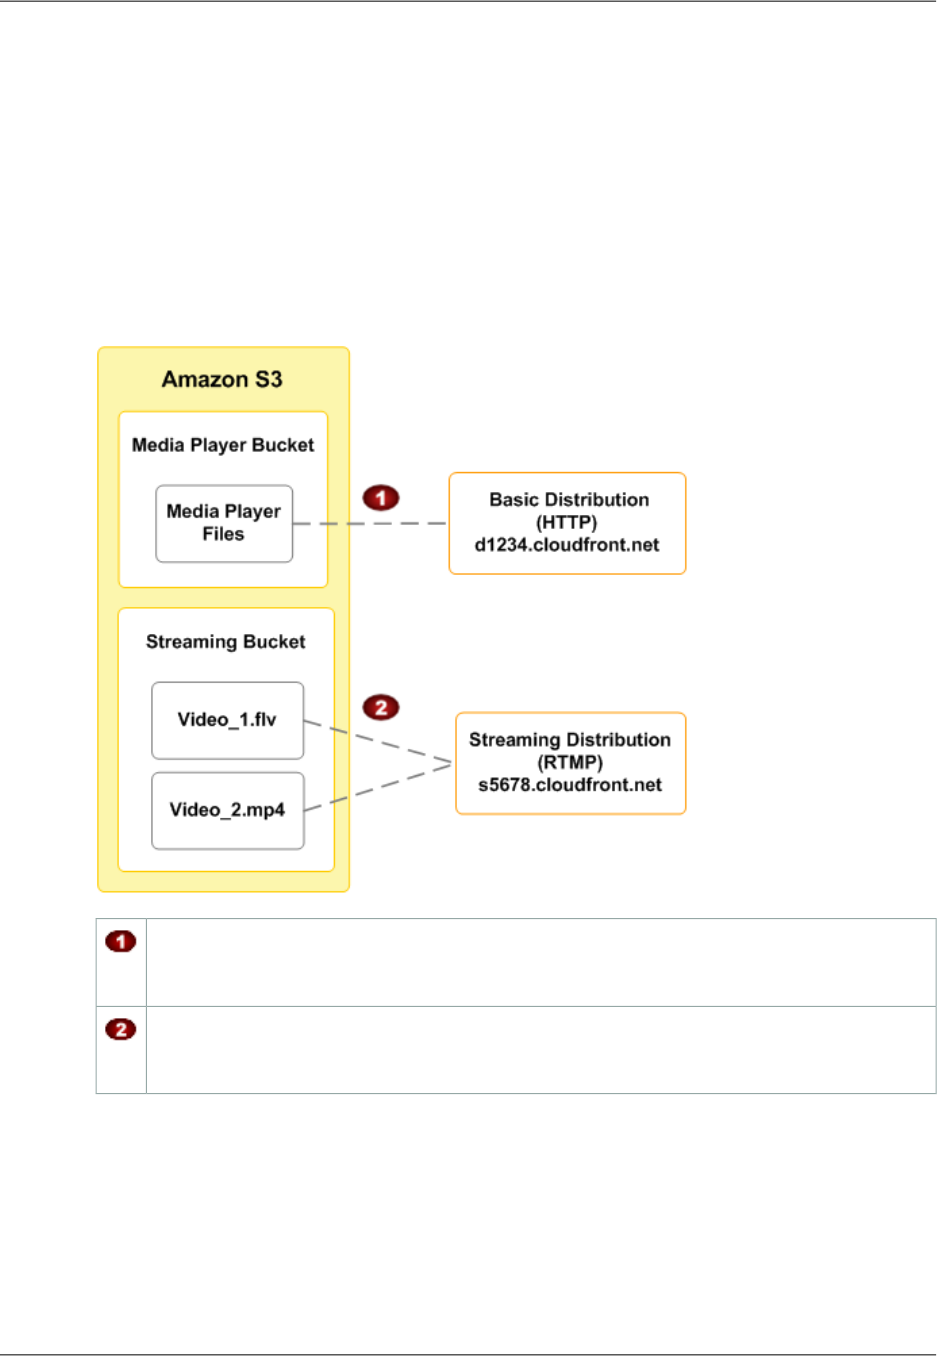
To use CloudFront to serve both the media player and the media files, you need two types of distributions:
a web distribution for the media player, and an RTMP distribution for the media files. Web distributions
serve files over HTTP, while RTMP distributions stream media files over RTMP (or a variant of RTMP).
The following example assumes that your media files and your media player are stored in different buckets
in Amazon S3, but that isn't required—you can store media files and your media player in the same
Amazon S3 bucket.You can also make the media player available to end users in other ways, for example,
using CloudFront and a custom origin. However, the media files must use an Amazon S3 bucket as the
origin.
In the following diagram, your site serves a cached copy of the media player to each end user through
the d1234.cloudfront.net domain. The media player then accesses cached copies of your media
files through the s5678.cloudfront.net domain.
Your media player bucket holds the media player and is the origin server for a regular HTTP
distribution. In this example, the domain name for the distribution is d1234.cloudfront.net.
(The d in d1234.cloudfront.net indicates that this is a web distribution.)
Your streaming media bucket holds your media files and is the origin server for an RTMP distri-
bution. In this example, the domain name for the distribution is s5678.cloudfront.net. (The
s in s5678.cloudfront.net indicates that this is an RTMP distribution.)
When you configure CloudFront to distribute media files, CloudFront uses Adobe Flash Media Server 3.5
as the streaming server and streams your media files using Adobe's Real-Time Messaging Protocol
(RTMP). CloudFront accepts RTMP requests over port 1935 and port 80.
CloudFront supports the following variants of the RTMP protocol:
•RTMP—Adobe's Real-Time Message Protocol
•RTMPT—Adobe streaming tunneled over HTTP
API Version 2016-08-01
88
Amazon CloudFront Developer Guide
How RTMP Distributions Work

•RTMPE—Adobe encrypted
•RTMPTE—Adobe encrypted tunneled over HTTP
For a basic summary of RTMP and the file formats that Adobe Flash Media Server supports, go to
Overview of Streaming with Flash Media Server 3 on the Adobe website.The overview includes information
about supported codecs and containers.
CloudFront supports all of the features in Adobe Flash Media Server 3.5 related to dynamic streaming,
which lets you switch between streams of different qualities during playback. For more information, go
to Dynamic streaming in Flash Media Server 3.5: Part 1 on the Adobe website.
To serve streamed content, you need to provide your end users with a media player.You can write your
own player using Adobe Flash. For more information, go to http://www.adobe.com/products/flashplayer/.
Alternatively, you can use an existing player. For more information, see the following tutorials:
•On-Demand Video Streaming Using CloudFront and Adobe Flash Player (p. 338)
•On-Demand Video Streaming Using CloudFront and Flowplayer for Adobe Flash (p. 343)
•On-Demand Video Streaming Using CloudFront and JW Player (p. 348)
Task List for Streaming Media Files Using RTMP
This section summarizes the general process for configuring on-demand streaming using the Adobe
RTMP protocol for any media player. If you're using Adobe Flash Player, Flowplayer, or JW Player for
your media player, see the applicable tutorial instead:
•On-Demand Video Streaming Using CloudFront and Adobe Flash Player (p. 338)
•On-Demand Video Streaming Using CloudFront and Flowplayer for Adobe Flash (p. 343)
•On-Demand Video Streaming Using CloudFront and JW Player (p. 348)
The following task list summarizes the process for creating a web distribution.
To Create an RTMP Distribution
1. Create an Amazon S3 bucket for your media files. If you are using a different Amazon S3 bucket for
your media player, create an Amazon S3 bucket for the media player files, too.
The names of your buckets must be all lowercase and cannot contain spaces.
2. Choose and configure a media player to play your media files. For more information, refer to the
documentation for the media player.
3. Upload the files for your media player to the origin from which you want CloudFront to get the files.
If you are using an Amazon S3 bucket as the origin for the media player, make the files (not the
bucket) publicly readable.
4. Create a web distribution for your media player. (You can also use an existing distribution.) For more
information, see Task List for Creating a Web Distribution (p. 58).
5. Upload your media files to the Amazon S3 bucket that you created for the media files, and make the
content (not the bucket) publicly readable.
Important
Media files in a Flash Video container must include the .flv filename extension, or the media
will not stream.
You can put media player files and media files in the same bucket.
6. Create an RTMP distribution for your media files:
API Version 2016-08-01
89
Amazon CloudFront Developer Guide
Task List for Streaming Media Files Using RTMP

For more information about creating a web distribution using the CloudFront console, see Creating
an RTMP Distribution Using the CloudFront Console (p. 90).
•
•For information about creating a web distribution using the CloudFront API, go to POST Streaming
Distribution in the Amazon CloudFront API Reference.
7. Configure your media player. For more information, see Configuring the Media Player (p. 96).
If you have trouble getting your content to play, see Troubleshooting RTMP Distributions (p. 98).
Creating an RTMP Distribution Using the
CloudFront Console
The following procedure explains how to create an RTMP distribution using the CloudFront console. If
you want to create an RTMP distribution using the CloudFront API, go to POST Streaming Distribution
in the Amazon CloudFront API Reference.
For the current limit on the number of RTMP distributions that you can create for each AWS account, see
Amazon CloudFront Limits in the Amazon Web Services General Reference.To request a higher limit,
go to https://console.aws.amazon.com/support/home#/case/
create?issueType=service-limit-increase&limitType=service-code-cloudfront-distributions.
To create an RTMP distribution using the CloudFront console
1. Sign in to the AWS Management Console and open the CloudFront console at https://
console.aws.amazon.com/cloudfront/.
2. Click Create Distribution.
3. On the first page of the Create Distribution Wizard, in the RTMP section, choose Get Started.
4. Specify settings for the distribution. For more information, see Values that You Specify When You
Create or Update an RTMP Distribution (p. 90).
5. Click Create Distribution.
6. After CloudFront creates your distribution, the value of the Status column for your distribution will
change from InProgress to Deployed. If you chose to enable the distribution, it will then be ready
to process requests.This should take less than 15 minutes.
The domain name that CloudFront assigns to your distribution appears in the list of distributions.The
domain name also appears on the General tab for a selected distribution.
Values that You Specify When You Create or
Update an RTMP Distribution
To stream media files using CloudFront, you create an RTMP distribution and specify the following values.
Topics
•Origin Domain Name (Amazon S3 Bucket) (p. 91)
•Restrict Bucket Access (Amazon S3 Only) (p. 92)
•Origin Access Identity (Amazon S3 Only) (p. 92)
•Comment for New Identity(Amazon S3 Only) (p. 92)
API Version 2016-08-01
90
Amazon CloudFront Developer Guide
Creating an RTMP Distribution Using the CloudFront
Console

•Your Identities (Amazon S3 Only) (p. 92)
•Grant Read Permissions on Bucket (Amazon S3 Only) (p. 92)
•Price Class (p. 92)
•Alternate Domain Names (CNAMEs) (p. 93)
•Logging (p. 93)
•Bucket for Logs (p. 93)
•Log Prefix (p. 93)
•Comment (p. 93)
•Distribution State (p. 93)
•Restrict Viewer Access (Use Signed URLs) (p. 94)
•Trusted Signers (p. 94)
•AWS Account Numbers (p. 94)
Origin Domain Name (Amazon S3 Bucket)
The DNS domain name of the Amazon S3 bucket from which you want CloudFront to get objects for this
origin, for example, myawsbucket.s3.amazonaws.com. In the CloudFront console, click in the Origin
Domain Name field, and a list enumerates the Amazon S3 buckets that are associated with the current
AWS account. To use a bucket from a different AWS account, type the domain name of the bucket in the
following format:
bucket-name.s3.amazonaws.com
If your bucket is in the US Standard region and you want Amazon S3 to route requests to a facility in
Northern Virginia, use the following format:
bucket-name.s3-external-1.amazonaws.com
If you configured Amazon S3 Transfer Acceleration for your bucket, do not specify the s3-accelerate
endpoint for Origin Domain Name.
The files must be publicly readable unless you secure your content in Amazon S3 by using a CloudFront
origin access identity. For more information, see Using an Origin Access Identity to Restrict Access to
Your Amazon S3 Content (p. 166).
Important
The bucket name must conform to DNS naming requirements. For more information, go to Bucket
Restrictions and Limitations in the Amazon Simple Storage Service Developer Guide.
When you change the bucket from which CloudFront gets objects for the current origin, CloudFront
immediately begins replicating the change to CloudFront edge locations. Until the distribution configuration
is updated in a given edge location, CloudFront will continue to forward requests to the previous Amazon
S3 bucket. As soon as the distribution configuration is updated in that edge location, CloudFront begins
to forward requests to the new Amazon S3 bucket.
Changing the bucket does not require CloudFront to repopulate edge caches with objects from the new
origin. As long as the viewer requests in your application have not changed, CloudFront will continue to
serve objects that are already in an edge cache until the TTL on each object expires or until
seldom-requested objects are evicted.
For more information, see Using an Amazon S3 Bucket as the Origin for an RTMP Distribution (p. 96).
API Version 2016-08-01
91
Amazon CloudFront Developer Guide
Origin Domain Name (Amazon S3 Bucket)

Restrict Bucket Access (Amazon S3 Only)
Click Yes if you want to require end users to access objects in an Amazon S3 bucket by using only
CloudFront URLs, not by using Amazon S3 URLs. Then specify the applicable values.
Click No if you want end users to be able to access objects using either CloudFront URLs or Amazon S3
URLs.
For more information, see Using an Origin Access Identity to Restrict Access to Your Amazon S3
Content (p. 166).
Origin Access Identity (Amazon S3 Only)
If you chose Yes for Restrict Bucket Access, choose whether to create a new origin access identity or
use an existing one that is associated with your AWS account. If you already have an origin access
identity, we recommend that you reuse it to simplify maintenance. For more information about origin
access identities, see Using an Origin Access Identity to Restrict Access to Your Amazon S3
Content (p. 166).
Comment for New Identity(Amazon S3 Only)
If you chose Create a New Identity for Origin Access Identity, enter a comment that identifies the new
origin access identity. CloudFront will create the origin access identity when you create this distribution.
Your Identities (Amazon S3 Only)
If you chose Use an Existing Identity for Origin Access Identity, choose the origin access identity that
you want to use.You cannot use an origin access identity that is associated with another AWS account.
Grant Read Permissions on Bucket (Amazon S3
Only)
If you want CloudFront to automatically grant the origin access identity the permission to read objects in
your Amazon S3 bucket, click Yes, Update Bucket Policy.
Important
If you click Yes, Update Bucket Policy, CloudFront updates the bucket policy to grant the
specified origin access identity the permission to read objects in your bucket. However, CloudFront
does not remove existing permissions in the bucket policy or permissions on individual objects.
If users currently have permission to access the objects in your bucket using Amazon S3 URLs,
they will still have that permission after CloudFront updates your bucket policy.To view or change
the existing bucket policy and the existing permissions on the objects in your bucket, use a
method provided by Amazon S3. For more information, see Granting the Origin Access Identity
Permission to Read Objects in Your Amazon S3 Bucket (p. 168).
If you want to update permissions manually, for example, if you want to update ACLs on your objects
instead of updating bucket permissions, click No, I will Update Permissions.
Price Class
The price class that corresponds with the maximum price that you want to pay for CloudFront service.
By default, CloudFront serves your objects from edge locations in all CloudFront regions.
API Version 2016-08-01
92
Amazon CloudFront Developer Guide
Restrict Bucket Access (Amazon S3 Only)

For more information about price classes and about how your choice of price class affects CloudFront
performance for your distribution, see Choosing the Price Class for a CloudFront Distribution (p. 54). For
information about CloudFront pricing, including how price classes map to CloudFront regions, go to
Amazon CloudFront Pricing.
Alternate Domain Names (CNAMEs)
Optional.You can associate one or more CNAME aliases with a distribution so that you can use your
domain name (for example, example.com) in the URLs for your objects instead of using the domain name
that CloudFront assigned when you created your distribution. For more information, see Using Alternate
Domain Names (CNAMEs) (p. 50).
Logging
Whether you want CloudFront to log information about each request for an object and store the log files
in an Amazon S3 bucket.You can enable or disable logging at any time.There is no extra charge if you
enable logging, but you accrue the usual Amazon S3 charges for storing and accessing the files in an
Amazon S3 bucket.You can delete the logs at any time. For more information about CloudFront access
logs, see Access Logs (p. 256).
Bucket for Logs
If you chose On for Logging, the Amazon S3 bucket that you want CloudFront to store access logs in,
for example, myawslogbucket.s3.amazonaws.com. If you enable logging, CloudFront records
information about each end-user request for an object and stores the files in the specified Amazon S3
bucket.You can enable or disable logging at any time. For more information about CloudFront access
logs, see Access Logs (p. 256).
Log Prefix
Optional. If you chose On for Logging, specify the string, if any, that you want CloudFront to prefix to
the access log filenames for this distribution, for example, exampleprefix/. The trailing slash ( / ) is
optional but recommended to simplify browsing your log files. For more information about CloudFront
access logs, see Access Logs (p. 256).
Comment
Optional. When you create a distribution, you can include a comment of up to 128 characters.You can
update the comment at any time.
Distribution State
When you create a distribution, you must specify whether you want the distribution to be enabled or
disabled after it's created:
•Enabled means that as soon as the distribution is fully deployed you can deploy links that use the
distribution's domain name and end users can retrieve content. Whenever a distribution is enabled,
CloudFront accepts and processes any end-user requests for content that use the domain name
associated with that distribution.
When you create, modify, or delete a CloudFront distribution, it takes time for your changes to propagate
to the CloudFront database. An immediate request for information about a distribution might not show
the change. Propagation usually completes within minutes, but a high system load or network partition
might increase this time.
API Version 2016-08-01
93
Amazon CloudFront Developer Guide
Alternate Domain Names (CNAMEs)

•Disabled means that even though the distribution might be deployed and ready to use, end users can't
use it. When a distribution is disabled, CloudFront doesn't accept any end-user requests that use the
domain name associated with that distribution. Until you switch the distribution from disabled to enabled
(by updating the distribution's configuration), no one can use it.
You can toggle a distribution between disabled and enabled as often as you want. For information about
updating a distribution's configuration, see Listing, Viewing, and Updating CloudFront Distributions (p. 48).
Restrict Viewer Access (Use Signed URLs)
If you want requests for objects served by this distribution to use public URLs, click No. If you want
requests to use signed URLs, click Yes. Then specify the AWS accounts that you want to use to create
signed URLs; these accounts are known as trusted signers.
For more information about trusted signers, see Specifying the AWS Accounts That Can Create Signed
URLs and Signed Cookies (Trusted Signers) (p. 171).
Trusted Signers
Choose which AWS accounts you want to use as trusted signers for this distribution:
•Self: Use the account with which you're currently signed into the AWS Management Console as a
trusted signer. If you're currently signed in as an IAM user, the associated AWS account is added as
a trusted signer.
•Specify Accounts: Enter account numbers for trusted signers in the AWS Account Numbers field.
To create signed URLs, an AWS account must have at least one active CloudFront key pair.
Caution
If you're updating a distribution that you're already using to distribute content, add trusted signers
only when you're ready to start generating signed URLs for your objects. After you add trusted
signers to a distribution, users must use signed URLs to access the objects served by this
distribution.
AWS Account Numbers
If you want to create signed URLs using AWS accounts in addition to or instead of the current account,
enter one AWS account number per line in this field. Note the following:
•The accounts that you specify must have at least one active CloudFront key pair. For more information,
see Creating CloudFront Key Pairs for Your Trusted Signers (p. 172).
• You can't create CloudFront key pairs for IAM users, so you can't use IAM users as trusted signers.
•For information about how to get the AWS account number for an account, see How Do I Get Security
Credentials? in the Amazon Web Services General Reference.
• If you enter the account number for the current account, CloudFront automatically checks the Self
checkbox and removes the account number from the AWS Account Numbers list.
API Version 2016-08-01
94
Amazon CloudFront Developer Guide
Restrict Viewer Access (Use Signed URLs)
Values that CloudFront Displays in the Console
When You Create or Update an RTMP
Distribution
When you create a new RTMP distribution or update an existing distribution, CloudFront displays the
following information in the CloudFront console.
Note
Active trusted signers, the AWS accounts that have an active CloudFront key pair and can be
used to create valid signed URLs, are currently not visible in the CloudFront console.
Distribution ID
When you perform an action on a distribution using the CloudFront API, you use the distribution ID to
specify which distribution you want to perform the action on, for example, EDFDVBD6EXAMPLE.You can't
change the distribution ID.
Status
The possible status values for a distribution are listed in the following table.
DescriptionValue
The distribution is still being created or updated.InProgress
The distribution has been created or updated and the changes have been fully
propagated through the CloudFront system.
Deployed
In addition to ensuring that the status for a distribution is Deployed, you must enable the distribution
before end users can use CloudFront to access your content. For more information, see Distribution
State (p. 93).
Last Modified
The date and time that the distribution was last modified, using ISO 8601 format, for example,
2012-05-19T19:37:58Z. For more information, go to http://www.w3.org/TR/NOTE-datetime.
Domain Name
You use the distribution's domain name in the links to your objects, unless you're using alternate domain
names (CNAMEs). For example, if your distribution's domain name is
d111111abcdef8.cloudfront.net, the link to the example /images/image.jpg file would be
http://d111111abcdef8.cloudfront.net/images/image.jpg.You can't change the CloudFront
domain name for your distribution. For more information about CloudFront URLs for links to your objects,
see Format of URLs for CloudFront Objects (p. 99).
If you specified one or more alternate domain names (CNAMEs), you can use your own domain names
for links to your objects instead of using the CloudFront domain name. For more information about
CNAMEs, see Alternate Domain Names (CNAMEs) (p. 76).
API Version 2016-08-01
95
Amazon CloudFront Developer Guide
Values that CloudFront Displays in the Console When
You Create or Update an RTMP Distribution

Note
CloudFront domain names are unique.Your distribution's domain name was never used for a
previous distribution and will never be reused for another distribution in the future.
Configuring the Media Player
To play a media file, you must configure the media player with the correct path to the file. How you
configure the media depends on which media player you're using and how you're using it.
When you configure the media player, the path you specify to the media file must contain the characters
cfx/st immediately after the domain name, for example:
rtmp://s5c39gqb8ow64r.cloudfront.net/cfx/st/mediafile.flv.
Note
CloudFront follows Adobe's FMS naming requirements. Different players have their own rules
about how to specify streams. The example above is for JW Player. Check your player's
documentation. For example, Adobe's Flash Media Server does not allow the .flv extension
to be present on the play path. Many players remove the .flv extension for you.
Your media player might ask for the path separate from the file name. For example, with the JW Player
wizard, you specify a streamer and file variable:
•streamer—rtmp://s5c39gqb8ow64r.cloudfront.net/cfx/st (with no trailing slash)
•file— mediafile.flv
If you've stored the media files in a directory in your bucket (for example, videos/mediafile.flv),
then the variables for JW Player would be:
•streamer—rtmp://s5c39gqb8ow64r.cloudfront.net/cfx/st (with no trailing slash)
•file— videos/mediafile.flv
To use the JW Player wizard, go to the Setup Wizard page on the JW Player website.
MPEG Files
To serve MP3 audio files or H.264/MPEG-4 video files, you might need to prefix the file name with mp3:
or mp4:. Some media players can be configured to add the prefix automatically. The media player might
also require you to specify the file name without the file extension (for example, magicvideo instead of
magicvideo.mp4).
Using an Amazon S3 Bucket as the Origin for
an RTMP Distribution
When you create a distribution, you specify where CloudFront gets the files that it distributes to edge
locations. For an RTMP distribution, you must use an Amazon S3 bucket; custom origins are not supported.
To get your objects into your bucket, you can use any method supported by Amazon S3, for example,
the Amazon S3 API or a third-party tool.You can create a hierarchy in your bucket just as you would with
any other Amazon S3 bucket.You incur regular Amazon S3 charges for storing the objects in the bucket.
For more information about the charges to use CloudFront, see CloudFront Reports (p. 15).
API Version 2016-08-01
96
Amazon CloudFront Developer Guide
Configuring the Media Player

Using an existing Amazon S3 bucket as your CloudFront origin server doesn't change the bucket in any
way; you can still use it as you normally would to store and access Amazon S3 objects (at the normal
Amazon S3 prices).
You can use the same Amazon S3 bucket for both RTMP and web distributions.
Note
After you create an RTMP distribution, you can't change its origin server. If you need to change
the Amazon S3 bucket for an RTMP distribution, you must create a new distribution that uses
the new bucket and update either your links or your DNS records to use the domain name for
the new distribution.You can then delete the original distribution. For more information, see
Deleting a Distribution (p. 49).
When you specify the name of the Amazon S3 bucket that you want CloudFront to get objects from, you
generally use the following format:
bucket-name.s3.amazonaws.com
If your bucket is in the US Standard region and you want Amazon S3 to route requests to a facility in
Northern Virginia, use the following format:
bucket-name.s3-external-1.amazonaws.com
Do not specify the name of the bucket using the following values:
• The Amazon S3 path style, s3.amazonaws.com/bucket-name
• The Amazon S3 CNAME, if any
Important
For your bucket to work with CloudFront, the name must conform to DNS naming requirements.
For more information, go to Bucket Restrictions and Limitations in the Amazon Simple Storage
Service Developer Guide.
Creating Multiple RTMP Distributions for an
Origin Server
You typically create one RTMP distribution per Amazon S3 bucket, but you can choose to create multiple
RTMP distributions for the same bucket. For example, if you had two distributions for an Amazon S3
bucket, you could reference a single media file using either distribution. In this case, if you had a media
file called media.flv in your origin server, CloudFront would work with each distribution as though it
referenced an individual media.flv object: one media.flv accessible through one distribution, and
another media.flv accessible through the other distribution.
Restricting Access Using Crossdomain.xml
The Adobe Flash Media Server crossdomain.xml file specifies which domains can access media files
in a particular domain. CloudFront supplies a default file that allows all domains to access the media files
in your RTMP distribution, and you cannot change this behavior. If you include a more restrictive
crossdomain.xml file in your Amazon S3 bucket, CloudFront ignores it.
API Version 2016-08-01
97
Amazon CloudFront Developer Guide
Creating Multiple RTMP Distributions for an Origin
Server

Error Codes for RTMP Distributions
The following table lists the error codes that CloudFront can send to your media player. The errors are
part of the string returned with Event.info.application.message or Event.info.description.
DescriptionError
The distribution was not found.DistributionNotFound
The distribution is not an RTMP distribution.DistributionTypeMismatch
The instance is invalid.InvalidInstance
The URI is invalid.InvalidURI
Troubleshooting RTMP Distributions
If you're having trouble getting your media files to play, check the following items.
DescriptionItem to Check
The media player must be served by a regular HTTP distribution (for example,
domain name d111111abcdef8.cloudfront.net), and media files must be served
by an RTMP distribution (for example, domain name
s5c39gqb8ow64r.cloudfront.net). Make sure you're not using the same distri-
bution for both.
Separate distributions
for the media player files
and media files
Confirm that the path for the file includes /cfx/st.You don't need to include
/cfx/st in the path to the object in the Amazon S3 bucket. For more inform-
ation, see Configuring the Media Player (p. 96).
/cfx/st in the file path
Some media players require that you include the file name extension (for
example, mp4:) before the file name in the file path. Some media players
also require that you exclude the file name extension (for example, .mp4)
from the file path. For more information, see MPEG Files (p. 96).
Note
The names of the media files in your Amazon S3 bucket must always
include the applicable file name extension.
File names in the file
path
Adobe Flash Media Server uses port 1935 for RTMP. Make sure your firewall
has this port open. If it doesn't, the typical message returned is "Unable to
play video." You can also switch to RTMPT to tunnel over HTTP using port
80.
Port 1935 on your fire-
wall
By default, the Adobe Flash Player won't display a message if the video file
it's trying to play is missing. Instead, it waits for the file to show up.You might
want to change this behavior to give your end users a better experience.
To instead have the player send a message if the video is missing, use
play("vid",0,-1) instead of play("vid").
Adobe Flash Player
messaging
API Version 2016-08-01
98
Amazon CloudFront Developer Guide
Error Codes for RTMP Distributions

Working with Objects
Topics
•Format of URLs for CloudFront Objects (p. 99)
•How CloudFront Processes HTTP and HTTPS Requests (p. 102)
•Increasing the Proportion of Requests that Are Served from CloudFront Edge Caches (p. 102)
•Configuring CloudFront to Cache Based on Query String Parameters (p. 105)
•Configuring CloudFront to Cache Objects Based on Cookies (p. 106)
•Configuring CloudFront to Cache Objects Based on Request Headers (p. 108)
•Forwarding Custom Headers to Your Origin (Web Distributions Only) (p. 112)
•Adding, Removing, or Replacing Objects in a Distribution (p. 114)
•Customizing Error Responses (p. 127)
•How CloudFront Processes Partial Requests for an Object (Range GETs) (p. 132)
•Specifying a Default Root Object (Web Distributions Only) (p. 132)
•Serving Compressed Files (p. 135)
This section describes how you work with objects in CloudFront.
Format of URLs for CloudFront Objects
Topics
•Format of Public URLs for Objects in Amazon S3 (p. 100)
•Format of Public URLs for Objects in a Custom Origin (p. 101)
•How Public URLs Affect the Invalidation of Directories (p. 101)
•Format of Signed URLs (p. 101)
When you create a distribution, you receive the CloudFront domain name associated with that distribution.
You use that domain name when creating the links to your objects. If you have another domain name
that you'd rather use (for example, www.example.com), you can add a CNAME alias. For more information,
see Using Alternate Domain Names (CNAMEs) (p. 50).
When you create URLs to give end users access to objects in your CloudFront distribution, the URLs are
either public URLs or signed URLs:
API Version 2016-08-01
99
Amazon CloudFront Developer Guide
Format of URLs for CloudFront Objects

Public URLs allow users to access the following objects:
• Objects on which there are no restrictions.
•Objects in an Amazon S3 bucket that end users must access through CloudFront but that don't require
a signed URL. These objects can't be accessed using an Amazon S3 URL.
Signed URLs are required to access the objects that are specified by a cache behavior that you have
configured to require signed URLs. Note that if a request for an object (for example, image.jpg) matches
the path patterns for two or more cache behaviors, CloudFront will process the request based on the
cache behavior that is listed first in the distribution. If the first cache behavior doesn't require signed URLs
and the second cache behavior does require signed URLs, end users will be able to access image.jpg
without a signed URL.
For more information about cache behaviors, including path patterns, see Cache Behavior Settings (p.68).
For more information about signed URLs, see Serving Private Content through CloudFront (p. 162).
Format of Public URLs for Objects in Amazon S3
A public URL for an object in an Amazon S3 bucket uses this format:
http://<CloudFront domain name>/<object name in Amazon S3 bucket>
Important
If the distribution serves streaming content, additional characters are required in the path to the
file. For more information, see Configuring the Media Player (p. 96).
For example, suppose you have an Amazon S3 bucket called mybucket.The bucket contains a publicly
readable object named /images/image.jpg.
You create a CloudFront distribution and specify mybucket.s3.amazonaws.com as the origin server
for this distribution. CloudFront returns d111111abcdef8.cloudfront.net as the domain name for
the distribution and EDFDVBD6EXAMPLE as the distribution ID.
The URL you give to end users to access the object in this example is:
http://d111111abcdef8.cloudfront.net/images/image.jpg
For web distributions, if you're storing your content in more than one Amazon S3 bucket, the format of
URLs is the same—URLs don't include any information about your Amazon S3 buckets.To route requests
to the applicable bucket, you create an origin for each bucket and create one or more cache behaviors
that route requests to each origin. The path pattern in a cache behavior specifies which requests are
routed to the origin (the Amazon S3 bucket) that is associated with that cache behavior. For more
information about the settings for origins and for cache behaviors in a CloudFront distribution, see Values
that You Specify When You Create or Update a Web Distribution (p. 63).
For more information about names and paths for Amazon S3 buckets, see Virtual Hosting of Buckets in
the Amazon Simple Storage Service Developer Guide.
Anytime an end user accesses that object, CloudFront serves the object from the appropriate edge
location. If the object isn't in that edge location, CloudFront goes to the origin server associated with the
EDFDVBD6EXAMPLE distribution (mybucket.s3.amazonaws.com) and gets a copy of the object for the
edge location to serve to the end user.
API Version 2016-08-01
100
Amazon CloudFront Developer Guide
Format of Public URLs for Objects in Amazon S3

Format of Public URLs for Objects in a Custom
Origin
The format of public URLs for objects in a custom origin are much like public URLs for objects in Amazon
S3:
http://<CloudFront domain name>/<object name in custom origin>
If your object is in a folder on your origin server, then the CloudFront URL must include the name of the
folder. For example, if image.jpg is located in the images folder, then the URL is:
http://d111111abcdef8.cloudfront.net/images/image.jpg
CloudFront gets objects from the domain that you specified when you created the distribution, using the
object path and name in the public URL. For example, if the domain for your custom origin is example.com
and the object path and name is /images/image.jpg, CloudFront will get the object from the following
location:
http://example.com/images/image.jpg
If you're storing your content on more than one custom origin, the format of URLs is the same—URLs
don't include any information about the custom origin. To route requests to the applicable custom origin,
you add an origin to your distribution for each custom origin and create one or more cache behaviors that
route requests to each origin. The path pattern in a cache behavior specifies which requests are routed
to the origin that is associated with that cache behavior. For more information about the settings for origins
and for cache behaviors in a CloudFront distribution, see Values that You Specify When You Create or
Update a Web Distribution (p. 63).
How Public URLs Affect the Invalidation of
Directories
If you use CloudFront URLs that give end users access to directories, we recommend that you always
use the same URL format, either with a trailing slash (/) or without, for example:
http://d111111abcdef8.cloudfront.net/images/
http://d111111abcdef8.cloudfront.net/images
Browsers and other web applications will resolve both formats to the same directory. However, CloudFront
stores public URLs exactly as they appear in the request. If you want to invalidate a directory, you'll need
to specify the exact same directory, including or excluding the slash. If you don't have a standard for how
you specify directories, you'll need to invalidate the directory with and without the slash to ensure that
CloudFront removes the directory from the edge location. If you've reached the limit for free invalidations
for the month, you'll pay for both invalidations even though only one of the directories exists.
Format of Signed URLs
Signed URLs allow end users to access objects in a distribution that is configured to serve private content.
The URLs include extra information that restricts access to the cached objects. For information about the
format of signed URLs, see Serving Private Content through CloudFront (p. 162).
API Version 2016-08-01
101
Amazon CloudFront Developer Guide
Format of Public URLs for Objects in a Custom Origin

How CloudFront Processes HTTP and HTTPS
Requests
For Amazon S3 origins, CloudFront accepts requests in both HTTP and HTTPS protocols for objects in
a CloudFront distribution by default. CloudFront then forwards the requests to your Amazon S3 bucket
using the same protocol in which the requests were made.
For custom origins, when you create your distribution, you can specify how CloudFront accesses your
origin: HTTP only, or matching the protocol that is used by the viewer. For more information about how
CloudFront handles HTTP and HTTPS requests for custom origins, see Protocols (p. 153).
For information about how to restrict your web distribution so that end users can only access objects
using HTTPS, see Using an HTTPS Connection to Access Your Objects (p. 229). (This option doesn't
apply to RTMP distributions, which use the RTMP protocol.)
Note
The charge for HTTPS requests is higher than the charge for HTTP requests. For more information
about billing rates, go to the CloudFront pricing plan.
Increasing the Proportion of Requests that Are
Served from CloudFront Edge Caches
One of the purposes of using CloudFront is to reduce the number of requests that your origin server
responds to.This reduces the load on your origin server and also reduces latency because more objects
are served from CloudFront edge locations, which are closer to your users.The more requests that
CloudFront is able to serve from edge caches as a proportion of all requests (the greater the cache hit
ratio), the fewer requests that CloudFront needs to forward to your origin to get the latest version or a
unique version of an object.
You can view the percentage of viewer requests that are hits, misses, and errors in the CloudFront
console. For more information, see CloudFront Cache Statistics Reports (p.16) in the Amazon CloudFront
Developer Guide.
The following sections explain how to improve your cache hit ratio.
Topics
•Specifying How Long CloudFront Caches Your Objects (p. 102)
•Caching Based on Query String Parameters (p. 103)
•Caching Based on Cookie Values (p. 103)
•Caching Based on Request Headers (p. 104)
•Serving Media Content by Using HTTP (p. 104)
Specifying How Long CloudFront Caches Your
Objects
To increase your cache hit ratio, you can configure your origin to add a Cache-Control max-age
directive to your objects, and specify the longest practical value for max-age. The shorter the cache
duration, the more frequently CloudFront forwards another request to your origin to determine whether
API Version 2016-08-01
102
Amazon CloudFront Developer Guide
How CloudFront Processes HTTP and HTTPS Requests

the object has changed and, if so, to get the latest version. For more information, see Specifying How
Long Objects Stay in a CloudFront Edge Cache (Expiration) (p. 116).
Caching Based on Query String Parameters
If you configure CloudFront to cache based on query string parameters, you can improve caching if you
do the following:
•Configure CloudFront to forward only the query strings for which your origin will return unique objects.
• Use the same case (uppercase or lowercase) for all instances of the same parameter. For example, if
one request contains parameter1=A and another contains parameter1=a, CloudFront forwards
separate requests to your origin when a request contains parameter1=A and when a request contains
parameter1=a. CloudFront then separately caches the corresponding objects returned by your origin
separately even if the objects are identical. If you use just A or a, CloudFront forwards fewer requests
to your origin.
• List parameters in the same order. As with differences in case, if one request for an object contains
the query string parameter1=a¶meter2=b and another request for the same object contains
parameter2=b¶meter1=a, CloudFront forwards both requests to your origin and separately
caches the corresponding objects even if they're identical. If you always use the same order for
parameters, CloudFront forwards fewer requests to your origin.
For more information, see Configuring CloudFront to Cache Based on Query String Parameters (p. 105).
If you want to review the query strings that CloudFront forwards to your origin, enable CloudFront access
logs and see the values in the cs-uri-query column of your log files. For more information, see Access
Logs (p. 256).
Caching Based on Cookie Values
If you configure CloudFront to cache based on cookie values, you can improve caching if you do the
following:
•Configure CloudFront to forward only specified cookies instead of forwarding all cookies. For the cookies
that you configure CloudFront to forward to your origin, CloudFront forwards every combination of
cookie name and value, and separately caches the objects that your origin returns, even if they're all
identical.
For example, suppose that viewers include two cookies in every request, that each cookie has three
possible values, and that all combinations of cookie values are possible. CloudFront forwards up to six
different requests to your origin for each object. If your origin returns different versions of an object
based on only one of the cookies, then CloudFront is forwarding more requests to your origin than
necessary and is needlessly caching multiple identical versions of the object.
•Create separate cache behaviors for static and dynamic content, and configure CloudFront to forward
cookies to your origin only for dynamic content.
For example, suppose you have just one cache behavior for your distribution and that you're using the
distribution both for dynamic content, such as .php files, and for .css files that rarely change. CloudFront
caches separate versions of your .css files based on cookie values, so each CloudFront edge location
forwards a request to your origin for every new cookie value or combination of cookie values.
If you create a cache behavior for which the path pattern is *.css and for which CloudFront doesn't
cache based on cookie values, then CloudFront forwards requests for .css files to your origin only for
the first request that an edge location receives for a given .css file and for the first request after a .css
file expires.
API Version 2016-08-01
103
Amazon CloudFront Developer Guide
Caching Based on Query String Parameters

• If possible, create separate cache behaviors for dynamic content for which cookie values are unique
for each user (such as a user ID) and dynamic content that varies based on a smaller number of unique
values.
For more information, see Configuring CloudFront to Cache Objects Based on Cookies (p. 106). If you
want to review the cookies that CloudFront forwards to your origin, enable CloudFront access logs and
see the values in the cs(Cookie) column of your log files. For more information, see Access Logs (p.256).
Caching Based on Request Headers
If you configure CloudFront to cache based on request headers, you can improve caching if you do the
following:
• Configure CloudFront to forward and cache based only specified headers instead of forwarding and
caching based on all headers. For the headers that you specify, CloudFront forwards every combination
of header name and value and separately caches the objects that your origin returns even if they're all
identical.
Note
CloudFront always forwards to your origin the headers specified in the following topics:
• How CloudFront Processes and Forwards Requests to Your Amazon S3 Origin Server >
HTTP Request Headers that CloudFront Removes or Updates (p. 142)
•How CloudFront Processes and Forwards Requests to Your Custom Origin Server > HTTP
Request Headers and CloudFront Behavior (p. 149)
When you configure CloudFront to cache based on request headers, you don't change the headers
that CloudFront forwards, only whether CloudFront caches objects based on the header values.
• Try to avoid caching based on request headers that have large numbers of unique values.
For example, if you want to serve different sizes of an image based on the user's device, then don't
configure CloudFront to cache based on the User-Agent header, which has an enormous number of
possible values. Instead, configure CloudFront to cache based on the CloudFront device-type headers
CloudFront-Is-Desktop-Viewer, CloudFront-Is-Mobile-Viewer,
CloudFront-Is-SmartTV-Viewer, and CloudFront-Is-Tablet-Viewer. In addition, if you're
returning the same version of the image for tablets and desktops, then forward only the
CloudFront-Is-Tablet-Viewer header, not the CloudFront-Is-Desktop-Viewer header.
For more information, see Configuring CloudFront to Cache Objects Based on Request Headers (p. 108).
Serving Media Content by Using HTTP
When you use HTTP to serve media content, we recommend that you use an HTTP-based dynamic
streaming protocol such as Apple HTTP Dynamic Streaming (Apple HDS), Apple HTTP Live Streaming
(Apple HLS), Microsoft Smooth Streaming, or MPEG-DASH. For dynamic-streaming protocols, a video
is divided into a lot of small segments that are typically just a few seconds long each. If your users
commonly stop watching before the end of a video (for example, because they close their viewer during
the credits), CloudFront has still cached all of the small segments up to that point in the video. If you're
using a protocol for which a video is served in a single, large file and a user stops watching before the
end, CloudFront might not cache the entire video, and it might need to request the video from your origin
again the next time that CloudFront receives a request for it.
API Version 2016-08-01
104
Amazon CloudFront Developer Guide
Caching Based on Request Headers

Configuring CloudFront to Cache Based on
Query String Parameters
For web distributions, you can choose whether you want CloudFront to forward query string parameters
to your origin. For RTMP distributions, you cannot configure CloudFront to forward query string parameters
to your origin.
For both types of distributions, if you enable logging, CloudFront logs the full URL, including query string
parameters. For web distributions, this is true regardless of whether you have configured CloudFront to
forward query strings. For more information about CloudFront logging, see Access Logs (p. 256).
For more information, see the applicable topic:
•Query String Parameters and Web Distributions (p. 105)
•Query String Parameters and RTMP Distributions (p. 106)
Query String Parameters and Web Distributions
For web distributions, you can specify whether you want CloudFront to include query strings when it
forwards requests to your origin. For example, you can specify whether you want CloudFront to forward
the ?parameter1=a part of the following URL:
http://d111111abcdef8.cloudfront.net/images/image.jpg?parameter1=a
If you configure CloudFront to forward query strings to your origin, CloudFront will include the query string
portion of the URL when caching the object. For example, the following query strings cause CloudFront
to cache three objects.This is true even if your origin always returns the same image.jpg regardless
of the query string:
•http://d111111abcdef8.cloudfront.net/images/image.jpg?parameter1=a
•http://d111111abcdef8.cloudfront.net/images/image.jpg?parameter1=b
•http://d111111abcdef8.cloudfront.net/images/image.jpg?parameter1=c
If your origin returns different versions of an object (for example, /images/image.jpg) based on the
query string, select Yes for Forward Query Strings in the CloudFront console or specify true for the
value of the QueryString element in the DistributionConfig complex type when you're using the
CloudFront API.
If your origin returns the same version of an object regardless of the query string, select No or false.
This increases the likelihood that CloudFront can serve a request from the cache, which improves
performance and reduces the load on your origin.
The order of parameters matters in query strings. If you configure CloudFront to forward query strings to
your origin, the following query strings cause CloudFront to cache two objects:
•http://d111111abcdef8.cloudfront.net/images/image.jpg?parameter1=a¶meter2=b
•http://d111111abcdef8.cloudfront.net/images/image.jpg?parameter2=b¶meter1=a
Case also matters in query strings. If you configure CloudFront to forward query strings to your origin,
the following query strings cause CloudFront to cache two objects:
•http://d111111abcdef8.cloudfront.net/images/image.jpg?parameter1=a
•http://d111111abcdef8.cloudfront.net/images/image.jpg?parameter1=A
API Version 2016-08-01
105
Amazon CloudFront Developer Guide
Configuring CloudFront to Cache Based on Query String
Parameters

If you're using signed URLs to restrict access to your content (if you added trusted signers to your
distribution), CloudFront removes the following query string parameters before forwarding the rest of the
URL to your origin:
•Expires
•Key-Pair-Id
•Policy
•Signature
This means that if you're using signed URLs and you're configuring CloudFront to forward query string
parameters to your origin, your own query string parameters cannot be named Expires, Key-Pair-Id,
Policy, or Signature.
Query String Parameters and RTMP Distributions
For RTMP distributions, when CloudFront requests an object from the origin server, it removes any query
string parameters. For example, if CloudFront receives the following request and media.flv is not
already in the CloudFront cache:
http://d111111abcdef8.cloudfront.net/media/media.flv?parameter1=a
it sends the following URL to your origin server:
http://d111111abcdef8.cloudfront.net/media/media.flv
Configuring CloudFront to Cache Objects Based
on Cookies
For web distributions, you can choose whether you want CloudFront to forward cookies to your origin
and to cache separate versions of your objects based on cookie values in viewer requests.
For Real Time Messaging Protocol (RTMP) distributions, you cannot configure CloudFront to process
cookies. When CloudFront requests an object from the origin server, it removes any cookies before
forwarding the request to your origin. If your origin returns any cookies along with the object, CloudFront
removes them before returning the object to the viewer. For RTMP distributions, CloudFront does not
cache cookies in edge caches.
Important
Amazon S3 and some HTTP servers do not process cookies. Do not configure CloudFront cache
behaviors to forward cookies to an origin that doesn't process cookies, or you'll adversely affect
cacheability and, therefore, performance. For more information about cache behaviors, see
Cache Behavior Settings (p. 68).
For HTTP and HTTPS web distributions, you can choose whether you want CloudFront to forward cookies
to your origin. For RTMP distributions, you cannot configure CloudFront to process cookies.
For web distributions, CloudFront by default doesn't consider cookies when caching your objects in edge
locations. If your origin returns two objects and they differ only by the values in the Set-Cookie header,
CloudFront caches only one version of the object.
You can configure CloudFront to forward to your origin some or all of the cookies in viewer requests.
CloudFront uses the cookies in viewer requests to uniquely identify an object in the cache. For example,
suppose that requests for locations.html contain a country cookie that has a value of either uk or
fr. When you configure CloudFront to cache your objects based on the value of the country cookie,
API Version 2016-08-01
106
Amazon CloudFront Developer Guide
Query String Parameters and RTMP Distributions

CloudFront forwards requests for locations.html to the origin and includes the country cookie and
cookie values.Your origin returns locations.html, and CloudFront caches the object once for requests
in which the value of the country cookie is uk and once for requests in which the value is fr.
Note
If you configure CloudFront to forward cookies to your origin, CloudFront caches based on cookie
values.This is true even if your origin ignores the cookie values in the request and, in the previous
example, always returns the same version of locations.html to CloudFront. As a result,
CloudFront forwards more requests to your origin server for the same object, which slows
performance and increases the load on your origin server. If your origin server does not vary its
response based on the value of a given cookie, we recommend that you do not configure
CloudFront to forward that cookie to your origin.
You can configure each cache behavior in a web distribution to do one of the following:
•Forward all cookies to your origin – CloudFront forwards viewer requests to your origin, including
all cookies. When your origin returns a response, CloudFront caches the response, and the cookies
and cookie values in the viewer request. (If your origin returns cookies that were not in the viewer
request, CloudFront does not cache them.) CloudFront returns to the viewer the requested object and
all cookies and cookie values, including cookies that were not in the viewer request.
•Forward a whitelist of cookies that you specify – CloudFront removes any cookies that aren't on
the whitelist before forwarding requests to your origin. CloudFront caches the response from your origin
as well as the specified cookies and their values. (If your origin returns both whitelisted cookies and
cookies that aren't on your whitelist, CloudFront caches only the whitelisted cookies.) CloudFront also
returns to the viewer the object, including the specified cookies and cookie values. If the response from
the origin includes cookies that aren't on the whitelist, CloudFront returns those cookies to the viewer,
too.
For information about specifying wildcards in cookie names, see Whitelist Cookies (Amazon EC2 and
Other Custom Origins Only) (p. 73).
For the current limit on the number of cookie names that you can whitelist for each cache behavior,
see Amazon CloudFront Limits in the Amazon Web Services General Reference.To request a higher
limit, go to https://console.aws.amazon.com/support/home#/case/
create?issueType=service-limit-increase&limitType=service-code-cloudfront-distributions.
•Don't forward cookies to your origin – CloudFront doesn't cache your objects based on cookie
values. In addition, CloudFront removes the Cookie header from requests that it forwards to your origin
and removes the Set-Cookie header from responses that it returns to your viewers.
Note the following about specifying the cookies that you want to forward:
Access Logs
If you configure CloudFront to log requests and to log cookies, CloudFront logs all cookies and all
cookie attributes, even if you configure CloudFront not to forward cookies to your origin or if you
configure CloudFront to forward only a specified list of cookies. For more information about CloudFront
logging, see Access Logs (p. 256).
Case Sensitivity
Cookie names and values are both case sensitive. For example, if two cookies for the same object
are identical except for case, CloudFront will cache the object twice.
CloudFront Sorts Cookies
CloudFront sorts the cookies in natural order by cookie name before forwarding the request to your
origin.
If-Modified-Since and If-None-Match
If-Modified-Since and If-None-Match conditional requests are not supported.
Suspending Caching Based on Cookies
If you want CloudFront to temporarily stop caching cookies and cookie attributes, configure your
origin server to add the following header in responses to CloudFront:
API Version 2016-08-01
107
Amazon CloudFront Developer Guide
Configuring CloudFront to Cache Objects Based on
Cookies

no-cache="Set-Cookie"
Total Length of Cookie Names
The total number of bytes in all of the cookie names that you configure CloudFront to forward to your
origin can't exceed:
512 – (the number of cookies that you're forwarding)
For example, if you configure CloudFront to forward 10 cookies to your origin, the combined length
of the names of the 10 cookies can't exceed 502 bytes (512 – 10). If you configure CloudFront to
forward all cookies to your origin, the length of cookie names doesn't matter.
For information about using the CloudFront console to update a distribution so CloudFront forwards
cookies to the origin, see Listing, Viewing, and Updating CloudFront Distributions (p. 48). For information
about using the CloudFront API to update a distribution, see PUT Distribution Config in the Amazon
CloudFront API Reference.
Configuring CloudFront to Cache Objects Based
on Request Headers
For web distributions, CloudFront lets you choose whether you want CloudFront to forward headers to
your origin and to cache separate versions of a specified object based on the header values in viewer
requests.This allows you to serve different versions of your content based on the device the user is using,
the location of the viewer, the language the viewer is using, and a variety of other criteria. For RTMP
distributions, you cannot configure CloudFront to cache based on header values.
Topics
•Headers and Web Distributions (p. 108)
•Headers and RTMP Distributions (p. 112)
Headers and Web Distributions
By default, CloudFront doesn't consider headers when caching your objects in edge locations. If your
origin returns two objects and they differ only by the values in the request headers, CloudFront caches
only one version of the object.
You can configure CloudFront to forward headers to the origin, which causes CloudFront to cache multiple
versions of an object based on the values in one or more request headers. For example, suppose viewer
requests for logo.jpg contain a custom Product header that has a value of either Acme or Apex.When
you configure CloudFront to cache your objects based on the value of the Product header, CloudFront
forwards requests for logo.jpg to the origin and includes the Product header and header values.
CloudFront caches logo.jpg once for requests in which the value of the Product header is Acme and
once for requests in which the value is Apex.
You can configure each cache behavior in a web distribution to do one of the following:
• Forward all headers to your origin
Important
If you configure CloudFront to forward all headers to your origin, CloudFront doesn't cache
the objects associated with this cache behavior. Instead, it sends every request to the origin.
API Version 2016-08-01
108
Amazon CloudFront Developer Guide
Configuring CloudFront to Cache Objects Based on
Request Headers

• Forward a whitelist of headers that you specify. CloudFront caches your objects based on the values
in all of the specified headers. CloudFront also forwards the headers that it forwards by default, but it
caches your objects based only on the headers that you specify.
• Forward only the default headers. In this configuration, CloudFront doesn't cache your objects based
on the values in the request headers.
For the current limit on the number of headers that you can whitelist for each cache behavior, see Amazon
CloudFront Limits in the Amazon Web Services General Reference.To request a higher limit, go to https://
console.aws.amazon.com/support/home#/case/
create?issueType=service-limit-increase&limitType=service-code-cloudfront-distributions.
For information about using the CloudFront console to update a distribution so CloudFront forwards
headers to the origin, see Listing, Viewing, and Updating CloudFront Distributions (p. 48). For information
about using the CloudFront API to update an existing web distribution, see PUT Distribution Config in the
Amazon CloudFront API Reference.
Topics
•Selecting the Headers on Which You Want CloudFront to Base Caching (p. 109)
•Configuring CloudFront to Respect Cross-Origin Resource Sharing (CORS) Settings (p. 110)
•Configuring CloudFront to Cache Objects Based on the Device Type (p. 110)
•Configuring CloudFront to Cache Objects Based on the Language of the Viewer (p. 111)
•Configuring CloudFront to Cache Objects Based on the Location of the Viewer (p. 111)
•Configuring CloudFront to Cache Objects Based on the Protocol of the Request (p. 111)
•How Caching Based on Headers Affects Performance (p. 111)
•How the Case of Headers and Header Values Affects Caching (p. 111)
•Headers that CloudFront Returns to the Viewer (p. 111)
Selecting the Headers on Which You Want CloudFront to
Base Caching
The headers that you can forward to the origin and that CloudFront bases caching on depend on whether
you're using an Amazon S3 bucket or a custom origin.
•Amazon S3 – You can configure CloudFront to forward and to cache your objects based only on three
headers:Access-Control-Request-Headers, Access-Control-Request-Method, and Origin.
Forwarding these headers allows CloudFront to distribute content for websites that are enabled for
cross-origin resource sharing (CORS).You can't configure CloudFront to forward custom headers to
Amazon S3. For more information, see Configuring CloudFront to Respect Cross-Origin Resource
Sharing (CORS) Settings (p. 110).
•Custom origin – You can configure CloudFront to cache based on the value of any request header
except the following:
•Accept-Encoding
•Connection
•Cookie – If you want to forward and cache based on cookies, you use a separate setting in your
distribution. For more information, see Configuring CloudFront to Cache Objects Based on
Cookies (p. 106).
•Proxy-Authorization
•TE
•Upgrade
API Version 2016-08-01
109
Amazon CloudFront Developer Guide
Headers and Web Distributions

You can configure CloudFront to cache objects based on values in the Date and User-Agent headers,
but we don't recommend it. These headers have a lot of possible values, and caching based on their
values would cause CloudFront to forward significantly more requests to your origin.
For a full list of HTTP request headers and how CloudFront processes them, see the applicable topic:
•Amazon S3 origin – HTTP Request Headers that CloudFront Removes or Updates (p. 142)
•Custom origin – HTTP Request Headers and CloudFront Behavior (p. 149)
Configuring CloudFront to Respect Cross-Origin Resource
Sharing (CORS) Settings
If you enabled cross-origin resource sharing (CORS) on an Amazon S3 bucket or a custom origin, you
can configure CloudFront to respect the CORS settings. Configure CloudFront to forward a whitelist of
headers and include the applicable headers in the list of headers to forward, depending on whether you're
using Amazon S3 or a custom origin:
Amazon S3
• When you want OPTIONS responses to be cached, configure CloudFront to forward the following
headers:Origin, Access-Control-Request-Headers, and Access-Control-Request-Method.
• When you don't want OPTIONS responses to be cached, configure CloudFront to forward the Origin
header.You can also configure CloudFront to forward Access-Control-Request-Headers and
Access-Control-Request-Method headers, but it's not required.
Custom origins – Forward the Origin header along with any other headers required by your origin.
For more information about CORS and Amazon S3, see Enabling Cross-Origin Resource Sharing in the
Amazon Simple Storage Service Developer Guide.
Configuring CloudFront to Cache Objects Based on the
Device Type
If you want CloudFront to cache different versions of your objects based on the device a user is using to
view your content, configure CloudFront to forward the applicable headers to your custom origin:
•CloudFront-Is-Desktop-Viewer
•CloudFront-Is-Mobile-Viewer
•CloudFront-Is-SmartTV-Viewer
•CloudFront-Is-Tablet-Viewer
Based on the value of the User-Agent header, CloudFront sets the value of these headers to true or
false before forwarding the request to your origin. If a device falls into more than one category, more
than one value might be true. For example, for some tablet devices, CloudFront might set both
CloudFront-Is-Mobile-Viewer and CloudFront-Is-Tablet-Viewer to true.
API Version 2016-08-01
110
Amazon CloudFront Developer Guide
Headers and Web Distributions

Configuring CloudFront to Cache Objects Based on the
Language of the Viewer
If you want CloudFront to cache different versions of your objects based on the language specified in the
request, program your application to include the language in the Accept-Language header, and configure
CloudFront to forward the Accept-Language header to your origin.
Configuring CloudFront to Cache Objects Based on the
Location of the Viewer
If you want CloudFront to cache different versions of your objects based on the country that the request
came from, configure CloudFront to forward the CloudFront-Viewer-Country header to your origin.
CloudFront automatically converts the IP address that the request came from into a two-letter country
code. For an easy-to-use list of country codes, sortable by code and by country name, see the Wikipedia
entry ISO 3166-1 alpha-2.
Configuring CloudFront to Cache Objects Based on the
Protocol of the Request
If you want CloudFront to cache different versions of your objects based on the protocol of the request,
HTTP or HTTPS, configure CloudFront to forward the CloudFront-Forwarded-Proto header to your
origin.
How Caching Based on Headers Affects Performance
When you configure CloudFront to cache based on one or more headers and the headers have more
than one possible value, CloudFront forwards more requests to your origin server for the same object.
This slows performance and increases the load on your origin server. If your origin server returns the
same object regardless of the value of a given header, we recommend that you don't configure CloudFront
to cache based on that header.
If you configure CloudFront to forward more than one header, the order of the headers in viewer requests
doesn't affect caching as long as the values are the same. For example, if one request contains the
headers A:1,B:2 and another request contains B:2,A:1, CloudFront caches just one copy of the object.
How the Case of Headers and Header Values Affects Caching
When CloudFront caches based on header values, it doesn't consider the case of the header name, but
it does consider the case of the header value:
•If viewer requests include both Product:Acme and product:Acme, CloudFront caches an object only
once.The only difference between them is the case of the header name, which doesn't affect caching.
• If viewer requests include both Product:Acme and Product:acme, CloudFront caches an object
twice, because the value is Acme in some requests and acme in others.
Headers that CloudFront Returns to the Viewer
Configuring CloudFront to forward and cache headers does not affect which headers CloudFront returns
to the viewer. CloudFront returns all of the headers that it gets from the origin with a few exceptions. For
more information, see the applicable topic:
•Amazon S3 origins – See HTTP Response Headers that CloudFront Removes or Updates (p. 144).
•Custom origins – See HTTP Response Headers that CloudFront Removes or Updates (p. 156).
API Version 2016-08-01
111
Amazon CloudFront Developer Guide
Headers and Web Distributions

Headers and RTMP Distributions
For RTMP distributions, you cannot configure CloudFront to cache your content based on the headers
in viewer requests.
Forwarding Custom Headers to Your Origin (Web
Distributions Only)
You can configure CloudFront to include custom headers whenever it forwards a request to your origin.
You can specify the names and values of custom headers for each origin, both for custom origins and
for Amazon S3 buckets. Custom headers have a variety of uses, such as the following:
• You can identify the requests that are forwarded to your custom origin by CloudFront. This is useful if
you want to know whether users are bypassing CloudFront or if you're using more than one CDN and
you want information about which requests are coming from each CDN. (If you're using an Amazon
S3 origin and you enable Amazon S3 server access logging, the logs don't include header information.)
• If you've configured more than one CloudFront distribution to use the same origin, you can specify
different custom headers for the origins in each distribution and use the logs for your web server to
distinguish between the requests that CloudFront forwards for each distribution.
• If some of your users use viewers that don't support cross-origin resource sharing (CORS), you can
configure CloudFront to forward the Origin header to your origin. That will cause your origin to return
the Access-Control-Allow-Origin header for every request.
•You can use custom headers together and, optionally, signed URLs or signed cookies, to control access
to content on a custom origin. If you configure your custom origin to respond to requests only if they
include a custom header, you can prevent users from bypassing CloudFront and submitting requests
directly to your origin.
Topics
•Configuring CloudFront to Forward Custom Headers to Your Origin (p. 112)
•Custom Headers that CloudFront Can't Forward to Your Origin (p. 113)
•Using Custom Headers for Cross-Origin Resource Sharing (CORS) (p. 113)
•Using Custom Headers to Restrict Access to Your Content on a Custom Origin (p. 113)
Configuring CloudFront to Forward Custom
Headers to Your Origin
To configure a web distribution to forward custom headers to your origin, you update the configuration
of the applicable origins by using one of the following methods:
CloudFront console
When you create or update a distribution, specify header names and values in the Origin Custom
Headers settings. For more information, see Creating or Updating a Web Distribution Using the
CloudFront Console (p. 59).
CloudFront API
For each origin that you want to forward custom headers to, add header names and values to the
CustomHeaders section of the DistributionConfig complex type. For more information, see
POST Distribution (to create a new distribution) or PUT Distribution Config (to update an existing
distribution).
API Version 2016-08-01
112
Amazon CloudFront Developer Guide
Headers and RTMP Distributions

If the header names and values that you specify are not already present in the viewer request, CloudFront
adds them. If a header is present, CloudFront overwrites the header value before forwarding the request
to the origin.
For the current limits related to forwarding custom headers to the origin, see Limits (p. 353).
Custom Headers that CloudFront Can't Forward
to Your Origin
You can't configure CloudFront to forward the following custom headers to your origin.
Proxy-AuthenticateAccept-Encoding
Proxy-AuthorizationCache-Control
Proxy-ConnectionConnection
RangeContent-Length
Request-RangeCookie
TEHost
TrailerIf-Match
Transfer-EncodingIf-Modified-Since
UpgradeIf-None-Match
ViaIf-Range
Headers that begin with X-Amz-*If-Unmodified-Since
Headers that begin with X-Edge-*Max-Forwards
X-Real-IpPragma
Using Custom Headers for Cross-Origin Resource
Sharing (CORS)
You can configure CloudFront to always forward the applicable headers to your origin to accommodate
viewers that don't automatically include those headers in requests.You also need to configure CloudFront
to respect CORS settings. For more information, see Configuring CloudFront to Respect Cross-Origin
Resource Sharing (CORS) Settings (p. 110).
Using Custom Headers to Restrict Access to Your
Content on a Custom Origin
If you're using a custom origin, you can use custom headers to prevent users from bypassing CloudFront
and requesting content directly from your origin.You can also optionally restrict access to your content
by requiring that your users access your objects by using either signed URLs or signed cookies. For more
information about private content, see Serving Private Content through CloudFront (p. 162).
To require that users access your content through CloudFront, change the following settings in your
CloudFront distributions:
API Version 2016-08-01
113
Amazon CloudFront Developer Guide
Custom Headers that CloudFront Can't Forward to Your
Origin

Origin Custom Headers
Configure CloudFront to forward custom headers to your origin. See Configuring CloudFront to
Forward Custom Headers to Your Origin (p. 112).
Viewer Protocol Policy
Configure your distribution to require viewers to use HTTPS to access CloudFront. See Viewer
Protocol Policy (p. 70).
Origin Protocol Policy
Configure your distribution to require CloudFront to use the same protocol as viewers to forward
requests to the origin. See Origin Protocol Policy (Amazon EC2 and Other Custom Origins
Only) (p. 67).
The combination of Viewer Protocol Policy and Origin Protocol Policy ensure that your custom headers
are encrypted between the viewer and your origin. However, we recommend that you periodically perform
the following tasks to rotate the custom headers that CloudFront forwards to your origin:
1. Update your CloudFront distribution to begin forwarding a new header to your custom origin.
2. Update your application to accept the new header as confirmation that the request is coming from
CloudFront.
3. When viewer requests no longer include the header that you're replacing, update your application to
no longer accept the old header as confirmation that the request is coming from CloudFront.
Adding, Removing, or Replacing Objects in a
Distribution
For information about adding objects to a distribution, see Adding Objects that You Want CloudFront to
Distribute (p. 114).
When you replace objects in your distribution, we recommend that you use versioned object names. For
more information, see Updating Existing Objects Using Versioned Object Names (p. 115).You can also
replace objects with objects that have the same name. See Updating Existing Objects Using the Same
Object Names (p.115). Regardless of how you choose to replace objects in your distribution, we recommend
that you specify when objects should be removed from the CloudFront cache. For more information, see
Specifying How Long Objects Stay in a CloudFront Edge Cache (Expiration) (p. 116).
If you need to quickly remove objects from a distribution, you can invalidate them. For more information,
see Invalidating Objects (Web Distributions Only) (p. 121).
Adding Objects that You Want CloudFront to
Distribute
When you want CloudFront to start distributing additional objects, you add the objects to one of the origins
that you specified for the distribution, and you expose a CloudFront link to the objects. A CloudFront edge
location doesn't fetch the new objects from an origin until the edge location receives viewer requests for
the objects. For more information, see How CloudFront Delivers Content (p. 4).
When you add an object that you want CloudFront to distribute, ensure that you add it to one of the
Amazon S3 buckets specified in your distribution or, for a custom origin, to a directory in the specified
domain. In addition, confirm that the path pattern in the applicable cache behavior sends requests to the
correct origin. For example, suppose the path pattern for a cache behavior is *.html. If no other cache
behaviors are configured to forward requests to that origin, CloudFront will never distribute .jpg files that
you upload to the origin.
API Version 2016-08-01
114
Amazon CloudFront Developer Guide
Adding, Removing, or Replacing Objects in a Distribution

CloudFront servers don't determine the MIME type for the objects they serve.When you upload an object
to your origin, you should set the Content-Type header field for the object.
Updating Existing Objects Using Versioned Object
Names
When you update existing objects in a CloudFront distribution, we recommend that you include some
sort of version identifier either in your object names or in your directory names to give yourself better
control over your content.This identifier might be a date-time stamp, a sequential number, or some other
method of distinguishing two versions of the same object.
For example, instead of naming a graphic file image.jpg, you might call it image_1.jpg. When you want
to start serving a new version of the file, you'd name the new file image_2.jpg, and you'd update the links
in your web application or website to point to image_2.jpg. Alternatively, you might put all graphics in an
images_v1 directory and, when you want to start serving new versions of one or more graphics, you'd
create a new images_v2 directory, and you'd update your links to point to that directory. With versioning,
you don't have to wait for an object to expire before CloudFront begins to serve a new version of it, and
you don't have to pay for object invalidation.
Even if you version your objects, we still recommend that you set an expiration date. For more information,
see Specifying How Long Objects Stay in a CloudFront Edge Cache (Expiration) (p. 116).
Note
Specifying versioned object names or directory names is not related to Amazon S3 object
versioning.
Updating Existing Objects Using the Same Object
Names
Although you can update existing objects in a CloudFront distribution and use the same object names,
we don't recommend it. CloudFront distributes objects to edge locations only when the objects are
requested, not when you put new or updated objects in your origin. If you update an existing object in
your origin with a newer version that has the same name, an edge location won't get that new version
from your origin until both of the following occur:
• The old version of the object in the cache expires. For more information, see Specifying How Long
Objects Stay in a CloudFront Edge Cache (Expiration) (p. 116).
• There's an end user request for the object at that edge location.
If you use the same names when you replace objects, you can't control when CloudFront starts to serve
the new files. By default, CloudFront caches objects in edge locations for 24 hours. (For more information,
see Specifying How Long Objects Stay in a CloudFront Edge Cache (Expiration) (p. 116).) For example,
if you're replacing all of the objects on an entire website:
•Objects for the less popular pages may not be in any edge locations.The new versions of these objects
will start being served on the next request.
• Objects for some pages may be in some edge locations and not in others, so your end users will see
different versions depending on which edge location they're served from.
•New versions of the objects for the most popular pages might not be served for up to 24 hours because
CloudFront might have retrieved the objects for those pages just before you replaced the objects with
new versions.
API Version 2016-08-01
115
Amazon CloudFront Developer Guide
Updating Existing Objects Using Versioned Object
Names

Specifying How Long Objects Stay in a CloudFront
Edge Cache (Expiration)
You can control how long your objects stay in a CloudFront cache before CloudFront forwards another
request to your origin. Reducing the duration allows you to serve dynamic content. Increasing the duration
means your users get better performance because your objects are more likely to be served directly from
the edge cache. A longer duration also reduces the load on your origin.
Typically, CloudFront serves an object from an edge location until the cache duration that you specified
passes—that is, until the object expires. After it expires, the next time the edge location gets a user request
for the object, CloudFront forwards the request to the origin server to verify that the cache contains the
latest version of the object.The response from the origin depends on whether the object has changed:
•If the CloudFront cache already has the latest version, the origin returns a 304 status code (Not Modified).
•If the CloudFront cache does not have the latest version, the origin returns a 200 status code (OK) and
the latest version of the object.
If an object in an edge location isn't frequently requested, CloudFront might evict the object—remove the
object before its expiration date—to make room for objects that have been requested more recently.
By default, each object automatically expires after 24 hours. For web distributions, you can change the
default behavior in two ways:
• To change the cache duration for all objects that match the same path pattern, you can change the
CloudFront settings for Minimum TTL, Maximum TTL, and Default TTL for a cache behavior. For
information about the individual settings, see Minimum TTL, Maximum TTL, and Default TTL. To use
these settings, you must choose the Customize option for the Object Caching setting.
• To change the cache duration for an individual object, you can configure your origin to add a
Cache-Control max-age or Cache-Control s-maxage directive, or an Expires header field to
the object. For more information, see Using Headers to Control Cache Duration for Individual
Objects (p. 117).
For more information about how Minimum TTL, Default TTL, and Maximum TTL interact with
Cache-Control max-age and Cache-Control s-maxage directives and the Expires header field,
see Specifying the Amount of Time that CloudFront Caches Objects for Web Distributions (p. 117).
You can also control how long errors (for example, 404, Not Found) stay in a CloudFront cache before
CloudFront tries again to get the requested object by forwarding another request to your origin. For more
information, see How CloudFront Processes and Caches HTTP 4xx and 5xx Status Codes from Your
Origin (p. 158).
Topics
•Using Headers to Control Cache Duration for Individual Objects (p. 117)
•Specifying the Amount of Time that CloudFront Caches Objects for Web Distributions (p. 117)
•Specifying the Minimum Time that CloudFront Caches Objects for RTMP Distributions (p. 120)
•Adding Headers to Your Objects Using the Amazon S3 Console (p. 121)
API Version 2016-08-01
116
Amazon CloudFront Developer Guide
Specifying How Long Objects Stay in a CloudFront Edge
Cache (Expiration)

Using Headers to Control Cache Duration for Individual
Objects
You can use the Cache-Control and Expires headers to control how long objects stay in the cache.
Settings for Minimum TTL, Default TTL, and Maximum TTL also affect cache duration, but here's an
overview of how headers can affect cache duration:
• The Cache-Control max-age directive lets you specify how long (in seconds) that you want an
object to remain in the cache before CloudFront gets the object again from the origin server. The
minimum expiration time CloudFront supports is 0 seconds for web distributions and 3600 seconds for
RTMP distributions. The maximum value is 100 years. Specify the value in the following format:
Cache-Control: max-age=seconds
For example, the following directive tells CloudFront to keep the associated object in the cache for
3600 seconds (one hour):
Cache-Control: max-age=3600
If you want objects to stay in CloudFront edge caches for a different duration than they stay in browser
caches, you can use the Cache-Control max-age and Cache-Control s-maxage directives
together. For more information, see Specifying the Amount of Time that CloudFront Caches Objects
for Web Distributions (p. 117).
• The Expires header field lets you specify an expiration date and time using the format specified in
RFC 2616, Hypertext Transfer Protocol -- HTTP/1.1 Section 3.3.1, Full Date, for example:
Sat, 27 Jun 2015 23:59:59 GMT
We recommend that you use the Cache-Control max-age directive instead of the Expires header
field to control object caching. If you specify values both for Cache-Control max-age and for Expires,
CloudFront uses only the value of Cache-Control max-age.
For more information, see Specifying the Amount of Time that CloudFront Caches Objects for Web
Distributions (p. 117).
You cannot use the HTTP Cache-Control or Pragma header fields in a GET request from a viewer to
force CloudFront to go back to the origin server for the object. CloudFront ignores those header fields in
viewer requests.
For more information about the Cache-Control and Expires header fields, see the following sections
in RFC 2616, Hypertext Transfer Protocol -- HTTP/1.1:
•Section 14.9 Cache Control
•Section 14.21 Expires
For an example of how to add Cache-Control and Expires header fields using the AWS SDK for PHP,
see Upload an Object Using the AWS SDK for PHP in the Amazon Simple Storage Service Developer
Guide. Some third-party tools are also able to add these fields.
Specifying the Amount of Time that CloudFront Caches
Objects for Web Distributions
For web distributions, you can use Cache-Control or Expires headers, and CloudFront minimum,
maximum, and default TTL values to control the amount of time in seconds that CloudFront keeps an
API Version 2016-08-01
117
Amazon CloudFront Developer Guide
Specifying How Long Objects Stay in a CloudFront Edge
Cache (Expiration)

object in the cache before forwarding another request to the origin. Headers values also determine how
long a browser keeps an object in the cache before forwarding another request to CloudFront.
Important
If you configure CloudFront to forward all headers to your origin for a cache behavior, CloudFront
never caches the associated objects. Instead, CloudFront forwards all requests for those objects
to the origin. In that configuration, the value of minimum TTL must be 0. For more information,
see Configuring CloudFront to Cache Objects Based on Request Headers (p. 108).
To specify values for Minimum TTL, Maximum TTL, and Default TTL, you must choose the Customize
option for the Object Caching setting.
Minimum TTL > 0 SecondsMinimum TTL = 0 SecondsOrigin Configuration
CloudFront caching
CloudFront caching depends on
the values of the CloudFront min-
imum TTL and maximum TTL and
the Cache-Control max-age
directive:
• Minimum TTL < max-age <
maximum TTL
CloudFront caches objects for
the value of the Cache-Con-
trol max-age directive.
•max-age < minimum TTL
CloudFront caches objects for
the value of the CloudFront
minimum TTL.
•max-age > maximum TTL
CloudFront caches objects for
the value of the CloudFront
maximum TTL.
Browser caching
Browsers cache objects for the
value of the Cache-Control
max-age directive.
CloudFront caching
CloudFront caches objects for
the lesser of the value of the
Cache-Control max-age dir-
ective or the value of the Cloud-
Front maximum TTL.
Browser caching
Browsers cache objects for the
value of the Cache-Control
max-age directive.
The origin adds a Cache-Con-
trol max-age directive to ob-
jects
CloudFront caching
CloudFront caches objects for the
greater of the value of the Cloud-
Front minimum TTL or default
TTL.
Browser caching
Depends on the browser.
CloudFront caching
CloudFront caches objects for
the value of the CloudFront de-
fault TTL.
Browser caching
Depends on the browser.
The origin does not add a
Cache-Control max-age dir-
ective to objects
API Version 2016-08-01
118
Amazon CloudFront Developer Guide
Specifying How Long Objects Stay in a CloudFront Edge
Cache (Expiration)

Minimum TTL > 0 SecondsMinimum TTL = 0 SecondsOrigin Configuration
CloudFront caching
CloudFront caching depends on
the values of the CloudFront min-
imum TTL and maximum TTL and
the Cache-Control s-maxage
directive:
• Minimum TTL < s-maxage <
maximum TTL
CloudFront caches objects for
the value of the Cache-Con-
trol s-maxage directive.
•s-maxage < minimum TTL
CloudFront caches objects for
the value of the CloudFront
minimum TTL.
•s-maxage > maximum TTL
CloudFront caches objects for
the value of the CloudFront
maximum TTL.
Browser caching
Browsers cache objects for the
value of the Cache-Control
max-age directive.
CloudFront caching
CloudFront caches objects for
the lesser of the value of the
Cache-Control s-maxage
directive or the value of the
CloudFront maximum TTL.
Browser caching
Browsers cache objects for the
value of the Cache-Control
max-age directive.
The origin adds Cache-Con-
trol max-age and Cache-
Control s-maxage directives
to objects
API Version 2016-08-01
119
Amazon CloudFront Developer Guide
Specifying How Long Objects Stay in a CloudFront Edge
Cache (Expiration)

Minimum TTL > 0 SecondsMinimum TTL = 0 SecondsOrigin Configuration
CloudFront caching
CloudFront caching depends on
the values of the CloudFront min-
imum TTL and maximum TTL and
the Expires header:
• Minimum TTL < Expires <
maximum TTL
CloudFront caches objects until
the date and time in the Ex-
pires header.
•Expires < minimum TTL
CloudFront caches objects for
the value of the CloudFront
minimum TTL.
•Expires > maximum TTL
CloudFront caches objects for
the value of the CloudFront
maximum TTL.
Browser caching
Browsers cache objects until the
date and time in the Expires
header.
CloudFront caching
CloudFront caches objects until
the date in the Expires header
or for the value of the CloudFront
maximum TTL, whichever is
sooner.
Browser caching
Browsers cache objects until the
date in the Expires header.
The origin adds an Expires
header to objects
CloudFront caching
CloudFront caches objects for the
value of the CloudFront minimum
TTL.
Browser caching
Browsers respect the headers.
CloudFront and browsers respect
the headers.
For an exception to how Cloud-
Front handles the Cache-Con-
trol: no-cache header, see
Simultaneous Requests for the
Same Object (Traffic
Spikes) (p. 154).
Origin adds Cache-Control:
no-cache,no-store, and/or
private directives to objects
For information about how to change settings for web distributions using the CloudFront console, see
Listing, Viewing, and Updating CloudFront Distributions (p. 48). For information about how to change
settings for web distributions using the CloudFront API, see PUT Config.
Specifying the Minimum Time that CloudFront Caches
Objects for RTMP Distributions
For RTMP distributions, CloudFront keeps objects in edge caches for 24 hours by default.You can add
Cache-Control or Expires headers to your objects to change the amount of time that CloudFront
keeps objects in edge caches before it forwards another request to the origin. The minimum duration is
3600 seconds (one hour). If you specify a lower value, CloudFront uses 3600 seconds.
API Version 2016-08-01
120
Amazon CloudFront Developer Guide
Specifying How Long Objects Stay in a CloudFront Edge
Cache (Expiration)

Adding Headers to Your Objects Using the Amazon S3
Console
Note
Using the Amazon S3 console, you can only add headers to one object at a time, but with some
third-party tools, you can add headers to multiple Amazon S3 objects at a time. For more
information about third-party tools that support Amazon S3, perform a web search on AWS S3
third party tools.
To add a Cache-Control or Expires header field to Amazon S3 objects using the Amazon
S3 console
1. Sign in to the AWS Management Console and open the Amazon S3 console at https://
console.aws.amazon.com/s3.
2. In the Amazon S3 console, in the buckets pane, click the name of the bucket that contains the files.
3. In the list of objects, select the first object to which you want to add a header field.
4. Click Actions and click Properties.
5. In the right pane, expand Metadata.
6. Click Add More Metadata.
7. In the Key list, click Cache-Control or Expires, as applicable.
8. In the Value field, enter the applicable value:
• For a Cache-Control field, enter:
max-age=number of seconds that you want objects to stay in a CloudFront
edge cache
• For an Expires field, enter a date and time in HTML format.
9. Click Save.
10. If you want to add a header field to additional objects, click the name of the next object, and repeat
steps 5 through 9.
Invalidating Objects (Web Distributions Only)
If you need to remove an object from CloudFront edge caches before it expires, you can do one of the
following:
•Invalidate the object from edge caches.The next time a viewer requests the object, CloudFront returns
to the origin to fetch the latest version of the object.
• Use object versioning to serve a different version of the object that has a different name. For more
information, see Updating Existing Objects Using Versioned Object Names (p. 115).
Important
You can invalidate most types of objects that are served by a web distribution, but you cannot
invalidate media files in the Microsoft Smooth Streaming format when you have enabled Smooth
Streaming for the corresponding cache behavior. In addition, you cannot invalidate objects that
are served by an RTMP distribution.
To invalidate objects, you can specify either the path for individual objects or a path that ends with the *
wildcard, which might apply to one object or to many, as shown in the following examples:
•/images/image1.jpg
API Version 2016-08-01
121
Amazon CloudFront Developer Guide
Invalidating Objects (Web Distributions Only)

•/images/image*
•/images/*
You can submit a specified number of invalidation paths each month for free. If you submit more than
the allotted number of invalidation paths in a month, you pay a fee for each invalidation path that you
submit. For more information about the charges for invalidation, see Paying for Object Invalidation (p. 127).
Topics
•Choosing Between Invalidating Objects and Using Versioned Object Names (p. 122)
•Determining Which Objects to Invalidate (p. 122)
•Specifying the Objects to Invalidate (p. 123)
•Invalidating Objects and Displaying Information about Invalidations (p. 124)
•Third-Party Tools for Invalidating Objects (p. 126)
•Invalidation Limits (p. 127)
•Paying for Object Invalidation (p. 127)
Choosing Between Invalidating Objects and Using Versioned
Object Names
To control the versions of objects that are served from your distribution, you can either invalidate objects
or give them versioned file names. If you'll want to update your objects frequently, we recommend that
you primarily use object versioning for the following reasons:
• Versioning enables you to control which object a request returns even when the user has a version
cached either locally or behind a corporate caching proxy. If you invalidate the object, the user might
continue to see the old version until it expires from those caches.
• CloudFront access logs include the names of your objects, so versioning makes it easier to analyze
the results of object changes.
• Versioning provides a way to serve different versions of objects to different users.
• Versioning simplifies rolling forward and back between object revisions.
• Versioning is less expensive.You still have to pay for CloudFront to transfer new versions of your
objects to edge locations, but you don't have to pay for invalidating objects.
For more information about object versioning, see Updating Existing Objects Using Versioned Object
Names (p. 115).
Determining Which Objects to Invalidate
If you want to invalidate multiple objects such as all of the objects in a directory or all of the objects whose
names begin with the same characters, you can include the * wildcard at the end of the invalidation path.
For more information about using the * wildcard, see Invalidation paths.
If you want to invalidate selected objects but your users don't necessarily access every object on your
origin, you can determine which objects viewers have requested from CloudFront and invalidate only
those objects.To determine which objects viewers have requested, enable CloudFront access logging.
For more information about access logs, see Access Logs (p. 256).
API Version 2016-08-01
122
Amazon CloudFront Developer Guide
Invalidating Objects (Web Distributions Only)

Specifying the Objects to Invalidate
Whether you invalidate objects by using the CloudFront console or the CloudFront API, the requirements
and limitations for specifying objects are the same. Note the following about specifying the objects that
you want to invalidate.
Case sensitivity
Invalidation paths are case sensitive, so /images/image.jpg and /images/Image.jpg specify
two different objects.
Default root object
To invalidate the default root object, specify the path the same way that you specify the path for any
other object.
Distribution types
You can invalidate only objects that are associated with a web distribution.
Forwarding cookies
If you configured CloudFront to forward cookies to your origin, CloudFront edge caches might contain
several versions of the object. When you invalidate an object, CloudFront invalidates every cached
version of the object regardless of its associated cookies.You can't selectively invalidate some
versions and not others based on the associated cookies. For more information, see Configuring
CloudFront to Cache Objects Based on Cookies (p. 106).
Forwarding headers
If you configured CloudFront to forward a whitelist of headers to your origin and to cache based on
the values of the headers, CloudFront edge caches might contain several versions of the object.
When you invalidate an object, CloudFront invalidates every cached version of the object regardless
of the header values.You can't selectively invalidate some versions and not others based on header
values. (If you configure CloudFront to forward all headers to your origin, CloudFront doesn't cache
your objects.) For more information, see Configuring CloudFront to Cache Objects Based on Request
Headers (p. 108).
Forwarding query strings
If you configured CloudFront to forward query strings to your origin, you must include the query strings
when invalidating objects, as shown in the following examples:
•images/image.jpg?parameter1=a
•images/image.jpg?parameter1=b
If client requests include five different query strings for the same object, you can either invalidate the
object five times, once for each query string, or you can use the * wildcard in the invalidation path,
as shown in the following example:
/images/image.jpg*
For more information about using wildcards in the invalidation path, see Invalidation paths. For more
information about query strings, see Configuring CloudFront to Cache Based on Query String
Parameters (p. 105).To determine which query strings are in use, you can enable CloudFront logging.
For more information, see Access Logs (p. 256).
Limits
For information about limits on invalidations, see Invalidation Limits (p. 127).
Microsoft Smooth Streaming files
You cannot invalidate media files in the Microsoft Smooth Streaming format when you have enabled
Smooth Streaming for the corresponding cache behavior.
Non-ASCII or unsafe characters in the path
If the path includes non-ASCII characters or unsafe characters as defined in RFC 1783 (http://
www.ietf.org/rfc/rfc1738.txt), URL-encode those characters. Do not URL-encode any other characters
in the path, or CloudFront will not invalidate the old version of the updated object.
API Version 2016-08-01
123
Amazon CloudFront Developer Guide
Invalidating Objects (Web Distributions Only)

Invalidation paths
The path is relative to the distribution. A leading / is optional. For example, to invalidate the object
at http://d111111abcdef8.cloudfront.net/images/image2.jpg, you would specify the
following:
/images/image2.jpg
or
images/image2.jpg
You can also invalidate multiple objects simultaneously by using the * wildcard.The *, which replaces
0 or more characters, must be the last character in the invalidation path. For example:
• To invalidate all of the objects in a directory:
/directory-path/*
• To invalidate a directory, all of its subdirectories, and all of the objects in the directory and
subdirectories:
/directory-path*
•To invalidate all files that have the same name but different file name extensions, such as logo.jpg,
logo.png, and logo.gif:
/directory-path/file-name*
• To invalidate all of the files in a directory for which the file name starts with the same characters
(such as all of the files for a video in HLS format), regardless of the file name extension:
/directory-path/initial-characters-in-file-name*
• When you configure CloudFront to cache based on query string parameters and you want to
invalidate every version of an object:
/directory-path/file-name.file-name-extension*
• To invalidate all of the objects in a distribution:
/*
The maximum length of a path is 4,000 characters.
The charge to submit an invalidation path is the same regardless of the number of objects you're
invalidating: a single object (/images/logo.jpg) or all of the objects that are associated with a
distribution (/*). For more information, see Amazon CloudFront Pricing.
If the invalidation path is a directory and if you have not standardized on a method for specifying
directories—with or without a trailing slash (/)—we recommend that you invalidate the directory both
with and without a trailing slash, for example, /images and /images/. For more information, see
How Public URLs Affect the Invalidation of Directories (p. 101).
Signed URLs
If you are using signed URLs, invalidate an object by including only the portion of the URL before
the question mark (?).
Invalidating Objects and Displaying Information about
Invalidations
You can use the CloudFront console or CloudFront API actions to create and run an invalidation, display
a list of the invalidations that you submitted previously, and display detailed information about an individual
API Version 2016-08-01
124
Amazon CloudFront Developer Guide
Invalidating Objects (Web Distributions Only)

invalidation.You can also copy an existing invalidation, edit the list of object paths, and run the edited
invalidation.
See the applicable topic:
•Invalidating Objects Using the CloudFront Console (p. 125)
•Copying, Editing, and Rerunning an Existing Invalidation Using the CloudFront Console (p. 125)
•Listing Invalidations Using the CloudFront Console (p. 126)
•Displaying Information about an Invalidation Using the CloudFront Console (p. 126)
•Invalidating Objects and Displaying Information about Invalidations Using the CloudFront API (p. 126)
Invalidating Objects Using the CloudFront Console
To invalidate objects using the CloudFront console, do the following procedure.
To invalidate objects using the CloudFront console
1. Sign in to the AWS Management Console and open the CloudFront console at https://
console.aws.amazon.com/cloudfront/.
2. Choose the distribution for which you want to invalidate objects.
3. Choose Distribution Settings.
4. Choose the Invalidations tab.
5. Choose Create Invalidation.
6. For the objects that you want to invalidate, enter one invalidation path per line. For information about
specifying invalidation paths, see Specifying the Objects to Invalidate (p. 123).
Important
Specify object paths carefully.You can't cancel an invalidation request after you start it.
7. Choose Invalidate.
Copying, Editing, and Rerunning an Existing Invalidation Using the
CloudFront Console
You can copy an invalidation that you created previously, update the list of invalidation paths, and run
the updated invalidation.You cannot copy an existing invalidation, update the invalidation paths, and
save the updated invalidation without running it.
Important
If you copy an invalidation that is still in progress, update the list of invalidation paths, and run
the updated invalidation, CloudFront will not stop or delete the invalidation that you copied. If
any invalidation paths appear in the original and in the copy, CloudFront will try to invalidate the
objects twice, and both invalidations will count against your maximum number of free invalidations
for the month. If you've already reached the maximum number of free invalidations, you'll be
charged for both invalidations of each object. For more information, see Invalidation Limits (p. 127).
To copy, edit, and rerun an existing invalidation using the CloudFront console
1. Sign in to the AWS Management Console and open the CloudFront console at https://
console.aws.amazon.com/cloudfront/.
2. Choose the distribution that contains the invalidation that you want to copy.
3. Choose Distribution Settings.
4. Choose the Invalidations tab.
5. Choose the invalidation that you want to copy.
API Version 2016-08-01
125
Amazon CloudFront Developer Guide
Invalidating Objects (Web Distributions Only)

If you aren't sure which invalidation you want to copy, you can choose an invalidation and choose
Details to display detailed information about that invalidation.
6. Choose Copy.
7. Update the list of invalidation paths if applicable.
8. Choose Invalidate.
Listing Invalidations Using the CloudFront Console
Using the console, you can display a list of the last 100 invalidations that you've created and run for a
distribution. If you want to get a list of more than 100 invalidations, use the GET Invalidation List API
action. For more information, see GET Invalidation List in the Amazon CloudFront API Reference.
To list invalidations using the CloudFront console
1. Sign in to the AWS Management Console and open the CloudFront console at https://
console.aws.amazon.com/cloudfront/.
2. Choose the distribution for which you want to display a list of invalidations.
3. Choose Distribution Settings.
4. Choose the Invalidations tab.
Displaying Information about an Invalidation Using the CloudFront Console
You can display detailed information about an invalidation, including distribution ID, invalidation ID, the
status of the invalidation, the date and time that the invalidation was created, and a complete list of the
invalidation paths.
To display information about an invalidation using the CloudFront console
1. Sign in to the AWS Management Console and open the CloudFront console at https://
console.aws.amazon.com/cloudfront/.
2. Choose the distribution that contains the invalidation about which you want to display detailed
information.
3. Choose Distribution Settings.
4. Choose the Invalidations tab.
5. Choose the invalidation about which you want to display detailed information.
6. Choose Details.
Invalidating Objects and Displaying Information about Invalidations Using
the CloudFront API
For information about invalidating objects and about displaying information about invalidations using the
CloudFront API, see the applicable topic in the Amazon CloudFront API Reference:
• Invalidating objects: POST Invalidation
• Getting a list of your invalidations: GET Invalidation List
• Getting information about a specific invalidation: GET Invalidation
Third-Party Tools for Invalidating Objects
In addition to the invalidation methods provided by CloudFront, several third-party tools provide ways to
invalidate objects. For a list of tools, see Invalidating Objects (p. 357).
API Version 2016-08-01
126
Amazon CloudFront Developer Guide
Invalidating Objects (Web Distributions Only)

Invalidation Limits
If you're invalidating objects individually, you can have invalidation requests for up to 3,000 objects per
distribution in progress at one time. This can be one invalidation request for up to 3,000 objects, up to
3,000 requests for one object each, or any other combination that doesn't exceed 3,000 objects. For
example, you can submit 30 invalidation requests that invalidate 100 objects each. As long as all 30
invalidation requests are still in progress, you can't submit any more invalidation requests. If you exceed
the limit, CloudFront returns an error message.
If you're using the * wildcard, you can have requests for up to 15 invalidation paths in progress at one
time.You can also have invalidation requests for up to 3,000 individual objects per distribution in progress
at the same time; the limit on wildcard invalidation requests is independent of the limit on invalidating
objects individually.
Note
It usually takes 10 to 15 minutes for CloudFront to complete your invalidation request, depending
on the number of invalidation paths that you included in the request.
Paying for Object Invalidation
The first 1,000 invalidation paths that you submit per month are free; you pay for each invalidation path
over 1,000 in a month. An invalidation path can be for a single object (such as /images/logo.jpg) or
for multiple objects (such as /images/*). A path that includes the * wildcard counts as one path even
if it causes CloudFront to invalidate thousands of objects.
This limit of 1000 invalidation paths per month applies to the total number of invalidation paths across all
of the distributions that you create with one AWS account. For example, if you use the AWS account
john@example.com to create three distributions, and you submit 600 invalidation paths for each
distribution in a given month (for a total of 1,800 invalidation paths), AWS will charge you for 800 invalidation
paths in that month. For specific information about invalidation pricing, go to Amazon CloudFront Pricing.
For more information about invalidation paths, see Invalidation paths.
Customizing Error Responses
Topics
•Creating or Updating a Cache Behavior for Custom Error Pages (p. 129)
•Changing Response Codes (p. 129)
•Controlling How Long CloudFront Caches Errors (p. 129)
•How CloudFront Responds When a Custom Error Page Is Unavailable (p. 130)
•Pricing for Custom Error Pages (p. 130)
•Configuring Error Response Behavior (p. 131)
If the objects that you're serving through CloudFront are unavailable for some reason, your web server
typically returns an HTTP status code to CloudFront. For example, if a viewer specifies an invalid URL,
your web server returns a 404 status code to CloudFront, and CloudFront returns that status code to the
viewer. The viewer displays a brief and sparsely formatted default message similar to this:
Not Found: The requested URL /myfilename.html was not found on this server.
If you'd rather display a custom error message, possibly using the same formatting as the rest of your
website, you can have CloudFront return to the viewer an object (for example, an HTML file) that contains
your custom error message.
API Version 2016-08-01
127
Amazon CloudFront Developer Guide
Customizing Error Responses
You can specify a different object for each supported HTTP status code, or you can use the same object
for all of the supported status codes.You can also choose to specify objects for some status codes and
not for others.
The objects that you're serving through CloudFront can be unavailable for a variety of reasons. These
fall into two broad categories:
•Client errors indicate a problem with the request. For example, an object with the specified name isn't
available, or the user doesn't have the permissions required to get an object in your Amazon S3 bucket.
When a client error occurs, the origin returns an HTTP status code in the 400 range to CloudFront.
•Server errors indicate a problem with the origin server. For example, the HTTP server is busy or
unavailable. When a server error occurs, either your origin server returns an HTTP status code in the
500 range to CloudFront, or CloudFront doesn't get a response from your origin server for a certain
period of time and assumes a 504 status code (gateway timeout).
The HTTP status codes for which CloudFront can return a custom error page include the following:
• 400, 403, 404, 405, 414, 416
• 500, 501, 502, 503, 504
Note
You can create a custom error page for HTTP status code 416 (Requested Range Not Satisfiable),
and you can change the HTTP status code that CloudFront returns to viewers when your origin
returns a status code 416 to CloudFront. (For more information, see Changing Response
Codes (p. 129).) However, CloudFront doesn't cache status code 416 responses, so you can
specify a value for Error Caching Minimum TTL for status code 416, but CloudFront doesn't
use it.
For a detailed explanation of how CloudFront handles error responses from your origin, see How CloudFront
Processes and Caches HTTP 4xx and 5xx Status Codes from Your Origin (p. 158).
API Version 2016-08-01
128
Amazon CloudFront Developer Guide
Customizing Error Responses

Creating or Updating a Cache Behavior for Custom
Error Pages
If you want to store your objects and your custom error pages in different locations, your distribution must
include a cache behavior for which the following is true:
• The value of Path Pattern matches the path to your custom error messages. For example, suppose
you saved custom error pages for 4xx errors in an Amazon S3 bucket in a directory named
/4xx-errors.Your distribution must include a cache behavior for which the path pattern routes
requests for your custom error pages to that location, for example, /4xx-errors/*.
•The value of Origin specifies the value of Origin ID for the origin that contains your custom error pages.
For more information, see Cache Behavior Settings (p. 68) in the topic Values that You Specify When
You Create or Update a Web Distribution (p. 63).
Changing Response Codes
You can choose the HTTP status code CloudFront returns along with a custom error page for a given
HTTP status code. For example, if your origin returns a 500 status code to CloudFront, you might want
CloudFront to return a custom error page and a 200 status code (OK) to the viewer. There are a variety
of reasons that you might want CloudFront to return a status code to the viewer that is different from the
one that your origin returned to CloudFront:
• Some Internet devices (some firewalls and corporate proxies, for example) intercept HTTP 4xx and
5xx and prevent the response from being returned to the viewer. If you substitute 200, the response
typically won't be intercepted.
•If you don't care about distinguishing among different client errors or server errors, you can specify 400
or 500 as the value that CloudFront returns for all 4xx or 5xx status codes.
•You might want to return a 200 status code (OK) and static website so your customers don't know that
your website is down.
If you enable CloudFront access logs and you configure CloudFront to change the HTTP status code in
the response, the value of the sc-status column in access logs will contain the status code that you
specify. However, the value of the x-edge-result-type column will not be affected; it will still contain
the result type of the response from the origin. For example, suppose you configure CloudFront to return
a status code of 200 to the viewer when the origin returns 404 (Not Found) to CloudFront. When the
origin responds to a request with a 404 status code, the value in the sc-status column in the access
log will be 200, but the value in the x-edge-result-type column will be Error.
You can configure CloudFront to return any of the following HTTP status codes along with a custom error
page:
• 200
• 400, 403, 404, 405, 414, 416
• 500, 501, 502, 503, 504
Controlling How Long CloudFront Caches Errors
By default, when your origin returns an HTTP 4xx or 5xx status code, CloudFront caches these error
responses for five minutes and then submits the next request for the object to your origin to see whether
the problem that caused the error has been resolved and the requested object is now available.
API Version 2016-08-01
129
Amazon CloudFront Developer Guide
Creating or Updating a Cache Behavior for Custom Error
Pages

Note
You can create a custom error page for HTTP status code 416 (Requested Range Not Satisfiable),
and you can change the HTTP status code that CloudFront returns to viewers when your origin
returns a status code 416 to CloudFront. (For more information, see Changing Response
Codes (p. 129).) However, CloudFront doesn't cache status code 416 responses, so you can
specify a value for Error Caching Minimum TTL for status code 416, but CloudFront doesn't
use it.
You can specify the error-caching duration—the Error Caching Minimum TTL—for each 4xx and 5xx
status code that CloudFront caches. For a procedure, see Configuring Error Response Behavior (p.131).
When you specify a duration, note the following:
• If you specify a short error-caching duration, CloudFront forwards more requests to your origin than if
you specify a longer duration. For 5xx errors, this may aggravate the problem that originally caused
your origin to return an error.
• When your origin returns an error for an object, CloudFront responds to requests for the object either
with the error response or with your custom error page until the error-caching duration elapses. If you
specify a long error-caching duration, CloudFront might continue to respond to requests with an error
response or your custom error page for a long time after the object becomes available again.
If you want to control how long CloudFront caches errors for individual objects, you can configure your
origin server to add the applicable header to the error response for that object:
•If the origin adds a Cache-Control max-age or Cache-Control s-maxage directive, or an
Expires header: CloudFront caches error responses for the greater of the value in the header or the
value of Error Caching Minimum TTL.
•If the origin adds other Cache-Control directives or adds no headers: CloudFront caches error
responses for the value of Error Caching Minimum TTL.
If the expiration time for a 4xx or 5xx status code for an object is longer than you want to wait, you can
invalidate the status code by using the URL of the requested object. If your origin is returning an error
response for multiple objects, you need to invalidate each object separately. For more information about
invalidating objects, see Invalidating Objects (Web Distributions Only) (p. 121).
How CloudFront Responds When a Custom Error
Page Is Unavailable
If you configure CloudFront to return a custom error page for an HTTP status code but the custom error
page isn't available, CloudFront returns to the viewer the status code that CloudFront received from the
origin that contains the custom error pages. For example, suppose your custom origin returns a 500 status
code and you have configured CloudFront to get a custom error page for a 500 status code from an
Amazon S3 bucket. However, someone accidentally deleted the custom error page from your bucket.
CloudFront will return an HTTP 404 status code (not found) to the viewer that requested the object.
Pricing for Custom Error Pages
When CloudFront returns a custom error page to a viewer, you pay the standard CloudFront charges for
the custom error page, not the charges for the requested object. For more information about CloudFront
charges, see Amazon CloudFront Pricing.
API Version 2016-08-01
130
Amazon CloudFront Developer Guide
How CloudFront Responds When a Custom Error Page
Is Unavailable
Configuring Error Response Behavior
You can use either the CloudFront API or console to configure CloudFront error responses. For information
about using the CloudFront API to configure error responses, go to PUT Distribution Config in the Amazon
CloudFront API Reference, and see the CustomErrorResponses element.
To configure CloudFront error responses using the console
1. Create the custom error pages that you want CloudFront to return to viewers when your origin returns
HTTP 4xx or 5xx errors. Save the pages in a location that is accessible to CloudFront.
We recommend that you store custom error pages in an Amazon S3 bucket even if you're using a
custom origin. If you store custom error pages on an HTTP server and the server starts to return 5xx
errors, CloudFront can't get the files that you want to return to viewers because the origin server is
unavailable.
2. Confirm that you have granted CloudFront at least read permission to your custom error page objects.
For more information about Amazon S3 permissions, see Access Control in the Amazon Simple
Storage Service Developer Guide. For information on using the Amazon S3 console to update
permissions, go to the Amazon Simple Storage Service Console User Guide.
3. (Optional) Configure your origin server to add Cache-Control directives or an Expires header
along with the error response for specific objects, if applicable. For more information, see Controlling
How Long CloudFront Caches Errors (p. 129).
4. Sign in to the AWS Management Console and open the CloudFront console at https://
console.aws.amazon.com/cloudfront/.
5. In the list of distributions, select the distribution to update and choose Distribution Settings.
6. Choose the Error Pages tab.Then either choose Create Custom Error Response, or choose an
existing error code and choose Edit.
7. Enter the applicable values. For more information, see Custom Error Pages and Error Caching (p. 79).
8. If you configured CloudFront to return custom error pages, add or update the applicable cache
behaviors. For more information, see Creating or Updating a Cache Behavior for Custom Error
Pages (p. 129).
9. To save your changes, choose Yes, Edit.
API Version 2016-08-01
131
Amazon CloudFront Developer Guide
Configuring Error Response Behavior

How CloudFront Processes Partial Requests for
an Object (Range GETs)
For a large object, an end user's browser or client might make multiple GET requests and use the Range
request header to download the object in smaller units. These requests for ranges of bytes, sometimes
known as Range GET requests, improve the efficiency of partial downloads and the recovery from partially
failed transfers.
When CloudFront receives a Range GET request, it checks the cache in the edge location that received
the request. If the cache in that edge location already contains the entire object or the requested portion
of the object, CloudFront immediately serves the requested range from the cache.
If the cache doesn't contain the requested range, CloudFront forwards the request to the origin. (To
optimize performance, CloudFront may request a larger range than the client requested in the Range
GET.) What happens next depends on whether the origin supports Range GET requests:
•If the origin supports Range GET requests: It returns the requested range. CloudFront serves the
requested range and also caches it for future requests. (Amazon S3 supports Range GET requests,
as do some HTTP servers, for example, Apache and IIS. For information about whether your HTTP
server does, see the documentation for your HTTP server.)
•If the origin doesn't support Range GET requests: It returns the entire object. CloudFront serves
the entire object and also caches the entire object for future requests. After CloudFront caches the
entire object in an edge cache, it responds to Range GET requests by serving the requested range.
In either case, CloudFront begins to serve the requested range or object to the end user as soon as the
first byte arrives from the origin.
Note
If the viewer makes a Range GET request and the origin returns Transfer-Encoding:
chunked, CloudFront returns the entire object to the viewer instead of the requested range.
CloudFront generally follows the RFC specification for the Range header. However, if your Range headers
don't adhere to the following requirements, CloudFront will return HTTP status code 200 with the full
object instead of status code 206 with the specified ranges:
• The ranges must be listed in ascending order. For example, 100-200,300-400 is valid,
300-400,100-200 is not valid.
• The ranges must not overlap. For example, 100-200,150-250 is not valid.
• All of the ranges specifications must be valid. For example, you can't specify a negative value as part
of a range.
For more information about the Range request header, see "Section 14.35 Range" in Hypertext Transfer
Protocol -- HTTP/1.1 at http://www.w3.org/Protocols/rfc2616/rfc2616-sec14.html#sec14.35.
Specifying a Default Root Object (Web
Distributions Only)
You can configure CloudFront to return a specific object (the default root object) when an end user
requests the root URL for your distribution instead of an object in your distribution. Specifying a default
root object avoids exposing the contents of your distribution.
API Version 2016-08-01
132
Amazon CloudFront Developer Guide
How CloudFront Processes Partial Requests for an
Object (Range GETs)

For example, the following request points to the object image.jpg:
http://d111111abcdef8.cloudfront.net/image.jpg
The following request points to the root URL of the same distribution instead of to a specific object:
http://d111111abcdef8.cloudfront.net/
When you define a default root object, an end-user request that calls the root of your distribution returns
the default root object. For example, if you designate the file index.html as your default root object, a
request for:
http://d111111abcdef8.cloudfront.net/
returns:
http://d111111abcdef8.cloudfront.net/index.html
However, if you define a default root object, an end-user request for a subdirectory of your distribution
does not return the default root object. For example, suppose index.html is your default root object
and that CloudFront receives an end-user request for the install directory under your CloudFront
distribution:
http://d111111abcdef8.cloudfront.net/install/
CloudFront will not return the default root object even if a copy of index.html appears in the install
directory.
If you configure your distribution to allow all of the HTTP methods that CloudFront supports, the default
root object applies to all methods. For example, if your default root object is index.php and you write your
application to submit a POST request to the root of your domain (http://example.com), CloudFront will
send the request to http://example.com/index.php.
The behavior of CloudFront default root objects is different from the behavior of Amazon S3 index
documents. When you configure an Amazon S3 bucket as a website and specify the index document,
Amazon S3 returns the index document even if a user requests a subdirectory in the bucket. (A copy of
the index document must appear in every subdirectory.) For more information about configuring Amazon
S3 buckets as websites and about index documents, see the Hosting Websites on Amazon S3 chapter
in the Amazon Simple Storage Service Developer Guide.
Important
Remember that a default root object applies only to your CloudFront distribution.You still need
to manage security for your origin. For example, if you are using an Amazon S3 origin, you still
need to set your Amazon S3 bucket ACLs appropriately to ensure the level of access you want
on your bucket.
If you don't define a default root object, requests for the root of your distribution pass to your origin server.
If you are using an Amazon S3 origin, any of the following might be returned:
•A list of the contents of your Amazon S3 bucket—Under any of the following conditions, the contents
of your origin are visible to anyone who uses CloudFront to access your distribution:
• Your bucket is not properly configured.
• The Amazon S3 permissions on the bucket associated with your distribution and on the objects in
the bucket grant access to everyone.
• An end user accesses your origin using your origin root URL.
•A list of the private contents of your origin—If you configure your origin as a private distribution
(only you and CloudFront have access), the contents of the Amazon S3 bucket associated with your
distribution are visible to anyone who has the credentials to access your distribution through CloudFront.
API Version 2016-08-01
133
Amazon CloudFront Developer Guide
Specifying a Default Root Object (Web Distributions
Only)

In this case, users are not able to access your content through your origin root URL. For more information
about distributing private content, see Serving Private Content through CloudFront (p. 162).
•Error 403 Forbidden—CloudFront returns this error if the permissions on the Amazon S3 bucket
associated with your distribution or the permissions on the objects in that bucket deny access to
CloudFront and to everyone.
To avoid exposing the contents of your web distribution or returning an error, perform the following
procedure to specify a default root object for your distribution.
To specify a default root object for your distribution
1. Upload the default root object to the origin that your distribution points to.
The file can be any type supported by CloudFront. For a list of constraints on the file name, see the
description of the DefaultRootObject element in DistributionConfig Complex Type.
Note
If the file name of the default root object is too long or contains an invalid character,
CloudFront returns the error HTTP 400 Bad Request - InvalidDefaultRootObject.
In addition, CloudFront caches the code for five minutes and writes the results to the access
logs.
2. Confirm that the permissions for the object grant CloudFront at least read access.
For more information about Amazon S3 permissions, see Access Control in the Amazon Simple
Storage Service Developer Guide. For information on using the Amazon S3 console to update
permissions, go to the Amazon Simple Storage Service Console User Guide.
3. Update your distribution to refer to the default root object using the CloudFront console or the
CloudFront API.
To specify a default root object using the CloudFront console:
a. Sign in to the AWS Management Console and open the CloudFront console at https://
console.aws.amazon.com/cloudfront/.
b. In the list of distributions in the top pane, select the distribution to update.
c. In the Distribution Details pane, on the General tab, click Edit.
d. In the Edit Distribution dialog box, in the Default Root Object field, enter the file name of the
default root object.
Enter only the object name, for example, index.html. Do not add a / before the object name.
e. To save your changes, click Yes, Edit.
To update your configuration using the CloudFront API, you specify a value for the
DefaultRootObject element in your distribution. For information about using the CloudFront API
to specify a default root object, see PUT Distribution Config in the Amazon CloudFront API Reference.
4. Confirm that you have enabled the default root object by requesting your root URL. If your browser
doesn't display the default root object, perform the following steps:
a. Confirm that your distribution is fully deployed by viewing the status of your distribution in the
CloudFront console.
b. Repeat Steps 2 and 3 to verify that you granted the correct permissions and that you correctly
updated the configuration of your distribution to specify the default root object.
API Version 2016-08-01
134
Amazon CloudFront Developer Guide
Specifying a Default Root Object (Web Distributions
Only)

Serving Compressed Files
You can configure CloudFront to automatically compress files of certain types and serve the compressed
files when viewer requests include Accept-Encoding: gzip in the request header. When content is
compressed, downloads are faster because the files are smaller—in some cases, less than a quarter the
size of the original. Especially for JavaScript and CSS files, faster downloads translates into faster rendering
of web pages for your users. In addition, because the cost of CloudFront data transfer is based on the
total amount of data served, serving compressed files is less expensive than serving uncompressed files.
Important
A viewer request must include Accept-Encoding: gzip in the request header, or CloudFront
won't compress the requested file.
If you're using a custom origin, you can configure your origin to compress files with or without CloudFront
compression.Your origin can compress file types that CloudFront doesn't compress. (See File Types
that CloudFront Compresses (p. 137).) If your origin returns a compressed file to CloudFront, CloudFront
detects that the file is compressed based on the value of the Content-Encoding header and doesn't
compress the file again.
Topics
•Using CloudFront to Compress Your Content (p. 135)
•Using a Custom Origin to Compress Your Content (p. 137)
Using CloudFront to Compress Your Content
CloudFront can compress files both for Amazon S3 origins and for custom origins. When you configure
CloudFront to compress your content, you specify the setting in your cache behaviors.
When you configure CloudFront to compress your content, here's how CloudFront serves your content:
1. You create or update a CloudFront distribution and configure CloudFront to compress content.
2. A viewer requests a file. The viewer adds the Accept-Encoding: gzip header to the request. This
indicates that the viewer supports compressed content.
3. At the edge location, CloudFront checks the cache for a compressed version of the file that is referenced
in the request.
4. If the compressed file is already in the cache, CloudFront returns the file to the viewer and skips the
remaining steps.
5. If the compressed file is not in the cache, CloudFront forwards the request to the origin server, which
can be either an Amazon S3 bucket or a custom origin.
Note
If CloudFront has an uncompressed version of the file in the cache, it still forwards a request
to the origin.
6. The origin server returns an uncompressed version of the requested file to CloudFront.
7. CloudFront determines whether the file is compressible:
• The file must be of a type that CloudFront compresses.
• The file size must be between 1,000 and 10,000,000 bytes.
• The response must include a Content-Length header so CloudFront can determine whether the
size of the file is in the range that CloudFront compresses. If the Content-Length header is missing,
CloudFront won't compress the file.
• The response must not include a Content-Encoding header.
8. If the file is compressible, CloudFront compresses it, returns the compressed file to the viewer, and
adds it to the cache.
API Version 2016-08-01
135
Amazon CloudFront Developer Guide
Serving Compressed Files

9. The viewer uncompresses the file.
Note the following:
File types that CloudFront compresses
CloudFront compresses files in a large number of file types. For a complete list, see File Types that
CloudFront Compresses (p. 137).
Size of files that CloudFront compresses
CloudFront compresses files that are between 1,000 bytes and 10,000,000 bytes in size.
Content-Length header
The origin must include a Content-Length header in the response so CloudFront can determine
whether the size of the file is in the range that CloudFront compresses. If the Content-Length
header is missing, CloudFront won't compress the file.
Etag header
If you configure CloudFront to compress content, CloudFront removes the ETag response header
from the files that it compresses. When the ETag header is present, CloudFront and your origin can
use it to determine whether the version of a file in a CloudFront edge cache is identical to the version
on the origin server. However, after compression the two versions are no longer identical. As a result,
when a compressed file expires and CloudFront forwards another request to your origin, your origin
always returns the file to CloudFront instead of an HTTP status code 304 (Not Modified).
Content already in edge locations when you configure CloudFront to compress files
CloudFront compresses files in each edge location when it gets the files from your origin. When you
configure CloudFront to compress your content, it doesn't compress files that are already in edge
locations. In addition, when a file expires in an edge location and CloudFront forwards another request
for the file to your origin, CloudFront doesn't compress the file if your origin returns an HTTP status
code 304, which means that the edge location already has the latest version of the file. If you want
CloudFront to compress the files that are already in edge locations, you'll need to invalidate those
files. For more information, see Invalidating Objects (Web Distributions Only) (p. 121).
Custom origin is already configured to compress files
If you configure CloudFront to compress files and CloudFront is forwarding requests to a custom
origin that is also configured to compress files, the custom origin will include a Content-Encoding:
gzip header, which indicates that the file that the origin returned to CloudFront has already been
compressed. CloudFront returns the cached file to the viewer and caches it in the edge location.
Note
CloudFront does not compress a file if the response includes a Content-Encoding header,
regardless of the value.
Request doesn't include Accept-Encoding: gzip
If the Accept-Encoding header is missing from the request, CloudFront serves uncompressed
content. If the Accept-Encoding header includes additional values such as deflate or sdch,
CloudFront removes them before forwarding the request to the origin server.
CloudFront is busy
In rare cases, when a CloudFront edge location is unusually busy, some files might not be compressed.
Configuring a CloudFront Distribution to Compress Content
To configure a web distribution to compress your content, you update the applicable cache behaviors by
using one of the following methods:
•CloudFront console – Update the Compress objects automatically setting. For more information,
see Creating or Updating a Web Distribution Using the CloudFront Console (p. 59).
•CloudFront API – Change the value of the Compress element to true. For more information, see
POST Distribution (to create a new distribution) or PUT Distribution Config (to update an existing
distribution).
API Version 2016-08-01
136
Amazon CloudFront Developer Guide
Using CloudFront to Compress Your Content

•One of the AWS SDKs – See the applicable SDK documentation on the AWS Documentation page.
•The AWS CLI – For more information, see create-distribution or update-distribution in the AWS
Command Line Interface Reference.
File Types that CloudFront Compresses
If you configure CloudFront to compress your content, CloudFront compresses files that have the following
values in the Content-Type header:
application/x-otfapplication/eot
application/x-perlapplication/font
application/x-ttfapplication/font-sfnt
font/eotapplication/javascript
font/ttfapplication/json
font/otfapplication/opentype
font/opentypeapplication/otf
image/svg+xmlapplication/pkcs7-mime
text/cssapplication/truetype
text/csvapplication/ttf
text/htmlapplication/vnd.ms-fontobject
text/javascriptapplication/xhtml+xml
text/jsapplication/xml
text/plainapplication/xml+rss
text/richtextapplication/x-font-opentype
text/tab-separated-valuesapplication/x-font-truetype
text/xmlapplication/x-font-ttf
text/x-scriptapplication/x-httpd-cgi
text/x-componentapplication/x-javascript
text/x-java-sourceapplication/x-mpegurl
application/x-opentype
Using a Custom Origin to Compress Your Content
If you want to compress file types that CloudFront doesn't compress, you can configure your custom
origin to compress files of those types using gzip. CloudFront doesn't support other compression algorithms.
When your origin returns the compressed file to CloudFront, it will include a Content-Encoding: gzip
header, which indicates to CloudFront that the file is already compressed.
API Version 2016-08-01
137
Amazon CloudFront Developer Guide
Using a Custom Origin to Compress Your Content

Note
CloudFront does not compress a file if the response includes a Content-Encoding header,
regardless of the value.
Serving Compressed Files When Your Origin Server Is
Running IIS
By default, IIS does not serve compressed content for requests that come through proxy servers such
as CloudFront. If you're using IIS and if you configured IIS to compress content by using the
httpCompressionelement, change the value of the noCompressionForProxies attribute to false
so IIS will return compressed content to CloudFront.
In addition, if you have compressed objects that are requested less frequently than every few seconds,
you might have to change the values of frequentHitThreshold and frequentHitTimePeriod.
For more information, refer to the IIS documentation on the Microsoft website.
Serving Compressed Files When Your Origin Server Is
Running NGINX
When CloudFront forwards a request to the origin server, it includes a Via header. This causes NGINX
to interpret the request as proxied and, by default, NGINX disables compression for proxied requests. If
your version of NGINX includes the gzip_proxied setting, change the value to any so that NGINX will
return compressed content to CloudFront. For more information, see the NGINX documentation for the
module ngx_http_gzip_module.
API Version 2016-08-01
138
Amazon CloudFront Developer Guide
Using a Custom Origin to Compress Your Content

Request and Response Behavior
The following sections explain how CloudFront processes viewer requests and forwards the requests to
your Amazon S3 or custom origin, and how CloudFront processes responses from your origin, including
how CloudFront processes and caches 4xx and 5xx HTTP status codes.
Topics
•Request and Response Behavior for Amazon S3 Origins (p. 139)
•Request and Response Behavior for Custom Origins (p. 145)
•How CloudFront Processes HTTP 3xx Status Codes from Your Origin (p. 158)
•How CloudFront Processes and Caches HTTP 4xx and 5xx Status Codes from Your Origin (p. 158)
Request and Response Behavior for Amazon S3
Origins
Topics
•How CloudFront Processes and Forwards Requests to Your Amazon S3 Origin Server (p. 139)
•How CloudFront Processes Responses from Your Amazon S3 Origin Server (p. 144)
How CloudFront Processes and Forwards
Requests to Your Amazon S3 Origin Server
For information about how CloudFront processes viewer requests and forwards the requests to your
Amazon S3 origin, see the applicable topic:
Topics
•Caching Duration and Minimum TTL (p. 140)
•Client IP Addresses (p. 140)
•Conditional GETs (p. 140)
•Cookies (p. 141)
•Cross-Origin Resource Sharing (CORS) (p. 141)
•GET Requests that Include a Body (p. 141)
API Version 2016-08-01
139
Amazon CloudFront Developer Guide
Request and Response Behavior for Amazon S3 Origins

•HTTP Methods (p. 141)
•HTTP Request Headers that CloudFront Removes or Updates (p. 142)
•Maximum Length of a Request and Maximum Length of a URL (p. 142)
•OCSP Stapling (p. 142)
•Protocols (p. 143)
•Query Strings (p. 143)
•Request Timeout (p. 143)
•Simultaneous Requests for the Same Object (Traffic Spikes) (p. 143)
Caching Duration and Minimum TTL
For web distributions, to control how long your objects stay in a CloudFront cache before CloudFront
forwards another request to your origin, you can:
• Configure your origin to add a Cache-Control or an Expires header field to each object.
• Specify a value for Minimum TTL in CloudFront cache behaviors.
• Use the default value of 24 hours.
For more information, see Specifying How Long Objects Stay in a CloudFront Edge Cache
(Expiration) (p. 116).
Client IP Addresses
If a viewer sends a request to CloudFront and does not include an X-Forwarded-For request header,
CloudFront gets the IP address of the viewer from the TCP connection, adds an X-Forwarded-For
header that includes the IP address, and forwards the request to the origin. For example, if CloudFront
gets the IP address 192.0.2.2 from the TCP connection, it forwards the following header to the origin:
X-Forwarded-For: 192.0.2.2
If a viewer sends a request to CloudFront and includes an X-Forwarded-For request header, CloudFront
gets the IP address of the viewer from the TCP connection, appends it to the end of the X-Forwarded-For
header, and forwards the request to the origin. For example, if the viewer request includes
X-Forwarded-For: 192.0.2.4,192.0.2.3 and CloudFront gets the IP address 192.0.2.2 from
the TCP connection, it forwards the following header to the origin:
X-Forwarded-For: 192.0.2.4,192.0.2.3,192.0.2.2
Conditional GETs
When CloudFront receives a request for an object that has expired from an edge cache, it forwards the
request to the Amazon S3 origin either to get the latest version of the object or to get confirmation from
Amazon S3 that the CloudFront edge cache already has the latest version. When Amazon S3 originally
sent the object to CloudFront, it included an ETag value and a LastModified value in the response. In
the new request that CloudFront forwards to Amazon S3, CloudFront adds one or both of the following:
• An If-Match or If-None-Match header that contains the ETag value for the expired version of the
object.
• An If-Modified-Since header that contains the LastModified value for the expired version of
the object.
Amazon S3 uses this information to determine whether the object has been updated and, therefore,
whether to return the entire object to CloudFront or to return only an HTTP 304 status code (not modified).
API Version 2016-08-01
140
Amazon CloudFront Developer Guide
How CloudFront Processes and Forwards Requests to
Your Amazon S3 Origin Server

Cookies
Amazon S3 doesn't process cookies. If you configure a cache behavior to forward cookies to an Amazon
S3 origin, CloudFront forwards the cookies, but Amazon S3 ignores them.
Cross-Origin Resource Sharing (CORS)
If you want CloudFront to respect Amazon S3 cross-origin resource sharing settings, configure CloudFront
to forward selected headers to Amazon S3. For more information, see Configuring CloudFront to Cache
Objects Based on Request Headers (p. 108).
GET Requests that Include a Body
If a viewer GET request includes a body, CloudFront returns an HTTP status code 403 (Forbidden) to the
viewer.
HTTP Methods
If you configure CloudFront to process all of the HTTP methods that it supports, CloudFront accepts the
following requests from viewers and forwards them to your Amazon S3 origin:
•DELETE
•GET
•HEAD
•OPTIONS
•PATCH
•POST
•PUT
CloudFront always caches responses to GET and HEAD requests.You can also configure CloudFront to
cache responses to OPTIONS requests. CloudFront does not cache responses to requests that use the
other methods.
If you use an Amazon S3 bucket as the origin for your distribution and if you use CloudFront origin access
identities, POST requests aren't supported in some Amazon S3 regions and PUT requests in those regions
require an additional header. For more information, see Using an Origin Access Identity in Amazon S3
Regions that Support Only Signature Version 4 Authentication (p. 170).
If you want to use multi-part uploads to add objects to an Amazon S3 bucket, you must add a CloudFront
origin access identity to your distribution and grant the origin access identity the applicable permissions.
For more information, see Using an Origin Access Identity to Restrict Access to Your Amazon S3
Content (p. 166).
Caution
If you configure CloudFront to accept and forward to Amazon S3 all of the HTTP methods that
CloudFront supports, you must create a CloudFront origin access identity to restrict access to
your Amazon S3 content and grant the origin access identity the applicable permissions. For
example, if you configure CloudFront to accept and forward these methods because you want
to use PUT, you must configure Amazon S3 bucket policies or ACLs to handle DELETE requests
appropriately so viewers can't delete resources that you don't want them to. For more information,
see Using an Origin Access Identity to Restrict Access to Your Amazon S3 Content (p. 166).
For information about the operations supported by Amazon S3, see the Amazon S3 documentation.
API Version 2016-08-01
141
Amazon CloudFront Developer Guide
How CloudFront Processes and Forwards Requests to
Your Amazon S3 Origin Server

HTTP Request Headers that CloudFront Removes or Updates
CloudFront removes or updates the following header fields before forwarding requests to your Amazon
S3 origin:
•Accept
•Accept-Charset
•Accept-Encoding – If the value contains gzip, CloudFront forwards Accept-Encoding: gzip to
your Amazon S3 origin. If the value does not contain gzip, CloudFront removes the Accept-Encoding
header field before forwarding the request to your origin.
•Accept-Language
•Authorization:
•GET and HEAD requests: CloudFront removes the Authorization header field before forwarding
the request to your origin.
•OPTIONS requests: CloudFront removes the Authorization header field before forwarding the
request to your origin if you configure CloudFront to cache responses to OPTIONS requests.
CloudFront forwards the Authorization header field to your origin if you do not configure CloudFront
to cache responses to OPTIONS requests.
•DELETE, PATCH, POST, and PUT requests: CloudFront does not remove the header field before
forwarding the request to your origin.
•Connection – CloudFront replaces this header with Connection: Keep-Alive before forwarding
the request to your Amazon S3 origin.
•Cookie – If you configure CloudFront to forward cookies, it will forward the Cookie header field to
your Amazon S3 origin. If you don't, CloudFront removes the Cookie header field. For more information,
see Configuring CloudFront to Cache Objects Based on Cookies (p. 106).
•Expect
•Host – CloudFront sets the value to the name of the Amazon S3 bucket that is associated with the
requested object.
•Proxy-Authorization
•Referer
•TE
•Upgrade
•User-Agent – CloudFront replaces the value of this header field with Amazon CloudFront.
Maximum Length of a Request and Maximum Length of a
URL
The maximum length of a request, including the path, the query string (if any), and headers, is 20480
bytes.
CloudFront constructs a URL from the request. The maximum length of this URL is 8192 bytes.
If a request or a URL exceeds these limits, CloudFront returns HTTP status code 413, Request Header
Fields Too Large, to the viewer, and then terminates the TCP connection to the viewer.
OCSP Stapling
When a viewer submits an HTTPS request for an object, either CloudFront or the viewer needs to confirm
with the certificate authority (CA) that the SSL certificate for the domain has not been revoked. OCSP
API Version 2016-08-01
142
Amazon CloudFront Developer Guide
How CloudFront Processes and Forwards Requests to
Your Amazon S3 Origin Server

stapling speeds up certificate validation by allowing CloudFront to validate the certificate and to cache
the response from the CA, so the client doesn't need to validate the certificate directly with the CA.
The performance improvement of OCSP stapling is more pronounced when CloudFront receives a lot of
HTTPS requests for objects in the same domain. Each server in a CloudFront edge location must submit
a separate validation request. When CloudFront receives a lot of HTTPS requests for the same domain,
every server in the edge location soon has a response from the CA that it can "staple" to a packet in the
SSL handshake; when the viewer is satisfied that the certificate is valid, CloudFront can serve the requested
object. If your distribution doesn't get much traffic in a CloudFront edge location, new requests are more
likely to be directed to a server that hasn't validated the certificate with the CA yet. In that case, the viewer
separately performs the validation step and the CloudFront server serves the object. That CloudFront
server also submits a validation request to the CA, so the next time it receives a request that includes
the same domain name, it has a validation response from the CA.
Protocols
CloudFront forwards HTTP or HTTPS requests to the origin server based on the protocol of the viewer
request, either HTTP or HTTPS.
Important
If your Amazon S3 bucket is configured as a website endpoint, you cannot configure CloudFront
to use HTTPS to communicate with your origin because Amazon S3 doesn't support HTTPS
connections in that configuration.
Query Strings
For web distributions, you can configure whether CloudFront forwards query string parameters to your
Amazon S3 origin. For RTMP distributions, CloudFront does not forward query string parameters. For
more information, see Configuring CloudFront to Cache Based on Query String Parameters (p. 105).
Request Timeout
The request timeout for CloudFront depends on the HTTP method:
•GET and HEAD requests – If Amazon S3 doesn't respond within 30 seconds or stops responding for 30
seconds, CloudFront drops the connection and makes two additional attempts to contact the origin. If
the origin doesn't reply during the third attempt, CloudFront doesn't try again until it receives another
request for content on the same origin.
•DELETE, OPTIONS, PATCH, POST, and PUT requests – If Amazon S3 doesn't respond within 30 seconds,
CloudFront drops the connection and doesn't try again to contact the origin. The client can resubmit
the request if necessary.
The request timeout cannot be changed.
Simultaneous Requests for the Same Object (Traffic Spikes)
When a CloudFront edge location receives a request for an object and either the object isn't currently in
the cache or the object has expired, CloudFront immediately sends the request to your Amazon S3 origin.
If there's a traffic spike—if additional requests for the same object arrive at the edge location before
Amazon S3 responds to the first request—CloudFront pauses briefly before forwarding additional requests
for the object to your origin. Typically, the response to the first request will arrive at the CloudFront edge
location before the response to subsequent requests.This brief pause helps to reduce unnecessary load
on Amazon S3. If additional requests are not identical because, for example, you configured CloudFront
to cache based on request headers or query strings, CloudFront forwards all of the unique requests to
your origin.
API Version 2016-08-01
143
Amazon CloudFront Developer Guide
How CloudFront Processes and Forwards Requests to
Your Amazon S3 Origin Server

When the response from the origin includes a Cache-Control: no-cache header, CloudFront typically
forwards the next request for the same object to the origin to determine whether the object has been
updated. However, when there's a traffic spike and CloudFront pauses after forwarding the first request
to your origin, multiple viewer requests might arrive before CloudFront receives a response from the
origin. When CloudFront receives a response that contains a Cache-Control: no-cache header, it
sends the object in the response to the viewer that made the original request and to all of the viewers
that requested the object during the pause. After the response arrives from the origin, CloudFront forwards
the next viewer request for the same object to the origin. In CloudFront access logs, the first request is
identified as a Miss in the x-edge-result-type column, and all subsequent requests that CloudFront
received during the pause are identified as a Hit. For more information about access log file format, see
Web Distribution Log File Format (p. 261).
How CloudFront Processes Responses from Your
Amazon S3 Origin Server
Topics
•Canceled Requests (p. 144)
•HTTP Response Headers that CloudFront Removes or Updates (p. 144)
•Maximum File Size (p. 145)
•Redirects (p. 145)
Canceled Requests
If an object is not in the edge cache, and if a viewer terminates a session (for example, closes a browser)
after CloudFront gets the object from your origin but before it can deliver the requested object, CloudFront
does not cache the object in the edge location.
HTTP Response Headers that CloudFront Removes or
Updates
CloudFront removes or updates the following header fields before forwarding the response from your
Amazon S3 origin to the viewer:
•Set-Cookie – If you configure CloudFront to forward cookies, it will forward the Set-Cookie header
field to clients. For more information, see Configuring CloudFront to Cache Objects Based on
Cookies (p. 106).
•Trailer
•Transfer-Encoding – If your Amazon S3 origin returns this header field, CloudFront sets the value
to chunked before returning the response to the viewer.
•Upgrade
•Via – CloudFront sets the value to:
Via: 1.1 alphanumeric-string.cloudfront.net (CloudFront)
before returning the response to the viewer. For example:
Via: 1.1 1026589cc7887e7a0dc7827b4example.cloudfront.net (CloudFront)
API Version 2016-08-01
144
Amazon CloudFront Developer Guide
How CloudFront Processes Responses from Your
Amazon S3 Origin Server

Maximum File Size
The maximum size of a response body that CloudFront will return to the viewer is 20 GB.This includes
chunked transfer responses that don't specify the Content-Length header value.
Redirects
You can configure an Amazon S3 bucket to redirect all requests to another host name; this can be another
Amazon S3 bucket or an HTTP server. If you configure a bucket to redirect all requests and if the bucket
is the origin for a CloudFront distribution, we recommend that you configure the bucket to redirect all
requests to a CloudFront distribution using either the domain name for the distribution (for example,
d111111abcdef8.cloudfront.net) or an alternate domain name (a CNAME) that is associated with a
distribution (for example, example.com). Otherwise, viewer requests bypass CloudFront, and the objects
are served directly from the new origin.
Note
If you redirect requests to an alternate domain name, you must also update the DNS service for
your domain by adding a CNAME record. For more information, see Using Alternate Domain
Names (CNAMEs) (p. 50).
Here's what happens when you configure a bucket to redirect all requests:
1. A viewer (for example, a browser) requests an object from CloudFront.
2. CloudFront forwards the request to the Amazon S3 bucket that is the origin for your distribution.
3. Amazon S3 returns an HTTP status code 301 (Moved Permanently) as well as the new location.
4. CloudFront caches the redirect status code and the new location, and returns the values to the viewer.
CloudFront does not follow the redirect to get the object from the new location.
5. The viewer sends another request for the object, but this time the viewer specifies the new location
that it got from CloudFront:
• If the Amazon S3 bucket is redirecting all requests to a CloudFront distribution, using either the
domain name for the distribution or an alternate domain name, CloudFront requests the object
from the Amazon S3 bucket or the HTTP server in the new location.When the new location returns
the object, CloudFront returns it to the viewer and caches it in an edge location.
•If the Amazon S3 bucket is redirecting requests to another location, the second request bypasses
CloudFront. The Amazon S3 bucket or the HTTP server in the new location returns the object
directly to the viewer, so the object is never cached in a CloudFront edge cache.
Request and Response Behavior for Custom
Origins
Topics
•How CloudFront Processes and Forwards Requests to Your Custom Origin Server (p. 146)
•How CloudFront Processes Responses from Your Custom Origin Server (p. 155)
API Version 2016-08-01
145
Amazon CloudFront Developer Guide
Request and Response Behavior for Custom Origins

How CloudFront Processes and Forwards
Requests to Your Custom Origin Server
For information about how CloudFront processes viewer requests and forwards the requests to your
custom origin, see the applicable topic:
Topics
•Authentication (p. 146)
•Caching Duration and Minimum TTL (p. 146)
•Client IP Addresses (p. 147)
•Client-Side SSL Authentication (p. 147)
•Compression (p. 147)
•Conditional Requests (p. 147)
•Cookies (p. 148)
•Cross-Origin Resource Sharing (CORS) (p. 148)
•Encryption (p. 148)
•GET Requests that Include a Body (p. 149)
•HTTP Methods (p. 149)
•HTTP Request Headers and CloudFront Behavior (p. 149)
•HTTP Version (p. 152)
•Maximum Length of a Request and Maximum Length of a URL (p. 152)
•OCSP Stapling (p. 153)
•Persistent Connections (p. 153)
•Protocols (p. 153)
•Query Strings (p. 153)
•Request Timeout (p. 154)
•Simultaneous Requests for the Same Object (Traffic Spikes) (p. 154)
•User-Agent Header (p. 154)
Authentication
For DELETE, GET, HEAD, PATCH, POST, and PUT requests, if you configure CloudFront to forward the
Authorization header to your origin, you can configure your origin server to request client authentication.
For OPTIONS requests, you can configure your origin server to request client authentication only if you
use the following CloudFront settings:
• Configure CloudFront to forward the Authorization header to your origin
• Configure CloudFront to not cache the response to OPTIONS requests
You can configure CloudFront to forward requests to your origin using either HTTP or HTTPS; for more
information, see How to Require HTTPS for Communication between Viewers, CloudFront, and Your
Origin (p. 230).
Caching Duration and Minimum TTL
For web distributions, to control how long your objects stay in a CloudFront cache before CloudFront
forwards another request to your origin, you can:
API Version 2016-08-01
146
Amazon CloudFront Developer Guide
How CloudFront Processes and Forwards Requests to
Your Custom Origin Server

• Configure your origin to add a Cache-Control or an Expires header field to each object.
• Specify a value for Minimum TTL in CloudFront cache behaviors.
• Use the default value of 24 hours.
For more information, see Specifying How Long Objects Stay in a CloudFront Edge Cache
(Expiration) (p. 116).
Client IP Addresses
If a viewer sends a request to CloudFront and does not include an X-Forwarded-For request header,
CloudFront gets the IP address of the viewer from the TCP connection, adds an X-Forwarded-For
header that includes the IP address, and forwards the request to the origin. For example, if CloudFront
gets the IP address 192.0.2.2 from the TCP connection, it forwards the following header to the origin:
X-Forwarded-For: 192.0.2.2
If a viewer sends a request to CloudFront and includes an X-Forwarded-For request header, CloudFront
gets the IP address of the viewer from the TCP connection, appends it to the end of the X-Forwarded-For
header, and forwards the request to the origin. For example, if the viewer request includes
X-Forwarded-For: 192.0.2.4,192.0.2.3 and CloudFront gets the IP address 192.0.2.2 from
the TCP connection, it forwards the following header to the origin:
X-Forwarded-For: 192.0.2.4,192.0.2.3,192.0.2.2
Some applications, such as load balancers (including Elastic Load Balancing), web application firewalls,
reverse proxies, intrusion prevention systems, and API Gateway, append the IP address of the CloudFront
edge server that forwarded the request onto the end of the X-Forwarded-For header. For example, if
CloudFront includes X-Forwarded-For: 192.0.2.2 in a request that it forwards to ELB and if the IP
address of the CloudFront edge server is 192.0.2.199, the request that your EC2 instance receives
contains the following header:
X-Forwarded-For: 192.0.2.2,192.0.2.199
Client-Side SSL Authentication
CloudFront does not support client authentication with client-side SSL certificates. If an origin requests
a client-side certificate, CloudFront drops the request.
Compression
CloudFront forwards requests that have the Accept-Encoding field values "identity" and "gzip".
For more information, see Serving Compressed Files (p. 135).
Conditional Requests
When CloudFront receives a request for an object that has expired from an edge cache, it forwards the
request to the origin either to get the latest version of the object or to get confirmation from the origin that
the CloudFront edge cache already has the latest version. Typically, when the origin last sent the object
to CloudFront, it included an ETag value, a LastModified value, or both values in the response. In the
new request that CloudFront forwards to the origin, CloudFront adds one or both of the following:
• An If-Match or If-None-Match header that contains the ETag value for the expired version of the
object.
• An If-Modified-Since header that contains the LastModified value for the expired version of
the object.
API Version 2016-08-01
147
Amazon CloudFront Developer Guide
How CloudFront Processes and Forwards Requests to
Your Custom Origin Server

The origin uses this information to determine whether the object has been updated and, therefore, whether
to return the entire object to CloudFront or to return only an HTTP 304 status code (not modified).
Cookies
You can configure CloudFront to forward cookies to your origin. For more information, see Configuring
CloudFront to Cache Objects Based on Cookies (p. 106).
Cross-Origin Resource Sharing (CORS)
If you want CloudFront to respect cross-origin resource sharing settings, configure CloudFront to forward
the Origin header to your origin. For more information, see Configuring CloudFront to Cache Objects
Based on Request Headers (p. 108).
Encryption
You can require viewers to use HTTPS to send requests to CloudFront and require CloudFront to forward
requests to your custom origin by using the protocol that is used by the viewer. For more information,
see the following distribution settings:
•Viewer Protocol Policy (p. 70)
•Origin Protocol Policy (Amazon EC2 and Other Custom Origins Only) (p. 67)
CloudFront forwards HTTPS requests to the origin server using the SSLv3, TLSv1.0, TLSv1.1, and
TLSv1.2 protocols. For custom origins, you can choose the SSL protocols that you want CloudFront to
use when communicating with your origin:
• If you're using the CloudFront console, choose protocols by using the Origin SSL Protocols check
boxes. For more information, see Creating or Updating a Web Distribution Using the CloudFront
Console (p. 59).
•If you're using the CloudFront API, specify protocols by using the OriginSslProtocols element. For
more information, see DistributionConfig Complex Type in the Amazon CloudFront API Reference.
If the origin is an Amazon S3 bucket, CloudFront always uses TLSv1.2.
Important
Other versions of SSL and TLS are not supported.
CloudFront forwards HTTPS requests to the origin server by using the following ciphers:
• ECDHE-RSA-AES128-SHA
• ECDHE-RSA-AES256-SHA
• AES256-SHA
• AES128-SHA
• DES-CBC3-SHA
• RC4-MD5
Your origin server must support at least one of these ciphers for CloudFront to establish an SSL connection
to your origin.
When establishing an HTTPS connection to the origin, CloudFront adds a Server Name Indication (SNI)
extension and includes the value of Origin Domain Name for the applicable origin in your distribution.
For more information about SNI, see Section 3.1 of RFC 4366, Transport Layer Security (TLS) Extensions.
API Version 2016-08-01
148
Amazon CloudFront Developer Guide
How CloudFront Processes and Forwards Requests to
Your Custom Origin Server

GET Requests that Include a Body
If a viewer GET request includes a body, CloudFront returns an HTTP status code 403 (Forbidden) to the
viewer.
HTTP Methods
If you configure CloudFront to process all of the HTTP methods that it supports, CloudFront accepts the
following requests from viewers and forwards them to your custom origin:
•DELETE
•GET
•HEAD
•OPTIONS
•PATCH
•POST
•PUT
CloudFront always caches responses to GET and HEAD requests.You can also configure CloudFront to
cache responses to OPTIONS requests. CloudFront does not cache responses to requests that use the
other methods.
For information about configuring whether your custom origin processes these methods, see the
documentation for your origin.
Caution
If you configure CloudFront to accept and forward to your origin all of the HTTP methods that
CloudFront supports, configure your origin server to handle all methods. For example, if you
configure CloudFront to accept and forward these methods because you want to use POST, you
must configure your origin server to handle DELETE requests appropriately so viewers can't
delete resources that you don't want them to. For more information, see the documentation for
your HTTP server.
HTTP Request Headers and CloudFront Behavior
The following table lists HTTP request headers and, for each header, explains the following:
•CloudFront behavior if you don't configure CloudFront to forward the header to your origin, which causes
CloudFront to cache your objects based on header values.
• Whether you can configure CloudFront to cache objects based on header values for that header.
You can configure CloudFront to cache objects based on values in the Date and User-Agent headers,
but we don't recommend it. These headers have a lot of possible values, and caching based on their
values would cause CloudFront to forward significantly more requests to your origin.
For more information about caching based on header values, see Configuring CloudFront to Cache
Objects Based on Request Headers (p. 108).
API Version 2016-08-01
149
Amazon CloudFront Developer Guide
How CloudFront Processes and Forwards Requests to
Your Custom Origin Server

Caching
Based on
Header Val-
ues Is Suppor-
ted
Behavior If You Don't Configure CloudFront to
Cache Based on Header Values
Header
YesCloudFront forwards the headers to your origin.Customer-defined headers
YesCloudFront removes the header.Accept
YesCloudFront removes the header.Accept-Charset
NoIf the value contains gzip, CloudFront forwards Ac-
cept-Encoding: gzip to your origin.
If the value does not contain gzip, CloudFront removes
the Accept-Encoding header field before forwarding
the request to your origin.
Accept-Encoding
YesCloudFront removes the header.Accept-Language
Yes• GET and HEAD requests – CloudFront removes the
Authorization header field before forwarding the
request to your origin.
•OPTIONS requests – CloudFront removes the Author-
ization header field before forwarding the request
to your origin if you configure CloudFront to cache
responses to OPTIONS requests.
CloudFront forwards the Authorization header
field to your origin if you do not configure CloudFront
to cache responses to OPTIONS requests.
•DELETE, PATCH, POST, and PUT requests – Cloud-
Front does not remove the header field before for-
warding the request to your origin.
Authorization
NoCloudFront forwards the header to your origin.Cache-Control
YesCloudFront does not add the header before forwarding
the request to your origin.
For more information, see Configuring CloudFront to
Cache Objects Based on the Protocol of the Re-
quest (p. 111).
CloudFront-Forwarded-
Proto
YesCloudFront does not add the header before forwarding
the request to your origin.
For more information, see Configuring CloudFront to
Cache Objects Based on the Device Type (p. 110).
CloudFront-Is-Desktop-
Viewer
YesCloudFront does not add the header before forwarding
the request to your origin.
For more information, see Configuring CloudFront to
Cache Objects Based on the Device Type (p. 110).
CloudFront-Is-Mobile-
Viewer
API Version 2016-08-01
150
Amazon CloudFront Developer Guide
How CloudFront Processes and Forwards Requests to
Your Custom Origin Server

Caching
Based on
Header Val-
ues Is Suppor-
ted
Behavior If You Don't Configure CloudFront to
Cache Based on Header Values
Header
YesCloudFront does not add the header before forwarding
the request to your origin.
For more information, see Configuring CloudFront to
Cache Objects Based on the Device Type (p. 110).
CloudFront-Is-Tablet-
Viewer
YesCloudFront does not add the header before forwarding
the request to your origin.
CloudFront-Viewer-
Country
NoCloudFront replaces this header with Connection:
Keep-Alive before forwarding the request to your
origin.
Connection
NoCloudFront forwards the header to your origin.Content-Length
YesCloudFront forwards the header to your origin.Content-MD5
YesCloudFront forwards the header to your origin.Content-Type
NoIf you configure CloudFront to forward cookies, it will
forward the Cookie header field to your origin. If you
don't, CloudFront removes the Cookie header field.
For more information, see Configuring CloudFront to
Cache Objects Based on Cookies (p. 106).
Cookie
Yes, but not
recommended
CloudFront forwards the header to your origin.Date
YesCloudFront removes the header.Expect
YesCloudFront forwards the header to your origin.From
YesCloudFront sets the value to the domain name of the
origin that is associated with the requested object.
Host
YesCloudFront forwards the header to your origin.If-Match
YesCloudFront forwards the header to your origin.If-Modified-Since
YesCloudFront forwards the header to your origin.If-None-Match
YesCloudFront forwards the header to your origin.If-Range
YesCloudFront forwards the header to your origin.If-Unmodified-Since
NoCloudFront forwards the header to your origin.Max-Forwards
YesCloudFront forwards the header to your origin.Origin
NoCloudFront forwards the header to your origin.Pragma
NoCloudFront removes the header.Proxy-Authenticate
NoCloudFront removes the header.Proxy-Authorization
NoCloudFront removes the header.Proxy-Connection
API Version 2016-08-01
151
Amazon CloudFront Developer Guide
How CloudFront Processes and Forwards Requests to
Your Custom Origin Server

Caching
Based on
Header Val-
ues Is Suppor-
ted
Behavior If You Don't Configure CloudFront to
Cache Based on Header Values
Header
Yes, by defaultCloudFront forwards the header to your origin. For more
information, see How CloudFront Processes Partial
Requests for an Object (Range GETs) (p. 132).
Range
YesCloudFront removes the header.Referer
NoCloudFront forwards the header to your origin.Request-Range
NoCloudFront removes the header.TE
NoCloudFront removes the header.Trailer
NoCloudFront forwards the header to your origin.Transfer-Encoding
NoCloudFront removes the header.Upgrade
Yes, but not
recommended
CloudFront replaces the value of this header field with
Amazon CloudFront. If you want CloudFront to cache
your content based on the device the user is using, see
Configuring CloudFront to Cache Objects Based on
the Device Type (p. 110).
User-Agent
YesCloudFront forwards the header to your origin.Via
YesCloudFront forwards the header to your origin.Warning
NoCloudFront adds the header to the viewer request be-
fore forwarding the request to your origin. The header
value contains an encrypted string that uniquely identi-
fies the request.
X-Amz-Cf-Id
NoCloudFront removes all X-Edge-* headers.X-Edge-*
YesCloudFront forwards the header to your origin. For more
information, see Client IP Addresses (p. 147).
X-Forwarded-For
YesCloudFront removes the header.X-Forwarded-Proto
NoCloudFront removes the header.X-Real-IP
HTTP Version
CloudFront forwards requests to your custom origin using HTTP/1.1.
Maximum Length of a Request and Maximum Length of a
URL
The maximum length of a request, including the path, the query string (if any), and headers, is 20480
bytes.
CloudFront constructs a URL from the request. The maximum length of this URL is 8192 bytes.
API Version 2016-08-01
152
Amazon CloudFront Developer Guide
How CloudFront Processes and Forwards Requests to
Your Custom Origin Server

If a request or a URL exceeds these limits, CloudFront returns HTTP status code 413, Request Header
Fields Too Large, to the viewer, and then terminates the TCP connection to the viewer.
OCSP Stapling
When a viewer submits an HTTPS request for an object, either CloudFront or the viewer needs to confirm
with the certificate authority (CA) that the SSL certificate for the domain has not been revoked. OCSP
stapling speeds up certificate validation by allowing CloudFront to validate the certificate and to cache
the response from the CA, so the client doesn't need to validate the certificate directly with the CA.
The performance improvement of OCSP stapling is more pronounced when CloudFront receives a lot of
HTTPS requests for objects in the same domain. Each server in a CloudFront edge location must submit
a separate validation request. When CloudFront receives a lot of HTTPS requests for the same domain,
every server in the edge location soon has a response from the CA that it can "staple" to a packet in the
SSL handshake; when the viewer is satisfied that the certificate is valid, CloudFront can serve the requested
object. If your distribution doesn't get much traffic in a CloudFront edge location, new requests are more
likely to be directed to a server that hasn't validated the certificate with the CA yet. In that case, the viewer
separately performs the validation step and the CloudFront server serves the object. That CloudFront
server also submits a validation request to the CA, so the next time it receives a request that includes
the same domain name, it has a validation response from the CA.
Persistent Connections
When CloudFront gets a response from your origin, it tries to maintain the connection for several seconds
in case another request arrives during that period. Maintaining a persistent connection saves the time
that is required to re-establish the TCP connection and perform another TLS handshake for subsequent
requests.To improve performance, we recommend that you configure your origin server to allow persistent
connections.
Protocols
CloudFront forwards HTTP or HTTPS requests to the origin server based on the following:
• The protocol of the request that the viewer sends to CloudFront, either HTTP or HTTPS.
•The value of the Origin Protocol Policy field in the CloudFront console or, if you're using the CloudFront
API, the OriginProtocolPolicy element in the DistributionConfig complex type. In the
CloudFront console, the options are HTTP Only, HTTPS Only, and Match Viewer.
If you specify HTTP Only or HTTPS Only, CloudFront forwards requests to the origin server using the
specified protocol, regardless of the protocol in the viewer request.
If you specify Match Viewer, CloudFront forwards requests to the origin server using the protocol in the
viewer request. Note that CloudFront caches the object only once even if viewers make requests using
both HTTP and HTTPS protocols.
Caution
If CloudFront forwards a request to the origin using the HTTPS protocol, and if the origin server
returns an invalid certificate or a self-signed certificate, CloudFront drops the TCP connection.
For information about how to update a distribution using the CloudFront console, see Listing, Viewing,
and Updating CloudFront Distributions (p. 48). For information about how to update a distribution using
the CloudFront API, go to PUT Distribution Config in the Amazon CloudFront API Reference.
Query Strings
You can configure whether CloudFront forwards query string parameters to your origin. For more
information, see Configuring CloudFront to Cache Based on Query String Parameters (p. 105).
API Version 2016-08-01
153
Amazon CloudFront Developer Guide
How CloudFront Processes and Forwards Requests to
Your Custom Origin Server

Request Timeout
The request timeout for CloudFront depends on the HTTP method:
•GET and HEAD requests – If the origin doesn't respond within 30 seconds or stops responding for 30
seconds, CloudFront drops the connection and makes two additional attempts to contact the origin. If
the origin doesn't reply during the third attempt, CloudFront doesn't try again until it receives another
request for content on the same origin.
•DELETE, OPTIONS, PATCH, POST, and POST requests – If the origin doesn't respond within 30 seconds,
CloudFront drops the connection and doesn't try again to contact the origin. The client can resubmit
the request if necessary.
The request timeout cannot be changed.
Simultaneous Requests for the Same Object (Traffic Spikes)
When a CloudFront edge location receives a request for an object and either the object isn't currently in
the cache or the object has expired, CloudFront immediately sends the request to your origin. If there's
a traffic spike—if additional requests for the same object arrive at the edge location before your origin
responds to the first request—CloudFront pauses briefly before forwarding additional requests for the
object to your origin.Typically, the response to the first request will arrive at the CloudFront edge location
before the response to subsequent requests.This brief pause helps to reduce unnecessary load on your
origin server. If additional requests are not identical because, for example, you configured CloudFront to
cache based on request headers or cookies, CloudFront forwards all of the unique requests to your origin.
User-Agent Header
If you want CloudFront to cache different versions of your objects based on the device a user is using to
view your content, we recommend that you configure CloudFront to forward the applicable headers to
your custom origin:
•CloudFront-Is-Desktop-Viewer
•CloudFront-Is-Mobile-Viewer
•CloudFront-Is-SmartTV-Viewer
•CloudFront-Is-Tablet-Viewer
Based on the value of the User-Agent header, CloudFront sets the value of these headers to true or
false before forwarding the request to your origin. If a device falls into more than one category, more
than one value might be true. For example, for some tablet devices, CloudFront might set both
CloudFront-Is-Mobile-Viewer and CloudFront-Is-Tablet-Viewer to true. For more information
about configuring CloudFront to cache based on request headers, see Configuring CloudFront to Cache
Objects Based on Request Headers (p. 108).
You can configure CloudFront to cache objects based on values in the User-Agent header, but we don't
recommend it.The User-Agent header has a lot of possible values, and caching based on those values
would cause CloudFront to forward significantly more requests to your origin.
If you do not configure CloudFront to cache objects based on values in the User-Agent header,
CloudFront CloudFront adds a User-Agent header with the following value before it forwards a request
to your origin:
User-Agent = Amazon CloudFront
CloudFront adds this header regardless of whether the request from the viewer includes a User-Agent
header. If the request from the viewer includes a User-Agent header, CloudFront removes it.
API Version 2016-08-01
154
Amazon CloudFront Developer Guide
How CloudFront Processes and Forwards Requests to
Your Custom Origin Server

How CloudFront Processes Responses from Your
Custom Origin Server
For information about how CloudFront processes responses from custom origin servers, see the applicable
topic:
Topics
•Caching (p. 155)
•Canceled Requests (p. 155)
•Content Negotiation (p. 155)
•Cookies (p. 155)
•Dropped TCP Connections (p. 156)
•HTTP Response Headers that CloudFront Removes or Updates (p. 156)
•Maximum File Size (p. 157)
•Origin Unavailable (p. 157)
•Redirects (p. 157)
•Transfer Encoding (p. 157)
Caching
•Ensure that the origin server sets valid and accurate values for the Date and Last-Modified header
fields.
•If requests from viewers include the If-Match or If-None-Match request header fields, set the ETag
response header field. If you do not specify an ETag value, CloudFront ignores subsequent If-Match
or If-None-Match headers.
•CloudFront normally respects a Cache-Control: no-cache header in the response from the origin.
For an exception, see Simultaneous Requests for the Same Object (Traffic Spikes) (p. 154).
Canceled Requests
If an object is not in the edge cache, and if a viewer terminates a session (for example, closes a browser)
after CloudFront gets the object from your origin but before it can deliver the requested object, CloudFront
does not cache the object in the edge location.
Content Negotiation
If your origin returns Vary:* in the response, and if the value of Minimum TTL for the corresponding
cache behavior is 0, CloudFront caches the object but still forwards every subsequent request for the
object to the origin to confirm that the cache contains the latest version of the object.
If your origin returns Vary:* in the response, and if the value of Minimum TTL for the corresponding
cache behavior is any other value, CloudFront processes the Vary header as described in HTTP Response
Headers that CloudFront Removes or Updates (p. 156).
Cookies
If you enable cookies for a cache behavior, and if the origin returns cookies with an object, CloudFront
caches both the object and the cookies. Note that this reduces cacheability for an object. For more
information, see Configuring CloudFront to Cache Objects Based on Cookies (p. 106).
API Version 2016-08-01
155
Amazon CloudFront Developer Guide
How CloudFront Processes Responses from Your
Custom Origin Server

Dropped TCP Connections
If the TCP connection between CloudFront and your origin drops while your origin is returning an object
to CloudFront, CloudFront behavior depends on whether your origin included a Content-Length header
in the response:
•Content-Length header – CloudFront returns the object to the viewer as it gets the object from your
origin. However, if the value of the Content-Length header doesn't match the size of the object,
CloudFront doesn't cache the object.
•Transfer-Encoding: Chunked – CloudFront returns the object to the viewer as it gets the object from
your origin. However, if the chunked response is not complete, CloudFront does not cache the object.
•No Content-Length header – CloudFront returns the object to the viewer and caches it, but the object
may not be complete. Without a Content-Length header, CloudFront cannot determine whether the
TCP connection was dropped accidentally or on purpose.
We recommend that you configure your HTTP server to add a Content-Length header to prevent
CloudFront from caching partial objects.
HTTP Response Headers that CloudFront Removes or
Updates
CloudFront removes or updates the following header fields before forwarding the response from your
origin to the viewer:
•Set-Cookie – If you configure CloudFront to forward cookies, it will forward the Set-Cookie header
field to clients. For more information, see Configuring CloudFront to Cache Objects Based on
Cookies (p. 106).
•Trailer
•Transfer-Encoding – If your origin returns this header field, CloudFront sets the value to chunked
before returning the response to the viewer.
•Upgrade
•Vary – Note the following:
• If you configure CloudFront to forward any of the device-specific headers to your origin
(CloudFront-Is-Desktop-Viewer, CloudFront-Is-Mobile-Viewer,
CloudFront-Is-SmartTV-Viewer, CloudFront-Is-Tablet-Viewer) and you configure your
origin to return Vary:User-Agent to CloudFront, CloudFront returns Vary:User-Agent to the
viewer. For more information, see Configuring CloudFront to Cache Objects Based on the Device
Type (p. 110).
• If you configure your origin to include either Accept-Encoding or Cookie in the Vary header,
CloudFront includes the values in the response to the viewer.
•If you configure CloudFront to forward a whitelist of headers to your origin, and if you configure your
origin to return the header names to CloudFront in the Vary header (for example,
Vary:Accept-Charset,Accept-Language), CloudFront returns the Vary header with those
value to the viewer.
• For information about how CloudFront processes a value of * in the Vary header, see Content
Negotiation (p. 155).
•If you configure your origin to include any other values in the Vary header, CloudFront removes the
values before returning the response to the viewer.
•Via – Regardless of whether your origin returns this header field to CloudFront, CloudFront sets the
value to:
Via: 1.1 alphanumeric-string.cloudfront.net (CloudFront)
API Version 2016-08-01
156
Amazon CloudFront Developer Guide
How CloudFront Processes Responses from Your
Custom Origin Server

before returning the response to the viewer. For example:
Via: 1.1 1026589cc7887e7a0dc7827b4example.cloudfront.net (CloudFront)
Maximum File Size
The maximum size of a response body that CloudFront will return to the viewer is 20 GB.This includes
chunked transfer responses that don't specify the Content-Length header value.
Origin Unavailable
If your origin server is unavailable and CloudFront gets a request for an object that is in the edge cache
but that has expired (for example, because the period of time specified in the Cache-Control max-age
directive has passed), CloudFront either serves the expired version of the object or serves a custom error
page. For more information, see How CloudFront Processes and Caches HTTP 4xx and 5xx Status Codes
from Your Origin (p. 158).
In some cases, an object that is seldom requested is evicted and is no longer available in the edge cache.
CloudFront can't serve an object that has been evicted.
Redirects
If you change the location of an object on the origin server, you can configure your web server to redirect
requests to the new location. After you configure the redirect, the first time a viewer submits a request
for the object, CloudFront Front sends the request to the origin, and the origin responds with a redirect
(for example, 302 Moved Temporarily). CloudFront caches the redirect and returns it to the viewer.
CloudFront does not follow the redirect.
You can configure your web server to redirect requests to one of the following locations:
• The new URL of the object on the origin server. When the viewer follows the redirect to the new URL,
the viewer bypasses CloudFront and goes straight to the origin. As a result, we recommend that you
not redirect requests to the new URL of the object on the origin.
• The new CloudFront URL for the object.When the viewer submits the request that contains the new
CloudFront URL, CloudFront gets the object from the new location on your origin, caches it at the edge
location, and returns the object to the viewer. Subsequent requests for the object will be served by the
edge location.This avoids the latency and load associated with viewers requesting the object from the
origin. However, every new request for the object will incur charges for two requests to CloudFront.
Transfer Encoding
CloudFront supports only the chunked value of the Transfer-Encoding header. If your origin returns
Transfer-Encoding: chunked, CloudFront returns the object to the client as the object is received
at the edge location, and caches the object in chunked format for subsequent requests.
If the viewer makes a Range GET request and the origin returns Transfer-Encoding: chunked,
CloudFront returns the entire object to the viewer instead of the requested range.
We recommend that you use chunked encoding if the content length of your response cannot be
predetermined. For more information, see Dropped TCP Connections (p. 156).
API Version 2016-08-01
157
Amazon CloudFront Developer Guide
How CloudFront Processes Responses from Your
Custom Origin Server

How CloudFront Processes HTTP 3xx Status
Codes from Your Origin
When CloudFront requests an object from your Amazon S3 bucket or custom origin server, your origin
sometimes returns an HTTP 3xx status code, which typically indicates either that the URL has changed
(301, Moved Permanently, or 307, Temporary Redirect) or that the object hasn't changed since the last
time CloudFront requested it (304, Not Modified). CloudFront caches 3xx responses for the duration
specified by the settings in your CloudFront distribution and by the header fields that your origin returns
along with an object. For more information, see Specifying How Long Objects Stay in a CloudFront Edge
Cache (Expiration) (p. 116).
If your origin returns a 301 or 307 status code, CloudFront doesn't follow the redirect to the new location.
How CloudFront Processes and Caches HTTP
4xx and 5xx Status Codes from Your Origin
Topics
•How CloudFront Processes Errors When You Have Configured Custom Error Pages (p. 158)
•How CloudFront Processes Errors When You Have Not Configured Custom Error Pages (p. 160)
•HTTP 4xx and 5xx Status Codes that CloudFront Caches (p. 161)
When CloudFront requests an object from your Amazon S3 bucket or custom origin server, your origin
sometimes returns an HTTP 4xx or 5xx status code, which indicates an error has occurred. CloudFront
behavior depends on:
• Whether you have configured custom error pages.
•Whether you have configured how long you want CloudFront to cache error responses from your origin
(error caching minimum TTL).
• The status code.
• For 5xx status codes, whether the requested object is currently in the CloudFront edge cache.
For information about settings for custom error pages in the CloudFront console, see Custom Error Pages
and Error Caching (p. 79). For information about the error caching minimum TTL in the CloudFront
console, see Error Caching Minimum TTL (p. 79).
For a list of the HTTP status codes that CloudFront caches, see HTTP 4xx and 5xx Status Codes that
CloudFront Caches (p. 161).
If you have enabled logging, CloudFront writes the results to the logs regardless of the HTTP status code.
How CloudFront Processes Errors When You Have
Configured Custom Error Pages
If you have configured custom error pages, CloudFront behavior depends on whether the requested
object is in the edge cache.
API Version 2016-08-01
158
Amazon CloudFront Developer Guide
How CloudFront Processes HTTP 3xx Status Codes from
Your Origin

The Requested Object Is Not in the Edge Cache
CloudFront continues to try to get the requested object from your origin when all of the following are true:
• A viewer requests an object
• The object isn't in the edge cache
•Your origin returns an HTTP 4xx or 5xx status code instead of returning a 304 status code (Not Modified)
or an updated version of the object
CloudFront does the following:
1. In the CloudFront edge cache that received the viewer request, CloudFront checks your distribution
configuration and gets the path of the custom error page that corresponds with the status code that
your origin returned.
2. CloudFront finds the first cache behavior in your distribution that has a path pattern that matches the
path of the custom error page.
3. The CloudFront edge location sends a request for the custom error page to the origin that is specified
in the cache behavior.
4. The origin returns the custom error page to the edge location.
5. CloudFront returns the custom error page to the viewer that made the request, and also caches the
custom error page for the amount of time specified by the error caching minimum TTL (five minutes
by default).
6. After the error caching minimum TTL has elapsed, CloudFront tries again to get the requested object
by forwarding another request to your origin. CloudFront continues to retry at intervals specified by the
error caching minimum TTL.
The Requested Object Is in the Edge Cache
CloudFront continues to serve the object that is currently in the edge cache when all of the following are
true:
• A viewer requests an object
• The object is in the edge cache but it has expired
•Your origin returns an HTTP 4xx or 5xx status code instead of returning a 304 status code (Not Modified)
or an updated version of the object
CloudFront does the following:
1. If your origin returns a 5xx status code, CloudFront serves the object even though it has expired. For
the duration of the error caching minimum TTL, CloudFront continues to respond to viewer requests
by serving the object from the edge cache.
If your origin returns a 4xx status code, CloudFront returns the status code, not the requested object,
to the viewer.
2. After the error caching minimum TTL has elapsed, CloudFront tries again to get the requested object
by forwarding another request to your origin. Note that if the object is not requested frequently,
CloudFront might evict it from the edge cache while your origin server is still returning 5xx responses.
For information about how long objects stay in CloudFront edge caches, see Specifying How Long
Objects Stay in a CloudFront Edge Cache (Expiration) (p. 116).
API Version 2016-08-01
159
Amazon CloudFront Developer Guide
How CloudFront Processes Errors When You Have
Configured Custom Error Pages

How CloudFront Processes Errors When You Have
Not Configured Custom Error Pages
If you have not configured custom error pages, CloudFront behavior depends on whether the requested
object is in the edge cache.
The Requested Object Is Not in the Edge Cache
CloudFront continues to try to get the requested object from your origin when all of the following are true:
• A viewer requests an object
• The object isn't in the edge cache
•Your origin returns an HTTP 4xx or 5xx status code instead of returning a 304 status code (Not Modified)
or an updated version of the object
CloudFront does the following:
1. CloudFront returns the 4xx or 5xx status code to the viewer.
2. CloudFront also caches the status code in the edge cache that received the request.
3. For the duration of the error caching minimum TTL (five minutes by default), CloudFront responds to
subsequent viewer requests for the same object with the cached 4xx or 5xx status code.
4. After the error caching minimum TTL has elapsed, CloudFront tries again to get the requested object
by forwarding another request to your origin.
The Requested Object Is in the Edge Cache
CloudFront continues to serve the object that is currently in the edge cache when all of the following are
true:
• A viewer requests an object
• The object is in the edge cache but it has expired
•Your origin returns an HTTP 4xx or 5xx status code instead of returning a 304 status code (Not Modified)
or an updated version of the object
CloudFront does the following:
1. If your origin returns a 5xx error code, CloudFront serves the object even though it has expired. For
the duration of the error caching minimum TTL (five minutes by default), CloudFront continues to
respond to viewer requests by serving the object from the edge cache.
If your origin returns a 4xx status code, CloudFront returns the status code, not the requested object,
to the viewer.
2. After the error caching minimum TTL has elapsed, CloudFront tries again to get the requested object
by forwarding another request to your origin. Note that if the object is not requested frequently,
CloudFront might evict it from the edge cache while your origin server is still returning 5xx responses.
For information about how long objects stay in CloudFront edge caches, see Specifying How Long
Objects Stay in a CloudFront Edge Cache (Expiration) (p. 116).
API Version 2016-08-01
160
Amazon CloudFront Developer Guide
How CloudFront Processes Errors When You Have Not
Configured Custom Error Pages

HTTP 4xx and 5xx Status Codes that CloudFront
Caches
CloudFront caches the following HTTP 4xx and 5xx status codes returned by Amazon S3 or your custom
origin server. If you have configured a custom error page for an HTTP status code, CloudFront caches
the custom error page.
Bad Request400
Forbidden403
Not Found404
Method Not Allowed405
Request-URI Too Large414
Internal Service Error500
Not Implemented501
Bad Gateway502
Service Unavailable503
Gateway Time-out504
API Version 2016-08-01
161
Amazon CloudFront Developer Guide
HTTP 4xx and 5xx Status Codes that CloudFront Caches

Serving Private Content through
CloudFront
Many companies that distribute content via the Internet want to restrict access to documents, business
data, media streams, or content that is intended for selected users, for example, users who have paid a
fee. To securely serve this private content using CloudFront, you can do the following:
•Require that your users access your private content by using special CloudFront signed URLs or signed
cookies.
• Require that your users access your Amazon S3 content using CloudFront URLs, not Amazon S3
URLs. Requiring CloudFront URLs isn't required, but we recommend it to prevent users from bypassing
the restrictions that you specify in signed URLs or signed cookies.
Topics
•Overview of Private Content (p. 162)
•Using an HTTP Server for Private Content (p. 164)
•Task List: Serving Private Content (p. 165)
•Using an Origin Access Identity to Restrict Access to Your Amazon S3 Content (p. 166)
•Specifying the AWS Accounts That Can Create Signed URLs and Signed Cookies (Trusted
Signers) (p. 171)
•Choosing Between Signed URLs and Signed Cookies (p. 178)
•Using Signed URLs (p. 179)
•Using Signed Cookies (p. 198)
•Using a Linux Command and OpenSSL for Base64-Encoding and Encryption (p. 213)
•Code Examples for Creating a Signature for a Signed URL (p. 214)
Overview of Private Content
You can control user access to your private content in two ways, as shown in the following illustration:
1. Restrict access to objects in CloudFront edge caches
2. Restrict access to objects in your Amazon S3 bucket
API Version 2016-08-01
162
Amazon CloudFront Developer Guide
Overview of Private Content

Restricting Access to Objects in CloudFront Edge
Caches
You can configure CloudFront to require that users access your objects using either signed URLs or
signed cookies.You then develop your application either to create and distribute signed URLs to
authenticated users or to send Set-Cookie headers that set signed cookies on the viewers for
authenticated users. (To give a few users long-term access to a limited number of objects, you can also
create signed URLs manually.)
When you create signed URLs or signed cookies to control access to your objects, you can specify the
following restrictions:
• An ending date and time, after which the URL is no longer valid.
• (Optional) The date and time that the URL becomes valid.
• (Optional) The IP address or range of addresses of the computers that can be used to access your
content.
One part of a signed URL or a signed cookie is hashed and signed using the private key from a
public/private key pair.When someone uses a signed URL or signed cookie to access an object, CloudFront
compares the signed and unsigned portions of the URL or cookie. If they don't match, CloudFront doesn't
serve the object.
Restricting Access to Objects in Amazon S3
Buckets
You can optionally secure the content in your Amazon S3 bucket so users can access it through CloudFront
but cannot access it directly by using Amazon S3 URLs.This prevents anyone from bypassing CloudFront
and using the Amazon S3 URL to get content that you want to restrict access to. This step isn't required
to use signed URLs, but we recommend it.
To require that users access your content through CloudFront URLs, you perform the following tasks:
• Create a special CloudFront user called an origin access identity.
• Give the origin access identity permission to read the objects in your bucket.
• Remove permission for anyone else to use Amazon S3 URLs to read the objects.
API Version 2016-08-01
163
Amazon CloudFront Developer Guide
Restricting Access to Objects in CloudFront Edge
Caches

Using an HTTP Server for Private Content
You can use signed URLs or signed cookies for any CloudFront distribution, regardless of whether the
origin is an Amazon S3 bucket or an HTTP server. However, for CloudFront to get your objects from an
HTTP server, the objects must remain publicly accessible. When the objects are publicly accessible,
anyone who has the URL for an object on your HTTP server can access the object without logging in or
paying for your content. If you use signed URLs or signed cookies and your origin is an HTTP server, do
not give the URLs for the objects on your HTTP server to your customers or to others outside your
organization.
API Version 2016-08-01
164
Amazon CloudFront Developer Guide
Using an HTTP Server for Private Content

Task List: Serving Private Content
To configure CloudFront to serve private content, perform the following tasks:
1. (Optional but recommended) Require your users to access your content only through CloudFront.
The method that you use depends on whether you're using Amazon S3 or custom origins:
•Amazon S3 – See Using an Origin Access Identity to Restrict Access to Your Amazon S3
Content (p. 166).
•Custom origin – See Using Custom Headers to Restrict Access to Your Content on a Custom
Origin (p. 113).
2. Specify the AWS accounts that you want to use to create signed URLs or signed cookies. For more
information, see Specifying the AWS Accounts That Can Create Signed URLs and Signed Cookies
(Trusted Signers) (p. 171).
3. Write your application to respond to requests from authorized users either with signed URLs or with
Set-Cookie headers that set signed cookies. For more information, see Choosing Between Signed
URLs and Signed Cookies (p. 178).
API Version 2016-08-01
165
Amazon CloudFront Developer Guide
Task List: Serving Private Content

Using an Origin Access Identity to Restrict
Access to Your Amazon S3 Content
Topics
•Creating a CloudFront Origin Access Identity and Adding it to Your Distribution (p. 166)
•Granting the Origin Access Identity Permission to Read Objects in Your Amazon S3 Bucket (p. 168)
•Using an Origin Access Identity in Amazon S3 Regions that Support Only Signature Version 4
Authentication (p. 170)
Typically, if you're using an Amazon S3 bucket as the origin for a CloudFront distribution, you grant
everyone permission to read the objects in your bucket.This allows anyone to access your objects either
through CloudFront or using the Amazon S3 URL. CloudFront doesn't expose Amazon S3 URLs, but
your users might have those URLs if your application serves any objects directly from Amazon S3 or if
anyone gives out direct links to specific objects in Amazon S3.
Note
You can also restrict access to content on a custom origin by using custom headers. For more
information, see Using Custom Headers to Restrict Access to Your Content on a Custom
Origin (p. 113).
If you want to use CloudFront signed URLs or signed cookies to provide access to objects in your Amazon
S3 bucket, you probably also want to prevent users from accessing your Amazon S3 objects using Amazon
S3 URLs. If users access your objects directly in Amazon S3, they bypass the controls provided by
CloudFront signed URLs or signed cookies, for example, control over the date and time that a user can
no longer access your content and control over which IP addresses can be used to access content. In
addition, if users access objects both through CloudFront and directly by using Amazon S3 URLs,
CloudFront access logs are less useful because they're incomplete.
Note
To create origin access identities, you must use the CloudFront console or CloudFront API
version 2009-09-09 or later.
To ensure that your users access your objects using only CloudFront URLs, regardless of whether the
URLs are signed, perform the following tasks:
1. Create an origin access identity, which is a special CloudFront user, and associate the origin access
identity with your distribution. (For web distributions, you associate the origin access identity with
origins, so you can secure all or just some of your Amazon S3 content.) You can also create an origin
access identity and add it to your distribution when you create the distribution. For more information,
see Creating a CloudFront Origin Access Identity and Adding it to Your Distribution (p. 166).
2. Change the permissions either on your Amazon S3 bucket or on the objects in your bucket so only
the origin access identity has read permission (or read and download permission). When your users
access your Amazon S3 objects through CloudFront, the CloudFront origin access identity gets the
objects on your users' behalf. If your users request objects directly by using Amazon S3 URLs, they're
denied access.The origin access identity has permission to access objects in your Amazon S3
bucket, but users don't. For more information, see Granting the Origin Access Identity Permission
to Read Objects in Your Amazon S3 Bucket (p. 168).
Creating a CloudFront Origin Access Identity and
Adding it to Your Distribution
An AWS account can have up to 100 CloudFront origin access identities. However, you can add an origin
access identity to as many distributions as you want, so one origin access identity is usually sufficient.
API Version 2016-08-01
166
Amazon CloudFront Developer Guide
Using an Origin Access Identity to Restrict Access to
Your Amazon S3 Content

If you didn't create an origin access identity and add it to your distribution when you created the distribution,
you can create and add one now using either the CloudFront console or the CloudFront API:
•If you're using the CloudFront console – You can create an origin access identity and add it to your
distribution at the same time. For more information, see Creating an Origin Access Identity and Adding
it to Your Distribution Using the CloudFront Console (p. 167).
•If you're using the CloudFront API – You create an origin access identity and then you add it to your
distribution. Perform the procedure in each of the following topics:
•Creating an Origin Access Identity Using the CloudFront API (p. 168)
•Adding an Origin Access Identity to Your Distribution Using the CloudFront API (p. 168)
Creating an Origin Access Identity and Adding it to Your
Distribution Using the CloudFront Console
If you didn't create an origin access identity when you created your distribution, perform the following
procedure.
To create a CloudFront origin access identity using the CloudFront console
1. Sign in to the AWS Management Console and open the CloudFront console at https://
console.aws.amazon.com/cloudfront/.
2. Click the ID of the distribution that you want to add an origin access identity to.
3. Change to edit mode:
•Web distributions – Click the Origins tab, select the origin that you want to edit, and click Edit.
You can only create an origin access identity for origins for which Origin Type is S3 Origin.
•RTMP distributions – Click Edit.
4. For Restrict Bucket Access, click Yes.
5. If you already have an origin access identity that you want to use, click Use an Existing Identity.
Then select the identity in the Your Identities list.
Note
If you already have an origin access identity, we recommend that you reuse it to simplify
maintenance.
If you want to create an identity, click Create a New Identity.Then enter a description for the identity
in the Comment field.
6. If you want CloudFront to automatically give the origin access identity permission to read the objects
in the Amazon S3 bucket specified in Origin Domain Name, click Yes, Update Bucket Policy.
Important
If you click Yes, Update Bucket Policy, CloudFront updates bucket permissions to grant
the specified origin access identity the permission to read objects in your bucket. However,
CloudFront does not remove existing permissions. If users currently have permission to
access the objects in your bucket using Amazon S3 URLs, they will still have that permission
after CloudFront updates your bucket permissions. To view or remove existing bucket
permissions, use a method provided by Amazon S3. For more information, see Granting
the Origin Access Identity Permission to Read Objects in Your Amazon S3 Bucket (p. 168).
If you want to manually update permissions on your Amazon S3 bucket, click No, I Will Update
Permissions.
7. Click Yes, Edit.
API Version 2016-08-01
167
Amazon CloudFront Developer Guide
Creating a CloudFront Origin Access Identity and Adding
it to Your Distribution

8. If you're adding an origin access identity to a web distribution and you have more than one origin,
repeat Step 3 through Step 7 as applicable.
Creating an Origin Access Identity Using the CloudFront API
If you already have an origin access identity and you want to reuse it instead of creating another one,
skip to Adding an Origin Access Identity to Your Distribution Using the CloudFront API (p. 168).
To create a CloudFront origin access identity using the CloudFront API, use the POST Origin Access
Identity API action. The response includes an Id and an S3CanonicalUserId for the new origin
access identity. Make note of these values because you will use them later in the process:
•Id element – You use the value of the Id element to associate an origin access ID with your distribution.
•S3CanonicalUserId element – You use the value of the S3CanonicalUserId element when you
give CloudFront access to your Amazon S3 bucket or objects.
For more information about the POST Origin Access Identity API action, go to POST Origin
Access Identity in the Amazon CloudFront API Reference. For a list of other actions that you can perform
on origin access identities, go to Actions on Origin Access Identities, also in the Amazon CloudFront API
Reference.
Adding an Origin Access Identity to Your Distribution Using
the CloudFront API
You can use the CloudFront API to add a CloudFront origin access identity to an existing distribution or
to create a new distribution that includes an origin access identity. In either case, include an
OriginAccessIdentity element. This element contains the value of the Id element that the POST
Origin Access Identity API action returned when you created the origin access identity. For web
distributions, add the OriginAccessIdentity element to one or more origins. For RTMP distributions,
add the OriginAccessIdentity element to the distribution.
See the applicable topic in the Amazon CloudFront API Reference:
•Create a new web distribution – POST Distribution
•Update an existing web distribution – PUT Distribution Config
•Create a new RTMP distribution – POST Streaming Distribution
•Update an existing RTMP distribution – PUT Streaming Distribution Config
Granting the Origin Access Identity Permission to
Read Objects in Your Amazon S3 Bucket
When you create or update a distribution, you can add an origin access identity and automatically update
the bucket policy to give the origin access identity permission to access your bucket. Alternatively, you
can choose to manually change the bucket policy or change ACLs, which control permissions on individual
objects in your bucket.
Whichever method you use, you should still review the bucket policy for your bucket and review the
permissions on your objects to ensure that:
•CloudFront can access objects in the bucket on behalf of users who are requesting your objects through
CloudFront.
• Users can't use Amazon S3 URLs to access your objects.
API Version 2016-08-01
168
Amazon CloudFront Developer Guide
Granting the Origin Access Identity Permission to Read
Objects in Your Amazon S3 Bucket

Caution
If you configure CloudFront to accept and forward to Amazon S3 all of the HTTP methods that
CloudFront supports, create a CloudFront origin access identity to restrict access to your Amazon
S3 content, and grant the origin access identity the applicable permissions. For example, if you
configure CloudFront to accept and forward these methods because you want to use the PUT
method, you must configure Amazon S3 bucket policies or ACLs to handle DELETE requests
appropriately so users can't delete resources that you don't want them to.
Note the following:
•You might find it easier to update Amazon S3 bucket policies than ACLs because you can add objects
to the bucket without updating permissions. However, ACLs give you more fine-grained control because
you're granting permissions on each object.
• By default, your Amazon S3 bucket and all of the objects in it are private—only the AWS account that
created the bucket has permission to read or write the objects in it.
• If you're adding an origin access identity to an existing distribution, modify the bucket policy or any
object ACLs as appropriate to ensure that the objects are not publicly available.
• Grant additional permissions to one or more secure administrator accounts so you can continue to
update the contents of the Amazon S3 bucket.
Important
There might be a brief delay between when you save your changes to Amazon S3 permissions
and when the changes take effect. Until the changes take effect, you can get permission-denied
errors when you try to access objects in your bucket.
Updating Amazon S3 Bucket Policies
You can update the Amazon S3 bucket policy using either the AWS Management Console or the Amazon
S3 API:
• Grant the CloudFront origin access identity the applicable permissions on the bucket.
To specify an origin access identity, use the value of Amazon S3 Canonical User ID on the Origin
Access Identity page in the CloudFront console. If you're using the CloudFront API, use the value of
the S3CanonicalUserId element that was returned when you created the origin access identity.
• Deny access to anyone that you don't want to have access using Amazon S3 URLs.
For more information, go to Using Bucket Policies and User Policies in the Amazon Simple Storage
Service Developer Guide.
For an example, see "Granting Permission to an Amazon CloudFront Origin Identify" in the topic Bucket
Policy Examples, also in the Amazon Simple Storage Service Developer Guide.
Updating Amazon S3 ACLs
Using either the AWS Management Console or the Amazon S3 API, change the Amazon S3 ACL:
•Grant the CloudFront origin access identity the applicable permissions on each object that the CloudFront
distribution serves.
To specify an origin access identity, use the value of Amazon S3 Canonical User ID on the Origin
Access Identity page in the CloudFront console. If you're using the CloudFront API, use the value of
the S3CanonicalUserId element that was returned when you created the origin access identity.
• Deny access to anyone that you don't want to have access using Amazon S3 URLs.
API Version 2016-08-01
169
Amazon CloudFront Developer Guide
Granting the Origin Access Identity Permission to Read
Objects in Your Amazon S3 Bucket

If another AWS account uploads objects to your bucket, that account is the owner of the objects. By
default, the account that owns objects in a bucket is the only account that can grant permissions to those
objects. However, the AWS account that owns the objects can make you an owner, too, which allows
you to change permissions on the objects.
For more information, go to Managing Access with ACLs in the Amazon Simple Storage Service Developer
Guide.
You can also change the ACLs using code and one of the AWS SDKs. For an example, see the
downloadable sample code in Create a URL Signature Using C# and the .NET Framework (p. 218).
Using an Origin Access Identity in Amazon S3
Regions that Support Only Signature Version 4
Authentication
Newer Amazon S3 regions require that you use signature version 4 for authenticated requests. (For the
versions of signature supported in each Amazon S3 region, see Amazon Simple Storage Service (S3) in
the topic Regions and Endpoints in the Amazon Web Services General Reference.) However, when you
create an origin access identity and add it to a CloudFront distribution, CloudFront typically uses signature
version 2 for authentication when it requests objects in your Amazon S3 bucket. If you're using an origin
access identity and if your bucket is in one of the regions that requires signature version 4 for authentication,
note the following:
•DELETE, GET, HEAD, OPTIONS, and PATCH requests are supported without qualifications.
• If you want to submit PUT requests to CloudFront to upload objects to your Amazon S3 bucket, you
must add an x-amz-content-sha256 header to the request, and the header value must contain a
SHA256 hash of the body of the request. For more information, see the documentation about the
x-amz-content-sha256 header on the Common Request Headers page in the Amazon Simple
Storage Service API Reference.
•POST requests are not supported.
API Version 2016-08-01
170
Amazon CloudFront Developer Guide
Using an Origin Access Identity in Amazon S3 Regions
that Support Only Signature Version 4 Authentication

Specifying the AWS Accounts That Can Create
Signed URLs and Signed Cookies (Trusted
Signers)
Topics
•Creating CloudFront Key Pairs for Your Trusted Signers (p. 172)
•Reformatting the CloudFront Private Key (.NET and Java Only) (p. 173)
•Adding Trusted Signers to Your Distribution (p. 174)
•Verifying that Trusted Signers Are Active (Optional) (p. 176)
•Rotating CloudFront Key Pairs (p. 176)
To create signed URLs or signed cookies, you need at least one AWS account that has an active
CloudFront key pair. This account is known as a trusted signer.The trusted signer has two purposes:
• As soon as you add the AWS account ID for your trusted signer to your distribution, CloudFront starts
to require that users use signed URLs or signed cookies to access your objects.
•When you create signed URLs or signed cookies, you use the private key from the trusted signer's key
pair to sign a portion of the URL or the cookie.When someone requests a restricted object, CloudFront
compares the signed portion of the URL or cookie with the unsigned portion to verify that the URL or
cookie hasn't been tampered with. CloudFront also verifies that the URL or cookie is valid, meaning,
for example, that the expiration date and time hasn't passed.
When you specify trusted signers, you also indirectly specify the objects that require signed URLs or
signed cookies:
•Web distributions – You add trusted signers to cache behaviors. If your distribution has only one
cache behavior, users must use signed URLs or signed cookies to access any object associated with
the distribution. If you create multiple cache behaviors and add trusted signers to some cache behaviors
and not to others, you can require that users use signed URLs or signed cookies to access some
objects and not others.
•RTMP distributions (signed URLs only) – You add trusted signers to a distribution. After you add
trusted signers to an RTMP distribution, users must use signed URLs to access any object associated
with the distribution.
Note
To specify trusted signers for a distribution, you must use the CloudFront console or CloudFront
API version 2009-09-09 or later.
To specify the accounts that are allowed to create signed URLs or signed cookies and to add the accounts
to your CloudFront distribution, perform the following tasks:
1. Decide which AWS accounts you want to use as trusted signers. Most CloudFront customers use
the account that they used to create the distribution.
2. For each of the accounts that you selected in Step 1, create a CloudFront key pair. For more
information, see Creating CloudFront Key Pairs for Your Trusted Signers (p. 172).
3. If you're using to .NET or Java to create signed URLs or signed cookies, reformat the CloudFront
private key. For more information, see Reformatting the CloudFront Private Key (.NET and Java
Only) (p. 173).
API Version 2016-08-01
171
Amazon CloudFront Developer Guide
Specifying the AWS Accounts That Can Create Signed
URLs and Signed Cookies (Trusted Signers)

4. In the distribution for which you're creating signed URLs or signed cookies, specify the AWS account
IDs of your trusted signers. For more information, see Adding Trusted Signers to Your
Distribution (p. 174).
5. (Optional) Verify that CloudFront recognizes that your trusted signers have active CloudFront key
pairs. For more information, see Verifying that Trusted Signers Are Active (Optional) (p. 176).
Creating CloudFront Key Pairs for Your Trusted
Signers
Each of the AWS accounts that you use to create CloudFront signed URLs or signed cookies—your
trusted signers—must have its own CloudFront key pair, and the key pair must be active. Note that you
can't substitute an Amazon EC2 key pair for a CloudFront key pair.When you create a CloudFront signed
URL or signed cookie, you include the key pair ID for the trusted signer's key pair in the URL. Amazon
EC2 does not make key pair IDs available.
To help secure your applications, we recommend that you change CloudFront key pairs every 90 days
or more often. For more information, see Rotating CloudFront Key Pairs (p. 176).
You can create a key pair in the following ways:
•Create a key pair in the AWS Management Console and download the private key. See the procedure
To create CloudFront key pairs in the AWS Management Console (p. 172).
• Create an RSA key pair by using an application such as OpenSSL, and upload the public key to the
AWS Management Console. See the procedure To create an RSA key pair and upload the public key
in the AWS Management Console (p. 173).
To create CloudFront key pairs in the AWS Management Console
1. Sign in to the AWS Management Console using the root credentials for an AWS account.
Important
IAM users can't create CloudFront key pairs.You must log in using root credentials to create
key pairs.
2. On the account-name menu, click Security Credentials.
3. Expand CloudFront Key Pairs.
4. Confirm that you have no more than one active key pair.You can't create a key pair if you already
have two active key pairs.
5. Click Create New Key Pair.
6. In the Create Key Pair dialog box, click Download Private Key File.
7. In the Opening <filename> dialog box, accept the default value of Save File, and click OK to
download and save the private key for your CloudFront key pair.
Important
Save the private key for your CloudFront key pair in a secure location, and set permissions
on the file so that only the desired administrator users can read it. If someone gets your
private key, they can generate valid signed URLs and signed cookies and download your
content.You cannot get the private key again, so if you lose or delete it, you must create a
new CloudFront key pair.
8. Record the key pair ID for your key pair. (In the AWS Management Console, this is called the access
key ID.) You'll use it when you create signed URLs or signed cookies.
API Version 2016-08-01
172
Amazon CloudFront Developer Guide
Creating CloudFront Key Pairs for Your Trusted Signers

To create an RSA key pair and upload the public key in the AWS Management Console
1. Use OpenSSL or another tool to create a key pair.
For example, if you're using OpenSSL, you can use the following command to generate a key pair
with a length of 4096 bits and save it in the file private_key.pem:
$ openssl genrsa -out private_key.pem 4096
The resulting file contains both the public and the private key. To extract the public key from that file,
run the following command:
$ openssl rsa -pubout -in private_key.pem -out public_key.pem
The public key is the file that you upload later in this procedure
Note the following requirements for the key:
• The key pair must be an SSH-2 RSA key pair.
• The key pair must be in base64 encoded PEM format.
• The supported key lengths are 1024, 2048, and 4096 bits.
2. Sign in to the AWS Management Console using the root credentials for an AWS account.
Important
IAM users can't create CloudFront key pairs.You must log in using root credentials to create
key pairs.
3. On the account-name menu, click Security Credentials.
4. Expand CloudFront Key Pairs.
5. Confirm that you have no more than one active key pair.You can't upload your own key pair if you
already have two active key pairs.
6. Click Upload Your Own Key Pair.
7. In the Upload Your Own Key Pair dialog box, click Choose File and choose the public key file that
you created in step 1.
8. Click Upload.
The Upload Key Pair dialog box clears, and the new key pair appears at the top of the list of
CloudFront key pairs.
9. Record the key pair ID for your key pair. (In the AWS Management Console, this is called the access
key ID.) You'll use it when you create signed URLs or signed cookies.
Reformatting the CloudFront Private Key (.NET
and Java Only)
If you're using .NET or Java to create signed URLs or signed cookies, you cannot use the private key
from your key pair in the default .pem format to create the signature:
•.NET framework – Convert the private key to the XML format that the .NET framework uses. Several
tools are available.
•Java – Convert the private key to DER format. To do this, you can use OpenSSL:
$ openssl pkcs8 -topk8 -nocrypt -in origin.pem -inform PEM -out new.der
-outform DER
API Version 2016-08-01
173
Amazon CloudFront Developer Guide
Reformatting the CloudFront Private Key (.NET and Java
Only)

To ensure that the encoder works correctly, add the jar for the Bouncy Castle Java cryptography APIs
to your project and then add the Bouncy Castle provider.
Adding Trusted Signers to Your Distribution
Trusted signers are the AWS accounts that can create signed URLs and signed cookies for a distribution.
By default, no account, not even the account that created the distribution, is allowed to create signed
URLs or signed cookies.To specify the AWS accounts that you want to use as trusted signers, add the
accounts to your distribution:
•Web distributions – Trusted signers are associated with cache behaviors. This allows you to require
signed URLs or signed cookies for some objects and not for others in the same distribution.Trusted
signers can only create signed URLs or cookies for objects that are associated with the corresponding
cache behaviors. For example, if you have one trusted signer for one cache behavior and a different
trusted signer for a different cache behavior, neither trusted signer can create signed URLs or cookies
for objects that are associated with the other cache behavior.
•RTMP distributions (signed URLs only) – Trusted signers are associated with the distribution. After
you add trusted signers to an RTMP distribution, users must use signed URLs or signed cookies to
access any of the objects associated with the distribution.
Caution
Define path patterns and their sequence carefully so you don't either give users unintended
access to your content or prevent them from accessing content that you want to be available to
everyone. For example, suppose a request matches the path pattern for two cache behaviors.
The first cache behavior does not require signed URLs or signed cookies and the second cache
behavior does. Users will be able to access the objects without using signed URLs or signed
cookies because CloudFront processes the cache behavior that is associated with the first match.
For more information about path patterns, see Path Pattern (p. 69).
Caution
If you're updating a distribution that you're already using to distribute content, add trusted signers
only when you're ready to start generating signed URLs or signed cookies for your objects, or
CloudFront will reject the requests:
•Web distributions – After you add trusted signers to a cache behavior for a web distribution,
users must use signed URLs or signed cookies to access the objects that are associated with
the cache behavior.
•RTMP distributions (signed URLs only) – After you add trusted signers to an RTMP
distribution, users must use signed URLs to access any of the objects associated with the
distribution.
The maximum number of trusted signers depends on the type of distribution:
•Web distributions – A maximum of five for each cache behavior
•RTMP distributions – A maximum of five for the distribution
You can add trusted signers to your distribution using either the CloudFront console or the CloudFront
API. See the applicable topic:
•Adding Trusted Signers to Your Distribution Using the CloudFront Console (p. 175)
•Adding Trusted Signers to Your Distribution Using the CloudFront API (p. 175)
API Version 2016-08-01
174
Amazon CloudFront Developer Guide
Adding Trusted Signers to Your Distribution

Adding Trusted Signers to Your Distribution Using the
CloudFront Console
To add trusted signers to your distribution using the CloudFront console
1. If you want to use only the AWS account that created the distribution as a trusted signer, skip to Step
2.
If you want to use other AWS accounts, get the AWS account ID for each account:
a. Sign in to the AWS Management Console at https://console.aws.amazon.com/console/home
using an account that you want to use as a trusted signer.
b. In the upper-right corner of the console, click the name associated with the account, and click
My Account.
c. Under Account Settings, make note of the account ID.
d. Sign out of the AWS Management Console.
e. Repeat steps a through d for the other accounts that you want to use as trusted signers.
2. Open the Amazon CloudFront console at https://console.aws.amazon.com/cloudfront/, and sign in
using the account that you used to create the distribution that you want to add trusted signers to.
3. Click the distribution ID.
4. Change to edit mode:
•Web distributions – Click the Behaviors tab, click the behavior that you want to edit, and click
Edit.
•RTMP distributions – Click Edit.
5. For Restrict Viewer Access (Use Signed URLs or Signed Cookies), click Yes.
6. For Trusted Signers, check the applicable check boxes:
•Self – Check this check box if you want to use the current account (the account that you used to
create the distribution).
•Specify Accounts – Check this check box if you want to use other AWS accounts.
7. If you checked the Specify Accounts check box, enter AWS account IDs in the AWS Account
Number field. These are the account IDs that you got in the first step of this procedure. Enter one
account ID per line.
8. Click Yes, Edit.
9. If you're adding trusted signers to a web distribution and you have more than one cache behavior,
repeat steps 4 through 8 as applicable.
Adding Trusted Signers to Your Distribution Using the
CloudFront API
You can use the CloudFront API to add the AWS account IDs for trusted signers to an existing distribution
or to create a new distribution that includes trusted signers. In either case, specify the applicable values
in the TrustedSigners element. For web distributions, add the TrustedSigners element to one or
more cache behaviors. For RTMP distributions, add the TrustedSigners element to the distribution.
See the applicable topic in the Amazon CloudFront API Reference:
API Version 2016-08-01
175
Amazon CloudFront Developer Guide
Adding Trusted Signers to Your Distribution

•Create a new web distribution – POST Distribution
•Update an existing web distribution – PUT Distribution Config
•Create a new RTMP distribution – POST Streaming Distribution
•Update an existing RTMP distribution – PUT Streaming Distribution Config
Verifying that Trusted Signers Are Active
(Optional)
After you add trusted signers to your distribution, you might want to verify that the signers are active. For
a trusted signer to be active, the following must be true:
• The AWS account must have at least one active key pair. If you're rotating key pairs, the account will
temporarily have two active key pairs, the old key pair and the new one.
•CloudFront must be aware of the active key pair. After you create a key pair, there can be a short period
of time before CloudFront is aware that the key pair exists.
Note
To display a list of active trusted signers for a distribution, you currently must use the CloudFront
API. A list of active trusted signers is not available in the CloudFront console.
Verifying that Trusted Signers Are Active Using the
CloudFront API
To determine which trusted signers have active key pairs (are active trusted signers), you get the distribution
and review the values in the ActiveTrustedSigners element. This element lists the AWS account ID
of each account that the distribution identifies as a trusted signer. If the trusted signer has one or more
active CloudFront key pairs, the ActiveTrustedSigners element also lists the key pair IDs. For more
information, see the applicable topic in the Amazon CloudFront API Reference:
•Web distributions – GET Distribution
•RTMP distributions – GET Streaming Distribution
Rotating CloudFront Key Pairs
AWS recommends that you rotate (change) your active CloudFront key pairs every 90 days.To rotate
CloudFront key pairs that you're using to create signed URLs or signed cookies without invalidating URLs
or cookies that haven't expired yet, perform the following tasks:
1. Create a new key pair for each of the accounts that you're using to create signed URLs. For more
information, see Creating CloudFront Key Pairs for Your Trusted Signers (p. 172).
2. Verify that CloudFront is aware of the new key pairs. For more information, see Verifying that Trusted
Signers Are Active (Optional) (p. 176).
3. Update your application to create signatures using the private keys from the new key pairs.
4. Confirm that URLs or cookies that you're signing using the new private keys are working.
5. Wait until the expiration date has passed in URLs or cookies that were signed using the old CloudFront
key pairs.
6. Change the old CloudFront key pairs to Inactive:
a. Sign in to the AWS Management Console using the root credentials for an AWS account for
which you want to make key pairs inactive.
API Version 2016-08-01
176
Amazon CloudFront Developer Guide
Verifying that Trusted Signers Are Active (Optional)

b. On the account-name menu, click Security Credentials.
c. Expand CloudFront Key Pairs.
d. For the applicable key pairs, click Make Inactive.
e. Repeat steps a through d for each of the AWS accounts for which you want to make key pairs
inactive.
7. Reconfirm that URLs or cookies that you're signing using the new private keys are working.
8. Delete the old CloudFront key pairs:
a. Go to the Your Security Credentials page.
b. Expand CloudFront Key Pairs.
c. For the applicable key pairs, click Delete.
9. Delete the old private keys from the location where you stored them.
API Version 2016-08-01
177
Amazon CloudFront Developer Guide
Rotating CloudFront Key Pairs

Choosing Between Signed URLs and Signed
Cookies
CloudFront signed URLs and signed cookies provide the same basic functionality: they allow you to
control who can access your content. If you want to serve private content through CloudFront and you're
trying to decide whether to use signed URLs or signed cookies, consider the following.
Use signed URLs in the following cases:
• You want to use an RTMP distribution. Signed cookies aren't supported for RTMP distributions.
•You want to restrict access to individual files, for example, an installation download for your application.
• Your users are using a client (for example, a custom HTTP client) that doesn't support cookies.
Use signed cookies in the following cases:
• You want to provide access to multiple restricted files, for example, all of the files for a video in HLS
format or all of the files in the subscribers' area of a website.
• You don't want to change your current URLs.
If you are not currently using signed URLs and if your URLs contain any of the following query string
parameters, you cannot use either signed URLs or signed cookies:
• Expires
• Policy
• Signature
• Key-Pair-Id
CloudFront assumes that URLs that contain any of those query string parameters are signed URLs and
therefore won't look at signed cookies.
Using Both Signed URLs and Signed Cookies
If you use both signed URLs and signed cookies to control access to the same objects and a viewer uses
a signed URL to request an object, CloudFront determines whether to return the object to the viewer
based only on the signed URL.
API Version 2016-08-01
178
Amazon CloudFront Developer Guide
Choosing Between Signed URLs and Signed Cookies
Using Signed URLs
Topics
•Choosing Between Canned and Custom Policies for Signed URLs (p. 179)
•How Signed URLs Work (p. 180)
•Choosing How Long Signed URLs Are Valid (p. 180)
•When Does CloudFront Check the Expiration Date and Time in a Signed URL? (p. 181)
•Sample Code and Third-Party Tools (p. 181)
•Creating a Signed URL Using a Canned Policy (p. 182)
•Creating a Signed URL Using a Custom Policy (p. 189)
A signed URL includes additional information, for example, an expiration date and time, that gives you
more control over access to your content.This additional information appears in a policy statement, which
is based on either a canned policy or a custom policy. The differences between canned and custom
policies are explained in the next two sections.
Note
You can create some signed URLs using canned policies and create some signed URLs using
custom policies for the same distribution.
Choosing Between Canned and Custom Policies
for Signed URLs
When you create a signed URL, you write a policy statement in JSON format that specifies the restrictions
on the signed URL, for example, how long the URL is valid.You can use either a canned policy or a
custom policy. Here's how canned and custom policies compare:
Custom PolicyCanned PolicyDescription
YesNoYou can reuse the policy statement for multiple objects.
To reuse the policy statement, you must use wildcard
characters in the Resource object. For more informa-
tion, see Values that You Specify in the Policy Statement
for a Signed URL That Uses a Custom Policy (p. 192).)
Yes (optional)NoYou can specify the date and time that users can begin
to access your content.
YesYesYou can specify the date and time that users can no
longer access your content.
Yes (optional)NoYou can specify the IP address or range of IP addresses
of the users who can access your content.
YesNoThe signed URL includes a base64-encoded version of
the policy, which results in a longer URL.
For information about creating signed URLs using a canned policy, see Creating a Signed URL Using a
Canned Policy (p. 182).
For information about creating signed URLs using a custom policy, see Creating a Signed URL Using a
Custom Policy (p. 189).
API Version 2016-08-01
179
Amazon CloudFront Developer Guide
Using Signed URLs

How Signed URLs Work
Here's an overview of how you configure CloudFront and Amazon S3 for signed URLs and how CloudFront
responds when a user uses a signed URL to request an object.
1. In your CloudFront distribution, specify one or more trusted signers, which are the AWS accounts
that you want to have permission to create signed URLs.
For more information, see Specifying the AWS Accounts That Can Create Signed URLs and Signed
Cookies (Trusted Signers) (p. 171).
2. You develop your application to determine whether a user should have access to your content and
to create signed URLs for the objects or parts of your application that you want to restrict access to.
For more information, see the applicable topic:
•Creating a Signed URL Using a Canned Policy (p. 182)
•Creating a Signed URL Using a Custom Policy (p. 189)
3. A user requests an object for which you want to require signed URLs.
4. Your application verifies that the user is entitled to access the object: they've signed in, they've paid
for access to the content, or they've met some other requirement for access.
5. Your application creates and returns a signed URL to the user.
6. The signed URL allows the user to download or stream the content.
This step is automatic; the user usually doesn't have to do anything additional to access the content.
For example, if a user is accessing your content in a web browser, your application returns the signed
URL to the browser. The browser immediately uses the signed URL to access the object in the
CloudFront edge cache without any intervention from the user.
7. CloudFront uses the public key to validate the signature and confirm that the URL hasn't been
tampered with. If the signature is invalid, the request is rejected.
If the signature is valid, CloudFront looks at the policy statement in the URL (or constructs one if
you're using a canned policy) to confirm that the request is still valid. For example, if you specified
a beginning and ending date and time for the URL, CloudFront confirms that the user is trying to
access your content during the time period that you want to allow access.
If the request meets the requirements in the policy statement, CloudFront performs the standard
operations: determines whether the object is already in the edge cache, forwards the request to the
origin if necessary, and returns the object to the user.
Choosing How Long Signed URLs Are Valid
You can distribute private content using a signed URL that is valid for only a short time—possibly for as
little as a few minutes. Signed URLs that are valid for such a short period are good for distributing content
on-the-fly to a user for a limited purpose, such as distributing movie rentals or music downloads to
customers on demand. If your signed URLs will be valid for just a short period, you'll probably want to
generate them automatically using an application that you develop.When the user starts to download an
object or starts to play a media file, CloudFront compares the expiration time in the URL with the current
time to determine whether the URL is still valid.
You can also distribute private content using a signed URL that is valid for a longer time, possibly for
years. Signed URLs that are valid for a longer period are useful for distributing private content to known
users, such as distributing a business plan to investors or distributing training materials to employees.
You can develop an application to generate these longer-term signed URLs for you, or you can use one
of the third-party GUI tools listed in Tools and Code Examples for Configuring Private Content (p. 357).
API Version 2016-08-01
180
Amazon CloudFront Developer Guide
How Signed URLs Work

When Does CloudFront Check the Expiration Date
and Time in a Signed URL?
When CloudFront checks the expiration date and time in a signed URL to determine whether the URL is
still valid depends on whether the URL is for a web distribution or an RTMP distribution:
•Web distributions – CloudFront checks the expiration date and time in a signed URL at the time of
the HTTP request. If a client begins to download a large object immediately before the expiration time,
the download should complete even if the expiration time passes during the download. If the TCP
connection drops and the client tries to restart the download after the expiration time passes, the
download will fail.
If a client uses Range GETs to get an object in smaller pieces, any GET request that occurs after the
expiration time passes will fail. For more information about Range GETs, see How CloudFront Processes
Partial Requests for an Object (Range GETs) (p. 132).
•RTMP distributions – CloudFront checks the expiration time in a signed URL at the start of a play
event. If a client starts to play a media file before the expiration time passes, CloudFront allows the
entire media file to play. However, depending on the media player, pausing and restarting might trigger
another play event. Skipping to another position in the media file will trigger another play event. If the
subsequent play event occurs after the expiration time passes, CloudFront won't serve the media file.
Sample Code and Third-Party Tools
For sample code that creates the hashed and signed part of signed URLs, see the following topics:
•Create a URL Signature Using Perl (p. 214)
•Create a URL Signature Using PHP (p. 216)
•Create a URL Signature Using C# and the .NET Framework (p. 218)
•Create a URL Signature Using Java (p. 226)
Additional sample code for creating signed URLs is available on the Amazon CloudFront Sample Code
& Libraries page.
For information about third-party tools that support private content, including creating signed URLs, see
Tools and Code Examples for Configuring Private Content (p. 357).
API Version 2016-08-01
181
Amazon CloudFront Developer Guide
When Does CloudFront Check the Expiration Date and
Time in a Signed URL?

Creating a Signed URL Using a Canned Policy
To create a signed URL using a canned policy, perform the following procedure.
To create a signed URL using a canned policy
1. If you're using .NET or Java to create signed URLs, and if you haven't reformatted the private key
for your key pair from the default .pem format to a format compatible with .NET or with Java, do so
now. For more information, see Reformatting the CloudFront Private Key (.NET and Java Only) (p. 173).
2. Concatenate the following values in the specified order, and remove the whitespace (including tabs
and newline characters) between the parts.You might have to include escape characters in the string
in application code. All values have a type of String. Each part is keyed by number ( ) to the two
examples that follow.
Base URL for the object
The base URL is the CloudFront URL that you would use to access the object if you were not
using signed URLs, including your own query string parameters, if any. For more information
about the format of URLs for web distributions, see Format of URLs for CloudFront Objects (p. 99).
The following examples show values that you specify for web distributions.
• The following CloudFront URL is for an object in a web distribution (using the CloudFront
domain name). Note that image.jpg is in an images directory. The path to the object in the
URL must match the path to the object on your HTTP server or in your Amazon S3 bucket.
http://d111111abcdef8.cloudfront.net/images/image.jpg
• The following CloudFront URL includes a query string:
http://d111111abcdef8.cloudfront.net/images/image.jpg?size=large
• The following CloudFront URLs are for objects in a web distribution. Both use an alternate
domain name; the second one includes a query string:
http://www.example.com/images/image.jpg
http://www.example.com/images/image.jpg?color=red
• The following CloudFront URL is for an objects in a web distribution that uses an alternate
domain name and the HTTPS protocol:
https://www.example.com/images/image.jpg
For RTMP distributions, the following examples are for objects in two different video formats,
MP4 and FLV:
•MP4 – mp4:sydney-vacation.mp4
•FLV – sydney-vacation
•FLV – sydney-vacation.flv
Note
For .flv files, whether you include the .flv filename extension depends on your player.
To serve MP3 audio files or H.264/MPEG-4 video files, you might need to prefix the file
name with mp3: or mp4:. Some media players can be configured to add the prefix
automatically. The media player might also require you to specify the file name without
the file extension (for example, sydney-vacation instead of sydney-vacation.mp4).
?
The ? indicates that query string parameters follow the base URL. Include the ? even if you don't
have any query string parameters of your own.
API Version 2016-08-01
182
Amazon CloudFront Developer Guide
Creating a Signed URL Using a Canned Policy

Your query string parameters, if any&
This value is optional. If you want to add your own query string parameters, for example:
color=red&size=medium
then add the parameters after the ? (see ) and before the Expires parameter. In certain
rare circumstances, you might need to put your query string parameters after Key-Pair-Id.
Important
Your parameters cannot be named Expires, Signature, or Key-Pair-Id.
If you add your own parameters, append an & after each one, including the last one.
Expires=date and time in Unix time format (in seconds) and Coordinated
Universal Time (UTC)
Specify the expiration date and time in Unix time format and Coordinated Universal Time (UTC).
For example, January 1, 2013 10:00 am UTC converts to 1357034400 in Unix time format. For
information about UTC, see RFC 3339, Date and Time on the Internet: Timestamps, http://
tools.ietf.org/html/rfc3339.
Specify the date and time, in Unix time format (in seconds) and Coordinated Universal Time
(UTC), that you want the URL to stop allowing access to the object. For example, January 1,
2013 10:00 am UTC converts to 1357034400 in Unix time format.
&Signature=hashed and signed version of the policy statement
A hashed, signed, and base64-encoded version of the JSON policy statement. For more
information, see Creating a Signature for a Signed URL That Uses a Canned Policy (p. 184).
&Key-Pair-Id=active CloudFront key pair Id for the key pair that you're
using to generate the signature
The ID for an active CloudFront key pair, for example, APKA9ONS7QCOWEXAMPLE. The
CloudFront key pair ID tells CloudFront which public key to use to validate the signed URL.
CloudFront compares the information in the signature with the information in the policy statement
to verify that the URL has not been tampered with.
The key pair ID that you include in CloudFront signed URLs must be the ID of an active key pair
for one of your trusted signers:
•Web distributions – The key pair must be associated with an AWS account that is one of
the trusted signers for the applicable cache behavior.
•RTMP distributions – The key pair must be associated with an AWS account that is one of
the trusted signers for the distribution.
For more information, see Specifying the AWS Accounts That Can Create Signed URLs and
Signed Cookies (Trusted Signers) (p. 171).
If you make a key pair inactive while rotating CloudFront key pairs, and if you're generating
signed URLs programmatically, you must update your application to use a new active key pair
for one of your trusted signers. If you're generating signed URLs manually, you must create new
signed URLs. For more information about rotating key pairs, see Rotating CloudFront Key
Pairs (p. 176).
Example signed URL for a web distribution:
http://d111111abcdef8.cloudfront.net/image.jpg ? color=red&size=medium&
Expires=1357034400 &Signature=nitfHRCrtziwO2HwPfWw~yYDhUF5EwRunQA-j19DzZr
API Version 2016-08-01
183
Amazon CloudFront Developer Guide
Creating a Signed URL Using a Canned Policy
vDh6hQ73lDx~-ar3UocvvRQVw6EkC~GdpGQyyOSKQim-TxAnW7d8F5Kkai9HVx0FIu-
5jcQb0UEmatEXAMPLE3ReXySpLSMj0yCd3ZAB4UcBCAqEijkytL6f3fVYNGQI6
&Key-Pair-Id=APKA9ONS7QCOWEXAMPLE
Example signed URL for an RTMP distribution:
videos/mediafile.flv ? color=red&size=medium& Expires=1357034400
&Signature=nitfHRCrtziwO2HwPfWw~yYDhUF5EwRunQA-j19DzZr
vDh6hQ73lDx~-ar3UocvvRQVw6EkC~GdpGQyyOSKQim-TxAnW7d8F5Kkai9HVx0FIu-
5jcQb0UEmatEXAMPLE3ReXySpLSMj0yCd3ZAB4UcBCAqEijkytL6f3fVYNGQI6
&Key-Pair-Id=APKA9ONS7QCOWEXAMPLE
Creating a Signature for a Signed URL That Uses a Canned
Policy
To create the signature for a signed URL that uses a canned policy, you perform the following procedures:
1. Create a policy statement. See Creating a Policy Statement for a Signed URL That Uses a Canned
Policy (p. 184).
2. Sign the policy statement to create a signature. See Creating a Signature for a Signed URL That
Uses a Canned Policy (p. 186).
Creating a Policy Statement for a Signed URL That Uses a Canned Policy
When you create a signed URL using a canned policy, the Signature parameter is a hashed and signed
version of a policy statement. For signed URLs that use a canned policy, you don't include the policy
statement in the URL, as you do for signed URLs that use a custom policy.To create the policy statement,
perform the following procedure.
To create the policy statement for a signed URL that uses a canned policy
1. Construct the policy statement using the following JSON format and using UTF-8 character encoding.
Include all punctuation and other literal values exactly as specified. For information about the
Resource and DateLessThan parameters, see Values that You Specify in the Policy Statement
for a Signed URL That Uses a Canned Policy (p. 185).
{
"Statement":[
{
"Resource":"base URL or stream name",
"Condition":{
"DateLessThan":{
"AWS:EpochTime":ending date and time in Unix time format and
UTC
}
}
}
]
}
2. Remove all whitespace (including tabs and newline characters) from the policy statement.You might
have to include escape characters in the string in application code.
API Version 2016-08-01
184
Amazon CloudFront Developer Guide
Creating a Signed URL Using a Canned Policy

Values that You Specify in the Policy Statement for a Signed URL That Uses a Canned
Policy
When you create a policy statement for a canned policy, you specify the following values.
Resource
The value that you specify depends on whether you're creating the signed URL for a web distribution
or an RTMP distribution.
Note
You can specify only one value for Resource.
Web distributions
The base URL including your query strings, if any, but excluding the CloudFront Expires,
Signature, and Key-Pair-Id parameters, for example:
http://d111111abcdef8.cloudfront.net/images/horizon.jpg?size=large&license=yes
Note the following:
•Protocol – The value must begin with http://, https://, or http*://.
•Query string parameters – If you have no query string parameters, omit the question mark.
•Alternate domain names – If you specify an alternate domain name (CNAME) in the URL,
you must specify the alternate domain name when referencing the object in your web page
or application. Do not specify the Amazon S3 URL for the object.
RTMP distributions
Include only the stream name. For example, if the full URL for a streaming video is:
rtmp://s5c39gqb8ow64r.cloudfront.net/videos/cfx/st/mp3_name.mp3
then use the following value for Resource:
videos/mp3_name
Do not include a prefix such as mp3: or mp4:. Also, depending on the player you're using, you
might have to omit the file extension from the value of Resource. For example, you might need
to use sydney-vacation instead of sydney-vacation.flv.
DateLessThan
The expiration date and time for the URL in Unix time format (in seconds) and Coordinated Universal
Time (UTC). For example, January 1, 2013 10:00 am UTC converts to 1357034400 in Unix time
format.
This value must match the value of the Expires query string parameter in the signed URL. Do not
enclose the value in quotation marks.
For more information, see When Does CloudFront Check the Expiration Date and Time in a Signed
URL? (p. 181).
Example Policy Statement for a Signed URL That Uses a Canned Policy
When you use the following example policy statement in a signed URL, a user can access the object
http://d111111abcdef8.cloudfront.net/horizon.jpg until January 1, 2013 10:00 am UTC:
{
"Statement":[
{
"Resource":"http://d111111abcdef8.cloudfront.net/hori
zon.jpg?size=large&license=yes",
API Version 2016-08-01
185
Amazon CloudFront Developer Guide
Creating a Signed URL Using a Canned Policy
"Condition":{
"DateLessThan":{
"AWS:EpochTime":1357034400
}
}
}
]
}
Creating a Signature for a Signed URL That Uses a Canned Policy
To create the value for the Signature parameter in a signed URL, you hash and sign the policy statement
that you created in Creating a Policy Statement for a Signed URL That Uses a Canned Policy (p. 184).
There are two versions of this procedure. Perform the applicable procedure:
•Option 1: To create a signature for a web distribution or for an RTMP distribution (without Adobe Flash
Player) by using a canned policy (p. 186)
•Option 2: To create a signature for an RTMP distribution by using a canned policy (Adobe Flash
Player) (p. 187)
For additional information and examples of how to hash, sign, and encode the policy statement, see:
•Using a Linux Command and OpenSSL for Base64-Encoding and Encryption (p. 213)
•Code Examples for Creating a Signature for a Signed URL (p. 214)
•Tools and Code Examples for Configuring Private Content (p. 357)
Option 1:To create a signature for a web distribution or for an RTMP distribution (without
Adobe Flash Player) by using a canned policy
1. Use the SHA-1 hash function and RSA to hash and sign the policy statement that you created in the
procedure To create the policy statement for a signed URL that uses a canned policy (p. 184). Use
the version of the policy statement that no longer includes whitespace.
For the private key that is required by the hash function, use the private key that is associated with
the applicable active trusted signer.
Note
The method that you use to hash and sign the policy statement depends on your
programming language and platform. For sample code, see Code Examples for Creating a
Signature for a Signed URL (p. 214).
2. Remove whitespace (including tabs and newline characters) from the hashed and signed string.
3. Base64-encode the string using MIME base64 encoding. For more information, see Section 6.8,
Base64 Content-Transfer-Encoding in RFC 2045, MIME (Multipurpose Internet Mail Extensions) Part
One: Format of Internet Message Bodies.
4. Replace characters that are invalid in a URL query string with characters that are valid.The following
table lists invalid and valid characters.
With these valid charactersReplace these invalid characters
- (hyphen)+
_ (underscore)=
~ (tilde)/
API Version 2016-08-01
186
Amazon CloudFront Developer Guide
Creating a Signed URL Using a Canned Policy
5. Append the resulting value to your signed URL after &Signature=, and return to To create a signed
URL using a canned policy (p. 182) to finish concatenating the parts of your signed URL.
Option 2:To create a signature for an RTMP distribution by using a canned policy (Adobe
Flash Player)
1. Use the SHA-1 hash function and RSA to hash and sign the policy statement that you created in the
To create the policy statement for a signed URL that uses a canned policy (p. 184) procedure. Use
the version of the policy statement that no longer includes whitespace.
For the private key that is required by the hash function, use the private key that is associated with
the applicable active trusted signer.
Note
The method that you use to hash and sign the policy statement depends on your
programming language and platform. For sample code, see Code Examples for Creating a
Signature for a Signed URL (p. 214).
2. Remove whitespace (including tabs and newline characters) from the hashed and signed string.
Continue on to Step 3 if you're using Adobe Flash Player and the stream name is passed in from a
web page.
If you're using Adobe Flash Player and if the stream name is not passed in from a web page, skip
the rest of this procedure. For example, if you wrote your own player that fetches stream names from
within the Adobe Flash .swf file, skip the rest of this procedure.
3. Base64-encode the string using MIME base64 encoding. For more information, see Section 6.8,
Base64 Content-Transfer-Encoding in RFC 2045, MIME (Multipurpose Internet Mail Extensions) Part
One: Format of Internet Message Bodies.
4. Replace characters that are invalid in a URL query string with characters that are valid.The following
table lists invalid and valid characters.
With these valid charactersReplace these invalid characters
- (hyphen)+
_ (underscore)=
~ (tilde)/
5. Some versions of Adobe Flash Player require that you URL-encode the characters ?, =, and &. For
information about whether your version of Adobe Flash Player requires this character substitution,
refer to the Adobe website.
If your version of Flash does not require URL-encoding those character, skip to Step 6.
If your version of Flash requires URL-encoding those characters, replace them as indicated in the
following table. (You already replaced = in the previous step.)
With this URL encodingReplace these invalid characters
%3F?
%26&
API Version 2016-08-01
187
Amazon CloudFront Developer Guide
Creating a Signed URL Using a Canned Policy


Creating a Signed URL Using a Custom Policy
Topics
•Creating a Policy Statement for a Signed URL That Uses a Custom Policy (p. 191)
•Example Policy Statements for a Signed URL That Uses a Custom Policy (p. 194)
•Creating a Signature for a Signed URL That Uses a Custom Policy (p. 195)
To create a signed URL using a custom policy, perform the following procedure.
To create a signed URL using a custom policy
1. If you're using .NET or Java to create signed URLs, and if you haven't reformatted the private key
for your key pair from the default .pem format to a format compatible with .NET or with Java, do so
now. For more information, see Reformatting the CloudFront Private Key (.NET and Java Only) (p. 173).
2. Concatenate the following values in the specified order, and remove the whitespace (including tabs
and newline characters) between the parts.You might have to include escape characters in the string
in application code. All values have a type of String. Each part is keyed by number ( ) to the two
examples that follow.
Base URL for the object
The base URL is the CloudFront URL that you would use to access the object if you were not
using signed URLs, including your own query string parameters, if any. For more information
about the format of URLs for web distributions, see Format of URLs for CloudFront Objects (p. 99).
The following examples show values that you specify for web distributions.
• The following CloudFront URL is for an object in a web distribution (using the CloudFront
domain name). Note that image.jpg is in an images directory. The path to the object in the
URL must match the path to the object on your HTTP server or in your Amazon S3 bucket.
http://d111111abcdef8.cloudfront.net/images/image.jpg
• The following CloudFront URL includes a query string:
http://d111111abcdef8.cloudfront.net/images/image.jpg?size=large
• The following CloudFront URLs are for objects in a web distribution. Both use an alternate
domain name; the second one includes a query string:
http://www.example.com/images/image.jpg
http://www.example.com/images/image.jpg?color=red
• The following CloudFront URL is for an objects in a web distribution that uses an alternate
domain name and the HTTPS protocol:
https://www.example.com/images/image.jpg
For RTMP distributions, the following examples are for objects in two different video formats,
MP4 and FLV:
•MP4 – mp4:sydney-vacation.mp4
•FLV – sydney-vacation
•FLV – sydney-vacation.flv
Note
For .flv files, whether you include the .flv filename extension depends on your player.
To serve MP3 audio files or H.264/MPEG-4 video files, you might need to prefix the file
name with mp3: or mp4:. Some media players can be configured to add the prefix
API Version 2016-08-01
189
Amazon CloudFront Developer Guide
Creating a Signed URL Using a Custom Policy
automatically. The media player might also require you to specify the file name without
the file extension (for example, sydney-vacation instead of sydney-vacation.mp4).
?
The ? indicates that query string parameters follow the base URL. Include the ? even if you don't
have any query string parameters of your own.
Your query string parameters, if any&
This value is optional. If you want to add your own query string parameters, for example:
color=red&size=medium
then add them after the ? (see ) and before the Policy parameter. In certain rare
circumstances, you might need to put your query string parameters after Key-Pair-Id.
Important
Your parameters cannot be named Policy, Signature, or Key-Pair-Id.
If you add your own parameters, append an & after each one, including the last one.
Policy=base64 encoded version of policy statement
Your policy statement in JSON format, with white space removed, then base64 encoded. For
more information, see Creating a Policy Statement for a Signed URL That Uses a Custom
Policy (p. 191).
The policy statement controls the access that a signed URL grants to a user: the URL of the
object (for web distributions) or the stream name (for RTMP distributions), an expiration date
and time, an optional date and time that the URL becomes valid, and an optional IP address or
range of IP addresses that are allowed to access the object.
&Signature=hashed and signed version of the policy statement
A hashed, signed, and base64-encoded version of the JSON policy statement. For more
information, see Creating a Signature for a Signed URL That Uses a Custom Policy (p. 195).
&Key-Pair-Id=active CloudFront key pair Id for the key pair that you're
using to sign the policy statement
The ID for an active CloudFront key pair, for example, APKA9ONS7QCOWEXAMPLE. The
CloudFront key pair ID tells CloudFront which public key to use to validate the signed URL.
CloudFront compares the information in the signature with the information in the policy statement
to verify that the URL has not been tampered with.
The key pair ID that you include in CloudFront signed URLs must be the ID of an active key pair
for one of your trusted signers:
•Web distributions – The key pair must be associated with an AWS account that is one of
the trusted signers for the applicable cache behavior.
•RTMP distributions – The key pair must be associated with an AWS account that is one of
the trusted signers for the distribution.
For more information, see Specifying the AWS Accounts That Can Create Signed URLs and
Signed Cookies (Trusted Signers) (p. 171).
If you make a key pair inactive while rotating CloudFront key pairs, and if you're generating
signed URLs programmatically, you must update your application to use a new active key pair
for one of your trusted signers. If you're generating signed URLs manually, you must create new
signed URLs. For more information about rotating key pairs, see Rotating CloudFront Key
Pairs (p. 176).
API Version 2016-08-01
190
Amazon CloudFront Developer Guide
Creating a Signed URL Using a Custom Policy
Example signed URL for a web distribution:
http://d111111abcdef8.cloudfront.net/image.jpg ? color=red&size=medium&
Policy=eyANCiAgICEXAMPLEW1lbnQiOiBbeyANCiAgICAgICJSZXNvdXJjZSI6Imh0dHA
6Ly9kemJlc3FtN3VuMW0wLmNsb3VkZnJvbnQubmV0L2RlbW8ucGhwIiwgDQogICAgICAiQ
29uZGl0aW9uIjp7IA0KICAgICAgICAgIklwQWRkcmVzcyI6eyJBV1M6U291cmNlSXAiOiI
yMDcuMTcxLjE4MC4xMDEvMzIifSwNCiAgICAgICAgICJEYXRlR3JlYXRlclRoYW4iOnsiQ
VdTOkVwb2NoVGltZSI6MTI5Njg2MDE3Nn0sDQogICAgICAgICAiRGF0ZUxlc3NUaGFuIjp
7IkFXUzpFcG9jaFRpbWUiOjEyOTY4NjAyMjZ9DQogICAgICB9IA0KICAgfV0gDQp9DQo
&Signature=nitfHRCrtziwO2HwPfWw~yYDhUF5EwRunQA-j19DzZrvDh6hQ73lDx~
-ar3UocvvRQVw6EkC~GdpGQyyOSKQim-TxAnW7d8F5Kkai9HVx0FIu-5jcQb0UEmat
EXAMPLE3ReXySpLSMj0yCd3ZAB4UcBCAqEijkytL6f3fVYNGQI6
&Key-Pair-Id=APKA9ONS7QCOWEXAMPLE
Example signed URL for an RTMP distribution:
videos/mediafile.flv ? color=red&size=medium&
Policy=eyANCiAgICEXAMPLEW1lbnQiOiBbeyANCiAgICAgICJSZXNvdXJjZSI6Imh0dHA
6Ly9kemJlc3FtN3VuMW0wLmNsb3VkZnJvbnQubmV0L2RlbW8ucGhwIiwgDQogICAgICAiQ
29uZGl0aW9uIjp7IA0KICAgICAgICAgIklwQWRkcmVzcyI6eyJBV1M6U291cmNlSXAiOiI
yMDcuMTcxLjE4MC4xMDEvMzIifSwNCiAgICAgICAgICJEYXRlR3JlYXRlclRoYW4iOnsiQ
VdTOkVwb2NoVGltZSI6MTI5Njg2MDE3Nn0sDQogICAgICAgICAiRGF0ZUxlc3NUaGFuIjp
7IkFXUzpFcG9jaFRpbWUiOjEyOTY4NjAyMjZ9DQogICAgICB9IA0KICAgfV0gDQp9DQo
&Signature=nitfHRCrtziwO2HwPfWw~yYDhUF5EwRunQA-j19DzZrvDh6hQ73lDx~
-ar3UocvvRQVw6EkC~GdpGQyyOSKQim-TxAnW7d8F5Kkai9HVx0FIu-5jcQb0UEmat
EXAMPLE3ReXySpLSMj0yCd3ZAB4UcBCAqEijkytL6f3fVYNGQI6
&Key-Pair-Id=APKA9ONS7QCOWEXAMPLE
Creating a Policy Statement for a Signed URL That Uses a
Custom Policy
To create a policy statement for a custom policy, perform the following procedure. For several example
policy statements that control access to objects in a variety of ways, see Example Policy Statements for
a Signed URL That Uses a Custom Policy (p. 194).
To create the policy statement for a signed URL that uses a custom policy
1. Construct the policy statement using the following JSON format. For more information, see Values
that You Specify in the Policy Statement for a Signed URL That Uses a Custom Policy (p. 192).
{
"Statement": [
{
"Resource":"URL or stream name of the object",
"Condition":{
"DateLessThan":{"AWS:EpochTime":required ending date and time
in Unix time format and UTC},
"DateGreaterThan":{"AWS:EpochTime":optional beginning date and
time in Unix time format and UTC},
"IpAddress":{"AWS:SourceIp":"optional IP address"}
}
}
API Version 2016-08-01
191
Amazon CloudFront Developer Guide
Creating a Signed URL Using a Custom Policy
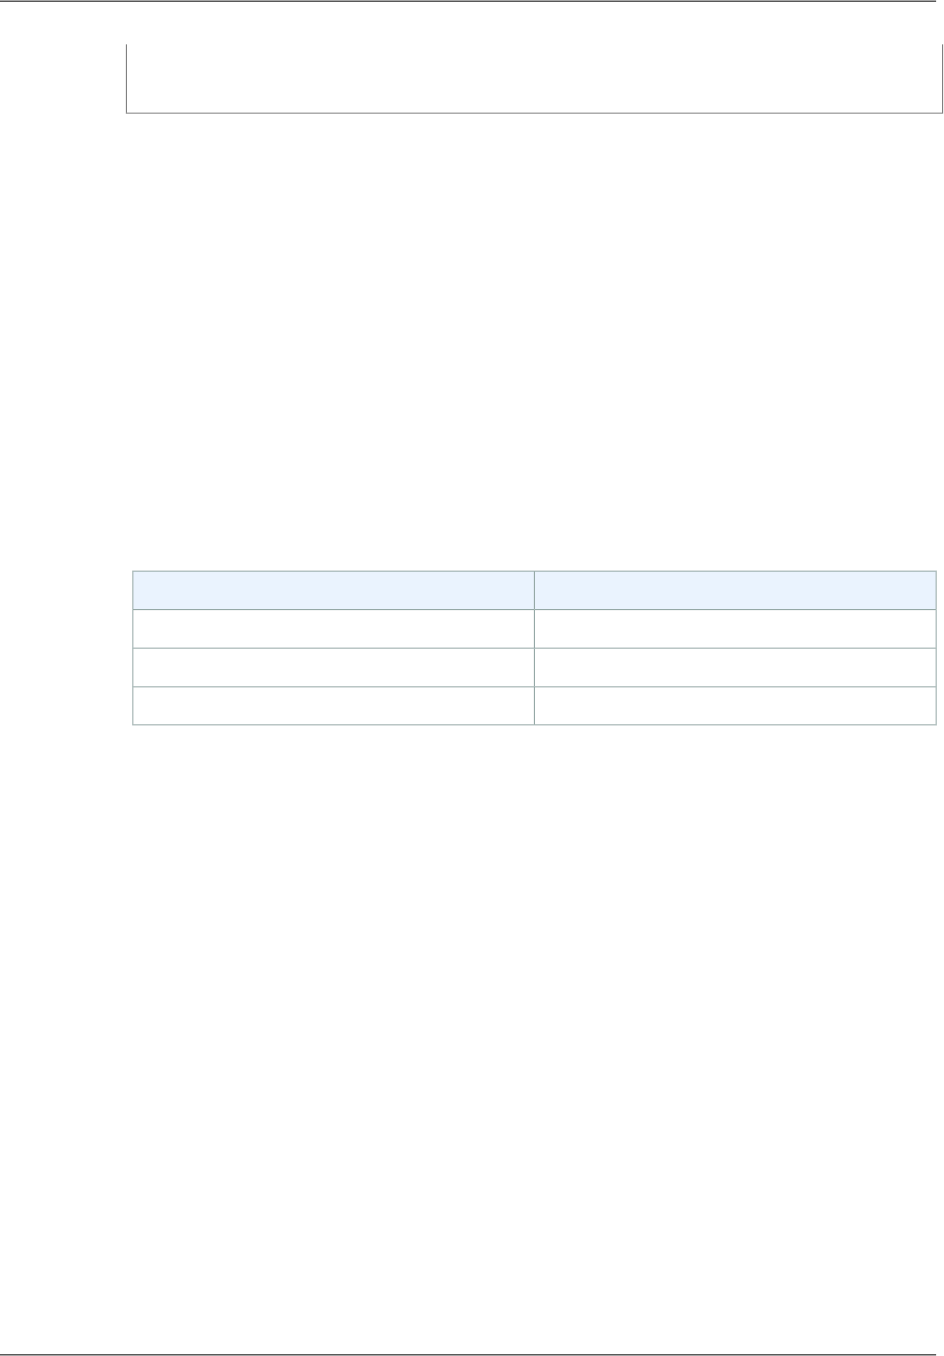
]
}
Note the following:
• Use UTF-8 character encoding.
• Include all punctuation and parameter names exactly as specified. Abbreviations for parameter
names are not accepted.
• The order of the parameters in the Condition section doesn't matter.
• For information about the values for Resource, DateLessThan, DateGreaterThan, and
IpAddress, see Values that You Specify in the Policy Statement for a Signed URL That Uses a
Custom Policy (p. 192).
2. Remove all whitespace (including tabs and newline characters) from the policy statement.You might
have to include escape characters in the string in application code.
3. Base64-encode the policy statement using MIME base64 encoding. For more information, see Section
6.8, Base64 Content-Transfer-Encoding in RFC 2045, MIME (Multipurpose Internet Mail Extensions)
Part One: Format of Internet Message Bodies.
4. Replace characters that are invalid in a URL query string with characters that are valid.The following
table lists invalid and valid characters.
With these valid charactersReplace these invalid characters
- (hyphen)+
_ (underscore)=
~ (tilde)/
5. Append the resulting value to your signed URL after Policy=.
6. Create a signature for the signed URL by hashing, signing, and base64-encoding the policy statement.
For more information, see Creating a Signature for a Signed URL That Uses a Custom Policy (p. 195).
Values that You Specify in the Policy Statement for a Signed URL That Uses
a Custom Policy
When you create a policy statement for a custom policy, you specify the following values.
Resource
The value that you specifies depends on whether you're creating signed URLs for web or RTMP
distributions.
Note
You can specify only one value for Resource.
Web distributions (optional but recommended)
The base URL including your query strings, if any, but excluding the CloudFront Policy,
Signature, and Key-Pair-Id parameters, for example:
http://d111111abcdef8.cloudfront.net/images/horizon.jpg?size=large&license=yes
API Version 2016-08-01
192
Amazon CloudFront Developer Guide
Creating a Signed URL Using a Custom Policy

Caution
If you omit the Resource parameter for a web distribution, users can access all of the
objects associated with any distribution that is associated with the key pair that you use
to create the signed URL.
Note the following:
•Protocol – The value must begin with http://, https://, or *.
•Query string parameters – If you have no query string parameters, omit the question mark.
•Wildcard characters – You can use the wildcard character that matches zero or more
characters (*) or the wild-card character that matches exactly one character (?) anywhere in
the string. For example, the value:
http*://d111111abcdef8.cloudfront.net/*game_download.zip*
would include (for example) all of the following objects:
•http://d111111abcdef8.cloudfront.net/example_game_download.zip?license=yes
•https://d111111abcdef8.cloudfront.net/example_game_download.zip?license=yes
•http://d111111abcdef8.cloudfront.net/test_game_download.zip?license=temp
•https://d111111abcdef8.cloudfront.net/test_game_download.zip?license=temp
•Alternate domain names – If you specify an alternate domain name (CNAME) in the URL,
you must specify the alternate domain name when referencing the object in your web page
or application. Do not specify the Amazon S3 URL for the object.
RTMP distributions
Include only the stream name. For example, if the full URL for a streaming video is:
rtmp://s5c39gqb8ow64r.cloudfront.net/videos/cfx/st/mp3_name.mp3
then use the following value for Resource:
videos/mp3_name
Do not include a prefix such as mp3: or mp4:. Also, depending on the player you're using, you
might have to omit the file extension from the value of Resource. For example, you might need
to use sydney-vacation instead of sydney-vacation.flv.
DateLessThan
The expiration date and time for the URL in Unix time format (in seconds) and Coordinated Universal
Time (UTC). Do not enclose the value in quotation marks. For information about UTC, see RFC 3339,
Date and Time on the Internet: Timestamps, http://tools.ietf.org/html/rfc3339.
For example, January 1, 2013 10:00 am UTC converts to 1357034400 in Unix time format.
This is the only required parameter in the Condition section. CloudFront requires this value to
prevent users from having permanent access to your private content.
For more information, see When Does CloudFront Check the Expiration Date and Time in a Signed
URL? (p. 181)
DateGreaterThan (Optional)
An optional start date and time for the URL in Unix time format (in seconds) and Coordinated Universal
Time (UTC). Users are not allowed to access the object before the specified date and time. Do not
enclose the value in quotation marks.
IpAddress (Optional)
The IP address of the client making the GET request. Note the following:
• To allow any IP address to access the object, omit the IpAddress parameter.
• You can specify either one IP address or one IP address range. For example, you can't set the
policy to allow access if the client's IP address is in one of two separate ranges.
API Version 2016-08-01
193
Amazon CloudFront Developer Guide
Creating a Signed URL Using a Custom Policy

• To allow access from a single IP address, you specify:
"IPv4 IP address/32"
•You must specify IP address ranges in standard IPv4 CIDR format (for example, 10.52.176.0/24).
For more information, go to RFC 4632, Classless Inter-domain Routing (CIDR): The Internet
Address Assignment and Aggregation Plan, http://tools.ietf.org/html/rfc4632.
Example Policy Statements for a Signed URL That Uses a
Custom Policy
The following example policy statements show how to control access to a specific object, all of the objects
in a directory, or all of the objects associated with a key pair ID. The examples also show how to control
access from an individual IP address or a range of IP addresses, and how to prevent users from using
the signed URL after a specified date and time.
If you copy and paste any of these examples, remove any whitespace (including tabs and newline
characters), replace the applicable values with your own values, and include a newline character after
the closing brace ( } ).
For more information, see Values that You Specify in the Policy Statement for a Signed URL That Uses
a Custom Policy (p. 192).
Topics
•Example Policy Statement: Accessing One Object from a Range of IP Addresses (p. 194)
•Example Policy Statement: Accessing All Objects in a Directory from a Range of IP Addresses (p. 194)
•Example Policy Statement: Accessing All Objects Associated with a Key Pair ID from One IP
Address (p. 195)
Example Policy Statement: Accessing One Object from a Range of IP
Addresses
The following example custom policy in a signed URL specifies that a user can access the object
http://d111111abcdef8.cloudfront.net/game_download.zip from IP addresses in the range
192.0.2.0/24 until January 1, 2013 10:00 am UTC:
{
"Statement": [
{
"Resource":"http://d111111abcdef8.cloudfront.net/game_download.zip",
"Condition":{
"IpAddress":{"AWS:SourceIp":"192.0.2.0/24"},
"DateLessThan":{"AWS:EpochTime":1357034400}
}
}
]
}
Example Policy Statement: Accessing All Objects in a Directory from a
Range of IP Addresses
The following example custom policy allows you to create signed URLs for any object in the training
directory, as indicated by the * wildcard character in the Resource parameter. Users can access the
object from an IP address in the range 192.0.2.0/24 until January 1, 2013 10:00 am UTC:
API Version 2016-08-01
194
Amazon CloudFront Developer Guide
Creating a Signed URL Using a Custom Policy

{
"Statement": [
{
"Resource":"http://d111111abcdef8.cloudfront.net/training/*",
"Condition":{
"IpAddress":{"AWS:SourceIp":"192.0.2.0/24"},
"DateLessThan":{"AWS:EpochTime":1357034400}
}
}
]
}
Each signed URL in which you use this policy includes a base URL that identifies a specific object, for
example:
http://d111111abcdef8.cloudfront.net/training/orientation.pdf
Example Policy Statement: Accessing All Objects Associated with a Key
Pair ID from One IP Address
The following sample custom policy allows you to create signed URLs for any object associated with any
distribution, as indicated by the * wildcard character in the Resource parameter. The user must use the
IP address 192.0.2.10/32. (The value 192.0.2.10/32 in CIDR notation refers to a single IP address,
192.0.2.10.) The objects are available only from January 1, 2013 10:00 am UTC until January 2, 2013
10:00 am UTC:
{
"Statement": [
{
"Resource":"http://*",
"Condition":{
"IpAddress":{"AWS:SourceIp":"192.0.2.10/32"},
"DateGreaterThan":{"AWS:EpochTime":1357034400},
"DateLessThan":{"AWS:EpochTime":1357120800}
}
}
]
}
Each signed URL in which you use this policy includes a base URL that identifies a specific object in a
specific CloudFront distribution, for example:
http://d111111abcdef8.cloudfront.net/training/orientation.pdf
The signed URL also includes a key pair ID, which must be associated with a trusted signer in the
distribution (d111111abcdef8.cloudfront.net) that you specify in the base URL.
Creating a Signature for a Signed URL That Uses a Custom
Policy
The signature for a signed URL that uses a custom policy is a hashed, signed, and base64-encoded
version of the policy statement.To create a signature for a custom policy, perform the applicable procedure.
The version that you choose depends on your distribution type (web or RTMP) and, for RTMP distributions,
the media player that you're using (Adobe Flash Player or another media player):
API Version 2016-08-01
195
Amazon CloudFront Developer Guide
Creating a Signed URL Using a Custom Policy
•Option 1: To create a signature for a web distribution or for an RTMP distribution (without Adobe Flash
Player) by using a custom policy (p. 196)
•Option 2: To create a signature for an RTMP distribution by using a custom policy (Adobe Flash
Player) (p. 196)
For additional information and examples of how to hash, sign, and encode the policy statement, see:
•Using a Linux Command and OpenSSL for Base64-Encoding and Encryption (p. 213)
•Code Examples for Creating a Signature for a Signed URL (p. 214)
•Tools and Code Examples for Configuring Private Content (p. 357)
Option 1:To create a signature for a web distribution or for an RTMP distribution (without
Adobe Flash Player) by using a custom policy
1. Use the SHA-1 hash function and RSA to hash and sign the JSON policy statement that you created
in the procedure To create the policy statement for a signed URL that uses a custom policy (p. 191).
Use the version of the policy statement that no longer includes whitespace but that has not yet been
base64-encoded.
For the private key that is required by the hash function, use the private key that is associated with
the applicable active trusted signer.
Note
The method that you use to hash and sign the policy statement depends on your
programming language and platform. For sample code, see Code Examples for Creating a
Signature for a Signed URL (p. 214).
2. Remove whitespace (including tabs and newline characters) from the hashed and signed string.
3. Base64-encode the string using MIME base64 encoding. For more information, see Section 6.8,
Base64 Content-Transfer-Encoding in RFC 2045, MIME (Multipurpose Internet Mail Extensions) Part
One: Format of Internet Message Bodies.
4. Replace characters that are invalid in a URL query string with characters that are valid.The following
table lists invalid and valid characters.
With these valid charactersReplace these invalid characters
- (hyphen)+
_ (underscore)=
~ (tilde)/
5. Append the resulting value to your signed URL after &Signature=, and return to To create a signed
URL using a custom policy (p. 189) to finish concatenating the parts of your signed URL.
Option 2:To create a signature for an RTMP distribution by using a custom policy (Adobe
Flash Player)
1. Use the SHA-1 hash function and RSA to hash and sign the JSON policy statement that you created
in the To create the policy statement for a signed URL that uses a custom policy (p. 191) procedure.
Use the version of the policy statement that no longer includes whitespace but that has not yet been
base64-encoded.
For the private key that is required by the hash function, use the private key that is associated with
the applicable active trusted signer.
API Version 2016-08-01
196
Amazon CloudFront Developer Guide
Creating a Signed URL Using a Custom Policy

Note
The method that you use to hash and sign the policy statement depends on your
programming language and platform. For sample code, see Code Examples for Creating a
Signature for a Signed URL (p. 214).
2. Remove whitespace (including tabs and newline characters) from the hashed and signed string.
Continue on to Step 3 if the stream name is passed in from a web page.
If the stream name is not passed in from a web page, skip the rest of this procedure. For example,
if you wrote your own player that fetches stream names from within the Adobe Flash .swf file, skip
the rest of this procedure.
3. Base64-encode the string using MIME base64 encoding. For more information, see Section 6.8,
Base64 Content-Transfer-Encoding in RFC 2045, MIME (Multipurpose Internet Mail Extensions) Part
One: Format of Internet Message Bodies.
4. Replace characters that are invalid in a URL query string with characters that are valid.The following
table lists invalid and valid characters.
With these valid charactersReplace these invalid characters
- (hyphen)+
_ (underscore)=
~ (tilde)/
5. Some versions of Adobe Flash Player require that you URL-encode the characters ?, =, and &. For
information about whether your version of Adobe Flash Player requires this character substitution,
refer to the Adobe website.
If your version of Adobe Flash Player does not require that you URL-encode the characters ?, =, and
&, skip to Step 6.
If your version of Adobe Flash Player requires URL-encoding those characters, replace them as
indicated in the following table. (You already replaced = in the previous step.)
With this URL encodingReplace these invalid characters
%3F?
%26&
6. Append the resulting value to your signed URL after &Signature=, and return to To create a signed
URL using a custom policy (p. 189) to finish concatenating the parts of your signed URL.
API Version 2016-08-01
197
Amazon CloudFront Developer Guide
Creating a Signed URL Using a Custom Policy

Using Signed Cookies
CloudFront signed cookies allow you to control who can access your content when you don't want to
change your current URLs or when you want to provide access to multiple restricted files, for example,
all of the files in the subscribers' area of a website. This topic explains the considerations when using
signed cookies and describes how to set signed cookies using canned and custom policies.
Topics
•Choosing Between Canned and Custom Policies for Signed Cookies (p. 198)
•How Signed Cookies Work (p. 198)
•Preventing Misuse of Signed Cookies (p. 199)
•When Does CloudFront Check the Expiration Date and Time in a Signed Cookie? (p. 200)
•Sample Code and Third-Party Tools (p. 200)
•Setting Signed Cookies Using a Canned Policy (p. 200)
•Setting Signed Cookies Using a Custom Policy (p. 205)
Choosing Between Canned and Custom Policies
for Signed Cookies
When you create a signed cookie, you write a policy statement in JSON format that specifies the restrictions
on the signed cookie, for example, how long the cookie is valid.You can use canned policies or custom
policies.The following table compares canned and custom policies:
Custom PolicyCanned PolicyDescription
YesNoYou can reuse the policy statement for multiple objects.
To reuse the policy statement, you must use wildcard
characters in the Resource object. For more informa-
tion, see Values That You Specify in the Policy State-
ment for a Custom Policy for Signed Cookies (p. 208).)
Yes (optional)NoYou can specify the date and time that users can begin
to access your content
YesYesYou can specify the date and time that users can no
longer access your content
Yes (optional)NoYou can specify the IP address or range of IP addresses
of the users who can access your content
For information about creating signed cookies using a canned policy, see Setting Signed Cookies Using
a Canned Policy (p. 200).
For information about creating signed cookies using a custom policy, see Setting Signed Cookies Using
a Custom Policy (p. 205).
How Signed Cookies Work
Here's an overview of how you configure CloudFront for signed cookies and how CloudFront responds
when a user submits a request that contains a signed cookie.
API Version 2016-08-01
198
Amazon CloudFront Developer Guide
Using Signed Cookies

1. In your CloudFront distribution, you specify one or more trusted signers, which are the AWS accounts
that you want to have permission to create signed URLs and signed cookies.
For more information, see Specifying the AWS Accounts That Can Create Signed URLs and Signed
Cookies (Trusted Signers) (p. 171).
2. You develop your application to determine whether a user should have access to your content and,
if so, to send three Set-Cookie headers to the viewer. (Each Set-Cookie header can contain only
one name-value pair, and a CloudFront signed cookie requires three name-value pairs.) You must
send the Set-Cookie headers to the viewer before the viewer requests your private content. If you
set a short expiration time on the cookie, you might also want to send three more Set-Cookie
headers in response to subsequent requests, so that the user continues to have access.
Typically, your CloudFront distribution will have at least two cache behaviors, one that doesn't require
authentication and one that does.The error page for the secure portion of the site includes a redirector
or a link to a login page.
If you configure your distribution to cache objects based on cookies, CloudFront doesn't cache
separate objects based on the attributes in signed cookies.
3. A user signs in to your website and either pays for content or meets some other requirement for
access.
4. Your application returns the Set-Cookie headers in the response, and the viewer stores the
name-value pairs.
5. The user requests an object.
The user's browser or other viewer gets the name-value pairs from step 4 and adds them to the
request in a Cookie header. This is the signed cookie.
6. CloudFront uses the public key to validate the signature in the signed cookie and to confirm that the
cookie hasn't been tampered with. If the signature is invalid, the request is rejected.
If the signature in the cookie is valid, CloudFront looks at the policy statement in the cookie (or
constructs one if you're using a canned policy) to confirm that the request is still valid. For example,
if you specified a beginning and ending date and time for the cookie, CloudFront confirms that the
user is trying to access your content during the time period that you want to allow access.
If the request meets the requirements in the policy statement, CloudFront serves your content as it
does for content that isn't restricted: it determines whether the object is already in the edge cache,
forwards the request to the origin if necessary, and returns the object to the user.
Preventing Misuse of Signed Cookies
If you specify the Domain parameter in a Set-Cookie header, specify the most precise value possible
to limit potential access by someone with the same root domain name. For example, apex.example.com
is preferable to example.com, especially when you don't control example.com.This helps prevent someone
from accessing your content from nadir.example.com.
To prevent this type of attack, do the following:
•Exclude the Expires and Max-Age cookie attributes, so that the Set-Cookie header creates a session
cookie. Session cookies are automatically deleted when the user closes the browser, which reduces
the possibility of someone getting unauthorized access to your content.
• Include the Secure attribute, so that the cookie is encrypted when a viewer includes it in a request.
• When possible, use a custom policy and include the IP address of the viewer.
•In the CloudFront-Expires attribute, specify the shortest reasonable expiration time based on how
long you want users to have access to your content.
API Version 2016-08-01
199
Amazon CloudFront Developer Guide
Preventing Misuse of Signed Cookies

When Does CloudFront Check the Expiration Date
and Time in a Signed Cookie?
To determine whether a signed cookie is still valid, CloudFront checks the expiration date and time in the
cookie at the time of the HTTP request. If a client begins to download a large object immediately before
the expiration time, the download should complete even if the expiration time passes during the download.
If the TCP connection drops and the client tries to restart the download after the expiration time passes,
the download will fail.
If a client uses Range GETs to get an object in smaller pieces, any GET request that occurs after the
expiration time passes will fail. For more information about Range GETs, see How CloudFront Processes
Partial Requests for an Object (Range GETs) (p. 132).
Sample Code and Third-Party Tools
The sample code for private content shows only how to create the signature for signed URLs. However,
the process for creating a signature for a signed cookie is very similar, so much of the sample code is
still relevant. For more information, see the following topics:
•Create a URL Signature Using Perl (p. 214)
•Create a URL Signature Using PHP (p. 216)
•Create a URL Signature Using C# and the .NET Framework (p. 218)
•Create a URL Signature Using Java (p. 226)
Additional sample code for creating signed URLs is available on the Amazon CloudFront Sample Code
& Libraries page.
For information about third-party tools that support private content, including creating signed URLs, see
Tools and Code Examples for Configuring Private Content (p. 357).
Setting Signed Cookies Using a Canned Policy
Topics
•Creating a Signature for a Signed Cookie That Uses a Canned Policy (p. 202)
To set a signed cookie using a canned policy, perform the following procedure.
To set a signed cookie using a canned policy
1. If you're using .NET or Java to create signed URLs, and if you haven't reformatted the private key
for your key pair from the default .pem format to a format compatible with .NET or with Java, do so
now. For more information, see Reformatting the CloudFront Private Key (.NET and Java Only) (p. 173).
2. Program your application to send three Set-Cookie headers to approved viewers.You need three
Set-Cookie headers because each Set-Cookie header can contain only one name-value pair,
and a CloudFront signed cookie requires three name-value pairs.The name-value pairs are:
CloudFront-Expires, CloudFront-Signature, and CloudFront-Key-Pair-Id. The values
must be present on the viewer before a user makes the first request for an object that you want to
control access to.
Note
In general, we recommend that you exclude Expires and Max-Age attributes. Excluding
the attributes causes the browser to delete the cookie when the user closes the browser,
API Version 2016-08-01
200
Amazon CloudFront Developer Guide
When Does CloudFront Check the Expiration Date and
Time in a Signed Cookie?

which reduces the possibility of someone getting unauthorized access to your content. For
more information, see Preventing Misuse of Signed Cookies (p. 199).
The names of cookie attributes are case sensitive.
Line breaks are included only to make the attributes more readable.
Set-Cookie:
Domain=optional domain name;
Path=/optional directory path;
Secure;
HttpOnly;
CloudFront-Expires=date and time in Unix time format (in seconds) and Co
ordinated Universal Time (UTC)
Set-Cookie:
Domain=optional domain name;
Path=/optional directory path;
Secure;
HttpOnly;
CloudFront-Signature=hashed and signed version of the policy statement
Set-Cookie:
Domain=optional domain name;
Path=/optional directory path;
Secure;
HttpOnly;
CloudFront-Key-Pair-Id=active CloudFront key pair Id for the key pair that
you are using to generate the signature
(Optional) Domain
The domain name for the requested object. If you don't specify a Domain attribute, the default
value is the domain name in the URL, and it applies only to the specified domain name, not to
subdomains. If you specify a Domain attribute, it also applies to subdomains. A leading dot in
the domain name (for example, Domain=.example.com) is optional. In addition, if you specify
a Domain attribute, the domain name in the URL and the value of the Domain attribute must
match.
You can specify the domain name that CloudFront assigned to your distribution, for example,
d111111abcdef8.cloudfront.net, but you can't specify *.cloudfront.net for the domain name.
If you want to use an alternate domain name such as example.com in URLs, you must add the
alternate domain name to your distribution regardless of whether you specify the Domain attribute.
For more information, see Alternate Domain Names (CNAMEs) (p. 76) in the topic Values that
You Specify When You Create or Update a Web Distribution (p. 63).
(Optional) Path
The path for the requested object. If you don't specify a Path attribute, the default value is the
path in the URL.
Secure
Requires that the viewer encrypt cookies before sending a request. We recommend that you
send the Set-Cookie header over an HTTPS connection to ensure that the cookie attributes
are protected from man-in-the-middle attacks.
HttpOnly
Requires that the viewer send the cookie only in HTTP or HTTPS requests.
CloudFront-Expires
Specify the expiration date and time in Unix time format and Coordinated Universal Time (UTC).
For example, March 16, 2015 10:00 am UTC converts to 1426500000 in Unix time format. For
API Version 2016-08-01
201
Amazon CloudFront Developer Guide
Setting Signed Cookies Using a Canned Policy
information about UTC, see RFC 3339, Date and Time on the Internet: Timestamps, http://
tools.ietf.org/html/rfc3339.
CloudFront-Signature
A hashed, signed, and base64-encoded version of a JSON policy statement. For more information,
see Creating a Signature for a Signed Cookie That Uses a Canned Policy (p. 202).
CloudFront-Key-Pair-Id
The ID for an active CloudFront key pair, for example, APKA9ONS7QCOWEXAMPLE. The
CloudFront key pair ID tells CloudFront which public key to use to validate the signed cookie.
CloudFront compares the information in the signature with the information in the policy statement
to verify that the URL has not been tampered with.
The key pair ID that you include in CloudFront signed cookies must be associated with an AWS
account that is one of the trusted signers for the applicable cache behavior.
For more information, see Specifying the AWS Accounts That Can Create Signed URLs and
Signed Cookies (Trusted Signers) (p. 171).
If you make a key pair inactive while rotating CloudFront key pairs, you must update your
application to use a new active key pair for one of your trusted signers. For more information
about rotating key pairs, see Rotating CloudFront Key Pairs (p. 176).
Example Set-Cookie headers for one signed cookie when you're using the domain name that is
associated with your distribution in the URLs for your objects:
Set-Cookie: Domain=d111111abcdef8.cloudfront.net; Path=/images/*; Secure; Ht
tpOnly; CloudFront-Expires=1426500000
Set-Cookie: Domain=d111111abcdef8.cloudfront.net; Path=/images/*; Secure; Ht
tpOnly; CloudFront-Signature=yXrSIgyQoeE4FBI4eMKF6ho~CA8_
Set-Cookie: Domain=d111111abcdef8.cloudfront.net; Path=/images/*; Secure; Ht
tpOnly; CloudFront-Key-Pair-Id=APKA9ONS7QCOWEXAMPLE
Example Set-Cookie headers for one signed cookie when you're using the alternate domain name
example.org in the URLs for your objects:
Set-Cookie: Domain=example.org; Path=/images/*; Secure; HttpOnly; CloudFront-
Expires=1426500000
Set-Cookie: Domain=example.org; Path=/images/*; Secure; HttpOnly; CloudFront-
Signature=yXrSIgyQoeE4FBI4eMKF6ho~CA8_
Set-Cookie: Domain=example.org; Path=/images/*; Secure; HttpOnly; CloudFront-
Key-Pair-Id=APKA9ONS7QCOWEXAMPLE
If you want to use an alternate domain name such as example.com in URLs, you must add the alternate
domain name to your distribution regardless of whether you specify the Domain attribute. For more
information, see Alternate Domain Names (CNAMEs) (p. 76) in the topic Values that You Specify When
You Create or Update a Web Distribution (p. 63).
Creating a Signature for a Signed Cookie That Uses a Canned
Policy
To create the signature for a signed cookie that uses a canned policy, you perform the following tasks:
1. Create a policy statement. See Creating a Policy Statement for a Signed Cookie That Uses a Canned
Policy (p. 203).
API Version 2016-08-01
202
Amazon CloudFront Developer Guide
Setting Signed Cookies Using a Canned Policy

2. Sign the policy statement to create a signature. See Signing the Policy Statement to Create a Signature
for a Signed Cookie That Uses a Canned Policy (p. 204).
Creating a Policy Statement for a Signed Cookie That Uses a Canned Policy
When you set a signed cookie that uses a canned policy, the CloudFront-Signature attribute is a
hashed and signed version of a policy statement. For signed cookies that use a canned policy, you don't
include the policy statement in the Set-Cookie header, as you do for signed cookies that use a custom
policy. To create the policy statement, perform the following procedure.
To create a policy statement for a signed cookie that uses a canned policy
1. Construct the policy statement using the following JSON format and using UTF-8 character encoding.
Include all punctuation and other literal values exactly as specified. For information about the
Resource and DateLessThan parameters, see Values That You Specify in the Policy Statement
for a Canned Policy for Signed Cookies (p. 203).
{
"Statement":[
{
"Resource":"base URL or stream name",
"Condition":{
"DateLessThan":{
"AWS:EpochTime":ending date and time in Unix time format and
UTC
}
}
}
]
}
2. Remove all whitespace (including tabs and newline characters) from the policy statement.You might
have to include escape characters in the string in application code.
Values That You Specify in the Policy Statement for a Canned Policy for Signed Cookies
When you create a policy statement for a canned policy, you specify the following values:
Resource
The base URL including your query strings, if any, for example:
http://d111111abcdef8.cloudfront.net/images/horizon.jpg?size=large&license=yes
You can specify only one value for Resource.
Note the following:
•Protocol – The value must begin with http://, https://, or http*://.
•Query string parameters – If you have no query string parameters, omit the question mark.
•Alternate domain names – If you specify an alternate domain name (CNAME) in the URL, you
must specify the alternate domain name when referencing the object in your web page or application.
Do not specify the Amazon S3 URL for the object.
DateLessThan
The expiration date and time for the URL in Unix time format (in seconds) and Coordinated Universal
Time (UTC). Do not enclose the value in quotation marks.
API Version 2016-08-01
203
Amazon CloudFront Developer Guide
Setting Signed Cookies Using a Canned Policy

For example, March 16, 2015 10:00 am UTC converts to 1426500000 in Unix time format.
This value must match the value of the CloudFront-Expires attribute in the Set-Cookie header.
Do not enclose the value in quotation marks.
For more information, see When Does CloudFront Check the Expiration Date and Time in a Signed
Cookie? (p. 200).
Example Policy Statement for a Canned Policy
When you use the following example policy statement in a signed cookie, a user can access the object
http://d111111abcdef8.cloudfront.net/horizon.jpg until March 16, 2015 10:00 am UTC:
{
"Statement":[
{
"Resource":"http://d111111abcdef8.cloudfront.net/hori
zon.jpg?size=large&license=yes",
"Condition":{
"DateLessThan":{
"AWS:EpochTime":1426500000
}
}
}
]
}
Signing the Policy Statement to Create a Signature for a Signed Cookie
That Uses a Canned Policy
To create the value for the CloudFront-Signature attribute in a Set-Cookie header, you hash and
sign the policy statement that you created in To create a policy statement for a signed cookie that uses
a canned policy (p. 203).
For additional information and examples of how to hash, sign, and encode the policy statement, see the
following topics:
•Using a Linux Command and OpenSSL for Base64-Encoding and Encryption (p. 213)
•Code Examples for Creating a Signature for a Signed URL (p. 214)
•Tools and Code Examples for Configuring Private Content (p. 357)
To create a signature for a signed cookie using a canned policy
1. Use the SHA-1 hash function and RSA to hash and sign the policy statement that you created in the
procedure To create a policy statement for a signed cookie that uses a canned policy (p. 203). Use
the version of the policy statement that no longer includes whitespace.
For the private key that is required by the hash function, use the private key that is associated with
the applicable active trusted signer.
Note
The method that you use to hash and sign the policy statement depends on your
programming language and platform. For sample code, see Code Examples for Creating a
Signature for a Signed URL (p. 214).
2. Remove whitespace (including tabs and newline characters) from the hashed and signed string.
API Version 2016-08-01
204
Amazon CloudFront Developer Guide
Setting Signed Cookies Using a Canned Policy
3. Base64-encode the string using MIME base64 encoding. For more information, see Section 6.8,
Base64 Content-Transfer-Encoding in RFC 2045, MIME (Multipurpose Internet Mail Extensions) Part
One: Format of Internet Message Bodies.
4. Replace characters that are invalid in a URL query string with characters that are valid.The following
table lists invalid and valid characters.
With these valid charactersReplace these invalid characters
- (hyphen)+
_ (underscore)=
~ (tilde)/
5. Include the resulting value in the Set-Cookie header for the CloudFront-Signature name-value
pair.Then return to To set a signed cookie using a canned policy (p. 200) add the Set-Cookie header
for CloudFront-Key-Pair-Id.
Setting Signed Cookies Using a Custom Policy
Topics
•Creating a Policy Statement for a Signed Cookie That Uses a Custom Policy (p. 207)
•Example Policy Statements for a Signed Cookie That Uses a Custom Policy (p. 209)
•Creating a Signature for a Signed Cookie That Uses a Custom Policy (p. 211)
To set a signed cookie that uses a custom policy, perform the following procedure.
To set a signed cookie using a custom policy
1. If you're using .NET or Java to create signed URLs, and if you haven't reformatted the private key
for your key pair from the default .pem format to a format compatible with .NET or with Java, do so
now. For more information, see Reformatting the CloudFront Private Key (.NET and Java Only) (p. 173).
2. Program your application to send three Set-Cookie headers to approved viewers.You need three
Set-Cookie headers because each Set-Cookie header can contain only one name-value pair,
and a CloudFront signed cookie requires three name-value pairs.The name-value pairs are:
CloudFront-Policy, CloudFront-Signature, and CloudFront-Key-Pair-Id. The values
must be present on the viewer before a user makes the first request for an object that you want to
control access to.
Note
In general, we recommend that you exclude Expires and Max-Age attributes.This causes
the browser to delete the cookie when the user closes the browser, which reduces the
possibility of someone getting unauthorized access to your content. For more information,
see Preventing Misuse of Signed Cookies (p. 199).
The names of cookie attributes are case sensitive.
Line breaks are included only to make the attributes more readable.
Set-Cookie:
Domain=optional domain name;
Path=/optional directory path;
Secure;
API Version 2016-08-01
205
Amazon CloudFront Developer Guide
Setting Signed Cookies Using a Custom Policy

HttpOnly;
CloudFront-Policy=base64 encoded version of the policy statement
Set-Cookie:
Domain=optional domain name;
Path=/optional directory path;
Secure;
HttpOnly;
CloudFront-Signature=hashed and signed version of the policy statement
Set-Cookie:
Domain=optional domain name;
Path=/optional directory path;
Secure;
HttpOnly;
CloudFront-Key-Pair-Id=active CloudFront key pair Id for the key pair that
you are using to generate the signature
(Optional) Domain
The domain name for the requested object. If you don't specify a Domain attribute, the default
value is the domain name in the URL, and it applies only to the specified domain name, not to
subdomains. If you specify a Domain attribute, it also applies to subdomains. A leading dot in
the domain name (for example, Domain=.example.com) is optional. In addition, if you specify
a Domain attribute, the domain name in the URL and the value of the Domain attribute must
match.
You can specify the domain name that CloudFront assigned to your distribution, for example,
d111111abcdef8.cloudfront.net, but you can't specify *.cloudfront.net for the domain name.
If you want to use an alternate domain name such as example.com in URLs, you must add the
alternate domain name to your distribution regardless of whether you specify the Domain attribute.
For more information, see Alternate Domain Names (CNAMEs) (p. 76) in the topic Values that
You Specify When You Create or Update a Web Distribution (p. 63).
(Optional) Path
The path for the requested object. If you don't specify a Path attribute, the default value is the
path in the URL.
Secure
Requires that the viewer encrypt cookies before sending a request. We recommend that you
send the Set-Cookie header over an HTTPS connection to ensure that the cookie attributes
are protected from man-in-the-middle attacks.
HttpOnly
Requires that the viewer send the cookie only in HTTP or HTTPS requests.
CloudFront-Policy
Your policy statement in JSON format, with white space removed, then base64 encoded. For
more information, see Creating a Policy Statement for a Custom Policy.
The policy statement controls the access that a signed cookie grants to a user: the objects that
the user can access, an expiration date and time, an optional date and time that the URL becomes
valid, and an optional IP address or range of IP addresses that are allowed to access the object.
CloudFront-Signature
A hashed, signed, and base64-encoded version of the JSON policy statement. For more
information, see Creating a Signature for a Signed Cookie That Uses a Custom Policy (p. 211).
CloudFront-Key-Pair-Id
The ID for an active CloudFront key pair, for example, APKA9ONS7QCOWEXAMPLE. The
CloudFront key pair ID tells CloudFront which public key to use to validate the signed cookie.
API Version 2016-08-01
206
Amazon CloudFront Developer Guide
Setting Signed Cookies Using a Custom Policy
CloudFront compares the information in the signature with the information in the policy statement
to verify that the URL has not been tampered with.
The key pair ID that you include in CloudFront signed cookies must be associated with an AWS
account that is one of the trusted signers for the applicable cache behavior.
For more information, see Specifying the AWS Accounts That Can Create Signed URLs and
Signed Cookies (Trusted Signers) (p. 171).
If you make a key pair inactive while rotating CloudFront key pairs, you must update your
application to use a new active key pair for one of your trusted signers. For more information
about rotating key pairs, see Rotating CloudFront Key Pairs (p. 176).
Example Set-Cookie headers for one signed cookie when you're using the domain name that is
associated with your distribution in the URLs for your objects:
Set-Cookie: Domain=d111111abcdef8.cloudfront.net; Path=/; Secure; HttpOnly;
CloudFront-Policy=eyJTdGF0ZW1lbnQiOlt7IlJlc291cmNlIjoiaHR0cDovL2QxMTExMTF
hYmNkZWY4LmNsb3VkZnJvbnQubmV0L2dhbWVfZG93bmxvYWQuemlwIiwiQ29uZGl0aW9uIjp7Ikl
wQWRkcmVzcyI6eyJBV1M6U291cmNlSXAiOiIxOTIuMC4yLjAvMjQifSwiRGF0ZUxlc3NUaG
FuIjp7IkFXUzpFcG9jaFRpbWUiOjE0MjY1MDAwMDB9fX1dfQ__
Set-Cookie: Domain=d111111abcdef8.cloudfront.net; Path=/; Secure; HttpOnly;
CloudFront-Signature=dtKhpJ3aUYxqDIwepczPiDb9NXQ_
Set-Cookie: Domain=d111111abcdef8.cloudfront.net; Path=/; Secure; HttpOnly;
CloudFront-Key-Pair-Id=APKA9ONS7QCOWEXAMPLE
Example Set-Cookie headers for one signed cookie when you're using the alternate domain name
example.org in the URLs for your objects:
Set-Cookie: Domain=example.org; Path=/; Secure; HttpOnly; CloudFront-
Policy=eyJTdGF0ZW1lbnQiOlt7IlJlc291cmNlIjoiaHR0cDovL2QxMTExMTFhYmNkZWY4LmNsb3VkZn
JvbnQubmV0L2dhbWVfZG93bmxvYWQuemlwIiwiQ29uZGl0aW9uIjp7IklwQWRkcm
VzcyI6eyJBV1M6U291cmNlSXAiOiIxOTIuMC4yLjAvMjQifSwiRGF0ZUxlc3NUaGFuIjp7IkFXUzp
FcG9jaFRpbWUiOjE0MjY1MDAwMDB9fX1dfQ__
Set-Cookie: Domain=example.org; Path=/; Secure; HttpOnly; CloudFront-Signa
ture=dtKhpJ3aUYxqDIwepczPiDb9NXQ_
Set-Cookie: Domain=example.org; Path=/; Secure; HttpOnly; CloudFront-Key-Pair-
Id=APKA9ONS7QCOWEXAMPLE
If you want to use an alternate domain name such as example.com in URLs, you must add the alternate
domain name to your distribution regardless of whether you specify the Domain attribute. For more
information, see Alternate Domain Names (CNAMEs) (p. 76) in the topic Values that You Specify When
You Create or Update a Web Distribution (p. 63).
Creating a Policy Statement for a Signed Cookie That Uses
a Custom Policy
To create a policy statement for a custom policy, perform the following procedure. For several example
policy statements that control access to objects in a variety of ways, see Example Policy Statements for
a Signed Cookie That Uses a Custom Policy (p. 209).
To create the policy statement for a signed cookie that uses a custom policy
1. Construct the policy statement using the following JSON format.
API Version 2016-08-01
207
Amazon CloudFront Developer Guide
Setting Signed Cookies Using a Custom Policy
{
"Statement": [
{
"Resource":"URL of the object",
"Condition":{
"DateLessThan":{"AWS:EpochTime":required ending date and time
in Unix time format and UTC},
"DateGreaterThan":{"AWS:EpochTime":optional beginning date and
time in Unix time format and UTC},
"IpAddress":{"AWS:SourceIp":"optional IP address"}
}
}
]
}
Note the following:
• Use UTF-8 character encoding.
• Include all punctuation and parameter names exactly as specified. Abbreviations for parameter
names are not accepted.
• The order of the parameters in the Condition section doesn't matter.
• For information about the values for Resource, DateLessThan, DateGreaterThan, and
IpAddress, see Values That You Specify in the Policy Statement for a Custom Policy for Signed
Cookies (p. 208).
2. Remove all whitespace (including tabs and newline characters) from the policy statement.You might
have to include escape characters in the string in application code.
3. Base64-encode the policy statement using MIME base64 encoding. For more information, see Section
6.8, Base64 Content-Transfer-Encoding in RFC 2045, MIME (Multipurpose Internet Mail Extensions)
Part One: Format of Internet Message Bodies.
4. Replace characters that are invalid in a URL query string with characters that are valid.The following
table lists invalid and valid characters.
With these valid charactersReplace these invalid characters
- (hyphen)+
_ (underscore)=
~ (tilde)/
5. Include the resulting value in your Set-Cookie header after CloudFront-Policy=.
6. Create a signature for the Set-Cookie header for CloudFront-Signature by hashing, signing,
and base64-encoding the policy statement. For more information, see Creating a Signature for a
Signed Cookie That Uses a Custom Policy (p. 211).
Values That You Specify in the Policy Statement for a Custom Policy for
Signed Cookies
When you create a policy statement for a custom policy, you specify the following values.
Resource
The base URL including your query strings, if any:
API Version 2016-08-01
208
Amazon CloudFront Developer Guide
Setting Signed Cookies Using a Custom Policy

http://d111111abcdef8.cloudfront.net/images/horizon.jpg?size=large&license=yes
Caution
If you omit the Resource parameter, users can access all of the objects associated with
any distribution that is associated with the key pair that you use to create the signed URL.
You can specify only one value for Resource.
Note the following:
•Protocol – The value must begin with http://, https://, or http*://.
•Query string parameters – If you have no query string parameters, omit the question mark.
•Wildcards – You can use the wildcard character that matches zero or more characters (*) or the
wild-card character that matches exactly one character (?) anywhere in the string. For example,
the value:
http*://d111111abcdef8.cloudfront.net/*game_download.zip*
would include (for example) all of the following objects:
•http://d111111abcdef8.cloudfront.net/example_game_download.zip?license=yes
•https://d111111abcdef8.cloudfront.net/example_game_download.zip?license=yes
•http://d111111abcdef8.cloudfront.net/test_game_download.zip?license=temp
•https://d111111abcdef8.cloudfront.net/test_game_download.zip?license=temp
•Alternate domain names – If you specify an alternate domain name (CNAME) in the URL, you
must specify the alternate domain name when referencing the object in your web page or application.
Do not specify the Amazon S3 URL for the object.
DateLessThan
The expiration date and time for the URL in Unix time format (in seconds) and Coordinated Universal
Time (UTC). Do not enclose the value in quotation marks.
For example, March 16, 2015 10:00 am UTC converts to 1426500000 in Unix time format.
For more information, see When Does CloudFront Check the Expiration Date and Time in a Signed
Cookie? (p. 200).
DateGreaterThan (Optional)
An optional start date and time for the URL in Unix time format (in seconds) and Coordinated Universal
Time (UTC). Users are not allowed to access the object before the specified date and time. Do not
enclose the value in quotation marks.
IpAddress (Optional)
The IP address of the client making the GET request. Note the following:
• To allow any IP address to access the object, omit the IpAddress parameter.
• You can specify either one IP address or one IP address range. For example, you can't set the
policy to allow access if the client's IP address is in one of two separate ranges.
• To allow access from a single IP address, you specify:
"IPv4 IP address/32"
•You must specify IP address ranges in standard IPv4 CIDR format (for example, 10.52.176.0/24).
For more information, go to RFC 4632, Classless Inter-domain Routing (CIDR): The Internet
Address Assignment and Aggregation Plan, http://tools.ietf.org/html/rfc4632.
Example Policy Statements for a Signed Cookie That Uses
a Custom Policy
The following example policy statements show how to control access to a specific object, all of the objects
in a directory, or all of the objects associated with a key pair ID. The examples also show how to control
API Version 2016-08-01
209
Amazon CloudFront Developer Guide
Setting Signed Cookies Using a Custom Policy

access from an individual IP address or a range of IP addresses, and how to prevent users from using
the signed cookie after a specified date and time.
If you copy and paste any of these examples, remove any whitespace (including tabs and newline
characters), replace the applicable values with your own values, and include a newline character after
the closing brace ( } ).
For more information, see Values That You Specify in the Policy Statement for a Custom Policy for Signed
Cookies (p. 208).
Topics
•Example Policy Statement: Accessing One Object from a Range of IP Addresses (p. 210)
•Example Policy Statement: Accessing All Objects in a Directory from a Range of IP Addresses (p. 210)
•Example Policy Statement: Accessing All Objects Associated with a Key Pair ID from One IP
Address (p. 211)
Example Policy Statement: Accessing One Object from a Range of IP
Addresses
The following example custom policy in a signed cookie specifies that a user can access the object
http://d111111abcdef8.cloudfront.net/game_download.zip from IP addresses in the range
192.0.2.0/24 until January 1, 2013 10:00 am UTC:
{
"Statement": [
{
"Resource":"http://d111111abcdef8.cloudfront.net/game_download.zip",
"Condition":{
"IpAddress":{"AWS:SourceIp":"192.0.2.0/24"},
"DateLessThan":{"AWS:EpochTime":1357034400}
}
}
]
}
Example Policy Statement: Accessing All Objects in a Directory from a
Range of IP Addresses
The following example custom policy allows you to create signed cookies for any object in the training
directory, as indicated by the * wildcard character in the Resource parameter. Users can access the
object from an IP address in the range 192.0.2.0/24 until January 1, 2013 10:00 am UTC:
{
"Statement": [
{
"Resource":"http://d111111abcdef8.cloudfront.net/training/*",
"Condition":{
"IpAddress":{"AWS:SourceIp":"192.0.2.0/24"},
"DateLessThan":{"AWS:EpochTime":1357034400}
}
}
]
}
API Version 2016-08-01
210
Amazon CloudFront Developer Guide
Setting Signed Cookies Using a Custom Policy

Each signed cookie in which you use this policy includes a base URL that identifies a specific object, for
example:
http://d111111abcdef8.cloudfront.net/training/orientation.pdf
Example Policy Statement: Accessing All Objects Associated with a Key
Pair ID from One IP Address
The following sample custom policy allows you to set signed cookies for any object associated with any
distribution, as indicated by the * wildcard character in the Resource parameter. The user must use the
IP address 192.0.2.10/32. (The value 192.0.2.10/32 in CIDR notation refers to a single IP address,
192.0.2.10.) The objects are available only from January 1, 2013 10:00 am UTC until January 2, 2013
10:00 am UTC:
{
"Statement": [
{
"Resource":"http://*",
"Condition":{
"IpAddress":{"AWS:SourceIp":"192.0.2.10/32"},
"DateGreaterThan":{"AWS:EpochTime":1357034400},
"DateLessThan":{"AWS:EpochTime":1357120800}
}
}
]
}
Each signed cookie in which you use this policy includes a base URL that identifies a specific object in
a specific CloudFront distribution, for example:
http://d111111abcdef8.cloudfront.net/training/orientation.pdf
The signed cookie also includes a key pair ID, which must be associated with a trusted signer in the
distribution (d111111abcdef8.cloudfront.net) that you specify in the base URL.
Creating a Signature for a Signed Cookie That Uses a Custom
Policy
The signature for a signed cookie that uses a custom policy is a hashed, signed, and base64-encoded
version of the policy statement.
For additional information and examples of how to hash, sign, and encode the policy statement, see:
•Using a Linux Command and OpenSSL for Base64-Encoding and Encryption (p. 213)
•Code Examples for Creating a Signature for a Signed URL (p. 214)
•Tools and Code Examples for Configuring Private Content (p. 357)
To create a signature for a signed cookie by using a custom policy
1. Use the SHA-1 hash function and RSA to hash and sign the JSON policy statement that you created
in the procedure To create the policy statement for a signed URL that uses a custom policy (p. 191).
Use the version of the policy statement that no longer includes whitespace but that has not yet been
base64-encoded.
For the private key that is required by the hash function, use the private key that is associated with
the applicable active trusted signer.
API Version 2016-08-01
211
Amazon CloudFront Developer Guide
Setting Signed Cookies Using a Custom Policy
Note
The method that you use to hash and sign the policy statement depends on your
programming language and platform. For sample code, see Code Examples for Creating a
Signature for a Signed URL (p. 214).
2. Remove whitespace (including tabs and newline characters) from the hashed and signed string.
3. Base64-encode the string using MIME base64 encoding. For more information, see Section 6.8,
Base64 Content-Transfer-Encoding in RFC 2045, MIME (Multipurpose Internet Mail Extensions) Part
One: Format of Internet Message Bodies.
4. Replace characters that are invalid in a URL query string with characters that are valid.The following
table lists invalid and valid characters.
With these valid charactersReplace these invalid characters
- (hyphen)+
_ (underscore)=
~ (tilde)/
5. Include the resulting value in the Set-Cookie header for the CloudFront-Signature= name-value
pair, and return to To set a signed cookie using a custom policy (p. 205) to add the Set-Cookie
header for CloudFront-Key-Pair-Id.
API Version 2016-08-01
212
Amazon CloudFront Developer Guide
Setting Signed Cookies Using a Custom Policy
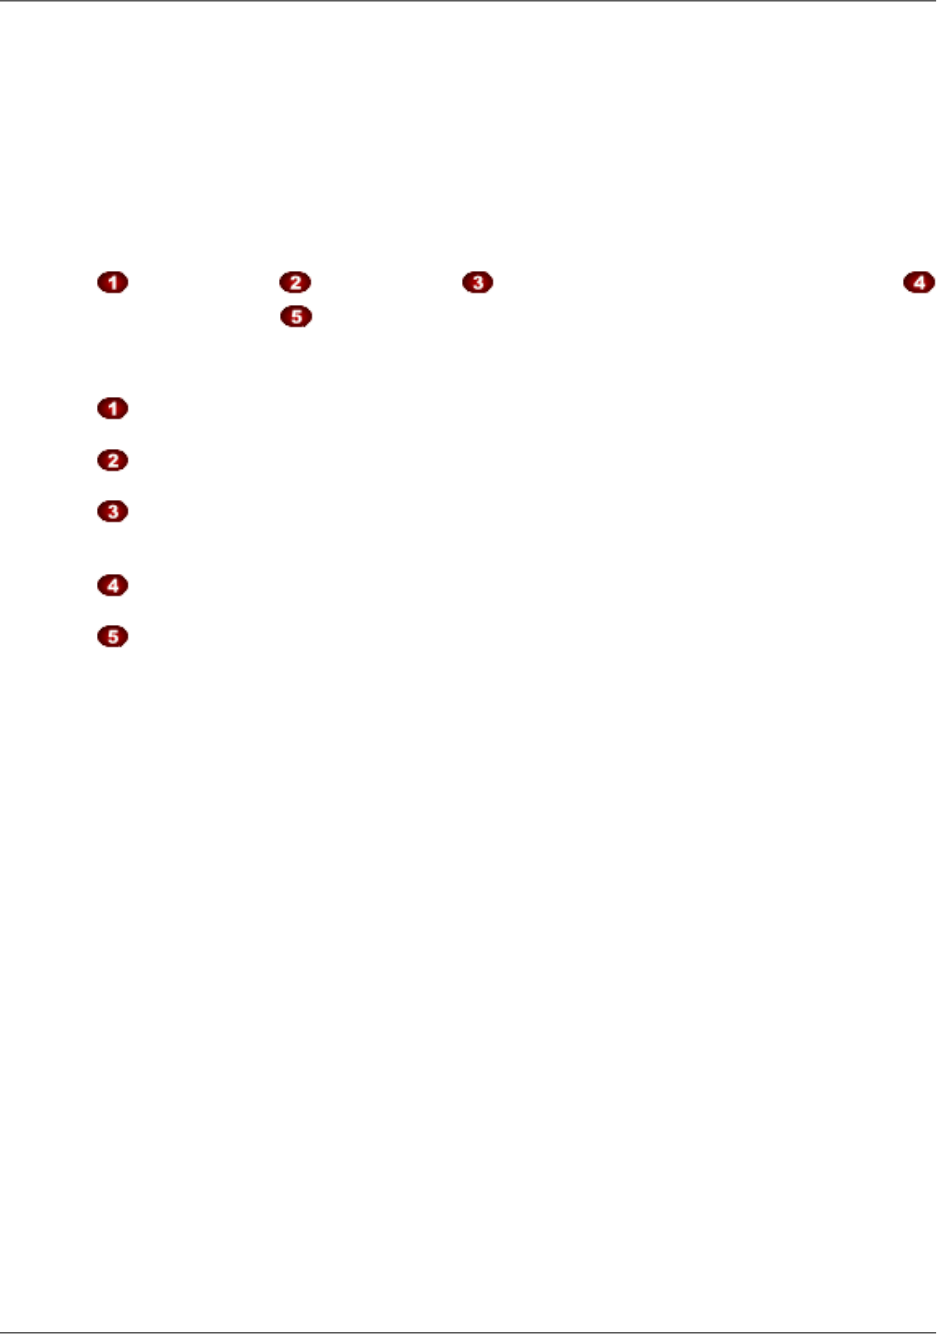
Using a Linux Command and OpenSSL for
Base64-Encoding and Encryption
You can use the following Linux command-line command and OpenSSL to hash and sign the policy
statement, base64-encode the signature, and replace characters that are not valid in URL query string
parameters with characters that are valid.
For information about OpenSSL, go to http://www.openssl.org.
cat policy | tr -d "\n" | openssl sha1 -sign private-key.pem |
openssl base64 | tr -- '+=/' '-_~'
where:
cat reads the policy file.
tr -d "\n" removes a newline character that was added by cat.
OpenSSL hashes the file using SHA-1 and signs it using RSA and the private key file
private-key.pem.
OpenSSL base64-encodes the hashed and signed policy statement.
tr replaces characters that are not valid in URL query string parameters with characters that are
valid.
For code examples that demonstrate creating a signature in several programming languages see Code
Examples for Creating a Signature for a Signed URL (p. 214).
API Version 2016-08-01
213
Amazon CloudFront Developer Guide
Using a Linux Command and OpenSSL for
Base64-Encoding and Encryption
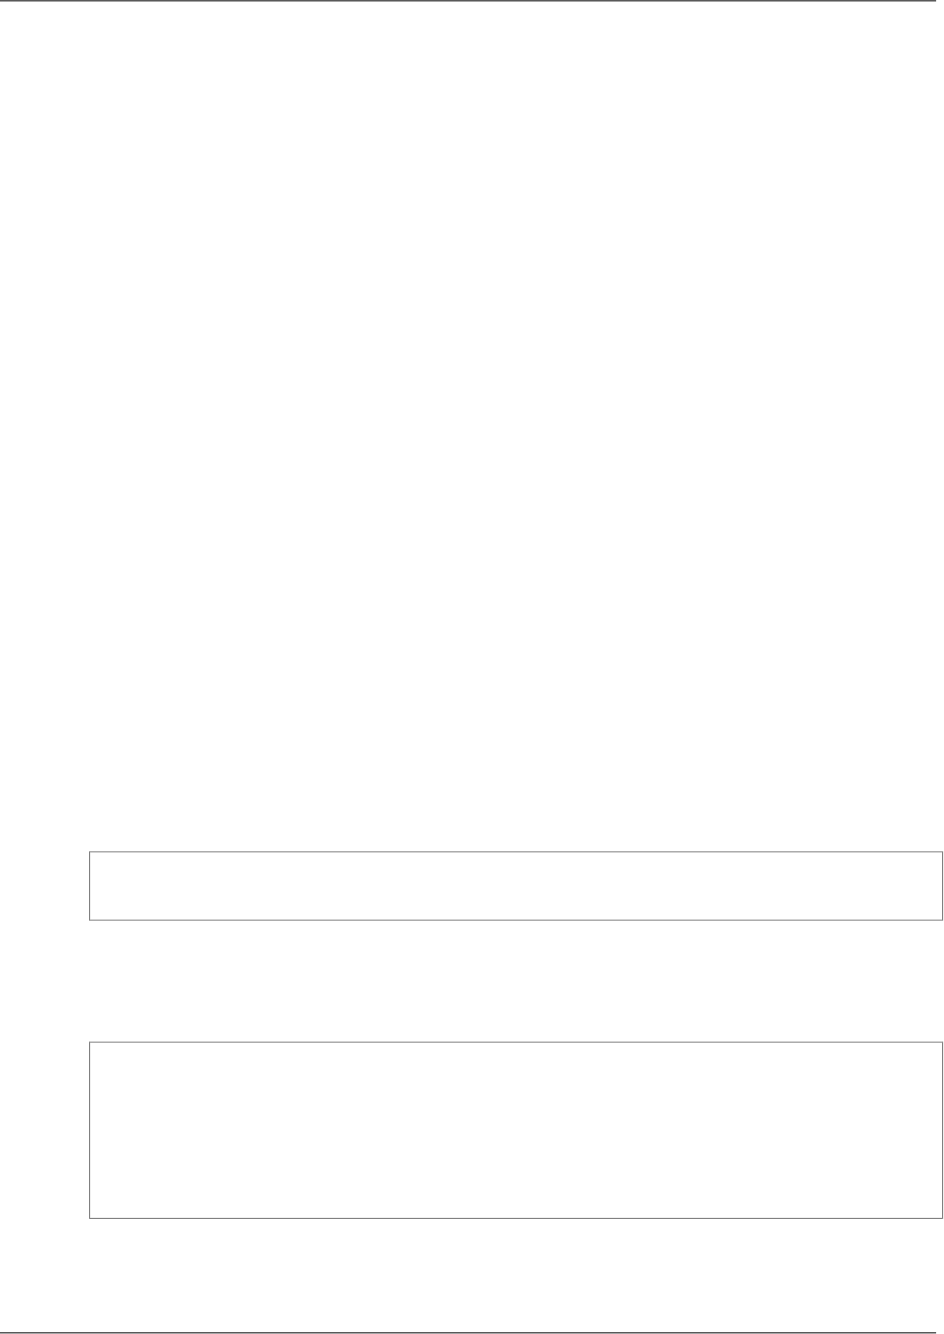
Code Examples for Creating a Signature for a
Signed URL
This section includes downloadable application examples that demonstrate how to create signatures for
signed URLs. Examples are available in Perl, PHP, C#, and Java. You can use any of the examples to
create signed URLs.The Perl script runs on Linux/Mac platforms.The PHP example will work on any
server that runs PHP. The C# example uses the .NET Framework.
For an example of how to use cookies with Ruby on Rails, see Tools and Code Examples for Configuring
Private Content (p. 357) in the topic Amazon CloudFront Resources (p. 355).
You can find example code for signed URLs and for signed cookies in a variety of programming languages.
Perform an Internet search on sample app language cloudfront signed URLs or on sample app
language cloudfront signed cookies.
Topics
•Create a URL Signature Using Perl (p. 214)
•Create a URL Signature Using PHP (p. 216)
•Create a URL Signature Using C# and the .NET Framework (p. 218)
•Create a URL Signature Using Java (p. 226)
Create a URL Signature Using Perl
The Perl script creates the signature for private content from command line arguments that specify the
CloudFront URL, the path to the private key of the signer, the key ID, and an expiration date for the URL.
The tool can also decode signed URLs.To get the tool cfsign.pl, go to Amazon CloudFront Signed
URLs Helper Tool.
Note
Creating a URL signature is just one part of the process of serving private content using a signed
URL. For more information about the entire process, see Using Signed URLs (p. 179).
The following example shows how you might use cfsign.pl to create an RTMP distribution signature.
$ cfsign.pl --action encode --stream example/video.mp4 --private-key
/path/to/my-private-key.pem --key-pair-id PK12345EXAMPLE --expires 1265838202
This tool generates the policy statement from the command line arguments.The signature that it generates
is an SHA1 hash of the policy statement.
The following is a example base64-encoded stream name.
mp4:example/video.mp4%3FPolicy%3DewogICJTdGF0ZW1lbnQiOlt7CiAgICAgICJSZXNvdXJjZSI
6ImRyciIsCiAgICAgICJDb25kaXRpb24iOnsKICAgICAgICAiSXBBZGRyZXNzIjp7IkFXUzpTb3VyY2V
JcCI6IjAuMC4wLjAvMCJ9LAogICAgICAgICJEYXRlTGVzc1RoYW4iOnsiQVdTOkVwb2NoVGltZSI6MjE
0NTkxNjgwMH0KICAgICAgfQogICAgEXAMPLE_%26Signature%3DewtHqEXK~68tsZt-eOFnZKGwTf2a
JlbKhXkK5SSiVqcG9pieCRV3xTEPtc29OzeXlsDvRycOM2WK0cXzcyYZhpl9tv2796ihHiCTAwIHQ8yP
17Af4nWtOLIZHoH6wkR3tU1cQHs8R1d-g-SlZGjNBXr~J2MbaJzm8i6EXAMPLE_%26Key-Pair-Id%3
DPK12345EXAMPLE
This signature authenticates the request to stream private content, example/video.mp4. If you're using
Adobe Flash Player and the stream name is passed in from a web page using JavaScript, you must
base64-encode the signature and replace characters that are invalid in a URL request parameter (+, =,
API Version 2016-08-01
214
Amazon CloudFront Developer Guide
Code Examples for Creating a Signature for a Signed
URL

/) with characters that are valid (-, _, and ~, respectively). If the stream name is not passed in from a web
page, you don't need to base64-encode the signature. For example, you would not base64-encode the
signature if you write your own player and the stream names are fetched from within the Adobe Flash
.swf file.
The following example uses jwplayer with CloudFront.
<script type='text/javascript'>
var so1 = new SWFObject
('http://d84l721fxaaqy9.cloudfront.net/player/player.swf',
'mpl', '640', '360', '9');
so1.addParam('allowfullscreen','true');
so1.addParam('allowscriptaccess','always');
so1.addParam('wmode','opaque');
so1.addVariable('streamer','rtmp://s33r3xe4ayhhis.cloudfront.net/cfx/st');
so1.addVariable("file","mp4:example/video.mp4%3FPolicy%3DewogICJTdGF0ZW1lbnQi
Olt7CiAgICAgICJSZXNvdXJjZSI6ImRyciIsCiAgICAgICJDb25kaXRpb24iOnsKICAgICAgICA
iSXBBZGRyZXNzIjp7IkFXUzpTb3VyY2VJcCI6IjAuMC4wLjAvMCJ9LAogICAgICAgICJEYXRlTG
Vzc1RoYW4iOnsiQVdTOkVwb2NoVGltZSI6MjE0NTkxNjgwMH0KICAgICAgfQogICAgEXAMPLE_%
26Signature%3DewtHqEXK~68tsZt-eOFnZKGwTf2aJlbKhXkK5SSiVqcG9pieCRV3xTEPtc29O
zeXlsDvRycOM2WK0cXzcyYZhpl9tv2796ihHiCTAwIHQ8yP17Af4nWtOLIZHoH6wkR3tU1cQHs8
R1d-g-SlZGjNBXr~J2MbaJzm8i6EXAMPLE_%26Key-Pair-Id%3DPK12345EXAMPLE
so1.write('flv');
</script>
When you retrieve a stream to play from within an Adobe Flash .swf file, do not URL-encode the stream
name, for example:
mp4:example/video.mp4?Policy=ewogICJTdGF0ZW1lbnQiOlt7CiAgICAgICJSZXNvdXJjZSI6ImR
yciIsCiAgICAgICJDb25kaXRpb24iOnsKICAgICAgICAiSXBBZGRyZXNzIjp7IkFXUzpTb3VyY2VJcCI
6IjAuMC4wLjAvMCJ9LAogICAgICAgICJEYXRlTGVzc1RoYW4iOnsiQVdTOkVwb2NoVGltZSI6MjE0NTk
xNjgwMH0KICAgICAgfQogICAgEXAMPLE_&Signature=ewtHqEXK~68tsZt-eOFnZKGwTf2aJlbKhXkK
5SSiVqcG9pieCRV3xTEPtc29OzeXlsDvRycOM2WK0cXzcyYZhpl9tv2796ihHiCTAwIHQ8yP17Af4nWt
OLIZHoH6wkR3tU1cQHs8R1d-g-SlZGjNBXr~J2MbaJzm8i6EXAMPLE_&Key-Pair-Id=PK12345
EXAMPLE
See the comments in the Perl source code for more information about the command line switches and
features of this tool.
See also
•Create a URL Signature Using PHP (p. 216)
•Create a URL Signature Using C# and the .NET Framework (p. 218)
•Create a URL Signature Using Java (p. 226)
•Tools and Code Examples for Configuring Private Content (p. 357)
API Version 2016-08-01
215
Amazon CloudFront Developer Guide
Create a URL Signature Using Perl

Create a URL Signature Using PHP
Any web server that runs PHP can use the PHP demo code to create policy statements and signatures
for private CloudFront RTMP distributions.The example creates a functioning web page with signed URL
links that play a video stream using CloudFront streaming.To get the example, download Signature Code
for Video Streaming in PHP.
You can also create signed URLs by using the UrlSigner class in the AWS SDK for PHP. For more
information, see Class UrlSigner in the AWS SDK for PHP API Reference.
Note
Creating a URL signature is just one part of the process of serving private content using a signed
URL. For more information about the entire process, see Using Signed URLs (p. 179).
In the following code segment, the function rsa_sha1_sign hashes and signs the policy statement.The
arguments required are a policy statement, an out parameter to contain the signature, and the private
key for your AWS account or for a trusted AWS account that you specify. Next, the
url_safe_base64_encode function creates a URL-safe version of the signature.
Example RSA SHA1 Hashing in PHP
function rsa_sha1_sign($policy, $private_key_filename) {
$signature = "";
// load the private key
$fp = fopen($private_key_filename, "r");
$priv_key = fread($fp, 8192);
fclose($fp);
$pkeyid = openssl_get_privatekey($priv_key);
// compute signature
openssl_sign($policy, $signature, $pkeyid);
// free the key from memory
openssl_free_key($pkeyid);
return $signature;
}
function url_safe_base64_encode($value) {
$encoded = base64_encode($value);
// replace unsafe characters +, = and / with
// the safe characters -, _ and ~
return str_replace(
array('+', '=', '/'),
array('-', '_', '~'),
$encoded);
}
The following code constructs a canned policy statement needed for creating the signature. For more
information about canned policies, see Creating a Signed URL Using a Canned Policy (p. 182).
API Version 2016-08-01
216
Amazon CloudFront Developer Guide
Create a URL Signature Using PHP

Example Canned Signing Function in PHP
function get_canned_policy_stream_name($video_path, $private_key_filename,
$key_pair_id, $expires) {
// this policy is well known by CloudFront, but you still need to sign it,
// since it contains your parameters
$canned_policy = '{"Statement":[{"Resource":"' . $video_path . '","Condi
tion":{"DateLessThan":{"AWS:EpochTime":'. $expires . '}}}]}';
// sign the canned policy
$signature = rsa_sha1_sign($canned_policy, $private_key_filename);
// make the signature safe to be included in a url
$encoded_signature = url_safe_base64_encode($signature);
// combine the above into a stream name
$stream_name = create_stream_name($video_path, null, $encoded_signature,
$key_pair_id, $expires);
// url-encode the query string characters to work around a flash player bug
return encode_query_params($stream_name);
}
The following code constructs a custom policy statement needed for creating the signature. For more
information about custom policies, see Creating a Signed URL Using a Custom Policy (p. 189).
Example Custom Signing Function in PHP
function get_custom_policy_stream_name($video_path, $private_key_filename,
$key_pair_id, $policy) {
// sign the policy
$signature = rsa_sha1_sign($policy, $private_key_filename);
// make the signature safe to be included in a url
$encoded_signature = url_safe_base64_encode($signature);
// combine the above into a stream name
$stream_name = create_stream_name($video_path, $encoded_policy, $encoded_sig
nature, $key_pair_id, null);
// url-encode the query string characters to work around a flash player bug
return encode_query_params($stream_name);
}
For more information about the OpenSSL implementation of SHA-1, see The Open Source Toolkit for
SSL/TLS.
See also
•Create a URL Signature Using Perl (p. 214)
•Create a URL Signature Using C# and the .NET Framework (p. 218)
•Create a URL Signature Using Java (p. 226)
•Tools and Code Examples for Configuring Private Content (p. 357)
API Version 2016-08-01
217
Amazon CloudFront Developer Guide
Create a URL Signature Using PHP

Create a URL Signature Using C# and the .NET
Framework
The C# examples in this section implement an example application that demonstrates how to create the
signatures for CloudFront private distributions using canned and custom policy statements.The examples
includes utility functions based on the AWS .NET SDK that can be useful in .NET applications.
You can also create signed URLs and signed cookies by using the AWS SDK for .NET. In the AWS SDK
for .NET API Reference, see the following topics:
•Signed URLs – Amazon.CloudFront > AmazonCloudFrontUrlSigner
•Signed cookies – Amazon.CloudFront > AmazonCloudFrontCookieSigner
Note
Creating a URL signature is just one part of the process of serving private content using a signed
URL. For more information about the entire process, see Using Signed URLs (p. 179).
To download the code, go to Signature Code in C#.
To use the RSA keys provided by AWS Account/Security in the .NET framework, you must convert the
AWS-supplied .pem files to the XML format that the .NET framework uses.
After conversion, the RSA private key file is in the following format:
API Version 2016-08-01
218
Amazon CloudFront Developer Guide
Create a URL Signature Using C# and the .NET
Framework

Example RSA Private Key in the XML .NET Framework Format
<RSAKeyValue>
<Modulus>
wO5IvYCP5UcoCKDo1dcspoMehWBZcyfs9QEzGi6Oe5y+ewGr1oW+vB2GPB
ANBiVPcUHTFWhwaIBd3oglmF0lGQljP/jOfmXHUK2kUUnLnJp+oOBL2Ni
uFtqcW6h/L5lIpD8Yq+NRHg
Ty4zDsyr2880MvXv88yEFURCkqEXAMPLE=
</Modulus>
<Exponent>AQAB</Exponent>
<P>
5bmKDaTz
npENGVqz4Cea8XPH+sxt+2VaAwYnsarVUoS
BeVt8WLloVuZGG9IZYmH5KteXEu7fZveYd9UEXAMPLE==
</P>
<Q>
1v9l/WN1a1N3rOK4VGoCokx7kR2SyTMSbZgF9IWJNOugR/WZw7HTnjipO3c9dy1Ms9pUKwUF4
6d7049EXAMPLE==
</Q>
<DP>
RgrSKuLWXMyBH+/l1Dx/I4tXuAJIrlPyo+VmiOc7b5NzHptkSHEPfR9s1
OK0VqjknclqCJ3Ig86OMEtEXAMPLE==
</DP>
<DQ>
pjPjvSFw+RoaTu0pgCA/jwW/FGyfN6iim1RFbkT4
z49DZb2IM885f3vf35eLTaEYRYUHQgZtChNEV0TEXAMPLE==
</DQ>
<InverseQ>
nkvOJTg5QtGNgWb9i
cVtzrL/1pFEOHbJXwEJdU99N+7sMK+1066DL/HSBUCD63qD4USpnf0myc24in0EXAMPLE==</In
verseQ>
<D>
Bc7mp7XYHynuPZxChjWNJZIq+A73gm0ASDv6At7F8Vi9r0xUlQe/v0AQS3ycN8QlyR4XMbzMLYk
3yjxFDXo4ZKQtOGzLGteCU2srANiLv26/imXA8FVidZftTAtLviWQZB
VPTeYIA69ATUYPEq0a5u5wjGy
UOij9OWyuEXAMPLE=
</D>
</RSAKeyValue>
The following C# code creates a signed URL that uses a canned policy by performing the following steps:
• Creates a policy statement.
• Hashes the policy statement using SHA1, and signs the result using RSA and the private key for your
AWS account or for a trusted AWS account that you specify.
•Base64-encodes the hashed and signed policy statement and replaces special characters to make the
string safe to use as a URL request parameter.
• Concatenates the applicable values.
For the complete implementation, see the example at Signature Code in C#.
API Version 2016-08-01
219
Amazon CloudFront Developer Guide
Create a URL Signature Using C# and the .NET
Framework

Example Canned Policy Signing Method in C#
public static string ToUrlSafeBase64String(byte[] bytes)
{
return System.Convert.ToBase64String(bytes)
.Replace('+', '-')
.Replace('=', '_')
.Replace('/', '~');
}
public static string CreateCannedPrivateURL(string urlString,
string durationUnits, string durationNumber, string pathToPolicyStmnt,
string pathToPrivateKey, string privateKeyId)
{
// args[] 0-thisMethod, 1-resourceUrl, 2-seconds-minutes-hours-days
// to expiration, 3-numberOfPreviousUnits, 4-pathToPolicyStmnt,
// 5-pathToPrivateKey, 6-PrivateKeyId
TimeSpan timeSpanInterval = GetDuration(durationUnits, durationNumber);
// Create the policy statement.
string strPolicy = CreatePolicyStatement(pathToPolicyStmnt,
urlString,
DateTime.Now,
DateTime.Now.Add(timeSpanInterval),
"0.0.0.0/0");
if ("Error!" == strPolicy) return "Invalid time frame." +
"Start time cannot be greater than end time.";
// Copy the expiration time defined by policy statement.
string strExpiration = CopyExpirationTimeFromPolicy(strPolicy);
// Read the policy into a byte buffer.
byte[] bufferPolicy = Encoding.ASCII.GetBytes(strPolicy);
// Initialize the SHA1CryptoServiceProvider object and hash the policy data.
using (SHA1CryptoServiceProvider
cryptoSHA1 = new SHA1CryptoServiceProvider())
{
bufferPolicy = cryptoSHA1.ComputeHash(bufferPolicy);
// Initialize the RSACryptoServiceProvider object.
RSACryptoServiceProvider providerRSA = new RSACryptoServiceProvider();
XmlDocument xmlPrivateKey = new XmlDocument();
// Load PrivateKey.xml, which you created by converting your
// .pem file to the XML format that the .NET framework uses.
// Several tools are available.
xmlPrivateKey.Load(pathToPrivateKey);
// Format the RSACryptoServiceProvider providerRSA and
// create the signature.
providerRSA.FromXmlString(xmlPrivateKey.InnerXml);
RSAPKCS1SignatureFormatter rsaFormatter =
new RSAPKCS1SignatureFormatter(providerRSA);
API Version 2016-08-01
220
Amazon CloudFront Developer Guide
Create a URL Signature Using C# and the .NET
Framework

rsaFormatter.SetHashAlgorithm("SHA1");
byte[] signedPolicyHash = rsaFormatter.CreateSignature(bufferPolicy);
// Convert the signed policy to URL-safe base64 encoding and
// replace unsafe characters + = / with the safe characters - _ ~
string strSignedPolicy = ToUrlSafeBase64String(signedPolicyHash);
// Concatenate the URL, the timestamp, the signature,
// and the key pair ID to form the signed URL.
return urlString +
"?Expires=" +
strExpiration +
"&Signature=" +
strSignedPolicy +
"&Key-Pair-Id=" +
privateKeyId;
}
}
The following C# code creates a signed URL that uses a custom policy by performing the following steps:
• Creates a policy statement.
• Base64-encodes the policy statement and replaces special characters to make the string safe to use
as a URL request parameter.
• Hashes the policy statement using SHA1, and encrypts the result using RSA and the private key for
your AWS account or for a trusted AWS account that you specify.
•Base64-encodes the hashed policy statement and replacing special characters to make the string safe
to use as a URL request parameter.
• Concatenates the applicable values.
For the complete implementation, see the example at Signature Code in C#.
API Version 2016-08-01
221
Amazon CloudFront Developer Guide
Create a URL Signature Using C# and the .NET
Framework

Example Custom Policy Signing Method in C#
public static string ToUrlSafeBase64String(byte[] bytes)
{
return System.Convert.ToBase64String(bytes)
.Replace('+', '-')
.Replace('=', '_')
.Replace('/', '~');
}
public static string CreateCustomPrivateURL(string urlString,
string durationUnits, string durationNumber, string startIntervalFromNow,
string ipaddress, string pathToPolicyStmnt, string pathToPrivateKey,
string PrivateKeyId)
{
// args[] 0-thisMethod, 1-resourceUrl, 2-seconds-minutes-hours-days
// to expiration, 3-numberOfPreviousUnits, 4-starttimeFromNow,
// 5-ip_address, 6-pathToPolicyStmt, 7-pathToPrivateKey, 8-privateKeyId
TimeSpan timeSpanInterval = GetDuration(durationUnits, durationNumber);
TimeSpan timeSpanToStart = GetDurationByUnits(durationUnits,
startIntervalFromNow);
if (null == timeSpanToStart)
return "Invalid duration units." +
"Valid options: seconds, minutes, hours, or days";
string strPolicy = CreatePolicyStatement(
pathToPolicyStmnt, urlString, DateTime.Now.Add(timeSpanToStart),
DateTime.Now.Add(timeSpanInterval), ipaddress);
// Read the policy into a byte buffer.
byte[] bufferPolicy = Encoding.ASCII.GetBytes(strPolicy);
// Convert the policy statement to URL-safe base64 encoding and
// replace unsafe characters + = / with the safe characters - _ ~
string urlSafePolicy = ToUrlSafeBase64String(bufferPolicy);
// Initialize the SHA1CryptoServiceProvider object and hash the policy data.
byte[] bufferPolicyHash;
using (SHA1CryptoServiceProvider cryptoSHA1 =
new SHA1CryptoServiceProvider())
{
bufferPolicyHash = cryptoSHA1.ComputeHash(bufferPolicy);
// Initialize the RSACryptoServiceProvider object.
RSACryptoServiceProvider providerRSA = new RSACryptoServiceProvider();
XmlDocument xmlPrivateKey = new XmlDocument();
// Load PrivateKey.xml, which you created by converting your
// .pem file to the XML format that the .NET framework uses.
// Several tools are available.
xmlPrivateKey.Load("PrivateKey.xml");
API Version 2016-08-01
222
Amazon CloudFront Developer Guide
Create a URL Signature Using C# and the .NET
Framework

// Format the RSACryptoServiceProvider providerRSA
// and create the signature.
providerRSA.FromXmlString(xmlPrivateKey.InnerXml);
RSAPKCS1SignatureFormatter RSAFormatter =
new RSAPKCS1SignatureFormatter(providerRSA);
RSAFormatter.SetHashAlgorithm("SHA1");
byte[] signedHash = RSAFormatter.CreateSignature(bufferPolicyHash);
// Convert the signed policy to URL-safe base64 encoding and
// replace unsafe characters + = / with the safe characters - _ ~
string strSignedPolicy = ToUrlSafeBase64String(signedHash);
return urlString +
"?Policy=" +
urlSafePolicy +
"&Signature=" +
strSignedPolicy +
"&Key-Pair-Id=" +
PrivateKeyId;
}
}
API Version 2016-08-01
223
Amazon CloudFront Developer Guide
Create a URL Signature Using C# and the .NET
Framework

Example Utility Methods for Signature Generation
The following methods get the policy statement from a file and parse time intervals for signature generation.
public static string CreatePolicyStatement(string policyStmnt,
string resourceUrl,
DateTime startTime,
DateTime endTime,
string ipAddress)
{
// Create the policy statement.
FileStream streamPolicy = new FileStream(policyStmnt, FileMode.Open,
FileAccess.Read);
using (StreamReader reader = new StreamReader(streamPolicy))
{
string strPolicy = reader.ReadToEnd();
TimeSpan startTimeSpanFromNow = (startTime - DateTime.Now);
TimeSpan endTimeSpanFromNow = (endTime - DateTime.Now);
TimeSpan intervalStart =
(DateTime.UtcNow.Add(startTimeSpanFromNow)) -
new DateTime(1970, 1, 1, 0, 0, 0, DateTimeKind.Utc);
TimeSpan intervalEnd =
(DateTime.UtcNow.Add(endTimeSpanFromNow)) -
new DateTime(1970, 1, 1, 0, 0, 0, DateTimeKind.Utc);
int startTimestamp = (int)intervalStart.TotalSeconds; // START_TIME
int endTimestamp = (int)intervalEnd.TotalSeconds; // END_TIME
if (startTimestamp > endTimestamp)
return "Error!";
// Replace variables in the policy statement.
strPolicy = strPolicy.Replace("RESOURCE", resourceUrl);
strPolicy = strPolicy.Replace("START_TIME", startTimestamp.ToString());
strPolicy = strPolicy.Replace("END_TIME", endTimestamp.ToString());
strPolicy = strPolicy.Replace("IP_ADDRESS", ipAddress);
strPolicy = strPolicy.Replace("EXPIRES", endTimestamp.ToString());
return strPolicy;
}
}
public static TimeSpan GetDuration(string units, string numUnits)
{
TimeSpan timeSpanInterval = new TimeSpan();
switch (units)
{
case "seconds":
timeSpanInterval = new TimeSpan(0, 0, 0, int.Parse(numUnits));
break;
case "minutes":
timeSpanInterval = new TimeSpan(0, 0, int.Parse(numUnits), 0);
break;
case "hours":
timeSpanInterval = new TimeSpan(0, int.Parse(numUnits), 0 ,0);
break;
case "days":
API Version 2016-08-01
224
Amazon CloudFront Developer Guide
Create a URL Signature Using C# and the .NET
Framework

timeSpanInterval = new TimeSpan(int.Parse(numUnits),0 ,0 ,0);
break;
default:
Console.WriteLine("Invalid time units;" +
"use seconds, minutes, hours, or days");
break;
}
return timeSpanInterval;
}
private static TimeSpan GetDurationByUnits(string durationUnits,
string startIntervalFromNow)
{
switch (durationUnits)
{
case "seconds":
return new TimeSpan(0, 0, int.Parse(startIntervalFromNow));
case "minutes":
return new TimeSpan(0, int.Parse(startIntervalFromNow), 0);
case "hours":
return new TimeSpan(int.Parse(startIntervalFromNow), 0, 0);
case "days":
return new TimeSpan(int.Parse(startIntervalFromNow), 0, 0, 0);
default:
return new TimeSpan(0, 0, 0, 0);
}
}
public static string CopyExpirationTimeFromPolicy(string policyStatement)
{
int startExpiration = policyStatement.IndexOf("EpochTime");
string strExpirationRough = policyStatement.Substring(startExpiration +
"EpochTime".Length);
char[] digits = { '0', '1', '2', '3', '4', '5', '6', '7', '8', '9' };
List<char> listDigits = new List<char>(digits);
StringBuilder buildExpiration = new StringBuilder(20);
foreach (char c in strExpirationRough)
{
if (listDigits.Contains(c))
buildExpiration.Append(c);
}
return buildExpiration.ToString();
}
See also
•Create a URL Signature Using Perl (p. 214)
•Create a URL Signature Using PHP (p. 216)
•Create a URL Signature Using Java (p. 226)
•Tools and Code Examples for Configuring Private Content (p. 357)
API Version 2016-08-01
225
Amazon CloudFront Developer Guide
Create a URL Signature Using C# and the .NET
Framework

Create a URL Signature Using Java
The Open source Java toolkit for Amazon S3 and CloudFront provides example code and information
about CloudFront development in Java. For information about private distributions, go to Private
Distributions at Programmer Guide: Code Samples.
You can also create signed URLs by using the CloudFrontUrlSigner class in the AWS SDK for Java.
For more information, see Class UrlSigner in the AWS SDK for Java API Reference.
Note
Creating a URL signature is just one part of the process of serving private content using a signed
URL. For more information about the entire process, see Using Signed URLs (p. 179).
The following methods are from the Java open source toolkit for Amazon S3 and CloudFront.You must
convert the private key from PEM to DER format for Java implementations to use it.
API Version 2016-08-01
226
Amazon CloudFront Developer Guide
Create a URL Signature Using Java

Example Java Policy and Signature Encryption Methods
// Signed URLs for a private distribution
// Note that Java only supports SSL certificates in DER format,
// so you will need to convert your PEM-formatted file to DER format.
// To do this, you can use openssl:
// openssl pkcs8 -topk8 -nocrypt -in origin.pem -inform PEM -out new.der
// -outform DER
// So the encoder works correctly, you should also add the bouncy castle jar
// to your project and then add the provider.
Security.addProvider(new org.bouncycastle.jce.provider.BouncyCastleProvider());
String distributionDomain = "a1b2c3d4e5f6g7.cloudfront.net";
String privateKeyFilePath = "/path/to/rsa-private-key.der";
String s3ObjectKey = "s3/object/key.txt";
String policyResourcePath = "http://" + distributionDomain + "/" + s3ObjectKey;
// Convert your DER file into a byte array.
byte[] derPrivateKey = ServiceUtils.readInputStreamToBytes(new
FileInputStream(privateKeyFilePath));
// Generate a "canned" signed URL to allow access to a
// specific distribution and object
String signedUrlCanned = CloudFrontService.signUrlCanned(
"http://" + distributionDomain + "/" + s3ObjectKey, // Resource URL or Path
keyPairId, // Certificate identifier,
// an active trusted signer for the distribution
derPrivateKey, // DER Private key data
ServiceUtils.parseIso8601Date("2011-11-14T22:20:00.000Z") // DateLessThan
);
System.out.println(signedUrlCanned);
// Build a policy document to define custom restrictions for a signed URL.
String policy = CloudFrontService.buildPolicyForSignedUrl(
// Resource path (optional, can include '*' and '?' wildcards)
policyResourcePath,
// DateLessThan
ServiceUtils.parseIso8601Date("2011-11-14T22:20:00.000Z"),
// CIDR IP address restriction (optional, 0.0.0.0/0 means everyone)
"0.0.0.0/0",
// DateGreaterThan (optional)
ServiceUtils.parseIso8601Date("2011-10-16T06:31:56.000Z")
);
// Generate a signed URL using a custom policy document.
String signedUrl = CloudFrontService.signUrl(
// Resource URL or Path
"http://" + distributionDomain + "/" + s3ObjectKey,
// Certificate identifier, an active trusted signer for the distribution
keyPairId,
// DER Private key data
derPrivateKey,
API Version 2016-08-01
227
Amazon CloudFront Developer Guide
Create a URL Signature Using Java

// Access control policy
policy
);
System.out.println(signedUrl);
See also
•Create a URL Signature Using Perl (p. 214)
•Create a URL Signature Using PHP (p. 216)
•Create a URL Signature Using C# and the .NET Framework (p. 218)
•Tools and Code Examples for Configuring Private Content (p. 357)
API Version 2016-08-01
228
Amazon CloudFront Developer Guide
Create a URL Signature Using Java

Using an HTTPS Connection to
Access Your Objects
Topics
•How CloudFront Works with HTTPS Connections (p. 230)
•How to Require HTTPS for Communication between Viewers, CloudFront, and Your Origin (p. 230)
•Supported Protocols and Ciphers (p. 233)
•Using Alternate Domain Names and HTTPS (p. 234)
•Charges for HTTPS Connections (p. 242)
For web distributions, you can use HTTPS requests to ensure that your objects are encrypted when
CloudFront serves them to viewers and, optionally, when CloudFront gets the objects from your origin:
•To require HTTPS between CloudFront and viewers: Configure the Viewer Protocol Policy for
some or all of your CloudFront cache behaviors either to redirect HTTP requests to HTTPS requests
or to require that viewers use only the HTTPS protocol to access your objects in the CloudFront cache.
You can also configure one or more cache behaviors in the same distribution to allow both HTTP and
HTTPS, so you can require HTTPS for some objects but not for others.
•To require HTTPS between CloudFront and your origin (optional): Configure the Origin Protocol
Policy for one or more CloudFront origins either to require that CloudFront fetches objects from your
origin by using HTTPS or to require that CloudFront uses the protocol that the viewer used to request
the objects. For example, if you choose Match Viewer for the Origin Protocol Policy and the viewer
uses HTTPS to request an object from CloudFront, CloudFront also uses HTTPS to forward the request
to your origin. When your origin is an Amazon S3 bucket, Match Viewer is the default setting and
cannot be changed.
Important
If your Amazon S3 bucket is configured as a website endpoint, you cannot configure CloudFront
to use HTTPS to communicate with your origin because Amazon S3 doesn't support HTTPS
connections in that configuration.
For information about the SSL/TLS versions and the ciphers that CloudFront can use to forward requests
to custom origins, see Encryption (p. 148) in the topic How CloudFront Processes and Forwards Requests
to Your Custom Origin Server (p. 146).
If you're using an HTTP server as your origin, and if you want to use HTTPS both between viewers and
CloudFront and between CloudFront and your origin, you must install an SSL/TLS certificate on the HTTP
API Version 2016-08-01
229
Amazon CloudFront Developer Guide

server that is signed by a trusted certificate authority, for example, Comodo, DigiCert, or Symantec. If
your origin is an Elastic Load Balancing load balancer, you can use an SSL/TLS certificate from the
Amazon Trust Services certificate authority (via AWS Certificate Manager).
Caution
If the origin server returns an expired certificate, an invalid certificate or a self-signed certificate,
or if the origin server returns the certificate chain in the wrong order, CloudFront drops the TCP
connection, returns HTTP error code 502, and sets the X-Cache header to Error from
cloudfront.
How CloudFront Works with HTTPS Connections
The following example of how CloudFront works with HTTPS connections assumes the following:
• Your CloudFront distribution has one cache behavior (the default cache behavior) and one origin.
• You have configured your distribution to use HTTPS between viewers and CloudFront and between
CloudFront and your origin.
• Your origin has an SSL/TLS certificate that was signed by a trusted certificate authority.
The process works basically the same way whether your origin server is an Amazon S3 bucket or an
HTTP server.
CloudFront Process for Serving Objects Using HTTPS
1. A viewer submits an HTTPS request to CloudFront. There's some SSL negotiation here between
the viewer and CloudFront. In the end, the viewer submits the request in an encrypted format.
2. If the object is in the CloudFront edge cache, CloudFront encrypts the object and returns it to the
viewer, and the viewer decrypts it.
3. If the object is not in the CloudFront cache, CloudFront performs the SSL negotiation with your origin
and, when the negotiation is complete, forwards the request to your origin in an encrypted format.
4. Your origin decrypts the request, encrypts the requested object, and returns the object to CloudFront.
5. CloudFront decrypts the object, re-encrypts it, and forwards the object to the viewer. CloudFront also
saves the object in the edge cache so the object is available next time it's requested.
6. The viewer decrypts the object.
How to Require HTTPS for Communication
between Viewers, CloudFront, and Your Origin
You can configure CloudFront to require HTTPS for communication between viewers and CloudFront
and, optionally, between CloudFront and your origin.
Note
To ensure that objects are encrypted from the origin to CloudFront edge caches and from edge
caches to viewers, use only HTTPS. If you ever configure CloudFront to get objects from your
origin using HTTP, CloudFront adds the objects to the edge cache and continues to serve them
to viewers until the objects expire, or until you remove or replace them. For more information
about removing or replacing objects in a distribution, see Adding, Removing, or Replacing Objects
in a Distribution (p. 114).
For a list of supported ciphers, see Encryption (p. 148).
API Version 2016-08-01
230
Amazon CloudFront Developer Guide
How CloudFront Works with HTTPS Connections

If you want to use alternate domain names (for example, example.com) instead of the domain name
that CloudFront assigns to your distribution, also see Using Alternate Domain Names and HTTPS (p.234).
The procedure that you use to require HTTPS for communication between viewers, CloudFront, and your
origin depends on whether you're using a custom origin or Amazon S3. See the applicable procedure:
•To require HTTPS for communication between viewers, CloudFront, and your custom origin (p. 231)
•To require HTTPS for communication between viewers, CloudFront, and your Amazon S3 origin (p. 232)
To require HTTPS for communication between viewers, CloudFront, and your custom
origin
1. Get an SSL/TLS certificate from a trusted certificate authority such as Comodo, DigiCert, or Symantec,
and install it on your origin web server. If your origin is an Elastic Load Balancing load balancer, you
can also use AWS Certificate Manager to provision a certificate.
For CloudFront to use HTTPS when communicating with your origin, one of the domain names in
the certificate must match one or both of the following values:
•The value that you specified for Origin Domain Name for the applicable origin in your distribution.
• If you configured CloudFront to forward the Host header to your origin, the value of the Host
header. For more information about forwarding headers to your origin, see Configuring CloudFront
to Cache Objects Based on Request Headers (p. 108).
The SSL/TLS certificate on your origin includes a domain name in the Common Name field and possibly
several more in the Subject Alternative Names field. (CloudFront supports wildcard characters
in certificate domain names.) If your certificate doesn't contain any domain names that match either
Origin Domain Name or the domain name in the Host header, CloudFront returns an HTTP status
code 502 (Bad Gateway) to the viewer.
Important
When CloudFront uses HTTPS to communicate with your origin, CloudFront verifies that
the certificate was issued by a trusted certificate authority. CloudFront supports the same
certificate authorities as Mozilla; for the current list, see Mozilla Included CA Certificate List.
You cannot use a self-signed certificate.
For more information about getting and installing an SSL/TLS certificate, refer to the documentation
for your HTTP server software and to the documentation for the certificate authority. For information
about AWS Certificate Manager, see the AWS Certificate Manager User Guide.
2. To require HTTPS for communication between viewers and CloudFront, configure your distribution
either to redirect viewer HTTP requests to HTTPS or to require that viewers use HTTPS when
communicating with CloudFront. To do this in the CloudFront console, create or update one or more
cache behaviors in your distribution to have one of the following settings for Viewer Protocol Policy:
•Redirect to HTTPS: If a viewer sends an HTTP request instead of an HTTPS request, CloudFront
returns an HTTP status code of 301 (Moved Permanently) along with the new HTTPS URL. The
viewer then resubmits the request to CloudFront using the HTTPS URL.
Important
CloudFront doesn't redirect DELETE, OPTIONS, PATCH, POST, or PUT requests from HTTP
to HTTPS. If you configure a cache behavior to redirect to HTTPS, CloudFront responds
to HTTP DELETE, OPTIONS, PATCH, POST, or PUT requests for that cache behavior with
an HTTP status code 403 (Forbidden).
When a viewer makes an HTTP request that is redirected to an HTTPS request, CloudFront charges
for both requests. For the HTTP request, the charge is only for the request and for the headers
that CloudFront returns to the viewer. For the HTTPS request, the charge is for the request, and
for the headers and the object returned by your origin.
API Version 2016-08-01
231
Amazon CloudFront Developer Guide
How to Require HTTPS for Communication between
Viewers, CloudFront, and Your Origin

•HTTPS Only: If a viewer sends an HTTP request instead of an HTTPS request, CloudFront returns
an HTTP status code of 403 (Forbidden) and does not return the object.
For information about using the CloudFront console to update a web distribution, see Listing, Viewing,
and Updating CloudFront Distributions (p. 48).
For information about using the CloudFront API to update a web distribution, see PUT Distribution
Config in the Amazon CloudFront API Reference. If you're using the API, see the
ViewerProtocolPolicy element.
3. Choose the protocols that you want CloudFront to use when communicating with your origin:
•CloudFront Console: For Origin SSL Protocols, choose the applicable protocols.
•CloudFront API: For SslProtocol, specify SSLv3, TLSv1, TLSv1.1, and/or TLSv1.2.
The SSLv3 protocol is less secure, so we recommend that you choose SSLv3 only if your origin
doesn't support TLSv1 or later.
4. To configure CloudFront to use HTTPS when communicating with your origin, create or update one
or more origins in your distribution to have the following settings:
•CloudFront Console: For Origin Protocol Policy, specify HTTPS Only or Match Viewer.
•CloudFront API: For OriginProtocolPolicy, specify https-only or match-viewer.
5. Confirm the following:
• The path pattern in each cache behavior applies only to the requests for which you want viewers
to use HTTPS.
•The cache behaviors are listed in the desired order. For more information, see Path Pattern (p. 69).
• The cache behaviors are routing requests to the origins for which you have configured an Origin
Protocol Policy of HTTPS Only or Match Viewer, if applicable.
•If you're using a custom origin and you configured CloudFront to use HTTPS when communicating
with the origin, the origin must have a valid certificate signed by a trusted certificate authority.
6. Test the configuration before you use it in a production environment.
To require HTTPS for communication between viewers, CloudFront, and your Amazon S3
origin
1. To require HTTPS for communication between viewers and CloudFront, configure your distribution
either to redirect viewer HTTP requests to HTTPS or to require that viewers use HTTPS when
communicating with CloudFront. To do this in the CloudFront console, create or update one or more
cache behaviors in your distribution to have one of the following settings for Viewer Protocol Policy:
•Redirect to HTTPS: If a viewer sends an HTTP request instead of an HTTPS request, CloudFront
returns an HTTP status code of 301 (Moved Permanently) along with the new HTTPS URL. The
viewer then resubmits the request to CloudFront using the HTTPS URL.
Note
When a viewer makes an HTTP request that is redirected to an HTTPS request, CloudFront
charges for both requests. For the HTTP request, the charge is only for the request and
for the headers that CloudFront returns to the viewer. For the HTTPS request, the charge
is for the request, and for the headers and the object returned by Amazon S3.
API Version 2016-08-01
232
Amazon CloudFront Developer Guide
How to Require HTTPS for Communication between
Viewers, CloudFront, and Your Origin

•HTTPS Only: If a viewer makes an HTTP request instead of an HTTPS request, CloudFront returns
an HTTP status code of 403 (Forbidden) and does not return the object.
Note
The setting that controls the protocol that CloudFront uses to communicate with the origin,
Origin Protocol Policy, has a default setting of Match Viewer for Amazon S3 buckets.
This value can't be changed.When you configure CloudFront to require HTTPS between
the viewer and CloudFront, CloudFront automatically uses HTTPS to communicate with
Amazon S3.
CloudFront doesn't redirect DELETE, OPTIONS, PATCH, POST, or PUT requests from HTTP to HTTPS.
If you configure a cache behavior to redirect to HTTPS, CloudFront responds to DELETE, OPTIONS,
PATCH, POST, or PUT requests for that cache behavior with an HTTP status code 403 (Forbidden).
For information about using the CloudFront console to update a web distribution, see Listing, Viewing,
and Updating CloudFront Distributions (p. 48).
For information about using the CloudFront API to update a web distribution, see PUT Distribution
Config in the Amazon CloudFront API Reference. If you're using the API, see the
ViewerProtocolPolicy element.
2. Confirm the following:
• The path pattern in each cache behavior applies only to the requests for which you want viewers
to use HTTPS.
•The cache behaviors are listed in the desired order. For more information, see Path Pattern (p. 69).
• The cache behaviors are routing requests to the correct Amazon S3 buckets.
3. Test the configuration before you use it in a production environment.
Supported Protocols and Ciphers
You can require viewers to use HTTPS to send requests to CloudFront and require CloudFront to forward
requests to your custom origin by using the protocol that is used by the viewer. For more information,
see the following distribution settings:
•Viewer Protocol Policy (p. 70)
•Origin Protocol Policy (Amazon EC2 and Other Custom Origins Only) (p. 67)
You can also choose whether you want viewers to submit HTTPS requests to CloudFront by using TLSv1.0
or later, or you want to allow viewers to use the less secure SSLv3 protocol. For more information, see
the distribution setting Minimum SSL Protocol Version (p. 77).
Important
CloudFront supports only viewer requests using SSLv3 and TLSv1.0, 1.1, and 1.2.
In addition, you can choose the protocols that you want CloudFront to use when establishing an HTTPS
connection with your origin. For more information, see the distribution setting Origin SSL Protocols
(Amazon EC2 and Other Custom Origins Only) (p. 67).
Viewers can use the following ciphers to encrypt communication with CloudFront. With the exception of
RC4-MD5, all ciphers are supported whether you selected SSLv3 or TLSv1.0 as the value for Minimum
SSL Protocol Version (p. 77). CloudFront chooses a cipher in the following order from among the ciphers
that the viewer supports:
API Version 2016-08-01
233
Amazon CloudFront Developer Guide
Supported Protocols and Ciphers

• ECDHE-RSA-AES128-GCM-SHA256
• ECDHE-RSA-AES128-SHA256
• ECDHE-RSA-AES128-SHA
• ECDHE-RSA-AES256-GCM-SHA384
• ECDHE-RSA-AES256-SHA384
• ECDHE-RSA-AES256-SHA
• AES128-GCM-SHA256
• AES256-GCM-SHA384
• AES128-SHA256
• AES256-SHA
• AES128-SHA
• DES-CBC3-SHA
• RC4-MD5 (supported only when the value of Minimum SSL Protocol Version (p. 77) is SSLv3)
A viewer must support at least one of these ciphers to establish an SSL connection with CloudFront. If
you're using an SSL/TLS certificate that you got from AWS Certificate Manager, a viewer must support
one of the *-RSA-* ciphers.
Using Alternate Domain Names and HTTPS
Topics
•Choosing How CloudFront Serves HTTPS Requests (p. 234)
•Requirements and Limits on Using SSL/TLS Certificates with CloudFront (p. 236)
•To use alternate domain names with HTTPS (p. 238)
•Determining the Size of the Public Key in an SSL/TLS Certificate (p. 239)
•Rotating SSL/TLS Certificates (p. 240)
•Reverting from a Custom SSL/TLS Certificate to the Default CloudFront Certificate (p. 241)
•Switching from a Custom SSL/TLS Certificate with Dedicated IP Addresses to SNI (p. 241)
By default, you can deliver your content to viewers over HTTPS by using your CloudFront distribution
domain name in your URLs, for example, https://d111111abcdef8.cloudfront.net/image.jpg.
For more information, see How to Require HTTPS for Communication between Viewers, CloudFront, and
Your Origin (p. 230).
If you want your viewers to use HTTPS and you want to use your own domain name in the URLs for your
objects (for example, https://www.example.com/image.jpg), you need to perform several additional
steps, as explained in this topic.
Important
When you add a certificate to your distribution, CloudFront immediately propagates the certificate
to all of its edge locations. As new edge locations become available, CloudFront will propagate
the certificate to those locations, too.You cannot restrict the edge locations to which CloudFront
propagates the certificates.
Choosing How CloudFront Serves HTTPS
Requests
If you want your users to use HTTPS and to use alternate domain names for your objects, you need to
choose how CloudFront serves HTTPS requests.When you configure CloudFront to use alternate domain
API Version 2016-08-01
234
Amazon CloudFront Developer Guide
Using Alternate Domain Names and HTTPS

names, CloudFront can serve HTTPS requests either by using a dedicated IP address in each edge
location or by using Server Name Indication (SNI).
Serving HTTPS Requests Using Dedicated IP Addresses
(Works for All Clients)
If you configure CloudFront to serve HTTPS requests using dedicated IP addresses, CloudFront associates
your alternate domain name with a dedicated IP address in each CloudFront edge location. When a
viewer submits an HTTPS request for your content, DNS routes the request to the IP address for your
distribution in the applicable edge location. CloudFront uses the IP address to identify your distribution
and to determine which SSL/TLS certificate to return to the viewer. The viewer and CloudFront perform
SSL negotiation using your SSL/TLS certificate, and CloudFront returns the requested content to the
viewer. This method works for every HTTPS request, regardless of the browser or other viewer that the
user is using.
Important
If you configure CloudFront to serve HTTPS requests using dedicated IP addresses, you incur
an additional monthly charge.The charge begins when you associate your SSL/TLS certificate
with a distribution and you enable the distribution. For more information about CloudFront pricing,
see Amazon CloudFront Pricing.
Serving HTTPS Requests Using SNI (Works for Most Clients)
If you configure CloudFront to serve HTTPS requests using Server Name Indication (SNI), CloudFront
associates your alternate domain name with an IP address for each edge location, but the IP address is
not dedicated to your distribution.When a viewer submits an HTTPS request for your content, DNS routes
the request to the IP address for the applicable edge location. However, because the IP address isn't
dedicated to your distribution, CloudFront can't determine, based on the IP address, which domain the
request is for.
SSL negotiation occurs very early in the process of establishing an HTTPS connection. If CloudFront
can't immediately determine which domain the request is for, it drops the connection. Using a dedicated
IP address is one way to associate a request with a domain. The other is SNI, which is an extension to
the TLS protocol that is supported by most modern browsers. Browsers that support SNI automatically
get the domain name from the request URL and add it to a new field in the request header. When
CloudFront receives an HTTPS request from a browser that supports SNI, it finds the domain name in
the request header and responds to the request with the applicable SSL/TLS certificate. The viewer and
CloudFront perform SSL negotiation, and CloudFront returns the requested content to the viewer.
For a current list of the browsers that support SNI, see the Wikipedia entry Server Name Indication.
If you want to use SNI but some of your users' browsers don't support SNI, you have several options:
• Configure CloudFront to serve HTTPS requests by using dedicated IP addresses instead of SNI.
• Use the CloudFront SSL/TLS certificate instead of a custom certificate. This requires that you use the
CloudFront domain name for your distribution in the URLs for your objects, for example,
https://d111111abcdef8.cloudfront.net/logo.png.
You also need to change the SSL/TLS certificate that CloudFront is using from a custom certificate to
the default CloudFront certificate:
•If you haven't used your distribution to distribute your content, you can just change the configuration.
For more information, see Listing, Viewing, and Updating CloudFront Distributions (p. 48).
• If you have used your distribution to distribute your content, you need to create a new CloudFront
distribution and change the URLs for your objects to reduce or eliminate the amount of time that your
content is unavailable. For more information, see Reverting from a Custom SSL/TLS Certificate to
the Default CloudFront Certificate (p. 241).
API Version 2016-08-01
235
Amazon CloudFront Developer Guide
Choosing How CloudFront Serves HTTPS Requests
•If you can control which browser your users use, have them upgrade their browser to one that supports
SNI.
• Use HTTP instead of HTTPS.
Requirements and Limits on Using SSL/TLS
Certificates with CloudFront
Note the following requirements for certificates:
Certificate Issuer
The certificate must be issued by a trusted certificate authority (CA) such as Comodo, DigiCert, or
Symantec. If your origin is an Elastic Load Balancing load balancer, you can also use a certificate
provisioned by Amazon (via AWS Certificate Manager). Self-signed certificates are not accepted.
Certificate Format
The certificate must be in X.509 PEM format.This is the default format if you're using AWS Certificate
Manager.
Intermediate Certificates
If you're using a CA other than Amazon (via AWS Certificate Manager), in the .pem file, list all of the
intermediate certificates in the certificate chain, beginning with one for the CA that signed the certificate
for your domain. Typically, you'll find a file on your CA's website that lists intermediate and root
certificates in the proper chained order.
Important
Do not include the root certificate, intermediate certificates that are not in the trust path, or
your CA's public key certificate.
Here's an example:
-----BEGIN CERTIFICATE-----
Intermediate certificate 2
-----END CERTIFICATE-----
-----BEGIN CERTIFICATE-----
Intermediate certificate 1
-----END CERTIFICATE-----
Private Key
If you're using a CA other than Amazon (via AWS Certificate Manager), the private key must match
the public key that is in the certificate. It must also be an RSA private key in PEM format, where the
PEM header is BEGIN RSA PRIVATE KEY and the footer is END RSA PRIVATE KEY. The private
key cannot be encrypted with a password.
If you're using Amazon as the CA, AWS Certificate Manager doesn't release the private key. The
private key is stored in AWS Certificate Manager for use by AWS services that are integrated with
AWS Certificate Manager.
Permissions
You must have permission to use and upload the SSL/TLS certificate, including permission from the
certificate authority that issued the certificate to upload it onto a content delivery network.
If you're using AWS Certificate Manager, we recommend that you use IAM permissions to restrict
access to the certificates. For more information, see Permissions and Policies in the AWS Certificate
Manager User Guide.
Maximum Size of the Public Key
The maximum size of the public key in an SSL/TLS certificate is 2048 bits. For information about the
public keys for AWS Certificate Manager certificates, see ACM Certificate Characteristics in the AWS
API Version 2016-08-01
236
Amazon CloudFront Developer Guide
Requirements and Limits on Using SSL/TLS Certificates
with CloudFront

Certificate Manager User Guide. For information about how to determine the size of the public key,
see Determining the Size of the Public Key in an SSL/TLS Certificate (p. 239).
Supported Types of Certificates
CloudFront supports all types of certificates including domain-validated certificates, extended validation
(EV) certificates, high-assurance certificates, wildcard certificates (*.example.com), subject
alternative name (SAN) certificates (example.com and example.net), and so on.
Certificate Expiration Date and Renewal
If you're using a CA other than Amazon (via AWS Certificate Manager), you are responsible for
monitoring certificate expiration dates and for renewing SSL/TLS certificates that you upload and
use with CloudFront. AWS Certificate Manager renews certificates automatically. For more information,
see Managed Renewal in the AWS Certificate Manager User Guide.
Domain Names in the CloudFront Distribution and in the Certificate
When you're using a custom origin, the SSL/TLS certificate on your origin includes a domain name
in the Common Name field and possibly several more in the Subject Alternative Names field.
(CloudFront supports wildcard characters in certificate domain names.) One of the domain names
in the certificate must match the domain name that you specify for Origin Domain Name. If the domain
names don't match, CloudFront returns an HTTP status code 502 (Bad Gateway) to the viewer.
In addition, note the following limits on using SSL/TLS certificates with CloudFront:
Maximum Number of Certificates per CloudFront Distribution
You can associate a maximum of one SSL/TLS certificate with each CloudFront distribution.
Maximum Number of Certificates in the IAM Certificate Store
If you obtained your SSL/TLS certificates from a CA other than Amazon (via AWS Certificate Manager),
you need to upload them to the IAM certificate store as explained later in this topic.You can upload
a maximum of 10 certificates to the IAM certificate store for each AWS account.To request a higher
limit, see Request IAM limit increase.
Maximum Number of Certificates per AWS Account
If you want to serve HTTPS requests using dedicated IP addresses, note the following:
• By default, AWS gives you permission to use two certificates with your AWS account, one for
everyday use and one for when you need to rotate certificates for multiple distributions.
• If you're already using this feature but you need to increase the number of custom SSL/TLS
certificates that you can use with your AWS account, go to the Support Center and create a case.
Indicate how many certificates you need permission to use, and describe the circumstances in
your request. We'll update your account as soon as possible.
Using the Same Certificate for CloudFront Distributions that Were Created by Using Different AWS
Accounts
If you're using a CA other than Amazon (via AWS Certificate Manager) and if you want to use the
same certificate with multiple CloudFront distributions that were created by using different AWS
accounts, you must upload the certificate to the IAM certificate store once for each AWS account.
If you're using Amazon (via AWS Certificate Manager) as your CA, you can't configure CloudFront
to use certificates that were created by a different AWS account.
Using the Same Certificate for CloudFront and for Other AWS Services
If you're using a CA other than AWS Certificate Manager and if you want to use the same certificate
both for CloudFront and for other AWS services, you must upload the certificate twice: once for
CloudFront and once for the other services. For information about how to upload the certificate for
CloudFront, see the following procedure.
If you're using Amazon (via AWS Certificate Manager) as your CA, the certificates are stored in AWS
Certificate Manager.
Using the Same Certificate for Multiple CloudFront Distributions
Whether you're using AWS Certificate Manager or another CA, you can use the same certificate for
any or all of the CloudFront distributions that you're using to serve HTTPS requests.You can use
API Version 2016-08-01
237
Amazon CloudFront Developer Guide
Requirements and Limits on Using SSL/TLS Certificates
with CloudFront

the same certificate both for serving requests using dedicated IP addresses and for serving requests
using SNI. (You can associate only one certificate with each distribution.)
Each distribution must include one or more alternate domain names that also appear in the Common
Name field or the Subject Alternative Names field in the certificate. If you're serving HTTPS requests
using dedicated IP addresses and you created all of your distributions by using the same AWS
account, this can significantly reduce your cost because you're charged for each certificate, not for
each distribution. For example, suppose you create three distributions by using the same AWS
account, and you use the same certificate for all three distributions.You would be charged only one
fee for using dedicated IP addresses.
However, if you're serving HTTPS requests using dedicated IP addresses and using the same
certificate to create CloudFront distributions in different AWS accounts, each account will be charged
the fee for using dedicated IP addresses. For example, if you create three distributions by using three
different AWS accounts and you use the same certificate for all three distributions, each account will
be charged the full fee for using dedicated IP addresses.
To use alternate domain names with HTTPS
1. Get an SSL/TLS certificate if you don't already have one. For more information, see the applicable
documentation:
• To have AWS Certificate Manager provision a certificate, see the AWS Certificate Manager User
Guide. Then skip to step 4.
Note
You can only use AWS Certificate Manager to provision a certificate if the origin for your
CloudFront distribution is an Elastic Load Balancing load balancer.
• To get a certificate from another certificate authority, see the following topics in the Creating,
Uploading, and Deleting Server Certificates topic in IAM User Guide:
•Prerequisites
•Create a Private Key
•Create a Certificate Signing Request
•Submit the CSR to a Certificate Authority
Then continue with step 2.
2. Certificates that you get from a certificate authority other than Amazon (via AWS Certificate Manager)
– If you want to serve HTTPS requests using Server Name Indication (SNI), skip to step 3.
If you want to serve HTTPS requests by using dedicated IP addresses, and if you need to permanently
associate two or more certificates with your distributions, request an increase in the number of
certificates that you can use:
a. Go to the Support Center and create a case.
b. Indicate how many certificates you need permission to use, and describe the circumstances in
your request. We'll update your account as soon as possible.
3. Certificates that you get from a certificate authority other than Amazon (via AWS Certificate Manager)
– Use the following AWS CLI command to upload your SSL/TLS certificate to the IAM certificate
store:
API Version 2016-08-01
238
Amazon CloudFront Developer Guide
To use alternate domain names with HTTPS
aws iam upload-server-certificate --server-certificate-name CertificateName
--certificate-body file://public_key_certificate_file --private-key
file://privatekey.pem --certificate-chain file://certificate_chain_file -
-path /cloudfront/path/
Note the following:
•AWS Account – You must upload the certificate to the IAM certificate store using the same AWS
account that you used to create your CloudFront distribution.
•--path Parameter – When you upload the certificate to IAM, the value of the -path parameter
(certificate path) must start with /cloudfront/, for example, /cloudfront/production/ or
/cloudfront/test/. The path also must end with a /.
•Using the CloudFront Console – If you plan to use the CloudFront console to create or update
your distribution, the value that you specify for the --server-certificate-name parameter in
the AWS CLI, for example, myServerCertificate, is the value that will appear in the SSL
Certificate list in the CloudFront console.
•Using the CloudFront API – If you plan to use the CloudFront API to create or update your
distribution, make note of the alphanumeric string that the AWS CLI returns, for example,
AS1A2M3P4L5E67SIIXR3J. This is the value that you will specify in the IAMCertificateId
element.You don't need the IAM ARN, which is also returned by the CLI.
For more information about the AWS CLI, see the AWS Command Line Interface User Guide and
the AWS Command Line Interface Reference.
4. Update your distribution to include your alternate domain names, to specify which SSL/TLS certificate
you want to use, and to specify whether you want CloudFront to use dedicated IP addresses or SNI
to serve HTTPS requests.You also need to add or update DNS records. For more information and
a procedure, see Using Alternate Domain Names (CNAMEs) (p. 50).
Caution
After you associate your SSL/TLS certificate with your CloudFront distribution, do not delete
the certificate from the IAM certificate store until you remove the certificate from all
distributions and until the status of the distributions has changed to Deployed.
Determining the Size of the Public Key in an
SSL/TLS Certificate
When you're using CloudFront alternate domain names and HTTPS, the size of the public key in an
SSL/TLS certificate cannot exceed 2048 bits. (This is not the number of characters in the public key.)
You can determine the size of the public key by running the following OpenSSL command:
openssl x509 -in path and filename of SSL/TLS certificate -text -noout
where:
•-in specifies the path and filename of your SSL/TLS certificate.
•-text causes OpenSSL to display the length of the public key in bits.
•-noout prevents OpenSSL from displaying the public key.
Example output:
API Version 2016-08-01
239
Amazon CloudFront Developer Guide
Determining the Size of the Public Key in an SSL/TLS
Certificate

Public-Key: (2048 bit)
Rotating SSL/TLS Certificates
If you're using AWS Certificate Manager, you don't need to rotate certificates. AWS Certificate Manager
automatically renews certificates.
If you're using another certificate authority, occasionally you'll need to replace one SSL/TLS certificate
with another, because, for example, the expiration date is approaching.The process depends on whether
you have associated your SSL/TLS certificate with one or more CloudFront distributions under the same
AWS account:
•SSL/TLS certificate associated with one distribution: You can just update your distribution and
replace the old certificate with the new one. For more information, see Listing, Viewing, and Updating
CloudFront Distributions (p. 48).
•SSL/TLS certificate associated with two or more distributions under the same AWS account:
By default, you can associate only two SSL/TLS certificates with the CloudFront distributions under
one AWS account. Typically, you'll use the second certificate only when you have more than one
distribution and you need to rotate certificates. One certificate is associated with distributions that you
haven't updated yet, and the other certificate is associated with distributions that you have updated.
Perform the following procedure.
Important
While you're rotating certificates, you might incur an additional, pro-rated charge for using the
second certificate. We recommend that you update your distributions promptly to minimize
the additional charge.
Viewers can continue to access your content while you rotate certificates as well as after the process is
complete.
To rotate SSL/TLS certificates for two or more CloudFront distributions
1. If you configured CloudFront to use dedicated IP addresses to serve HTTPS requests and you have
already associated the maximum number of SSL/TLS certificates permitted by AWS for your account,
request permission to associate an additional certificate. Go to the Support Center and create a case.
Indicate how many certificates you need permission to use, and explain that you're rotating certificates.
We'll update your account as soon as possible.
2. Upload the new certificate to the IAM certificate store. For more information, see step 3 of the
procedure To use alternate domain names with HTTPS (p. 238).
Note that you must specify different values for the --server-certificate-name and --path
parameters than the values that are associated with existing certificates.
3. Update your distributions one at a time to use the new certificate.
If you submitted a request to AWS in step 1, wait until you receive notification that your AWS account
has been updated.
For more information, see Listing, Viewing, and Updating CloudFront Distributions (p. 48).
4. (Optional) After you have updated all of your CloudFront distributions, you can delete the old certificate
from the IAM certificate store.
Caution
Do not delete an SSL/TLS certificate from the IAM certificate store until you remove it from
all distributions and until the status of the distributions that you have updated has changed
to Deployed.
API Version 2016-08-01
240
Amazon CloudFront Developer Guide
Rotating SSL/TLS Certificates

Reverting from a Custom SSL/TLS Certificate to
the Default CloudFront Certificate
If you configured CloudFront to use a custom SSL/TLS certificate and you want to change your configuration
to use CloudFront's SSL/TLS certificate, the process depends on whether you've used your distribution
to distribute your content:
•If you have not used your distribution to distribute your content, you can just change the configuration.
For more information, see Listing, Viewing, and Updating CloudFront Distributions (p. 48).
• If you have used your distribution to distribute your content, you need to create a new CloudFront
distribution and change the URLs for your objects to reduce or eliminate the amount of time that your
content is unavailable. Perform the following procedure.
To revert to the default CloudFront certificate
1. Create a new CloudFront distribution with the desired configuration. For SSL Certificate, choose
Default CloudFront Certificate (*.cloudfront.net).
For more information, see Task List for Creating a Web Distribution (p. 58).
2. For objects that you're distributing using CloudFront, update the URLs in your application to use the
domain name that CloudFront assigned to the new distribution. For example, change
https://www.example.com/images/logo.png to
https://d111111abcdef8.cloudfront.net/images/logo.png.
3. Either delete the distribution that is associated with a custom SSL/TLS certificate, or update the
distribution to change the value of SSL Certificate to Default CloudFront Certificate
(*.cloudfront.net). For more information, see Listing, Viewing, and Updating CloudFront
Distributions (p. 48).
Important
Until you complete this step, Amazon Web Services continues to charge you for using a
custom SSL/TLS certificate.
4. (Optional) Use the AWS CLI to delete your custom SSL/TLS certificate from the IAM certificate store.
This is the same application that you used to add the custom SSL/TLS certificate to the IAM certificate
store:
a. Run the AWS CLI command list-signing-certificates to get the certificate ID of the
certificate that you want to delete. For more information, see list-signing-certificates in the AWS
Command Line Interface Reference.
b. Run the AWS CLI command delete-signing-certificateto delete the certificate. For more
information, see delete-signing-certificate in the AWS Command Line Interface Reference.
Switching from a Custom SSL/TLS Certificate with
Dedicated IP Addresses to SNI
If you configured CloudFront to use a custom SSL/TLS certificate with dedicated IP addresses, you can
switch to using a custom SSL/TLS certificate with SNI instead. The following procedure shows you how.
Important
This update to your CloudFront configuration has no effect on viewers that support SNI; they
can access your content before and after the change, as well as while the change is propagating
to CloudFront edge locations. Viewers that don't support SNI cannot access your content after
API Version 2016-08-01
241
Amazon CloudFront Developer Guide
Reverting from a Custom SSL/TLS Certificate to the
Default CloudFront Certificate

the change. For more information, see Choosing How CloudFront Serves HTTPS
Requests (p. 234).
To switch from a custom SSL/TLS certificate with dedicated IP addresses to SNI
1. Sign in to the AWS Management Console and open the CloudFront console at https://
console.aws.amazon.com/cloudfront/.
2. In the top pane of the CloudFront console, select the distribution that you want to view or update.
3. Choose Distribution Settings.
4. On the General tab, choose Edit.
5. Change the setting of Custom SSL Client Support to Only Clients that Support Server Name
Indication (SNI).
6. Choose Yes, Edit.
Charges for HTTPS Connections
You always incur a surcharge for HTTPS requests. For more information, see Amazon CloudFront Pricing.
API Version 2016-08-01
242
Amazon CloudFront Developer Guide
Charges for HTTPS Connections

Authentication and Access Control
for CloudFront
To perform any operation on CloudFront resources, such as creating a web distribution or an invalidation,
AWS Identity and Access Management (IAM) requires you to authenticate that you're an approved AWS
user. If you're using the CloudFront console, you authenticate your identity by providing your AWS user
name and a password. If you're accessing CloudFront programmatically, your application authenticates
your identity for you by using access keys or by signing requests.
After you authenticate your identity, IAM controls your access to AWS by verifying that you have
permissions to perform operations and access resources. If you are an account administrator, you can
use IAM to control the access of other users to the resources that are associated with your account.
This chapter explains how to use AWS Identity and Access Management (IAM) and CloudFront to help
secure your resources.
Topics
•Authentication (p. 243)
•Access Control (p. 244)
Authentication
You can access AWS as any of the following types of identities:
•AWS account root user – When you sign up for AWS, you provide an email address and password
that is associated with your AWS account. These are your root credentials and they provide complete
access to all of your AWS resources.
Important
For security reasons, we recommend that you use the root credentials only to create an
administrator user, which is an IAM user with full permissions to your AWS account. Then,
you can use this administrator user to create other IAM users and roles with limited permissions.
For more information, see IAM Best Practices and Creating an Admin User and Group in the
IAM User Guide.
•IAM user – An IAM user is simply an identity within your AWS account that has specific custom
permissions (for example, permissions to create a web distribution in CloudFront).You can use an IAM
API Version 2016-08-01
243
Amazon CloudFront Developer Guide
Authentication

user name and password to sign in to secure AWS webpages like the AWS Management Console,
AWS Discussion Forums, or the AWS Support Center.
In addition to a user name and password, you can also generate access keys for each user.You can
use these keys when you access AWS services programmatically, either through one of the several
SDKs or by using the AWS Command Line Interface (CLI). The SDK and CLI tools use the access
keys to cryptographically sign your request. If you don’t use the AWS tools, you must sign the request
yourself. CloudFront supports Signature Version 4, a protocol for authenticating inbound API requests.
For more information about authenticating requests, see Signature Version 4 Signing Process in the
AWS General Reference.
•IAM role – An IAM role is another IAM identity you can create in your account that has specific
permissions. It is similar to an IAM user, but it is not associated with a specific person. An IAM role
enables you to obtain temporary access keys that can be used to access AWS services and resources.
IAM roles with temporary credentials are useful in the following situations:
•Federated user access – Instead of creating an IAM user, you can use preexisting user identities
from AWS Directory Service, your enterprise user directory, or a web identity provider. These are
known as federated users. AWS assigns a role to a federated user when access is requested through
an identity provider. For more information about federated users, see Federated Users and Roles in
the IAM User Guide.
•Cross-account access – You can use an IAM role in your account to grant another AWS account
permissions to access your account’s resources. For an example, see Tutorial: Delegate Access
Across AWS Accounts Using IAM Roles in the IAM User Guide.
•AWS service access – You can use an IAM role in your account to grant an AWS service permissions
to access your account’s resources. For example, you can create a role that allows Amazon Redshift
to access an Amazon S3 bucket on your behalf and then load data stored in the bucket into an
Amazon Redshift cluster. For more information, see Creating a Role to Delegate Permissions to an
AWS Service in the IAM User Guide.
•Applications running on Amazon EC2 – Instead of storing access keys within the EC2 instance
for use by applications running on the instance and making AWS API requests, you can use an IAM
role to manage temporary credentials for these applications.To assign an AWS role to an EC2
instance and make it available to all of its applications, you can create an instance profile that is
attached to the instance. An instance profile contains the role and enables programs running on the
EC2 instance to get temporary credentials. For more information, see Using Roles for Applications
on Amazon EC2 in the IAM User Guide.
Access Control
To create, update, delete, or list CloudFront resources, you need permissions to perform the operation,
and you need permissions to access the corresponding resources. In addition, to perform the operation
programmatically, you need valid access keys.
The following sections describe how to manage permissions for CloudFront:
API Version 2016-08-01
244
Amazon CloudFront Developer Guide
Access Control

•Overview of Managing Access Permissions to Your CloudFront Resources (p. 245)
•Using Identity-Based Policies (IAM Policies) for CloudFront (p. 248)
•CloudFront API Permissions: Actions, Resources, and Conditions Reference (p. 253)
Overview of Managing Access Permissions to
Your CloudFront Resources
Every AWS resource is owned by an AWS account, and permissions to create or access a resource are
governed by permissions policies.
Note
An account administrator (or administrator user) is a user that has administrator privileges. For
more information about administrators, see IAM Best Practices in the IAM User Guide.
When you grant permissions, you decide who gets the permissions, the resources they get permissions
for, and the actions that they get permission to perform.
Topics
•ARNs for CloudFront Resources (p. 245)
•Understanding Resource Ownership (p. 245)
•Managing Access to Resources (p. 246)
•Specifying Policy Elements: Resources, Actions, Effects, and Principals (p. 247)
•Specifying Conditions in a Policy (p. 247)
ARNs for CloudFront Resources
All CloudFront resources—web and RTMP distributions, invalidations, and origin access identities—use
the same format for Amazon Resource Names (ARNs):
arn:aws:cloudfront::optional-account-id:*
CloudFront provides API actions to work with each of these types of resources. For more information,
see the Amazon CloudFront API Reference. For a list of actions and the ARN that you specify to grant
or deny permission to use each action, see CloudFront API Permissions: Actions, Resources, and
Conditions Reference (p. 253).
Understanding Resource Ownership
An AWS account owns the resources that are created in the account, regardless of who created the
resources. Specifically, the resource owner is the AWS account of the principal entity (that is, the root
account, an IAM user, or an IAM role) that authenticates the resource creation request.
The following examples illustrate how this works:
• If you use the root account credentials of your AWS account to create a web distribution, your AWS
account is the owner of the distribution.
• If you create an IAM user in your AWS account and grant permissions to create a web distribution to
that user, the user can create a web distribution. The AWS account that created the user owns the
distribution.
API Version 2016-08-01
245
Amazon CloudFront Developer Guide
Overview of Managing Access

• If you create an IAM role in your AWS account with permissions to create a web distribution, anyone
who can assume the role can create a web distribution.Your AWS account, to which the role belongs,
owns the distribution.
Managing Access to Resources
A permissions policy specifies who has access to what. This section explains the options for creating
permissions policies for CloudFront. For general information about IAM policy syntax and descriptions,
see the AWS IAM Policy Reference in the IAM User Guide.
Policies attached to an IAM identity are referred to as identity-based policies (IAM policies), and policies
attached to a resource are referred to as resource-based policies. CloudFront supports only identity-based
policies (IAM policies).
Topics
•Identity-Based Policies (IAM Policies) (p. 246)
•Resource-Based Policies (p. 247)
Identity-Based Policies (IAM Policies)
You can attach policies to IAM identities. For example, you can do the following:
•Attach a permissions policy to a user or a group in your account – An account administrator can
use a permissions policy that is associated with a particular user to grant permissions for that user to
create a web distribution.
•Attach a permissions policy to a role (grant cross-account permissions) – You can grant
permissions to perform CloudFront actions to a user that was created in another AWS account. To do
so, you attach a permissions policy to an IAM role, and then you allow the user in the other account to
assume the role.The following example explains how this works for two AWS accounts, account A and
account B:
1. Account A administrator creates an IAM role and attaches to the role a permissions policy that grants
permissions to create or access resources that are owned by account A.
2. Account A administrator attaches a trust policy to the role. The trust policy identifies account B as
the principal that can assume the role.
3. Account B administrator can then delegate permissions to assume the role to users or groups in
account B.This allows users in account B to create or access resources in account A.
For more information about how to delegate permissions to users in another AWS account, see Access
Management in the IAM User Guide.
The following example policy allows a user to perform the CreateDistribution action to
programmatically create a web distribution for your AWS account:
{
"Version": "2012-10-17",
"Statement": [
{
"Effect": "Allow",
"Action": [
"cloudfront:CreateDistribution"
],
"Resource":"*"
}
API Version 2016-08-01
246
Amazon CloudFront Developer Guide
Managing Access to Resources

]
}
For information about the permissions required to perform operations by using the CloudFront console,
see Permissions Required to Use the CloudFront Console (p. 248). For more information about attaching
policies to identities for CloudFront, see Using Identity-Based Policies (IAM Policies) for CloudFront (p. 248).
For more information about users, groups, roles, and permissions, see Identities (Users, Groups, and
Roles) in the IAM User Guide.
Resource-Based Policies
Other services, such as Amazon S3, support attaching permissions policies to resources. For example,
you can attach a policy to an S3 bucket to manage access permissions to that bucket. CloudFront doesn't
support attaching policies to resources.
Specifying Policy Elements: Resources, Actions,
Effects, and Principals
CloudFront includes API actions (see Amazon CloudFront API Reference) that you can use on each
CloudFront resource (see ARNs for CloudFront Resources (p. 245)).You can grant a user or a federated
user permission to perform any or all of these actions.
The following are the basic policy elements:
•Resource – You use an Amazon Resource Name (ARN) to identify the resource that the policy applies
to. For more information, see ARNs for CloudFront Resources (p. 245).
•Action – You use action keywords to identify resource operations that you want to allow or deny. For
example, depending on the specified Effect, the cloudfront:CreateDistribution permission
allows or denies the user permissions to perform the CloudFront CreateDistribution action.
•Effect – You specify the effect, either allow or deny, when a user tries to perform the action on the
specified resource. If you don't explicitly grant access to an action, access is implicitly denied.You can
also explicitly deny access to a resource, which you might do to make sure that a user cannot access
it, even if a different policy grants access.
•Principal – In identity-based policies (IAM policies), the user that the policy is attached to is the implicit
principal. For resource-based policies, you specify the user, account, service, or other entity that you
want to receive permissions (applies to resource-based policies only). CloudFront doesn't support
resource-based policies.
For more information about IAM policy syntax and descriptions, see the AWS IAM Policy Reference in
the IAM User Guide.
For a list showing all of the CloudFront API operations and the resources that they apply to, see CloudFront
API Permissions: Actions, Resources, and Conditions Reference (p. 253).
Specifying Conditions in a Policy
When you grant permissions, you can use the IAM policy language to specify when a policy should take
effect. For example, you might want a policy to be applied only after a specific date. For more information
about specifying conditions in a policy language, see Condition in the IAM User Guide.
To express conditions, you use predefined condition keys. There are no condition keys specific to
CloudFront. However, there are AWS-wide condition keys that you can use as appropriate. For a complete
list of AWS-wide keys, see Available Keys for Conditions in the IAM User Guide.
API Version 2016-08-01
247
Amazon CloudFront Developer Guide
Specifying Policy Elements: Resources, Actions, Effects,
and Principals

Using Identity-Based Policies (IAM Policies) for
CloudFront
This topic provides examples of identity-based policies that demonstrate how an account administrator
can attach permissions policies to IAM identities (that is, users, groups, and roles) and thereby grant
permissions to perform operations on CloudFront resources.
Important
We recommend that you first review the introductory topics that explain the basic concepts and
options to manage access to your CloudFront resources. For more information, see Overview
of Managing Access Permissions to Your CloudFront Resources (p. 245).
Topics
•Permissions Required to Use the CloudFront Console (p. 248)
•AWS Managed (Predefined) Policies for CloudFront (p. 250)
•Customer Managed Policy Examples (p. 250)
The following shows a permissions policy. The Sid, or statement ID, is optional:
{
"Version": "2012-10-17",
"Statement": [
{
"Sid": "AllowAllCloudFrontPermissions",
"Effect": "Allow",
"Action": ["cloudfront:*"],
"Resource": "*"
}
]
}
The policy grants permissions to perform all CloudFront operations, which is sufficient to access CloudFront
programmatically. If you're using the console to access CloudFront, see Permissions Required to Use
the CloudFront Console (p. 248).
For a list of actions and the ARN that you specify to grant or deny permission to use each action, see
CloudFront API Permissions: Actions, Resources, and Conditions Reference (p. 253).
Permissions Required to Use the CloudFront
Console
To grant full access to the CloudFront console, you grant the permissions in the following permissions
policy:
{
"Version": "2012-10-17",
"Statement":[
{
"Effect":"Allow",
"Action":[
"acm:ListCertificates",
"cloudfront:*",
API Version 2016-08-01
248
Amazon CloudFront Developer Guide
Using IAM Policies for CloudFront

"cloudwatch:DescribeAlarms",
"cloudwatch:PutMetricAlarm",
"cloudwatch:GetMetricStatistics",
"elasticloadbalancing:DescribeLoadBalancers",
"iam:ListServerCertificates",
"sns:ListSubscriptionsByTopic",
"sns:ListTopics",
"waf:GetWebACL",
"waf:ListWebACLs"
],
"Resource":"*"
},
{
"Effect":"Allow",
"Action":[
"s3:ListAllMyBuckets",
"s3:PutBucketPolicy"
],
"Resource":"arn:aws:s3:::*"
}
]
}
Here's why the permissions are required:
acm:ListCertificates
When you're creating and updating web distributions by using the CloudFront console and you want
to configure CloudFront to require HTTPS between the viewer and CloudFront or between CloudFront
and the origin, lets you view a list of ACM (ACM) certificates.
This permission isn't required if you aren't using the CloudFront console.
cloudfront:*
Lets you perform all CloudFront actions.
cloudwatch:DescribeAlarms and cloudwatch:PutMetricAlarm
Let you create and view CloudWatch alarms in the CloudFront console. See also
sns:ListSubscriptionsByTopic and sns:ListTopics.
These permissions aren't required if you aren't using the CloudFront console.
cloudwatch:GetMetricStatistics
Lets CloudFront render CloudWatch metrics in the CloudFront console.
This permission isn't required if you aren't using the CloudFront console.
elasticloadbalancing:DescribeLoadBalancers
When creating and updating web distributions, lets you view a list of Elastic Load Balancing load
balancers in the list of available origins.
This permission isn't required if you aren't using the CloudFront console.
iam:ListServerCertificates
When you're creating and updating web distributions by using the CloudFront console and you want
to configure CloudFront to require HTTPS between the viewer and CloudFront or between CloudFront
and the origin, lets you view a list of certificates in the IAM certificate store.
This permission isn't required if you aren't using the CloudFront console.
s3:ListAllMyBuckets
When you're creating and updating web and RTMP distributions, lets you perform the following
operations:
API Version 2016-08-01
249
Amazon CloudFront Developer Guide
Permissions Required to Use the CloudFront Console

• View a list of S3 buckets in the list of available origins
• View a list of S3 buckets that you can save access logs in
This permission isn't required if you aren't using the CloudFront console.
S3:PutBucketPolicy
When you're creating or updating distributions that restrict access to S3 buckets, lets a user update
the bucket policy to grant access to the CloudFront origin access identity. For more information, see
Using an Origin Access Identity to Restrict Access to Your Amazon S3 Content (p. 166).
This permission isn't required if you aren't using the CloudFront console.
sns:ListSubscriptionsByTopic and sns:ListTopics
When you create CloudWatch alarms in the CloudFront console, lets you choose an SNS topic for
notifications.
These permissions aren't required if you aren't using the CloudFront console.
waf:GetWebACL and waf:ListWebACLs
Lets you view a list of AWS WAF web ACLs in the CloudFront console.
These permissions aren't required if you aren't using the CloudFront console.
AWS Managed (Predefined) Policies for CloudFront
AWS addresses many common use cases by providing standalone IAM policies that are created and
administered by AWS.These AWS managed policies grant necessary permissions for common use cases
so that you can avoid having to investigate what permissions are needed. For more information, see AWS
Managed Policies in the IAM User Guide. For CloudFront, IAM provides two managed policies:
•CloudFrontFullAccess – Grants full access to CloudFront resources.
•CloudFrontReadOnlyAccess – Grants read-only access to CloudFront resources.
Note
You can review these permissions policies by signing in to the IAM console and searching for
specific policies there.You can also create your own custom IAM policies to allow permissions
for CloudFront API operations.You can attach these custom policies to the IAM users or groups
that require those permissions.
Customer Managed Policy Examples
You can create your own custom IAM policies to allow permissions for CloudFront API actions.You can
attach these custom policies to the IAM users or groups that require the specified permissions. These
policies work when you are using the CloudFront API, the AWS SDKs, or the AWS CLI. The following
examples show permissions for a few common use cases. For the policy that grants a user full access
to CloudFront, see Permissions Required to Use the CloudFront Console (p. 248).
Examples
•Example 1: Allow Read Access to All Web Distributions (p. 250)
•Example 2: Allow Creation, Updating, and Deletion of Web Distributions (p. 251)
•Example 3: Allow Creation and Listing of Invalidations (p. 252)
Example 1: Allow Read Access to All Web Distributions
The following permissions policy grants the user permissions to view all web distributions in the CloudFront
console:
API Version 2016-08-01
250
Amazon CloudFront Developer Guide
AWS Managed (Predefined) Policies for CloudFront

{
"Version": "2012-10-17",
"Statement":[
{
"Effect":"Allow",
"Action":[
"acm:ListCertificates",
"cloudfront:GetDistribution",
"cloudfront:GetDistributionConfig",
"cloudfront:ListDistributions",
"cloudfront:ListCloudFrontOriginAccessIdentities",
"elasticloadbalancing:DescribeLoadBalancers",
"iam:ListServerCertificates",
"sns:ListSubscriptionsByTopic",
"sns:ListTopics",
"waf:GetWebACL",
"waf:ListWebACLs"
],
"Resource":"*"
},
{
"Effect":"Allow",
"Action":[
"s3:ListAllMyBuckets",
],
"Resource":"arn:aws:s3:::*"
}
]
}
Example 2: Allow Creation, Updating, and Deletion of Web
Distributions
The following permissions policy allows users to create, update, and delete web distributions by using
the CloudFront console:
{
"Version": "2012-10-17",
"Statement":[
{
"Effect":"Allow",
"Action":[
"acm:ListCertificates",
"cloudfront:CreateDistribution",
"cloudfront:DeleteDistribution",
"cloudfront:GetDistribution",
"cloudfront:GetDistributionConfig",
"cloudfront:ListDistributions",
"cloudfront:UpdateDistribution",
"cloudfront:ListCloudFrontOriginAccessIdentities",
"elasticloadbalancing:DescribeLoadBalancers",
"iam:ListServerCertificates",
"sns:ListSubscriptionsByTopic",
"sns:ListTopics",
"waf:GetWebACL",
"waf:ListWebACLs"
API Version 2016-08-01
251
Amazon CloudFront Developer Guide
Customer Managed Policy Examples

],
"Resource":"*"
},
{
"Effect":"Allow",
"Action":[
"s3:ListAllMyBuckets",
"s3:PutBucketPolicy"
],
"Resource":"arn:aws:s3:::*"
}
]
}
The cloudfront:ListCloudFrontOriginAccessIdentities permission allows users to automatically
grant to an existing origin access identity the permission to access objects in an Amazon S3 bucket. If
you also want users to be able to create origin access identities, you also need to allow the
cloudfront:CreateCloudFrontOriginAccessIdentity permission.
Example 3: Allow Creation and Listing of Invalidations
The following permissions policy allows users to create and list invalidations. It includes read access to
CloudFront distributions because you create and view invalidations by first displaying settings for a
distribution:
{
"Version": "2012-10-17",
"Statement":[
{
"Effect":"Allow",
"Action":[
"acm:ListCertificates",
"cloudfront:GetDistribution",
"cloudfront:GetDistributionConfig",
"cloudfront:ListDistributions",
"cloudfront:ListCloudFrontOriginAccessIdentities",
"cloudfront:CreateInvalidation",
"cloudfront:GetInvalidation",
"cloudfront:ListInvalidations",
"elasticloadbalancing:DescribeLoadBalancers",
"iam:ListServerCertificates",
"sns:ListSubscriptionsByTopic",
"sns:ListTopics",
"waf:GetWebACL",
"waf:ListWebACLs"
],
"Resource":"*"
},
{
"Effect":"Allow",
"Action":[
"s3:ListAllMyBuckets",
],
"Resource":"arn:aws:s3:::*"
}
API Version 2016-08-01
252
Amazon CloudFront Developer Guide
Customer Managed Policy Examples

]
}
CloudFront API Permissions: Actions,
Resources, and Conditions Reference
When you are setting up Access Control (p. 244) and writing a permissions policy that you can attach to
an IAM identity (identity-based policies), you can use the following lists as a reference. The lists include
each CloudFront API operation, the corresponding actions for which you can grant permissions to perform
the action, and the AWS resource for which you can grant the permissions.You specify the actions in
the policy's Action field, and you specify the resource value in the policy's Resource field.
You can use AWS-wide condition keys in your CloudFront policies to express conditions. For a complete
list of AWS-wide keys, see Available Keys in the IAM User Guide.
Topics
•Required Permissions for Actions on Web Distributions (p. 253)
•Required Permissions for Actions on RTMP Distributions (p. 254)
•Required Permissions for Actions on Invalidations (p. 255)
•Required Permissions for Actions on Origin Access Identities (p. 255)
•Required Permissions for Actions on Tags (p. 255)
Required Permissions for Actions on Web
Distributions
POST Distribution (CreateDistribution)
Required Permissions (API Action): cloudfront:CreateDistribution
Resources: *
POST Distribution With Tags (CreateDistributionWithTags)
Required Permissions (API Action): cloudfront:CreateDistribution,
cloudfront:TagResource
Resources: *
GET Distribution (GetDistribution)
Required Permissions (API Action): cloudfront:GetDistribution
Resources: *
GET Distribution Config (GetDistributionConfig)
Required Permissions (API Action): cloudfront:GetDistributionConfig
Resources: *
GET Distribution List (ListDistributions)
Required Permissions (API Action): cloudfront:ListDistributions
Resources: *
PUT Distribution Config (UpdateDistribution)
Required Permissions (API Action): cloudfront:UpdateDistribution
API Version 2016-08-01
253
Amazon CloudFront Developer Guide
CloudFront API Permissions Reference

Resources: *
DELETE Distribution (DeleteDistribution)
Required Permissions (API Action): cloudfront:DeleteDistribution
Resources: *
Required Permissions for Actions on RTMP
Distributions
POST Streaming Distribution (CreateStreamingDistribution)
Required Permissions (API Action): cloudfront:CreateStreamingDistribution
Resources: *
POST Streaming Distribution With Tags (CreateStreamingDistributionWithTags)
Required Permissions (API Action): cloudfront:CreateStreamingDistribution,
cloudfront:TagResource
Resources: *
GET Streaming Distribution (GetStreamingDistribution)
Required Permissions (API Action): cloudfront:GetStreamingDistribution
Resources: *
GET Streaming Distribution Config (GetStreamingDistributionConfig)
Required Permissions (API Action): cloudfront:GetStreamingDistributionConfig
Resources: *
GET Streaming Distribution List (ListStreamingDistributions)
Required Permissions (API Action): cloudfront:ListStreamingDistributions
Resources: *
PUT Streaming Distribution Config (UpdateStreamingDistribution)
Required Permissions (API Action): cloudfront:UpdateStreamingDistribution
Resources: *
DELETE Streaming Distribution (DeleteStreamingDistribution)
Required Permissions (API Action): cloudfront:DeleteDistribution
Resources: *
Required Permissions for Actions on Invalidations
POST Invalidation (CreateInvalidation)
Required Permissions (API Action): cloudfront:CreateInvalidation
Resources: *
GET Invalidation (GetInvalidation)
Required Permissions (API Action): cloudfront:GetInvalidation
Resources: *
GET Invalidation List (ListInvalidations)
Required Permissions (API Action): cloudfront:ListInvalidations
Resources: *
API Version 2016-08-01
254
Amazon CloudFront Developer Guide
Required Permissions for Actions on RTMP Distributions

Required Permissions for Actions on Origin
Access Identities
POST Origin Access Identity (CreateCloudFrontOriginAccessIdentity)
Required Permissions (API Action): cloudfront:CreateCloudFrontOriginAccessIdentity
Resources: *
GET Origin Access Identity (GetCloudFrontOriginAccessIdentity)
Required Permissions (API Action): cloudfront:GetCloudFrontOriginAccessIdentity
Resources: *
GET Origin Access Identity Config (GetCloudFrontOriginAccessIdentityConfig)
Required Permissions (API Action):
cloudfront:GetCloudFrontOriginAccessIdentityConfig
Resources: *
GET Origin Access Identity List (ListCloudFrontOriginAccessIdentities)
Required Permissions (API Action): cloudfront:ListDistributions
Resources: *
PUT Origin Access Identity Config (UpdateCloudFrontOriginAccessIdentity)
Required Permissions (API Action): cloudfront:UpdateCloudFrontOriginAccessIdentity
Resources: *
DELETE Origin Access Identity (DeleteCloudFrontOriginAccessIdentity)
Required Permissions (API Action): cloudfront:DeleteCloudFrontOriginAccessIdentity
Resources: *
Required Permissions for Actions on Tags
POST Tag Resource
Required Permissions (API Action): cloudfront:TagResource
Resources: *
http://docs.aws.amazon.com/AmazonCloudFront/latest/APIReference/tags-untag-resource.htmlPOST
Untag Resource
Required Permissions (API Action): cloudfront:UntagResource
Resources: *
GET Tags
Required Permissions (API Action): cloudfront:ListTagsForResource
Resources: *
API Version 2016-08-01
255
Amazon CloudFront Developer Guide
Required Permissions for Actions on Origin Access
Identities

Access Logs
You can configure CloudFront to create log files that contain detailed information about every user request
that CloudFront receives.These access logs are available for both web and RTMP distributions. If you
enable logging, you can also specify the Amazon S3 bucket that you want CloudFront to save files in.
Topics
•How Logging Works (p. 256)
•Choosing an Amazon S3 Bucket for Your Access Logs (p. 257)
•Amazon S3 Permissions Required to Access Your Log Files (p. 258)
•File Name Format (p. 258)
•Timing of Log File Delivery (p. 258)
•Analyzing Access Logs (p. 259)
•Editing Your Logging Settings (p. 259)
•Deleting Log Files from an Amazon S3 Bucket (p. 260)
•Log File Format (p. 260)
•Charges for Access Logs (p. 269)
How Logging Works
The following diagram shows how CloudFront logs information about requests for your objects.
API Version 2016-08-01
256
Amazon CloudFront Developer Guide
How Logging Works
How CloudFront Logs Information About Requests for Your Objects
In this diagram, you have two websites, A and B, and two corresponding CloudFront distributions.
Users request your objects using URLs that are associated with your distributions.
CloudFront routes each request to the appropriate edge location.
CloudFront writes data about each request to a log file specific to that distribution. In this example,
information about requests related to Distribution A goes into a log file just for Distribution A, and
information about requests related to Distribution B goes into a log file just for Distribution B.
CloudFront periodically saves the log file for a distribution in the Amazon S3 bucket that you
specified when you enabled logging. CloudFront then starts saving information about subsequent
requests in a new log file for the distribution.
Each entry in a log file gives details about a single request. For more information about log file format,
see Log File Format (p. 260).
Choosing an Amazon S3 Bucket for Your Access
Logs
When you enable logging for a distribution, you specify the Amazon S3 bucket that you want CloudFront
to store log files in. If you're using Amazon S3 as your origin, we recommend that you do not use the
same bucket for your log files; using a separate bucket simplifies maintenance.
You can store the log files for multiple distributions in the same bucket. When you enable logging, you
can specify an optional prefix for the file names, so you can keep track of which log files are associated
with which distributions.
If no users access your content during a given hour, you don't receive any log files for that hour.
API Version 2016-08-01
257
Amazon CloudFront Developer Guide
Choosing an Amazon S3 Bucket for Your Access Logs

Amazon S3 Permissions Required to Access
Your Log Files
Your AWS account must have Amazon S3 FULL_CONTROL permission for the bucket that you specify for
log files. If you're the bucket owner, your account has this permission by default. If you're not, the bucket
owner must update the access control list (ACL) for the bucket to grant your AWS account FULL_CONTROL
permission.
When you enable logging, CloudFront automatically updates the ACL for the bucket to give the
awsdatafeeds account FULL_CONTROL permission. This account writes log files to the bucket.
Note
If you update the ACL for the bucket to remove permissions for the awsdatafeeds account,
CloudFront updates the ACL again the next time the awsdatafeeds account needs to write a log
file to your log bucket.
In addition to the ACL on the bucket, there's an ACL on each log file.The bucket owner has FULL_CONTROL
permission on each log file, the distribution owner (if different from the bucket owner) has no permission,
and the awsdatafeeds account has read and write permissions.
If you disable logging, CloudFront doesn't delete the ACLs for either the bucket or the log files. If you
want, you can do that yourself.
File Name Format
The name of each log file that CloudFront saves in your Amazon S3 bucket uses the following file name
format:
bucket-name.s3.amazonaws.com/optional-prefix/distribution-ID.YYYY-MM-DD-HH.unique-ID.gz
The date and time are in Coordinated Universal time (UTC).
For example, if your bucket name is mylogs, your prefix is myprefix/, and your distribution ID is
EMLARXS9EXAMPLE, your file names look similar to this:
mylogs.s3.amazonaws.com/myprefix/EMLARXS9EXAMPLE.2014-11-14-20.RT4KCN4SGK9.gz
When you enable logging for a distribution, you can specify an optional prefix for the file names, so you
can keep track of which log files are associated with which distributions. If you include a value for the log
file prefix and your prefix doesn't include a /, CloudFront adds one automatically. If your value does
include a /, CloudFront doesn't add another one.
The .gz at the end of the file name indicates that CloudFront has compressed the log file using gzip.
Timing of Log File Delivery
CloudFront delivers access logs for a distribution up to several times an hour. In general, a log file contains
information about the requests that CloudFront received during a given time period. CloudFront usually
delivers the log file for that time period to your Amazon S3 bucket within an hour of the events that appear
in the log. Note, however, that some or all log file entries for a time period can sometimes be delayed by
up to 24 hours.When log entries are delayed, CloudFront saves them in a log file for which the file name
includes the date and time of the period in which the requests occurred, not the date and time when the
file was delivered.
API Version 2016-08-01
258
Amazon CloudFront Developer Guide
Amazon S3 Permissions Required to Access Your Log
Files

When creating a log file, CloudFront consolidates information for your distribution from all of the edge
locations that received requests for your objects during the time period that the log file covers.
CloudFront can save more than one file for a time period depending on how many requests CloudFront
receives for the objects associated with a distribution.
CloudFront begins to reliably deliver access logs about four hours after you enable logging.You might
get a few access logs before that time.
Note
If no users request your objects during the time period, you don't receive any log files for that
period.
Analyzing Access Logs
Because you can receive multiple access logs an hour, we recommend that you combine all the log files
you receive for a given period into one file.You can then analyze the data for that period more quickly
and accurately.
Important
We recommend that you use the logs to understand the nature of the requests for your content,
not as a complete accounting of all requests. CloudFront delivers access logs on a best-effort
basis.The log entry for a particular request might be delivered long after the request was actually
processed and, in rare cases, a log entry might not be delivered at all.When a log entry is omitted
from access logs, the number of entries in the access logs won't match the usage that appears
in the AWS usage and billing reports.
For more information about CloudFront access logs, including recommendations for tools that you can
use to analyze access logs, see Using CloudFront Logging (p. 356).
Editing Your Logging Settings
You can enable or disable logging, change the Amazon S3 bucket where your logs are stored, and change
the prefix for log files by using the CloudFront console or the CloudFront API.Your changes to logging
settings take effect within 12 hours.
For more information, see the following topics:
•Updating a web or an RTMP distribution using the CloudFront console: Listing, Viewing, and Updating
CloudFront Distributions (p. 48).
•Updating a web distribution using the CloudFront API: PUT Distribution Config in the Amazon CloudFront
API Reference.
• Updating an RTMP distribution using the CloudFront API: PUT Streaming Distribution Config in the
Amazon CloudFront API Reference.
To use the CloudFront API to change access log settings for web distributions, you must use the
2009-04-02 or later version of the API.To use the CloudFront API to change access log settings for RTMP
distributions, you must use the 2010-05-01 or later version of the API.
API Version 2016-08-01
259
Amazon CloudFront Developer Guide
Analyzing Access Logs
Deleting Log Files from an Amazon S3 Bucket
CloudFront does not automatically delete log files from your Amazon S3 bucket. For information about
deleting log files from an Amazon S3 bucket, see the following topics:
• Using the Amazon S3 console: Deleting an Object in the Amazon Simple Storage Service Console
User Guide.
• Using the REST API: DELETE Object in the Amazon Simple Storage Service API Reference.
• Using the SOAP API: DeleteObject in the Amazon Simple Storage Service API Reference.
Log File Format
Topics
•Web Distribution Log File Format (p. 261)
•RTMP Distribution Log File Format (p. 267)
Each entry in a log file gives details about a single user request. The log files for web and for RTMP
distributions are not identical, but they share the following characteristics:
• Use the W3C extended log file format. (For more information, go to http://www.w3.org/TR/
WD-logfile.html.)
• Contain tab-separated values.
• Contain records that are not necessarily in chronological order.
•Contain two header lines: one with the file-format version, and another that lists the W3C fields included
in each record.
• Substitute URL-encoded equivalents for spaces and non-standard characters in field values.
These non-standard characters consist of all ASCII codes below 32 and above 127, plus the characters
in the following table. The URL encoding standard is RFC 1738. For more information, go to http://
www.ietf.org/rfc/rfc1738.txt.
CharacterURL-Encoded
Value
<%3C
>%3E
"%22
#%23
%%25
{%7B
}%7D
|%7C
\%5C
^%5E
API Version 2016-08-01
260
Amazon CloudFront Developer Guide
Deleting Log Files from an Amazon S3 Bucket

CharacterURL-Encoded
Value
~%7E
[%5B
]%5D
`%60
'%27
space%20
Web Distribution Log File Format
The log file for a web distribution includes the following fields in the listed order.
DescriptionField NameField Num-
ber
The date on which the event occurred in the format yyyy-mm-dd, for
example, 2015-06-30.The date and time are in Coordinated Univer-
sal Time (UTC).
date1
The time when the CloudFront server finished responding to the re-
quest (in UTC), for example, 01:42:39.
time2
The edge location that served the request. Each edge location is
identified by a three-letter code and an arbitrarily assigned number,
for example, DFW3. The three-letter code typically corresponds with
the International Air Transport Association airport code for an airport
near the edge location. (These abbreviations might change in the fu-
ture.) For a list of edge locations, see the Amazon CloudFront detail
page, http://aws.amazon.com/cloudfront.
x-edge-loca-
tion
3
The total number of bytes that CloudFront served to the viewer in re-
sponse to the request, including headers, for example, 1045619.
sc-bytes4
The IP address of the viewer that made the request, for example,
192.0.2.183. If the viewer used an HTTP proxy or a load balancer
to send the request, the value of c-ip is the IP address of the proxy
or load balancer. See also X-Forwarded-For in field 20.
c-ip5
The HTTP access method: DELETE, GET, HEAD, OPTIONS, PATCH,
POST, or PUT.
cs-method6
The domain name of the CloudFront distribution, for example,
d111111abcdef8.cloudfront.net.
cs(Host)7
The portion of the URI that identifies the path and object, for example,
/images/daily-ad.jpg.
cs-uri-stem8
API Version 2016-08-01
261
Amazon CloudFront Developer Guide
Web Distribution Log File Format

DescriptionField NameField Num-
ber
One of the following values:
• An HTTP status code (for example, 200). For a list of HTTP status
codes, see RFC 2616, Hypertext Transfer Protocol—HTTP 1.1,
section 10, Status Code Definitions. For more information, see How
CloudFront Processes and Caches HTTP 4xx and 5xx Status Codes
from Your Origin (p. 158).
•000, which indicates that the viewer closed the connection (for ex-
ample, closed the browser tab) before CloudFront could respond
to a request.
sc-status9
The name of the domain that originated the request. Common referrers
include search engines, other websites that link directly to your objects,
and your own website.
cs(Referer)10
The value of the User-Agent header in the request.The User-Agent
header identifies the source of the request, such as the type of device
and browser that submitted the request and, if the request came from
a search engine, which search engine. For more information, see
User-Agent Header (p. 154).
cs(User-
Agent)
11
The query string portion of the URI, if any.When a URI doesn't contain
a query string, the value of cs-uri-query is a hyphen (-).
For more information, see Configuring CloudFront to Cache Based
on Query String Parameters (p. 105).
cs-uri-query12
The cookie header in the request, including name-value pairs and the
associated attributes. If you enable cookie logging, CloudFront logs
the cookies in all requests regardless of which cookies you choose to
forward to the origin: none, all, or a whitelist of cookie names. When
a request doesn't include a cookie header, the value of cs(Cookie)
is a hyphen (-).
For more information about cookies, see Configuring CloudFront to
Cache Objects Based on Cookies (p. 106).
cs(Cookie)13
API Version 2016-08-01
262
Amazon CloudFront Developer Guide
Web Distribution Log File Format
DescriptionField NameField Num-
ber
How CloudFront classified the response after the last byte left the
edge location. In some cases, the result type can change between
the time that CloudFront is ready to send the response and the time
that CloudFront has finished sending the response. For example, in
HTTP streaming, suppose CloudFront finds a segment in the edge
cache.The value of x-edge-response-result-type, the result
type immediately before CloudFront begins to respond to the request,
is Hit. However, if the user closes the viewer before CloudFront has
delivered the entire segment, the final result type—the value of x-
edge-result-type—changes to Error.
Possible values include:
•Hit – CloudFront served the object to the viewer from the edge
cache.
For information about a situation in which CloudFront classifies the
result type as Hit even though the response from the origin contains
a Cache-Control: no-cache header, see Simultaneous Re-
quests for the Same Object (Traffic Spikes) (p. 154).
•RefreshHit – CloudFront found the object in the edge cache but
it had expired, so CloudFront contacted the origin to determine
whether the cache has the latest version of the object and, if not,
to get the latest version.
•Miss – The request could not be satisfied by an object in the edge
cache, so CloudFront forwarded the request to the origin server
and returned the result to the viewer.
•LimitExceeded – The request was denied because a CloudFront
limit was exceeded.
•CapacityExceeded – CloudFront returned an HTTP 503 status
code (Service Unavailable) because the CloudFront edge server
was temporarily unable to respond to requests.
•Error – Typically, this means the request resulted in a client error
(sc-status is 4xx) or a server error (sc-status is 5xx).
If sc-status is 403 and you configured CloudFront to restrict the
geographic distribution of your content, the request might have
come from a restricted location. For more information about geo
restriction, see Restricting the Geographic Distribution of Your
Content (p. 82).
If the value of x-edge-result-type is Error and the value of
x-edge-response-result-type is not Error, the client discon-
nected before finishing the download.
x-edge-res-
ult-type
14
An encrypted string that uniquely identifies a request.x-edge-re-
quest-id
15
API Version 2016-08-01
263
Amazon CloudFront Developer Guide
Web Distribution Log File Format
DescriptionField NameField Num-
ber
The value that the viewer included in the Host header for this request.
This is the domain name in the request:
• If you're using the CloudFront domain name in your object URLs,
such as http://d111111abcdef8.cloudfront.net/logo.png,
the x-host-header field contains that domain name.
• If you're using alternate domain names in your object URLs, such
as http://example.com/logo.png, the x-host-header field contains
the alternate domain name, such as example.com.To use alternate
domain names, you must add them to your distribution. For more
information, see Using Alternate Domain Names (CNAMEs) (p.50).
If you're using alternate domain names, see cs(Host) in field 7
for the domain name that is associated with your distribution.
x-host-header16
The protocol that the viewer specified in the request, either http or
https.
cs-protocol17
The number of bytes of data that the viewer included in the request
(client to server bytes), including headers.
cs-bytes18
The number of seconds (to the thousandth of a second, for example,
0.002) between the time that a CloudFront edge server receives a
viewer's request and the time that CloudFront writes the last byte of
the response to the edge server's output queue as measured on the
server. From the perspective of the viewer, the total time to get the
full object will be longer than this value due to network latency and
TCP buffering.
time-taken19
If the viewer used an HTTP proxy or a load balancer to send the re-
quest, the value of c-ip in field 5 is the IP address of the proxy or
load balancer. In that case, x-forwarded-for is the IP address of
the viewer that originated the request.
If the viewer did not use an HTTP proxy or a load balancer, the value
of x-forwarded-for is a hyphen (-).
x-forwarded-
for
20
When cs-protocol in field 17 is https, the SSL protocol that the
client and CloudFront negotiated for transmitting the request and re-
sponse. When cs-protocol is http, the value for ssl-protocol
is a hyphen (-).
Possible values include the following:
•SSLv3
•TLSv1
•TLSv1.1
•TLSv1.2
ssl-protocol21
API Version 2016-08-01
264
Amazon CloudFront Developer Guide
Web Distribution Log File Format
DescriptionField NameField Num-
ber
When cs-protocol in field 17 is https, the SSL cipher that the client
and CloudFront negotiated for encrypting the request and response.
When cs-protocol is http, the value for ssl-cipher is a hyphen
(-).
Possible values include the following:
•ECDHE-RSA-AES128-GCM-SHA256
•ECDHE-RSA-AES128-SHA256
•ECDHE-RSA-AES128-SHA
•ECDHE-RSA-AES256-GCM-SHA384
•ECDHE-RSA-AES256-SHA384
•ECDHE-RSA-AES256-SHA
•AES128-GCM-SHA256
•AES256-GCM-SHA384
•AES128-SHA256
•AES256-SHA
•AES128-SHA
•DES-CBC3-SHA
•RC4-MD5
ssl-cipher22
API Version 2016-08-01
265
Amazon CloudFront Developer Guide
Web Distribution Log File Format

DescriptionField NameField Num-
ber
How CloudFront classified the response just before returning the re-
sponse to the viewer. See also x-edge-result-type in field 14.
Possible values include:
•Hit – CloudFront served the object to the viewer from the edge
cache.
•RefreshHit – CloudFront found the object in the edge cache but
it had expired, so CloudFront contacted the origin to verify that the
cache has the latest version of the object.
•Miss – The request could not be satisfied by an object in the edge
cache, so CloudFront forwarded the request to the origin server
and returned the result to the viewer.
•LimitExceeded – The request was denied because a CloudFront
limit was exceeded.
•CapacityExceeded – CloudFront returned a 503 error because
the edge location didn't have enough capacity at the time of the re-
quest to serve the object.
•Error – Typically, this means the request resulted in a client error
(sc-status is 4xx) or a server error (sc-status is 5xx).
If sc-status is 403 and you configured CloudFront to restrict the
geographic distribution of your content, the request might have
come from a restricted location. For more information about geo
restriction, see Restricting the Geographic Distribution of Your
Content (p. 82).
If the value of x-edge-result-type is Error and the value of
x-edge-response-result-type is not Error, the client discon-
nected before finishing the download.
x-edge-re-
sponse-res-
ult-type
23
The HTTP version that the viewer specified in the request. Possible
values include HTTP/0.9, HTTP/1.0, and HTTP/1.1.
cs-protocol-
version
24
Note
Question marks (?) in URLs and query strings are not included in the log.
The following is an example log file for a web distribution:
#Version: 1.0
#Fields: date time x-edge-location sc-bytes c-ip cs-method cs(Host) cs-uri-stem
sc-status cs(Referer) cs(User-Agent) cs-uri-query cs(Cookie) x-edge-result-
type x-edge-request-id x-host-header cs-protocol cs-bytes time-taken x-forwarded-
for ssl-protocol ssl-cipher x-edge-response-result-type cs-protocol-version
2014-05-23 01:13:11 FRA2 182 192.0.2.10 GET d111111abcdef8.cloudfront.net
/view/my/file.html 200 www.displaymyfiles.com Mozilla/4.0%20(compat
ible;%20MSIE%205.0b1;%20Mac_PowerPC) - zip=98101 RefreshHit MRVMF7KydIvxMWf
JIglgwHQwZsbG2IhRJ07sn9AkKUFSHS9EXAMPLE== d111111abcdef8.cloudfront.net http -
0.001 - - - RefreshHit HTTP/1.1
2014-05-23 01:13:12 LAX1 2390282 192.0.2.202 GET d111111abcdef8.cloudfront.net
/soundtrack/happy.mp3 304 www.unknownsingers.com Mozilla/4.0%20(compat
API Version 2016-08-01
266
Amazon CloudFront Developer Guide
Web Distribution Log File Format
ible;%20MSIE%207.0;%20Windows%20NT%205.1) a=b&c=d zip=50158 Hit
xGN7KWpVEmB9Dp7ctcVFQC4E-nrcOcEKS3QyAez--06dV7TEXAMPLE== d111111abcdef8.cloud
front.net http - 0.002 - - - Hit HTTP/1.1
RTMP Distribution Log File Format
Each record in an RTMP access log represents a playback event, for example, connect, play, pause,
stop, disconnect, and so on. As a result, CloudFront generates multiple log records each time a viewer
watches a video. To relate log records that stem from the same stream ID, use the x-sid field.
Note
Some fields have values for all events, and some have values only for Play, Stop, Pause,
Unpause, and Seek events. Usually, when the log file contains a hyphen (-) for a field, the field
isn't relevant for the corresponding event.
The following table describes the fields that are present in each record in the RTMP distribution log file,
regardless of the type of event.The fields appear in the log in the order listed.
DescriptionField NameField Number
The date on which the event occurred in the format yyyy-mm-dd, for
example, 2014-05-23.The date and time are in Coordinated Universal
Time (UTC).
date1
The time when the server received the request (in UTC), for example,
01:42:39.
time2
The edge location where the playback event occurred. Each edge
location is identified by a three-letter code and an arbitrarily assigned
number, for example, DFW3. The three-letter code typically corres-
ponds with the International Air Transport Association airport code for
an airport near the edge location. (These abbreviations might change
in the future.) For a list of edge locations, see the Amazon CloudFront
detail page, http://aws.amazon.com/cloudfront.
x-edge-loca-
tion
3
Client IP, for example, 192.0.2.183.c-ip4
The event type. This is a Connect, Disconnect, Play, Stop, Pause,
Unpause, or Seek event.
x-event5
The running total number of bytes sent from the server to the client,
up to the time of the event.
sc-bytes6
A code indicating the status of the event. Currently, "OK" is the only
value for this field. New functionality in the future could require new
status codes.
x-cf-status7
An opaque string identifier that can be used to differentiate clients.
This value is unique for each connection.
x-cf-client-id8
The stem portion of the URI, including the application and the applic-
ation instance.This is sometimes referred to as the FMS connect
string. For example, rtmp://shqshne4jdp4b6.cloud-
front.net/cfx/st.
cs-uri-stem9
The query string portion of the URI that is included on the connect
string.
cs-uri-query10
API Version 2016-08-01
267
Amazon CloudFront Developer Guide
RTMP Distribution Log File Format
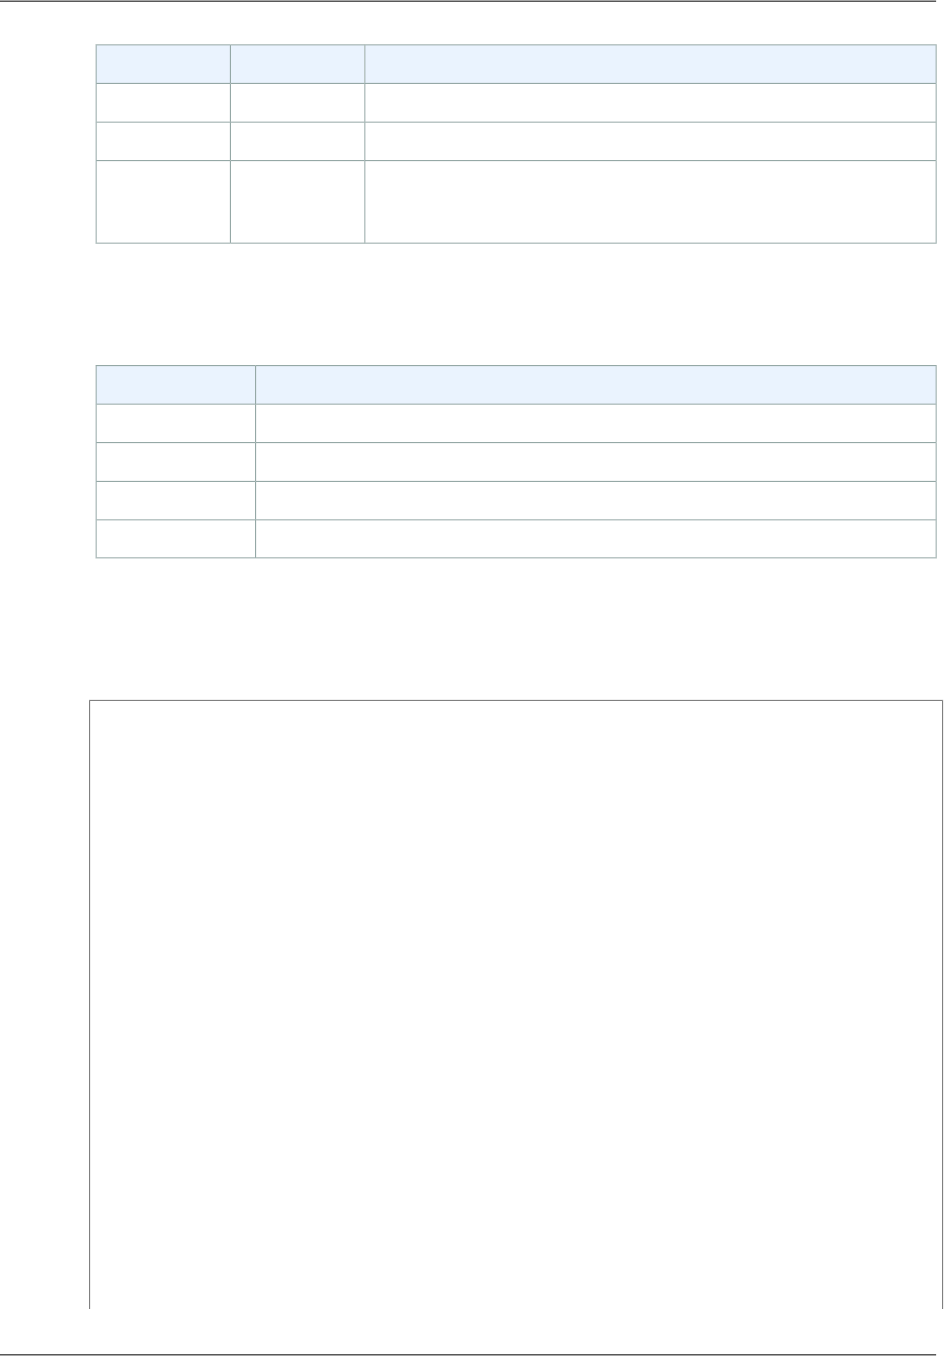
DescriptionField NameField Number
The URI of the referrer.c-referrer11
The URL of the page from which the SWF is linked.x-page-url12
The value of the User-Agent header in the request.The User-Agent
header identifies the type of device that submitted the request. For
more information, see User-Agent Header (p. 154).
c-user-agent13
The following fields usually have values only for Play, Stop, Pause, Unpause, and Seek events. For other
events, they contain a single hyphen (-). These fields appear in the log after the fields in the preceding
table and in the order listed.
DescriptionField
The stream name.x-sname
The stream query string, if any.x-sname-query
The stream type, for example, FLV.x-file-ext
The stream ID. This is a unique integer identifier for the connection.x-sid
Note
Question marks (?) in URLs and query strings are not included in the log.
The following is an example of a log file for an RTMP distribution:
#Version: 1.0
#Fields: date time x-edge-location c-ip x-event sc-bytes x-cf-status x-cf-client-
id cs-uri-stem cs-uri-query c-referrer x-page-url c-user-agent x-sname x-sname-
query x-file-ext x-sid
2010-03-12 23:51:20 SEA4 192.0.2.147 connect 2014 OK
bfd8a98bee0840d9b871b7f6ade9908f rtmp://shqshne4jdp4b6.cloudfront.net/cfx/st
key=value http://player.longtailvideo.com/player.swf http://www.long
tailvideo.com/support/jw-player-setup-wizard?example=204 LNX%2010,0,32,18
- - - -
2010-03-12 23:51:21 SEA4 192.0.2.222 play 3914 OK
bfd8a98bee0840d9b871b7f6ade9908f rtmp://shqshne4jdp4b6.cloudfront.net/cfx/st
key=value http://player.longtailvideo.com/player.swf http://www.long
tailvideo.com/support/jw-player-setup-wizard?example=204 LNX%2010,0,32,18
myvideo p=2&q=4 flv 1
2010-03-12 23:53:44 SEA4 192.0.2.4 stop 323914 OK
bfd8a98bee0840d9b871b7f6ade9908f rtmp://shqshne4jdp4b6.cloudfront.net/cfx/st
key=value http://player.longtailvideo.com/player.swf http://www.long
tailvideo.com/support/jw-player-setup-wizard?example=204 LNX%2010,0,32,18
dir/other/myvideo p=2&q=4 flv 1
2010-03-12 23:53:44 SEA4 192.0.2.103 play 8783724 OK
bfd8a98bee0840d9b871b7f6ade9908f rtmp://shqshne4jdp4b6.cloudfront.net/cfx/st
key=value http://player.longtailvideo.com/player.swf http://www.long
tailvideo.com/support/jw-player-setup-wizard?example=204 LNX%2010,0,32,18
dir/favs/myothervideo p=42&q=14 mp4 2
2010-03-12 23:56:21 SEA4 192.0.2.199 stop 429822014 OK
bfd8a98bee0840d9b871b7f6ade9908f rtmp://shqshne4jdp4b6.cloudfront.net/cfx/st
key=value http://player.longtailvideo.com/player.swf http://www.long
API Version 2016-08-01
268
Amazon CloudFront Developer Guide
RTMP Distribution Log File Format

tailvideo.com/support/jw-player-setup-wizard?example=204 LNX%2010,0,32,18
dir/favs/myothervideo p=42&q=14 mp4 2
2010-03-12 23:59:44 SEA4 192.0.2.14 disconnect 429824092 OK
bfd8a98bee0840d9b871b7f6ade9908f rtmp://shqshne4jdp4b6.cloudfront.net/cfx/st
key=value http://player.longtailvideo.com/player.swf http://www.long
tailvideo.com/support/jw-player-setup-wizard?example=204 LNX%2010,0,32,18
- - - -
Charges for Access Logs
Access logging is an optional feature of CloudFront.There is no extra charge for enabling access logging.
However, you accrue the usual Amazon S3 charges for storing and accessing the files on Amazon S3
(you can delete them at any time). For more information about charges for CloudFront, see CloudFront
Reports (p. 15).
API Version 2016-08-01
269
Amazon CloudFront Developer Guide
Charges for Access Logs

Monitoring CloudFront Activity
Using CloudWatch
Amazon CloudFront integrates with Amazon CloudWatch metrics so that you can monitor your website
or application. CloudFront currently provides six free metrics, and these metrics don't count against
CloudWatch limits. When viewing metrics, you can specify a time interval of as little as one minute for
time periods in the previous two weeks.
You can view the following CloudFront metrics in the CloudWatch console:
•Requests – Number of requests for all HTTP methods and for both HTTP and HTTPS requests
•BytesDownloaded – Number of bytes downloaded by viewers for GET, HEAD, and OPTIONS requests
•BytesUploaded – Number of bytes uploaded to your origin with CloudFront using POST and PUT
requests
•TotalErrorRate – Percentage of all requests for which the HTTP status code is 4xx or 5xx
•4xxErrorRate – Percentage of all requests for which the HTTP status code is 4xx
•5xxErrorRate – Percentage of all requests for which the HTTP status code is 5xx
Note
CloudFront is a global service, and metrics are available only when you choose the US East (N.
Virginia) region in the AWS console. If you choose another region, no CloudFront metrics will
appear in the CloudWatch console.
To view metrics for a distribution in the CloudWatch console
1. Sign in to the AWS Management Console and open the CloudFront console at https://
console.aws.amazon.com/cloudfront/.
2. In the navigation pane, click Monitoring and Alarms.
3. In the CloudFront Metrics and Alarms From CloudWatch pane, specify the following values:
From and To
Select the date and time range for which you want to display CloudWatch metrics.
Granularity
Specify the interval of the data points, for example, one per minute or one per hour. Note that
the time period that you choose affects the available granularity. For example, if you choose to
API Version 2016-08-01
270
Amazon CloudFront Developer Guide

view data for two weeks, the finest granularity is one hour, and if you choose to view data for 24
hours, the finest granularity is one minute.
Web Distribution
Select the distribution that you want to display metrics for.
4. Click Update Graph to refresh the graph based on the settings that you specified.
To receive an Amazon Simple Notification Service (Amazon SNS) notification based on a
CloudFront metric
1. On the CloudFront Metrics and Alarms From CloudWatch page, expand the list of existing alarms
to confirm that the alarm that you want to create doesn't already exist.
2. Click Create Alarm.
3. In the Create Alarm dialog box, specify the following values:
Metric
Choose the metric for which you want to create the alarm.
Distribution
Choose the CloudFront distribution for which you want to create the alarm.
Name of alarm
Enter a name for the alarm.
Send notification to
Choose the existing Amazon SNS topic that you want to send notification to if the status of this
metric triggers an alarm.
Whenever metric operator value
Specify when CloudWatch should trigger an alarm and send a notification to the specified email
list. For example, to receive notification when the 5xx error rate exceeds 1%, you'd specify the
following:
Whenever Average of 5xxErrorRate > 1
Note the following about specifying values for value:
• Enter only whole numbers without punctuation. For example, to specify one thousand, enter
1000.
• For 4xx, 5xx, and total error rates, the value that you specify is a percentage.
• For requests, bytes downloaded, and bytes uploaded, the value you specify is in units, for
example, 1000000000 bytes.
For at least xconsecutive periods of time period
Specify how many consecutive time periods of the specified duration the metric must meet the
criteria before CloudWatch sends notification. When you choose a value, you need to find an
appropriate balance between a value that produces frequent notifications for fleeting problems
and delayed notifications for real problems.
4. If you created a new Amazon SNS topic, when you click Create, Amazon SNS sends you an email
with information about the new topic. Follow the instructions in the email.
Downloading Data in CSV Format
You can download the CloudWatch Metrics report in CSV format. This section explains how to download
the report and describes the values in the report.
API Version 2016-08-01
271
Amazon CloudFront Developer Guide
Downloading Data in CSV Format

To download the CloudWatch Metrics report in CSV format
1. While viewing the CloudWatch metrics, click CSV.
2. In the Opening file name dialog box, choose whether to open or save the file.
Information About the Report
The first few rows of the report include the following information:
Version
The CloudFront reporting version.
Report
The name of the report.
DistributionID
The ID of the distribution that you ran the report for.
StartDateUTC
The beginning of the date range for which you ran the report, in Coordinated Universal Time (UTC).
EndDateUTC
The end of the date range for which you ran the report, in Coordinated Universal Time (UTC).
GeneratedTimeUTC
The date and time on which you ran the report, in Coordinated Universal Time (UTC).
Granularity
The time period for each row in the report, for example, ONE_MINUTE.
Data in the CloudWatch Metrics Report
The report includes the following values:
DistributionID
The ID of the distribution that you ran the report for.
FriendlyName
An alternate domain name (CNAME) for the distribution, if any. If a distribution has no alternate
domain names, the list includes an origin domain name for the distribution.
TimeBucket
The hour or the day that data applies to, in Coordinated Universal Time (UTC).
Requests
The total number of requests for all HTTP status codes (for example, 200 or 404) and all methods
(for example, GET, HEAD, or POST) during the time period.
BytesDownloaded
The number of bytes that viewers downloaded for the specified distribution during the time period.
BytesUploaded
The number of bytes that viewers uploaded to your origin for the specified distribution during the time
period.
TotalErrorRatePct
Requests for which the HTTP status code was a 4xx or 5xx error for the specified distribution during
the time period.
4xxErrorRatePct
Requests for which the HTTP status code was a 4xx error for the specified distribution during the
time period.
API Version 2016-08-01
272
Amazon CloudFront Developer Guide
Information About the Report

5xxErrorRatePct
Requests for which the HTTP status code was a 5xx error for the specified distribution during the
time period.
API Version 2016-08-01
273
Amazon CloudFront Developer Guide
Data in the CloudWatch Metrics Report

Using AWS CloudTrail to Capture
Requests Sent to the CloudFront
API
CloudFront is integrated with CloudTrail, an AWS service that captures information about every request
that is sent to the CloudFront API by your AWS account, including your IAM users. CloudTrail periodically
saves log files of these requests to an Amazon S3 bucket that you specify. CloudTrail captures information
about all requests, whether they were made using the CloudFront console, the CloudFront API, the AWS
SDKs, the CloudFront CLI, or another service, for example, AWS CloudFormation.
You can use information in the CloudTrail log files to determine which requests were made to CloudFront,
the source IP address from which each request was made, who made the request, when it was made,
and so on. To learn more about CloudTrail, including how to configure and enable it, see the AWS
CloudTrail User Guide.
Note
CloudFront is a global service.To view CloudFront requests in CloudTrail logs, you must update
an existing trail to include global services. For more information, see Updating a Trail and About
Global Service Events in the AWS CloudTrail User Guide.
Topics
•CloudFront Information in CloudTrail Log Files (p. 274)
•Understanding CloudFront Log File Entries (p. 275)
CloudFront Information in CloudTrail Log Files
When you enable CloudTrail, CloudTrail captures every request that you make to every AWS service
that CloudTrail supports. (For a list of supported services, see Supported Services in the AWS CloudTrail
User Guide.) The log files aren't organized or sorted by service; each log file might contain records from
more than one service. CloudTrail determines when to create a new log file.
Note
CloudTrail supports all CloudFront API actions.
API Version 2016-08-01
274
Amazon CloudFront Developer Guide
CloudFront Information in CloudTrail Log Files

Every log file entry contains information about who made the request.The user identity information in the
log file helps you determine whether the request was made using root or IAM user credentials, using
temporary security credentials for a role or federated user, or by another AWS service. For more
information, see userIdentity Element in the AWS CloudTrail User Guide.
You can store log files for as long as you want.You can also define Amazon S3 lifecycle rules to archive
or delete log files automatically.
By default, your log files are encrypted by using Amazon S3 server-side encryption (SSE).
You can choose to have CloudTrail publish Amazon SNS notifications when new log files are delivered
if you want to take quick action upon log file delivery. For more information, see Configuring Amazon
SNS Notifications in the AWS CloudTrail User Guide.
You can also aggregate log files from multiple AWS regions and multiple AWS accounts into a single
Amazon SNS bucket. For more information, see Aggregating CloudTrail Log Files to a Single Amazon
S3 Bucket in the AWS CloudTrail User Guide.
Understanding CloudFront Log File Entries
Each JSON-formatted CloudTrail log file can contain one or more log entries. A log entry represents a
single request from any source and includes information about the requested action, including any
parameters, the date and time of the action, and so on.The log entries are not guaranteed to be in any
particular order; they are not an ordered stack trace of API calls.
The eventName element identifies the action that occurred and the API version that was used to perform
that action. For example, the following eventName value indicates that a web distribution was updated,
and the 2014-01-31 API version was used to perform the action:
UpdateDistribution2014_01_31
The following example shows a CloudTrail log entry that demonstrates five actions:
• Updating a web distribution configuration.The value of eventName is UpdateDistribution.
• Listing web distributions that are associated with the current account.The value of eventName is
ListDistributions.
•Getting the configuration for a specific web distribution.The value of eventName is GetDistribution.
• Creating an invalidation batch request. The value of eventName is CreateInvalidation.
• Listing origin access identities that are associated with the current account. The value of eventName
is ListCloudFrontOriginAccessIdentities.
{
"Records": [{
"eventVersion": "1.01",
"userIdentity": {
"type": "IAMUser",
"principalId": "A1B2C3D4E5F6G7EXAMPLE",
"arn": "arn:aws:iam::111122223333:user/smithj",
"accountId": "111122223333",
"accessKeyId": "AKIAIOSFODNN7EXAMPLE",
"userName": "smithj"
},
"eventTime": "2014-05-06T18:00:32Z",
"eventName": "UpdateDistribution2014_01_31",
API Version 2016-08-01
275
Amazon CloudFront Developer Guide
Understanding CloudFront Log File Entries

"sourceIPAddress": "192.0.2.17",
"userAgent": "aws-sdk-ruby/1.39.0 ruby/1.9.3 x86_64-linux",
"requestParameters": {
"id": "EDFDVBD6EXAMPLE",
"ifMatch": "E9LHASXEXAMPLE",
"distributionConfig": {
"restrictions": {
"geoRestriction": {
"quantity": 0,
"restrictionType": "none"
}
},
"customErrorResponses": {
"quantity": 0
},
"defaultRootObject": "index.html",
"aliases": {
"quantity": 1,
"items": ["example.com"]
},
"logging": {
"bucket": "",
"enabled": false,
"prefix": "",
"includeCookies": false
},
"viewerCertificate": {
"iAMCertificateId": "A1B2C3D4E5F6G7EXAMPLE",
"sSLSupportMethod": "sni-only"
},
"callerReference": "2014-05-06 64832",
"defaultCacheBehavior": {
"targetOriginId": "Images",
"allowedMethods": {
"items": ["GET",
"HEAD"],
"quantity": 2
},
"forwardedValues": {
"cookies": {
"forward": "none"
},
"queryString": false
},
"minTTL": 300,
"trustedSigners": {
"enabled": false,
"quantity": 0
},
"viewerProtocolPolicy": "redirect-to-https",
"smoothStreaming": false
},
"origins": {
"items": [{
"customOriginConfig": {
"hTTPSPort": 443,
"originProtocolPolicy": "http-only",
"hTTPPort": 80
API Version 2016-08-01
276
Amazon CloudFront Developer Guide
Understanding CloudFront Log File Entries

},
"domainName": "myawsbucket.s3-website-us-east-1.amazonaws.com",
"id": "Web page origin"
},
{
"customOriginConfig": {
"hTTPSPort": 443,
"originProtocolPolicy": "http-only",
"hTTPPort": 80
},
"domainName": "myotherawsbucket.s3-website-us-west-2.amazon
aws.com",
"id": "Images"
}],
"quantity": 2
},
"enabled": true,
"cacheBehaviors": {
"allowedMethods": {
"items": ["GET",
"HEAD"],
"quantity": 2
},
"trustedSigners": {
"enabled": false,
"quantity": 0
},
"targetOriginId": "Web page origin",
"smoothStreaming": false,
"viewerProtocolPolicy": "redirect-to-https",
"minTTL": 300,
"forwardedValues": {
"cookies": {
"forward": "none"
},
"queryString": false
},
"pathPattern": "*.html"
}],
"quantity": 1
},
"priceClass": "PriceClass_All",
"comment": "Added an origin and a cache behavior"
}
},
"responseElements": {
"eTag": "E2QWRUHEXAMPLE",
"distribution": {
"domainName": "d111111abcdef8.cloudfront.net",
"status": "InProgress",
"distributionConfig": {
distributionConfig response omitted
},
"id": "EDFDVBD6EXAMPLE",
"lastModifiedTime": "May 6, 2014 6:00:32 PM",
"activeTrustedSigners": {
"quantity": 0,
API Version 2016-08-01
277
Amazon CloudFront Developer Guide
Understanding CloudFront Log File Entries

"enabled": false
},
"inProgressInvalidationBatches": 0
}
},
"requestID": "4e6b66f9-d548-11e3-a8a9-73e33example",
"eventID": "5ab02562-0fc5-43d0-b7b6-90293example"
},
{
"eventVersion": "1.01",
"userIdentity": {
"type": "IAMUser",
"principalId": "A1B2C3D4E5F6G7EXAMPLE",
"arn": "arn:aws:iam::111122223333:user/smithj",
"accountId": "111122223333",
"accessKeyId": "AKIAIOSFODNN7EXAMPLE",
"userName": "smithj"
},
"eventTime": "2014-05-06T18:01:35Z",
"eventName": "ListDistributions2014_01_31",
"sourceIPAddress": "192.0.2.17",
"userAgent": "aws-sdk-ruby/1.39.0 ruby/1.9.3 x86_64-linux",
"requestParameters": null,
"responseElements": null,
"requestID": "52de9f97-d548-11e3-8fb9-4dad0example",
"eventID": "eb91f423-6dd3-4bb0-a148-3cdfbexample"
},
{
"eventVersion": "1.01",
"userIdentity": {
"type": "IAMUser",
"principalId": "A1B2C3D4E5F6G7EXAMPLE",
"arn": "arn:aws:iam::111122223333:user/smithj",
"accountId": "111122223333",
"accessKeyId": "AKIAIOSFODNN7EXAMPLE",
"userName": "smithj"
},
"eventTime": "2014-05-06T18:01:59Z",
"eventName": "GetDistribution2014_01_31",
"sourceIPAddress": "192.0.2.17",
"userAgent": "aws-sdk-ruby/1.39.0 ruby/1.9.3 x86_64-linux",
"requestParameters": {
"id": "EDFDVBD6EXAMPLE"
},
"responseElements": null,
"requestID": "497b3622-d548-11e3-8fb9-4dad0example",
"eventID": "c32289c7-005a-46f7-9801-cba41example"
},
{
"eventVersion": "1.01",
"userIdentity": {
"type": "IAMUser",
"principalId": "A1B2C3D4E5F6G7EXAMPLE",
"arn": "arn:aws:iam::111122223333:user/smithj",
"accountId": "111122223333",
"accessKeyId": "AKIAIOSFODNN7EXAMPLE",
"userName": "smithj"
},
API Version 2016-08-01
278
Amazon CloudFront Developer Guide
Understanding CloudFront Log File Entries

"eventTime": "2014-05-06T18:02:27Z",
"eventName": "CreateInvalidation2014_01_31",
"sourceIPAddress": "192.0.2.17",
"userAgent": "aws-sdk-ruby/1.39.0 ruby/1.9.3 x86_64-linux",
"requestParameters": {
"invalidationBatch": {
"callerReference": "2014-05-06 64947",
"paths": {
"quantity": 3,
"items": ["/images/new.jpg",
"/images/logo.jpg",
"/images/banner.jpg"]
}
},
"distributionId": "EDFDVBD6EXAMPLE"
},
"responseElements": {
"invalidation": {
"createTime": "May 6, 2014 6:02:27 PM",
"invalidationBatch": {
"callerReference": "2014-05-06 64947",
"paths": {
"quantity": 3,
"items": ["/images/banner.jpg",
"/images/logo.jpg",
"/images/new.jpg"]
}
},
"status": "InProgress",
"id": "ISRZ85EXAMPLE"
},
"location": "https://cloudfront.amazonaws.com/2014-01-31/distribution/ED
FDVBD6EXAMPLE/invalidation/ISRZ85EXAMPLE"
},
"requestID": "4e200613-d548-11e3-a8a9-73e33example",
"eventID": "191ebb93-66b7-4517-a741-92b0eexample"
},
{
"eventVersion": "1.01",
"userIdentity": {
"type": "IAMUser",
"principalId": "A1B2C3D4E5F6G7EXAMPLE",
"arn": "arn:aws:iam::111122223333:user/smithj",
"accountId": "111122223333",
"accessKeyId": "AKIAIOSFODNN7EXAMPLE",
"userName": "smithj"
},
"eventTime": "2014-05-06T18:03:08Z",
"eventName": "ListCloudFrontOriginAccessIdentities2014_01_31",
"sourceIPAddress": "192.0.2.17",
"userAgent": "aws-sdk-ruby/1.39.0 ruby/1.9.3 x86_64-linux",
"requestParameters": null,
"responseElements": null,
"requestID": "42ca4299-d548-11e3-8fb9-4dad0example",
"eventID": "7aeb434f-eb55-4e2a-82d8-417d5example"
}]
}
API Version 2016-08-01
279
Amazon CloudFront Developer Guide
Understanding CloudFront Log File Entries

Tagging Amazon CloudFront
Distributions
Tags are words or phrases that you can use to identify and organize your AWS resources.You can add
multiple tags to each resource, and each tag includes a key and a value that you define. For example,
the key might be "domain" and the value might be "example.com".You can search and filter your resources
based on the tags you add.
When you apply tags to CloudFront distributions or other AWS resources (such as Amazon EC2 instances
or Amazon S3 buckets) and activate the tags, AWS generates a cost allocation report as a
comma-separated value (CSV file) with your usage and costs aggregated by your active tags.You can
apply tags that represent business categories (such as cost centers, application names, or owners) to
organize your costs across multiple services. For more information about using tags for cost allocation,
see Use Cost Allocation Tags in the AWS Billing and Cost Management User Guide.
For the current limit on the number of tags that you can add to a distribution, see Limits (p. 353).To request
a higher limit, create a case with the AWS Support Center.
Note the following:
• You can tag web and RTMP distributions, but you can't tag origin access identities or invalidations.
•Tag Editor and Resource Groups are currently not supported for CloudFront.
You can also apply tags to resources by using the CloudFront API, AWS CLI, SDKs, and AWS Tools for
Windows PowerShell. For more information, see the following documentation:
• CloudFront API – See Actions on Tags in the Amazon CloudFront API Reference
• AWS CLI – See cloudfront in the AWS Command Line Interface Reference
• SDKs – See the applicable SDK documentation on the AWS Documentation page
• Tools for Windows PowerShell – See Amazon CloudFront in the AWS Tools for Windows PowerShell
Reference
Topics
•Tag Restrictions (p. 281)
•Adding, Editing, and Deleting Tags for Distributions (p. 281)
API Version 2016-08-01
280
Amazon CloudFront Developer Guide

Tag Restrictions
The following basic restrictions apply to tags:
• Maximum number of tags per resource – 10
• Maximum key length – 128 Unicode characters
• Maximum value length – 256 Unicode characters
• Valid values for key and value – a-z, A-Z, 0-9, space, and the following characters: _ . : / = + - and @
• Tag keys and values are case sensitive
• Don't use aws: as a prefix for keys; it's reserved for AWS use
Adding, Editing, and Deleting Tags for
Distributions
The following procedure explains how to add, edit, and delete tags for your distributions in the CloudFront
console.
To add tags, edit, or delete tags for a distribution
1. Sign in to the AWS Management Console and open the CloudFront console at https://
console.aws.amazon.com/cloudfront/.
2. Choose the ID for the distribution that you want to update.
3. Choose the Tags tab.
4. Choose Add or edit tags.
5. On the Add or edit tags page, you can do the following:
Add a tag
Enter a key and, optionally, a value for the tag.
Edit a tag
Change the key, the value, or both.You can also delete the value for a tag, but the key is required.
Delete a tag
Choose the X on the right side of the value field.
6. Choose Save.
API Version 2016-08-01
281
Amazon CloudFront Developer Guide
Tag Restrictions

Troubleshooting
Topics
•I can't view the files in my web distribution. (p. 282)
•I can't view the files in my RTMP distribution. (p. 284)
•Error Message: Certificate: <certificate-id> is being used by CloudFront. (p. 284)
I can't view the files in my web distribution.
If you cannot view file in your CloudFront web distribution, the following topics describe some common
solutions.
Did you sign up for both CloudFront and Amazon
S3?
To use Amazon CloudFront with an Amazon S3 origin, you must sign up for both CloudFront and Amazon
S3, separately. For more information about signing up for CloudFront and Amazon S3, see Getting Started
with CloudFront (p. 37).
Are your Amazon S3 bucket and object
permissions set correctly?
If you are using CloudFront with an Amazon S3 origin, the original versions of your content are stored in
an Amazon S3 bucket. The easiest way to use CloudFront with Amazon S3 is to make all your objects
publicly readable in Amazon S3.To do this, you must explicitly enable public read privileges for each
object you upload to Amazon S3.
If your content is not publicly readable, you need to create a CloudFront origin access identity so CloudFront
can access it. For more information about CloudFront origin access identities, see Using an Origin Access
Identity to Restrict Access to Your Amazon S3 Content (p. 166).
Object properties and bucket properties are independent.You must explicitly grant privileges to each
object in Amazon S3. Objects do not inherit properties from buckets and object properties must be set
independently of the bucket.
API Version 2016-08-01
282
Amazon CloudFront Developer Guide
I can't view the files in my web distribution.

Is your alternate domain name (CNAME) correctly
configured?
If you already have an existing CNAME record for your domain name, update that record or replace it
with a new one that points to your distribution's domain name.
Also, make sure your CNAME record points to your distribution's domain name, not your Amazon S3
bucket.You can confirm that the CNAME record in your DNS system points to your distribution's domain
name.To do so, use a DNS tool like dig. (For information about dig, go to http://www.kloth.net/services/
dig.php.)
The following shows an example dig request on a domain name called images.example.com, and the
relevant part of the response. Under ANSWER SECTION, see the line that contains CNAME. The CNAME
record for your domain name is set up correctly if the value on the right side of CNAME is your CloudFront
distribution's domain name. If it's your Amazon S3 origin server bucket or some other domain name, then
the CNAME record is set up incorrectly.
[prompt]> dig images.example.com
; <<> DiG 9.3.3rc2 <<> images.example.com
;; global options: printcmd
;; Got answer:
;; ->>HEADER<<- opcode: QUERY, status: NOERROR, id: 15917
;; flags: qr rd ra; QUERY: 1, ANSWER: 9, AUTHORITY: 2, ADDITIONAL: 0
;; QUESTION SECTION:
;images.example.com. IN A
;; ANSWER SECTION:
images.example.com. 10800 IN CNAME d111111abcdef8.cloudfront.net.
...
...
For more information about CNAMEs, see Using Alternate Domain Names (CNAMEs) (p. 50).
Are you referencing the correct URL for your
CloudFront distribution?
Make sure the URL you're referencing uses your CloudFront distribution domain name (or your CNAME),
not your Amazon S3 bucket or custom origin.
Do you need help troubleshooting a custom
origin?
If you need AWS to help you troubleshoot a custom origin, we will probably need to inspect the
X-Amz-Cf-Id header entries from your requests. If you are not already logging these entries, you might
want to consider it for the future. For more information, see Requirements and Recommendations for
Using Amazon EC2 and Other Custom Origins (p. 81).
API Version 2016-08-01
283
Amazon CloudFront Developer Guide
Is your alternate domain name (CNAME) correctly
configured?

I can't view the files in my RTMP distribution.
If you cannot view the files in an RTMP distribution, are your URL and your playback client correctly
configured? RTMP distributions require you to use an RTMP protocol instead of HTTP, and you must
make a few minor configuration changes to your playback client. For information about creating RTMP
distributions, see Task List for Streaming Media Files Using RTMP (p. 89).
Error Message: Certificate: <certificate-id> is
being used by CloudFront.
Problem: You're trying to delete an SSL certificate from the IAM certificate store, and you're getting the
message "Certificate: <certificate-id> is being used by CloudFront."
Solution: Every CloudFront web distribution must be associated either with the default CloudFront
certificate or with a custom SSL certificate. Before you can delete an SSL certificate, you need to either
rotate SSL certificates (replace the current custom SSL certificate with another custom SSL certificate)
or revert from using a custom SSL certificate to using the default CloudFront certificate. Perform the
procedure in the applicable section:
•Rotating SSL/TLS Certificates (p. 240)
•Reverting from a Custom SSL/TLS Certificate to the Default CloudFront Certificate (p. 241)
API Version 2016-08-01
284
Amazon CloudFront Developer Guide
I can't view the files in my RTMP distribution.

Load Testing CloudFront
Traditional load testing methods don't work well with CloudFront because CloudFront uses DNS to balance
loads across geographically dispersed edge locations and within each edge location. When a client
requests content from CloudFront, the client receives a DNS response that includes a set of IP addresses.
If you test by sending requests to just one of the IP addresses that DNS returns, you're testing only a
small subset of the resources in one CloudFront edge location, which doesn't accurately represent actual
traffic patterns. Depending on the volume of data requested, testing in this way may overload and degrade
the performance of that small subset of CloudFront servers.
CloudFront is designed to scale for viewers that have different client IP addresses and different DNS
resolvers across multiple geographic regions.To perform load testing that accurately assesses CloudFront
performance, we recommend that you do all of the following:
• Send client requests from multiple geographic regions.
•Configure your test so each client makes an independent DNS request; each client will then receive a
different set of IP addresses from DNS.
•For each client that is making requests, spread your client requests across the set of IP addresses that
are returned by DNS, which ensures that the load is distributed across multiple servers in a CloudFront
edge location.
API Version 2016-08-01
285
Amazon CloudFront Developer Guide

CloudFront Streaming Tutorials
The following tutorials explain how to use CloudFront for live streaming, for geoblocking, and for RTMP
streaming.
Live Streaming
•Live HTTP Streaming Using CloudFront and Adobe Media Server 5.0 (p. 286)
•Live Smooth Streaming Using Amazon CloudFront and IIS Media Services 4.1 (p. 304)
•Live HTTP Streaming Using Wowza Streaming Engine 4.2 (p. 314)
•Live HTTP Streaming Using CloudFront and Any HTTP Origin (p. 324)
On-Demand Streaming
•On-Demand Media Streaming with Unified Streaming (p. 325)
RTMP Streaming
•On-Demand Video Streaming Using CloudFront and Adobe Flash Player (p. 338)
•On-Demand Video Streaming Using CloudFront and Flowplayer for Adobe Flash (p. 343)
•On-Demand Video Streaming Using CloudFront and JW Player (p. 348)
Live HTTP Streaming Using CloudFront and
Adobe Media Server 5.0
Topics
•Overview (p. 287)
•Steps to Configure Live Streaming (p. 288)
•Creating an Amazon Web Services Account (p. 288)
API Version 2016-08-01
286
Amazon CloudFront Developer Guide
Live Streaming

•Creating an Amazon EC2 Key Pair (p. 288)
•Subscribing to Adobe Media Server (p. 289)
•Creating an AWS CloudFormation Stack for Live Streaming (p. 290)
•Verifying that Adobe Media Server Is Running (p. 291)
•Setting Up Adobe Flash Media Live Encoder to Publish a Live Stream (p. 292)
•Embedding Strobe Media Playback for an Amazon CloudFront Live HTTP Stream in a Web
Application (p. 295)
•Deleting an AWS CloudFormation Stack and an Amazon EBS Volume for Live Streaming (p. 296)
•Frequently Asked Questions (p. 297)
•Additional Documentation (p. 303)
With Amazon Web Services live streaming, you can use Adobe Media Server version 5.0 to stream live
performances, webinars, and other events.This tutorial walks you through the process of configuring live
streaming with Adobe Media Server 5.0.
Overview
Adobe Media Server 5.0 supports two HTTP streaming formats:
• HLS (HTTP Live Streaming), supported by iOS devices
•HDS (HTTP Dynamic Streaming), supported by Flash applications (including Strobe Media Playback)
Note
An earlier version of this tutorial explained how to configure HDS streaming using the Flash
Media Playback player, but Adobe stopped supporting that player. We've updated the tutorial
to use Strobe Media Playback, an open-source media player that is similar in functionality to
Flash Media Playback.
Here's how Adobe Media Server and CloudFront work together to stream an event in realtime:
1. You use AWS CloudFormation to provision an Amazon EC2 instance running Adobe Media Server
5.0 and to create a CloudFront distribution, as described in this tutorial.
2. You capture your event using a digital video camera, for example, the video camera in a laptop
computer.
3. You use an encoder on the site of the event, for example, Adobe Flash Media Live Encoder, to
compress the raw video feed and send it to Adobe Media Server. (Flash Media Live Encoder is a
free download and is available for Windows and Mac OS.)
4. Adobe Media Server breaks the video stream into a series of smaller files. This server is the origin
for your CloudFront distribution.
5. When your users browse to the CloudFront URL that you gave them to view the event, CloudFront
routes their HTTP requests to the nearest edge location (by latency).
6. The edge location requests the video stream from Adobe Media Server.
7. Adobe Media Server returns the video stream in small files to the CloudFront edge location.
8. The CloudFront edge location serves the video stream to the viewer that made the request, and
caches the small files to speed up the response to subsequent requests for the live stream.
This tutorial summarizes how to integrate CloudFront with Adobe Media Server running on an Amazon
EC2 instance. For more information about Adobe Media Server and about the AWS services that you
use for live streaming, see the following:
• For more information about Adobe Media Server options not covered in this tutorial, see Additional
Documentation (p. 303).
API Version 2016-08-01
287
Amazon CloudFront Developer Guide
Overview

• For information about available Adobe Media Server features, see Adobe Media Server 5 on Amazon
Web Services.
• To review the new features in Adobe Media Server 5.0, see What's New in Adobe Media Server 5.0.1
on the Adobe website.
• For more information about how to manage and secure your Amazon EC2 instance, see the Amazon
EC2 documentation.
• For more information about AWS CloudFormation, see AWS CloudFormation Documentation.
• For more help, see Frequently Asked Questions (p. 297).
Steps to Configure Live Streaming
To set up live streaming with Amazon Web Services (AWS), review the system requirements for Adobe
Flash Player. Then perform the procedures in the following sections:
1. Creating an Amazon Web Services Account (p. 288)
2. Creating an Amazon EC2 Key Pair (p. 288)
3. Subscribing to Adobe Media Server (p. 289)
4. Creating an AWS CloudFormation Stack for Live Streaming (p. 290)
5. Verifying that Adobe Media Server Is Running (p. 291)
6. Setting Up Adobe Flash Media Live Encoder to Publish a Live Stream (p. 292)
7. Embedding Strobe Media Playback for an Amazon CloudFront Live HTTP Stream in a Web
Application (p. 295)
8. Deleting an AWS CloudFormation Stack and an Amazon EBS Volume for Live Streaming (p. 296)
Creating an Amazon Web Services Account
If you already have an AWS account, skip to Creating an Amazon EC2 Key Pair (p. 288). If you don't
already have an AWS account, use the following procedure to create one.
Note
When you create an account, AWS automatically signs up the account for all services.You are
charged only for the services you use.
To create an AWS account
1. Go to http://aws.amazon.com, and click Create an AWS Account.
2. Follow the on-screen instructions.
Part of the sign-up procedure involves receiving a phone call and entering a PIN using the phone
keypad.
Next: Creating an Amazon EC2 Key Pair (p. 288)
Creating an Amazon EC2 Key Pair
If you already have an Amazon EC2 key pair in the Amazon EC2 region in which you want to configure
live streaming, skip to Subscribing to Adobe Media Server (p. 289). If you don't have a key pair in that
region, perform the following procedure.
A key pair is a security credential similar to a password.You specify a key pair when you create an AWS
CloudFormation stack for live streaming, later in this process. After live streaming is configured, you use
the key pair to securely connect to your Amazon EC2 instance.
API Version 2016-08-01
288
Amazon CloudFront Developer Guide
Steps to Configure Live Streaming

To create an Amazon EC2 key pair
1. Sign in to the AWS Management Console and open the Amazon EC2 console at https://
console.aws.amazon.com/ec2/.
2. In the Region list, click the region in which you want to create the key pair.
You must create the key pair in the same region in which you will create your AWS CloudFormation
stack for live streaming later in this process. We recommend that you create the key pair and the
stack for live streaming in the region that is closest to the users who will be doing the streaming.
3. In the navigation pane, click Key Pairs.
4. In the Key Pairs pane, click Create Key Pair.
5. In the Create Key Pair dialog box, enter a name for the key pair, and make note of the name.You'll
enter this value when you create an AWS CloudFormation live-streaming stack, later in the process
of setting up live streaming.
6. Click Create.
7. In the Opening <key_pair_name>.pem dialog box, save the .pem file to a safe place on your computer.
Important
This is the only opportunity you'll have to download and save your private key.
8. Click Close to close the Create Key Pair dialog box.
Next: Subscribing to Adobe Media Server (p. 289)
Subscribing to Adobe Media Server
Perform the following procedure to subscribe to Adobe Media Server for Amazon Web Services through
AWS Marketplace.
Important
You can subscribe an AWS account to Adobe Media Server only once. If your AWS account
already has an Adobe Media Server subscription, use that subscription to configure live streaming.
Adobe Media Server has a $5.00 monthly subscription fee, which includes an unlimited number of Adobe
Media Server instances. In addition to the monthly subscription fee, you pay a fee for hourly usage and
a fee for data transfer.You can view a detailed price list as part of the following procedure.
Note
In an earlier version of this tutorial, you subscribed to Adobe Media Server using Amazon DevPay
instead of AWS Marketplace. If you're currently running Adobe Media Server and you subscribed
using Amazon DevPay, go to the Adobe Media Server on Amazon Web Services page and
cancel your Amazon DevPay subscription to Adobe Media Server. Otherwise, you'll continue to
be billed $5 per month for the old subscription through Amazon DevPay, and you'll be billed an
additional $5 per month for the new subscription through AWS Marketplace.
To order Adobe Media Server 5 for Amazon Web Services
1. Go to the Adobe Media Server 5 Extended page on the AWS Marketplace website.
2. Review product information and click Continue.
3. On the Launch on EC2: Adobe Media Server 5 Extended page, click the Manual Launch with
EC2 Console, APIs or CLI tab.
4. In the Pricing Details section, select the region in which to create an Amazon EC2 instance for live
streaming. Review the corresponding pricing information.
API Version 2016-08-01
289
Amazon CloudFront Developer Guide
Subscribing to Adobe Media Server

Important
Don't use the buttons on this page to launch Adobe Media Server. In the next procedure,
you create an AWS CloudFormation stack that launches an Amazon EC2 instance and
installs Adobe Media Server.
5. Click Accept Terms to sign up for a monthly subscription.
Next: Creating an AWS CloudFormation Stack for Live Streaming (p. 290)
Creating an AWS CloudFormation Stack for Live
Streaming
The following procedure uses an AWS CloudFormation template to create a stack that launches the AWS
resources required by live streaming, including an Amazon EC2 instance and a CloudFront distribution.
Important
You incur hourly charges for an Amazon EC2 instance beginning when you create the AWS
CloudFormation stack that deploys the Amazon EC2 instance. Charges continue to accrue until
you delete the AWS CloudFormation stack regardless of whether you use the Amazon EC2
instance to stream live video. For more information, see the Adobe Media Server 5 Extended
page on the AWS Marketplace website. When your live event is over, delete the stack that you
created for live streaming.This deletes the AWS resources that were created for your
live-streaming event, and stops the AWS charges for the resources. For more information, see
Deleting an AWS CloudFormation Stack and an Amazon EBS Volume for Live Streaming (p. 296).
For more information about AWS CloudFormation, see AWS CloudFormation Documentation.
To create an AWS CloudFormation stack for live streaming
1. To start the Create Stack wizard, click one of the following Amazon EC2 regions:
•Create a stack in US East (N.Virginia)
•Create a stack in US West (Oregon)
•Create a stack in US West (N. California)
•Create a stack in EU (Ireland)
•Create a stack in Asia Pacific (Singapore)
•Create a stack in Asia Pacific (Tokyo)
•Create a stack in Asia Pacific (Sydney)
•Create a stack in South America (São Paulo)
The wizard starts and the applicable URL automatically appears in the Provide an S3 URL to
template field.
Note
If you want users to view your live stream using a Flash-based player that is hosted on your
own domain, see How do I update crossdomain.xml for a Flash-based stream hosted on
my own domain? (p. 299).
2. If you are not already signed in to the AWS Management Console, sign in when prompted.
3. (Optional) Change the Stack Name.The stack name must not contain spaces, and it must be unique
within your AWS account.
Do not change the Template option or the address in Provide an S3 URL to template.
4. Click Next Step.
API Version 2016-08-01
290
Amazon CloudFront Developer Guide
Creating an AWS CloudFormation Stack for Live
Streaming

5. On the Specify Parameters page, for AMSAdminPassword, enter a password (minimum 8
characters) for the AMS Administration Console.
6. For AMSAdminUserName, enter a user name.You'll use this value and the password that you
entered in the previous step to log in to the AMS Administration Console after your Amazon EC2
Adobe Media Server instance is created.
7. For InstanceType, enter an instance type, which determines pricing for your Adobe Media Server
instance. For more information about Amazon EC2 instance types, see Available Instance Types in
the Amazon EC2 User Guide for Linux Instances.
For information about pricing, see the Adobe Media Server 5 Extended page on the AWS Marketplace
website.
8. For KeyPair, enter the name of an Amazon EC2 key pair in the same region that you chose in Step
1.The key pair must be associated with the account that you're currently signed in with. If you created
a key pair when you performed the procedure in Creating an Amazon EC2 Key Pair (p. 288), enter
the name of that key pair.
9. For StreamName, enter a short name (without spaces) for your live stream.
10. Click Next Step.
11. (Optional) On the Add Tags page, add one or more tags.
12. (Optional) To configure SNS notification, to specify how long you're willing to wait for the stack to be
created, to choose whether to roll back changes if stack creation fails, and to enter a stack policy,
click Advanced, and adjust settings as desired.
13. Click Next Step.
14. Review the settings for the stack. When you're satisfied with the settings, click Create, and AWS
CloudFormation creates the stack.
Creating your stack may take several minutes.To track the progress of the stack creation, select the
stack, and click the Events tab in the bottom frame. If AWS CloudFormation cannot create the stack,
the Events tab lists error messages.
When your stack is ready, in the top frame, the status for the stack changes to CREATE_COMPLETE.
When your stack is created, click the Outputs tab, which displays the stack creation outputs.You
will use these values when you set up Adobe Flash Media Live Encoder later in the process.
Next: Verifying that Adobe Media Server Is Running (p. 291)
Verifying that Adobe Media Server Is Running
After AWS CloudFormation creates the stack, perform the following procedure to verify Adobe Media
Server is running on the Amazon Amazon EC2 instance you provisioned using AWS CloudFormation.
To verify that Adobe Media Server is running
1. Open the AWS CloudFormation console at https://console.aws.amazon.com/cloudformation/.
2. In the top pane, select the stack that you created in Creating an AWS CloudFormation Stack for Live
Streaming (p. 290).
3. In the bottom pane, click the Outputs tab.
4. Click on the value of the AMSServer key, which is the URL to the Amazon EC2 instance that you
provisioned when you performed the procedure in Creating an AWS CloudFormation Stack for Live
Streaming (p. 290).
5. The Adobe Media Server page appears and begins streaming content, which shows that Adobe
Media Server is running.
API Version 2016-08-01
291
Amazon CloudFront Developer Guide
Verifying that Adobe Media Server Is Running

If streaming does not start, return to Overview (p. 287), and verify that the values you specified in the
first four tasks are correct.
If the values were all correct, but streaming still has not started, see How do I troubleshoot my Amazon
EC2 instance if streaming doesn't start? (p. 303).
Next: Setting Up Adobe Flash Media Live Encoder to Publish a Live Stream (p. 292)
Setting Up Adobe Flash Media Live Encoder to
Publish a Live Stream
Adobe Media Server on Amazon Web Services includes an application called livepkgr that packages
published streams for delivery using HTTP Dynamic Streaming (HDS) and HTTP Live Streaming (HLS).
The following procedure shows how to set up Adobe Flash Media Live Encoder (FMLE) to publish your
live stream to the livepkgr application on Adobe Media Server 5.0.
Note
The Windows version of Flash Media Live Encoder doesn't support the AAC audio format. To
add support for AAC, Adobe recommends that you purchase the MainConcept AAC encoder.
To specify live-streaming settings in Flash Media Live Encoder
1. Sign in to the computer that you'll use to broadcast the live stream.
2. Open a web browser, and go to the Adobe Flash Media Live Encoder page.
3. Download and install Flash Media Live Encoder.
Note
Flash Media Live Encoder is free, but to download it, you need an Adobe account (also
free).
4. Open the Flash Media Live Encoder config.xml file in a text editor.The default installation location
depends on your operating system:
•32-bit Windows: C:\Program Files\Adobe\Flash Media Live Encoder 3.2.
•64-bit Windows: C:\Program Files (x86)\Adobe\Flash Media Live Encoder 3.2\Conf.
•Macintosh: Applications:Adobe:Flash Media Live Encoder 3.2.
5. In config.xml, set the value of the following <enable> element to true:
<flashmedialiveencoder_config>
...
<mbrconfig>
...
<streamsynchronization>
...
<!-- "true" to enable this feature, "false" to disable. -->
<enable>true</enable>
6. Save the file.
7. Run Flash Media Live Encoder.
8. On the Encoding Options tab, for Preset, select High Bandwidth (800 Kbps) — H.264.
9. On the Encoding Options tab, under the Audio check box, for Format, select AAC.
API Version 2016-08-01
292
Amazon CloudFront Developer Guide
Setting Up Adobe Flash Media Live Encoder to Publish
a Live Stream
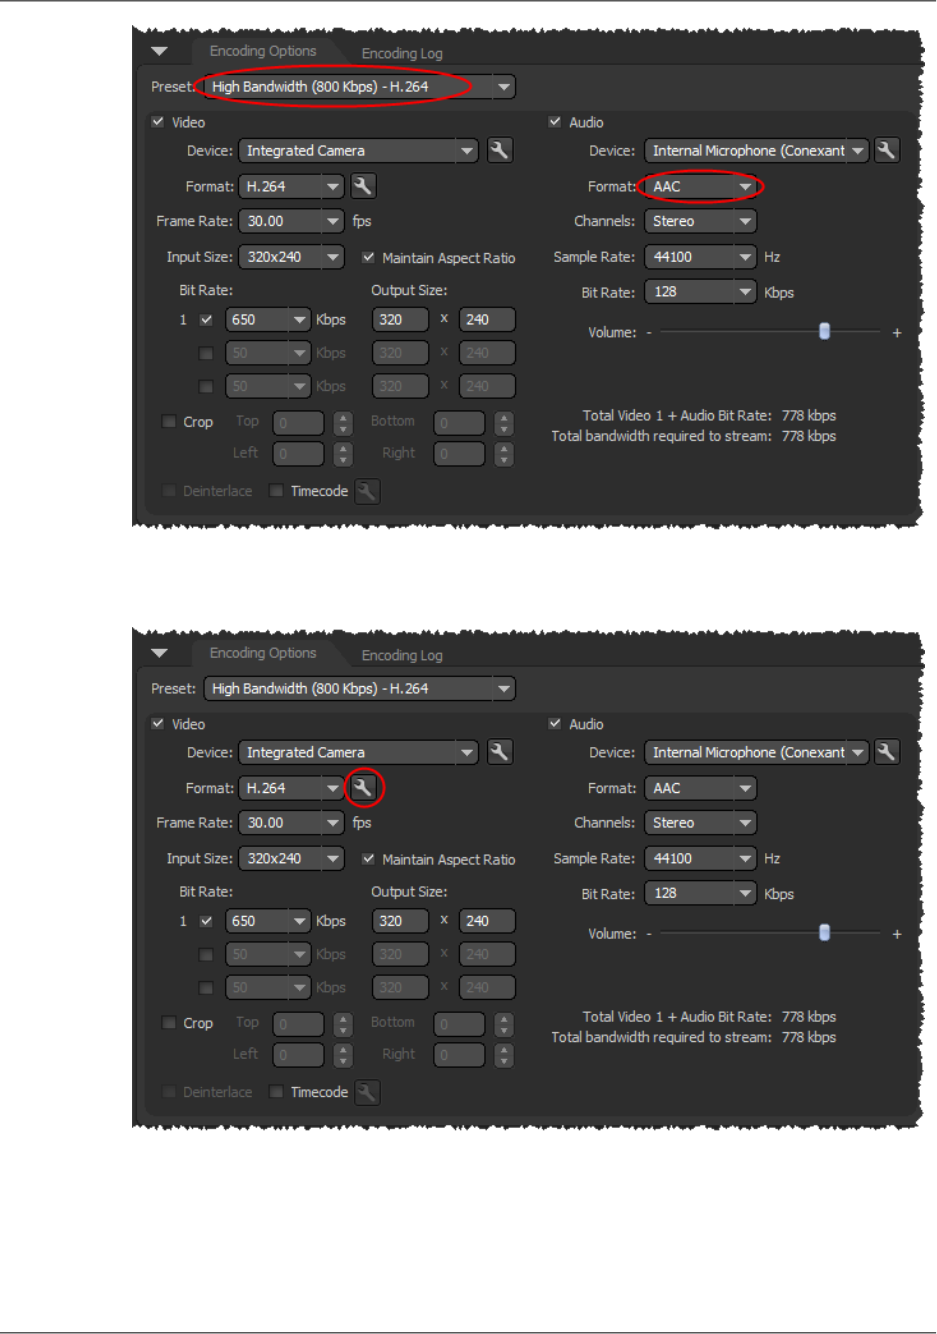
10. In the Video section of the Encoding Options tab, click the wrench icon to the right of the Format
list to open the Advanced Encoder Settings dialog box.
11. In the Advanced Encoder Settings dialog box, for Keyframe Frequency, select 4 Seconds.
You can also use a multiple of the value of the <FragmentDuration> element in the
applications/livepkgr/events/_definst_/liveevent/Event.xml file.The default value
of <FragmentDuration> is 4000 milliseconds (4 seconds).
API Version 2016-08-01
293
Amazon CloudFront Developer Guide
Setting Up Adobe Flash Media Live Encoder to Publish
a Live Stream
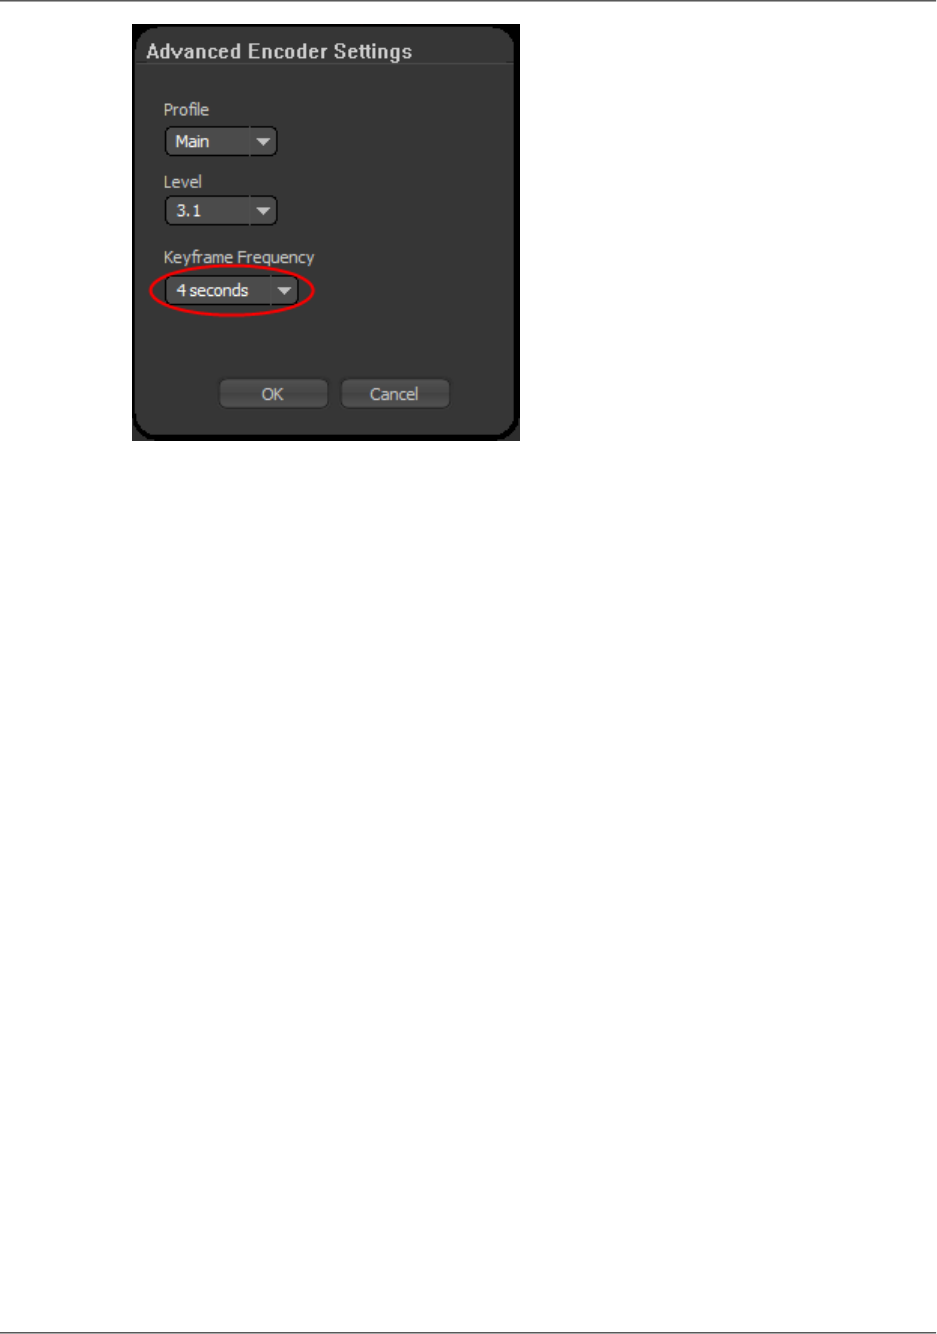
12. Click OK to save the setting and return to the main page.The selection for the Preset list changes
to Custom.
13. Open the AWS CloudFormation console at https://console.aws.amazon.com/cloudformation/.
14. Check the checkbox for the stack that you created for live streaming.
15. In the bottom pane, click the Outputs tab.
16. Copy the value of the AMSURL key, for example,
rtmp://ec2-00-11-22-33.us-west-1.compute.amazonaws.com/livepkgr.
17. In Flash Media Live Encoder, in the Stream to Flash Media Server section, in the FMS URL setting,
paste the value of the AMSURL key that you copied from the AWS CloudFormation console.
18. In the AWS CloudFormation console, copy the value of the Stream key, for example,
livestream?adbe-live-event=liveevent.
19. In Flash Media Live Encoder, in the Stream setting, paste the value of the Stream key that you
copied from the AWS CloudFormation console.
Note
If you anticipate having to stop and restart the live stream, enter the following value in the
Stream field instead:
livestream?adbe-live-event=liveevent&adbe-record-mode=record
If you publish a live stream in record mode (adbe-record-mode=record), and then stop
the stream and restart it, Adobe Media Server will delete the previous stream and start a
new stream instead of appending to the previous stream when you restart. However, if you
don't use record mode and you stop the live stream, you have to reconfigure live streaming
before you can restart the stream.
API Version 2016-08-01
294
Amazon CloudFront Developer Guide
Setting Up Adobe Flash Media Live Encoder to Publish
a Live Stream
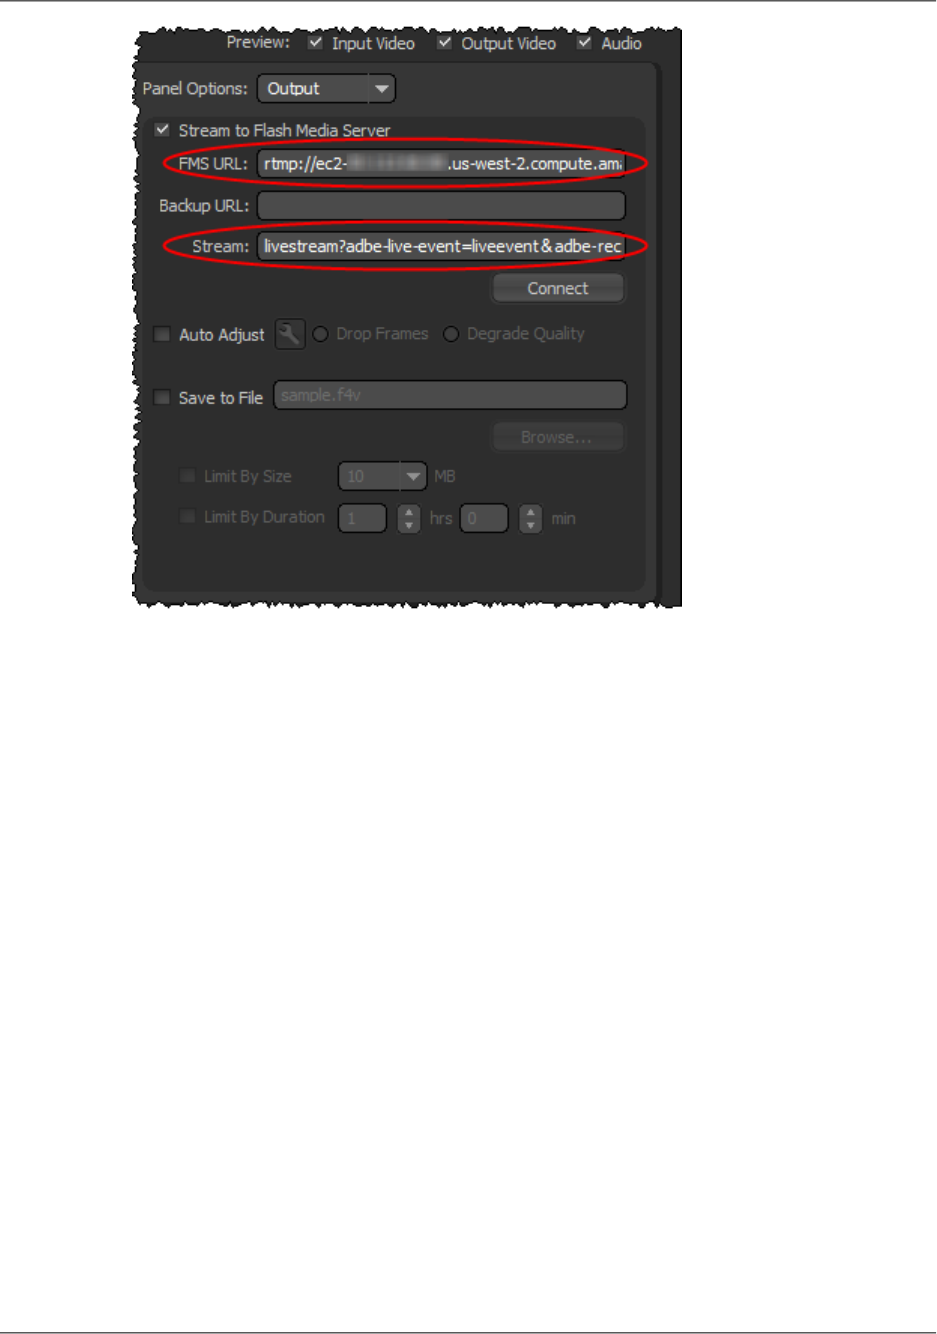
20. Uncheck Save to File.
21. Click Connect to connect to your Adobe Media Server instance.
22. Click Start to start encoding and publishing your live stream to the livepkgr application on your Adobe
Media Server instance.
Next: Embedding Strobe Media Playback for an Amazon CloudFront Live HTTP Stream in a Web
Application (p. 295)
Embedding Strobe Media Playback for an Amazon
CloudFront Live HTTP Stream in a Web Application
Follow one of these procedures to get the embed code that you will include in your web page for the live
stream:
•To embed Strobe Media Playback for your HTTP stream (p. 295)
•To play your live HLS stream on an Apple device by using CloudFront (p. 296)
To embed Strobe Media Playback for your HTTP stream
1. Download the latest version of Open Source Media Framework (OSMF), which contains Strobe
Media Playback. OSMF is available at http://sourceforge.net/projects/osmf.adobe/files/.
2. Unzip the file that you downloaded in step 1.
3. In the location where you unzipped the downloaded file, find StrobeMediaPlayback.swf, and copy it
to a location, such as an Amazon S3 bucket, that is accessible to your live-streaming users.
4. Confirm that your users have the permissions necessary to access StrobeMediaPlayback.swf.
API Version 2016-08-01
295
Amazon CloudFront Developer Guide
Embedding Strobe Media Playback for an Amazon
CloudFront Live HTTP Stream in a Web Application

5. Change permissions in the crossdomain.xml file to allow users to view the live stream using Strobe
Media Playback. For more information, see How do I update crossdomain.xml for a Flash-based
stream hosted on my own domain? (p. 299)
6. In the location where you unzipped the downloaded file, find setup.html and open it in a web browser.
7. On the Change Your Flash Vars page, in the Embed Parameters section, in the Source field, enter
the full URL for StrobeMediaPlayback.swf.This is the file that you copied in step 3. For example:
https://myawsbucket.s3.amazonaws.com/LiveStreaming/StrobeMediaPlayback.swf
8. Open the AWS CloudFormation console at https://console.aws.amazon.com/cloudformation/.
9. Select the stack for live streaming.
10. In the bottom pane, click the Outputs tab.
11. Copy the value of the LiveHDSManifest key, as shown in the following example:
http://d123.cloudfront.net/hds-live/livepkgr/_definst_/liveevent/livestream.f4m
12. Back on the Change Your Flash Vars page, in the Flash Vars section, in the src field, paste the
value that you copied in step 11.
13. At the bottom of the Change Your Flash Vars page, click Preview and Update.
14. Play the video to ensure that you're satisfied with the current settings, and update the settings as
needed.
15. If you change any settings, click Preview and Update again.
16. To embed Strobe Media Playback in a web page, copy the contents of the Preview Code text box,
and paste it into the HTML code for your website.
To play your live HLS stream on an Apple device by using CloudFront
1. Change permissions in the crossdomain.xml file to allow users to view the live stream using an Apple
device. For more information, see How do I update crossdomain.xml for a Flash-based stream hosted
on my own domain? (p. 299)
2. Open the AWS CloudFormation console at https://console.aws.amazon.com/cloudformation/.
3. Select the stack for live streaming.
4. In the bottom pane, click the Outputs tab.
5. Copy the value of the LiveHLSManifest key, as shown in the following example:
http://d123.cloudfront.net/hls-live/livepkgr/_definst_/liveevent/livestream.m3u8.
6. Navigate to this URL using an iOS device to verify that HLS streaming is working correctly.
For information about where to use the URL to serve various iOS devices, QuickTime, and Safari, see
HTTP Live Streaming Overview in the iOS Developer Library.
For more information about publishing and playing live streams over HTTP, see URLs for publishing and
playing live streams over HTTP in the Adobe Media Server 5.0.1 Developer's Guide.
Next: Deleting an AWS CloudFormation Stack and an Amazon EBS Volume for Live Streaming (p. 296)
Deleting an AWS CloudFormation Stack and an
Amazon EBS Volume for Live Streaming
When your live event is over, delete the stack that you created for live streaming. This deletes most of
the AWS resources that were created for your live-streaming event, and stops most of the AWS charges
for the resources. In addition, delete the Amazon EBS volume that is created by AWS CloudFormation
but is not deleted when you delete the stack.This stops the rest of the AWS charges for the resources.
API Version 2016-08-01
296
Amazon CloudFront Developer Guide
Deleting an AWS CloudFormation Stack and an Amazon
EBS Volume for Live Streaming

To delete an AWS CloudFormation stack and an Amazon EBS volume for live streaming
1. Sign in to the AWS Management Console and open the AWS CloudFormation console at https://
console.aws.amazon.com/cloudformation/.
2. Find the AWS CloudFormation stack that you created for live streaming, and make note of the creation
time.This will help you identify the Amazon EBS volume that you'll delete later in this procedure.
3. Select the stack, and click Delete Stack.
4. Click Yes, Delete to confirm.
5. To track the progress of the stack deletion, select the stack, and click the Events tab in the bottom
frame.
6. Navigate to the Amazon EC2 console.
7. In the navigation pane, click Volumes.
8. Select the volume that the AWS CloudFormation stack created, click Actions, and click Delete
Volume.
If you have multiple Amazon EBS volumes, use the date and time that you made note of in step 2
to locate the volume that the AWS CloudFormation stack created.
9. If you don't plan to use live streaming again soon, you can cancel your subscription to Adobe Media
Server on AWS Marketplace. To cancel the subscription, go to your subscriptions page on AWS
Marketplace, find the row for Adobe Media Server, click Cancel Subscription, and follow the
on-screen prompts.
Frequently Asked Questions
•How can I use Secure Shell (SSH) to connect to my Amazon EC2 instance that is running Adobe Media
Server 5.0? (p. 297)
•How do I update crossdomain.xml for a Flash-based stream hosted on my own domain? (p. 299)
•What is the price for live HTTP streaming using CloudFront and Adobe Media Server 5.0? (p. 300)
•How can I create a CNAME alias for my Amazon EC2 instance or for my CloudFront distribution? (p. 300)
•How can I connect to the Adobe Media Server Administration Console? (p. 300)
•Can I stream my live event both to Apple devices and to Flash Player–compatible devices? (p. 301)
•Does Adobe Media Server 5.0 support HTML5? (p. 301)
•Does Adobe Media Server have logging? (p. 302)
•How can I enable authentication on Adobe Media Server? (p. 302)
•What are the default cache-control settings on HDS- and HLS-related files? (p. 302)
•What is the difference between HLS and HDS? (p. 302)
•How do I troubleshoot my Amazon EC2 instance if streaming doesn't start? (p. 303)
•Where can I find the documentation for live streaming using Adobe Flash Media Server 4.5? (p. 303)
How can I use Secure Shell (SSH) to connect to my Amazon
EC2 instance that is running Adobe Media Server 5.0?
Note
By default, the SSH port for the Amazon EC2 instance (port 22) is disabled for security reasons.
The following procedure explains how to enable the SSH port and how to use SSH to connect
to your Amazon EC2 instance.
API Version 2016-08-01
297
Amazon CloudFront Developer Guide
Frequently Asked Questions

To enable access to port 22 on your Amazon EC2 instance that is running Adobe Media
Server 5.0
1. Get the name of the Amazon EC2 security group that is associated with your Amazon EC2 instance:
a. Sign in to the AWS Management Console and open the AWS CloudFormation console at https://
console.aws.amazon.com/cloudformation/.
b. In the Region list, select the region in which you created your Amazon EC2 instance.
c. Click the row for your AWS CloudFormation stack.
d. In the bottom pane, click the Resources tab.
e. In the left column of the Stack Resources table, find the row for which the value is
AMSOriginServerSecurityGroup.
f. For that row, write down the value of the Physical ID column.
2. Open the Amazon EC2 console at https://console.aws.amazon.com/ec2/.
3. In the navigation pane, click Security Groups.
4. On the Security Groups page, select the row in which the Name column matches the physical ID
that you got in Step 1f.
5. In the bottom pane, click the Inbound tab.
6. For Create a new rule, select SSH.
7. Click Add Rule.
8. Click Apply Rule Changes.
To use SSH to connect to your Amazon EC2 instance that is running Adobe Media Server
5.0
1. Open the Amazon EC2 console at https://console.aws.amazon.com/ec2/.
2. In the navigation pane, click Instances.
3. Right-click the correct instance, and click Connect to view instructions on how to use SSH to connect
to your Amazon EC2 instance.
API Version 2016-08-01
298
Amazon CloudFront Developer Guide
Frequently Asked Questions
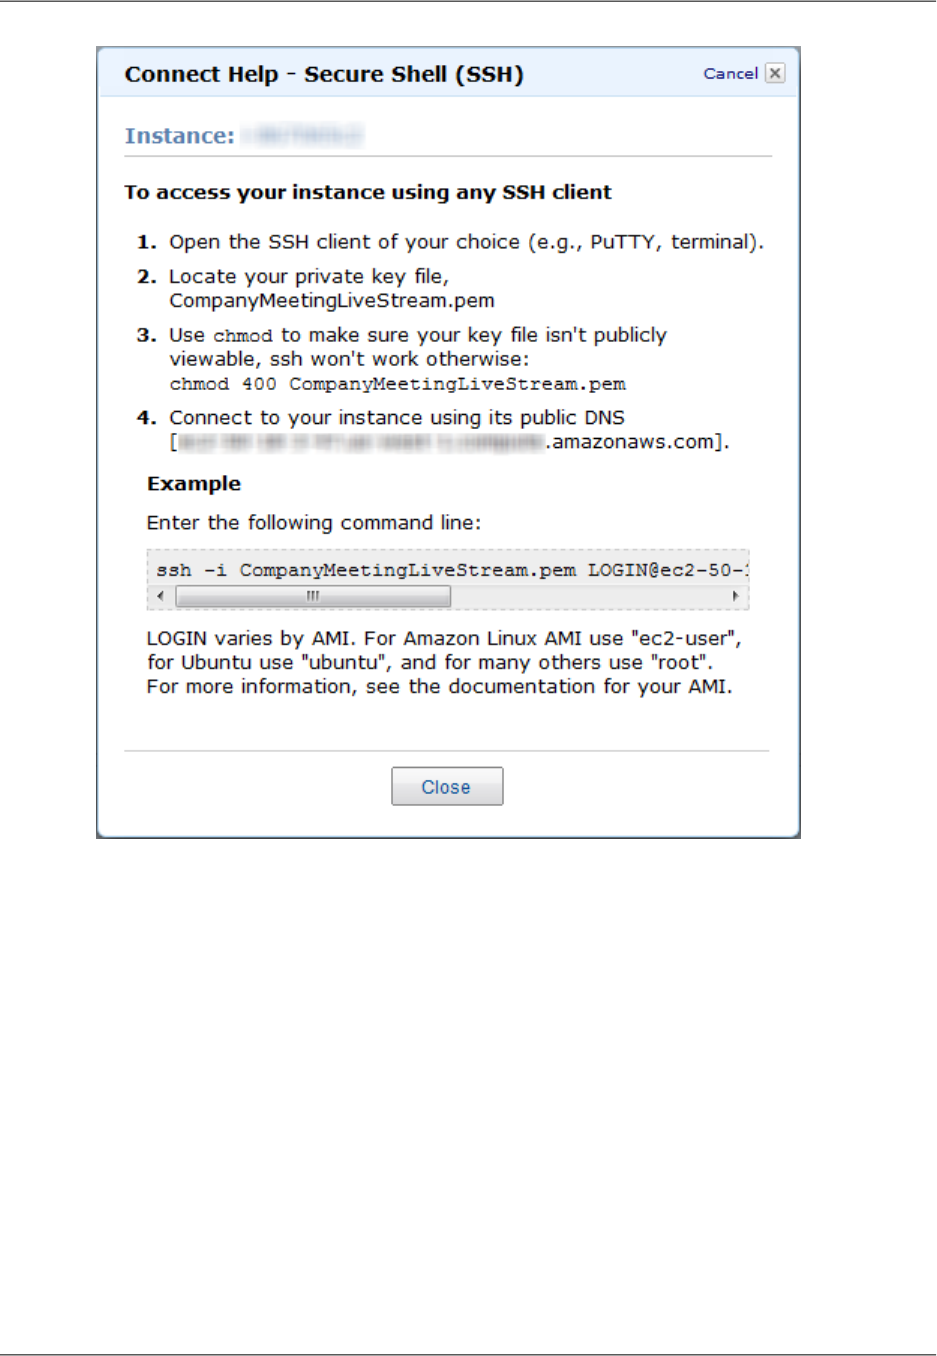
How do I update crossdomain.xml for a Flash-based stream
hosted on my own domain?
You can change permissions in crossdomain.xml either before or after you create the AWS
CloudFormation stack:
•If you have not created your AWS CloudFormation stack, download the AWS CloudFormation template
for Live Streaming using Amazon CloudFront and Adobe Media Server 5.0 at https://s3.amazonaws.com/
cloudfront-live/live-http-streaming-ams-5-0-1-using-cloudfront.txt. In the template, edit the UserData
section, which contains the crossdomain.xml settings, and save the updated template on your local
computer. Then create your AWS CloudFormation stack using the updated template.
• If you have already created your AWS CloudFormation stack, log in to Adobe Media Server running
on your Amazon EC2 instance, and change permissions in the cross-domain policy file,
/mnt/webroot/crossdomain.xml.
For more information about editing the crossdomain.xml file, see Adobe Cross Domain Policy File
Specification.
API Version 2016-08-01
299
Amazon CloudFront Developer Guide
Frequently Asked Questions

What is the price for live HTTP streaming using CloudFront
and Adobe Media Server 5.0?
In addition to the $5.00 monthly subscription fee for Adobe Media Server on Amazon EC2, you pay only
for the AWS resources you consume:
•For pricing information about Adobe Media Server running on Amazon EC2, see Adobe Media Server
5 on Amazon Web Services / Pricing.
• For pricing information about CloudFront, see Amazon CloudFront Pricing.
There is no charge for using AWS CloudFormation.
How can I create a CNAME alias for my Amazon EC2 instance
or for my CloudFront distribution?
Your Amazon EC2 instance running Adobe Media Server 5.0 comes with an internal and an external
DNS name. Amazon EC2 does not provide access to modify these DNS settings. If you want to map an
existing domain name to your Amazon EC2 instance running Adobe Media Server, use a DNS service
provider such as Amazon Route 53. When using your own domain name, we recommend that you map
to the instance's external DNS name using a CNAME, not by using an A record that points to the instance's
IP address.
To map your own domain name to your CloudFront distribution, see Using Alternate Domain Names
(CNAMEs) (p. 50).
How can I connect to the Adobe Media Server Administration
Console?
To connect to the Adobe Media Server Administration Console
1. Sign in to the AWS Management Console and open the AWS CloudFormation console at https://
console.aws.amazon.com/cloudformation/.
2. Select the stack for live streaming.
3. In the bottom pane, click the Outputs tab.
4. Copy the value of the AMSAdminConsoleServerAddress key.
5. Click the value of the AMSServerAdminConsole key, for example,
http://ec2-00-11-22-33.us-west-1.compute.amazonaws.com/ams_adminConsole.htm.
6. On the login page for the Adobe Media Server Administration Console, in Server Address, paste
the AMSAdminConsoleServerAddress key that you copied in Step 4.
7. In the Username and Password fields, enter the values that you specified in Creating an AWS
CloudFormation Stack for Live Streaming (p. 290).
8. Click Login.
For information about using the Adobe Media Server 5.0 Administration Console, see the Adobe Media
Server documentation.
Note
Adobe recommends that you block all external access to port 1111 so that access to the
Administration Console is restricted only to clients that are within your firewall. As an alternative,
you can restrict access to the server by using domain-based restrictions. For more information,
see Limit access to Adobe Media Administration Server in the Adobe documentation.
API Version 2016-08-01
300
Amazon CloudFront Developer Guide
Frequently Asked Questions

To disable or restrict access to port 1111 on your Adobe Media Server
1. Get the name of the Amazon EC2 security group that is associated with your Amazon EC2 instance:
a. Sign in to the AWS Management Console and open the AWS CloudFormation console at https://
console.aws.amazon.com/cloudformation/.
b. For Region, click the name of the region in which you created your Amazon EC2 instance.
c. Select the row for your AWS CloudFormation stack.
d. In the bottom pane, click the Resources tab.
e. In the Stack Resources table, in the AMSOriginServerSecurityGroup row, write down the
value of the Physical ID column.
2. Display the Amazon EC2 console.
3. In the navigation pane, click Security Groups.
4. In the Security Groups pane, select the security group that AWS CloudFormation created for your
Amazon EC2 instance. The name is the value that you wrote down in Step 1e.
5. In the bottom pane, click the Inbound tab.
6. To completely disable access to the Adobe Media Server Administration console:
a. In the TCP Port (Service) column, find 1111.
b. In the Action column for that row, click Delete.
c. Click Apply Rule Changes.
7. To restrict access to selected IP addresses:
a. In the TCP Port (Service) column, find 1111, and click Delete.
b. For Create a new rule, accept the default value, Custom TCP rule.
c. For Port range, enter 1111.
d. For Source, enter an IP address or range, or enter the name of another security group. For
more information, click Help.
e. Click Add Rule.
f. To create additional rules, repeat Steps b through e.
g. Click Apply Rule Changes.
Can I stream my live event both to Apple devices and to
Flash Player–compatible devices?
Yes, Adobe Media Server 5.0 enables the delivery of live streams to both Flash-based and iOS devices
at the same time.You can stream to the Safari browser using an HTML5 player or an Objective C ("native")
application.You can also use Adobe AIR for iOS to develop a rich video experience on iOS.
Does Adobe Media Server 5.0 support HTML5?
Yes. Adobe Media Server can deliver content to HTML5 on Apple iOS devices using the HLS streaming
format. For other browsers supporting HTML5, you can use Adobe Media Server to deliver progressively.
API Version 2016-08-01
301
Amazon CloudFront Developer Guide
Frequently Asked Questions

Does Adobe Media Server have logging?
Yes.W3C-compliant ASCII logs, a real-time usage monitor, and a complete API for server and stream
events help to ensure that you have all the tools you need to track and generate reports on your audience's
content use. For more information about monitoring and managing log files in Adobe Media Server 5.0,
see Monitoring and Managing Log Files in the Adobe documentation.
How can I enable authentication on Adobe Media Server?
You can restrict access to RTMP port 1935 (for both TCP and UDP) in the security group created by
AWS CloudFormation for your Adobe Media Server Amazon EC2 instance. Just create new TCP and
UDP rules for port 1935 and then delete the existing TCP and UDP rules for port 1935, which allow access
to all IP addresses.
For a quick overview of how to add a rule to a security group, see How can I connect to the Adobe Media
Server Administration Console? (p. 300). For more information about Amazon EC2 security groups, see
Amazon EC2 Security Groups in the Amazon EC2 User Guide for Linux Instances.
What are the default cache-control settings on HDS- and
HLS-related files?
The default cache control headers on HDS- and HLS-related files are set to the following values:
Cache-Control Setting (Seconds)File Type
2.bootstrap
60HDS Fragment
2.f4m
2.m3u8
60.ts
The CloudFront edge cache servers honor these cache control headers.You can change the default
settings by changing the values of the HttpStreamingF4MMaxAge, HttpStreamingBootstrapMaxAge,
and HttpStreamingFragMaxAge parameters on the server. For more information, see HTTP streaming
configuration file reference in the Adobe documentation.
What is the difference between HLS and HDS?
HLS is a file container format optimized for Apple devices. The container supports H.264/AAC-encoded
video and audio, and is based on MPEG-2 transport stream (TS). All video delivered to iOS (including
AIR for IOS) must use this format.
HDS is a file container format optimized for applications that run in Flash Player. The container also
supports H.264/AAC-encoded video and audio and is based on MPEG-4 TS. HDS is not supported on
AIR for iOS.
API Version 2016-08-01
302
Amazon CloudFront Developer Guide
Frequently Asked Questions

How do I troubleshoot my Amazon EC2 instance if streaming
doesn't start?
If you performed the procedure To verify that Adobe Media Server is running (p. 291) and streaming still
hasn't started, perform the following procedure to confirm that the Amazon EC2 instance is functioning
correctly.
To troubleshoot your Amazon EC2 instance running Adobe Media Server 5.0
1. In the AWS CloudFormation console, in the top pane, select the stack.
2. In the bottom pane, click the Resources tab.
3. For the AMSOriginServer row, write down the value of the Physical ID column.
4. Go to the Amazon EC2 console.
5. In the Region list, select the region in which you created the AWS CloudFormation stack.
6. In the navigation pane, click Instances.
7. In the Instance column, find the value that you wrote down in Step c.
8. Select the corresponding row.
9. In the bottom pane, review the information on the Status Checks tab, and take the recommended
actions.
10. Return to the procedure To verify that Adobe Media Server is running (p. 291), and repeat Steps 2
through 5.
Where can I find the documentation for live streaming using
Adobe Flash Media Server 4.5?
For the documentation for live streaming using Adobe Flash Media Server 4.5, see "Live Streaming Using
CloudFront and Adobe Flash Media Server 4.5" in the "CloudFront Tutorials" chapter of the Amazon
CloudFront Developer Guide for CloudFront API version 2012-07-01.
Additional Documentation
Adobe Documentation
•Using Adobe Media Server on Amazon Web Services
•Adobe Cross Domain Policy File Specification
•Flash Media Live Encoder
•Flash Media Live Encoder FAQ
•Video Encoding and Transcoding Recommendations for HTTP Dynamic Streaming on the Adobe Media
Server Platform
•Adobe Media Server Technical Overview
Amazon Web Services Documentation
•Amazon Elastic Compute Cloud documentation
•AWS CloudFormation documentation
API Version 2016-08-01
303
Amazon CloudFront Developer Guide
Additional Documentation

Live Smooth Streaming Using Amazon
CloudFront and IIS Media Services 4.1
Topics
•Overview of Live Smooth Streaming with Amazon Web Services (p. 304)
•Creating an Amazon Web Services Account (p. 305)
•Creating an Amazon EC2 Key Pair (p. 305)
•Creating an AWS CloudFormation Stack for Live Smooth Streaming (p. 306)
•Verifying that Your Amazon EC2 Windows Server Instance Is Running (p. 309)
•Getting Your Windows Password (p. 309)
•Encoding Your Live Stream (p. 310)
•Viewing Your Live Smooth Stream (p. 311)
•Deleting Your AWS CloudFormation Live Smooth Streaming Stack (p. 311)
•Frequently Asked Questions (p. 311)
•Additional Documentation (p. 313)
Overview of Live Smooth Streaming with Amazon
Web Services
Smooth Streaming is the Microsoft implementation of adaptive streaming technology, which is a form of
web-based media content delivery that uses standard HTTP. An extension of IIS Media Services, Smooth
Streaming enables adaptive streaming of live events to Smooth Streaming clients such as Microsoft
Silverlight. When you configure Smooth Streaming to use CloudFront, you benefit from the scale of
CloudFront's global HTTP network and from latency-based routing of viewers to edge nodes on the
network. To learn more about CloudFront, go to the CloudFront product page.
Smooth Streaming content is delivered to clients as a series of MPEG-4 (MP4) fragments that can be
cached at the CloudFront edge servers. Smooth Streaming–compatible clients use special heuristics to
dynamically monitor current network and local PC conditions, and seamlessly switch the video quality of
the Smooth Streaming presentation that the clients receive. As clients play the fragments, network
conditions may change (for example, bandwidth may decrease) or video processing may be affected by
other applications that are running on the client. Clients can immediately request that the next fragment
come from a stream that is encoded at a different bit rate to accommodate the changing conditions.This
enables clients to play the media without stuttering, buffering, or freezing. As a result, users experience
the highest-quality playback available without interruptions in the stream.
To encode a live broadcast to Smooth Streaming format, you use Microsoft Expression Encoder 4 Pro.
To serve the encoded Smooth Stream, you can then use an Amazon EC2 Amazon Machine Image (AMI)
that is running Windows IIS Media Services. CloudFront caches the live video and audio content, and
viewers connect to the CloudFront edge servers to play the stream using a Smooth Streaming-compatible
client such as Microsoft Silverlight. This tutorial walks you through the entire setup process.
Note
Microsoft Expression Encoder 4 Pro with Service Pack 2 is not included in the Amazon EC2
Amazon Machine Image (AMI) that is running Windows IIS Media Services, and it is not a free
download. For information about features and pricing, go to the Expression Encoder 4 Pro page
on the Microsoft Store website.You can also use a third-party encoding tool to encode your
video for Live Smooth Streaming. For a list of Microsoft partners that provide encoding software,
see the Partners tab on the IIS Media Services page on the Microsoft website.
API Version 2016-08-01
304
Amazon CloudFront Developer Guide
Live Smooth Streaming Using Amazon CloudFront and
IIS Media Services 4.1

Note
This tutorial provides an overview of how to integrate CloudFront with Microsoft Live Smooth
Streaming running on an Amazon EC2 instance. For more information about how to manage
and secure your Amazon EC2 instance, refer to the Amazon EC2 documentation. For more
information about Microsoft Live Smooth Streaming options not covered in this tutorial, see
Microsoft Documentation (p. 313).
To set up Live Smooth Streaming with Amazon Web Services (AWS), review the system requirements
for IIS Smooth Streaming in the Smooth Streaming Deployment Guide.Then perform the procedures in
the following sections:
1. Creating an Amazon Web Services Account (p. 305)
2. Creating an Amazon EC2 Key Pair (p. 305)
3. Creating an AWS CloudFormation Stack for Live Smooth Streaming (p. 306)
4. Verifying that Your Amazon EC2 Windows Server Instance Is Running (p. 309)
5. Getting Your Windows Password (p. 309)
6. Encoding Your Live Stream (p. 310)
7. Viewing Your Live Smooth Stream (p. 311)
8. Deleting Your AWS CloudFormation Live Smooth Streaming Stack (p. 311)
For frequently asked questions, see Frequently Asked Questions (p. 311).
For links to additional Microsoft and AWS documentation, see Additional Documentation (p. 313).
Creating an Amazon Web Services Account
If you already have an AWS account, skip to Creating an Amazon EC2 Key Pair (p. 305). If you don't
already have an AWS account, use the following procedure to create one.
Note
When you create an account, AWS automatically signs up the account for all services.You are
charged only for the services you use.
To create an AWS account
1. Go to http://aws.amazon.com, and click Create an AWS Account.
2. Follow the on-screen instructions.
Part of the sign-up procedure involves receiving a phone call and entering a PIN using the phone
keypad.
Next: Creating an Amazon EC2 Key Pair (p. 305)
Creating an Amazon EC2 Key Pair
If you already have an Amazon EC2 key pair in the Amazon EC2 region in which you want to configure
Live Smooth Streaming, skip to Creating an AWS CloudFormation Stack for Live Smooth Streaming (p. 306).
If you don't have a key pair in that region, perform the following procedure.
A key pair is a security credential similar to a password.You specify a key pair when you create an AWS
CloudFormation stack for live streaming, later in this process. After live streaming is configured, you use
the key pair to retrieve the password for your Amazon EC2 Windows Server instance.
API Version 2016-08-01
305
Amazon CloudFront Developer Guide
Creating an Amazon Web Services Account

To create an Amazon EC2 key pair
1. Sign in to the AWS Management Console and open the Amazon EC2 console at https://
console.aws.amazon.com/ec2/.
2. In the Region list, click the region in which you want to create the key pair.
You must create the key pair in the same region where you will create your AWS CloudFormation
stack for live streaming later in this process. We recommend that you create the key pair and the
stack for live streaming in the region that is closest to the location of your live event.
3. In the Navigation pane, click Key Pairs.
4. In the Key Pairs pane, click Create Key Pair.
5. In the Create Key Pair dialog box, enter a name for the key pair, and make note of the name.You'll
enter this value when you create an AWS CloudFormation live-streaming stack, later in the process
of setting up live streaming.
6. Click Create, and the Opening <key_pair_name>.pem dialog box appears.
7. Save the .pem file to a safe place on your computer.
8. Click Close to close the Create Key Pair dialog box.
Next: Creating an AWS CloudFormation Stack for Live Smooth Streaming (p. 306)
Creating an AWS CloudFormation Stack for Live
Smooth Streaming
The following procedure uses an AWS CloudFormation template to create a stack that launches the AWS
resources required for Live Smooth Streaming, including an Amazon EC2 instance.
Important
You incur hourly charges for an Amazon EC2 instance beginning when you create the AWS
CloudFormation stack that deploys the Amazon EC2 instance. Charges continue to accrue until
you delete the AWS CloudFormation stack regardless of whether you use the Amazon EC2
instance to stream live video. For more information, see Pricing on the Amazon Elastic Compute
Cloud (Amazon EC2) detail page.When your live event is over, delete the stack that you created
for Live Smooth Streaming.This deletes the AWS resources that were created for your
live-streaming event, and stops the AWS charges for the resources. For more information, see
Deleting Your AWS CloudFormation Live Smooth Streaming Stack (p. 311).
To create an AWS CloudFormation stack for live streaming
1. In the following list, click the Amazon EC2 Region where you want to create the stack.The Create
Stack wizard starts, and a region-specific value is automatically entered in the Provide a Template
URL field.
US East (N. Virginia)
US West (Oregon)
US West (N. California)
EU (Ireland)
Asia Pacific (Singapore)
Asia Pacific (Tokyo)
South America (São Paulo)
API Version 2016-08-01
306
Amazon CloudFront Developer Guide
Creating an AWS CloudFormation Stack for Live Smooth
Streaming
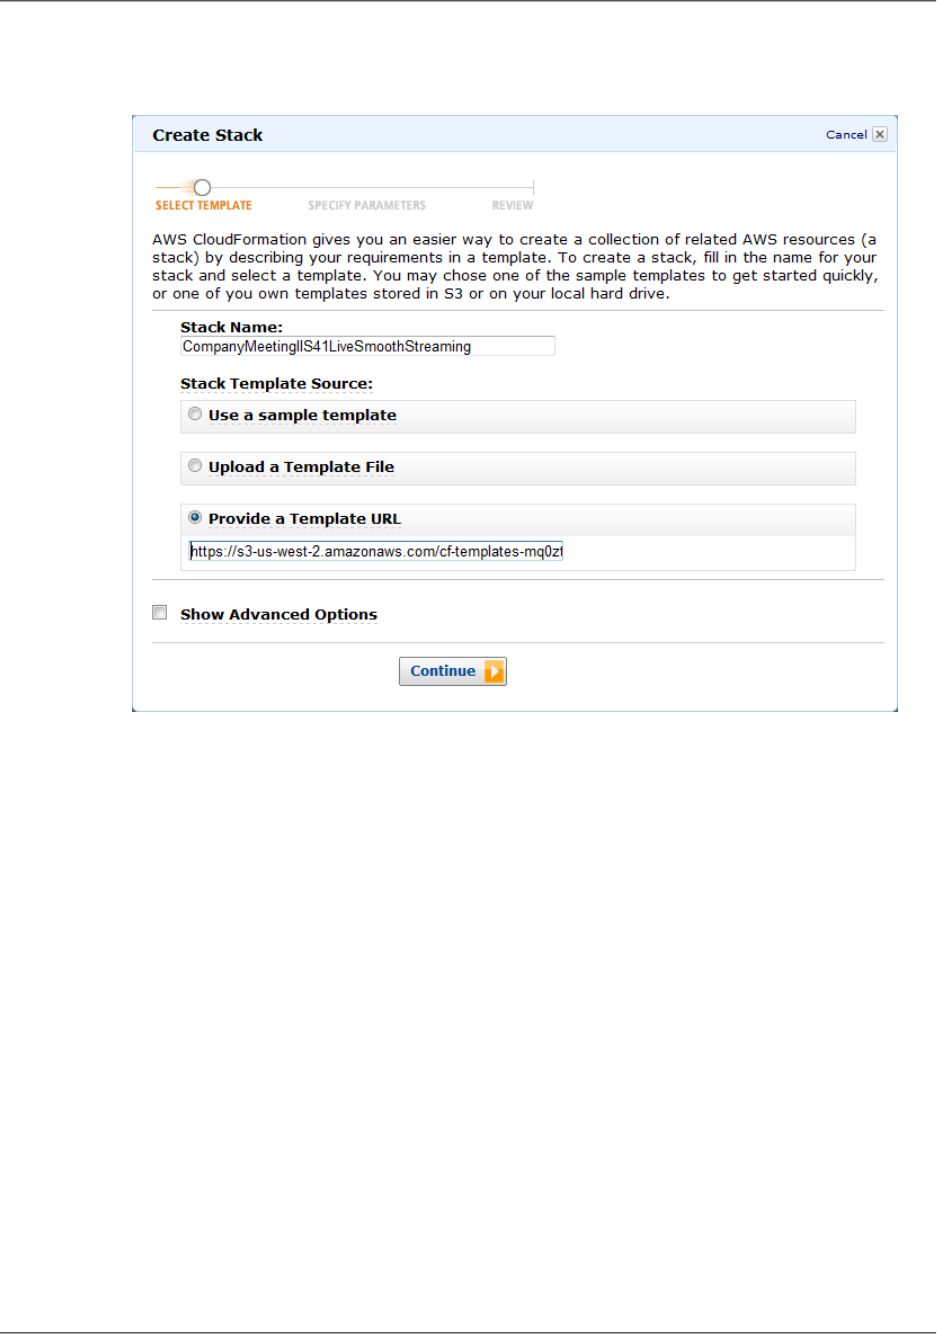
2. If you are not already signed in to the AWS Management Console, sign in when prompted.
3. Optional: In the Create Stack wizard, change the value of the Stack Name field. The stack name
must not contain spaces, and it must be unique within your AWS account.
4. Do not change the Stack Template Source option or the value of Provide a Template URL.
5. Optional: To configure SNS notification, to specify how long you're willing to wait for the stack to be
created, and to choose whether to roll back changes if stack creation fails, check the Show Advanced
Options checkbox, and specify the applicable values.
6. Click Continue.
API Version 2016-08-01
307
Amazon CloudFront Developer Guide
Creating an AWS CloudFormation Stack for Live Smooth
Streaming
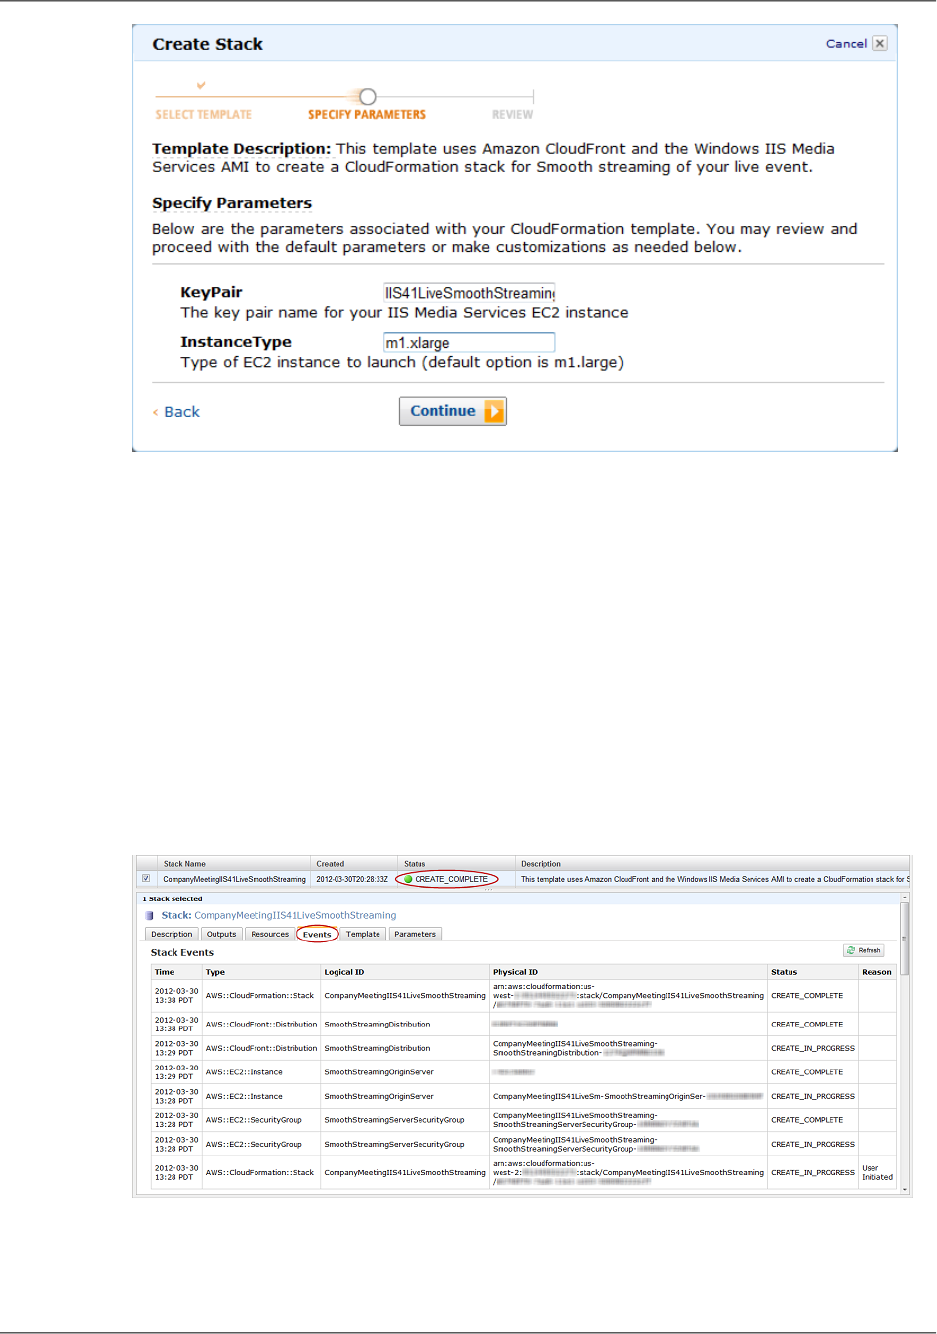
7. On the Specify Parameters page, in the KeyPair field, enter the name of an Amazon EC2 key pair
in the region in which you want to create the stack for live streaming.The key pair must be associated
with the account that you're currently logged on with. If you created a key pair when you performed
the procedure in Creating an Amazon EC2 Key Pair (p. 305), enter the name of that key pair.
8. In the InstanceType field, enter an instance type, and click Continue.The default value is m1.xlarge.
The instance type determines the pricing for your Amazon EC2 instance that is running Windows
Server. For more information about Amazon EC2 instance types for Windows, including pricing
information, go to Amazon EC2 Running Microsoft Windows Server & SQL Server.
9. Review the settings for the stack. When you're satisfied with the settings, click Create Stack.
Your stack may take several minutes to create. To track the progress of the stack creation, select
the stack, and click the Events tab in the bottom frame. If AWS CloudFormation cannot create the
stack, the Events tab lists error messages.
When your stack is ready, in the top frame, the status for the stack changes to CREATE_COMPLETE.
When your stack is created, click the Outputs tab, which displays the stack creation outputs.You
will use these values when you set up Microsoft Expression Encoder later in the process.
API Version 2016-08-01
308
Amazon CloudFront Developer Guide
Creating an AWS CloudFormation Stack for Live Smooth
Streaming
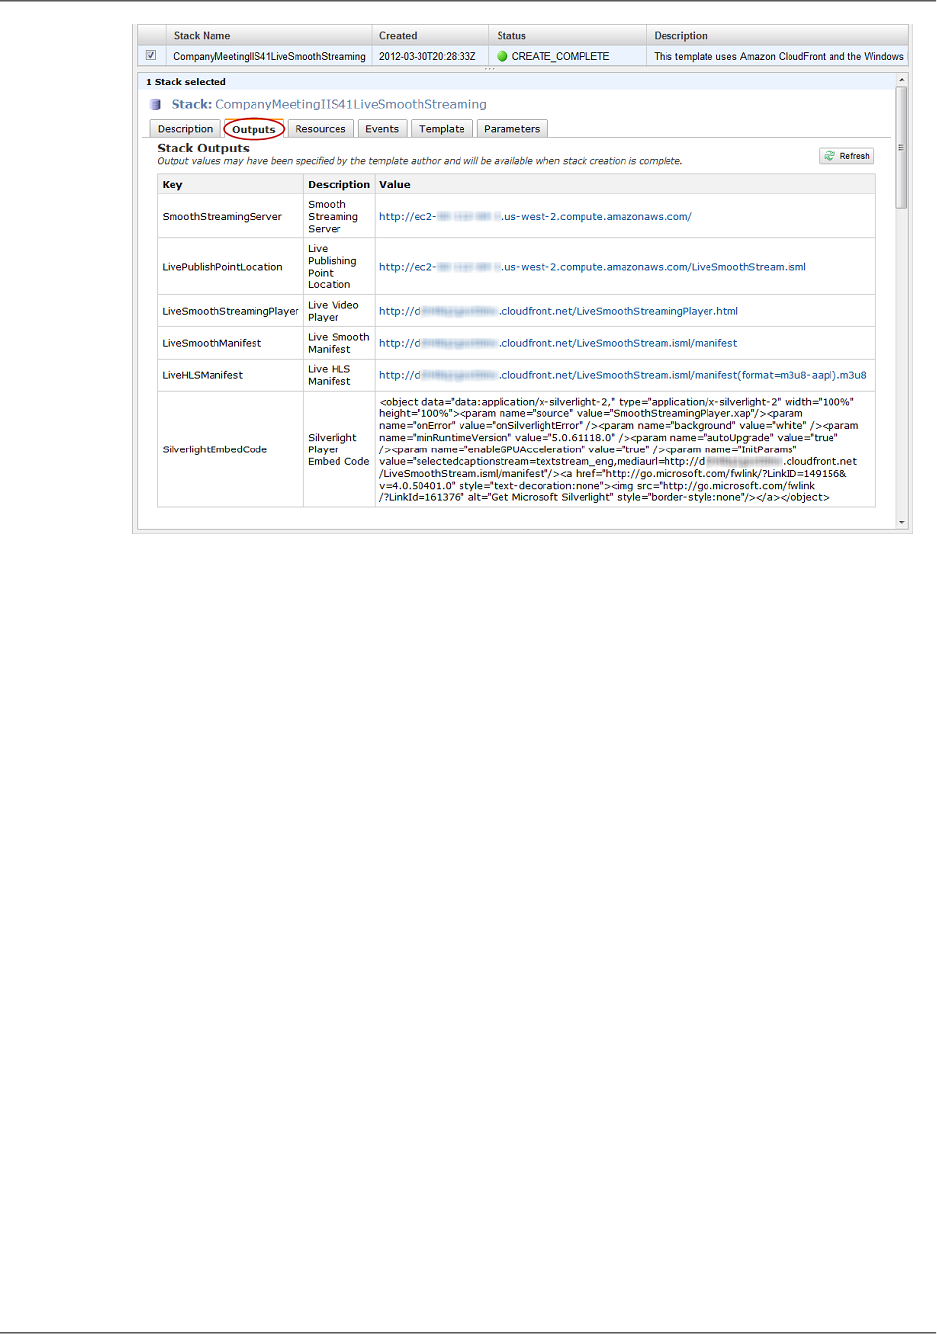
Next: Verifying that Your Amazon EC2 Windows Server Instance Is Running (p. 309)
Verifying that Your Amazon EC2 Windows Server
Instance Is Running
After AWS CloudFormation creates the stack, perform the following procedure to verify that your Windows
IIS Media Services webserver is running on the Amazon EC2 instance that you provisioned via AWS
CloudFormation.
To verify that your Windows Server is running
1. Sign in to the AWS Management Console and open the AWS CloudFormation console at https://
console.aws.amazon.com/cloudformation/.
2. In the top pane, select the stack that you created in Creating an AWS CloudFormation Stack for Live
Smooth Streaming (p. 306).
3. In the bottom pane, click the Outputs tab.
4. Click on the value of the SmoothStreamingServer key, for example,
http://ec2-00-11-22-33.us-west-1.compute.amazonaws.com.
The Windows IIS Server banner screen appears, indicating that your Windows Server is running.
Next: Getting Your Windows Password (p. 309)
Getting Your Windows Password
To connect to your Amazon EC2 instance running Windows Server 2008 R2 and IIS Media Services, use
the following procedure to retrieve the initial password for the Windows Server Administrator account.
You only need to retrieve the password once for your Amazon EC2 instance. When you are finished with
API Version 2016-08-01
309
Amazon CloudFront Developer Guide
Verifying that Your Amazon EC2 Windows Server
Instance Is Running

this procedure, you'll be able to work with your Amazon EC2 instance as you would any Windows Server
computer.
For more information about connecting to an Amazon EC2 instance running Windows, go to Getting
Started with Amazon EC2 Windows Instances.
Important
Amazon EC2 can take as long as 30 minutes to retrieve your password from Windows Server.
To get the Windows password for your Amazon EC2 instance
1. Confirm that you can access the Amazon EC2 private key file (the .pem file) that you created in
Creating an Amazon EC2 Key Pair (p. 305).
2. Sign in to the AWS Management Console and open the Amazon EC2 console at https://
console.aws.amazon.com/ec2/.
3. In the Region list, click the region in which you created the Amazon EC2 instance for Live Smooth
Streaming.
4. In the Navigation pane, click Instances.
5. In the My Instances pane, right-click the instance for which the value of the Name column is
LiveSmoothStreaming, and click Get Windows Password.
6. On the Retrieve Default Windows Administrator Password page, click Browse, and browse to the
location on your computer where you saved the .pem file.
7. Select the .pem file, and the contents of the file appear in the window.
8. Click Decrypt Password.
9. Write down the password.You'll need it to connect to the Amazon EC2 instance.
10. Optional but recommended: Log into the Windows Server instance that you just launched, and change
the password for the default Windows Server account. The username is Administrator.
You may also want to create another user account and add it to the Administrators group. Another
administrator account is a safeguard in case you forget your administrator password or have a
problem with the Administrator account.
Note
For information about how to update the Amazon EC2 Security Group settings for your Windows
server so you can access the server using port 3389, see How can I enable access to the
Windows server? (p. 312). For information about how to log on to the instance using the
Administrator account, see How can I securely connect to my Amazon EC2 instance running
Windows IIS Media Services? (p. 313).
Next: Encoding Your Live Stream (p. 310)
Encoding Your Live Stream
You're now ready to publish your live stream to the Live Smooth Streaming publishing point on your
Amazon EC2 instance running Windows Server and Windows IIS Media Services. Microsoft has stopped
selling Expression Encoder 4 Pro. For a list of Microsoft partners that provide third-party encoding tools
that you can use to encode your video for Live Smooth Streaming, see the Partners section on the IIS
Media Services page on the Microsoft website.
Next: Viewing Your Live Smooth Stream (p. 311)
API Version 2016-08-01
310
Amazon CloudFront Developer Guide
Encoding Your Live Stream

Viewing Your Live Smooth Stream
Perform the following procedure to view your live smooth stream using CloudFront.You can also embed
the Microsoft Silverlight player code in your own web page.
1. Sign in to the AWS Management Console and open the AWS CloudFormation console at https://
console.aws.amazon.com/cloudformation/.
2. Select the stack for live streaming.
3. In the bottom pane of the AWS CloudFormation console, click the Outputs tab.
4. Click the value of the LiveSmoothStreamingPlayer key, for example,
http://d123.cloudfront.net/LiveSmoothStreamingPlayer.html.
5. To embed the Silverlight player code into your web page, on the Outputs tab, copy the value of the
SilverlightEmbedCode key.
Note
Microsoft recommends that viewers have the latest version of Microsoft Silverlight installed
for the best playback experience.
6. To view your live stream on an Apple device such as an iPad or an iPhone, display the AWS
CloudFormation console from a compatible Apple device, and click the value of the LiveHLSManifest
key. The manifest URL looks like
http://d123.cloudfront.net/LiveSmoothStream.isml/manifest(format=m3u8-aapl).m3u8.
For information about where to use the URL to serve various iOS devices, QuickTime, and Safari,
go to HTTP Live Streaming Overview in the iOS Developer Library.
Next: Deleting Your AWS CloudFormation Live Smooth Streaming Stack (p. 311)
Deleting Your AWS CloudFormation Live Smooth
Streaming Stack
When your live event is over, delete the stack that you created for Live Smooth Streaming. This deletes
the AWS resources that were created for your live event, and stops the AWS charges for those resources.
To delete an AWS CloudFormation stack for live streaming
1. Sign in to the AWS Management Console and open the AWS CloudFormation console at https://
console.aws.amazon.com/cloudformation/.
2. Check the checkbox for the stack, and click Delete Stack.
3. Click Yes, Delete to confirm.
4. To track the progress of the stack deletion, check the checkbox for the stack, and click the Events
tab in the bottom frame.
Frequently Asked Questions
•What is the price for Live Smooth Streaming using CloudFront? (p. 312)
•Can I deliver my live streaming video to both Smooth Streaming clients and Apple devices? (p. 312)
•How can I set-up a CNAME alias for my Amazon EC2 instance or my CloudFront distribution? (p. 312)
•How can I enable access to the Windows server? (p. 312)
•How can I securely connect to my Amazon EC2 instance running Windows IIS Media Services? (p.313)
•How can I restrict access to my Live Smooth Streaming content from another domain? (p. 313)
API Version 2016-08-01
311
Amazon CloudFront Developer Guide
Viewing Your Live Smooth Stream

What is the price for Live Smooth Streaming using
CloudFront?
To Smooth Stream your live event, you pay only for the AWS resources you consume:
• For pricing information about Amazon EC2 instances running Windows Server, see Pricing on the
Amazon EC2 Running Microsoft Windows Server & SQL Server page.
• For pricing information about CloudFront, see Amazon CloudFront Pricing.
There is no charge for using AWS CloudFormation.
Can I deliver my live streaming video to both Smooth
Streaming clients and Apple devices?
Yes.You can use Microsoft Expression Encoder 4 Pro to encode your live video for both Smooth Streaming
clients (for example, Microsoft Silverlight) and Apple devices (for example, iPad and iPhone). After your
AWS CloudFormation stack is launched, you will find the manifest file URLs both for Live Smooth Streaming
(.isml) and for Apple HLS (.m3u8) on the Outputs tab of your AWS CloudFormation template.
How can I set-up a CNAME alias for my Amazon EC2 instance
or my CloudFront distribution?
Your Amazon EC2 Windows Server instance comes with an internal and an external DNS name. Amazon
EC2 does not provide access to modify these DNS settings. If you want to map an existing domain name
to your Amazon EC2 instance running Windows Server, use a DNS service provider such as Amazon
Route 53. When using your own domain name, we recommend that you map to the instance's external
DNS name using a CNAME, not by using an A record that points to the instance's IP address.
To map your own domain name to your CloudFront distribution, see Using Alternate Domain Names
(CNAMEs) (p. 50).
How can I enable access to the Windows server?
To enable access to port 3389 on your Windows server via selected IP addresses
By default, the Amazon EC2 security group for your Windows server instance does not have port 3389
enabled; this is the port you use to administer the Windows server. If you want to log on to your Windows
server instance, perform the following procedure to enable access via port 3389.
1. Sign in to the AWS Management Console and open the Amazon EC2 console at https://
console.aws.amazon.com/ec2/.
2. In the Region list, click the Amazon EC2 region in which you used AWS CloudFormation to create
your Amazon EC2 instance.
3. In the Navigation pane, click Security Groups.
4. In the Security Groups pane, click the row for which the value of the Name column begins with the
name of the AWS CloudFormation stack that you created in Creating an AWS CloudFormation Stack
for Live Smooth Streaming (p. 306).
5. In the bottom pane, click the Inbound tab.
6. To enable access to your Windows server and specify the client IP addresses that can access the
server:
a. In the Create a new rule list, do not change the default value, Custom TCP rule.
b. In the Port range field, enter 3389.
API Version 2016-08-01
312
Amazon CloudFront Developer Guide
Frequently Asked Questions

c. In the Source field, enter an IP address or range, or enter the name of another security group.
For more information, click Help.
d. Click Add Rule.
e. To create additional rules, repeat Steps a through d.
f. Click Apply Rule Changes.
How can I securely connect to my Amazon EC2 instance
running Windows IIS Media Services?
To connect to your Windows server instance, you must retrieve the initial password for the Administrator
account and then use it with Windows Remote Desktop.You'll also need the contents of the private key
file that you created, for example, <keypairname.pem>.pem. For more information, go to Getting Started
with Amazon EC2 Windows Instances.
How can I restrict access to my Live Smooth Streaming
content from another domain?
Microsoft Silverlight includes support for cross-domain connectivity, which allows the Silverlight player to
access content from locations other than the domain where the Smooth Streaming content originates.
The security policy system in Silverlight requires that a Silverlight policy file named
ClientAccessPolicy.xml be downloaded from a target domain before a network connection is allowed
to access a network resource under that target domain. A default policy file is already included at the root
of the default website on your Windows server running on Amazon EC2.To restrict cross-domain access,
log on to your Windows server and update the ClientAccessPolicy.xml file.
Additional Documentation
Microsoft Documentation
•IIS Smooth Streaming Deployment Guide
•IIS Media Services 4.1 Readme
•IIS Smooth Streaming Management REST Services
•Configuring Authentication in IIS 7
•Microsoft Expression Encoder blog
•Managing live publishing points from Microsoft Expression Encoder 4 Pro SP2
•Live IIS Smooth Streaming in Expression Encoder 4 Pro
•Apple HTTP Live Streaming with IIS Media Services
Amazon Web Services Documentation
•Amazon EC2 Running Microsoft Windows Server & SQL Server
•Amazon Elastic Compute Cloud Microsoft Windows Guide
•Amazon CloudFront
•AWS CloudFormation
API Version 2016-08-01
313
Amazon CloudFront Developer Guide
Additional Documentation

Live HTTP Streaming Using Wowza Streaming
Engine 4.2
You can use Wowza Streaming Engine 4.2 to create live streaming sessions for global delivery using
CloudFront. Wowza Streaming Engine 4.2 supports the following HTTP based streaming protocols:
• HLS (HTTP Live Streaming)
• HDS (HTTP Dynamic Streaming)
• Smooth Streaming
• MPEG DASH
When a user streams a video using one of the above protocols, the video is broken into smaller chunks
that are cached in the CloudFront network for improved performance and scalability.
This tutorial explains how to integrate CloudFront with Wowza Streaming Engine 4.2 running on an
Amazon EC2 instance. For more information about how to manage and secure your Amazon EC2 instance,
refer to the Amazon EC2 documentation. For more information about Wowza Streaming Engine options
not covered in this tutorial, see the Wowza documentation.
Topics
•Creating an Amazon Web Services Account (p. 314)
•Creating an Amazon EC2 Key Pair (p. 315)
•Getting a License for Wowza Streaming Engine 4.2 (p. 315)
•Subscribing to Wowza Streaming Engine 4.2 through AWS Marketplace (p. 315)
•Creating an AWS CloudFormation Stack for Live Streaming (p. 316)
•Verifying that Wowza Streaming Engine 4.2 Is Running (p. 318)
•Setting Up an Encoder to Publish a Live Stream (p. 318)
•Playing the Live Stream in a Web Application (p. 319)
•Deleting an AWS CloudFormation Stack for Live Streaming (p. 321)
•Frequently Asked Questions (p. 321)
•Additional Documentation (p. 322)
Creating an Amazon Web Services Account
If you already have an AWS account, skip to Creating an Amazon EC2 Key Pair (p. 315). If you don't
already have an AWS account, use the following procedure to create one.
To create an AWS account
1. Open http://aws.amazon.com/, and then choose Create an AWS Account.
2. Follow the online instructions.
Part of the sign-up procedure involves receiving a phone call and entering a PIN using the phone
keypad.
Next: Creating an Amazon EC2 Key Pair (p. 315)
API Version 2016-08-01
314
Amazon CloudFront Developer Guide
Live Streaming with Wowza Streaming Engine 4.2

Creating an Amazon EC2 Key Pair
If you already have an Amazon EC2 key pair for the Amazon EC2 region in which you want to configure
live streaming, skip to Getting a License for Wowza Streaming Engine 4.2 (p. 315). If you don't have a key
pair in that region, follow the steps below.
A key pair is a security credential similar to a password and is specific to an AWS region.You need to
specify a key pair when you create an AWS CloudFormation stack for live streaming, later in this process.
After live streaming is configured, you use the key pair to securely connect to your Amazon EC2 instance.
To create an Amazon EC2 key pair
1. Sign in to the AWS Management Console and open the Amazon EC2 console at https://
console.aws.amazon.com/ec2/.
2. In the region selector, choose the region in which you want to create the key pair.
You must create the key pair in the same region where you will create your AWS CloudFormation
stack for live streaming later in this process. We recommend that you create the key pair and the
stack for live streaming in the region that is closest to the location from which the live stream will be
published.
3. In the left navigation pane, choose Key Pairs.
4. In the key pairs pane, choose Create Key Pair.
5. In the Create Key Pair dialog box, enter a name for the key pair, and make note of the name.You'll
need it later when you create an AWS CloudFormation live-streaming stack.
6. Choose Create, and, when prompted, save the .pem file to a safe place on your computer. Note that
you will not be able re-download this file.
7. Choose Close to close the Create Key Pair dialog box.
Next: Getting a License for Wowza Streaming Engine 4.2 (p. 315)
Getting a License for Wowza Streaming Engine
4.2
You need a license for Wowza Streaming Engine 4.2 to configure live streaming.You have two options:
• If you already have a license, you can use that license to configure live streaming. Go to the next
procedure.
• To buy a license by using your AWS account, go to the Pricing page on the Wowza website, and
purchase the Wowza Streaming Engine license that works best for you.
Next: Subscribing to Wowza Streaming Engine 4.2 through AWS Marketplace (p. 315)
Subscribing to Wowza Streaming Engine 4.2
through AWS Marketplace
The next step is to subscribe to Wowza Streaming Engine 4.2 in AWS Marketplace.
To order Wowza Streaming Engine for Amazon Web Services
1. Go to the Amazon Web Services page, and sign in using your Amazon.com account or create a new
account.
API Version 2016-08-01
315
Amazon CloudFront Developer Guide
Creating an Amazon EC2 Key Pair

2. If you're using your own license, go to https://aws.amazon.com/marketplace/pp/B013FEULQA.
Review the details, and choose Continue.
If you're buying a license by using your AWS account, go to https://aws.amazon.com/marketplace/
pp/B012BW3WB8. Review the details, and choose Continue.
3. Choose the Manual Launch tab.
4. Review the pricing information, and choose Accept Terms.
Important
Don't use the buttons on this page to launch Wowza.
Next: Creating an AWS CloudFormation Stack for Live Streaming (p. 316)
Creating an AWS CloudFormation Stack for Live
Streaming
The following procedure uses an AWS CloudFormation template to create a stack that launches the AWS
resources required by live streaming, including an Amazon EC2 instance.
Important
You begin to incur hourly charges for an Amazon EC2 instance when you create the AWS
CloudFormation stack that deploys that instance. Charges continue to accrue until you delete
the AWS CloudFormation stack regardless of whether you use the Amazon EC2 instance to
stream live video.When your live event is over, delete the stack that you created for live streaming.
This deletes the AWS resources that were created for your live-streaming event, and stops the
AWS charges for the resources. For more information, see Deleting an AWS CloudFormation
Stack for Live Streaming (p. 321).
To create an AWS CloudFormation stack for live streaming
1. To start the wizard that creates a AWS CloudFormation stack, choose the applicable link:
If you have your own Wowza license, choose the Amazon EC2 region where you want AWS
CloudFormation to launch an Amazon EC2 instance:
•Create a stack in US East (N.Virginia)
•Create a stack in US West (Oregon)
•Create a stack in US West (N. California)
•Create a stack in EU (Ireland)
•Create a stack in EU (Frankfurt)
•Create a stack in Asia Pacific (Singapore)
•Create a stack in Asia Pacific (Sydney)
•Create a stack in Asia Pacific (Tokyo)
•Create a stack in South America (São Paulo)
If you want to charge a Wowza license to your AWS account, choose the Amazon EC2 region
where you want AWS CloudFormation to launch an Amazon EC2 instance:
•Create a stack in US East (N.Virginia)
•Create a stack in US West (Oregon)
•Create a stack in US West (N. California)
•Create a stack in EU (Ireland)
•Create a stack in EU (Frankfurt)
API Version 2016-08-01
316
Amazon CloudFront Developer Guide
Creating an AWS CloudFormation Stack for Live
Streaming

•Create a stack in Asia Pacific (Singapore)
•Create a stack in Asia Pacific (Sydney)
•Create a stack in Asia Pacific (Tokyo)
•Create a stack in South America (São Paulo)
2. If you are not already signed in to the AWS Management Console, sign in when prompted.The
wizard starts, and the selected URL automatically appears under Provide an S3 URL to template.
3. (Optional) In the Create a New Stack wizard, you can change the stack name to something
appropriate for your live-streaming event. The stack name must not contain spaces and must be
unique within your AWS account.
Do not change the Template option or the address in Provide an S3 URL to template.
4. Choose Next Step.
5. On the Specify Parameters page, for ApplicationName, enter a short name (without spaces) for
your Wowza application, or keep the default.
6. For InstanceType, enter an instance type, which determines pricing for your Wowza instance. For
more information about Amazon EC2 instance types, see Available Instance Types.
For information about pricing, see Amazon EC2 Pricing.
7. For KeyPair, enter the name of an Amazon EC2 key pair for the region in which you want to create
the live streaming stack. The key pair must be associated with the account that you're currently
logged on with. If you created a key pair when you performed the procedure in Creating an Amazon
EC2 Key Pair (p. 315), enter that name here.
8. For StartupPackageURL, enter a URL that points to a startup package to configure the Wowza
Streaming Engine to your needs, or keep the default.
9. For StreamName, enter a short name (without spaces) for your live stream, or keep the default.
10. Enter your license key in the WowzaLicenseKey field.This is either the key for a license that you
already owned or a key that you got when you performed the procedure in the Getting a License for
Wowza Streaming Engine 4.2 (p. 315) topic.
If you purchased AddOns, you can include additional license keys by separating the key values with
a pipe (|) character.
11. Choose Next Step.
12. (Optional) On the Options page, add the key-value pairs for any tags you plan to use. For more
information about using tags, see Adding Tags to Your AWS CloudFormation Stack.
13. (Optional) To configure SNS notification, to specify how long you're willing to wait for the stack to be
created, to choose whether to roll back changes if stack creation fails, and to enter a stack policy,
choose Advanced, and adjust settings as desired.
14. Choose Next Step
15. Review the settings for the stack, and then choose Create. AWS CloudFormation creates the stack.
Creating your stack creation might take several minutes. To track the progress of stack creation,
select the stack, and then choose the Events tab. If AWS CloudFormation cannot create the stack,
the Events tab lists error messages.
When your stack is ready, in the list of stacks, the status for the stack changes to
CREATE_COMPLETE.
When your stack is created, choose the Outputs tab, which displays the stack creation outputs.You
will use these values when you set up the encoder later in the process.
Next: Verifying that Wowza Streaming Engine 4.2 Is Running (p. 318)
API Version 2016-08-01
317
Amazon CloudFront Developer Guide
Creating an AWS CloudFormation Stack for Live
Streaming

Verifying that Wowza Streaming Engine 4.2 Is
Running
After AWS CloudFormation creates the stack, perform the following steps to verify that Wowza Streaming
Engine 4.2 is running on the Amazon EC2 instance that you provisioned through AWS CloudFormation.
To verify that Wowza Streaming Engine 4.2 is running
1. Sign in to the AWS Management Console and open the AWS CloudFormation console at https://
console.aws.amazon.com/cloudformation/.
2. In the region selector, choose the region in which you created the AWS CloudFormation stack.
3. In the list of stacks, select the stack that you created in Creating an AWS CloudFormation Stack for
Live Streaming (p. 316).
4. Choose the Outputs tab.
5. On the Outputs tab, get the value of the WowzaServerLoginInfo key, which you'll use for login
credentials in the next step.
6. Choose the URL in the WowzaEngineManagerURL key, for example,
http://ec2-xx-xx-xxx-xxx.compute-1.amazonaws.com:8088/enginemanager.When you're prompted
for login credentials, use the value of the WowzaServerLoginInfo key that you got in step 5.
Important
This URL uses port 8088 to connect to the Amazon EC2 instance that is running Wowza
Streaming Engine. Depending on your firewall settings, you might not be able to connect
to the Amazon EC2 instance. If you have trouble, contact your network administrator.
Next: Setting Up an Encoder to Publish a Live Stream (p. 318)
Setting Up an Encoder to Publish a Live Stream
You need to encode the live stream captured by your device before you send it to Wowza Streaming
Engine 4.2.You can encode the live stream by using either the Wowza GoCoder app for iOS-based
devices or encoders that support RTMP encoding, such as Telestream Wirecast.
The steps for publishing a stream from your encoder to Wowza Streaming Engine vary with your choice
of encoder. For more information about how to configure your encoder, go to Specific Encoding
Technologies on the Wowza website or review the documentation for your encoder.
Encode Apple HLS streams using the following formats:
•Video:
•Apple iPhone, iPod, and iPod touch – H.264 Baseline Profile Level 3.0. Don't use B-frames when
targeting iPhone and iPod devices.
•Apple iPad – H.264 Main Profile Level 3.1
•Audio: AAC-LC up to 48 kHz, stereo audio.
Smooth Streams must have both audio and video. The key frame frequency must be between 1 and 4
seconds. We recommend a key frame frequency of two seconds.
Wowza Gocoder
To configure Wowza GoCoder to publish a live stream, perform the following steps.
API Version 2016-08-01
318
Amazon CloudFront Developer Guide
Verifying that Wowza Streaming Engine 4.2 Is Running

Note
Wowza GoCoder is available for purchase from the Apple AppStore.
1. Go to the Wowza tutorial How to use Wowza GoCoder video broadcasting iOS app with Wowza
Streaming Engine.
2. Follow the procedure in the Configure Wowza GoCoder App section of the tutorial. Specify the
following values for Host settings:
a. Open the AWS CloudFormation console at https://console.aws.amazon.com/cloudformation/.
b. On the AWS CloudFormation console, choose the Outputs tab.
c. Copy the value of the WowzaEngineDomainName key, for example,
ec2-xx-xx-xxx-xxx.compute-1.amazonaws.com.
d. For Server, paste the value that you just copied.
e. For Port, enter 1935.
3. Specify the following values for Application settings:
a. For Application, enter the application name that you specified when you created the stack, for
example, livecf.
b. On the Outputs tab of the AWS CloudFormation console, copy the value of the
PublishStreamName key, for example, myStream.
c. For StreamName, paste the value that you just copied in the previous step.
4. Change other values as applicable.
RTMP encoder
RTMP encoders typically use the following settings:
Publish URL
This is the value of the AWS CloudFormation PublishRTMPURL key, for example,
rtmp://ec2-xx-xx-xxx-xxx.compute-1.amazonaws.com/livecf.
Stream Name
This is the value of the AWS CloudFormation PublishStreamName key, for example, myStream.
Login Credentials
If you are prompted for login credentials, use the values from the AWS CloudFormation
WowzaServerLoginInfo key, for example, username=wowza, password=i-1234a567.
Next: Playing the Live Stream in a Web Application (p. 319).
Playing the Live Stream in a Web Application
Wowza Media Services provides online example player web pages that you can use to play the live
stream from your Wowza Streaming Engine distribution. These players can help you verify that your
streaming stack has been set up correctly.You can use the same streaming manifest URLs for other
players that support the streaming protocol that you want to use.
Perform the applicable procedure to get the embed code that you will include in your web page for the
live stream.
API Version 2016-08-01
319
Amazon CloudFront Developer Guide
Playing the Live Stream in a Web Application

Note
Wait at least 30 seconds after you perform the applicable procedure in Setting Up an Encoder
to Publish a Live Stream (p. 318) before following the steps below to play the stream.
•To play your live HDS stream on Adobe Flash Player via CloudFront (p. 320)
•To play your live HLS stream on an Apple or other device via CloudFront (p. 320)
•To play your Live Smooth Stream via CloudFront (p. 320)
To play your live HDS stream on Adobe Flash Player via CloudFront
1. Open the AWS CloudFormation console at https://console.aws.amazon.com/cloudformation/.
2. Select the stack for live HTTP streaming.
3. On the AWS CloudFormation console, choose the Outputs tab.
4. Copy the value of the PlaybackHDSURL key, for example,
http://d111111abcdef8.cloudfront.net/livecf/myStream/manifest.f4m.
5. Go to the Flash HTTP Player example web page on the Wowza website, paste the URL that you
copied in the preceding step into the Stream field, and choose Connect.
To play your live HLS stream on an Apple or other device via CloudFront
1. Open the AWS CloudFormation console at https://console.aws.amazon.com/cloudformation/.
2. Select the stack for live streaming.
3. In the AWS CloudFormation console, choose the Outputs tab.
4. Copy the value of the PlaybackHLSURL key, for example,
http://d111111abcdef8.cloudfront.net/livecf/myStream/playlist.m3u8.
5. Using one of the following applications, go to the iOS/Mac OS X example web page on the Wowza
website, paste the URL that you copied in the preceding step into the Stream field, and then choose
Connect:
• Safari web browser on a computer running Mac OS X Snow Leopard (version 10.6) or later
•QuickTime Player 10.x or later on a computer running Mac OS X Snow Leopard (version 10.6) or
later
• Safari web browser on an Apple iOS device
To play your Live Smooth Stream via CloudFront
1. Open the AWS CloudFormation console at https://console.aws.amazon.com/cloudformation/.
2. Select the stack for live streaming.
3. In the AWS CloudFormation console, choose the Outputs tab.
4. Copy the value of the PlaybackSmoothURL key, for example,
http://d111111abcdef8.cloudfront.net/livecf/myStream/Manifest.
5. Go to the Silverlight Player example web page on the Wowza website, paste the URL that you copied
in the previous step into the Stream field, and then choose Connect.
Next: Deleting an AWS CloudFormation Stack for Live Streaming (p. 321).
API Version 2016-08-01
320
Amazon CloudFront Developer Guide
Playing the Live Stream in a Web Application

Deleting an AWS CloudFormation Stack for Live
Streaming
When your live event is over, delete the stack that you created for live streaming. This deletes the AWS
resources that were created for your live-streaming event and stops the on-demand charges for the
resources.
To delete an AWS CloudFormation stack for live streaming
1. Open the AWS CloudFormation console at https://console.aws.amazon.com/cloudformation/.
2. In the upper right corner, choose the region in which you created your stack.
3. Select the stack, and then choose Delete Stack.
4. Choose Yes, Delete to confirm.
5. To track the progress of the stack deletion, select the stack, and then choose the Events tab.
Frequently Asked Questions
•What is the price for live HTTP streaming using CloudFront and Wowza Streaming Engine 4.2? (p.321)
•How can I use Secure Shell (SSH) to connect to my Amazon EC2 instance that is running Wowza
Streaming Engine 4.2? (p. 321)
•How can I create a CNAME alias for my Amazon EC2 instance or for my CloudFront distribution? (p. 322)
•Can I stream my live event to Flash Player–compatible devices, Apple devices, and Smooth Streaming
players at the same time? (p. 322)
•Does Wowza Streaming Engine 4.2 support HTML5? (p. 322)
•Can I serve private live streams using Wowza and CloudFront? (p. 322)
What is the price for live HTTP streaming using CloudFront
and Wowza Streaming Engine 4.2?
Charges for live HTTP streaming using CloudFront and Wowza Streaming Engine 4.2 include:
•Wowza Streaming Engine software and AddOns: For more information, see Licenses Built For You
on the Wowza website.
•Amazon EC2: For more information, see the Linux tab in the On-Demand Instances Pricing table.
•CloudFront: For more information, see Amazon CloudFront Pricing.
There is no charge for using AWS CloudFormation.
How can I use Secure Shell (SSH) to connect to my Amazon
EC2 instance that is running Wowza Streaming Engine 4.2?
You can use SSH to connect to your Amazon EC2 instance in just a few steps.
To use SSH to connect to your Amazon EC2 instance that is running Wowza Streaming
Engine 4.2
1. Open the Amazon EC2 console at https://console.aws.amazon.com/ec2/.
2. In the left navigation, choose Instances.
API Version 2016-08-01
321
Amazon CloudFront Developer Guide
Deleting an AWS CloudFormation Stack for Live
Streaming

3. Right-click the correct instance, and choose Connect to view instructions on how to use SSH to
connect to your Amazon EC2 instance. The username is ec2-user.
How can I create a CNAME alias for my Amazon EC2 instance
or for my CloudFront distribution?
Your Amazon EC2 instance running Wowza Streaming Engine 4.2 comes with an internal and an external
DNS name. Amazon EC2 does not provide access to modify these DNS settings. If you want to map an
existing domain name to your Amazon EC2 instance running Wowza Streaming Engine, use a DNS
service provider such as Amazon Route 53. When using your own domain name, we recommend that
you map to the instance's external DNS name using a CNAME, not by using an A record that points to
the instance's IP address.
To map your own domain name to your CloudFront distribution, see Using Alternate Domain Names
(CNAMEs) (p. 50).
Can I stream my live event to Flash Player–compatible
devices, Apple devices, and Smooth Streaming players at
the same time?
Yes, Wowza Streaming Engine 4.2 enables the delivery of live streams in Adobe HTTP Dynamic Streaming
(Adobe HDS), Apple HTTP Live Streaming (Apple HLS), and Microsoft Smooth Streaming formats
simultaneously, which enables playing on Adobe Flash Player applications, Apple iOS devices, and
Smooth Streaming players, respectively.
Does Wowza Streaming Engine 4.2 support HTML5?
Yes, Wowza Streaming Engine can deliver content to HTML5 in the following configurations:
• You can use the Apple HLS streaming format on Apple iOS devices.
• You can use the Smooth Streaming format on Windows 8 devices. For more information, go to
Walkthrough: Building Your First HTML5 Smooth Streaming Player on the MSDN website.
• For other browsers supporting HTML5, you can use Wowza Streaming Engine to deliver video via
progressive download.
Can I serve private live streams using Wowza and
CloudFront?
At this time, live streams cannot be delivered securely using CloudFront signed URLs. However,
progressively downloaded media can be delivered privately by using signed URLs. For more information,
see Serving Private Content through CloudFront (p. 162).
Additional Documentation
The following resources might assist you as you work with Wowza.
Wowza Documentation
The Wowza website includes articles, documentation and pricing information for using Wowza live streams
with Amazon Web Services:
API Version 2016-08-01
322
Amazon CloudFront Developer Guide
Additional Documentation

•Wowza for Amazon EC2 Articles
•Wowza Streaming Engine User's Guide
•Wowza on Amazon Web Services
Amazon Web Services Documentation
The following resources include user guides and reference works for Amazon Web Services.
•Amazon Elastic Compute Cloud documentation
•AWS CloudFormation documentation
API Version 2016-08-01
323
Amazon CloudFront Developer Guide
Additional Documentation

Live HTTP Streaming Using CloudFront and Any
HTTP Origin
With Amazon CloudFront live streaming, you can use any live encoder, such as Elemental Live, that
outputs HTTP-based streams to stream live performances, webinars, and other events.This tutorial walks
you through the process of configuring live streaming.
Note
This tutorial assumes that you have already set up your live encoder.
Topics
•Creating a New CloudFront Distribution for Live Streaming (p. 324)
•Configuring Web Players to Play the Live Stream (p. 325)
•(Optional) Deleting an AWS CloudFormation Stack for Live Streaming (p. 325)
Creating a New CloudFront Distribution for Live
Streaming
The following procedure uses an AWS CloudFormation template to create a new CloudFront distribution
that you will use for your live stream.
To create a new CloudFront distribution for live streaming
1. Go to the Amazon Web Services page, and sign in using your Amazon.com account or create a new
account.
2. To start the wizard that creates a new CloudFront distribution, choose the following link:
Create a CloudFront distribution for live HTTP streaming
3. On the Select Template page, choose Next.
4. On the Specify Details page, type the following values:
Stack name
Type a descriptive name for your live streaming stack, or accept the default name.
CustomOriginDNSName
Type the DNS name of the custom origin that CloudFront will get the live feed from.
CustomOriginHTTPPort
Type the HTTP TCP port that you want CloudFront to use to communicate with your custom
origin.
DistributionComment
Type a comment to help you identify your distribution, which is useful if you manage multiple
distributions.The value that you type here appears in the CloudFront console.
5. Choose Next.
6. (Optional) On the Options page, add the key-value pairs for any tags you plan to use. In addition,
to configure SNS notification, to specify how long you're willing to wait for the stack to be created, to
choose whether to roll back changes if stack creation fails, and to enter a stack policy, choose
Advanced, and adjust settings as desired. For more information, see Setting AWS CloudFormation
Stack Options.
7. Choose Next.
8. Review the settings for the stack, and then choose Create. AWS CloudFormation creates the stack.
API Version 2016-08-01
324
Amazon CloudFront Developer Guide
Live HTTP Streaming Using CloudFront and Any HTTP
Origin

Creating your stack creation might take several minutes. To track the progress of stack creation,
select the stack, and then choose the Events tab. If AWS CloudFormation cannot create the stack,
the Events tab lists error messages.
When your stack is ready, in the list of stacks, the status for the stack changes to
CREATE_COMPLETE.
9. When your stack is created, choose the Outputs tab, which will display the CloudFront domain name.
You'll need this value when you set up the live stream playback in your web player.
Configuring Web Players to Play the Live Stream
To play the live stream, embed the manifest URL in the players that your users will play your live stream
with. For example, to play a live stream for which the manifest file is myStream/playlist.m3u8 and the
CloudFront distribution is d111111abcdef8.cloudfront.net, you embed the following URL in players:
http://d111111abcdef8.cloudfront.net/myStream/playlist.m3u8
(Optional) Deleting an AWS CloudFormation Stack
for Live Streaming
When your live event is over, delete the stack that you created for live streaming. This deletes the
CloudFront distribution that you created for your live-streaming event.
Note
When you stop streaming, you also stop incurring CloudFront charges for this distribution.There
are no charges for the AWS CloudFormation stack.
To delete an AWS CloudFormation stack for live streaming
1. Sign in to the AWS Management Console and open the AWS CloudFormation console at https://
console.aws.amazon.com/cloudformation/.
2. In the upper-right corner, choose the region in which you created your stack.
3. Select the stack, and then choose Delete Stack.
4. Choose Yes, Delete to confirm.
5. To track the progress of the stack deletion, select the stack, and then choose the Events tab.
On-Demand Media Streaming with Unified
Streaming
When you use Amazon CloudFront to deliver on-demand streaming over HTTP, you can transcode your
content yourself into multiple bitrates and formats and use CloudFront to distribute the transcoded content.
Alternatively, you can use CloudFront with Unified Streaming, which performs the transcoding step
automatically when a user requests your content. Here's how you can use CloudFront and Unified
Streaming together:
1. You use a AWS CloudFormation stack to configure the applicable AWS resources for you, including
an Amazon EC2 instance running Unified Streaming Platform, an Amazon S3 bucket, and a CloudFront
distribution.
2. You upload your video files into the Amazon S3 bucket in MP4 format.
3. You add the applicable links to your website or web application.The links access your content by using
CloudFront URLs. (You can also route DNS requests for your own domain name to CloudFront.)
API Version 2016-08-01
325
Amazon CloudFront Developer Guide
Configuring Web Players to Play the Live Stream

4. When a user accesses your content, the request is forwarded to a CloudFront edge location.
5. The CloudFront edge location forwards the requests to Unified Streaming Platform.
6. Based on the value of the User-Agent header, Unified Streaming Platform determines the format
that the user's viewer requires, transcodes your content into that format, and returns the transcoded
content to CloudFront.
7. CloudFront returns the transcoded content to the viewer and caches the files in the edge location.The
next time a user requests your content in the same format from the same edge cache, CloudFront
responds with files that are already in the cache.
Unified Streaming Platform supports the following HTTP-based dynamic streaming protocols:
• Adobe HTTP Dynamic Streaming (Adobe HDS)
• Apple HTTP Live Streaming (Apple HLS)
• Microsoft Smooth Streaming
• MPEG-DASH
In this tutorial, you use an AWS CloudFormation stack to create an Amazon S3 bucket for your media
files, an Amazon EC2 instance running Unified Streaming media server software, and a CloudFront
distribution. Note that this tutorial describes only one of many ways that you can configure AWS resources
for on-demand streaming with Unified Streaming.
Note
For information about how to manage and secure your Amazon EC2 instance, see the Amazon
EC2 documentation.
For a list of supported platforms, clients, codecs, DRM formats, and other specifications for Unified
Streaming, see the Unified Streaming Platform fact sheet. For links to additional Unified Streaming and
Amazon Web Services (AWS) documentation, see Additional Documentation (p. 336).
Topics
•Creating an Amazon Web Services Account (p. 326)
•Creating an Amazon EC2 Key Pair (p. 327)
•Subscribing to Unified Streaming (p. 327)
•Creating an AWS CloudFormation Stack for On-Demand Streaming (p. 328)
•Verifying that Unified Streaming Server Is Running (p. 330)
•Uploading Your Media Files to Amazon S3 (p. 330)
•Playing the On-Demand Stream In a Test Web Application (p. 331)
•Deleting the AWS CloudFormation Stack and Amazon S3 Bucket for On-Demand Streaming (p. 333)
•Frequently Asked Questions (p. 334)
•Additional Documentation (p. 336)
Creating an Amazon Web Services Account
If you already have an AWS account, skip to Creating an Amazon EC2 Key Pair (p. 327). If you don't
already have an AWS account, use the following procedure to create one.
Note
When you create an account, AWS automatically signs up the account for all services.You are
charged only for the services you use.
API Version 2016-08-01
326
Amazon CloudFront Developer Guide
Creating an Amazon Web Services Account

To create an AWS account
1. Go to http://aws.amazon.com, and choose Sign In to the Console.
2. Follow the on-screen instructions.
Part of the sign-up procedure involves receiving a phone call and entering a PIN using the phone
keypad.
Next: Creating an Amazon EC2 Key Pair (p. 327)
Creating an Amazon EC2 Key Pair
If you already have an Amazon EC2 key pair in the Amazon EC2 region in which you want to create an
AWS CloudFormation stack for Unified Streaming, skip to Subscribing to Unified Streaming (p. 327). If
you don't have a key pair in that region, use the following procedure to create one.
A key pair is a security credential similar to a password.You specify a key pair when you create an AWS
CloudFormation stack for on-demand streaming, later in this process. After on-demand streaming is
configured, you use the key pair to securely connect to your Amazon EC2 instance.
To create an Amazon EC2 key pair
1. Sign in to the AWS Management Console and open the Amazon EC2 console at https://
console.aws.amazon.com/ec2/.
2. In the Region list, choose the region in which you want to create the key pair.
You must create the key pair in the same region in which you will create your AWS CloudFormation
stack for on-demand streaming later in this process. We recommend that you create the key pair
and the stack for on-demand streaming in the region that is closest to the users who will be doing
the streaming.
3. In the navigation pane, choose Key Pairs.
4. In the Key Pairs pane, choose Create Key Pair.
5. In the Create Key Pair dialog box, enter a name for the key pair such as on-demand-streaming,
and make note of the name.You'll enter this value when you create an AWS CloudFormation stack
for on-demand streaming, later in the process.
6. Click Create.
7. In the Opening <key_pair_name>.pem dialog box, save the .pem file to a safe place on your computer.
Important
This is the only opportunity you'll have to download and save your private key.
8. Click Close to close the Create Key Pair dialog box.
Next: Subscribing to Unified Streaming (p. 327)
Subscribing to Unified Streaming
Perform the following procedure to subscribe to Unified Streaming for Amazon Web Services through
AWS Marketplace.
Important
You can subscribe an AWS account to Unified Streaming only once. If your AWS account already
has a Unified Streaming subscription, use that subscription to configure on-demand streaming.
The Unified Streaming subscription is free.You pay only for hourly usage and for data transfer.You can
view a detailed price list as part of the following procedure.
API Version 2016-08-01
327
Amazon CloudFront Developer Guide
Creating an Amazon EC2 Key Pair

To order Unified Streaming for Amazon Web Services
1. Go to the Unified Streaming (USP) page on the AWS Marketplace website.
2. Review product information and choose Continue.
3. Click the Manual Launch with EC2 Console, APIs or CLI tab.
4. Review the pricing information, and choose Accept Terms.
Important
Don't use the buttons on this page to launch Unified Streaming. In the next procedure, you
create an AWS CloudFormation stack that launches an Amazon EC2 instance and installs
Unified Streaming.
Next: Creating an AWS CloudFormation Stack for On-Demand Streaming (p. 328)
Creating an AWS CloudFormation Stack for
On-Demand Streaming
You use an AWS CloudFormation template to create a stack that creates the AWS resources required
by on-demand streaming.These resources include an Amazon EC2 instance, an Amazon S3 bucket,
and a CloudFront distribution. (You can optionally use an existing bucket.)
Important
You incur charges for your AWS resources beginning when you create the AWS CloudFormation
stack:
• Hourly charges for the Amazon EC2 instances and the load balancer and monthly charges
for CloudWatch continue to accrue until you delete the AWS CloudFormation stack regardless
of whether you use the resources to stream video.
•Usage charges for Amazon S3 and CloudFront depend on how much you use the resources.
When you no longer want to use the resources that the AWS CloudFormation stack creates,
delete the stack.This deletes the AWS resources that the stack created, and stops the AWS
charges for the resources. (Deleting the stack does not delete the Amazon S3 bucket because
the bucket might contain your media files.)
For more information about pricing for AWS resources, see AWS Service Pricing Overview. For more
information about how to delete an AWS CloudFormation stack, see Deleting the AWS CloudFormation
Stack and Amazon S3 Bucket for On-Demand Streaming (p. 333). For more information about AWS
CloudFormation, see AWS CloudFormation Documentation.
To create an AWS CloudFormation stack for on-demand streaming
1. To start the Create Stack wizard, choose the link that corresponds with the applicable Amazon EC2
region. Click a link in the first group or the second group depending on whether you want AWS
CloudFormation to create an Amazon S3 bucket for you in addition to creating an Amazon EC2
instance and a CloudFront distribution:
•If you choose a link in the first group, AWS CloudFormation creates an Amazon EC2 instance and
an Amazon S3 bucket in the corresponding region. (CloudFront distributions aren't associated with
a specific region.)
•If you choose a link in the second group, AWS CloudFormation creates an Amazon EC2 instance
and prompts you to specify the Amazon S3 bucket that you want to use. We recommend that you
choose a region in which you already have an Amazon S3 bucket so you aren't charged for
transferring data between regions.
API Version 2016-08-01
328
Amazon CloudFront Developer Guide
Creating an AWS CloudFormation Stack for On-Demand
Streaming

Create all required resources, including a new Amazon S3 bucket for media upload and storage
•Create a stack in US East (N.Virginia)
•Create a stack in US West (Oregon)
•Create a stack in US West (N. California)
•Create a stack in EU (Ireland)
•Create a stack in EU (Frankfurt)
•Create a stack in Asia Pacific (Singapore)
•Create a stack in Asia Pacific (Tokyo)
•Create a stack in Asia Pacific (Sydney)
•Create a stack in South America (São Paulo)
Create an Amazon EC2 instance and a CloudFront distribution but use an existing Amazon
S3 bucket for media upload and storage
•Create a stack in US East (N.Virginia)
•Create a stack in US West (Oregon)
•Create a stack in US West (N. California)
•Create a stack in EU (Ireland)
•Create a stack in EU (Frankfurt)
•Create a stack in Asia Pacific (Singapore)
•Create a stack in Asia Pacific (Tokyo)
•Create a stack in Asia Pacific (Sydney)
•Create a stack in South America (São Paulo)
The wizard starts and the applicable URL automatically appears in the Provide an S3 URL to
template field.
2. If you aren't already signed in to the AWS Management Console, sign in when prompted.
3. (Optional) Change the Stack Name.The stack name must not contain spaces, and it must be unique
within your AWS account.
Do not change the Template option or the address in Provide an S3 URL to template.
4. Click Next.
5. For Amazon EC2KeyPair, enter the name of an Amazon EC2 key pair in the same region that you
chose in Step 1. The key pair must be associated with the account that you're currently signed in
with. If you created a key pair when you performed the procedure in Creating an Amazon EC2 Key
Pair (p. 327), enter the name of that key pair.
6. If you chose a link to use an existing Amazon S3 bucket in step 1, enter the name of the bucket in
the AmazonS3BucketName field.
7. For InstanceType, enter an instance type, which determines pricing for your Amazon EC2 instance.
For more information about Amazon EC2 instance types, see Available Instance Types in the Amazon
EC2 User Guide for Linux Instances.
For information about pricing, see the Unified Streaming (USP) page on the AWS Marketplace
website.
8. Click Next.
9. (Optional) On the Options page, add one or more tags. The tags that you specify are applied to the
Amazon EC2 instance and the Amazon S3 bucket that AWS CloudFormation creates. However, the
tags are not applied to the CF; distribution that AWS CloudFormation creates; AWS CloudFormation
does not support adding tags to CloudFront distributions.
API Version 2016-08-01
329
Amazon CloudFront Developer Guide
Creating an AWS CloudFormation Stack for On-Demand
Streaming

10. (Optional) To configure SNS notification, to specify how long you're willing to wait for the stack to be
created, to choose whether to roll back changes if stack creation fails, and to enter a stack policy,
choose Advanced, and adjust settings as desired.
11. Click Next.
12. Review the settings for the stack. When you're satisfied with the settings, choose Create, and AWS
CloudFormation creates the stack.
Creating your stack might take several minutes. To track the progress of the stack creation, select
the stack, and choose the Events tab in the bottom frame. If AWS CloudFormation cannot create
the stack, the Events tab lists error messages.
When your stack is ready, the status for the stack changes to CREATE_COMPLETE.
Next: Verifying that Unified Streaming Server Is Running (p. 330)
Verifying that Unified Streaming Server Is Running
After AWS CloudFormation creates the stack, perform the following procedure to verify that Unified
Streaming Server is running on the Amazon EC2 instance you provisioned by using AWS CloudFormation.
To verify that Unified Streaming Server is running
1. Open the AWS CloudFormation console at https://console.aws.amazon.com/cloudformation/.
2. In the region selector, choose the region in which you created the AWS CloudFormation stack.
3. In the list of stacks, select the stack that you created in Creating an AWS CloudFormation Stack for
On-Demand Streaming (p. 328).
4. Click the Outputs tab.
5. Copy the URL in the UnifiedServer key, for example,
http://ec2-01-2-34-567.compute-1.amazonaws.com/.
6. Paste the URL into the address bar in a web browser, and press Enter.
7. On the Unified Streaming home page, choose the player links to verify that they play on your computer
or device.
If the Unified Streaming home page doesn't appear, return to On-Demand Media Streaming with
Unified Streaming (p. 325), and verify that the values that you specified in the first four tasks are
correct.
Next: Uploading Your Media Files to Amazon S3 (p. 330)
Uploading Your Media Files to Amazon S3
You use the Amazon S3 bucket that you specified in the AWS CloudFormation stack (or that you had
AWS CloudFormation create for you) to store your media content.These files must be publicly readable
so that the Unified Streaming server can deliver them to players through CloudFront.
To upload media files to your Amazon S3 bucket
1. Review the Unified Streaming fact sheet and confirm that your media is encoded in a format that
Unified Streaming supports.
2. Sign in to the AWS Management Console and open the AWS CloudFormation console at https://
console.aws.amazon.com/cloudformation/.
3. Choose the stack that you created in Creating an AWS CloudFormation Stack for On-Demand
Streaming (p. 328).
API Version 2016-08-01
330
Amazon CloudFront Developer Guide
Verifying that Unified Streaming Server Is Running

4. Choose the Outputs tab.
5. Make note of the value of the S3BucketName key. This is the Amazon S3 bucket that you'll upload
your media files to.
6. Open the Amazon S3 console at https://console.aws.amazon.com/s3/.
7. In the list of buckets on the left, choose the name of the bucket that you made note of in step 5.
8. Choose Upload.
9. In the Upload - Select Files and Folders dialog box, choose Add Files.
10. Choose the files to upload.
11. Choose Set Details.
12. Choose Set Permissions.
13. Choose Make everything public, and choose Start Upload.
Next: Playing the On-Demand Stream In a Test Web Application (p. 331)
Playing the On-Demand Stream In a Test Web
Application
To confirm that on-demand streaming is working, you play the stream in a test web application. When
AWS CloudFormation created an Amazon EC2 instance, it also installed sample video files and two
sample players:
• Silverlight – for streaming videos using the Microsoft Smooth Streaming protocol
• OSMF 2.0 – for streaming videos in Adobe Flash using the Adobe HTTP Dynamic Streaming (Adobe
HDS) protocol
The following procedures explain how to play the on-demand stream using different protocols:
•To play a video using the Microsoft Smooth Streaming protocol (p. 331)
•To play a video using the Apple HTTP Live Streaming (HLS) protocol (p. 332)
•To play a video using the Adobe HTTP Dynamic Streaming (HDS) protocol (p. 332)
•To play a video using the MPEG-DASH protocol (p. 333)
To play a video using the Microsoft Smooth Streaming protocol
1. Open the AWS CloudFormation console at https://console.aws.amazon.com/cloudformation/.
2. In the list of AWS CloudFormation stacks, choose the stack for on-demand HTTP streaming.
3. In the bottom pane of the AWS CloudFormation console, choose the Outputs tab.
4. On the Outputs tab, copy the URL in the OriginS3 field. This is the URL for the Microsoft Smooth
Streaming example web page on your Unified Streaming server.
5. Paste the URL into a browser and go to the website.
6. Copy the value of the SmoothManifest key, and paste it into URL field on the example web page.
In the following example URL, note that
media-file-path-excluding-bucket-name-but-including-media-file-name is literal
text that you'll replace in the next step:
http://d111111abcdef8.cloudfront.net/unifiedhttpstreaming-unifiedvods3bucket-123abc4/media-file-path-excluding-bucket-name-but-including-media-file-name/manifest
7. In the example web page, replace
media-file-path-excluding-bucket-name-but-including-media-file-name with the
correct path of the video in Amazon S3 that you want to play. For example, if your media file name
is nasa_msl_launch.mp4, then the URL is the following:
API Version 2016-08-01
331
Amazon CloudFront Developer Guide
Playing the On-Demand Stream In a Test Web
Application

http://d111111abcdef8.cloudfront.net/unifiedhttpstreaming-unifiedvods3bucket-123abc4/nasa_msl_launch.mp4/manifest
If the video is in the folder space-videos in your Amazon S3 bucket, then the URL is the following:
http://d111111abcdef8.cloudfront.net/unifiedhttpstreaming-unifiedvods3bucket-123abc4/space-videos/nasa_msl_launch.mp4/manifest
To play a video using the Apple HTTP Live Streaming (HLS) protocol
1. Open the AWS CloudFormation console at https://console.aws.amazon.com/cloudformation/.
2. In the list of AWS CloudFormation stacks, choose the stack for on-demand HTTP streaming.
3. In the bottom pane of the AWS CloudFormation console, choose the Outputs tab.
4. Open a Safari web browser on an Apple iOS device, or open the Safari web browser or QuickTime
Player 10.x on a computer running Mac OS X Snow Leopard (version 10.6) or later.
5. Copy the value of the SmoothManifest key, and paste it into URL field in the Safari browser or
QuickTime Player. In the following example URL, note that
media-file-path-excluding-bucket-name-but-including-media-file-name is literal
text that you'll replace in the next step:
http://d111111abcdef8.cloudfront.net/unifiedhttpstreaming-unifiedvods3bucket-123abc4/media-file-path-excluding-bucket-name-but-including-media-file-name/manifest
6. In the URL field, replace
media-file-path-excluding-bucket-name-but-including-media-file-name with the
correct path of the video in Amazon S3 that you want to play. For example, if your media file name
is nasa_msl_launch.mp4, then the URL is the following:
http://d111111abcdef8.cloudfront.net/unifiedhttpstreaming-unifiedvods3bucket-123abc4/nasa_msl_launch.mp4/manifest
If the video is in the folder space-videos in your Amazon S3 bucket, then the URL is the following:
http://d111111abcdef8.cloudfront.net/unifiedhttpstreaming-unifiedvods3bucket-123abc4/space-videos/nasa_msl_launch.mp4/manifest
To play a video using the Adobe HTTP Dynamic Streaming (HDS) protocol
1. Open the AWS CloudFormation console at https://console.aws.amazon.com/cloudformation/.
2. In the list of AWS CloudFormation stacks, choose the stack for on-demand HTTP streaming.
3. In the bottom pane of the AWS CloudFormation console, choose the Outputs tab.
4. On the Outputs tab, copy the URL in the OriginS3 field. This is the URL for the Flash TTP Player
example web page on your Unified Streaming server.
5. Paste the URL into a browser and go to the website.
6. Copy the value of the HDSManifest key, and paste it into URL field on the example web page. In
the following example URL, note that
media-file-path-excluding-bucket-name-but-including-media-file-name is literal
text that you'll replace in the next step:
http://d111111abcdef8.cloudfront.net/unifiedhttpstreaming-unifiedvods3bucket-123abc4/media-file-path-excluding-bucket-name-but-including-media-file-name/manifest
7. In the URL field, replace
media-file-path-excluding-bucket-name-but-including-media-file-name with the
correct path of the video in Amazon S3 that you want to play. For example, if your media file name
is nasa_msl_launch.mp4, then the URL is the following:
http://d111111abcdef8.cloudfront.net/unifiedhttpstreaming-unifiedvods3bucket-123abc4/nasa_msl_launch.mp4/manifest
If the video is in the folder space-videos in your Amazon S3 bucket, then the URL is the following:
http://d111111abcdef8.cloudfront.net/unifiedhttpstreaming-unifiedvods3bucket-123abc4/space-videos/nasa_msl_launch.mp4/manifest
API Version 2016-08-01
332
Amazon CloudFront Developer Guide
Playing the On-Demand Stream In a Test Web
Application

To play a video using the MPEG-DASH protocol
1. Browse to http://dashif.org/reference/players/javascript/index.html, which is a list of available versions
of an MPEG-DASH test client.
2. Choose the latest version of the Dash client.
3. On the Reference Client version number page, in the Stream list, choose a streaming format.
4. Open the AWS CloudFormation console at https://console.aws.amazon.com/cloudformation/.
5. In the list of AWS CloudFormation stacks, choose the stack for on-demand HTTP streaming.
6. In the bottom pane of the AWS CloudFormation console, choose the Outputs tab.
7. Copy the value of the MPEGDASHManifest key, and paste it into manifest field on the Reference
Client page. In the following example URL, note that
media-file-path-excluding-bucket-name-but-including-media-file-name is literal
text that you'll replace in the next step:
http://d111111abcdef8.cloudfront.net/unifiedhttpstreaming-unifiedvods3bucket-123abc4/media-file-path-excluding-bucket-name-but-including-media-file-name/manifest
8. In the manifest field, replace
media-file-path-excluding-bucket-name-but-including-media-file-name with the
correct path of the video in Amazon S3 that you want to play. For example, if your media file name
is nasa_msl_launch.mp4, then the URL is the following:
http://d111111abcdef8.cloudfront.net/unifiedhttpstreaming-unifiedvods3bucket-123abc4/nasa_msl_launch.mp4/manifest
If the video is in the folder space-videos in your Amazon S3 bucket, then the URL is the following:
http://d111111abcdef8.cloudfront.net/unifiedhttpstreaming-unifiedvods3bucket-123abc4/space-videos/nasa_msl_launch.mp4/manifest
Next: Deleting the AWS CloudFormation Stack and Amazon S3 Bucket for On-Demand Streaming (p. 333)
Deleting the AWS CloudFormation Stack and
Amazon S3 Bucket for On-Demand Streaming
When you no longer want to use this setup for on-demand HTTP streaming, delete the AWS
CloudFormation stack.This deletes most of the AWS resources that AWS CloudFormation created, and
stops most of the AWS charges for the resources. In addition, if you no longer want the Amazon S3 bucket
that you were using for your media files, delete the bucket manually. AWS CloudFormation doesn't delete
the bucket automatically in case you need the media files in the bucket. Deleting the bucket stops the
rest of the AWS charges for the resources.
To delete an AWS CloudFormation stack and an Amazon S3 bucket for on-demand
streaming
1. Sign in to the AWS Management Console and open the AWS CloudFormation console at https://
console.aws.amazon.com/cloudformation/.
2. Find the AWS CloudFormation stack that you created for on-demand streaming, and make note of
the creation time.This will help you identify the Amazon EBS volume that you'll delete later in this
procedure.
3. Select the stack that you want to delete, and choose Delete Stack.
4. Click Yes, Delete to confirm.
5. To track the progress of the stack deletion, select the stack, and choose the Events tab in the bottom
frame.
6. Navigate to the Amazon S3 console.
7. Choose the name of the bucket.
8. On the All Buckets / bucket name page, delete your files.
API Version 2016-08-01
333
Amazon CloudFront Developer Guide
Deleting the AWS CloudFormation Stack and Amazon
S3 Bucket for On-Demand Streaming

9. Choose All Buckets.
10. Choose the row for the bucket but don't choose the bucket name.
11. On the Actions menu, choose Delete.
Frequently Asked Questions
•What is the price for on-demand HTTP streaming using CloudFront and Unified Streaming? (p. 334)
•How can I use Secure Shell (SSH) to connect to my Amazon EC2 instance that is running Unified
Streaming? (p. 334)
•How can I create a CNAME alias for my Amazon EC2 instance or for my CloudFront distribution? (p. 335)
•Can I stream my media in multiple formats to a variety of devices simultaneously? (p. 336)
•How can I secure my content? (p. 336)
What is the price for on-demand HTTP streaming using
CloudFront and Unified Streaming?
When you use Unified Streaming with CloudFront, you incur the following charges:
•Unified Streaming on Amazon EC2 – See Unified Streaming on AWS Marketplace.
•CloudFront – See Amazon CloudFront Pricing.
•Amazon S3 – See Amazon Simple Storage Service Pricing.
There is no charge for using AWS CloudFormation.
How can I use Secure Shell (SSH) to connect to my Amazon
EC2 instance that is running Unified Streaming?
Note
By default, the SSH port for the Amazon EC2 instance (port 22) is disabled for security reasons.
The following procedure explains how to enable the SSH port and how to use SSH to connect
to your Amazon EC2 instance.
To enable access to port 22 on your Amazon EC2 instance that is running Unified Streaming
1. Get the name of the Amazon EC2 security group that is associated with your Amazon EC2 instance:
a. Sign in to the AWS Management Console and open the AWS CloudFormation console at https://
console.aws.amazon.com/cloudformation/.
b. In the Region list, select the region in which you created your Amazon EC2 instance.
c. Click the row for your AWS CloudFormation stack.
d. In the bottom pane, choose the Resources tab.
e. In the left column of the Stack Resources table, find the row for which the value is
AMSOriginServerSecurityGroup.
f. For that row, write down the value of the Physical ID column.
2. Open the Amazon EC2 console at https://console.aws.amazon.com/ec2/.
3. In the navigation pane, choose Security Groups.
4. On the Security Groups page, select the row in which the Name column matches the physical ID
that you got in Step 1f.
API Version 2016-08-01
334
Amazon CloudFront Developer Guide
Frequently Asked Questions

5. In the bottom pane, choose the Inbound tab.
6. For Create a new rule, select SSH.
7. Click Add Rule.
8. Click Apply Rule Changes.
To use SSH to connect to your Amazon EC2 instance that is running Unified Streaming
1. Open the Amazon EC2 console at https://console.aws.amazon.com/ec2/.
2. In the navigation pane, choose Instances.
3. Right-click the correct instance, and choose Connect to view instructions on how to use SSH to
connect to your Amazon EC2 instance. The user name is ubuntu.
How can I create a CNAME alias for my Amazon EC2 instance
or for my CloudFront distribution?
Your Amazon EC2 instance running Unified Streaming has an internal and an external DNS name.
Amazon EC2 does not provide access to modify these DNS settings. If you want to map an existing
API Version 2016-08-01
335
Amazon CloudFront Developer Guide
Frequently Asked Questions

domain name to your Amazon EC2 instance that is running Unified Streaming, use a DNS service provider
such as Amazon Route 53.When using your own domain name, we recommend that you create a CNAME
resource record set that maps your domain name to the external DNS name for your Amazon EC2
instance. Alternatively, if you associated an Elastic IP address with your Amazon EC2 instance, you can
create an A record that points to the Elastic IP address.
For information about using your own domain name with your CloudFront distribution, see Using Alternate
Domain Names (CNAMEs) (p. 50).
Can I stream my media in multiple formats to a variety of
devices simultaneously?
Yes. Unified Streaming supports streaming content to a wide array of devices using the following protocols:
• Adobe HTTP Dynamic Streaming (Adobe HDS)
• Apple HTTP Live Streaming (Apple HLS)
• Microsoft Smooth Streaming
• MPEG-DASH
How can I secure my content?
Unified Streaming supports several DRM, encryption (AES), and token-based protection schemes. For
information about DRM, see Unified Origin (DRM) on the Unified Streaming website. For specific tutorials
on individual technologies, see the following pages on the Unified Streaming website:
•Adobe Access
•BuyDRM PlayReady
•EZDRM PlayReady
•HTTP Live Streaming with AES
For token-based access strategies, see the following pages on the Unified Streaming website:
•Securing your video presentations with Nginx' HttpSecureLinkModule
•Securing your video presentations with Apache's mod_auth_token
Additional Documentation
Unified Streaming Documentation and Other Resources
The Unified Streaming site includes numerous resources, including tutorials that explain how to configure
Unified Streaming as well as in-depth documentation of options.
•Documentation
•Tutorials
•Frequently Asked Questions
Amazon Web Services Documentation
The following links take you to documentation for the AWS services used in this tutorial:
•AWS CloudFormation documentation
API Version 2016-08-01
336
Amazon CloudFront Developer Guide
Additional Documentation


On-Demand Video Streaming Using CloudFront
and Adobe Flash Player
When you stream media files using CloudFront, you provide both your media file and the media player
with which you want end users to play the media file. To use Adobe Flash Player to stream media files
with CloudFront, perform the procedures in the following topics:
1. Creating an Amazon S3 Bucket (p. 338)
2. Creating CloudFront Web and RTMP Distributions (p. 338)
3. Creating a Flash Project Using Adobe Flash Builder (p. 340)
4. Uploading Media and Flash Builder Files to an Amazon S3 Bucket (p. 341)
5. Playing the Media File (p. 342)
This tutorial uses Adobe Flash Builder version 4.6 to generate the files necessary to stream a video using
Adobe Flash Player. For more information about Flash Builder, go to the Flash Builder page on the Adobe
website. For information about downloading a free trial version of Adobe Flash Builder, go to the
Downloads/Adobe Flash Builder 4.6 page.
For a list of the codecs that Flash Player supports, go to the Supported codecs | Flash Player page on
the Adobe website.
For more information about streaming media using CloudFront, see Working with RTMP
Distributions (p. 87).
Creating an Amazon S3 Bucket
You can upload your media files and your media player files to the same Amazon S3 bucket or to separate
buckets. For this tutorial, you'll create one bucket for both a media file and the Flash Player media player
files.You'll upload the files later in the process, after you create the Adobe Flash Player files.
To create an Amazon S3 bucket
1. Sign in to the AWS Management Console and open the Amazon S3 console at https://
console.aws.amazon.com/s3/.
2. In the Amazon S3 console, choose Create Bucket.
3. In the Create Bucket dialog, enter a bucket name.
Important
For your bucket to work with CloudFront, the name must conform to DNS naming
requirements. For more information, go to Bucket Restrictions and Limitations in the Amazon
Simple Storage Service Developer Guide.
4. Select a region for your bucket. By default, Amazon S3 creates buckets in the US Standard region.
We recommend that you choose a region close to you to optimize latency, minimize costs, or to
address regulatory requirements.
5. Choose Create.
Creating CloudFront Web and RTMP Distributions
To configure CloudFront to stream a media file, you need a CloudFront RTMP distribution. For this tutorial,
you'll also create a CloudFront web distribution to access the .hlml file that Adobe Flash Builder creates.
Perform the following two procedures.
API Version 2016-08-01
338
Amazon CloudFront Developer Guide
On-Demand Video Streaming Using CloudFront and
Adobe Flash Player

To create a CloudFront web distribution
1. Open the CloudFront console at https://console.aws.amazon.com/cloudfront/.
2. Choose Create Distribution.
3. On the first page of the Create Distribution Wizard, in the Web section, choose Get Started.
4. On the second page of the wizard, choose in the Origin Domain Name field, and select the Amazon
S3 bucket that you created in the procedure To create an Amazon S3 bucket (p. 338). If you have a
lot of Amazon S3 buckets, you can type the first few characters of the bucket name to filter the list.
5. Accept the default values for the remaining fields, and choose Create Distribution.
6. After CloudFront creates your distribution, the value of the Status column for your distribution will
change from InProgress to Deployed. This should take less than 15 minutes.
The domain name that CloudFront assigns to your distribution appears in the list of distributions. (It
also appears on the General tab for a selected distribution.)
To create a CloudFront RTMP distribution
1. In the CloudFront console, choose Create Distribution.
2. In the Create Distribution Wizard, in the RTMP section, choose Get Started.
3. On the second page of the wizard, choose in the Origin Domain Name field, and select the Amazon
S3 bucket that you created in the procedure To create an Amazon S3 bucket (p. 338). If you have a
lot of Amazon S3 buckets, you can type the first few characters of the bucket name to filter the list.
4. Accept the default values for the remaining fields on the Create Distribution page, and choose
Create Distribution.
5. After CloudFront creates your distribution, the value of the Status column for your distribution will
change from InProgress to Deployed. This should take less than 15 minutes.
The domain name that CloudFront assigns to your distribution appears in the list of distributions.The
domain name also appears on the General tab for a selected distribution.
API Version 2016-08-01
339
Amazon CloudFront Developer Guide
Creating CloudFront Web and RTMP Distributions

Creating a Flash Project Using Adobe Flash
Builder
You can use Adobe Flash Builder to automatically create a Flash project, which contains all of the files
necessary to play a media file using Adobe Flash.
To create a Flash project using Adobe Flash Builder
1. Start Adobe Flash Builder.
2. On the Flash Builder File menu, choose New > Flex Project.
3. Enter the following values:
•Project name: Enter a name for your project, for example, CloudFrontStreaming.
•Folder: Specify where you want Flash Builder to save the files for this project. If you don't want to
use the default location, uncheck the Use default location checkbox, and choose another location.
Make note of the location; you'll need it later in the process.
•Application type: Accept the default value, Web.
•Flex SDK version: Accept the default value, Use default SDK.
4. To create the project, choose Finish.
After Flash Builder creates the project, a new tab that has the name of your project appears in the
Flash Builder user interface. The Source button on the <project-name> tab is selected, and the
Source page contains several lines of XML code.
5. Delete the default XML code on the Source page.
6. Copy the following XML code, and paste it into the blank Source page in Adobe Flash Builder.
<?xml version="1.0" encoding="utf-8"?>
<s:Application xmlns:fx="http://ns.adobe.com/mxml/2009"
xmlns:s="library://ns.adobe.com/flex/spark"
xmlns:mx="library://ns.adobe.com/flex/mx" minWidth="955" min
Height="600">
<fx:Declarations>
<!-- Place non-visual elements here, for example, services and value
objects -->
</fx:Declarations>
<fx:Script>
<![CDATA[
import mx.events.FlexEvent;
import org.osmf.net.StreamingURLResource; import org.osmf.net.FMSURL;
protected function vp_preinitializeHandler(event:FlexEvent): void
{
var myURL:StreamingURLResource = new StreamingURLResource("rtmp://RT
MP-DISTRIBUTION-DOMAIN-NAME/cfx/st/mp4:VIDEO-FILE-NAME-WITHOUT-EXTENSION");
myURL.urlIncludesFMSApplicationInstance = true;
myVideoPlayer.source = myURL;
}
]]>
</fx:Script>
<s:VideoPlayer id="myVideoPlayer" autoPlay="true" preinitialize="vp_prein
API Version 2016-08-01
340
Amazon CloudFront Developer Guide
Creating a Flash Project Using Adobe Flash Builder

itializeHandler(event)" x="32" y="52"/>
</s:Application>
7. In the XML code that you pasted into the Source page, replace the following values:
•Replace RTMP-DISTRIBUTION-DOMAIN-NAME with the CloudFront domain name for your RTMP
distribution, for example, s5c39gqb8ow64r.cloudfront.net.
•Replace VIDEO-FILE-NAME-WITHOUT-EXTENSION with the name of your video file, but exclude
the filename extension. For example, if the name of your video is my-vacation.mp4, enter only
my-vacation.
8. Save your changes.
9. On the Flash Builder Project menu, choose Export Release Build.
10. In the Export Release Build dialog box, accept all default values, and choose Finish.
Flash Builder creates the files for your project and saves them in the location that you specified in
Step 3.
Uploading Media and Flash Builder Files to an
Amazon S3 Bucket
When you use Adobe Flash Builder to generate the files for streaming media files, you upload media files
and Flash Builder files to the same Amazon S3 bucket.
To upload your media and Flash Builder files to an Amazon S3 bucket
1. Sign in to the AWS Management Console and open the Amazon S3 console at https://
console.aws.amazon.com/s3/.
2. In the Buckets pane, select your bucket, and choose Upload.
3. On the Upload - Select Files page, choose Add Files, and add the following files:
• Your media file
•The files that Flash Builder generated when you performed the procedure To create a Flash project
using Adobe Flash Builder (p. 340). Upload only the files in the bin-release directory.You can
exclude the files in the bin-release/history subdirectory.
API Version 2016-08-01
341
Amazon CloudFront Developer Guide
Uploading Media and Flash Builder Files to an Amazon
S3 Bucket

4. Grant public read permissions for the files that you added in the previous step.
a. Choose Set Details.
b. On the Set Details page, choose Set Permissions.
c. On the Set Permissions page, choose Make everything public.
5. Choose Start Upload.
Playing the Media File
To play the media file, you display the HTML file that Flash Builder created for your project and that you
uploaded to your Amazon S3 bucket.
To play the media file
1. Enter the CloudFront URL of the HTML file that Flash Builder created for your project by concatenating
the following values:
http://domain-name-for-your-CloudFront-distribution/HTML-file-name
For example:
http://d111111abcdef8.cloudfront.net/CloudFrontStreaming.html
2. In the video player, choose the arrow button.
The video should begin to play.
API Version 2016-08-01
342
Amazon CloudFront Developer Guide
Playing the Media File

On-Demand Video Streaming Using CloudFront
and Flowplayer for Adobe Flash
When you stream media files using CloudFront, you provide both your media file and the media player
with which you want end users to play the media file.To use the Flowplayer for Adobe Flash media player
to stream media files with CloudFront, perform the procedures in the following topics:
1. Uploading Media and Flowplayer Files to an Amazon S3 Bucket (p. 343)
2. Creating CloudFront Web and RTMP Distributions (p. 344)
3. Embedding Video in an HTML Page (p. 345)
Note
To stream video using CloudFront and Flowplayer for Adobe Flash, your users must enable
Javascript in their browsers.
This tutorial is based on version 3.2.12 of Flowplayer for Adobe Flash. For more information about
Flowplayer Flash, go to the Flowplayer Flash website. For a list of the video formats that Flowplayer Flash
supports, go to Video formats in the Flowplayer developer documentation about the Flowplayer
development environment.
Note
Flowplayer has released an HTML 5 version of their media player. The following procedures
only work with Flowplayer Flash, not with Flowplayer HTML5.
For more information about streaming media using CloudFront, see Working with RTMP
Distributions (p. 87).
Uploading Media and Flowplayer Files to an
Amazon S3 Bucket
You can upload your media files and your media player files to the same Amazon S3 bucket or to separate
buckets. For this tutorial, you'll upload an .mp4 media file and the Flowplayer media player files to the
same bucket.
To upload media and Flowplayer files to an Amazon S3 bucket
1. Download the following files from the Flowplayer website:
• The Flowplayer media player. After you download Flowplayer, extract the contents of the .zip file.
•flowplayer.rtmp-3.2.10.swf.This is a plugin that allows Flowplayer to stream video using the RTMP
protocol. The file is available on the RTMP page on the Flowplayer website.
2. Sign in to the AWS Management Console and open the Amazon S3 console at https://
console.aws.amazon.com/s3/.
3. In the Amazon S3 console, choose Create Bucket.
4. In the Create Bucket dialog, enter a bucket name.
Important
For your bucket to work with CloudFront, the name must conform to DNS naming
requirements. For more information, go to Bucket Restrictions and Limitations in the Amazon
Simple Storage Service Developer Guide.
API Version 2016-08-01
343
Amazon CloudFront Developer Guide
On-Demand Video Streaming Using CloudFront and
Flowplayer for Adobe Flash
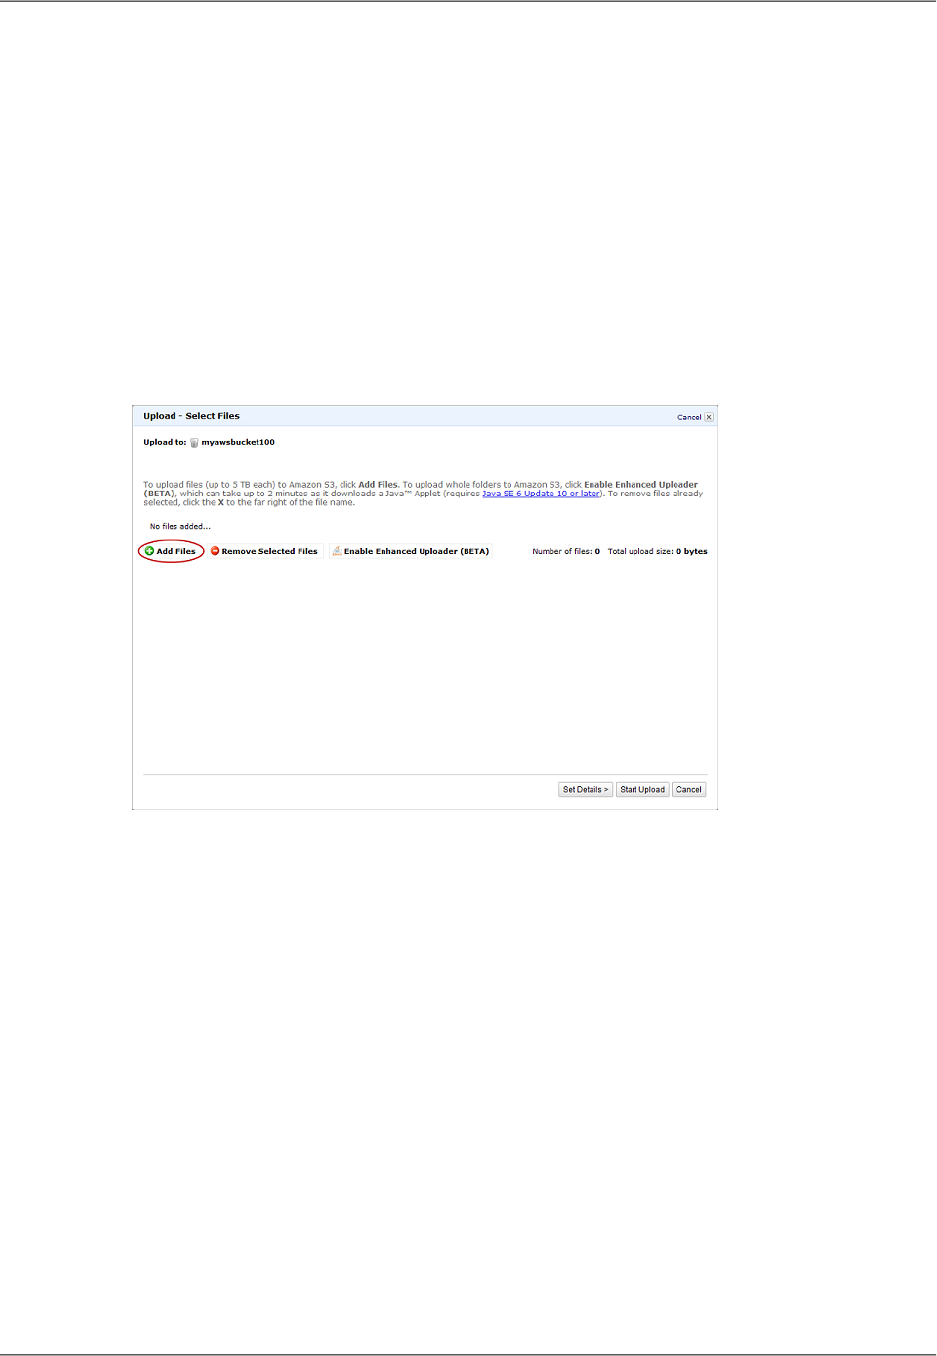
5. Select a region for your bucket. By default, Amazon S3 creates buckets in the US Standard region.
We recommend that you choose a region close to you to optimize latency, minimize costs, or to
address regulatory requirements.
6. Choose Create.
7. Select your bucket in the Buckets pane, and choose Upload.
8. On the Upload - Select Files page, choose Add Files, and add the following files (the Flowplayer
version numbers in your files may be different):
• flowplayer.controls-3.2.12.swf
• flowplayer-3.2.11.min.js
• flowplayer-3.2.12.swf
• flowplayer.rtmp-3.2.10.swf
• Your media file in .mp4 format
9. Grant public read permissions for the files that you added in the previous step.
a. Choose Set Details.
b. On the Set Details page, choose Set Permissions.
c. On the Set Permissions page, choose Make everything public.
10. Choose Start Upload.
Creating CloudFront Web and RTMP Distributions
To configure CloudFront to stream a media file, you need a CloudFront web distribution for the Flowplayer
files and an RTMP distribution for the media file. Perform the following two procedures to create a web
distribution and an RTMP distribution.
To create a CloudFront web distribution for your Flowplayer files
1. Open the CloudFront console at https://console.aws.amazon.com/cloudfront/.
2. Choose Create Distribution.
3. On the first page of the Create Distribution Wizard, in the Web section, choose Get Started.
API Version 2016-08-01
344
Amazon CloudFront Developer Guide
Creating CloudFront Web and RTMP Distributions
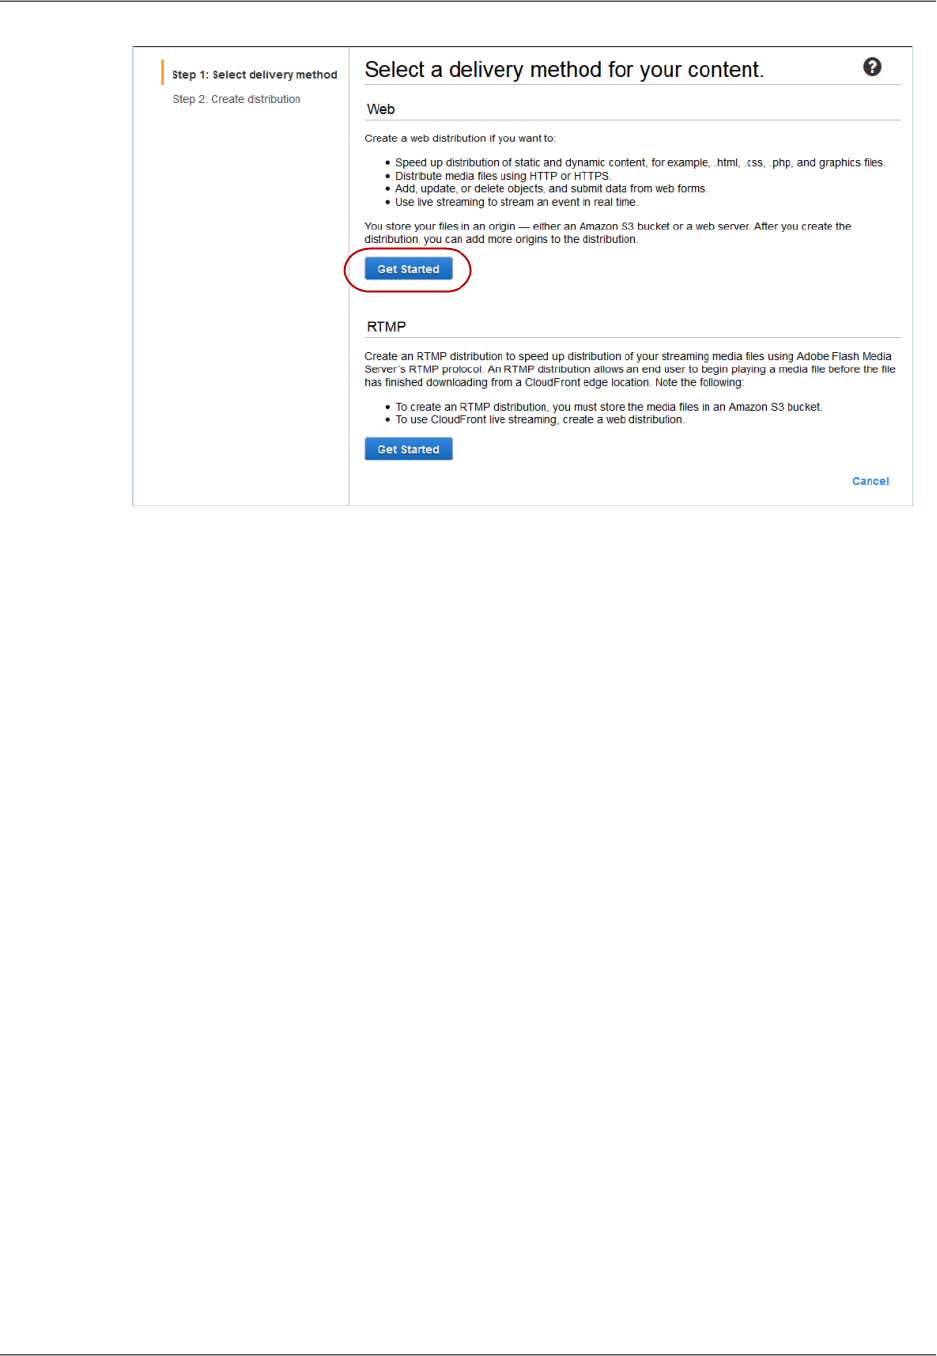
4. On the second page of the wizard, choose in the Origin Domain Name field, and select the Amazon
S3 bucket that you created in the procedure To upload media and Flowplayer files to an Amazon S3
bucket (p. 343). If you have a lot of Amazon S3 buckets, you can type the first few characters of the
bucket name to filter the list.
5. Accept the default values for the remaining fields, and choose Create Distribution.
6. After CloudFront creates your distribution, the value of the Status column for your distribution will
change from InProgress to Deployed. This should take less than 15 minutes.
The domain name that CloudFront assigns to your distribution appears in the list of distributions. (It
also appears on the General tab for a selected distribution.)
To create a CloudFront RTMP distribution for your media file
1. In the CloudFront console, choose Create Distribution.
2. In the Create Distribution Wizard, in the RTMP section, choose Get Started.
3. On the second page of the wizard, choose in the Origin Domain Name field, and select the Amazon
S3 bucket that you created in the procedure To upload media and Flowplayer files to an Amazon S3
bucket (p. 343). If you have a lot of Amazon S3 buckets, you can type the first few characters of the
bucket name to filter the list.
4. Accept the default values for the remaining fields on the Create Distribution page, and choose
Create Distribution.
5. After CloudFront creates your distribution, the value of the Status column for your distribution will
change from InProgress to Deployed. This should take less than 15 minutes.
The domain name that CloudFront assigns to your distribution appears in the list of distributions.The
domain name also appears on the General tab for a selected distribution.
Embedding Video in an HTML Page
The following sample HTML file shows you how to stream a video using the web and RTMP distributions
that you created in Creating CloudFront Web and RTMP Distributions (p. 344). To use this sample to
stream your video, perform the following steps:
API Version 2016-08-01
345
Amazon CloudFront Developer Guide
Embedding Video in an HTML Page

1. Copy the HTML code below, and paste it into a text editor.
2. Review the comments in the HTML file, and replace the following placeholders with the applicable
values:
• WEB-DISTRIBUTION-DOMAIN-NAME
• VIDEO-FILE-NAME
• RTMP-DISTRIBUTION-DOMAIN-NAME
3. Save the file with a .html filename extension, for example, flowplayer-example.html.
4. Open the .html file in a web browser, and play your video.
<HTML>
<HEAD>
<TITLE>Amazon CloudFront Streaming with Flowplayer</TITLE>
</HEAD>
<BODY>
<H1>This video is streamed by CloudFront and played in Flowplayer.</H1>
<!-- This HTML file plays an MP4 media file using Flowplayer.
Replace all instances of WEB-DISTRIBUTION-DOMAIN-NAME with the
domain name of your CloudFront web distribution, for example,
d111111abcdef8.cloudfront.net (begins with "d").
Update the version number that appears in the flowplayer-version filenames
with the version number of the files that you downloaded from the Flowplayer
website.
The files may not have the same version number.
Ensure that URLs don't contain any spaces.
-->
<!-- Call the Flowplayer JavaScript file. -->
<script src="http://WEB-DISTRIBUTION-DOMAIN-NAME/flowplayer-
3.2.11.min.js"></script>
<!-- Style section. Specify the attributes of the player
such as height, width, color, and so on.
-->
<style>
a.rtmp {
display:block;
width:720px;
height:480px;
margin:25px 0;
text-align:center;
background-color:black;
}
</style>
<!-- Replace VIDEO-FILE-NAME with the name of your .mp4 video file,
excluding the .mp4 filename extension. For example, if you uploaded a file
called my-vacation-video.mp4, enter my-vacation-video.
API Version 2016-08-01
346
Amazon CloudFront Developer Guide
Embedding Video in an HTML Page

If you're streaming an .flv file, use the following format:
<a class="rtmp" href="VIDEO-FILE-NAME"/>
-->
<a class="rtmp" href="mp4:VIDEO-FILE-NAME"/>
<script type="text/javascript">
$f("a.rtmp", "http://WEB-DISTRIBUTION-DOMAIN-NAME/flowplayer-3.2.12.swf", {
// Configure Flowplayer to use the RTMP plugin for streaming.
clip: {
provider: 'rtmp'
},
// Specify the location of the RTMP plugin.
plugins: {
rtmp: {
url: 'http://WEB-DISTRIBUTION-DOMAIN-NAME/flowplayer.rtmp-3.2.10.swf',
// Replace RTMP-DISTRIBUTION-DOMAIN-NAME with the domain name of your
// CloudFront RTMP distribution, for example, s5c39gqb8ow64r.cloud
front.net.
netConnectionUrl: 'rtmp://RTMP-DISTRIBUTION-DOMAIN-NAME/cfx/st'
}
}
});
</script>
</BODY>
</HTML>
API Version 2016-08-01
347
Amazon CloudFront Developer Guide
Embedding Video in an HTML Page

On-Demand Video Streaming Using CloudFront
and JW Player
When you stream media files using CloudFront, you provide both your media file and the media player
with which you want end users to play the media file.To use the JW Player media player to stream media
files with CloudFront, perform the procedures in the following topics:
1. Uploading Media and JW Player Files to an Amazon S3 Bucket (p. 348)
2. Creating CloudFront Web and RTMP Distributions (p. 349)
3. Embedding Video in a Web Page (p. 350)
4. Uploading the HTML File and Playing the Video (p. 352)
This tutorial is based on the free edition of JW Player version 7.3. For more information about JW Player,
go to the JW Player website.
For more information about streaming media using CloudFront, see Working with RTMP
Distributions (p. 87).
Uploading Media and JW Player Files to an
Amazon S3 Bucket
You can upload your media files and your media player files to the same Amazon S3 bucket or to separate
buckets. For this tutorial, you'll upload an .mp4 or .flv media file and the JW Player media player files to
the same bucket.
To upload media and JW Player files to an Amazon S3 bucket
1. If you don't already have the files for the JW Player media player, download the player (JW Player
7) from the Downloads page on the JW Player website.Then extract the contents of the .zip file.
2. Sign in to the AWS Management Console and open the Amazon S3 console at https://
console.aws.amazon.com/s3/.
3. In the Amazon S3 console, choose Create Bucket.
4. In the Create Bucket dialog, enter a bucket name.
Important
For your bucket to work with CloudFront, the name must conform to DNS naming
requirements. For more information, go to Bucket Restrictions and Limitations in the Amazon
Simple Storage Service Developer Guide.
5. Select a region for your bucket. By default, Amazon S3 creates buckets in the US Standard region.
We recommend that you choose a region close to you to optimize latency, minimize costs, or to
address regulatory requirements.
6. Choose Create.
7. Select your bucket in the Buckets pane, and choose Upload.
8. On the Upload - Select Files page, choose Add Files, and add the following files:
• jwplayer.flash.swf
• jwplayer.js
• Your .mp4 or .flv media file.
API Version 2016-08-01
348
Amazon CloudFront Developer Guide
On-Demand Video Streaming Using CloudFront and JW
Player
9. Grant public read permissions for the files that you added in the previous step.
a. Choose Set Details.
b. On the Set Details page, choose Set Permissions.
c. On the Set Permissions page, choose Make everything public.
10. Choose Start Upload.
Creating CloudFront Web and RTMP Distributions
To configure CloudFront to stream a media file, you need a CloudFront web distribution for the JW Player
files and an HTML file, and an RTMP distribution for the media file. Perform the following two procedures
to create a web distribution and an RTMP distribution.
To create a CloudFront web distribution for your JW Player files
1. Open the CloudFront console at https://console.aws.amazon.com/cloudfront/.
2. Choose Create Distribution.
3. On the first page of the Create Distribution Wizard, in the Web section, choose Get Started.
API Version 2016-08-01
349
Amazon CloudFront Developer Guide
Creating CloudFront Web and RTMP Distributions

4. On the second page of the wizard, choose in the Origin Domain Name field, and select the Amazon
S3 bucket that you created in the procedure To upload media and JW Player files to an Amazon S3
bucket (p. 348). If you have a lot of Amazon S3 buckets, you can type the first few characters of the
bucket name to filter the list.
5. Accept the default values for the remaining fields, and choose Create Distribution.
6. After CloudFront creates your distribution, the value of the Status column for your distribution will
change from InProgress to Deployed. This should take less than 15 minutes.
The domain name that CloudFront assigns to your distribution appears in the list of distributions.The
domain name also appears on the Distribution Settings page for a selected distribution.)
To create a CloudFront RTMP distribution for your media file
1. In the CloudFront console, choose Create Distribution.
2. In the Create Distribution Wizard, in the RTMP section, choose Get Started.
3. On the second page of the wizard, choose in the Origin Domain Name field, and select the Amazon
S3 bucket that you created in the procedure To upload media and JW Player files to an Amazon S3
bucket (p. 348). If you have a lot of Amazon S3 buckets, you can type the first few characters of the
bucket name to filter the list.
4. Accept the default values for the remaining fields on the Create Distribution page, and choose
Create Distribution.
5. After CloudFront creates your distribution, the value of the Status column for your distribution will
change from InProgress to Deployed. This should take less than 15 minutes.
The domain name that CloudFront assigns to your distribution appears in the list of distributions.The
domain name also appears on the Distribution Settings page for a selected distribution.
Embedding Video in a Web Page
The following example shows you how to embed a video in a web page using the web and RTMP
distributions that you created in Creating CloudFront Web and RTMP Distributions (p. 349).
API Version 2016-08-01
350
Amazon CloudFront Developer Guide
Embedding Video in a Web Page

Perform the following steps:
1. Sign in to the JW Player website. If you don't already have a JW Player account, create one.
2. On the Downloads page, get the license key for the player that you downloaded earlier in this tutorial.
3. Copy the HTML code below, and paste it into a text editor.
4. Review the comments in the HTML file, and replace the following placeholders with the applicable
values:
• WEB-DISTRIBUTION-DOMAIN-NAME
• RTMP-DISTRIBUTION-DOMAIN-NAME
• VIDEO-FILE-NAME
• LICENSE-KEY
5. Save the file with a .html filename extension, for example, jwplayer-example.html.
<HTML>
<HEAD>
<TITLE>Amazon CloudFront Streaming with JW Player 7</TITLE>
<!-- Call the JW Player JavaScript file, jwplayer.js.
Replace WEB-DISTRIBUTION-DOMAIN-NAME with the domain name of your
CloudFront web distribution, for example, d1234.cloudfront.net
(begins with "d"). This causes a browser to download the JW Player file
before streaming begins.
Replace LICENSE-KEY with your personal license key from JW Player.
-->
<script type='text/javascript' src='WEB-DISTRIBUTION-NAME/jwplayer.js'></script>
<script type='text/javascript' src='WEB-DISTRIBUTION-NAME/jwplay
er.flash.swf'></script>
<script>jwplayer.key="LICENSE-KEY";</script>
</HEAD>
<BODY>
<H1>This video is streamed by CloudFront and played by JW Player 7.</H1>
<!-- Replace RTMP-DISTRIBUTION-DOMAIN-NAME with the domain name of your
RTMP distribution, for example, s5678.cloudfront.net (begins with "s").
Replace VIDEO-FILE-NAME with the name of your .mp4 or .flv video file,
including the .mp4 or .flv filename extension. For example, if you uploaded
my-vacation.mp4, enter my-vacation.mp4. You might need to prepend "mp4:" to the
name of your video file, for example, mp4:my-vacation.mp4.
If the file is in a subdirectory, include the subdirectory name just before
the file name, for example:
"rtmp://RTMP-DISTRIBUTION-DOMAIN-NAME/cfx/st/sample-directory/VIDEO-FILE-NAME"
-->
API Version 2016-08-01
351
Amazon CloudFront Developer Guide
Embedding Video in a Web Page

<div id="my-video"></div>
<script type="text/javascript">
jwplayer("my-video").setup({
file: "rtmp://RTMP-DISTRIBUTION-DOMAIN-NAME/cfx/st/VIDEO-FILE-NAME",
width: "720",
height: "480",
primary: "flash"
});
</script>
</BODY>
</HTML>
Uploading the HTML File and Playing the Video
To play the video using the HTML file that you created in Embedding Video in a Web Page (p. 350), upload
the file to your Amazon S3 bucket, and use the URL for your CloudFront distribution.
To upload the HTML file and play the video
1. Open the Amazon S3 console at https://console.aws.amazon.com/s3/.
2. Select your bucket, and choose Upload.
3. On the Upload - Select Files page, choose Add Files, and add your HTML file.
4. Grant public read permissions for the HTML file that you added in the previous step.
a. Choose Set Details.
b. On the Set Details page, choose Set Permissions.
c. On the Set Permissions page, choose Make everything public.
5. Choose Start Upload.
6. To play the video, enter the following URL in a web browser:
http://domain name of your CloudFront web distribution/your HTML file name
API Version 2016-08-01
352
Amazon CloudFront Developer Guide
Uploading the HTML File and Playing the Video
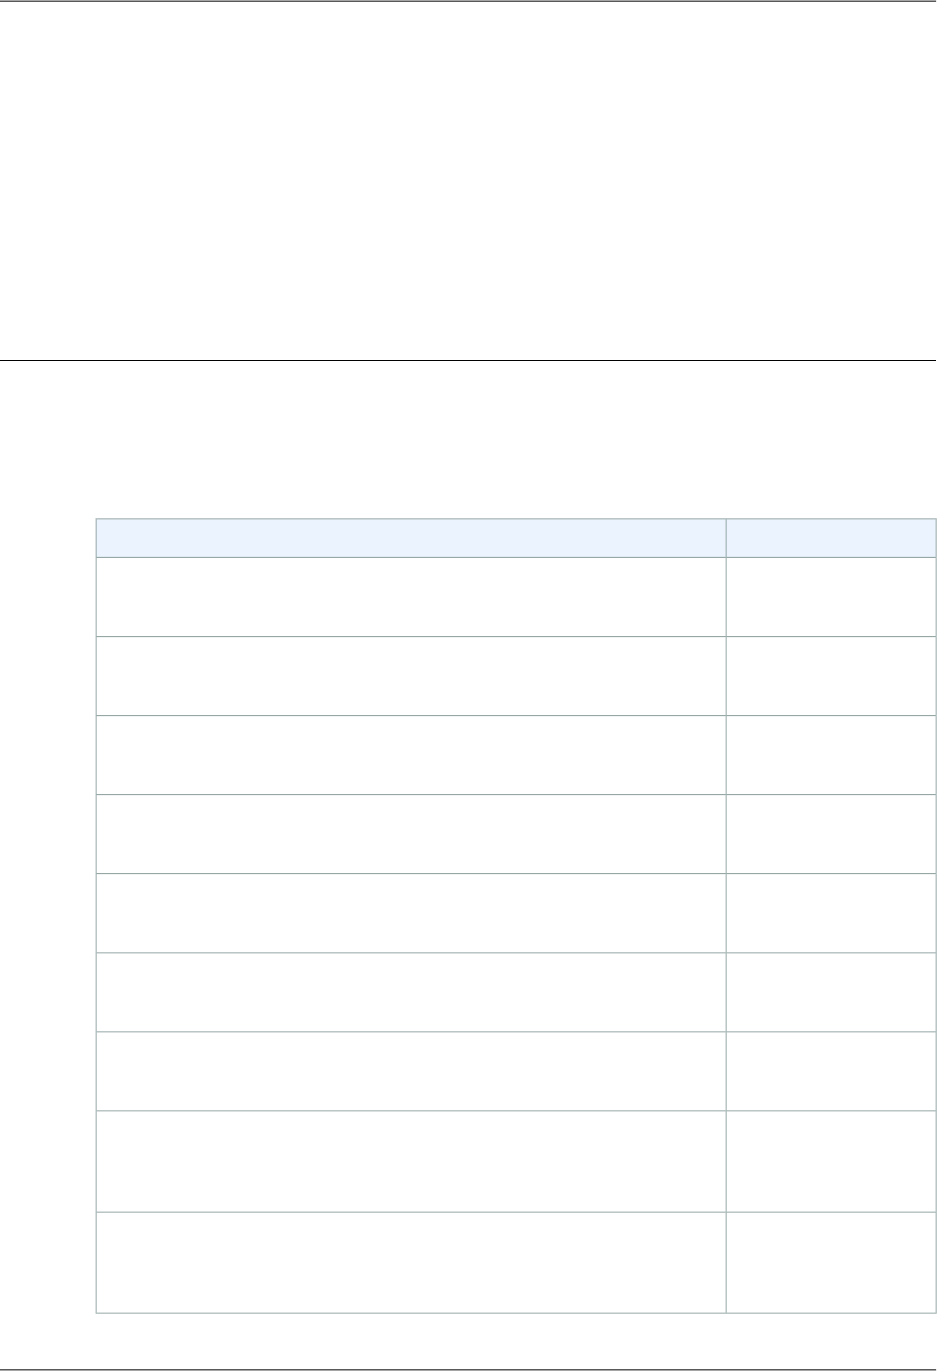
Limits
CloudFront entities are subject to the following limits.
LimitEntity
10 Gbps
Request a higher limit
Data transfer rate per distribution
15,000
Request a higher limit
Requests per second per distribution
200
Request a higher limit
Web distributions per AWS account
For more information, see Working with Web Distributions (p. 58).
100
Request a higher limit
RTMP distributions per AWS account
For more information, see Working with RTMP Distributions (p. 87).
100
Request a higher limit
Alternate domain names (CNAMEs) per distribution
For more information, see Using Alternate Domain Names (CNAMEs) (p. 50).
25
Request a higher limit
Origins per distribution
25
Request a higher limit
Cache behaviors per distribution
10
Request a higher limit
Whitelisted headers per cache behavior
For more information, see Configuring CloudFront to Cache Objects Based
on Request Headers (p. 108).
10
Request a higher limit
Whitelisted cookies per cache behavior
For more information, see Configuring CloudFront to Cache Objects Based
on Cookies (p. 106).
API Version 2016-08-01
353
Amazon CloudFront Developer Guide

LimitEntity
512 minus the number
of whitelisted cookies
Total number of bytes in whitelisted cookie names (doesn't apply if you con-
figure CloudFront to forward all cookies to the origin)
10 name/value pairs
Request a higher limit
Custom headers: maximum number of custom headers that you can configure
CloudFront to forward to the origin
For more information, see Forwarding Custom Headers to Your Origin (Web
Distributions Only) (p. 112).
256 charactersCustom headers: maximum length of a header name
2,048 charactersCustom headers: maximum length of a header value
10,240 charactersCustom headers: maximum length of all header values and names combined
2
Request a higher limit
SSL certificates per AWS account when serving HTTPS requests using
dedicated IP addresses (no limit when serving HTTPS requests using SNI)
For more information, see Using an HTTPS Connection to Access Your Ob-
jects (p. 229).
1SSL certificates that can be associated with a CloudFront web distribution
50Tags that can be added to a CloudFront web or RTMP distribution
UnlimitedObjects that you can serve per distribution
20 GBMaximum file size for HTTP GET, POST, and PUT requests
20,480 bytesMaximum length of a request, including headers and query strings
8,192 bytesMaximum length of a URL
1,000 to 10,000,000
bytes
File compression: range of file sizes that CloudFront compresses
For more information, see Serving Compressed Files (p. 135).
3,000Object invalidation: maximum number of objects allowed in active invalidation
requests, excluding wildcard invalidations
For more information, see Invalidating Objects (Web Distributions
Only) (p. 121).
15Object invalidation: maximum number of active wildcard invalidations allowed
UnlimitedObject invalidation: maximum number of objects that one wildcard invalidation
can process
API Version 2016-08-01
354
Amazon CloudFront Developer Guide

Amazon CloudFront Resources
Although fairly simple to use, CloudFront is rich in functionality. The resources listed here can help you
learn more about CloudFront.
Topics
•Additional Amazon CloudFront Documentation (p. 355)
•Getting Support (p. 356)
•CloudFront Developer Tools and SDKs (p. 356)
•Using CloudFront Logging (p. 356)
•Additional Tips from the Amazon Web Services Blog (p. 356)
•Invalidating Objects (p. 357)
•Distributing Streaming Media (p. 357)
•Tools and Code Examples for Configuring Private Content (p. 357)
•Using CloudFront with a Content Management System (p. 358)
Additional Amazon CloudFront Documentation
The following related resources can help you as you work with this service.
•Amazon CloudFront API Reference – Gives complete descriptions of the API actions, parameters, and
data types, and a list of errors that the service returns.
•Document History (p. 359) – A high-level overview of current and previous releases with specific attention
to new features, corrections, known issues, and documentation improvements.
•Technical documentation for the Amazon Simple Storage Service (S3) – A detailed discussion of the
Amazon S3 service, including the basics of getting started, an overview of the service, a programming
reference, and an API reference.
•Amazon CloudFront product information – The primary web page for information about CloudFront,
including features and pricing information.
•Terms of Use – Detailed information about our copyright and trademark; your account, license, and
site access; and other topics.
API Version 2016-08-01
355
Amazon CloudFront Developer Guide
Additional Amazon CloudFront Documentation

Getting Support
Support for CloudFront is available in a number of forms.
•Discussion forums – A community-based forum for developers to discuss technical questions related
to CloudFront.
•AWS Support Center – This site brings together information about your recent support cases and results
from AWS Trusted Advisor and health checks, as well as providing links to discussion forums, technical
FAQs, the service health dashboard, and information about AWS support plans.
•AWS Premium Support Information – The primary web page for information about AWS Premium
Support, a one-on-one, fast-response support channel to help you build and run applications on AWS
Infrastructure Services.
•Contact Us – Links for inquiring about your billing or account. For technical questions, use the discussion
forums or support links above.
CloudFront Developer Tools and SDKs
See the Developer Tools page for links to developer resources that provide documentation, code samples,
release notes, and other information to help you build innovative applications with AWS.
In addition, Amazon Web Services provides software development kits for accessing CloudFront
programmatically. The SDK libraries automate a number of common tasks, including cryptographically
signing your service requests, retrying requests, and handling error responses.
•AWS SDK for Java – Setup and other documentation
•AWS SDK for .NET – Setup and other documentation
•AWS SDK for PHP – Setup and other documentation
•AWS SDK for Ruby – Setup and other documentation
Using CloudFront Logging
The following AWS blog posts discuss enhancements to CloudFront logging as well as some ways to
analyze access logs.
• AWS Blog – Amazon CloudFront Request Logging (for content delivered via HTTP)
• AWS Blog – Amazon CloudFront Now Supports Streaming Access Logs (for content delivered via
RTMP)
• AWS Blog – Enhanced CloudFront Logs, Now With Query Strings
Additional Tips from the Amazon Web Services
Blog
The AWS Blog has a number of posts to help you use CloudFront:
• Improving website performance – Improving Global Application Performance
• Creating secure connections using HTTPS – Amazon CloudFront: HTTPS Access, Another Edge
Location, Price Reduction
API Version 2016-08-01
356
Amazon CloudFront Developer Guide
Getting Support

• Using custom origins – New Amazon CloudFront Feature: Custom Origins
•Learning more about third-party tools for Amazon CloudFront – CloudFront Management Tool Roundup
Invalidating Objects
In addition to the invalidation methods provided by CloudFront, you can use the following third-party tools
to invalidate objects.
Note
These tools were developed by third-party vendors who are not associated with Amazon Web
Services. For information on how to use these tools, please refer to the vendor's documentation
or contact the vendor.
• CloudBuddy Personal – http://m1.mycloudbuddy.com/index.html
• CloudBerry Explorer – http://cloudberrylab.com
• Ylastic – http://ylastic.com
• Cyberduck – http://cyberduck.ch
• Bucket Explorer – http://www.bucketexplorer.com
• CloudFront Invalidator – http://www.swook.net/p/cloudfront-invalidator.html
• CDN Planet CloudFront Purge Tool – http://www.cdnplanet.com/tools/cloudfront-purge-tool/
You can also search for code samples on Github, https://github.com. Search for the phrase CloudFront
invalidation.
Distributing Streaming Media
The following third-party sources provide additional information on distributing streaming media.
• StreamingMedia.com – How To Get Started With Amazon CloudFront Streaming
• Ioncannon.net –
•iPhone Windowed HTTP Live Streaming Using Amazon S3 and CloudFront Proof of Concept
•HTTP Live Video Stream Segmenter and Distributor
•iPhone Windowed HTTP Live Streaming Server
• Flowplayer.org – Bandwidth detection: Make sure you reach your entire audience with good quality
• JW Player – About RTMP Streaming
Tools and Code Examples for Configuring
Private Content
In addition to the methods provided by CloudFront, the following third-party tools provide web forms for
configuring your distribution for private content. Some of the tools also provide web forms for creating
signed URLs.
•CloudBuddy – Supports configuring a distribution for private content and supports creating signed
URLs.
API Version 2016-08-01
357
Amazon CloudFront Developer Guide
Invalidating Objects

For more information about using CloudBuddy for CloudFront private content, go to Configuring
CloudFront Distribution and Private Content.
This tool is based on research at CSS CorpLabs for a .NET implementation of CloudFront private URLs.
•Bucket Explorer – Supports configuring a distribution for private content
For information about using Bucket Explorer for CloudFront private content, go to How to Create a
Private Distribution on a Bucket.
•CloudBerry – Supports configuring a distribution for private content and supports creating signed
URLs.
For information about using CloudBerry for CloudFront private content, go to How to Configure Private
Content for CloudFront Streaming with CloudBerry.
For information on setting a default root object, see How to set CloudFront Default Object with CloudBerry
S3 Explorer.
For more information about private content, see the blog post New Amazon CloudFront Feature: Private
Content on the AWS blog.
For an example of how to use signed cookies, use your domain name in object URLs, and still use the
SSL certificate for the cloudfront.net domain, see the Space Vatican blog post Using CloudFront Signed
Cookies. This allows you to use an alternate domain name with HTTPS without incurring the expense of
dedicated IP addresses or the limitations of SNI, as documented in Using Alternate Domain Names and
HTTPS (p. 234).
Using CloudFront with a Content Management
System
You can use CloudFront with several popular content management systems.The following links tell you
how.
Drupal
• Drupal.org – CloudFront Installation
• DrupalModules.com – CloudFront Drupal Module
Sitecore
• NTT Data Advisory Service – AWS CloudFront Sitecore Integration
WordPress
• om4.com – Using Amazon CloudFront with WordPress and WordPress MU
• WordPress.org – W3 Total Cache
• WordPress.org – Simple Amazon S3 Upload Form
• WordPress.org – OSSDL CDN Off-linker
• WordPress.org – My CDN
• Inquisiter.com – Amazon CloudFront CDN with a WordPress Blog
API Version 2016-08-01
358
Amazon CloudFront Developer Guide
Using CloudFront with a Content Management System
Document History
The following table describes the important changes to the documentation since the last release of
CloudFront.
•API Version: 2016-01-13
•Latest documentation update: January 21, 2016
Date ChangedDescriptionChange
January 21,
2016
You can now configure CloudFront to use SSL/TLS certificates that
you provisioned by using the new AWS Certificate Manager service.
Note that CloudFront still supports using certificates that you ob-
tained from a third-party certificate authority and uploaded to the
IAM certificate store. For more information, see Using an HTTPS
Connection to Access Your Objects (p. 229).To specify an SSL/TLS
certificate by using the CloudFront API, use the new Certificate
and CertificateSource elements. For more information, see
the descriptions of these elements in the DistributionConfig Complex
Type topic in the Amazon CloudFront API Reference.
New Feature
January 13,
2016
For web distributions, you can now further protect communication
between CloudFront and your origin server:
•Enforce HTTPS-only connection between CloudFront and
your origin webserver – You can configure CloudFront to con-
nect to your origin server using HTTPS regardless of whether the
viewer made the request by using HTTP or HTTPS.
•Support for TLSv1.1 and TLSv1.2 between CloudFront and
your origin webserver – CloudFront now supports TLSv1.1 and
TLSv1.2 for communication between CloudFront and your origin.
In addition, you can choose the protocols that you want CloudFront
to use when communicating with your origin so you can, for ex-
ample, choose not to allow CloudFront to communicate with your
origin by using SSLv3, which is less secure than TLS.
For more information, see How to Require HTTPS for Communica-
tion between Viewers, CloudFront, and Your Origin (p. 230).
New Features
API Version 2016-08-01
359
Amazon CloudFront Developer Guide

Date ChangedDescriptionChange
December 28,
2015
For web distributions, you can now configure CloudFront to include
custom headers when it forwards requests to your origin. Custom
headers have a variety of uses, such as the following:
• You can distinguish the requests that are forwarded to your cus-
tom origin by CloudFront from requests that come from other
sources.
•If you've configured more than one CloudFront distribution to use
the same origin, you can distinguish between the requests that
CloudFront forwards for each distribution.
• You can use custom headers to control access to content on a
custom origin.
For more information, see Forwarding Custom Headers to Your
Origin (Web Distributions Only) (p. 112).
New Feature
December 17,
2015
For web distributions, you can now configure CloudFront to automat-
ically compress files of certain types for both Amazon S3 and custom
origins, so downloads are faster and your web pages render faster.
Compression also reduces your CloudFront data transfer cost be-
cause you pay for the total amount of data served. For more inform-
ation, see Serving Compressed Files (p. 135).
New Feature
October 6, 2015You can now integrate CloudFront with AWS WAF, a web application
firewall that lets you monitor the HTTP and HTTPS requests that
are forwarded to CloudFront and lets you control access to your
content. Based on conditions that you specify, such as the IP ad-
dresses that requests originate from or the values of query strings,
CloudFront responds to requests either with the requested content
or with an HTTP 403 status code (Forbidden).You can also config-
ure CloudFront to return a custom error page when a request is
blocked.
For more information about AWS WAF, see the AWS WAF De-
veloper Guide. For information about how to add the ID for an AWS
WAF web ACL to a CloudFront distribution, see AWS WAF Web
ACL (p. 75) in the topic Values that You Specify When You Create
or Update a Web Distribution (p. 63).
New Feature
API Version 2016-08-01
360
Amazon CloudFront Developer Guide

Date ChangedDescriptionChange
June 30, 2015CloudFront access logs for web distributions now include four new
columns:
•x-forwarded-for – The originating IP address of the client that
made a request.
•ssl-protocol – The SSL protocol (for example, TLSv1.1) that
the client and CloudFront negotiated for transmitting the request
and response.
•ssl-cipher – The SSL cipher (for example, ECDHE-RSA-
AES128-GCM-SHA256) that the client and CloudFront negotiated
for transmitting the request and response.
•x-edge-response-result-type – The classification of the
response (for example, Hit or Miss) just before CloudFront be-
gins to return the response to the viewer. In some cases, this
value can differ from the value of the existing log field x-edge-
result-type, which shows how CloudFront classified the re-
sponse after the last byte left the edge location.
For more information about access logs, see Access Logs (p. 256).
For a complete listing of all of the fields that appear in access logs
for web distributions, see Web Distribution Log File Format (p. 261).
New Feature
June 17, 2015You can now configure a maximum time-to-live (TTL) and a default
TTL to specify how long CloudFront caches your objects in edge
locations.You can set the TTL at the edge when your origin doesn't
include a Cache-Control max-age, Cache-Control s-maxage,
or Expires header in the response, or you can override the header
value. For more information, see Specifying How Long Objects Stay
in a CloudFront Edge Cache (Expiration) (p. 116).
New Feature
May 21, 2015The invalidation feature, which allows you to remove objects from
CloudFront edge caches before they expire, now supports the *
wildcard character.You can add a * wildcard character at the end
of an invalidation path to remove all objects that match this path.
For more information, see Invalidating Objects (Web Distributions
Only) (p. 121).
New Feature
API Version 2016-08-01
361
Amazon CloudFront Developer Guide

Date ChangedDescriptionChange
March 25, 2015This release of CloudFront includes the following improvements to
CloudFront reports:
• A new Devices report lets you see what types of devices your
users are using to view your content.
•You can now download the data for CloudFront reports in comma-
separated values (CSV) format.
•You can now view CloudWatch metrics in the CloudFront console,
which lets you more easily view all of the metrics for a distribution.
• For Devices, Browsers, and Operating Systems reports, we cre-
ated separate categories for requests from bots and crawlers, for
requests from custom viewers, and for requests for which the
value of the User-Agent header is empty.
•The Popular Objects report now lets you view up to 500 characters
of the URL for each object.
For more information about CloudFront reports, see CloudFront
Reports (p. 15).
New Features
March 18, 2015When you have Amazon S3 buckets in regions that require signature
version 4 for authentication and you're using an origin access
identity to restrict access to your Amazon S3 bucket, you can now
submit PUT requests to CloudFront to upload objects to your bucket.
For more information, see Using an Origin Access Identity in Amazon
S3 Regions that Support Only Signature Version 4 Authentica-
tion (p. 170).
New Feature
March 12, 2015This release of CloudFront introduces the following new features:
• For web distributions, you can now use signed cookies instead
of signed URLs to control who can access your content. Signed
cookies are useful when you don't want to change your current
URLs or when you want to provide access to multiple restricted
files, for example, all of the files in the subscribers' area of a
website. For information about using signed cookies to protect
your private content, see Serving Private Content through
CloudFront (p. 162).
• For web distributions, you can configure CloudFront to cache
different versions of your objects based on the device a user is
using to view your content. With this release, we add support for
caching a different version of your objects when the device is a
smart TV. For more information, see User-Agent Header (p. 154).
New Features
API Version 2016-08-01
362
Amazon CloudFront Developer Guide

Date ChangedDescriptionChange
December 15,
2014
This release of CloudFront introduces the following new features:
•Adding a path to the origin – For web distributions, you can
now specify a path in addition to a domain name when you con-
figure the origin. For example, if you're using an Amazon S3
bucket as your origin, you can specify bucket-
name.s3.amazonaws.com/production instead of just bucket-
name.s3.amazonaws.com. This allows you to use a single
bucket to serve content for multiple distributions. This feature
works both for Amazon S3 origins and for custom origins. For in-
formation about specifying an origin path in the CloudFront con-
sole, see Origin Path (p. 66).
•Top-referrers report and viewer reports – For web distributions,
you can now display a list of the top referrers.You can also display
information about the viewers that are accessing your content,
including the browsers that your users are using, the operating
systems that the browsers are running on, and the locations of
viewers. For information about these reports, see CloudFront Top
Referrers Report (p.23) and CloudFront Viewers Reports (p. 29).
New Features
October 24,
2014
For web distributions, you can now choose the minimum SSL pro-
tocol version, SSLv3 or TLSv1, that you want CloudFront to allow
when responding to requests from your users. If a user is using a
browser or device that doesn't support the minimum protocol version
that you specify, CloudFront won't serve your objects to the user.
For information about choosing the minimum SSL protocol version
in the CloudFront console, see Minimum SSL Protocol Ver-
sion (p. 77).
New Feature
October 21,
2014
This release of CloudFront introduces the following new features:
•Cache Statistics charts – You can now view a graphical repres-
entation of statistics related to CloudFront edge locations. The
following statistics are available for a specified time period over
the last 60 days: total number of requests; hits, misses, and errors
as a percentage of total requests; total bytes transferred to viewers
and bytes transferred for cache misses; viewer requests by HTTP
status code (2xx, 3xx, 4xx, and 5xx); and the percentage of GET
requests that didn't finish downloading. For more information, see
CloudFront Cache Statistics Reports (p. 16).
•Faster delivery of access logs – CloudFront access log files
are now delivered several times per hour, and the files are avail-
able within an hour of viewer requests. For more information about
access logs, see Access Logs (p. 256).
•Popular Objects report – The Popular Objects report lists the
number of requests, cache hits, and cache misses, as well as
error rates for the 50 most popular objects during a specified
period. For more information, see CloudFront Popular Objects
Report (p. 20).
New Features
API Version 2016-08-01
363
Amazon CloudFront Developer Guide

Date ChangedDescriptionChange
October 9, 2014For web distributions, you can now monitor six CloudFront metrics
in near real time using CloudFront. This lets you quickly spot trends
in usage and availability.You can also set alarms based on the
metrics, so you can get notification when a specific event occurs.
For more information, see Monitoring CloudFront Activity Using
CloudWatch (p. 270).
New Feature
September 29,
2014
This release of CloudFront introduces the following new features:
•For web distributions, you can now configure CloudFront to cache
the response to OPTIONS requests.The response includes inform-
ation about the options provided by a web server and can apply
to a specific resource or to the server as a whole. For more inform-
ation, see Allowed HTTP Methods (p. 71) and Cached HTTP
Methods (p. 71).
• For web distributions, when you configure CloudFront to forward
whitelisted cookies to your origin and to cache objects based on
cookie values, you can now use * and ? wildcards in cookie
names. For more information, see Configuring CloudFront to
Cache Objects Based on Cookies (p. 106).
New Features
August 20, 2014CloudFront now supports more ciphers for forwarding HTTPS re-
quests to custom origin servers. For more information, see Encryp-
tion (p. 148).
New Feature
June 26, 2014For web distributions, CloudFront lets you choose whether you want
CloudFront to forward headers to your origin and to cache separate
versions of a specified object based on the header values in viewer
requests.This allows you to serve different versions of your content
based on the device the user is using, the location of the viewer,
the language the viewer is using, and a variety of other criteria. For
more information, see Configuring CloudFront to Cache Objects
Based on Request Headers (p. 108).
New Feature
May 28, 2014Amazon CloudFront now works with AWS CloudTrail to capture in-
formation about every request that your AWS account (including
your IAM users) sends to the CloudFront API. Integrating CloudFront
and CloudTrail lets you determine which requests were made to the
CloudFront API, the source IP address from which each request
was made, who made the request, when it was made, and more.
For more information about using CloudFront with CloudTrail, see
Using AWS CloudTrail to Capture Requests Sent to the CloudFront
API (p. 274).
New Feature
May 16, 2014With this release, for HTTPS viewer requests that CloudFront for-
wards to a custom origin, CloudFront validates that one of the do-
main names in the SSL certificate on your origin server matches
the domain name that you specify for Origin Domain Name. If the
domain names don't match, CloudFront responds to viewer requests
with an HTTP status code 502 (bad gateway) instead of the reques-
ted objects.To enable this functionality, you must specify an Origin
Protocol Policy of Match Viewer. For more information, see How
to Require HTTPS for Communication between Viewers, CloudFront,
and Your Origin (p. 230).
New Feature
API Version 2016-08-01
364
Amazon CloudFront Developer Guide

Date ChangedDescriptionChange
April 28, 2014This release of CloudFront introduces a new field in CloudFront
access logs for web distributions.The time-taken field shows the
number of seconds between the time a CloudFront edge server re-
ceives a viewer's request and the time that CloudFront writes the
last byte of the response to the server's output queue as measured
on the server. For more information about the file format of Cloud-
Front access logs for web distributions, see Web Distribution Log
File Format (p. 261).
New Feature
March 18, 2014Live HTTP Streaming Using CloudFront and Adobe Media Server
5.0 (p. 286) has updated procedures for subscribing to Adobe Media
Server and for creating an AWS CloudFormation stack.
Updated Docu-
mentation
March 13, 2014This release of CloudFront introduces usage charts that contain a
subset of data from the CloudFront usage report. For more inform-
ation, see CloudFront Usage Reports (p. 25).
New Feature
March 5, 2014This release of CloudFront introduces the following new features:
•Redirect viewer HTTP requests to HTTPS: You can now con-
figure CloudFront to redirect viewer HTTP requests to HTTPS.
For more information, see How to Require HTTPS for Communic-
ation between Viewers, CloudFront, and Your Origin (p. 230).
•Server Name Indication (SNI) for HTTPS requests with altern-
ate domain names: If you're using your domain name in the
URLs for your objects, you can now configure CloudFront to serve
HTTPS requests to users whose browsers support Server Name
Indication (SNI). For more information, see Using Alternate Do-
main Names and HTTPS (p. 234).
New Features
February 20,
2014
This release of CloudFront introduces support for HTTP on-demand
streaming of media files in the Microsoft Smooth Streaming format.
For more information, see Configuring On-Demand Smooth
Streaming (p. 85).
New Feature
February 7, 2014This release of CloudFront introduces support for HTTP 1.1. For
more information, see Transfer Encoding (p. 157).
In addition, we added documentation about on-demand progressive
downloads and on-demand Apple HTTP live streaming. For more
information, see Configuring On-Demand Progressive Downloads
and Configuring On-Demand Apple HTTP Live Streaming (HLS) in
the Amazon CloudFront Developer Guide.
New Feature
API Version 2016-08-01
365
Amazon CloudFront Developer Guide

Date ChangedDescriptionChange
December 18,
2013
This release of CloudFront introduces geo restriction. If you need
to prevent users in selected countries from accessing your content,
you can configure a CloudFront web distribution to do one of the
following:
•Allow users to access content only if they're in a whitelist of spe-
cified countries.
• Prevent users from accessing content if they're in a blacklist of
specified countries.
For more information, see Restricting the Geographic Distribution
of Your Content (p. 82).
New Features
October 15,
2013
This release of CloudFront introduces the following features:
•DELETE, OPTIONS, PATCH, POST, and PUT support: You
can now use the DELETE, OPTIONS, PATCH, POST, and PUT HTTP
methods in requests that you send to CloudFront. For more in-
formation, see Allowed HTTP Methods (p. 71).
For information about how to specify HTTP methods by using the
CloudFront API, see Method in the topic DistributionConfig
Complex Type in the Amazon CloudFront API Reference.
•Distribution types renamed: CloudFront download distributions
are now known as web distributions, and streaming distributions
are now known as RTMP distributions.
•New columns in access logs for web distributions: Access
logs for CloudFront web distributions now include three additional
columns for each request: x-host-header, cs-protocol, and
cs-bytes. For more information, see Web Distribution Log File
Format (p. 261).
New Features
API Version 2016-08-01
366
Amazon CloudFront Developer Guide
Date ChangedDescriptionChange
September 23,
2013
This release of CloudFront introduces the following features:
•Custom error pages: You can now serve error pages with your
own branding and content instead of the default HTTP error
messages, such as "404, page not found." You can also use
custom error pages to serve a static page when your web server
is unavailable. For more information, see Customizing Error Re-
sponses (p. 127).
For information about how to specify custom error pages by using
the CloudFront API, see CustomErrorResponses in the topic
DistributionConfig Complex Type in the Amazon CloudFront API
Reference.
•Configurable cache duration for error responses: Also known
as error caching minimum TTL, this feature lets you specify how
long you want CloudFront to cache each error at CloudFront edge
locations. CloudFront previously cached all error responses for
five minutes; now you can specify any duration and thereby control
how frequently CloudFront checks with your origin after an error.
For more information, see Customizing Error Responses (p. 127).
For information about how to specify the cache duration for error
responses by using the CloudFront API, see CustomErrorRes-
ponses in the topic DistributionConfig Complex Type in the
Amazon CloudFront API Reference.
New Features
September 18,
2013
You can now include the * wildcard in a CloudFront alternate domain
name (CNAME), such as *.example.com. This is useful when you
want to route all requests for objects in a domain and its subdomains
to a CloudFront distribution. For more information, see Using Altern-
ate Domain Names (CNAMEs) (p. 50).
New Feature
September 10,
2013
Documentation about live streaming with Wowza Media Server 3.6
was added. For more information, see Live HTTP Streaming Using
Wowza Streaming Engine 4.2 (p. 314).
Updated Docu-
mentation
July 31, 2013The documentation about live streaming with Adobe Flash Media
Server was replaced with documentation about live streaming with
Adobe Media Server version 5.0. For more information, see Live
HTTP Streaming Using CloudFront and Adobe Media Server
5.0 (p. 286).
Updated Docu-
mentation
API Version 2016-08-01
367
Amazon CloudFront Developer Guide
Date ChangedDescriptionChange
June 11, 2013This release of CloudFront introduces the following features:
•Authentication with AWS Signature Version 4: If you are using
CloudFront API version 2013-05-12 or later, you must authenticate
requests by using AWS Signature version 4. For more information,
see Authenticating REST Requests in the Amazon CloudFront
API Reference.
•SSL for CloudFront alternate domain names: CloudFront now
supports using HTTPS and using your own domain name in the
URLs for your objects (for example, http://www.ex-
ample.com/image.jpg). For more information, see Using Al-
ternate Domain Names and HTTPS (p. 234).
In addition, a simultaneous release of Amazon Route 53 introduces
the following CloudFront–related feature:
•Amazon Route 53 aliases to CloudFront distributions: Amazon
Route 53 now supports creating alias resource record sets that
route DNS queries to alternate domain names for CloudFront
distributions.You can use this feature both for alternate domain
names at the zone apex (example.com) and alternate domain
names for subdomains (www.example.com). For more information,
see Routing Queries to an Amazon CloudFront Distribution in the
Amazon Route 53 Developer Guide.
New Features
September 27,
2012
This release of CloudFront introduces the following features:
•Fields for private content in the AWS Management Console:
Settings for private content, which previously could be configured
or changed only using the CloudFront API, can now be configured
or changed in the AWS Management Console. This includes
settings for origin access identities and trusted signers. In addition,
the documentation about private content was reorganized and
clarified.
For more information, see Serving Private Content through
CloudFront (p. 162).
•Improvements to the AWS Management Console: Wizards
and dialog boxes in the AWS Management Console have been
resized to simplify viewing on tablet computers without comprom-
ising the appearance for other viewers. In addition, the number
of pages in the Create Distribution wizard was reduced to simplify
the process of creating a new distribution.
New Features
API Version 2016-08-01
368
Amazon CloudFront Developer Guide
Date ChangedDescriptionChange
September 5,
2012
This release of CloudFront introduces the following features:
•Access log improvements for web distributions: For web
distributions, CloudFront access logs now include fields for:
• The cookie header in each viewer request, including name-
value pairs and attributes. This field is optional.
• The result type of a request (for example, Hit, RefreshHit,
or Miss).
• An identifier that uniquely identifies each request (the Cloud-
Front request ID).
For more information, see Web Distribution Log File
Format (p. 261).
For information about how to configure a CloudFront distribution
to include cookies in access logs by using the CloudFront API,
see IncludeCookies in the topic DistributionConfig Complex
Type in the Amazon CloudFront API Reference.
•Cookie support for web distributions: You can now choose
whether you want CloudFront to forward cookies and the associ-
ated cookie attributes to your origin. If so, you can also choose
whether to forward all cookies or just a selected list of cookies.
For more information, see Configuring CloudFront to Cache Ob-
jects Based on Cookies (p. 106).
For information about how to configure a CloudFront distribution
to forward cookies to your origin by using the CloudFront API,
see Cookies in the topic DistributionConfig Complex Type in the
Amazon CloudFront API Reference.
•Price classes for web and RTMP distributions: You can now
choose a price class that corresponds with the maximum price
that you want to pay for CloudFront service. If you're willing to
accept higher latency for your viewers in some geographic regions
in return for lower cost, you can choose a price class that doesn't
include all CloudFront regions. For more information, see
Choosing the Price Class for a CloudFront Distribution (p. 54).
For information about how to specify the price class for a Cloud-
Front web distribution by using the CloudFront API, see Price-
Class in the topic DistributionConfig Complex Type in the Amazon
CloudFront API Reference.
For information about how to specify the price class for a Cloud-
Front RTMP distribution by using the CloudFront API, see
PriceClass in the topic StreamingDistributionConfig Complex
Type in the Amazon CloudFront API Reference.
New Features
API Version 2016-08-01
369
Amazon CloudFront Developer Guide

Date ChangedDescriptionChange
June 22, 2012This release of CloudFront introduces the following features:
• You can now invalidate objects using the CloudFront console.
For more information, see Invalidating Objects (Web Distributions
Only) (p. 121).
• The CloudFront console was updated to better support viewing
on tablet devices.
New Features
May 13, 2012This release of CloudFront introduces the following features for web
distributions:
•You can forward query strings to your origin. For more information,
see Configuring CloudFront to Cache Based on Query String
Parameters (p. 105).
•You can specify up to 10 origins. For more information, see Values
that You Specify When You Create or Update a Web Distribu-
tion (p. 63).
• You can specify path patterns. For more information, see Values
that You Specify When You Create or Update a Web Distribu-
tion (p. 63).
For information about how to specify these values by using the
CloudFront API, see DistributionConfig Complex Type in the Amazon
CloudFront API Reference.
In addition, the CloudFront console has been updated. For more
information, see Task List for Creating a Web Distribution (p. 58)
and Task List for Streaming Media Files Using RTMP (p. 89).
The Amazon CloudFront Getting Started Guide was merged into
the Amazon CloudFront Developer Guide, and the Amazon Cloud-
Front Developer Guide was reorganized to enhance usability.
New Features
April 4, 2012The documentation about working with objects was reorganized
and clarified. For the revised documentation, see Working with Ob-
jects (p. 99).
Updated Docu-
mentation
April 1, 2012Documentation about live streaming with Microsoft IIS Media Ser-
vices version 4.1 was added. For more information, see Live Smooth
Streaming Using Amazon CloudFront and IIS Media Services
4.1 (p. 304).
New Docu-
mentation
March 29, 2012The documentation about live streaming with Adobe Flash Media
Server was updated with information about Adobe Flash Media
Server version 4.5.
As of July 31, 2013, CloudFront supports live streaming with Adobe
Media Server 5.0. For more information, see Live HTTP Streaming
Using CloudFront and Adobe Media Server 5.0 (p. 286).
Updated Docu-
mentation
API Version 2016-08-01
370
Amazon CloudFront Developer Guide

Date ChangedDescriptionChange
March 15, 2012This release of CloudFront reduces the minimum TTL value for a
web distribution. If you don't specify a minimum TTL when you create
a distribution, CloudFront sets the minimum TTL to 0 seconds. For
more information, see the following documentation:
•Specifying How Long Objects Stay in a CloudFront Edge Cache
(Expiration) (p. 116)
• The CachingBehavior element in the topic DistributionConfig
Complex Type in the Amazon CloudFront API Reference.
New Feature
February 2, 2012Topics about live streaming with Adobe Flash Media Server and
about geoblocking were moved from a separate document into the
CloudFront Streaming Tutorials (p. 286) chapter in this guide.
Updated Docu-
mentation
April 27, 2011This release of CloudFront introduces AWS Management Console
support for creating a distribution with a custom origin, restricting
your distribution to HTTPS exclusively, and specifying a default root
object. For more information, go to the Amazon CloudFront product
page or see any of the following topics in the Amazon CloudFront
Developer Guide:
•Task List for Creating a Web Distribution (p. 58)
•Using an HTTPS Connection to Access Your Objects (p. 229)
•Specifying a Default Root Object (Web Distributions Only) (p. 132)
New Feature
March 10, 2011This release of CloudFront includes integration with AWS Identity
and Access Management (IAM). For more information, see Authen-
tication and Access Control for CloudFront (p. 243).
New Feature
November 9,
2010
This release of CloudFront includes new APIs to support custom
origins. For more information, go to the Amazon CloudFront product
page or Task List for Creating a Web Distribution (p. 58) in the
Amazon CloudFront Developer Guide.
New Feature
August 31, 2010This release of CloudFront includes new APIs for object invalidation.
For more information, go to the Amazon CloudFront product page
or Invalidating Objects (Web Distributions Only) (p. 121) in the
Amazon CloudFront Developer Guide.
New Feature
August 5, 2010CloudFront now supports the ability to assign a default root object
to your distribution. For more information, see Specifying a Default
Root Object (Web Distributions Only) (p. 132).
New Feature
July 14, 2010Access logging for HTTP distributions now includes a field for query
string parameters. For more information, see Web Distribution Log
File Format (p. 261).
New Feature
June 7, 2010Added support for secure connections using HTTPS. For more in-
formation, see Using an HTTPS Connection to Access Your Ob-
jects (p. 229).
New Feature
May 13, 2010Added logging for RTMP content. For more information, see RTMP
Distribution Log File Format (p. 267).
New Feature
API Version 2016-08-01
371
Amazon CloudFront Developer Guide

Date ChangedDescriptionChange
April 13, 2010Reduced the minimum amount of time an object can be on an edge
server from 24 hours to 1 hour. The default, however, remains 24
hours. For more information, see Specifying How Long Objects Stay
in a CloudFront Edge Cache (Expiration) (p. 116).
New Feature
March 28, 2010Added feature to serve private streaming content over a Real-Time
Messaging Protocol (RTMP) and prevent the content from being
downloaded. For more information, see Serving Private Content
through CloudFront (p. 162).
New Feature
December 15,
2009
Added feature to deliver streaming content over a Real-Time Mes-
saging Protocol (RTMP) connection. For more information, see Task
List for Streaming Media Files Using RTMP (p. 89).
New Feature
November 11,
2009
Added feature to restrict access to your content delivered over HTTP.
For more information, see Serving Private Content through Cloud-
Front (p. 162).
New Feature
November 11,
2009
We've separated the API reference material into its own guide.The
Amazon CloudFront Developer Guide contains general information
about how to use CloudFront, and the Auto Scaling API Reference
contains detailed information about the control API requests, re-
sponses, and errors.
New Guide
API Version 2016-08-01
372
Amazon CloudFront Developer Guide

