Digital Certificate Instructions
User Manual:
Open the PDF directly: View PDF ![]() .
.
Page Count: 20

LOC-AID Digital Certificate Instructions, August 2, 2011 Page 1 of 20
Location MattersTM
LOC-AID Digital Certificate Instructions
August 2, 2011
LOC-AID Technologies, Inc.
Restricted Information. All data and information contained in or disclosed by this document is confidential
and proprietary information of LOC-AID Technologies, Inc., and all rights therein are expressly reserved. By
accepting this material the recipient agrees that this material and the information contained therein is held in
confidence and in trust, and will not be used, copied, reproduced in whole or in part, nor its contents revealed
in any manner to others without the express written permission of LOC-AID Technologies, Inc. LOC-AID is a
registered trademark and registered service mark of LOC-AID Technologies, Inc. Other product and brand
names may be trademarks or registered trademarks of their respective owners.
Copyright Notice
Copyright 2011 © LOC-AID Technologies, Inc. All rights reserved.
LOC-AID Digital Certificate Instructions, August 2, 2011 Page 2 of 20
Introduction
Each Third Party Application not previously certified to interact with the LOC-AID LBS
Platform must go through a certification process. All applications interfacing with the LOC-
AID Web Services will require a digital certificate for authentication of the application.
There are two main steps that need to be completed in order to complete certification:
1. Download the LOC-AID Web Services certificate
2. Import the LOC-AID certificate into your application
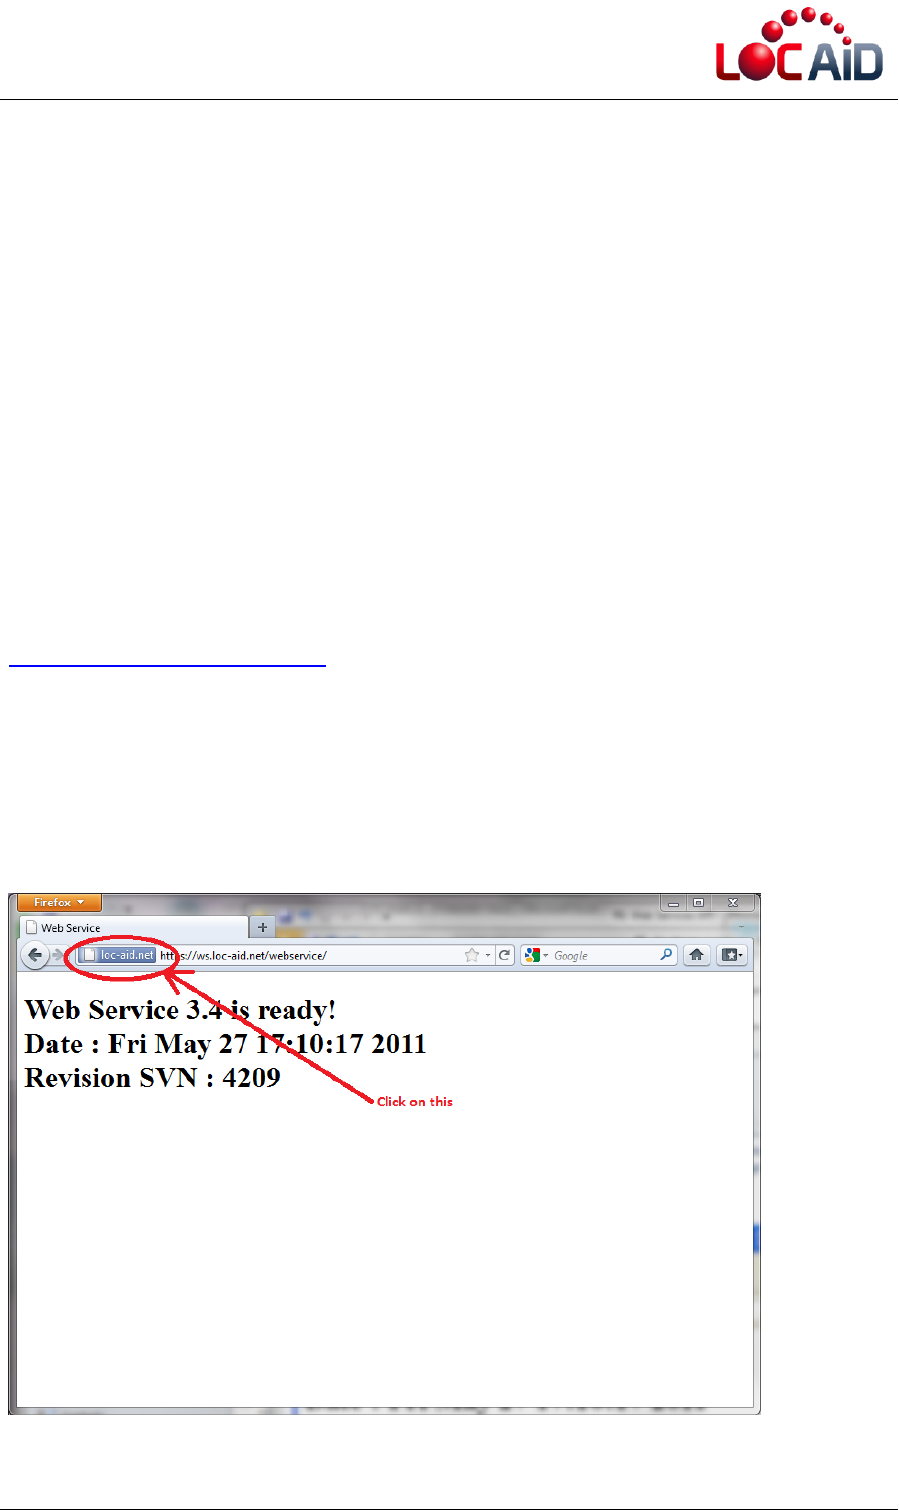
Download the LOC-AID Web Services Certificate
Before you import the LOC-AID certificate into your application, first you will need to
download it from our website. To download the certificate, first go to the following URL:
https://ws.loc-aid.net/webservice
Note1: To obtain a certificate from LOC-AID Web Services we recommend access
using Firefox (version > 4.0).
Note2: In some instances, your browser settings may not allow you to navigate to
the LOC-AID certificate directly. If this is the case, you will have to follow your
browser instructions to make LOC-AID a trusted partner and grant an exception.
Figure 1: Screenshot of Mozilla after navigating to https://ws.loc-aid.net/webservice
LOC-AID Digital Certificate Instructions, August 2, 2011 Page 3 of 20
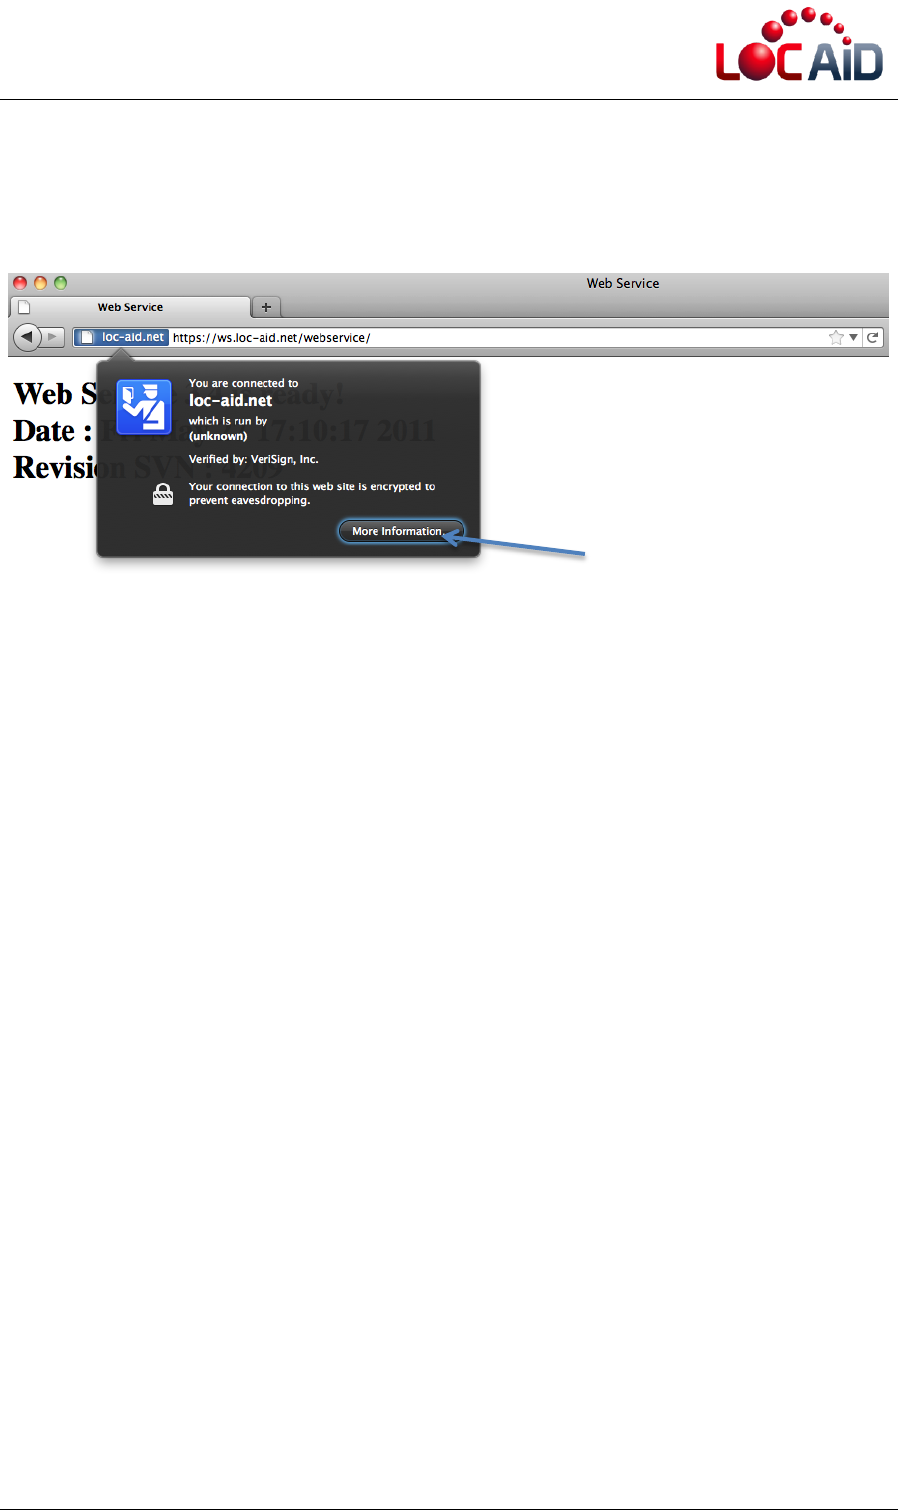
Click on the verification icon (blue by default) that is in the top-left corner of Firefox and to
the left of the URL input box (see Figure 1). When the verification information box appears
(Figure 2), select “More Information”.
Figure 2: Firefox/Mozilla screenshot after clicking on verification icon
Another dialog box appears (Figure 3), check the “View Certificate” button.
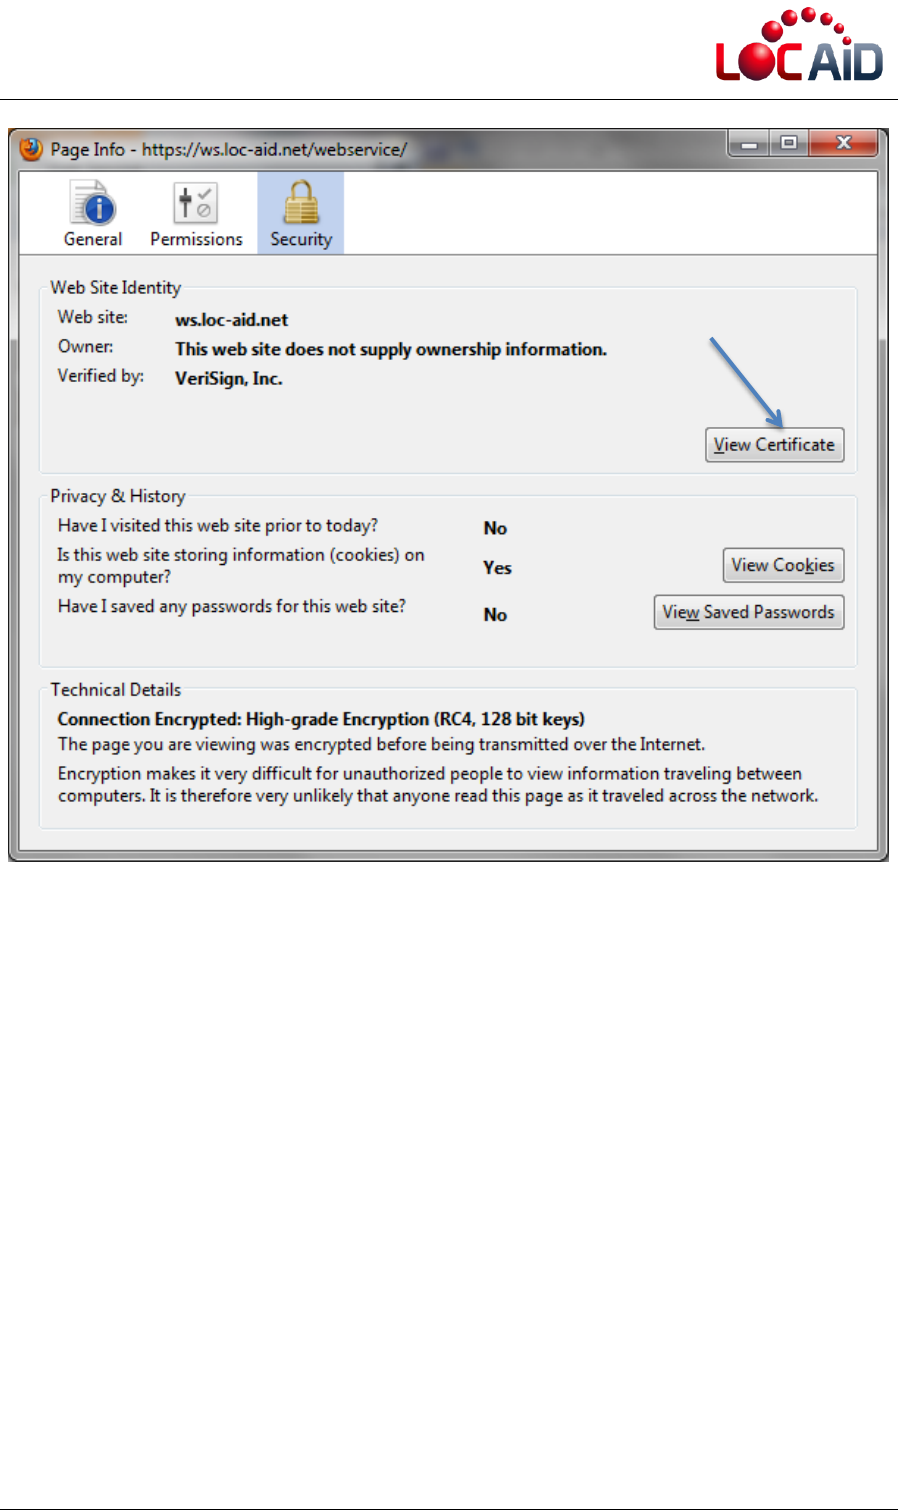
LOC-AID Digital Certificate Instructions, August 2, 2011 Page 5 of 20
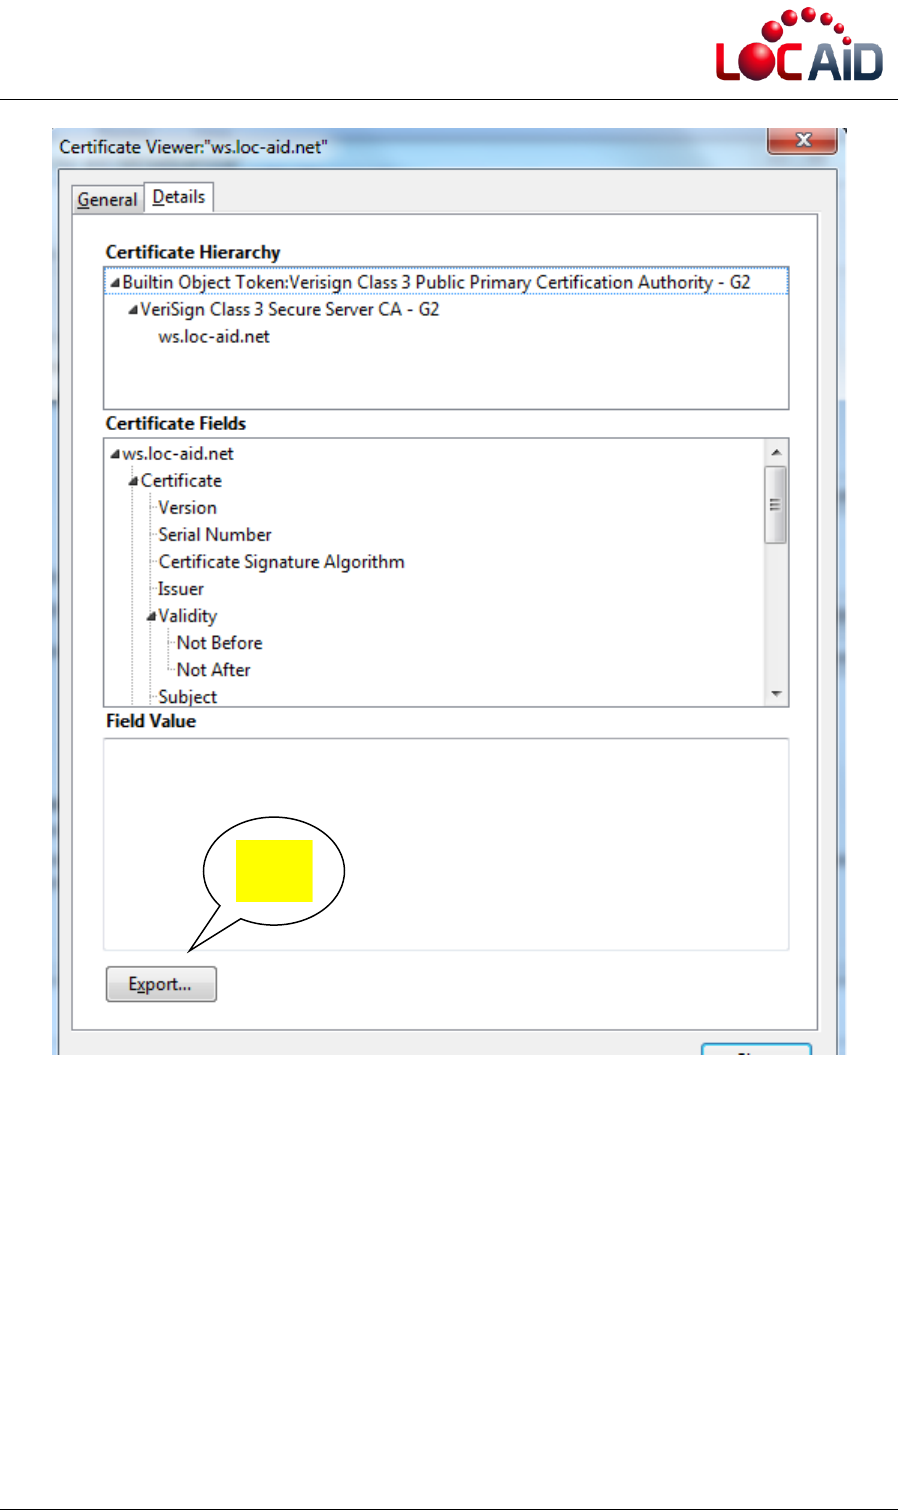
Figure 4: Mozilla Certificate Viewer screenshot
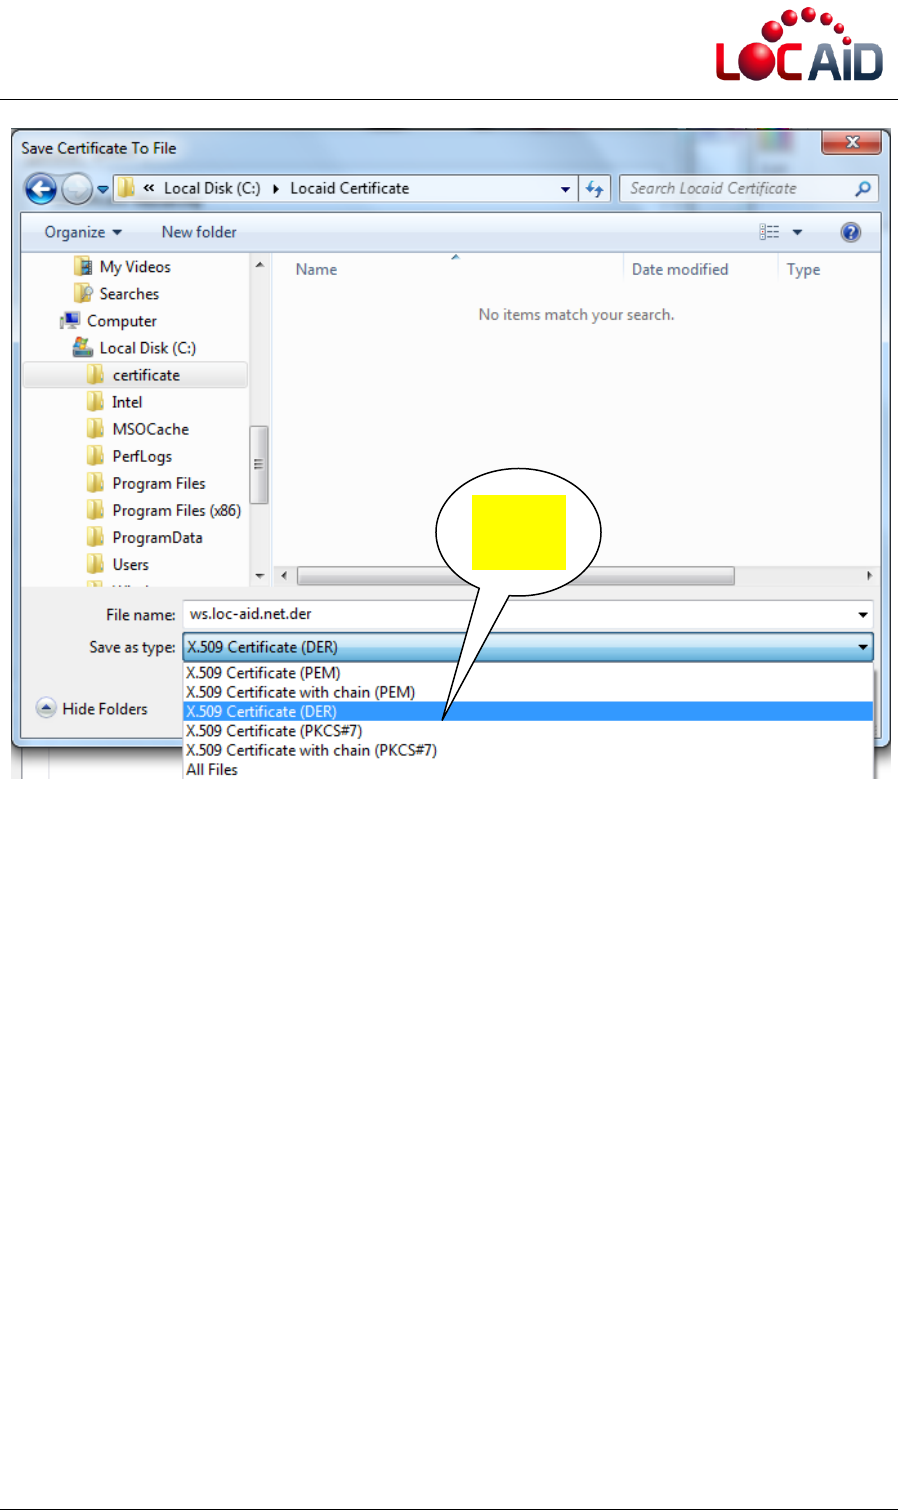
Then, select a place and name where you will save the certificate. For example,
"c:\Locaid certificated\mycertificate.der" (Figure 5).
Important Note: Make sure you save the file as a .DER extension
Click
Export
LOC-AID Digital Certificate Instructions, August 2, 2011 Page 6 of 20
Figure 5: Screenshot of renaming certificate to .DER extension and downloading LOC-AID certificate
to your computer
Change
extension
to .DER
LOC-AID Digital Certificate Instructions, August 2, 2011 Page 7 of 20
Import the LOC-AID Web Services Certificate into
your Application
Once you have downloaded the LOC-AID Web Services certificate, now you will need to
import it into your development environment in order to integrate it into your application.
We have provided instructions for doing so for the following development environments.
Java Keytool and Glassfish users
.NET developers
Note that all steps must be completed in order to successfully import and use LOC-AID’s
certificate in your application.
Java Developers
Keytool
Keytool is a key and certificate management utility that is available as part of the Java
development kit (JDK). It stores the keys and certificates in a so-called keystore. Keytool
by default can only work with keystores of type JKS.
In order to use it, you must have JAVA’s JDK installed and you have to execute the
program through the system’s console.
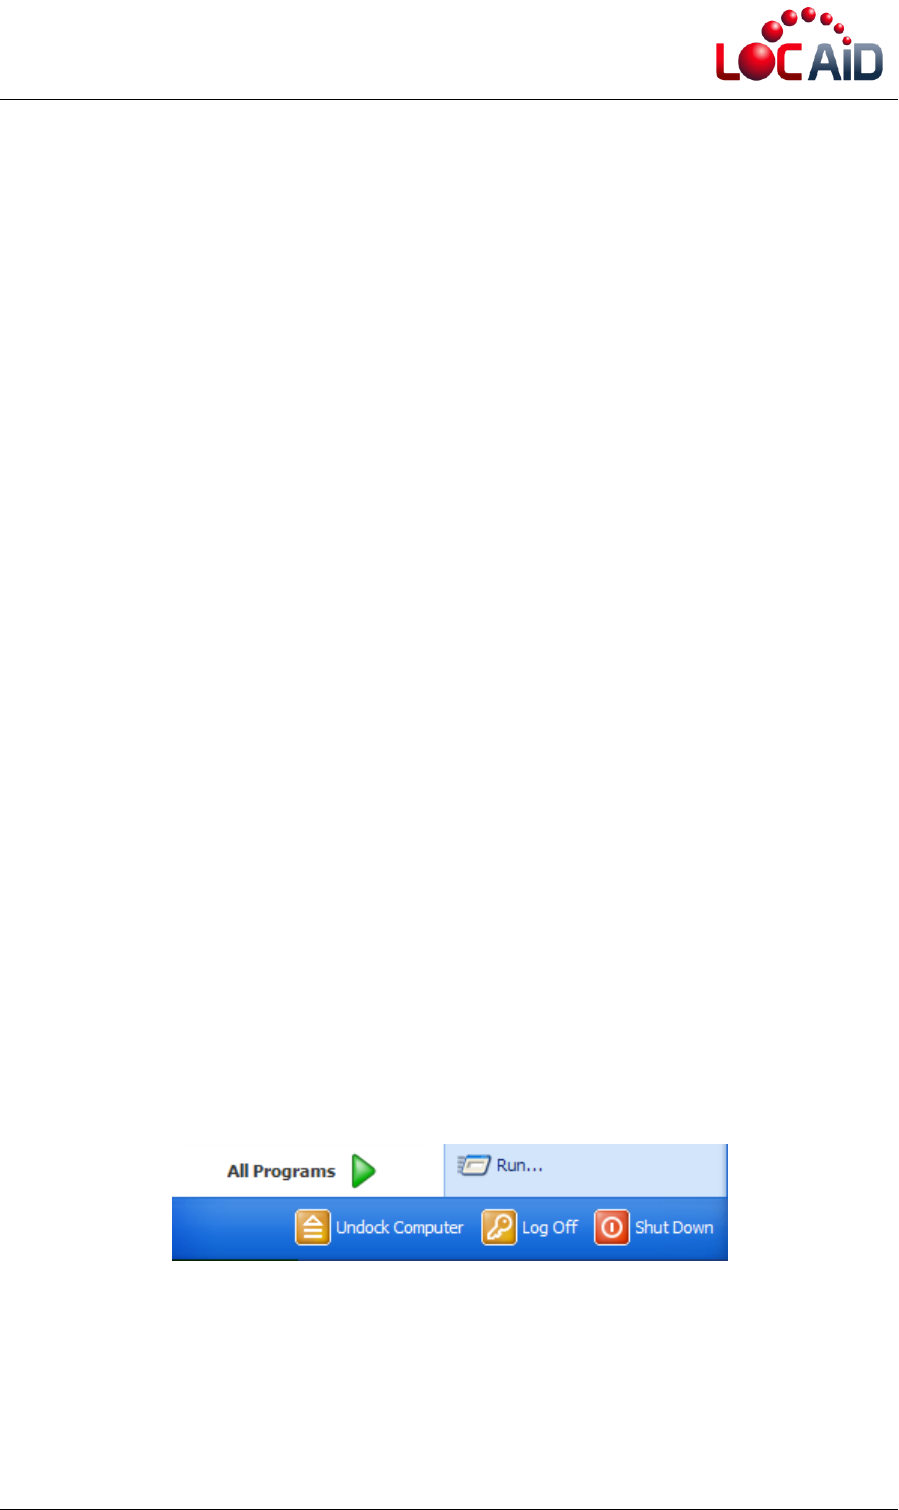
To run the console’s system, left click on the start button and choose “run”. When the
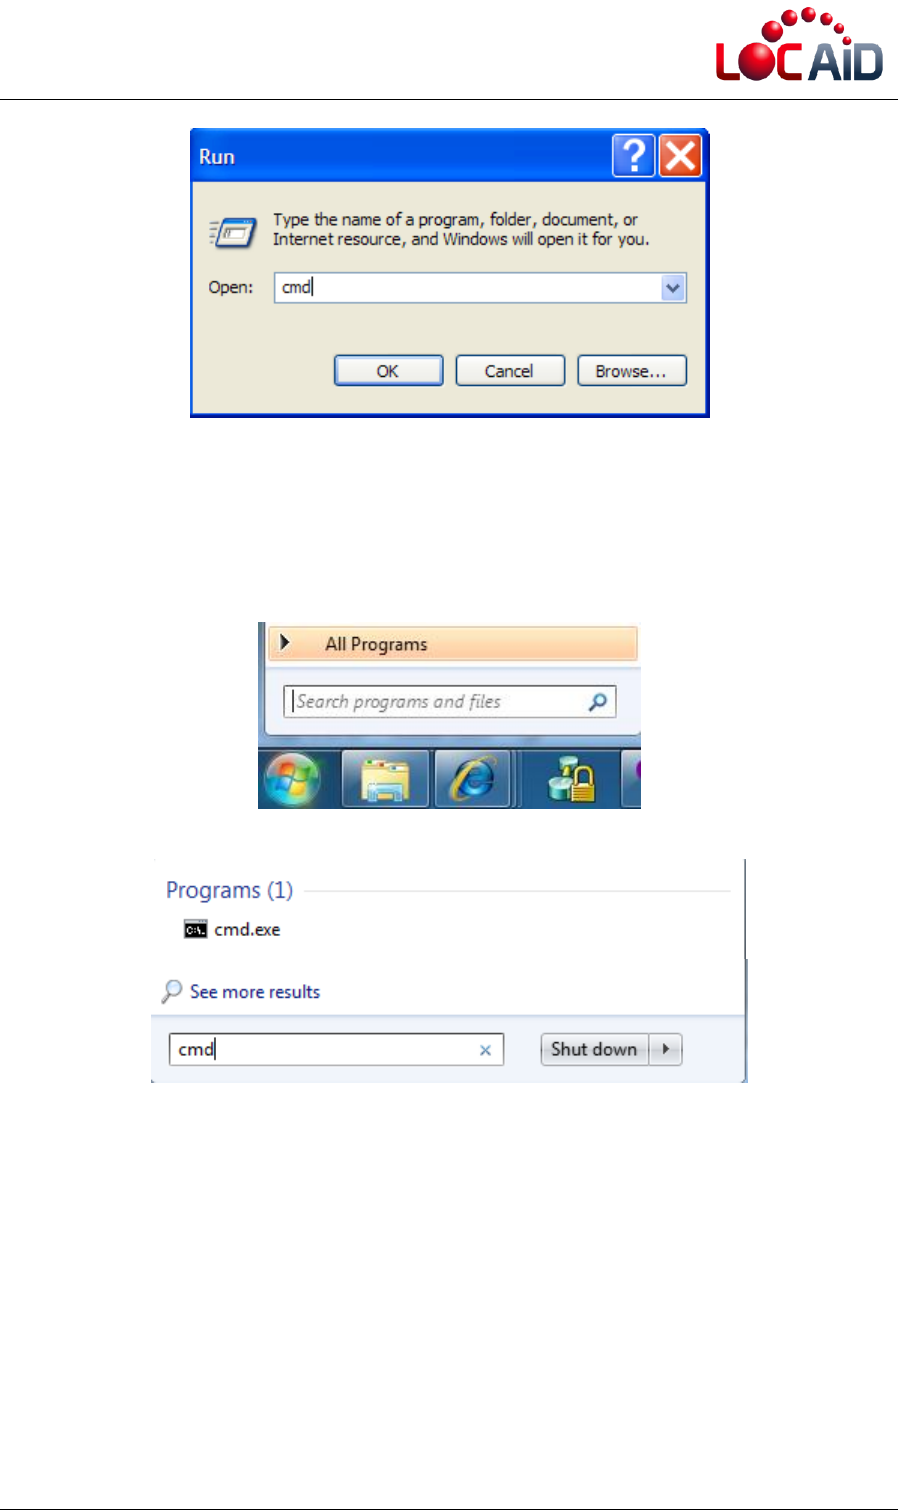
dialogue menu appears, write “cmd” and click on OK.
LOC-AID Digital Certificate Instructions, August 2, 2011 Page 8 of 20
Figure 6: Opening the system console (Windows XP)
Navigation to the system console may be a little different depending on your version of
windows. Here is how to do it for Windows 7. Click on the Windows button to open the
“Run” dialog box. Type “cmd” where it says “Search programs and files”
Figure 7: Opening the system console (Windows 7)
Once the system’s console has been opened, run the “keytool” command. For example, in
order to see all the options that Keytool accepts, type “keytool - help” on the system’s
console.

LOC-AID Digital Certificate Instructions, August 2, 2011 Page 9 of 20
Figure 8: keytool – help for a list of all commands and options
All available options will appear after this as the following figure shows:
Figure 9: list of all keytool commands and options
Import Certificate
To import a “c:\certificates\mycertificate.der” certificate into a new
“c:\certificates\mykeystore.jks” storage file, you will need to run the Keytool command as
follows:
keytool -import -alias myalias -keystore mykeystore.jks -file mycertificate.der
Once the command has been entered in the system’s console, it will ask for the password
that will protect the storage file. Type: “mypassword”. Then it will ask if you trust this
certificate. Type: yes. The following figure shows the result:

LOC-AID Digital Certificate Instructions, August 2, 2011 Page 10 of 20
Figure 10: Importing the certificate
Parameters used for Importing are the following:
Option
Description
-import
This option indicates that Keytool will
import a certificate to the password and
certificate storage file. It should be the first
option to be placed. After this option, other
sub-options follow which are described
below in this table.
-alias <alias>
Optional. Used to identify the certificate
inside storage.
-keystore <file_storage>
The file for the password and certificate
storage file. If the file doesn’t exist, you
have to create it. If it exists, the password
should be the password that protects it.
-file <file_certificate>
The file that contains the certificate.
List of Certificates
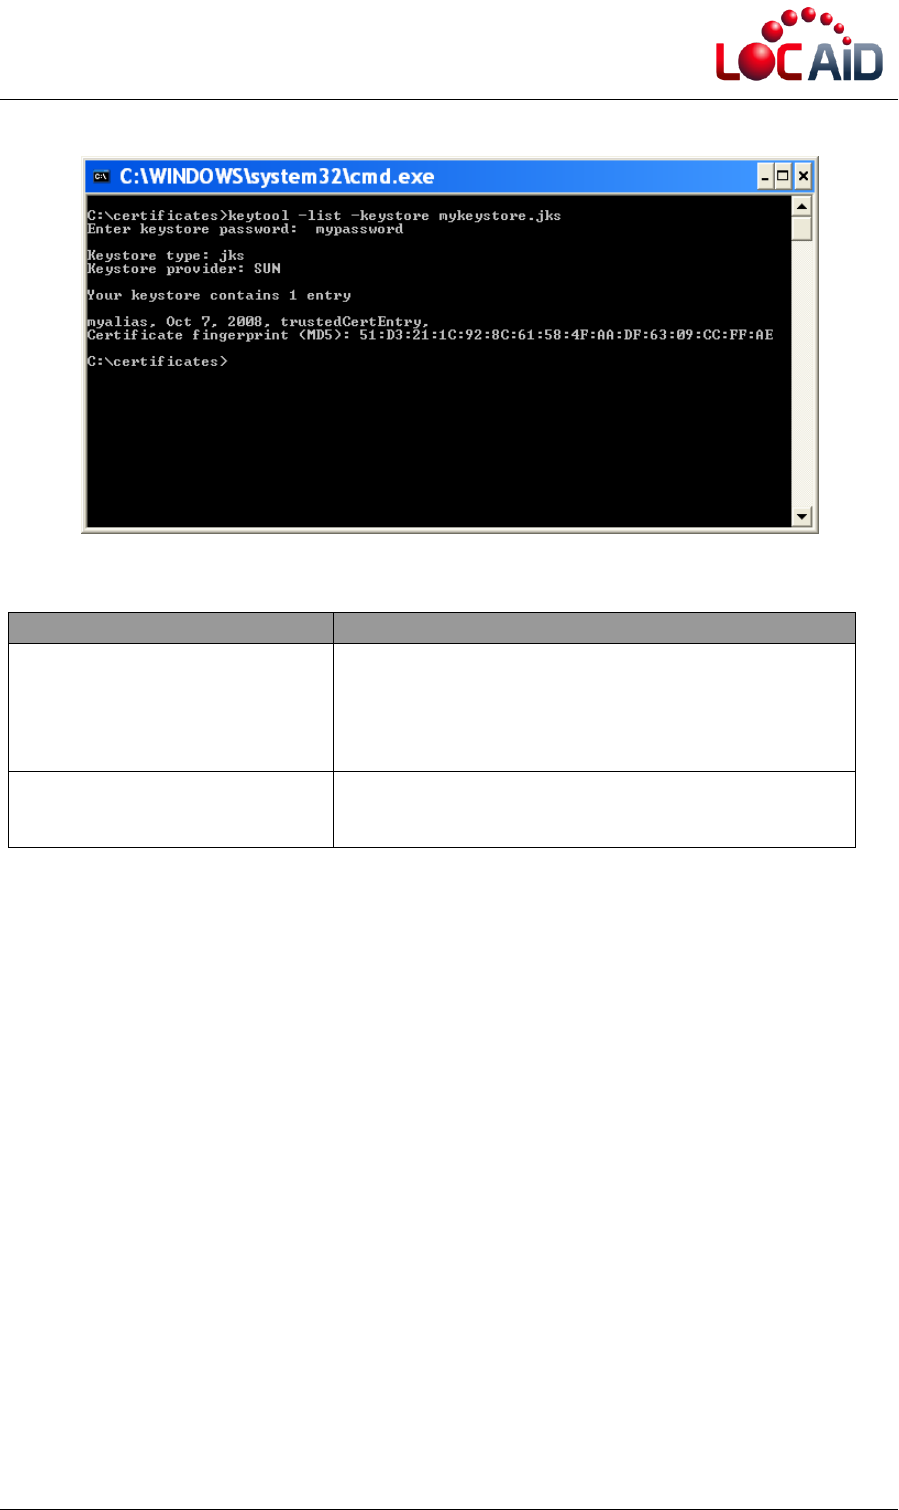
To list the existing certificates in the password and certificate storage, the following line
has to be typed on the system’s console and the system will request the password that will
protect the storage:
keytool -list -keystore mykeystore.jks
The result is shown in the following figure.
LOC-AID Digital Certificate Instructions, August 2, 2011 Page 11 of 20
Figure 11: List the certificate in password and certificate storage
Option
Description
-list
This option should be the first option to be given to
Keytool. It indicates that Keytool should show the
certificates contained in a certain password and
certificate storage.
-keystore <file_storage>
The file for the storage of passwords and
certificates. The file should exist.
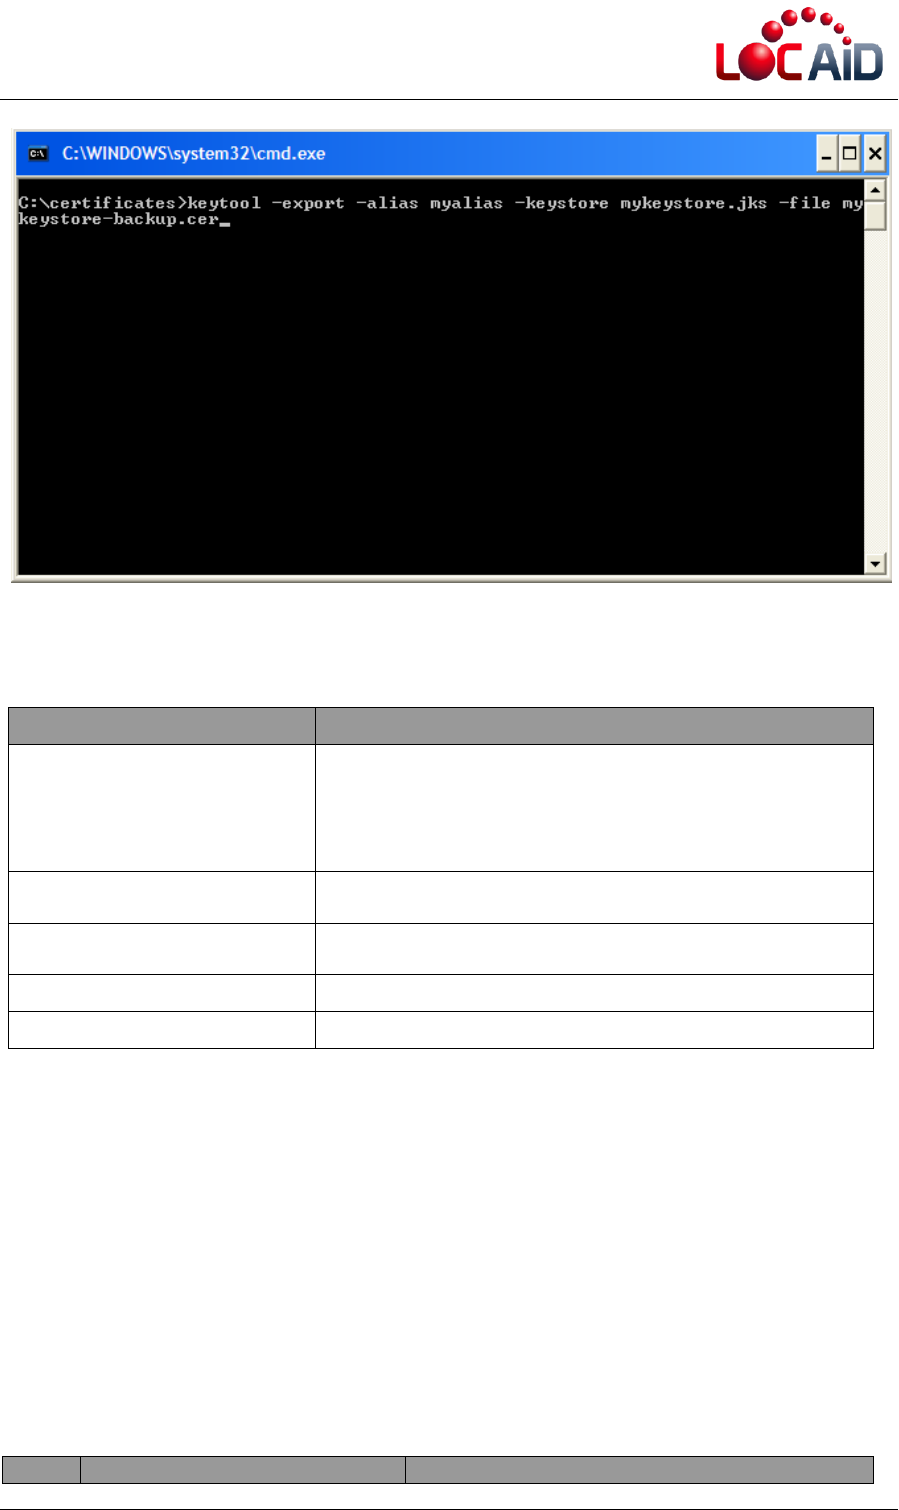
Exporting Certificates
To export certificates, the following line has to be typed on the system’s console:
keytool -export -alias myalias -keystore mykeystore.jks -file mykeystore-backup.cer
When the program requests a password, type the password that is associated with the
password and certificate storage file. The following figure shows the result:
LOC-AID Digital Certificate Instructions, August 2, 2011 Page 12 of 20
Figure 12: Export the certificate
The used options are described below:
Option
Description
-export
This option indicates that keytool will import the
certificate to the password and certificate storage. It
should be the first option to be placed. After this option,
other sub-options follow which are described below in
this table.
-alias <alias>
Identifies the certificate in the certificate storage that
will be exported.
–trustcacerts
Additional certificates are considered for the chain of
trust.
-keystore <file_storage>
The file to store the passwords and certificates.
-file <file_certificate>
The file that will contain the certificate.
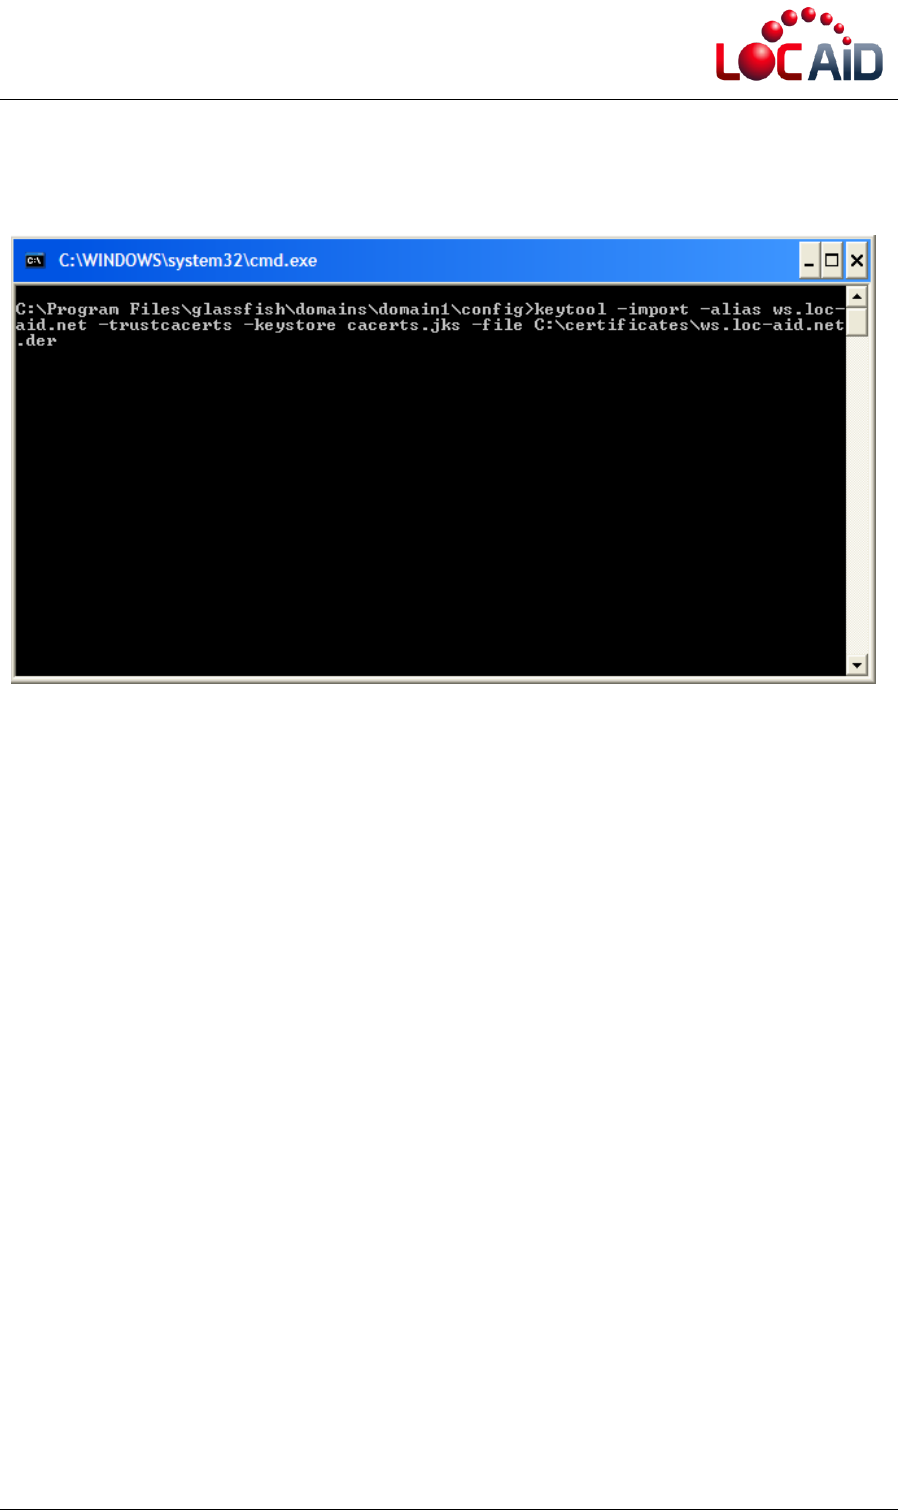
Adding Security Certificates to Glassfish
JAVA’s virtual machine has two – among many – parameters that overload the route of
the password and certificate storage file which is configured by default.
Glassfish makes use of these configuration parameters to define its own password and
certificate storage file. Specifically, Glassfish uses the following options:
Item
Option
Description
LOC-AID Digital Certificate Instructions, August 2, 2011 Page 13 of 20
These options are configured in the “domain.xml” file of a Glassfish application. This file
can be found in the configuration directory of the application:
“<DIR_INSTANCE>/config”
Where DIR_INSTANCE is the route of the directory of the application.
If Glassfish was installed by default, you use the directory of applications by default and
the application by default. For example, the directory for the installation of Glassfish is:
“C:\Program Files\glassfish”, then the directory for applications by default is: “C:\Program
Files \glassfish\domains” and the address of the application by default is: “C:\Program
Files \glassfish\domains\domain1”. This last value shall be named DIR_INSTANCE. The
route of the domain.xml file is:
“C:\Program Files \glassfish\domains\domain1\config\domain.xml”
In the “domain.xml” file, make a search for the variable value “-Djavax.net.ssl.trustStore”,
and you’ll obtain a similar entry as the following one:
<jvm-options>-
Djavax.net.ssl.trustStore=${com.sun.aas.instanceRoot}/config/cacerts.jks</jvm-options>
The value ${com.sun.aas.instanceRoot}/config/cacerts.jks represents the complete route
of the password and certificate storage file that Glassfish uses. The parameter
“${com.sun.aas.instanceRoot}” is the same as DIR_INSTANCE, and by replacing its value
you’ll have the complete route.
“C:\Program Files \glassfish\domains\domain1\config\ cacerts.jks”
On the other hand, if the certificate is found in the following route:
“C:\certificates\locaidNet.der” ,and the protection password for the storage file is “admin.”,
the Keytool command will be as follows:
1
-Djavax.net.ssl.keyStore
Through this option the file is shown that
contains the passwords.
2
- Djavax.net.ssl.trustStore
Through this option the file is shown that
contains the certificates.
LOC-AID Digital Certificate Instructions, August 2, 2011 Page 14 of 20
keytool -import -alias ws.loc-aid.net -trustcacerts -keystore cacerts.jks -file
C:\certificates\ws.loc-aid.net.der
Figure 13: Adding the certificate to Glassfish security
Note: The protection password for the certificate storage file is defined when Glassfish is
installed.
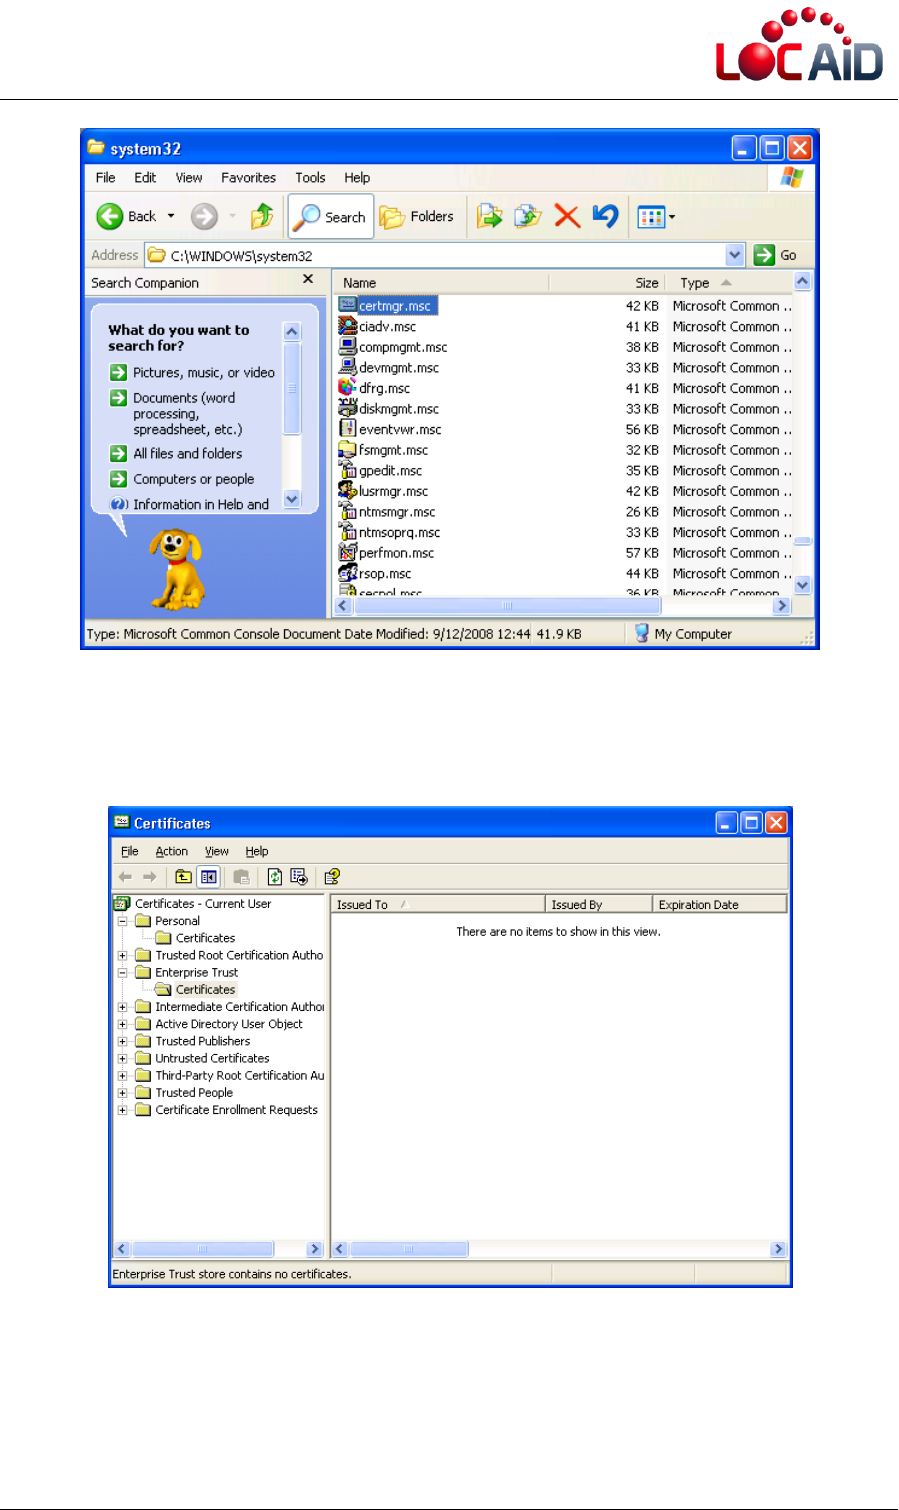
.NET Developers
Import Certificate
Run Windows Explorer and look for the program that administers certificates called
“certmgr.msc” in the “C:\windows\system32” directory.
LOC-AID Digital Certificate Instructions, August 2, 2011 Page 15 of 20
Figure 14: Navigate to the certificate administration program
Double-click on the “certmgr.msc” icon. When the “Certificates” window appears select the
“Enterprise Trust” option. Click right on that option. Go to “All tasks” -> “Import…”
The window on the certificate import will appear. Click on “Next >”.
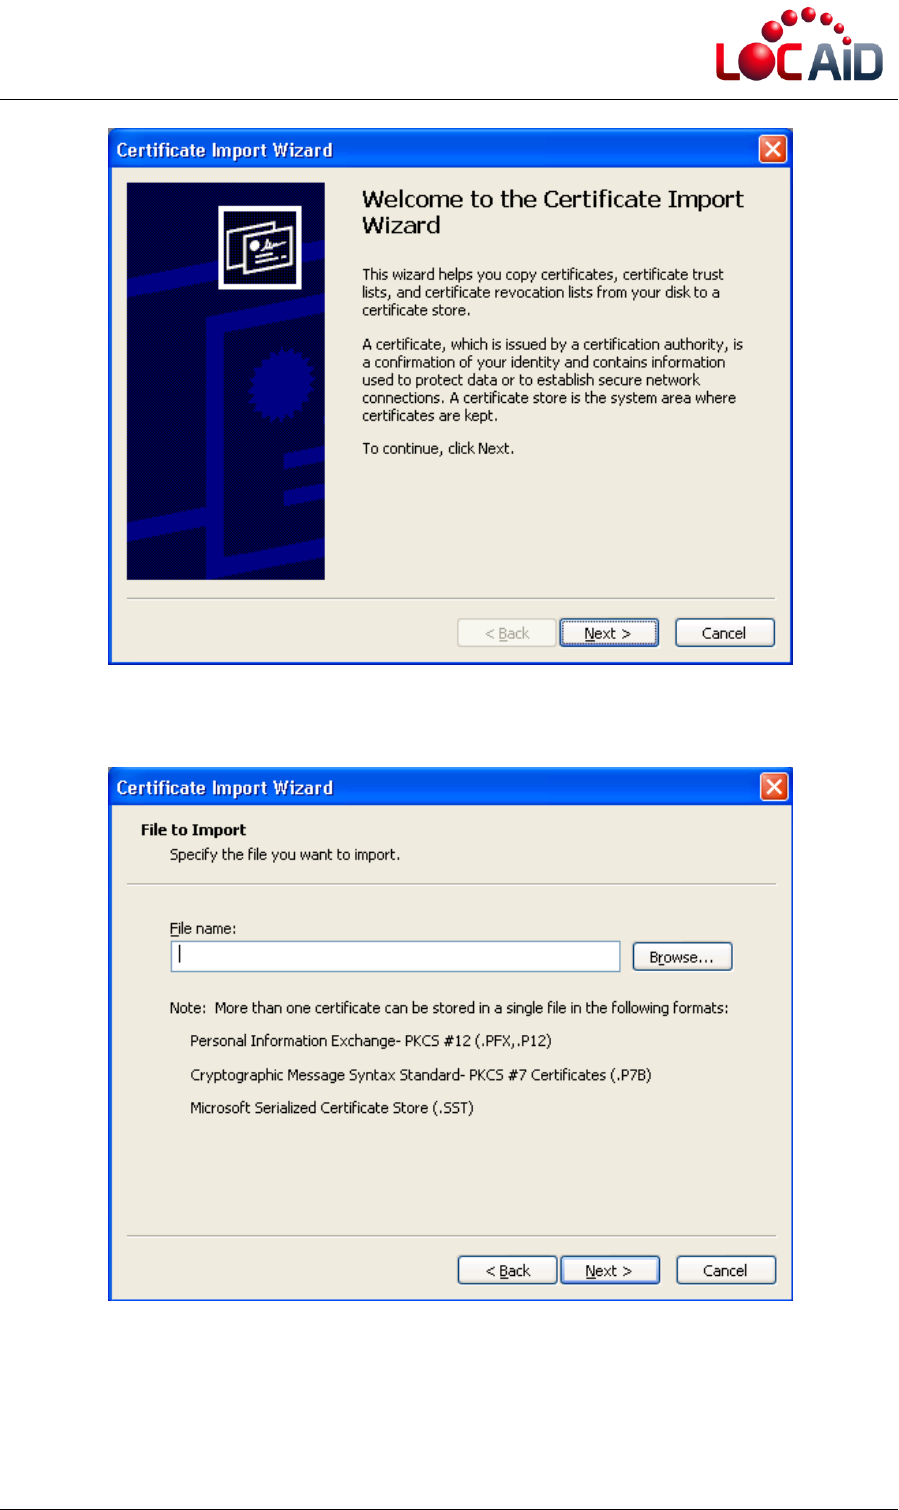
LOC-AID Digital Certificate Instructions, August 2, 2011 Page 16 of 20
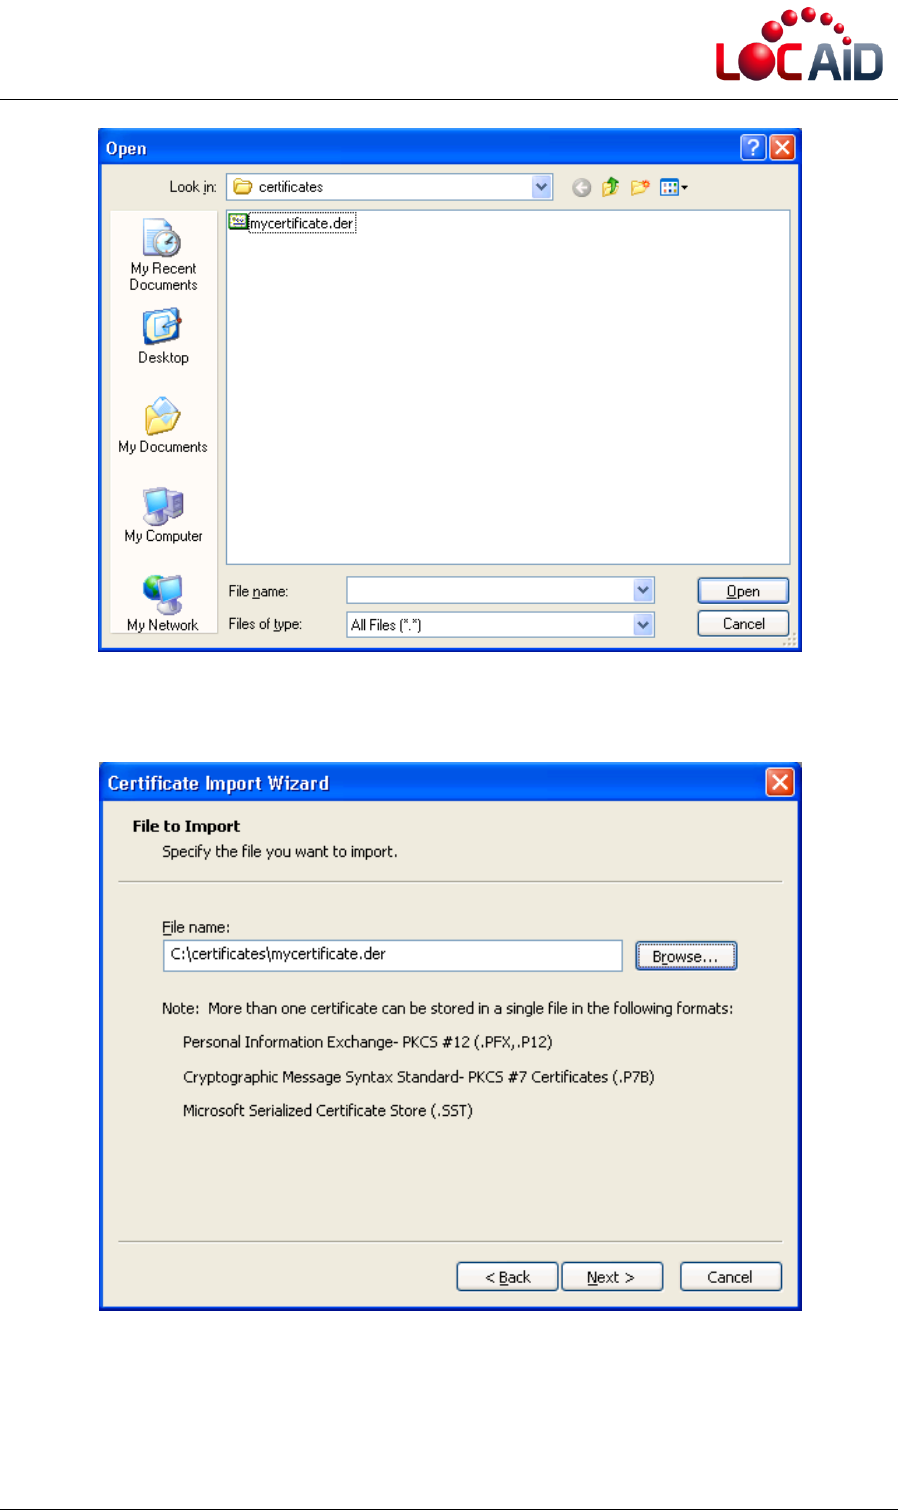
Now, click on “Browse”
When the dialogue screen appears, select file to import. Look for and select the obtained
certificate of the last step. Click on “Open”. On the following screen, click on “Next”
LOC-AID Digital Certificate Instructions, August 2, 2011 Page 17 of 20
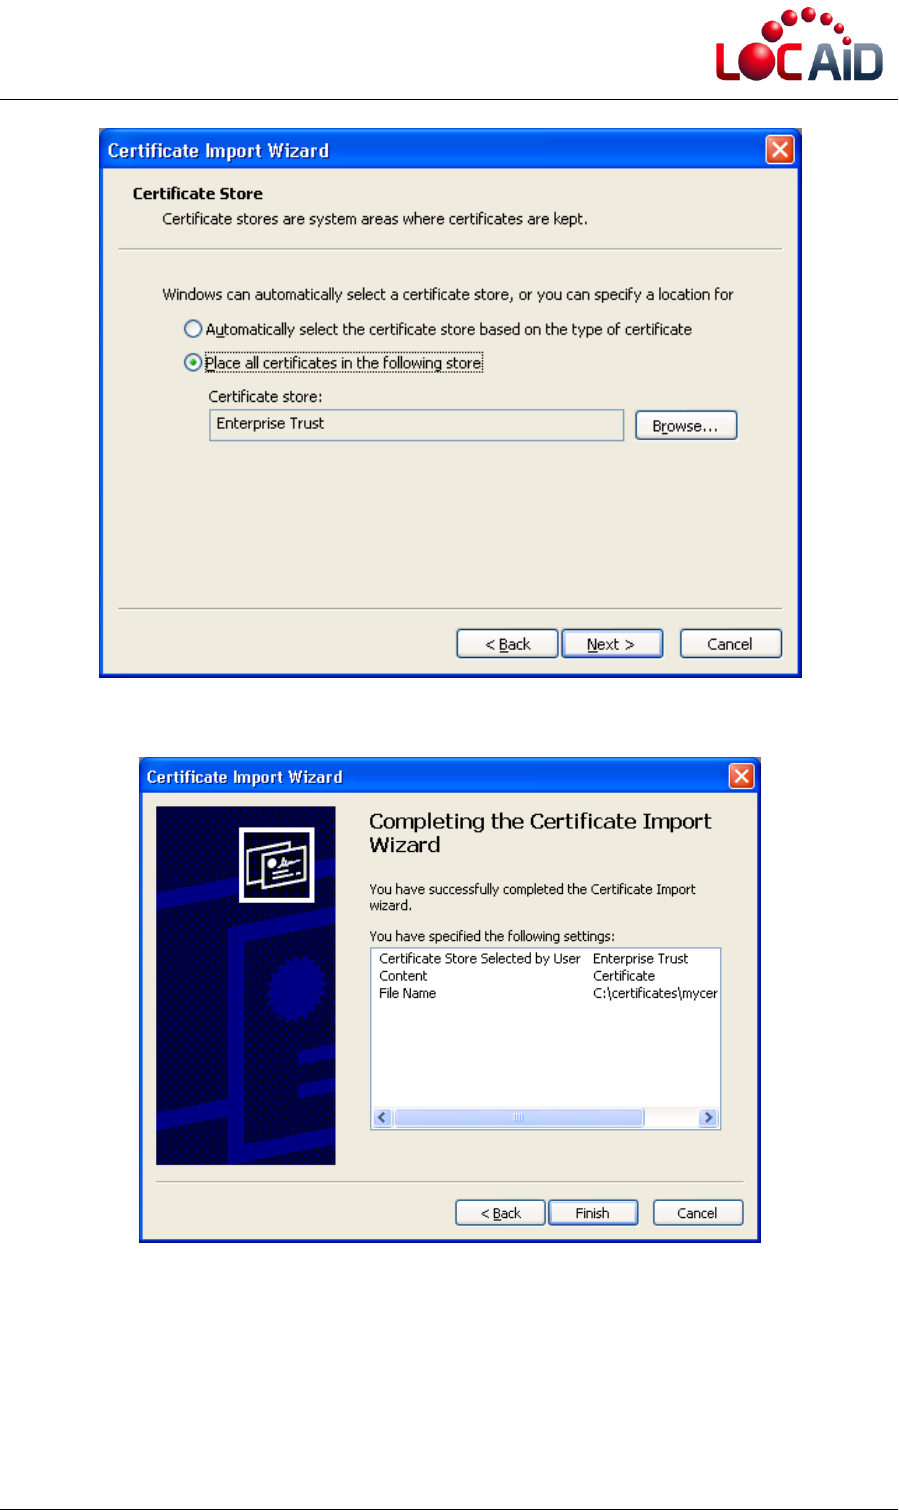
LOC-AID Digital Certificate Instructions, August 2, 2011 Page 18 of 20
Finally, click on “Finish”.
Figure 15: Screenshots showing process to import certificate into
The following screen tells you that the import of the certificate was successful.
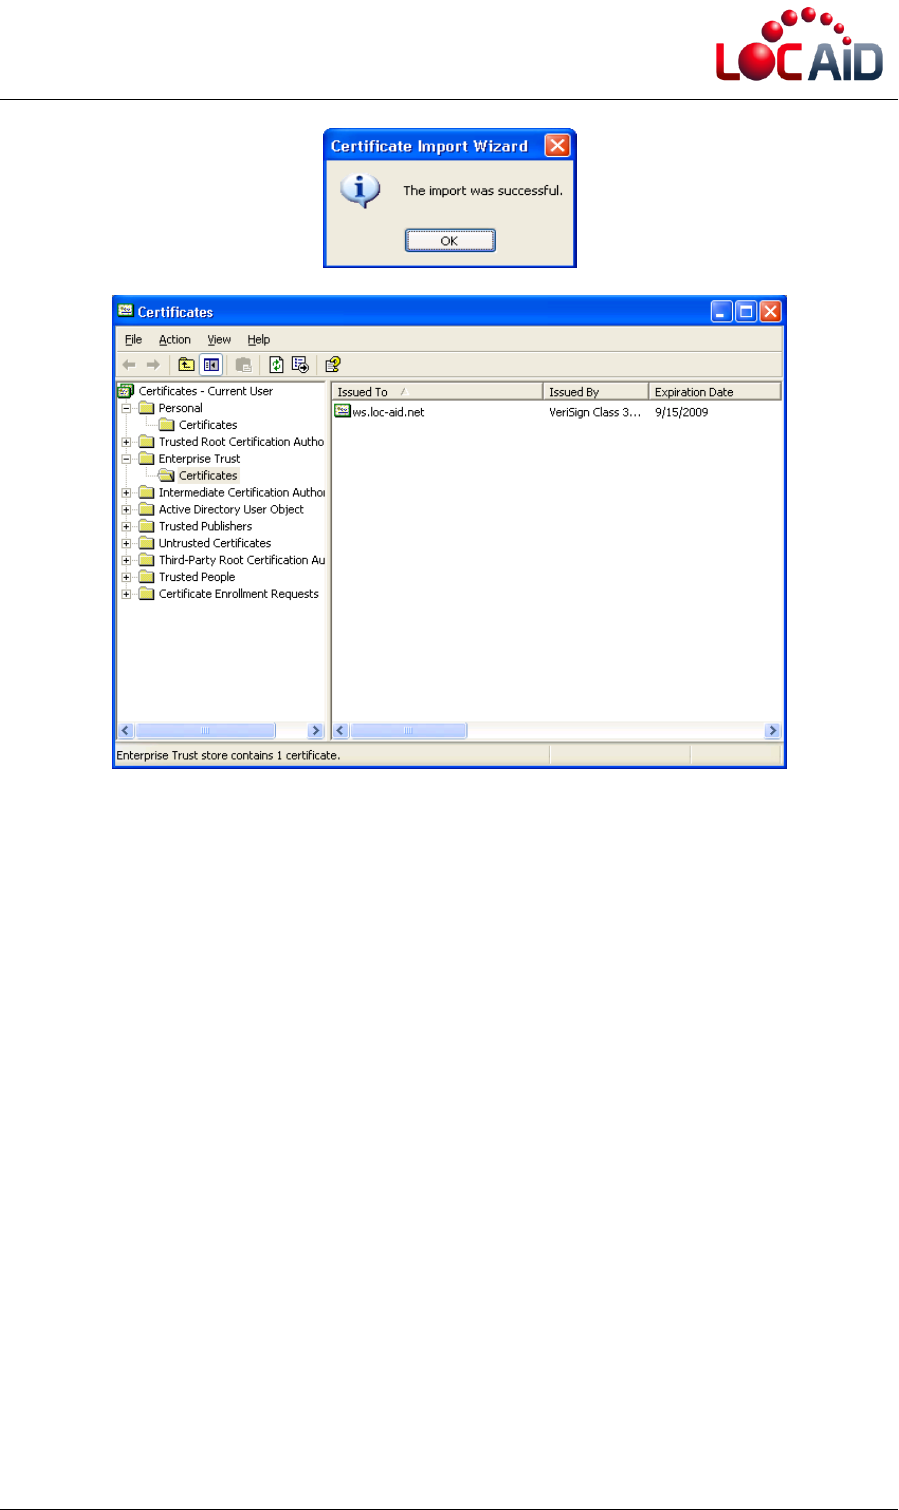
LOC-AID Digital Certificate Instructions, August 2, 2011 Page 19 of 20
Figure 16: Successful import
Note: The "VeriSign Class 3 Secure Server CA" certificate should be installed in Windows
certificate administrator. That's the entity that certifies the https://ws.loc-aid.net site. If this
certificate is not installed in the Windows administrator, then the .NET applications cannot
access the services offered by LOC-AID LBS Aggregation Platform.
LOC-AID Digital Certificate Instructions, August 2, 2011 Page 20 of 20
About LOC-AID Technologies
LOC‐AID operates the world’s largest mobile location data gateway and manages the
most secure, privacy‐protected platform for wireless providers including Verizon
Wireless, Sprint, America Movil, TelCel, Bell Mobility, AT&T and TELUS. Based in San
Francisco, CA, with offices across North America, LOC‐AID simplifies and manages the
complex technical and approval interfaces of location‐based services (LBS) for mobile
developers. LOC‐AID also offers a portfolio of location‐enablement services including
geo‐fencing, geo‐coding, map appends and location analytics.
For more information, visit www.loc‐aid.com
© 2011 LOC‐AID Technologies, Inc.
